course outline - combustion safety testing - bidnet
TRANSCRIPT
AHFC
Residential Energy Education
SOQ#12-R2D2-018
Methods of Analysis for Residential Structures
Combustion Safety Outline
Combustion Safety Testing - Course Outline
8 Hours
(4 in class, 4 in field)
A. Why is Combustion Safety Important?
1. Health and safety of occupants i.
Back drafting
1. Carbon Monoxide 2. Other combustion gasses
ii. Flame roll out
iii. Gas leaks
B. What is a Combustion Safety Test? (Short Version)
1. Check for gas leaks
2. Note any hazardous or unsafe conditions
3. Depressurize the CAZ (Combustion Appliance Zone) to worst case
4. Fire appliance, check for flame roll out
5. Check for spillage (back drafting)
6. Measure draft pressure
7. Measure CO in exhaust gasses
C. Heating System Basics
1. Appliance Types
i. Draft Types – Natural Draft
1. Photos
ii. Draft Types – Assisted Draft
1. Photos
iii. Draft Types – Power/Forced Draft
1. Photos
iv. Combustion Types – Open
1. Photos
v. Combustion Types – Closed
1. Photos
D. Basic Tools and Equipment
1. Digital Manometer
i. Measure draft of combustion appliance
ii. Measure depressurization inside the house
2. Digital combustion gas tester
i. Check Ambient CO levels inside the home ii.
Monitor technician safety during tests
iii. Check CO output of combustion appliances
3. Fuel Leak Detector
i. Check for propane, natural gas leaks or oil leaks
ii. All accessible lines, connections, connectors
4. Smoke pencil or generator
i. Check for spillage at combustion appliances
ii. Check door position for worst case depressurization
5. Your eyes
i. Observation is the best tool – can find things instruments and gauges will
miss
E. Test Procedures - Check for Gas Leaks
1. Gas Line Inspection – Objectives
i. Entire propane/gas line must be examined for leaks with detector
ii. Special attention around appliances, joints, valves and pilot lines
iii. Detect leak and isolate with soap bubble solution
iv. Flexible Gas Lines 1. Must be replaced if kinked, corroded, visible wear
2. Manufactured before 1973
3. Date stamped on date ring
4. Any soldered connections
v. Photo sniffing gas lines
vi. Inspect gas / propane system for leaks, potential problems
vii. Proper location of the fuel storage tank if present
viii. Verifying significant gas / propane leak (bubble solution)
ix. Visual signs of oil leaks, proper installation of fuel line to avoid damage,
line, filter
F. Common Unsafe Conditions
1. Find unsafe conditions with heating appliances and document
2. Flammable Materials
3. Signs of Soot/Flame Roll Out
i. Picture of flame roll out
4. Improper Chimney Clearance
i. Picture of improper clearance
5. No Shutoffs
i. Picture of Shutoffs
6. Heating Ducts in Garage
i. Picture of heat ducts in garage
7. Pressure Relief Valves
i. Picture of Relief Valve
8. Sources of Ignition on Garage Floor
9. Improper Vent Slope
i. Picture of Improper Vent Slope
10. Excessive Horizontal Run
i. Picture of Excessive Horizontal Run
11. Chimney Too Short
i. Picture of Chimney Too Short
12. Rusted or Damaged Chimney
i. Picture of Rusted or Damaged Chimney
13. Too Close to Openings
14. Other Problems
G. Combustion Safety Test Procedure
1. Scope
i. Preliminary and post installation safety inspection of all combustion
appliances
ii. Required on every appliance, type for every energy rating
2. Tests
i. Before any testing:
1. Take ambient CO measurement outside of house before entering
2. Monitor ambient CO levels in the CAZ (Combustion Appliance
Zone) before and during test for all appliances
3. If ambient levels exceed 35 ppm at any time, turn off appliance
immediately!
ii. CO measurement of each combustion appliance
iii. Draft measurement and spillage evaluation for each atmospherically
vented appliance
iv. Worst case pressure measurement for each combustion appliance zone
v. Results compared against Safety Action Level table
3. Combustion Safety Test Road Map
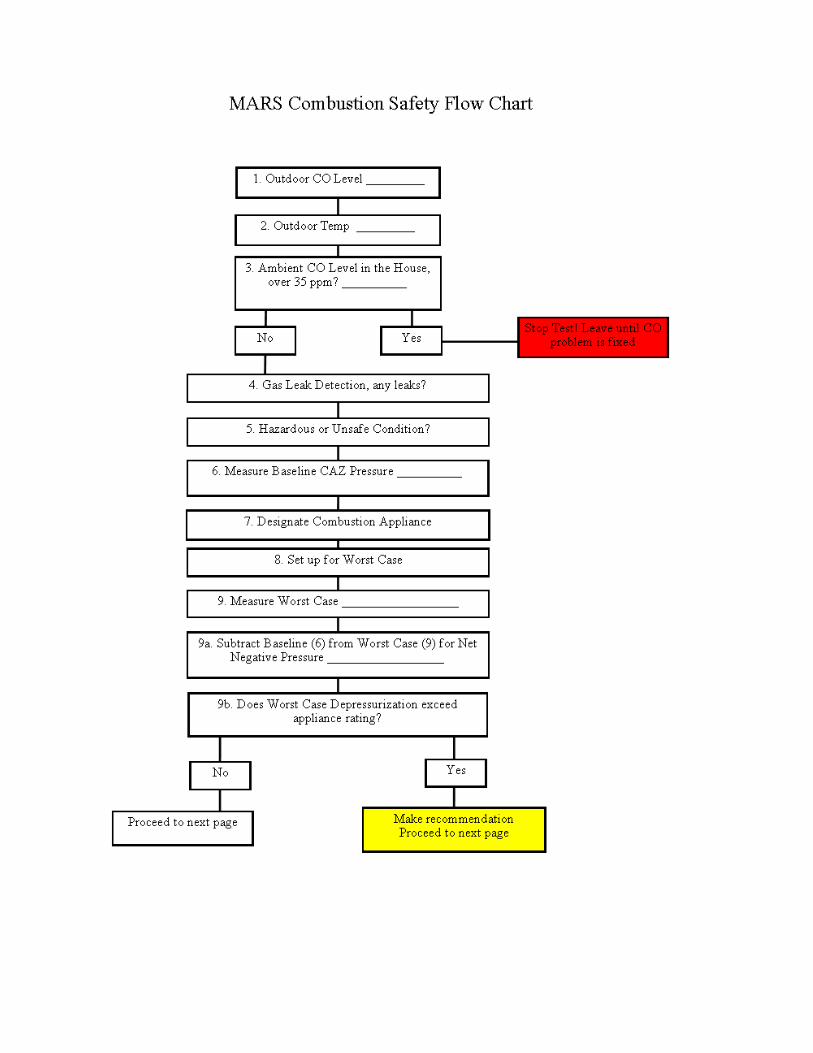
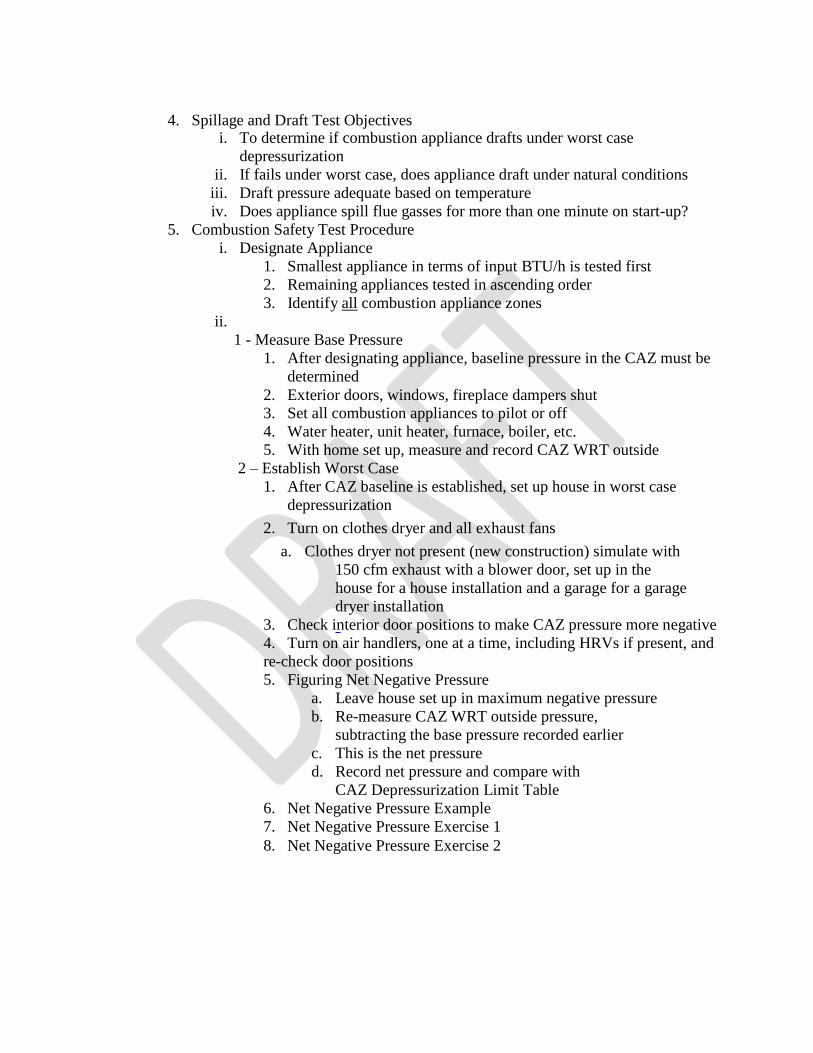
4. Spillage and Draft Test Objectives i. To determine if combustion appliance drafts under worst case
depressurization
ii. If fails under worst case, does appliance draft under natural conditions
iii. Draft pressure adequate based on temperature
iv. Does appliance spill flue gasses for more than one minute on start-up?
5. Combustion Safety Test Procedure
i. Designate Appliance
1. Smallest appliance in terms of input BTU/h is tested first
2. Remaining appliances tested in ascending order
3. Identify all combustion appliance zones
ii.
1 - Measure Base Pressure
1. After designating appliance, baseline pressure in the CAZ must be
determined
2. Exterior doors, windows, fireplace dampers shut
3. Set all combustion appliances to pilot or off
4. Water heater, unit heater, furnace, boiler, etc.
5. With home set up, measure and record CAZ WRT outside
2 – Establish Worst Case
1. After CAZ baseline is established, set up house in worst case
depressurization
2. Turn on clothes dryer and all exhaust fans
a. Clothes dryer not present (new construction) simulate with
150 cfm exhaust with a blower door, set up in the
house for a house installation and a garage for a garage
dryer installation
3. Check interior door positions to make CAZ pressure more negative
4. Turn on air handlers, one at a time, including HRVs if present, and
re-check door positions
5. Figuring Net Negative Pressure
a. Leave house set up in maximum negative pressure
b. Re-measure CAZ WRT outside pressure,
subtracting the base pressure recorded earlier
c. This is the net pressure
d. Record net pressure and compare with
CAZ Depressurization Limit Table
6. Net Negative Pressure Example
7. Net Negative Pressure Exercise 1
8. Net Negative Pressure Exercise 2
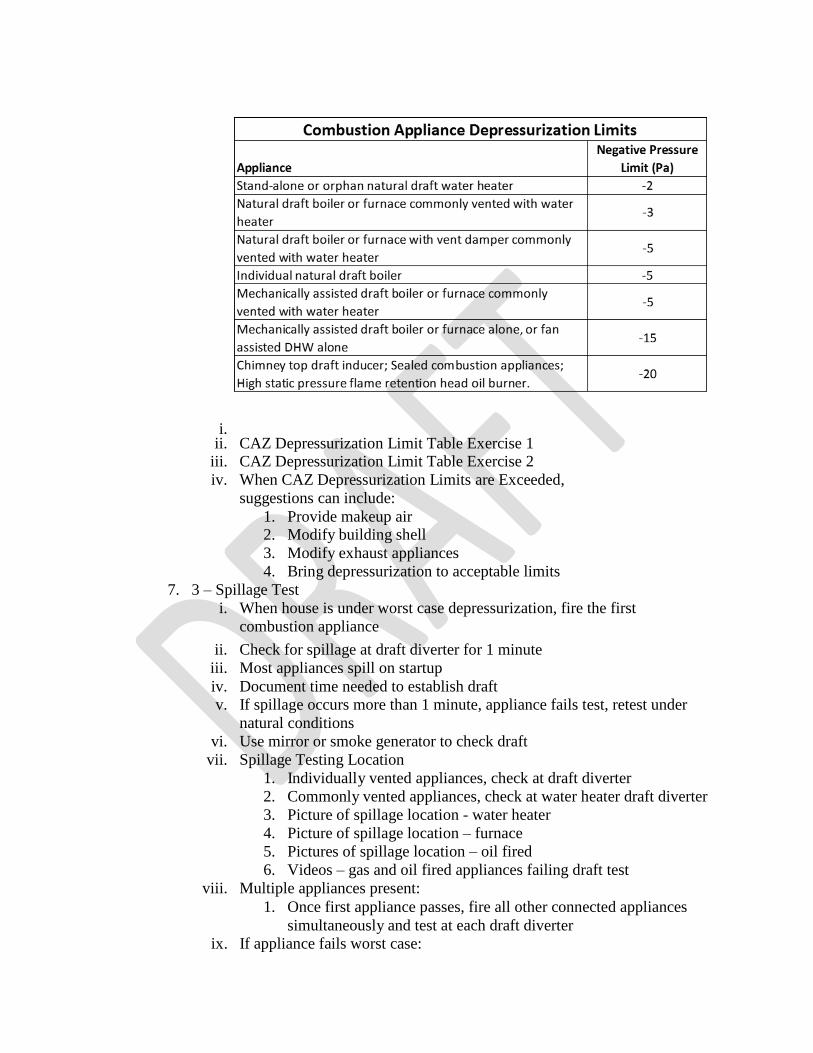
i. ii. CAZ Depressurization Limit Table Exercise 1
iii. CAZ Depressurization Limit Table Exercise 2
iv. When CAZ Depressurization Limits are Exceeded,
suggestions can include:
1. Provide makeup air 2. Modify building shell
3. Modify exhaust appliances
4. Bring depressurization to acceptable limits
7. 3 – Spillage Test
i. When house is under worst case depressurization, fire the first
combustion appliance
ii. Check for spillage at draft diverter for 1 minute
iii. Most appliances spill on startup
iv. Document time needed to establish draft
v. If spillage occurs more than 1 minute, appliance fails test, retest under
natural conditions
vi. Use mirror or smoke generator to check draft
vii. Spillage Testing Location
1. Individually vented appliances, check at draft diverter
2. Commonly vented appliances, check at water heater draft diverter
3. Picture of spillage location - water heater
4. Picture of spillage location – furnace
5. Pictures of spillage location – oil fired
6. Videos – gas and oil fired appliances failing draft test
viii. Multiple appliances present:
1. Once first appliance passes, fire all other connected appliances
simultaneously and test at each draft diverter
ix. If appliance fails worst case:
1. Turn appliance off
2. Turn off exhaust fans
3. Open interior doors
4. Allow vent to cool before re-testing
5. Resume entire test under natural conditions
6. Allow vent to cool before testing multiple appliances/shared vents
7. Videos – gas and oil fired passing natural conditions draft test
8. Draft Test
i. When spillage testing is complete, perform draft test
1. Drill hole in vent pipe
2. Do not drill holes in power vented or sealed combustion appliances
a. Vent under positive pressure
3. Test 1’ to 2’ after diverter or first elbow
a. Photo
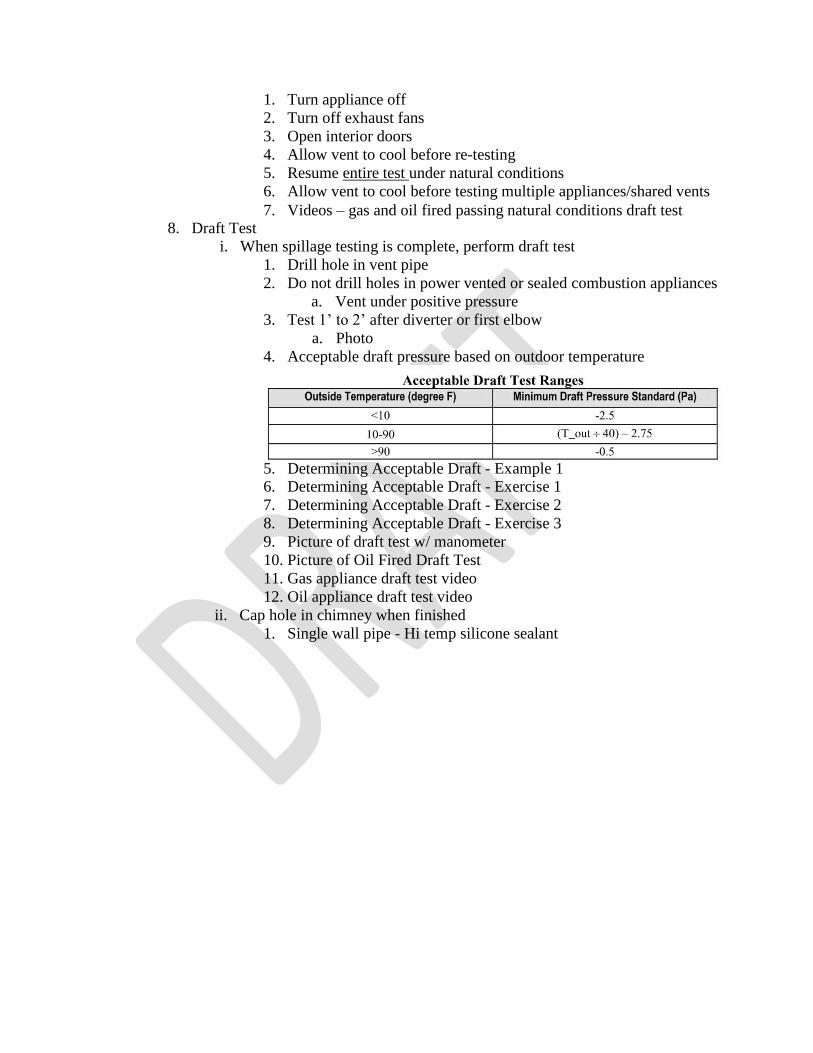
4. Acceptable draft pressure based on outdoor temperature
5. Determining Acceptable Draft - Example 1 6. Determining Acceptable Draft - Exercise 1
7. Determining Acceptable Draft - Exercise 2
8. Determining Acceptable Draft - Exercise 3
9. Picture of draft test w/ manometer
10. Picture of Oil Fired Draft Test
11. Gas appliance draft test video
12. Oil appliance draft test video
ii. Cap hole in chimney when finished
1. Single wall pipe - Hi temp silicone sealant
9. CO Test
2. Double wall - lag screw w/ hi temp silicone
i. CO measured in undiluted flue gasses
ii. Measured with digital gauge in parts per million
iii. Do not drill holes in power vented or sealed combustion appliances
iv. Vent under positive pressure
v. Test CO in sealed combustion/power vent units at chimney termination
vi. CO measured at steady state operating efficiency
vii. Hole may be required in water heater draft diverter to reach undiluted flue
gasses
viii. Test both sides of water heater flue
ix. Test all furnace/boiler flue openings
x. Undiluted CO Locations
1. Picture of hole drilled in water heater draft diverter
2. Video – water heater CO test
3. Video – unit heater CO test
4. Video – oil fired boiler CO test
10. Ambient CO
i. Monitor ambient CO in breathing zone during test
ii. If exceeds 35 ppm, turn off appliance, ventilate space, evacuate building
iii. Building may be re-entered after levels drop below 35 ppm
iv. Appliance must be repaired prior to completing combustion safety testing
v. If CO exceeds 35 ppm during a natural conditions test, stop work until
problem is fixed
vi. Instruct homeowner to have appliance repaired prior to operation
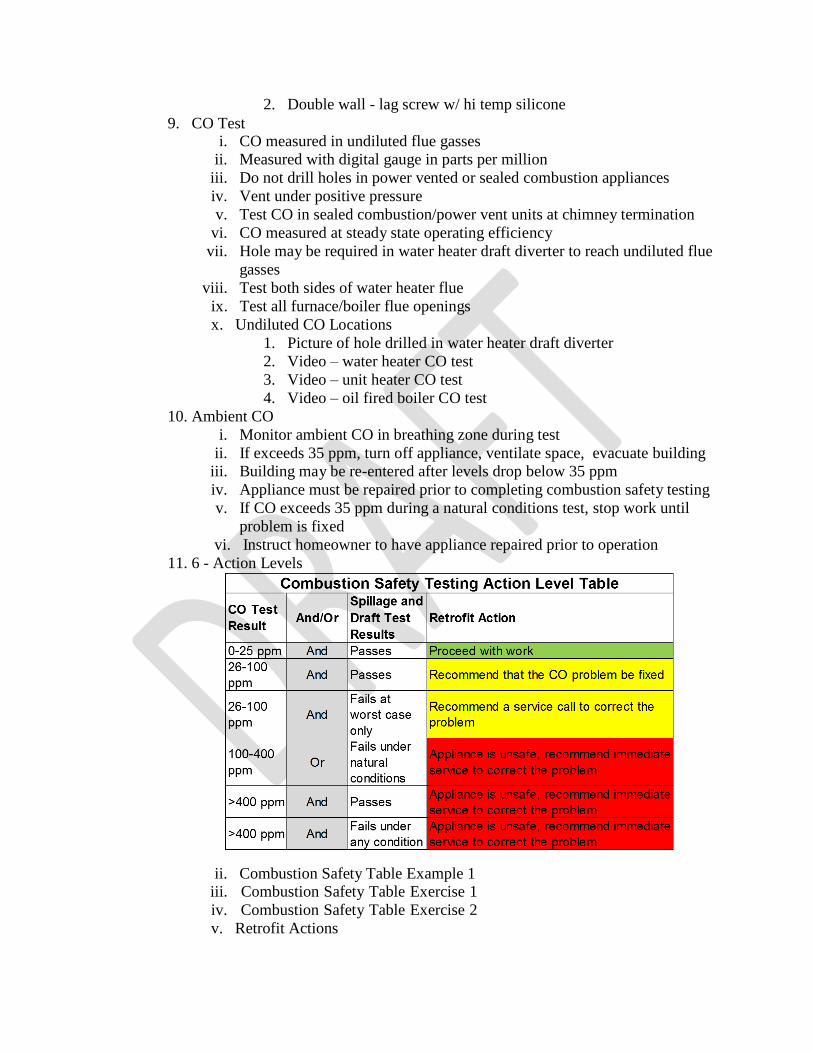
11. 6 - Action Levels
ii. Combustion Safety Table Example 1 iii. Combustion Safety Table Exercise 1
iv. Combustion Safety Table Exercise 2
v. Retrofit Actions
12. Gas Ranges/Ovens
i. Unvented Appliances
1. NO unvented appliances allowed, except gas range/ovens
2. Must recommend exhaust ventilation where gas range/oven is
present
3. Range tops and ovens produce moisture, oxides of nitrogen, CO
4. Excess moisture bad for durability
5. CO detector always recommended
6. Homeowners should be instructed to use exhaust fan when
operating ranges/ovens
7. New ovens may take an extended period to reach steady state
ii. Gas/Propane Oven Test Procedure
1. Remove items/foil from oven before starting test
2. Set oven to highest setting, do not activate self-cleaning feature
3. Test oven for CO in flue, before dilution air
4. After 5 min. check for steady state
5. Picture of testing oven CO
a. Level 1 Action - 100 ppm to 300 ppm as measured you
must recommend a CO detector and service to the
customer
b. Level II Action - Greater than 300 ppm as measured,
you must recommend a CO detector, service and exhaust
ventilation to the customer
i. Minimum 25 cfm continuous, or 100 cfm
intermittent
13. CO Detectors
i. CO Detector Locations
14. Combustion Testing Checklist
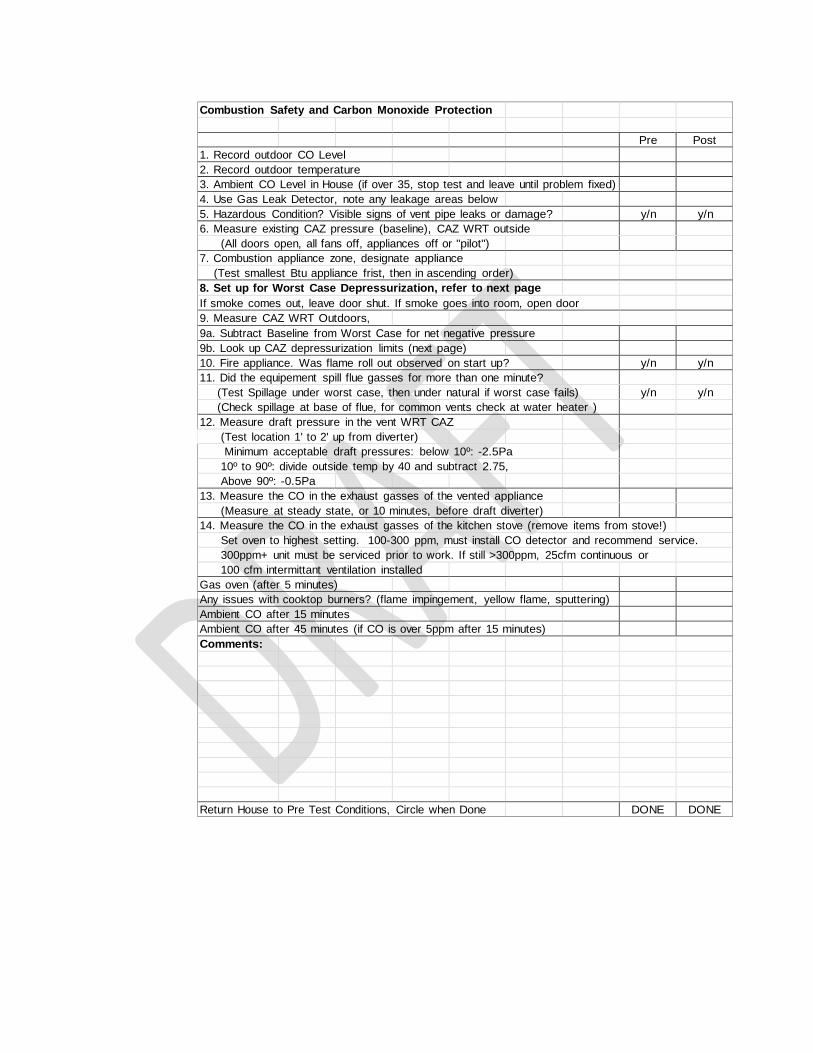
Combustion Safety and Carbon Monoxide Protection Pre Post
1. Record outdoor CO Level 2. Record outdoor temperature 3. Ambient CO Level in House (if over 35, stop test and leave until problem fixed) 4. Use Gas Leak Detector, note any leakage areas below 5. Hazardous Condition? Visible signs of vent pipe leaks or damage? y/n y/n
6. Measure existing CAZ pressure (baseline), CAZ WRT outside (All doors open, all fans off, appliances off or "pilot")
7. Combustion appliance zone, designate appliance (Test smallest Btu appliance frist, then in ascending order)
8. Set up for Worst Case Depressurization, refer to next page If smoke comes out, leave door shut. If smoke goes into room, open door 9. Measure CAZ WRT Outdoors, 9a. Subtract Baseline from Worst Case for net negative pressure 9b. Look up CAZ depressurization limits (next page) 10. Fire appliance. Was flame roll out observed on start up? y/n y/n
11. Did the equipement spill flue gasses for more than one minute? (Test Spillage under worst case, then under natural if worst case fails) y/n y/n
(Check spillage at base of flue, for common vents check at water heater ) 12. Measure draft pressure in the vent WRT CAZ
(Test location 1' to 2' up from diverter) Minimum acceptable draft pressures: below 10º: -2.5Pa
10º to 90º: divide outside temp by 40 and subtract 2.75, Above 90º: -0.5Pa
13. Measure the CO in the exhaust gasses of the vented appliance (Measure at steady state, or 10 minutes, before draft diverter)
14. Measure the CO in the exhaust gasses of the kitchen stove (remove items from stove!) Set oven to highest setting. 100-300 ppm, must install CO detector and recommend service.
300ppm+ unit must be serviced prior to work. If still >300ppm, 25cfm continuous or 100 cfm intermittant ventilation installed
Gas oven (after 5 minutes) Any issues with cooktop burners? (flame impingement, yellow flame, sputtering) Ambient CO after 15 minutes Ambient CO after 45 minutes (if CO is over 5ppm after 15 minutes) Comments: Return House to Pre Test Conditions, Circle when Done DONE DONE

15. Combustion Testing Checklist Example 1 16. Combustion Testing Checklist Example 2
17. Hands On – 4 hours