forensic imaging guide
TRANSCRIPT

FORENSIC IMAGING GUIDE
This document is designed to walk through the steps of creating a forensic image of a compromised machine and its memory
The Center for Internet Security Multi-‐State Information Sharing and Analysis Center
1
Table of Contents Memory Dump Creation .............................................................................................................................. 2
Windows ................................................................................................................................................... 2
Preparation: .......................................................................................................................................... 2
Memory Dump Creation: ..................................................................................................................... 2
Unix/Linux ................................................................................................................................................ 4
Preparation: .......................................................................................................................................... 4
Memory Dump Creation: ..................................................................................................................... 4
Image Creation ............................................................................................................................................. 6
Virtual Machines ...................................................................................................................................... 6
Live Image: ........................................................................................................................................... 6
Offline: ................................................................................................................................................ 10
Live Image Creation: ............................................................................................................................... 10
Windows ............................................................................................................................................. 10
Unix/Linux .......................................................................................................................................... 22
Offline Image Creation ........................................................................................................................... 23
All Operating Systems ........................................................................................................................ 23
2
Memory Dump Creation If the computer hasn’t been rebooted since the incident occurred, creating a physical memory dump of the suspect system can provide detailed information regarding the current system state. It should be noted that creating a memory dump will introduce artifacts onto the suspect system.
Windows
Preparation: 1. Obtain and format a USB drive or other removable media with at least 200 MB of size. 2. Visit http://www.accessdata.com/support/product-‐downloads and click on the line that says
“FTK IMAGER”. 3. Click on the download button next to “FTK Imager Lite”. 4. Download the tool onto the USB drive or other type of removable media. 5. Extract the contents of the downloaded zip file to the USB drive. 6. Obtain and format a USB drive or other removable media large enough to hold the entire
contents of the memory to be imaged.
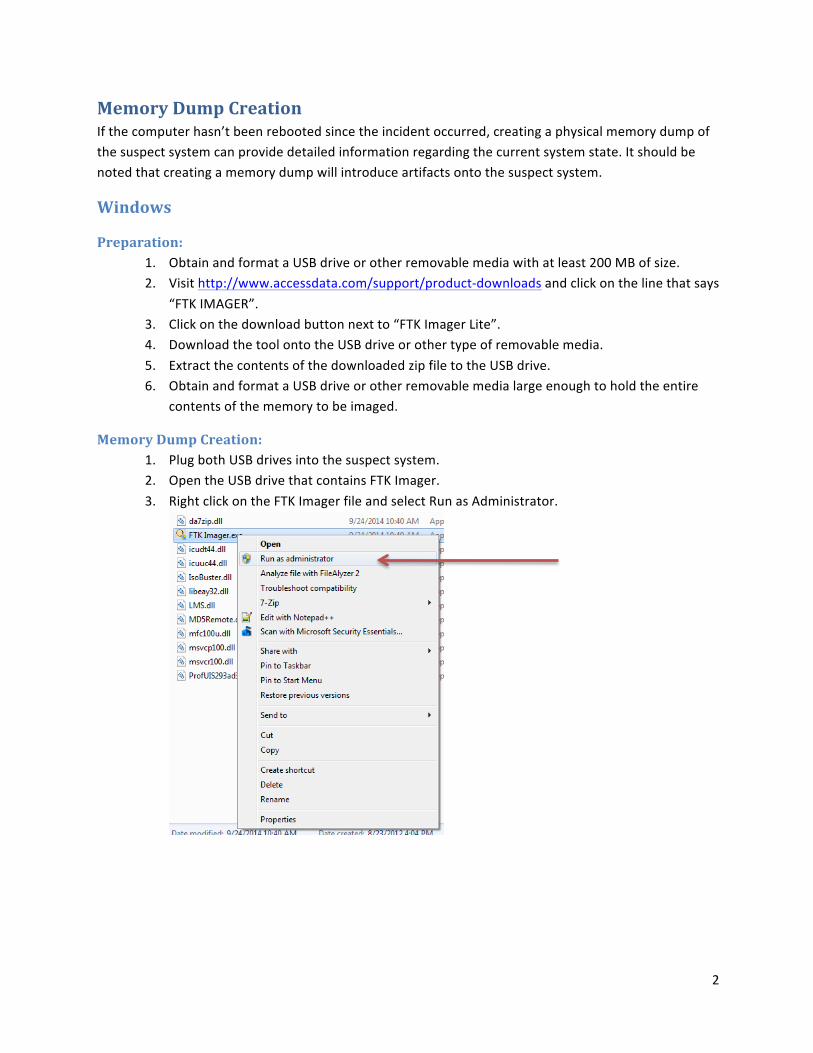
Memory Dump Creation: 1. Plug both USB drives into the suspect system. 2. Open the USB drive that contains FTK Imager. 3. Right click on the FTK Imager file and select Run as Administrator.
3
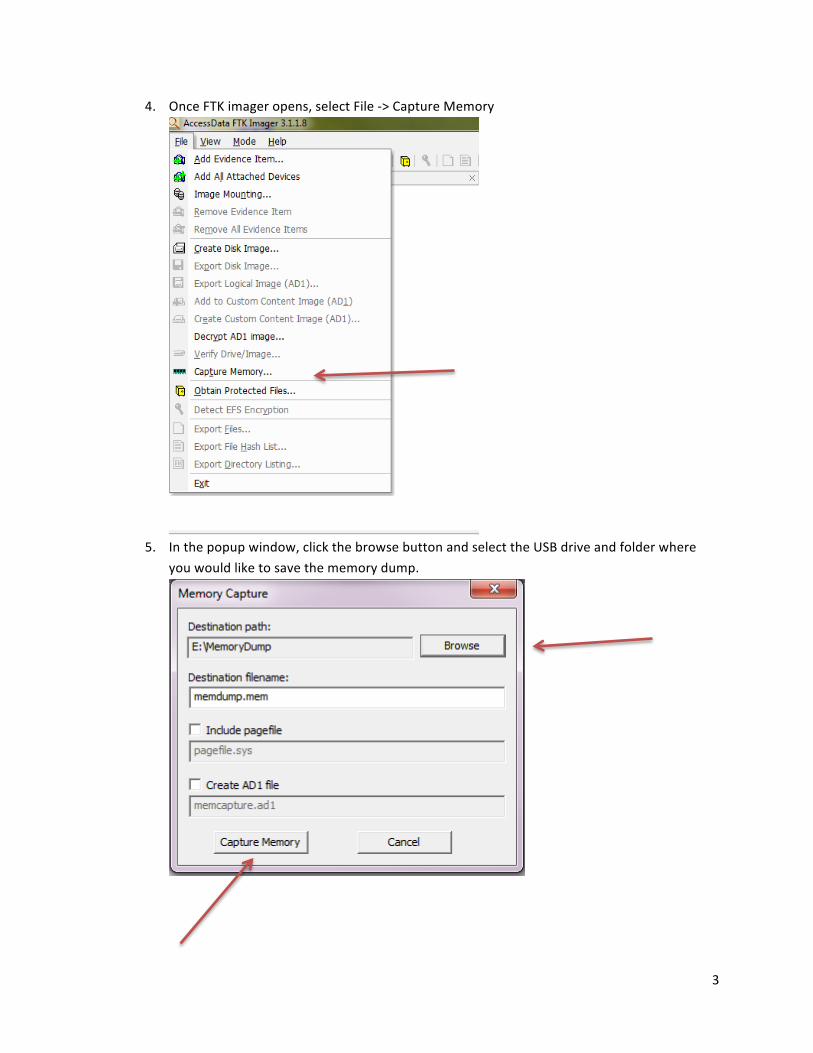
4. Once FTK imager opens, select File -‐> Capture Memory
5. In the popup window, click the browse button and select the USB drive and folder where
you would like to save the memory dump.
4
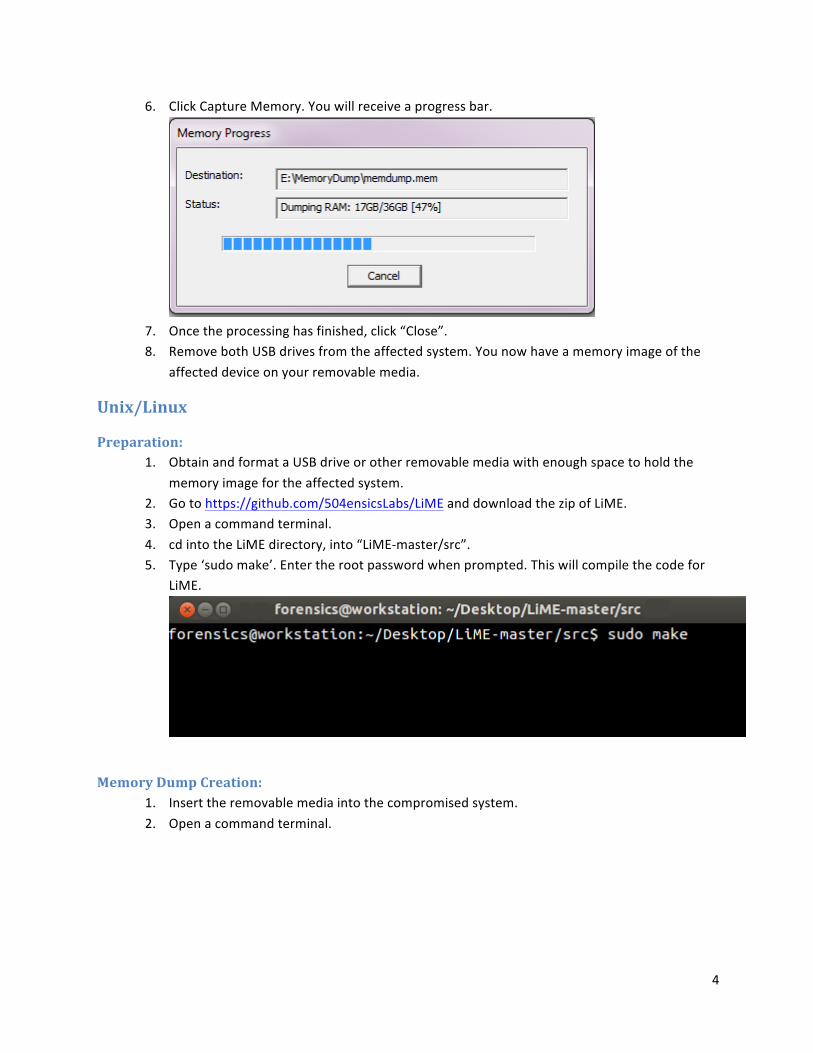
6. Click Capture Memory. You will receive a progress bar.
7. Once the processing has finished, click “Close”. 8. Remove both USB drives from the affected system. You now have a memory image of the
affected device on your removable media.
Unix/Linux
Preparation: 1. Obtain and format a USB drive or other removable media with enough space to hold the
memory image for the affected system. 2. Go to https://github.com/504ensicsLabs/LiME and download the zip of LiME. 3. Open a command terminal. 4. cd into the LiME directory, into “LiME-‐master/src”. 5. Type ‘sudo make’. Enter the root password when prompted. This will compile the code for
LiME.
Memory Dump Creation: 1. Insert the removable media into the compromised system. 2. Open a command terminal.
5
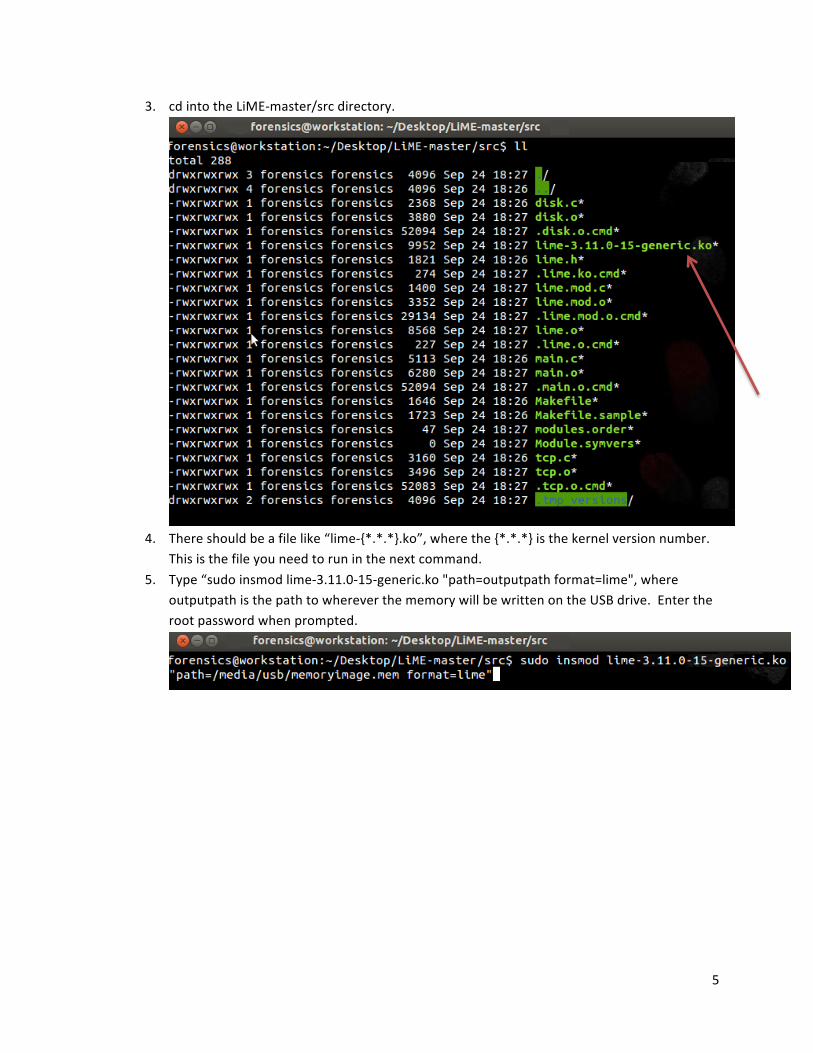
3. cd into the LiME-‐master/src directory.
4. There should be a file like “lime-‐{*.*.*}.ko”, where the {*.*.*} is the kernel version number.
This is the file you need to run in the next command. 5. Type “sudo insmod lime-‐3.11.0-‐15-‐generic.ko "path=outputpath format=lime", where
outputpath is the path to wherever the memory will be written on the USB drive. Enter the root password when prompted.
6
Image Creation
Virtual Machines
Live Image: Live images can be created two ways. You can create it just as you would an offline image (see below), but it will lock the file for the duration of the copy. Otherwise, you can follow the below steps.
Preparation: 1. Obtain and format a USB drive or other removable media with enough space to hold the
forensic image for the affected system. 2. Go to http://www.vmware.com/products/converter. You will have to create a free account on
the site in order to be able to download the tool. 3. Download the executable for VMware-‐converter. 4. Install VMware-‐converter onto your Windows based analysis workstation.
Image Creation:
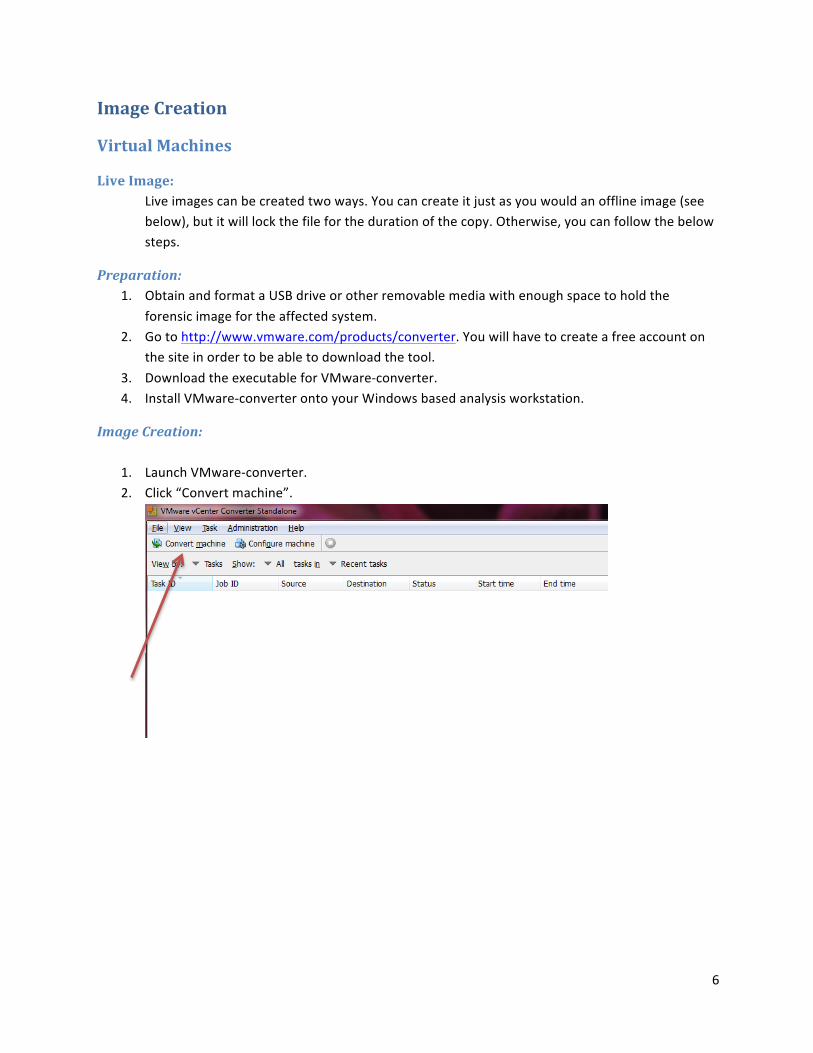
1. Launch VMware-‐converter. 2. Click “Convert machine”.
7
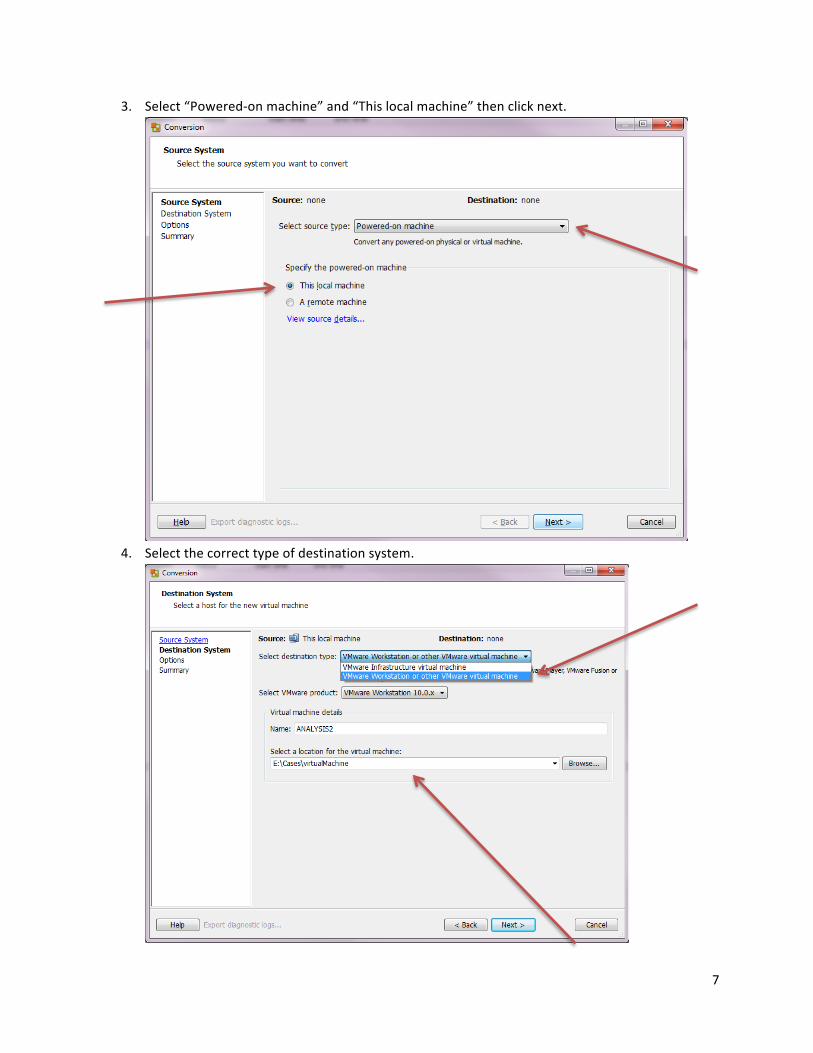
3. Select “Powered-‐on machine” and “This local machine” then click next.
4. Select the correct type of destination system.
8
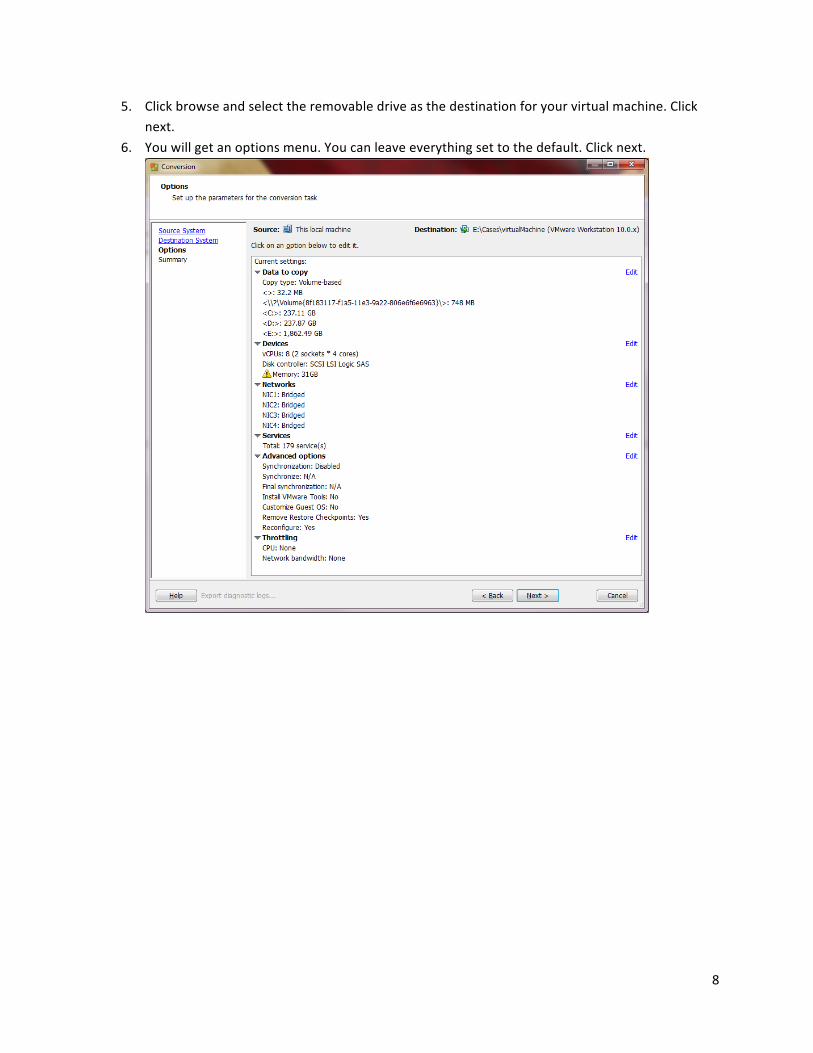
5. Click browse and select the removable drive as the destination for your virtual machine. Click next.
6. You will get an options menu. You can leave everything set to the default. Click next.
9
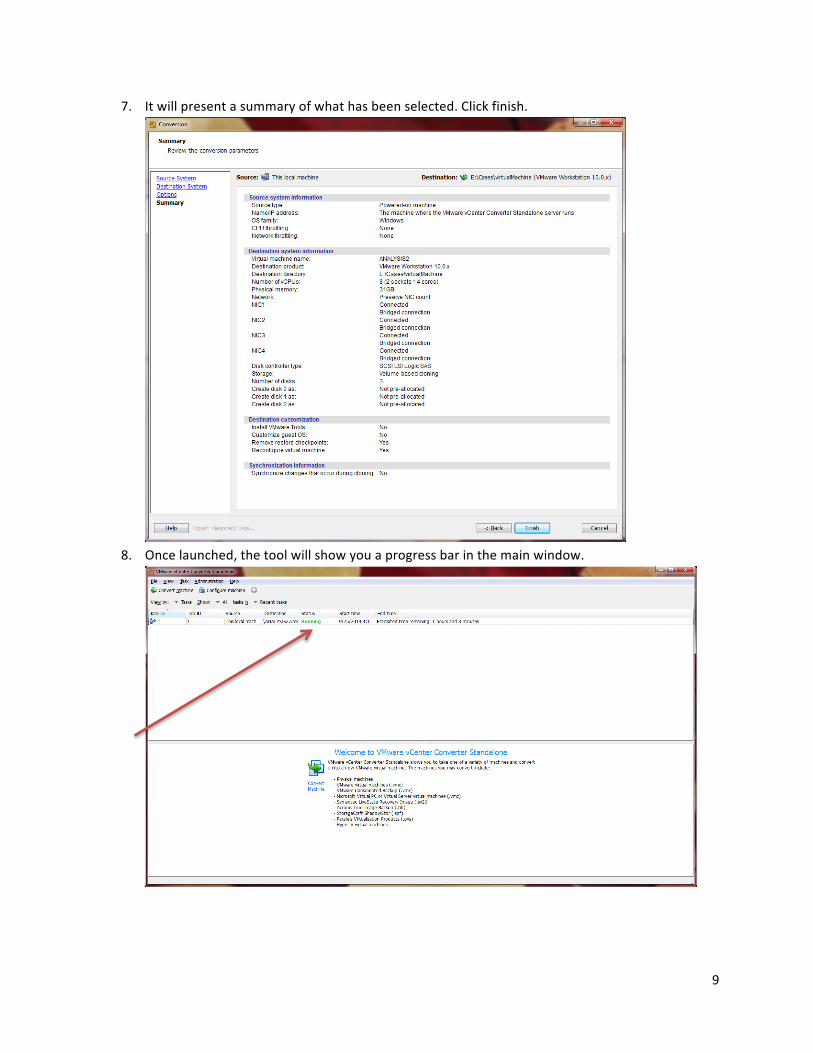
7. It will present a summary of what has been selected. Click finish.
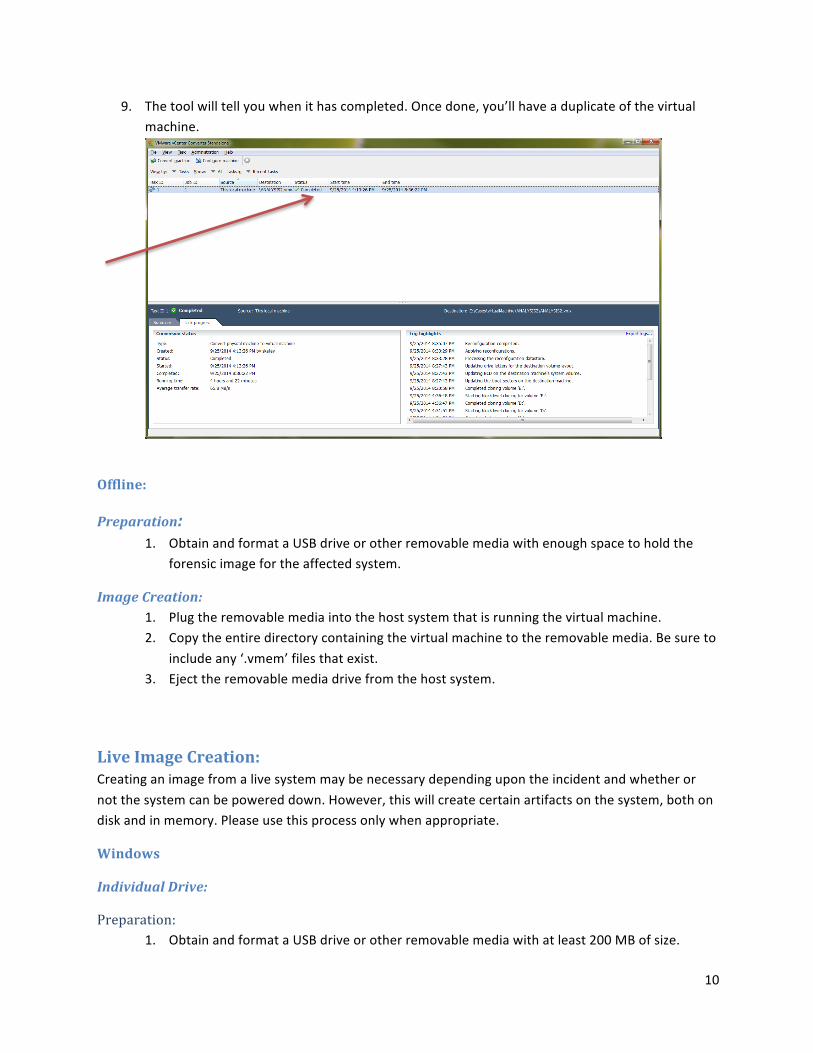
8. Once launched, the tool will show you a progress bar in the main window.
10
9. The tool will tell you when it has completed. Once done, you’ll have a duplicate of the virtual machine.
Offline:
Preparation: 1. Obtain and format a USB drive or other removable media with enough space to hold the
forensic image for the affected system.
Image Creation: 1. Plug the removable media into the host system that is running the virtual machine. 2. Copy the entire directory containing the virtual machine to the removable media. Be sure to
include any ‘.vmem’ files that exist. 3. Eject the removable media drive from the host system.
Live Image Creation: Creating an image from a live system may be necessary depending upon the incident and whether or not the system can be powered down. However, this will create certain artifacts on the system, both on disk and in memory. Please use this process only when appropriate.
Windows
Individual Drive:
Preparation: 1. Obtain and format a USB drive or other removable media with at least 200 MB of size.
11
2. Visit http://www.accessdata.com/support/product-‐downloads and click on the line that says “FTK IMAGER”.
3. Click on the download button next to “FTK Imager Lite”. 4. Download the tool onto the USB drive or other type of removable media. 5. Extract the contents of the downloaded zip file to the USB drive. 6. Obtain and format a USB drive or other removable media large enough to hold the entire
contents of the drive(s) to be imaged. For example, if you have a 1TB drive, a 250GB drive and a 500GB drive, you would need media able to support minimum of 1.75TBs.
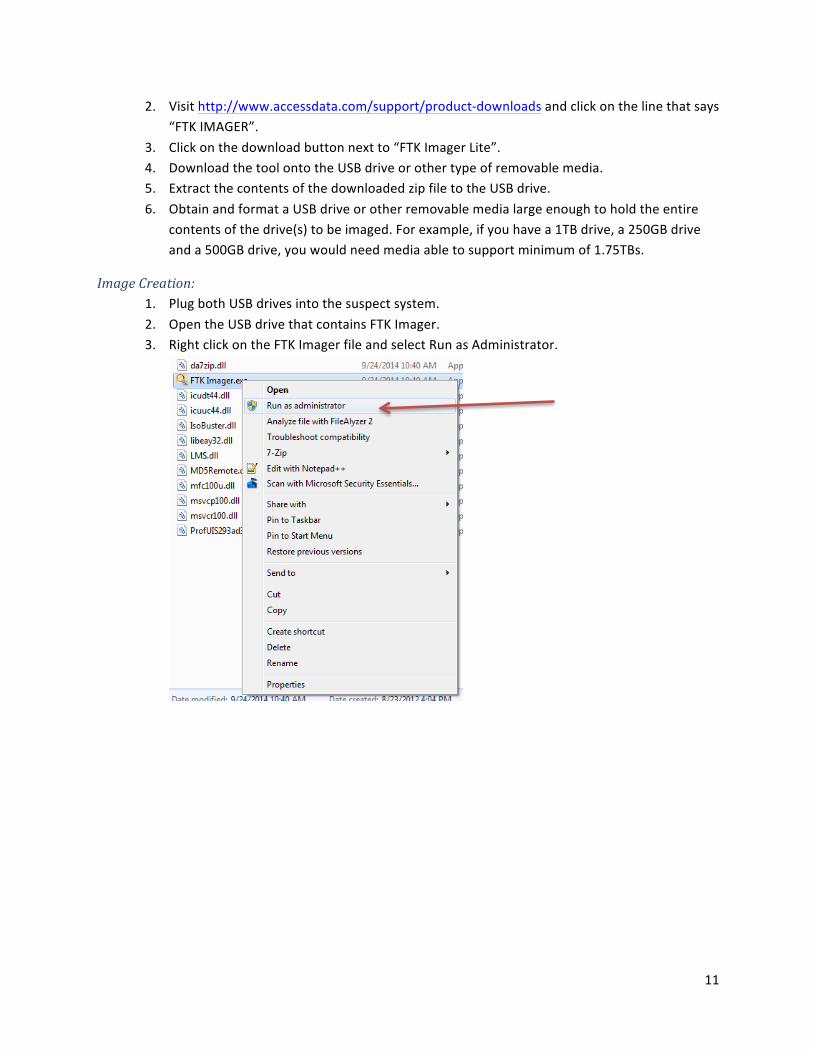
Image Creation: 1. Plug both USB drives into the suspect system. 2. Open the USB drive that contains FTK Imager. 3. Right click on the FTK Imager file and select Run as Administrator.
12
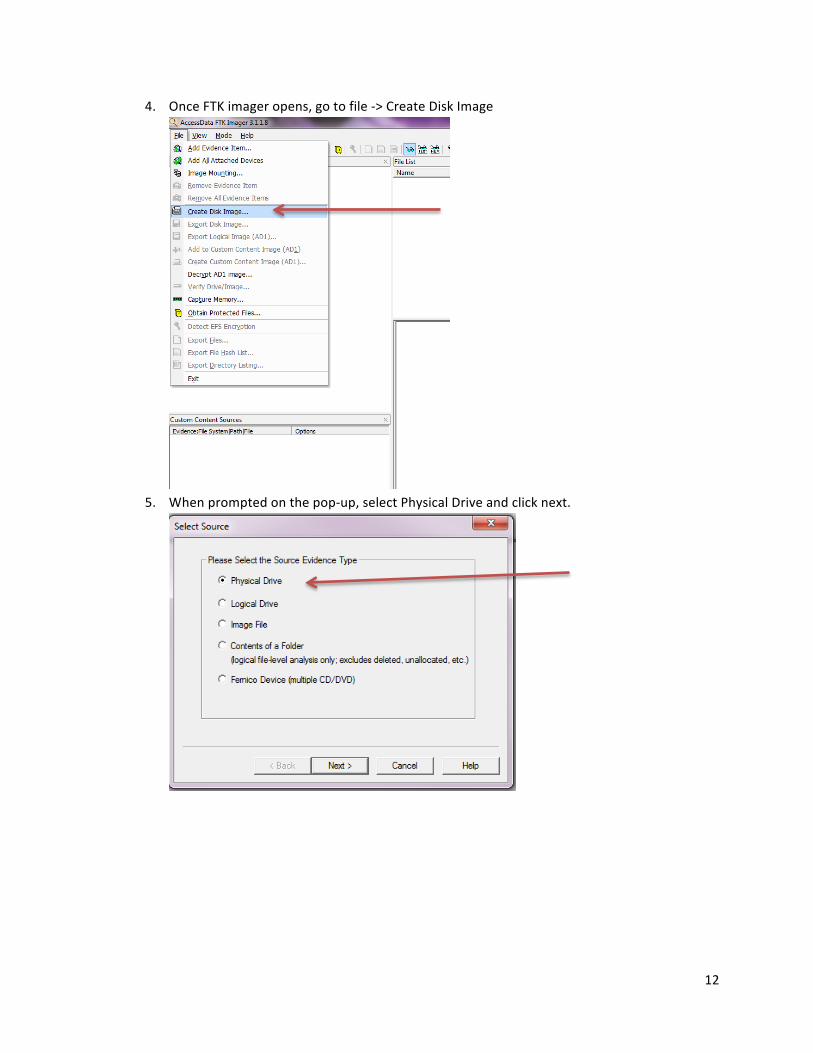
4. Once FTK imager opens, go to file -‐> Create Disk Image
5. When prompted on the pop-‐up, select Physical Drive and click next.
13
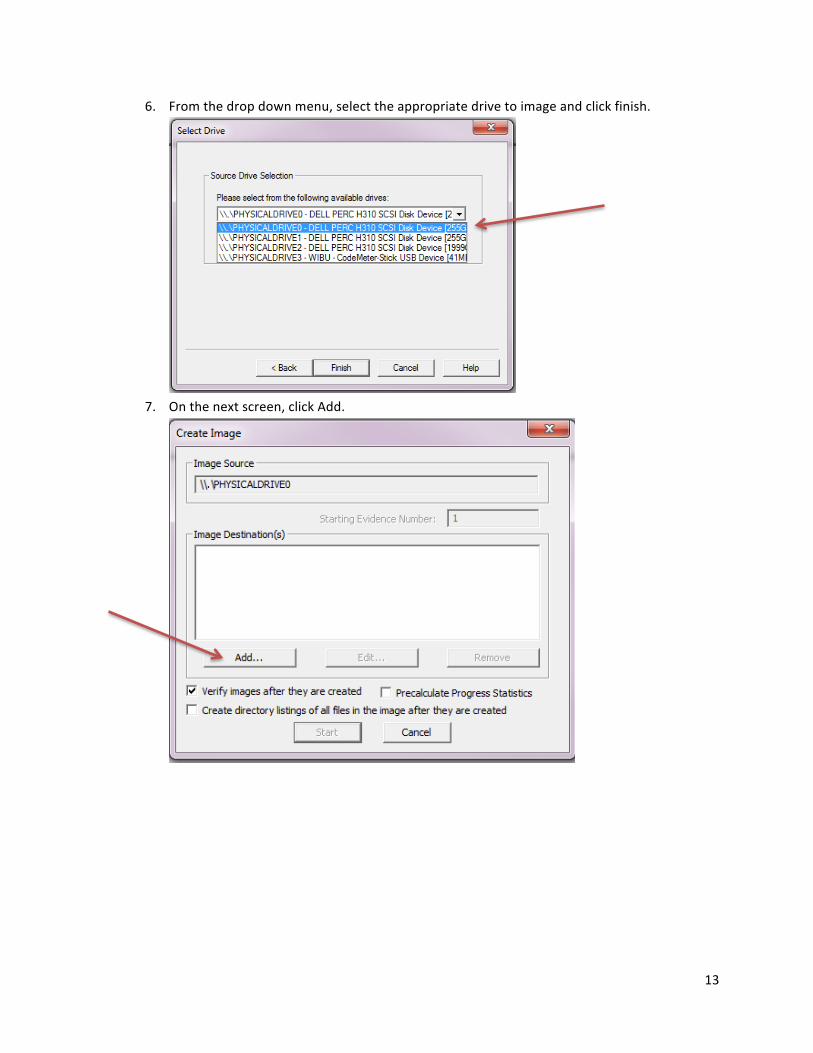
6. From the drop down menu, select the appropriate drive to image and click finish.
7. On the next screen, click Add.
14
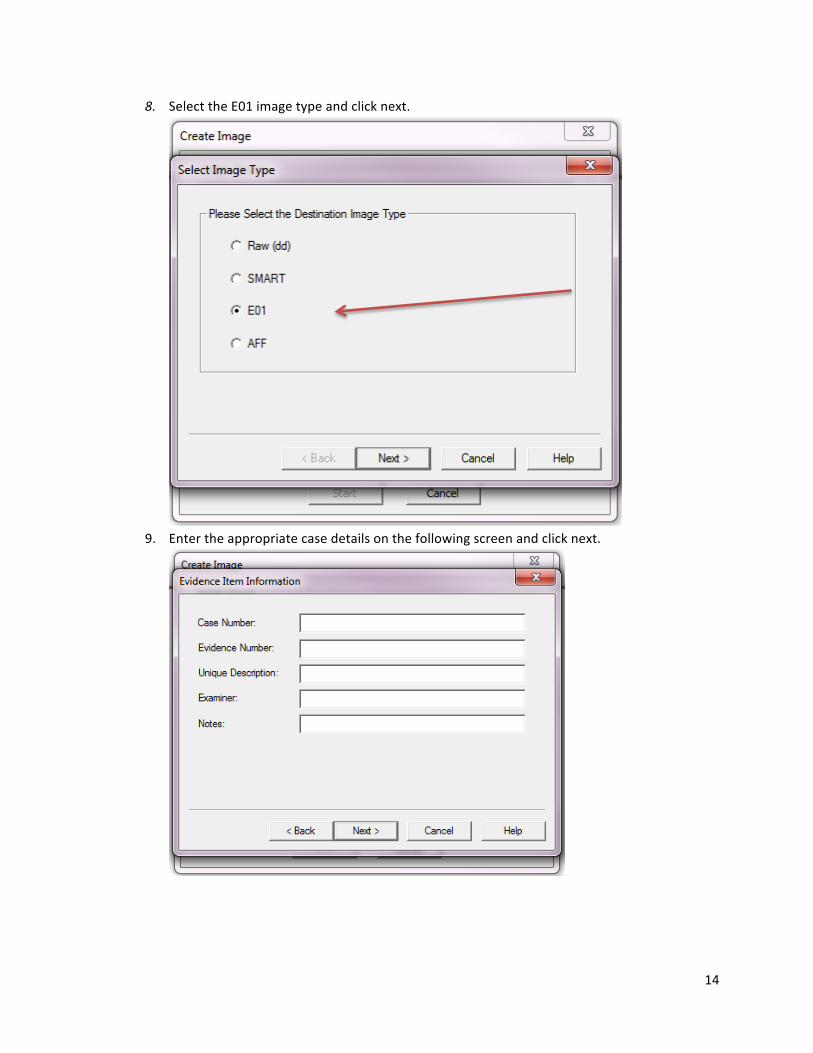
8. Select the E01 image type and click next.
9. Enter the appropriate case details on the following screen and click next.
15
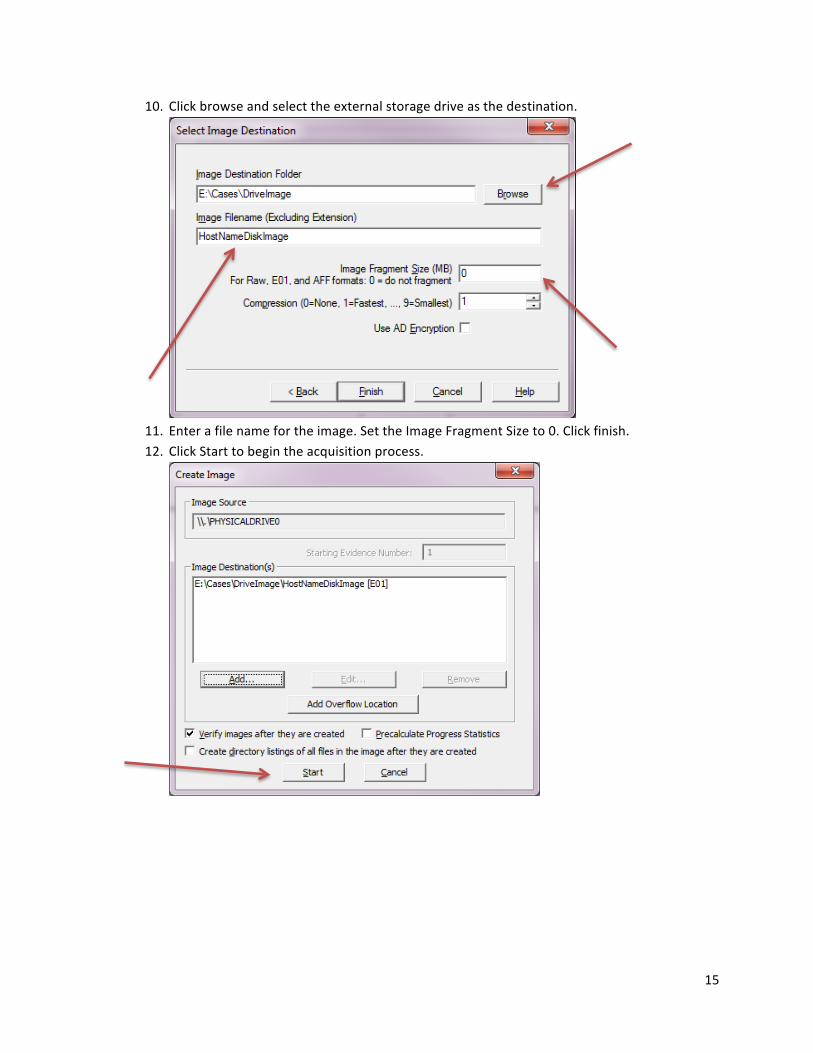
10. Click browse and select the external storage drive as the destination.
11. Enter a file name for the image. Set the Image Fragment Size to 0. Click finish. 12. Click Start to begin the acquisition process.

16
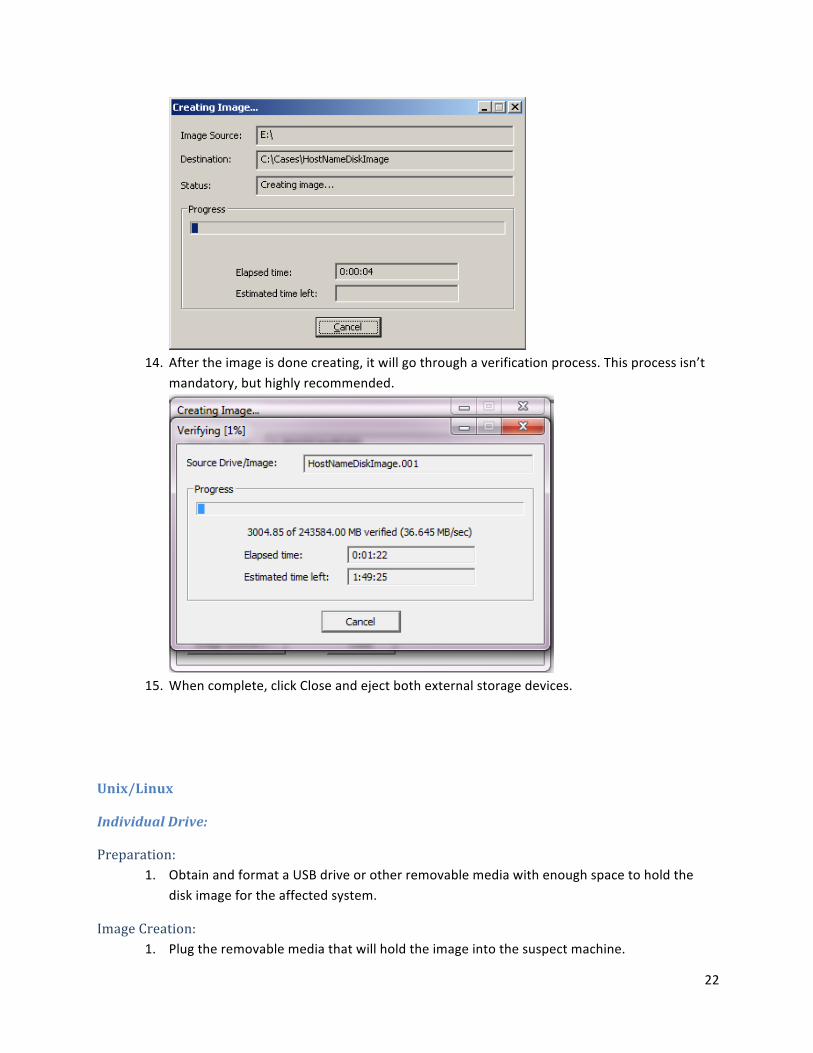
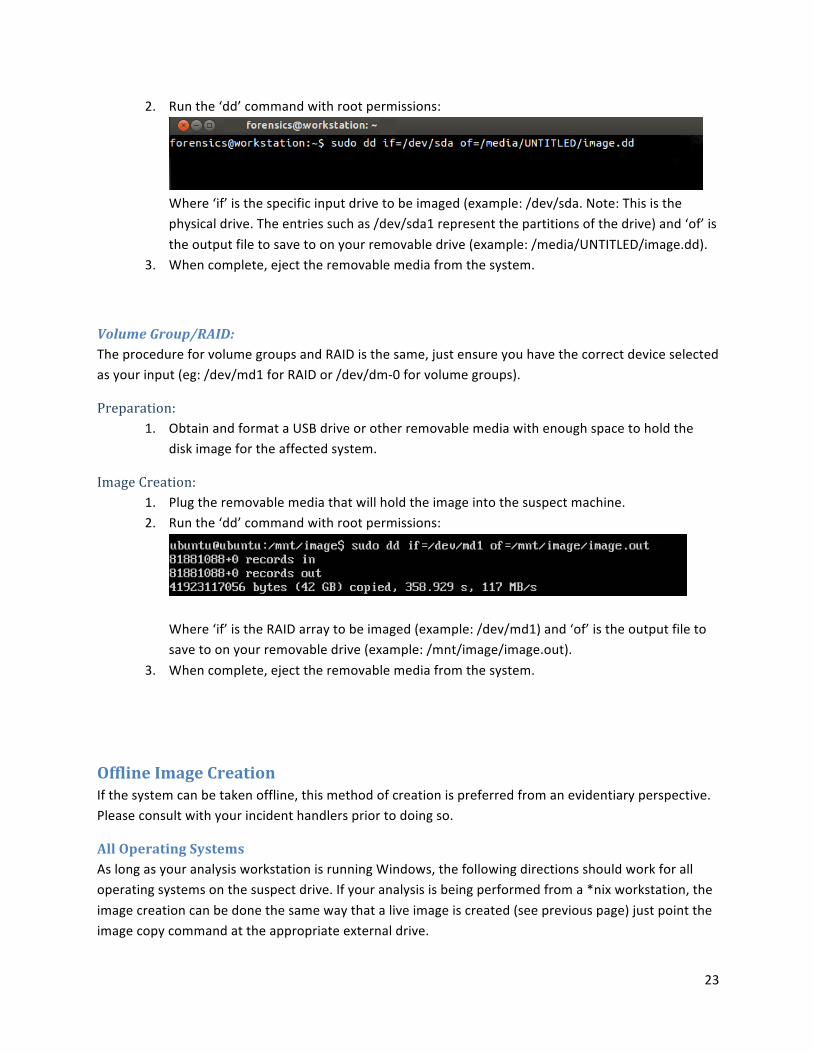
13. You will receive a progress bar.
14. After the image is done creating, it will go through a verification process. This process isn’t
mandatory, but highly recommended.
15. When complete, click Close and eject both external storage devices.
RAID:
Preparation: 1. Obtain and format a USB drive or other removable media with at least 200 MB of size. 2. Visit http://www.accessdata.com/support/product-‐downloads and click on the line that says
“FTK IMAGER”. 3. Click on the download button next to “FTK Imager Lite”. 4. Download the tool onto the USB drive or other type of removable media.
17
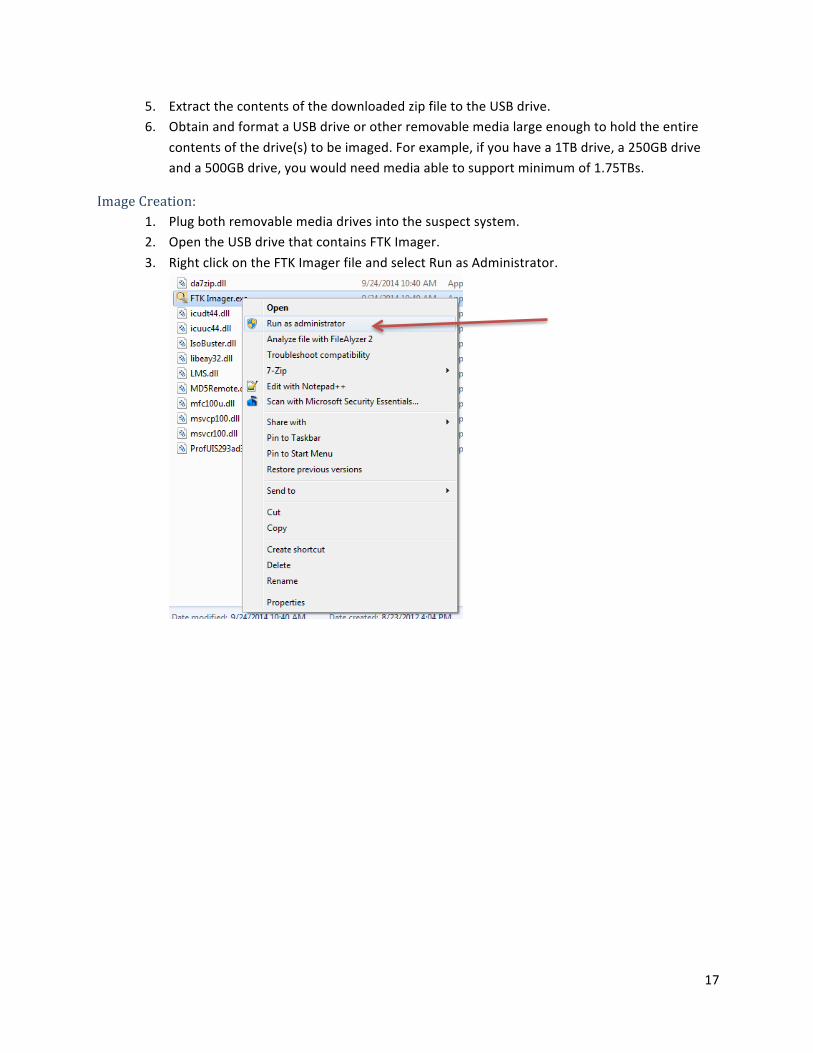
5. Extract the contents of the downloaded zip file to the USB drive. 6. Obtain and format a USB drive or other removable media large enough to hold the entire
contents of the drive(s) to be imaged. For example, if you have a 1TB drive, a 250GB drive and a 500GB drive, you would need media able to support minimum of 1.75TBs.
Image Creation: 1. Plug both removable media drives into the suspect system. 2. Open the USB drive that contains FTK Imager. 3. Right click on the FTK Imager file and select Run as Administrator.
18
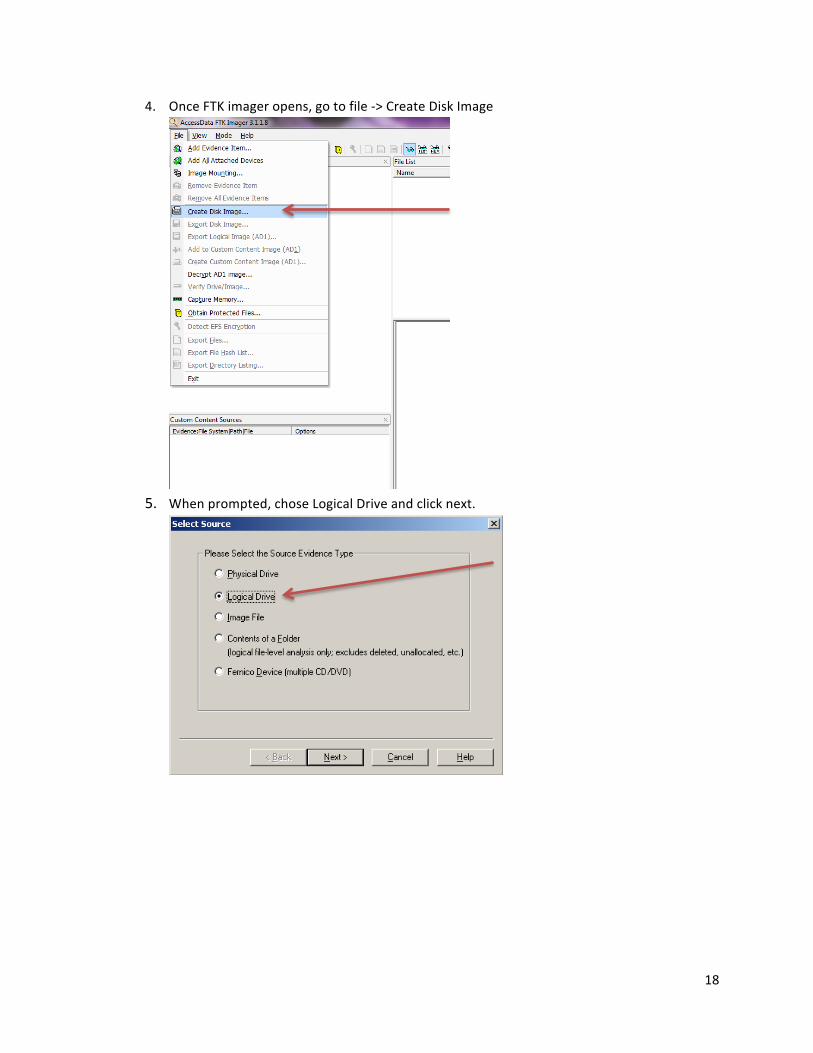
4. Once FTK imager opens, go to file -‐> Create Disk Image
5. When prompted, chose Logical Drive and click next.
19
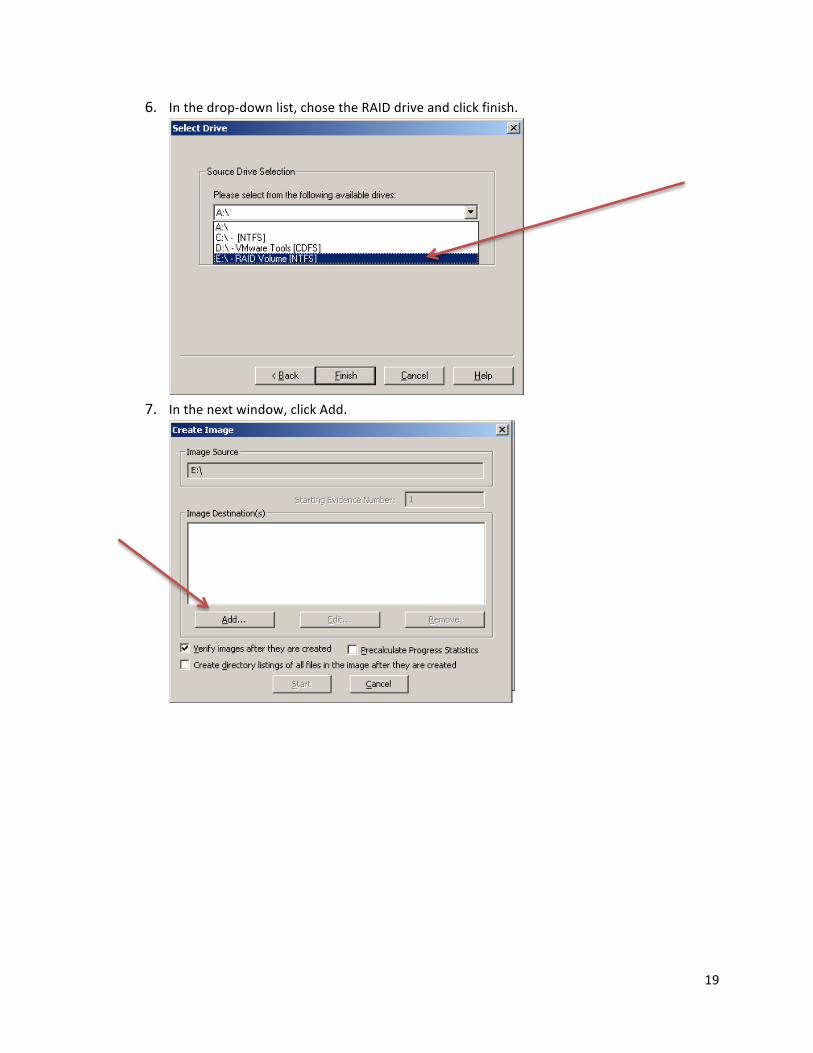
6. In the drop-‐down list, chose the RAID drive and click finish.
7. In the next window, click Add.
20
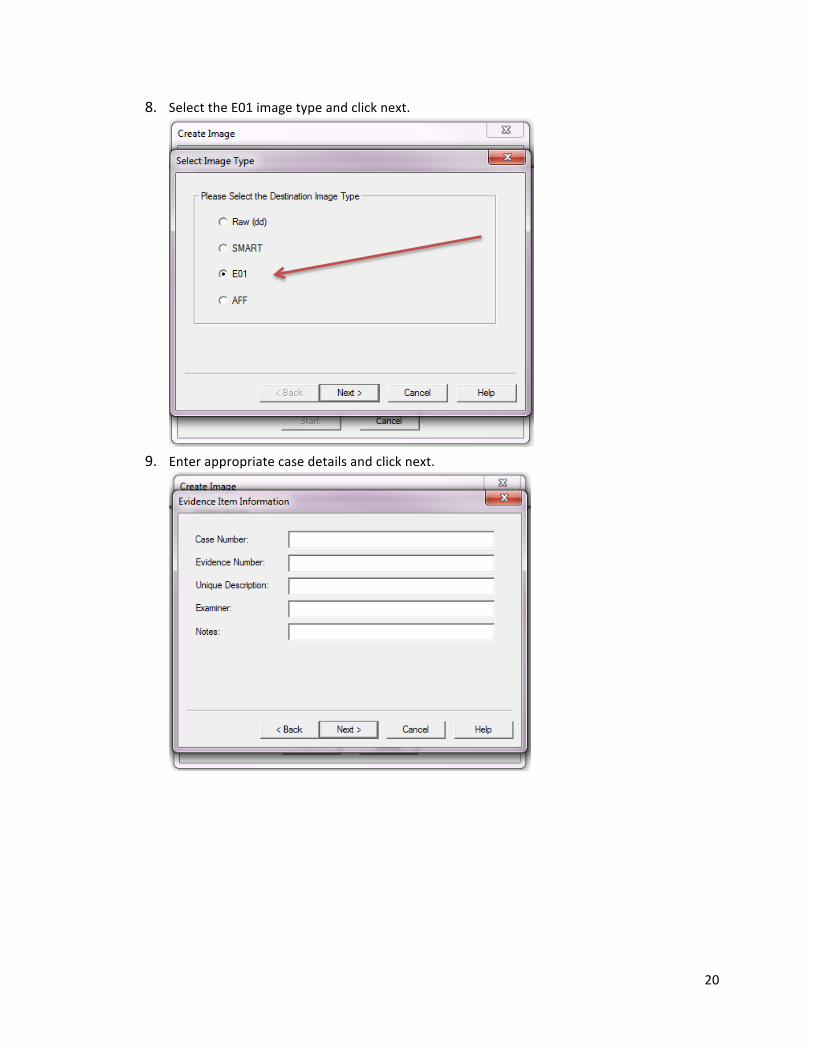
8. Select the E01 image type and click next.
9. Enter appropriate case details and click next.
21
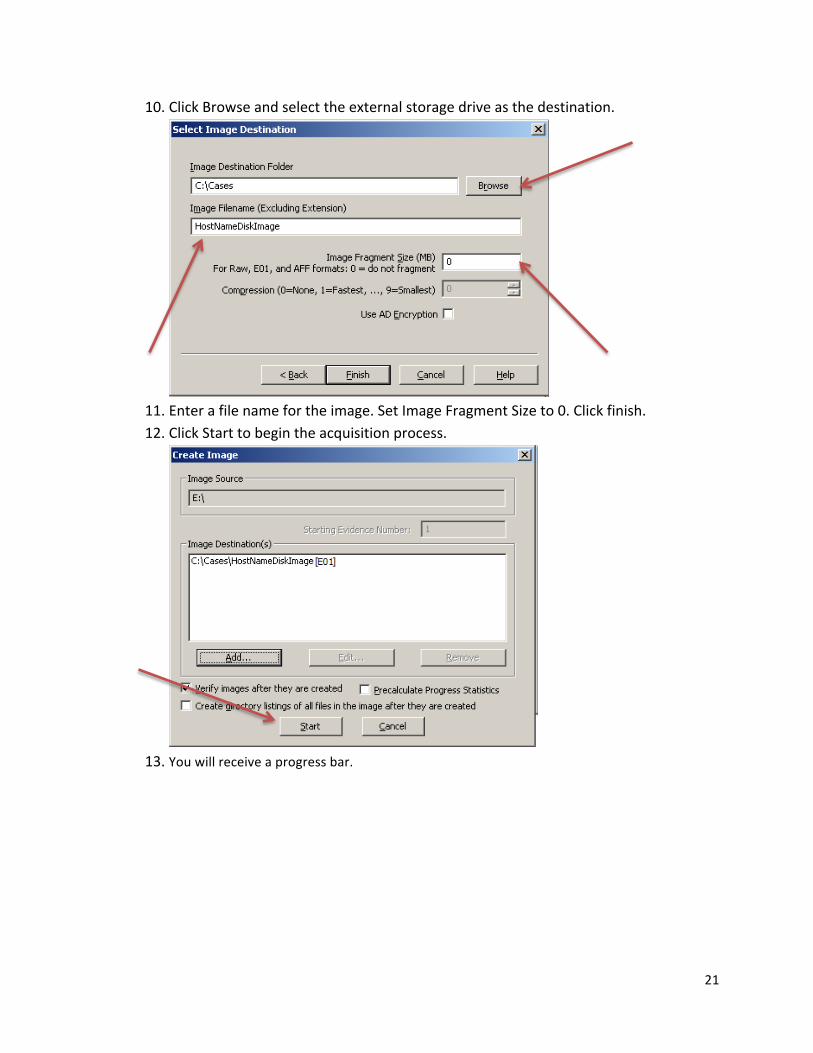
10. Click Browse and select the external storage drive as the destination.
11. Enter a file name for the image. Set Image Fragment Size to 0. Click finish. 12. Click Start to begin the acquisition process.
13. You will receive a progress bar.
22
14. After the image is done creating, it will go through a verification process. This process isn’t
mandatory, but highly recommended.
15. When complete, click Close and eject both external storage devices.
Unix/Linux
Individual Drive:
Preparation: 1. Obtain and format a USB drive or other removable media with enough space to hold the
disk image for the affected system.
Image Creation: 1. Plug the removable media that will hold the image into the suspect machine.
23
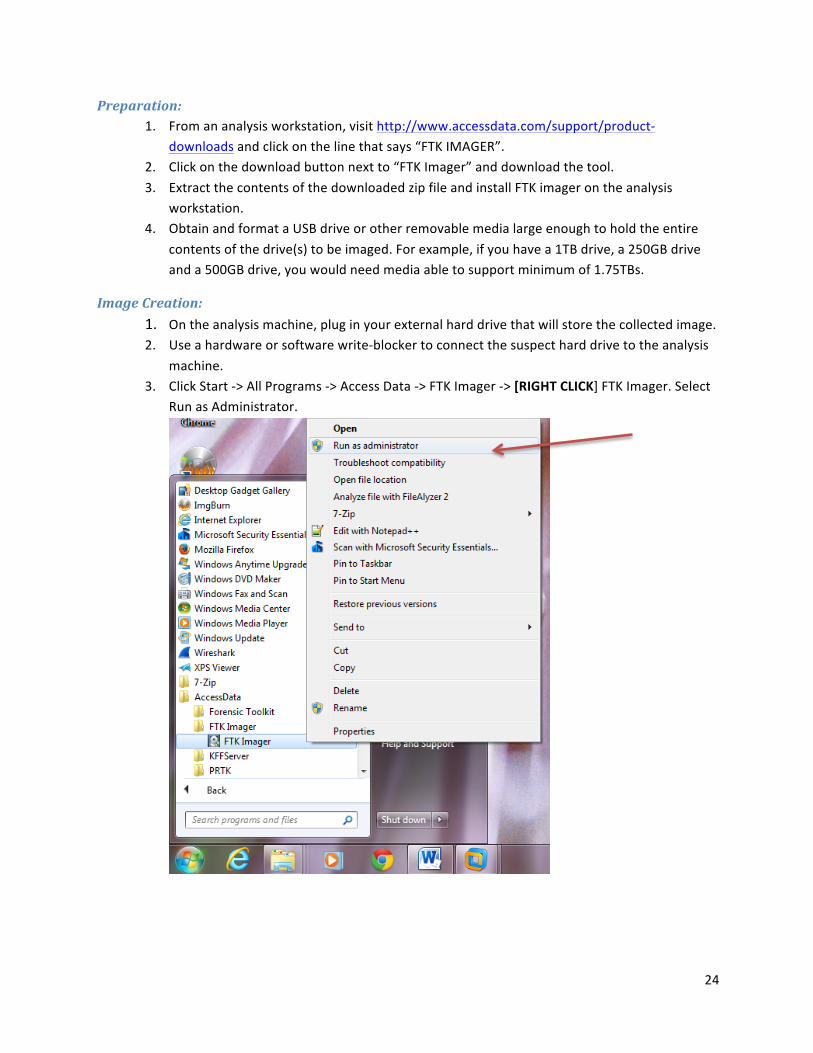
2. Run the ‘dd’ command with root permissions:
Where ‘if’ is the specific input drive to be imaged (example: /dev/sda. Note: This is the physical drive. The entries such as /dev/sda1 represent the partitions of the drive) and ‘of’ is the output file to save to on your removable drive (example: /media/UNTITLED/image.dd).
3. When complete, eject the removable media from the system.
Volume Group/RAID: The procedure for volume groups and RAID is the same, just ensure you have the correct device selected as your input (eg: /dev/md1 for RAID or /dev/dm-‐0 for volume groups).
Preparation: 1. Obtain and format a USB drive or other removable media with enough space to hold the
disk image for the affected system.
Image Creation: 1. Plug the removable media that will hold the image into the suspect machine. 2. Run the ‘dd’ command with root permissions:
Where ‘if’ is the RAID array to be imaged (example: /dev/md1) and ‘of’ is the output file to save to on your removable drive (example: /mnt/image/image.out).
3. When complete, eject the removable media from the system.
Offline Image Creation If the system can be taken offline, this method of creation is preferred from an evidentiary perspective. Please consult with your incident handlers prior to doing so.
All Operating Systems As long as your analysis workstation is running Windows, the following directions should work for all operating systems on the suspect drive. If your analysis is being performed from a *nix workstation, the image creation can be done the same way that a live image is created (see previous page) just point the image copy command at the appropriate external drive.
24
Preparation: 1. From an analysis workstation, visit http://www.accessdata.com/support/product-‐
downloads and click on the line that says “FTK IMAGER”. 2. Click on the download button next to “FTK Imager” and download the tool. 3. Extract the contents of the downloaded zip file and install FTK imager on the analysis
workstation. 4. Obtain and format a USB drive or other removable media large enough to hold the entire
contents of the drive(s) to be imaged. For example, if you have a 1TB drive, a 250GB drive and a 500GB drive, you would need media able to support minimum of 1.75TBs.
Image Creation: 1. On the analysis machine, plug in your external hard drive that will store the collected image. 2. Use a hardware or software write-‐blocker to connect the suspect hard drive to the analysis
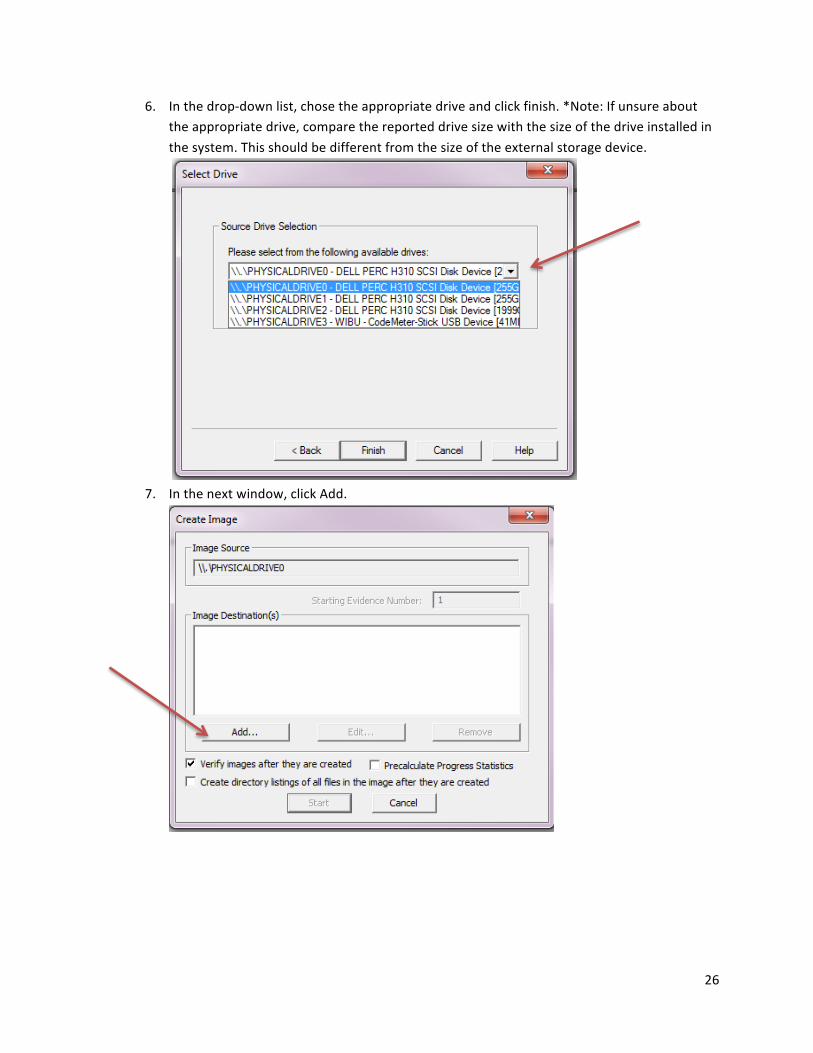
machine. 3. Click Start -‐> All Programs -‐> Access Data -‐> FTK Imager -‐> [RIGHT CLICK] FTK Imager. Select
Run as Administrator.

25
4. In FTK imager, click File -‐> Create Disk Image.
5. When prompted, select Physical Drive and click next.
26
6. In the drop-‐down list, chose the appropriate drive and click finish. *Note: If unsure about the appropriate drive, compare the reported drive size with the size of the drive installed in the system. This should be different from the size of the external storage device.
7. In the next window, click Add.

27
8. Select the E01 image type and click next.
9. Enter the appropriate case details in the next window and click next.
28
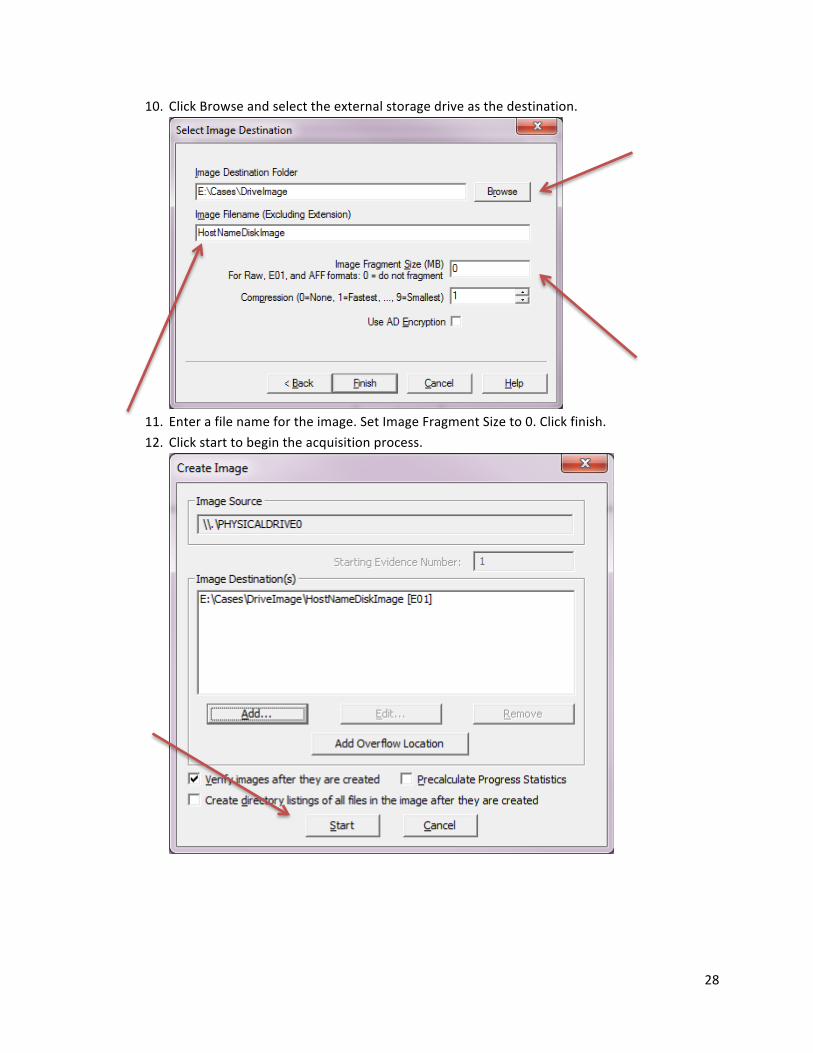
10. Click Browse and select the external storage drive as the destination.
11. Enter a file name for the image. Set Image Fragment Size to 0. Click finish. 12. Click start to begin the acquisition process.
29
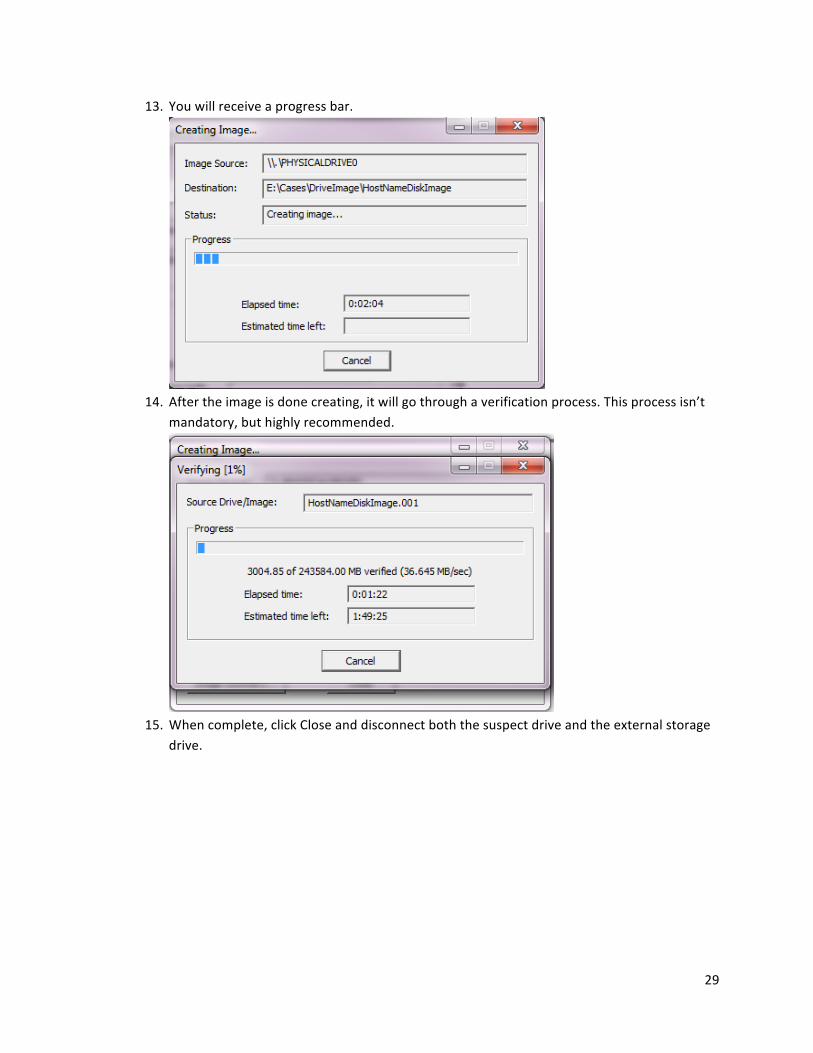
13. You will receive a progress bar.
14. After the image is done creating, it will go through a verification process. This process isn’t
mandatory, but highly recommended.
15. When complete, click Close and disconnect both the suspect drive and the external storage
drive.