cryogenic apparatus foibles - cern indico
TRANSCRIPT
UNITED STATES DEPARTMENT OF COMMERCE
National Institute of Standards and Technology
Cryogenic Apparatus Foibles Jack Ekin National Institute of Standards and Technology Boulder, Colorado 80305
CERN, March 19, 2013
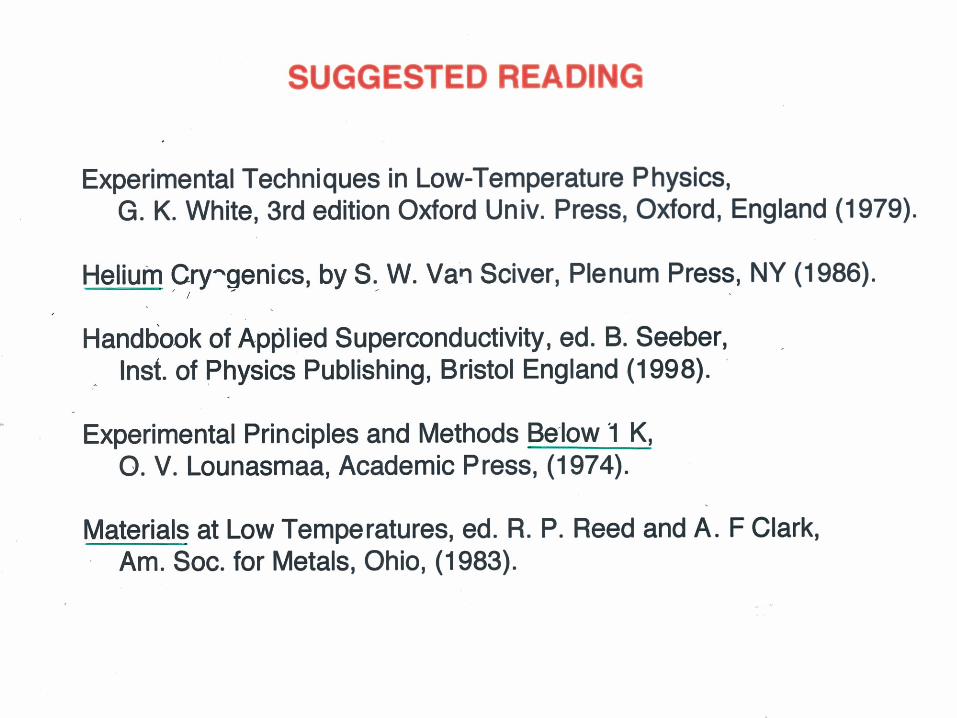
Sources of additional information: Book: Experimental Techniques for Low Temperature Measurements, Jack Ekin (Oxford Univ. Press, 2006, 2007, 2011 (Fourth Printing!) Website containing updated data tables and enlarged figure drawings: www.ResearchMeasurements.com. (Now complete!)
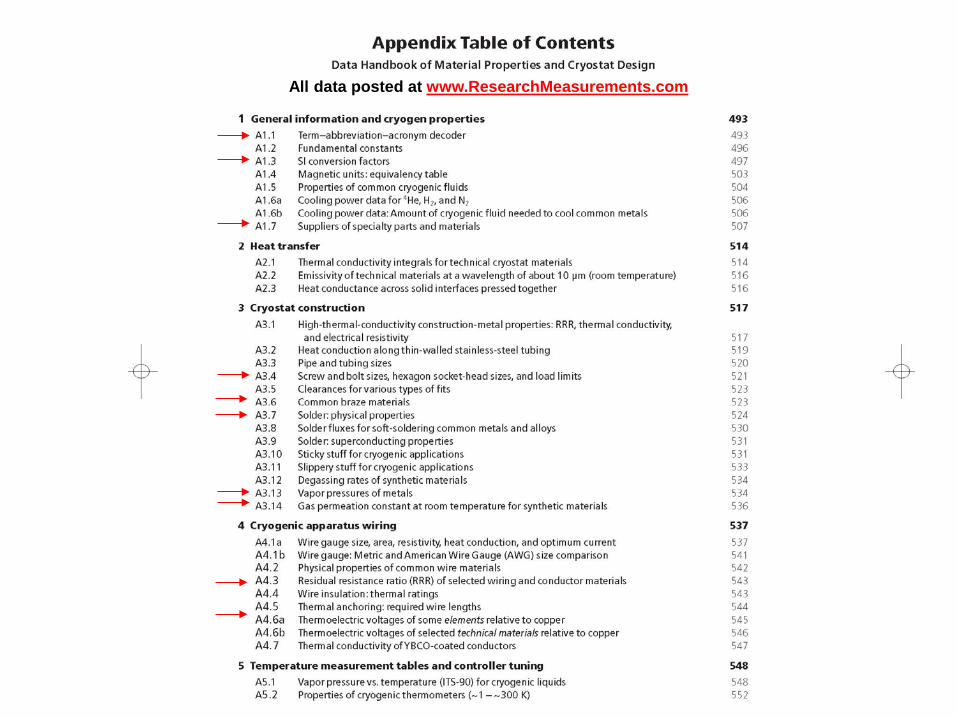
Free source of materials and design data. www.ResearchMeasurements.com Recently updated with over 113 graphs of materials and design data in pdf format Also 71 tables of cryogenic data – book’s appendix. [Appendix tables also translated into Chinese by Dr. Xi Chuanying] All the info I wish were assembled in one place when I design a cryostat
Book Web Site
Suggestions, questions: [email protected] Site development: Tom Goldberg with TGCS
Web site has two advantages over the book: 1) The price (nothing) 2) It offers instant lookup using the “find” function (Ctrl F) in Acrobat Reader. Of course, it doesn’t tell you how to use the data, which is the subject of the rest of the book .
Foibles (mostly mine ): weaknesses, defects, failures
Few comments up-front
(screw-ups)
Why? Screw-ups are instructive, but usually not publicized. (and then we get to learn the lessons all over again, the hard way!) The whole emphasis is pedagogical – motivation for how to do it right.
Some items are well known by those in the field, but may be useful. Others are more subtle (magnetic snowballs?)
Wise people learn from their own mistakes The wisest people learn from other’s mistakes.
Summary – Main Points
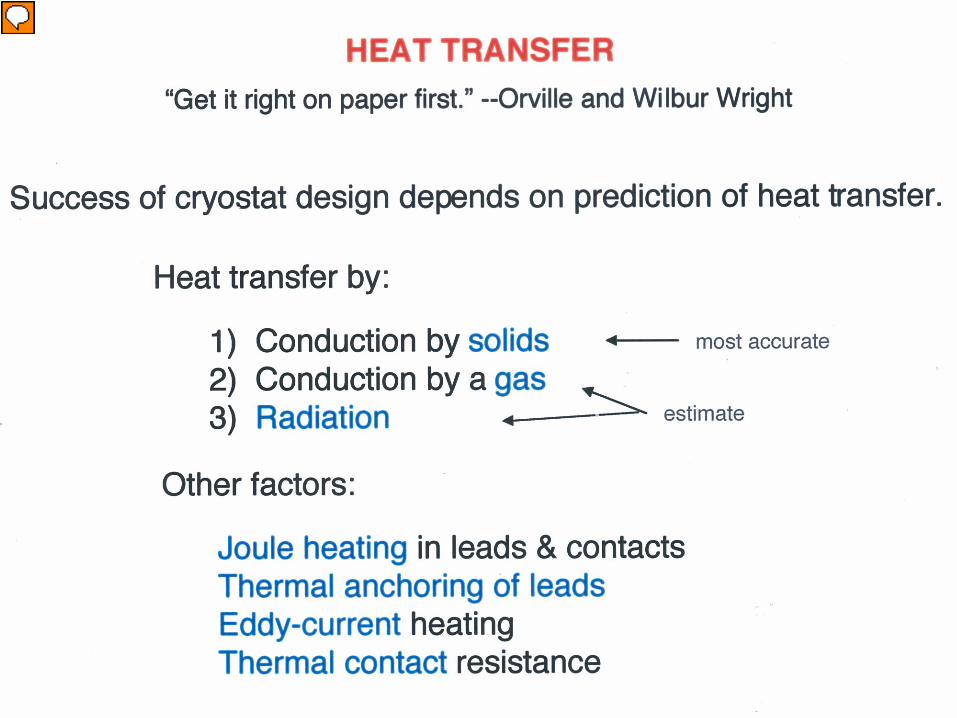
Make a cryogenic apparatus the way you would build a house: 1) Start with heat transfer calculations (blueprint – whole chapter of examples)
-- the most important thing you can do in designing an apparatus 2) Construct the apparatus
-- start from the center and work outward from there -- select materials carefully (Chap 6 + Appendix data)
3) Apparatus wiring 4) Select thermometers and instrumentation ________________ Other tips (simple listing of things I’ve learned, mostly the hard way): 5) Helium handling
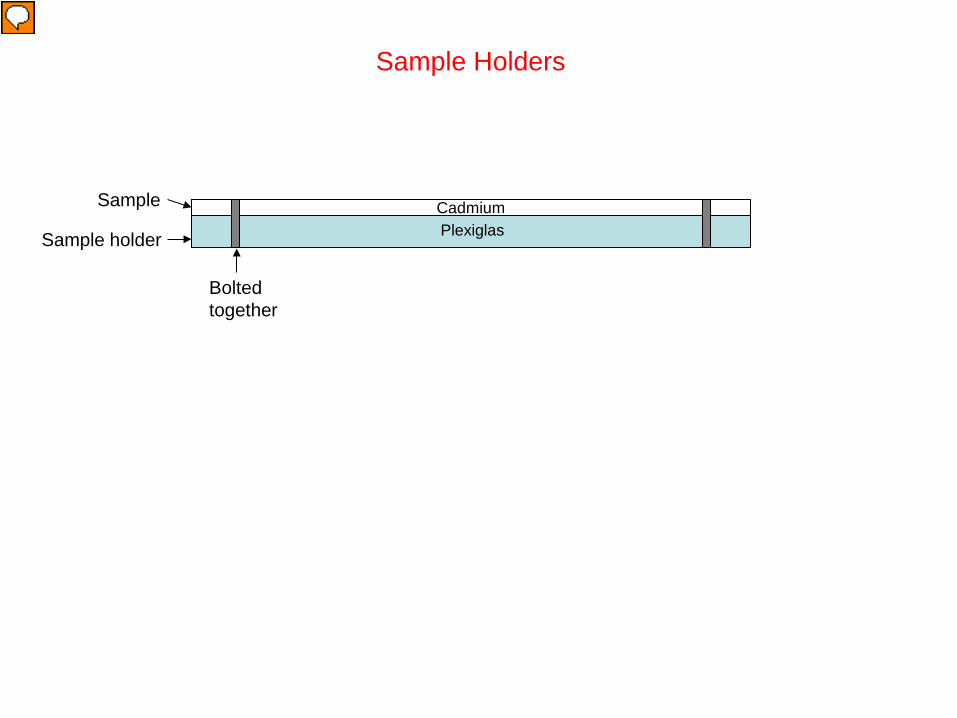
Sample Holders
Cadmium Plexiglas
Sample
Sample holder
Bolted together
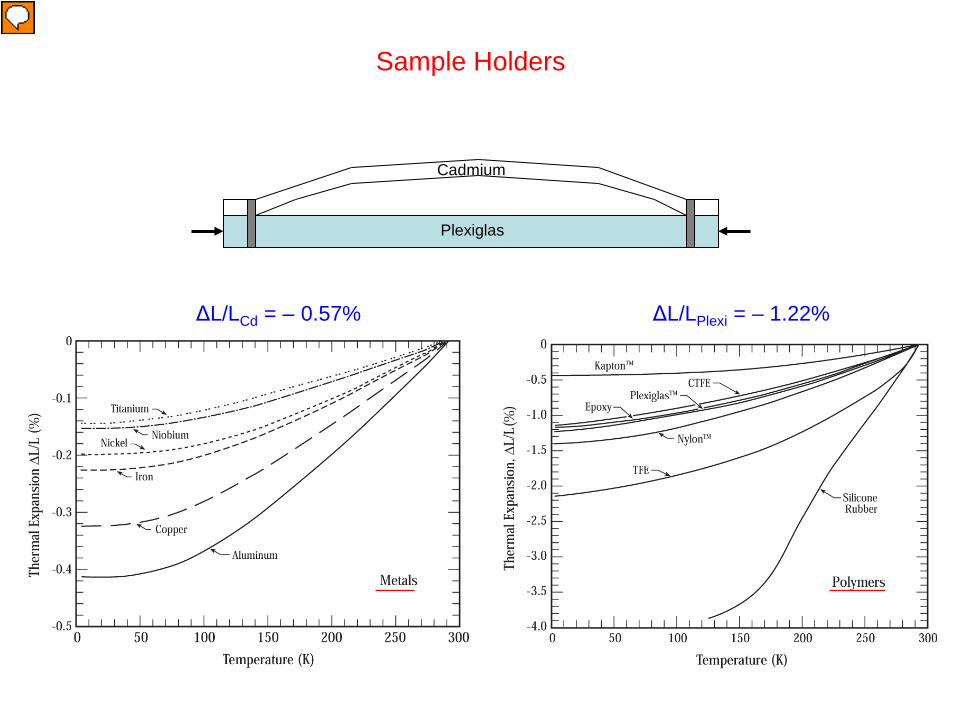
Sample Holders
Plexiglas
Cadmium
ΔL/LCd = – 0.57% ΔL/LPlexi = – 1.22%
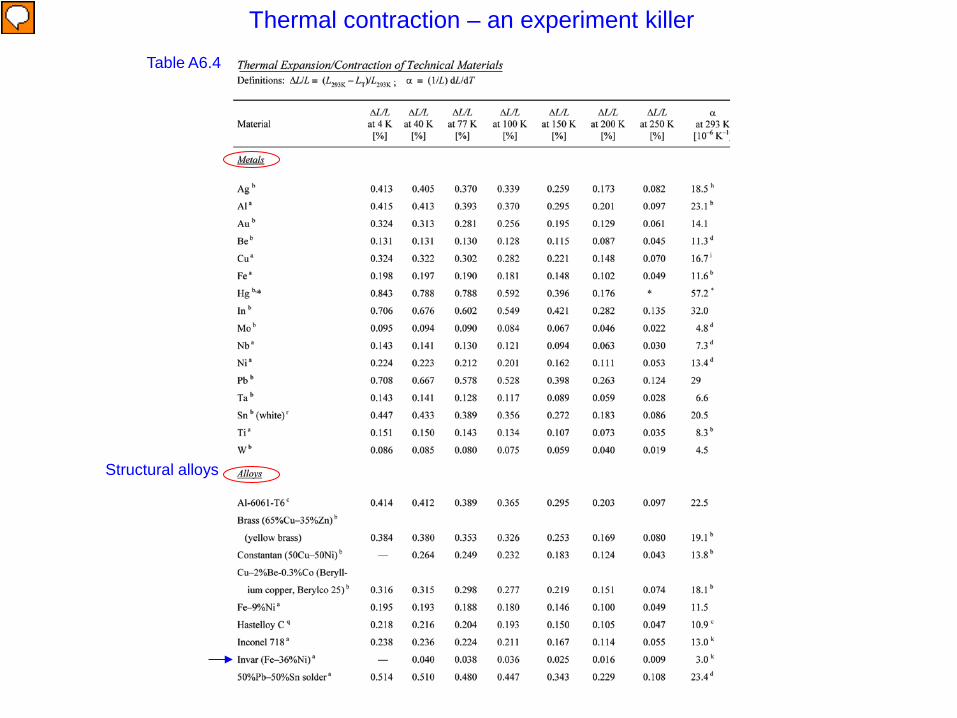
Thermal contraction – an experiment killer
Table A6.4
Structural alloys
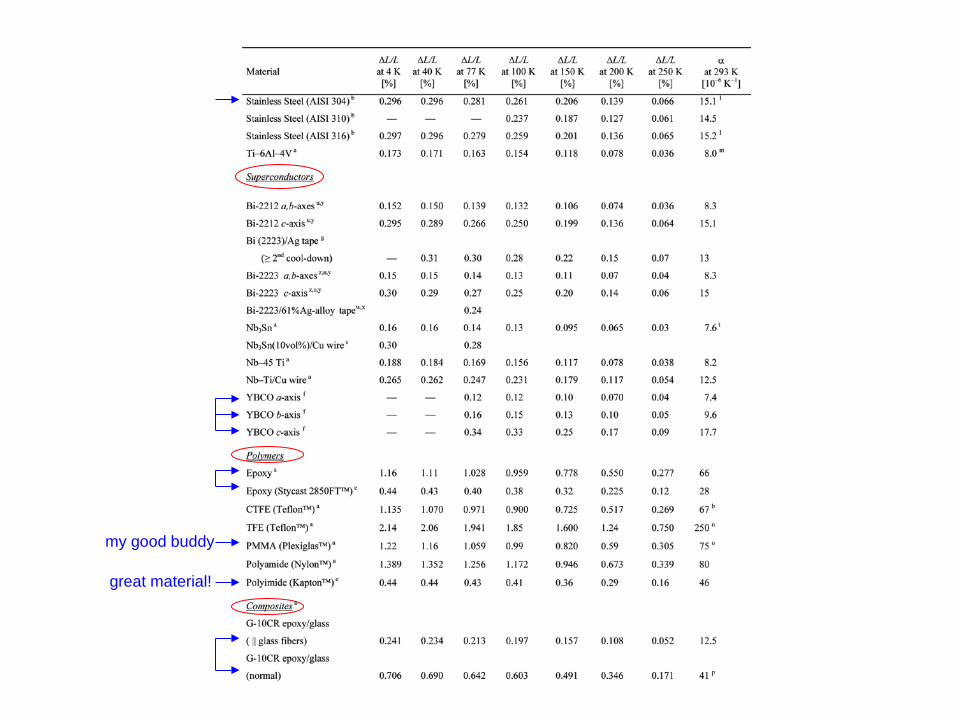
my good buddy
great material!
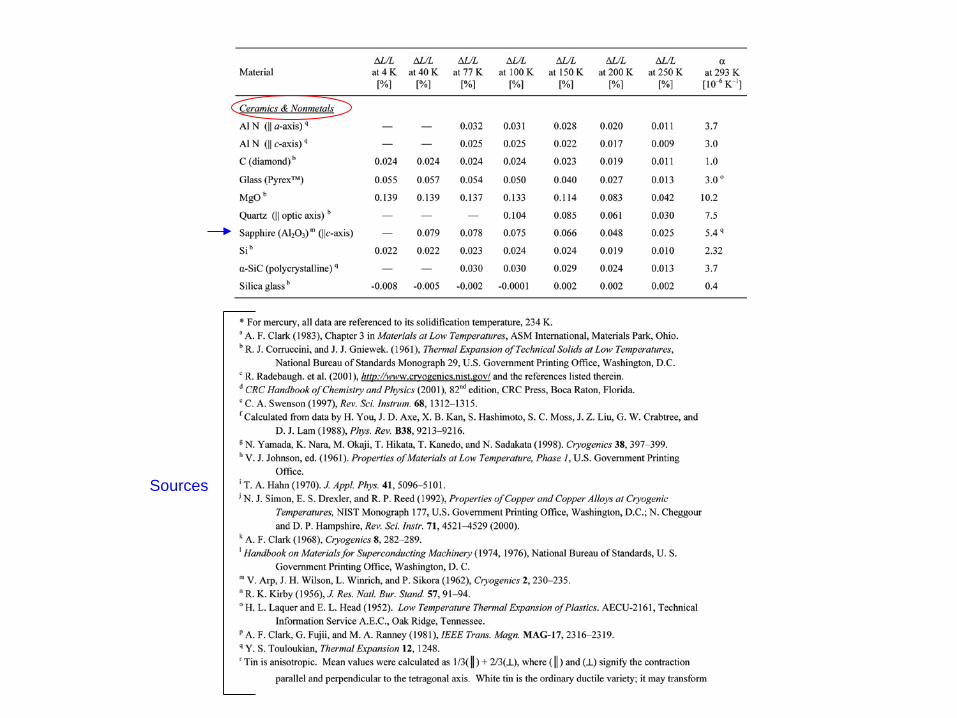
Sources
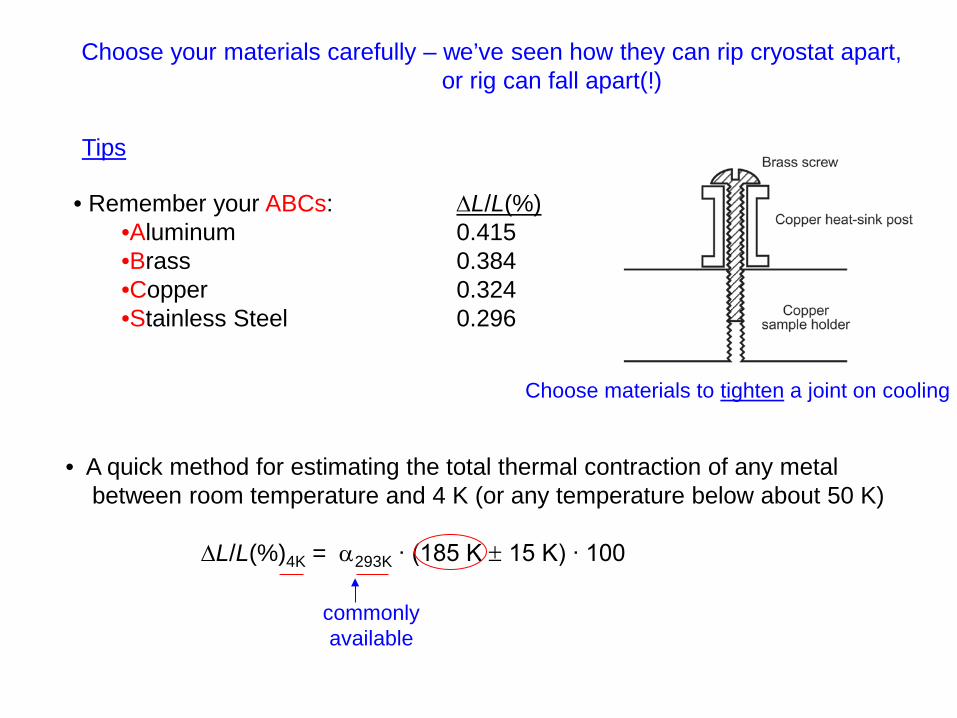
Choose your materials carefully – we’ve seen how they can rip cryostat apart, or rig can fall apart(!)
Tips
• Remember your ABCs: ∆L/L(%) •Aluminum 0.415 •Brass 0.384 •Copper 0.324 •Stainless Steel 0.296
• A quick method for estimating the total thermal contraction of any metal between room temperature and 4 K (or any temperature below about 50 K) ∆L/L(%)4K = α293K ∙ (185 K ± 15 K) ∙ 100
Choose materials to tighten a joint on cooling
commonly available
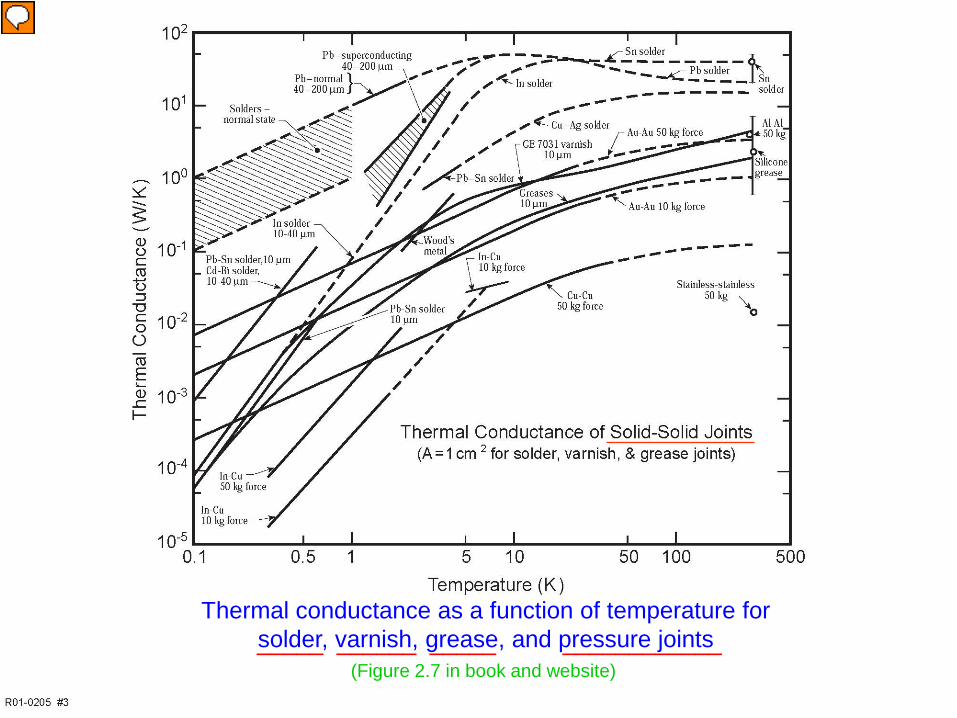
Thermal conductance as a function of temperature for solder, varnish, grease, and pressure joints
(Figure 2.7 in book and website) _____ ______ _____ ____________
Non magnetic SS – testing Sy Foner’s strength
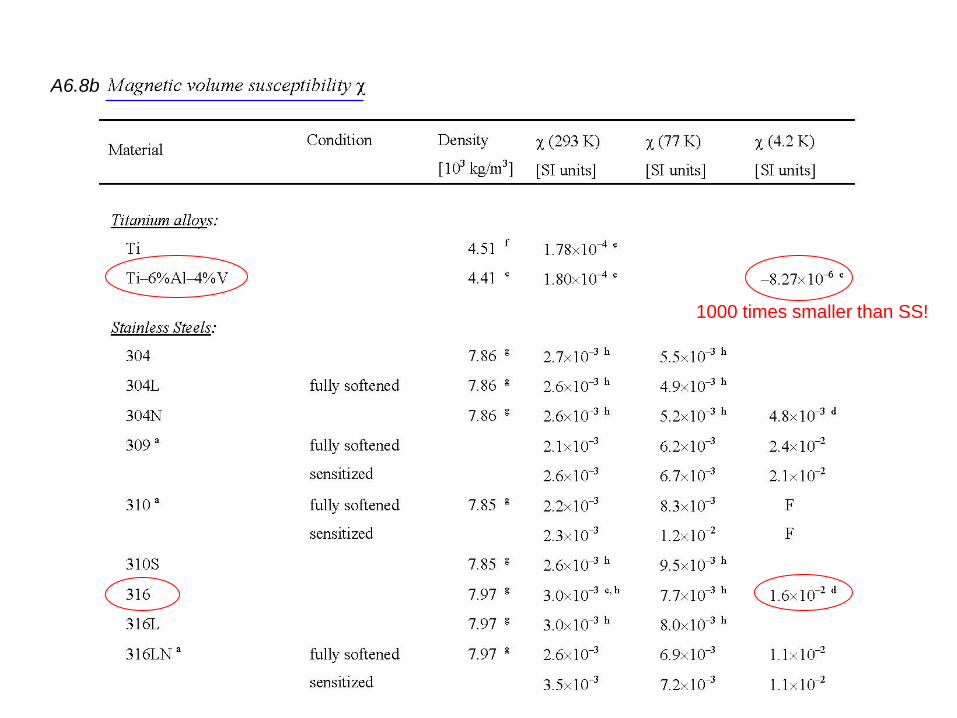
1000 times smaller than SS!
A6.8b
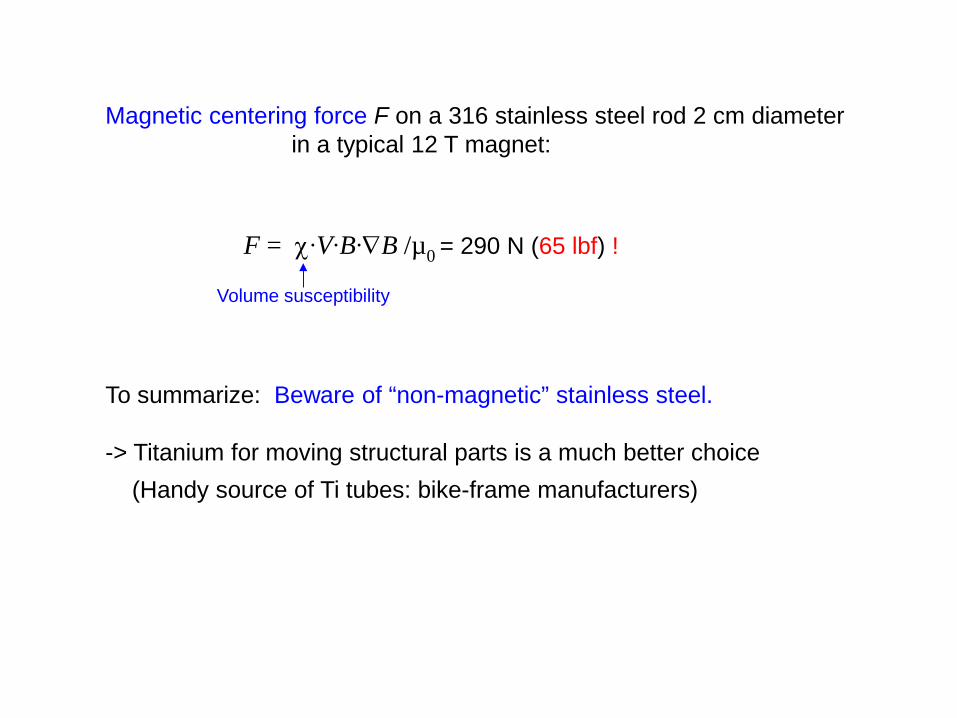
F = χ∙V∙B∙∇B /µ0 = 290 N (65 lbf) !
Magnetic centering force F on a 316 stainless steel rod 2 cm diameter in a typical 12 T magnet:
Volume susceptibility
To summarize: Beware of “non-magnetic” stainless steel. -> Titanium for moving structural parts is a much better choice (Handy source of Ti tubes: bike-frame manufacturers)
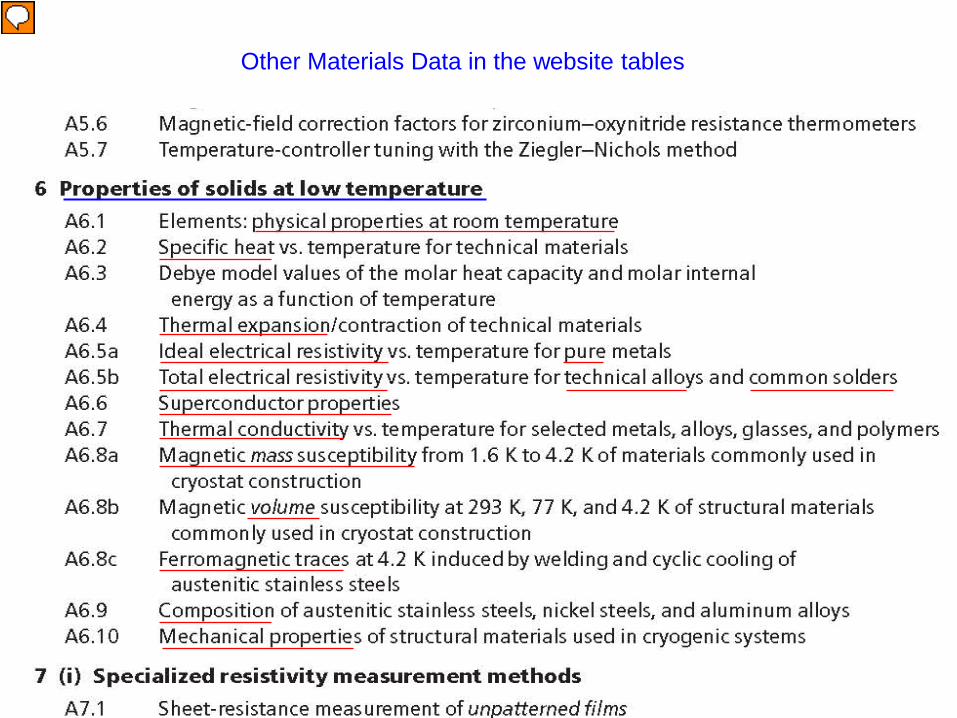
Other Materials Data in the website tables
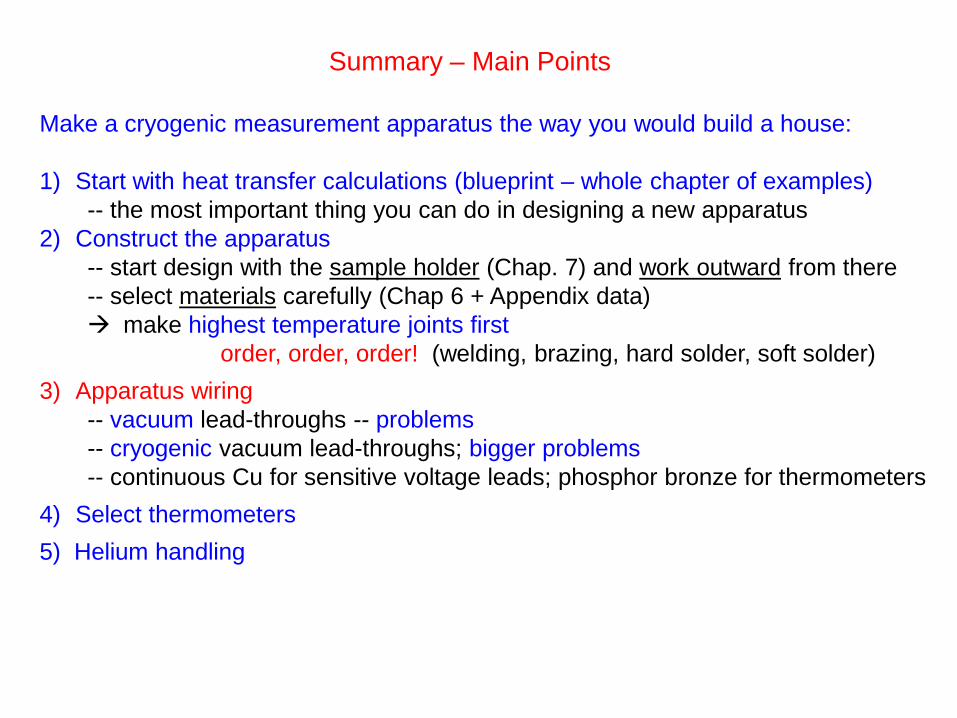
Summary – Main Points
Make a cryogenic measurement apparatus the way you would build a house: 1) Start with heat transfer calculations (blueprint – whole chapter of examples)
-- the most important thing you can do in designing a new apparatus 2) Construct the apparatus
-- start design with the sample holder (Chap. 7) and work outward from there -- select materials carefully (Chap 6 + Appendix data) make highest temperature joints first order, order, order! (welding, brazing, hard solder, soft solder)
3) Apparatus wiring -- vacuum lead-throughs -- problems -- cryogenic vacuum lead-throughs; bigger problems -- continuous Cu for sensitive voltage leads; phosphor bronze for thermometers
4) Select thermometers 5) Helium handling
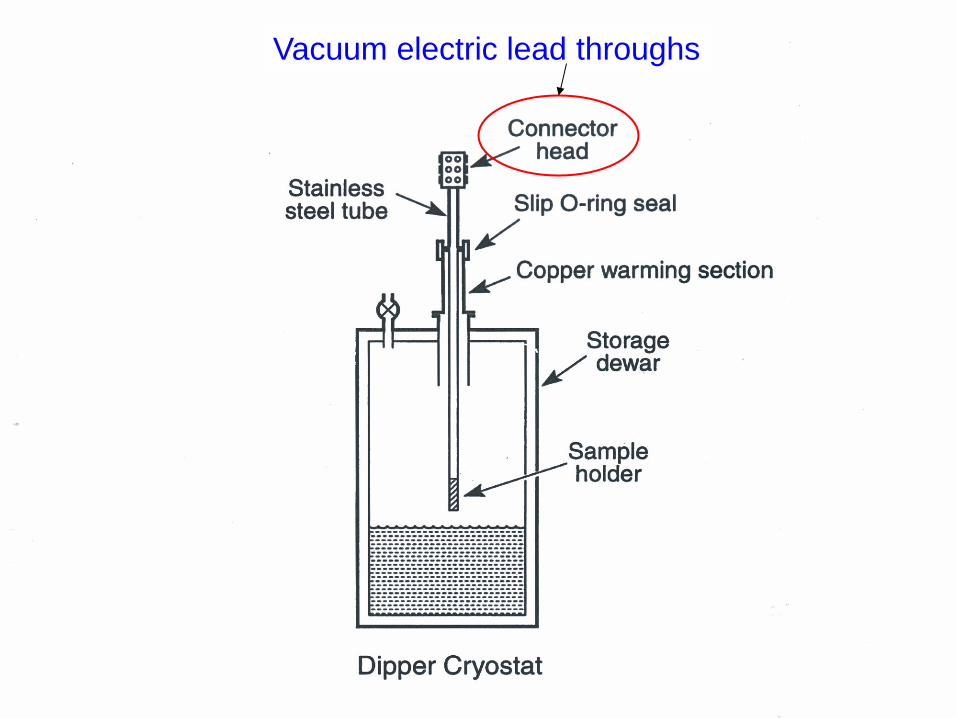
Vacuum electric lead throughs
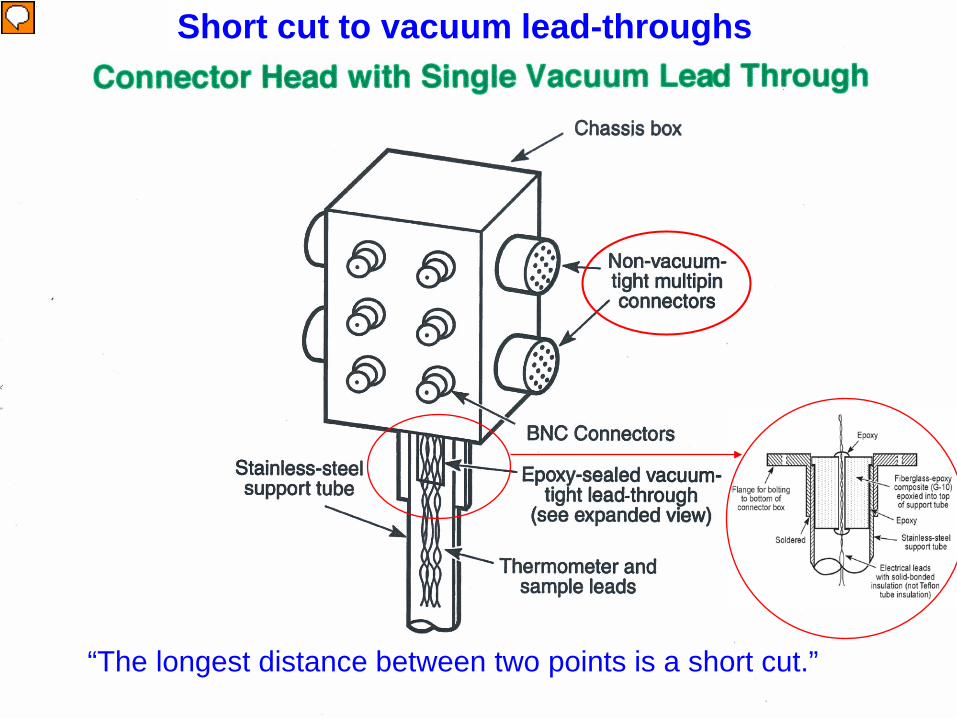
Short cut to vacuum lead-throughs
“The longest distance between two points is a short cut.”
__________
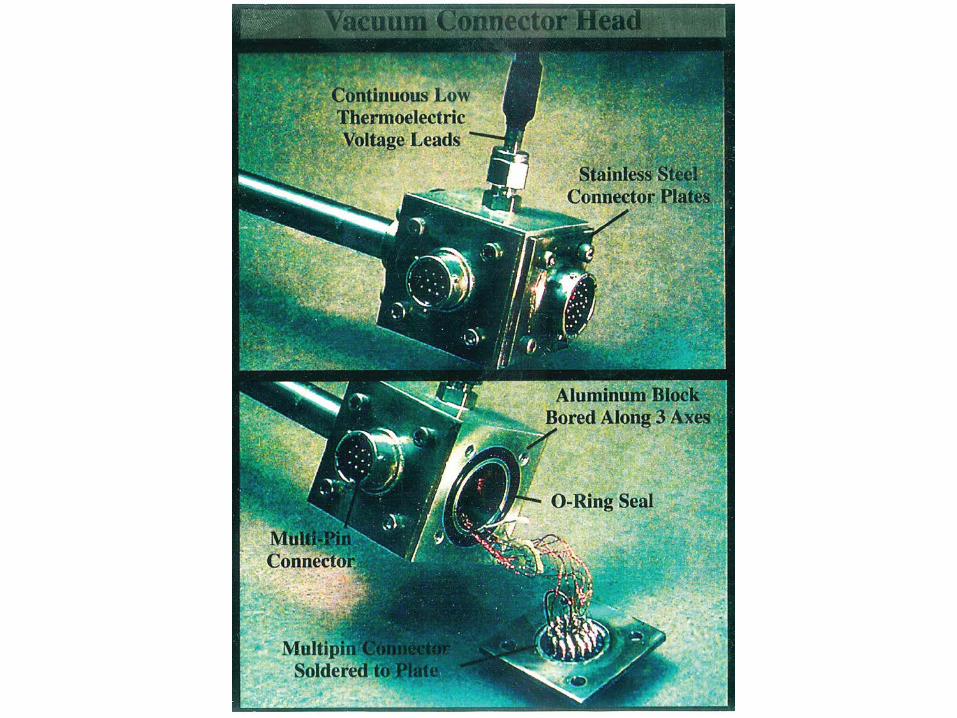
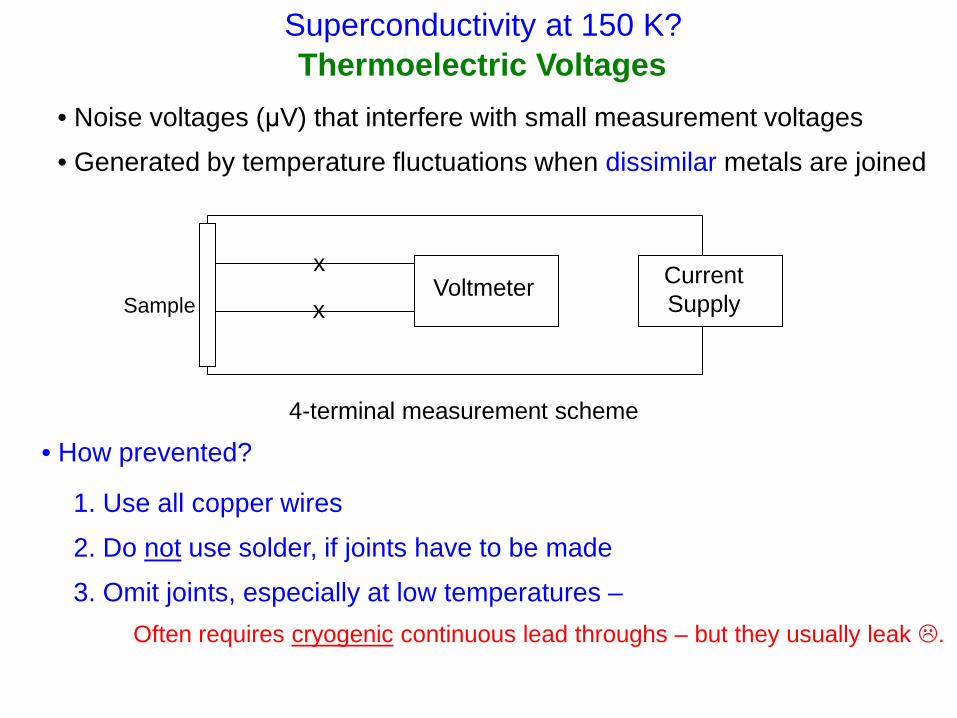
Thermoelectric Voltages • Noise voltages (μV) that interfere with small measurement voltages
• Generated by temperature fluctuations when dissimilar metals are joined
• How prevented?
1. Use all copper wires
2. Do not use solder, if joints have to be made
3. Omit joints, especially at low temperatures – Often requires cryogenic continuous lead throughs – but they usually leak .
Voltmeter Current Supply
x
x
4-terminal measurement scheme
Sample
Superconductivity at 150 K?
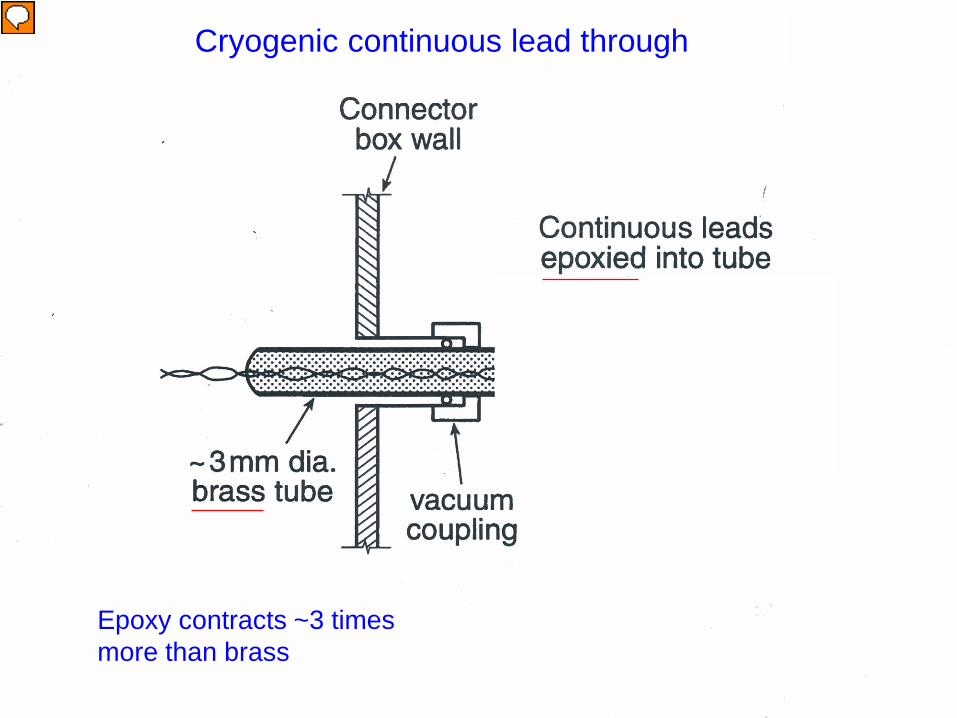
Cryogenic continuous lead through
Epoxy contracts ~3 times more than brass
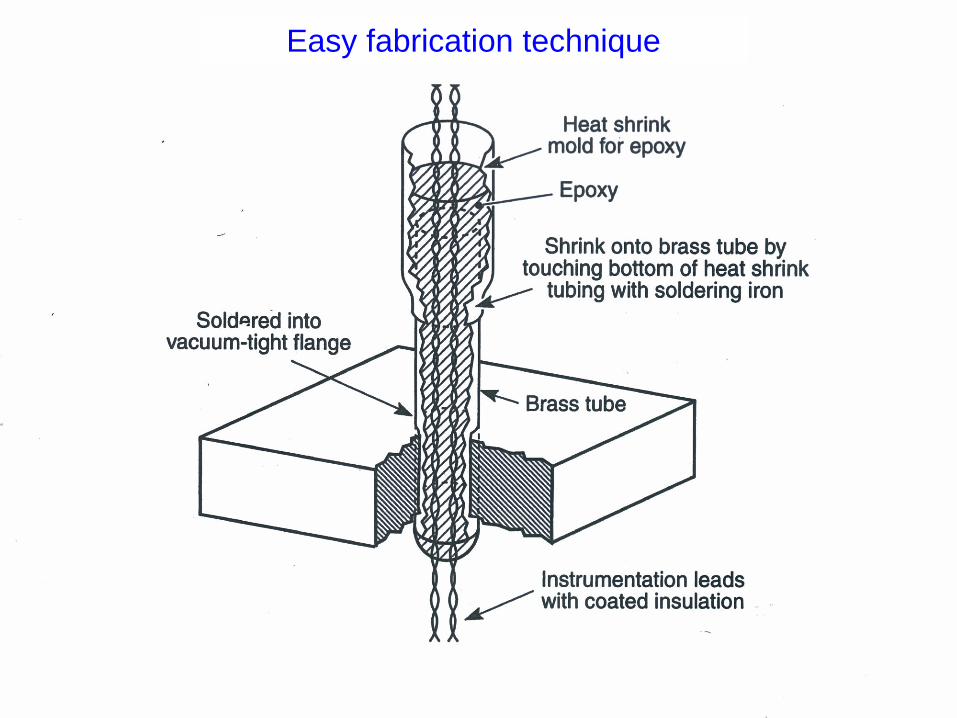
Easy fabrication technique
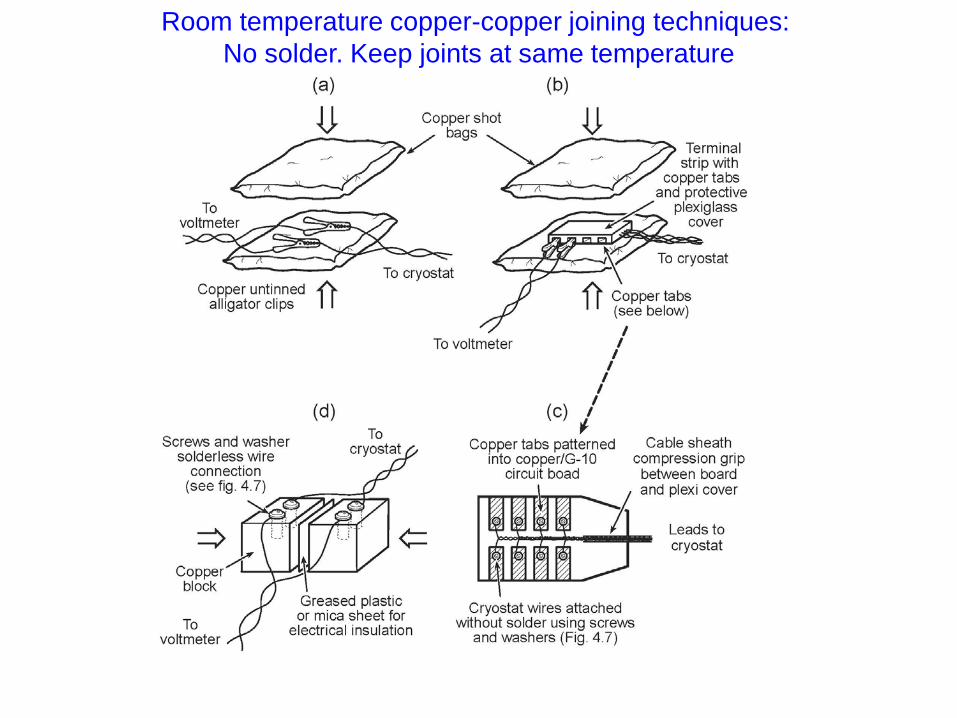
Room temperature copper-copper joining techniques: No solder. Keep joints at same temperature
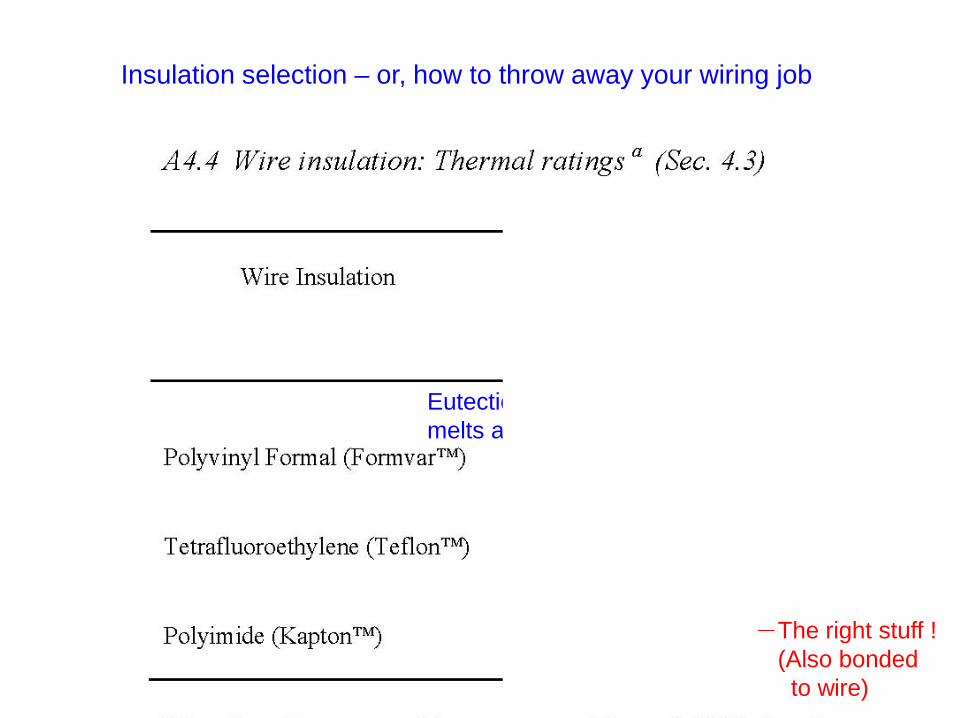
Insulation selection – or, how to throw away your wiring job
Eutectic Pb-Sn solder melts at 183 oC !
The right stuff ! (Also bonded to wire)
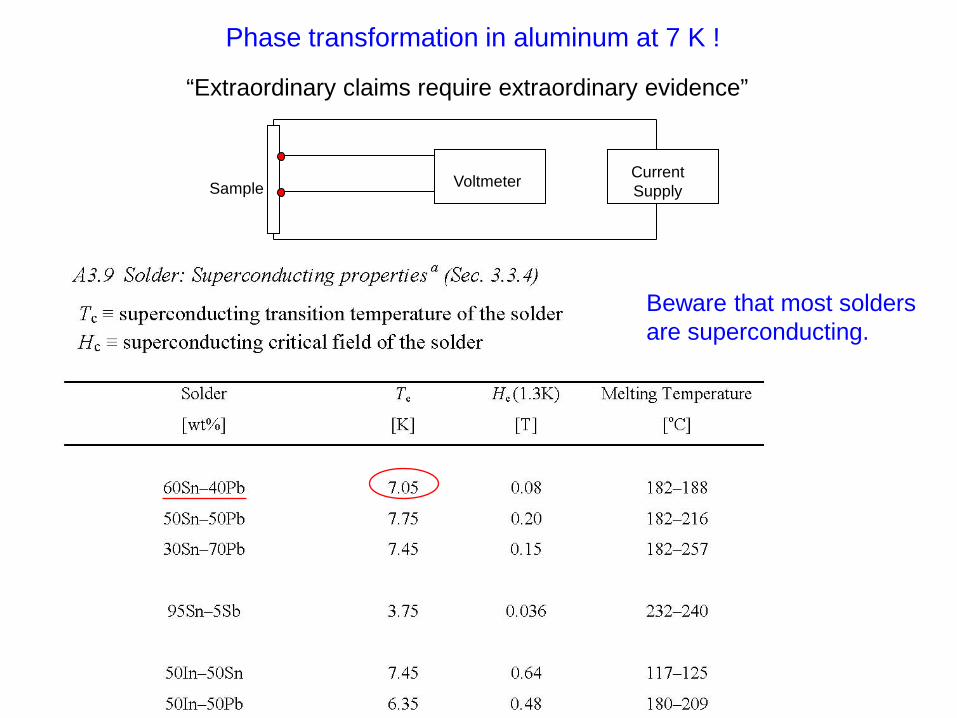
Phase transformation in aluminum at 7 K !
“Extraordinary claims require extraordinary evidence”
Voltmeter Current Supply Sample
Beware that most solders are superconducting.
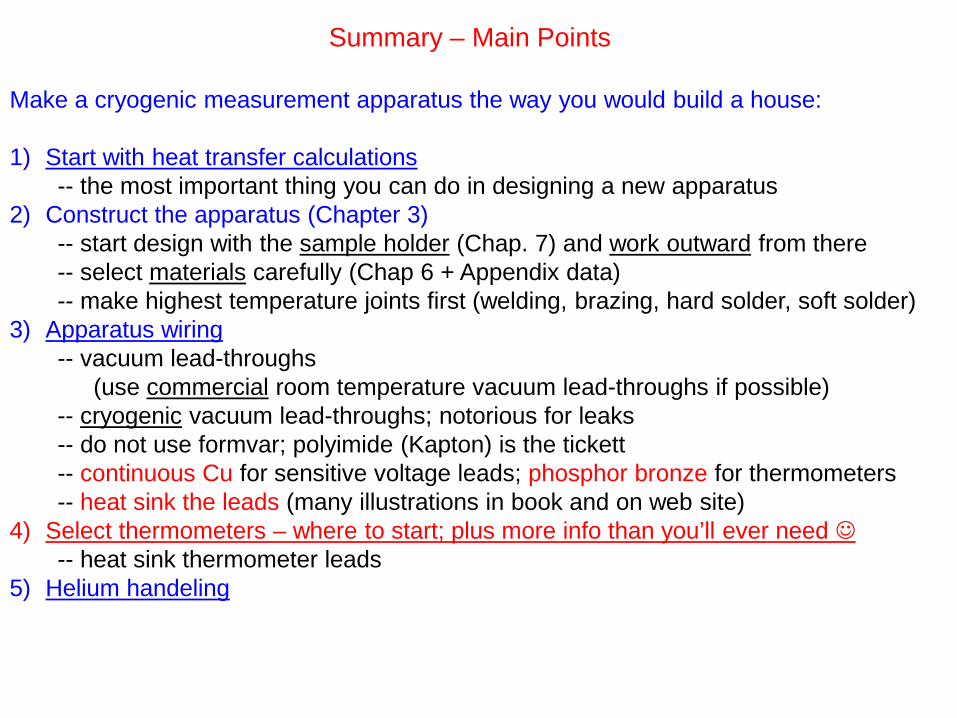
Summary – Main Points
Make a cryogenic measurement apparatus the way you would build a house: 1) Start with heat transfer calculations
-- the most important thing you can do in designing a new apparatus 2) Construct the apparatus (Chapter 3)
-- start design with the sample holder (Chap. 7) and work outward from there -- select materials carefully (Chap 6 + Appendix data) -- make highest temperature joints first (welding, brazing, hard solder, soft solder)
3) Apparatus wiring -- vacuum lead-throughs (use commercial room temperature vacuum lead-throughs if possible) -- cryogenic vacuum lead-throughs; notorious for leaks -- do not use formvar; polyimide (Kapton) is the tickett -- continuous Cu for sensitive voltage leads; phosphor bronze for thermometers -- heat sink the leads (many illustrations in book and on web site)
4) Select thermometers – where to start; plus more info than you’ll ever need -- heat sink thermometer leads
5) Helium handeling
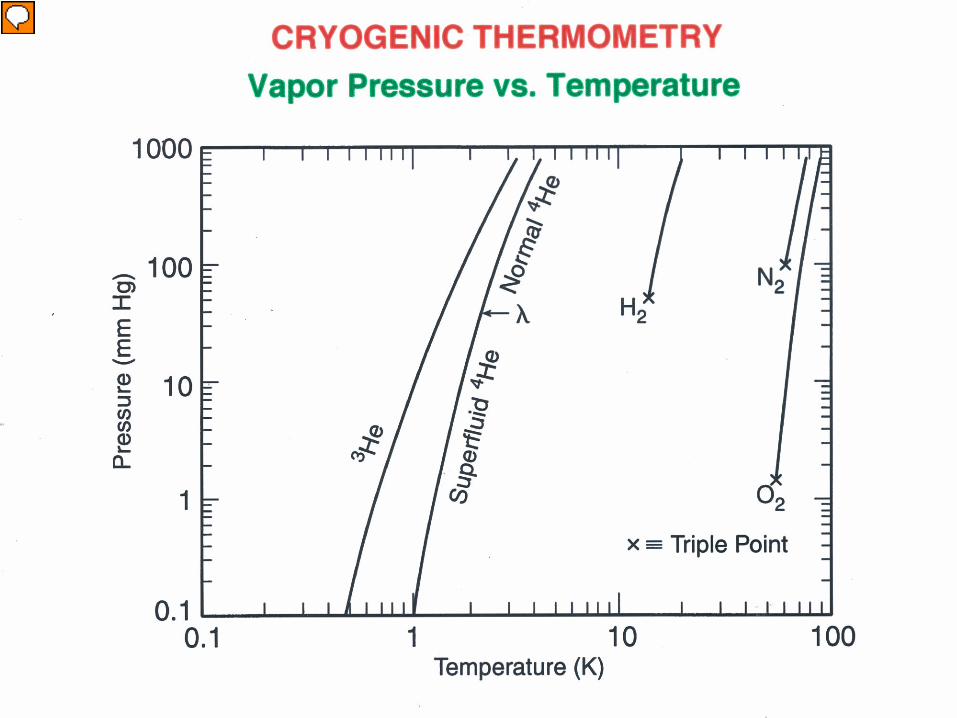
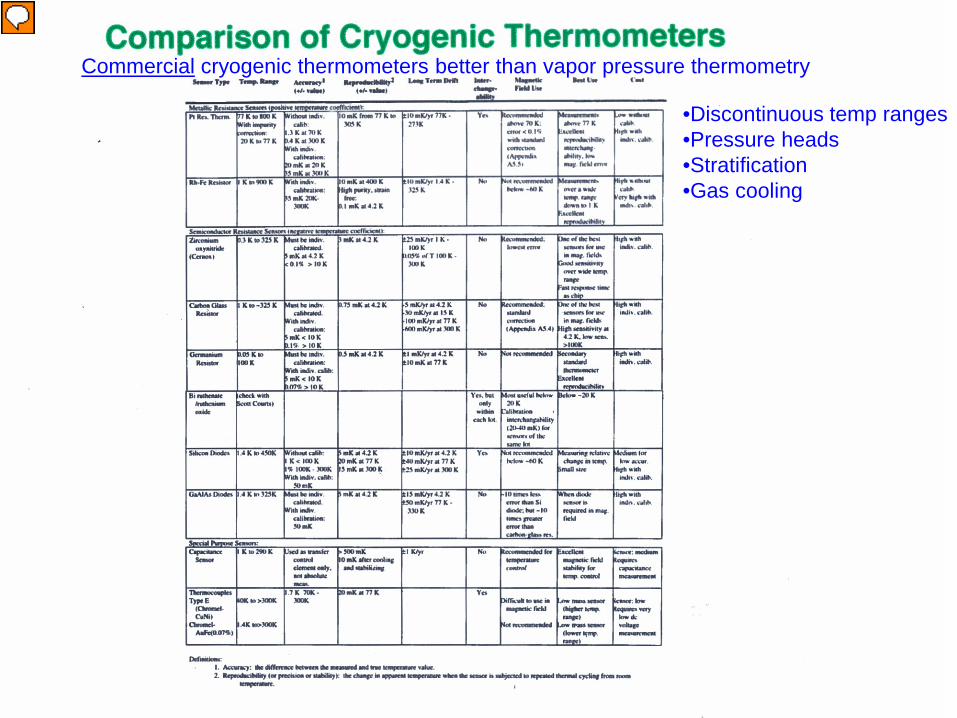
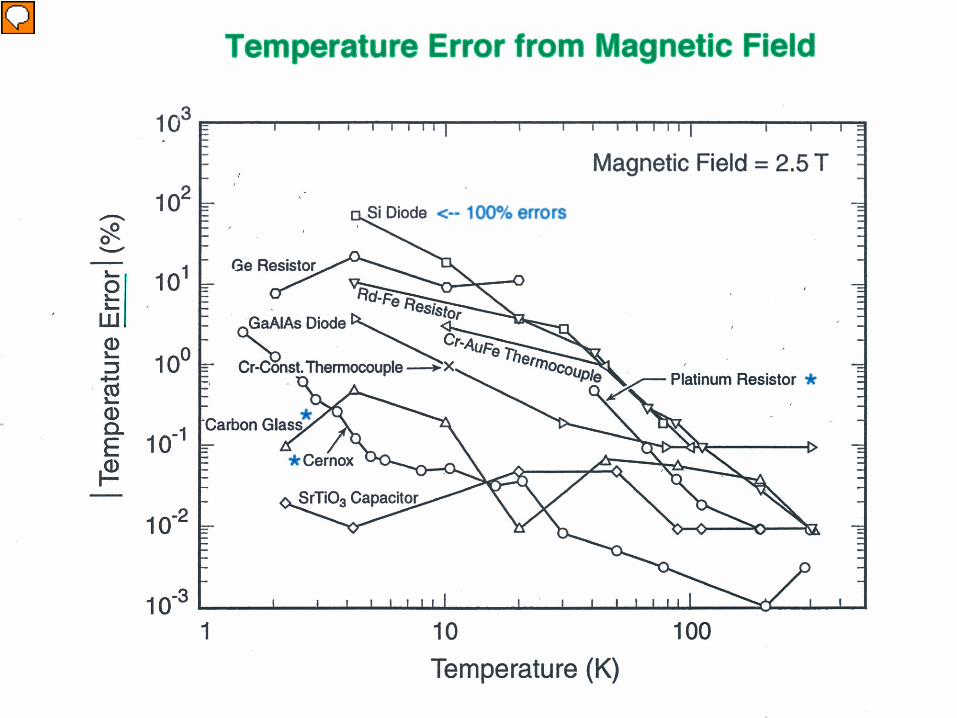
Commercial cryogenic thermometers better than vapor pressure thermometry
•Discontinuous temp ranges •Pressure heads •Stratification •Gas cooling
__________
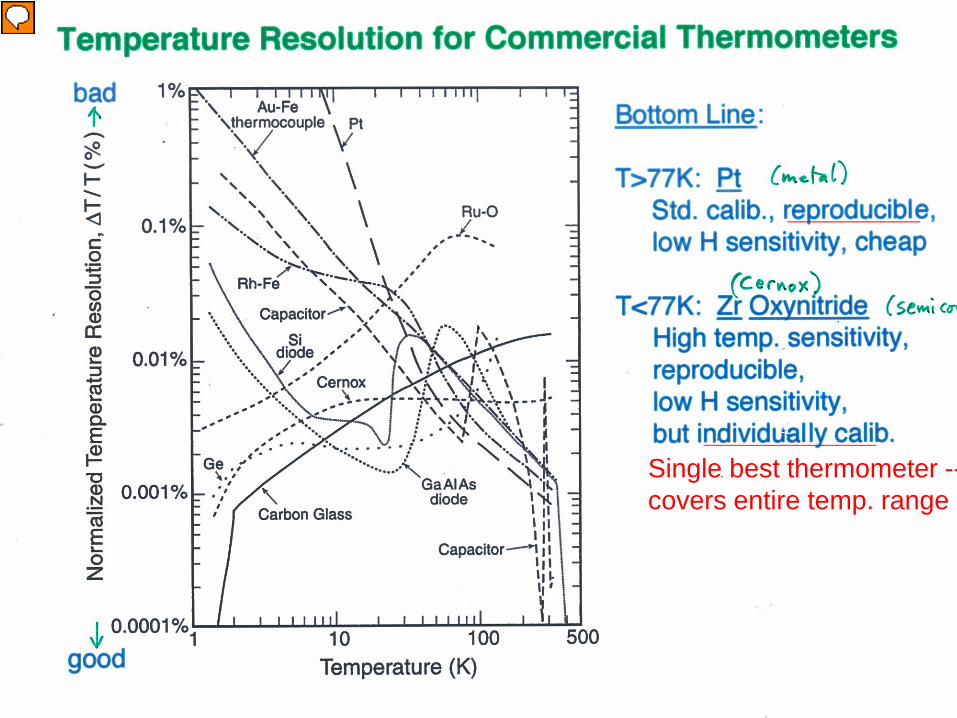
_____________ Single best thermometer -- covers entire temp. range

Summary – Main Points
Make a cryogenic measurement apparatus the way you would build a house: 1) Start with heat transfer calculations (blueprint – whole chapter of examples)
-- the most important thing you can do in designing a new apparatus 2) Construct the apparatus
-- start design with the sample holder (Chap. 7) and work outward from there -- select materials carefully (Chap 6 + Appendix data)
3) Wire the rig 4) Select thermometers ________________ Other tips 5) Helium handling
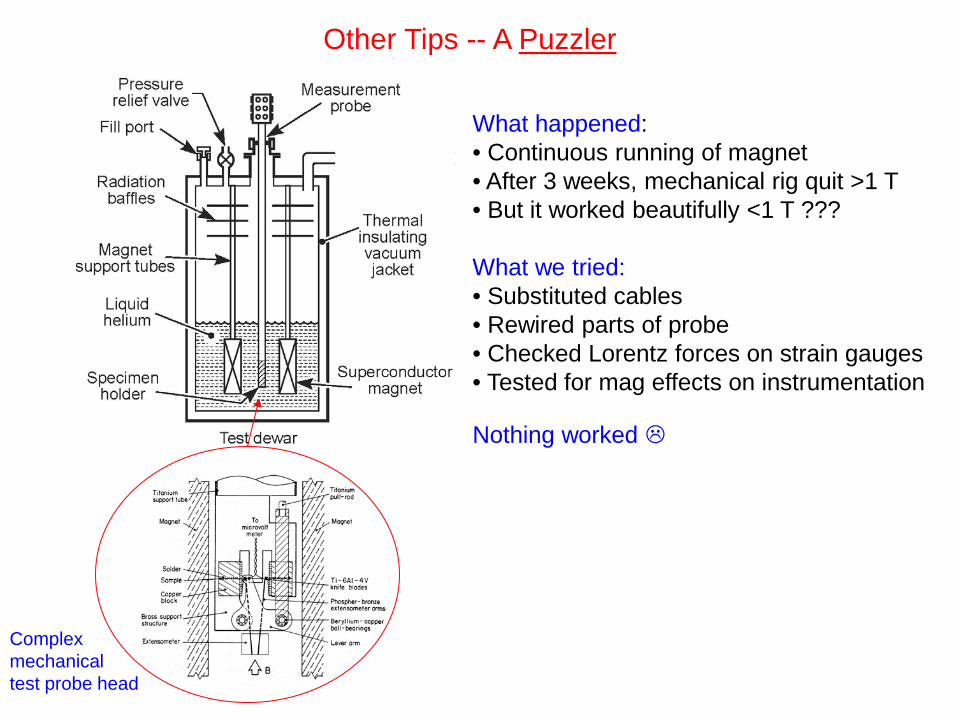
Other Tips -- A Puzzler
Complex mechanical test probe head
What happened: • Continuous running of magnet • After 3 weeks, mechanical rig quit >1 T • But it worked beautifully <1 T ???
What we tried: • Substituted cables • Rewired parts of probe • Checked Lorentz forces on strain gauges • Tested for mag effects on instrumentation
Nothing worked
. . .
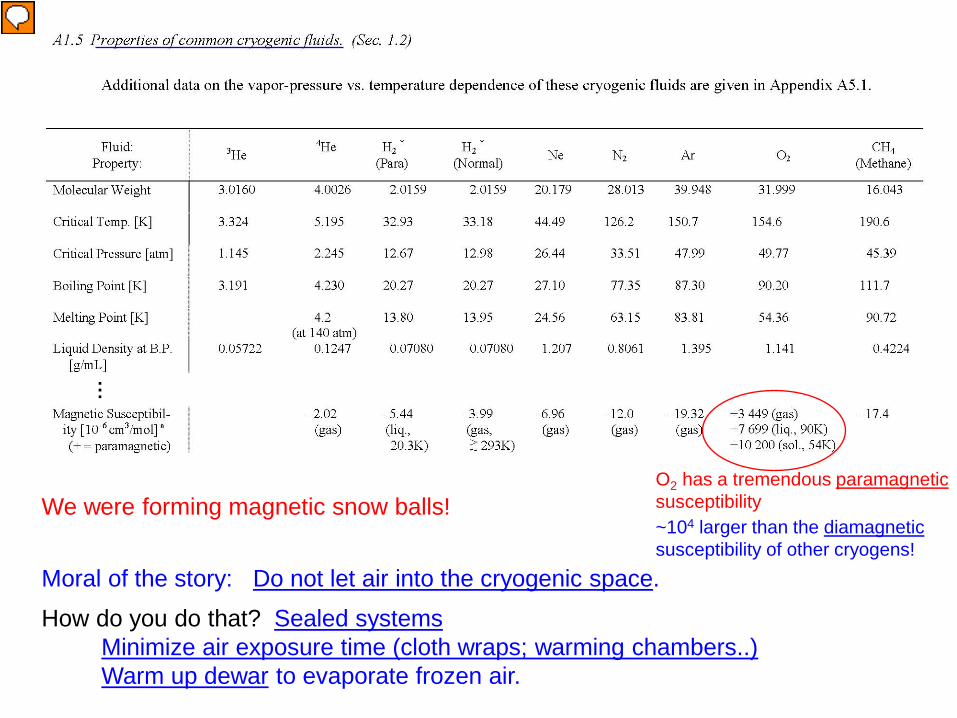
O2 has a tremendous paramagnetic susceptibility ~104 larger than the diamagnetic susceptibility of other cryogens!
We were forming magnetic snow balls!
Moral of the story: Do not let air into the cryogenic space.
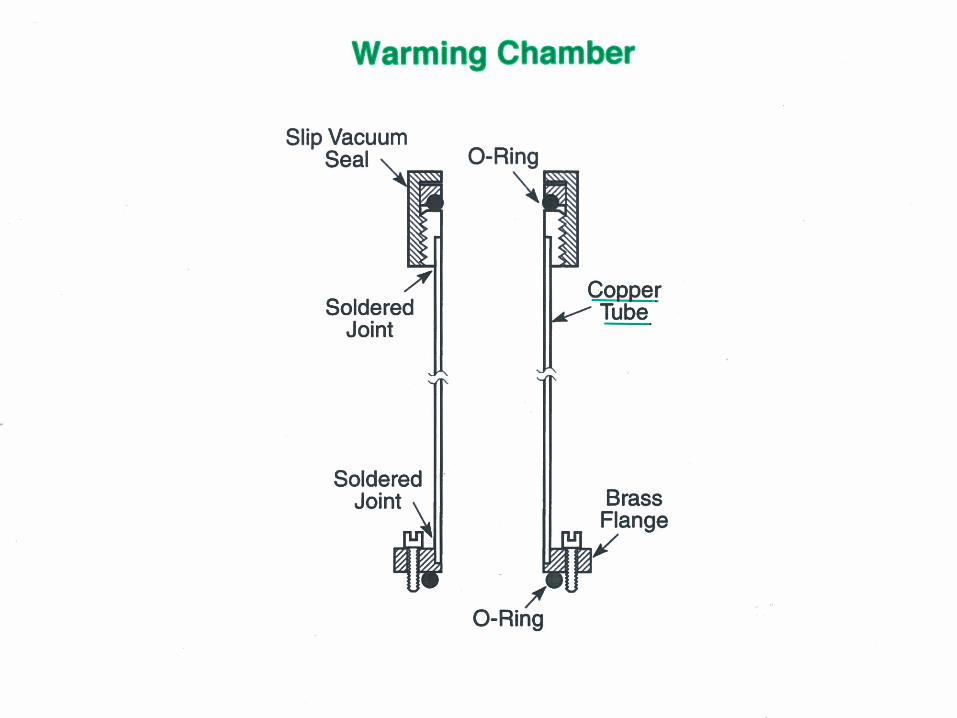
How do you do that? Sealed systems Minimize air exposure time (cloth wraps; warming chambers..) Warm up dewar to evaporate frozen air.
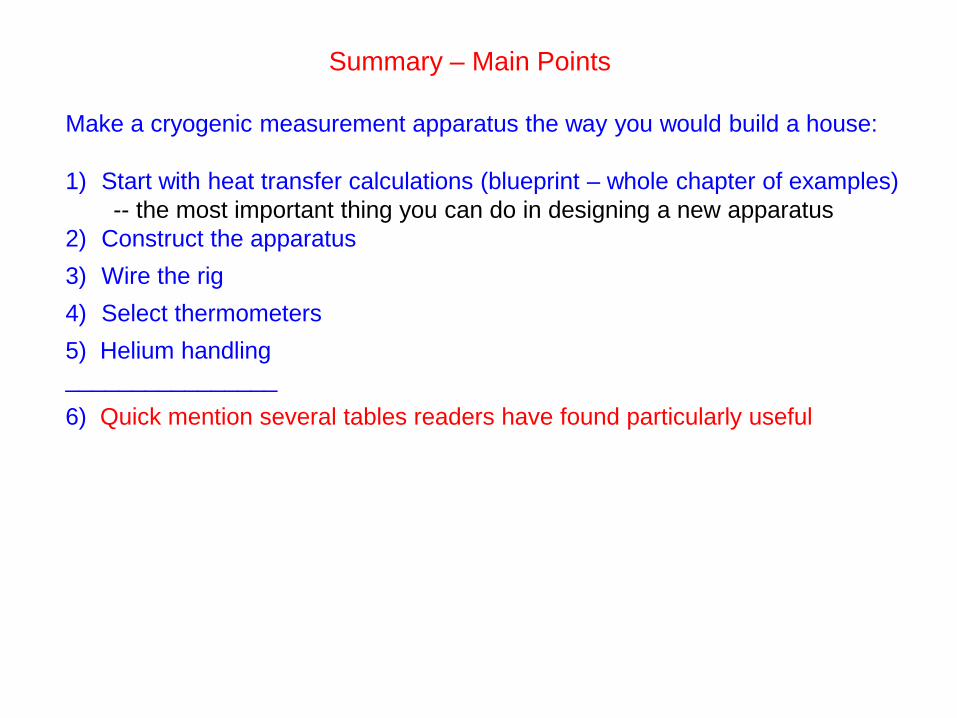
Summary – Main Points
Make a cryogenic measurement apparatus the way you would build a house: 1) Start with heat transfer calculations (blueprint – whole chapter of examples)
-- the most important thing you can do in designing a new apparatus 2) Construct the apparatus 3) Wire the rig 4) Select thermometers 5) Helium handling ________________ 6) Quick mention several tables readers have found particularly useful

All data posted at www.ResearchMeasurements.com
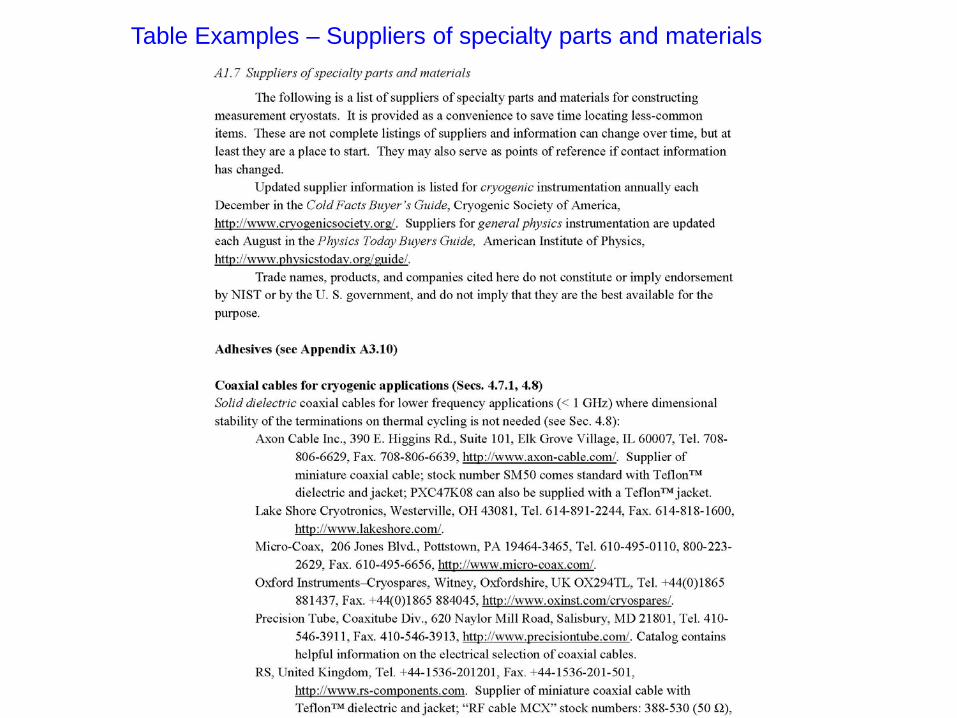
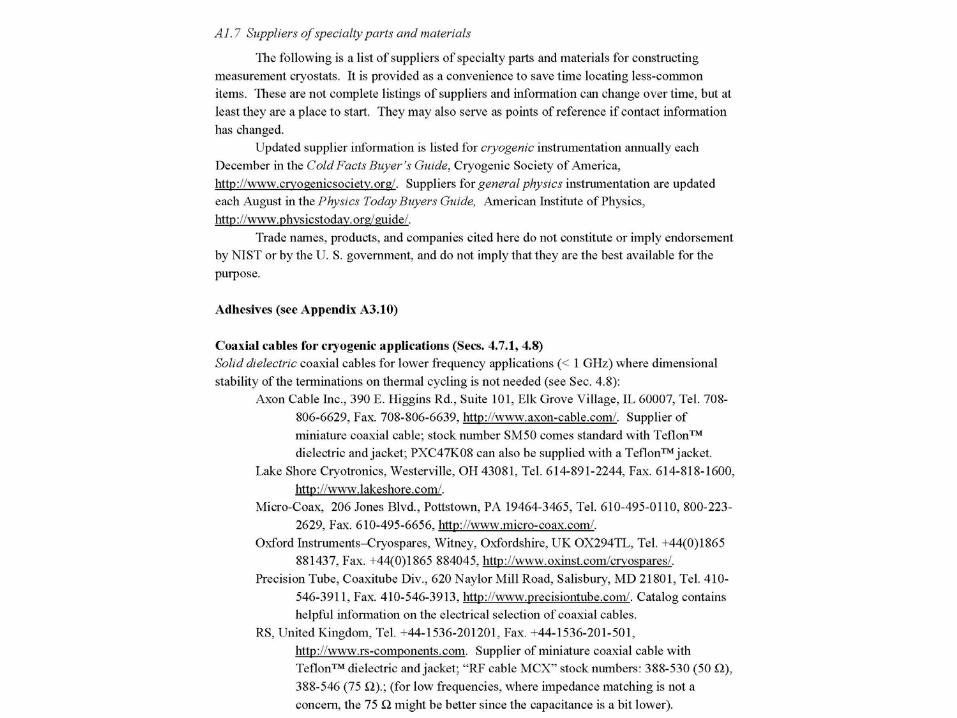
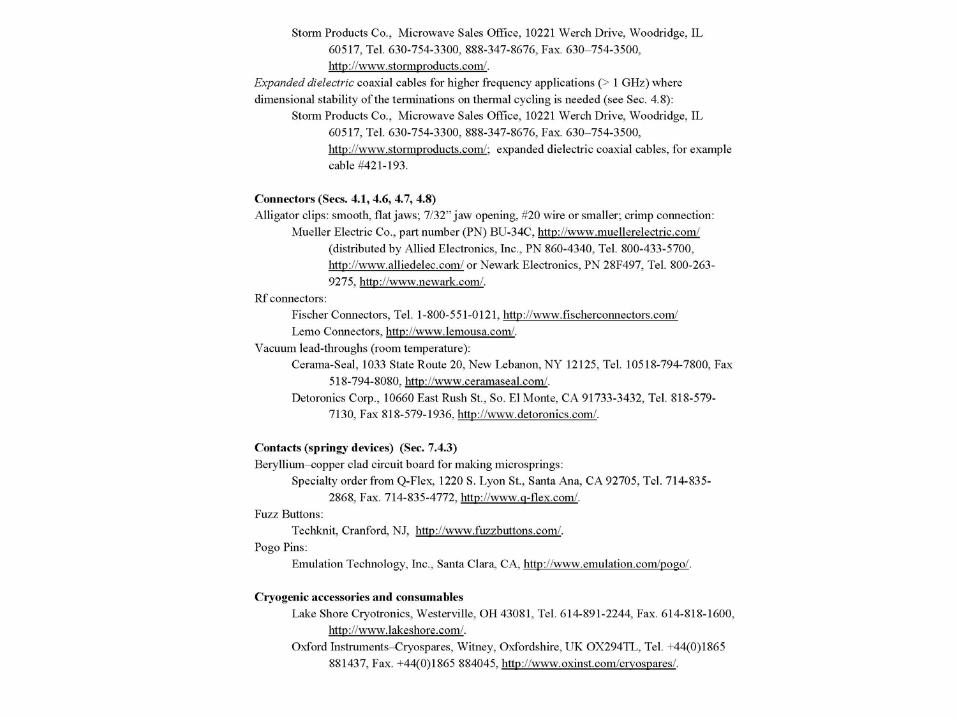
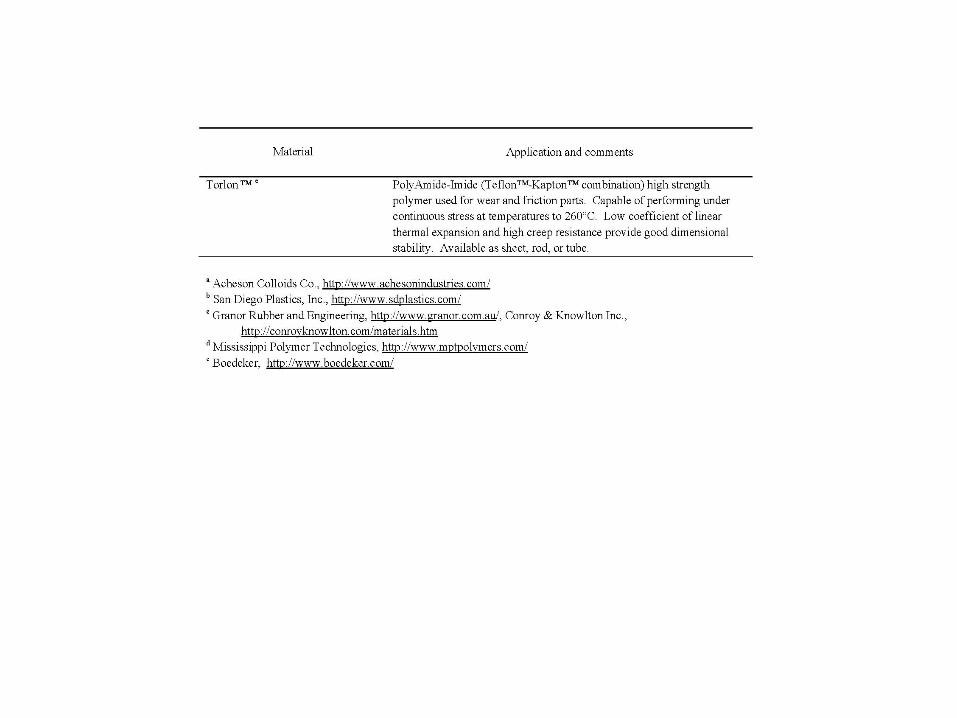
Table Examples – Suppliers of specialty parts and materials
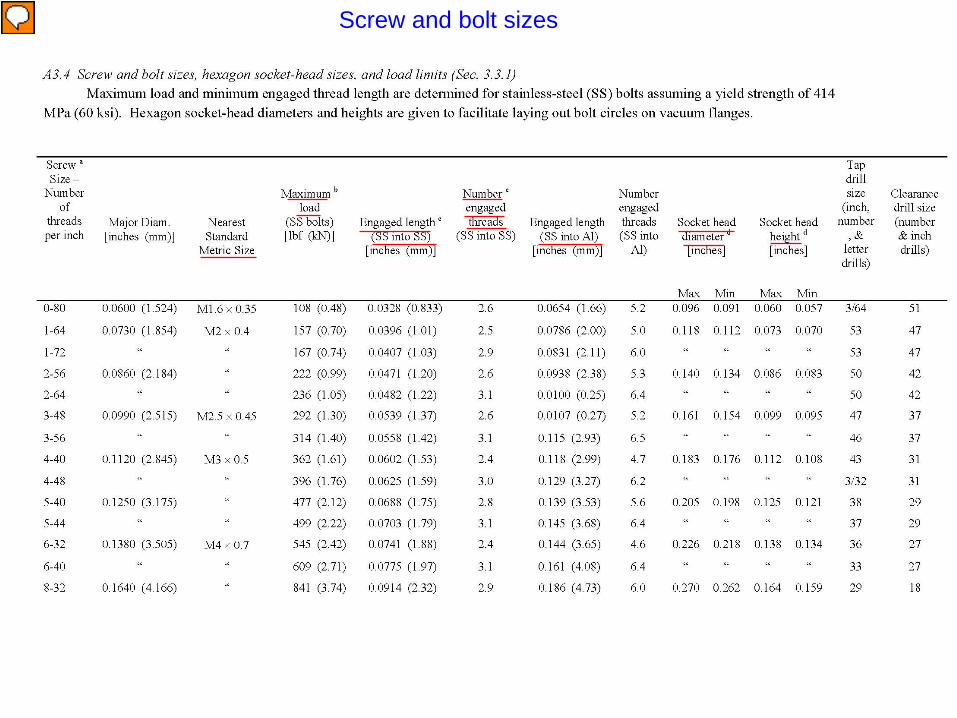
Screw and bolt sizes
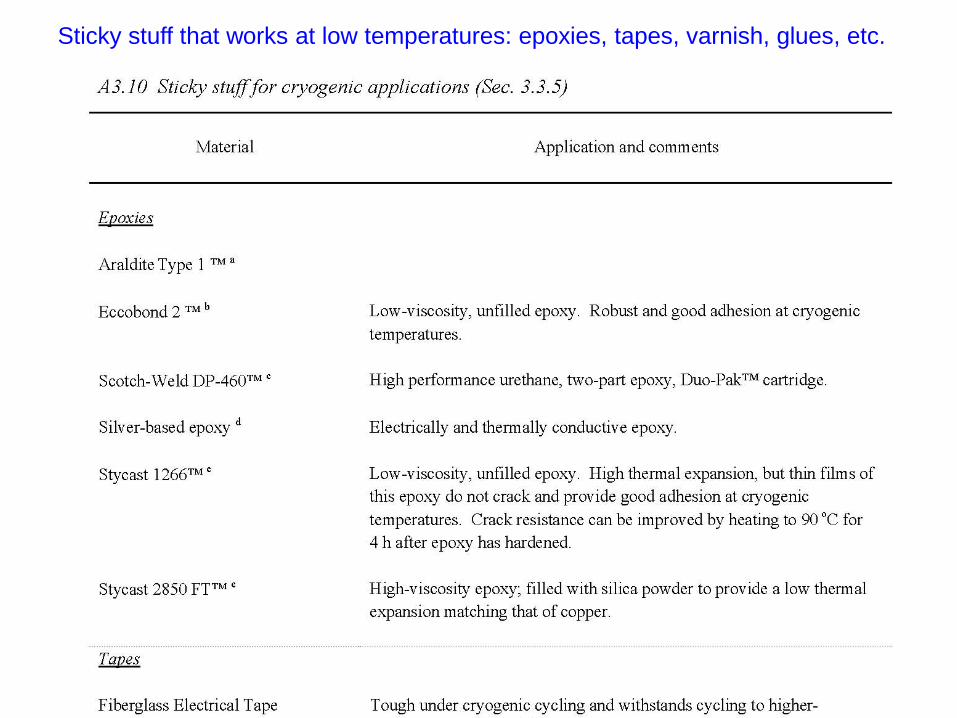
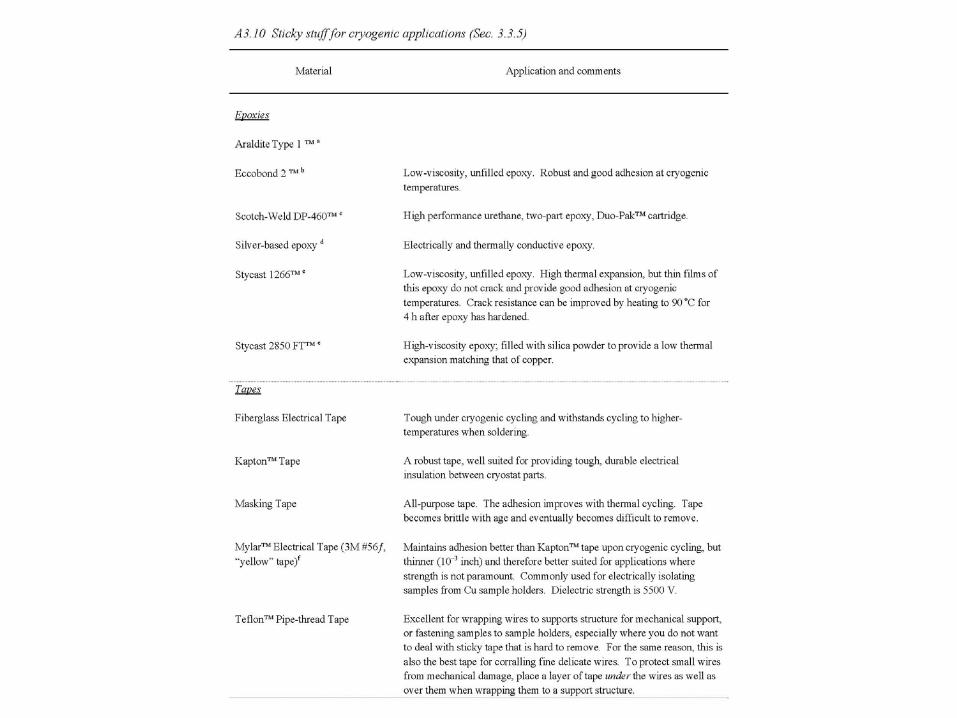
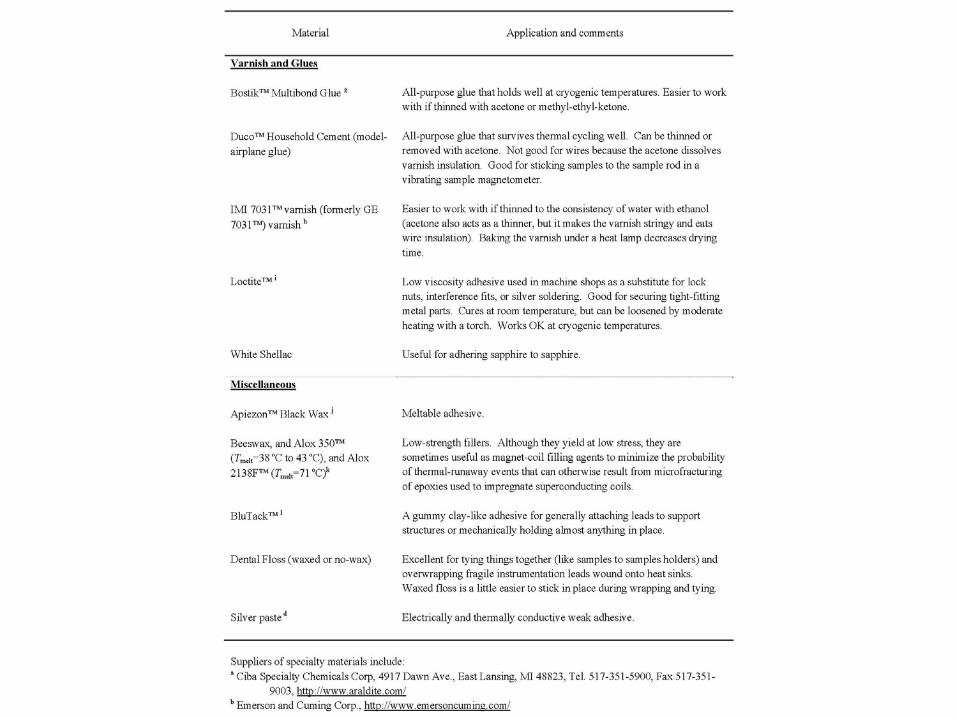
Sticky stuff that works at low temperatures: epoxies, tapes, varnish, glues, etc.
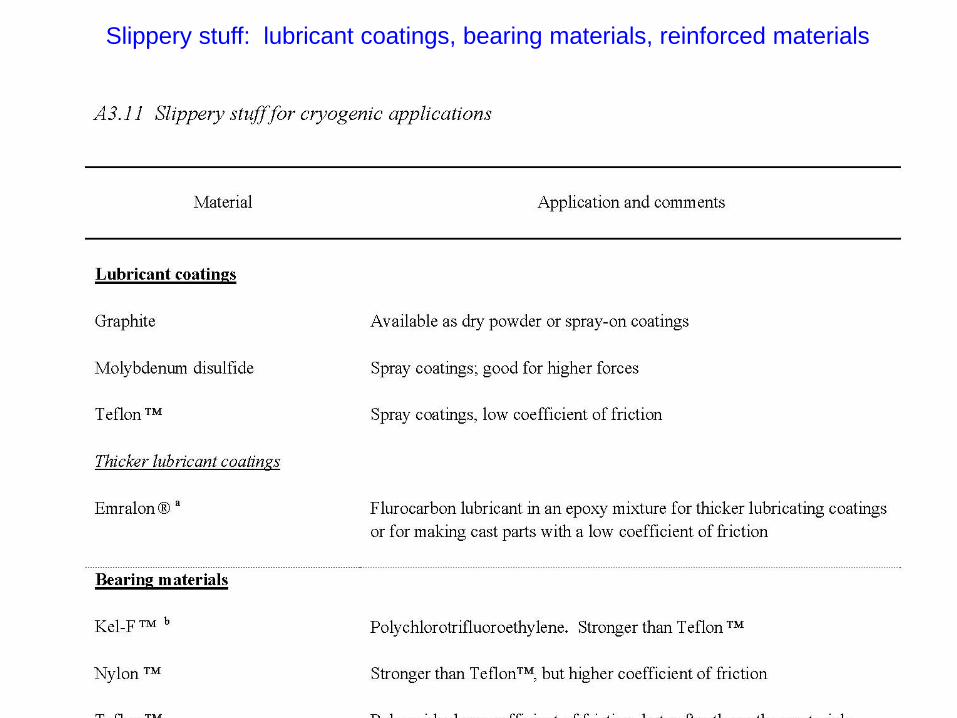
Slippery stuff: lubricant coatings, bearing materials, reinforced materials
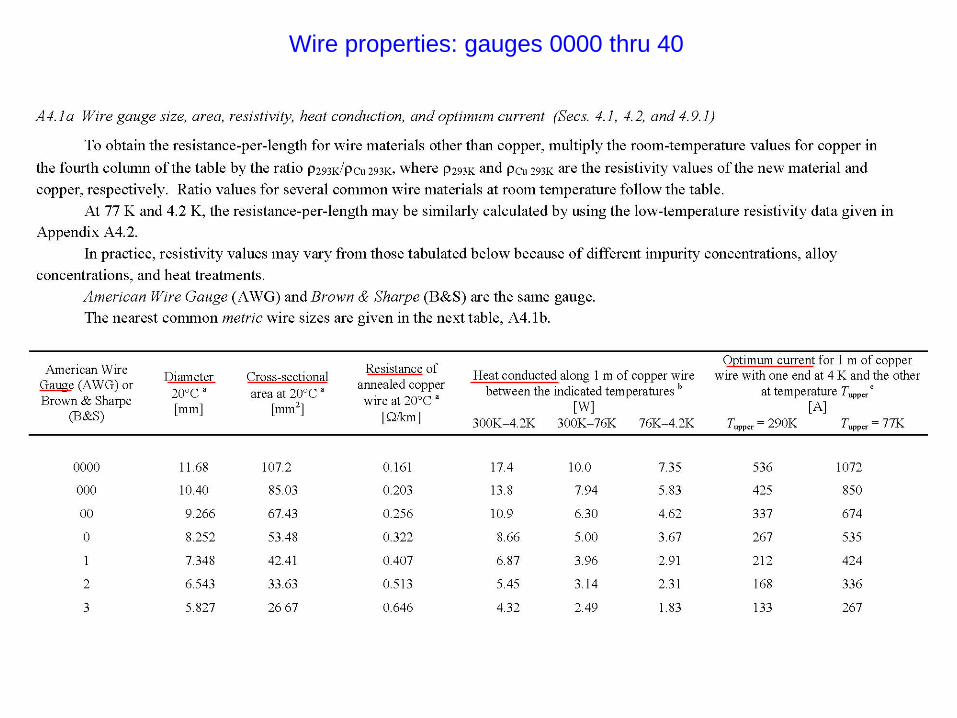
Wire properties: gauges 0000 thru 40

Tempering lengths for wrapping wires around copper heat sink posts
All data posted at www.ResearchMeasurements.com
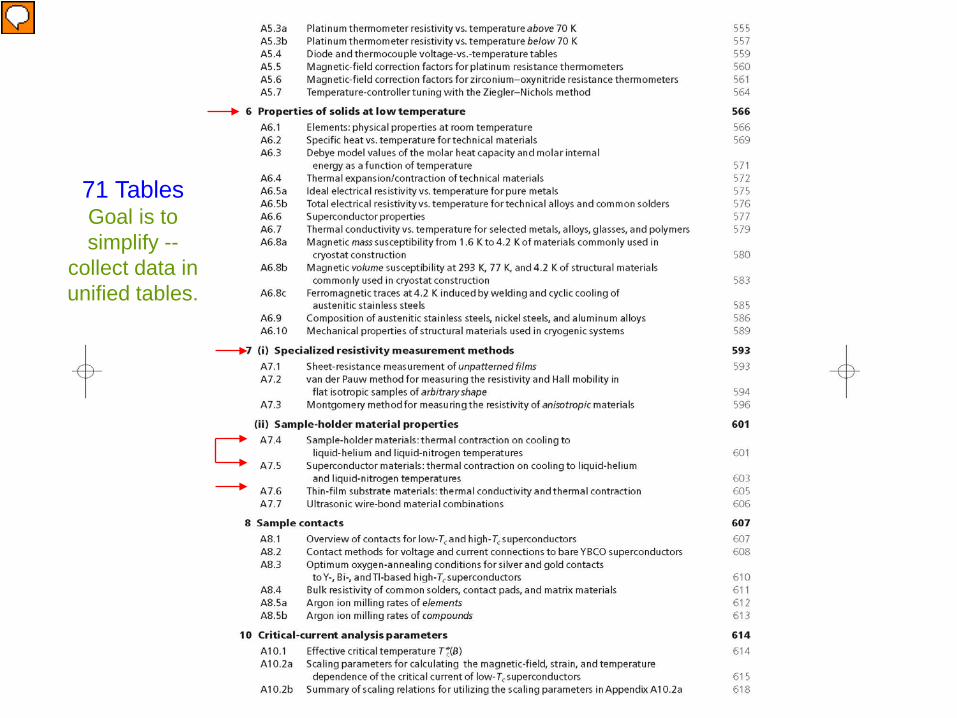
71 Tables Goal is to simplify --
collect data in unified tables.

Everything should be made as simple as possible, but not simpler.
-- Albert Einstein

All data posted at www.ResearchMeasurements.com

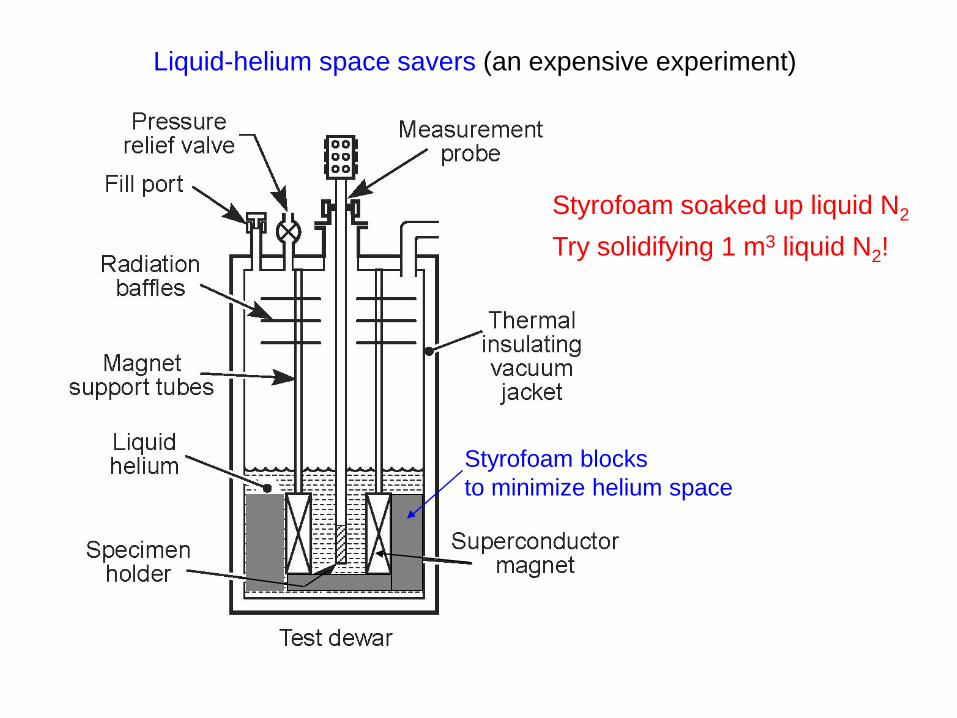
Liquid-helium space savers (an expensive experiment)
Styrofoam blocks to minimize helium space
Styrofoam soaked up liquid N2
Try solidifying 1 m3 liquid N2!
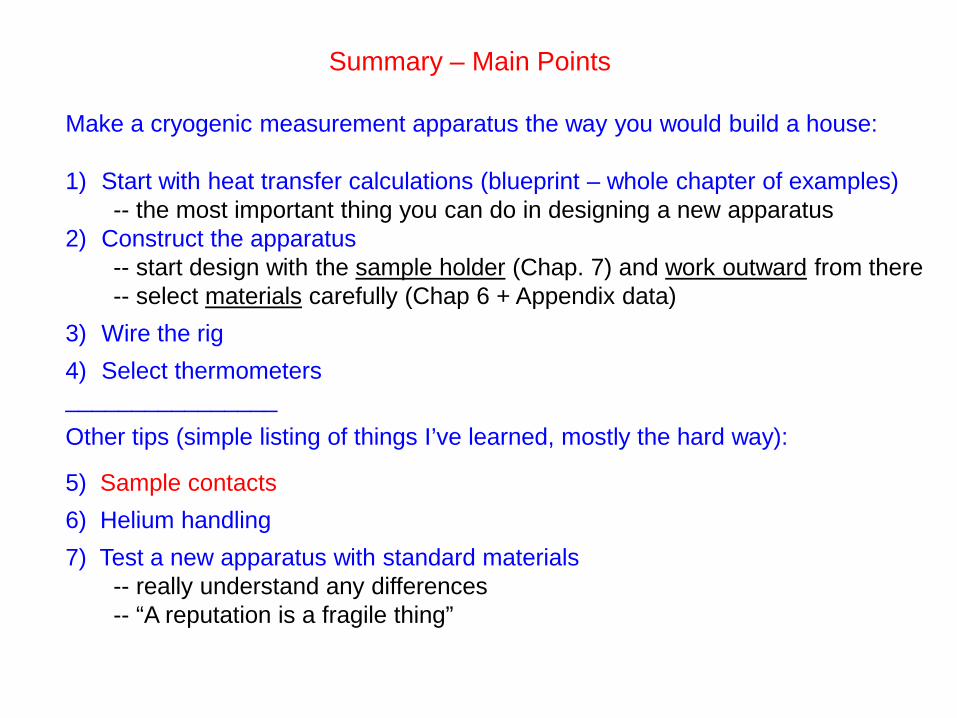
Summary – Main Points
Make a cryogenic measurement apparatus the way you would build a house: 1) Start with heat transfer calculations (blueprint – whole chapter of examples)
-- the most important thing you can do in designing a new apparatus 2) Construct the apparatus
-- start design with the sample holder (Chap. 7) and work outward from there -- select materials carefully (Chap 6 + Appendix data)
3) Wire the rig 4) Select thermometers ________________ Other tips (simple listing of things I’ve learned, mostly the hard way):
5) Sample contacts 6) Helium handling 7) Test a new apparatus with standard materials
-- really understand any differences -- “A reputation is a fragile thing”
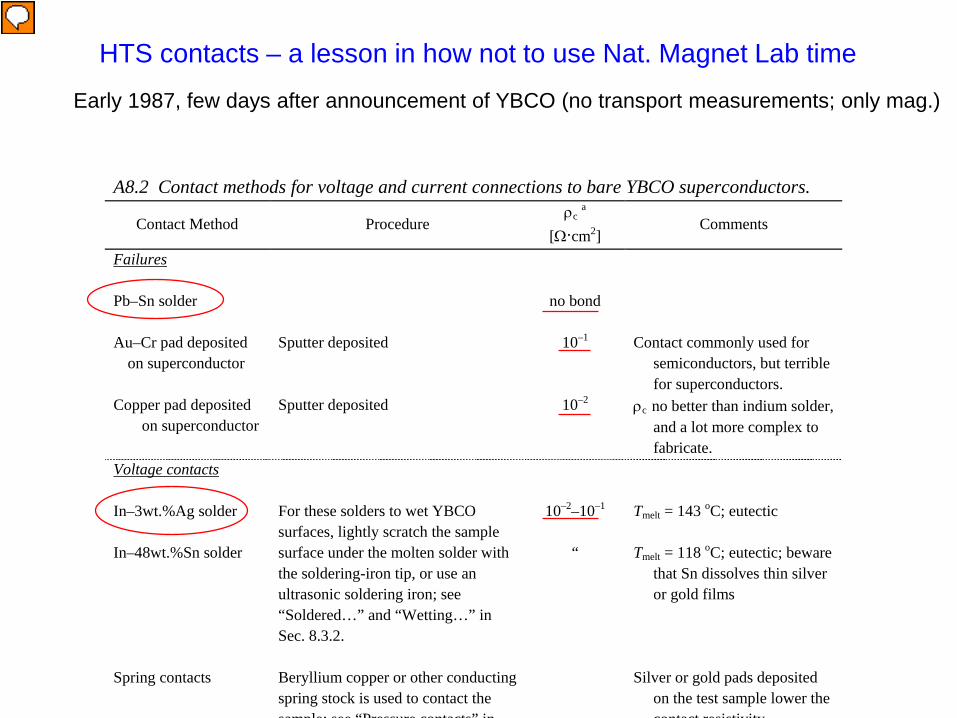
HTS contacts – a lesson in how not to use Nat. Magnet Lab time
Early 1987, few days after announcement of YBCO (no transport measurements; only mag.)
A8.2 Contact methods for voltage and current connections to bare YBCO superconductors.
Contact Method Procedure ρc a
[Ω∙cm2] Comments
Failures Pb–Sn solder no bond
Au–Cr pad deposited on superconductor
Sputter deposited 10–1 Contact commonly used for semiconductors, but terrible for superconductors.
Copper pad deposited on superconductor
Sputter deposited 10–2 ρc no better than indium solder, and a lot more complex to fabricate.
Voltage contacts In–3wt.%Ag solder In–48wt.%Sn solder
For these solders to wet YBCO surfaces, lightly scratch the sample surface under the molten solder with the soldering-iron tip, or use an ultrasonic soldering iron; see “Soldered…” and “Wetting…” in Sec. 8.3.2.
10–2–10–1 “
Tmelt = 143 oC; eutectic Tmelt = 118 oC; eutectic; beware
that Sn dissolves thin silver or gold films
Spring contacts Beryllium copper or other conducting
spring stock is used to contact the sample; see “Pressure contacts” in
Silver or gold pads deposited on the test sample lower the contact resistivity
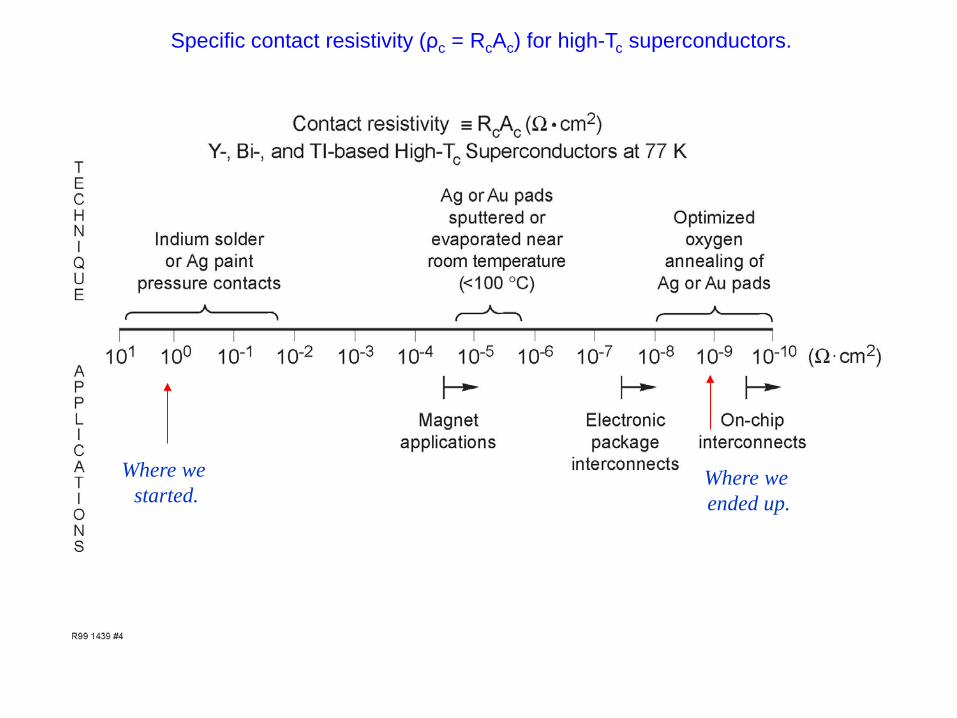
Specific contact resistivity (ρc = RcAc) for high-Tc superconductors.
Where we started.
Where we ended up.
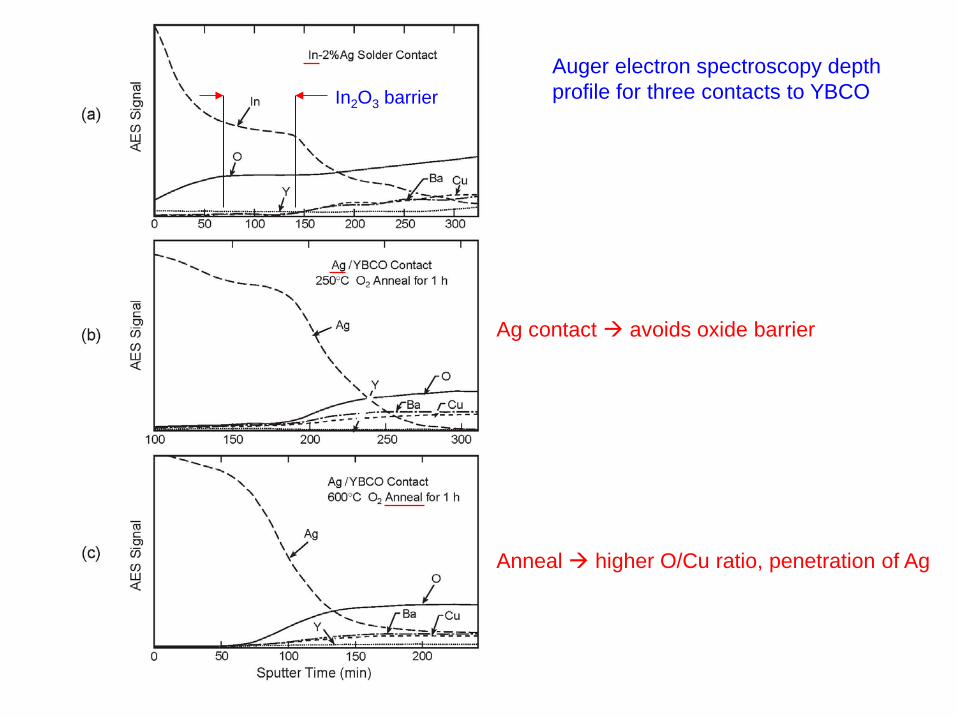
Auger electron spectroscopy depth profile for three contacts to YBCO In2O3 barrier
Ag contact avoids oxide barrier
Anneal higher O/Cu ratio, penetration of Ag
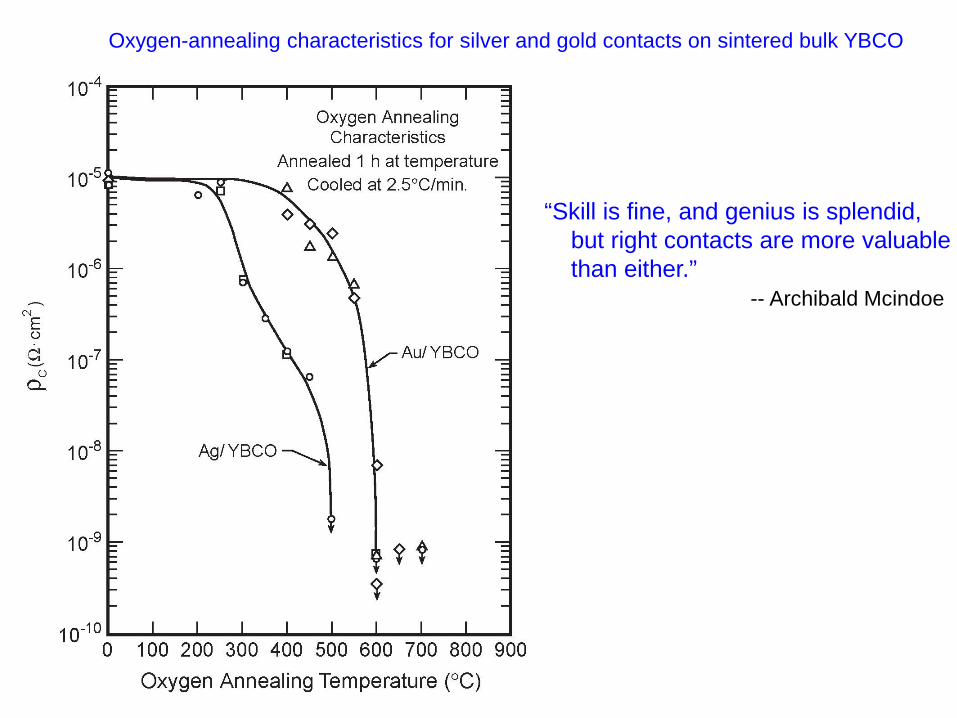
Oxygen-annealing characteristics for silver and gold contacts on sintered bulk YBCO
“Skill is fine, and genius is splendid, but right contacts are more valuable than either.” -- Archibald Mcindoe
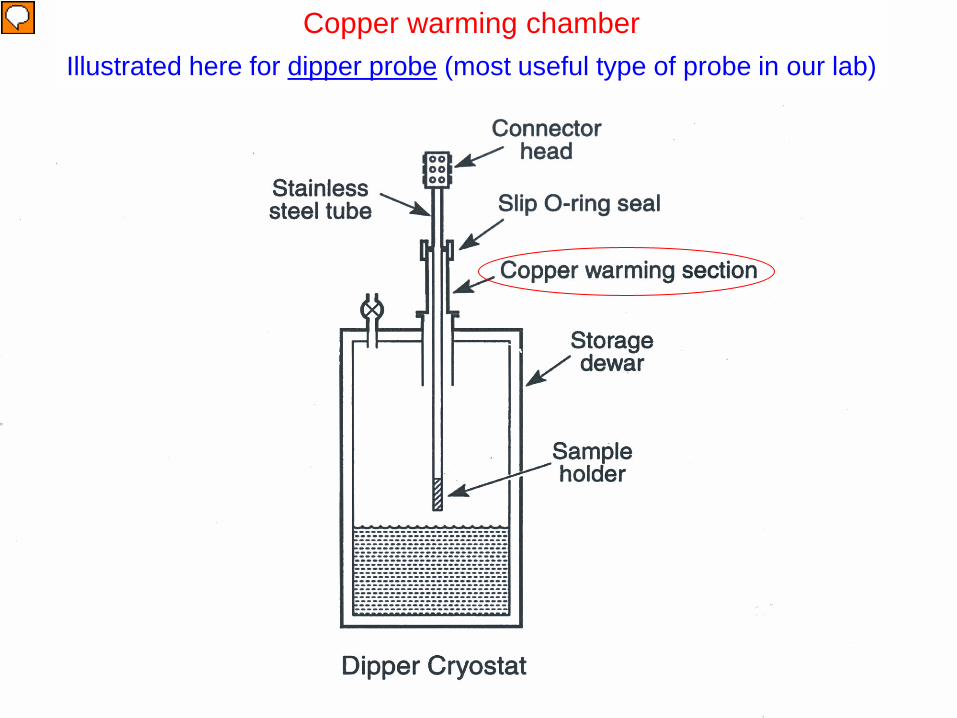
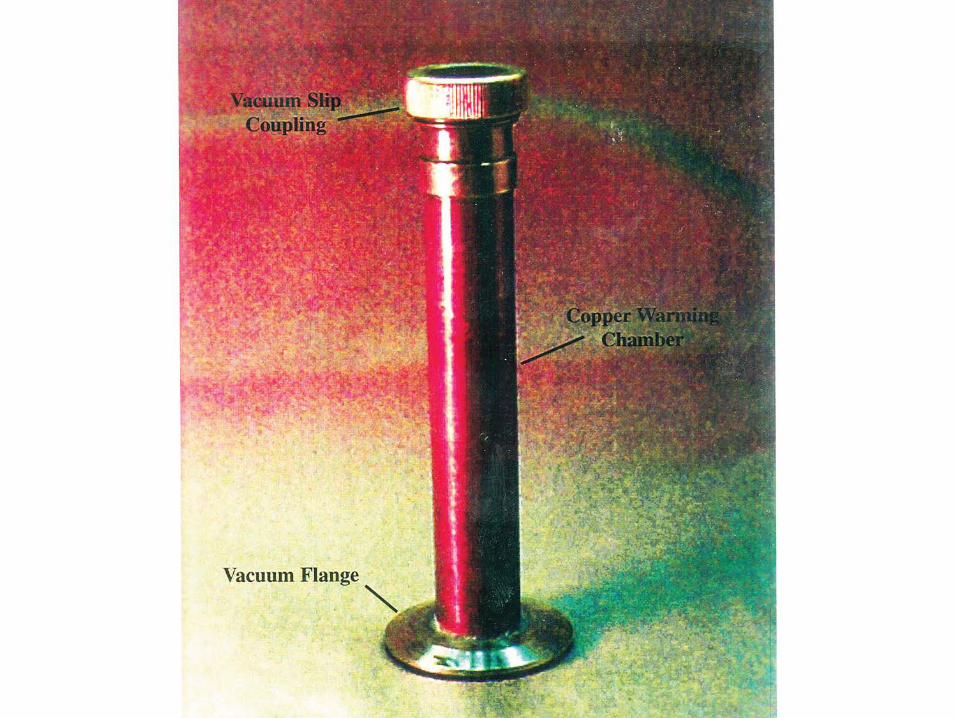
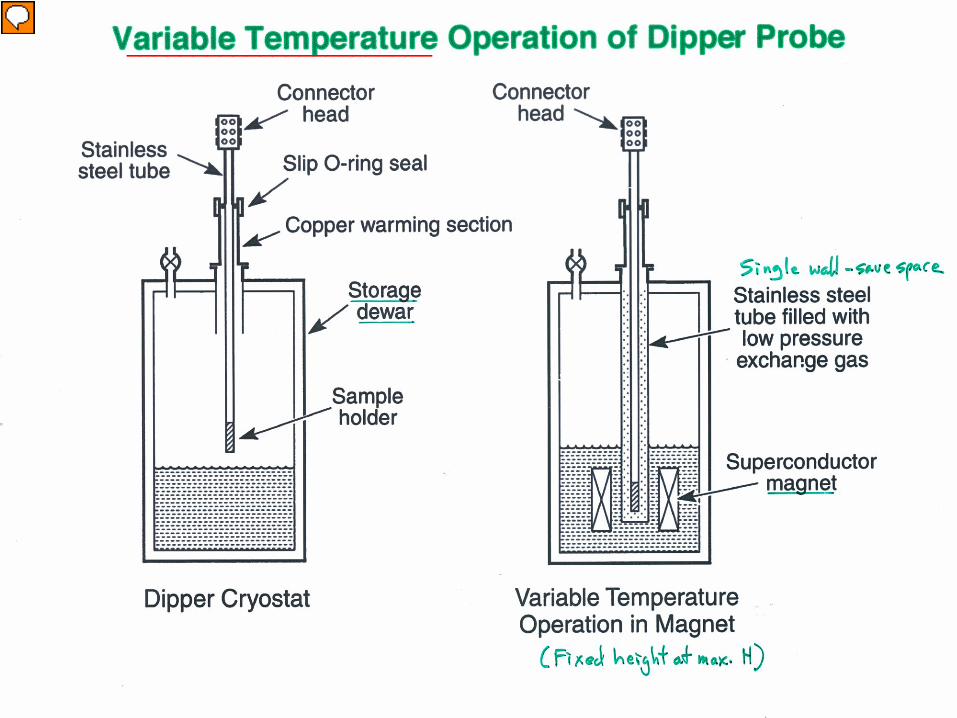
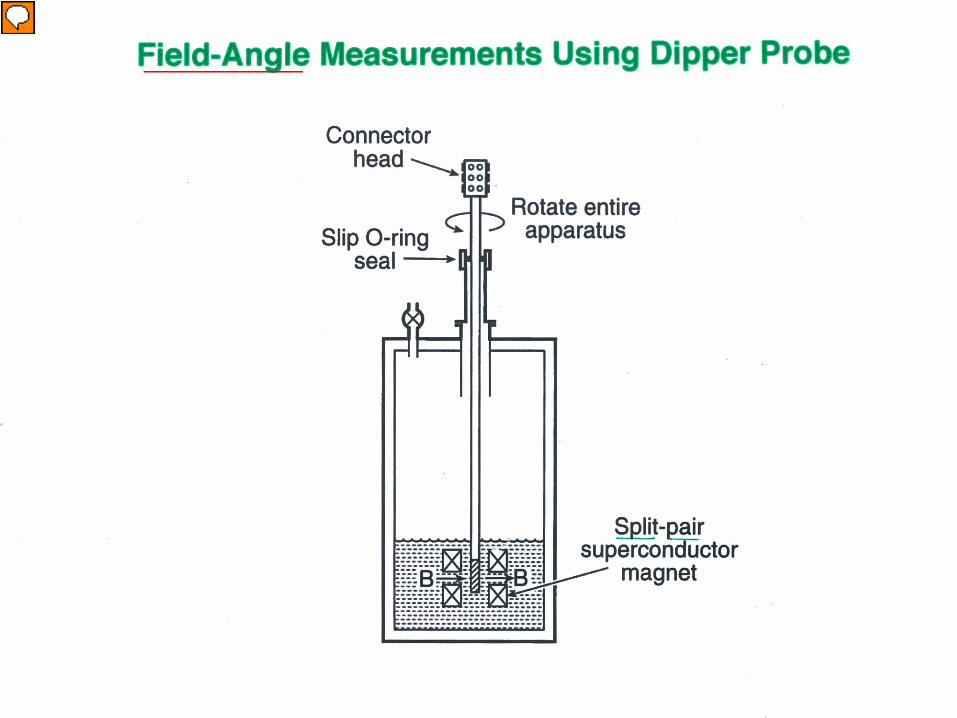
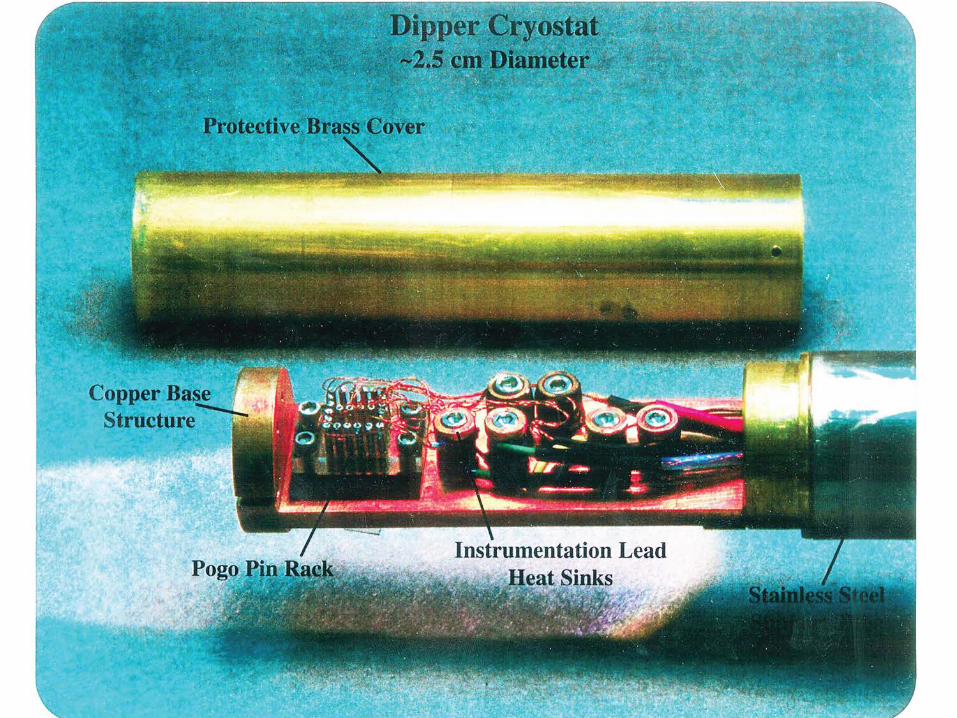
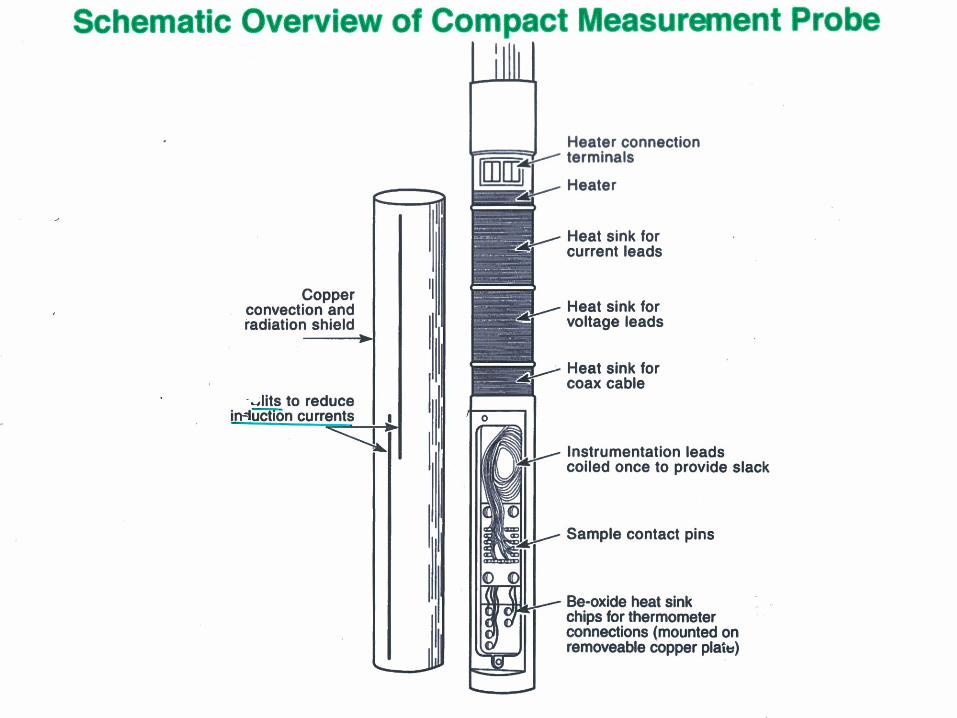
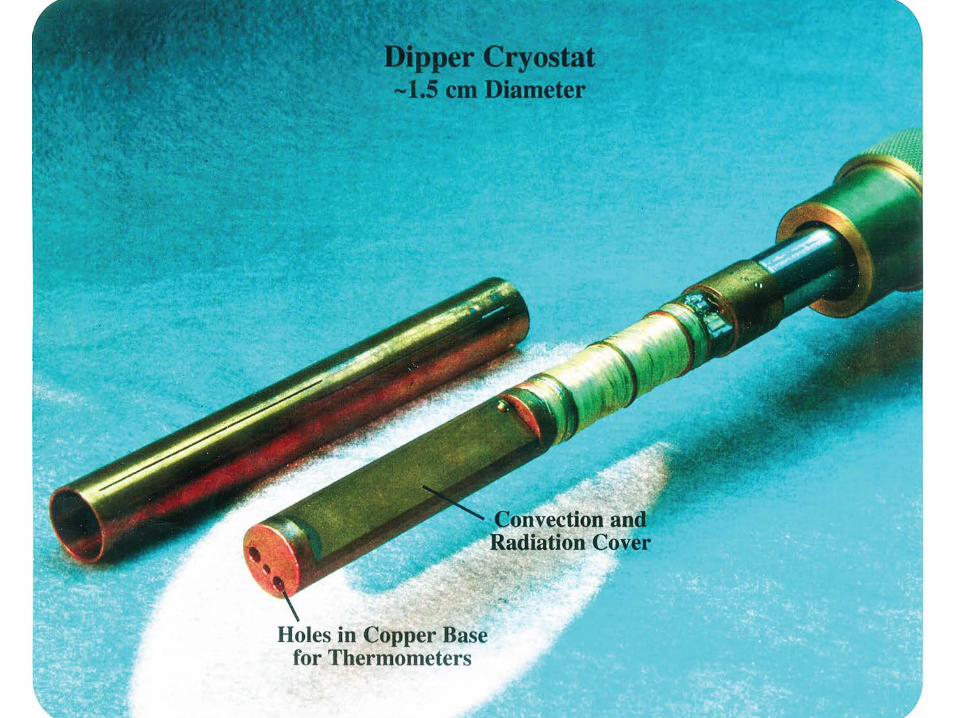
Copper warming chamber Illustrated here for dipper probe (most useful type of probe in our lab)
_______________________
____________
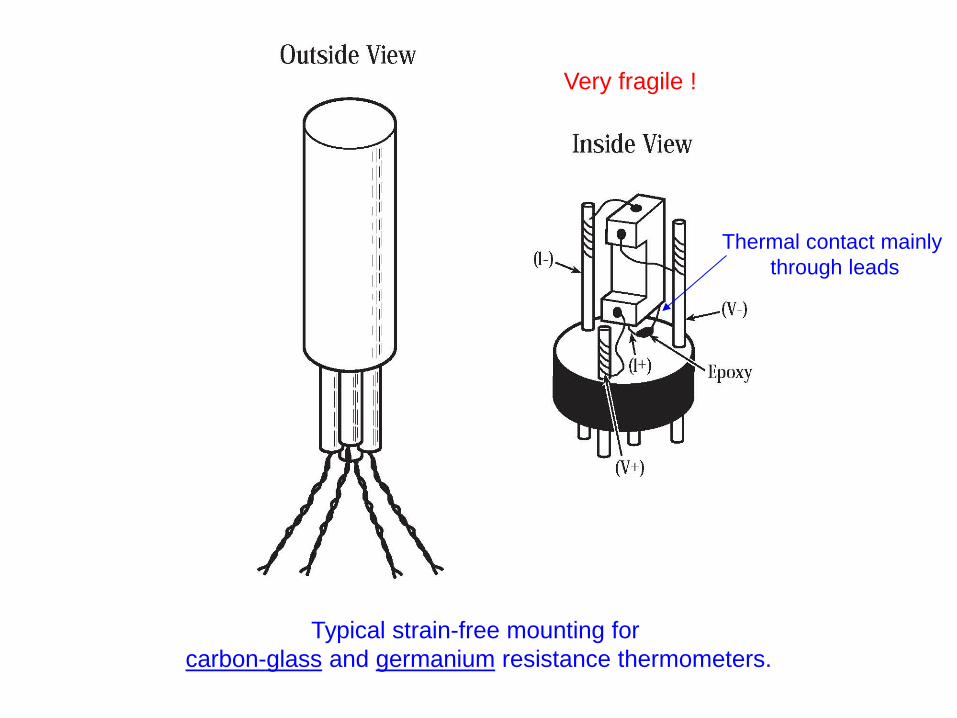
Typical strain-free mounting for carbon-glass and germanium resistance thermometers.
Thermal contact mainly through leads
Very fragile !
• Because most textbooks are about science and not about how to design and construct apparatus to do science! • No one book can do it all, however – you have to have experience in the laboratory. Do not be afraid to make mistakes; it’s the only way to really learn. • Despite that, many techniques are the same for different experiments. The book describes techniques that are common to most experiments. It is my hope that it will shorten the learning curve.
Why did I write the book?

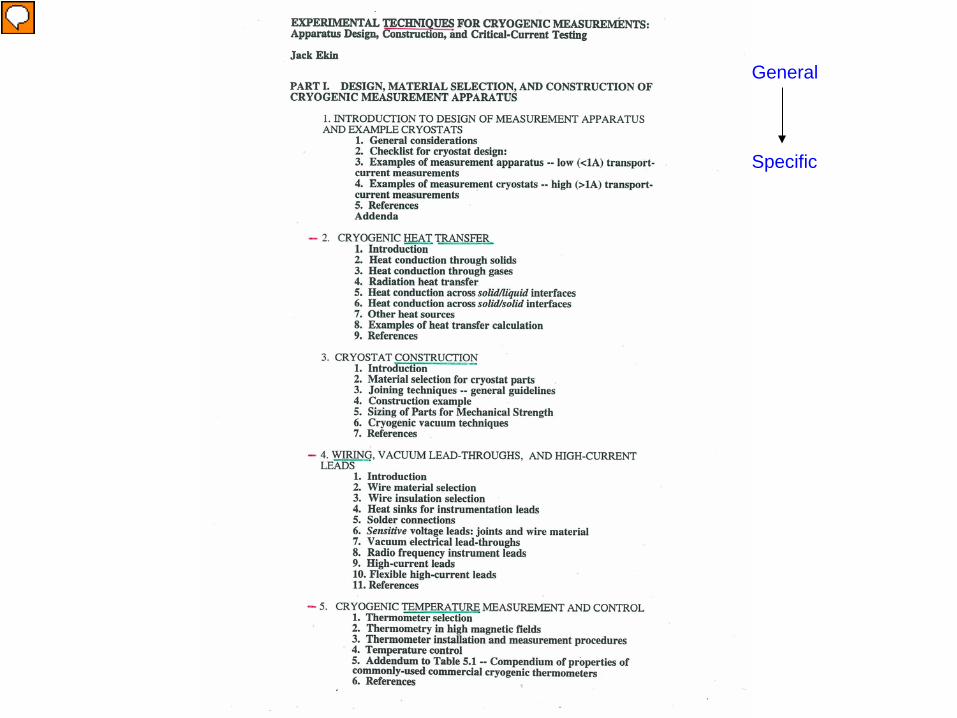
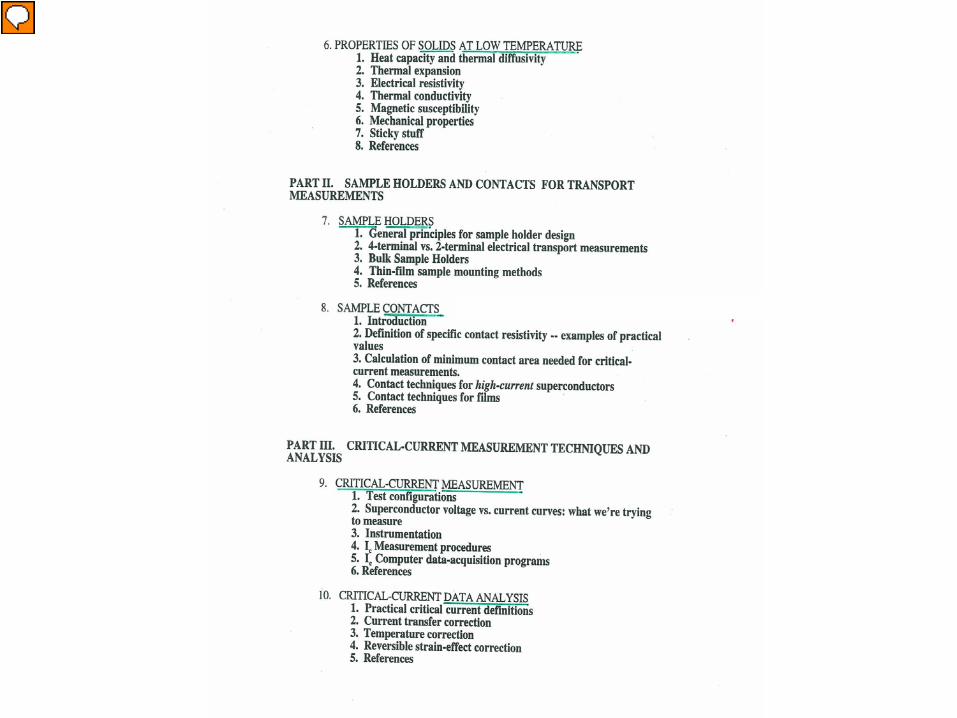
General Specific
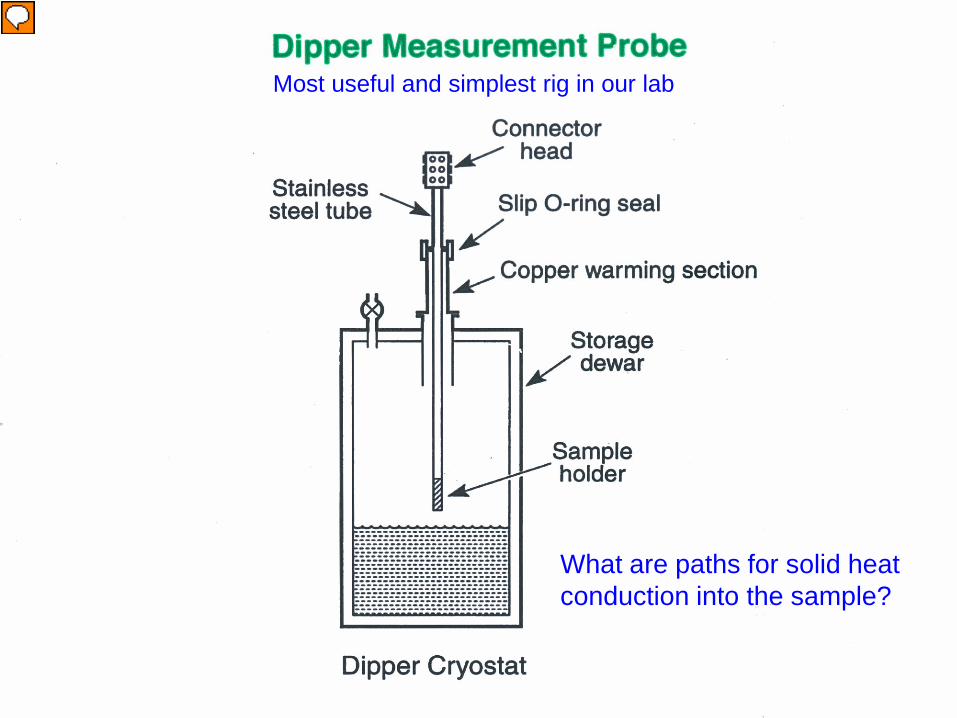
Most useful and simplest rig in our lab
What are paths for solid heat conduction into the sample?
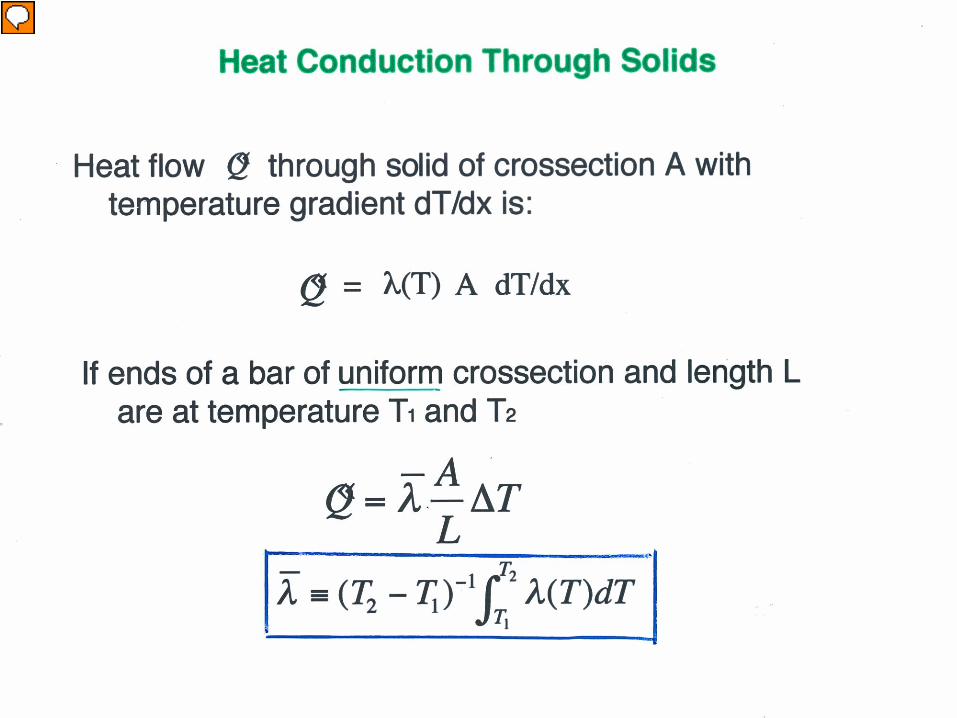
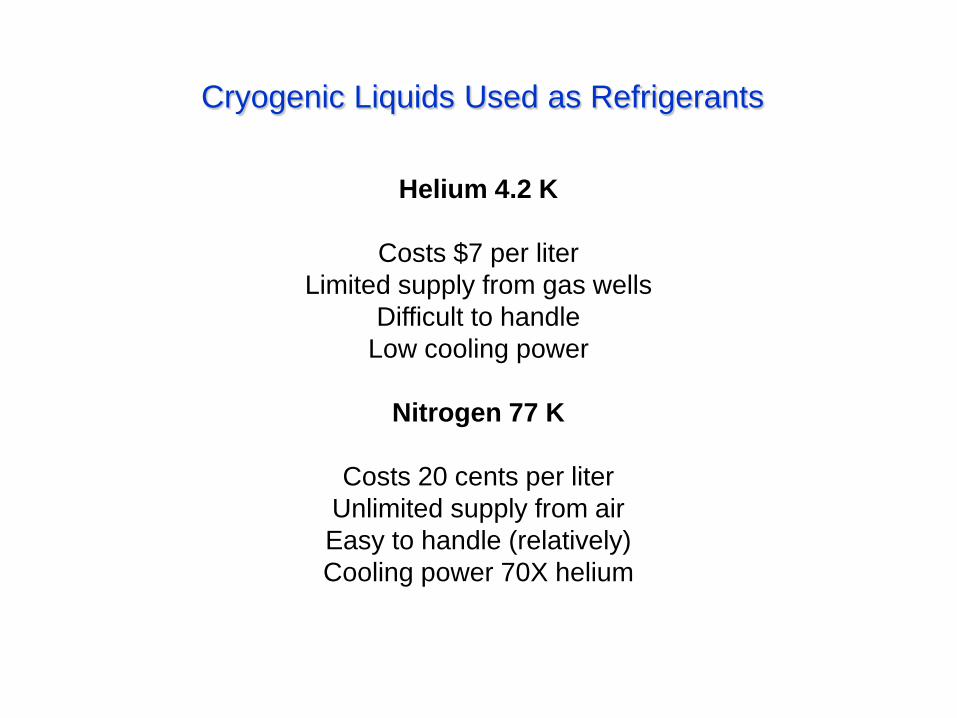
Cryogenic Liquids Used as Refrigerants
Helium 4.2 K
Costs $7 per liter Limited supply from gas wells
Difficult to handle Low cooling power
Nitrogen 77 K
Costs 20 cents per liter
Unlimited supply from air Easy to handle (relatively) Cooling power 70X helium
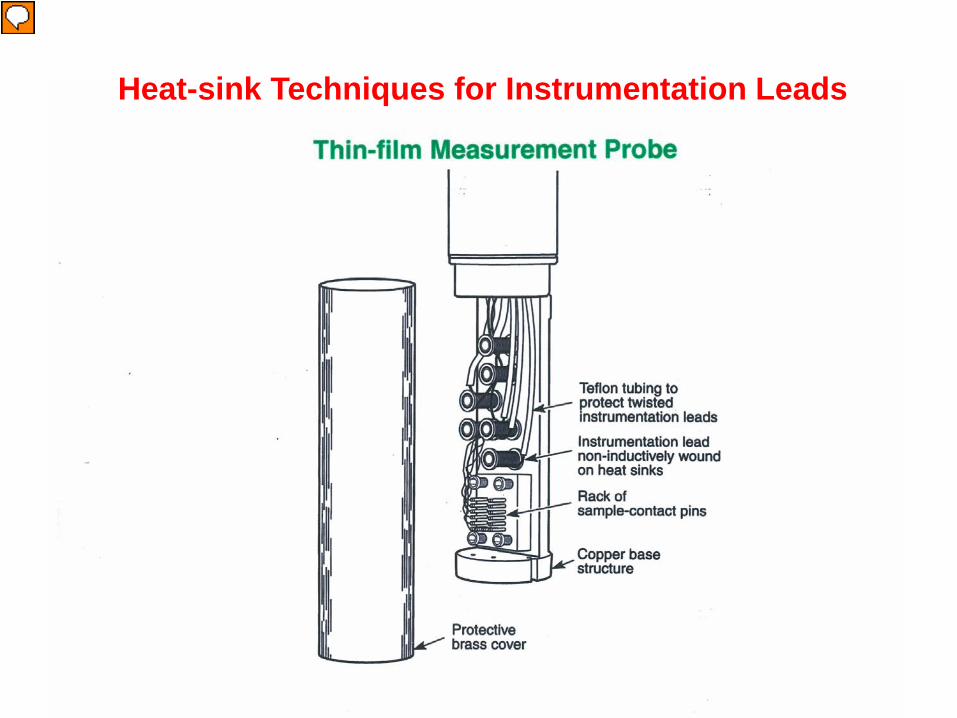
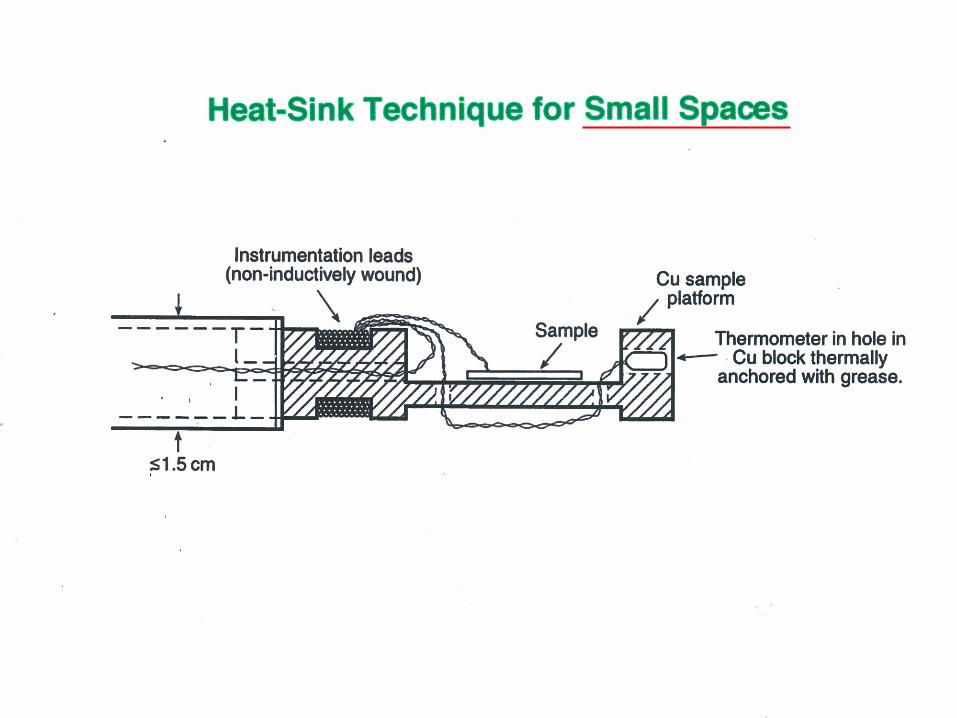
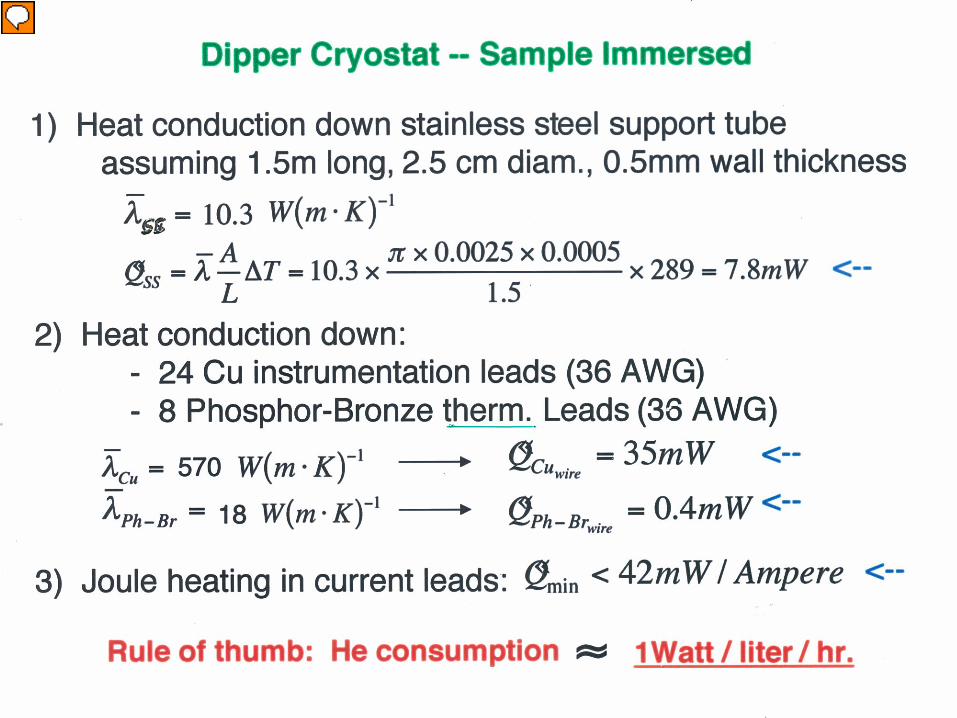
Heat-sink Techniques for Instrumentation Leads
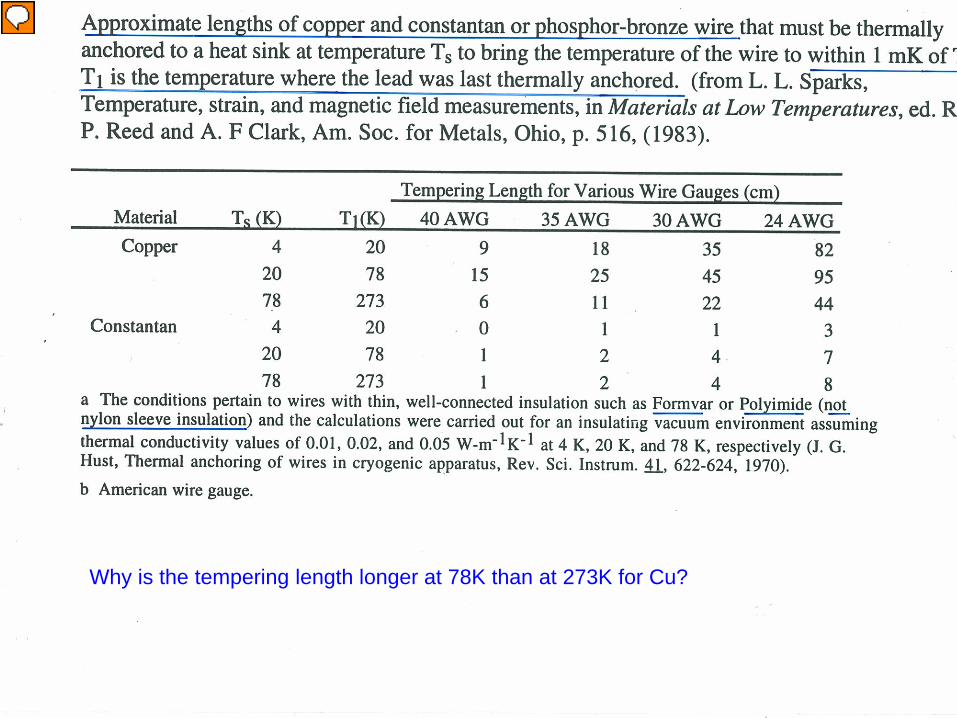
Why is the tempering length longer at 78K than at 273K for Cu?
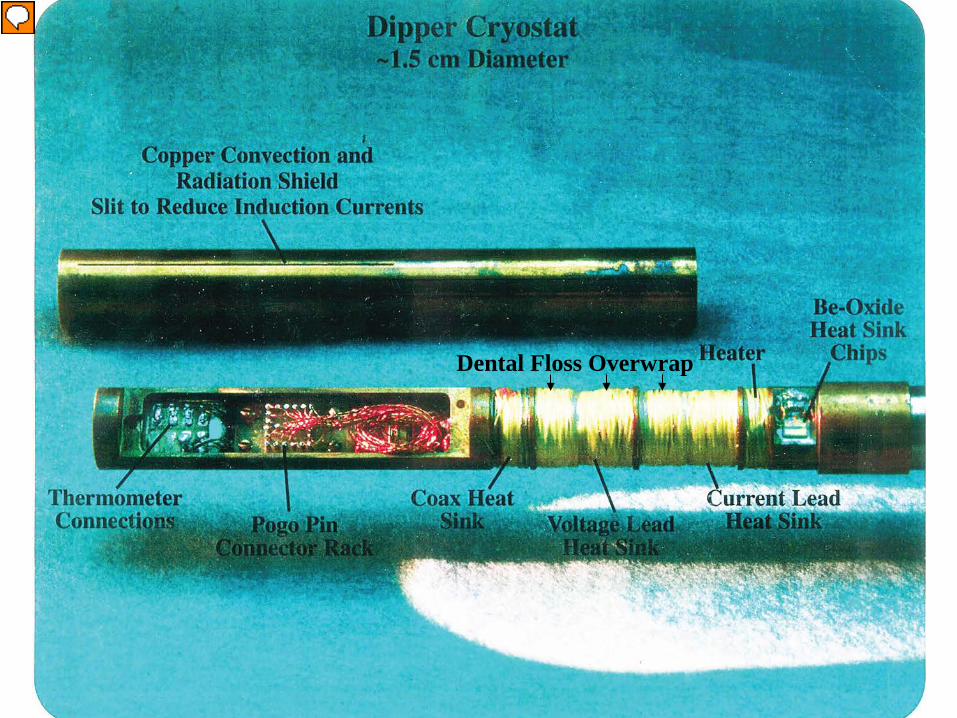
Dental Floss Overwrap
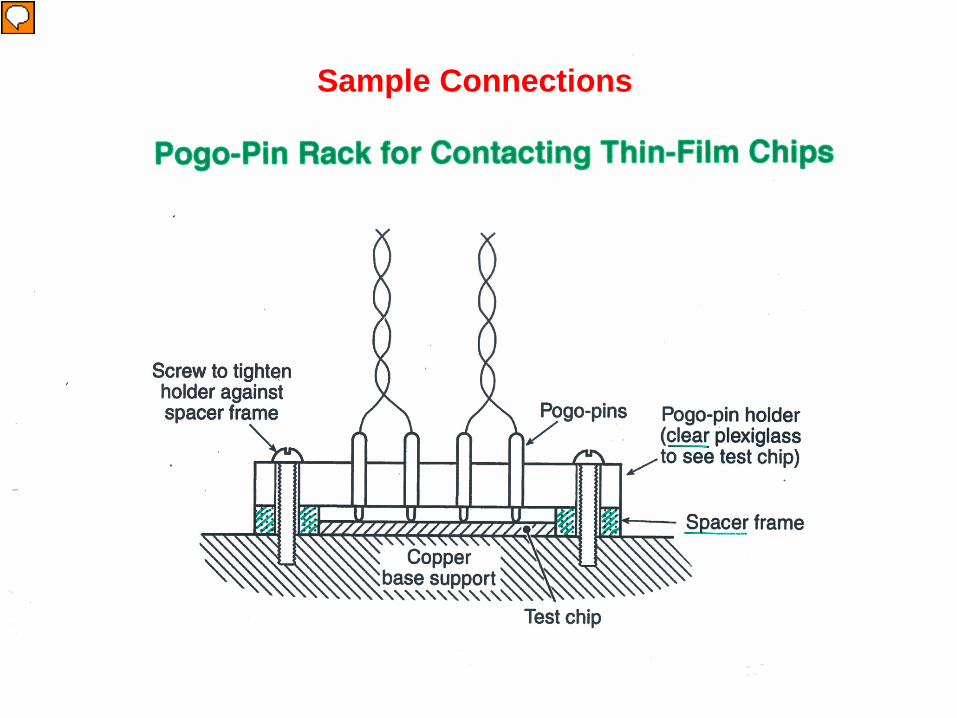
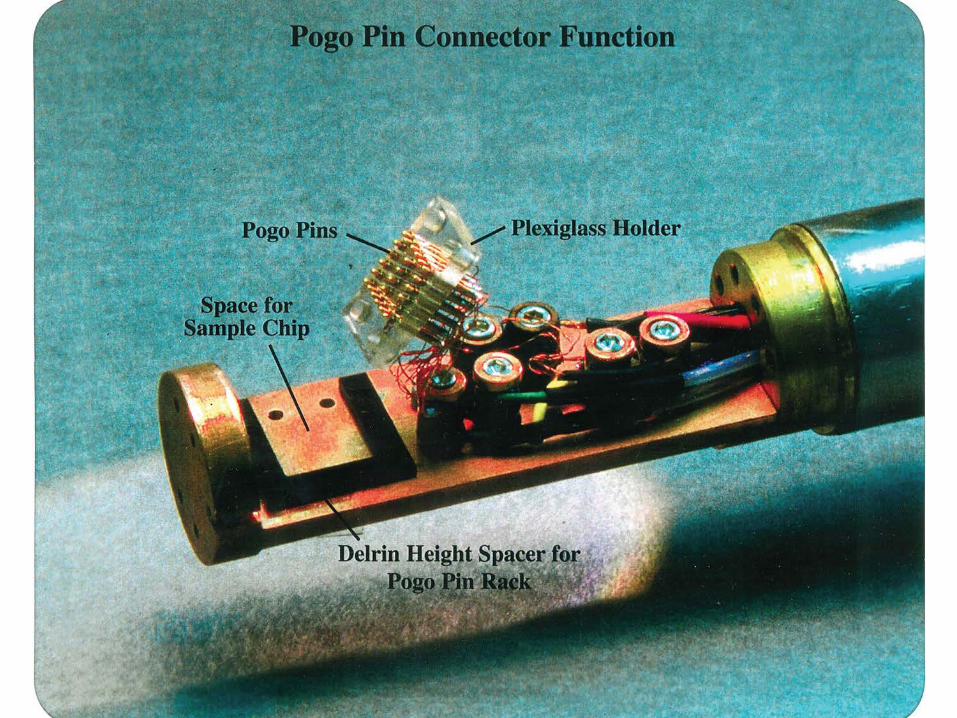
Sample Connections
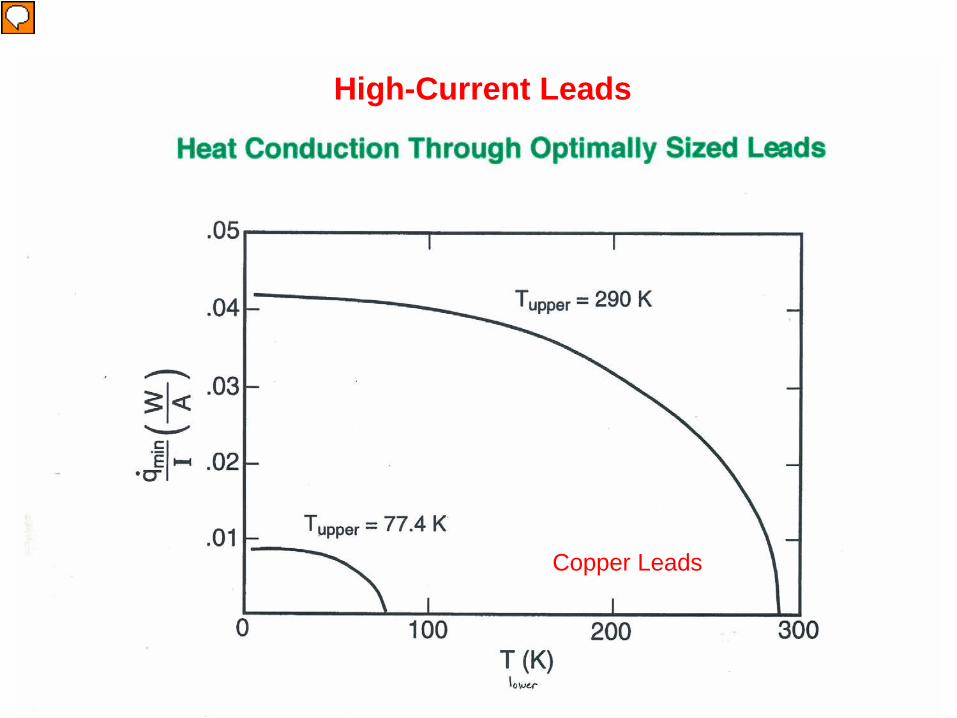
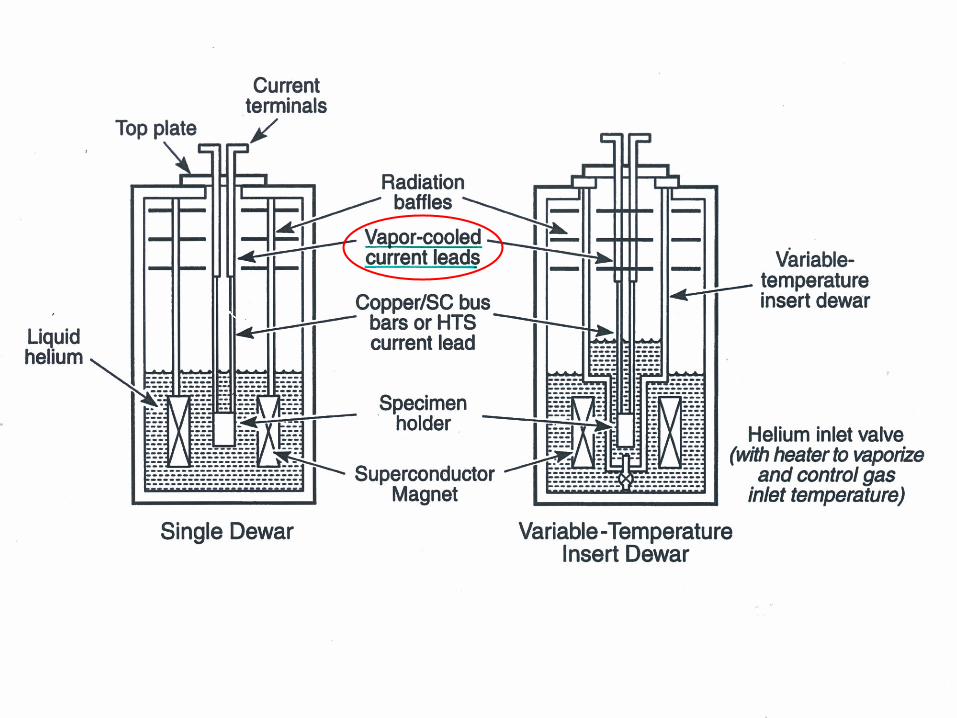
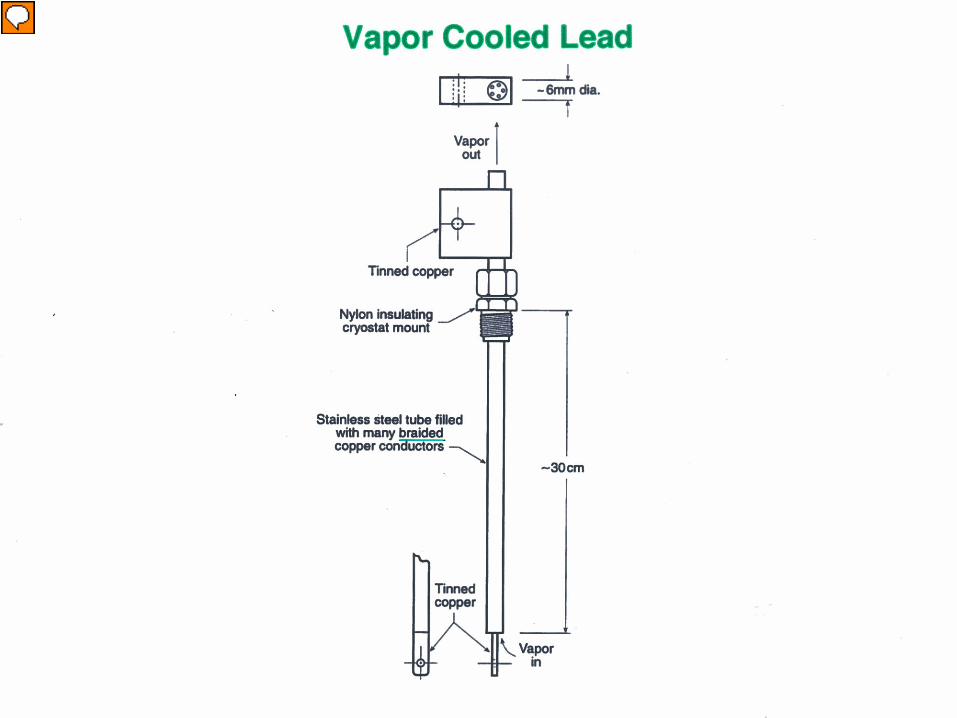
High-Current Leads
Copper Leads
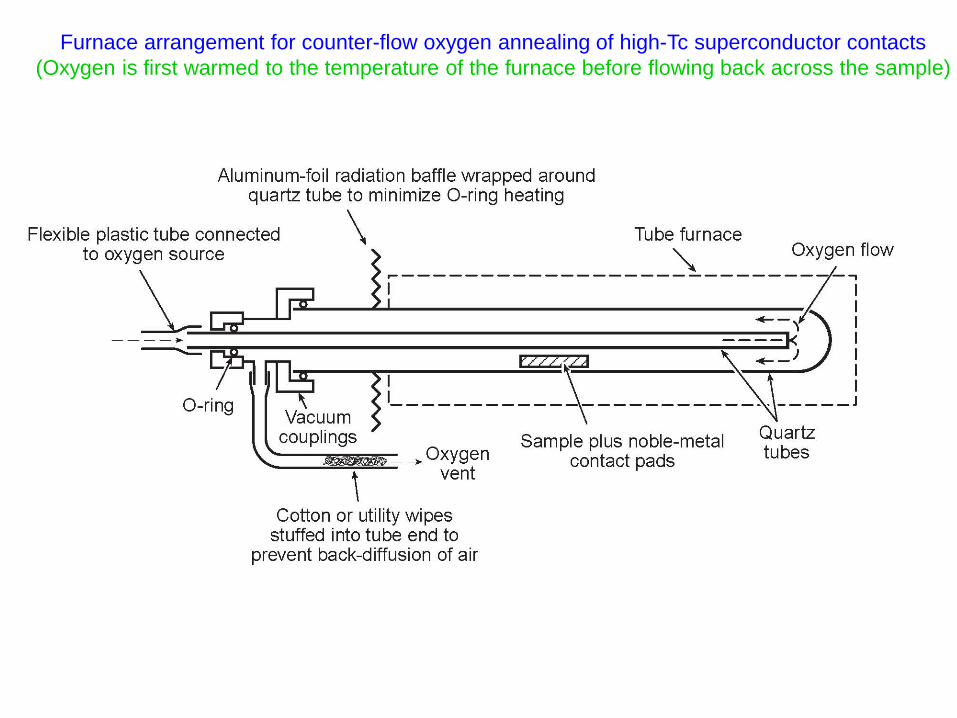
Furnace arrangement for counter-flow oxygen annealing of high-Tc superconductor contacts (Oxygen is first warmed to the temperature of the furnace before flowing back across the sample)