building fll robots april 22, 2005 nathan gray frc team #1519 mechanical mayhem
Post on 22-Dec-2015
214 views
TRANSCRIPT

Building FLL RobotsApril 22, 2005
Nathan GrayFRC Team #1519
Mechanical Mayhemwww.mechanicalmayhem.org

April 22, 2005 Mechanical Mayhem 2
Objective of this talk• To teach sound building fundamentals for
FIRST LEGO League robots
• Some discussion may not be applicable to general purpose robots– Assuming the usual FLL parts restrictions– Assumng a vinyl mat on a 4x8’ table with
2x4” walls will be used again next year– And so on…

April 22, 2005 Mechanical Mayhem 3
Contents
• Robot Components Overview• Robot Design Options• Common Robot Issues• Robot Design Goals• Dynamic Environment• Some Robust Techniques• Examples• Resources

April 22, 2005 Mechanical Mayhem 4
Components Overview
• Technic beams and plates
• Pins and axles
• RCX Microcontroller
• Motors
• Sensors
• Gears, Pulleys, Wheels
• Special pieces

April 22, 2005 Mechanical Mayhem 5
Technic beams and plates
• STandard Unit of Dimension is a STUD
• Six studs = five beams, so beams are 6/5 (or 1.2) studs high
• Three plates = one beam, so plates are 0.4 studs high
• Hole spacing is the same as stud spacing

April 22, 2005 Mechanical Mayhem 6
Pins and axles• Many various kinds• Pin, friction pin, and long
variants• Evil, super friction pin that
looks very similar to the normal friction pin
• Axles, come in various numbers of studs
• Never bend axles! Axles holding wheels or gears should be closely supported on both sides

April 22, 2005 Mechanical Mayhem 7
RCX Microcontroller
• 3 outputs for motors or lamps
• 3 inputs for sensors
• RCX v1.0 has a power adapter input (which isn’t generally used for FLL)
• Any of RCX versions 1.0, 1.5, 2.0 are fine for FLL – Use the latest RIS or RoboLab software on all of them

April 22, 2005 Mechanical Mayhem 8
Motors
• There are several different kinds, but• FLL allows three 9 volt geared grey motors• Caution! Two different kinds of grey geared 9
volt motors look very similar– The newer version is much lighter, but slightly
slower and less powerful
• For great info on LEGO motors, see– http://www.philohome.com/motors/motorcomp.htm

April 22, 2005 Mechanical Mayhem 9
Sensors
• FLL allows– Two light sensors that measure 0-100% light –
typical FLL table measurements are approximately 30-60
– Two touch sensors which can be used as bumper sensors or limit switches
– One rotation sensor• Measurement granularity is 1/16 of a rotation• Can give bad data if very fast or very slow• Rotational speed near motor speed is fine (200-400 rpm)

April 22, 2005 Mechanical Mayhem 10
Sensors (continued)
• Use all the permitted sensors!• Can stack touch sensors on top of light
sensor inputs– A closed touch switch reads 100% brightness– Cannot read 100% otherwise, unless pointed at
light source
• Good sensor information at:– http://www.plazaearth.com/usr/gasperi/lego.htm
• Note: homebrew sensors are not FLL legal

April 22, 2005 Mechanical Mayhem 11
Gears
• Transfer rotation from one axle to another• Even number of gears reverses the direction of
rotation• The radii determine gear spacing, transferred speed,
and power• Inverse relationship between power and speed• There are lots of gear spacing issues beyond the
scope of this talk– Special half-stud beams or diagonal spacing sometimes
help– An eight tooth gear has a diameter equal to one stud– 8, 24, and 40 tooth gears work well together because their
radii are all multiples of 0.5

April 22, 2005 Mechanical Mayhem 12
Gears (continued)
• Worm gears – Are effectively one tooth gears– Significant efficiency lost to friction– Since they can’t be back driven, they are
great for arms that should hold their position
• Some good gear info at– http://www.owlnet.rice.edu/%7Eelec201/
Book/legos.html

April 22, 2005 Mechanical Mayhem 13
Pulleys• Work like toothless gears
• All the same radius principles apply
• Spacing is more flexible than gears
• Can be useful when want to allow slip
• Higher frictional load than gears or chain, and belts can stretch and break
• Try to use gears instead– Use a clutch gear if necessary

April 22, 2005 Mechanical Mayhem 14
Wheels
• Like pulleys and gears, the wheel dimension is key!
• Think of the wheel as the final gear in the drive train– Larger wheels will make the robot move faster,
with less power• With stability, traction, turning agility, and so
on, there are lots of trade-offs in choosing wheels
• See the LEGO tire traction tests at:– http://www.philohome.com/traction/traction.htm

April 22, 2005 Mechanical Mayhem 15
Special pieces
• 1x1 beam, and double-hole 1x2 beam, can be used to get half stud spacing
• Clutch gears: protects motors and LEGO from self-destruction
• U-joints: can be used when a straight axle just won’t do
– Should always be used in pairs– Original and final shaft should
be parallel• Worm gearbox – the perfect
thing to raise and lower an arm• Chain – achieves some of the
flexibility of pulleys, but more precise, efficient, and reliable than belts

April 22, 2005 Mechanical Mayhem 16
Robot Design Options
• Drive systems
• Modular vs. Monolithic Robots

April 22, 2005 Mechanical Mayhem 17
Robot Drive Systems
• Dual motor / wheel differential drive is a good (and common) choice for FLL– Important to have well-matched motors!
• Treaded skid steer / tank drive can sometimes be useful for ATV missions– Very stable, but usually slow and sometimes hard to
navigate accurately• Active steering (e.g., like a car) has some attractive
features, but:– Might require a dedicated motor– Cannot spin in place
• Legs?

April 22, 2005 Mechanical Mayhem 18
Modular versus Monolithic?
• A “modular” robot is a core robot with attachments that snap on at specific interface points – e.g. might have a different attachment for each FLL mission
• A “monolithic” (or self-contained) robot has no (or very few) attachments that go on or come off the robot.
• Either approach can be very successful!

April 22, 2005 Mechanical Mayhem 19
“Monolithic” Considerations• Purpose built for each year’s missions• Fewer parts to bring to the competition table• Fewer attachments create fewer opportunities for
operator errors• Fewer attachments mean less time spent in base,
and more table time available for the robot to actually accomplish the missions
• Might be easier / better to solve particular missions with dedicated robot features rather than an attachment that uses a standardized interface

April 22, 2005 Mechanical Mayhem 20
“Modular” Considerations
• Don’t necessarily need to redesign everything every year
• Can accumulate libraries of reusable code for the core robot base
• Easy to prototype new ideas• Attachments can be used interchangeably on
duplicate robot bases• Student sub-groups can develop separate
attachments in parallel without interfering with other mission solutions

April 22, 2005 Mechanical Mayhem 21
Common Robot “Issues”
• Robot could fall apart at a bad time
• It may not drive straight
• Robot might get “lost” on the table
• Maybe it is inconsistent and does something slightly different every time

April 22, 2005 Mechanical Mayhem 22
Robot design goals
• Simple: easy to replicate and less to go wrong!– Ask: Is there an easier solution?
• Robust: don’t want robots falling apart on the table!• Compact
– Small enough to turn in tight spaces– Keep the center of gravity between the wheels– Wire routing – tuck wires in so they don’t get pulled loose
• Predictable and reliable– Behavior should be consistent and repeatable
• Aesthetics: it’s nice to have a good looking robot!

April 22, 2005 Mechanical Mayhem 23
Some Robust Techniques
• Shielding light sensors
• Solid construction
• Using good batteries
• Going straight (enough)
• Reliable Navigation

April 22, 2005 Mechanical Mayhem 24
Dynamic Environment
• Even with good design, construction and programming, there can still be problems
• FLL robots and programs are generally designed assuming a well known (static) environment without any interference
• Unfortunately, things do change: sunlight, spotlights, camera flashes, dust on the tables and wheels, the battery power level, etc
• There are ways to mitigate some of these

April 22, 2005 Mechanical Mayhem 25
Shielding Light Sensors
• You cannot control ambient light, but
• You can control what the sensor sees
• Build a light box, or other light barrier, around the light sensors

April 22, 2005 Mechanical Mayhem 26
Solid Construction
• Use cross-bracing and vertical ties
• Connect enough studs – use significant overlap
• Use plates to lock the alignment of beams
• Mount motors and sensors securely
• Tie down sensor and motor wires

April 22, 2005 Mechanical Mayhem 27
Using Good Batteries• Important! Battery levels can affect
robot behavior in many ways!
• Experiment with both strong and weak batteries
• Know you battery’s discharge behavior
• We like Sanyo NiMH rechargeables
• Alkaline have more initial power, but consistency is usually more important

April 22, 2005 Mechanical Mayhem 28
Going Straight
• Use matched motors (especially if differential drive)
• Matched frictional drag – minimize drag on both sides
• Uniform weight distribution
• Front guide wheels that roll straight (but that will slip sideways when necessary)

April 22, 2005 Mechanical Mayhem 29
Three levels of Navigation
• Dead reckoning– e.g. aim and shoot for time
• Odometry / counting rotations– e.g. aim and shoot for wheel spins
• Feedback orientation– Use walls, mat, field elements so the robot
“knows” where it is on the table– Self correcting, no jigs or precise starts

April 22, 2005 Mechanical Mayhem 30
Feedback Orientation Sites
• Can frequently run a wheel along a wall• Turns parallel to a wall can sometimes align
on the perpendicular wall• Look for reliable “attack points”:
– Intersections of linear table features, e.g. wall corners, line intersections, other mat features
– Field element corners can also be used for alignment

April 22, 2005 Mechanical Mayhem 31
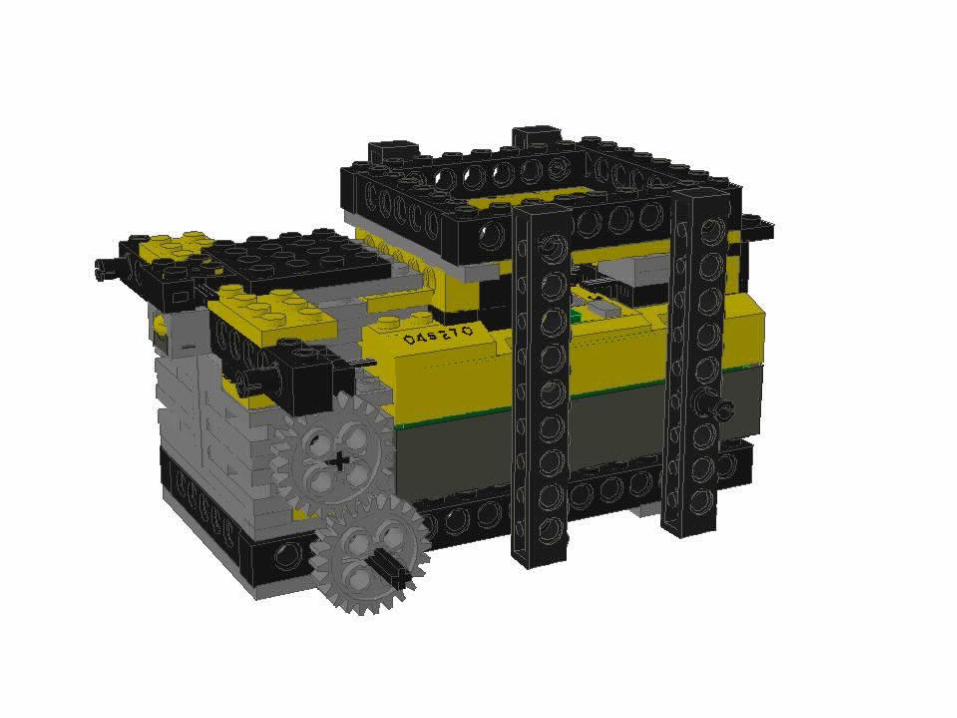
Sample MAYHEM Robot Core
• Similar to one used for “City Sights”
• Missing sensors, weights, and standardized power take off interface, as compared to current robot core base

April 22, 2005 Mechanical Mayhem 32

April 22, 2005 Mechanical Mayhem 33

April 22, 2005 Mechanical Mayhem 34

April 22, 2005 Mechanical Mayhem 35

April 22, 2005 Mechanical Mayhem 36

April 22, 2005 Mechanical Mayhem 37

April 22, 2005 Mechanical Mayhem 38

April 22, 2005 Mechanical Mayhem 39

April 22, 2005 Mechanical Mayhem 40
April 22, 2005 Mechanical Mayhem 41

April 22, 2005 Mechanical Mayhem 42

April 22, 2005 Mechanical Mayhem 43

April 22, 2005 Mechanical Mayhem 44

April 22, 2005 Mechanical Mayhem 45

April 22, 2005 Mechanical Mayhem 46

April 22, 2005 Mechanical Mayhem 47

April 22, 2005 Mechanical Mayhem 48
Sample MAYHEM attachments
• Rover retriever
• Crater transmission

April 22, 2005 Mechanical Mayhem 49
Where to get LEGO?
• Ebay
• Look up set parts on:– www.peeron.com
• PITSCO LEGO Dacta:– www.legoeducationstore.com
• Bricklink: www.bricklink.com
• The LEGO Group store: www.lego.com

April 22, 2005 Mechanical Mayhem 50
Other Resources
• Excellent building guide from Minnesota INSciTE, hightechkids.org -- search for “Building LEGO Robots For FIRST LEGO League by Dean Hystad”
• Tons of info at LEGO Mindstorms Internals:– www.crynwr.com/lego-robotics/
• The Ferrari’s book: Building Robots with LEGO Mindstorms
• Comprehensive FLL Coach’s Handbook at– http://www.fll-freak.com
• Mike’s LEGO Cad: – http://www.lm-software.com/mlcad

April 22, 2005 Mechanical Mayhem 51
Summary
• Probably want to use dual motor / differential drive
• Probably want to use gears (especially 8, 24, and/or 40 tooth gears)
• Use vertical ties and cross bracing
• Have a reliable plan for navigation