american express online (axo) - slu · american express online (axo) powered by cliqbook . ......
TRANSCRIPT

American Express Online
(AXO)
Powered by Cliqbook
Reference Guide
For
Saint Louis University
July 2006 V1.4
0

Welcome to AXO / powered by Cliqbook. This is Saint Louis University’s designated corporate online booking tool.
Table of Contents
Getting Connected, Login and Password....….…………........................2
Travel Profile...................…………………..............................................3
Travel Center ..................…………………....…......................................4
Book a Trip.............................………………..….....................................5
Search by Schedule ........................…………............…........................ 6
Choose a Flight................................…………......….............................. 7
Trip Booking Information & Pre-Trip Approval Process….…................. 9
Reservation Complete .............................………...................... 11
Awaiting Approval Notification Email......…………...................... 12
Trip Rejection Email Notification..................….…...................... 13
Trip Approved Email Notification.............................……............ 15
Final Email – Ticket Issued......……....................………............ 16
Trip Itinerary/Invoice – My Travel Plans Website......….……............ 16
1

Getting Connected, Login and Password
1. Connect to the Internet and enter URL: https://app2.outtask.com/default.asp?host=amex 2. Save this address as a “Favorite” or “Bookmark” in your browser. 3. Enter your Login and Password into the appropriate field and click on GO to login. Login = entire SLU email address (i.e. [email protected]) Password = password (see mandatory change instructions below)
Log-in Page
Changing Your Password/Password Hint 1. You will automatically be prompted to change your password the first time you login to the
system. 2. Enter your old password, then enter the new password and re-enter it again. 3. Click on the Submit button to make the change. Important Tip! Be sure to set up a password hint that will allow the system to prompt you should you forget your password.
2
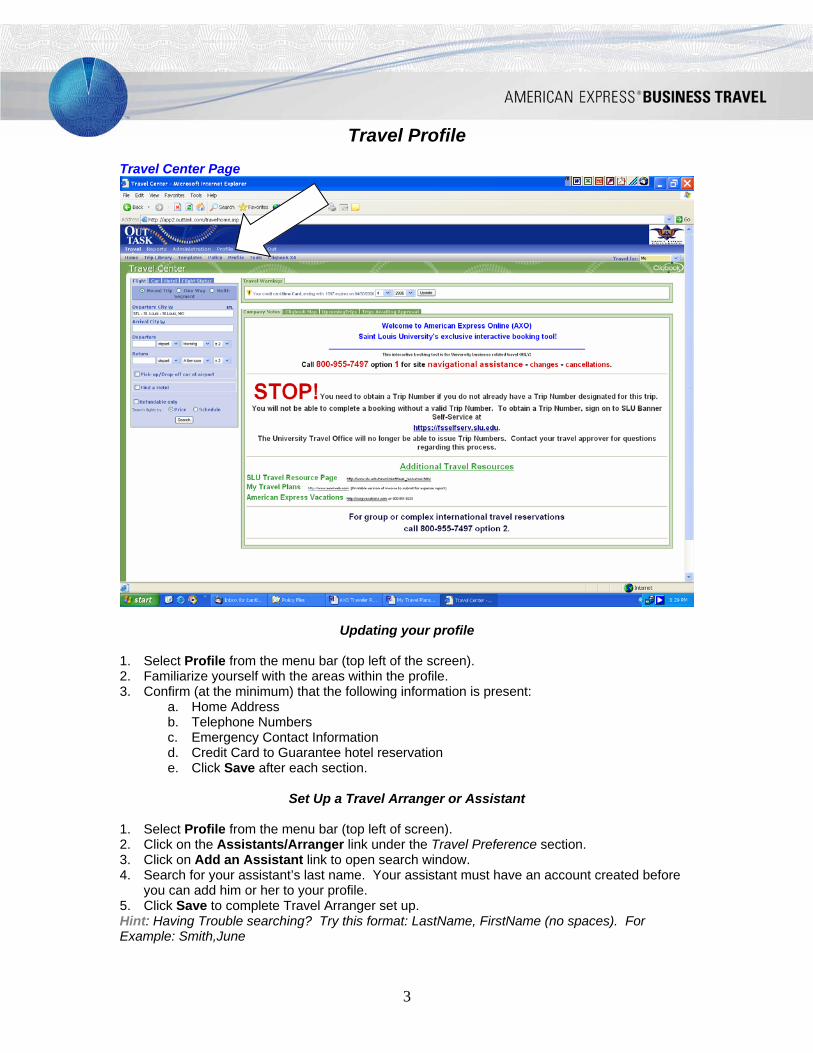
Travel Profile Travel Center Page
Updating your profile 1. Select Profile from the menu bar (top left of the screen). 2. Familiarize yourself with the areas within the profile. 3. Confirm (at the minimum) that the following information is present:
a. Home Address b. Telephone Numbers c. Emergency Contact Information d. Credit Card to Guarantee hotel reservation e. Click Save after each section.
Set Up a Travel Arranger or Assistant
1. Select Profile from the menu bar (top left of screen). 2. Click on the Assistants/Arranger link under the Travel Preference section. 3. Click on Add an Assistant link to open search window. 4. Search for your assistant’s last name. Your assistant must have an account created before
you can add him or her to your profile. 5. Click Save to complete Travel Arranger set up. Hint: Having Trouble searching? Try this format: LastName, FirstName (no spaces). For Example: Smith,June
3

Travel Center Page
Additional elements of this page include:
• Company Notes that contain information from the SLU Travel Office • Upcoming Trips tab to view all trips waiting approval • Trips Awaiting Approval (your will only be able to view if you are a designated arranger) For travel assistants or arrangers, you will also see a drop-down list of your travelers near the top right corner of the page.
Select a different name to book a trip for him or her, view or update a profile, or view a list of booked trips.
4

Book a Trip
The tabs on the left side of the Travel Center page let you enter information for booking a trip.
If you have a flight, use the Flight tab. You can add a car or a hotel from this tab. If you have other segments to add, such as multiple hotels you can add those from the Itinerary.
If you have a Car or a Hotel to book without airfare, use the corresponding tabs.
You can also use the Flight Status tab to check the status of a flight. Enter the cities, date, and airline and you can see arrival times for the flight.
If you are set up as a travel arranger, select the person for whom you would like to book travel before you start entering your travel request information. When you type in a city, airport name, or airport code, Cliqbook will automatically search for a match.
5

Choose the airport you want, or choose the Area Airports option (if available) to search multiple airports.
Click in the Departure and Arrival date fields to select dates from the calendar. Choose times, and also your time range. Cliqbook always searches before and after the time you select.
If you need a car at the airport, place a check in the Pickup/Dropoff car at airport box. Once you select your vendor and car type, a car is automatically added to your reservation.
If you need an off-airport car, or have other special requests, skip this step and you can add a car from the itinerary.
If you need a hotel, check Find a Hotel. Choose whether to search by airport, or a reference point or zip code. Once you choose how to search, enter the required details. You can also choose a range in miles or kilometers within which to search.
If you have multiple hotels, or don’t need a hotel for the entire length of your stay, skip this step and you can add a hotel from the itinerary.
To get the most options for available flights, choose to search by schedule. Cliqbook will give you options for departure and return flights, and then will perform a search by price. Choose to check the Flights with/ no penalties (refundable) box (if available) to search only fully refundable fares.
Once you have entered all your information, click the Search button to open the wizard and see your flight results.
Search by Schedule
When you search by schedule, you will see a list of outbound and return flights. Make sure to choose both your departure and return flights on this page. Prices do NOT appear on the Search by Schedule page; once you select your flights, Cliqbook will price the flights and you will be able to purchase the flight you chose, or a similar flight.
Search by Schedule allows you to see the seat map for this flight.
You can also hold your cursor over any airport code or airline name to see the full name for the airport or airline.
Indicates the flight you selected once you get to the next screen
There are also symbols that indicate a flight is a code share, is direct but has stops, or is sold out. AXO will always show what these symbols mean, typically when you hold your cursor over the symbol.
6

Choosing Flights
When you Search by Schedule, the Choose a Flight page will show up once you choose your flights and continue. If you search by price, you will go directly to the Choose a Flight page. Results appear on tabs on this page. Directly above the tabs will be a grid near the top of the screen.
AXO shows all the available fares in a grid near the top of the screen:
Each fare appears beneath the grid on a tab. You can sort or filter the tabs using the grid.
By default, all results will appear on the tabs beneath the grid. To filter the fares, click on the corresponding row, column, or cell in the grid.
To see all non-stop fares, click the Nonstop cell, and the tabs will only show non-stop fares.
7

To see all fares for a particular vendor, click that vendor cell and the tabs will only show fares for that vendor.
GREEN
YELLOW
Cliqbook shows additional information about each fare on the tab, including:
• Green tab – displayed fare is within Saint Louis University’s travel policy • Yellow tab – displayed fare may be outside of Saint Louis University’s policy; will
require additional information (reason code) and approval.
8

Pre-Trip Approval Process
Trip Booking Information Page
All of the information in the Trip Booking Information screen will appear in the email to your manager and the authorized approver for your travel.
1. Trip Name [Required] The required information in this field is Destination and Business Travel Dates. AXO will automatically include the destination based on information you entered on the Travel Center page. Add the business travel dates, which in some cases will be different from your departure and return dates if you are adding on personal days to the trip. The trip name will appear on your itinerary and in automated emails. 2. Comments for the Travel Agent Leave Blank! Additional agency fees will be incurred. 3. Acknowledging Manager’s Approval [Required] Enter the name of the manager that has pre-approved this trip. The manager set up in your profile will receive an e-mail notifying them that this trip is being reserved. 4. Fund Number/Funding Source [Required] Identify the name of the funding source or the six-digit fund number that will cover the cost of this trip. Contact your departmental business manager or administrator to obtain this information if you don’t know it.
9

Pre-Trip Approval Process
(continued) 5. Trip Purpose [Required] Choose from the drop down box the option that best describes the purpose of your trip. Choose Other if none of the options apply and then include the purpose in the Trip Description box. 6. Trip Description [Required if any of the below apply]
• Include trip purpose if you chose Other in the Trip Purpose box. • Personal Dates of Travel - If you are adding personal days to your trip, note the
dates in this box. • Not Booking a Hotel with this Reservation – You must provide a reason for not
booking a hotel with this reservation. Acceptable reasons are: o Staying at a conference hotel o Sharing a room with a colleague o Staying at alternative lodging at a lower rate
• Also, include any additional information about your booking and trip that will assist the approver and facilitate their review.
7. Send a copy of the confirmation to: [Optional] Choose if there is anyone else who should receive the initial confirmation email. You, along with your manager identified in your profile will automatically receive the email. If you book as an arranger, you will receive the email as well. It is recommended that you send the email in plain text. 8. Additional Estimated Trip Cost [Required] Itemize the additional cost of your trip not included in this booking. For example, if you are booking airfare, hotel and car, include any conference fees, meals, and incidentals. If you are only booking airfare because the conference hotel rate is lower than the AXO rate, then include hotel costs, conference fees, meals, ground transportation and incidentals. It is required that you also include a total for the estimated additional costs. 9. Trip Number [Required] Enter the 7-digit trip number. The format will be A0xxxxx.
Once this information has been entered – please select Confirm Booking.
10

Reservation Complete!
Finished! Page
Your reservation request has been sent to your department’s designated pre-trip approver.
11

Awaiting Approval Notification Email
You, as well as, your supervisor will receive an email notification from “Cliqbook” / [email protected]. This is a copy of the pending itinerary that is awaiting approval. This itinerary lists all information completed in the Trip Booking Information page at the top of the itinerary.
Approver receives this same information for review. The Approver has two options available to him/her: 1. Reject Trip (process is outlined below) 2. Approve Trip (process is outlined below)
12

Rejection Email Notification
Rejection Email Notification
This is the notification you will receive via email when your trip is rejected by your department’s designated approver. Any comments added by the approver will be visible for you in this email.
13

Once the trip has been rejected there are two options: 1. Resubmit
a. Allows traveler / travel arranger to add notes b. Emails arranger with notes asking for further consideration.
2. Withdraw Request a. Cancels your reservation.
14
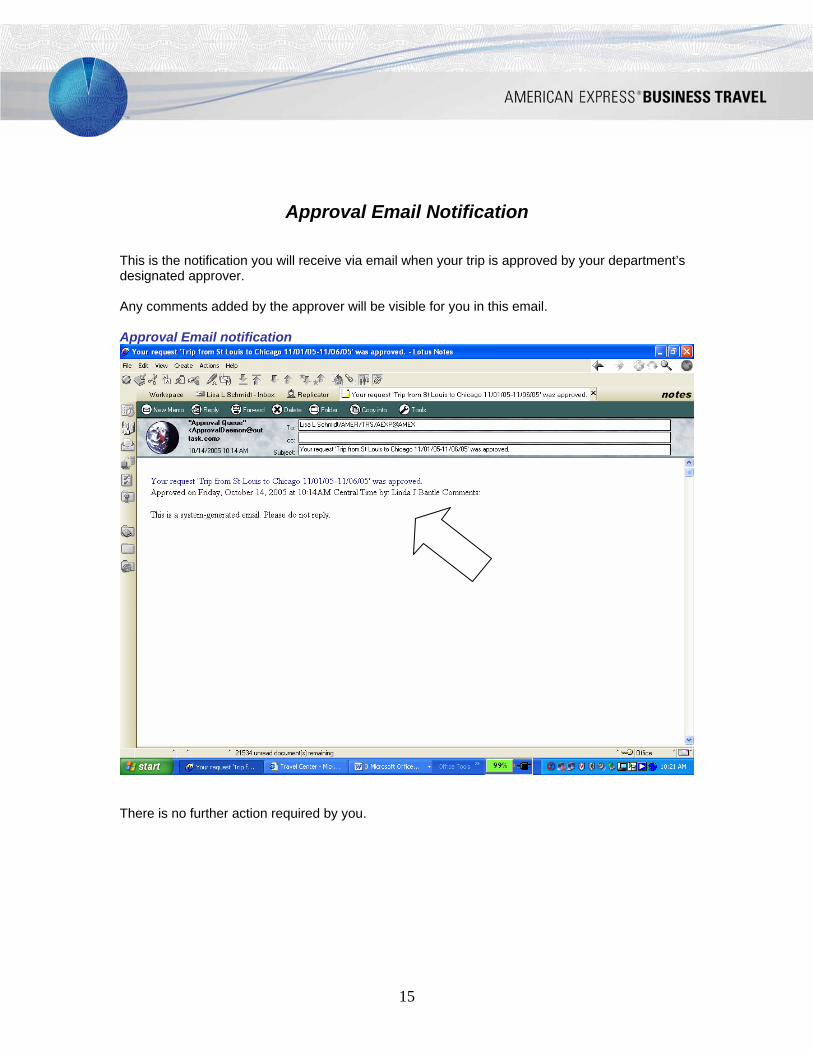
Approval Email Notification This is the notification you will receive via email when your trip is approved by your department’s designated approver. Any comments added by the approver will be visible for you in this email. Approval Email notification
There is no further action required by you.
15

Final Email – Ticket Issued Once approved – the reservation will be automatically sent to the American Express Interactive Travel office and a ticket will be issued. Any changes / cancellations to the trip must be called into the American Express Interactive Travel office at 1-800-955-7497, option 1, then option 2. The AXO system is not configured to allow travelers or travel arrangers to make changes. Changes to airline reservations often result in penalties and additional cost in airfare. As a result, SLU has decided to keep the change functionality with the professional travel counselors. You will receive a final email with your itinerary invoice attached. This is the invoice that must be submitted with your expense report after the trip. The e-mail will also include instructions on accessing the American Express My Travel Plans Website. See below for a sample e-mail, itinerary/invoice and additional information regarding this website.
My Travel Plans Website
My Travel Plans is an American Express product that provides a secure way to transmit traveler's itinerary/invoice data via the Internet. My Travel Plans automatically generates an email to alert the traveler that their itinerary/invoice information is available for viewing via the secure American Express My Travel Plans website www.aeairweb.com. Traveler data on the My Travel Plans website will be maintained for 90 days past the last date of travel and will be available to view in three formats:
• Itinerary view, which contains the travel information only, • Invoice View, which will contains the Invoice Detail, the travel information along with the
ticket number, invoice # and cost information, (needed for airport check in and expense report)
• History view which contains all travel information related to that trip. Added benefits include: • The ability for Travelers to have other individuals view their travel arrangements via the
website • The ability for Travelers to email their itineraries/invoices to another individual • The ability for Travelers to download their information to a palm-held device or electronic
calendar • The ability to view the www.aeairweb.com site from their wireless PDA, Blackberry, or
phone (fee associated) Invoice Detail Once a trip is approved and a ticket is issued, travelers (and arrangers if applicable) will received a separate email from "American Express Business Travel" <[email protected]> indicating the above URL link. With the first trip booked, the email will include a login ID and temporary password. When you login the first time, you will be prompted to create your own unique password. Going forward you can access your invoices/itineraries wherever you have Internet access.
16

17
If you have not saved the email from <[email protected]> with your itinerary/invoice or with your temporary password, follow the steps below to obtain a copy of your official American Express Business Travel Invoice for airport check in and to submit with your Travel Expense Report:
• Access My Travel Plans website at www.aeairweb.com • Click on Forgot Password and follow instructions. The system will send a temporary
password to the indicated email address • Sign on to My Travel Plans with the temporary password and you will be prompted to
create a new password (must be at least seven characters long) • Choose a traveler from list by clicking on View Trips • Click on Invoice for the appropriate trip from list • Click Printable Version and print • Attach to expense report
Sample E-mail From: "American Express Business Travel" <[email protected]>
To: Lisa L Schmidt/AMER/TRS/AEXP@AMEX Subject: Travel invoice for Lisa Schmidt traveling on /14/2006
Note - Please do not reply back to this email message as this email address is used for outbound messages only. You are receiving this email notification to advise you that your travel arrangements have been posted to the American Express My Travel Plans web site. This web site allows you and any other person(s) you have designated to view and print your travel invoice/itinerary 24 hours a day for up to 90 days. Click on the link below to view your trip details: http://www.aeairweb.com/[email protected] For First Time users, you will receive a SECOND email containing your temporary password. You will be prompted to change this password and answer a secret question when you access the site for the first time. *** Travel Tip - Boarding Pass Requirement, U.S. Travel: The Transportation Security Administration (TSA) now requires that ALL passengers obtain a boarding pass before entering secured areas of the Airport. For more information please refer to the TSA website: www.tsa.gov Thank you and have a pleasant trip.
A sample Itinerary Invoice is shown on the next two pages.