muscles and bones: framework and movement · 2005 core knowledge® national conference, muscles and...
TRANSCRIPT
2005 Core Knowledge® National Conference, Muscles and Bones: Framework and Movement, 3rd Grade
1
Muscles and Bones: Framework and Movement Grade Level or Special Area: 3rd Grade Written by: Anita Gimple, Lincoln Academy Charter School, Arvada, Colorado Length of Unit: Nine lessons and culminating activity (10 days, one day = 60 minutes) I. ABSTRACT
This unit is an interactive approach to learning about our muscular and skeletal systems as detailed in the Core Knowledge Sequence. It looks at each system individually and then how they relate to one another.
II. OVERVIEW
A. Concept Objectives 1. Students understand the processes of scientific investigation and design, conduct,
communicate about and evaluate such investigations. (Colorado Science Content Standard 1)
2. Students understand the structures and functions of the skeletal and muscular systems. (adapted from Colorado Science Standard 3.3d)
3. Students understand the characteristics and structures of living things. (adapted from Colorado Science Standard 3)
B. Content from the Core Knowledge Sequence 1. Third Grade Science: The Human Body (p. 81)
a. The Muscular System i. Muscles
a) Involuntary and voluntary muscles b. The Skeletal System
i. Skeletal, bones, marrow ii. Muscular-skeletal connections
a) Ligaments b) Tendons, Achilles tendon c) Cartilage
iii. Skull, cranium iv. Spinal column, vertebrae v. Joints vi. Ribs, rib cage, sternum vii. Scapula (shoulder blades), pelvis, tibia, fibula viii. Broken bones, x-rays
C. Skill Objectives 1. Students will compare and contrast voluntary muscles and involuntary muscles.
(adapted from Jefferson County Standards Science Strand 3.3) 2. Students will seek answers by making careful observations and trying things out.
(Benchmark B, Jefferson County Standards Science Strand 1.1) 3. Students will follow written directions. (Benchmark D, Jefferson County
Standards Science Strand 1.1) 4. Students will use data including observations and experiences to answer a
question. (Benchmark G, Jefferson County Standards Science Strand 1.1) 5. Students will explain procedures or ideas in a variety of ways, such as sketching,
diagramming, labeling, and writing. (Benchmark A, Jefferson County Standards Science Strand 1.2)
6. Students will share findings and results with classmates. (Benchmark C, Jefferson County Standards Science Strand 1.2)
2005 Core Knowledge® National Conference, Muscles and Bones: Framework and Movement, 3rd Grade
2
7. Students will describe the basic food requirements for humans. (adapted from benchmark C, Jefferson County Standards Science Strand 3.3)
8. Students will know and understand the function of their bones and bone marrow. (adapted from Jefferson County Standards Science Strand 3.3)
9. Students will know and understand the function of ligaments, cartilage, and tendons.
10. Students will know and understand the function of their skull and cranium. 11. Students will know and understand the function of their spinal column and
vertebrae. 12. Students will know and understand the function of their joints and how the
different kinds of joints move. 13. Students will know and understand the function of their rib cage. 14. Students will know the location of their ribs and sternum. 15. Students will know the location of their scapula, pelvis, tibia and fibula. 16. Students will know how bones heal and what x-rays are.
III. BACKGROUND KNOWLEDGE
A. For Teachers 1. Muscles: Our Muscular System, by Seymour Simons 2. The Big Book of Bones, by Claire Llewellyn 3. Kids Discover Bones, edited by Stella Sands
B. For Students 1. Grade K: Science: Human Body (page 19), Core Knowledge Sequence 2. Grade 1: Science: Body Systems (page 38), Core Knowledge Sequence 3. Grade 2: Science: Cells (page 60), Core Knowledge Sequence
IV. RESOURCES A. Bones, by Seymour Simons (Lessons Two through Nine) B. The Incredible Human Body, by Esther Weiner (Lessons One – Seven) C. You Can’t See Your Bones with Binoculars, by Harriet Ziefert (Lesson Eight)
V. LESSONS
Lesson One: Your Mighty Muscles (60 minutes) A. Daily Objectives
1. Concept Objective(s) a. Students understand the processes of scientific investigation and design,
conduct, communicate about and evaluate such investigations. b. Students understand the structures and functions of the skeletal and
muscular systems. c. Students understand the characteristics and structures of living things.
2. Lesson Content a. The Muscular System
i. Muscles a) Involuntary and voluntary muscles
3. Skill Objective(s) a. Students will compare and contrast voluntary muscles and involuntary
muscles. b. Students will seek answers by making careful observations and trying
things out. B. Materials
1. The Incredible Human Body, by Esther Weiner
2005 Core Knowledge® National Conference, Muscles and Bones: Framework and Movement, 3rd Grade
3
2. Pages 59-60 of The Incredible Human Body copied for each student 3. Appendix A: The Mighty Muscle (one per student) 4. Scissors and colored pencils for making Close-up book
C. Key Vocabulary 1. Voluntary muscles – muscles that we can control the movement of 2. Skeletal muscles – the same as voluntary muscles; they attach to the bones and
allow the voluntary movement of limbs 3. Involuntary muscles – muscles that we do not control 4. Cardiac muscle – a special involuntary muscle that controls the powerful walls of
the heart D. Procedures/Activities
1. Ask your students to tell you what they know about the muscles in their body. Allow a few students to share what they already know.
2. Introduce the main ideas about muscles. Let them know that whenever they run, walk or play, muscles are moving their body. There are more than 650 muscles in their body. Muscles make up 40% of your weight whereas fat only makes up 10%. There are muscles in your ears that are as tiny as a thread. Your hamstring in the back of your leg is thick and wide. When you eat meat you are eating the muscle of that animal.
3. Ask for students to predict which muscle they think is the largest in their body. After several volunteers, let them know that it is the gluteus maximus. This is the muscle that you sit on and that helps hold you up at the hip area.
4. Tell students that there are two major types of muscles – voluntary and involuntary.
5. Explain that voluntary muscles are those that you can tighten on your own. 6. Have students flex their bicep of one arm and feel it with the other hand. The
muscle bulges as it shortens, or contracts. Most muscles work in teams. On the back of your arms you have triceps that work to move your arm in the other direction. Let students experiment with their own arm muscles for a few minutes.
7. Explain that there are also involuntary muscles that are automatic and we do not have to think about. We depend on these muscles and they work whether we are asleep or awake. Examples of these are the stomach, intestine and esophagus. These muscles control respiration, circulation and digestion. Furthermore, this kind of muscle controls your eyes blinking.
8. Explain that the heart is a special kind of involuntary muscle. It is a very powerful muscle that never tires out even though it beats an average of 70 times per minute.
9. Pass out Appendix A: The Mighty Muscle. 10. Explain directions and give students a few minutes to complete. 11. Discuss their answers and clear up any confusion that students may have had.
Have students make corrections in a colored pen. 12. Have students try to roll their tongue. Explain that the tongue is a group of
muscles. 13. Have students say “Oh” or pretend they are sucking on a straw. Explain that a
round or sphincter muscle surrounds their mouth. 14. Hand out the copies of the Close-up book Muscles Move You! Have students
make the book according to the directions on page 6 (The Incredible Human Body, E. Weiner.).
15. Read close-up book together as a class. As you read have them use colored pencils to color the specific areas that you are trying to emphasize. On both page
2005 Core Knowledge® National Conference, Muscles and Bones: Framework and Movement, 3rd Grade
4
two and the flap, use blue to color the biceps and orange to color the triceps. On page three have them color the smooth, stomach muscle yellow. On the flap of page three, have them color the smooth muscle yellow (corresponds to the stomach) and the skeletal muscle both orange and blue (triceps and biceps). As you read the back page about the cardiac muscle, have them color it red.
16. Have students take the book home as a review tool. E. Assessment/Evaluation
1. Collect Appendix A: The Mighty Muscle that was done in steps 9 -11. Review to determine the level of mastery achieved.
2. Proper completion of close-up book. 3. Questions on voluntary, involuntary and cardiac muscles on the unit test
Lesson Two: A Bone’s Story (60 minutes) A. Daily Objectives
1. Concept Objective(s) a. Students understand the processes of scientific investigation and design,
conduct, communicate about and evaluate such investigations. b. Students understand the structures and functions of the skeletal and
muscular systems. c. Students understand the characteristics and structures of living things.
2. Lesson Content a. The Skeletal System
i. Skeletal, bones, marrow 3. Skill Objective(s)
a. Students will seek answers by making careful observations and trying things out.
b. Students will follow written directions. c. Students will use data including observations and experiences to answer
a question. d. Students will explain procedures or ideas in a variety of ways, such as
sketching, diagramming, labeling, and writing. e. Students will share findings and results with classmates. f. Students will describe the basic food requirements for humans. g. Students will know and understand the function of their bones and bone
marrow. B. Materials
1. Bones, by Seymour Simon. 2. The Incredible Human Body, by Esther Weiner 3. Pages 47-48 and 50 of The Incredible Human Body copied for each student 4. Scissors and colored pencils for making Close-up book 5. One index card per student 6. Tape
C. Key Vocabulary 1. Marrow – soft jelly-like material that fills the inside of bones; one type makes red
blood cells 2. Compact bone – the hard outer part of the bone 3. Spongy bone – the inner part of the bone
D. Procedures/Activities 1. Review concepts and vocabulary from yesterday’s lesson. 2. Have students give you an example of both a voluntary muscle and an
involuntary muscle.
2005 Core Knowledge® National Conference, Muscles and Bones: Framework and Movement, 3rd Grade
5
3. Explain to students that today they will learn about the skeleton. The skeleton provides the framework for the muscles.
4. Read the first three text pages of Bones, by Seymour Simon. 5. Hand out Bones in Shape worksheet (page 50, The Incredible Human Body, by E.
Weiner). 6. Hand out index cards and make sure students know where to get tape and books.
Have them work in pairs to complete the experiment. 7. Pull class back together and let them share their results. 8. Have one student explain in their own words what they did in the experiment. 9. Have another student explain what resulted from them putting the books on top
of the different shaped index cards. 10. Ask them to discuss why our bones are the shape that they are. 11. Discuss with students that your bones are living things. We know this because
they make blood, heal and grow. To keep our bones healthy we need calcium, phosphorus and vitamin D to stay healthy. You get calcium from dairy products. Phosphorus is found in beans, milk and meat. You can get your vitamin D by being out in the sun or eating fish.
12. Hand out the copies of the Close-up book A Bone’s Story. Have students make the book according to the directions on page 6 (The Incredible Human Body, by E. Weiner).
13. Read close-up book together as a class. As you read have them use colored pencils to color the specific areas that you are trying to emphasize. Tell them to leave the bone on the cover white. Turn the first flap: have them leave the compact bone white, color the spongy bone a light yellow, color the bone marrow pink and the blood vessels red. On page two let them choose what color to color the blob and have them leave the skeleton white. On page 3 have them color the skull orange and the ribs brown. Now open the flap, point out the protected organs and color them as follows: brain, gray; heart, red; and lungs, pink. On the back cover let them color as they choose.
14. Have students take the book home as a review tool. 15. Send home Appendix B: Your Bones as a homework assignment.
E. Assessment/Evaluation 1. Proper completion of the close-up book. 2. Completion of “Bone in Shape” experiment 3. Questions on compact bone, spongy bone and bone marrow on the unit test 4. Appendix B: Your Bones – evaluate to check if they can identify the three parts
of the bone and their definitions.
Lesson Three: Let’s Make a Connection (60 minutes) A. Daily Objectives
1. Concept Objective(s) a. Students understand the processes of scientific investigation and design,
conduct, communicate about and evaluate such investigations. b. Students understand the structures and functions of the skeletal and
muscular systems. c. Students understand the characteristics and structures of living things.
2. Lesson Content a. The Skeletal System
i. Muscular-skeletal connections a) Ligaments b) Tendons, Achilles tendon
2005 Core Knowledge® National Conference, Muscles and Bones: Framework and Movement, 3rd Grade
6
c) Cartilage 3. Skill Objective(s)
a. Students will seek answers by making careful observations and trying things out.
b. Students will follow written directions. c. Use data including observations and experiences to answer a question. d. Share findings and results with classmates. e. Students will know and understand the function of ligaments, cartilage,
and tendons. B. Materials
1. Petroleum jelly 2. Pencils with erasers 3. Bones, by Seymour Simons
C. Key Vocabulary 1. Ligament – a fibrous connective tissue that binds bones or cartilage together 2. Tendon – a tough, fibrous connective tissue that connects muscles to bones 3. Cartilage – a tough, but elastic, connective tissue that cushions joints against
shock 4. Friction – the resistance of an object to what it is traveling on or through
D. Procedures/Activities 1. Go over any questions on the homework from Lesson Two. 2. Ask questions to review the terms learned yesterday. 3. Have someone explain what they learned from yesterday’s experiment. 4. Explain to students that our muscles pull on our bones to make us move. In order
to do that the muscles have to be connected to the bones. A tendon is what makes that connection. A tendon is a cord made of tough, white tissue that attaches muscles to bones. Without tendons you would not be able to move. The force with which muscles pull on tendons in enormous, yet the tendons do not tear.
5. Explain about the Achilles tendon that is located in the back of your ankle. The Achilles tendon is the largest tendon in your body. This tendon connects your calf muscles with your heel bones.
6. In Greek Mythology, the greatest warrior in the Trojan War was Achilles. When he was a baby, his mother wanted to make him live forever by bathing him in a magical river of Styx. His mother held him by his heel as she dipped him in the river. This heel never touched the water and this left him vulnerable in that heel. During the Trojan War, he fought bravely but he was wounded in the heel by an arrow and died. That is why we used the expression Achilles’ heel to mean a point of vulnerability.
7. Have every student find their Achilles tendon. 8. Ask a student to explain what our tendons do and why we need them. 9. Ask a student to give an example of how one might use the expression “Achilles’
heel.” 10. Tendons connect our muscles to our bones, but we need something that connects
bones to other bones. Ligaments connect bone to bone. Ligaments also can connect cartilage.
11. An example of where this is needed is in our knees and elbows. Have students feel their knees and see if they can tell how the bones come together.
12. Ask a student to tell you the difference between tendons and ligaments. 13. Have students get in groups of two. Make sure each student has a pencil with an
eraser. Have student one dip their eraser in petroleum jelly. Student two will not
2005 Core Knowledge® National Conference, Muscles and Bones: Framework and Movement, 3rd Grade
7
dip their pencil. Have each student rub their pencil vigorously against the top of the desk. Have them compare what happened to the two erasers. The eraser without the jelly will start to fall apart and will be used up. Friction or the resistance of the eraser against the desk is what caused the eraser to fall apart. The one with petroleum jelly is protected.
14. Ask someone to predict how the pencil experiment might apply to bones in our body. If they need to be led at all, ask them to think about two bones rubbing together.
15. Ask them why we do not want friction between our bones. 16. Discuss that our bones need something to cushion them against one another.
Cartilage is what cushions our bones. Cartilage is soft tissue found at the ends of bones. It is slippery and allows bones to move against one another without causing any damage.
17. Have a student predict what would happen if we did not have cartilage. 18. Have them touch the top portion of their ears and tell them that there is cartilage
in there also. Ask them to think and then predict where else on their head there is cartilage. Have them touch the end of their nose to feel the cartilage.
19. Read the fifth text page of Bones, by Seymour Simon. 20. Hand out Appendix C: Making the Connection. 21. Have students work in pairs to complete worksheet. 22. Bring class back together and ask if there are any questions from the worksheet. 23. Collect worksheet for a completion grade. 24. Ask students to discuss the function of ligaments, tendons and cartilage.
E. Assessment/Evaluation 1. Teacher observation of proper completion of the worksheet 2. Completion of pencil experiment 3. Questions on ligaments, tendons and cartilage on the unit test 4. Appendix C: Making the Connection .
Lesson Four: The Skull (60 minutes) A. Daily Objectives
1. Concept Objective(s) a. Students understand the processes of scientific investigation and design,
conduct, communicate about and evaluate such investigations. b. Students understand the structures and functions of the skeletal and
muscular systems. c. Students understand the characteristics and structures of living things.
2. Lesson Content a. The Skeletal System
i. Skull, cranium 3. Skill Objective(s)
a. Students will seek answers by making careful observations and trying things out.
b. Students will follow written directions. c. Use data including observations and experiences to answer a question. d. Explain procedures or ideas in a variety of ways, such as sketching,
diagramming, labeling, and writing. e. Share findings and results with classmates. f. Students will know and understand the function of their skull and
cranium.
2005 Core Knowledge® National Conference, Muscles and Bones: Framework and Movement, 3rd Grade
8
B. Materials 1. Bones, by Seymour Simon 2. The Incredible Human Body, by Esther Weiner 3. Page 55 of The Incredible Human Body copied for each student 4. Two small balls of clay for each set of partners 5. Plastic sandwich bags 6. A small bowl for each set of partners 7. Appendix D: Your Head Bones (one per student) 8. Two hard boiled eggs 9. Two small toy pick-up trucks 10. Tape and newspapers
C. Key Vocabulary 1. Skull – the bony case that protects the brain, eyes and ears 2. Cranium – the part of the skull that protects the brain 3. Fontanel – the openings in the cranium in an infant
D. Procedures/Activities 1. Divide students into partners. 2. Pass out copies of page 55 of The Incredible Human Body. 3. Pass out two small balls of clay, two plastic sandwich bags, and one small bowl
to each set of partners. 4. Have the students complete the “A Hard Noggin” worksheet as they experiment
with the clay. 5. Bring class back together and discuss worksheet. Discuss the role that a helmet
plays in protecting our brain. 6. Set up the Health and Safety extension on page 46 in The Incredible Human
Body, by Esther Weiner. 7. Perform the safety demonstration at the bottom of page 46. Now let them discuss
what they have learned about using helmets and seat belts. 8. Read the sixth text page of Bones, by Seymour Simon 9. Tell students that even though the skull looks like one bone, it is actually 28
different bones. The cranium, which is the top part of your skull, is made up of eight bones. The cranium is the chief protector of your brain. There are 14 bones in your face, and each ear has three tiny bones. You can make all kinds of expressive faces because of the incredible mobility all those bones give your face.
10. Have students tap gently on their head. Tell them that it sounds hollow because it is a bony box and its hard walls are protecting the brain from hard knocks and blows.
11. Ask students to identify the four senses that are housed in the skull (hearing, smell, sight and taste).
12. Have students move their jaw and point out their jawbone to them. 13. Ask students what their nose is made out of (cartilage). Let them know that
when they look at a skull they will see a hole where the nose was. They will also see holes for the eyes and ears.
14. Explain to students that when a baby is first born there are gaps, fontanels, in six places between the cranial bones. There is a tough membrane covering these areas in infants. These fontanels, or soft spots, allow the baby to squeeze through the birth canal. They also help as the baby’s brain is tripling in size the first few years of their life. By around two years of age these openings are closed up.
15. Draw a picture on the board to show that a baby’s skull is ¼ of their skeleton length while an adult’s is only 1/8 of their mature skeleton.
2005 Core Knowledge® National Conference, Muscles and Bones: Framework and Movement, 3rd Grade
9
16. Tell students that scientists study skeletons from people who lived and died a long time ago. Scientists have found skulls that are thousands of years old. Some of these skulls have unusual holes in them. Scientists have found that these holes were made while the people were still alive. They know this because they have found scar tissue around the holes where some of the people healed. Remind students that bones are alive and heal. Scientists believe that surgery was done back then. These surgeries may have been done for headaches, tremors, or mental conditions. This was widely done on men, women and children.
17. Pass out Appendix D: Your Head Bones to each student. Have them use the word bank and label the diagram.
18. Have students turn in Appendix D: Your Head Bones. 19. Wrap up by reviewing all vocabulary learned so far in this unit.
E. Assessment/Evaluation 1. Appendix D: Your Head Bones 2. Teacher review of proper completion of the worksheet 3. Completion of Hard Noggin experiment 4. Questions on the skull and cranium on the unit test
Lesson Five: Up and Down Your Spine (60 minutes) A. Daily Objectives
1. Concept Objective(s) a. Students understand the processes of scientific investigation and design,
conduct, communicate about and evaluate such investigations. b. Students understand the structures and functions of the skeletal and
muscular systems. c. Students understand the characteristics and structures of living things.
2. Lesson Content a. The Skeletal System
i. Spinal column, vertebrae 3. Skill Objective(s)
a. Students will seek answers by making careful observations and trying things out.
b. Students will follow written directions. c. Students will use data including observations and experiences to answer
a question. d. Students will explain procedures or ideas in a variety of ways, such as
sketching, diagramming, labeling, and writing. e. Students will share findings and results with classmates. f. Students will know and understand the function of their spinal column
and vertebrae. B. Materials
1. Bones, by Seymour Simon 2. The Incredible Human Body, by Esther Weiner 3. Page 54 of The Incredible Human Body copied for each student 4. Index cards 5. Yarn, tape and scissors 6. Appendix E copied and prepared for play 7. Markers to play The Body Game
C. Key Vocabulary 1. Spinal column – the flexible chain of bones in your back
2005 Core Knowledge® National Conference, Muscles and Bones: Framework and Movement, 3rd Grade
10
2. Vertebrae – the 24 bones that are stacked up to make up your spinal column D. Procedures/Activities
1. Read text pages seven and eight in Bones, by Seymour Simon. 2. Explain to the students that your backbone, or spine, supports your body. There
are 24 vertebrae that make up three sections - the neck, chest and back. There are seven vertebrae that are in the neck. These support your neck and allow you to look up, down and turn to each side.
3. In Greek mythology, Atlas, a Titan known for his strength, was defeated by Zeus. He was condemned to support the earth on his shoulders for all eternity. The top bone in your neck that holds up your head is called the atlas after this story.
4. Ask students to identify the two parts of their body that we have learned about that are named after a Greek story. (Achilles tendon and atlas vertebrae)
5. The next 12 vertebrae make up the chest section. Each of these vertebrae is connected to a pair of ribs.
6. Following this there are five vertebrae that make up the back section. These are the largest vertebrae that support the most weight.
7. Below those vertebras are two more groups that are fused, or grown together, to make up the area of your tailbone.
8. Ask a student to tell you where the smallest vertebrae are. 9. Ask a student to explain why the larger vertebrae are in your back section. 10. Ask students what would be connecting the vertebrae to each other in your spinal
column (ligaments – bone to bone). 11. Tell students that below each of the vertebrae there is a cushion of cartilage. Ask
students what the function of this cartilage would be. 12. Hand out the copies of page 54 – Celebrate Vertebrates! 13. Have students complete the experiment and worksheet individually. 14. Have students share with the class what they have learned. 15. Play The Body Game as a review tool of the unit so far (Appendix E -use only
the terms from the unit through this lesson). E. Assessment/Evaluation
1. Proper completion of the worksheet activity 2. Sharing time from Celebrate Vertebrates! worksheet 3. Questions on spinal column and vertebrae on the unit test 4. Participation in The Body Game
Lesson Six: Join it Together (60 minutes) A. Daily Objectives
1. Concept Objective(s) a. Students understand the processes of scientific investigation and design,
conduct, communicate about and evaluate such investigations. b. Students understand the structures and functions of the skeletal and
muscular systems c. Students understand the characteristics and structures of living things.
2. Lesson Content a. The Skeletal System
i. Joints 3. Skill Objective(s)
a. Students will seek answers by making careful observations and trying things out.
b. Students will follow written directions.
2005 Core Knowledge® National Conference, Muscles and Bones: Framework and Movement, 3rd Grade
11
c. Students will use data including observations and experiences to answer a question.
d. Students will share findings and results with classmates. e. Students will know and understand the function of their joints and how
the different kinds of joints move. B. Materials
1. Bones, by Seymour Simon 2. The Incredible Human Body, by Esther Weiner 3. Page 52 of The Incredible Human Body copied for each student 4. Two popsicle sticks per student 5. Tape
C. Key Vocabulary 1. Joint – places where bones meet and fit together 2. Fixed joint – a joint that does not move 3. Sliding or gliding joints – one in which two bones that can move separately meet 4. Hinge joint – this joint lets bones swing fully in one direction (up and down, but
not side to side) 5. Ball-and-socket joint – this is the most flexible joint allowing movement in
many directions 6. Pivot joint – one bone twists around another joint, allowing it to rotate or turn
from side to side D. Procedures/Activities
1. Read the fourth text page of Bones, by Seymour Simon. 2. We have over 200 joints in our body. There are 56 joints in each hand. Each
joint allows your skeleton the kind of movement needed to keep our bodies in action.
3. Hand out the worksheet, Go on a Joint Hunt!, to each student. 4. Hand out popsicle sticks and make tape available to complete worksheet activity. 5. Have students work independently or in groups to explore the worksheet
activities. 6. Bring class back together and let them share with each other what they
discovered. Tell them that you are not going to collect the worksheet, but as you explain about joints they can record the different kinds of joints on the back of the paper.
7. Tell students that there are joints, or places that bones come together in our body, that do not move. Ask kids to think of a place that we have already learned about where bones have grown together. (Hint: think of a baby) Explain that we have fixed joints where the bones of our skull come together.
8. Explain that they have joints where they are allowed movement only in one direction. Have them picture a hinge of a door and let them predict where there are hinge joints in their bodies. The elbow and knee are examples of hinge joints. They allow for movement up and down but not side to side.
9. We also have joints that allow the bones to swing in almost any direction. Let them think for a few minutes and predict where those joints might be. The ball-shaped end of the upper arm bones fits into the end of the shoulder bone. This is a ball and socket joint. Your hip is also this kind of joint. This joint allows the greatest motion of any joint.
10. A pivot joint is where one bone rests and rotates from a specific point. The top two vertebrae let your skull pivot from side to side and up and down. Have kids shake their head “no” and then “yes”.
2005 Core Knowledge® National Conference, Muscles and Bones: Framework and Movement, 3rd Grade
12
11. Explain that their wrist and ankle are sliding or gliding joints. This is a joint where two bones that move separately meet and slide over one another. The spine would also be an example of this.
12. Have students get in pairs and quiz each other on where different types of joints are. Have one student move a joint and the other identify the type it is, then reverse roles.
13. Ask students to identify a type of joint as you move a joint on your body. 14. Re-read text pages through to the page on spines in Bones, by Seymour Simon as
a review of the unit so far. E. Assessment/Evaluation
1. Proper completion of the worksheet activity 2. Participation in discussion and predicting about where certain types of joints are 3. Questions on joints on the unit test
Lesson Seven: Suit of Honor (60 minutes) A. Daily Objectives
1. Concept Objective(s) a. Students understand the processes of scientific investigation and design,
conduct, communicate about and evaluate such investigations. b. Students understand the structures and functions of the skeletal and
muscular systems. c. Students understand the characteristics and structures of living things.
2. Lesson Content a. The Skeletal System
i. Ribs, rib cage, sternum 3. Skill Objective(s)
a. Students will seek answers by making careful observations and trying things out.
b. Students will follow written directions. c. Students will use data including observations and experiences to answer
a question. d. Students will explain procedures or ideas in a variety of ways, such as
sketching, diagramming, labeling, and writing. e. Students will share findings and results with classmates. f. Students will know and understand the function of their rib cage. g. Students will know the location of their ribs and sternum.
B. Materials 1. Bones, by Seymour Simon 2. The Incredible Human Body, by Esther Weiner 3. A copy of Appendix F: Your Suit of Honor for each student 4. Colored pencils 5. Copy of Appendix F made into an overhead 6. Overhead pens 7. Appendix G: Rubric copied to grade each students paragraph
C. Key Vocabulary 1. Ribs – long, thin bones that connect to the vertebrae 2. Rib cage – 12 pairs of ribs that protect the organs in the chest 3. Sternum – also called the breastbone, it protects the center of the chest and the
first seven pairs of ribs connect to it
2005 Core Knowledge® National Conference, Muscles and Bones: Framework and Movement, 3rd Grade
13
D. Procedures/Activities 1. Read the text page on ribs in Bones, by Seymour Simon and show the colorful
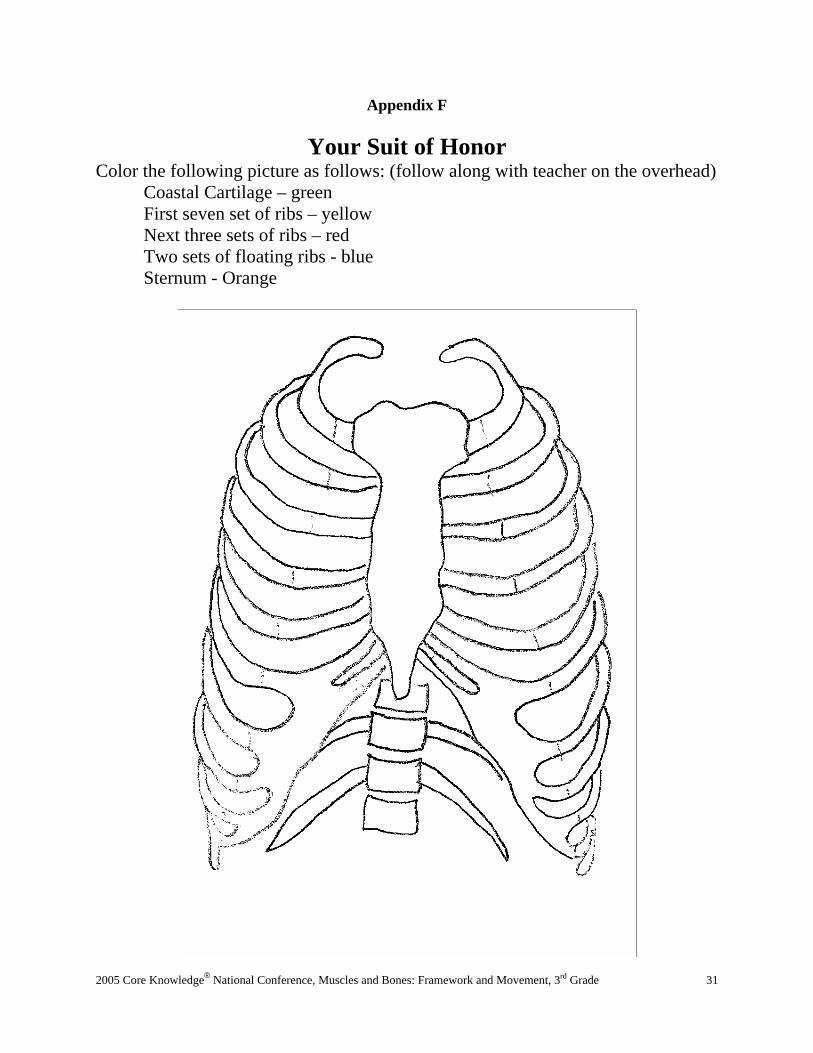
picture of the rib cage. 2. Pass out the copies of Appendix F: Your Suit of Honor. 3. Turn on overhead and put on a copy of Appendix F. 4. Explain to students that just like your brain is protected by a helmet of bone, your
heart and lungs also need protection. 5. Ask students if they want to predict what protects our heart and lungs. 6. We have a bony framework made up of twelve pairs or ribs that protect our vital
organs in our chest. The skull is a solid case that protects our brain. We need a different design to protect the organs in our chest. Your chest cavity needs to be able to expand and contract when you breathe. The ribs form a cage of bones that has space between them.
7. Explain that the ribs come in pairs, one on each side. There are 24 ribs all together and they are arranged in 12 pairs.
8. Have the students try to feel and count their ribs. 9. Have students feel down the center of their chest. Explain that the bone running
down the center is called the sternum. Have them locate the sternum on their worksheet and color it orange. Point the sternum out and color it on the overhead. Tell them that the sternum also helps protect the heart and lungs.
10. Each of the ribs is attached to your spinal column in your back. In the front, only the first seven pairs of ribs attach to the sternum.
11. Explain to the students that the ribs attach to the sternum by cartilage. This helps in the movement of our chest. Also, the cartilage also serves as a shock absorber here. If you bump your chest the joints allow the ribs to move slightly, absorbing the shock and preventing injury to the internal organs inside.
12. Have students follow your example and color the cartilage green. 13. Have students color the first seven pairs of ribs yellow. Point this out and color
them on the overhead. 14. Explain that the next three pairs of ribs attach to the other ribs by cartilage.
Color the next three pairs of ribs red. 15. Following this there are two pairs of ribs that do not attach to the sternum. These
are called floating ribs and are attached only to your vertebrae. 16. Have students color the floating ribs blue. 17. Give students a few minutes to finish. Circulate around the room and visually
check on their progress. 18. Explain that there are muscles that move your ribs and give room for your lungs
to expand. Ask students what kinds of muscles are responsible for our breathing (involuntary).
19. Review types of joints from Lesson Six. 20. Ask students to point to their sternum. 21. Ask what the purpose of our rib cage is. 22. Ask students to write you a paragraph comparing and contrasting the skull and
the rib cage and how they provide protection. E. Assessment/Evaluation
1. Proper completion of the worksheet coloring activity 2. Questions on ribs, rib cage and sternum on the unit test 3. Compare and contrast paragraph graded according to Appendix G rubric
2005 Core Knowledge® National Conference, Muscles and Bones: Framework and Movement, 3rd Grade
14
Lesson Eight: Boning Up on Bones (60 minutes) A. Daily Objectives
1. Concept Objective(s) a. Students understand the processes of scientific investigation and design,
conduct, communicate about and evaluate such investigations. b. Students understand the structures and functions of the skeletal and
muscular systems. c. Students understand the characteristics and structures of living things.
2. Lesson Content a. The Skeletal System
i. Scapula (shoulder blades), pelvis, tibia, fibula 3. Skill Objective(s)
a. Students will seek answers by making careful observations and trying things out.
b. Students will follow written directions. c. Students will use data including observations and experiences to answer
a question. d. Students will explain procedures or ideas in a variety of ways, such as
sketching, diagramming, labeling, and writing. e. Students will share findings and results with classmates. f. Students will know the location of their scapula, pelvis, tibia and fibula.
B. Materials 1. Bones, by Seymour Simon 2. A copy of Appendix H for each student 3. A copy of Appendix I for each student 4. An overhead made from Appendix I 5. You Can’t See Your Bones with Binoculars, by Harriet Ziefert 6. Colored pencils
C. Key Vocabulary 1. Scapula – a large, flat, triangular bone also known as the shoulder blade 2. Pelvis – the basin-shaped structure that sticks out to form our hips and curves
around to the lower back 3. Tibia – the shin bone at the front of your lower leg 4. Fibula – the thinner bone running alongside the tibia
D. Procedures/Activities 1. Read the tenth and eleventh text pages of Bones, by Seymour Simons. 2. Hand out Appendix I: Boning Up on Bones to each student. 3. Put on overhead of Appendix I. 4. Ask students to predict which joint is the most flexible joint in the body. Give
them the hints that you use it to hang in a tree, throw a ball and hug your dog (shoulder).
5. The shoulder joint is the only joint that can revolve in a complete circle. The shoulder joins three bones, the collarbone, the upper arm bone and the shoulder blade. The name for the shoulder blade is scapula.
6. Point out the scapula on the overhead and have the kids color it blue. 7. Ask students to tell you what kind of joint attaches the arms to the shoulders (ball
and socket). 8. Have students place their hands on their hips and feel the hard ridge that curves
around to their lower back. This is the pelvis. The word pelvis means “basin” in Latin. The pelvis cradles the soft organs of your lower abdomen and protects them.
2005 Core Knowledge® National Conference, Muscles and Bones: Framework and Movement, 3rd Grade
15
9. Ask students to identify what bone protects their brain (skull). 10. Ask students to identify what bones protect their heart and lungs (ribs and
sternum). 11. Ask kids to identify what bone protects their lower abdominal organs (pelvis). 12. Point out the scapula on the overhead and have the students color it orange. 13. Ask students to review what kind of joint the hip is (ball and socket). 14. Have students feel the bone in the top of their leg. Tell students that this bone is
the strongest, longest and heaviest bone in your body. 15. Have the students feel the bone in the bottom of their leg that is on the front.
This is the bone that hurts so much if you get kicked in it. This is called the tibia, but we often call it the shinbone.
16. Point the tibia out on the overhead and have the students color it yellow. 17. Have students feel the side of their lower leg where their little toe is. Tell them
that this bone is much smaller and harder to feel as it is deeper in the muscle. This bone is called the fibula.
18. Point out the fibula on the overhead and have students color it purple. 19. Let students get in groups of two or three and take turns pointing to the bones on
the overhead and having the others identify it. 20. Pass out Appendix H to each student and have them fill in the blanks as a quiz. 21. Collect quiz. 22. As a review, read You Can’t See Your Bones with Binoculars, by Harriet Ziefert.
E. Assessment/Evaluation 1. Proper completion of the worksheet activity 2. Questions on scapula, pelvis, tibia and fibula on the unit test 3. Review questions spread throughout lesson 4. Boning Up on Bones Quiz (Appendix H)
Lesson Nine: Breaking and Healing (60 minutes) A. Daily Objectives
1. Concept Objective(s) a. Students understand the processes of scientific investigation and design,
conduct, communicate about and evaluate such investigations. b. Students understand the structures and functions of the skeletal and
muscular systems. c. Students understand the characteristics and structures of living things.
2. Lesson Content a. The Skeletal System
i. Broken bones, x-rays 3. Skill Objective(s)
a. Students will know how bones heal and what x-rays are B. Materials
1. Bones, by Seymour Simon C. Key Vocabulary
1. X-rays – a special picture done with x-rays (special wavelengths of light) that can see through muscle but not bone
2. Fracture – a break in a bone D. Procedures/Activities
1. Read the last three text pages of Bones, by Seymour Simon. 2. Ask students how many have ever broken a bone. Show this as a fraction of the
class on the board. Also, show the fraction of those who have not broken a bone. Show them how these two fractions add together to make one (the whole class).
2005 Core Knowledge® National Conference, Muscles and Bones: Framework and Movement, 3rd Grade
16
3. Tell students that bones are very strong, but that sometimes they do break. A break is called a fracture. There are two kinds of breaks; a compound fracture sticks through the skin, a simple fracture does not.
4. Explain that an x-ray is done to see if there is a fracture in the bone. An x-ray is a picture done with special rays of light that see through your muscle but not your bones. This way a doctor can look at your bones.
5. Explain that a broken bone does all, or most, of the healing on its own. First, a clot of blood in formed at the location of the break. Then fiber cells grow from one side of the break to the other to join the broken edges. After that, new bone cells start to grow between the fibers until the break is all filled in.
6. Explain that doctors help by putting a cast or splint on to keep the bone in place until it heals. Sometimes, a doctor also will have to put a pin in to hold the pieces of bone together.
7. Have a student explain the process of the bone healing in their own words. 8. Play The Body Game as a review tool of the second half of the unit (Appendix J-
Lessons Six through Nine). 9. Play The Body Game again using two cards and all the caller cards from the unit
(Appendix E). E. Assessment/Evaluation
1. Questions on x-rays and the healing process of bones on the unit test 2. Proper answers when playing The Body Game
VI. CULMINATING ACTIVITY
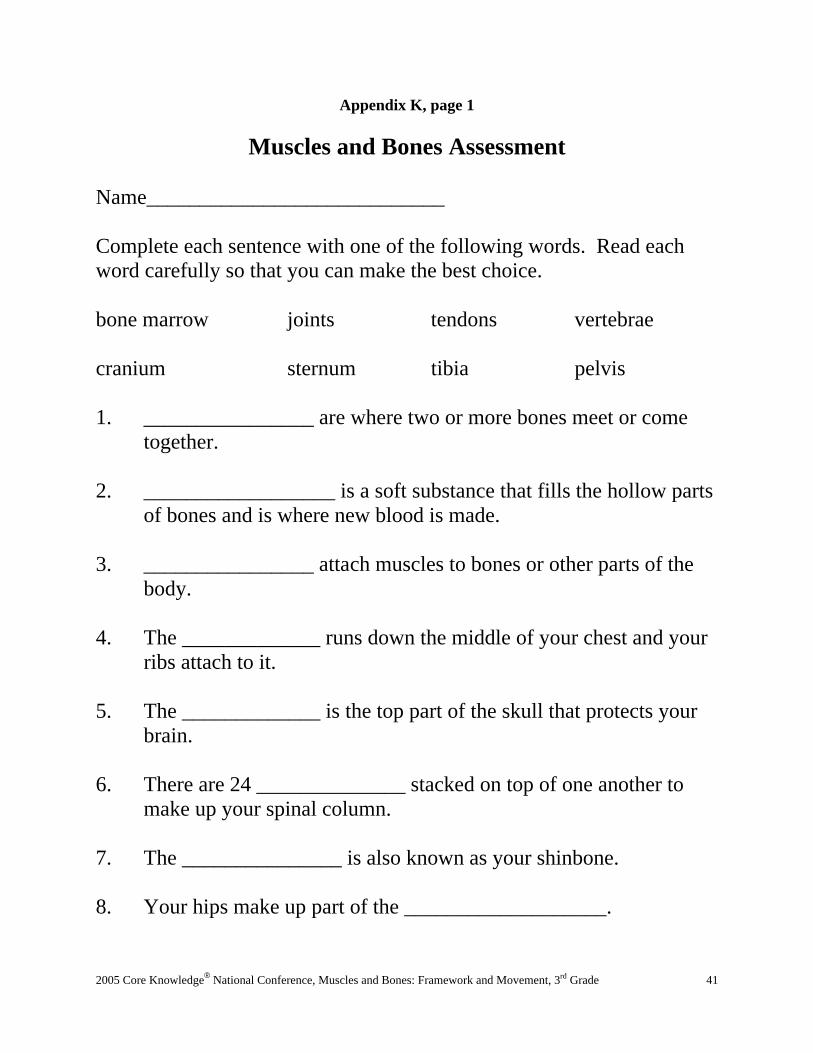
A. Muscles and Bones Unit Assessment, Appendix K
VII. HANDOUTS/WORKSHEETS A. Appendix A: The Mighty Muscle B. Appendix A-1: The Mighty Muscle Answer Key C. Appendix B: Your Bones D. Appendix B-1: Your Bones Answer Key E. Appendix C: Making the Connection F. Appendix C-1: Making the Connection Answer Key G. Appendix D: Your Head Bones H. Appendix D-1: Your Head Bones Answer Key I. Appendix E: The Body Game (Lessons One – Five) J. Appendix F: Your Suit of Honor K. Appendix F-1: Your Suite of Honor Answer Key L. Appendix G: Rubric for compare and contrast paragraph M. Appendix H: Boning Up on Bones Quiz N. Appendix H-1: Boning Up on Bones Quiz Answer Key O. Appendix I: Bones Worksheet P. Appendix I-1: Bones Worksheet Q. Appendix J: The Body Game (Lessons Six – Nine) R. Appendix K: Muscles and Bones Unit Assessment S. Appendix K-1: Muscles and Bones Unit Assessment Answer Key
VIII. BIBLIOGRAPHY
A. Allison, L. Blood and Guts. Boston. Little Brown and Company, 1976. 0-316-03442-8. B. Avila, V. How Our Muscles Work. New York. Chelsea House Publishers, 1995. 0-
7910-3150-0. C. Cumbaa, S. The Bones Book. New York. Workman Publishing, 1991. 0-89480-860-5.
2005 Core Knowledge® National Conference, Muscles and Bones: Framework and Movement, 3rd Grade
17
D. Elting, M. The Macmillian Book of the Human Body. New York. Aladdin Books, 1986. 0-02-043080-9.
E. Gray, S. The Skeletal System. Chanhassen, MN. The Child’s World, 2004. 1-59296-041-3.
F. Hirsch, E.D., Kett, J., and Trefil, J. The Dictionary of Cultural Literacy. Boston. Houghton Mifflin Company, 1993. 0-395-65597-8.
G. The Human Body 100 Reproducible Activities. Grand Rapids. Instructional Fair, Inc., 1990. 0-88012-827-5.
H. Jeffries, D. The Human Body Thematic Unit. Huntington Beach. Teacher Created Materials, Inc., 1993. 1-55734-235-0.
I. Llamas, A. Muscles and Bones. Milwaukee. Gareth Stevens Publishing, 1998. 0-8368-2112-2.
J. Llewellyn, Claire. The Big Book of Bones. New York. Peter Bedrick Books, 1999. 0-87226-546-3.
K. Parker, S. Human Body. London. Dorling Kindersley, 2000. 0-7894-6182-X. L. Sands, S., editor. Kids Discover Bones. New York. Kids Discover, 2001. M. Silverstein, Alvin. The Muscular System. New York. Twenty-First Century Books,
1994. 0-8050-2836-6. N. Silverstein, Alvin. The Skeletal System. New York. Twenty-First Century Books, 1994.
0-8050-2837-4. O. Simon, S. Bones. New York. Morrow Junior Books, 1998. 0-688-14644-9. P. Simon, S. Muscles: Our Muscular System. New York. Morrow Junior Books, 1998. 0-
688-14642-2. Q. Vriesenga, D. The Human Body. Grand Rapids. McGraw Hill, 1990. 0-88012-827-5. R. Weiner, E. The Incredible Human Body. New York. Scholastic Professional Books,
1996. 0-590-59928-3. S. Ziefert, Harriet. You Can’t See Your Bones with Binoculars. Maplewood, NJ. Ble Apple
Books, 2003. 1-59354-015-9. T. Zike, D. Science Pocket: Human Senses and Body Parts. Oak Lawn, IL. Ideal School
Supply Company, 1987. Catalog number 5738.
2005 Core Knowledge® National Conference, Muscles and Bones: Framework and Movement, 3rd Grade
18
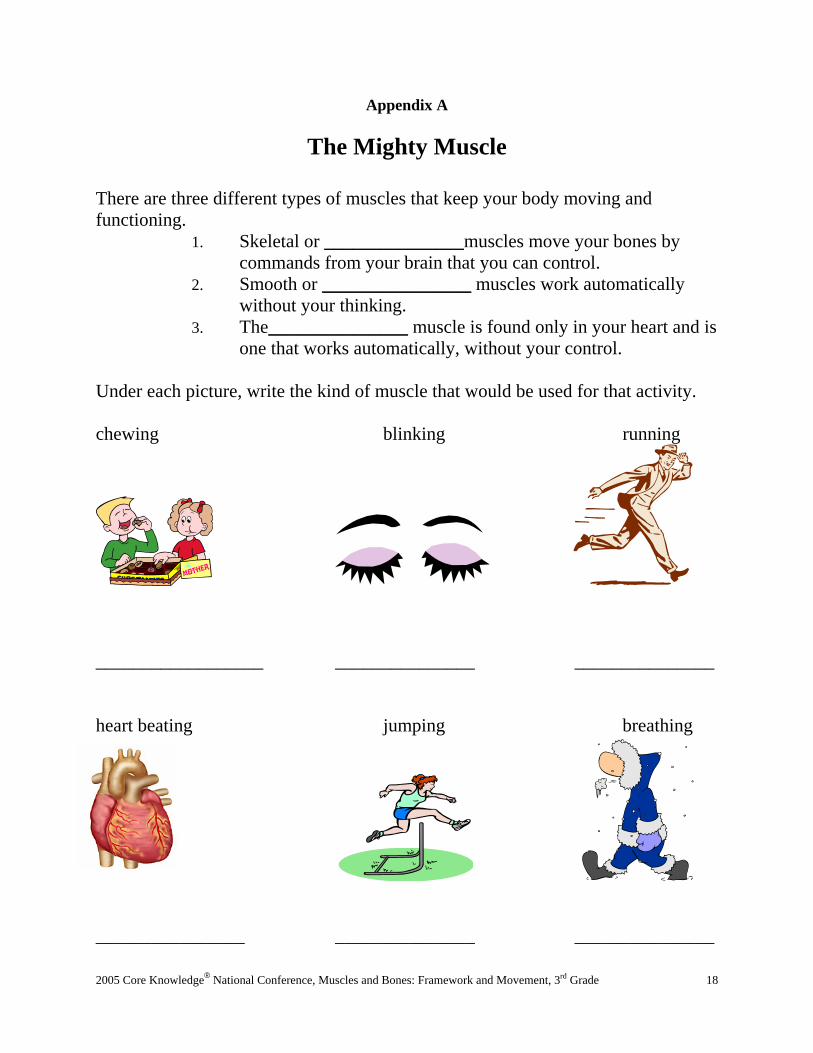
Appendix A
The Mighty Muscle There are three different types of muscles that keep your body moving and functioning.
1. Skeletal or _______________muscles move your bones by commands from your brain that you can control.
2. Smooth or ________________ muscles work automatically without your thinking.
3. The_______________ muscle is found only in your heart and is one that works automatically, without your control.
Under each picture, write the kind of muscle that would be used for that activity. chewing blinking running
__________________ _______________ _______________ heart beating jumping breathing
________________ _______________ _______________

2005 Core Knowledge® National Conference, Muscles and Bones: Framework and Movement, 3rd Grade
19
Appendix A-1
The Mighty Muscle – Answer Key There are three different types of muscles that keep your body moving and functioning.
4. Skeletal or ___voluntary_______muscles move your bones by commands from your brain that you can control.
5. Smooth or ___involuntary________ muscles work automatically without your thinking.
6. The___cardiac_______ muscle is found only in your heart and is another one that works automatically, without your control.
Under each picture, write the kind of muscle that would be used for that activity. chewing blinking running
voluntary or skeletal involuntary or smooth voluntary or skeletal heart beating jumping breathing
cardiac or involuntary voluntary or skeletal involuntary or smooth
2005 Core Knowledge® National Conference, Muscles and Bones: Framework and Movement, 3rd Grade
20
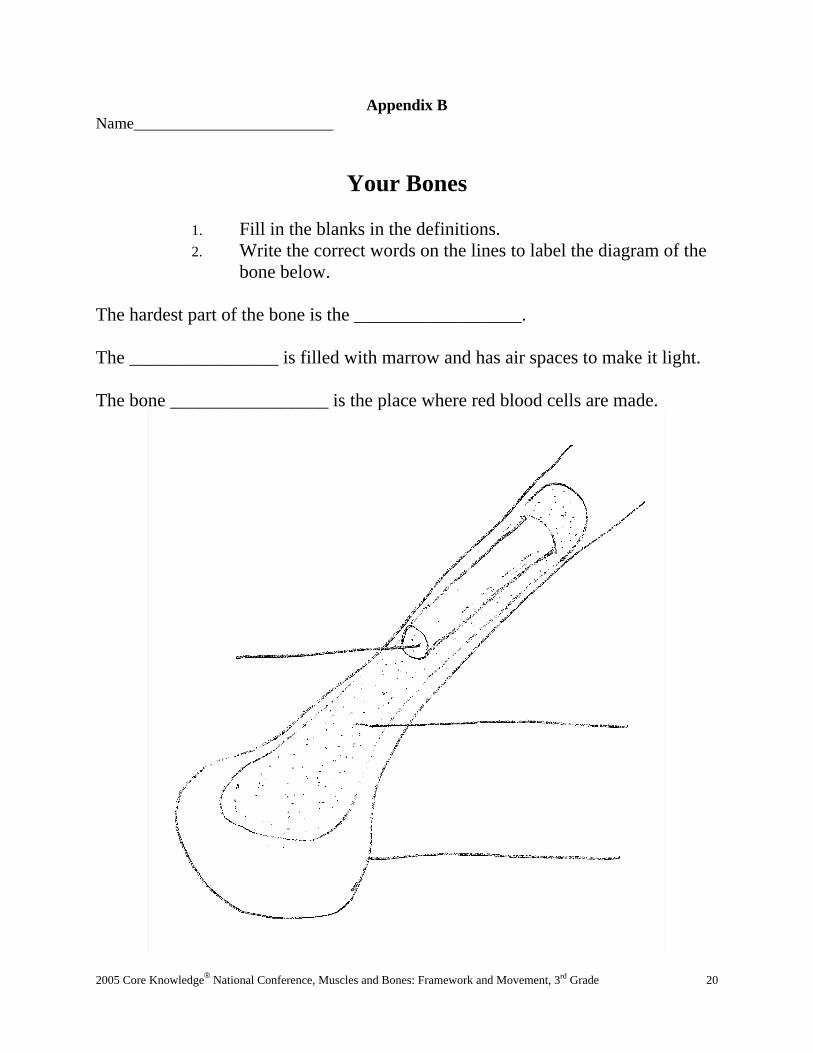
Appendix B Name_________________________
Your Bones
1. Fill in the blanks in the definitions. 2. Write the correct words on the lines to label the diagram of the
bone below. The hardest part of the bone is the __________________. The ________________ is filled with marrow and has air spaces to make it light. The bone _________________ is the place where red blood cells are made.
2005 Core Knowledge® National Conference, Muscles and Bones: Framework and Movement, 3rd Grade
21
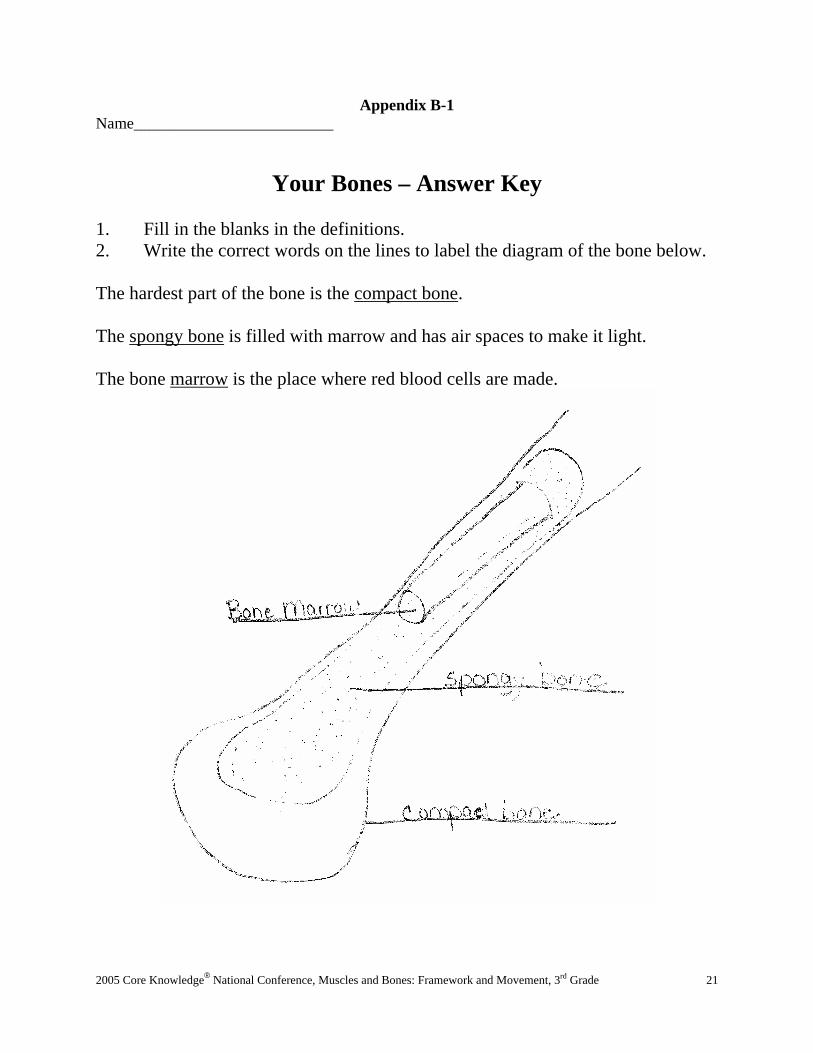
Appendix B-1 Name_________________________
Your Bones – Answer Key 1. Fill in the blanks in the definitions. 2. Write the correct words on the lines to label the diagram of the bone below. The hardest part of the bone is the compact bone. The spongy bone is filled with marrow and has air spaces to make it light. The bone marrow is the place where red blood cells are made.
2005 Core Knowledge® National Conference, Muscles and Bones: Framework and Movement, 3rd Grade
22
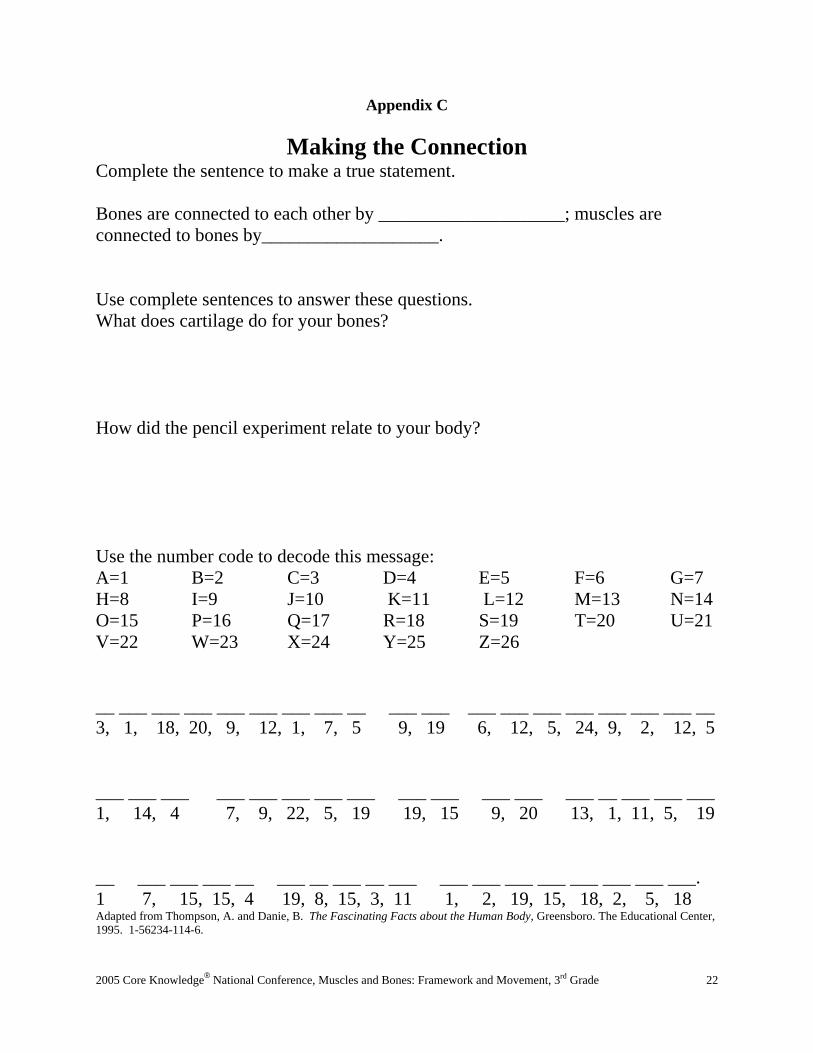
Appendix C
Making the Connection Complete the sentence to make a true statement. Bones are connected to each other by ____________________; muscles are connected to bones by___________________. Use complete sentences to answer these questions. What does cartilage do for your bones? How did the pencil experiment relate to your body? Use the number code to decode this message: A=1 B=2 C=3 D=4 E=5 F=6 G=7 H=8 I=9 J=10 K=11 L=12 M=13 N=14 O=15 P=16 Q=17 R=18 S=19 T=20 U=21 V=22 W=23 X=24 Y=25 Z=26 __ ___ ___ ___ ___ ___ ___ ___ __ ___ ___ ___ ___ ___ ___ ___ ___ ___ __ 3, 1, 18, 20, 9, 12, 1, 7, 5 9, 19 6, 12, 5, 24, 9, 2, 12, 5 ___ ___ ___ ___ ___ ___ ___ ___ ___ ___ ___ ___ ___ __ ___ ___ ___ 1, 14, 4 7, 9, 22, 5, 19 19, 15 9, 20 13, 1, 11, 5, 19 __ ___ ___ ___ __ ___ __ ___ __ ___ ___ ___ ___ ___ ___ ___ ___ ___. 1 7, 15, 15, 4 19, 8, 15, 3, 11 1, 2, 19, 15, 18, 2, 5, 18 Adapted from Thompson, A. and Danie, B. The Fascinating Facts about the Human Body, Greensboro. The Educational Center, 1995. 1-56234-114-6.
2005 Core Knowledge® National Conference, Muscles and Bones: Framework and Movement, 3rd Grade
23
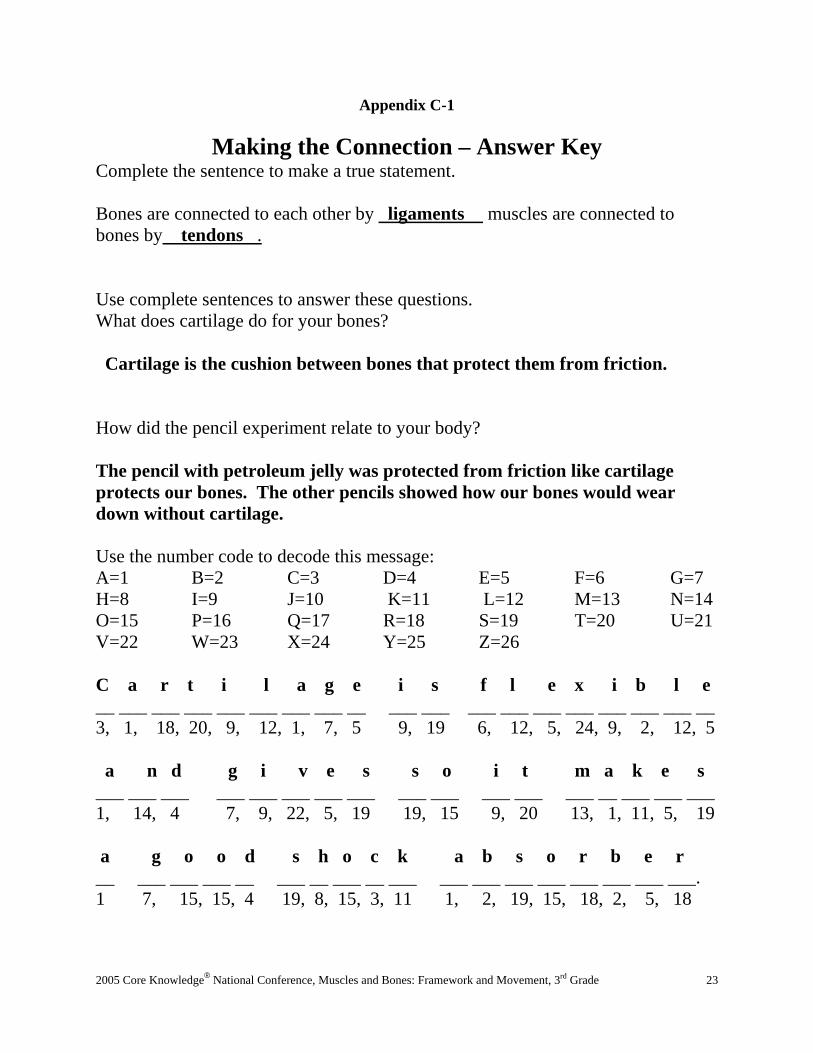
Appendix C-1
Making the Connection – Answer Key Complete the sentence to make a true statement. Bones are connected to each other by ligaments muscles are connected to bones by tendons . Use complete sentences to answer these questions. What does cartilage do for your bones? Cartilage is the cushion between bones that protect them from friction. How did the pencil experiment relate to your body? The pencil with petroleum jelly was protected from friction like cartilage protects our bones. The other pencils showed how our bones would wear down without cartilage. Use the number code to decode this message: A=1 B=2 C=3 D=4 E=5 F=6 G=7 H=8 I=9 J=10 K=11 L=12 M=13 N=14 O=15 P=16 Q=17 R=18 S=19 T=20 U=21 V=22 W=23 X=24 Y=25 Z=26 C a r t i l a g e i s f l e x i b l e __ ___ ___ ___ ___ ___ ___ ___ __ ___ ___ ___ ___ ___ ___ ___ ___ ___ __ 3, 1, 18, 20, 9, 12, 1, 7, 5 9, 19 6, 12, 5, 24, 9, 2, 12, 5 a n d g i v e s s o i t m a k e s ___ ___ ___ ___ ___ ___ ___ ___ ___ ___ ___ ___ ___ __ ___ ___ ___ 1, 14, 4 7, 9, 22, 5, 19 19, 15 9, 20 13, 1, 11, 5, 19 a g o o d s h o c k a b s o r b e r __ ___ ___ ___ __ ___ __ ___ __ ___ ___ ___ ___ ___ ___ ___ ___ ___. 1 7, 15, 15, 4 19, 8, 15, 3, 11 1, 2, 19, 15, 18, 2, 5, 18
2005 Core Knowledge® National Conference, Muscles and Bones: Framework and Movement, 3rd Grade
24
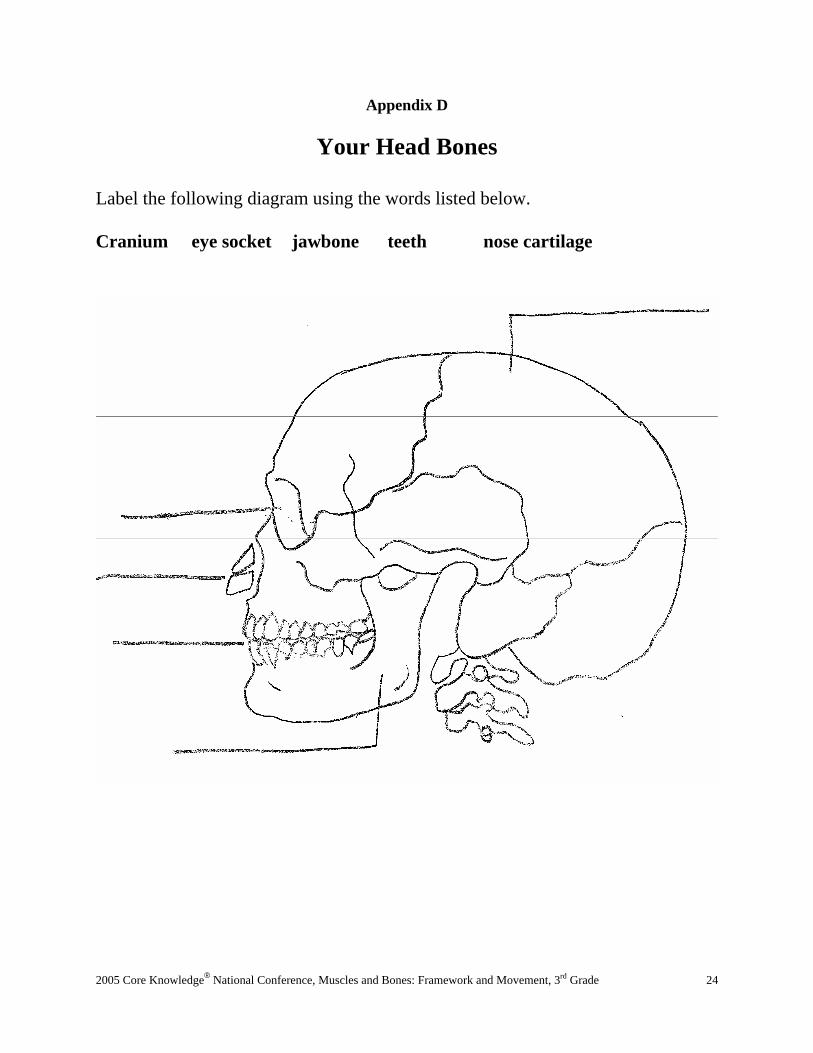
Appendix D
Your Head Bones Label the following diagram using the words listed below. Cranium eye socket jawbone teeth nose cartilage
2005 Core Knowledge® National Conference, Muscles and Bones: Framework and Movement, 3rd Grade
25
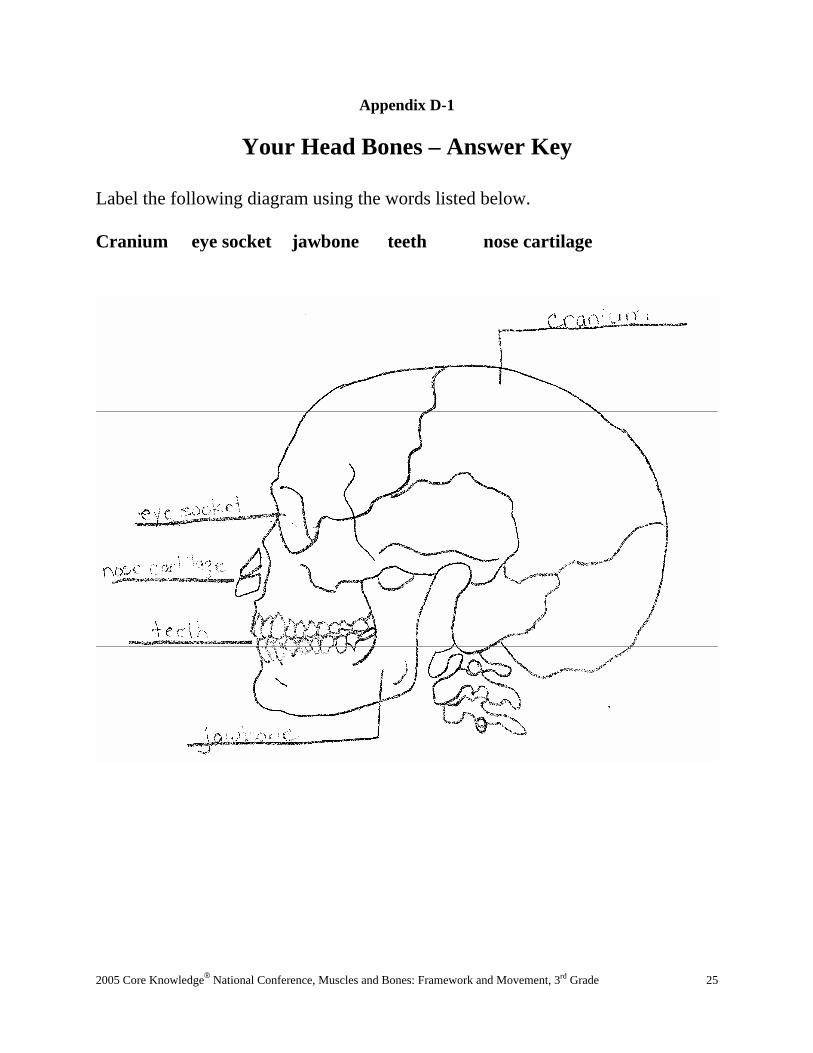
Appendix D-1
Your Head Bones – Answer Key Label the following diagram using the words listed below. Cranium eye socket jawbone teeth nose cartilage

2005 Core Knowledge® National Conference, Muscles and Bones: Framework and Movement, 3rd Grade
26
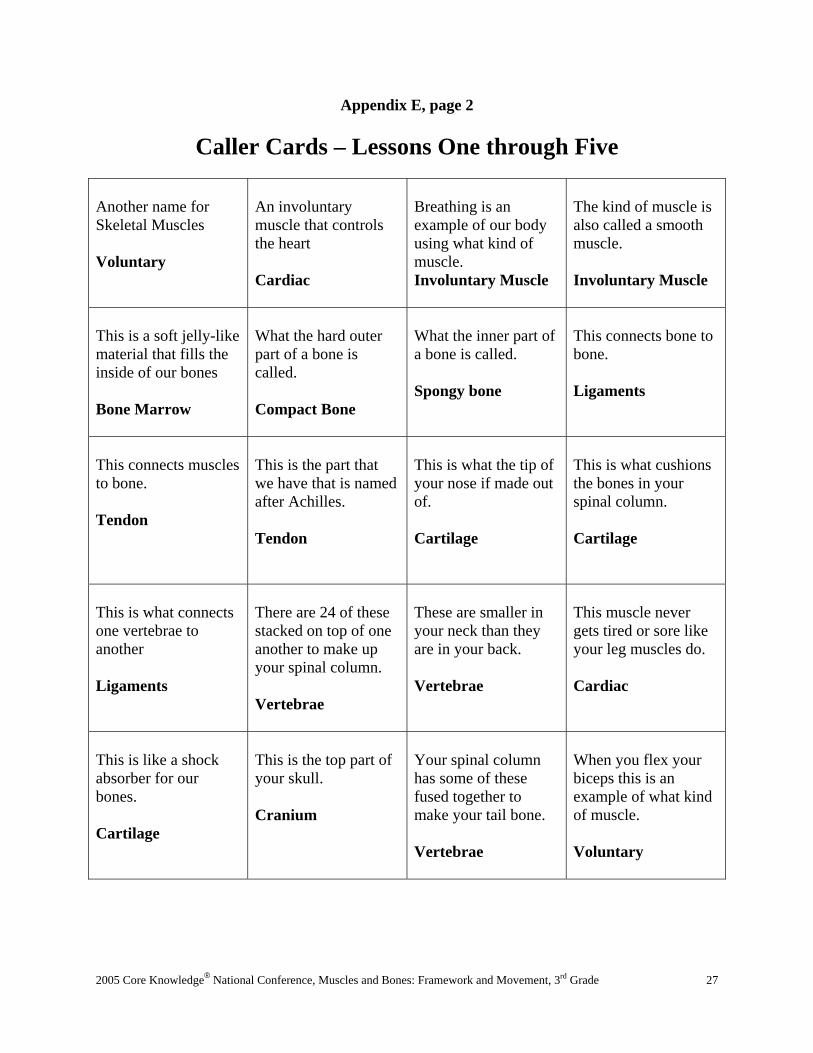
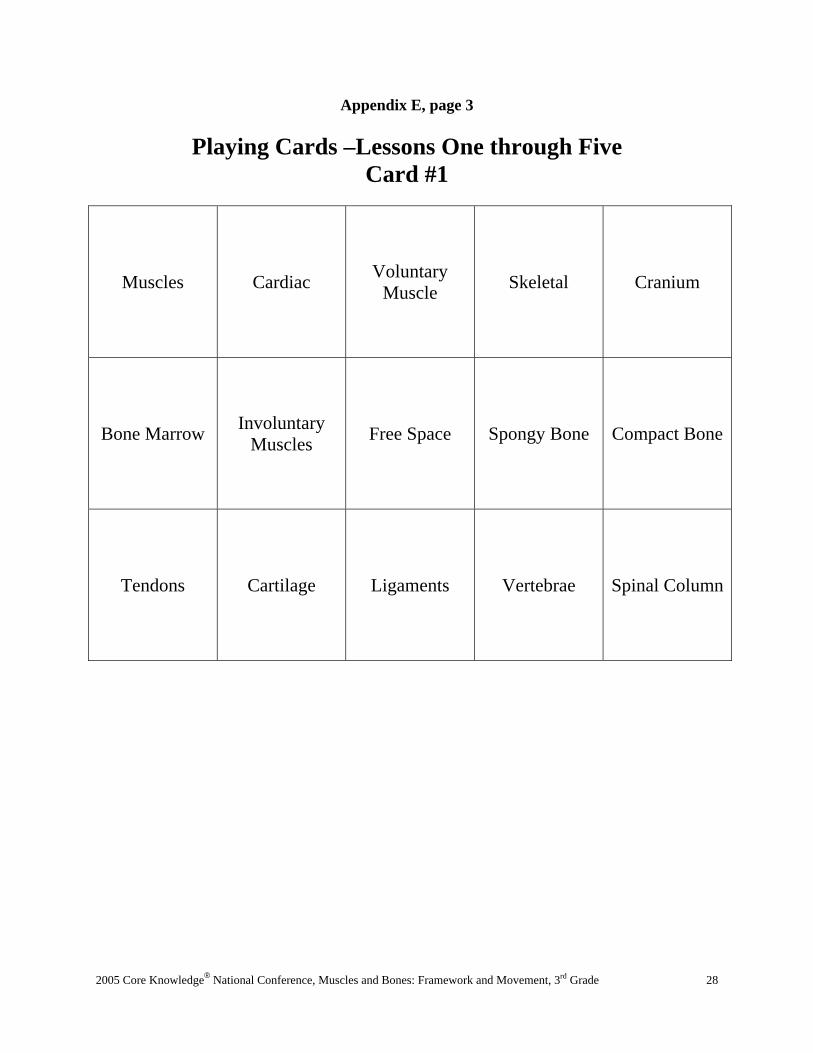
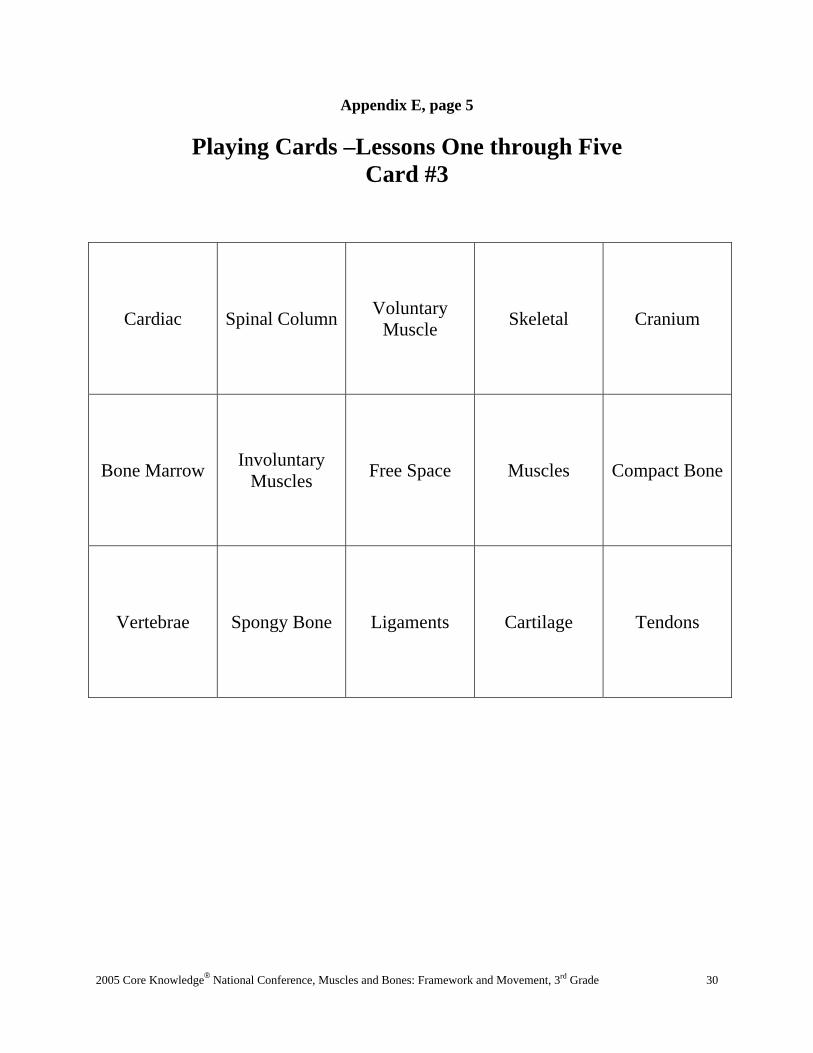
Appendix E, page 1
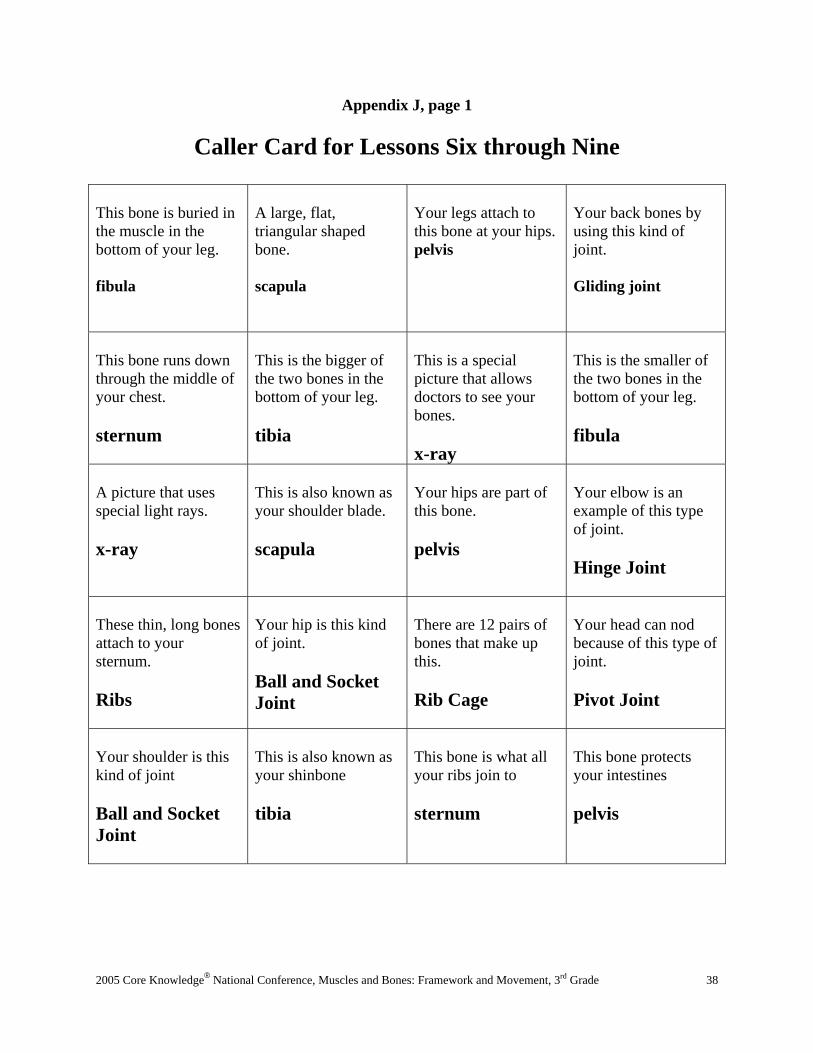
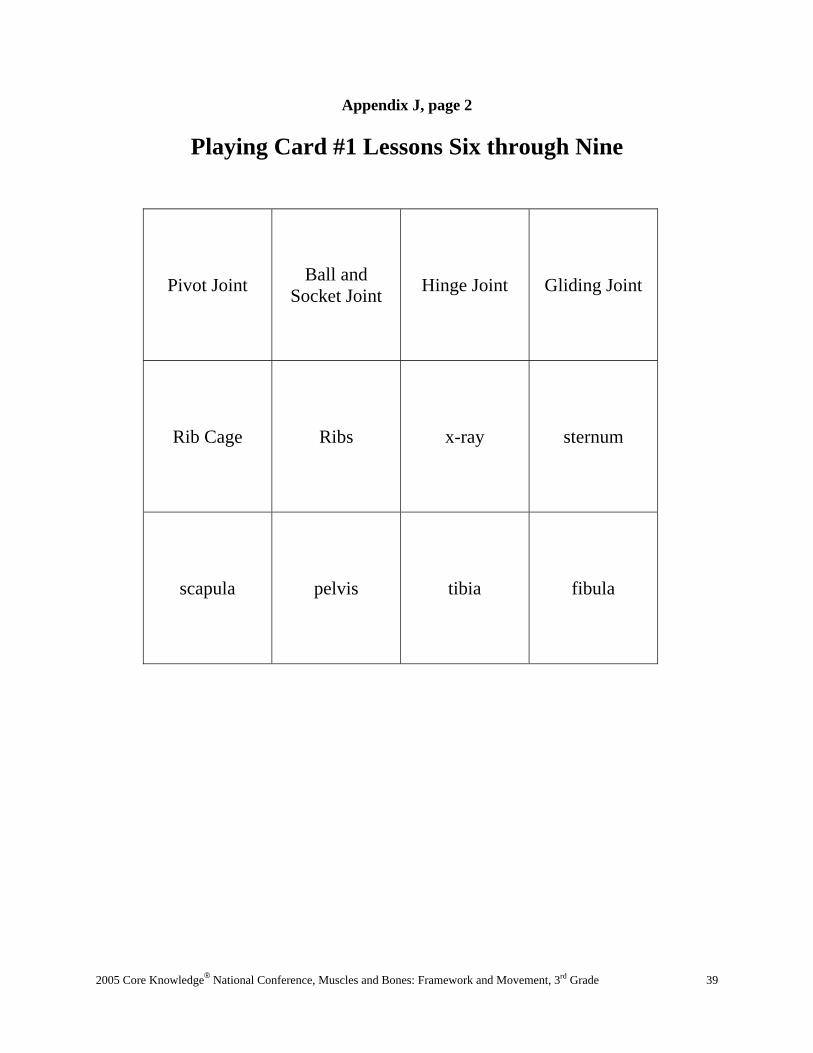
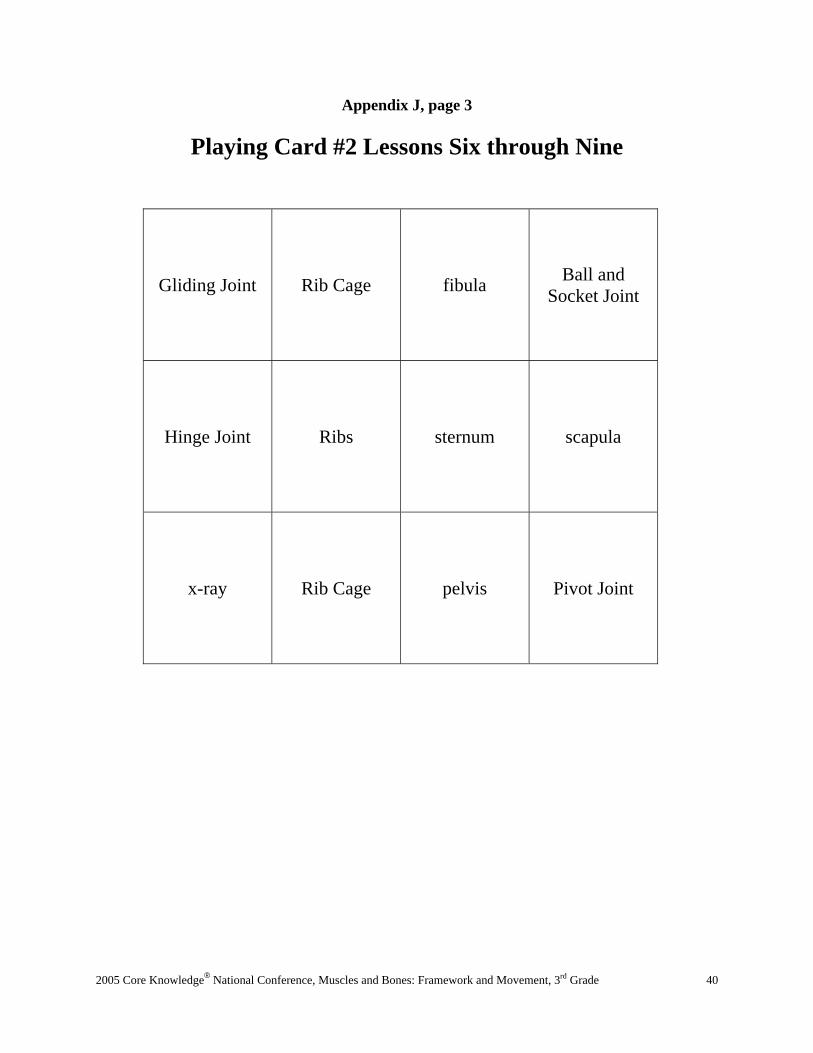
The Body Game Copy the caller cards and the game cards. You may laminate them if desired for durability. Cut out the cards and place them into an envelope. Directions to play (similar to Bingo) -Distribute a game card to each student. Read the card together to make sure everyone knows what they say before playing the game. -Designate a caller for the game. The caller will draw a caller card from the envelope. The caller will read the information without telling the answer at the bottom of the card. If a player can identify the answer, they place a marker over that square. -The first player to cover four squares across, down or diagonally calls out ‘”body” and their answers are checked. That student then becomes the new caller.
Caller Cards –Lessons One through Five Many of these are attached to bones and help you to move. Muscles
The heart is this kind of muscle. Cardiac
You can contract and relax this in order to move body parts. Voluntary Muscle
This system is made up of over 200 bones. Skeletal
The part of the skull that protects your brain. Cranium
This system provides the framework for your body. Skeletal
This is where red blood cells are made. Bone Marrow
These are muscles that we do not control. Involuntary Muscles
2005 Core Knowledge® National Conference, Muscles and Bones: Framework and Movement, 3rd Grade
27
Appendix E, page 2
Caller Cards – Lessons One through Five
Another name for Skeletal Muscles Voluntary
An involuntary muscle that controls the heart Cardiac
Breathing is an example of our body using what kind of muscle. Involuntary Muscle
The kind of muscle is also called a smooth muscle. Involuntary Muscle
This is a soft jelly-like material that fills the inside of our bones Bone Marrow
What the hard outer part of a bone is called. Compact Bone
What the inner part of a bone is called. Spongy bone
This connects bone to bone. Ligaments
This connects muscles to bone. Tendon
This is the part that we have that is named after Achilles. Tendon
This is what the tip of your nose if made out of. Cartilage
This is what cushions the bones in your spinal column. Cartilage
This is what connects one vertebrae to another Ligaments
There are 24 of these stacked on top of one another to make up your spinal column. Vertebrae
These are smaller in your neck than they are in your back. Vertebrae
This muscle never gets tired or sore like your leg muscles do. Cardiac
This is like a shock absorber for our bones. Cartilage
This is the top part of your skull. Cranium
Your spinal column has some of these fused together to make your tail bone. Vertebrae
When you flex your biceps this is an example of what kind of muscle. Voluntary
2005 Core Knowledge® National Conference, Muscles and Bones: Framework and Movement, 3rd Grade
28
Appendix E, page 3
Playing Cards –Lessons One through Five Card #1
Muscles Cardiac Voluntary Muscle Skeletal Cranium
Bone Marrow Involuntary Muscles Free Space Spongy Bone Compact Bone
Tendons Cartilage Ligaments Vertebrae Spinal Column

2005 Core Knowledge® National Conference, Muscles and Bones: Framework and Movement, 3rd Grade
29
Appendix E, page 4
Playing Cards –Lessons One through Five Card #2
Muscles Spinal Column Voluntary Muscle Skeletal Vertebrae
Bone Marrow Involuntary Muscles Free Space Spongy Bone Compact Bone
Cardiac Cranium Ligaments Cartilage Tendons
2005 Core Knowledge® National Conference, Muscles and Bones: Framework and Movement, 3rd Grade
30
Appendix E, page 5
Playing Cards –Lessons One through Five Card #3
Cardiac Spinal Column Voluntary Muscle Skeletal Cranium
Bone Marrow Involuntary Muscles Free Space Muscles Compact Bone
Vertebrae Spongy Bone Ligaments Cartilage Tendons
2005 Core Knowledge® National Conference, Muscles and Bones: Framework and Movement, 3rd Grade
31
Appendix F
Your Suit of Honor Color the following picture as follows: (follow along with teacher on the overhead) Coastal Cartilage – green First seven set of ribs – yellow Next three sets of ribs – red Two sets of floating ribs - blue Sternum - Orange

2005 Core Knowledge® National Conference, Muscles and Bones: Framework and Movement, 3rd Grade
32
Appendix F-1
Your Suit of Honor – Answer Key Color the following picture as follows: (follow along with teacher on the overhead) Coastal Cartilage – green G First seven set of ribs – yellow Y Next three sets of ribs – red R Two sets of floating ribs – blue B Sternum – Orange O
2005 Core Knowledge® National Conference, Muscles and Bones: Framework and Movement, 3rd Grade
33
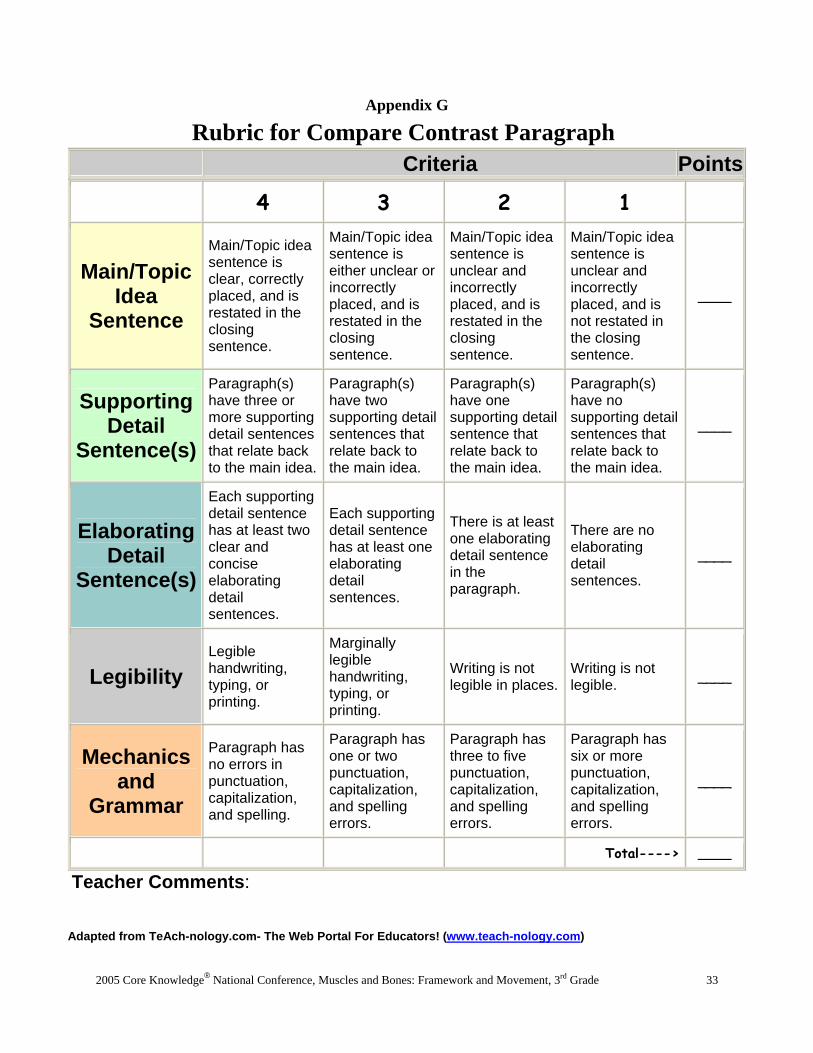
Appendix G
Rubric for Compare Contrast Paragraph Criteria Points
4 3 2 1
Main/Topic Idea
Sentence
Main/Topic idea sentence is clear, correctly placed, and is restated in the closing sentence.
Main/Topic idea sentence is either unclear or incorrectly placed, and is restated in the closing sentence.
Main/Topic idea sentence is unclear and incorrectly placed, and is restated in the closing sentence.
Main/Topic idea sentence is unclear and incorrectly placed, and is not restated in the closing sentence.
____
Supporting Detail
Sentence(s)
Paragraph(s) have three or more supporting detail sentences that relate back to the main idea.
Paragraph(s) have two supporting detail sentences that relate back to the main idea.
Paragraph(s) have one supporting detail sentence that relate back to the main idea.
Paragraph(s) have no supporting detail sentences that relate back to the main idea.
____
Elaborating Detail
Sentence(s)
Each supporting detail sentence has at least two clear and concise elaborating detail sentences.
Each supporting detail sentence has at least one elaborating detail sentences.
There is at least one elaborating detail sentence in the paragraph.
There are no elaborating detail sentences.
____
Legibility Legible handwriting, typing, or printing.
Marginally legible handwriting, typing, or printing.
Writing is not legible in places.
Writing is not legible. ____
Mechanics and
Grammar
Paragraph has no errors in punctuation, capitalization, and spelling.
Paragraph has one or two punctuation, capitalization, and spelling errors.
Paragraph has three to five punctuation, capitalization, and spelling errors.
Paragraph has six or more punctuation, capitalization, and spelling errors.
____
Total----> ____ Teacher Comments:
Adapted from TeAch-nology.com- The Web Portal For Educators! (www.teach-nology.com)
2005 Core Knowledge® National Conference, Muscles and Bones: Framework and Movement, 3rd Grade
34
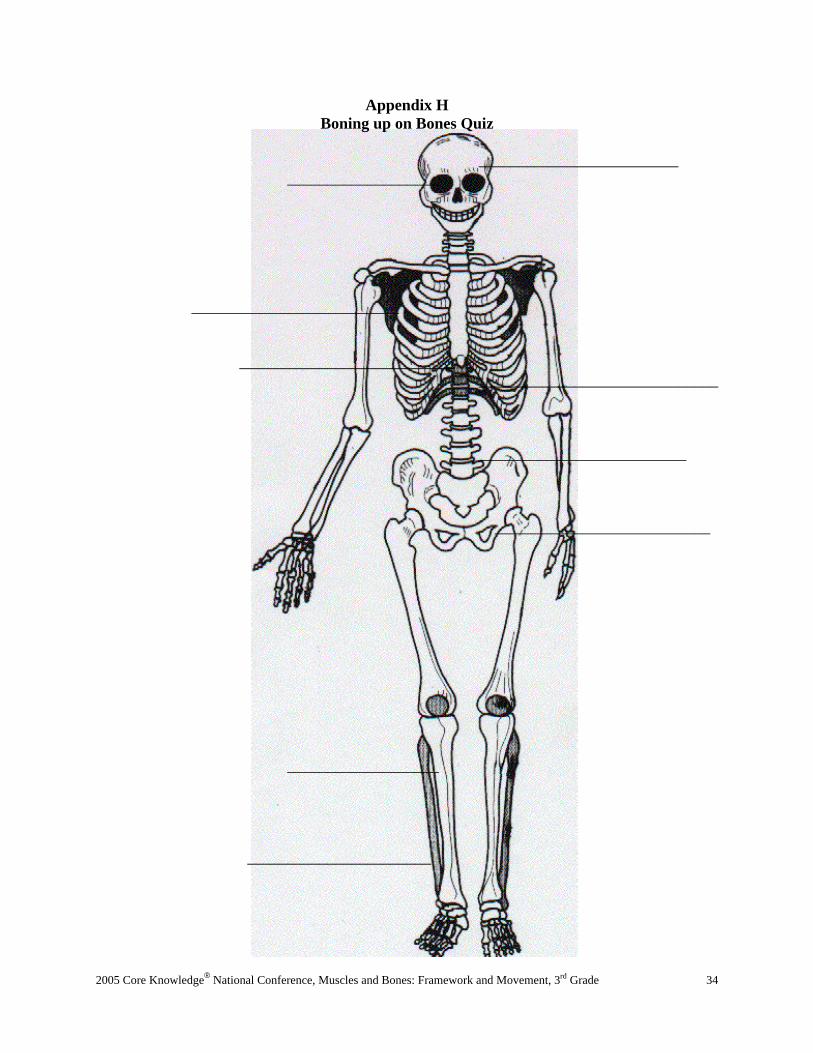
Appendix H Boning up on Bones Quiz
_________________________
___________________ __________________________ ___________________________ ______________________________ __________________________ ___________________________ ___________________ _______________________

2005 Core Knowledge® National Conference, Muscles and Bones: Framework and Movement, 3rd Grade
35
Appendix H-1 Quiz Answer Key
Cranium Skull
___scapula_______ sternum
____________ribs
____________________vertebrae _______________pelvis
______tibia____________ ________fibula __
2005 Core Knowledge® National Conference, Muscles and Bones: Framework and Movement, 3rd Grade
36
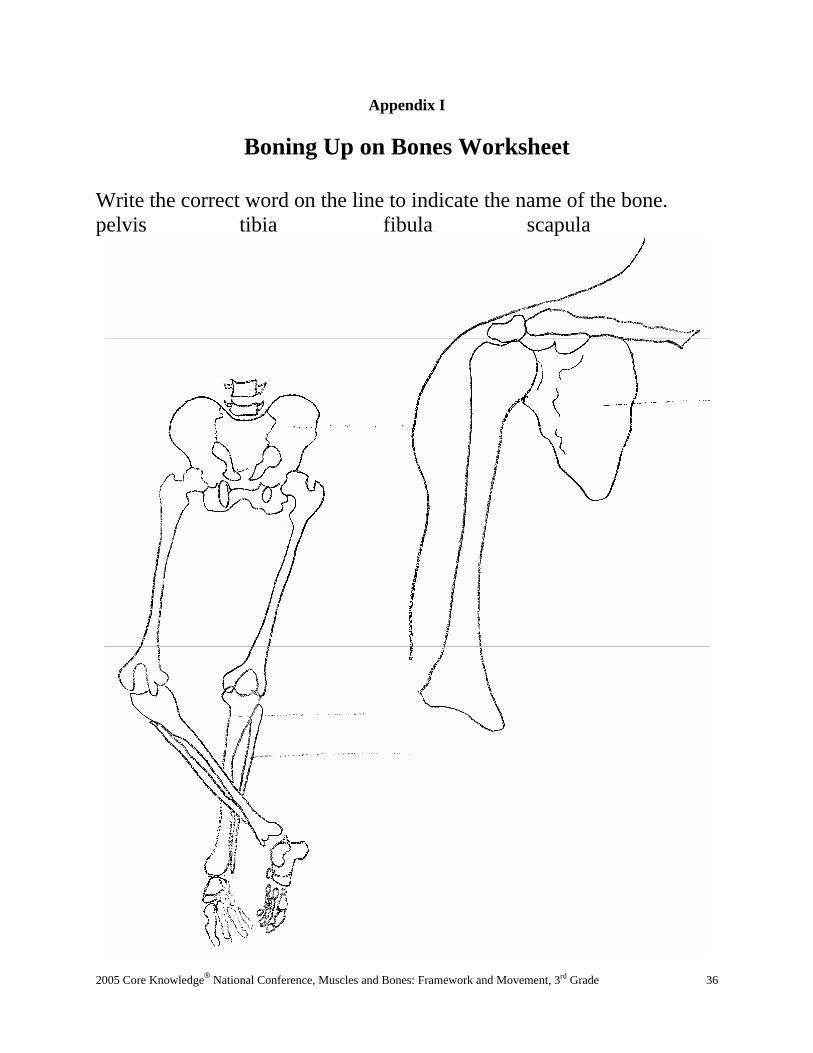
Appendix I
Boning Up on Bones Worksheet Write the correct word on the line to indicate the name of the bone. pelvis tibia fibula scapula
2005 Core Knowledge® National Conference, Muscles and Bones: Framework and Movement, 3rd Grade
37
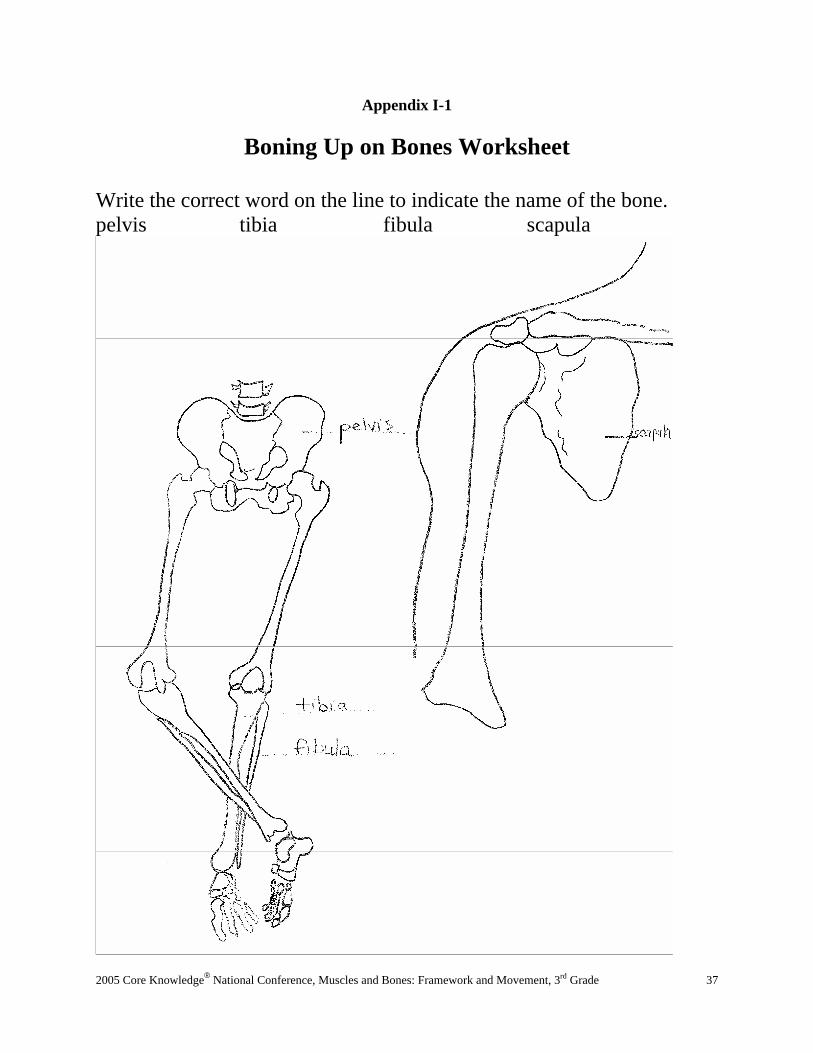
Appendix I-1
Boning Up on Bones Worksheet Write the correct word on the line to indicate the name of the bone. pelvis tibia fibula scapula
2005 Core Knowledge® National Conference, Muscles and Bones: Framework and Movement, 3rd Grade
38
Appendix J, page 1
Caller Card for Lessons Six through Nine This bone is buried in the muscle in the bottom of your leg. fibula
A large, flat, triangular shaped bone. scapula
Your legs attach to this bone at your hips. pelvis
Your back bones by using this kind of joint. Gliding joint
This bone runs down through the middle of your chest. sternum
This is the bigger of the two bones in the bottom of your leg. tibia
This is a special picture that allows doctors to see your bones. x-ray
This is the smaller of the two bones in the bottom of your leg. fibula
A picture that uses special light rays. x-ray
This is also known as your shoulder blade. scapula
Your hips are part of this bone. pelvis
Your elbow is an example of this type of joint. Hinge Joint
These thin, long bones attach to your sternum. Ribs
Your hip is this kind of joint. Ball and Socket Joint
There are 12 pairs of bones that make up this. Rib Cage
Your head can nod because of this type of joint. Pivot Joint
Your shoulder is this kind of joint Ball and Socket Joint
This is also known as your shinbone tibia
This bone is what all your ribs join to sternum
This bone protects your intestines pelvis
2005 Core Knowledge® National Conference, Muscles and Bones: Framework and Movement, 3rd Grade
39
Appendix J, page 2
Playing Card #1 Lessons Six through Nine
Pivot Joint Ball and Socket Joint Hinge Joint Gliding Joint
Rib Cage Ribs x-ray sternum
scapula pelvis tibia fibula
2005 Core Knowledge® National Conference, Muscles and Bones: Framework and Movement, 3rd Grade
40
Appendix J, page 3
Playing Card #2 Lessons Six through Nine
Gliding Joint Rib Cage fibula Ball and Socket Joint
Hinge Joint Ribs sternum scapula
x-ray Rib Cage pelvis Pivot Joint
2005 Core Knowledge® National Conference, Muscles and Bones: Framework and Movement, 3rd Grade
41
Appendix K, page 1
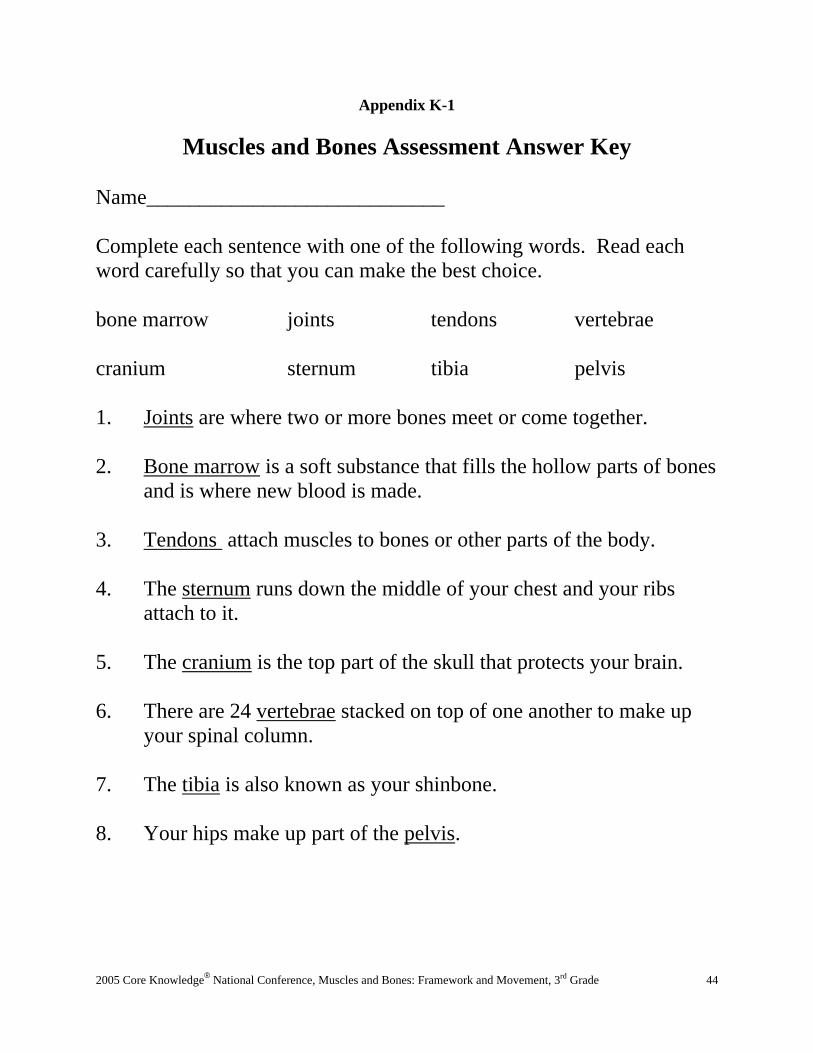
Muscles and Bones Assessment Name____________________________ Complete each sentence with one of the following words. Read each word carefully so that you can make the best choice. bone marrow joints tendons vertebrae cranium sternum tibia pelvis 1. ________________ are where two or more bones meet or come
together. 2. __________________ is a soft substance that fills the hollow parts
of bones and is where new blood is made. 3. ________________ attach muscles to bones or other parts of the
body. 4. The _____________ runs down the middle of your chest and your
ribs attach to it. 5. The _____________ is the top part of the skull that protects your
brain. 6. There are 24 ______________ stacked on top of one another to
make up your spinal column. 7. The _______________ is also known as your shinbone. 8. Your hips make up part of the ___________________.
2005 Core Knowledge® National Conference, Muscles and Bones: Framework and Movement, 3rd Grade
42
Appendix K, page 2
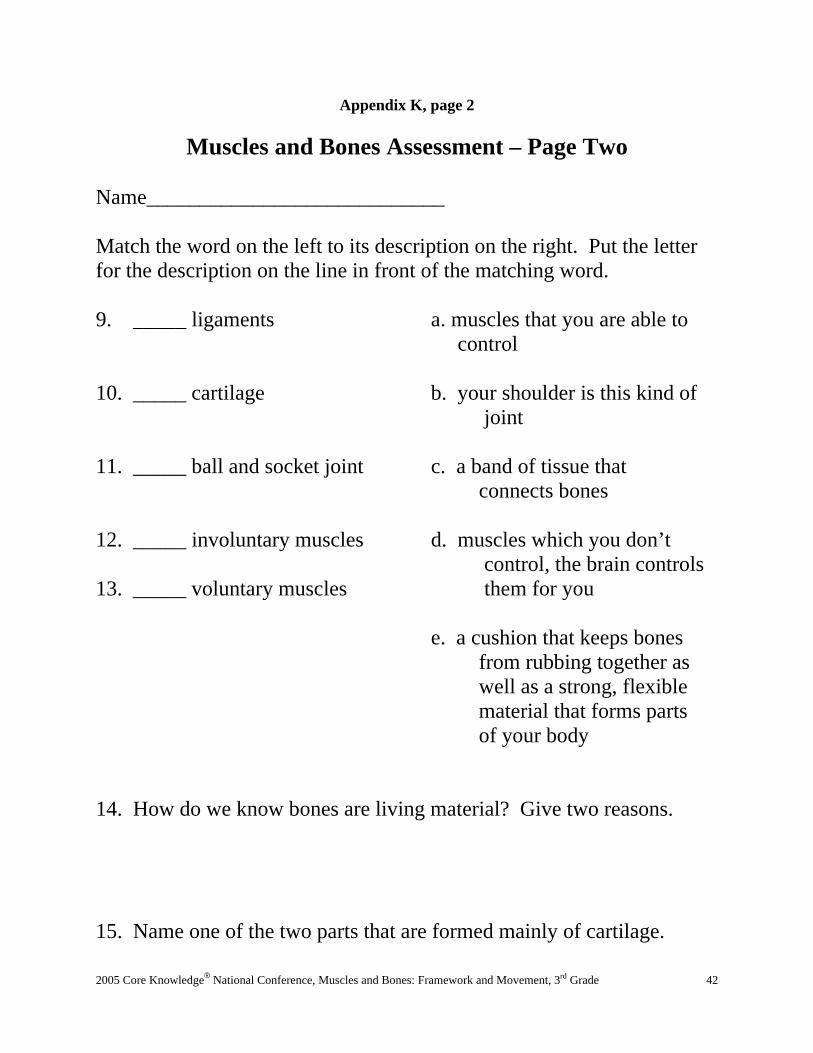
Muscles and Bones Assessment – Page Two Name____________________________ Match the word on the left to its description on the right. Put the letter for the description on the line in front of the matching word. 9. _____ ligaments a. muscles that you are able to control 10. _____ cartilage b. your shoulder is this kind of
joint
11. _____ ball and socket joint c. a band of tissue that connects bones 12. _____ involuntary muscles d. muscles which you don’t
control, the brain controls 13. _____ voluntary muscles them for you e. a cushion that keeps bones from rubbing together as well as a strong, flexible material that forms parts of your body 14. How do we know bones are living material? Give two reasons. 15. Name one of the two parts that are formed mainly of cartilage.
2005 Core Knowledge® National Conference, Muscles and Bones: Framework and Movement, 3rd Grade
43
Appendix K, page 3
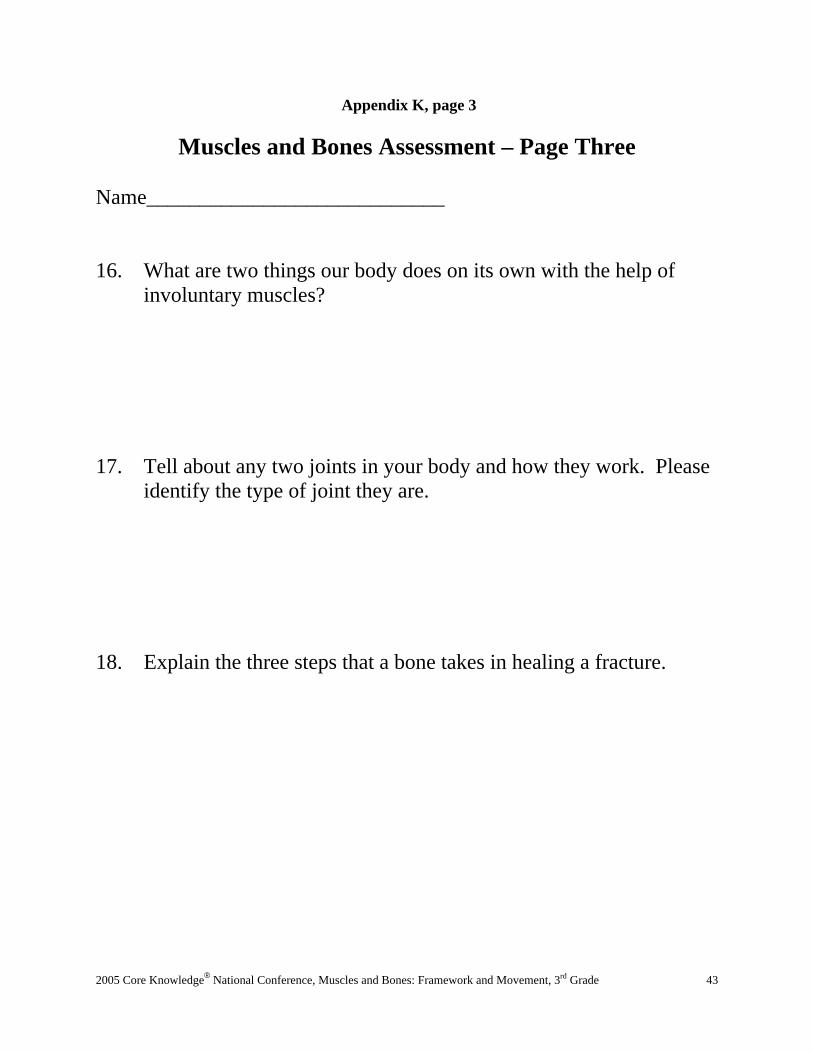
Muscles and Bones Assessment – Page Three Name____________________________ 16. What are two things our body does on its own with the help of
involuntary muscles? 17. Tell about any two joints in your body and how they work. Please
identify the type of joint they are. 18. Explain the three steps that a bone takes in healing a fracture.
2005 Core Knowledge® National Conference, Muscles and Bones: Framework and Movement, 3rd Grade
44
Appendix K-1
Muscles and Bones Assessment Answer Key Name____________________________ Complete each sentence with one of the following words. Read each word carefully so that you can make the best choice. bone marrow joints tendons vertebrae cranium sternum tibia pelvis 1. Joints are where two or more bones meet or come together. 2. Bone marrow is a soft substance that fills the hollow parts of bones
and is where new blood is made. 3. Tendons attach muscles to bones or other parts of the body. 4. The sternum runs down the middle of your chest and your ribs
attach to it. 5. The cranium is the top part of the skull that protects your brain. 6. There are 24 vertebrae stacked on top of one another to make up
your spinal column. 7. The tibia is also known as your shinbone. 8. Your hips make up part of the pelvis.
2005 Core Knowledge® National Conference, Muscles and Bones: Framework and Movement, 3rd Grade
45
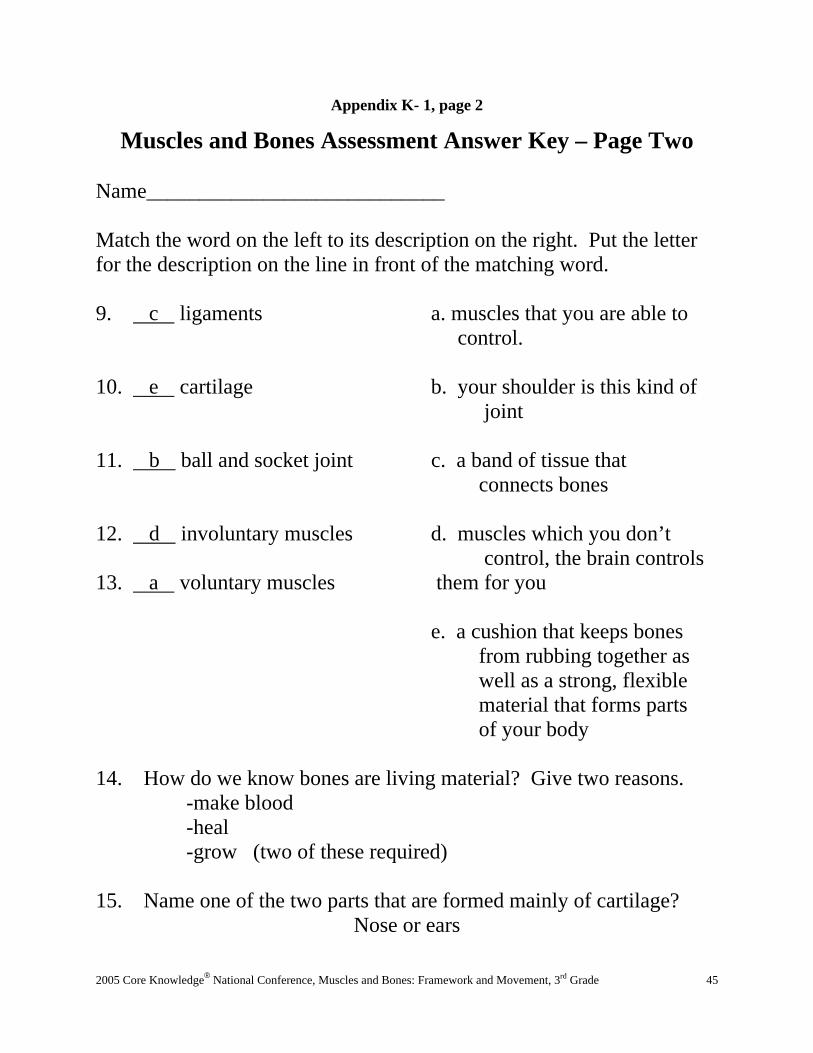
Appendix K- 1, page 2
Muscles and Bones Assessment Answer Key – Page Two Name____________________________ Match the word on the left to its description on the right. Put the letter for the description on the line in front of the matching word. 9. c ligaments a. muscles that you are able to control. 10. e cartilage b. your shoulder is this kind of
joint
11. b ball and socket joint c. a band of tissue that connects bones 12. d involuntary muscles d. muscles which you don’t
control, the brain controls 13. a voluntary muscles them for you e. a cushion that keeps bones from rubbing together as well as a strong, flexible material that forms parts of your body 14. How do we know bones are living material? Give two reasons. -make blood -heal -grow (two of these required) 15. Name one of the two parts that are formed mainly of cartilage?
Nose or ears
2005 Core Knowledge® National Conference, Muscles and Bones: Framework and Movement, 3rd Grade
46
Appendix K-1, page 3
Muscles and Bones Assessment Answer Key – Page Three Name____________________________ 16. What are two things our body does on its own with the help of
involuntary muscles?
Heart beating, blinking, breathing 17. Tell about any two joints in your body and how they work. Please
identify the type of joint they are. Ball and socket – hip, shoulder Gliding or sliding – wrist, vertebrae, ankle Hinge – elbow, knee Fixed – skull Pivot – neck 18. Explain the three steps that a bone takes in healing a fracture. Clot Fibers grow across fracture New bone cells form to close fracture