how to build a blog in 10 minutes or less
TRANSCRIPT

libmode.com http://libmode.com/how-to-build-a-blog
How To Build A Blog In 10 Minutes or Less

If you are wanting to learn how to build a blog, you’ve come to the right spot. Whether you want to use your blog forpersonal or business reasons, building a blog is highly recommend and they are easy to get setup and online.
I will show you step by step how to build your own blog in less than 10 minutes using WordPress as your bloggingsystem (CMS), and Bluehost as your host. I use WordPress and Bluehost on many websites (Including LibMode),and I absolutely love them both.
In this post we’ll essentially cover three steps on how to build a blog:
1. Select Domain & Purchase Hosting
2. Installing WordPress
3. Start Using WordPress

Select Domain & Purchase Hosting
What is a host? Simply put, a host provides server space for your website or blog on a computer configured for it.There are free hosting services out there such as Blogger, but they limit your ability to customize your blog and youdo not have full control. I highly recommend a stand-alone blog. They’re inexpensive, you’ll have full control, andyou’ll be glad you opted for it.

The first thing you need to do is click here to go to Bluehost. Once you open up Bluehost, you’ll see a green “getstarted now” button as shown above or in the previous slide. Click it.
Next you’ll want to choose your plan. I recommend the basic plan. Bluehost has a special right now for $3.95 –$5.95 per month (billed annually) which is a very affordable price, and you can upgrade to the other plans atanytime.
Next you’ll want to choose a domain name. Basically, a domain name is a web address at which people can typein their browser URL field to find your website or blog online. My domain name for this blog is LibMode.com.
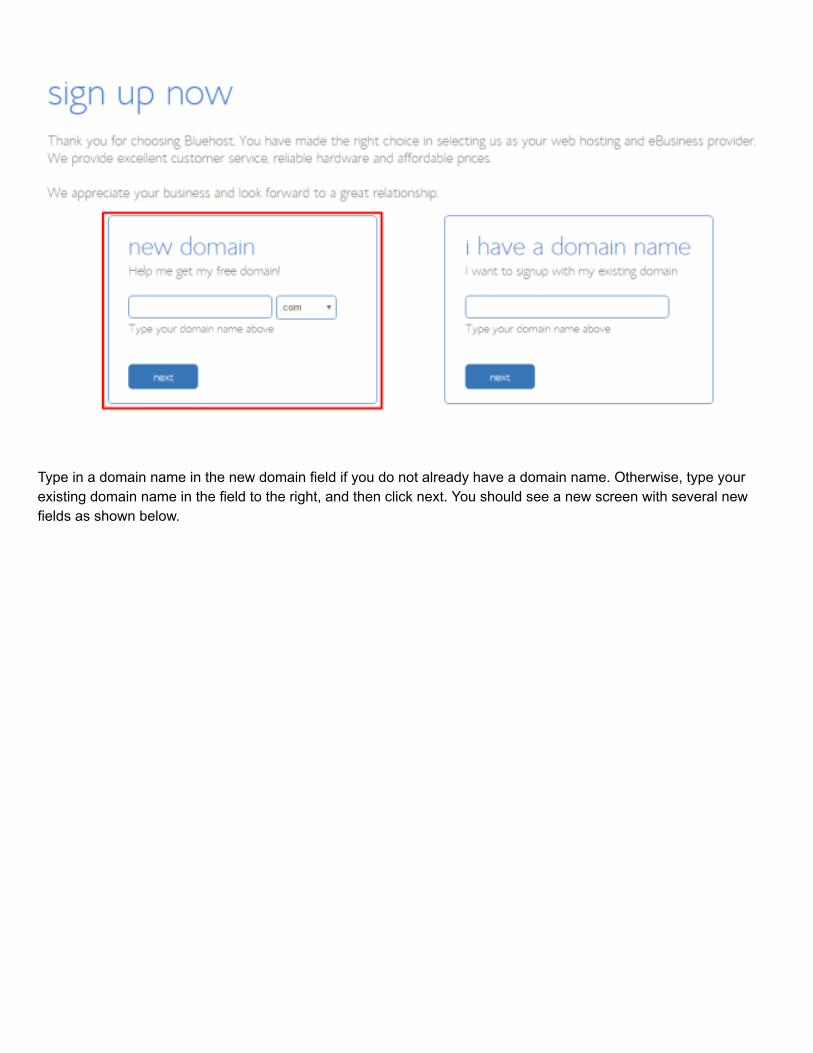
Type in a domain name in the new domain field if you do not already have a domain name. Otherwise, type yourexisting domain name in the field to the right, and then click next. You should see a new screen with several newfields as shown below.

Fill out all the account information details, and then proceed to scroll down to the Package Information section.Choose your Account Plan from the dropdown menu. Choose a package based on how far in advance you want topay — the further out you pay the better the price. Bluehost bills a year at a time, but they give you a free domain, nosetup fee, and a very reasonable price overall.

I recommend that you uncheck / skip all the extra add-ons. In my opinion the only one you should consider getting isthe Domain Privacy Protection if you’re using your personal home address. This add-on will hide your basic info(street address, ect…) when people do a reverse lookup on your domain, and it’s only 99 cents a month. All theothers aren’t neccessary. Once this step is complete, move onto the billing information section.

Once you have all the billing information input. Confirm that you have read their Terms of Service, and then click thesubmit button. Afterwords, check your email. You’ll have a welcome email from Bluehost with the information youneed to access your control panel (otherwise known as cpanel). Once you have that information we can move ontothe next step — installing WordPress (your blog).
Installing WordPress
Now that you have successfully purchased a host you can go back to Bluehost, and click the login button in the topright corner as shown in the image below or you can click the cpanel link from your welcome email.
Once you’re on the Bluehost login page. Fill in your cpanel username and password, and then login. If you do nothave your username and password handy you can find it in your welcome email.

Once you’re logged into cpanel the next step is to install WordPress (your blog content management system). Youcan install WordPress quickly within cpanel by clicking on the “Install WordPress” button as shown below.

The instructions for setting up WordPress are quite simple. Follow each step and put in the information as needed,setup your username and password, and then finish the installation. Once the installation is complete you shouldhave a live blog up and running on WordPress.
After WordPress has been installed, you should see a success status. Take note of the information to access yournew WordPress blog. This information will also be sent to the email you used to sign up.
Congratulations! Your blog is now setup and online. You can find it by inputing your domain name into your browserURL bar.
Start Using WordPress
Now that your blog is setup and online you can access your WordPress admin panel anytime byvisiting “yourdomain.com/admin.”

Once you are logged in you’ll see your WordPress dashboard (backend). I recommend that you take time to getfamiliar with the backend of WordPress. There are a lot of online tutorials and videos that will help you quickly learnthe basics of WordPress. You can Google or YouTube them.
You can quickly create your first blog post by clicking “Posts” and then “Add New.” Once you’re done writing yourblog post you can click the blue “Publish” button in the top right corner, and your post will go live.
That covers the basics! If you have any questions related to setting up your blog with Bluehost you can ask in thecomments section below. I’ll do what I can to help you get your blog setup.