laboratory-exercises-in-microbiology-book.pdf - wordpress.com
TRANSCRIPT

Harley−Prescott: Laboratory Exercises in Microbiology, Fifth Edition
Front Matter Preface © The McGraw−Hill Companies, 2002
P R E F A C E
There are many excellent microbiology laboratorymanuals on the market and many others that arecalled “in-house” productions because they are writ-ten for a microbiology course at a particular school.Why another microbiology manual? The answer isstraightforward. Many instructors want a manualthat is directly correlated with a specific textbook.As a result, this laboratory manual was designedand written to be used in conjunction with the text-book Microbiology, fifth edition, by Lansing M.Prescott, John P. Harley, and Donald A. Klein; how-ever, it can be used with other textbooks with slightadaptation.
Since this manual correlates many of the micro-biological concepts in the textbook with the variousexercises, comprehensive introductory material isnot given at the beginning of each exercise. Instead,just enough specific explanation is given to com-plement, augment, reinforce, and enhance what isin the textbook. We feel that time allocation is animportant aspect of any microbiology course. Stu-dents should not be required to reread in the labora-tory manual an in-depth presentation of materialthat has already been covered satisfactorily inthe textbook.
Each exercise has been designed to be modularand short. This will allow the instructor to pick andchoose only those exercises or parts of exercisesthat are applicable to a specific course. Several ex-ercises usually can be completed in a two- or three-hour laboratory period. The exercises have alsobeen designed to use commonly available equip-ment, with the least expense involved, and to becompleted in the shortest possible time period.
Considering the above parameters, the purpose ofthis laboratory manual is to guide students through aprocess of development of microbiological technique,experimentation, interpretation of data, and discovery
in a manner that will complement the textbook andmake the study of microbiology both exciting andchallenging. According to an old Chinese proverb:
Tell me and I will forget.Show me and I might remember.Involve me and I will understand.
These words convey our basic philosophy that it is ex-periences in the microbiology laboratory and the sci-entific method that help develop students’ criticalthinking and creativity and that increase their appreci-ation of the mechanisms by which microbiologists an-alyze information. The laboratory accomplishes thisby having students become intensely and personallyinvolved in the knowledge they acquire.
The array of exercises was chosen to illustrate thebasic concepts of general microbiology as a wholeand of the individual applied fields. The protocolsvary in content and complexity, providing the instruc-tor with flexibility to mold the laboratory syllabus tothe particular needs of the students, available time andequipment, and confines and scope of the course. Fur-thermore, it provides a wide spectrum of individualexercises suitable for students in elementary and ad-vanced general microbiology as well as those in vari-ous allied health programs.
In 1997, the American Society for Microbiology,through its Office of Education and Training, adopteda Laboratory Core Curriculum representing themesand topics considered essential to teach in every intro-ductory microbiology laboratory, regardless of its em-phasis. An instructor might add items appropriate toallied health, applied, environmental, or majors mi-crobiology courses.
The Laboratory Core is not meant to be a syllabusor outline. The core themes and topics are meant toframe objectives to be met somewhere within the in-troductory microbiology laboratory. Depending on the
Take interest, I implore you, in those sacred dwellings which one designatesby the expressive term: laboratories. Demand that they be multiplied, thatthey be adorned. These are the temples of the future—temples of well-beingand of happiness. There it is that humanity grows greater, stronger, better.
Louis Pasteur(French chemist, founder of microbiology, 1822–1895)
v
Harley−Prescott: Laboratory Exercises in Microbiology, Fifth Edition
Front Matter Preface © The McGraw−Hill Companies, 2002
vi Preface
specific emphasis of the course, a single lab sessioncould meet multiple core objectives, focus on one ob-jective, or emphasize a topic that is not in the lab corebut is important to that particular course.
Laboratory Skills
A student successfully completing basic microbiol-ogy will demonstrate the ability to
1. Use a bright-field light microscope to view andinterpret slides, including
a. correctly setting up and focusing themicroscope
b. proper handling, cleaning and storage of themicroscope
c. correct use of all lensesd. recording microscopic observations
2. Properly prepare slides for microbiologicalexamination, including
a. cleaning and disposal of slidesb. preparing smears from solid and liquid
culturesc. performing wet-mount and/or hanging drop
preparationsd. performing Gram stains
3. Properly use aseptic techniques for the transferand handling of microorganisms and instruments,including
a. sterilizing and maintaining sterility oftransfer instruments
b. performing aseptic transferc. obtaining microbial samples
4. Use appropriate microbiological media andtest systems, including
a. isolating colonies and/or plaquesb. maintaining pure culturesc. using biochemical test mediad. accurately recording macroscopic
observations
5. Estimate the number of microorganisms in asample using serial dilution techniques, including
a. correctly choosing and using pipettes andpipetting devices
b. correctly spreading diluted samples forcounting
c. estimating appropriate dilutions
d. extrapolating plate counts to obtain correctCFU or PFU in the starting sample
6. Use standard microbiology laboratoryequipment correctly, including
a. using the standard metric system forweights, lengths, diameters, and volumes
b. lighting and adjusting a laboratory burnerc. using an incubator
Laboratory Thinking Skills
A student successfully completing basic microbiol-ogy will demonstrate an increased skill level in
1. Cognitive processes, including
a. formulating a clear, answerable questionb. developing a testable hypothesisc. predicting expected resultsd. following an experimental protocol
2. Analysis skills, including
a. collecting and organizing data in asystematic fashion
b. presenting data in an appropriate form(graphs, tables, figures, or descriptiveparagraphs)
c. assessing the validity of the data (includingintegrity and significance)
d. drawing appropriate conclusions based onthe results
3. Communications skills, including
a. discussing and presenting laboratory resultsor findings in the laboratory
4. Interpersonal and citizenry skills, including
a. working effectively in groups or teams sothat the task, results, and analysis are shared
b. effectively managing time and tasks to bedone simultaneously, by individuals andwithin a group
c. integrating knowledge and making informedjudgments about microbiology in everydaylife
Laboratories typically supplement and integrateclosely with the lecture content in ways that are unique toeach instructor. Consequently, the laboratory content thatis considered essential for laboratory work by one instruc-tor may be covered in lecture portion of the course by an-other instructor, making it difficult to define specific top-
Harley−Prescott: Laboratory Exercises in Microbiology, Fifth Edition
Front Matter Preface © The McGraw−Hill Companies, 2002
Preface vii
ics that should be integral in all microbiology laborato-ries. As a result, the ASM Laboratory Core CurriculumCommittee developed themes, which are broadly basedand will enable instructors to have the flexibility to use awide variety of laboratories to meet the suggested core.
A student successfully completing basic microbi-ology will demonstrate mastery of the basic principlesof the following themes and complete laboratory activ-ities that focus on one or more of the topics under eachtheme.
Theme 1. Integrating themes—impact ofmicroorganisms on the biosphere and humans;microbial diversity
Theme 2. Microbial cell biology, including cellstructure and function, growth and division, andmetabolism
Theme 3. Microbial genetics, including mutationsTheme 4. Interactions of microorganisms with
hosts (humans, other animals, plants), includingpathogenicity mechanisms and antimicrobialagents
In order to meet the above themes, topics, andskills (The American Society for Microbiology Labo-ratory Core Curriculum), this manual consists of 66exercises arranged into 11 parts covering the followingbasic topics:
PART ONE, Microscopic Techniques, introducesthe students to the proper use and care of thedifferent types of microscopes used in themicrobiology laboratory for the study ofmicroorganisms.
PART TWO, Bacterial Morphology and Staining,presents the basic procedures for visualization anddifferentiation of microorganisms based on cellform and various structures.
PART THREE, Basic Laboratory and CultureTechniques, acquaints students with properlaboratory procedures in preparingmicrobiological media and in culture techniquesthat are used in isolating microorganisms.
PART FOUR, Biochemical Activities of Bacteria,introduces some of the biochemical activitiesthat may be used in characterizing andidentifying bacteria.
PART FIVE, Rapid Multitest Systems, acquaintsstudents with some of the multitest systems thatcan be used to identify bacteria.
PART SIX, Unknown Identification, contains twoexercises that guide students through the use of
Bergey’s Manual of Systematic Bacteriology inthe identification of unknown bacteria.
PART SEVEN, Environmental Factors AffectingGrowth of Microorganisms, acquaints studentswith some of the various physical and chemicalagents that affect microbial growth.
PART EIGHT, Environmental and FoodMicrobiology, is concerned with theenvironmental aspects of water, milk, and food.
PART NINE, Medical Microbiology, presents anoverview of some pathogenic microorganisms,and acquaints students with basic procedures usedin isolation and identification of pathogens frominfected hosts, including those from the student’sown body.
PART TEN, Survey of Selected EucaryoticMicroorganisms, presents an overview that isintended to help students appreciate themorphology, taxonomy, and biology of the fungi.
PART ELEVEN, Microbial Genetics andGenomics, presents six experiments designed toillustrate the general principles of bacterialgenetics and genomics.
The format of each exercise in this manual is in-tended to promote learning and mastery in the shortestpossible time. To this end, each experiment is de-signed as follows:
Safety Considerations
This laboratory manual endeavors to include manyof the safety precautionary measures established bythe Centers for Disease Control and Prevention(CDC), Atlanta, Georgia; the Occupational Safetyand Health Administration (OSHA); and the Envi-ronmental Protection Agency (EPA). Efforts aremade to instruct the student on safety, and all exer-cises will contain precautionary procedures thatthese agencies are enforcing in hospitals, nursinghomes, commercial laboratories, and industry. Asafety considerations box is included for each ex-ercise to help both the instructor and student preparethemselves for the possibility of accidents.
Both the instructor and student should keep inmind at all times that most technical programs, suchas a microbiology laboratory, carry some measure ofassociated risk. The microbiology laboratory is aplace where infectious microorganisms are handled,examined, and studied with safety and effectiveness.However, any of the microorganisms we work with
Harley−Prescott: Laboratory Exercises in Microbiology, Fifth Edition
Front Matter Preface © The McGraw−Hill Companies, 2002
viii Preface
may be pathogenic in an immunocompromised per-son. Therefore, rather than modifying the objectivesin this laboratory manual to avoid any risk, the au-thors propose that instructors and students imple-ment the Centers for Disease Control and Preven-tion (CDC) principles of biosafety throughout. Oneway we propose is to simply modify the “UniversalPrecautions” (see pp. xiii–xiv) so the wording is ap-propriate for the classroom by simply changing“laboratory worker” to “student.” In addition, awritten safety policy consistent with CDC guide-lines and adopted by your institution’s governingbody will protect you, your institution, and the stu-dents. As in any laboratory, safety should be a majorpart of the curriculum. Students should be requiredto demonstrate their knowledge of safety beforethey begin each laboratory exercise.
Materials per Student or Group of Students
To aid in the preparation of all exercises, each proce-dure contains a list of the required cultures with Amer-ican Type Culture Collection catalog numbers (Ameri-can Type Culture Collection, 12301 Parklawn Drive,Rockville, Maryland 29852–1776; www.ATCC.org;703-365-2700), media, reagents, and other equipmentnecessary to complete the exercise in the allocated labtime either per student or group of students. Appen-dixes H and I provide recipes for reagents, stains, andculture media. Appendix J describes the maintenanceof microorganisms and supply sources.
Learning Objectives
Each exercise has a set of learning objectives thatdefine the specific goals of the laboratory session. Itis to the student’s advantage to read through this listbefore coming to class. In like manner, these objec-tives should be given special attention during thelaboratory exercise. Upon conscientious completionof the exercise, the student should be able to meet allof the objectives for that exercise. Before leaving theclass, students should check the objectives onceagain to see that they can master them. If problemsarise, consult the instructor.
Suggested Reading in Textbook
These cross-references have been designed to save thestudent’s time. By referring the student to sections,paragraphs, tables, charts, figures, and boxes withinthe textbook, unnecessary duplication is avoided.
Pronunciation Guide
This section contains the phonetic pronunciations forall organisms used in the exercise. If students take thetime to sound out new and unfamiliar terms and saythem aloud several times, they will learn to use thevocabulary of microbiologists.
Why Are the Above Bacteria, Slides, or OtherMicroorganisms Used in This Experiment?
The authors have chosen specific viruses, bacteria,fungi, protozoa, algae, and various prepared slides foreach exercise. This microbial material has been se-lected based on cost, ease of growth, availability, reli-ability, and most importantly, the ability to producethe desired experimental results. In order to communi-cate these guidelines to the student, this section ex-plains why the authors have chosen the microbial ma-terial being used and also gives additionalbiochemical, morphological, and taxonomic informa-tion about the microorganism(s) that the studentshould find helpful when performing the experiment.
Medical Application
Many students using this laboratory manual are eitherin one of the allied health disciplines, such as nursing,or in a preprofessional program such as premed, pre-dent, or prevet and need to know the clinical relevanceof each exercise performed. To satisfy this need, a Med-ical Application section is included for some of themedically oriented exercises. Medical applications aredescribed for most clinical procedures as a specific ap-plication of the purpose of the exercise. For example, aprocedure can be used for the identification of a partic-ular microorganism or used in combination with otherexercises in a diagnosis. For these exercises, some im-portant pathogens with their diseases and their need forthe test being performed in the exercise are listed.
Principles
This section contains a brief discussion of the micro-biological principles, concepts, and techniques thatunderlie the experimental procedures being performedin the exercise.
Procedure
Explicit instructions are augmented by diagrams to aidstudents in executing the experiment as well as interpret-ing the results. Where applicable, actual results are shownso that the student can see what should be obtained.
Harley−Prescott: Laboratory Exercises in Microbiology, Fifth Edition
Front Matter Preface © The McGraw−Hill Companies, 2002
Preface ix
Hints and Precautions
Additional information on what to watch out for, whatcan go wrong, and helpful tidbits to make the experimentwork properly are presented in accompanying boxes.
Laboratory Report
Various pedagogical techniques are used for recordingthe obtained results. This part of the exercise can beturned in to the instructor for checking or grading.
Review Questions
Review questions are located at the end of each labo-ratory report. These were written so that students cantest their understanding of the concepts and tech-niques presented in each exercise.
Dilution Ratios Used in This Manual
According to the American Society for MicrobiologyStyle Manual, dilution ratios may be reported with ei-ther colons (:) or shills (/), but note there is a differencebetween them. A shill indicates the ratio of a part to awhole; e.g., d means 1 of 2 parts, with a total of 2 parts.A colon indicates the ratio of 1 part to 2 parts, with atotal of 3 parts. Thus, d equals 1:1, but 1:2 equals h.
Dilution Problems
Since dilution problems are such an integral part of anymicrobiology course, Appendix A gives an overview of
the different types of dilution. This includes a variety ofpractice problems. Answers are provided.
Instructor’s Guide
An instructor’s guide has been prepared for the labora-tory manual and is available on our web site atwww.mhhe.com/prescott5. This guide provides answersto the questions in this manual.
Finally, it is our hope that this manual will serveas a vehicle to (1) introduce the complexity and diver-sity of microorganisms and their relationships to oneanother; (2) provide a solid foundation for furtherstudy for those electing a career in science; and(3) convey something of the meaning, scope, and ex-citement of microbiology as a significant perspectivefrom which to view the world.
We appreciate the many comments offered to usover the years by both faculty and students. In our desireto continue to improve this laboratory manual, we inviteconstructive comments from those using it. Please con-tact us through the Cell and Molecular Biology Editor,McGraw-Hill Publishers (www.mhhe.com/prescott5).
John P. HarleyLansing M. Prescott

Harley−Prescott: Laboratory Exercises in Microbiology, Fifth Edition
Front Matter Acknowledgments © The McGraw−Hill Companies, 2002
x
Our special thanks go to the following reviewers,whose comments proved very helpful to us:
Ghayasuddin AhmadSeton Hall University
Alberta M. AlbrechtManhattanville College
Mary A. AndersonGustavus Adolphus College
Susan T. BagleyMichigan Tech University
Paul BlumUniversity of Nebraska–Lincoln
Geoffrey W. GearnerMorehead State University
Robert J. KearnsUniversity of Dayton
Dana KolibachukRhode Island College
David MardonEastern Kentucky University
Glendon MillerWichita State University
Rita MoyesTexas A&M University
Raymond B. OteroEastern Kentucky University
Norbert A. PilewskiDuquesne University School of Pharmacy
Marcia PierceEastern Kentucky University
Ralph J. RascatiKennesaw State College
Jackie ReynoldsRichland College
Nancy RickerCapilano College
Ivan RothUniversity of Georgia
Julie J. ShafferUniversity of Nebraska at Kearney
Thomas TerryUniversity of Connecticut
Robert TwarogUniversity of North Carolina
A special thanks also goes to Kay Baitz, KEY Scien-tific Products, 1402 Chisholm Trail, Suite D, RoundRock, Texas 78681, for all of her help with the KEYproducts.
A C K N O W L E D G M E N T S
Harley−Prescott: Laboratory Exercises in Microbiology, Fifth Edition
Front Matter Orientation to the Laboratory: Rules of Conduct and General Safety
© The McGraw−Hill Companies, 2002
xi
O R I E N T A T I O N T O T H EL A B O R A T O R Y :
R U L E S O F C O N D U C TA N D G E N E R A L S A F E T Y
Many of the microorganisms used in this course maybe pathogenic for humans and animals. As a result,certain rules are necessary to avoid the possibility ofinfecting yourself or other people. Anyone whochooses to disregard these rules or exhibits careless-ness that endangers others may be subject to immedi-ate dismissal from the laboratory. If doubt arises as tothe procedure involved in handling infectious mate-rial, consult your instructor.
In 1997, the American Society for Microbiology,through its Office of Education and Training, adoptedthe following on laboratory safety. Each point is con-sidered essential for every introductory microbiologylaboratory, regardless of its emphasis.
A student successfully completing basic micro-biology will demonstrate the ability to explain andpractice safe
1. Microbiological procedures, including
a. reporting all spills and broken glassware tothe instructor and receiving instructions forcleanup
b. methods for aseptic transferc. minimizing or containing the production of
aerosols and describing the hazardsassociated with aerosols
d. washing hands prior to and followinglaboratories and at any time contamination issuspected
e. never eating or drinking in the laboratoryf. using universal precautions (see inside front
and end covers of this laboratory manual)g. disinfecting lab benches prior to and at the
conclusion of each lab session
h. identification and proper disposal ofdifferent types of waste
i. never applying cosmetics, including contactlenses, or placing objects (fingers, pencils)in the mouth or touching the face
j. reading and signing a laboratory safetyagreement indicating that the student hasread and understands the safety rules of thelaboratory
k. good lab practice, including returningmaterials to proper locations, proper careand handling of equipment, and keeping thebench top clear of extraneous materials
2. Protective procedures, including
a. tying long hair back, wearing personalprotective equipment (eye protection, coats,closed shoes; glasses may be preferred tocontact lenses), and using such equipment inappropriate situations
b. always using appropriate pipetting devicesand understanding that mouth pipetting isforbidden
3. Emergency procedures, including
a. locating and properly using emergencyequipment (eye-wash stations, first-aid kits,fire extinguishers, chemical safety showers,telephones, and emergency numbers)
b. reporting all injuries immediately to theinstructor
c. following proper steps in the event of anemergency
Harley−Prescott: Laboratory Exercises in Microbiology, Fifth Edition
Front Matter Orientation to the Laboratory: Rules of Conduct and General Safety
© The McGraw−Hill Companies, 2002
xii Orientation to the Laboratory: Rules of Conduct and General Safety
In addition, institutions where microbiology lab-oratories are taught will
1. train faculty and staff in proper waste streammanagement
2. provide and maintain necessary safety equipmentand information resources
3. train faculty, staff, and students in the use ofsafety equipment and procedures
4. train faculty and staff in the use of MSDS. TheWorkplace Hazardous Materials InformationSystem (WHMIS) requires that all hazardoussubstances, including microorganisms, be labeledin a specific manner. In addition, there must be aMaterial Safety Data Sheet (MSDS) available toaccompany each hazardous substance. MSDSsheets are now supplied with every chemical soldby supply houses. The person in charge of themicrobiology laboratory should ensure thatadherence to this law is enforced.
All laboratory work can be done more effectivelyand efficiently if the subject matter is understood be-fore coming to the laboratory. To accomplish this, readthe experiment several times before the laboratory be-gins. Know how each exercise is to be done and what
principle it is intended to convey. Also, read the appro-priate sections in your textbook that pertain to the ex-periment being performed, this will save you muchtime and effort during the actual laboratory period.
All laboratory experiments will begin with a briefdiscussion by your instructor of what is to be done,the location of the materials, and other important in-formation. Feel free to ask questions if you do not un-derstand the instructor or the principle involved.
Much of the work in the laboratory is designed tobe carried out in groups or with a partner. This is to aidin coverage of subject matter, to save time and ex-pense, and to encourage discussion of data and results.
Many of the ASM’s recommended precautions arerepresented by the specific safety guidelines given in-side the cover of this laboratory manual.
I have read the above rules and understandtheir meaning
___________________________Signature
___________________________Date
Harley−Prescott: Laboratory Exercises in Microbiology, Fifth Edition
Front Matter Summary of Universal Precautions and Laboratory Safety Procedures
© The McGraw−Hill Companies, 2002
xiii
S U M M A R Y O F U N I V E R S A LP R E C A U T I O N S A N D
L A B O R A T O R Y S A F E T YP R O C E D U R E S
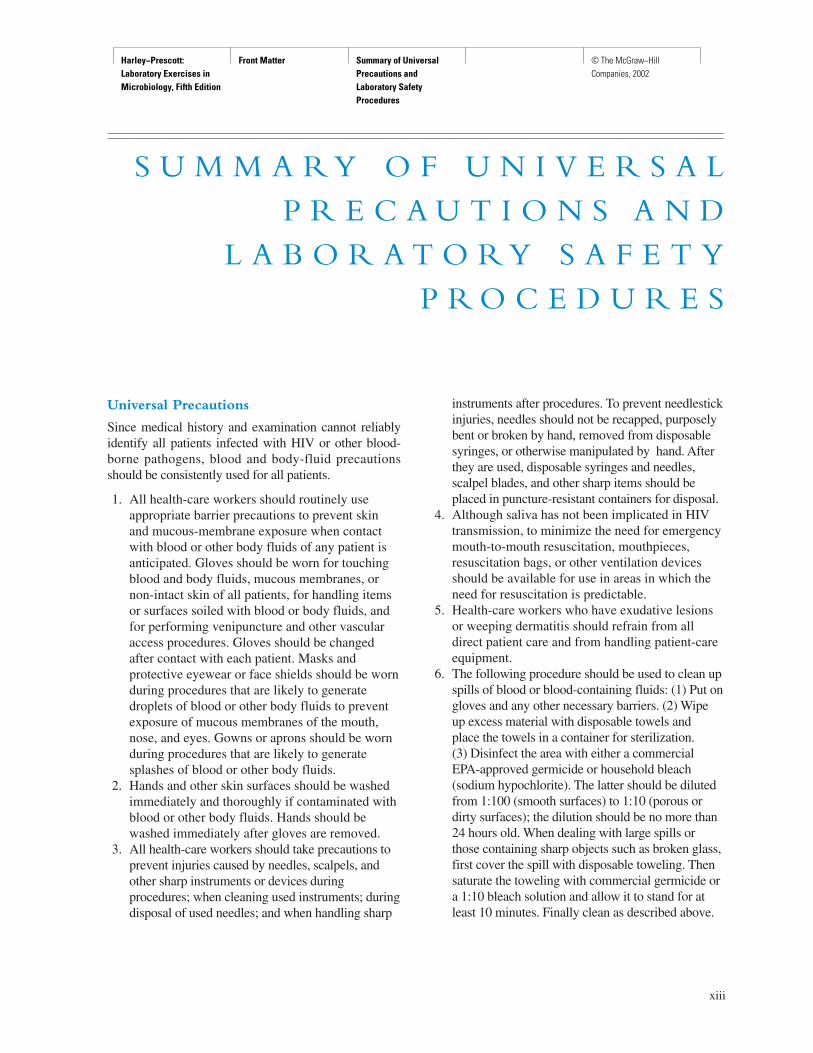
Universal Precautions
Since medical history and examination cannot reliablyidentify all patients infected with HIV or other blood-borne pathogens, blood and body-fluid precautionsshould be consistently used for all patients.
1. All health-care workers should routinely useappropriate barrier precautions to prevent skinand mucous-membrane exposure when contactwith blood or other body fluids of any patient isanticipated. Gloves should be worn for touchingblood and body fluids, mucous membranes, ornon-intact skin of all patients, for handling itemsor surfaces soiled with blood or body fluids, andfor performing venipuncture and other vascularaccess procedures. Gloves should be changedafter contact with each patient. Masks andprotective eyewear or face shields should be wornduring procedures that are likely to generatedroplets of blood or other body fluids to preventexposure of mucous membranes of the mouth,nose, and eyes. Gowns or aprons should be wornduring procedures that are likely to generatesplashes of blood or other body fluids.
2. Hands and other skin surfaces should be washedimmediately and thoroughly if contaminated withblood or other body fluids. Hands should bewashed immediately after gloves are removed.
3. All health-care workers should take precautions toprevent injuries caused by needles, scalpels, andother sharp instruments or devices duringprocedures; when cleaning used instruments; duringdisposal of used needles; and when handling sharp
instruments after procedures. To prevent needlestickinjuries, needles should not be recapped, purposelybent or broken by hand, removed from disposablesyringes, or otherwise manipulated by hand. Afterthey are used, disposable syringes and needles,scalpel blades, and other sharp items should beplaced in puncture-resistant containers for disposal.
4. Although saliva has not been implicated in HIVtransmission, to minimize the need for emergencymouth-to-mouth resuscitation, mouthpieces,resuscitation bags, or other ventilation devicesshould be available for use in areas in which theneed for resuscitation is predictable.
5. Health-care workers who have exudative lesionsor weeping dermatitis should refrain from alldirect patient care and from handling patient-careequipment.
6. The following procedure should be used to clean upspills of blood or blood-containing fluids: (1) Put ongloves and any other necessary barriers. (2) Wipeup excess material with disposable towels and place the towels in a container for sterilization. (3) Disinfect the area with either a commercialEPA-approved germicide or household bleach(sodium hypochlorite). The latter should be dilutedfrom 1:100 (smooth surfaces) to 1:10 (porous ordirty surfaces); the dilution should be no more than24 hours old. When dealing with large spills orthose containing sharp objects such as broken glass,first cover the spill with disposable toweling. Thensaturate the toweling with commercial germicide ora 1:10 bleach solution and allow it to stand for atleast 10 minutes. Finally clean as described above.
Harley−Prescott: Laboratory Exercises in Microbiology, Fifth Edition
Front Matter Summary of Universal Precautions and Laboratory Safety Procedures
© The McGraw−Hill Companies, 2002
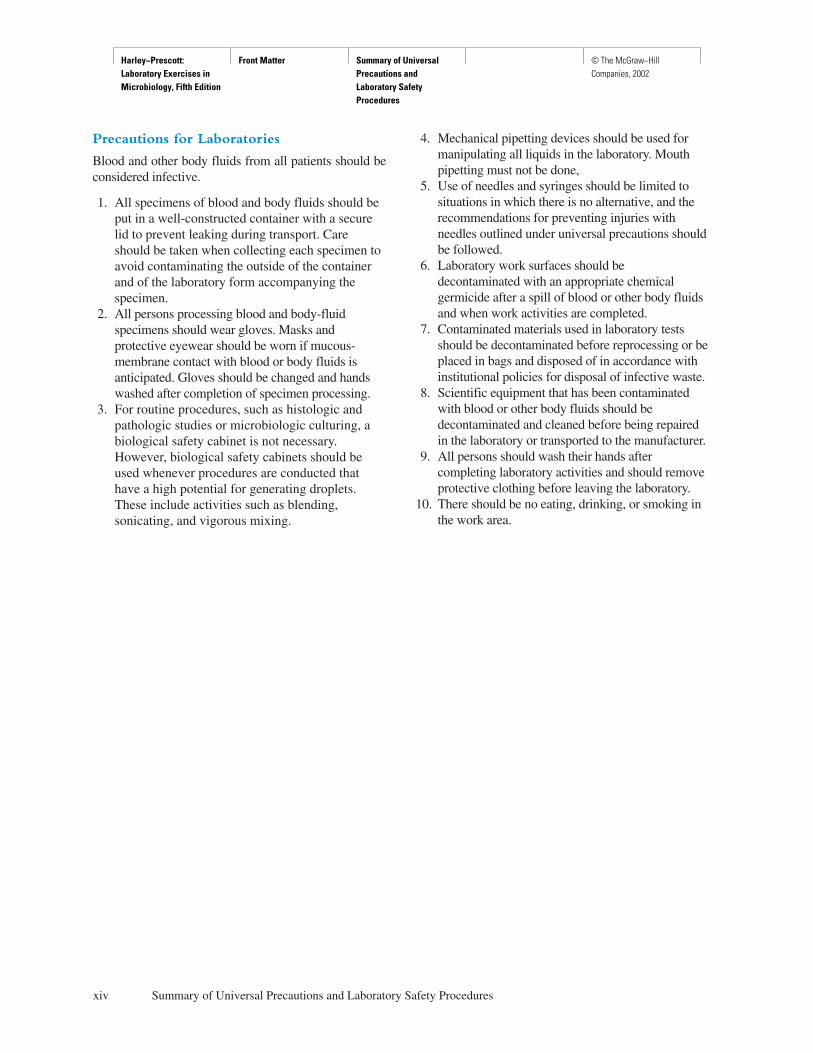
Precautions for Laboratories
Blood and other body fluids from all patients should beconsidered infective.
1. All specimens of blood and body fluids should beput in a well-constructed container with a securelid to prevent leaking during transport. Careshould be taken when collecting each specimen toavoid contaminating the outside of the containerand of the laboratory form accompanying thespecimen.
2. All persons processing blood and body-fluidspecimens should wear gloves. Masks andprotective eyewear should be worn if mucous-membrane contact with blood or body fluids isanticipated. Gloves should be changed and handswashed after completion of specimen processing.
3. For routine procedures, such as histologic andpathologic studies or microbiologic culturing, abiological safety cabinet is not necessary.However, biological safety cabinets should beused whenever procedures are conducted thathave a high potential for generating droplets.These include activities such as blending,sonicating, and vigorous mixing.
xiv Summary of Universal Precautions and Laboratory Safety Procedures
4. Mechanical pipetting devices should be used formanipulating all liquids in the laboratory. Mouthpipetting must not be done,
5. Use of needles and syringes should be limited tosituations in which there is no alternative, and therecommendations for preventing injuries withneedles outlined under universal precautions shouldbe followed.
6. Laboratory work surfaces should bedecontaminated with an appropriate chemicalgermicide after a spill of blood or other body fluidsand when work activities are completed.
7. Contaminated materials used in laboratory testsshould be decontaminated before reprocessing or beplaced in bags and disposed of in accordance withinstitutional policies for disposal of infective waste.
8. Scientific equipment that has been contaminatedwith blood or other body fluids should bedecontaminated and cleaned before being repairedin the laboratory or transported to the manufacturer.
9. All persons should wash their hands aftercompleting laboratory activities and should removeprotective clothing before leaving the laboratory.
10. There should be no eating, drinking, or smoking inthe work area.
Harley−Prescott: Laboratory Exercises in Microbiology, Fifth Edition
I. Microscopic Techniques Introduction © The McGraw−Hill Companies, 2002
1
P A R T O N E
Microscopic Techniques
The most important discoveries of the laws, methods and progress of nature have nearly always sprung from the examination of the
smallest objects which she contains.Jean Baptiste Pierre Antoine Monet de Lamarck
(French naturalist, 1744–1829)
Microbiologists employ a variety of light microscopesin their work: bright-field, dark-field, phase-contrast,
and fluorescence are most commonly used. In fact, the samemicroscope may be a combination of types: bright-field andphase-contrast, or phase-contrast and fluorescence. You willuse these microscopes and the principles of microscopy ex-tensively in this course as you study the form, structure,
staining characteristics, and motility of different microorgan-isms. Therefore, proficiency in using the different micro-scopes is essential to all aspects of microbiology and must bemastered at the very beginning of a microbiology course.The next five exercises have been designed to accomplishthis major objective.
After completing at least exercise 1, you will, atthe minimum, be able to demonstrate the ability touse a bright-field light microscope. This will meetthe American Society for Microbiology Core Cur-riculum skill number 1 (see pp. vi–viii): (a) correctlysetting up and focusing the microscope; (b) properhandling, cleaning, and storage of the microscope;(c) correct use of all lenses; and (d) recording micro-scopic observations.
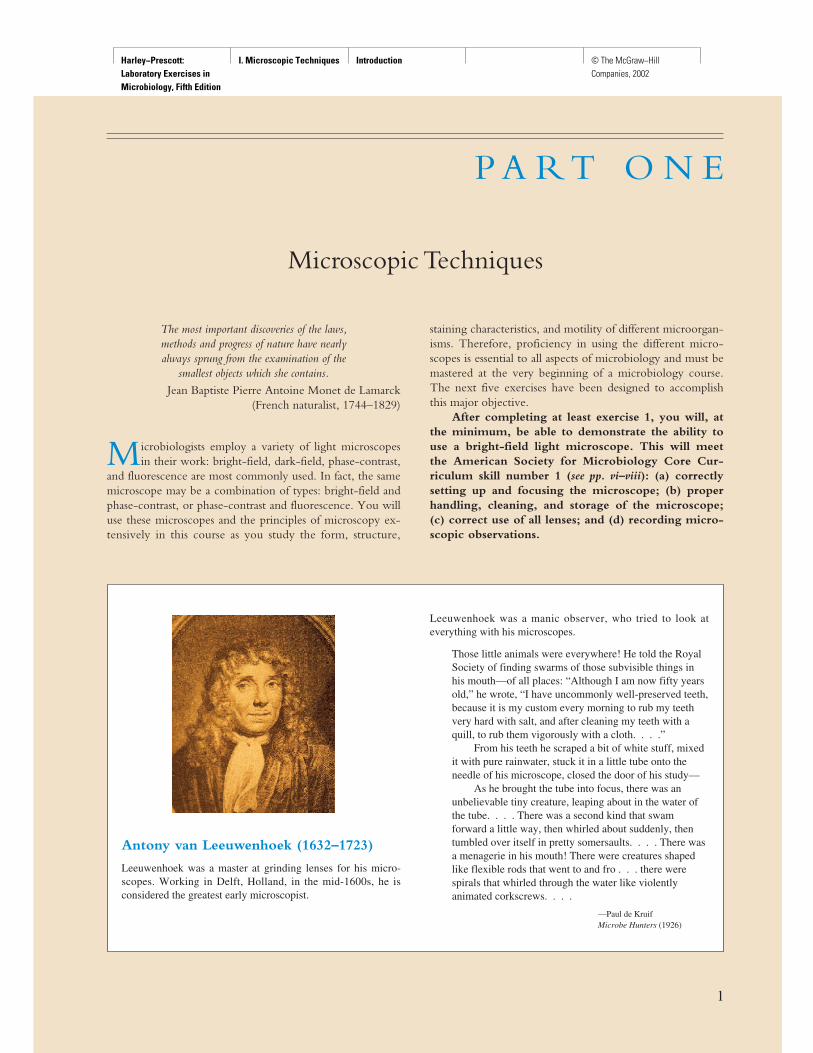
Antony van Leeuwenhoek (1632–1723)
Leeuwenhoek was a master at grinding lenses for his micro-scopes. Working in Delft, Holland, in the mid-1600s, he isconsidered the greatest early microscopist.
Leeuwenhoek was a manic observer, who tried to look ateverything with his microscopes.
Those little animals were everywhere! He told the RoyalSociety of finding swarms of those subvisible things inhis mouth—of all places: “Although I am now fifty yearsold,” he wrote, “I have uncommonly well-preserved teeth,because it is my custom every morning to rub my teethvery hard with salt, and after cleaning my teeth with aquill, to rub them vigorously with a cloth. . . .”
From his teeth he scraped a bit of white stuff, mixedit with pure rainwater, stuck it in a little tube onto theneedle of his microscope, closed the door of his study—
As he brought the tube into focus, there was anunbelievable tiny creature, leaping about in the water ofthe tube. . . . There was a second kind that swamforward a little way, then whirled about suddenly, thentumbled over itself in pretty somersaults. . . . There wasa menagerie in his mouth! There were creatures shapedlike flexible rods that went to and fro . . . there werespirals that whirled through the water like violentlyanimated corkscrews. . . .
—Paul de KruifMicrobe Hunters (1926)
Harley−Prescott: Laboratory Exercises in Microbiology, Fifth Edition
I. Microscopic Techniques 1. Bright−Field Light Microscope and Microscopic Measurement of Organisms
© The McGraw−Hill Companies, 2002
2
E X E R C I S E
Bright-Field Light Microscope and Microscopic Measurement of Organisms
Materials per Student
compound microscopelens paper and lens cleanerimmersion oilprepared stained slides of several types of bacteria
(rods, cocci, spirilla), fungi, algae, and protozoaglass slidescoverslipsdropper with bulbnewspaper or cut-out letter e’stweezersocular micrometerstage micrometer
Learning Objectives
Each student should be able to
1. Identify all the parts of a compound microscope2. Know how to correctly use the microscope—
especially the oil immersion lens3. Learn how to make and examine a wet-mount
preparation4. Understand how microorganisms can be measured
under the light microscope5. Calibrate an ocular micrometer6. Perform some measurements on different
microorganisms
Suggested Reading in Textbook
1. The Bright-Field Microscope, section 2.2; seealso figures 2.3–2.6.
2. See tables 2.1 and 34.1
Medical Application
In the clinical laboratory, natural cell size, arrangement andmotility are important characteristics in the identification ofa bacterial pathogen.
Why Are Prepared Slides Used in This Exercise?
Because this is a microbiology course and most of the mi-croorganisms studied are bacteria, this is an excellent placeto introduce the student to the three basic bacterial shapes:cocci, rods, and spirilla. By gaining expertise in using thebright-field light microscope, the student should be able toobserve these three bacterial shapes by the end of the labperiod. In addition, the student will gain an appreciation forthe small size and arrangement of procaryotic cell structure.
One major objective of this exercise is for the studentto understand how microorganisms can be measured underthe light microscope and to actually perform some mea-surements on different microorganisms. By making mea-surements on prepared slides of various bacteria, fungi,algae, and protozoa, the student will gain an appreciationfor the size of different microorganisms discussed through-out both the lecture and laboratory portions of this course.
Principles
The bright-field light microscope is an instrumentthat magnifies images using two lens systems. Initialmagnification occurs in the objective lens. Most mi-croscopes have at least three objective lenses on a ro-tating base, and each lens may be rotated into align-ment with the eyepiece or ocular lens in which thefinal magnification occurs. The objective lenses areidentified as the low-power, high-dry, and oil immer-sion objectives. Each objective is also designated byother terms. These terms give either the linear magni-
SAFETY CONSIDERATIONSSlides and coverslips are glass. Be careful with them. Donot cut yourself when using them. The coverslips arevery thin and easily broken. Dispose of any broken glassin the appropriately labeled container. If your micro-scope has an automatic stop, do not use it as the stagemicrometer is too thick to allow it to function properly.It may result in a shattered or broken slide or lens.
1
Harley−Prescott: Laboratory Exercises in Microbiology, Fifth Edition
I. Microscopic Techniques 1. Bright−Field Light Microscope and Microscopic Measurement of Organisms
© The McGraw−Hill Companies, 2002
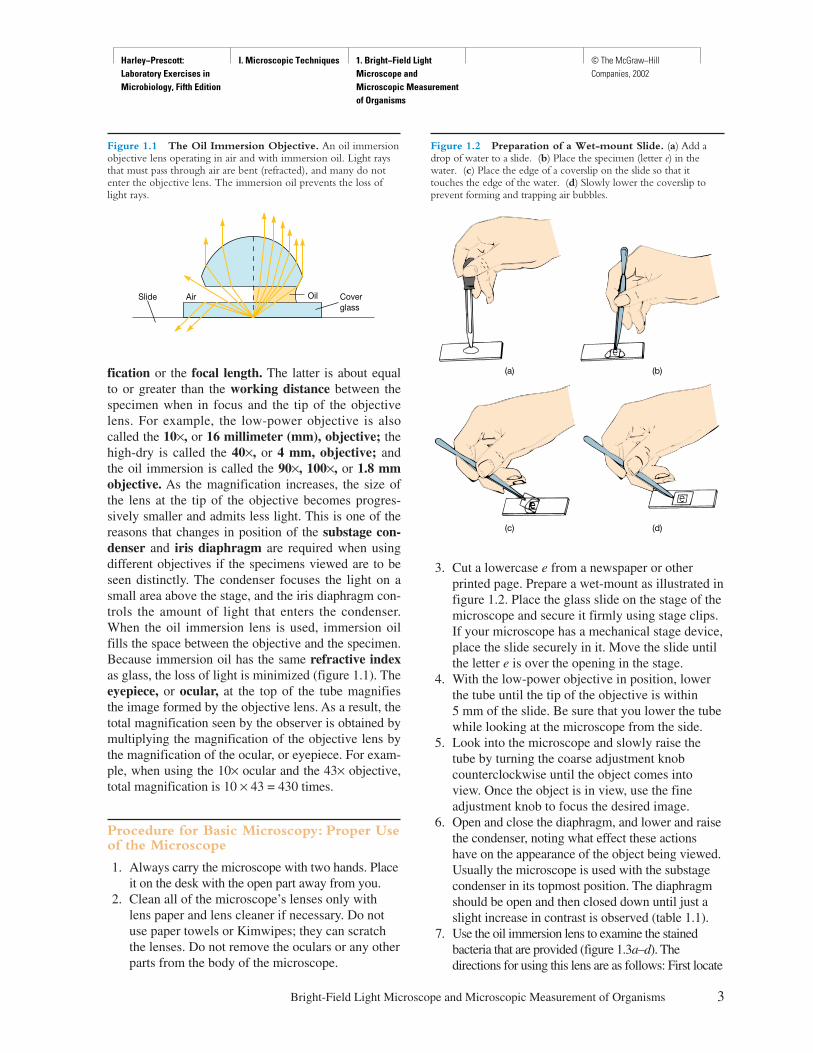
fication or the focal length. The latter is about equalto or greater than the working distance between thespecimen when in focus and the tip of the objectivelens. For example, the low-power objective is alsocalled the 10×, or 16 millimeter (mm), objective; thehigh-dry is called the 40×, or 4 mm, objective; andthe oil immersion is called the 90×, 100×, or 1.8 mmobjective. As the magnification increases, the size ofthe lens at the tip of the objective becomes progres-sively smaller and admits less light. This is one of thereasons that changes in position of the substage con-denser and iris diaphragm are required when usingdifferent objectives if the specimens viewed are to beseen distinctly. The condenser focuses the light on asmall area above the stage, and the iris diaphragm con-trols the amount of light that enters the condenser.When the oil immersion lens is used, immersion oilfills the space between the objective and the specimen.Because immersion oil has the same refractive indexas glass, the loss of light is minimized (figure 1.1). Theeyepiece, or ocular, at the top of the tube magnifiesthe image formed by the objective lens. As a result, thetotal magnification seen by the observer is obtained bymultiplying the magnification of the objective lens bythe magnification of the ocular, or eyepiece. For exam-ple, when using the 10× ocular and the 43× objective,total magnification is 10 × 43 = 430 times.
Procedure for Basic Microscopy: Proper Useof the Microscope
1. Always carry the microscope with two hands. Placeit on the desk with the open part away from you.
2. Clean all of the microscope’s lenses only withlens paper and lens cleaner if necessary. Do notuse paper towels or Kimwipes; they can scratchthe lenses. Do not remove the oculars or any otherparts from the body of the microscope.
3. Cut a lowercase e from a newspaper or otherprinted page. Prepare a wet-mount as illustrated infigure 1.2. Place the glass slide on the stage of themicroscope and secure it firmly using stage clips.If your microscope has a mechanical stage device,place the slide securely in it. Move the slide untilthe letter e is over the opening in the stage.
4. With the low-power objective in position, lowerthe tube until the tip of the objective is within 5 mm of the slide. Be sure that you lower the tubewhile looking at the microscope from the side.
5. Look into the microscope and slowly raise thetube by turning the coarse adjustment knobcounterclockwise until the object comes intoview. Once the object is in view, use the fineadjustment knob to focus the desired image.
6. Open and close the diaphragm, and lower and raisethe condenser, noting what effect these actionshave on the appearance of the object being viewed.Usually the microscope is used with the substagecondenser in its topmost position. The diaphragmshould be open and then closed down until just aslight increase in contrast is observed (table 1.1).
7. Use the oil immersion lens to examine the stainedbacteria that are provided (figure 1.3a–d). Thedirections for using this lens are as follows: First locate
Bright-Field Light Microscope and Microscopic Measurement of Organisms 3
Figure 1.1 The Oil Immersion Objective. An oil immersionobjective lens operating in air and with immersion oil. Light raysthat must pass through air are bent (refracted), and many do notenter the objective lens. The immersion oil prevents the loss oflight rays.
Figure 1.2 Preparation of a Wet-mount Slide. (a) Add adrop of water to a slide. (b) Place the specimen (letter e) in thewater. (c) Place the edge of a coverslip on the slide so that ittouches the edge of the water. (d) Slowly lower the coverslip toprevent forming and trapping air bubbles.
(a)
(c) (d)
(b)
Air Oil Coverglass
Slide
Harley−Prescott: Laboratory Exercises in Microbiology, Fifth Edition
I. Microscopic Techniques 1. Bright−Field Light Microscope and Microscopic Measurement of Organisms
© The McGraw−Hill Companies, 2002
4 Microscopic Techniques
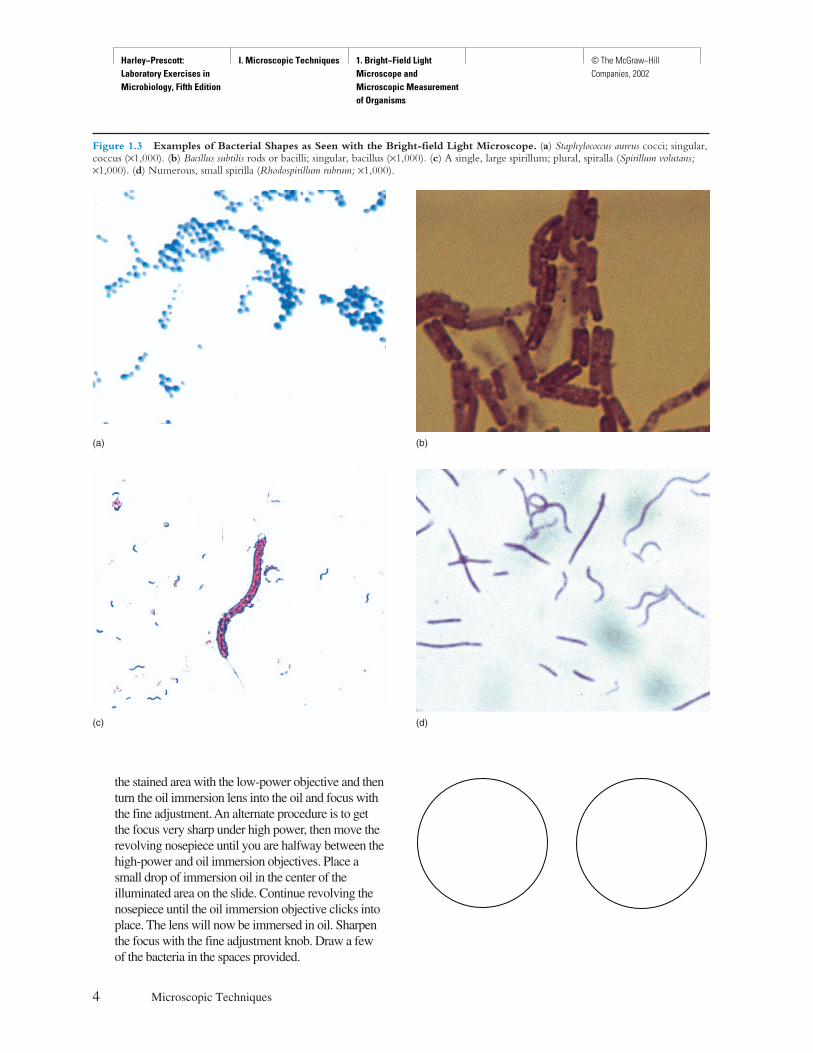
Figure 1.3 Examples of Bacterial Shapes as Seen with the Bright-field Light Microscope. (a) Staphylococcus aureus cocci; singular,coccus (×1,000). (b) Bacillus subtilis rods or bacilli; singular, bacillus (×1,000). (c) A single, large spirillum; plural, spiralla (Spirillum volutans;×1,000). (d) Numerous, small spirilla (Rhodospirillum rubrum; ×1,000).
(a) (b)
(c) (d)
the stained area with the low-power objective and thenturn the oil immersion lens into the oil and focus withthe fine adjustment. An alternate procedure is to getthe focus very sharp under high power, then move therevolving nosepiece until you are halfway between thehigh-power and oil immersion objectives. Place asmall drop of immersion oil in the center of theilluminated area on the slide. Continue revolving thenosepiece until the oil immersion objective clicks intoplace. The lens will now be immersed in oil. Sharpenthe focus with the fine adjustment knob. Draw a fewof the bacteria in the spaces provided.
Harley−Prescott: Laboratory Exercises in Microbiology, Fifth Edition
I. Microscopic Techniques 1. Bright−Field Light Microscope and Microscopic Measurement of Organisms
© The McGraw−Hill Companies, 2002
Bright-Field Light Microscope and Microscopic Measurement of Organisms 5
Table 1.1 Troubleshooting the Bright-Field Light Microscope
Common Problem Possible Correction
No light passing through the ocular Check to ensure that the microscope is completely plugged into a good receptacle
Check to ensure that the power switch to the microscope is turned on
Make sure the objective is locked or clicked in place
Make sure the iris diaphragm is open
Insufficient light passing through the ocular Raise the condenser as high as possible
Open the iris diaphragm completely
Make sure the objective is locked or clicked in place
Lint, dust, eyelashes interferring with view Clean ocular with lens paper and cleaner
Particles seem to move in hazy visual field Air bubbles in immersion oil; add more oil or make certain that oil immersion objective is in the oil
Make sure that the high-dry objective is not being used with oil
Make sure a temporary coverslip is not being used with oil. Oil causes the coverslip to float since the coverslip sticks to the oil and not the slide, making viewing very hazy or impossible
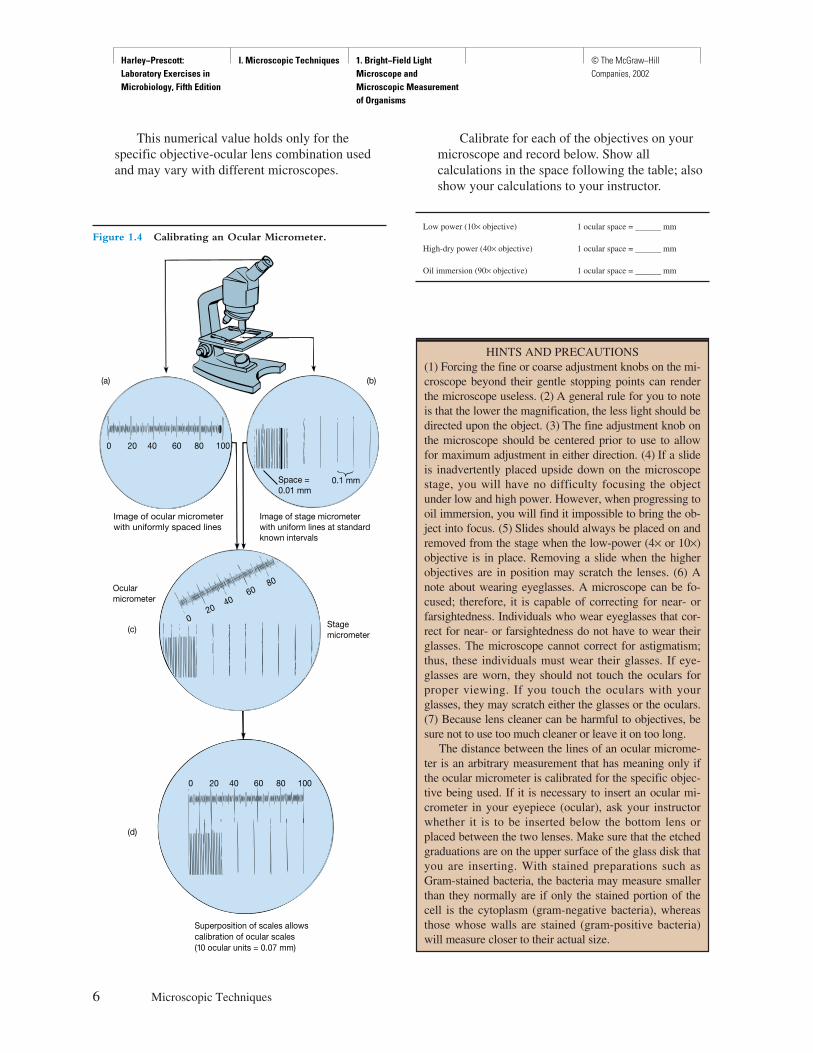
the stage micrometer would appear as illustratedin figure 1.4b.
2. When in place, the two micrometers appear asshown in figure 1.4c. Turn the ocular in the bodytube until the lines of the ocular micrometer areparallel with those of the stage micrometer (figure1.4d ). Match the lines at the left edges of the twomicrometers by moving the stage micrometer.
3. Calculate the actual distance in millimetersbetween the lines of the ocular micrometer byobserving how many spaces of the stagemicrometer are included within a given number ofspaces on the ocular micrometer. You will get thegreatest accuracy in calibration if you use moreocular micrometer spaces to match with stagemicrometer lines.
Because the smallest space on the stagemicrometer equals 0.01 millimeter or 10 �m(figure 1.4b), you can calibrate the ocularmicrometer using the following:
10 spaces on the ocular micrometer = Y spaceson the stage micrometer.
Since the smallest space on a stage micrometer =0.01 mm, then
10 spaces on the ocular micrometer = Y spaces onthe stage micrometer × 0.01 mm, and 1 space onthe ocular micrometer = Y spaces on the stage
micrometer × 0.01 mm .10
For example, if 10 spaces on the ocularmicrometer = 6 spaces on the stage micrometer,then
1 ocular space = 6 × 0.01 mm ,10
1 ocular space = 0.006 mm or 6.0 �m.
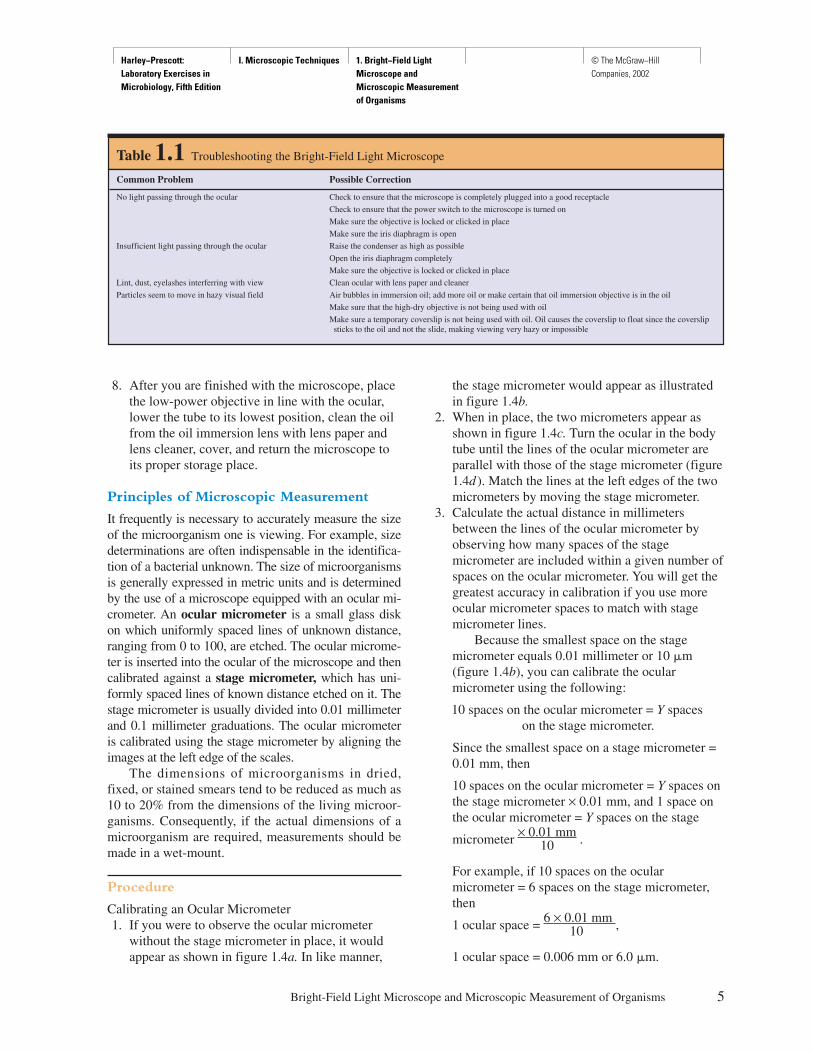
8. After you are finished with the microscope, placethe low-power objective in line with the ocular,lower the tube to its lowest position, clean the oilfrom the oil immersion lens with lens paper andlens cleaner, cover, and return the microscope toits proper storage place.
Principles of Microscopic Measurement
It frequently is necessary to accurately measure the sizeof the microorganism one is viewing. For example, sizedeterminations are often indispensable in the identifica-tion of a bacterial unknown. The size of microorganismsis generally expressed in metric units and is determinedby the use of a microscope equipped with an ocular mi-crometer. An ocular micrometer is a small glass diskon which uniformly spaced lines of unknown distance,ranging from 0 to 100, are etched. The ocular microme-ter is inserted into the ocular of the microscope and thencalibrated against a stage micrometer, which has uni-formly spaced lines of known distance etched on it. Thestage micrometer is usually divided into 0.01 millimeterand 0.1 millimeter graduations. The ocular micrometeris calibrated using the stage micrometer by aligning theimages at the left edge of the scales.
The dimensions of microorganisms in dried,fixed, or stained smears tend to be reduced as much as10 to 20% from the dimensions of the living microor-ganisms. Consequently, if the actual dimensions of amicroorganism are required, measurements should bemade in a wet-mount.
Procedure
Calibrating an Ocular Micrometer1. If you were to observe the ocular micrometer
without the stage micrometer in place, it wouldappear as shown in figure 1.4a. In like manner,
Harley−Prescott: Laboratory Exercises in Microbiology, Fifth Edition
I. Microscopic Techniques 1. Bright−Field Light Microscope and Microscopic Measurement of Organisms
© The McGraw−Hill Companies, 2002
This numerical value holds only for thespecific objective-ocular lens combination usedand may vary with different microscopes.
6 Microscopic Techniques
Stagemicrometer
Superposition of scales allows calibration of ocular scales(10 ocular units = 0.07 mm)
(d)
(c)
Ocularmicrometer
Image of ocular micrometerwith uniformly spaced lines
Image of stage micrometerwith uniform lines at standardknown intervals
Space =0.01 mm
0.1 mm
0 10020 40 60 80
020
4060
80
0 10020 40 60 80
(a) (b)
Figure 1.4 Calibrating an Ocular Micrometer.
HINTS AND PRECAUTIONS(1) Forcing the fine or coarse adjustment knobs on the mi-croscope beyond their gentle stopping points can renderthe microscope useless. (2) A general rule for you to noteis that the lower the magnification, the less light should bedirected upon the object. (3) The fine adjustment knob onthe microscope should be centered prior to use to allowfor maximum adjustment in either direction. (4) If a slideis inadvertently placed upside down on the microscopestage, you will have no difficulty focusing the objectunder low and high power. However, when progressing tooil immersion, you will find it impossible to bring the ob-ject into focus. (5) Slides should always be placed on andremoved from the stage when the low-power (4× or 10×)objective is in place. Removing a slide when the higherobjectives are in position may scratch the lenses. (6) Anote about wearing eyeglasses. A microscope can be fo-cused; therefore, it is capable of correcting for near- orfarsightedness. Individuals who wear eyeglasses that cor-rect for near- or farsightedness do not have to wear theirglasses. The microscope cannot correct for astigmatism;thus, these individuals must wear their glasses. If eye-glasses are worn, they should not touch the oculars forproper viewing. If you touch the oculars with yourglasses, they may scratch either the glasses or the oculars.(7) Because lens cleaner can be harmful to objectives, besure not to use too much cleaner or leave it on too long.
The distance between the lines of an ocular microme-ter is an arbitrary measurement that has meaning only ifthe ocular micrometer is calibrated for the specific objec-tive being used. If it is necessary to insert an ocular mi-crometer in your eyepiece (ocular), ask your instructorwhether it is to be inserted below the bottom lens orplaced between the two lenses. Make sure that the etchedgraduations are on the upper surface of the glass disk thatyou are inserting. With stained preparations such asGram-stained bacteria, the bacteria may measure smallerthan they normally are if only the stained portion of thecell is the cytoplasm (gram-negative bacteria), whereasthose whose walls are stained (gram-positive bacteria)will measure closer to their actual size.
Calibrate for each of the objectives on yourmicroscope and record below. Show allcalculations in the space following the table; alsoshow your calculations to your instructor.
Low power (10× objective) 1 ocular space = ______ mm
High-dry power (40× objective) 1 ocular space = ______ mm
Oil immersion (90× objective) 1 ocular space = ______ mm
Harley−Prescott: Laboratory Exercises in Microbiology, Fifth Edition
I. Microscopic Techniques 1. Bright−Field Light Microscope and Microscopic Measurement of Organisms
© The McGraw−Hill Companies, 2002
7
Name: ———————————————————————
Date: ————————————————————————
Lab Section: —————————————————————
Laboratory Report 1
Bright-Field Light Microscope(Basic Microscopy)
Parts of a Compound Microscope
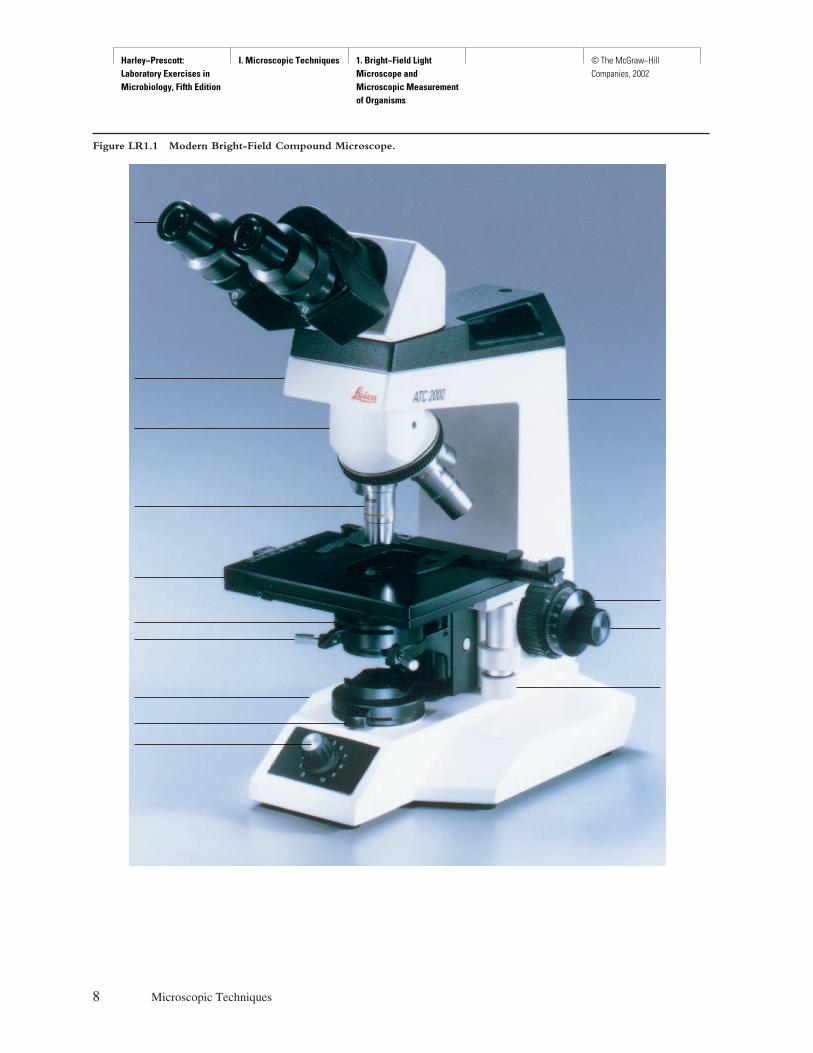
1. Your microscope may have all or most of the features described below and illustrated in figure 2.3 in yourtextbook. By studying this figure and reading your textbook, label the compound microscope in figure LR1.1on the next page. Locate the indicated parts of your microscope and answer the following questions.
a. What is the magnification stamped on the housing of the oculars on your microscope? _______________
b. What are the magnifications of each of the objectives on your microscope? ________________________
_____________________________________________________________________________________
c. Calculate the total magnification for each ocular/objective combination on your microscope.
Ocular × Objective = Total Magnification
___________________ _______________ __________________________________
___________________ _______________ __________________________________
___________________ _______________ __________________________________
___________________ _______________ __________________________________
d. List the magnification and numerical aperture for each objective on your microscope.
Magnification of Objective Numerical Aperture (NA)
____________________________________ ____________________________________
____________________________________ ____________________________________
____________________________________ ____________________________________
____________________________________ ____________________________________
e. With some compound microscopes, loosening a lock screw allows you to rotate the body tube 180°.
What is the advantage of being able to rotate the body tube? ____________________________________
_____________________________________________________________________________________
f. Note the horizontal and vertical scales on the mechanical stage. What is the function of these scales?
_____________________________________________________________________________________
g. Where is the diaphragm on your microscope located? _________________________________________
_____________________________________________________________________________________
Harley−Prescott: Laboratory Exercises in Microbiology, Fifth Edition
I. Microscopic Techniques 1. Bright−Field Light Microscope and Microscopic Measurement of Organisms
© The McGraw−Hill Companies, 2002
Figure LR1.1 Modern Bright-Field Compound Microscope.
8 Microscopic Techniques
Harley−Prescott: Laboratory Exercises in Microbiology, Fifth Edition
I. Microscopic Techniques 1. Bright−Field Light Microscope and Microscopic Measurement of Organisms
© The McGraw−Hill Companies, 2002
How can you regulate the diaphragm? ______________________________________________________
_____________________________________________________________________________________
h. Locate the substage condenser on your microscope. What is its function, and how can it be regulated?
_____________________________________________________________________________________
_____________________________________________________________________________________
i. Can the light intensity of your microscope be regulated? Explain. ________________________________
_____________________________________________________________________________________
Microscopic Measurement of Microorganisms
2. After your ocular micrometer has been calibrated, determine the dimensions of the prepared slides of thefollowing microorganisms.
Microorganism Length Width Magnification
Bacteriumname ________________________ ________________________ ____________ __________________
Fungus name ___________________ ________________________ ____________ __________________
Alga name _____________________ ________________________ ____________ __________________
Protozoan name_________________ ________________________ ____________ __________________
3. Draw and label, as completely as possible, the microorganisms that you measured.
Genus and species: ________________________ Genus and species: ___________________________
Magnification: ___________________________ Magnification: _______________________________
Genus and species: ________________________ Genus and species: ___________________________
Magnification: ___________________________ Magnification: _______________________________
Bright-Field Light Microscope (Basic Microscopy) 9
× ×
× ×

Harley−Prescott: Laboratory Exercises in Microbiology, Fifth Edition
I. Microscopic Techniques 1. Bright−Field Light Microscope and Microscopic Measurement of Organisms
© The McGraw−Hill Companies, 2002
Review Questions
1. Differentiate between the resolving power and magnifying power of a lens. What is meant by the term“parfocal”?
2. Why is the low-power objective placed in position when the microscope is stored or carried?
3. Why is oil necessary when using the 90× to 100× objective?
4. What is the function of the iris diaphragm? The substage condenser?
5. What is meant by the limit of resolution?
10 Microscopic Techniques
Harley−Prescott: Laboratory Exercises in Microbiology, Fifth Edition
I. Microscopic Techniques 1. Bright−Field Light Microscope and Microscopic Measurement of Organisms
© The McGraw−Hill Companies, 2002
6. How can you increase the bulb life of your microscope if its voltage is regulated by a rheostat?
7. In general, at what position should you keep your microscope’s substage condenser lens?
8. What are three bacterial shapes you observed?
9. How can you increase the resolution on your microscope?
10. In microbiology, what is the most commonly used objective? Explain your answer.
11. In microbiology, what is the most commonly used ocular? Explain your answer.
12. If 5× instead of 10× oculars were used in your microscope with the same objectives, what magnificationswould be achieved?
Bright-Field Light Microscope (Basic Microscopy) 11
Harley−Prescott: Laboratory Exercises in Microbiology, Fifth Edition
I. Microscopic Techniques 1. Bright−Field Light Microscope and Microscopic Measurement of Organisms
© The McGraw−Hill Companies, 2002
13. Why is it necessary to calibrate the ocular micrometer with each objective?
14. In the prepared slides, which organism was the largest?
15. When identifying microorganisms, why should a wet-mount be used when making measurements?
16. What is a stage micrometer?
17. Complete the following for the 10 × objective:a. _____ ocular micrometer divisions = _____ stage micrometer divisions
b. _____ ocular micrometer divisions = 1 stage micrometer division = _____ mm
c. One ocular micrometer division = _____ stage micrometer divisions = _____ mm
18. Complete the following on units of measurement:Unit Abbreviation Value
a. 1 centimeter ____________ 10–2 meterb. 1 millimeter mm ____________c. ____________ �m 10–6 meterd. 1 nanometer ____________ 10–9 metere. 1 angstrom ____________ 10–10 meter
12 Microscopic Techniques

Harley−Prescott: Laboratory Exercises in Microbiology, Fifth Edition
I. Microscopic Techniques 2. The Hanging Drop Slide and Bacterial Motility
© The McGraw−Hill Companies, 2002
E X E R C I S E
The Hanging Drop Slide and Bacterial Motility
13
Materials per Student
24- to 48-hour tryptic soy broth cultures ofPseudomonas aeruginosa (ATCC 10145,small, motile bacillus), Bacillus cereus (ATCC21768, large, motile bacillus), and Spirillumvolutans (ATCC 19554, spiral, motilebacterium)
microscope or phase-contrast microscopelens paper and lens cleanerimmersion oilclean depression slides and coverslipspetroleum jelly (Vaseline)inoculating looptoothpicksBunsen burner
Learning Objectives
Each student should be able to
1. Make a hanging drop slide in order to observeliving bacteria
2. Differentiate between the three bacterial speciesused in this exercise on the basis of size, shape,arrangement, and motility
Suggested Reading in Textbook
1. Flagella and Motility, section 3.6; see also figures 3.31–3.36.
Pronunciation Guide
Bacillus cereus (bah-SIL-lus SEE-ree-us)Pseudomonas aeruginosa (soo-do-MO-nas a-ruh-jin-
OH-sah)Spirillum volutans (spy-RIL-lum VOL-u-tans)
Why Are the Above Bacteria Usedin This Exercise?
The major objectives of this exercise are to allow studentsto gain expertise in making hanging drop slides and observ-ing the motility of living bacteria. To accomplish these ob-jectives, the authors have chosen three bacteria that areeasy to culture and vary in size, shape, arrangement of fla-gella, and types of motion. Specifically, Pseudomonasaeruginosa (L. aeruginosa, full of copper rust, hencegreen) is a straight or slightly curved rod (1.5 to 3.0 �m inlength) that exhibits high motility by way of a polar flagel-lum; Bacillus cereus (L. cereus, waxen, wax colored) is alarge (3.0 to 5.0 �m in length) rod-shaped and straightbacillus that moves by peritrichous flagella; and Spirillumvolutans (L. voluto, tumble about) is a rigid helical cell (14to 60 �m in length) that is highly motile since it containslarge bipolar tufts of flagella having a long wavelength andabout one helical turn. P. aeruginosa is widely distributedin nature and may be a saprophytic or opportunistic animalpathogen. B. cereus is found in a wide range of habitats andis a significant cause of food poisoning. S. volutans occursin stagnant freshwater environments.
Principles
Many bacteria show no motion and are termed non-motile. However, in an aqueous environment, thesesame bacteria appear to be moving erratically. This er-ratic movement is due to Brownian movement.
2
SAFETY PRECAUTIONSBe careful with the Bunsen burner flame. Slides andcoverslips are glass. Do not cut yourself when usingthem. Dispose of any broken glass in the appropriatelylabeled container. Discard contaminated depressionslides in a container with disinfectant.
Harley−Prescott: Laboratory Exercises in Microbiology, Fifth Edition
I. Microscopic Techniques 2. The Hanging Drop Slide and Bacterial Motility
© The McGraw−Hill Companies, 2002
Brownian movement results from the random motionof the water molecules bombarding the bacteria andcausing them to move.
True motility (self-propulsion) has been recog-nized in other bacteria and involves several differentmechanisms. Bacteria that possess flagella exhibit fla-gellar motion. Helical-shaped spirochetes have axialfibrils (modified flagella that wrap around the bac-terium) that form axial filaments. These spirochetesmove in a corkscrew- and bending-type motion.Other bacteria simply slide over moist surfaces in aform of gliding motion.
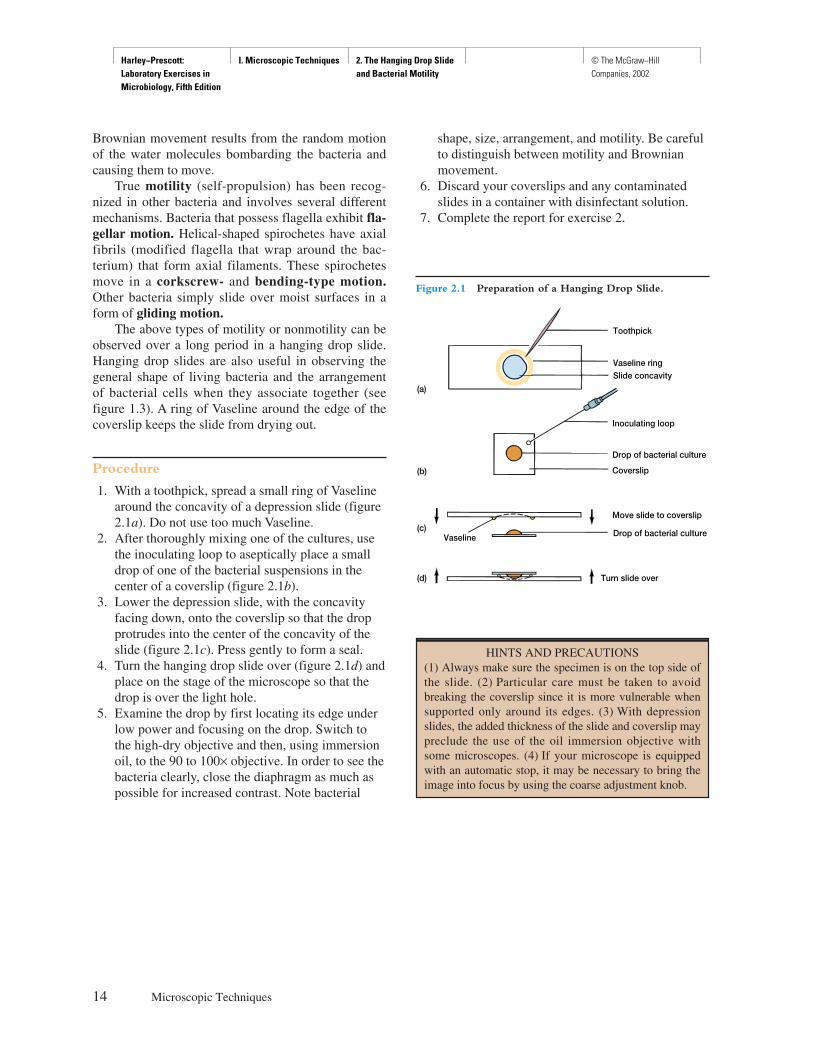
The above types of motility or nonmotility can beobserved over a long period in a hanging drop slide.Hanging drop slides are also useful in observing thegeneral shape of living bacteria and the arrangementof bacterial cells when they associate together (seefigure 1.3). A ring of Vaseline around the edge of thecoverslip keeps the slide from drying out.
Procedure
1. With a toothpick, spread a small ring of Vaselinearound the concavity of a depression slide (figure2.1a). Do not use too much Vaseline.
2. After thoroughly mixing one of the cultures, usethe inoculating loop to aseptically place a smalldrop of one of the bacterial suspensions in thecenter of a coverslip (figure 2.1b).
3. Lower the depression slide, with the concavityfacing down, onto the coverslip so that the dropprotrudes into the center of the concavity of theslide (figure 2.1c). Press gently to form a seal.
4. Turn the hanging drop slide over (figure 2.1d) andplace on the stage of the microscope so that thedrop is over the light hole.
5. Examine the drop by first locating its edge underlow power and focusing on the drop. Switch tothe high-dry objective and then, using immersionoil, to the 90 to 100× objective. In order to see thebacteria clearly, close the diaphragm as much aspossible for increased contrast. Note bacterial
14 Microscopic Techniques
Figure 2.1 Preparation of a Hanging Drop Slide.
Turn slide over(d)
(c)
Coverslip
Vaseline
(b)
(a)
Drop of bacterial culture
Drop of bacterial culture
Inoculating loop
Slide concavityVaseline ring
Toothpick
Move slide to coverslip
HINTS AND PRECAUTIONS(1) Always make sure the specimen is on the top side ofthe slide. (2) Particular care must be taken to avoidbreaking the coverslip since it is more vulnerable whensupported only around its edges. (3) With depressionslides, the added thickness of the slide and coverslip maypreclude the use of the oil immersion objective withsome microscopes. (4) If your microscope is equippedwith an automatic stop, it may be necessary to bring theimage into focus by using the coarse adjustment knob.
shape, size, arrangement, and motility. Be carefulto distinguish between motility and Brownianmovement.
6. Discard your coverslips and any contaminatedslides in a container with disinfectant solution.
7. Complete the report for exercise 2.
Harley−Prescott: Laboratory Exercises in Microbiology, Fifth Edition
I. Microscopic Techniques 2. The Hanging Drop Slide and Bacterial Motility
© The McGraw−Hill Companies, 2002
15
Name: ———————————————————————
Date: ————————————————————————
Lab Section: —————————————————————
Laboratory Report 2
The Hanging Drop Slide and Bacterial Motility
1. Examine the hanging drop slide and complete the following table with respect to the size, shape, and motilityof the different bacteria.
Bacterium Size Shape Type of Motility Cell Arrangement
B. cereus ____________ __________________ _____________________ ________________________
P. aeruginosa ____________ __________________ _____________________ ________________________
S. volutans ____________ __________________ _____________________ ________________________
2. Draw a representative field for each bacterium.
Magnification: ___________ Magnification: ___________ Magnification: ___________
B. cereus S. volutansP. aeruginosa
× × ×

Harley−Prescott: Laboratory Exercises in Microbiology, Fifth Edition
I. Microscopic Techniques 2. The Hanging Drop Slide and Bacterial Motility
© The McGraw−Hill Companies, 2002
Review Questions
1. Why are unstained bacteria more difficult to observe than stained bacteria?
2. What are some reasons for making a hanging drop slide?
3. Describe the following types of bacterial movement:a. Brownian movement
b. flagellar motion
c. gliding motion
4. Why do you have to reduce the amount of light with the diaphragm in order to see bacteria in a hanging dropslide?
5. Can the hanging drop slide be used to examine other microorganisms? Explain which ones.
6. Which of the bacteria exhibited true motility on the slides?
7. How does true motility differ from Brownian movement?
16 Microscopic Techniques

Harley−Prescott: Laboratory Exercises in Microbiology, Fifth Edition
I. Microscopic Techniques 3. Dark−Field Light Microscope
© The McGraw−Hill Companies, 2002
17
E X E R C I S E
Dark-Field Light Microscope
Materials per Group of Students
dark-field light microscopeflat toothpickslens paper and lens cleanerimmersion oilslides and coverslipsprepared slides of spirochetes (e.g., Treponema
denticola), radiolarians, protozoatweezers
Learning Objectives
Each student should be able to
1. Understand the principles behind dark-fieldmicroscopy
2. Correctly use the dark-field microscope3. Make a wet-mount and examine it for spirochetes
with the dark-field microscope
Suggested Reading in Textbook
1. The Dark-Field Microscope, section 2.2; see alsofigures 2.7 and 2.8.
Pronunciation Guide
Treponema denticola (trep-o-NE-mah dent-A-cola)
Why Is the Following BacteriumUsed in This Exercise?
Treponema denticola (M.L. n, denticola, tooth dweller)often is a part of the normal microbiota of the oral mucosa;thus, this spirochete is readily available and does not haveto be cultured. Most species stain poorly if at all withGram’s or Giemsa’s methods and are best observed withdark-field or phase-contrast microscopy. Thus, T. denticolais an excellent specimen to observe when practicing the useof a dark-field microscope, and also allows the student tocontinue practicing the wet-mount preparation. T. denticolais a slender, helical cell, 6 to 16 �m in length. In a wet-mount, the bacteria show both rotational and translationalmovements due to two or three periplasmic flagella insertedat each end of the protoplasmic cylinder. Young cells rotaterapidly on their axis. Thus, by using T. denticola, the stu-dent is also able to observe bacterial motility.
Principles
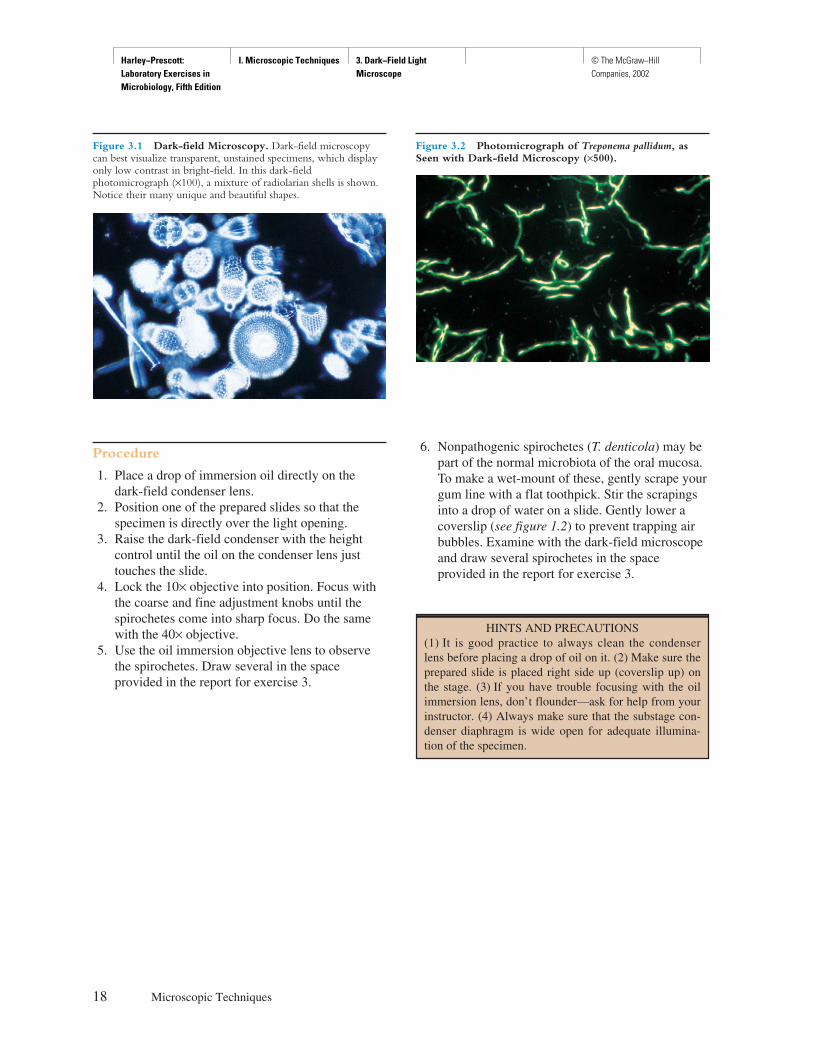
The compound microscope may be fitted with a dark-field condenser that has a numerical aperture (resolv-ing power) greater than the objective. The condenseralso contains a dark-field stop. The compound micro-scope now becomes a dark-field microscope. Lightpassing through the specimen is diffracted and entersthe objective lens, whereas undiffracted light doesnot, resulting in a bright image against a dark back-ground (figures 3.1–3.2). Since light objects against adark background are seen more clearly by the eyethan the reverse, dark-field microscopy is useful inobserving unstained living microorganisms, microor-ganisms that are difficult to stain, and spirochetes(figure 3.2), which are poorly defined by bright-fieldmicroscopy.
3
SAFETY CONSIDERATIONSGently scrape the gum line or gingival sulcus with a flattoothpick so that you obtain a small amount of surfacescrapings and not lacerated gum tissue or impactedfood. Slides and coverslips are glass. Do not cut your-self when using them. Dispose of any broken glass inthe appropriately labeled container. Do not throw usedtoothpicks in the wastebasket. Place them in the appro-priate container for disposal.
Harley−Prescott: Laboratory Exercises in Microbiology, Fifth Edition
I. Microscopic Techniques 3. Dark−Field Light Microscope
© The McGraw−Hill Companies, 2002
18 Microscopic Techniques
Procedure
1. Place a drop of immersion oil directly on thedark-field condenser lens.
2. Position one of the prepared slides so that thespecimen is directly over the light opening.
3. Raise the dark-field condenser with the heightcontrol until the oil on the condenser lens justtouches the slide.
4. Lock the 10× objective into position. Focus withthe coarse and fine adjustment knobs until thespirochetes come into sharp focus. Do the samewith the 40× objective.
5. Use the oil immersion objective lens to observethe spirochetes. Draw several in the spaceprovided in the report for exercise 3.
6. Nonpathogenic spirochetes (T. denticola) may bepart of the normal microbiota of the oral mucosa.To make a wet-mount of these, gently scrape yourgum line with a flat toothpick. Stir the scrapingsinto a drop of water on a slide. Gently lower acoverslip (see figure 1.2) to prevent trapping airbubbles. Examine with the dark-field microscopeand draw several spirochetes in the spaceprovided in the report for exercise 3.
Figure 3.1 Dark-field Microscopy. Dark-field microscopycan best visualize transparent, unstained specimens, which displayonly low contrast in bright-field. In this dark-fieldphotomicrograph (×100), a mixture of radiolarian shells is shown.Notice their many unique and beautiful shapes.
Figure 3.2 Photomicrograph of Treponema pallidum, asSeen with Dark-field Microscopy (×500).
HINTS AND PRECAUTIONS(1) It is good practice to always clean the condenserlens before placing a drop of oil on it. (2) Make sure theprepared slide is placed right side up (coverslip up) onthe stage. (3) If you have trouble focusing with the oilimmersion lens, don’t flounder—ask for help from yourinstructor. (4) Always make sure that the substage con-denser diaphragm is wide open for adequate illumina-tion of the specimen.
Harley−Prescott: Laboratory Exercises in Microbiology, Fifth Edition
I. Microscopic Techniques 3. Dark−Field Light Microscope
© The McGraw−Hill Companies, 2002
Dark-Field Light Microscope
1. Drawing of spirochetes from a prepared slide. Drawing of spirochetes from a wet-mount.
Magnification: × __________________________ Magnification: × _____________________________
Genus and species: ________________________ Genus and species: ____________________________
Shape: __________________________________ Shape: _____________________________________
2. Label the following parts of a dark-field microscope. Use the following terms: dark-field stop, specimen,Abbé condenser, and objective.
19
Name: ———————————————————————
Date: ————————————————————————
Lab Section: —————————————————————
Laboratory Report 3

Harley−Prescott: Laboratory Exercises in Microbiology, Fifth Edition
I. Microscopic Techniques 3. Dark−Field Light Microscope
© The McGraw−Hill Companies, 2002
Review Questions
1. What is the principle behind dark-field microscopy?
2. When would you use the dark-field microscope?
3. Why is the field dark and the specimen bright when a dark-field microscope is used to examine a specimen?
4. Differentiate between bright-field and dark-field microscopy.
5. What is the function of the Abbé condenser in dark-field microscopy?
6. What is the function of the dark-field stop?
7. In dark-field microscopy, why is a drop of oil placed directly on the condenser lens?
20 Microscopic Techniques
Harley−Prescott: Laboratory Exercises in Microbiology, Fifth Edition
I. Microscopic Techniques 4. Phase−Contrast Light Microscope
© The McGraw−Hill Companies, 2002
21
E X E R C I S E
Phase-Contrast Light Microscope
Materials per Group of Students
pond waterphase-contrast light microscopenew microscope slides and coverslipsPasteur pipette with pipettorpictorial guides of common pond water
microorganismsmethyl cellulose (Protoslo, Carolina Biological
Supply)tweezerslens paper and lens cleanerprepared slides of Bacillus or Clostridium
showing endospores
Learning Objectives
Each student should be able to
1. Understand the basic principles behind phase-contrast microscopy
2. Correctly use the phase-contrast microscope3. Make a wet-mount of pond water and observe
some of the transparent, colorless microorganismsthat are present
Suggested Reading in Textbook
1. The Phase-Contrast Microscope, section 2.2; seealso figures 2.8 and 2.9.
Pronunciation Guide
Bacillus (bah-SIL-lus)Clostridium (klos-STRID-ee-um)
Why Are the Following Bacteria andPond Water Used in This Exercise?
Most microorganisms and their organelles are colorless andoften difficult to see by ordinary bright-field or dark-fieldmicroscopy. Phase-contrast microscopy permits the obser-vation of otherwise indistinct, living, unstained bacteria andtheir associated structures (such as endospores). Bacillusspecies are rod shaped, often arranged in pairs or chains,with rounded or square ends. Endospores are oval or some-times cylindrical. Clostridium species are often arranged inpairs or short chains, with rounded or sometimes pointedends. The endospores often distend the cell. Thus, by usingprepared slides of Bacillus and Clostridium, the studentgains expertise in using the phase-contrast microscope andin observing specific bacterial structures, such as differentendospores.
Pond water is usually teeming with bacteria and pro-tists. By using the phase-contrast microscope and slowingdown the many microorganisms with Protoslo, the studentis able to observe the internal structure of protists such asParamecium.
Principles
Certain transparent, colorless living microorganismsand their internal organelles are often impossible tosee by ordinary bright-field or dark-field microscopybecause they do not absorb, reflect, refract, or diffractsufficient light to contrast with the surrounding envi-ronment or the rest of the microorganism. Microor-ganisms and their organelles are only visible whenthey absorb, reflect, refract, or diffract more light thantheir environment. The phase-contrast microscopepermits the observation of otherwise invisible living,unstained microorganisms (figure 4.1a–d).
In the phase-contrast microscope, the condenserhas an annular diaphragm, which produces a hollowcone of light; the objective has a glass disk (the phase
SAFETY CONSIDERATIONSBe careful with the glass slides and coverslips. Disposeof the slides and coverslips, the used Pasteur pipettes,and pond water properly when finished. Do not pipettepond water with your mouth—use the pipettor provided.
4
Harley−Prescott: Laboratory Exercises in Microbiology, Fifth Edition
I. Microscopic Techniques 4. Phase−Contrast Light Microscope
© The McGraw−Hill Companies, 2002
22 Microscopic Techniques
plate) with a thin film of transparent material de-posited on it, which accentuates phase changes pro-duced in the specimen. This phase change is observedin the specimen as a difference in light intensity.Phase plates may either retard (positive phase plate)the diffracted light relative to the undiffracted light,producing dark-phase-contrast microscopy, or ad-vance (negative phase plate) the undiffracted light rel-ative to the directed light, producing bright-phase-contrast microscopy.
Procedure
1. Make a wet-mount of pond water. Add a drop ofmethyl cellulose (Protoslo) to slow the swimmingof the microorganisms. Prepared slides of Bacillusor Clostridium may also be used.
2. Place the slide on the stage of the phase-contrastmicroscope so that the specimen is over the lighthole.
3. Rotate the 10× objective into place.4. Rotate into position the annular diaphragm that
corresponds to the 10× objective. It is absolutelynecessary that the cone of light produced by theannular diaphragm below the condenser becentered exactly with the phase plate of theobjective (see figure 2.9 in textbook if you do notunderstand this procedure). Consequently, thereare three different annular diaphragms that matchthe phase plates of the three different phaseobjectives (10×, 40×, and 90× or 100×). Thesubstage unit beneath the condenser contains adisk that can be rotated in order to position thecorrect annular diaphragm.
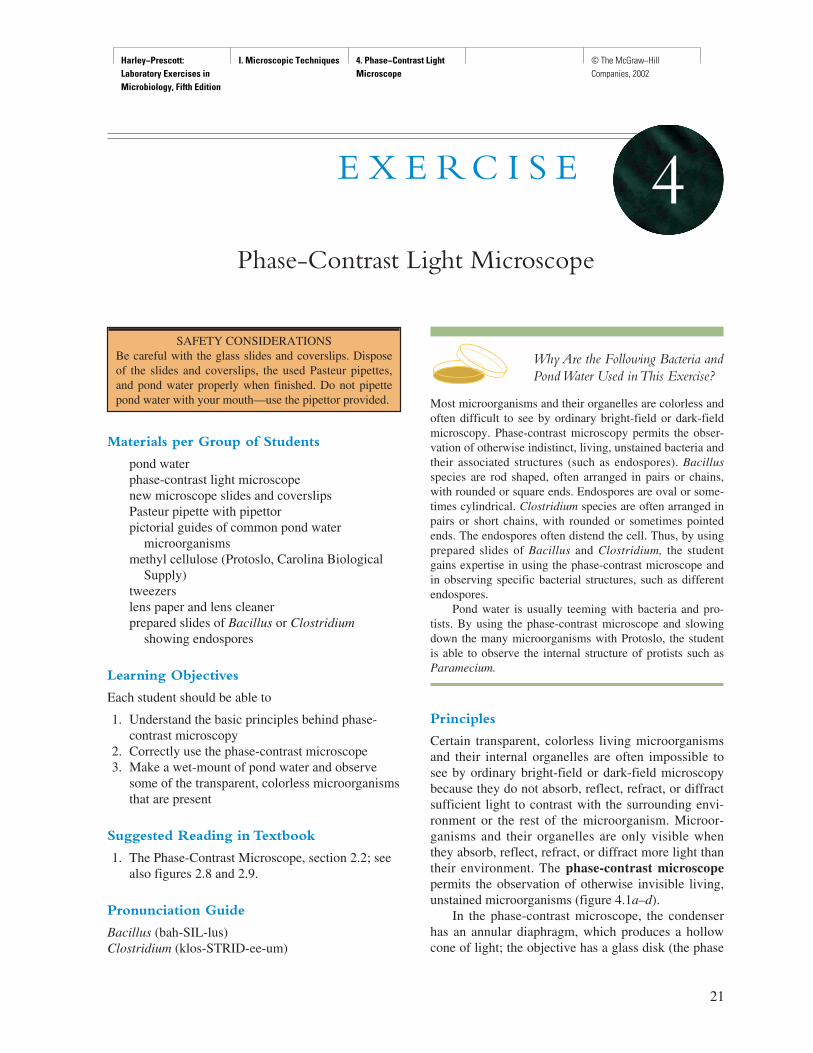
Figure 4.1 Some Examples of Microorganisms Seen with Phase-contrast Microscopy. (a) A protozoan, Paramecium caudatum,from pond water stained to show internal structures (×200). (b) A bacterium, Bacillus cereus, stained to show spores (×1,000). (c) A yeast,Saccharomyces cerevisiae, stained to show budding (×1,000). (d) A filamentous green alga, Spirogyra, showing its helical chloroplasts (×200).
(b)(a)
(c) (d)

Harley−Prescott: Laboratory Exercises in Microbiology, Fifth Edition
I. Microscopic Techniques 4. Phase−Contrast Light Microscope
© The McGraw−Hill Companies, 2002
Phase-Contrast Light Microscope 23
5. Focus with the 10× objective and observe themicroorganisms.
6. Rotate the nosepiece and annular diaphragm intothe proper position for observation with the 40×objective.
7. Do the same with the oil immersion lens.8. In the report for exercise 4, sketch several of the
microorganisms that you have observed.9. If you examined pond water, use the pictorial
guides provided by your instructor to assist you inidentifying some of the microorganisms present.
HINTS AND PRECAUTIONS(1) Make sure the specimen is directly over the lighthole in the stage of the microscope. (2) The phase ele-ments must be properly aligned. Misalignment is themajor pitfall that beginning students encounter in phase-contrast microscopy. (3) If your microscope is not prop-erly aligned, ask your instructor for help.
Harley−Prescott: Laboratory Exercises in Microbiology, Fifth Edition
I. Microscopic Techniques 4. Phase−Contrast Light Microscope
© The McGraw−Hill Companies, 2002
25
Name: ———————————————————————
Date: ————————————————————————
Lab Section: —————————————————————
Laboratory Report 4
Phase-Contrast Light Microscope
1. Some typical microorganisms in pond water as seen with the phase-contrast light microscope.
2. Drawings of Bacillus, Clostridium, or another bacterium showing endospores as seen with the phase-contrastmicroscope.
Low power High-dry power
Oil immersion
Bacillus Clostridium
Third specimen

Harley−Prescott: Laboratory Exercises in Microbiology, Fifth Edition
I. Microscopic Techniques 4. Phase−Contrast Light Microscope
© The McGraw−Hill Companies, 2002
Review Questions
1. In the phase-contrast microscope, what does the annular diaphragm do?
2. When would you use the phase-contrast microscope?
3. Explain how the phase plate works in a phase-contrast microscope that produces bright objects with respect tothe background.
4. What happens to the phase of diffracted light in comparison to undiffracted light in a phase-contrastmicroscope?
5. What advantage does the phase-contrast microscope have over the ordinary bright-field microscope?
6. What is the difference between a bright-phase-contrast and a dark-phase-contrast microscope?
7. In microscopy, what does the term “phase” mean?
26 Microscopic Techniques

Harley−Prescott: Laboratory Exercises in Microbiology, Fifth Edition
I. Microscopic Techniques 5. Fluorescence Microscope
© The McGraw−Hill Companies, 2002
27
E X E R C I S E
Fluorescence Microscope
Materials per Group of Students
fluorescence microscopelens paper and lens cleanerlow-fluorescing immersion oilprotective glasses that filter UV lightprepared slides of known bacteria (M.
tuberculosis) stained with fluorescent dye
Learning Objectives
Each student should be able to
1. Understand the principles behind the fluorescencemicroscope
2. Correctly use the fluorescence microscope byobserving prepared slides of known bacteriastained with a fluorescent dye
Suggested Reading in Textbook
1. The Fluorescence Microscope, section 2.2; seealso figures 2.12, 2.13.
Pronunciation Guide
Mycobacterium tuberculosis (mi-ko-bak-TE-re-umtoo-ber-ku-LO-sis)
Why Is the Following BacteriumUsed in This Exercise?
Mycobacterium tuberculosis (L. tuberculum, a small swelling+ Gr. -osis, characterized by) is a human pathogen that causestuberculosis. It is very slow growing and not readily stainedby Gram’s method. The cell is 1 to 4 �m in length, straight orslightly curved, occurring singly and in occasional threads.This bacterium can most readily be identified after stainingwith fluorochromes or specifically labelling it with fluores-cent antibodies using complicated immunofluorescence pro-cedures, which are both time consuming and expensive. Byusing commercially prepared slides, the student is able to im-mediately examine a pathogenic bacterium, such as M. tuber-culosis, and gain expertise in using the fluorescence micro-scope. In this exercise, microscopic technique is moreimportant than what is being observed.
Medical Applications
Fluorescence microscopy is commonly used in the clinicallaboratory for the rapid detection and identification of bacte-rial antigens in tissue smears, sections, and fluids, as well asthe rapid identification of many disease-causing microor-ganisms. For example, a sputum specimen can be quicklyscreened for M. tuberculosis by staining it with a fluorescentdye that binds specifically to M. tuberculosis. Only thestained bacterium of interest will be visible when the speci-men is viewed under the fluorescence microscope.
Principles
Fluorescence microscopy is based on the principle ofremoval of incident illumination by selective absorp-tion, whereas light that has been absorbed by the
SAFETY CONSIDERATIONSRemember that the pressurized mercury vapor arc lampis potentially explosive. Never attempt to touch thelamp while it is hot. Never expose your eyes to the di-rect rays of the mercury vapor arc lamp. Severe burns ofthe retina can result from exposure to the rays. In likemanner, removal of either the barrier or exciter filtercan cause retinal injury while looking through themicroscope.
5
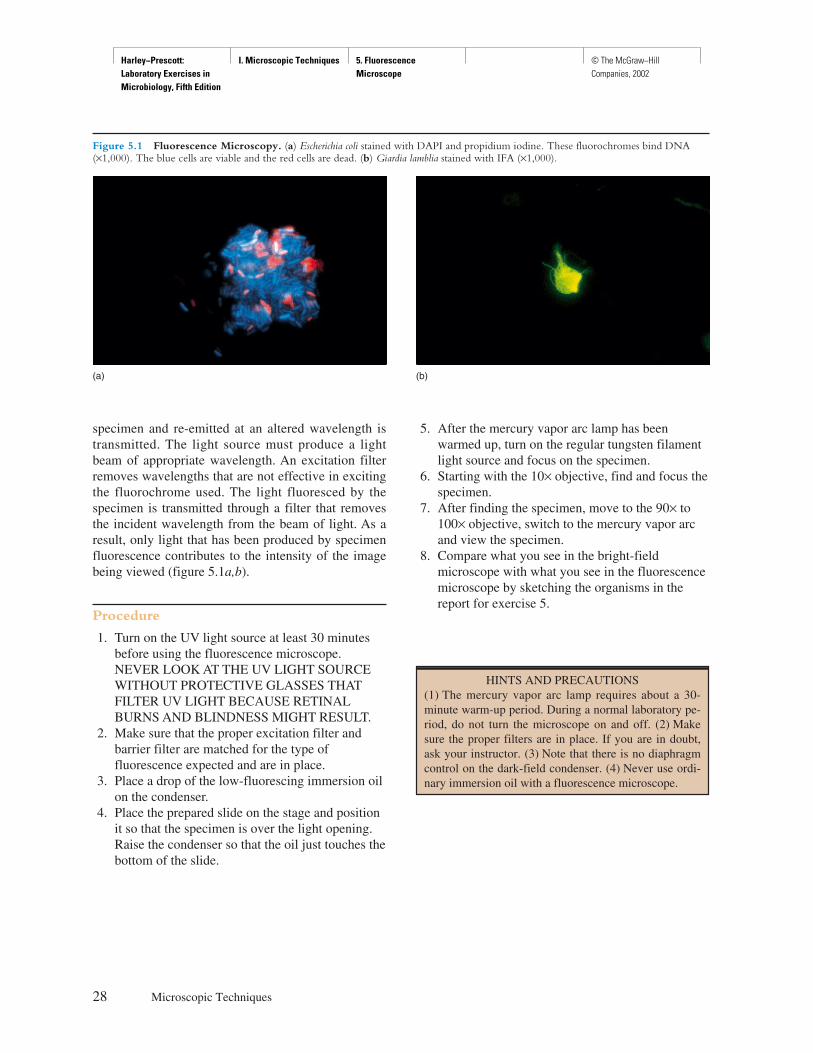
Harley−Prescott: Laboratory Exercises in Microbiology, Fifth Edition
I. Microscopic Techniques 5. Fluorescence Microscope
© The McGraw−Hill Companies, 2002
28 Microscopic Techniques
specimen and re-emitted at an altered wavelength istransmitted. The light source must produce a lightbeam of appropriate wavelength. An excitation filterremoves wavelengths that are not effective in excitingthe fluorochrome used. The light fluoresced by thespecimen is transmitted through a filter that removesthe incident wavelength from the beam of light. As aresult, only light that has been produced by specimenfluorescence contributes to the intensity of the imagebeing viewed (figure 5.1a,b).
Procedure
1. Turn on the UV light source at least 30 minutesbefore using the fluorescence microscope.NEVER LOOK AT THE UV LIGHT SOURCEWITHOUT PROTECTIVE GLASSES THATFILTER UV LIGHT BECAUSE RETINALBURNS AND BLINDNESS MIGHT RESULT.
2. Make sure that the proper excitation filter andbarrier filter are matched for the type offluorescence expected and are in place.
3. Place a drop of the low-fluorescing immersion oilon the condenser.
4. Place the prepared slide on the stage and positionit so that the specimen is over the light opening.Raise the condenser so that the oil just touches thebottom of the slide.
5. After the mercury vapor arc lamp has beenwarmed up, turn on the regular tungsten filamentlight source and focus on the specimen.
6. Starting with the 10× objective, find and focus thespecimen.
7. After finding the specimen, move to the 90× to100× objective, switch to the mercury vapor arcand view the specimen.
8. Compare what you see in the bright-fieldmicroscope with what you see in the fluorescencemicroscope by sketching the organisms in thereport for exercise 5.
Figure 5.1 Fluorescence Microscopy. (a) Escherichia coli stained with DAPI and propidium iodine. These fluorochromes bind DNA(×1,000). The blue cells are viable and the red cells are dead. (b) Giardia lamblia stained with IFA (×1,000).
(a) (b)
HINTS AND PRECAUTIONS(1) The mercury vapor arc lamp requires about a 30-minute warm-up period. During a normal laboratory pe-riod, do not turn the microscope on and off. (2) Makesure the proper filters are in place. If you are in doubt,ask your instructor. (3) Note that there is no diaphragmcontrol on the dark-field condenser. (4) Never use ordi-nary immersion oil with a fluorescence microscope.
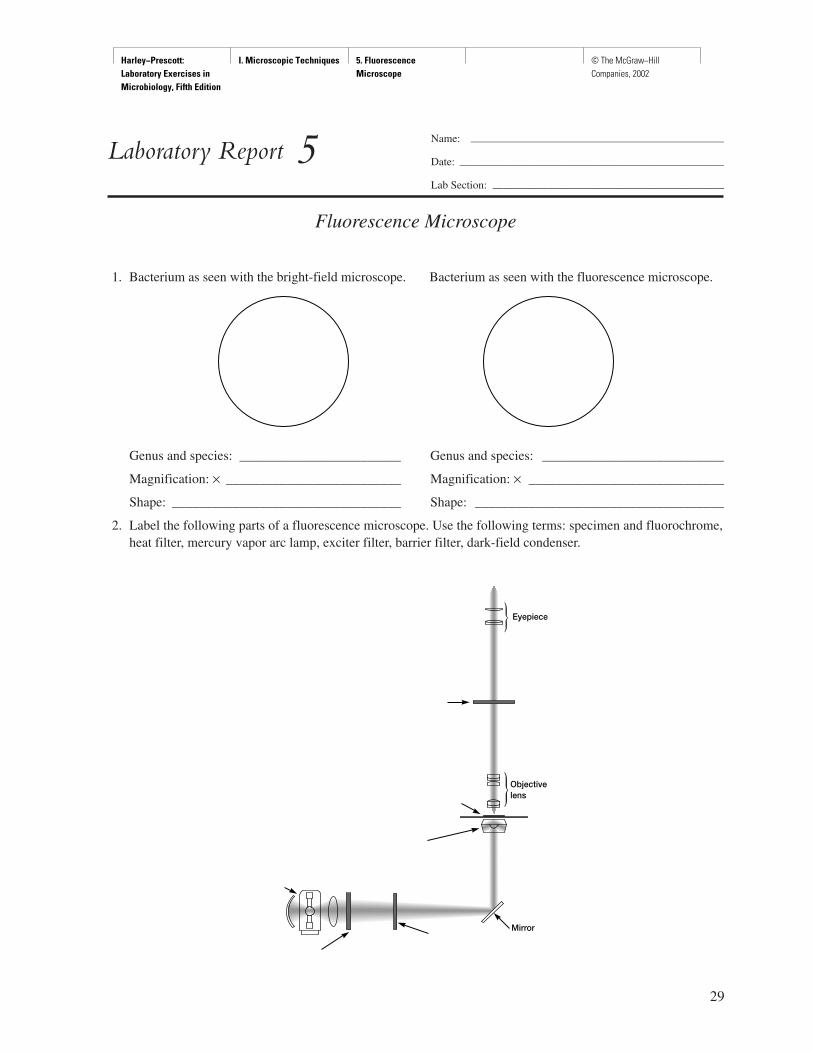
Harley−Prescott: Laboratory Exercises in Microbiology, Fifth Edition
I. Microscopic Techniques 5. Fluorescence Microscope
© The McGraw−Hill Companies, 2002
29
Name: ———————————————————————
Date: ————————————————————————
Lab Section: —————————————————————
Laboratory Report 5
Fluorescence Microscope
1. Bacterium as seen with the bright-field microscope. Bacterium as seen with the fluorescence microscope.
Genus and species: ________________________ Genus and species: ___________________________
Magnification: × __________________________ Magnification: × _____________________________
Shape: __________________________________ Shape: _____________________________________
2. Label the following parts of a fluorescence microscope. Use the following terms: specimen and fluorochrome,heat filter, mercury vapor arc lamp, exciter filter, barrier filter, dark-field condenser.
Eyepiece
Objectivelens
Mirror
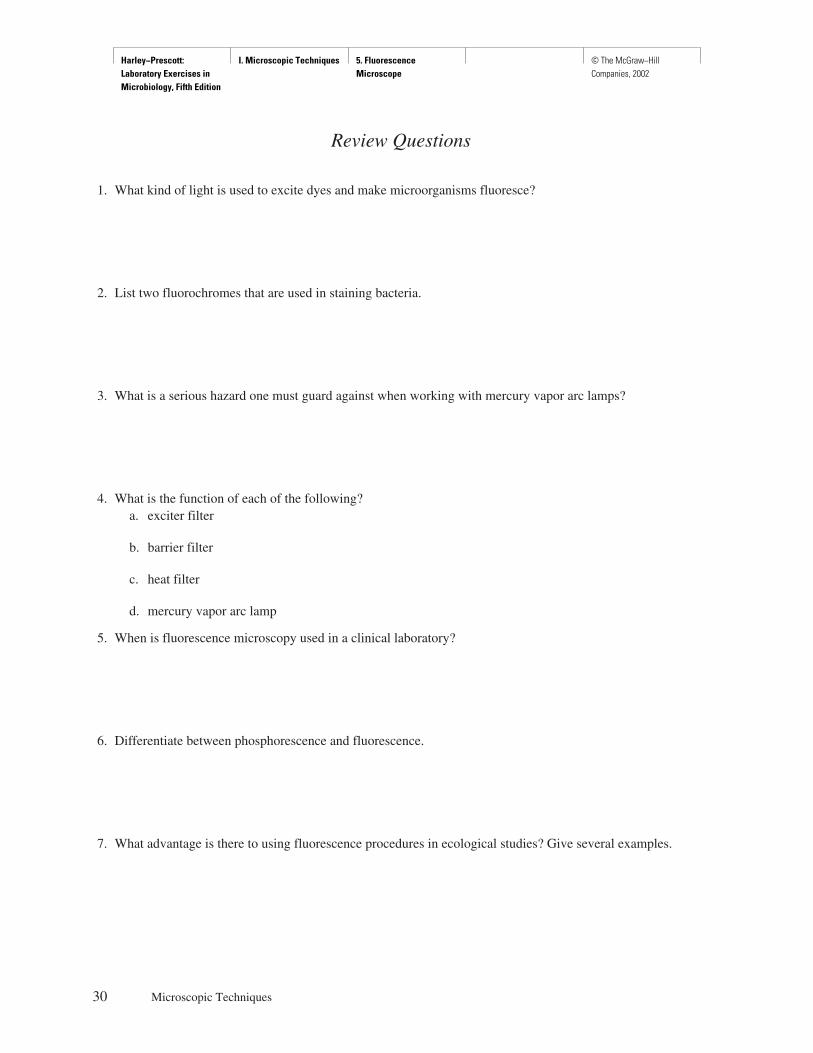
Harley−Prescott: Laboratory Exercises in Microbiology, Fifth Edition
I. Microscopic Techniques 5. Fluorescence Microscope
© The McGraw−Hill Companies, 2002
30 Microscopic Techniques
Review Questions
1. What kind of light is used to excite dyes and make microorganisms fluoresce?
2. List two fluorochromes that are used in staining bacteria.
3. What is a serious hazard one must guard against when working with mercury vapor arc lamps?
4. What is the function of each of the following?a. exciter filter
b. barrier filter
c. heat filter
d. mercury vapor arc lamp
5. When is fluorescence microscopy used in a clinical laboratory?
6. Differentiate between phosphorescence and fluorescence.
7. What advantage is there to using fluorescence procedures in ecological studies? Give several examples.
Harley−Prescott: Laboratory Exercises in Microbiology, Fifth Edition
II. Bacterial Morphology and Staining
Introduction © The McGraw−Hill Companies, 2002
31
P A R T T W O
Bacterial Morphology and Staining
The more I practice, the luckier I get.Lee Trevino (Professional golfer, 1939– )
Living bacteria sometimes may be studied directly bybright-field or phase-contrast microscopy. This is useful
when one needs to demonstrate, for example, bacterialmotility. The first exercise in this part of the manual providesan opportunity for observing bacteria alive and unstained.
Since living bacteria are generally colorless and almostinvisible because of their lack of contrast with the water inwhich they may reside, staining is necessary in order tomake them readily visible for observation of intracellularstructures as well as overall morphology. The exercises in
this part of the manual have been designed to give the stu-dent expertise in staining and slide preparation, an apprecia-tion for bacterial morphology, and experience in how tospecifically stain some specialized bacterial features such asendospores, capsules, and flagella.
After completing the exercises in Part Two, youwill be able to demonstrate how to properly prepareslides for microbiological examination. This willmeet the American Society for Microbiology CoreCurriculum skill number 1 (see pp. vi–viii): (a) clean-ing and disposal of slides; (b) preparing smears fromsolid and liquid cultures; (c) performing wet-mountsand/or hanging drop preparations; and (d) perform-ing Gram stains.
Hans Christian Joachim Gram(1853–1938)
The most widely used staining procedure in microbiology isthe Gram stain, discovered by the Danish scientist and physi-cian Christian Gram.
In 1884, Gram entitled his procedure “The Differential Stain-ing of Schizomycetes in Sections and in Smear Preparations”(Fortschr. Med. 2:185–89, 1884), and described it as follows:
After having been dehydrated in alcohol, the preparationsare immersed in the aniline-gentian violet solution ofEhrlich for 1 to 3 minutes. . . . The preparations are thenplaced in an aqueous solution of iodine-potassium iodidedirectly or after a rapid rinsing in alcohol. They areallowed to remain there for 1 to 3 minutes, during whichtime the color of the preparations changes from dark blue-violet to deep purple-red. The preparations are thencompletely decolorized with absolute alcohol. Furtherclearing is achieved with clove oil. . . . Bacteria arestained intense blue while the background tissues are lightyellow. . . .
The Gram stain, as devised by Gram in 1884, was his attemptto differentiate bacterial cells from infected tissue. AlthoughGram observed what is now called the “Gram reaction,” he didnot recognize the taxonomic value of his technique.

Harley−Prescott: Laboratory Exercises in Microbiology, Fifth Edition
II. Bacterial Morphology and Staining
6. Negative Staining © The McGraw−Hill Companies, 2002
Materials per Student
24- to 48-hour tryptic soy broth cultures ofBacillus subtilis (ATCC 6051), Micrococcusluteus (ATCC 9341), and Spirillum volutans(ATCC 19554)
Dorner’s nigrosin solution, India ink, or eosin blueclean microscope slidesinoculating loopimmersion oilmicroscopelens paper and lens cleanerwax pencilBunsen burner
Learning Objectives
Each student should be able to
1. Understand the reason for the negative stainingprocedure
2. Stain three different bacteria using the negativestaining procedure
Suggested Reading in Textbook
1. Dyes and Simple Staining, section 2.2.
Pronunciation Guide
Bacillus subtilis (bah-SIL-lus sub-til-us)Micrococcus luteus (my-kro-KOK-us LOO-tee-us)Spirillum volutans (spy-RIL-lum VOL-u-tans)
Why Are the Following BacteriaUsed in This Exercise?
Because cultures of Bacillus subtilis (L. subtilis, slender)and Spirillum volutans were used in exercise 6, students arenow familiar with the rod-shaped morphology of these bac-teria. Thus, these same bacteria can be used to illustrate thenegative staining technique. One new bacterium has beenadded to broaden the student’s awareness of bacterial mor-phology by way of negative staining. Micrococcus luteus(L. luteus, golden yellow) is a spherical cell, 0.9 to 1.8 �min diameter, occurring in pairs, tetrads, or irregular clustersbut not chains. It is nonsporing and seldom motile. Thebacterium is easy to culture since it grows on simplemedium and forms yellow, yellowish green, or orangecolonies. M. luteus occurs primarily on mammalian skinand in soil but can be easily isolated from food productsand the air.
Medical Application
Treponema pallidum is the spirochete that causes the sexuallytransmitted disease syphilis. This bacterium is a very delicatecell that is easily distorted by heat-fixing; thus, negative stain-ing is the procedure of choice in the clinical laboratory.
Principles
Sometimes it is convenient to determine overall bacte-rial morphology without the use of harsh staining orheat-fixing techniques that change the shape of cells.This might be the case when the bacterium does notstain well (e.g., some of the spirochetes) or when it isdesirable to confirm observations made on the shape
32
E X E R C I S E
Negative Staining
6
SAFETY PRECAUTIONS Be careful with the Bunsen burner flame. If the stainsused in this experiment get on your clothing, they willnot wash out. When preparing a negative stain smear,push the top slide away from the end of the slide youare holding (figure 6.2). Slides should always be dis-carded in a container with disinfectant.
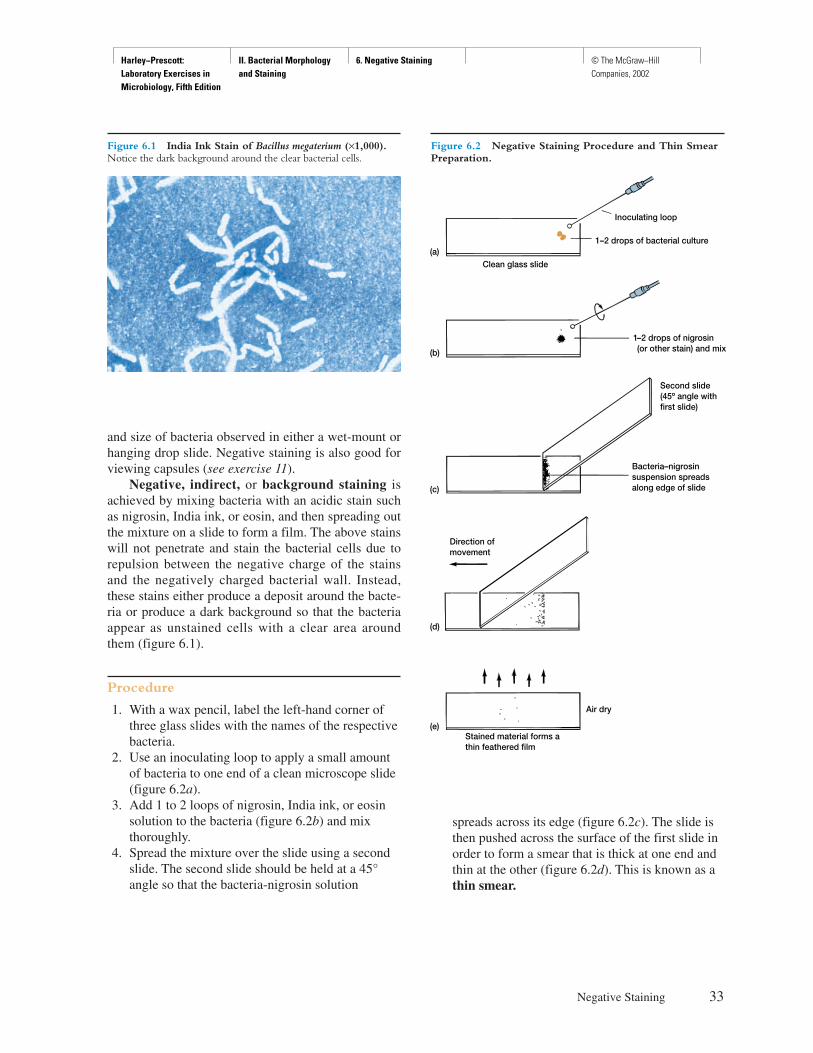
Harley−Prescott: Laboratory Exercises in Microbiology, Fifth Edition
II. Bacterial Morphology and Staining
6. Negative Staining © The McGraw−Hill Companies, 2002
and size of bacteria observed in either a wet-mount orhanging drop slide. Negative staining is also good forviewing capsules (see exercise 11).
Negative, indirect, or background staining isachieved by mixing bacteria with an acidic stain suchas nigrosin, India ink, or eosin, and then spreading outthe mixture on a slide to form a film. The above stainswill not penetrate and stain the bacterial cells due torepulsion between the negative charge of the stainsand the negatively charged bacterial wall. Instead,these stains either produce a deposit around the bacte-ria or produce a dark background so that the bacteriaappear as unstained cells with a clear area aroundthem (figure 6.1).
Procedure
1. With a wax pencil, label the left-hand corner ofthree glass slides with the names of the respectivebacteria.
2. Use an inoculating loop to apply a small amountof bacteria to one end of a clean microscope slide(figure 6.2a).
3. Add 1 to 2 loops of nigrosin, India ink, or eosinsolution to the bacteria (figure 6.2b) and mixthoroughly.
4. Spread the mixture over the slide using a secondslide. The second slide should be held at a 45°angle so that the bacteria-nigrosin solution
Negative Staining 33
Figure 6.1 India Ink Stain of Bacillus megaterium (×1,000).Notice the dark background around the clear bacterial cells.
Figure 6.2 Negative Staining Procedure and Thin SmearPreparation.
Inoculating loop
Air dry
Stained material forms athin feathered film
Direction ofmovement
Bacteria–nigrosinsuspension spreadsalong edge of slide
Second slide(45º angle withfirst slide)
1–2 drops of nigrosin(or other stain) and mix
1–2 drops of bacterial culture
Clean glass slide(a)
(b)
(c)
(d)
(e)
spreads across its edge (figure 6.2c). The slide isthen pushed across the surface of the first slide inorder to form a smear that is thick at one end andthin at the other (figure 6.2d). This is known as athin smear.
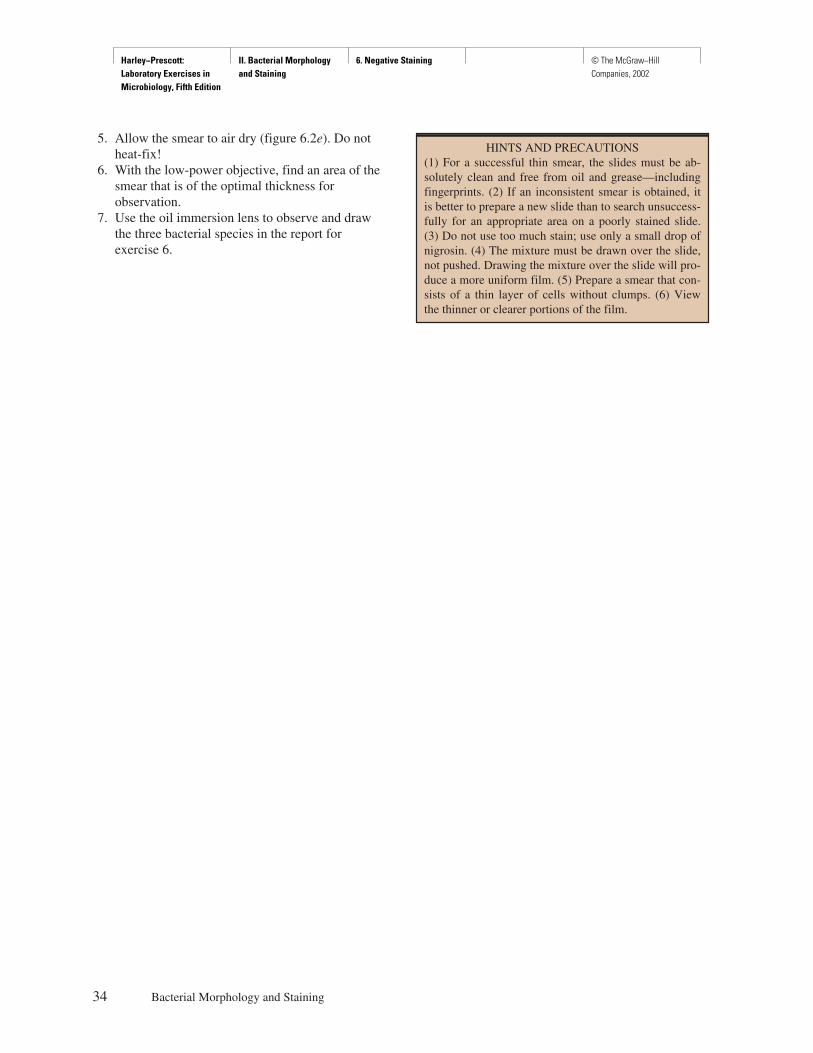
Harley−Prescott: Laboratory Exercises in Microbiology, Fifth Edition
II. Bacterial Morphology and Staining
6. Negative Staining © The McGraw−Hill Companies, 2002
5. Allow the smear to air dry (figure 6.2e). Do notheat-fix!
6. With the low-power objective, find an area of thesmear that is of the optimal thickness forobservation.
7. Use the oil immersion lens to observe and drawthe three bacterial species in the report forexercise 6.
34 Bacterial Morphology and Staining
HINTS AND PRECAUTIONS (1) For a successful thin smear, the slides must be ab-solutely clean and free from oil and grease—includingfingerprints. (2) If an inconsistent smear is obtained, itis better to prepare a new slide than to search unsuccess-fully for an appropriate area on a poorly stained slide.(3) Do not use too much stain; use only a small drop ofnigrosin. (4) The mixture must be drawn over the slide,not pushed. Drawing the mixture over the slide will pro-duce a more uniform film. (5) Prepare a smear that con-sists of a thin layer of cells without clumps. (6) Viewthe thinner or clearer portions of the film.

Harley−Prescott: Laboratory Exercises in Microbiology, Fifth Edition
II. Bacterial Morphology and Staining
6. Negative Staining © The McGraw−Hill Companies, 2002
35
Name: ———————————————————————
Date: ————————————————————————
Lab Section: —————————————————————
Laboratory Report 6
Negative Staining
1. Draw a representative field of your microscopic observation as seen with the oil immersion lens.
Magnification: ___________ Magnification: ___________ Magnification: ___________
2. Describe the microscopic appearance of the three bacteria.
a. B. subtilis
b. M. luteus
c. S. volutans
B. subtilis M. luteus S. volutans
× × ×

Harley−Prescott: Laboratory Exercises in Microbiology, Fifth Edition
II. Bacterial Morphology and Staining
6. Negative Staining © The McGraw−Hill Companies, 2002
Review Questions
1. When is negative staining used?
2. Name three stains that can be used for negative staining.a.
b.
c.
3. Why do the bacteria remain unstained in the negative staining procedure?
4. What is an advantage of negative staining?
5. Why didn’t you heat-fix the bacterial suspension before staining?
6. Why is negative staining also called either indirect or background staining?
7. When streaking with the second slide, why must it be held at a 45° angle?
36 Bacterial Morphology and Staining
Harley−Prescott: Laboratory Exercises in Microbiology, Fifth Edition
II. Bacterial Morphology and Staining
7. Smear Preparation and Simple Staining
© The McGraw−Hill Companies, 2002
Materials per Student
24- to 48-hour tryptic soy broth or agar slants ofBacillus subtilis (ATCC 6051),Corynebacterium pseudodiphtheriticum(ATCC 7091), Micrococcus luteus (ATCC9341), and Spirillum volutans (ATCC 19554)
microscopeclean microscope slidesbibulous paperinoculating loop and needlesterile distilled waterBunsen burnerLoeffler’s alkaline methylene bluecrystal violet (1% aqueous solution)Ziehl’s carbolfuchsinwax pencilimmersion oillens paper and lens cleanerslide holder or clothespinslide warmer
Learning Objectives
Each student should be able to
1. Learn the proper procedure for preparing abacterial smear
2. Do several simple staining procedures
Suggested Reading in Textbook
1. Fixation, section 2.3.2. Dyes and Simple Staining, section 2.3.3. Size, Shape, and Arrangement, section 3.1; see
also figures 3.1 and 3.2.
Pronunciation Guide
Bacillus subtilis (bah-SIL-lus sub-til-us)Corynebacterium pseudodiphtheriticum (koh-rye-nee-
back-TIR-ee-um soo-doh-dif-theh-RIT-ee-cum)Micrococcus luteus (my-kro-KOK-us LOO-tee-us)Spirillum volutans (spy-RIL-lum VOL-u-tans)
Why Are the Above Bacteria Usedin This Exercise?
The same three cultures (B. subtilis, M. luteus, and S volu-tans) that were used for the negative staining exercise willcontinue to be used in this exercise. The new bacterium isCorynebacterium pseudodiphtheriticum. C. pseudodiph-theriticum (M.L. n, pseudodiphtheriticum, relating to falsediphtheria) is a straight or slightly curved slender rod 0.5 to2.0 �m in length that has tapered or sometimes clubbedends. Cells are arranged singly or in pairs, often in a “V”formation or in palisades of several parallel cells. C. pseu-dodiphtheriticum is primarily an obligate parasite of mu-cous membranes or the skin of mammals. By using Loef-fler’s alkaline methylene blue, crystal violet, and Ziehl’scarbolfuchsin, the student gains expertise in using somesimple stains to observe the morphology and characteristicsof four different bacteria.
Principles
While negative staining is satisfactory when makingsimple observations on bacterial morphology and size,more specific stains are necessary if bacterial detail is
37
E X E R C I S E
Smear Preparation and Simple Staining
7
SAFETY CONSIDERATIONS Always use a slide holder or clothespin to hold glassslides when heat-fixing them. Never touch a hot slideuntil it cools. If a glass slide is held in the flame toolong, it can shatter. Be careful with the Bunsen burnerflame. If the stains used in this experiment get on yourclothing, they will not wash out. Always discard slidesin a container with disinfectant.
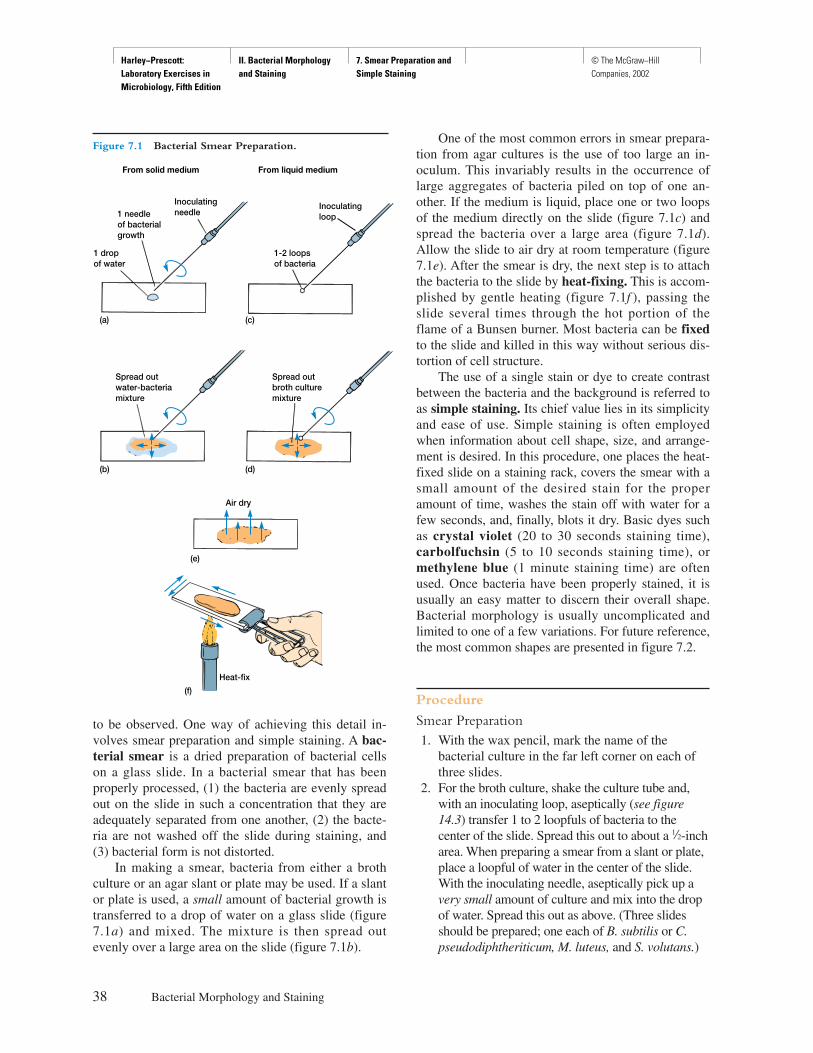
Harley−Prescott: Laboratory Exercises in Microbiology, Fifth Edition
II. Bacterial Morphology and Staining
7. Smear Preparation and Simple Staining
© The McGraw−Hill Companies, 2002
to be observed. One way of achieving this detail in-volves smear preparation and simple staining. A bac-terial smear is a dried preparation of bacterial cellson a glass slide. In a bacterial smear that has beenproperly processed, (1) the bacteria are evenly spreadout on the slide in such a concentration that they areadequately separated from one another, (2) the bacte-ria are not washed off the slide during staining, and(3) bacterial form is not distorted.
In making a smear, bacteria from either a brothculture or an agar slant or plate may be used. If a slantor plate is used, a small amount of bacterial growth istransferred to a drop of water on a glass slide (figure7.1a) and mixed. The mixture is then spread outevenly over a large area on the slide (figure 7.1b).
One of the most common errors in smear prepara-tion from agar cultures is the use of too large an in-oculum. This invariably results in the occurrence oflarge aggregates of bacteria piled on top of one an-other. If the medium is liquid, place one or two loopsof the medium directly on the slide (figure 7.1c) andspread the bacteria over a large area (figure 7.1d).Allow the slide to air dry at room temperature (figure7.1e). After the smear is dry, the next step is to attachthe bacteria to the slide by heat-fixing. This is accom-plished by gentle heating (figure 7.1f ), passing theslide several times through the hot portion of theflame of a Bunsen burner. Most bacteria can be fixedto the slide and killed in this way without serious dis-tortion of cell structure.
The use of a single stain or dye to create contrastbetween the bacteria and the background is referred toas simple staining. Its chief value lies in its simplicityand ease of use. Simple staining is often employedwhen information about cell shape, size, and arrange-ment is desired. In this procedure, one places the heat-fixed slide on a staining rack, covers the smear with asmall amount of the desired stain for the properamount of time, washes the stain off with water for afew seconds, and, finally, blots it dry. Basic dyes suchas crystal violet (20 to 30 seconds staining time),carbolfuchsin (5 to 10 seconds staining time), ormethylene blue (1 minute staining time) are oftenused. Once bacteria have been properly stained, it isusually an easy matter to discern their overall shape.Bacterial morphology is usually uncomplicated andlimited to one of a few variations. For future reference,the most common shapes are presented in figure 7.2.
Procedure
Smear Preparation1. With the wax pencil, mark the name of the
bacterial culture in the far left corner on each ofthree slides.
2. For the broth culture, shake the culture tube and,with an inoculating loop, aseptically (see figure14.3) transfer 1 to 2 loopfuls of bacteria to thecenter of the slide. Spread this out to about a d-incharea. When preparing a smear from a slant or plate,place a loopful of water in the center of the slide.With the inoculating needle, aseptically pick up avery small amount of culture and mix into the dropof water. Spread this out as above. (Three slidesshould be prepared; one each of B. subtilis or C.pseudodiphtheriticum, M. luteus, and S. volutans.)
38 Bacterial Morphology and Staining
Figure 7.1 Bacterial Smear Preparation.
1 dropof water
Air dry
Heat-fix
(f)
(e)
Spread outwater-bacteriamixture
Spread outbroth culturemixture
(b) (d)
(a) (c)
1 needleof bacterialgrowth
Inoculatingneedle
Inoculatingloop
1-2 loopsof bacteria
From solid medium From liquid medium
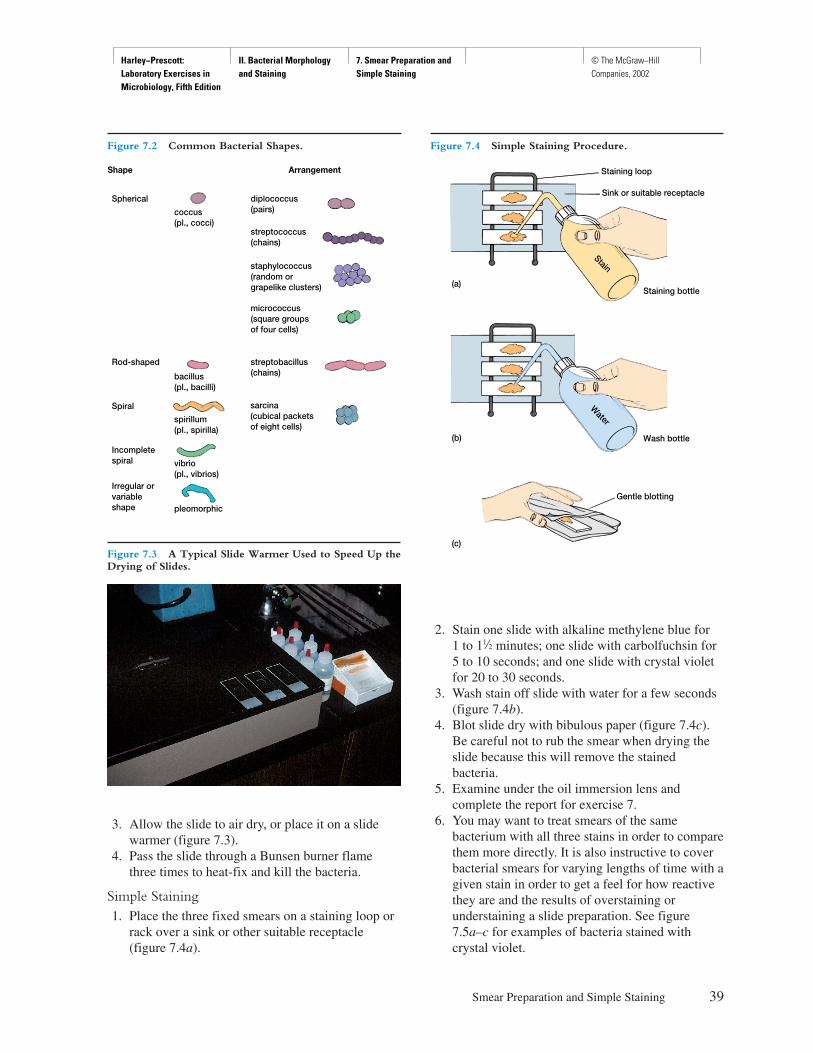
Harley−Prescott: Laboratory Exercises in Microbiology, Fifth Edition
II. Bacterial Morphology and Staining
7. Smear Preparation and Simple Staining
© The McGraw−Hill Companies, 2002
3. Allow the slide to air dry, or place it on a slidewarmer (figure 7.3).
4. Pass the slide through a Bunsen burner flamethree times to heat-fix and kill the bacteria.
Simple Staining1. Place the three fixed smears on a staining loop or
rack over a sink or other suitable receptacle(figure 7.4a).
2. Stain one slide with alkaline methylene blue for 1 to 1d minutes; one slide with carbolfuchsin for5 to 10 seconds; and one slide with crystal violetfor 20 to 30 seconds.
3. Wash stain off slide with water for a few seconds(figure 7.4b).
4. Blot slide dry with bibulous paper (figure 7.4c).Be careful not to rub the smear when drying theslide because this will remove the stainedbacteria.
5. Examine under the oil immersion lens andcomplete the report for exercise 7.
6. You may want to treat smears of the samebacterium with all three stains in order to comparethem more directly. It is also instructive to coverbacterial smears for varying lengths of time with agiven stain in order to get a feel for how reactivethey are and the results of overstaining orunderstaining a slide preparation. See figure 7.5a–c for examples of bacteria stained withcrystal violet.
Smear Preparation and Simple Staining 39
Figure 7.2 Common Bacterial Shapes.
Shape
coccus(pl., cocci)
Arrangement
diplococcus(pairs)
staphylococcus(random orgrapelike clusters)
micrococcus(square groupsof four cells)
bacillus(pl., bacilli)
spirillum(pl., spirilla)
vibrio(pl., vibrios)
pleomorphic
Spherical
Rod-shaped
Spiral
Incompletespiral
streptococcus(chains)
sarcina(cubical packetsof eight cells)
streptobacillus(chains)
Irregular orvariableshape
Figure 7.3 A Typical Slide Warmer Used to Speed Up theDrying of Slides.
Figure 7.4 Simple Staining Procedure.
(c)
Gentle blotting
(b) Wash bottle
Water
Staining bottle(a)
Stain
Staining loop
Sink or suitable receptacle
Harley−Prescott: Laboratory Exercises in Microbiology, Fifth Edition
II. Bacterial Morphology and Staining
7. Smear Preparation and Simple Staining
© The McGraw−Hill Companies, 2002
40 Bacterial Morphology and Staining
(a) (c)
(b)
Figure 7.5 Bacteria Stained with Crystal Violet. (a) Bacillus subtilis (×1,000). (b) Spirillus volutans (×1,000). (c) Micrococcus luteus(×1,000).
HINTS AND PRECAUTIONS(1) When heat-fixing a smear, always make sure that thesmear is on the top of the slide as you pass it throughthe flame. (2) Bacteria growing on solid media tend tocling to each other and must be dispersed sufficiently bydiluting with water. If this is not done, the smear will betoo thick and uneven. Be careful not to use too muchpaste in making the smear. It is easy to ruin your resultsby using too many bacteria. (3) Always wait until theslide is dry before heat-fixing. (4) Fixing smears withan open flame may create artifacts. (5) The inoculatingloop must be relatively cool before inserting it into anybroth. If the loop is too hot, it will spatter the broth andsuspend bacteria into the air. Always flame the inoculat-ing loop after using it and before setting it down. (6)When rinsing with water, direct the stream of water sothat it runs gently over the smear.
Harley−Prescott: Laboratory Exercises in Microbiology, Fifth Edition
II. Bacterial Morphology and Staining
7. Smear Preparation and Simple Staining
© The McGraw−Hill Companies, 2002
41
Name: ———————————————————————
Date: ————————————————————————
Lab Section: —————————————————————
Laboratory Report 7
Smear Preparation and Simple Staining
1. Complete the following drawings and table for the simple staining procedure.
C. pseudodiphtheriticum
M. luteusB. subtilis S. volutans
Drawing ofrepresentativefield
Bacterium ______________________ ______________________ ______________________ ______________________
Magnification ______________________ ______________________ ______________________ ______________________
Stain ______________________ ______________________ ______________________ ______________________
Cell form (shape) ______________________ ______________________ ______________________ ______________________
Cell color ______________________ ______________________ ______________________ ______________________
Background color ______________________ ______________________ ______________________ ______________________
Cell grouping ______________________ ______________________ ______________________ ______________________

Harley−Prescott: Laboratory Exercises in Microbiology, Fifth Edition
II. Bacterial Morphology and Staining
7. Smear Preparation and Simple Staining
© The McGraw−Hill Companies, 2002
Review Questions
1. What are the two purposes of heat fixation?a.
b.
2. What is the purpose of simple staining?
3. Why are basic dyes more successful in staining bacteria than acidic dyes?
4. Name three basic stains.a.
b.
c.
5. Why is time an important factor in simple staining?
6. How would you define a properly prepared bacterial smear?
7. Why should you use an inoculating needle when making smears from solid media? An inoculating loop fromliquid media?
42 Bacterial Morphology and Staining

Harley−Prescott: Laboratory Exercises in Microbiology, Fifth Edition
II. Bacterial Morphology and Staining
8. Gram Stain © The McGraw−Hill Companies, 2002
Materials per Student
18- to 24-hour tryptic soy broth cultures offormalinized (1 ml of concentrated formalinper 10 ml of culture) Staphyloccus aureus(ATCC 25923), Escherichia coli (ATCC25922), and a mixture of S. aureus and E. coli
solutions of crystal violet, Gram’s iodine (2 gpotassium iodide in 300 ml distilled water plus1 g iodine crystals), 95% ethanol and/orisopropanol-acetone mixture (3:1 v/v), andsafranin
Bismark brown stain (for color-blind students)clean glass slidesinoculating loopBunsen burnerbibulous papermicroscopelens paper and lens cleanerimmersion oilHyphomonas (Hyphomicrobium) neptunium
(ATCC 15444) grown in marine broth (Difco)slide warmerstaining rackBacto Gram Stain Reagents from Difco for the
three-step Gram stain
Learning Objectives
Each student should be able to
1. Understand the biochemistry underlying the Gramstain
2. Understand the theoretical basis for differentialstaining procedures
3. Perform a satisfactory Gram stain4. Differentiate a mixture of bacteria into gram-
positive and gram-negative cells
Suggested Reading in Textbook
1. Differential Staining, section 2.3; see also figures2.14 and 2.15.
2. Gram-Positive Cell Walls, section 3.5.3. Gram-Negative Cell Walls, section 3.5.4. The Mechanism of Gram Staining, section 3.5.5. Budding and/or Appendaged Bacteria, section 22.1;
see also figures 22.4 and 22.5.
Pronunciation Guide
Escherichia coli (esh-er-I-ke-a KOH-lee)Hyphomonas (Hyphomicrobium) neptunium (hi-fo-
MO-nas nep-TU-ne-um)Staphylococcus aureus (staf-il-oh-KOK-us ORE-ee-us)
43
E X E R C I S E
Gram Stain
8
SAFETY CONSIDERATIONS Be careful with the Bunsen burner flame. Volatile andflammable liquids (ethanol, isopropanol-acetone) areused in this experiment. Do not use them near an openflame. If the stains used in this experiment get on yourclothing, they will not wash out. Discard slides in a con-tainer with disinfectant. Hold all slides with forceps or aclothespin when heat-fixing. Gram crystal violet,safranin, and iodine can cause irritation to the eyes, res-piratory system and skin. Avoid contact with skin andeyes. Do not breathe spray. Wear suitable protectivegloves. Always keep the containers tightly closed.
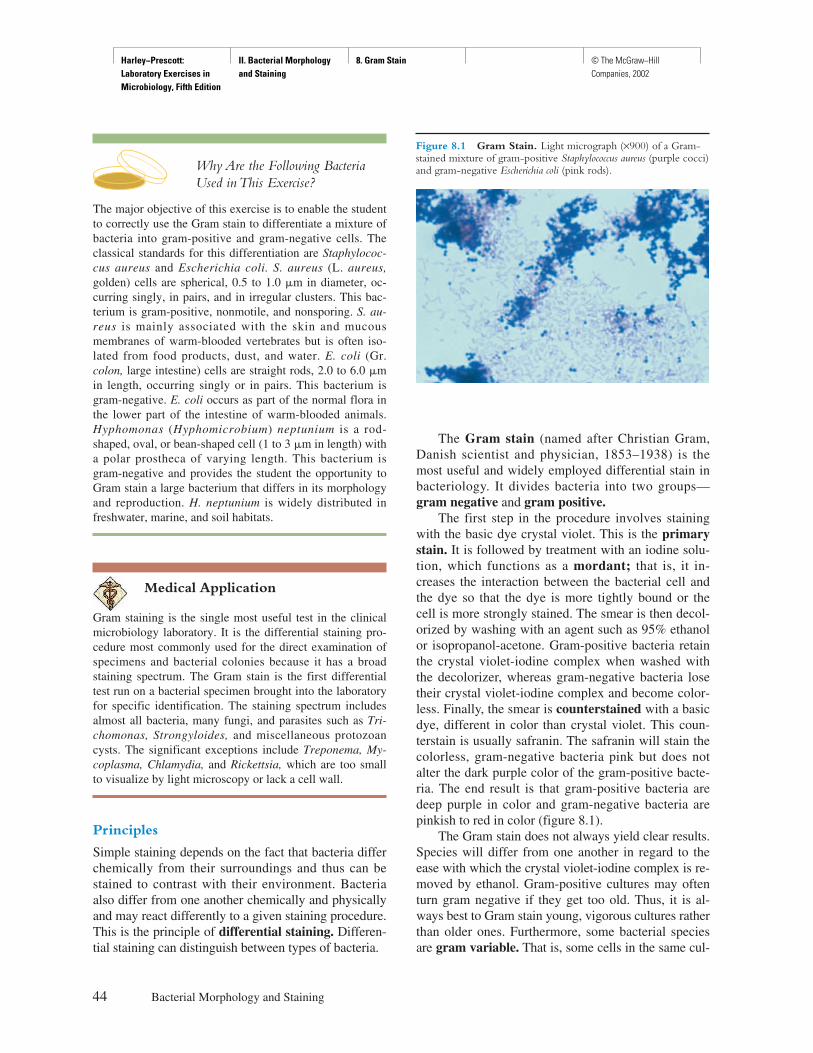
Harley−Prescott: Laboratory Exercises in Microbiology, Fifth Edition
II. Bacterial Morphology and Staining
8. Gram Stain © The McGraw−Hill Companies, 2002
Why Are the Following BacteriaUsed in This Exercise?
The major objective of this exercise is to enable the studentto correctly use the Gram stain to differentiate a mixture ofbacteria into gram-positive and gram-negative cells. Theclassical standards for this differentiation are Staphylococ-cus aureus and Escherichia coli. S. aureus (L. aureus,golden) cells are spherical, 0.5 to 1.0 �m in diameter, oc-curring singly, in pairs, and in irregular clusters. This bac-terium is gram-positive, nonmotile, and nonsporing. S. au-reus is mainly associated with the skin and mucousmembranes of warm-blooded vertebrates but is often iso-lated from food products, dust, and water. E. coli (Gr.colon, large intestine) cells are straight rods, 2.0 to 6.0 �min length, occurring singly or in pairs. This bacterium isgram-negative. E. coli occurs as part of the normal flora inthe lower part of the intestine of warm-blooded animals.Hyphomonas (Hyphomicrobium) neptunium is a rod-shaped, oval, or bean-shaped cell (1 to 3 �m in length) witha polar prostheca of varying length. This bacterium isgram-negative and provides the student the opportunity toGram stain a large bacterium that differs in its morphologyand reproduction. H. neptunium is widely distributed infreshwater, marine, and soil habitats.
Medical Application
Gram staining is the single most useful test in the clinicalmicrobiology laboratory. It is the differential staining pro-cedure most commonly used for the direct examination ofspecimens and bacterial colonies because it has a broadstaining spectrum. The Gram stain is the first differentialtest run on a bacterial specimen brought into the laboratoryfor specific identification. The staining spectrum includesalmost all bacteria, many fungi, and parasites such as Tri-chomonas, Strongyloides, and miscellaneous protozoancysts. The significant exceptions include Treponema, My-coplasma, Chlamydia, and Rickettsia, which are too smallto visualize by light microscopy or lack a cell wall.
Principles
Simple staining depends on the fact that bacteria differchemically from their surroundings and thus can bestained to contrast with their environment. Bacteriaalso differ from one another chemically and physicallyand may react differently to a given staining procedure.This is the principle of differential staining. Differen-tial staining can distinguish between types of bacteria.
The Gram stain (named after Christian Gram,Danish scientist and physician, 1853–1938) is themost useful and widely employed differential stain inbacteriology. It divides bacteria into two groups—gram negative and gram positive.
The first step in the procedure involves stainingwith the basic dye crystal violet. This is the primarystain. It is followed by treatment with an iodine solu-tion, which functions as a mordant; that is, it in-creases the interaction between the bacterial cell andthe dye so that the dye is more tightly bound or thecell is more strongly stained. The smear is then decol-orized by washing with an agent such as 95% ethanolor isopropanol-acetone. Gram-positive bacteria retainthe crystal violet-iodine complex when washed withthe decolorizer, whereas gram-negative bacteria losetheir crystal violet-iodine complex and become color-less. Finally, the smear is counterstained with a basicdye, different in color than crystal violet. This coun-terstain is usually safranin. The safranin will stain thecolorless, gram-negative bacteria pink but does notalter the dark purple color of the gram-positive bacte-ria. The end result is that gram-positive bacteria aredeep purple in color and gram-negative bacteria arepinkish to red in color (figure 8.1).
The Gram stain does not always yield clear results.Species will differ from one another in regard to theease with which the crystal violet-iodine complex is re-moved by ethanol. Gram-positive cultures may oftenturn gram negative if they get too old. Thus, it is al-ways best to Gram stain young, vigorous cultures ratherthan older ones. Furthermore, some bacterial speciesare gram variable. That is, some cells in the same cul-
44 Bacterial Morphology and Staining
Figure 8.1 Gram Stain. Light micrograph (×900) of a Gram-stained mixture of gram-positive Staphylococcus aureus (purple cocci)and gram-negative Escherichia coli (pink rods).
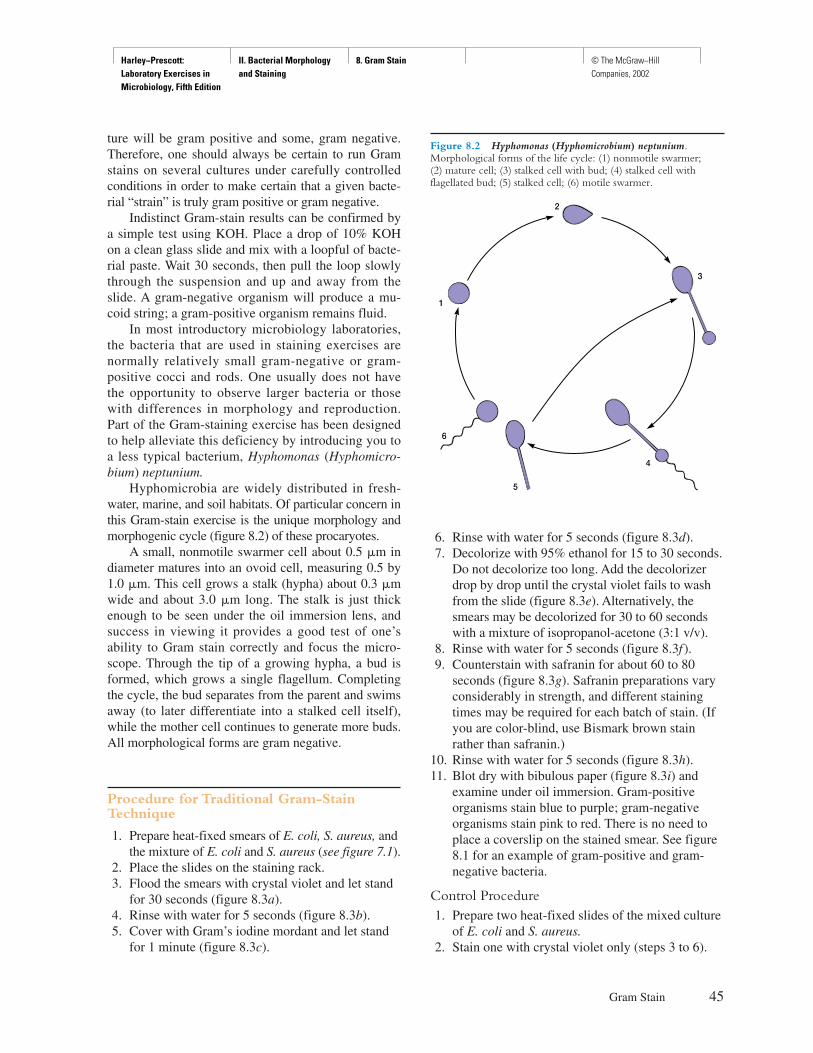
Harley−Prescott: Laboratory Exercises in Microbiology, Fifth Edition
II. Bacterial Morphology and Staining
8. Gram Stain © The McGraw−Hill Companies, 2002
ture will be gram positive and some, gram negative.Therefore, one should always be certain to run Gramstains on several cultures under carefully controlledconditions in order to make certain that a given bacte-rial “strain” is truly gram positive or gram negative.
Indistinct Gram-stain results can be confirmed bya simple test using KOH. Place a drop of 10% KOHon a clean glass slide and mix with a loopful of bacte-rial paste. Wait 30 seconds, then pull the loop slowlythrough the suspension and up and away from theslide. A gram-negative organism will produce a mu-coid string; a gram-positive organism remains fluid.
In most introductory microbiology laboratories,the bacteria that are used in staining exercises arenormally relatively small gram-negative or gram-positive cocci and rods. One usually does not havethe opportunity to observe larger bacteria or thosewith differences in morphology and reproduction.Part of the Gram-staining exercise has been designedto help alleviate this deficiency by introducing you toa less typical bacterium, Hyphomonas (Hyphomicro-bium) neptunium.
Hyphomicrobia are widely distributed in fresh-water, marine, and soil habitats. Of particular concern inthis Gram-stain exercise is the unique morphology andmorphogenic cycle (figure 8.2) of these procaryotes.
A small, nonmotile swarmer cell about 0.5 �m indiameter matures into an ovoid cell, measuring 0.5 by1.0 �m. This cell grows a stalk (hypha) about 0.3 �mwide and about 3.0 �m long. The stalk is just thickenough to be seen under the oil immersion lens, andsuccess in viewing it provides a good test of one’sability to Gram stain correctly and focus the micro-scope. Through the tip of a growing hypha, a bud isformed, which grows a single flagellum. Completingthe cycle, the bud separates from the parent and swimsaway (to later differentiate into a stalked cell itself),while the mother cell continues to generate more buds.All morphological forms are gram negative.
Procedure for Traditional Gram-StainTechnique
1. Prepare heat-fixed smears of E. coli, S. aureus, andthe mixture of E. coli and S. aureus (see figure 7.1).
2. Place the slides on the staining rack.3. Flood the smears with crystal violet and let stand
for 30 seconds (figure 8.3a).4. Rinse with water for 5 seconds (figure 8.3b).5. Cover with Gram’s iodine mordant and let stand
for 1 minute (figure 8.3c).
6. Rinse with water for 5 seconds (figure 8.3d).7. Decolorize with 95% ethanol for 15 to 30 seconds.
Do not decolorize too long. Add the decolorizerdrop by drop until the crystal violet fails to washfrom the slide (figure 8.3e). Alternatively, thesmears may be decolorized for 30 to 60 secondswith a mixture of isopropanol-acetone (3:1 v/v).
8. Rinse with water for 5 seconds (figure 8.3f).9. Counterstain with safranin for about 60 to 80
seconds (figure 8.3g). Safranin preparations varyconsiderably in strength, and different stainingtimes may be required for each batch of stain. (Ifyou are color-blind, use Bismark brown stainrather than safranin.)
10. Rinse with water for 5 seconds (figure 8.3h).11. Blot dry with bibulous paper (figure 8.3i) and
examine under oil immersion. Gram-positiveorganisms stain blue to purple; gram-negativeorganisms stain pink to red. There is no need toplace a coverslip on the stained smear. See figure8.1 for an example of gram-positive and gram-negative bacteria.
Control Procedure1. Prepare two heat-fixed slides of the mixed culture
of E. coli and S. aureus.2. Stain one with crystal violet only (steps 3 to 6).
Gram Stain 45
Figure 8.2 Hyphomonas (Hyphomicrobium) neptunium.Morphological forms of the life cycle: (1) nonmotile swarmer;(2) mature cell; (3) stalked cell with bud; (4) stalked cell withflagellated bud; (5) stalked cell; (6) motile swarmer.
2
1
3
6
5
4
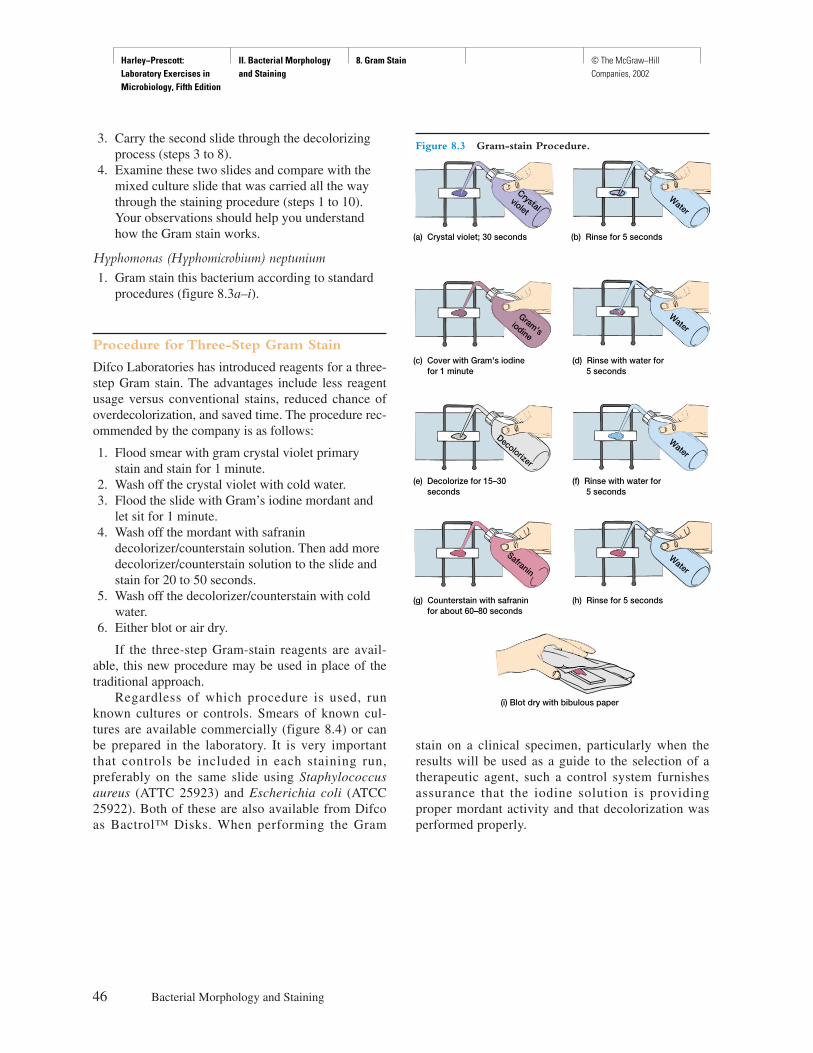
Harley−Prescott: Laboratory Exercises in Microbiology, Fifth Edition
II. Bacterial Morphology and Staining
8. Gram Stain © The McGraw−Hill Companies, 2002
stain on a clinical specimen, particularly when theresults will be used as a guide to the selection of atherapeutic agent, such a control system furnishesassurance that the iodine solution is providingproper mordant activity and that decolorization wasperformed properly.
3. Carry the second slide through the decolorizingprocess (steps 3 to 8).
4. Examine these two slides and compare with themixed culture slide that was carried all the waythrough the staining procedure (steps 1 to 10).Your observations should help you understandhow the Gram stain works.
Hyphomonas (Hyphomicrobium) neptunium1. Gram stain this bacterium according to standard
procedures (figure 8.3a–i).
Procedure for Three-Step Gram Stain
Difco Laboratories has introduced reagents for a three-step Gram stain. The advantages include less reagentusage versus conventional stains, reduced chance ofoverdecolorization, and saved time. The procedure rec-ommended by the company is as follows:
1. Flood smear with gram crystal violet primarystain and stain for 1 minute.
2. Wash off the crystal violet with cold water.3. Flood the slide with Gram’s iodine mordant and
let sit for 1 minute.4. Wash off the mordant with safranin
decolorizer/counterstain solution. Then add moredecolorizer/counterstain solution to the slide andstain for 20 to 50 seconds.
5. Wash off the decolorizer/counterstain with coldwater.
6. Either blot or air dry.
If the three-step Gram-stain reagents are avail-able, this new procedure may be used in place of thetraditional approach.
Regardless of which procedure is used, runknown cultures or controls. Smears of known cul-tures are available commercially (figure 8.4) or canbe prepared in the laboratory. It is very importantthat controls be included in each staining run,preferably on the same slide using Staphylococcusaureus (ATTC 25923) and Escherichia coli (ATCC25922). Both of these are also available from Difcoas Bactrol™ Disks. When performing the Gram
46 Bacterial Morphology and Staining
Figure 8.3 Gram-stain Procedure.
(a) Crystal violet; 30 seconds (b) Rinse for 5 seconds
(c) Cover with Gram's iodine for 1 minute
(d) Rinse with water for 5 seconds
Water
Safranin
Water
Decolorizer
Gram'siodine
Water
Crystalviolet
Water
(e) Decolorize for 15–30 seconds
(f) Rinse with water for 5 seconds
(h) Rinse for 5 seconds(g) Counterstain with safranin for about 60–80 seconds
(i) Blot dry with bibulous paper
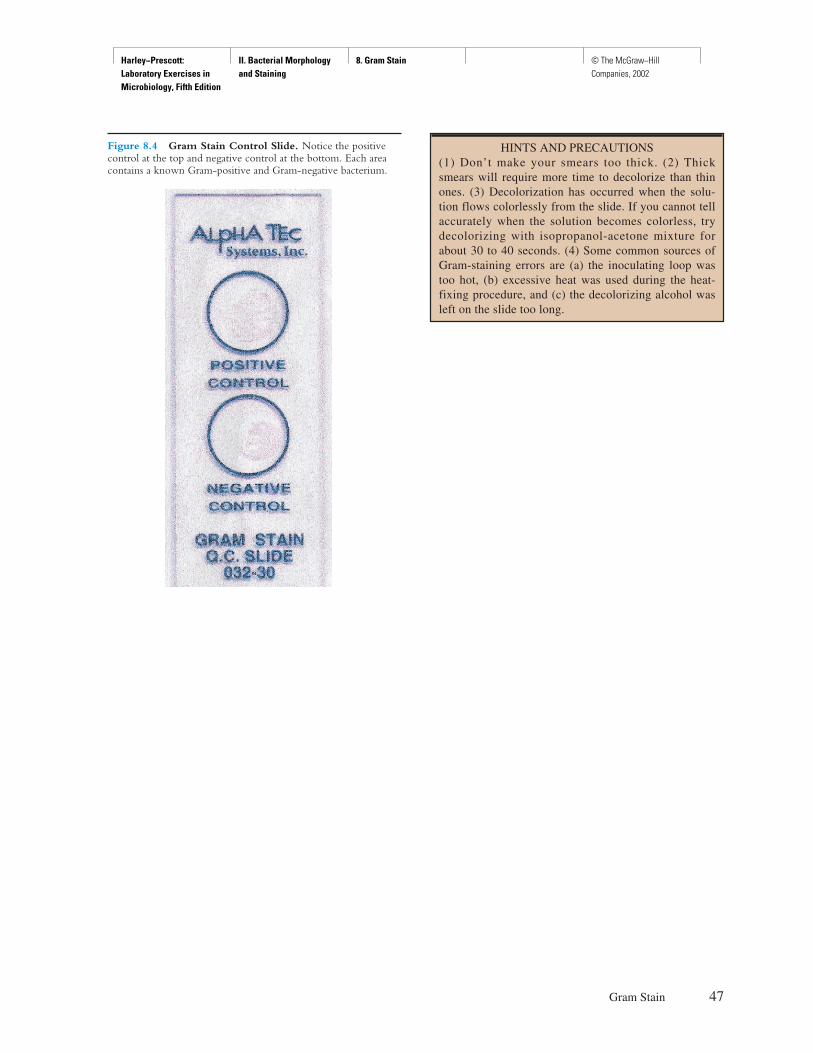
Harley−Prescott: Laboratory Exercises in Microbiology, Fifth Edition
II. Bacterial Morphology and Staining
8. Gram Stain © The McGraw−Hill Companies, 2002
Gram Stain 47
HINTS AND PRECAUTIONS (1) Don’t make your smears too thick. (2) Thicksmears will require more time to decolorize than thinones. (3) Decolorization has occurred when the solu-tion flows colorlessly from the slide. If you cannot tellaccurately when the solution becomes colorless, trydecolorizing with isopropanol-acetone mixture forabout 30 to 40 seconds. (4) Some common sources ofGram-staining errors are (a) the inoculating loop wastoo hot, (b) excessive heat was used during the heat-fixing procedure, and (c) the decolorizing alcohol wasleft on the slide too long.
Figure 8.4 Gram Stain Control Slide. Notice the positivecontrol at the top and negative control at the bottom. Each areacontains a known Gram-positive and Gram-negative bacterium.
Harley−Prescott: Laboratory Exercises in Microbiology, Fifth Edition
II. Bacterial Morphology and Staining
8. Gram Stain © The McGraw−Hill Companies, 2002
49
Name: ———————————————————————
Date: ————————————————————————
Lab Section: —————————————————————
Laboratory Report 81. Draw the Gram-stained bacteria in the following circles.
2. Control Gram-stain results.
3. Gram stain of H. neptunium illustrating the different stages in its life cycle.
Stage _____ _____ _____
S. aureus E. coli Mixed culture(E. coli + S. aureus)
Steps 3–6 Steps 3–8
Bacterialcolor

Harley−Prescott: Laboratory Exercises in Microbiology, Fifth Edition
II. Bacterial Morphology and Staining
8. Gram Stain © The McGraw−Hill Companies, 2002
Review Questions
1. What is the difference between a simple and differential stain?
2. Name the reagent used and state the purpose of each of the following in the Gram stain:a. mordant
b. primary stain
c. decolorizer
d. counterstain
3. Which step is the most crucial or most likely to cause poor results in the Gram stain? Why?
4. Why must young cultures be used when doing a Gram stain?
5. Why was H. neptunium Gram stained?
6. What is meant by gram variable?
7. What part of the bacterial cell is most involved with Gram staining, and why?
50 Bacterial Morphology and Staining
Harley−Prescott: Laboratory Exercises in Microbiology, Fifth Edition
II. Bacterial Morphology and Staining
9. Acid−Fast Staining (Ziehl−Neelsen and Kinyoun) Procedures
© The McGraw−Hill Companies, 2002
Materials per Student
tryptic soy broth culture of Escherichia coli(ATCC 11229) and nutrient agar slant cultureof Mycobacterium smegmatis (ATCC 19420)or Mycobacterium phlei (ATCC 354)—5-day-old cultures
Ziehl’s carbolfuchsincarbolfuchsin prepared with either Tergitol No. 4(a drop per 30 ml of carbolfuchsin) or Triton-X(2 drops per 100 ml of carbolfuchsin). TergitolNo. 4 and Triton-X act as detergents,emulsifiers, and wetting agents.
alkaline methylene blueacid-alcoholclean glass slidescommercial slides showing acid-fast
Mycobacterium tuberculosis (CarolinaBiological Supply, Wards)
inoculating loophot platemicroscopebibulous paperpaper towelinglens paper and lens cleanerimmersion oilstaining racks1-ml pipettes with pipettor
Learning Objectives
Each student should be able to
1. Understand the biochemical basis of the acid-faststain
2. Perform an acid-fast stain3. Differentiate bacteria into acid-fast and non-acid-
fast groups
Suggested Reading in Textbook
1. Differential Staining, section 2.3.2. The Mycobacteria, section 24.5; see also figure 24.9.3. Tuberculosis, section 39.1.4. Leprosy, section 39.3.
Pronunciation Guide
Cryptosporidium (krip-toe-spoh-RED-jee-um)Escherichia coli (esh-er-I-ke-a KOH-lee)Mycobacterium phlei (mi-ko-bak-TE-re-um fee-ii)M. smegmatis (M. smeg-MEH-tis)M. tuberculosis (M. too-ber-ku-LO-sis)Nocardia (no-KAR-dee-ah)
51
E X E R C I S E
Acid-Fast Staining (Ziehl-Neelsen and Kinyoun) Procedures
9
SAFETY CONSIDERATIONS A volatile and flammable liquid (acid-alcohol) is usedin this experiment. Do not use near an open flame. If thecarbolfuchsin or methylene blue get on your clothing,they will not wash out. Note: when carbolfuchsin isheated, phenol is driven off. Phenol is poisonous andcaustic. Thus, always use a chemical hood with the ex-haust fan on for the hot plate or boiling water bath set-up. Discard slides in a container with disinfectant. Nomouth pipetting. Mycobacteria should be handled in asafety cabinet to prevent dissemination in case thehuman pathogen Mycobacterium tuberculosis shouldoccur among the cultures. Infected material should bedisinfected by heat because mycobacteria are relativelyresistant to chemical disinfectants.
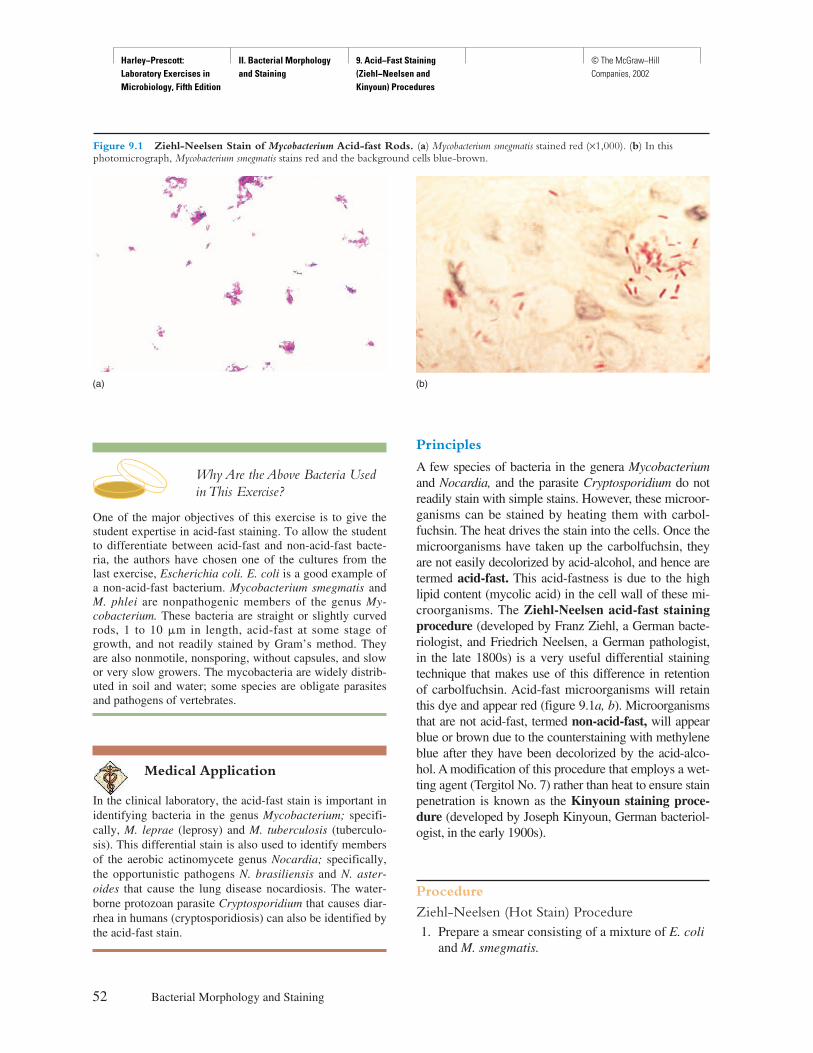
Harley−Prescott: Laboratory Exercises in Microbiology, Fifth Edition
II. Bacterial Morphology and Staining
9. Acid−Fast Staining (Ziehl−Neelsen and Kinyoun) Procedures
© The McGraw−Hill Companies, 2002
Why Are the Above Bacteria Usedin This Exercise?
One of the major objectives of this exercise is to give thestudent expertise in acid-fast staining. To allow the studentto differentiate between acid-fast and non-acid-fast bacte-ria, the authors have chosen one of the cultures from thelast exercise, Escherichia coli. E. coli is a good example ofa non-acid-fast bacterium. Mycobacterium smegmatis andM. phlei are nonpathogenic members of the genus My-cobacterium. These bacteria are straight or slightly curvedrods, 1 to 10 �m in length, acid-fast at some stage ofgrowth, and not readily stained by Gram’s method. Theyare also nonmotile, nonsporing, without capsules, and slowor very slow growers. The mycobacteria are widely distrib-uted in soil and water; some species are obligate parasitesand pathogens of vertebrates.
Medical Application
In the clinical laboratory, the acid-fast stain is important inidentifying bacteria in the genus Mycobacterium; specifi-cally, M. leprae (leprosy) and M. tuberculosis (tuberculo-sis). This differential stain is also used to identify membersof the aerobic actinomycete genus Nocardia; specifically,the opportunistic pathogens N. brasiliensis and N. aster-oides that cause the lung disease nocardiosis. The water-borne protozoan parasite Cryptosporidium that causes diar-rhea in humans (cryptosporidiosis) can also be identified bythe acid-fast stain.
Principles
A few species of bacteria in the genera Mycobacteriumand Nocardia, and the parasite Cryptosporidium do notreadily stain with simple stains. However, these microor-ganisms can be stained by heating them with carbol-fuchsin. The heat drives the stain into the cells. Once themicroorganisms have taken up the carbolfuchsin, theyare not easily decolorized by acid-alcohol, and hence aretermed acid-fast. This acid-fastness is due to the highlipid content (mycolic acid) in the cell wall of these mi-croorganisms. The Ziehl-Neelsen acid-fast stainingprocedure (developed by Franz Ziehl, a German bacte-riologist, and Friedrich Neelsen, a German pathologist,in the late 1800s) is a very useful differential stainingtechnique that makes use of this difference in retentionof carbolfuchsin. Acid-fast microorganisms will retainthis dye and appear red (figure 9.1a, b). Microorganismsthat are not acid-fast, termed non-acid-fast, will appearblue or brown due to the counterstaining with methyleneblue after they have been decolorized by the acid-alco-hol. A modification of this procedure that employs a wet-ting agent (Tergitol No. 7) rather than heat to ensure stainpenetration is known as the Kinyoun staining proce-dure (developed by Joseph Kinyoun, German bacteriol-ogist, in the early 1900s).
Procedure
Ziehl-Neelsen (Hot Stain) Procedure1. Prepare a smear consisting of a mixture of E. coli
and M. smegmatis.
52 Bacterial Morphology and Staining
Figure 9.1 Ziehl-Neelsen Stain of Mycobacterium Acid-fast Rods. (a) Mycobacterium smegmatis stained red (×1,000). (b) In thisphotomicrograph, Mycobacterium smegmatis stains red and the background cells blue-brown.
(a) (b)
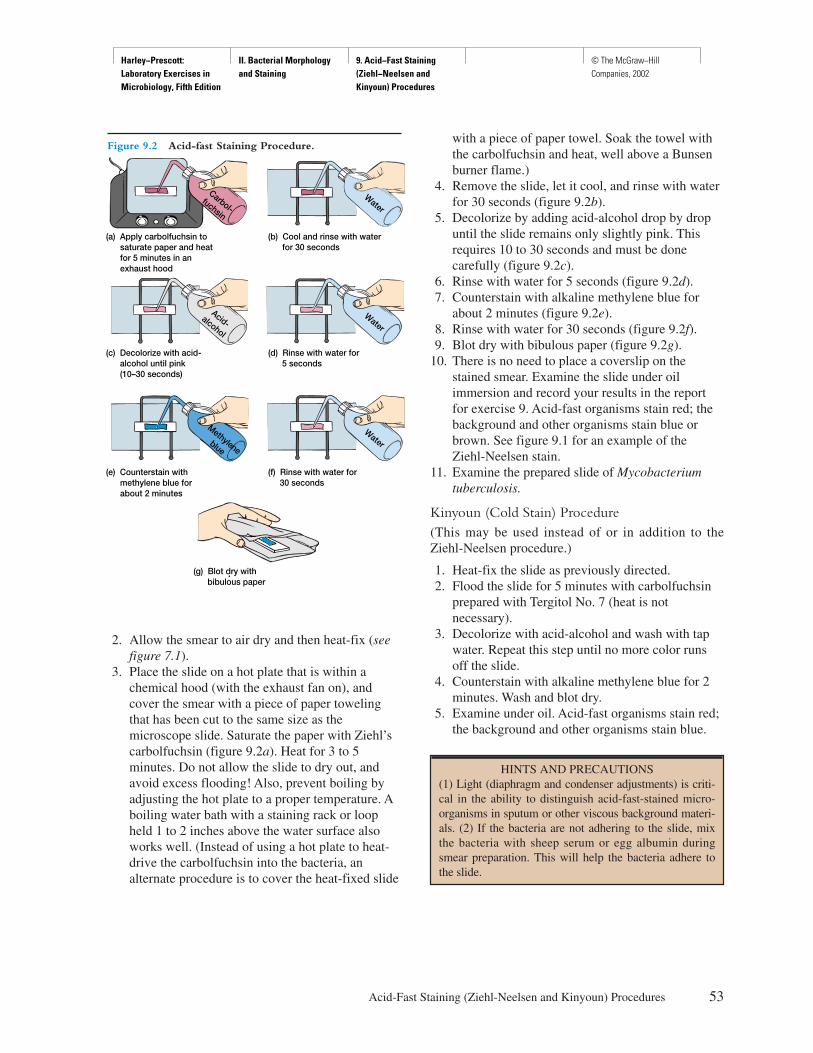
Harley−Prescott: Laboratory Exercises in Microbiology, Fifth Edition
II. Bacterial Morphology and Staining
9. Acid−Fast Staining (Ziehl−Neelsen and Kinyoun) Procedures
© The McGraw−Hill Companies, 2002
2. Allow the smear to air dry and then heat-fix (seefigure 7.1).
3. Place the slide on a hot plate that is within achemical hood (with the exhaust fan on), andcover the smear with a piece of paper towelingthat has been cut to the same size as themicroscope slide. Saturate the paper with Ziehl’scarbolfuchsin (figure 9.2a). Heat for 3 to 5minutes. Do not allow the slide to dry out, andavoid excess flooding! Also, prevent boiling byadjusting the hot plate to a proper temperature. Aboiling water bath with a staining rack or loopheld 1 to 2 inches above the water surface alsoworks well. (Instead of using a hot plate to heat-drive the carbolfuchsin into the bacteria, analternate procedure is to cover the heat-fixed slide
with a piece of paper towel. Soak the towel withthe carbolfuchsin and heat, well above a Bunsenburner flame.)
4. Remove the slide, let it cool, and rinse with waterfor 30 seconds (figure 9.2b).
5. Decolorize by adding acid-alcohol drop by dropuntil the slide remains only slightly pink. Thisrequires 10 to 30 seconds and must be donecarefully (figure 9.2c).
6. Rinse with water for 5 seconds (figure 9.2d).7. Counterstain with alkaline methylene blue for
about 2 minutes (figure 9.2e).8. Rinse with water for 30 seconds (figure 9.2f).9. Blot dry with bibulous paper (figure 9.2g).
10. There is no need to place a coverslip on thestained smear. Examine the slide under oilimmersion and record your results in the reportfor exercise 9. Acid-fast organisms stain red; thebackground and other organisms stain blue orbrown. See figure 9.1 for an example of the Ziehl-Neelsen stain.
11. Examine the prepared slide of Mycobacteriumtuberculosis.
Kinyoun (Cold Stain) Procedure(This may be used instead of or in addition to theZiehl-Neelsen procedure.)
1. Heat-fix the slide as previously directed.2. Flood the slide for 5 minutes with carbolfuchsin
prepared with Tergitol No. 7 (heat is notnecessary).
3. Decolorize with acid-alcohol and wash with tapwater. Repeat this step until no more color runsoff the slide.
4. Counterstain with alkaline methylene blue for 2minutes. Wash and blot dry.
5. Examine under oil. Acid-fast organisms stain red;the background and other organisms stain blue.
Acid-Fast Staining (Ziehl-Neelsen and Kinyoun) Procedures 53
Figure 9.2 Acid-fast Staining Procedure.
(a) Apply carbolfuchsin to saturate paper and heat for 5 minutes in an exhaust hood
Carbol-fuchsin
Water
Water
Water
Acid-alcohol
Methyleneblue
(b) Cool and rinse with water for 30 seconds
(d) Rinse with water for 5 seconds
(c) Decolorize with acid- alcohol until pink (10–30 seconds)
(e) Counterstain with methylene blue for about 2 minutes
(f) Rinse with water for 30 seconds
(g) Blot dry with bibulous paper
HINTS AND PRECAUTIONS (1) Light (diaphragm and condenser adjustments) is criti-cal in the ability to distinguish acid-fast-stained micro-organisms in sputum or other viscous background materi-als. (2) If the bacteria are not adhering to the slide, mixthe bacteria with sheep serum or egg albumin duringsmear preparation. This will help the bacteria adhere tothe slide.
Harley−Prescott: Laboratory Exercises in Microbiology, Fifth Edition
II. Bacterial Morphology and Staining
9. Acid−Fast Staining (Ziehl−Neelsen and Kinyoun) Procedures
© The McGraw−Hill Companies, 2002
55
Name: ———————————————————————
Date: ————————————————————————
Lab Section: —————————————————————
Laboratory Report 9
Acid-Fast Staining (Ziehl-Neelsen and Kinyoun) Procedures
1. Complete the following table with respect to the acid-fast stain and draw representative specimens.
2. Are you satisfied with your results? __________ If not, what can you do to improve your technique the nexttime you prepare an acid-fast stain from a broth culture?
E. coli M. smegmatis M. phlei
Magnification ____________________ ____________________ ____________________
Bacterium other than above ____________________ ____________________ ____________________
Bacterial shape ____________________ ____________________ ____________________
Cell color ____________________ ____________________ ____________________
Acid-fast ____________________ ____________________ ____________________
× × ×

Harley−Prescott: Laboratory Exercises in Microbiology, Fifth Edition
II. Bacterial Morphology and Staining
9. Acid−Fast Staining (Ziehl−Neelsen and Kinyoun) Procedures
© The McGraw−Hill Companies, 2002
Review Questions
1. What is the purpose of the heat during the acid-fast staining procedure?
2. What is the function of the counterstain in the acid-fast staining procedure?
3. Are acid-fast bacteria gram positive or gram negative? Explain your answer.
4. For what diseases would you use an acid-fast stain?
5. What makes a microorganism non-acid-fast?
6. What chemical is responsible for the acid-fast property of mycobacteria?
7. Is a Gram stain an adequate substitute for an acid-fast stain? Why or why not?
56 Bacterial Morphology and Staining

Harley−Prescott: Laboratory Exercises in Microbiology, Fifth Edition
II. Bacterial Morphology and Staining
10. Endospore Staining (Schaeffer−Fulton or Wirtz−Conklin)
© The McGraw−Hill Companies, 2002
Materials per Student
24- to 48-hour nutrient agar slant cultures ofBacillus megaterium (ATCC 12872) andBacillus macerans (ATCC 8244), and old(more than 48 hours) thioglycollate cultures ofClostridium butyricum (ATCC 19398) andBacillus circulans (ATCC 4513)
clean glass slidesmicroscopeimmersion oilwax pencilinoculating loophot plate or boiling water bath with staining rack
or loop5% malachite green solutionsafraninbibulous paperpaper towelinglens paper and lens cleanerslide warmerforceps
Learning Objectives
Each student should be able to
1. Understand the biochemistry underlyingendospore staining
2. Perform an endospore stain3. Differentiate between bacterial endospore and
vegetative cell forms
Suggested Reading in Textbook
1. Staining Specific Structures, section 2.3.2. The Bacterial Endospore, section 3.8; see also
figures 3.40–3.44, 23.5, 23.6, 23.8.3. Anthrax, section 39.3.4. Tetanus, section 39.3.
Pronunciation Guide
Bacillus megaterium (bah-SIL-us meg-AH-ter-ee-um)B. macerans (ma-ser-ANS)B. circulans (sir-KOO-lanz)Clostridium butyricum (klos-STRID-ee-um bu-TER-
a-cum)
Why Are the Above Bacteria Usedin This Exercise?
Because the major objective of this exercise is to provide ex-perience in endospore staining, the authors have chosen sev-eral bacteria that vary in the size and shape of their en-dospores. Bacillus megaterium (M. L. n. megaterium, bigbeast) is a cylindrical to oval or pear-shaped cell about 1.2 to1.5 �m in diameter and 2 to 5 �m long; it tends to occur inshort, twisted chains. The spores are central and vary fromshort oval to elongate. Spores occur in the soil. Bacillus mac-erans (L. macerans, softening by steeping, rotting) is anelongated cell 0.5 to 0.7 �m wide and 2.5 to 5 �m in lengthwith terminal spores. Spores are relatively scarce in the soil.Bacillus circulans (L. circulans, circling) is an elongate cell2 to 5 �m in length and 0.5 to 0.7 �m wide. In most strains,the spore is terminal to subterminal; it is central in a spindle-shaped sporangium if the bacillus is short. In many strains,deeply stainable material persists on the surface of the freespores. The spores are found in the soil. Clostridium bu-tyricum (Gr. butyrum, butter) is a straight or slightly curvedrod, 2.4 to 7.6 �m in length and 0.5 to 1.7 �m wide, withrounded ends. The cells occur singly, in pairs, in shortchains, and occasionally as long filaments. They are motilewith peritrichous flagella. Spores are oval and eccentric tosubterminal and are found in the soil and animal feces.
57
E X E R C I S E
Endospore Staining(Schaeffer-Fulton or Wirtz-Conklin)
10
SAFETY CONSIDERATIONSBe careful with the Bunsen burner flame and boilingwater bath. If either malachite green or safranin get onyour clothes, they will not wash out. Discard slides in acontainer with disinfectant.
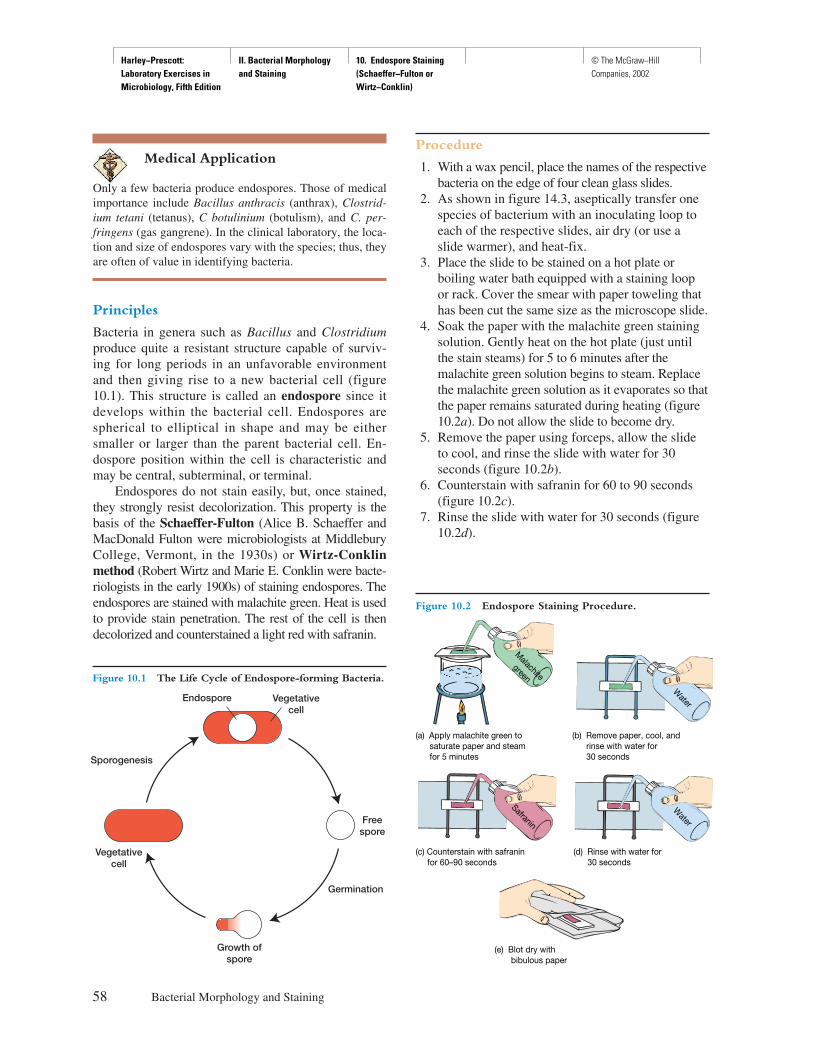
Harley−Prescott: Laboratory Exercises in Microbiology, Fifth Edition
II. Bacterial Morphology and Staining
10. Endospore Staining (Schaeffer−Fulton or Wirtz−Conklin)
© The McGraw−Hill Companies, 2002
Medical Application
Only a few bacteria produce endospores. Those of medicalimportance include Bacillus anthracis (anthrax), Clostrid-ium tetani (tetanus), C botulinium (botulism), and C. per-fringens (gas gangrene). In the clinical laboratory, the loca-tion and size of endospores vary with the species; thus, theyare often of value in identifying bacteria.
Principles
Bacteria in genera such as Bacillus and Clostridiumproduce quite a resistant structure capable of surviv-ing for long periods in an unfavorable environmentand then giving rise to a new bacterial cell (figure10.1). This structure is called an endospore since itdevelops within the bacterial cell. Endospores arespherical to elliptical in shape and may be eithersmaller or larger than the parent bacterial cell. En-dospore position within the cell is characteristic andmay be central, subterminal, or terminal.
Endospores do not stain easily, but, once stained,they strongly resist decolorization. This property is thebasis of the Schaeffer-Fulton (Alice B. Schaeffer andMacDonald Fulton were microbiologists at MiddleburyCollege, Vermont, in the 1930s) or Wirtz-Conklinmethod (Robert Wirtz and Marie E. Conklin were bacte-riologists in the early 1900s) of staining endospores. Theendospores are stained with malachite green. Heat is usedto provide stain penetration. The rest of the cell is thendecolorized and counterstained a light red with safranin.
Procedure
1. With a wax pencil, place the names of the respectivebacteria on the edge of four clean glass slides.
2. As shown in figure 14.3, aseptically transfer onespecies of bacterium with an inoculating loop toeach of the respective slides, air dry (or use aslide warmer), and heat-fix.
3. Place the slide to be stained on a hot plate orboiling water bath equipped with a staining loopor rack. Cover the smear with paper toweling thathas been cut the same size as the microscope slide.
4. Soak the paper with the malachite green stainingsolution. Gently heat on the hot plate (just untilthe stain steams) for 5 to 6 minutes after themalachite green solution begins to steam. Replacethe malachite green solution as it evaporates so thatthe paper remains saturated during heating (figure10.2a). Do not allow the slide to become dry.
5. Remove the paper using forceps, allow the slideto cool, and rinse the slide with water for 30seconds (figure 10.2b).
6. Counterstain with safranin for 60 to 90 seconds(figure 10.2c).
7. Rinse the slide with water for 30 seconds (figure10.2d).
58 Bacterial Morphology and Staining
Figure 10.2 Endospore Staining Procedure.
(c) Counterstain with safranin for 60–90 seconds
Safranin
Water
Malachitegreen
(a) Apply malachite green to saturate paper and steam for 5 minutes
(b) Remove paper, cool, and rinse with water for 30 seconds
Water
(d) Rinse with water for 30 seconds
(e) Blot dry with bibulous paper
Figure 10.1 The Life Cycle of Endospore-forming Bacteria.
Sporogenesis
Endospore Vegetativecell
Vegetativecell
Growth ofspore
Freespore
Germination
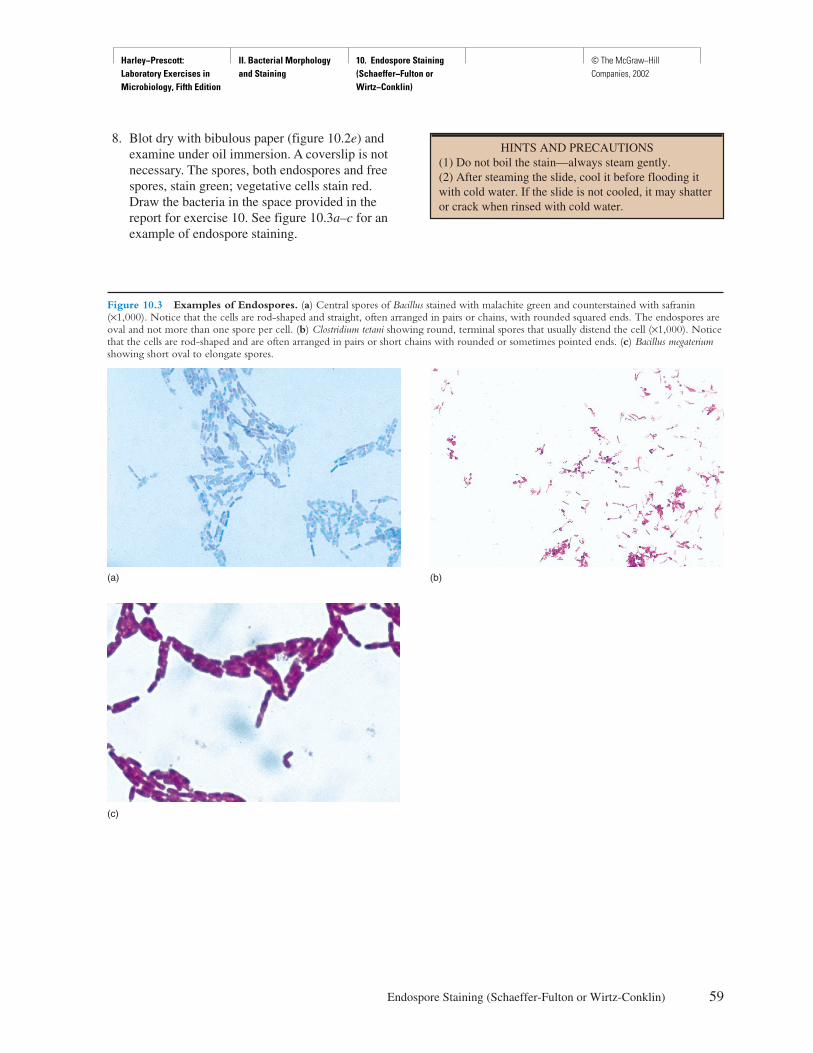
Harley−Prescott: Laboratory Exercises in Microbiology, Fifth Edition
II. Bacterial Morphology and Staining
10. Endospore Staining (Schaeffer−Fulton or Wirtz−Conklin)
© The McGraw−Hill Companies, 2002
Endospore Staining (Schaeffer-Fulton or Wirtz-Conklin) 59
HINTS AND PRECAUTIONS (1) Do not boil the stain—always steam gently.(2) After steaming the slide, cool it before flooding itwith cold water. If the slide is not cooled, it may shatteror crack when rinsed with cold water.
Figure 10.3 Examples of Endospores. (a) Central spores of Bacillus stained with malachite green and counterstained with safranin(×1,000). Notice that the cells are rod-shaped and straight, often arranged in pairs or chains, with rounded squared ends. The endospores areoval and not more than one spore per cell. (b) Clostridium tetani showing round, terminal spores that usually distend the cell (×1,000). Noticethat the cells are rod-shaped and are often arranged in pairs or short chains with rounded or sometimes pointed ends. (c) Bacillus megateriumshowing short oval to elongate spores.
(a) (b)
(c)
8. Blot dry with bibulous paper (figure 10.2e) andexamine under oil immersion. A coverslip is notnecessary. The spores, both endospores and freespores, stain green; vegetative cells stain red.Draw the bacteria in the space provided in thereport for exercise 10. See figure 10.3a–c for anexample of endospore staining.
Harley−Prescott: Laboratory Exercises in Microbiology, Fifth Edition
II. Bacterial Morphology and Staining
10. Endospore Staining (Schaeffer−Fulton or Wirtz−Conklin)
© The McGraw−Hill Companies, 2002
61
Name: ———————————————————————
Date: ————————————————————————
Lab Section: —————————————————————
Laboratory Report 10
Endospore Staining (Schaeffer–Fulton or Wirtz–Conklin)
1. Make drawings and answer the questions for each of the bacterial endospore slides.
2. Are you satisfied with the results of your endospore stain? ______ If not, how can you improve your resultsthe next time you prepare an endospore stain?
Bacterium __________________ __________________ __________________ __________________
Magnification __________________ __________________ __________________ __________________
Bacterium other than above __________________ __________________ __________________ __________________
Spore color __________________ __________________ __________________ __________________
Color of vegetative cell __________________ __________________ __________________ __________________
Location of endospore (central,terminal, subterminal) __________________ __________________ __________________ __________________
× ×× ×
B. megaterium B. macerans B. circulans C. butyricum

Harley−Prescott: Laboratory Exercises in Microbiology, Fifth Edition
II. Bacterial Morphology and Staining
10. Endospore Staining (Schaeffer−Fulton or Wirtz−Conklin)
© The McGraw−Hill Companies, 2002
Review Questions
1. Why is heat necessary in order to stain endospores?
2. Where are endospores located within vegetative cells?
3. In the Schaeffer–Fulton endospore stain, what is the primary stain? The counterstain?
4. Name two disease-causing bacteria that produce endospores.a.
b.
5. What is the function of an endospore?
6. Why are endospores so difficult to stain?
7. What do endospore stains have in common with the acid-fast (Ziehl–Neelsen) stain?
62 Bacterial Morphology and Staining
Harley−Prescott: Laboratory Exercises in Microbiology, Fifth Edition
II. Bacterial Morphology and Staining
11. Capsule Staining © The McGraw−Hill Companies, 2002
Materials per Student
18-hour skim milk cultures of Klebsiellapneumoniae (ATCC e13883) and Alcaligenesdenitrificans (ATCC 15173)
Tyler’s crystal violet (1% aqueous solution) orGram’s crystal violet (1% aqueous solution)
20% (w/v) solution of copper sulfate (CuSO4 � 5H2O)
microscopeimmersion oillens paper and lens cleanerclean glass slideswax pencilbibulous paperinoculating loopBon Ami70% ethyl alcoholIndia ink (Higgins no. 4465 black or Pelikan
Drawing ink No. 17 black for technical pens)or SpotTest India ink ampules from Difco
safranin stain
Learning Objectives
Each student should be able to
1. Understand the biochemistry of the capsule stain2. Perform a capsule stain3. Distinguish capsular material from the bacterial
cell
Suggested Reading in Textbook
1. Capsules, Slime Layers, and S Layers, section3.6; see also figure 3.27.
Pronunciation Guide
Alcaligenes denitrificans (al-kah-LIJ-e-neez de-ni-tri-fi-KANS)
Klebsiella pneumoniae (kleb-se-EL-lah nu-MO-ne-EYE)
Why Are the Above Bacteria Usedin This Exercise?
One of the major objectives of this exercise is to give thestudent experience in capsule staining. To help accomplishthis objective, the authors have chosen one capsulated andone noncapsulated bacterium. Klebsiella pneumoniae (Gr.pneumonia, pneumonia) is a nonmotile, capsulated rod, 0.6to 6 �m in length, and is arranged singly, in pairs, or shortchains. Cells contain a large polysaccharide capsule andgive rise to large mucoid colonies. There are more than 80capsular (K) antigens that can be used to serotype klebsiel-lae. K. pneumoniae occurs in human feces and clinical spec-imens, water, grain, fruits, and vegetables. Alcaligenes deni-trificans (are able to reduce NO3
– to NO2– and N2) occurs as
a rod, a coccal rod, or a coccus; is 0.5 to 2.6 �m in length;and usually occurs singly in water and soil. It is motile with1 to 4 peritrichous flagella. No capsule is present.
Medical Application
Many bacteria (e.g., Bacillus anthracis [anthrax], Streptococ-cus mutans [tooth decay], Streptococcus pneumoniae [pneu-monia]) and the fungus Cryptococcus neoformans [crypto-coccosis] contain a gelatinous covering called a capsule. Inthe clinical laboratory, demonstrating the presence of a cap-sule is a means of diagnosis and determining the organism’svirulence, the degree to which a pathogen can cause disease.
63
E X E R C I S E
Capsule Staining
11
SAFETY CONSIDERATIONSBe careful with the Bunsen burner flame. If India ink,crystal violet, or safranin get on your clothes, they willnot wash out. Seventy percent ethyl alcohol is flamma-ble—keep away from open flames. Discard slides in acontainer with disinfectant.
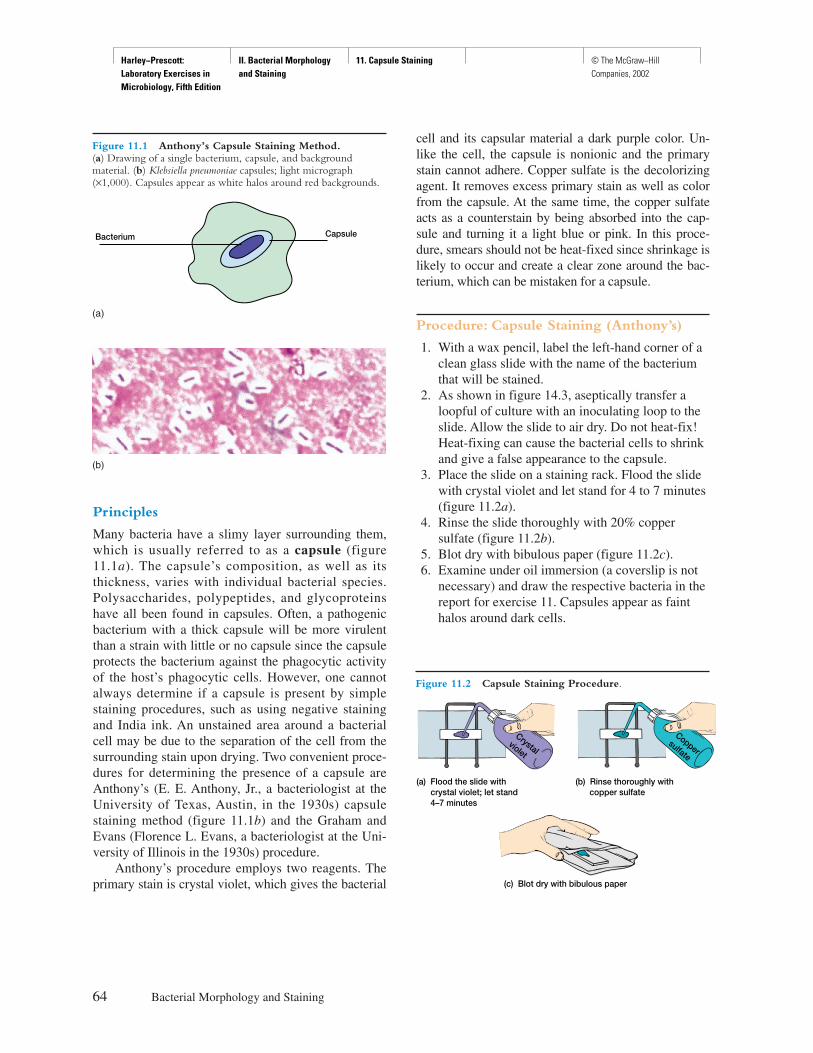
Harley−Prescott: Laboratory Exercises in Microbiology, Fifth Edition
II. Bacterial Morphology and Staining
11. Capsule Staining © The McGraw−Hill Companies, 2002
Principles
Many bacteria have a slimy layer surrounding them,which is usually referred to as a capsule (figure11.1a). The capsule’s composition, as well as itsthickness, varies with individual bacterial species.Polysaccharides, polypeptides, and glycoproteinshave all been found in capsules. Often, a pathogenicbacterium with a thick capsule will be more virulentthan a strain with little or no capsule since the capsuleprotects the bacterium against the phagocytic activityof the host’s phagocytic cells. However, one cannotalways determine if a capsule is present by simplestaining procedures, such as using negative stainingand India ink. An unstained area around a bacterialcell may be due to the separation of the cell from thesurrounding stain upon drying. Two convenient proce-dures for determining the presence of a capsule areAnthony’s (E. E. Anthony, Jr., a bacteriologist at theUniversity of Texas, Austin, in the 1930s) capsulestaining method (figure 11.1b) and the Graham andEvans (Florence L. Evans, a bacteriologist at the Uni-versity of Illinois in the 1930s) procedure.
Anthony’s procedure employs two reagents. Theprimary stain is crystal violet, which gives the bacterial
cell and its capsular material a dark purple color. Un-like the cell, the capsule is nonionic and the primarystain cannot adhere. Copper sulfate is the decolorizingagent. It removes excess primary stain as well as colorfrom the capsule. At the same time, the copper sulfateacts as a counterstain by being absorbed into the cap-sule and turning it a light blue or pink. In this proce-dure, smears should not be heat-fixed since shrinkage islikely to occur and create a clear zone around the bac-terium, which can be mistaken for a capsule.
Procedure: Capsule Staining (Anthony’s)
1. With a wax pencil, label the left-hand corner of aclean glass slide with the name of the bacteriumthat will be stained.
2. As shown in figure 14.3, aseptically transfer aloopful of culture with an inoculating loop to theslide. Allow the slide to air dry. Do not heat-fix!Heat-fixing can cause the bacterial cells to shrinkand give a false appearance to the capsule.
3. Place the slide on a staining rack. Flood the slidewith crystal violet and let stand for 4 to 7 minutes(figure 11.2a).
4. Rinse the slide thoroughly with 20% coppersulfate (figure 11.2b).
5. Blot dry with bibulous paper (figure 11.2c).6. Examine under oil immersion (a coverslip is not
necessary) and draw the respective bacteria in thereport for exercise 11. Capsules appear as fainthalos around dark cells.
64 Bacterial Morphology and Staining
Figure 11.1 Anthony’s Capsule Staining Method.(a) Drawing of a single bacterium, capsule, and backgroundmaterial. (b) Klebsiella pneumoniae capsules; light micrograph(×1,000). Capsules appear as white halos around red backgrounds.
Bacterium Capsule
(a)
(b)
Figure 11.2 Capsule Staining Procedure.
Coppersulfate
Crystalviolet
(a) Flood the slide with crystal violet; let stand 4–7 minutes
(b) Rinse thoroughly with copper sulfate
(c) Blot dry with bibulous paper
Harley−Prescott: Laboratory Exercises in Microbiology, Fifth Edition
II. Bacterial Morphology and Staining
11. Capsule Staining © The McGraw−Hill Companies, 2002
Modified Capsule Stain (Graham and Evans)
1. Thoroughly clean the slide to be used with a house-hold cleanser (such as Bon Ami) and alcohol.
2. Mix two loopfuls of culture with a small amount(1 to 2 drops) of India ink at one end of the slide.
3. Spread out the drop using a second slide in the sameway one prepares a thin smear (see figure 6.2).
4. Dry the smear.5. GENTLY rinse with distilled water so that the
bacteria do not wash off the slide.6. Stain for 1 minute with Gram’s crystal violet.7. Rinse again with water.
8. Stain for 1d minutes with safranin stain.9. Rinse with water and blot dry.
10. If a capsule is present, the pink to red bacteria aresurrounded by a clear zone. The background is dark.
Capsule Staining 65
HINTS AND PRECAUTIONS(1) As with any materials stained with similar or identi-cal colors, light adjustments under the microscope willbe critical for optimal visualization of capsules. (2) Besure to use a very small amount of India ink or the cap-sules will not be clearly visible.
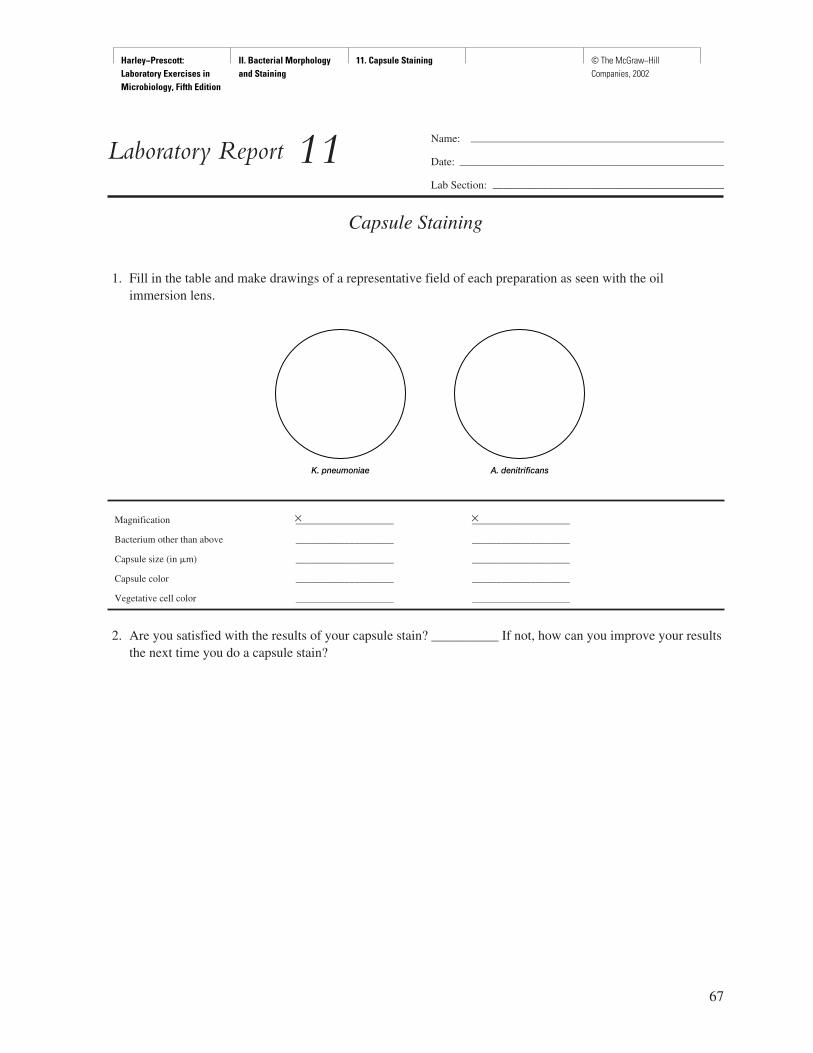
Harley−Prescott: Laboratory Exercises in Microbiology, Fifth Edition
II. Bacterial Morphology and Staining
11. Capsule Staining © The McGraw−Hill Companies, 2002
Capsule Staining
1. Fill in the table and make drawings of a representative field of each preparation as seen with the oilimmersion lens.
2. Are you satisfied with the results of your capsule stain? __________ If not, how can you improve your resultsthe next time you do a capsule stain?
67
Name: ———————————————————————
Date: ————————————————————————
Lab Section: —————————————————————
Laboratory Report 11
Magnification ____________________ ____________________
Bacterium other than above ____________________ ____________________
Capsule size (in �m) ____________________ ____________________
Capsule color ____________________ ____________________
Vegetative cell color ____________________ ____________________
× ×
K. pneumoniae A. denitrificans

Harley−Prescott: Laboratory Exercises in Microbiology, Fifth Edition
II. Bacterial Morphology and Staining
11. Capsule Staining © The McGraw−Hill Companies, 2002
Review Questions
1. What three chemical substances have been identified in bacterial capsules?
a.
b.
c.
2. What is the relationship between the presence of capsules and bacterial pathogenicity?
3. What is the dual function of copper sulfate in capsule staining?
4. In staining bacterial capsules, why is heat-fixing omitted?
5. How is the capsule stain used in clinical microbiology?
6. Name several bacteria that have capsules.
7. Of what value is a capsule to a bacterium?
68 Bacterial Morphology and Staining
Harley−Prescott: Laboratory Exercises in Microbiology, Fifth Edition
II. Bacterial Morphology and Staining
12. Flagella Staining:West and Difco’s SpotTest Methods
© The McGraw−Hill Companies, 2002
Materials per Student
young, 18-hour tryptic soy agar slants ofAlcaligenes faecalis (ATCC 8750,peritrichously flagellated) and Pseudomonasfluorescens (ATCC 13525, polarly flagellated)
wax pencilinoculating loopacid-cleaned glass slides with frosted endsclean distilled watermicroscopeimmersion oillens paper and lens cleanerboiling water bath (250-ml beaker with distilled
water, ring stand, wire gauze pad, and Bunsenburner or hot plate)
Pasteur pipettes with pipettorWest stain
solution Asolution B
Difco’s SpotTest Flagella stain
Learning Objectives
Each student should be able to
1. Understand the biochemical basis of flagella staining2. Perform a flagella stain3. Differentiate between two types of flagellar
arrangement
Suggested Reading in Textbook
1. Staining Specific Structures, section 2.3.2. Flagella and Motility, section 3.6.3. Flagella Ultrastructure, section 3.6.4. Flagellar Synthesis, section 3.6.5. The Mechanism of Flagellar Movement, section
3.6; see also figures 3.30–3.36.
Pronunciation Guide
Alcaligenes faecalis (al-kah-LIJ-en-eez fee-KAL-iss)Pseudomonas fluorescens (soo-do-MO-nas floor-ES-
sens)
Why Are the Above Bacteria Usedin This Exercise?
After this exercise the student should be able to correctlystain bacteria to determine the presence of flagella and theirarrangement. The authors have chosen two easily main-tained bacteria that have different flagellar arrangements.Alcaligenes faecalis (M. L. adj. faecalis, fecal) cells existas cocci or coccal rods 0.5 to 2.6 �m in length, usually oc-curring singly. Motility is with 1 to 8 (occasionally up to12) peritrichous flagella. A. faecalis normally occurs inwater and soil. Pseudomonas fluorescens (M. L. v., fluo-resco, fluoresce) cells are rods 2.0 to 2.8 �m in length and0.7 to 0.8 �m in width. They occur singly and in pairs.Motility is with one to several polar flagella. P. fluorescensis widely distributed in nature.
69
E X E R C I S E
Flagella Staining:West and Difco’s SpotTest Methods
12
SAFETY CONSIDERATIONSBe careful with the boiling water bath and Bunsenburner flame. No mouth pipetting. West stain solutionsA and B and Difco’s SpotTest Flagella stain are irri-tants. Do not breathe vapors or get solutions on yourskin. Always prepare solutions A and B while using anexhaust hood with the fan on. Also, always use thehoods when applying heat to the staining solutions. Dis-card slides in a container with disinfectant.
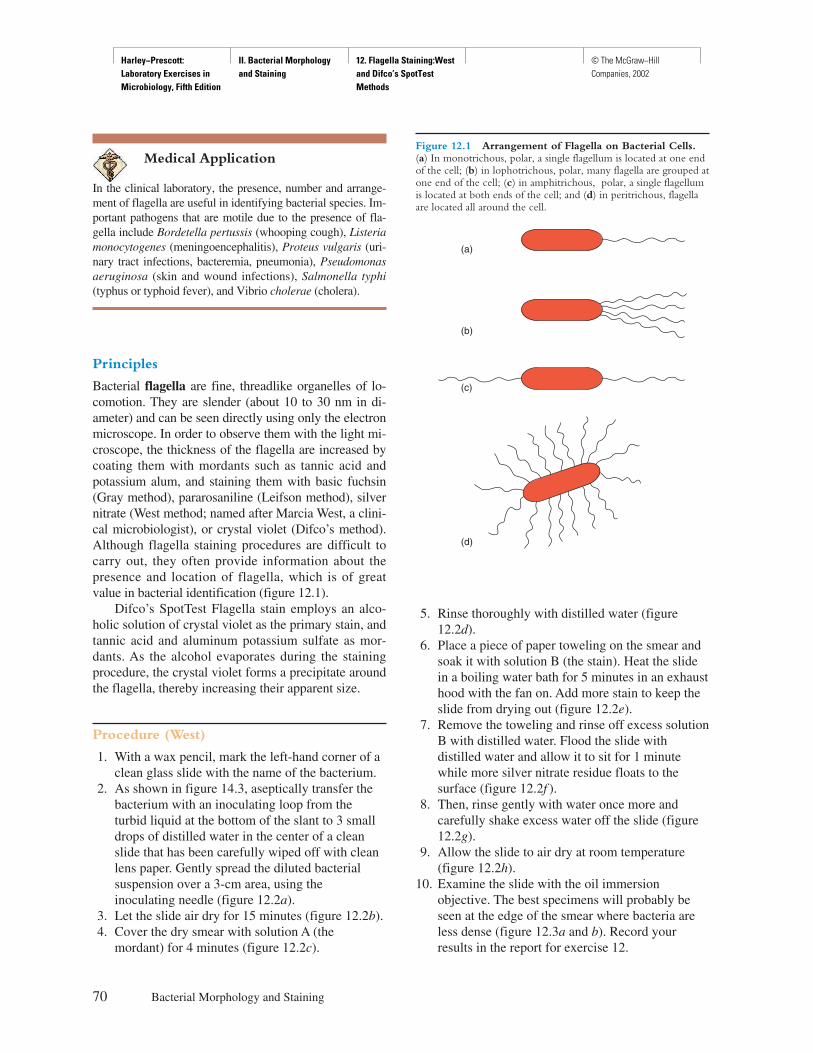
Harley−Prescott: Laboratory Exercises in Microbiology, Fifth Edition
II. Bacterial Morphology and Staining
12. Flagella Staining:West and Difco’s SpotTest Methods
© The McGraw−Hill Companies, 2002
Medical Application
In the clinical laboratory, the presence, number and arrange-ment of flagella are useful in identifying bacterial species. Im-portant pathogens that are motile due to the presence of fla-gella include Bordetella pertussis (whooping cough), Listeriamonocytogenes (meningoencephalitis), Proteus vulgaris (uri-nary tract infections, bacteremia, pneumonia), Pseudomonasaeruginosa (skin and wound infections), Salmonella typhi(typhus or typhoid fever), and Vibrio cholerae (cholera).
Principles
Bacterial flagella are fine, threadlike organelles of lo-comotion. They are slender (about 10 to 30 nm in di-ameter) and can be seen directly using only the electronmicroscope. In order to observe them with the light mi-croscope, the thickness of the flagella are increased bycoating them with mordants such as tannic acid andpotassium alum, and staining them with basic fuchsin(Gray method), pararosaniline (Leifson method), silvernitrate (West method; named after Marcia West, a clini-cal microbiologist), or crystal violet (Difco’s method).Although flagella staining procedures are difficult tocarry out, they often provide information about thepresence and location of flagella, which is of greatvalue in bacterial identification (figure 12.1).
Difco’s SpotTest Flagella stain employs an alco-holic solution of crystal violet as the primary stain, andtannic acid and aluminum potassium sulfate as mor-dants. As the alcohol evaporates during the stainingprocedure, the crystal violet forms a precipitate aroundthe flagella, thereby increasing their apparent size.
Procedure (West)
1. With a wax pencil, mark the left-hand corner of aclean glass slide with the name of the bacterium.
2. As shown in figure 14.3, aseptically transfer thebacterium with an inoculating loop from theturbid liquid at the bottom of the slant to 3 smalldrops of distilled water in the center of a cleanslide that has been carefully wiped off with cleanlens paper. Gently spread the diluted bacterialsuspension over a 3-cm area, using theinoculating needle (figure 12.2a).
3. Let the slide air dry for 15 minutes (figure 12.2b).4. Cover the dry smear with solution A (the
mordant) for 4 minutes (figure 12.2c).
5. Rinse thoroughly with distilled water (figure12.2d).
6. Place a piece of paper toweling on the smear andsoak it with solution B (the stain). Heat the slidein a boiling water bath for 5 minutes in an exhausthood with the fan on. Add more stain to keep theslide from drying out (figure 12.2e).
7. Remove the toweling and rinse off excess solutionB with distilled water. Flood the slide withdistilled water and allow it to sit for 1 minutewhile more silver nitrate residue floats to thesurface (figure 12.2f ).
8. Then, rinse gently with water once more andcarefully shake excess water off the slide (figure12.2g).
9. Allow the slide to air dry at room temperature(figure 12.2h).
10. Examine the slide with the oil immersionobjective. The best specimens will probably beseen at the edge of the smear where bacteria areless dense (figure 12.3a and b). Record yourresults in the report for exercise 12.
70 Bacterial Morphology and Staining
Figure 12.1 Arrangement of Flagella on Bacterial Cells.(a) In monotrichous, polar, a single flagellum is located at one endof the cell; (b) in lophotrichous, polar, many flagella are grouped atone end of the cell; (c) in amphitrichous, polar, a single flagellumis located at both ends of the cell; and (d) in peritrichous, flagellaare located all around the cell.
(a)
(b)
(c)
(d)
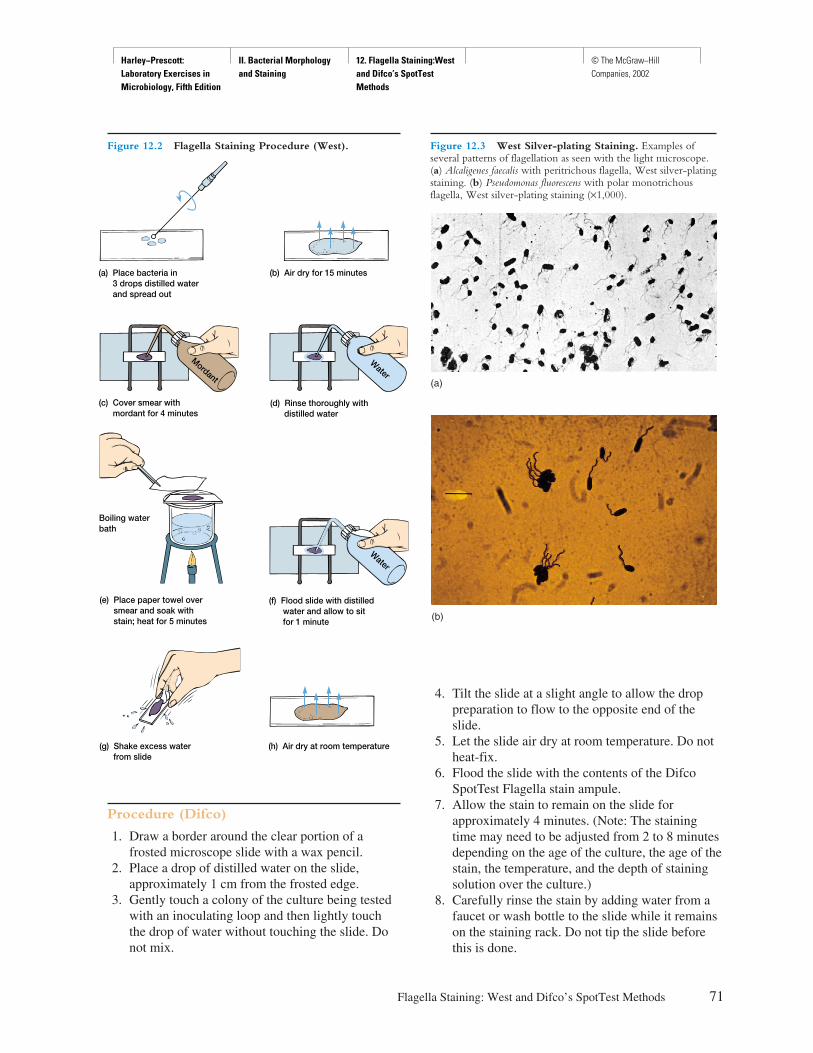
Harley−Prescott: Laboratory Exercises in Microbiology, Fifth Edition
II. Bacterial Morphology and Staining
12. Flagella Staining:West and Difco’s SpotTest Methods
© The McGraw−Hill Companies, 2002
Procedure (Difco)
1. Draw a border around the clear portion of afrosted microscope slide with a wax pencil.
2. Place a drop of distilled water on the slide,approximately 1 cm from the frosted edge.
3. Gently touch a colony of the culture being testedwith an inoculating loop and then lightly touchthe drop of water without touching the slide. Donot mix.
Flagella Staining: West and Difco’s SpotTest Methods 71
Mordant
(a) Place bacteria in 3 drops distilled water and spread out
Water
Water
(b) Air dry for 15 minutes
(d) Rinse thoroughly with distilled water
(c) Cover smear with mordant for 4 minutes
Boiling waterbath
(e) Place paper towel over smear and soak with stain; heat for 5 minutes
(f) Flood slide with distilled water and allow to sit for 1 minute
(g) Shake excess water from slide
(h) Air dry at room temperature
Figure 12.2 Flagella Staining Procedure (West).
(a)
(b)
Figure 12.3 West Silver-plating Staining. Examples ofseveral patterns of flagellation as seen with the light microscope.(a) Alcaligenes faecalis with peritrichous flagella, West silver-platingstaining. (b) Pseudomonas fluorescens with polar monotrichousflagella, West silver-plating staining (×1,000).
4. Tilt the slide at a slight angle to allow the droppreparation to flow to the opposite end of theslide.
5. Let the slide air dry at room temperature. Do notheat-fix.
6. Flood the slide with the contents of the DifcoSpotTest Flagella stain ampule.
7. Allow the stain to remain on the slide forapproximately 4 minutes. (Note: The stainingtime may need to be adjusted from 2 to 8 minutesdepending on the age of the culture, the age of thestain, the temperature, and the depth of stainingsolution over the culture.)
8. Carefully rinse the stain by adding water from afaucet or wash bottle to the slide while it remainson the staining rack. Do not tip the slide beforethis is done.

Harley−Prescott: Laboratory Exercises in Microbiology, Fifth Edition
II. Bacterial Morphology and Staining
12. Flagella Staining:West and Difco’s SpotTest Methods
© The McGraw−Hill Companies, 2002
9. After rinsing, gently tilt the slide to allow excesswater to run off and let the slide air dry at roomtemperature or place on a slide warmer.
10. Examine the slide microscopically with the oilimmersion objective. Begin examination atthinner areas of the preparation and move towardthe center. Look for fields that contain severalisolated bacteria, rather than fields that containclumps of many bacteria. Bacteria and theirflagella should stain purple.
72 Bacterial Morphology and Staining
HINTS AND PRECAUTIONS(1) Do not vortex the cultures, and be gentle when mak-ing smears to avoid detaching the flagella. (2) New tryp-tic soy agar slants must be used to prepare cultures sothat there is still liquid at the bottom of the slant. (3) Per-form all steps as gently as possible, rough handling ofbacteria could cause flagella to be broken off and lost.
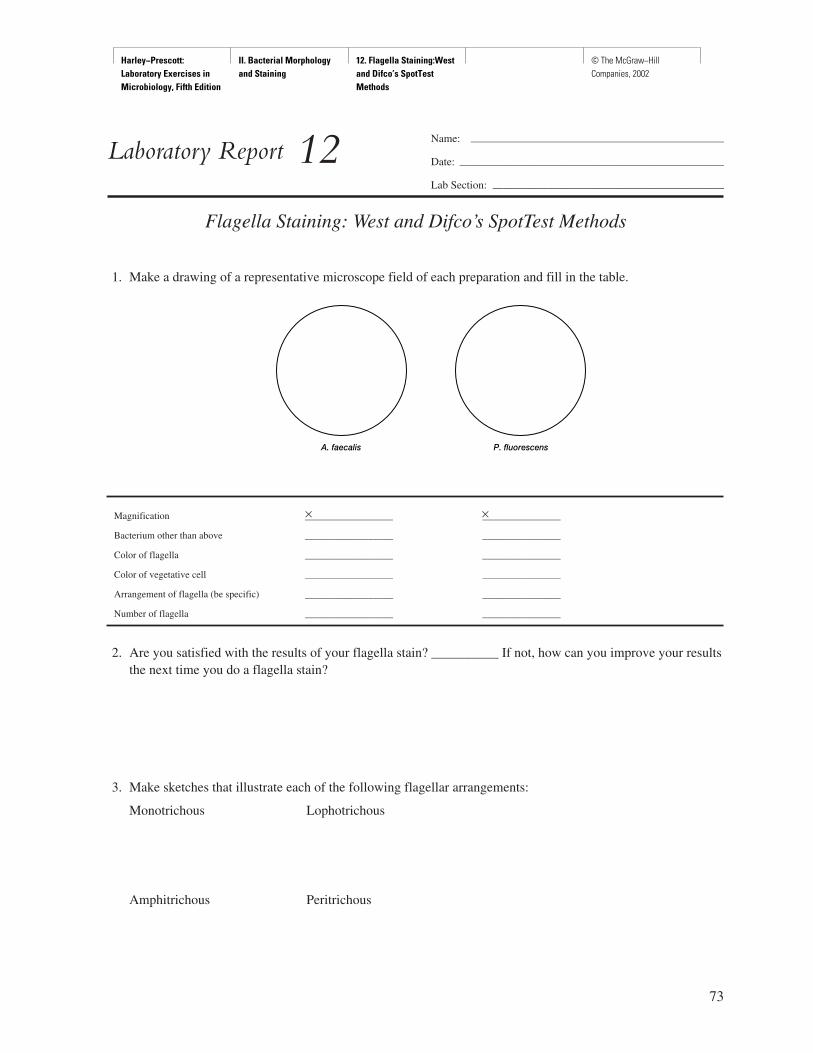
Harley−Prescott: Laboratory Exercises in Microbiology, Fifth Edition
II. Bacterial Morphology and Staining
12. Flagella Staining:West and Difco’s SpotTest Methods
© The McGraw−Hill Companies, 2002
73
Name: ———————————————————————
Date: ————————————————————————
Lab Section: —————————————————————
Laboratory Report 12
Flagella Staining: West and Difco’s SpotTest Methods
1. Make a drawing of a representative microscope field of each preparation and fill in the table.
2. Are you satisfied with the results of your flagella stain? __________ If not, how can you improve your resultsthe next time you do a flagella stain?
3. Make sketches that illustrate each of the following flagellar arrangements:
Monotrichous Lophotrichous
Amphitrichous Peritrichous
A. faecalis P. fluorescens
Magnification __________________ ________________
Bacterium other than above __________________ ________________
Color of flagella __________________ ________________
Color of vegetative cell __________________ ________________
Arrangement of flagella (be specific) __________________ ________________
Number of flagella __________________ ________________
× ×

Harley−Prescott: Laboratory Exercises in Microbiology, Fifth Edition
II. Bacterial Morphology and Staining
12. Flagella Staining:West and Difco’s SpotTest Methods
© The McGraw−Hill Companies, 2002
Review Questions
1. Why are flagella so difficult to stain?
2. Why did you use a young culture for the flagella stain?
3. Why must the glass slide be free of grease and oil before staining for flagella?
4. Name four types of flagella arrangements.
a.
b.
c.
d.
5. What is a mordant?
6. Compare the usefulness of a flagella stain with that of the hanging drop preparation.
7. What happens to the size of flagella when they are stained?
74 Bacterial Morphology and Staining

Harley−Prescott: Laboratory Exercises in Microbiology, Fifth Edition
III. Basic Laboratory and Culture Techniques
Introduction © The McGraw−Hill Companies, 2002
75
P A R T T H R E E
Basic Laboratory and Culture Techniques
What is education but a process by which a person begins to learnhow to learn?
Peter Alexander Ustinov(English actor and entertainer, 1921– )
In this part of the manual you will be introduced to thebasic techniques employed in microbiology laboratories
to prepare and sterilize culture media, to isolate bacteria inpure culture from various types of specimens, and to subcul-ture bacteria and fungi in the laboratory. You will also learnhow to determine the number of bacteria in a given culture.
Along with Parts One and Two of this manual, PartThree continues your acquisition of basic microbiologicaltechniques. A thorough understanding and applicability ofmicroscopic, slide, and culture techniques are an importantfoundation on which the rest of this manual is built.
After completing the exercises in Part Three,you will be able to (1) demonstrate the proper useof aseptic techniques. This will meet the AmericanSociety for Microbiology Core Curriculum skillnumber 3 (see pp. vi-viii): (a) sterilizing and main-taining sterility of transfer instruments; (b) per-forming aseptic transfers; and (c) obtaining micro-bial samples. (2) You will also be able to estimatethe number of microorganisms in a sample usingserial dilution techniques. This will meet the Amer-ican Society for Microbiology Core Curriculumskill number 5 (see pp. vi-viii): (a) correctly choosingand using pipettes and pipetting devices; (b) cor-rectly spreading diluted samples for counting; (c)estimating appropriate dilutions; and (d) extrapolat-ing plate counts to obtain correct CFU or PFU inthe starting sample.
Alfred Theodore MacConkey (1861–1931).Alfred MacConkey was an English bacteriologist who de-scribed the first and most famous solid differential medium—MacConkey’s agar.
The first and most famous solid differential medium was de-scribed by MacConkey in 1900 in The Lancet. The medium isused for the detection of coliforms and enteric pathogens based
on their ability to ferment lactose. Lactose-fermenting bacteriaappear as red to pink colonies. Lactose nonfermenting bacteriaappear as colorless or transparent colonies.
The story of the development of this medium is of inter-est. The first formula was for a bile salt litmus medium thatcontained glycocholate, lactose, and litmus, and that was to beincubated at 22°C. A year later MacConkey published a newformulation of the medium in the Zentralblatt fur Bakteriolo-gie. The modified medium contained taurocholate in place ofglycocholate and was to be incubated at 42°C. Finally, in1905, MacConkey published a third formula for his medium inwhich neutral red was substituted for litmus as an indicator. Itis this last formula that we use today for making MacConkey’smedium, which is as follows:
MacConkey’s Agar (pH 7.1)
Bacto peptone 17.0 g
Proteose peptone 3.0 g
Lactose 10.0 g
Bile salts mixture 1.5 g
Sodium Chloride 5.0 g
Agar 13.5 g
Neutral red 0.03 g
Crystal violet 0.001 g
Distilled water 1,000.0 ml
Harley−Prescott: Laboratory Exercises in Microbiology, Fifth Edition
III. Basic Laboratory and Culture Techniques
13. Microbiological Culture Media Preparation and Sterilization
© The McGraw−Hill Companies, 2002
Materials per Group of Students
24- to 48-hour tryptic soy broth culture ofEscherichia coli (ATCC 11229)
autoclave for the entire classpetri platesculture tubestest-tube rack or wire baskettest-tube capsdefined culture medium as in table 13.1complex culture medium as in table 13.22-liter Erlenmeyer flask10-ml pipettes with pipettorweighing paper or boatsbalanceagarheat-proof Zetex fabric gloveswater bath set at 48° to 50°Cboiling water bathaluminum foilstirring rod or plate with stirring barBunsen burner or hot plateDifco Manual or BBL Manual
Learning Objectives
Each student should be able to
1. Describe the different types of culture media andtheir composition, and give several examples ofwhat each is used for
2. Describe the various ways culture tubes are capped3. Describe how to prepare and transfer culture media4. Prepare defined and undefined media, and prepare
agar plates5. Describe the concept of sterility6. Describe how various media, supplies, and
equipment can be sterilized7. Correctly and safely use the autoclave
Suggested Reading in Textbook
1. Definition of Frequently Used Terms, section 7.1.2. The Use of Physical Methods in Control, section
7.4; see also figures 7.3–7.5.3. Filtration, section 7.4.4. Sterilizing Gases, section 7.5.5. Culture Media, section 5.7.6. Synthetic or Defined Media, section 5.7 and table
5.4.7. Complex Media, section 5.7 and table 5.5.8. Types of Media, section 5.7; see also table 36.1.
Pronunciation Guide
Escherichia coli (esh-er-I-ke-a KOH-lee)
Why Is the Above Bacterium Usedin This Exercise?
One of the major objectives of this exercise is to preparedefined and complex media. After the media have been pre-pared, they can be inoculated with Escherichia coli. E. coliis facultatively anaerobic and chemoorganoheterotrophic,having both a respiratory and a fermentative type of metab-olism. Glucose and other carbohydrates are catabolizedwith the formation of acid and gas.
76
E X E R C I S E
Microbiological Culture MediaPreparation and Sterilization
13
SAFETY CONSIDERATIONSSeveral types of heat that can cause severe burns areused in this experiment. Do not operate the autoclavewithout approval from your instructor. Always wearheat-proof (Zetex) gloves when unloading the auto-clave. Zetex fabric gives all of the protection of as-bestos with none of the health hazards. In like manner,boiling agar can cause severe burns if spilled on yourhands. Be especially careful with Bunsen burners, hotplates, and boiling water baths. All are potentially haz-ardous and can cause burns. If you are burned, seek im-mediate treatment. Do not pipette by mouth.
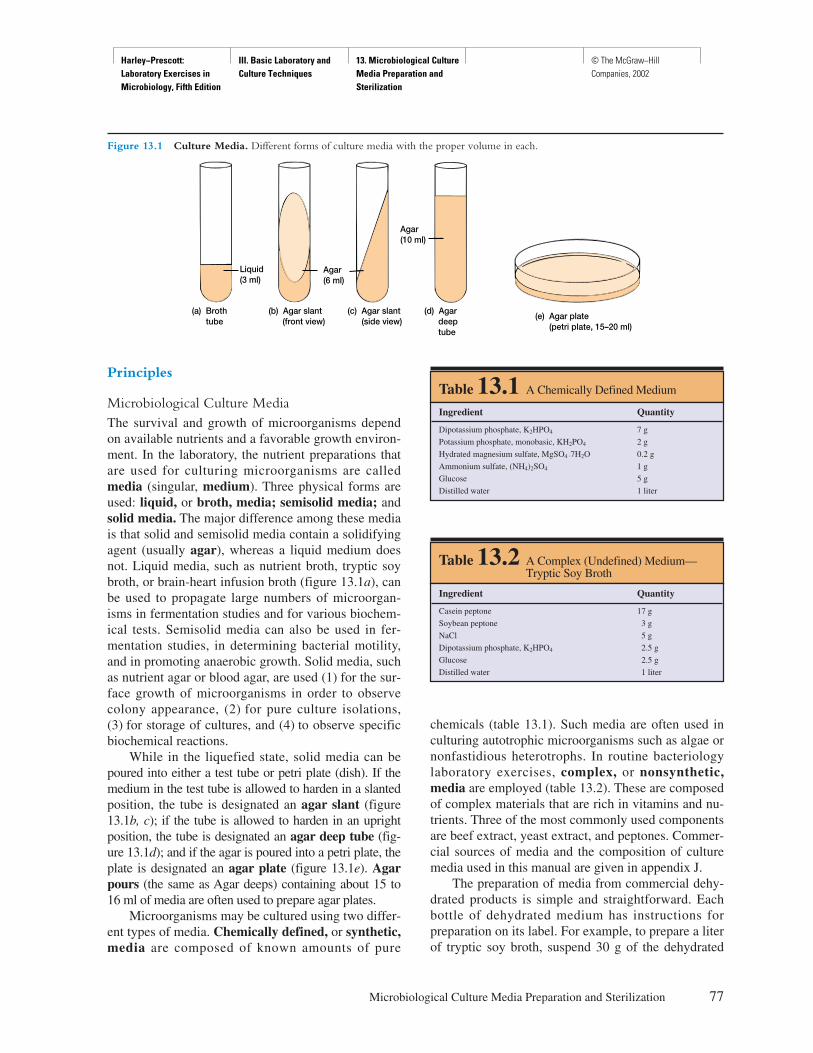
Harley−Prescott: Laboratory Exercises in Microbiology, Fifth Edition
III. Basic Laboratory and Culture Techniques
13. Microbiological Culture Media Preparation and Sterilization
© The McGraw−Hill Companies, 2002
Principles
Microbiological Culture MediaThe survival and growth of microorganisms dependon available nutrients and a favorable growth environ-ment. In the laboratory, the nutrient preparations thatare used for culturing microorganisms are calledmedia (singular, medium). Three physical forms areused: liquid, or broth, media; semisolid media; andsolid media. The major difference among these mediais that solid and semisolid media contain a solidifyingagent (usually agar), whereas a liquid medium doesnot. Liquid media, such as nutrient broth, tryptic soybroth, or brain-heart infusion broth (figure 13.1a), canbe used to propagate large numbers of microorgan-isms in fermentation studies and for various biochem-ical tests. Semisolid media can also be used in fer-mentation studies, in determining bacterial motility,and in promoting anaerobic growth. Solid media, suchas nutrient agar or blood agar, are used (1) for the sur-face growth of microorganisms in order to observecolony appearance, (2) for pure culture isolations,(3) for storage of cultures, and (4) to observe specificbiochemical reactions.
While in the liquefied state, solid media can bepoured into either a test tube or petri plate (dish). If themedium in the test tube is allowed to harden in a slantedposition, the tube is designated an agar slant (figure13.1b, c); if the tube is allowed to harden in an uprightposition, the tube is designated an agar deep tube (fig-ure 13.1d); and if the agar is poured into a petri plate, theplate is designated an agar plate (figure 13.1e). Agarpours (the same as Agar deeps) containing about 15 to16 ml of media are often used to prepare agar plates.
Microorganisms may be cultured using two differ-ent types of media. Chemically defined, or synthetic,media are composed of known amounts of pure
chemicals (table 13.1). Such media are often used inculturing autotrophic microorganisms such as algae ornonfastidious heterotrophs. In routine bacteriologylaboratory exercises, complex, or nonsynthetic,media are employed (table 13.2). These are composedof complex materials that are rich in vitamins and nu-trients. Three of the most commonly used componentsare beef extract, yeast extract, and peptones. Commer-cial sources of media and the composition of culturemedia used in this manual are given in appendix J.
The preparation of media from commercial dehy-drated products is simple and straightforward. Eachbottle of dehydrated medium has instructions forpreparation on its label. For example, to prepare a literof tryptic soy broth, suspend 30 g of the dehydrated
Microbiological Culture Media Preparation and Sterilization 77
Table 13.1 A Chemically Defined Medium
Ingredient Quantity
Dipotassium phosphate, K2HPO4 7 g
Potassium phosphate, monobasic, KH2PO4 2 g
Hydrated magnesium sulfate, MgSO4 �7H2O 0.2 g
Ammonium sulfate, (NH4)2SO4 1 g
Glucose 5 g
Distilled water 1 liter
Table 13.2 A Complex (Undefined) Medium—Tryptic Soy Broth
Ingredient Quantity
Casein peptone 17 g
Soybean peptone 3 g
NaCl 5 g
Dipotassium phosphate, K2HPO4 2.5 g
Glucose 2.5 g
Distilled water 1 liter
Figure 13.1 Culture Media. Different forms of culture media with the proper volume in each.
(a) Broth tube
Liquid(3 ml)
(b) Agar slant (front view)
(c) Agar slant (side view)
Agar(6 ml)
(d) Agar deep tube
Agar(10 ml)
(e) Agar plate (petri plate, 15–20 ml)
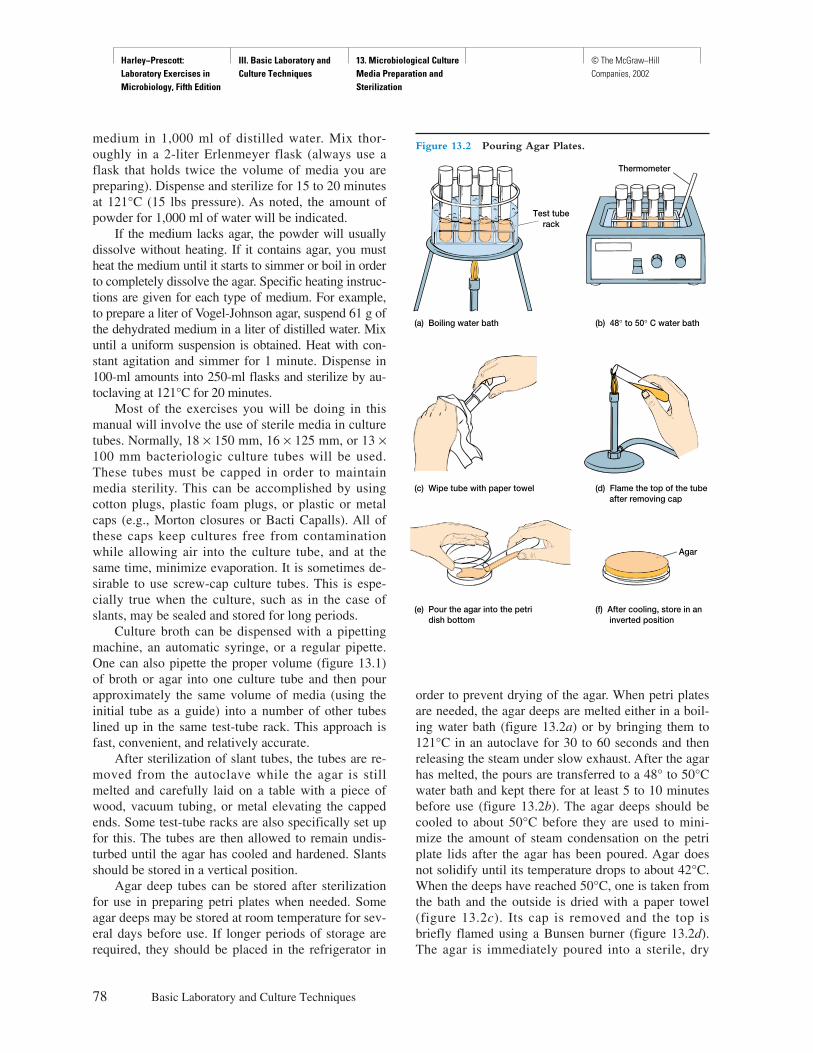
Harley−Prescott: Laboratory Exercises in Microbiology, Fifth Edition
III. Basic Laboratory and Culture Techniques
13. Microbiological Culture Media Preparation and Sterilization
© The McGraw−Hill Companies, 2002
medium in 1,000 ml of distilled water. Mix thor-oughly in a 2-liter Erlenmeyer flask (always use aflask that holds twice the volume of media you arepreparing). Dispense and sterilize for 15 to 20 minutesat 121°C (15 lbs pressure). As noted, the amount ofpowder for 1,000 ml of water will be indicated.
If the medium lacks agar, the powder will usuallydissolve without heating. If it contains agar, you mustheat the medium until it starts to simmer or boil in orderto completely dissolve the agar. Specific heating instruc-tions are given for each type of medium. For example,to prepare a liter of Vogel-Johnson agar, suspend 61 g ofthe dehydrated medium in a liter of distilled water. Mixuntil a uniform suspension is obtained. Heat with con-stant agitation and simmer for 1 minute. Dispense in100-ml amounts into 250-ml flasks and sterilize by au-toclaving at 121°C for 20 minutes.
Most of the exercises you will be doing in thismanual will involve the use of sterile media in culturetubes. Normally, 18 × 150 mm, 16 × 125 mm, or 13 ×100 mm bacteriologic culture tubes will be used.These tubes must be capped in order to maintainmedia sterility. This can be accomplished by usingcotton plugs, plastic foam plugs, or plastic or metalcaps (e.g., Morton closures or Bacti Capalls). All ofthese caps keep cultures free from contaminationwhile allowing air into the culture tube, and at thesame time, minimize evaporation. It is sometimes de-sirable to use screw-cap culture tubes. This is espe-cially true when the culture, such as in the case ofslants, may be sealed and stored for long periods.
Culture broth can be dispensed with a pipettingmachine, an automatic syringe, or a regular pipette.One can also pipette the proper volume (figure 13.1)of broth or agar into one culture tube and then pourapproximately the same volume of media (using theinitial tube as a guide) into a number of other tubeslined up in the same test-tube rack. This approach isfast, convenient, and relatively accurate.
After sterilization of slant tubes, the tubes are re-moved from the autoclave while the agar is stillmelted and carefully laid on a table with a piece ofwood, vacuum tubing, or metal elevating the cappedends. Some test-tube racks are also specifically set upfor this. The tubes are then allowed to remain undis-turbed until the agar has cooled and hardened. Slantsshould be stored in a vertical position.
Agar deep tubes can be stored after sterilizationfor use in preparing petri plates when needed. Someagar deeps may be stored at room temperature for sev-eral days before use. If longer periods of storage arerequired, they should be placed in the refrigerator in
order to prevent drying of the agar. When petri platesare needed, the agar deeps are melted either in a boil-ing water bath (figure 13.2a) or by bringing them to121°C in an autoclave for 30 to 60 seconds and thenreleasing the steam under slow exhaust. After the agarhas melted, the pours are transferred to a 48° to 50°Cwater bath and kept there for at least 5 to 10 minutesbefore use (figure 13.2b). The agar deeps should becooled to about 50°C before they are used to mini-mize the amount of steam condensation on the petriplate lids after the agar has been poured. Agar doesnot solidify until its temperature drops to about 42°C.When the deeps have reached 50°C, one is taken fromthe bath and the outside is dried with a paper towel(figure 13.2c). Its cap is removed and the top isbriefly flamed using a Bunsen burner (figure 13.2d).The agar is immediately poured into a sterile, dry
78 Basic Laboratory and Culture Techniques
Test tuberack
(a) Boiling water bath (b) 48° to 50° C water bath
Thermometer
(d) Flame the top of the tube after removing cap
(c) Wipe tube with paper towel
(e) Pour the agar into the petri dish bottom
(f) After cooling, store in an inverted position
Agar
Figure 13.2 Pouring Agar Plates.
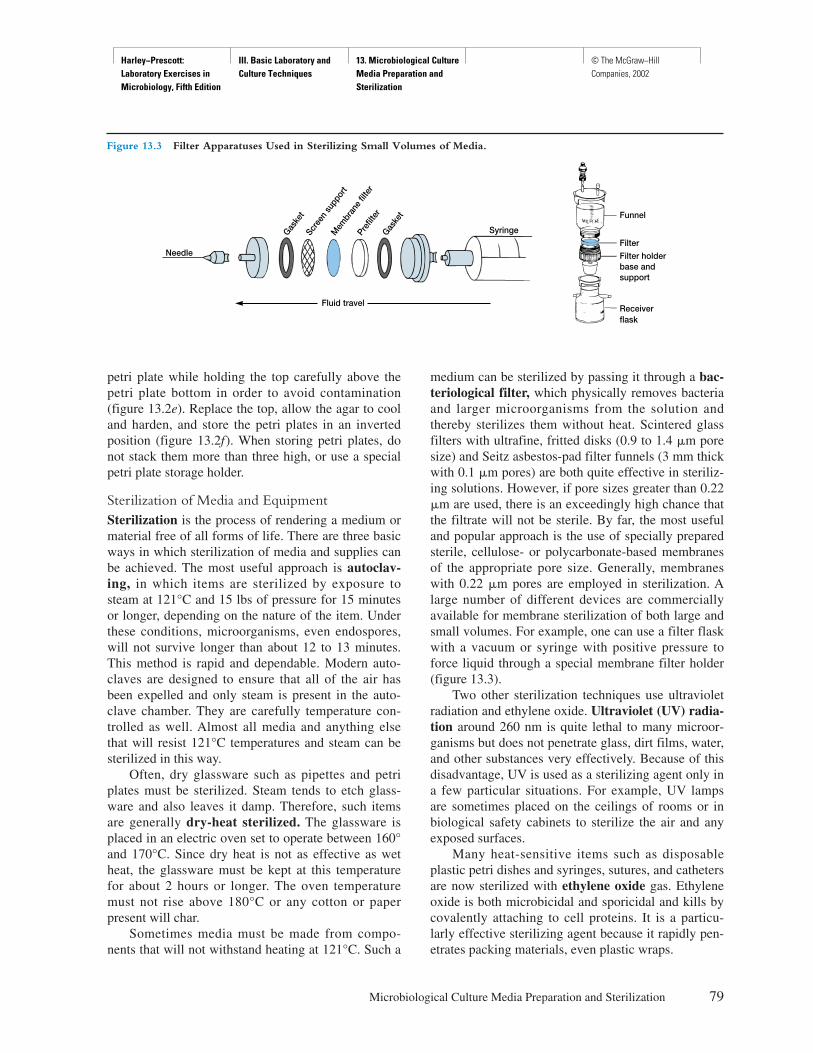
Harley−Prescott: Laboratory Exercises in Microbiology, Fifth Edition
III. Basic Laboratory and Culture Techniques
13. Microbiological Culture Media Preparation and Sterilization
© The McGraw−Hill Companies, 2002
petri plate while holding the top carefully above thepetri plate bottom in order to avoid contamination(figure 13.2e). Replace the top, allow the agar to cooland harden, and store the petri plates in an invertedposition (figure 13.2f). When storing petri plates, donot stack them more than three high, or use a specialpetri plate storage holder.
Sterilization of Media and EquipmentSterilization is the process of rendering a medium ormaterial free of all forms of life. There are three basicways in which sterilization of media and supplies canbe achieved. The most useful approach is autoclav-ing, in which items are sterilized by exposure tosteam at 121°C and 15 lbs of pressure for 15 minutesor longer, depending on the nature of the item. Underthese conditions, microorganisms, even endospores,will not survive longer than about 12 to 13 minutes.This method is rapid and dependable. Modern auto-claves are designed to ensure that all of the air hasbeen expelled and only steam is present in the auto-clave chamber. They are carefully temperature con-trolled as well. Almost all media and anything elsethat will resist 121°C temperatures and steam can besterilized in this way.
Often, dry glassware such as pipettes and petriplates must be sterilized. Steam tends to etch glass-ware and also leaves it damp. Therefore, such itemsare generally dry-heat sterilized. The glassware isplaced in an electric oven set to operate between 160°and 170°C. Since dry heat is not as effective as wetheat, the glassware must be kept at this temperaturefor about 2 hours or longer. The oven temperaturemust not rise above 180°C or any cotton or paperpresent will char.
Sometimes media must be made from compo-nents that will not withstand heating at 121°C. Such a
medium can be sterilized by passing it through a bac-teriological filter, which physically removes bacteriaand larger microorganisms from the solution andthereby sterilizes them without heat. Scintered glassfilters with ultrafine, fritted disks (0.9 to 1.4 �m poresize) and Seitz asbestos-pad filter funnels (3 mm thickwith 0.1 �m pores) are both quite effective in steriliz-ing solutions. However, if pore sizes greater than 0.22�m are used, there is an exceedingly high chance thatthe filtrate will not be sterile. By far, the most usefuland popular approach is the use of specially preparedsterile, cellulose- or polycarbonate-based membranesof the appropriate pore size. Generally, membraneswith 0.22 �m pores are employed in sterilization. Alarge number of different devices are commerciallyavailable for membrane sterilization of both large andsmall volumes. For example, one can use a filter flaskwith a vacuum or syringe with positive pressure toforce liquid through a special membrane filter holder(figure 13.3).
Two other sterilization techniques use ultravioletradiation and ethylene oxide. Ultraviolet (UV) radia-tion around 260 nm is quite lethal to many microor-ganisms but does not penetrate glass, dirt films, water,and other substances very effectively. Because of thisdisadvantage, UV is used as a sterilizing agent only ina few particular situations. For example, UV lampsare sometimes placed on the ceilings of rooms or inbiological safety cabinets to sterilize the air and anyexposed surfaces.
Many heat-sensitive items such as disposableplastic petri dishes and syringes, sutures, and cathetersare now sterilized with ethylene oxide gas. Ethyleneoxide is both microbicidal and sporicidal and kills bycovalently attaching to cell proteins. It is a particu-larly effective sterilizing agent because it rapidly pen-etrates packing materials, even plastic wraps.
Microbiological Culture Media Preparation and Sterilization 79
Figure 13.3 Filter Apparatuses Used in Sterilizing Small Volumes of Media.
Needle
Funnel
FilterFilter holderbase andsupport
Receiverflask
Mem
bran
e fil
ter
Prefil
ter
Gaske
t
Syringe
Fluid travel
Gaske
tSc
reen
sup
port
Harley−Prescott: Laboratory Exercises in Microbiology, Fifth Edition
III. Basic Laboratory and Culture Techniques
13. Microbiological Culture Media Preparation and Sterilization
© The McGraw−Hill Companies, 2002
Procedure
Preparing a Chemically Defined Medium
1. Prepare 500 ml of glucose-mineral salts broth forthe culture of E. coli using the recipe outlined intable 13.1. To a 1-liter Erlenmeyer flask add 375ml of distilled water. Weigh out and add eachingredient to the water in the order listed and stirafter each addition until the ingredient iscompletely dissolved. Remember to halve thequantity of each ingredient. Add the remaining125 ml of water to wash the inside of the flask.
2. Adjust the pH to 7.2 to 7.4 by adding just enoughHCl or NaOH dropwise (see appendix E).
3. Dispense 3 to 5 ml of the glucose-mineral saltsbroth into each of 10 test tubes using a 10-mlpipette and then loosely cap the tubes. Otherstudents can use the remaining 450 ml of brothfor their tubes. Place your tubes in a test-tube rackor basket. Place the basket or rack in theautoclave.
Preparing a Complex Medium1. Prepare 500 ml of tryptic soy broth according to
the recipe outlined in table 13.2.2. Add 375 ml of distilled water to a 1-liter
Erlenmeyer flask and add the ingredientsindividually (use half the amounts given); mixafter each addition.
3. Add the remaining 125 ml of water to rinse thesides of the flask.
4. Adjust the pH to 7.3 by adding just enough HClor NaOH dropwise (see appendix E).
5. Dispense 3 to 5 ml of the broth into each of 10tubes and loosely cap them. Place the tubes in atest-tube rack or basket, and place in theautoclave.
6. To the remaining broth (450 ml), add 7.2 g of agarto give an agar concentration of approximately1.6%. Heat the contents of the flask and graduallybring to a boil. Heat the agar until it is completelymelted. Cover with aluminum foil and place inthe autoclave. After autoclaving, cool the flask ofsterile agar in a 48° to 50°C water bath. Line upthe desired number of sterile petri plates on thebench top. Remove the aluminum foil cap fromthe flask and briefly flame the flask’s neck. Liftthe top of each plate, pour about 15 ml of agar,and quickly replace the top (the agar should beapproximately 3 to 5 mm deep in the plate). Pourall plates without stopping.
Alternatively, after dissolving the agar medium,dispense 15-ml portions into 18 × 150 mm tubes; capand autoclave the tubes. Cool them in a 48° to 50°Cwater bath and pour the agar as shown in figure 13.2.
Procedure for Autoclaving1. Your instructor will demonstrate the use of the
autoclave.2. Load the autoclave with the freshly prepared
culture media.3. Close and lock the autoclave door.4. Set the autoclave time for 15 minutes or longer
and select a slow rate of exhaust.5. Make certain that the autoclave temperature is set
to 121°C.6. Start the autoclave by pushing the start button or
twisting the knob to the start position.7. When the period of sterilization is completed and
the pressure in the chamber reads 0, carefullyopen the door and remove the containers, usingheat-proof gloves.
Preparing Agar Plates1. As outlined previously and in figure 13.2a–f, use
some of the sterilized tryptic soy agar to prepareagar plates.
2. When the plates are cool (agar solidified), invertthem to prevent condensing moisture fromaccumulating on the agar surfaces.
3. All plates and tubes should be incubated for atleast 24 hours to ensure sterility before you usethem.
80 Basic Laboratory and Culture Techniques
HINTS AND PRECAUTIONS(1) Don’t overload the autoclave chamber. Provideample space between baskets of media to allow circula-tion of steam. (2) You should bring media to a boil andthen, using heat-proof gloves, quickly remove the mediafrom the Bunsen burner or hot plate to prevent boilingover. Do not shake or swirl the flask as you remove itfrom the heat because such shaking may cause the mediato boil over. (3) Before opening the door to the auto-clave, you should always wear heat-proof gloves, standat arm’s length, and slowly open the door. This will pre-vent two problems from occurring: (a) the trapped steamwill dissipate toward the ceiling in a controlled fashionwithout burning the skin, and (b) the media will not boilout of the stoppered containers because of a too rapidchange in internal pressure in the flask.
Harley−Prescott: Laboratory Exercises in Microbiology, Fifth Edition
III. Basic Laboratory and Culture Techniques
13. Microbiological Culture Media Preparation and Sterilization
© The McGraw−Hill Companies, 2002
81
Name: ———————————————————————
Date: ————————————————————————
Lab Section: —————————————————————
Laboratory Report 13
Microbiological Culture Media Preparation and Sterilization
1. After at least 24 hours of incubation, do your prepared plates and broths appear to be sterile? Explain youranswer.
2. List the steps you would go through to make tryptic soy agar slants.
a. ____________________________________________________________________________________
b. ____________________________________________________________________________________
c. ____________________________________________________________________________________
d. ____________________________________________________________________________________
e. ____________________________________________________________________________________
f. ____________________________________________________________________________________
3. List the steps you would go through to make Vogel–Johnson agar plates (refer to the Difco Manual or the BBLManual).
a. ____________________________________________________________________________________
b. ____________________________________________________________________________________
c. ____________________________________________________________________________________
d. ____________________________________________________________________________________
e. ____________________________________________________________________________________
f. ____________________________________________________________________________________
4. Provide the requested information using a Difco Manual or BBL Manual.
a. Quantity of starch in Mueller–Hinton agar__________________________________________________
b. Quantity of lactose in Levine eosin methylene blue agar_______________________________________
c. Percent of sodium chloride in mannitol salt agar _____________________________________________
d. Percent of agar in MacConkey agar _______________________________________________________
e. Quantity of beef extract in nutrient broth ___________________________________________________
Harley−Prescott: Laboratory Exercises in Microbiology, Fifth Edition
III. Basic Laboratory and Culture Techniques
13. Microbiological Culture Media Preparation and Sterilization
© The McGraw−Hill Companies, 2002
5. Using a Difco Manual or BBL Manual, find the following:
a. The purpose of Endo agar
b. The way in which bismuth sulfite agar selects for Salmonella and Shigella species
c. The use of Sabouraud dextrose agar and the role of pH in this selectivity
d. The roles of thioglycollate and methylene blue in thioglycollate medium
e. The function of autoclaving in the preparation of Salmonella-Shigella agar
Review Questions
1. What are the three main types (in terms of their physical forms) of microbiological culture media?____________________ ____________________ ____________________
2. Define culture medium, defined or synthetic medium, and complex or nonsynthetic medium.
3. Why are culture media sterilized before use?
4. Describe three ways for sterilizing culture media and supplies.a.
b.
c.
5. Why are petri plates inverted after they cool?
6. Why is culture medium cooled to about 48° to 50°C before it is poured into petri plates?
7. What is a buffer? What is the buffer system used in this exercise?
8. What is the source of carbon in the chemically defined medium in table 13.1? The source of nitrogen?
82 Basic Laboratory and Culture Techniques
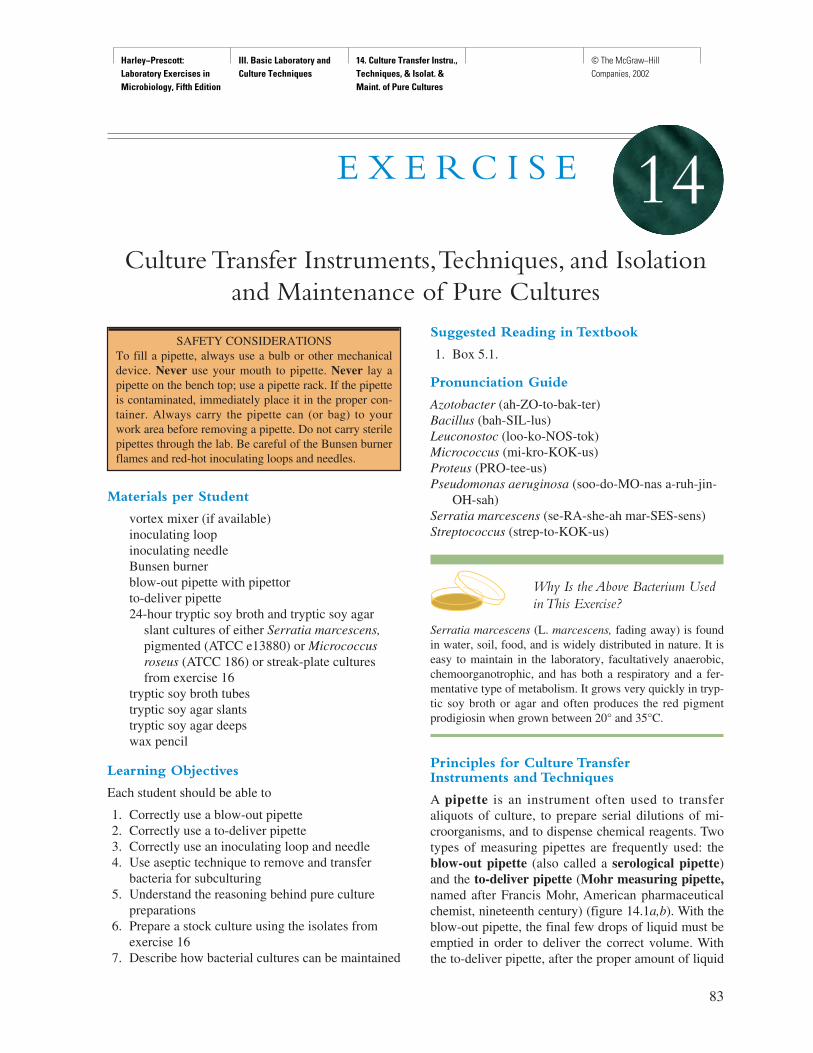
Harley−Prescott: Laboratory Exercises in Microbiology, Fifth Edition
III. Basic Laboratory and Culture Techniques
14. Culture Transfer Instru., Techniques, & Isolat. & Maint. of Pure Cultures
© The McGraw−Hill Companies, 2002
Materials per Student
vortex mixer (if available)inoculating loopinoculating needleBunsen burnerblow-out pipette with pipettorto-deliver pipette24-hour tryptic soy broth and tryptic soy agar
slant cultures of either Serratia marcescens,pigmented (ATCC e13880) or Micrococcusroseus (ATCC 186) or streak-plate culturesfrom exercise 16
tryptic soy broth tubestryptic soy agar slantstryptic soy agar deepswax pencil
Learning Objectives
Each student should be able to
1. Correctly use a blow-out pipette2. Correctly use a to-deliver pipette3. Correctly use an inoculating loop and needle4. Use aseptic technique to remove and transfer
bacteria for subculturing5. Understand the reasoning behind pure culture
preparations6. Prepare a stock culture using the isolates from
exercise 167. Describe how bacterial cultures can be maintained
Suggested Reading in Textbook
1. Box 5.1.
Pronunciation Guide
Azotobacter (ah-ZO-to-bak-ter)Bacillus (bah-SIL-lus)Leuconostoc (loo-ko-NOS-tok)Micrococcus (mi-kro-KOK-us)Proteus (PRO-tee-us)Pseudomonas aeruginosa (soo-do-MO-nas a-ruh-jin-
OH-sah)Serratia marcescens (se-RA-she-ah mar-SES-sens)Streptococcus (strep-to-KOK-us)
Why Is the Above Bacterium Usedin This Exercise?
Serratia marcescens (L. marcescens, fading away) is foundin water, soil, food, and is widely distributed in nature. It iseasy to maintain in the laboratory, facultatively anaerobic,chemoorganotrophic, and has both a respiratory and a fer-mentative type of metabolism. It grows very quickly in tryp-tic soy broth or agar and often produces the red pigmentprodigiosin when grown between 20° and 35°C.
Principles for Culture Transfer Instruments and Techniques
A pipette is an instrument often used to transferaliquots of culture, to prepare serial dilutions of mi-croorganisms, and to dispense chemical reagents. Twotypes of measuring pipettes are frequently used: theblow-out pipette (also called a serological pipette)and the to-deliver pipette (Mohr measuring pipette,named after Francis Mohr, American pharmaceuticalchemist, nineteenth century) (figure 14.1a,b). With theblow-out pipette, the final few drops of liquid must beemptied in order to deliver the correct volume. Withthe to-deliver pipette, after the proper amount of liquid
83
E X E R C I S E
Culture Transfer Instruments,Techniques, and Isolationand Maintenance of Pure Cultures
14
SAFETY CONSIDERATIONS To fill a pipette, always use a bulb or other mechanicaldevice. Never use your mouth to pipette. Never lay apipette on the bench top; use a pipette rack. If the pipetteis contaminated, immediately place it in the proper con-tainer. Always carry the pipette can (or bag) to yourwork area before removing a pipette. Do not carry sterilepipettes through the lab. Be careful of the Bunsen burnerflames and red-hot inoculating loops and needles.
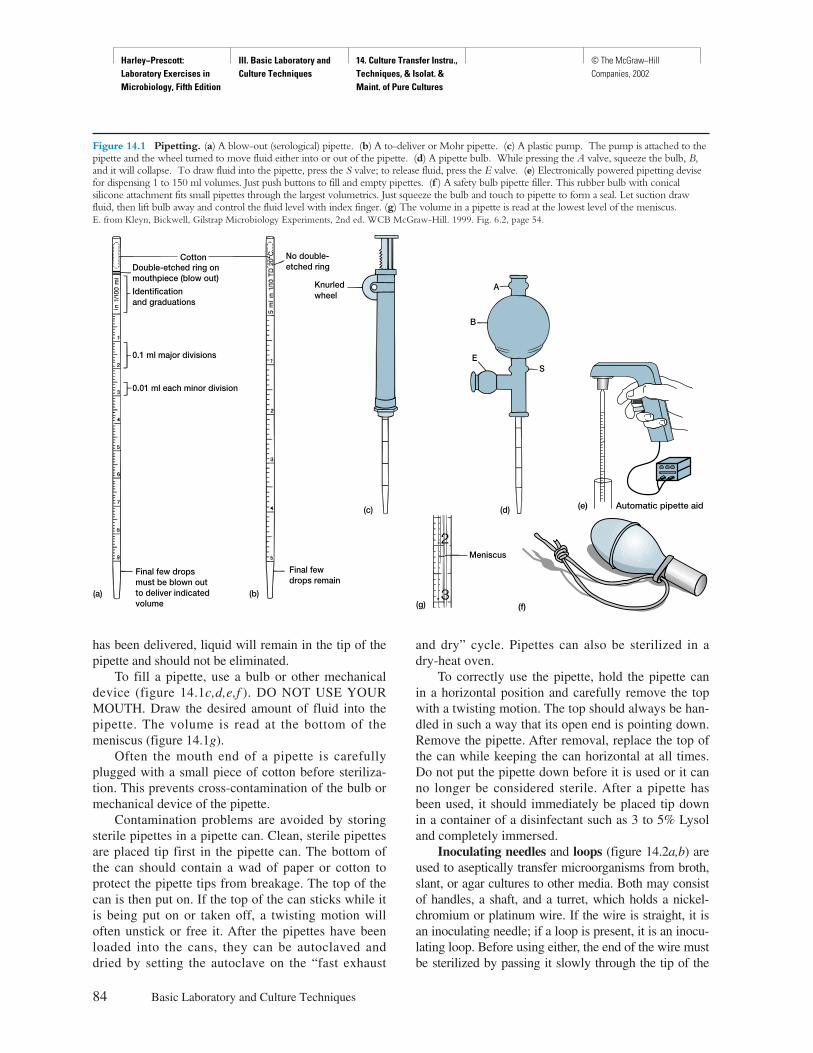
Harley−Prescott: Laboratory Exercises in Microbiology, Fifth Edition
III. Basic Laboratory and Culture Techniques
14. Culture Transfer Instru., Techniques, & Isolat. & Maint. of Pure Cultures
© The McGraw−Hill Companies, 2002
has been delivered, liquid will remain in the tip of thepipette and should not be eliminated.
To fill a pipette, use a bulb or other mechanicaldevice (figure 14.1c,d,e,f ). DO NOT USE YOURMOUTH. Draw the desired amount of fluid into thepipette. The volume is read at the bottom of themeniscus (figure 14.1g).
Often the mouth end of a pipette is carefullyplugged with a small piece of cotton before steriliza-tion. This prevents cross-contamination of the bulb ormechanical device of the pipette.
Contamination problems are avoided by storingsterile pipettes in a pipette can. Clean, sterile pipettesare placed tip first in the pipette can. The bottom ofthe can should contain a wad of paper or cotton toprotect the pipette tips from breakage. The top of thecan is then put on. If the top of the can sticks while itis being put on or taken off, a twisting motion willoften unstick or free it. After the pipettes have beenloaded into the cans, they can be autoclaved anddried by setting the autoclave on the “fast exhaust
and dry” cycle. Pipettes can also be sterilized in adry-heat oven.
To correctly use the pipette, hold the pipette canin a horizontal position and carefully remove the topwith a twisting motion. The top should always be han-dled in such a way that its open end is pointing down.Remove the pipette. After removal, replace the top ofthe can while keeping the can horizontal at all times.Do not put the pipette down before it is used or it canno longer be considered sterile. After a pipette hasbeen used, it should immediately be placed tip downin a container of a disinfectant such as 3 to 5% Lysoland completely immersed.
Inoculating needles and loops (figure 14.2a,b) areused to aseptically transfer microorganisms from broth,slant, or agar cultures to other media. Both may consistof handles, a shaft, and a turret, which holds a nickel-chromium or platinum wire. If the wire is straight, it isan inoculating needle; if a loop is present, it is an inocu-lating loop. Before using either, the end of the wire mustbe sterilized by passing it slowly through the tip of the
84 Basic Laboratory and Culture Techniques
Figure 14.1 Pipetting. (a) A blow-out (serological) pipette. (b) A to-deliver or Mohr pipette. (c) A plastic pump. The pump is attached to thepipette and the wheel turned to move fluid either into or out of the pipette. (d) A pipette bulb. While pressing the A valve, squeeze the bulb, B,and it will collapse. To draw fluid into the pipette, press the S valve; to release fluid, press the E valve. (e) Electronically powered pipetting devisefor dispensing 1 to 150 ml volumes. Just push buttons to fill and empty pipettes. (f ) A safety bulb pipette filler. This rubber bulb with conicalsilicone attachment fits small pipettes through the largest volumetrics. Just squeeze the bulb and touch to pipette to form a seal. Let suction drawfluid, then lift bulb away and control the fluid level with index finger. (g) The volume in a pipette is read at the lowest level of the meniscus.E. from Kleyn, Bickwell, Gilstrap Microbiology Experiments, 2nd ed. WCB McGraw-Hill. 1999. Fig. 6.2, page 54.
AKnurledwheel
B
ES
(d)
Meniscus
(g)
(c)
(b)
0.01 ml each minor division
(a)
Double-etched ring onmouthpiece (blow out)
Identificationand graduations
Cotton
0.1 ml major divisions
Final few dropsmust be blown outto deliver indicatedvolume
No double-etched ring
Final fewdrops remain
Automatic pipette aid(e)
(f)
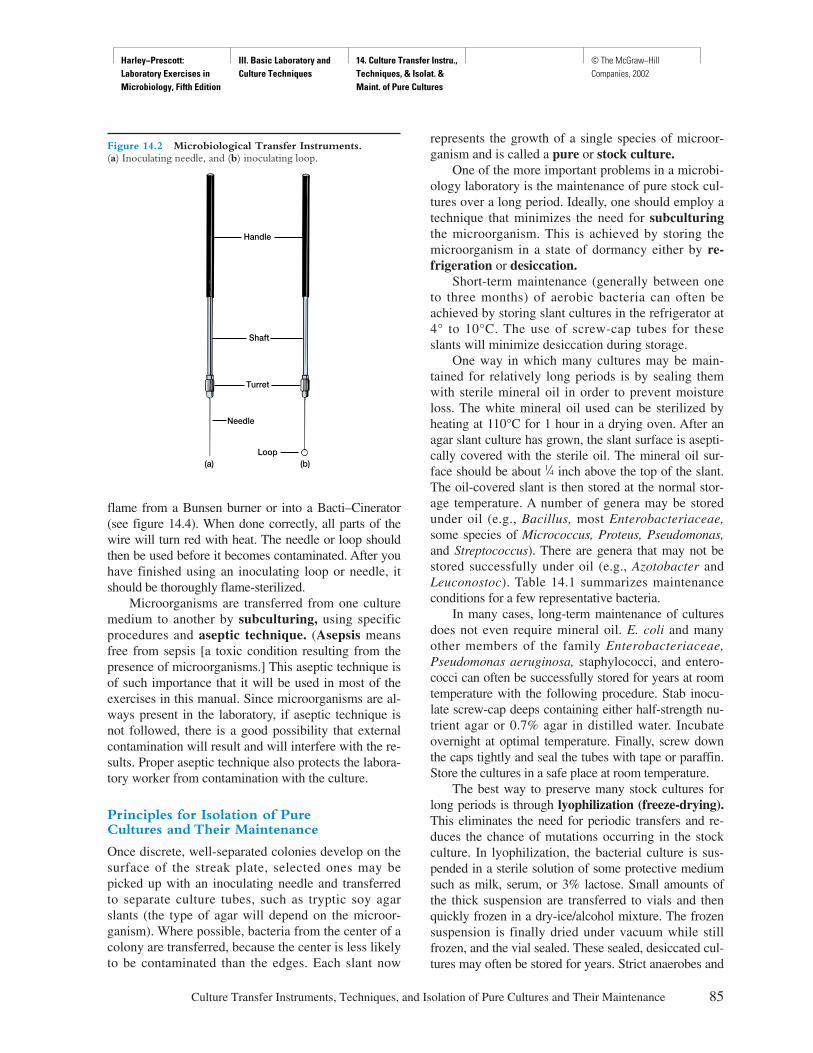
Harley−Prescott: Laboratory Exercises in Microbiology, Fifth Edition
III. Basic Laboratory and Culture Techniques
14. Culture Transfer Instru., Techniques, & Isolat. & Maint. of Pure Cultures
© The McGraw−Hill Companies, 2002
represents the growth of a single species of microor-ganism and is called a pure or stock culture.
One of the more important problems in a microbi-ology laboratory is the maintenance of pure stock cul-tures over a long period. Ideally, one should employ atechnique that minimizes the need for subculturingthe microorganism. This is achieved by storing themicroorganism in a state of dormancy either by re-frigeration or desiccation.
Short-term maintenance (generally between oneto three months) of aerobic bacteria can often beachieved by storing slant cultures in the refrigerator at4° to 10°C. The use of screw-cap tubes for theseslants will minimize desiccation during storage.
One way in which many cultures may be main-tained for relatively long periods is by sealing themwith sterile mineral oil in order to prevent moistureloss. The white mineral oil used can be sterilized byheating at 110°C for 1 hour in a drying oven. After anagar slant culture has grown, the slant surface is asepti-cally covered with the sterile oil. The mineral oil sur-face should be about b inch above the top of the slant.The oil-covered slant is then stored at the normal stor-age temperature. A number of genera may be storedunder oil (e.g., Bacillus, most Enterobacteriaceae,some species of Micrococcus, Proteus, Pseudomonas,and Streptococcus). There are genera that may not bestored successfully under oil (e.g., Azotobacter andLeuconostoc). Table 14.1 summarizes maintenanceconditions for a few representative bacteria.
In many cases, long-term maintenance of culturesdoes not even require mineral oil. E. coli and manyother members of the family Enterobacteriaceae,Pseudomonas aeruginosa, staphylococci, and entero-cocci can often be successfully stored for years at roomtemperature with the following procedure. Stab inocu-late screw-cap deeps containing either half-strength nu-trient agar or 0.7% agar in distilled water. Incubateovernight at optimal temperature. Finally, screw downthe caps tightly and seal the tubes with tape or paraffin.Store the cultures in a safe place at room temperature.
The best way to preserve many stock cultures forlong periods is through lyophilization (freeze-drying).This eliminates the need for periodic transfers and re-duces the chance of mutations occurring in the stockculture. In lyophilization, the bacterial culture is sus-pended in a sterile solution of some protective mediumsuch as milk, serum, or 3% lactose. Small amounts ofthe thick suspension are transferred to vials and thenquickly frozen in a dry-ice/alcohol mixture. The frozensuspension is finally dried under vacuum while stillfrozen, and the vial sealed. These sealed, desiccated cul-tures may often be stored for years. Strict anaerobes and
Culture Transfer Instruments, Techniques, and Isolation of Pure Cultures and Their Maintenance 85
Figure 14.2 Microbiological Transfer Instruments.(a) Inoculating needle, and (b) inoculating loop.
Handle
Shaft
Needle
Loop(a) (b)
Turret
flame from a Bunsen burner or into a Bacti–Cinerator(see figure 14.4). When done correctly, all parts of thewire will turn red with heat. The needle or loop shouldthen be used before it becomes contaminated. After youhave finished using an inoculating loop or needle, itshould be thoroughly flame-sterilized.
Microorganisms are transferred from one culturemedium to another by subculturing, using specificprocedures and aseptic technique. (Asepsis meansfree from sepsis [a toxic condition resulting from thepresence of microorganisms.] This aseptic technique isof such importance that it will be used in most of theexercises in this manual. Since microorganisms are al-ways present in the laboratory, if aseptic technique isnot followed, there is a good possibility that externalcontamination will result and will interfere with the re-sults. Proper aseptic technique also protects the labora-tory worker from contamination with the culture.
Principles for Isolation of Pure Cultures and Their Maintenance
Once discrete, well-separated colonies develop on thesurface of the streak plate, selected ones may bepicked up with an inoculating needle and transferredto separate culture tubes, such as tryptic soy agarslants (the type of agar will depend on the microor-ganism). Where possible, bacteria from the center of acolony are transferred, because the center is less likelyto be contaminated than the edges. Each slant now
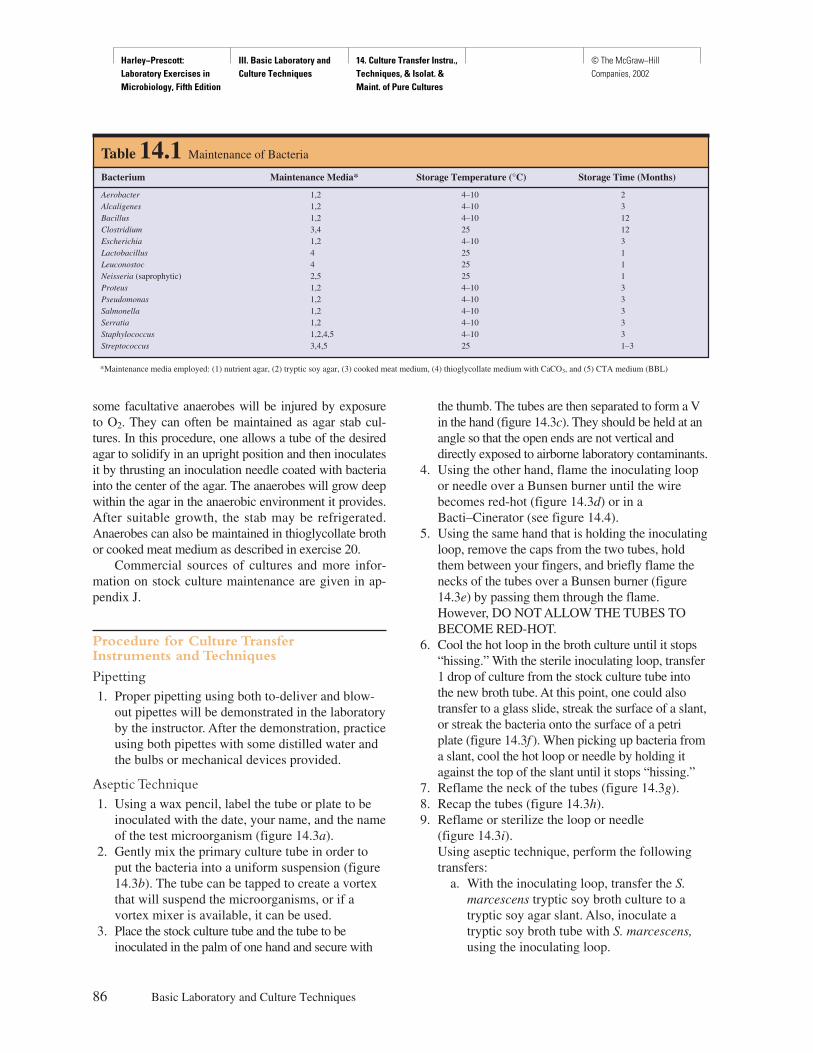
Harley−Prescott: Laboratory Exercises in Microbiology, Fifth Edition
III. Basic Laboratory and Culture Techniques
14. Culture Transfer Instru., Techniques, & Isolat. & Maint. of Pure Cultures
© The McGraw−Hill Companies, 2002
some facultative anaerobes will be injured by exposureto O2. They can often be maintained as agar stab cul-tures. In this procedure, one allows a tube of the desiredagar to solidify in an upright position and then inoculatesit by thrusting an inoculation needle coated with bacteriainto the center of the agar. The anaerobes will grow deepwithin the agar in the anaerobic environment it provides.After suitable growth, the stab may be refrigerated.Anaerobes can also be maintained in thioglycollate brothor cooked meat medium as described in exercise 20.
Commercial sources of cultures and more infor-mation on stock culture maintenance are given in ap-pendix J.
Procedure for Culture Transfer Instruments and Techniques
Pipetting1. Proper pipetting using both to-deliver and blow-
out pipettes will be demonstrated in the laboratoryby the instructor. After the demonstration, practiceusing both pipettes with some distilled water andthe bulbs or mechanical devices provided.
Aseptic Technique1. Using a wax pencil, label the tube or plate to be
inoculated with the date, your name, and the nameof the test microorganism (figure 14.3a).
2. Gently mix the primary culture tube in order toput the bacteria into a uniform suspension (figure14.3b). The tube can be tapped to create a vortexthat will suspend the microorganisms, or if avortex mixer is available, it can be used.
3. Place the stock culture tube and the tube to beinoculated in the palm of one hand and secure with
the thumb. The tubes are then separated to form a Vin the hand (figure 14.3c). They should be held at anangle so that the open ends are not vertical anddirectly exposed to airborne laboratory contaminants.
4. Using the other hand, flame the inoculating loopor needle over a Bunsen burner until the wirebecomes red-hot (figure 14.3d) or in aBacti–Cinerator (see figure 14.4).
5. Using the same hand that is holding the inoculatingloop, remove the caps from the two tubes, holdthem between your fingers, and briefly flame thenecks of the tubes over a Bunsen burner (figure14.3e) by passing them through the flame.However, DO NOT ALLOW THE TUBES TOBECOME RED-HOT.
6. Cool the hot loop in the broth culture until it stops“hissing.” With the sterile inoculating loop, transfer1 drop of culture from the stock culture tube intothe new broth tube. At this point, one could alsotransfer to a glass slide, streak the surface of a slant,or streak the bacteria onto the surface of a petriplate (figure 14.3f ). When picking up bacteria froma slant, cool the hot loop or needle by holding itagainst the top of the slant until it stops “hissing.”
7. Reflame the neck of the tubes (figure 14.3g).8. Recap the tubes (figure 14.3h).9. Reflame or sterilize the loop or needle
(figure 14.3i).Using aseptic technique, perform the followingtransfers:
a. With the inoculating loop, transfer the S.marcescens tryptic soy broth culture to atryptic soy agar slant. Also, inoculate atryptic soy broth tube with S. marcescens,using the inoculating loop.
86 Basic Laboratory and Culture Techniques
Table 14.1 Maintenance of Bacteria
Bacterium Maintenance Media* Storage Temperature (°C) Storage Time (Months)
Aerobacter 1,2 4–10 2Alcaligenes 1,2 4–10 3Bacillus 1,2 4–10 12Clostridium 3,4 25 12Escherichia 1,2 4–10 3Lactobacillus 4 25 1Leuconostoc 4 25 1Neisseria (saprophytic) 2,5 25 1Proteus 1,2 4–10 3Pseudomonas 1,2 4–10 3Salmonella 1,2 4–10 3Serratia 1,2 4–10 3Staphylococcus 1,2,4,5 4–10 3Streptococcus 3,4,5 25 1–3
*Maintenance media employed: (1) nutrient agar, (2) tryptic soy agar, (3) cooked meat medium, (4) thioglycollate medium with CaCO3, and (5) CTA medium (BBL)
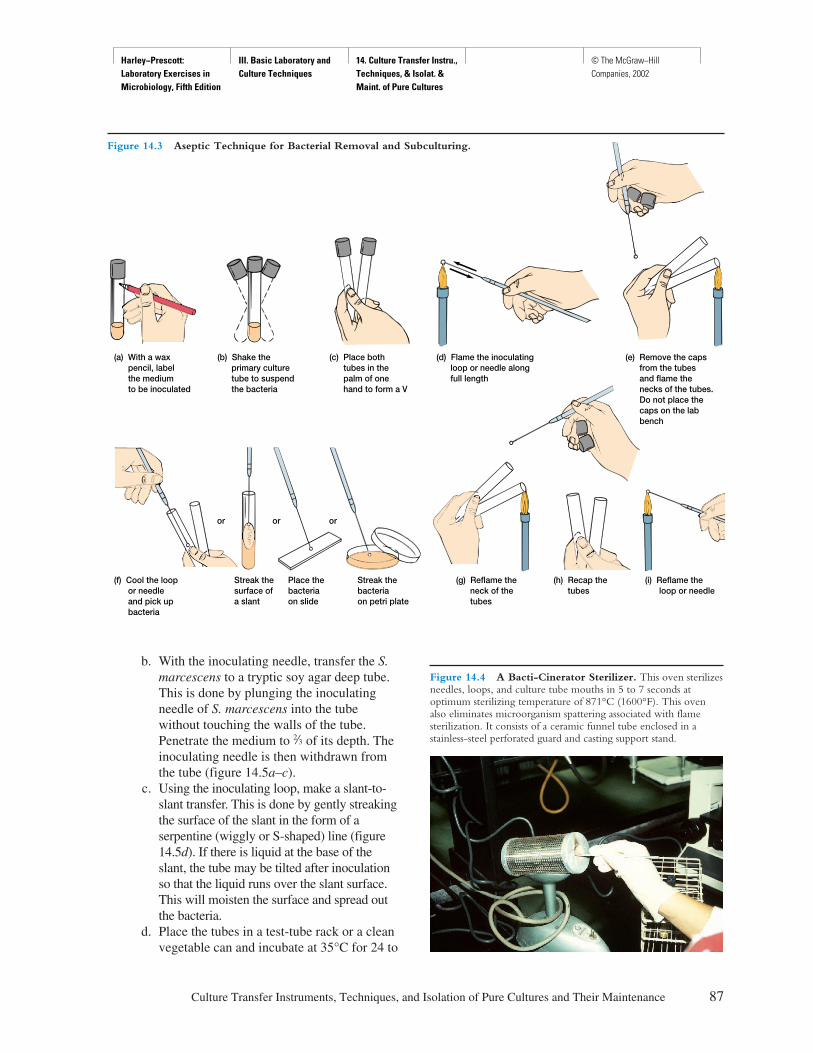
Harley−Prescott: Laboratory Exercises in Microbiology, Fifth Edition
III. Basic Laboratory and Culture Techniques
14. Culture Transfer Instru., Techniques, & Isolat. & Maint. of Pure Cultures
© The McGraw−Hill Companies, 2002
b. With the inoculating needle, transfer the S.marcescens to a tryptic soy agar deep tube.This is done by plunging the inoculatingneedle of S. marcescens into the tubewithout touching the walls of the tube.Penetrate the medium to i of its depth. Theinoculating needle is then withdrawn fromthe tube (figure 14.5a–c).
c. Using the inoculating loop, make a slant-to-slant transfer. This is done by gently streakingthe surface of the slant in the form of aserpentine (wiggly or S-shaped) line (figure14.5d). If there is liquid at the base of theslant, the tube may be tilted after inoculationso that the liquid runs over the slant surface.This will moisten the surface and spread outthe bacteria.
d. Place the tubes in a test-tube rack or a cleanvegetable can and incubate at 35°C for 24 to
Culture Transfer Instruments, Techniques, and Isolation of Pure Cultures and Their Maintenance 87
Figure 14.3 Aseptic Technique for Bacterial Removal and Subculturing.
or oror
(a) With a wax pencil, label the medium to be inoculated
(b) Shake the primary culture tube to suspend the bacteria
(c) Place both tubes in the palm of one hand to form a V
(d) Flame the inoculating loop or needle along full length
(e) Remove the caps from the tubes and flame the necks of the tubes. Do not place the caps on the lab bench
(f) Cool the loop or needle and pick up bacteria
Streak thesurface ofa slant
Place thebacteriaon slide
Streak thebacteriaon petri plate
(g) Reflame the neck of the tubes
(h) Recap the tubes
(i) Reflame the loop or needle
Figure 14.4 A Bacti-Cinerator Sterilizer. This oven sterilizesneedles, loops, and culture tube mouths in 5 to 7 seconds atoptimum sterilizing temperature of 871°C (1600°F). This ovenalso eliminates microorganism spattering associated with flamesterilization. It consists of a ceramic funnel tube enclosed in astainless-steel perforated guard and casting support stand.
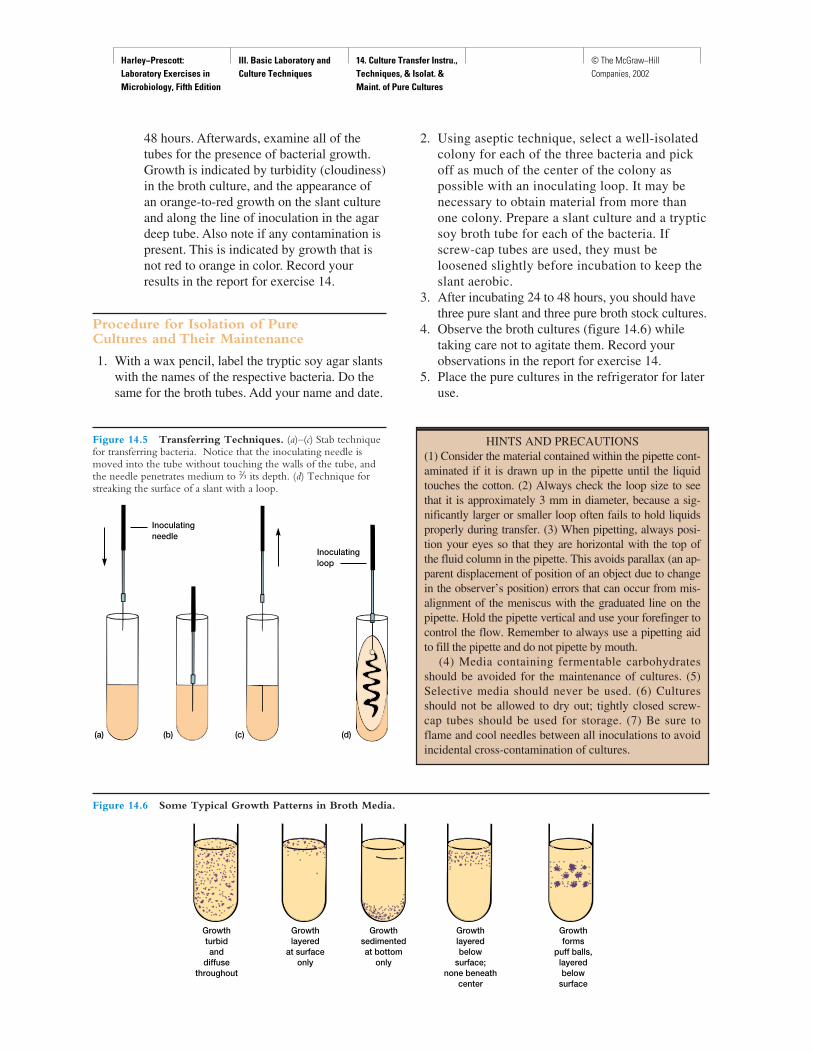
Harley−Prescott: Laboratory Exercises in Microbiology, Fifth Edition
III. Basic Laboratory and Culture Techniques
14. Culture Transfer Instru., Techniques, & Isolat. & Maint. of Pure Cultures
© The McGraw−Hill Companies, 2002
48 hours. Afterwards, examine all of thetubes for the presence of bacterial growth.Growth is indicated by turbidity (cloudiness)in the broth culture, and the appearance ofan orange-to-red growth on the slant cultureand along the line of inoculation in the agardeep tube. Also note if any contamination ispresent. This is indicated by growth that isnot red to orange in color. Record yourresults in the report for exercise 14.
Procedure for Isolation of Pure Cultures and Their Maintenance
1. With a wax pencil, label the tryptic soy agar slantswith the names of the respective bacteria. Do thesame for the broth tubes. Add your name and date.
Figure 14.6 Some Typical Growth Patterns in Broth Media.
Growthturbidand
diffusethroughout
Growthlayered
at surfaceonly
Growthsedimentedat bottom
only
Growthforms
puff balls,layeredbelow
surface
Growthlayeredbelow
surface;none beneath
center
HINTS AND PRECAUTIONS (1) Consider the material contained within the pipette cont-aminated if it is drawn up in the pipette until the liquidtouches the cotton. (2) Always check the loop size to seethat it is approximately 3 mm in diameter, because a sig-nificantly larger or smaller loop often fails to hold liquidsproperly during transfer. (3) When pipetting, always posi-tion your eyes so that they are horizontal with the top ofthe fluid column in the pipette. This avoids parallax (an ap-parent displacement of position of an object due to changein the observer’s position) errors that can occur from mis-alignment of the meniscus with the graduated line on thepipette. Hold the pipette vertical and use your forefinger tocontrol the flow. Remember to always use a pipetting aidto fill the pipette and do not pipette by mouth.
(4) Media containing fermentable carbohydratesshould be avoided for the maintenance of cultures. (5)Selective media should never be used. (6) Culturesshould not be allowed to dry out; tightly closed screw-cap tubes should be used for storage. (7) Be sure toflame and cool needles between all inoculations to avoidincidental cross-contamination of cultures.
Figure 14.5 Transferring Techniques. (a)–(c) Stab techniquefor transferring bacteria. Notice that the inoculating needle ismoved into the tube without touching the walls of the tube, andthe needle penetrates medium to i its depth. (d) Technique forstreaking the surface of a slant with a loop.
Inoculatingloop
Inoculatingneedle
(d)(c)(b)(a)
2. Using aseptic technique, select a well-isolatedcolony for each of the three bacteria and pickoff as much of the center of the colony aspossible with an inoculating loop. It may benecessary to obtain material from more thanone colony. Prepare a slant culture and a trypticsoy broth tube for each of the bacteria. Ifscrew-cap tubes are used, they must beloosened slightly before incubation to keep theslant aerobic.
3. After incubating 24 to 48 hours, you should havethree pure slant and three pure broth stock cultures.
4. Observe the broth cultures (figure 14.6) whiletaking care not to agitate them. Record yourobservations in the report for exercise 14.
5. Place the pure cultures in the refrigerator for lateruse.
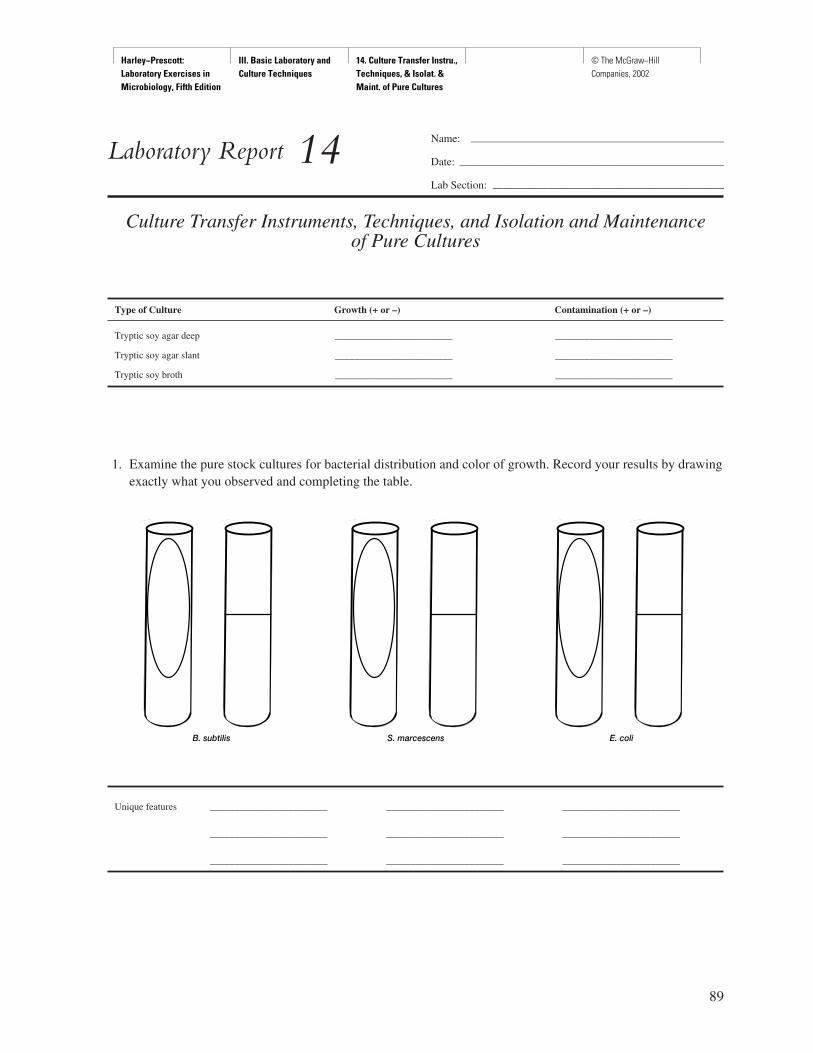
Harley−Prescott: Laboratory Exercises in Microbiology, Fifth Edition
III. Basic Laboratory and Culture Techniques
14. Culture Transfer Instru., Techniques, & Isolat. & Maint. of Pure Cultures
© The McGraw−Hill Companies, 2002
89
Name: ———————————————————————
Date: ————————————————————————
Lab Section: —————————————————————
Laboratory Report 14
Culture Transfer Instruments, Techniques, and Isolation and Maintenance of Pure Cultures
Type of Culture Growth (+ or –) Contamination (+ or –)
Tryptic soy agar deep ________________________ ________________________
Tryptic soy agar slant ________________________ ________________________
Tryptic soy broth ________________________ ________________________
1. Examine the pure stock cultures for bacterial distribution and color of growth. Record your results by drawingexactly what you observed and completing the table.
Unique features ________________________ ________________________ ________________________
________________________ ________________________ ________________________
________________________ ________________________ ________________________
B. subtilis S. marcescens E. coli

Harley−Prescott: Laboratory Exercises in Microbiology, Fifth Edition
III. Basic Laboratory and Culture Techniques
14. Culture Transfer Instru., Techniques, & Isolat. & Maint. of Pure Cultures
© The McGraw−Hill Companies, 2002
Review Questions
1. Describe how to use the two most common types of pipettes.
2. What is the purpose of flaming in the aseptic technique?
3. What is the purpose of subculturing?
4. In subculturing, when do you use the inoculating loop?
5. How is it possible to contaminate a subculture?
6. How would you determine whether culture media given to you by the laboratory instructor are sterile beforeyou use them?
7. What are some signs of growth in a liquid medium?
90 Basic Laboratory and Culture Techniques
Harley−Prescott: Laboratory Exercises in Microbiology, Fifth Edition
III. Basic Laboratory and Culture Techniques
14. Culture Transfer Instru., Techniques, & Isolat. & Maint. of Pure Cultures
© The McGraw−Hill Companies, 2002
8. Why did you use an inoculating loop instead of a needle to make the transfers from the culture plates to theculture tubes?
9. How do the pure broth cultures differ? The slant cultures?
10. What is the function of sterile mineral oil in the maintenance of stock cultures?
11. Describe how a culture can be lyophilized.
12. How can some anaerobes be maintained in pure cultures?
13. How could you determine whether the culture media given to you are sterile before you use them?
14. What are some signs of growth in a liquid medium?
Culture Transfer Instruments, Techniques, and Isolation of Pure Cultures and Their Maintenance 91

Harley−Prescott: Laboratory Exercises in Microbiology, Fifth Edition
III. Basic Laboratory and Culture Techniques
15. Spread−Plate Technique
© The McGraw−Hill Companies, 2002
Materials per Student
24- to 48-hour tryptic soy broth cultures ofBacillus subtilis (ATCC 6051, white or creamcolonies), Serratia marcescens (ATCC 13880,red colonies) or Micrococcus roseus (ATCC186, red colonies), and a mixture of the two (S. marcescens [or M. roseus] and B. subtilis)
Bunsen burnerinoculating loop95% ethyl alcoholL-shaped glass rodwax pencil500-ml beakerpipettes with pipettor3 tryptic soy agar platesrulers
Learning Objectives
Each student should be able to
1. Understand the purpose of the spread-platetechnique
2. Perform the spread-plate technique
Suggested Reading in Textbook
1. Isolation of Pure Cultures, section 5.8.2. The Spread Plate and Streak Plate, section 5.8;
see also figures 5.7–5.9, 5.11.3. Colony Morphology and Growth, section 5.8.
Pronunciation Guide
Bacillus subtilis (bah-SIL-lus sub-til-lus)Serratia marcescens (se-RA-she-ah mar-SES-sens)
Why Are the Above Bacteria Usedin This Exercise?
After this exercise, the student should be able to use thespread-plate technique to separate a mixture of two ormore bacteria into well-isolated colonies. The bacteria tobe used are Bacillus subtilis and Serratia marcescens orM. roseus. B. subtilis is easy to culture since it grows onsimple medium (e.g., tryptic soy agar) and produces dullwhite to cream colonies that are easy to see. S. marcescenswas used in the last experiment and produces large red,pink, or magenta colonies. By using color and colony mor-phology, the student can see what a well-isolated colony ofeach of the above bacteria looks like. The isolated bacteriacan then be picked up and streaked onto fresh medium toobtain a pure culture.
Medical Application
In the clinical laboratory, growth of a pure culture is ab-solutely necessary before any biochemical tests can be per-formed to identify a suspect microorganism.
Principles
In natural habitats, bacteria usually grow together inpopulations containing a number of species. In order toadequately study and characterize an individual bacte-rial species, one needs a pure culture. The spread-plate technique is an easy, direct way of achievingthis result. In this technique, a small volume of dilute
93
E X E R C I S E
Spread-Plate Technique
15
SAFETY CONSIDERATIONS Alcohol is extremely flammable. Keep the beaker ofethyl alcohol away from the Bunsen burner. Do notpipette with your mouth. Do not put a flaming glass rodback into the alcohol. Be certain you know the locationof the fire extinguisher.
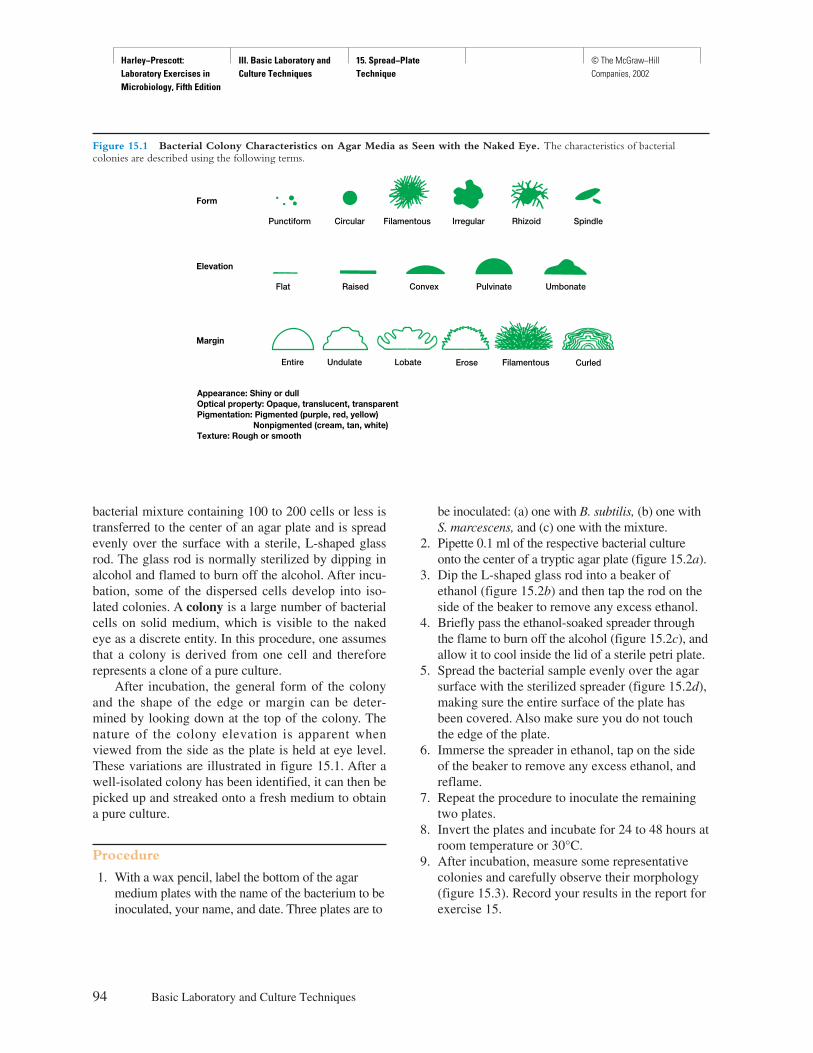
Harley−Prescott: Laboratory Exercises in Microbiology, Fifth Edition
III. Basic Laboratory and Culture Techniques
15. Spread−Plate Technique
© The McGraw−Hill Companies, 2002
bacterial mixture containing 100 to 200 cells or less istransferred to the center of an agar plate and is spreadevenly over the surface with a sterile, L-shaped glassrod. The glass rod is normally sterilized by dipping inalcohol and flamed to burn off the alcohol. After incu-bation, some of the dispersed cells develop into iso-lated colonies. A colony is a large number of bacterialcells on solid medium, which is visible to the nakedeye as a discrete entity. In this procedure, one assumesthat a colony is derived from one cell and thereforerepresents a clone of a pure culture.
After incubation, the general form of the colonyand the shape of the edge or margin can be deter-mined by looking down at the top of the colony. Thenature of the colony elevation is apparent whenviewed from the side as the plate is held at eye level.These variations are illustrated in figure 15.1. After awell-isolated colony has been identified, it can then bepicked up and streaked onto a fresh medium to obtaina pure culture.
Procedure
1. With a wax pencil, label the bottom of the agarmedium plates with the name of the bacterium to beinoculated, your name, and date. Three plates are to
be inoculated: (a) one with B. subtilis, (b) one withS. marcescens, and (c) one with the mixture.
2. Pipette 0.1 ml of the respective bacterial cultureonto the center of a tryptic agar plate (figure 15.2a).
3. Dip the L-shaped glass rod into a beaker ofethanol (figure 15.2b) and then tap the rod on theside of the beaker to remove any excess ethanol.
4. Briefly pass the ethanol-soaked spreader throughthe flame to burn off the alcohol (figure 15.2c), andallow it to cool inside the lid of a sterile petri plate.
5. Spread the bacterial sample evenly over the agarsurface with the sterilized spreader (figure 15.2d),making sure the entire surface of the plate hasbeen covered. Also make sure you do not touchthe edge of the plate.
6. Immerse the spreader in ethanol, tap on the sideof the beaker to remove any excess ethanol, andreflame.
7. Repeat the procedure to inoculate the remainingtwo plates.
8. Invert the plates and incubate for 24 to 48 hours atroom temperature or 30°C.
9. After incubation, measure some representativecolonies and carefully observe their morphology(figure 15.3). Record your results in the report forexercise 15.
94 Basic Laboratory and Culture Techniques
Figure 15.1 Bacterial Colony Characteristics on Agar Media as Seen with the Naked Eye. The characteristics of bacterialcolonies are described using the following terms.
Spindle
Umbonate
RhizoidIrregularFilamentous
PulvinateConvexRaised
CurledFilamentousEroseLobateUndulateEntire
Flat
CircularPunctiform
Form
Margin
Appearance: Shiny or dullOptical property: Opaque, translucent, transparentPigmentation: Pigmented (purple, red, yellow) Nonpigmented (cream, tan, white)Texture: Rough or smooth
Elevation
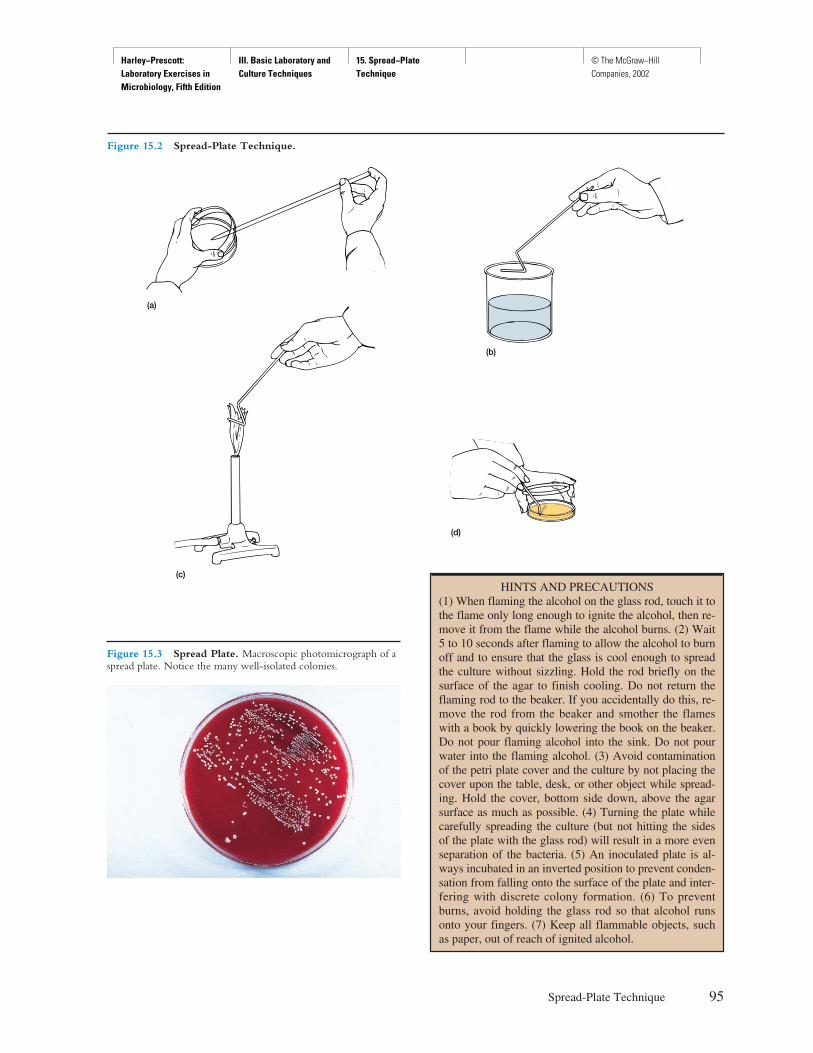
Harley−Prescott: Laboratory Exercises in Microbiology, Fifth Edition
III. Basic Laboratory and Culture Techniques
15. Spread−Plate Technique
© The McGraw−Hill Companies, 2002
Spread-Plate Technique 95
(a)
(c)
(b)
(d)
Figure 15.2 Spread-Plate Technique.
Figure 15.3 Spread Plate. Macroscopic photomicrograph of aspread plate. Notice the many well-isolated colonies.
HINTS AND PRECAUTIONS (1) When flaming the alcohol on the glass rod, touch it tothe flame only long enough to ignite the alcohol, then re-move it from the flame while the alcohol burns. (2) Wait5 to 10 seconds after flaming to allow the alcohol to burnoff and to ensure that the glass is cool enough to spreadthe culture without sizzling. Hold the rod briefly on thesurface of the agar to finish cooling. Do not return theflaming rod to the beaker. If you accidentally do this, re-move the rod from the beaker and smother the flameswith a book by quickly lowering the book on the beaker.Do not pour flaming alcohol into the sink. Do not pourwater into the flaming alcohol. (3) Avoid contaminationof the petri plate cover and the culture by not placing thecover upon the table, desk, or other object while spread-ing. Hold the cover, bottom side down, above the agarsurface as much as possible. (4) Turning the plate whilecarefully spreading the culture (but not hitting the sidesof the plate with the glass rod) will result in a more evenseparation of the bacteria. (5) An inoculated plate is al-ways incubated in an inverted position to prevent conden-sation from falling onto the surface of the plate and inter-fering with discrete colony formation. (6) To preventburns, avoid holding the glass rod so that alcohol runsonto your fingers. (7) Keep all flammable objects, suchas paper, out of reach of ignited alcohol.
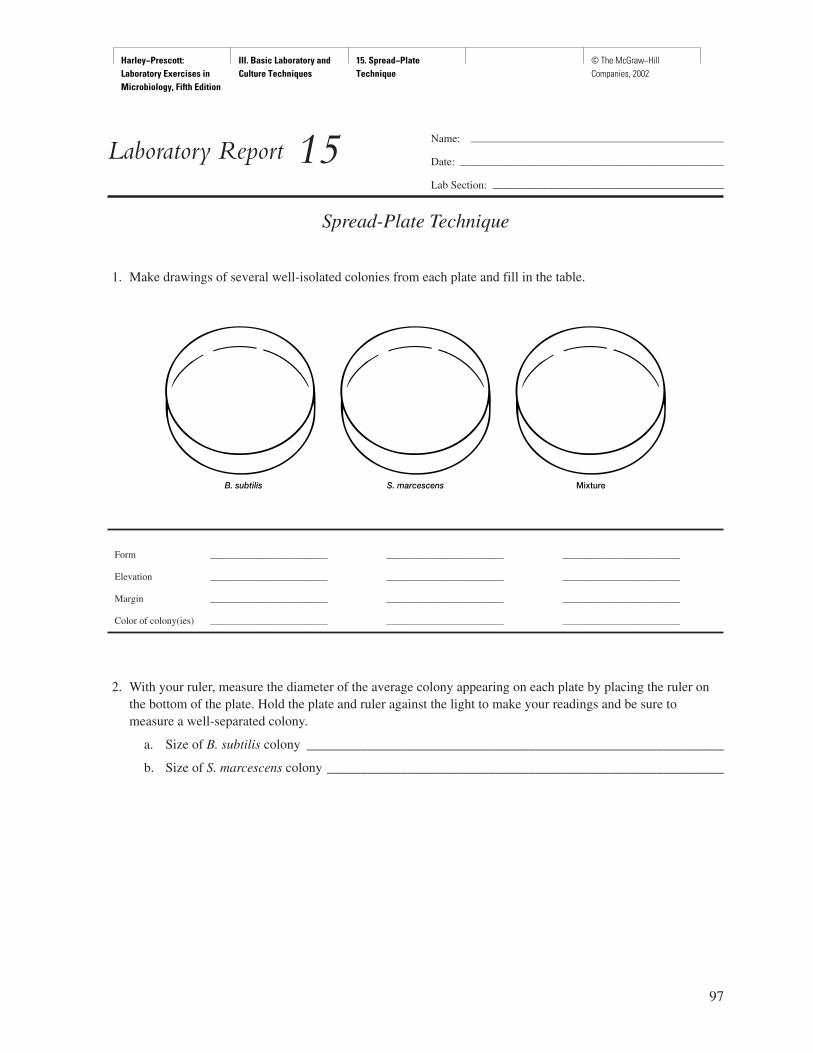
Harley−Prescott: Laboratory Exercises in Microbiology, Fifth Edition
III. Basic Laboratory and Culture Techniques
15. Spread−Plate Technique
© The McGraw−Hill Companies, 2002
97
Name: ———————————————————————
Date: ————————————————————————
Lab Section: —————————————————————
Laboratory Report 15
Spread-Plate Technique
1. Make drawings of several well-isolated colonies from each plate and fill in the table.
Form ________________________ ________________________ ________________________
Elevation ________________________ ________________________ ________________________
Margin ________________________ ________________________ ________________________
Color of colony(ies) ________________________ ________________________ ________________________
2. With your ruler, measure the diameter of the average colony appearing on each plate by placing the ruler onthe bottom of the plate. Hold the plate and ruler against the light to make your readings and be sure tomeasure a well-separated colony.
a. Size of B. subtilis colony ______________________________________________________________
b. Size of S. marcescens colony ___________________________________________________________
B. subtilis S. marcescens Mixture

Harley−Prescott: Laboratory Exercises in Microbiology, Fifth Edition
III. Basic Laboratory and Culture Techniques
15. Spread−Plate Technique
© The McGraw−Hill Companies, 2002
Review Questions
1. What is a bacterial colony?
2. What is the purpose of the ethanol in the spread-plate technique?
3. Why is it necessary to use only diluted cultures that contain 100 to 200 cells for a successful spread plate?
4. Describe the form of some typical bacterial colonies.
5. What is the purpose of the spread-plate technique?
6. In all routine laboratory work, petri plates are labeled on the bottom. Why?
98 Basic Laboratory and Culture Techniques

Harley−Prescott: Laboratory Exercises in Microbiology, Fifth Edition
III. Basic Laboratory and Culture Techniques
16. The Streak−Plate Technique and Differential Media
© The McGraw−Hill Companies, 2002
Materials per Student
(Streak-Plate Technique)24- to 48-hour tryptic soy broth cultures of
Escherichia coli (ATCC 11229, whitecolonies), Serratia marcescens (ATCC 13880,red colonies; Micrococcus roseus ATCC 186can also be used), and Bacillus subtilis (ATCC6051, white or cream colonies)
3 tryptic soy agar poursboiling water bath48° to 50°C water bathBunsen burnerpetri platesinoculating loopwax pencil
(Differential Media)24- to 48-hour tryptic soy broth culture of a mixture
of Escherichia coli (ATCC 11229), Proteusvulgaris (ATCC 13315), and Staphylococcusaureus (ATCC 25903).
mannitol salt agar poureosin methylene blue agar pour
Learning Objectives
Each student should be able to
1. Understand the purpose of the streak-platetechnique and differential media
2. Perform a streak-plate technique and isolatediscrete colonies for subculturing
Suggested Reading in Textbook
1. Isolation of Pure Cultures, section 5.8.2. The Spread Plate and Streak Plate, section 5.8.3. Colony Morphology and Growth, section 5.8.4. Differential Media, section 5.7.
Pronunciation Guide
Escherichia coli (esh-er-I-ke-a KOH-lee)Bacillus subtilis (bah-SIL-lus sub-til-lus)Serratia marcescens (se-RA-she-ah mar-SES-sens)
Why Are the Following BacteriaUsed in This Exercise?
Another procedure that is used to obtain well-isolated, purecolonies is the streak-plate technique. Since Serratiamarcescens, Bacillus subtilis, and Escherichia coli wereused in the past few exercises, these same cultures are usedin this exercise. Remember, S. marcescens produces redcolonies; B. subtilis, white to cream colonies; and E. coli,white colonies. These same cultures will also be used in thenext exercise (number 17).
Medical Application
In the clinical laboratory, growth of a pure culture is ab-solutely necessary before any biochemical tests can be per-formed to identify a suspect microorganism.
Principles of the Streak-Plate Technique
Isolated, pure colonies can also be obtained by thestreak-plate technique. In this technique, the bacterialmixture is transferred to the edge of an agar plate withan inoculating loop and then streaked out over the sur-face in one of several patterns. At some point on thestreaks, individual cells will be removed from the loopas it glides along the agar surface and will give rise toseparate colonies (figure 16.1). Again, one assumes thatone colony comes from one cell. The key principle ofthis method is that by streaking, a dilution gradient is es-tablished on the surface of the plate as cells are de-posited on the agar surface. Because of this gradient,
99
E X E R C I S E
The Streak-Plate Technique and Differential Media
16
SAFETY CONSIDERATIONS Be careful with the Bunsen burner flame and the hotwater baths.
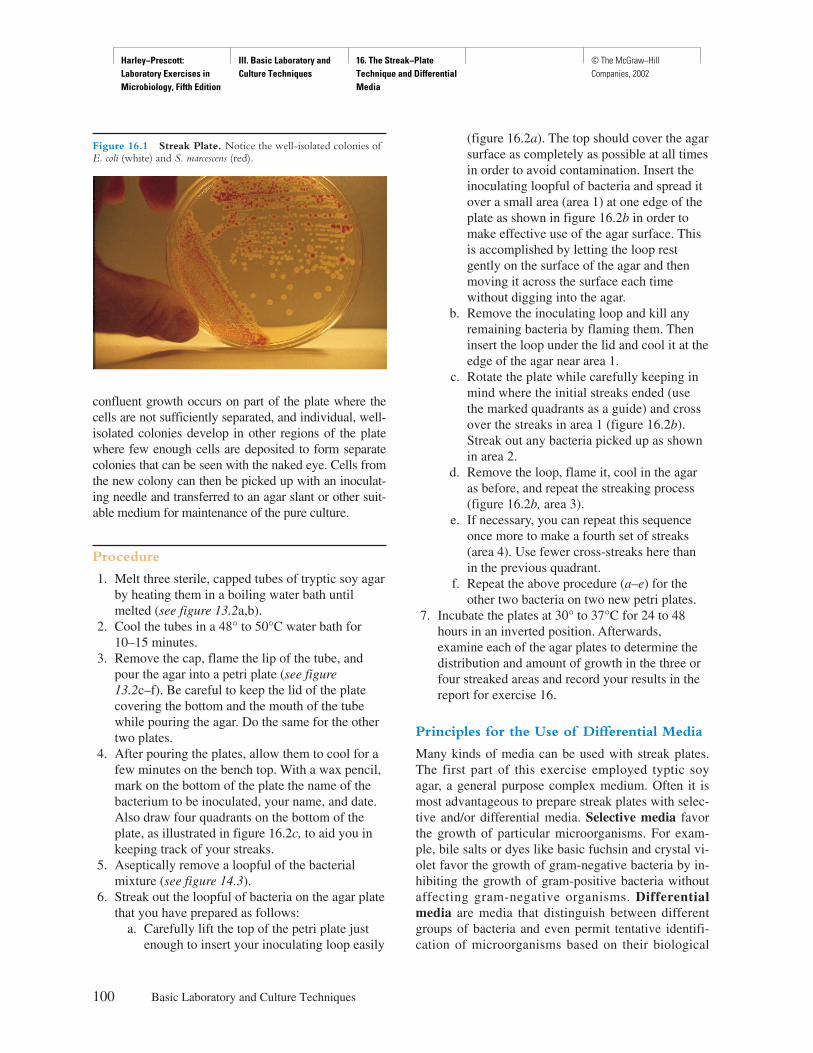
Harley−Prescott: Laboratory Exercises in Microbiology, Fifth Edition
III. Basic Laboratory and Culture Techniques
16. The Streak−Plate Technique and Differential Media
© The McGraw−Hill Companies, 2002
confluent growth occurs on part of the plate where thecells are not sufficiently separated, and individual, well-isolated colonies develop in other regions of the platewhere few enough cells are deposited to form separatecolonies that can be seen with the naked eye. Cells fromthe new colony can then be picked up with an inoculat-ing needle and transferred to an agar slant or other suit-able medium for maintenance of the pure culture.
Procedure
1. Melt three sterile, capped tubes of tryptic soy agarby heating them in a boiling water bath untilmelted (see figure 13.2a,b).
2. Cool the tubes in a 48° to 50°C water bath for10–15 minutes.
3. Remove the cap, flame the lip of the tube, andpour the agar into a petri plate (see figure 13.2c–f). Be careful to keep the lid of the platecovering the bottom and the mouth of the tubewhile pouring the agar. Do the same for the othertwo plates.
4. After pouring the plates, allow them to cool for afew minutes on the bench top. With a wax pencil,mark on the bottom of the plate the name of thebacterium to be inoculated, your name, and date.Also draw four quadrants on the bottom of theplate, as illustrated in figure 16.2c, to aid you inkeeping track of your streaks.
5. Aseptically remove a loopful of the bacterialmixture (see figure 14.3).
6. Streak out the loopful of bacteria on the agar platethat you have prepared as follows:
a. Carefully lift the top of the petri plate justenough to insert your inoculating loop easily
(figure 16.2a). The top should cover the agarsurface as completely as possible at all timesin order to avoid contamination. Insert theinoculating loopful of bacteria and spread itover a small area (area 1) at one edge of theplate as shown in figure 16.2b in order tomake effective use of the agar surface. Thisis accomplished by letting the loop restgently on the surface of the agar and thenmoving it across the surface each timewithout digging into the agar.
b. Remove the inoculating loop and kill anyremaining bacteria by flaming them. Theninsert the loop under the lid and cool it at theedge of the agar near area 1.
c. Rotate the plate while carefully keeping inmind where the initial streaks ended (usethe marked quadrants as a guide) and crossover the streaks in area 1 (figure 16.2b).Streak out any bacteria picked up as shownin area 2.
d. Remove the loop, flame it, cool in the agaras before, and repeat the streaking process(figure 16.2b, area 3).
e. If necessary, you can repeat this sequenceonce more to make a fourth set of streaks(area 4). Use fewer cross-streaks here thanin the previous quadrant.
f. Repeat the above procedure (a–e) for theother two bacteria on two new petri plates.
7. Incubate the plates at 30° to 37°C for 24 to 48hours in an inverted position. Afterwards,examine each of the agar plates to determine thedistribution and amount of growth in the three orfour streaked areas and record your results in thereport for exercise 16.
Principles for the Use of Differential Media
Many kinds of media can be used with streak plates.The first part of this exercise employed typtic soyagar, a general purpose complex medium. Often it ismost advantageous to prepare streak plates with selec-tive and/or differential media. Selective media favorthe growth of particular microorganisms. For exam-ple, bile salts or dyes like basic fuchsin and crystal vi-olet favor the growth of gram-negative bacteria by in-hibiting the growth of gram-positive bacteria withoutaffecting gram-negative organisms. Differentialmedia are media that distinguish between differentgroups of bacteria and even permit tentative identifi-cation of microorganisms based on their biological
100 Basic Laboratory and Culture Techniques
Figure 16.1 Streak Plate. Notice the well-isolated colonies ofE. coli (white) and S. marcescens (red).
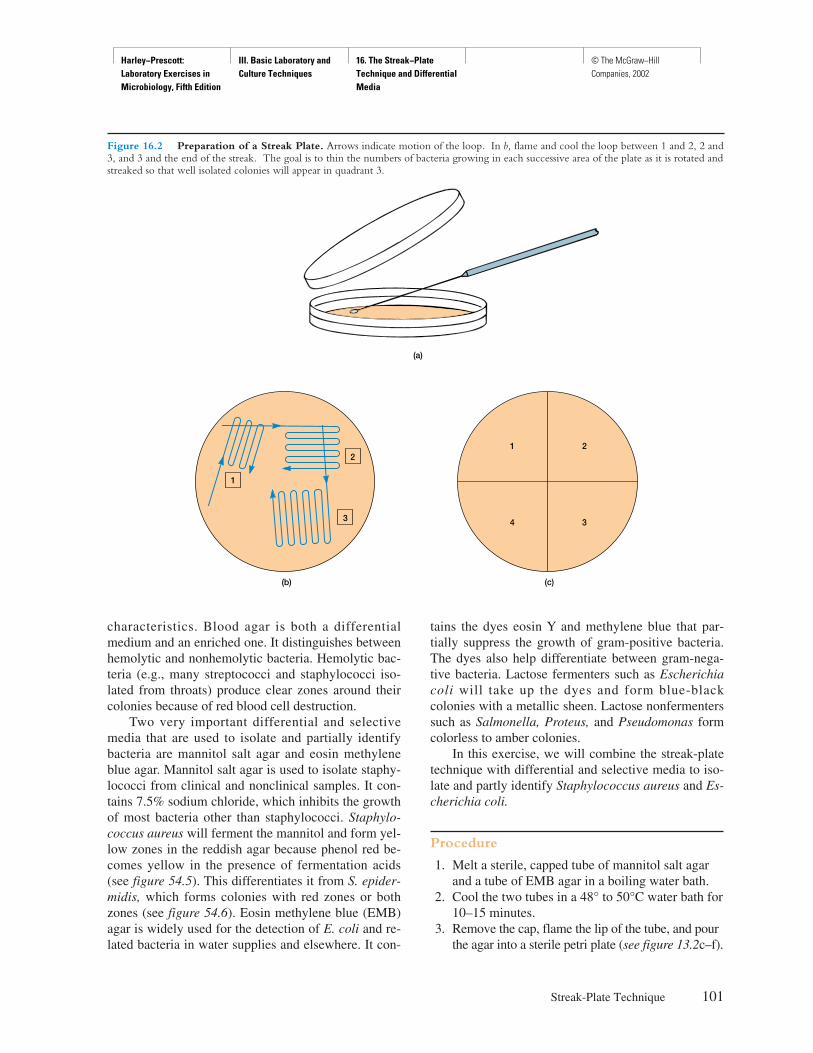
Harley−Prescott: Laboratory Exercises in Microbiology, Fifth Edition
III. Basic Laboratory and Culture Techniques
16. The Streak−Plate Technique and Differential Media
© The McGraw−Hill Companies, 2002
Streak-Plate Technique 101
Figure 16.2 Preparation of a Streak Plate. Arrows indicate motion of the loop. In b, flame and cool the loop between 1 and 2, 2 and3, and 3 and the end of the streak. The goal is to thin the numbers of bacteria growing in each successive area of the plate as it is rotated andstreaked so that well isolated colonies will appear in quadrant 3.
(a)
1 2
4 3
(b) (c)
1
2
3
characteristics. Blood agar is both a differentialmedium and an enriched one. It distinguishes betweenhemolytic and nonhemolytic bacteria. Hemolytic bac-teria (e.g., many streptococci and staphylococci iso-lated from throats) produce clear zones around theircolonies because of red blood cell destruction.
Two very important differential and selectivemedia that are used to isolate and partially identifybacteria are mannitol salt agar and eosin methyleneblue agar. Mannitol salt agar is used to isolate staphy-lococci from clinical and nonclinical samples. It con-tains 7.5% sodium chloride, which inhibits the growthof most bacteria other than staphylococci. Staphylo-coccus aureus will ferment the mannitol and form yel-low zones in the reddish agar because phenol red be-comes yellow in the presence of fermentation acids(see figure 54.5). This differentiates it from S. epider-midis, which forms colonies with red zones or bothzones (see figure 54.6). Eosin methylene blue (EMB)agar is widely used for the detection of E. coli and re-lated bacteria in water supplies and elsewhere. It con-
tains the dyes eosin Y and methylene blue that par-tially suppress the growth of gram-positive bacteria.The dyes also help differentiate between gram-nega-tive bacteria. Lactose fermenters such as Escherichiacoli will take up the dyes and form blue-blackcolonies with a metallic sheen. Lactose nonfermenterssuch as Salmonella, Proteus, and Pseudomonas formcolorless to amber colonies.
In this exercise, we will combine the streak-platetechnique with differential and selective media to iso-late and partly identify Staphylococcus aureus and Es-cherichia coli.
Procedure
1. Melt a sterile, capped tube of mannitol salt agarand a tube of EMB agar in a boiling water bath.
2. Cool the two tubes in a 48° to 50°C water bath for10–15 minutes.
3. Remove the cap, flame the lip of the tube, and pourthe agar into a sterile petri plate (see figure 13.2c–f).
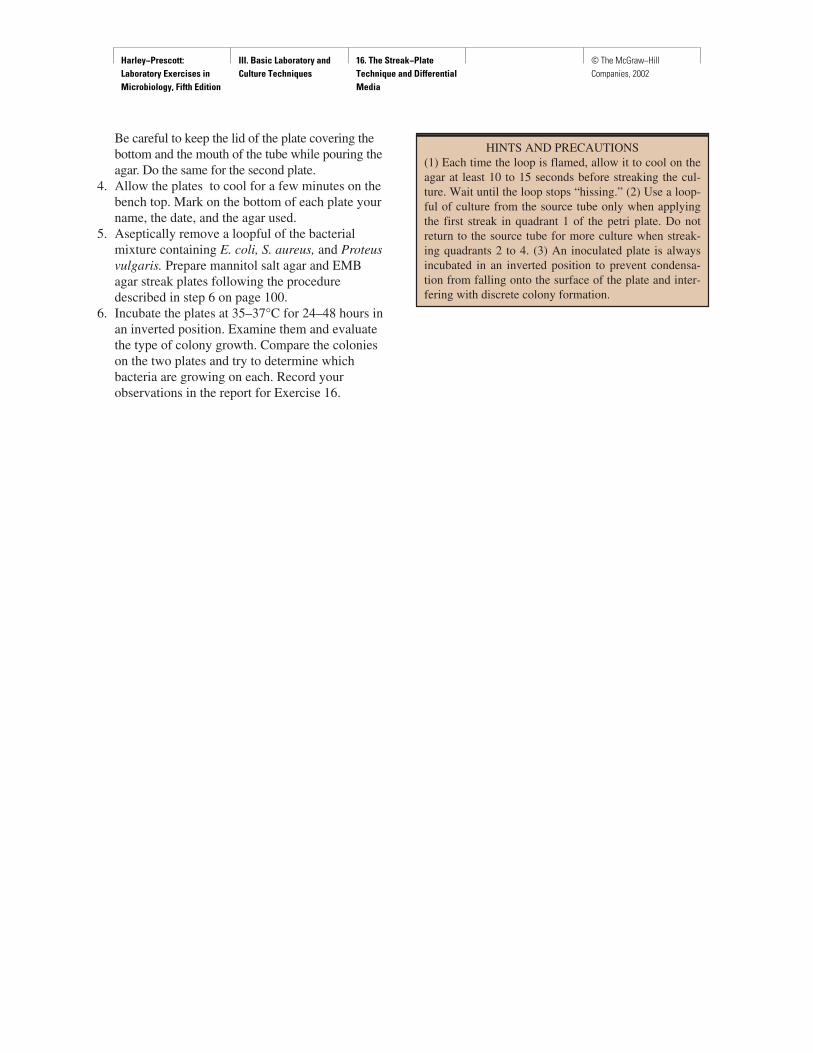
Harley−Prescott: Laboratory Exercises in Microbiology, Fifth Edition
III. Basic Laboratory and Culture Techniques
16. The Streak−Plate Technique and Differential Media
© The McGraw−Hill Companies, 2002
HINTS AND PRECAUTIONS (1) Each time the loop is flamed, allow it to cool on theagar at least 10 to 15 seconds before streaking the cul-ture. Wait until the loop stops “hissing.” (2) Use a loop-ful of culture from the source tube only when applyingthe first streak in quadrant 1 of the petri plate. Do notreturn to the source tube for more culture when streak-ing quadrants 2 to 4. (3) An inoculated plate is alwaysincubated in an inverted position to prevent condensa-tion from falling onto the surface of the plate and inter-fering with discrete colony formation.
Be careful to keep the lid of the plate covering thebottom and the mouth of the tube while pouring theagar. Do the same for the second plate.
4. Allow the plates to cool for a few minutes on thebench top. Mark on the bottom of each plate yourname, the date, and the agar used.
5. Aseptically remove a loopful of the bacterialmixture containing E. coli, S. aureus, and Proteusvulgaris. Prepare mannitol salt agar and EMBagar streak plates following the proceduredescribed in step 6 on page 100.
6. Incubate the plates at 35–37°C for 24–48 hours inan inverted position. Examine them and evaluatethe type of colony growth. Compare the colonieson the two plates and try to determine whichbacteria are growing on each. Record yourobservations in the report for Exercise 16.
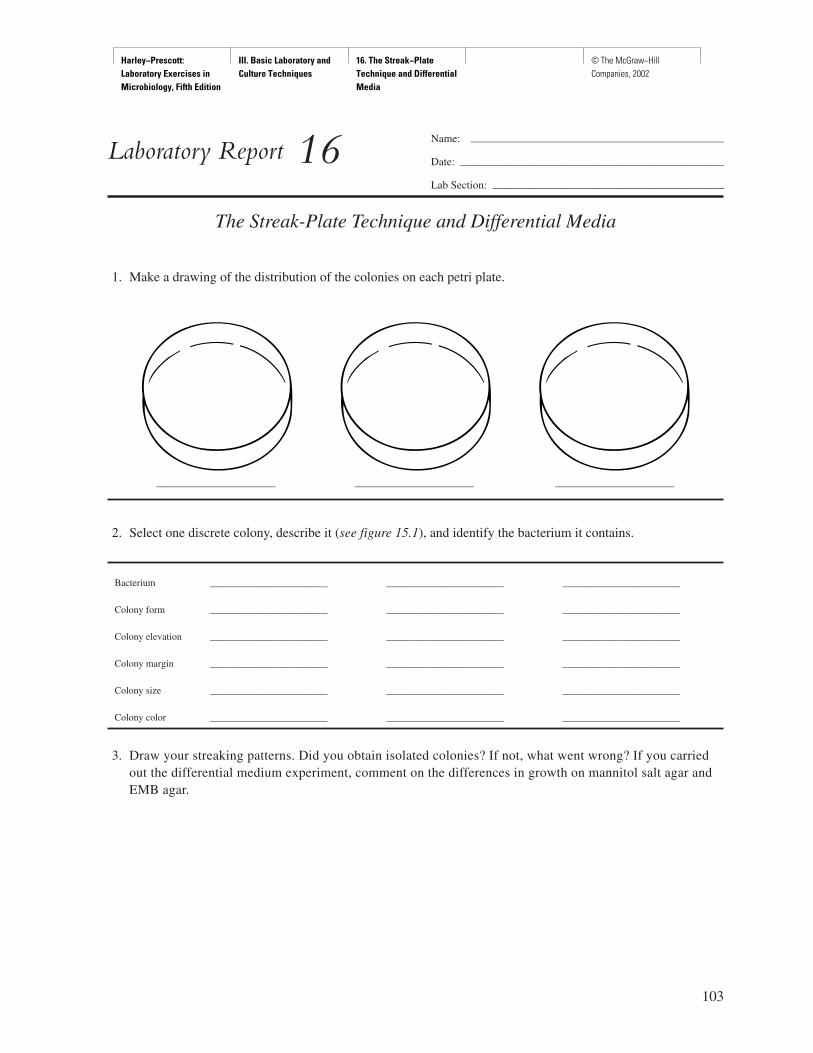
Harley−Prescott: Laboratory Exercises in Microbiology, Fifth Edition
III. Basic Laboratory and Culture Techniques
16. The Streak−Plate Technique and Differential Media
© The McGraw−Hill Companies, 2002
103
Name: ———————————————————————
Date: ————————————————————————
Lab Section: —————————————————————
Laboratory Report 16
The Streak-Plate Technique and Differential Media
1. Make a drawing of the distribution of the colonies on each petri plate.
2. Select one discrete colony, describe it (see figure 15.1), and identify the bacterium it contains.
Bacterium ________________________ ________________________ ________________________
Colony form ________________________ ________________________ ________________________
Colony elevation ________________________ ________________________ ________________________
Colony margin ________________________ ________________________ ________________________
Colony size ________________________ ________________________ ________________________
Colony color ________________________ ________________________ ________________________
3. Draw your streaking patterns. Did you obtain isolated colonies? If not, what went wrong? If you carriedout the differential medium experiment, comment on the differences in growth on mannitol salt agar andEMB agar.
___________________________ ___________________________ ___________________________
Harley−Prescott: Laboratory Exercises in Microbiology, Fifth Edition
III. Basic Laboratory and Culture Techniques
16. The Streak−Plate Technique and Differential Media
© The McGraw−Hill Companies, 2002
Review Questions
1. In the streak-plate technique, how are microorganisms diluted and spread out to form individual colonies?
2. Which area of a streak plate will contain the greatest amount of growth? The least amount of growth? Explainyour answers.
3. Does each discrete colony represent the growth of one cell? Explain your answer. Why can a single colony ona plate be used to start a pure culture?
4. Why can mannitol salt agar and EMB agar be described as both selective and differential media?
5. How can a streak plate become contaminated?
104 Basic Laboratory and Culture Techniques
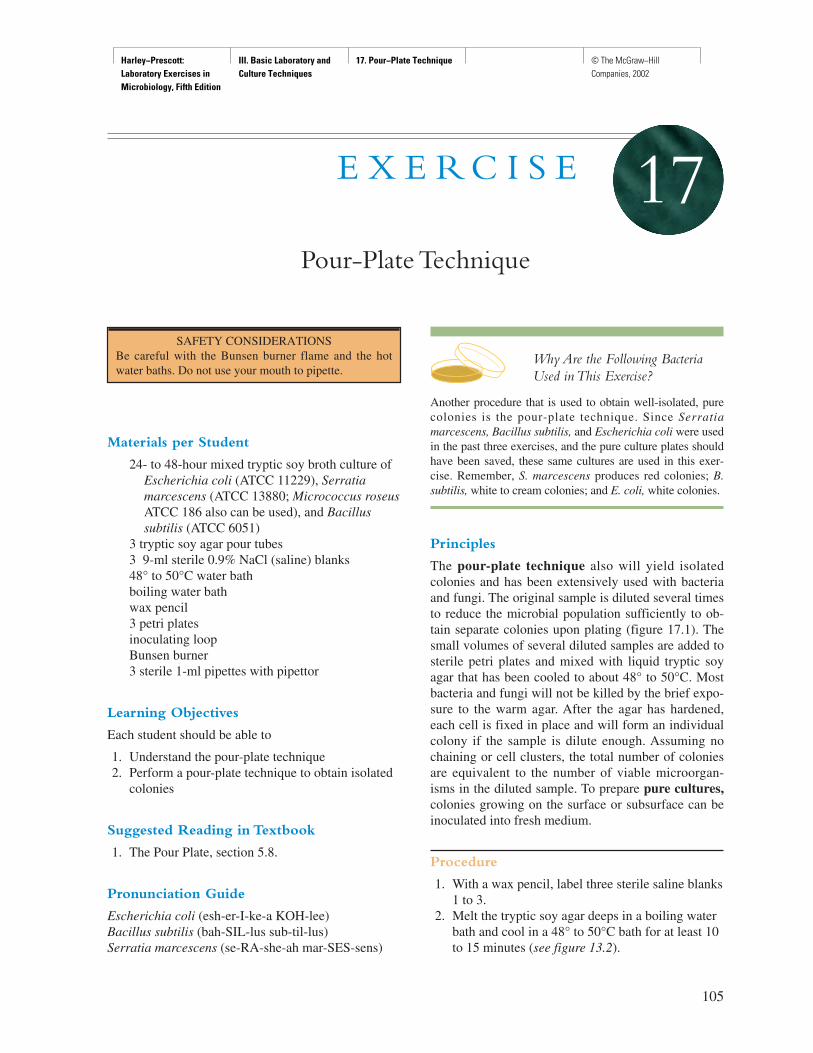
Harley−Prescott: Laboratory Exercises in Microbiology, Fifth Edition
III. Basic Laboratory and Culture Techniques
17. Pour−Plate Technique © The McGraw−Hill Companies, 2002
Materials per Student
24- to 48-hour mixed tryptic soy broth culture ofEscherichia coli (ATCC 11229), Serratiamarcescens (ATCC 13880; Micrococcus roseusATCC 186 also can be used), and Bacillussubtilis (ATCC 6051)
3 tryptic soy agar pour tubes3 9-ml sterile 0.9% NaCl (saline) blanks48° to 50°C water bathboiling water bathwax pencil3 petri platesinoculating loopBunsen burner3 sterile 1-ml pipettes with pipettor
Learning Objectives
Each student should be able to
1. Understand the pour-plate technique2. Perform a pour-plate technique to obtain isolated
colonies
Suggested Reading in Textbook
1. The Pour Plate, section 5.8.
Pronunciation Guide
Escherichia coli (esh-er-I-ke-a KOH-lee)Bacillus subtilis (bah-SIL-lus sub-til-lus)Serratia marcescens (se-RA-she-ah mar-SES-sens)
Why Are the Following BacteriaUsed in This Exercise?
Another procedure that is used to obtain well-isolated, purecolonies is the pour-plate technique. Since Serratiamarcescens, Bacillus subtilis, and Escherichia coli were usedin the past three exercises, and the pure culture plates shouldhave been saved, these same cultures are used in this exer-cise. Remember, S. marcescens produces red colonies; B.subtilis, white to cream colonies; and E. coli, white colonies.
Principles
The pour-plate technique also will yield isolatedcolonies and has been extensively used with bacteriaand fungi. The original sample is diluted several timesto reduce the microbial population sufficiently to ob-tain separate colonies upon plating (figure 17.1). Thesmall volumes of several diluted samples are added tosterile petri plates and mixed with liquid tryptic soyagar that has been cooled to about 48° to 50°C. Mostbacteria and fungi will not be killed by the brief expo-sure to the warm agar. After the agar has hardened,each cell is fixed in place and will form an individualcolony if the sample is dilute enough. Assuming nochaining or cell clusters, the total number of coloniesare equivalent to the number of viable microorgan-isms in the diluted sample. To prepare pure cultures,colonies growing on the surface or subsurface can beinoculated into fresh medium.
Procedure
1. With a wax pencil, label three sterile saline blanks1 to 3.
2. Melt the tryptic soy agar deeps in a boiling waterbath and cool in a 48° to 50°C bath for at least 10to 15 minutes (see figure 13.2).
105
E X E R C I S E
Pour-Plate Technique
17
SAFETY CONSIDERATIONS Be careful with the Bunsen burner flame and the hotwater baths. Do not use your mouth to pipette.
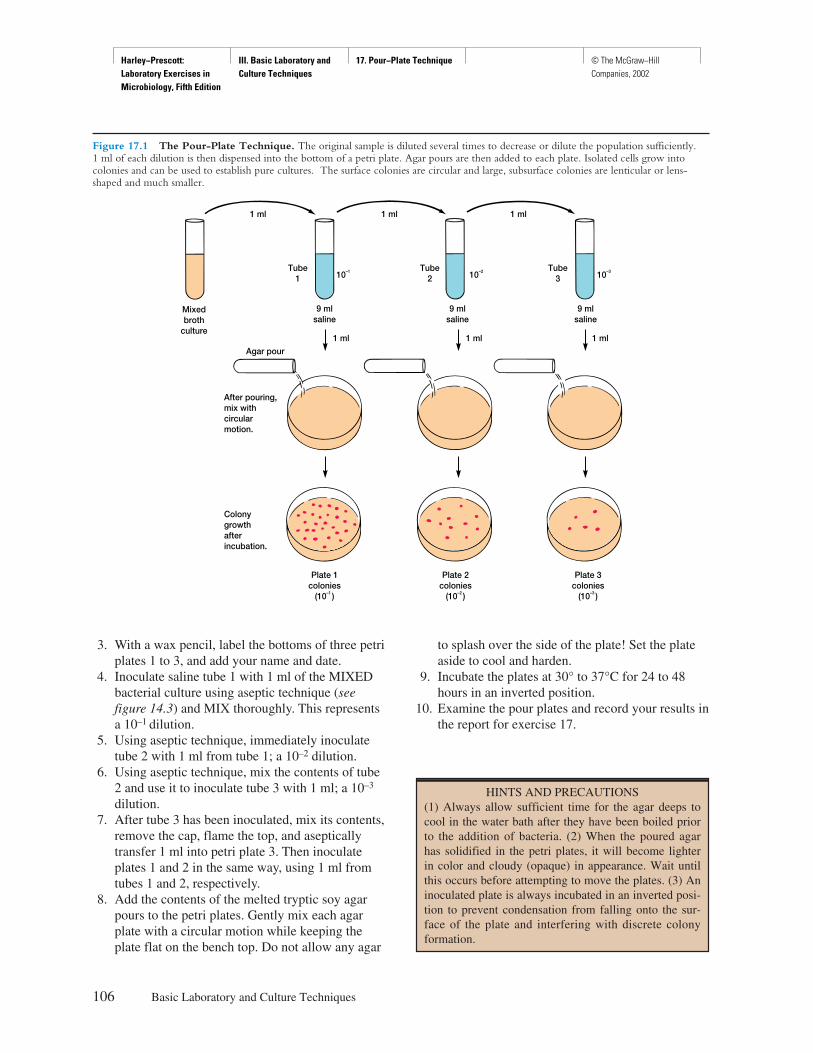
Harley−Prescott: Laboratory Exercises in Microbiology, Fifth Edition
III. Basic Laboratory and Culture Techniques
17. Pour−Plate Technique © The McGraw−Hill Companies, 2002
3. With a wax pencil, label the bottoms of three petriplates 1 to 3, and add your name and date.
4. Inoculate saline tube 1 with 1 ml of the MIXEDbacterial culture using aseptic technique (seefigure 14.3) and MIX thoroughly. This representsa 10–1 dilution.
5. Using aseptic technique, immediately inoculatetube 2 with 1 ml from tube 1; a 10–2 dilution.
6. Using aseptic technique, mix the contents of tube2 and use it to inoculate tube 3 with 1 ml; a 10–3
dilution.7. After tube 3 has been inoculated, mix its contents,
remove the cap, flame the top, and asepticallytransfer 1 ml into petri plate 3. Then inoculateplates 1 and 2 in the same way, using 1 ml fromtubes 1 and 2, respectively.
8. Add the contents of the melted tryptic soy agarpours to the petri plates. Gently mix each agarplate with a circular motion while keeping theplate flat on the bench top. Do not allow any agar
to splash over the side of the plate! Set the plateaside to cool and harden.
9. Incubate the plates at 30° to 37°C for 24 to 48hours in an inverted position.
10. Examine the pour plates and record your results inthe report for exercise 17.
106 Basic Laboratory and Culture Techniques
HINTS AND PRECAUTIONS (1) Always allow sufficient time for the agar deeps tocool in the water bath after they have been boiled priorto the addition of bacteria. (2) When the poured agarhas solidified in the petri plates, it will become lighterin color and cloudy (opaque) in appearance. Wait untilthis occurs before attempting to move the plates. (3) Aninoculated plate is always incubated in an inverted posi-tion to prevent condensation from falling onto the sur-face of the plate and interfering with discrete colonyformation.
Figure 17.1 The Pour-Plate Technique. The original sample is diluted several times to decrease or dilute the population sufficiently. 1 ml of each dilution is then dispensed into the bottom of a petri plate. Agar pours are then added to each plate. Isolated cells grow intocolonies and can be used to establish pure cultures. The surface colonies are circular and large, subsurface colonies are lenticular or lens-shaped and much smaller.
1 ml 1 ml 1 ml
1 ml1 ml1 ml
Mixedbroth
culture
Tube1
Tube2
Tube3
9 mlsaline
9 mlsaline
9 mlsaline
10–1 10–2 10–3
Plate 3colonies
(10–3 )
Plate 2colonies
(10–2 )
Plate 1colonies
(10–1 )
Colonygrowthafterincubation.
Agar pour
After pouring,mix withcircularmotion.
Harley−Prescott: Laboratory Exercises in Microbiology, Fifth Edition
III. Basic Laboratory and Culture Techniques
17. Pour−Plate Technique © The McGraw−Hill Companies, 2002
107
Name: ———————————————————————
Date: ————————————————————————
Lab Section: —————————————————————
Laboratory Report 17
Pour-Plate Technique
1. Examine each of the agar plates for colony distribution and amount of growth. Look for discrete surfacecolonies and record your results. Do the same for the subsurface colonies. Color each species of bacterium adifferent color or label each. Fill in the table.
Surface Colonies
Form ________________________ ________________________ ________________________
Elevation ________________________ ________________________ ________________________
Margin ________________________ ________________________ ________________________
Number ________________________ ________________________ ________________________
Subsurface Colonies
Form ________________________ ________________________ ________________________
Elevation ________________________ ________________________ ________________________
Margin ________________________ ________________________ ________________________
Number ________________________ ________________________ ________________________
Plate 1 Plate 2 Plate 3

Harley−Prescott: Laboratory Exercises in Microbiology, Fifth Edition
III. Basic Laboratory and Culture Techniques
17. Pour−Plate Technique © The McGraw−Hill Companies, 2002
Review Questions
1. How do the results of the pour-plate method compare with those obtained using the streak-plate and spread-plate methods?
2. What is the main advantage of the pour-plate method over other methods of bacterial colony isolation? Whatare some problems?
3. Why are the surface colonies on a pour plate larger than those within the medium?
4. Why doesn’t the 48° to 50°C temperature of the melted agar kill most of the bacteria?
5. Explain how the pour-plate method can be used to isolate fungi.
6. Why must tryptic soy agar be cooled below 50°C before pouring and inoculating?
7. Why is it important to invert the petri plates during incubation?
108 Basic Laboratory and Culture Techniques

Harley−Prescott: Laboratory Exercises in Microbiology, Fifth Edition
III. Basic Laboratory and Culture Techniques
18. Cultivation of Anaerobic Bacteria
© The McGraw−Hill Companies, 2002
Materials per Group of Students
24- to 48-hour Eugon broth cultures ofPseudomonas aeruginosa (ATCC e10145), andEscherichia coli (ATCC 11229); thioglycollatebroth cultures of Clostridium sporogenes(ATCC 3584)
3 Eugon agar deepsboiling water bath48° to 50°C water bath4 thioglycollate broth tubesinoculating loop2 tryptic soy agar plates4 petri plates containing Brewer’s anaerobic agarsterilized Brewer’s anaerobic coversGasPak Jar, GasPak Disposable Anaerobic
System (BBL Microbiology Systems), GasPakPouch (BBL), Difco Gas Generatingenvelopes, BioBag (Marion Scientific),Anaero-Pack System (KEY ScientificProducts)
Oxyrase For Broth, Oxyrase For Agar, OxyDish,OxyPlates (Oxyrase, Inc., P.O. Box 1345,Mansfield, OH 44901; 419–589–8800;www.oxyrase.com)
3 trypticase soy broth tubes containing 0.1-mlOxyrase For Broth
3 OxyDishes containing Oxyrase For Agar4 tryptic soy agar slantsscissorscotton plugspyrogallol crystals (poisonous)10% NaOH (caustic)test tubesrubber stopperstest-tube rackwax pencildisposable glovesspatula for handling pyrogallol crystals and soil1-ml pipette with pipettorgarden soil
Learning Objectives
Each student should be able to:
1. Appreciate why some bacteria need an anaerobicenvironment to grow
2. Understand some of the different methods that areused to cultivate anaerobic bacteria
3. Successfully cultivate several anaerobic bacteria
Suggested Reading in Textbook
1. Oxygen Concentration, section 6.4.2. Anaerobic Respiration, section 9.6.3. Fermentations, section 9.3.
Pronunciation Guide
Clostridium sporogenes (klos-STRID-ee-um spo-ROJ-ah-nees)
Escherichia coli (esh-er-I-ke-a KOH-lee)Pseudomonas aeruginosa (soo-do-MO-nas a-ruh-jin-
OH-sah)
109
SAFETY CONSIDERATIONSNo mouth pipetting. Be careful with the Bunsen burnerflame and water baths. Pyrogallol is poisonous; percu-taneous absorption through the skin is possible—weardisposable gloves and use the spatula when transfer-ring the crystals. Ten percent NaOH is caustic to theskin, and the vapors may cause damage to the respira-tory tract. Use a pipette with pipettor when transfer-ring this caustic soda. The various gas-generating en-velopes that liberate hydrogen react rapidly with waterto produce flammable gas. Observe appropriate pre-cautions when handling these products. Further, theanaerobic jar used must not leak and the lid sealshould be tight. Envelopes that have been activatedwith water but not used in anaerobic jars should bekept in a ventilating hood away from open flames orsparks for approximately 30 minutes until the reactionhas subsided.
E X E R C I S E
Cultivation of Anaerobic Bacteria
18
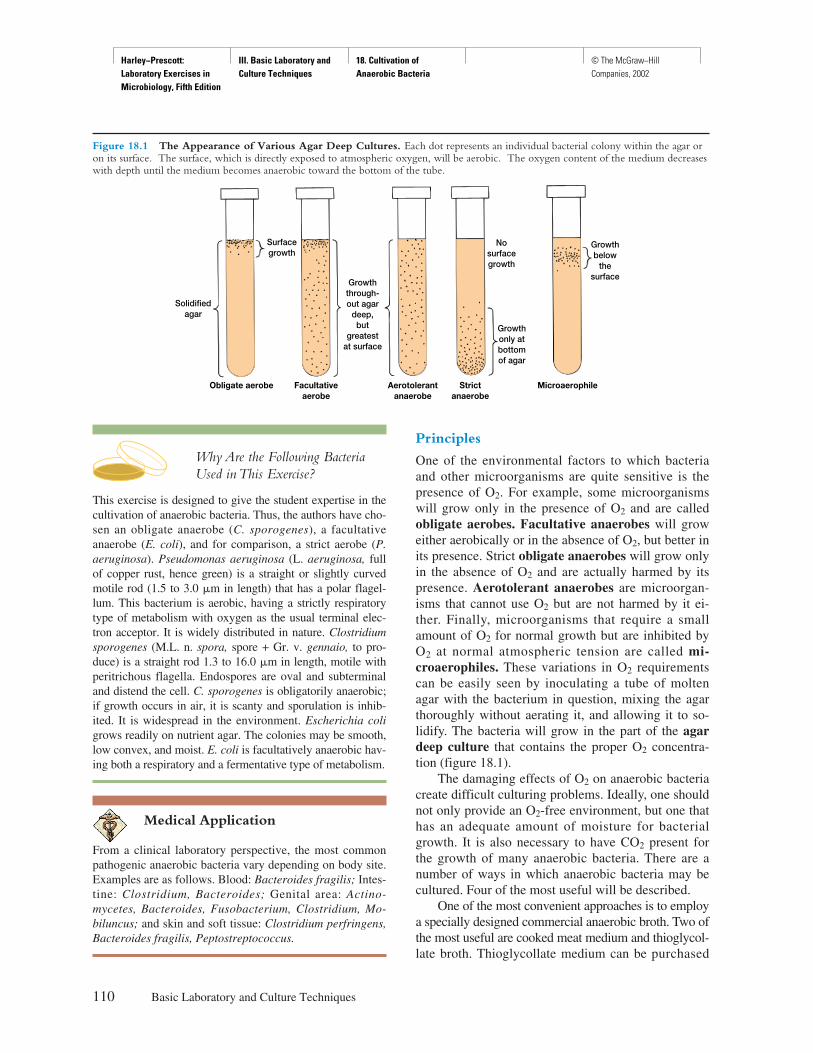
Harley−Prescott: Laboratory Exercises in Microbiology, Fifth Edition
III. Basic Laboratory and Culture Techniques
18. Cultivation of Anaerobic Bacteria
© The McGraw−Hill Companies, 2002
Why Are the Following BacteriaUsed in This Exercise?
This exercise is designed to give the student expertise in thecultivation of anaerobic bacteria. Thus, the authors have cho-sen an obligate anaerobe (C. sporogenes), a facultativeanaerobe (E. coli), and for comparison, a strict aerobe (P.aeruginosa). Pseudomonas aeruginosa (L. aeruginosa, fullof copper rust, hence green) is a straight or slightly curvedmotile rod (1.5 to 3.0 �m in length) that has a polar flagel-lum. This bacterium is aerobic, having a strictly respiratorytype of metabolism with oxygen as the usual terminal elec-tron acceptor. It is widely distributed in nature. Clostridiumsporogenes (M.L. n. spora, spore + Gr. v. gennaio, to pro-duce) is a straight rod 1.3 to 16.0 �m in length, motile withperitrichous flagella. Endospores are oval and subterminaland distend the cell. C. sporogenes is obligatorily anaerobic;if growth occurs in air, it is scanty and sporulation is inhib-ited. It is widespread in the environment. Escherichia coligrows readily on nutrient agar. The colonies may be smooth,low convex, and moist. E. coli is facultatively anaerobic hav-ing both a respiratory and a fermentative type of metabolism.
Medical Application
From a clinical laboratory perspective, the most commonpathogenic anaerobic bacteria vary depending on body site.Examples are as follows. Blood: Bacteroides fragilis; Intes-tine: Clostridium, Bacteroides; Genital area: Actino-mycetes, Bacteroides, Fusobacterium, Clostridium, Mo-biluncus; and skin and soft tissue: Clostridium perfringens,Bacteroides fragilis, Peptostreptococcus.
Principles
One of the environmental factors to which bacteriaand other microorganisms are quite sensitive is thepresence of O2. For example, some microorganismswill grow only in the presence of O2 and are calledobligate aerobes. Facultative anaerobes will groweither aerobically or in the absence of O2, but better inits presence. Strict obligate anaerobes will grow onlyin the absence of O2 and are actually harmed by itspresence. Aerotolerant anaerobes are microorgan-isms that cannot use O2 but are not harmed by it ei-ther. Finally, microorganisms that require a smallamount of O2 for normal growth but are inhibited byO2 at normal atmospheric tension are called mi-croaerophiles. These variations in O2 requirementscan be easily seen by inoculating a tube of moltenagar with the bacterium in question, mixing the agarthoroughly without aerating it, and allowing it to so-lidify. The bacteria will grow in the part of the agardeep culture that contains the proper O2 concentra-tion (figure 18.1).
The damaging effects of O2 on anaerobic bacteriacreate difficult culturing problems. Ideally, one shouldnot only provide an O2-free environment, but one thathas an adequate amount of moisture for bacterialgrowth. It is also necessary to have CO2 present forthe growth of many anaerobic bacteria. There are anumber of ways in which anaerobic bacteria may becultured. Four of the most useful will be described.
One of the most convenient approaches is to employa specially designed commercial anaerobic broth. Two ofthe most useful are cooked meat medium and thioglycol-late broth. Thioglycollate medium can be purchased
110 Basic Laboratory and Culture Techniques
Figure 18.1 The Appearance of Various Agar Deep Cultures. Each dot represents an individual bacterial colony within the agar oron its surface. The surface, which is directly exposed to atmospheric oxygen, will be aerobic. The oxygen content of the medium decreaseswith depth until the medium becomes anaerobic toward the bottom of the tube.
Solidifiedagar
Surfacegrowth
Obligate aerobe Facultativeaerobe
Growththrough-out agar
deep,but
greatestat surface
Aerotolerantanaerobe
Strictanaerobe
Growthonly atbottomof agar
Nosurfacegrowth
Growthbelow
thesurface
Microaerophile
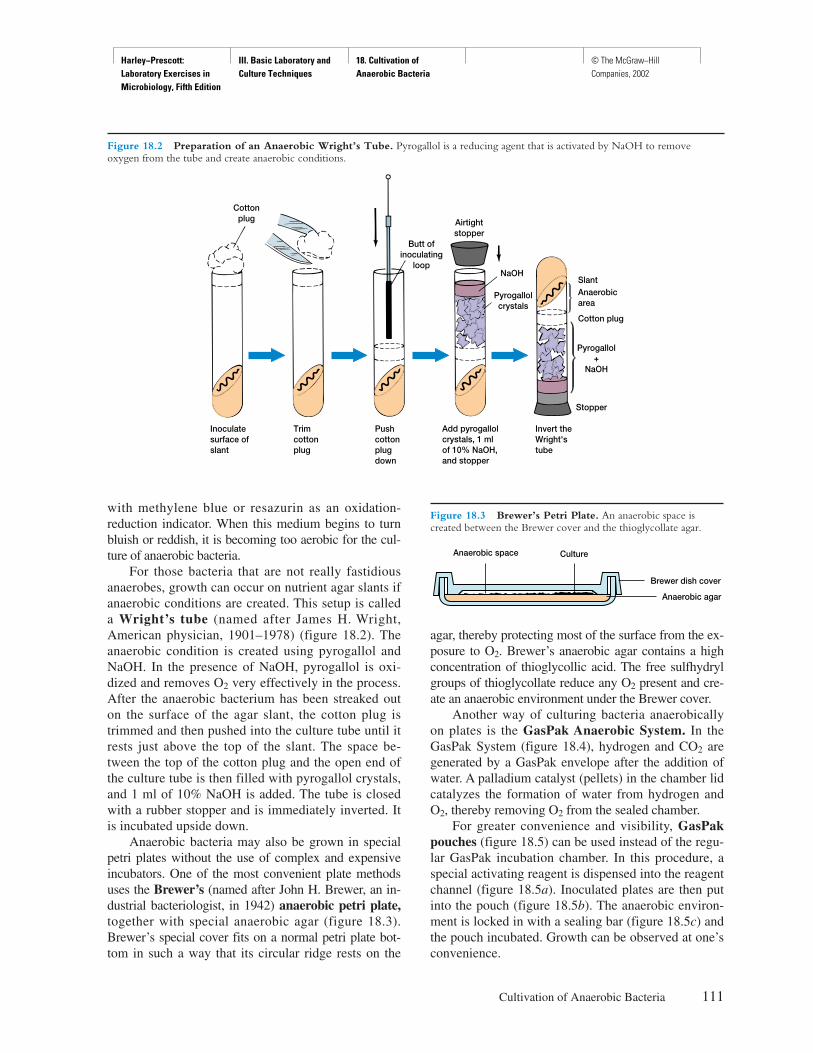
Harley−Prescott: Laboratory Exercises in Microbiology, Fifth Edition
III. Basic Laboratory and Culture Techniques
18. Cultivation of Anaerobic Bacteria
© The McGraw−Hill Companies, 2002
with methylene blue or resazurin as an oxidation-reduction indicator. When this medium begins to turnbluish or reddish, it is becoming too aerobic for the cul-ture of anaerobic bacteria.
For those bacteria that are not really fastidiousanaerobes, growth can occur on nutrient agar slants ifanaerobic conditions are created. This setup is calleda Wright’s tube (named after James H. Wright,American physician, 1901–1978) (figure 18.2). Theanaerobic condition is created using pyrogallol andNaOH. In the presence of NaOH, pyrogallol is oxi-dized and removes O2 very effectively in the process.After the anaerobic bacterium has been streaked outon the surface of the agar slant, the cotton plug istrimmed and then pushed into the culture tube until itrests just above the top of the slant. The space be-tween the top of the cotton plug and the open end ofthe culture tube is then filled with pyrogallol crystals,and 1 ml of 10% NaOH is added. The tube is closedwith a rubber stopper and is immediately inverted. Itis incubated upside down.
Anaerobic bacteria may also be grown in specialpetri plates without the use of complex and expensiveincubators. One of the most convenient plate methodsuses the Brewer’s (named after John H. Brewer, an in-dustrial bacteriologist, in 1942) anaerobic petri plate,together with special anaerobic agar (figure 18.3).Brewer’s special cover fits on a normal petri plate bot-tom in such a way that its circular ridge rests on the
agar, thereby protecting most of the surface from the ex-posure to O2. Brewer’s anaerobic agar contains a highconcentration of thioglycollic acid. The free sulfhydrylgroups of thioglycollate reduce any O2 present and cre-ate an anaerobic environment under the Brewer cover.
Another way of culturing bacteria anaerobicallyon plates is the GasPak Anaerobic System. In theGasPak System (figure 18.4), hydrogen and CO2 aregenerated by a GasPak envelope after the addition ofwater. A palladium catalyst (pellets) in the chamber lidcatalyzes the formation of water from hydrogen andO2, thereby removing O2 from the sealed chamber.
For greater convenience and visibility, GasPakpouches (figure 18.5) can be used instead of the regu-lar GasPak incubation chamber. In this procedure, aspecial activating reagent is dispensed into the reagentchannel (figure 18.5a). Inoculated plates are then putinto the pouch (figure 18.5b). The anaerobic environ-ment is locked in with a sealing bar (figure 18.5c) andthe pouch incubated. Growth can be observed at one’sconvenience.
Cultivation of Anaerobic Bacteria 111
Figure 18.2 Preparation of an Anaerobic Wright’s Tube. Pyrogallol is a reducing agent that is activated by NaOH to removeoxygen from the tube and create anaerobic conditions.
Stopper
NaOH
Airtightstopper
Cottonplug
Inoculatesurface ofslant
Trimcottonplug
Pushcottonplugdown
Add pyrogallolcrystals, 1 mlof 10% NaOH,and stopper
Invert theWright'stube
Pyrogallol+
NaOH
SlantAnaerobicarea
Cotton plug
Pyrogallolcrystals
Butt ofinoculating
loop
Figure 18.3 Brewer’s Petri Plate. An anaerobic space iscreated between the Brewer cover and the thioglycollate agar.
Anaerobic space Culture
Brewer dish cover
Anaerobic agar
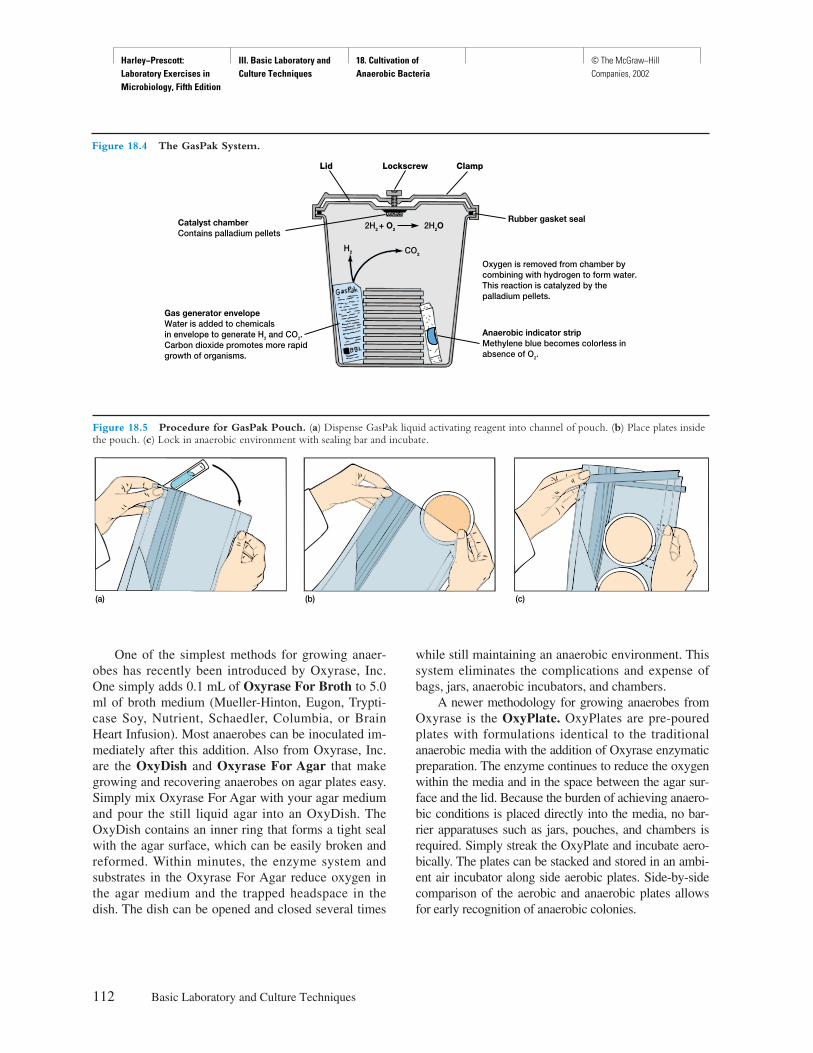
Harley−Prescott: Laboratory Exercises in Microbiology, Fifth Edition
III. Basic Laboratory and Culture Techniques
18. Cultivation of Anaerobic Bacteria
© The McGraw−Hill Companies, 2002
One of the simplest methods for growing anaer-obes has recently been introduced by Oxyrase, Inc.One simply adds 0.1 mL of Oxyrase For Broth to 5.0ml of broth medium (Mueller-Hinton, Eugon, Trypti-case Soy, Nutrient, Schaedler, Columbia, or BrainHeart Infusion). Most anaerobes can be inoculated im-mediately after this addition. Also from Oxyrase, Inc.are the OxyDish and Oxyrase For Agar that makegrowing and recovering anaerobes on agar plates easy.Simply mix Oxyrase For Agar with your agar mediumand pour the still liquid agar into an OxyDish. TheOxyDish contains an inner ring that forms a tight sealwith the agar surface, which can be easily broken andreformed. Within minutes, the enzyme system andsubstrates in the Oxyrase For Agar reduce oxygen inthe agar medium and the trapped headspace in thedish. The dish can be opened and closed several times
while still maintaining an anaerobic environment. Thissystem eliminates the complications and expense ofbags, jars, anaerobic incubators, and chambers.
A newer methodology for growing anaerobes fromOxyrase is the OxyPlate. OxyPlates are pre-pouredplates with formulations identical to the traditionalanaerobic media with the addition of Oxyrase enzymaticpreparation. The enzyme continues to reduce the oxygenwithin the media and in the space between the agar sur-face and the lid. Because the burden of achieving anaero-bic conditions is placed directly into the media, no bar-rier apparatuses such as jars, pouches, and chambers isrequired. Simply streak the OxyPlate and incubate aero-bically. The plates can be stacked and stored in an ambi-ent air incubator along side aerobic plates. Side-by-sidecomparison of the aerobic and anaerobic plates allowsfor early recognition of anaerobic colonies.
112 Basic Laboratory and Culture Techniques
Figure 18.4 The GasPak System.
Lid Lockscrew Clamp
Oxygen is removed from chamber bycombining with hydrogen to form water.This reaction is catalyzed by thepalladium pellets.
Anaerobic indicator stripMethylene blue becomes colorless inabsence of O2.
Rubber gasket seal
Gas generator envelopeWater is added to chemicalsin envelope to generate H2 and CO2.Carbon dioxide promotes more rapidgrowth of organisms.
Catalyst chamberContains palladium pellets
H2 CO2
2H2 + O2 2H2O
Figure 18.5 Procedure for GasPak Pouch. (a) Dispense GasPak liquid activating reagent into channel of pouch. (b) Place plates insidethe pouch. (c) Lock in anaerobic environment with sealing bar and incubate.
(a) (b) (c)
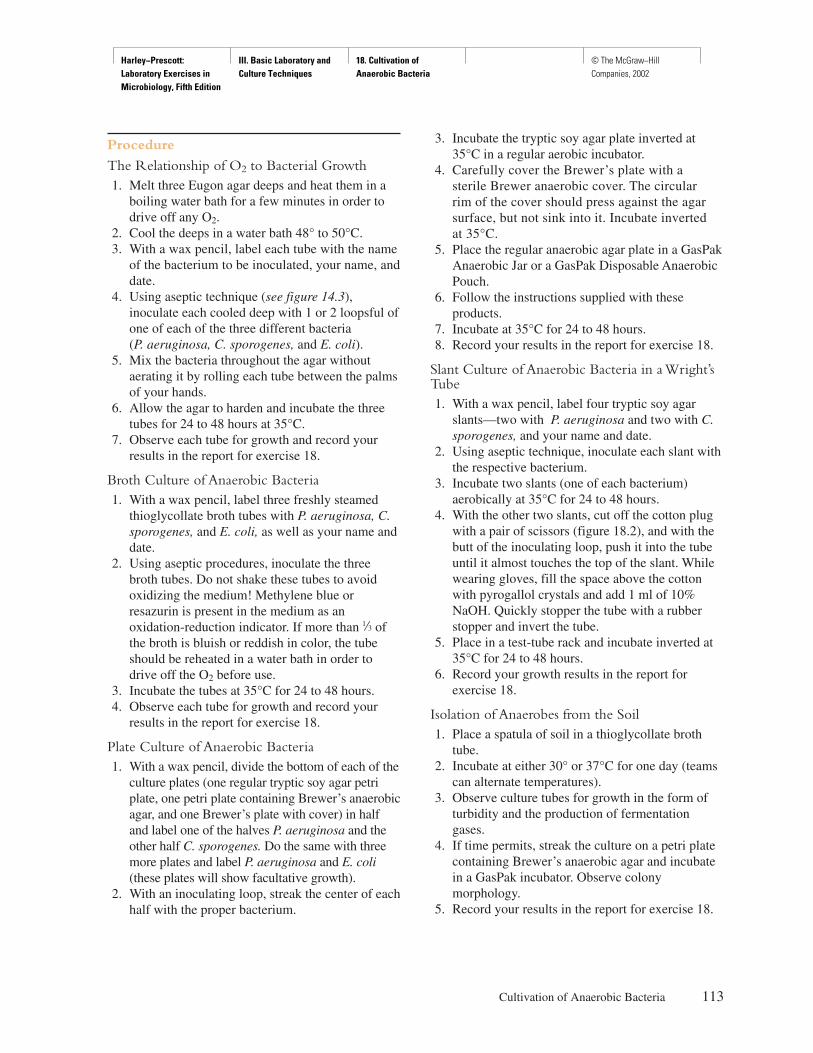
Harley−Prescott: Laboratory Exercises in Microbiology, Fifth Edition
III. Basic Laboratory and Culture Techniques
18. Cultivation of Anaerobic Bacteria
© The McGraw−Hill Companies, 2002
Procedure
The Relationship of O2 to Bacterial Growth1. Melt three Eugon agar deeps and heat them in a
boiling water bath for a few minutes in order todrive off any O2.
2. Cool the deeps in a water bath 48° to 50°C.3. With a wax pencil, label each tube with the name
of the bacterium to be inoculated, your name, anddate.
4. Using aseptic technique (see figure 14.3),inoculate each cooled deep with 1 or 2 loopsful ofone of each of the three different bacteria (P. aeruginosa, C. sporogenes, and E. coli).
5. Mix the bacteria throughout the agar withoutaerating it by rolling each tube between the palmsof your hands.
6. Allow the agar to harden and incubate the threetubes for 24 to 48 hours at 35°C.
7. Observe each tube for growth and record yourresults in the report for exercise 18.
Broth Culture of Anaerobic Bacteria1. With a wax pencil, label three freshly steamed
thioglycollate broth tubes with P. aeruginosa, C.sporogenes, and E. coli, as well as your name anddate.
2. Using aseptic procedures, inoculate the threebroth tubes. Do not shake these tubes to avoidoxidizing the medium! Methylene blue orresazurin is present in the medium as anoxidation-reduction indicator. If more than h ofthe broth is bluish or reddish in color, the tubeshould be reheated in a water bath in order todrive off the O2 before use.
3. Incubate the tubes at 35°C for 24 to 48 hours.4. Observe each tube for growth and record your
results in the report for exercise 18.
Plate Culture of Anaerobic Bacteria1. With a wax pencil, divide the bottom of each of the
culture plates (one regular tryptic soy agar petriplate, one petri plate containing Brewer’s anaerobicagar, and one Brewer’s plate with cover) in halfand label one of the halves P. aeruginosa and theother half C. sporogenes. Do the same with threemore plates and label P. aeruginosa and E. coli(these plates will show facultative growth).
2. With an inoculating loop, streak the center of eachhalf with the proper bacterium.
3. Incubate the tryptic soy agar plate inverted at35°C in a regular aerobic incubator.
4. Carefully cover the Brewer’s plate with a sterile Brewer anaerobic cover. The circular rim of the cover should press against the agarsurface, but not sink into it. Incubate inverted at 35°C.
5. Place the regular anaerobic agar plate in a GasPakAnaerobic Jar or a GasPak Disposable AnaerobicPouch.
6. Follow the instructions supplied with theseproducts.
7. Incubate at 35°C for 24 to 48 hours.8. Record your results in the report for exercise 18.
Slant Culture of Anaerobic Bacteria in a Wright’sTube1. With a wax pencil, label four tryptic soy agar
slants—two with P. aeruginosa and two with C.sporogenes, and your name and date.
2. Using aseptic technique, inoculate each slant withthe respective bacterium.
3. Incubate two slants (one of each bacterium)aerobically at 35°C for 24 to 48 hours.
4. With the other two slants, cut off the cotton plugwith a pair of scissors (figure 18.2), and with thebutt of the inoculating loop, push it into the tubeuntil it almost touches the top of the slant. Whilewearing gloves, fill the space above the cottonwith pyrogallol crystals and add 1 ml of 10%NaOH. Quickly stopper the tube with a rubberstopper and invert the tube.
5. Place in a test-tube rack and incubate inverted at35°C for 24 to 48 hours.
6. Record your growth results in the report forexercise 18.
Isolation of Anaerobes from the Soil1. Place a spatula of soil in a thioglycollate broth
tube.2. Incubate at either 30° or 37°C for one day (teams
can alternate temperatures).3. Observe culture tubes for growth in the form of
turbidity and the production of fermentationgases.
4. If time permits, streak the culture on a petri platecontaining Brewer’s anaerobic agar and incubatein a GasPak incubator. Observe colonymorphology.
5. Record your results in the report for exercise 18.
Cultivation of Anaerobic Bacteria 113

Harley−Prescott: Laboratory Exercises in Microbiology, Fifth Edition
III. Basic Laboratory and Culture Techniques
18. Cultivation of Anaerobic Bacteria
© The McGraw−Hill Companies, 2002
Simplified Method For Growing Anaerobes1. Using aseptic technique, inoculate each trypticase
soy broth tube containing Oxyrase For Broth withP. aeruginosa, C. sporogenes, and E. coli. Repeatthe inoculation on the OxyDish containing trypticsoy agar and Oxyrase For Agar.
2. Incubate for 24 to 48 hours at 37°C.3. Record your growth results in the report for
exercise 18.
114 Basic Laboratory and Culture Techniques
HINTS AND PRECAUTIONS(1) If screw-cap tubes are used with any tubed media(such as thioglycollate broth), the cap should be tightlyclosed during incubation outside of an anaerobic incu-bator to avoid unnecessary penetration of oxygen fromthe atmosphere. (2) In an anaerobic GasPak jar, the capsshould be loosened slightly to allow neutralization ofoxygen within the tubes by the hydrogen gas generatedwithin the system.
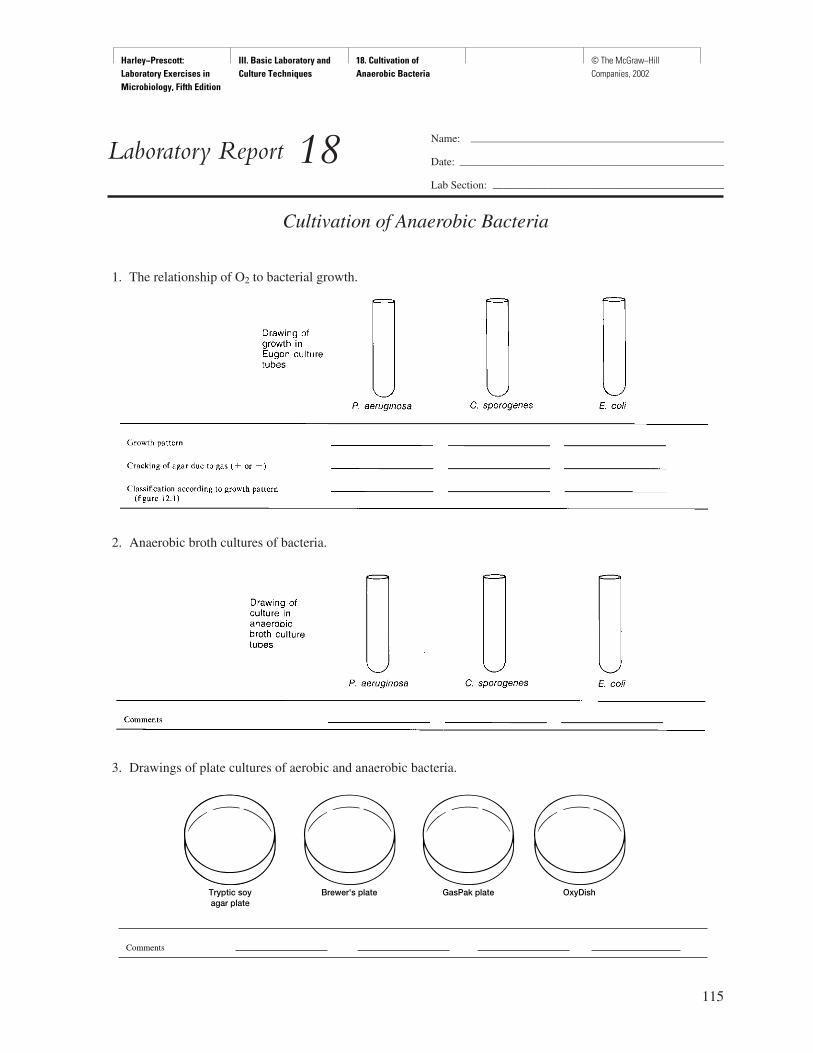
Harley−Prescott: Laboratory Exercises in Microbiology, Fifth Edition
III. Basic Laboratory and Culture Techniques
18. Cultivation of Anaerobic Bacteria
© The McGraw−Hill Companies, 2002
115
Name: ———————————————————————
Date: ————————————————————————
Lab Section: —————————————————————
Laboratory Report 18
Cultivation of Anaerobic Bacteria
1. The relationship of O2 to bacterial growth.
2. Anaerobic broth cultures of bacteria.
3. Drawings of plate cultures of aerobic and anaerobic bacteria.
Tryptic soyagar plate
Brewer's plate GasPak plate OxyDish
Comments
Harley−Prescott: Laboratory Exercises in Microbiology, Fifth Edition
III. Basic Laboratory and Culture Techniques
18. Cultivation of Anaerobic Bacteria
© The McGraw−Hill Companies, 2002
4. Slant cultures of anaerobic bacteria.
Review Questions
1. Explain how an anaerobic atmosphere can be created in a jar.
2. Explain what happens in a Wright’s tube.
3. Differentiate between the following:a. an obligate anaerobe
b. an obligate aerobe
c. a facultative anaerobe
d. an aerotolerant anaerobe
e. a microaerophile
4. What are the ingredients in Brewer’s anaerobic agar that remove O2 from the medium? Briefly explain howan Oxyrase plate works.
5. Of the methods used in this exercise to create an anaerobic environment, which works the best, and why?
116 Basic Laboratory and Culture Techniques
Harley−Prescott: Laboratory Exercises in Microbiology, Fifth Edition
III. Basic Laboratory and Culture Techniques
19. Determination of Bacterial Numbers
© The McGraw−Hill Companies, 2002
Materials per Student
24-hour tryptic soy broth culture of Escherichiacoli (ATCC 11229)
4 sterile 99-ml saline or phosphate buffer blanks1-ml or 1.1-ml pipettes with pipettor6 petri plates6 agar pour tubes of tryptone glucose yeast agar
(plate count agar)48° to 50°C water bathboiling water bathBunsen burnercuvettesspectrophotometer4 tubes of tryptic soy broth
Learning Objectives
Each student should be able to
1. Describe several different ways to quantify thenumber of bacteria in a given sample
2. Determine quantitatively the number of viablecells in a bacterial culture by the standard platecount technique
3. Measure the turbidity of a culture with aspectrophotometer and relate this to the number(biomass) of bacteria
Suggested Reading in Textbook
1. Measurement of Microbial Growth, section 6.2.2. Measurement of Cell Numbers, section 6.2.3. Measurement of Cell Mass, section 6.2.
Pronunciation Guide
Escherichia coli (esh-er-I-ke-a KOH-lee)
Why Is the Following BacteriumUsed in This Exercise?
All of the learning objectives of this exercise are related todetermining bacterial numbers. When working with largenumbers and a short time frame, one of the most reliablemicroorganisms is one that has been used in previous ex-periments, namely, Escherichia coli. E. coli has a genera-tion time at 37°C of 0.35 hours. Thus, it reproduces veryrapidly and is easy to quantify (i.e., the number [biomass]of viable E. coli cells in a bacterial culture can be easily de-termined by spectrophotometry).
Medical Application
In the clinical laboratory and in research laboratories, it isfrequently necessary to have an accurate count of living(viable) cells in a given culture. If done properly, countingprocedures can produce very accurate results.
Principles
Many studies require the quantitative determination ofbacterial populations. The two most widely usedmethods for determining bacterial numbers are thestandard, or viable, plate count method and spec-trophotometric (turbidimetric) analysis. Althoughthe two methods are somewhat similar in the resultsthey yield, there are distinct differences. For example,the standard plate count method is an indirect mea-surement of cell density and reveals information re-lated only to live bacteria. The spectrophotometricanalysis is based on turbidity and indirectly measuresall bacteria (cell biomass), dead or alive.
The standard plate count method consists of dilut-ing a sample with sterile saline or phosphate buffer
117
E X E R C I S E
Determination of Bacterial Numbers
19
SAFETY PRECAUTIONSNo mouth pipetting. Be careful with the Bunsen burnerflame and water baths.
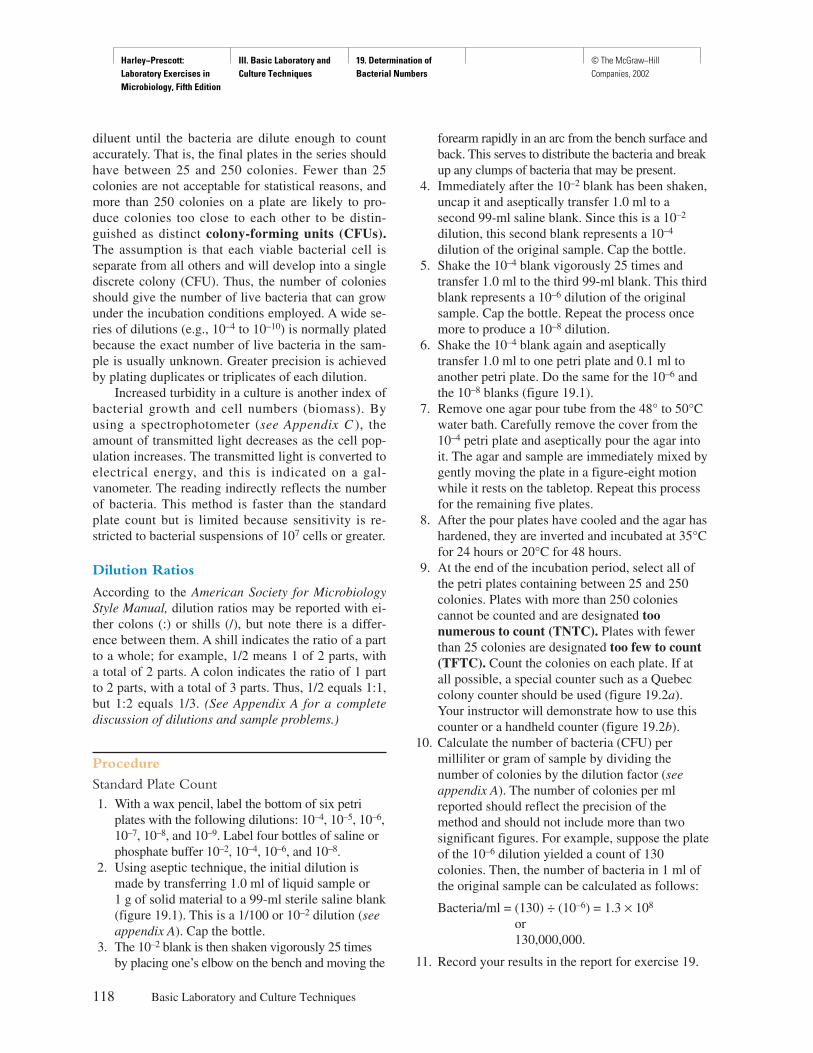
Harley−Prescott: Laboratory Exercises in Microbiology, Fifth Edition
III. Basic Laboratory and Culture Techniques
19. Determination of Bacterial Numbers
© The McGraw−Hill Companies, 2002
diluent until the bacteria are dilute enough to countaccurately. That is, the final plates in the series shouldhave between 25 and 250 colonies. Fewer than 25colonies are not acceptable for statistical reasons, andmore than 250 colonies on a plate are likely to pro-duce colonies too close to each other to be distin-guished as distinct colony-forming units (CFUs).The assumption is that each viable bacterial cell isseparate from all others and will develop into a singlediscrete colony (CFU). Thus, the number of coloniesshould give the number of live bacteria that can growunder the incubation conditions employed. A wide se-ries of dilutions (e.g., 10–4 to 10–10) is normally platedbecause the exact number of live bacteria in the sam-ple is usually unknown. Greater precision is achievedby plating duplicates or triplicates of each dilution.
Increased turbidity in a culture is another index ofbacterial growth and cell numbers (biomass). Byusing a spectrophotometer (see Appendix C ), theamount of transmitted light decreases as the cell pop-ulation increases. The transmitted light is converted toelectrical energy, and this is indicated on a gal-vanometer. The reading indirectly reflects the numberof bacteria. This method is faster than the standardplate count but is limited because sensitivity is re-stricted to bacterial suspensions of 107 cells or greater.
Dilution Ratios
According to the American Society for MicrobiologyStyle Manual, dilution ratios may be reported with ei-ther colons (:) or shills (/), but note there is a differ-ence between them. A shill indicates the ratio of a partto a whole; for example, 1/2 means 1 of 2 parts, witha total of 2 parts. A colon indicates the ratio of 1 partto 2 parts, with a total of 3 parts. Thus, 1/2 equals 1:1,but 1:2 equals 1/3. (See Appendix A for a completediscussion of dilutions and sample problems.)
Procedure
Standard Plate Count1. With a wax pencil, label the bottom of six petri
plates with the following dilutions: 10–4, 10–5, 10–6,10–7, 10–8, and 10–9. Label four bottles of saline orphosphate buffer 10–2, 10–4, 10–6, and 10–8.
2. Using aseptic technique, the initial dilution ismade by transferring 1.0 ml of liquid sample or1 g of solid material to a 99-ml sterile saline blank(figure 19.1). This is a 1/100 or 10–2 dilution (seeappendix A). Cap the bottle.
3. The 10–2 blank is then shaken vigorously 25 timesby placing one’s elbow on the bench and moving the
forearm rapidly in an arc from the bench surface andback. This serves to distribute the bacteria and breakup any clumps of bacteria that may be present.
4. Immediately after the 10–2 blank has been shaken,uncap it and aseptically transfer 1.0 ml to asecond 99-ml saline blank. Since this is a 10–2
dilution, this second blank represents a 10–4
dilution of the original sample. Cap the bottle.5. Shake the 10–4 blank vigorously 25 times and
transfer 1.0 ml to the third 99-ml blank. This thirdblank represents a 10–6 dilution of the originalsample. Cap the bottle. Repeat the process oncemore to produce a 10–8 dilution.
6. Shake the 10–4 blank again and asepticallytransfer 1.0 ml to one petri plate and 0.1 ml toanother petri plate. Do the same for the 10–6 andthe 10–8 blanks (figure 19.1).
7. Remove one agar pour tube from the 48° to 50°Cwater bath. Carefully remove the cover from the10–4 petri plate and aseptically pour the agar intoit. The agar and sample are immediately mixed bygently moving the plate in a figure-eight motionwhile it rests on the tabletop. Repeat this processfor the remaining five plates.
8. After the pour plates have cooled and the agar hashardened, they are inverted and incubated at 35°Cfor 24 hours or 20°C for 48 hours.
9. At the end of the incubation period, select all ofthe petri plates containing between 25 and 250colonies. Plates with more than 250 coloniescannot be counted and are designated toonumerous to count (TNTC). Plates with fewerthan 25 colonies are designated too few to count(TFTC). Count the colonies on each plate. If atall possible, a special counter such as a Quebeccolony counter should be used (figure 19.2a).Your instructor will demonstrate how to use thiscounter or a handheld counter (figure 19.2b).
10. Calculate the number of bacteria (CFU) permilliliter or gram of sample by dividing thenumber of colonies by the dilution factor (seeappendix A). The number of colonies per mlreported should reflect the precision of themethod and should not include more than twosignificant figures. For example, suppose the plateof the 10–6 dilution yielded a count of 130colonies. Then, the number of bacteria in 1 ml ofthe original sample can be calculated as follows:
Bacteria/ml = (130) ÷ (10–6) = 1.3 × 10⁸
or130,000,000.
11. Record your results in the report for exercise 19.
118 Basic Laboratory and Culture Techniques
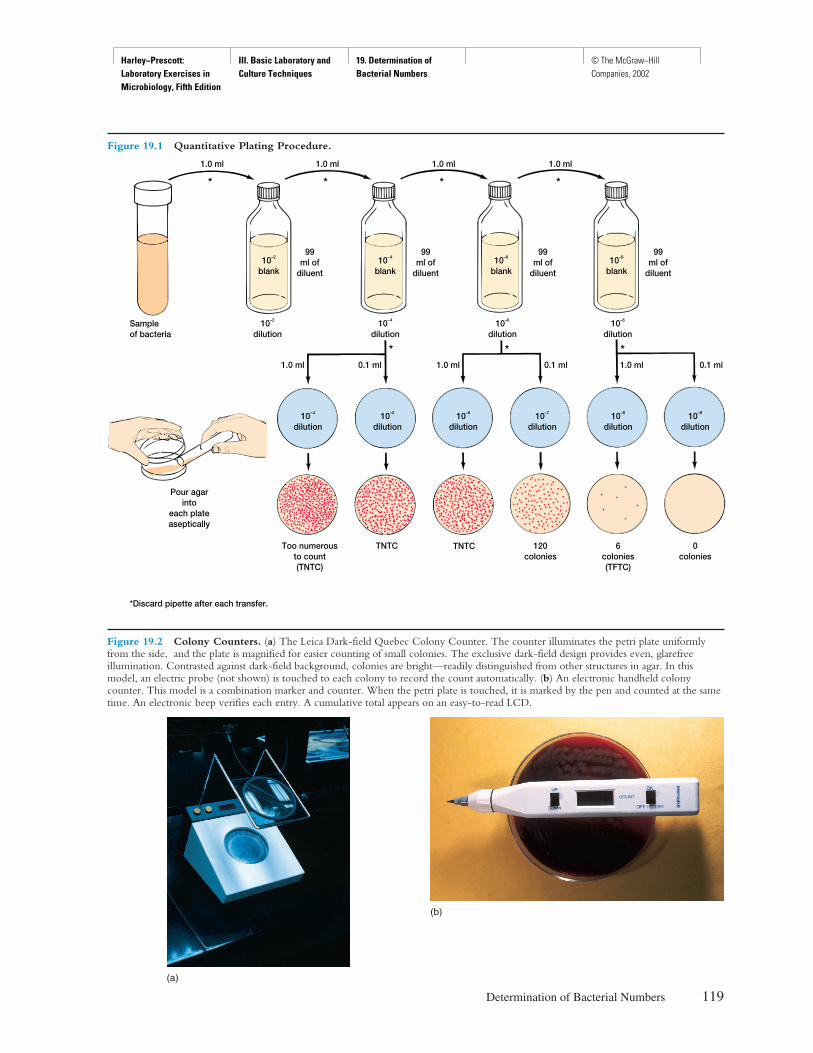
Harley−Prescott: Laboratory Exercises in Microbiology, Fifth Edition
III. Basic Laboratory and Culture Techniques
19. Determination of Bacterial Numbers
© The McGraw−Hill Companies, 2002
Determination of Bacterial Numbers 119
Figure 19.1 Quantitative Plating Procedure.
TNTC
1.0 ml 0.1 ml 1.0 ml 0.1 ml 1.0 ml 0.1 ml
* * *
* * * *
*Discard pipette after each transfer.
Pour agarinto
each plateaseptically
Too numerousto count(TNTC)
TNTC 120colonies
6colonies(TFTC)
0colonies
10–9
dilution10–7
dilution10–8
dilution
10–8
dilution
10–5
dilution10–4
dilution
10–4
dilution
10–4
blank
10–2
dilution
10–2
blank
10–6
dilution
10–6
dilution
99ml of
diluent
99ml of
diluent10–6
blank
99ml of
diluent10–8
blank
99ml of
diluent
1.0 ml1.0 ml1.0 ml1.0 ml
Sampleof bacteria
Figure 19.2 Colony Counters. (a) The Leica Dark-field Quebec Colony Counter. The counter illuminates the petri plate uniformlyfrom the side, and the plate is magnified for easier counting of small colonies. The exclusive dark-field design provides even, glarefreeillumination. Contrasted against dark-field background, colonies are bright—readily distinguished from other structures in agar. In thismodel, an electric probe (not shown) is touched to each colony to record the count automatically. (b) An electronic handheld colonycounter. This model is a combination marker and counter. When the petri plate is touched, it is marked by the pen and counted at the sametime. An electronic beep verifies each entry. A cumulative total appears on an easy-to-read LCD.
(a)
(b)

Harley−Prescott: Laboratory Exercises in Microbiology, Fifth Edition
III. Basic Laboratory and Culture Techniques
19. Determination of Bacterial Numbers
© The McGraw−Hill Companies, 2002
Turbidimetry Determination of Bacterial Numbers1. Put one empty tube and four tubes of the sterile
tryptic soy broth in a test-tube rack. With theexception of the empty tube, each tube contains3 ml of sterile broth. Use four of these tubes(tubes 2 to 5) of broth to make four serialdilutions of the culture (figure 19.3).
2. Standardize and use the spectrophotometer (figure19.4) as follows:
a. Turn on the spectrophotometer by rotatingknob B in figure 19.4 to the right.
b. Set the monochromator dial (D in figure19.4) so that the correct wavelength innanometers (550 to 600 nm) is lined up withthe indicator in the window adjacent to thisdial. (Your instructor will inform you whichwavelength to use.)
c. When there is no cuvette in the cuvette holder(A in figure 19.4), the light source is blocked.The pointer should thus read zerotransmittance or infinite absorbance. This is atthe left end of the scale. Turn knob B until thepointer is aligned with the left end of the scale.
d. Place in the cuvette holder (A in figure 19.4)the cuvette that contains just sterile broth.
This tube is called the blank because it has asample concentration equal to zero. It shouldtherefore have an absorbance of zero (or atransmittance of 100%). This is at the rightend of the scale. Set the pointer to the rightend of the scale using knob C (figure 19.4).
e. Place the other cuvettes, which contain thediluted bacterial suspension, in the cuvettechamber one at a time. Repeat steps c and dbetween experimental readings to confirmsettings.
f. Close the hatch and read the absorbancevalues of each bacterial dilution, and recordyour values. Remember to mix the bacterialsuspension just before reading its absorbance.
g. Record your values in the report for exercise 19.Using the plate count data, calculate the colony-forming units per milliliter for each dilution.
120 Basic Laboratory and Culture Techniques
Figure 19.3 Twofold Serial Dilution for Standard Curve.
3 ml 3 ml 3 ml 3 ml 3 ml 3 ml
* * *
Bacterialculture
Discard
Tube1
Tube2
Tube3
Tube4
Tube5
These tubes contain 3 ml of sterilebroth plus the diluted sample
1/1 1/2 1/4 1/8 1/16
No sterilebroth
Figure 19.4 Typical Spectrophotometers. (a) The top photoillustrates an analog model where (A) is the sample holder; (B) thepower switch/zero control knob; (C) the 100% T control knob;(D) the wavelength control knob. (b) The bottom photo is adigital model that features direct concentration readout.
(a)
(b)
*Discard pipette after each transfer.
HINTS AND PRECAUTIONSWhen mixing dilution tubes, do not use a vortex mixer.
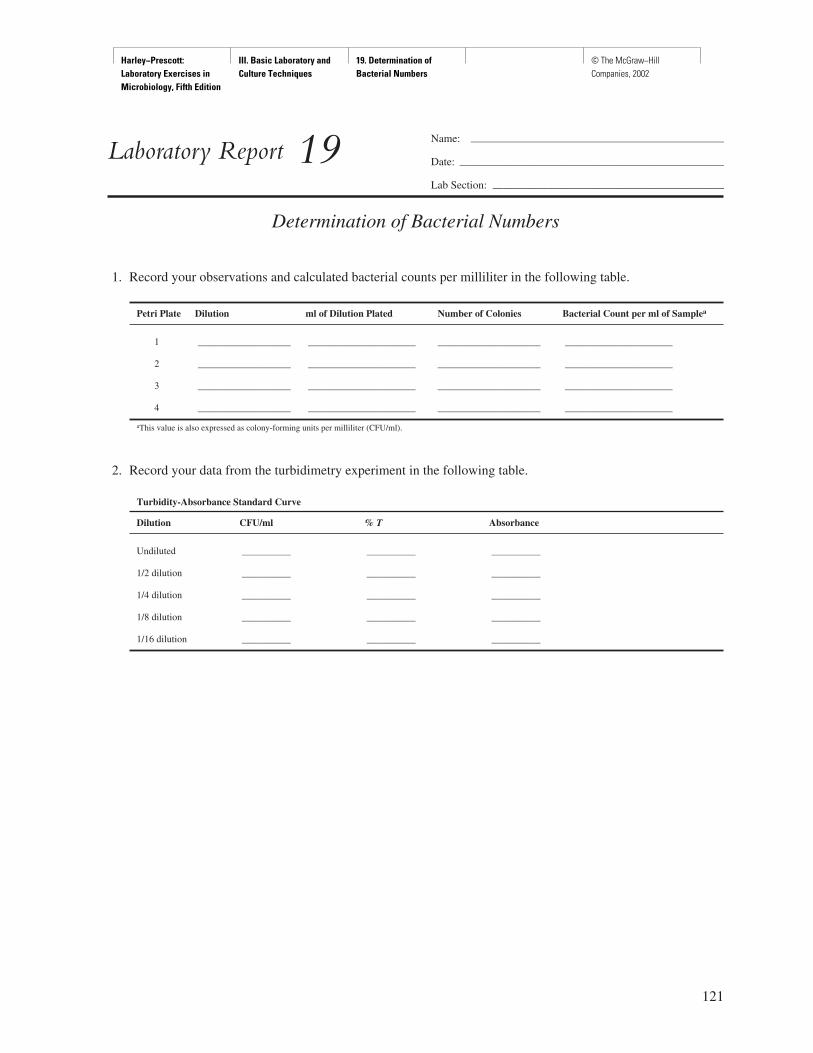
Harley−Prescott: Laboratory Exercises in Microbiology, Fifth Edition
III. Basic Laboratory and Culture Techniques
19. Determination of Bacterial Numbers
© The McGraw−Hill Companies, 2002
121
Name: ———————————————————————
Date: ————————————————————————
Lab Section: —————————————————————
Laboratory Report 19
Determination of Bacterial Numbers
1. Record your observations and calculated bacterial counts per milliliter in the following table.
Petri Plate Dilution ml of Dilution Plated Number of Colonies Bacterial Count per ml of Samplea
1 ___________________ ______________________ _____________________ ______________________
2 ___________________ ______________________ _____________________ ______________________
3 ___________________ ______________________ _____________________ ______________________
4 ___________________ ______________________ _____________________ ______________________
aThis value is also expressed as colony-forming units per milliliter (CFU/ml).
2. Record your data from the turbidimetry experiment in the following table.
Turbidity-Absorbance Standard Curve
Dilution CFU/ml % T Absorbance
Undiluted __________ __________ __________
1/2 dilution __________ __________ __________
1/4 dilution __________ __________ __________
1/8 dilution __________ __________ __________
1/16 dilution __________ __________ __________
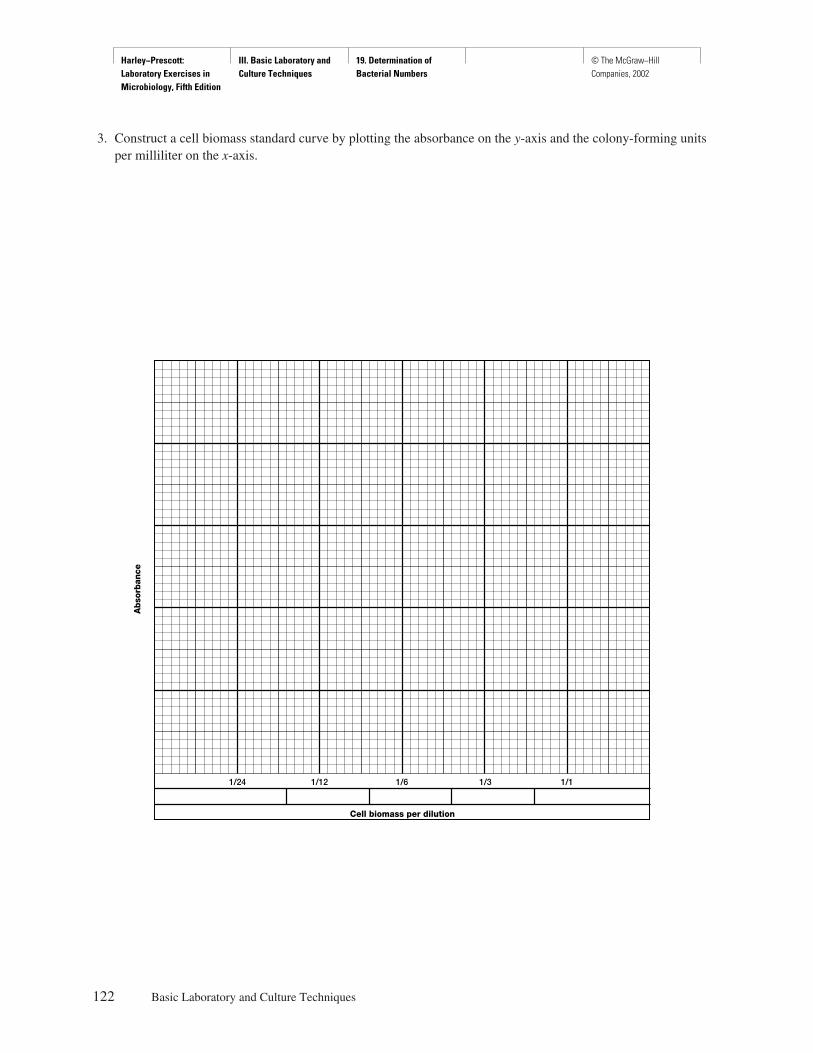
Harley−Prescott: Laboratory Exercises in Microbiology, Fifth Edition
III. Basic Laboratory and Culture Techniques
19. Determination of Bacterial Numbers
© The McGraw−Hill Companies, 2002
3. Construct a cell biomass standard curve by plotting the absorbance on the y-axis and the colony-forming unitsper milliliter on the x-axis.
122 Basic Laboratory and Culture Techniques
1/24 1/12 1/6 1/3 1/1
Cell biomass per dilution
Abs
orba
nce
Harley−Prescott: Laboratory Exercises in Microbiology, Fifth Edition
III. Basic Laboratory and Culture Techniques
19. Determination of Bacterial Numbers
© The McGraw−Hill Companies, 2002
Review Questions
1. What is the difference between % T and absorbance?
2. Why is the viable plate count technique considered to be an indirect measurement of cell density, whereas theturbidimetry method is not a “count” at all?
3. Why is absorbance used in constructing a calibration curve instead of percent transmittance?
4. What is the purpose of constructing a calibration curve?
5. Why is it necessary to perform a plate count in conjunction with the turbidimetry procedure?
6. Give several reasons why it is necessary to shake the water blanks 25 times.
7. What is a CFU?
Determination of Bacterial Numbers 123
Harley−Prescott: Laboratory Exercises in Microbiology, Fifth Edition
III. Basic Laboratory and Culture Techniques
19. Determination of Bacterial Numbers
© The McGraw−Hill Companies, 2002
8. How would you prepare a series of dilutions to get a final dilution of 10–10? Outline each step.
9. Why was 550 to 600 nm used in the spectroscopy portion of this experiment?
10. How would you define biomass?
11. What are several advantages to spectrophotometric determination of bacterial numbers? Severaldisadvantages?
124 Basic Laboratory and Culture Techniques
Harley−Prescott: Laboratory Exercises in Microbiology, Fifth Edition
IV. Biochemical Activities of Bacteria
Introduction © The McGraw−Hill Companies, 2002
P A R T F O U R
Biochemical Activities of Bacteria
Life is driven by nothing else but electrons, by the energy given offby these electrons while cascading down from the high level to whichthey have been boosted up by photons. An electron going around
is a little current. What drives life is thus a little current, kept up by the sunshine. All the complexes of intermediary
metabolism are but lacework around this basic fact.Albert Azent-Gyorgi (American physician and
biochemist, Nobel recipient, 1893–1986)
B acteria accomplish their various biochemical activities(growth and multiplication) using raw materials (nu-
trients) obtained from the environment. The biochemicaltransformations that occur both inside and outside of bacte-ria are governed by biological catalysts called enzymes.
This part of the laboratory manual presents exercisesthat have been designed to experimentally demonstrate ortest for some of the biochemical activities of bacteria. Thiswill be accomplished by observing the ability of bacteria touse enzymes and degrade carbohydrates, lipids, proteins,and amino acids. The metabolism, or use, of these organicmolecules often produces by-products that can be used inthe identification and characterization of bacteria.
After completing the exercises in Part Four, youwill be able to demonstrate the ability to use appro-priate microbiological media and test systems. Thiswill meet the American Society for MicrobiologyCore Curriculum skill number 4 (see pp. vi–viii): (a)using biochemical test media and (b) accuratelyrecording macroscopic observations.
Sir Alexander Fleming (1881–1955)
Fleming was a co-winner, with Ernst Boris Chain and SirHoward Walter Florey, of the Nobel prize for medicine orphysiology in 1945 for the discovery of penicillin.
In 1922, Alexander Fleming, a bacteriologist in London, had acold. He allowed a few drops of his nasal mucus to fall on aculture plate containing bacteria. Some time later, he noticedthat the bacteria near the mucus had been dissolved away, andhe thought that the mucus might contain the “universal antibi-otic” he was seeking. From this observation, Fleming showedthat the antibacterial substance was an enzyme, which henamed lysozyme—lyso- because of its ability to lyse bacteriaand -zyme because it was an enzyme. He discovered a smallcoccus that was particularly susceptible to lysozyme andnamed it Micrococcus lysodeikticus because it exhibited lysis(Greek deiktikos, to show). Fleming also found that tears are arich source of lysozyme. To continue his research, volunteersprovided tears after they suffered a few squirts of lemon—an“ordeal by lemon.” The St. Mary’s Hospital Gazette publisheda cartoon showing children coming in to Fleming’s laboratoryfor a few pennies where an attendant administered the beatingswhile another collected their tears. Fleming was disappointedto learn that lysozyme was not effective against harmful bacte-ria. However, seven years later, he discovered a highly effec-tive antibiotic: penicillin—a striking illustration of Pasteur’sfamous comment that “Chance favors the prepared mind.”
125
Harley−Prescott: Laboratory Exercises in Microbiology, Fifth Edition
IV. Biochemical Activities of Bacteria
20. Carbohydrates I: Fermentation andßGalactosidase Activity
© The McGraw−Hill Companies, 2002
Materials per Student
20- to 24-hour tryptic soy broth cultures ofEscherichia coli (ATCC 11229), Alcaligenesfaecalis (ATCC 8750), Salmonella cholerae-suis (ATCC 29631), and a 7- to 10-daySabouraud dextrose plate culture ofSaccharomyces cerevisiae (ATCC 2366)
phenol red (or bromcresol purple) dextrose, lactose,and sucrose peptone broths with Durham tubes
Bunsen burnerinoculating loop and forcepstest-tube rackincubator set at 35°C5 tryptic agar base tubesdifferentiation disks for dextrose, lactose, sucrose
(Difco, BBL, or KEY Scientific Products, 1402Chisholm Trail, Suite D, Round Rock, TX 78681;800–843–1539; www.keyscientific.com)
ONPG disks (Difco) or ONPG tablets (KEYScientific Products) for �-galactosidase
inoculating needle and forceps100-ml beakers containing 70% ethanol1-ml pipette and pipettorsterile 0.85% NaCl (for �-galactosidase test)3 sterile test tubes
Learning Objectives
Each student should be able to
1. Understand the biochemical process of fermentation2. Describe how the carbohydrate fermentation
patterns of some bacteria result in the productionof an acid, or an acid and a gas
3. Explain how a Durham tube or a tryptic agar basetube and a differentiation disk can be used todetect acid and gas production
4. Perform a carbohydrate and a �-galactosidasefermentation test
5. Understand the function of �-galactosidase
Suggested Reading in Textbook
1. Fermentations, section 9.3.
Pronunciation Guide
Alcaligenes faecalis (al-kah-LIJ-e-neez fee-KAL-iss)Escherichia coli (esh-er-I-ke-a KOH-lee)Salmonella cholerae-suis (sal-mon-EL-ah col-ER-AE
su-is)Saccharomyces cerevisiae (sak-a-row-MY-sees seri-
VISS-ee-eye)Staphylococcus aureus (staf-il-oh-KOK-kus ORE-ee-us)
Why Are the Above MicroorganismsUsed in This Exercise?
In this exercise, students will observe how microbial fer-mentation can yield acid, gas, or acid and a gas. Studentsalso will test microorganisms for the presence of the en-zyme �-galactosidase. To accomplish these objectives, theauthors have chosen three bacteria and one yeast, each witha different fermentation pattern. Escherichia coli is a facul-tatively anaerobic gram-negative rod that produces acid andgas by catabolizing D-glucose (dextrose) and other carbohy-drates. E. coli is �-galactosidase positive since it can alsouse lactose as its sole source of carbon. Alcaligenes faecalisis an obligately aerobic rod, coccal rod, or coccus that usesacetate, propionate, butyrate, and some other organic acidsas a sole carbon and energy source; because carbohydratesare not used, it does not produce acid or gas. A. faecalis alsois �-galactosidase negative. Salmonella cholerae-suis is afacultatively anaerobic gram-negative rod having both a res-piratory and fermentative type of metabolism; thus, D-glu-cose and other types of carbohydrates are metabolized with
126
E X E R C I S E
Carbohydrates I:Fermentation and �-Galactosidase Activity
20
SAFETY CONSIDERATIONSBe careful with the Bunsen burner flame. Seventy per-cent ethanol is flammable—keep away from open flames.Keep all culture tubes upright in a test-tube rack or inempty cans.
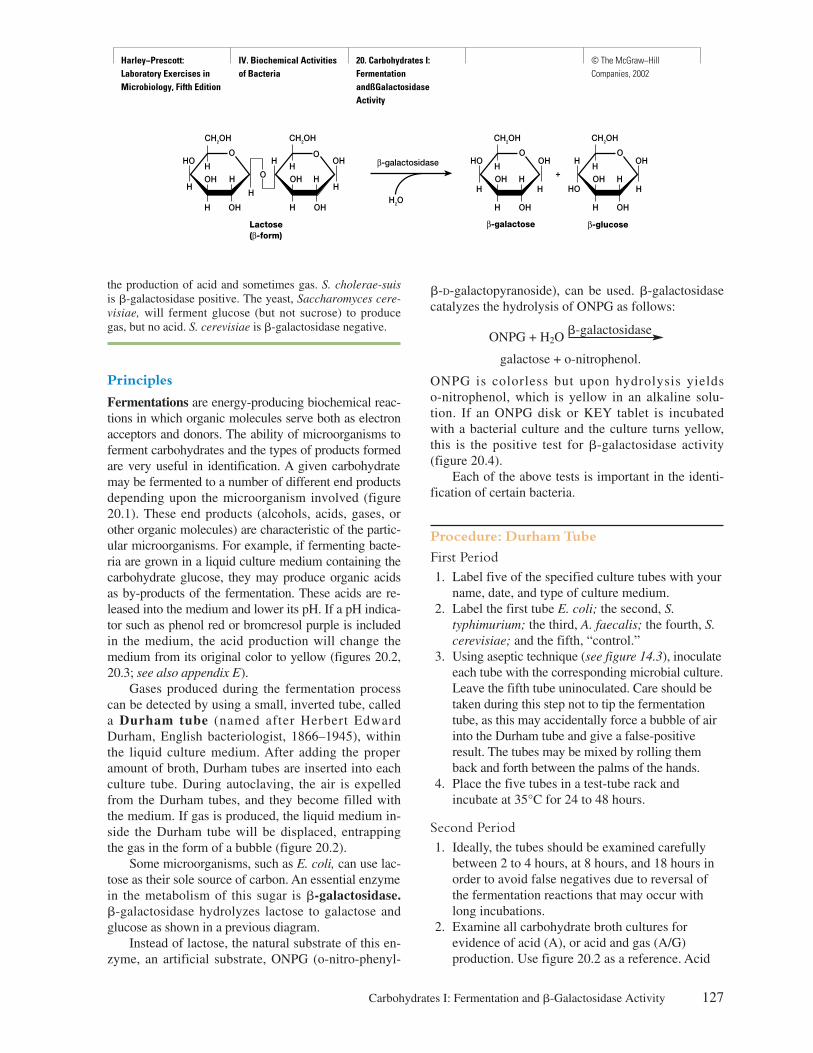
Harley−Prescott: Laboratory Exercises in Microbiology, Fifth Edition
IV. Biochemical Activities of Bacteria
20. Carbohydrates I: Fermentation andßGalactosidase Activity
© The McGraw−Hill Companies, 2002
the production of acid and sometimes gas. S. cholerae-suisis �-galactosidase positive. The yeast, Saccharomyces cere-visiae, will ferment glucose (but not sucrose) to producegas, but no acid. S. cerevisiae is �-galactosidase negative.
Principles
Fermentations are energy-producing biochemical reac-tions in which organic molecules serve both as electronacceptors and donors. The ability of microorganisms toferment carbohydrates and the types of products formedare very useful in identification. A given carbohydratemay be fermented to a number of different end productsdepending upon the microorganism involved (figure20.1). These end products (alcohols, acids, gases, orother organic molecules) are characteristic of the partic-ular microorganisms. For example, if fermenting bacte-ria are grown in a liquid culture medium containing thecarbohydrate glucose, they may produce organic acidsas by-products of the fermentation. These acids are re-leased into the medium and lower its pH. If a pH indica-tor such as phenol red or bromcresol purple is includedin the medium, the acid production will change themedium from its original color to yellow (figures 20.2,20.3; see also appendix E).
Gases produced during the fermentation processcan be detected by using a small, inverted tube, calleda Durham tube (named after Herbert EdwardDurham, English bacteriologist, 1866–1945), withinthe liquid culture medium. After adding the properamount of broth, Durham tubes are inserted into eachculture tube. During autoclaving, the air is expelledfrom the Durham tubes, and they become filled withthe medium. If gas is produced, the liquid medium in-side the Durham tube will be displaced, entrappingthe gas in the form of a bubble (figure 20.2).
Some microorganisms, such as E. coli, can use lac-tose as their sole source of carbon. An essential enzymein the metabolism of this sugar is �-galactosidase.�-galactosidase hydrolyzes lactose to galactose andglucose as shown in a previous diagram.
Instead of lactose, the natural substrate of this en-zyme, an artificial substrate, ONPG (o-nitro-phenyl-
�-D-galactopyranoside), can be used. �-galactosidasecatalyzes the hydrolysis of ONPG as follows:
ONPG + H2O�-galactosidase
galactose + o-nitrophenol.
ONPG is colorless but upon hydrolysis yields o-nitrophenol, which is yellow in an alkaline solu-tion. If an ONPG disk or KEY tablet is incubatedwith a bacterial culture and the culture turns yellow,this is the positive test for �-galactosidase activity(figure 20.4).
Each of the above tests is important in the identi-fication of certain bacteria.
Procedure: Durham Tube
First Period1. Label five of the specified culture tubes with your
name, date, and type of culture medium.2. Label the first tube E. coli; the second, S.
typhimurium; the third, A. faecalis; the fourth, S.cerevisiae; and the fifth, “control.”
3. Using aseptic technique (see figure 14.3), inoculateeach tube with the corresponding microbial culture.Leave the fifth tube uninoculated. Care should betaken during this step not to tip the fermentationtube, as this may accidentally force a bubble of airinto the Durham tube and give a false-positiveresult. The tubes may be mixed by rolling themback and forth between the palms of the hands.
4. Place the five tubes in a test-tube rack andincubate at 35°C for 24 to 48 hours.
Second Period1. Ideally, the tubes should be examined carefully
between 2 to 4 hours, at 8 hours, and 18 hours inorder to avoid false negatives due to reversal ofthe fermentation reactions that may occur withlong incubations.
2. Examine all carbohydrate broth cultures forevidence of acid (A), or acid and gas (A/G)production. Use figure 20.2 as a reference. Acid
Carbohydrates I: Fermentation and �-Galactosidase Activity 127
Lactose(β-form)
CH2OH
H OHO
CH2OH CH2OHCH2OH
HO
OH
H
H OH
OH H
H
O
HOH H
H
H OH
HO+
HOH H
H
H OH
H
OHO
HO
HOH H
H
H OH
HO
OH
β-galactose β-glucose
H2O
β-galactosidase
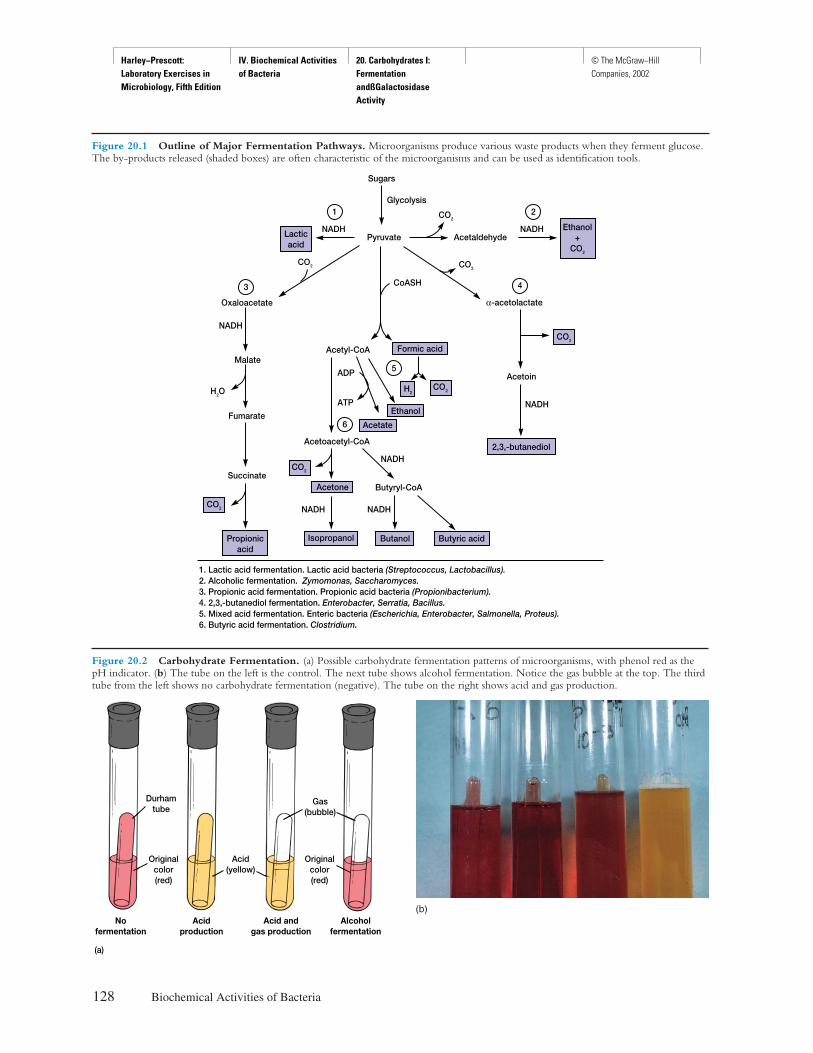
Harley−Prescott: Laboratory Exercises in Microbiology, Fifth Edition
IV. Biochemical Activities of Bacteria
20. Carbohydrates I: Fermentation andßGalactosidase Activity
© The McGraw−Hill Companies, 2002
128 Biochemical Activities of Bacteria
Figure 20.1 Outline of Major Fermentation Pathways. Microorganisms produce various waste products when they ferment glucose.The by-products released (shaded boxes) are often characteristic of the microorganisms and can be used as identification tools.
Sugars
Glycolysis
NADH NADHPyruvate Acetaldehyde
CoASH
1 2
α-acetolactate
Formic acid
4
Acetyl-CoA
Acetoin
NADH
2,3,-butanediol
5ADP
ATP
NADH
Acetoacetyl-CoA
Ethanol
Butyryl-CoA
NADHNADH
6
3
NADH
Oxaloacetate
Malate
Fumarate
SuccinateAcetone
Propionicacid
Isopropanol Butanol Butyric acid
1. Lactic acid fermentation. Lactic acid bacteria (Streptococcus, Lactobacillus).2. Alcoholic fermentation. Zymomonas, Saccharomyces.3. Propionic acid fermentation. Propionic acid bacteria (Propionibacterium).4. 2,3,-butanediol fermentation. Enterobacter, Serratia, Bacillus.5. Mixed acid fermentation. Enteric bacteria (Escherichia, Enterobacter, Salmonella, Proteus).6. Butyric acid fermentation. Clostridium.
Acetate
H2O H2
CO2
CO2
CO2
CO2
CO2
CO2
CO2
Ethanol+
CO2
Lacticacid
Figure 20.2 Carbohydrate Fermentation. (a) Possible carbohydrate fermentation patterns of microorganisms, with phenol red as thepH indicator. (b) The tube on the left is the control. The next tube shows alcohol fermentation. Notice the gas bubble at the top. The thirdtube from the left shows no carbohydrate fermentation (negative). The tube on the right shows acid and gas production.
(a)
Nofermentation
Alcoholfermentation
Acidproduction
Acid andgas production
Durhamtube
Originalcolor(red)
Originalcolor(red)
Acid(yellow)
Gas(bubble)
(b)
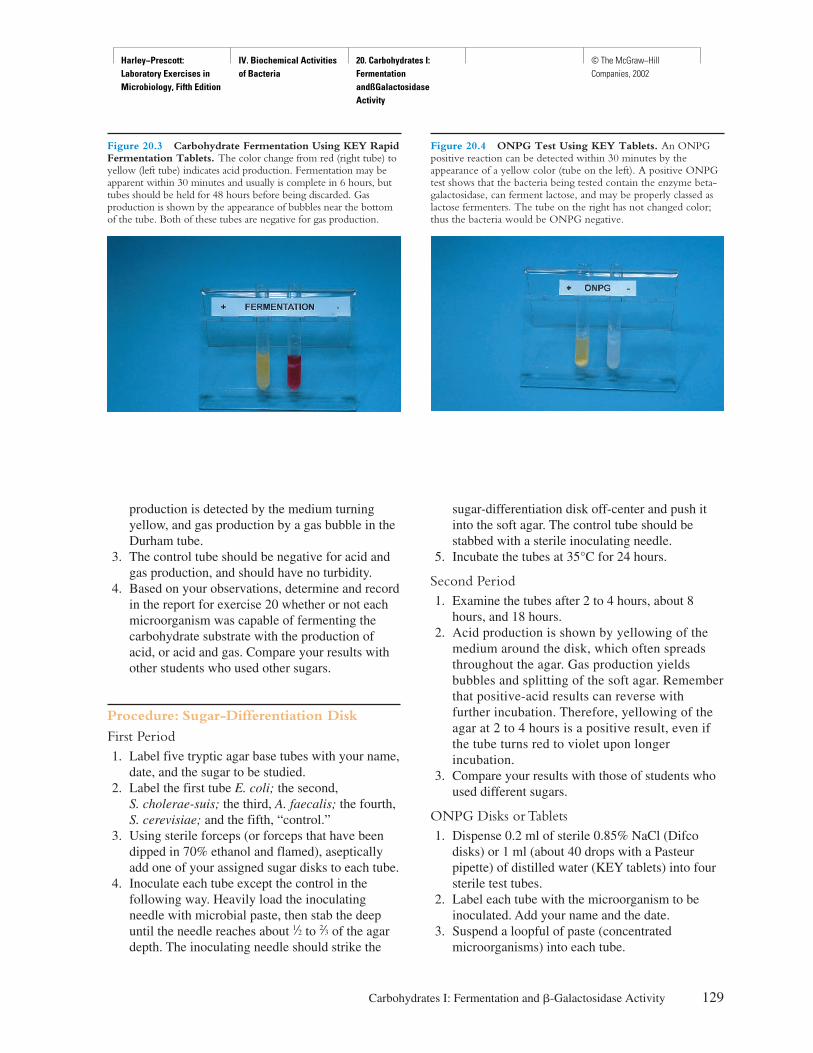
Harley−Prescott: Laboratory Exercises in Microbiology, Fifth Edition
IV. Biochemical Activities of Bacteria
20. Carbohydrates I: Fermentation andßGalactosidase Activity
© The McGraw−Hill Companies, 2002
production is detected by the medium turningyellow, and gas production by a gas bubble in theDurham tube.
3. The control tube should be negative for acid andgas production, and should have no turbidity.
4. Based on your observations, determine and recordin the report for exercise 20 whether or not eachmicroorganism was capable of fermenting thecarbohydrate substrate with the production ofacid, or acid and gas. Compare your results withother students who used other sugars.
Procedure: Sugar-Differentiation Disk
First Period1. Label five tryptic agar base tubes with your name,
date, and the sugar to be studied.2. Label the first tube E. coli; the second,
S. cholerae-suis; the third, A. faecalis; the fourth, S. cerevisiae; and the fifth, “control.”
3. Using sterile forceps (or forceps that have beendipped in 70% ethanol and flamed), asepticallyadd one of your assigned sugar disks to each tube.
4. Inoculate each tube except the control in thefollowing way. Heavily load the inoculatingneedle with microbial paste, then stab the deepuntil the needle reaches about d to i of the agardepth. The inoculating needle should strike the
sugar-differentiation disk off-center and push itinto the soft agar. The control tube should bestabbed with a sterile inoculating needle.
5. Incubate the tubes at 35°C for 24 hours.
Second Period1. Examine the tubes after 2 to 4 hours, about 8
hours, and 18 hours.2. Acid production is shown by yellowing of the
medium around the disk, which often spreadsthroughout the agar. Gas production yieldsbubbles and splitting of the soft agar. Rememberthat positive-acid results can reverse withfurther incubation. Therefore, yellowing of theagar at 2 to 4 hours is a positive result, even ifthe tube turns red to violet upon longerincubation.
3. Compare your results with those of students whoused different sugars.
ONPG Disks or Tablets1. Dispense 0.2 ml of sterile 0.85% NaCl (Difco
disks) or 1 ml (about 40 drops with a Pasteurpipette) of distilled water (KEY tablets) into foursterile test tubes.
2. Label each tube with the microorganism to beinoculated. Add your name and the date.
3. Suspend a loopful of paste (concentratedmicroorganisms) into each tube.
Carbohydrates I: Fermentation and �-Galactosidase Activity 129
Figure 20.3 Carbohydrate Fermentation Using KEY RapidFermentation Tablets. The color change from red (right tube) toyellow (left tube) indicates acid production. Fermentation may beapparent within 30 minutes and usually is complete in 6 hours, buttubes should be held for 48 hours before being discarded. Gasproduction is shown by the appearance of bubbles near the bottomof the tube. Both of these tubes are negative for gas production.
Figure 20.4 ONPG Test Using KEY Tablets. An ONPGpositive reaction can be detected within 30 minutes by theappearance of a yellow color (tube on the left). A positive ONPGtest shows that the bacteria being tested contain the enzyme beta-galactosidase, can ferment lactose, and may be properly classed aslactose fermenters. The tube on the right has not changed color;thus the bacteria would be ONPG negative.

Harley−Prescott: Laboratory Exercises in Microbiology, Fifth Edition
IV. Biochemical Activities of Bacteria
20. Carbohydrates I: Fermentation andßGalactosidase Activity
© The McGraw−Hill Companies, 2002
4. Place an ONPG disk or tablet into each tube andincubate at 35°C.
5. Check at 20 minutes and 4 hours (the KEY tablettest can run up to 6 hours).
6. A positive �-galactosidase test is indicated by ayellow color; no color change indicates a negativetest.
7. Record your results in the report for exercise 20.
130 Biochemical Activities of Bacteria
HINTS AND PRECAUTIONS(1) The amount of inoculum placed in each tube shouldbe small. Too much inoculum may lead to overgrowthand neutralization of acidic fermentation products bythe bacteria, thus resulting in false negatives. (2) Do notvortex the fermentation tubes when inoculating becausethis can force air into the Durham tubes and result infalse-positive recordings for gas production.
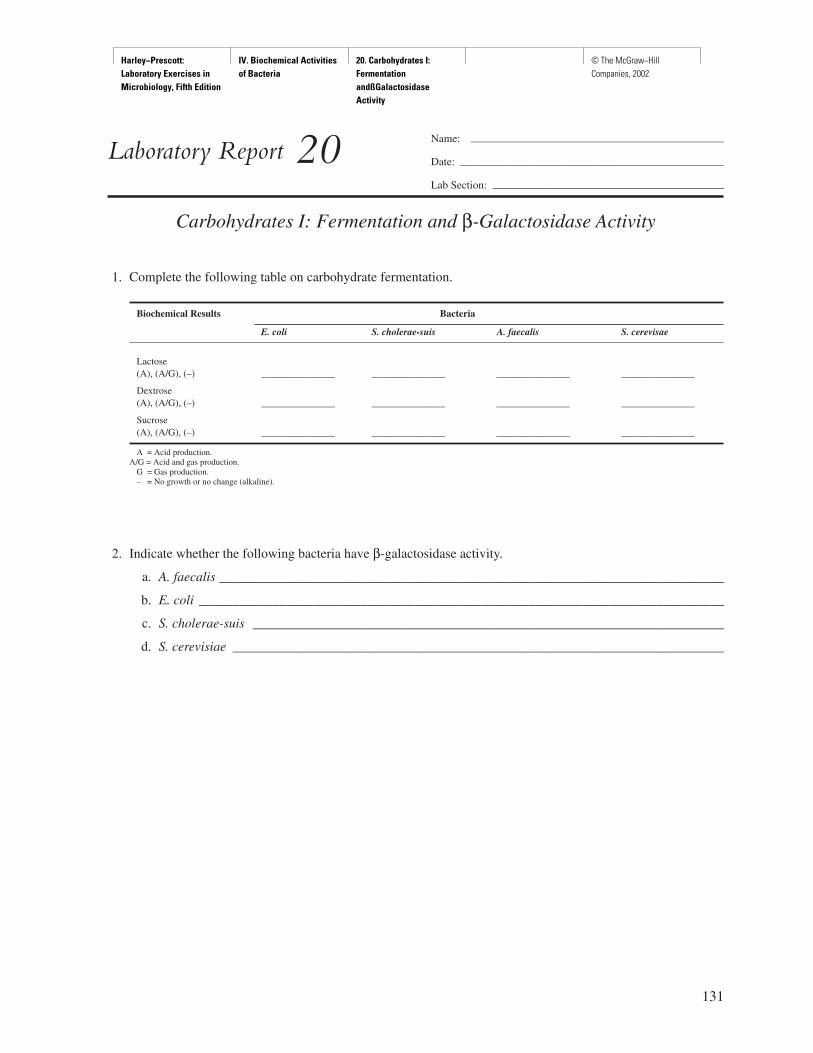
Harley−Prescott: Laboratory Exercises in Microbiology, Fifth Edition
IV. Biochemical Activities of Bacteria
20. Carbohydrates I: Fermentation andßGalactosidase Activity
© The McGraw−Hill Companies, 2002
131
Name: ———————————————————————
Date: ————————————————————————
Lab Section: —————————————————————
Laboratory Report 20
Carbohydrates I: Fermentation and β-Galactosidase Activity
1. Complete the following table on carbohydrate fermentation.
Biochemical Results Bacteria
E. coli S. cholerae-suis A. faecalis S. cerevisae
Lactose(A), (A/G), (–) _______________ _______________ _______________ _______________
Dextrose(A), (A/G), (–) _______________ _______________ _______________ _______________
Sucrose(A), (A/G), (–) _______________ _______________ _______________ _______________
A = Acid production.A/G = Acid and gas production.
G = Gas production.– = No growth or no change (alkaline).
2. Indicate whether the following bacteria have β-galactosidase activity.
a. A. faecalis ___________________________________________________________________________
b. E. coli ______________________________________________________________________________
c. S. cholerae-suis ______________________________________________________________________
d. S. cerevisiae _________________________________________________________________________
Harley−Prescott: Laboratory Exercises in Microbiology, Fifth Edition
IV. Biochemical Activities of Bacteria
20. Carbohydrates I: Fermentation andßGalactosidase Activity
© The McGraw−Hill Companies, 2002
Review Questions
1. Define fermentation.
2. Do all microorganisms produce the same end product from pyruvate? Explain your answer.
3. What is the purpose of the phenol red or bromcresol purple in the fermentation tube?
4. What is the function of the Durham tube in the fermentation tube?
5. What are some of the metabolic end products produced by the different microorganisms used in thisexperiment?
6. What is the color of phenol red at an acid pH?
7. What is the function of β-galactosidase?
132 Biochemical Activities of Bacteria

Harley−Prescott: Laboratory Exercises in Microbiology, Fifth Edition
IV. Biochemical Activities of Bacteria
21. Carbohydrates II: Triple Sugar Iron Agar Test
© The McGraw−Hill Companies, 2002
133
E X E R C I S E
Carbohydrates II: Triple Sugar Iron Agar Test
21
Materials per Student
24- to 48-hour tryptic soy broth cultures ofAlcaligenes faecalis (ATCC 8750), Escherichiacoli (ATCC 11229), Proteus vulgaris (ATCC13315), Pseudomonas aeruginosa (ATCC10145), and Shigella flexneri (ATCC 12661)
5 triple sugar iron agar slantsBunsen burnerinoculating needleincubator set at 35°Ctest-tube rack
Learning Objectives
Each student should be able to1. Understand the biochemical reactions involved in
the triple sugar iron agar test2. Differentiate among members of the family
Enterobacteriaceae3. Distinguish between the Enterobacteriaceae and
other intestinal bacteria4. Perform a TSI test
Suggested Reading in Textbook
1. Carbohydrate catabolism, section 9.7.2. The Enterobacteriaceae, section 22.3.
Pronunciation Guide
Alcaligenes faecalis (al-kah-LIJ-e-neez fee-KAL-iss)Escherichia coli (esh-er-I-ke-a KOH-lee)Proteus vulgaris (PRO-tee-us vul-GA-ris)
Pseudomonas aeruginosa (soo-do-MO-nas a-ruh-jin-OH-sah)
Shigella flexneri (shi-GEL-la flex-ner-i)
Why Are the Above Bacteria Usedin This Exercise?
This exercise will provide the student experience in using thetriple sugar iron agar test to differentiate among the membersof the family Enterobacteriaceae and between Enterobacte-riaceae and other intestinal bacteria. The authors have cho-sen three common bacteria in the family Enterobacteriaceae:Escherichia coli, Proteus vulgaris, and Shigella flexneri. Allthree are facultatively anaerobic gram-negative rods. In aTSI tube, E. coli produces an acid butt, an acid or alkalineslant, and no H2S, but does produce gas. P. vulgaris pro-duces an acid butt, an acid or alkaline slant, H2S, and gas. S.flexneri produces an acid butt, an alkaline slant, no H2S, andno gas. For the other intestinal bacteria, the authors havechosen Alcaligenes faecalis and Pseudomonas aeruginosa.Both of these intestinal bacteria are gram-negative aerobicrods. In a TSI tube, A. faecalis produces an alkaline butt, al-kaline slant, H2S, and gas; P. aeruginosa, an acid butt, alka-line slant, H2S, and gas.
Principles
As originally described in 1911 by F. F. Russell, thetriple sugar iron (TSI) agar test is generally used forthe identification of enteric bacteria (Enterobacteri-aceae). It is also used to distinguish the Enterobacteri-aceae from other gram-negative intestinal bacilli bytheir ability to catabolize glucose, lactose, or sucrose,and to liberate sulfides from ferrous ammonium sulfateor sodium thiosulfate. (See exercise 24 for the biochem-istry of H2S production.) TSI agar slants contain a 1%concentration of lactose and sucrose, and a 0.1% glu-cose concentration. The pH indicator, phenol red, is also
SAFETY CONSIDERATIONSBe careful with the Bunsen burner flame. Be carefulwhen working with these bacteria, especially Shigelladysenteriae, as they are known pathogens. Keep all cul-ture tubes upright in a test-tube rack or in empty cans.
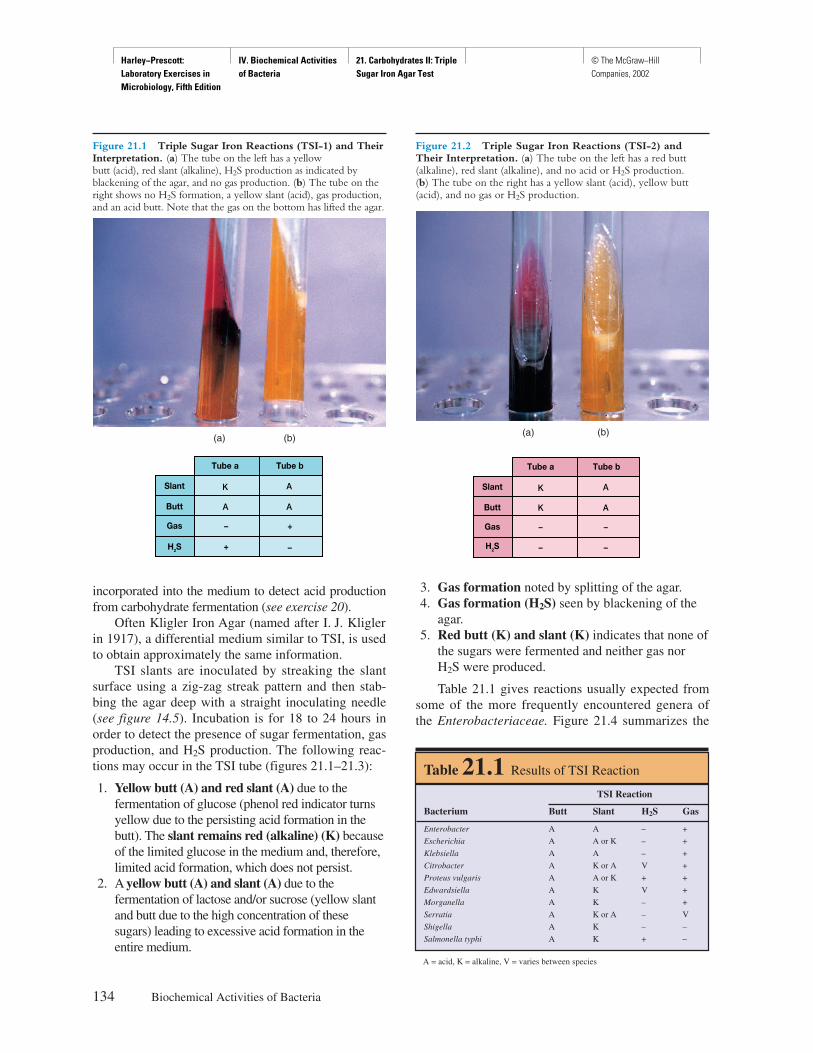
Harley−Prescott: Laboratory Exercises in Microbiology, Fifth Edition
IV. Biochemical Activities of Bacteria
21. Carbohydrates II: Triple Sugar Iron Agar Test
© The McGraw−Hill Companies, 2002
incorporated into the medium to detect acid productionfrom carbohydrate fermentation (see exercise 20).
Often Kligler Iron Agar (named after I. J. Kliglerin 1917), a differential medium similar to TSI, is usedto obtain approximately the same information.
TSI slants are inoculated by streaking the slantsurface using a zig-zag streak pattern and then stab-bing the agar deep with a straight inoculating needle(see figure 14.5). Incubation is for 18 to 24 hours inorder to detect the presence of sugar fermentation, gasproduction, and H2S production. The following reac-tions may occur in the TSI tube (figures 21.1–21.3):
1. Yellow butt (A) and red slant (A) due to thefermentation of glucose (phenol red indicator turnsyellow due to the persisting acid formation in thebutt). The slant remains red (alkaline) (K) becauseof the limited glucose in the medium and, therefore,limited acid formation, which does not persist.
2. A yellow butt (A) and slant (A) due to thefermentation of lactose and/or sucrose (yellow slantand butt due to the high concentration of thesesugars) leading to excessive acid formation in theentire medium.
3. Gas formation noted by splitting of the agar.4. Gas formation (H2S) seen by blackening of the
agar.5. Red butt (K) and slant (K) indicates that none of
the sugars were fermented and neither gas norH2S were produced.
Table 21.1 gives reactions usually expected fromsome of the more frequently encountered genera ofthe Enterobacteriaceae. Figure 21.4 summarizes the
134 Biochemical Activities of Bacteria
A = acid, K = alkaline, V = varies between species
Slant
Butt
Gas
AK
AA
+–
+ –H2S
Tube a Tube b
Figure 21.1 Triple Sugar Iron Reactions (TSI-1) and TheirInterpretation. (a) The tube on the left has a yellow butt (acid), red slant (alkaline), H2S production as indicated byblackening of the agar, and no gas production. (b) The tube on theright shows no H2S formation, a yellow slant (acid), gas production,and an acid butt. Note that the gas on the bottom has lifted the agar.
Figure 21.2 Triple Sugar Iron Reactions (TSI-2) andTheir Interpretation. (a) The tube on the left has a red butt(alkaline), red slant (alkaline), and no acid or H2S production. (b) The tube on the right has a yellow slant (acid), yellow butt(acid), and no gas or H2S production.
Slant
Butt
Gas
AK
AK
––
––H2S
Tube a Tube b
(b)(a) (a) (b)
Table 21.1 Results of TSI Reaction
TSI Reaction
Bacterium Butt Slant H2S Gas
Enterobacter A A – +
Escherichia A A or K – +
Klebsiella A A – +
Citrobacter A K or A V +
Proteus vulgaris A A or K + +
Edwardsiella A K V +
Morganella A K – +
Serratia A K or A – V
Shigella A K – –
Salmonella typhi A K + –
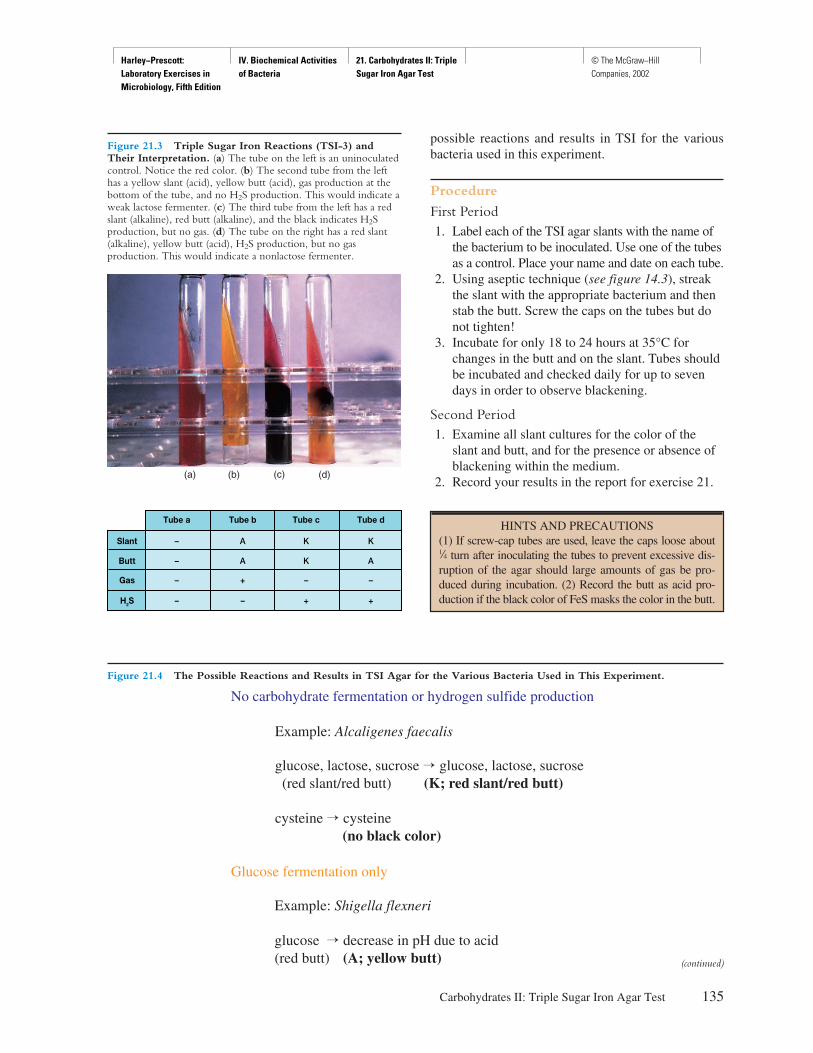
Harley−Prescott: Laboratory Exercises in Microbiology, Fifth Edition
IV. Biochemical Activities of Bacteria
21. Carbohydrates II: Triple Sugar Iron Agar Test
© The McGraw−Hill Companies, 2002
possible reactions and results in TSI for the variousbacteria used in this experiment.
Procedure
First Period1. Label each of the TSI agar slants with the name of
the bacterium to be inoculated. Use one of the tubesas a control. Place your name and date on each tube.
2. Using aseptic technique (see figure 14.3), streakthe slant with the appropriate bacterium and thenstab the butt. Screw the caps on the tubes but donot tighten!
3. Incubate for only 18 to 24 hours at 35°C forchanges in the butt and on the slant. Tubes shouldbe incubated and checked daily for up to sevendays in order to observe blackening.
Second Period1. Examine all slant cultures for the color of the
slant and butt, and for the presence or absence ofblackening within the medium.
2. Record your results in the report for exercise 21.
Carbohydrates II: Triple Sugar Iron Agar Test 135
HINTS AND PRECAUTIONS(1) If screw-cap tubes are used, leave the caps loose aboutb turn after inoculating the tubes to prevent excessive dis-ruption of the agar should large amounts of gas be pro-duced during incubation. (2) Record the butt as acid pro-duction if the black color of FeS masks the color in the butt.
(a) (b) (c)
Figure 21.3 Triple Sugar Iron Reactions (TSI-3) andTheir Interpretation. (a) The tube on the left is an uninoculatedcontrol. Notice the red color. (b) The second tube from the lefthas a yellow slant (acid), yellow butt (acid), gas production at thebottom of the tube, and no H2S production. This would indicate aweak lactose fermenter. (c) The third tube from the left has a redslant (alkaline), red butt (alkaline), and the black indicates H2Sproduction, but no gas. (d) The tube on the right has a red slant(alkaline), yellow butt (acid), H2S production, but no gasproduction. This would indicate a nonlactose fermenter.
Slant
Butt
Gas
–
–
–
–H2S
Tube a
A
A
+
–
Tube b
K
K
–
+
Tube c
K
A
–
+
Tube d
(d)
No carbohydrate fermentation or hydrogen sulfide production
Glucose fermentation only
Example: Alcaligenes faecalis
Example: Shigella flexneri
glucose, lactose, sucrose � glucose, lactose, sucrose(red slant/red butt) (K; red slant/red butt)
glucose � decrease in pH due to acid(red butt) (A; yellow butt)
cysteine � cysteine(no black color)
Figure 21.4 The Possible Reactions and Results in TSI Agar for the Various Bacteria Used in This Experiment.
(continued)
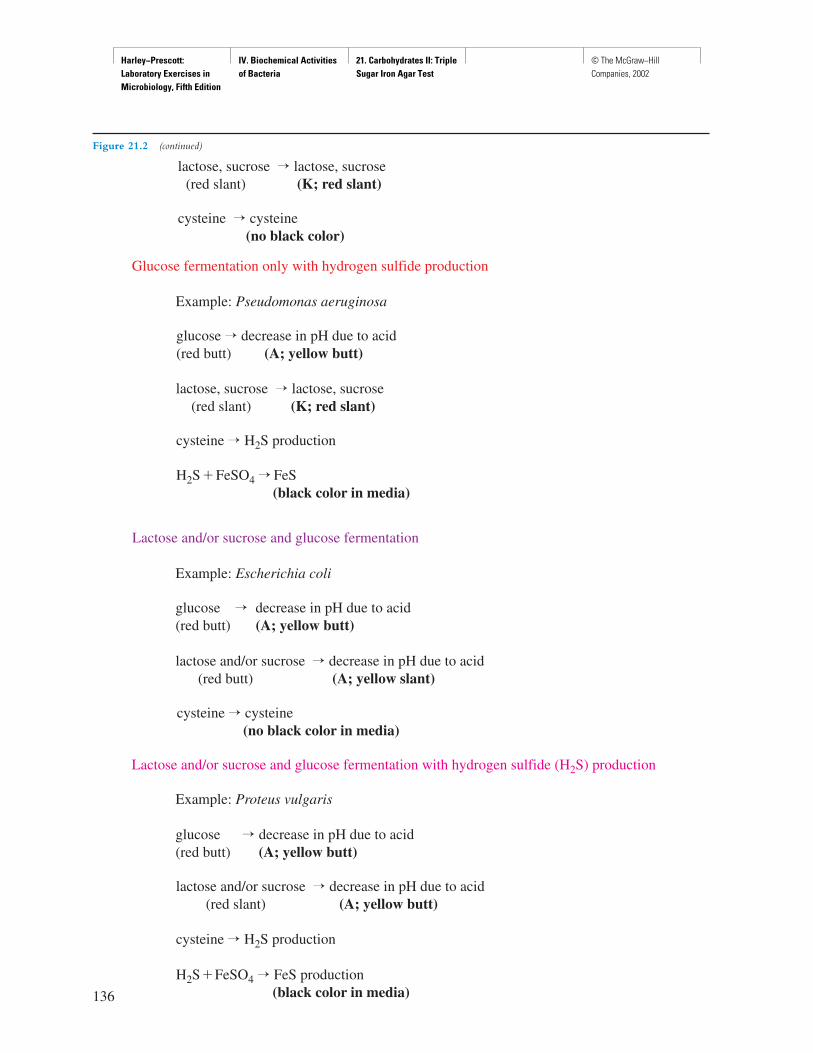
Harley−Prescott: Laboratory Exercises in Microbiology, Fifth Edition
IV. Biochemical Activities of Bacteria
21. Carbohydrates II: Triple Sugar Iron Agar Test
© The McGraw−Hill Companies, 2002
136
Glucose fermentation only with hydrogen sulfide production
Lactose and/or sucrose and glucose fermentation
Example: Pseudomonas aeruginosa
Example: Escherichia coli
glucose � decrease in pH due to acid(red butt) (A; yellow butt)
lactose, sucrose � lactose, sucrose(red slant) (K; red slant)
lactose and/or sucrose � decrease in pH due to acid(red butt) (A; yellow slant)
glucose � decrease in pH due to acid(red butt) (A; yellow butt)
cysteine � H2S production
H2S� FeSO4 � FeS(black color in media)
cysteine � cysteine(no black color in media)
Lactose and/or sucrose and glucose fermentation with hydrogen sulfide (H2S) production
Example: Proteus vulgaris
lactose and/or sucrose � decrease in pH due to acid(red slant) (A; yellow butt)
glucose � decrease in pH due to acid(red butt) (A; yellow butt)
cysteine � H2S production
H2S� FeSO4 � FeS production(black color in media)
Figure 21.2 (continued)
lactose, sucrose � lactose, sucrose(red slant) (K; red slant)
cysteine � cysteine(no black color)
Harley−Prescott: Laboratory Exercises in Microbiology, Fifth Edition
IV. Biochemical Activities of Bacteria
21. Carbohydrates II: Triple Sugar Iron Agar Test
© The McGraw−Hill Companies, 2002
137
Name: ———————————————————————
Date: ————————————————————————
Lab Section: —————————————————————
Laboratory Report 21
Carbohydrates II: Triple Sugar Iron Agar Test
1. Complete the following table on the TSI test.
Carbohydrate Fermentation H2S Production
Bacterium Butt Color Slant Color Black H2S
A. faecalis ______________ __________________ ____________ ____________
E. coli ______________ __________________ ____________ ____________
P. vulgaris ______________ __________________ ____________ ____________
P. aeruginosa ______________ __________________ ____________ ____________
S. flexneri ______________ __________________ ____________ ____________
Harley−Prescott: Laboratory Exercises in Microbiology, Fifth Edition
IV. Biochemical Activities of Bacteria
21. Carbohydrates II: Triple Sugar Iron Agar Test
© The McGraw−Hill Companies, 2002
Review Questions
1. For what bacteria would you use the TSI test?
2. Why must TSI test observations be made between 18 to 24 hours after inoculation?
3. Distinguish between an acid and alkaline slant.
4. What is the purpose of thiosulfate in the TSI agar?
5. What is meant by a saccharolytic bacterium? What reaction would it give in a TSI tube?
6. Why is there more lactose and sucrose in TSI agar than glucose?
7. What is the pH indicator in TSI agar?
138 Biochemical Activities of Bacteria
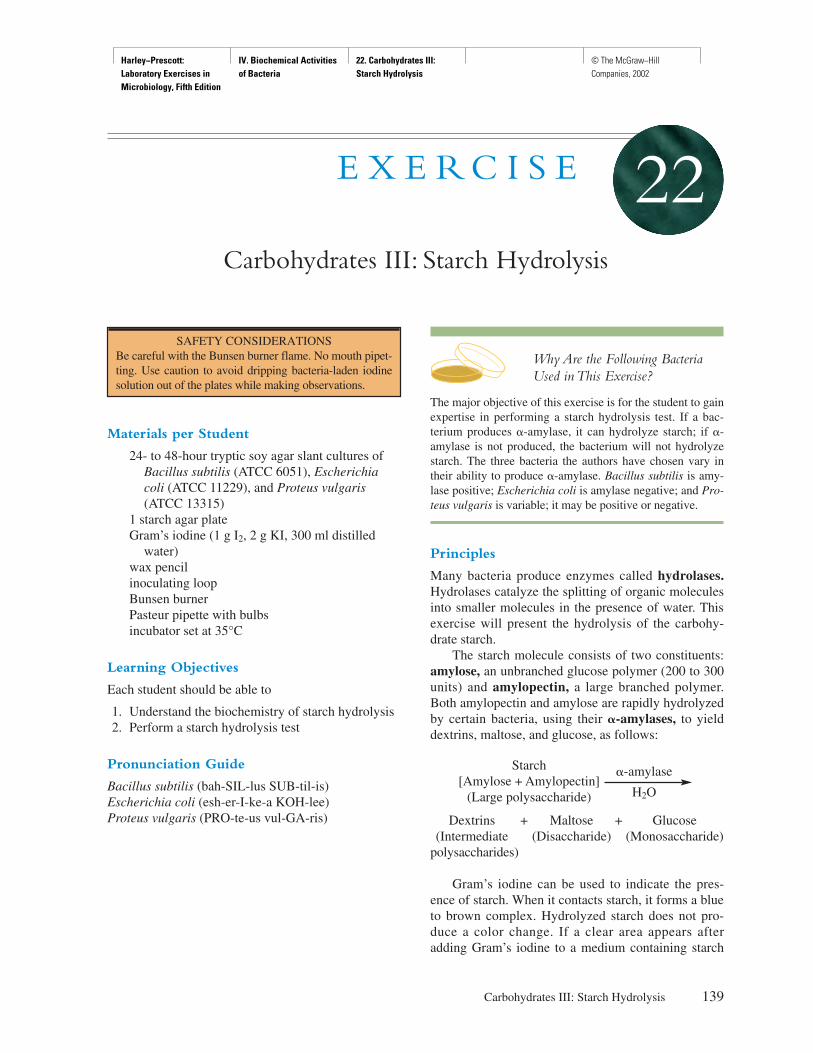
Harley−Prescott: Laboratory Exercises in Microbiology, Fifth Edition
IV. Biochemical Activities of Bacteria
22. Carbohydrates III: Starch Hydrolysis
© The McGraw−Hill Companies, 2002
Materials per Student
24- to 48-hour tryptic soy agar slant cultures ofBacillus subtilis (ATCC 6051), Escherichiacoli (ATCC 11229), and Proteus vulgaris(ATCC 13315)
1 starch agar plateGram’s iodine (1 g I2, 2 g KI, 300 ml distilled
water)wax pencilinoculating loopBunsen burnerPasteur pipette with bulbsincubator set at 35°C
Learning Objectives
Each student should be able to
1. Understand the biochemistry of starch hydrolysis2. Perform a starch hydrolysis test
Pronunciation Guide
Bacillus subtilis (bah-SIL-lus SUB-til-is)Escherichia coli (esh-er-I-ke-a KOH-lee)Proteus vulgaris (PRO-te-us vul-GA-ris)
Why Are the Following BacteriaUsed in This Exercise?
The major objective of this exercise is for the student to gainexpertise in performing a starch hydrolysis test. If a bac-terium produces �-amylase, it can hydrolyze starch; if �-amylase is not produced, the bacterium will not hydrolyzestarch. The three bacteria the authors have chosen vary intheir ability to produce �-amylase. Bacillus subtilis is amy-lase positive; Escherichia coli is amylase negative; and Pro-teus vulgaris is variable; it may be positive or negative.
Principles
Many bacteria produce enzymes called hydrolases.Hydrolases catalyze the splitting of organic moleculesinto smaller molecules in the presence of water. Thisexercise will present the hydrolysis of the carbohy-drate starch.
The starch molecule consists of two constituents:amylose, an unbranched glucose polymer (200 to 300units) and amylopectin, a large branched polymer.Both amylopectin and amylose are rapidly hydrolyzedby certain bacteria, using their �-amylases, to yielddextrins, maltose, and glucose, as follows:
Starch �-amylase[Amylose + Amylopectin]
(Large polysaccharide) H2O
Dextrins + Maltose + Glucose(Intermediate (Disaccharide) (Monosaccharide)
polysaccharides)
Gram’s iodine can be used to indicate the pres-ence of starch. When it contacts starch, it forms a blueto brown complex. Hydrolyzed starch does not pro-duce a color change. If a clear area appears afteradding Gram’s iodine to a medium containing starch
Carbohydrates III: Starch Hydrolysis 139
E X E R C I S E
Carbohydrates III: Starch Hydrolysis
22
SAFETY CONSIDERATIONSBe careful with the Bunsen burner flame. No mouth pipet-ting. Use caution to avoid dripping bacteria-laden iodinesolution out of the plates while making observations.
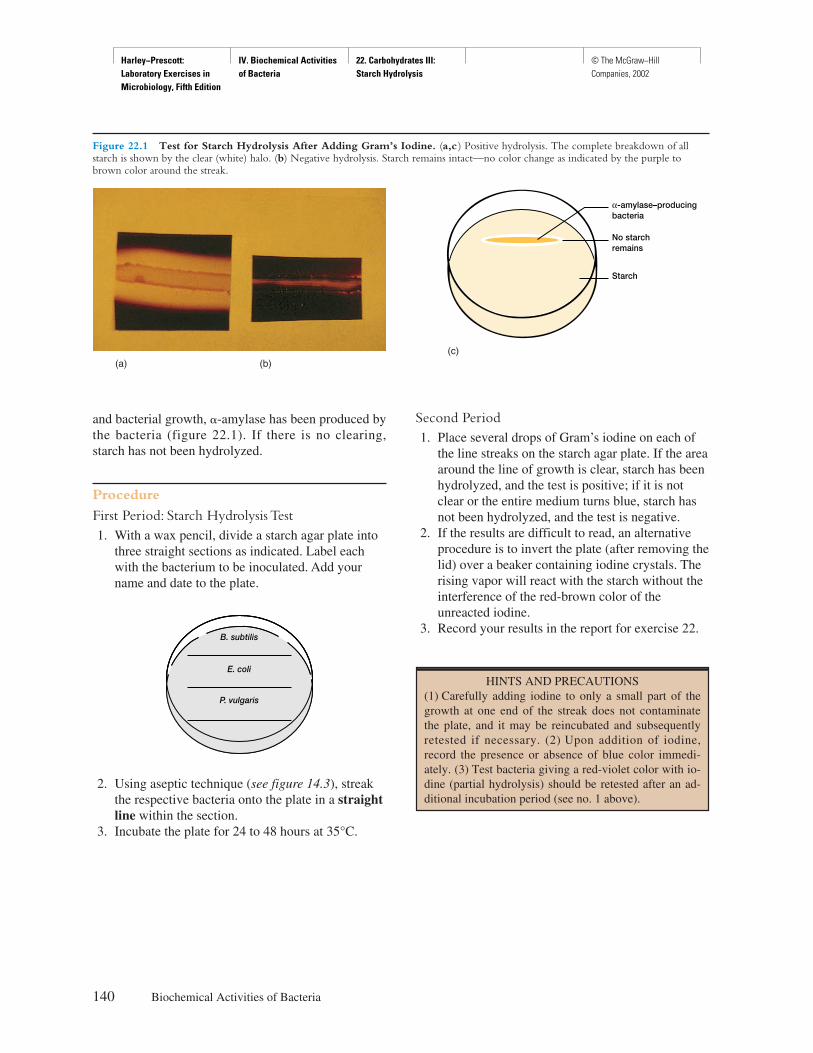
Harley−Prescott: Laboratory Exercises in Microbiology, Fifth Edition
IV. Biochemical Activities of Bacteria
22. Carbohydrates III: Starch Hydrolysis
© The McGraw−Hill Companies, 2002
and bacterial growth, �-amylase has been produced bythe bacteria (figure 22.1). If there is no clearing,starch has not been hydrolyzed.
Procedure
First Period: Starch Hydrolysis Test1. With a wax pencil, divide a starch agar plate into
three straight sections as indicated. Label eachwith the bacterium to be inoculated. Add yourname and date to the plate.
2. Using aseptic technique (see figure 14.3), streakthe respective bacteria onto the plate in a straightline within the section.
3. Incubate the plate for 24 to 48 hours at 35°C.
B. subtilis
E. coli
P. vulgaris
B. subtilis
E. coli
P. vulgaris
Second Period1. Place several drops of Gram’s iodine on each of
the line streaks on the starch agar plate. If the areaaround the line of growth is clear, starch has beenhydrolyzed, and the test is positive; if it is notclear or the entire medium turns blue, starch hasnot been hydrolyzed, and the test is negative.
2. If the results are difficult to read, an alternativeprocedure is to invert the plate (after removing thelid) over a beaker containing iodine crystals. Therising vapor will react with the starch without theinterference of the red-brown color of theunreacted iodine.
3. Record your results in the report for exercise 22.
140 Biochemical Activities of Bacteria
HINTS AND PRECAUTIONS(1) Carefully adding iodine to only a small part of thegrowth at one end of the streak does not contaminatethe plate, and it may be reincubated and subsequentlyretested if necessary. (2) Upon addition of iodine,record the presence or absence of blue color immedi-ately. (3) Test bacteria giving a red-violet color with io-dine (partial hydrolysis) should be retested after an ad-ditional incubation period (see no. 1 above).
Figure 22.1 Test for Starch Hydrolysis After Adding Gram’s Iodine. (a,c ) Positive hydrolysis. The complete breakdown of allstarch is shown by the clear (white) halo. (b) Negative hydrolysis. Starch remains intact—no color change as indicated by the purple tobrown color around the streak.
α-amylase–producingbacteria
No starchremains
Starch
(a) (b)(c)
Harley−Prescott: Laboratory Exercises in Microbiology, Fifth Edition
IV. Biochemical Activities of Bacteria
22. Carbohydrates III: Starch Hydrolysis
© The McGraw−Hill Companies, 2002
141
Name: ———————————————————————
Date: ————————————————————————
Lab Section: —————————————————————
Laboratory Report 22
Carbohydrates III: Starch Hydrolysis
1. In the following plate, sketch the presence or absence of starch hydrolysis.

Harley−Prescott: Laboratory Exercises in Microbiology, Fifth Edition
IV. Biochemical Activities of Bacteria
22. Carbohydrates III: Starch Hydrolysis
© The McGraw−Hill Companies, 2002
Review Questions
1. Describe the function of hydrolases.
2. Describe the chemistry of starch hydrolysis.
3. The chemical used to detect microbial starch hydrolysis on starch plates is ___________________________.
4. What does starch hydrolysis by a bacterium indicate?
5. Amylase is an enzyme that attacks starch. The smallest product of this hydrolysis is called _______________.
6. How is it possible that bacteria may grow heavily on starch agar but not necessarily produce α-amylase?
7. What are the ingredients of starch agar?
142 Biochemical Activities of Bacteria
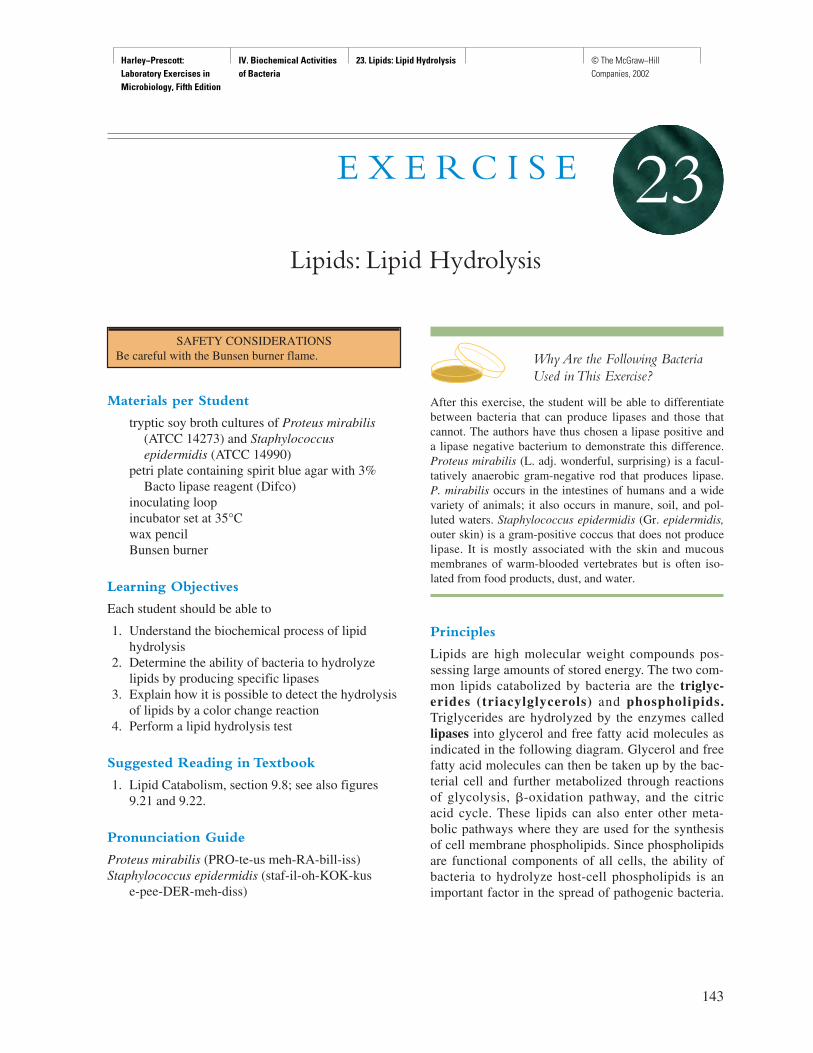
Harley−Prescott: Laboratory Exercises in Microbiology, Fifth Edition
IV. Biochemical Activities of Bacteria
23. Lipids: Lipid Hydrolysis © The McGraw−Hill Companies, 2002
Materials per Student
tryptic soy broth cultures of Proteus mirabilis(ATCC 14273) and Staphylococcusepidermidis (ATCC 14990)
petri plate containing spirit blue agar with 3%Bacto lipase reagent (Difco)
inoculating loopincubator set at 35°Cwax pencilBunsen burner
Learning Objectives
Each student should be able to
1. Understand the biochemical process of lipidhydrolysis
2. Determine the ability of bacteria to hydrolyzelipids by producing specific lipases
3. Explain how it is possible to detect the hydrolysisof lipids by a color change reaction
4. Perform a lipid hydrolysis test
Suggested Reading in Textbook
1. Lipid Catabolism, section 9.8; see also figures9.21 and 9.22.
Pronunciation Guide
Proteus mirabilis (PRO-te-us meh-RA-bill-iss)Staphylococcus epidermidis (staf-il-oh-KOK-kus
e-pee-DER-meh-diss)
Why Are the Following BacteriaUsed in This Exercise?
After this exercise, the student will be able to differentiatebetween bacteria that can produce lipases and those thatcannot. The authors have thus chosen a lipase positive anda lipase negative bacterium to demonstrate this difference.Proteus mirabilis (L. adj. wonderful, surprising) is a facul-tatively anaerobic gram-negative rod that produces lipase.P. mirabilis occurs in the intestines of humans and a widevariety of animals; it also occurs in manure, soil, and pol-luted waters. Staphylococcus epidermidis (Gr. epidermidis,outer skin) is a gram-positive coccus that does not producelipase. It is mostly associated with the skin and mucousmembranes of warm-blooded vertebrates but is often iso-lated from food products, dust, and water.
Principles
Lipids are high molecular weight compounds pos-sessing large amounts of stored energy. The two com-mon lipids catabolized by bacteria are the triglyc-erides (triacylglycerols) and phospholipids.Triglycerides are hydrolyzed by the enzymes calledlipases into glycerol and free fatty acid molecules asindicated in the following diagram. Glycerol and freefatty acid molecules can then be taken up by the bac-terial cell and further metabolized through reactionsof glycolysis, �-oxidation pathway, and the citricacid cycle. These lipids can also enter other meta-bolic pathways where they are used for the synthesisof cell membrane phospholipids. Since phospholipidsare functional components of all cells, the ability ofbacteria to hydrolyze host-cell phospholipids is animportant factor in the spread of pathogenic bacteria.
143
E X E R C I S E
Lipids: Lipid Hydrolysis
23
SAFETY CONSIDERATIONSBe careful with the Bunsen burner flame.
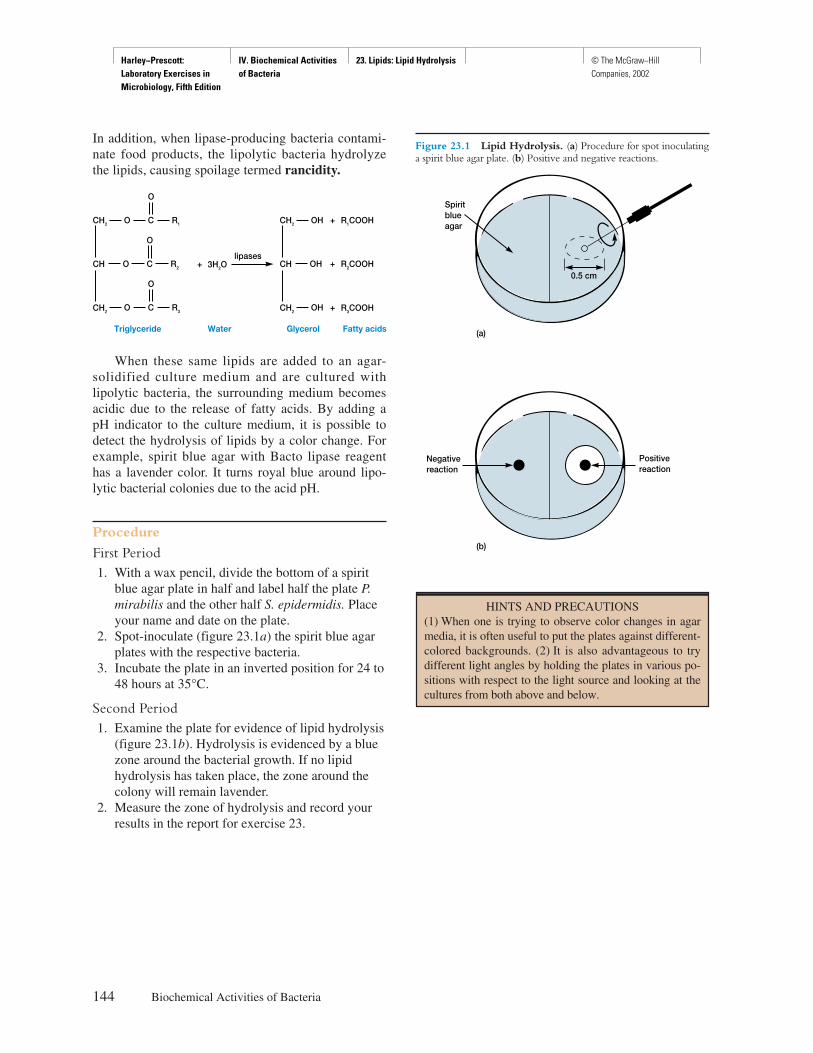
Harley−Prescott: Laboratory Exercises in Microbiology, Fifth Edition
IV. Biochemical Activities of Bacteria
23. Lipids: Lipid Hydrolysis © The McGraw−Hill Companies, 2002
In addition, when lipase-producing bacteria contami-nate food products, the lipolytic bacteria hydrolyzethe lipids, causing spoilage termed rancidity.
When these same lipids are added to an agar-solidified culture medium and are cultured withlipolytic bacteria, the surrounding medium becomesacidic due to the release of fatty acids. By adding apH indicator to the culture medium, it is possible todetect the hydrolysis of lipids by a color change. Forexample, spirit blue agar with Bacto lipase reagenthas a lavender color. It turns royal blue around lipo-lytic bacterial colonies due to the acid pH.
Procedure
First Period1. With a wax pencil, divide the bottom of a spirit
blue agar plate in half and label half the plate P.mirabilis and the other half S. epidermidis. Placeyour name and date on the plate.
2. Spot-inoculate (figure 23.1a) the spirit blue agarplates with the respective bacteria.
3. Incubate the plate in an inverted position for 24 to48 hours at 35°C.
Second Period1. Examine the plate for evidence of lipid hydrolysis
(figure 23.1b). Hydrolysis is evidenced by a bluezone around the bacterial growth. If no lipidhydrolysis has taken place, the zone around thecolony will remain lavender.
2. Measure the zone of hydrolysis and record yourresults in the report for exercise 23.
144 Biochemical Activities of Bacteria
Triglyceride Water
CH2 R1O
O
C
CH2
CH
+ R1COOH
+ R2COOH
+ R3COOH
+ 3H2O
R3O
O
C
R2Olipases
O
C
Glycerol Fatty acids
CH2 OH
CH2
CH
OH
OH
Figure 23.1 Lipid Hydrolysis. (a) Procedure for spot inoculatinga spirit blue agar plate. (b) Positive and negative reactions.
Spiritblueagar
0.5 cm
Positivereaction
Negativereaction
(a)
(b)
HINTS AND PRECAUTIONS(1) When one is trying to observe color changes in agarmedia, it is often useful to put the plates against different-colored backgrounds. (2) It is also advantageous to trydifferent light angles by holding the plates in various po-sitions with respect to the light source and looking at thecultures from both above and below.

Harley−Prescott: Laboratory Exercises in Microbiology, Fifth Edition
IV. Biochemical Activities of Bacteria
23. Lipids: Lipid Hydrolysis © The McGraw−Hill Companies, 2002
145
Name: ———————————————————————
Date: ————————————————————————
Lab Section: —————————————————————
Laboratory Report 23
Lipids: Lipid Hydrolysis
1. Based on your observations, complete the following table on lipid hydrolysis.
Bacterium Lipid Hydrolysis Zone of Hydrolysis
P. mirabilis ___________________________ ___________________________
S. epidermidis ___________________________ ___________________________
2. Sketch and describe what is happening on the petri plate with respect to lipid hydrolysis.
Harley−Prescott: Laboratory Exercises in Microbiology, Fifth Edition
IV. Biochemical Activities of Bacteria
23. Lipids: Lipid Hydrolysis © The McGraw−Hill Companies, 2002
Review Questions
1. What is the function of lipases?
2. How can one determine whether a bacterium is lipolytic?
3. What are two functions of lipids in bacterial cells?
4. Give some examples of foods that might be spoiled by lipolytic bacteria.
5. How is the ability of certain bacteria to attack phospholipids related to pathogenicity?
6. What is the difference between a triglyceride (triacylglycerol) and a phospholipid?
7. What are several pathways that bacteria use to metabolize lipids?
146 Biochemical Activities of Bacteria

Harley−Prescott: Laboratory Exercises in Microbiology, Fifth Edition
IV. Biochemical Activities of Bacteria
24. Proteins, Amino Acids, & Enzymes I: Hydrogen Sulfide Production & Motility
© The McGraw−Hill Companies, 2002
Materials per Student
24- to 48-hour tryptic soy broth cultures ofKlebsiella pneumoniae (ATCC e13883),Proteus vulgaris (ATCC 13315), andSalmonella typhimurium (ATCC 29631)
Bunsen burnerinoculating needletest-tube rack3 SIM (sulfide-indole-motility) agar deeps3 motility test medium deepsKovacs’ reagentincubator set at 35°Cwax pencil
Learning Objectives
Each student should be able to
1. Understand the biochemical process of hydrogensulfide production by bacteria
2. Describe two ways hydrogen sulfide productioncan be detected
3. Describe how motility can be detected4. Perform hydrogen sulfide and motility tests
Suggested Reading in Textbook
1. Requirements for Nitrogen, Phosphorus, andSulfur, section 5.4.
2. Oxidation of Inorganic Molecules, section 9.10.
Pronunciation Guide
Klebsiella pneumoniae (kleb-se-EL-lah nu-MO-ne-ah)Proteus vulgaris (PRO-tee-us vul-GA-ris)Salmonella typhimurium (sal-mon-EL-ah tie-fee-
MUR-ee-um)
Why Are the Following BacteriaUsed in This Exercise?
In this exercise, the student will gain experience in differ-entiating between bacteria based on hydrogen sulfide pro-duction (H2S) and motility. Thus, the authors have chosentwo bacteria that are H2S producers and motile, and onebacterium that is nonmotile and does not produce H2S. Sal-monella typhimurium (Gr. typhus, a stupor) is a faculta-tively anaerobic gram-negative rod that occurs in humans,warm- and cold-blooded animals, food, and the environ-ment. It is H2S positive and motile. Proteus vulgaris (L.vulgaris, common) is a gram-negative facultatively anaero-bic rod that occurs in the intestines of both humans and awide variety of animals, manure, and polluted waters. It ismotile and produces H2S. Klebsiella pneumonia (Gr. pneu-monia, pneumonia, inflammation of the lungs) is a faculta-tively anaerobic gram-negative rod that occurs in humanfeces, clinical specimens, soil, water, grain, fruits, and veg-etables. It is nonmotile and does not produce H2S.
Principles
Many proteins are rich in sulfur-containing aminoacids such as cysteine. When these proteins are hy-drolyzed by some bacteria, the amino acids are re-leased and taken up as nutrients. Cysteine, in the pres-ence of cysteine desulfurase, loses its sulfur atomthrough the addition of hydrogen from water to formhydrogen sulfide gas (figure 24.1a).
Gaseous hydrogen sulfide may also be producedby the reduction of inorganic sulfur-containing com-pounds such as thiosulfate (S2O3
2–), sulfate (SO42–),
or sulfite (SO32–). For example, when certain bacteria
take up sodium thiosulfate, they can reduce it to sul-fite using the enzyme thiosulfate reductase, with therelease of hydrogen sulfide gas (figure 24.1b).
147
E X E R C I S E
Proteins,Amino Acids, and Enzymes I:Hydrogen Sulfide Production and Motility
24
SAFETY CONSIDERATIONSBe careful with the Bunsen burner flame. Be carefulwhen handling the Kovacs’ reagent. It contains concen-trated hydrochloric acid. Keep all culture tubes uprightin a test-tube rack or in empty cans.
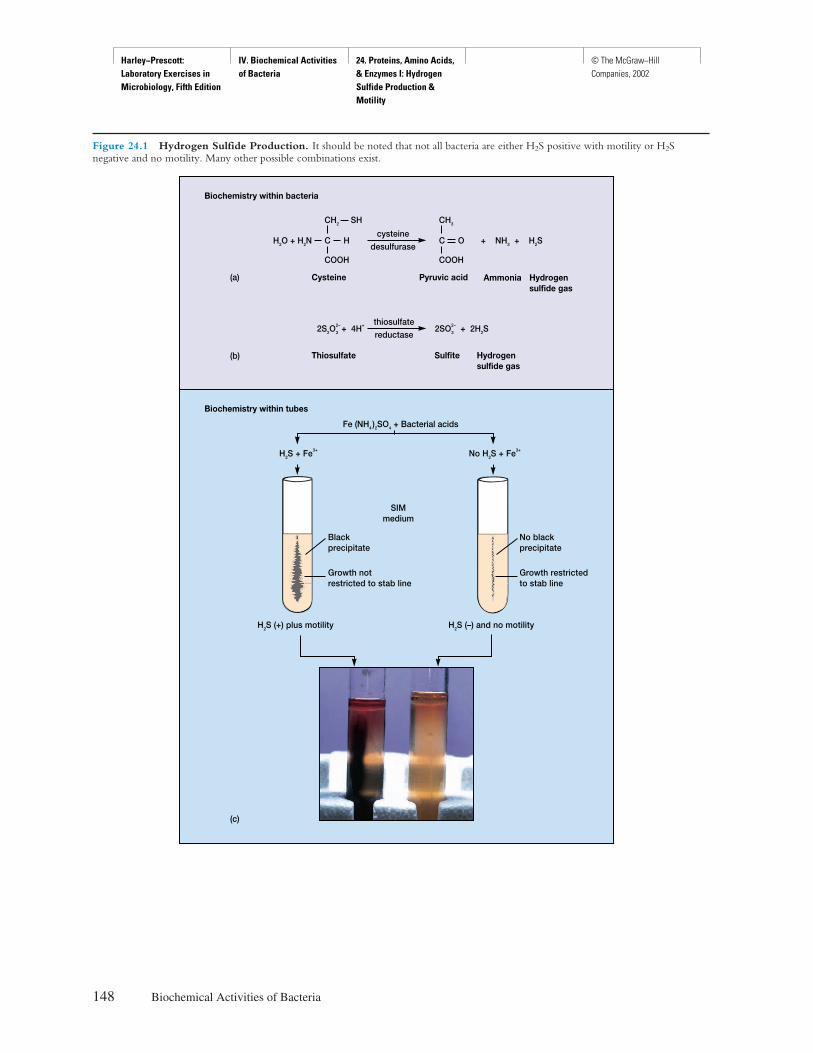
Harley−Prescott: Laboratory Exercises in Microbiology, Fifth Edition
IV. Biochemical Activities of Bacteria
24. Proteins, Amino Acids, & Enzymes I: Hydrogen Sulfide Production & Motility
© The McGraw−Hill Companies, 2002
148 Biochemical Activities of Bacteria
Figure 24.1 Hydrogen Sulfide Production. It should be noted that not all bacteria are either H2S positive with motility or H2Snegative and no motility. Many other possible combinations exist.
SIMmedium
Biochemistry within tubes
Biochemistry within bacteria
Cysteine
H2O + H2N
SH
cysteine
desulfuraseC H
COOH
CH2
C O + NH3 + H2S
COOH
CH3
Pyruvic acid Hydrogensulfide gas
Thiosulfate
2S2O2
3
– + 4H+ thiosulfate
reductase
Sulfite Hydrogensulfide gas
2SO2
3
– + 2H2S
Ammonia(a)
(b)
(c)
Fe (NH4 )2SO4 + Bacterial acids
H2S + Fe3+ No H2S + Fe3+
H2S (+) plus motility H2S (–) and no motility
Growth restrictedto stab line
No blackprecipitate
Blackprecipitate
Growth notrestricted to stab line
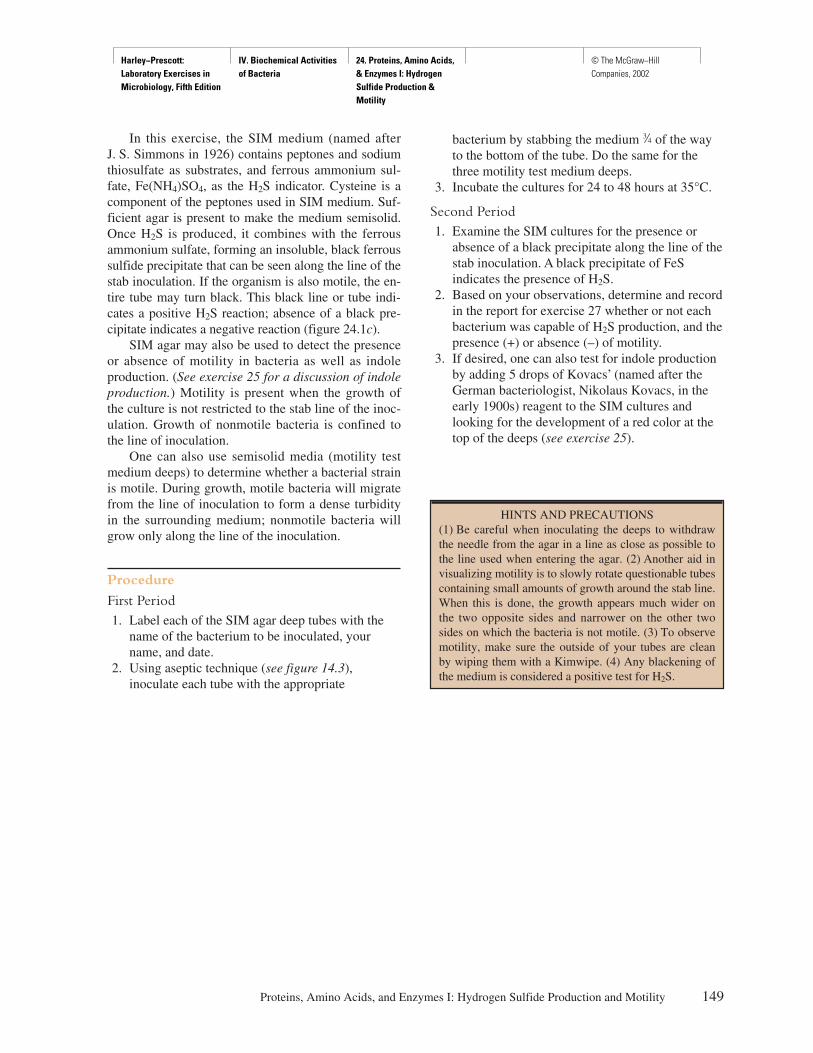
Harley−Prescott: Laboratory Exercises in Microbiology, Fifth Edition
IV. Biochemical Activities of Bacteria
24. Proteins, Amino Acids, & Enzymes I: Hydrogen Sulfide Production & Motility
© The McGraw−Hill Companies, 2002
In this exercise, the SIM medium (named after J. S. Simmons in 1926) contains peptones and sodiumthiosulfate as substrates, and ferrous ammonium sul-fate, Fe(NH4)SO4, as the H2S indicator. Cysteine is acomponent of the peptones used in SIM medium. Suf-ficient agar is present to make the medium semisolid.Once H2S is produced, it combines with the ferrousammonium sulfate, forming an insoluble, black ferroussulfide precipitate that can be seen along the line of thestab inoculation. If the organism is also motile, the en-tire tube may turn black. This black line or tube indi-cates a positive H2S reaction; absence of a black pre-cipitate indicates a negative reaction (figure 24.1c).
SIM agar may also be used to detect the presenceor absence of motility in bacteria as well as indoleproduction. (See exercise 25 for a discussion of indoleproduction.) Motility is present when the growth ofthe culture is not restricted to the stab line of the inoc-ulation. Growth of nonmotile bacteria is confined tothe line of inoculation.
One can also use semisolid media (motility testmedium deeps) to determine whether a bacterial strainis motile. During growth, motile bacteria will migratefrom the line of inoculation to form a dense turbidityin the surrounding medium; nonmotile bacteria willgrow only along the line of the inoculation.
Procedure
First Period1. Label each of the SIM agar deep tubes with the
name of the bacterium to be inoculated, yourname, and date.
2. Using aseptic technique (see figure 14.3),inoculate each tube with the appropriate
bacterium by stabbing the medium f of the wayto the bottom of the tube. Do the same for thethree motility test medium deeps.
3. Incubate the cultures for 24 to 48 hours at 35°C.
Second Period1. Examine the SIM cultures for the presence or
absence of a black precipitate along the line of thestab inoculation. A black precipitate of FeSindicates the presence of H2S.
2. Based on your observations, determine and recordin the report for exercise 27 whether or not eachbacterium was capable of H2S production, and thepresence (+) or absence (–) of motility.
3. If desired, one can also test for indole productionby adding 5 drops of Kovacs’ (named after theGerman bacteriologist, Nikolaus Kovacs, in theearly 1900s) reagent to the SIM cultures andlooking for the development of a red color at thetop of the deeps (see exercise 25).
Proteins, Amino Acids, and Enzymes I: Hydrogen Sulfide Production and Motility 149
HINTS AND PRECAUTIONS(1) Be careful when inoculating the deeps to withdrawthe needle from the agar in a line as close as possible tothe line used when entering the agar. (2) Another aid invisualizing motility is to slowly rotate questionable tubescontaining small amounts of growth around the stab line.When this is done, the growth appears much wider onthe two opposite sides and narrower on the other twosides on which the bacteria is not motile. (3) To observemotility, make sure the outside of your tubes are cleanby wiping them with a Kimwipe. (4) Any blackening ofthe medium is considered a positive test for H2S.
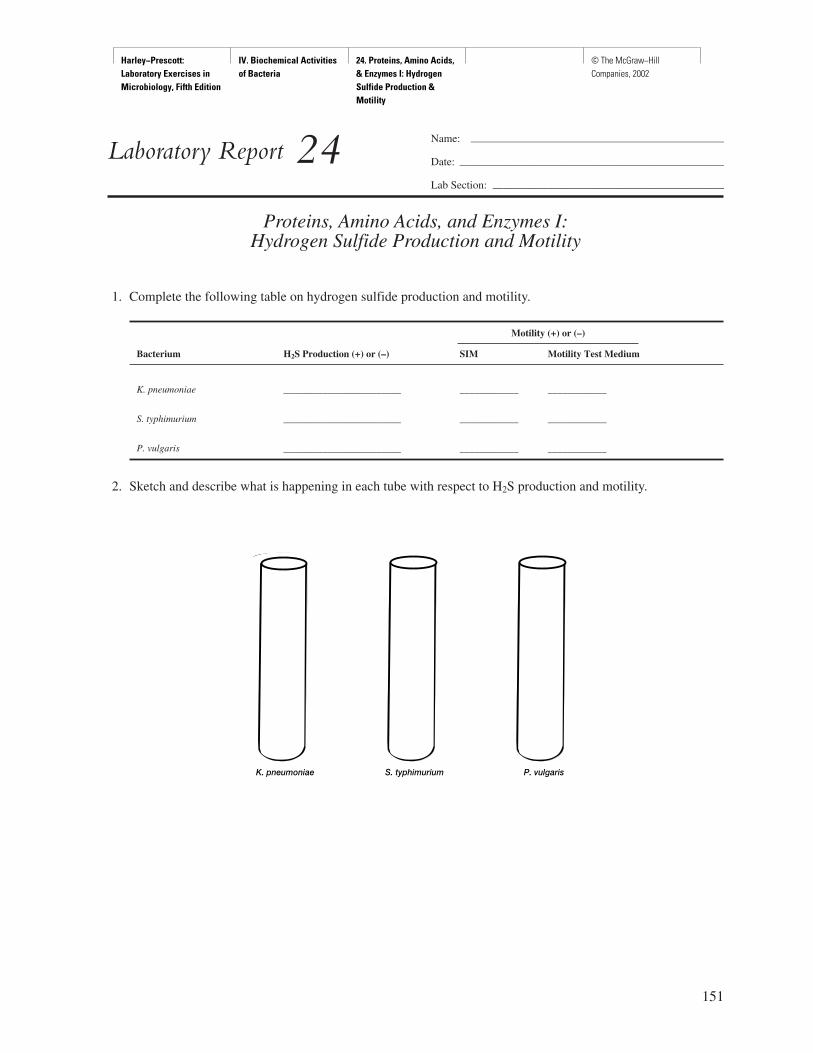
Harley−Prescott: Laboratory Exercises in Microbiology, Fifth Edition
IV. Biochemical Activities of Bacteria
24. Proteins, Amino Acids, & Enzymes I: Hydrogen Sulfide Production & Motility
© The McGraw−Hill Companies, 2002
151
Name: ———————————————————————
Date: ————————————————————————
Lab Section: —————————————————————
Laboratory Report 24
Proteins, Amino Acids, and Enzymes I:Hydrogen Sulfide Production and Motility
1. Complete the following table on hydrogen sulfide production and motility.
Motility (+) or (–)
Bacterium H2S Production (+) or (–) SIM Motility Test Medium
K. pneumoniae ________________________ ____________ ____________
S. typhimurium ________________________ ____________ ____________
P. vulgaris ________________________ ____________ ____________
2. Sketch and describe what is happening in each tube with respect to H2S production and motility.
P. vulgarisS. typhimuriumK. pneumoniae
Harley−Prescott: Laboratory Exercises in Microbiology, Fifth Edition
IV. Biochemical Activities of Bacteria
24. Proteins, Amino Acids, & Enzymes I: Hydrogen Sulfide Production & Motility
© The McGraw−Hill Companies, 2002
Review Questions
1. Of what use to bacteria is the ability to produce H2S?
2. How is SIM medium used to detect motility?
3. What substrates are acted on in SIM medium in order for H2S to be produced?
4. In addition to H2S production and motility, for what other test can SIM medium be used?
5. How does a black precipitate of FeS indicate the production of H2S?
6. What does cysteine desulfurase catalyze? Show the reaction.
7. What does thiosulfate reductase catalyze? Show the reaction.
152 Biochemical Activities of Bacteria
Harley−Prescott: Laboratory Exercises in Microbiology, Fifth Edition
IV. Biochemical Activities of Bacteria
25. Proteins, Amino Acids, and Enzymes II: The IMViC Tests
© The McGraw−Hill Companies, 2002
Materials per Student
24- to 48-hour tryptic soy broth cultures ofEnterobacter aerogenes (ATCC 13048),Escherichia coli (ATCC 11229), Klebsiellaoxytoca (ATCC 13182), and Proteus vulgaris(ATCC 13315)
4 SIM agar deep tubesKovacs’ reagent, KEY Indole Test Tablets, or
Difco’s SpotTest Indole Reagent KovacsBunsen burnerinoculating loop and needle4 MR-VP broth tubes each containing 5 ml of
mediummethyl red indicatorBarritt’s reagent (solutions A and B) or Difco’s
SpotTest Voges-Proskauer reagents A and B4 Simmons citrate agar slants4 empty test tubes4-ml pipettes with pipettorwax pencildisposable gloves
Learning Objectives
Each student should be able to
1. Understand how some bacteria degrade the aminoacid tryptophan
2. Determine the ability of some bacteria to oxidizeglucose with the production of acid end products
3. Differentiate between glucose-fermenting entericbacteria
4. Explain the purpose of the Voges-Proskauer test5. Differentiate among enteric bacteria on the basis
of their ability to ferment citrate6. Perform the IMViC series of tests
Suggested Reading in Textbook
1. Catabolism of Carbohydrates and IntracellularReserve Polymers, section 9.7, see figure 9.10.
2. The Enterobacteriaceae, section 22.3, seetable 22.7.
Pronunciation Guide
Enterobacter aerogenes (en-ter-oh-BAK-ter a-RAH-jen-eez)
Escherichia coli (esh-er-I-ke-a KOH-lee)Klebsiella oxytoca (kleb-se-EL-lah ok-se-TO-se-ah)Proteus vulgaris (PRO-te-us vul-GA-ris)Salmonella (sal-mon-EL-ah)Shigella (shi-GEL-la)
Enterobacteriaceae
Enterobacter aerogenesEscherichia coliKlebsiella oxytoca
Alcaligenes faecalisProteus vulgarisSalmonella typhimuriumShigella dysentariae
153
E X E R C I S E
Proteins,Amino Acids, and Enzymes II:The IMViC Tests
25
SAFETY CONSIDERATIONSBe careful with the Bunsen burner flame. No mouthpipetting. Barritt’s reagent contains naphthol, which istoxic and may cause peeling of the skin; thus, weargloves when using this reagent. Kovacs’ reagent is alsocaustic to the skin and mucous membranes due to theconcentrated HCl and p-dimethylaminobenzaldehyde.In case of contact with either reagent, immediately flusheyes or skin with plenty of water for at least 15 minutes.Keep all culture tubes upright in a test-tube rack or can.
Lactosefermenters
Lactosenonfermenter
Someenteric(intestinal)bacteria
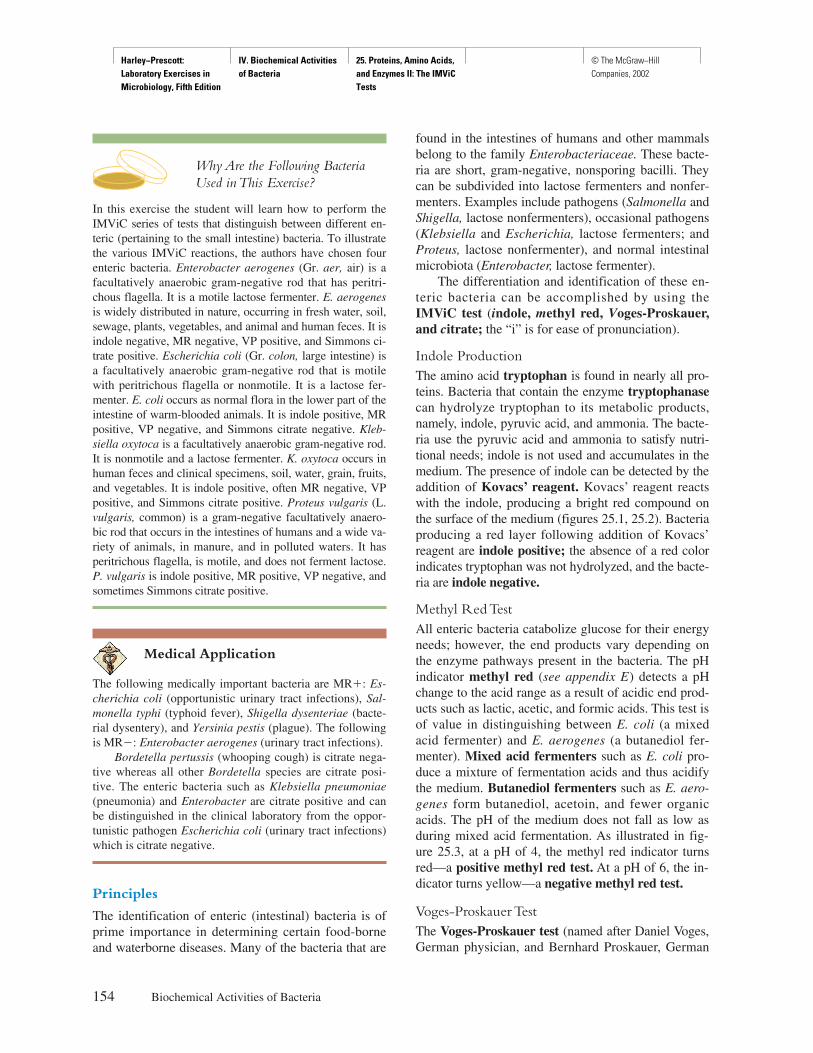
Harley−Prescott: Laboratory Exercises in Microbiology, Fifth Edition
IV. Biochemical Activities of Bacteria
25. Proteins, Amino Acids, and Enzymes II: The IMViC Tests
© The McGraw−Hill Companies, 2002
Why Are the Following BacteriaUsed in This Exercise?
In this exercise the student will learn how to perform theIMViC series of tests that distinguish between different en-teric (pertaining to the small intestine) bacteria. To illustratethe various IMViC reactions, the authors have chosen fourenteric bacteria. Enterobacter aerogenes (Gr. aer, air) is afacultatively anaerobic gram-negative rod that has peritri-chous flagella. It is a motile lactose fermenter. E. aerogenesis widely distributed in nature, occurring in fresh water, soil,sewage, plants, vegetables, and animal and human feces. It isindole negative, MR negative, VP positive, and Simmons ci-trate positive. Escherichia coli (Gr. colon, large intestine) isa facultatively anaerobic gram-negative rod that is motilewith peritrichous flagella or nonmotile. It is a lactose fer-menter. E. coli occurs as normal flora in the lower part of theintestine of warm-blooded animals. It is indole positive, MRpositive, VP negative, and Simmons citrate negative. Kleb-siella oxytoca is a facultatively anaerobic gram-negative rod.It is nonmotile and a lactose fermenter. K. oxytoca occurs inhuman feces and clinical specimens, soil, water, grain, fruits,and vegetables. It is indole positive, often MR negative, VPpositive, and Simmons citrate positive. Proteus vulgaris (L.vulgaris, common) is a gram-negative facultatively anaero-bic rod that occurs in the intestines of humans and a wide va-riety of animals, in manure, and in polluted waters. It hasperitrichous flagella, is motile, and does not ferment lactose.P. vulgaris is indole positive, MR positive, VP negative, andsometimes Simmons citrate positive.
Medical Application
The following medically important bacteria are MR�: Es-cherichia coli (opportunistic urinary tract infections), Sal-monella typhi (typhoid fever), Shigella dysenteriae (bacte-rial dysentery), and Yersinia pestis (plague). The followingis MR�: Enterobacter aerogenes (urinary tract infections).
Bordetella pertussis (whooping cough) is citrate nega-tive whereas all other Bordetella species are citrate posi-tive. The enteric bacteria such as Klebsiella pneumoniae(pneumonia) and Enterobacter are citrate positive and canbe distinguished in the clinical laboratory from the oppor-tunistic pathogen Escherichia coli (urinary tract infections)which is citrate negative.
Principles
The identification of enteric (intestinal) bacteria is ofprime importance in determining certain food-borneand waterborne diseases. Many of the bacteria that are
154 Biochemical Activities of Bacteria
found in the intestines of humans and other mammalsbelong to the family Enterobacteriaceae. These bacte-ria are short, gram-negative, nonsporing bacilli. Theycan be subdivided into lactose fermenters and nonfer-menters. Examples include pathogens (Salmonella andShigella, lactose nonfermenters), occasional pathogens(Klebsiella and Escherichia, lactose fermenters; andProteus, lactose nonfermenter), and normal intestinalmicrobiota (Enterobacter, lactose fermenter).
The differentiation and identification of these en-teric bacteria can be accomplished by using theIMViC test (indole, methyl red, Voges-Proskauer,and citrate; the “i” is for ease of pronunciation).
Indole ProductionThe amino acid tryptophan is found in nearly all pro-teins. Bacteria that contain the enzyme tryptophanasecan hydrolyze tryptophan to its metabolic products,namely, indole, pyruvic acid, and ammonia. The bacte-ria use the pyruvic acid and ammonia to satisfy nutri-tional needs; indole is not used and accumulates in themedium. The presence of indole can be detected by theaddition of Kovacs’ reagent. Kovacs’ reagent reactswith the indole, producing a bright red compound onthe surface of the medium (figures 25.1, 25.2). Bacteriaproducing a red layer following addition of Kovacs’reagent are indole positive; the absence of a red colorindicates tryptophan was not hydrolyzed, and the bacte-ria are indole negative.
Methyl Red TestAll enteric bacteria catabolize glucose for their energyneeds; however, the end products vary depending onthe enzyme pathways present in the bacteria. The pHindicator methyl red (see appendix E) detects a pHchange to the acid range as a result of acidic end prod-ucts such as lactic, acetic, and formic acids. This test isof value in distinguishing between E. coli (a mixedacid fermenter) and E. aerogenes (a butanediol fer-menter). Mixed acid fermenters such as E. coli pro-duce a mixture of fermentation acids and thus acidifythe medium. Butanediol fermenters such as E. aero-genes form butanediol, acetoin, and fewer organicacids. The pH of the medium does not fall as low asduring mixed acid fermentation. As illustrated in fig-ure 25.3, at a pH of 4, the methyl red indicator turnsred—a positive methyl red test. At a pH of 6, the in-dicator turns yellow—a negative methyl red test.
Voges-Proskauer TestThe Voges-Proskauer test (named after Daniel Voges,German physician, and Bernhard Proskauer, German
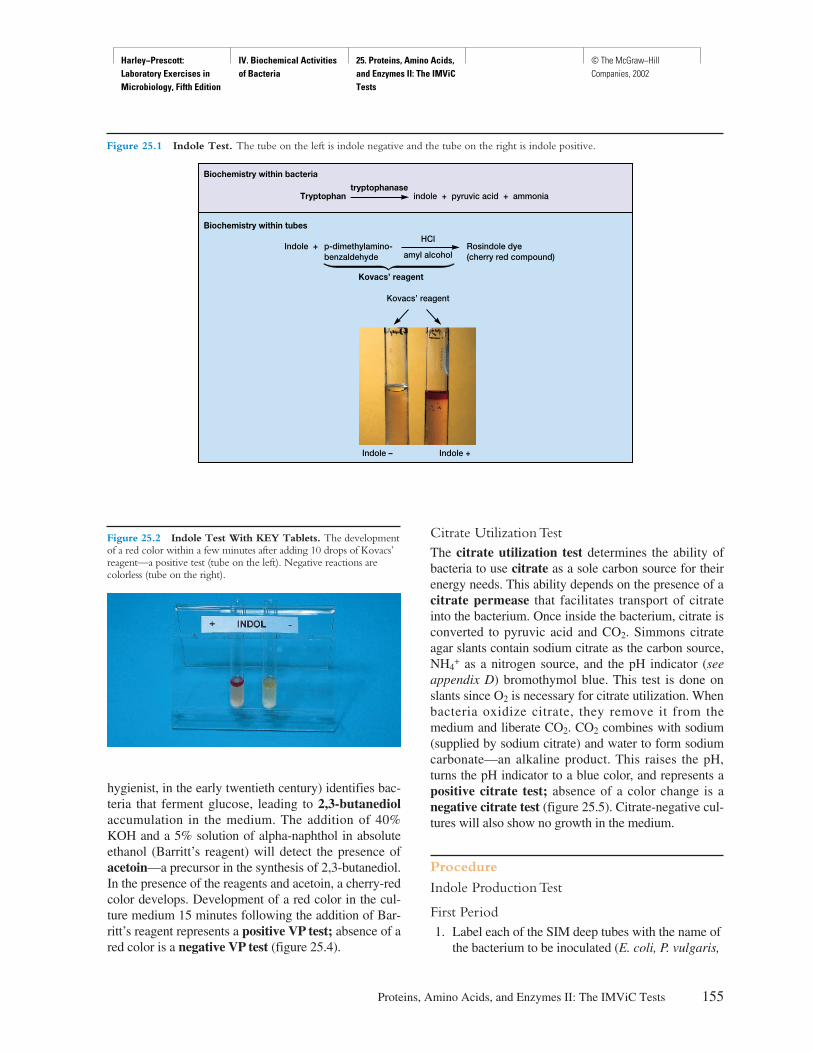
Harley−Prescott: Laboratory Exercises in Microbiology, Fifth Edition
IV. Biochemical Activities of Bacteria
25. Proteins, Amino Acids, and Enzymes II: The IMViC Tests
© The McGraw−Hill Companies, 2002
hygienist, in the early twentieth century) identifies bac-teria that ferment glucose, leading to 2,3-butanediolaccumulation in the medium. The addition of 40%KOH and a 5% solution of alpha-naphthol in absoluteethanol (Barritt’s reagent) will detect the presence ofacetoin—a precursor in the synthesis of 2,3-butanediol.In the presence of the reagents and acetoin, a cherry-redcolor develops. Development of a red color in the cul-ture medium 15 minutes following the addition of Bar-ritt’s reagent represents a positive VP test; absence of ared color is a negative VP test (figure 25.4).
Citrate Utilization TestThe citrate utilization test determines the ability ofbacteria to use citrate as a sole carbon source for theirenergy needs. This ability depends on the presence of acitrate permease that facilitates transport of citrateinto the bacterium. Once inside the bacterium, citrate isconverted to pyruvic acid and CO2. Simmons citrateagar slants contain sodium citrate as the carbon source,NH4
+ as a nitrogen source, and the pH indicator (seeappendix D) bromothymol blue. This test is done onslants since O2 is necessary for citrate utilization. Whenbacteria oxidize citrate, they remove it from themedium and liberate CO2. CO2 combines with sodium(supplied by sodium citrate) and water to form sodiumcarbonate—an alkaline product. This raises the pH,turns the pH indicator to a blue color, and represents apositive citrate test; absence of a color change is anegative citrate test (figure 25.5). Citrate-negative cul-tures will also show no growth in the medium.
Procedure
Indole Production Test
First Period1. Label each of the SIM deep tubes with the name of
the bacterium to be inoculated (E. coli, P. vulgaris,
Proteins, Amino Acids, and Enzymes II: The IMViC Tests 155
Figure 25.1 Indole Test. The tube on the left is indole negative and the tube on the right is indole positive.
indole + pyruvic acid + ammonia
p-dimethylamino-benzaldehyde
HClRosindole dye(cherry red compound)amyl alcohol
Indole +
Kovacs’ reagent
Kovacs’ reagent
Indole – Indole +
Biochemistry within bacteria
Biochemistry within tubes
Tryptophantryptophanase
Figure 25.2 Indole Test With KEY Tablets. The developmentof a red color within a few minutes after adding 10 drops of Kovacs’reagent—a positive test (tube on the left). Negative reactions arecolorless (tube on the right).
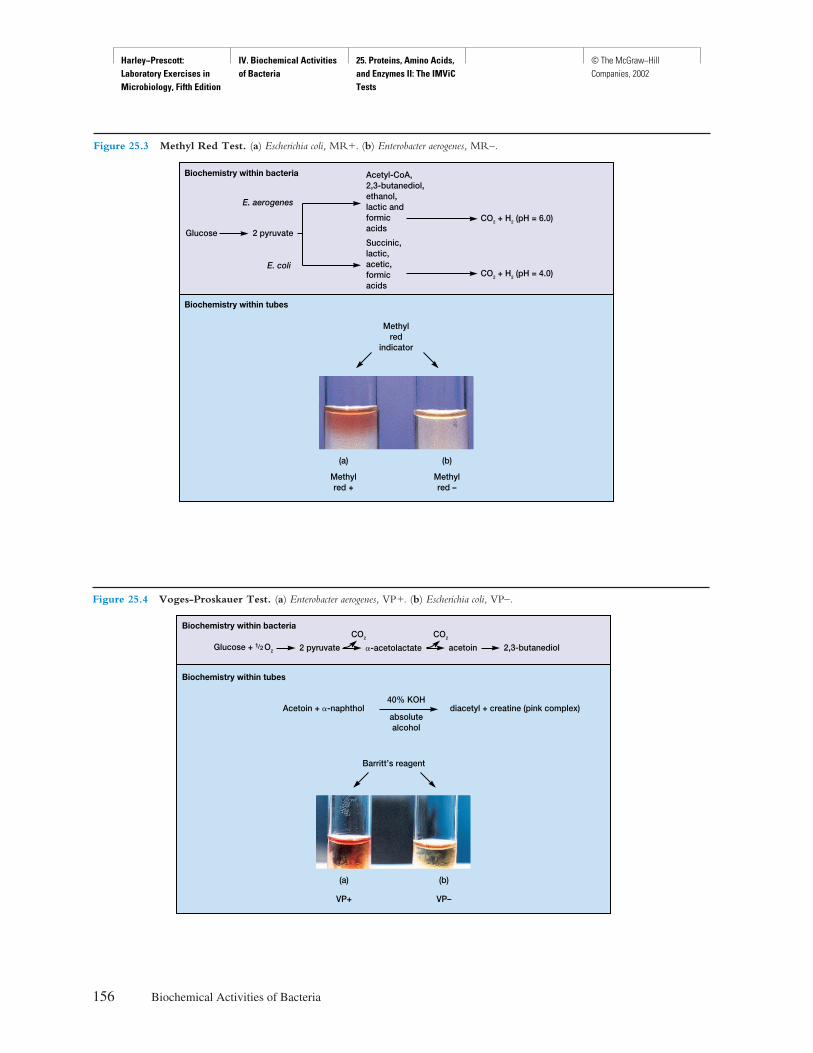
Harley−Prescott: Laboratory Exercises in Microbiology, Fifth Edition
IV. Biochemical Activities of Bacteria
25. Proteins, Amino Acids, and Enzymes II: The IMViC Tests
© The McGraw−Hill Companies, 2002
156 Biochemical Activities of Bacteria
Figure 25.3 Methyl Red Test. (a) Escherichia coli, MR+. (b) Enterobacter aerogenes, MR–.
E. aerogenes
Acetyl-CoA,2,3-butanediol,ethanol,lactic andformicacids
Succinic,lactic,acetic,formicacids
E. coli
Glucose 2 pyruvate
Methylred
indicator
Methylred +
Methylred –
(a) (b)
Biochemistry within bacteria
Biochemistry within tubes
CO2 + H2 (pH = 6.0)
CO2 + H2 (pH = 4.0)
Figure 25.4 Voges-Proskauer Test. (a) Enterobacter aerogenes, VP+. (b) Escherichia coli, VP–.
40% KOHdiacetyl + creatine (pink complex)
absolutealcohol
Acetoin + �-naphthol
Barritt’s reagent
(a) (b)
VP+ VP–
Glucose + 1/2 O2 2 pyruvate �-acetolactate acetoin 2,3-butanediol
CO2 CO2
Biochemistry within bacteria
Biochemistry within tubes
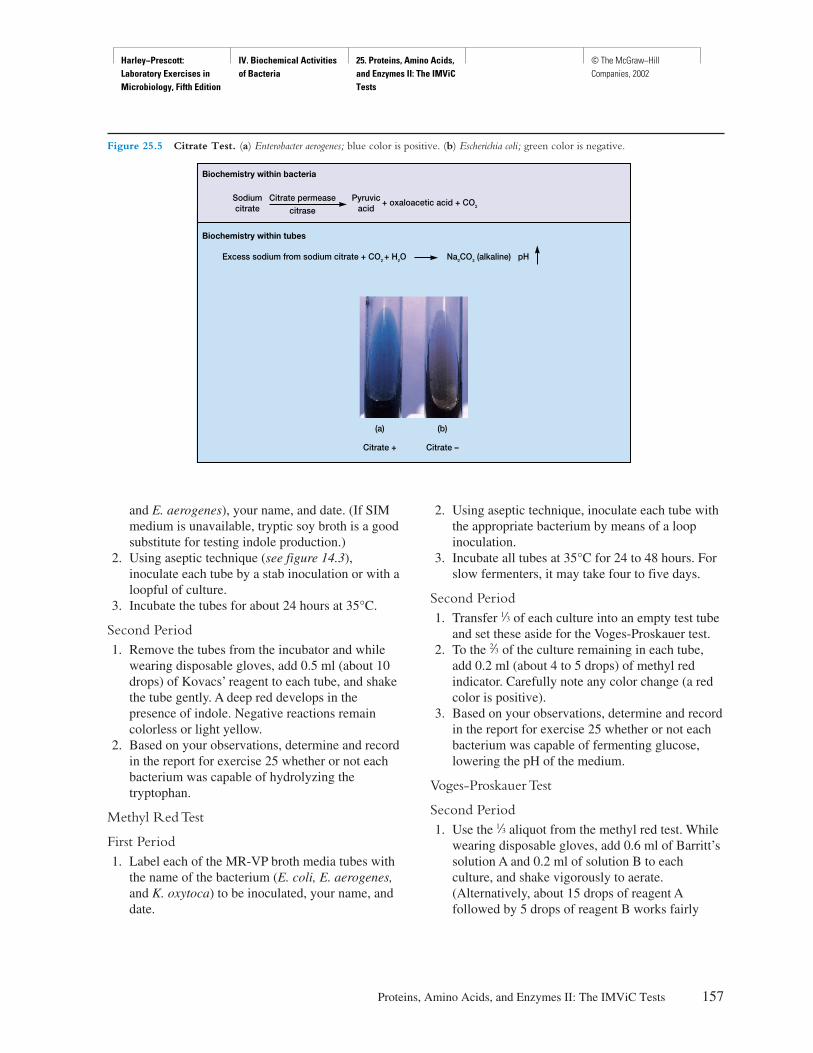
Harley−Prescott: Laboratory Exercises in Microbiology, Fifth Edition
IV. Biochemical Activities of Bacteria
25. Proteins, Amino Acids, and Enzymes II: The IMViC Tests
© The McGraw−Hill Companies, 2002
and E. aerogenes), your name, and date. (If SIMmedium is unavailable, tryptic soy broth is a goodsubstitute for testing indole production.)
2. Using aseptic technique (see figure 14.3),inoculate each tube by a stab inoculation or with aloopful of culture.
3. Incubate the tubes for about 24 hours at 35°C.
Second Period1. Remove the tubes from the incubator and while
wearing disposable gloves, add 0.5 ml (about 10drops) of Kovacs’ reagent to each tube, and shakethe tube gently. A deep red develops in thepresence of indole. Negative reactions remaincolorless or light yellow.
2. Based on your observations, determine and recordin the report for exercise 25 whether or not eachbacterium was capable of hydrolyzing thetryptophan.
Methyl Red Test
First Period1. Label each of the MR-VP broth media tubes with
the name of the bacterium (E. coli, E. aerogenes,and K. oxytoca) to be inoculated, your name, anddate.
2. Using aseptic technique, inoculate each tube withthe appropriate bacterium by means of a loopinoculation.
3. Incubate all tubes at 35°C for 24 to 48 hours. Forslow fermenters, it may take four to five days.
Second Period1. Transfer h of each culture into an empty test tube
and set these aside for the Voges-Proskauer test.2. To the i of the culture remaining in each tube,
add 0.2 ml (about 4 to 5 drops) of methyl redindicator. Carefully note any color change (a redcolor is positive).
3. Based on your observations, determine and recordin the report for exercise 25 whether or not eachbacterium was capable of fermenting glucose,lowering the pH of the medium.
Voges-Proskauer Test
Second Period1. Use the h aliquot from the methyl red test. While
wearing disposable gloves, add 0.6 ml of Barritt’ssolution A and 0.2 ml of solution B to eachculture, and shake vigorously to aerate.(Alternatively, about 15 drops of reagent Afollowed by 5 drops of reagent B works fairly
Proteins, Amino Acids, and Enzymes II: The IMViC Tests 157
Figure 25.5 Citrate Test. (a) Enterobacter aerogenes; blue color is positive. (b) Escherichia coli; green color is negative.
Biochemistry within tubes
Biochemistry within bacteria
Na2CO3 (alkaline) pH
(a)
Citrate +
(b)
Citrate –
Excess sodium from sodium citrate + CO2 + H2O
Sodiumcitrate
Citrate permeasecitrase
Pyruvicacid
+ oxaloacetic acid + CO2
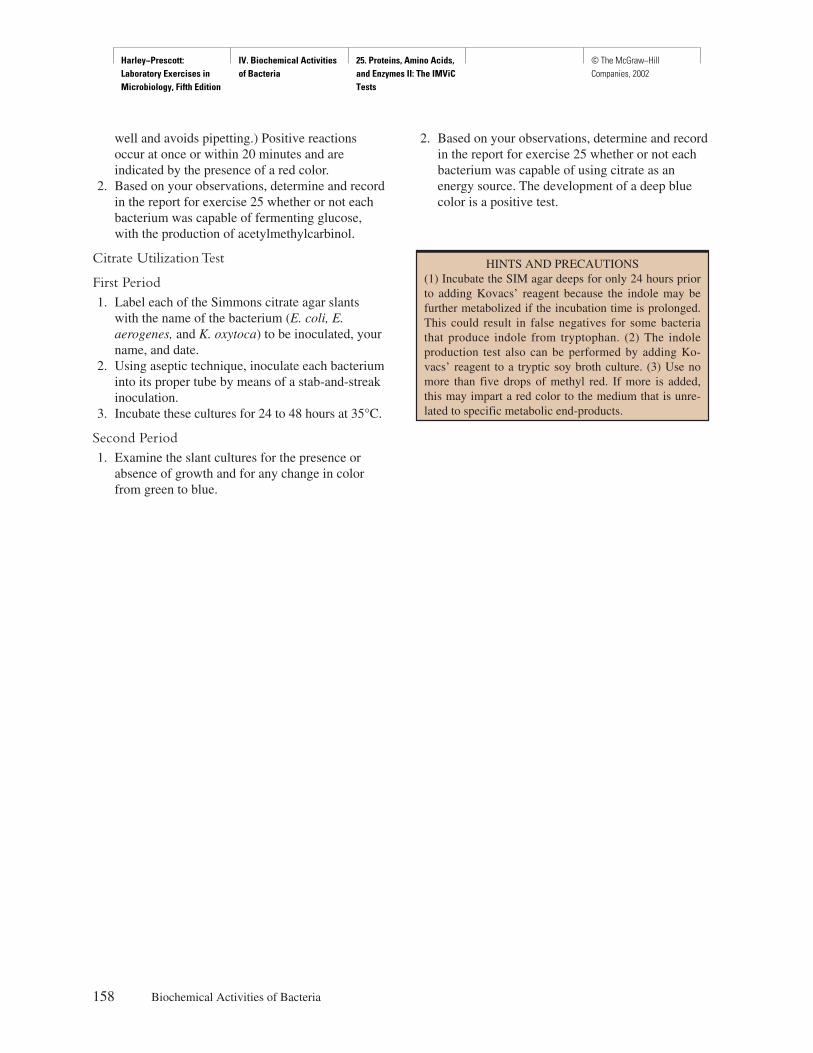
Harley−Prescott: Laboratory Exercises in Microbiology, Fifth Edition
IV. Biochemical Activities of Bacteria
25. Proteins, Amino Acids, and Enzymes II: The IMViC Tests
© The McGraw−Hill Companies, 2002
well and avoids pipetting.) Positive reactionsoccur at once or within 20 minutes and areindicated by the presence of a red color.
2. Based on your observations, determine and recordin the report for exercise 25 whether or not eachbacterium was capable of fermenting glucose,with the production of acetylmethylcarbinol.
Citrate Utilization Test
First Period1. Label each of the Simmons citrate agar slants
with the name of the bacterium (E. coli, E.aerogenes, and K. oxytoca) to be inoculated, yourname, and date.
2. Using aseptic technique, inoculate each bacteriuminto its proper tube by means of a stab-and-streakinoculation.
3. Incubate these cultures for 24 to 48 hours at 35°C.
Second Period1. Examine the slant cultures for the presence or
absence of growth and for any change in colorfrom green to blue.
2. Based on your observations, determine and recordin the report for exercise 25 whether or not eachbacterium was capable of using citrate as anenergy source. The development of a deep bluecolor is a positive test.
158 Biochemical Activities of Bacteria
HINTS AND PRECAUTIONS(1) Incubate the SIM agar deeps for only 24 hours priorto adding Kovacs’ reagent because the indole may befurther metabolized if the incubation time is prolonged.This could result in false negatives for some bacteriathat produce indole from tryptophan. (2) The indoleproduction test also can be performed by adding Ko-vacs’ reagent to a tryptic soy broth culture. (3) Use nomore than five drops of methyl red. If more is added,this may impart a red color to the medium that is unre-lated to specific metabolic end-products.
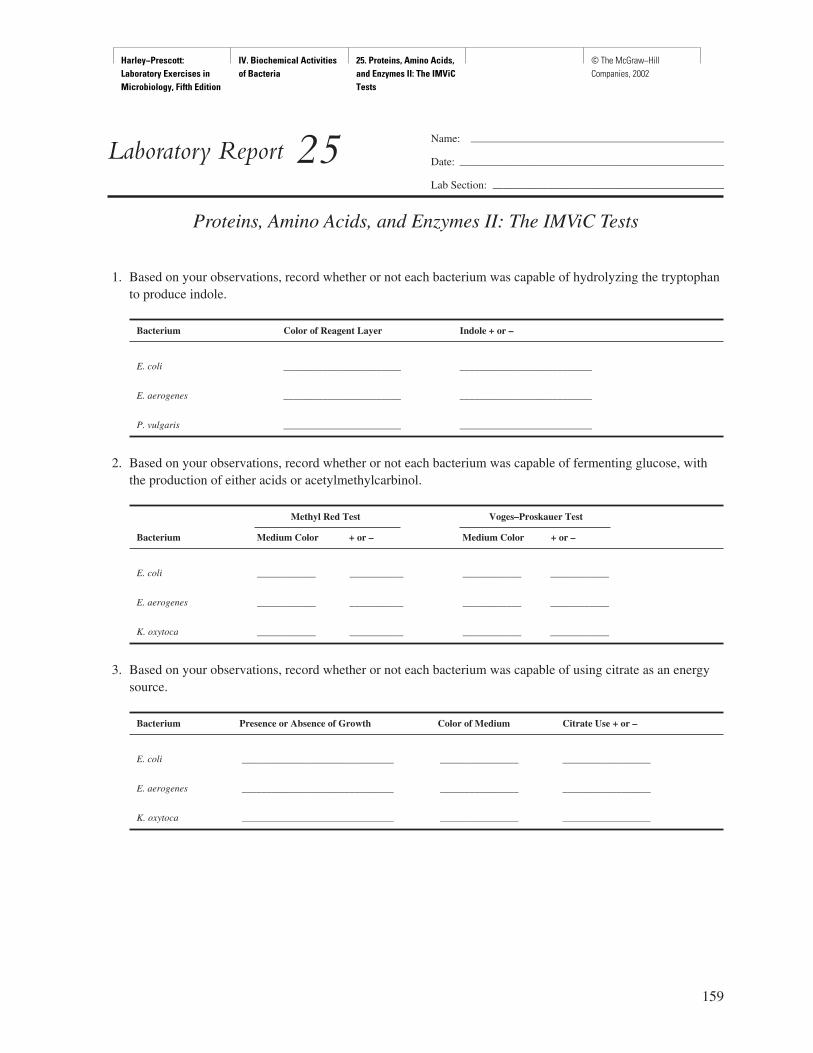
Harley−Prescott: Laboratory Exercises in Microbiology, Fifth Edition
IV. Biochemical Activities of Bacteria
25. Proteins, Amino Acids, and Enzymes II: The IMViC Tests
© The McGraw−Hill Companies, 2002
159
Name: ———————————————————————
Date: ————————————————————————
Lab Section: —————————————————————
Laboratory Report 25
Proteins, Amino Acids, and Enzymes II: The IMViC Tests
1. Based on your observations, record whether or not each bacterium was capable of hydrolyzing the tryptophanto produce indole.
Bacterium Color of Reagent Layer Indole + or –
E. coli ________________________ ___________________________
E. aerogenes ________________________ ___________________________
P. vulgaris ________________________ ___________________________
2. Based on your observations, record whether or not each bacterium was capable of fermenting glucose, withthe production of either acids or acetylmethylcarbinol.
Methyl Red Test Voges–Proskauer Test
Bacterium Medium Color + or – Medium Color + or –
E. coli ____________ ___________ ____________ ____________
E. aerogenes ____________ ___________ ____________ ____________
K. oxytoca ____________ ___________ ____________ ____________
3. Based on your observations, record whether or not each bacterium was capable of using citrate as an energysource.
Bacterium Presence or Absence of Growth Color of Medium Citrate Use + or –
E. coli _______________________________ ________________ __________________
E. aerogenes _______________________________ ________________ __________________
K. oxytoca _______________________________ ________________ __________________
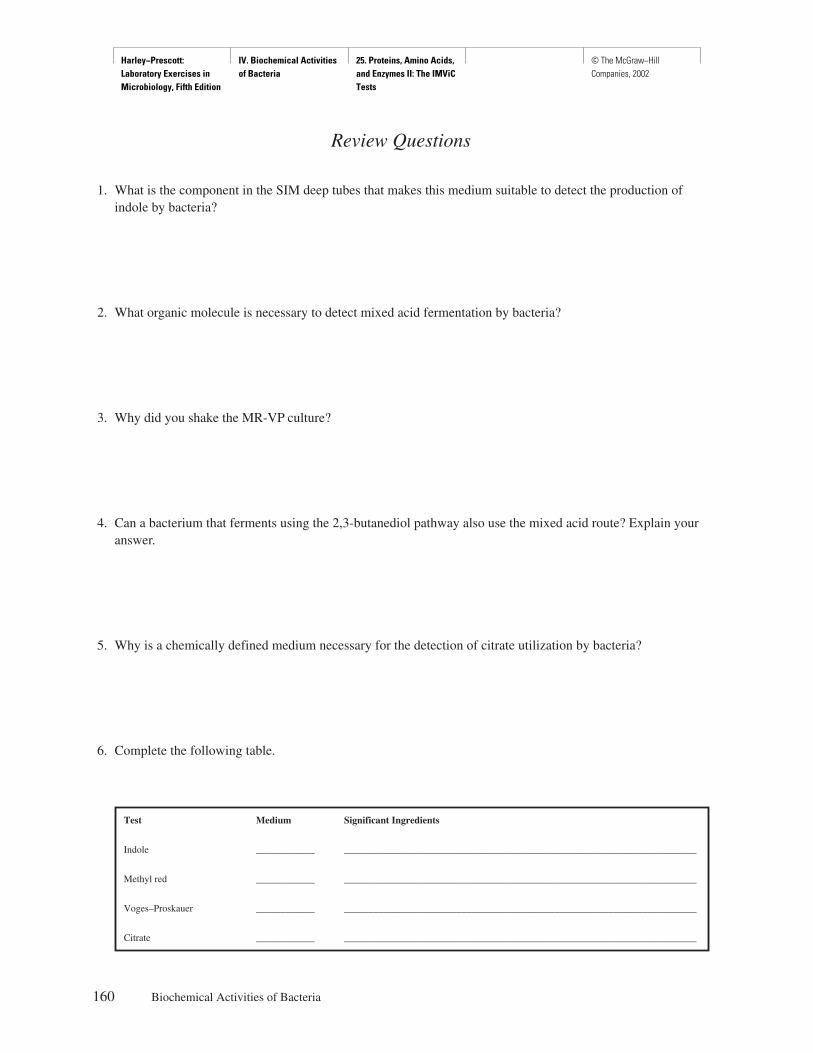
Harley−Prescott: Laboratory Exercises in Microbiology, Fifth Edition
IV. Biochemical Activities of Bacteria
25. Proteins, Amino Acids, and Enzymes II: The IMViC Tests
© The McGraw−Hill Companies, 2002
Review Questions
1. What is the component in the SIM deep tubes that makes this medium suitable to detect the production ofindole by bacteria?
2. What organic molecule is necessary to detect mixed acid fermentation by bacteria?
3. Why did you shake the MR-VP culture?
4. Can a bacterium that ferments using the 2,3-butanediol pathway also use the mixed acid route? Explain youranswer.
5. Why is a chemically defined medium necessary for the detection of citrate utilization by bacteria?
6. Complete the following table.
160 Biochemical Activities of Bacteria
Test Medium Significant Ingredients
Indole ____________ ________________________________________________________________________
Methyl red ____________ ________________________________________________________________________
Voges–Proskauer ____________ ________________________________________________________________________
Citrate ____________ ________________________________________________________________________

Harley−Prescott: Laboratory Exercises in Microbiology, Fifth Edition
IV. Biochemical Activities of Bacteria
26. Proteins, Amino Acids, and Enzymes III: Casein Hydrolysis
© The McGraw−Hill Companies, 2002
Materials per Student
24- to 48-hour tryptic soy broth cultures ofEscherichia coli (ATCC 11229), Bacillussubtilis (ATCC 6051), and Pseudomonasaeruginosa (ATCC 10145)
tubes of plate count agar (tryptone glucose yeastagar)
inoculating loopboiling water bathsterile petri plateswater bath set at 48° to 50°Cwater bath set at 35°CBunsen burnertest-tube rackwax pencilsterile skim milk5-ml pipette with pipettor
Learning Objectives
Each student should be able to
1. Understand the biochemical process ofdeamination
2. Determine the ability of some bacteria to secreteproteolytic enzymes capable of hydrolyzing theprotein casein by performing a casein hydrolysistest
3. Explain what a zone of proteolysis indicates
Suggested Reading in Textbook
1. Protein and Amino Acid Catabolism, section 9.9.2. Dairy Products, section 41.6.
Pronunciation Guide
Bacillus subtilis (bah-SIL-lus SUB-til-us)Escherichia coli (esh-er-I-ke-a KOH-lee)Pseudomonas aeruginosa (soo-do-MO-nas a-ruh-jin-
OH-sa)
Why Are the Above Bacteria Usedin This Exercise?
In this exercise, the student will learn how to perform a ca-sein hydrolysis test to detect the presence of proteolytic en-zymes. Thus, the authors have chosen three bacteria thathave been used in prior exercises. Escherichia coli will pro-duce a negative reaction; Bacillus subtilis and Pseudomonasaeruginosa will produce positive reactions.
Principles
Casein is a large milk protein incapable of permeatingthe plasma membrane of bacteria. (Its presence is thereason milk is white.) Therefore, before casein can beused by some bacteria as their source of carbon andenergy, it must be degraded into amino acids. Bacteriaaccomplish this by secreting proteolytic enzymes thatcatalyze the hydrolysis of casein to yield amino acids(figure 26.1), which are then transported into the celland catabolized.
When milk is mixed with plate count agar, the ca-sein in the milk makes the agar cloudy. Following in-oculation of the plate count agar, bacteria that liberateproteases (e.g., caseinase) will produce a zone of pro-teolysis (a clear area surrounding the colony). Clear-ing of the cloudy agar (a positive reaction) is the re-sult of a hydrolytic reaction that yields soluble aminoacids (figure 26.2b). In a negative reaction, there is noprotease activity, and the medium surrounding thebacterial colony remains opaque (figure 26.2b)
161
E X E R C I S E
Proteins,Amino Acids, and Enzymes III:Casein Hydrolysis
26
SAFETY CONSIDERATIONSBe careful with the Bunsen burner flame and the waterbaths. No mouth pipetting. Keep all culture tubes up-right in a test-tube rack or in a can.

Harley−Prescott: Laboratory Exercises in Microbiology, Fifth Edition
IV. Biochemical Activities of Bacteria
26. Proteins, Amino Acids, and Enzymes III: Casein Hydrolysis
© The McGraw−Hill Companies, 2002
Procedure
First Period1. Melt the tubes of plate count agar by placing them
in the boiling water bath. After melting, place thetubes in the 48° to 50°C water bath for 10minutes.
2. With a wax pencil, mark the bottom of a petriplate into three sections: label one E. coli, thesecond, B. subtilis, and the third, P. aeruginosa.Add your name and date to the plate.
3. Pipette 2 ml of warm (48° to 50°C) sterile skimmilk into the petri plate. Add the melted agar andmix thoroughly by moving the plate in a circularmotion. Allow this medium to gel on a cool, levelsurface.
4. As shown in figure 14.3, aseptically spot-inoculate (figure 26.2a) each third of the petriplate with the appropriate bacterium as per thelabel. Place a loopful of culture on the center ofeach section and spread it in a circular fashion tocover an area about the size of a dime or less (5 to18 mm in diameter).
5. Incubate the plate in an inverted position at 35°Cfor 24 to 48 hours.
Second Period1. Examine the plate count agar for the presence or
absence of a clear zone (zone of proteolysis)surrounding the growth of each of the bacterialtest organisms. You can see the clear zones bestagainst a black background.
2. Based on your observations, determine and recordin the report for exercise 26 which of the bacteriawere capable of hydrolyzing the casein. Also,measure the zone of hydrolysis for each colony.
162 Biochemical Activities of Bacteria
Figure 26.1 Proteolytic Hydrolysis.
Protease
N
H
+
Peptide
Peptidebond
H O
C CN
H R1 R1 R2
H3N+
R2
H2O
HO
C CN
H
C C
H O
C C
H O
O–
+
Carboxylcomponent
Aminocomponent
Figure 26.2 Procedure for Determining CaseinHydrolysis. (a) Spot inoculation of a plate count agar with milkplate. (b) Plate exhibiting two zones of proteolysis.
Plate count agar
(a)
(b)
Zones ofproteolysis
0.5 cm
Bacterial growth(no proteolysis)
HINTS AND PRECAUTIONSAseptic technique must be followed because possiblecontaminating microorganisms from the air or bodymight be capable of hydrolyzing casein and thus lead toerroneous results.
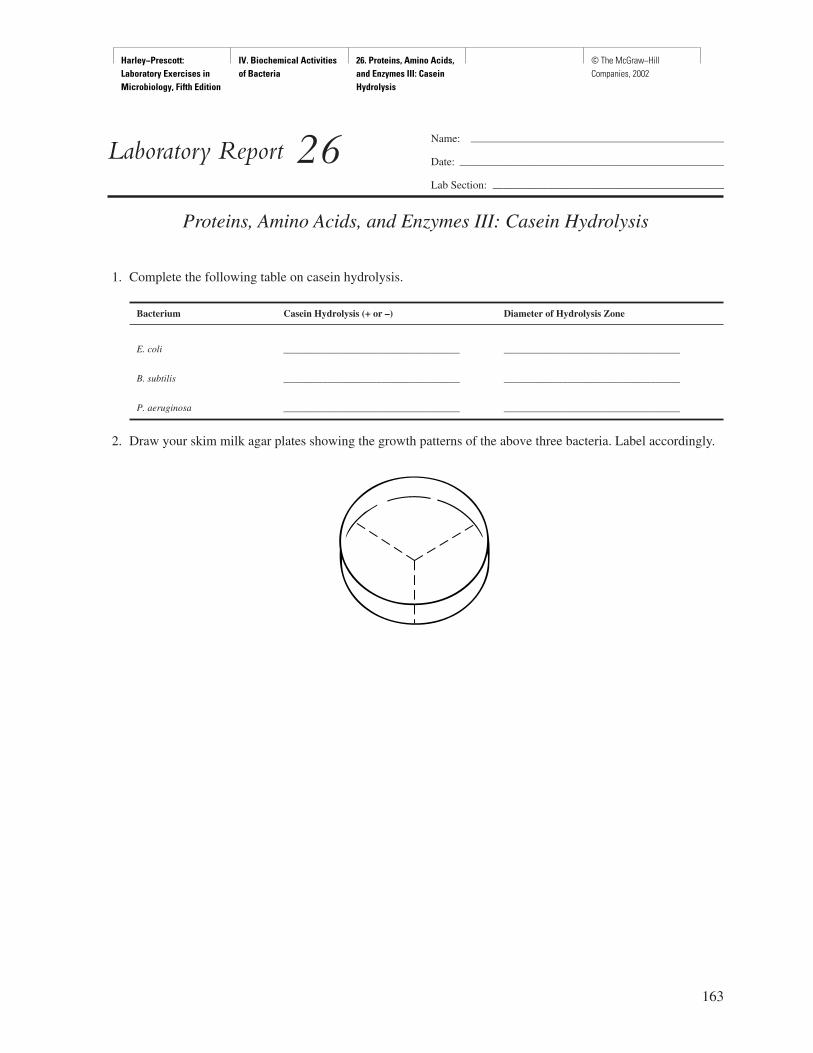
Harley−Prescott: Laboratory Exercises in Microbiology, Fifth Edition
IV. Biochemical Activities of Bacteria
26. Proteins, Amino Acids, and Enzymes III: Casein Hydrolysis
© The McGraw−Hill Companies, 2002
163
Name: ———————————————————————
Date: ————————————————————————
Lab Section: —————————————————————
Laboratory Report 26
Proteins, Amino Acids, and Enzymes III: Casein Hydrolysis
1. Complete the following table on casein hydrolysis.
Bacterium Casein Hydrolysis (+ or –) Diameter of Hydrolysis Zone
E. coli ____________________________________ ____________________________________
B. subtilis ____________________________________ ____________________________________
P. aeruginosa ____________________________________ ____________________________________
2. Draw your skim milk agar plates showing the growth patterns of the above three bacteria. Label accordingly.

Harley−Prescott: Laboratory Exercises in Microbiology, Fifth Edition
IV. Biochemical Activities of Bacteria
26. Proteins, Amino Acids, and Enzymes III: Casein Hydrolysis
© The McGraw−Hill Companies, 2002
Review Questions
1. Define the following terms:a. protein
b. hydrolysis
c. casein
d. protease
e. amino acid
f. peptide bond
g. proteolysis
2. How can plate count agar that contains milk be used to demonstrate proteolysis?
3. Why are some bacteria able to grow on plate count agar that contains milk even though they do not produceany proteases?
4. Draw the chemical reaction for proteolytic hydrolysis.
5. Why was sterile skim milk used in this experiment?
6. Why is milk white?
164 Biochemical Activities of Bacteria
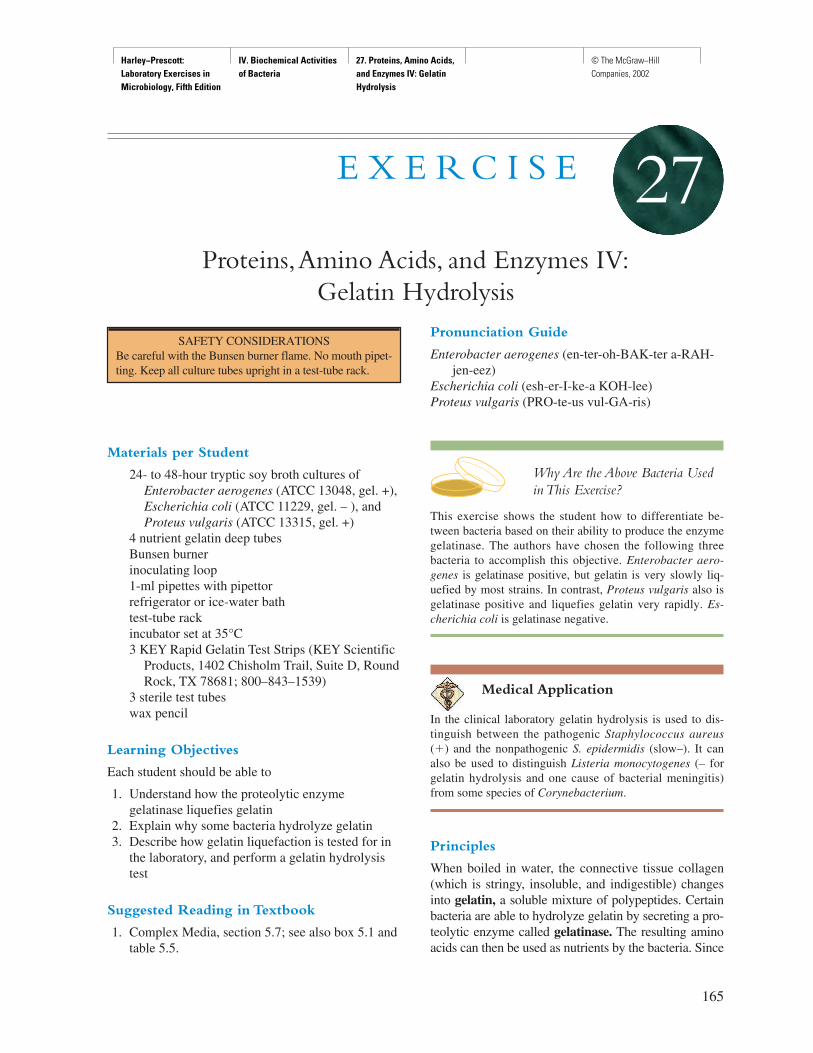
Harley−Prescott: Laboratory Exercises in Microbiology, Fifth Edition
IV. Biochemical Activities of Bacteria
27. Proteins, Amino Acids, and Enzymes IV: Gelatin Hydrolysis
© The McGraw−Hill Companies, 2002
Materials per Student
24- to 48-hour tryptic soy broth cultures ofEnterobacter aerogenes (ATCC 13048, gel. +),Escherichia coli (ATCC 11229, gel. – ), andProteus vulgaris (ATCC 13315, gel. +)
4 nutrient gelatin deep tubesBunsen burnerinoculating loop1-ml pipettes with pipettorrefrigerator or ice-water bathtest-tube rackincubator set at 35°C3 KEY Rapid Gelatin Test Strips (KEY Scientific
Products, 1402 Chisholm Trail, Suite D, RoundRock, TX 78681; 800–843–1539)
3 sterile test tubeswax pencil
Learning Objectives
Each student should be able to
1. Understand how the proteolytic enzymegelatinase liquefies gelatin
2. Explain why some bacteria hydrolyze gelatin3. Describe how gelatin liquefaction is tested for in
the laboratory, and perform a gelatin hydrolysistest
Suggested Reading in Textbook
1. Complex Media, section 5.7; see also box 5.1 andtable 5.5.
Pronunciation Guide
Enterobacter aerogenes (en-ter-oh-BAK-ter a-RAH-jen-eez)
Escherichia coli (esh-er-I-ke-a KOH-lee)Proteus vulgaris (PRO-te-us vul-GA-ris)
Why Are the Above Bacteria Usedin This Exercise?
This exercise shows the student how to differentiate be-tween bacteria based on their ability to produce the enzymegelatinase. The authors have chosen the following threebacteria to accomplish this objective. Enterobacter aero-genes is gelatinase positive, but gelatin is very slowly liq-uefied by most strains. In contrast, Proteus vulgaris also isgelatinase positive and liquefies gelatin very rapidly. Es-cherichia coli is gelatinase negative.
Medical Application
In the clinical laboratory gelatin hydrolysis is used to dis-tinguish between the pathogenic Staphylococcus aureus(�) and the nonpathogenic S. epidermidis (slow–). It canalso be used to distinguish Listeria monocytogenes (– forgelatin hydrolysis and one cause of bacterial meningitis)from some species of Corynebacterium.
Principles
When boiled in water, the connective tissue collagen(which is stringy, insoluble, and indigestible) changesinto gelatin, a soluble mixture of polypeptides. Certainbacteria are able to hydrolyze gelatin by secreting a pro-teolytic enzyme called gelatinase. The resulting aminoacids can then be used as nutrients by the bacteria. Since
165
E X E R C I S E
Proteins,Amino Acids, and Enzymes IV:Gelatin Hydrolysis
27
SAFETY CONSIDERATIONSBe careful with the Bunsen burner flame. No mouth pipet-ting. Keep all culture tubes upright in a test-tube rack.
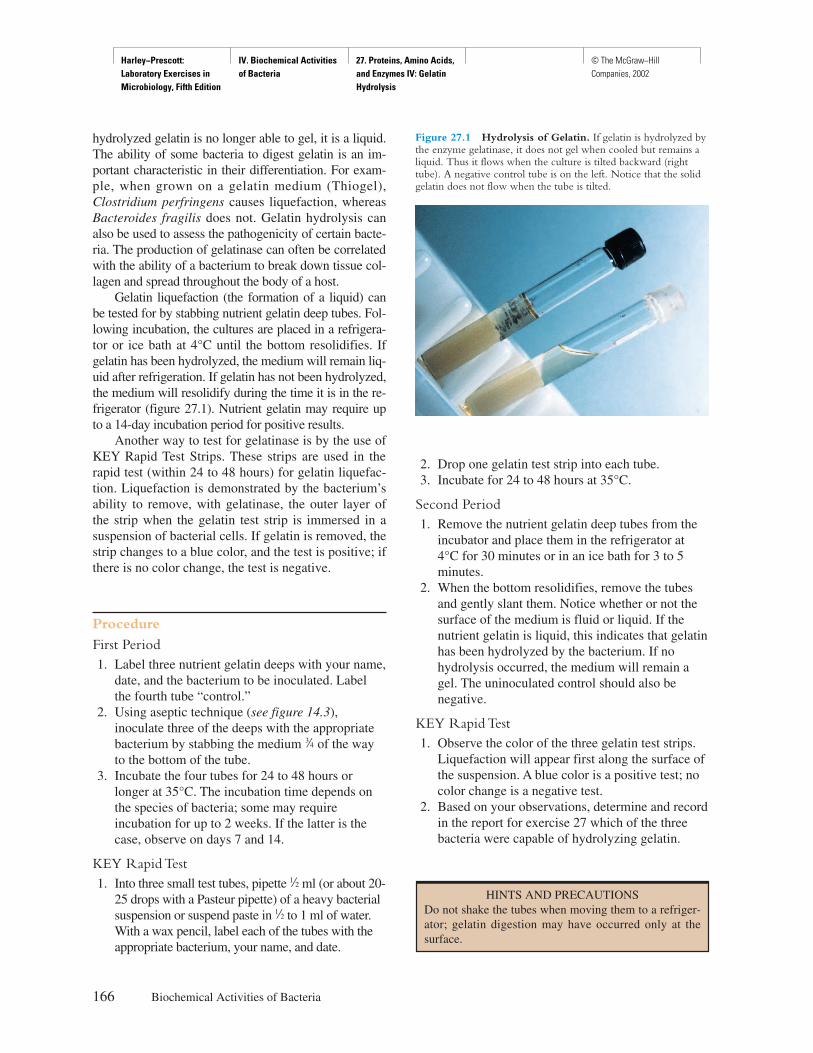
Harley−Prescott: Laboratory Exercises in Microbiology, Fifth Edition
IV. Biochemical Activities of Bacteria
27. Proteins, Amino Acids, and Enzymes IV: Gelatin Hydrolysis
© The McGraw−Hill Companies, 2002
hydrolyzed gelatin is no longer able to gel, it is a liquid.The ability of some bacteria to digest gelatin is an im-portant characteristic in their differentiation. For exam-ple, when grown on a gelatin medium (Thiogel),Clostridium perfringens causes liquefaction, whereasBacteroides fragilis does not. Gelatin hydrolysis canalso be used to assess the pathogenicity of certain bacte-ria. The production of gelatinase can often be correlatedwith the ability of a bacterium to break down tissue col-lagen and spread throughout the body of a host.
Gelatin liquefaction (the formation of a liquid) canbe tested for by stabbing nutrient gelatin deep tubes. Fol-lowing incubation, the cultures are placed in a refrigera-tor or ice bath at 4°C until the bottom resolidifies. Ifgelatin has been hydrolyzed, the medium will remain liq-uid after refrigeration. If gelatin has not been hydrolyzed,the medium will resolidify during the time it is in the re-frigerator (figure 27.1). Nutrient gelatin may require upto a 14-day incubation period for positive results.
Another way to test for gelatinase is by the use ofKEY Rapid Test Strips. These strips are used in therapid test (within 24 to 48 hours) for gelatin liquefac-tion. Liquefaction is demonstrated by the bacterium’sability to remove, with gelatinase, the outer layer ofthe strip when the gelatin test strip is immersed in asuspension of bacterial cells. If gelatin is removed, thestrip changes to a blue color, and the test is positive; ifthere is no color change, the test is negative.
Procedure
First Period1. Label three nutrient gelatin deeps with your name,
date, and the bacterium to be inoculated. Labelthe fourth tube “control.”
2. Using aseptic technique (see figure 14.3),inoculate three of the deeps with the appropriatebacterium by stabbing the medium f of the wayto the bottom of the tube.
3. Incubate the four tubes for 24 to 48 hours orlonger at 35°C. The incubation time depends onthe species of bacteria; some may requireincubation for up to 2 weeks. If the latter is thecase, observe on days 7 and 14.
KEY Rapid Test1. Into three small test tubes, pipette d ml (or about 20-
25 drops with a Pasteur pipette) of a heavy bacterialsuspension or suspend paste in d to 1 ml of water.With a wax pencil, label each of the tubes with theappropriate bacterium, your name, and date.
2. Drop one gelatin test strip into each tube.3. Incubate for 24 to 48 hours at 35°C.
Second Period1. Remove the nutrient gelatin deep tubes from the
incubator and place them in the refrigerator at 4°C for 30 minutes or in an ice bath for 3 to 5minutes.
2. When the bottom resolidifies, remove the tubesand gently slant them. Notice whether or not thesurface of the medium is fluid or liquid. If thenutrient gelatin is liquid, this indicates that gelatinhas been hydrolyzed by the bacterium. If nohydrolysis occurred, the medium will remain agel. The uninoculated control should also benegative.
KEY Rapid Test1. Observe the color of the three gelatin test strips.
Liquefaction will appear first along the surface ofthe suspension. A blue color is a positive test; nocolor change is a negative test.
2. Based on your observations, determine and recordin the report for exercise 27 which of the threebacteria were capable of hydrolyzing gelatin.
166 Biochemical Activities of Bacteria
HINTS AND PRECAUTIONSDo not shake the tubes when moving them to a refriger-ator; gelatin digestion may have occurred only at thesurface.
Figure 27.1 Hydrolysis of Gelatin. If gelatin is hydrolyzed bythe enzyme gelatinase, it does not gel when cooled but remains aliquid. Thus it flows when the culture is tilted backward (righttube). A negative control tube is on the left. Notice that the solidgelatin does not flow when the tube is tilted.
Harley−Prescott: Laboratory Exercises in Microbiology, Fifth Edition
IV. Biochemical Activities of Bacteria
27. Proteins, Amino Acids, and Enzymes IV: Gelatin Hydrolysis
© The McGraw−Hill Companies, 2002
167
Name: ———————————————————————
Date: ————————————————————————
Lab Section: —————————————————————
Laboratory Report 27
Proteins, Amino Acids, and Enzymes IV: Gelatin Hydrolysis
1. Complete the following table on gelatin hydrolysis.
Gelatin Hydrolysis (+ or –)
Bacterium Tube Results KEY Strips
E. aerogenes __________________ __________________
E. coli __________________ __________________
P. vulgaris __________________ __________________
2. Sketch and describe what is happening in each tube with respect to gelatin hydrolysis.
E. aerogenes E. coli P. vulgaris
Harley−Prescott: Laboratory Exercises in Microbiology, Fifth Edition
IV. Biochemical Activities of Bacteria
27. Proteins, Amino Acids, and Enzymes IV: Gelatin Hydrolysis
© The McGraw−Hill Companies, 2002
Review Questions
1. How can gelatin hydrolysis be beneficial to certain bacteria?
2. What is gelatin?
3. What is unique about gelatin at 35°C versus 5°C?
4. Why did you refrigerate the gelatin cultures before observing them for liquefaction?
5. Can gelatin hydrolysis be correlated with the pathogenicity of a bacterium? Explain your answer.
6. Why is gelatin liquefied in the presence of gelatinase?
7. How does a KEY Rapid Gelatin Test Strip work?
168 Biochemical Activities of Bacteria
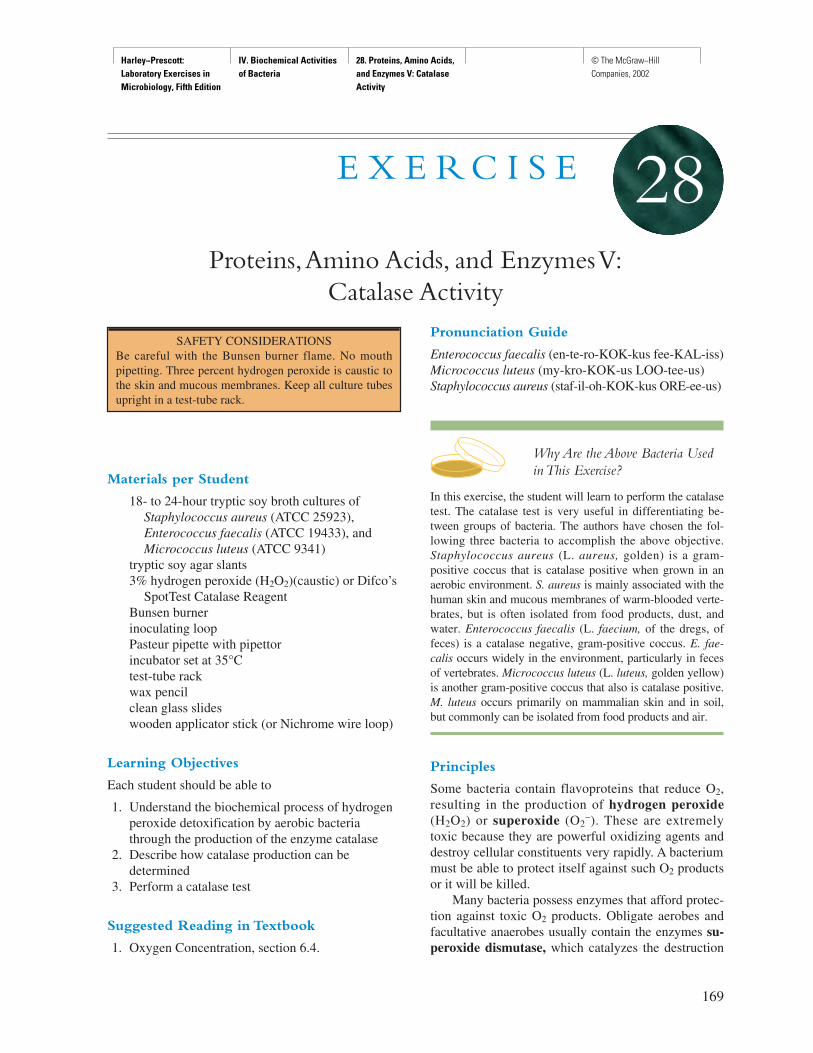
Harley−Prescott: Laboratory Exercises in Microbiology, Fifth Edition
IV. Biochemical Activities of Bacteria
28. Proteins, Amino Acids, and Enzymes V: Catalase Activity
© The McGraw−Hill Companies, 2002
Materials per Student
18- to 24-hour tryptic soy broth cultures ofStaphylococcus aureus (ATCC 25923),Enterococcus faecalis (ATCC 19433), andMicrococcus luteus (ATCC 9341)
tryptic soy agar slants3% hydrogen peroxide (H2O2)(caustic) or Difco’s
SpotTest Catalase ReagentBunsen burnerinoculating loopPasteur pipette with pipettorincubator set at 35°Ctest-tube rackwax pencilclean glass slideswooden applicator stick (or Nichrome wire loop)
Learning Objectives
Each student should be able to
1. Understand the biochemical process of hydrogenperoxide detoxification by aerobic bacteriathrough the production of the enzyme catalase
2. Describe how catalase production can bedetermined
3. Perform a catalase test
Suggested Reading in Textbook
1. Oxygen Concentration, section 6.4.
Pronunciation Guide
Enterococcus faecalis (en-te-ro-KOK-kus fee-KAL-iss)Micrococcus luteus (my-kro-KOK-us LOO-tee-us)Staphylococcus aureus (staf-il-oh-KOK-kus ORE-ee-us)
Why Are the Above Bacteria Usedin This Exercise?
In this exercise, the student will learn to perform the catalasetest. The catalase test is very useful in differentiating be-tween groups of bacteria. The authors have chosen the fol-lowing three bacteria to accomplish the above objective.Staphylococcus aureus (L. aureus, golden) is a gram-positive coccus that is catalase positive when grown in anaerobic environment. S. aureus is mainly associated with thehuman skin and mucous membranes of warm-blooded verte-brates, but is often isolated from food products, dust, andwater. Enterococcus faecalis (L. faecium, of the dregs, offeces) is a catalase negative, gram-positive coccus. E. fae-calis occurs widely in the environment, particularly in fecesof vertebrates. Micrococcus luteus (L. luteus, golden yellow)is another gram-positive coccus that also is catalase positive.M. luteus occurs primarily on mammalian skin and in soil,but commonly can be isolated from food products and air.
Principles
Some bacteria contain flavoproteins that reduce O2,resulting in the production of hydrogen peroxide(H2O2) or superoxide (O2
–). These are extremelytoxic because they are powerful oxidizing agents anddestroy cellular constituents very rapidly. A bacteriummust be able to protect itself against such O2 productsor it will be killed.
Many bacteria possess enzymes that afford protec-tion against toxic O2 products. Obligate aerobes andfacultative anaerobes usually contain the enzymes su-peroxide dismutase, which catalyzes the destruction
169
E X E R C I S E
Proteins,Amino Acids, and Enzymes V:Catalase Activity
28
SAFETY CONSIDERATIONSBe careful with the Bunsen burner flame. No mouthpipetting. Three percent hydrogen peroxide is caustic tothe skin and mucous membranes. Keep all culture tubesupright in a test-tube rack.
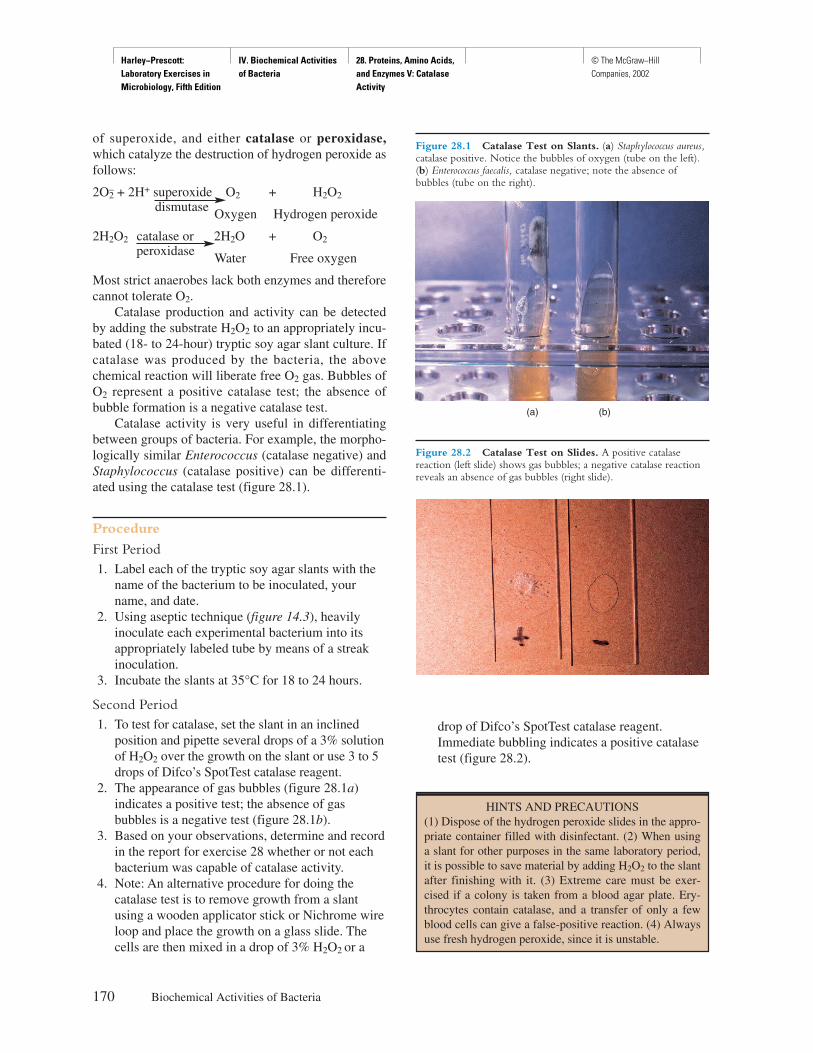
Harley−Prescott: Laboratory Exercises in Microbiology, Fifth Edition
IV. Biochemical Activities of Bacteria
28. Proteins, Amino Acids, and Enzymes V: Catalase Activity
© The McGraw−Hill Companies, 2002
of superoxide, and either catalase or peroxidase,which catalyze the destruction of hydrogen peroxide asfollows:
2O–2 + 2H+ superoxide O2 + H2O2
dismutase Oxygen Hydrogen peroxide
2H2O2 catalase or 2H2O + O2peroxidase Water Free oxygen
Most strict anaerobes lack both enzymes and thereforecannot tolerate O2.
Catalase production and activity can be detectedby adding the substrate H2O2 to an appropriately incu-bated (18- to 24-hour) tryptic soy agar slant culture. Ifcatalase was produced by the bacteria, the abovechemical reaction will liberate free O2 gas. Bubbles ofO2 represent a positive catalase test; the absence ofbubble formation is a negative catalase test.
Catalase activity is very useful in differentiatingbetween groups of bacteria. For example, the morpho-logically similar Enterococcus (catalase negative) andStaphylococcus (catalase positive) can be differenti-ated using the catalase test (figure 28.1).
Procedure
First Period1. Label each of the tryptic soy agar slants with the
name of the bacterium to be inoculated, yourname, and date.
2. Using aseptic technique (figure 14.3), heavilyinoculate each experimental bacterium into itsappropriately labeled tube by means of a streakinoculation.
3. Incubate the slants at 35°C for 18 to 24 hours.
Second Period1. To test for catalase, set the slant in an inclined
position and pipette several drops of a 3% solutionof H2O2 over the growth on the slant or use 3 to 5drops of Difco’s SpotTest catalase reagent.
2. The appearance of gas bubbles (figure 28.1a)indicates a positive test; the absence of gasbubbles is a negative test (figure 28.1b).
3. Based on your observations, determine and recordin the report for exercise 28 whether or not eachbacterium was capable of catalase activity.
4. Note: An alternative procedure for doing thecatalase test is to remove growth from a slantusing a wooden applicator stick or Nichrome wireloop and place the growth on a glass slide. Thecells are then mixed in a drop of 3% H2O2 or a
drop of Difco’s SpotTest catalase reagent.Immediate bubbling indicates a positive catalasetest (figure 28.2).
170 Biochemical Activities of Bacteria
Figure 28.1 Catalase Test on Slants. (a) Staphylococcus aureus,catalase positive. Notice the bubbles of oxygen (tube on the left).(b) Enterococcus faecalis, catalase negative; note the absence ofbubbles (tube on the right).
Figure 28.2 Catalase Test on Slides. A positive catalasereaction (left slide) shows gas bubbles; a negative catalase reactionreveals an absence of gas bubbles (right slide).
(a) (b)
HINTS AND PRECAUTIONS(1) Dispose of the hydrogen peroxide slides in the appro-priate container filled with disinfectant. (2) When usinga slant for other purposes in the same laboratory period,it is possible to save material by adding H2O2 to the slantafter finishing with it. (3) Extreme care must be exer-cised if a colony is taken from a blood agar plate. Ery-throcytes contain catalase, and a transfer of only a fewblood cells can give a false-positive reaction. (4) Alwaysuse fresh hydrogen peroxide, since it is unstable.
Harley−Prescott: Laboratory Exercises in Microbiology, Fifth Edition
IV. Biochemical Activities of Bacteria
28. Proteins, Amino Acids, and Enzymes V: Catalase Activity
© The McGraw−Hill Companies, 2002
171
Name: ———————————————————————
Date: ————————————————————————
Lab Section: —————————————————————
Laboratory Report 28
Proteins, Amino Acids, and Enzymes V: Catalase Activity
1. Complete the following table on catalase activity.
Bacterium Presence of Bubbling (catalase positive) Absence of Bubbling (catalase negative)
E. faecalis ____________________________________ ____________________________________
S. aureus ____________________________________ ____________________________________
M. luteus ____________________________________ ____________________________________
Harley−Prescott: Laboratory Exercises in Microbiology, Fifth Edition
IV. Biochemical Activities of Bacteria
28. Proteins, Amino Acids, and Enzymes V: Catalase Activity
© The McGraw−Hill Companies, 2002
Review Questions
1. What is the importance of catalase to certain bacteria?
2. Do anaerobic bacteria require catalase? Explain your answer.
3. Write a balanced equation for the degradation of H2O2 in the presence of catalase.
4. What two groups of bacteria can be differentiated with the catalase test?
5. What are three products that result when flavoproteins reduce O2?a.
b.
c.
6. What are several bacteria that produce catalase?
7. What is the substrate of the catalase reaction?
172 Biochemical Activities of Bacteria
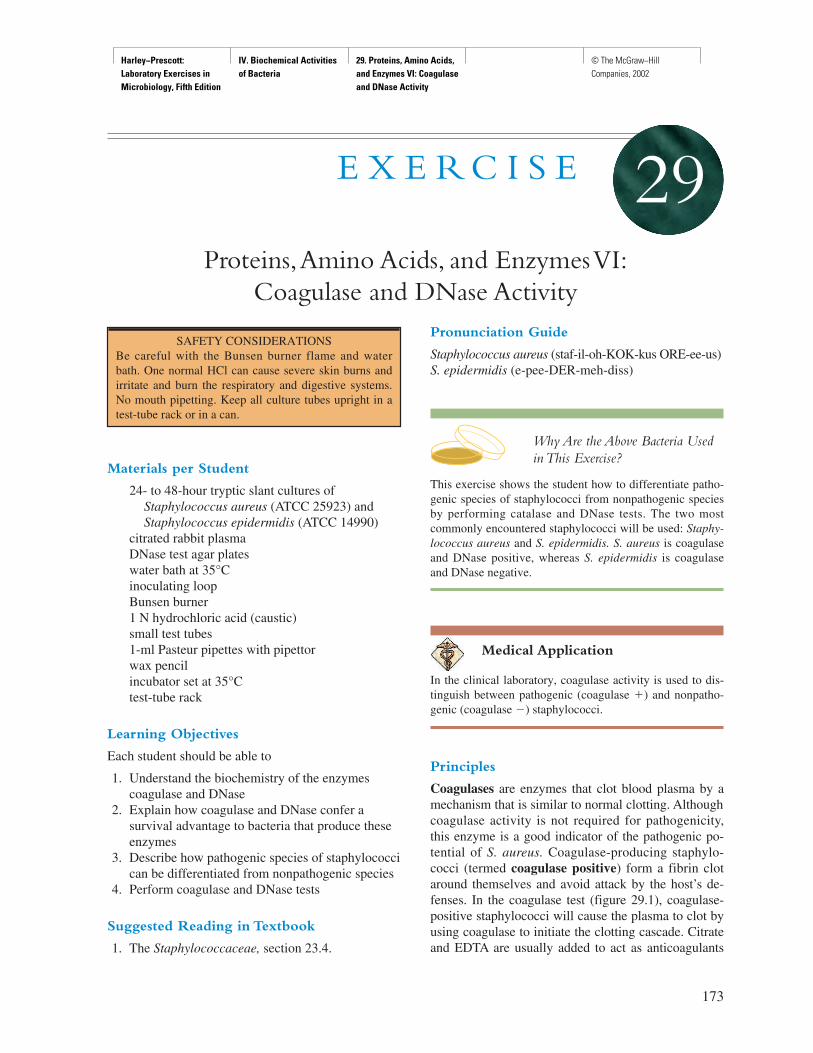
Harley−Prescott: Laboratory Exercises in Microbiology, Fifth Edition
IV. Biochemical Activities of Bacteria
29. Proteins, Amino Acids, and Enzymes VI: Coagulase and DNase Activity
© The McGraw−Hill Companies, 2002
Materials per Student
24- to 48-hour tryptic slant cultures ofStaphylococcus aureus (ATCC 25923) andStaphylococcus epidermidis (ATCC 14990)
citrated rabbit plasmaDNase test agar plateswater bath at 35°Cinoculating loopBunsen burner1 N hydrochloric acid (caustic)small test tubes1-ml Pasteur pipettes with pipettorwax pencilincubator set at 35°Ctest-tube rack
Learning Objectives
Each student should be able to
1. Understand the biochemistry of the enzymescoagulase and DNase
2. Explain how coagulase and DNase confer asurvival advantage to bacteria that produce theseenzymes
3. Describe how pathogenic species of staphylococcican be differentiated from nonpathogenic species
4. Perform coagulase and DNase tests
Suggested Reading in Textbook
1. The Staphylococcaceae, section 23.4.
Pronunciation Guide
Staphylococcus aureus (staf-il-oh-KOK-kus ORE-ee-us)S. epidermidis (e-pee-DER-meh-diss)
Why Are the Above Bacteria Usedin This Exercise?
This exercise shows the student how to differentiate patho-genic species of staphylococci from nonpathogenic speciesby performing catalase and DNase tests. The two mostcommonly encountered staphylococci will be used: Staphy-lococcus aureus and S. epidermidis. S. aureus is coagulaseand DNase positive, whereas S. epidermidis is coagulaseand DNase negative.
Medical Application
In the clinical laboratory, coagulase activity is used to dis-tinguish between pathogenic (coagulase �) and nonpatho-genic (coagulase �) staphylococci.
Principles
Coagulases are enzymes that clot blood plasma by amechanism that is similar to normal clotting. Althoughcoagulase activity is not required for pathogenicity,this enzyme is a good indicator of the pathogenic po-tential of S. aureus. Coagulase-producing staphylo-cocci (termed coagulase positive) form a fibrin clotaround themselves and avoid attack by the host’s de-fenses. In the coagulase test (figure 29.1), coagulase-positive staphylococci will cause the plasma to clot byusing coagulase to initiate the clotting cascade. Citrateand EDTA are usually added to act as anticoagulants
173
E X E R C I S E
Proteins,Amino Acids, and Enzymes VI:Coagulase and DNase Activity
29
SAFETY CONSIDERATIONSBe careful with the Bunsen burner flame and waterbath. One normal HCl can cause severe skin burns andirritate and burn the respiratory and digestive systems.No mouth pipetting. Keep all culture tubes upright in atest-tube rack or in a can.
Harley−Prescott: Laboratory Exercises in Microbiology, Fifth Edition
IV. Biochemical Activities of Bacteria
29. Proteins, Amino Acids, and Enzymes VI: Coagulase and DNase Activity
© The McGraw−Hill Companies, 2002
and prevent false-positive results. Cultures should beconsidered coagulase negative if they are unclottedafter 4 hours.
In addition to coagulase production, most patho-genic strains of staphylococci produce a nuclease en-zyme called DNase. DNase degrades host DNA andincreases the pathogenicity of staphylococci that pos-sess it. To demonstrate the presence of DNase, agarcontaining dissolved DNA is spot-inoculated withstaphylococci. A zone of clearing around the colonyindicates a positive DNase test. This clearing occursbecause the large DNA molecule has been degraded bythe enzyme, and the end products dissolve in the addedacid. Intact DNA does not dissolve in weak acid butrather is precipitated by it; thus, the medium aroundcolonies that do not produce DNase becomes opaque.
Procedure
First Period
Coagulase Test
1. Add 0.5 ml of citrated rabbit plasma to twosmall test tubes. With the wax pencil, label thetubes with the respective bacteria, your name,and date.
2. Inoculate one tube with enough S. aureus paste tomake a cloudy suspension. Inoculate the othertube with S. epidermidis. Alternatively, one canadd about 5 drops of thick 18- to 24-hour brothculture to each tube.
3. Incubate both tubes at 35°C for 1 to 4 hours in awater bath. Afterward, examine both tubes for thepresence or absence of clouding and clots.
174 Biochemical Activities of Bacteria
Pipette 0.5 mlof citrated
rabbit plasmainto each
tube
Inoculate withS. aureus
Inoculate withS. epidermidis
Incubate at37°C for 1 hour
Figure 29.1 Steps in the Coagulase Test. (a) Positive reaction is indicated by clouding and solidification of plasma due to Staphylococcusaureus. (b) Negative reaction with coagulase-negative Staphylococcus epidermidis.
(a) (b)
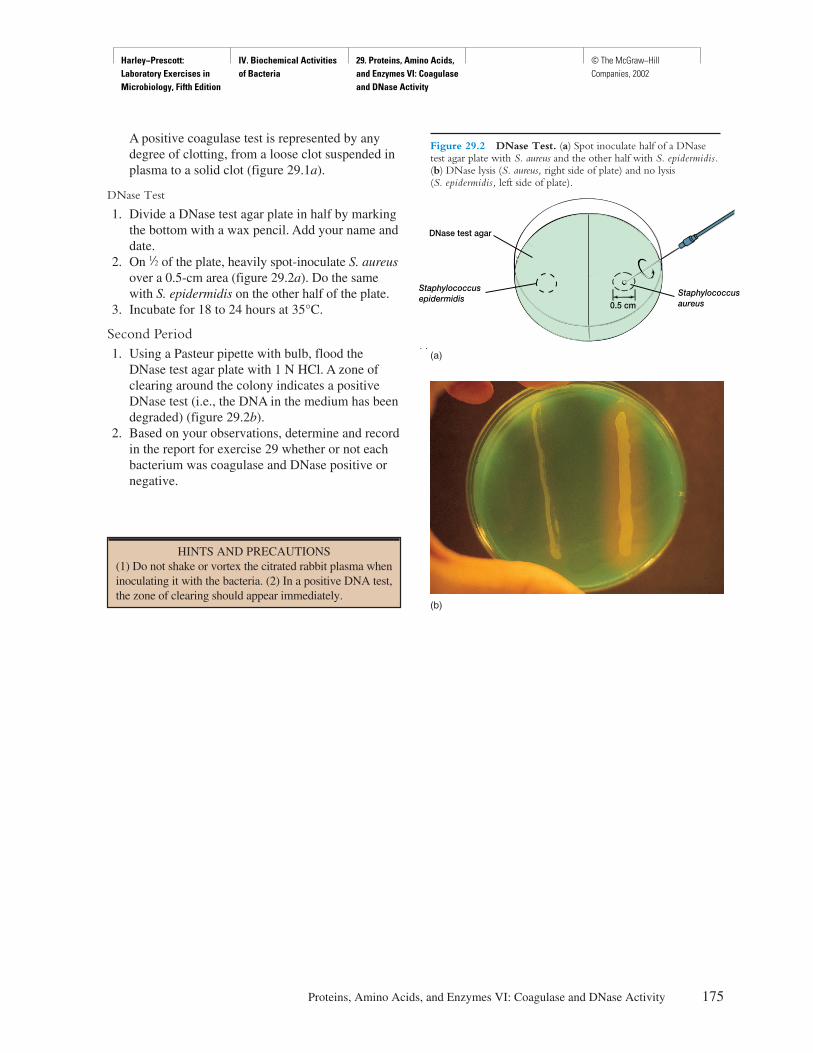
Harley−Prescott: Laboratory Exercises in Microbiology, Fifth Edition
IV. Biochemical Activities of Bacteria
29. Proteins, Amino Acids, and Enzymes VI: Coagulase and DNase Activity
© The McGraw−Hill Companies, 2002
A positive coagulase test is represented by anydegree of clotting, from a loose clot suspended inplasma to a solid clot (figure 29.1a).
DNase Test
1. Divide a DNase test agar plate in half by markingthe bottom with a wax pencil. Add your name anddate.
2. On d of the plate, heavily spot-inoculate S. aureusover a 0.5-cm area (figure 29.2a). Do the samewith S. epidermidis on the other half of the plate.
3. Incubate for 18 to 24 hours at 35°C.
Second Period1. Using a Pasteur pipette with bulb, flood the
DNase test agar plate with 1 N HCl. A zone ofclearing around the colony indicates a positiveDNase test (i.e., the DNA in the medium has beendegraded) (figure 29.2b).
2. Based on your observations, determine and recordin the report for exercise 29 whether or not eachbacterium was coagulase and DNase positive ornegative.
Proteins, Amino Acids, and Enzymes VI: Coagulase and DNase Activity 175
Figure 29.2 DNase Test. (a) Spot inoculate half of a DNasetest agar plate with S. aureus and the other half with S. epidermidis.(b) DNase lysis (S. aureus, right side of plate) and no lysis (S. epidermidis, left side of plate).
DNase test agar
0.5 cm
( )
Staphylococcusepidermidis
Staphylococcusaureus
(b)
(a)
HINTS AND PRECAUTIONS(1) Do not shake or vortex the citrated rabbit plasma wheninoculating it with the bacteria. (2) In a positive DNA test,the zone of clearing should appear immediately.
Harley−Prescott: Laboratory Exercises in Microbiology, Fifth Edition
IV. Biochemical Activities of Bacteria
29. Proteins, Amino Acids, and Enzymes VI: Coagulase and DNase Activity
© The McGraw−Hill Companies, 2002
177
Name: ———————————————————————
Date: ————————————————————————
Lab Section: —————————————————————
Laboratory Report 29
Proteins, Amino Acids, and Enzymes VI: Coagulase and DNase Activity
1. Complete the following table on coagulase and DNase activity.
Biochemical Results S. aureus S. epidermidis
Coagulase test (+ or –) ________________________ ________________________
DNase test (+ or –) ________________________ ________________________
2. Make a drawing of your DNase test agar plate observations.
Harley−Prescott: Laboratory Exercises in Microbiology, Fifth Edition
IV. Biochemical Activities of Bacteria
29. Proteins, Amino Acids, and Enzymes VI: Coagulase and DNase Activity
© The McGraw−Hill Companies, 2002
Review Questions
1. How does the enzyme coagulase function?
2. How does the enzyme DNase function?
3. False-positive coagulase tests have been reported for some bacteria that can metabolize citrate. Explain.
4. Does a coagulase-positive staphylococcus also have to be DNase positive? Explain why or why not.
5. What is the function of the 1 N HCl added to the DNase plates after incubation?
6. Describe a positive DNase test.
7. Describe a negative DNase test.
178 Biochemical Activities of Bacteria
Harley−Prescott: Laboratory Exercises in Microbiology, Fifth Edition
IV. Biochemical Activities of Bacteria
30. Proteins, Amino Acids, and Enzymes VII: Oxidase Test
© The McGraw−Hill Companies, 2002
Materials per Student
young 24-hour tryptic soy broth cultures ofAlcaligenes faecalis (ATCC 8750),Escherichia coli (ATCC 25922), andPseudomonas aeruginosa (ATCC 27853)
tryptic soy agar platestetramethyl-p-phenylenediamine dihydrochloride
(oxidase reagent)Bunsen burnerplatinum or plastic loopswax pencilPasteur pipette with pipettorOxidase Disks or Dry Slides (Difco); Oxidase
Test Strips (KEY Scientific Products); SpotTestOxidase Reagent (Difco)
wooden applicator sticksWhatman No. 2 filter paper
Learning Objectives
Each student should be able to
1. Understand the biochemistry underlying oxidaseenzymes
2. Describe the experimental procedure that enablesone to distinguish between groups of bacteriabased on cytochrome oxidase activity
3. Give examples of oxidase-positive and oxidase-negative bacteria
4. Perform an oxidase test
Suggested Reading in Textbook
1. The Electron Transport Chain, section 9.5; seealso figures 9.13–9.15.
2. Rapid Methods of Identification, section 36.2; seealso table 36.3.
Pronunciation Guide
Alcaligenes faecalis (al-kah-LIJ-e-neez fee-KAL-iss)Escherichia coli (esh-er-I-ke-a KOH-lee)Pseudomonas aeruginosa (soo-do-MO-nas a-ruh-jin-
OH-sah)
Why Are the Above Bacteria Usedin This Exercise?
This exercise gives the student experience in performingthe oxidase test. The oxidase test distinguishes betweengroups of bacteria based on cytochrome oxidase activity.Three bacteria will be used. Alcaligenes faecalis (L. fae-cium, of the dregs, of feces) is a gram-negative, aerobicrod (coccal rod or coccus) that possesses a strictly respi-ratory type of metabolism with oxygen as the terminalelectron acceptor. It is thus oxidase positive. Escherichiacoli is a facultatively anaerobic gram-negative rod thathas both respiratory and fermentative types of metabo-lism and isoxidase negative. Pseudomonas aeruginosa isa gram-negative, aerobic rod having a strictly respiratorytype of metabolism with oxygen as the terminal electronacceptor and thus is oxidase positive.
179
E X E R C I S E
Proteins,Amino Acids, and Enzymes VII: Oxidase Test
30
SAFETY CONSIDERATIONSBe careful with the Bunsen burner flame. No mouthpipetting. The oxidase reagent is caustic. Avoid contactwith eyes and skin. In case of contact, immediately flusheyes or skin with plenty of water for at least 15 minutes.
Harley−Prescott: Laboratory Exercises in Microbiology, Fifth Edition
IV. Biochemical Activities of Bacteria
30. Proteins, Amino Acids, and Enzymes VII: Oxidase Test
© The McGraw−Hill Companies, 2002
Medical Application
The oxidase test is a useful procedure in the clinical labora-tory because some gram-negative pathogenic species of bac-teria (such as Neisseria gonorrhoeae, P. aeruginosa, andVibrio species) are oxidase positive, in contrast to species inthe family Enterobacteriaceae, which are oxidase negative.
Principles
Oxidase enzymes play an important role in the opera-tion of the electron transport system during aerobic res-piration. Cytochrome oxidase (aa3 type) uses O2 as anelectron acceptor during the oxidation of reduced cy-tochrome c to form water and oxidized cytochrome c.
The ability of bacteria to produce cytochrome ox-idase can be determined by the addition of the oxidasetest reagent or test strip (tetramethyl-p-phenylenedi-amine dihydrochloride or an Oxidase Disk, p-amino-dimethylaniline) to colonies that have grown on aplate medium. Or, using a wooden applicator stick, abacterial sample can either be rubbed on a Dry SlideOxidase reaction area, on a KEY test strip, or filterpaper moistened with the oxidase reagent. The lightpink oxidase test reagent (Disk, strip, or Slide) servesas an artificial substrate, donating electrons to cy-tochrome oxidase and in the process becoming oxi-dized to a purple and then dark purple (figure 30.1)compound in the presence of free O2 and the oxidase.The presence of this dark purple coloration representsa positive test. No color change or a light pink col-oration on the colonies indicates the absence of oxi-dase and is a negative test.
Procedure
First Period1. With a wax pencil, divide the bottom of a tryptic
soy agar plate into three sections and label each
with the name of the bacterium to be inoculated,your name, and date.
2. Using aseptic technique (see figure 14.3), make asingle streak-line inoculation on the agar surfacewith the appropriate bacterium.
3. Incubate the plate in an inverted position for 24 to47 hours at 35°C.
Second Period1. Add 2 to 3 drops of the oxidase reagent to the
surface of the growth of several isolated coloniesof each test bacterium or to some paste that hasbeen transferred to a piece of filter paper. Usinganother colony, place an Oxidase Disk on it. Add adrop of sterile water. If Dry Slides or test strips areavailable, use a wooden applicator stick to transfera sample to the slide, test strip, or filter papermoistened with oxidase reagent. Alternatively, dropa KEY oxidase test strip onto the surface of a slantculture and moisten it with water if necessary.
2. Observe the colony or sample for the presence orabsence of a color change from pink to purple,and finally to dark purple. This color change willoccur within 20 to 30 seconds. Color changesafter 20 to 30 seconds are usually disregardedsince the reagent begins to change color with timedue to auto-oxidation. Oxidase-negative bacteriawill not produce a color change or will produce alight pink color.
3. Based on your observations, determine and recordin the report for exercise 30 whether or not eachbacterium was capable of producing oxidase.
180 Biochemical Activities of Bacteria
HINTS AND PRECAUTIONS (1) Students should note the color change immediatelyfollowing the addition of oxidase reagent. Color changesafter 20 seconds are not valid. (2) Using Nichrome orother iron-containing inoculating devices may causefalse-positive reactions. (3) If bacterial paste is trans-ferred with an applicator stick, put the stick in a jar ofdisinfectant or a Biohazard bag immediately after use.

Harley−Prescott: Laboratory Exercises in Microbiology, Fifth Edition
IV. Biochemical Activities of Bacteria
30. Proteins, Amino Acids, and Enzymes VII: Oxidase Test
© The McGraw−Hill Companies, 2002
Proteins, Amino Acids, and Enzymes VII: Oxidase Test 181
Figure 30.1 Oxidase Test. Note the purple to dark purple color after the colonies have been added to filter paper moistened withoxidase reagent.
2 reduced cytochrome c + 2H+ + 2 oxidized cytochrome c + H2O1/2 O2
2 oxidized cytochrome c + + 2 reduced cytochrome c
N
N
Wurster's blue(dark purple)
Biochemistry within bacteria
Biochemistry on filter paper (disk/slide)
cytochrome
oxidase
H3C CH3 H3C CH3
H3C CH3 H3C CH3
N+
N+
Tetramethyl-p-phenylenediamine(reagent)
Harley−Prescott: Laboratory Exercises in Microbiology, Fifth Edition
IV. Biochemical Activities of Bacteria
30. Proteins, Amino Acids, and Enzymes VII: Oxidase Test
© The McGraw−Hill Companies, 2002
183
Name: ———————————————————————
Date: ————————————————————————
Lab Section: —————————————————————
Laboratory Report 30
Proteins, Amino Acids, and Enzymes VII: Oxidase Test
1. Complete the following table on the oxidase test.
Color of Colonies after Adding Oxidase Production (+ or –)
Bacterium Reagent Disk or Slide Reagent Disk or Slide
A. faecalis ____________ ____________ ____________ ____________
E. coli ____________ ____________ ____________ ____________
P. aeruginosa ____________ ____________ ____________ ____________

Harley−Prescott: Laboratory Exercises in Microbiology, Fifth Edition
IV. Biochemical Activities of Bacteria
30. Proteins, Amino Acids, and Enzymes VII: Oxidase Test
© The McGraw−Hill Companies, 2002
Review Questions
1. What metabolic property characterizes bacteria that possess oxidase activity?
2. What is the importance of cytochrome oxidase to bacteria that possess it?
3. Do anaerobic bacteria require oxidase? Explain your answer.
4. What is the function of the test reagent in the oxidase test?
5. The oxidase test is used to differentiate among which groups of bacteria?
6. Why should nichrome or other iron-containing inoculating devices not be used in the oxidase test?
7. Are there limitations to the oxidase test?
184 Biochemical Activities of Bacteria
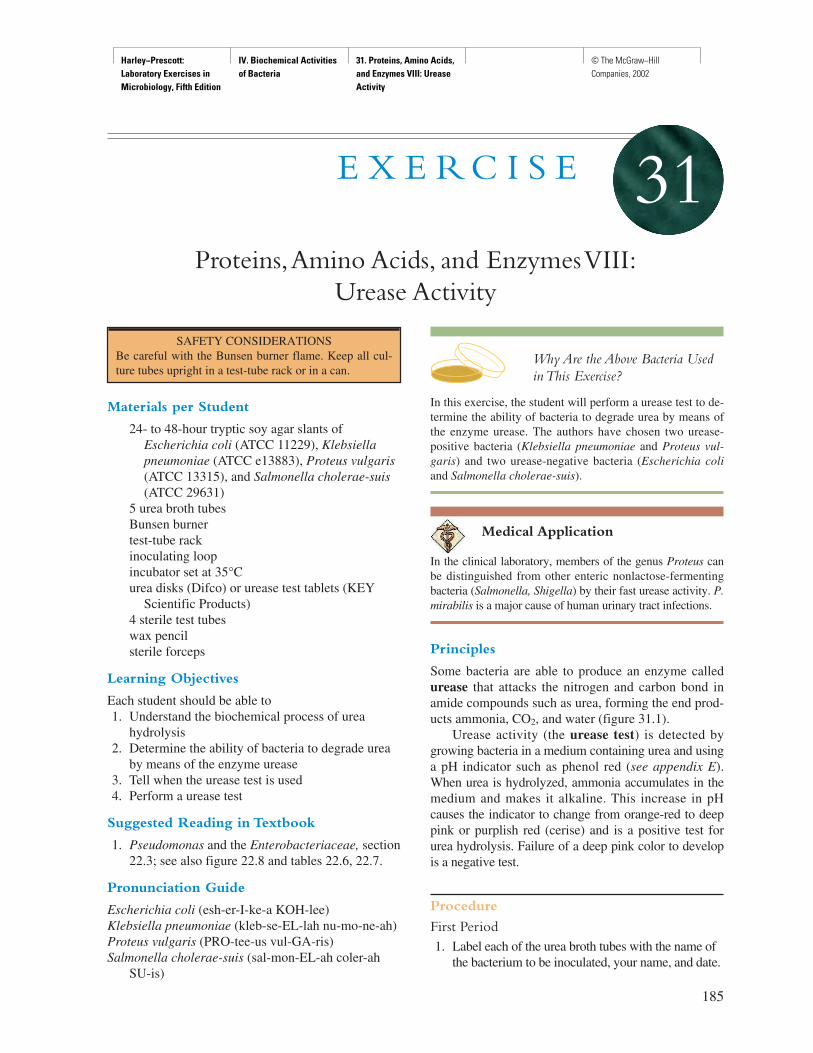
Harley−Prescott: Laboratory Exercises in Microbiology, Fifth Edition
IV. Biochemical Activities of Bacteria
31. Proteins, Amino Acids, and Enzymes VIII: Urease Activity
© The McGraw−Hill Companies, 2002
Materials per Student
24- to 48-hour tryptic soy agar slants ofEscherichia coli (ATCC 11229), Klebsiellapneumoniae (ATCC e13883), Proteus vulgaris(ATCC 13315), and Salmonella cholerae-suis(ATCC 29631)
5 urea broth tubesBunsen burnertest-tube rackinoculating loopincubator set at 35°Curea disks (Difco) or urease test tablets (KEY
Scientific Products)4 sterile test tubeswax pencilsterile forceps
Learning Objectives
Each student should be able to1. Understand the biochemical process of urea
hydrolysis2. Determine the ability of bacteria to degrade urea
by means of the enzyme urease3. Tell when the urease test is used4. Perform a urease test
Suggested Reading in Textbook
1. Pseudomonas and the Enterobacteriaceae, section22.3; see also figure 22.8 and tables 22.6, 22.7.
Pronunciation Guide
Escherichia coli (esh-er-I-ke-a KOH-lee)Klebsiella pneumoniae (kleb-se-EL-lah nu-mo-ne-ah)Proteus vulgaris (PRO-tee-us vul-GA-ris)Salmonella cholerae-suis (sal-mon-EL-ah coler-ah
SU-is)
Why Are the Above Bacteria Usedin This Exercise?
In this exercise, the student will perform a urease test to de-termine the ability of bacteria to degrade urea by means ofthe enzyme urease. The authors have chosen two urease-positive bacteria (Klebsiella pneumoniae and Proteus vul-garis) and two urease-negative bacteria (Escherichia coliand Salmonella cholerae-suis).
Medical Application
In the clinical laboratory, members of the genus Proteus canbe distinguished from other enteric nonlactose-fermentingbacteria (Salmonella, Shigella) by their fast urease activity. P.mirabilis is a major cause of human urinary tract infections.
Principles
Some bacteria are able to produce an enzyme calledurease that attacks the nitrogen and carbon bond inamide compounds such as urea, forming the end prod-ucts ammonia, CO2, and water (figure 31.1).
Urease activity (the urease test) is detected bygrowing bacteria in a medium containing urea and usinga pH indicator such as phenol red (see appendix E).When urea is hydrolyzed, ammonia accumulates in themedium and makes it alkaline. This increase in pHcauses the indicator to change from orange-red to deeppink or purplish red (cerise) and is a positive test forurea hydrolysis. Failure of a deep pink color to developis a negative test.
Procedure
First Period1. Label each of the urea broth tubes with the name of
the bacterium to be inoculated, your name, and date.
185
E X E R C I S E
Proteins,Amino Acids, and Enzymes VIII:Urease Activity
31
SAFETY CONSIDERATIONSBe careful with the Bunsen burner flame. Keep all cul-ture tubes upright in a test-tube rack or in a can.
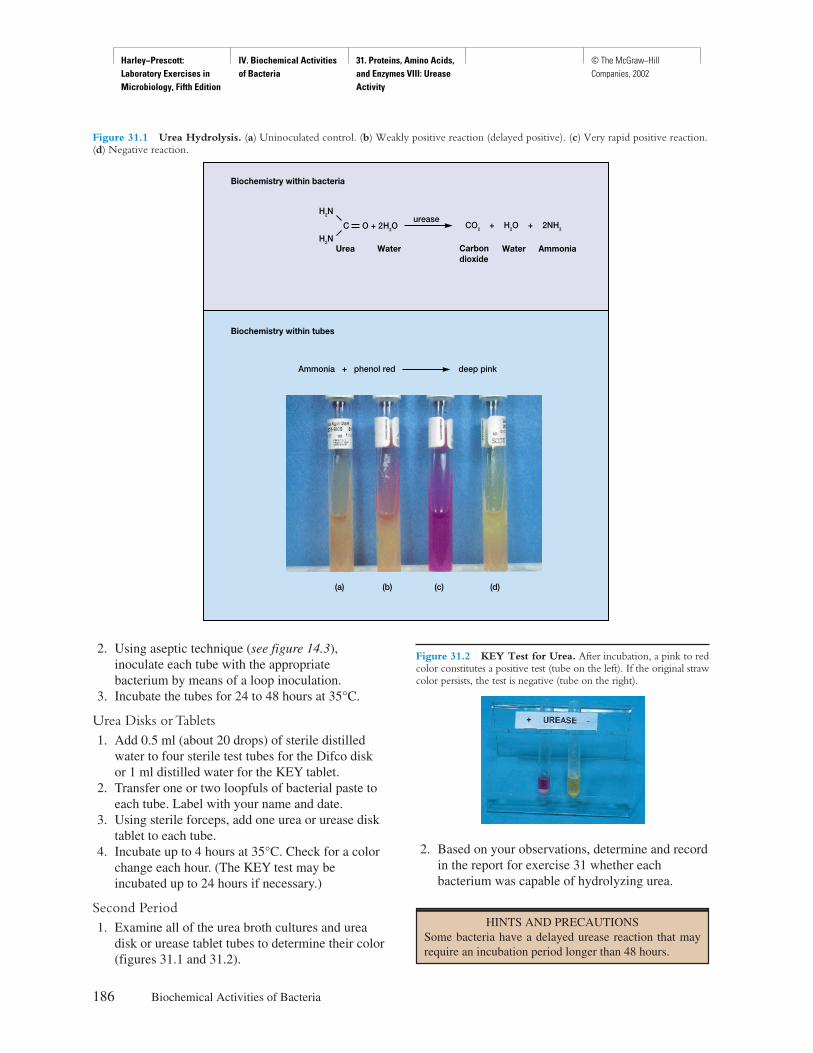
Harley−Prescott: Laboratory Exercises in Microbiology, Fifth Edition
IV. Biochemical Activities of Bacteria
31. Proteins, Amino Acids, and Enzymes VIII: Urease Activity
© The McGraw−Hill Companies, 2002
2. Using aseptic technique (see figure 14.3),inoculate each tube with the appropriatebacterium by means of a loop inoculation.
3. Incubate the tubes for 24 to 48 hours at 35°C.
Urea Disks or Tablets1. Add 0.5 ml (about 20 drops) of sterile distilled
water to four sterile test tubes for the Difco diskor 1 ml distilled water for the KEY tablet.
2. Transfer one or two loopfuls of bacterial paste toeach tube. Label with your name and date.
3. Using sterile forceps, add one urea or urease disktablet to each tube.
4. Incubate up to 4 hours at 35°C. Check for a colorchange each hour. (The KEY test may beincubated up to 24 hours if necessary.)
Second Period1. Examine all of the urea broth cultures and urea
disk or urease tablet tubes to determine their color(figures 31.1 and 31.2).
2. Based on your observations, determine and recordin the report for exercise 31 whether eachbacterium was capable of hydrolyzing urea.
186 Biochemical Activities of Bacteria
HINTS AND PRECAUTIONSSome bacteria have a delayed urease reaction that mayrequire an incubation period longer than 48 hours.
Figure 31.1 Urea Hydrolysis. (a) Uninoculated control. (b) Weakly positive reaction (delayed positive). (c) Very rapid positive reaction.(d) Negative reaction.
Ammonia + phenol red
Biochemistry within tubes
Biochemistry within bacteria
Water
ureaseCO2 + H2O + 2NH3
Carbondioxide
AmmoniaWaterUrea
C
deep pink
(c)(b)(a) (d)
H2N
O + 2H2OH2N
Figure 31.2 KEY Test for Urea. After incubation, a pink to redcolor constitutes a positive test (tube on the left). If the original strawcolor persists, the test is negative (tube on the right).
Harley−Prescott: Laboratory Exercises in Microbiology, Fifth Edition
IV. Biochemical Activities of Bacteria
31. Proteins, Amino Acids, and Enzymes VIII: Urease Activity
© The McGraw−Hill Companies, 2002
187
Name: ———————————————————————
Date: ————————————————————————
Lab Section: —————————————————————
Laboratory Report 31
Proteins, Amino Acids, and Enzymes VIII: Urease Activity
1. Complete the following table on urease activity.
Color of
Bacterium Urea Broth Disks Urea Hydrolysis (+ or –)
E. coli ______________ ____________ _____________________
K. pneumoniae ______________ ____________ _____________________
P. vulgaris ______________ ____________ _____________________
S. cholerae-suis ______________ ____________ _____________________

Harley−Prescott: Laboratory Exercises in Microbiology, Fifth Edition
IV. Biochemical Activities of Bacteria
31. Proteins, Amino Acids, and Enzymes VIII: Urease Activity
© The McGraw−Hill Companies, 2002
Review Questions
1. Explain the biochemistry of the urease reaction.
2. What is the purpose of the phenol red in the urea broth medium?
3. When would you use the urease test?
4. Why does the urea disk change color?
5. What is the main advantage of the urea disk over the broth tubes with respect to the detection of urease?
6. What is in urea broth?
7. What color is cerise?
188 Biochemical Activities of Bacteria
Harley−Prescott: Laboratory Exercises in Microbiology, Fifth Edition
IV. Biochemical Activities of Bacteria
32. Proteins, Amino Acids, & Enzymes IX: Lysine & Ornithine Decarboxylase Test
© The McGraw−Hill Companies, 2002
Materials per Student
24- to 48-hour tryptic soy broth cultures ofEnterobacter aerogenes (ATCC 13048),Citrobacter freundii (ATCC 8090), Klebsiellapneumoniae (ATCC e13883), and Proteusvulgaris (ATCC 13315)
4 Moeller’s lysine decarboxylase broth withlysine (LDC)
4 lysine iron agar slants (LIA)4 Moeller’s ornithine decarboxylase broth with
ornithine (ODC)1 Moeller’s lysine decarboxylase broth without
lysine (DC), which will serve as the control1 Moeller’s ornithine decarboxylase broth without
ornithine (OD), which will serve as the controlPasteur pipettes with pipettorinoculating looptest-tube racksterile distilled watersterile mineral oilincubator set at 35°C8 sterile test tubesornithine, lysine, and decarboxylase KEY Rapid
Substrate Tablets and strips (KEY ScientificProducts, 1402 Chisholm Trail, Suite D, RoundRock, TX 78681; 800–843–1539;www.keyscientific.com)
Bunsen burnerninhydrin in chloroform (Dissolve 50 mg
ninhydrin in 0.4 ml of dimethylsulfoxide[DMSO], then add 25 ml of chloroform to theDMSO solution.)
10% KOH
Learning Objectives
Each student should be able to
1. Understand the biochemical process ofdecarboxylation
2. Tell why decarboxylases are important to somebacteria
3. Explain how the decarboxylation of lysine can bedetected in culture
4. Perform lysine and ornithine decarboxylase tests
Suggested Reading in Textbook
1. Protein and Amino Acid Catabolism, section 9.9;see also figure 9.23.
Pronunciation Guide
Citrobacter freundii (SIT-ro-bac-ter FRUN-dee)Enterobacter aerogenes (en-ter-oh-BAK-ter a-RAH-
jen-eez)Klebsiella pneumoniae (kleb-se-EL-lah nu-MO-ne-ah)Proteus vulgaris (PRO-te-us vul-GA-ris)
Why Are the Above Bacteria Usedin This Exercise?
This exercise gives the student experience using the lysineand ornithine decarboxylase test to differentiate betweenbacteria. Two lysine decarboxylase-positive (Enterobacteraerogenes and Klebsiella pneumoniae) and two lysine de-carboxylase-negative (Proteus vulgaris and Citrobacterfreundii) bacteria, and two ornithine decarboxylase-positive(E. aerogenes and Citrobacter freundii) and two ornithinedecarboxylase-negative (K. pneumoniae and P. vulgaris)bacteria were chosen to demonstrate the lysine and or-nithine decarboxylase tests.
189
E X E R C I S E
Proteins,Amino Acids, and Enzymes IX:Lysine and Ornithine Decarboxylase Test
32
SAFETY CONSIDERATIONS Be careful with the Bunsen burner flame. No mouthpipetting. Keep all culture tubes upright in a test-tuberack or in a can.
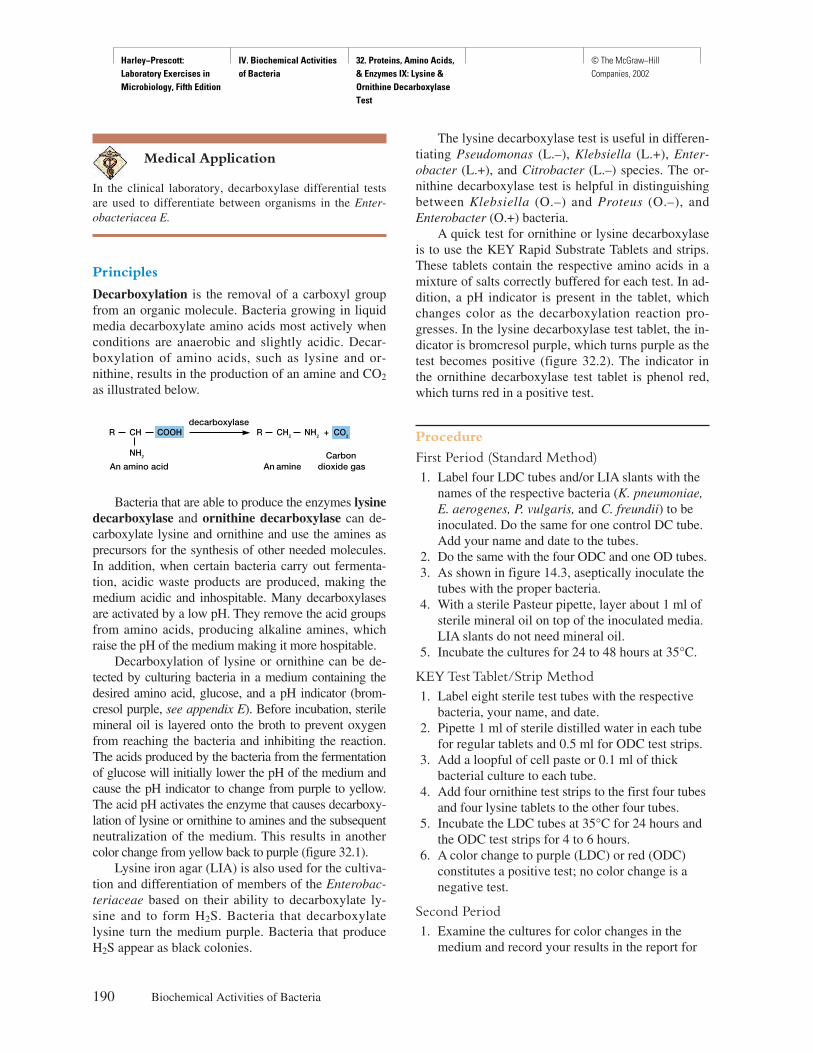
Harley−Prescott: Laboratory Exercises in Microbiology, Fifth Edition
IV. Biochemical Activities of Bacteria
32. Proteins, Amino Acids, & Enzymes IX: Lysine & Ornithine Decarboxylase Test
© The McGraw−Hill Companies, 2002
Medical Application
In the clinical laboratory, decarboxylase differential testsare used to differentiate between organisms in the Enter-obacteriacea E.
Principles
Decarboxylation is the removal of a carboxyl groupfrom an organic molecule. Bacteria growing in liquidmedia decarboxylate amino acids most actively whenconditions are anaerobic and slightly acidic. Decar-boxylation of amino acids, such as lysine and or-nithine, results in the production of an amine and CO2
as illustrated below.
Bacteria that are able to produce the enzymes lysinedecarboxylase and ornithine decarboxylase can de-carboxylate lysine and ornithine and use the amines asprecursors for the synthesis of other needed molecules.In addition, when certain bacteria carry out fermenta-tion, acidic waste products are produced, making themedium acidic and inhospitable. Many decarboxylasesare activated by a low pH. They remove the acid groupsfrom amino acids, producing alkaline amines, whichraise the pH of the medium making it more hospitable.
Decarboxylation of lysine or ornithine can be de-tected by culturing bacteria in a medium containing thedesired amino acid, glucose, and a pH indicator (brom-cresol purple, see appendix E). Before incubation, sterilemineral oil is layered onto the broth to prevent oxygenfrom reaching the bacteria and inhibiting the reaction.The acids produced by the bacteria from the fermentationof glucose will initially lower the pH of the medium andcause the pH indicator to change from purple to yellow.The acid pH activates the enzyme that causes decarboxy-lation of lysine or ornithine to amines and the subsequentneutralization of the medium. This results in anothercolor change from yellow back to purple (figure 32.1).
Lysine iron agar (LIA) is also used for the cultiva-tion and differentiation of members of the Enterobac-teriaceae based on their ability to decarboxylate ly-sine and to form H2S. Bacteria that decarboxylatelysine turn the medium purple. Bacteria that produceH2S appear as black colonies.
decarboxylaseCOOHCHR
NH2
An amino acid
R CH2 NH2 + CO2
An amineCarbon
dioxide gas
The lysine decarboxylase test is useful in differen-tiating Pseudomonas (L.–), Klebsiella (L.+), Enter-obacter (L.+), and Citrobacter (L.–) species. The or-nithine decarboxylase test is helpful in distinguishingbetween Klebsiella (O.–) and Proteus (O.–), andEnterobacter (O.+) bacteria.
A quick test for ornithine or lysine decarboxylaseis to use the KEY Rapid Substrate Tablets and strips.These tablets contain the respective amino acids in amixture of salts correctly buffered for each test. In ad-dition, a pH indicator is present in the tablet, whichchanges color as the decarboxylation reaction pro-gresses. In the lysine decarboxylase test tablet, the in-dicator is bromcresol purple, which turns purple as thetest becomes positive (figure 32.2). The indicator inthe ornithine decarboxylase test tablet is phenol red,which turns red in a positive test.
Procedure
First Period (Standard Method)1. Label four LDC tubes and/or LIA slants with the
names of the respective bacteria (K. pneumoniae,E. aerogenes, P. vulgaris, and C. freundii) to beinoculated. Do the same for one control DC tube.Add your name and date to the tubes.
2. Do the same with the four ODC and one OD tubes.3. As shown in figure 14.3, aseptically inoculate the
tubes with the proper bacteria.4. With a sterile Pasteur pipette, layer about 1 ml of
sterile mineral oil on top of the inoculated media.LIA slants do not need mineral oil.
5. Incubate the cultures for 24 to 48 hours at 35°C.
KEY Test Tablet/Strip Method1. Label eight sterile test tubes with the respective
bacteria, your name, and date.2. Pipette 1 ml of sterile distilled water in each tube
for regular tablets and 0.5 ml for ODC test strips.3. Add a loopful of cell paste or 0.1 ml of thick
bacterial culture to each tube.4. Add four ornithine test strips to the first four tubes
and four lysine tablets to the other four tubes.5. Incubate the LDC tubes at 35°C for 24 hours and
the ODC test strips for 4 to 6 hours.6. A color change to purple (LDC) or red (ODC)
constitutes a positive test; no color change is anegative test.
Second Period1. Examine the cultures for color changes in the
medium and record your results in the report for
190 Biochemical Activities of Bacteria
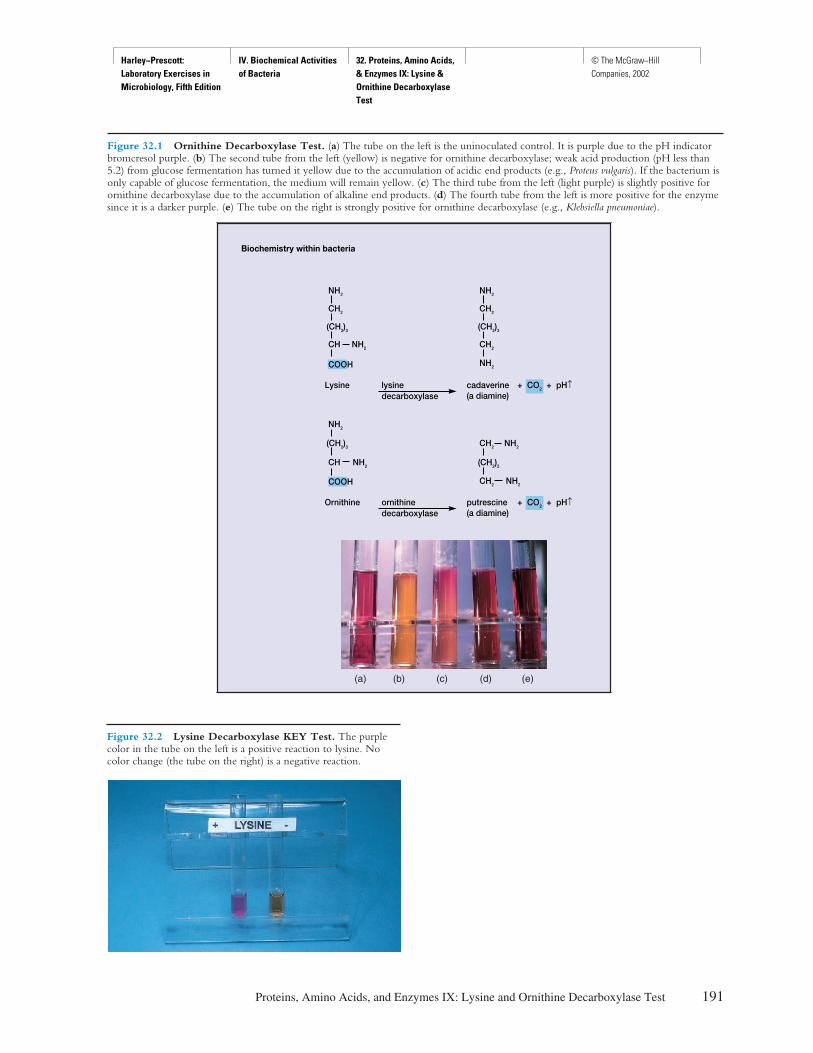
Harley−Prescott: Laboratory Exercises in Microbiology, Fifth Edition
IV. Biochemical Activities of Bacteria
32. Proteins, Amino Acids, & Enzymes IX: Lysine & Ornithine Decarboxylase Test
© The McGraw−Hill Companies, 2002
Proteins, Amino Acids, and Enzymes IX: Lysine and Ornithine Decarboxylase Test 191
Figure 32.1 Ornithine Decarboxylase Test. (a) The tube on the left is the uninoculated control. It is purple due to the pH indicatorbromcresol purple. (b) The second tube from the left (yellow) is negative for ornithine decarboxylase; weak acid production (pH less than5.2) from glucose fermentation has turned it yellow due to the accumulation of acidic end products (e.g., Proteus vulgaris). If the bacterium isonly capable of glucose fermentation, the medium will remain yellow. (c) The third tube from the left (light purple) is slightly positive forornithine decarboxylase due to the accumulation of alkaline end products. (d) The fourth tube from the left is more positive for the enzymesince it is a darker purple. (e) The tube on the right is strongly positive for ornithine decarboxylase (e.g., Klebsiella pneumoniae).
putrescine(a diamine)
+ CO2 + pH↑ornithinedecarboxylase
Ornithine
NH2
(CH2)3
CH NH2
COOH
NH2CH2
(CH2)2
CH2 NH2
cadaverine(a diamine)
+ CO2 + pH↑lysinedecarboxylase
Lysine
COOH
NH2
CH2
(CH2)3
CH2
NH2
Biochemistry within bacteria
NH2
CH2
(CH2)3
CH NH2
Figure 32.2 Lysine Decarboxylase KEY Test. The purplecolor in the tube on the left is a positive reaction to lysine. Nocolor change (the tube on the right) is a negative reaction.
(a) (b) (c) (d) (e)
Harley−Prescott: Laboratory Exercises in Microbiology, Fifth Edition
IV. Biochemical Activities of Bacteria
32. Proteins, Amino Acids, & Enzymes IX: Lysine & Ornithine Decarboxylase Test
© The McGraw−Hill Companies, 2002
exercise 32. Enzymatic activity is indicated by analkaline (dark purple) reaction when comparedwith the inoculated control medium (light slatecolor) in the LDC, LIA, and ODC tubes. PositiveKEY tests are purple (LDC) and red (ODC).
2. The KEY ODC and LDC results can be confirmedby the Ninhydrin procedure.a. Add 1 drop of 10% KOH to each tube and mix.b. Add either 1.0 ml (tablet test) or 0.5 ml (strip
test) of Ninhydrin in chloroform. Let standfor 10 to 15 minutes without shaking.
HINTS AND PRECAUTIONS (1) In biochemical tests involving visual evaluation ofcolor changes that are sometimes minimal, it is oftenuseful to hold the control and experimental tubes next toeach other to discern any color differences. (2) In decar-boxylase tests, any trace of purple, from light to darkpurple, is considered a positive test.
c. Purple color in the bottom chloroform layer ispositive for decarboxylation.
192 Biochemical Activities of Bacteria
Harley−Prescott: Laboratory Exercises in Microbiology, Fifth Edition
IV. Biochemical Activities of Bacteria
32. Proteins, Amino Acids, & Enzymes IX: Lysine & Ornithine Decarboxylase Test
© The McGraw−Hill Companies, 2002
193
Name: ———————————————————————
Date: ————————————————————————
Lab Section: —————————————————————
Laboratory Report 32
Proteins, Amino Acids, and Enzymes IX:Lysine and Ornithine Decarboxylase Test
1. Results from the decarboxylase tests.
Bacterium Color of LIA Color of LDC Color of ODC LD Tablets OD Tablets
C. freundii ___________ ____________ ____________ ____________ ____________
E. aerogenes ___________ ____________ ____________ ____________ ____________
K. pneumoniae ___________ ____________ ____________ ____________ ____________
P. vulgaris ___________ ____________ ____________ ____________ ____________
2. Tabulate the significant ingredients of the following broths.
Medium Ingredients
Moeller’s lysine decarboxylase broth _______________________________________________________________
_______________________________________________________________
Moeller’s ornithine decarboxylase broth _______________________________________________________________
_______________________________________________________________
Lysine iron agar _______________________________________________________________
_______________________________________________________________
Harley−Prescott: Laboratory Exercises in Microbiology, Fifth Edition
IV. Biochemical Activities of Bacteria
32. Proteins, Amino Acids, & Enzymes IX: Lysine & Ornithine Decarboxylase Test
© The McGraw−Hill Companies, 2002
Review Questions
1. Explain what occurs during decarboxylation.
2. Why does the LDC broth or lysine iron agar turn purple when lysine is decarboxylated?
3. Why does the LDC medium always turn yellow regardless of the ability of the bacteria to produce lysinedecarboxylase?
4. Why is the lysine decarboxylase test negative if both LDC and DC broths turn purple?
5. Why is sterile mineral oil added to LDC test media?
6. What is the basis for the quick KEY test for ornithine or lysine decarboxylase?
7. How does the pH indicator bromcresol purple indicate a change in pH?
194 Biochemical Activities of Bacteria
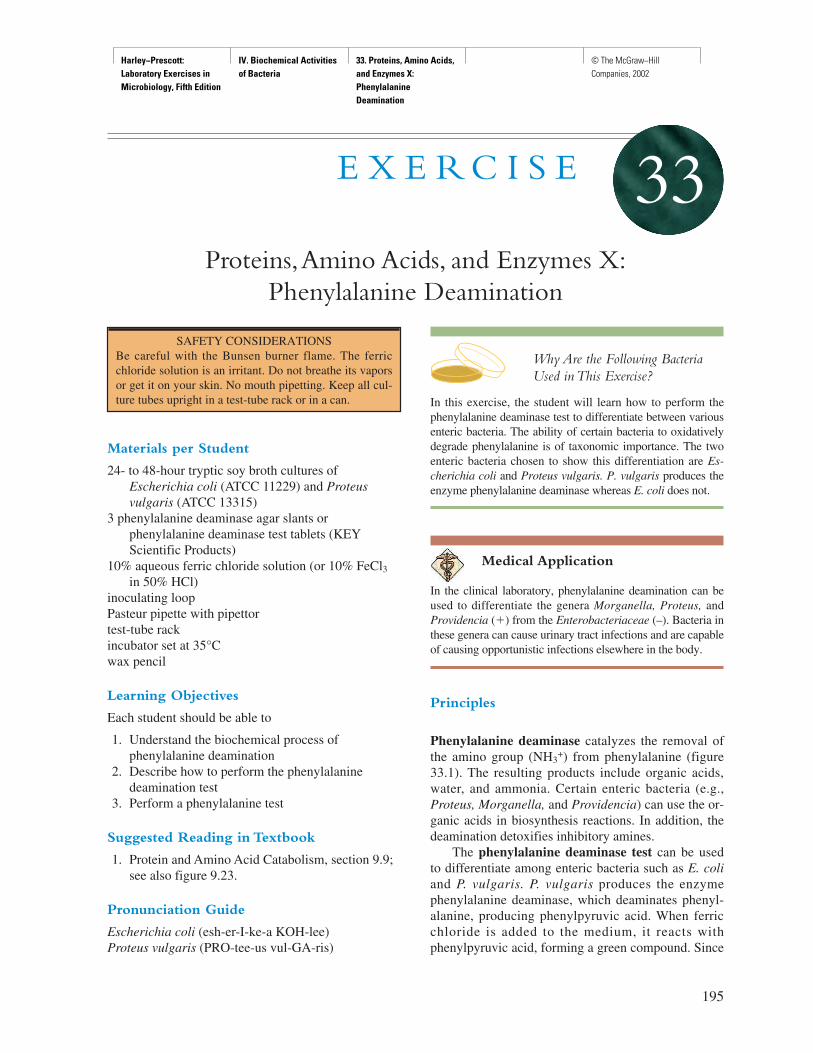
Harley−Prescott: Laboratory Exercises in Microbiology, Fifth Edition
IV. Biochemical Activities of Bacteria
33. Proteins, Amino Acids, and Enzymes X: Phenylalanine Deamination
© The McGraw−Hill Companies, 2002
Materials per Student
24- to 48-hour tryptic soy broth cultures ofEscherichia coli (ATCC 11229) and Proteusvulgaris (ATCC 13315)
3 phenylalanine deaminase agar slants orphenylalanine deaminase test tablets (KEYScientific Products)
10% aqueous ferric chloride solution (or 10% FeCl3in 50% HCl)
inoculating loopPasteur pipette with pipettortest-tube rackincubator set at 35°Cwax pencil
Learning Objectives
Each student should be able to
1. Understand the biochemical process ofphenylalanine deamination
2. Describe how to perform the phenylalaninedeamination test
3. Perform a phenylalanine test
Suggested Reading in Textbook
1. Protein and Amino Acid Catabolism, section 9.9;see also figure 9.23.
Pronunciation Guide
Escherichia coli (esh-er-I-ke-a KOH-lee)Proteus vulgaris (PRO-tee-us vul-GA-ris)
Why Are the Following BacteriaUsed in This Exercise?
In this exercise, the student will learn how to perform thephenylalanine deaminase test to differentiate between variousenteric bacteria. The ability of certain bacteria to oxidativelydegrade phenylalanine is of taxonomic importance. The twoenteric bacteria chosen to show this differentiation are Es-cherichia coli and Proteus vulgaris. P. vulgaris produces theenzyme phenylalanine deaminase whereas E. coli does not.
Medical Application
In the clinical laboratory, phenylalanine deamination can beused to differentiate the genera Morganella, Proteus, andProvidencia (�) from the Enterobacteriaceae (–). Bacteria inthese genera can cause urinary tract infections and are capableof causing opportunistic infections elsewhere in the body.
Principles
Phenylalanine deaminase catalyzes the removal ofthe amino group (NH3
+) from phenylalanine (figure33.1). The resulting products include organic acids,water, and ammonia. Certain enteric bacteria (e.g.,Proteus, Morganella, and Providencia) can use the or-ganic acids in biosynthesis reactions. In addition, thedeamination detoxifies inhibitory amines.
The phenylalanine deaminase test can be usedto differentiate among enteric bacteria such as E. coliand P. vulgaris. P. vulgaris produces the enzymephenylalanine deaminase, which deaminates phenyl-alanine, producing phenylpyruvic acid. When ferricchloride is added to the medium, it reacts withphenylpyruvic acid, forming a green compound. Since
195
E X E R C I S E
Proteins,Amino Acids, and Enzymes X:Phenylalanine Deamination
33
SAFETY CONSIDERATIONS Be careful with the Bunsen burner flame. The ferricchloride solution is an irritant. Do not breathe its vaporsor get it on your skin. No mouth pipetting. Keep all cul-ture tubes upright in a test-tube rack or in a can.
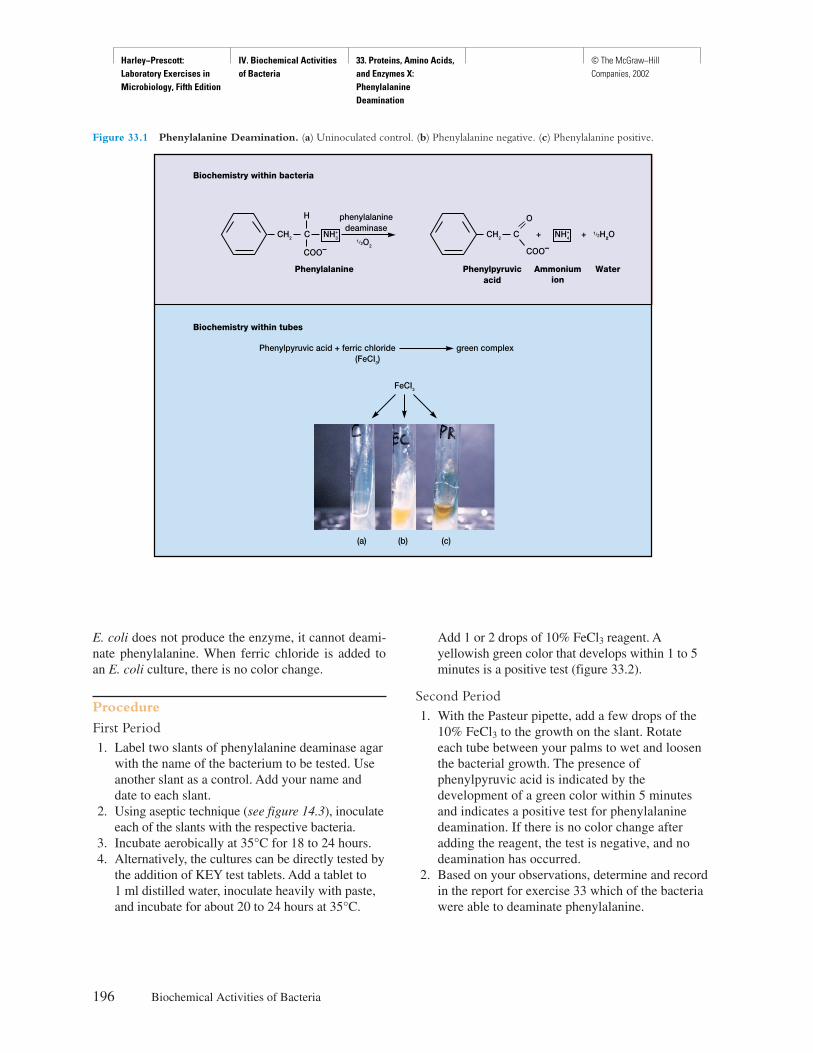
Harley−Prescott: Laboratory Exercises in Microbiology, Fifth Edition
IV. Biochemical Activities of Bacteria
33. Proteins, Amino Acids, and Enzymes X: Phenylalanine Deamination
© The McGraw−Hill Companies, 2002
E. coli does not produce the enzyme, it cannot deami-nate phenylalanine. When ferric chloride is added toan E. coli culture, there is no color change.
Procedure
First Period1. Label two slants of phenylalanine deaminase agar
with the name of the bacterium to be tested. Useanother slant as a control. Add your name anddate to each slant.
2. Using aseptic technique (see figure 14.3), inoculateeach of the slants with the respective bacteria.
3. Incubate aerobically at 35°C for 18 to 24 hours.4. Alternatively, the cultures can be directly tested by
the addition of KEY test tablets. Add a tablet to1 ml distilled water, inoculate heavily with paste,and incubate for about 20 to 24 hours at 35°C.
Add 1 or 2 drops of 10% FeCl3 reagent. Ayellowish green color that develops within 1 to 5minutes is a positive test (figure 33.2).
Second Period1. With the Pasteur pipette, add a few drops of the
10% FeCl3 to the growth on the slant. Rotateeach tube between your palms to wet and loosenthe bacterial growth. The presence ofphenylpyruvic acid is indicated by thedevelopment of a green color within 5 minutesand indicates a positive test for phenylalaninedeamination. If there is no color change afteradding the reagent, the test is negative, and nodeamination has occurred.
2. Based on your observations, determine and recordin the report for exercise 33 which of the bacteriawere able to deaminate phenylalanine.
196 Biochemical Activities of Bacteria
Figure 33.1 Phenylalanine Deamination. (a) Uninoculated control. (b) Phenylalanine negative. (c) Phenylalanine positive.
Biochemistry within bacteria
Biochemistry within tubes
Phenylpyruvic acid + ferric chloride green complex(FeCI3)
FeCI3
Phenylalanine
H
C
COO–
CH2
phenylalaninedeaminase
1/2O2
Phenylpyruvicacid
O
C
COO–
+ + 1/2H2O
Ammoniumion
Water
NH+3 CH2 NH+
4
(c)(b)(a)

Harley−Prescott: Laboratory Exercises in Microbiology, Fifth Edition
IV. Biochemical Activities of Bacteria
33. Proteins, Amino Acids, and Enzymes X: Phenylalanine Deamination
© The McGraw−Hill Companies, 2002
Proteins, Amino Acids, and Enzymes X: Phenylalanine Deamination 197
HINTS AND PRECAUTIONS (1) A positive phenylalanine test must be interpretedimmediately after the addition of the FeCl3 reagent be-cause the green color fades quickly. (2) Rolling theFeCl3 over the slant aids in obtaining a faster reactionwith a more pronounced color.
All phenylalanine tests should be read within 5 min-utes. After 5 minutes, the green color disappears.
Figure 33.2 KEY Test for Phenylalanine. A greenish–yellowcolor developing in 1 to 5 minutes (tube on the left) is a positivetest for phenylalanine deaminase. No color change (the tube onthe right) is a negative reaction.
Harley−Prescott: Laboratory Exercises in Microbiology, Fifth Edition
IV. Biochemical Activities of Bacteria
33. Proteins, Amino Acids, and Enzymes X: Phenylalanine Deamination
© The McGraw−Hill Companies, 2002
199
Name: ———————————————————————
Date: ————————————————————————
Lab Section: —————————————————————
Laboratory Report 33
Proteins, Amino Acids, and Enzymes X: Phenylalanine Deamination
1. Complete the following table on phenylalanine deamination.
Bacterium Color of the Slant Deamination (+ or –)
E. coli ________________________ ________________________
P. vulgaris ________________________ ________________________
2. Describe the phenylalanine deamination reaction.
Harley−Prescott: Laboratory Exercises in Microbiology, Fifth Edition
IV. Biochemical Activities of Bacteria
33. Proteins, Amino Acids, and Enzymes X: Phenylalanine Deamination
© The McGraw−Hill Companies, 2002
Review Questions
1. What are two ways that phenylalanine can be used by P. vulgaris?
2. What is the purpose of the ferric chloride in the phenylalanine deamination test?
3. When would you use the phenylalanine deamination test?
4. Name some bacteria that can deaminate phenylalanine.
5. Describe the process of deamination.
6. Why must the phenylalanine test be determined within 5 minutes?
7. Describe the color of an uninoculated tube of phenylalanine agar.
200 Biochemical Activities of Bacteria
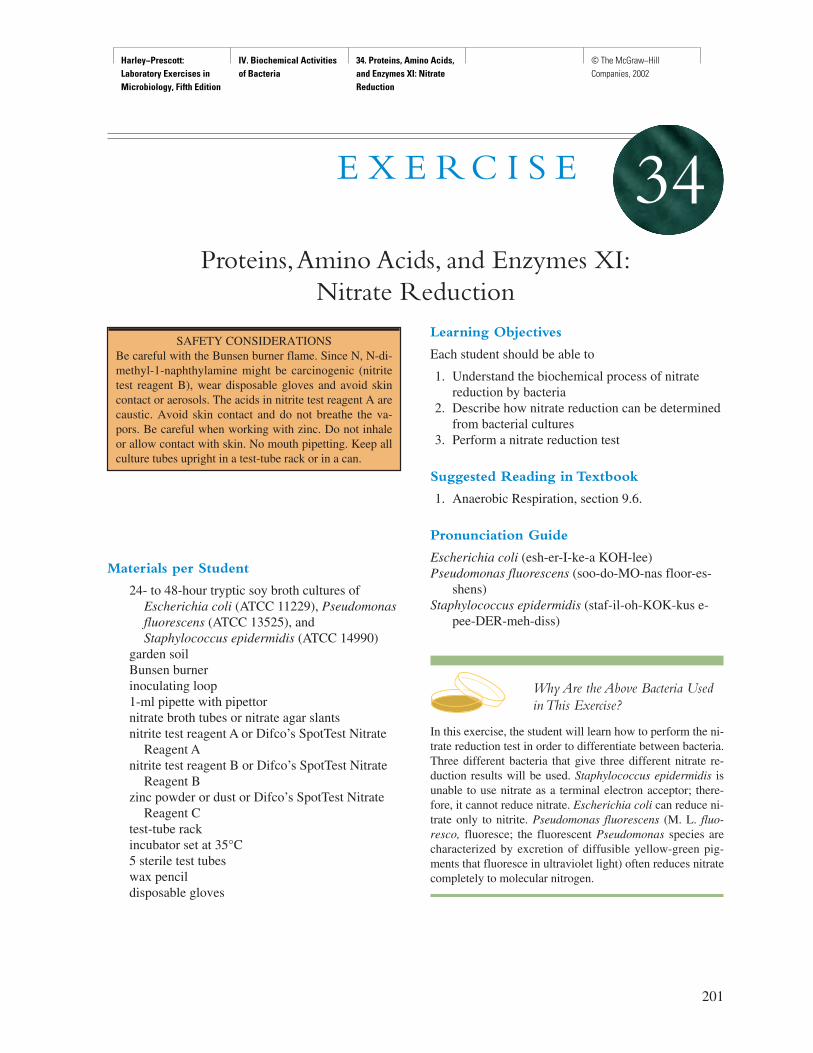
Harley−Prescott: Laboratory Exercises in Microbiology, Fifth Edition
IV. Biochemical Activities of Bacteria
34. Proteins, Amino Acids, and Enzymes XI: Nitrate Reduction
© The McGraw−Hill Companies, 2002
Materials per Student
24- to 48-hour tryptic soy broth cultures ofEscherichia coli (ATCC 11229), Pseudomonasfluorescens (ATCC 13525), andStaphylococcus epidermidis (ATCC 14990)
garden soilBunsen burnerinoculating loop1-ml pipette with pipettornitrate broth tubes or nitrate agar slantsnitrite test reagent A or Difco’s SpotTest Nitrate
Reagent Anitrite test reagent B or Difco’s SpotTest Nitrate
Reagent Bzinc powder or dust or Difco’s SpotTest Nitrate
Reagent Ctest-tube rackincubator set at 35°C5 sterile test tubeswax pencildisposable gloves
Learning Objectives
Each student should be able to
1. Understand the biochemical process of nitratereduction by bacteria
2. Describe how nitrate reduction can be determinedfrom bacterial cultures
3. Perform a nitrate reduction test
Suggested Reading in Textbook
1. Anaerobic Respiration, section 9.6.
Pronunciation Guide
Escherichia coli (esh-er-I-ke-a KOH-lee)Pseudomonas fluorescens (soo-do-MO-nas floor-es-
shens)Staphylococcus epidermidis (staf-il-oh-KOK-kus e-
pee-DER-meh-diss)
Why Are the Above Bacteria Usedin This Exercise?
In this exercise, the student will learn how to perform the ni-trate reduction test in order to differentiate between bacteria.Three different bacteria that give three different nitrate re-duction results will be used. Staphylococcus epidermidis isunable to use nitrate as a terminal electron acceptor; there-fore, it cannot reduce nitrate. Escherichia coli can reduce ni-trate only to nitrite. Pseudomonas fluorescens (M. L. fluo-resco, fluoresce; the fluorescent Pseudomonas species arecharacterized by excretion of diffusible yellow-green pig-ments that fluoresce in ultraviolet light) often reduces nitratecompletely to molecular nitrogen.
201
E X E R C I S E
Proteins,Amino Acids, and Enzymes XI:Nitrate Reduction
34
SAFETY CONSIDERATIONS Be careful with the Bunsen burner flame. Since N, N-di-methyl-1-naphthylamine might be carcinogenic (nitritetest reagent B), wear disposable gloves and avoid skincontact or aerosols. The acids in nitrite test reagent A arecaustic. Avoid skin contact and do not breathe the va-pors. Be careful when working with zinc. Do not inhaleor allow contact with skin. No mouth pipetting. Keep allculture tubes upright in a test-tube rack or in a can.
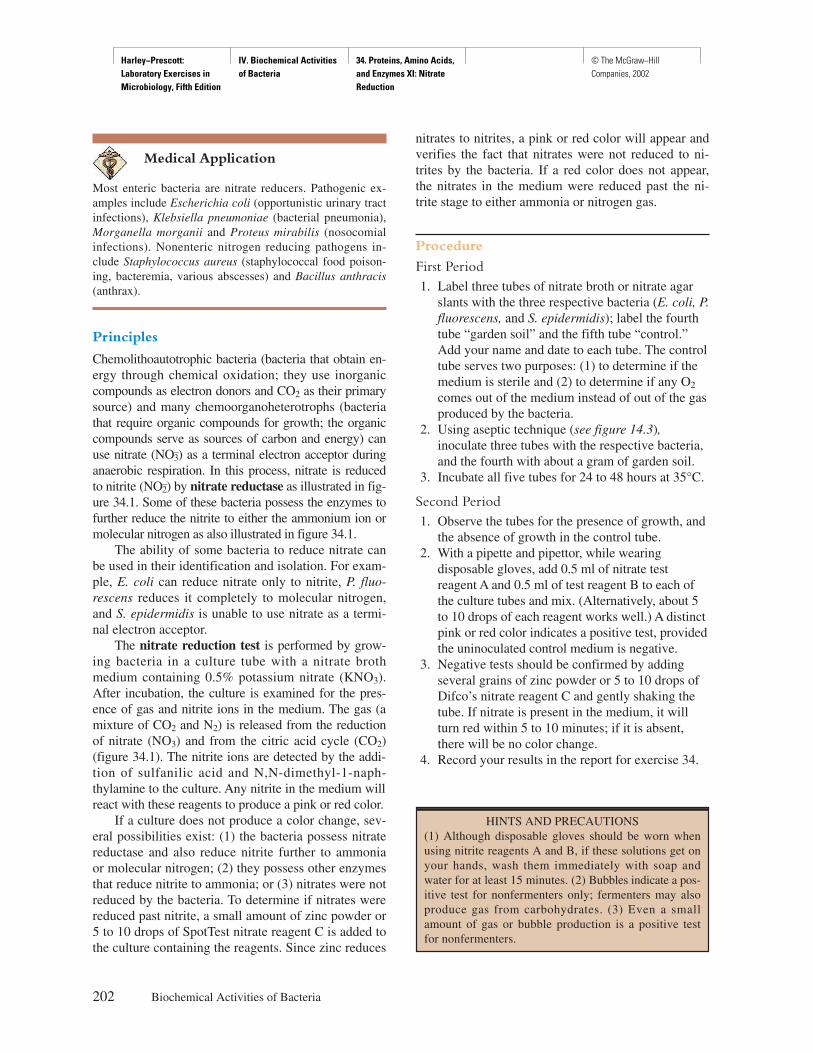
Harley−Prescott: Laboratory Exercises in Microbiology, Fifth Edition
IV. Biochemical Activities of Bacteria
34. Proteins, Amino Acids, and Enzymes XI: Nitrate Reduction
© The McGraw−Hill Companies, 2002
Medical Application
Most enteric bacteria are nitrate reducers. Pathogenic ex-amples include Escherichia coli (opportunistic urinary tractinfections), Klebsiella pneumoniae (bacterial pneumonia),Morganella morganii and Proteus mirabilis (nosocomialinfections). Nonenteric nitrogen reducing pathogens in-clude Staphylococcus aureus (staphylococcal food poison-ing, bacteremia, various abscesses) and Bacillus anthracis(anthrax).
Principles
Chemolithoautotrophic bacteria (bacteria that obtain en-ergy through chemical oxidation; they use inorganiccompounds as electron donors and CO2 as their primarysource) and many chemoorganoheterotrophs (bacteriathat require organic compounds for growth; the organiccompounds serve as sources of carbon and energy) canuse nitrate (NO–
3) as a terminal electron acceptor duringanaerobic respiration. In this process, nitrate is reducedto nitrite (NO–
2) by nitrate reductase as illustrated in fig-ure 34.1. Some of these bacteria possess the enzymes tofurther reduce the nitrite to either the ammonium ion ormolecular nitrogen as also illustrated in figure 34.1.
The ability of some bacteria to reduce nitrate canbe used in their identification and isolation. For exam-ple, E. coli can reduce nitrate only to nitrite, P. fluo-rescens reduces it completely to molecular nitrogen,and S. epidermidis is unable to use nitrate as a termi-nal electron acceptor.
The nitrate reduction test is performed by grow-ing bacteria in a culture tube with a nitrate brothmedium containing 0.5% potassium nitrate (KNO3).After incubation, the culture is examined for the pres-ence of gas and nitrite ions in the medium. The gas (amixture of CO2 and N2) is released from the reductionof nitrate (NO3) and from the citric acid cycle (CO2)(figure 34.1). The nitrite ions are detected by the addi-tion of sulfanilic acid and N,N-dimethyl-1-naph-thylamine to the culture. Any nitrite in the medium willreact with these reagents to produce a pink or red color.
If a culture does not produce a color change, sev-eral possibilities exist: (1) the bacteria possess nitratereductase and also reduce nitrite further to ammoniaor molecular nitrogen; (2) they possess other enzymesthat reduce nitrite to ammonia; or (3) nitrates were notreduced by the bacteria. To determine if nitrates werereduced past nitrite, a small amount of zinc powder or5 to 10 drops of SpotTest nitrate reagent C is added tothe culture containing the reagents. Since zinc reduces
nitrates to nitrites, a pink or red color will appear andverifies the fact that nitrates were not reduced to ni-trites by the bacteria. If a red color does not appear,the nitrates in the medium were reduced past the ni-trite stage to either ammonia or nitrogen gas.
Procedure
First Period1. Label three tubes of nitrate broth or nitrate agar
slants with the three respective bacteria (E. coli, P.fluorescens, and S. epidermidis); label the fourthtube “garden soil” and the fifth tube “control.”Add your name and date to each tube. The controltube serves two purposes: (1) to determine if themedium is sterile and (2) to determine if any O2
comes out of the medium instead of out of the gasproduced by the bacteria.
2. Using aseptic technique (see figure 14.3),inoculate three tubes with the respective bacteria,and the fourth with about a gram of garden soil.
3. Incubate all five tubes for 24 to 48 hours at 35°C.
Second Period1. Observe the tubes for the presence of growth, and
the absence of growth in the control tube.2. With a pipette and pipettor, while wearing
disposable gloves, add 0.5 ml of nitrate testreagent A and 0.5 ml of test reagent B to each ofthe culture tubes and mix. (Alternatively, about 5to 10 drops of each reagent works well.) A distinctpink or red color indicates a positive test, providedthe uninoculated control medium is negative.
3. Negative tests should be confirmed by addingseveral grains of zinc powder or 5 to 10 drops ofDifco’s nitrate reagent C and gently shaking thetube. If nitrate is present in the medium, it willturn red within 5 to 10 minutes; if it is absent,there will be no color change.
4. Record your results in the report for exercise 34.
202 Biochemical Activities of Bacteria
HINTS AND PRECAUTIONS (1) Although disposable gloves should be worn whenusing nitrite reagents A and B, if these solutions get onyour hands, wash them immediately with soap andwater for at least 15 minutes. (2) Bubbles indicate a pos-itive test for nonfermenters only; fermenters may alsoproduce gas from carbohydrates. (3) Even a smallamount of gas or bubble production is a positive testfor nonfermenters.
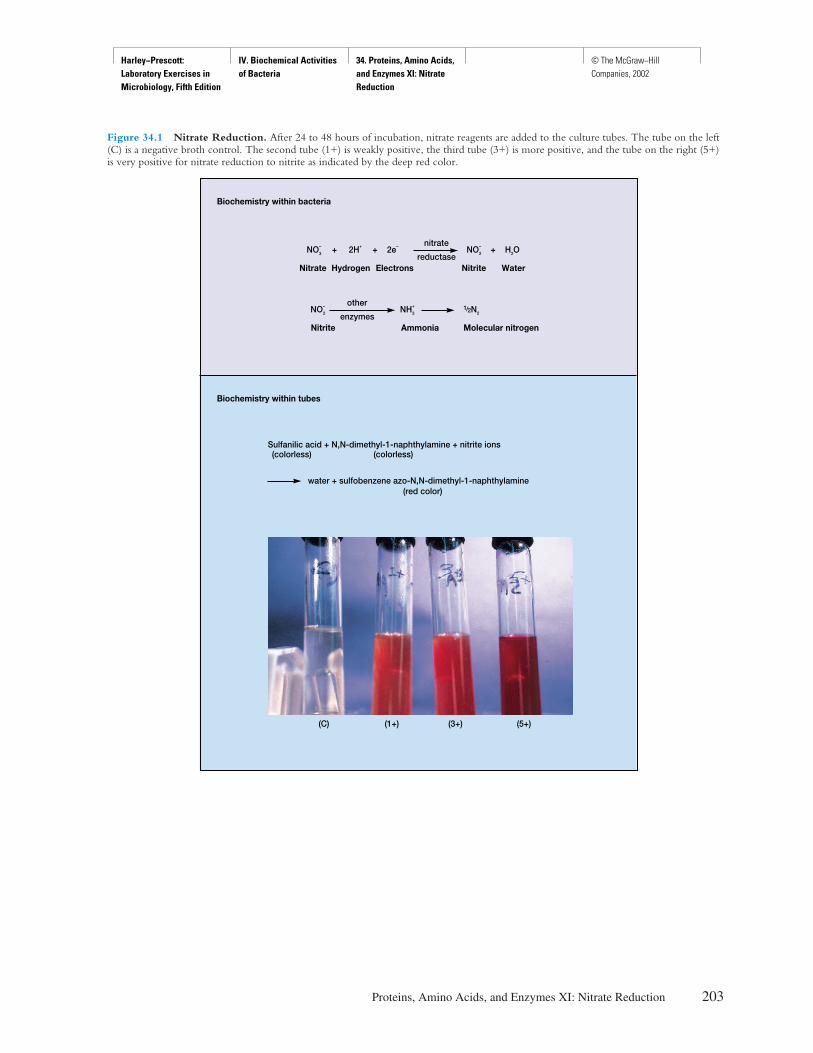
Harley−Prescott: Laboratory Exercises in Microbiology, Fifth Edition
IV. Biochemical Activities of Bacteria
34. Proteins, Amino Acids, and Enzymes XI: Nitrate Reduction
© The McGraw−Hill Companies, 2002
Proteins, Amino Acids, and Enzymes XI: Nitrate Reduction 203
Figure 34.1 Nitrate Reduction. After 24 to 48 hours of incubation, nitrate reagents are added to the culture tubes. The tube on the left(C) is a negative broth control. The second tube (1+) is weakly positive, the third tube (3+) is more positive, and the tube on the right (5+)is very positive for nitrate reduction to nitrite as indicated by the deep red color.
Biochemistry within bacteria
Biochemistry within tubes
nitrate
reductaseNO–
2 + H2O
Nitrate Hydrogen Electrons Nitrite Water
NO–
2
other
enzymes1/2N2
Nitrite Molecular nitrogen
NH+
3
Ammonia
Sulfanilic acid + N,N-dimethyl-1-naphthylamine + nitrite ions(colorless) (colorless)
water + sulfobenzene azo-N,N-dimethyl-1-naphthylamine(red color)
NO–
3 + 2H+ + 2e–
(C) (1+) (3+) (5+)
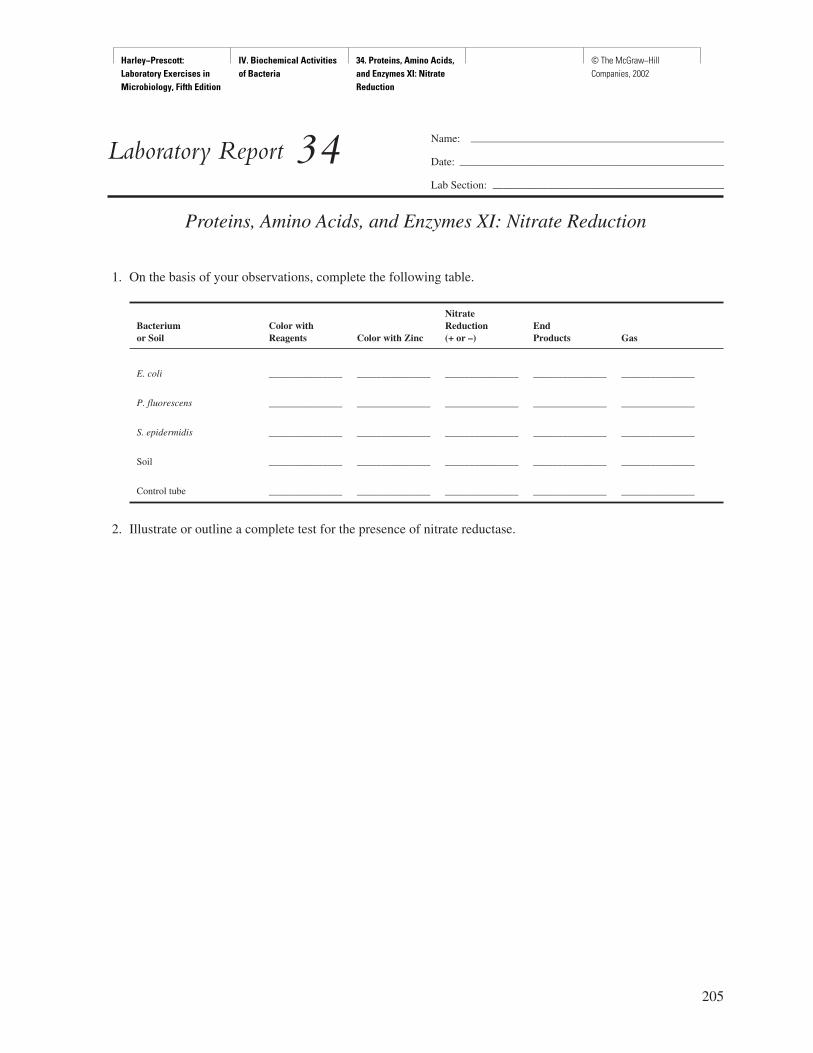
Harley−Prescott: Laboratory Exercises in Microbiology, Fifth Edition
IV. Biochemical Activities of Bacteria
34. Proteins, Amino Acids, and Enzymes XI: Nitrate Reduction
© The McGraw−Hill Companies, 2002
205
Name: ———————————————————————
Date: ————————————————————————
Lab Section: —————————————————————
Laboratory Report 34
Proteins, Amino Acids, and Enzymes XI: Nitrate Reduction
1. On the basis of your observations, complete the following table.
NitrateBacterium Color with Reduction Endor Soil Reagents Color with Zinc (+ or –) Products Gas
E. coli _______________ _______________ _______________ _______________ _______________
P. fluorescens _______________ _______________ _______________ _______________ _______________
S. epidermidis _______________ _______________ _______________ _______________ _______________
Soil _______________ _______________ _______________ _______________ _______________
Control tube _______________ _______________ _______________ _______________ _______________
2. Illustrate or outline a complete test for the presence of nitrate reductase.

Harley−Prescott: Laboratory Exercises in Microbiology, Fifth Edition
IV. Biochemical Activities of Bacteria
34. Proteins, Amino Acids, and Enzymes XI: Nitrate Reduction
© The McGraw−Hill Companies, 2002
Review Questions
1. From your results, which bacteria are negative for nitrate reduction? Which are positive?
2. How do you explain the results from the soil sample?
3. Why is the development of a red color a negative test when zinc is added?
4. What are the end products that may result from the action of bacteria with nitrate-reducing enzymes?
5. What is the purpose of a control tube in this exercise?
6. How would you perform a complete test for the presence of nitrate reduction?
206 Biochemical Activities of Bacteria
Harley−Prescott: Laboratory Exercises in Microbiology, Fifth Edition
V: Rapid Multitest Systems Introduction © The McGraw−Hill Companies, 2002
207
P A R T F I V E
Rapid Multitest Systems
Man is a tool-using animal . . . without tools he is nothing, with tools he is all. . . .
Thomas Carlyle (Scottish critic, historian, 1795–1881)
S taining, morphology, motility, culture data, enzymatic,and biochemical activities can be used to identify mi-
croorganisms. These characteristics were the basis for PartsTwo through Four of this manual. In determining each ofthese characteristics, a large amount of media, test tubes,culture plates, and time were involved. In order to reducethese factors, several rapid multitest systems have beendeveloped for the identification of medically important
microorganisms in a relatively short period. To facilitaterapid identification, some of these systems use a uniformcoding procedure that can be computerized.
The purpose of Part Five of this manual is to introduceyou to two of these systems: API 20E and Enterotube II.The API 20E and Enterotube II Systems are used to identify primarily the gram-negative, oxidase-negative Enterobacteriaceae.
After completing either of these two exercises,you will, at the minimum, be able to demonstrate theability to use appropriate microbiological test systemsand accurately record macroscopic observations. Thiswill meet the American Society for MicrobiologyCore Curriculum skill number 4 (see pp. vi–viii).
Harley−Prescott: Laboratory Exercises in Microbiology, Fifth Edition
V: Rapid Multitest Systems 35. The API 20E System © The McGraw−Hill Companies, 2002
test-tube rackwax pencildisposable gloves
Learning Objectives
Each student should be able to
1. Understand why an oxidase test is first performedin the API 20E System
2. Correctly inoculate the API 20E System3. Read and record the various biochemical
reactions that occur after 18 to 24 hours ofincubation
4. Determine a seven-digit profile number5. Look up the unknown bacterium in the API 20E
Quick Index Booklet
Suggested Reading in Textbook
1. The Enterobacteriaceae, section 22.3.2. Rapid Methods of Identification, section 36.2; see
also figures 36.7 and 36.8.
Medical Application
The API 20E system and Enterotube II system are used in theclinical laboratory for the identification of enteric bacteria.Among them are Escherichia coli (opportunistic urinary tractinfections), Proteus mirabilis (opportunistic urinary tract in-fections), Shigella dysenteriae (bacillary dysentery), Salmo-nella typhi (typhoid fever), and Yersinia pestis (plague).
Principles
The API 20E System is a standardized, miniaturizedversion of conventional biochemical procedures usedin the identification of Enterobacteriaceae and othergram-negative bacteria. A total of 127 taxa can be
Materials per Group of Students
API 20E System strip, incubator tray, and cover(bioMérieux Vitek, PO Box 42016,Hazelwood, MO 63042–2395. Phone800–638–4835).
tryptic soy agar slant or plate culture of unknownmember of the Enterobacteriaceae
5 ml of sterile 0.85% saline in test tube with cap50-ml plastic squeeze bottle containing tap water5-ml Pasteur pipettes with pipettoroxidase test reagent or disk/strippetri plateTSA plateWhatman No. 2 filter paper10% ferric chlorideBarritt’s reagents A and Bsterile mineral oiltube containing McFarland No. 3 (BaSO4)
reference standardplatinum inoculating loop (Nichrome wire loops
should NOT be used) or a wooden applicatorstick
Bunsen burnerKovacs’ reagentnitrite test reagents A and B solutionzinc dust or 20-mesh granular zinc1.5% hydrogen peroxideincubator set at 35° to 37°CAPI 20E Quick Index Booklet
208
E X E R C I S E
The API 20E System
35
SAFETY CONSIDERATIONSBe careful with the Bunsen burner flame. No mouthpipetting. Since nitrite test reagent B might be carcino-genic, wear gloves and avoid skin contact or aerosols.The acids in the nitrite test reagent A are caustic. The fer-ric chloride solution is an irritant. Avoid skin contact anddo not breathe the vapors. Do not breathe the zinc dust.
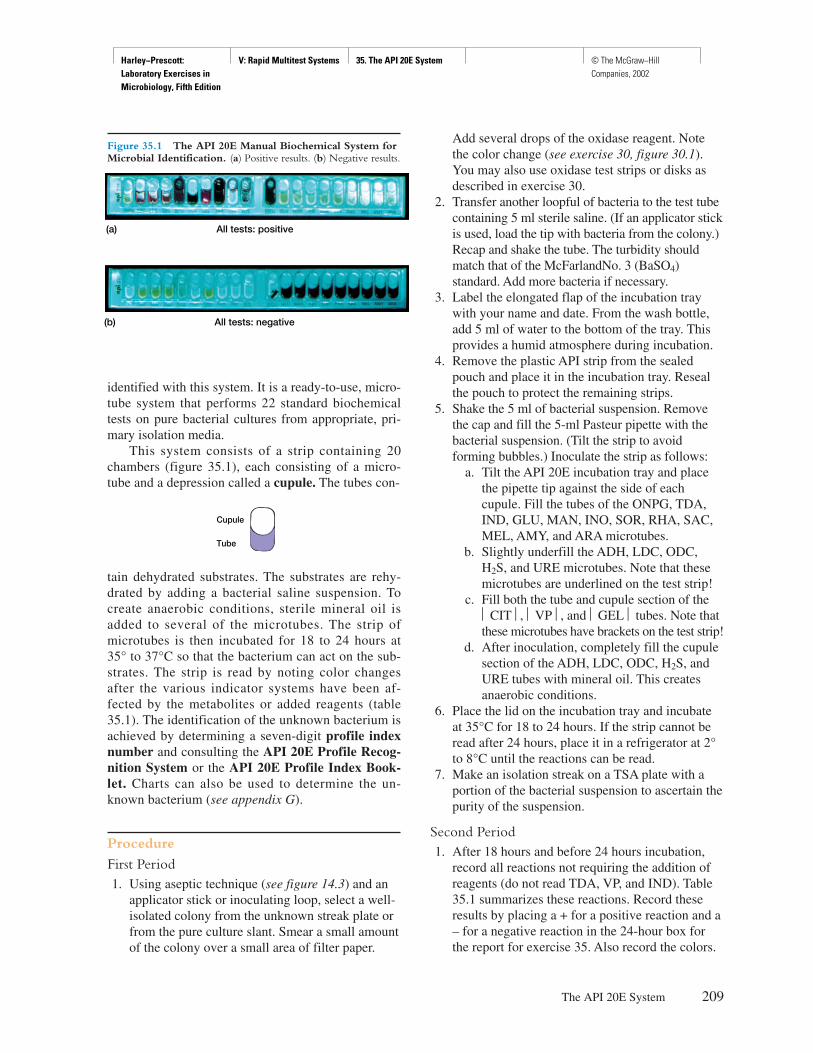
Harley−Prescott: Laboratory Exercises in Microbiology, Fifth Edition
V: Rapid Multitest Systems 35. The API 20E System © The McGraw−Hill Companies, 2002
identified with this system. It is a ready-to-use, micro-tube system that performs 22 standard biochemicaltests on pure bacterial cultures from appropriate, pri-mary isolation media.
This system consists of a strip containing 20chambers (figure 35.1), each consisting of a micro-tube and a depression called a cupule. The tubes con-
tain dehydrated substrates. The substrates are rehy-drated by adding a bacterial saline suspension. Tocreate anaerobic conditions, sterile mineral oil isadded to several of the microtubes. The strip ofmicrotubes is then incubated for 18 to 24 hours at35° to 37°C so that the bacterium can act on the sub-strates. The strip is read by noting color changesafter the various indicator systems have been af-fected by the metabolites or added reagents (table35.1). The identification of the unknown bacterium isachieved by determining a seven-digit profile indexnumber and consulting the API 20E Profile Recog-nition System or the API 20E Profile Index Book-let. Charts can also be used to determine the un-known bacterium (see appendix G).
Procedure
First Period1. Using aseptic technique (see figure 14.3) and an
applicator stick or inoculating loop, select a well-isolated colony from the unknown streak plate orfrom the pure culture slant. Smear a small amountof the colony over a small area of filter paper.
Cupule
Tube
Add several drops of the oxidase reagent. Notethe color change (see exercise 30, figure 30.1).You may also use oxidase test strips or disks asdescribed in exercise 30.
2. Transfer another loopful of bacteria to the test tubecontaining 5 ml sterile saline. (If an applicator stickis used, load the tip with bacteria from the colony.)Recap and shake the tube. The turbidity shouldmatch that of the McFarlandNo. 3 (BaSO4)standard. Add more bacteria if necessary.
3. Label the elongated flap of the incubation traywith your name and date. From the wash bottle,add 5 ml of water to the bottom of the tray. Thisprovides a humid atmosphere during incubation.
4. Remove the plastic API strip from the sealedpouch and place it in the incubation tray. Resealthe pouch to protect the remaining strips.
5. Shake the 5 ml of bacterial suspension. Removethe cap and fill the 5-ml Pasteur pipette with thebacterial suspension. (Tilt the strip to avoidforming bubbles.) Inoculate the strip as follows:
a. Tilt the API 20E incubation tray and placethe pipette tip against the side of eachcupule. Fill the tubes of the ONPG, TDA,IND, GLU, MAN, INO, SOR, RHA, SAC,MEL, AMY, and ARA microtubes.
b. Slightly underfill the ADH, LDC, ODC,H2S, and URE microtubes. Note that thesemicrotubes are underlined on the test strip!
c. Fill both the tube and cupule section of the CIT , VP , and GEL tubes. Note thatthese microtubes have brackets on the test strip!
d. After inoculation, completely fill the cupulesection of the ADH, LDC, ODC, H2S, andURE tubes with mineral oil. This createsanaerobic conditions.
6. Place the lid on the incubation tray and incubateat 35°C for 18 to 24 hours. If the strip cannot beread after 24 hours, place it in a refrigerator at 2°to 8°C until the reactions can be read.
7. Make an isolation streak on a TSA plate with aportion of the bacterial suspension to ascertain thepurity of the suspension.
Second Period1. After 18 hours and before 24 hours incubation,
record all reactions not requiring the addition ofreagents (do not read TDA, VP, and IND). Table35.1 summarizes these reactions. Record theseresults by placing a + for a positive reaction and a– for a negative reaction in the 24-hour box forthe report for exercise 35. Also record the colors.
The API 20E System 209
Figure 35.1 The API 20E Manual Biochemical System forMicrobial Identification. (a) Positive results. (b) Negative results.
All tests: positive
All tests: negative
(a)
(b)

Harley−Prescott: Laboratory Exercises in Microbiology, Fifth Edition
V: Rapid Multitest Systems 35. The API 20E System © The McGraw−Hill Companies, 2002
210 Rapid Multitest Systems
Table 35.1 Chart I. Summary of Results—18- to 24-Hour Procedure
Interpretation of Reactions
Tube Positive Negative Comments
ONPG Yellow Colorless (1) Any shade of yellow is a positive reaction. (2) VP tube, before the addition of reagents, can be used as a negative control.
ADH Incubation Orange reactions occurring at 36 to 48 hours should be interpreted as negative.
18–24 h Red or orange Yellow
36–48 h Red Yellow or orange
LDC 18–24 h Red or orange Yellow Any shade of orange within 18 to 24 hours is a positive reaction. At 36 to 48 hours, orange 36–48 h Red Yellow or orange decarboxylase reactions should be interpreted as negative.
ODC 18–24 h Red or orange Yellow Orange reactions occurring at 36 to 48 hours should be interpreted as negative.
36–48 h Red Yellow or orange
CIT Turquoise or dark Light green (1) Both the tube and cupule should be filled. (2) Reaction is read in the aerobic (cupule) area.blue or yellow
H2S Black No black (1) H2S production may range from a heavy black deposit to a very thin black line around the deposit deposit tube bottom. Carefully examine the bottom of the tube before considering the reaction
negative. (2) A “browning” of the medium is a negative reaction unless a black deposit is present. “Browning” occurs with TDA positive organisms.
URE 18–24 h Red or orange Yellow A method of lower sensitivity has been chosen. 36–48 h Red Yellow or orange Klebsiella, Proteus, and Yersinia routinely give positive reactions.
TDA Add 1 drop 10% ferric chloride (1) Immediate reaction. (2) Indole positive organisms may produce a golden orange colordue to indole production. This is a negative reaction.
Brown-red Yellow
IND Add 1 drop Kovacs’ reagent (1) The reaction should be read within 2 minutes after the addition of the Kovacs’ reagent and the results recorded. (2) After several minutes, the HCI present in Kovacs’ reagent may
Red ring Yellow react with the plastic of the cupule resulting in a change from a negative (yellow) color to a brownish-red. This is a negative reaction.
VP Add 1 drop of 40% potassium hydroxide, then 1 (1) Wait 10 minutes before considering the reaction negative. (2) A pale pink color (after 10drop of 6% α-naphthol. minutes) should be interpreted as negative. A pale pink color which appears immediately
after the addition of reagents but which turns dark pink or red after 10 minutes should be Red Colorless interpreted as positive.
Motility may be observed by hanging drop or wet-mount preparation.
GEL Diffusion of the No (1) The solid gelatin particles may spread throughout the tube after inoculation. Unless pigment diffusion diffusion occurs, the reaction is negative. (2) Any degree of diffusion is a positive reaction.
GLU Yellow Blue or Fermentation (Enterobacteriaceae, Aeromonas, Vibrio)or gray blue-green (1) Fermentation of the carbohydrates begins in the most anaerobic portion (bottom)
of the tube. Therefore, these reactions should be read from the bottom of the tube tothe top. (2) A yellow color at the bottom of the tube only indicates a weak or delayedpositive reaction.
MAN Yellow Blue or Oxidation (Other gram negatives)INO blue-green (1) Oxidative utilization of the carbohydrates begins in the most aerobic portion SOR (top) of the tube. Therefore, these reactions should be read from the top to the RHA bottom of the tube. (2) A yellow color in the upper portion of the tube and a SAC blue color in the bottom of the tube indicates oxidative utilization of the sugar. MEL This reaction should be considered positive only for nonEnterobacteriaceaeAMY gram-negative rods. This is a negative reaction for fermentative organisms suchARA as Enterobacteriaceae.
GLU After reading GLU reaction, add 2 drops 0.8% (1) Before addition of reagents, observe GLU tube (positive or negative) for bubbles.sulfanilic acid and 2 drops 0.5% N,N-dimethyl-�- Bubbles are indicative of reduction of nitrate to the nitrogenous (N2) state. (2) A naphthylamine positive reaction may take 2 to 3 minutes for the red color to appear. (3) Confirm a
Nitrate NO2 Red Yellow negative test by adding zinc dust or 20-mesh granular zinc. A pink-orange color afterreduction N2 gas Bubbles; Yellow Orange after 10 minutes confirms a negative reaction. A yellow color indicates reduction of nitrates to
after reagents reagents nitrogenous (N2) state.and zinc and zinc
MAN After reading carbohydrate reaction, add 1 drop (1) Bubbles may take 1 to 2 minutes to appear. (2) Best results will be obtained if the testINO 1.5% H2O2 is run in tubes that have no gas from fermentation.SORCatalase Bubbles No bubbles
Com
men
ts f
or a
ll
carb
ohyd
rate
s
The following abbreviations are used: ONPG (�-galactosidase), ADH (arginine dihydrolase), LDC (lysine decarboxylase), ODC (ornithine decarboxylase), CIT (citrate), H2S(hydrogen sulfide), URE (urease), TDA (tryptophan deaminase), IND (indole), VP (Voges-Proskauer), GEL (gelatin), GLU (glucose), MAN (mannitol), INO (inositol), SOR(sorbitol), RHA (rhamnose), SAC (sucrose), MEL (melibiose), AMY (amygdalin), ARA (arabinose).Copyright BioMerieux Vitek, Inc., Hazelwood, MO. Reprinted by permission.
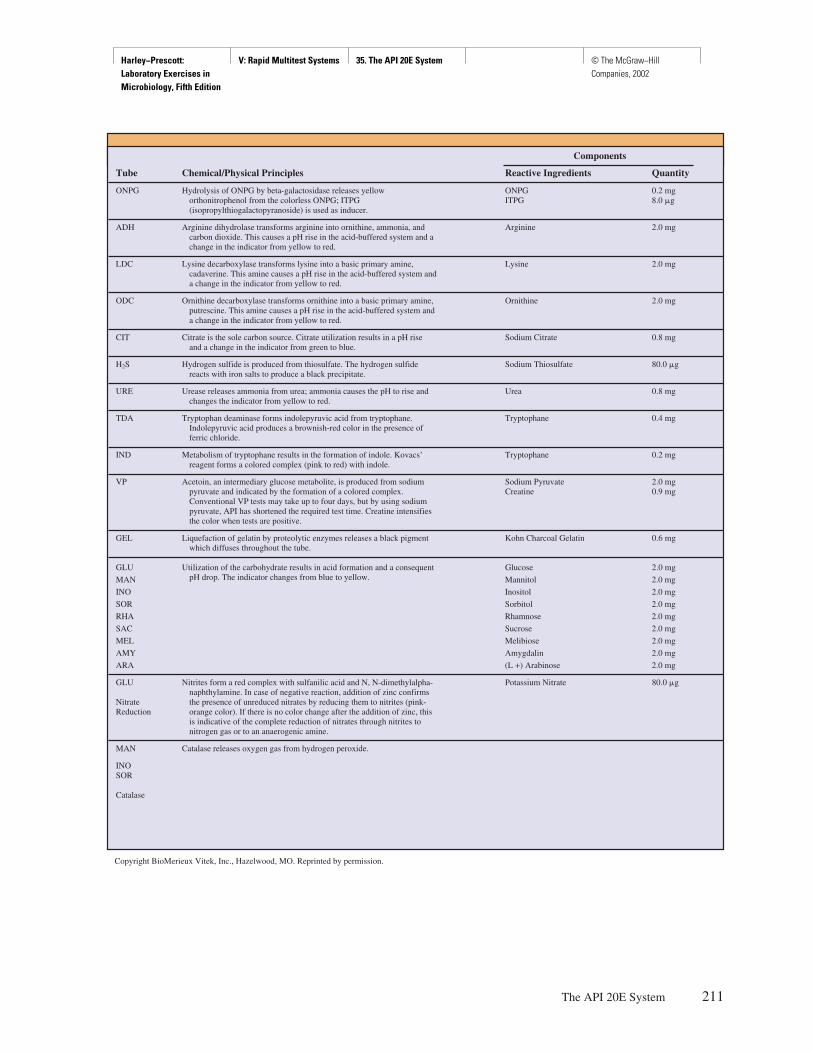
Harley−Prescott: Laboratory Exercises in Microbiology, Fifth Edition
V: Rapid Multitest Systems 35. The API 20E System © The McGraw−Hill Companies, 2002
The API 20E System 211
Chart II. Symbol Interpretation of API 20E System Components
Tube Chemical/Physical Principles Reactive Ingredients Quantity
ONPG Hydrolysis of ONPG by beta-galactosidase releases yellow ONPG 0.2 mgorthonitrophenol from the colorless ONPG; ITPG ITPG 8.0 �g(isopropylthiogalactopyranoside) is used as inducer.
ADH Arginine dihydrolase transforms arginine into ornithine, ammonia, and Arginine 2.0 mgcarbon dioxide. This causes a pH rise in the acid-buffered system and a change in the indicator from yellow to red.
LDC Lysine decarboxylase transforms lysine into a basic primary amine, Lysine 2.0 mgcadaverine. This amine causes a pH rise in the acid-buffered system and a change in the indicator from yellow to red.
ODC Ornithine decarboxylase transforms ornithine into a basic primary amine, Ornithine 2.0 mgputrescine. This amine causes a pH rise in the acid-buffered system and a change in the indicator from yellow to red.
CIT Citrate is the sole carbon source. Citrate utilization results in a pH rise Sodium Citrate 0.8 mgand a change in the indicator from green to blue.
H2S Hydrogen sulfide is produced from thiosulfate. The hydrogen sulfide Sodium Thiosulfate 80.0 �greacts with iron salts to produce a black precipitate.
URE Urease releases ammonia from urea; ammonia causes the pH to rise and Urea 0.8 mgchanges the indicator from yellow to red.
TDA Tryptophan deaminase forms indolepyruvic acid from tryptophane. Tryptophane 0.4 mgIndolepyruvic acid produces a brownish-red color in the presence of ferric chloride.
IND Metabolism of tryptophane results in the formation of indole. Kovacs’ Tryptophane 0.2 mgreagent forms a colored complex (pink to red) with indole.
VP Acetoin, an intermediary glucose metabolite, is produced from sodium Sodium Pyruvate 2.0 mgpyruvate and indicated by the formation of a colored complex. Creatine 0.9 mgConventional VP tests may take up to four days, but by using sodium pyruvate, API has shortened the required test time. Creatine intensifies the color when tests are positive.
GEL Liquefaction of gelatin by proteolytic enzymes releases a black pigment Kohn Charcoal Gelatin 0.6 mgwhich diffuses throughout the tube.
GLU Utilization of the carbohydrate results in acid formation and a consequent Glucose 2.0 mg
MAN pH drop. The indicator changes from blue to yellow. Mannitol 2.0 mg
INO Inositol 2.0 mg
SOR Sorbitol 2.0 mg
RHA Rhamnose 2.0 mg
SAC Sucrose 2.0 mg
MEL Melibiose 2.0 mg
AMY Amygdalin 2.0 mg
ARA (L +) Arabinose 2.0 mg
GLU Nitrites form a red complex with sulfanilic acid and N, N-dimethylalpha- Potassium Nitrate 80.0 �gnaphthylamine. In case of negative reaction, addition of zinc confirms
Nitrate the presence of unreduced nitrates by reducing them to nitrites (pink-Reduction orange color). If there is no color change after the addition of zinc, this
is indicative of the complete reduction of nitrates through nitrites to nitrogen gas or to an anaerogenic amine.
MAN Catalase releases oxygen gas from hydrogen peroxide.
INOSOR
Catalase
Copyright BioMerieux Vitek, Inc., Hazelwood, MO. Reprinted by permission.
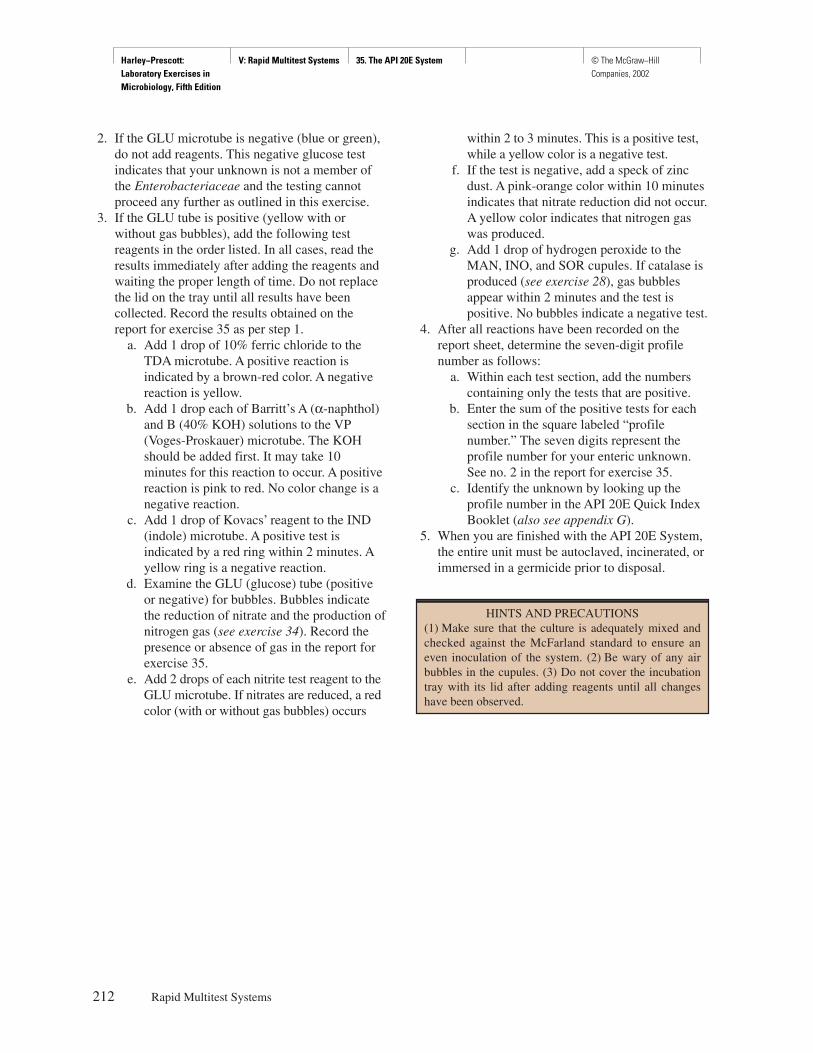
Harley−Prescott: Laboratory Exercises in Microbiology, Fifth Edition
V: Rapid Multitest Systems 35. The API 20E System © The McGraw−Hill Companies, 2002
2. If the GLU microtube is negative (blue or green),do not add reagents. This negative glucose testindicates that your unknown is not a member ofthe Enterobacteriaceae and the testing cannotproceed any further as outlined in this exercise.
3. If the GLU tube is positive (yellow with orwithout gas bubbles), add the following testreagents in the order listed. In all cases, read theresults immediately after adding the reagents andwaiting the proper length of time. Do not replacethe lid on the tray until all results have beencollected. Record the results obtained on thereport for exercise 35 as per step 1.
a. Add 1 drop of 10% ferric chloride to theTDA microtube. A positive reaction isindicated by a brown-red color. A negativereaction is yellow.
b. Add 1 drop each of Barritt’s A (α-naphthol)and B (40% KOH) solutions to the VP(Voges-Proskauer) microtube. The KOHshould be added first. It may take 10minutes for this reaction to occur. A positivereaction is pink to red. No color change is anegative reaction.
c. Add 1 drop of Kovacs’ reagent to the IND(indole) microtube. A positive test isindicated by a red ring within 2 minutes. Ayellow ring is a negative reaction.
d. Examine the GLU (glucose) tube (positiveor negative) for bubbles. Bubbles indicatethe reduction of nitrate and the production ofnitrogen gas (see exercise 34). Record thepresence or absence of gas in the report forexercise 35.
e. Add 2 drops of each nitrite test reagent to theGLU microtube. If nitrates are reduced, a redcolor (with or without gas bubbles) occurs
within 2 to 3 minutes. This is a positive test,while a yellow color is a negative test.
f. If the test is negative, add a speck of zincdust. A pink-orange color within 10 minutesindicates that nitrate reduction did not occur.A yellow color indicates that nitrogen gaswas produced.
g. Add 1 drop of hydrogen peroxide to theMAN, INO, and SOR cupules. If catalase isproduced (see exercise 28), gas bubblesappear within 2 minutes and the test ispositive. No bubbles indicate a negative test.
4. After all reactions have been recorded on thereport sheet, determine the seven-digit profilenumber as follows:
a. Within each test section, add the numberscontaining only the tests that are positive.
b. Enter the sum of the positive tests for eachsection in the square labeled “profilenumber.” The seven digits represent theprofile number for your enteric unknown.See no. 2 in the report for exercise 35.
c. Identify the unknown by looking up theprofile number in the API 20E Quick IndexBooklet (also see appendix G).
5. When you are finished with the API 20E System,the entire unit must be autoclaved, incinerated, orimmersed in a germicide prior to disposal.
212 Rapid Multitest Systems
HINTS AND PRECAUTIONS(1) Make sure that the culture is adequately mixed andchecked against the McFarland standard to ensure aneven inoculation of the system. (2) Be wary of any airbubbles in the cupules. (3) Do not cover the incubationtray with its lid after adding reagents until all changeshave been observed.
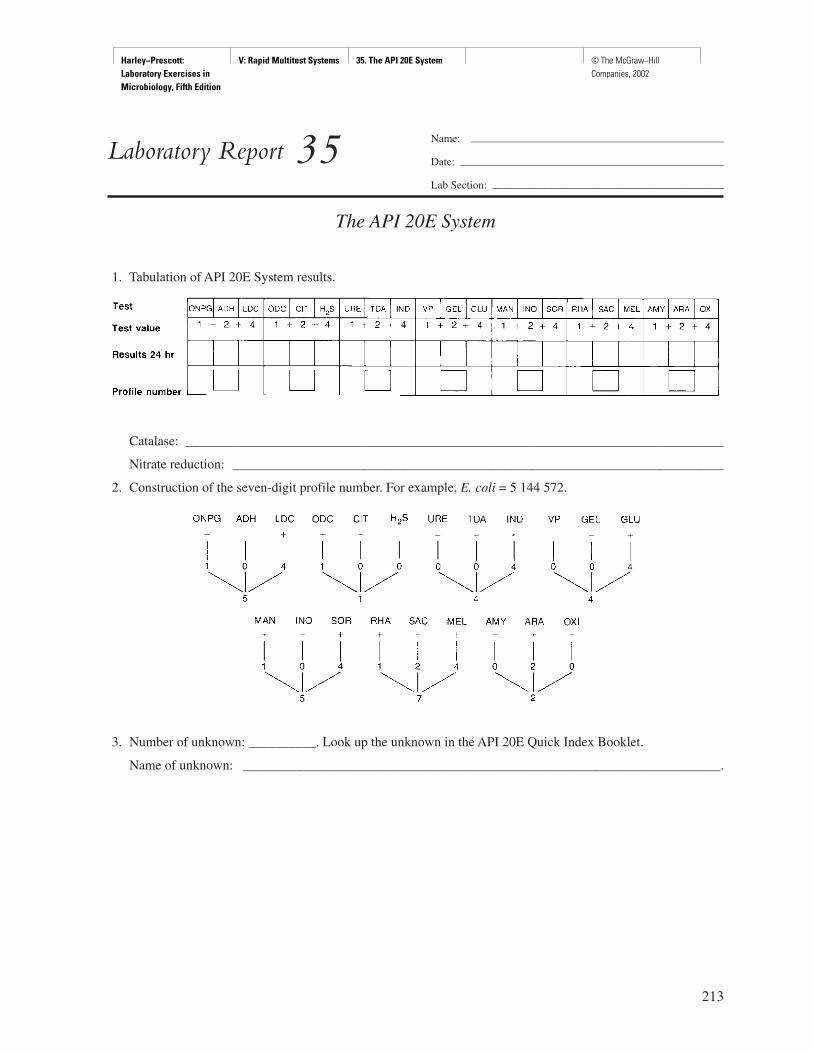
Harley−Prescott: Laboratory Exercises in Microbiology, Fifth Edition
V: Rapid Multitest Systems 35. The API 20E System © The McGraw−Hill Companies, 2002
213
Name: ———————————————————————
Date: ————————————————————————
Lab Section: —————————————————————
Laboratory Report 35
The API 20E System
1. Tabulation of API 20E System results.
Catalase: ________________________________________________________________________________
Nitrate reduction: _________________________________________________________________________
2. Construction of the seven-digit profile number. For example, E. coli = 5 144 572.
3. Number of unknown: __________. Look up the unknown in the API 20E Quick Index Booklet.
Name of unknown: _______________________________________________________________________.

Harley−Prescott: Laboratory Exercises in Microbiology, Fifth Edition
V: Rapid Multitest Systems 35. The API 20E System © The McGraw−Hill Companies, 2002
Review Questions
1. What is the purpose of the sterile mineral oil in the API 20E System?
2. What group of pathogens is the API 20E System used to detect in a clinical laboratory?
3. Why is the recommended incubation procedure for the API 20E System 18 to 24 hours?
4. Can gram-negative, oxidase-positive bacteria be identified with the API 20E System? Explain your answer.
5. What is a cupule?
6. What is a profile index number?
7. What is found in the API 20E Profile Index Booklet?
214 Rapid Multitest Systems
Harley−Prescott: Laboratory Exercises in Microbiology, Fifth Edition
V: Rapid Multitest Systems 36. The Enterotube II System
© The McGraw−Hill Companies, 2002
Materials per Student
1 Enterotube II System (Becton DickinsonMicrobiology Systems, Sparks, MD 21152 (1–800–638–8663) also available from FisherScientific)
plate culture(s) of unknown Enterobacteriaceaefrom EMB, MacConkey, SS, Hektoen enteric,or TSA
TSA plateKovacs’ reagent10% KOH with 3% creatine solution5% α-naphthol in absolute ethanol3 syringes with needles or Pasteur pipettes with
pipettortest-tube rackplatinum inoculating loop (Nichrome wire should
NOT be used)wax pencilBunsen burnerRoche Enterotube II Computer Coding Manual
Learning Objectives
Each student should be able to
1. Correctly inoculate the Enterotube II System2. Read and record the various biochemical reactions
that occur after 18 to 24 hours of incubation
3. Determine a five-digit numerical code4. Identify unknown Enterobacteriaceae using the
Enterotube II System and the Computer CodingManual
Suggested Reading in Textbook
1. The Enterobacteriaceae, section 22.3.2. Rapid Methods of Identification, section 36.2.
Principles
The basic philosophy of the Enterotube II System isthe same as the API 20E System (see exercise 35)—speed, ease, and low cost in the identification ofgram-negative, glucose-fermenting, oxidase-negativeEnterobacteriaceae. Some microbiologists prefer thissystem over the API 20E System. Both systems arepresented in this manual although they accomplish thesame end.
The Enterotube II System consists of a single tubecontaining 12 compartments (figure 36.1), each contain-ing a different agar-solidified culture medium. Compart-ments that require aerobic conditions have small open-ings that allow air in; those requiring anaerobicconditions have a layer of paraffin wax on the top of themedia. There is a self-enclosed inoculating needle(wire). This needle can touch an isolated bacterialcolony and then in one movement can be drawn throughthe 12 compartments, inoculating the test media. Fifteenstandard tests are performed. After 18 to 24 hours of in-cubation, the color changes that occur in each of thecompartments are recorded and interpreted according tothe manufacturer’s instructions. This is done by deter-mining a five-digit code from the results and consultinga coding manual, or by comparing the results obtainedwith those outlined in a differential chart provided bythe manufacturer (see appendix G). This quick multitest
215
E X E R C I S E
The Enterotube II System
36
SAFETY CONSIDERATIONSBe careful with the Bunsen burner flame. No mouthpipetting. Kovacs’ reagent is caustic to the skin andmucous membranes due to the concentrated HCl andp-dimethylaminobenzaldehyde. The 5% α-naphthol inabsolute ethanol is highly flammable.
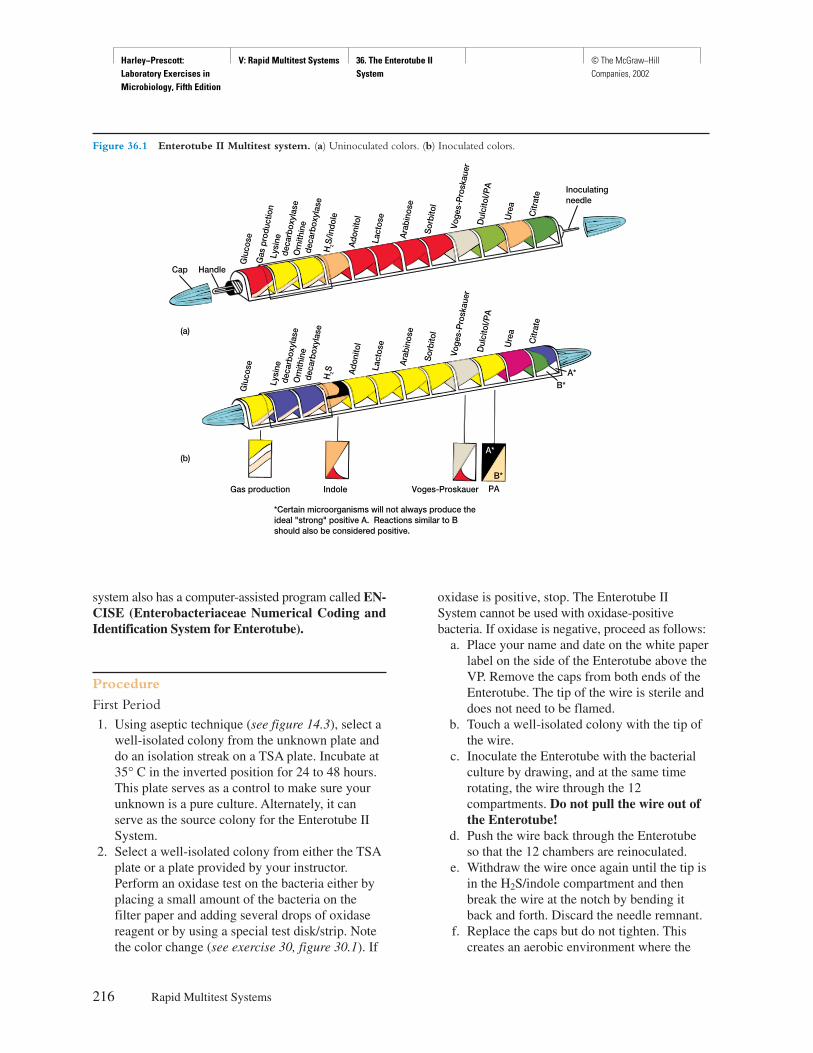
Harley−Prescott: Laboratory Exercises in Microbiology, Fifth Edition
V: Rapid Multitest Systems 36. The Enterotube II System
© The McGraw−Hill Companies, 2002
system also has a computer-assisted program called EN-CISE (Enterobacteriaceae Numerical Coding andIdentification System for Enterotube).
Procedure
First Period1. Using aseptic technique (see figure 14.3), select a
well-isolated colony from the unknown plate anddo an isolation streak on a TSA plate. Incubate at35° C in the inverted position for 24 to 48 hours.This plate serves as a control to make sure yourunknown is a pure culture. Alternately, it canserve as the source colony for the Enterotube IISystem.
2. Select a well-isolated colony from either the TSAplate or a plate provided by your instructor.Perform an oxidase test on the bacteria either byplacing a small amount of the bacteria on thefilter paper and adding several drops of oxidasereagent or by using a special test disk/strip. Notethe color change (see exercise 30, figure 30.1). If
oxidase is positive, stop. The Enterotube IISystem cannot be used with oxidase-positivebacteria. If oxidase is negative, proceed as follows:
a. Place your name and date on the white paperlabel on the side of the Enterotube above theVP. Remove the caps from both ends of theEnterotube. The tip of the wire is sterile anddoes not need to be flamed.
b. Touch a well-isolated colony with the tip ofthe wire.
c. Inoculate the Enterotube with the bacterialculture by drawing, and at the same timerotating, the wire through the 12compartments. Do not pull the wire out ofthe Enterotube!
d. Push the wire back through the Enterotubeso that the 12 chambers are reinoculated.
e. Withdraw the wire once again until the tip isin the H2S/indole compartment and thenbreak the wire at the notch by bending itback and forth. Discard the needle remnant.
f. Replace the caps but do not tighten. Thiscreates an aerobic environment where the
216 Rapid Multitest Systems
Figure 36.1 Enterotube II Multitest system. (a) Uninoculated colors. (b) Inoculated colors.
Gas production
Cap
(a)
Handle
(b)
Indole Voges-Proskauer PA
A*
B*
A*B*
Glu
cose
H2S
/indo
le
Ado
nito
l
Sor
bito
l
Voge
s-P
rosk
auer
Ara
bino
se
Lact
ose
Orn
ithin
e d
ecar
boxy
lase
Lysi
ne d
ecar
boxy
lase
Gas
pro
duct
ion
Dul
cito
l/PA
Ure
a
Citr
ate
Glu
cose
H2S Ado
nito
l
Sor
bito
l
Voge
s-P
rosk
auer
Ara
bino
se
Lact
ose
Orn
ithin
e d
ecar
boxy
lase
Lysi
ne d
ecar
boxy
lase
Dul
cito
l/PA
Ure
a
Citr
ate
Inoculatingneedle
*Certain microorganisms will not always produce theideal "strong" positive A. Reactions similar to Bshould also be considered positive.
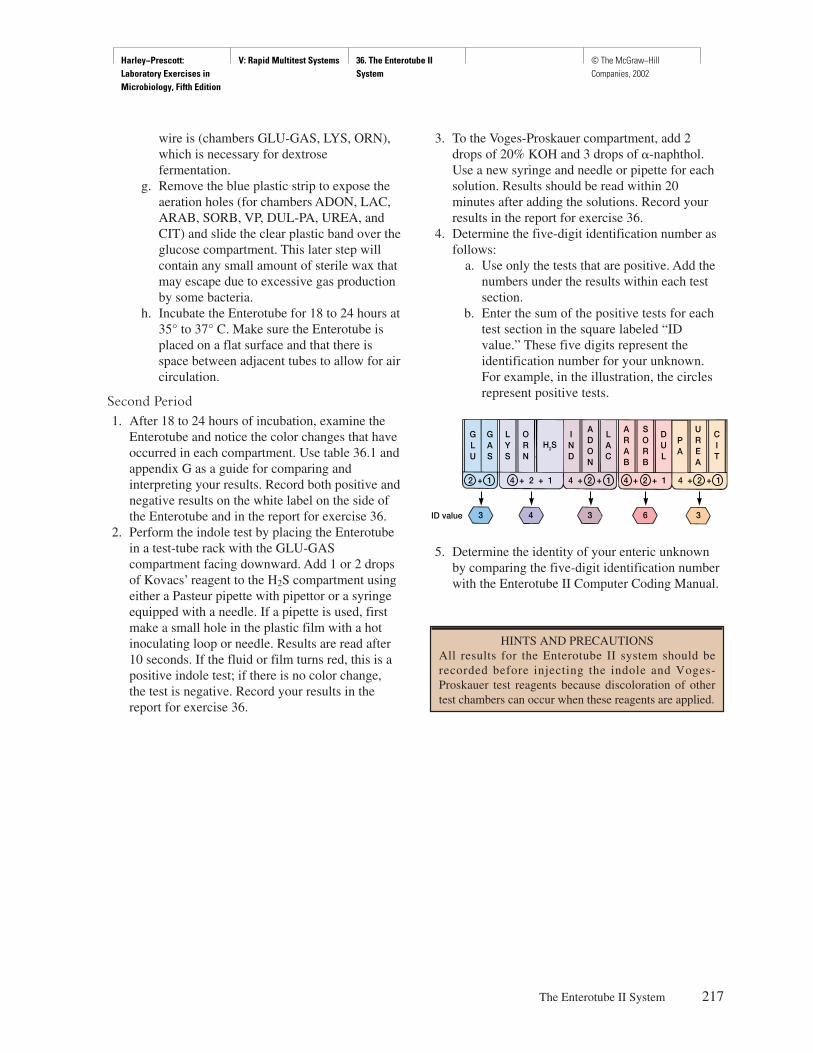
Harley−Prescott: Laboratory Exercises in Microbiology, Fifth Edition
V: Rapid Multitest Systems 36. The Enterotube II System
© The McGraw−Hill Companies, 2002
wire is (chambers GLU-GAS, LYS, ORN),which is necessary for dextrosefermentation.
g. Remove the blue plastic strip to expose theaeration holes (for chambers ADON, LAC,ARAB, SORB, VP, DUL-PA, UREA, andCIT) and slide the clear plastic band over theglucose compartment. This later step willcontain any small amount of sterile wax thatmay escape due to excessive gas productionby some bacteria.
h. Incubate the Enterotube for 18 to 24 hours at35° to 37° C. Make sure the Enterotube isplaced on a flat surface and that there isspace between adjacent tubes to allow for aircirculation.
Second Period1. After 18 to 24 hours of incubation, examine the
Enterotube and notice the color changes that haveoccurred in each compartment. Use table 36.1 andappendix G as a guide for comparing andinterpreting your results. Record both positive andnegative results on the white label on the side ofthe Enterotube and in the report for exercise 36.
2. Perform the indole test by placing the Enterotubein a test-tube rack with the GLU-GAScompartment facing downward. Add 1 or 2 dropsof Kovacs’ reagent to the H2S compartment usingeither a Pasteur pipette with pipettor or a syringeequipped with a needle. If a pipette is used, firstmake a small hole in the plastic film with a hotinoculating loop or needle. Results are read after10 seconds. If the fluid or film turns red, this is apositive indole test; if there is no color change,the test is negative. Record your results in thereport for exercise 36.
3. To the Voges-Proskauer compartment, add 2drops of 20% KOH and 3 drops of �-naphthol.Use a new syringe and needle or pipette for eachsolution. Results should be read within 20minutes after adding the solutions. Record yourresults in the report for exercise 36.
4. Determine the five-digit identification number asfollows:
a. Use only the tests that are positive. Add thenumbers under the results within each testsection.
b. Enter the sum of the positive tests for eachtest section in the square labeled “IDvalue.” These five digits represent theidentification number for your unknown.For example, in the illustration, the circlesrepresent positive tests.
5. Determine the identity of your enteric unknownby comparing the five-digit identification numberwith the Enterotube II Computer Coding Manual.
The Enterotube II System 217
HINTS AND PRECAUTIONSAll results for the Enterotube II system should berecorded before injecting the indole and Voges-Proskauer test reagents because discoloration of othertest chambers can occur when these reagents are applied.
ID value 3 4 63 3
GLU
GAS
LYS
ORN
IND
ADON
LAC
ARAB
SORB
DUL
PA
UREA
CIT
H2S
2 + 1 4 + 2 + 1 4 + 2 + 1 4 + 2 + 1 4 + 2 + 1
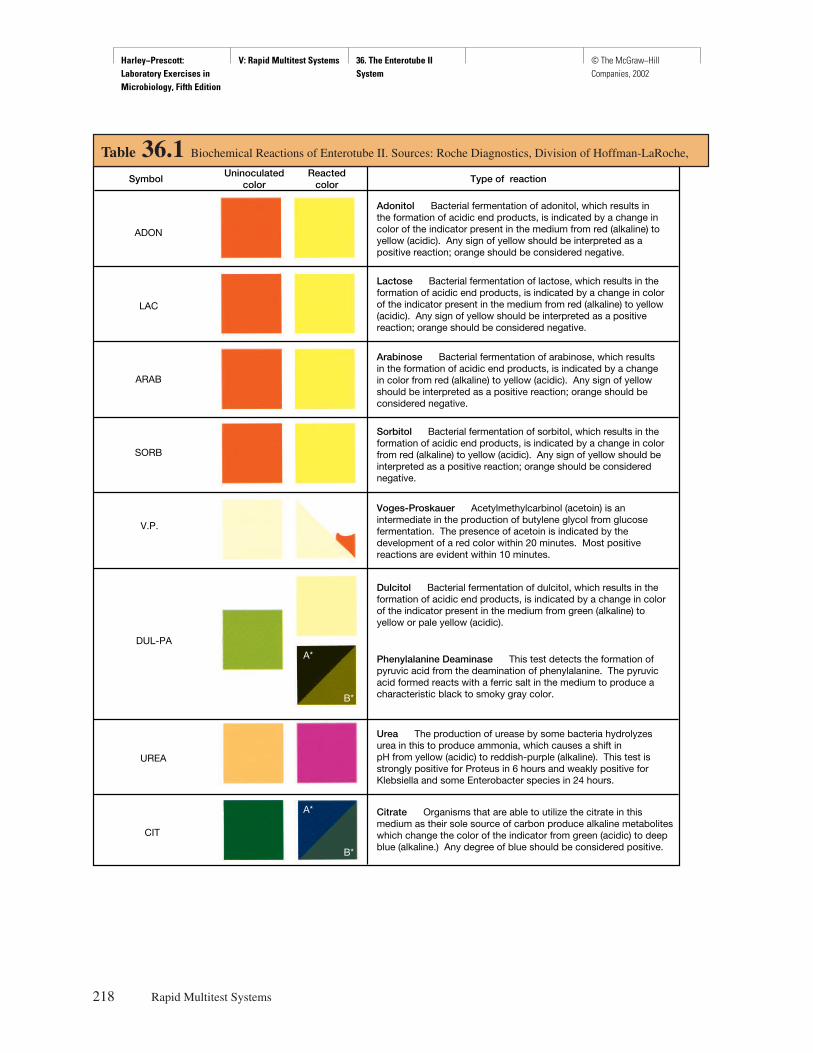
Harley−Prescott: Laboratory Exercises in Microbiology, Fifth Edition
V: Rapid Multitest Systems 36. The Enterotube II System
© The McGraw−Hill Companies, 2002
218 Rapid Multitest Systems
Symbol
ADON
LAC
ARAB
SORB
V.P.
Type of reaction
DUL-PA
UREA
CIT
A*
B*
A*
B*
Adonitol Bacterial fermentation of adonitol, which results inthe formation of acidic end products, is indicated by a change incolor of the indicator present in the medium from red (alkaline) toyellow (acidic). Any sign of yellow should be interpreted as apositive reaction; orange should be considered negative.
Lactose Bacterial fermentation of lactose, which results in theformation of acidic end products, is indicated by a change in colorof the indicator present in the medium from red (alkaline) to yellow(acidic). Any sign of yellow should be interpreted as a positivereaction; orange should be considered negative.
Arabinose Bacterial fermentation of arabinose, which resultsin the formation of acidic end products, is indicated by a changein color from red (alkaline) to yellow (acidic). Any sign of yellowshould be interpreted as a positive reaction; orange should beconsidered negative.
Sorbitol Bacterial fermentation of sorbitol, which results in theformation of acidic end products, is indicated by a change in colorfrom red (alkaline) to yellow (acidic). Any sign of yellow should beinterpreted as a positive reaction; orange should be considerednegative.
Voges-Proskauer Acetylmethylcarbinol (acetoin) is anintermediate in the production of butylene glycol from glucosefermentation. The presence of acetoin is indicated by thedevelopment of a red color within 20 minutes. Most positivereactions are evident within 10 minutes.
Dulcitol Bacterial fermentation of dulcitol, which results in theformation of acidic end products, is indicated by a change in colorof the indicator present in the medium from green (alkaline) to yellow or pale yellow (acidic).
Phenylalanine Deaminase This test detects the formation ofpyruvic acid from the deamination of phenylalanine. The pyruvicacid formed reacts with a ferric salt in the medium to produce acharacteristic black to smoky gray color.
Urea The production of urease by some bacteria hydrolyzesurea in this to produce ammonia, which causes a shift inpH from yellow (acidic) to reddish-purple (alkaline). This test isstrongly positive for Proteus in 6 hours and weakly positive forKlebsiella and some Enterobacter species in 24 hours.
Citrate Organisms that are able to utilize the citrate in thismedium as their sole source of carbon produce alkaline metaboliteswhich change the color of the indicator from green (acidic) to deepblue (alkaline.) Any degree of blue should be considered positive.
Reactedcolor
Uninoculatedcolor
Table 36.1 Biochemical Reactions of Enterotube II. Sources: Roche Diagnostics, Division of Hoffman-LaRoche,
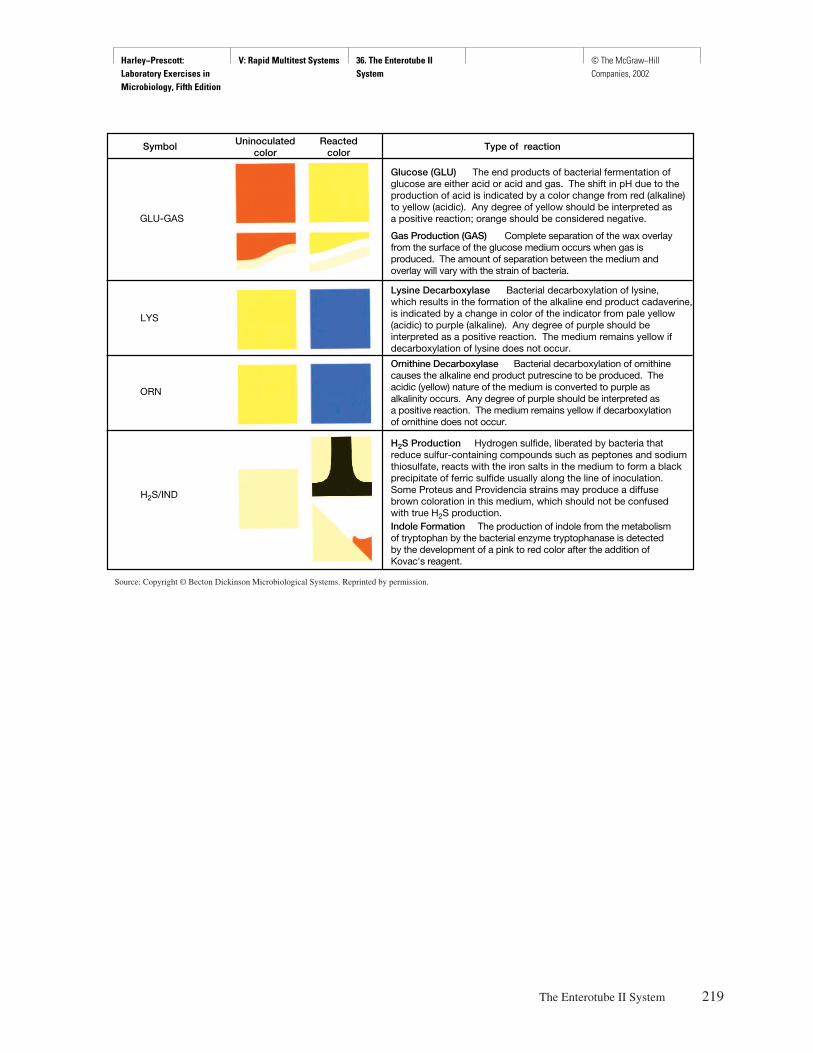
Harley−Prescott: Laboratory Exercises in Microbiology, Fifth Edition
V: Rapid Multitest Systems 36. The Enterotube II System
© The McGraw−Hill Companies, 2002
The Enterotube II System 219
GLU-GAS
Symbol Type of reaction
Glucose (GLU) The end products of bacterial fermentation ofglucose are either acid or acid and gas. The shift in pH due to theproduction of acid is indicated by a color change from red (alkaline)to yellow (acidic). Any degree of yellow should be interpreted asa positive reaction; orange should be considered negative.
Gas Production (GAS) Complete separation of the wax overlayfrom the surface of the glucose medium occurs when gas isproduced. The amount of separation between the medium and overlay will vary with the strain of bacteria.
Lysine Decarboxylase Bacterial decarboxylation of lysine,which results in the formation of the alkaline end product cadaverine,is indicated by a change in color of the indicator from pale yellow(acidic) to purple (alkaline). Any degree of purple should be interpreted as a positive reaction. The medium remains yellow ifdecarboxylation of lysine does not occur.
Ornithine Decarboxylase Bacterial decarboxylation of ornithinecauses the alkaline end product putrescine to be produced. Theacidic (yellow) nature of the medium is converted to purple as alkalinity occurs. Any degree of purple should be interpreted asa positive reaction. The medium remains yellow if decarboxylationof ornithine does not occur.
H2S Production Hydrogen sulfide, liberated by bacteria thatreduce sulfur-containing compounds such as peptones and sodiumthiosulfate, reacts with the iron salts in the medium to form a blackprecipitate of ferric sulfide usually along the line of inoculation.Some Proteus and Providencia strains may produce a diffusebrown coloration in this medium, which should not be confusedwith true H2S production.Indole Formation The production of indole from the metabolismof tryptophan by the bacterial enzyme tryptophanase is detectedby the development of a pink to red color after the addition ofKovac's reagent.
LYS
ORN
H2S/IND
Reactedcolor
Uninoculatedcolor
Source: Copyright © Becton Dickinson Microbiological Systems. Reprinted by permission.
Harley−Prescott: Laboratory Exercises in Microbiology, Fifth Edition
V: Rapid Multitest Systems 36. The Enterotube II System
© The McGraw−Hill Companies, 2002
221
Name: ———————————————————————
Date: ————————————————————————
Lab Section: —————————————————————
Laboratory Report 36
The Enterotube II System
1. Record the results of your unknown in the following chart. Use a + for a positive test and a – for anegative test.
2. Using the Enterotube II Computer Coding Manual, determine the five-digit code number by encircling thenumbers (4, 2, or 1) only under the tests that are positive. Total these numbers within each group to form adigit for that group.
Harley−Prescott: Laboratory Exercises in Microbiology, Fifth Edition
V: Rapid Multitest Systems 36. The Enterotube II System
© The McGraw−Hill Companies, 2002
Review Questions
1. What are some advantages of the Enterotube II System over the API 20E System? Some disadvantages?
2. Why can the Enterotube II System be used to identify only gram-negative, oxidase-negativeEnterobacteriaceae?
3. What is the medical significance of members of the Enterobacteriaceae?
4. Why is part of the wire left in the Enterotube II? Why is part of the wire broken off?
5. What is a coding manual?
6. What are some biochemical characteristics shared by the family Enterobacteriaceae?
7. What is the advantage of ENCISE over a coding manual?
222 Rapid Multitest Systems
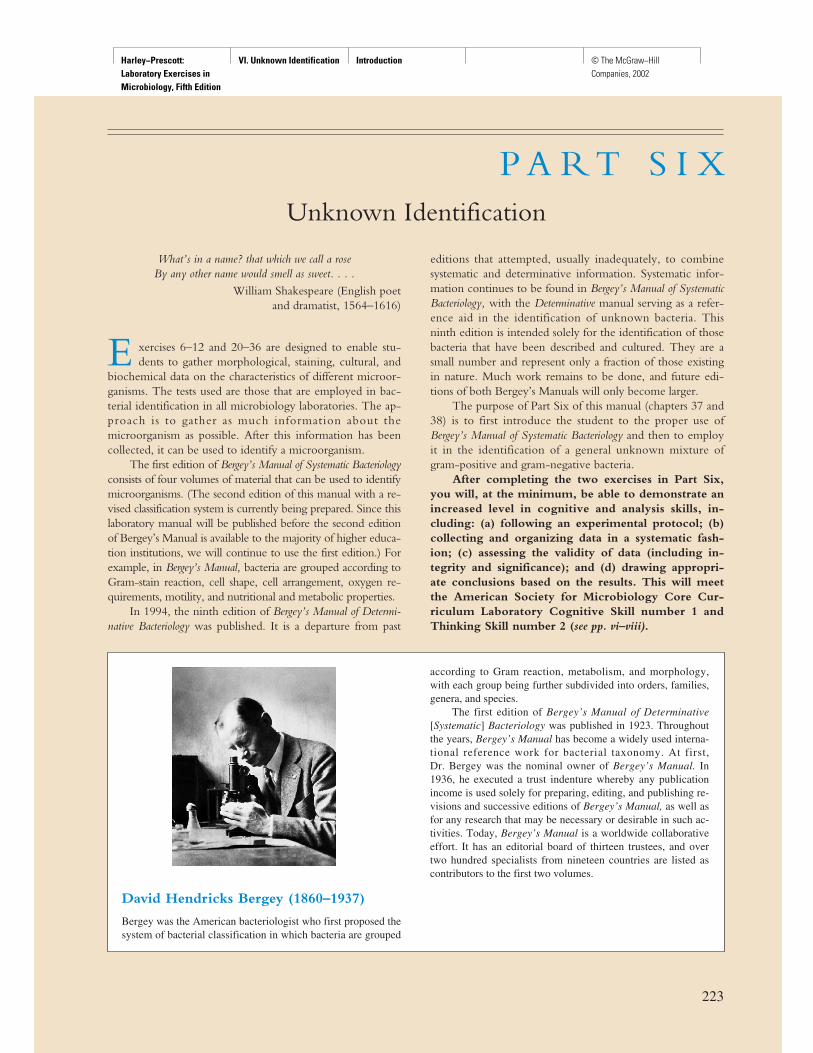
Harley−Prescott: Laboratory Exercises in Microbiology, Fifth Edition
VI. Unknown Identification Introduction © The McGraw−Hill Companies, 2002
P A R T S I XUnknown Identification
What’s in a name? that which we call a roseBy any other name would smell as sweet. . . .
William Shakespeare (English poet and dramatist, 1564–1616)
E xercises 6–12 and 20–36 are designed to enable stu-dents to gather morphological, staining, cultural, and
biochemical data on the characteristics of different microor-ganisms. The tests used are those that are employed in bac-terial identification in all microbiology laboratories. The ap-proach is to gather as much information about themicroorganism as possible. After this information has beencollected, it can be used to identify a microorganism.
The first edition of Bergey’s Manual of Systematic Bacteriologyconsists of four volumes of material that can be used to identifymicroorganisms. (The second edition of this manual with a re-vised classification system is currently being prepared. Since thislaboratory manual will be published before the second editionof Bergey’s Manual is available to the majority of higher educa-tion institutions, we will continue to use the first edition.) Forexample, in Bergey’s Manual, bacteria are grouped according toGram-stain reaction, cell shape, cell arrangement, oxygen re-quirements, motility, and nutritional and metabolic properties.
In 1994, the ninth edition of Bergey’s Manual of Determi-native Bacteriology was published. It is a departure from past
David Hendricks Bergey (1860–1937)
Bergey was the American bacteriologist who first proposed thesystem of bacterial classification in which bacteria are grouped
according to Gram reaction, metabolism, and morphology,with each group being further subdivided into orders, families,genera, and species.
The first edition of Bergey’s Manual of Determinative[Systematic] Bacteriology was published in 1923. Throughoutthe years, Bergey’s Manual has become a widely used interna-tional reference work for bacterial taxonomy. At first, Dr. Bergey was the nominal owner of Bergey’s Manual. In1936, he executed a trust indenture whereby any publicationincome is used solely for preparing, editing, and publishing re-visions and successive editions of Bergey’s Manual, as well asfor any research that may be necessary or desirable in such ac-tivities. Today, Bergey’s Manual is a worldwide collaborativeeffort. It has an editorial board of thirteen trustees, and overtwo hundred specialists from nineteen countries are listed ascontributors to the first two volumes.
editions that attempted, usually inadequately, to combinesystematic and determinative information. Systematic infor-mation continues to be found in Bergey’s Manual of SystematicBacteriology, with the Determinative manual serving as a refer-ence aid in the identification of unknown bacteria. Thisninth edition is intended solely for the identification of thosebacteria that have been described and cultured. They are asmall number and represent only a fraction of those existingin nature. Much work remains to be done, and future edi-tions of both Bergey’s Manuals will only become larger.
The purpose of Part Six of this manual (chapters 37 and38) is to first introduce the student to the proper use ofBergey’s Manual of Systematic Bacteriology and then to employit in the identification of a general unknown mixture ofgram-positive and gram-negative bacteria.
After completing the two exercises in Part Six,you will, at the minimum, be able to demonstrate anincreased level in cognitive and analysis skills, in-cluding: (a) following an experimental protocol; (b)collecting and organizing data in a systematic fash-ion; (c) assessing the validity of data (including in-tegrity and significance); and (d) drawing appropri-ate conclusions based on the results. This will meetthe American Society for Microbiology Core Cur-riculum Laboratory Cognitive Skill number 1 andThinking Skill number 2 (see pp. vi–viii).
223
Harley−Prescott: Laboratory Exercises in Microbiology, Fifth Edition
VI. Unknown Identification 37. Using the 1st Ed. of Bergey’s Man. of Syst. Bacteriology to Ident. Bacteria
© The McGraw−Hill Companies, 2002
Materials per Group of Students
Krieg, N. R., ed. 1984. Bergey’s Manual ofSystematic Bacteriology, editor-in-chief J. G.Holt, vol. 1. Baltimore, Maryland: Williams &Wilkins.
Sneath, P. H. A., Mair, N. S., and Sharpe, M. E.1986. Bergey’s Manual of SystematicBacteriology, editor-in-chief J. G. Holt, vol. 2.Baltimore, Maryland: Williams & Wilkins.
Learning Objectives
Each student should be able to
1. Use Bergey’s Manual to identify an unknownbacterial strain
2. Use Bergey’s Manual as a source of furtherinformation about a group of bacteria
Suggested Reading in Textbook
1. Microbial Taxonomy, Chapter 19.2. The bacterial survey chapters, Chapter 20–24.
These should be consulted for specificinformation about particular volumes of themanual and groups of bacteria. Chapters 21 and22 cover the bacteria in Volume 1 of Bergey’sManual and chapters 23 and 24 describe thebacteria in Volume 2.
3. Bacterial Classification according to the firstedition of Bergey’s Manual of SystematicBacteriology, appendix III.
Pronunciation Guide
Streptococcus (strep-to-KOK-us)
Principles
Bergey’s Manual of Systematic Bacteriology is intendedto aid microbiologists in identifying unknown bacteria
and also to provide information about the biology ofeach bacterial group. The first edition of the manual isdivided into four volumes and 33 sections. Each sectioncontains bacteria sharing a few easily determined char-acteristics and bears a title that either describes theseproperties or provides the vernacular names of the bac-teria included. The characteristics used to define sec-tions are normally features such as general shape andmorphology, Gram-staining properties, oxygen depen-dence, motility, the presence of endospores, and themode of energy production. Each volume focuses on adifferent collection of bacteria.
Volume 1. The gram-negative bacteria of general,medical, or industrial importance.
Volume 2. Gram-positive bacteria other thanactinomycetes.
Volume 3. Gram-negative bacteria with distinctiveproperties, cyanobacteria, and archaeobacteria.
Volume 4. Actinomycetes (gram-positive filamentousbacteria).
Several useful introductory articles on various as-pects of bacterial taxonomy are located at the begin-ning of each volume. These articles cover such topicsas using the manual, bacterial classification andnomenclature, the identification of bacteria, referencecollections of bacteria, and higher bacterial taxa. Thevolumes are numbered sequentially. For example, Vol-ume 1 ends on page 964, and the introduction to bacte-rial classification in Volume 2 begins on page 965.
The sections in the first edition of Bergey’s Manualvary considerably in content. Some contain only onemajor bacterial taxon. For example, Section 1 has onlythe order Spirochetales. Other sections contain morethan one family (Section 5, the facultatively anaerobicgram-negative rods) or more than one order (Section 9,the Rickettsias and Chlamydiae). Many sections lackany taxa above the genus level (Section 13, endospore-forming, gram-positive rods and cocci). Several sec-tions also have genera grouped under the heading
224
E X E R C I S E
Using the First Edition of Bergey’s Manual of SystematicBacteriology to Identify Bacteria
37
Harley−Prescott: Laboratory Exercises in Microbiology, Fifth Edition
VI. Unknown Identification 37. Using the 1st Ed. of Bergey’s Man. of Syst. Bacteriology to Ident. Bacteria
© The McGraw−Hill Companies, 2002
“Other Genera” or “Other Organisms.” These groupsbelong in the section, but cannot yet be placed in a rec-ognized family.
Each article on a genus of bacteria is organized ina specific sequence to provide essential informationabout the genus as efficiently as possible. Some of themore important parts of each article are the following:
1. Name of the Genus. The accepted name is givenin boldface.
2. Capsule Description. A brief summary of themajor characteristics of the genus, with the mostimportant properties in boldface, is provided forconvenience.
3. Further Descriptive Information. A moreextensive description of the biology of the genusis then given. Although this description is notexhaustive, it provides a great deal of usefulinformation about such items as morphology,growth conditions and nutrition, physiology andmetabolism, genetics, pathogenicity, and ecology.
4. Enrichment and Isolation. Selected methods forgrowth of the bacteria are presented.
5. Differentiation of the Genus from OtherGenera. Characteristics that are particularlyuseful in distinguishing related genera are given,often in the form of a table.
6. Taxonomic Comment. This part summarizes thereasons for placing the genus in its currenttaxonomic position. The placement of species inthe genus is also discussed.
7. Differentiation of the Species of the Genus. Thecharacteristics most useful for distinguishingbetween species are described and usuallysummarized in table form.
8. List of the Species of the Genus. Descriptions ofeach species in the genus are given. Wherepossible, much of the essential information issummarized in tables.
In articles on the bacterial genera, three types oftables are used to summarize a great deal of informa-tion: (1) tables that differentiate between related gen-era; (2) tables that differentiate between specieswithin a genus; and (3) tables that provide extra infor-mation about particular species. A variety of symbolsare used in these tables. The most important are de-fined as follows:
+ 90% or more strains are positive for thecharacteristic
– 90% or more strains are negatived 11% to 89% of the strains are positive
v strain instability (this is not equivalent to“d”)
D different reactions in different taxa (speciesof a genus or genera of a family)
Footnotes to the tables give additional symbols andexceptions to the above symbols.
One can use the manual for unknown identifica-tion in the following way. First, determine which vol-ume to employ based on the Gram-staining propertiesof the unknown and its general shape. For example,most ordinary gram-negative bacteria are found inVolume 1, while ordinary gram-positive bacteria (ex-cluding the actinomycetes) are found in Volume 2.Most unknowns provided for student laboratory exer-cises will be found in the first two volumes. Next,proceed to the Table of Contents in the appropriatevolume and carefully study the descriptive title foreach section. The titles should provide sufficient in-formation to place the unknown within a section. De-termine the genus of the unknown using the keys ortables that are normally found at the beginning ofeach section. Once the proper genus has been se-lected, the unknown can be placed in a species usinginformation contained in the generic and species de-scriptions. Tables and written descriptive materialfrom both generic and species descriptions should beemployed in the final identification because character-istics discussed in the generic descriptions are notnormally repeated in the species descriptions.
Two examples of unknown identification usingBergey’s Manual may be helpful in understanding thisapproach to unknown identification. First, suppose thatyou are trying to identify a gram-negative, facultativelyanaerobic straight rod that is oxidase negative andmotile by peritrichous flagella. Since the unknown is aregular gram-negative bacterium, you would use Vol-ume 1. Inspection of the Table of Contents will lead toSection 5 because the unknown is a facultatively anaer-obic, gram-negative rod. Table 5.1 on page 408 differ-entiates between the three families in Section 5. Theunknown is a straight rod that is oxidase negative andperitrichous; thus, it is a member of the family Enter-obacteriaceae. Properties of the family are describedon pages 408–420. Tentative identification of the genuscan be made using the biochemical characteristicsgiven in Table 5.3, pages 414–417. Genus identity canbe confirmed from the descriptions beginning on page420 with particular emphasis on the properties given inboldface in the Capsule Descriptions of the genera.
Now imagine that the unknown is a gram-posi-tive, facultatively anaerobic coccus that grows in
Using Bergey’s Manual of Systematic Bacteriology to Identify Bacteria 225

Harley−Prescott: Laboratory Exercises in Microbiology, Fifth Edition
VI. Unknown Identification 37. Using the 1st Ed. of Bergey’s Man. of Syst. Bacteriology to Ident. Bacteria
© The McGraw−Hill Companies, 2002
chains and pairs, is catalase negative, and fermentsglucose to lactate. Because the bacterium is gram pos-itive and not an actinomycete, one would use Volume2. Inspection of the Table of Contents shows that onlySection 12 of the six sections contains gram-positivecocci. Table 12.1, pages 999–1,001, can be used toidentify the genus. Since the unknown is a facultativeanaerobe, one would turn to the part of the table thatdescribes facultatively anaerobic genera (page 1,000).The genus Streptococcus best fits the unknown be-cause it forms chains and pairs and produces lactate.This can be confirmed by testing for the characteris-tics given in the Capsule Description of the genus onpage 1,043 and the section entitled “Differentiation ofthe genus Streptococcus from other taxa” on page1,046. Identification of the species is made from thedescriptive material in the list of species that beginson page 1,047. In particular, the summary tables onpage 1,048 and elsewhere are especially useful inspecies identification.
One must very carefully use the Table of Contentsas a key to the sections. If there are many discrepan-cies between the unknown’s properties and the de-scriptions of the leading candidates within a section,an error may have been made in Gram staining orsome other basic laboratory procedure so that the un-
known has been placed in the wrong section. If facedwith this situation, it is best to recheck the results usedto select the volume and the section.
It should also be kept in mind that there is often agreat deal of variation between different strains of aspecies. A bacterium might differ from the species de-scription in one test and match the description in allothers. Sometimes all one can do is select the speciesor genus with the best overall match to the data. Ifpossible, extra tests should be run to eliminate alter-nate candidates.
As mentioned earlier, Bergey’s Manual of System-atic Bacteriology also serves as an excellent source ofinformation about the biology of bacteria. The Tableof Contents of each volume may be used to find thebacterial group of interest. However, it is usually eas-ier to simply look for the desired family, genus, orspecies in the Index of Scientific Names of Bacteria atthe end of each volume. All references to each bacte-rial taxon are noted in the index. The page numbers inboldface indicate the page on which the actual de-scription of the taxon begins. Each volume also con-tains an extensive bibliography that lists in alphabeti-cal order all the papers cited in the volume. Thesearticles may be consulted for more information aboutthe genus or species of interest.
226 Unknown Identification
Harley−Prescott: Laboratory Exercises in Microbiology, Fifth Edition
VI. Unknown Identification 37. Using the 1st Ed. of Bergey’s Man. of Syst. Bacteriology to Ident. Bacteria
© The McGraw−Hill Companies, 2002
227
Name: ———————————————————————
Date: ————————————————————————
Lab Section: —————————————————————
Laboratory Report 37
Using the First Edition of Bergey’s Manual of Systematic Bacteriology to Identify Bacteria
1. Find the pages in Volume 1 or 2 on which the following topics are discussed:
a. How to use the manual. _______________________________________________________________
b. The nature of taxonomic ranks. _________________________________________________________
c. Major developments in bacterial classification. _____________________________________________
d. The use of nucleic acids in bacterial classification. __________________________________________
2. Give the page in Volume 1 or 2 on which R. G. E. Murray proposes a new arrangement of higher bacterialtaxa (divisions and classes). _________________________________________________________________
Where does he describe the kingdom Procaryotae and its four divisions? _____________________________
3. Using the indexes in Volumes 1 and 2, find the pages on which descriptions of the following taxa begin:
a. Enterobacteriaceae ___________________ e. Rickettsiales _____________________________
b. Pseudomonas aeruginosa ______________ f. Treponema ______________________________
c. Salmonella _________________________ g. Lactobacillus ____________________________
d. Mycobacterium tuberculosis ____________ h. Staphylococcus ___________________________
4. Use Bergey’s Manual to find the genus and species of an unknown with the following characteristics: gram-negative straight rod, facultatively anaerobic, motile by peritrichous flagella, oxidase negative, hydrolyzesurea and gelatin, produces hydrogen sulfide, oxidatively deaminates the amino acids phenylalanine andtryptophan, indole positive, and ornithine-decarboxylase negative.
Genus: __________________________________________________________________________________
Species: _________________________________________________________________________________
5. Use Bergey’s Manual to find the genus and species of an unknown with the following characteristics: gram-positive straight rod, cell diameter 1.0 to 1.2 µm, motile by peritrichous flagella, grows in chains, facultativeand can grow anaerobically, catalase positive, reduces nitrate to nitrite, elliptical endospores formed centrallyin an unswollen cell (sporangium), colonies dull or frosted in appearance with an undulated margin, noparasporal body, Voges–Proskauer test positive, gelatin and starch hydrolyzed, and citrate catabolized.
Genus: __________________________________________________________________________________
Species: _________________________________________________________________________________

Harley−Prescott: Laboratory Exercises in Microbiology, Fifth Edition
VI. Unknown Identification 37. Using the 1st Ed. of Bergey’s Man. of Syst. Bacteriology to Ident. Bacteria
© The McGraw−Hill Companies, 2002
Review Questions
1. What is found in each section of the first edition of Bergey’s Manual of Systematic Bacteriology?
2. In articles on the bacterial genera, what types of tables are used to summarize data?
3. How would you use Bergey’s Manual to identify an unknown?
4. When using the Table of Contents in Bergey’s Manual, why must you be very careful?
5. Of what value is the Bibliography in Bergey’s Manual?
6. How many current volumes are there of Bergey’s Manual?
7. What are the three types of tables found in Bergey’s Manual?
228 Unknown Identification
Harley−Prescott: Laboratory Exercises in Microbiology, Fifth Edition
VI. Unknown Identification 38. General Unknown © The McGraw−Hill Companies, 2002
Materials per Student
number-coded, 24-hour tryptic soy broth culturecontaining a mixture of any two bacteria (onegram positive and one gram negative) listed inthe table on the next page
1 mannitol salt agar plate1 EMB plate1 blood agar plate4 TSA slants—2 screw cap and 2 regular
Materials to Be Requested
2 tryptic soy agar plates2 nutrient gelatin deep tubes or gelatin test strips2 starch agar plates2 tributyrin agar plates2 SIM agar deeps2 Simmons’ citrate slants2 urea broth tubes or urease test disks/strips2 phenol red dextrose broth tubes or dextrose
tablets2 phenol red lactose broth tubes or lactose tablets2 phenol red sucrose broth tubes or sucrose tablets2 tryptic nitrate broth tubes2 litmus milk tubes2 MR-VP broth tubes
General Laboratory Material
Gram-stain and acid-fast materials3% hydrogen peroxideBarritt’s reagentsKovacs’ reagentzinc powdertetramethyl-p-phenylenediamine dihydrochloride
or oxidase test disk/stripglass slideswax pencil35°C incubatorBunsen burnerinoculating loop and needledisposable glovesPasteur pipettes with pipettor
Learning Objectives
Each student should be able to
1. Perform an isolation streak to separate twounknown bacteria
2. Identify unknown gram-positive and gram-negative bacteria
Principles
The identification of unknown bacteria is one of themajor responsibilities of the microbiologist. At thispoint in the course, students should have developedsufficient knowledge in staining methods, isolationtechniques, microbial nutrition, biochemical activities,and characteristics of microorganisms to be able towork independently in identifying unknown bacteria.
This exercise is called a general unknown becauseunknown gram-positive and gram-negative bacteriawill be used. Any of the following bacteria may bepresent in the unknown.
229
E X E R C I S E
General Unknown
38
SAFETY CONSIDERATIONSBe careful with the Bunsen burner flame. No mouthpipetting. Barritt’s reagent contains naphthol, which istoxic and may cause peeling of the skin; thus, weargloves when using this reagent. Kovacs’ reagent is alsocaustic to the skin and mucous membranes due to theconcentrated HCl and p-dimethylaminobenzaldehyde.Handle all cultures with care. Some may be pathogensor potential pathogens.
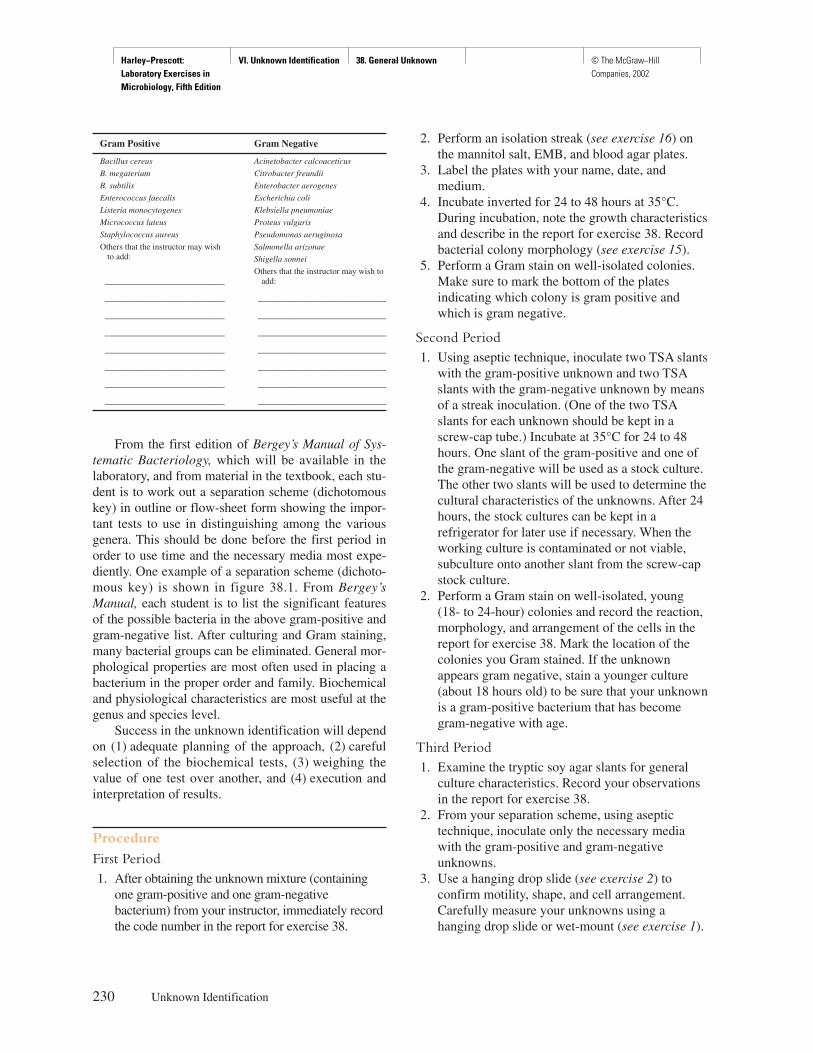
Harley−Prescott: Laboratory Exercises in Microbiology, Fifth Edition
VI. Unknown Identification 38. General Unknown © The McGraw−Hill Companies, 2002
From the first edition of Bergey’s Manual of Sys-tematic Bacteriology, which will be available in thelaboratory, and from material in the textbook, each stu-dent is to work out a separation scheme (dichotomouskey) in outline or flow-sheet form showing the impor-tant tests to use in distinguishing among the variousgenera. This should be done before the first period inorder to use time and the necessary media most expe-diently. One example of a separation scheme (dichoto-mous key) is shown in figure 38.1. From Bergey’sManual, each student is to list the significant featuresof the possible bacteria in the above gram-positive andgram-negative list. After culturing and Gram staining,many bacterial groups can be eliminated. General mor-phological properties are most often used in placing abacterium in the proper order and family. Biochemicaland physiological characteristics are most useful at thegenus and species level.
Success in the unknown identification will dependon (1) adequate planning of the approach, (2) carefulselection of the biochemical tests, (3) weighing thevalue of one test over another, and (4) execution andinterpretation of results.
Procedure
First Period1. After obtaining the unknown mixture (containing
one gram-positive and one gram-negativebacterium) from your instructor, immediately recordthe code number in the report for exercise 38.
2. Perform an isolation streak (see exercise 16) onthe mannitol salt, EMB, and blood agar plates.
3. Label the plates with your name, date, andmedium.
4. Incubate inverted for 24 to 48 hours at 35°C.During incubation, note the growth characteristicsand describe in the report for exercise 38. Recordbacterial colony morphology (see exercise 15).
5. Perform a Gram stain on well-isolated colonies.Make sure to mark the bottom of the platesindicating which colony is gram positive andwhich is gram negative.
Second Period1. Using aseptic technique, inoculate two TSA slants
with the gram-positive unknown and two TSAslants with the gram-negative unknown by meansof a streak inoculation. (One of the two TSAslants for each unknown should be kept in ascrew-cap tube.) Incubate at 35°C for 24 to 48hours. One slant of the gram-positive and one ofthe gram-negative will be used as a stock culture.The other two slants will be used to determine thecultural characteristics of the unknowns. After 24hours, the stock cultures can be kept in arefrigerator for later use if necessary. When theworking culture is contaminated or not viable,subculture onto another slant from the screw-capstock culture.
2. Perform a Gram stain on well-isolated, young(18- to 24-hour) colonies and record the reaction,morphology, and arrangement of the cells in thereport for exercise 38. Mark the location of thecolonies you Gram stained. If the unknownappears gram negative, stain a younger culture(about 18 hours old) to be sure that your unknownis a gram-positive bacterium that has becomegram-negative with age.
Third Period1. Examine the tryptic soy agar slants for general
culture characteristics. Record your observationsin the report for exercise 38.
2. From your separation scheme, using aseptictechnique, inoculate only the necessary mediawith the gram-positive and gram-negativeunknowns.
3. Use a hanging drop slide (see exercise 2) toconfirm motility, shape, and cell arrangement.Carefully measure your unknowns using ahanging drop slide or wet-mount (see exercise 1).
230 Unknown Identification
Gram Positive Gram Negative
Bacillus cereus Acinetobacter calcoaceticus
B. megaterium Citrobacter freundii
B. subtilis Enterobacter aerogenes
Enterococcus faecalis Escherichia coli
Listeria monocytogenes Klebsiella pneumoniae
Micrococcus luteus Proteus vulgaris
Staphylococcus aureus Pseudomonas aeruginosa
Others that the instructor may wish Salmonella arizonaeto add: Shigella sonnei
Others that the instructor may wish to____________________________ add:
____________________________ ______________________________
____________________________ ______________________________
____________________________ ______________________________
____________________________ ______________________________
____________________________ ______________________________
____________________________ ______________________________
____________________________ ______________________________
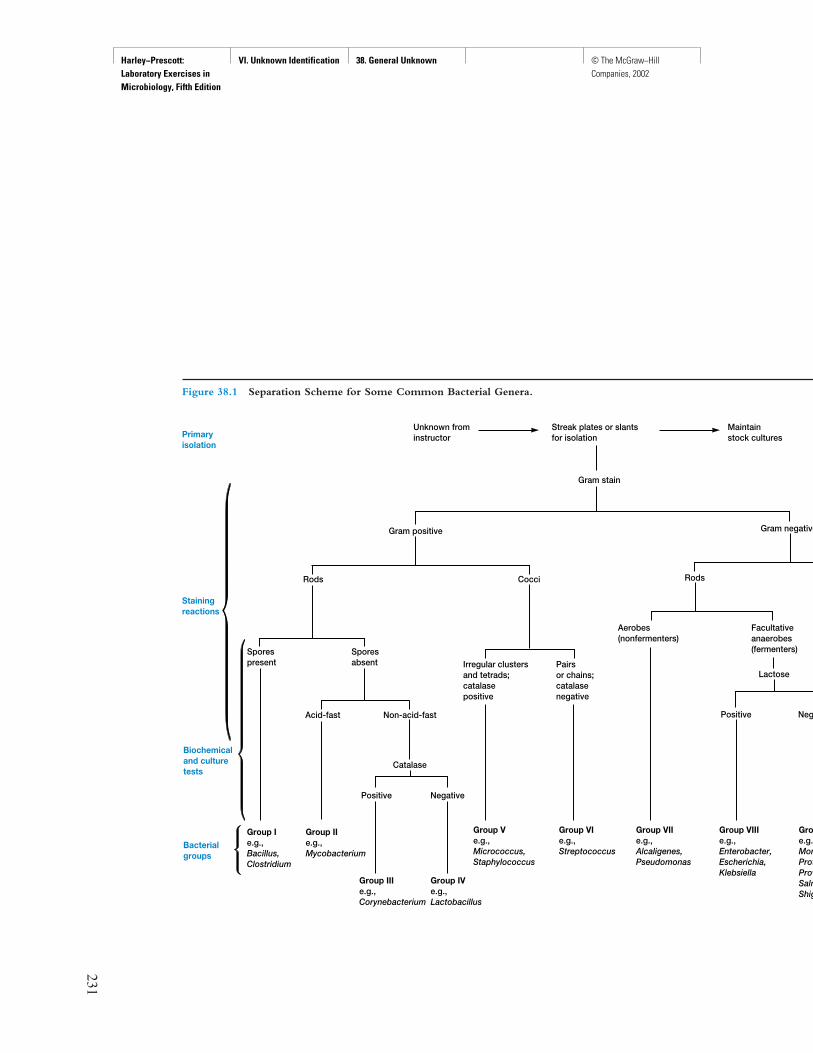
Harley−Prescott: Laboratory Exercises in Microbiology, Fifth Edition
VI. Unknown Identification 38. General Unknown © The McGraw−Hill Companies, 2002
231
Streak plates or slantsfor isolation
Unknown frominstructor
Maintainstock cultures
Gram stain
RodsCocci
Primaryisolation
Stainingreactions
Biochemicaland culturetests
Bacterialgroups
Group Ie.g.,Bacillus,Clostridium
Group IIe.g.,Mycobacterium
Group Ve.g.,Micrococcus,Staphylococcus
Group VIe.g.,Streptococcus
Group VIIe.g.,Alcaligenes,Pseudomonas
Group VIIIe.g.,Enterobacter,Escherichia,Klebsiella
Groue.g.,MorProtProvSalmShig
Group IIIe.g.,Corynebacterium
Group IVe.g.,Lactobacillus
Sporesabsent
Acid-fast
Rods
Aerobes(nonfermenters)
Facultativeanaerobes(fermenters)
Irregular clustersand tetrads;catalasepositive
Pairsor chains;catalasenegative
Lactose
Positive Neg
Gram positive Gram negative
Catalase
Positive Negative
Sporespresent
Non-acid-fast
Figure 38.1 Separation Scheme for Some Common Bacterial Genera.

Harley−Prescott: Laboratory Exercises in Microbiology, Fifth Edition
VI. Unknown Identification 38. General Unknown © The McGraw−Hill Companies, 2002
232 Unknown Identification
4. If your unknown is a gram-positive rod, stain forendospores (see exercise 10) after incubating anutrient agar slant culture for 2 to 4 days.
Fourth Period1. Based on your results, identify the unknown
bacteria as to their genus and species. Use figure38.1, your own outline or flow sheet (figure 38.2is an example), and Bergey’s Manual as guides.Medium Test
Phenol red broth tubes or tryptic Carbohydrate fermentationagar base tubes for dextrose, lactose, and sucrose
Starch agar plate Starch hydrolysis
Tryptic soy agar plate Oxidase test
Nutrient gelatin deep tube, gelatin test strip Gelatin liquefaction
SIM medium H2S, indole, motility
Tributyrin agar plate Lipid hydrolysis
Tryptic nitrate broth Nitrate reduction
MR-VP broth Methyl red test, Voges-Proskauer test
Tryptic soy agar slant Catalase activity
Simmons’ citrate agar slant Citrate utilization
Urea broth, urease test disk/strip Urease activity
HINTS AND PRECAUTIONS(1) It is advisable to review the Hints and Precautionspreviously listed for exercises 17–34 before progressingwith the identification of unknowns. (2) When usingBergey’s Manual, be sure to keep in mind strain varia-tions and give greatest weight to the most important de-scriptive properties. Remember that if you have toomany discrepancies, you may be in the wrong volumeor section.
Gram stain
Positive Negative
RodCoccus
(�)
(�)
(�) (�)
(�) (�)
(�)
(�)
Shape
Oxidasetest
Growth oncitrate
Indoleproduction
Escherichia coliis the
unknown bacterium
Lactosefermentation
Figure 38.2 An Example of a Dichotomous Key Leading to the Identification of Escherichia coli.
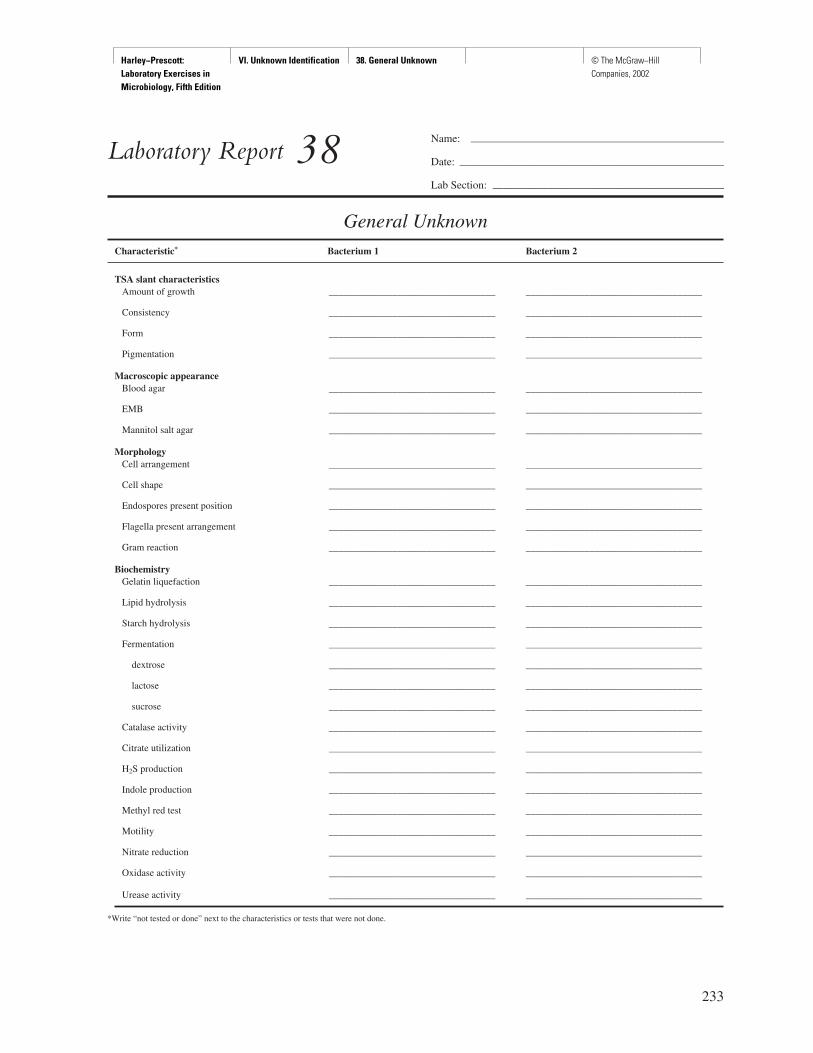
Harley−Prescott: Laboratory Exercises in Microbiology, Fifth Edition
VI. Unknown Identification 38. General Unknown © The McGraw−Hill Companies, 2002
233
Name: ———————————————————————
Date: ————————————————————————
Lab Section: —————————————————————
Laboratory Report 38
General UnknownCharacteristic* Bacterium 1 Bacterium 2
TSA slant characteristicsAmount of growth __________________________________ ____________________________________
Consistency __________________________________ ____________________________________
Form __________________________________ ____________________________________
Pigmentation __________________________________ ____________________________________
Macroscopic appearanceBlood agar __________________________________ ____________________________________
EMB __________________________________ ____________________________________
Mannitol salt agar __________________________________ ____________________________________
MorphologyCell arrangement __________________________________ ____________________________________
Cell shape __________________________________ ____________________________________
Endospores present position __________________________________ ____________________________________
Flagella present arrangement __________________________________ ____________________________________
Gram reaction __________________________________ ____________________________________
BiochemistryGelatin liquefaction __________________________________ ____________________________________
Lipid hydrolysis __________________________________ ____________________________________
Starch hydrolysis __________________________________ ____________________________________
Fermentation __________________________________ ____________________________________
dextrose __________________________________ ____________________________________
lactose __________________________________ ____________________________________
sucrose __________________________________ ____________________________________
Catalase activity __________________________________ ____________________________________
Citrate utilization __________________________________ ____________________________________
H2S production __________________________________ ____________________________________
Indole production __________________________________ ____________________________________
Methyl red test __________________________________ ____________________________________
Motility __________________________________ ____________________________________
Nitrate reduction __________________________________ ____________________________________
Oxidase activity __________________________________ ____________________________________
Urease activity __________________________________ ____________________________________
*Write “not tested or done” next to the characteristics or tests that were not done.
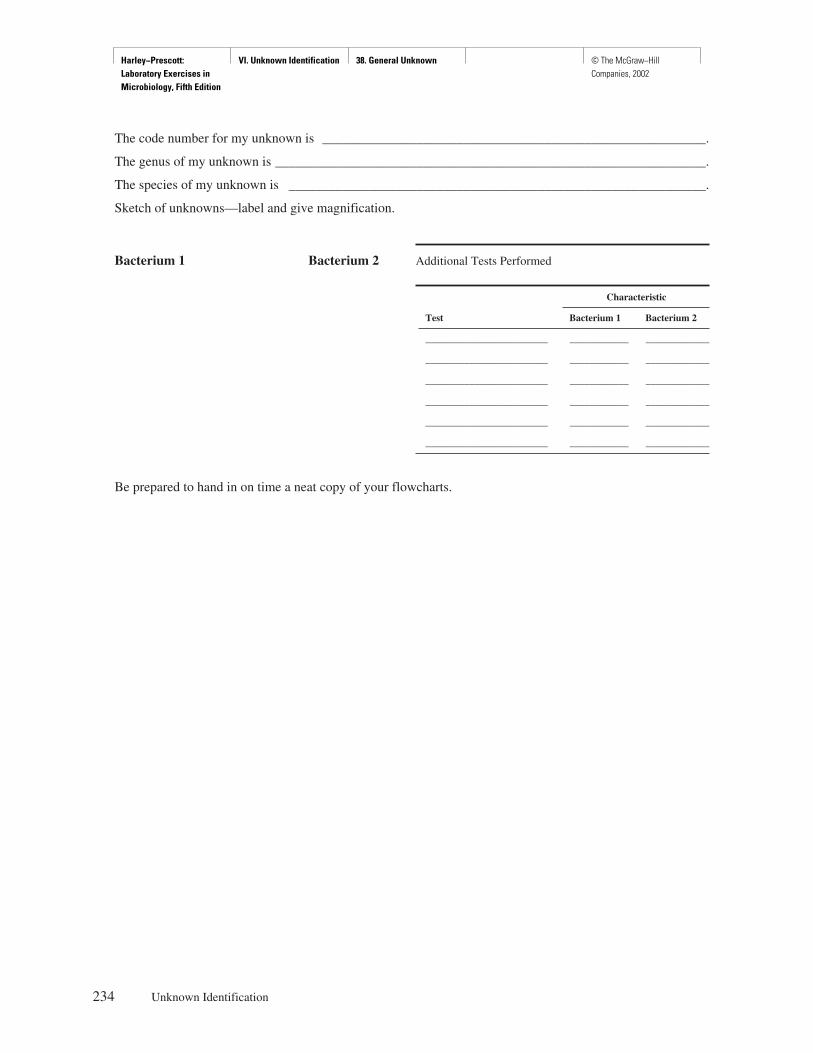
Harley−Prescott: Laboratory Exercises in Microbiology, Fifth Edition
VI. Unknown Identification 38. General Unknown © The McGraw−Hill Companies, 2002
The code number for my unknown is _________________________________________________________.
The genus of my unknown is ________________________________________________________________.
The species of my unknown is ______________________________________________________________.
Sketch of unknowns—label and give magnification.
Bacterium 1 Bacterium 2 Additional Tests Performed
Characteristic
Test Bacterium 1 Bacterium 2
_________________________ ____________ _____________
_________________________ ____________ _____________
_________________________ ____________ _____________
_________________________ ____________ _____________
_________________________ ____________ _____________
_________________________ ____________ _____________
Be prepared to hand in on time a neat copy of your flowcharts.
234 Unknown Identification
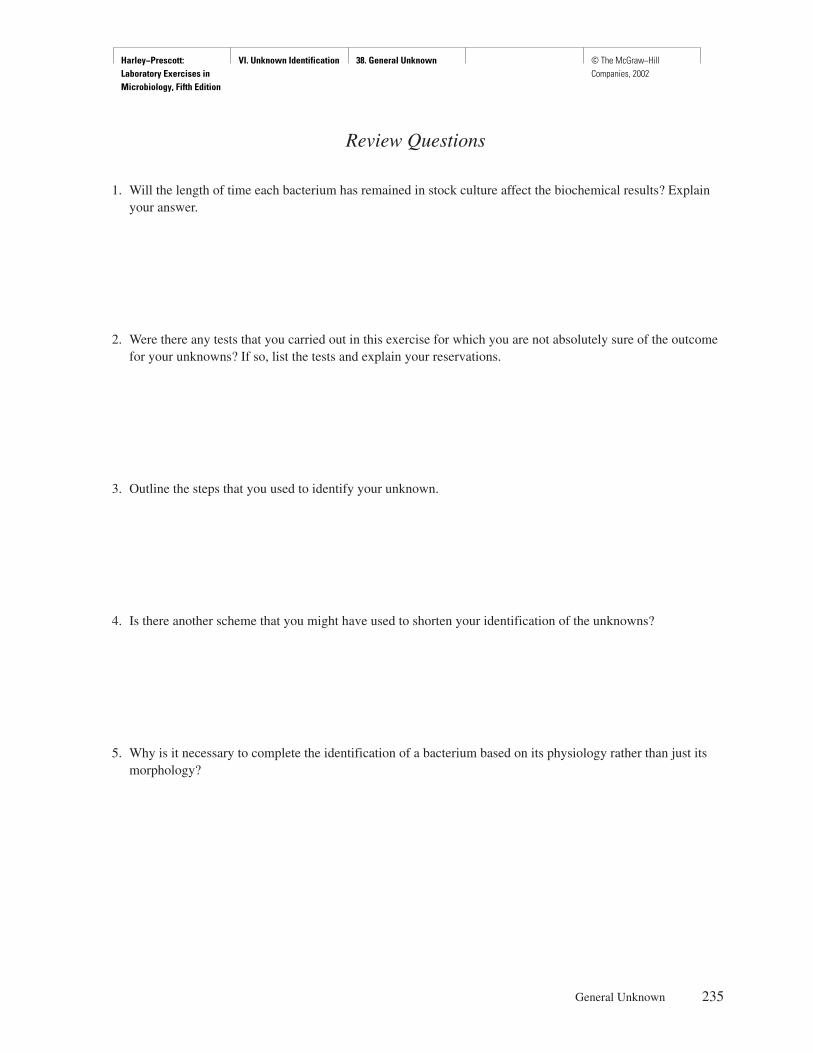
Harley−Prescott: Laboratory Exercises in Microbiology, Fifth Edition
VI. Unknown Identification 38. General Unknown © The McGraw−Hill Companies, 2002
Review Questions
1. Will the length of time each bacterium has remained in stock culture affect the biochemical results? Explainyour answer.
2. Were there any tests that you carried out in this exercise for which you are not absolutely sure of the outcomefor your unknowns? If so, list the tests and explain your reservations.
3. Outline the steps that you used to identify your unknown.
4. Is there another scheme that you might have used to shorten your identification of the unknowns?
5. Why is it necessary to complete the identification of a bacterium based on its physiology rather than just itsmorphology?
General Unknown 235
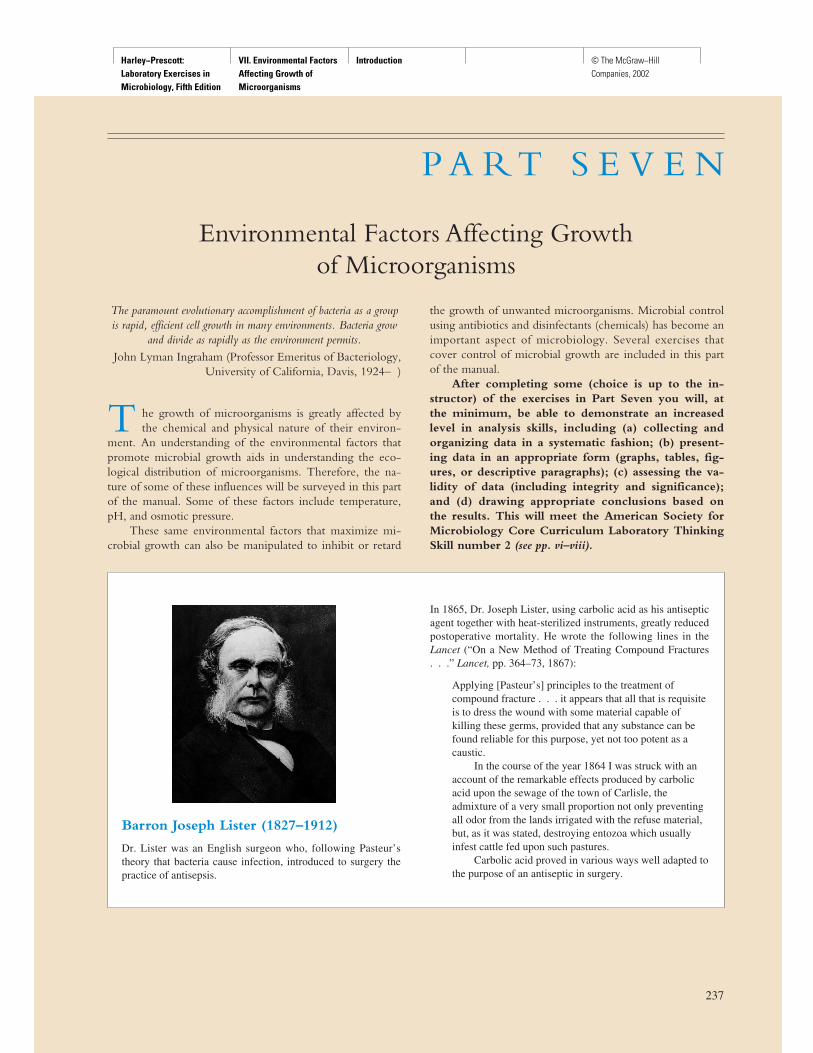
Harley−Prescott: Laboratory Exercises in Microbiology, Fifth Edition
VII. Environmental Factors Affecting Growth of Microorganisms
Introduction © The McGraw−Hill Companies, 2002
237237
P A R T S E V E N
Environmental Factors Affecting Growthof Microorganisms
The paramount evolutionary accomplishment of bacteria as a groupis rapid, efficient cell growth in many environments. Bacteria grow
and divide as rapidly as the environment permits.John Lyman Ingraham (Professor Emeritus of Bacteriology,
University of California, Davis, 1924– )
T he growth of microorganisms is greatly affected bythe chemical and physical nature of their environ-
ment. An understanding of the environmental factors thatpromote microbial growth aids in understanding the eco-logical distribution of microorganisms. Therefore, the na-ture of some of these influences will be surveyed in this partof the manual. Some of these factors include temperature,pH, and osmotic pressure.
These same environmental factors that maximize mi-crobial growth can also be manipulated to inhibit or retard
the growth of unwanted microorganisms. Microbial controlusing antibiotics and disinfectants (chemicals) has become animportant aspect of microbiology. Several exercises thatcover control of microbial growth are included in this partof the manual.
After completing some (choice is up to the in-structor) of the exercises in Part Seven you will, atthe minimum, be able to demonstrate an increasedlevel in analysis skills, including (a) collecting andorganizing data in a systematic fashion; (b) present-ing data in an appropriate form (graphs, tables, fig-ures, or descriptive paragraphs); (c) assessing the va-lidity of data (including integrity and significance);and (d) drawing appropriate conclusions based onthe results. This will meet the American Society forMicrobiology Core Curriculum Laboratory ThinkingSkill number 2 (see pp. vi–viii).
Barron Joseph Lister (1827–1912)
Dr. Lister was an English surgeon who, following Pasteur’stheory that bacteria cause infection, introduced to surgery thepractice of antisepsis.
In 1865, Dr. Joseph Lister, using carbolic acid as his antisepticagent together with heat-sterilized instruments, greatly reducedpostoperative mortality. He wrote the following lines in theLancet (“On a New Method of Treating Compound Fractures. . .” Lancet, pp. 364–73, 1867):
Applying [Pasteur’s] principles to the treatment ofcompound fracture . . . it appears that all that is requisiteis to dress the wound with some material capable ofkilling these germs, provided that any substance can befound reliable for this purpose, yet not too potent as acaustic.
In the course of the year 1864 I was struck with anaccount of the remarkable effects produced by carbolicacid upon the sewage of the town of Carlisle, theadmixture of a very small proportion not only preventingall odor from the lands irrigated with the refuse material,but, as it was stated, destroying entozoa which usuallyinfest cattle fed upon such pastures.
Carbolic acid proved in various ways well adapted tothe purpose of an antiseptic in surgery.
Harley−Prescott: Laboratory Exercises in Microbiology, Fifth Edition
VII. Environmental Factors Affecting Growth of Microorganisms
39. Temperature © The McGraw−Hill Companies, 2002
Materials per Group of Students
24- to 48-hour tryptic soy broth cultures ofEscherichia coli (ATCC 11229), Bacillusstearothermophilus (ATCC 7953), Bacillusglobisporus (ATCC 23301), Pseudomonasaeruginosa (ATCC 10145), Staphylococcusaureus (ATCC 25923), and spore suspension ofBacillus subtilis (ATCC 6051). (To produceendospores, grow B. subtilis for 48 hours at35°C on endospore agar, nutrient agar plus0.002% MnCl2 • 4H2O. Resuspend the paste inat least 7 ml of sterile diluent.)
12 tryptic soy agar slantsBunsen burnerinoculating loop15 tryptic soy broth tubes (9.9 ml per tube)test-tube rack18 sterile 1-ml pipettes with pipettor3 sterile test tubesrefrigerator set at 4°Cincubators or water baths set at 4°, 23° to 25°
(room temperature), 60°, 85°, and 100°C (Theinstructor or students are not limited to thesetemperatures. Modifications can be institutedbased on incubators or water baths available.)
wax pencilsterile water
Learning Objectives
Each student should be able to
1. Understand how microorganisms are affected bythe temperature of their environment
2. Carry out an experiment that differentiates betweenseveral bacteria based on temperature sensitivity
3. Classify these same bacteria based on theirtemperature preference for growth
4. Determine the effects of heat on bacteria
Suggested Reading in Textbook
1. Temperature, section 6.4; see also figures 6.12and 6.13, and table 6.5.
2. Heat, section 7.4, see also table 7.2.
Pronunciation Guide
Bacillus globisporus (bah-SIL-lus glob-EE-spor-us)B. stearothermophilus (ste-row-ther-MAH-fil-us)B. subtilis (sub-til-us)Escherichia coli (esh-er-I-ke-a KOH-lee)Pseudomonas aeruginosa (soo-do-MO-nas a-ruh-jin-
OH-sah)Staphylococcus aureus (staf-il-oh-KOK-kus ORE-ee-us)
Why Are the Above Bacteria Usedin This Exercise?
In this exercise, the student will gain expertise in differenti-ating between bacteria based on temperature sensitivity andclassifying bacteria based on their temperature preferencefor growth. The six bacteria the authors have chosen to ac-complish the above are the following. Bacillus globisporus(L. globus, a sphere) is an endospore-forming rod that hasan optimum growth temperature of 20° to 25°C. Bacillusstearothermophilus (Gr. thermus, heat + philus, loving) isan endospore-forming rod that has an optimum growth tem-perature of 60° to 65°C. Its spores are more heat resistantthan those of any mesophilic species in the genus. Bacillussubtilis (L. subtilis, slender) is an endospore-forming rodthat has an optimum growth temperature of about 30° to40°C. Escherichia coli is a gram-negative, facultativelyanaerobic rod that does not form spores and has an optimumgrowth temperature of 37°C. Pseudomonas aeruginosa is agram-negative rod with an optimum growth temperature of37°C. Staphylococcus aureus is a gram-positive coccus withan optimum growth temperature of 30° to 37°C.
238
E X E R C I S E
Temperature
39
SAFETY CONSIDERATIONSBe careful with the Bunsen burner flame. No mouthpipetting. Use caution with the hot water baths. Keep allculture tubes upright in a test-tube rack or in a can.
Harley−Prescott: Laboratory Exercises in Microbiology, Fifth Edition
VII. Environmental Factors Affecting Growth of Microorganisms
39. Temperature © The McGraw−Hill Companies, 2002
Principles
Each microbial species requires a temperature growthrange that is determined by the heat sensitivity of itsparticular enzymes, membranes, ribosomes, and othercomponents. As a consequence, microbial growth hasa fairly characteristic temperature dependence with dis-tinct cardinal temperatures—minimum, maximum,and optimum. Minimum growth temperature is thelowest temperature at which growth will occur; maxi-mum growth temperature is the highest temperatureat which growth will occur; and optimum growth tem-perature is the temperature at which the rate of cellularreproduction is most rapid. The optimum temperaturefor the growth of a given microorganism is correlatedwith the temperature of the normal habitat of the mi-croorganism. For example, the optimum temperature forthe growth of bacteria pathogenic to humans is near thatof the temperature of human blood (35° to 37°C).
Most bacteria can be classified into one of threemajor groups based on their temperature require-ments. Psychrophiles can grow at 0°C and have anoptimum growth temperature of 15°C or lower; themaximum is around 20°C. Mesophiles have growthoptima between 20° and 45°C. The majority of bacte-ria fall into this category. Thermophiles can grow attemperatures of 55°C or higher.
Boiling is probably one of the easiest methodsof ridding materials of harmful bacteria. However,not all bacteria are equally sensitive to this hightemperature. Some bacteria may be able to surviveboiling even though they are unable to grow. Thesebacteria are termed thermoduric. Many of thespore formers (such as B. subtilis) can withstandboiling for 15 minutes because of their resistant en-dospores. Thus, both temperature and the species ofbacteria will affect the disinfection of certain speci-mens. This is important to know when trying to killpathogenic bacteria with heat.
Procedure
First Period1. Work in groups of three to four students. Each
group of students will be assigned one temperatureto study: 4°, 23° to 25°, 60°, 85°, or 100°C.
2. Label each of the tryptic soy agar slants with thename of the test bacterium to be inoculated (E. coli, B. stearothermophilus, and B.globisporus), your name, and date.
3. Using aseptic technique (see figure 14.3), streakthe surface of each slant with the appropriatebacterium. Incubate the slants for 24 to 48 hoursat the temperature assigned to your group.
4. Take three sterile test tubes and label one S. aureus, the second B. subtilis spores, and thethird P. aeruginosa. Add your name and date.
5. With a sterile pipette, aseptically add 1 ml ofbacterial culture or spore suspension to therespective tubes.
6. Subject your tubes to the temperature you arestudying for 15 minutes (i.e., either place them inthe refrigerator, let them stand at room temperature,or put them in one of the water baths).
7. After 15 minutes, let the samples cool or warm upto room temperature. For each bacterial sample,make a dilution series as follows (see appendix A):
a. Pipette 0.1 ml of the incubated sample into the9.9 ml tryptic soy broth (10–2 dilution). Mixthe tube thoroughly. With a fresh pipette,transfer 0.1 ml of this 10–2 dilution into 9.9 mlof broth (10–4 dilution) and mix. In the sameway, prepare a 10–6, 10–8, and 10–10 dilution.
8. Incubate all dilutions at 35°C for 24 to 48 hours.
Second Period1. At the end of incubation, observe the slants for
the presence of growth. Record your observationsand those of your classmates; use a + for thepresence of growth and a – for the absence ofgrowth in Part 1 of the report for exercise 39.
2. Observe your dilution series to see which tubeshave bacterial growth as indicated by turbidity.The logic of this procedure is that reproductionwill have occurred in each tube that received atleast one living bacterium. The greater the numberof bacteria present in the particular sample, themore such a sample can be diluted and still containbacteria in the aliquot transferred. Thus, if bacteriaA are less susceptible to heat than bacteria B,bacteria A will require more dilutions in order toobtain a sterile sample as indicated by no growth.
3. From your results and those of your classmates,complete Part 2 of the report for exercise 39 byindicating the last dilution in which growth occurred.
Temperature 239
HINTS AND PRECAUTIONSMake sure the spore suspension is diluted with sterilewater to ensure that spores will not germinate prematurely.
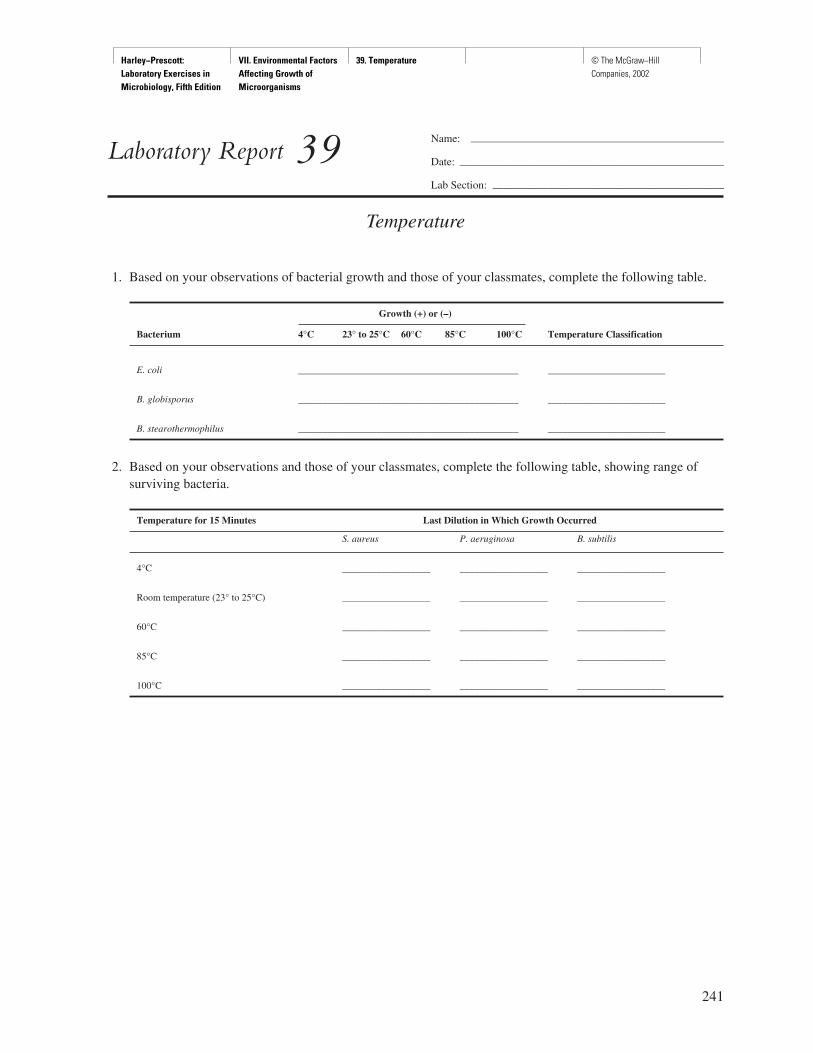
Harley−Prescott: Laboratory Exercises in Microbiology, Fifth Edition
VII. Environmental Factors Affecting Growth of Microorganisms
39. Temperature © The McGraw−Hill Companies, 2002
241
Name: ———————————————————————
Date: ————————————————————————
Lab Section: —————————————————————
Laboratory Report 39
Temperature
1. Based on your observations of bacterial growth and those of your classmates, complete the following table.
Growth (+) or (–)
Bacterium 4°C 23° to 25°C 60°C 85°C 100°C Temperature Classification
E. coli _____________________________________________ ________________________
B. globisporus _____________________________________________ ________________________
B. stearothermophilus _____________________________________________ ________________________
2. Based on your observations and those of your classmates, complete the following table, showing range ofsurviving bacteria.
Temperature for 15 Minutes Last Dilution in Which Growth Occurred
S. aureus P. aeruginosa B. subtilis
4°C __________________ __________________ __________________
Room temperature (23° to 25°C) __________________ __________________ __________________
60°C __________________ __________________ __________________
85°C __________________ __________________ __________________
100°C __________________ __________________ __________________

Harley−Prescott: Laboratory Exercises in Microbiology, Fifth Edition
VII. Environmental Factors Affecting Growth of Microorganisms
39. Temperature © The McGraw−Hill Companies, 2002
Review Questions
1. How can you be sure that the turbidity produced in the broth tubes was caused by the bacteria used for theinoculation?
2. How can you determine experimentally whether a bacterium is a psychrophile or a mesophile?
3. What limitations are there for using boiling water as a means of sterilizing materials?
4. Is S. aureus a mesophile? Explain your answer.
5. Describe the three cardinal temperatures.
6. Which bacterium had the widest range of temperature tolerance? The narrowest range of temperaturetolerance?
7. What are thermoduric bacteria?
242 Environmental Factors Affecting Growth of Microorganisms
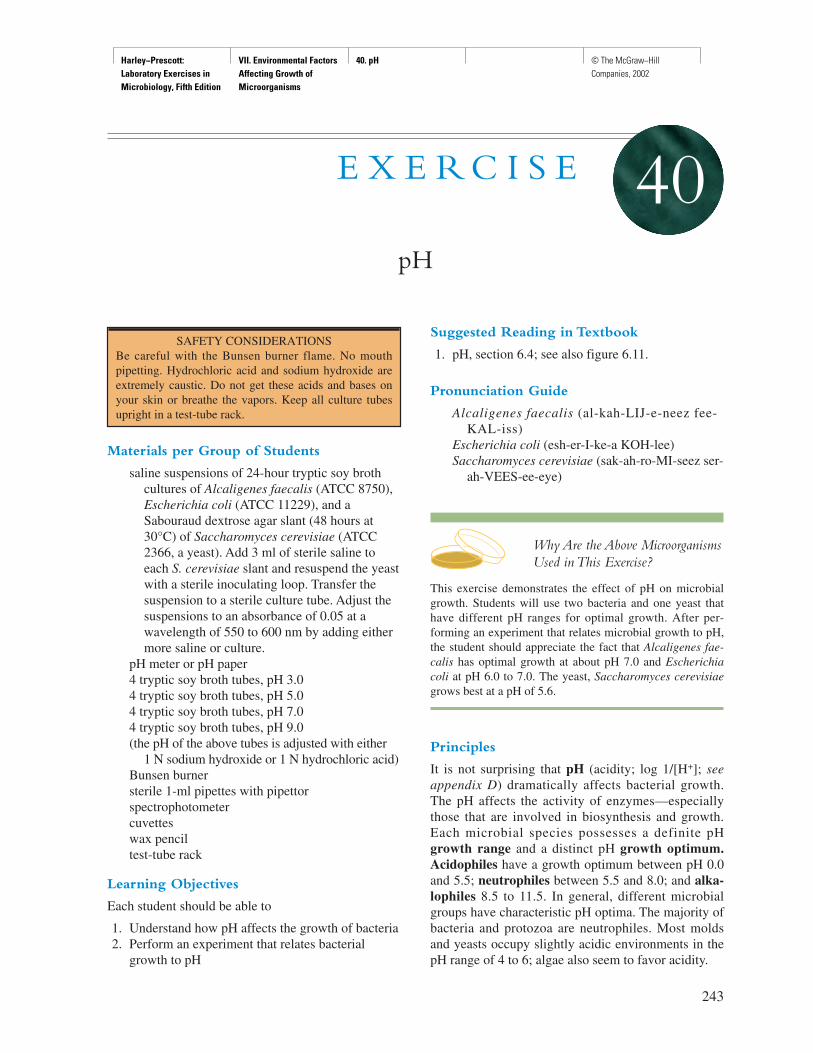
Harley−Prescott: Laboratory Exercises in Microbiology, Fifth Edition
VII. Environmental Factors Affecting Growth of Microorganisms
40. pH © The McGraw−Hill Companies, 2002
Materials per Group of Students
saline suspensions of 24-hour tryptic soy brothcultures of Alcaligenes faecalis (ATCC 8750),Escherichia coli (ATCC 11229), and aSabouraud dextrose agar slant (48 hours at30°C) of Saccharomyces cerevisiae (ATCC2366, a yeast). Add 3 ml of sterile saline toeach S. cerevisiae slant and resuspend the yeastwith a sterile inoculating loop. Transfer thesuspension to a sterile culture tube. Adjust thesuspensions to an absorbance of 0.05 at awavelength of 550 to 600 nm by adding eithermore saline or culture.
pH meter or pH paper4 tryptic soy broth tubes, pH 3.04 tryptic soy broth tubes, pH 5.04 tryptic soy broth tubes, pH 7.04 tryptic soy broth tubes, pH 9.0(the pH of the above tubes is adjusted with either
1 N sodium hydroxide or 1 N hydrochloric acid)Bunsen burnersterile 1-ml pipettes with pipettorspectrophotometercuvetteswax penciltest-tube rack
Learning Objectives
Each student should be able to
1. Understand how pH affects the growth of bacteria2. Perform an experiment that relates bacterial
growth to pH
Suggested Reading in Textbook
1. pH, section 6.4; see also figure 6.11.
Pronunciation Guide
Alcaligenes faecalis (al-kah-LIJ-e-neez fee-KAL-iss)
Escherichia coli (esh-er-I-ke-a KOH-lee)Saccharomyces cerevisiae (sak-ah-ro-MI-seez ser-
ah-VEES-ee-eye)
Why Are the Above MicroorganismsUsed in This Exercise?
This exercise demonstrates the effect of pH on microbialgrowth. Students will use two bacteria and one yeast thathave different pH ranges for optimal growth. After per-forming an experiment that relates microbial growth to pH,the student should appreciate the fact that Alcaligenes fae-calis has optimal growth at about pH 7.0 and Escherichiacoli at pH 6.0 to 7.0. The yeast, Saccharomyces cerevisiaegrows best at a pH of 5.6.
Principles
It is not surprising that pH (acidity; log 1/[H+]; seeappendix D) dramatically affects bacterial growth.The pH affects the activity of enzymes—especiallythose that are involved in biosynthesis and growth.Each microbial species possesses a definite pHgrowth range and a distinct pH growth optimum.Acidophiles have a growth optimum between pH 0.0and 5.5; neutrophiles between 5.5 and 8.0; and alka-lophiles 8.5 to 11.5. In general, different microbialgroups have characteristic pH optima. The majority ofbacteria and protozoa are neutrophiles. Most moldsand yeasts occupy slightly acidic environments in thepH range of 4 to 6; algae also seem to favor acidity.
243
E X E R C I S E
pH
40
SAFETY CONSIDERATIONSBe careful with the Bunsen burner flame. No mouthpipetting. Hydrochloric acid and sodium hydroxide areextremely caustic. Do not get these acids and bases onyour skin or breathe the vapors. Keep all culture tubesupright in a test-tube rack.
Harley−Prescott: Laboratory Exercises in Microbiology, Fifth Edition
VII. Environmental Factors Affecting Growth of Microorganisms
40. pH © The McGraw−Hill Companies, 2002
Many bacteria produce metabolic acids that maylower the pH and inhibit their growth (see exercises20 and 25). To prevent this, buffers that produce a pHequilibrium are added to culture media to neutralizethese acids. For example, the peptones in complexmedia act as buffers. Phosphate salts are often addedas buffers in chemically defined media.
In this exercise, you will work in groups to see howthe pH affects the growth of several microorganisms.
Procedure
First Period1. Label each of the tryptic soy broth tubes with the
pH of the medium, your name, date, and themicroorganism to be inoculated.
2. Using a sterile pipette, add 0.1 ml of the E. colisaline culture to the tube that has a pH of 3.0. Dothe same for the tubes that have pH values of 5.0,7.0, and 9.0.
3. Repeat the above for A. faecalis and S. cerevisiae.4. Incubate the E. coli and A. faecalis cultures for 24
to 48 hours at 35°C, and the S. cerevisiae culturefor 48 to 72 hours at room temperature.
Second Period1. Use the spectrophotometer as described in
exercise 19. Set the wavelength at 550 to 600 nm.Calibrate the spectrophotometer, using a trypticsoy broth blank of each pH for each respective setof cultures.
2. Fill each cuvette 2/3 full of the respective pHculture and read the absorbance. Blank thespectrophotometer with tryptic soy broth.
3. If no spectrophotometer is available, record yourvisual results as – (no growth), +, ++, +++, and++++ (for increasing growth, respectively).
4. Record your results and those of your classmatesin the report for exercise 40.
244 Environmental Factors Affecting Growth of Microorganisms
HINTS AND PRECAUTIONS(1) Be sure to thoroughly mix the microbial suspensionsjust before reading the absorbance. (2) Wipe any finger-prints off the cuvette before making a reading.
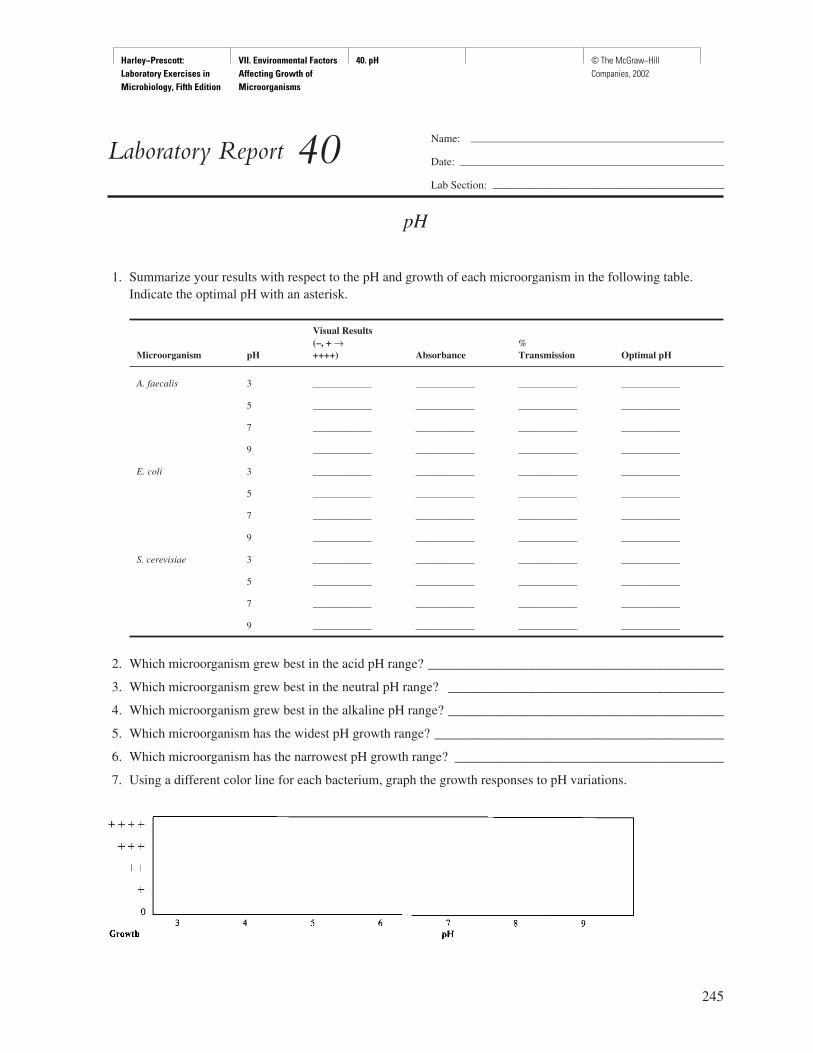
Harley−Prescott: Laboratory Exercises in Microbiology, Fifth Edition
VII. Environmental Factors Affecting Growth of Microorganisms
40. pH © The McGraw−Hill Companies, 2002
245
Name: ———————————————————————
Date: ————————————————————————
Lab Section: —————————————————————
Laboratory Report 40
pH
1. Summarize your results with respect to the pH and growth of each microorganism in the following table.Indicate the optimal pH with an asterisk.
Visual Results(–, + → %
Microorganism pH ++++) Absorbance Transmission Optimal pH
A. faecalis 3 ____________ ____________ ____________ ____________
5 ____________ ____________ ____________ ____________
7 ____________ ____________ ____________ ____________
9 ____________ ____________ ____________ ____________
E. coli 3 ____________ ____________ ____________ ____________
5 ____________ ____________ ____________ ____________
7 ____________ ____________ ____________ ____________
9 ____________ ____________ ____________ ____________
S. cerevisiae 3 ____________ ____________ ____________ ____________
5 ____________ ____________ ____________ ____________
7 ____________ ____________ ____________ ____________
9 ____________ ____________ ____________ ____________
2. Which microorganism grew best in the acid pH range? ____________________________________________
3. Which microorganism grew best in the neutral pH range? _________________________________________
4. Which microorganism grew best in the alkaline pH range? _________________________________________
5. Which microorganism has the widest pH growth range? ___________________________________________
6. Which microorganism has the narrowest pH growth range? ________________________________________
7. Using a different color line for each bacterium, graph the growth responses to pH variations.

Harley−Prescott: Laboratory Exercises in Microbiology, Fifth Edition
VII. Environmental Factors Affecting Growth of Microorganisms
40. pH © The McGraw−Hill Companies, 2002
Review Questions
1. Why are buffers added to culture media?
2. Why do microorganisms differ in their pH requirements for growth?
3. What inhibits microbial growth at nonoptimal pHs?
4. What is the pH tolerance of bacteria compared to yeasts?
5. List and describe the chemistry of several common buffers used in microbiological media.
6. How would you define a buffer?
7. How do microorganisms change the pH of their own environment?
246 Environmental Factors Affecting Growth of Microorganisms
Harley−Prescott: Laboratory Exercises in Microbiology, Fifth Edition
VII. Environmental Factors Affecting Growth of Microorganisms
41. Osmotic Pressure © The McGraw−Hill Companies, 2002
Materials per Student
24- to 48-hour tryptic soy broth cultures ofEscherichia coli (ATCC 11229) andStaphylococcus aureus (ATCC 25923). A 48-hour salt broth culture of Halobacteriumsalinarium (ATCC 19700)
1 petri plate nutrient agar with 0% NaCl1 petri plate nutrient agar with 0.5% NaCl1 petri plate nutrient agar with 5% NaCl1 petri plate nutrient agar with 10% NaCl1 petri plate nutrient agar with 20% NaClwax pencilinoculation loopBunsen burnerDifco Manual or BBL Manual for the laboratory
report
Learning Objectives
Each student should be able to
1. Define osmotic pressure and explain how itaffects a bacterial cell
2. Explain how bacterial growth is related toosmotic pressure in the environment
3. Carry out an experiment that differentiates amongthree different bacteria based on their tolerance fordifferent salt concentrations (osmotic pressure)
Suggested Reading in Textbook
1. The Cell Wall and Osmotic Protection, section 3.5.2. Solutes and Water Activity, section 6.4; see also
table 6.4.
Pronunciation Guide
Escherichia coli (esh-er-I-ke-a KOH-lee)Halobacterium salinarium (hal-o-bak-TE-re-um sal-i-
nar-e-um)Staphylococcus aureus (staf-il-oh-KOK-kus ORE-
ee-us)
Why Are the Above Bacteria Usedin This Exercise?
In this exercise, the student will differentiate three differentbacteria based on their tolerance for different salt concen-trations (osmotic pressure). The authors have thus chosenthree bacteria that vary widely in osmotic tolerance.Halobacterium salinarium (Genus = Gr. hals, the sea +bacterium, small rod; species = L. salinarium, pertaining tosalt works) is a gram-negative aerobic rod that requires ahigh salt concentration for growth. It is normally found inhighly saline environments such as salt lakes and marinesalterns and is associated with the spoilage of salted fishand hides. Mature cells retain their rod shape in 3.5 toabout 5.2 M NaCl (aw ≅ 0.75); at lower concentrations,pleomorphic forms appear, and at 1.5 M the cells are spher-ical because of loss of the cell wall. Suspensions are vis-cous at 1.5 M because of partial cell lysis; at 0.5 M, few, ifany, cells can be detected. Sodium, chloride, and magne-sium are required to maintain cell structure and rigidity. Atlow concentrations, the cell wall dissolves, and the cellmembrane breaks up into tiny fragments. Staphylococcusaureus is a gram-positive coccus. S. aureus can grow in thepresence of 15% (about 2.5 M) sodium chloride, or at an aw
of 0.86. Escherichia coli is a gram-negative rod that occursas normal flora in the lower part of the intestine of warm-blooded animals. It is very sensitive to high salt concentra-tions—it lacks osmotic tolerance and can’t grow below anaw of 0.95.
247
E X E R C I S E
Osmotic Pressure
41
SAFETY CONSIDERATIONSBe careful with the Bunsen burner flame.
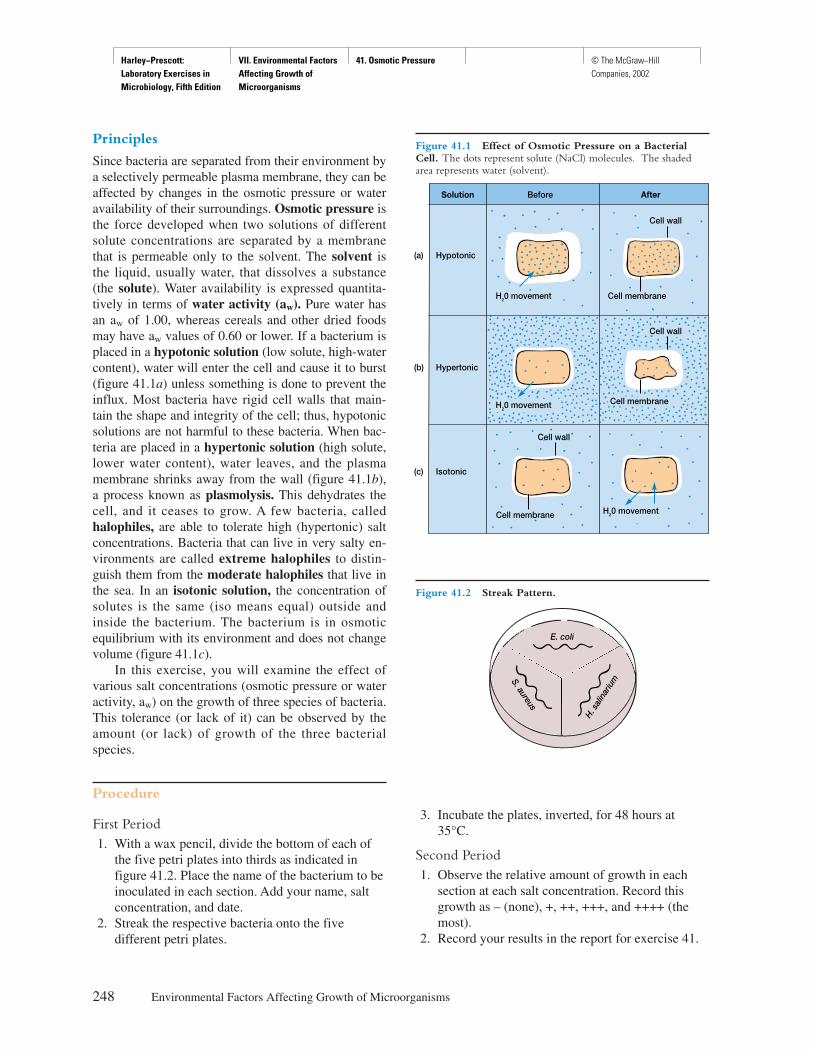
Harley−Prescott: Laboratory Exercises in Microbiology, Fifth Edition
VII. Environmental Factors Affecting Growth of Microorganisms
41. Osmotic Pressure © The McGraw−Hill Companies, 2002
Principles
Since bacteria are separated from their environment bya selectively permeable plasma membrane, they can beaffected by changes in the osmotic pressure or wateravailability of their surroundings. Osmotic pressure isthe force developed when two solutions of differentsolute concentrations are separated by a membranethat is permeable only to the solvent. The solvent isthe liquid, usually water, that dissolves a substance(the solute). Water availability is expressed quantita-tively in terms of water activity (aw). Pure water hasan aw of 1.00, whereas cereals and other dried foodsmay have aw values of 0.60 or lower. If a bacterium isplaced in a hypotonic solution (low solute, high-watercontent), water will enter the cell and cause it to burst(figure 41.1a) unless something is done to prevent theinflux. Most bacteria have rigid cell walls that main-tain the shape and integrity of the cell; thus, hypotonicsolutions are not harmful to these bacteria. When bac-teria are placed in a hypertonic solution (high solute,lower water content), water leaves, and the plasmamembrane shrinks away from the wall (figure 41.1b),a process known as plasmolysis. This dehydrates thecell, and it ceases to grow. A few bacteria, calledhalophiles, are able to tolerate high (hypertonic) saltconcentrations. Bacteria that can live in very salty en-vironments are called extreme halophiles to distin-guish them from the moderate halophiles that live inthe sea. In an isotonic solution, the concentration ofsolutes is the same (iso means equal) outside andinside the bacterium. The bacterium is in osmoticequilibrium with its environment and does not changevolume (figure 41.1c).
In this exercise, you will examine the effect ofvarious salt concentrations (osmotic pressure or wateractivity, aw) on the growth of three species of bacteria.This tolerance (or lack of it) can be observed by theamount (or lack) of growth of the three bacterialspecies.
Procedure
First Period1. With a wax pencil, divide the bottom of each of
the five petri plates into thirds as indicated infigure 41.2. Place the name of the bacterium to beinoculated in each section. Add your name, saltconcentration, and date.
2. Streak the respective bacteria onto the fivedifferent petri plates.
3. Incubate the plates, inverted, for 48 hours at35°C.
Second Period1. Observe the relative amount of growth in each
section at each salt concentration. Record thisgrowth as – (none), +, ++, +++, and ++++ (themost).
2. Record your results in the report for exercise 41.
248 Environmental Factors Affecting Growth of Microorganisms
Hypotonic(a)
Hypertonic(b)
Isotonic(c)
Solution After
Cell membrane
Cell wall
Cell membrane
Cell wall
Cell membrane
Cell wall
Before
H20 movement
H20 movement
H20 movement
Figure 41.1 Effect of Osmotic Pressure on a BacterialCell. The dots represent solute (NaCl) molecules. The shadedarea represents water (solvent).
H. s
alin
ariu
m
E. coli
S. aureus
Figure 41.2 Streak Pattern.
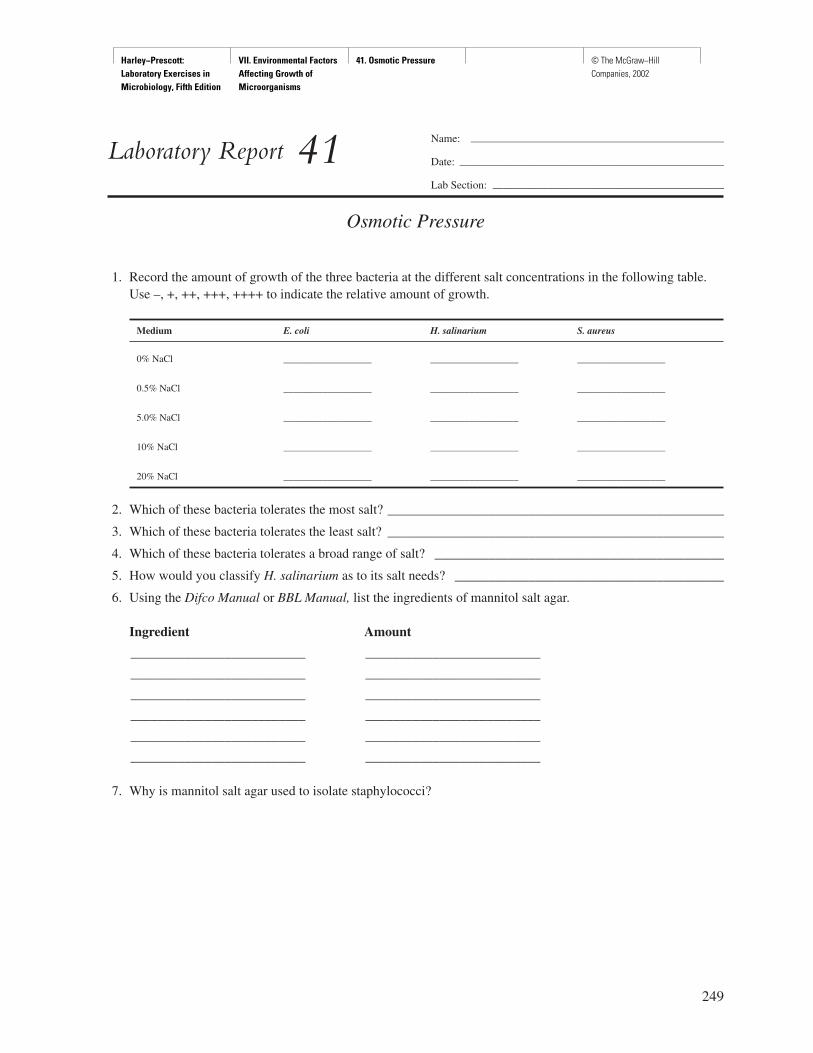
Harley−Prescott: Laboratory Exercises in Microbiology, Fifth Edition
VII. Environmental Factors Affecting Growth of Microorganisms
41. Osmotic Pressure © The McGraw−Hill Companies, 2002
249
Name: ———————————————————————
Date: ————————————————————————
Lab Section: —————————————————————
Laboratory Report 41
Osmotic Pressure
1. Record the amount of growth of the three bacteria at the different salt concentrations in the following table.Use –, +, ++, +++, ++++ to indicate the relative amount of growth.
Medium E. coli H. salinarium S. aureus
0% NaCl __________________ __________________ __________________
0.5% NaCl __________________ __________________ __________________
5.0% NaCl __________________ __________________ __________________
10% NaCl __________________ __________________ __________________
20% NaCl __________________ __________________ __________________
2. Which of these bacteria tolerates the most salt? __________________________________________________
3. Which of these bacteria tolerates the least salt? __________________________________________________
4. Which of these bacteria tolerates a broad range of salt? ___________________________________________
5. How would you classify H. salinarium as to its salt needs? ________________________________________
6. Using the Difco Manual or BBL Manual, list the ingredients of mannitol salt agar.
Ingredient Amount
__________________________ __________________________
__________________________ __________________________
__________________________ __________________________
__________________________ __________________________
__________________________ __________________________
__________________________ __________________________
7. Why is mannitol salt agar used to isolate staphylococci?
Harley−Prescott: Laboratory Exercises in Microbiology, Fifth Edition
VII. Environmental Factors Affecting Growth of Microorganisms
41. Osmotic Pressure © The McGraw−Hill Companies, 2002
Review Questions
1. Compare isotonic, hypotonic, and hypertonic solutions and their effects on bacterial cells.
2. Define:
a. osmosis
b. osmotic pressure
c. plasmolysis
d. halophilic
3. How is it possible for a bacterium to grow in a hypertonic environment?
4. What concentrations of NaCl are optimal for most bacteria?
5. What is unique about H. salinarium?
6. What foods can you think of that are protected from microbial destruction by salting?
7. Why don’t bacteria lyse when placed in a hypotonic solution?
250 Environmental Factors Affecting Growth of Microorganisms
Harley−Prescott: Laboratory Exercises in Microbiology, Fifth Edition
VII. Environmental Factors Affecting Growth of Microorganisms
42. The Effects of Chemical Agents on Bacteria I: Disinfectants
© The McGraw−Hill Companies, 2002
Materials per Group of Students
20-hour tryptic soy broth cultures ofStaphylococcus aureus (ATCC 25923) andPseudomonas aeruginosa (ATCC 10145)
2 sterile screw-cap test tubes1 sterile 5-ml pipette with pipettor12 sterile 1-ml pipettes48 tryptic soy broth tubes (10 ml per tube)sterile water in Erlenmeyer flask12 sterile tubes for making dilutionsLysolcommercial disinfectants such as 3% hydrogen
peroxide, 70% isopropyl alcohol, bleach, orLysol cleaner. Many others may be used (seetable 42.1), or students can bring in their ownto test. If commercial disinfectants are used,note the use-dilution and active ingredients.Dilute with normal tap water. The tap waterneed not be sterilized for commercialdisinfectants. Note if any of the disinfectantscontain triclosan. Why is this important?
phenol (carbolic acid)wax pencil35°C incubatortest-tube rackBunsen burnerinoculating loop
Learning Objectives
Each student should be able to
1. Determine the effectiveness of some chemicaldisinfectants used in hospitals or homes asantimicrobial agents
2. Calculate a phenol coefficient
Suggested Reading in Textbook
1. The Use of Chemical Agents in Control, section7.5; see also tables 7.4 and 7.5.
2. Phenolics, section 7.5.3. Alcohols, section 7.5.4. Halogens, section 7.5.5. Quaternary Ammonium Compounds, section 7.5.6. Aldehydes, section 7.5.7. Evaluation of Antimicrobial Agent Effectiveness,
section 7.6; see also table 7.6.
Pronunciation Guide
Pseudomonas aeruginosa (soo-do-MO-nas a-ruh-jin-OH-sah)
Staphylococcus aureus (staf-il-oh-KOK-kus ORE-ee-us)
Why Are the Above Bacteria Usedin This Exercise?
In this exercise, the student will determine the antimicro-bial effectiveness of some common disinfectants and calcu-late a phenol coefficient. The authors have chosen twocommon bacteria (Staphylococcus aureus and Pseudomonasaeruginosa) for use. Both of these bacteria give excellentpositive or negative results depending on the disinfectantused. S. aureus is often used by laboratories as a test mi-croorganism to determine phenol coefficients.
251
E X E R C I S E
The Effects of Chemical Agentson Bacteria I: Disinfectants
42
SAFETY CONSIDERATIONSBe careful with the Bunsen burner flame. No mouthpipetting. Always handle cultures with care since theymay be potential pathogens. Keep all culture tubes up-right in a test-tube rack or in a can. Phenol is poisonousand caustic. Do not handle with bare hands.
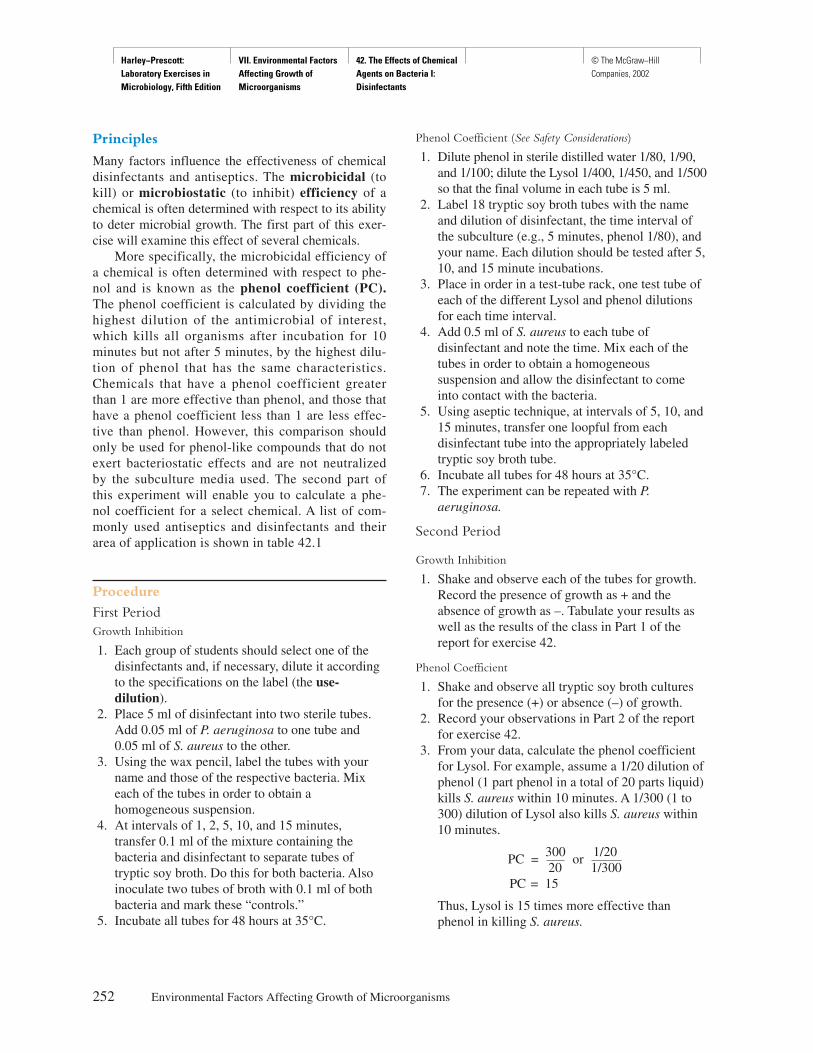
Harley−Prescott: Laboratory Exercises in Microbiology, Fifth Edition
VII. Environmental Factors Affecting Growth of Microorganisms
42. The Effects of Chemical Agents on Bacteria I: Disinfectants
© The McGraw−Hill Companies, 2002
Principles
Many factors influence the effectiveness of chemicaldisinfectants and antiseptics. The microbicidal (tokill) or microbiostatic (to inhibit) efficiency of achemical is often determined with respect to its abilityto deter microbial growth. The first part of this exer-cise will examine this effect of several chemicals.
More specifically, the microbicidal efficiency ofa chemical is often determined with respect to phe-nol and is known as the phenol coefficient (PC).The phenol coefficient is calculated by dividing thehighest dilution of the antimicrobial of interest,which kills all organisms after incubation for 10minutes but not after 5 minutes, by the highest dilu-tion of phenol that has the same characteristics.Chemicals that have a phenol coefficient greaterthan 1 are more effective than phenol, and those thathave a phenol coefficient less than 1 are less effec-tive than phenol. However, this comparison shouldonly be used for phenol-like compounds that do notexert bacteriostatic effects and are not neutralizedby the subculture media used. The second part ofthis experiment will enable you to calculate a phe-nol coefficient for a select chemical. A list of com-monly used antiseptics and disinfectants and theirarea of application is shown in table 42.1
Procedure
First PeriodGrowth Inhibition
1. Each group of students should select one of thedisinfectants and, if necessary, dilute it accordingto the specifications on the label (the use-dilution).
2. Place 5 ml of disinfectant into two sterile tubes.Add 0.05 ml of P. aeruginosa to one tube and0.05 ml of S. aureus to the other.
3. Using the wax pencil, label the tubes with yourname and those of the respective bacteria. Mixeach of the tubes in order to obtain ahomogeneous suspension.
4. At intervals of 1, 2, 5, 10, and 15 minutes,transfer 0.1 ml of the mixture containing thebacteria and disinfectant to separate tubes oftryptic soy broth. Do this for both bacteria. Alsoinoculate two tubes of broth with 0.1 ml of bothbacteria and mark these “controls.”
5. Incubate all tubes for 48 hours at 35°C.
Phenol Coefficient (See Safety Considerations)
1. Dilute phenol in sterile distilled water 1/80, 1/90,and 1/100; dilute the Lysol 1/400, 1/450, and 1/500so that the final volume in each tube is 5 ml.
2. Label 18 tryptic soy broth tubes with the nameand dilution of disinfectant, the time interval ofthe subculture (e.g., 5 minutes, phenol 1/80), andyour name. Each dilution should be tested after 5,10, and 15 minute incubations.
3. Place in order in a test-tube rack, one test tube ofeach of the different Lysol and phenol dilutionsfor each time interval.
4. Add 0.5 ml of S. aureus to each tube ofdisinfectant and note the time. Mix each of thetubes in order to obtain a homogeneoussuspension and allow the disinfectant to comeinto contact with the bacteria.
5. Using aseptic technique, at intervals of 5, 10, and15 minutes, transfer one loopful from eachdisinfectant tube into the appropriately labeledtryptic soy broth tube.
6. Incubate all tubes for 48 hours at 35°C.7. The experiment can be repeated with P.
aeruginosa.
Second Period
Growth Inhibition
1. Shake and observe each of the tubes for growth.Record the presence of growth as + and theabsence of growth as –. Tabulate your results aswell as the results of the class in Part 1 of thereport for exercise 42.
Phenol Coefficient
1. Shake and observe all tryptic soy broth culturesfor the presence (+) or absence (–) of growth.
2. Record your observations in Part 2 of the reportfor exercise 42.
3. From your data, calculate the phenol coefficientfor Lysol. For example, assume a 1/20 dilution ofphenol (1 part phenol in a total of 20 parts liquid)kills S. aureus within 10 minutes. A 1/300 (1 to300) dilution of Lysol also kills S. aureus within10 minutes.
PC = 300 or 1/2020 1/300
PC = 15
Thus, Lysol is 15 times more effective thanphenol in killing S. aureus.
252 Environmental Factors Affecting Growth of Microorganisms

Harley−Prescott: Laboratory Exercises in Microbiology, Fifth Edition
VII. Environmental Factors Affecting Growth of Microorganisms
42. The Effects of Chemical Agents on Bacteria I: Disinfectants
© The McGraw−Hill Companies, 2002
The Effects of Chemical Agents on Bacteria I: Disinfectants 253
Table 42.1 Some Chemical Compounds Commonly Used for Controlling the Growth of Microorganisms
Sodium hypochlorite (5%) Disinfectant External surfaces, such as tables
Iodine (1% in 70% alcohol) Disinfectant External surfaces, such as tables
Iodophors (70 ppm avail. I2) Disinfectant External surfaces, such as tables
Lysol (5%), a solution of phenolics and/or quaterinary Disinfectant External surfaces, such as tablesammonium compounds with soap
Phenol (5%), carbolic acid, source coal tar Disinfectant External surfaces, such as tables
Hexachlorophene (pHisoHex, Dial soap) Disinfectant Presurgical hand washing
Formaldehyde (4%) Disinfectant Oral and rectal thermometers
Iodophors (70 ppm avail. I2) Disinfectant Oral and rectal thermometers
Zephrin (0.001%) Disinfectant Oral and rectal thermometers
Alcohol, ethanol (70%) Antiseptic Skin
Iodine (tincture in alcohol with KI) Antiseptic Skin
Iodophors Antiseptic Skin
Organic mercury compounds (merthiolate, mercurochrome) Antiseptic Skin
Hydrogen peroxide (3%) Antiseptic Superficial skin infections
Potassium permanganate Antiseptic Urethral, superficial skin fungus infections
Silver nitrate (1%)(Argyrol) Antiseptic Prevention of eye infections in newborn babies
Zinc oxide paste Antiseptic Diaper rash
Zinc salts of fatty acids (Desenex) Antiseptic Treatment of athlete’s foot
Glycerol (50%) Antiseptic Prevent bacterial growth in stool and surgical specimens
Ethylene oxide gas (12%) Sterilization Linens, syringes, etc.
Formaldehyde (20% in 70% alcohol) Sterilization Metal instruments
Glutaraldehyde (pH 7.5 or more) Sterilization Metal instruments
Adapted from Microbiology Experiments: A Health Science Perspective. Kleyn, Bicknell, Gilstrap. 1999. McGraw-Hill. By permission
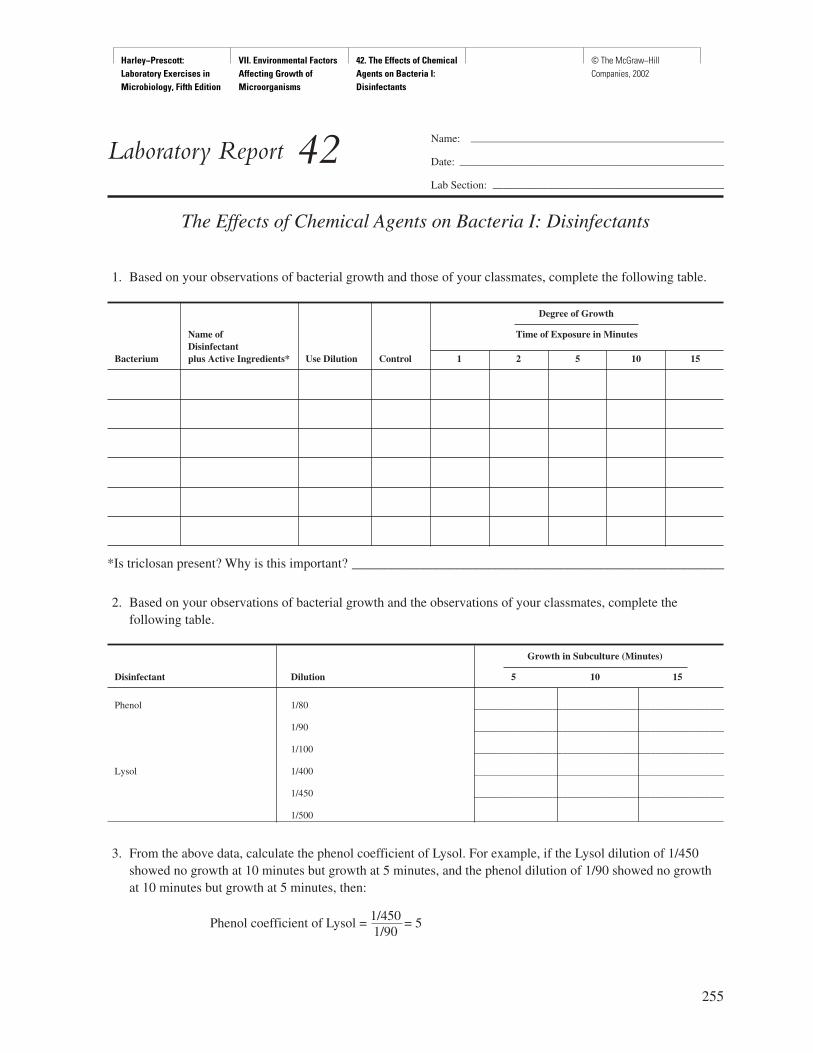
Harley−Prescott: Laboratory Exercises in Microbiology, Fifth Edition
VII. Environmental Factors Affecting Growth of Microorganisms
42. The Effects of Chemical Agents on Bacteria I: Disinfectants
© The McGraw−Hill Companies, 2002
255
Name: ———————————————————————
Date: ————————————————————————
Lab Section: —————————————————————
Laboratory Report 42
The Effects of Chemical Agents on Bacteria I: Disinfectants
1. Based on your observations of bacterial growth and those of your classmates, complete the following table.
Degree of Growth
Name of Time of Exposure in MinutesDisinfectant
Bacterium plus Active Ingredients* Use Dilution Control 1 2 5 10 15
*Is triclosan present? Why is this important? _________________________________________________________
2. Based on your observations of bacterial growth and the observations of your classmates, complete thefollowing table.
Growth in Subculture (Minutes)
Disinfectant Dilution 5 10 15
Phenol 1/80 ___________________________________________________
1/90 ___________________________________________________
1/100 ___________________________________________________
Lysol 1/400 ___________________________________________________
1/450 ___________________________________________________
1/500
3. From the above data, calculate the phenol coefficient of Lysol. For example, if the Lysol dilution of 1/450showed no growth at 10 minutes but growth at 5 minutes, and the phenol dilution of 1/90 showed no growthat 10 minutes but growth at 5 minutes, then:
Phenol coefficient of Lysol = 1/450 = 51/90
Harley−Prescott: Laboratory Exercises in Microbiology, Fifth Edition
VII. Environmental Factors Affecting Growth of Microorganisms
42. The Effects of Chemical Agents on Bacteria I: Disinfectants
© The McGraw−Hill Companies, 2002
256 Environmental Factors Affecting Growth of Microorganisms
Review Questions
1. What are some limitations of a test such as you performed on the evaluation of a disinfectant?
2. List some criteria of a good disinfectant.
3. What is the phenol coefficient technique?
4. A disinfectant diluted 1/500 with water kills a bacterium after 10 minutes but not after 5 minutes. A 1/100dilution of phenol kills the same bacterium after 10 minutes but not after 5 minutes. What is the phenolcoefficient of the disinfectant?
5. What is the difference between microbicidal and microbiostatic?
6. What physical factors can influence the activity of a disinfectant?
7. Why do microorganisms differ in their response to disinfectants?

Harley−Prescott: Laboratory Exercises in Microbiology, Fifth Edition
VII. Environmental Factors Affecting Growth of Microorganisms
43. The Effects of Chemical Agents on Bacteria II: Antimicrobial
© The McGraw−Hill Companies, 2002
Materials per Group of Students
4 150 × 15 mm Mueller-Hinton agar platesantibiotic disk dispensers (BBL or Difco) or
assorted individual vials containing antibioticdisks
4 sterile swabs4- to 6-hour tryptic soy broth cultures of
Staphylococcus aureus (ATCC 25903),Escherichia coli (ATCC 11229), Pseudomonasaeruginosa (ATCC 10145), and Klebsiellapneumoniae (ATCC e13883)
35°C incubatorforcepsmetric rulerswax pencil70% ethyl alcohol and beakersBunsen burner
Learning Objectives
Each student should be able to1. Appreciate the scope of antimicrobial activity of
selected antibiotics2. Perform the Kirby-Bauer method for
determination of antibiotic sensitivity3. Correctly interpret a Kirby-Bauer plate
Suggested Reading in Textbook
1. Disk Diffusion Tests, section 35.3; also see table35.3 and figures 35.1 and 35.2.
2. Susceptibility Testing, section 36.3; see alsofigure 36.5o.
Pronunciation Guide
Escherichia coli (esh-er-I-ke-a KOH-lee)Klebsiella pneumoniae (kleb-se-EL-lah nu-MO-ne-ah)Pseudomonas aeruginosa (soo-do-MO-nas a-ruh-jin-
OH-sah)Staphylococcus aureus (staf-il-oh-KOK-kus ORE-ee-us)
Why Are the Above Bacteria Usedin This Exercise?
In this exercise, the student will evaluate the antimicrobialactivity of selected antibiotics using the Kirby-Bauermethod. To accomplish this objective, the authors havechosen four bacteria that the student has worked with inprevious exercises and which often infect humans. The fourbacteria are Staphylococcus aureus, Escherichia coli,Pseudomonas aeruginosa, and Klebsiella pneumoniae.
Medical Application
The number of antibiotics (and other antimicrobics) avail-able today is larger than ever before. New antibiotics arecontinuously being developed and discovered; thus there isan increasing demand on the clinical laboratory to deter-mine the antibiotic susceptibility or resistance of variouspathogenic bacteria. In most clinical laboratories, the an-tibiogram has been replaced with molecular techniques.
Principles
One method that is used to determine antibiotic sus-ceptibility is the sensitivity disk method of Kirby-Bauer (named after W. Kirby and A. W. Bauer in1966). In this method, antibiotics are impregnated ontopaper disks and then placed on a seeded Mueller-Hin-ton agar plate using a mechanical dispenser or sterile
257
E X E R C I S E
The Effects of Chemical Agents on Bacteria II:Antimicrobial Agents (Kirby-Bauer Method)
43
SAFETY CONSIDERATIONSBe careful with the Bunsen burner flame. Always han-dle cultures with care since they may be potentialpathogens. The ethyl alcohol that is used to sterilize theforceps is flammable.
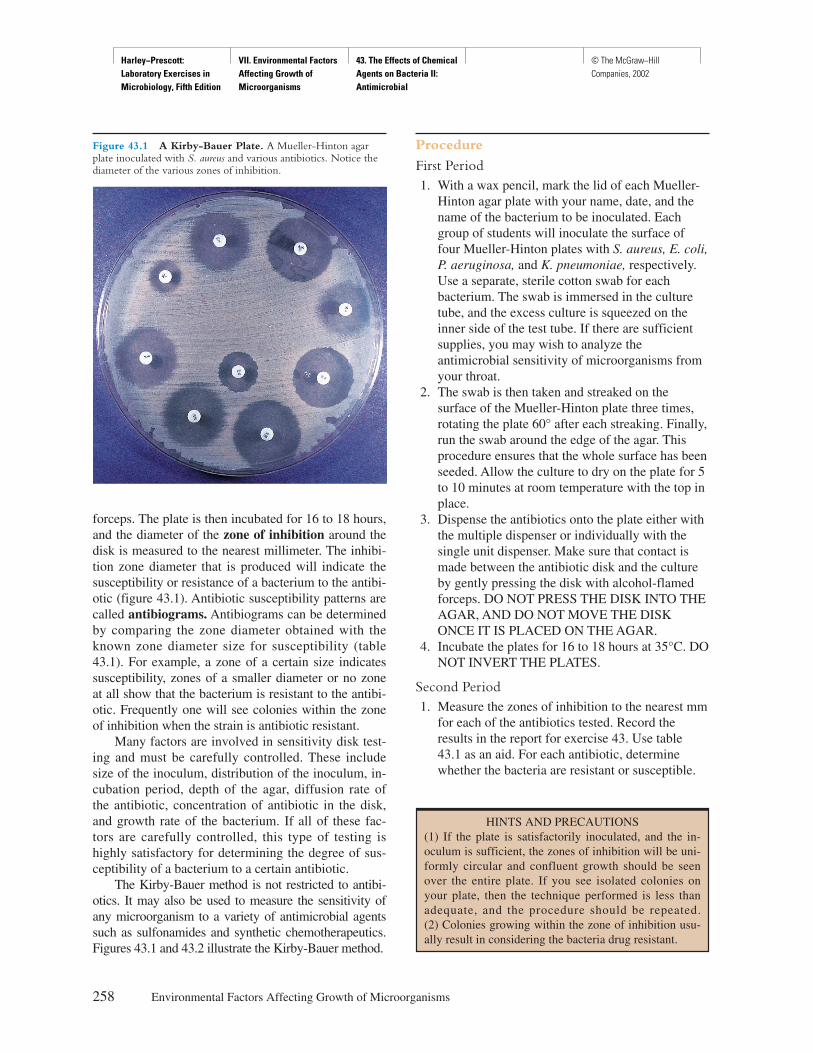
Harley−Prescott: Laboratory Exercises in Microbiology, Fifth Edition
VII. Environmental Factors Affecting Growth of Microorganisms
43. The Effects of Chemical Agents on Bacteria II: Antimicrobial
© The McGraw−Hill Companies, 2002
forceps. The plate is then incubated for 16 to 18 hours,and the diameter of the zone of inhibition around thedisk is measured to the nearest millimeter. The inhibi-tion zone diameter that is produced will indicate thesusceptibility or resistance of a bacterium to the antibi-otic (figure 43.1). Antibiotic susceptibility patterns arecalled antibiograms. Antibiograms can be determinedby comparing the zone diameter obtained with theknown zone diameter size for susceptibility (table43.1). For example, a zone of a certain size indicatessusceptibility, zones of a smaller diameter or no zoneat all show that the bacterium is resistant to the antibi-otic. Frequently one will see colonies within the zoneof inhibition when the strain is antibiotic resistant.
Many factors are involved in sensitivity disk test-ing and must be carefully controlled. These includesize of the inoculum, distribution of the inoculum, in-cubation period, depth of the agar, diffusion rate ofthe antibiotic, concentration of antibiotic in the disk,and growth rate of the bacterium. If all of these fac-tors are carefully controlled, this type of testing ishighly satisfactory for determining the degree of sus-ceptibility of a bacterium to a certain antibiotic.
The Kirby-Bauer method is not restricted to antibi-otics. It may also be used to measure the sensitivity ofany microorganism to a variety of antimicrobial agentssuch as sulfonamides and synthetic chemotherapeutics.Figures 43.1 and 43.2 illustrate the Kirby-Bauer method.
Procedure
First Period1. With a wax pencil, mark the lid of each Mueller-
Hinton agar plate with your name, date, and thename of the bacterium to be inoculated. Eachgroup of students will inoculate the surface offour Mueller-Hinton plates with S. aureus, E. coli,P. aeruginosa, and K. pneumoniae, respectively.Use a separate, sterile cotton swab for eachbacterium. The swab is immersed in the culturetube, and the excess culture is squeezed on theinner side of the test tube. If there are sufficientsupplies, you may wish to analyze theantimicrobial sensitivity of microorganisms fromyour throat.
2. The swab is then taken and streaked on thesurface of the Mueller-Hinton plate three times,rotating the plate 60° after each streaking. Finally,run the swab around the edge of the agar. Thisprocedure ensures that the whole surface has beenseeded. Allow the culture to dry on the plate for 5to 10 minutes at room temperature with the top inplace.
3. Dispense the antibiotics onto the plate either withthe multiple dispenser or individually with thesingle unit dispenser. Make sure that contact ismade between the antibiotic disk and the cultureby gently pressing the disk with alcohol-flamedforceps. DO NOT PRESS THE DISK INTO THEAGAR, AND DO NOT MOVE THE DISKONCE IT IS PLACED ON THE AGAR.
4. Incubate the plates for 16 to 18 hours at 35°C. DONOT INVERT THE PLATES.
Second Period1. Measure the zones of inhibition to the nearest mm
for each of the antibiotics tested. Record theresults in the report for exercise 43. Use table43.1 as an aid. For each antibiotic, determinewhether the bacteria are resistant or susceptible.
258 Environmental Factors Affecting Growth of Microorganisms
Figure 43.1 A Kirby-Bauer Plate. A Mueller-Hinton agarplate inoculated with S. aureus and various antibiotics. Notice thediameter of the various zones of inhibition.
HINTS AND PRECAUTIONS(1) If the plate is satisfactorily inoculated, and the in-oculum is sufficient, the zones of inhibition will be uni-formly circular and confluent growth should be seenover the entire plate. If you see isolated colonies onyour plate, then the technique performed is less thanadequate, and the procedure should be repeated. (2) Colonies growing within the zone of inhibition usu-ally result in considering the bacteria drug resistant.
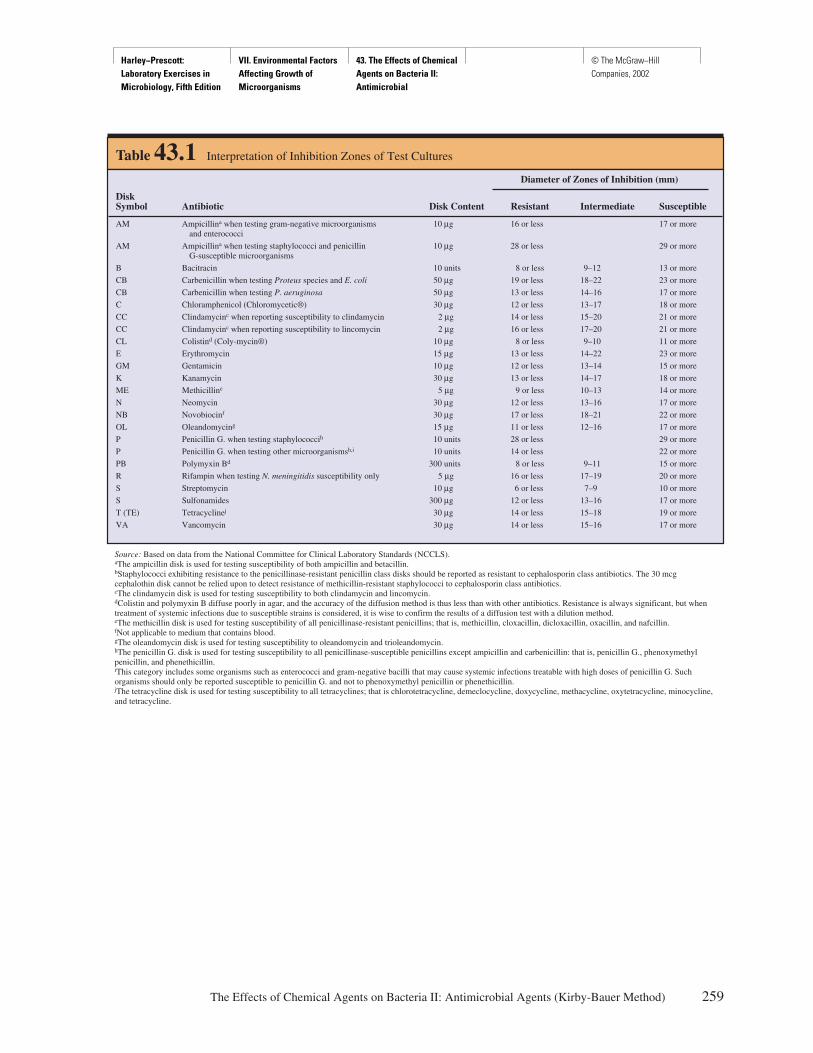
Harley−Prescott: Laboratory Exercises in Microbiology, Fifth Edition
VII. Environmental Factors Affecting Growth of Microorganisms
43. The Effects of Chemical Agents on Bacteria II: Antimicrobial
© The McGraw−Hill Companies, 2002
The Effects of Chemical Agents on Bacteria II: Antimicrobial Agents (Kirby-Bauer Method) 259
Table 43.1 Interpretation of Inhibition Zones of Test Cultures
Diameter of Zones of Inhibition (mm)
DiskSymbol Antibiotic Disk Content Resistant Intermediate Susceptible
AM Ampicillina when testing gram-negative microorganisms 10 µg 16 or less 17 or moreand enterococci
AM Ampicillina when testing staphylococci and penicillin 10 µg 28 or less 29 or moreG-susceptible microorganisms
B Bacitracin 10 units 8 or less 9–12 13 or more
CB Carbenicillin when testing Proteus species and E. coli 50 µg 19 or less 18–22 23 or more
CB Carbenicillin when testing P. aeruginosa 50 µg 13 or less 14–16 17 or more
C Chloramphenicol (Chloromycetic®) 30 µg 12 or less 13–17 18 or more
CC Clindamycinc when reporting susceptibility to clindamycin 2 µg 14 or less 15–20 21 or more
CC Clindamycinc when reporting susceptibility to lincomycin 2 µg 16 or less 17–20 21 or more
CL Colistind (Coly-mycin®) 10 µg 8 or less 9–10 11 or more
E Erythromycin 15 µg 13 or less 14–22 23 or more
GM Gentamicin 10 µg 12 or less 13–14 15 or more
K Kanamycin 30 µg 13 or less 14–17 18 or more
ME Methicilline 5 µg 9 or less 10–13 14 or more
N Neomycin 30 µg 12 or less 13–16 17 or more
NB Novobiocinf 30 µg 17 or less 18–21 22 or more
OL Oleandomycing 15 µg 11 or less 12–16 17 or more
P Penicillin G. when testing staphylococcih 10 units 28 or less 29 or more
P Penicillin G. when testing other microorganismsh,i 10 units 14 or less 22 or more
PB Polymyxin Bd 300 units 8 or less 9–11 15 or more
R Rifampin when testing N. meningitidis susceptibility only 5 µg 16 or less 17–19 20 or more
S Streptomycin 10 µg 6 or less 7–9 10 or more
S Sulfonamides 300 µg 12 or less 13–16 17 or more
T (TE) Tetracyclinej 30 µg 14 or less 15–18 19 or more
VA Vancomycin 30 µg 14 or less 15–16 17 or more
Source: Based on data from the National Committee for Clinical Laboratory Standards (NCCLS).aThe ampicillin disk is used for testing susceptibility of both ampicillin and betacillin.bStaphylococci exhibiting resistance to the penicillinase-resistant penicillin class disks should be reported as resistant to cephalosporin class antibiotics. The 30 mcgcephalothin disk cannot be relied upon to detect resistance of methicillin-resistant staphylococci to cephalosporin class antibiotics.cThe clindamycin disk is used for testing susceptibility to both clindamycin and lincomycin.dColistin and polymyxin B diffuse poorly in agar, and the accuracy of the diffusion method is thus less than with other antibiotics. Resistance is always significant, but whentreatment of systemic infections due to susceptible strains is considered, it is wise to confirm the results of a diffusion test with a dilution method.eThe methicillin disk is used for testing susceptibility of all penicillinase-resistant penicillins; that is, methicillin, cloxacillin, dicloxacillin, oxacillin, and nafcillin.fNot applicable to medium that contains blood.gThe oleandomycin disk is used for testing susceptibility to oleandomycin and trioleandomycin.hThe penicillin G. disk is used for testing susceptibility to all penicillinase-susceptible penicillins except ampicillin and carbenicillin: that is, penicillin G., phenoxymethylpenicillin, and phenethicillin.iThis category includes some organisms such as enterococci and gram-negative bacilli that may cause systemic infections treatable with high doses of penicillin G. Suchorganisms should only be reported susceptible to penicillin G. and not to phenoxymethyl penicillin or phenethicillin.jThe tetracycline disk is used for testing susceptibility to all tetracyclines; that is chlorotetracycline, demeclocycline, doxycycline, methacycline, oxytetracycline, minocycline,and tetracycline.
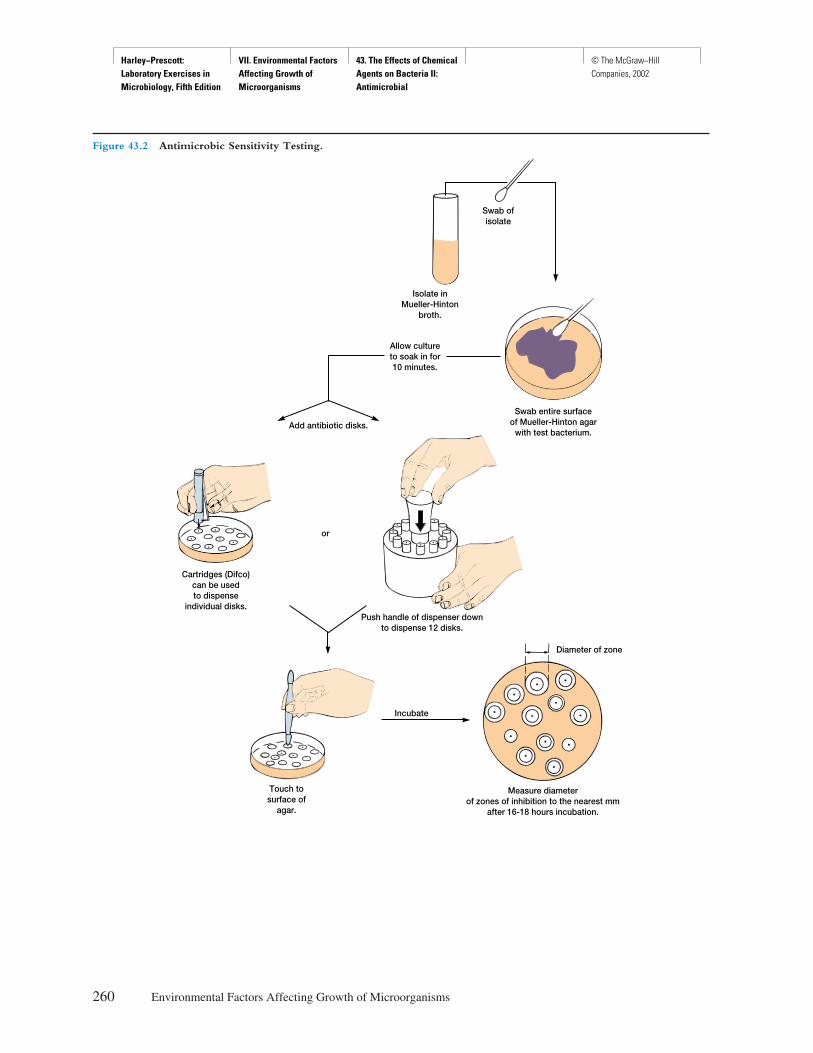
Harley−Prescott: Laboratory Exercises in Microbiology, Fifth Edition
VII. Environmental Factors Affecting Growth of Microorganisms
43. The Effects of Chemical Agents on Bacteria II: Antimicrobial
© The McGraw−Hill Companies, 2002
260 Environmental Factors Affecting Growth of Microorganisms
Add antibiotic disks.
or
Incubate
Swab ofisolate
Isolate inMueller-Hinton
broth.
Allow cultureto soak in for10 minutes.
Swab entire surfaceof Mueller-Hinton agar
with test bacterium.
Push handle of dispenser downto dispense 12 disks.
Diameter of zone
Cartridges (Difco)can be usedto dispense
individual disks.
Touch tosurface of
agar.
Measure diameterof zones of inhibition to the nearest mm
after 16-18 hours incubation.
Figure 43.2 Antimicrobic Sensitivity Testing.
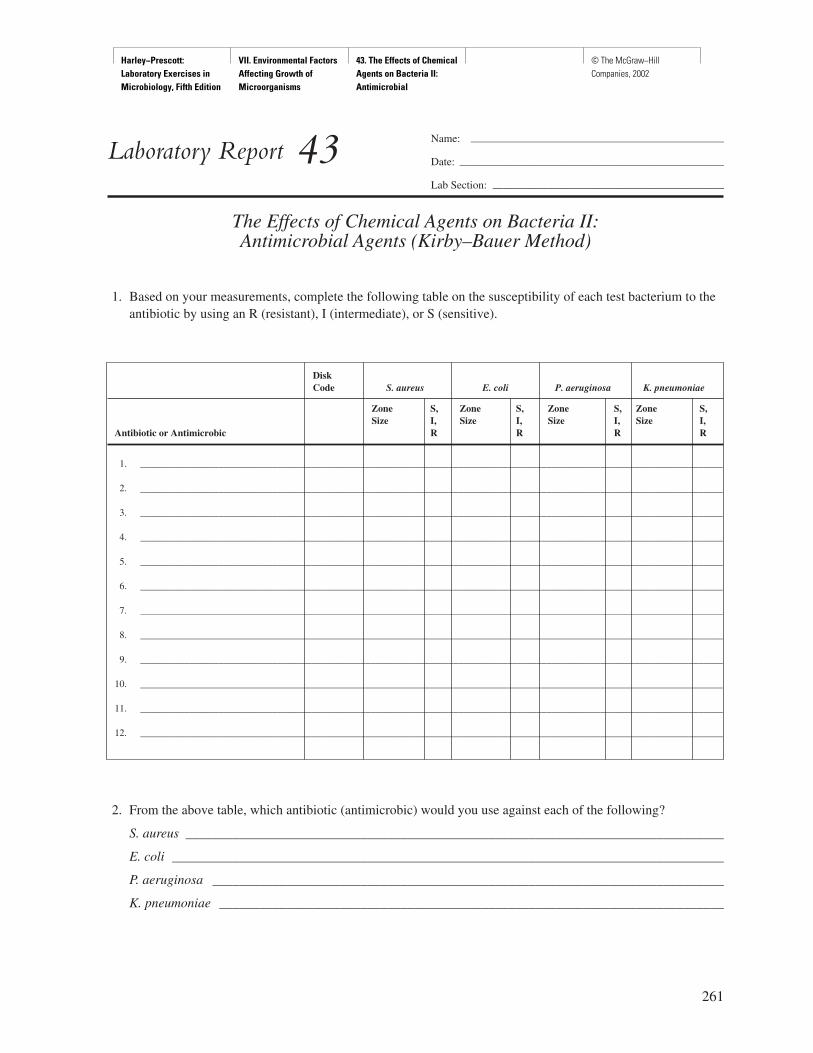
Harley−Prescott: Laboratory Exercises in Microbiology, Fifth Edition
VII. Environmental Factors Affecting Growth of Microorganisms
43. The Effects of Chemical Agents on Bacteria II: Antimicrobial
© The McGraw−Hill Companies, 2002
261
Name: ———————————————————————
Date: ————————————————————————
Lab Section: —————————————————————
Laboratory Report 43
The Effects of Chemical Agents on Bacteria II:Antimicrobial Agents (Kirby–Bauer Method)
1. Based on your measurements, complete the following table on the susceptibility of each test bacterium to theantibiotic by using an R (resistant), I (intermediate), or S (sensitive).
DiskCode S. aureus E. coli P. aeruginosa K. pneumoniae
Zone S, Zone S, Zone S, Zone S,Size I, Size I, Size I, Size I,
Antibiotic or Antimicrobic R R R R
1. _______________________________________________________________________________________________________________________
2. _______________________________________________________________________________________________________________________
3. _______________________________________________________________________________________________________________________
4. _______________________________________________________________________________________________________________________
5. _______________________________________________________________________________________________________________________
6. _______________________________________________________________________________________________________________________
7. _______________________________________________________________________________________________________________________
8. _______________________________________________________________________________________________________________________
9. _______________________________________________________________________________________________________________________
10. _______________________________________________________________________________________________________________________
11. _______________________________________________________________________________________________________________________
12. _______________________________________________________________________________________________________________________
2. From the above table, which antibiotic (antimicrobic) would you use against each of the following?
S. aureus ________________________________________________________________________________
E. coli __________________________________________________________________________________
P. aeruginosa ____________________________________________________________________________
K. pneumoniae ___________________________________________________________________________

Harley−Prescott: Laboratory Exercises in Microbiology, Fifth Edition
VII. Environmental Factors Affecting Growth of Microorganisms
43. The Effects of Chemical Agents on Bacteria II: Antimicrobial
© The McGraw−Hill Companies, 2002
Review Questions
1. How can you determine whether the zone of inhibition is due to death or to inhibition of a bacterium?
2. What factors must be carefully controlled in the Kirby–Bauer method?
3. In which growth phase is a bacterium most sensitive to an antibiotic?
4. If the clinical laboratory reports bacterial susceptibility to an antibiotic but the patient is not responding to it,what could have gone wrong?
5. What are the similarities and differences in response to plates with gram-positive and gram-negative bacteria?Between enterics and nonenterics?
6. What is the difference between an antibiotic and an antimicrobic?
7. What are some reasons bacteria are becoming more resistant to antibiotics?
262 Environmental Factors Affecting Growth of Microorganisms

Harley−Prescott: Laboratory Exercises in Microbiology, Fifth Edition
VII. Environmental Factors Affecting Growth of Microorganisms
44. Hand Washing, Environmental Sampling, and Microbiological Monitoring
© The McGraw−Hill Companies, 2002
Materials per Student
2 petri plates of TSA containing lecithin andpolysorbate 80
2 RODAC plates containing TSA with lecithinand polysorbate 80 for environmental sampling
HYcheck System for Disinfection Control (Difco,9039-36-4)
Millipore Membrane Sampler and Swab Test Kits(Coli-Count Sampler [MCOO] or Swab[MCSK], Yeast and Mold Sampler [MYOO] orSwab [MYSK], Total Count Sampler [MTOO]or Swab [MTSK])
variety of chemical disinfectants such as Staphene(Vestal Labs), Lysol, Zephiran (WinthropLabs), alcohol (70%), and others
variety of hand soaps such as Ivory, Dial, Dove,Zest, Palmolive, Lifebuoy, Phisohex (WinthropLabs), Betadine (Purdue Federick Co.),Septisoft (Vestal Labs), and others. Note if anyof these products contain triclosan!
1-ml and 10-ml pipettes with pipettor forpreparing dilutions
paper towelswax pencil35°C incubatorsterile single-use surgical scrub brushreceptacle for used brushes
Learning Objectives
Each student should be able to
1. Understand the value of proper hand washing2. Understand the importance of efficient
decontamination procedures
3. Evaluate the effectiveness of hand washing anddecontamination
4. Perform routine microbiological monitoring
Suggested Reading in Textbook
1. Definition of Frequently Used Terms, section 7.1.2. The Use of Chemical Agents in Control, section
7.5; see also tables 7.4 and 7.5.
Principles
Most commercial hand washing products contain an-tibacterial chemicals. These products are widely usedin the home and workplace. There are two types avail-able: hand soaps contain the phenolic antiseptic calledtriclosan and hand gels contain ethyl alcohol. Handgels can be used without water whereas soaps requirethe addition of water.
Proper hand-washing technique performed by clin-ical personnel is the most effective method of control-ling infections, especially nosocomial (hospital-acquired) infections. A layer of oil and the structure ofthe skin prevent the removal of microorganisms bysimple hand washing. Using a soap or gel will help re-move the oil, and scrubbing with a brush for 7 to 8minutes will maximize the removal of both transient(contaminated) and resident microorganisms. In thisexercise, each student will be given a specific soap orgel to evaluate. The proper hand-washing techniquewill be demonstrated by the instructor. The effective-ness of the hand-washing technique and the soap or gelwill then be shown by the presence or absence ofgrowth on a culture plate.
Also in this exercise, various environmental surfaceswill be disinfected with chemicals generally employedin a clinical setting. Disinfection is the killing of vegeta-tive forms of pathogenic microorganisms or viruses. Dis-infectants are agents, usually chemicals, used to carryout disinfection and are normally used only on inanimateobjects. The purpose for this part of the exercise is to
263
E X E R C I S E
Hand Washing, Environmental Sampling, andMicrobiological Monitoring
44
ATTENTIONDO NOT WASH YOUR HANDS BEFORE THIS EX-ERCISE. Remove jewelry from your hands and store itin a safe place during the experiment.
Harley−Prescott: Laboratory Exercises in Microbiology, Fifth Edition
VII. Environmental Factors Affecting Growth of Microorganisms
44. Hand Washing, Environmental Sampling, and Microbiological Monitoring
© The McGraw−Hill Companies, 2002
show the student the importance of both chemical andphysical removal of potentially harmful microorganismsby disinfectants and, at the same time, to provide experi-ence in routine biological monitoring. RODAC (repli-cate organism detection and counting) plates will beused for this part of the exercise. The design of the platepermits the pouring of a raised surface of the culturemedium for total surface contact of the area being sam-pled. The 10-mm grid on the bottom of the plate facili-tates counting and colony location. These plates are usedfor the detection and enumeration of microorganismspresent on surfaces that must be kept sanitary.
Alternatives for environmental sampling are ei-ther Difco’s HYcheck System for Disinfection Con-trol or Millipore’s Sampler and Swab Test Kits formicrobiological monitoring.
Procedure
First PeriodHand Washing
1. Before doing any hand washing, using one ofyour hands, gently make a five-finger impressionon one of the TSA plates by rolling each fingerand your thumb on the agar. With the wax pencil,label this plate with your name, date, and “before”hand washing.
2. Take one of the soaps supplied and wash yourhands according to the directions of themanufacturer or your instructor. Wash your handsfor the length of time assigned by the instructor.Some appropriate intervals are 10 seconds, 30seconds, and 3 minutes, but other times may bechosen. In this way, the effect of both the soapselected and the length of scrubbing can bestudied. The hand-washing technique involves:
a. Using continuously running hot waterb. Using plenty of soapc. Applying the soap with vigorous contact on
all surfaces of the handsd. Washing hands with a surgical scrub brushe. Keeping hands down at all times, so any
runoff will go into the sink and not down thearms
f. Avoiding splashing; rinsing thoroughlyg. Drying well with paper towelsh. Discarding the towels into a bag provided
for that purposei. Using a paper towel to turn off the faucet
3. After washing, make another five-fingerimpression (using the same hand and fingers) on a
different TSA plate. Mark this plate with yourname, date, and the duration of hand washing.
4. Incubate both plates at 35°C for 24 to 48 hours.
First PeriodEnvironmental Sampling
1. Choose any environmental surface such as a floor,wall, table, or drinking fountain, and place aRODAC plate on its surface (figure 44.1). Makesure that a perfect contact has occurred. Mark thisplate with your name, date, and “before”disinfection.
2. Take one of the disinfectants supplied and makethe proper use-dilution as suggested by themanufacturer. Pour some of the chemical (5 to 10ml) on the area that was previously sampled withthe RODAC plate. Allow sufficient time forcontact (your instructor will suggest timeintervals). Wipe the area with a paper towel toabsorb the excess fluid. Scrubbing with the towelcan also be done.
3. Make another impression of the area with anotherRODAC plate. Mark this plate with your name,date, and “after” disinfection.
4. Place both RODAC plates in a 35°C incubator for24 to 48 hours.
5. The HYcheck contact slide for Disinfection Control(Difco) is a convenient alternative for testingdisinfectant effectiveness. The hinged slide paddlehas tryptic soy agar on one side and D/Eneutralizing agar for disinfectant testing on theother. The paddle’s surface is marked off in one-square-centimeter units for ease in colony counting.Surfaces can be quickly tested in the following way(your instructor will demonstrate the procedure).
a. Press the paddle’s terminal spike against thesurface to be tested and bend the paddlehinge to a convenient angle.
b. Holding the slide by its cap, gently press theTSA plate firmly against the surface to besampled and hold it there for a few seconds.Then bend the paddle back straight andreturn it to its container.
c. Disinfect the surface as described in step 2.d. Remove the slide and press the purple D/E
neutralizing agar against the disinfectedsurface; hold it there for a few seconds.
e. Return the slide to its container, seal it tightly,and label the container. Incubate at 35° to37°C and count any colonies on the two sidesafter about 24 and 48 hours incubation.
264 Environmental Factors Affecting Growth of Microorganisms

Harley−Prescott: Laboratory Exercises in Microbiology, Fifth Edition
VII. Environmental Factors Affecting Growth of Microorganisms
44. Hand Washing, Environmental Sampling, and Microbiological Monitoring
© The McGraw−Hill Companies, 2002
6. Sampler and Swab Test Kits from Millipore canalso be used for routine microbiological samplingand monitoring of a specific environment.Advantages of these kits include no media to mix,no agar plates to prepare, and nothing to sterilizeand clean. Testing is as simple as sample,incubate, and count (figures 44.2 and 44.3).Specific temperatures and incubation times aregiven in table 44.1.
Second PeriodHand Washing
1. Examine the TSA plates around the area wherethe finger impressions were made. Compare the“before” and “after” plates. Complete the dataasked for in Part 1 of the report for exercise 44.
2. It will be necessary to exchange data with otherstudents in order to answer some of the reviewquestions.
Second PeriodEnvironmental Sampling
1. Examine the RODAC plates, HYcheck slide, and/orMillipore test kit/sampler. Count the number ofcolonies on each plate, slide, and /or testkit/sampler. Record your results and complete thedata asked for in Part 2 of the report for exercise 44.
2. It will be necessary to exchange data with otherstudents in order to answer some of the reviewquestions.
Hand Washing, Environmental Sampling, and Microbiological Monitoring 265
Figure 44.1 RODAC Plates. (a) A RODAC plate. (b) Applying a RODAC plate to an environmental surface.
(a) (b)
HINTS AND PRECAUTIONS(1) If you have to dilute concentrated disinfectants,wear gloves and carry out the dilutions in the chemical(fume) hood. (2) Millipore samplers should be usedonly when counts >10 colonies/ml are anticipated. (3) Samplers are not recommended for testing drinkingwater or when a 100-ml sample is required due to a lownumber of microorganisms or for marine water wheresalt concentrations might alter nutrients. (4) Triclosan isprimarily effective against Gram-positive bacteria.
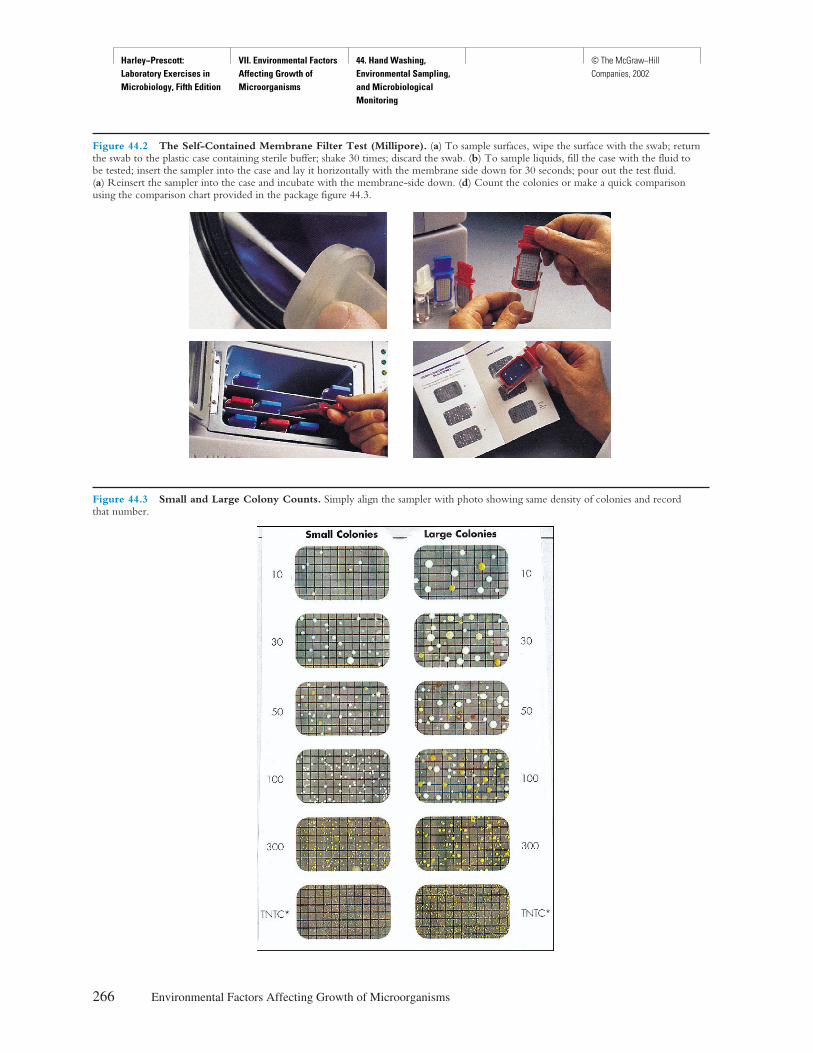
Harley−Prescott: Laboratory Exercises in Microbiology, Fifth Edition
VII. Environmental Factors Affecting Growth of Microorganisms
44. Hand Washing, Environmental Sampling, and Microbiological Monitoring
© The McGraw−Hill Companies, 2002
266 Environmental Factors Affecting Growth of Microorganisms
Figure 44.2 The Self-Contained Membrane Filter Test (Millipore). (a) To sample surfaces, wipe the surface with the swab; returnthe swab to the plastic case containing sterile buffer; shake 30 times; discard the swab. (b) To sample liquids, fill the case with the fluid tobe tested; insert the sampler into the case and lay it horizontally with the membrane side down for 30 seconds; pour out the test fluid. (a) Reinsert the sampler into the case and incubate with the membrane-side down. (d) Count the colonies or make a quick comparisonusing the comparison chart provided in the package figure 44.3.
Figure 44.3 Small and Large Colony Counts. Simply align the sampler with photo showing same density of colonies and record that number.
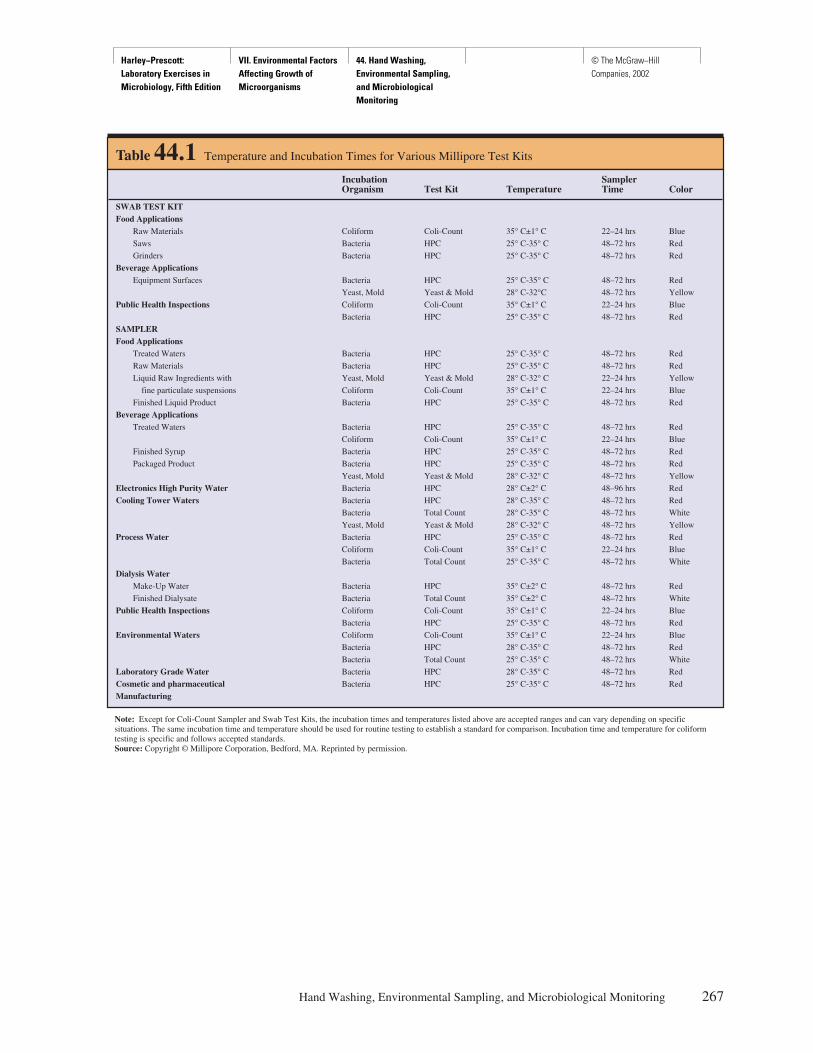
Harley−Prescott: Laboratory Exercises in Microbiology, Fifth Edition
VII. Environmental Factors Affecting Growth of Microorganisms
44. Hand Washing, Environmental Sampling, and Microbiological Monitoring
© The McGraw−Hill Companies, 2002
Hand Washing, Environmental Sampling, and Microbiological Monitoring 267
Table 44.1 Temperature and Incubation Times for Various Millipore Test Kits
Incubation SamplerOrganism Test Kit Temperature Time Color
SWAB TEST KITFood Applications
Raw Materials Coliform Coli-Count 35° C±1° C 22–24 hrs Blue
Saws Bacteria HPC 25° C-35° C 48–72 hrs Red
Grinders Bacteria HPC 25° C-35° C 48–72 hrs Red
Beverage ApplicationsEquipment Surfaces Bacteria HPC 25° C-35° C 48–72 hrs Red
Yeast, Mold Yeast & Mold 28° C-32°C 48–72 hrs Yellow
Public Health Inspections Coliform Coli-Count 35° C±1° C 22–24 hrs Blue
Bacteria HPC 25° C-35° C 48–72 hrs Red
SAMPLERFood Applications
Treated Waters Bacteria HPC 25° C-35° C 48–72 hrs Red
Raw Materials Bacteria HPC 25° C-35° C 48–72 hrs Red
Liquid Raw Ingredients with Yeast, Mold Yeast & Mold 28° C-32° C 22–24 hrs Yellow
fine particulate suspensions Coliform Coli-Count 35° C±1° C 22–24 hrs Blue
Finished Liquid Product Bacteria HPC 25° C-35° C 48–72 hrs Red
Beverage ApplicationsTreated Waters Bacteria HPC 25° C-35° C 48–72 hrs Red
Coliform Coli-Count 35° C±1° C 22–24 hrs Blue
Finished Syrup Bacteria HPC 25° C-35° C 48–72 hrs Red
Packaged Product Bacteria HPC 25° C-35° C 48–72 hrs Red
Yeast, Mold Yeast & Mold 28° C-32° C 48–72 hrs Yellow
Electronics High Purity Water Bacteria HPC 28° C±2° C 48–96 hrs Red
Cooling Tower Waters Bacteria HPC 28° C-35° C 48–72 hrs Red
Bacteria Total Count 28° C-35° C 48–72 hrs White
Yeast, Mold Yeast & Mold 28° C-32° C 48–72 hrs Yellow
Process Water Bacteria HPC 25° C-35° C 48–72 hrs Red
Coliform Coli-Count 35° C±1° C 22–24 hrs Blue
Bacteria Total Count 25° C-35° C 48–72 hrs White
Dialysis WaterMake-Up Water Bacteria HPC 35° C±2° C 48–72 hrs Red
Finished Dialysate Bacteria Total Count 35° C±2° C 48–72 hrs White
Public Health Inspections Coliform Coli-Count 35° C±1° C 22–24 hrs Blue
Bacteria HPC 25° C-35° C 48–72 hrs Red
Environmental Waters Coliform Coli-Count 35° C±1° C 22–24 hrs Blue
Bacteria HPC 28° C-35° C 48–72 hrs Red
Bacteria Total Count 25° C-35° C 48–72 hrs White
Laboratory Grade Water Bacteria HPC 28° C-35° C 48–72 hrs Red
Cosmetic and pharmaceutical Bacteria HPC 25° C-35° C 48–72 hrs Red
Manufacturing
Note: Except for Coli-Count Sampler and Swab Test Kits, the incubation times and temperatures listed above are accepted ranges and can vary depending on specificsituations. The same incubation time and temperature should be used for routine testing to establish a standard for comparison. Incubation time and temperature for coliformtesting is specific and follows accepted standards.Source: Copyright © Millipore Corporation, Bedford, MA. Reprinted by permission.
Harley−Prescott: Laboratory Exercises in Microbiology, Fifth Edition
VII. Environmental Factors Affecting Growth of Microorganisms
44. Hand Washing, Environmental Sampling, and Microbiological Monitoring
© The McGraw−Hill Companies, 2002
269
Name: ———————————————————————
Date: ————————————————————————
Lab Section: —————————————————————
Laboratory Report 44
Hand Washing, Environmental Sampling, and Microbiological Monitoring
1. Data from hand-washing experiment.
a. Type of hand-washing material used: _____________________________________________________
b. Length of time of hand washing: ________________________________________________________
c. Type of culture medium used: __________________________________________________________
d. Hours of incubation: __________________________________________________________________
e. Temperature of incubation: _____________________________________________________________
f. Colony count prior to hand washing: _____________________________________________________
g. Colony count after hand washing: _______________________________________________________
h. Colony shape (see figure 15.1): _________________________________________________________
i. Interpretation: _______________________________________________________________________
2. Data from environmental sampling.
a. Chemical used: ______________________________________________________________________
b. Use-dilution of chemical: ______________________________________________________________
c. Contact time used: ___________________________________________________________________
d. Hours of incubation: __________________________________________________________________
e. Temperature of incubation: _____________________________________________________________
f. Colony count prior to disinfection: _______________________________________________________
g. Colony count after disinfection: _________________________________________________________
h. Colony shape (see figure 15.1): _________________________________________________________
i. Interpretation: _______________________________________________________________________
3. Additional data from microbiological monitoring.
Harley−Prescott: Laboratory Exercises in Microbiology, Fifth Edition
VII. Environmental Factors Affecting Growth of Microorganisms
44. Hand Washing, Environmental Sampling, and Microbiological Monitoring
© The McGraw−Hill Companies, 2002
Review Questions
1. Why is contact so important in the disinfection process?
2. What disinfectant proved to be the most effective? The least effective? Suggest reasons why.
3. What soap proved to be the most effective? The least effective? Did any contain triclosan? Suggest reasonswhy and the significance of triclosan.
4. Since most normal flora are not harmful, why must they be removed in a surgical scrub?
5. List some of the reasons why hand washing fails to remove all microorganisms. In your discussion, analyzethe effect of hand scrubbing time (as well as the soap).
6. Why is liquid soap preferred to bar soap during a surgical scrub?
7. What microbial advantage is there to paper towels in a rest room over a continuous-feed cloth towel?
270 Environmental Factors Affecting Growth of Microorganisms

Harley−Prescott: Laboratory Exercises in Microbiology, Fifth Edition
VII. Environmental Factors Affecting Growth of Microorganisms
45. Determination of a Bacterial Growth Curve: Classical and Two−Hour Methods
© The McGraw−Hill Companies, 2002
Materials per Group of Students (ClassicalMethod)
10- to 12-hour (log phase) tryptic soy brothcultures of Escherichia coli (ATCC 11229).Cultures can be maintained in log phase byimmersion in an ice-water bath
100 ml of brain-heart infusion in a 250-mlErlenmeyer flask
21 99-ml saline saline blanks3 100-ml bottles of tryptic soy agar37°C water bath with shaker or temperature
controlled shaker incubatorspectrophotometer13 × 100 mm cuvettesNephelo culture flasks (Bellco Glass Co., 340
Edrudo Rd., Vineland, NJ 08360; 800–257–7043; www.bellcoglass.com)
colony counter28 petri plates1-ml and 10-ml sterile pipettes with pipettorBunsen burnerwax pencil1,000-ml beakerruler
Materials per Group of Students(Two-Hour Method)
6-hour starter culture of Vibrio natriegens (ATCC14048; Preceptrol)
500-ml flask containing approximately 300 mlof V. natriegens medium (3.7% [37 g/liter]brain-heart infusion + 2% [20 g/liter] NaCl,final pH 7.4)
1- and 10-ml pipettes with pipettorwater bath or incubator at 37°C
Learning Objectives
Each student should be able to
1. Understand the growth dynamics of a bacterialculture
2. Identify the typical phases of a bacterial growthcurve
3. Use a spectrophotometer4. Measure bacterial growth and turbidity5. Plot a growth curve and determine the generation
time of a culture of E. coli and/or Vibrio natriegens
Suggested Reading in Textbook
1. The Growth Curve, section 6.1; see also figures6.1 to 6.3.
2. Measurement of Microbial Growth, section 6.2.
Pronunciation Guide
Escherichia coli (esh-er-I-ke-a KOH-lee)Vibrio natriegens (VIB-ree-o nat-re-gens)
Why Are the Above Bacteria Usedin This Exercise?
In this experiment, the student will learn how to measurebacterial growth, plot a bacterial growth curve, and deter-mine the generation time. To accomplish this, the authorshave chosen the common bacterium Escherichia coli thathas a generation time of approximately 21 minutes at 40°Cand Vibrio natriegens that has a generation time of lessthan 10 minutes at 37°C.
Principles
Classical Growth CurveThe four phases (lag, logarithmic, stationary, anddeath or decline) of growth of a bacterial populationcan be determined by measuring the turbidity of the
271
E X E R C I S E
Determination of a Bacterial Growth Curve:Classical and Two-Hour Methods
45
SAFETY CONSIDERATIONSBe careful with the Bunsen burner flame. No mouthpipetting.
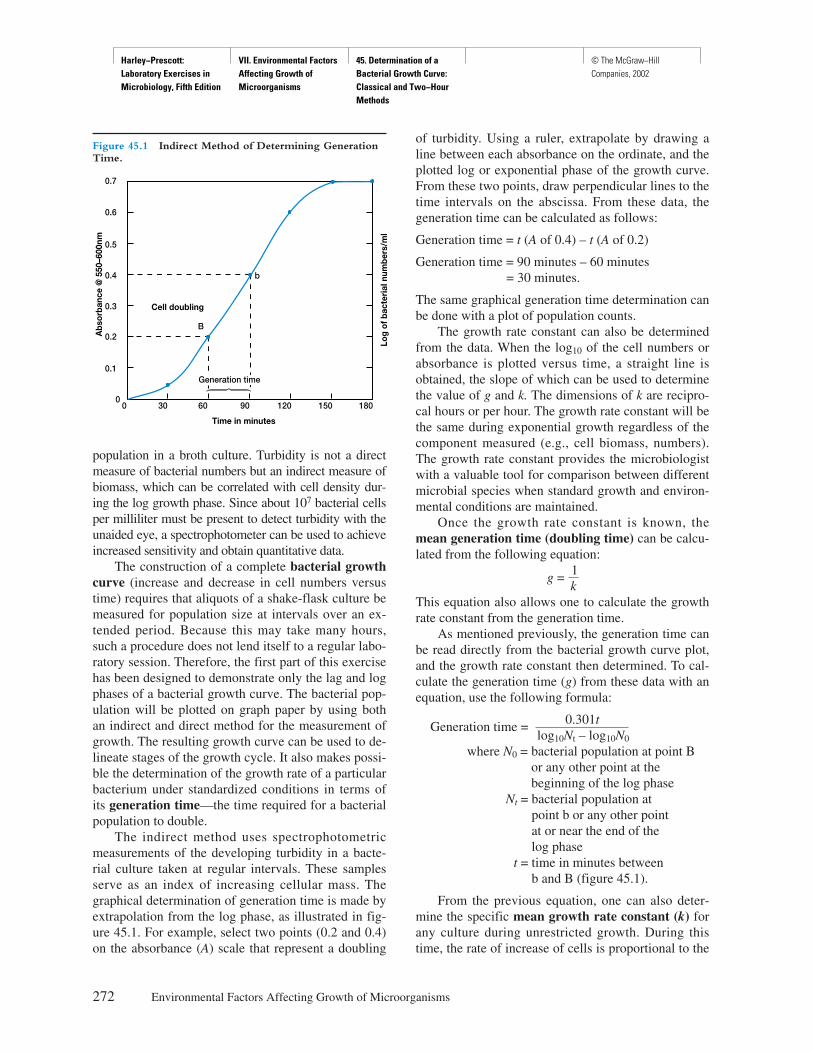
Harley−Prescott: Laboratory Exercises in Microbiology, Fifth Edition
VII. Environmental Factors Affecting Growth of Microorganisms
45. Determination of a Bacterial Growth Curve: Classical and Two−Hour Methods
© The McGraw−Hill Companies, 2002
population in a broth culture. Turbidity is not a directmeasure of bacterial numbers but an indirect measure ofbiomass, which can be correlated with cell density dur-ing the log growth phase. Since about 107 bacterial cellsper milliliter must be present to detect turbidity with theunaided eye, a spectrophotometer can be used to achieveincreased sensitivity and obtain quantitative data.
The construction of a complete bacterial growthcurve (increase and decrease in cell numbers versustime) requires that aliquots of a shake-flask culture bemeasured for population size at intervals over an ex-tended period. Because this may take many hours,such a procedure does not lend itself to a regular labo-ratory session. Therefore, the first part of this exercisehas been designed to demonstrate only the lag and logphases of a bacterial growth curve. The bacterial pop-ulation will be plotted on graph paper by using bothan indirect and direct method for the measurement ofgrowth. The resulting growth curve can be used to de-lineate stages of the growth cycle. It also makes possi-ble the determination of the growth rate of a particularbacterium under standardized conditions in terms ofits generation time—the time required for a bacterialpopulation to double.
The indirect method uses spectrophotometricmeasurements of the developing turbidity in a bacte-rial culture taken at regular intervals. These samplesserve as an index of increasing cellular mass. Thegraphical determination of generation time is made byextrapolation from the log phase, as illustrated in fig-ure 45.1. For example, select two points (0.2 and 0.4)on the absorbance (A) scale that represent a doubling
of turbidity. Using a ruler, extrapolate by drawing aline between each absorbance on the ordinate, and theplotted log or exponential phase of the growth curve.From these two points, draw perpendicular lines to thetime intervals on the abscissa. From these data, thegeneration time can be calculated as follows:
Generation time = t (A of 0.4) – t (A of 0.2)
Generation time = 90 minutes – 60 minutes= 30 minutes.
The same graphical generation time determination canbe done with a plot of population counts.
The growth rate constant can also be determinedfrom the data. When the log10 of the cell numbers orabsorbance is plotted versus time, a straight line isobtained, the slope of which can be used to determinethe value of g and k. The dimensions of k are recipro-cal hours or per hour. The growth rate constant will bethe same during exponential growth regardless of thecomponent measured (e.g., cell biomass, numbers).The growth rate constant provides the microbiologistwith a valuable tool for comparison between differentmicrobial species when standard growth and environ-mental conditions are maintained.
Once the growth rate constant is known, themean generation time (doubling time) can be calcu-lated from the following equation:
g = 1k
This equation also allows one to calculate the growthrate constant from the generation time.
As mentioned previously, the generation time canbe read directly from the bacterial growth curve plot,and the growth rate constant then determined. To cal-culate the generation time (g) from these data with anequation, use the following formula:
Generation time = 0.301tlog10Nt – log10N0
where N0 = bacterial population at point Bor any other point at thebeginning of the log phase
Nt = bacterial population at point b or any other pointat or near the end of thelog phase
t = time in minutes betweenb and B (figure 45.1).
From the previous equation, one can also deter-mine the specific mean growth rate constant (k) forany culture during unrestricted growth. During thistime, the rate of increase of cells is proportional to the
272 Environmental Factors Affecting Growth of Microorganisms
0.7
0.6
0.5
0.4
0.3
0.2
0.1
0
Time in minutes
0 30 60 90 120 150 180
B
b
Generation time
Cell doubling
Log
of b
acte
rial
num
bers
/ml
Abs
orba
nce
@ 5
50–6
00nm
Figure 45.1 Indirect Method of Determining GenerationTime.
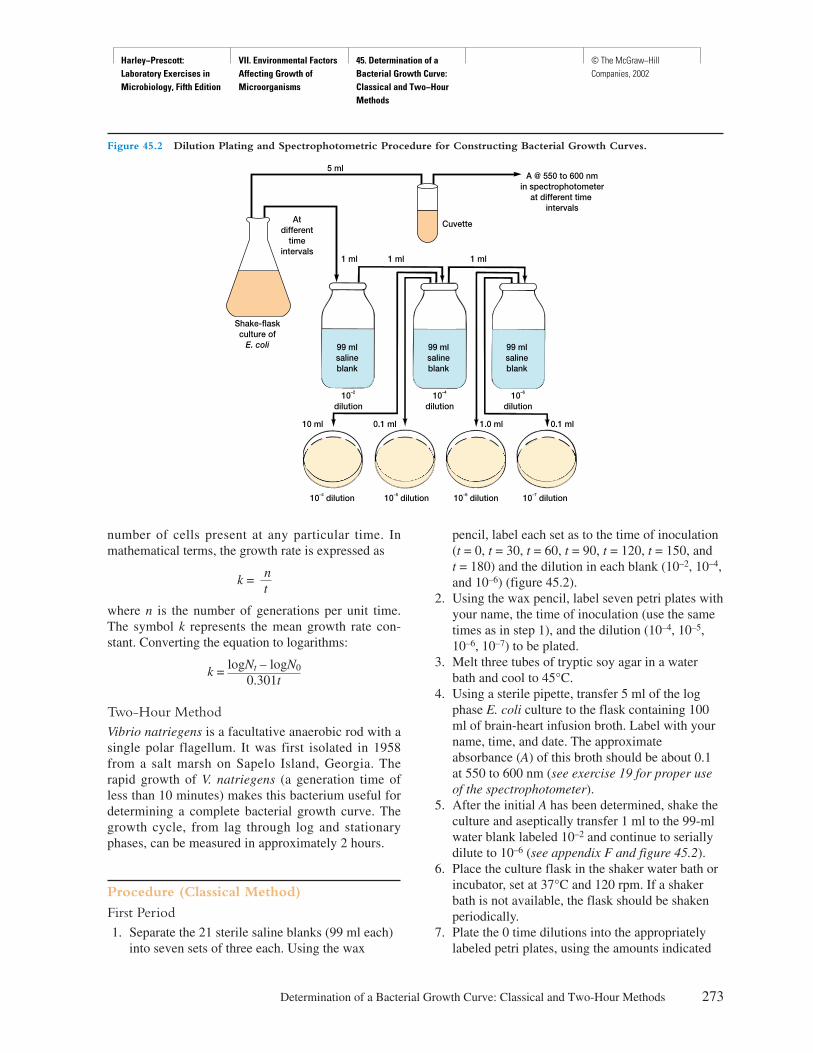
Harley−Prescott: Laboratory Exercises in Microbiology, Fifth Edition
VII. Environmental Factors Affecting Growth of Microorganisms
45. Determination of a Bacterial Growth Curve: Classical and Two−Hour Methods
© The McGraw−Hill Companies, 2002
number of cells present at any particular time. Inmathematical terms, the growth rate is expressed as
k = nt
where n is the number of generations per unit time.The symbol k represents the mean growth rate con-stant. Converting the equation to logarithms:
k = logNt – logN0
0.301t
Two-Hour MethodVibrio natriegens is a facultative anaerobic rod with asingle polar flagellum. It was first isolated in 1958from a salt marsh on Sapelo Island, Georgia. Therapid growth of V. natriegens (a generation time ofless than 10 minutes) makes this bacterium useful fordetermining a complete bacterial growth curve. Thegrowth cycle, from lag through log and stationaryphases, can be measured in approximately 2 hours.
Procedure (Classical Method)
First Period1. Separate the 21 sterile saline blanks (99 ml each)
into seven sets of three each. Using the wax
pencil, label each set as to the time of inoculation(t = 0, t = 30, t = 60, t = 90, t = 120, t = 150, andt = 180) and the dilution in each blank (10–2, 10–4,and 10–6) (figure 45.2).
2. Using the wax pencil, label seven petri plates withyour name, the time of inoculation (use the sametimes as in step 1), and the dilution (10–4, 10–5,10–6, 10–7) to be plated.
3. Melt three tubes of tryptic soy agar in a waterbath and cool to 45°C.
4. Using a sterile pipette, transfer 5 ml of the logphase E. coli culture to the flask containing 100ml of brain-heart infusion broth. Label with yourname, time, and date. The approximateabsorbance (A) of this broth should be about 0.1at 550 to 600 nm (see exercise 19 for proper useof the spectrophotometer).
5. After the initial A has been determined, shake theculture and aseptically transfer 1 ml to the 99-mlwater blank labeled 10–2 and continue to seriallydilute to 10–6 (see appendix F and figure 45.2).
6. Place the culture flask in the shaker water bath orincubator, set at 37°C and 120 rpm. If a shakerbath is not available, the flask should be shakenperiodically.
7. Plate the 0 time dilutions into the appropriatelylabeled petri plates, using the amounts indicated
Determination of a Bacterial Growth Curve: Classical and Two-Hour Methods 273
5 ml
Cuvette
1 ml 1 ml 1 ml
A @ 550 to 600 nmin spectrophotometer
at different time intervals
Atdifferent
timeintervals
Shake-flaskculture of
E. coli 99 mlsalineblank
10–2
dilution
10–4 dilution 10–5 dilution 10–6 dilution 10–7 dilution
99 mlsalineblank
10–4
dilution
99 mlsalineblank
10–6
dilution
10 ml 1.0 ml0.1 ml 0.1 ml
Figure 45.2 Dilution Plating and Spectrophotometric Procedure for Constructing Bacterial Growth Curves.
Harley−Prescott: Laboratory Exercises in Microbiology, Fifth Edition
VII. Environmental Factors Affecting Growth of Microorganisms
45. Determination of a Bacterial Growth Curve: Classical and Two−Hour Methods
© The McGraw−Hill Companies, 2002
in figure 45.2. Pour 15 ml of the melted agar intoeach plate and mix by gentle rotation on a flatsurface.
8. Thereafter, at 30-minute intervals, transfer 5 ml ofthe broth culture to a cuvette and determine the Aof the culture at 550 to 600 nm. Be sure tosuspend the bacteria thoroughly each time beforetaking a sample.
9. At the same time interval, transfer 1 ml of theculture into the 10–2 water blank of the set labeledwith the appropriate time (see step 1). Completethe serial dilution once again as indicated infigure 45.2 and plate into the labeled (see step 2)petri plates. Add melted agar as per step 7.
10. When the media in the petri plates hardens,incubate them in an inverted position for 24 hoursat 35°C.
Second Period1. Perform colony counts on all plates as described
in exercise 19.2. Record all measurements and corresponding
bacterial counts in the table in the report forexercise 45.
3. On the paper provided, plot the following:a. Log absorbances on the ordinate, and
incubation times on the abscissa. Use figure45.1 as an example.
b. Log10 values of the bacterial counts on theordinate, and incubation times on theabscissa. Connect the points with a ruler.
c. Also construct a graph of the data usingsemilog graph paper. Calculate generationtime and mean growth rate constant. Employboth the graphical method and growthequations.
Procedure (Two-Hour Method)
1. Zero the spectrophotometer at 550 to 600 nm withthe V. natriegens medium from the flask.
2. Place the flask containing the brain-heart infusionmedium in the 37°C water bath or incubator for15 minutes.
3. While slowly agitating the flask in the water bath,inoculate it with 10 ml of 6-hour V. natriegensculture.
4. Read and record the %T of this initial culture (0time) and every 10 minutes thereafter for about2 hours. Be sure to suspend the bacteriathoroughly each time before taking a sample.Use appendix B to accurately convert %T(transmittance) to A (absorbancy). If yourspectrophotometer has a digital readout,measure the absorbance directly rather thancalculating it from the %T.
5. Construct a growth curve by plotting A againsttime on semilog graph paper. Calculate the meangeneration time and growth rate constant usingboth equations and the graphical method.
274 Environmental Factors Affecting Growth of Microorganisms
HINTS AND PRECAUTIONS(1) Be sure to maintain good aseptic technique whenmaking transfers and report any spills to your instructor.Carefully clean and decontaminate your work area atthe end of the experiment. (2) The bacterial growthcurve study can be very easily run using Nephlo cultureflasks. These flasks have side arms that fit into the spec-trophotometer’s cuvette compartment so that growthcan be followed without removing samples.
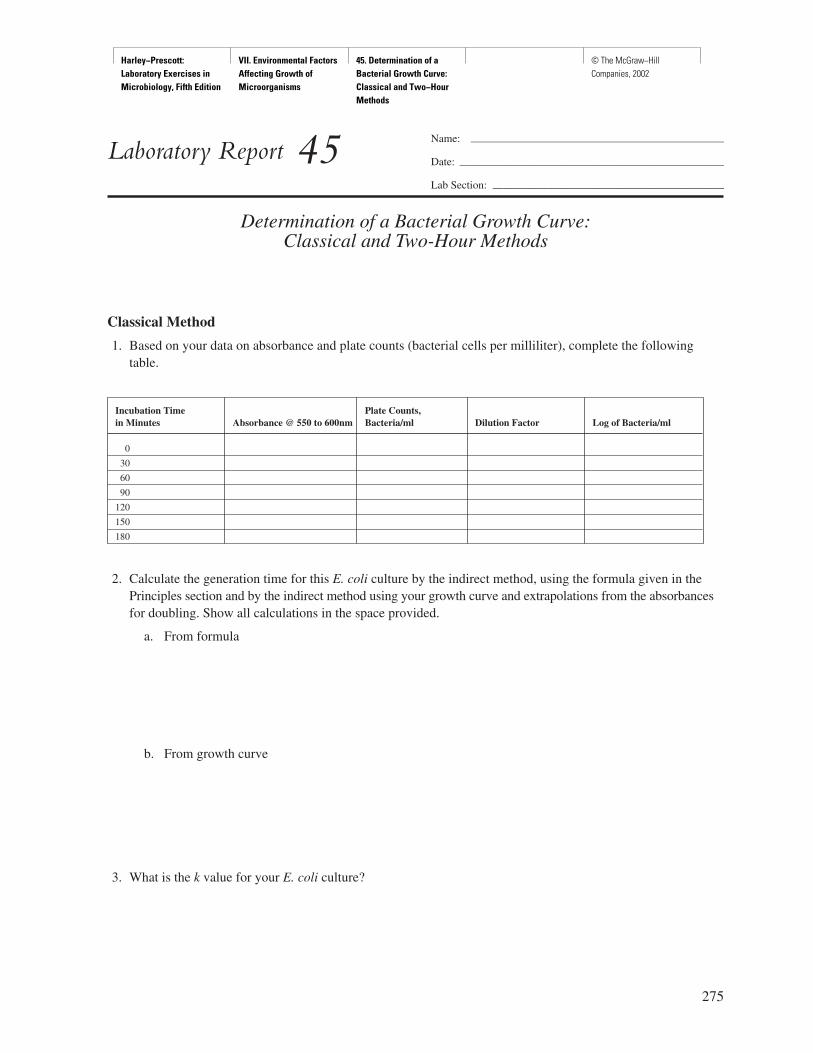
Harley−Prescott: Laboratory Exercises in Microbiology, Fifth Edition
VII. Environmental Factors Affecting Growth of Microorganisms
45. Determination of a Bacterial Growth Curve: Classical and Two−Hour Methods
© The McGraw−Hill Companies, 2002
275
Name: ———————————————————————
Date: ————————————————————————
Lab Section: —————————————————————
Laboratory Report 45
Determination of a Bacterial Growth Curve:Classical and Two-Hour Methods
Classical Method
1. Based on your data on absorbance and plate counts (bacterial cells per milliliter), complete the followingtable.
Incubation Time Plate Counts,in Minutes Absorbance @ 550 to 600nm Bacteria/ml Dilution Factor Log of Bacteria/ml
0
30
60
90
120
150
180
2. Calculate the generation time for this E. coli culture by the indirect method, using the formula given in thePrinciples section and by the indirect method using your growth curve and extrapolations from the absorbancesfor doubling. Show all calculations in the space provided.
a. From formula
b. From growth curve
3. What is the k value for your E. coli culture?

Harley−Prescott: Laboratory Exercises in Microbiology, Fifth Edition
VII. Environmental Factors Affecting Growth of Microorganisms
45. Determination of a Bacterial Growth Curve: Classical and Two−Hour Methods
© The McGraw−Hill Companies, 2002
Two-Hour Method
1. Based on your data on absorbance, complete the following table.
Incubation Timein Minutes %T A
0 _________ _________
20 _________ _________
40 _________ _________
60 _________ _________
80 _________ _________
100 _________ _________
120 _________ _________
276 Environmental Factors Affecting Growth of Microorganisms

Harley−Prescott: Laboratory Exercises in Microbiology, Fifth Edition
VII. Environmental Factors Affecting Growth of Microorganisms
45. Determination of a Bacterial Growth Curve: Classical and Two−Hour Methods
© The McGraw−Hill Companies, 2002
Review Questions
1. Define generation time.
2. When following bacterial growth, why is absorbance plotted instead of percent transmission?
3. Can generation time be calculated from any phase of the growth curve? Explain your answer.
4. What is occurring in a bacterial culture during the lag phase? During the growth phase?
5. What is the significance of a k value?
6. What is meant by the turbidity of a culture?
7. How can the mean generation time be determined for a bacterial culture?
Determination of a Bacterial Growth Curve: Classical and Two-Hour Methods 277
Harley−Prescott: Laboratory Exercises in Microbiology, Fifth Edition
VII. Environmental Factors Affecting Growth of Microorganisms
45. Determination of a Bacterial Growth Curve: Classical and Two−Hour Methods
© The McGraw−Hill Companies, 2002
278 Environmental Factors Affecting Growth of Microorganisms
Harley−Prescott: Laboratory Exercises in Microbiology, Fifth Edition
VII. Environmental Factors Affecting Growth of Microorganisms
45. Determination of a Bacterial Growth Curve: Classical and Two−Hour Methods
© The McGraw−Hill Companies, 2002
Determination of a Bacterial Growth Curve: Classical and Two-Hour Methods 279

Harley−Prescott: Laboratory Exercises in Microbiology, Fifth Edition
VII. Environmental Factors Affecting Growth of Microorganisms
45. Determination of a Bacterial Growth Curve: Classical and Two−Hour Methods
© The McGraw−Hill Companies, 2002

Harley−Prescott: Laboratory Exercises in Microbiology, Fifth Edition
VII. Environmental Factors Affecting Growth of Microorganisms
45. Determination of a Bacterial Growth Curve: Classical and Two−Hour Methods
© The McGraw−Hill Companies, 2002
Harley−Prescott: Laboratory Exercises in Microbiology, Fifth Edition
VIII. Environmental and Food Microbiology
Introduction © The McGraw−Hill Companies, 2002
283283
P A R T E I G H TEnvironmental and Food Microbiology
Like a bridge over troubled waterI will lay me down.
(Paul Simon, songwriter and singer, 1942– )
This part of the manual contains exercises dealing withenvironmental and food microbiology.The quality of potable (drinking) water available for
public use is of major concern to everyone. Municipal andrural water supplies can transmit human diseases such ascholera, typhoid fever, shigellosis, salmonellosis, and gas-troenteritis. It is generally time consuming and difficult to di-rectly isolate and identify the relevant human pathogens be-cause of their low numbers. Therefore, the amount of fecalcontamination is monitored by counting the number of non-pathogenic, or indicator, bacteria, almost completely fecal inorigin, present in human sewage in large numbers, and thatsurvive in water long enough to be satisfactorily counted. Thebacterium that satisfies these criteria best is Escherichia coli. It is amember of the coliform group of bacteria. Even though allcoliforms do not come from human feces, the total coliformcount is used as an index of sewage pollution. Coliform bac-teria are counted during water quality monitoring in fourways: (1) The most probable number (MPN) of col-iforms is determined by the use of lactose or lauryl tryptosebroth fermentation tubes. (2) The presence-absence test(P-A) for coliforms and fecal coliforms is a modification of
the MPN procedure in which a large water sample (100 ml)is incubated in a single culture bottle. (3) The membranefilter technique (MF) employs a membrane filter. Use ofthe proper culture medium to grow the bacteria trapped onthe filter allows the rapid detection of total coliforms, fecalcoliforms, or fecal streptococci by the appearance of theircharacteristic colonies. (4) To test for both coliforms and E.coli, the related KONFIRM Test can be used. All four ofthese procedures follow the American Public Health Associ-ation’s recommendations in its Standard Methods for the Exam-ination of Water and Wastewater (19th ed) and are the basis forthe first two exercises in this part of the lab manual.
Viruses are extremely small infective agents. A completevirus particle, or virion, has a much simpler structure than acell. It essentially consists of a block of genetic material(DNA or RNA) surrounded by a proteinaceous coat thatprotects it from the environment and aids in its transmissionfrom host to host. The protein coat of a virus is called thecapsid. Capsids normally have one of three shapes: (1) icosa-hedral (as in the poliovirus and adenovirus); (2) helical (as inthe tobacco mosaic virus); or (3) complex (as in the vacciniavirus). An excellent example of a complex virus is the bacte-riophage, or phage, a virus that reproduces within bacterialcells and destroys them in the process. It is called complexbecause additional structures are attached to the portion ofthe capsid that surrounds its nucleic acid. In the third exercisethis part of the manual, we will work with bacteriophages
Louis Pasteur (1822–1895)
Louis Pasteur was the developer of pasteurization.
In 1866, the first edition of Studies on Wine was published.Pasteur showed that sour wines were caused by contaminationof the wine yeast with acid-producing organisms. He alsoshowed that other contaminating organisms were responsiblefor undesirable secondary fermentations, producing tastelesswines. Having shown that wine was the result of the action ofthe right yeast and proper method of maturation, Pasteurpointed out that the application of heat was a practical methodfor killing undesirable ferments. He stated:
One should not confuse . . . the slow heating of wine,which is used only to help oxygen change the color ofwine, with my process of heating which aims essentiallyat destroying parasites.
Harley−Prescott: Laboratory Exercises in Microbiology, Fifth Edition
VIII. Environmental and Food Microbiology
Introduction © The McGraw−Hill Companies, 2002
that reproduce within the common bacterium, Escherichia coli.One of the most thoroughly studied of these phages is the T4bacteriophage. Its capsid consists of a head containing thedouble-stranded DNA genome and a complex tail. The virusattaches to its host cell by the base plate on its tail. The sheaththen contracts and injects the viral DNA into the host cell.
Soils are complex environments in which microorgan-isms play a major role. For example, the soil microbial com-munity is a source of nutrients, contributing to nutrient cy-cling and decomposition. Complex microbial interactionswith other microorganisms, macroorganisms, and nutrientsinfluence degradation processes. These organisms interactwith each other and with plants in the formation and mainte-nance of soils. Unfortunately, most microorganisms in soilshave not been cultured and studied. Nevertheless, life onearth could not be sustained in the absence of the soil micro-biota and their many important interactions. This section ofthe manual contains one exercise that is intended to acquaintstudents with the characteristics and activities of soil microor-ganisms and to familiarize the student with the quantificationof soil microbiota.
Most of the foods we consume contain microorganisms.In many instances, these microorganisms have been intro-duced into the food from the environment or during foodpreparation. In some cases, specific microorganisms are pur-posely added to a food product as part of the productionprocess (e.g., cheese, pickles, buttermilk, sauerkraut, yogurt,and sausage). Once in the food product and when a suit-able temperature exists, the microorganisms will use thefood product as an energy source, metabolizing it, and ex-creting waste products. Some of these waste products maymake the food product unpalatable, and, as a result, thefood source is said to be spoiled. At other times, the wasteproducts from the microorganisms may cause food poi-sonings or food intoxications in the consumer. In yetother instances, the waste products of the microorganismsmay be desirable (this is called “beneficial spoilage”) sincetheir products aid in the production of a specific food orfood product (e.g., cheese, yogurt). Finally, there are mi-croorganisms whose presence indicates the sanitary qualityof the food product. These indicator microorganismsare primarily bacteria. The exercise included in this part ofthe manual is intended to introduce some of the microor-ganisms involved in food spoilage, food poisonings, foodproduction, and the sanitary analysis of food products. Themethods for the latter can be found in the Compendium ofMethods for the Microbiological Examination of Foods, prepared
by the American Public Health Association, 1015 FifteenthSt., NW, Washington, DC 20005.
When suitable temperatures exist, milk provides an ex-cellent medium for the growth of many bacteria that causediseases such as salmonellosis (Salmonella spp.), brucellosis(Brucella spp.), listeriosis (Listeria spp.), and tuberculosis (My-cobacterium). Although these diseases are still transmitted bycontaminated milk (and milk products), their incidence hasbeen greatly reduced since the introduction of pasteuriza-tion. Pasteurization of milk is designed to expose the milk toa high enough temperature for a long enough period to de-stroy all pathogens. In this process, the nutritional quality andtaste of milk is not altered. As a result, most disease outbreakstoday are the result of consuming raw, or unpasteurized,milk. It is also vital that milk be routinely subjected to bacte-rial counts in order to prevent any disease outbreaks. If thebacterial population of milk is high, this may indicate that themilk has been improperly collected, handled, or stored or thatthe dairy cows from which the milk was obtained were dis-eased. The dairy industry (just as is done for water) uses col-iform and total bacterial counts as indicators of the sanitary qual-ity of milk. Various methods are used in the analysis of milk anddairy products. These methods can be found in Standard Methodsfor the Examination of Dairy Products, published by the AmericanPublic Health Association, 1015 Fifteenth St., NW, Washing-ton, DC 20005. The last exercise in this part of the manualdemonstrates several of these methods.
After completing the exercises in Part Eight, youwill, at the minimum, be able to demonstrate an in-creased level in analysis skills, including: (a) collectingand organizing data in a systematic fashion; (b) pre-senting data in an appropriate form (graphs, tables,figures, or descriptive paragraphs); (c) obtaining mi-crobial samples; (d) assessing the validity of the data(integrity and significance); and (e) drawing appropri-ate conclusions based on the results. This will meet theAmerican Society for Microbiology Core CurriculumLaboratory Thinking Skills number 2. Laboratory skillsnumbers 3, 4, and 5 will also be improved. These in-clude: (a) using biochemical test media and accuratelyrecording macroscopic observations; (b) performingaseptic transfers; (c) isolating colonies and/or plaques;(d) correctly spreading appropriate dilutions; (e) esti-mating the number of microorganisms in a sample,using serial dilution techniques; and (f) extrapolatingplate counts to obtain correct CCU or PAU in thestarting sample (see pp. vi–viii).
284 Environmental and Food Microbiology
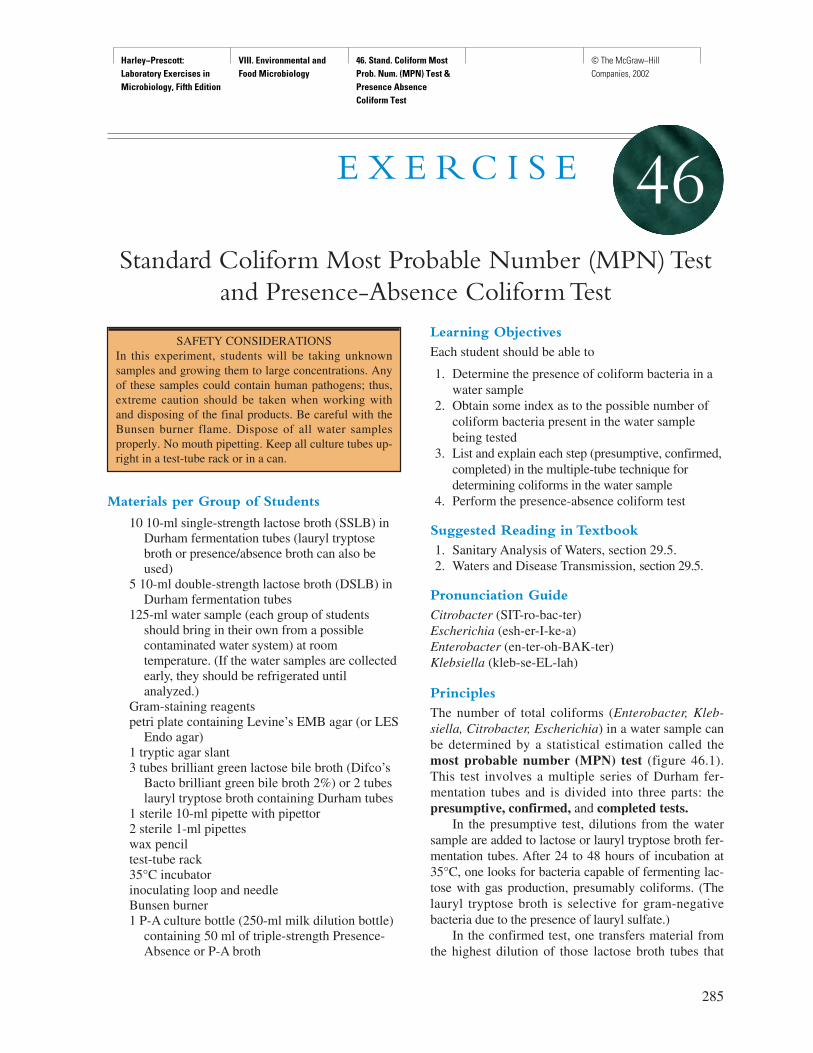
Harley−Prescott: Laboratory Exercises in Microbiology, Fifth Edition
VIII. Environmental and Food Microbiology
46. Stand. Coliform Most Prob. Num. (MPN) Test & Presence Absence Coliform Test
© The McGraw−Hill Companies, 2002
Materials per Group of Students
10 10-ml single-strength lactose broth (SSLB) inDurham fermentation tubes (lauryl tryptosebroth or presence/absence broth can also beused)
5 10-ml double-strength lactose broth (DSLB) inDurham fermentation tubes
125-ml water sample (each group of studentsshould bring in their own from a possiblecontaminated water system) at roomtemperature. (If the water samples are collectedearly, they should be refrigerated untilanalyzed.)
Gram-staining reagentspetri plate containing Levine’s EMB agar (or LES
Endo agar)1 tryptic agar slant3 tubes brilliant green lactose bile broth (Difco’s
Bacto brilliant green bile broth 2%) or 2 tubeslauryl tryptose broth containing Durham tubes
1 sterile 10-ml pipette with pipettor2 sterile 1-ml pipetteswax penciltest-tube rack35°C incubatorinoculating loop and needleBunsen burner1 P-A culture bottle (250-ml milk dilution bottle)
containing 50 ml of triple-strength Presence-Absence or P-A broth
Learning ObjectivesEach student should be able to
1. Determine the presence of coliform bacteria in awater sample
2. Obtain some index as to the possible number ofcoliform bacteria present in the water samplebeing tested
3. List and explain each step (presumptive, confirmed,completed) in the multiple-tube technique fordetermining coliforms in the water sample
4. Perform the presence-absence coliform test
Suggested Reading in Textbook1. Sanitary Analysis of Waters, section 29.5.2. Waters and Disease Transmission, section 29.5.
Pronunciation GuideCitrobacter (SIT-ro-bac-ter)Escherichia (esh-er-I-ke-a)Enterobacter (en-ter-oh-BAK-ter)Klebsiella (kleb-se-EL-lah)
PrinciplesThe number of total coliforms (Enterobacter, Kleb-siella, Citrobacter, Escherichia) in a water sample canbe determined by a statistical estimation called themost probable number (MPN) test (figure 46.1).This test involves a multiple series of Durham fer-mentation tubes and is divided into three parts: thepresumptive, confirmed, and completed tests.
In the presumptive test, dilutions from the watersample are added to lactose or lauryl tryptose broth fer-mentation tubes. After 24 to 48 hours of incubation at35°C, one looks for bacteria capable of fermenting lac-tose with gas production, presumably coliforms. (Thelauryl tryptose broth is selective for gram-negativebacteria due to the presence of lauryl sulfate.)
In the confirmed test, one transfers material fromthe highest dilution of those lactose broth tubes that
285
E X E R C I S E
Standard Coliform Most Probable Number (MPN) Testand Presence-Absence Coliform Test
46
SAFETY CONSIDERATIONS In this experiment, students will be taking unknownsamples and growing them to large concentrations. Anyof these samples could contain human pathogens; thus,extreme caution should be taken when working withand disposing of the final products. Be careful with theBunsen burner flame. Dispose of all water samplesproperly. No mouth pipetting. Keep all culture tubes up-right in a test-tube rack or in a can.
Harley−Prescott: Laboratory Exercises in Microbiology, Fifth Edition
VIII. Environmental and Food Microbiology
46. Stand. Coliform Most Prob. Num. (MPN) Test & Presence Absence Coliform Test
© The McGraw−Hill Companies, 2002
286 Environmental and Food Microbiology
Inoculate 15 tubes: 5 with 10 ml of sample, 5 with 1.0 ml of sample, and 5 with 0.1 ml of sample.
Watersample
Single-strength brothDouble-strength broth
10 10 10 10 10 1.0 1.0 1.0 1.0 1.0
(ml)
0.1
(ml)
0.1 0.1 0.1 0.1
24 +– 2 hours35°C
Negative Positive
Negative
—
Positive
(ml)
Pre
sum
ptiv
eC
onfir
med
Lactose or lauryl tryptose broth
Negative presumptive.The absence of gas inbroth tubes indicatescoliforms are absent.Incubate an additional24 hours to be sure.
After 24 hours ofincubation, the tubes oflactose broth are examinedfor gas production.
No gas produced.Negative test.Coliform group absent.
Positive test: gas productionuse positive confirmedtubes to determine MPN.
All positive presumptivecultures used to inoculatetubes of brilliant green lactosebile broth. Incubation for 48 +– 3hours at 35°C.
Plates of Levine's EMB or LES Endoagar are streaked from positive tubes and incubated at 35°Cfor 18–24 hours.
After 24 hours of incubation make aGram-stained slide from the slant.If the bacteria are gram-negative,nonsporing rods and produce gas fromlactose, the completed test is positive.
Nutrientagar slant
Use coliform coloniesto inoculate nutrientagar slant and abroth tube.
Com
plet
ed
Brilliantgreen
lactosebile broth
or lauryltryptose
broth
Figure 46.1 The Most Probable Number (MPN) Procedure for Water Examination for the Presence of Coliforms by thePresumptive, Confirmed, and Completed Tests.

Harley−Prescott: Laboratory Exercises in Microbiology, Fifth Edition
VIII. Environmental and Food Microbiology
46. Stand. Coliform Most Prob. Num. (MPN) Test & Presence Absence Coliform Test
© The McGraw−Hill Companies, 2002
showed growth and gas production into brilliant greenlactose bile broth, which is selective and differentialfor coliforms. The tube is incubated for 48 ± 3 hoursat 35°C. Gas formation in the Durham tube is a con-firmed test for total coliforms.
In the completed test, a sample from the positivegreen lactose bile broth is streaked onto Levine’sEMB or LES Endo agar and incubated for 18 to 24hours at 35°C. On EMB agar, coliforms produce smallcolonies with dark centers. On LES Endo agar, co-liforms produce reddish colonies. Samples are theninoculated into brilliant green lactose bile broth andonto a nutrient agar slant. These tubes are incubatedfor 24 hours at 35°C. If gas is produced in the lactosebroth (see figure 20.2), and the isolated bacterium is agram-negative (based on a Gram stain) nonsporingrod, the completed test is positive.
An estimate of the number of coliforms (mostprobable number) can also be done in the presumptivetest. In this procedure, 15 lactose broth tubes are inoc-ulated with the water sample. Five tubes receive 10 mlof water, 5 tubes receive 1 ml of water, and 5 tubes re-ceive 0.1 ml of water. A count of the number of tubesshowing gas production is then made, and the figure is
compared to a table (table 46.1) developed by theAmerican Public Health Association. The number isthe most probable number (MPN) of coliforms per 100ml of the water sample. (It should be noted that theMPN index usually comes from the presumptive test ifraw sewage is being tested and comes from confirmedor completed tests for other types of samples.)
More recently, a simple and very sensitive alter-native to the classical MPN procedure has been devel-oped: the presence-absence (P-A) coliform test. TheP-A test is a modification of the MPN procedure inwhich a large water sample (100 ml) is incubated in asingle culture bottle with triple-strength broth contain-ing lactose, sodium lauryl sulfate, and bromcresolpurple indicator. The P-A test is based on the assump-tion that no coliforms should be present in 100 ml ofdrinking water. Sodium lauryl sulfate inhibits manybacteria, but not coliforms. A positive test results inthe production of acid from lactose fermentation(bromcresol purple changes from purple to yellow)and constitutes a positive presumptive test. As withthe MPN test, it requires confirmation. If there is nocolor change, the results are negative for coliforms inthe 100-ml water sample.
Standard Coliform Most Probable Number (MPN) Test and Presence-Absence Coliform Test 287
Table 46.1 Most Probable Number (MPN) Index for Various Combinations of Positive and Negative Results WhenFive 10-ml Portions, Five 1-ml Portions, and Five 0.1-ml Portions Are Used
No. of Tubes Giving Positive Reactions Out of No. of Tubes Giving Positive Reaction Out of
5 of 10 ml 5 of 1 ml 5 of 0.1 ml MPN Index per 5 of 10 ml 5 of 1 ml 5 of 0.1 ml MPN IndexEach Each Each 100 ml Each Each Each per 100 ml
0 0 0 <2 4 2 1 260 0 1 2 4 3 0 270 1 0 2 4 3 1 330 2 0 4 4 4 0 341 0 0 2 5 0 0 231 0 1 4 5 0 1 311 1 0 4 5 0 2 431 1 1 6 5 1 0 331 2 0 6 5 1 1 462 0 0 5 5 1 2 632 0 1 7 5 2 0 492 1 0 7 5 2 1 702 1 1 9 5 2 2 942 2 0 9 5 3 0 792 3 0 12 5 3 1 1103 0 0 8 5 3 2 1403 0 1 11 5 3 3 1803 1 0 11 5 4 0 1303 1 1 14 5 4 1 1703 2 0 14 5 4 2 2203 2 1 17 5 4 3 2803 3 0 17 5 4 4 3504 0 0 13 5 5 0 2404 0 1 17 5 5 1 3504 1 0 17 5 5 2 5404 1 1 21 5 5 3 9204 1 2 26 5 5 4 1,6004 2 0 22 5 5 5 ≥2,400
Harley−Prescott: Laboratory Exercises in Microbiology, Fifth Edition
VIII. Environmental and Food Microbiology
46. Stand. Coliform Most Prob. Num. (MPN) Test & Presence Absence Coliform Test
© The McGraw−Hill Companies, 2002
Procedure for the MPN Test
First PeriodPresumptive Test
1. Mix the bottle of water to be tested 25 times.Inoculate five of the double-strength lactose (orlauryl tryptose) broth tubes with 10 ml of thewater sample; five single-strength tubes with 1 mlof the water sample; and five single-strengthtubes with 0.1 ml of the water sample. Carefullymix the contents of each tube without spilling anyof the broth by rolling the tubes between thepalms of your hands. Using the wax pencil, labelall tubes with your name, date, and the amount ofwater added.
2. Incubate the three sets of tubes for 24 to 48 hoursat 35°C.
3. Observe after 24 ±2 and 48 ±3 hours. Thepresence of gas in any tube after 24 hours is apositive presumptive test. The formation of gasduring the next 24 hours is a doubtful test. Theabsence of gas after 48 hours is a negative test.
4. Determine the number of coliforms per 100 ml ofwater sample (see Principles section and use table46.1). For example, if gas was present in all fiveof the 10-ml tubes, only in one of the 1-ml series,and none in the 0.1-ml series, your test resultswould read 5–1–0. Table 46.1 indicates that theMPN for this reading would be 33 coliforms per100 ml of water sample.
Second PeriodConfirmed Test
1. Record your results of the presumptive test in thereport for exercise 46.
2. Using an inoculating loop, from the tube that hasthe highest dilution of water sample and showsgas production transfer one loopful of culture tothe brilliant-green lactose bile broth tube.Incubate for 48 ± 3 hours at 35°C. The formationof gas at any time within 48 hours constitutes apositive confirmed test.
Third PeriodCompleted Test
1. Record your results of the confirmed test in thereport for exercise 46.
2. From the positive brilliant green lactose bile brothtube, streak a LES Endo or Levine’s EMB plate.
3. Incubate the plate inverted for 24 hours at 35°C.4. If coliforms are present, select a well-isolated
colony and inoculate a single-strength, brilliant
green lactose bile broth tube and streak a nutrientagar slant.
5. Gram stain any bacteria found on the slant.6. The formation of gas in the lactose broth and the
demonstration of gram-negative, nonsporing rodsin the agar culture is a satisfactorily completedtest revealing the presence of coliforms andindicating that the water sample was polluted.This is a positive completed test.
Procedure for the P-A Coliform Test
First Period1. Inoculate 100 ml of the water sample into a 250-
ml P-A culture bottle containing 50 ml of triple-strength P-A broth. Mix thoroughly by invertingthe bottle five times to achieve even distribution ofthe triple-strength medium throughout the sample.
2. Incubate at 35°C.
Second Period1. Inspect the P-A culture bottle after 24 and 48
hours for acid production. A distinct yellow colorforms in the medium when acid conditions existfollowing lactose fermentation. If gas also isbeing produced, gently shaking the bottle willresult in a foaming reaction.
2. With an inoculating loop, transfer any culture thatshows acid production or acid and gas (a positivepresumptive test) to a tube of brilliant greenlactose bile (BGLB) broth containing a Durhamtube for incubation at 35°C.
Third Period1. Turbidity in the BGLB broth and gas in the Durham
tube within 48 hours confirm the presence ofcoliform bacteria (e.g., Escherichia coli).
2. Record results as presence-absence test positiveor negative for coliforms in 100 ml of watersample in the report for exercise 46.
288 Environmental and Food Microbiology
HINTS AND PRECAUTIONS (1) Do not confuse the appearance of an air bubble in aclear Durham tube with actual gas production. If gas isformed as a result of fermentation, the broth mediumwill become cloudy. Active fermentation may be shownby the continued appearance of small bubbles of gasthroughout the medium outside the inner vial when thefermentation tube is gently shaken. (2) When takingyour water sample, the upper 38 cm of most waters usu-ally contains the greatest numbers of live bacteria. (3) Use sterile containers to collect water samples.
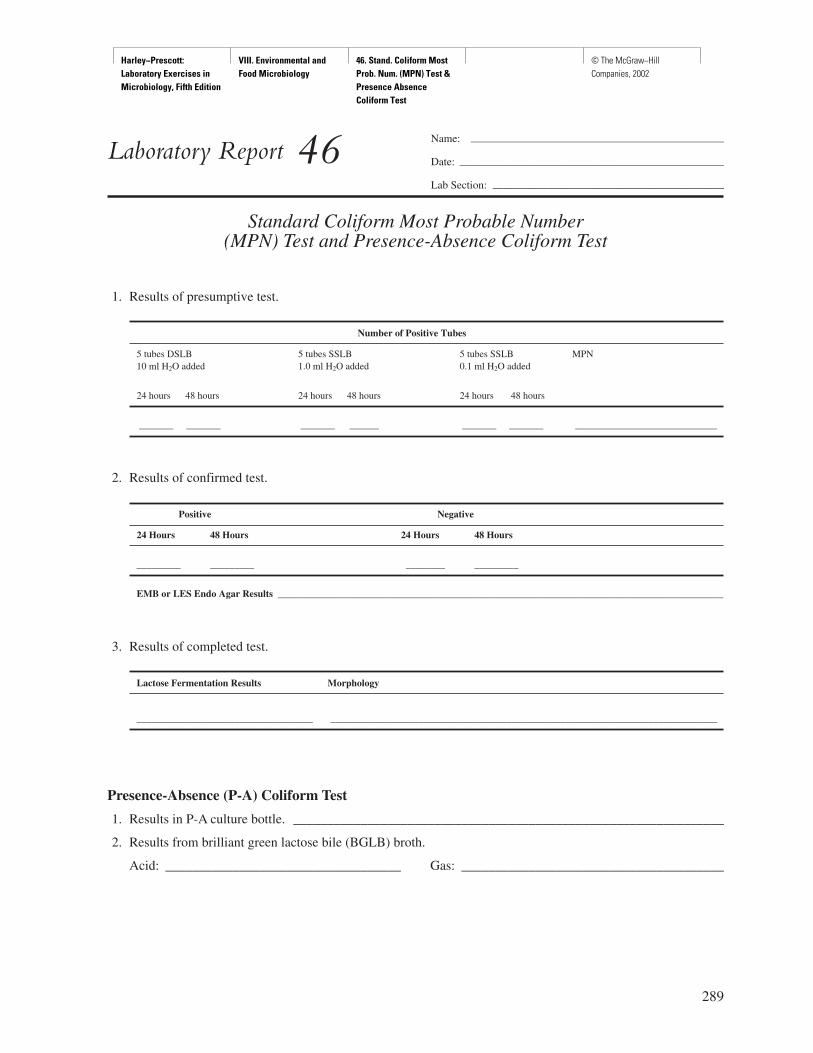
Harley−Prescott: Laboratory Exercises in Microbiology, Fifth Edition
VIII. Environmental and Food Microbiology
46. Stand. Coliform Most Prob. Num. (MPN) Test & Presence Absence Coliform Test
© The McGraw−Hill Companies, 2002
289
Name: ———————————————————————
Date: ————————————————————————
Lab Section: —————————————————————
Laboratory Report 46
Standard Coliform Most Probable Number(MPN) Test and Presence-Absence Coliform Test
1. Results of presumptive test.
Number of Positive Tubes
5 tubes DSLB 5 tubes SSLB 5 tubes SSLB MPN10 ml H2O added 1.0 ml H2O added 0.1 ml H2O added
24 hours 48 hours 24 hours 48 hours 24 hours 48 hours
_______ _______ _______ ______ _______ _______ _____________________________
2. Results of confirmed test.
Positive Negative
24 Hours 48 Hours 24 Hours 48 Hours
_________ _________ ________ _________
EMB or LES Endo Agar Results ___________________________________________________________________________________________
3. Results of completed test.
Lactose Fermentation Results Morphology
____________________________________ _______________________________________________________________________________
Presence-Absence (P-A) Coliform Test
1. Results in P-A culture bottle. ________________________________________________________________
2. Results from brilliant green lactose bile (BGLB) broth.
Acid: ___________________________________ Gas: _______________________________________
Harley−Prescott: Laboratory Exercises in Microbiology, Fifth Edition
VIII. Environmental and Food Microbiology
46. Stand. Coliform Most Prob. Num. (MPN) Test & Presence Absence Coliform Test
© The McGraw−Hill Companies, 2002
Review Questions
1. Why are coliforms selected as the indicator of water potability?
2. Does a positive presumptive test indicate that water is potable?
3. Why is the MPN test qualitative rather than quantitative?
4. What is the function of the following in the MPN test?
a. lactose broth
b. Levine’s EMB or LES Endo agar
c. nutrient agar slant
d. Gram stain
5. What does a metallic green sheen indicate on an EMB plate? Pink to dark red colonies with a metallic surfacesheen on LES Endo agar?
6. What bacterial diseases can be transmitted by polluted water?
7. What does a positive presence-absence test indicate? A negative presence-absence test?
290 Environmental and Food Microbiology
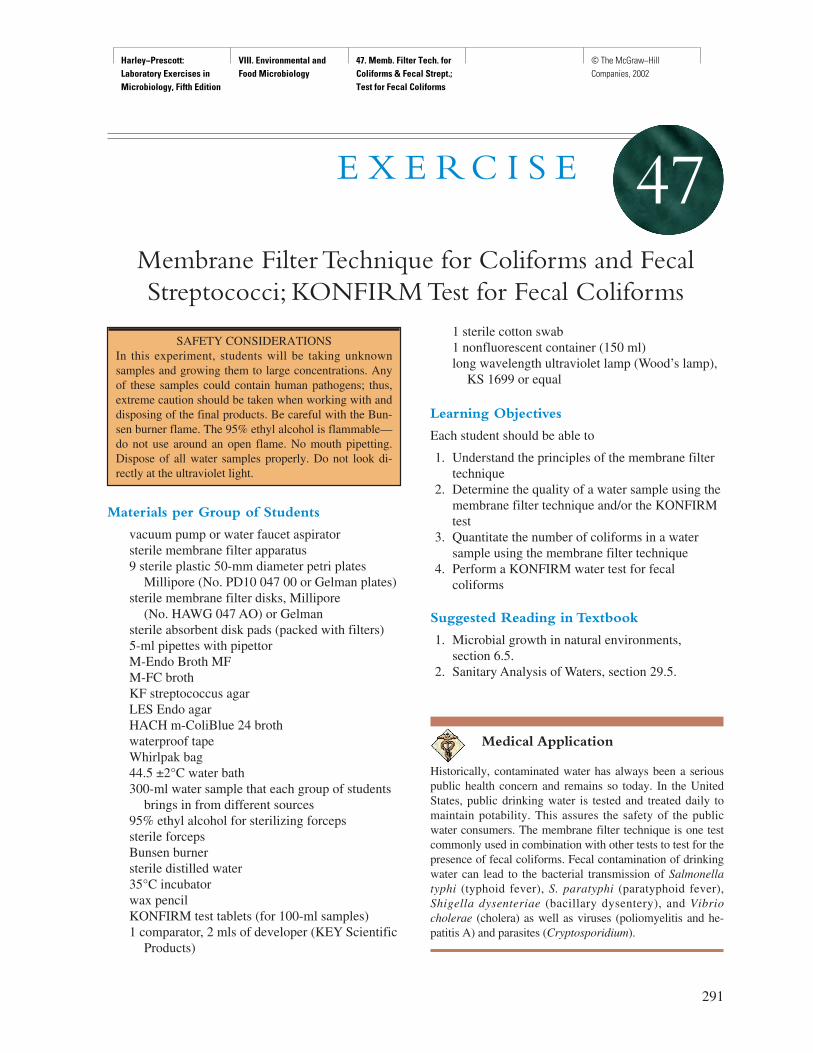
Harley−Prescott: Laboratory Exercises in Microbiology, Fifth Edition
VIII. Environmental and Food Microbiology
47. Memb. Filter Tech. for Coliforms & Fecal Strept.; Test for Fecal Coliforms
© The McGraw−Hill Companies, 2002
Materials per Group of Students
vacuum pump or water faucet aspiratorsterile membrane filter apparatus9 sterile plastic 50-mm diameter petri plates
Millipore (No. PD10 047 00 or Gelman plates)sterile membrane filter disks, Millipore
(No. HAWG 047 AO) or Gelmansterile absorbent disk pads (packed with filters)5-ml pipettes with pipettorM-Endo Broth MFM-FC brothKF streptococcus agarLES Endo agarHACH m-ColiBlue 24 brothwaterproof tapeWhirlpak bag44.5 ±2°C water bath300-ml water sample that each group of students
brings in from different sources95% ethyl alcohol for sterilizing forcepssterile forcepsBunsen burnersterile distilled water35°C incubatorwax pencilKONFIRM test tablets (for 100-ml samples)1 comparator, 2 mls of developer (KEY Scientific
Products)
1 sterile cotton swab1 nonfluorescent container (150 ml)long wavelength ultraviolet lamp (Wood’s lamp),
KS 1699 or equal
Learning Objectives
Each student should be able to
1. Understand the principles of the membrane filtertechnique
2. Determine the quality of a water sample using themembrane filter technique and/or the KONFIRMtest
3. Quantitate the number of coliforms in a watersample using the membrane filter technique
4. Perform a KONFIRM water test for fecalcoliforms
Suggested Reading in Textbook
1. Microbial growth in natural environments, section 6.5.
2. Sanitary Analysis of Waters, section 29.5.
Medical Application
Historically, contaminated water has always been a seriouspublic health concern and remains so today. In the UnitedStates, public drinking water is tested and treated daily tomaintain potability. This assures the safety of the publicwater consumers. The membrane filter technique is one testcommonly used in combination with other tests to test for thepresence of fecal coliforms. Fecal contamination of drinkingwater can lead to the bacterial transmission of Salmonellatyphi (typhoid fever), S. paratyphi (paratyphoid fever),Shigella dysenteriae (bacillary dysentery), and Vibriocholerae (cholera) as well as viruses (poliomyelitis and he-patitis A) and parasites (Cryptosporidium).
291
E X E R C I S E
Membrane Filter Technique for Coliforms and FecalStreptococci; KONFIRM Test for Fecal Coliforms
47
SAFETY CONSIDERATIONSIn this experiment, students will be taking unknownsamples and growing them to large concentrations. Anyof these samples could contain human pathogens; thus,extreme caution should be taken when working with anddisposing of the final products. Be careful with the Bun-sen burner flame. The 95% ethyl alcohol is flammable—do not use around an open flame. No mouth pipetting.Dispose of all water samples properly. Do not look di-rectly at the ultraviolet light.
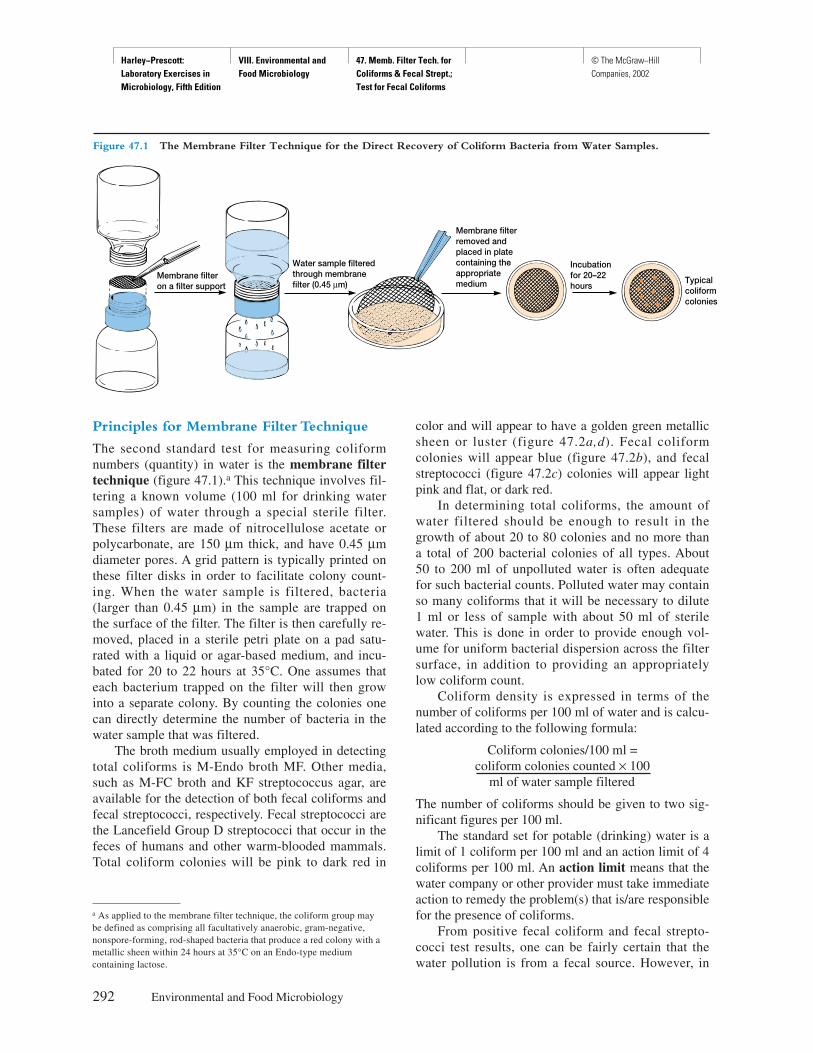
Harley−Prescott: Laboratory Exercises in Microbiology, Fifth Edition
VIII. Environmental and Food Microbiology
47. Memb. Filter Tech. for Coliforms & Fecal Strept.; Test for Fecal Coliforms
© The McGraw−Hill Companies, 2002
Principles for Membrane Filter Technique
The second standard test for measuring coliformnumbers (quantity) in water is the membrane filtertechnique (figure 47.1).a This technique involves fil-tering a known volume (100 ml for drinking watersamples) of water through a special sterile filter.These filters are made of nitrocellulose acetate orpolycarbonate, are 150 µm thick, and have 0.45 µmdiameter pores. A grid pattern is typically printed onthese filter disks in order to facilitate colony count-ing. When the water sample is filtered, bacteria(larger than 0.45 µm) in the sample are trapped onthe surface of the filter. The filter is then carefully re-moved, placed in a sterile petri plate on a pad satu-rated with a liquid or agar-based medium, and incu-bated for 20 to 22 hours at 35°C. One assumes thateach bacterium trapped on the filter will then growinto a separate colony. By counting the colonies onecan directly determine the number of bacteria in thewater sample that was filtered.
The broth medium usually employed in detectingtotal coliforms is M-Endo broth MF. Other media,such as M-FC broth and KF streptococcus agar, areavailable for the detection of both fecal coliforms andfecal streptococci, respectively. Fecal streptococci arethe Lancefield Group D streptococci that occur in thefeces of humans and other warm-blooded mammals.Total coliform colonies will be pink to dark red in
color and will appear to have a golden green metallicsheen or luster (figure 47.2a,d). Fecal coliformcolonies will appear blue (figure 47.2b), and fecalstreptococci (figure 47.2c) colonies will appear lightpink and flat, or dark red.
In determining total coliforms, the amount ofwater filtered should be enough to result in thegrowth of about 20 to 80 colonies and no more thana total of 200 bacterial colonies of all types. About50 to 200 ml of unpolluted water is often adequatefor such bacterial counts. Polluted water may containso many coliforms that it will be necessary to dilute1 ml or less of sample with about 50 ml of sterilewater. This is done in order to provide enough vol-ume for uniform bacterial dispersion across the filtersurface, in addition to providing an appropriatelylow coliform count.
Coliform density is expressed in terms of thenumber of coliforms per 100 ml of water and is calcu-lated according to the following formula:
Coliform colonies/100 ml =coliform colonies counted × 100
ml of water sample filtered
The number of coliforms should be given to two sig-nificant figures per 100 ml.
The standard set for potable (drinking) water is alimit of 1 coliform per 100 ml and an action limit of 4coliforms per 100 ml. An action limit means that thewater company or other provider must take immediateaction to remedy the problem(s) that is/are responsiblefor the presence of coliforms.
From positive fecal coliform and fecal strepto-cocci test results, one can be fairly certain that thewater pollution is from a fecal source. However, in
292 Environmental and Food Microbiology
a As applied to the membrane filter technique, the coliform group maybe defined as comprising all facultatively anaerobic, gram-negative,nonspore-forming, rod-shaped bacteria that produce a red colony with ametallic sheen within 24 hours at 35°C on an Endo-type mediumcontaining lactose.
Membrane filteron a filter support
Water sample filteredthrough membranefilter (0.45 µm)
Membrane filterremoved andplaced in platecontaining the appropriatemedium
Incubationfor 20–22hours
Typicalcoliformcolonies
Figure 47.1 The Membrane Filter Technique for the Direct Recovery of Coliform Bacteria from Water Samples.
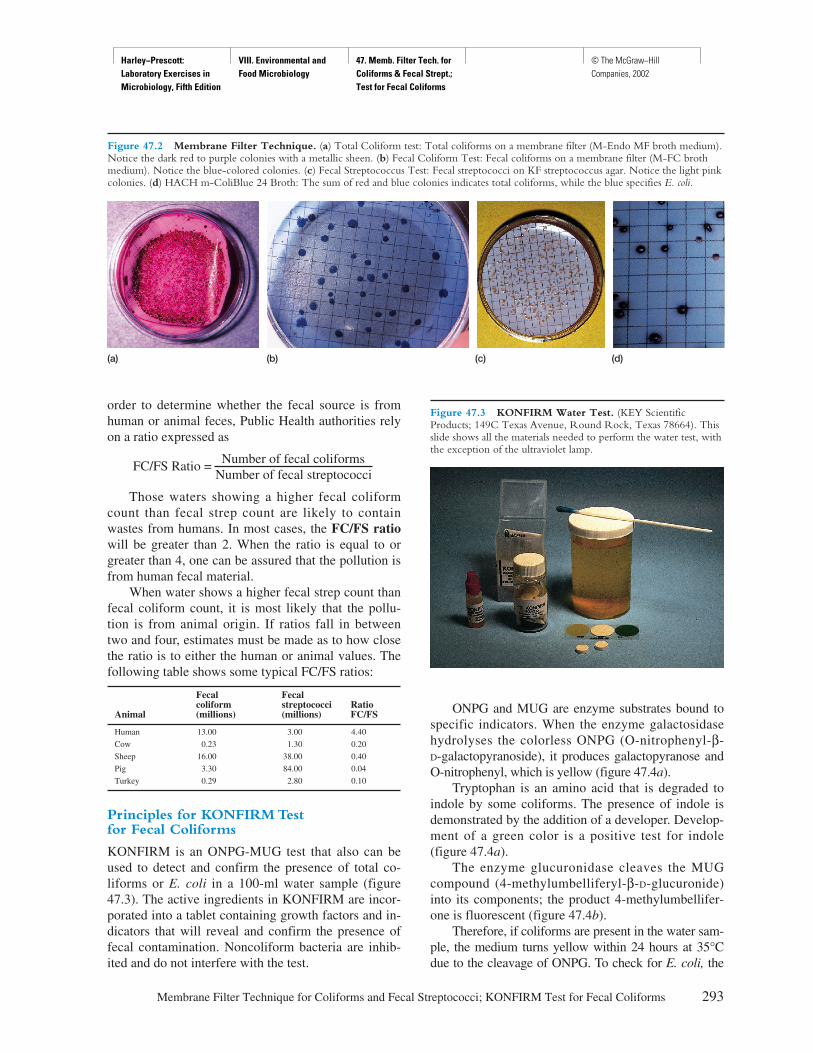
Harley−Prescott: Laboratory Exercises in Microbiology, Fifth Edition
VIII. Environmental and Food Microbiology
47. Memb. Filter Tech. for Coliforms & Fecal Strept.; Test for Fecal Coliforms
© The McGraw−Hill Companies, 2002
order to determine whether the fecal source is fromhuman or animal feces, Public Health authorities relyon a ratio expressed as
FC/FS Ratio = Number of fecal coliformsNumber of fecal streptococci
Those waters showing a higher fecal coliformcount than fecal strep count are likely to containwastes from humans. In most cases, the FC/FS ratiowill be greater than 2. When the ratio is equal to orgreater than 4, one can be assured that the pollution isfrom human fecal material.
When water shows a higher fecal strep count thanfecal coliform count, it is most likely that the pollu-tion is from animal origin. If ratios fall in betweentwo and four, estimates must be made as to how closethe ratio is to either the human or animal values. Thefollowing table shows some typical FC/FS ratios:
Fecal Fecal coliform streptococci Ratio
Animal (millions) (millions) FC/FS
Human 13.00 3.00 4.40
Cow 0.23 1.30 0.20
Sheep 16.00 38.00 0.40
Pig 3.30 84.00 0.04
Turkey 0.29 2.80 0.10
Principles for KONFIRM Testfor Fecal Coliforms
KONFIRM is an ONPG-MUG test that also can beused to detect and confirm the presence of total co-liforms or E. coli in a 100-ml water sample (figure47.3). The active ingredients in KONFIRM are incor-porated into a tablet containing growth factors and in-dicators that will reveal and confirm the presence offecal contamination. Noncoliform bacteria are inhib-ited and do not interfere with the test.
ONPG and MUG are enzyme substrates bound tospecific indicators. When the enzyme galactosidasehydrolyses the colorless ONPG (O-nitrophenyl-β-D-galactopyranoside), it produces galactopyranose andO-nitrophenyl, which is yellow (figure 47.4a).
Tryptophan is an amino acid that is degraded toindole by some coliforms. The presence of indole isdemonstrated by the addition of a developer. Develop-ment of a green color is a positive test for indole(figure 47.4a).
The enzyme glucuronidase cleaves the MUGcompound (4-methylumbelliferyl-β-D-glucuronide)into its components; the product 4-methylumbellifer-one is fluorescent (figure 47.4b).
Therefore, if coliforms are present in the water sam-ple, the medium turns yellow within 24 hours at 35°Cdue to the cleavage of ONPG. To check for E. coli, the
Membrane Filter Technique for Coliforms and Fecal Streptococci; KONFIRM Test for Fecal Coliforms 293
Figure 47.2 Membrane Filter Technique. (a) Total Coliform test: Total coliforms on a membrane filter (M-Endo MF broth medium).Notice the dark red to purple colonies with a metallic sheen. (b) Fecal Coliform Test: Fecal coliforms on a membrane filter (M-FC brothmedium). Notice the blue-colored colonies. (c) Fecal Streptococcus Test: Fecal streptococci on KF streptococcus agar. Notice the light pinkcolonies. (d) HACH m-ColiBlue 24 Broth: The sum of red and blue colonies indicates total coliforms, while the blue specifies E. coli.
(a) (b) (c) (d)
Figure 47.3 KONFIRM Water Test. (KEY ScientificProducts; 149C Texas Avenue, Round Rock, Texas 78664). Thisslide shows all the materials needed to perform the water test, withthe exception of the ultraviolet lamp.

Harley−Prescott: Laboratory Exercises in Microbiology, Fifth Edition
VIII. Environmental and Food Microbiology
47. Memb. Filter Tech. for Coliforms & Fecal Strept.; Test for Fecal Coliforms
© The McGraw−Hill Companies, 2002
medium is observed under long-wavelength UV lightfor fluorescence. When E. coli is present, the MUG ishydrolyzed to yield a fluorescent product. After devel-oper is added to the water, the development of a greencolor is positive for indole. A positive indole along witha positive ONPG and MUG is confirmatory for E. coli;only E. coli is positive for all three substrates.
If the above tests are negative for fecal coliforms,the water is considered acceptable for human con-sumption; if it is positive for coliforms or E. coli, it isnot acceptable for human consumption.
Procedure
General Procedure for the Membrane FilterApparatus (figure 47.1)1. Using alcohol-sterilized forceps, place a sterile
absorbent pad in a sterile petri plate.
2. Transfer 2.0 ml of sterile M-Endo broth to theabsorbent pad using a 5-ml pipette. Place the lidon the dish.
3. Aseptically place a sterile membrane filter holderon a filter flask.
4. Using sterile forceps, place a sterile membranefilter on the filter holder with its grid side up.
5. Place a sterile filter funnel on top of themembrane filter disk and secure it to the holder.
6. Attach the assembled membrane filter outfit to avacuum source.
7. Pour the premeasured water sample into thefunnel. If the sample is less than 20 ml, add about25 to 50 ml of sterile water to the funnel first. Mixafter adding water sample. Apply the vacuum tofilter the sample through the membrane.
8. Rinse the walls of the funnel with 20 ml of steriledistilled water and pull the rinse water through thefilter.
9. Remove the funnel and use sterile forceps tocarefully transfer the filter to the absorbent padsoaked with M-Endo media or onto a plate ofLES Endo agar. Make sure that the grid side is up.The membrane should be rolled onto the agar orfilter pad so that no air pockets form between themembrane and medium. Incubate the plate at35°C. Don’t invert.
10. After 24 hours, remove the filter from the dishand dry it on a piece of absorbent paper at roomtemperature for d to 1 hour.
11. Count the colonies and record your results in thereport for exercise 47.
Total Coliform Test1. Using the sterile forceps, place a sterile absorbent
pad into each of three petri plates. With the waxpencil, label these plates with your name, date,and TCT (total coliform test).
2. Add 2.0 ml of M-Endo broth MF (or m-ColiBlue24 broth) to the surface of each pad.
3. Filter 1, 5, and 15 ml of the water sample, and addthe membranes respectively to each plate.
4. Incubate the plates at 35°C for 22 to 24 hours.5. Count only those colonies that are pink to dark
red with a metallic sheen (figure 47.2a). Use aplate containing 20 to 80 colonies and no morethan 200 of all types of colonies. If the m-ColiBlue 24 broth is used, blue to purplecolonies indicate E. coli. The total coliformcount is given by the sum of red and bluecolonies (figure 47.2d).
6. Record your results in the report for exercise 47.
294 Environmental and Food Microbiology
ONPGCOMPARATOR
MUG IND
Figure 47.4 Use of the KONFIRM Comparator. (a) Thecomparator shows the approximate color of the positive yellowONPG, green indole, and white MUG. ONPG and MUGcomparisons are more accurate by holding the comparator behindthe bottle, half above and half below the water line and observingthrough the bottle. To observe the desired color of a positiveONPG test, the YELLOW dot is used. Water that is yellow orbrown at the onset should develop to this compared color ordarker. (b) To observe fluorescence, hold the Wood’s lamp overthe WHITE dot. A positive MUG (left) will be only slightlyduller than this color. A positive indole will progress to the colorof the GREEN dot in 1 to 5 minutes.
(a)
(b)
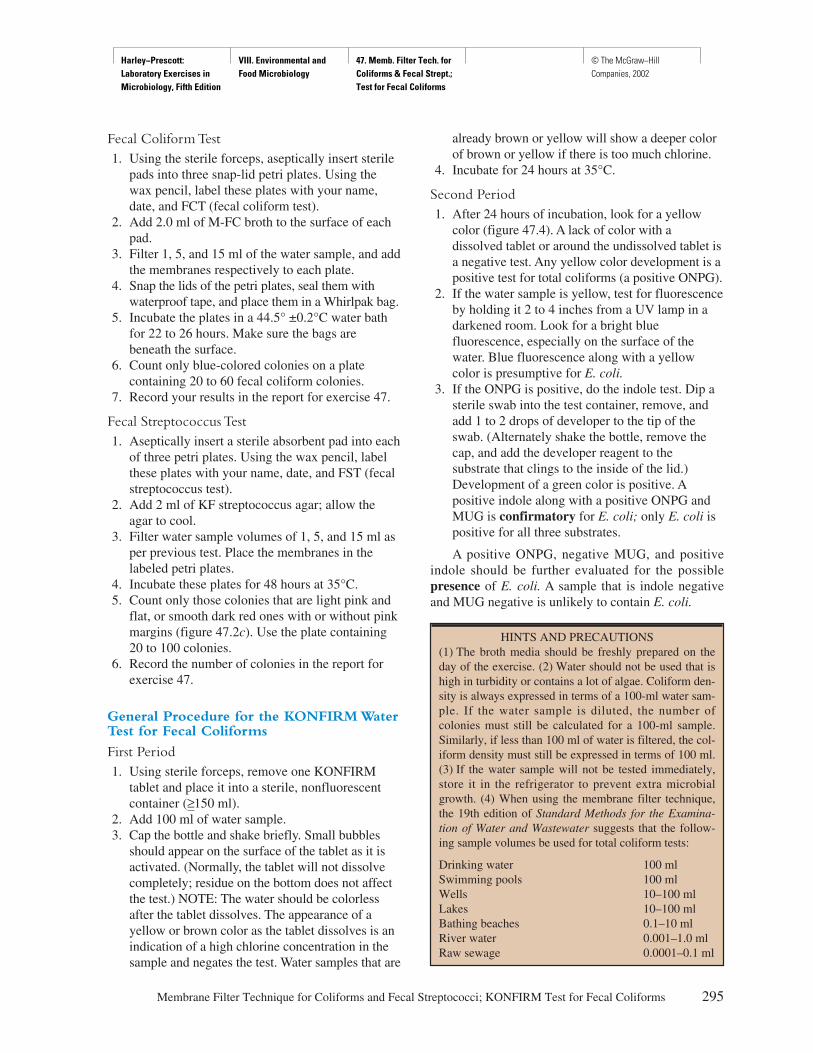
Harley−Prescott: Laboratory Exercises in Microbiology, Fifth Edition
VIII. Environmental and Food Microbiology
47. Memb. Filter Tech. for Coliforms & Fecal Strept.; Test for Fecal Coliforms
© The McGraw−Hill Companies, 2002
Fecal Coliform Test1. Using the sterile forceps, aseptically insert sterile
pads into three snap-lid petri plates. Using thewax pencil, label these plates with your name,date, and FCT (fecal coliform test).
2. Add 2.0 ml of M-FC broth to the surface of eachpad.
3. Filter 1, 5, and 15 ml of the water sample, and addthe membranes respectively to each plate.
4. Snap the lids of the petri plates, seal them withwaterproof tape, and place them in a Whirlpak bag.
5. Incubate the plates in a 44.5° ±0.2°C water bathfor 22 to 26 hours. Make sure the bags arebeneath the surface.
6. Count only blue-colored colonies on a platecontaining 20 to 60 fecal coliform colonies.
7. Record your results in the report for exercise 47.
Fecal Streptococcus Test 1. Aseptically insert a sterile absorbent pad into each
of three petri plates. Using the wax pencil, labelthese plates with your name, date, and FST (fecalstreptococcus test).
2. Add 2 ml of KF streptococcus agar; allow theagar to cool.
3. Filter water sample volumes of 1, 5, and 15 ml asper previous test. Place the membranes in thelabeled petri plates.
4. Incubate these plates for 48 hours at 35°C.5. Count only those colonies that are light pink and
flat, or smooth dark red ones with or without pinkmargins (figure 47.2c). Use the plate containing20 to 100 colonies.
6. Record the number of colonies in the report forexercise 47.
General Procedure for the KONFIRM WaterTest for Fecal Coliforms
First Period1. Using sterile forceps, remove one KONFIRM
tablet and place it into a sterile, nonfluorescentcontainer (≥150 ml).
2. Add 100 ml of water sample.3. Cap the bottle and shake briefly. Small bubbles
should appear on the surface of the tablet as it isactivated. (Normally, the tablet will not dissolvecompletely; residue on the bottom does not affectthe test.) NOTE: The water should be colorlessafter the tablet dissolves. The appearance of ayellow or brown color as the tablet dissolves is anindication of a high chlorine concentration in thesample and negates the test. Water samples that are
already brown or yellow will show a deeper colorof brown or yellow if there is too much chlorine.
4. Incubate for 24 hours at 35°C.
Second Period1. After 24 hours of incubation, look for a yellow
color (figure 47.4). A lack of color with adissolved tablet or around the undissolved tablet isa negative test. Any yellow color development is apositive test for total coliforms (a positive ONPG).
2. If the water sample is yellow, test for fluorescenceby holding it 2 to 4 inches from a UV lamp in adarkened room. Look for a bright bluefluorescence, especially on the surface of thewater. Blue fluorescence along with a yellowcolor is presumptive for E. coli.
3. If the ONPG is positive, do the indole test. Dip asterile swab into the test container, remove, andadd 1 to 2 drops of developer to the tip of theswab. (Alternately shake the bottle, remove thecap, and add the developer reagent to thesubstrate that clings to the inside of the lid.)Development of a green color is positive. Apositive indole along with a positive ONPG andMUG is confirmatory for E. coli; only E. coli ispositive for all three substrates.
A positive ONPG, negative MUG, and positiveindole should be further evaluated for the possiblepresence of E. coli. A sample that is indole negativeand MUG negative is unlikely to contain E. coli.
Membrane Filter Technique for Coliforms and Fecal Streptococci; KONFIRM Test for Fecal Coliforms 295
HINTS AND PRECAUTIONS(1) The broth media should be freshly prepared on theday of the exercise. (2) Water should not be used that ishigh in turbidity or contains a lot of algae. Coliform den-sity is always expressed in terms of a 100-ml water sam-ple. If the water sample is diluted, the number ofcolonies must still be calculated for a 100-ml sample.Similarly, if less than 100 ml of water is filtered, the col-iform density must still be expressed in terms of 100 ml.(3) If the water sample will not be tested immediately,store it in the refrigerator to prevent extra microbialgrowth. (4) When using the membrane filter technique,the 19th edition of Standard Methods for the Examina-tion of Water and Wastewater suggests that the follow-ing sample volumes be used for total coliform tests:
Drinking water 100 mlSwimming pools 100 mlWells 10–100 mlLakes 10–100 mlBathing beaches 0.1–10 mlRiver water 0.001–1.0 mlRaw sewage 0.0001–0.1 ml
Harley−Prescott: Laboratory Exercises in Microbiology, Fifth Edition
VIII. Environmental and Food Microbiology
47. Memb. Filter Tech. for Coliforms & Fecal Strept.; Test for Fecal Coliforms
© The McGraw−Hill Companies, 2002
297
Name: ———————————————————————
Date: ————————————————————————
Lab Section: —————————————————————
Laboratory Report 47
Membrane Filter Technique for Coliforms and Fecal Streptococci;KONFIRM Test for Fecal Coliforms
1. What was the total coliform count of the water sample? Show your calculations in the space below.
2. What was the fecal coliform count of the water sample? Show your calculations in the space below.
3. What was the fecal streptococci count of the water sample? Show your calculations in the space below.
4. What are some other applications of the membrane filter technique?
5. Results for the KONFIRM water test.
a. ONPG _____________________________________________________________________________
b. MUG ______________________________________________________________________________
c. Indole _____________________________________________________________________________

Harley−Prescott: Laboratory Exercises in Microbiology, Fifth Edition
VIII. Environmental and Food Microbiology
47. Memb. Filter Tech. for Coliforms & Fecal Strept.; Test for Fecal Coliforms
© The McGraw−Hill Companies, 2002
Review Questions
1. What are some advantages of the membrane filter technique in the analysis of a water sample? Somedisadvantages?
2. What color are coliform colonies?
3. Would you consider your water sample safe to drink? Why or why not?
4. What problems would be encountered if you used the membrane filter technique on a water sample with a lotof suspended solids in it?
5. What might your results be if a 0.10 �m filter is used to filter the water sample?
6. Other than for water examination, what are some additional applications of the membrane filter technique inmicrobiology?
7. What is the bacteriological standard for potable water?
298 Environmental and Food Microbiology
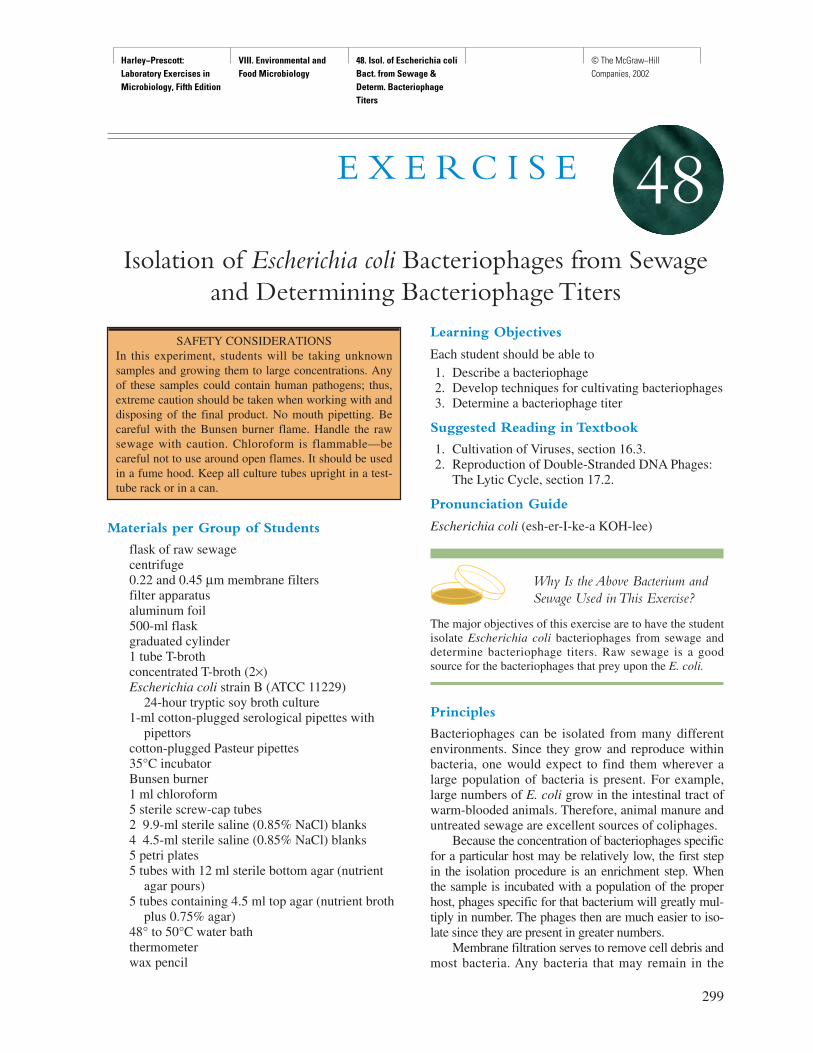
Harley−Prescott: Laboratory Exercises in Microbiology, Fifth Edition
VIII. Environmental and Food Microbiology
48. Isol. of Escherichia coli Bact. from Sewage & Determ. Bacteriophage Titers
© The McGraw−Hill Companies, 2002
Materials per Group of Students
flask of raw sewagecentrifuge0.22 and 0.45 µm membrane filtersfilter apparatusaluminum foil500-ml flaskgraduated cylinder1 tube T-brothconcentrated T-broth (2×)Escherichia coli strain B (ATCC 11229)
24-hour tryptic soy broth culture1-ml cotton-plugged serological pipettes with
pipettorscotton-plugged Pasteur pipettes35°C incubatorBunsen burner1 ml chloroform5 sterile screw-cap tubes2 9.9-ml sterile saline (0.85% NaCl) blanks4 4.5-ml sterile saline (0.85% NaCl) blanks5 petri plates5 tubes with 12 ml sterile bottom agar (nutrient
agar pours)5 tubes containing 4.5 ml top agar (nutrient broth
plus 0.75% agar)48° to 50°C water baththermometerwax pencil
Learning Objectives
Each student should be able to1. Describe a bacteriophage2. Develop techniques for cultivating bacteriophages3. Determine a bacteriophage titer
Suggested Reading in Textbook
1. Cultivation of Viruses, section 16.3.2. Reproduction of Double-Stranded DNA Phages:
The Lytic Cycle, section 17.2.
Pronunciation Guide
Escherichia coli (esh-er-I-ke-a KOH-lee)
Why Is the Above Bacterium andSewage Used in This Exercise?
The major objectives of this exercise are to have the studentisolate Escherichia coli bacteriophages from sewage anddetermine bacteriophage titers. Raw sewage is a goodsource for the bacteriophages that prey upon the E. coli.
Principles
Bacteriophages can be isolated from many differentenvironments. Since they grow and reproduce withinbacteria, one would expect to find them wherever alarge population of bacteria is present. For example,large numbers of E. coli grow in the intestinal tract ofwarm-blooded animals. Therefore, animal manure anduntreated sewage are excellent sources of coliphages.
Because the concentration of bacteriophages specificfor a particular host may be relatively low, the first stepin the isolation procedure is an enrichment step. Whenthe sample is incubated with a population of the properhost, phages specific for that bacterium will greatly mul-tiply in number. The phages then are much easier to iso-late since they are present in greater numbers.
Membrane filtration serves to remove cell debris andmost bacteria. Any bacteria that may remain in the
299
E X E R C I S E
Isolation of Escherichia coli Bacteriophages from Sewageand Determining Bacteriophage Titers
48
SAFETY CONSIDERATIONSIn this experiment, students will be taking unknownsamples and growing them to large concentrations. Anyof these samples could contain human pathogens; thus,extreme caution should be taken when working with anddisposing of the final product. No mouth pipetting. Becareful with the Bunsen burner flame. Handle the rawsewage with caution. Chloroform is flammable—becareful not to use around open flames. It should be usedin a fume hood. Keep all culture tubes upright in a test-tube rack or in a can.
Harley−Prescott: Laboratory Exercises in Microbiology, Fifth Edition
VIII. Environmental and Food Microbiology
48. Isol. of Escherichia coli Bact. from Sewage & Determ. Bacteriophage Titers
© The McGraw−Hill Companies, 2002
enriched culture can be killed and lysed by treatmentwith chloroform. The filtrate containing bacterial virusesmay now be stored in the refrigerator for months.
Individual viruses in the filtrate can be isolated bymixing a small amount of filtrate with a young cultureof the host bacterium and then spreading the mixture outon the surface of a petri plate containing nutrient agar.This is called the double-layered culture technique. Inpractice, the viruses and bacteria are mixed with a diluteagar medium (the top agar) and then poured in a thinlayer on the surface of harder bottom, or base, agar.When the top agar jells, the viruses and bacteria are im-mobilized. Whenever a virus particle is present in theagar, it will infect an adjacent bacterial cell, reproduce,and lyse its host cell. The virus particle will then giverise to millions of virions, and a clear area of lysed bac-teria will develop in the bacterial lawn. This clear area iscalled a plaque (figure 48.1). Ideally, each virus willproduce one plaque containing enormous numbers of itsprogeny. Samples of each plaque can then be removedand used to culture large quantities of a single type ofvirus for further study. Because each plaque arises froma single virus particle, a count of the number of plaqueswill enable one to calculate the concentration of virusesin the original undiluted sample.
Procedure
First Period1. Obtain about 25 ml of raw sewage. Centrifuge it
for 10 minutes at just below top speed in a tablemodel clinical centrifuge (figure 48.2a).
2. Pass the supernatant through a 0.22 µmmembrane filter to remove bacterial contaminants(figure 48.2b).
3. Add 20 ml of the filtered supernatant to analuminum-foil-capped, 500-ml flask containing20 ml of sterile, twofold concentrated T-broth (thefinal broth concentration will be normal).
4. Inoculate the mixture with 1 ml of an overnight(109 cells per milliliter) E. coli tryptic soy brothculture (figure 48.2c). Incubate for 24 hours at35°C (figure 48.2d).
5. Melt five tubes with 12 ml sterile bottom agar,cool them in a water bath to 48° to 50°C, andpour into five sterile petri plates. This forms thebase agar (figure 48.2i). After the plates havehardened, dry them overnight in a 35°Cincubator.
6. Inoculate a T-broth culture tube with 1 ml of E. coli and incubate it at 35°C overnight or for 24 hours (figure 48.2f ). This will serve as a stockculture.
Second Period1. Filter the stock culture through another 0.45 µm
membrane filter (figure 48.2e). Transfer 8.0-mlportions of the filtrate into sterile, screw-cap tubes(figure 48.2h).
2. Add 0.2 ml of chloroform to each screw–cap tubewith a sterile pipette (figure 48.2g). Mixthoroughly.
3. The virus stock can be used immediately or keptin the refrigerator until it can be analyzed.
4. Prepare a serial dilution of the enrichedbacteriophage sample as shown in figure 48.2i.Withdraw a sample after lowering the pipette tipinto the medium as short a distance as possible soas not to transfer extra culture. Transfer an aliquotto the next tube and mix by drawing the culture inand out of the pipette several times. Discard thepipette. With a new pipette, transfer an aliquot tothe next tube in the series. Use a new, sterile,cotton-plugged pipette for each transfer.
5. After all dilutions have been prepared, add 2drops of the overnight E. coli culture to themelted, cooled 10–4 to 10–8 dilution tubes of topagar (figure 48.2i). Use a sterile, cotton-pluggedPasteur pipette for this. Keep the tubes in the 48°to 50°C water bath as much of the time aspossible during this process.
6. As soon as possible after the top agar tubes havebeen inoculated, each dilution should be plated outin the following way. Use a new, sterile, 1-ml pipetteand transfer 0.5 ml of 10–4 dilution to a 45°C soft
300 Environmental and Food Microbiology
Figure 48.1 Plaques of Viruses. Plaques of a bacteriophage ona lawn of Escherichia coli.
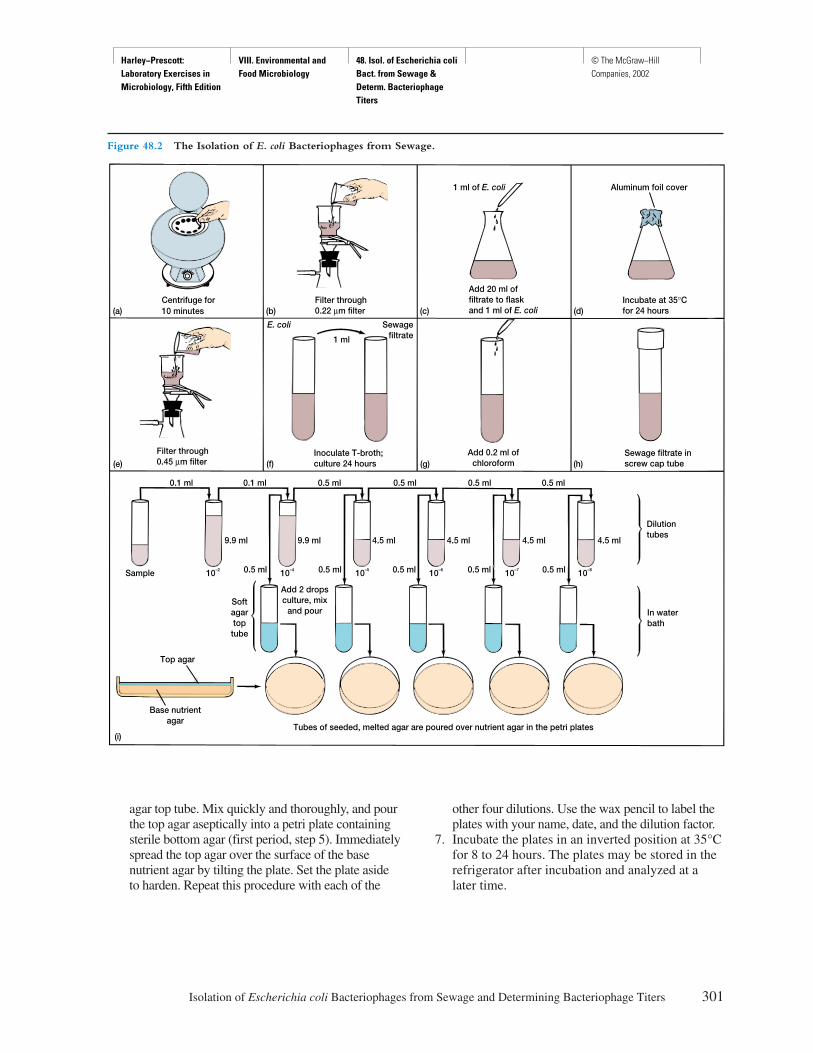
Harley−Prescott: Laboratory Exercises in Microbiology, Fifth Edition
VIII. Environmental and Food Microbiology
48. Isol. of Escherichia coli Bact. from Sewage & Determ. Bacteriophage Titers
© The McGraw−Hill Companies, 2002
Isolation of Escherichia coli Bacteriophages from Sewage and Determining Bacteriophage Titers 301
Centrifuge for10 minutes(a)
Filter through0.22 µm filter(b) (d)
1 ml of E. coli Aluminum foil cover
(g) (h)
(c)
Filter through0.45 µm filter (f)(e)
4.5 ml4.5 ml
0.5 ml
4.5 ml4.5 ml9.9 ml9.9 ml
Sample 0.5 ml 0.5 ml 0.5 ml 0.5 ml 0.5 ml
0.5 ml0.5 ml0.5 ml0.1 ml0.1 ml
(i)
Inoculate T-broth;culture 24 hours
E. coli Sewagefiltrate1 ml
Softagartoptube
Add 2 dropsculture, mix
and pour
10–2 10–5 10–6 10–7 10–810–4
Top agar
Dilutiontubes
In waterbath
Base nutrientagar
Tubes of seeded, melted agar are poured over nutrient agar in the petri plates
Add 20 ml offiltrate to flaskand 1 ml of E. coli
Incubate at 35°Cfor 24 hours
Add 0.2 ml ofchloroform
Sewage filtrate inscrew cap tube
Figure 48.2 The Isolation of E. coli Bacteriophages from Sewage.
agar top tube. Mix quickly and thoroughly, and pourthe top agar aseptically into a petri plate containingsterile bottom agar (first period, step 5). Immediatelyspread the top agar over the surface of the basenutrient agar by tilting the plate. Set the plate asideto harden. Repeat this procedure with each of the
other four dilutions. Use the wax pencil to label theplates with your name, date, and the dilution factor.
7. Incubate the plates in an inverted position at 35°Cfor 8 to 24 hours. The plates may be stored in therefrigerator after incubation and analyzed at alater time.
Harley−Prescott: Laboratory Exercises in Microbiology, Fifth Edition
VIII. Environmental and Food Microbiology
48. Isol. of Escherichia coli Bact. from Sewage & Determ. Bacteriophage Titers
© The McGraw−Hill Companies, 2002
302 Environmental and Food Microbiology
Third Period1. Examine the plates carefully and, using a Quebec
colony counter, count the number of plaques on eachplate. Complete Part 1 of the report for exercise 48.Also, carefully note the plaque morphology.
2. Use the plate(s) with the most favorable number ofplaques (25 to 250) to determine the number ofcoliphages in 1 ml of the original enriched sample.This is done by dividing the plaque number by thedilution factor as shown by the following example:
Plaque count = 250/ml0.5 × 10–6
= 500 × 106
= 5 × 10⁸.
3. Complete Part 2 of the report for exercise 48.
HINTS AND PRECAUTIONS(1) Rapid centrifugation is necessary to separate thephages from the E. coli. If centrifugation is incomplete,the membrane filter will clog and filtration willprogress slowly. (2) Plaque size should be checkedevery 2 hours for changes, beginning within the first 12hours of incubation, as some coliphages can form largeplaques quickly enough to clear the plate within 24hours. (3) If necessary, review the material on dilutionsin Appendix G.
Harley−Prescott: Laboratory Exercises in Microbiology, Fifth Edition
VIII. Environmental and Food Microbiology
48. Isol. of Escherichia coli Bact. from Sewage & Determ. Bacteriophage Titers
© The McGraw−Hill Companies, 2002
303
Name: ———————————————————————
Date: ————————————————————————
Lab Section: —————————————————————
Laboratory Report 48
Isolation of Escherichia coli Bacteriophages from Sewageand Determining Bacteriophage Titers
1. Data: PFU __________ Dilution __________
PFU __________ Dilution __________
2. a. How many coliphages are present in a milliliter of the enriched sewage isolate? Show your calculations in the space provided.
b. Are there obvious variations in plaque size and morphology? Explain your answer.
c. What does (b) indicate about the nature of the coliphage sample that you have isolated?

Harley−Prescott: Laboratory Exercises in Microbiology, Fifth Edition
VIII. Environmental and Food Microbiology
48. Isol. of Escherichia coli Bact. from Sewage & Determ. Bacteriophage Titers
© The McGraw−Hill Companies, 2002
Review Questions
1. What is meant by a plaque-forming unit?
2. Determine the number of plaque-forming units per ml in a sample that has been diluted 10–8 and has given200 plaque-forming units when 0.5 ml is plated.
3. What are coliphages?
4. Why is enrichment of the sewage necessary for the isolation of coliphages?
5. Describe the similarities between the plaque technique in this exercise and the standard plate count forbacteria.
6. What effect does chloroform have on viruses? On bacteria?
7. Why are two different size filters used in this experiment?
304 Environmental and Food Microbiology
Harley−Prescott: Laboratory Exercises in Microbiology, Fifth Edition
VIII. Environmental and Food Microbiology
49. Enumeration of Soil Microorganisms
© The McGraw−Hill Companies, 2002
Materials per Group of Students
1 g of rich garden soil in 99 ml sterile waterStudents may want to bring in their own soiland weigh out 1 g on a balance
1 50-ml flask of melted (50°C) tryptic soy agar1 50-ml flask of melted glycerol yeast extract
agar that contains cyclohexamide (actidione0.05 g/50 ml) to inhibit fungal growth.Actidione® Agar (Cycloheximide Agar) can bepurchased from Oxoid Unipath, 800 ProctorAve., Ogdensburg, NY 13669, or by calling 1-800-567-8378.
1 50-ml flask of melted Sabouraud dextrose agar2 99-ml bottles of sterile water48° to 50°C water bathwax pencilBunsen burner1-ml pipettes with pipettor12 petri platesDifco Manual or BBL Manual
Learning Objectives
Each student should be able to
1. Become acquainted with some of themicroorganisms present in garden soil
2. Determine the number of bacteria, actinomycetes,and fungi in the garden soil using the plate countmethod
Suggested Reading in Textbook
1. Microorganisms and the Formation of DifferentSoils, section 30.3; see also table 30.2.
Pronunciation Guide
Aspergillus (as-per-JIL-us)Mucor (MU-kor)Penicillium (pen-a-SIL-ee-um)Rhizopus (rye-ZOH-pus)
Principles
Actinomycetes (including actinoplanetes, nocardio-forms, and streptomycetes), other bacteria, and fila-mentous fungi (Rhizopus, Mucor, Penicillium, andAspergillus) are all important members of the soilmicrobial community. Protozoa, algae, cyanobacte-ria, nematodes, insects and other invertebrates, andviruses are also important members but will not bestudied in this exercise. Each gram of rich gardensoil may contain millions of these micro- andmacroorganisms.
Since soils vary greatly with respect to theirphysical features (e.g., pH, general type, temperature,and other related factors), the microorganisms pres-ent will also vary. For example, acid soils will have ahigher number of fungi compared to alkaline soils,and rich garden soil will contain more actinomycetesthan either the other bacteria or fungi. Not surpris-ingly, no single technique is available to count themicrobial diversity found in average garden soil.Thus, in this exercise, each group of students will tryto determine only the relative number of fungi, actin-omycetes, and other bacteria in a sample of gardensoil using the serial dilution agar plating procedurecovered in exercise 17.
To support the three different groups of micro-organisms, you will use three types of media:(1) Sabouraud dextrose agar for the isolation of fungi,(2) glycerol yeast agar for the isolation of actino-mycetes, and (3) tryptic soy agar for the isolation ofother bacteria.
305
E X E R C I S E
Enumeration of Soil Microorganisms
49
SAFETY CONSIDERATIONSBe careful with the Bunsen burner flame. No mouthpipetting.
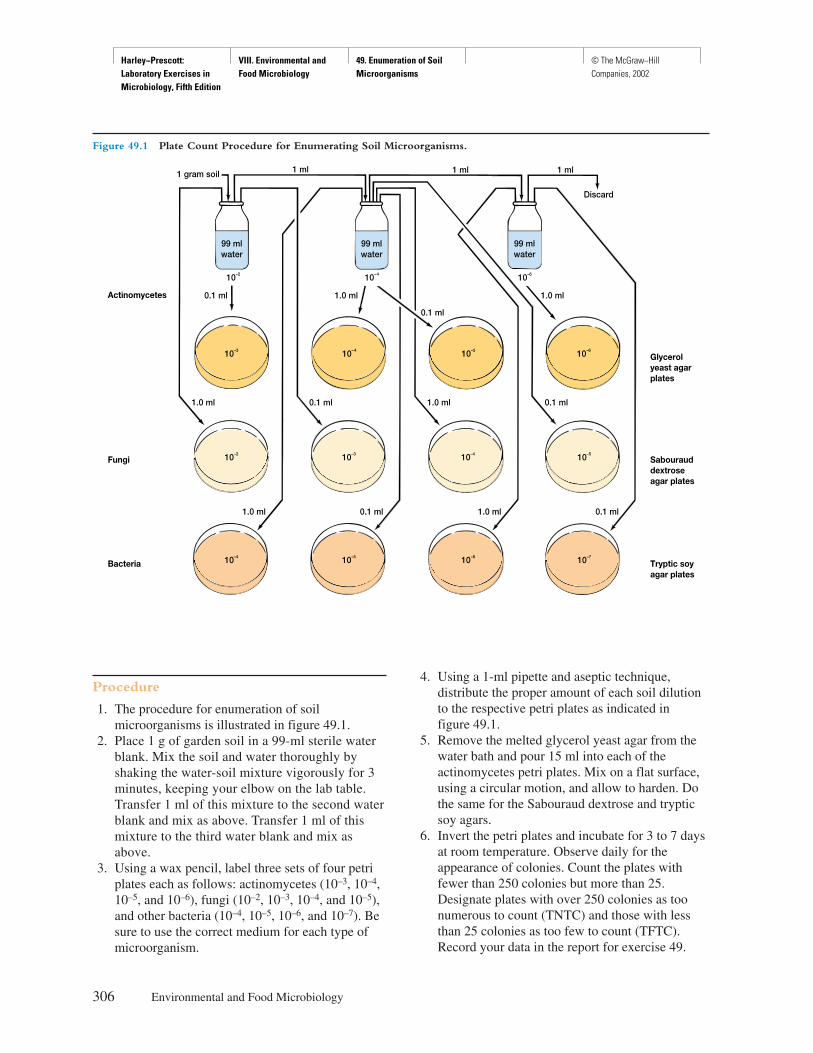
Harley−Prescott: Laboratory Exercises in Microbiology, Fifth Edition
VIII. Environmental and Food Microbiology
49. Enumeration of Soil Microorganisms
© The McGraw−Hill Companies, 2002
Procedure
1. The procedure for enumeration of soilmicroorganisms is illustrated in figure 49.1.
2. Place 1 g of garden soil in a 99-ml sterile waterblank. Mix the soil and water thoroughly byshaking the water-soil mixture vigorously for 3minutes, keeping your elbow on the lab table.Transfer 1 ml of this mixture to the second waterblank and mix as above. Transfer 1 ml of thismixture to the third water blank and mix asabove.
3. Using a wax pencil, label three sets of four petriplates each as follows: actinomycetes (10–3, 10–4,10–5, and 10–6), fungi (10–2, 10–3, 10–4, and 10–5),and other bacteria (10–4, 10–5, 10–6, and 10–7). Besure to use the correct medium for each type ofmicroorganism.
4. Using a 1-ml pipette and aseptic technique,distribute the proper amount of each soil dilutionto the respective petri plates as indicated in figure 49.1.
5. Remove the melted glycerol yeast agar from thewater bath and pour 15 ml into each of theactinomycetes petri plates. Mix on a flat surface,using a circular motion, and allow to harden. Dothe same for the Sabouraud dextrose and trypticsoy agars.
6. Invert the petri plates and incubate for 3 to 7 daysat room temperature. Observe daily for theappearance of colonies. Count the plates withfewer than 250 colonies but more than 25.Designate plates with over 250 colonies as toonumerous to count (TNTC) and those with lessthan 25 colonies as too few to count (TFTC).Record your data in the report for exercise 49.
306 Environmental and Food Microbiology
Bacteria
1 gram soil 1 ml 1 ml 1 ml
Discard
0.1 ml 1.0 ml
0.1 ml
1.0 ml
10–6
1.0 ml 0.1 ml 1.0 ml 0.1 ml
Fungi
Actinomycetes
Tryptic soyagar plates
Sabourauddextroseagar plates
Glycerolyeast agarplates
1.0 ml 0.1 ml 1.0 ml 0.1 ml
99 mlwater
99 mlwater
10–2
10–3
10–310–2
10–510–4
10–4
10–510–4
99 mlwater
10–6
10–6
10–4
10–7
10–5
Figure 49.1 Plate Count Procedure for Enumerating Soil Microorganisms.

Harley−Prescott: Laboratory Exercises in Microbiology, Fifth Edition
VIII. Environmental and Food Microbiology
49. Enumeration of Soil Microorganisms
© The McGraw−Hill Companies, 2002
7. Determine the number of respectivemicroorganisms per milliliter of original culture(gram of soil) as follows:
Microorganisms per gram of soil = count/platedilution used
For example, if 200 colonies were present on the10–7 plate, the calculation would be
Microorganisms per gram of soil
= 20010–7
= 2.0 × 10⁹ colonies/gram
Enumeration of Soil Microorganisms 307
HINTS AND PRECAUTIONSOptimal results in this exercise depend on thoroughlymixed soil samples containing evenly distributedmicroorganisms.
Harley−Prescott: Laboratory Exercises in Microbiology, Fifth Edition
VIII. Environmental and Food Microbiology
49. Enumeration of Soil Microorganisms
© The McGraw−Hill Companies, 2002
309
Name: ———————————————————————
Date: ————————————————————————
Lab Section: —————————————————————
Laboratory Report 49
Enumeration of Soil Microorganisms
1. Number of microorganisms per gram of soil.
Dilution Number of Microorganisms/GramMicroorganism Factor Colonies of Garden Soil
Actinomycetes 10–3 ____________ __________________________
10–4 ____________ __________________________
10–5 ____________ __________________________
10–6 ____________ __________________________
Other bacteria 10–4 ____________ __________________________
10–5 ____________ __________________________
10–6 ____________ __________________________
10–7 ____________ __________________________
Fungi 10–2 ____________ __________________________
10–3 ____________ __________________________
10–4 ____________ __________________________
10–5 ____________ __________________________
2. Some normal population sizes for soil microorganisms are as follows:
a. Actinomycetes = 7 × 10⁶ per gram
b. Other bacteria = 53 × 106 per gram
c. Fungi = 1 × 10⁵ per gram
Harley−Prescott: Laboratory Exercises in Microbiology, Fifth Edition
VIII. Environmental and Food Microbiology
49. Enumeration of Soil Microorganisms
© The McGraw−Hill Companies, 2002
Review Questions
1. Why were three different media used in this experiment?
2. Would the same results be obtained in this experiment if the soil sample was collected during a different timeof the year? Explain your answer.
3. What general group of soil bacteria cannot be determined using the media and procedures in this exercise?
4. What generalizations can you make from this exercise with respect to your garden soil?
5. What are some physical features of soil that influence microbial populations?
6. Using a Difco or BBL Manual, what is the composition of glycerol yeast extract agar?
7. Why are different dilutions used for bacteria, fungi, and actinomycetes?
310 Environmental and Food Microbiology

Harley−Prescott: Laboratory Exercises in Microbiology, Fifth Edition
VIII. Environmental and Food Microbiology
50. Bacterial Count of a Food Product
© The McGraw−Hill Companies, 2002
Materials per Group of Students
20 g of hamburger or chicken180 ml of sterile distilled waterweighing paperscale or balanceBunsen burnercolony counterplate count agar (Standards Methods Agar)2 99-ml sterile saline dilution blankssterile 1-ml pipettes with pipettor5 sterile petri plates35°C incubatorwax pencilboiling water bath48° to 50°C water bath for cooling tubes
Learning Objectives
Each student should be able to
1. Explain why the standard plate count is used infood quality control
2. Determine the number of bacteria in a foodsample by performing a standard plate count
Suggested Reading in Textbook
1. Food Spoilage Processes, section 41.2.
Principles
The sanitary control of food quality is primarily con-cerned with testing food products for the presence ofspecific microorganisms. Food products are the pri-mary vehicle responsible for the transmission of mi-crobial diseases of the gastrointestinal system. Forthis reason, food products are routinely examined forthe presence of bacteria.
The heterotrophic plate count can be used todetermine the number of viable bacteria in a foodsample. The larger the count, the greater the likeli-hood that specific pathogens capable of causing dis-ease will be present and also that the food will spoil.Normally, raw hamburger should not contain over106 bacteria per gram.
One of the limitations of the heterotrophic platecount is that only bacteria capable of growing in theculture medium under the environmental conditionsprovided will be counted. As a result, a medium thatsupports the growth of most heterotrophic (requiringorganic carbon) bacteria is commonly used.
Figure 50.1 illustrates the procedure for perform-ing a heterotrophic plate count on a food product.
Procedure
First Period1. Weigh out 20 g of raw hamburger or chicken.2. Blend the 20 g of the meat in a blender with 180
ml of sterile distilled water for 5 minutes. Thisgives a 1/10 dilution.
3. Make dilutions from 10-2 to 10-6 as indicated infigure 50.1.
4. Using the wax pencil, label the petri plates withyour name, date, and dilution.
5. Using aseptic technique, pipette aliquots from thedilution blanks to the petri plates.
311
E X E R C I S E
Bacterial Count of a Food Product
50
SAFETY CONSIDERATIONS In this experiment, students will be taking unknownsamples and growing them to large concentrations. Anyof these samples could contain human pathogens; thus,extreme caution should be taken when working with anddisposing of the final product. No mouth pipetting. Al-ways handle raw meat with caution.
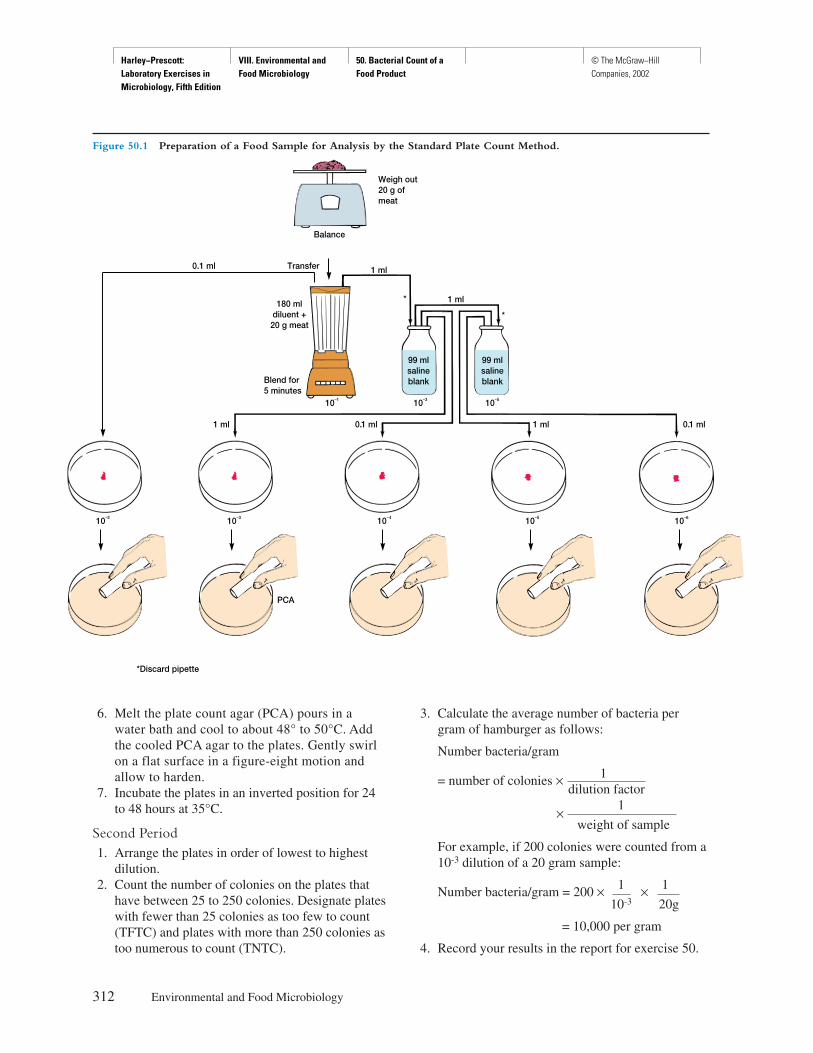
Harley−Prescott: Laboratory Exercises in Microbiology, Fifth Edition
VIII. Environmental and Food Microbiology
50. Bacterial Count of a Food Product
© The McGraw−Hill Companies, 2002
6. Melt the plate count agar (PCA) pours in awater bath and cool to about 48° to 50°C. Addthe cooled PCA agar to the plates. Gently swirlon a flat surface in a figure-eight motion andallow to harden.
7. Incubate the plates in an inverted position for 24to 48 hours at 35°C.
Second Period1. Arrange the plates in order of lowest to highest
dilution.2. Count the number of colonies on the plates that
have between 25 to 250 colonies. Designate plateswith fewer than 25 colonies as too few to count(TFTC) and plates with more than 250 colonies astoo numerous to count (TNTC).
3. Calculate the average number of bacteria pergram of hamburger as follows:
Number bacteria/gram
= number of colonies × 1dilution factor
1×weight of sample
For example, if 200 colonies were counted from a10-3 dilution of a 20 gram sample:
Number bacteria/gram = 200 × 1 × 1
10-3 20g
= 10,000 per gram
4. Record your results in the report for exercise 50.
312 Environmental and Food Microbiology
Transfer
1 ml
0.1 ml
*
*
1 ml1 ml 0.1 ml
PCA
*Discard pipette
1 ml
Weigh out20 g ofmeat
Balance
180 mldiluent +
20 g meat
0.1 ml
Blend for5 minutes
10–1 10–3 10–5
10–5 10–610–4
99 mlsalineblank
99 mlsalineblank
10–2 10–3
Figure 50.1 Preparation of a Food Sample for Analysis by the Standard Plate Count Method.

Harley−Prescott: Laboratory Exercises in Microbiology, Fifth Edition
VIII. Environmental and Food Microbiology
50. Bacterial Count of a Food Product
© The McGraw−Hill Companies, 2002
313
Name: ———————————————————————
Date: ————————————————————————
Lab Section: —————————————————————
Laboratory Report 50
Bacterial Count of a Food Product
1. Record in the table the number of colonies per plate.
Dilution Number of Colonies/Plate
10–3 __________________________________________
10–4 __________________________________________
10–5 __________________________________________
10–6 __________________________________________
2. Number of bacteria per gram of hamburger _____________________________________________________
In the space provided, do your calculations from the plate that had between 25 to 250 colonies.
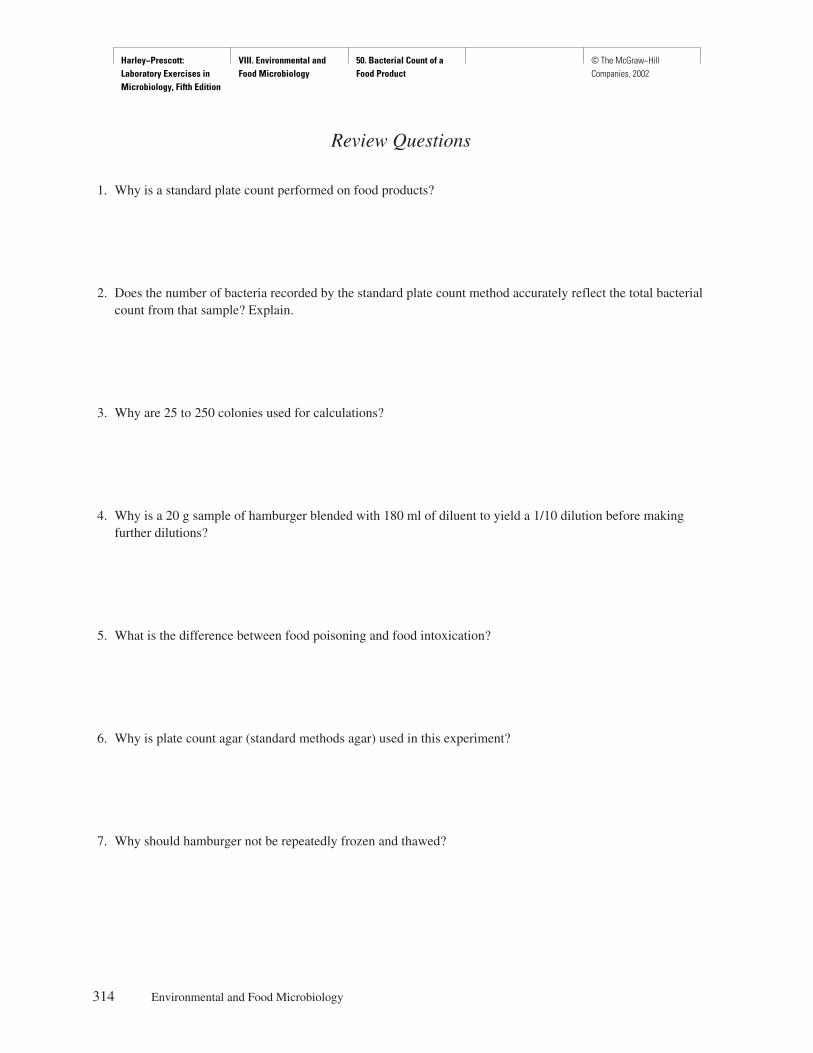
Harley−Prescott: Laboratory Exercises in Microbiology, Fifth Edition
VIII. Environmental and Food Microbiology
50. Bacterial Count of a Food Product
© The McGraw−Hill Companies, 2002
Review Questions
1. Why is a standard plate count performed on food products?
2. Does the number of bacteria recorded by the standard plate count method accurately reflect the total bacterialcount from that sample? Explain.
3. Why are 25 to 250 colonies used for calculations?
4. Why is a 20 g sample of hamburger blended with 180 ml of diluent to yield a 1/10 dilution before makingfurther dilutions?
5. What is the difference between food poisoning and food intoxication?
6. Why is plate count agar (standard methods agar) used in this experiment?
7. Why should hamburger not be repeatedly frozen and thawed?
314 Environmental and Food Microbiology
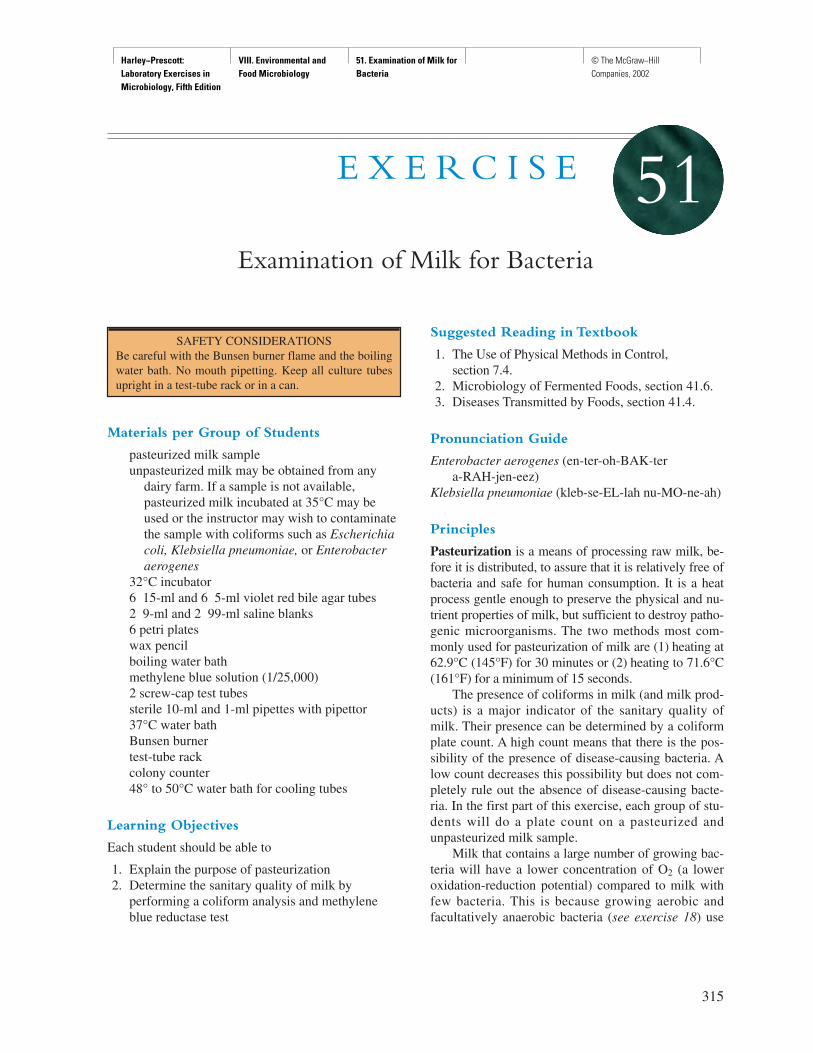
Harley−Prescott: Laboratory Exercises in Microbiology, Fifth Edition
VIII. Environmental and Food Microbiology
51. Examination of Milk for Bacteria
© The McGraw−Hill Companies, 2002
Materials per Group of Students
pasteurized milk sampleunpasteurized milk may be obtained from any
dairy farm. If a sample is not available,pasteurized milk incubated at 35°C may beused or the instructor may wish to contaminatethe sample with coliforms such as Escherichiacoli, Klebsiella pneumoniae, or Enterobacteraerogenes
32°C incubator6 15-ml and 6 5-ml violet red bile agar tubes2 9-ml and 2 99-ml saline blanks6 petri plateswax pencilboiling water bathmethylene blue solution (1/25,000)2 screw-cap test tubessterile 10-ml and 1-ml pipettes with pipettor37°C water bathBunsen burnertest-tube rackcolony counter48° to 50°C water bath for cooling tubes
Learning Objectives
Each student should be able to
1. Explain the purpose of pasteurization2. Determine the sanitary quality of milk by
performing a coliform analysis and methyleneblue reductase test
Suggested Reading in Textbook
1. The Use of Physical Methods in Control, section 7.4.
2. Microbiology of Fermented Foods, section 41.6.3. Diseases Transmitted by Foods, section 41.4.
Pronunciation Guide
Enterobacter aerogenes (en-ter-oh-BAK-tera-RAH-jen-eez)
Klebsiella pneumoniae (kleb-se-EL-lah nu-MO-ne-ah)
Principles
Pasteurization is a means of processing raw milk, be-fore it is distributed, to assure that it is relatively free ofbacteria and safe for human consumption. It is a heatprocess gentle enough to preserve the physical and nu-trient properties of milk, but sufficient to destroy patho-genic microorganisms. The two methods most com-monly used for pasteurization of milk are (1) heating at62.9°C (145°F) for 30 minutes or (2) heating to 71.6°C(161°F) for a minimum of 15 seconds.
The presence of coliforms in milk (and milk prod-ucts) is a major indicator of the sanitary quality ofmilk. Their presence can be determined by a coliformplate count. A high count means that there is the pos-sibility of the presence of disease-causing bacteria. Alow count decreases this possibility but does not com-pletely rule out the absence of disease-causing bacte-ria. In the first part of this exercise, each group of stu-dents will do a plate count on a pasteurized andunpasteurized milk sample.
Milk that contains a large number of growing bac-teria will have a lower concentration of O2 (a loweroxidation-reduction potential) compared to milk withfew bacteria. This is because growing aerobic andfacultatively anaerobic bacteria (see exercise 18) use
315
E X E R C I S E
Examination of Milk for Bacteria
51
SAFETY CONSIDERATIONSBe careful with the Bunsen burner flame and the boilingwater bath. No mouth pipetting. Keep all culture tubesupright in a test-tube rack or in a can.
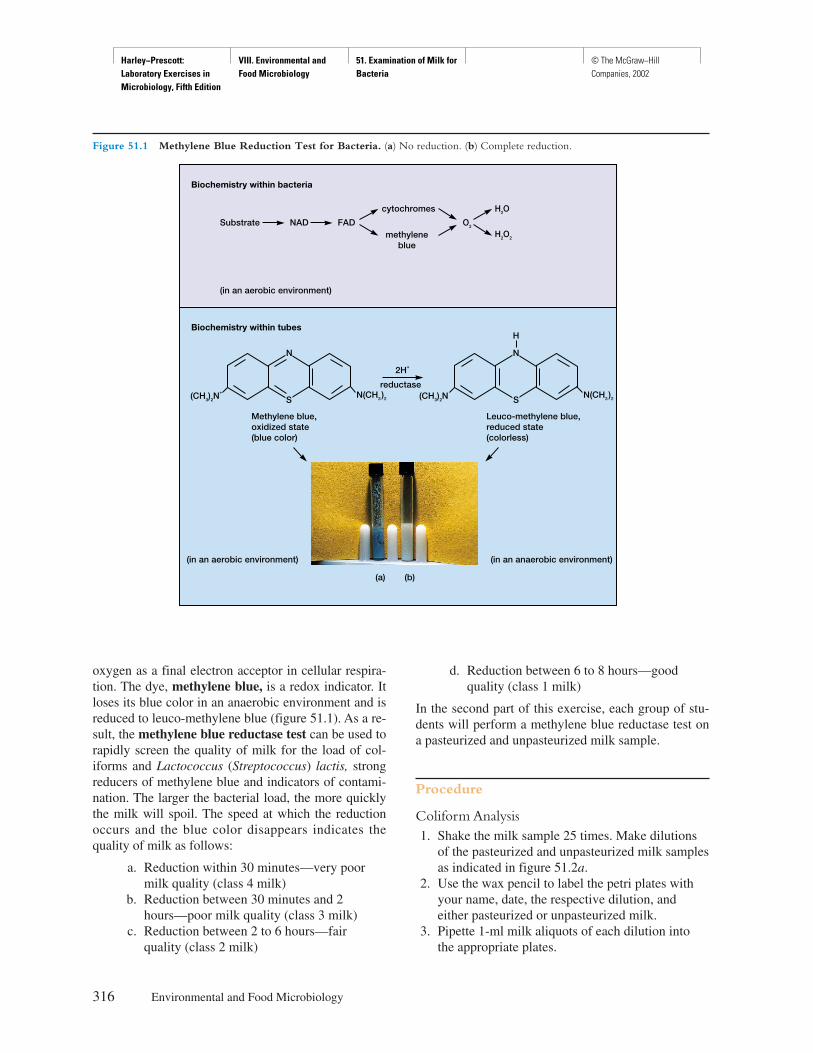
Harley−Prescott: Laboratory Exercises in Microbiology, Fifth Edition
VIII. Environmental and Food Microbiology
51. Examination of Milk for Bacteria
© The McGraw−Hill Companies, 2002
oxygen as a final electron acceptor in cellular respira-tion. The dye, methylene blue, is a redox indicator. Itloses its blue color in an anaerobic environment and isreduced to leuco-methylene blue (figure 51.1). As a re-sult, the methylene blue reductase test can be used torapidly screen the quality of milk for the load of col-iforms and Lactococcus (Streptococcus) lactis, strongreducers of methylene blue and indicators of contami-nation. The larger the bacterial load, the more quicklythe milk will spoil. The speed at which the reductionoccurs and the blue color disappears indicates thequality of milk as follows:
a. Reduction within 30 minutes—very poormilk quality (class 4 milk)
b. Reduction between 30 minutes and 2hours—poor milk quality (class 3 milk)
c. Reduction between 2 to 6 hours—fairquality (class 2 milk)
d. Reduction between 6 to 8 hours—goodquality (class 1 milk)
In the second part of this exercise, each group of stu-dents will perform a methylene blue reductase test ona pasteurized and unpasteurized milk sample.
Procedure
Coliform Analysis1. Shake the milk sample 25 times. Make dilutions
of the pasteurized and unpasteurized milk samplesas indicated in figure 51.2a.
2. Use the wax pencil to label the petri plates withyour name, date, the respective dilution, andeither pasteurized or unpasteurized milk.
3. Pipette 1-ml milk aliquots of each dilution intothe appropriate plates.
316 Environmental and Food Microbiology
Biochemistry within bacteria
Biochemistry within tubes
Substrate NAD FAD
cytochromes
methyleneblue
O2
(in an aerobic environment)
reductase
N
S
N
S
(in an aerobic environment)
H
H2O
H2O2
Methylene blue,oxidized state(blue color)
(CH3)2N+ (CH3)2NN(CH3)2 N(CH3)2
2H+
Leuco-methylene blue,reduced state(colorless)
(in an anaerobic environment)
(a) (b)
Figure 51.1 Methylene Blue Reduction Test for Bacteria. (a) No reduction. (b) Complete reduction.
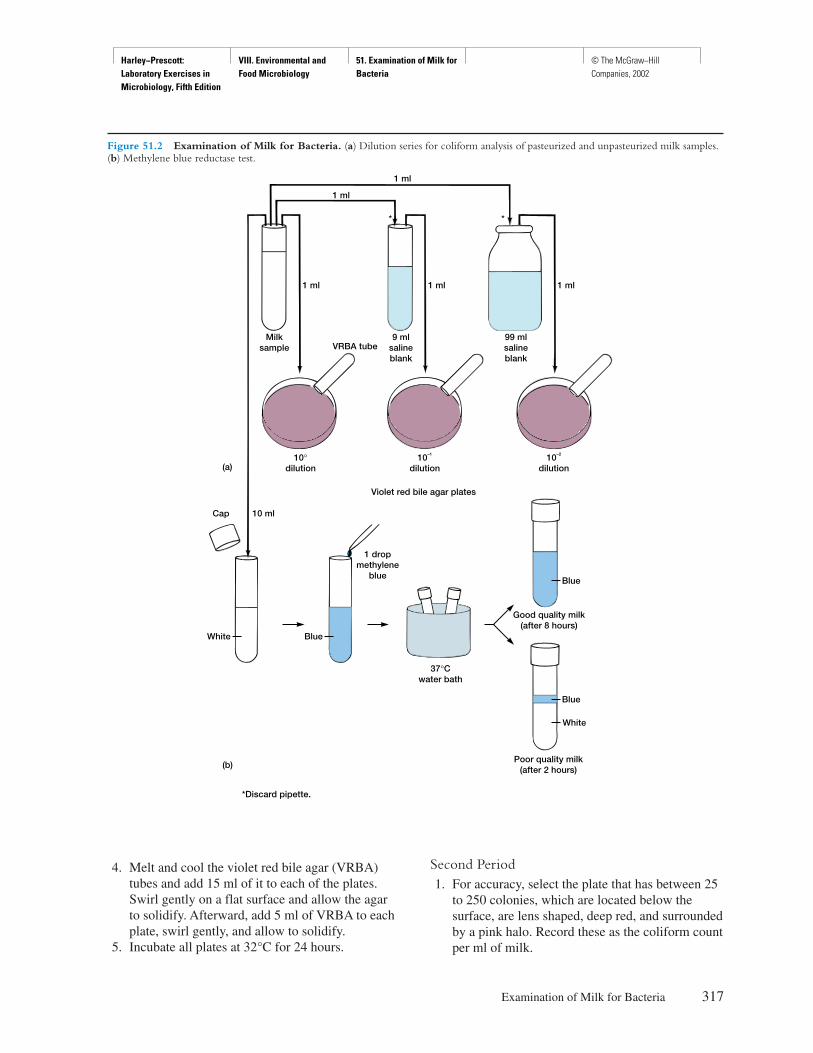
Harley−Prescott: Laboratory Exercises in Microbiology, Fifth Edition
VIII. Environmental and Food Microbiology
51. Examination of Milk for Bacteria
© The McGraw−Hill Companies, 2002
4. Melt and cool the violet red bile agar (VRBA)tubes and add 15 ml of it to each of the plates.Swirl gently on a flat surface and allow the agarto solidify. Afterward, add 5 ml of VRBA to eachplate, swirl gently, and allow to solidify.
5. Incubate all plates at 32°C for 24 hours.
Second Period1. For accuracy, select the plate that has between 25
to 250 colonies, which are located below thesurface, are lens shaped, deep red, and surroundedby a pink halo. Record these as the coliform countper ml of milk.
Examination of Milk for Bacteria 317
1 ml
1 ml
**
1 ml 1 ml 1 ml
(a)
Cap
(b)
10 ml
White Blue
Blue
White
Blue
Milksample VRBA tube
9 mlsalineblank
99 mlsalineblank
10°dilution
10–1
dilution10–2
dilution
Violet red bile agar plates
1 dropmethylene
blue
Good quality milk(after 8 hours)
Poor quality milk(after 2 hours)
37°Cwater bath
*Discard pipette.
Figure 51.2 Examination of Milk for Bacteria. (a) Dilution series for coliform analysis of pasteurized and unpasteurized milk samples.(b) Methylene blue reductase test.
Harley−Prescott: Laboratory Exercises in Microbiology, Fifth Edition
VIII. Environmental and Food Microbiology
51. Examination of Milk for Bacteria
© The McGraw−Hill Companies, 2002
Methylene Blue Reductase Test1. Label the two screw-cap tubes with your name
and pasteurized and unpasteurized, respectively.2. Using the 10-ml pipette, transfer 10 ml of
unpasteurized milk to one screw-cap tube and,with another pipette, 10 ml of pasteurized milk tothe other tube (figure 51.2b).
3. Add 1 drop of methylene blue to each tube.4. Cap tightly and invert the tubes several times.5. Place the tubes in a test-tube rack and place the
rack in the 37°C water bath. After a 5-minute
incubation, remove the tubes from the water bathand invert several times to mix again.
6. Observe the tubes at 30-minute intervals for 8hours. Reduction is demonstrated by a change incolor of the milk sample from blue to white.When at least 4/5 of the tube has turned white, theend point of reduction has been reached, and thetime should be recorded.
7. Record your results and the class of milk in thereport for exercise 51.
318 Environmental and Food Microbiology
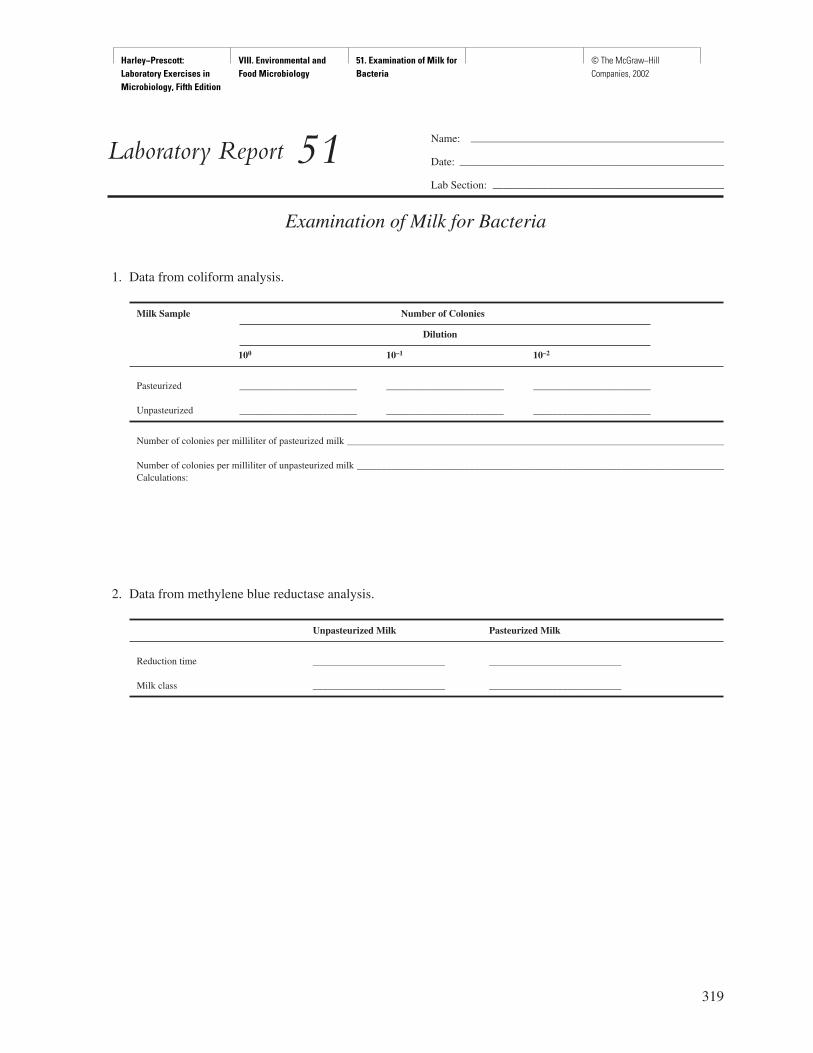
Harley−Prescott: Laboratory Exercises in Microbiology, Fifth Edition
VIII. Environmental and Food Microbiology
51. Examination of Milk for Bacteria
© The McGraw−Hill Companies, 2002
319
Name: ———————————————————————
Date: ————————————————————————
Lab Section: —————————————————————
Laboratory Report 51
Examination of Milk for Bacteria
1. Data from coliform analysis.
Milk Sample Number of Colonies
Dilution
100 10–1 10–2
Pasteurized ________________________ ________________________ ________________________
Unpasteurized ________________________ ________________________ ________________________
Number of colonies per milliliter of pasteurized milk _____________________________________________________________________________
Number of colonies per milliliter of unpasteurized milk ___________________________________________________________________________Calculations:
2. Data from methylene blue reductase analysis.
Unpasteurized Milk Pasteurized Milk
Reduction time ___________________________ ___________________________
Milk class ___________________________ ___________________________

Harley−Prescott: Laboratory Exercises in Microbiology, Fifth Edition
VIII. Environmental and Food Microbiology
51. Examination of Milk for Bacteria
© The McGraw−Hill Companies, 2002
Review Questions
1. What is the function of the methylene blue in the reductase test for milk quality?
2. Why does milk sour when it is not refrigerated?
3. How can a milk sample be contaminated by humans?
4. Why is milk pasteurized and not sterilized?
5. What are the differences in methylene blue reduction time between the different classes of milk? What dothese differences signify?
6. As a bacteriological medium, how does milk differ from water?
7. What are some bacteria normally found in milk?
320 Environmental and Food Microbiology
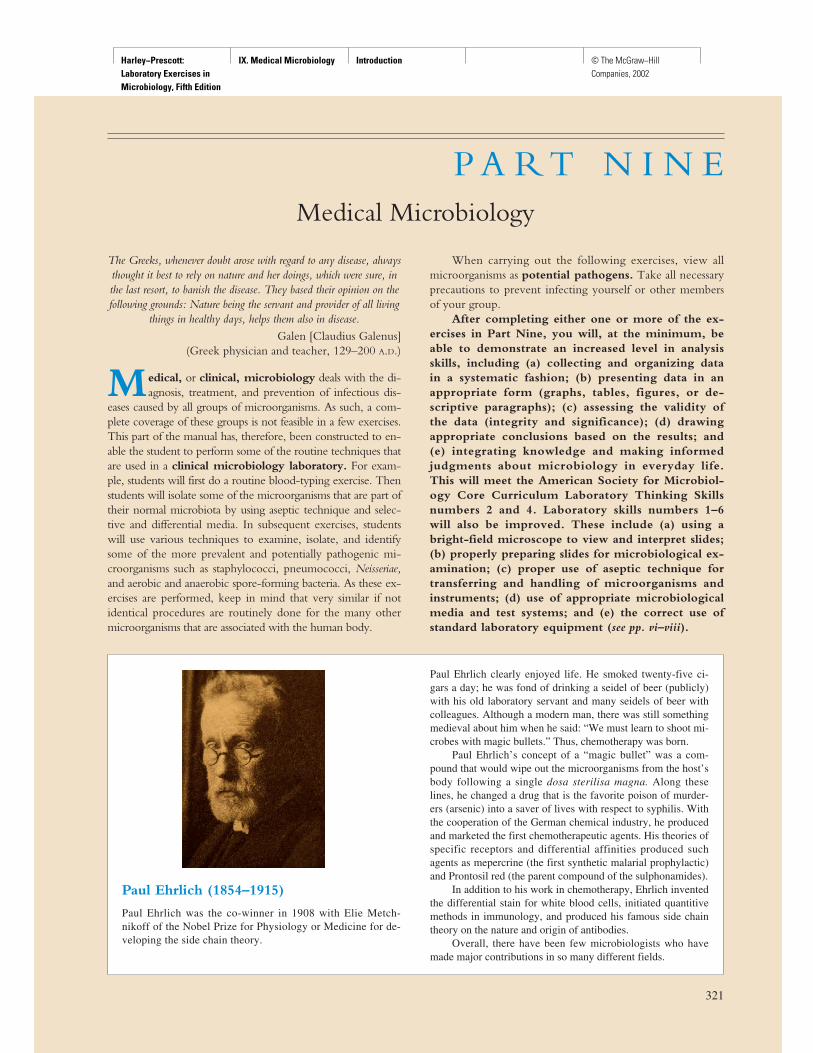
Harley−Prescott: Laboratory Exercises in Microbiology, Fifth Edition
IX. Medical Microbiology Introduction © The McGraw−Hill Companies, 2002
321321
P A R T N I N EMedical Microbiology
The Greeks, whenever doubt arose with regard to any disease, alwaysthought it best to rely on nature and her doings, which were sure, inthe last resort, to banish the disease. They based their opinion on thefollowing grounds: Nature being the servant and provider of all living
things in healthy days, helps them also in disease.Galen [Claudius Galenus]
(Greek physician and teacher, 129–200 A.D.)
Medical, or clinical, microbiology deals with the di-agnosis, treatment, and prevention of infectious dis-
eases caused by all groups of microorganisms. As such, a com-plete coverage of these groups is not feasible in a few exercises.This part of the manual has, therefore, been constructed to en-able the student to perform some of the routine techniques thatare used in a clinical microbiology laboratory. For exam-ple, students will first do a routine blood-typing exercise. Thenstudents will isolate some of the microorganisms that are part oftheir normal microbiota by using aseptic technique and selec-tive and differential media. In subsequent exercises, studentswill use various techniques to examine, isolate, and identifysome of the more prevalent and potentially pathogenic mi-croorganisms such as staphylococci, pneumococci, Neisseriae,and aerobic and anaerobic spore-forming bacteria. As these ex-ercises are performed, keep in mind that very similar if notidentical procedures are routinely done for the many othermicroorganisms that are associated with the human body.
When carrying out the following exercises, view allmicroorganisms as potential pathogens. Take all necessaryprecautions to prevent infecting yourself or other membersof your group.
After completing either one or more of the ex-ercises in Part Nine, you will, at the minimum, beable to demonstrate an increased level in analysisskills, including (a) collecting and organizing datain a systematic fashion; (b) presenting data in anappropriate form (graphs, tables, figures, or de-scriptive paragraphs); (c) assessing the validity ofthe data (integrity and significance); (d) drawingappropriate conclusions based on the results; and(e) integrating knowledge and making informedjudgments about microbiology in everyday life.This will meet the American Society for Microbiol-ogy Core Curriculum Laboratory Thinking Skillsnumbers 2 and 4. Laboratory skills numbers 1–6will also be improved. These include (a) using abright-field microscope to view and interpret slides;(b) properly preparing slides for microbiological ex-amination; (c) proper use of aseptic technique fortransferring and handling of microorganisms andinstruments; (d) use of appropriate microbiologicalmedia and test systems; and (e) the correct use ofstandard laboratory equipment (see pp. vi–viii).
Paul Ehrlich (1854–1915)
Paul Ehrlich was the co-winner in 1908 with Elie Metch-nikoff of the Nobel Prize for Physiology or Medicine for de-veloping the side chain theory.
Paul Ehrlich clearly enjoyed life. He smoked twenty-five ci-gars a day; he was fond of drinking a seidel of beer (publicly)with his old laboratory servant and many seidels of beer withcolleagues. Although a modern man, there was still somethingmedieval about him when he said: “We must learn to shoot mi-crobes with magic bullets.” Thus, chemotherapy was born.
Paul Ehrlich’s concept of a “magic bullet” was a com-pound that would wipe out the microorganisms from the host’sbody following a single dosa sterilisa magna. Along theselines, he changed a drug that is the favorite poison of murder-ers (arsenic) into a saver of lives with respect to syphilis. Withthe cooperation of the German chemical industry, he producedand marketed the first chemotherapeutic agents. His theories ofspecific receptors and differential affinities produced suchagents as mepercrine (the first synthetic malarial prophylactic)and Prontosil red (the parent compound of the sulphonamides).
In addition to his work in chemotherapy, Ehrlich inventedthe differential stain for white blood cells, initiated quantitivemethods in immunology, and produced his famous side chaintheory on the nature and origin of antibodies.
Overall, there have been few microbiologists who havemade major contributions in so many different fields.
Harley−Prescott: Laboratory Exercises in Microbiology, Fifth Edition
IX. Medical Microbiology 52. Agglutination Reactions: Blood Groups
© The McGraw−Hill Companies, 2002
Materials per Student
sterile, unused blood lancets or an automaticlancet device
glass slidetoothpicks70% ethyl alcohol and iodinecotton applicators or cotton swabsanti-A and anti-B serawax pencilgrease-cutting detergent (Bon Ami)commercially prepared and tested blood (A, B,
AB, and O) or WARD’s artificial blooddisposable glovesBIOHAZARD Bags and a SHARPS container for
proper disposal of material
Learning Objectives
Each student should be able to
1. Appreciate and understand the potential hazardsinvolved with using human blood
2. Understand the meaning of the termsagglutination and hemagglutination
3. Determine his or her own blood type (or the bloodtypes of the commercial blood)
Suggested Reading in Textbook
1. Agglutination, section 33.3.
Principles
When agglutination reactions involve the clumping ofred blood cells, they are termed hemagglutinations.Hemagglutination occurs because of the ability of an-tibodies to cross-link red blood cells by binding tosurface antigens. Hemagglutination microscopic-slidetests are routinely used in blood typing.
The four major human blood types (A, B, AB, andO) are genetically determined. Individuals with bloodtypes A, B, or AB have antigens on the surface oftheir red blood cells. These antigens, known as agglu-tinogens, correspond to the specific group (e.g., typeA has agglutinogen A). An individual having bloodtype O lacks these agglutinogens. These surface anti-gens are also referred to as isoantigens (antigens thatexist in alternative forms in a species and which arecapable of causing an immune response in geneticallydifferent individuals of the same species, but not in in-dividuals who carry them). The ABO blood groupingsystem is unique because individuals who haveisoantigens on their red blood cells will have the op-posite isoantibodies (agglutinins) in their serum. Forexample, persons with type A red blood cells haveanti-B isoantibodies (table 52.1).
322
E X E R C I S E
Agglutination Reactions: Blood Groups
52
SAFETY CONSIDERATIONSHuman blood may be a vehicle for the transmission ofblood-borne diseases such as AIDS and hepatitis.Therefore, some instructors may wish to use commer-cially prepared blood that has been tested and is free ofthe microorganisms responsible for these diseases in-stead of having students use their own blood. In 1992,WARD’s started marketing simulated ABO and Rhblood and antisera for safe smears and analysis. Someinstructors may want to use this artificial blood. Otherinstructors may want to do this classical experiment asit has been done for years. If the latter is followed, it isat the students’ own risk. Each instructor should advisethe students of the safety and precautions necessary tocarry out this experiment. At a minimum, precautionsshould include
1. The use of disposable gloves by the students.2. Procedures for the prevention of accidental needle
or lancet sticks.3. The use of appropriate containers for the disposal
of lancets, cotton, slides, toothpicks, and gloves.Immediately report any blood that has been dropped onthe lab table, bench, or floor to your instructor.
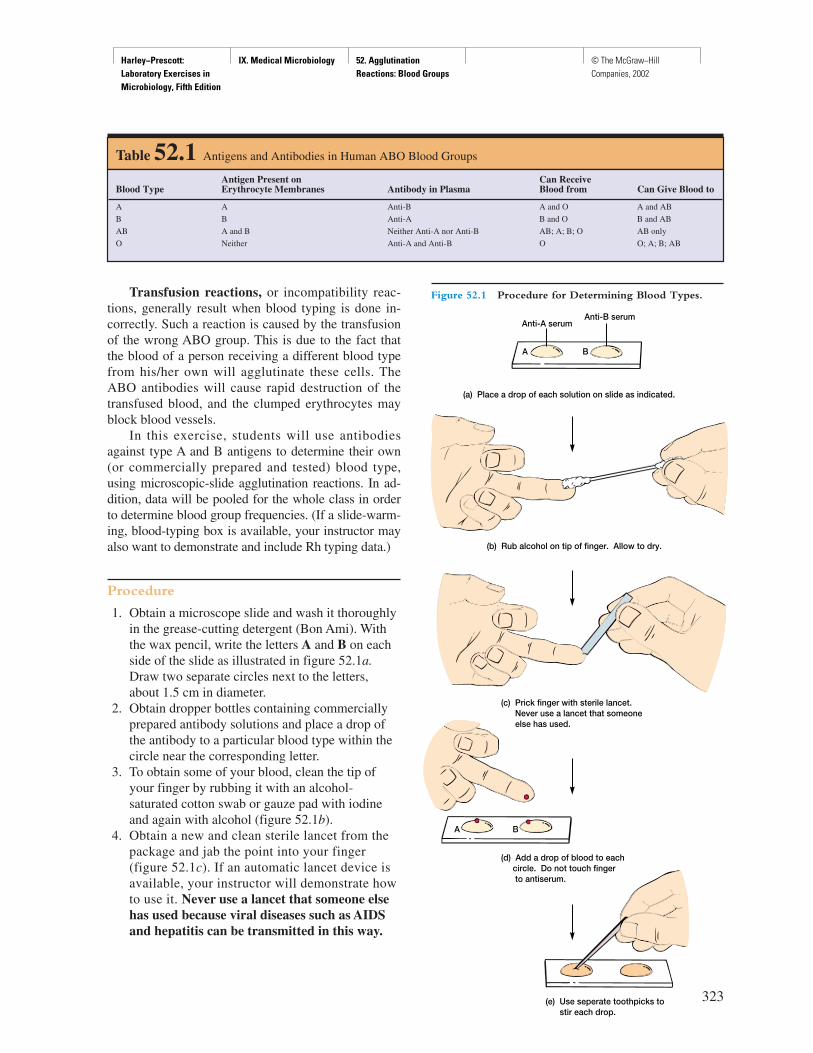
Harley−Prescott: Laboratory Exercises in Microbiology, Fifth Edition
IX. Medical Microbiology 52. Agglutination Reactions: Blood Groups
© The McGraw−Hill Companies, 2002
Transfusion reactions, or incompatibility reac-tions, generally result when blood typing is done in-correctly. Such a reaction is caused by the transfusionof the wrong ABO group. This is due to the fact thatthe blood of a person receiving a different blood typefrom his/her own will agglutinate these cells. TheABO antibodies will cause rapid destruction of thetransfused blood, and the clumped erythrocytes mayblock blood vessels.
In this exercise, students will use antibodiesagainst type A and B antigens to determine their own(or commercially prepared and tested) blood type,using microscopic-slide agglutination reactions. In ad-dition, data will be pooled for the whole class in orderto determine blood group frequencies. (If a slide-warm-ing, blood-typing box is available, your instructor mayalso want to demonstrate and include Rh typing data.)
Procedure
1. Obtain a microscope slide and wash it thoroughlyin the grease-cutting detergent (Bon Ami). Withthe wax pencil, write the letters A and B on eachside of the slide as illustrated in figure 52.1a.Draw two separate circles next to the letters,about 1.5 cm in diameter.
2. Obtain dropper bottles containing commerciallyprepared antibody solutions and place a drop ofthe antibody to a particular blood type within thecircle near the corresponding letter.
3. To obtain some of your blood, clean the tip ofyour finger by rubbing it with an alcohol-saturated cotton swab or gauze pad with iodineand again with alcohol (figure 52.1b).
4. Obtain a new and clean sterile lancet from thepackage and jab the point into your finger(figure 52.1c). If an automatic lancet device isavailable, your instructor will demonstrate howto use it. Never use a lancet that someone elsehas used because viral diseases such as AIDSand hepatitis can be transmitted in this way.
323
A B
BA
Anti-A serumAnti-B serum
(a) Place a drop of each solution on slide as indicated.
(b) Rub alcohol on tip of finger. Allow to dry.
(c) Prick finger with sterile lancet. Never use a lancet that someone else has used.
(d) Add a drop of blood to each circle. Do not touch finger to antiserum.
(e) Use seperate toothpicks to stir each drop.
Figure 52.1 Procedure for Determining Blood Types.
Table 52.1 Antigens and Antibodies in Human ABO Blood Groups
Antigen Present on Can ReceiveBlood Type Erythrocyte Membranes Antibody in Plasma Blood from Can Give Blood to
A A Anti-B A and O A and AB
B B Anti-A B and O B and AB
AB A and B Neither Anti-A nor Anti-B AB; A; B; O AB only
O Neither Anti-A and Anti-B O O; A; B; AB
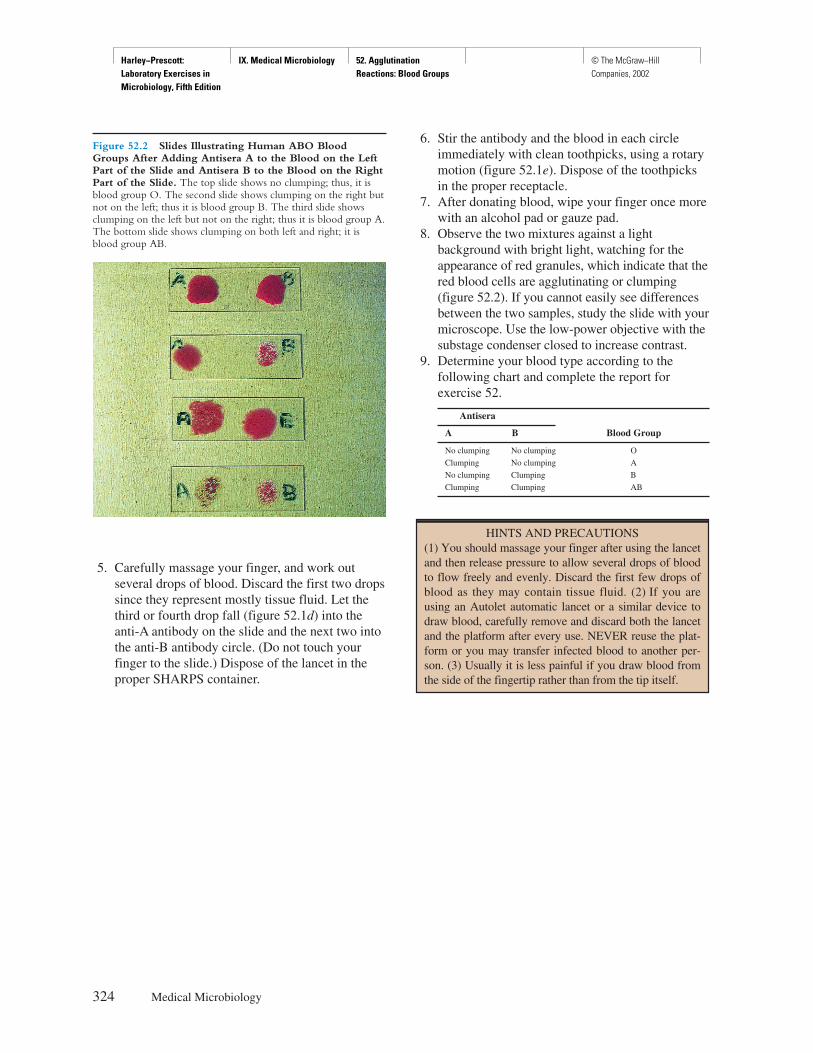
Harley−Prescott: Laboratory Exercises in Microbiology, Fifth Edition
IX. Medical Microbiology 52. Agglutination Reactions: Blood Groups
© The McGraw−Hill Companies, 2002
5. Carefully massage your finger, and work outseveral drops of blood. Discard the first two dropssince they represent mostly tissue fluid. Let thethird or fourth drop fall (figure 52.1d) into theanti-A antibody on the slide and the next two intothe anti-B antibody circle. (Do not touch yourfinger to the slide.) Dispose of the lancet in theproper SHARPS container.
6. Stir the antibody and the blood in each circleimmediately with clean toothpicks, using a rotarymotion (figure 52.1e). Dispose of the toothpicksin the proper receptacle.
7. After donating blood, wipe your finger once morewith an alcohol pad or gauze pad.
8. Observe the two mixtures against a lightbackground with bright light, watching for theappearance of red granules, which indicate that thered blood cells are agglutinating or clumping(figure 52.2). If you cannot easily see differencesbetween the two samples, study the slide with yourmicroscope. Use the low-power objective with thesubstage condenser closed to increase contrast.
9. Determine your blood type according to thefollowing chart and complete the report forexercise 52.
Antisera
A B Blood Group
No clumping No clumping O
Clumping No clumping A
No clumping Clumping B
Clumping Clumping AB
324 Medical Microbiology
Figure 52.2 Slides Illustrating Human ABO BloodGroups After Adding Antisera A to the Blood on the LeftPart of the Slide and Antisera B to the Blood on the RightPart of the Slide. The top slide shows no clumping; thus, it isblood group O. The second slide shows clumping on the right butnot on the left; thus it is blood group B. The third slide showsclumping on the left but not on the right; thus it is blood group A.The bottom slide shows clumping on both left and right; it isblood group AB.
HINTS AND PRECAUTIONS(1) You should massage your finger after using the lancetand then release pressure to allow several drops of bloodto flow freely and evenly. Discard the first few drops ofblood as they may contain tissue fluid. (2) If you areusing an Autolet automatic lancet or a similar device todraw blood, carefully remove and discard both the lancetand the platform after every use. NEVER reuse the plat-form or you may transfer infected blood to another per-son. (3) Usually it is less painful if you draw blood fromthe side of the fingertip rather than from the tip itself.
Harley−Prescott: Laboratory Exercises in Microbiology, Fifth Edition
IX. Medical Microbiology 52. Agglutination Reactions: Blood Groups
© The McGraw−Hill Companies, 2002
325
Name: ———————————————————————
Date: ————————————————————————
Lab Section: —————————————————————
Laboratory Report 52
Agglutination Reactions: Blood Groups
1. Your blood type is _____________.
2. Tabulate the class results and determine the distribution of blood types by completing the following table.
Blood Groups Number of Students Tested Number Positive Percent
O __________________________________________ ________________________ _________
A __________________________________________ ________________________ _________
B __________________________________________ ________________________ _________
AB __________________________________________ ________________________ _________
3. How do the class results compare with table 52.1?

Harley−Prescott: Laboratory Exercises in Microbiology, Fifth Edition
IX. Medical Microbiology 52. Agglutination Reactions: Blood Groups
© The McGraw−Hill Companies, 2002
Review Questions
1. Could a type AB individual receive blood from a type B individual? Who would receive type O blood?Explain your answers.
2. Could a person with blood type AB receive blood from a primate with the same blood type? Explain youranswer.
3. What is the blood type of the person to either your left or right? _____________ Are your blood typescompatible? Explain why or why not.
4. Why would a person with blood type A exhibit a transfusion reaction if given type B blood?
5. What causes clumping to occur?
6. What is an agglutination reaction?
7. What is serotyping?
326 Medical Microbiology
Harley−Prescott: Laboratory Exercises in Microbiology, Fifth Edition
IX. Medical Microbiology 53. Isolation of Normal Microbiota from the Human Body
© The McGraw−Hill Companies, 2002
Materials per Student
1 blood agar plate1 tryptic soy agar plate (TSA)1 eosin methylene blue (EMB) plate2 triple sugar iron (TSI) agar slants2 Simmons citrate agar slants2 lysine agar (LIA) slants2 SIM tube agar deeps2 methyl red–Voges-Proskauer (MR-VP) broth3 sterile swabstube of 0.85% saline (NaCl)3% hydrogen peroxidesterile tongue depressorsKovacs’ solutionmethyl red indicatorVoges-Proskauer reagentwax pencilBunsen burnerinoculating loopinoculating needle35°C incubatorGram-stain reagentsdisinfectant for swabs and tongue depressorstest-tube rack or can
Learning Objectives
Each student should be able to
1. Isolate pure cultures of bacteria from his or herthroat, skin, and rectal area
2. Become better acquainted with the normalmicrobiota of the human body
3. Learn several techniques for culturing microbiotafrom the human body
Suggested Reading in Textbook
1. Normal Microbiota of the Human Body, section 31.2.
2. Skin, section 31.2.3. Oropharynx, section 31.2.4. Large Intestine (Colon), section 31.2.5. Identification of Microorganisms from
Specimens, section 36.2.
Pronunciation Guide
Enterobacter aerogenes (en-ter-oh-BAK-ter a-RAH-jen-eez)
Escherichia coli (esh-er-I-ke-a KOH-lee)
Medical Application
EMB and MacConkey’s agar allows a quick preliminary in-dication of whether a clinical specimen contains entericbacteria. Enteric bacteria are facultatively anaerobic Gram-negative rods. They can be divided into those bacteria thatproduce acid from lactose fermentation (the coliforms; e.g.,the nonpathogenic Escherichia coli and Enterobacter aero-genes) and those that don’t (non lactose fermenters; e.g.,the pathogenic Salmonella typhi [typhoid fever] andSchigella dysenteriae [bacillary dysentery]).
327
E X E R C I S E
Isolation of Normal Microbiota from the Human Body
53
SAFETY CONSIDERATIONSIn this experiment, students will be taking unknown mi-crobial samples from the human body and growingthem to large concentrations. Any of these samplescould contain human pathogens; thus, extreme cautionshould be taken when working with and disposing ofthe final product. Kovacs’ reagent is caustic to the skinand mucous membranes due to the concentrated HCland p-dimethyl-aminebenzaldehyde. When finished,place all used swabs and tongue depressors in disinfec-tant. Keep all culture tubes upright in a test-tube rack orin a can.
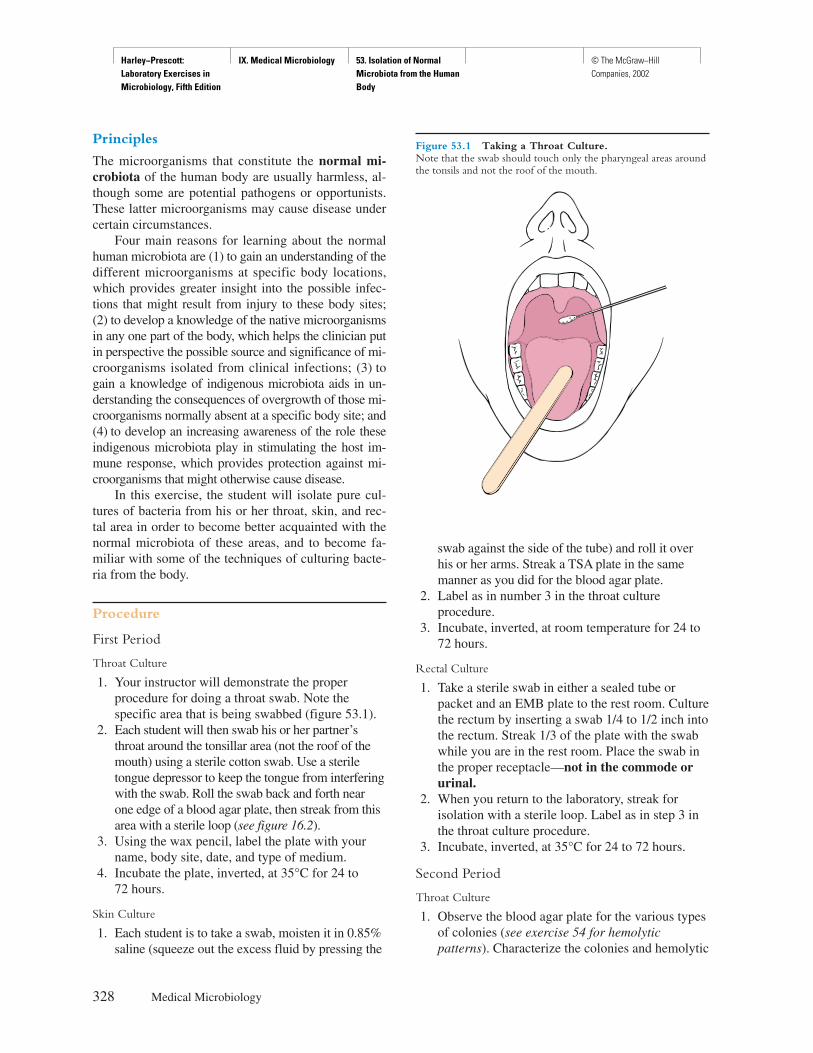
Harley−Prescott: Laboratory Exercises in Microbiology, Fifth Edition
IX. Medical Microbiology 53. Isolation of Normal Microbiota from the Human Body
© The McGraw−Hill Companies, 2002
Principles
The microorganisms that constitute the normal mi-crobiota of the human body are usually harmless, al-though some are potential pathogens or opportunists.These latter microorganisms may cause disease undercertain circumstances.
Four main reasons for learning about the normalhuman microbiota are (1) to gain an understanding of thedifferent microorganisms at specific body locations,which provides greater insight into the possible infec-tions that might result from injury to these body sites;(2) to develop a knowledge of the native microorganismsin any one part of the body, which helps the clinician putin perspective the possible source and significance of mi-croorganisms isolated from clinical infections; (3) togain a knowledge of indigenous microbiota aids in un-derstanding the consequences of overgrowth of those mi-croorganisms normally absent at a specific body site; and(4) to develop an increasing awareness of the role theseindigenous microbiota play in stimulating the host im-mune response, which provides protection against mi-croorganisms that might otherwise cause disease.
In this exercise, the student will isolate pure cul-tures of bacteria from his or her throat, skin, and rec-tal area in order to become better acquainted with thenormal microbiota of these areas, and to become fa-miliar with some of the techniques of culturing bacte-ria from the body.
Procedure
First Period
Throat Culture
1. Your instructor will demonstrate the properprocedure for doing a throat swab. Note thespecific area that is being swabbed (figure 53.1).
2. Each student will then swab his or her partner’sthroat around the tonsillar area (not the roof of themouth) using a sterile cotton swab. Use a steriletongue depressor to keep the tongue from interferingwith the swab. Roll the swab back and forth nearone edge of a blood agar plate, then streak from thisarea with a sterile loop (see figure 16.2).
3. Using the wax pencil, label the plate with yourname, body site, date, and type of medium.
4. Incubate the plate, inverted, at 35°C for 24 to 72 hours.
Skin Culture
1. Each student is to take a swab, moisten it in 0.85%saline (squeeze out the excess fluid by pressing the
swab against the side of the tube) and roll it overhis or her arms. Streak a TSA plate in the samemanner as you did for the blood agar plate.
2. Label as in number 3 in the throat cultureprocedure.
3. Incubate, inverted, at room temperature for 24 to72 hours.
Rectal Culture
1. Take a sterile swab in either a sealed tube orpacket and an EMB plate to the rest room. Culturethe rectum by inserting a swab 1/4 to 1/2 inch intothe rectum. Streak 1/3 of the plate with the swabwhile you are in the rest room. Place the swab inthe proper receptacle—not in the commode orurinal.
2. When you return to the laboratory, streak forisolation with a sterile loop. Label as in step 3 inthe throat culture procedure.
3. Incubate, inverted, at 35°C for 24 to 72 hours.
Second Period
Throat Culture
1. Observe the blood agar plate for the various typesof colonies (see exercise 54 for hemolyticpatterns). Characterize the colonies and hemolytic
328 Medical Microbiology
Figure 53.1 Taking a Throat Culture.Note that the swab should touch only the pharyngeal areas aroundthe tonsils and not the roof of the mouth.
Harley−Prescott: Laboratory Exercises in Microbiology, Fifth Edition
IX. Medical Microbiology 53. Isolation of Normal Microbiota from the Human Body
© The McGraw−Hill Companies, 2002
Isolation of Normal Microbiota from the Human Body 329
types. Select a number of well-isolated coloniesthat fit the descriptions in table 53.1.
2. Stain each colony you select with the Gram stain(see exercise 8). Perform a catalase test on thesame colonies you Gram stained (see exercise 28and figure 28.1). Extreme care must be exercisedif a colony is taken from a blood agar plate.Erythrocytes contain catalase, and a carryover ofonly a few blood cells can give a false-positivereaction.
3. Complete Part 1 of the report for exercise 53.
Skin Culture
1. Observe the TSA plate for microorganisms thathave been isolated from the skin. If no coloniesgrew after 24 hours, incubate for an additional 24to 48 hours.
2. Select isolated colonies, describe their appearance(table 53.1), and do a Gram stain.
3. Complete Part 2 of the report for exercise 53.
Rectal Culture
1. The most common rectal isolates will beEscherichia coli and Enterobacter aerogenes.These can be distinguished by biochemical tests.Select two different colonies from your EMBplate (see exercise 16) and inoculate the followingmedia with each, respectively:
a. TSI slant. With a needle, stab the butt andstreak the surface (see figure 14.3).
b. LIA slant. With a needle, stab the butt andstreak the surface.
c. SIM deep. Do a needle stab only.d. Simmons citrate slant. With a loop, streak
the slant.e. MR-VP broth. Inoculate with a loop.
2. Incubate all tubes at 35°C for 18 to 24 hours.
Third Period
TSI
1. Identify your rectal bacteria from the followingbiochemical tests in the TSI tube: acid slant andacid butt with gas (A/Ag); acid slant and acid butt(A/A); acid slant and acid butt with H2S (A/Awith H2S); alkaline slant and alkaline butt (K/K);alkaline slant and neutral butt (K/N).
For acid production, the medium will turnyellow; for gas production, the medium will bebroken up; for an alkaline reaction, the medium
will be pinkish; and for H2S production, themedium in the butt will turn black. See figures21.1 and 21.2 for examples of the abovereactions.
2. Table 53.1 gives a list of some of the morefrequently encountered Enterobacteriaceae foundin the rectal area.
LIA
1. Observe the LIA tube for the following reactions:alkaline slant and alkaline or neutral butt (K/K orK/N); alkaline slant and acid butt (K/A); and redslant and acid butt (R/A). See figure 32.1 for anexample of the above reactions.
2. Interpretation:K/K or K/N lysine-decarboxylase positiveK/A lysine-decarboxylase negativeR/A lysine-deaminase positive
SIM
1. First, observe the SIM tube for motility and H2Sproduction. Motile cultures will have growthdiffusing from the stab line while nonmotile oneswill not (see figure 24.1c).
2. H2S production is indicated by blackening alongthe line of growth (see figure 24.1c).
3. Add 2 to 4 drops of Kovacs’ reagent to thesurface, shake gently, and allow to stand for a fewminutes. Indole production is indicated by a redcolor (see figure 25.1).
Simmons Citrate
1. If the citrate slant turns blue, this indicates citrateutilization and is a positive test (see figure 25.4).
MR-VP Broth
1. Transfer half of the MR-VP broth culture to aclean tube. Add 2 drops of methyl red indicator. Apink color indicates a positive test. To the otherportion of MR-VP broth add 3 to 4 drops of VPreagent. Shake gently and allow to stand at roomtemperature for 15 minutes (see exercise 25). Ifacetoin is produced, a red color will develop, andthe test is positive.
2. Complete Part 3 of the report for exercise 53.
HINTS AND PRECAUTIONSWhen taking a throat culture, it helps if the patient ispositioned in good light so that you can see the back ofthe throat and the position of the swab as you insert it.
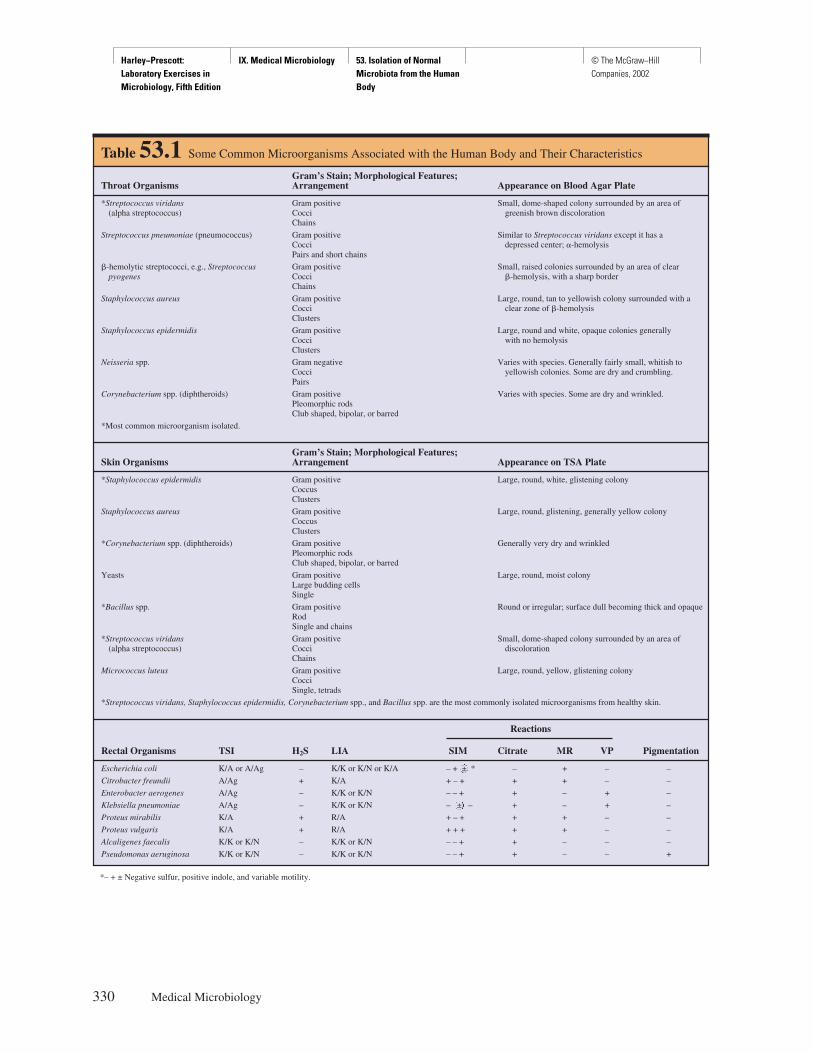
Harley−Prescott: Laboratory Exercises in Microbiology, Fifth Edition
IX. Medical Microbiology 53. Isolation of Normal Microbiota from the Human Body
© The McGraw−Hill Companies, 2002
330 Medical Microbiology
Table 53.1 Some Common Microorganisms Associated with the Human Body and Their Characteristics
Gram’s Stain; Morphological Features;Throat Organisms Arrangement Appearance on Blood Agar Plate
*Streptococcus viridans Gram positive Small, dome-shaped colony surrounded by an area of (alpha streptococcus) Cocci greenish brown discoloration
Chains
Streptococcus pneumoniae (pneumococcus) Gram positive Similar to Streptococcus viridans except it has aCocci depressed center; �-hemolysisPairs and short chains
�-hemolytic streptococci, e.g., Streptococcus Gram positive Small, raised colonies surrounded by an area of clear pyogenes Cocci �-hemolysis, with a sharp border
Chains
Staphylococcus aureus Gram positive Large, round, tan to yellowish colony surrounded with aCocci clear zone of �-hemolysisClusters
Staphylococcus epidermidis Gram positive Large, round and white, opaque colonies generallyCocci with no hemolysisClusters
Neisseria spp. Gram negative Varies with species. Generally fairly small, whitish toCocci yellowish colonies. Some are dry and crumbling.Pairs
Corynebacterium spp. (diphtheroids) Gram positive Varies with species. Some are dry and wrinkled.Pleomorphic rodsClub shaped, bipolar, or barred
*Most common microorganism isolated.
Gram’s Stain; Morphological Features;Skin Organisms Arrangement Appearance on TSA Plate
*Staphylococcus epidermidis Gram positive Large, round, white, glistening colonyCoccusClusters
Staphylococcus aureus Gram positive Large, round, glistening, generally yellow colonyCoccusClusters
*Corynebacterium spp. (diphtheroids) Gram positive Generally very dry and wrinkledPleomorphic rodsClub shaped, bipolar, or barred
Yeasts Gram positive Large, round, moist colonyLarge budding cellsSingle
*Bacillus spp. Gram positive Round or irregular; surface dull becoming thick and opaqueRodSingle and chains
*Streptococcus viridans Gram positive Small, dome-shaped colony surrounded by an area of (alpha streptococcus) Cocci discoloration
Chains
Micrococcus luteus Gram positive Large, round, yellow, glistening colonyCocciSingle, tetrads
*Streptococcus viridans, Staphylococcus epidermidis, Corynebacterium spp., and Bacillus spp. are the most commonly isolated microorganisms from healthy skin.
Reactions
Rectal Organisms TSI H2S LIA SIM Citrate MR VP Pigmentation
Escherichia coli K/A or A/Ag – K/K or K/N or K/A – + ± * – + – –
Citrobacter freundii A/Ag + K/A + – + + + – –
Enterobacter aerogenes A/Ag – K/K or K/N – – + + – + –
Klebsiella pneumoniae A/Ag – K/K or K/N – ± – + – + –
Proteus mirabilis K/A + R/A + – + + + – –
Proteus vulgaris K/A + R/A + + + + + – –
Alcaligenes faecalis K/K or K/N – K/K or K/N – – + + – – –
Pseudomonas aeruginosa K/K or K/N – K/K or K/N – – + + – – +
*– + ± Negative sulfur, positive indole, and variable motility.
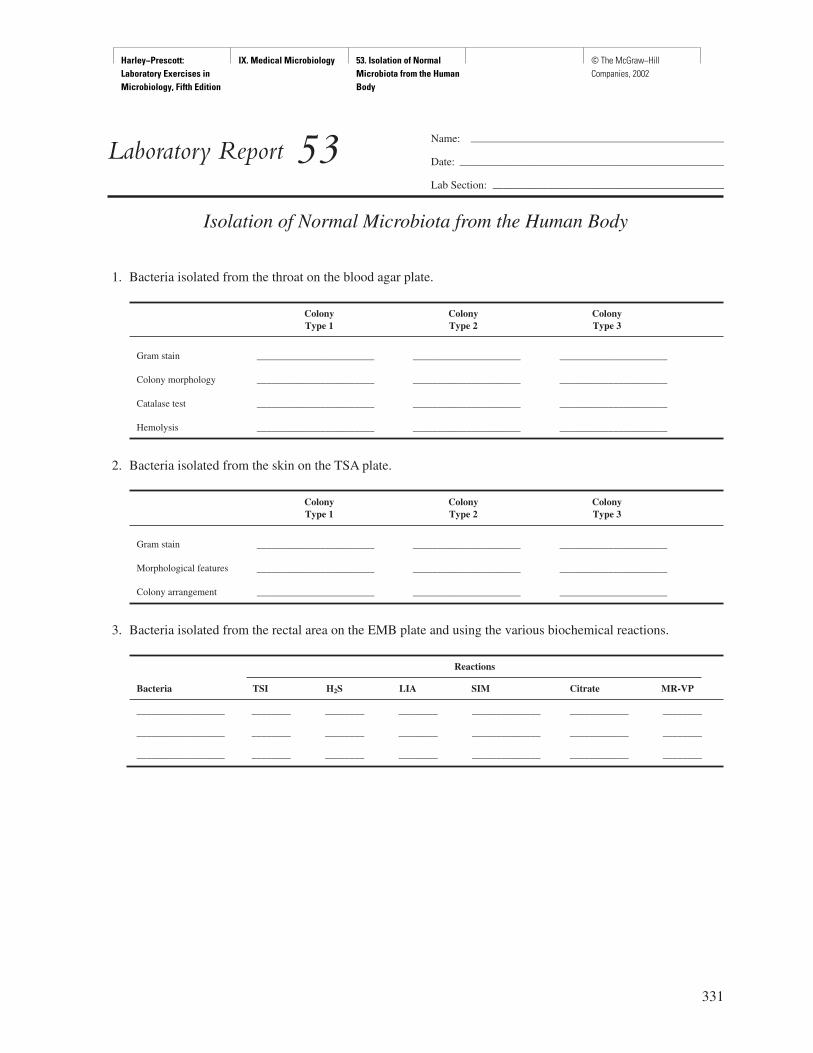
Harley−Prescott: Laboratory Exercises in Microbiology, Fifth Edition
IX. Medical Microbiology 53. Isolation of Normal Microbiota from the Human Body
© The McGraw−Hill Companies, 2002
331
Name: ———————————————————————
Date: ————————————————————————
Lab Section: —————————————————————
Laboratory Report 53
Isolation of Normal Microbiota from the Human Body
1. Bacteria isolated from the throat on the blood agar plate.
Colony Colony ColonyType 1 Type 2 Type 3
Gram stain ________________________ ______________________ ______________________
Colony morphology ________________________ ______________________ ______________________
Catalase test ________________________ ______________________ ______________________
Hemolysis ________________________ ______________________ ______________________
2. Bacteria isolated from the skin on the TSA plate.
Colony Colony ColonyType 1 Type 2 Type 3
Gram stain ________________________ ______________________ ______________________
Morphological features ________________________ ______________________ ______________________
Colony arrangement ________________________ ______________________ ______________________
3. Bacteria isolated from the rectal area on the EMB plate and using the various biochemical reactions.
Reactions
Bacteria TSI H2S LIA SIM Citrate MR-VP
__________________ ________ ________ ________ ______________ ____________ ________
__________________ ________ ________ ________ ______________ ____________ ________
__________________ ________ ________ ________ ______________ ____________ ________
Harley−Prescott: Laboratory Exercises in Microbiology, Fifth Edition
IX. Medical Microbiology 53. Isolation of Normal Microbiota from the Human Body
© The McGraw−Hill Companies, 2002
Review Questions
1. When doing a throat culture, what specific area of the throat is swabbed, and why?
2. When doing a skin culture, why is the swab first moistened with saline?
3. What are four reasons for knowing which microorganisms are associated with different parts of the body?a.
b.
c.
d.
4. Why were the blood agar plates incubated at 35°C, whereas the TSA plates were at room temperature?
5. Why is EMB used for rectal cultures?
6. What are fastidious streptococci?
7. Would you expect to isolate β-hemolytic streptococci from the skin? Explain your answer.
332 Medical Microbiology
Harley−Prescott: Laboratory Exercises in Microbiology, Fifth Edition
IX. Medical Microbiology 54. Staphylococci © The McGraw−Hill Companies, 2002
Materials per Student
0.85% sterile saline (NaCl)1 Vogel-Johnson plate (for coagulase positive [+]
colonies)1 Mueller-Hinton plateif desired, m-staphylococcus broth tube and/or
mannitol salt agar plate4 sterile cotton swabs1 tryptic soy broth tube (2 ml)1 blood agar plate1 citrated rabbit plasma tube (0.5 ml)1 DNase test agar plate1 nutrient gelatin deep or KEY gelatin test stripantibiotic disks (including penicillin G,
methicillin, and novobiocin; 5 µg)ß-lactamase detection disks (Difco or KEY)forceps and 70% alcohol for disinfecting1 N hydrochloric acid37°C water bath35°C incubatorSTAPHAUREX rapid latex test kit (Wellcome
Diagnostics)disinfectant for swabs and mixing sticksdisposable glovesBunsen burnerinoculating loopGram-staining material
Learning Objectives
Each student should be able to
1. Recognize the medical significance of thestaphylococci
2. Perform selected clinical procedures to isolatestaphylococci from certain areas of the human body
3. Perform selected clinical procedures thatdistinguish the pathogenic species ofstaphylococci from the nonpathogenic species
Suggested Reading in Textbook
1. The Staphylococcaceae, section 23.4; see alsotable 23.3.
2. Staphylococcal Diseases, section 39.3.
Pronunciation Guide
Micrococcus (my-kro-KOK-us)Staphylococcus aureus (staf-il-oh-KOK-kus ORE-ee-us)S. epidermidis (e-pee-DER-meh-diss)S. saprophyticus (sa-pro-FIT-e-kus)Streptococcus (strep-to-KOK-us)S. salvarius (sal-vah-REE-uss)
Medical Application
Mannitol salt and DNase test agars are used in the clinicallaboratory to differentiate the pathogenic Staphylococcusspp. which ferment mannitol from the nonpathogenic Mi-crococcus spp. The pathogen most often encountered isStaphylococcus aureus that causes common food poisoning,osteomyelitis, bacterial pneumonia, and other diseases. Thecoagulase test is used to distinguish between pathogenic andnonpathogenic members of the genus Staphylococcus. Allpathogenic strains of S. aureus are coagulase positivewhereas the nonpathogenic species (S. epidermidis) arecoagulase negative. The coagulase increases virulence bysurrounding those bacteria that produce it with a clot thatprotects the bacteria from phagocytosis and antibodies.
333
E X E R C I S E
Staphylococci
54
SAFETY CONSIDERATIONSBe careful with the 1 N HCl. Since you are workingwith staphylococcal cultures (S. aureus is an oppor-tunistic pathogen), apply your knowledge of aseptictechnique and make certain that you do not carrystaphylococci out of the laboratory as new additions tothe microbiota of your hands. Keep your hands scrupu-lously clean. If you have any minor cuts or scratches,they should be protected with gloves. While in the labo-ratory, keep your hands away from your face. Disposeof all swabs and mixing sticks in the disinfectant. Keepall culture tubes upright in a test-tube rack or in a can.
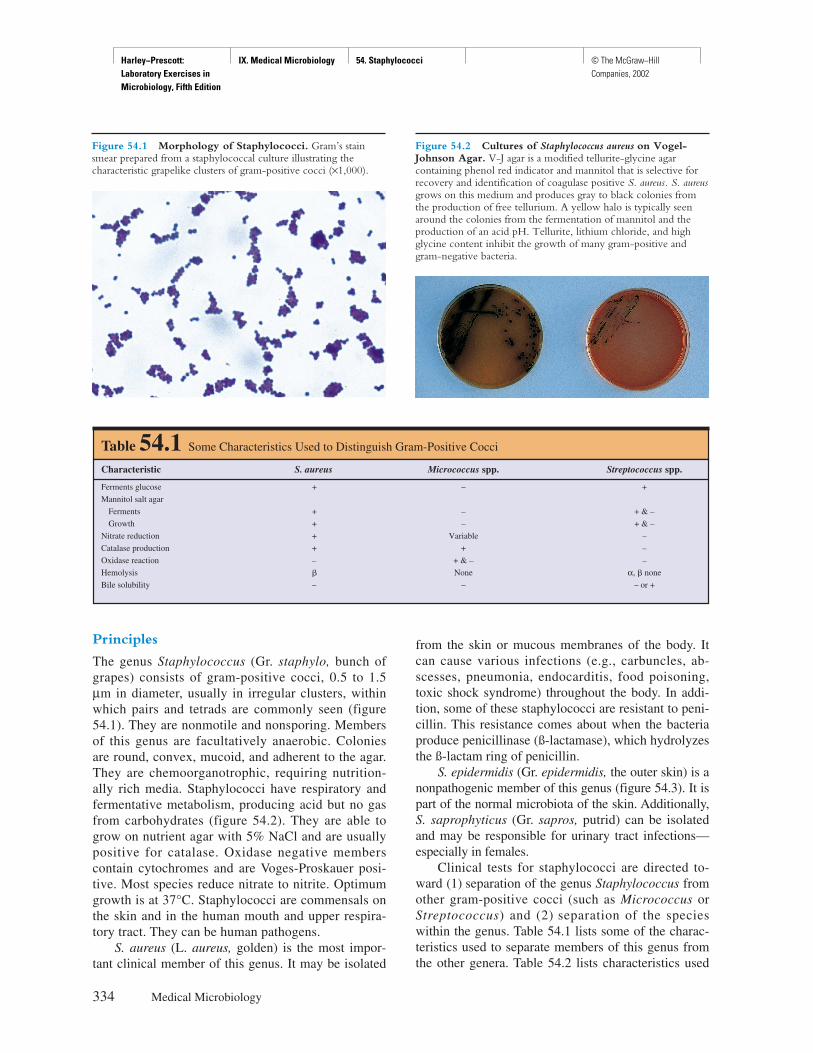
Harley−Prescott: Laboratory Exercises in Microbiology, Fifth Edition
IX. Medical Microbiology 54. Staphylococci © The McGraw−Hill Companies, 2002
Principles
The genus Staphylococcus (Gr. staphylo, bunch ofgrapes) consists of gram-positive cocci, 0.5 to 1.5µm in diameter, usually in irregular clusters, withinwhich pairs and tetrads are commonly seen (figure54.1). They are nonmotile and nonsporing. Membersof this genus are facultatively anaerobic. Coloniesare round, convex, mucoid, and adherent to the agar.They are chemoorganotrophic, requiring nutrition-ally rich media. Staphylococci have respiratory andfermentative metabolism, producing acid but no gasfrom carbohydrates (figure 54.2). They are able togrow on nutrient agar with 5% NaCl and are usuallypositive for catalase. Oxidase negative memberscontain cytochromes and are Voges-Proskauer posi-tive. Most species reduce nitrate to nitrite. Optimumgrowth is at 37°C. Staphylococci are commensals onthe skin and in the human mouth and upper respira-tory tract. They can be human pathogens.
S. aureus (L. aureus, golden) is the most impor-tant clinical member of this genus. It may be isolated
from the skin or mucous membranes of the body. Itcan cause various infections (e.g., carbuncles, ab-scesses, pneumonia, endocarditis, food poisoning,toxic shock syndrome) throughout the body. In addi-tion, some of these staphylococci are resistant to peni-cillin. This resistance comes about when the bacteriaproduce penicillinase (ß-lactamase), which hydrolyzesthe ß-lactam ring of penicillin.
S. epidermidis (Gr. epidermidis, the outer skin) is anonpathogenic member of this genus (figure 54.3). It ispart of the normal microbiota of the skin. Additionally,S. saprophyticus (Gr. sapros, putrid) can be isolatedand may be responsible for urinary tract infections—especially in females.
Clinical tests for staphylococci are directed to-ward (1) separation of the genus Staphylococcus fromother gram-positive cocci (such as Micrococcus orStreptococcus) and (2) separation of the specieswithin the genus. Table 54.1 lists some of the charac-teristics used to separate members of this genus fromthe other genera. Table 54.2 lists characteristics used
334 Medical Microbiology
Table 54.1 Some Characteristics Used to Distinguish Gram-Positive Cocci
Characteristic S. aureus Micrococcus spp. Streptococcus spp.
Ferments glucose + – +
Mannitol salt agar
Ferments + – + & –
Growth + – + & –
Nitrate reduction + Variable –
Catalase production + + –
Oxidase reaction – + & – –
Hemolysis � None α, � none
Bile solubility – – – or +
Figure 54.1 Morphology of Staphylococci. Gram’s stainsmear prepared from a staphylococcal culture illustrating thecharacteristic grapelike clusters of gram-positive cocci (×1,000).
Figure 54.2 Cultures of Staphylococcus aureus on Vogel-Johnson Agar. V-J agar is a modified tellurite-glycine agarcontaining phenol red indicator and mannitol that is selective forrecovery and identification of coagulase positive S. aureus. S. aureusgrows on this medium and produces gray to black colonies fromthe production of free tellurium. A yellow halo is typically seenaround the colonies from the fermentation of mannitol and theproduction of an acid pH. Tellurite, lithium chloride, and highglycine content inhibit the growth of many gram-positive andgram-negative bacteria.
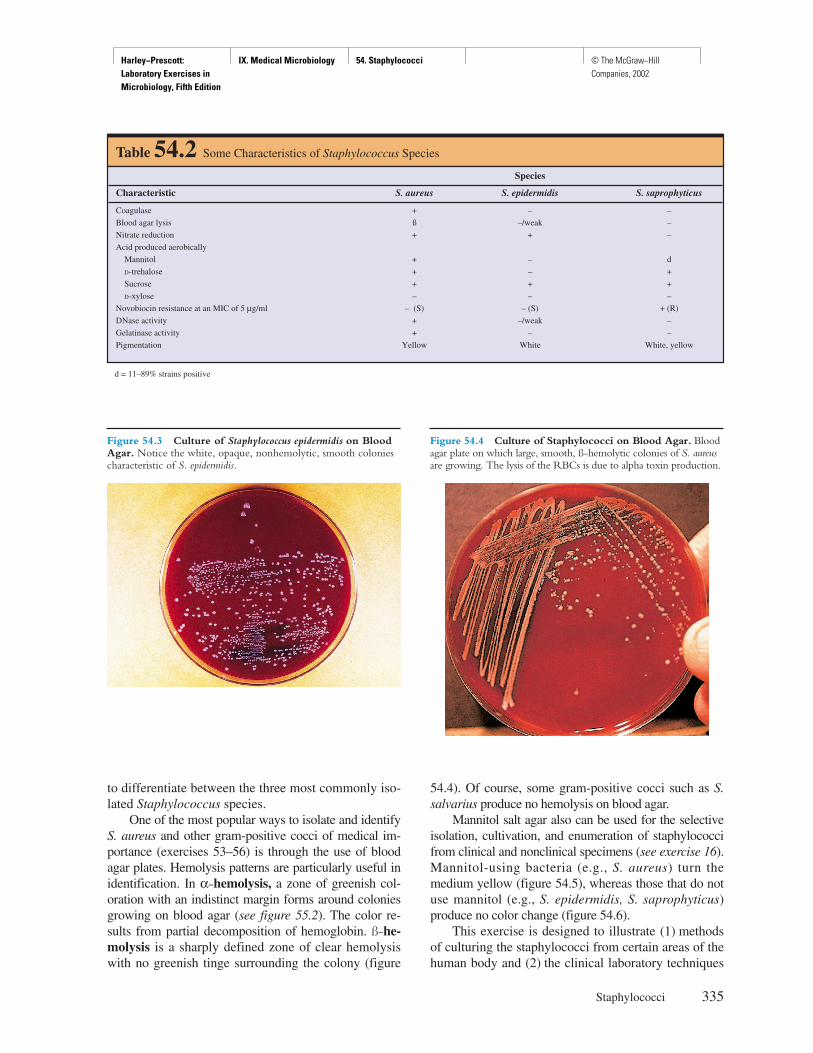
Harley−Prescott: Laboratory Exercises in Microbiology, Fifth Edition
IX. Medical Microbiology 54. Staphylococci © The McGraw−Hill Companies, 2002
to differentiate between the three most commonly iso-lated Staphylococcus species.
One of the most popular ways to isolate and identifyS. aureus and other gram-positive cocci of medical im-portance (exercises 53–56) is through the use of bloodagar plates. Hemolysis patterns are particularly useful inidentification. In α-hemolysis, a zone of greenish col-oration with an indistinct margin forms around coloniesgrowing on blood agar (see figure 55.2). The color re-sults from partial decomposition of hemoglobin. ß-he-molysis is a sharply defined zone of clear hemolysiswith no greenish tinge surrounding the colony (figure
Staphylococci 335
Table 54.2 Some Characteristics of Staphylococcus Species
Species
Characteristic S. aureus S. epidermidis S. saprophyticus
Coagulase + – –
Blood agar lysis ß –/weak –
Nitrate reduction + + –
Acid produced aerobically
Mannitol + – d
D-trehalose + – +
Sucrose + + +
D-xylose – – –
Novobiocin resistance at an MIC of 5 µg/ml – (S) – (S) + (R)
DNase activity + –/weak –
Gelatinase activity + – –
Pigmentation Yellow White White, yellow
d = 11–89% strains positive
Figure 54.3 Culture of Staphylococcus epidermidis on BloodAgar. Notice the white, opaque, nonhemolytic, smooth coloniescharacteristic of S. epidermidis.
Figure 54.4 Culture of Staphylococci on Blood Agar. Bloodagar plate on which large, smooth, ß-hemolytic colonies of S. aureusare growing. The lysis of the RBCs is due to alpha toxin production.
54.4). Of course, some gram-positive cocci such as S.salvarius produce no hemolysis on blood agar.
Mannitol salt agar also can be used for the selectiveisolation, cultivation, and enumeration of staphylococcifrom clinical and nonclinical specimens (see exercise 16).Mannitol-using bacteria (e.g., S. aureus) turn themedium yellow (figure 54.5), whereas those that do notuse mannitol (e.g., S. epidermidis, S. saprophyticus)produce no color change (figure 54.6).
This exercise is designed to illustrate (1) methodsof culturing the staphylococci from certain areas of thehuman body and (2) the clinical laboratory techniques
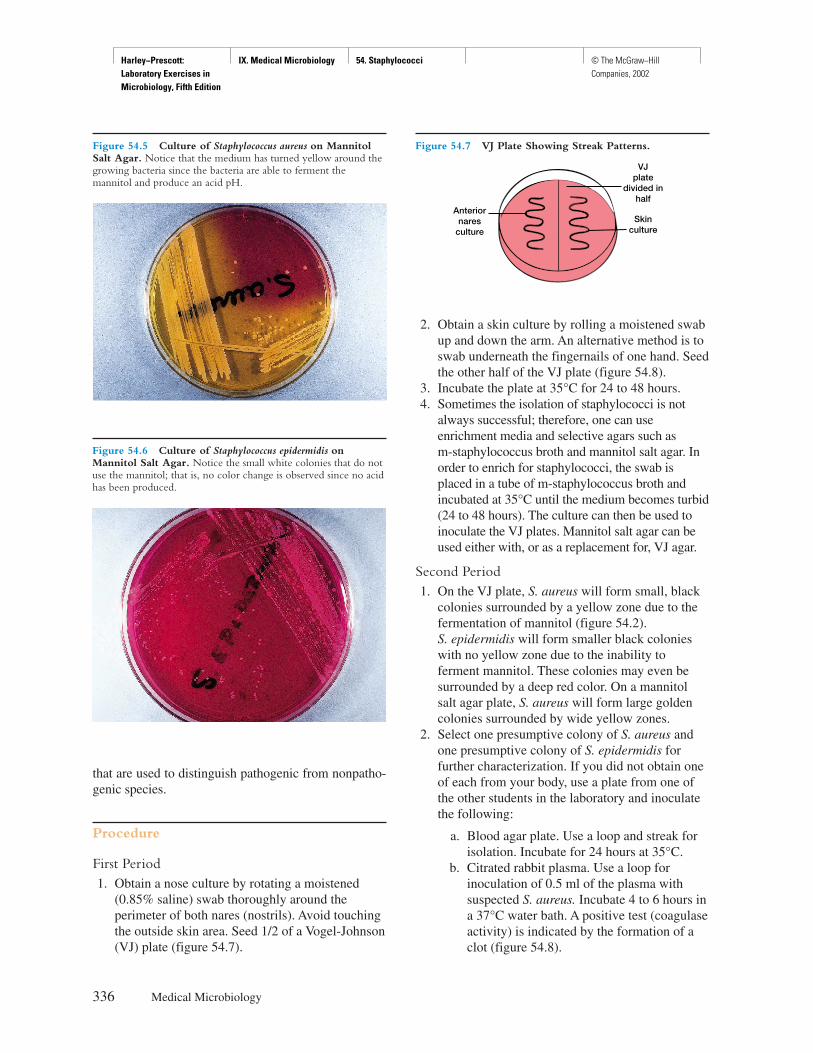
Harley−Prescott: Laboratory Exercises in Microbiology, Fifth Edition
IX. Medical Microbiology 54. Staphylococci © The McGraw−Hill Companies, 2002
that are used to distinguish pathogenic from nonpatho-genic species.
Procedure
First Period1. Obtain a nose culture by rotating a moistened
(0.85% saline) swab thoroughly around theperimeter of both nares (nostrils). Avoid touchingthe outside skin area. Seed 1/2 of a Vogel-Johnson(VJ) plate (figure 54.7).
2. Obtain a skin culture by rolling a moistened swabup and down the arm. An alternative method is toswab underneath the fingernails of one hand. Seedthe other half of the VJ plate (figure 54.8).
3. Incubate the plate at 35°C for 24 to 48 hours.4. Sometimes the isolation of staphylococci is not
always successful; therefore, one can useenrichment media and selective agars such as m-staphylococcus broth and mannitol salt agar. Inorder to enrich for staphylococci, the swab isplaced in a tube of m-staphylococcus broth andincubated at 35°C until the medium becomes turbid(24 to 48 hours). The culture can then be used toinoculate the VJ plates. Mannitol salt agar can beused either with, or as a replacement for, VJ agar.
Second Period1. On the VJ plate, S. aureus will form small, black
colonies surrounded by a yellow zone due to thefermentation of mannitol (figure 54.2). S. epidermidis will form smaller black colonieswith no yellow zone due to the inability toferment mannitol. These colonies may even besurrounded by a deep red color. On a mannitolsalt agar plate, S. aureus will form large goldencolonies surrounded by wide yellow zones.
2. Select one presumptive colony of S. aureus andone presumptive colony of S. epidermidis forfurther characterization. If you did not obtain oneof each from your body, use a plate from one ofthe other students in the laboratory and inoculatethe following:
a. Blood agar plate. Use a loop and streak forisolation. Incubate for 24 hours at 35°C.
b. Citrated rabbit plasma. Use a loop forinoculation of 0.5 ml of the plasma withsuspected S. aureus. Incubate 4 to 6 hours ina 37°C water bath. A positive test (coagulaseactivity) is indicated by the formation of aclot (figure 54.8).
336 Medical Microbiology
Figure 54.5 Culture of Staphylococcus aureus on MannitolSalt Agar. Notice that the medium has turned yellow around thegrowing bacteria since the bacteria are able to ferment themannitol and produce an acid pH.
Anteriornares
culture
VJplate
divided inhalf
Skinculture
Figure 54.7 VJ Plate Showing Streak Patterns.
Figure 54.6 Culture of Staphylococcus epidermidis onMannitol Salt Agar. Notice the small white colonies that do notuse the mannitol; that is, no color change is observed since no acidhas been produced.
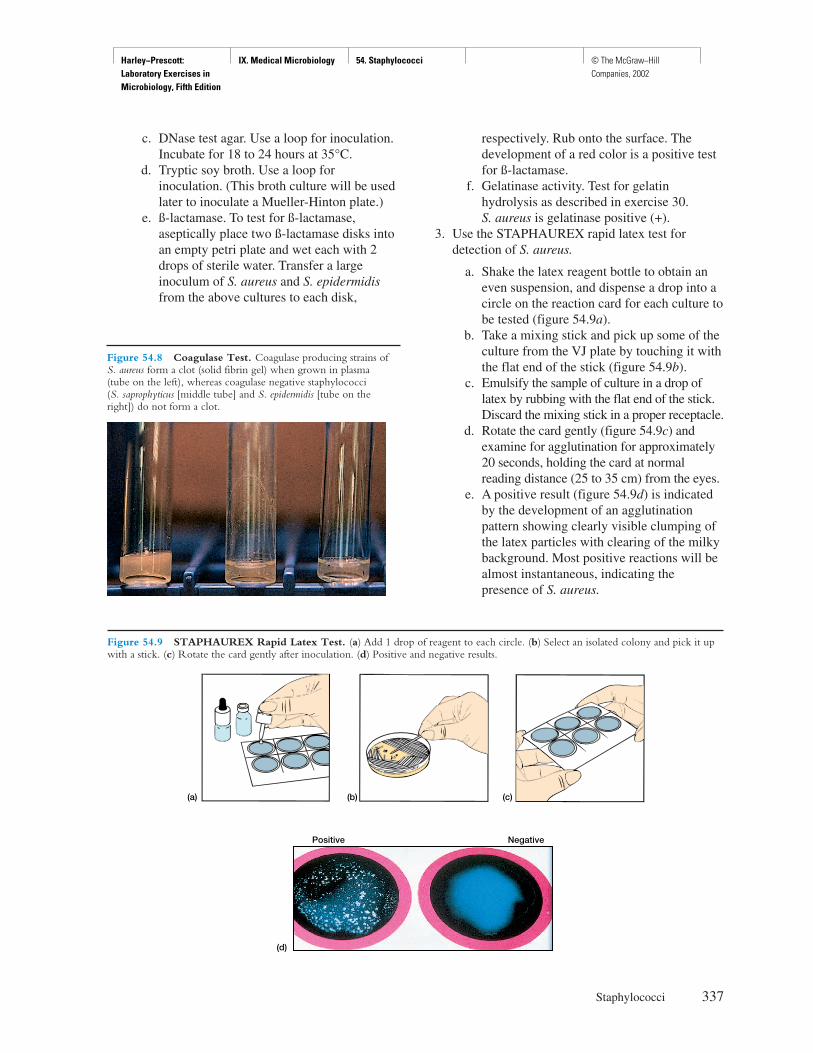
Harley−Prescott: Laboratory Exercises in Microbiology, Fifth Edition
IX. Medical Microbiology 54. Staphylococci © The McGraw−Hill Companies, 2002
c. DNase test agar. Use a loop for inoculation.Incubate for 18 to 24 hours at 35°C.
d. Tryptic soy broth. Use a loop forinoculation. (This broth culture will be usedlater to inoculate a Mueller-Hinton plate.)
e. ß-lactamase. To test for ß-lactamase,aseptically place two ß-lactamase disks intoan empty petri plate and wet each with 2drops of sterile water. Transfer a largeinoculum of S. aureus and S. epidermidisfrom the above cultures to each disk,
respectively. Rub onto the surface. Thedevelopment of a red color is a positive testfor ß-lactamase.
f. Gelatinase activity. Test for gelatinhydrolysis as described in exercise 30.S. aureus is gelatinase positive (+).
3. Use the STAPHAUREX rapid latex test fordetection of S. aureus.
a. Shake the latex reagent bottle to obtain aneven suspension, and dispense a drop into acircle on the reaction card for each culture tobe tested (figure 54.9a).
b. Take a mixing stick and pick up some of theculture from the VJ plate by touching it withthe flat end of the stick (figure 54.9b).
c. Emulsify the sample of culture in a drop oflatex by rubbing with the flat end of the stick.Discard the mixing stick in a proper receptacle.
d. Rotate the card gently (figure 54.9c) andexamine for agglutination for approximately20 seconds, holding the card at normalreading distance (25 to 35 cm) from the eyes.
e. A positive result (figure 54.9d) is indicatedby the development of an agglutinationpattern showing clearly visible clumping ofthe latex particles with clearing of the milkybackground. Most positive reactions will bealmost instantaneous, indicating thepresence of S. aureus.
Staphylococci 337
Figure 54.8 Coagulase Test. Coagulase producing strains ofS. aureus form a clot (solid fibrin gel) when grown in plasma (tube on the left), whereas coagulase negative staphylococci (S. saprophyticus [middle tube] and S. epidermidis [tube on theright]) do not form a clot.
(a) (b) (c)
(d)
Positive Negative
Figure 54.9 STAPHAUREX Rapid Latex Test. (a) Add 1 drop of reagent to each circle. (b) Select an isolated colony and pick it upwith a stick. (c) Rotate the card gently after inoculation. (d) Positive and negative results.
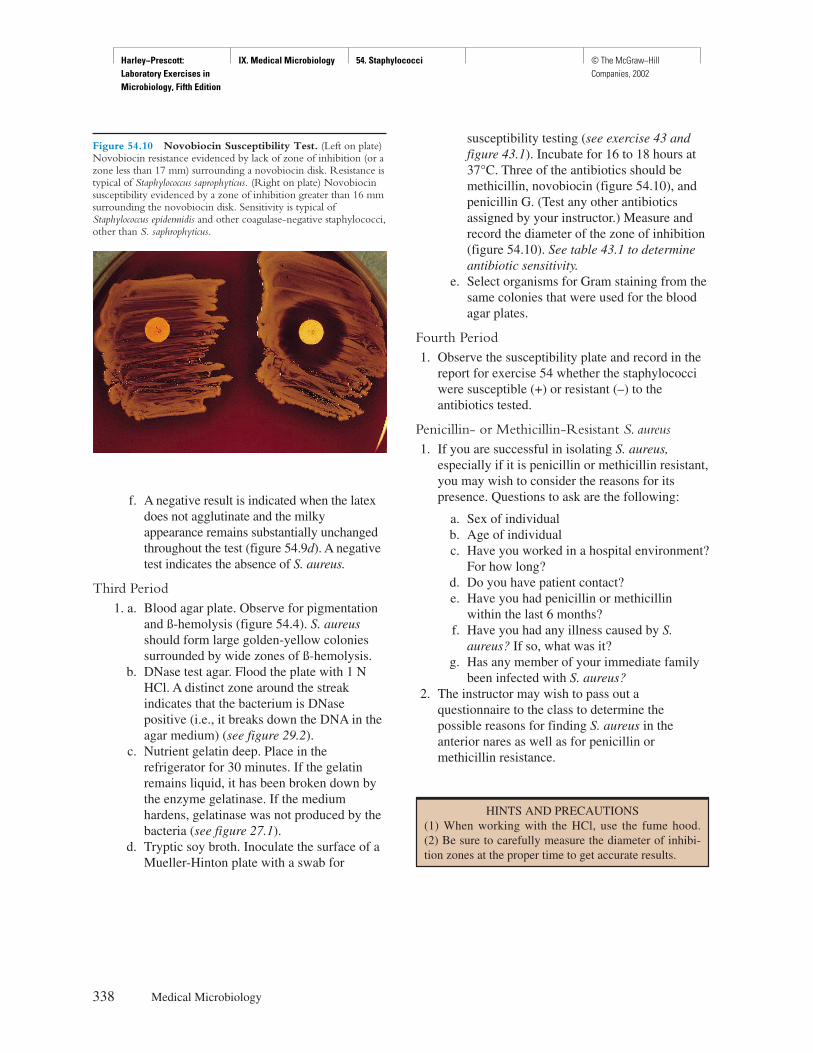
Harley−Prescott: Laboratory Exercises in Microbiology, Fifth Edition
IX. Medical Microbiology 54. Staphylococci © The McGraw−Hill Companies, 2002
f. A negative result is indicated when the latexdoes not agglutinate and the milkyappearance remains substantially unchangedthroughout the test (figure 54.9d). A negativetest indicates the absence of S. aureus.
Third Period1. a. Blood agar plate. Observe for pigmentation
and ß-hemolysis (figure 54.4). S. aureusshould form large golden-yellow coloniessurrounded by wide zones of ß-hemolysis.
b. DNase test agar. Flood the plate with 1 NHCl. A distinct zone around the streakindicates that the bacterium is DNasepositive (i.e., it breaks down the DNA in theagar medium) (see figure 29.2).
c. Nutrient gelatin deep. Place in therefrigerator for 30 minutes. If the gelatinremains liquid, it has been broken down bythe enzyme gelatinase. If the mediumhardens, gelatinase was not produced by thebacteria (see figure 27.1).
d. Tryptic soy broth. Inoculate the surface of aMueller-Hinton plate with a swab for
susceptibility testing (see exercise 43 andfigure 43.1). Incubate for 16 to 18 hours at37°C. Three of the antibiotics should bemethicillin, novobiocin (figure 54.10), andpenicillin G. (Test any other antibioticsassigned by your instructor.) Measure andrecord the diameter of the zone of inhibition(figure 54.10). See table 43.1 to determineantibiotic sensitivity.
e. Select organisms for Gram staining from thesame colonies that were used for the bloodagar plates.
Fourth Period1. Observe the susceptibility plate and record in the
report for exercise 54 whether the staphylococciwere susceptible (+) or resistant (–) to theantibiotics tested.
Penicillin- or Methicillin-Resistant S. aureus1. If you are successful in isolating S. aureus,
especially if it is penicillin or methicillin resistant,you may wish to consider the reasons for itspresence. Questions to ask are the following:
a. Sex of individualb. Age of individualc. Have you worked in a hospital environment?
For how long?d. Do you have patient contact?e. Have you had penicillin or methicillin
within the last 6 months?f. Have you had any illness caused by S.
aureus? If so, what was it?g. Has any member of your immediate family
been infected with S. aureus?2. The instructor may wish to pass out a
questionnaire to the class to determine thepossible reasons for finding S. aureus in theanterior nares as well as for penicillin ormethicillin resistance.
338 Medical Microbiology
Figure 54.10 Novobiocin Susceptibility Test. (Left on plate)Novobiocin resistance evidenced by lack of zone of inhibition (or azone less than 17 mm) surrounding a novobiocin disk. Resistance istypical of Staphylococcus saprophyticus. (Right on plate) Novobiocinsusceptibility evidenced by a zone of inhibition greater than 16 mmsurrounding the novobiocin disk. Sensitivity is typical ofStaphylococcus epidermidis and other coagulase-negative staphylococci,other than S. saphrophyticus.
HINTS AND PRECAUTIONS(1) When working with the HCl, use the fume hood. (2) Be sure to carefully measure the diameter of inhibi-tion zones at the proper time to get accurate results.
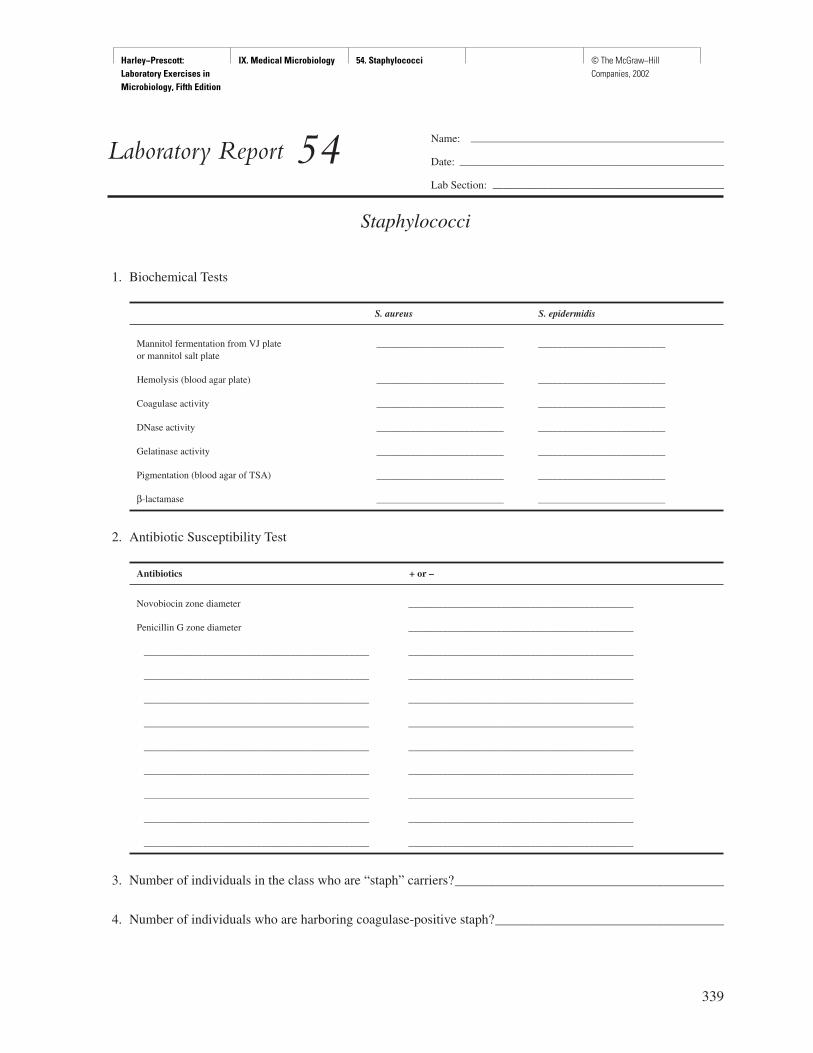
Harley−Prescott: Laboratory Exercises in Microbiology, Fifth Edition
IX. Medical Microbiology 54. Staphylococci © The McGraw−Hill Companies, 2002
339
Name: ———————————————————————
Date: ————————————————————————
Lab Section: —————————————————————
Laboratory Report 54
Staphylococci
1. Biochemical Tests
S. aureus S. epidermidis
Mannitol fermentation from VJ plate __________________________ __________________________or mannitol salt plate
Ηemolysis (blood agar plate) __________________________ __________________________
Coagulase activity __________________________ __________________________
DNase activity __________________________ __________________________
Gelatinase activity __________________________ __________________________
Pigmentation (blood agar of TSA) __________________________ __________________________
β-lactamase __________________________ __________________________
2. Antibiotic Susceptibility Test
Antibiotics + or –
Novobiocin zone diameter ______________________________________________
Penicillin G zone diameter ______________________________________________
______________________________________________ ______________________________________________
______________________________________________ ______________________________________________
______________________________________________ ______________________________________________
______________________________________________ ______________________________________________
______________________________________________ ______________________________________________
______________________________________________ ______________________________________________
______________________________________________ ______________________________________________
______________________________________________ ______________________________________________
______________________________________________ ______________________________________________
3. Number of individuals in the class who are “staph” carriers?________________________________________
4. Number of individuals who are harboring coagulase-positive staph?__________________________________

Harley−Prescott: Laboratory Exercises in Microbiology, Fifth Edition
IX. Medical Microbiology 54. Staphylococci © The McGraw−Hill Companies, 2002
Review Questions
1. What precautions should be taken by a nurse who is a “staph’’ carrier?
2. What test can differentiate the three major species of Staphylococcus?
3. How would you treat a person who has a carbuncle?
4. Describe the cellular morphology and arrangement of staphylococci?
5. What is the principle behind the rapid STAPHAUREX test?
6. How could you distinguish S. epidermidis from S. saprophyticus?
7. Why are staphylococcal infections frequent among hospital patients?
340 Medical Microbiology
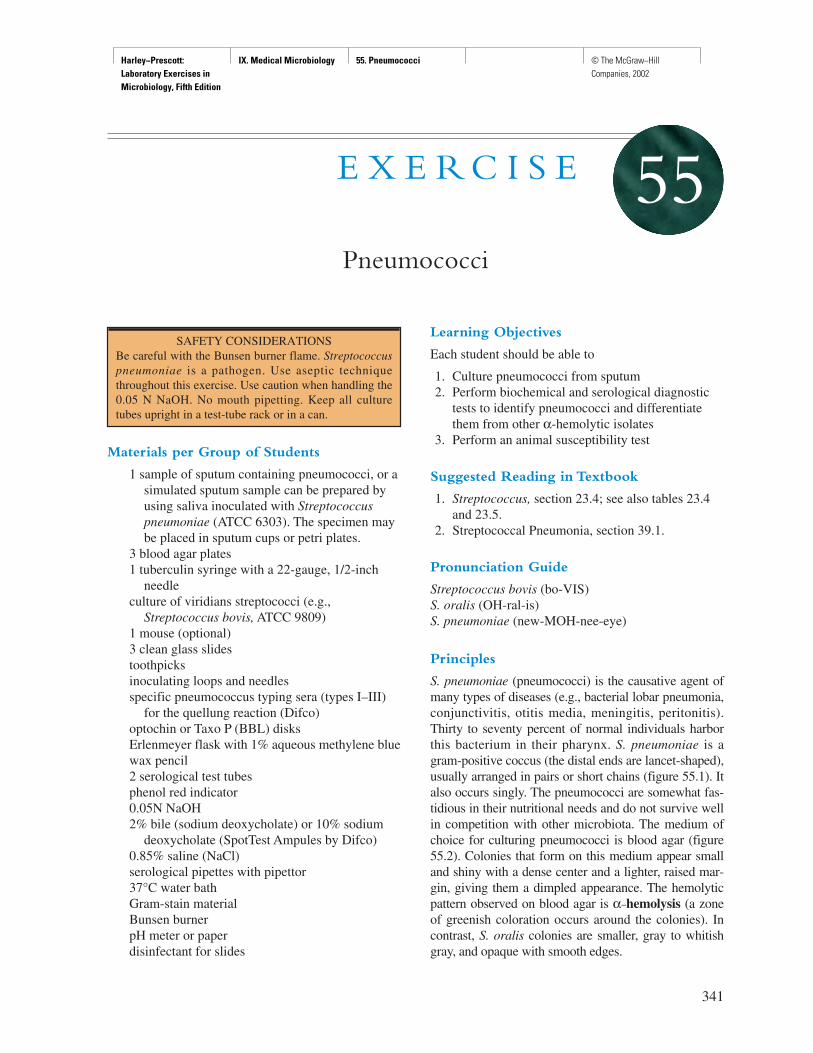
Harley−Prescott: Laboratory Exercises in Microbiology, Fifth Edition
IX. Medical Microbiology 55. Pneumococci © The McGraw−Hill Companies, 2002
Materials per Group of Students
1 sample of sputum containing pneumococci, or asimulated sputum sample can be prepared byusing saliva inoculated with Streptococcuspneumoniae (ATCC 6303). The specimen maybe placed in sputum cups or petri plates.
3 blood agar plates1 tuberculin syringe with a 22-gauge, 1/2-inch
needleculture of viridians streptococci (e.g.,
Streptococcus bovis, ATCC 9809)1 mouse (optional)3 clean glass slidestoothpicksinoculating loops and needlesspecific pneumococcus typing sera (types I–III)
for the quellung reaction (Difco)optochin or Taxo P (BBL) disksErlenmeyer flask with 1% aqueous methylene bluewax pencil2 serological test tubesphenol red indicator0.05N NaOH2% bile (sodium deoxycholate) or 10% sodium
deoxycholate (SpotTest Ampules by Difco)0.85% saline (NaCl)serological pipettes with pipettor37°C water bathGram-stain materialBunsen burnerpH meter or paperdisinfectant for slides
Learning Objectives
Each student should be able to
1. Culture pneumococci from sputum2. Perform biochemical and serological diagnostic
tests to identify pneumococci and differentiatethem from other α-hemolytic isolates
3. Perform an animal susceptibility test
Suggested Reading in Textbook
1. Streptococcus, section 23.4; see also tables 23.4and 23.5.
2. Streptococcal Pneumonia, section 39.1.
Pronunciation Guide
Streptococcus bovis (bo-VIS)S. oralis (OH-ral-is)S. pneumoniae (new-MOH-nee-eye)
Principles
S. pneumoniae (pneumococci) is the causative agent ofmany types of diseases (e.g., bacterial lobar pneumonia,conjunctivitis, otitis media, meningitis, peritonitis).Thirty to seventy percent of normal individuals harborthis bacterium in their pharynx. S. pneumoniae is agram-positive coccus (the distal ends are lancet-shaped),usually arranged in pairs or short chains (figure 55.1). Italso occurs singly. The pneumococci are somewhat fas-tidious in their nutritional needs and do not survive wellin competition with other microbiota. The medium ofchoice for culturing pneumococci is blood agar (figure55.2). Colonies that form on this medium appear smalland shiny with a dense center and a lighter, raised mar-gin, giving them a dimpled appearance. The hemolyticpattern observed on blood agar is α-hemolysis (a zoneof greenish coloration occurs around the colonies). Incontrast, S. oralis colonies are smaller, gray to whitishgray, and opaque with smooth edges.
341
E X E R C I S E
Pneumococci
55
SAFETY CONSIDERATIONSBe careful with the Bunsen burner flame. Streptococcuspneumoniae is a pathogen. Use aseptic techniquethroughout this exercise. Use caution when handling the0.05 N NaOH. No mouth pipetting. Keep all culturetubes upright in a test-tube rack or in a can.
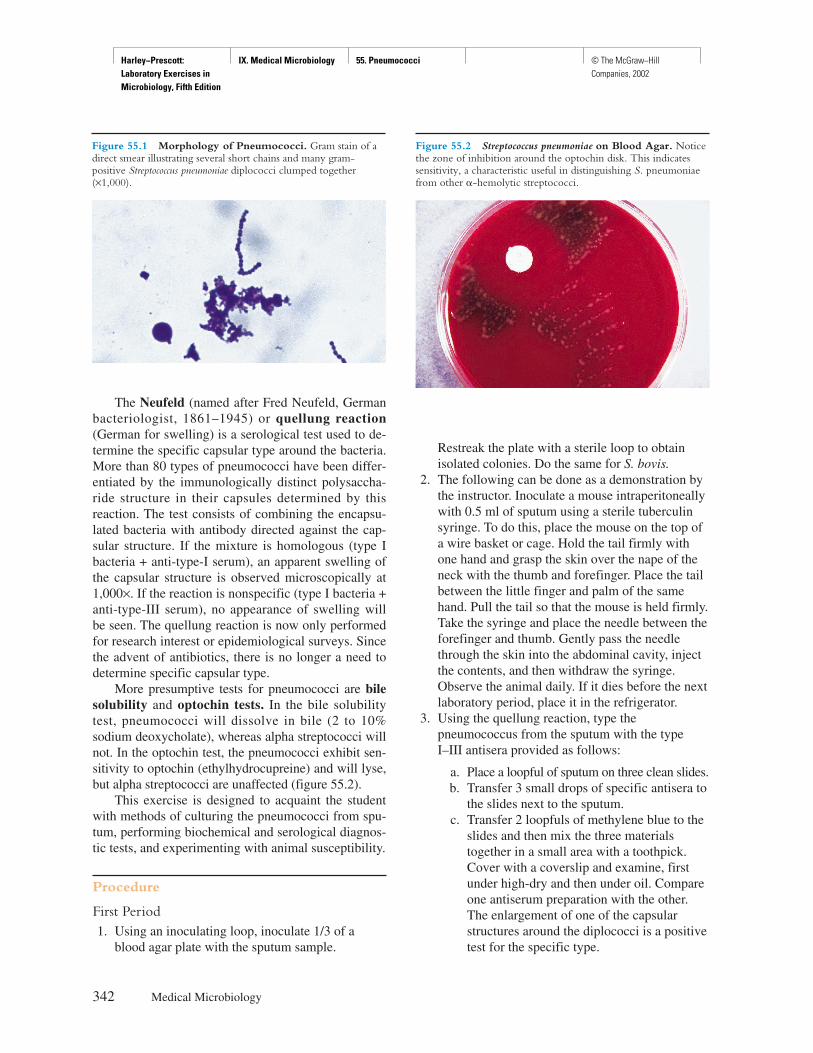
Harley−Prescott: Laboratory Exercises in Microbiology, Fifth Edition
IX. Medical Microbiology 55. Pneumococci © The McGraw−Hill Companies, 2002
The Neufeld (named after Fred Neufeld, Germanbacteriologist, 1861–1945) or quellung reaction(German for swelling) is a serological test used to de-termine the specific capsular type around the bacteria.More than 80 types of pneumococci have been differ-entiated by the immunologically distinct polysaccha-ride structure in their capsules determined by thisreaction. The test consists of combining the encapsu-lated bacteria with antibody directed against the cap-sular structure. If the mixture is homologous (type Ibacteria + anti-type-I serum), an apparent swelling ofthe capsular structure is observed microscopically at1,000×. If the reaction is nonspecific (type I bacteria +anti-type-III serum), no appearance of swelling willbe seen. The quellung reaction is now only performedfor research interest or epidemiological surveys. Sincethe advent of antibiotics, there is no longer a need todetermine specific capsular type.
More presumptive tests for pneumococci are bilesolubility and optochin tests. In the bile solubilitytest, pneumococci will dissolve in bile (2 to 10%sodium deoxycholate), whereas alpha streptococci willnot. In the optochin test, the pneumococci exhibit sen-sitivity to optochin (ethylhydrocupreine) and will lyse,but alpha streptococci are unaffected (figure 55.2).
This exercise is designed to acquaint the studentwith methods of culturing the pneumococci from spu-tum, performing biochemical and serological diagnos-tic tests, and experimenting with animal susceptibility.
Procedure
First Period1. Using an inoculating loop, inoculate 1/3 of a
blood agar plate with the sputum sample.
Restreak the plate with a sterile loop to obtainisolated colonies. Do the same for S. bovis.
2. The following can be done as a demonstration bythe instructor. Inoculate a mouse intraperitoneallywith 0.5 ml of sputum using a sterile tuberculinsyringe. To do this, place the mouse on the top ofa wire basket or cage. Hold the tail firmly withone hand and grasp the skin over the nape of theneck with the thumb and forefinger. Place the tailbetween the little finger and palm of the samehand. Pull the tail so that the mouse is held firmly.Take the syringe and place the needle between theforefinger and thumb. Gently pass the needlethrough the skin into the abdominal cavity, injectthe contents, and then withdraw the syringe.Observe the animal daily. If it dies before the nextlaboratory period, place it in the refrigerator.
3. Using the quellung reaction, type thepneumococcus from the sputum with the typeI–III antisera provided as follows:
a. Place a loopful of sputum on three clean slides.b. Transfer 3 small drops of specific antisera to
the slides next to the sputum.c. Transfer 2 loopfuls of methylene blue to the
slides and then mix the three materialstogether in a small area with a toothpick.Cover with a coverslip and examine, firstunder high-dry and then under oil. Compareone antiserum preparation with the other.The enlargement of one of the capsularstructures around the diplococci is a positivetest for the specific type.
342 Medical Microbiology
Figure 55.1 Morphology of Pneumococci. Gram stain of adirect smear illustrating several short chains and many gram-positive Streptococcus pneumoniae diplococci clumped together(×1,000).
Figure 55.2 Streptococcus pneumoniae on Blood Agar. Noticethe zone of inhibition around the optochin disk. This indicatessensitivity, a characteristic useful in distinguishing S. pneumoniaefrom other �-hemolytic streptococci.
Harley−Prescott: Laboratory Exercises in Microbiology, Fifth Edition
IX. Medical Microbiology 55. Pneumococci © The McGraw−Hill Companies, 2002
4. The bile solubility test is performed as follows:
a. Using a wax pencil, mark one of theserological tubes “bile” and the other“saline.” Place your name on the tubes.Pipette 0.5 ml of bile and saline into therespective tubes.
b. With the inoculating loop, transfer 2loopfuls of sputum into each tube.
c. Add 2 drops of phenol red indicator to eachtube. Adjust the pH to 7.0 with the 0.05 NNaOH.
d. Place both tubes in a 37°C water bath andexamine at 30-minute intervals for 2 hours.If the turbidity clears in the bile tube, itindicates that the bacteria have disintegratedand the test is positive for S. pneumoniae.
e. The bile solubility test can also be carriedout on isolated colonies. Simply place 1 or 2drops of 10% deoxycholate on the suspectedcolony and observe it carefully. If the colonydissolves or flattens and disappears in about5 minutes, it is bile soluble.
Second Period1. Observe for colonies of pneumococci on the blood
agar, if possible, with a dissecting scope. Inoculatea colony believed to be pneumococci from thesputum sample over 1/2 of a blood agar plate. Keepthe streaks close together. Streak the other half with
a broth culture of the α-hemolytic streptococcusprovided. Place an optochin-impregnated disk orTaxo P disk in the center of each streaked area andincubate at 35°C for 24 hours.
2. If a mouse was infected with S. pneumoniaeduring the first period, kill it and make cultures ofblood from the heart and/or peritoneal exudate ona blood agar plate. Smear and Gram stain theblood and/or peritoneal exudate, and examine forwhite cells and pneumococci. Perform a quellungreaction on the peritoneal exudate.
Third Period1. Examine both the alpha streptococci and
pneumococci for optochin susceptibility. S.pneumoniae should have a zone of inhibition ≥14mm in width when b-inch disks are used. Alsoexamine the blood and/or peritoneal exudate.
2. Complete the report for exercise 55.
Pneumococci 343
HINTS AND PRECAUTIONS (1) If the student or instructor does not have experienceworking with mice, it is advisable to obtain commer-cially available mouse restrainers for inoculation ofmice. (2) A mouse is most rapidly and efficiently killedusing cervical dislocation or with ether in a fume hood.(3) A candle jar (see figure 57.4) can also be used tocreate a microaerophilic environment preferred by manypneumococci.
Harley−Prescott: Laboratory Exercises in Microbiology, Fifth Edition
IX. Medical Microbiology 55. Pneumococci © The McGraw−Hill Companies, 2002
345
Name: ———————————————————————
Date: ————————————————————————
Lab Section: —————————————————————
Laboratory Report 55
Pneumococci
1. Description of a S. pneumoniae colony. ________________________________________________________
________________________________________________________________________________________
2. Description of a S. mitis colony. ______________________________________________________________
________________________________________________________________________________________
3. Optochin susceptibility: + –
a. S. pneumoniae ________________ ________________
b. S. bovis ________________ ________________
4. Quellung reaction:
a. Type I
b. Type II
c. Type III
5. Clinical observations from the mouse experiment:
________________________________________________________________________________________
________________________________________________________________________________________
________________________________________________________________________________________
________________________________________________________________________________________
________________________________________________________________________________________
6. Pneumococcus suspension with bile ___________________________________________________________
7. Pneumococcus suspension without bile ________________________________________________________

Harley−Prescott: Laboratory Exercises in Microbiology, Fifth Edition
IX. Medical Microbiology 55. Pneumococci © The McGraw−Hill Companies, 2002
Review Questions
1. What differentiates sputum from saliva?
2. What does the optochin test illustrate?
3. Describe the quellung reaction.
4. How can you differentiate between S. mitis and S. pneumoniae?
5. What does the bile solubility test indicate?
6. What type of hemolysis is produced by S. pneumoniae?
7. What role does a bacterial capsule play in an infection?
346 Medical Microbiology
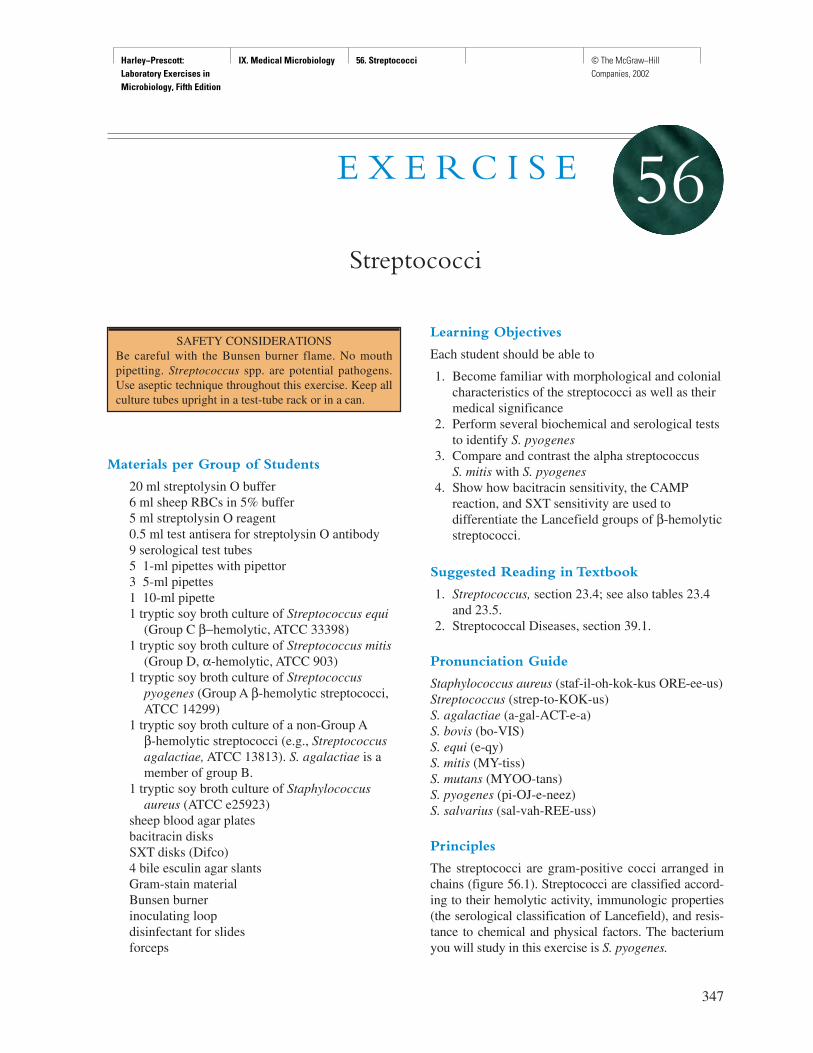
Harley−Prescott: Laboratory Exercises in Microbiology, Fifth Edition
IX. Medical Microbiology 56. Streptococci © The McGraw−Hill Companies, 2002
Materials per Group of Students
20 ml streptolysin O buffer6 ml sheep RBCs in 5% buffer5 ml streptolysin O reagent0.5 ml test antisera for streptolysin O antibody9 serological test tubes5 1-ml pipettes with pipettor3 5-ml pipettes1 10-ml pipette1 tryptic soy broth culture of Streptococcus equi
(Group C β−hemolytic, ATCC 33398)1 tryptic soy broth culture of Streptococcus mitis
(Group D, α-hemolytic, ATCC 903)1 tryptic soy broth culture of Streptococcus
pyogenes (Group A β-hemolytic streptococci,ATCC 14299)
1 tryptic soy broth culture of a non-Group Aβ-hemolytic streptococci (e.g., Streptococcusagalactiae, ATCC 13813). S. agalactiae is amember of group B.
1 tryptic soy broth culture of Staphylococcusaureus (ATCC e25923)
sheep blood agar platesbacitracin disksSXT disks (Difco)4 bile esculin agar slantsGram-stain materialBunsen burnerinoculating loopdisinfectant for slidesforceps
Learning Objectives
Each student should be able to
1. Become familiar with morphological and colonialcharacteristics of the streptococci as well as theirmedical significance
2. Perform several biochemical and serological teststo identify S. pyogenes
3. Compare and contrast the alpha streptococcus S. mitis with S. pyogenes
4. Show how bacitracin sensitivity, the CAMPreaction, and SXT sensitivity are used todifferentiate the Lancefield groups of β-hemolyticstreptococci.
Suggested Reading in Textbook
1. Streptococcus, section 23.4; see also tables 23.4and 23.5.
2. Streptococcal Diseases, section 39.1.
Pronunciation Guide
Staphylococcus aureus (staf-il-oh-kok-kus ORE-ee-us)Streptococcus (strep-to-KOK-us)S. agalactiae (a-gal-ACT-e-a)S. bovis (bo-VIS)S. equi (e-qy)S. mitis (MY-tiss)S. mutans (MYOO-tans)S. pyogenes (pi-OJ-e-neez)S. salvarius (sal-vah-REE-uss)
Principles
The streptococci are gram-positive cocci arranged inchains (figure 56.1). Streptococci are classified accord-ing to their hemolytic activity, immunologic properties(the serological classification of Lancefield), and resis-tance to chemical and physical factors. The bacteriumyou will study in this exercise is S. pyogenes.
347
E X E R C I S E
Streptococci
56
SAFETY CONSIDERATIONSBe careful with the Bunsen burner flame. No mouthpipetting. Streptococcus spp. are potential pathogens.Use aseptic technique throughout this exercise. Keep allculture tubes upright in a test-tube rack or in a can.
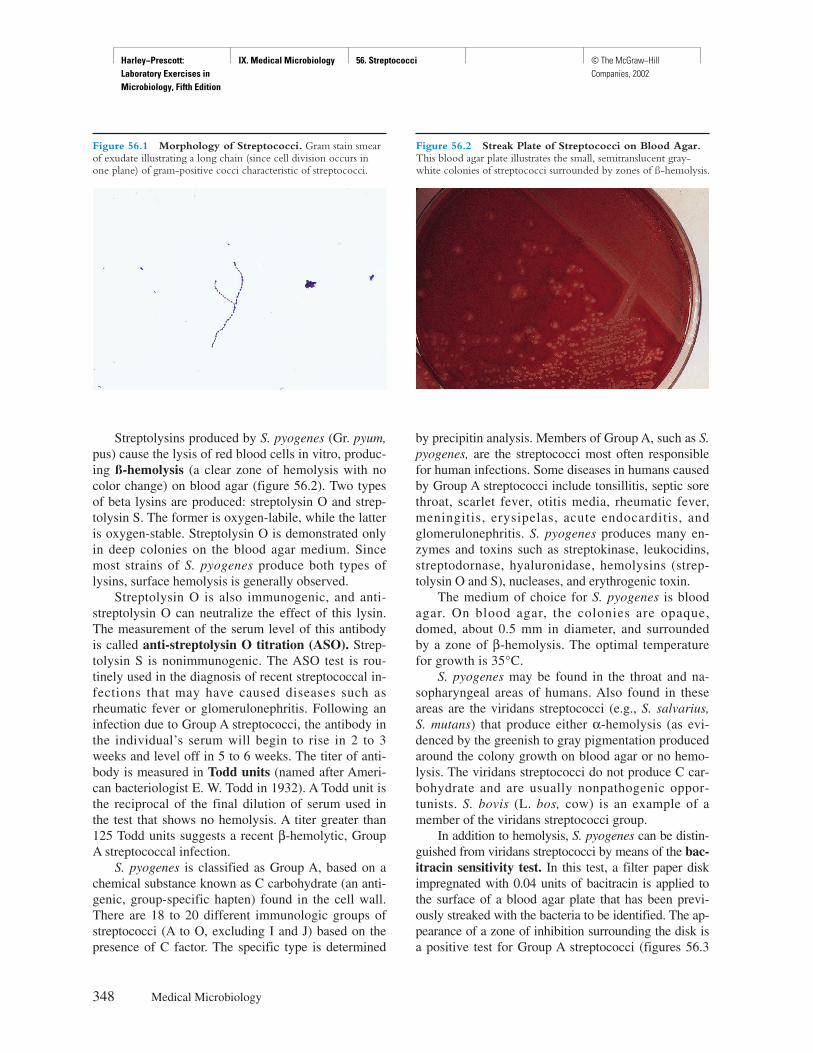
Harley−Prescott: Laboratory Exercises in Microbiology, Fifth Edition
IX. Medical Microbiology 56. Streptococci © The McGraw−Hill Companies, 2002
Streptolysins produced by S. pyogenes (Gr. pyum,pus) cause the lysis of red blood cells in vitro, produc-ing ß-hemolysis (a clear zone of hemolysis with nocolor change) on blood agar (figure 56.2). Two typesof beta lysins are produced: streptolysin O and strep-tolysin S. The former is oxygen-labile, while the latteris oxygen-stable. Streptolysin O is demonstrated onlyin deep colonies on the blood agar medium. Sincemost strains of S. pyogenes produce both types oflysins, surface hemolysis is generally observed.
Streptolysin O is also immunogenic, and anti-streptolysin O can neutralize the effect of this lysin.The measurement of the serum level of this antibodyis called anti-streptolysin O titration (ASO). Strep-tolysin S is nonimmunogenic. The ASO test is rou-tinely used in the diagnosis of recent streptococcal in-fections that may have caused diseases such asrheumatic fever or glomerulonephritis. Following aninfection due to Group A streptococci, the antibody inthe individual’s serum will begin to rise in 2 to 3weeks and level off in 5 to 6 weeks. The titer of anti-body is measured in Todd units (named after Ameri-can bacteriologist E. W. Todd in 1932). A Todd unit isthe reciprocal of the final dilution of serum used inthe test that shows no hemolysis. A titer greater than125 Todd units suggests a recent β-hemolytic, GroupA streptococcal infection.
S. pyogenes is classified as Group A, based on achemical substance known as C carbohydrate (an anti-genic, group-specific hapten) found in the cell wall.There are 18 to 20 different immunologic groups ofstreptococci (A to O, excluding I and J) based on thepresence of C factor. The specific type is determined
by precipitin analysis. Members of Group A, such as S.pyogenes, are the streptococci most often responsiblefor human infections. Some diseases in humans causedby Group A streptococci include tonsillitis, septic sorethroat, scarlet fever, otitis media, rheumatic fever,meningitis, erysipelas, acute endocarditis, andglomerulonephritis. S. pyogenes produces many en-zymes and toxins such as streptokinase, leukocidins,streptodornase, hyaluronidase, hemolysins (strep-tolysin O and S), nucleases, and erythrogenic toxin.
The medium of choice for S. pyogenes is bloodagar. On blood agar, the colonies are opaque,domed, about 0.5 mm in diameter, and surroundedby a zone of β-hemolysis. The optimal temperaturefor growth is 35°C.
S. pyogenes may be found in the throat and na-sopharyngeal areas of humans. Also found in theseareas are the viridans streptococci (e.g., S. salvarius,S. mutans) that produce either α-hemolysis (as evi-denced by the greenish to gray pigmentation producedaround the colony growth on blood agar or no hemo-lysis. The viridans streptococci do not produce C car-bohydrate and are usually nonpathogenic oppor-tunists. S. bovis (L. bos, cow) is an example of amember of the viridans streptococci group.
In addition to hemolysis, S. pyogenes can be distin-guished from viridans streptococci by means of the bac-itracin sensitivity test. In this test, a filter paper diskimpregnated with 0.04 units of bacitracin is applied tothe surface of a blood agar plate that has been previ-ously streaked with the bacteria to be identified. The ap-pearance of a zone of inhibition surrounding the disk isa positive test for Group A streptococci (figures 56.3
348 Medical Microbiology
Figure 56.1 Morphology of Streptococci. Gram stain smearof exudate illustrating a long chain (since cell division occurs inone plane) of gram-positive cocci characteristic of streptococci.
Figure 56.2 Streak Plate of Streptococci on Blood Agar.This blood agar plate illustrates the small, semitranslucent gray-white colonies of streptococci surrounded by zones of ß-hemolysis.
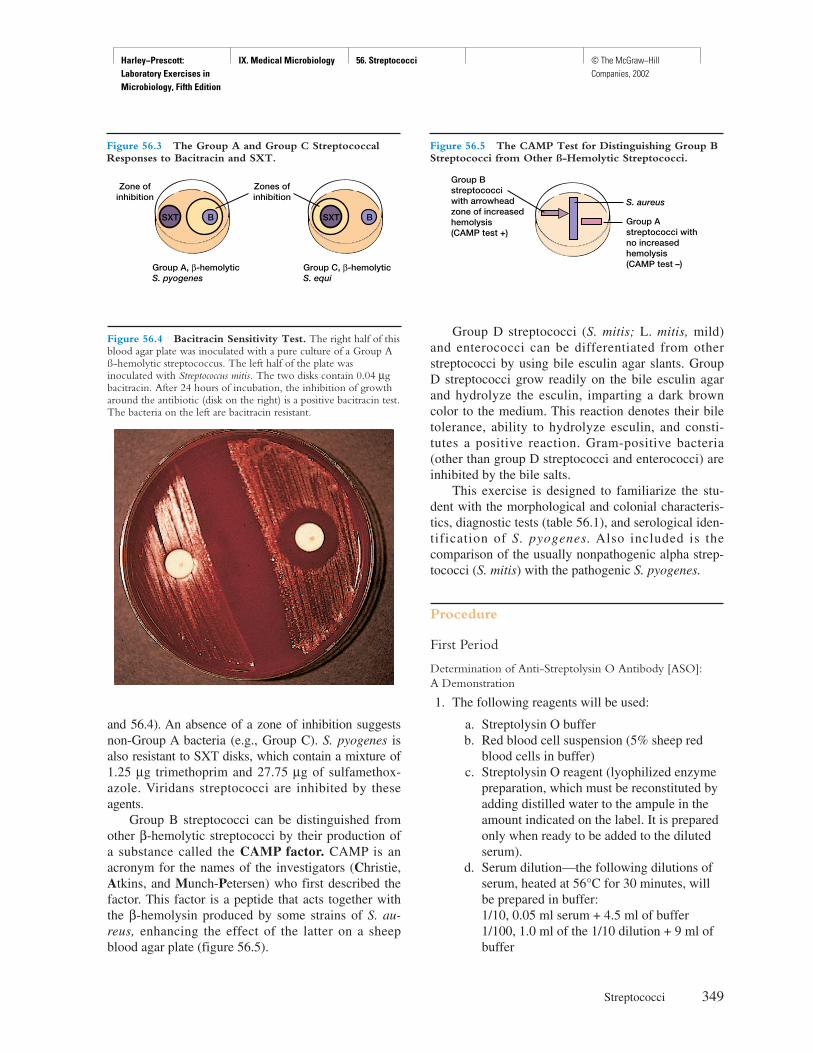
Harley−Prescott: Laboratory Exercises in Microbiology, Fifth Edition
IX. Medical Microbiology 56. Streptococci © The McGraw−Hill Companies, 2002
and 56.4). An absence of a zone of inhibition suggestsnon-Group A bacteria (e.g., Group C). S. pyogenes isalso resistant to SXT disks, which contain a mixture of1.25 µg trimethoprim and 27.75 µg of sulfamethox-azole. Viridans streptococci are inhibited by theseagents.
Group B streptococci can be distinguished fromother β-hemolytic streptococci by their production ofa substance called the CAMP factor. CAMP is anacronym for the names of the investigators (Christie,Atkins, and Munch-Petersen) who first described thefactor. This factor is a peptide that acts together withthe β-hemolysin produced by some strains of S. au-reus, enhancing the effect of the latter on a sheepblood agar plate (figure 56.5).
Group D streptococci (S. mitis; L. mitis, mild)and enterococci can be differentiated from otherstreptococci by using bile esculin agar slants. GroupD streptococci grow readily on the bile esculin agarand hydrolyze the esculin, imparting a dark browncolor to the medium. This reaction denotes their biletolerance, ability to hydrolyze esculin, and consti-tutes a positive reaction. Gram-positive bacteria(other than group D streptococci and enterococci) areinhibited by the bile salts.
This exercise is designed to familiarize the stu-dent with the morphological and colonial characteris-tics, diagnostic tests (table 56.1), and serological iden-tification of S. pyogenes. Also included is thecomparison of the usually nonpathogenic alpha strep-tococci (S. mitis) with the pathogenic S. pyogenes.
Procedure
First Period
Determination of Anti-Streptolysin O Antibody [ASO]: A Demonstration
1. The following reagents will be used:
a. Streptolysin O bufferb. Red blood cell suspension (5% sheep red
blood cells in buffer)c. Streptolysin O reagent (lyophilized enzyme
preparation, which must be reconstituted byadding distilled water to the ampule in theamount indicated on the label. It is preparedonly when ready to be added to the dilutedserum).
d. Serum dilution—the following dilutions ofserum, heated at 56°C for 30 minutes, willbe prepared in buffer:1/10, 0.05 ml serum + 4.5 ml of buffer1/100, 1.0 ml of the 1/10 dilution + 9 ml ofbuffer
Streptococci 349
SXTB BSXT
Group A, β-hemolyticS. pyogenes
Group C, β-hemolyticS. equi
Zone ofinhibition
Zones ofinhibition
Figure 56.3 The Group A and Group C StreptococcalResponses to Bacitracin and SXT.
Figure 56.4 Bacitracin Sensitivity Test. The right half of thisblood agar plate was inoculated with a pure culture of a Group Aß-hemolytic streptococcus. The left half of the plate wasinoculated with Streptococcus mitis. The two disks contain 0.04 µgbacitracin. After 24 hours of incubation, the inhibition of growtharound the antibiotic (disk on the right) is a positive bacitracin test.The bacteria on the left are bacitracin resistant.
S. aureus
Group Bstreptococciwith arrowheadzone of increasedhemolysis(CAMP test +)
Group Astreptococci withno increasedhemolysis(CAMP test –)
Figure 56.5 The CAMP Test for Distinguishing Group BStreptococci from Other ß-Hemolytic Streptococci.
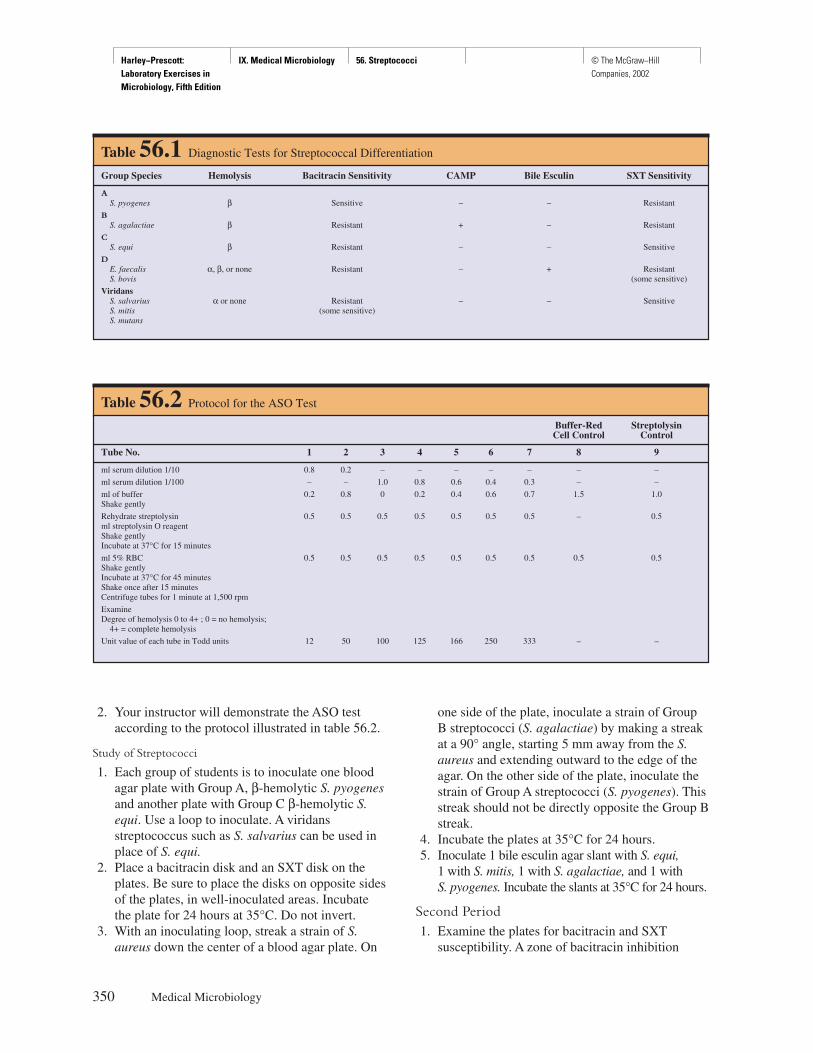
Harley−Prescott: Laboratory Exercises in Microbiology, Fifth Edition
IX. Medical Microbiology 56. Streptococci © The McGraw−Hill Companies, 2002
2. Your instructor will demonstrate the ASO testaccording to the protocol illustrated in table 56.2.
Study of Streptococci
1. Each group of students is to inoculate one bloodagar plate with Group A, β-hemolytic S. pyogenesand another plate with Group C β-hemolytic S.equi. Use a loop to inoculate. A viridansstreptococcus such as S. salvarius can be used inplace of S. equi.
2. Place a bacitracin disk and an SXT disk on theplates. Be sure to place the disks on opposite sidesof the plates, in well-inoculated areas. Incubatethe plate for 24 hours at 35°C. Do not invert.
3. With an inoculating loop, streak a strain of S.aureus down the center of a blood agar plate. On
one side of the plate, inoculate a strain of GroupB streptococci (S. agalactiae) by making a streakat a 90° angle, starting 5 mm away from the S.aureus and extending outward to the edge of theagar. On the other side of the plate, inoculate thestrain of Group A streptococci (S. pyogenes). Thisstreak should not be directly opposite the Group Bstreak.
4. Incubate the plates at 35°C for 24 hours.5. Inoculate 1 bile esculin agar slant with S. equi,
1 with S. mitis, 1 with S. agalactiae, and 1 withS. pyogenes. Incubate the slants at 35°C for 24 hours.
Second Period1. Examine the plates for bacitracin and SXT
susceptibility. A zone of bacitracin inhibition
350 Medical Microbiology
Table 56.2 Protocol for the ASO Test
Buffer-Red Streptolysin Cell Control Control
Tube No. 1 2 3 4 5 6 7 8 9
ml serum dilution 1/10 0.8 0.2 – – – – – – –
ml serum dilution 1/100 – – 1.0 0.8 0.6 0.4 0.3 – –
ml of buffer 0.2 0.8 0 0.2 0.4 0.6 0.7 1.5 1.0Shake gently
Rehydrate streptolysin 0.5 0.5 0.5 0.5 0.5 0.5 0.5 – 0.5ml streptolysin O reagentShake gentlyIncubate at 37°C for 15 minutes
ml 5% RBC 0.5 0.5 0.5 0.5 0.5 0.5 0.5 0.5 0.5Shake gentlyIncubate at 37°C for 45 minutesShake once after 15 minutesCentrifuge tubes for 1 minute at 1,500 rpm
ExamineDegree of hemolysis 0 to 4+ ; 0 = no hemolysis;
4+ = complete hemolysis
Unit value of each tube in Todd units 12 50 100 125 166 250 333 – –
Table 56.1 Diagnostic Tests for Streptococcal Differentiation
Group Species Hemolysis Bacitracin Sensitivity CAMP Bile Esculin SXT Sensitivity
AS. pyogenes β Sensitive – – Resistant
BS. agalactiae β Resistant + – Resistant
CS. equi β Resistant – – Sensitive
DE. faecalis α, β, or none Resistant – + ResistantS. bovis (some sensitive)
ViridansS. salvarius α or none Resistant – – SensitiveS. mitis (some sensitive)S. mutans
Harley−Prescott: Laboratory Exercises in Microbiology, Fifth Edition
IX. Medical Microbiology 56. Streptococci © The McGraw−Hill Companies, 2002
greater than or equal to 14 mm in diameterindicates the presence of Group A streptococci.There will not be a zone around the non-Group Astreptococci. Positive SXT results for the presenceof Group C streptococci are indicated by a zoneof inhibition greater than or equal to 16 mm indiameter. There will not be a zone around thenon-Group C.
2. Observe the area of hemolysis around the S.aureus streak. At the point adjacent to the streakof Group B streptococci, you should be able tosee an arrowhead-shaped area of increasedhemolysis indicating the production of the CAMPfactor. There should be no change in thehemolytic zone adjacent to the streak of theGroup A streptococci since most strains do notproduce the CAMP factor.
3. Gram stain each group of streptococci from theblood agar plates.
4. Examine the bile esculin agar slants for any colorchange. A dark brown color change is a positivereaction for group D streptococci. No colorchange is a negative reaction.
5. Complete the report for exercise 56.
Streptococci 351
HINTS AND PRECAUTIONS(1) It should be noted that the zone of hemolysis aroundthe bacitracin disk is so distinct because a pure cultureis being used. If this is not so, then your stock culture is probably contaminated. (2) Sometimes it is easiest to observe hemolysis by examining the zone with the 4× objective of a compound microscope. Any intact erythrocytes are readily seen.
Harley−Prescott: Laboratory Exercises in Microbiology, Fifth Edition
IX. Medical Microbiology 56. Streptococci © The McGraw−Hill Companies, 2002
353
Name: ———————————————————————
Date: ————————————————————————
Lab Section: —————————————————————
Laboratory Report 56
Streptococci
1. Serum titer in Todd units: ___________________________________________________________________
2. Streptococci.
Colony on Bacitracin SXT Bile Esculin Bacterium Gram Stain Group CAMP Factor Blood Agar Hemolysis Sensitivity Sensitivity Hydrolysis
S. mitis __________ __________ __________ __________ __________ __________ __________ ____________
S. pyogenes __________ __________ __________ __________ __________ __________ __________ ____________
S. equi __________ __________ __________ __________ __________ __________ __________ ____________
S. agalactiae __________ __________ __________ __________ __________ __________ __________ ____________

Harley−Prescott: Laboratory Exercises in Microbiology, Fifth Edition
IX. Medical Microbiology 56. Streptococci © The McGraw−Hill Companies, 2002
Review Questions
1. How could you determine if a sore throat was caused by S. pyogenes (Group A, � hemolytic)?
2. What types of diseases are caused by S. pyogenes?
3. What is a Todd unit?
4. Do all Group A streptococci produce erythrogenic toxin? Explain your answer.
5. What is the purpose of the ASO test? When would you use it in a clinical laboratory?
6. What is SXT sensitivity? CAMP factor? What organisms are identified by those tests?
7. How would you differentiate between α- and β-hemolysis?
354 Medical Microbiology
Harley−Prescott: Laboratory Exercises in Microbiology, Fifth Edition
IX. Medical Microbiology 57. Neisseriae © The McGraw−Hill Companies, 2002
Materials per Group of Students
1 tryptic soy agar plate1 modified Thayer-Martin plate3 tubes enriched nitrate broth containing
Durham tubescandle jar1 stock culture of Neisseria gonorrhoeae (ATCC
9793)1 stock culture of Neisseria flavescens (ATCC
13120)1 stock culture of Moraxella nonliquefaciens
(ATCC 19975)3 CTA (cystine tryptic agar) glucose medium
tubes3 CTA fructose medium tubes3 CTA maltose medium tubes3 CTA sucrose medium tubesindophenol oxidase reagent or Difco SpotTest
Oxidase reagentcatalase reagent (3% hydrogen peroxide)nitrate test reagentsDNase test agar plate1-ml pipettes with pipettorGram-stain reagentsglass slideswax pencil37°C incubatorprepared slides of Neisseria gonorrhoeae exudate1 N HClBunsen burner
Learning Objectives
Each student should be able to
1. Become familiar with the clinical isolation andidentification of Neisseria species
2. Perform isolation and biochemical tests todifferentiate N. gonorrhoeae, N. flavescens, andM. nonliquefaciens
Suggested Reading in Textbook
1. Order Neisseriales, section 22.2.2. Gonorrhea, section 39.3.
Pronunciation Guide
Moraxella nonliquefaciens (mo-rak-SEL-ah non-li-kwe-FA-sens)
Neisseria flavescens (nis-SE-re-ah flav-ES-sens)N. gonorrhoeae (go-nor-REE-ah)N. lactamica (lak-tam-ica)N. mucosa (MU-cosa)N. sicca (sik-ah)N. subflava (sub-FLA-vah)
Principles
The family Neisseriaceae includes bacteria that aregram-negative cocci occurring in pairs or groups. Thetwo species that are pathogenic in humans are N. gon-orrhoeae (Gr. gonorrhoea, gonorrhea), which causesgonorrhea, and N. meningitidis (Gr. meninx, the mem-brane enclosing the brain), which causes cerebrospinalmeningitis. Since these bacteria are very fastidious andsensitive to changes in the atmosphere, the followingprecautions must be taken in isolating and culturingthem: (1) highly enriched media must be used, and(2) the bacteria must be incubated in an increased CO2
and water atmosphere.Other nonpathogenic Neisseria may be isolated
from the respiratory tract of humans. These include
355
E X E R C I S E
Neisseriae
57
SAFETY CONSIDERATIONSBe careful with the Bunsen burner flame. The catalasereagent (3% hydrogen peroxide) and 1 N HCl are caus-tic. Work with them in the fume hood. No mouth pipet-ting. Neisseria spp. are potential pathogens. Use aseptictechnique throughout this experiment. Keep all culturetubes upright in a test-tube rack or in a can.
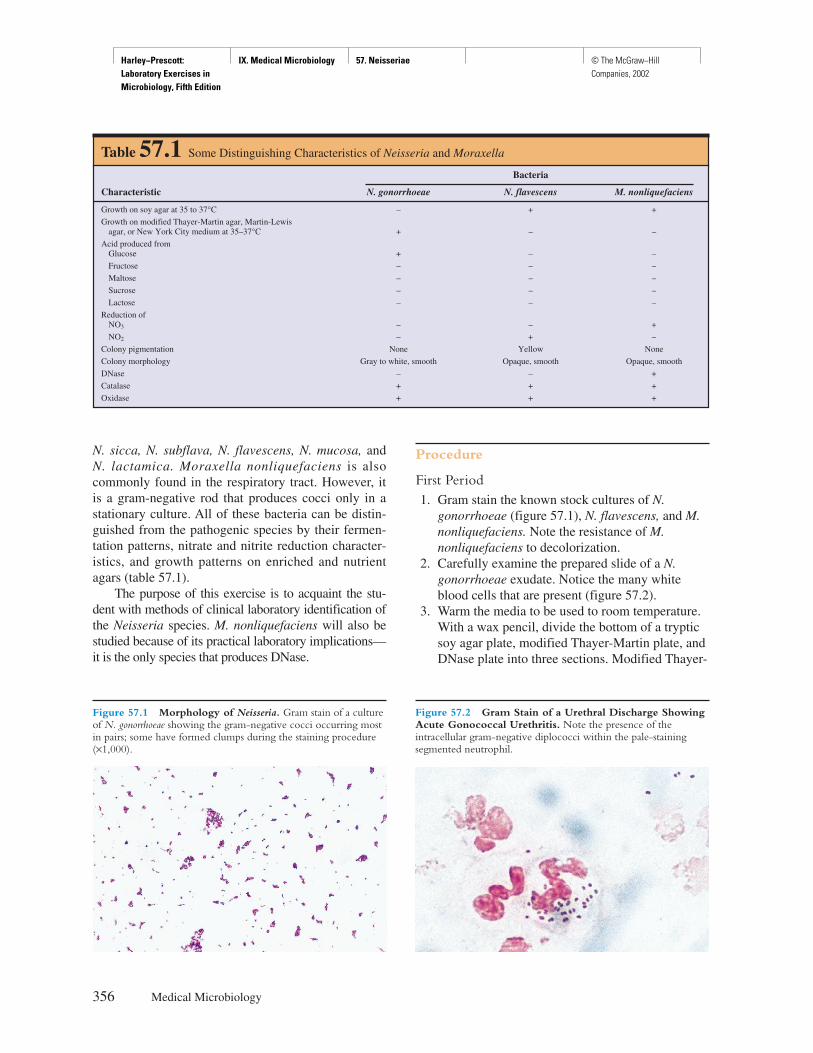
Harley−Prescott: Laboratory Exercises in Microbiology, Fifth Edition
IX. Medical Microbiology 57. Neisseriae © The McGraw−Hill Companies, 2002
N. sicca, N. subflava, N. flavescens, N. mucosa, andN. lactamica. Moraxella nonliquefaciens is alsocommonly found in the respiratory tract. However, itis a gram-negative rod that produces cocci only in astationary culture. All of these bacteria can be distin-guished from the pathogenic species by their fermen-tation patterns, nitrate and nitrite reduction character-istics, and growth patterns on enriched and nutrientagars (table 57.1).
The purpose of this exercise is to acquaint the stu-dent with methods of clinical laboratory identification ofthe Neisseria species. M. nonliquefaciens will also bestudied because of its practical laboratory implications—it is the only species that produces DNase.
Procedure
First Period1. Gram stain the known stock cultures of N.
gonorrhoeae (figure 57.1), N. flavescens, and M.nonliquefaciens. Note the resistance of M.nonliquefaciens to decolorization.
2. Carefully examine the prepared slide of a N.gonorrhoeae exudate. Notice the many whiteblood cells that are present (figure 57.2).
3. Warm the media to be used to room temperature.With a wax pencil, divide the bottom of a trypticsoy agar plate, modified Thayer-Martin plate, andDNase plate into three sections. Modified Thayer-
356 Medical Microbiology
Table 57.1 Some Distinguishing Characteristics of Neisseria and Moraxella
Bacteria
Characteristic N. gonorrhoeae N. flavescens M. nonliquefaciens
Growth on soy agar at 35 to 37°C – + +
Growth on modified Thayer-Martin agar, Martin-Lewisagar, or New York City medium at 35–37°C + – –
Acid produced fromGlucose + – –
Fructose – – –
Maltose – – –
Sucrose – – –
Lactose – – –
Reduction ofNO3 – – +
NO2 – + –
Colony pigmentation None Yellow None
Colony morphology Gray to white, smooth Opaque, smooth Opaque, smooth
DNase – – +
Catalase + + +
Oxidase + + +
Figure 57.1 Morphology of Neisseria. Gram stain of a cultureof N. gonorrhoeae showing the gram-negative cocci occurring mostin pairs; some have formed clumps during the staining procedure(×1,000).
Figure 57.2 Gram Stain of a Urethral Discharge ShowingAcute Gonococcal Urethritis. Note the presence of theintracellular gram-negative diplococci within the pale-stainingsegmented neutrophil.
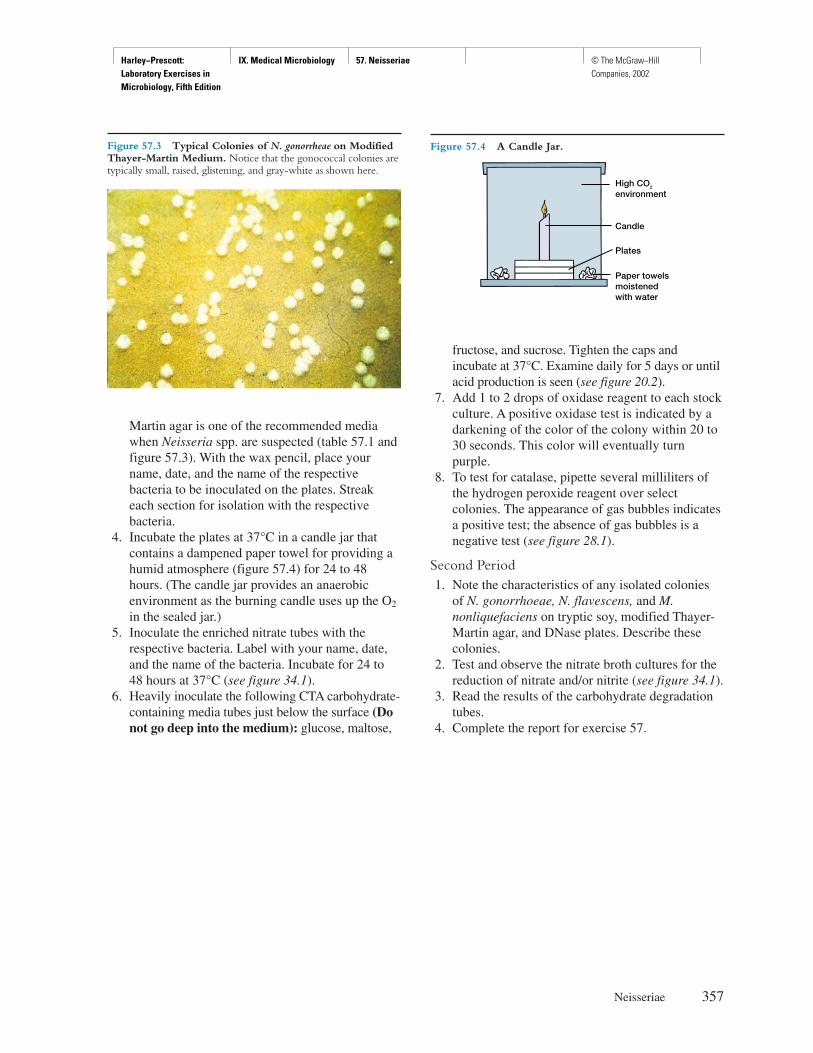
Harley−Prescott: Laboratory Exercises in Microbiology, Fifth Edition
IX. Medical Microbiology 57. Neisseriae © The McGraw−Hill Companies, 2002
Martin agar is one of the recommended mediawhen Neisseria spp. are suspected (table 57.1 andfigure 57.3). With the wax pencil, place yourname, date, and the name of the respectivebacteria to be inoculated on the plates. Streakeach section for isolation with the respectivebacteria.
4. Incubate the plates at 37°C in a candle jar thatcontains a dampened paper towel for providing ahumid atmosphere (figure 57.4) for 24 to 48hours. (The candle jar provides an anaerobicenvironment as the burning candle uses up the O2
in the sealed jar.)5. Inoculate the enriched nitrate tubes with the
respective bacteria. Label with your name, date,and the name of the bacteria. Incubate for 24 to48 hours at 37°C (see figure 34.1).
6. Heavily inoculate the following CTA carbohydrate-containing media tubes just below the surface (Donot go deep into the medium): glucose, maltose,
fructose, and sucrose. Tighten the caps andincubate at 37°C. Examine daily for 5 days or untilacid production is seen (see figure 20.2).
7. Add 1 to 2 drops of oxidase reagent to each stockculture. A positive oxidase test is indicated by adarkening of the color of the colony within 20 to30 seconds. This color will eventually turnpurple.
8. To test for catalase, pipette several milliliters ofthe hydrogen peroxide reagent over selectcolonies. The appearance of gas bubbles indicatesa positive test; the absence of gas bubbles is anegative test (see figure 28.1).
Second Period1. Note the characteristics of any isolated colonies
of N. gonorrhoeae, N. flavescens, and M.nonliquefaciens on tryptic soy, modified Thayer-Martin agar, and DNase plates. Describe thesecolonies.
2. Test and observe the nitrate broth cultures for thereduction of nitrate and/or nitrite (see figure 34.1).
3. Read the results of the carbohydrate degradationtubes.
4. Complete the report for exercise 57.
Neisseriae 357
Figure 57.3 Typical Colonies of N. gonorrheae on ModifiedThayer-Martin Medium. Notice that the gonococcal colonies aretypically small, raised, glistening, and gray-white as shown here.
Plates
Candle
High CO2
environment
Paper towelsmoistenedwith water
Figure 57.4 A Candle Jar.
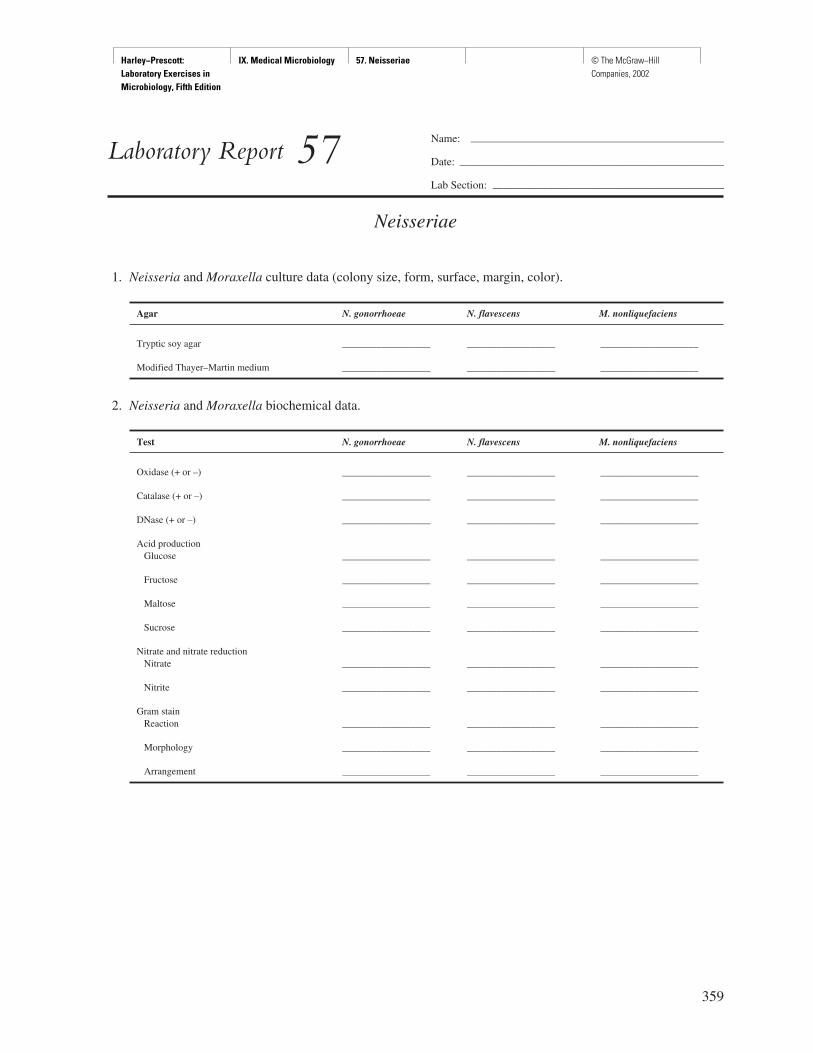
Harley−Prescott: Laboratory Exercises in Microbiology, Fifth Edition
IX. Medical Microbiology 57. Neisseriae © The McGraw−Hill Companies, 2002
359
Name: ———————————————————————
Date: ————————————————————————
Lab Section: —————————————————————
Laboratory Report 57
Neisseriae
1. Neisseria and Moraxella culture data (colony size, form, surface, margin, color).
Agar N. gonorrhoeae N. flavescens M. nonliquefaciens
Tryptic soy agar __________________ __________________ ____________________
Modified Thayer–Martin medium __________________ __________________ ____________________
2. Neisseria and Moraxella biochemical data.
Test N. gonorrhoeae N. flavescens M. nonliquefaciens
Oxidase (+ or –) __________________ __________________ ____________________
Catalase (+ or –) __________________ __________________ ____________________
DNase (+ or –) __________________ __________________ ____________________
Acid productionGlucose __________________ __________________ ____________________
Fructose __________________ __________________ ____________________
Maltose __________________ __________________ ____________________
Sucrose __________________ __________________ ____________________
Nitrate and nitrate reductionNitrate __________________ __________________ ____________________
Nitrite __________________ __________________ ____________________
Gram stainReaction __________________ __________________ ____________________
Morphology __________________ __________________ ____________________
Arrangement __________________ __________________ ____________________
Harley−Prescott: Laboratory Exercises in Microbiology, Fifth Edition
IX. Medical Microbiology 57. Neisseriae © The McGraw−Hill Companies, 2002
Review Questions
1. From what type of clinical specimen would one expect to isolate N. gonorrhoeae? M. nonliquefaciens?
2. Why is the oxidase test useful in the separation of gram-negative, facultatively anaerobic bacteria?
3. Give one example in which gonococci might give a false negative test in a CTA carbohydrate test.
4. How does a candle jar function?
5. Since the Neisseria are fastidious and sensitive to atmospheric changes, what precautions must be taken inisolating and culturing them?
6. How are pathogenic Neisseria identified?
7. What are intracellular gram-negative diplococci?
360 Medical Microbiology
Harley−Prescott: Laboratory Exercises in Microbiology, Fifth Edition
IX. Medical Microbiology 58. Aerobic and Anaerobic Endospore−Forming Bacteria
© The McGraw−Hill Companies, 2002
Materials per Group of Students
1 tryptic soy agar plate1 24-hour tryptic soy broth culture of Bacillus
subtilis (ATCC 6051)1 36-hour tryptic soy agar slant of Bacillus
megaterium1 24-hour sodium thioglycollate broth culture of
Clostridium perfringens (ATCC 3620)2 blood agar platesspore-staining material (see exercise 11)anaerobic jar, GasPak System (BBL), or Oxyrase
platewax pencilinoculating loop35°C incubatorclean glass slidesBunsen burnerGram-stain reagentstest-tube rack or can
Learning Objectives
Each student should be able to
1. Perform aerobic and anaerobic cultures onendospore-forming bacteria
2. Do an endospore stain
Suggested Reading in Textbook
1. The Bacilli and Lactobacilli, section 23.4; seealso tables 23.2 and 23.3, and figures 23.5, 23.6,and 23.8.
2. Anthrax, section 39.3.3. Gas Gangrene, section 39.3.4. Tetanus, section 39.3.5. Botulism, section 39.4.
Pronunciation Guide
Bacillus subtilis (bah-SIL-lus sub-til-us)B. megaterium (meg-AH-ter-ee-um)Clostridium perfringens (klos-STRID-ee-um per-
FRIN-jens)
Principles
Bergey’s Manual lists six gram-positive, endospore-forming genera. The most thoroughly studied andmost important are Bacillus and Clostridium.
The genus Bacillus (e.g., B. subtilis, B. mega-terium) is aerobic, or sometimes facultatively anaero-bic, and catalase positive. Bacillus species are ubiqui-tous in soil and are common laboratory contaminants.In older cultures, these bacteria will lose their abilityto retain the primary stain (crystal violet) in the Gramreaction. Under adverse conditions, Bacillus spp. formendospores (figure 58.1a,b). Subgroups of the Bacil-lus genus have been constructed based on endosporeshape (oval, spherical), position of the spore in thecell (central, terminal), and the species’ ability to fer-ment sugars. Most members of this group are motile,some produce capsules, some are thermophilic (heat-loving), and with the exceptions of B. anthracis (theetiologic agent of anthrax) and B. cereus (the etio-logic agent of gastroenteritis), are nonpathogenic.
Members of the genus Clostridium are obligatelyanaerobic and lack both catalase and a complete elec-tron transport chain. The endospores may be central,subterminal, or terminal in position, and spherical oroval in shape. Like Bacillus, bacteria of this genus tendto give a gram-negative stain in older cultures. Clostrid-ium bacteria are widely distributed in the soil and in theintestinal tract of humans and other animals. Threespecies are of medical importance:C. tetani, whichcauses tetanus (figure 58.1d); C. botulinum, whichcauses botulism; and C. perfringens, which causes gasgangrene and food poisoning (figure 58.1c). Tetanus iscaused by C. tetani endospores entering tissue with alow oxidation-reduction potential. The spores germinate,
361
E X E R C I S E
Aerobic and Anaerobic Endospore-Forming Bacteria
58
SAFETY CONSIDERATIONSBe careful with the Bunsen burner flame. Handle allbacteria as if they are pathogens. Use aseptic techniquethroughout this experiment. Keep all culture tubes up-right in a test-tube rack or in a can.
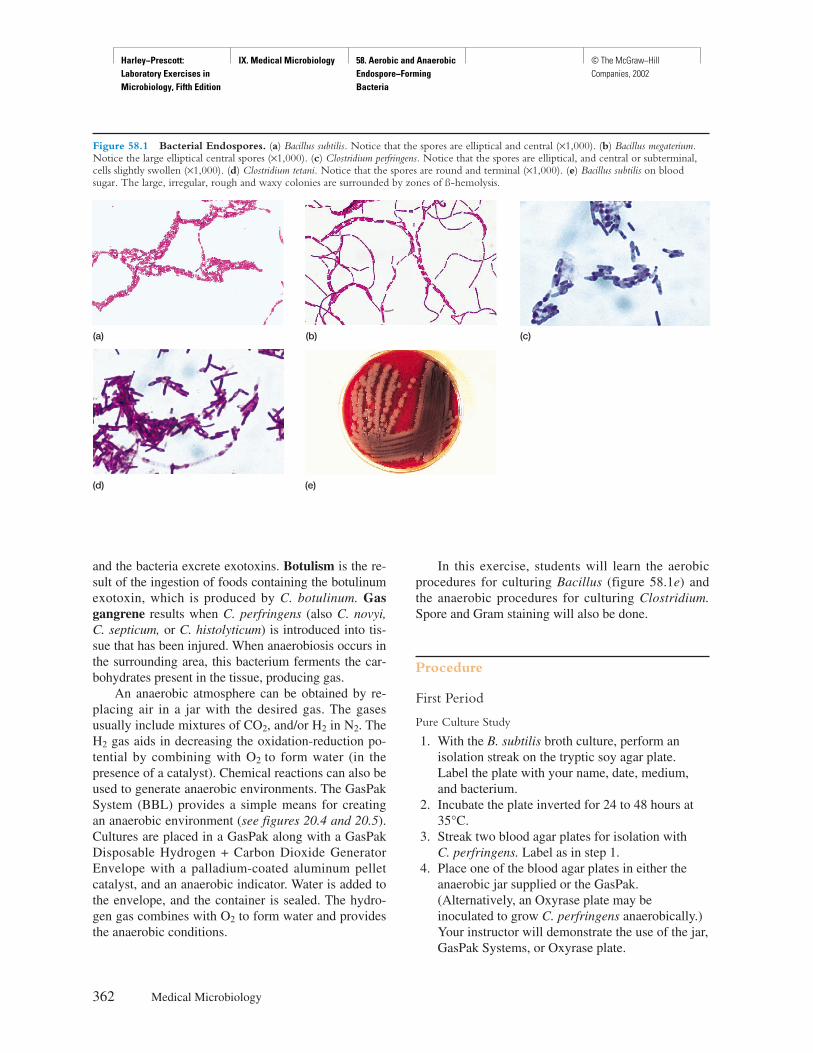
Harley−Prescott: Laboratory Exercises in Microbiology, Fifth Edition
IX. Medical Microbiology 58. Aerobic and Anaerobic Endospore−Forming Bacteria
© The McGraw−Hill Companies, 2002
and the bacteria excrete exotoxins. Botulism is the re-sult of the ingestion of foods containing the botulinumexotoxin, which is produced by C. botulinum. Gasgangrene results when C. perfringens (also C. novyi,C. septicum, or C. histolyticum) is introduced into tis-sue that has been injured. When anaerobiosis occurs inthe surrounding area, this bacterium ferments the car-bohydrates present in the tissue, producing gas.
An anaerobic atmosphere can be obtained by re-placing air in a jar with the desired gas. The gasesusually include mixtures of CO2, and/or H2 in N2. TheH2 gas aids in decreasing the oxidation-reduction po-tential by combining with O2 to form water (in thepresence of a catalyst). Chemical reactions can also beused to generate anaerobic environments. The GasPakSystem (BBL) provides a simple means for creatingan anaerobic environment (see figures 20.4 and 20.5).Cultures are placed in a GasPak along with a GasPakDisposable Hydrogen + Carbon Dioxide GeneratorEnvelope with a palladium-coated aluminum pelletcatalyst, and an anaerobic indicator. Water is added tothe envelope, and the container is sealed. The hydro-gen gas combines with O2 to form water and providesthe anaerobic conditions.
In this exercise, students will learn the aerobicprocedures for culturing Bacillus (figure 58.1e) andthe anaerobic procedures for culturing Clostridium.Spore and Gram staining will also be done.
Procedure
First Period
Pure Culture Study
1. With the B. subtilis broth culture, perform anisolation streak on the tryptic soy agar plate.Label the plate with your name, date, medium,and bacterium.
2. Incubate the plate inverted for 24 to 48 hours at35°C.
3. Streak two blood agar plates for isolation with C. perfringens. Label as in step 1.
4. Place one of the blood agar plates in either theanaerobic jar supplied or the GasPak.(Alternatively, an Oxyrase plate may beinoculated to grow C. perfringens anaerobically.)Your instructor will demonstrate the use of the jar,GasPak Systems, or Oxyrase plate.
362 Medical Microbiology
Figure 58.1 Bacterial Endospores. (a) Bacillus subtilis. Notice that the spores are elliptical and central (×1,000). (b) Bacillus megaterium.Notice the large elliptical central spores (×1,000). (c) Clostridium perfringens. Notice that the spores are elliptical, and central or subterminal,cells slightly swollen (×1,000). (d) Clostridium tetani. Notice that the spores are round and terminal (×1,000). (e) Bacillus subtilis on bloodsugar. The large, irregular, rough and waxy colonies are surrounded by zones of ß-hemolysis.
(a)
(d)
(b) (c)
(e)
Harley−Prescott: Laboratory Exercises in Microbiology, Fifth Edition
IX. Medical Microbiology 58. Aerobic and Anaerobic Endospore−Forming Bacteria
© The McGraw−Hill Companies, 2002
5. Place either the jar or the GasPak and the otherblood agar plate in the 35°C incubator for 48 hours.
6. Save all cultures for the second period, includingthe stock cultures.
Endospore Stain
1. Fix a smear from each culture (tryptic soy agarslant and sodium thioglycollate broth) on a cleanglass slide.
2. Stain for endospores as described in exercise 11.3. Draw the endospores in Part 1 of the report for
exercise 58 (figure 58.1a,b).
Second Period1. Examine the aerobic culture of B. subtilis and
record the colonial morphology in Part 2 of thereport for exercise 58.
2. Do Gram stains on well-isolated bacterialcolonies from the TSA plate and from the trypticsoy broth tube.
3. Examine the aerobic and anaerobic cultures of C.perfringens. Notice that no growth was observedin the aerobic culture due to the fact that thisbacterium is a strict anaerobe.
4. Record the colonial morphology of the blood agarplate grown under anaerobic conditions in Part 2of the report for exercise 58. Also notice thedouble zone of β-hemolysis, which is acharacteristic used in the identification of C.perfringens.
5. Do Gram stains on well-isolated colonies fromthe blood agar plate and sodium thioglycollatebroth.
Aerobic and Anaerobic Endospore-Forming Bacteria 363
HINTS AND PRECAUTIONSUse the fume hood when heat-staining spores withmalachite green.
Harley−Prescott: Laboratory Exercises in Microbiology, Fifth Edition
IX. Medical Microbiology 58. Aerobic and Anaerobic Endospore−Forming Bacteria
© The McGraw−Hill Companies, 2002
365
Name: ———————————————————————
Date: ————————————————————————
Lab Section: —————————————————————
Laboratory Report 58
Aerobic and Anaerobic Endospore-Forming Bacteria
1. Drawing of endospores.
a. C. perfringens
b. B. megaterium
2. Pure culture study.
Gram Stain
Position of the Young OldBacterium Colonial Morphology Spore Culture Culture
C. perfringens ______________________________ ______________ ____________ ____________
B. subtilis ______________________________ ______________ ____________ ____________

Harley−Prescott: Laboratory Exercises in Microbiology, Fifth Edition
IX. Medical Microbiology 58. Aerobic and Anaerobic Endospore−Forming Bacteria
© The McGraw−Hill Companies, 2002
Review Questions
1. What are several functions of bacterial endospores?
2. Can the position of an endospore help in identifying bacteria? Give examples.
3. What is the major source of Clostridium in our environment?
4. Discuss oxidation-reduction potentials in terms of anaerobiosis.
5. How does a GasPak System function?
6. Why is sodium thioglycollate used to culture anaerobic bacteria?
7. Would you expect to find endospores in the blood agar plate culture of Clostridium? Why or why not?
366 Medical Microbiology
Harley−Prescott: Laboratory Exercises in Microbiology, Fifth Edition
X. Survey of Selected Eucaryotic Microorganisms
Introduction © The McGraw−Hill Companies, 2002
367367
Fungi
For 300 years after the birth of Christ rainfall was abnormallyheavy. . . . The crops flourished and so did the host of tiny livingorganisms—the rusts, rots, mildews, molds, smuts, and blights
that were to ultimately destroy the grain. . . . Field after field waslaid to waste. History is made by a multiplicity of little things,
as well as major revolutions, wars, earthquakes and floods. And so it was that the fungi, by bringing hunger and unrest,
contributed to the decline of the Great Roman Empire.Lucy Kavaler (American author
of Mushrooms, Molds, and Miracles, 1938– )
Eucaryotic microorganisms include the algae, fungi(yeasts and molds), and the protozoa. All of these eucaryotesconsist of single cells (or simple aggregates of cells) that con-tain a membrane-bound nucleus and intracellular mem-brane-bound organelles. Free-living, eucaryotic microor-
ganisms are widely distributed in the environment; eucary-otic microorganisms also participate in various types of sym-biotic relationships. Many cause human diseases and are ofmedical importance; others are domestic animal and agricul-tural plant pathogens; still others benefit society.
This section of the manual contains two laboratory ex-ercises that have been designed to better acquaint the stu-dent with the fungi. Students will work with both preparedspecimens and living microorganisms in order to better un-derstand the life cycles, salient characteristics, and morphol-ogy of selected examples.
After completing one or more of the exercises inPart Ten, you will, at the minimum, be able todemonstrate an increased understanding of microbialdiversity. This will meet the American Society forMicrobiology Core Curriculum theme number 1:impact of microorganisms on the biosphere and hu-mans; microbial diversity (see pp. vi–viii).
P A R T T E N
Survey of SelectedEucaryotic Microorganisms

Harley−Prescott: Laboratory Exercises in Microbiology, Fifth Edition
X. Survey of Selected Eucaryotic Microorganisms
59. Fungi I:Yeasts © The McGraw−Hill Companies, 2002
Materials per Student
7- to 10-day Sabouraud dextrose plate culture ofSaccharomyces cerevisiae (ATCC 2366) and/orRhodotorula species (ATCC 22078)
dried commercial baker’s yeastiodine solution (3 ml water to 1 ml Gram’s iodine)methylene blue solutionBunsen burnerinoculating loopclean glass slidescoverslipswax pencil2 Sabouraud dextrose agar plates35°C incubator1 glucose fermentation tube with Durham tube
(Difco: neopeptone + 1% yeast extract + 1%glucose)
1 sucrose fermentation tube with Durham tube(Difco: neopeptone + 1% yeast extract + 1%sucrose)
sterile cotton swabs
Learning Objectives
Each student should be able to
1. Understand the morphological characteristics ofyeast cells
2. Culture a typical yeast and study carbohydratefermentation
3. Stain a typical yeast cell
Suggested Reading in Textbook
1. Structure (of Yeast), section 25.3; see alsofigure 25.3.
2. Division Ascomycota, section 25.6; see alsofigures 25.2 and 25.10.
3. Opportunistic Mycoses, section 40.1; see alsofigure 40.16.
Pronunciation Guide
Rhodotorula spp. (ro-do-TOR-u-lah) Saccharomyces cerevisiae (sak-ah-ro-MI-seez ser-ah-
VEES-ee-eye)
Why Are the Above Fungi Usedin This Exercise?
The major objectives of this exercise are to learn yeast mor-phology and culture some typical yeasts. To achieve theseobjectives, the authors have chosen the common yeast Sac-charomyces cerevisiae (or Rhodotorula spp.) for this exer-cise. Because Candida albicans is a yeast that is commonlyfound in the mouth, the student should be able to isolate it.
Principles
Yeasts are unicellular fungi that are spherical, ellip-soidal, or oval in shape, and usually (with the excep-tion of the dimorphic yeasts such as Candida) do notform hyphae (fungal filaments). They are about 5 to10 times larger than bacteria. Yeasts commonly repro-duce asexually by budding, a process in which a newcell (called a daughter cell) is formed by the parentcell from a protuberance called a bud. When yeastsreproduce sexually, they produce several types of sex-ual spores (e.g., ascospores). The type of spore pro-duced is very useful in classifying yeasts. Metabolicactivities are also used to identify and classify yeasts.For example, the yeast Saccharomyces cerevisiae willferment glucose but not sucrose. In the laboratory,Sabouraud dextrose agar is commonly used to iso-
368
E X E R C I S E
Fungi I:Yeasts
59
SAFETY CONSIDERATIONSBe careful with the Bunsen burner flame. Keep all cul-ture tubes upright in a test-tube rack or can.
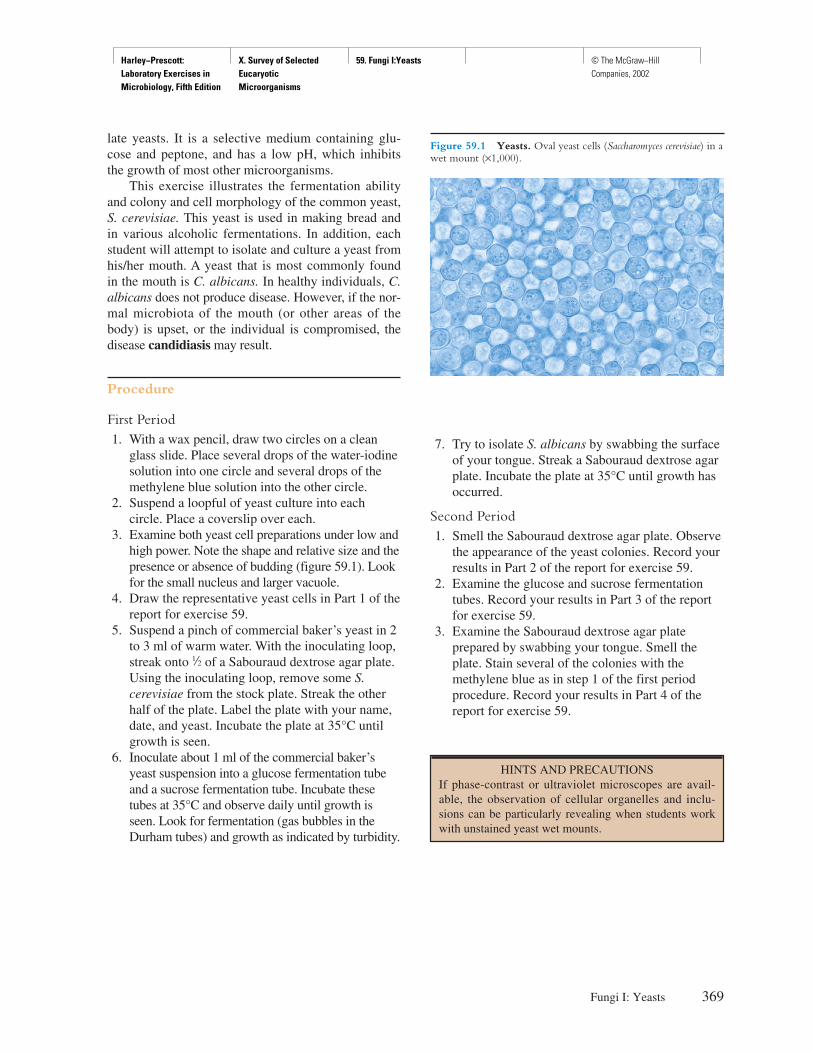
Harley−Prescott: Laboratory Exercises in Microbiology, Fifth Edition
X. Survey of Selected Eucaryotic Microorganisms
59. Fungi I:Yeasts © The McGraw−Hill Companies, 2002
late yeasts. It is a selective medium containing glu-cose and peptone, and has a low pH, which inhibitsthe growth of most other microorganisms.
This exercise illustrates the fermentation abilityand colony and cell morphology of the common yeast,S. cerevisiae. This yeast is used in making bread andin various alcoholic fermentations. In addition, eachstudent will attempt to isolate and culture a yeast fromhis/her mouth. A yeast that is most commonly foundin the mouth is C. albicans. In healthy individuals, C.albicans does not produce disease. However, if the nor-mal microbiota of the mouth (or other areas of thebody) is upset, or the individual is compromised, thedisease candidiasis may result.
Procedure
First Period1. With a wax pencil, draw two circles on a clean
glass slide. Place several drops of the water-iodinesolution into one circle and several drops of themethylene blue solution into the other circle.
2. Suspend a loopful of yeast culture into eachcircle. Place a coverslip over each.
3. Examine both yeast cell preparations under low andhigh power. Note the shape and relative size and thepresence or absence of budding (figure 59.1). Lookfor the small nucleus and larger vacuole.
4. Draw the representative yeast cells in Part 1 of thereport for exercise 59.
5. Suspend a pinch of commercial baker’s yeast in 2to 3 ml of warm water. With the inoculating loop,streak onto d of a Sabouraud dextrose agar plate.Using the inoculating loop, remove some S.cerevisiae from the stock plate. Streak the otherhalf of the plate. Label the plate with your name,date, and yeast. Incubate the plate at 35°C untilgrowth is seen.
6. Inoculate about 1 ml of the commercial baker’syeast suspension into a glucose fermentation tubeand a sucrose fermentation tube. Incubate thesetubes at 35°C and observe daily until growth isseen. Look for fermentation (gas bubbles in theDurham tubes) and growth as indicated by turbidity.
7. Try to isolate S. albicans by swabbing the surfaceof your tongue. Streak a Sabouraud dextrose agarplate. Incubate the plate at 35°C until growth hasoccurred.
Second Period1. Smell the Sabouraud dextrose agar plate. Observe
the appearance of the yeast colonies. Record yourresults in Part 2 of the report for exercise 59.
2. Examine the glucose and sucrose fermentationtubes. Record your results in Part 3 of the reportfor exercise 59.
3. Examine the Sabouraud dextrose agar plateprepared by swabbing your tongue. Smell theplate. Stain several of the colonies with themethylene blue as in step 1 of the first periodprocedure. Record your results in Part 4 of thereport for exercise 59.
Fungi I: Yeasts 369
HINTS AND PRECAUTIONSIf phase-contrast or ultraviolet microscopes are avail-able, the observation of cellular organelles and inclu-sions can be particularly revealing when students workwith unstained yeast wet mounts.
Figure 59.1 Yeasts. Oval yeast cells (Saccharomyces cerevisiae) in awet mount (×1,000).
Harley−Prescott: Laboratory Exercises in Microbiology, Fifth Edition
X. Survey of Selected Eucaryotic Microorganisms
59. Fungi I:Yeasts © The McGraw−Hill Companies, 2002
371
Name: ———————————————————————
Date: ————————————————————————
Lab Section: —————————————————————
Laboratory Report 59
Fungi I: Yeasts
1. Draw typical yeast cells in the following space.
a. Water-iodine suspension (Magnification: × ).
b. Methylene blue suspension (Magnification: × ).
2. Draw typical yeast colonies in the following space (Magnification: × ).
Commercial baker’s yeast S. cerevisiae
a. color ____________________________ a. color ________________________________
b. smell ____________________________ b. smell ________________________________
3. Fermentation.
a. What is the color of the glucose broth after ____________ days incubation? _____________________
Was gas produced? Explain. ____________________________________________________________
b. What is the color of the sucrose broth after ____________ days incubation? _____________________
Was gas produced? Explain. ____________________________________________________________
Harley−Prescott: Laboratory Exercises in Microbiology, Fifth Edition
X. Survey of Selected Eucaryotic Microorganisms
59. Fungi I:Yeasts © The McGraw−Hill Companies, 2002
4. Draw the appearance of the yeast colony from your mouth in the following space. Do the same for the cellmorphology.
Magnification ×
Review Questions
1. Define:a. budding
b. hyphae
c. yeast
2. Compare and contrast the characteristics of baker’s yeast and Saccharomyces cerevisiae.
3. Why are yeast colonies larger than bacterial colonies?
4. Why do yeasts generally have to be cultured for longer periods than most bacteria?
5. What are some similarities and differences of the yeasts that were cultured from your mouth?
6. Why are stains not required for yeast identification?
7. Why is Sabouraud dextrose agar used to cultivate yeasts?
372 Survey of Selected Eucaryotic Microorganisms
Harley−Prescott: Laboratory Exercises in Microbiology, Fifth Edition
X. Survey of Selected Eucaryotic Microorganisms
60. Fungi II: Phycomycetes, Ascomycetes, and Basidiomycetes
© The McGraw−Hill Companies, 2002
Materials per Group of Students
7- to 10-day Sabouraud dextrose plate cultures ofPenicillium notatum (ATCC 9178) andAspergillus niger (ATCC 10535)
preserved mushrooms (Agaricus or Coprinus)plus and minus strains of Rhizopus stolonifer
(ATCC 12938+, 12939–)1 Sabouraud dextrose agar deep2 potato dextrose agar deeps48° to 50°C water bath3 sterile petri platesmethylene blue in 90% methanolinoculating loopwax pencilclean microscope slides22 × 40-mm coverslipstweezersBunsen burnersyringes containing paraffin and oil, or tubes of
silicone tub caulkwooden swab sticks (or a syringe)1-ml pipettes with pipettorglass or wooden support rodssterile Pasteur pipettes and bulbsprepared slides of Phycomycetes (e.g., Rhizopus,
Saprolegnia), Ascomycetes (e.g., Penicillium,Aspergillus, Morchella), Basidiomycetes (e.g.,Polyporus, Lycoperdon, Coprinus, Puccinia)
Learning Objectives
Each student should be able to1. Describe a typical mold2. Grow colonies of several molds on Sabouraud
agar plates3. Prepare culture slides of several molds4. Identify the morphology and reproductive
structures of representative molds5. Observe a complete mold life cycle
Suggested Reading in Textbook
1. The Fungi, chapter 25. It is suggested that eachstudent bring his or her textbook to the laboratorysince all of the morphology data, life cycles, andterminology covered in this exercise can be foundin chapter 25 and will not be repeated here.
Pronunciation Guide
Aspergillus niger (as-per-JIL-us NI-jer)Penicillium notatum (pen-a-SIL-ee-um no-TAY-tum)Rhizopus stolonifer (ri-ZO-pus sto-LON-a-fer)
Why Are the Above Molds Usedin This Exercise?
In this exercise, the student will become familiar with sev-eral aspects of fungus biology. The authors have chosenthree of the most common molds (Penicillium notatum,Rhizopus stolonifer, and Aspergillus niger) for the studentto culture and study. Other fungi are introduced using pre-pared slides and preserved materials.
Principles
Molds are multicellular, filamentous fungi. The tech-niques of culturing and observing fungi differ fromthe methods used to study bacteria. Fungi grow at
373
E X E R C I S E
Fungi II: Phycomycetes,Ascomycetes, and Basidiomycetes
60
SAFETY CONSIDERATIONSWhen working with sporulating fungi, avoid prolonged ex-posure to the plates. Some individuals may be allergic tothe fungi, and the laboratory may become excessively con-taminated with spores when the plates are left uncovered.Although many procedures used in this experiment are un-like those for bacteria, aseptic technique is still required.
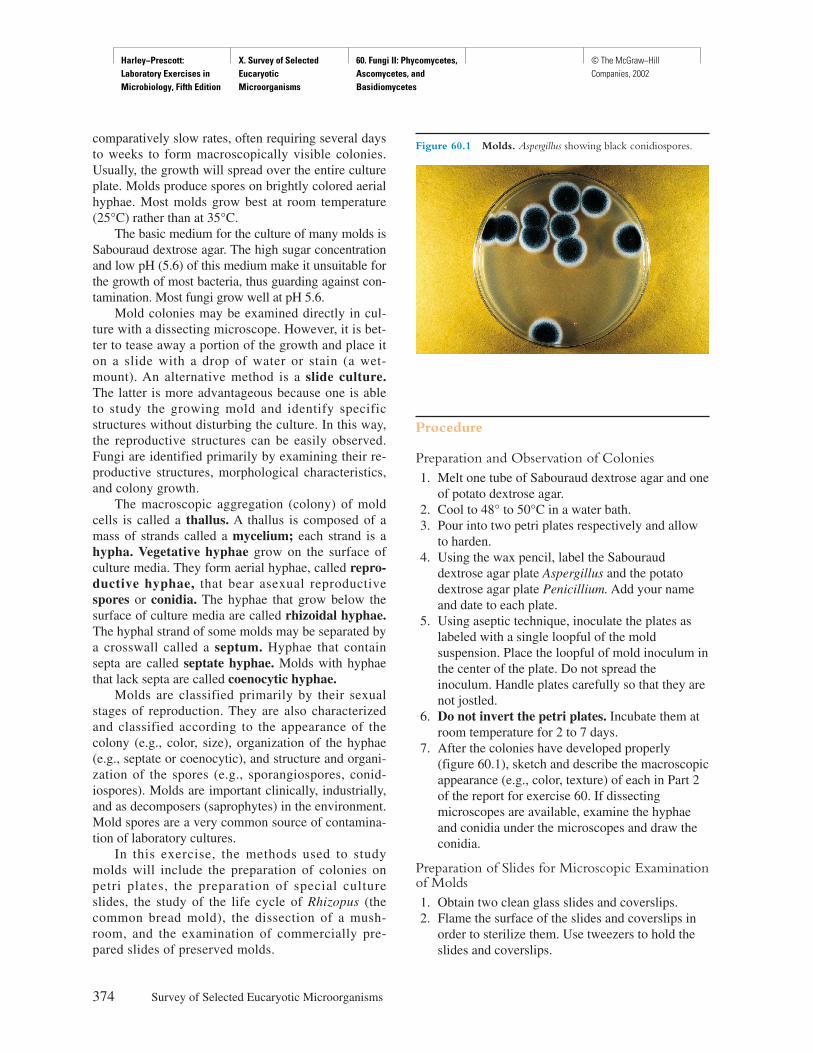
Harley−Prescott: Laboratory Exercises in Microbiology, Fifth Edition
X. Survey of Selected Eucaryotic Microorganisms
60. Fungi II: Phycomycetes, Ascomycetes, and Basidiomycetes
© The McGraw−Hill Companies, 2002
comparatively slow rates, often requiring several daysto weeks to form macroscopically visible colonies.Usually, the growth will spread over the entire cultureplate. Molds produce spores on brightly colored aerialhyphae. Most molds grow best at room temperature(25°C) rather than at 35°C.
The basic medium for the culture of many molds isSabouraud dextrose agar. The high sugar concentrationand low pH (5.6) of this medium make it unsuitable forthe growth of most bacteria, thus guarding against con-tamination. Most fungi grow well at pH 5.6.
Mold colonies may be examined directly in cul-ture with a dissecting microscope. However, it is bet-ter to tease away a portion of the growth and place iton a slide with a drop of water or stain (a wet-mount). An alternative method is a slide culture.The latter is more advantageous because one is ableto study the growing mold and identify specificstructures without disturbing the culture. In this way,the reproductive structures can be easily observed.Fungi are identified primarily by examining their re-productive structures, morphological characteristics,and colony growth.
The macroscopic aggregation (colony) of moldcells is called a thallus. A thallus is composed of amass of strands called a mycelium; each strand is ahypha. Vegetative hyphae grow on the surface ofculture media. They form aerial hyphae, called repro-ductive hyphae, that bear asexual reproductivespores or conidia. The hyphae that grow below thesurface of culture media are called rhizoidal hyphae.The hyphal strand of some molds may be separated bya crosswall called a septum. Hyphae that containsepta are called septate hyphae. Molds with hyphaethat lack septa are called coenocytic hyphae.
Molds are classified primarily by their sexualstages of reproduction. They are also characterizedand classified according to the appearance of thecolony (e.g., color, size), organization of the hyphae(e.g., septate or coenocytic), and structure and organi-zation of the spores (e.g., sporangiospores, conid-iospores). Molds are important clinically, industrially,and as decomposers (saprophytes) in the environment.Mold spores are a very common source of contamina-tion of laboratory cultures.
In this exercise, the methods used to studymolds will include the preparation of colonies onpetri plates, the preparation of special cultureslides, the study of the life cycle of Rhizopus (thecommon bread mold), the dissection of a mush-room, and the examination of commercially pre-pared slides of preserved molds.
Procedure
Preparation and Observation of Colonies1. Melt one tube of Sabouraud dextrose agar and one
of potato dextrose agar.2. Cool to 48° to 50°C in a water bath.3. Pour into two petri plates respectively and allow
to harden.4. Using the wax pencil, label the Sabouraud
dextrose agar plate Aspergillus and the potatodextrose agar plate Penicillium. Add your nameand date to each plate.
5. Using aseptic technique, inoculate the plates aslabeled with a single loopful of the moldsuspension. Place the loopful of mold inoculum inthe center of the plate. Do not spread theinoculum. Handle plates carefully so that they arenot jostled.
6. Do not invert the petri plates. Incubate them atroom temperature for 2 to 7 days.
7. After the colonies have developed properly(figure 60.1), sketch and describe the macroscopicappearance (e.g., color, texture) of each in Part 2of the report for exercise 60. If dissectingmicroscopes are available, examine the hyphaeand conidia under the microscopes and draw theconidia.
Preparation of Slides for Microscopic Examinationof Molds1. Obtain two clean glass slides and coverslips.2. Flame the surface of the slides and coverslips in
order to sterilize them. Use tweezers to hold theslides and coverslips.
374 Survey of Selected Eucaryotic Microorganisms
Figure 60.1 Molds. Aspergillus showing black conidiospores.
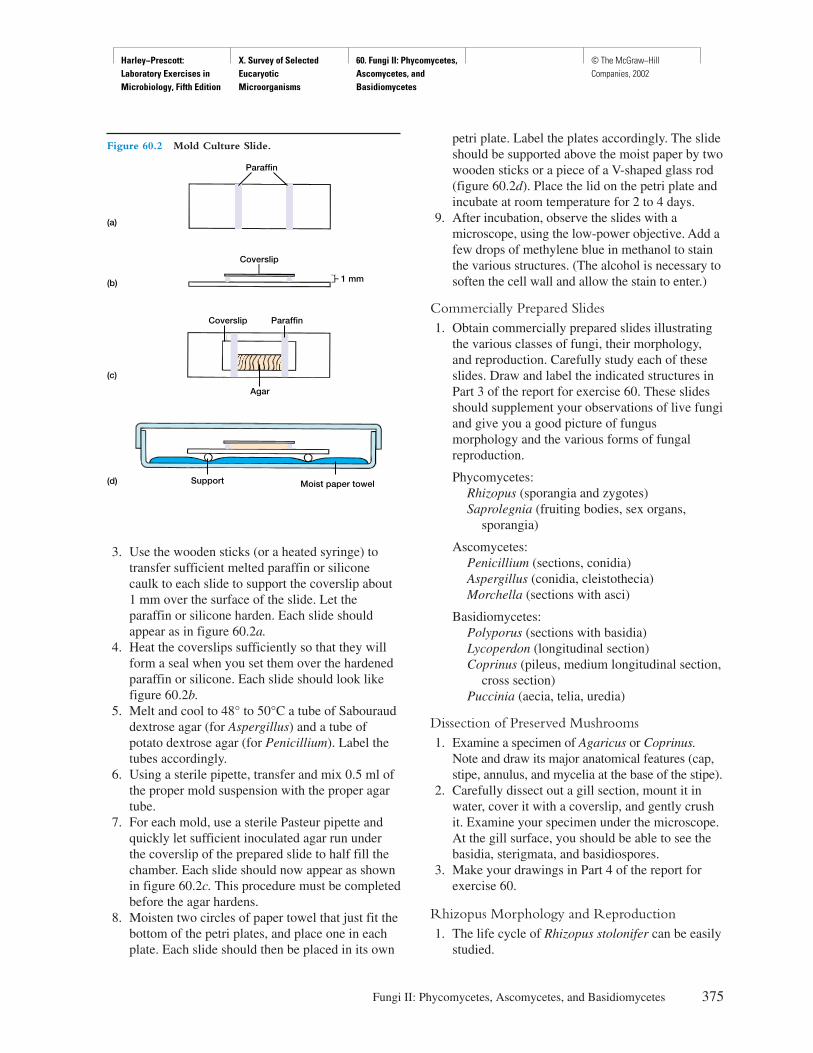
Harley−Prescott: Laboratory Exercises in Microbiology, Fifth Edition
X. Survey of Selected Eucaryotic Microorganisms
60. Fungi II: Phycomycetes, Ascomycetes, and Basidiomycetes
© The McGraw−Hill Companies, 2002
3. Use the wooden sticks (or a heated syringe) totransfer sufficient melted paraffin or siliconecaulk to each slide to support the coverslip about1 mm over the surface of the slide. Let theparaffin or silicone harden. Each slide shouldappear as in figure 60.2a.
4. Heat the coverslips sufficiently so that they willform a seal when you set them over the hardenedparaffin or silicone. Each slide should look likefigure 60.2b.
5. Melt and cool to 48° to 50°C a tube of Sabourauddextrose agar (for Aspergillus) and a tube ofpotato dextrose agar (for Penicillium). Label thetubes accordingly.
6. Using a sterile pipette, transfer and mix 0.5 ml ofthe proper mold suspension with the proper agartube.
7. For each mold, use a sterile Pasteur pipette andquickly let sufficient inoculated agar run underthe coverslip of the prepared slide to half fill thechamber. Each slide should now appear as shownin figure 60.2c. This procedure must be completedbefore the agar hardens.
8. Moisten two circles of paper towel that just fit thebottom of the petri plates, and place one in eachplate. Each slide should then be placed in its own
petri plate. Label the plates accordingly. The slideshould be supported above the moist paper by twowooden sticks or a piece of a V-shaped glass rod(figure 60.2d). Place the lid on the petri plate andincubate at room temperature for 2 to 4 days.
9. After incubation, observe the slides with amicroscope, using the low-power objective. Add afew drops of methylene blue in methanol to stainthe various structures. (The alcohol is necessary tosoften the cell wall and allow the stain to enter.)
Commercially Prepared Slides1. Obtain commercially prepared slides illustrating
the various classes of fungi, their morphology,and reproduction. Carefully study each of theseslides. Draw and label the indicated structures inPart 3 of the report for exercise 60. These slidesshould supplement your observations of live fungiand give you a good picture of fungusmorphology and the various forms of fungalreproduction.
Phycomycetes:Rhizopus (sporangia and zygotes)Saprolegnia (fruiting bodies, sex organs,
sporangia)
Ascomycetes:Penicillium (sections, conidia)Aspergillus (conidia, cleistothecia)Morchella (sections with asci)
Basidiomycetes:Polyporus (sections with basidia)Lycoperdon (longitudinal section)Coprinus (pileus, medium longitudinal section,
cross section)Puccinia (aecia, telia, uredia)
Dissection of Preserved Mushrooms1. Examine a specimen of Agaricus or Coprinus.
Note and draw its major anatomical features (cap,stipe, annulus, and mycelia at the base of the stipe).
2. Carefully dissect out a gill section, mount it inwater, cover it with a coverslip, and gently crushit. Examine your specimen under the microscope.At the gill surface, you should be able to see thebasidia, sterigmata, and basidiospores.
3. Make your drawings in Part 4 of the report forexercise 60.
Rhizopus Morphology and Reproduction1. The life cycle of Rhizopus stolonifer can be easily
studied.
Fungi II: Phycomycetes, Ascomycetes, and Basidiomycetes 375
Paraffin
Coverslip
(a)
(b)
(c)
(d)
1 mm
Coverslip Paraffin
Agar
Support Moist paper towel
Figure 60.2 Mold Culture Slide.

Harley−Prescott: Laboratory Exercises in Microbiology, Fifth Edition
X. Survey of Selected Eucaryotic Microorganisms
60. Fungi II: Phycomycetes, Ascomycetes, and Basidiomycetes
© The McGraw−Hill Companies, 2002
2. Inoculate a potato dextrose agar plate with theplus and minus culture strains provided.
3. A spot of each spore type should be placed atopposite sides of the plate, about 4 cm or moreapart.
4. Within 4 to 7 days, the two strains will havegrown together and a line of zygospores will beformed in the center of the plate. Carefullyremove the cover of the petri plate and observethe morphology of the zygomycete with adissecting scope. You should be able to see thehyphae and sporangia. Zygospores can be studiedby carefully teasing apart the mycelium in thecenter of the plate. Zygospores in various stagesof development will be seen beneath the surface.
You should also be able to observe gametangia aswell. Portions of the thallus may also be removedand pressed under a coverslip for observation athigher magnifications.
376 Survey of Selected Eucaryotic Microorganisms
HINTS AND PRECAUTIONS(1) When preparing slides for fungal culture and obser-vation, it is essential to heat the coverslip properly (step4). If the coverslip is heated too little, it will not stick tothe paraffin. However, be careful not to overheat thecoverslip, or the paraffin will liquify and run over theslide surface. (2) After the fungi are incubated for sev-eral days, desiccation of the agar and cultures can beavoided if the petri plates are taped for a tighter seal.
Harley−Prescott: Laboratory Exercises in Microbiology, Fifth Edition
X. Survey of Selected Eucaryotic Microorganisms
60. Fungi II: Phycomycetes, Ascomycetes, and Basidiomycetes
© The McGraw−Hill Companies, 2002
377
Name: ———————————————————————
Date: ————————————————————————
Lab Section: —————————————————————
Laboratory Report 60
Fungi II: Phycomycetes, Ascomycetes, and Basidiomycetes
1. Mold plate colonies.Aspergillus Penicillium
a. extent of growth ____________________ a. extent of growth _________________________
b. pigmentation ________________________ b. pigmentation ___________________________
c. aerial hyphae present ________________ c. aerial hyphae present _____________________
2. Mold slide cultures.
3. Commercially prepared slides.
Aspergillus Penicillium
Rhizopus
Penicillium
Saprolegnia
Aspergillus Morchella
Harley−Prescott: Laboratory Exercises in Microbiology, Fifth Edition
X. Survey of Selected Eucaryotic Microorganisms
60. Fungi II: Phycomycetes, Ascomycetes, and Basidiomycetes
© The McGraw−Hill Companies, 2002
4. Dissection of preserved mushrooms.a. Drawing of the major anatomical features of a mushroom.
b. Drawing of a mushroom gill section.
378 Survey of Selected Eucaryotic Microorganisms
Polyporus Lycoperdon Coprinus Puccinia

Harley−Prescott: Laboratory Exercises in Microbiology, Fifth Edition
X. Survey of Selected Eucaryotic Microorganisms
60. Fungi II: Phycomycetes, Ascomycetes, and Basidiomycetes
© The McGraw−Hill Companies, 2002
Review Questions
1. What is the difference between vegetative and aerial mycelia?
2. Can bacteriological media be used for the cultivation of molds? Explain your answer.
3. In the common bread-mold life cycle, what do the plus and minus signs mean?
4. Why aren’t molds streaked for isolation like previous exercises have done for bacteria?
5. What is the difference between reproductive and rhizoidal hyphae?
6. Are Rhizopus hyphae coenocytic or septate?
7. How would you describe the fruiting bodies of Aspergillus? Penicillium?
Fungi II: Phycomycetes, Ascomycetes, and Basidiomycetes 379
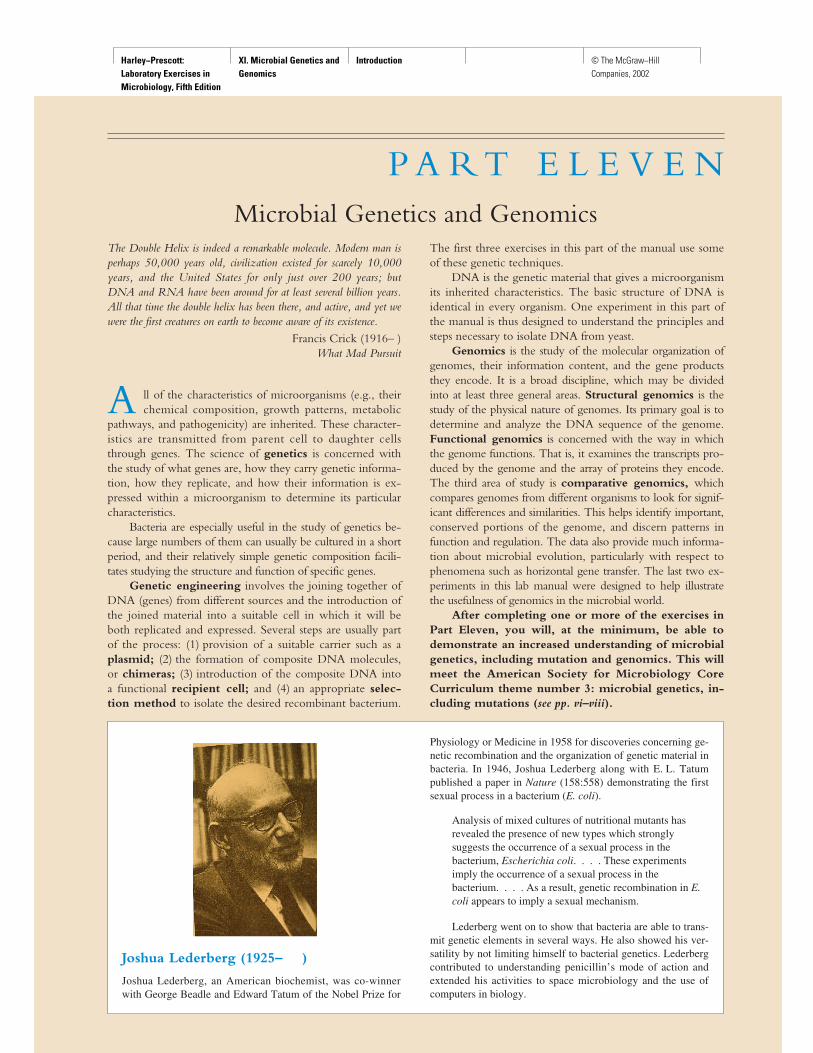
Harley−Prescott: Laboratory Exercises in Microbiology, Fifth Edition
XI. Microbial Genetics and Genomics
Introduction © The McGraw−Hill Companies, 2002
381381
P A R T E L E V E NMicrobial Genetics and Genomics
The Double Helix is indeed a remarkable molecule. Modern man isperhaps 50,000 years old, civilization existed for scarcely 10,000years, and the United States for only just over 200 years; butDNA and RNA have been around for at least several billion years.All that time the double helix has been there, and active, and yet wewere the first creatures on earth to become aware of its existence.
Francis Crick (1916– ) What Mad Pursuit
A ll of the characteristics of microorganisms (e.g., theirchemical composition, growth patterns, metabolic
pathways, and pathogenicity) are inherited. These character-istics are transmitted from parent cell to daughter cellsthrough genes. The science of genetics is concerned withthe study of what genes are, how they carry genetic informa-tion, how they replicate, and how their information is ex-pressed within a microorganism to determine its particularcharacteristics.
Bacteria are especially useful in the study of genetics be-cause large numbers of them can usually be cultured in a shortperiod, and their relatively simple genetic composition facili-tates studying the structure and function of specific genes.
Genetic engineering involves the joining together ofDNA (genes) from different sources and the introduction ofthe joined material into a suitable cell in which it will beboth replicated and expressed. Several steps are usually partof the process: (1) provision of a suitable carrier such as aplasmid; (2) the formation of composite DNA molecules,or chimeras; (3) introduction of the composite DNA intoa functional recipient cell; and (4) an appropriate selec-tion method to isolate the desired recombinant bacterium.
The first three exercises in this part of the manual use someof these genetic techniques.
DNA is the genetic material that gives a microorganismits inherited characteristics. The basic structure of DNA isidentical in every organism. One experiment in this part ofthe manual is thus designed to understand the principles andsteps necessary to isolate DNA from yeast.
Genomics is the study of the molecular organization ofgenomes, their information content, and the gene productsthey encode. It is a broad discipline, which may be dividedinto at least three general areas. Structural genomics is thestudy of the physical nature of genomes. Its primary goal is todetermine and analyze the DNA sequence of the genome.Functional genomics is concerned with the way in whichthe genome functions. That is, it examines the transcripts pro-duced by the genome and the array of proteins they encode.The third area of study is comparative genomics, whichcompares genomes from different organisms to look for signif-icant differences and similarities. This helps identify important,conserved portions of the genome, and discern patterns infunction and regulation. The data also provide much informa-tion about microbial evolution, particularly with respect tophenomena such as horizontal gene transfer. The last two ex-periments in this lab manual were designed to help illustratethe usefulness of genomics in the microbial world.
After completing one or more of the exercises inPart Eleven, you will, at the minimum, be able todemonstrate an increased understanding of microbialgenetics, including mutation and genomics. This willmeet the American Society for Microbiology CoreCurriculum theme number 3: microbial genetics, in-cluding mutations (see pp. vi–viii).
Joshua Lederberg (1925– )
Joshua Lederberg, an American biochemist, was co-winnerwith George Beadle and Edward Tatum of the Nobel Prize for
Physiology or Medicine in 1958 for discoveries concerning ge-netic recombination and the organization of genetic material inbacteria. In 1946, Joshua Lederberg along with E. L. Tatumpublished a paper in Nature (158:558) demonstrating the firstsexual process in a bacterium (E. coli).
Analysis of mixed cultures of nutritional mutants hasrevealed the presence of new types which stronglysuggests the occurrence of a sexual process in thebacterium, Escherichia coli. . . . These experimentsimply the occurrence of a sexual process in thebacterium. . . . As a result, genetic recombination in E.coli appears to imply a sexual mechanism.
Lederberg went on to show that bacteria are able to trans-mit genetic elements in several ways. He also showed his ver-satility by not limiting himself to bacterial genetics. Lederbergcontributed to understanding penicillin’s mode of action andextended his activities to space microbiology and the use ofcomputers in biology.
Harley−Prescott: Laboratory Exercises in Microbiology, Fifth Edition
XI. Microbial Genetics and Genomics
61. Bacterial Mutation © The McGraw−Hill Companies, 2002
Materials per Group of Students
sterile petri plateglass rod or wooden dowel stick (1.6 mm in
diameter)2 tryptic soy agar tubes containing 6 to 7 ml of agar1 tryptic soy agar tube containing 0.05 mg of
streptomycin in 6 to 7 ml of agar1-ml pipette with pipettor24-hour tryptic soy broth culture of
Staphylococcus aureus (ATCC 25903);Serratia marcescens (ATCC 13880) can also beused
95% ethyl alcoholspreading rod3 tryptic soy broth tubes2 tryptic soy broth tubes containing 0.01 mg of
streptomycin in 6 to 7 ml of broth2 tryptic soy broth tubes containing 0.05 mg of
streptomycin in 6 to 7 ml of broth
Learning Objectives
Each student should be able to
1. Define a bacterial mutation2. Isolate a streptomycin-resistant mutant
Suggested Reading in Textbook
1. Mutations and Their Chemical Basis, section 11.6.2. Streptomycin, section 35.6.3. Drug Resistance, section 35.7.
Pronunciation Guide
Staphylococcus aureus (staf-il-oh-KOK-kus ORE-ee-us)
Why Is the Above Bacterium Usedin This Exercise?
The student will isolate a streptomycin-resistant mutantbacterium in this experiment. For this purpose, the authorshave chosen the common bacterium Staphylococcus au-reus. Some mutant strains of S. aureus are resistant to highconcentrations of streptomycin. These strains are present ina ratio of only about one streptomycin-resistant cell to sev-eral million sensitive cells. However, these rare S. aureusmutants can be readily detected by plating a large numberof cells on a medium containing a high concentration ofstreptomycin. Because the bacteria have not been exposedto any mutagenic agent, the isolated mutants are sponta-neous mutants.
Principles
A mutation is the result of a stable, heritable changein the nucleotide sequence of DNA. By manipulatingthe chemical or physical environment of a bacterium,one can increase the frequency of mutations. If a mu-tant bacterium, by virtue of the change that it has un-dergone, is suited to the environment in which it isformed, its growth can be greater than the parent bac-terium. In such a case, the mutant will quickly be-come the dominant bacterium in a culture.
Mutations occur in one of two ways. (1) Sponta-neous mutations arise occasionally in all bacteria anddevelop in the absence of any added agent. (2) Inducedmutations are the result of the bacterium’s exposure toa mutagen, which is a physical or chemical agent.
Spontaneous mutations resistant to antibiotics suchas streptomycin are easily detected because they growin the presence of antibiotic concentrations that inhibit
382 Microbial Genetics and Genomics
E X E R C I S E
Bacterial Mutation
61
SAFETY CONSIDERATIONSStaphylococcus aureus is a pathogen. Follow asepticprocedures. Alcohol is extremely flammable. Keep thebeaker of ethyl alcohol away from the Bunsen burner.Do not put a flaming rod back into the alcohol. Nomouth pipetting. Keep all culture tubes upright in a test-tube rack or can.
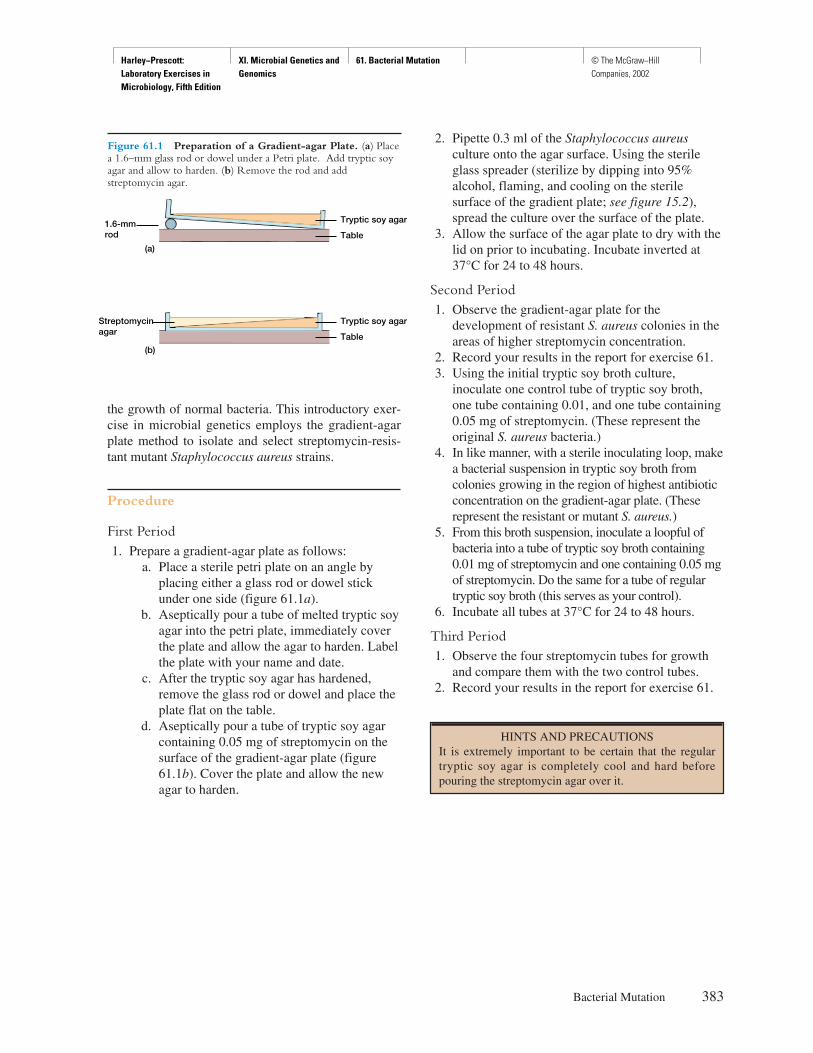
Harley−Prescott: Laboratory Exercises in Microbiology, Fifth Edition
XI. Microbial Genetics and Genomics
61. Bacterial Mutation © The McGraw−Hill Companies, 2002
the growth of normal bacteria. This introductory exer-cise in microbial genetics employs the gradient-agarplate method to isolate and select streptomycin-resis-tant mutant Staphylococcus aureus strains.
Procedure
First Period1. Prepare a gradient-agar plate as follows:
a. Place a sterile petri plate on an angle byplacing either a glass rod or dowel stickunder one side (figure 61.1a).
b. Aseptically pour a tube of melted tryptic soyagar into the petri plate, immediately coverthe plate and allow the agar to harden. Labelthe plate with your name and date.
c. After the tryptic soy agar has hardened,remove the glass rod or dowel and place theplate flat on the table.
d. Aseptically pour a tube of tryptic soy agarcontaining 0.05 mg of streptomycin on thesurface of the gradient-agar plate (figure61.1b). Cover the plate and allow the newagar to harden.
2. Pipette 0.3 ml of the Staphylococcus aureusculture onto the agar surface. Using the sterileglass spreader (sterilize by dipping into 95%alcohol, flaming, and cooling on the sterilesurface of the gradient plate; see figure 15.2),spread the culture over the surface of the plate.
3. Allow the surface of the agar plate to dry with thelid on prior to incubating. Incubate inverted at37°C for 24 to 48 hours.
Second Period1. Observe the gradient-agar plate for the
development of resistant S. aureus colonies in theareas of higher streptomycin concentration.
2. Record your results in the report for exercise 61.3. Using the initial tryptic soy broth culture,
inoculate one control tube of tryptic soy broth,one tube containing 0.01, and one tube containing0.05 mg of streptomycin. (These represent theoriginal S. aureus bacteria.)
4. In like manner, with a sterile inoculating loop, makea bacterial suspension in tryptic soy broth fromcolonies growing in the region of highest antibioticconcentration on the gradient-agar plate. (Theserepresent the resistant or mutant S. aureus.)
5. From this broth suspension, inoculate a loopful ofbacteria into a tube of tryptic soy broth containing0.01 mg of streptomycin and one containing 0.05 mgof streptomycin. Do the same for a tube of regulartryptic soy broth (this serves as your control).
6. Incubate all tubes at 37°C for 24 to 48 hours.
Third Period1. Observe the four streptomycin tubes for growth
and compare them with the two control tubes.2. Record your results in the report for exercise 61.
Bacterial Mutation 383
HINTS AND PRECAUTIONSIt is extremely important to be certain that the regulartryptic soy agar is completely cool and hard beforepouring the streptomycin agar over it.
(a)
(b)
1.6-mmrod
Streptomycinagar
Tryptic soy agar
Table
Tryptic soy agar
Table
Figure 61.1 Preparation of a Gradient-agar Plate. (a) Placea 1.6–mm glass rod or dowel under a Petri plate. Add tryptic soyagar and allow to harden. (b) Remove the rod and addstreptomycin agar.
Harley−Prescott: Laboratory Exercises in Microbiology, Fifth Edition
XI. Microbial Genetics and Genomics
61. Bacterial Mutation © The McGraw−Hill Companies, 2002
385
Name: ———————————————————————
Date: ————————————————————————
Lab Section: —————————————————————
Laboratory Report 61
Bacterial Mutation
1. Draw the number of Staphylococcus aureus colonies growing on the different areas of the gradient-agar plate.
2. Record the relative growth of S. aureus in the three tryptic soy broth tubes. Use a scale from 0 for no growthto + + + + for heavy growth.
Inoculum Streptomycin
Control 0.01 mg 0.05 mg
Original S. aureus __________________________ __________________________ __________________________
Resistant S. aureus __________________________ __________________________ __________________________

Harley−Prescott: Laboratory Exercises in Microbiology, Fifth Edition
XI. Microbial Genetics and Genomics
61. Bacterial Mutation © The McGraw−Hill Companies, 2002
Review Questions
1. How would you define a bacterial mutation?
2. How would you describe a streptomycin-dependent mutant bacterium?
3. How can bacterial mutations occur?
4. What is a mutagen? Give several examples.
5. What methods could be used to increase the frequency of the appearance of mutant Staphylococcus aureus?
6. Could a gradient-agar plate be used for any antibiotic? Explain your answer.
386 Microbial Genetics and Genomics
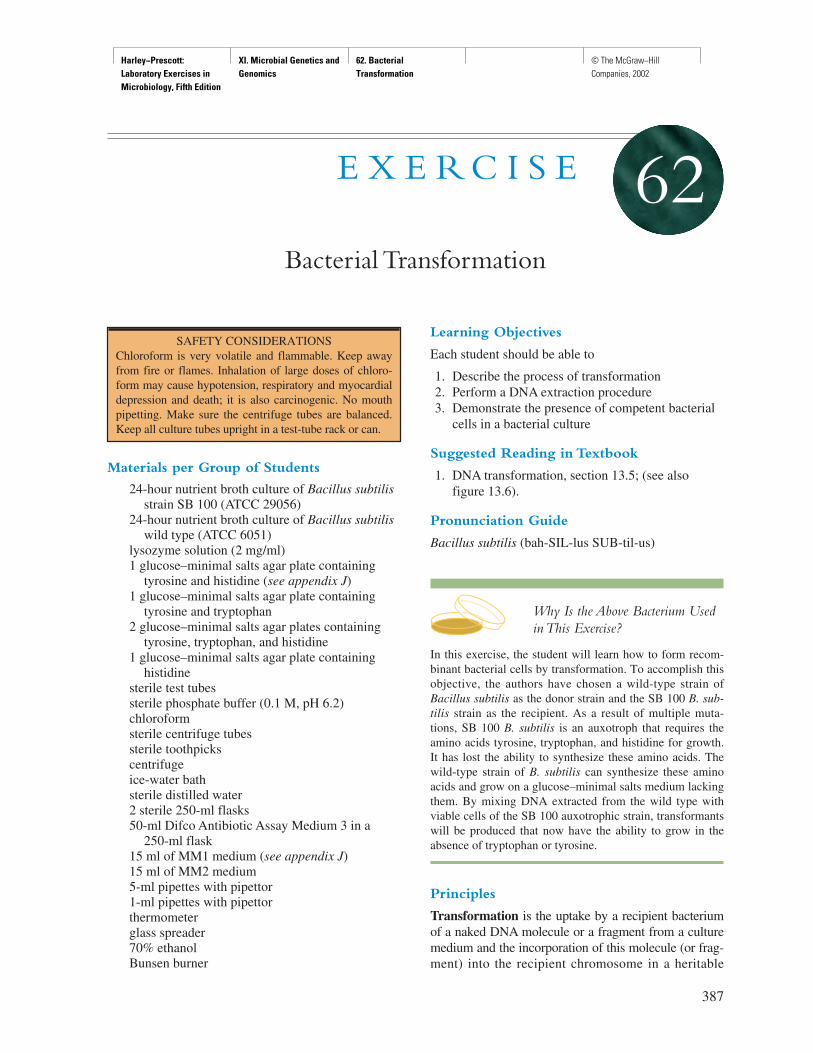
Harley−Prescott: Laboratory Exercises in Microbiology, Fifth Edition
XI. Microbial Genetics and Genomics
62. Bacterial Transformation
© The McGraw−Hill Companies, 2002
Materials per Group of Students
24-hour nutrient broth culture of Bacillus subtilisstrain SB 100 (ATCC 29056)
24-hour nutrient broth culture of Bacillus subtiliswild type (ATCC 6051)
lysozyme solution (2 mg/ml)1 glucose–minimal salts agar plate containing
tyrosine and histidine (see appendix J)1 glucose–minimal salts agar plate containing
tyrosine and tryptophan2 glucose–minimal salts agar plates containing
tyrosine, tryptophan, and histidine1 glucose–minimal salts agar plate containing
histidinesterile test tubessterile phosphate buffer (0.1 M, pH 6.2)chloroformsterile centrifuge tubessterile toothpickscentrifugeice-water bathsterile distilled water2 sterile 250-ml flasks50-ml Difco Antibiotic Assay Medium 3 in a
250-ml flask15 ml of MM1 medium (see appendix J)15 ml of MM2 medium5-ml pipettes with pipettor1-ml pipettes with pipettorthermometerglass spreader70% ethanolBunsen burner
Learning Objectives
Each student should be able to
1. Describe the process of transformation2. Perform a DNA extraction procedure3. Demonstrate the presence of competent bacterial
cells in a bacterial culture
Suggested Reading in Textbook
1. DNA transformation, section 13.5; (see alsofigure 13.6).
Pronunciation Guide
Bacillus subtilis (bah-SIL-lus SUB-til-us)
Why Is the Above Bacterium Usedin This Exercise?
In this exercise, the student will learn how to form recom-binant bacterial cells by transformation. To accomplish thisobjective, the authors have chosen a wild-type strain ofBacillus subtilis as the donor strain and the SB 100 B. sub-tilis strain as the recipient. As a result of multiple muta-tions, SB 100 B. subtilis is an auxotroph that requires theamino acids tyrosine, tryptophan, and histidine for growth.It has lost the ability to synthesize these amino acids. Thewild-type strain of B. subtilis can synthesize these aminoacids and grow on a glucose–minimal salts medium lackingthem. By mixing DNA extracted from the wild type withviable cells of the SB 100 auxotrophic strain, transformantswill be produced that now have the ability to grow in theabsence of tryptophan or tyrosine.
Principles
Transformation is the uptake by a recipient bacteriumof a naked DNA molecule or a fragment from a culturemedium and the incorporation of this molecule (or frag-ment) into the recipient chromosome in a heritable
387
E X E R C I S E
Bacterial Transformation
62
SAFETY CONSIDERATIONSChloroform is very volatile and flammable. Keep awayfrom fire or flames. Inhalation of large doses of chloro-form may cause hypotension, respiratory and myocardialdepression and death; it is also carcinogenic. No mouthpipetting. Make sure the centrifuge tubes are balanced.Keep all culture tubes upright in a test-tube rack or can.
Harley−Prescott: Laboratory Exercises in Microbiology, Fifth Edition
XI. Microbial Genetics and Genomics
62. Bacterial Transformation
© The McGraw−Hill Companies, 2002
form. In natural transformation, the DNA comes from adonor bacterium. The process is random, and any por-tion of the genome may be transferred between bacteria.
When bacteria lyse, they release considerableamounts of DNA into the surrounding environment.These fragments may be relatively large and containseveral genes. If a fragment contacts a competentbacterium, one able to take up DNA and be trans-formed, it can be bound by the cell and taken inside.Transformation may be an important route of geneticexchange in nature.
In this introductory transformation exercise, awild-type strain of Bacillus subtilis will be used as thedonor strain and B. subtilis strain SB 100 as the recip-ient strain. This recipient strain is an auxotroph (amutated bacterium that lacks the ability to synthesizean essential nutrient and must obtain it from its sur-roundings) that requires the amino acids tyrosine,tryptophan, and histidine to grow because it has lostthe ability to synthesize these amino acids. The wild-type strain, however, can synthesize these amino acidsand grow on a glucose–minimal salts medium lackingthese amino acids. By mixing DNA extracted from thewild strain with viable bacteria of the auxotrophicstrain, you will (1) look for transformants that havegained the ability to grow in the absence of trypto-phan, and (2) look for those which have acquired theability to synthesize tryptophan and/or histidine andno longer require that the particular amino acid besupplied to the medium.
Procedure
First Period
Preparation of Donor DNA
1. Aseptically transfer 5 ml of the wild-type Bacillussubtilis to a centrifuge tube and centrifuge at5,000 g for 10 minutes.
2. After centrifugation, using a new pipette, discardthe supernatant and resuspend the bacteria in 5 mlof sterile phosphate buffer.
3. Add 0.05 ml of the lysozyme solution andincubate (with gentle agitation) for 30 minutes atroom temperature.
4. Cool the centrifuge tube to 5°C in an ice-waterbath.
5. Add 5 drops of chloroform to lyse the bacteriawhose walls have been weakened by lysozymedigestion. Agitate the tube to mix the chloroformand medium. This is the source of transforming
DNA for the second period of this procedure. Thispreparation can be stored at 5°C for several days.
Preparation of Competent Bacteria
1. Aseptically inoculate a culture of B. subtilis SB100 into a 250-ml flask containing 50 ml of DifcoAntibiotic Assay Medium 3.
2. Incubate for 24 hours at 37°C. The culture shouldbe gently agitated.
Second Period
Preparation of Competent Bacteria (continued)
1. Harvest the bacteria by centrifugation at 5,000 gfor 10 minutes and resuspend them in 15 ml ofMM1 medium.
2. Add 12.5 ml of the resuspended culture to asterile 250-ml culture flask and incubate withshaking for 5 hours.
3. Harvest these bacteria by centrifugation and dilutethem fivefold by resuspending in 15 ml of MM2(transformation medium). These are thecompetent bacteria that will be used in the nextpart of this experiment.
Transformation of Competent Bacteria
1. Aseptically transfer 0.9 ml of the competentbacteria (B. subtilis SB 100) into a sterile testtube. Carefully, without adding any chloroform,add 0.1 ml of the DNA solution (the donor DNA)prepared from the wild-type B. subtilis. The whiteDNA layer is at the chloroform-water interface.
2. Incubate the test tube at 37°C for 30 minutes withgentle shaking.
3. Pipette 0.1 ml of the transformation mixture ontoa glucose–minimal salts agar plate containingtryptophan, tyrosine, and histidine. Spread thebacteria with a flame-sterilized glass spreader.Label the plate with your name, date, and aminoacid mixture.
4. Dilute the transformation mixture 1/10 usingsterile distilled water. Pipette 0.1 ml of thisdilution onto a glucose–minimal salts agar platecontaining a mixture of tryptophan, tyrosine, andhistidine. Spread out the bacteria as before. Labelwith your name, date, and amino acid mixture.
5. Incubate the plates at 37°C for 48 to 72 hours.6. Using sterile toothpicks, transfer 59 well-isolated
colonies from a transforming petri plate to fourglucose–minimal salts plates containing(1) tyrosine and histidine, (2) tyrosine andtryptophan, (3) tyrosine, tryptophan, and
388 Microbial Genetics and Genomics
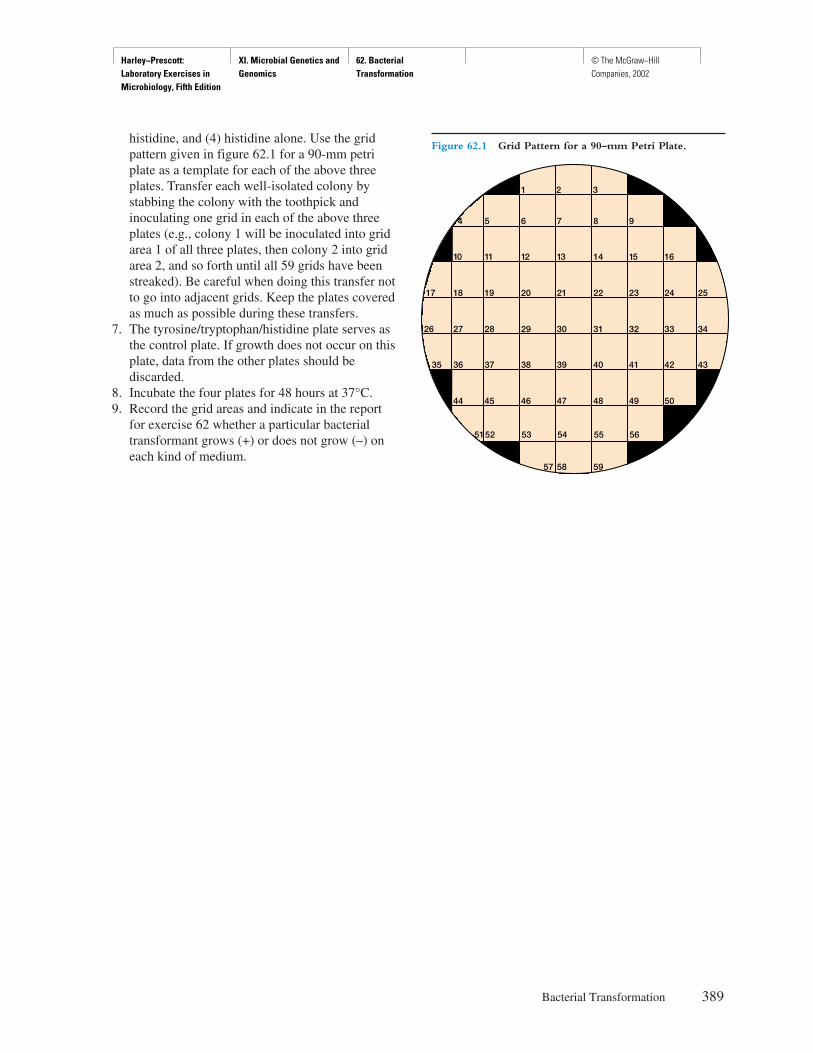
Harley−Prescott: Laboratory Exercises in Microbiology, Fifth Edition
XI. Microbial Genetics and Genomics
62. Bacterial Transformation
© The McGraw−Hill Companies, 2002
histidine, and (4) histidine alone. Use the gridpattern given in figure 62.1 for a 90-mm petriplate as a template for each of the above threeplates. Transfer each well-isolated colony bystabbing the colony with the toothpick andinoculating one grid in each of the above threeplates (e.g., colony 1 will be inoculated into gridarea 1 of all three plates, then colony 2 into gridarea 2, and so forth until all 59 grids have beenstreaked). Be careful when doing this transfer notto go into adjacent grids. Keep the plates coveredas much as possible during these transfers.
7. The tyrosine/tryptophan/histidine plate serves asthe control plate. If growth does not occur on thisplate, data from the other plates should bediscarded.
8. Incubate the four plates for 48 hours at 37°C.9. Record the grid areas and indicate in the report
for exercise 62 whether a particular bacterialtransformant grows (+) or does not grow (–) oneach kind of medium.
Bacterial Transformation 389
11 12 13 14 1510 16
19 20 21 22 2318 2417 25
28 29 30 31 3227 3326 34
37 38 39 40 4136 4235 43
45 46 47 48 4944 50
52 53 54 55 56
57 58 59
51
5 6 7 8 94
1 2 3
Figure 62.1 Grid Pattern for a 90–mm Petri Plate.
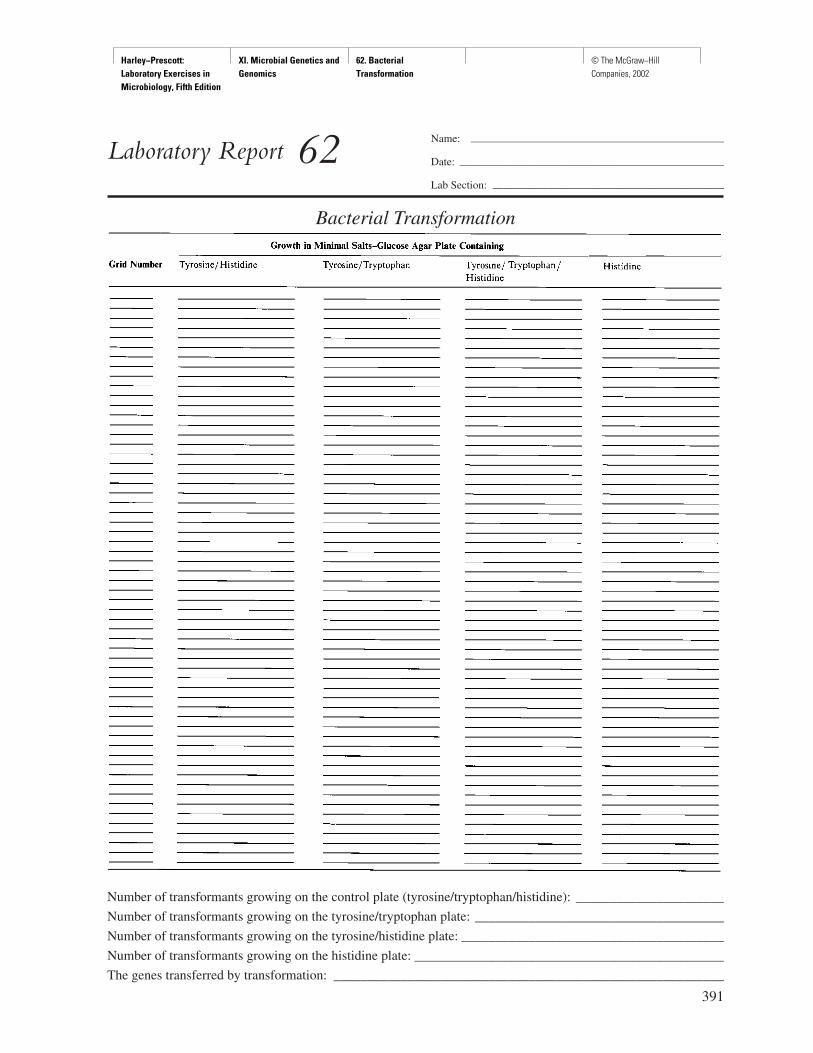
Harley−Prescott: Laboratory Exercises in Microbiology, Fifth Edition
XI. Microbial Genetics and Genomics
62. Bacterial Transformation
© The McGraw−Hill Companies, 2002
391
Name: ———————————————————————
Date: ————————————————————————
Lab Section: —————————————————————
Laboratory Report 62
Number of transformants growing on the control plate (tyrosine/tryptophan/histidine): ______________________
Number of transformants growing on the tyrosine/tryptophan plate: _____________________________________
Number of transformants growing on the tyrosine/histidine plate: _______________________________________
Number of transformants growing on the histidine plate: ______________________________________________
The genes transferred by transformation: __________________________________________________________
Bacterial Transformation
Harley−Prescott: Laboratory Exercises in Microbiology, Fifth Edition
XI. Microbial Genetics and Genomics
62. Bacterial Transformation
© The McGraw−Hill Companies, 2002
Review Questions
1. How would you define bacterial transformation?
2. What is a competent bacterium?
3. What is an auxotroph?
4. Could phenylalanine replace the amino acid tyrosine in this experiment? Explain your answer.
5. What are several factors upon which the successful development of a transformation system depends?
6. What are some important uses of transformation?
392 Microbial Genetics and Genomics
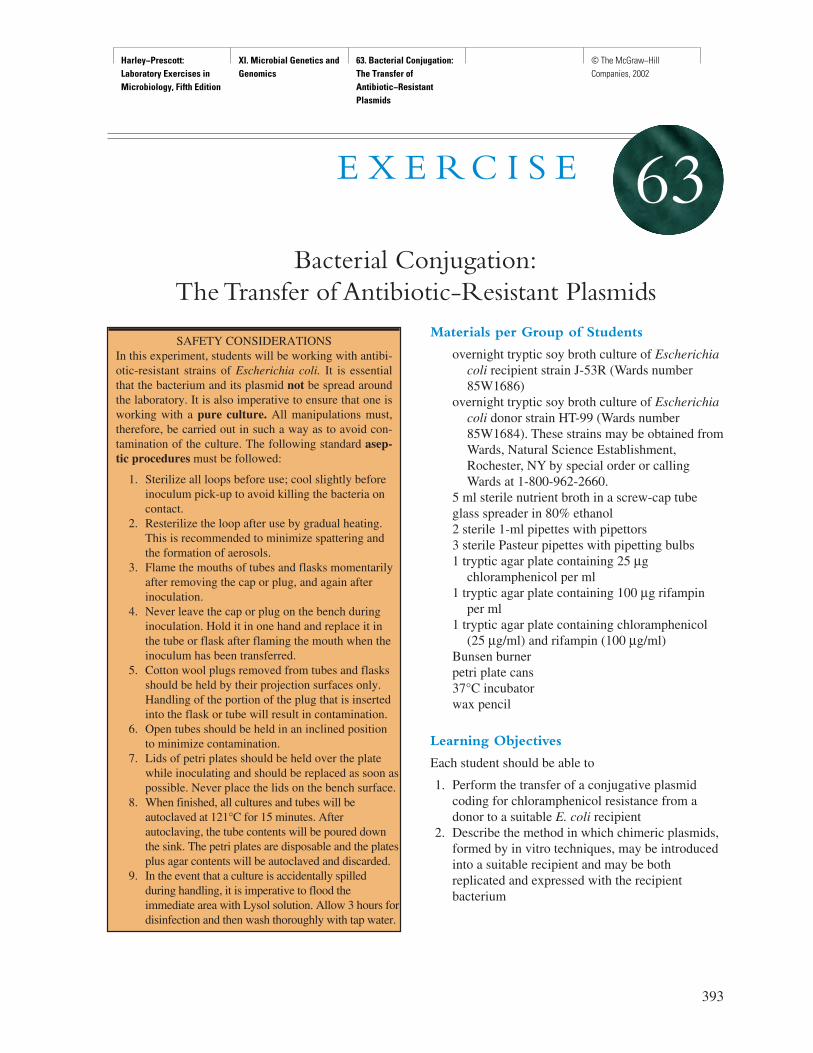
Harley−Prescott: Laboratory Exercises in Microbiology, Fifth Edition
XI. Microbial Genetics and Genomics
63. Bacterial Conjugation: The Transfer of Antibiotic−Resistant Plasmids
© The McGraw−Hill Companies, 2002
Materials per Group of Students
overnight tryptic soy broth culture of Escherichiacoli recipient strain J-53R (Wards number85W1686)
overnight tryptic soy broth culture of Escherichiacoli donor strain HT-99 (Wards number85W1684). These strains may be obtained fromWards, Natural Science Establishment,Rochester, NY by special order or callingWards at 1-800-962-2660.
5 ml sterile nutrient broth in a screw-cap tubeglass spreader in 80% ethanol2 sterile 1-ml pipettes with pipettors3 sterile Pasteur pipettes with pipetting bulbs1 tryptic agar plate containing 25 µg
chloramphenicol per ml1 tryptic agar plate containing 100 µg rifampin
per ml1 tryptic agar plate containing chloramphenicol
(25 µg/ml) and rifampin (100 µg/ml)Bunsen burnerpetri plate cans37°C incubatorwax pencil
Learning Objectives
Each student should be able to
1. Perform the transfer of a conjugative plasmidcoding for chloramphenicol resistance from adonor to a suitable E. coli recipient
2. Describe the method in which chimeric plasmids,formed by in vitro techniques, may be introducedinto a suitable recipient and may be bothreplicated and expressed with the recipientbacterium
393
E X E R C I S E
Bacterial Conjugation:The Transfer of Antibiotic-Resistant Plasmids
63
SAFETY CONSIDERATIONSIn this experiment, students will be working with antibi-otic-resistant strains of Escherichia coli. It is essentialthat the bacterium and its plasmid not be spread aroundthe laboratory. It is also imperative to ensure that one isworking with a pure culture. All manipulations must,therefore, be carried out in such a way as to avoid con-tamination of the culture. The following standard asep-tic procedures must be followed:
1. Sterilize all loops before use; cool slightly beforeinoculum pick-up to avoid killing the bacteria oncontact.
2. Resterilize the loop after use by gradual heating.This is recommended to minimize spattering andthe formation of aerosols.
3. Flame the mouths of tubes and flasks momentarilyafter removing the cap or plug, and again afterinoculation.
4. Never leave the cap or plug on the bench duringinoculation. Hold it in one hand and replace it inthe tube or flask after flaming the mouth when theinoculum has been transferred.
5. Cotton wool plugs removed from tubes and flasksshould be held by their projection surfaces only.Handling of the portion of the plug that is insertedinto the flask or tube will result in contamination.
6. Open tubes should be held in an inclined positionto minimize contamination.
7. Lids of petri plates should be held over the platewhile inoculating and should be replaced as soon aspossible. Never place the lids on the bench surface.
8. When finished, all cultures and tubes will beautoclaved at 121°C for 15 minutes. Afterautoclaving, the tube contents will be poured downthe sink. The petri plates are disposable and the platesplus agar contents will be autoclaved and discarded.
9. In the event that a culture is accidentally spilledduring handling, it is imperative to flood theimmediate area with Lysol solution. Allow 3 hours fordisinfection and then wash thoroughly with tap water.
Harley−Prescott: Laboratory Exercises in Microbiology, Fifth Edition
XI. Microbial Genetics and Genomics
63. Bacterial Conjugation: The Transfer of Antibiotic−Resistant Plasmids
© The McGraw−Hill Companies, 2002
Suggested Reading in Textbook
1. Chloramphenicol, section 35.6; see also tables35.1, 35.2, and 35.4.
2. The Origin and Transmission of Drug Resistance,section 35.7.
3. Bacterial Plasmids, section 13.2.4. Bacterial Conjugation, section 13.4.5. Transduction, section 13.6.6. Cloning Vectors, section 14.5.7. Expression of Foreign Genes in Bacteria, section 14.7.
Pronunciation Guide
Escherichia coli (esh-er-I-ke-a KOH-lee)
Why Is the Above Bacterium Usedin This Exercise?
The student will perform a bacterial conjugation experi-ment in this exercise. The authors have chosen two strainsof Escherichia coli for this purpose. The HT-99 donorstrain of E. coli is resistant to chloramphenicol. The J-53Rrecipient strain of E. coli cannot synthesize methionine andproline and is rifampin resistant. Recombinants of thesetwo strains will have different combinations of either thedonor or recipient strains’ characteristics and can be readilydetected by using selective plating media.
Principles
Plasmids that can affect the conjugation between indi-vidual bacteria are termed conjugative plasmids.These plasmids carry genes that code for the ability totransfer themselves from the donor host bacterium toa suitable recipient bacterium by conjugation. Conju-gation describes the “mating” between two bacteria,when (part of) the chromosome is transferred fromone to the other. In order for conjugation to occur,there must be direct physical contact between bacte-ria. The actual “mating” between donor and recipientis dependent on the production of special filamentscalled sex pili by the donor bacteria. Since the genesfor sex pili formation are an integral part of the con-jugative plasmid DNA, the plasmids themselves de-termine their own transmissibility between bacteria.
Plasmids are small, circular, double-stranded DNAmolecules that can act as extrachromosomal elements(i.e., they can carry genetic information and exist apartfrom the chromosome). These small DNA circles can
reproduce independently of the bacterial genome, andmany can be incorporated into it and reproduce whenthe genome does. The plasmid used in this experimentcarries a gene for chloramphenicol resistance and canbe transferred during bacterial conjugation.
This experiment employs a broth procedure for invitro mating. Since conjugation requires cell-to-cellcontact, it can be described as a collision-dependentprocess. In the experimental procedure, sufficient timemust be provided for the mating cells to make contact.
In this experiment, students will work in groupsusing two E. coli strains: E. coli J-53R (recipient) and E.coli HT-99 (donor). J-53R is an auxotrophic strain (amutant that has a growth factor requirement) for theamino acids methionine and proline. It also carries achromosomal gene for rifampin resistance. HT-99 is awild-type isolate that is resistant to chloramphenicol,and the resistance determinant is located on a conjuga-tive plasmid. By this simple experiment, the basic goalof genetic engineering research (i.e., the creation, repli-cation, and expression of hybrid strains) is illustrated.
Procedure
First Period1. Prepare the mating mixture by aseptically
transferring 0.1 ml of an overnight tryptic soybroth culture of E. coli HT-99 (donor) and 0.9 mlof an overnight tryptic soy broth culture of E. coliJ-53R (recipient) into 5 ml of sterile tryptic soybroth (figure 63.1).
2. Mix and incubate at 37°C for 3 hours orovernight.
3. Confirm the resistance status of the donor andrecipient by culturing on antibiotic-containingpetri plates as follows:
a. Using the wax pencil, divide thechloramphenicol and the rifampin plates inhalf by drawing a line on the bottom surfaceof the plate.
b. Using the same sterile Pasteur pipette,transfer a drop of donor culture to 1/2 of thechloramphenicol plate and one drop to 1/2of the rifampin plate. Carefully spread over1/2 of the plate using the glass spreadersterilized by flaming (see exercise 15 andfigure 15.1). Sterilize the glass spreaderbetween spreadings. Using another sterilePasteur pipette, transfer a drop of recipientculture to the other half of thechloramphenicol and rifampin plates. Spread
394 Microbial Genetics and Genomics
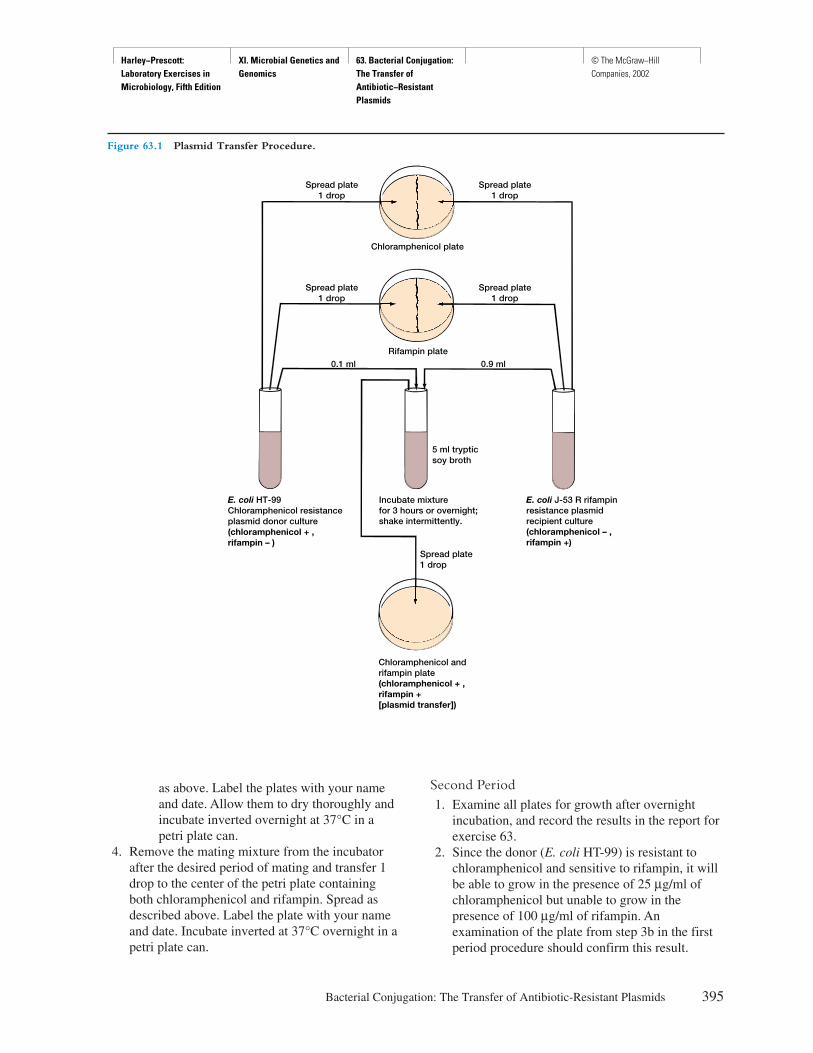
Harley−Prescott: Laboratory Exercises in Microbiology, Fifth Edition
XI. Microbial Genetics and Genomics
63. Bacterial Conjugation: The Transfer of Antibiotic−Resistant Plasmids
© The McGraw−Hill Companies, 2002
as above. Label the plates with your nameand date. Allow them to dry thoroughly andincubate inverted overnight at 37°C in apetri plate can.
4. Remove the mating mixture from the incubatorafter the desired period of mating and transfer 1drop to the center of the petri plate containingboth chloramphenicol and rifampin. Spread asdescribed above. Label the plate with your nameand date. Incubate inverted at 37°C overnight in apetri plate can.
Second Period1. Examine all plates for growth after overnight
incubation, and record the results in the report forexercise 63.
2. Since the donor (E. coli HT-99) is resistant tochloramphenicol and sensitive to rifampin, it willbe able to grow in the presence of 25 µg/ml ofchloramphenicol but unable to grow in thepresence of 100 µg/ml of rifampin. Anexamination of the plate from step 3b in the firstperiod procedure should confirm this result.
Bacterial Conjugation: The Transfer of Antibiotic-Resistant Plasmids 395
E. coli J-53 R rifampinresistance plasmidrecipient culture(chloramphenicol – ,rifampin +)
E. coli HT-99Chloramphenicol resistanceplasmid donor culture(chloramphenicol + ,rifampin – )
5 ml trypticsoy broth
Spread plate1 drop
Spread plate1 drop
Spread plate1 drop
Spread plate1 drop
Chloramphenicol plate
Rifampin plate0.1 ml 0.9 ml
Incubate mixturefor 3 hours or overnight;shake intermittently.
Spread plate1 drop
Chloramphenicol andrifampin plate(chloramphenicol + ,rifampin +[plasmid transfer])
Figure 63.1 Plasmid Transfer Procedure.
Harley−Prescott: Laboratory Exercises in Microbiology, Fifth Edition
XI. Microbial Genetics and Genomics
63. Bacterial Conjugation: The Transfer of Antibiotic−Resistant Plasmids
© The McGraw−Hill Companies, 2002
3. The recipient (E. coli J-53R) is sensitive tochloramphenicol and resistant to rifampin; thus, itwill be able to grow on the rifampin plate butunable to grow on the chloramphenicol plate(plate from step 3b).
4. Neither the donor nor the recipient can grow in thepresence of chloramphenicol plus rifampin becauseboth strains are inhibited by one or the other of theantibiotics. Colonies appearing on the doubleantibiotic plate prepared in step 4 during the firstperiod must, therefore, result from growth of
exconjugant bacteria arising by conjugal transfer ofthe chloramphenicol resistance plasmid from adonor to a recipient bacterium. Such bacteria arethe result of in vivo natural genetic engineering andare genetically new bacteria.
5. Count the number of doubly resistant bacterialcolonies that have been formed. If desired, eachteam may use a different time period of mating(e.g., 1 to 24 hours) and observe the effect ofmating time on the number of exconjugantsappearing on the plates.
396 Microbial Genetics and Genomics
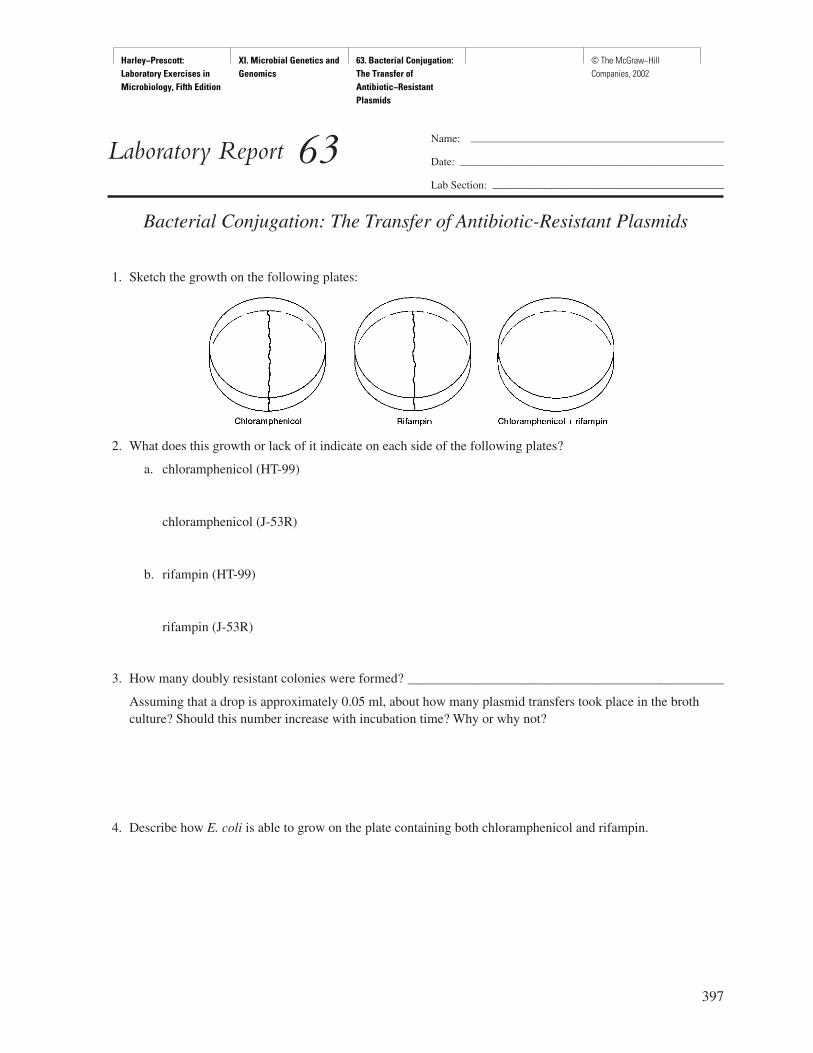
Harley−Prescott: Laboratory Exercises in Microbiology, Fifth Edition
XI. Microbial Genetics and Genomics
63. Bacterial Conjugation: The Transfer of Antibiotic−Resistant Plasmids
© The McGraw−Hill Companies, 2002
397
Name: ———————————————————————
Date: ————————————————————————
Lab Section: —————————————————————
Laboratory Report 63
Bacterial Conjugation: The Transfer of Antibiotic-Resistant Plasmids
1. Sketch the growth on the following plates:
2. What does this growth or lack of it indicate on each side of the following plates?
a. chloramphenicol (HT-99)
chloramphenicol (J-53R)
b. rifampin (HT-99)
rifampin (J-53R)
3. How many doubly resistant colonies were formed? _______________________________________________
Assuming that a drop is approximately 0.05 ml, about how many plasmid transfers took place in the brothculture? Should this number increase with incubation time? Why or why not?
4. Describe how E. coli is able to grow on the plate containing both chloramphenicol and rifampin.

Harley−Prescott: Laboratory Exercises in Microbiology, Fifth Edition
XI. Microbial Genetics and Genomics
63. Bacterial Conjugation: The Transfer of Antibiotic−Resistant Plasmids
© The McGraw−Hill Companies, 2002
Review Questions
1. Why is the aseptic technique so important in this experiment?
2. Why is E. coli HT-99 able to grow in the presence of chloramphenicol but not in the presence of rifampin?Why is E. coli J-53R able to grow on the rifampin plate but unable to grow on the chloramphenicol plate?
3. Would you expect that the new doubly antibiotic-resistant strain could grow well if it was released into theenvironment? Explain.
4. Is it likely that rifampin resistance will be frequently transferred from the J-53R strain to HT-99? Explain yourreasoning.
5. How do plasmids function?
6. Do bacteria reproduce sexually? Explain.
7. How would you define genetic engineering?
398 Microbial Genetics and Genomics

Harley−Prescott: Laboratory Exercises in Microbiology, Fifth Edition
XI. Microbial Genetics and Genomics
64. Isolation of Genomic DNA from Saccharomyces cerevisiae
© The McGraw−Hill Companies, 2002
Materials per Group of Students
glass stirring rodsbaker’s yeast, dehydrated or Saccharomyces
cerevisiae YPH499 (ATCC #76625)95% ethanolplastic 10 ml transfer pipettes250-ml beaker50-60° tap watertemperature controlled hot platethermometerliquid kitchen dishwashing detergent
(concentrated)Adolph’s meat tenderizermicrobalance
Learning Objectives
Each student should be able to
1. Understand the basics of DNA structure andfunction
2. Understand the principles and steps needed toisolate genomic DNA from the yeast,Saccharomyces cerevisiae
Suggested Reading in Textbook
1. All of chapter 15 on Microbial Genomics.2. DNA as genetic material, section 11.1.3. The genetic code, section 11.4.
Pronunciation Guide
Saccharomyces cerevisiae (sak-ah-ro-MI-seez SER-ah-VEES-ee-eye)
Why Is the Above Yeast Used inThis Exercise?
Isolation and purification of DNA are often the first steps instarting genetic analysis. DNA is basically the same fromyeast to bacteria to humans. However, DNA packagingvaries greatly. The structure of each organism’s cells and theapplication for which the extracted DNA is required must betaken into consideration when selecting an extraction proce-dure. Do you want plasmid DNA or genomic DNA? Are youisolating DNA from a bacterium or a multicellular organism?Do you want to use DNA for Southern blotting, the poly-merase chain reaction, restriction enzyme analysis, cloning,or other types of analysis? How does this affect isolation andpurification schemes? The simple procedure described in thisexperiment uses yeast genomic DNA; it omits purificationsteps, is quick, easy, and an inexpensive method that can beused in any microbiology laboratory with minimum equip-ment and time. The resulting DNA is visible and provides asource of student discussion for the DNA molecule, genetics,evolution, and biotechnology.
Principles
DNA is the genetic material that gives an organism itsinherited characteristics. The basic structure of DNAis the same in every organism. DNA is composed oftwo strands of nucleotides wound together in a doublehelix. Each nucleotide consists of a deoxyribosesugar, a phosphate group, and one of four possiblenitrogenous bases: adenine pairing with thymine andcytosine pairing with guanine. The two strands are at-tached to each other by complementary base pairing.This base pairing involves hydrogen bonds betweenopposing adenine and thymine residues and opposingcytosine and guanine residues.
Spooling DNA onto a glass stirring rod (figure64.1) is a common way to isolate DNA once it has
399
E X E R C I S E
Isolation of Genomic DNA from Saccharomyces cerevisiae
64
SAFETY CONSIDERATIONSBe careful with the 95% ethanol and the hot plate.Ethanol is very flammable.
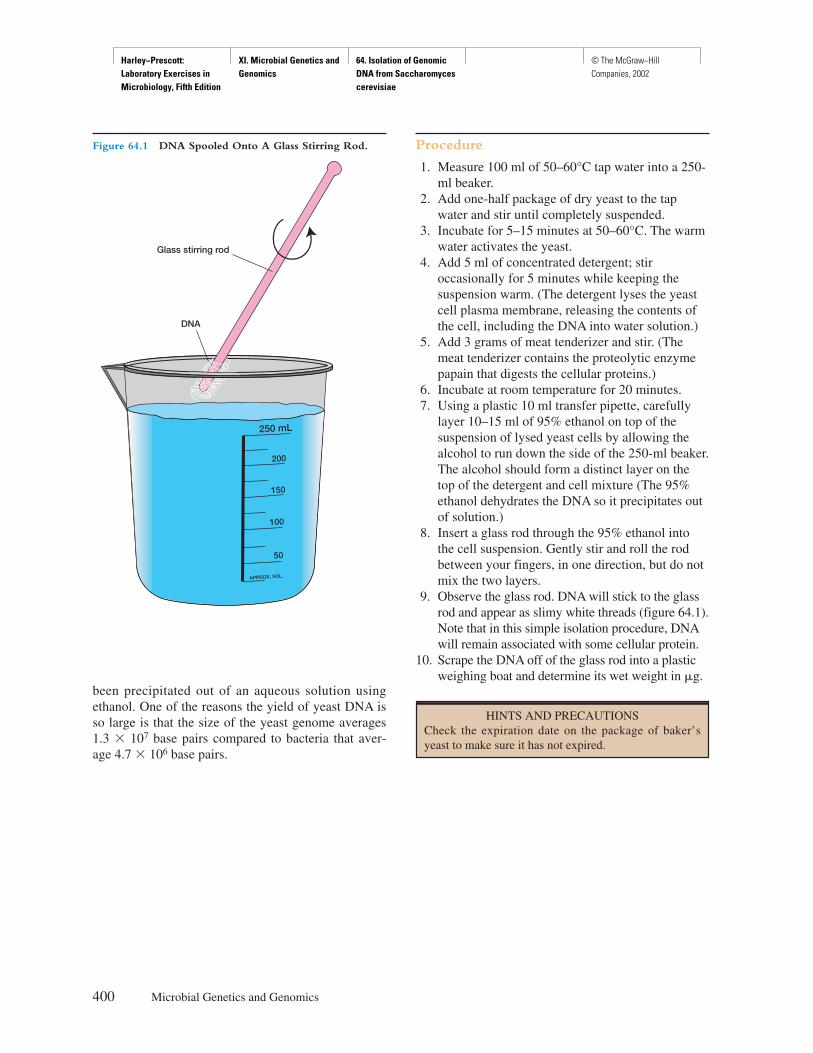
Harley−Prescott: Laboratory Exercises in Microbiology, Fifth Edition
XI. Microbial Genetics and Genomics
64. Isolation of Genomic DNA from Saccharomyces cerevisiae
© The McGraw−Hill Companies, 2002
been precipitated out of an aqueous solution usingethanol. One of the reasons the yield of yeast DNA isso large is that the size of the yeast genome averages1.3 � 107 base pairs compared to bacteria that aver-age 4.7 � 106 base pairs.
Procedure
1. Measure 100 ml of 50–60°C tap water into a 250-ml beaker.
2. Add one-half package of dry yeast to the tapwater and stir until completely suspended.
3. Incubate for 5–15 minutes at 50–60°C. The warmwater activates the yeast.
4. Add 5 ml of concentrated detergent; stiroccasionally for 5 minutes while keeping thesuspension warm. (The detergent lyses the yeastcell plasma membrane, releasing the contents ofthe cell, including the DNA into water solution.)
5. Add 3 grams of meat tenderizer and stir. (Themeat tenderizer contains the proteolytic enzymepapain that digests the cellular proteins.)
6. Incubate at room temperature for 20 minutes.7. Using a plastic 10 ml transfer pipette, carefully
layer 10–15 ml of 95% ethanol on top of thesuspension of lysed yeast cells by allowing thealcohol to run down the side of the 250-ml beaker.The alcohol should form a distinct layer on thetop of the detergent and cell mixture (The 95%ethanol dehydrates the DNA so it precipitates outof solution.)
8. Insert a glass rod through the 95% ethanol intothe cell suspension. Gently stir and roll the rodbetween your fingers, in one direction, but do notmix the two layers.
9. Observe the glass rod. DNA will stick to the glassrod and appear as slimy white threads (figure 64.1).Note that in this simple isolation procedure, DNAwill remain associated with some cellular protein.
10. Scrape the DNA off of the glass rod into a plasticweighing boat and determine its wet weight in �g.
400 Microbial Genetics and Genomics
HINTS AND PRECAUTIONSCheck the expiration date on the package of baker’syeast to make sure it has not expired.
250 mL
200
150
100
50
APPROX. VOL.
Glass stirring rod
DNA
Figure 64.1 DNA Spooled Onto A Glass Stirring Rod.
Harley−Prescott: Laboratory Exercises in Microbiology, Fifth Edition
XI. Microbial Genetics and Genomics
64. Isolation of Genomic DNA from Saccharomyces cerevisiae
© The McGraw−Hill Companies, 2002
401
Name: ———————————————————————
Date: ————————————————————————
Lab Section: —————————————————————
Laboratory Report 64
Isolation of Genomic DNA from Saccharomyces cerevisiae
1. Sketch the appearance of the DNA on the glass stirring rod.
2. How much DNA, in �g wet weight, did you isolate from the yeast?

Harley−Prescott: Laboratory Exercises in Microbiology, Fifth Edition
XI. Microbial Genetics and Genomics
64. Isolation of Genomic DNA from Saccharomyces cerevisiae
© The McGraw−Hill Companies, 2002
Review Questions
1. Where is DNA located in a yeast cell?
2. What is the purpose of the household detergent in this isolation procedure?
3. What are some factors that can affect the amount of DNA isolated?
4. How is DNA organized to fit inside the yeast cell?
5. Describe the chemical structure of DNA.
402 Microbial Genetics and Genomics

Harley−Prescott: Laboratory Exercises in Microbiology, Fifth Edition
XI. Microbial Genetics and Genomics
65. Isolation and Purification of Genomic DNA from Escherichia coli
© The McGraw−Hill Companies, 2002
Materials per Group of Students
10–12 hour (log phase) tryptic soy broth cultureof Escherichia coli (ATCC 11229) Cultures canbe maintained in the log phase by immersion inan ice-water bath
0.5- to 10 �l micropipettes and sterile tips10- to 100 �l micropipettes and sterile tips100- to 1,000 �l micropipettes and sterile tipsmicrocentrifuge tubesmicrocentrifuge1 ml pipettesPasteur pipettesdisinfectant (70% ethanol or 3% hydrogen peroxide)80°C modular dry bath incubator37°C modular dry bath incubatorheating block modules65°C water bath20-mg/ml RNase A solution (DNASE free;
dissolve 1 mg/ml in 1 � TE [10 mM Tris, pH7.4 � 1 mM EDTA, pH 8.0], boil 10–30 min,cool to room temperature, store at �20°C)
cell lysate solution (Tris-EDTA-SDS) from Puregene(Gentra Systems, PO Box 13159, ResearchTriangle Park, NC 27709; 1-800-866-3039)
protein precipitation solution (ammonium acetate)from Puregene
1.5 ml tubes100% isopropanol70% ethanol100% absolute ethanolvortex mixerhydration solution (1 � Tris-EDTA hydration
solution from Puregene)
Learning Objectives
Each student should be able to
1. Understand how to isolate genomic DNA fromthe bacterium, Escherichia coli
2. Explain why different protocols are needed forDNA isolation from various taxa
Suggested Reading in Textbook
1. All of chapter 15 on Microbial Genomics.2. DNA as genetic material, section 11.1.3. The genetic code, section 11.4.
Pronunciation Guide
Escherichia coli (esh-er-I-ke-a KOH-lee)
Why Is the Above Bacterium Usedin This Exercise?
Chemically, DNA is identical in structure from one organismto another. It is the sequence of base pairs that distinguishesDNA from various species. The composition of an organism,whether it is unicellular or multicellular, the exact makeup ofthe individual cells and tissues, and whether or not a cell wallis present, affects protocols used to isolate DNA. Also, the usefor which DNA is required may dictate the specific methodemployed in its isolation. In the previous exercise (exercise64), a simple procedure was used to quickly isolate and visual-ize genomic DNA from yeast. Since Escherichia coli is one ofthe most studied procaryotic cells, it will be used in this exer-cise as a source of DNA. Once the DNA has been obtainedand purified, it can be saved and used in more complex exer-cises such as quantitation by gel electrophoresis, PCR amplifi-cation, digestion with restriction endonucleases, and mem-brane hybridizations such as Southern blots. To carry out thelatter requires a lot of time and expensive equipment that mostgeneral microbiology laboratories do not possess. Therefore,this experiment stops with pure DNA from E. coli and if in-structors wish, depending on time and equipment, they cansupplement it with additional genomic protocols.
403
E X E R C I S E
Isolation and Purification of Genomic DNA from Escherichia coli
65
SAFETY CONSIDERATIONSThe alcohols used in this experiment are volatile andflammable liquids. Do not use near an open flame. Pro-longed exposure to ethanol can cause central nervoussystem depression. Disposable exam gloves, lab coats,and chemical splash goggles are required. Discard cul-tures and contaminated wastes only in the appropriatebiohazard container indicated by your instructor.
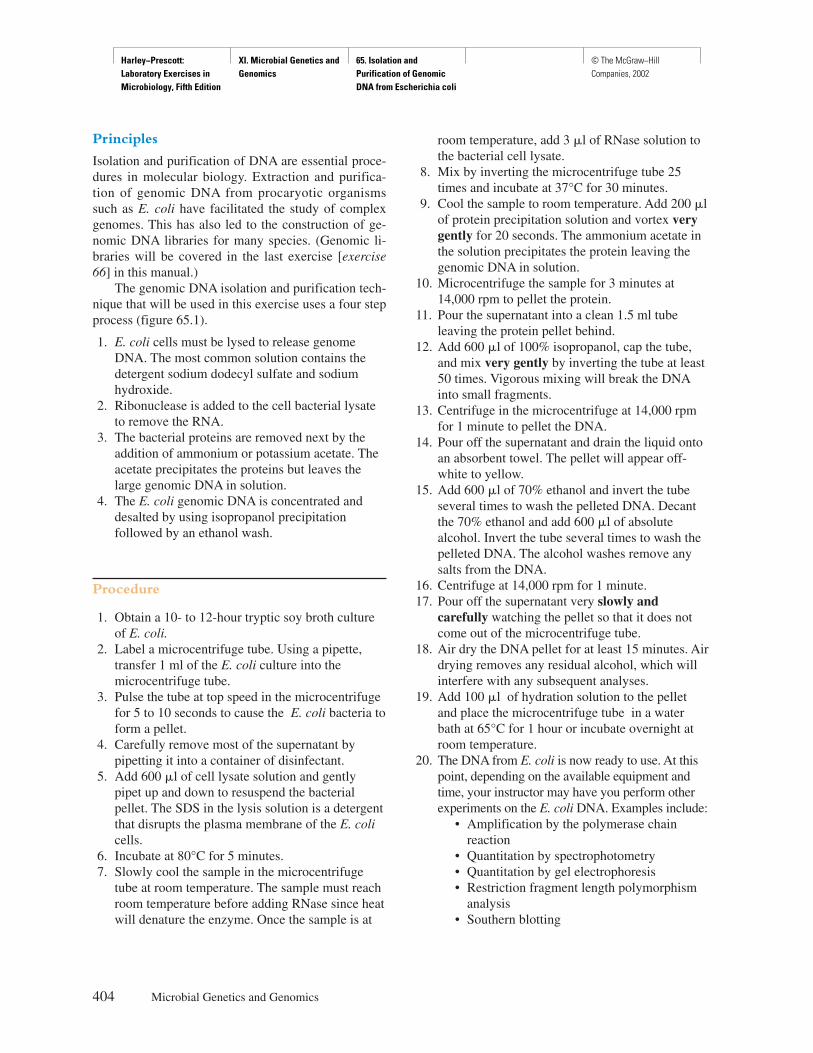
Harley−Prescott: Laboratory Exercises in Microbiology, Fifth Edition
XI. Microbial Genetics and Genomics
65. Isolation and Purification of Genomic DNA from Escherichia coli
© The McGraw−Hill Companies, 2002
Principles
Isolation and purification of DNA are essential proce-dures in molecular biology. Extraction and purifica-tion of genomic DNA from procaryotic organismssuch as E. coli have facilitated the study of complexgenomes. This has also led to the construction of ge-nomic DNA libraries for many species. (Genomic li-braries will be covered in the last exercise [exercise66] in this manual.)
The genomic DNA isolation and purification tech-nique that will be used in this exercise uses a four stepprocess (figure 65.1).
1. E. coli cells must be lysed to release genomeDNA. The most common solution contains thedetergent sodium dodecyl sulfate and sodiumhydroxide.
2. Ribonuclease is added to the cell bacterial lysateto remove the RNA.
3. The bacterial proteins are removed next by theaddition of ammonium or potassium acetate. Theacetate precipitates the proteins but leaves thelarge genomic DNA in solution.
4. The E. coli genomic DNA is concentrated anddesalted by using isopropanol precipitationfollowed by an ethanol wash.
Procedure
1. Obtain a 10- to 12-hour tryptic soy broth cultureof E. coli.
2. Label a microcentrifuge tube. Using a pipette,transfer 1 ml of the E. coli culture into themicrocentrifuge tube.
3. Pulse the tube at top speed in the microcentrifugefor 5 to 10 seconds to cause the E. coli bacteria toform a pellet.
4. Carefully remove most of the supernatant bypipetting it into a container of disinfectant.
5. Add 600 �l of cell lysate solution and gentlypipet up and down to resuspend the bacterialpellet. The SDS in the lysis solution is a detergentthat disrupts the plasma membrane of the E. colicells.
6. Incubate at 80°C for 5 minutes.7. Slowly cool the sample in the microcentrifuge
tube at room temperature. The sample must reachroom temperature before adding RNase since heatwill denature the enzyme. Once the sample is at
room temperature, add 3 �l of RNase solution tothe bacterial cell lysate.
8. Mix by inverting the microcentrifuge tube 25times and incubate at 37°C for 30 minutes.
9. Cool the sample to room temperature. Add 200 �lof protein precipitation solution and vortex verygently for 20 seconds. The ammonium acetate inthe solution precipitates the protein leaving thegenomic DNA in solution.
10. Microcentrifuge the sample for 3 minutes at14,000 rpm to pellet the protein.
11. Pour the supernatant into a clean 1.5 ml tubeleaving the protein pellet behind.
12. Add 600 �l of 100% isopropanol, cap the tube,and mix very gently by inverting the tube at least50 times. Vigorous mixing will break the DNAinto small fragments.
13. Centrifuge in the microcentrifuge at 14,000 rpmfor 1 minute to pellet the DNA.
14. Pour off the supernatant and drain the liquid ontoan absorbent towel. The pellet will appear off-white to yellow.
15. Add 600 �l of 70% ethanol and invert the tubeseveral times to wash the pelleted DNA. Decantthe 70% ethanol and add 600 �l of absolutealcohol. Invert the tube several times to wash thepelleted DNA. The alcohol washes remove anysalts from the DNA.
16. Centrifuge at 14,000 rpm for 1 minute.17. Pour off the supernatant very slowly and
carefully watching the pellet so that it does notcome out of the microcentrifuge tube.
18. Air dry the DNA pellet for at least 15 minutes. Airdrying removes any residual alcohol, which willinterfere with any subsequent analyses.
19. Add 100 �l of hydration solution to the pelletand place the microcentrifuge tube in a waterbath at 65°C for 1 hour or incubate overnight atroom temperature.
20. The DNA from E. coli is now ready to use. At thispoint, depending on the available equipment andtime, your instructor may have you perform otherexperiments on the E. coli DNA. Examples include:
• Amplification by the polymerase chainreaction
• Quantitation by spectrophotometry• Quantitation by gel electrophoresis• Restriction fragment length polymorphism
analysis• Southern blotting
404 Microbial Genetics and Genomics

Harley−Prescott: Laboratory Exercises in Microbiology, Fifth Edition
XI. Microbial Genetics and Genomics
65. Isolation and Purification of Genomic DNA from Escherichia coli
© The McGraw−Hill Companies, 2002
Isolation and Purification of Genomic DNA from Escherichia coli 405
E.coli brothculture
Centrifuge topellet bacteria
Incubation at 80°Cfor 5 minutes
Mix by inversion
Add cell lysissolution
Add RNase
DNA pellet
Wash DNA pelletonce with 70%ethanol and oncewith absolute alcohol
Centrifuge at 14,000 rpmfor 1 minute
Centrifuge topellet DNA
Air dry pellet for15 minutes
Resuspend inhydration solution
Incubate for 1 hourat 65°C in a water bath
DNA ready for use
Incubate at37° C for 30
minutes
Centrifuge at 14,000 rpmto pellet protein
Add proteinprecipitation solutionand vortex
Protein debris
UsesupernatantDNA
DNA
Isopropanolprecipitation
Mix by inversion 50 times
Figure 65.1 Summary of Genomic DNA Isolation.

Harley−Prescott: Laboratory Exercises in Microbiology, Fifth Edition
XI. Microbial Genetics and Genomics
65. Isolation and Purification of Genomic DNA from Escherichia coli
© The McGraw−Hill Companies, 2002
406 Microbial Genetics and Genomics
HINTS AND PRECAUTIONS(1) Remember that heat denatures the RNase enzymeand vigorous mixing will shear DNA into small frag-ments. (2) To locate the tiny DNA pellet, orient thehinge on the microcentrifuge tube outward in the micro-centrifuge. After centrifugation, the DNA pellet will belocated towards the bottom of the tube on the same sideas the hinge. (3) Any residual alcohol will interfere withsubsequent DNA analysis. (4) Do not pipette the DNAto mix, as this will cause shearing.
Harley−Prescott: Laboratory Exercises in Microbiology, Fifth Edition
XI. Microbial Genetics and Genomics
65. Isolation and Purification of Genomic DNA from Escherichia coli
© The McGraw−Hill Companies, 2002
407
Name: ———————————————————————
Date: ————————————————————————
Lab Section: —————————————————————
Laboratory Report 65
Isolation and Purification of Genomic DNA from Escherichia coli
For each of the steps or reagents in the isolation and purification of genomic DNA from Escherichia coli, indicatewhat each accomplishes.
Step/Reagent Accomplishes
cell lysis solution ____________________________________________________
____________________________________________________
incubation ____________________________________________________
____________________________________________________
RNase ____________________________________________________
____________________________________________________
protein precipitation solution ____________________________________________________
____________________________________________________
centrifugation ____________________________________________________
____________________________________________________
isopropanol precipitation ____________________________________________________
____________________________________________________
alcohol washes ____________________________________________________
____________________________________________________
hydration solution ____________________________________________________
____________________________________________________
Harley−Prescott: Laboratory Exercises in Microbiology, Fifth Edition
XI. Microbial Genetics and Genomics
65. Isolation and Purification of Genomic DNA from Escherichia coli
© The McGraw−Hill Companies, 2002
Review Questions
1. Using your knowledge of the cell structure of various procaryotic organisms, hypothesize why specificconditions are used in the cell lysis step.
2. You have just isolated and identified a new bacterium. Design a protocol for isolating its genomic DNA.Explain your rationale.
3. How might you optimize the purity of DNA you extracted from your new organism?
4. Why must you handle DNA gently in this extraction procedure?
408 Microbial Genetics and Genomics

Harley−Prescott: Laboratory Exercises in Microbiology, Fifth Edition
XI. Microbial Genetics and Genomics
66. Ident. Archaea & Bact. Using the Internet & Computer−Assisted Gene Analysis
© The McGraw−Hill Companies, 2002
Materials per Group of Students
computer with Internet accessWeb browser (such as Netscape or Internet
Explorer)printer
Learning Objectives
Each student should be able to:
1. Understand the importance of bioinformatics inmicrobiology
2. Understand the significance of the 16S rRNAsequence in the identification of archaea andbacteria
3. Appreciate the importance of identifying archaeaand bacteria using the Ribosomal DatabaseProject as well as the availability of other gatewaywebsites containing links to sequence databasesand computational centers for sequence analysis
Suggested Reading in Textbook
1. Chapter 15 on Microbial Genomics.2. Mapping and Sequencing the Genome, sections
13.7 and 15.3.3. Bioinformatics, section 15.4.4. Chapter 19 on Microbial Taxonomy.5. Chapter 20 on the Archaea.6. Chapters 21–24 on the Bacteria.
Principles
Bioinformatics is the branch of science devoted tocomputational information management systems usedto collect, store, analyze, and disseminate biologicalinformation. It was created with the union of informa-tion technology and gene-sequencing projects. Data-bases for nucleic acids and proteins and the analyticaltools needed for management are available to studentsand scientists on the World Wide Web at no cost.
The classical way for identifying and classifyingarchaea and bacteria involve morphology and stain-ing, biochemical activities, and rapid multitext sys-tems as presented in Parts two, four, and five of thismanual. As we move into the new millennium, bioin-formatics and the ability to sequence the DNA of or-ganisms has offered new ways of identification. Thecloser organisms are related to each other, the moresimilar their DNA sequences. These sequences repre-sent the order that nucleotide bases are found in apiece of DNA. Certain genes common to all organ-isms can be sequenced and compared. The most use-ful ones involve the DNA coding for the part of the ri-bosome called 16S ribosome subunit.
Ribosomes are involved in protein synthesis. Ri-bosomes are composed of two subunits, each of whichconsists of protein and a type of RNA called riboso-mal RNA (rRNA). Procaryotic ribosomes are made upof a small 30S subunit, consisting of a 16S rRNA par-ticle and 21 polypeptide chains, and a large 50S sub-unit which together make up the complete 70S ribo-some. Since the 16S rRNA DNA segment is found inall organisms with the same function, ribosomal RNAgene sequences can easily be compared.
Ribosomal RNA gene sequencing is currentlybeing used to study the diversity of procaryotes, as wellas all other organisms, and the phylogenetic relationshipsamong them. There are several advantages to usingrRNA. First, all cells contain ribosomes and ribosomalRNA. Two closely related organisms will have fewer
409
E X E R C I S E
Identifying Archaea and Bacteria Using the Internet and Computer-Assisted Gene Analysis
66
SAFETY CONSIDERATIONSProtect your system from computer viruses. A computervirus is a potential damaging computer program de-signed to infect other software or files by attaching it-self to the software or files with which it comes in con-tact. Virus programs are dangerous because they oftendestroy or corrupt data stored on the infected computer.You can protect your computer from viruses by in-stalling an antivirus program.
Harley−Prescott: Laboratory Exercises in Microbiology, Fifth Edition
XI. Microbial Genetics and Genomics
66. Ident. Archaea & Bact. Using the Internet & Computer−Assisted Gene Analysis
© The McGraw−Hill Companies, 2002
different bases in their rRNA than two organisms thatare more distantly related. A second advantage is thatRNA genes have undergone few changes over timeand are highly conserved. If the sequences were toodifferent, they could not be compared. Third, whendoing rRNA sequencing, cells do not have to be cul-tured in the laboratory
This approach to identification of organisms hasyielded exciting results. For example, some specificbase sequences are always found in particular groupsof organisms. These are called signature sequences.Signature sequences are DNA sequences about 5–10bases long found at a specific location in the 16SrRNA that are unique to the Archaea, Bacteria, Eu-carya, and many major groups within the procary-otes. New relationships between organisms can bedetermined by comparing base sequences by meansof computer programs. The more the sequences di-verge, the more the organisms have evolved fromone another.
In bioinformatics, these gene sequences often canbe used to identify specific organisms. The sequencesof more than 16,000 organisms are in public databases. When a new sequence is submitted to a data-base management organization, in seconds it will re-spond with the most likely identification of thespecies containing the sequence.
This exercise is designed to enable you to sendthe DNA sequence of the 16S rRNA of several bacte-ria and one archaeon to the Ribosomal DatabaseProject (rdp.cme.msu.edu/html/) at Michigan StateUniversity, the Center of Microbial Ecology, to deter-mine the identification of these unknown organisms.This project is sponsored by the National ScienceFoundation, The U.S. Department of Energy, andMichigan State University. It provides ribosome-related data services to the scientific community, in-cluding online data analysis, rRNA derived phyloge-netic trees, and aligned and annotated rRNAsequences. Other important gateway websites, con-taining links to sequence databases and computationalcenters for sequence analysis include the following:
• The Institute for Genomic Research(http://www.tigr.org/)
• Genomics: A Global Resource(http://genomics.phrma.org/)
• European Bioinformatics Institute(www.ebi.ac.uk/)
• GeneBank (http://www.ncbi.nlm.nih.gov/) is asequence of databases maintained by the NationalCenter of Biotechnology Information, theNational Library of Medicine, and the NationalInstitute of Health.
Procedure
1. Open Netscape or Microsoft Explore on yourcomputer.
2. Type in the URL rpd.cme.msu.edu/html/3. When the Ribosomal Database Project II comes
up, click on “Online Analysis.”4. Find the “Sequence Match” in the purple column.
Click on the gray arrow in the run column for thesequence match.
5. In the large clear box that appears at the bottom ofthe screen, cut and paste the gene sequences(using either Microsoft Word or the sequencesfound on the McGraw-Hill website,www.mhhe.com/prescott5/labsequencedata) fromthe four unknown bacteria and one archaon(figures 66.1–66.5) into the box.
6. Click on “Submit Sequence” a few screens down.Certain parameters will have to be changed inorder to complete a successful search.
7. As soon as the analysis has been complete, thegenus and species which most closely matches theentered sequence appears. Also appearing is thepercent of the sequences which matched yourentered sample nucleotide sequence. Other speciesand their percent of similarity are also presented.
410 Microbial Genetics and Genomics
HINTS AND PRECAUTIONSTyping gene sequences is most easily done by one per-son doing the typing on the keyboard and another read-ing the letters and spaces. The gene sequences are alsoavailable electronically on the McGraw-Hill website,www.mhhe.com/prescott5/labsequencedata
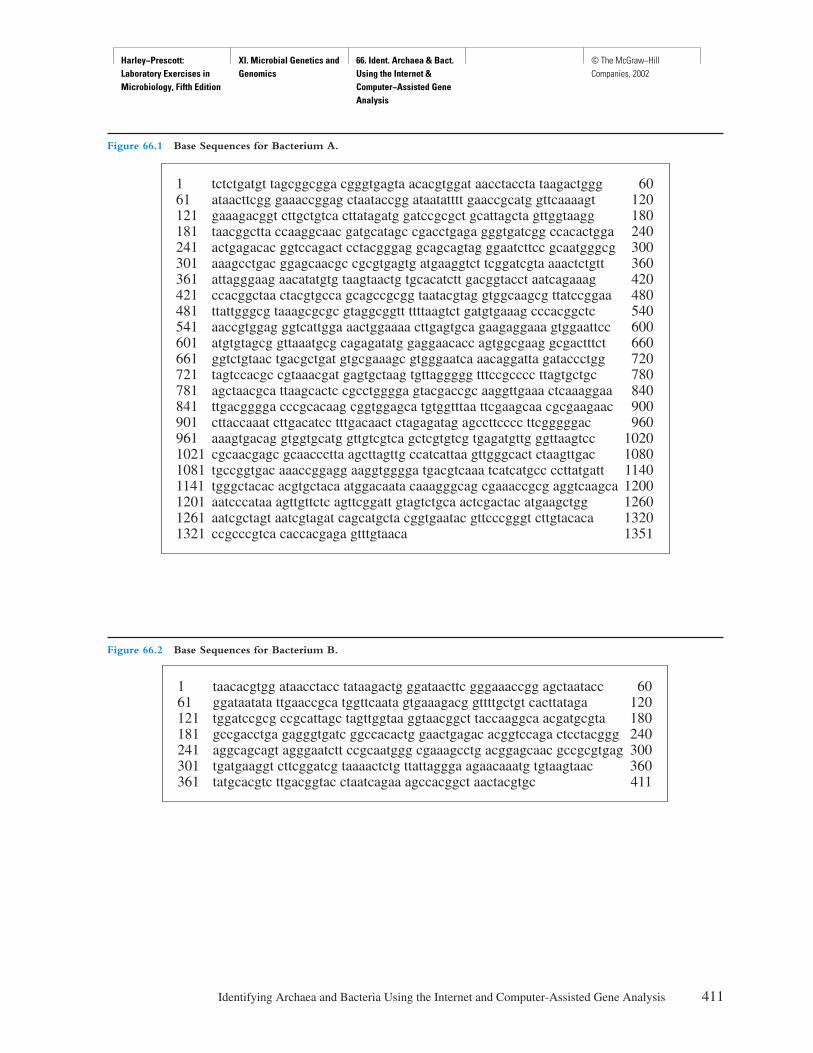
Harley−Prescott: Laboratory Exercises in Microbiology, Fifth Edition
XI. Microbial Genetics and Genomics
66. Ident. Archaea & Bact. Using the Internet & Computer−Assisted Gene Analysis
© The McGraw−Hill Companies, 2002
Identifying Archaea and Bacteria Using the Internet and Computer-Assisted Gene Analysis 411
tctctgatgt tagcggcgga cgggtgagta acacgtggat aacctaccta taagactgggataacttcgg gaaaccggag ctaataccgg ataatatttt gaaccgcatg gttcaaaagtgaaagacggt cttgctgtca cttatagatg gatccgcgct gcattagcta gttggtaaggtaacggctta ccaaggcaac gatgcatagc cgacctgaga gggtgatcgg ccacactggaactgagacac ggtccagact cctacgggag gcagcagtag ggaatcttcc gcaatgggcgaaagcctgac ggagcaacgc cgcgtgagtg atgaaggtct tcggatcgta aaactctgttattagggaag aacatatgtg taagtaactg tgcacatctt gacggtacct aatcagaaagccacggctaa ctacgtgcca gcagccgcgg taatacgtag gtggcaagcg ttatccggaattattgggcg taaagcgcgc gtaggcggtt ttttaagtct gatgtgaaag cccacggctcaaccgtggag ggtcattgga aactggaaaa cttgagtgca gaagaggaaa gtggaattccatgtgtagcg gttaaatgcg cagagatatg gaggaacacc agtggcgaag gcgactttctggtctgtaac tgacgctgat gtgcgaaagc gtgggaatca aacaggatta gataccctggtagtccacgc cgtaaacgat gagtgctaag tgttaggggg tttccgcccc ttagtgctgcagctaacgca ttaagcactc cgcctgggga gtacgaccgc aaggttgaaa ctcaaaggaattgacgggga cccgcacaag cggtggagca tgtggtttaa ttcgaagcaa cgcgaagaaccttaccaaat cttgacatcc tttgacaact ctagagatag agccttcccc ttcgggggacaaagtgacag gtggtgcatg gttgtcgtca gctcgtgtcg tgagatgttg ggttaagtcccgcaacgagc gcaaccctta agcttagttg ccatcattaa gttgggcact ctaagttgactgccggtgac aaaccggagg aaggtgggga tgacgtcaaa tcatcatgcc ccttatgatttgggctacac acgtgctaca atggacaata caaagggcag cgaaaccgcg aggtcaagcaaatcccataa agttgttctc agttcggatt gtagtctgca actcgactac atgaagctggaatcgctagt aatcgtagat cagcatgcta cggtgaatac gttcccgggt cttgtacacaccgcccgtca caccacgaga gtttgtaaca
161121181241301361421481541601661721781841901961102110811141120112611321
60120180240300360420480540600660720780840900960
1020108011401200126013201351
Figure 66.1 Base Sequences for Bacterium A.
taacacgtgg ataacctacc tataagactg ggataacttc gggaaaccgg agctaataccggataatata ttgaaccgca tggttcaata gtgaaagacg gttttgctgt cacttatagatggatccgcg ccgcattagc tagttggtaa ggtaacggct taccaaggca acgatgcgtagccgacctga gagggtgatc ggccacactg gaactgagac acggtccaga ctcctacgggaggcagcagt agggaatctt ccgcaatggg cgaaagcctg acggagcaac gccgcgtgagtgatgaaggt cttcggatcg taaaactctg ttattaggga agaacaaatg tgtaagtaactatgcacgtc ttgacggtac ctaatcagaa agccacggct aactacgtgc
161121181241301361
60120180240300360411
Figure 66.2 Base Sequences for Bacterium B.
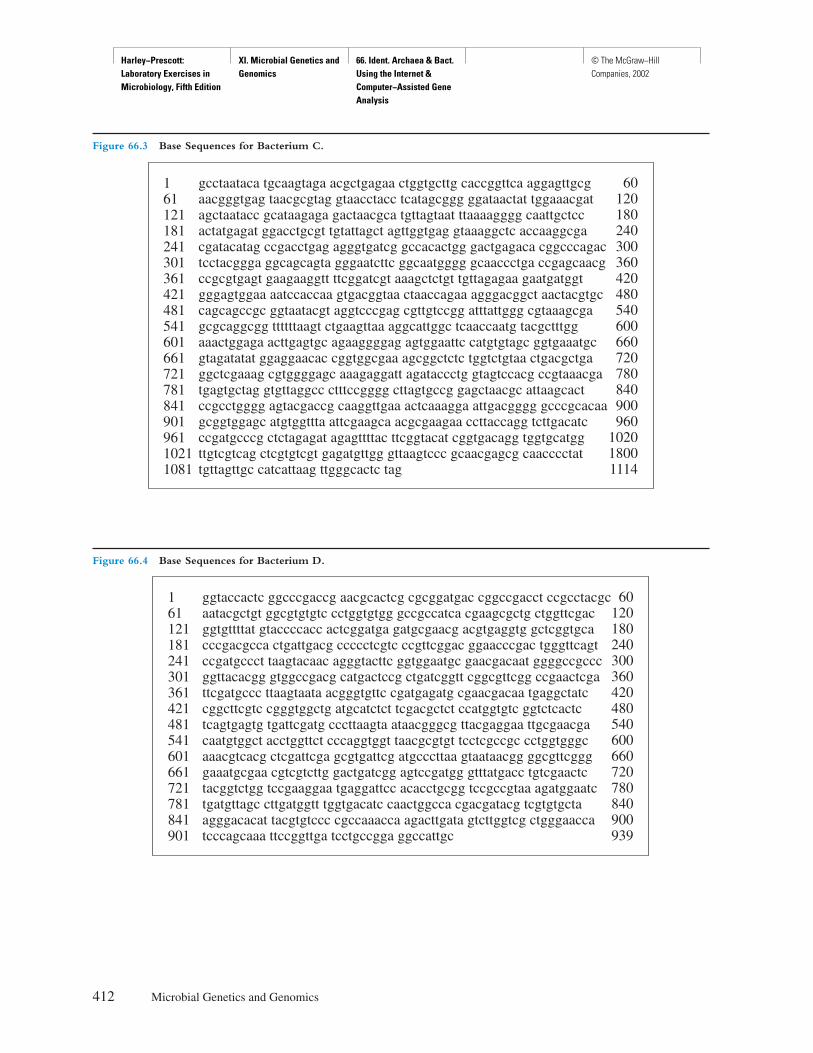
Harley−Prescott: Laboratory Exercises in Microbiology, Fifth Edition
XI. Microbial Genetics and Genomics
66. Ident. Archaea & Bact. Using the Internet & Computer−Assisted Gene Analysis
© The McGraw−Hill Companies, 2002
412 Microbial Genetics and Genomics
gcctaataca tgcaagtaga acgctgagaa ctggtgcttg caccggttca aggagttgcgaacgggtgag taacgcgtag gtaacctacc tcatagcggg ggataactat tggaaacgatagctaatacc gcataagaga gactaacgca tgttagtaat ttaaaagggg caattgctccactatgagat ggacctgcgt tgtattagct agttggtgag gtaaaggctc accaaggcgacgatacatag ccgacctgag agggtgatcg gccacactgg gactgagaca cggcccagactcctacggga ggcagcagta gggaatcttc ggcaatgggg gcaaccctga ccgagcaacgccgcgtgagt gaagaaggtt ttcggatcgt aaagctctgt tgttagagaa gaatgatggtgggagtggaa aatccaccaa gtgacggtaa ctaaccagaa agggacggct aactacgtgccagcagccgc ggtaatacgt aggtcccgag cgttgtccgg atttattggg cgtaaagcgagcgcaggcgg ttttttaagt ctgaagttaa aggcattggc tcaaccaatg tacgctttggaaactggaga acttgagtgc agaaggggag agtggaattc catgtgtagc ggtgaaatgcgtagatatat ggaggaacac cggtggcgaa agcggctctc tggtctgtaa ctgacgctgaggctcgaaag cgtggggagc aaagaggatt agataccctg gtagtccacg ccgtaaacgatgagtgctag gtgttaggcc ctttccgggg cttagtgccg gagctaacgc attaagcactccgcctgggg agtacgaccg caaggttgaa actcaaagga attgacgggg gcccgcacaagcggtggagc atgtggttta attcgaagca acgcgaagaa ccttaccagg tcttgacatcccgatgcccg ctctagagat agagttttac ttcggtacat cggtgacagg tggtgcatggttgtcgtcag ctcgtgtcgt gagatgttgg gttaagtccc gcaacgagcg caacccctattgttagttgc catcattaag ttgggcactc tag
16112118124130136142148154160166172178184190196110211081
60120180240300360420480540600660720780840900960
102018001114
Figure 66.3 Base Sequences for Bacterium C.
ggtaccactc ggcccgaccg aacgcactcg cgcggatgac cggccgacct ccgcctacgcaatacgctgt ggcgtgtgtc cctggtgtgg gccgccatca cgaagcgctg ctggttcgacggtgttttat gtaccccacc actcggatga gatgcgaacg acgtgaggtg gctcggtgcacccgacgcca ctgattgacg ccccctcgtc ccgttcggac ggaacccgac tgggttcagtccgatgccct taagtacaac agggtacttc ggtggaatgc gaacgacaat ggggccgcccggttacacgg gtggccgacg catgactccg ctgatcggtt cggcgttcgg ccgaactcgattcgatgccc ttaagtaata acgggtgttc cgatgagatg cgaacgacaa tgaggctatccggcttcgtc cgggtggctg atgcatctct tcgacgctct ccatggtgtc ggtctcactctcagtgagtg tgattcgatg cccttaagta ataacgggcg ttacgaggaa ttgcgaacgacaatgtggct acctggttct cccaggtggt taacgcgtgt tcctcgccgc cctggtgggcaaacgtcacg ctcgattcga gcgtgattcg atgcccttaa gtaataacgg ggcgttcggggaaatgcgaa cgtcgtcttg gactgatcgg agtccgatgg gtttatgacc tgtcgaactctacggtctgg tccgaaggaa tgaggattcc acacctgcgg tccgccgtaa agatggaatctgatgttagc cttgatggtt tggtgacatc caactggcca cgacgatacg tcgtgtgctaagggacacat tacgtgtccc cgccaaacca agacttgata gtcttggtcg ctgggaaccatcccagcaaa ttccggttga tcctgccgga ggccattgc
161121181241301361421481541601661721781841901
60120180240300360420480540600660720780840900939
Figure 66.4 Base Sequences for Bacterium D.

Harley−Prescott: Laboratory Exercises in Microbiology, Fifth Edition
XI. Microbial Genetics and Genomics
66. Ident. Archaea & Bact. Using the Internet & Computer−Assisted Gene Analysis
© The McGraw−Hill Companies, 2002
Identifying Archaea and Bacteria Using the Internet and Computer-Assisted Gene Analysis 413
agagtttgat cctggctcag agcgaacgct ggcggcaggc ttaacacatg caagtcgaacgggcgtagca atacgtcagt ggcagacggg tgagtaacgc gtgggaacgt accttttggttcggaacaac acagggaaac ttgtgctaat accggataag cccttacggg gaaagatttatcgccgaaag atcggcccgc gtctgattag ctagttggtg aggtaatggc tcaccaaggcgacgatcagt agctggtctg agaggatgat cagccacatt gggactgaga cacggcccaaactcctacgg gaggcagcag tggggaatat tggacaatgg gcgaaagcct gatccagccatgccgcgtga gtgatgaagg ccctagggtt gtaaagctct tttgtgcggg aagataatgacggtaccgca agaataagcc ccggctaact tcgtgccagc agccgcggta atacgaagggggctagcgtt gctcggaatc actgggcgta aagggtgcgt aggcgggttt ctaagtcagaggtgaaagcc tggagctcaa ctccagaact gcctttgata ctggaagtct tgagtatggcagaggtgagt ggaactgcga gtgtagaggt gaaattcgta gatattcgca agaacaccagtggcgaaggc ggctcactgg gccattactg acgctgaggc acgaaagcgt ggggagcaaacaggattaga taccctggta gtccacgccg taaacgatga atgccagccg ttagtgggtttactcactag tggcgcagct aacgctttaa gcattccgcc tggggagtac ggtcgcaagattaaaactca aaggaattga cgggggcccg cacaagcggt ggagcatgtg gtttaattcgacgcaacgcg cagaacctta ccagcccttg acatgtccag gaccggtcgc agagacgtgaccttctcttc ggagcctgga gcacaggtgc tgcatggctg tcgtcagctc gtgtcgtgagatgttgggtt aagtcccgca acgagcgcaa cccccgtcct tagttgctac catttagttgagcactctaa ggagactgcc ggtgataagc cgcgaggaag gtggggatga cgtcaagtcctcatggccct tacgggctgg gctacacacg tgctacaatg gcggtgacaa tgggaagctaaggggtgacc cttcgcaaat ctcaaaaagc cgtctcagtt cggattgggc tctgcaactcgagcccatga agttggaatc gctagtaatc gtggatcagc atgccacggt gaatacgttcccgggccttg tacacaccgc ccgtcacacc atgggagttg gctttacctg aagacggtgcgctaaccagc aatgggggca gccggccacg gtagggtcag cgactggggt gaagtcgtaacaaggtagcc gtaggggaac ctgcggctgg atcacctcct t
16112118124130136142148154160166172178184190196110211081114112011261132113811441
60120180240300360420480540600660720780840900960
102010801140120012601320138014401481
Figure 66.5 Base Sequences for one Archaeon.
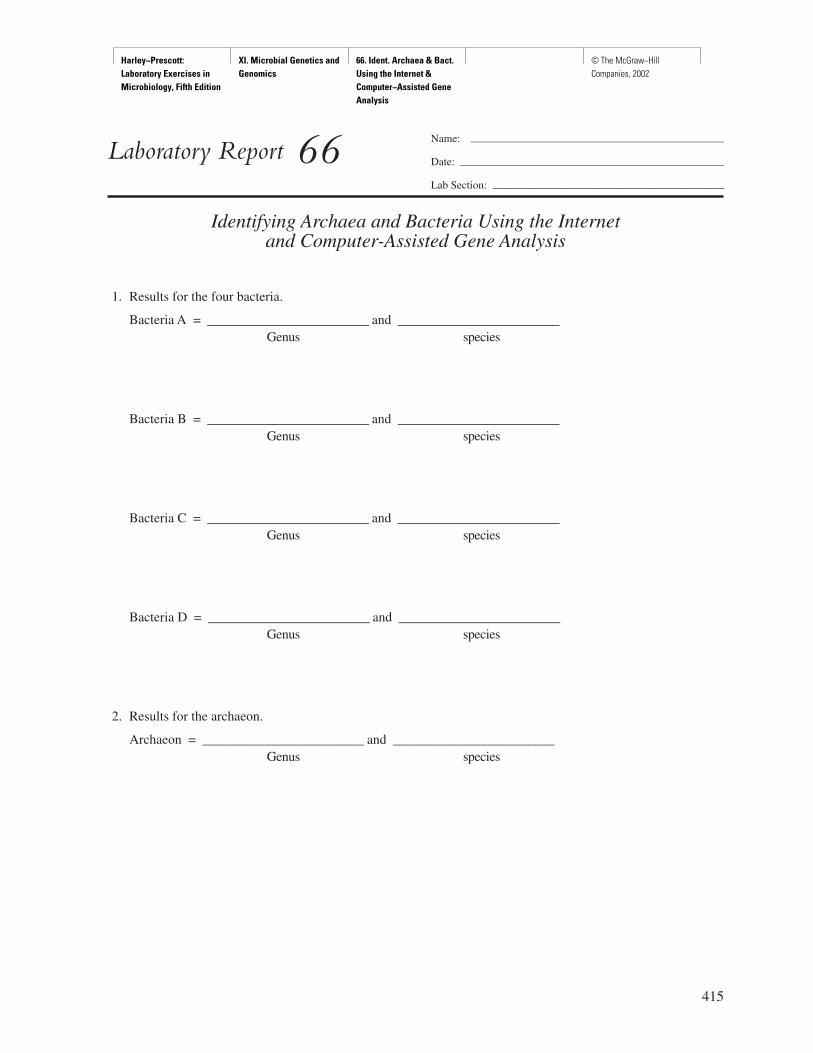
Harley−Prescott: Laboratory Exercises in Microbiology, Fifth Edition
XI. Microbial Genetics and Genomics
66. Ident. Archaea & Bact. Using the Internet & Computer−Assisted Gene Analysis
© The McGraw−Hill Companies, 2002
415
Name: ———————————————————————
Date: ————————————————————————
Lab Section: —————————————————————
Laboratory Report 66
Identifying Archaea and Bacteria Using the Internet and Computer-Assisted Gene Analysis
1. Results for the four bacteria.
Bacteria A = _________________________ and _________________________ Genus species
Bacteria B = _________________________ and _________________________ Genus species
Bacteria C = _________________________ and _________________________ Genus species
Bacteria D = _________________________ and _________________________ Genus species
2. Results for the archaeon.
Archaeon = _________________________ and _________________________ Genus species

Harley−Prescott: Laboratory Exercises in Microbiology, Fifth Edition
XI. Microbial Genetics and Genomics
66. Ident. Archaea & Bact. Using the Internet & Computer−Assisted Gene Analysis
© The McGraw−Hill Companies, 2002
Review Questions
1. What are some advantages of identifying an organism by using the Ribosomal Data Project?
2. What are some disadvantages of identifying an organism by using the Ribosomal Data Project?
3. Why might you obtain different search results from one time to another?
4. What essential terms or search parameters did you find most useful in narrowing your search?
5. Was your search successful? Why or why not?
6. How could a search be performed that accesses only the desired sequence?
7. What is the main purpose of the Ribosomal Data Base Project?
8. How would you define bioinformatics? Signature sequences?
416 Microbial Genetics and Genomics
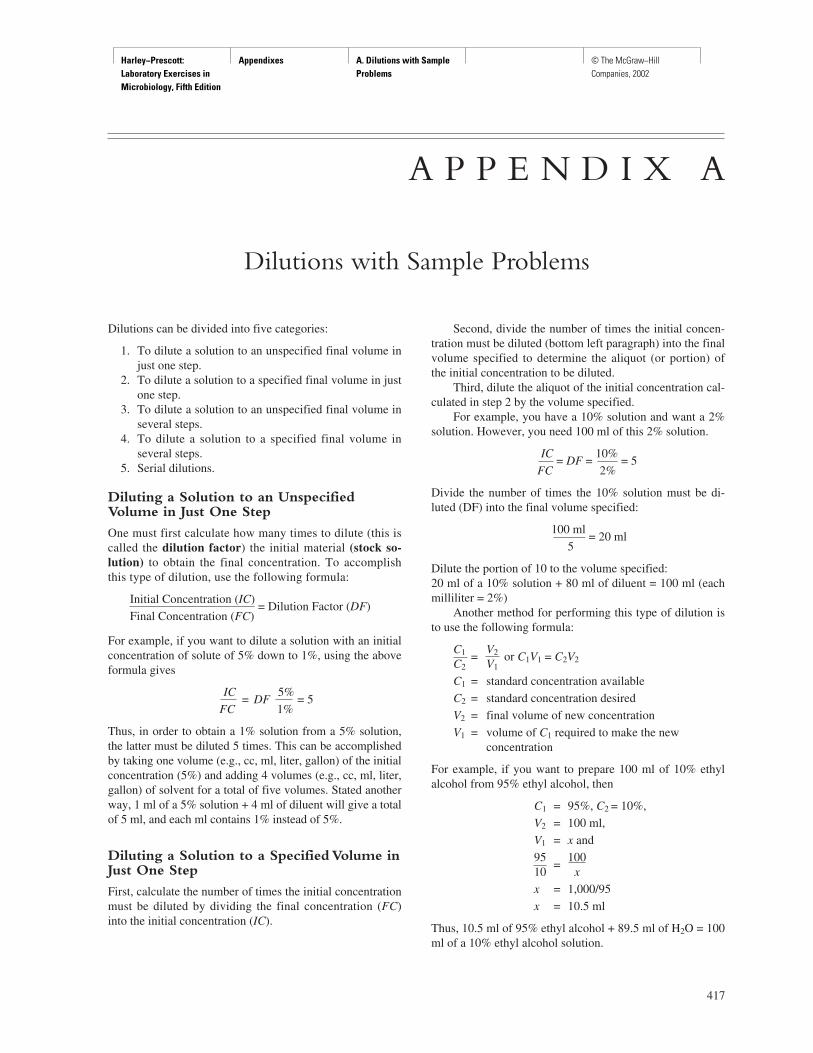
Harley−Prescott: Laboratory Exercises in Microbiology, Fifth Edition
Appendixes A. Dilutions with Sample Problems
© The McGraw−Hill Companies, 2002
417
A P P E N D I X A
Dilutions with Sample Problems
Dilutions can be divided into five categories:
1. To dilute a solution to an unspecified final volume injust one step.
2. To dilute a solution to a specified final volume in justone step.
3. To dilute a solution to an unspecified final volume inseveral steps.
4. To dilute a solution to a specified final volume inseveral steps.
5. Serial dilutions.
Diluting a Solution to an UnspecifiedVolume in Just One Step
One must first calculate how many times to dilute (this iscalled the dilution factor) the initial material (stock so-lution) to obtain the final concentration. To accomplishthis type of dilution, use the following formula:
Initial Concentration (IC)= Dilution Factor (DF)
Final Concentration (FC)
For example, if you want to dilute a solution with an initialconcentration of solute of 5% down to 1%, using the aboveformula gives
IC= DF
5%= 5
FC 1%
Thus, in order to obtain a 1% solution from a 5% solution,the latter must be diluted 5 times. This can be accomplishedby taking one volume (e.g., cc, ml, liter, gallon) of the initialconcentration (5%) and adding 4 volumes (e.g., cc, ml, liter,gallon) of solvent for a total of five volumes. Stated anotherway, 1 ml of a 5% solution + 4 ml of diluent will give a totalof 5 ml, and each ml contains 1% instead of 5%.
Diluting a Solution to a Specified Volume inJust One Step
First, calculate the number of times the initial concentrationmust be diluted by dividing the final concentration (FC)into the initial concentration (IC).
Second, divide the number of times the initial concen-tration must be diluted (bottom left paragraph) into the finalvolume specified to determine the aliquot (or portion) ofthe initial concentration to be diluted.
Third, dilute the aliquot of the initial concentration cal-culated in step 2 by the volume specified.
For example, you have a 10% solution and want a 2%solution. However, you need 100 ml of this 2% solution.
IC= DF =
10%= 5
FC 2%
Divide the number of times the 10% solution must be di-luted (DF) into the final volume specified:
100 ml= 20 ml
5
Dilute the portion of 10 to the volume specified:20 ml of a 10% solution + 80 ml of diluent = 100 ml (eachmilliliter = 2%)
Another method for performing this type of dilution isto use the following formula:
C1 =V2 or C1V1 = C2V2C2 V1
C1 = standard concentration available
C2 = standard concentration desired
V2 = final volume of new concentration
V1 = volume of C1 required to make the newconcentration
For example, if you want to prepare 100 ml of 10% ethylalcohol from 95% ethyl alcohol, then
C1 = 95%, C2 = 10%,
V2 = 100 ml,
V1 = x and
95=
10010 x
x = 1,000/95
x = 10.5 ml
Thus, 10.5 ml of 95% ethyl alcohol + 89.5 ml of H2O = 100ml of a 10% ethyl alcohol solution.

Harley−Prescott: Laboratory Exercises in Microbiology, Fifth Edition
Appendixes A. Dilutions with Sample Problems
© The McGraw−Hill Companies, 2002
418 Appendix A Dilutions with Sample Problems
Diluting a Solution to an UnspecifiedVolume in Several Steps
Frequently in the microbiology laboratory, large dilutionsmust be employed. They cannot be done in one step be-cause they are too large. As a result, they must be done inseveral steps to conserve not only amounts of diluent to beused but also space. For example, a 0.5 g/ml solution di-luted to 1 µg/ml is a 500,000-fold dilution.
0.5 g = 0.5 g × 106 µg/g
= 500,000 µg
To obtain a solution containing 500,000 µg/ml in one stepwould require taking 1 ml of 0.5 gm/ml stock solution andadding 499,999 ml of diluent. As you can see, it would bealmost impossible to work with such a large fluid volume.
A 500,000 times dilution can be easily performed intwo steps by first taking 1 ml of the initial concentrationand diluting it to 500 ml and second, by diluting 1 ml of thefirst dilution to 1,000 ml.
1 ml of 500,000 µg/ml + 499 ml of diluent = 1,000µg/ml
1 ml of 1,000 µg/ml + 999 ml of diluent = 1 µg/ml
Thus, by this two-step procedure, we have cut down thevolume of diluent used from 499,999 to 1,498 (499 ml+ 999 ml).
Dilution Ratios Used in This Manual
According to the ASM (American Society for Microbiology)Style Manual, dilution ratios may be reported with eithercolons (:) or shills (/), but note there is a difference betweenthem. A shill indicates the ratio of a part to a whole: for ex-ample, 1/2 means 1 of 2 parts, with a total of 2 parts. Acolon indicates the ratio of 1 part to 2 parts, with a total of3 parts. Thus, 1/2 equals 1:1, but 1:2 equals 1/3.
Diluting a Solution to a SpecifiedVolume in Several Steps
This type of dilution is identical to all previous dilutionswith the exception that the specified final volume must beone factor of the total dilution ratio.
For example, you want a 1/10,000 dilution of wholeserum (undiluted) and you need 50 ml.
Divide dilution needed by the volume:
10,000= 200
50
200 (1/200 dilution) = the first step in the dilution factor;the second is 1/50, obtained as follows:
1 ml of serum + 199 ml of diluent = 1/200 dilution.
1 ml of 1/200 dilution + 49 ml of diluent = 1/50.
To check: 50 × 200 = 10,000.
Serial Dilutions
The usefulness of dilutions becomes most apparent whensmall volumes of a material are required in serological pro-cedures. For example, if 0.01 ml of serum were required ina certain test, instead of measuring out this small volumewith a consequent sacrifice of accuracy, it would be moreadvantageous to dilute the serum 100 times. One ml of this1/100 dilution would then contain 0.01 ml of the serum.Each ml of this dilution would be equivalent to the required0.01 ml of undiluted serum.
Dilutions represent fractional amounts of a materialand are generally expressed as the ratio of one volume ofmaterial to the final volume of the dilution. Thus, a 1/10 di-lution of serum represents 1 volume of serum in 10 vol-umes of dilution (1 volume of serum + 9 volumes of dilu-ent). Undiluted serum may be expressed as 1/1.
1 ml of serum + 1 ml of saline may be expressed as1/2. Each milliliter of this dilution is equivalent to 0.5 ml ofundiluted serum.
1 ml of serum + 2 ml of saline may be expressed as1/3. Each milliliter of this dilution is equivalent to 0.33 mlof undiluted serum.
1 ml of serum + 99 ml of saline may be expressed as1/100. Each milliliter of this dilution is equivalent to 0.01ml of undiluted serum.
From the above, one can see that dilution expressionsare fractions written as ratios where the numerator is unityand the denominator is the dilution value.
Division of the numerator by the denominator will givethe amount of material per milliliter of the dilution. For ex-ample, in a 1/25 dilution, 1/25 = 0.04. Therefore, each mil-liliter of this dilution contains 1/25 or 0.04 ml of the origi-nal material (e.g., serum).
To convert a ratio into a dilution expression, divideboth the numerator and denominator by the value of the nu-merator. For example, in a mixture consisting of 4 ml ofserum and 6 ml of saline,
4 ml of serum + 6 ml of saline
= 10 ml of serum dilution
Ratio of serum dilution = 4/10.
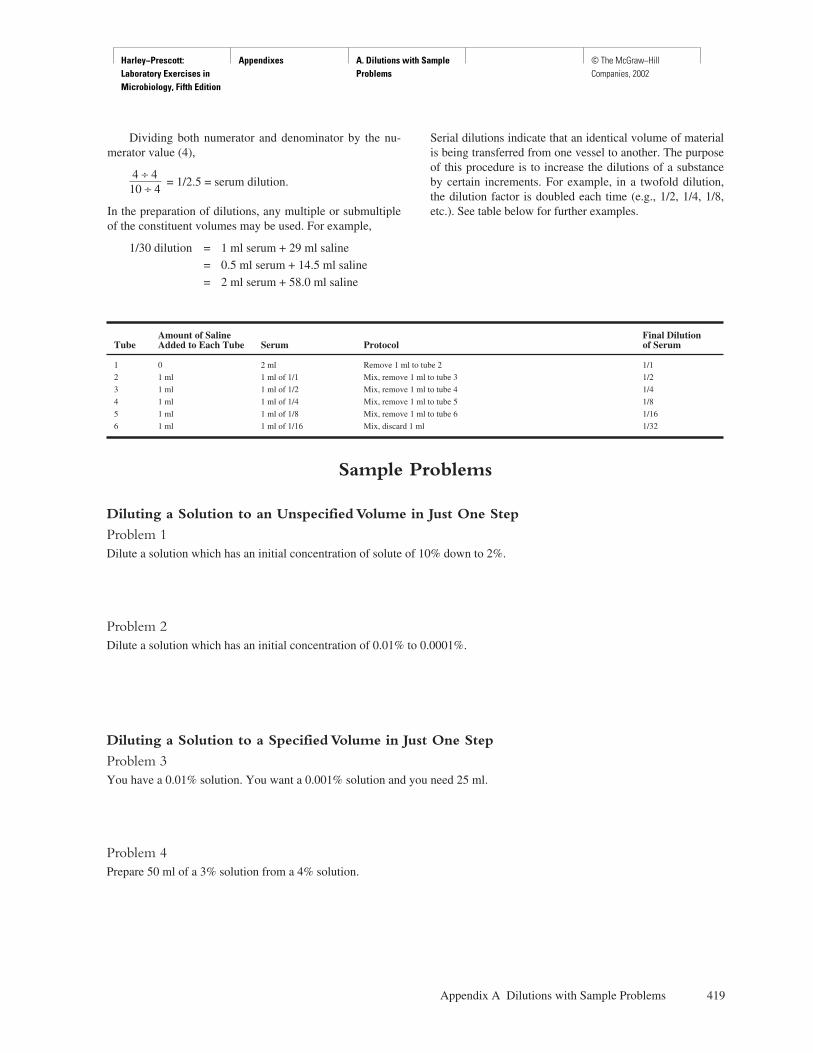
Harley−Prescott: Laboratory Exercises in Microbiology, Fifth Edition
Appendixes A. Dilutions with Sample Problems
© The McGraw−Hill Companies, 2002
Appendix A Dilutions with Sample Problems 419
Dividing both numerator and denominator by the nu-merator value (4),
4 ÷ 4= 1/2.5 = serum dilution.
10 ÷ 4
In the preparation of dilutions, any multiple or submultipleof the constituent volumes may be used. For example,
1/30 dilution = 1 ml serum + 29 ml saline
= 0.5 ml serum + 14.5 ml saline
= 2 ml serum + 58.0 ml saline
Serial dilutions indicate that an identical volume of materialis being transferred from one vessel to another. The purposeof this procedure is to increase the dilutions of a substanceby certain increments. For example, in a twofold dilution,the dilution factor is doubled each time (e.g., 1/2, 1/4, 1/8,etc.). See table below for further examples.
Amount of Saline Final Dilution Tube Added to Each Tube Serum Protocol of Serum
1 0 2 ml Remove 1 ml to tube 2 1/1
2 1 ml 1 ml of 1/1 Mix, remove 1 ml to tube 3 1/2
3 1 ml 1 ml of 1/2 Mix, remove 1 ml to tube 4 1/4
4 1 ml 1 ml of 1/4 Mix, remove 1 ml to tube 5 1/8
5 1 ml 1 ml of 1/8 Mix, remove 1 ml to tube 6 1/16
6 1 ml 1 ml of 1/16 Mix, discard 1 ml 1/32
Sample Problems
Diluting a Solution to an Unspecified Volume in Just One Step
Problem 1Dilute a solution which has an initial concentration of solute of 10% down to 2%.
Problem 2Dilute a solution which has an initial concentration of 0.01% to 0.0001%.
Diluting a Solution to a Specified Volume in Just One Step
Problem 3You have a 0.01% solution. You want a 0.001% solution and you need 25 ml.
Problem 4Prepare 50 ml of a 3% solution from a 4% solution.

Harley−Prescott: Laboratory Exercises in Microbiology, Fifth Edition
Appendixes A. Dilutions with Sample Problems
© The McGraw−Hill Companies, 2002
Problem 5Prepare 100 ml of 10% alcohol from 95% alcohol.
Problem 6You need 45 ml of 50% alcohol. How can you prepare this from 70% alcohol?
Problem 7What volume of a 20% dextrose broth solution should be used to prepare 250 ml of 1% dextrose broth?
Problem 8Prepare a 45 ml of a 2% suspension of RBCs from a 5% suspension.
Problem 9What volume of a 0.02% solution can be prepared from 25 ml of a 0.1% solution?
Problem 10What percent concentration of alcohol is prepared when 10 ml of 95% alcohol is diluted with H2O to make a final volume of 38 ml?
Problem 11What percent of dextrose is prepared when 3 ml of a 10% dextrose solution is mixed with 12 ml of broth?
Diluting a Solution to an Unspecified Volume in Several Steps
Problem 12You have a stock solution of protein containing 10 grams per ml. You want a concentration of 2 mg/ml. How would youperform this dilution in just three steps?
420 Appendix A Dilutions with Sample Problems
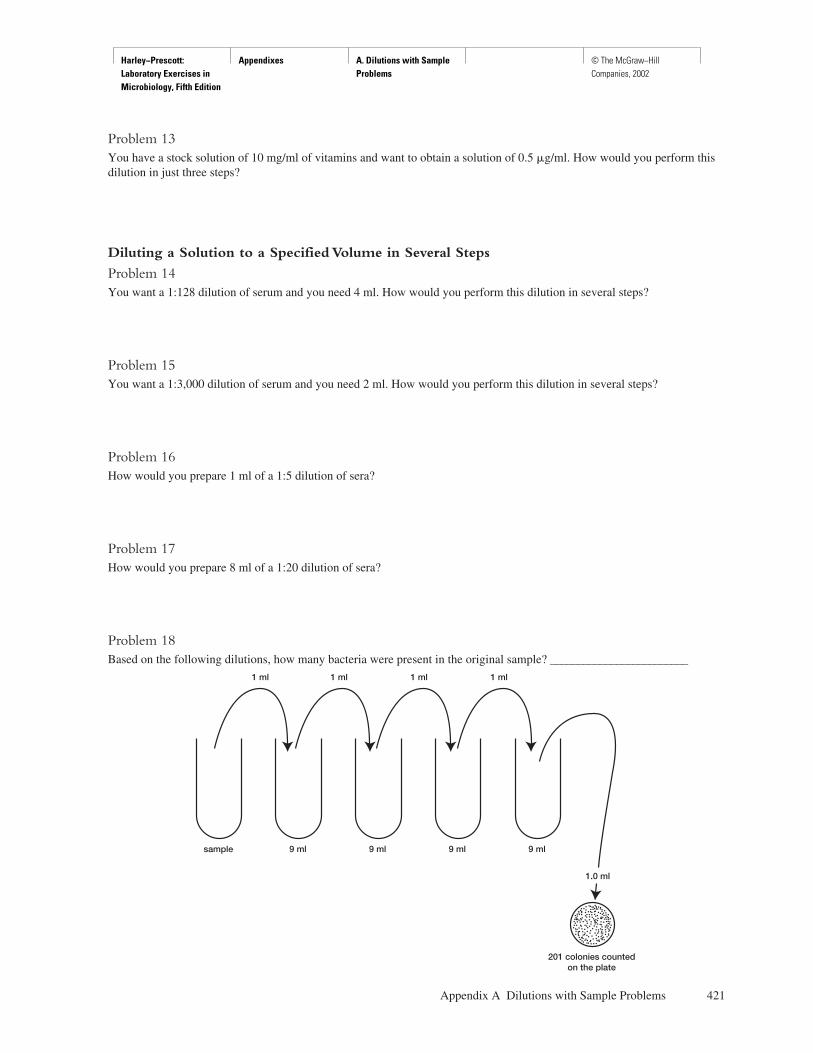
Harley−Prescott: Laboratory Exercises in Microbiology, Fifth Edition
Appendixes A. Dilutions with Sample Problems
© The McGraw−Hill Companies, 2002
Problem 13You have a stock solution of 10 mg/ml of vitamins and want to obtain a solution of 0.5 �g/ml. How would you perform thisdilution in just three steps?
Diluting a Solution to a Specified Volume in Several Steps
Problem 14You want a 1:128 dilution of serum and you need 4 ml. How would you perform this dilution in several steps?
Problem 15You want a 1:3,000 dilution of serum and you need 2 ml. How would you perform this dilution in several steps?
Problem 16How would you prepare 1 ml of a 1:5 dilution of sera?
Problem 17How would you prepare 8 ml of a 1:20 dilution of sera?
Problem 18Based on the following dilutions, how many bacteria were present in the original sample? _________________________
Appendix A Dilutions with Sample Problems 421
sample 9 ml
1 ml 1 ml 1 ml 1 ml
1.0 ml
201 colonies countedon the plate
9 ml 9 ml 9 ml
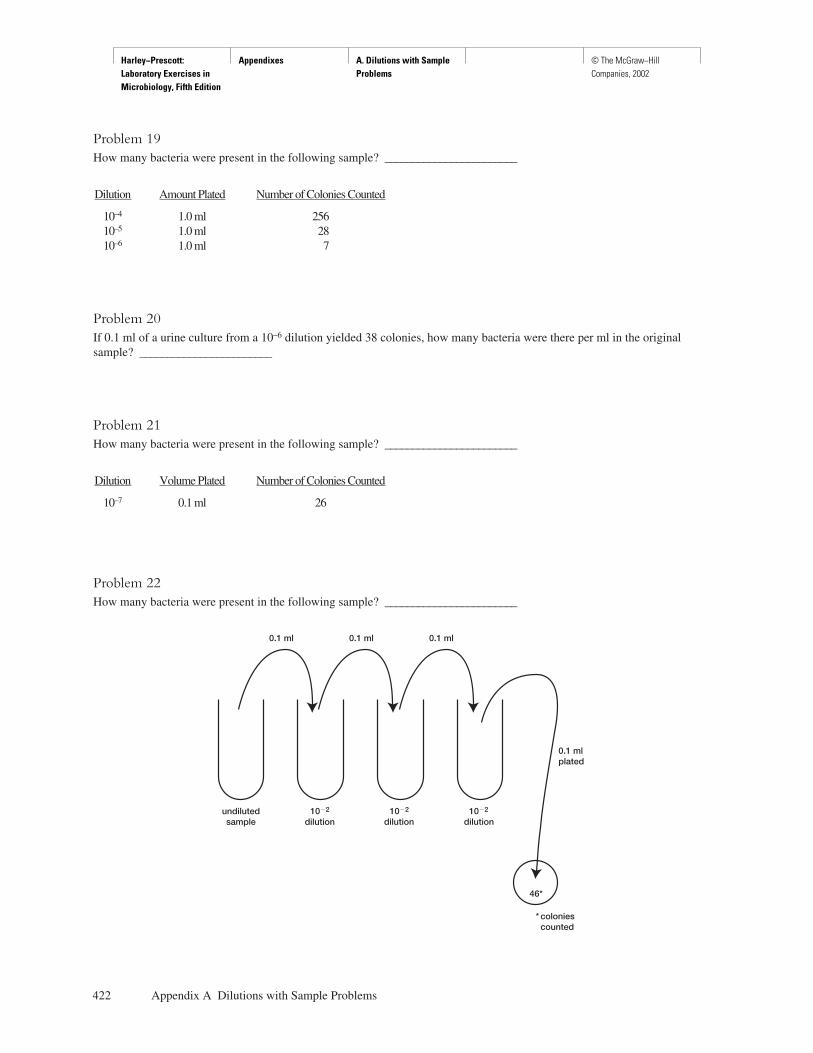
Harley−Prescott: Laboratory Exercises in Microbiology, Fifth Edition
Appendixes A. Dilutions with Sample Problems
© The McGraw−Hill Companies, 2002
Problem 19How many bacteria were present in the following sample? ________________________
Dilution Amount Plated Number of Colonies Counted
10–4 1.0 ml 25610–5 1.0 ml 2810–6 1.0 ml 7
Problem 20If 0.1 ml of a urine culture from a 10–6 dilution yielded 38 colonies, how many bacteria were there per ml in the originalsample? ________________________
Problem 21How many bacteria were present in the following sample? ________________________
Dilution Volume Plated Number of Colonies Counted
10–7 0.1 ml 26
Problem 22How many bacteria were present in the following sample? ________________________
422 Appendix A Dilutions with Sample Problems
0.1 ml 0.1 ml 0.1 ml
0.1 mlplated
46*
dilutionundilutedsample dilution dilution
* coloniescounted
10�2 10�2 10�2
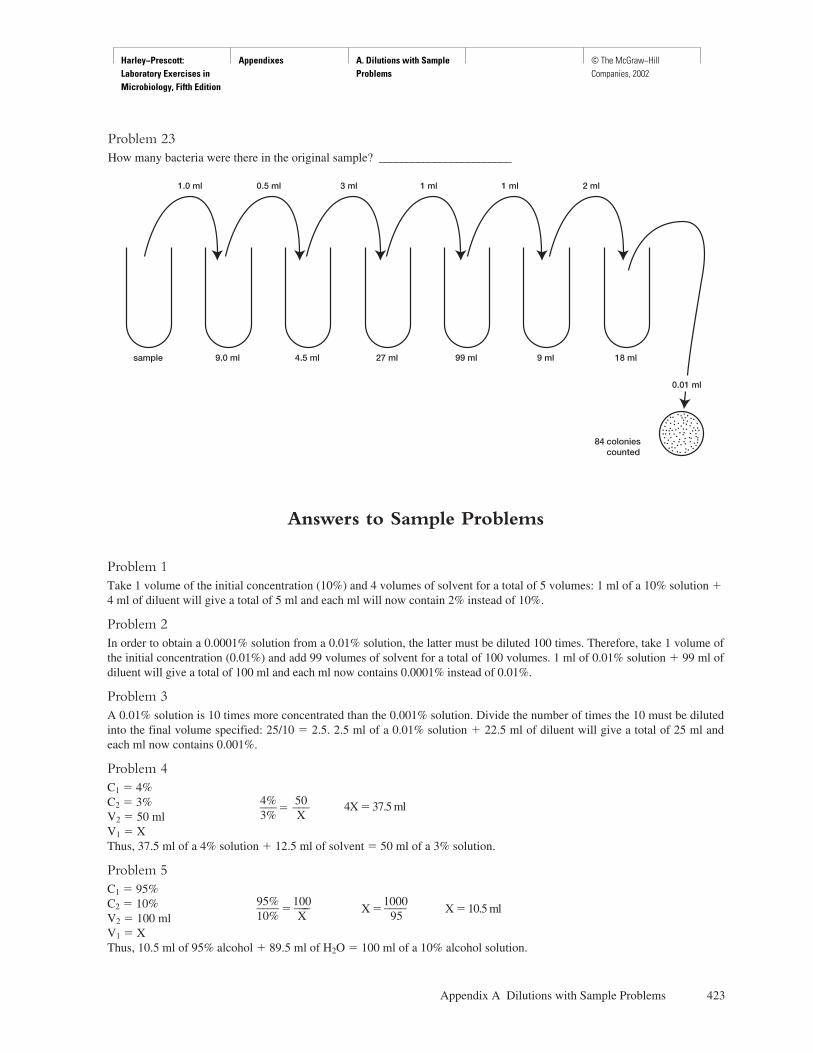
Harley−Prescott: Laboratory Exercises in Microbiology, Fifth Edition
Appendixes A. Dilutions with Sample Problems
© The McGraw−Hill Companies, 2002
Problem 23How many bacteria were there in the original sample? ________________________
Appendix A Dilutions with Sample Problems 423
sample 9.0 ml
1.0 ml 0.5 ml 3 ml 1 ml
0.01 ml
84 coloniescounted
4.5 ml 27 ml 99 ml 9 ml 18 ml
1 ml 2 ml
Answers to Sample Problems
Problem 1Take 1 volume of the initial concentration (10%) and 4 volumes of solvent for a total of 5 volumes: 1 ml of a 10% solution �4 ml of diluent will give a total of 5 ml and each ml will now contain 2% instead of 10%.
Problem 2In order to obtain a 0.0001% solution from a 0.01% solution, the latter must be diluted 100 times. Therefore, take 1 volume ofthe initial concentration (0.01%) and add 99 volumes of solvent for a total of 100 volumes. 1 ml of 0.01% solution � 99 ml ofdiluent will give a total of 100 ml and each ml now contains 0.0001% instead of 0.01%.
Problem 3A 0.01% solution is 10 times more concentrated than the 0.001% solution. Divide the number of times the 10 must be dilutedinto the final volume specified: 25/10 � 2.5. 2.5 ml of a 0.01% solution � 22.5 ml of diluent will give a total of 25 ml andeach ml now contains 0.001%.
Problem 4C1 � 4%C2 � 3%V2 � 50 mlV1 � XThus, 37.5 ml of a 4% solution � 12.5 ml of solvent � 50 ml of a 3% solution.
Problem 5C1 � 95%C2 � 10%V2 � 100 mlV1 � XThus, 10.5 ml of 95% alcohol � 89.5 ml of H2O � 100 ml of a 10% alcohol solution.
4% 50___� ___ 4X � 37.5 ml3% X
95% 100 1000____ � ____ X � ____ X � 10.5 ml10% X 95

Harley−Prescott: Laboratory Exercises in Microbiology, Fifth Edition
Appendixes A. Dilutions with Sample Problems
© The McGraw−Hill Companies, 2002
Problem 6C1 � 70%C2 � 50%V2 � 45 mlV1 � XThus, 32.1 ml of 70% alcohol � 12.9 ml of H2O � 45 ml of a 50% alcohol solution.
Problem 7C1 � 20%C2 � 1%V2 � 150 mlV1 � XThus, 12.5 ml of a 20% solution � 237.5 ml of broth � 250 ml of a 1% dextrose broth solution.
Problem 8C1 � 5%C2 � 2%V2 � 45 mlV1 � XThus, 18 ml of 5% � 27 ml of saline � 45 ml of a 2% red blood cell suspension.
Problem 9C1 � 0.1%C2 � 0.02%V2 � XV1 � 25 mlThus, prepare a total volume of 125 of a 0.02% solution from 25 ml of 0.01% solution by adding 100 ml of diluent to the latter.
Problem 10C1 � 95%C2 � XV2 � 38 mlV1 � 10 ml
Problem 11C1 � 10%C2 � XV2 � 15 mlV1 � 3 ml
Problem 12In order to make all units equal, you have to convert 10 grams to milligrams.
stock solution � 10,000 mg/mlfinal concentration � 2 mg/mlIC 10,000 mg/ml___ � _____________ � 5,000FC 2 mg/ml
Thus, the dilution factor is 5,000.
To perform a 1:5000 dilution:Step #1 1 ml of 10,000 mg/ml stock solution protein � 49 ml of diluent � 1:50 dilution � 200 mg/mlStep #2 1 ml of 200 mg/ml � 9 ml of diluent � 1:10 dilution � 20 mg/mlStep #3 1 ml of 20 mg/ml � 9 ml of diluent � 1:10 dilution � 2 mg/mlTo check to make sure the correct dilution was made:
50 � 10 � 10 � 5,000
424 Appendix A Dilutions with Sample Problems
70% 45 50 � 45____ � ___ X � ________ X � 32.1 ml50% X 70
20% 250____ � ___ 20X � 250 X � 12.5 ml1% X
5% 45 ml 90___ � _________ X � ___ X � 18 ml2% X 5
0.1% X______ � _____ 0.02X � 2.5 X � 125 ml0.02% 25 ml
95% 38 ml____ � _____ 38X � 950 X � 25%X 10 ml
10% 15 ml*____ � ______ 15X � 30 X � 2%X 3 ml
*3 � 12 � 15 ml (total volume)
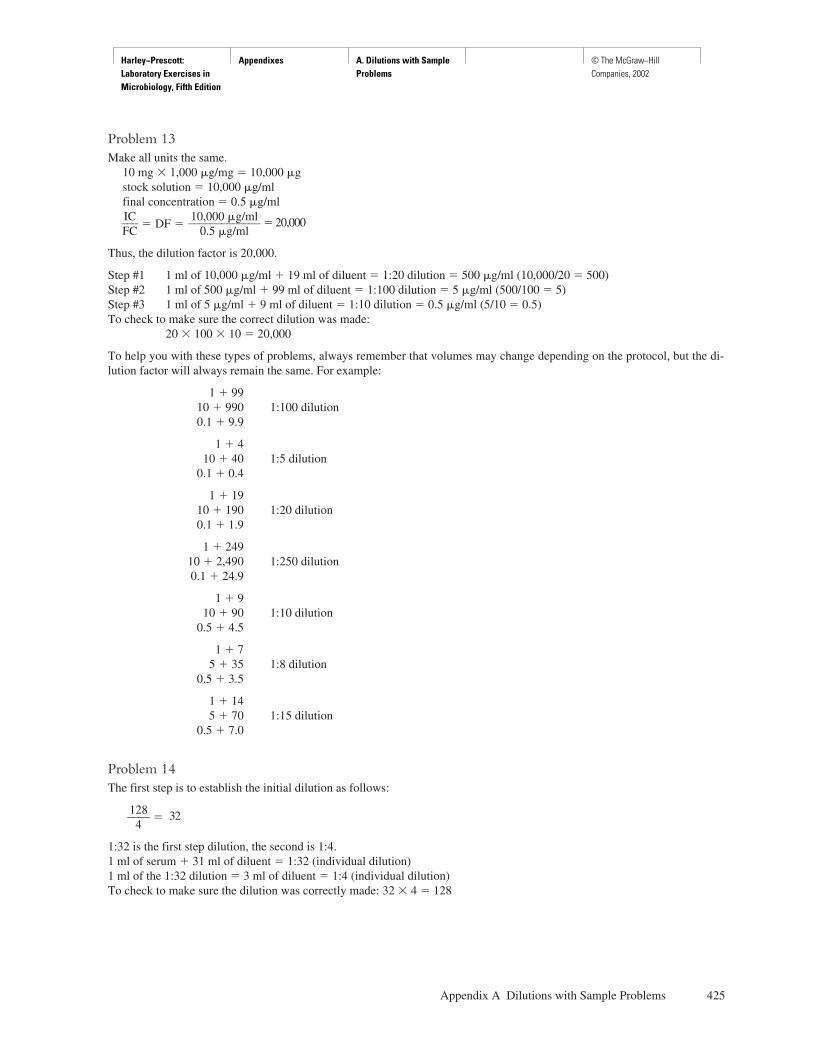
Harley−Prescott: Laboratory Exercises in Microbiology, Fifth Edition
Appendixes A. Dilutions with Sample Problems
© The McGraw−Hill Companies, 2002
Problem 13Make all units the same.
10 mg � 1,000 �g/mg � 10,000 �gstock solution � 10,000 �g/mlfinal concentration � 0.5 �g/mlIC 10,000 �g/ml___ � DF � _____________ � 20,000FC 0.5 �g/ml
Thus, the dilution factor is 20,000.
Step #1 1 ml of 10,000 �g/ml � 19 ml of diluent � 1:20 dilution � 500 �g/ml (10,000/20 � 500)Step #2 1 ml of 500 �g/ml � 99 ml of diluent � 1:100 dilution � 5 �g/ml (500/100 � 5)Step #3 1 ml of 5 �g/ml � 9 ml of diluent � 1:10 dilution � 0.5 �g/ml (5/10 � 0.5)To check to make sure the correct dilution was made:
20 � 100 � 10 � 20,000
To help you with these types of problems, always remember that volumes may change depending on the protocol, but the di-lution factor will always remain the same. For example:
1 � 9910 � 990 1:100 dilution0.1 � 9.9
1 � 410 � 40 1:5 dilution
0.1 � 0.4
1 � 1910 � 190 1:20 dilution0.1 � 1.9
1 � 24910 � 2,490 1:250 dilution0.1 � 24.9
1 � 910 � 90 1:10 dilution
0.5 � 4.5
1 � 75 � 35 1:8 dilution
0.5 � 3.5
1 � 145 � 70 1:15 dilution
0.5 � 7.0
Problem 14The first step is to establish the initial dilution as follows:
128____ � 324
1:32 is the first step dilution, the second is 1:4.1 ml of serum � 31 ml of diluent � 1:32 (individual dilution)1 ml of the 1:32 dilution � 3 ml of diluent � 1:4 (individual dilution)To check to make sure the dilution was correctly made: 32 � 4 � 128
Appendix A Dilutions with Sample Problems 425
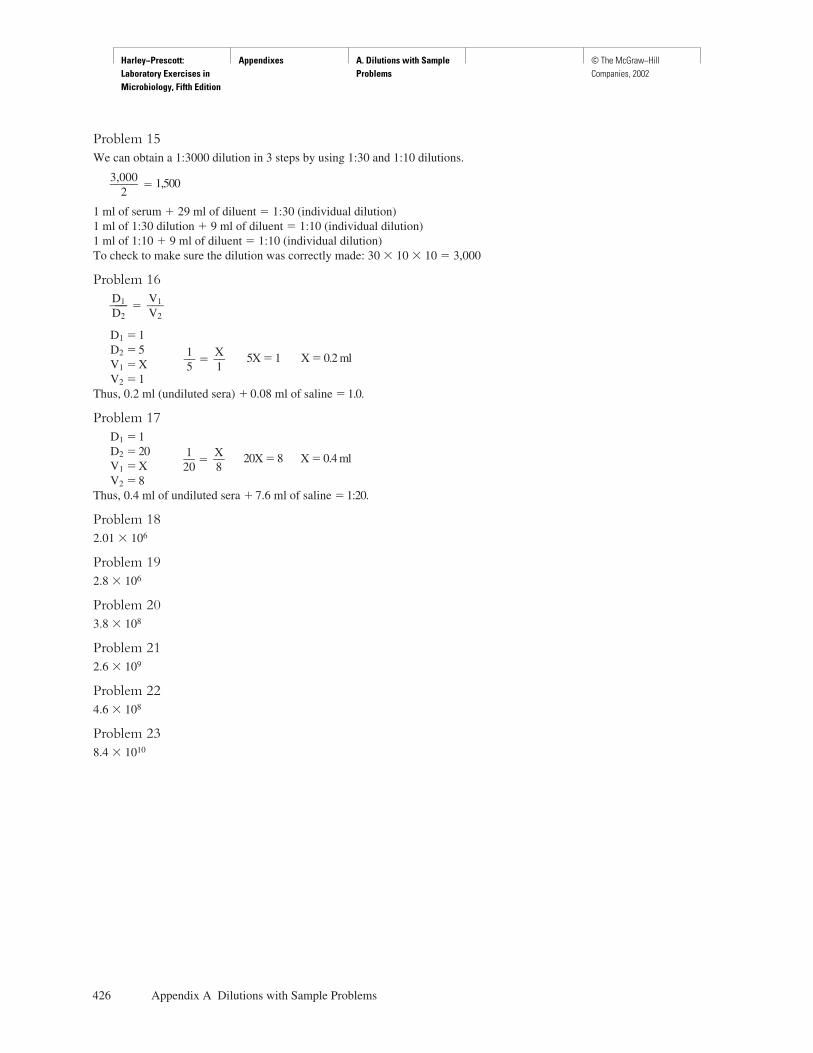
Harley−Prescott: Laboratory Exercises in Microbiology, Fifth Edition
Appendixes A. Dilutions with Sample Problems
© The McGraw−Hill Companies, 2002
Problem 15We can obtain a 1:3000 dilution in 3 steps by using 1:30 and 1:10 dilutions.
3,000_____ � 1,5002
1 ml of serum � 29 ml of diluent � 1:30 (individual dilution)1 ml of 1:30 dilution � 9 ml of diluent � 1:10 (individual dilution)1 ml of 1:10 � 9 ml of diluent � 1:10 (individual dilution)To check to make sure the dilution was correctly made: 30 � 10 � 10 � 3,000
Problem 16D1 V1_____ � ___D2 V2
D1 � 1D2 � 5V1 � XV2 � 1
Thus, 0.2 ml (undiluted sera) � 0.08 ml of saline � 1.0.
Problem 17D1 � 1D2 � 20V1 � XV2 � 8
Thus, 0.4 ml of undiluted sera � 7.6 ml of saline � 1:20.
Problem 182.01 � 106
Problem 192.8 � 106
Problem 203.8 � 108
Problem 212.6 � 109
Problem 224.6 � 108
Problem 238.4 � 1010
426 Appendix A Dilutions with Sample Problems
1 X__ � __ 5X � 1 X � 0.2 ml5 1
1 X__ � __ 20X � 8 X � 0.4 ml20 8

Harley−Prescott: Laboratory Exercises in Microbiology, Fifth Edition
Appendixes B. Metric and English Measurement Equivalents
© The McGraw−Hill Companies, 2002
427
A P P E N D I X B
Metric and English Measurement Equivalents
The Metric System
The metric system comprises three basic units of measure-ment: distance measured in meters, volume measured inliters, and mass measured in grams. In order to designatelarger and smaller measures, a system of prefixes based onmultiples of ten is used in conjunction with the basic unit ofmeasurement. The most common prefixes are
kilo = 103 = 1,000
centi = 10–2 = 0.01 = 1/100
milli = 10–3 = 0.001 = 1/1,000
micro = 10–6 = 0.000001 = 1/1,000,000
nano = 10–9 = 0.000000001 = 1/1,000,000,000
The English System
The measurements of the English system used in the UnitedStates unfortunately are not systematically related. For ex-ample, there are 12 inches in a foot and 3 feet in a yard.Quick conversion tables for the metric and English systemsare listed below.
Units of Length
Metric to English1 centimeter (cm) or 10 mm = 0.394 in or 0.0328 ft
1 meter (m) = 100 cm or 1,000 mm = 39.4 in or3.28 ft or 1.09 yd
1 kilometer (km) = 1,000 m = 3,281 ft or0.621 mile (mi)
The Number of: Multiplied by: Equals:millimeters 0.04 inchescentimeters 0.4 inchesmeters 3.3 feetmeters 1.1 yardskilometers 0.6 miles
English to Metric1 in = 2.54 cm
1 ft or 12 in = 30.48 cm
1 yd or 3 ft or 36 in = 91.44 cm or 0.9144 m
1 mi or 5,280 ft or 1,760 yd = 1,609 m or 1.609 km
The Number of: Multiplied by: Equals:inches 2.5 centimetersfeet 30.5 centimetersyards 0.9 metersmiles 1.6 kilometers
Units of Area
Metric to English1 square centimeter (cm2) or 100 mm2 = 0.155 in2
1 square meter (m2) = 1,550 in2 or 1.196 yd2
1 hectare (ha) or 10,000 m2 = 107,600 ft2 or 2.471acres (A)
1 square kilometer (km2) or 1,000,000 m2 or 100 ha =247 A or 0.3861 mi2
The Number of: Multiplied by: Equals:square centimeters 0.16 square inchessquare meters 1.2 square yardssquare kilometers 0.4 square miles
English to Metric1 square foot (ft2) or 144 in2 = 929 cm2
1 square yard (yd2) or 9 ft2 = 8,361 cm2 or 0.836 m2
1 acre or 43,560 ft2 or 4,840 yd2 = 4,047 m2 = 0.405 ha
1 square mile (mi2) or 27,878 ft2 or 640 A = 259 ha or2.59 km2
The Number of: Multiplied by: Equals:square inches 6.5 square centimeterssquare feet 0.09 square meterssquare yards 0.8 square meterssquare miles 2.6 square kilometersacres 0.4 hectares
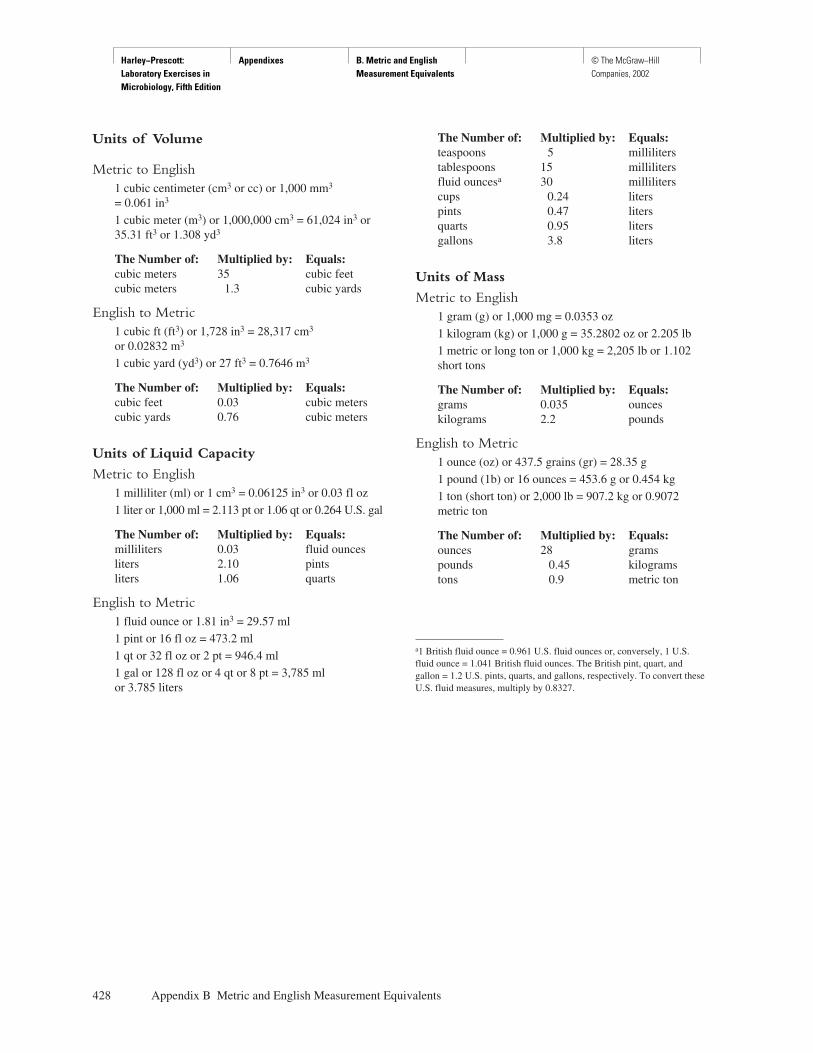
Harley−Prescott: Laboratory Exercises in Microbiology, Fifth Edition
Appendixes B. Metric and English Measurement Equivalents
© The McGraw−Hill Companies, 2002
Units of Volume
Metric to English1 cubic centimeter (cm3 or cc) or 1,000 mm3
= 0.061 in3
1 cubic meter (m3) or 1,000,000 cm3 = 61,024 in3 or35.31 ft3 or 1.308 yd3
The Number of: Multiplied by: Equals:cubic meters 35 cubic feetcubic meters 1.3 cubic yards
English to Metric1 cubic ft (ft3) or 1,728 in3 = 28,317 cm3
or 0.02832 m3
1 cubic yard (yd3) or 27 ft3 = 0.7646 m3
The Number of: Multiplied by: Equals:cubic feet 0.03 cubic meterscubic yards 0.76 cubic meters
Units of Liquid Capacity
Metric to English1 milliliter (ml) or 1 cm3 = 0.06125 in3 or 0.03 fl oz
1 liter or 1,000 ml = 2.113 pt or 1.06 qt or 0.264 U.S. gal
The Number of: Multiplied by: Equals:milliliters 0.03 fluid ouncesliters 2.10 pintsliters 1.06 quarts
English to Metric1 fluid ounce or 1.81 in3 = 29.57 ml
1 pint or 16 fl oz = 473.2 ml
1 qt or 32 fl oz or 2 pt = 946.4 ml
1 gal or 128 fl oz or 4 qt or 8 pt = 3,785 mlor 3.785 liters
The Number of: Multiplied by: Equals:teaspoons 5 milliliterstablespoons 15 millilitersfluid ouncesa 30 milliliterscups 0.24 literspints 0.47 litersquarts 0.95 litersgallons 3.8 liters
Units of Mass
Metric to English1 gram (g) or 1,000 mg = 0.0353 oz
1 kilogram (kg) or 1,000 g = 35.2802 oz or 2.205 lb
1 metric or long ton or 1,000 kg = 2,205 lb or 1.102short tons
The Number of: Multiplied by: Equals:grams 0.035 ounceskilograms 2.2 pounds
English to Metric1 ounce (oz) or 437.5 grains (gr) = 28.35 g
1 pound (1b) or 16 ounces = 453.6 g or 0.454 kg
1 ton (short ton) or 2,000 lb = 907.2 kg or 0.9072metric ton
The Number of: Multiplied by: Equals:ounces 28 gramspounds 0.45 kilogramstons 0.9 metric ton
428 Appendix B Metric and English Measurement Equivalents
a1 British fluid ounce = 0.961 U.S. fluid ounces or, conversely, 1 U.S.fluid ounce = 1.041 British fluid ounces. The British pint, quart, andgallon = 1.2 U.S. pints, quarts, and gallons, respectively. To convert theseU.S. fluid measures, multiply by 0.8327.
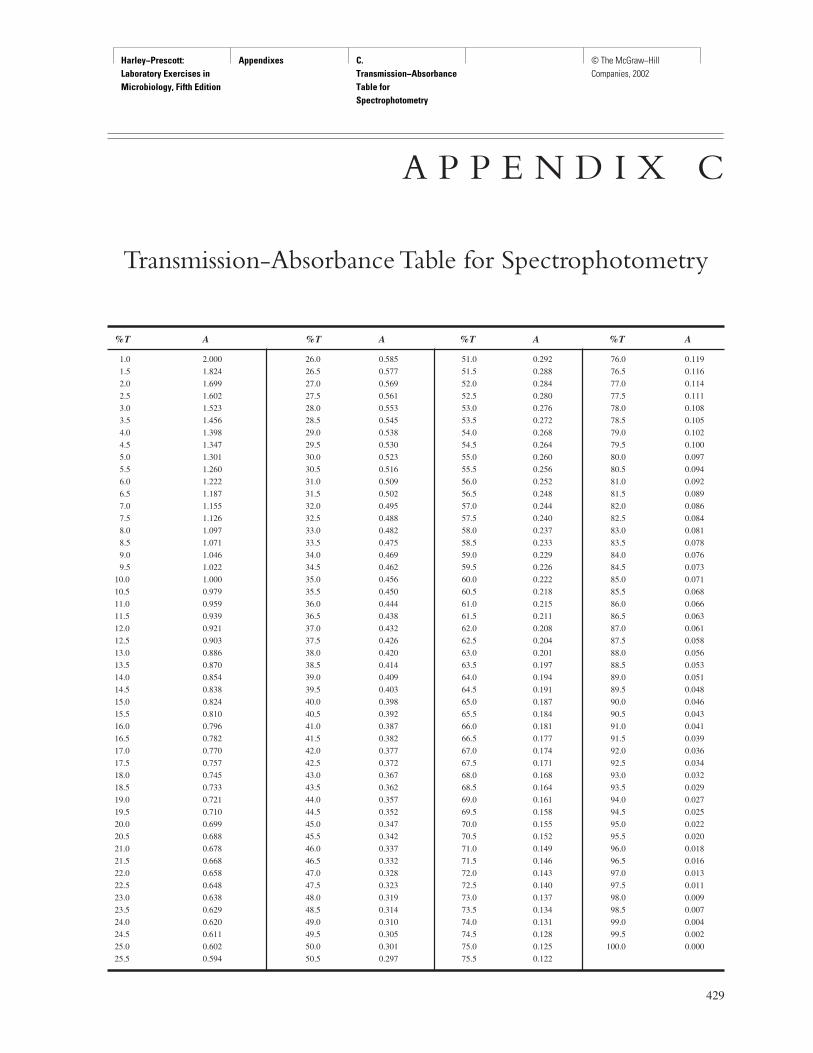
Harley−Prescott: Laboratory Exercises in Microbiology, Fifth Edition
Appendixes C. Transmission−Absorbance Table for Spectrophotometry
© The McGraw−Hill Companies, 2002
429
A P P E N D I X C
Transmission-Absorbance Table for Spectrophotometry
%T A %T A %T A %T A
1.0 2.000 26.0 0.585 51.0 0.292 76.0 0.119
1.5 1.824 26.5 0.577 51.5 0.288 76.5 0.116
2.0 1.699 27.0 0.569 52.0 0.284 77.0 0.114
2.5 1.602 27.5 0.561 52.5 0.280 77.5 0.111
3.0 1.523 28.0 0.553 53.0 0.276 78.0 0.108
3.5 1.456 28.5 0.545 53.5 0.272 78.5 0.105
4.0 1.398 29.0 0.538 54.0 0.268 79.0 0.102
4.5 1.347 29.5 0.530 54.5 0.264 79.5 0.100
5.0 1.301 30.0 0.523 55.0 0.260 80.0 0.097
5.5 1.260 30.5 0.516 55.5 0.256 80.5 0.094
6.0 1.222 31.0 0.509 56.0 0.252 81.0 0.092
6.5 1.187 31.5 0.502 56.5 0.248 81.5 0.089
7.0 1.155 32.0 0.495 57.0 0.244 82.0 0.086
7.5 1.126 32.5 0.488 57.5 0.240 82.5 0.084
8.0 1.097 33.0 0.482 58.0 0.237 83.0 0.081
8.5 1.071 33.5 0.475 58.5 0.233 83.5 0.078
9.0 1.046 34.0 0.469 59.0 0.229 84.0 0.076
9.5 1.022 34.5 0.462 59.5 0.226 84.5 0.073
10.0 1.000 35.0 0.456 60.0 0.222 85.0 0.071
10.5 0.979 35.5 0.450 60.5 0.218 85.5 0.068
11.0 0.959 36.0 0.444 61.0 0.215 86.0 0.066
11.5 0.939 36.5 0.438 61.5 0.211 86.5 0.063
12.0 0.921 37.0 0.432 62.0 0.208 87.0 0.061
12.5 0.903 37.5 0.426 62.5 0.204 87.5 0.058
13.0 0.886 38.0 0.420 63.0 0.201 88.0 0.056
13.5 0.870 38.5 0.414 63.5 0.197 88.5 0.053
14.0 0.854 39.0 0.409 64.0 0.194 89.0 0.051
14.5 0.838 39.5 0.403 64.5 0.191 89.5 0.048
15.0 0.824 40.0 0.398 65.0 0.187 90.0 0.046
15.5 0.810 40.5 0.392 65.5 0.184 90.5 0.043
16.0 0.796 41.0 0.387 66.0 0.181 91.0 0.041
16.5 0.782 41.5 0.382 66.5 0.177 91.5 0.039
17.0 0.770 42.0 0.377 67.0 0.174 92.0 0.036
17.5 0.757 42.5 0.372 67.5 0.171 92.5 0.034
18.0 0.745 43.0 0.367 68.0 0.168 93.0 0.032
18.5 0.733 43.5 0.362 68.5 0.164 93.5 0.029
19.0 0.721 44.0 0.357 69.0 0.161 94.0 0.027
19.5 0.710 44.5 0.352 69.5 0.158 94.5 0.025
20.0 0.699 45.0 0.347 70.0 0.155 95.0 0.022
20.5 0.688 45.5 0.342 70.5 0.152 95.5 0.020
21.0 0.678 46.0 0.337 71.0 0.149 96.0 0.018
21.5 0.668 46.5 0.332 71.5 0.146 96.5 0.016
22.0 0.658 47.0 0.328 72.0 0.143 97.0 0.013
22.5 0.648 47.5 0.323 72.5 0.140 97.5 0.011
23.0 0.638 48.0 0.319 73.0 0.137 98.0 0.009
23.5 0.629 48.5 0.314 73.5 0.134 98.5 0.007
24.0 0.620 49.0 0.310 74.0 0.131 99.0 0.004
24.5 0.611 49.5 0.305 74.5 0.128 99.5 0.002
25.0 0.602 50.0 0.301 75.0 0.125 100.0 0.000
25.5 0.594 50.5 0.297 75.5 0.122
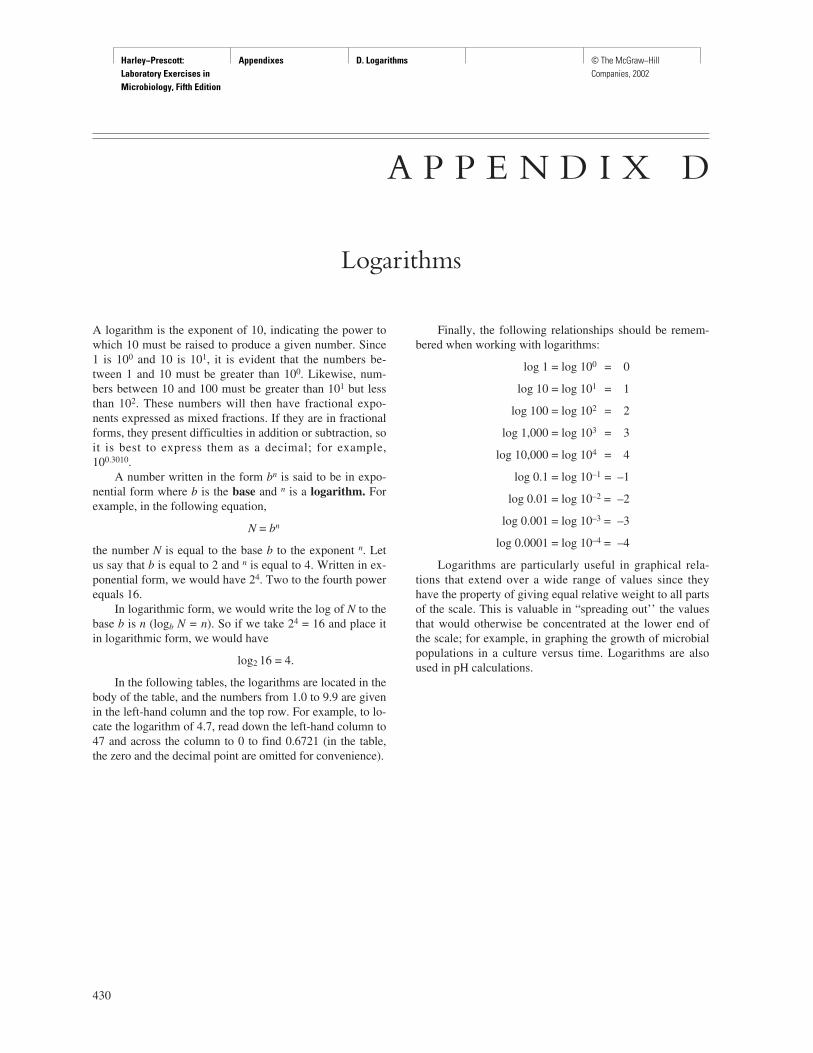
Harley−Prescott: Laboratory Exercises in Microbiology, Fifth Edition
Appendixes D. Logarithms © The McGraw−Hill Companies, 2002
A logarithm is the exponent of 10, indicating the power towhich 10 must be raised to produce a given number. Since1 is 100 and 10 is 101, it is evident that the numbers be-tween 1 and 10 must be greater than 100. Likewise, num-bers between 10 and 100 must be greater than 101 but lessthan 102. These numbers will then have fractional expo-nents expressed as mixed fractions. If they are in fractionalforms, they present difficulties in addition or subtraction, soit is best to express them as a decimal; for example,100.3010.
A number written in the form bn is said to be in expo-nential form where b is the base and n is a logarithm. Forexample, in the following equation,
N = bn
the number N is equal to the base b to the exponent n. Letus say that b is equal to 2 and n is equal to 4. Written in ex-ponential form, we would have 24. Two to the fourth powerequals 16.
In logarithmic form, we would write the log of N to thebase b is n (logb N = n). So if we take 24 = 16 and place itin logarithmic form, we would have
log2 16 = 4.
In the following tables, the logarithms are located in thebody of the table, and the numbers from 1.0 to 9.9 are givenin the left-hand column and the top row. For example, to lo-cate the logarithm of 4.7, read down the left-hand column to47 and across the column to 0 to find 0.6721 (in the table,the zero and the decimal point are omitted for convenience).
Finally, the following relationships should be remem-bered when working with logarithms:
log 1 = log 100 = 0
log 10 = log 101 = 1
log 100 = log 102 = 2
log 1,000 = log 103 = 3
log 10,000 = log 104 = 4
log 0.1 = log 10–1 = –1
log 0.01 = log 10–2 = –2
log 0.001 = log 10–3 = –3
log 0.0001 = log 10–4 = –4
Logarithms are particularly useful in graphical rela-tions that extend over a wide range of values since theyhave the property of giving equal relative weight to all partsof the scale. This is valuable in “spreading out’’ the valuesthat would otherwise be concentrated at the lower end ofthe scale; for example, in graphing the growth of microbialpopulations in a culture versus time. Logarithms are alsoused in pH calculations.
430
A P P E N D I X D
Logarithms
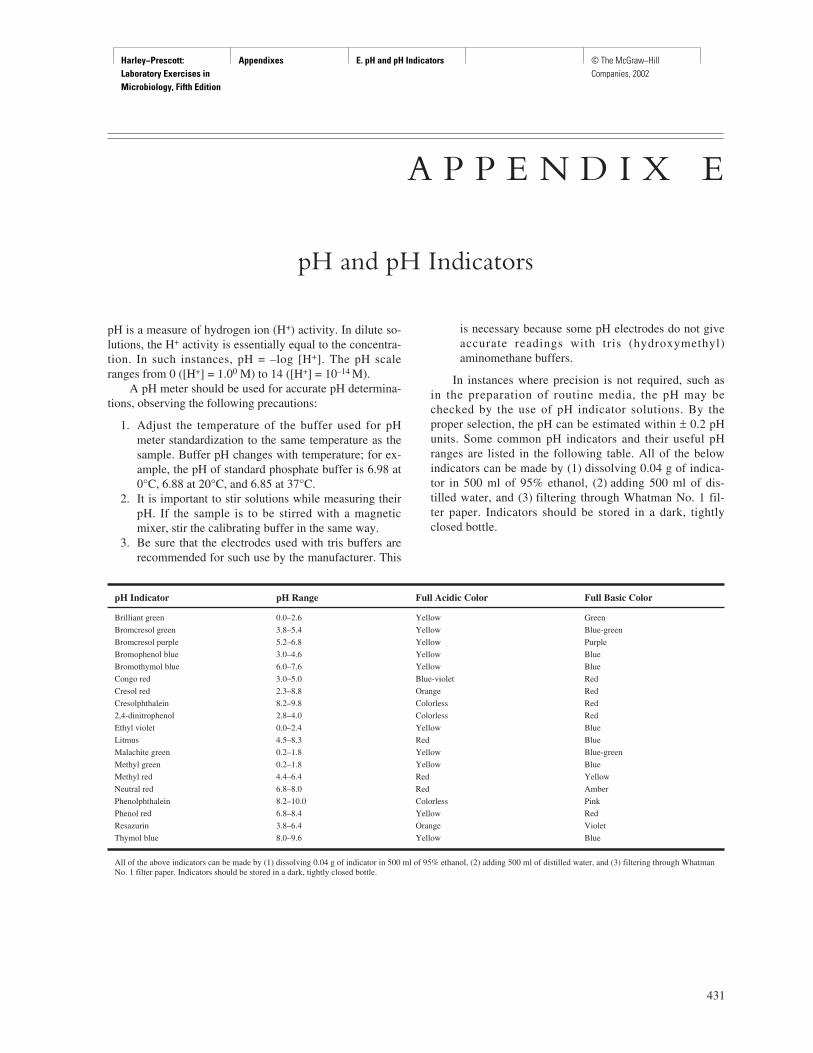
Harley−Prescott: Laboratory Exercises in Microbiology, Fifth Edition
Appendixes E. pH and pH Indicators © The McGraw−Hill Companies, 2002
431
A P P E N D I X E
pH and pH Indicators
pH is a measure of hydrogen ion (H+) activity. In dilute so-lutions, the H+ activity is essentially equal to the concentra-tion. In such instances, pH = –log [H+]. The pH scaleranges from 0 ([H+] = 1.00 M) to 14 ([H+] = 10–14 M).
A pH meter should be used for accurate pH determina-tions, observing the following precautions:
1. Adjust the temperature of the buffer used for pHmeter standardization to the same temperature as thesample. Buffer pH changes with temperature; for ex-ample, the pH of standard phosphate buffer is 6.98 at0°C, 6.88 at 20°C, and 6.85 at 37°C.
2. It is important to stir solutions while measuring theirpH. If the sample is to be stirred with a magneticmixer, stir the calibrating buffer in the same way.
3. Be sure that the electrodes used with tris buffers arerecommended for such use by the manufacturer. This
is necessary because some pH electrodes do not giveaccurate readings with tris (hydroxymethyl)aminomethane buffers.
In instances where precision is not required, such asin the preparation of routine media, the pH may bechecked by the use of pH indicator solutions. By theproper selection, the pH can be estimated within ± 0.2 pHunits. Some common pH indicators and their useful pHranges are listed in the following table. All of the belowindicators can be made by (1) dissolving 0.04 g of indica-tor in 500 ml of 95% ethanol, (2) adding 500 ml of dis-tilled water, and (3) filtering through Whatman No. 1 fil-ter paper. Indicators should be stored in a dark, tightlyclosed bottle.
pH Indicator pH Range Full Acidic Color Full Basic Color
Brilliant green 0.0–2.6 Yellow Green
Bromcresol green 3.8–5.4 Yellow Blue-green
Bromcresol purple 5.2–6.8 Yellow Purple
Bromophenol blue 3.0–4.6 Yellow Blue
Bromothymol blue 6.0–7.6 Yellow Blue
Congo red 3.0–5.0 Blue-violet Red
Cresol red 2.3–8.8 Orange Red
Cresolphthalein 8.2–9.8 Colorless Red
2,4-dinitrophenol 2.8–4.0 Colorless Red
Ethyl violet 0.0–2.4 Yellow Blue
Litmus 4.5–8.3 Red Blue
Malachite green 0.2–1.8 Yellow Blue-green
Methyl green 0.2–1.8 Yellow Blue
Methyl red 4.4–6.4 Red Yellow
Neutral red 6.8–8.0 Red Amber
Phenolphthalein 8.2–10.0 Colorless Pink
Phenol red 6.8–8.4 Yellow Red
Resazurin 3.8–6.4 Orange Violet
Thymol blue 8.0–9.6 Yellow Blue
All of the above indicators can be made by (1) dissolving 0.04 g of indicator in 500 ml of 95% ethanol, (2) adding 500 ml of distilled water, and (3) filtering through WhatmanNo. 1 filter paper. Indicators should be stored in a dark, tightly closed bottle.
Harley−Prescott: Laboratory Exercises in Microbiology, Fifth Edition
Appendixes F. Scientific Notation © The McGraw−Hill Companies, 2002
432
A P P E N D I X F
Scientific Notation
Microbiologists often have to deal with either very large orvery small numbers, such as 5,550,000,000 or 0.00000082.The mere manipulation of these numbers is cumbersome.As a result, it is more convenient to express such numbers inscientific notation (standard exponential notation). Sci-entific notation is a set of rules involving a shorthandmethod for writing these numbers and performing simplemanipulations with them. Scientific notation uses the factthat every number can be expressed as the product of twonumbers—one of which is a power of the number of ten.
Numbers greater than one can be expressed as follows:1 = 100 100,000 = 105
10 = 101 1,000,000 = 106
100 = 102 10,000,000 = 107
1,000 = 103 100,000,000 = 108
10,000 = 104 1,000,000,000 = 109
In the above notations, the exponent to which the ten israised is equal to the number of zeroes following the one.
Numbers less than one can be expressed as follows:0.1 = 10–1 0.000001 = 10–6
0.01 = 10–2 0.0000001 = 10–7
0.001 = 10–3 0.00000001 = 10–8
0.0001 = 10–4 0.000000001 = 10–9
0.00001 = 10–5
In the above notations, the number of the negative exponentto which ten is raised is equal to the number of digits to theright of the decimal point.
Numbers that are not an exact power of ten can also bedealt with in scientific notation. For example, a numbersuch as 1234, which is greater than one, can be expressedin the following ways:
123.4 × 10 0.1234 × 10,000
12.34 × 100 0.01234 × 100,000
1.234 × 1,000
The same numbers can be expressed in scientific notationas follows:
123.4 × 101 0.1234 × 10⁴
12.34 × 10² 0.01234 × 10⁵
1.234 × 10³
The same reasoning is followed for numbers less than one.Consider the number 0.1234; it can be expressed in the fol-lowing ways:
1.234 × 0.1 1,234 × 0.0001
12.34 × 0.01 12,340 × 0.00001
123.4 × 0.001
The same numbers can be expressed in scientific notationas follows:
1.234 × 10⁻¹ 1,234 × 10–4
12.34 × 10⁻² 12,340 × 10–5
123.4 × 10⁻³
Multiplication can also be done in scientific notation.Consider the following multiplication:
50 × 250
First, rewriting each number in scientific notation:
(5.0 × 101) × (2.5 × 102)
To multiply, multiply the first two numbers:
5.0 × 2.5 = 12.5
To multiply the second part, add the exponents:
101 + 102 = 103
The answer is written as 12.5 × 10³. It can also be writtenas 1.25 × 10⁴. These same two steps are done in every caseof multiplication, even with numbers less than one. For ex-ample, to multiply 0.5 × 0.25:
(5 × 10–1) × (2.5 × 10–1)
= 12.5 × 10–2
= 1.25 × 10–1 = 0.125
When multiplying numbers greater than one by numbersless than one, express the numbers in convenient form,multiply the first part, add the exponents of the second part,and then express the answer in scientific notation. For ex-ample, multiply 0.125 × 5,000:
(1.25 × 10⁻¹) = (5 × 10³) = 6.25 × 10²
Harley−Prescott: Laboratory Exercises in Microbiology, Fifth Edition
Appendixes F. Scientific Notation © The McGraw−Hill Companies, 2002
Appendix F Scientific Notation 433
When adding a negative number to a positive number, al-ways subtract the negative number from the positive number.
Dividing in scientific notation is similar to multiplying.Consider dividing 2,500/500.
First, rewriting in scientific notation gives
2.5 × 10³
5 × 10²
Second, divide the first two numbers as follows:
2.5= 0.5
5
Third, subtract the bottom exponent from the topexponent:
103 – 102 = 101
The answer in scientific notation is expressed as 0.5 × 101.Always remember that when you subtract one negativenumber from another negative number, you add the num-bers and express the answer as a negative number. Whensubtracting a negative number from a positive number, it isthe same as adding a positive number to a positive number.To subtract a positive number from a negative number, addthe positive number to the negative number and express theanswer as a negative number.
Microbiologists use scientific notation continuously.For example, in this laboratory manual, it is used to de-scribe the number of bacteria in a population and to expressconcentrations of chemicals in solution, of disinfectants,and of antibiotics.

Harley−Prescott: Laboratory Exercises in Microbiology, Fifth Edition
Appendixes G. Identification Charts © The McGraw−Hill Companies, 2002
A P P E N D I X G *
Identification Charts
*The identification charts presented in this appendix are based on rapidtest systems. At times these test results may differ from results obtainedwith so-called “conventional” tests.
434
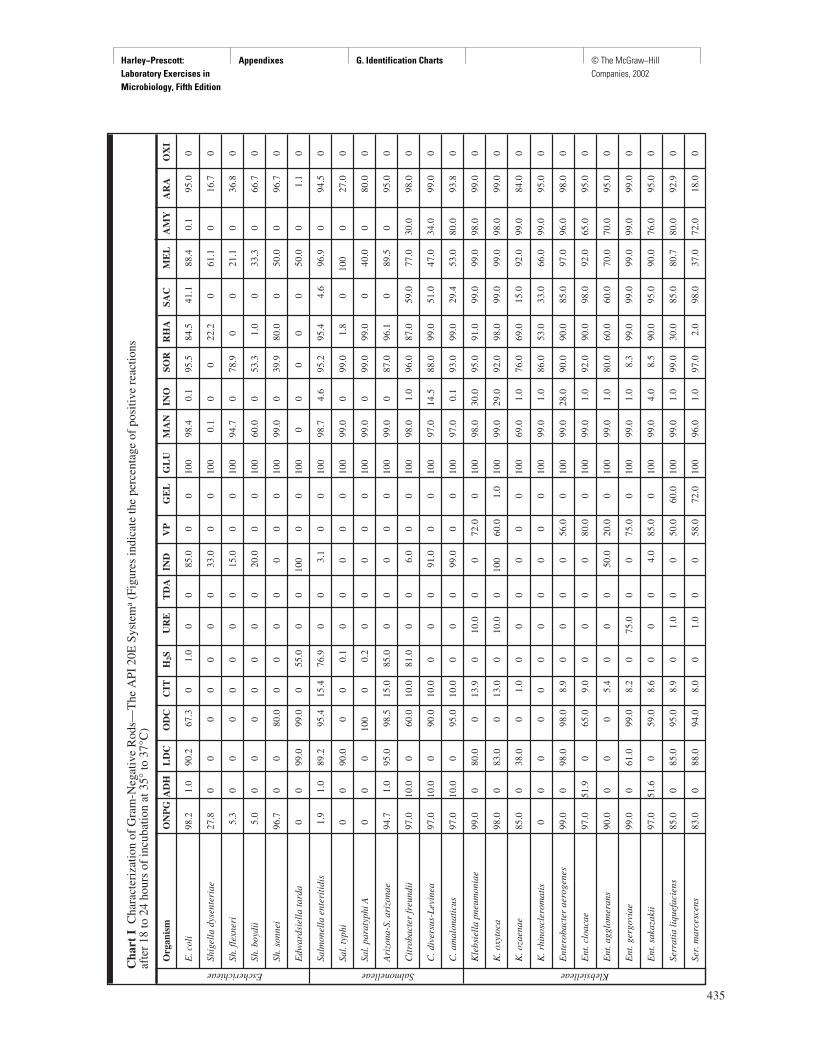
Harley−Prescott: Laboratory Exercises in Microbiology, Fifth Edition
Appendixes G. Identification Charts © The McGraw−Hill Companies, 2002
435
Cha
rt I
Cha
ract
eriz
atio
n of
Gra
m-N
egat
ive
Rod
s—T
he A
PI 2
0E S
yste
ma
(Fig
ures
indi
cate
the
perc
enta
ge o
f po
sitiv
e re
actio
nsaf
ter
18 to
24
hour
s of
incu
batio
n at
35°
to 3
7°C
)
Org
anis
mO
NP
GA
DH
LD
CO
DC
CIT
H2S
UR
ET
DA
IND
VP
GE
LG
LU
MA
NIN
OSO
RR
HA
SAC
ME
LA
MY
AR
AO
XI
E. c
oli
98.2
1.0
90.2
67.3
01.
00
085
.00
010
098
.40.
195
.584
.541
.188
.40.
195
.00
Shig
ella
dys
ente
riae
27.8
00
00
00
033
.00
010
00.
10
022
.20
61.1
016
.70
Sh. f
lexn
eri
5.3
00
00
00
015
.00
010
094
.70
78.9
00
21.1
036
.80
Sh. b
oydi
i5.
00
00
00
00
20.0
00
100
60.0
053
.31.
00
33.3
066
.70
Sh. s
onne
i96
.70
080
.00
00
00
00
100
99.0
039
.980
.00
50.0
096
.70
Edw
ards
iell
a ta
rda
00
99.0
99.0
055
.00
010
00
010
00
00
00
50.0
01.
10
Salm
onel
la e
nter
itid
is1.
91.
089
.295
.415
.476
.90
03.
10
010
098
.74.
695
.295
.44.
696
.90
94.5
0
Sal.
typh
i0
090
.00
00.
10
00
00
100
99.0
099
.01.
80
100
027
.00
Sal.
para
typh
i A0
00
100
00.
20
00
00
100
99.0
099
.099
.00
40.0
080
.00
Ari
zona
-S. a
rizo
nae
94.7
1.0
95.0
98.5
15.0
85.0
00
00
010
099
.00
87.0
96.1
089
.50
95.0
0
Cit
roba
cter
freu
ndii
97.0
10.0
060
.010
.081
.00
06.
00
010
098
.01.
096
.087
.059
.077
.030
.098
.00
C. d
iver
sus-
Lev
inea
97.0
10.0
090
.010
.00
00
91.0
00
100
97.0
14.5
88.0
99.0
51.0
47.0
34.0
99.0
0
C. a
mal
onat
icus
97.0
10.0
095
.010
.00
00
99.0
00
100
97.0
0.1
93.0
99.0
29.4
53.0
80.0
93.8
0
Kle
bsie
lla
pneu
mon
iae
99.0
080
.00
13.9
010
.00
072
.00
100
98.0
30.0
95.0
91.0
99.0
99.0
98.0
99.0
0
K. o
xyto
ca98
.00
83.0
013
.00
10.0
010
060
.01.
010
099
.029
.092
.098
.099
.099
.098
.099
.00
K. o
zaen
ae85
.00
38.0
01.
00
00
00
010
069
.01.
076
.069
.015
.092
.099
.084
.00
K. r
hino
scle
rom
atis
00
00
00
00
00
010
099
.01.
086
.053
.033
.066
.099
.095
.00
Ent
erob
acte
r ae
roge
nes
99.0
098
.098
.08.
90
00
056
.00
100
99.0
28.0
90.0
90.0
85.0
97.0
96.0
98.0
0
Ent
. clo
acae
97.0
51.9
065
.09.
00
00
080
.00
100
99.0
1.0
92.0
90.0
98.0
92.0
65.0
95.0
0
Ent
. agg
lom
eran
s90
.00
00
5.4
00
050
.020
.00
100
99.0
1.0
80.0
60.0
60.0
70.0
70.0
95.0
0
Ent
. ger
govi
ae99
.00
61.0
99.0
8.2
075
.00
075
.00
100
99.0
1.0
8.3
99.0
99.0
99.0
99.0
99.0
0
Ent
. sak
azak
ii97
.051
.60
59.0
8.6
00
04.
085
.00
100
99.0
4.0
8.5
90.0
95.0
90.0
76.0
95.0
0
Serr
atia
liqu
efac
iens
85.0
085
.095
.08.
90
1.0
00
50.0
60.0
100
99.0
1.0
99.0
30.0
85.0
80.7
80.0
92.9
0
Ser.
mar
cesc
ens
83.0
088
.094
.08.
00
1.0
00
58.0
72.0
100
96.0
1.0
97.0
2.0
98.0
37.0
72.0
18.0
0
KlebsielleaeSalmonelleaeEscherichieae
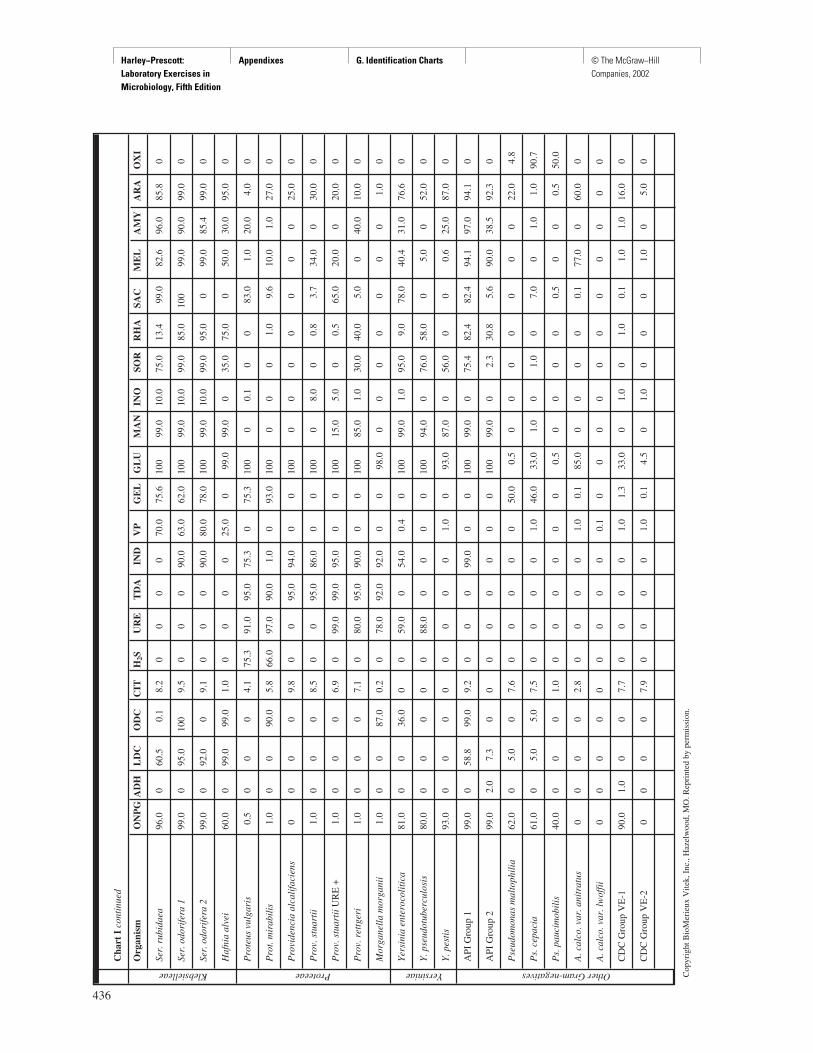
Harley−Prescott: Laboratory Exercises in Microbiology, Fifth Edition
Appendixes G. Identification Charts © The McGraw−Hill Companies, 2002
436
Cha
rt I
cont
inue
d
Org
anis
mO
NP
GA
DH
LD
CO
DC
CIT
H2S
UR
ET
DA
IND
VP
GE
LG
LU
MA
NIN
OSO
RR
HA
SAC
ME
LA
MY
AR
AO
XI
Ser.
rub
idae
a96
.00
60.5
0.1
8.2
00
00
70.0
75.6
100
99.0
10.0
75.0
13.4
99.0
82.6
96.0
85.8
0
Ser.
odo
rife
ra 1
99.0
095
.010
09.
50
00
90.0
63.0
62.0
100
99.0
10.0
99.0
85.0
100
99.0
90.0
99.0
0
Ser.
odo
rife
ra 2
99.0
092
.00
9.1
00
090
.080
.078
.010
099
.010
.099
.095
.00
99.0
85.4
99.0
0
Haf
nia
alve
i60
.00
99.0
99.0
1.0
00
00
25.0
099
.099
.00
35.0
75.0
050
.030
.095
.00
Pro
teus
vul
gari
s0.
50
00
4.1
75.3
91.0
95.0
75.3
075
.310
00
0.1
00
83.0
1.0
20.0
4.0
0
Pro
t. m
irab
ilis
1.0
00
90.0
5.8
66.0
97.0
90.0
1.0
093
.010
00
00
1.0
9.6
10.0
1.0
27.0
0
Pro
vide
ncia
alc
alif
acie
ns0
00
09.
80
095
.094
.00
010
00
00
00
00
25.0
0
Pro
v. s
tuar
tii
1.0
00
08.
50
095
.086
.00
010
00
8.0
00.
83.
734
.00
30.0
0
Pro
v. s
tuar
tiiU
RE
+1.
00
00
6.9
099
.099
.095
.00
010
015
.05.
00
0.5
65.0
20.0
020
.00
Pro
v. r
ettg
eri
1.0
00
07.
10
80.0
95.0
90.0
00
100
85.0
1.0
30.0
40.0
5.0
040
.010
.00
Mor
gane
lla
mor
gani
i1.
00
087
.00.
20
78.0
92.0
92.0
00
98.0
00
00
00
01.
00
Yer
sini
a en
tero
coli
tica
81.0
00
36.0
00
59.0
054
.00.
40
100
99.0
1.0
95.0
9.0
78.0
40.4
31.0
76.6
0
Y. p
seud
otub
ercu
losi
s80
.00
00
00
88.0
00
00
100
94.0
076
.058
.00
5.0
052
.00
Y. p
esti
s93
.00
00
00
00
01.
00
93.0
87.0
056
.00
00.
625
.087
.00
API
Gro
up 1
99.0
058
.899
.09.
20
00
99.0
00
100
99.0
075
.482
.482
.494
.197
.094
.10
API
Gro
up 2
99.0
2.0
7.3
00
00
00
00
100
99.0
02.
330
.85.
690
.038
.592
.30
Pse
udom
onas
mal
toph
ilia
62.0
05.
00
7.6
00
00
050
.00.
50
00
00
00
22.0
4.8
Ps.
cep
acia
61.0
05.
05.
07.
50
00
01.
046
.033
.01.
00
1.0
07.
00
1.0
1.0
90.7
Ps.
pau
cim
obil
is40
.00
00
1.0
00
00
00
0.5
00
00
0.5
00
0.5
50.0
A. c
alco
. var
. ani
trat
us0
00
02.
80
00
01.
00.
185
.00
00
00.
177
.00
60.0
0
A. c
alco
. var
. lw
offi
i0
00
00
00
00
0.1
00
00
00
00
00
0
CD
C G
roup
VE
-190
.01.
00
07.
70
00
01.
01.
333
.00
1.0
01.
00.
11.
01.
016
.00
CD
C G
roup
VE
-20
00
07.
90
00
01.
00.
14.
50
1.0
00
01.
00
5.0
0
Other Gram-negativesYersiniaeProteeaeKlebsielleae Cop
yrig
ht B
ioM
erie
ux V
itek,
Inc
., H
azel
woo
d, M
O. R
epri
nted
by
perm
issi
on.
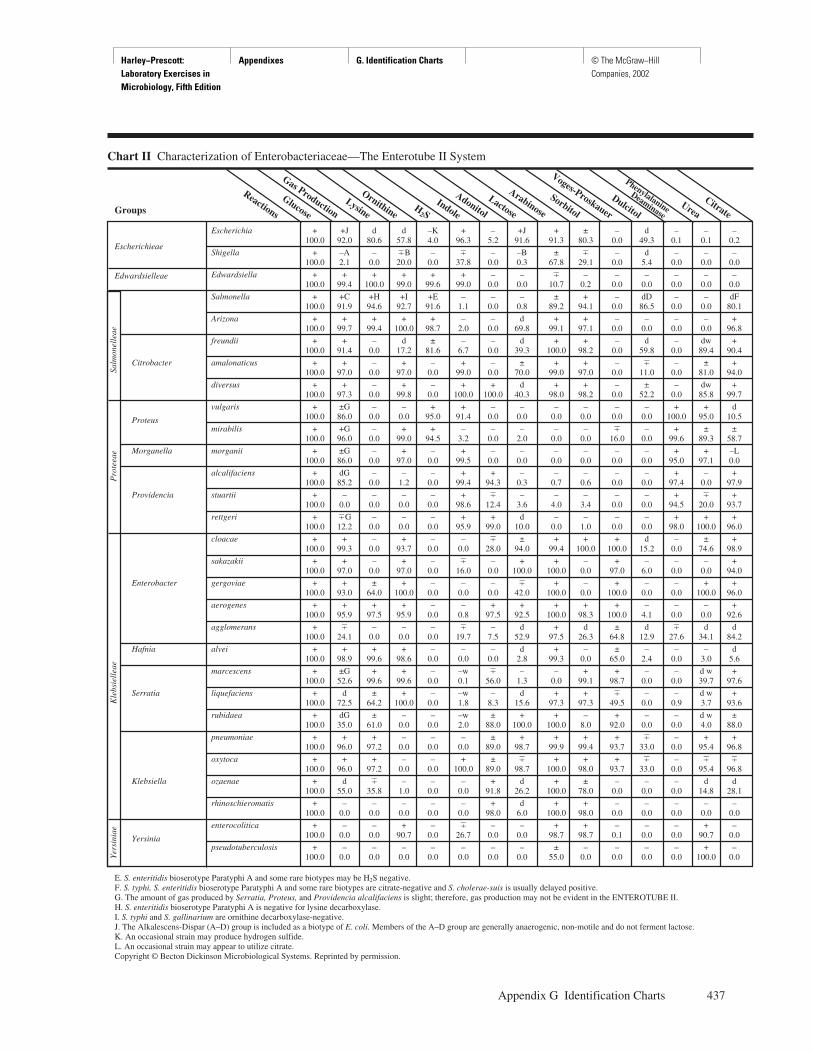
Harley−Prescott: Laboratory Exercises in Microbiology, Fifth Edition
Appendixes G. Identification Charts © The McGraw−Hill Companies, 2002
Appendix G Identification Charts 437
Chart II Characterization of Enterobacteriaceae—The Enterotube II System
E. S. enteritidis bioserotype Paratyphi A and some rare biotypes may be H2S negative.F. S. typhi, S. enteritidis bioserotype Paratyphi A and some rare biotypes are citrate-negative and S. cholerae-suis is usually delayed positive.G. The amount of gas produced by Serratia, Proteus, and Providencia alcalifaciens is slight; therefore, gas production may not be evident in the ENTEROTUBE II.H. S. enteritidis bioserotype Paratyphi A is negative for lysine decarboxylase.I. S. typhi and S. gallinarium are ornithine decarboxylase-negative.J. The Alkalescens-Dispar (A–D) group is included as a biotype of E. coli. Members of the A–D group are generally anaerogenic, non-motile and do not ferment lactose.K. An occasional strain may produce hydrogen sulfide.L. An occasional strain may appear to utilize citrate.Copyright © Becton Dickinson Microbiological Systems. Reprinted by permission.
Reactions
Glucose
Gas ProductionLysine
OrnithineH
2SIndole
Adonitol
Lactose
Arabinose
Sorbitol
Voges-Proskauer
Dulcitol
Phenylalanine
DeaminaseUrea
CitrateGroups
Escherichia + +J d d –K + – +J + ± – d – – –100.0 92.0 80.6 57.8 4.0 96.3 5.2 91.6 91.3 80.3 0.0 49.3 0.1 0.1 0.2
Shigella + –A – �B – � – –B ± � – d – – –100.0 2.1 0.0 20.0 0.0 37.8 0.0 0.3 67.8 29.1 0.0 5.4 0.0 0.0 0.0
Edwardsiella + + + + + + – – � – – – – – –100.0 99.4 100.0 99.0 99.6 99.0 0.0 0.0 10.7 0.2 0.0 0.0 0.0 0.0 0.0
Salmonella + +C +H +I +E – – – ± + – dD – – dF100.0 91.9 94.6 92.7 91.6 1.1 0.0 0.8 89.2 94.1 0.0 86.5 0.0 0.0 80.1
Arizona + + + + + – – d + + – – – – +100.0 99.7 99.4 100.0 98.7 2.0 0.0 69.8 99.1 97.1 0.0 0.0 0.0 0.0 96.8
freundii + + – d ± – – d + + – d – dw +100.0 91.4 0.0 17.2 81.6 6.7 0.0 39.3 100.0 98.2 0.0 59.8 0.0 89.4 90.4
amalonaticus + + – + – + – ± + + – � – ± +100.0 97.0 0.0 97.0 0.0 99.0 0.0 70.0 99.0 97.0 0.0 11.0 0.0 81.0 94.0
diversus + + – + – + + d + + – ± – dw +100.0 97.3 0.0 99.8 0.0 100.0 100.0 40.3 98.0 98.2 0.0 52.2 0.0 85.8 99.7
vulgaris + ±G – – + + – – – – – – + + d100.0 86.0 0.0 0.0 95.0 91.4 0.0 0.0 0.0 0.0 0.0 0.0 100.0 95.0 10.5
mirabilis + +G – + + – – – – – � – + ± ±100.0 96.0 0.0 99.0 94.5 3.2 0.0 2.0 0.0 0.0 16.0 0.0 99.6 89.3 58.7
morganii + ±G – + – + – – – – – – + + –L100.0 86.0 0.0 97.0 0.0 99.5 0.0 0.0 0.0 0.0 0.0 0.0 95.0 97.1 0.0
alcalifaciens + dG – – – + + – – – – – + – +100.0 85.2 0.0 1.2 0.0 99.4 94.3 0.3 0.7 0.6 0.0 0.0 97.4 0.0 97.9
stuartii + – – – – + � – – – – – + � +100.0 0.0 0.0 0.0 0.0 98.6 12.4 3.6 4.0 3.4 0.0 0.0 94.5 20.0 93.7
rettgeri + �G – – – + + d – – – – + + +100.0 12.2 0.0 0.0 0.0 95.9 99.0 10.0 0.0 1.0 0.0 0.0 98.0 100.0 96.0
cloacae + + – + – – � ± + + + d – ± +100.0 99.3 0.0 93.7 0.0 0.0 28.0 94.0 99.4 100.0 100.0 15.2 0.0 74.6 98.9
sakazakii + + – + – � – + + – + – – – +100.0 97.0 0.0 97.0 0.0 16.0 0.0 100.0 100.0 0.0 97.0 6.0 0.0 0.0 94.0
gergoviae + + ± + – – – � + – + – – + +100.0 93.0 64.0 100.0 0.0 0.0 0.0 42.0 100.0 0.0 100.0 0.0 0.0 100.0 96.0
aerogenes + + + + – – + + + + + – – – +100.0 95.9 97.5 95.9 0.0 0.8 97.5 92.5 100.0 98.3 100.0 4.1 0.0 0.0 92.6
agglomerans + � – – – � – d + d ± d � d d100.0 24.1 0.0 0.0 0.0 19.7 7.5 52.9 97.5 26.3 64.8 12.9 27.6 34.1 84.2
alvei + + + + – – – d + – ± – – – d100.0 98.9 99.6 98.6 0.0 0.0 0.0 2.8 99.3 0.0 65.0 2.4 0.0 3.0 5.6
marcescens + ±G + + – –w � – – + + – – d w +100.0 52.6 99.6 99.6 0.0 0.1 56.0 1.3 0.0 99.1 98.7 0.0 0.0 39.7 97.6
liquefaciens + d ± + – –w – d + + � – – d w +100.0 72.5 64.2 100.0 0.0 1.8 8.3 15.6 97.3 97.3 49.5 0.0 0.9 3.7 93.6
rubidaea + dG ± – – –w ± + + – + – – d w ±100.0 35.0 61.0 0.0 0.0 2.0 88.0 100.0 100.0 8.0 92.0 0.0 0.0 4.0 88.0
pneumoniae + + + – – – ± + + + + � – + +100.0 96.0 97.2 0.0 0.0 0.0 89.0 98.7 99.9 99.4 93.7 33.0 0.0 95.4 96.8
oxytoca + + + – – + ± � + + + � – � �100.0 96.0 97.2 0.0 0.0 100.0 89.0 98.7 100.0 98.0 93.7 33.0 0.0 95.4 96.8
ozaenae + d � – – – + d + ± – – – d d100.0 55.0 35.8 1.0 0.0 0.0 91.8 26.2 100.0 78.0 0.0 0.0 0.0 14.8 28.1
rhinoschieromatis + – – – – – + d + + – – – – –100.0 0.0 0.0 0.0 0.0 0.0 98.0 6.0 100.0 98.0 0.0 0.0 0.0 0.0 0.0
enterocolitica + – – + – � – – + + – – – + –100.0 0.0 0.0 90.7 0.0 26.7 0.0 0.0 98.7 98.7 0.1 0.0 0.0 90.7 0.0
pseudotuberculosis + – – – – – – – ± – – – – + –100.0 0.0 0.0 0.0 0.0 0.0 0.0 0.0 55.0 0.0 0.0 0.0 0.0 100.0 0.0
Escherichieae
Edwardsielleae
Citrobacter
Proteus
Morganella
Providencia
Enterobacter
Hafnia
Serratia
Klebsiella
Yersinia
Yer
sini
aeK
lebs
iell
eae
Pro
teea
eSa
lmon
elle
ae

Harley−Prescott: Laboratory Exercises in Microbiology, Fifth Edition
Appendixes G. Identification Charts © The McGraw−Hill Companies, 2002
438 Appendix G Identification Charts
Chart III Characterization of Oxidative-Fermentative Gram-Negative Rods
Legend+ = Positive– = NegativeV = Variable (11% to 89% positive)Data based on literature only
Species Bio. 1 – – + – – V – V V +
Achromobacter Bio. 2 – V V – – V V + V +
Xylosoxidans – – V – – V – – + +
AcinetobacterAnitratus V – – – – + + V V –
Lwoffii – – – – – – – V V –
Aeromonas hydrophila + V – – V – + – V +
Alcaligenes faecalis – – V – – – – V V +
Bordetella bronchiseptica – – – – – – – + + +
Flavobacterium species V – – – V – V – – +
2F Flavobacter- – – – – + – – – – +
2J IUM-Like – – – – + – – + – +
2K-1 Pseudomonas- – – – – – – – – – V
2K-2 Like + – – – – + V + + +
4E Alcaligenes-Like – – – – – – – V V +
Group 5A-1 – – + – – + + V + +
5A-2 Pseudomonas – – V – – V + + V +
5E-1 Like + + – – – + + V + –
5E-2 V – – – – + + V V –
M-4 Moraxella- – – – – – – – – + +
M-4f Like – – – – – – – + + +
MoraxellaSpecies – – – – – – – – – +
Phenylpyruvica – – – – – – – + – +
Haemolytica V – – – – – – – – +
Pasteurella Multocida – – – – + – – – – +
Ureae V – – – – – – V – +
Plesiomonas shigelloides + + – – + – + – – +
Aeruginosa – + V – – V V V V +
Acidovorans – – – – – – – – V +
Alcaligenes – – – – – – – V V +
Cepacia V – – – – V V V + V
Diminuta – – – – – – – – – +
Fluorescens – V – – – V V V + +
Mallei – + – – – – + – – –
Pseudomonas Maltophilia – – – – – – V V – V
Pseudoalcaligenes – – – – – – – – V +
Pseudomallei – + V – – – + V + +
Putida V + – – – + + V + +
Putrefaciens – – – + – – – V – +
Stutzeri – V V – – V V – + +
Testosteroni – – – – – – – – V +
Vesicularis V – – – – V V – – +
Alginolyticus + – – – V – + – – +
Vibrio Cholerae + – – – + V + – V +
Parahaemolyticus + – – – + – V – V +
Chromobacterium violaceum + + – – – – + – V V
Copyright © Becton Dickinson Microbiological Systems. Reprinted by permission.
Arginine Dihydrolase
Nitrogen GasIndole
OF XyloseCitrate
Oxidase
OF DextroseUrea
H2S
OF Anaerobic Dextrose
Harley−Prescott: Laboratory Exercises in Microbiology, Fifth Edition
Appendixes H. Reagents, Solutions, Stains, and Tests
© The McGraw−Hill Companies, 2002
439
Reagents and stains appear in this appendix as the authorshave presented the material in the individual laboratory ex-ercises and are listed in alphabetical order. When neces-sary, methodology is given with the reagents, stains, ortests. The detailed procedures, however, are presented inthe exercise in which their use is discussed.
Acid-Alcohol (for Ziehl-Neelsen stain)Concentrated hydrochloric acid.................. 3 ml
95% ethyl alcohol ....................................... 97 ml
Alcohol, 90%, 500 ml (from 95%)95% alcohol ................................................ 473 ml
Distilled water ............................................ 27 ml
Alcohol, 80%, 500 ml (from 95%)95% alcohol ................................................ 421 ml
Distilled water ............................................ 79 ml
Alcohol, 75%, 500 ml (from 95%)95% alcohol ................................................ 395 ml
Distilled water ............................................ 105 ml
Alcohol, 70%, 500 ml (from 95%)95% alcohol ................................................ 368 ml
Distilled water ............................................ 132 ml
Barritt’s Reagent (for Voges-Proskauer test)Solution A: 6 g of �-naphthol in 100 ml of 95%ethyl alcohol.Dissolve the �-naphthol in the ethanol withconstant stirring.Solution B: 40 g of potassium hydroxide in100 ml of water. Store in the refrigerator.
Bile Solubility Test (10% bile)Sodium deoxycholate ................................. 1 g
Sterile distilled water .................................. 9 ml
To test for bile solubility, prepare two tubes, each con-taining a sample of fresh culture (a light suspension ofthe bacterium in buffered broth, pH 7.4). To one tubeadd a few drops of a 10% solution of sodium deoxy-cholate. The same volume of sterile physiologicalsaline is added to the second tube. If the bacterial cellsare bile soluble, the tube containing the bile salt willlose its turbidity in 5 to 15 minutes and show an in-crease in viscosity.
Cleaning Solution for GlasswareStrong:
Potassium dichromate............................. 20 g
Distilled water......................................... 200 ml
Dissolve dichromate in water; when cool, add very slowly:
Concentrated sulfuric acid ................. 9 parts
2% aqueous potassium dichromate.... 1 part
Copper Sulfate Solution (20%)Copper sulfate (CuSO4
. 5H2O).............. 20 g
Distilled water......................................... 80 ml
Crystal Violet Capsule Stain (1%)Crystal violet (85% dye content) ............ 1 g
Distilled water......................................... 100 ml
Decolorizers (for Gram stain)1. Intermediate agent, 95% ethyl alcohol.2. Fastest agent, acetone.3. Slowest agent, acetone-isopropyl alcohol
(isopropyl alcohol, 300 ml; acetone, 100 ml).For the experienced microbiologist, any oneof the three decolorizing agents will yieldgood results.
Diphenylamine Reagent (for the nitrate test)Working in a fume hood, dissolve 0.7 g ofdiphenylamine in a mixture of 60 ml ofconcentrated sulfuric acid and 28.8 ml of distilledwater. Allow to cool. Slowly add 11.3 ml ofconcentrated hydrochloric acid. After the solutionhas stood for 12 to 24 hours, some of the base willseparate. This indicates that the reagent is saturated.
Eosin BlueEosin blue stain ....................................... 1 g
Distilled water......................................... 99 ml
Ferric Chloride ReagentFeCl3 . 6H2O........................................... 12 g
2% aqueous HCl ..................................... 100 ml
The 2% aqueous HCl is made by adding5.4 ml of concentrated HCl (37%) to 94.6 ml of distilled H2O.
A P P E N D I X H
Reagents, Solutions, Stains, and Tests
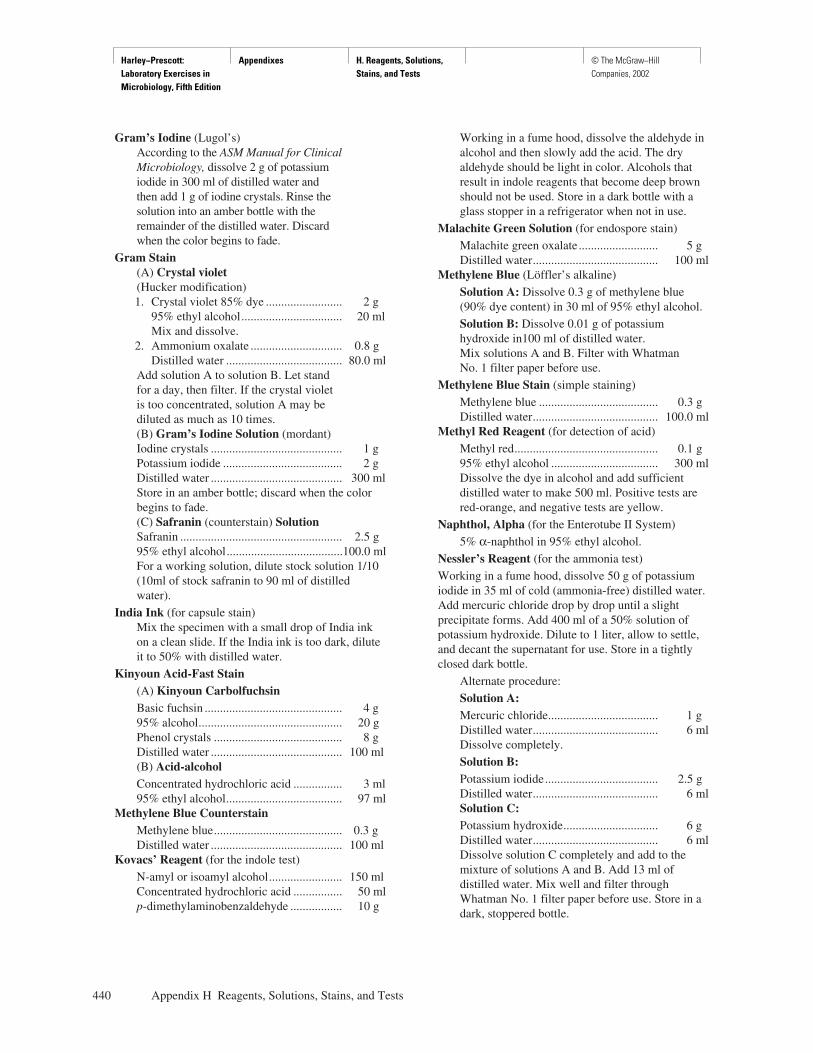
Harley−Prescott: Laboratory Exercises in Microbiology, Fifth Edition
Appendixes H. Reagents, Solutions, Stains, and Tests
© The McGraw−Hill Companies, 2002
440 Appendix H Reagents, Solutions, Stains, and Tests
Gram’s Iodine (Lugol’s)According to the ASM Manual for ClinicalMicrobiology, dissolve 2 g of potassiumiodide in 300 ml of distilled water andthen add 1 g of iodine crystals. Rinse thesolution into an amber bottle with theremainder of the distilled water. Discardwhen the color begins to fade.
Gram Stain(A) Crystal violet(Hucker modification)1. Crystal violet 85% dye ......................... 2 g
95% ethyl alcohol................................. 20 mlMix and dissolve.
2. Ammonium oxalate .............................. 0.8 gDistilled water ...................................... 80.0 ml
Add solution A to solution B. Let standfor a day, then filter. If the crystal violetis too concentrated, solution A may be diluted as much as 10 times.(B) Gram’s Iodine Solution (mordant)Iodine crystals ........................................... 1 gPotassium iodide ....................................... 2 gDistilled water ........................................... 300 mlStore in an amber bottle; discard when the colorbegins to fade.(C) Safranin (counterstain) SolutionSafranin ..................................................... 2.5 g95% ethyl alcohol......................................100.0 mlFor a working solution, dilute stock solution 1/10(10ml of stock safranin to 90 ml of distilledwater).
India Ink (for capsule stain)Mix the specimen with a small drop of India inkon a clean slide. If the India ink is too dark, diluteit to 50% with distilled water.
Kinyoun Acid-Fast Stain(A) Kinyoun CarbolfuchsinBasic fuchsin ............................................. 4 g95% alcohol............................................... 20 gPhenol crystals .......................................... 8 gDistilled water ........................................... 100 ml(B) Acid-alcoholConcentrated hydrochloric acid ................ 3 ml95% ethyl alcohol...................................... 97 ml
Methylene Blue CounterstainMethylene blue.......................................... 0.3 gDistilled water ........................................... 100 ml
Kovacs’ Reagent (for the indole test)
N-amyl or isoamyl alcohol........................ 150 mlConcentrated hydrochloric acid ................ 50 mlp-dimethylaminobenzaldehyde ................. 10 g
Working in a fume hood, dissolve the aldehyde inalcohol and then slowly add the acid. The dryaldehyde should be light in color. Alcohols thatresult in indole reagents that become deep brownshould not be used. Store in a dark bottle with aglass stopper in a refrigerator when not in use.
Malachite Green Solution (for endospore stain)
Malachite green oxalate.......................... 5 gDistilled water......................................... 100 ml
Methylene Blue (Löffler’s alkaline)
Solution A: Dissolve 0.3 g of methylene blue(90% dye content) in 30 ml of 95% ethyl alcohol.
Solution B: Dissolve 0.01 g of potassiumhydroxide in100 ml of distilled water.Mix solutions A and B. Filter with WhatmanNo. 1 filter paper before use.
Methylene Blue Stain (simple staining)
Methylene blue ....................................... 0.3 gDistilled water......................................... 100.0 ml
Methyl Red Reagent (for detection of acid)
Methyl red............................................... 0.1 g95% ethyl alcohol ................................... 300 mlDissolve the dye in alcohol and add sufficientdistilled water to make 500 ml. Positive tests arered-orange, and negative tests are yellow.
Naphthol, Alpha (for the Enterotube II System)
5% α-naphthol in 95% ethyl alcohol.
Nessler’s Reagent (for the ammonia test)
Working in a fume hood, dissolve 50 g of potassiumiodide in 35 ml of cold (ammonia-free) distilled water.Add mercuric chloride drop by drop until a slightprecipitate forms. Add 400 ml of a 50% solution ofpotassium hydroxide. Dilute to 1 liter, allow to settle,and decant the supernatant for use. Store in a tightlyclosed dark bottle.
Alternate procedure:
Solution A:Mercuric chloride.................................... 1 gDistilled water......................................... 6 mlDissolve completely.
Solution B:Potassium iodide..................................... 2.5 gDistilled water......................................... 6 mlSolution C:Potassium hydroxide............................... 6 gDistilled water......................................... 6 mlDissolve solution C completely and add to themixture of solutions A and B. Add 13 ml ofdistilled water. Mix well and filter throughWhatman No. 1 filter paper before use. Store in adark, stoppered bottle.
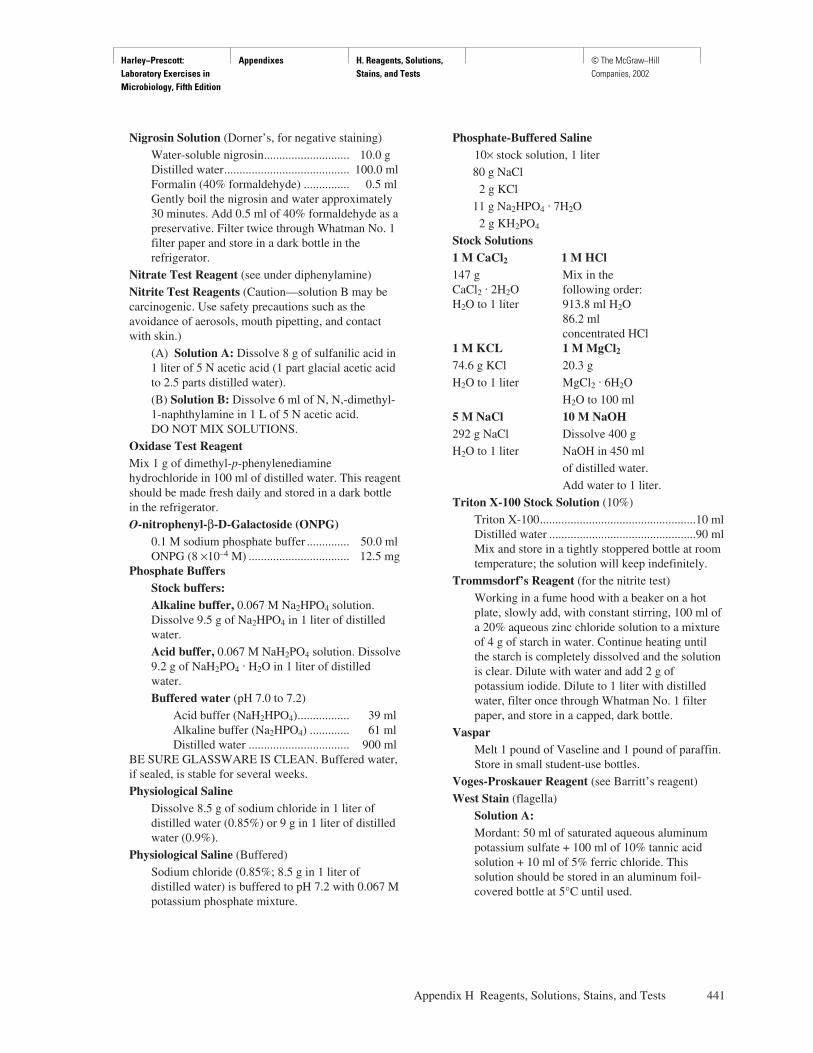
Harley−Prescott: Laboratory Exercises in Microbiology, Fifth Edition
Appendixes H. Reagents, Solutions, Stains, and Tests
© The McGraw−Hill Companies, 2002
Appendix H Reagents, Solutions, Stains, and Tests 441
Nigrosin Solution (Dorner’s, for negative staining)
Water-soluble nigrosin............................ 10.0 gDistilled water......................................... 100.0 mlFormalin (40% formaldehyde) ............... 0.5 mlGently boil the nigrosin and water approximately30 minutes. Add 0.5 ml of 40% formaldehyde as apreservative. Filter twice through Whatman No. 1filter paper and store in a dark bottle in therefrigerator.
Nitrate Test Reagent (see under diphenylamine)
Nitrite Test Reagents (Caution—solution B may becarcinogenic. Use safety precautions such as theavoidance of aerosols, mouth pipetting, and contactwith skin.)
(A) Solution A: Dissolve 8 g of sulfanilic acid in1 liter of 5 N acetic acid (1 part glacial acetic acidto 2.5 parts distilled water).
(B) Solution B: Dissolve 6 ml of N, N,-dimethyl-1-naphthylamine in 1 L of 5 N acetic acid.DO NOT MIX SOLUTIONS.
Oxidase Test ReagentMix 1 g of dimethyl-p-phenylenediaminehydrochloride in 100 ml of distilled water. This reagentshould be made fresh daily and stored in a dark bottlein the refrigerator.
O-nitrophenyl-β-D-Galactoside (ONPG)0.1 M sodium phosphate buffer .............. 50.0 mlONPG (8 ×10⁻⁴ M) ................................. 12.5 mg
Phosphate BuffersStock buffers:Alkaline buffer, 0.067 M Na2HPO4 solution.Dissolve 9.5 g of Na2HPO4 in 1 liter of distilledwater.
Acid buffer, 0.067 M NaH2PO4 solution. Dissolve9.2 g of NaH2PO4
. H2O in 1 liter of distilledwater.
Buffered water (pH 7.0 to 7.2)
Acid buffer (NaH2HPO4)................. 39 mlAlkaline buffer (Na2HPO4) ............. 61 mlDistilled water ................................. 900 ml
BE SURE GLASSWARE IS CLEAN. Buffered water,if sealed, is stable for several weeks.
Physiological SalineDissolve 8.5 g of sodium chloride in 1 liter ofdistilled water (0.85%) or 9 g in 1 liter of distilledwater (0.9%).
Physiological Saline (Buffered)
Sodium chloride (0.85%; 8.5 g in 1 liter ofdistilled water) is buffered to pH 7.2 with 0.067 Mpotassium phosphate mixture.
Phosphate-Buffered Saline10× stock solution, 1 liter
80 g NaCl
2 g KCl
11 g Na2HPO4. 7H2O
2 g KH2PO4
Stock Solutions1 M CaCl2 1 M HCl147 g Mix in the CaCl2 . 2H2O following order:H2O to 1 liter 913.8 ml H2O
86.2 mlconcentrated HCl
1 M KCL 1 M MgCl274.6 g KCl 20.3 g
H2O to 1 liter MgCl2 . 6H2O
H2O to 100 ml
5 M NaCl 10 M NaOH292 g NaCl Dissolve 400 g
H2O to 1 liter NaOH in 450 ml
of distilled water.
Add water to 1 liter.
Triton X-100 Stock Solution (10%)
Triton X-100...................................................10 mlDistilled water ................................................90 mlMix and store in a tightly stoppered bottle at roomtemperature; the solution will keep indefinitely.
Trommsdorf’s Reagent (for the nitrite test)
Working in a fume hood with a beaker on a hotplate, slowly add, with constant stirring, 100 ml ofa 20% aqueous zinc chloride solution to a mixtureof 4 g of starch in water. Continue heating untilthe starch is completely dissolved and the solutionis clear. Dilute with water and add 2 g ofpotassium iodide. Dilute to 1 liter with distilledwater, filter once through Whatman No. 1 filterpaper, and store in a capped, dark bottle.
VasparMelt 1 pound of Vaseline and 1 pound of paraffin.Store in small student-use bottles.
Voges-Proskauer Reagent (see Barritt’s reagent)
West Stain (flagella)
Solution A:Mordant: 50 ml of saturated aqueous aluminumpotassium sulfate + 100 ml of 10% tannic acidsolution + 10 ml of 5% ferric chloride. Thissolution should be stored in an aluminum foil-covered bottle at 5°C until used.
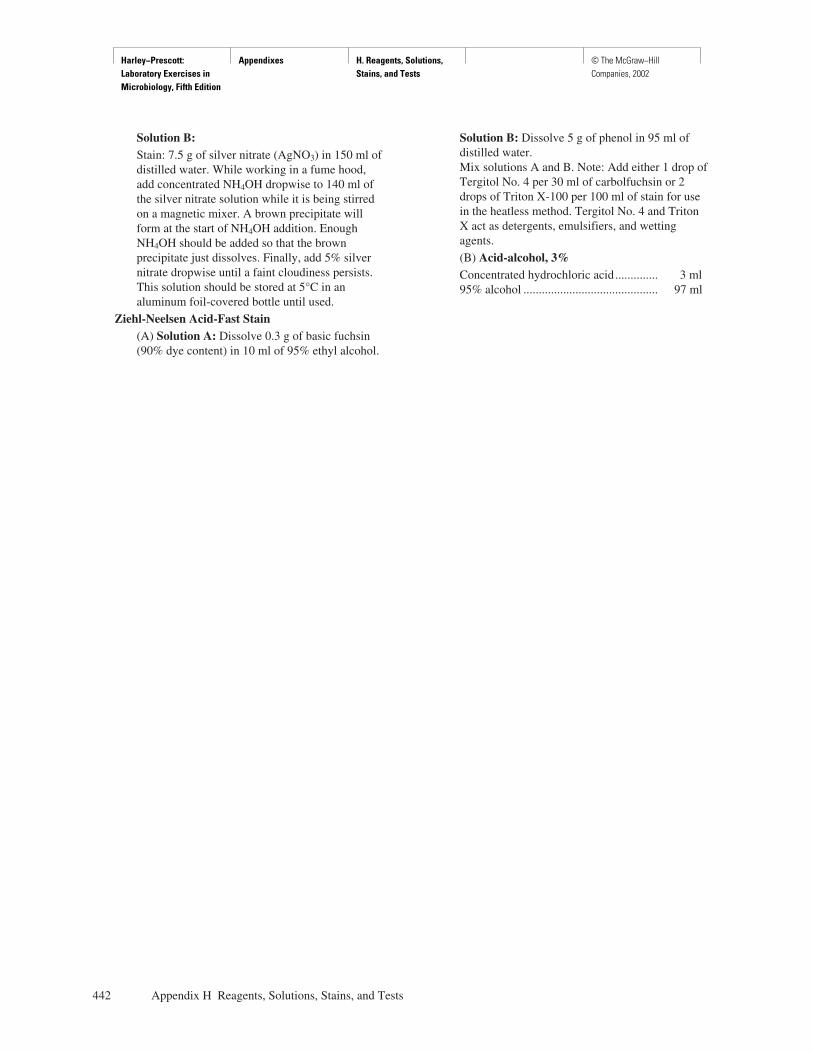
Harley−Prescott: Laboratory Exercises in Microbiology, Fifth Edition
Appendixes H. Reagents, Solutions, Stains, and Tests
© The McGraw−Hill Companies, 2002
442 Appendix H Reagents, Solutions, Stains, and Tests
Solution B:Stain: 7.5 g of silver nitrate (AgNO3) in 150 ml ofdistilled water. While working in a fume hood,add concentrated NH4OH dropwise to 140 ml ofthe silver nitrate solution while it is being stirredon a magnetic mixer. A brown precipitate willform at the start of NH4OH addition. EnoughNH4OH should be added so that the brownprecipitate just dissolves. Finally, add 5% silvernitrate dropwise until a faint cloudiness persists.This solution should be stored at 5°C in analuminum foil-covered bottle until used.
Ziehl-Neelsen Acid-Fast Stain(A) Solution A: Dissolve 0.3 g of basic fuchsin(90% dye content) in 10 ml of 95% ethyl alcohol.
Solution B: Dissolve 5 g of phenol in 95 ml ofdistilled water.Mix solutions A and B. Note: Add either 1 drop ofTergitol No. 4 per 30 ml of carbolfuchsin or 2drops of Triton X-100 per 100 ml of stain for usein the heatless method. Tergitol No. 4 and TritonX act as detergents, emulsifiers, and wettingagents.
(B) Acid-alcohol, 3%Concentrated hydrochloric acid.............. 3 ml95% alcohol ............................................ 97 ml
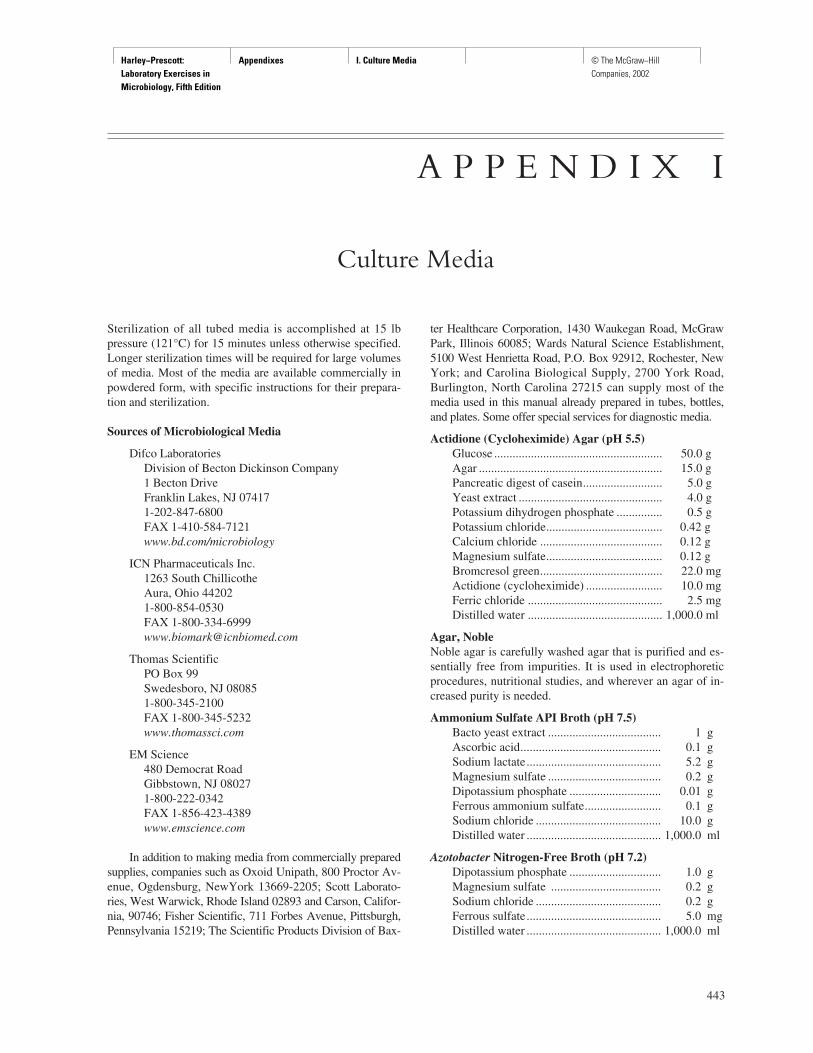
Harley−Prescott: Laboratory Exercises in Microbiology, Fifth Edition
Appendixes I. Culture Media © The McGraw−Hill Companies, 2002
Sterilization of all tubed media is accomplished at 15 lbpressure (121°C) for 15 minutes unless otherwise specified.Longer sterilization times will be required for large volumesof media. Most of the media are available commercially inpowdered form, with specific instructions for their prepara-tion and sterilization.
Sources of Microbiological Media
Difco LaboratoriesDivision of Becton Dickinson Company1 Becton DriveFranklin Lakes, NJ 074171-202-847-6800FAX 1-410-584-7121www.bd.com/microbiology
ICN Pharmaceuticals Inc.1263 South ChillicotheAura, Ohio 442021-800-854-0530FAX [email protected]
Thomas ScientificPO Box 99Swedesboro, NJ 080851-800-345-2100FAX 1-800-345-5232www.thomassci.com
EM Science480 Democrat RoadGibbstown, NJ 080271-800-222-0342FAX 1-856-423-4389www.emscience.com
In addition to making media from commercially preparedsupplies, companies such as Oxoid Unipath, 800 Proctor Av-enue, Ogdensburg, NewYork 13669-2205; Scott Laborato-ries, West Warwick, Rhode Island 02893 and Carson, Califor-nia, 90746; Fisher Scientific, 711 Forbes Avenue, Pittsburgh,Pennsylvania 15219; The Scientific Products Division of Bax-
ter Healthcare Corporation, 1430 Waukegan Road, McGrawPark, Illinois 60085; Wards Natural Science Establishment,5100 West Henrietta Road, P.O. Box 92912, Rochester, NewYork; and Carolina Biological Supply, 2700 York Road,Burlington, North Carolina 27215 can supply most of themedia used in this manual already prepared in tubes, bottles,and plates. Some offer special services for diagnostic media.
Actidione (Cycloheximide) Agar (pH 5.5)Glucose ....................................................... 50.0 gAgar ............................................................ 15.0 gPancreatic digest of casein.......................... 5.0 gYeast extract ............................................... 4.0 gPotassium dihydrogen phosphate ............... 0.5 gPotassium chloride...................................... 0.42 gCalcium chloride ........................................ 0.12 gMagnesium sulfate...................................... 0.12 gBromcresol green........................................ 22.0 mgActidione (cycloheximide) ......................... 10.0 mgFerric chloride ............................................ 2.5 mgDistilled water ............................................ 1,000.0 ml
Agar, NobleNoble agar is carefully washed agar that is purified and es-sentially free from impurities. It is used in electrophoreticprocedures, nutritional studies, and wherever an agar of in-creased purity is needed.
Ammonium Sulfate API Broth (pH 7.5)Bacto yeast extract ..................................... 1 gAscorbic acid.............................................. 0.1 gSodium lactate............................................ 5.2 gMagnesium sulfate ..................................... 0.2 gDipotassium phosphate .............................. 0.01 gFerrous ammonium sulfate......................... 0.1 gSodium chloride ......................................... 10.0 gDistilled water ............................................ 1,000.0 ml
Azotobacter Nitrogen-Free Broth (pH 7.2)Dipotassium phosphate .............................. 1.0 gMagnesium sulfate .................................... 0.2 gSodium chloride ......................................... 0.2 gFerrous sulfate............................................ 5.0 mgDistilled water ............................................ 1,000.0 ml
443
A P P E N D I X I
Culture Media
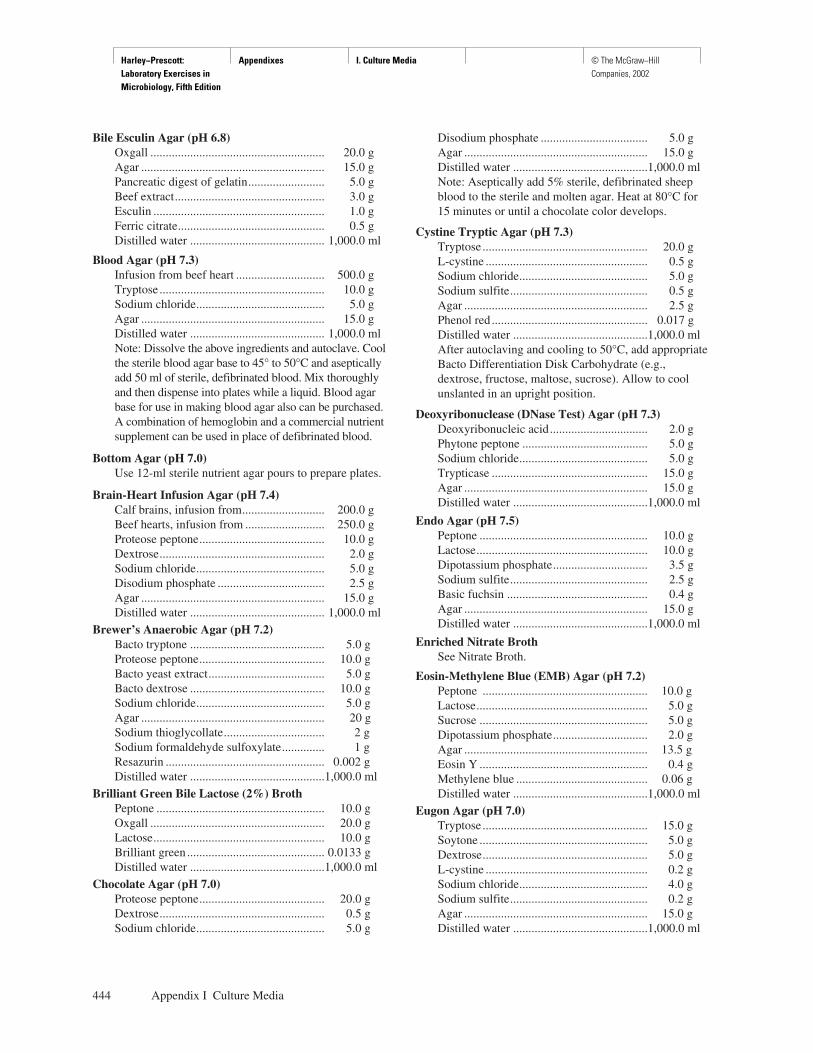
Harley−Prescott: Laboratory Exercises in Microbiology, Fifth Edition
Appendixes I. Culture Media © The McGraw−Hill Companies, 2002
444 Appendix I Culture Media
Bile Esculin Agar (pH 6.8)Oxgall ......................................................... 20.0 gAgar ............................................................ 15.0 gPancreatic digest of gelatin......................... 5.0 gBeef extract................................................. 3.0 gEsculin ........................................................ 1.0 gFerric citrate................................................ 0.5 gDistilled water ............................................ 1,000.0 ml
Blood Agar (pH 7.3)Infusion from beef heart ............................. 500.0 gTryptose ...................................................... 10.0 gSodium chloride.......................................... 5.0 gAgar ............................................................ 15.0 gDistilled water ............................................ 1,000.0 mlNote: Dissolve the above ingredients and autoclave. Coolthe sterile blood agar base to 45° to 50°C and asepticallyadd 50 ml of sterile, defibrinated blood. Mix thoroughlyand then dispense into plates while a liquid. Blood agarbase for use in making blood agar also can be purchased.A combination of hemoglobin and a commercial nutrientsupplement can be used in place of defibrinated blood.
Bottom Agar (pH 7.0)Use 12-ml sterile nutrient agar pours to prepare plates.
Brain-Heart Infusion Agar (pH 7.4)Calf brains, infusion from........................... 200.0 gBeef hearts, infusion from .......................... 250.0 gProteose peptone......................................... 10.0 gDextrose...................................................... 2.0 gSodium chloride.......................................... 5.0 gDisodium phosphate ................................... 2.5 gAgar ............................................................ 15.0 gDistilled water ............................................ 1,000.0 ml
Brewer’s Anaerobic Agar (pH 7.2)Bacto tryptone ............................................ 5.0 gProteose peptone......................................... 10.0 gBacto yeast extract...................................... 5.0 gBacto dextrose ............................................ 10.0 gSodium chloride.......................................... 5.0 gAgar ............................................................ 20 gSodium thioglycollate................................. 2 gSodium formaldehyde sulfoxylate.............. 1 gResazurin .................................................... 0.002 gDistilled water ............................................1,000.0 ml
Brilliant Green Bile Lactose (2%) BrothPeptone ....................................................... 10.0 gOxgall ......................................................... 20.0 gLactose........................................................ 10.0 gBrilliant green ............................................. 0.0133 gDistilled water ............................................1,000.0 ml
Chocolate Agar (pH 7.0)Proteose peptone......................................... 20.0 gDextrose...................................................... 0.5 gSodium chloride.......................................... 5.0 g
Disodium phosphate ................................... 5.0 gAgar ............................................................ 15.0 gDistilled water ............................................1,000.0 mlNote: Aseptically add 5% sterile, defibrinated sheepblood to the sterile and molten agar. Heat at 80°C for15 minutes or until a chocolate color develops.
Cystine Tryptic Agar (pH 7.3)Tryptose ...................................................... 20.0 gL-cystine ..................................................... 0.5 gSodium chloride.......................................... 5.0 gSodium sulfite............................................. 0.5 gAgar ............................................................ 2.5 gPhenol red ................................................... 0.017 gDistilled water ............................................1,000.0 mlAfter autoclaving and cooling to 50°C, add appropriateBacto Differentiation Disk Carbohydrate (e.g.,dextrose, fructose, maltose, sucrose). Allow to coolunslanted in an upright position.
Deoxyribonuclease (DNase Test) Agar (pH 7.3)Deoxyribonucleic acid................................ 2.0 gPhytone peptone ......................................... 5.0 gSodium chloride.......................................... 5.0 gTrypticase ................................................... 15.0 gAgar ............................................................ 15.0 gDistilled water ............................................1,000.0 ml
Endo Agar (pH 7.5)Peptone ....................................................... 10.0 gLactose........................................................ 10.0 gDipotassium phosphate............................... 3.5 gSodium sulfite............................................. 2.5 gBasic fuchsin .............................................. 0.4 gAgar ............................................................ 15.0 gDistilled water ............................................1,000.0 ml
Enriched Nitrate BrothSee Nitrate Broth.
Eosin-Methylene Blue (EMB) Agar (pH 7.2)Peptone ...................................................... 10.0 gLactose........................................................ 5.0 gSucrose ....................................................... 5.0 gDipotassium phosphate............................... 2.0 gAgar ............................................................ 13.5 gEosin Y ....................................................... 0.4 gMethylene blue ........................................... 0.06 gDistilled water ............................................1,000.0 ml
Eugon Agar (pH 7.0)Tryptose ...................................................... 15.0 gSoytone ....................................................... 5.0 gDextrose...................................................... 5.0 gL-cystine ..................................................... 0.2 gSodium chloride.......................................... 4.0 gSodium sulfite............................................. 0.2 gAgar ............................................................ 15.0 gDistilled water ............................................1,000.0 ml
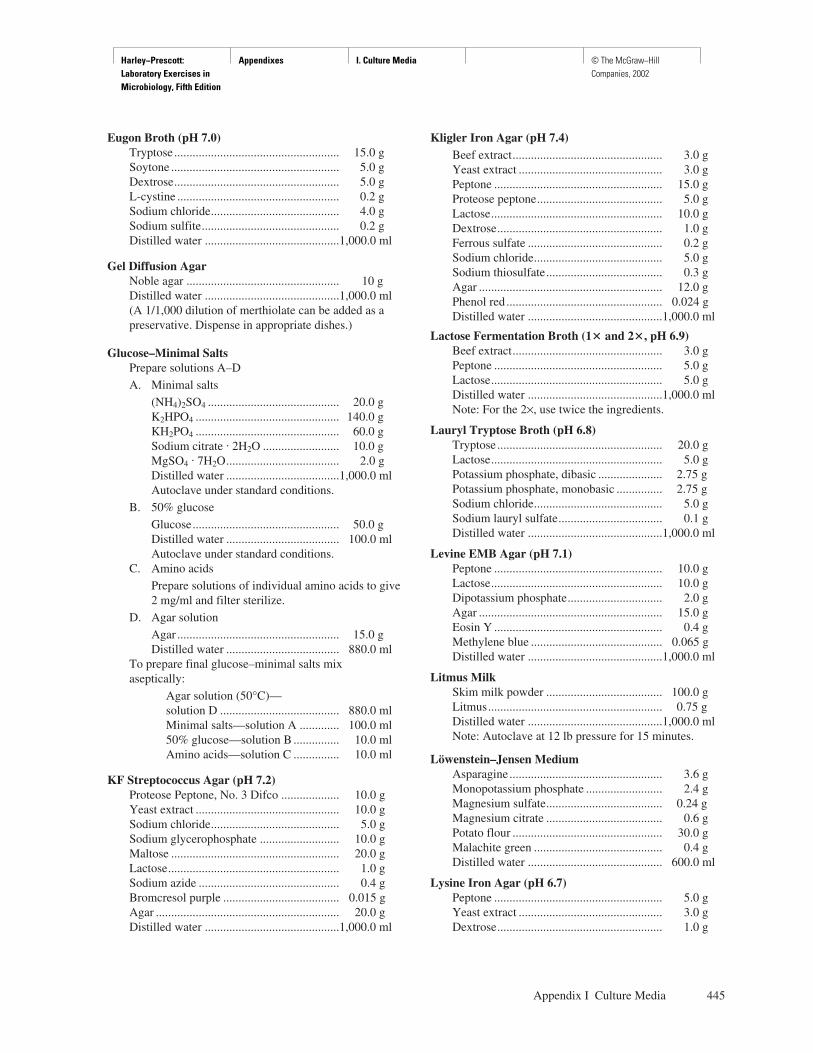
Harley−Prescott: Laboratory Exercises in Microbiology, Fifth Edition
Appendixes I. Culture Media © The McGraw−Hill Companies, 2002
Appendix I Culture Media 445
Eugon Broth (pH 7.0)Tryptose ...................................................... 15.0 gSoytone ....................................................... 5.0 gDextrose...................................................... 5.0 gL-cystine ..................................................... 0.2 gSodium chloride.......................................... 4.0 gSodium sulfite............................................. 0.2 gDistilled water ............................................1,000.0 ml
Gel Diffusion AgarNoble agar .................................................. 10 gDistilled water ............................................1,000.0 ml(A 1/1,000 dilution of merthiolate can be added as apreservative. Dispense in appropriate dishes.)
Glucose–Minimal SaltsPrepare solutions A–D
A. Minimal salts
(NH4)2SO4 ........................................... 20.0 gK2HPO4 ............................................... 140.0 gKH2PO4 ............................................... 60.0 gSodium citrate . 2H2O ......................... 10.0 gMgSO4
. 7H2O..................................... 2.0 gDistilled water .....................................1,000.0 mlAutoclave under standard conditions.
B. 50% glucose
Glucose................................................ 50.0 gDistilled water ..................................... 100.0 mlAutoclave under standard conditions.
C. Amino acids
Prepare solutions of individual amino acids to give2 mg/ml and filter sterilize.
D. Agar solution
Agar ..................................................... 15.0 gDistilled water ..................................... 880.0 ml
To prepare final glucose–minimal salts mix aseptically:
Agar solution (50°C)—solution D ....................................... 880.0 mlMinimal salts—solution A ............. 100.0 ml50% glucose—solution B ............... 10.0 mlAmino acids—solution C ............... 10.0 ml
KF Streptococcus Agar (pH 7.2)Proteose Peptone, No. 3 Difco ................... 10.0 gYeast extract ............................................... 10.0 gSodium chloride.......................................... 5.0 gSodium glycerophosphate .......................... 10.0 gMaltose ....................................................... 20.0 gLactose........................................................ 1.0 gSodium azide .............................................. 0.4 gBromcresol purple ...................................... 0.015 gAgar ............................................................ 20.0 gDistilled water ............................................1,000.0 ml
Kligler Iron Agar (pH 7.4)Beef extract................................................. 3.0 gYeast extract ............................................... 3.0 gPeptone ....................................................... 15.0 gProteose peptone......................................... 5.0 gLactose........................................................ 10.0 gDextrose...................................................... 1.0 gFerrous sulfate ............................................ 0.2 gSodium chloride.......................................... 5.0 gSodium thiosulfate...................................... 0.3 gAgar ............................................................ 12.0 gPhenol red ................................................... 0.024 gDistilled water ............................................1,000.0 ml
Lactose Fermentation Broth (1� and 2�, pH 6.9)Beef extract................................................. 3.0 gPeptone ....................................................... 5.0 gLactose........................................................ 5.0 gDistilled water ............................................1,000.0 mlNote: For the 2×, use twice the ingredients.
Lauryl Tryptose Broth (pH 6.8)Tryptose ...................................................... 20.0 gLactose........................................................ 5.0 gPotassium phosphate, dibasic ..................... 2.75 gPotassium phosphate, monobasic ............... 2.75 gSodium chloride.......................................... 5.0 gSodium lauryl sulfate.................................. 0.1 gDistilled water ............................................1,000.0 ml
Levine EMB Agar (pH 7.1)Peptone ....................................................... 10.0 gLactose........................................................ 10.0 gDipotassium phosphate............................... 2.0 gAgar ............................................................ 15.0 gEosin Y ....................................................... 0.4 gMethylene blue ........................................... 0.065 gDistilled water ............................................1,000.0 ml
Litmus MilkSkim milk powder ...................................... 100.0 gLitmus......................................................... 0.75 gDistilled water ............................................1,000.0 mlNote: Autoclave at 12 lb pressure for 15 minutes.
Löwenstein–Jensen MediumAsparagine .................................................. 3.6 gMonopotassium phosphate ......................... 2.4 gMagnesium sulfate...................................... 0.24 gMagnesium citrate ...................................... 0.6 gPotato flour ................................................. 30.0 gMalachite green .......................................... 0.4 gDistilled water ............................................ 600.0 ml
Lysine Iron Agar (pH 6.7)Peptone ....................................................... 5.0 gYeast extract ............................................... 3.0 gDextrose...................................................... 1.0 g
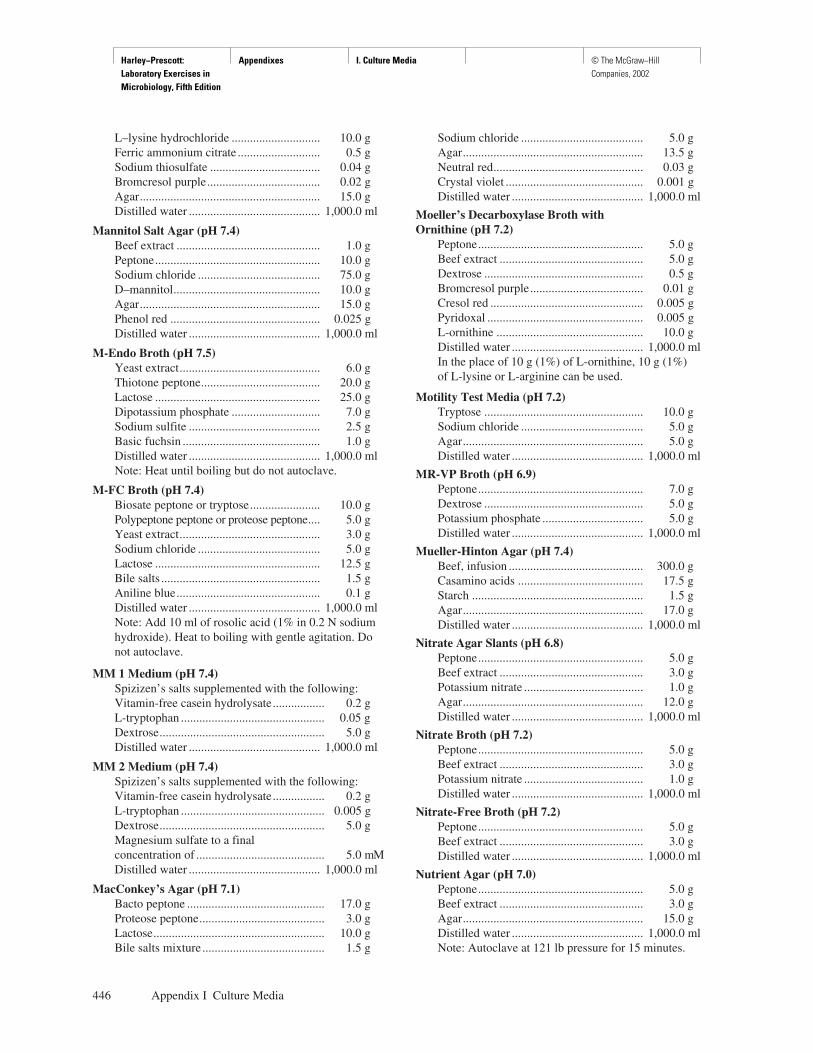
Harley−Prescott: Laboratory Exercises in Microbiology, Fifth Edition
Appendixes I. Culture Media © The McGraw−Hill Companies, 2002
446 Appendix I Culture Media
L–lysine hydrochloride ............................. 10.0 gFerric ammonium citrate ........................... 0.5 gSodium thiosulfate .................................... 0.04 gBromcresol purple..................................... 0.02 gAgar........................................................... 15.0 gDistilled water ........................................... 1,000.0 ml
Mannitol Salt Agar (pH 7.4)Beef extract ............................................... 1.0 gPeptone...................................................... 10.0 gSodium chloride ........................................ 75.0 gD–mannitol................................................ 10.0 gAgar........................................................... 15.0 gPhenol red ................................................. 0.025 gDistilled water ........................................... 1,000.0 ml
M-Endo Broth (pH 7.5)Yeast extract.............................................. 6.0 gThiotone peptone....................................... 20.0 gLactose ...................................................... 25.0 gDipotassium phosphate ............................. 7.0 gSodium sulfite ........................................... 2.5 gBasic fuchsin ............................................. 1.0 gDistilled water ........................................... 1,000.0 mlNote: Heat until boiling but do not autoclave.
M-FC Broth (pH 7.4)Biosate peptone or tryptose....................... 10.0 gPolypeptone peptone or proteose peptone.... 5.0 gYeast extract.............................................. 3.0 gSodium chloride ........................................ 5.0 gLactose ...................................................... 12.5 gBile salts .................................................... 1.5 gAniline blue............................................... 0.1 gDistilled water ........................................... 1,000.0 mlNote: Add 10 ml of rosolic acid (1% in 0.2 N sodiumhydroxide). Heat to boiling with gentle agitation. Donot autoclave.
MM 1 Medium (pH 7.4)Spizizen’s salts supplemented with the following:Vitamin-free casein hydrolysate................. 0.2 gL-tryptophan ............................................... 0.05 gDextrose...................................................... 5.0 gDistilled water ........................................... 1,000.0 ml
MM 2 Medium (pH 7.4)Spizizen’s salts supplemented with the following:Vitamin-free casein hydrolysate................. 0.2 gL-tryptophan ............................................... 0.005 gDextrose...................................................... 5.0 gMagnesium sulfate to a finalconcentration of .......................................... 5.0 mMDistilled water ........................................... 1,000.0 ml
MacConkey’s Agar (pH 7.1)Bacto peptone ............................................. 17.0 gProteose peptone......................................... 3.0 gLactose........................................................ 10.0 gBile salts mixture ........................................ 1.5 g
Sodium chloride ........................................ 5.0 gAgar........................................................... 13.5 gNeutral red................................................. 0.03 gCrystal violet ............................................. 0.001 gDistilled water ........................................... 1,000.0 ml
Moeller’s Decarboxylase Broth withOrnithine (pH 7.2)
Peptone...................................................... 5.0 gBeef extract ............................................... 5.0 gDextrose .................................................... 0.5 gBromcresol purple..................................... 0.01 gCresol red .................................................. 0.005 gPyridoxal ................................................... 0.005 gL-ornithine ................................................ 10.0 gDistilled water ........................................... 1,000.0 mlIn the place of 10 g (1%) of L-ornithine, 10 g (1%)of L-lysine or L-arginine can be used.
Motility Test Media (pH 7.2)Tryptose .................................................... 10.0 gSodium chloride ........................................ 5.0 gAgar........................................................... 5.0 gDistilled water ........................................... 1,000.0 ml
MR-VP Broth (pH 6.9)Peptone...................................................... 7.0 gDextrose .................................................... 5.0 gPotassium phosphate ................................. 5.0 gDistilled water ........................................... 1,000.0 ml
Mueller-Hinton Agar (pH 7.4)Beef, infusion ............................................ 300.0 gCasamino acids ......................................... 17.5 gStarch ........................................................ 1.5 gAgar........................................................... 17.0 gDistilled water ........................................... 1,000.0 ml
Nitrate Agar Slants (pH 6.8)Peptone...................................................... 5.0 gBeef extract ............................................... 3.0 gPotassium nitrate ....................................... 1.0 gAgar........................................................... 12.0 gDistilled water ........................................... 1,000.0 ml
Nitrate Broth (pH 7.2)Peptone...................................................... 5.0 gBeef extract ............................................... 3.0 gPotassium nitrate ....................................... 1.0 gDistilled water ........................................... 1,000.0 ml
Nitrate-Free Broth (pH 7.2)Peptone...................................................... 5.0 gBeef extract ............................................... 3.0 gDistilled water ........................................... 1,000.0 ml
Nutrient Agar (pH 7.0)Peptone...................................................... 5.0 gBeef extract ............................................... 3.0 gAgar........................................................... 15.0 gDistilled water ........................................... 1,000.0 mlNote: Autoclave at 121 lb pressure for 15 minutes.
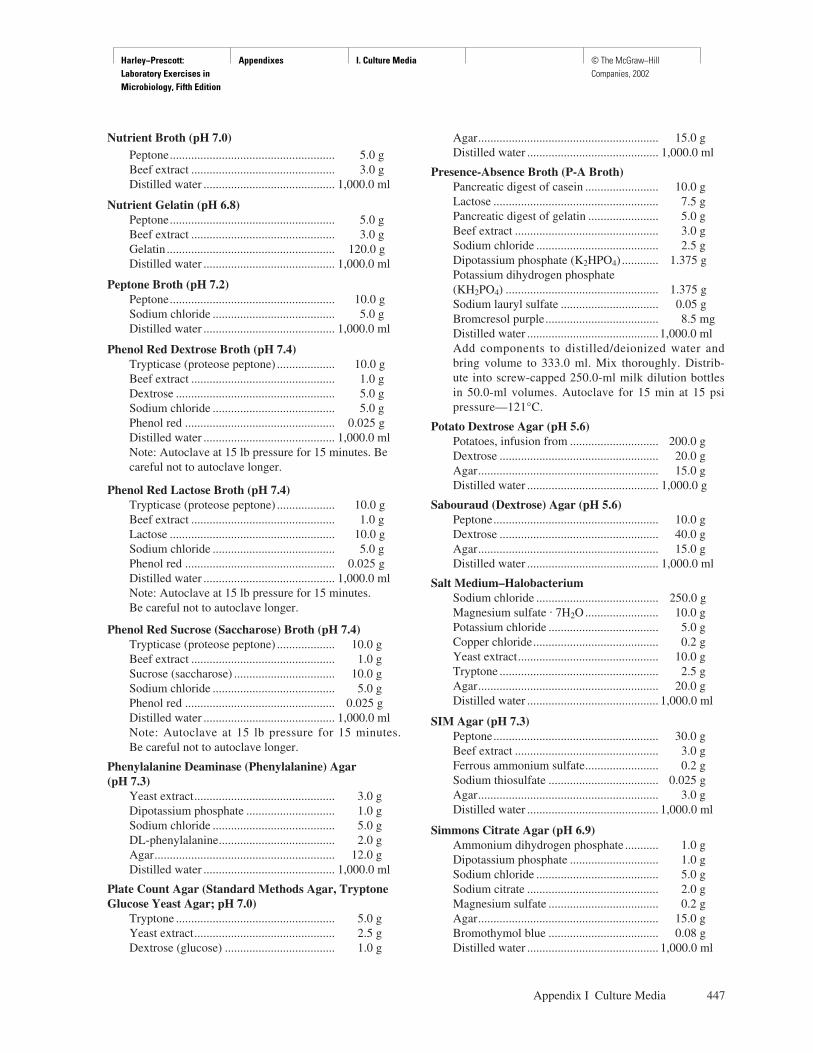
Harley−Prescott: Laboratory Exercises in Microbiology, Fifth Edition
Appendixes I. Culture Media © The McGraw−Hill Companies, 2002
Appendix I Culture Media 447
Nutrient Broth (pH 7.0)Peptone...................................................... 5.0 gBeef extract ............................................... 3.0 gDistilled water ........................................... 1,000.0 ml
Nutrient Gelatin (pH 6.8)Peptone...................................................... 5.0 gBeef extract ............................................... 3.0 gGelatin ....................................................... 120.0 gDistilled water ........................................... 1,000.0 ml
Peptone Broth (pH 7.2)Peptone...................................................... 10.0 gSodium chloride ........................................ 5.0 gDistilled water ........................................... 1,000.0 ml
Phenol Red Dextrose Broth (pH 7.4)Trypticase (proteose peptone) ................... 10.0 gBeef extract ............................................... 1.0 gDextrose .................................................... 5.0 gSodium chloride ........................................ 5.0 gPhenol red ................................................. 0.025 gDistilled water ........................................... 1,000.0 mlNote: Autoclave at 15 lb pressure for 15 minutes. Becareful not to autoclave longer.
Phenol Red Lactose Broth (pH 7.4)Trypticase (proteose peptone) ................... 10.0 gBeef extract ............................................... 1.0 gLactose ...................................................... 10.0 gSodium chloride ........................................ 5.0 gPhenol red ................................................. 0.025 gDistilled water ........................................... 1,000.0 mlNote: Autoclave at 15 lb pressure for 15 minutes.Be careful not to autoclave longer.
Phenol Red Sucrose (Saccharose) Broth (pH 7.4)Trypticase (proteose peptone) ................... 10.0 gBeef extract ............................................... 1.0 gSucrose (saccharose) ................................. 10.0 gSodium chloride ........................................ 5.0 gPhenol red ................................................. 0.025 gDistilled water ........................................... 1,000.0 mlNote: Autoclave at 15 lb pressure for 15 minutes.Be careful not to autoclave longer.
Phenylalanine Deaminase (Phenylalanine) Agar(pH 7.3)
Yeast extract.............................................. 3.0 gDipotassium phosphate ............................. 1.0 gSodium chloride ........................................ 5.0 gDL-phenylalanine...................................... 2.0 gAgar........................................................... 12.0 gDistilled water ........................................... 1,000.0 ml
Plate Count Agar (Standard Methods Agar, TryptoneGlucose Yeast Agar; pH 7.0)
Tryptone .................................................... 5.0 gYeast extract.............................................. 2.5 gDextrose (glucose) .................................... 1.0 g
Agar........................................................... 15.0 gDistilled water ........................................... 1,000.0 ml
Presence-Absence Broth (P-A Broth)Pancreatic digest of casein ........................ 10.0 gLactose ...................................................... 7.5 gPancreatic digest of gelatin ....................... 5.0 gBeef extract ............................................... 3.0 gSodium chloride ........................................ 2.5 gDipotassium phosphate (K2HPO4) ............ 1.375 gPotassium dihydrogen phosphate(KH2PO4) .................................................. 1.375 gSodium lauryl sulfate ................................ 0.05 gBromcresol purple..................................... 8.5 mgDistilled water ...........................................1,000.0 mlAdd components to distilled/deionized water andbring volume to 333.0 ml. Mix thoroughly. Distrib-ute into screw-capped 250.0-ml milk dilution bottlesin 50.0-ml volumes. Autoclave for 15 min at 15 psipressure—121°C.
Potato Dextrose Agar (pH 5.6)Potatoes, infusion from ............................. 200.0 gDextrose .................................................... 20.0 gAgar........................................................... 15.0 gDistilled water ........................................... 1,000.0 g
Sabouraud (Dextrose) Agar (pH 5.6)Peptone...................................................... 10.0 gDextrose .................................................... 40.0 gAgar........................................................... 15.0 gDistilled water ........................................... 1,000.0 ml
Salt Medium–HalobacteriumSodium chloride ........................................ 250.0 gMagnesium sulfate . 7H2O........................ 10.0 gPotassium chloride .................................... 5.0 gCopper chloride......................................... 0.2 gYeast extract.............................................. 10.0 gTryptone .................................................... 2.5 gAgar........................................................... 20.0 gDistilled water ........................................... 1,000.0 ml
SIM Agar (pH 7.3)Peptone...................................................... 30.0 gBeef extract ............................................... 3.0 gFerrous ammonium sulfate........................ 0.2 gSodium thiosulfate .................................... 0.025 gAgar........................................................... 3.0 gDistilled water ........................................... 1,000.0 ml
Simmons Citrate Agar (pH 6.9)Ammonium dihydrogen phosphate ........... 1.0 gDipotassium phosphate ............................. 1.0 gSodium chloride ........................................ 5.0 gSodium citrate ........................................... 2.0 gMagnesium sulfate .................................... 0.2 gAgar........................................................... 15.0 gBromothymol blue .................................... 0.08 gDistilled water ........................................... 1,000.0 ml
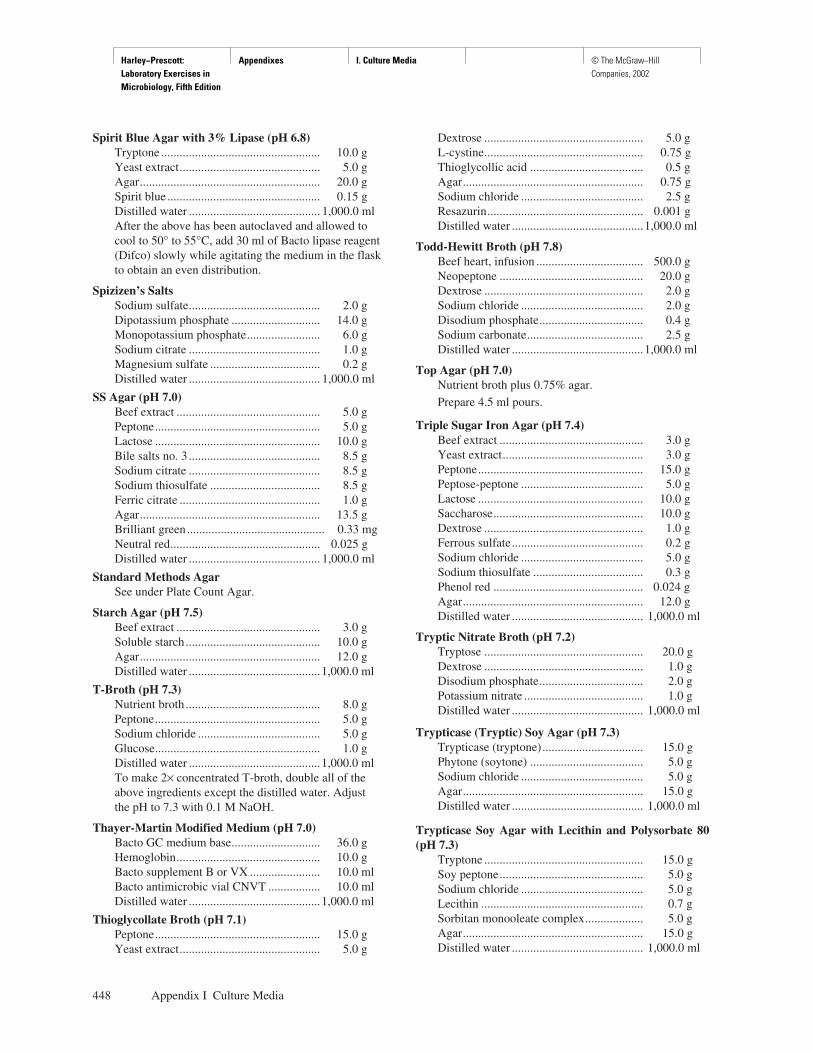
Harley−Prescott: Laboratory Exercises in Microbiology, Fifth Edition
Appendixes I. Culture Media © The McGraw−Hill Companies, 2002
448 Appendix I Culture Media
Spirit Blue Agar with 3% Lipase (pH 6.8)Tryptone .................................................... 10.0 gYeast extract.............................................. 5.0 gAgar........................................................... 20.0 gSpirit blue .................................................. 0.15 gDistilled water ........................................... 1,000.0 mlAfter the above has been autoclaved and allowed tocool to 50° to 55°C, add 30 ml of Bacto lipase reagent(Difco) slowly while agitating the medium in the flaskto obtain an even distribution.
Spizizen’s SaltsSodium sulfate........................................... 2.0 gDipotassium phosphate ............................. 14.0 gMonopotassium phosphate........................ 6.0 gSodium citrate ........................................... 1.0 gMagnesium sulfate .................................... 0.2 gDistilled water ........................................... 1,000.0 ml
SS Agar (pH 7.0)Beef extract ............................................... 5.0 gPeptone...................................................... 5.0 gLactose ...................................................... 10.0 gBile salts no. 3 ........................................... 8.5 gSodium citrate ........................................... 8.5 gSodium thiosulfate .................................... 8.5 gFerric citrate .............................................. 1.0 gAgar........................................................... 13.5 gBrilliant green ............................................. 0.33 mgNeutral red................................................. 0.025 gDistilled water ........................................... 1,000.0 ml
Standard Methods AgarSee under Plate Count Agar.
Starch Agar (pH 7.5)Beef extract ............................................... 3.0 gSoluble starch ............................................ 10.0 gAgar........................................................... 12.0 gDistilled water ...........................................1,000.0 ml
T-Broth (pH 7.3)Nutrient broth ............................................ 8.0 gPeptone...................................................... 5.0 gSodium chloride ........................................ 5.0 gGlucose...................................................... 1.0 gDistilled water ...........................................1,000.0 mlTo make 2× concentrated T-broth, double all of theabove ingredients except the distilled water. Adjustthe pH to 7.3 with 0.1 M NaOH.
Thayer-Martin Modified Medium (pH 7.0)Bacto GC medium base............................. 36.0 gHemoglobin............................................... 10.0 gBacto supplement B or VX ....................... 10.0 mlBacto antimicrobic vial CNVT ................. 10.0 mlDistilled water ...........................................1,000.0 ml
Thioglycollate Broth (pH 7.1)Peptone...................................................... 15.0 gYeast extract.............................................. 5.0 g
Dextrose .................................................... 5.0 gL-cystine.................................................... 0.75 gThioglycollic acid ..................................... 0.5 gAgar........................................................... 0.75 gSodium chloride ........................................ 2.5 gResazurin................................................... 0.001 gDistilled water ...........................................1,000.0 ml
Todd-Hewitt Broth (pH 7.8)Beef heart, infusion ................................... 500.0 gNeopeptone ............................................... 20.0 gDextrose .................................................... 2.0 gSodium chloride ........................................ 2.0 gDisodium phosphate.................................. 0.4 gSodium carbonate...................................... 2.5 gDistilled water ...........................................1,000.0 ml
Top Agar (pH 7.0)Nutrient broth plus 0.75% agar.
Prepare 4.5 ml pours.
Triple Sugar Iron Agar (pH 7.4)Beef extract ............................................... 3.0 gYeast extract.............................................. 3.0 gPeptone...................................................... 15.0 gPeptose-peptone ........................................ 5.0 gLactose ...................................................... 10.0 gSaccharose................................................. 10.0 gDextrose .................................................... 1.0 gFerrous sulfate........................................... 0.2 gSodium chloride ........................................ 5.0 gSodium thiosulfate .................................... 0.3 gPhenol red ................................................. 0.024 gAgar........................................................... 12.0 gDistilled water ........................................... 1,000.0 ml
Tryptic Nitrate Broth (pH 7.2)Tryptose .................................................... 20.0 gDextrose .................................................... 1.0 gDisodium phosphate.................................. 2.0 gPotassium nitrate ....................................... 1.0 gDistilled water ........................................... 1,000.0 ml
Trypticase (Tryptic) Soy Agar (pH 7.3)Trypticase (tryptone)................................. 15.0 gPhytone (soytone) ..................................... 5.0 gSodium chloride ........................................ 5.0 gAgar........................................................... 15.0 gDistilled water ........................................... 1,000.0 ml
Trypticase Soy Agar with Lecithin and Polysorbate 80(pH 7.3)
Tryptone .................................................... 15.0 gSoy peptone............................................... 5.0 gSodium chloride ........................................ 5.0 gLecithin ..................................................... 0.7 gSorbitan monooleate complex................... 5.0 gAgar........................................................... 15.0 gDistilled water ........................................... 1,000.0 ml
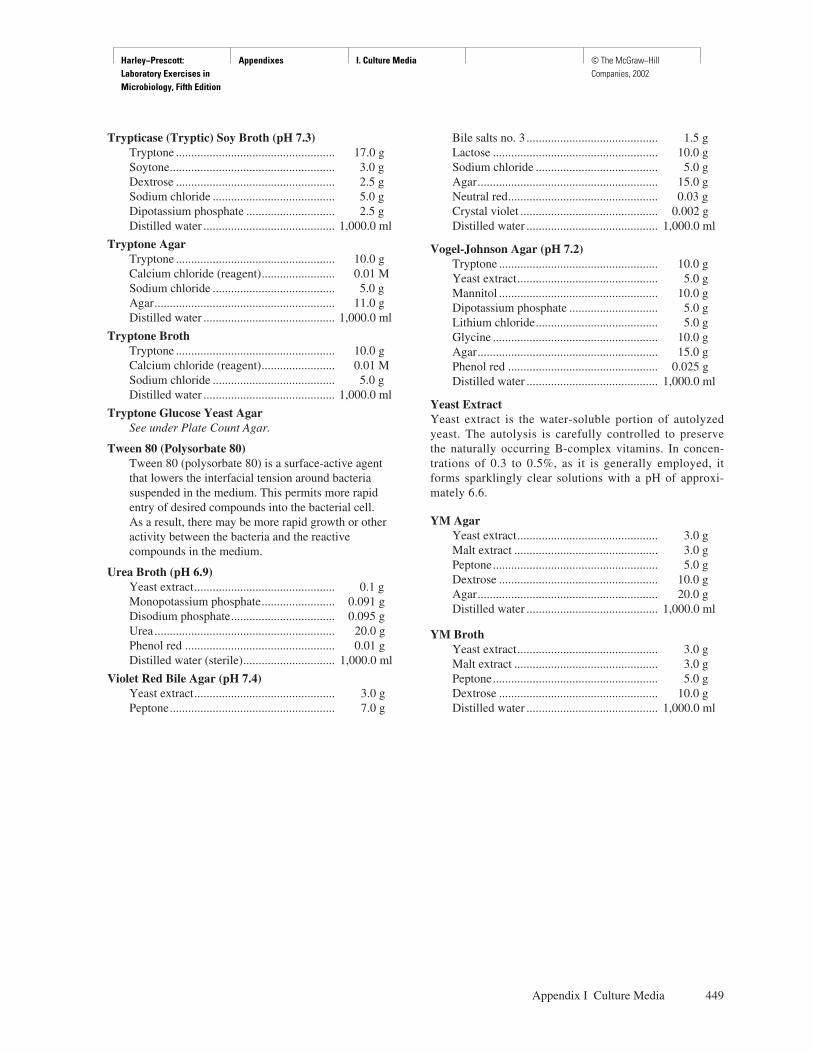
Harley−Prescott: Laboratory Exercises in Microbiology, Fifth Edition
Appendixes I. Culture Media © The McGraw−Hill Companies, 2002
Trypticase (Tryptic) Soy Broth (pH 7.3)Tryptone .................................................... 17.0 gSoytone...................................................... 3.0 gDextrose .................................................... 2.5 gSodium chloride ........................................ 5.0 gDipotassium phosphate ............................. 2.5 gDistilled water ........................................... 1,000.0 ml
Tryptone AgarTryptone .................................................... 10.0 gCalcium chloride (reagent)........................ 0.01 MSodium chloride ........................................ 5.0 gAgar........................................................... 11.0 gDistilled water ........................................... 1,000.0 ml
Tryptone BrothTryptone .................................................... 10.0 gCalcium chloride (reagent)........................ 0.01 MSodium chloride ........................................ 5.0 gDistilled water ........................................... 1,000.0 ml
Tryptone Glucose Yeast AgarSee under Plate Count Agar.
Tween 80 (Polysorbate 80)Tween 80 (polysorbate 80) is a surface-active agentthat lowers the interfacial tension around bacteriasuspended in the medium. This permits more rapidentry of desired compounds into the bacterial cell.As a result, there may be more rapid growth or otheractivity between the bacteria and the reactivecompounds in the medium.
Urea Broth (pH 6.9)Yeast extract.............................................. 0.1 gMonopotassium phosphate........................ 0.091 gDisodium phosphate.................................. 0.095 gUrea ........................................................... 20.0 gPhenol red ................................................. 0.01 gDistilled water (sterile).............................. 1,000.0 ml
Violet Red Bile Agar (pH 7.4)Yeast extract.............................................. 3.0 gPeptone...................................................... 7.0 g
Bile salts no. 3 ........................................... 1.5 gLactose ...................................................... 10.0 gSodium chloride ........................................ 5.0 gAgar........................................................... 15.0 gNeutral red................................................. 0.03 gCrystal violet ............................................. 0.002 gDistilled water ........................................... 1,000.0 ml
Vogel-Johnson Agar (pH 7.2)Tryptone .................................................... 10.0 gYeast extract.............................................. 5.0 gMannitol .................................................... 10.0 gDipotassium phosphate ............................. 5.0 gLithium chloride........................................ 5.0 gGlycine ...................................................... 10.0 gAgar........................................................... 15.0 gPhenol red ................................................. 0.025 gDistilled water ........................................... 1,000.0 ml
Yeast ExtractYeast extract is the water-soluble portion of autolyzedyeast. The autolysis is carefully controlled to preservethe naturally occurring B-complex vitamins. In concen-trations of 0.3 to 0.5%, as it is generally employed, itforms sparklingly clear solutions with a pH of approxi-mately 6.6.
YM AgarYeast extract.............................................. 3.0 gMalt extract ............................................... 3.0 gPeptone...................................................... 5.0 gDextrose .................................................... 10.0 gAgar........................................................... 20.0 gDistilled water ........................................... 1,000.0 ml
YM BrothYeast extract.............................................. 3.0 gMalt extract ............................................... 3.0 gPeptone...................................................... 5.0 gDextrose .................................................... 10.0 gDistilled water ........................................... 1,000.0 ml
Appendix I Culture Media 449
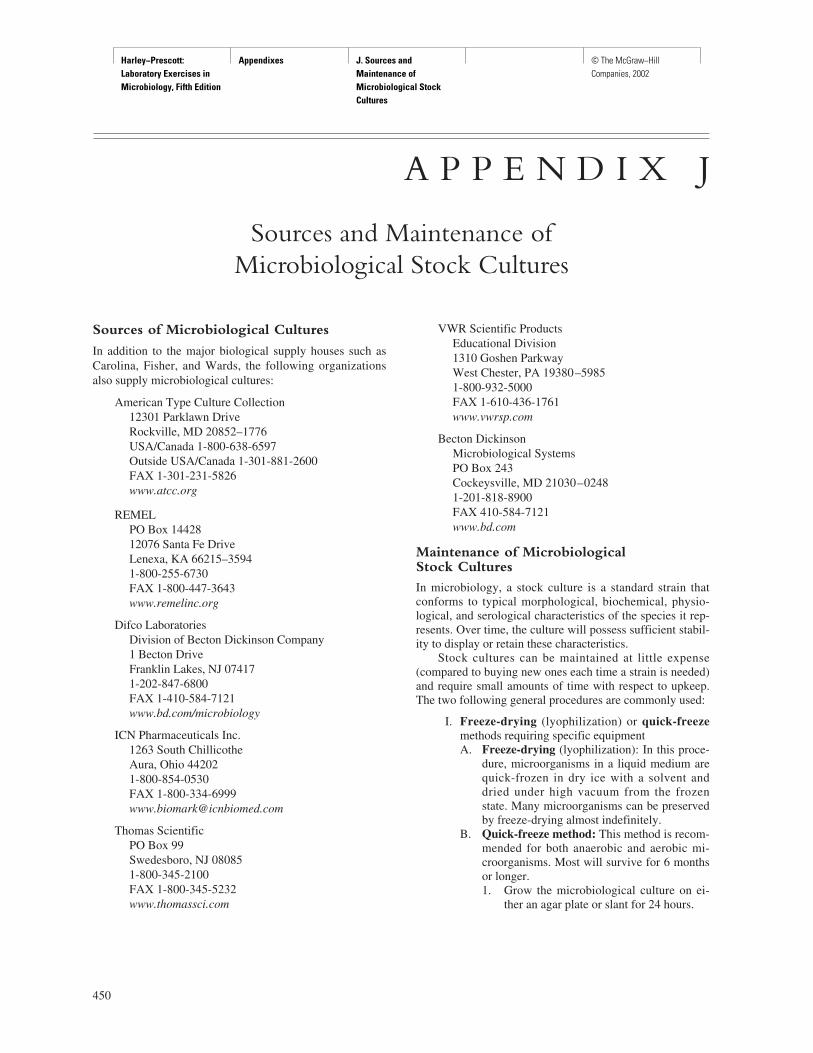
Harley−Prescott: Laboratory Exercises in Microbiology, Fifth Edition
Appendixes J. Sources and Maintenance of Microbiological Stock Cultures
© The McGraw−Hill Companies, 2002
A P P E N D I X J
Sources and Maintenance ofMicrobiological Stock Cultures
Sources of Microbiological Cultures
In addition to the major biological supply houses such asCarolina, Fisher, and Wards, the following organizationsalso supply microbiological cultures:
American Type Culture Collection12301 Parklawn DriveRockville, MD 20852–1776USA/Canada 1-800-638-6597Outside USA/Canada 1-301-881-2600FAX 1-301-231-5826www.atcc.org
REMELPO Box 1442812076 Santa Fe DriveLenexa, KA 66215–35941-800-255-6730FAX 1-800-447-3643www.remelinc.org
Difco LaboratoriesDivision of Becton Dickinson Company1 Becton DriveFranklin Lakes, NJ 074171-202-847-6800FAX 1-410-584-7121www.bd.com/microbiology
ICN Pharmaceuticals Inc.1263 South ChillicotheAura, Ohio 442021-800-854-0530FAX [email protected]
Thomas ScientificPO Box 99Swedesboro, NJ 080851-800-345-2100FAX 1-800-345-5232www.thomassci.com
450
VWR Scientific ProductsEducational Division1310 Goshen ParkwayWest Chester, PA 19380–59851-800-932-5000FAX 1-610-436-1761www.vwrsp.com
Becton DickinsonMicrobiological SystemsPO Box 243Cockeysville, MD 21030–02481-201-818-8900FAX 410-584-7121www.bd.com
Maintenance of MicrobiologicalStock CulturesIn microbiology, a stock culture is a standard strain thatconforms to typical morphological, biochemical, physio-logical, and serological characteristics of the species it rep-resents. Over time, the culture will possess sufficient stabil-ity to display or retain these characteristics.
Stock cultures can be maintained at little expense(compared to buying new ones each time a strain is needed)and require small amounts of time with respect to upkeep.The two following general procedures are commonly used:
I. Freeze-drying (lyophilization) or quick-freezemethods requiring specific equipmentA. Freeze-drying (lyophilization): In this proce-
dure, microorganisms in a liquid medium arequick-frozen in dry ice with a solvent anddried under high vacuum from the frozenstate. Many microorganisms can be preservedby freeze-drying almost indefinitely.
B. Quick-freeze method: This method is recom-mended for both anaerobic and aerobic mi-croorganisms. Most will survive for 6 monthsor longer.1. Grow the microbiological culture on ei-
ther an agar plate or slant for 24 hours.
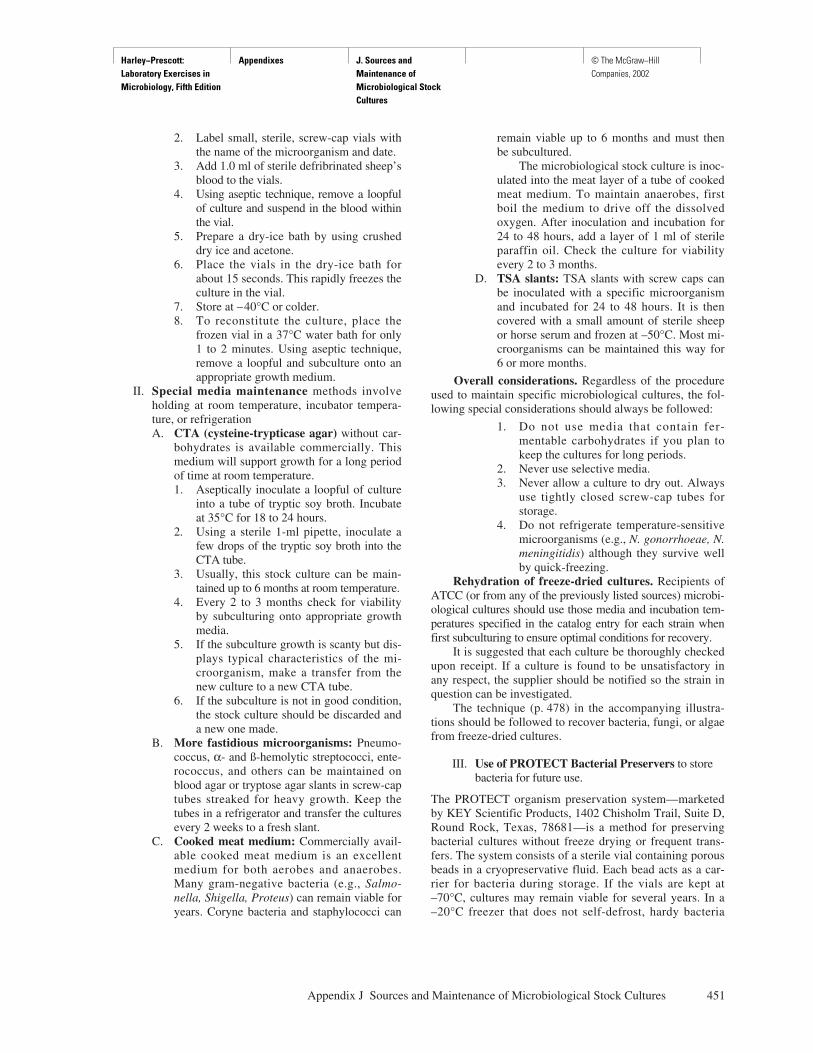
Harley−Prescott: Laboratory Exercises in Microbiology, Fifth Edition
Appendixes J. Sources and Maintenance of Microbiological Stock Cultures
© The McGraw−Hill Companies, 2002
Appendix J Sources and Maintenance of Microbiological Stock Cultures 451
2. Label small, sterile, screw-cap vials withthe name of the microorganism and date.
3. Add 1.0 ml of sterile defribrinated sheep’sblood to the vials.
4. Using aseptic technique, remove a loopfulof culture and suspend in the blood withinthe vial.
5. Prepare a dry-ice bath by using crusheddry ice and acetone.
6. Place the vials in the dry-ice bath forabout 15 seconds. This rapidly freezes theculture in the vial.
7. Store at –40°C or colder.8. To reconstitute the culture, place the
frozen vial in a 37°C water bath for only1 to 2 minutes. Using aseptic technique,remove a loopful and subculture onto anappropriate growth medium.
II. Special media maintenance methods involveholding at room temperature, incubator tempera-ture, or refrigerationA. CTA (cysteine-trypticase agar) without car-
bohydrates is available commercially. Thismedium will support growth for a long periodof time at room temperature.1. Aseptically inoculate a loopful of culture
into a tube of tryptic soy broth. Incubateat 35°C for 18 to 24 hours.
2. Using a sterile 1-ml pipette, inoculate afew drops of the tryptic soy broth into theCTA tube.
3. Usually, this stock culture can be main-tained up to 6 months at room temperature.
4. Every 2 to 3 months check for viabilityby subculturing onto appropriate growthmedia.
5. If the subculture growth is scanty but dis-plays typical characteristics of the mi-croorganism, make a transfer from thenew culture to a new CTA tube.
6. If the subculture is not in good condition,the stock culture should be discarded anda new one made.
B. More fastidious microorganisms: Pneumo-coccus, α- and ß-hemolytic streptococci, ente-rococcus, and others can be maintained onblood agar or tryptose agar slants in screw-captubes streaked for heavy growth. Keep thetubes in a refrigerator and transfer the culturesevery 2 weeks to a fresh slant.
C. Cooked meat medium: Commercially avail-able cooked meat medium is an excellentmedium for both aerobes and anaerobes.Many gram-negative bacteria (e.g., Salmo-nella, Shigella, Proteus) can remain viable foryears. Coryne bacteria and staphylococci can
remain viable up to 6 months and must thenbe subcultured.
The microbiological stock culture is inoc-ulated into the meat layer of a tube of cookedmeat medium. To maintain anaerobes, firstboil the medium to drive off the dissolvedoxygen. After inoculation and incubation for24 to 48 hours, add a layer of 1 ml of sterileparaffin oil. Check the culture for viabilityevery 2 to 3 months.
D. TSA slants: TSA slants with screw caps canbe inoculated with a specific microorganismand incubated for 24 to 48 hours. It is thencovered with a small amount of sterile sheepor horse serum and frozen at –50°C. Most mi-croorganisms can be maintained this way for6 or more months.
Overall considerations. Regardless of the procedureused to maintain specific microbiological cultures, the fol-lowing special considerations should always be followed:
1. Do not use media that contain fer-mentable carbohydrates if you plan tokeep the cultures for long periods.
2. Never use selective media.3. Never allow a culture to dry out. Always
use tightly closed screw-cap tubes forstorage.
4. Do not refrigerate temperature-sensitivemicroorganisms (e.g., N. gonorrhoeae, N.meningitidis) although they survive wellby quick-freezing.
Rehydration of freeze-dried cultures. Recipients ofATCC (or from any of the previously listed sources) microbi-ological cultures should use those media and incubation tem-peratures specified in the catalog entry for each strain whenfirst subculturing to ensure optimal conditions for recovery.
It is suggested that each culture be thoroughly checkedupon receipt. If a culture is found to be unsatisfactory inany respect, the supplier should be notified so the strain inquestion can be investigated.
The technique (p. 478) in the accompanying illustra-tions should be followed to recover bacteria, fungi, or algaefrom freeze-dried cultures.
III. Use of PROTECT Bacterial Preservers to storebacteria for future use.
The PROTECT organism preservation system—marketedby KEY Scientific Products, 1402 Chisholm Trail, Suite D,Round Rock, Texas, 78681—is a method for preservingbacterial cultures without freeze drying or frequent trans-fers. The system consists of a sterile vial containing porousbeads in a cryopreservative fluid. Each bead acts as a car-rier for bacteria during storage. If the vials are kept at–70°C, cultures may remain viable for several years. In a–20°C freezer that does not self-defrost, hardy bacteria
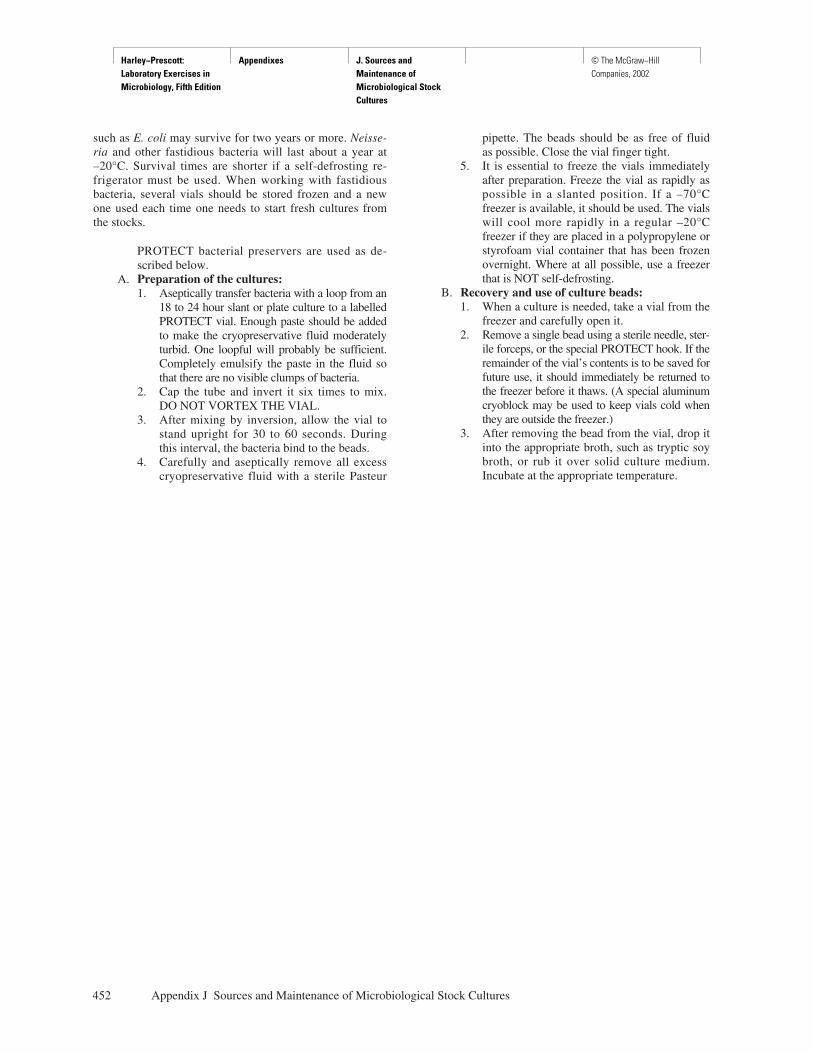
Harley−Prescott: Laboratory Exercises in Microbiology, Fifth Edition
Appendixes J. Sources and Maintenance of Microbiological Stock Cultures
© The McGraw−Hill Companies, 2002
such as E. coli may survive for two years or more. Neisse-ria and other fastidious bacteria will last about a year at–20°C. Survival times are shorter if a self-defrosting re-frigerator must be used. When working with fastidiousbacteria, several vials should be stored frozen and a newone used each time one needs to start fresh cultures fromthe stocks.
PROTECT bacterial preservers are used as de-scribed below.
A. Preparation of the cultures:1. Aseptically transfer bacteria with a loop from an
18 to 24 hour slant or plate culture to a labelledPROTECT vial. Enough paste should be addedto make the cryopreservative fluid moderatelyturbid. One loopful will probably be sufficient.Completely emulsify the paste in the fluid sothat there are no visible clumps of bacteria.
2. Cap the tube and invert it six times to mix.DO NOT VORTEX THE VIAL.
3. After mixing by inversion, allow the vial tostand upright for 30 to 60 seconds. Duringthis interval, the bacteria bind to the beads.
4. Carefully and aseptically remove all excesscryopreservative fluid with a sterile Pasteur
pipette. The beads should be as free of fluidas possible. Close the vial finger tight.
5. It is essential to freeze the vials immediatelyafter preparation. Freeze the vial as rapidly aspossible in a slanted position. If a –70°Cfreezer is available, it should be used. The vialswill cool more rapidly in a regular –20°Cfreezer if they are placed in a polypropylene orstyrofoam vial container that has been frozenovernight. Where at all possible, use a freezerthat is NOT self-defrosting.
B. Recovery and use of culture beads:1. When a culture is needed, take a vial from the
freezer and carefully open it.2. Remove a single bead using a sterile needle, ster-
ile forceps, or the special PROTECT hook. If theremainder of the vial’s contents is to be saved forfuture use, it should immediately be returned tothe freezer before it thaws. (A special aluminumcryoblock may be used to keep vials cold whenthey are outside the freezer.)
3. After removing the bead from the vial, drop itinto the appropriate broth, such as tryptic soybroth, or rub it over solid culture medium.Incubate at the appropriate temperature.
452 Appendix J Sources and Maintenance of Microbiological Stock Cultures
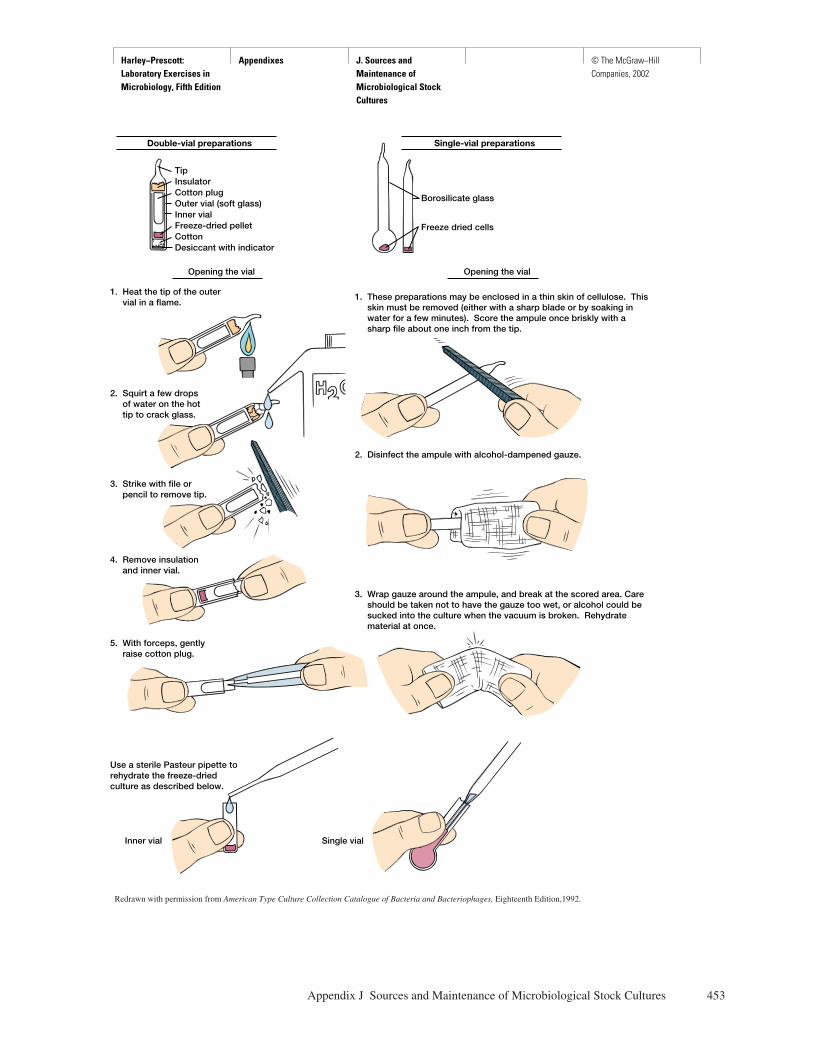
Harley−Prescott: Laboratory Exercises in Microbiology, Fifth Edition
Appendixes J. Sources and Maintenance of Microbiological Stock Cultures
© The McGraw−Hill Companies, 2002
Appendix J Sources and Maintenance of Microbiological Stock Cultures 453
Heat the tip of the outervial in a flame.
1.
Squirt a few dropsof water on the hottip to crack glass.
2.
Strike with file orpencil to remove tip.
3.
Remove insulationand inner vial.
4.
With forceps, gentlyraise cotton plug.
5.
Use a sterile Pasteur pipette torehydrate the freeze-driedculture as described below.
Inner vial Single vial
Wrap gauze around the ampule, and break at the scored area. Careshould be taken not to have the gauze too wet, or alcohol could besucked into the culture when the vacuum is broken. Rehydratematerial at once.
3.
Disinfect the ampule with alcohol-dampened gauze.2.
TipInsulatorCotton plugOuter vial (soft glass)Inner vialFreeze-dried pelletCottonDesiccant with indicator
Borosilicate glass
Double-vial preparations
Freeze dried cells
These preparations may be enclosed in a thin skin of cellulose. Thisskin must be removed (either with a sharp blade or by soaking inwater for a few minutes). Score the ampule once briskly with asharp file about one inch from the tip.
1.
Single-vial preparations
Opening the vial Opening the vial
Redrawn with permission from American Type Culture Collection Catalogue of Bacteria and Bacteriophages, Eighteenth Edition,1992.
Harley−Prescott: Laboratory Exercises in Microbiology, Fifth Edition
Back Matter Specific Guidelines for Lab Safety
© The McGraw−Hill Companies, 2002
S P E C I F I C G U I D E L I N E SF O R L A B S A F E T Y
1. Place all extra clothing, unnecessary books,purses, backpacks, and paraphernalia in anappropriate place. Racks are provided for thesematerials. The laboratory work area must be keptfree of articles not actually in use.
2. Eating, drinking, and smoking are forbidden at alltimes in the laboratory.
3. Keep your locker or laboratory door clean. Do not allow your locker drawer to become filledwith cultures that have no value in your currentwork.
4. Return all reagents, cultures, and glassware totheir appropriate places.
5. Wear a laboratory coat, smock, or lab apron whenworking in the laboratory. This will protectclothing from contamination or accidentaldiscoloration by staining solutions.
6. Do not place anything in your mouth while in thelaboratory. This includes pencils, food, andfingers. Learn to keep your hands away from yourmouth and eyes.
7. Avoid contamination of benches, floor, andwastebaskets.
8. Clean your work area (laboratory bench) with aphenolic disinfectant such as 5% Lysol or 5%phenol or a quaternary compound such ascetylpyridinium (Ceepyrn) before and after eachlaboratory period. This standard procedure lessensthe chance for accidental infection as well as forcontamination of cultures.
9. Special receptacles will be provided for infectiousmaterials and used glass slides. Place alldiscarded cultures and contaminated glasswareinto these receptacles. Do not let unwanted andunneeded materials accumulate. Tall jars filledwith a solution such as 5% Lysol or specialreceptacles will be provided for pipettes.
10. When infectious material is accidentally spilled,cover it immediately with a disinfectant such as5% Lysol or 5% phenol and notify your instructorat once.
11. Flame wire loops and needles before andimmediately after transfer of cultures. Do notmove through the laboratory with a loop orpipette containing infectious material.
12. Wash your hands thoroughly before and after eachexperiment, using disinfecting soap if possible.
13. Label all experimental material with your
a. Name M. Porterb. Date 1/18/01c. Exercise number Ex. 5d. Lab section 8–10 Me. Specimen/ Water/
Organism E. Coli
14. Telephone number to call in case of an emergency
__________________________ .

Harley−Prescott: Laboratory Exercises in Microbiology, Fifth Edition
Back Matter Credits © The McGraw−Hill Companies, 2002
454
Line Art
Chapter 8: Figure 8.4 Alpha-Tec Systems, Inc.;Chapter 36: Figure 36.1 Copyright © Becton-Dickinson Microbiology Systems, Cockeysville, MD.Reprinted by permission
Photos
Part Openers: 2: © Bettmann/CORBIS; 6: NationalLibrary of Medicine; 7: © Bettmann/CORBIS;Chapter 1: Laboratory Report 1: Photograph courtesyof Leica, Inc., Deerfield, IL; Chapter 3: Fig. 3.2: ©Arthur M. Siegelman/Visuals Unlimited; Chapter 12:Fig. 12.3a: Reprinted by permission of AmericanSociety for Microbiology; Fig. 12.3b: © E.S.Chan/Visuals Unlimited; Chapter 31: Fig. 31.1: ©Raymond B. Otero/Visuals Unlimited; Chapter 35:Fig. 35.1: Analytab Products, Inc.; Chapter 44: Fig.44.2a-d: Courtesy of Millipore Corporation; Chapter47: Fig. 47.3 and Fig. 47.4b: Courtesy of KeyScientific Products; Chapter 54: Fig. 54.9d: WellcomeDiagnostics
C R E D I T S
Harley−Prescott: Laboratory Exercises in Microbiology, Fifth Edition
Back Matter Index © The McGraw−Hill Companies, 2002
ABO blood group, 322–24Abscess, S. aureus, 202, 334Acetate precipitation, of proteins,
404–5Acetoin, 155–56Achromobacter, characterization, 438Acid-alcohol solution, 439Acid-fast staining, 231
Kinyoun procedure, 51–53Ziehl-Neelsen procedure, 51–53
Acidophile, 243Acid production
fermentation, 127–29triple sugar iron agar test, 134–36
Acid soil, 305Acinetobacter, characterization, 438Actidione Agar, 305
recipe, 443Actinomycetes, 110
soil, 305–7Action limit, 292Adonitol fermentation test, 218Aerobacter, maintenance of culture, 86Aerobe, obligate, 110Aeromonas hydrophila,
characterization, 438Aerotolerant anaerobe, 110Agar, 77–78
Noble, 443Agar deep tube, 77–78, 87, 110Agaricus, 375Agar plate, 77–79
preparation, 80smear preparation from, 37–38
Agar pour, 77, 117–19Agar slant, 77–78
culture of anaerobic bacteria, 113smear preparation from, 37–38storage of culture on, 85
Agar stab culture, 86Agglutination reactions, 322–24Agglutinin, 322–24Agglutinogen, 322–24Alcaligenes
identification, 231maintenance of culture, 86
Alcaligenes denitrificans, capsulestaining, 63–65
Alcaligenes faecalis, 153characterization, 438fermentation tests, 126–30flagella staining, 69–72normal microbiota from human
body, 330oxidase test, 179–81pH sensitivity, 243–44triple sugar iron agar test, 133–36
Alcoholic fermentation, 128Alcohol solutions, recipes, 439Alkaline soil, 305Alkalophile, 243Amino acids
casein hydrolysis test, 161–62catalase test, 169–70coagulase test, 173–75DNase test, 173–75gelatin hydrolysis test, 161–62hydrogen sulfide production and
motility test, 147–49IMViC tests, 153–58lysine decarboxylase test, 189–92nitrate reduction test, 201–3ornithine decarboxylase test, 189–91oxidase test, 179–81phenylalanine deaminase test,
195–97urease test, 185–86
Ammonium sulfate API broth, 443Amphitrichous flagella, 70Ampicillin, 259�-Amylase, 139–40Amylopectin, 139Amylose, 139Anaerobic agar, 111Anaerobic bacteria
aerotolerant, 110body sites occupied by, 110cultivation, 109–14endospore-forming, 361–63facultative, 110isolation from soil, 113maintenance of culture, 85–86obligate, 110strict, 110
Anaerobic culture, 362–63Anaero-Pack System, 109
Analog spectrophotometer, 120Annular diaphragm, 21–23Anthony, E. E., 64Anthony’s capsule staining
method, 64Anthrax, 58, 63, 202, 361Antibiogram, 258Antibiotic disks, 257–60, 333Antibiotic resistance, 257Antibiotic-resistant plasmid, 393–96Antigens, capsular, 63Antimicrobial sensitivity testing
Kirby-Bauer method, 257–60staphylococci, 338
Antisepsis, 237Antiseptics, 251–53Anti-streptolysin O titration (ASO) test,
streptococci, 348–50API 20E Profile Index Booklet, 209API 20E Profile Recognition
System, 209API 20E Quick Index Booklet, 212API 20E System, 208–12
gram-negative rods, 435–36Arabinose fermentation test, 218Archaea, identification using Internet
and computer-assisted geneanalysis, 409–13
Area, units of, 427Arginine dihydrolase test, 210–11Ascomycetes, 373–76Ascospore, 368Asepsis, 85Aseptic technique, 85–88, 237, 393ASO test. See Anti-streptolysin O
titration testAspergillus, 375
soil, 305Aspergillus niger, morphology and life
cycle, 373–76Autoclaving, 78–80Auxotroph, 387–89, 393–96Axial filament, 14Azotobacter, maintenance of culture, 85Azotobacter nitrogen-free broth, 443
Bacillary dysentery, 208, 291, 327Bacilli (rod-shaped bacteria), 4, 39
455
I N D E X

Harley−Prescott: Laboratory Exercises in Microbiology, Fifth Edition
Back Matter Index © The McGraw−Hill Companies, 2002
Bacillusendospores, 21–23identification, 231maintenance of culture, 85–86normal microbiota from human
body, 330phase-contrast microscopy, 21–23
Bacillus anthracis, 361capsule, 63endospores, 58nitrate reduction test, 202
Bacillus cereus, 361motility, 13–14phase-contrast microscopy, 22
Bacillus circulans, endospore staining,57–59
Bacillus globisporus, temperaturesensitivity, 238–39
Bacillus macerans, endospore staining,57–59
Bacillus megateriumendospore staining, 57–59identification of endospore-
forming bacteria, 361–63negative staining, 33
Bacillus stearothermophilus,temperature sensitivity, 238–39
Bacillus subtiliscasein hydrolysis test, 161–62identification of endospore-
forming bacteria, 361–63negative staining, 32–34pour-plate technique, 105–6shape, 4simple staining, 37–40spread-plate technique, 93–95starch hydrolysis test, 139–40streak-plate technique, 99–101temperature sensitivity, 238–39transformation, 387–89
Bacitracin, 259Bacitracin disks, 347–49Bacitracin sensitivity test, streptococci,
348–50Background staining. See Negative
stainingBacteremia
P. vulgaris, 70S. aureus, 202
Bacteriaarrangement of cells, 39, 231conjugation, 393–96determination of bacterial numbers,
117–20in food, 311–12identification, 2–6, 27–28, 51–53.
See also Stainingusing Internet and computer-
assisted gene analysis,409–13
in milk, 315–18motility, 13–14, 17–18mutations, 382–83non-motile, 13–14
shapes, 2–6, 39, 231soil, 305–7transformation, 387–89
Bacterial dysentery, 154Bacterial smear. See Smear preparationBacteriological filter, 79Bacteriophage. See PhageBacteroides, 110Bacteroides fragilis, 110
gelatin hydrolysis test, 166Bacti-Cinerator, 85–87Bacto lipase reagent, 143–44Baker’s yeast, 368–69Barrier filter, 28Barritt’s reagent, 153, 155–57, 212
recipe, 439Base, number in exponential form, 430Basic fuchsin, 70Basidiomycetes, 373–76Bauer, A. W., 257Beef extract, 77Bending-type motion, 14Bergey, David Hendricks, 223Bergey’s Manual of Determinative
Bacteriology, 223Bergey’s Manual of Systematic
Bacteriology, 223, 230identifying unknown bacteria,
224–26Betadine, 263�-oxidation, 1432% Bile, 341Bile esculin agar, 347
recipe, 444streptococci, 349–51
Bile solubility testpneumococci, 342–43reagents, 439staphylococci, 334
BioBag, 109Biochemical tests, 125–206
casein hydrolysis test, 161–62catalase test, 169–70coagulase test, 173–75DNase test, 173–75fermentation and �-galactosidase
tests, 126–30gelatin hydrolysis test, 161–62hydrogen sulfide production and
motility test, 147–49IMViC tests, 153–58lipid hydrolysis test, 143–44lysine decarboxylase test, 189–91nitrate reduction test, 201–3ornithine decarboxylase test,
189–92oxidase test, 179–81phenylalanine deaminase test,
195–97starch hydrolysis test, 139–40triple sugar iron agar test, 133–36urease test, 185–86
Bioinformatics, 409–10Biomass, 118, 272
Bismark brown stain, 43–47Blank (turbidity determination), 120Bleach, 251Blood agar, 77, 230, 327–29, 333,
335–36, 338, 341, 348, 361culture of pneumococci, 341–43recipe, 444
Blood groups, 322–24Blood typing, 322–24Blow-out pipette, 83–84Bordetella bronchiseptica,
characterization, 438Bordetella pertussis
flagella staining, 70methyl red test, 154
Bottom agar, 300–301recipe, 444
Botulism, 58, 361–62Brain-heart infusion media, 77, 271,
273–74recipe, 444
Brewer, John H., 111Brewer’s anaerobic agar, 109–14
recipe, 444Brewer’s anaerobic petri plate, 111Bright-field microscope, 2–6Bright-phase-contrast microscope, 22Brilliant green, 431Brilliant green lactose bile broth, 285–88
recipe, 444Bromcresol green, 431Bromcresol purple, 126, 190–91, 431Bromophenol blue, 431Bromothymol blue, 155, 431Broth culture, 77–78
anaerobic bacteria, 113growth patterns, 88smear preparation from, 37–38
Brownian movement, 13–14Brucella, in milk, 284Brucellosis, 284Bud, yeast, 368Budding, yeast, 22, 368Buffer, in culture media, 2442,3-Butanediol fermentation, 128,
154–56Butyric acid fermentation, 128
CAMP factor, 349CAMP test, streptococci, 349–51Candida albicans, 368–69Candidiasis, 369Candle jar, 357Capsid, 283Capsule, 64Capsule staining, 63–64Carbenicillin, 259Carbohydrates
fermentation tests, 126–30, 232�-galactosidase test, 126–30starch hydrolysis test, 139–40triple sugar iron agar test, 133–36
Carbolfuchsin, Ziehl’s, 37–40, 51–53Carbolic acid. See Phenol
456 Index
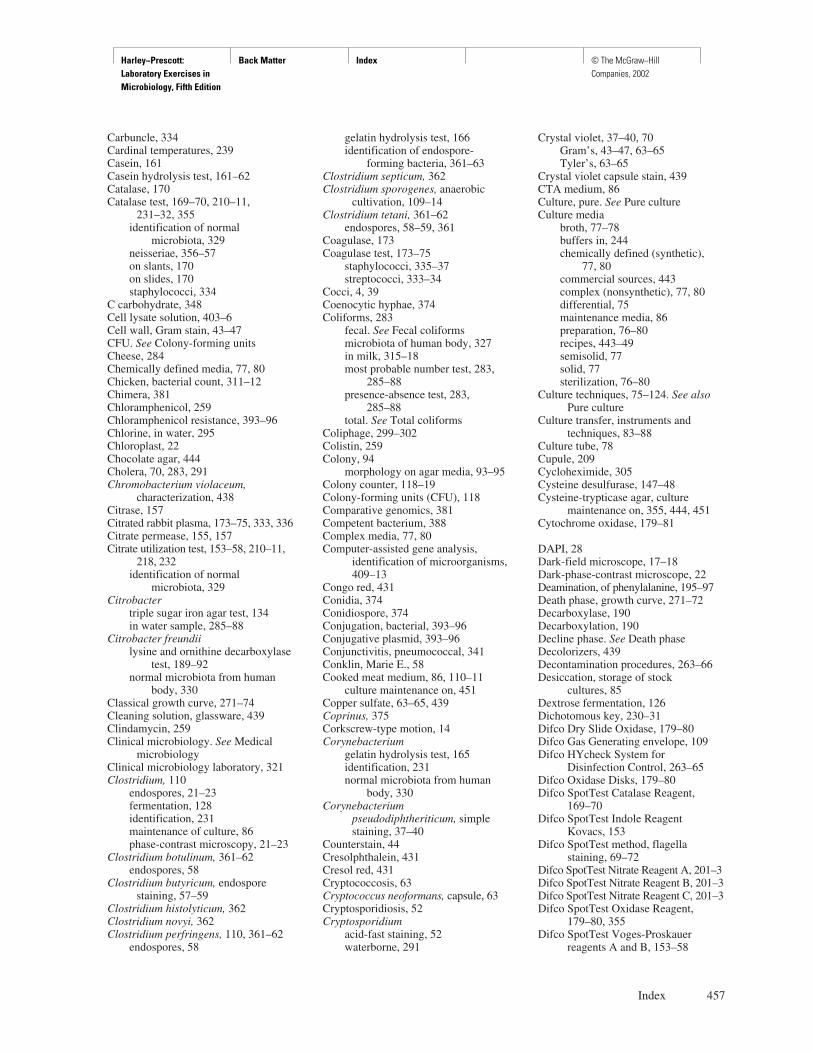
Harley−Prescott: Laboratory Exercises in Microbiology, Fifth Edition
Back Matter Index © The McGraw−Hill Companies, 2002
Carbuncle, 334Cardinal temperatures, 239Casein, 161Casein hydrolysis test, 161–62Catalase, 170Catalase test, 169–70, 210–11,
231–32, 355identification of normal
microbiota, 329neisseriae, 356–57on slants, 170on slides, 170staphylococci, 334
C carbohydrate, 348Cell lysate solution, 403–6Cell wall, Gram stain, 43–47CFU. See Colony-forming unitsCheese, 284Chemically defined media, 77, 80Chicken, bacterial count, 311–12Chimera, 381Chloramphenicol, 259Chloramphenicol resistance, 393–96Chlorine, in water, 295Chloroplast, 22Chocolate agar, 444Cholera, 70, 283, 291Chromobacterium violaceum,
characterization, 438Citrase, 157Citrated rabbit plasma, 173–75, 333, 336Citrate permease, 155, 157Citrate utilization test, 153–58, 210–11,
218, 232identification of normal
microbiota, 329Citrobacter
triple sugar iron agar test, 134in water sample, 285–88
Citrobacter freundiilysine and ornithine decarboxylase
test, 189–92normal microbiota from human
body, 330Classical growth curve, 271–74Cleaning solution, glassware, 439Clindamycin, 259Clinical microbiology. See Medical
microbiologyClinical microbiology laboratory, 321Clostridium, 110
endospores, 21–23fermentation, 128identification, 231maintenance of culture, 86phase-contrast microscopy, 21–23
Clostridium botulinum, 361–62endospores, 58
Clostridium butyricum, endosporestaining, 57–59
Clostridium histolyticum, 362Clostridium novyi, 362Clostridium perfringens, 110, 361–62
endospores, 58
gelatin hydrolysis test, 166identification of endospore-
forming bacteria, 361–63Clostridium septicum, 362Clostridium sporogenes, anaerobic
cultivation, 109–14Clostridium tetani, 361–62
endospores, 58–59, 361Coagulase, 173Coagulase test, 173–75
staphylococci, 335–37streptococci, 333–34
Cocci, 4, 39Coenocytic hyphae, 374Coliforms, 283
fecal. See Fecal coliformsmicrobiota of human body, 327in milk, 315–18most probable number test, 283,
285–88presence-absence test, 283,
285–88total. See Total coliforms
Coliphage, 299–302Colistin, 259Colony, 94
morphology on agar media, 93–95Colony counter, 118–19Colony-forming units (CFU), 118Comparative genomics, 381Competent bacterium, 388Complex media, 77, 80Computer-assisted gene analysis,
identification of microorganisms,409–13
Congo red, 431Conidia, 374Conidiospore, 374Conjugation, bacterial, 393–96Conjugative plasmid, 393–96Conjunctivitis, pneumococcal, 341Conklin, Marie E., 58Cooked meat medium, 86, 110–11
culture maintenance on, 451Copper sulfate, 63–65, 439Coprinus, 375Corkscrew-type motion, 14Corynebacterium
gelatin hydrolysis test, 165identification, 231normal microbiota from human
body, 330Corynebacterium
pseudodiphtheriticum, simplestaining, 37–40
Counterstain, 44Cresolphthalein, 431Cresol red, 431Cryptococcosis, 63Cryptococcus neoformans, capsule, 63Cryptosporidiosis, 52Cryptosporidium
acid-fast staining, 52waterborne, 291
Crystal violet, 37–40, 70Gram’s, 43–47, 63–65Tyler’s, 63–65
Crystal violet capsule stain, 439CTA medium, 86Culture, pure. See Pure cultureCulture media
broth, 77–78buffers in, 244chemically defined (synthetic),
77, 80commercial sources, 443complex (nonsynthetic), 77, 80differential, 75maintenance media, 86preparation, 76–80recipes, 443–49semisolid, 77solid, 77sterilization, 76–80
Culture techniques, 75–124. See alsoPure culture
Culture transfer, instruments andtechniques, 83–88
Culture tube, 78Cupule, 209Cycloheximide, 305Cysteine desulfurase, 147–48Cysteine-trypticase agar, culture
maintenance on, 355, 444, 451Cytochrome oxidase, 179–81
DAPI, 28Dark-field microscope, 17–18Dark-phase-contrast microscope, 22Deamination, of phenylalanine, 195–97Death phase, growth curve, 271–72Decarboxylase, 190Decarboxylation, 190Decline phase. See Death phaseDecolorizers, 439Decontamination procedures, 263–66Desiccation, storage of stock
cultures, 85Dextrose fermentation, 126Dichotomous key, 230–31Difco Dry Slide Oxidase, 179–80Difco Gas Generating envelope, 109Difco HYcheck System for
Disinfection Control, 263–65Difco Oxidase Disks, 179–80Difco SpotTest Catalase Reagent,
169–70Difco SpotTest Indole Reagent
Kovacs, 153Difco SpotTest method, flagella
staining, 69–72Difco SpotTest Nitrate Reagent A, 201–3Difco SpotTest Nitrate Reagent B, 201–3Difco SpotTest Nitrate Reagent C, 201–3Difco SpotTest Oxidase Reagent,
179–80, 355Difco SpotTest Voges-Proskauer
reagents A and B, 153–58
Index 457
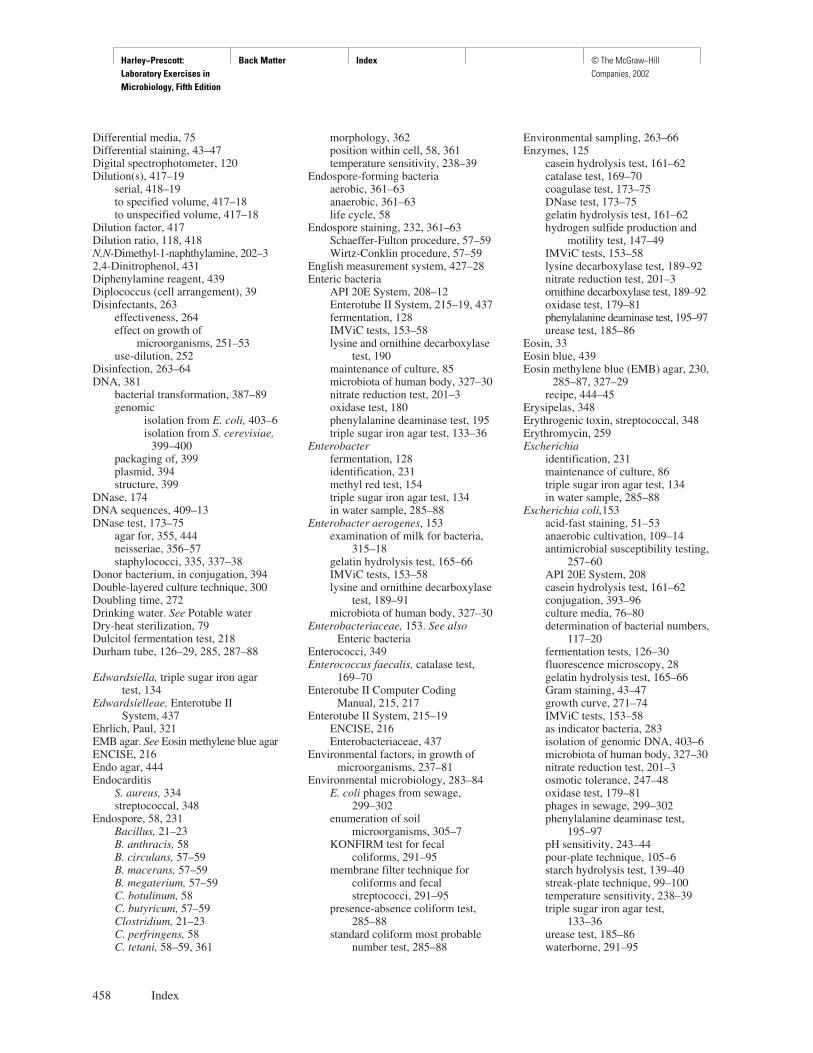
Harley−Prescott: Laboratory Exercises in Microbiology, Fifth Edition
Back Matter Index © The McGraw−Hill Companies, 2002
Differential media, 75Differential staining, 43–47Digital spectrophotometer, 120Dilution(s), 417–19
serial, 418–19to specified volume, 417–18to unspecified volume, 417–18
Dilution factor, 417Dilution ratio, 118, 418N,N-Dimethyl-1-naphthylamine, 202–32,4-Dinitrophenol, 431Diphenylamine reagent, 439Diplococcus (cell arrangement), 39Disinfectants, 263
effectiveness, 264effect on growth of
microorganisms, 251–53use-dilution, 252
Disinfection, 263–64DNA, 381
bacterial transformation, 387–89genomic
isolation from E. coli, 403–6isolation from S. cerevisiae,
399–400packaging of, 399plasmid, 394structure, 399
DNase, 174DNA sequences, 409–13DNase test, 173–75
agar for, 355, 444neisseriae, 356–57staphylococci, 335, 337–38
Donor bacterium, in conjugation, 394Double-layered culture technique, 300Doubling time, 272Drinking water. See Potable waterDry-heat sterilization, 79Dulcitol fermentation test, 218Durham tube, 126–29, 285, 287–88
Edwardsiella, triple sugar iron agartest, 134
Edwardsielleae, Enterotube II System, 437
Ehrlich, Paul, 321EMB agar. See Eosin methylene blue agarENCISE, 216Endo agar, 444Endocarditis
S. aureus, 334streptococcal, 348
Endospore, 58, 231Bacillus, 21–23B. anthracis, 58B. circulans, 57–59B. macerans, 57–59B. megaterium, 57–59C. botulinum, 58C. butyricum, 57–59Clostridium, 21–23C. perfringens, 58C. tetani, 58–59, 361
morphology, 362position within cell, 58, 361temperature sensitivity, 238–39
Endospore-forming bacteriaaerobic, 361–63anaerobic, 361–63life cycle, 58
Endospore staining, 232, 361–63Schaeffer-Fulton procedure, 57–59Wirtz-Conklin procedure, 57–59
English measurement system, 427–28Enteric bacteria
API 20E System, 208–12Enterotube II System, 215–19, 437fermentation, 128IMViC tests, 153–58lysine and ornithine decarboxylase
test, 190maintenance of culture, 85microbiota of human body, 327–30nitrate reduction test, 201–3oxidase test, 180phenylalanine deaminase test, 195triple sugar iron agar test, 133–36
Enterobacterfermentation, 128identification, 231methyl red test, 154triple sugar iron agar test, 134in water sample, 285–88
Enterobacter aerogenes, 153examination of milk for bacteria,
315–18gelatin hydrolysis test, 165–66IMViC tests, 153–58lysine and ornithine decarboxylase
test, 189–91microbiota of human body, 327–30
Enterobacteriaceae, 153. See alsoEnteric bacteria
Enterococci, 349Enterococcus faecalis, catalase test,
169–70Enterotube II Computer Coding
Manual, 215, 217Enterotube II System, 215–19
ENCISE, 216Enterobacteriaceae, 437
Environmental factors, in growth ofmicroorganisms, 237–81
Environmental microbiology, 283–84E. coli phages from sewage,
299–302enumeration of soil
microorganisms, 305–7KONFIRM test for fecal
coliforms, 291–95membrane filter technique for
coliforms and fecalstreptococci, 291–95
presence-absence coliform test,285–88
standard coliform most probablenumber test, 285–88
Environmental sampling, 263–66Enzymes, 125
casein hydrolysis test, 161–62catalase test, 169–70coagulase test, 173–75DNase test, 173–75gelatin hydrolysis test, 161–62hydrogen sulfide production and
motility test, 147–49IMViC tests, 153–58lysine decarboxylase test, 189–92nitrate reduction test, 201–3ornithine decarboxylase test, 189–92oxidase test, 179–81phenylalanine deaminase test, 195–97urease test, 185–86
Eosin, 33Eosin blue, 439Eosin methylene blue (EMB) agar, 230,
285–87, 327–29recipe, 444–45
Erysipelas, 348Erythrogenic toxin, streptococcal, 348Erythromycin, 259Escherichia
identification, 231maintenance of culture, 86triple sugar iron agar test, 134in water sample, 285–88
Escherichia coli,153acid-fast staining, 51–53anaerobic cultivation, 109–14antimicrobial susceptibility testing,
257–60API 20E System, 208casein hydrolysis test, 161–62conjugation, 393–96culture media, 76–80determination of bacterial numbers,
117–20fermentation tests, 126–30fluorescence microscopy, 28gelatin hydrolysis test, 165–66Gram staining, 43–47growth curve, 271–74IMViC tests, 153–58as indicator bacteria, 283isolation of genomic DNA, 403–6microbiota of human body, 327–30nitrate reduction test, 201–3osmotic tolerance, 247–48oxidase test, 179–81phages in sewage, 299–302phenylalanine deaminase test,
195–97pH sensitivity, 243–44pour-plate technique, 105–6starch hydrolysis test, 139–40streak-plate technique, 99–100temperature sensitivity, 238–39triple sugar iron agar test,
133–36urease test, 185–86waterborne, 291–95
458 Index
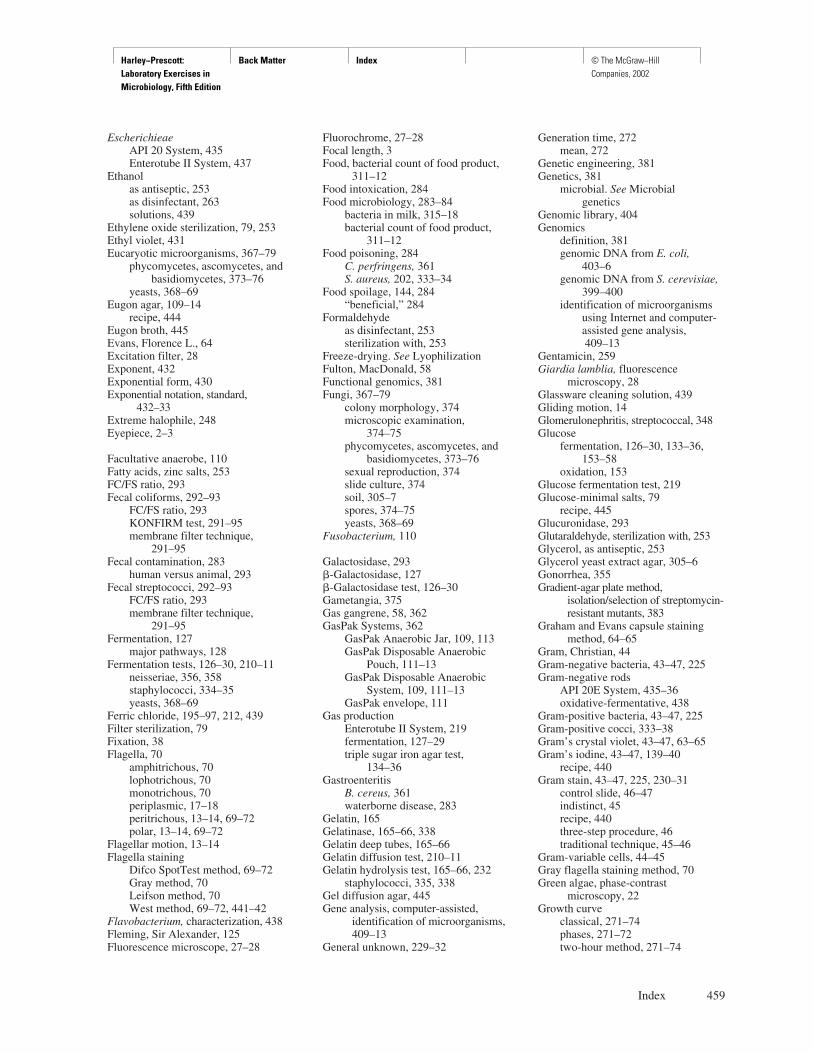
Harley−Prescott: Laboratory Exercises in Microbiology, Fifth Edition
Back Matter Index © The McGraw−Hill Companies, 2002
EscherichieaeAPI 20 System, 435Enterotube II System, 437
Ethanolas antiseptic, 253as disinfectant, 263solutions, 439
Ethylene oxide sterilization, 79, 253Ethyl violet, 431Eucaryotic microorganisms, 367–79
phycomycetes, ascomycetes, andbasidiomycetes, 373–76
yeasts, 368–69Eugon agar, 109–14
recipe, 444Eugon broth, 445Evans, Florence L., 64Excitation filter, 28Exponent, 432Exponential form, 430Exponential notation, standard,
432–33Extreme halophile, 248Eyepiece, 2–3
Facultative anaerobe, 110Fatty acids, zinc salts, 253FC/FS ratio, 293Fecal coliforms, 292–93
FC/FS ratio, 293KONFIRM test, 291–95membrane filter technique,
291–95Fecal contamination, 283
human versus animal, 293Fecal streptococci, 292–93
FC/FS ratio, 293membrane filter technique,
291–95Fermentation, 127
major pathways, 128Fermentation tests, 126–30, 210–11
neisseriae, 356, 358staphylococci, 334–35yeasts, 368–69
Ferric chloride, 195–97, 212, 439Filter sterilization, 79Fixation, 38Flagella, 70
amphitrichous, 70lophotrichous, 70monotrichous, 70periplasmic, 17–18peritrichous, 13–14, 69–72polar, 13–14, 69–72
Flagellar motion, 13–14Flagella staining
Difco SpotTest method, 69–72Gray method, 70Leifson method, 70West method, 69–72, 441–42
Flavobacterium, characterization, 438Fleming, Sir Alexander, 125Fluorescence microscope, 27–28
Fluorochrome, 27–28Focal length, 3Food, bacterial count of food product,
311–12Food intoxication, 284Food microbiology, 283–84
bacteria in milk, 315–18bacterial count of food product,
311–12Food poisoning, 284
C. perfringens, 361S. aureus, 202, 333–34
Food spoilage, 144, 284“beneficial,” 284
Formaldehydeas disinfectant, 253sterilization with, 253
Freeze-drying. See LyophilizationFulton, MacDonald, 58Functional genomics, 381Fungi, 367–79
colony morphology, 374microscopic examination,
374–75phycomycetes, ascomycetes, and
basidiomycetes, 373–76sexual reproduction, 374slide culture, 374soil, 305–7spores, 374–75yeasts, 368–69
Fusobacterium, 110
Galactosidase, 293�-Galactosidase, 127�-Galactosidase test, 126–30Gametangia, 375Gas gangrene, 58, 362GasPak Systems, 362
GasPak Anaerobic Jar, 109, 113GasPak Disposable Anaerobic
Pouch, 111–13GasPak Disposable Anaerobic
System, 109, 111–13GasPak envelope, 111
Gas productionEnterotube II System, 219fermentation, 127–29triple sugar iron agar test,
134–36Gastroenteritis
B. cereus, 361waterborne disease, 283
Gelatin, 165Gelatinase, 165–66, 338Gelatin deep tubes, 165–66Gelatin diffusion test, 210–11Gelatin hydrolysis test, 165–66, 232
staphylococci, 335, 338Gel diffusion agar, 445Gene analysis, computer-assisted,
identification of microorganisms,409–13
General unknown, 229–32
Generation time, 272mean, 272
Genetic engineering, 381Genetics, 381
microbial. See Microbialgenetics
Genomic library, 404Genomics
definition, 381genomic DNA from E. coli,
403–6genomic DNA from S. cerevisiae,
399–400identification of microorganisms
using Internet and computer-assisted gene analysis,409–13
Gentamicin, 259Giardia lamblia, fluorescence
microscopy, 28Glassware cleaning solution, 439Gliding motion, 14Glomerulonephritis, streptococcal, 348Glucose
fermentation, 126–30, 133–36,153–58
oxidation, 153Glucose fermentation test, 219Glucose-minimal salts, 79
recipe, 445Glucuronidase, 293Glutaraldehyde, sterilization with, 253Glycerol, as antiseptic, 253Glycerol yeast extract agar, 305–6Gonorrhea, 355Gradient-agar plate method,
isolation/selection of streptomycin-resistant mutants, 383
Graham and Evans capsule stainingmethod, 64–65
Gram, Christian, 44Gram-negative bacteria, 43–47, 225Gram-negative rods
API 20E System, 435–36oxidative-fermentative, 438
Gram-positive bacteria, 43–47, 225Gram-positive cocci, 333–38Gram’s crystal violet, 43–47, 63–65Gram’s iodine, 43–47, 139–40
recipe, 440Gram stain, 43–47, 225, 230–31
control slide, 46–47indistinct, 45recipe, 440three-step procedure, 46traditional technique, 45–46
Gram-variable cells, 44–45Gray flagella staining method, 70Green algae, phase-contrast
microscopy, 22Growth curve
classical, 271–74phases, 271–72two-hour method, 271–74
Index 459
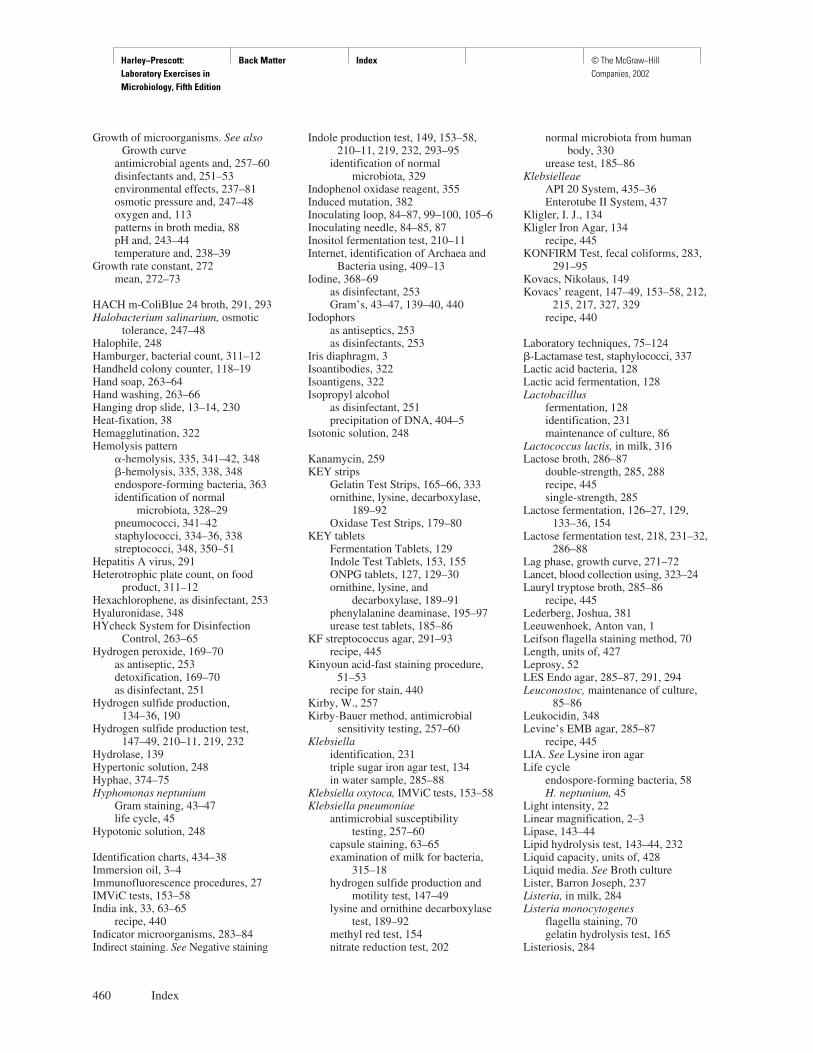
Harley−Prescott: Laboratory Exercises in Microbiology, Fifth Edition
Back Matter Index © The McGraw−Hill Companies, 2002
Growth of microorganisms. See alsoGrowth curve
antimicrobial agents and, 257–60disinfectants and, 251–53environmental effects, 237–81osmotic pressure and, 247–48oxygen and, 113patterns in broth media, 88pH and, 243–44temperature and, 238–39
Growth rate constant, 272mean, 272–73
HACH m-ColiBlue 24 broth, 291, 293Halobacterium salinarium, osmotic
tolerance, 247–48Halophile, 248Hamburger, bacterial count, 311–12Handheld colony counter, 118–19Hand soap, 263–64Hand washing, 263–66Hanging drop slide, 13–14, 230Heat-fixation, 38Hemagglutination, 322Hemolysis pattern
�-hemolysis, 335, 341–42, 348�-hemolysis, 335, 338, 348endospore-forming bacteria, 363identification of normal
microbiota, 328–29pneumococci, 341–42staphylococci, 334–36, 338streptococci, 348, 350–51
Hepatitis A virus, 291Heterotrophic plate count, on food
product, 311–12Hexachlorophene, as disinfectant, 253Hyaluronidase, 348HYcheck System for Disinfection
Control, 263–65Hydrogen peroxide, 169–70
as antiseptic, 253detoxification, 169–70as disinfectant, 251
Hydrogen sulfide production, 134–36, 190
Hydrogen sulfide production test,147–49, 210–11, 219, 232
Hydrolase, 139Hypertonic solution, 248Hyphae, 374–75Hyphomonas neptunium
Gram staining, 43–47life cycle, 45
Hypotonic solution, 248
Identification charts, 434–38Immersion oil, 3–4Immunofluorescence procedures, 27IMViC tests, 153–58India ink, 33, 63–65
recipe, 440Indicator microorganisms, 283–84Indirect staining. See Negative staining
Indole production test, 149, 153–58,210–11, 219, 232, 293–95
identification of normalmicrobiota, 329
Indophenol oxidase reagent, 355Induced mutation, 382Inoculating loop, 84–87, 99–100, 105–6Inoculating needle, 84–85, 87Inositol fermentation test, 210–11Internet, identification of Archaea and
Bacteria using, 409–13Iodine, 368–69
as disinfectant, 253Gram’s, 43–47, 139–40, 440
Iodophorsas antiseptics, 253as disinfectants, 253
Iris diaphragm, 3Isoantibodies, 322Isoantigens, 322Isopropyl alcohol
as disinfectant, 251precipitation of DNA, 404–5
Isotonic solution, 248
Kanamycin, 259KEY strips
Gelatin Test Strips, 165–66, 333ornithine, lysine, decarboxylase,
189–92Oxidase Test Strips, 179–80
KEY tabletsFermentation Tablets, 129Indole Test Tablets, 153, 155ONPG tablets, 127, 129–30ornithine, lysine, and
decarboxylase, 189–91phenylalanine deaminase, 195–97urease test tablets, 185–86
KF streptococcus agar, 291–93recipe, 445
Kinyoun acid-fast staining procedure,51–53
recipe for stain, 440Kirby, W., 257Kirby-Bauer method, antimicrobial
sensitivity testing, 257–60Klebsiella
identification, 231triple sugar iron agar test, 134in water sample, 285–88
Klebsiella oxytoca, IMViC tests, 153–58Klebsiella pneumoniae
antimicrobial susceptibilitytesting, 257–60
capsule staining, 63–65examination of milk for bacteria,
315–18hydrogen sulfide production and
motility test, 147–49lysine and ornithine decarboxylase
test, 189–92methyl red test, 154nitrate reduction test, 202
normal microbiota from humanbody, 330
urease test, 185–86Klebsielleae
API 20 System, 435–36Enterotube II System, 437
Kligler, I. J., 134Kligler Iron Agar, 134
recipe, 445KONFIRM Test, fecal coliforms, 283,
291–95Kovacs, Nikolaus, 149Kovacs’ reagent, 147–49, 153–58, 212,
215, 217, 327, 329recipe, 440
Laboratory techniques, 75–124�-Lactamase test, staphylococci, 337Lactic acid bacteria, 128Lactic acid fermentation, 128Lactobacillus
fermentation, 128identification, 231maintenance of culture, 86
Lactococcus lactis, in milk, 316Lactose broth, 286–87
double-strength, 285, 288recipe, 445single-strength, 285
Lactose fermentation, 126–27, 129, 133–36, 154
Lactose fermentation test, 218, 231–32,286–88
Lag phase, growth curve, 271–72Lancet, blood collection using, 323–24Lauryl tryptose broth, 285–86
recipe, 445Lederberg, Joshua, 381Leeuwenhoek, Anton van, 1Leifson flagella staining method, 70Length, units of, 427Leprosy, 52LES Endo agar, 285–87, 291, 294Leuconostoc, maintenance of culture,
85–86Leukocidin, 348Levine’s EMB agar, 285–87
recipe, 445LIA. See Lysine iron agarLife cycle
endospore-forming bacteria, 58H. neptunium, 45
Light intensity, 22Linear magnification, 2–3Lipase, 143–44Lipid hydrolysis test, 143–44, 232Liquid capacity, units of, 428Liquid media. See Broth cultureLister, Barron Joseph, 237Listeria, in milk, 284Listeria monocytogenes
flagella staining, 70gelatin hydrolysis test, 165
Listeriosis, 284
460 Index
Harley−Prescott: Laboratory Exercises in Microbiology, Fifth Edition
Back Matter Index © The McGraw−Hill Companies, 2002
Litmus, 431Litmus milk, 445Loeffler’s alkaline methylene blue,
37–40, 440Logarithm(s), 430Logarithmic phase, growth curve,
271–72Lophotrichous flagella, 70Löwenstein-Jensen medium, 445Low-power, high-dry objective, 2–3Lycoperdon, 375Lyophilization, 85–86, 450–51
rehydration of lyophilized culture, 451
Lysine deaminase test, identification ofnormal microbiota, 329
Lysine decarboxylase, 190Lysine decarboxylase test, 189–92,
210–11, 219identification of normal
microbiota, 329Lysine iron agar (LIA), 189–92, 327, 329
recipe, 445–46Lysis, of bacteria by phage, 300Lysol, 251–53, 263Lysozyme, 125, 387–88
MacConkey, Alfred Theodore, 75MacConkey’s agar, 75
recipe, 446“Magic bullet” concept, 321Magnification, 3Malachite green, 57–59, 431
recipe, 440Mannitol fermentation test,
staphylococci, 335–36Mannitol salt agar, 230, 336
recipe, 446Mannose fermentation test, 210–11Mass, units of, 428Maximum growth temperature, 239Mean generation time, 272Mean growth rate constant, 272–73Measurement
metric and English equivalents,427–28
of microorganisms, 2–6Meat tenderizer, 399–400Media. See Culture mediaMedical microbiology, 321–66
agglutination reactions, 322–24endospore-forming bacteria, 361–63neisseriae, 355–57normal microbiota from human
body, 327–30pneumococci, 341–43staphylococci, 333–38streptococci, 347–51
Membrane filter technique, 283coliforms and fecal streptococci,
291–95Membrane sterilization, 79M-Endo broth, 446M-Endo broth MF, 291–94
Meningitisbacterial, 165N. meningitidis, 355pneumococcal, 341
Meningoencephalitis, L.monocytogenes, 70
Mepercrine, 321Mercurochrome, 253Mercury vapor arc lamp, 28Merthiolate, 253Mesophile, 239Methicillin, 259Methicillin-resistant Staphylococcus
aureus, 338Methylene blue, 111, 316, 368–69, 373
alkaline, 51–53Loeffler’s alkaline, 37–40, 440recipe, 440
Methylene blue reductase test, on milk,315–18
Methyl red, 431Methyl red test, 153–58, 232
identification of normalmicrobiota, 329
recipe for methyl red reagent, 440Methyl red-Voges-Proskauer broth,
153, 327, 329recipe, 446
Metric system, 427–28M-FC broth, 291–93
recipe, 446Microaerophile, 110Microbial genetics, 381
bacterial conjugation, 393–96bacterial mutation, 382–83bacterial transformation, 387–89
Microbicidal chemical, 252Microbiological monitoring, 263–66Microbiological stock cultures. See
Stock culturesMicrobiostatic chemical, 252Microbiota, normal
isolation from human body, 327–30oral organisms, 17–18, 369rectal organisms, 330skin organisms, 330throat organisms, 330
Micrococcusdistinguishing gram-positive
cocci, 334identification, 231identification of staphylococci,
333–38maintenance of culture, 85
Micrococcus (cell arrangement), 39Micrococcus luteus
catalase test, 169–70negative staining, 32–34normal microbiota from human
body, 330simple staining, 37–40
Micrococcus lysodeikticus, 125Micrococcus roseus
pour-plate technique, 105–6
spread-plate technique, 93–95streak-plate technique, 99–100
Micrometerocular, 5–6stage, 5
Microscopebright-field, 2–6dark-field, 17–18fluorescence, 27–28phase-contrast, 21–23
Microscopic measurement, 2–6Microscopic techniques, 1–30Milk
examination for bacteria, 284,315–18
pasteurization, 284, 315Millipore Membrane Sampler and
Swab Test Kits, 263–66temperature and incubation
times, 267Mineral oil, sealing of cultures under, 85Minimal salts agar, 387Minimum growth temperature, 239Mixed acid fermentation, 128, 154, 156MM1 medium, 387–88
recipe, 446MM2 medium, 387–88
recipe, 446Mobiluncus, 110Moderate halophile, 248Moeller’s lysine decarboxylase broth,
189–91Moeller’s ornithine decarboxylase
broth, 189–91, 446Mohr, Francis, 83Mohr measuring pipette, 83–84Molds, 373–76. See also FungiMonitoring, microbiological, 263–66Monotrichous flagella, 70Moraxella, characterization, 438Moraxella nonliquefaciens, identification
of neisseriae, 355–57Morchella, 375Mordant, 44, 46Morganella
identification, 231phenylalanine deaminase test, 195triple sugar iron agar test, 134
Morganella morganii, nitrate reductiontest, 202
Most probable number (MPN) test, 283coliforms, 285–88completed test, 285–88confirmed test, 285–88MPN Index, 287presumptive test, 285–88
Motility, of bacteria, 13–14, 17–18Motility test, 147–49, 232
identification of normalmicrobiota, 329
Motility test medium, 147–49recipe, 446
Mouse susceptibility test, pneumococci,342–43
Index 461
Harley−Prescott: Laboratory Exercises in Microbiology, Fifth Edition
Back Matter Index © The McGraw−Hill Companies, 2002
MPN test. See Most probable number testM-staphylococcus broth, 333, 336Mucor, soil, 305Mueller-Hinton agar, 257–60, 333, 338
recipe, 446MUG test, 293–95Mushroom, 373–76
dissection, 375Mutagen, 382Mutation, 382
bacterial, 382–83Mycelium, 374Mycobacterium
identification, 231in milk, 284
Mycobacterium leprae, 52Mycobacterium phlei, acid-fast
staining, 51–53Mycobacterium smegmatis, acid-fast
staining, 51–53Mycobacterium tuberculosis
acid-fast staining, 51–53fluorescence microscopy, 27–28
Mycolic acid, 52
�-Naphthol, 215, 217, 440Neelsen, Friedrich, 52Negative staining, 32–34Neisseriae, 355–57
catalase test, 356–57DNase test, 356–57fermentation tests, 356, 358identification, 231maintenance of culture, 86morphology, 356nitrate reduction test, 356–57nitrite reduction test, 356–57normal microbiota from human
body, 330oxidase test, 356–57pigmentation, 356on Thayer-Martin agar, 356–57
Neisseria flavescens, 355–57Neisseria gonorrhoeae
identification of neisseriae, 355–57oxidase test, 180
Neisseria lactamica, 355–57Neisseria mucosa, 355–57Neisseria sicca, 355–57Neisseria subflava, 355–57Neomycin, 259Nephelo culture flask, 271Nessler’s reagent, 440Neufeld, Fred, 342Neufeld reaction, 342Neutral red, 431Neutrophile, 243Nigrosin, 33
recipe, 441Ninhydrin, 189–92Nitrate agar, 201–3
recipe, 446Nitrate broth, 201–3
recipe, 446
Nitrate-free broth, recipe, 446Nitrate reductase, 202–3Nitrate reduction test, 201–3, 210–11,
232, 355neisseriae, 356–57recipe for reagents, 441staphylococci, 334–35
Nitrite, 202reduction, 202–3
Nitrite reduction testneisseriae, 356–57recipe for reagent, 441
Nitrite test reagent A, 201–3Nitrite test reagent B, 201–3Noble agar, 443Nocardia asteroides, acid-fast
staining, 52Nocardia brasiliensis, acid-fast
staining, 52Nocardiosis, 52Non-acid-fast cells, 52Non-motile bacteria, 13–14Nosocomial infections, 263
P. mirabilis, 202Novobiocin, 259Novobiocin sensitivity test,
staphylococci, 335, 338Nutrient agar, 77, 86, 299
recipe, 446Nutrient broth, 77, 299, 387
recipe, 447Nutrient gelatin deep, 333, 338
recipe, 447
Objective lens, 2–3, 21–22Obligate aerobe, 110Obligate anaerobe, 110Ocular lens. See EyepieceOcular micrometer, 5–6Oil immersion objective, 2–4Oleandromycin, 259ONPG disks, 126, 129ONPG tablets, 126ONPG test, 127, 129–30, 210–11,
293–95reagents, 441
Optimum growth temperature, 239Optochin test, pneumococci, 341–43Organic mercury compounds, as
antiseptics, 253Ornithine decarboxylase, 190Ornithine decarboxylase test, 189–92,
210–11, 219Osmotic pressure, 248
effect on growth ofmicroorganisms, 247–48
Osteomyelitis, S. aureus, 333Otitis media
pneumococcal, 341streptococcal, 348
Oxidase test, 179–81, 216, 232neisseriae, 356–57reagents, 179–81, 441staphylococci, 334
Oxidative-fermentative gram-negativerods, 438
OxyDish, 109, 112, 114Oxygen
damaging effects on anaerobes, 110relationship to bacterial
growth, 113toxic oxygen products, 169–70
OxyPlate, 109, 112Oxyrase For Agar, 109, 112, 114Oxyrase For Broth, 109, 112, 114
Palladium catalyst, 111, 362Papain, 400Paramecium, phase-contrast
microscopy, 21–23Paramecium caudatum, phase-contrast
microscopy, 22Pararosaniline, 70Paratyphoid fever, 291Pasteur, Louis, 283Pasteurella, characterization, 438Pasteurization, 283
of milk, 284, 315P-A test. See Presence-absence testPathogen, potential, 321Penicillin, discovery, 125Penicillin G, 259Penicillin-resistant Staphylococcus
aureus, 338Penicillium, soil, 305Penicillium notatum, morphology and
life cycle, 373–76Peptone(s), 77Peptone broth, 447Peptostreptococcus, 110Periplasmic flagella, 17–18Peritonitis, pneumococcal, 341Peritrichous flagella, 13–14, 69–72Peroxidase, 170pH, 243, 431
effect on growth ofmicroorganisms, 243–44
growth optimum, 243growth range, 243pH indicators, 431pH meter, 431
Phage, 283E. coli, isolation from sewage,
299–302plaques, 300–301
Phage T4, 284Phage titer, 299–302Phase-contrast microscope, 21–23
bright-phase-contrastmicroscope, 22
dark-phase-contrast microscope, 22Phase plate, 21–22Phenol, 237, 251–52Phenol coefficient, 251–52Phenolphthalein, 431Phenol red, 126, 128, 133–34, 185–86,
190, 341Phenol red dextrose broth, 447
462 Index

Harley−Prescott: Laboratory Exercises in Microbiology, Fifth Edition
Back Matter Index © The McGraw−Hill Companies, 2002
Phenol red lactose broth, 447Phenol red sucrose broth, 447Phenylalanine deaminase, 195–96Phenylalanine deaminase test,
195–97, 218recipe for agar, 447
Phenylpyruvic acid, 195–96Phosphate buffer, 244
recipe, 441Phospholipids, 143Phycomycetes, 373–76Physiological saline, 441Pigmentation
neisseriae, 356staphylococci, 335
Pipette, 83blow-out (serological), 83–84sterilization, 84to-deliver (Mohr measuring), 83–84
Pipette bulb, 84Pipette can, 84Pipette filler, safety bulb, 84Pipetting, 84, 86Pipetting device, electronically
powered, 84Plague, 154, 208Plaque, phage, 300–301Plasmid, 381, 394
antibiotic-resistant, 393–96conjugative, 393–96
Plasmolysis, 248Plate count, 117–18
on food product, 311–12Plate count agar, 161–62, 311–12
recipe, 447Plate culture, anaerobic bacteria, 113Pleomorphic bacteria, 39Plesiomonas shigelloides,
characterization, 438Pneumococci, 341–43
bile solubility test, 342–43culture on blood agar, 341–43hemolysis pattern, 341–42identification, 341–43microbiota from human body, 330morphology, 341–42mouse susceptibility test, 342–43optochin test, 342–43quellung reaction, 342–43
PneumoniaK. pneumoniae, 154, 202pneumococcal, 341P. vulgaris, 70S. aureus, 333–34S. mutans, 63
Polar flagella, 13–14, 69–72Polio virus, 291Polymyxin B, 259Polyporus, 375Pond water, 21–23Potability, 291Potable water, 283, 291
standard set for, 292Potassium alum, 70
Potassium permanganate, as antiseptic, 253
Potato dextrose agar, 374–75recipe, 447
Potential pathogen, 321Pour-plate technique, 105–6Presence-absence (P-A) test, coliforms,
283, 285–88recipe for P-A broth, 447
Primary stain, 44Prodigiosin, 83Profile index number, 209, 212Prontosil red, 321Propidium iodine, 28Propionibacterium, fermentation, 128Propionic acid bacteria, 128Propionic acid fermentation, 128Proskauer, Bernhard, 154Proteae
API 20E System, 436Enterotube II System, 437
PROTECT bacterial preservers, 451–52
Proteinscasein hydrolysis test, 161–62catalase test, 169–70coagulase test, 173–75DNase test, 173–75gelatin hydrolysis test, 161–62hydrogen sulfide production and
motility test, 147–49IMViC tests, 153–58lysine decarboxylase test, 189–91nitrate reduction test, 201–3ornithine decarboxylase test, 189–92oxidase test, 179–81phenylalanine deaminase test,
195–97urease test, 185–86
Proteolytic enzymes, 161–62, 165–66Proteus
fermentation, 128identification, 231maintenance of culture, 85–86phenylalanine deaminase test, 195
Proteus mirabilisAPI 20E System, 208lipid hydrolysis test, 143–44normal microbiota from human
body, 330urease test, 185
Proteus vulgaris,153flagella staining, 70gelatin hydrolysis test, 165–66hydrogen sulfide production and
motility test, 147–49IMViC tests, 153–58lysine and ornithine decarboxylase
test, 189–91phenylalanine deaminase test,
195–97starch hydrolysis test, 139–40triple sugar iron agar test, 133–36urease test, 185–86
Protoslo, 21–23Protozoa, phase-contrast
microscopy, 22Providencia
identification, 231phenylalanine deaminase test, 195
Pseudomonasidentification, 231, 438maintenance of culture, 85–86
Pseudomonas aeruginosaanaerobic cultivation, 109–14antimicrobial susceptibility testing,
257–60casein hydrolysis test, 161–62effectiveness of disinfectants,
251–52flagella staining, 70motility, 13–14normal microbiota from human
body, 330oxidase test, 179–81temperature sensitivity, 238–39triple sugar iron agar test, 133–36
Pseudomonas fluorescensflagella staining, 69–72nitrate reduction test, 201–3
Psychrophile, 239Puccinia, 375Pure culture, 393
isolation, 83–88maintenance, 83–88pour-plate technique, 105–6spread-plate technique, 93–95streak-plate technique, 99–100
Pyrogallol, 109, 111
Quebec colony counter, 118–19Quellung reaction, pneumococci, 342–43Quick-freeze preservation methods,
450–51
Radiolarian shells, 18Rancidity, 144Rapid multitest systems, 207–22
API 20E System, 208–12, 435–36Enterotube II System, 215–19, 437
Reagents, recipes for, 439–42Recipient bacterium, in
conjugation, 394Recipient cell, in genetic
engineering, 381Rectal culture, 328–30Refractive index, 3Refrigeration, storage of stock
cultures, 85Reproductive hyphae, 374Resazurin, 111, 431Resident microorganisms, 263Rheumatic fever, 348Rhizoidal hyphae, 374Rhizopus, 375
soil, 305Rhizopus stolonifer, morphology and
life cycle, 373–76
Index 463
Harley−Prescott: Laboratory Exercises in Microbiology, Fifth Edition
Back Matter Index © The McGraw−Hill Companies, 2002
Rhodospirillum rubrum, 4Rhodotorula, morphology and culture,
368–69Ribonuclease, 404–5Ribosomal Database Project, 410Ribosomal RNA, 409Ribosomal RNA gene sequencing,
409–13Ribosomes, 409Rifampin, 259Rifampin resistance, 393–96RODAC plates, 263–65Rod-shaped bacteria, 4
Sabouraud dextrose agar, 305–6, 368–69,373–74
recipe, 447Saccharomyces, fermentation, 128Saccharomyces cerevisiae
fermentation tests, 126–30isolation of genomic DNA, 399–400morphology and culture, 368–69phase-contrast microscopy, 22pH sensitivity, 243–44
Safety bulb pipette filler, 84Safranin, 43–47, 57–59, 63–65Salmonella
identification, 231maintenance of culture, 86in milk, 284
Salmonella cholerae-suisfermentation tests, 126–30urease test, 185–86
Salmonella paratyphi, 291Salmonella typhi
API 20E System, 208flagella staining, 70methyl red test, 154non lactose fermenter, 327triple sugar iron agar test, 134waterborne, 291
Salmonella typhimurium, hydrogensulfide production and motilitytest, 147–49
SalmonelleaeAPI 20 System, 435Enterotube II System, 437
Salmonellosis, 283–84Salt medium-halobacterium, 447Saprolegnia, 375Sarcina (cell arrangement), 39Scarlet fever, 348Schaeffer, Alice B., 58Schaeffer-Fulton endospore staining
procedure, 57–59Scientific notation, 432–33Selection method, 381Semisolid media, 77Septate hyphae, 374Septic sore throat, streptococcal, 348Septisoft, 263Septum, 374Serial dilutions, 418–19Serological pipette, 83–84
Serratiafermentation, 128maintenance of culture, 86triple sugar iron agar test, 134
Serratia marcescensculture transfer, 83–88pour-plate technique, 105–6spread-plate technique, 93–95streak-plate technique, 99–100
Sewage, E. coli phages from, 299–302Sex pili, 394Sexual spore, 368Sheep blood agar, 347Shells, radiolarian, 18Shigella
identification, 231triple sugar iron agar test, 134urease test, 185
Shigella dysenteriae, 153API 20E System, 208methyl red test, 154non lactose fermenter, 327waterborne, 291
Shigella flexneri, triple sugar iron agartest, 133–36
Shigellosis, 283Shill, 118Side chain theory, 321Signature sequence, 410Silver nitrate
as antiseptic, 253flagella staining, 70
SIM agar deep, 147–49, 153–58, 327, 329
recipe, 447Simmons, J. S., 149Simmons citrate agar, 153–58, 327, 329
recipe, 447Simple staining, 37–40Skin culture, 328–30Skin infection, P. aeruginosa, 70Slide culture, of fungi, 374Smear preparation, 33–34, 37–40Sodium deoxycholate, 341Sodium dodecyl sulfate, cell lysis
with, 404Sodium hypochlorite, 253Sodium lauryl sulfate, 287Soil
acid, 305alkaline, 305enumeration of microorganisms in,
305–7isolation of anaerobes from, 113microorganisms in, 284
Solid media, 77Solute, 248Solutions, recipes, 439–42Solvent, 248Sorbitol fermentation test, 210–11, 218Spectrophotometer, 118–20
analog, 120digital, 120growth curve determination, 271–74
Spectrophotometry. See alsoTurbidometric analysis
transmission-absorbance table, 429Spirilla, 4, 39Spirillum volutans
motility, 13–14negative staining, 32–34shape, 4simple staining, 37–40
Spirit blue agar with 3% lipase, 143–44recipe, 448
Spirochete, dark-field microscopy,17–18
Spirogyra, phase-contrastmicroscopy, 22
Spizizen’s salts, 448Spontaneous mutation, 382Spore. See also Endospore
fungal, 374–75SpotTest method. See Difco SpotTest
entriesSpread-plate technique, 93–95Sputum specimen, 27
culture of pneumococci from, 342SS agar, 448Stab technique, for transferring bacteria,
87–88Stage micrometer, 5Stain. See also specific stains and dyes
primary, 44recipes for, 439–42
Stainingacid-fast staining, 51–53, 231capsule, 63–65differential, 43–47endospore, 57–59, 232, 361–63flagella, 69–72, 441–42Gram stain, 43–47, 225, 230–31, 440negative, 32–34simple, 37–40
Standard exponential notation, 432–33
Standard plate count. See Viable platecount
STAPHAUREX rapid latex test kit,333, 337
Staphene, 263Staphylococci, 333–38
antimicrobial sensitivity, 338bile solubility test, 334catalase test, 334coagulase negative, 174, 333coagulase positive, 173, 333–34coagulase test, 333–37DNase test, 335, 337–38fermentation tests, 334–35gelatin hydrolysis test, 335, 338hemolysis patterns, 334–36, 338identification, 231�-lactamase test, 337maintenance of culture, 86mannitol fermentation test, 335–36morphology, 334nitrate reduction test, 334–35
464 Index
Harley−Prescott: Laboratory Exercises in Microbiology, Fifth Edition
Back Matter Index © The McGraw−Hill Companies, 2002
novobiocin sensitivity test, 335, 338oxidase test, 334pathogenic versus nonpathogenic,
173–75, 333pigmentation, 335
Staphylococcus (cell arrangement), 39Staphylococcus aureus
antimicrobial susceptibility testing,257–60
catalase test, 169–70coagulase test, 173–75distinguishing gram-positive
cocci, 334DNase test, 173–75effectiveness of disinfectants,
251–52gelatin hydrolysis test, 165Gram staining, 43–47identification of staphylococci,
333–38identification of streptococci,
347–51methicillin-resistant, 338mutations, 382–83nitrate reduction test, 202normal microbiota from human
body, 330osmotic tolerance, 247–48penicillin-resistant, 338shape, 4temperature sensitivity, 238–39
Staphylococcus epidermidiscoagulase test, 173–75DNase test, 173–75gelatin hydrolysis test, 165identification of staphylococci,
333–38lipid hydrolysis test, 143–44nitrate reduction test, 201–3normal microbiota from human
body, 330Staphylococcus saprophyticus, 333–38Starch agar, 448Starch hydrolysis test, 139–40, 232Stationary phase, growth curve,
271–72Sterilization, 79
autoclaving, 78–80of culture media, 76–80dry-heat, 79of equipment, 79with ethylene oxide, 79, 253with formaldehyde, 253with glutaraldehyde, 253membrane filter, 79of pipettes, 84ultraviolet radiation, 79
Stock cultures, 85. See also Pureculture
commercial sources, 450maintenance, 450–53
Stock solution, 417Streak-plate technique, 99–100Streptobacillus (cell arrangement), 39
Streptococci, 347–51anti-streptolysin O titration test,
348–50bacitracin sensitivity test, 348–50on bile esculin agar, 349–51CAMP test, 349–51distinguishing gram-positive
cocci, 334fecal. See Fecal streptococcifermentation, 128Group A, 348, 351Group B, 349, 351Group C, 351Group D, 349hemolysis pattern, 348, 350–51identification of streptococci, 231,
347–51from Bergey’s Manual,
224–26identification of staphylococci,
333–38maintenance of culture, 85–86morphology, 347–48SXT sensitivity test, 349–50viridans, 330, 341–43, 348–49
Streptococcus (cell arrangement), 39Streptococcus agalactiae, 347–51Streptococcus bovis
identification of pneumococci,341–43
identification of streptococci,347–51
Streptococcus equi, 347–51Streptococcus mitis, 347–51Streptococcus mutans
capsule, 63identification of streptococci, 347–51
Streptococcus oralis, 341–43Streptococcus pneumoniae. See
PneumococciStreptococcus pyogenes
identification of streptococci,347–51
normal microbiota from humanbody, 330
Streptococcus salvariusidentification of staphylococci,
333–38identification of streptococci,
347–51Streptodornase, 348Streptokinase, 348Streptolysin O, 347–50Streptolysin S, 348Streptomycin, 259Streptomycin resistance, 382–83Strict anaerobe, 110Structural genomics, 381Subculturing, 85, 87Substage condenser, 3Sucrose fermentation, 126, 133–36Sugar-differentiation disk, 129–30Sulfanilic acid, 202–3Sulfate reduction, 147–49
Sulfide-indole-motility agar deep. SeeSIM agar deep
Sulfite reduction, 147–49Sulfonamides, 259Superoxide, 169–70Superoxide dismutase, 169–70SXT disks, 347, 349SXT sensitivity test, streptococci,
349–50Synthetic media. See Chemically
defined mediaSyphilis, 32, 321
Tannic acid, 70Taxo P disks, 341T-broth, 299, 301
recipe, 448Temperature effect, on growth of
microorganisms, 238–39Tergitol No. 4, 41–42Tetanus, 58, 361–62Tetracycline, 259Tetramethyl-p-phenylenediamine
dihydrochloride, 179–81TFTC plate. See Too few to count plateThallus, 374–75Thayer-Martin agar
neisseriae on, 356–57recipe, 448
Thermoduric bacteria, 239Thermophile, 239Thin smear, 33–34Thioglycollate medium, 109–14
recipe, 448Thioglycollate medium with calcium
carbonate, 86Thiosulfate reductase, 147–48Thiosulfate reduction, 147–49Throat culture, 328–30Throat swab, 328–29Thymol blue, 431Titer, phage, 299–302TNTC plate. See Too numerous to
count plateTodd, E. W., 348Todd-Hewitt broth, 448Todd unit, 348To-deliver pipette, 83–84Tonsillitis, streptococcal, 348Too few to count (TFTC) plate, 118Too numerous to count (TNTC)
plate, 118Top agar, 300–301
recipe, 448Total coliforms, 283, 292
membrane filter technique, 291–95most probable number test, 285–88
Toxic shock syndrome, 334Transferring techniques, 87–88Transformation, bacterial, 387–89Transfusion reactions, 323Transient microorganisms, 263Transmission-absorbance table, for
spectrophotometry, 429
Index 465
Harley−Prescott: Laboratory Exercises in Microbiology, Fifth Edition
Back Matter Index © The McGraw−Hill Companies, 2002
Treponema denticola, dark-fieldmicroscopy, 17–18
Treponema pallidum, negativestaining, 32
Triacylglycerols, 143Triclosan, 251–52, 263Triglycerides, 143Triple sugar iron (TSI) agar,
327–29recipe, 448
Triple sugar iron (TSI) agar test, 133–36
identification of normalmicrobiota, 329
Triton-X, 51–53Triton X-100 stock solution, 441Trommsdorf’s reagent, 441Trypticase (tryptic) soy agar, 86, 88,
93–95, 99–101, 105–6, 109–14,169–70, 179–81, 230, 238–39,271, 273, 285, 305–6, 327, 355,361, 382–83
recipe, 448Trypticase (tryptic) soy agar with
lecithin and polysorbate 80, 448Trypticase (tryptic) soy broth, 77–78,
80, 120, 333, 337–38, 393, 449Tryptic nitrate broth, 448Tryptone agar, 449Tryptone broth, 449Tryptone glucose yeast agar, 117–19,
161–62Tryptophanase, 154–55Tryptophan degradation, 153–55Tryptophan deaminase test, 210–11TSA agar, 230, 263–64
culture maintenance on, 451TSI agar. See Triple sugar iron agarTuberculosis, 27, 52, 284Turbidity, 271–72Turbidometric analysis
determination of bacterialnumbers, 117–20
growth curve determination, 271–74
transmission-absorbance table for, 429
Tween 80, 449Two-hour growth curve, 271–74Tyler’s crystal violet, 63–65Typhoid fever, 70, 154, 208, 283,
291, 327Typhus, 70
Ultraviolet radiation, sterilizationusing, 79
Unknown identification, 223–35general unknown, 229–32using Bergey’s Manual of Systematic
Bacteriology, 224–26Urea, hydrolysis, 185–86Urea broth, 185–86
recipe, 449Urease, 185Urease test, 185–86, 210–11, 218, 232Urethral discharge, 356Urethritis, gonococcal, 356Urinary tract infection
E. aerogenes, 154E. coli, 154, 202, 208Morganella, 195P. mirabilis, 185, 208Proteus, 195Providencia, 195P. vulgaris, 70S. saprophyticus, 334
Use-dilution, 252
Vancomycin, 259Vaspar, 441Vegetative hyphae, 374Veillonella, identification, 231Viable plate count, 117–20
on food product, 311–12Vibrio, characterization, 438Vibrio (cell shape), 39Vibrio cholerae
flagella staining, 70waterborne, 291
Vibrio natriegens, growth curve, 271–74Violet red bile agar, 315, 317
recipe, 449Virion, 283Virus, waterborne, 283, 291
E. coli phages, 299–302Vogel-Johnson agar, 78, 333–34, 336
recipe, 449Voges, Daniel, 154Voges-Proskauer test, 153–58, 210–11,
218, 232identification of normal
microbiota, 329Volume, units of, 428
Water activity, 248Water quality
action limit, 292
KONFIRM test for fecalcoliforms, 291–95
membrane filter technique forcoliforms and fecalstreptococci, 291–95
phage titer, 299–302presence-absence coliform test,
285–88standard coliform most probable
number test, 285–88West flagella staining method,
69–72West stain, 69–72
recipe, 441–42Wet-mount slide, 3, 17–18, 230Whooping cough, 70, 154Wine, sour, 283Wirtz, Robert, 58Wirtz-Conklin endospore staining
procedure, 57–59Wound infection, P. aeruginosa, 70Wright, James H., 111Wright’s tube, 111Wurster’s blue, 181
Yeast(s), 368–69. See alsoSaccharomyces cerevisiae
fermentation tests, 368–69phase-contrast microscopy, 22spores, 368
Yeast extract, 77, 449Yersiniae
API 20E System, 436Enterotube II System, 437
Yersinia pestisAPI 20E System, 208methyl red test, 154
YM agar, 449YM broth, 449Yogurt, 284
Zephiran, 263Ziehl, Franz, 52Ziehl-Neelsen acid-fast staining
procedure, 51–53solutions, 442
Ziehl’s carbolfuchsin, 37–40, 51–53Zinc oxide, as antiseptic, 253Zinc powder/dust, 201–3Zone of inhibition, 258–59Zone of proteolysis, 161–62Zygospore, 375Zymomonas, fermentation, 128
466 Index