surgical manual cerrahi el kitabı - bicon.com · tek aşamalı cerrahi teknik ... dokuyu...
TRANSCRIPT

Cerrahi El KitabıAdım Adım TekniklerStep By Step Techniques
Surgical Manual

3
Pre-Surgical | Bone Classification Type I-IV
Integra-CP™ Approximately 16-20 weeksType IV
Integra-CP™ Approximately 12 weeksType III
Integra-CP™ Approximately 10-12 weeksType II
Integra-CP™ Approximately 16 weeksType I
Fine TrabecularFlute of a 3.5mm reamer bur
devoid of bone
Porous Cortical and Fine Trabecular
Flute of a 3.5mm reamer bur only partially �lled with
blood wetted bone
Porous Cortical and Course Trabecular
Flute of a 3.5mm reamer bur �lled with blood
wetted bone
Dense Cortical Flute of a 3.5mm reamer bur �lled with bone and
minimal blood
DescriptionRecommended
Implant Surface* Integration TimeBone Type
*Integra-CP™ is the trade name for Bicon’s surface treatment which was formerly referred to as HA.3
Pre-Surgical | Bone Classification Type I-IV
Integra-CP™ Approximately 16-20 weeksType IV
Integra-CP™ Approximately 12 weeksType III
Integra-CP™ Approximately 10-12 weeksType II
Integra-CP™ Approximately 16 weeksType I
Fine TrabecularFlute of a 3.5mm reamer bur
devoid of bone
Porous Cortical and Fine Trabecular
Flute of a 3.5mm reamer bur only partially �lled with
blood wetted bone
Porous Cortical and Course Trabecular
Flute of a 3.5mm reamer bur �lled with blood
wetted bone
Dense Cortical Flute of a 3.5mm reamer bur �lled with bone and
minimal blood
DescriptionRecommended
Implant Surface* Integration TimeBone Type
*Integra-CP™ is the trade name for Bicon’s surface treatment which was formerly referred to as HA.
İçerik
Cerrahi Öncesi ...................................................................................................................................................1-8
Kemik Ölçümü .......................................................................................................................................................2
Kemik Sınıflandırılması ....................................................................................................................................3
İmplant Boyut Seçimi .........................................................................................................................................4-5
Cerrahi Kalıp Yapımı ..........................................................................................................................................6-8
Aletler ..............................................................................................................................................................................9-11
Set İçeriği ...................................................................................................................................................................10
Alet Tanımları ..........................................................................................................................................................11
Cerrahi Uygulamalar ..................................................................................................................................12-20
İki Aşamalı Cerrahi Teknik .............................................................................................................................13-16
Tek Aşamalı Cerrahi Teknik ...........................................................................................................................17
İki Aşamalı Mandibular Ridge Split .......................................................................................................18
İç Sinüs Lift ................................................................................................................................................................19
Ek ............................................................................................................................................................................................20
Abutment Ölçümü ..............................................................................................................................................20
3
Pre-Surgical | Bone Classification Type I-IV
Integra-CP™ Approximately 16-20 weeksType IV
Integra-CP™ Approximately 12 weeksType III
Integra-CP™ Approximately 10-12 weeksType II
Integra-CP™ Approximately 16 weeksType I
Fine TrabecularFlute of a 3.5mm reamer bur
devoid of bone
Porous Cortical and Fine Trabecular
Flute of a 3.5mm reamer bur only partially �lled with
blood wetted bone
Porous Cortical and Course Trabecular
Flute of a 3.5mm reamer bur �lled with blood
wetted bone
Dense Cortical Flute of a 3.5mm reamer bur �lled with bone and
minimal blood
DescriptionRecommended
Implant Surface* Integration TimeBone Type
*Integra-CP™ is the trade name for Bicon’s surface treatment which was formerly referred to as HA.11
Pre-SurgicalCerrahi Öncesi

3
Pre-Surgical | Bone Classification Type I-IV
Integra-CP™ Approximately 16-20 weeksType IV
Integra-CP™ Approximately 12 weeksType III
Integra-CP™ Approximately 10-12 weeksType II
Integra-CP™ Approximately 16 weeksType I
Fine TrabecularFlute of a 3.5mm reamer bur
devoid of bone
Porous Cortical and Fine Trabecular
Flute of a 3.5mm reamer bur only partially �lled with
blood wetted bone
Porous Cortical and Course Trabecular
Flute of a 3.5mm reamer bur �lled with blood
wetted bone
Dense Cortical Flute of a 3.5mm reamer bur �lled with bone and
minimal blood
DescriptionRecommended
Implant Surface* Integration TimeBone Type
*Integra-CP™ is the trade name for Bicon’s surface treatment which was formerly referred to as HA.2 3
Pre-Surgical | Bone Classification Type I-IV
Integra-CP™ Approximately 16-20 weeksType IV
Integra-CP™ Approximately 12 weeksType III
Integra-CP™ Approximately 10-12 weeksType II
Integra-CP™ Approximately 16 weeksType I
Fine TrabecularFlute of a 3.5mm reamer bur
devoid of bone
Porous Cortical and Fine Trabecular
Flute of a 3.5mm reamer bur only partially �lled with
blood wetted bone
Porous Cortical and Course Trabecular
Flute of a 3.5mm reamer bur �lled with blood
wetted bone
Dense Cortical Flute of a 3.5mm reamer bur �lled with bone and
minimal blood
DescriptionRecommended
Implant Surface* Integration TimeBone Type
*Integra-CP™ is the trade name for Bicon’s surface treatment which was formerly referred to as HA.
Cerrahi Öncesi | Kemiğin Ölçülmesi
Başarı AnahtarıHasta, planlanan protez için yeterli interoklüzal açıklık olup olmadığını kontrol etmek için, ağzı kapalı şekilde en ideal pozisyonda muayene edilmelidir.
Planlanan protezin etrafındaki yumuşak dokuyu düzenlemek için frenektomi düşünülebilir.
Bilgisayarlı tomografi (CAT scan), her zaman gerekli olmamasına rağmen, kemik seviyesinin yetersiz olduğu hastalarda implant uygulanabilecek en ideal bölgenin tespitinde veya anatomik bölgelerin tam yerlerinin tespitinde kolaylık sağlar. Mandibular sinirin de genellikle koronale eğimli
olduğu premolar bölgedeki inferior alveolar sinir ve mental foramene dikkat edilmelidir.
Reamer ya da implant tarafından istemsiz penetrasyonların önlenmesi için burun tabanı ve maksiller sinüs bölgeleri dikkatli saptanmalıdır.
Mylohyoid çizginin altında bulunan sublingual fossaya ve özellikle de sublingual arterin bulunduğu anterior mandibular bölgedeki sublingual boşluğa dikkat edilmelidir. Bu lingual bölgelere olabilecek istemsiz penetrasyonlar, pilot ve reamer frezleri bukkale yönlendirerek ve drill sırasında dijital görüntüleme yöntemlerinden faydalanılarak önlenebilir.
Genel olarak, implant osteotomisinin apeks bölgesi ve mandibular kanal arasında 2.0mm kemik bulunması yeterli sayılmaktadır.
Mylohyoid Line
Submandibular Fossa
2.0mm

3
Pre-Surgical | Bone Classification Type I-IV
Integra-CP™ Approximately 16-20 weeksType IV
Integra-CP™ Approximately 12 weeksType III
Integra-CP™ Approximately 10-12 weeksType II
Integra-CP™ Approximately 16 weeksType I
Fine TrabecularFlute of a 3.5mm reamer bur
devoid of bone
Porous Cortical and Fine Trabecular
Flute of a 3.5mm reamer bur only partially �lled with
blood wetted bone
Porous Cortical and Course Trabecular
Flute of a 3.5mm reamer bur �lled with blood
wetted bone
Dense Cortical Flute of a 3.5mm reamer bur �lled with bone and
minimal blood
DescriptionRecommended
Implant Surface* Integration TimeBone Type
*Integra-CP™ is the trade name for Bicon’s surface treatment which was formerly referred to as HA.3
Pre-Surgical | Bone Classification Type I-IV
Integra-CP™ Approximately 16-20 weeksType IV
Integra-CP™ Approximately 12 weeksType III
Integra-CP™ Approximately 10-12 weeksType II
Integra-CP™ Approximately 16 weeksType I
Fine TrabecularFlute of a 3.5mm reamer bur
devoid of bone
Porous Cortical and Fine Trabecular
Flute of a 3.5mm reamer bur only partially �lled with
blood wetted bone
Porous Cortical and Course Trabecular
Flute of a 3.5mm reamer bur �lled with blood
wetted bone
Dense Cortical Flute of a 3.5mm reamer bur �lled with bone and
minimal blood
DescriptionRecommended
Implant Surface* Integration TimeBone Type
*Integra-CP™ is the trade name for Bicon’s surface treatment which was formerly referred to as HA.3
Cerrahi Öncesi | Kemik Sınıflandırması Tip I-IV
Kemik Çeşidi
Tanım
Önerilen İmplant Yüzeyi*
Entegrasyon Süresi
Tip 1
Yoğun Kortikal 3.5 mm reamer ucu
kemik ve az seviyede kanla doludur.
Integra-CP™ Yaklaşık 16 hafta
Tip 2
Porözlü Kortikal ve Course Trabekuler
3.5 mm reamer burun ucu kanlı ıslak kemikle doludur.
Integra-CP™ Yaklaşık 10-12 hafta
Tip 3
Porözlü Kortikal ve Fine Trabekuler
3.5 mm reamer burun ucu kısmen kanlı kemikle doludur.
Integra-CP™ Yaklaşık 12 hafta
Tip 4
Fine Trabekuler 3.5 mm reamer burun
ucunde kemik bulunmamaktadır
Integra-CP™ Yaklaşık 16-20 hafta
*Integra-CP™ Bicon’un yüzey uygulamalarında kullandığı HA olarak bilinen uygulamanın piyasa ismidir.

3
Pre-Surgical | Bone Classification Type I-IV
Integra-CP™ Approximately 16-20 weeksType IV
Integra-CP™ Approximately 12 weeksType III
Integra-CP™ Approximately 10-12 weeksType II
Integra-CP™ Approximately 16 weeksType I
Fine TrabecularFlute of a 3.5mm reamer bur
devoid of bone
Porous Cortical and Fine Trabecular
Flute of a 3.5mm reamer bur only partially �lled with
blood wetted bone
Porous Cortical and Course Trabecular
Flute of a 3.5mm reamer bur �lled with blood
wetted bone
Dense Cortical Flute of a 3.5mm reamer bur �lled with bone and
minimal blood
DescriptionRecommended
Implant Surface* Integration TimeBone Type
*Integra-CP™ is the trade name for Bicon’s surface treatment which was formerly referred to as HA.4 3
Pre-Surgical | Bone Classification Type I-IV
Integra-CP™ Approximately 16-20 weeksType IV
Integra-CP™ Approximately 12 weeksType III
Integra-CP™ Approximately 10-12 weeksType II
Integra-CP™ Approximately 16 weeksType I
Fine TrabecularFlute of a 3.5mm reamer bur
devoid of bone
Porous Cortical and Fine Trabecular
Flute of a 3.5mm reamer bur only partially �lled with
blood wetted bone
Porous Cortical and Course Trabecular
Flute of a 3.5mm reamer bur �lled with blood
wetted bone
Dense Cortical Flute of a 3.5mm reamer bur �lled with bone and
minimal blood
DescriptionRecommended
Implant Surface* Integration TimeBone Type
*Integra-CP™ is the trade name for Bicon’s surface treatment which was formerly referred to as HA.4
Pre-Surgical | Implant Size Selection
0 1 2 3 4 5 6 7 8
1/8 inch
1mm
0 1 2 3 4 5 6 7 8 9 10 11 12 13 14 15 16 17 18 19 20
(100% SCALE) (125% SCALE)
260-103-005 R1208
3.5 x 11mm 6 x 5.7mm4.5 x 8mm4 x 11mm 5 x 6mm4.5 x 6mm 5 x 5mm 6 x 5mm 3.5 x 11mm 6 x 5.7mm4.5 x 8mm4 x 11mm 5 x 6mm4.5 x 6mm 5 x 5mm 6 x 5mm
Bicon Implant Ruler
Bicon Implant Overlay
Implant Size Selection � The appropriate implant length and width depends upon the available bone and the expected occlusal loads.
� In general, choose the widest but not necessarily the longest implant possible.
� Panoramic and periapical radiographs as well as diagnostic models and a clinical examination are used to determine if enough mesio-distal space and vertical bone height exist to place a Bicon implant safely and appropriately in a proposed site.
� A transparent ruler or an implant radiograph overlay, which depict implant outlines of actual size and 125% of actual size, is helpful in selecting an appropriately sized implant. Since radiographs are not necessarily precise representations, knowledge of their magni�cation must be considered while using them to determine an appropriately sized implant.
3 Keys to Success � The 3.5mm diameter implants are generally for mandibular anterior teeth. If practical, their use should be avoided for maxillary anterior and all posterior teeth.
� The 5.0 x 6.0mm implant is capable of supporting any tooth in the dental arch.
� From the canine posteriorly, if practical, place one implant per tooth being replaced.
� Consider using Integra-CP™ implants in poor quality or grafted bone.
� It is advisable to have at least 1.0mm of bone around the implant. Therefore, an advisable bone width is 5.5mm to comfortably accommodate a 3.5mm implant, unless ridge splitting or grafting techniques are employed to widen the site.
� In the anterior maxilla, it is advisable to place implants with a well diameter greater than 2.0mm, especially when the use of an angled abutment is intended.
� The width of the alveolar bone may be assessed with a periodontal probe or caliper. It is advisable to have 1.0mm of bone around an implant for a long-term favorable prognosis.
� For maxillary anterior implants, always anticipate the potential need for ridge splitting or bone grafting techniques.
Cerrahi Öncesi | İmplant Boyut Seçimi
İmplant Boyut Seçimiİmplantın uzunluğu ve genişliği mevcut kemik kalitesi ve implanta gelecek olan oklüzal kuvvete göre seçilir.
Genellikle mümkün olan en geniş implant tercih edilir fakat en uzun implant her zaman gerekli değildir.
Panaromik ve periapikal röntgenler, klinik muayene ve tanı modelleri, Bicon implantın güvenli bir şekilde yerleştirileceği planlanan bölgede yeterli mesio-distal boşluk ve dikey kemik yüksekliği olup olmadığını tespit etmekte önemli rol oynar.
İmplant sınırlarını tam ve %125 büyük şekilde gösteren transparan bir cetvel veya implant röntgen çizelgesi, uygulanacak implantın yaklaşık boyutunu saptamada faydalıdır. Röntgen görüntüleri implant boyutu seçimi hakkında tam bir bilgi veremese de tahmini implant boyutunu saptarken röntgen büyütme oranlarına dikkat edilmelidir.
Başarı Anahtarları3.5 mm çaplı implantlar genellikle alt ön dişler için kullanılırlar. Maksiller ön bölge ve diğer tüm arka bölge dişler için kullanımı uygun değildir.
5.0 x 6.00 mm implantlar dental arktaki tüm dişler için uygundurlar.
Kanin dişin arkasındaki her eksik diş için bir implant yerleştirilmesi uygundur.
Kemik kalitesi düşük ve ya greft uygulanmış bölgelerde Integra-CP™ implantlar uygulanmalıdır.
İmplant çevresinde en az 1 mm kemik bulunması önerilmektedir. Ridge splitting ve ya greft operasyonları uygulanmadıkça, 3.5 mm’lik bir implant yerleştirmek için 5.5 mm genişliğinde kemik bulunması yeterlidir.
Anterior maksillada, özellikle açılı abutment kullanılmak istendiğinde, 2.0 mm çaptan daha geniş implantların kullanılması önerilmektedir.
Alveolar kemiğin kalınlığı bir alveolar probe ya da kumpas ile saptanabilir. Uzun ömürlü tedaviler için implant çevresinde en az 1.0 mm kemik bulunması gerekmektedir.
Anterior maksillada implantlar için her zaman ridge splitting veya kemik grefti uygulamaları gerekebilir.
3
Pre-Surgical | Bone Classification Type I-IV
Integra-CP™ Approximately 16-20 weeksType IV
Integra-CP™ Approximately 12 weeksType III
Integra-CP™ Approximately 10-12 weeksType II
Integra-CP™ Approximately 16 weeksType I
Fine TrabecularFlute of a 3.5mm reamer bur
devoid of bone
Porous Cortical and Fine Trabecular
Flute of a 3.5mm reamer bur only partially �lled with
blood wetted bone
Porous Cortical and Course Trabecular
Flute of a 3.5mm reamer bur �lled with blood
wetted bone
Dense Cortical Flute of a 3.5mm reamer bur �lled with bone and
minimal blood
DescriptionRecommended
Implant Surface* Integration TimeBone Type
*Integra-CP™ is the trade name for Bicon’s surface treatment which was formerly referred to as HA.3
Pre-Surgical | Bone Classification Type I-IV
Integra-CP™ Approximately 16-20 weeksType IV
Integra-CP™ Approximately 12 weeksType III
Integra-CP™ Approximately 10-12 weeksType II
Integra-CP™ Approximately 16 weeksType I
Fine TrabecularFlute of a 3.5mm reamer bur
devoid of bone
Porous Cortical and Fine Trabecular
Flute of a 3.5mm reamer bur only partially �lled with
blood wetted bone
Porous Cortical and Course Trabecular
Flute of a 3.5mm reamer bur �lled with blood
wetted bone
Dense Cortical Flute of a 3.5mm reamer bur �lled with bone and
minimal blood
DescriptionRecommended
Implant Surface* Integration TimeBone Type
*Integra-CP™ is the trade name for Bicon’s surface treatment which was formerly referred to as HA.55
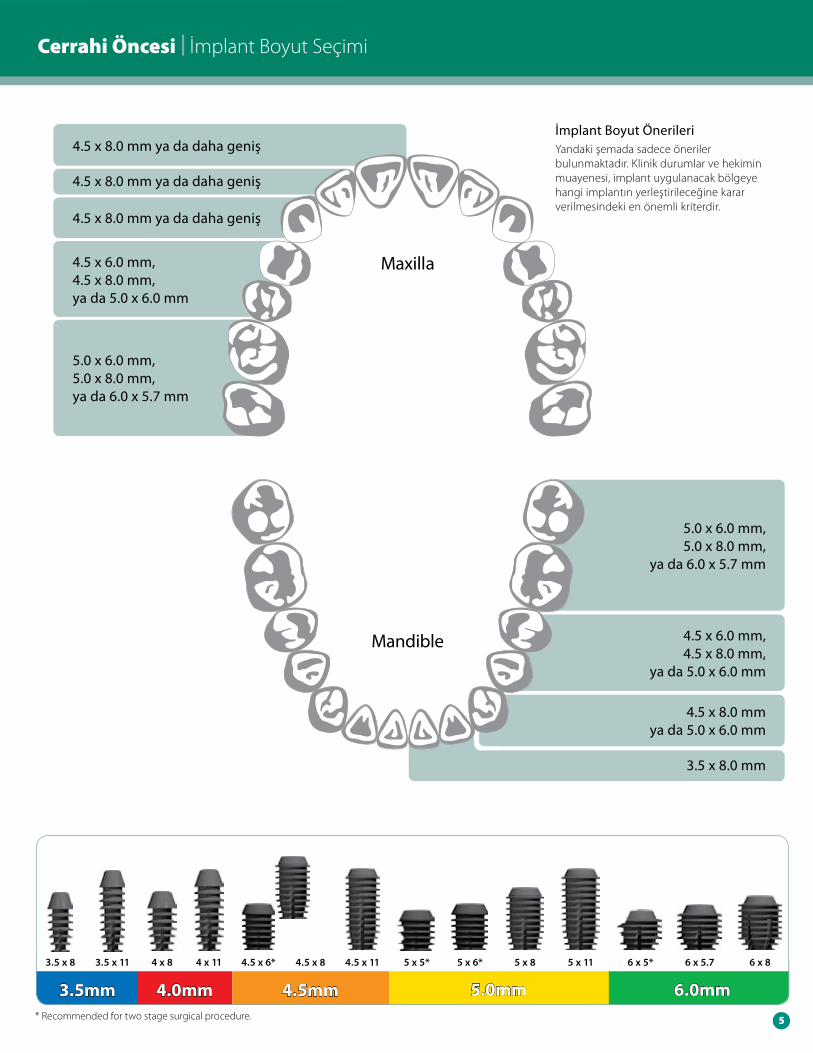
3.5mm 4.0mm 4.5mm 5.0mm 6.0mm
3.5 x 113.5 x 8 4 x 114 x 8 6 x 84.5 x 114.5 x 8 5 x 8 5 x 11 6 x 5.7 6 x 5*5 x 6* 5 x 5*4.5 x 6*
* Recommended for two stage surgical procedure.
Maxilla
Mandible
Cerrahi Öncesi | İmplant Boyut Seçimi
İmplant Boyut ÖnerileriYandaki şemada sadece öneriler bulunmaktadır. Klinik durumlar ve hekimin muayenesi, implant uygulanacak bölgeye hangi implantın yerleştirileceğine karar verilmesindeki en önemli kriterdir.
4.5 x 8.0 mm ya da daha geniş
4.5 x 8.0 mm ya da daha geniş
4.5 x 8.0 mm ya da daha geniş
4.5 x 6.0 mm,4.5 x 8.0 mm, ya da 5.0 x 6.0 mm
4.5 x 6.0 mm,4.5 x 8.0 mm,
ya da 5.0 x 6.0 mm
4.5 x 8.0 mmya da 5.0 x 6.0 mm
3.5 x 8.0 mm
5.0 x 6.0 mm,5.0 x 8.0 mm, ya da 6.0 x 5.7 mm
5.0 x 6.0 mm,5.0 x 8.0 mm,
ya da 6.0 x 5.7 mm
3
Pre-Surgical | Bone Classification Type I-IV
Integra-CP™ Approximately 16-20 weeksType IV
Integra-CP™ Approximately 12 weeksType III
Integra-CP™ Approximately 10-12 weeksType II
Integra-CP™ Approximately 16 weeksType I
Fine TrabecularFlute of a 3.5mm reamer bur
devoid of bone
Porous Cortical and Fine Trabecular
Flute of a 3.5mm reamer bur only partially �lled with
blood wetted bone
Porous Cortical and Course Trabecular
Flute of a 3.5mm reamer bur �lled with blood
wetted bone
Dense Cortical Flute of a 3.5mm reamer bur �lled with bone and
minimal blood
DescriptionRecommended
Implant Surface* Integration TimeBone Type
*Integra-CP™ is the trade name for Bicon’s surface treatment which was formerly referred to as HA.6 3
Pre-Surgical | Bone Classification Type I-IV
Integra-CP™ Approximately 16-20 weeksType IV
Integra-CP™ Approximately 12 weeksType III
Integra-CP™ Approximately 10-12 weeksType II
Integra-CP™ Approximately 16 weeksType I
Fine TrabecularFlute of a 3.5mm reamer bur
devoid of bone
Porous Cortical and Fine Trabecular
Flute of a 3.5mm reamer bur only partially �lled with
blood wetted bone
Porous Cortical and Course Trabecular
Flute of a 3.5mm reamer bur �lled with blood
wetted bone
Dense Cortical Flute of a 3.5mm reamer bur �lled with bone and
minimal blood
DescriptionRecommended
Implant Surface* Integration TimeBone Type
*Integra-CP™ is the trade name for Bicon’s surface treatment which was formerly referred to as HA.6
Pre-Surgical | Surgical Template
Vacuum-Formed Template
Template from Stone Model
Surgical TemplateAccurate placement of any implant requires the awareness of its intended prosthetic restoration. Mounted study casts and a diagnostic wax-up of the teeth to be replaced are usually necessary for the fabrication of a surgical template that will aid the dentist in the appropriate placement of multiple implants. Although the location and availability of bone will dictate the ultimate trajectory of the pilot drill, clinicians should strive to stay within the center of the intended tooth and within 10˚ of the trajectory of the intended prosthesis.
Remove the lingual half of the teeth to be replaced.
Cut a 2.5mm wide groove in the acrylic corresponding to the middle of each intended tooth to be replaced.
After making an impression and subsequent cast of the diagnostic wax-up of the intended restoration, a vacuum-formed template is prepared on the cast from thin template stock which is commonly used for the chairside fabrication of transitional restorations. A hole is drilled in the middle of the incisal or occlusal surface of the template in the location of the intended tooth. The vacuum-formed template, if possible, is trimmed to include at least one tooth distal and three or four teeth mesial to the area of the intended replacement.
Using a duplicated stone model of the diagnostic wax-up, draw a line through the incisal edge and occlusal surfaces of the teeth and another line in the center of each tooth to be replaced, intersecting the incisal or occlusal line.
Mold acrylic onto the lingual aspect of the model up to the level of the central fossa or incisal edge of the teeth to be restored.
1a
1
3
1b
2
4
6
Pre-Surgical | Surgical Template
Vacuum-Formed Template
Template from Stone Model
Surgical TemplateAccurate placement of any implant requires the awareness of its intended prosthetic restoration. Mounted study casts and a diagnostic wax-up of the teeth to be replaced are usually necessary for the fabrication of a surgical template that will aid the dentist in the appropriate placement of multiple implants. Although the location and availability of bone will dictate the ultimate trajectory of the pilot drill, clinicians should strive to stay within the center of the intended tooth and within 10˚ of the trajectory of the intended prosthesis.
Remove the lingual half of the teeth to be replaced.
Cut a 2.5mm wide groove in the acrylic corresponding to the middle of each intended tooth to be replaced.
After making an impression and subsequent cast of the diagnostic wax-up of the intended restoration, a vacuum-formed template is prepared on the cast from thin template stock which is commonly used for the chairside fabrication of transitional restorations. A hole is drilled in the middle of the incisal or occlusal surface of the template in the location of the intended tooth. The vacuum-formed template, if possible, is trimmed to include at least one tooth distal and three or four teeth mesial to the area of the intended replacement.
Using a duplicated stone model of the diagnostic wax-up, draw a line through the incisal edge and occlusal surfaces of the teeth and another line in the center of each tooth to be replaced, intersecting the incisal or occlusal line.
Mold acrylic onto the lingual aspect of the model up to the level of the central fossa or incisal edge of the teeth to be restored.
1a
1
3
1b
2
4
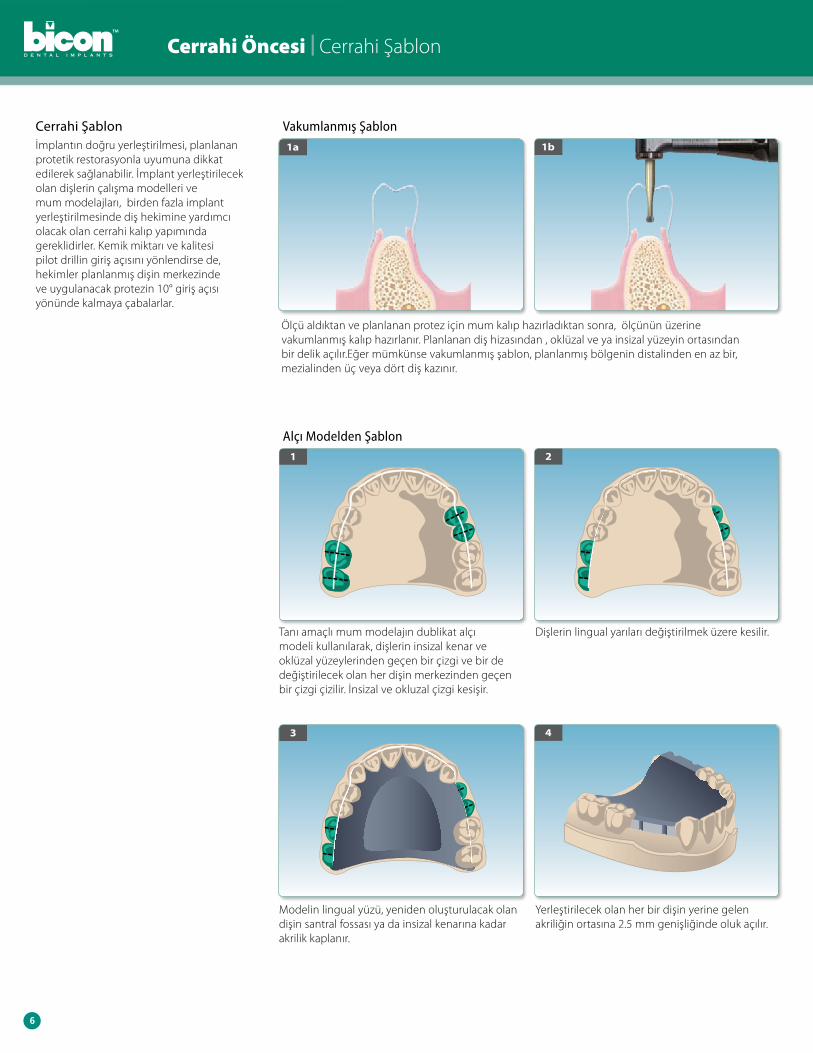
Cerrahi Şablonİmplantın doğru yerleştirilmesi, planlanan protetik restorasyonla uyumuna dikkat edilerek sağlanabilir. İmplant yerleştirilecek olan dişlerin çalışma modelleri ve mum modelajları, birden fazla implant yerleştirilmesinde diş hekimine yardımcı olacak olan cerrahi kalıp yapımında gereklidirler. Kemik miktarı ve kalitesi pilot drillin giriş açısını yönlendirse de, hekimler planlanmış dişin merkezinde ve uygulanacak protezin 10° giriş açısı yönünde kalmaya çabalarlar.
Ölçü aldıktan ve planlanan protez için mum kalıp hazırladıktan sonra, ölçünün üzerine vakumlanmış kalıp hazırlanır. Planlanan diş hizasından , oklüzal ve ya insizal yüzeyin ortasından bir delik açılır.Eğer mümkünse vakumlanmış şablon, planlanmış bölgenin distalinden en az bir, mezialinden üç veya dört diş kazınır.
Modelin lingual yüzü, yeniden oluşturulacak olan dişin santral fossası ya da insizal kenarına kadar akrilik kaplanır.
Yerleştirilecek olan her bir dişin yerine gelen akriliğin ortasına 2.5 mm genişliğinde oluk açılır.
Vakumlanmış Şablon
Alçı Modelden Şablon
Cerrahi Öncesi | Cerrahi Şablon
6
Pre-Surgical | Surgical Template
Vacuum-Formed Template
Template from Stone Model
Surgical TemplateAccurate placement of any implant requires the awareness of its intended prosthetic restoration. Mounted study casts and a diagnostic wax-up of the teeth to be replaced are usually necessary for the fabrication of a surgical template that will aid the dentist in the appropriate placement of multiple implants. Although the location and availability of bone will dictate the ultimate trajectory of the pilot drill, clinicians should strive to stay within the center of the intended tooth and within 10˚ of the trajectory of the intended prosthesis.
Remove the lingual half of the teeth to be replaced.
Cut a 2.5mm wide groove in the acrylic corresponding to the middle of each intended tooth to be replaced.
After making an impression and subsequent cast of the diagnostic wax-up of the intended restoration, a vacuum-formed template is prepared on the cast from thin template stock which is commonly used for the chairside fabrication of transitional restorations. A hole is drilled in the middle of the incisal or occlusal surface of the template in the location of the intended tooth. The vacuum-formed template, if possible, is trimmed to include at least one tooth distal and three or four teeth mesial to the area of the intended replacement.
Using a duplicated stone model of the diagnostic wax-up, draw a line through the incisal edge and occlusal surfaces of the teeth and another line in the center of each tooth to be replaced, intersecting the incisal or occlusal line.
Mold acrylic onto the lingual aspect of the model up to the level of the central fossa or incisal edge of the teeth to be restored.
1a
1
3
1b
2
4
Tanı amaçlı mum modelajın dublikat alçı modeli kullanılarak, dişlerin insizal kenar ve oklüzal yüzeylerinden geçen bir çizgi ve bir de değiştirilecek olan her dişin merkezinden geçen bir çizgi çizilir. İnsizal ve okluzal çizgi kesişir.
Dişlerin lingual yarıları değiştirilmek üzere kesilir.
3
Pre-Surgical | Bone Classification Type I-IV
Integra-CP™ Approximately 16-20 weeksType IV
Integra-CP™ Approximately 12 weeksType III
Integra-CP™ Approximately 10-12 weeksType II
Integra-CP™ Approximately 16 weeksType I
Fine TrabecularFlute of a 3.5mm reamer bur
devoid of bone
Porous Cortical and Fine Trabecular
Flute of a 3.5mm reamer bur only partially �lled with
blood wetted bone
Porous Cortical and Course Trabecular
Flute of a 3.5mm reamer bur �lled with blood
wetted bone
Dense Cortical Flute of a 3.5mm reamer bur �lled with bone and
minimal blood
DescriptionRecommended
Implant Surface* Integration TimeBone Type
*Integra-CP™ is the trade name for Bicon’s surface treatment which was formerly referred to as HA.3
Pre-Surgical | Bone Classification Type I-IV
Integra-CP™ Approximately 16-20 weeksType IV
Integra-CP™ Approximately 12 weeksType III
Integra-CP™ Approximately 10-12 weeksType II
Integra-CP™ Approximately 16 weeksType I
Fine TrabecularFlute of a 3.5mm reamer bur
devoid of bone
Porous Cortical and Fine Trabecular
Flute of a 3.5mm reamer bur only partially �lled with
blood wetted bone
Porous Cortical and Course Trabecular
Flute of a 3.5mm reamer bur �lled with blood
wetted bone
Dense Cortical Flute of a 3.5mm reamer bur �lled with bone and
minimal blood
DescriptionRecommended
Implant Surface* Integration TimeBone Type
*Integra-CP™ is the trade name for Bicon’s surface treatment which was formerly referred to as HA.77
Pre-Surgical | Surgical Template
Fabrication of Palatal Template from Existing ProsthesisFor larger edentulous areas, fabricate a palatal template by using an existing removal prosthesis. When fabricating the palatal template, the buccal aspect is inclined from the incisal edge or central fossa of the proposed teeth back to the crest of the alveolar ridge, which is represented on a duplicated prosthesis as the greatest concavity on the alveolar ridge side of the prosthesis.
Continued next page
Close and allow alginate to set.Fill other side with alginate.
3 4
Apply separating medium.Insert denture into alginate in denture duplicator.
1 2
Fill alginate mold with acrylic.Open and remove denture.
5 6
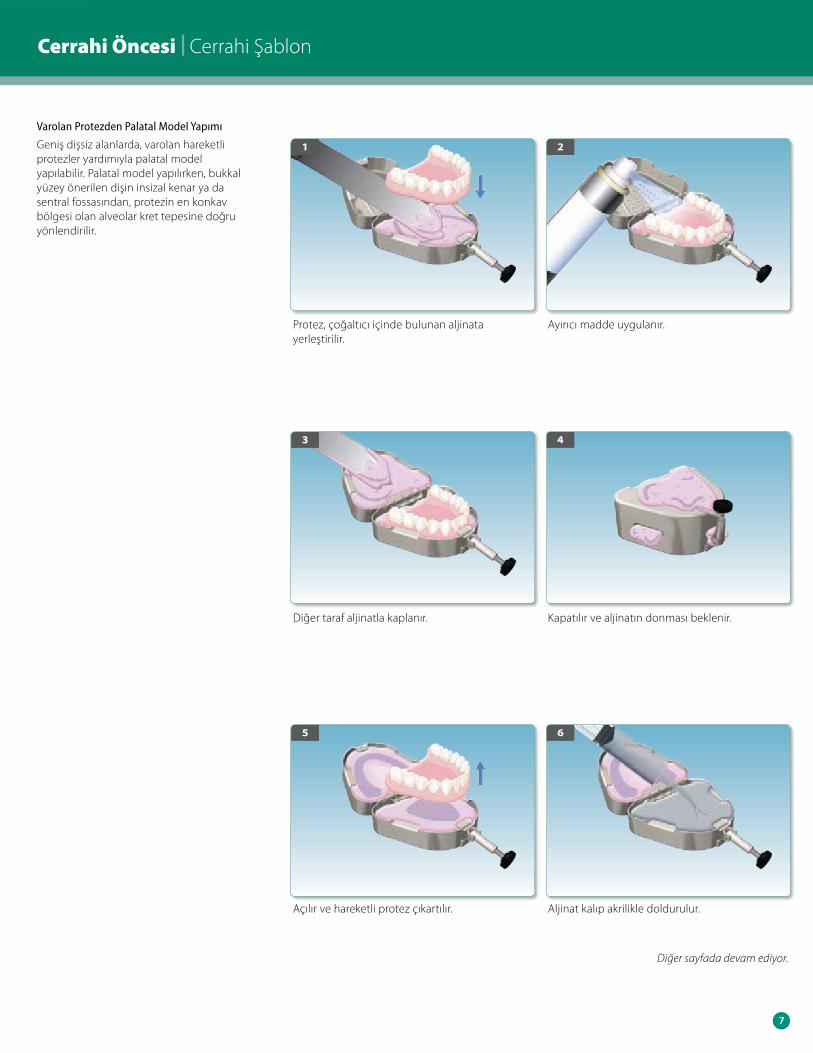
Protez, çoğaltıcı içinde bulunan aljinata yerleştirilir.
Diğer taraf aljinatla kaplanır.
Açılır ve hareketli protez çıkartılır.
Ayırıcı madde uygulanır.
Kapatılır ve aljinatın donması beklenir.
Aljinat kalıp akrilikle doldurulur.
Diğer sayfada devam ediyor.
Cerrahi Öncesi | Cerrahi Şablon
Varolan Protezden Palatal Model Yapımı
Geniş dişsiz alanlarda, varolan hareketli protezler yardımıyla palatal model yapılabilir. Palatal model yapılırken, bukkal yüzey önerilen dişin insizal kenar ya da sentral fossasından, protezin en konkav bölgesi olan alveolar kret tepesine doğru yönlendirilir.
7
Pre-Surgical | Surgical Template
Fabrication of Palatal Template from Existing ProsthesisFor larger edentulous areas, fabricate a palatal template by using an existing removal prosthesis. When fabricating the palatal template, the buccal aspect is inclined from the incisal edge or central fossa of the proposed teeth back to the crest of the alveolar ridge, which is represented on a duplicated prosthesis as the greatest concavity on the alveolar ridge side of the prosthesis.
Continued next page
Close and allow alginate to set.Fill other side with alginate.
3 4
Apply separating medium.Insert denture into alginate in denture duplicator.
1 2
Fill alginate mold with acrylic.Open and remove denture.
5 6

3
Pre-Surgical | Bone Classification Type I-IV
Integra-CP™ Approximately 16-20 weeksType IV
Integra-CP™ Approximately 12 weeksType III
Integra-CP™ Approximately 10-12 weeksType II
Integra-CP™ Approximately 16 weeksType I
Fine TrabecularFlute of a 3.5mm reamer bur
devoid of bone
Porous Cortical and Fine Trabecular
Flute of a 3.5mm reamer bur only partially �lled with
blood wetted bone
Porous Cortical and Course Trabecular
Flute of a 3.5mm reamer bur �lled with blood
wetted bone
Dense Cortical Flute of a 3.5mm reamer bur �lled with bone and
minimal blood
DescriptionRecommended
Implant Surface* Integration TimeBone Type
*Integra-CP™ is the trade name for Bicon’s surface treatment which was formerly referred to as HA.8 3
Pre-Surgical | Bone Classification Type I-IV
Integra-CP™ Approximately 16-20 weeksType IV
Integra-CP™ Approximately 12 weeksType III
Integra-CP™ Approximately 10-12 weeksType II
Integra-CP™ Approximately 16 weeksType I
Fine TrabecularFlute of a 3.5mm reamer bur
devoid of bone
Porous Cortical and Fine Trabecular
Flute of a 3.5mm reamer bur only partially �lled with
blood wetted bone
Porous Cortical and Course Trabecular
Flute of a 3.5mm reamer bur �lled with blood
wetted bone
Dense Cortical Flute of a 3.5mm reamer bur �lled with bone and
minimal blood
DescriptionRecommended
Implant Surface* Integration TimeBone Type
*Integra-CP™ is the trade name for Bicon’s surface treatment which was formerly referred to as HA.8
Pre-Surgical | Surgical Template
3 Keys to Success � The trajectory of the pilot bur will be the trajectory of the implant and the trajectory of a straight abutment.
� The �nal implant osteotomy, to the extent possible, should be centered in the middle of the intended prosthetic tooth.
� An appropriate mesio-distal positioning of a pilot osteotomy is more critical than a slightly o�-axis trajectory.
� Both the vacuum-formed and palatal templates are placed in cold sterilization prior to their being used to facilitate achieving an appropriate trajectory for the pilot bur.
Cut a 2.0mm wide groove in center of each tooth joining the lines representing the middle of each tooth and greatest concavity of the tissue side.
Draw a line in the middle of each tooth and a line representing greatest concavity on the tissue side.
9 10
Open and remove duplicated denture.Close and allow acrylic to set.
7 8
Template determines mesio-distal positioning. Availability of bone determines final bucco- lingual angulation.
Trim excess incisal length to prevent interference with head of handpiece.
Remove the buccal acrylic along the slope joining the two lines representing the middle of each tooth and greatest concavity of the tissue side.
1211 13
0˚ 15˚
Başarı AnahtarıPilot burun yönlendirme açısı, implant ve abutmentin yönlendirme açısı olacaktır.
Final implant osteotomisi, planlanan protetik dişin ortasında hizalandırılmalıdır.
Pilot osteotomisinin mesio-distal pozisyonlandırılması, çok az bir açısal sapmadan daha kritiktir.
Pilot frezin yaklaşık giriş açısının saptanabilmesi için vakum formlu ve palatal şalonların ikisi de soğuk sterilizasyona yerleştirilirler.
Kapatılır ve akriliğin donması beklenir.
Doku bölgesindeki en büyük konkaviteyi gösteren ve her dişin ortasından geçen bir çizgi çizilir.
Akriliğin bukkal yüzündeki, her dişin ortasını gösteren iki çizgiyi birleştiren oluklar ve en kovkav doku bölgesi çıkartılır.
Açılır ve dublike protez çıkartılır.
En konkav doku bölgesini ve her dişin ortasını gösteren 2.0 mm genişliğinde oluk kesilir.
El aletinin çalışmasını engelleyebilecek insizaldeki fazla yükseklikler alınır.
Kalıp sayesinde mesio-distal pozisyon belirlenir. Kemiğin özelliği son bukko-lingual açılandırmayı belirler.
Cerrahi Öncesi | Cerrahi Kalıp
8
Pre-Surgical | Surgical Template
3 Keys to Success � The trajectory of the pilot bur will be the trajectory of the implant and the trajectory of a straight abutment.
� The �nal implant osteotomy, to the extent possible, should be centered in the middle of the intended prosthetic tooth.
� An appropriate mesio-distal positioning of a pilot osteotomy is more critical than a slightly o�-axis trajectory.
� Both the vacuum-formed and palatal templates are placed in cold sterilization prior to their being used to facilitate achieving an appropriate trajectory for the pilot bur.
Cut a 2.0mm wide groove in center of each tooth joining the lines representing the middle of each tooth and greatest concavity of the tissue side.
Draw a line in the middle of each tooth and a line representing greatest concavity on the tissue side.
9 10
Open and remove duplicated denture.Close and allow acrylic to set.
7 8
Template determines mesio-distal positioning. Availability of bone determines final bucco- lingual angulation.
Trim excess incisal length to prevent interference with head of handpiece.
Remove the buccal acrylic along the slope joining the two lines representing the middle of each tooth and greatest concavity of the tissue side.
1211 13
0˚ 15˚

3
Pre-Surgical | Bone Classification Type I-IV
Integra-CP™ Approximately 16-20 weeksType IV
Integra-CP™ Approximately 12 weeksType III
Integra-CP™ Approximately 10-12 weeksType II
Integra-CP™ Approximately 16 weeksType I
Fine TrabecularFlute of a 3.5mm reamer bur
devoid of bone
Porous Cortical and Fine Trabecular
Flute of a 3.5mm reamer bur only partially �lled with
blood wetted bone
Porous Cortical and Course Trabecular
Flute of a 3.5mm reamer bur �lled with blood
wetted bone
Dense Cortical Flute of a 3.5mm reamer bur �lled with bone and
minimal blood
DescriptionRecommended
Implant Surface* Integration TimeBone Type
*Integra-CP™ is the trade name for Bicon’s surface treatment which was formerly referred to as HA.3
Pre-Surgical | Bone Classification Type I-IV
Integra-CP™ Approximately 16-20 weeksType IV
Integra-CP™ Approximately 12 weeksType III
Integra-CP™ Approximately 10-12 weeksType II
Integra-CP™ Approximately 16 weeksType I
Fine TrabecularFlute of a 3.5mm reamer bur
devoid of bone
Porous Cortical and Fine Trabecular
Flute of a 3.5mm reamer bur only partially �lled with
blood wetted bone
Porous Cortical and Course Trabecular
Flute of a 3.5mm reamer bur �lled with blood
wetted bone
Dense Cortical Flute of a 3.5mm reamer bur �lled with bone and
minimal blood
DescriptionRecommended
Implant Surface* Integration TimeBone Type
*Integra-CP™ is the trade name for Bicon’s surface treatment which was formerly referred to as HA.99
InstrumentationAletler
3
Pre-Surgical | Bone Classification Type I-IV
Integra-CP™ Approximately 16-20 weeksType IV
Integra-CP™ Approximately 12 weeksType III
Integra-CP™ Approximately 10-12 weeksType II
Integra-CP™ Approximately 16 weeksType I
Fine TrabecularFlute of a 3.5mm reamer bur
devoid of bone
Porous Cortical and Fine Trabecular
Flute of a 3.5mm reamer bur only partially �lled with
blood wetted bone
Porous Cortical and Course Trabecular
Flute of a 3.5mm reamer bur �lled with blood
wetted bone
Dense Cortical Flute of a 3.5mm reamer bur �lled with bone and
minimal blood
DescriptionRecommended
Implant Surface* Integration TimeBone Type
*Integra-CP™ is the trade name for Bicon’s surface treatment which was formerly referred to as HA.10 3
Pre-Surgical | Bone Classification Type I-IV
Integra-CP™ Approximately 16-20 weeksType IV
Integra-CP™ Approximately 12 weeksType III
Integra-CP™ Approximately 10-12 weeksType II
Integra-CP™ Approximately 16 weeksType I
Fine TrabecularFlute of a 3.5mm reamer bur
devoid of bone
Porous Cortical and Fine Trabecular
Flute of a 3.5mm reamer bur only partially �lled with
blood wetted bone
Porous Cortical and Course Trabecular
Flute of a 3.5mm reamer bur �lled with blood
wetted bone
Dense Cortical Flute of a 3.5mm reamer bur �lled with bone and
minimal blood
DescriptionRecommended
Implant Surface* Integration TimeBone Type
*Integra-CP™ is the trade name for Bicon’s surface treatment which was formerly referred to as HA.10
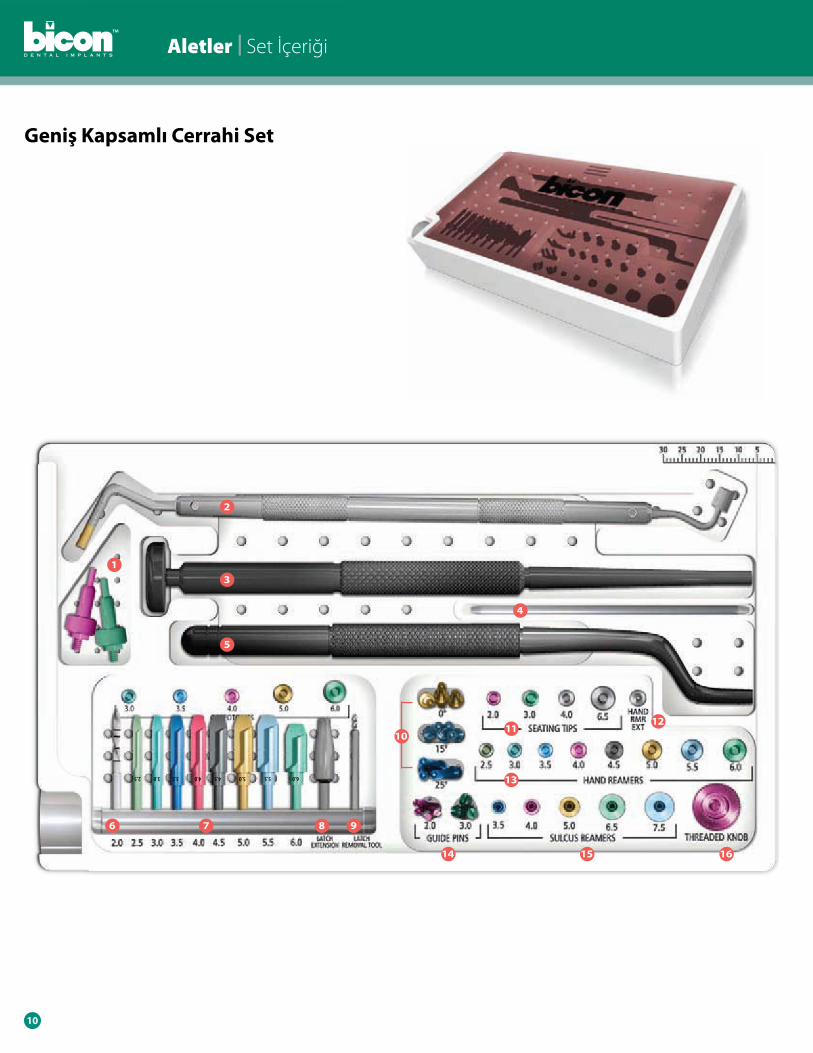
Instrumentation | Tray Contents
Comprehensive Surgical Kit
1
2
3
5
4
6 7 8 9
14 15
1112
13
16
10
3.02.5 3.5 4.0 4.5 5.0 5.5 6.0
Aletler | Set İçeriği
Geniş Kapsamlı Cerrahi Set

3
Pre-Surgical | Bone Classification Type I-IV
Integra-CP™ Approximately 16-20 weeksType IV
Integra-CP™ Approximately 12 weeksType III
Integra-CP™ Approximately 10-12 weeksType II
Integra-CP™ Approximately 16 weeksType I
Fine TrabecularFlute of a 3.5mm reamer bur
devoid of bone
Porous Cortical and Fine Trabecular
Flute of a 3.5mm reamer bur only partially �lled with
blood wetted bone
Porous Cortical and Course Trabecular
Flute of a 3.5mm reamer bur �lled with blood
wetted bone
Dense Cortical Flute of a 3.5mm reamer bur �lled with bone and
minimal blood
DescriptionRecommended
Implant Surface* Integration TimeBone Type
*Integra-CP™ is the trade name for Bicon’s surface treatment which was formerly referred to as HA.3
Pre-Surgical | Bone Classification Type I-IV
Integra-CP™ Approximately 16-20 weeksType IV
Integra-CP™ Approximately 12 weeksType III
Integra-CP™ Approximately 10-12 weeksType II
Integra-CP™ Approximately 16 weeksType I
Fine TrabecularFlute of a 3.5mm reamer bur
devoid of bone
Porous Cortical and Fine Trabecular
Flute of a 3.5mm reamer bur only partially �lled with
blood wetted bone
Porous Cortical and Course Trabecular
Flute of a 3.5mm reamer bur �lled with blood
wetted bone
Dense Cortical Flute of a 3.5mm reamer bur �lled with bone and
minimal blood
DescriptionRecommended
Implant Surface* Integration TimeBone Type
*Integra-CP™ is the trade name for Bicon’s surface treatment which was formerly referred to as HA.11
Aletler | Tanımlar
Yerleştirici ve sökücüler, klinik duruma bağlı olarak yerleştirme ve çıkarma işlemlerinde kullanılan topuz uçlu ya da düz uçlu aletlerdir. Hekimler, ağız içinde implantın yerleştirici ve sökücülerden nasıl ayrılacağını iyi bilmelidirler.
Latch reamer extension, komşu dişler sebebiyle el aletinin kullanımının zor olduğu bölgelerde, çalışılacak bölgeye ulaşımı kolaylaştırmak için latch reamerı uzatan parçadır. Eğer kullanım sırasında latch remaer, latch remaer extensiona tam olarak yerleştirilemezse, latch reamer sıkışabilir ve ya latch reamer extension zarar görebilir.
Ayırıcı parça, implantın açılması sırasında, implant yüzeyinden iyileşme tıkaçının çıkarılmasını kolaylaştıran aletdir.
Paralel pinler, pilot osteotomilerinin ve daha sonra da implantların dizilişlerini kontrolünü kolaylaştırmak için dizayn edilmiş aletlerdir.
Oturtucu uçlar, vidalı düz veya offset handle ile birlikte, implantın veya abutmentlerin oturtulmasını kolaylaştırmak için dizayn edilmiş aletlerdir. İmplant oturtucu uçlarını kullanırken, abutmentin tam birleşimini engelleyebilecek olan implant iç bölümünde bozulmayı önlemek amacıyla, oturtucu uçları implantın içine tam olarak oturtmak zorunludur.
Hand reamerların ters açılı el aletleriyle kullanımını sağlarlar.
Hand reamerlar, Manuel olarak osteotomi sırasında, vidalı düz handle ile birlikte kullanılmak için dizayn edimişlerdir..
Standart rehber pinler, doku punchları gibi sulkus ve ölçü reamerları için rehberlik yapan aletlerdir. Ayrıca implantın ne kadar iyi osteoentegre olduğunu incelemede de faydalıdırlar.
Abutmentin implantın içine kilitlenmesini engelleyecek, implantın üzerindeki herhangi bir yumuşak doku veya kemiğin uzaklaştırılması için dizayn edilmiş aletlerdir.
Vidalı topuz, sulkus reamer, yerleştirici / sökücüler, doku punchları ve ölçü reamerları ile birlikte kullanılan aletlerdir.
Pilo drill, başlangıç pilot osteotomisini ve osteotominin giriş yönünü belirlemekte kullanılır. 6.0, 8.0, 11.0 ve 14.0mm’de işaretleri vardır.
Latch reamer, osteotomi yapmak ve en fazla 50 rpm hızda, irrigasyonsuz olarak otojen kemik grefti toplamak için kullanılan alettir. Çeşitli klinik durumlarda kullanılmak üzere iki çeşiti vardır.
Kemik derinliği ölçücü, osteotomi derinliğini ölçmek için kullanılır. Kemik tıkacı, implant omzu üzerindeki otojen kemik greftini sıkıştırmak için kullanılır.
Vidalı düz handle, uyumlu olan bütün vidalı aletlerle kullanılmak için tasarlanmıştır: hand reamer, sulkus reamer, yerleştirici ve sökücüler, doku punchları, osteotomlar, keskiler, kemik genişleticiler, oturtucu uçlar ve ölçü reamerları
Çıkarıcı anahtarlar, hand reamerı, osteotomları, keskileri, kemik genişleticileri vidalı düz handle ve vidalı topuzlardan gevşetmek için kullanılırlar.
Vidalı ofset handle, direk temas mümkün olmayan bölgelerde, implant ve abutmentleri yerleştirmekte kullanılır.
İmplant yerleştirici ve sökücüler
Latch Reamer Extension
Ayırıcı Parça
Paralel Pinler
İmplant – Abutment Oturtucu Uçları
Hand Reamer Extension
Hand Reamerlar
Rehber Pinler
Sulkus Reamerlar
Vidalı Topuz
Pilot Drill
Latch Reamer
Kemik derinliği ölçücü, kemik tıkacı
Vidalı Düz Handle
Çıkarıcı Anahtar
Vidalı Offset Handle
3
Pre-Surgical | Bone Classification Type I-IV
Integra-CP™ Approximately 16-20 weeksType IV
Integra-CP™ Approximately 12 weeksType III
Integra-CP™ Approximately 10-12 weeksType II
Integra-CP™ Approximately 16 weeksType I
Fine TrabecularFlute of a 3.5mm reamer bur
devoid of bone
Porous Cortical and Fine Trabecular
Flute of a 3.5mm reamer bur only partially �lled with
blood wetted bone
Porous Cortical and Course Trabecular
Flute of a 3.5mm reamer bur �lled with blood
wetted bone
Dense Cortical Flute of a 3.5mm reamer bur �lled with bone and
minimal blood
DescriptionRecommended
Implant Surface* Integration TimeBone Type
*Integra-CP™ is the trade name for Bicon’s surface treatment which was formerly referred to as HA.12 3
Pre-Surgical | Bone Classification Type I-IV
Integra-CP™ Approximately 16-20 weeksType IV
Integra-CP™ Approximately 12 weeksType III
Integra-CP™ Approximately 10-12 weeksType II
Integra-CP™ Approximately 16 weeksType I
Fine TrabecularFlute of a 3.5mm reamer bur
devoid of bone
Porous Cortical and Fine Trabecular
Flute of a 3.5mm reamer bur only partially �lled with
blood wetted bone
Porous Cortical and Course Trabecular
Flute of a 3.5mm reamer bur �lled with blood
wetted bone
Dense Cortical Flute of a 3.5mm reamer bur �lled with bone and
minimal blood
DescriptionRecommended
Implant Surface* Integration TimeBone Type
*Integra-CP™ is the trade name for Bicon’s surface treatment which was formerly referred to as HA.12
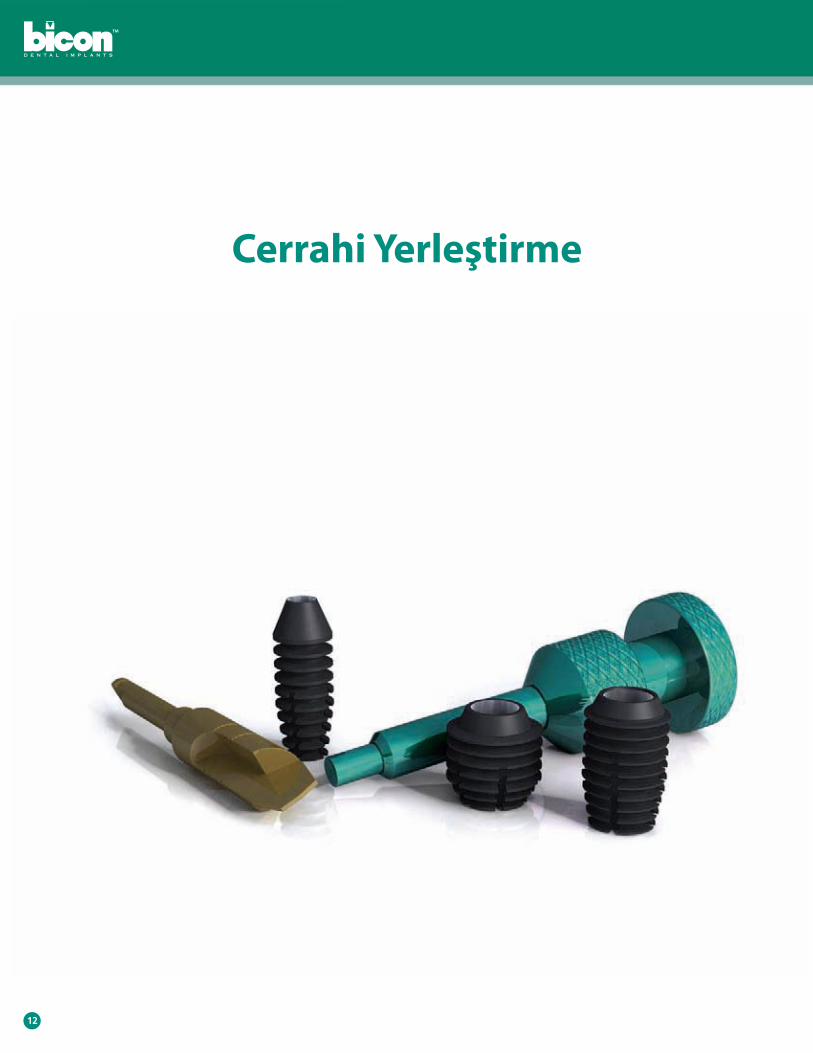
Surgical PlacementCerrahi Yerleştirme

3
Pre-Surgical | Bone Classification Type I-IV
Integra-CP™ Approximately 16-20 weeksType IV
Integra-CP™ Approximately 12 weeksType III
Integra-CP™ Approximately 10-12 weeksType II
Integra-CP™ Approximately 16 weeksType I
Fine TrabecularFlute of a 3.5mm reamer bur
devoid of bone
Porous Cortical and Fine Trabecular
Flute of a 3.5mm reamer bur only partially �lled with
blood wetted bone
Porous Cortical and Course Trabecular
Flute of a 3.5mm reamer bur �lled with blood
wetted bone
Dense Cortical Flute of a 3.5mm reamer bur �lled with bone and
minimal blood
DescriptionRecommended
Implant Surface* Integration TimeBone Type
*Integra-CP™ is the trade name for Bicon’s surface treatment which was formerly referred to as HA.3
Pre-Surgical | Bone Classification Type I-IV
Integra-CP™ Approximately 16-20 weeksType IV
Integra-CP™ Approximately 12 weeksType III
Integra-CP™ Approximately 10-12 weeksType II
Integra-CP™ Approximately 16 weeksType I
Fine TrabecularFlute of a 3.5mm reamer bur
devoid of bone
Porous Cortical and Fine Trabecular
Flute of a 3.5mm reamer bur only partially �lled with
blood wetted bone
Porous Cortical and Course Trabecular
Flute of a 3.5mm reamer bur �lled with blood
wetted bone
Dense Cortical Flute of a 3.5mm reamer bur �lled with bone and
minimal blood
DescriptionRecommended
Implant Surface* Integration TimeBone Type
*Integra-CP™ is the trade name for Bicon’s surface treatment which was formerly referred to as HA.1313
Two Stage Surgical Technique | Implant Placement
Two Stage Surgery Implant Insertion Technique
Drill 2.0mm pilot hole with external irrigation to a depth 2.0mm–3.0mm deeper than chosen implant when practical.
Use paralleling pins to facilitate alignment when placing multiple implants.
Extraction site ScallopedEnvelope
321 FLAP DESIGNS
Seat implant by tapping gently on healing plug or directly into the implant well with an appropriate seating tip.
10
Cut healing plug. Ensure that no sharp edges remain that could irritate soft tissue.
11
Place harvested bone graft over shoulder of implant. See Step #6 above.
12
Close and wait a minimum of ten to twelve weeks for osseointegration.
13
Place an abutment with a 2.0mm post into pilot hole and confirm appropriateness with a vacu-press template.
Widen socket with sequentially larger reamers without irrigation at a maximum of 50 RPM. In this case, a 5.0 x 6.0mm implant has been chosen so the final bur used also has a diameter of 5.0mm.
Place harvested autogenous bone, intermittently removed from the flutes of the reamer burs, into a silicone dappen dish for later use.
4
5.0
5
5.0
6
The implant’s sterile blister pack is dropped onto a sterile tray prior to removing its Tyvek® backing before the implant’s inner packaging is cut with a pair of scissors.
Remove implant from poly bag.Harvest bone debris from reamer flutes and socket.
7 8 9
İki Aşamalı Cerrahi Teknik | İmplant Yerleştirilmesi
İki aşamalı cerrahi implant yerleştirme tekniği
Pratik olması için seçilen implanttan 2.0 mm - 3.0 mm daha derine irigasyonla 2.0 mm’lik pilot delik açılır.
Pilot delik içerisine 2.0 mm postu olan abutment yerleştirilir ve vakumlu modelle uygunluğu kontrol edilir.
Soket içinden ve reamer oluklarından kemik artıkları toplanır.
Hafifce iyileşme tamponu üzerinden veya direkt olarak implant üzerinden uygun yerleştirme ucuyla itilerek implant yerleştirilir.
İyileşme tamponu kesilir. Yumuşak dokuyu irite edecek hiçbir keskin kenarın kalmadığına emin olunmalıdır.
İmplant omuzu üzerinden toplanan kemik grefti yerleştirilir (bkz basamak # 6).
Flep kapatılır ve minimum 10 veya 12 hafta osteoentegrasyon için beklenir.
Maksimum 50 RPM hızda irigasyon yapılmadan, sırayla daha geniş reamerlar kullanılarak soket genişletilir. Bu vakada, 5.0 x 6.0 mm implant seçildi ve böylece kullanılan son frez 5.0 mm ölçüsündedir.
İmplantın iç paketi makasla açılmadan önce, içinde seröz sıvı dolu olan steril paketi, Tyvek paketi kaldırıldıktan hemen sonra steril bir kaba konur.
Her arada reamer oluklarından toplanan otojen kemik grefti daha sonra kullanılmak üzere silikon kaba yerleştirilir.
İmplantın paketi kaldırılır.
Birden çok implant yerleştirilirken paralel yerleşimi kolaylaştırmak için pinler kullanılır.
Çekim bölgesi Zarf Scallop
FLEP TASARIMI
13
Two Stage Surgical Technique | Implant Placement
Two Stage Surgery Implant Insertion Technique
Drill 2.0mm pilot hole with external irrigation to a depth 2.0mm–3.0mm deeper than chosen implant when practical.
Use paralleling pins to facilitate alignment when placing multiple implants.
Extraction site ScallopedEnvelope
321 FLAP DESIGNS
Seat implant by tapping gently on healing plug or directly into the implant well with an appropriate seating tip.
10
Cut healing plug. Ensure that no sharp edges remain that could irritate soft tissue.
11
Place harvested bone graft over shoulder of implant. See Step #6 above.
12
Close and wait a minimum of ten to twelve weeks for osseointegration.
13
Place an abutment with a 2.0mm post into pilot hole and confirm appropriateness with a vacu-press template.
Widen socket with sequentially larger reamers without irrigation at a maximum of 50 RPM. In this case, a 5.0 x 6.0mm implant has been chosen so the final bur used also has a diameter of 5.0mm.
Place harvested autogenous bone, intermittently removed from the flutes of the reamer burs, into a silicone dappen dish for later use.
4
5.0
5
5.0
6
The implant’s sterile blister pack is dropped onto a sterile tray prior to removing its Tyvek® backing before the implant’s inner packaging is cut with a pair of scissors.
Remove implant from poly bag.Harvest bone debris from reamer flutes and socket.
7 8 9
13
Two Stage Surgical Technique | Implant Placement
Two Stage Surgery Implant Insertion Technique
Drill 2.0mm pilot hole with external irrigation to a depth 2.0mm–3.0mm deeper than chosen implant when practical.
Use paralleling pins to facilitate alignment when placing multiple implants.
Extraction site ScallopedEnvelope
321 FLAP DESIGNS
Seat implant by tapping gently on healing plug or directly into the implant well with an appropriate seating tip.
10
Cut healing plug. Ensure that no sharp edges remain that could irritate soft tissue.
11
Place harvested bone graft over shoulder of implant. See Step #6 above.
12
Close and wait a minimum of ten to twelve weeks for osseointegration.
13
Place an abutment with a 2.0mm post into pilot hole and confirm appropriateness with a vacu-press template.
Widen socket with sequentially larger reamers without irrigation at a maximum of 50 RPM. In this case, a 5.0 x 6.0mm implant has been chosen so the final bur used also has a diameter of 5.0mm.
Place harvested autogenous bone, intermittently removed from the flutes of the reamer burs, into a silicone dappen dish for later use.
4
5.0
5
5.0
6
The implant’s sterile blister pack is dropped onto a sterile tray prior to removing its Tyvek® backing before the implant’s inner packaging is cut with a pair of scissors.
Remove implant from poly bag.Harvest bone debris from reamer flutes and socket.
7 8 9

3
Pre-Surgical | Bone Classification Type I-IV
Integra-CP™ Approximately 16-20 weeksType IV
Integra-CP™ Approximately 12 weeksType III
Integra-CP™ Approximately 10-12 weeksType II
Integra-CP™ Approximately 16 weeksType I
Fine TrabecularFlute of a 3.5mm reamer bur
devoid of bone
Porous Cortical and Fine Trabecular
Flute of a 3.5mm reamer bur only partially �lled with
blood wetted bone
Porous Cortical and Course Trabecular
Flute of a 3.5mm reamer bur �lled with blood
wetted bone
Dense Cortical Flute of a 3.5mm reamer bur �lled with bone and
minimal blood
DescriptionRecommended
Implant Surface* Integration TimeBone Type
*Integra-CP™ is the trade name for Bicon’s surface treatment which was formerly referred to as HA.14 3
Pre-Surgical | Bone Classification Type I-IV
Integra-CP™ Approximately 16-20 weeksType IV
Integra-CP™ Approximately 12 weeksType III
Integra-CP™ Approximately 10-12 weeksType II
Integra-CP™ Approximately 16 weeksType I
Fine TrabecularFlute of a 3.5mm reamer bur
devoid of bone
Porous Cortical and Fine Trabecular
Flute of a 3.5mm reamer bur only partially �lled with
blood wetted bone
Porous Cortical and Course Trabecular
Flute of a 3.5mm reamer bur �lled with blood
wetted bone
Dense Cortical Flute of a 3.5mm reamer bur �lled with bone and
minimal blood
DescriptionRecommended
Implant Surface* Integration TimeBone Type
*Integra-CP™ is the trade name for Bicon’s surface treatment which was formerly referred to as HA.14
Two Stage Surgical Technique | Keys to Success
Prior to using a pilot drill, it is imperative that its markings are identified and understood. No assumption should be made about the height of the first marking.
Pilot Drill
Drill to the depth that will allow the chosen implant to be seated 1.0–3.0mm below the crest of bone. For optimal aesthetics in the anterior region, the implant should be placed 5.0mm below the buccal gingiva.
Ideal Drilling Depth for Di�erent Implant Lengths
If the trajectory is appropriate, continue drilling with the pilot drill to the depth marking, which will allow for the chosen implant to be seated below the bone. For aesthetic areas, the implant should be placed 5.0mm below the buccal gingiva. In non aesthetic areas, implants may be placed at the crest of bone level.
Ideal Drilling Depth for Di�erent Implant Lengths
11.0mm
8.0mm
6.0mm
14.0mm
!
5.0mm, 5.7mm & 6.0mm Implant Lengths
Drilling Depth:7.0mm–8.0mm
Drilling Depth:8.0mm–11.0mm
8.0mm Implant Lengths
Drilling Depth:11.0mm–14.0mm
11.0mm Implant Lengths
5.7mm/6.0mm Implant Lengths
Drilling Depth:7.0mm–8.0mm
5.0
Drilling Depth:8.0mm–11.0mm
8.0mm Implant Lengths
5.0
Drilling Depth:11.0mm–14.0mm
11.0mm Implant Lengths
5.0
The reamers are used sequentially beginning with a 2.5mm diameter and ending with the diameter of the intended implant. Reamers have horizontal markings at 6.0, 8.0, 11 and 14mm, whereas older reamers may have different markings. It is imperative that the depth indicators on the latch reamers are known prior to surgery. No assumptions should be made about the height of the first marking on any latch reamer. If there is any doubt about the markings on any drill or reamer, take a measurement prior to using the reamer.
Latch Reamer Markings
2.5mm 3.0mm 3.5mm 4.0mm 6.0mm5.5mm5.0mm
14.0mm11.0mm8.0mm
4.5mm
6.0mm
5.04.54.03.53.02.5
5.5 6.0
İki Aşamalı Cerrahi Teknik | Başarı Anahtarı
Pilot drill Farklı İmplant Uzunlukları İçin İdeal Drill Derinlikleri
Latch Reamer İşaretleri
Farklı İmplant Uzunlukları İçin İdeal Drill Derinlikleri
Pilot drill kullanılmadan önce üzerindeki işaretleri görmek ve anlamak zorunludur. İlk işaretlemenin seviyesi ile ilgili hiçbir varsayım yapılmamalıdır.
Eğer yörünge uygunsa, işaretlenen derinliğe doğru pilot dril ile delmeye devam edilir böylece seçilen implantın kemiğin altında yerleşmesine izin verilmiş olur. Estetik bölgeler için implant bukkal dişetinin 5.0mm altına yerleştirilir. Estetik olmayan bölgelerde implant kemik seviyesinde yerleştirilebilinir.
Reamerlar 2.5 mm genişikte olandan başlanarak sırayla kullanılır ve yerleştirilecek olan implantın genişliğinde bitirilir. Reamerlar 6.0, 8.0, 11 ve 14 mm olmak üzere horizontal işaretlere sahiptir. İmplant cerrahisinden hemen önce Latch reamerların üzerindeki derinlik belirleyicilerin bilinmesi zorunludur. Latch reamer üzerindeki ilk işaretlemenin seviyesi ile ilgili hiçbir varsayım yapılmamalıdır. Eğer herhangi bir dril veya reamer üzerindeki işaretlerle ilgili şüphe varsa, reamer kullanmadan hemen önce ölçüm yapılmalıdır.
Seçilen implantın kemik krestinin 1.0 - 3.0 mm altına yerleşmesine izin verecek şekilde derine girilir. Anterior bölgede optimal estetiğin sağlanması için implant bukkal gingivanın 5.0 mm altına yerleştirilmelidir.
14
Two Stage Surgical Technique | Keys to Success
Prior to using a pilot drill, it is imperative that its markings are identified and understood. No assumption should be made about the height of the first marking.
Pilot Drill
Drill to the depth that will allow the chosen implant to be seated 1.0–3.0mm below the crest of bone. For optimal aesthetics in the anterior region, the implant should be placed 5.0mm below the buccal gingiva.
Ideal Drilling Depth for Di�erent Implant Lengths
If the trajectory is appropriate, continue drilling with the pilot drill to the depth marking, which will allow for the chosen implant to be seated below the bone. For aesthetic areas, the implant should be placed 5.0mm below the buccal gingiva. In non aesthetic areas, implants may be placed at the crest of bone level.
Ideal Drilling Depth for Di�erent Implant Lengths
11.0mm
8.0mm
6.0mm
14.0mm
!
5.0mm, 5.7mm & 6.0mm Implant Lengths
Drilling Depth:7.0mm–8.0mm
Drilling Depth:8.0mm–11.0mm
8.0mm Implant Lengths
Drilling Depth:11.0mm–14.0mm
11.0mm Implant Lengths
5.7mm/6.0mm Implant Lengths
Drilling Depth:7.0mm–8.0mm
5.0
Drilling Depth:8.0mm–11.0mm
8.0mm Implant Lengths
5.0
Drilling Depth:11.0mm–14.0mm
11.0mm Implant Lengths
5.0
The reamers are used sequentially beginning with a 2.5mm diameter and ending with the diameter of the intended implant. Reamers have horizontal markings at 6.0, 8.0, 11 and 14mm, whereas older reamers may have different markings. It is imperative that the depth indicators on the latch reamers are known prior to surgery. No assumptions should be made about the height of the first marking on any latch reamer. If there is any doubt about the markings on any drill or reamer, take a measurement prior to using the reamer.
Latch Reamer Markings
2.5mm 3.0mm 3.5mm 4.0mm 6.0mm5.5mm5.0mm
14.0mm11.0mm8.0mm
4.5mm
6.0mm
5.04.54.03.53.02.5
5.5 6.0

3
Pre-Surgical | Bone Classification Type I-IV
Integra-CP™ Approximately 16-20 weeksType IV
Integra-CP™ Approximately 12 weeksType III
Integra-CP™ Approximately 10-12 weeksType II
Integra-CP™ Approximately 16 weeksType I
Fine TrabecularFlute of a 3.5mm reamer bur
devoid of bone
Porous Cortical and Fine Trabecular
Flute of a 3.5mm reamer bur only partially �lled with
blood wetted bone
Porous Cortical and Course Trabecular
Flute of a 3.5mm reamer bur �lled with blood
wetted bone
Dense Cortical Flute of a 3.5mm reamer bur �lled with bone and
minimal blood
DescriptionRecommended
Implant Surface* Integration TimeBone Type
*Integra-CP™ is the trade name for Bicon’s surface treatment which was formerly referred to as HA.3
Pre-Surgical | Bone Classification Type I-IV
Integra-CP™ Approximately 16-20 weeksType IV
Integra-CP™ Approximately 12 weeksType III
Integra-CP™ Approximately 10-12 weeksType II
Integra-CP™ Approximately 16 weeksType I
Fine TrabecularFlute of a 3.5mm reamer bur
devoid of bone
Porous Cortical and Fine Trabecular
Flute of a 3.5mm reamer bur only partially �lled with
blood wetted bone
Porous Cortical and Course Trabecular
Flute of a 3.5mm reamer bur �lled with blood
wetted bone
Dense Cortical Flute of a 3.5mm reamer bur �lled with bone and
minimal blood
DescriptionRecommended
Implant Surface* Integration TimeBone Type
*Integra-CP™ is the trade name for Bicon’s surface treatment which was formerly referred to as HA.1515
Two Stage Surgical Technique | Keys to Success
Maxillary Anterior Extraction Site
Uneven Crestal Bone
Initially drill into the palatal wall of the socket more perpendicularly than the proposed trajectory of the intended restoration.
Rotate a sulcus reamer as a planisher on a 2.0mm guide pin inserted into the 2.0mm pilot osteotomy. Alternatively, use a round bur to even the bone level around the orifice of the pilot osteotomy.
To prevent the inadvertent displacement of a reamer bur, uneven levels of bone must be leveled at the pilot osteotomy’s orifice.
Immediately upon the pilot drill’s engagement of the bone, change the drill’s trajectory to be more parallel with the adjacent teeth and the proposed restoration.
1 INITIAL TRAJECTORY
3 UNEVEN BONE LEVELS 4 SULCUS REAMER
2 CHANGE TRAJECTORY
15
Two Stage Surgical Technique | Keys to Success
Maxillary Anterior Extraction Site
Uneven Crestal Bone
Initially drill into the palatal wall of the socket more perpendicularly than the proposed trajectory of the intended restoration.
Rotate a sulcus reamer as a planisher on a 2.0mm guide pin inserted into the 2.0mm pilot osteotomy. Alternatively, use a round bur to even the bone level around the orifice of the pilot osteotomy.
To prevent the inadvertent displacement of a reamer bur, uneven levels of bone must be leveled at the pilot osteotomy’s orifice.
Immediately upon the pilot drill’s engagement of the bone, change the drill’s trajectory to be more parallel with the adjacent teeth and the proposed restoration.
1 INITIAL TRAJECTORY
3 UNEVEN BONE LEVELS 4 SULCUS REAMER
2 CHANGE TRAJECTORY
Maksiller Anterior Çekim Bölgesi
Düzensiz Krestal Kemik
Başlangıç drili soketin palatinal duvarının içinde amaçlanan restorasyonun yörüngesine göre daha dik durumda.
Reamerin dikkatsizce yanlış yerleşiminden kaçınmak için, kemik düzensizlikleri rehber osteotomi oluklarıyla seviyelendirilmelidir.
2.0 mm’lik rehber osteotominin içine yerleştirilmiş 2.0 mm’lik rehber pin üzerinde sulkus reameri rendeleyici olarak döndürülür. Alternatif olarak pilot osteotomi olukları çevresindeki kemik seviyesinde round frez kullanılır.
Pilot drilin kemiğe çarpmasıyla birlikte, drilin yörüngesi çekilen diş ve amaçlanan restorasyona daha paralel olacak şekilde değiştirilir.
İki Aşamalı Cerrahi Teknik | Başarı Anahtarı
BAŞLANGIÇ YÖRÜNGESİ
DÜZENSİZ KEMİK SEVİYESİ SULKUS REAMER
YÖRÜNGENİN DEĞİŞTİRİLMESİ

3
Pre-Surgical | Bone Classification Type I-IV
Integra-CP™ Approximately 16-20 weeksType IV
Integra-CP™ Approximately 12 weeksType III
Integra-CP™ Approximately 10-12 weeksType II
Integra-CP™ Approximately 16 weeksType I
Fine TrabecularFlute of a 3.5mm reamer bur
devoid of bone
Porous Cortical and Fine Trabecular
Flute of a 3.5mm reamer bur only partially �lled with
blood wetted bone
Porous Cortical and Course Trabecular
Flute of a 3.5mm reamer bur �lled with blood
wetted bone
Dense Cortical Flute of a 3.5mm reamer bur �lled with bone and
minimal blood
DescriptionRecommended
Implant Surface* Integration TimeBone Type
*Integra-CP™ is the trade name for Bicon’s surface treatment which was formerly referred to as HA.16 3
Pre-Surgical | Bone Classification Type I-IV
Integra-CP™ Approximately 16-20 weeksType IV
Integra-CP™ Approximately 12 weeksType III
Integra-CP™ Approximately 10-12 weeksType II
Integra-CP™ Approximately 16 weeksType I
Fine TrabecularFlute of a 3.5mm reamer bur
devoid of bone
Porous Cortical and Fine Trabecular
Flute of a 3.5mm reamer bur only partially �lled with
blood wetted bone
Porous Cortical and Course Trabecular
Flute of a 3.5mm reamer bur �lled with blood
wetted bone
Dense Cortical Flute of a 3.5mm reamer bur �lled with bone and
minimal blood
DescriptionRecommended
Implant Surface* Integration TimeBone Type
*Integra-CP™ is the trade name for Bicon’s surface treatment which was formerly referred to as HA.16
Two Stage Surgical Technique | Abutment Placement
Implant Uncovering Technique and Placement of Abutment
Expose the implant in aesthetic areas with a semilunar crestal incision.
Make split-thickness buccal flap. Remove healing plug with a healing plug removal instrument.
Insert chosen abutment. Use a template to confirm appropriateness of abutment prior to engagement of locking taper connection, then tap on abutment in long axis of abutment post to engage locking taper.
Place an acrylic emergence cuff or temporization sleeve onto abutment and modify, if necessary.
Place appropriate guide pin to check integration and angulation.
Flush and dry implant well with a cotton tip.Remove excess bone with sulcus reamer corresponding to the chosen abutment with either threaded knob or straight handle.
1
4
7
Inject acrylic around emergence cuff or temporization sleeve and into the vacu-press template.
10
Place template to form temporary crown.
11
Remove and polish acrylic confluent with emergence cuff or temporization sleeve to help form the gingival sulcus.
12
Wait for soft tissue healing prior to taking final impression.
13
3
6
9
2
5
8
İki Aşamalı Cerrahi Teknik | Abutment Yerleştirilmesi
İmplantın Açılma Tekniği ve Abutment Yerleştirilmesi
Estetik bölgede semilunar krestal insizyon ile implantlar açığa çıkarılır.
Adaptasyon ve açının kontrolu için uygun rehber pin yerleştirilir.
Seçilen implant yerleştirilir.
Çıkış manşeti veya geçici manşet üzerine ve vaku-press geçici içine akrilik enjekte edilir.
Geçici kron yerleştirilir. Çıkış manşeti veya geçici manşet ile birleşen akrilik çıkartılıp gingival sulkusa form vermesi için cilalanır.
Son ölçü alınana kadar yumuşak dokunun iyileşmesi beklenir.
Split-thickness bukkal flep kaldırılır.
Vida başlı veya düz saplı olarak seçilen implanta uygun olan sulkus reamarı ile fazla kemik kaldırılır.
Locking taper bağlantısının temasından hemen sonra abutmentın doğrultusu geçici restorasyon ile kontrol edilir ve sonra abument, abutment postunun uzun aksisi boyunca itilerek yerleştrilir.
İyileşme başlığı özel aleti yardımıyla kaldırılır.
İmplant yıkanır ve pamukla iyice kurulanır.
Eğer gerekli ise akrilik çıkış manşeti veya geçici manşet abutment üzerine yerleştirilir.
16
Two Stage Surgical Technique | Abutment Placement
Implant Uncovering Technique and Placement of Abutment
Expose the implant in aesthetic areas with a semilunar crestal incision.
Make split-thickness buccal flap. Remove healing plug with a healing plug removal instrument.
Insert chosen abutment. Use a template to confirm appropriateness of abutment prior to engagement of locking taper connection, then tap on abutment in long axis of abutment post to engage locking taper.
Place an acrylic emergence cuff or temporization sleeve onto abutment and modify, if necessary.
Place appropriate guide pin to check integration and angulation.
Flush and dry implant well with a cotton tip.Remove excess bone with sulcus reamer corresponding to the chosen abutment with either threaded knob or straight handle.
1
4
7
Inject acrylic around emergence cuff or temporization sleeve and into the vacu-press template.
10
Place template to form temporary crown.
11
Remove and polish acrylic confluent with emergence cuff or temporization sleeve to help form the gingival sulcus.
12
Wait for soft tissue healing prior to taking final impression.
13
3
6
9
2
5
8

3
Pre-Surgical | Bone Classification Type I-IV
Integra-CP™ Approximately 16-20 weeksType IV
Integra-CP™ Approximately 12 weeksType III
Integra-CP™ Approximately 10-12 weeksType II
Integra-CP™ Approximately 16 weeksType I
Fine TrabecularFlute of a 3.5mm reamer bur
devoid of bone
Porous Cortical and Fine Trabecular
Flute of a 3.5mm reamer bur only partially �lled with
blood wetted bone
Porous Cortical and Course Trabecular
Flute of a 3.5mm reamer bur �lled with blood
wetted bone
Dense Cortical Flute of a 3.5mm reamer bur �lled with bone and
minimal blood
DescriptionRecommended
Implant Surface* Integration TimeBone Type
*Integra-CP™ is the trade name for Bicon’s surface treatment which was formerly referred to as HA.3
Pre-Surgical | Bone Classification Type I-IV
Integra-CP™ Approximately 16-20 weeksType IV
Integra-CP™ Approximately 12 weeksType III
Integra-CP™ Approximately 10-12 weeksType II
Integra-CP™ Approximately 16 weeksType I
Fine TrabecularFlute of a 3.5mm reamer bur
devoid of bone
Porous Cortical and Fine Trabecular
Flute of a 3.5mm reamer bur only partially �lled with
blood wetted bone
Porous Cortical and Course Trabecular
Flute of a 3.5mm reamer bur �lled with blood
wetted bone
Dense Cortical Flute of a 3.5mm reamer bur �lled with bone and
minimal blood
DescriptionRecommended
Implant Surface* Integration TimeBone Type
*Integra-CP™ is the trade name for Bicon’s surface treatment which was formerly referred to as HA.1717
One Stage Surgical Technique | Implant Placement
One Stage Surgery Implant Insertion Technique
Drill 2.0mm pilot hole with external irrigation to a depth 2.0mm–3.0mm deeper than chosen implant when practical. See page 14.
Place an abutment with a 2.0mm post into pilot hole and confirm appropriateness with a vacu-press template.
Remove black healing plug.
Trim tissue if necessary. Wait for a minimum of 10–12 weeks for osseointegration before removing temporary abutment.
Replace black healing plug with appropriate temporary abutment.
Insert implant with abutment into socket.
The implant’s sterile blister pack is dropped onto a sterile tray prior to removing its Tyvek® backing before the implant’s inner packaging is cut with a pair of scissors.
Harvest bone debris from reamer flutes and socket.Widen socket with successively wider reamer burs without irrigation at a maximum of 50 RPM. See page 14.
3.5
4
7
10
3
6
9
2
5
8
1
Extraction site ScallopedEnvelope
Tek Aşamalı Cerrahi Teknik | İmplant Yerleştirlmesi
Tek Aşamalı İmplant Yerleştirme Tekniği
Pratik olması için seçilen implanttan 2.0 mm - 3.0 mm daha derine irigasyonla 2.0 mm’lik pilot delik açılır. (bak syf14)
Maksimum 50 RPM hızda irigasyon yapılmadan, sırayla daha geniş reamerlar kullanılarak soket genişletilir.
Siyah iyileşme başlığı çıkartılır.
Gerekli ise doku fazlalıkları alınır. Geçici abutmenti çıkarmadan önce osteoentegrasyon için minimum 10 -12 hafta beklenir.
Uygun geçici abutment ile siyah iyileşme başlığı yerleştirilir.
Soket içine abutment ile birlikte implant yerleştirilir.
Soket içinden ve reamer oluklarından kemik artıkları toplanır.
İmplantın iç paketi makasla açılmadan önce, içinde seröz sıvı dolu olan steril paketi, Tyvek paketi kaldırıldıktan hemen sonra steril bir kaba konur.
Pilot delik içerisine 2.0 mm postu olan abutment yerleştirilir ve vakumlu modelle uygunluğu kontrol edilir.
Çekim bölgesi Zarf Scallop
17
One Stage Surgical Technique | Implant Placement
One Stage Surgery Implant Insertion Technique
Drill 2.0mm pilot hole with external irrigation to a depth 2.0mm–3.0mm deeper than chosen implant when practical. See page 14.
Place an abutment with a 2.0mm post into pilot hole and confirm appropriateness with a vacu-press template.
Remove black healing plug.
Trim tissue if necessary. Wait for a minimum of 10–12 weeks for osseointegration before removing temporary abutment.
Replace black healing plug with appropriate temporary abutment.
Insert implant with abutment into socket.
The implant’s sterile blister pack is dropped onto a sterile tray prior to removing its Tyvek® backing before the implant’s inner packaging is cut with a pair of scissors.
Harvest bone debris from reamer flutes and socket.Widen socket with successively wider reamer burs without irrigation at a maximum of 50 RPM. See page 14.
3.5
4
7
10
3
6
9
2
5
8
1
Extraction site ScallopedEnvelope

3
Pre-Surgical | Bone Classification Type I-IV
Integra-CP™ Approximately 16-20 weeksType IV
Integra-CP™ Approximately 12 weeksType III
Integra-CP™ Approximately 10-12 weeksType II
Integra-CP™ Approximately 16 weeksType I
Fine TrabecularFlute of a 3.5mm reamer bur
devoid of bone
Porous Cortical and Fine Trabecular
Flute of a 3.5mm reamer bur only partially �lled with
blood wetted bone
Porous Cortical and Course Trabecular
Flute of a 3.5mm reamer bur �lled with blood
wetted bone
Dense Cortical Flute of a 3.5mm reamer bur �lled with bone and
minimal blood
DescriptionRecommended
Implant Surface* Integration TimeBone Type
*Integra-CP™ is the trade name for Bicon’s surface treatment which was formerly referred to as HA.18 3
Pre-Surgical | Bone Classification Type I-IV
Integra-CP™ Approximately 16-20 weeksType IV
Integra-CP™ Approximately 12 weeksType III
Integra-CP™ Approximately 10-12 weeksType II
Integra-CP™ Approximately 16 weeksType I
Fine TrabecularFlute of a 3.5mm reamer bur
devoid of bone
Porous Cortical and Fine Trabecular
Flute of a 3.5mm reamer bur only partially �lled with
blood wetted bone
Porous Cortical and Course Trabecular
Flute of a 3.5mm reamer bur �lled with blood
wetted bone
Dense Cortical Flute of a 3.5mm reamer bur �lled with bone and
minimal blood
DescriptionRecommended
Implant Surface* Integration TimeBone Type
*Integra-CP™ is the trade name for Bicon’s surface treatment which was formerly referred to as HA.18
Advanced Techniques | Two Stage Mandibular Ridge Split
Two Stage Mandibular Ridge Split Technique
Make a full-thickness flap and a narrow crestal osteotomy. Make a wider horizontal osteotomy 3.0mm above the mandibular canal.
Coronal view of mandible. Lateral view of two thin vertical osteotomies and a wider horizontal osteotomy.
Without reflecting the buccal periosteum, drill a 2.0mm pilot hole to a depth below the horizontal osteotomy.
Insert implant into a widened osteotomy apical to the horizontal cut. Allow a minimum of four months for osseointegration.
Close for three or four weeks to re-establish blood supply to the cortical bone.
Buccal plate separated, but remains attached to the buccal periosteum.
A Curved Cottle chisel is used to separate the buccal plate.
Buccal cortex is outfractured as wider reamers are used.
1
4
7
3
6
9
2
5
2.5
8
İleri Teknikler | iki Aşamalı Mandibular Rigde Split
İki Aşamalı Mandibular Rigde Split Tekniği
Mandibular kemiğin koronal görüntüsü.
Kortikal kemiğin beslenmesinin yeniden sağlanması için üç veya dört hafta beklenir.
Bukkal periosta değmeden, horizontal osteotominin altına doğru 2.0 mm pilot delik delinir.
Full thickness flep kaldırılır ve dar bir krestal osteotomi yapılır. Mandibular kanalın 3.0mm üzerinden daha geniş horizontal osteotomi yapılır.
Bukkal plakayı ayırmak için Curved Cottle chisel kullanılır.
Bukkal korteks daha geniş reamerlar kullanılarak dışarı doğru kırılır.
İki ince vertikal osteotomi ve bir geniş horizontal osteotominin lateral görüntüsü.
Bukkal plaka ayrılır, fakat bukkal periosta bağlı kalır.
Horizontal osteotominin apikaline genişletilen osteotominin içine implant yerleştirilir. Osteoentegrasyon için minimum dört ay beklenir.
18
Advanced Techniques | Two Stage Mandibular Ridge Split
Two Stage Mandibular Ridge Split Technique
Make a full-thickness flap and a narrow crestal osteotomy. Make a wider horizontal osteotomy 3.0mm above the mandibular canal.
Coronal view of mandible. Lateral view of two thin vertical osteotomies and a wider horizontal osteotomy.
Without reflecting the buccal periosteum, drill a 2.0mm pilot hole to a depth below the horizontal osteotomy.
Insert implant into a widened osteotomy apical to the horizontal cut. Allow a minimum of four months for osseointegration.
Close for three or four weeks to re-establish blood supply to the cortical bone.
Buccal plate separated, but remains attached to the buccal periosteum.
A Curved Cottle chisel is used to separate the buccal plate.
Buccal cortex is outfractured as wider reamers are used.
1
4
7
3
6
9
2
5
2.5
8
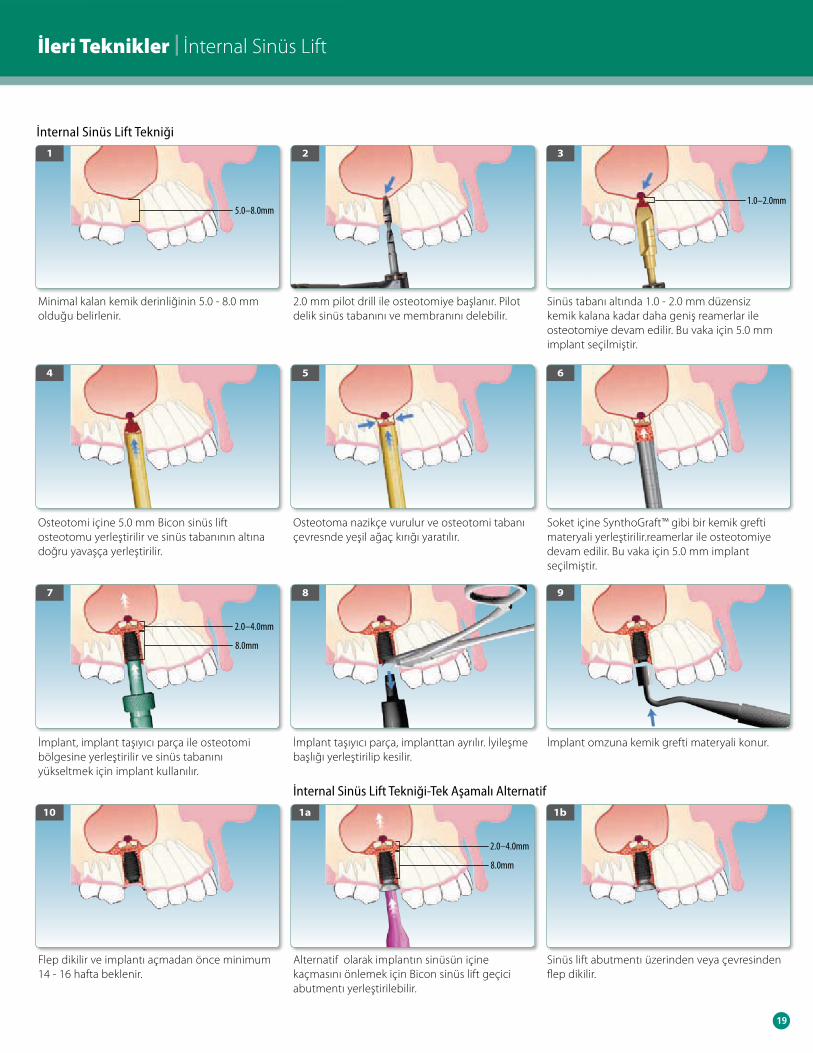
3
Pre-Surgical | Bone Classification Type I-IV
Integra-CP™ Approximately 16-20 weeksType IV
Integra-CP™ Approximately 12 weeksType III
Integra-CP™ Approximately 10-12 weeksType II
Integra-CP™ Approximately 16 weeksType I
Fine TrabecularFlute of a 3.5mm reamer bur
devoid of bone
Porous Cortical and Fine Trabecular
Flute of a 3.5mm reamer bur only partially �lled with
blood wetted bone
Porous Cortical and Course Trabecular
Flute of a 3.5mm reamer bur �lled with blood
wetted bone
Dense Cortical Flute of a 3.5mm reamer bur �lled with bone and
minimal blood
DescriptionRecommended
Implant Surface* Integration TimeBone Type
*Integra-CP™ is the trade name for Bicon’s surface treatment which was formerly referred to as HA.3
Pre-Surgical | Bone Classification Type I-IV
Integra-CP™ Approximately 16-20 weeksType IV
Integra-CP™ Approximately 12 weeksType III
Integra-CP™ Approximately 10-12 weeksType II
Integra-CP™ Approximately 16 weeksType I
Fine TrabecularFlute of a 3.5mm reamer bur
devoid of bone
Porous Cortical and Fine Trabecular
Flute of a 3.5mm reamer bur only partially �lled with
blood wetted bone
Porous Cortical and Course Trabecular
Flute of a 3.5mm reamer bur �lled with blood
wetted bone
Dense Cortical Flute of a 3.5mm reamer bur �lled with bone and
minimal blood
DescriptionRecommended
Implant Surface* Integration TimeBone Type
*Integra-CP™ is the trade name for Bicon’s surface treatment which was formerly referred to as HA.1919
7
Advanced Techniques | Internal Sinus Lift
Internal Sinus Lift Technique
Internal Sinus Lift Technique–One Stage Alternative
Note the minimal residual bone depth of 5.0–8.0mm.
Place a 5.0mm Bicon sinus lift osteotome into the osteotomy and engage the area slightly below the sinus floor.
Introduce the implant into the osteotomy site with the implant inserter and use the implant to raise the sinus floor.
Suture and wait a minimum of 14-16 weeks prior to uncovering.
Prepare osteotomy beginning with the 2.0mm Pilot Drill. Pilot hole may penetrate sinus floor and membrane.
Gently tap the osteotome and create a hairline fracture around the floor of the osteotomy.
Disengage the implant inserter from the implant. Insert and cut the healing plug.
Alternatively, a Bicon sinus lift temporary abutment may be inserted into the implant to prevent the implant from migrating into the sinus.
Continue to prepare osteotomy with successively larger reamers to the extent that 1.0–2.0mm of undisturbed bone remains below the sinus floor. A 5.0mm diameter implant has been chosen for this case.
Place a bone graft material such as SynthoGraft™ into the socket.
Place bone graft material over the shoulder of the implant.
Either suture around or over the sinus lift abutment.
5.0–8.0mm
1
4
2.0–4.0mm
8.0mm
10
5.0
1.0–2.0mm
3
6
9
1b
2
5
8
2.0–4.0mm
8.0mm
1a
İleri Teknikler | İnternal Sinüs Lift
İnternal Sinüs Lift Tekniği
İnternal Sinüs Lift Tekniği-Tek Aşamalı Alternatif
2.0 mm pilot drill ile osteotomiye başlanır. Pilot delik sinüs tabanını ve membranını delebilir.
Osteotoma nazikçe vurulur ve osteotomi tabanı çevresnde yeşil ağaç kırığı yaratılır.
İmplant taşıyıcı parça, implanttan ayrılır. İyileşme başlığı yerleştirilip kesilir.
Alternatif olarak implantın sinüsün içine kaçmasını önlemek için Bicon sinüs lift geçici abutmentı yerleştirilebilir.
Sinüs tabanı altında 1.0 - 2.0 mm düzensiz kemik kalana kadar daha geniş reamerlar ile osteotomiye devam edilir. Bu vaka için 5.0 mm implant seçilmiştir.
Soket içine SynthoGraft™ gibi bir kemik grefti materyali yerleştirilir.reamerlar ile osteotomiye devam edilir. Bu vaka için 5.0 mm implant seçilmiştir.
İmplant omzuna kemik grefti materyali konur.
Sinüs lift abutmentı üzerinden veya çevresinden flep dikilir.
Minimal kalan kemik derinliğinin 5.0 - 8.0 mm olduğu belirlenir.
Osteotomi içine 5.0 mm Bicon sinüs lift osteotomu yerleştirilir ve sinüs tabanının altına doğru yavaşça yerleştirilir.
İmplant, implant taşıyıcı parça ile osteotomi bölgesine yerleştirilir ve sinüs tabanını yükseltmek için implant kullanılır.
Flep dikilir ve implantı açmadan önce minimum 14 - 16 hafta beklenir.
19
7
Advanced Techniques | Internal Sinus Lift
Internal Sinus Lift Technique
Internal Sinus Lift Technique–One Stage Alternative
Note the minimal residual bone depth of 5.0–8.0mm.
Place a 5.0mm Bicon sinus lift osteotome into the osteotomy and engage the area slightly below the sinus floor.
Introduce the implant into the osteotomy site with the implant inserter and use the implant to raise the sinus floor.
Suture and wait a minimum of 14-16 weeks prior to uncovering.
Prepare osteotomy beginning with the 2.0mm Pilot Drill. Pilot hole may penetrate sinus floor and membrane.
Gently tap the osteotome and create a hairline fracture around the floor of the osteotomy.
Disengage the implant inserter from the implant. Insert and cut the healing plug.
Alternatively, a Bicon sinus lift temporary abutment may be inserted into the implant to prevent the implant from migrating into the sinus.
Continue to prepare osteotomy with successively larger reamers to the extent that 1.0–2.0mm of undisturbed bone remains below the sinus floor. A 5.0mm diameter implant has been chosen for this case.
Place a bone graft material such as SynthoGraft™ into the socket.
Place bone graft material over the shoulder of the implant.
Either suture around or over the sinus lift abutment.
5.0–8.0mm
1
4
2.0–4.0mm
8.0mm
10
5.0
1.0–2.0mm
3
6
9
1b
2
5
8
2.0–4.0mm
8.0mm
1a

3
Pre-Surgical | Bone Classification Type I-IV
Integra-CP™ Approximately 16-20 weeksType IV
Integra-CP™ Approximately 12 weeksType III
Integra-CP™ Approximately 10-12 weeksType II
Integra-CP™ Approximately 16 weeksType I
Fine TrabecularFlute of a 3.5mm reamer bur
devoid of bone
Porous Cortical and Fine Trabecular
Flute of a 3.5mm reamer bur only partially �lled with
blood wetted bone
Porous Cortical and Course Trabecular
Flute of a 3.5mm reamer bur �lled with blood
wetted bone
Dense Cortical Flute of a 3.5mm reamer bur �lled with bone and
minimal blood
DescriptionRecommended
Implant Surface* Integration TimeBone Type
*Integra-CP™ is the trade name for Bicon’s surface treatment which was formerly referred to as HA.20 3
Pre-Surgical | Bone Classification Type I-IV
Integra-CP™ Approximately 16-20 weeksType IV
Integra-CP™ Approximately 12 weeksType III
Integra-CP™ Approximately 10-12 weeksType II
Integra-CP™ Approximately 16 weeksType I
Fine TrabecularFlute of a 3.5mm reamer bur
devoid of bone
Porous Cortical and Fine Trabecular
Flute of a 3.5mm reamer bur only partially �lled with
blood wetted bone
Porous Cortical and Course Trabecular
Flute of a 3.5mm reamer bur �lled with blood
wetted bone
Dense Cortical Flute of a 3.5mm reamer bur �lled with bone and
minimal blood
DescriptionRecommended
Implant Surface* Integration TimeBone Type
*Integra-CP™ is the trade name for Bicon’s surface treatment which was formerly referred to as HA.20
Height
Diameter
Height
Diameter
Height
Diameter
Diameter
Height
3.0mm 2.5mm
Diameter
Height
Height
Height
Diameter
Height
Diameter
Appendiks | Abutment Ölçüleri
Abutment Ölçü RehberiBicon abutment sisteminin dizaynı şöyledir ki abutmentın küresel tabanı implant boynuna basamak oluşturarak oturmaz. Bu dizayn ile, abutment tamamen yerleştiğinde abutmentin altında radyolusenslik oluşur. Hiçbir abutment postunun modifiye edilmeyeceği bilinmelidir.
Geçici abutmentin genişliği acil başlık için yer ile daimi abutmentin genişliği toplamıdır.
Abutment genişili abutmentın en geniş bölgesinden ölçülür. Omuzsuz abutmentın yüksekliği en geniş bölgesinden insizal kenarına doğru ölçülür. Abutment post yüksekliği sabittir ve değişmez.
Locator® abutment yüksekliği altın parçanın tabanından Locator® abutment omzuna doğru ölçülür. Mevcut yükseklikler 1.0, 2.0, 3.0, 4.0 ve 5.0 mm’dir.
İyileşme başlığının boyutu, iyileşme başlığının en geniş yerinden ölçülür. Yüksekliği postun tepesinden iyileşme başlığının insizal kenarının en yüksek kısmına doğru ölçülür.
Abutment genişili abutmentın en geniş bölgesinden ölçülür. Omuzsuz abutmentın yüksekliği en geniş bölgesinden insizal kenarına doğru ölçülür. Abutment post yüksekliği sabittir ve değişmez.
Shealth omuzlu abutmentin yüksekliği implant tepesinden abutmentin omzuna doğru ölçülür. Yükseklikler abutment ölçülerine göre 1.5, 2.0, 3.0, 3.5, 4.0, 6.0 veya 8.0 mm’ dir.
Abutmentın en geniş bölgesideki genişliği 4.0 mm’dir. Fixed-detachable abutment yüksekliği implant tepesinden abutmentın en geniş bölgesine doğru ölçülür. Mevcut iki yükseklik 3.0 mm ve 5.0 mm’dir. Bu abutment 20° taper başa sahiptir.
Brevis™ abutmentin yüksekliği implant tepesinden Brevis™ abutmentin omzuna doğru ölçülür. Mevcut yükseklikler 2.0, 4.0 ve 6.0 mm’dir. İmplant tepesinden abutment tepesine kadar olan toplam yükseklik yaklaşık olarak 5.0, 7.0 veya 9.0 mm’dir.
Geçici Abutment
2.0 mm Post Omuzsuz Abutment
Locator ® Abutment
İyileşme Başlığı
3.0 mm Post Omuzsuz Abutment
Shealth Abutment
Fixed-Detachable Abutment
Brevis™ Abutment

3
Pre-Surgical | Bone Classification Type I-IV
Integra-CP™ Approximately 16-20 weeksType IV
Integra-CP™ Approximately 12 weeksType III
Integra-CP™ Approximately 10-12 weeksType II
Integra-CP™ Approximately 16 weeksType I
Fine TrabecularFlute of a 3.5mm reamer bur
devoid of bone
Porous Cortical and Fine Trabecular
Flute of a 3.5mm reamer bur only partially �lled with
blood wetted bone
Porous Cortical and Course Trabecular
Flute of a 3.5mm reamer bur �lled with blood
wetted bone
Dense Cortical Flute of a 3.5mm reamer bur �lled with bone and
minimal blood
DescriptionRecommended
Implant Surface* Integration TimeBone Type
*Integra-CP™ is the trade name for Bicon’s surface treatment which was formerly referred to as HA.3
Pre-Surgical | Bone Classification Type I-IV
Integra-CP™ Approximately 16-20 weeksType IV
Integra-CP™ Approximately 12 weeksType III
Integra-CP™ Approximately 10-12 weeksType II
Integra-CP™ Approximately 16 weeksType I
Fine TrabecularFlute of a 3.5mm reamer bur
devoid of bone
Porous Cortical and Fine Trabecular
Flute of a 3.5mm reamer bur only partially �lled with
blood wetted bone
Porous Cortical and Course Trabecular
Flute of a 3.5mm reamer bur �lled with blood
wetted bone
Dense Cortical Flute of a 3.5mm reamer bur �lled with bone and
minimal blood
DescriptionRecommended
Implant Surface* Integration TimeBone Type
*Integra-CP™ is the trade name for Bicon’s surface treatment which was formerly referred to as HA.Sec2:U
Copyright © 2009 Bicon LIT-005 R0309

Copyright © 2009 Bicon LIT-005 R0309
WORLD HEADQUARTERS
501 Arborway � Boston, MA 02130 USATEL 800.88.BICON � 617.524.4443FAX 800.28.BICON � 617.524.0096
www.bicon.com � [email protected]