it‘s easy to build your own lap steel · pdf fileit‘s easy to build your own lap...
TRANSCRIPT

It‘s easy to
Build Your Own Lap Steel Guitar
by Martin Koch
Copyright ©2004 by Martin KochAll rights reserved
ISBN 3-901314-09-1Published by Martin Koch, Gleisdorf, Austria
Copy editor: Franz LuttenbergerLayout, photos, line drawings and cover: Martin Koch
Sample eBook
You can order the complete eBook at www.BuildYourGuitar.com

Table of contents
Check out this book‘s website 3Parts of a lap steel guitar 6What is a lap steel guitar? 7Building a lap steel is easy 8
Why building a lap steel guitar is easy 8Measurement systems 9
A closer look at inches and millimeters 9My tiny workshop 11My small workbench 12My vise 14Hand tools 15A word on tool quality 15Sharpening 16
Sharpening plane blades and chisels 16Sharpening a scraper 18
Project One: Simple Lap Steel Guitar
List of tools used for Project One 23Measuring and marking tools 23Cutting tools 23Boring tools 26Tools for the electronics 27Special guitarbuilding tools 27Clamps 28
Materials 28Wood 28Hardware parts needed 31Finishing materials 31Rough calculation of material costs 31
Making the peghead 32Marking the peghead contour 32Cutting the peghead to shape 33Drilling the tuner holes 39
Mounting the hardware 41Mounting the tuners 41Mounting the nut 41Positioning the bridge 42
Fitting the electronics 45Cutting the pickup cavity 45Cutting the control cavity 45Making the pickup cavity and control cavity cover 46
Making the fretboard 48Marking the fret positions 48Cutting the fret slots 50Filling the fret slots 51Fitting the fretboard dot markers 52
Gluing on the fretboard 53Finishing the guitar 54
Finishing schedule 55Assembling the guitar 57
Wiring the electronics 57Putting the strings on 58Cutting the nut slots 58Final setup 59
Making the case 61
Sample eBook
You can order the complete eBook at www.BuildYourGuitar.com

Tools, wood and parts needed 65Tools 65Wood needed 67Additional parts needed 68Finishing materials needed 69Rough calculation of material costs 70
Making the template 71Shaping the guitar 73
Cutting out the shape 73Cutting the peghead angle 73Cutting the back of the neck 74
Drilling the tuner holes 75Making the fretboard 76
Marking the fret positions 76Cutting the fret slots 78Installing in the frets 79Cutting the fret ends fl ush 80
Binding the fretboard 81Cutting the binding fl ush 82
Binding the body 83Smoothing the body sides 83Cutting the binding rebate 83Gluing on the binding 85Scraping the binding fl ush 86
Gluing on the fretboard 86Mounting the bridge 87
Making the string mounting holes 88Cutting the cavities 89
Cutting the pickup cavity 89Cutting the control cavity 91Drilling the connection hole 91
Cutting and smoothing the neck 93Inlaying 95
Cutting the inlay pieces 95Cutting the inlay cavities 95Gluing in the inlay 95
Installing the nut 96
Finishing 96Final sanding of the guitar 96Filling the mahogany pores 96Scraping the binding 97Applying the fi nish 98Finishing schedule 101
Making the pickup 103Making the pickup bobbin 103Getting the wire 103Making a pickup winder 105Winding the pickup 105Wiring the pickup 107Potting the pickup 108
Assembling the guitar 109Wiring the electronics 109Stringing the guitar 111
Final setup 112Slotting the nut 112Saddle and pickup height adjustment 113
Making the case 115Materials needed 115Tools needed 115
Suppliers 118Common abbreviations 118Unit conversions 118
About the author 119About this book 119
Project Two: Conventional Lap Steel Guitar
Sample eBook
You can order the complete eBook at www.BuildYourGuitar.com

Project One: Simple Lap Steel Guitar
Sample eBook
You can order the complete eBook at www.BuildYourGuitar.com

Simple lap steel guitarI call this lap steel guitar simple because it is basi-cally just a blank with strings attached. However, that doesn‘t mean that the instrument lacks anything a lap steel guitar needs, and it can be played just as well as any other lap steel instrument.
Scal
e le
ngth
22.
5" (5
71.5
mm
)
32"
(800
mm
)
1�9/16" (40mm)
4" (100mm)
Sample eBook
You can order the complete eBook at www.BuildYourGuitar.com

23
Cutting tools
SawsRyoba saw: I can really recommend that you buy a Japanese Ryoba saw. Japanese saws can have thin blades because their teeth cut on the pull stroke. There‘s no bending of the saw blade when the tool is used correctly. A Ryoba saw has two cutting edges: the fi ne teeth are for cutting across the grain, and the large teeth opposite speed things up consider-ably when cutting along the grain. Japanese saws are very popular among woodworkers, so it won‘t be diffi cult to fi nd one at a good woodworking tools supplier. The only drawback I know of is that you have to blow away the saw dust rather frequently because there‘s always some there to cover the line you’re following. Ryoba saws are held at a low angle to prevent scratching the surface with the teeth of the other side when making deeper cuts.
Pencil, razor knife, caliper, ruler and square Thickness gauges and pin marker
List of tools used for Project One
Measuring and marking tools
Pencil: An ordinary pencil will do as long as you sharpen it regularly with a pencil sharp-ener.Rule: An 18“(500mm)-long stainless steel rule is suffi cient. The metric rule must have 0.5mm graduations and the imperial rule must have 1/64“ marks over the entire length. If you want a high-quality rule, get a Starrett. Square: Buy a quality square with 4”(100mm) blade.Caliper: A quality caliper should be in every guitarbuilder‘s toolbox.Thickness gauge: I use a Japanese-style thickness gauge. The excellent Veritas gauge is shown on the right in the picture above.
Sample eBook
You can order the complete eBook at www.BuildYourGuitar.com

24
Bow saw Hack saw
Chisels Block plane
File and rasp Rectangular and curved scraper
Sample eBook
You can order the complete eBook at www.BuildYourGuitar.com

25
Bow saw: A small bow saw with narrow blade can be used in place of a band saw. My bow saw is a luxury model with Japanese-style blade. Such blades are available as spare parts and can be used if you want to make your own bow saw. For making one you need three hardwood battens, four wood dowels, a threaded rod, two wing nuts and two washers.Hack saw: Another saw needed for cutting metal is a standard hack saw.
ChiselsOne 1/2“(12mm) and one 1“(24mm)-wide chisel are needed for making the cavities.
PlaneA simple block plane will do for all the planing tasks of Project One. You can spend a fortune on planes, and the quality you get is certainly worth the money. If you want a reasonably-priced, well-made plane, get a Record block plane.
File, raspOne fi ne mill fi le and one half-round rasp is needed.
ScraperYou need one rectangular and one curved scraper. Curved scrapers, like the one shown in the picture, are also called “goose-neck“ scrapers.
SandpaperGet some 80-grit, 120-grit and 180-grit sheets (or small rolls) of sandpaper.
Sanding blockAlso needed is a sanding block. The “Rolls Royce“ of sanding blocks is made by the Canadian company Veritas.
Sandpaper Veritas sanding block
Sample eBook
You can order the complete eBook at www.BuildYourGuitar.com

26
Boring tools
Hand drillI use a hand drill for boring small holes up to 3/8“ (9mm). With bits up to 1/8“ (3mm) in diameter the weight of the tool alone is suffi cient to drive the bit into the wood. Just support the hand drill in a vertical position without applying any force on the handle.
BraceMost braces are intended to be used with special-purpose, square-shanked bits. To be able to use conventional round-shanked drill bits look out for a brace with universal chuck. The chuck of my brace has four jaws. I even use 1“(25mm) Forstner bits with it. When the shank slips in the chuck, I‘m applying too much force.
Drill bitsTwist drill bit: One 3/32“(1.5mm) bit (for pre-drilling screw holes) and one 1/8“(3mm) bit are needed.Brad�point drill bits: You need a 5mm bit for the inlay dots (ready-made dots usually come in metric sizes). Alternatively, you can use a 3/8“ bit if you manage to get hold of dots of that diameter. A 10mm bit for the tuner holes and an 11mm one for the bridge posts are also required. I recommend that you use properly-sized bits. A 10mm drill bit is a must for every guitarbuilder as this is the tuner hole diameter required for the vast majority of tuners. If you live in the United States, you probably won‘t fi nd 10mm or 11mm drill bits around the corner, but from browsing the websites of larger woodworking and tool suppliers I know that they are available. Forstner bits: Buy a 3/4“ and a 1“ (20mm and 25mm) bit for removing material from the cavi-ties. I have special sawtooth bits made for use in electric power drills, but they can obviously also be used, without electric power, in a brace.
Brace and hand drillTwist drill bit, brad�point bit and Forstner�style bit
Sample eBook
You can order the complete eBook at www.BuildYourGuitar.com

27
Tools for the electronics
Soldering iron: A 25 to 30�watt soldering iron is suffi cient.Pliers: A pair of combiation cutting pliers is needed for bending, cutting and holding wires.Knife: Although there are a lot of different wire�stripping tools available, a normal paper knife will do for removing the insulation from the wire ends.
Special guitarbuilding tools
Nut fi les: If you want to do serious guitarbuilding, there‘s no way around expensive nut fi les. These special fi les, which are available from most suppliers of instrument-making tools, have teeth on their edges only and produce accurate, round-bottom nut slots. You don‘t have to buy all the different fi le sizes for making slots of different widths: wider slots can also be formed by simply rolling a fi le from side to side. The thinnest nut fi les available are as thin as saw blades and therefore very fragile. The following four fi le sizes would make a good starter set: .016“/ .025“/ .032“/ .042“ (0.4 / 0.6 / 0.8 / 1mm). It is also possible to cut the slots with
a saw fi rst and to continue with a nut fi le.
Nut fi les: the fi les on the left are actually small saw blades of different cutting widths
A pair of pliers and knife30�watt soldering iron and solder
Sample eBook
You can order the complete eBook at www.BuildYourGuitar.com

28
Clamps
Cam clamps: All-wood cam clamps, such as the one shown above, are extremely popular among guitarbuilders. They are lightweight and apply suffi cient, yet gentle force. Buy at least fi ve of them for a start.
GlueWood glue: I used a widely-available white wood glue (PVA glue) for gluing on the fi nger-board. Epoxy: Epoxy is needed for gluing in the inlays. It comes in two parts, the epoxy resin and a hardener, which have to be mixed before use. Buy a type with a long open time.Cyanoacrylate (CA) glue: One bottle or tube of thin CA glue (also known as “crazy glue”) comes in handy for several tasks. Another name for this glue (especially in Europe) is “super glue“. Double-faced tape: Thin double-faced tape from the stationer‘s is very useful for various fastening jobs.
White glue, epoxy, CA glue, double�faced tapeCam clamp
Materials
Wood
The guitar is made from one hardwood blank. I used maple, but you can, in principle, use any well-seasoned hardwood. Mahogany, walnut, cherry, oak, beech, alder, basswood could all be used just as well as any other tropical hardwood I may not even have heard of. Therefore, my standard answer to the question, “Can I use this particular type of wood?“ is inevitably, “Why not? Give it a try.“ Although even softwood timbers like spruce or pine are conceivable, hardwood is preferable. Each piece of wood sounds different, but it is practically impossible to predict exactly how. You would have to build several guitars and fi t the same electronics, pickup and strings on all of them to be able to compare them. But why should you want to do that anyway? I‘m sure you‘ll love the unique sound of your own, unique lap steel guitar.
Sample eBook
You can order the complete eBook at www.BuildYourGuitar.com

29
Use dry wood onlyThe wood has to be dry before it can be used; otherwise it will warp and not maintain its shape over time. For instrument-making the moisture content should not exceed 8 percent (just in case that you have access to a wood moisture meter). There is a very simple method of making sure that the wood is dry enough: put it into a room where humidity is below 50%
- this can be your workshop or any other room with constant humidity -, weigh the plank and note its weight and the date of weighing on it. Do this once a week until the weight remains constant (i.e. the piece doesn‘t lose any more weight). This is the point when the wood is in balance with the room and is ready for use.
Wood moisture contentThe weight of a piece of wood always includes the weight of the water contained in it. The wood moisture content is the ratio between the weight of the water contained in wood and the weight of the fully-seasoned wood. The approximate wood moisture content can be determined with electronic measuring instruments measuring the electrical conductivity of wood, which is directly linked to the wood moisture content.
Wood needed1 well-seasoned hardwood blank, 32” x 4“, 19/16“ thick (800x100mm, 40mm thick) 1 hardwood fretboard blank, 20” x 21/2“, 1/4“ thick (500x65mm, 6mm thick)1 piece of hardwood veneer, 8” x 11/2“, 1/64“ thick (200x40mm, 3mm thick) for making the pickup and control cavity cover
Maple blank Plum wood fretboard blank
Sample eBook
You can order the complete eBook at www.BuildYourGuitar.com

30
“L” (left) tuner “Les Paul Junior” bridge
Single�coil pickup Potentiometer
1/4“ output jack Inlay dots and brad�point drill bit of the same diameter
Sample eBook
You can order the complete eBook at www.BuildYourGuitar.com

31
Hardware parts needed
3 “L“ (left), 3 “R“ (right) tuners1 Les Paul Junior bridge1 single-coil neck pickup 1 250K-ohm control potentiometer1 knob1 mono 1/4“ output jack7 additional tuner mounting screws12 white pearl dots, 13/64“ (5mm) in diameter
Finishing materials
Danish OilWith a 1�pint (0.5l) can of Danish Oil you will be able to fi nish several guitars.
Steel wool“000“, or, if you can fi nd it, “0000“ steel wool will do the fi nal polishing.
GlovesA pair of rubber gloves and hand cream - just in case you suffer from dry skin when wearing gloves - will protect your hands.
Rough calculation of material costs
Sample eBook
You can order the complete eBook at www.BuildYourGuitar.com

32
Making the peghead
The peghead has to be made quite thin to allow mounting the tuners the conventional way (i.e. from the back of the peghead). Standard tuners can be mounted on 1/2“ to 5/8“(13�16mm)-thick pegheads.
Marking the peghead contour
Choose one side on one end as the face side and then put the blank face down on the bench. Measure 51/2“ (140mm) back from the end and pencil line A parallel to the end across the blank. Also mark this line on the sides of the blank. Set a marking gauge to 19/32“ (15mm) and mark the peghead thickness (line C) up to line A on both sides and on the front of the blank.Measure 180mm back from the end of the guitar blank and draw a line B parallel to the end all the way around the blank. Mark a round transition from the peghead to the body of the guitar on both sides. See if you can fi nd a circular object with a diameter of 4“ to 43/4“ (100�120mm) that can be used as a template; a compact disk, for example, would be fi ne. I used a plastic cup with a diameter of approximately 110mm. Finally, draw a line at a distance of about 1/32“ (1mm) from line C (i.e. 5/8“ (16mm) under the face-surface of the peghead). This will be the line for the saw to follow.
A
5�1/2"(140mm)
19/3
2"
(15m
m)
Peghead face
C
A
7" (180mm)B
Peghead face
The marked peghead contour
Sample eBook
You can order the complete eBook at www.BuildYourGuitar.com

33
Cutting the peghead to shape
Clamp the blank upright into the workbench vise so that the guide line is perfectly vertical. Start the cut at one corner using the fi ne (cross-cut) teeth of the Ryoba saw. Hold the saw at an angle of 45 degrees and turn it over when the cut is about 1/4“ (6mm) deep. This cut goes along the grain and is therefore best done with the larger teeth of the saw. Don‘t force the saw and don‘t pull too hard, but hold it gently and hold it steeper (i.e. lower the handle side of the saw) with each stroke. The pulling action of the saw leaves the blade dead straight, making it easy to follow the guide line. Continue until you‘ve cut just over the halfway point and halfway down. Then fl ip the blank over and do the same from the other side until both cuts meet at the top. From there saw downwards to remove the material in the center, holding the saw horizontally this time. Now that you have sawn halfway down the peghead, repeat the above cutting procedure once, sawing down to line A. Remove most of the waste by cutting across the blank at line A. This is quite a simple cut, but you must take great care not to cut too deep. A piece of veneer or cardboard stuck into the kerf will protect the back of the peghead against scratches. If you use veneer of a contrasting color, the differently-colored saw dust will tell you when to stop cutting.
Above left: Hold the saw at an angle and cut just over the halfway point and halfway down; fl ip the blank over and do the same from the other side until both cuts meet at the top
Above: Remove the remaining material; hold the saw horizontally as you cut
Left: Remove most of the waste by cutting across the blank at line A
Sample eBook
You can order the complete eBook at www.BuildYourGuitar.com

34
Now comes the most diffi cult cut: the concave transition to the full thickness of the blank. If you have access to a bandsaw with a narrow blade, this would be the ideal tool for the job. However, the old�fashioned bow saw will also do the same in a little more time. Clamp the blank to the workbench so that you can cut vertically. All cutting with a bow saw is done on the push stroke, with the teeth pointing away from you. Hold the saw with a light grip and let the blade do the work. Follow the guide line as close as possible, making sure it remains visible at all times. Also check frequently that the cut doesn‘t go astray at the bottom. If this happens, turn the blank over and correct the cut. With a bit of practice it is possible to make this cut in one pass. I had to turn the piece over and correct the cut several times, but was lucky because the blade had always entered the waste area. As you can see, the cut turned out reasonably well, just slightly off line B. If you have cut over the line, draw a new transition line and be more careful at the second attempt. There‘s some room for corrections; these will result in the bridge ending up a bit nearer the bridge�end of the blank.
Cutting the concave transition
Not too bad a cut, just slightly off line B
Sample eBook
You can order the complete eBook at www.BuildYourGuitar.com

35
Smoothing the transitionStart smoothing and correcting the transition area with a half-round rasp, then continue with a “goose-neck“ scraper until the surface is nearly smooth. Find a section on the scraper that resembles the curve of the transition. Continue on the back of the peghead, using a well-sharpened block plane to take off material in circular motions. Check the fl atness quite frequently by laying on a square and looking for light gaps; mark all sections where no light shines through with pencil lines. By moving the square to different areas you‘ll get a good picture of where the high spots are. Take off material in those areas with circular strokes of the plane. The smoother the surface gets, the longer the pencil lines drawn on the wood will become. You don‘t need to work the edges as they are in the waste area (which will be cut off later).
Smoothing the cut with a rasp ... ... and a “goose�neck” scraper
Marking high spots Removing material from the higher areas
Sample eBook
You can order the complete eBook at www.BuildYourGuitar.com

36
Measure 11/4“ (30mm) from both sides on the top of the peghead and mark the approximate peghead contour to get an impression of where the important areas are. Pay attention to keeping a uniform thickness and continue smoothing until you get near the line marking the thickness of the peghead. At this stage you will probably have a hump in the transition area, where the fl at part of the peghead ends and the round section starts. Depending on which one is higher, you‘ll have to remove material from either the fl at or the round part until one fl ows into the other smoothly. As a last step use a rectangular scraper and work the entire surface, scraping with the grain until all the tool marks have disappeared. I ended up with a uniform peghead thickness of 9/16“ (14mm). It is okay if the peghead becomes gradually thinner towards the end, but it doesn‘t look good if it gets thicker.
Cutting the peghead taperIf necessary, draw a new neck-peghead transition line B. Also mark a center line on the guitar block and draw two lines starting at a distance of 3/4“ (20mm) on either side of the center line on the face of the peghead. Mark the peghead taper as shown in the drawing on the facing page. Holding the Ryoba saw at a tight angle, cut out the peghead close to the fi nal shape.Smooth the surface with a block plane until you approach the line marking the peghead shape. Always work in the direction of the grain, i.e. towards the end of the peghead.
Final cleaning of the surfaceOnly the area between the two lines has to be perfect
BAD ACCEPTABLE
Thicker towards end Thinner towards end
Sample eBook
You can order the complete eBook at www.BuildYourGuitar.com

37
B
3/4" (20mm)
Center line
Cutting the peghead taper
Smoothing the cut with a block plane The smoothed back of the peghead
Sample eBook
You can order the complete eBook at www.BuildYourGuitar.com

38
10mm dia.
B
2�3/8" (60mm
)
1�5/8" (42mm
)
1�5/8" (42mm
)
13/32“ (10mm)
Positioning of tuner holes
Sample eBook
You can order the complete eBook at www.BuildYourGuitar.com

39
Drilling the tuner holes
Drilling the tuner holes
Measure the diameter of your tuner‘s mounting nut; this is the required tuner hole diameter (probably 10mm). Drilling the tuner holes is usually done on a drill press but can also be done by hand. To ensure that the holes are perpendicular to the peghead surface and to get the alignment and the distances between the holes right, I used a self-made drilling jig. If you mark and drill the holes carefully, you can get along without this jig. It consists of a 2” x 2” x 6” (50x50x150mm) hardwood block with three 10mm holes whose centers are 15/8“ (42mm) apart and 13/32“ (10mm) from one of its long edges. I have to admit that I went to a drill press for making this jig. With a piece of 1/4”(6mm) plywood glued to one side as a guide it was easy to correctly align and fi x the jig on the peghead.The fi rst tuner hole should be located 23/8“ (60mm) from line “B“. Position the jig and put a backing board on the back of the peghead before fi xing the jig with two clamps. Make sure that the clamps stay clear of the tuner holes.When using the brace I stabilize it by laying my chin on the back of my left hand. I drill with very little downward pressure and let the bit do the work.
13/32" (10mm)
1�5/8" (42mm) 1�5/8" (42mm)
2" x 2" x 6” (50x50x150mm) hardwood block
1/4” (6mm) plywood
Drilling jig
Sample eBook
You can order the complete eBook at www.BuildYourGuitar.com

40
The fi nished aluminum nut
The nut is fastened centered and fl ush to line “B”
Fixing the tuners with the supplied screws
Tightening the tuner nut
Sample eBook
You can order the complete eBook at www.BuildYourGuitar.com

41
Mounting the hardware
Mounting the tuners
Fasten the mounting nut lightly and line up one row of tuners with the help of a rule. Pre-drill each hole for the small mounting screws with a 1/16“(1.5mm) bit and fi x the tuners with the small screws. A piece of tape on the bit can serve as a visual depth stop to prevent drilling through the peghead. Then fasten the tuner mounting nuts. A common wrench size is 10mm.
Mounting the nut
The nut is a 27/16“(62mm)�long piece cut off a 5/8“ x 3/8“(15x10mm) aluminum angle. In Germany and Austria such angles can be found in 1-meter�(3-foot) lengths in any DIY center. If it is diffi cult to get hold of them in other parts of the world, buy a larger angle and cut it to size with a hack saw. The thickness of the angle doesn’t matter.Drill three 3/32“(2mm) holes into the 3/8“(10mm)-wide side as shown in the drawing below. Align the nut on line “B“, center it on the neck and fasten it with three tiny screws (see picture on facing page). I used the same screw type here as for mounting the tuners. These screws are about 3/8“ (10mm) long and approximately 3/32“ (2.2mm) in diameter. Pre-drill all the screw holes with a 1/16“(1.5mm) drill bit.
3/8"
(10m
m)1/4" (6mm) 1/4" (6mm)
= =
5/32
" (4
mm
)
5/8"(15mm)
3/32" (4mm) dia.
2�7/16" (62mm)
3/32
" (2
mm
)
The nut, made from an aluminum angle
Sample eBook
You can order the complete eBook at www.BuildYourGuitar.com

42
Positioning the bridge
The bridge is placed so that the saddle of the fi rst string is at a distance of 221/2“ (571.5mm) from the front of the nut. I used a compensated bridge model (Les Paul Junior), but compen-sation is not an issue on a lap steel guitar as, in practice, intonation errors can be corrected by holding the steel bar at a slight angle when playing. Measure a distance of 221/2“ (571.5mm) from the front of the nut and mark a line S perpen-dicular to the center line. Alternatively, you can also measure a distance of 111/4“ (half the scale length) from the 12th fret. Take your bridge and measure distance X as shown below. Next, determine the diameter D of the string posts with a caliper. Subtract half of this diameter from measurement X to get the required distance from line S; this distance was 5/32“ 4mm on my bridge model. If you work very accurately when marking and drilling the post holes, you can use this distance measurement and scribe line P parallel to line S and the bridge will sit right where it is meant to be. But because the whole bridge can be set further back with two allen screws, I recommend that you position the bridge (and draw line P) marginally closer to line S and then adjust the bridge to its exact position after mounting. I chose a distance of 1/8” (3mm).Measure the distance between the two bridge posts and mark this distance centered to the neck on line P. My bridge posts are 81mm (33/16”) apart; another common value is 31/4“ (82.55mm).Measure the diameter of the threaded inserts. They are ribbed and you need the diameter without ribs (in my case 11mm). Drill two holes of that diameter, then tap the threaded inserts into place using a piece of wood between hammer and metal for protection.
The holes for the threaded inserts The mounted bridge
X
Distance=X�D/2D
P
S
Sample eBook
You can order the complete eBook at www.BuildYourGuitar.com

43
Adjust to 22�1/2" (571.5mm) from front of nut
or 11�1/4" (285.75mm) from 12th fret
S
Set
the
brid
ge b
ack
wit
h th
ese
two
alle
n sc
rew
s
=Dep
ends
on
brid
ge m
odel
22�1/2" (571.5mm) from front of nut
or 11�1/4" (285.75mm) from 12th fret
Distance1/8" (3mm)
7/16" (11mm) dia.
7/16" (11mm) dia.
Center line
=
P
S
A note on the bridge usedI chose the Les Paul Junior bridge for its simplicity and easy availability and because it can be adjusted higher than the usual Fender-style bridges. There‘s no extra stringholder required, and for mounting the bridge you just have to drill two holes. It has two features which are not required on a lap steel guitar: (a) it is radiused, and (b) it has a (non-adjustable) compensation built in. This compensation can be corrected by holding the steel bar parallel to the fi xed saddles (instead of parallel to the frets). There isn‘t any adjustment possibility to get rid of the 12“ saddle radius, though. I solved the problem by fi ling small notches into all the saddles except the one for the 1st string. Cut the notches with nut fi les and deepen them until the tops of all the strings are at an equal height (see also page 58).
Sample eBook
You can order the complete eBook at www.BuildYourGuitar.com

44
Connecting the control cavity with the pickup cavity
Pre�drilling the control cavity
Cleaning up the cavity
The pre�drilled pickup cavity
Removing the remaining material with a chisel
Make pickup cavity 5/8" (15mm) deep
Trace outline from pickup baseplate
Cent
er li
ne"Harmonics line" (see text)
Add 1/32" (0.8mm) for cavity outline
Sample eBook
You can order the complete eBook at www.BuildYourGuitar.com

45
2�3/8" (60mm)
1" (2
5mm
)
Drill 1�3/16" (30mm) deep
1�3/8" (35mm)
Center line
Pickup cavity
Fitting the electronics
Cutting the pickup cavity
The only space available for mounting the pickup is the area between the end of the fretboard and the bridge. Lap steel guitars sound best when the pickup is placed close to the bridge as this gives a brighter sound. You can determine the best position by ear. String up the guitar and try to fi nd points of rich harmonics. You probably know that one point with distinct harmonics is the halfway point on the scale. When you pluck a string at the 12th fret and, immediately afterwards, tap on it gently with a fi nger, you‘ll hear the harmonics right away. Now do the same closer to the bridge. It is more diffi cult to produce and hear the harmonics there, but if you try at different locations on the bass (sixth) string, you will be successful. Note any occurrences of harmonics with a pencil mark directly on the blank. I discovered harmonics 9331/64“ (241mm) from the 12th fret on all three bass strings. Remove the strings and mark a “harmonics line“ across the plank. Then position the pickup so that the centers of its polepieces are exactly above this line. Also center the pickup on the plank, then lightly trace its outline on the wood. Add 1/32“ (0.8mm) on all sides and draw the pickup cavity shape. Cut most of the cavity with a 3/4“(20mm)-diameter Forstner drill bit, drilling to a depth of 5/8“ (15mm). Remove the remaining material with 1“(24mm) and 1/2“(12mm)-wide chisels.
Cutting the control cavity
The control cavity is made on the side of the blank (see drawing below and pictures on fol-lowing pages). Pre drill a 30mm �deep and 60mm� long cavity with a 1“(25mm) Forstner drill bit and fi nish with a 1“(24mm)� wide chisel. Finally, use a 1/4“(6mm) bit for drilling a channel to connect the pickup cavity with the control cavity.
Sample eBook
You can order the complete eBook at www.BuildYourGuitar.com

46
Making the pickup cavity and control cavity cover
Plane a 15/8“(40mm)-wide and 8“(200mm)-long hardwood strip down to a thickness of 1/8“ (3mm). Mark the cover shapes on the strip as shown in the drawings below and cut them out with the Ryoba saw. Drill through both ends of the pickup opening with a 11/16”(18mm) Forstner drill bit and cut out the material in between with a fret saw; then fi le and sand all the edges, closely following the drawn lines. This task looks quite easy, but I had to make three pickup covers until I was satisfi ed with the look and fi t of the cover.
Small springs between pickup baseplate and cover ensure some tension for pickup height adjustment
Pickup
Pickupcover
Spring
3�15/16" (100mm)
1/4"
(6m
m)
3�5/8" (93mm)
Depends on your pickup
2�3/4" (70mm)
23/3
2" (1
8mm
)
3/32" (2.5mm) dia.
1/8" (3.5mm) dia.
1�5/
8" (4
0mm
)
Center line
1/8" (3mm) thickPickup cavity cover
Sample eBook
You can order the complete eBook at www.BuildYourGuitar.com

47
Control cavity with cover
3/32" (2.5mm) dia.
3�1/8" (80mm)
2�3/4" (70mm)
1�3/16" (30mm)
1�3/
8" (3
5mm
)
5/16" (8mm) dia.3/8" (9mm) dia.
Center line
Control cavity cover
Sample eBook
You can order the complete eBook at www.BuildYourGuitar.com

48
Making the fretboard
Plane one of the sides of the fretboard blank dead-straight, then the other; make sure the two sides remain parallel. The fretboard should be 27/16“ (62mm) wide after planing. Then plane one surface as fl at as possible with a block plane. This will be the back of the fretboard (the gluing surface). Fretboard blanks from guitar shop suppliers have usually been prepared on a machine. If your blank already has a fl at surface, better leave it alone; if neces-sary, go over it with the scraper.Attach the back of the fretboard blank to your workbench with two long strips of double-faced tape. Then plane the top surface of the fretboard until it has a uniform thickness of 6/32“ to 1/4“ (5�6mm).
Marking the fret positions
Using three small pieces of double-faced tape, fasten a rule parallel to one edge of the fret-board so that the zero-mark of the rule is about 1/8“ (3mm) from one end. Cut the zero-mark into the fretboard surface with a razor knife and a square, then mark all the other (24) frets likewise. It is obviously impossible to work to an accuracy of one hundredth of a millimeter or one thousandth of an inch, so the fi gures will have to be rounded up (5-9) or down (1-4) to tenths of a millimeter or hundredths of an inch. Try to be as accurate as possible when laying out the frets. When you have marked the zero-fret and all other frets (plus an additional one for the fi ngerboard end), double-check the distances by reading each position off the rule and then comparing these values with the fi gures in the table. If the two differ by more than 0.3mm or 0.012”, the mark has to be recut. If you use a ruler with 1/64“ marks, you may fi nd the six “nearest fractions“ columns in the table on the opposite page helpful. Simply add up the values of a line: the 14th fret, for example, is located at 12“ plus 15/32“ plus 1/128“ (1/128“ being halfway between two 1/64“ marks). The “Result“ and “Error“ columns show the small and insignifi cant deviations from the calculated values.
Plane one side of the fretboard blank dead-straight Planing the fretboard blank to thickness
Sample eBook
You can order the complete eBook at www.BuildYourGuitar.com

Marking the fret positions
All fret distances are measured from the front of the nut
All distances are measured from the front of the nut Fret Calculated values Nearest fractions Result Error
mm inches Full inches 4th 16th 32nd 64th 128th inches inches
1 32.08 1.263 1 1 16 1 1.258 0.005 2 62.35 2.455 2 29 2.453 0.002 3 90.93 3.580 3 37 3.578 0.002 4 117.90 4.642 4 41 4.641 0.001 5 143.36 5.644 5 41 5.641 0.003 6 167.39 6.590 6 38 6.594 0.004 7 190.07 7.483 7 31 7.484 0.001 8 211.48 8.326 8 5 21 8.328 0.002 9 231.69 9.121 9 7 1 9.117 0.004 10 250.76 9.872 9 56 9.875 0.003 11 268.76 10.581 10 37 1 10.586 0.005 12 285.75 11.250 11 1 16 11.250 0.000 13 301.79 11.881 11 14 1 11.883 0.002 14 316.93 12.477 12 15 30 1 12.477 0.000 15 331.22 13.040 13 1 2 1 13.039 0.001 16 344.70 13.571 13 9 36 1 13.570 0.001 17 357.43 14.072 14 1 4 1 14.070 0.002 18 369.45 14.545 14 35 14.547 0.002 19 380.79 14.992 14 63 1 14.992 0.001 20 391.49 15.413 15 13 26 1 15.414 0.001 21 401.59 15.811 15 13 15.813 0.002 22 411.13 16.186 16 12 16.188 0.002 23 420.13 16.541 16 17 34 1 16.539 0.002 24 428.63 16.875 16 14 16.875 0.000 25 436.65 17.191 17 3 12 17.188 0.003
Fret distances for a scale length of 22.5“ (571.5mm)
Sample eBook
You can order the complete eBook at www.BuildYourGuitar.com

50
Cutting the fret slots
You can use any saw with fi ne teeth for cutting the fret slots. The slots will be fi lled with veneer strips later, so make sure to have veneer that fi ts tightly into the slots. Also note that the thickness of a saw blade is usually smaller than its width of cut. This is because most saws have set teeth, which means that they are slightly bent to the left or right. If your saw has a width of cut of 1mm, use 1mm�thick veneer. Because I wanted quite thin fret position markers, I used a saw with a width of cut of 0.024“ (0.6mm). I can recommend veneer 1/32“ to 1/16“ (1 to 2mm) thick as it is much more stable (see facing page).Cut the fret slots to a depth of about 1/16“ (2mm). I attached a strip of wood to the underside of the square to ensure that the saw blade would touch the square above the teeth of the saw. This is more accurate and prevents the teeth from rubbing against steel and thus dulling.When you have cut all the fret slots, deepen them to a uniform depth of 1/8“ (3mm). A simple depth stop can help to achieve equal slot depth: tape a thin strip of wood to one side of the blade (use double-stick tape) so that it is parallel to, and at a distance of 1/8“ (3mm) from, the tips of the teeth of the saw. Finally, cut through the fretboard at the zero-fret and the 25th fret.
Cutting the fret slots The taped�on stop allows cutting to a uniform depth
A strip of wood fastened to the underside of the square with double�faced tape raises its edge above the teeth of the saw
Sample eBook
You can order the complete eBook at www.BuildYourGuitar.com

51
Filling the fret slots
I fi lled the fret slots with 0.024“(0.6mm)-thick veneer strips. These were so fragile that I had to stick them into the slots dry before applying a thin, liquid kind of CA glue (crazy glue or super glue) which fl owed easily into the gaps on either side of the strips. Use wood glue for thicker types of veneer which can be pressed into the fret slots with the help of a clamp. Leave it all to dry for several hours; then take a chisel and cut the veneer strips fl ush to the fretboard surface. Take care not to mar the latter with the sharp edges of the chisel; better let the veneer protrude just a little and then fi nish the job with sandpaper.
Inserting the maple veneer strips into the slots
Applying thin CA glue
Cutting the “frets” fl ush
Sample eBook
You can order the complete eBook at www.BuildYourGuitar.com
52
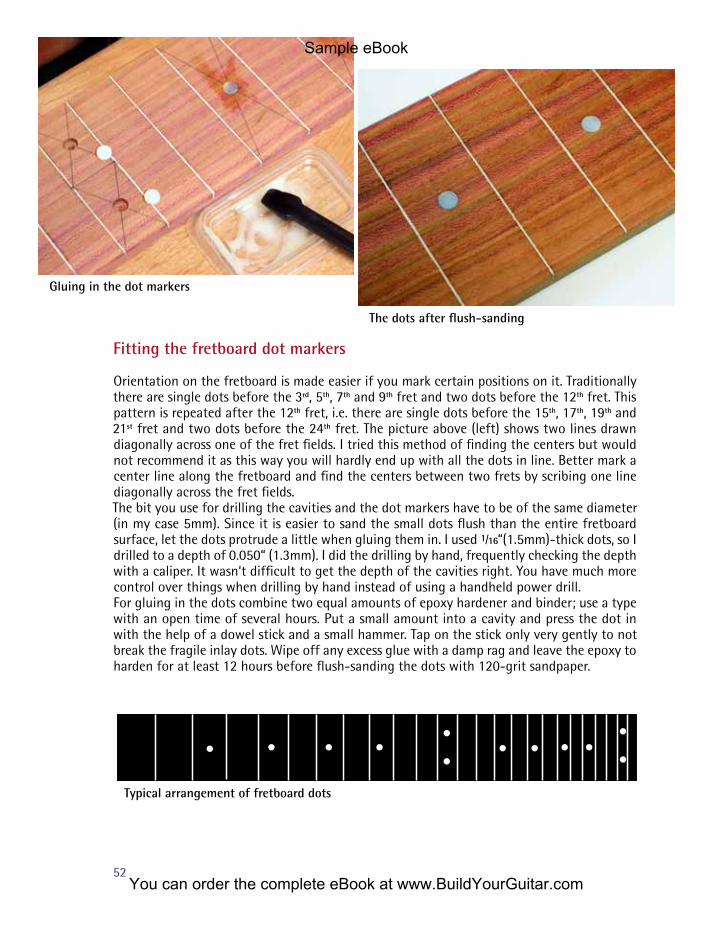
Fitting the fretboard dot markers
Orientation on the fretboard is made easier if you mark certain positions on it. Traditionally there are single dots before the 3rd, 5th, 7th and 9th fret and two dots before the 12th fret. This pattern is repeated after the 12th fret, i.e. there are single dots before the 15th, 17th, 19th and 21st fret and two dots before the 24th fret. The picture above (left) shows two lines drawn diagonally across one of the fret fi elds. I tried this method of fi nding the centers but would not recommend it as this way you will hardly end up with all the dots in line. Better mark a center line along the fretboard and fi nd the centers between two frets by scribing one line diagonally across the fret fi elds. The bit you use for drilling the cavities and the dot markers have to be of the same diameter (in my case 5mm). Since it is easier to sand the small dots fl ush than the entire fretboard surface, let the dots protrude a little when gluing them in. I used 1/16“(1.5mm)-thick dots, so I drilled to a depth of 0.050“ (1.3mm). I did the drilling by hand, frequently checking the depth with a caliper. It wasn‘t diffi cult to get the depth of the cavities right. You have much more control over things when drilling by hand instead of using a handheld power drill. For gluing in the dots combine two equal amounts of epoxy hardener and binder; use a type with an open time of several hours. Put a small amount into a cavity and press the dot in with the help of a dowel stick and a small hammer. Tap on the stick only very gently to not break the fragile inlay dots. Wipe off any excess glue with a damp rag and leave the epoxy to harden for at least 12 hours before fl ush-sanding the dots with 120-grit sandpaper.
Gluing in the dot markers
Typical arrangement of fretboard dots
The dots after fl ush�sanding
Sample eBook
You can order the complete eBook at www.BuildYourGuitar.com

53
Gluing on the fretboard
Now that the fretboard is fi nished it can be glued on the “neck”. For this you need fi ve to six clamps and a piece of wood slightly smaller than the fretboard to serve as a clamping caul. A caul is recommended because it distributes the pressure of the clamps evenly. Apply a thin, uniform glue fi lm on the back of the fretboard. I do this with my little fi nger so my other fi ngers remain clean. Place the board on the blank and butt it up against the nut. Then put the caul on top of it and tighten all the clamps a little. Increase the pressure on all the clamps in the row until they are all fully tightened. A clamp should ideally only exert downward pressure when tightened. There is, unfortunately, almost inevitably some other force involved which makes the fretboard move on the slippery glue coat. You can minimize this by clamping small pieces of wood to both sides and to the end of the fretboard. If you notice that the fretboard has slipped out of position and can no longer be moved, remove the clamps and the fretboard immediately, scrape the glue off carefully and start all over. I had to do this twice on this guitar until I discovered that it helps if you tighten every other clamp in the opposite direction, as shown in the picture below. Wipe off any glue that has been squeezed out with a damp rag.
Gluing on the fretboard
Sample eBook
You can order the complete eBook at www.BuildYourGuitar.com

54
Finishing the guitar
Clean all the surfaces with a scraper, then sand the whole guitar with 120-grit paper. Vacuum-clean the surfaces and repeat sanding with 180-grit paper until all the scratches of the previ-ous paper have gone; then remove any dust that may still be there with a vacuum cleaner. For rounding off the edges I used the 1/16”(1.5mm) Veritas cornering tool. This simple tool produces a nice and smooth corner radius when used with the grain.I chose Danish Oil for fi nishing the guitar. Danish oil is an oil-varnish blend that is very easy to apply. It gives a nice, smooth fi nish with a satin sheen and suffi cient protection against the wear a lap steel guitar is exposed to.
Veritas cornering tool in action Danish Oil
Applying the oil Wiping off the surplus
Sample eBook
You can order the complete eBook at www.BuildYourGuitar.com

55
Finishing schedule
Day one: Apply Danish Oil liberally to all surfaces with a rag or a brush. Wait for 5 minutes, then remove any surplus with a rag. No oil should remain on the surfaces. Leave the guitar to dry for at least eight hours.
Day two: Repeat the procedure of day one.
Day three: Apply a third coat of oil and rub the wet coat after 5 minutes with “000“ or “0000“ steel wool. Rub with the grain, then wipe off any remaining oil. One more night of drying and you can start assembling and stringing up the guitar.
Safety measurePlease note that oily rags can be dangerous: when wet, they can self-ignite by spontaneous reaction with the surrounding air. Used rags must therefore not be left lying around in the workshop but should be stored in an airtight glass container while waiting for the individual coats to dry. When they are no longer needed, they are best hung on a line and left to dry completely in an out-of-doors place before disposing of them.
Rubbing the wet oil coat with steel wool
Sample eBook
You can order the complete eBook at www.BuildYourGuitar.com

56
250K
The simplest of all circuits: connect the pickup wires directly to the output jack
Circuit diagram: the function is clearly visible
Wiring diagram: the various components are shown from the back
Pick
up
Out
put
jack
Volu
me
cont
rol
Sample eBook
You can order the complete eBook at www.BuildYourGuitar.com
57
Assembling the guitar
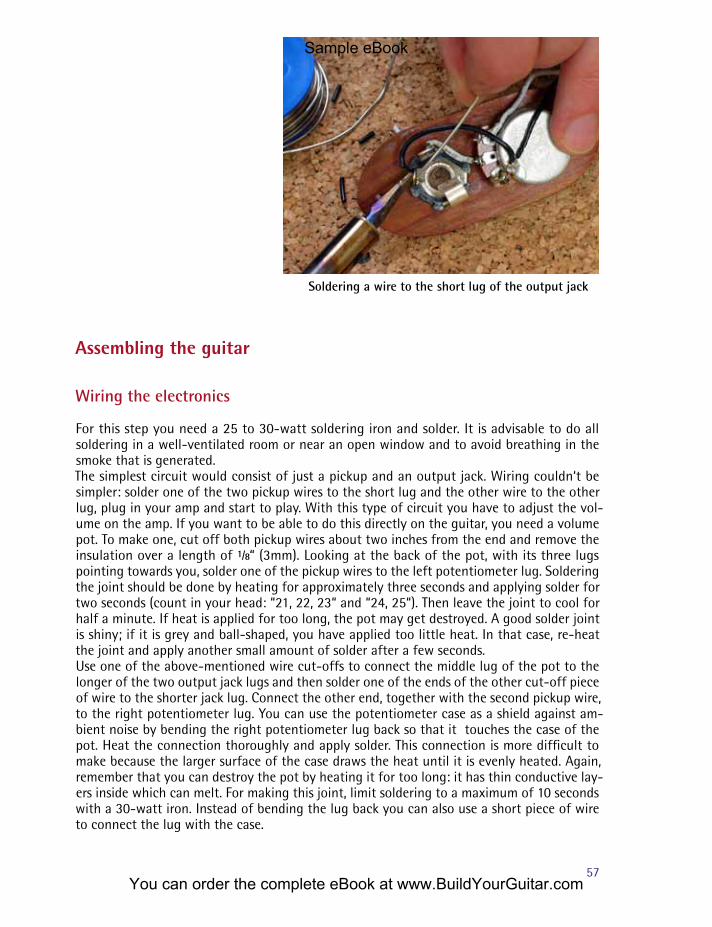
Wiring the electronics
For this step you need a 25 to 30-watt soldering iron and solder. It is advisable to do all soldering in a well-ventilated room or near an open window and to avoid breathing in the smoke that is generated.The simplest circuit would consist of just a pickup and an output jack. Wiring couldn‘t be simpler: solder one of the two pickup wires to the short lug and the other wire to the other lug, plug in your amp and start to play. With this type of circuit you have to adjust the vol-ume on the amp. If you want to be able to do this directly on the guitar, you need a volume pot. To make one, cut off both pickup wires about two inches from the end and remove the insulation over a length of 1/8“ (3mm). Looking at the back of the pot, with its three lugs pointing towards you, solder one of the pickup wires to the left potentiometer lug. Soldering the joint should be done by heating for approximately three seconds and applying solder for two seconds (count in your head: “21, 22, 23“ and “24, 25“). Then leave the joint to cool for half a minute. If heat is applied for too long, the pot may get destroyed. A good solder joint is shiny; if it is grey and ball-shaped, you have applied too little heat. In that case, re-heat the joint and apply another small amount of solder after a few seconds.Use one of the above-mentioned wire cut-offs to connect the middle lug of the pot to the longer of the two output jack lugs and then solder one of the ends of the other cut�off piece of wire to the shorter jack lug. Connect the other end, together with the second pickup wire, to the right potentiometer lug. You can use the potentiometer case as a shield against am-bient noise by bending the right potentiometer lug back so that it touches the case of the pot. Heat the connection thoroughly and apply solder. This connection is more diffi cult to make because the larger surface of the case draws the heat until it is evenly heated. Again, remember that you can destroy the pot by heating it for too long: it has thin conductive lay-ers inside which can melt. For making this joint, limit soldering to a maximum of 10 seconds with a 30-watt iron. Instead of bending the lug back you can also use a short piece of wire to connect the lug with the case.
Soldering a wire to the short lug of the output jack
Sample eBook
You can order the complete eBook at www.BuildYourGuitar.com

58
Putting the strings on
Thread the fi rst string through the bridge, stretch it over the nut to the second tuner and bend it there. This ensures suffi cient reserve for winding it three to four times around the fi rst tuner post. Put the string up to the bend through the fi rst tuner, start turning the peg with one hand while holding the string stretched with the other and wind the string on the post so that each new turn is placed below the previous one. Proceed similarly with the other strings. To get the required length reserve, always bend the strings towards the outside at the next tuner. For the two top tuners experience will tell you how much (approximately) you need to add.
Cutting the nut slots
Loosen the sixth and the fi rst string and put them to the side of the nut. With a fi ne saw, cut notches for the two outer strings 1/8” (3mm) from the ends of the nut. Deepen and round the bass string notch with a proper nut fi le so that half of the string lies in the slot. The thin treble string is simply placed in the notch cut with the saw. Arrange the remainig four strings at the top of the nut so that the distances appear equal (i.e. put the thicker bass strings slightly further apart and the treble strings a bit closer together). Mark their positions on both sides with a sharp pencil. Notch and fi le the remaining slots so that the tops of all the strings are at an equal height (see page 43 on how to slot the bridge).
Cutting a notch for a string Cutting the slot with a nut fi le
Slot the bridge so that the tops of the strings are at equal height
Slot the nut so that the tops of the strings are at equal height
Sample eBook
You can order the complete eBook at www.BuildYourGuitar.com

59
Final setup
Well, there‘s not much to set up on a lap steel guitar. As I have already mentioned, there are no truss rods to adjust, no frets to fi le, no action and no intonation to set. Check if the strings run parallel to the fretboard at a height of about 3/8“ (10mm). If necessary, adjust the string height by raising the bridge. When adjusting the pickup height, remember to maintain a minimum distance from the strings: the gap between the top of the highest polepiece and the bottom of the string above it should not be smaller than 1/8“ (3mm). If there is too much bass, you can set the bass side of the pickup further away from the strings.That‘s all. Enjoy your guitar!
Sample eBook
You can order the complete eBook at www.BuildYourGuitar.com

60
Sample eBook
You can order the complete eBook at www.BuildYourGuitar.com