user manual - copy - sanyo india
TRANSCRIPT
Product page
(HD/FHD)
XT-32A081H
E-mail: [email protected]
Need help? Please Call at Toll Free No. 1800 419 5088
To obtain a more detailed Electronic Copy of this Manual or much further contents,go to product page at our website www.sanyoappliance.in
Thank you for purchasing this Sanyo product.Please read these instructions carefully before operating this Product and retain them for future reference.The images shown in this manual are for illustrative purposes only.
XT-43A081F
LED TV

2
Chapter 1: Introduction
Chapter 3: Using your TV
Chapter 4: Other Information
4
3
4
4
4
5
5
18
18
19
15
15
15
15
66
7
9
15
16
17
Use Environment ................................................................................................................................
Cleaning .............................................................................................................................................
Hanging the TV Set on the Wall ..........................................................................................................
................................................................................................................................
Standard accessories .......................................................................................................................
Optional accessories ...........................................................................................................................
Basic connection .................................................................................................................................
External Equipment.............................................................................................................................
Remote Control Functions .................................................................................................................
.............................................................................................................................. 10
Base Installation
Buttons on the TV
Smart TV ...............................................................................................................................................
Network .................................................................................................................................................
System ..................................................................................................................................................
20Support .................................................................................................................................................
Chapter 2: Connections and Setup
11
11
.......................................................................................................................................
Switching off .........................................................................................................................................
13Initial Setup .............................................................................................................................................12Network Connection .................................................................................................................................
Switching on
Accessing channels ..............................................................................................................................
Watching connected devices ................................................................................................................
Volume...................................................................................................................................................
Using System Settings...........................................................................................................................
Power connection and aerial...............................................................................................................
Picture....................................................................................................................................................
...................................................................................................................................................
Channel .................................................................................................................................................
Sound
Troubleshooting ...................................................................................................................................
Safety Precautions .............................................................................................................................
24
25Specifications ......................................................................................................................................
Table of Contents
HOME Page .......................................................................................................................................... 21
Multimedia............................................................................................................................................. 22
Supported file format in Media Player.................................................................................................. 23
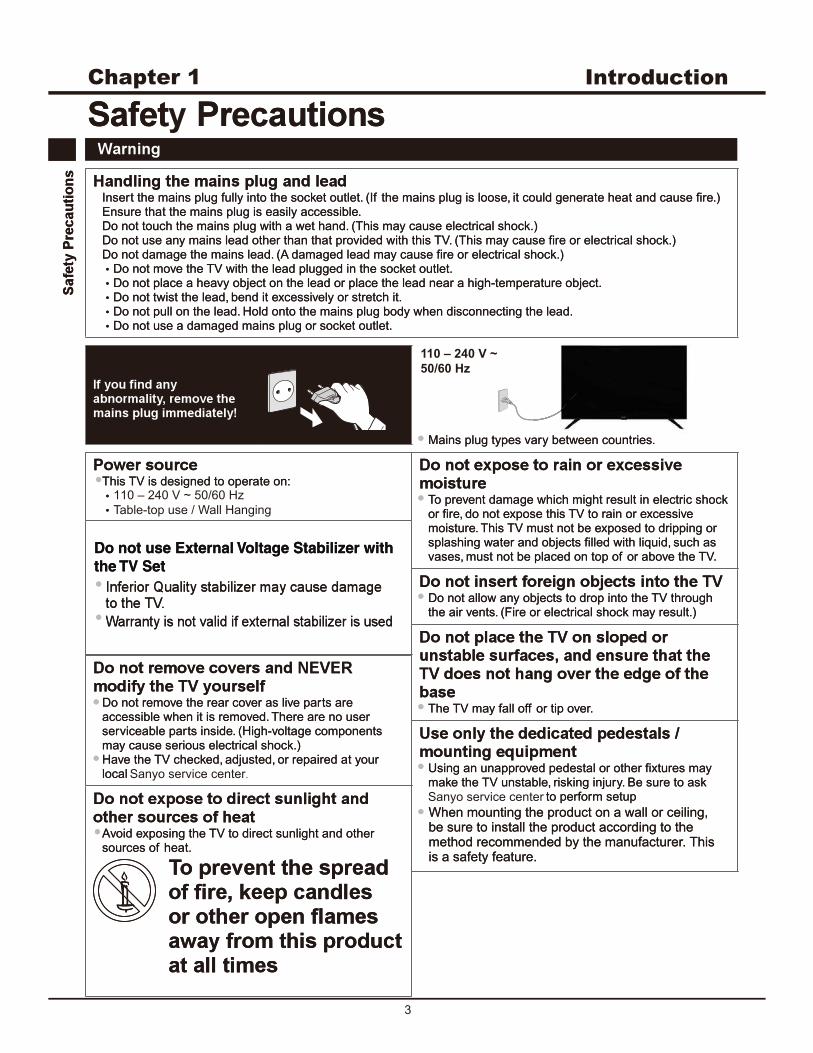
Table-top use / Wall Hanging
110 – 240 V ~ 50/60 Hz
When mounting the product on a wall or ceiling, be sure to install the product according to the method recommended by the manufacturer. This is a safety feature.
When mounting the product on a wall or ceiling, be sure to install the product according to the method recommended by the manufacturer. This is a safety feature.
3
Introduction
110 – 240 V ~
50/60 Hz
Sanyo service center.
Sanyo service center

4
Do not place the set on an unstable cart, stand, or table.
Place the set on a place that allows good ventilation.
Do not use the set near damp, and cold areas. Protect the set from overheating.
Keep the set away from direct sunlight.
Apparatus shall not be exposed to dripping or splashing and no objects filled with liquids, such as vases, shall be placed on the apparatus.
Do not use the set near dust place.
Use Environment
Introduction
Base Installation
To fix the double support base on the unit by screws,
the installation is completed.
1 Connect the pedestal to the TV set
Put the two pedestals on the designated positions
of the TV set carefully.
Lay your TV flat (screen down) on the edge of a
table or bench. Make sure that you put down a
soft cushion or cloth so that your TV is not
scratched.
2 Fasten and tighten the screws
Carefully put in screws and fasten them securely.
Hanging the TV Set on the WallWarning: This operation requires two people.
To ensure a safe installation, observe the following safety notes:
Check that the wall can support the weight of the TV set and wall mount assembly.
Follow the mounting instructions provided with the wall mount.
The TV set must be installed on a vertical wall.
Make sure to use only screws suitable for the material of the wall.
Make sure that the TV set cables are placed so that there is no danger of tripping over them.
All other safety instructions about our TV sets are also applicable here.
NoteGraphics contained within this operating
instructions are for presentation only.
WARNING:The batteries shall not be exposed to excessive heat such as sunshine, fire or the like.
Cleaning
5
Battery
(AA size, 2 pcs)
Screws
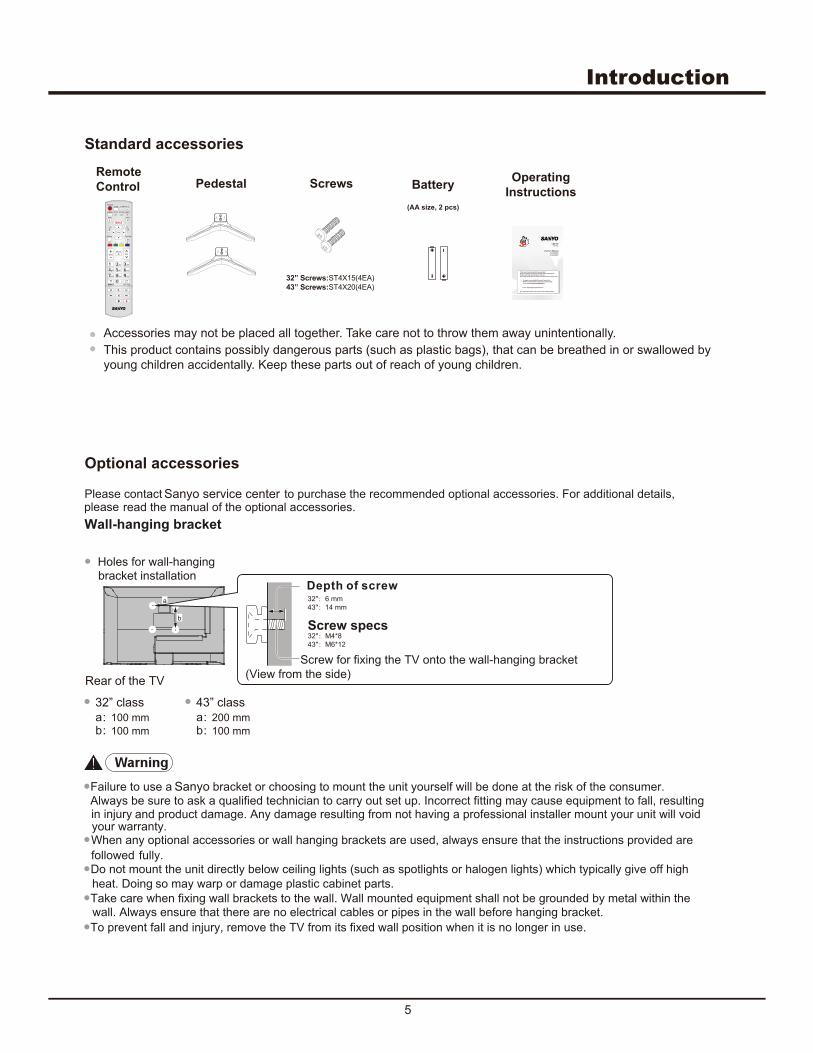
Rear of the TV
Introduction
Remote
Control Pedestal
Accessories may not be placed all together. Take care not to throw them away unintentionally.
This product contains possibly dangerous parts (such as plastic bags), that can be breathed in or swallowed by
young children accidentally. Keep these parts out of reach of young children.
Operating
Instructions
32” Screws:ST4X15(4EA)
43” Screws:ST4X20(4EA)
32” class
100 mm
100 mm
Standard accessories
Optional accessories
Sanyo service center
Sanyo
43” class
200 mm
100 mm
Screw specs32":M4*8
43":M6*12
32":6 mm
43":14 mm
Product page
(HD/FHD)
XT-32A081H
LED TV
E-mail: [email protected]
Need help? Please Call at Toll Free No. 1800 419 5088
To obtain a more detailed Electronic Copy of this
Manual or much further contents,go to product page
at our website www.sanyoappliance.in
Thank you for purchasing this Sanyo product.
Please read these instructions carefully before operating this
Product and retain them for future reference.
The images shown in this manual are for illustrative purposes only.
XT-43A081F
Introduction
6
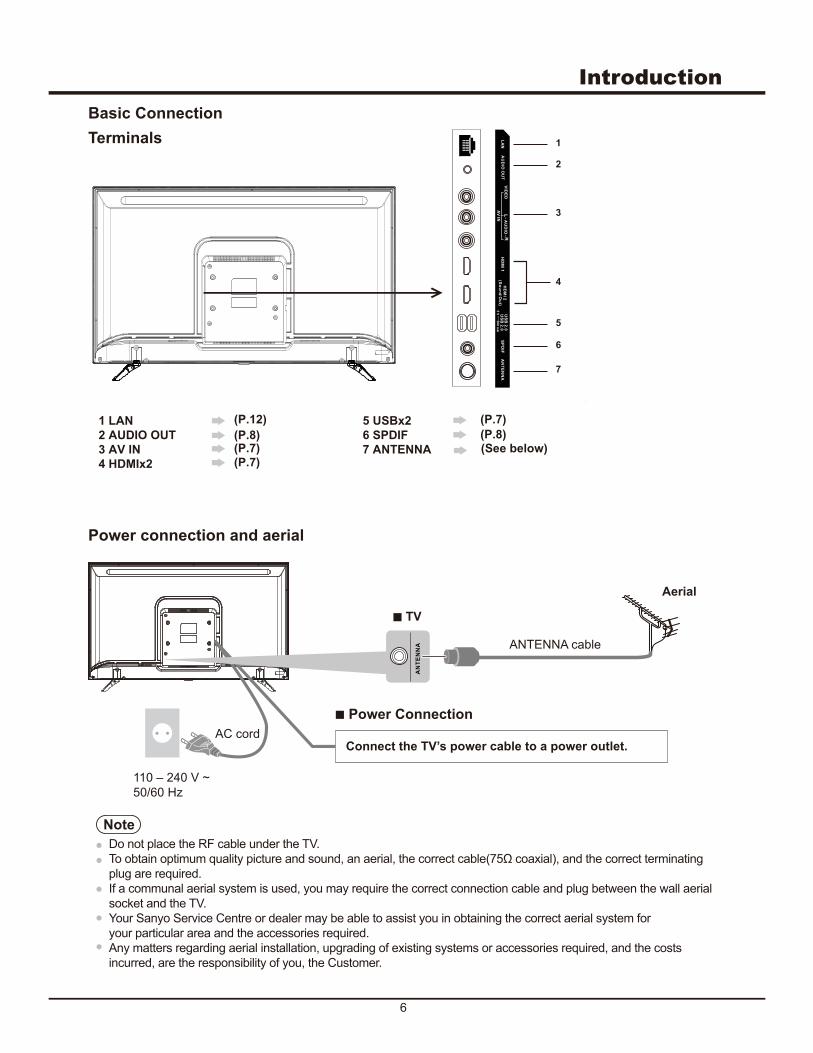
Basic Connection
Terminals
Power connection and aerial
Note
Do not place the RF cable under the TV.
plug are required.
If a communal aerial system is used, you may require the correct connection cable and plug between the wall aerial
socket and the TV.
Your Sanyo Service Centre or dealer may be able to assist you in obtaining the correct aerial system for
your particular area and the accessories required.
Any matters regarding aerial installation, upgrading of existing systems or accessories required, and the costs
incurred, are the responsibility of you, the Customer.
1
LA
N
4HD
MI 2
(So
un
d O
ut)
SP
DIF
AN
TE
NN
AH
DM
I 1U
SB
2.0
US
B 2
.0R
LV
IDE
O
AV
IN AU
DIO
AU
DIO
OU
T
3
2
6
5
7
1 LAN
2 AUDIO OUT
3 AV IN
4 HDMIx2
(P.8)
(P.12)
(P.7)
(P.7)
(P.7)
(P.8)5 USBx2
6 SPDIF
7 ANTENNA (See below)
AC cord
110 – 240 V ~
50/60 Hz
Power Connection
Connect the TV’s power cable to a power outlet.
ANTENNA cable
TV
Aerial
AN
TE
NN
A
7
Introduction
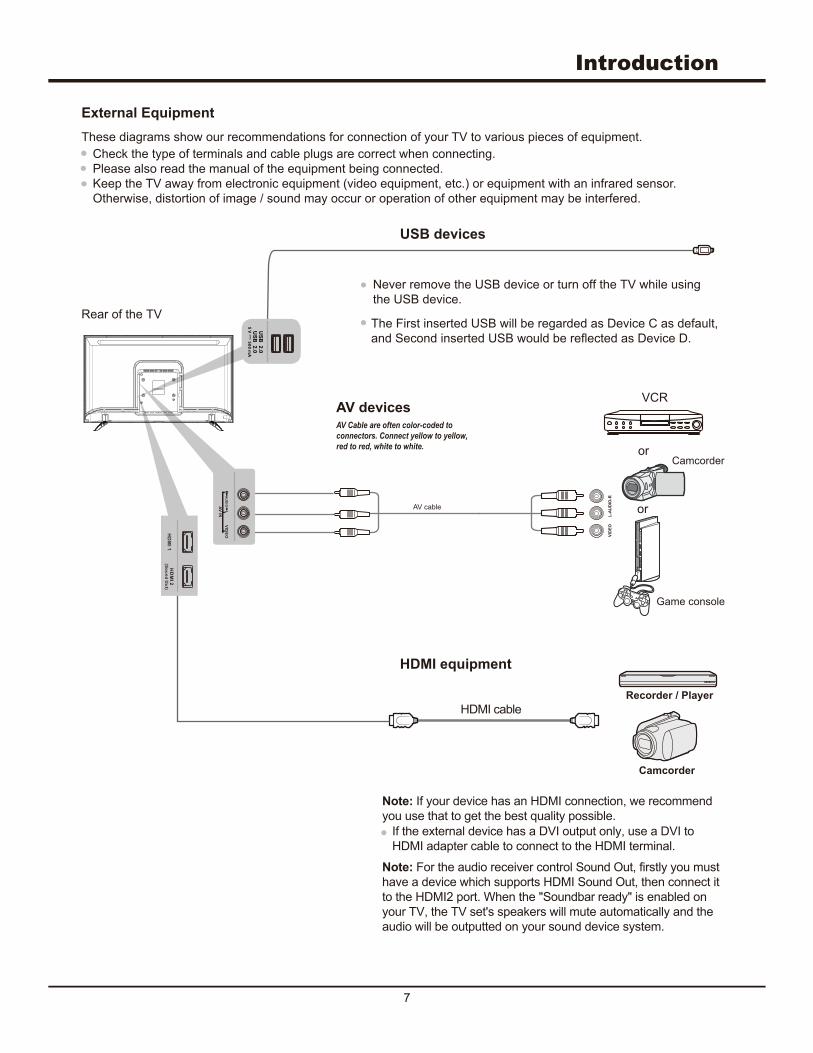
External Equipment
These diagrams show our recommendations for connection of your TV to various pieces of equipment.
Check the type of terminals and cable plugs are correct when connecting.
Please also read the manual of the equipment being connected.
Keep the TV away from electronic equipment (video equipment, etc.) or equipment with an infrared sensor.
Otherwise, distortion of image / sound may occur or operation of other equipment may be interfered.
AV Cable are often color-coded to
connectors. Connect yellow to yellow,
red to red, white to white.
HDMI cable
Rear of the TV
VCR
orCamcorder
Camcorder
Recorder / Player
Game console
or
USB devices
HDMI equipment
AV devices
VID
EO
L
-AU
DIO
-R
AV cableAV
IN
AU
DIO
LR
VID
EO
Never remove the USB device or turn off the TV while using
the USB device.
The First inserted USB will be regarded as Device C as default,
and Second inserted USB would be reflected as Device D.
Note: If your device has an HDMI connection, we recommend
you use that to get the best quality possible.
If the external device has a DVI output only, use a DVI to
HDMI adapter cable to connect to the HDMI terminal.
Note: For the audio receiver control Sound Out, firstly you must
have a device which supports HDMI Sound Out, then connect it
to the HDMI2 port. When the "Soundbar ready" is enabled on
your TV, the TV set's speakers will mute automatically and the
audio will be outputted on your sound device system.
5 V
50
0 m
A
US
B 2
.0U
SB
2.0
HD
MI 1
HD
MI 2
(So
un
d O
ut)
8
Introduction
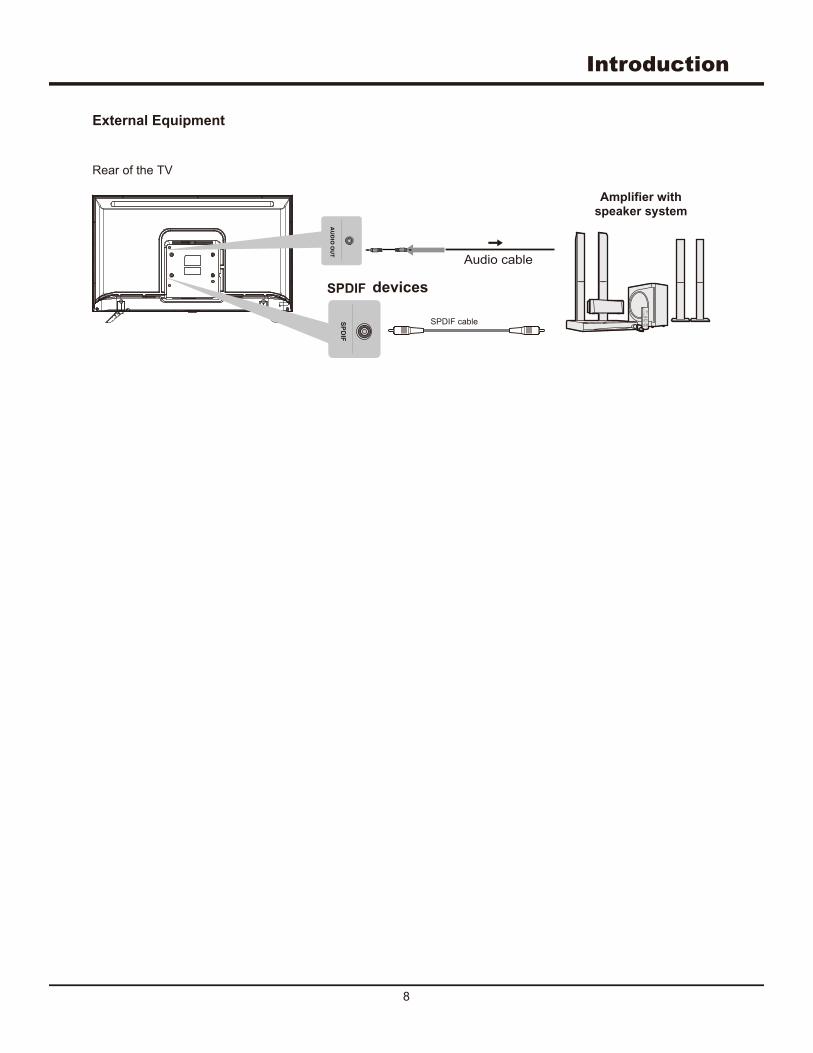
Rear of the TV
External Equipment
SPDIF cable
Amplifier with speaker system
AU
DIO
OU
T
Audio cable
9
Introduction
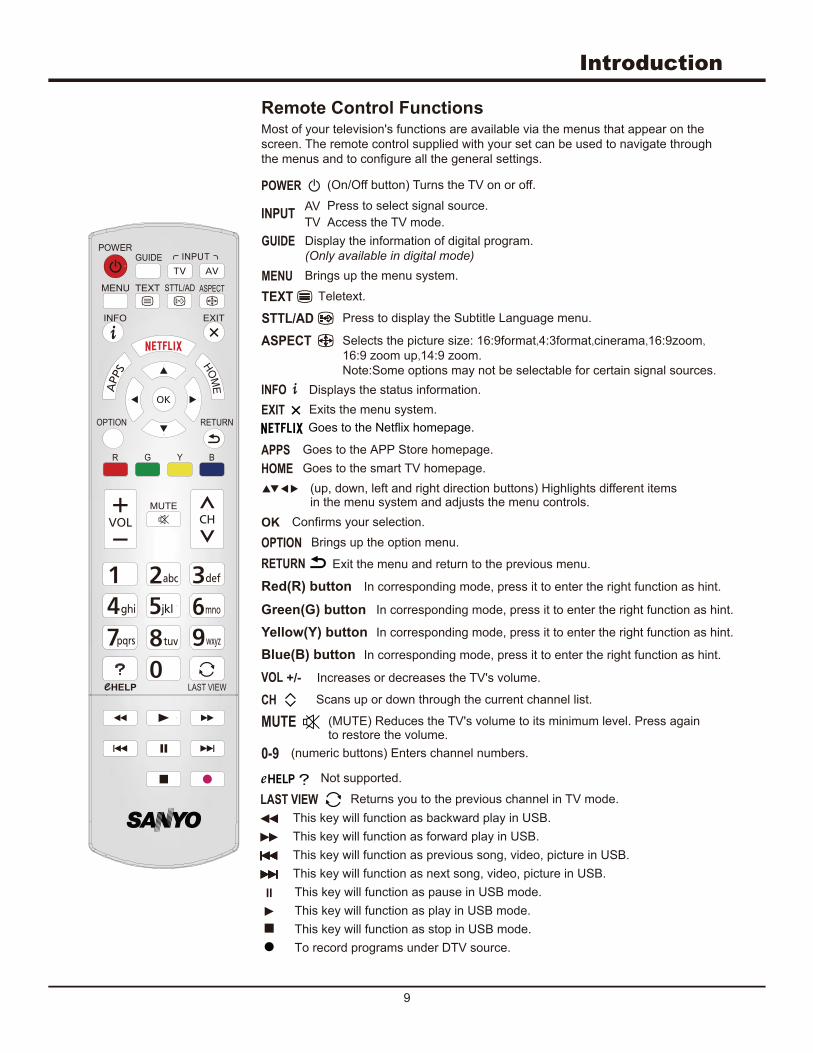
Remote Control FunctionsMost of your television's functions are available via the menus that appear on the
screen. The remote control supplied with your set can be used to navigate through
the menus and to configure all the general settings.
(MUTE) Reduces the TV's volume to its minimum level. Press again to restore the volume.
MUTE
POWER (On/Off button) Turns the TV on or off.
MENU Brings up the menu system.
(numeric buttons) Enters channel numbers.
Displays the status information.INFO
Green(G) button In corresponding mode, press it to enter the right function as hint.
Yellow(Y) button In corresponding mode, press it to enter the right function as hint.
In corresponding mode, press it to enter the right function as hint.Blue(B) button
Access the TV mode.
Press to select signal source.INPUT
TV
AV
Display the information of digital program.
(Only available in digital mode)GUIDE
TEXT Teletext.
Exits the menu system.EXIT
ASPECT
(up, down, left and right direction buttons) Highlights different items in the menu system and adjusts the menu controls.
OK Confirms your selection.
Goes to the APP Store homepage.APPS
Goes to the smart TV homepage.HOME
Brings up the option menu.OPTION
Exit the menu and return to the previous menu.RETURN
In corresponding mode, press it to enter the right function as hint.Red(R) button
VOL +/- Increases or decreases the TV's volume.
CH Scans up or down through the current channel list.
0-9
To record programs under DTV source.
This key will function as play in USB mode.
This key will function as pause in USB mode.
This key will function as stop in USB mode.
This key will function as backward play in USB.
This key will function as forward play in USB.
This key will function as previous song, video, picture in USB.
This key will function as next song, video, picture in USB.
LAST VIEW Returns you to the previous channel in TV mode.
STTL/AD Press to display the Subtitle Language menu.
Not supported.
Selects the picture size: 16:9format,4:3format,cinerama,16:9zoom,16:9 zoom up,14:9 zoom.
Note:Some options may not be selectable for certain signal sources.

10
Introduction
Buttons on the TV
Take a certain model for an example:
2. \ button
Increases/decreases the volume.In the menu system,they act like the right left direction buttons on the remote and adjust menu controls
1. \ button
Scans up/down through the channel list. In the menu system, they act like the up/down direction buttons on the remote and adjust menu controls.
/ button3.
Note: The location and names of the function buttons and power button on the TV may vary according to TV model.
Turns the TV on. The TV is on, press it to display Source Select. In some menus,press to return to the previous
menu,long press it for 3 seconds to display NAV menu.
11
Chapter 2 Connections and Setup
Switching on
Follow the instructions on this page on how to switch on your TV set and the remote control before going on to following pages describing how to use the channel set-up procedure.
1. Insert two AA batteries in the remote control.
Precautions on using batteries: - Only use the battery types specified. - Make sure you use the correct polarity. - Do not mix new and used batteries. - Do not use rechargeable batteries. -
- Remove the batteries from the remote control if you are not using it for a long period of time.
Do not expose batteries to excessive heat such as sunshine, fire or the like, throw them in a fire, recharge them or try to open them, as this could cause them to leak or explode.
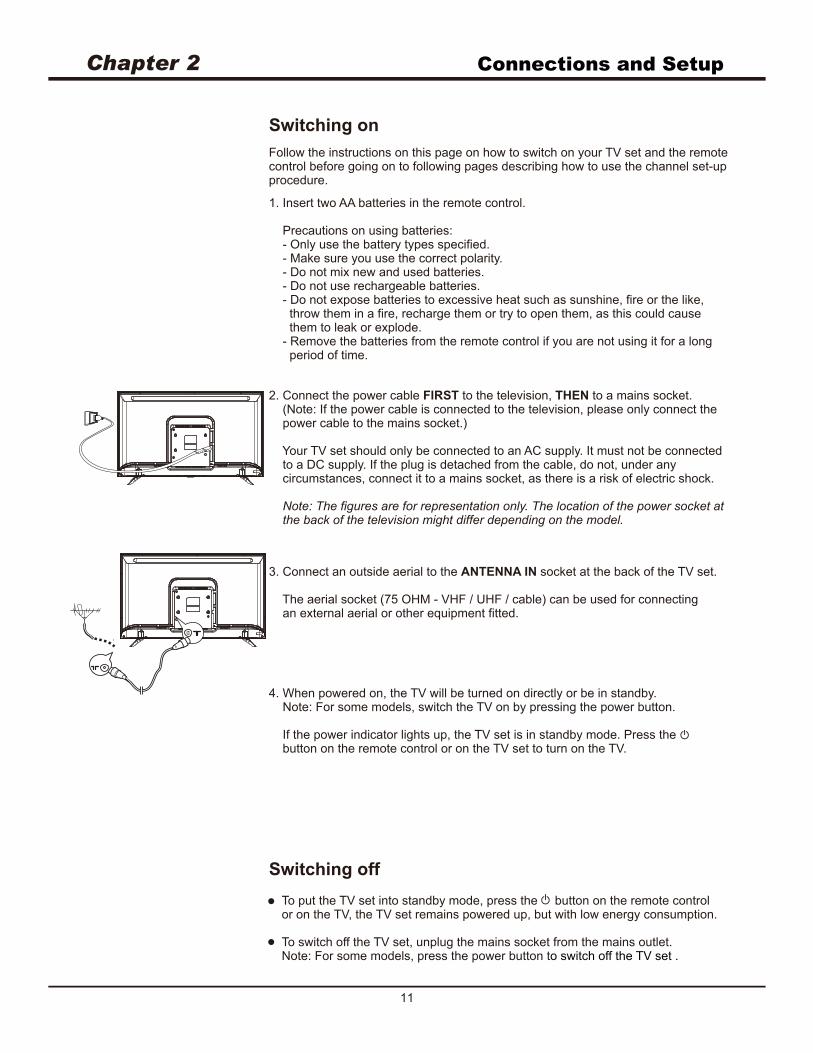
3. Connect an outside aerial to the ANTENNA IN socket at the back of the TV set.
The aerial socket (75 OHM - VHF / UHF / cable) can be used for connecting an external aerial or other equipment fitted.
4. When powered on, the TV will be turned on directly or be in standby. Note: For some models, switch the TV on by pressing the power button.
If the power indicator lights up, the TV set is in standby mode. Press the button on the remote control or on the TV set to turn on the TV.
2. Connect the power cable FIRST to the television, THEN to a mains socket. (Note: If the power cable is connected to the television, please only connect the power cable to the mains socket.)
Your TV set should only be connected to an AC supply. It must not be connected to a DC supply. If the plug is detached from the cable, do not, under any circumstances, connect it to a mains socket, as there is a risk of electric shock.
Note: The figures are for representation only. The location of the power socket at the back of the television might differ depending on the model.
Switching off
To put the TV set into standby mode, press the button on the remote controlor on the TV, the TV set remains powered up, but with low energy consumption.
To switch off the TV set, unplug the mains socket from the mains outlet.Note: For some models, press the power button to switch off the TV set .
Connections and Setup
12
Network Connection
Your TV will require an internet connection to operate all functions. Data usage
charges may apply.
Please refer to your Internet Service Provider (ISP) for additional information.To access the internet, you must subscribe high speed broadband internet service from your internet service
provider.
Your TV can be connected to your home network in two ways:
• Wired, using the RJ45 (LAN) connector on the back panel.
• Wireless, using the internal wireless to your home wireless network.
Note: The following instructions are just the usual ways to connect your TV to the wired or wireless
have any questions about your home network, please refer to your ISP(Internet Service Provider).
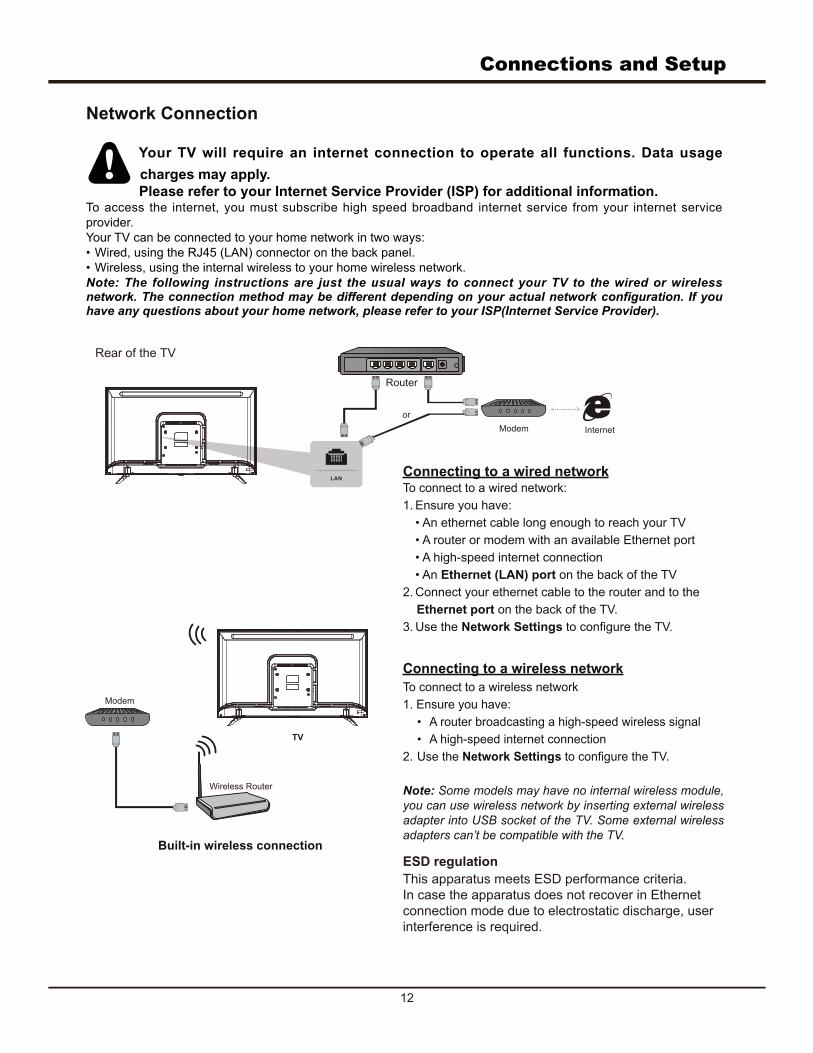
Built-in wireless connection
TV
Wireless Router
Modem
Router
Modem Internet
or
Connecting to a wired network To connect to a wired network:
1. Ensure you have:
• An ethernet cable long enough to reach your TV
• A router or modem with an available Ethernet port
• A high-speed internet connection
• An Ethernet (LAN) port on the back of the TV
2. Connect your ethernet cable to the router and to the
Ethernet port on the back of the TV.
3. Use the Network Settings
Connecting to a wireless network
To connect to a wireless network
1. Ensure you have:
• A router broadcasting a high-speed wireless signal
• A high-speed internet connection
2. Use the Network Settings
Note: Some models may have no internal wireless module,
you can use wireless network by inserting external wireless
adapter into USB socket of the TV. Some external wireless
adapters can’t be compatible with the TV.
ESD regulation
This apparatus meets ESD performance criteria.
In case the apparatus does not recover in Ethernet
connection mode due to electrostatic discharge, user
interference is required.
Rear of the TV
LAN
Connections and Setup
13
Select OKOKBack
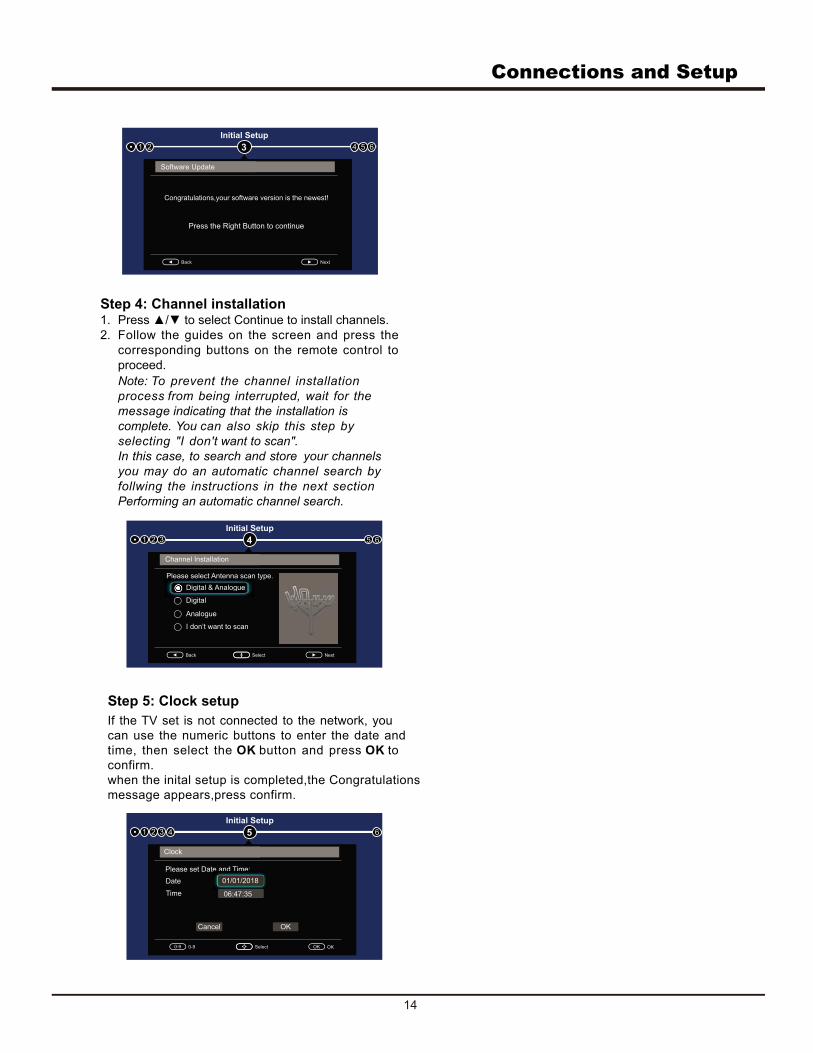
Step 3: Software Update1. If the TV set has connected to the network
successfully, it will search for upgrade files
automatically.
2. Follow the guides on the screen and press the
corresponding buttons on the remote control to
proceed.
Initial SetupInitial setup involves selecting all the settings required
to be able to search for and store all the analogue & digital
channels you can receive.
Make sure that the television is switched on and follow
all the steps in turn specified hereafter.
Note:If the channel search retrieved only the analogue
channels it could be caused by poor broadcasting and
therefore is not coverd by manufacturer war ran ty.
Manu fac tu re rs canno t be he ld responsible for
lack of or poor broadcasting in some areas.
wizard opens, which guides you through the initial
setup process.
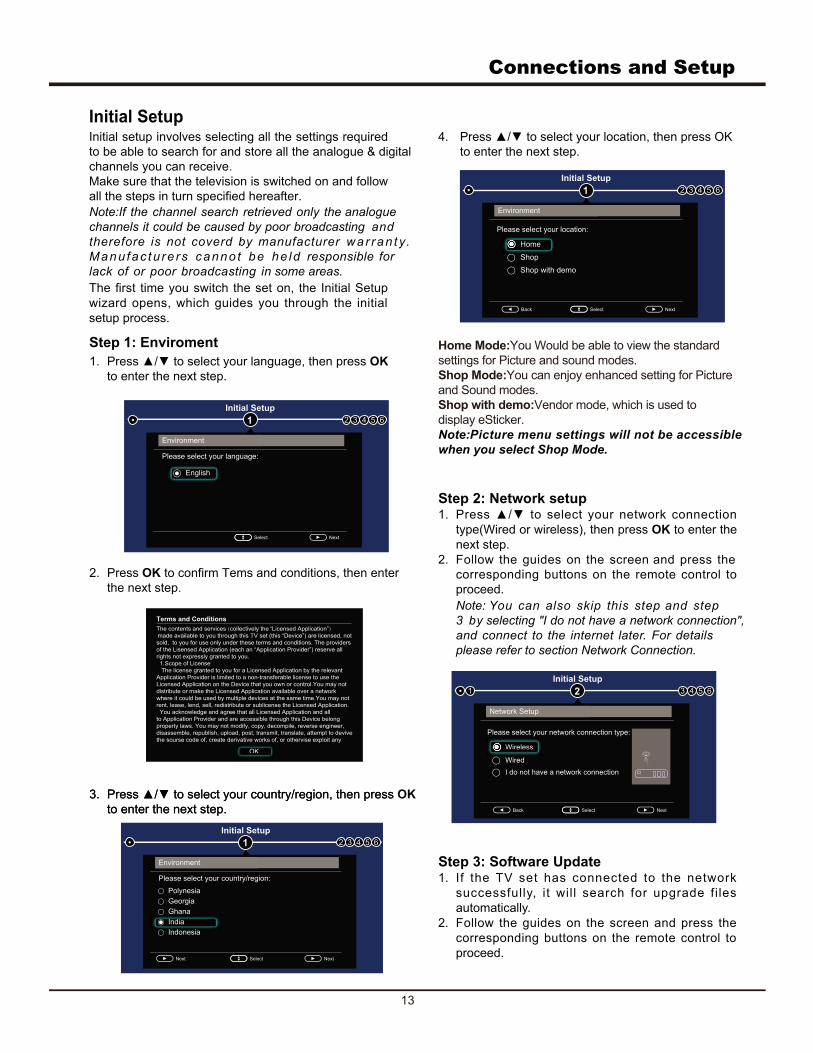
Step 1: Enviroment
1. OK
to enter the next step.
Step 2: Network setup1. Press to select your network connection
type(Wired or wireless), then press OK to enter the
next step.
2. Follow the guides on the screen and press the
corresponding buttons on the remote control to
proceed.
Note: You can also skip this step and step
3 by selecting "I do not have a network connection",
and connect to the internet later. For details
please refer to section Network Connection.
1
Initial Setup
2 3 4 5 6
Please select your language:
Select Next
English
Environment
Back Select Next
Network Setup
Please select your network connection type:
Wireless
Wired
I do not have a network connection
Wireless
2
Initial Setup
1 3 4 5 6
1
Initial Setup
2 3 4 5 6
Environment
Back Select Next
Please select your location:
Home
Shop
Shop with demo
1
Initial Setup
2 3 4 5 6
Environment
Back Select Next
Please select your location:
Home
Shop
Home
Shop with demo
2. Press OK to confirm Tems and conditions, then enter
the next step.
Terms and Conditions
The contents and services (collectively the “Licensed Application”) made available to you through this TV set (this “Device”) are licensed, not
sold, to you for use only under these terms and conditions. The providers
of the Lisensed Application (each an “Application Provider”) reserve all
rights not expressly granted to you.
1.Scope of License
The license granted to you for a Licensed Application by the relevant
Application Provider is limited to a non-transferable license to use the
Licensed Application on the Device that you own or control.You may not
distribute or make the Licensed Application available over a network
where it could be used by multiple devices at the same time.You may not
rent, lease, lend, sell, redistribute or sublicense the Licensed Application.
You acknowledge and agree that all Licensed Application and all
to Application Provider and are accessible through this Device belong
property laws. You may not modify, copy, decompile, reverse engineer,
disassemble, republish, upload, post, transmit, translate, attempt to devive
the sourse code of, create derivative works of, or othervise exploit any
OKOK
3. country/region, then press
to enter the next step.
3. country/region, then press OK
to enter the next step.
1
Initial Setup
2 3 4 5 6
Please select your country/region:
Select Next
Environment
Polynesia
Georgia
Ghana
India
Indonesia
Next
4. location, then press OK
to enter the next step.
Note:Picture menu settings will not be accessible
when you select Shop Mode.
Home Mode:You Would be able to view the standard
settings for Picture and sound modes.
Shop Mode:You can enjoy enhanced setting for Picture
and Sound modes.
Shop with demo:Vendor mode, which is used to
display eSticker.
Back Next
Software Update
Congratulations,your software version is the newest!
Press the Right Button to continue
3
Initial Setup
1 2 4 5 6
Connections and Setup
14
Select OKOKBack
Step 5: Clock setup
If the TV set is not connected to the network, you
can use the numeric buttons to enter the date and
time, then select the OK button and press OK to
confirm.
when the inital setup is completed,the Congratulations
message appears,press confirm.
Step 4: Channel installation1.
2. Follow the guides on the screen and press the
corresponding buttons on the remote control to
proceed.
Note: To prevent the channel installation
process from being interrupted, wait for the
message indicating that the installation is
complete. You can also skip this step by
selecting "I don't want to scan".
In this case, to search and store your channels
you may do an automatic channel search by
follwing the instructions in the next section
Performing an automatic channel search.
4
Initial Setup
1 2 3 5 6
Channel Installation
Back Select Next
Please select Antenna scan type.
Digital & Analogue
Digital
Please select Antenna scan tan t
Digital & Analogue
Analogue
I don’t want to scan
5
Initial Setup
1 2 3 4 6
Clock
Please set Date and Time:
Date
Time
ate and Time:
01/01/2018
06:47:35
0-9 Select
OKCancel
0-9 OK OK
Using your TV
15
PictureAccessing channelsUsing the numeric buttons: press the corresponding
numeric buttons on the remote control to access the
channels.
Using the buttons: press the buttons on
the remote control or the corresponding buttons on the
TV set to scroll through the channels.
Watching connected devicesPress AV or HOME on the remote control.
Press / to select your desired source,
and then press OK to confirm.
VolumeVolume control: press the VOL +/- buttons on the
remote control or the corresponding buttons on the TV
set to increase or decrease the volume.
Sound mute: press the button to temporatily mute the sound. Press this button again or the vol + button
to restore the sound.
CH / CH /
The menus for adjusting the picture are used to obtain
the best picture settings according to your preference,
the type of program you are watching and the ambient
lighting.
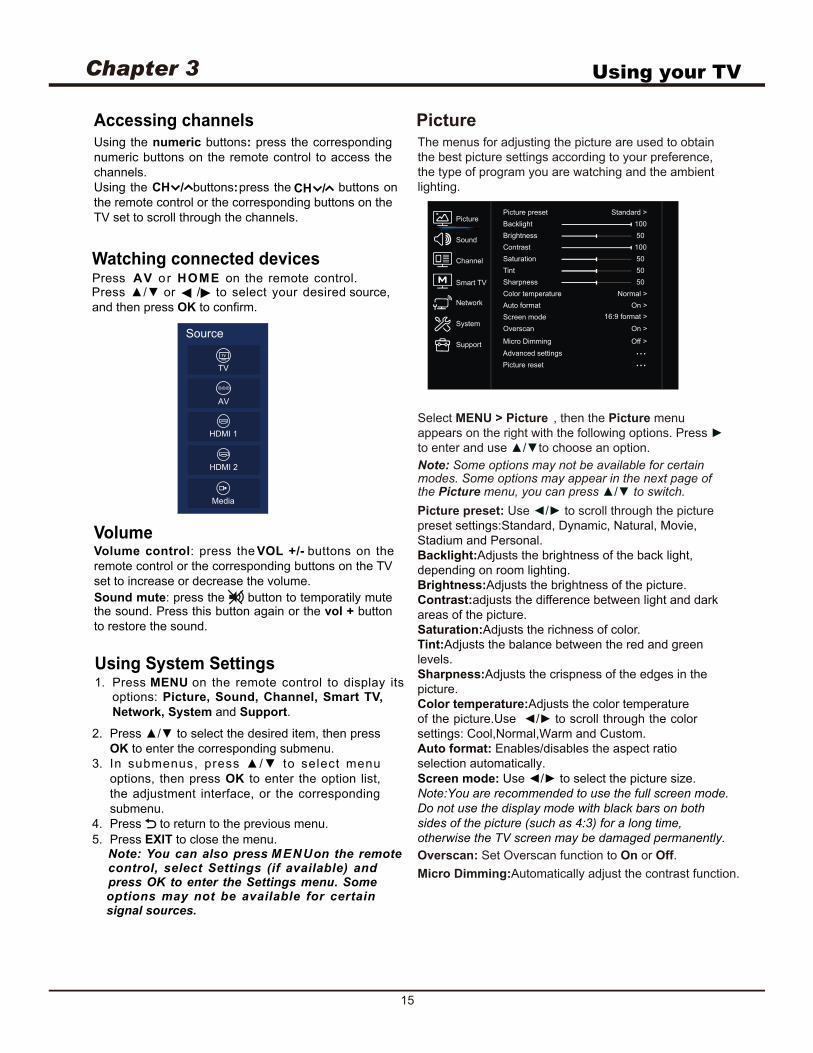
Select MENU > Picture , then the Picture menu
appears on the right with the following options. Press
to enter and use to choose an option.
Note: Some options may not be available for certain modes. Some options may appear in the next page of the Picture menu, you can press to switch.
Picture preset: Use to scroll through the picture
preset settings:Standard, Dynamic, Natural, Movie,
Stadium and Personal.
Backlight:Adjusts the brightness of the back light,
depending on room lighting.
Brightness:Adjusts the brightness of the picture.
Contrast:adjusts the difference between light and dark
areas of the picture.
Saturation:Adjusts the richness of color.
Tint:Adjusts the balance between the red and green
levels.
Sharpness:Adjusts the crispness of the edges in the
picture.
Color temperature:Adjusts the color temperature
of the picture.Use scroll through the color
settings: Cool,Normal,Warm and Custom.
Auto format: Enables/disables the aspect ratio
selection automatically.
Screen mode:
Note:You are recommended to use the full screen mode.
Do not use the display mode with black bars on both
sides of the picture (such as 4:3) for a long time,
otherwise the TV screen may be damaged permanently.
Overscan: Set Overscan function to On or Off.
Using System Settings1. Press MENU on the remote control to display its
options: Picture, Sound, Channel, Smart TV,
Network, System and Support.
2. Press to select the desired item, then press
OK to enter the corresponding submenu.
3. In submenus, press to select menu
options, then press OK to enter the option list,
the adjustment interface, or the corresponding
submenu.
4. Press to return to the previous menu.
5. Press EXIT to close the menu. Note: You can also press MENUon the remote
control, select Settings (if available) and press OK to enter the Settings menu. Some options may not be available for certain signal sources.
TV
TV
AV
HDMI 1
Source
HDMI 2
Media
Picture
Sound
System
Network
Smart TV
Channel
Support
Picture preset Standard >
Backlight 100
Contrast 100
Brightness 50
Color temperature Normal >
Auto format On >
Screen mode 16:9 format >
Overscan On >
Sharpness 50
Tint 50
Saturation 50
Advanced settings
Picture reset
Micro Dimming Off >
.Micro Dimming:Automatically adjust the contrast function.
Using your TV
16
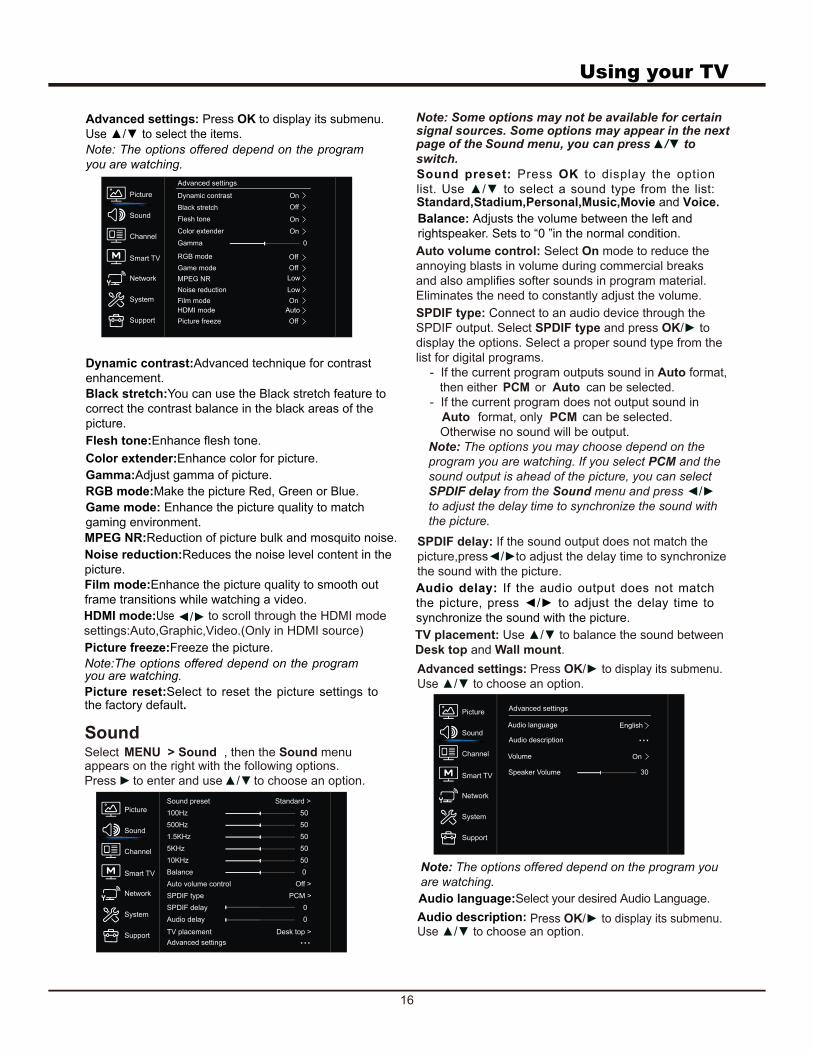
SoundSelect MENU > Sound , then the Sound menu
appears on the right with the following options.
Press to enter and use to choose an option.
Note: Some options may not be available for certain signal sources. Some options may appear in the next page of the Sound menu, you can press to
switch.
Dynamic contrast:Advanced technique for contrast
enhancement.
Black stretch:You can use the Black stretch feature to
correct the contrast balance in the black areas of the
picture.
Flesh tone:Enhance flesh tone.
RGB mode:Make the picture Red, Green or Blue.
Game mode: Enhance the picture quality to match
gaming environment.
MPEG NR:Reduction of picture bulk and mosquito noise.
Noise reduction:Reduces the noise level content in the
picture.
Film mode:Enhance the picture quality to smooth out
frame transitions while watching a video.
Picture freeze:Freeze the picture.
Color extender:Enhance color for picture.
Gamma:Adjust gamma of picture.
Note:The options offered depend on the program you are watching.
Picture reset:Select to reset the picture settings to the factory default.
Audio description:
Note: The options offered depend on the program you
are watching.
Audio language:Select your desired Audio Language.
Press OK/ to display its submenu.Use to choose an option.
Auto volume control: Select On mode to reduce the
annoying blasts in volume during commercial breaks
and also softer sounds in program material.
Eliminates the need to constantly adjust the volume.
SPDIF type: Connect to an audio device through the
SPDIF output. Select SPDIF type and press OK/ to
display the options. Select a proper sound type from the
list for digital programs.
- If the current program outputs sound in Auto format,
then either PCM or Auto can be selected.
- If the current program does not output sound in
Auto format, only PCM can be selected.
Otherwise no sound will be output.
Note: The options you may choose depend on the
program you are watching. If you select PCM and the
sound output is ahead of the picture, you can select
SPDIF delay from the Sound menu and press
to adjust the delay time to synchronize the sound with
the picture.
SPDIF delay: If the sound output does not match the
picture,press to adjust the delay time to synchronize
the sound with the picture.
Advanced settings: Press OK/ to display its submenu.
Use to choose an option.
Audio delay: If the audio output does not match
the picture, press to adjust the delay time to
synchronize the sound with the picture.
Balance: Adjusts the volume between the left and
rightspeaker. Sets to “0 ”in the normal condition.
Sound preset: Press OK to display the option
list. Use to select a sound type from the list: Standard,Stadium,Personal,Music,Movie and Voice.
HDMI mode:Use to scroll through the HDMI mode
settings:Auto,Graphic,Video.(Only in HDMI source)
Picture
Sound
System
Network
Smart TV
Channel
Support
Sound preset Standard >
Auto volume control Off >
SPDIF type PCM >
SPDIF delay 0
Advanced settings
TV placement Desk top >
100Hz 50
1.5KHz 50
5KHz 50
10KHz 50
Balance 0
500Hz 50
Audio delay 0
Picture
Sound
System
Network
Smart TV
Channel
Support
On
Audio language English
Advanced settings
Speaker Volume 30
Volume
Audio description
TV placement: Use to balance the sound between
Desk top and Wall mount.
Advanced settings: Press OK to display its submenu.
Use to select the items.
Note: The options offered depend on the program
you are watching.
Picture
Sound
System
Network
Smart TV
Channel
Support
Advanced settings
Dynamic contrast On
Flesh tone On
Color extender On
Film mode On
MPEG NR Low
Noise reduction Low
Black stretch Off
RGB mode Off
Game mode Off
HDMI mode Auto
Picture freeze Off
Gamma 0
17
Using your TV
Time shift:Set Time shift to On or Off.
Subtitle:this enables subtitle for digital TV channels.
Select Subtitle,press OK/ to display its submenus:
Subtitle: press OK/ to enter, press to turn On
or Off the subtitles. When Subtitle is set to On, you
can enable subtitle languages on digital TV channels:
1. Press to select Digital subtitle language.
2. Press OK/ to enter, press to select a
subtitle language as your preferred language.
3. Press to select Digital subtitle language 2nd.
4. Press OK/ to enter, press to select asecondary subtitle language.
6. Subtitle type: press OK/ to enter, press to select a subtitle type. You can select Hearing impaired to display the hearing impaired subtitle with your selected language.
Teletext: press OK/ to display its submenu.
Decoding page language: select a proper type of
language in which Teletext will display.
Digital teletext language: for digital TV channels,
your TV could zap to a service with multiple initial
Teletext pages in different languages. This function
allows you to select an available language as primary
language which relates to different initial Teletext page.
Volume: Turns the TV Volume On or Off.
Speaker Volume: Adjust the TV Volume level.
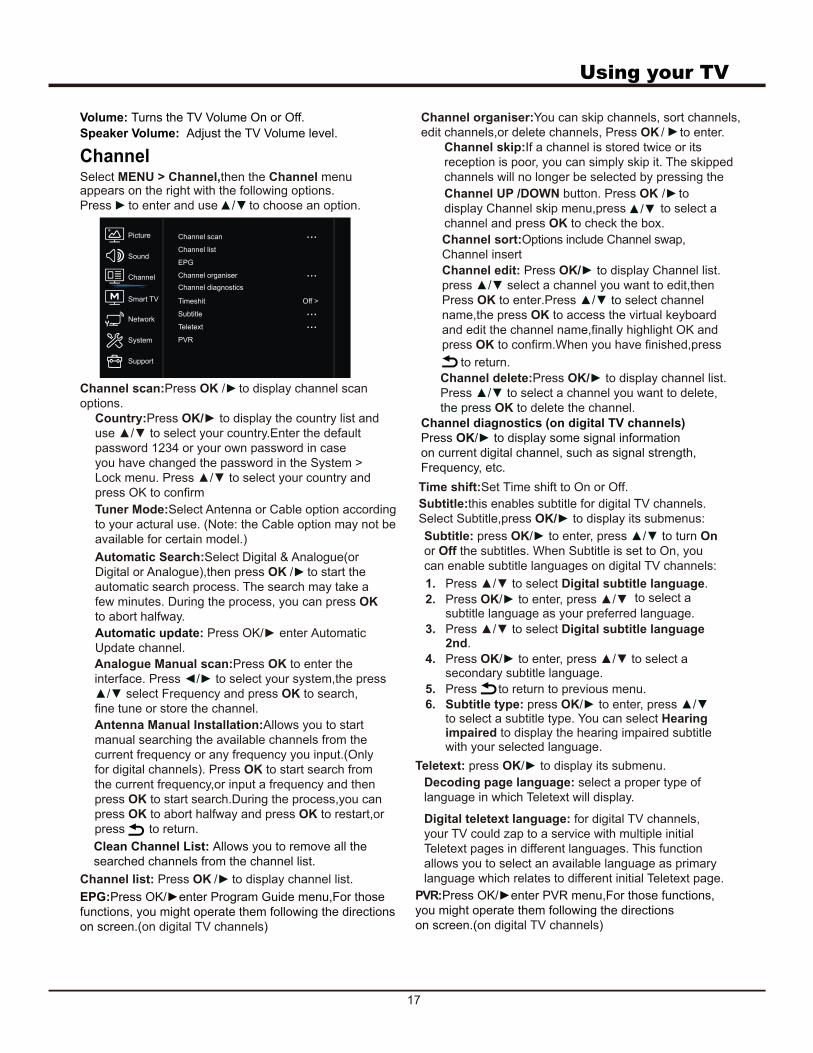
ChannelSelect MENU > Channel,then the Channel menu appears on the right with the following options.
Press to enter and use to choose an option.
Channel scan:Press OK to display channel scan
options.
/
Automatic Search:Select Digital & Analogue(or
Digital or Analogue),then press OK to start the
automatic search process. The search may take a
few minutes. During the process, you can press OK
to abort halfway.
/
Analogue Manual scan:Press OK to enter the
interface. Press to select your system,the press
select Frequency and press OK to search,
fine tune or store the channel.
Antenna Manual Installation:Allows you to start
manual searching the available channels from the
current frequency or any frequency you input.(Only
for digital channels). Press OK to start search from
the current frequency,or input a frequency and then
press OK to start search.During the process,you can
press OK to abort halfway and press OK to restart,or
press to return.
Channel list: Press OK to display channel list./
EPG:Press Guide menu,For those
functions, you might operate them following the directions
on screen.(on digital TV channels)
Channel organiser:You can skip channels, sort channels,
edit channels,or delete channels, Press OK to enter. /
Channel edit: Press OK/ to display Channel list.
press select a channel you want to edit,then
Press OK to enter.Press select channel
name,the press OK to access the virtual keyboard
and edit the channel name,finally highlight OK and
press OK to confirm.When you have finished,press
Channel delete:Press OK/ to display channel list.
Press to select a channel you want to delete,
the press OK to delete the channel.
to return.
Channel diagnostics (on digital TV channels)
Press OK/ to display some signal information
on current digital channel, such as signal strength,
Frequency, etc.
Clean Channel List: Allows you to remove all the
searched channels from the channel list.
Automatic update: Automatic
Update channel.
Picture
Sound
System
Network
Smart TV
Channel
Support
Channel scan
Channel list
EPG
Channel organiser
Timeshit Off >
Subtitle
Teletext
Channel diagnostics
Country:Press OK/
y.Enter the default
password 1234 or your own password in case
you have changed the password in the System >
press OK to confirm
Tuner Mode:Select Antenna or Cable option according
to your actural use. (Note: the Cable option may not be
available for certain model.)
Channel sort:Options include Channel swap,
Channel insert
Channel skip:If a channel is stored twice or its
reception is poor, you can simply skip it. The skipped
channels will no longer be selected by pressing the
Channel UP /DOWN button. Press OK to
display Channel skip menu,press to select a
channel and press OK to check the box.
/
5. to return to previous menu.Press
PVR
PVR:Press menu,For those functions,
you might operate them following the directions
on screen.(on digital TV channels)
Using your TV
18
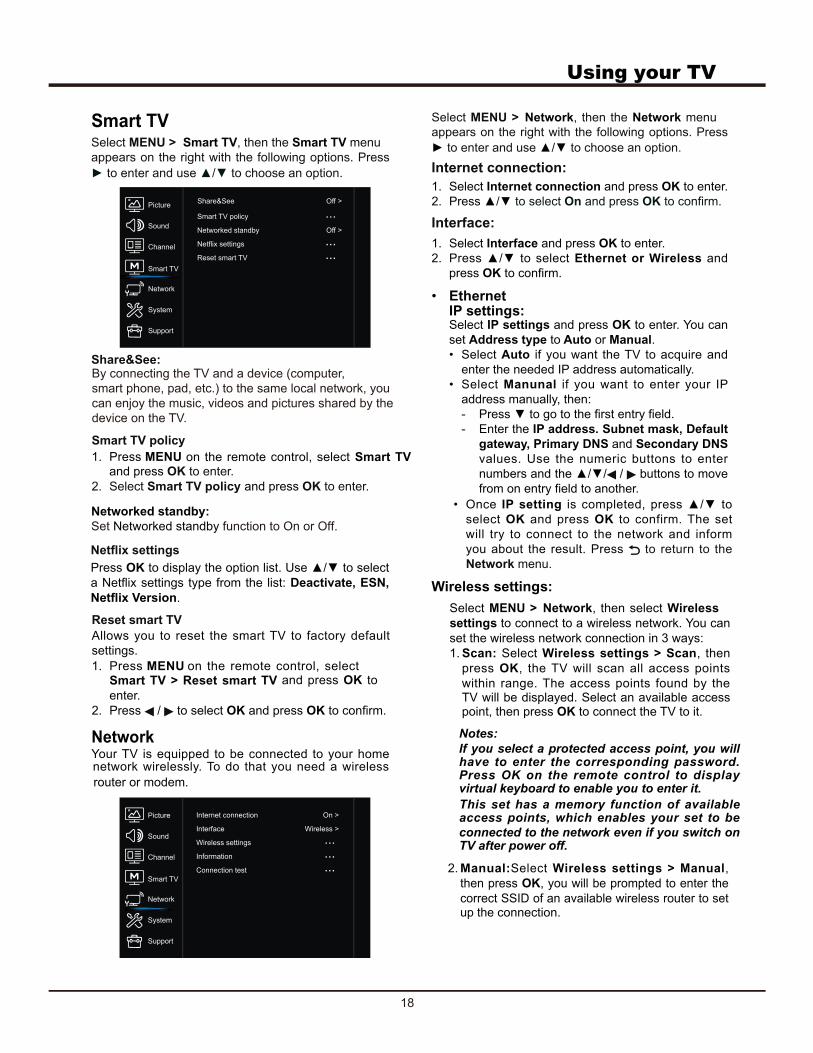
Smart TVSelect MENU > Smart TV, then the Smart TV menu
appears on the right with the following options. Press
to enter and use to choose an option.
Networked standby:
Set Networked standby function to On or Off.
Smart TV policy
1. Press MENU on the remote control, select Smart TV and press OK to enter.
2. Select Smart TV policy and press OK to enter.
Press OK to display the option list. Use to select
Deactivate, ESN,
.
Reset smart TV
Allows you to reset the smart TV to factory default
settings.
1. Press MENU on the remote control, select Smart TV > Reset smart TV and press OK to
enter.
2. Press / to select OK and press OK
NetworkYour TV is equipped to be connected to your home network wirelessly. To do that you need a wireless
router or modem.
Select MENU > Network, then the Network menu
appears on the right with the following options. Press
to enter and use to choose an option.
Internet connection:
1. Select Internet connection and press OK to enter.
2. to select On and press OK
Interface:
1. Select Interface and press OK to enter.
2. Press to select Ethernet or Wireless and
press OK
• EthernetIP settings:Select IP settings and press OK to enter. You can
set Address type to Auto or Manual.
• Select Auto if you want the TV to acquire and
enter the needed IP address automatically.
• Select Manunal if you want to enter your IP
address manually, then:
-
- Enter the IP address. Subnet mask, Default
gateway, Primary DNS and Secondary DNS
values. Use the numeric buttons to enter
numbers and the / buttons to move
• Once IP setting is completed, press to
select OK and press OK to confirm. The set
will try to connect to the network and inform
you about the result. Press to return to the
Network menu.
Wireless settings:
Select MENU > Network, then select Wireless
settings to connect to a wireless network. You can
set the wireless network connection in 3 ways:
1. Scan: Select Wireless settings > Scan, then
press OK, the TV will scan all access points
within range. The access points found by the TV will be displayed. Select an available access point, then press OK to connect the TV to it.
Notes:
If you select a protected access point, you will have to enter the corresponding password. Press OK on the remote control to display virtual keyboard to enable you to enter it.
This set has a memory function of available access points, which enables your set to be
connected to the network even if you switch on TV after power off.
2. Manual:Select Wireless settings > Manual,
then press OK, you will be prompted to enter the
correct SSID of an available wireless router to set up the connection.
Picture
Sound
System
Network
Smart TV
Channel
Support
Networked standby
Netflix settings
Smart TV policy
Reset smart TV
Share&See Off >
Off >
By connecting the TV and a device (computer,
smart phone, pad, etc.) to the same local network, you
can enjoy the music, videos and pictures shared by the
device on the TV.
Share&See:
Picture
Sound
System
Network
Smart TV
Channel
Support
Internet connection
Interface
Information
Wireless settings
Connection test
On >
Wireless >
19
Using your TV
3. Auto: I f your AP(Access Point ) suppor ts
WPS(WiFi Protected Setup), you can connect to the network via PIN(Personal Identification Number) or PBC(Push Button Configuration).
WPS will automatically configure the SSID and WPA key in either mode.
Select Wireless settings > Auto and press OK
to enter.
• PIN: Select PIN and press OK to enter. Choose
a random PIN code. Make sure this code is
installed on the AP. (For the procedures, refer
to your router manual.) Select OK and press
OK to set up the connection.
• PBC: If your router has a PBC push button,
select PBC and press OK to enter. Press
the PBC push button on your router within 2
minutes before you select OK and press OK
again. Your TV will automatically acquire all the
network setting values it needs and connect to
your network.
Information:Select Information and press OK to enter. You will
check the information on current connection, such
as Interface, Address type, IP address, etc., press
to return to the Network menu.
Connection test:Select Connection test and press OK to enter. You
will check the Internet connectivity.
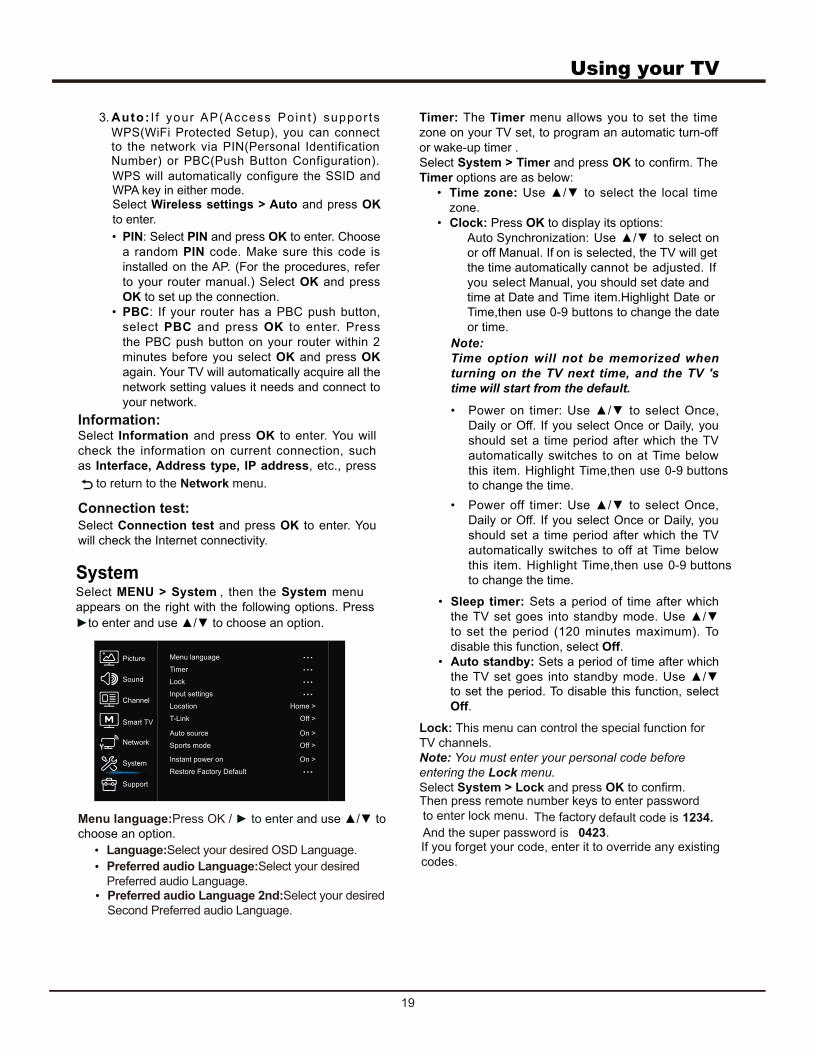
SystemSelect MENU > System , then the System menu
appears on the right with the following options. Press
Timer: The Timer menu allows you to set the time
zone on your TV set, to program an automatic turn-off
or wake-up timer .
Select System > Timer and press OK
Timer options are as below:
• Time zone: Use to select the local time
zone.
• Clock: Press OK to display its options:
Auto Synchronization: Use to select on
or off Manual. If on is selected, the TV will get
the time automatically cannot be adjusted. If
you select Manual, you should set date and
time at Date and Time item.Highlight Date or
Time,then use 0-9 buttons to change the date
or time.
Note:
Time option will not be memorized when
turning on the TV next time, and the TV 's
time will start from the default.
• Power on timer: Use / to select Once,
Daily or Off. If you select Once or Daily, you
should set a time period after which the TV
automatically switches to on at Time below
this item. Highlight Time,then use 0-9 buttons
to change the time.
• Power off timer: Use to select Once,
Daily or Off. If you select Once or Daily, you
should set a time period after which the TV
automatically switches to off at Time below
this item. Highlight Time,then use 0-9 buttons
to change the time.
• Sleep timer: Sets a period of time after which
the TV set goes into standby mode. Use
to set the period (120 minutes maximum). To
disable this function, select Off.
• Auto standby: Sets a period of time after which
the TV set goes into standby mode. Use
to set the period. To disable this function, select
Off.
Lock: This menu can control the special function for
TV channels.
Note: You must enter your personal code before
entering the Lock menu.
Select System > Lock and press OK
The factory
Then press remote number keys to enter password
to enter lock menu. default code is 1234.
And the super password is 0423. If you forget your code, enter it to override any existing
codes.
Menu language:Press OK /
choose an option.
• Language:Select your desired OSD Language.
• Preferred audio Language:Select your desired
Preferred audio Language.
• Preferred audio Language 2nd:Select your desired
Second Preferred audio Language.
Picture
Sound
System
Network
Smart TV
Channel
Support
Auto source On >
Location Home >
Timer
Lock
Input settings
Sports mode Off >
Instant power on On >
Restore Factory Default
Menu language
T-Link Off >
20
Using your TV
The Lock options are as below:
• Channel lock: This option allows you to lock a
certain Channel. Use to select a certain TV
channel you want to lock, then press OK to lock.
To unlock, use the same operation.
• Input lock: This option allows you to lock a
certain external source you want to lock. Press
OK to display Input lock menu, then press
to select a certain external source you want to
lock, and press OK to lock. To unlock, use the
same operation.
Note: when the current input is locked, you can
press OK and enter the password to enter.
• Front panel lock: Press to select On to
lock the set's buttons.
• Installation lock: Press to select On
to prevent access to the Installation menu to
prevent any channels from being set up without
your consent.
• Change password: This option allows you to
change the password. Press OK to enter,and
enter the new password twice.
• Max volume: Press OK to display the adjustment
bar and use to set the max volume when
watching program.
• Clean all: Press OK to enter, use to set
OK, clear all settings.
Input Settings: Select System > Input Settings,
press OK to enter. User can select the device name of
the input source here, easy to identify the source.
Location:Use Home,Shop and Shop
with demo,and press OK to confirm.
Auto source: Press OK to enter, press / to turn
On or Off the auto source, and press OK
Sports mode:Enhance the picture quality of moving
picture.
Instant power on: Press OK to enter, press
to turn On or Off the instant power, and press OK to
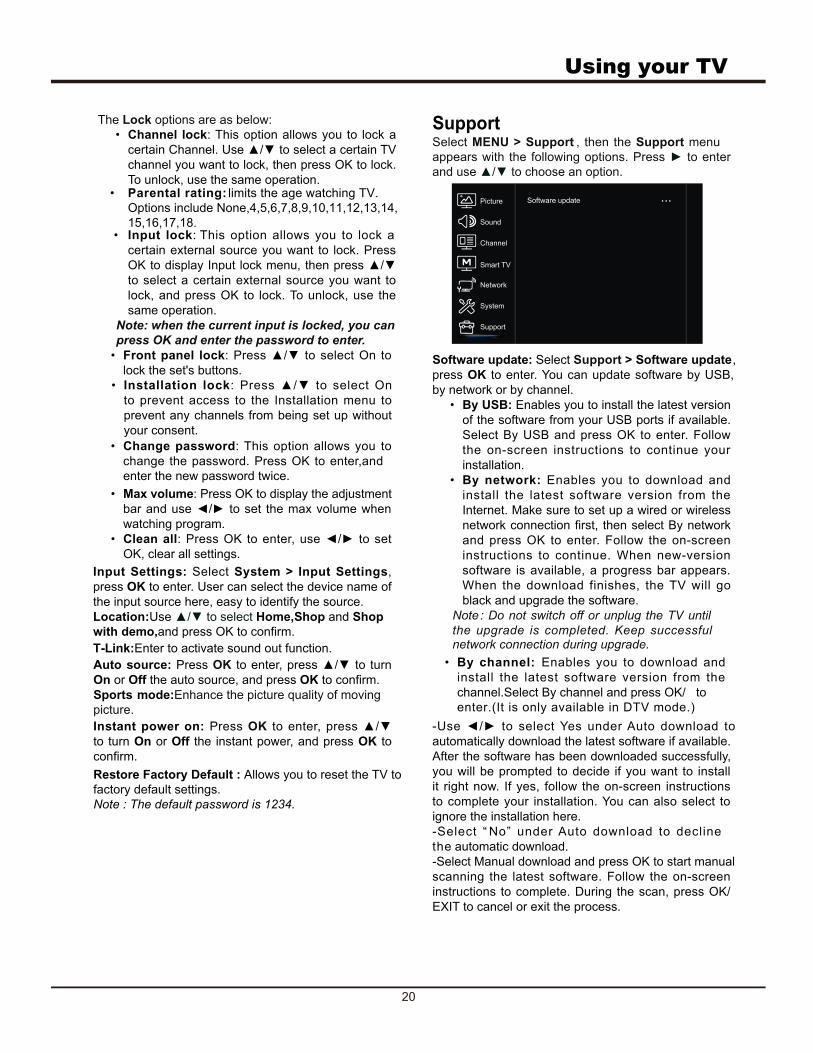
SupportSelect MENU > Support , then the Support menu
appears with the following options. Press to enter
and use to choose an option.
Software update: Select Support > Software update,
press OK to enter. You can update software by USB,
by network or by channel.
• By USB: Enables you to install the latest version
of the software from your USB ports if available.
Select By USB and press OK to enter. Follow
the on-screen instructions to continue your
installation.
• By network: Enables you to download and
install the latest software version from the
Internet. Make sure to set up a wired or wireless
and press OK to enter. Follow the on-screen
instructions to continue. When new-version
software is available, a progress bar appears.
og lliw VT eht ,sehsinif daolnwod eht nehW
black and upgrade the software.
Note: Do not switch off or unplug the TV until
the upgrade is completed. Keep successful network connection during upgrade.
-Use to select Yes under Auto download to
automatically download the latest software if available.
After the software has been downloaded successfully,
you will be prompted to decide if you want to install
it right now. If yes, follow the on-screen instructions
to complete your installation. You can also select to
ignore the installation here.
-Select “ No” under Auto download to decline
the automatic download.
-Select Manual download and press OK to start manual
scanning the latest software. Follow the on-screen
instructions to complete. During the scan, press OK/
EXIT to cancel or exit the process.
• Parental rating: limits the age watching TV.
Options include None,4,5,6,7,8,9,10,11,12,13,14,
15,16,17,18.
Picture
Sound
System
Network
Smart TV
Channel
Support
Software update
T-Link:Enter to activate sound out function.
Restore Factory Default : Allows you to reset the TV to
factory default settings.
Note : The default password is 1234.
• By channel: Enables you to download and
install the latest software version from the
channel.Select By channel and press OK/ to
enter.(It is only available in DTV mode.)
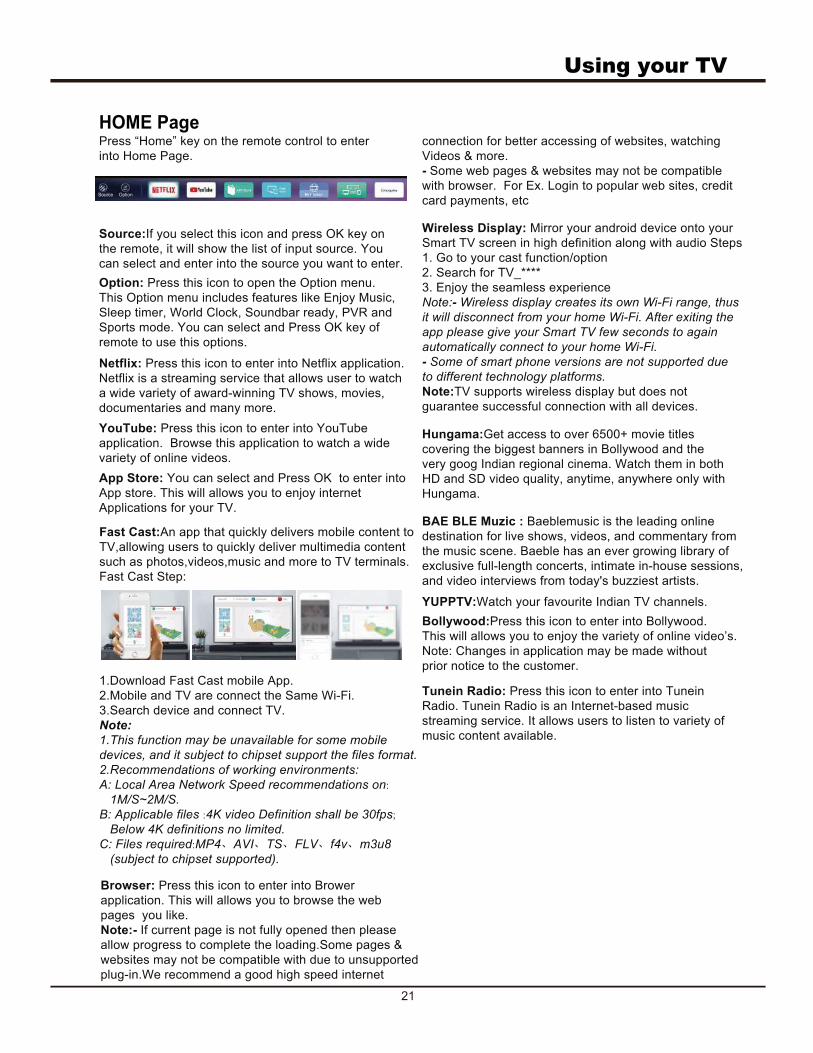
HOME PagePress “Home” key on the remote control to enter
into Home Page.
Source:If you select this icon and press OK key on
the remote, it will show the list of input source. You
can select and enter into the source you want to enter.
Source Option
Option: Press this icon to open the Option menu.
This Option menu includes features like Enjoy Music,
Sleep timer, World Clock, Soundbar ready, PVR and
Sports mode. You can select and Press OK key of
remote to use this options.
App Store: You can select and Press OK to enter into
App store. This will allows you to enjoy internet
Applications for your TV.
Netflix: Press this icon to enter into Netflix application.
Netflix is a streaming service that allows user to watch
a wide variety of award-winning TV shows, movies,
documentaries and many more.
YouTube: Press this icon to enter into YouTube
application. Browse this application to watch a wide
variety of online videos.
Hungama:Get access to over 6500+ movie titles
covering the biggest banners in Bollywood and the
very goog Indian regional cinema. Watch them in both
HD and SD video quality, anytime, anywhere only with
Hungama.
21
Using your TV
Source Option
Fast Cast:An app that quickly delivers mobile content to
TV,allowing users to quickly deliver multimedia content
such as photos,videos,music and more to TV terminals.
Fast Cast Step:
1.Download Fast Cast mobile App.
2.Mobile and TV are connect the Same Wi-Fi.
3.Search device and connect TV.
Note:
1.This function may be unavailable for some mobile
devices, and it subject to chipset support the files format.
2.Recommendations of working environments:
A: Local Area Network Speed recommendations on: 1M/S~2M/S.
B: Applicable files :4K video Definition shall be 30fps; Below 4K definitions no limited.
C: Files required:MP4、AVI、TS、FLV、f4v、m3u8
(subject to chipset supported).
Browser: Press this icon to enter into Brower
application. This will allows you to browse the web
pages you like.
Note:- If current page is not fully opened then please
allow progress to complete the loading.Some pages &
websites may not be compatible with due to unsupported
plug-in.We recommend a good high speed internet
Wireless Display: Mirror your android device onto your
Smart TV screen in high definition along with audio Steps
1. Go to your cast function/option
2. Search for TV_****
3. Enjoy the seamless experience
Note:- Wireless display creates its own Wi-Fi range, thus
it will disconnect from your home Wi-Fi. After exiting the
app please give your Smart TV few seconds to again
automatically connect to your home Wi-Fi.
- Some of smart phone versions are not supported due
to different technology platforms.
Note:TV supports wireless display but does not
guarantee successful connection with all devices.
connection for better accessing of websites, watching
Videos & more.
- Some web pages & websites may not be compatible
with browser. For Ex. Login to popular web sites, credit
card payments, etc
BAE BLE Muzic : Baeblemusic is the leading online
destination for live shows, videos, and commentary from
the music scene. Baeble has an ever growing library of
exclusive full-length concerts, intimate in-house sessions,
and video interviews from today's buzziest artists.
YUPPTV:Watch your favourite Indian TV channels.
Tunein Radio: Press this icon to enter into Tunein
Radio. Tunein Radio is an Internet-based music
streaming service. It allows users to listen to variety of
music content available.
Bollywood:Press this icon to enter into Bollywood.
This will allows you to enjoy the variety of online video’s.
Note: Changes in application may be made without
prior notice to the customer.
Using your TV
22
1. Under the following conditions, this system cannot
decode the file and the file cannot be play normally:
-The parameters of file, such as the pixel of picture,
code rate of audio and video file, sampling rate of
audio file, exceed the limit of the system;
-The format of file is not matched or the file is harmed.
Note: The code rate of this system does not support
exceed 20Mbps.
2. Hot plug: Do not disconnect when the system is
reading or transmitting data, avoid damaging the
system or the device.
3. Pay attention to the power supply of the device when
you are using a mobile hard disk or a digital camera.
If the power supply is not sufficient or not stable, you
may encounter problems during operating or can not
operate at all. In this case, please restart the device,
or unplug the device and plug it again, and ensure that
its power supply is normal.
Notes:
4. The system supports standard USB1.1,USB2.0 and
USB3.0 devices, such as standard U-disks, MP3
players,mobile hard disks, etc..
5. For obtaining better audio and video quality, It is
suggested to use the external device which accords
with USB2.0/USB3.0 standard.
6. When playing the video with high compression ratio,
these phenomenons, such as picture standstill and
menu long time response, are normal.
7. For some USB device with power supply, such as large
size hard disk, MP4, etc., Suggests using it with power
to avoid electric power shortage. The parameters of
file, such as the pixel of picture, code rate of audio and
video file, sampling rate of audio file, exceed the limit
of the system.
Multimedia
You can also select Media input by selecting input AV button.
In USB state, if no USB device connected, the USB
interface will be displayed.
Picture:
1. Select Picture icon, then press OK button to enter the
USB device.
2. Press Up, Down, Left or Right direction button to select
your desired picture file and press OK to show.
3. While showing picture, press OK key of remote to display
the play console.For the Play console,you might operate
them following the directions on screen.
4.Press Return key of remote to Stop playing.
Video :
1. Select Video icon, then press OK button to enter the USB
device.
2. Press Up, Down, Left or Right direction button to select
your desired file and press OK to Play.
3. While playing a Video, press OK key of remote to display
the play console. For the Play console, you might operate
them following the directions on screen.
4. Press Return key of remote to Stop playing.
Music :
1.Select Music icon, then press OK button to enter the USB
device.
2.Press Up, Down, Left or Right direction button to select your
desired file and press OK to Play.
3.The Play console includes Fast Backward, Previous,
Play/Pause, Next, Fast forward Repeat and List icons. Use
Left & Right key of remote to navigate on the Play console.
4. Press Return key of remote to Stop playing.
Using your TV
23
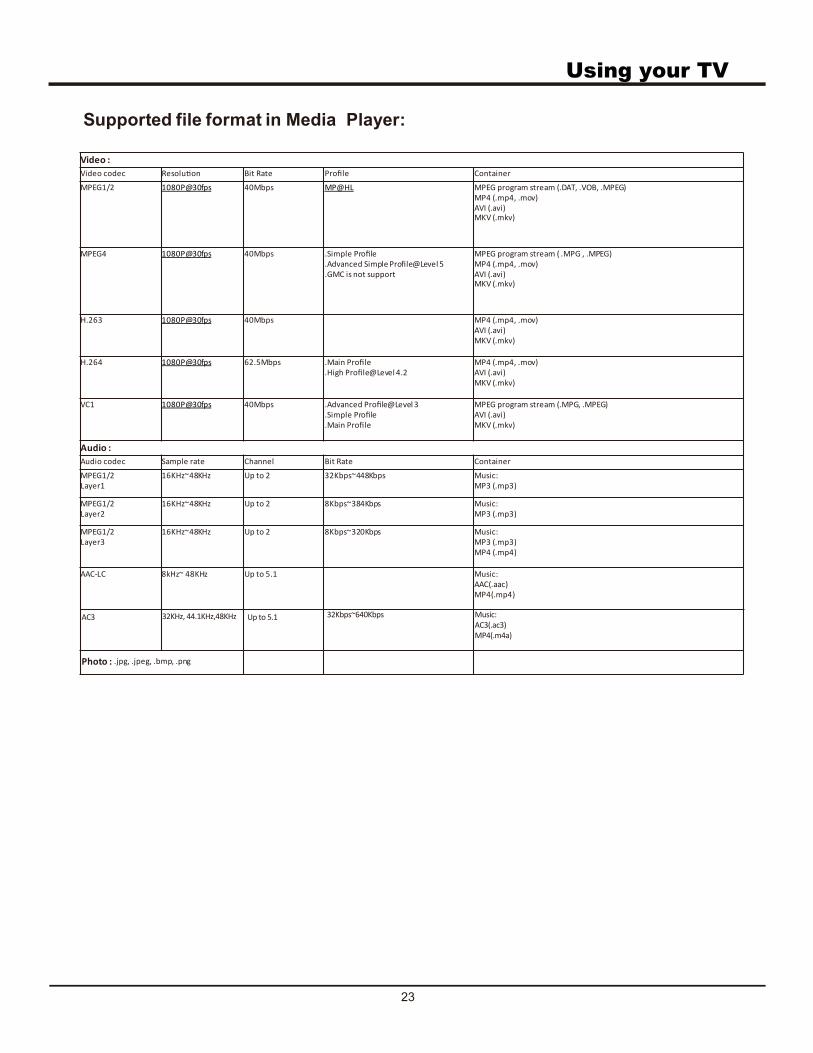
Supported file format in Media Player:
Video :
Video codec Resolu on Bit Rate Pro e Container
MPEG1/2 1080P@30fps 40Mbps MP@HL MPEG program stream (.DAT, .VOB, .MPEG)
MP4 (.mp4, .mov)
AVI (.avi) MKV (.mkv)
MPEG4 1080P@30fps 40Mbps .Simple Pro le
.Advanced Simple Pro e@Level 5
.GMC is not support
MPEG program stream ( .MPG , .MPEG)
MP4 (.mp4, .mov)
AVI (.avi) MKV (.mkv)
H.263 1080P@30fps 40Mbps MP4 (.mp4, .mov)
AVI (.avi)
MKV (.mkv)
H.264 1080P@30fps 62.5Mbps .Main Pro e
.High Pro e@Level 4.2
MP4 (.mp4, .mov)
AVI (.avi)
MKV (.mkv)
VC1 1080P@30fps 40Mbps .Advanced Pro le@Level 3
.Simple Pro le
.Main Pro e
MPEG program stream (.MPG, .MPEG)
AVI (.avi)
MKV (.mkv)
Audio :
Audio codec Sample rate Channel Bit Rate Container
MPEG1/2
Layer1
16KHz~48KHz Up to 2 32Kbps~448Kbps Music:
MP3 (.mp3)
MPEG1/2
Layer2
16KHz~48KHz Up to 2 8Kbps~384Kbps Music:
MP3 (.mp3)
MPEG1/2
Layer3
16KHz~48KHz Up to 2 8Kbps~320Kbps Music:
MP3 (.mp3)
MP4 (.mp4)
AAC
AC3 32KHz, 44.1KHz,48KHz Up to 5.1 32Kbps~640Kbps Music:
AC3(.ac3)
MP4(.m4a)
-LC 8kHz~ 48KHz Up to 5.1 Music:
AAC(.aac)
MP4(.mp4)
Photo : .jpg, .jpeg, .bmp, .png
24
Other Information
Most problems you encounter with your TV can be
corrected by consulting the following troubleshooting list.
1. Adjust the position and orientation of the indoor/outdoor
antenna.
2. Check the connection of antenna.
3. Fine tune the channel.
4. Try another channel. Broadcasting failure may happen.
1. Check if the fuse or circuit breaker is working.
2. Plug another electrical device into the outlet to make
sure it is working or turned on.
3. Power plug is in a bad contact with the outlet.
4. Check the signal source.
Black spots or horizontal streaks appear, or the picture
flutters or drifts. This is usually caused by interference
from car ignition system, neon lamps, electric drills, or
other electrical appliance.
Troubleshooting
No picture, no sound
Ignition
This interference produces moving ripples or diagonal
streaks, and in some case, loss of contrast in the picture.
Find out and remove the radio interference source.
Radio frequency interference1. Change the color system.
2. Adjust the saturation.
3. Try another channel. Black-white program may be
received.
No color
1. Change the batteries.
2. Batteries are not installed correctly.
3. Main power is not connected.
Remote control does not work
1. Adjust the brightness and contrast.
2. Broadcasting failure may happen.
No picture, normal sound
1. Press the Vol+ button to increase volume.
2. Volume is set to mute, press the mute button to restore
sound.
3. Change the sound system.
4. Broadcasting failure may happen.
Normal picture, no sound
It is usually caused by local interference, such as cars,
daylight lamps and hair driers. Adjust the antenna to
minimize the interference.
Unorderly ripples on the picture
Perhaps the TV can not recognize the resolution set by
the PC. Suggest to change to the best resolution or other
standard resolutions of the Windows system.
Blank screen when connected computer system
If the antenna is located in the fringe area of a television
signal where the signal is weak, the picture may be marred
by dots. When the signal is extremely weak, it may be
necessary to install a special antenna to improve the
reception.
Snowy dots and interference
resources,
1. Lead (Pb) – not over 0.1% by weight;
2. Cadmium (Cd) – not over 0.01% by weight;
3. Mercury (Hg) – not over 0.1% by weight;
4. Hexavalent chromium (Cr6+) – not over 0.1% by weight;
5. Polybrominated biphenyls (PBBs) – not over 0.1% by weight;
6. Polybrominated diphenyl ethers (PBDEs) – not over 0.1% by weight.
https://www.sanyoappliance.in/e-waste-program/
Customer care number ( Toll free ) : 1800 419 5088
Please see the Sanyo website for further information on collection centers,etc.
Declaration of Conformity with the requirements of the E - Waste (Management) Rules-2016
The Product is in conformity with the requirements of the reduction of hazardous substances
The content of hazardous substance with the exemption of the applications listed in SCHEDULE II
of the E-Waste Rules-2016
of the E-Waste Rules-2016
or call the customer care toll-free number
Sanyo
This product incorporates the following software or technology:
(1) the software based in part on the work of the Independent JPEG Group,
(2) the software developed by the FreeType Project,
(3) the software licensed under the GNU General Public License Version 2 (GPL v2),
GNU LIBRARY GENERAL PUBLIC LICENSE Version 2(LGPL v2),
GNU Lesser General Public License Version 2.1 (LGPL v2.1)
and/or Mozilla Public License Version 1.1 (MPL v1.1)and/or,
(4) open sourced software other than listed above.
The open source softwares are distributed in the hope that it will be useful, but
WITHOUT ANY WARRANTY, without even the implied warranty of
MERCHANTABILITY or FITNESS FOR A PARTICULAR PURPOSE.
In addition, some open source softwares are copyrighted by several individuals
or entities.
Please refer to the terms and conditions of open source softwares and the copy
right notice of applicable copyright holder at support page of this product
(https://www.sanyoappliance.in).
25
Other Information
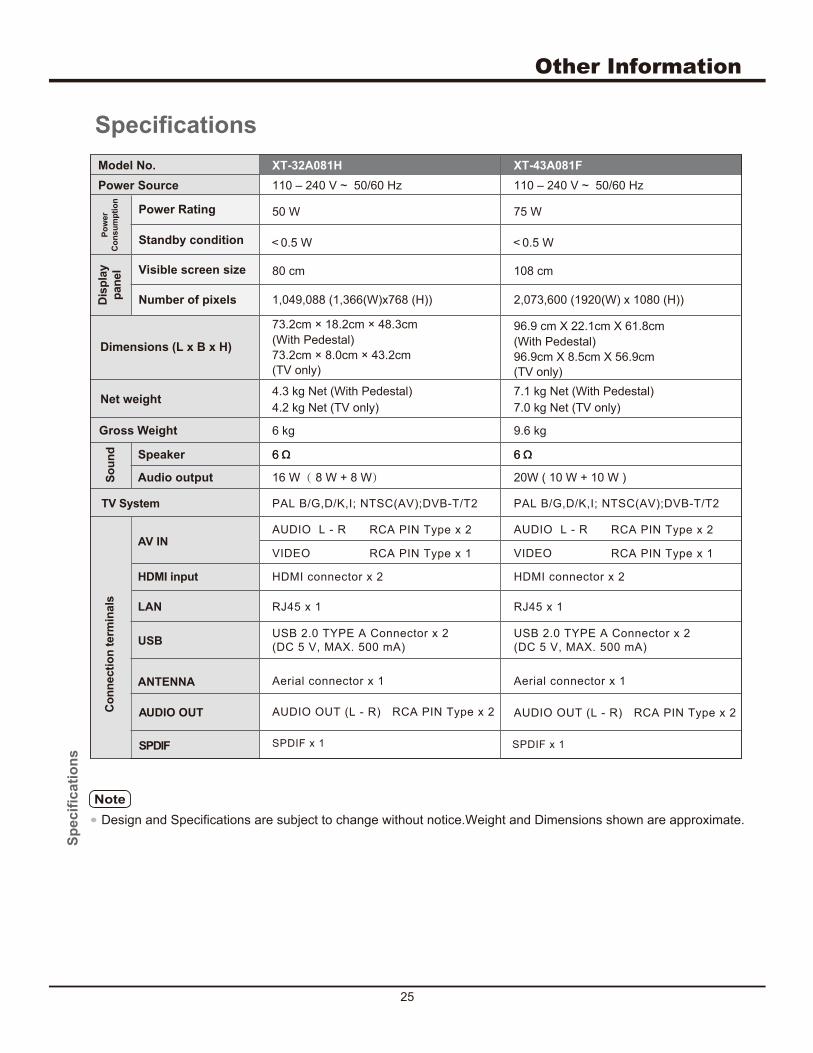
Design and Specifications are subject to change without notice.Weight and Dimensions shown are approximate.
Specifications
66
75 W
16 W( 8 W + 8 W)
Net weight
Dimensions (L x B x H)
Model No.
Power Source
Power Rating
Standby condition
Visible screen size
Number of pixels
Gross Weight
Speaker
Audio output
AUDIO OUT
AV IN
TV System
Co
nn
ecti
on
term
inals
So
un
dP
ow
er
Co
nsu
mp
tio
n
Dis
pla
y
pan
el
VIDEO RCA PIN Type x 1
RCA PIN Type x 2AUDIO L - R
PAL B/G,D/K,I; NTSC(AV);DVB-T/T2
HDMI input
AUDIO OUT (L - R) RCA PIN Type x 2 AUDIO OUT (L - R) RCA PIN Type x 2
HDMI connector x 2
RJ45 x 1
Aerial connector x 1
USB 2.0 TYPE A Connector x 2
(DC 5 V, MAX. 500 mA)
LAN
USB
ANTENNA
20W ( 10 W + 10 W )
VIDEO RCA PIN Type x 1
RCA PIN Type x 2AUDIO L - R
PAL B/G,D/K,I; NTSC(AV);DVB-T/T2
HDMI connector x 2
RJ45 x 1
Aerial connector x 1
USB 2.0 TYPE A Connector x 2
(DC 5 V, MAX. 500 mA)
XT-32A081H XT-43A081F
108 cm
0.5 W 0.5 W
1,049,088 (1,366(W)x768 (H)) 2,073,600 (1920(W) x 1080 (H))
110 – 240 V ~ 50/60 Hz 110 – 240 V ~ 50/60 Hz
50 W
80 cm
(With Pedestal)
(TV only)
73.2cm × 8.0cm × 43.2cm
73.2cm × 18.2cm × 48.3cm
(With Pedestal)
(TV only)
96.9cm X 8.5cm X 56.9cm
96.9 cm X 22.1cm X 61.8cm
4.3 kg Net (With Pedestal)
4.2 kg Net (TV only)
7.1 kg Net (With Pedestal)
7.0 kg Net (TV only)
6 kg 9.6 kg
SPDIF SPDIF x 1 SPDIF x 1
66
