the official mto driver's handbook - singulink
TRANSCRIPT

This handbook is only a guide. For official purposes, please refer to the Highway Traffic Act, the Motorized Snow Vehicles Act and the Off-Road VehiclesAct of Ontario.
If you're taking beginner driver education, make sure it's from a ministry-approved school. You can find them atwww.mto.gov.on.ca/english/dandv/driver/gradu/approve.shtml.
For more information about driver licensing, visit www.mto.gov.on.ca.
To request a copy of this book in an alternate format, contact Publications Ontario at 1-800-668-9938 or (416) 326-5300 or visitwww.publications.serviceontario.ca.
Driving is a privilege - not a right
This chapter tells you what licence you need to drive in Ontario and how to get it, whether you are a new driver, a visitor or a new resident in Ontario.
If you are applying for your first licence, this chapter explains the graduated licensing system, how to apply for a licence, the tests you will have to passand the driving privileges you will have at each licence level.
The Official MTO Driver's Handbook
In this chapter
Introduction
IntroductionOntario is a road safety leader in Canada and North America. The Ministry of Transportation has introduced a range of measures to maintain this recordand to improve the behaviour of all drivers.
Most collisions are caused by driver error or behaviours such as following too closely, speeding, failure to yield the right of way, improper turns, running redlights and frequently changing lanes. There are also drivers who intentionally put others at risk through such reckless behaviour. Statistics show that newdrivers of all ages are far more likely than experienced drivers to be involved in serious or fatal collisions.
Provincial campaigns promoting the correct use of seatbelts and child car seats, and informing people about drinking and driving and aggressive driving,are making a difference. Ontario's Graduated Licensing System (GLS), which lets new drivers gain skills and experience in low-risk environments, is alsohelping to develop better, safer drivers.
This handbook gives new drivers the basic information they need about learning to drive in Ontario: the rules of the road, safe driving practices and how toget a licence to drive a car, van or small truck. The ministry recommends that all drivers would benefit from taking an advanced course in driver training.
As you read, remember that this handbook is only a guide. For official descriptions of the laws, look in the Highway Traffic Act of Ontario and itsRegulations, available at www.e-laws.gov.on.ca. Information on how to get licences to drive other types of vehicles is available in Part Two of thishandbook, the Official MTO Motorcycle Handbook, the Official MTO Truck Handbook, the Official MTO Bus Handbook and the Official MTO Air BrakeHandbook.
Getting Your Driver's Licence
In this chapter
Requirements for driving in OntarioDriver's Licence Classification ChartWhat kind of licence?Graduated licensingApplying for a licenceAdditional documentsProof of legal nameDeclaration from a GuarantorGraduated licensing requirementsFailure to attend road test, or short notice cancellationOut-of-order road testNew Ontario residentsMotorcycle licence exchangesCould You Pass?Choosing a driving schoolSummary
Requirements for driving in OntarioIf you live in Ontario, you must be at least 16 years old and have a valid Ontario driver's licence to drive in this province.
If you are a visitor to Ontario and want to drive while you are here, you must be at least 16 years old and have a valid driver's licence from your ownprovince, state or country. If you are from another country and visiting Ontario for more than three months, you need an International Driver's Permit fromyour own country. If you are taking up residence, you must get an Ontario driver's licence.
If you are a new resident in Ontario and have a valid driver's licence from another province, state or country, you can use it for 60 days after you move toOntario. If you become a resident of Ontario, you must get an Ontario driver's licence. Ontario has licence exchange agreements with every Canadianprovince and territory (including Canadian Forces Europe). Also with Australia, Austria, Belgium, France, Germany, Great Britain, the Isle of Man, Japan,

Class A
Allowed to drive any tractor-trailer combinationMay also drive in class D and G
Diagram 1-1a-1
Class B
Allowed to drive any school purposes bus May also drive in class C, D, E, F and G
Diagram 1-1a-2
Class C
Allowed to drive any regular busMay also drive vehicles in class D, F and G.
Diagram 1-1a-3
Class D
A motor vehicle exceeding 11,000 kilograms gross weight or registered gross weight or any truck or combinationprovided the towed vehicle is not over 4,600 kilograms
May also drive in class G Diagram 1-1a-4
Class E
Allowed to drive any school purposes bus - maximum of 24-passenger capacityMay also drive in class F and G Diagram 1-1a-5
Class F
Allowed to drive any regular bus - maximum of 24-passenger capacity - and ambulancesMay also drive in class G Diagram 1-1a-6
Class G
Allowed to drive any car, van or small truck or combination of vehicle and towed vehicle up to 11,000 kilograms providedthe vehicle towed is not over 4,600 kilograms. A pickup truck towing a house trailer exceeds 4,600 kilograms, but thetotal combined weight of the truck and trailer does not exceed 11,000 kilograms is deemed a Class G vehicle. A ClassG vehicle has a maximum capacity of 11 passengers.
Diagram 1-1b-1
Class M
Allowed to drive any motorcycles, including motor tricycles, limited-speed motorcycles (motor scooters) and motor-assisted bicycles (mopeds). Holders may also drive a Class G vehicle under the conditions that apply to a Class G1
Diagram 1-1b-2
Northern Ireland, Korea, Switzerland and the United States.
Driver's Licence Classification Chart
Class G1
Level One of graduated licensing. Holders may drive Class G vehicles with an accompanying fully licensed driver with at least four years drivingexperience. Subject to certain conditions.
Class G2
Level Two of graduated licensing. Holders may drive Class G vehicles without accompanying driver but are subject to certain conditions.

licence holder.
Class M with L condition
Holders may operate a limited-speed motorcycle or moped only.
Class M2 with L condition
Holders may operate a limited-speed motorcycle or moped only.
Diagram 1-1b-3
Class M with M condition
Holders may operate a motor tricycle only.
Class M2 with M condition
Holders may operate a motor tricycle only.
Diagram 1-1b-4
Class M1
Level One of graduated licensing for motorcycles, including motor tricycles, limited-speed motorcycles (motor scooters) and motor-assisted bicycles(mopeds). Holders may drive a motorcycle under certain conditions.
Class M2
Level Two of graduated licensing for motorcycles, including motor tricycles, limited-speed motorcycles (motor scooters) and motor-assisted bicycles(mopeds). Holders may drive a motorcycle but only with a zero blood alcohol level. Holders may also drive a Class G vehicle under the conditions thatapply to a Class G1 licence holder.
Note: A "Z" air brake endorsement is required on a driver's licence to operate any air brake equipped motor vehicle.
What kind of licence?In Ontario, there are 12 different classes of licences. Each one qualifies you to drive a different type of vehicle. The class of licence you have must matchthe type of vehicle you are driving. You need a Class G licence to drive a car, van or small truck. You must have a Class G licence before you can belicensed to drive any other type of vehicle. The only exception is motorcycles. You may get a motorcycle licence (Class M) without first getting a Class Glicence. The Driver's Licence Classification Chart shows you what class of licence you need to drive different vehicles.
For information on the skills and knowledge you'll need to get a Class M motorcycle licence, study the Official MTO Motorcycle Handbook. You can getinformation on other kinds of licences - classes A, B, C, D, E and F - in the Official MTO Truck Handbook and the Official MTO Bus Handbook. If youwant to drive a vehicle equipped with air brakes, the Official MTO Air Brake Handbook tells you how to qualify.
Some recreational vehicles have special licence requirements. If you plan to drive an off-road vehicle or snowmobile, read the Off-Road Vehicles section inthis handbook.
You do not need a licence to ride a bicycle in Ontario; however bicycles are defined as vehicles in the Highway Traffic Act and bicyclists have rights andresponsibilities similar to other vehicle operators under the Act. Information on safe cycling can be found in the Ministry of Transportation publicationsCycling Skills and the Young Cyclist Guide.
Graduated licensingNew drivers applying for their first car or motorcycle licence enter Ontario's graduated licensing system. Graduated licensing lets new drivers get drivingexperience and skills gradually. The two-step licensing process takes at least 20 months to complete.
To apply for a licence, you must be at least 16 years old, pass a vision test and pass a test of your knowledge of the rules of the road and traffic signs.After you pass these tests, you will enter Level One and get a Class G1 licence.
You must pass two road tests to become fully licensed. Passing the first road test lets you move to Level Two (Class G2), and the second one gives youfull Class G driving privileges.
Applying for a licenceTo apply for a licence, you must show proof of your legal name, date of birth (showing day, month and year of birth) and signature. Documents must beoriginal and valid. Photocopies and expired documents are not acceptable. Any one of the following documents may be used to satisfy the requirement toprovide proof of legal name, complete date of birth and signature:
Passport (Canadian or foreign)

Canadian Citizenship Card with photo
Permanent immigration documentsPermanent Resident Card (PRC)Record of Landing (Form 1000)Confirmation of Permanent Residence (Form IMM 5292)
Temporary immigration documentsStudent Authorization (IMM 1442)Employment Authorization(IMM 1442)Visitor Record (IMM 1442)Temporary Resident's Permit (IMM 1442)Refugee Status Claim (IMM 1434)Acknowledgement of Intent to Claim Refugee Status (IMM 7703 with photo)Report Pursuant to the Immigration Act (IMM 1442 with photo)
Additional documentsAdditional documents are required if the document presented from the previous list does not indicate the legal name, complete date of birth (day, month,year) or signature. The additional documents must provide proof of the missing or incomplete information.
The following documents are acceptable as proof of date of birth and legal name:
Canadian or U.S. Birth Certificate
The following documents are acceptable as proof of signature:
Driver's Licence (Canadian and U.S. only)Identity Card with signature(issued by Canadian province/territory or U.S. state authority)Canadian Certificate of Indian StatusOntario Student Card with signatureOntario health card with applicant's signature. (Clients may choose to produce their Ontario health card for proof of signature. The health card andhealth number will not be recorded or photocopied)
Proof of legal nameIf additional documents presented to prove date of birth or signature do not indicate the applicant's legal name (for example, the name has been changed oris different on the two documents presented), the applicant will be required to provide additional documents as proof of legal name. The following additionaldocuments are acceptable as proof of legal name:
Marriage certificate (Canadian or foreign, government-issued)Change-of-name certificateCourt order for adoption, change of name or divorce (must bear legal name, date of birth and court seal)
To confirm complete date of birth where no or only partial date of birth is available:
Sworn affidavit stating reason why partial or no date is available, with supporting documents. Please contact ServiceOntario at (416) 235-2999 ortoll free at 1-800-387-3445 (Canada-wide) for further information.
Note: Direct identification by a parent or guardian is not acceptable. The applicant is required to present an acceptable document with his or her ownsignature.
Declaration from a guarantor If an applicant is unable to present one of the above documents as proof of signature, they may present an original, completed declaration from a guarantorform attesting to their signature. Applicants must first ensure that no other acceptable documents for signature are available from the list identifiedpreviously. To obtain a guarantor form:
Download the declaration-from-a-guarantor form from the Ministry of Transportation's website at www.mto.gov.on.ca or the DriveTest website atwww.drivetest.ca or,
Request a copy of the form at any DriveTest Centre.
Bring the documents to a DriveTest Centre or Travel Point (a temporary DriveTest Centre where there is no regional centre). Phone ahead to find outwhere the nearest Travel Point is and when it is open. You can also find it on the Internet at www.drivetest.ca.
You must pay a fee when you apply. This fee includes the cost of the knowledge test, your first road test and a five-year licensing fee. There are morecharges for your second road test and for any retests you may need to take. In order to schedule a road test appointment, you must prepay the road testfee.
When you apply for your licence, you will be asked questions about your health. People with certain physical or medical conditions are not allowed to drivefor safety reasons. If your physical or medical condition means you cannot be licensed, you will be told when you apply.
Once you have a licence, you should report any change in your medical condition that may affect your ability to drive safely. By law, doctors andoptometrists must report the name and address of anyone over 16 who has a condition that may make it unsafe for him or her to drive.
For further details on applying for a licence, visit the Ministry of Transportation website at www.mto.gov.on.ca.

Graduated licensing requirementsHere are the rules you must follow at each level:
Level One (Class G1)G1 knowledge test - checklistG1 exit test - checklistLevel Two (Class G2)Road testsG2 exit test - checklist
Graduated licensing requirementsLevel One (Class G1)
Level One lasts 12 months. The Ministry of Transportation encourages all new drivers to take an approved driver-education course to help learn the properdriving skills and knowledge. You should begin your training as soon as you become a Level One driver so you can get as much driving experience aspossible. If you pass an approved course, you can complete Level One in eight months. While at Level One, the following rules apply:
You must not drive if you have been drinking alcohol. Your blood-alcohol level must be zero.You must not drive alone; an accompanying driver must sit in the front passenger seat. This is the only person who can be in the front seat with youwhile you drive. The accompanying driver must have a valid Class G (or higher) licence, at least four years of driving experience and a blood-alcohollevel of less than .05 per cent when accompanying you. Time spent at the Class G2 level, as long as the G2 licence was valid (not suspended),does count toward the accompanying driver's four years of experience. The accompanying driver's licence may have demerit points, but it cannotbe suspended.Each person in the vehicle must have a working seatbelt. You must not drive on 400-series highways with a posted speed limit over 80km/h. Also, you must not drive on certain high-speed roads includingthe Queen Elizabeth Way, Don Valley Parkway and the Gardiner Expressway in the Greater Toronto Area, the E.C. Row Expressway in Windsorand the Conestoga Parkway in Kitchener-Waterloo. However, if your accompanying driver is a driving instructor, you may drive on any road.You must not drive between midnight and 5 a.m.
You must pass a road test of your driving skills to move to Level Two. At this time, you will be given a Class G2 licence.
Graduated licensing requirementsG1 knowledge test - checklist
Before taking the G1 knowledge test, make sure you have studied the Official MTO Driver's Handbook.
Bring the following items to the test:
Two pieces of identificationMoney for test fees - cash, debit or credit cardGlasses or contact lenses (if you need to wear them to drive)
Graduated licensing requirementsG1 exit test - checklist
Before taking the G1 exit test, make sure you have studied the Official MTO Driver's Handbook.
Bring the following items to the test:
Vehicle in good working orderMoney for test fees (if applicable)Glasses or contact lenses (if you need to wear them to drive)Arrive at least 30 minutes before Road Test appointment
Graduated licensing requirementsLevel Two (Class G2):
Level Two lasts at least 12 months.At this level, you have more privileges because of your driving experience.
At Level Two:
You must not drive if you have been drinking alcohol. Your blood-alcohol level must be zero.Each person in the vehicle must have a working seatbelt.
In addition, the following restrictions apply between the hours of midnight and 5 a.m. to G2 drivers aged 19 years and under.
In the first six months after receiving your G2 licence, you are allowed to carry only one passenger aged 19 or under.After six months with your G2 licence and until you obtain your full G licence or turn 20, you are allowed to carry up to three passengers aged 19 orunder.
Exemptions: The passenger restrictions for G2 drivers aged 19 and under do not apply if you are accompanied by a fully-licensed driver in the frontpassenger seat, or if the passengers are members of your immediate family (a guardian or those related to you by blood, marriage, common-lawrelationship or adoption).

After 12 months at Level Two, you may take a road test to qualify for full licence privileges. You must pass this test to get a Class G licence.
Note: It is now law that all young drivers 21 and under, regardless of licence class, must have a blood-alcohol level of zero.
Note: A restricted Class M licence for limited-speed motorcycle and moped drivers allows licence holders to drive only a limited-speed motorcycle andmoped. You are not permitted to drive a limited-speed motorcycle or moped on any driver's licence other than a class M licence (including M1, M2(L),M2,M(L) or M). For more information on how to obtain a restricted Class M licence to drive a moped, and graduated licensing requirements, please read theOfficial MTO Motorcycle Handbook.
Graduated licensing requirementsRoad tests
Road tests check your driving skills in the vehicle and in traffic. You will be tested on your ability to follow the rules of the road and safe driving practices.
The Level One road test deals with basic driving skills. The Level Two road test deals with more advanced knowledge and driving skills. Your performancein each of the tests will tell you whether you need more training or practice.
When you feel qualified to drive safely and confident enough to take your road test, contact the Road Test Booking Call Centre at (647) 776-0331 or 1-888-570-6110, or go online to www.mto.gov.on.ca, to schedule an appointment. If you are unable to keep the appointment, call the Road Test Booking CallCentre or go online to cancel your test. If you fail to attend or you cancel your appointment without providing at least 48 hours notice, your prepaid roadtest fee will not be refunded.
You must bring the appropriate vehicle to each of your road tests. Make sure it is in good working order and you feel comfortable driving it. Bring yourcurrent licence to the appointment. If you are a Level One driver, an accompanying driver must come with you to the test centre. If you are a Level Twodriver, please be prepared to take alternate transportation home in case you fail your road test and are unqualified to drive.
No pets or passengers other than the driver examiner are allowed in the vehicle during a road test.
All road tests have a set time frame. Before you begin your test, the examiner will inform you of the amount of time you have to complete the test. You willnot be asked to do anything illegal during the road test. The examiner will explain the test, and you should follow her or his instructions. The examiner isnot allowed to coach you during the test, so if you have any questions, ask them before you begin.
While the Level One road test checks your basic driving skills, the Level Two road test is much more demanding. You should learn the proper driving skillsas soon as you become a Level One driver so you can get as much driving experience as possible before taking the Level Two test.
For the Level Two test, you must demonstrate a high level of driving skill and knowledge. You will also have to show that you can drive well on a freewayor high-speed highway.
While you are taking the test, the examiner will be watching to see how well you control your vehicle and perform such driving tasks as starting, stopping,turning, parallel parking and three-point turning. The examiner will check your observation skills, including when and how often you use the mirrors, whereyou look, and how you respond to traffic, signs, pavement markings and possible hazards.
You will be tested on how well you manage the space around your vehicle, your ability to make safe lane changes and how closely you follow and stopbehind other vehicles. How you communicate with other road users, using turn signals and brake lights and making eye contact with other drivers andpedestrians, will also be noted, as well as the correctness of your driving decisions, such as knowing when to yield the right-of-way. For more informationon the Level Two road test, click here.
At the end of each test, the examiner will give you a complete report of your skills and explain any mistakes you have made. If you fail the test, the reportwill show you where you need to improve. When you have had more practice, you can make an appointment to take the test again. You must wait at least10 days between tests. Applicable road tests fees will be payable.
Graduated licensing requirementsG2 exit test - checklist
You must have highway driving experience (experience driving on highways with speed limits of at least 80 km/h) before taking the G2 exit test. You mustcomplete a Declaration of Highway Driving Experience form, describing the highway driving experience you have, before taking the road test. Bring thefollowing items to the test:
Vehicle in good working orderMoney for test fees (if applicable)Glasses or contact lenses (if you need to wear them to drive)Arrive at least 30 minutes before Road Test appointment
Failure to attend road test, or short notice cancellationIf you cancel or reschedule your road test appointment with less than 48 hours notice, or if you fail to attend your appointment, your prepaid road-test feewill not be refunded. Under certain extenuating circumstances only (such as a death in your immediate family), the road-test fee will remain as a credit onyour driving record.
Out-of-order road testIf your vehicle does not meet ministry standards for the purpose of a road test, or if there is a non-vehicle-related reason for which the examiner determinesthat the road test cannot be completed, the examiner declares the road test out-of-order. If your road test is declared out-of-order, you lose 50 per cent ofyour road test fee. The other 50 per cent of the fee remains as a credit on your driving record, and may be applied when booking a new road test. In orderto book the new road test, you will have to pay the 50 per cent of the fee deducted due to the out-of-order.

If you have any concerns that your road test may be declared out-of-order, contact the DriveTest Centre before your scheduled test to discuss it.
New Ontario residentsIf you are a new resident of Ontario and have a valid driver's licence from another province or country, you can use that licence for 60 days in Ontario. Ifyou want to continue to drive after 60 days, you must get an Ontario driver's licence.
Effective May 1, 2006, licensed driving experience for out-of-country applicants will be creditedas followsRequirements for all driver's licence applicants:
All applicants for an Ontario driver's licence are required to present a valid foreign driver's licence (if it is not in English or French, it is to beaccompanied by a written translation from a qualified translator), pass a vision test and a written knowledge test regarding Ontario's traffic rules,pay all applicable fees and provide acceptable proof of identity.Applicants who fulfill these requirements can obtain a G1 licence.All applicants must declare their licensed driving experience on the driver's-licence application form.Applicants are required to provide adequate proof of foreign licensed driving experience. However, if that is not possible, the ministry will accept anapplicant's declaration of their foreign licensed driving experience on the driver's licence application for up to a maximum of 12 months licensedexperience.This policy only applies to applicants for Class G licences.
Applicants declaring less than 12 months licensed driving experience within the preceding three years
Applicants are credited with the amount of licensed driving experience declared on the driver's-licence application.Applicants must have 12 month licensed driving experience before attempting the G1 road test.If an applicant successfully completes a ministry-approved beginner driver education course, the mandatory waiting time, prior to taking the G1 roadtest, will be reduced from 12 to eight months.The eight to 12 months may be a combination of licensed driving experience in the foreign jurisdiction and licensed experience in Ontario.
Applicants declaring more than 12 months licensed driving experience but less than 24 months within the preceding threeyears:
Applicants will be credited with 12 month vehicles' licensed driving experience and may proceed to take the G1 road test without having to fulfill themandatory 12-month G1 wait period.If the applicant passes the G1 road test, they will be issued a G2 licence and will not be subject to the six restrictions of the G1 licence, includingthe requirement to have a fully licensed driver accompany them in the vehicle and prohibition from driving on 400-series expressways.To obtain credit for more than 12 months licensed driving experience, applicants are required to obtain written authentication of their foreign licenseddriving experience from the originating licensing agency, or from the embassy, consulate or high commissioners' offices representing thejurisdiction. The authentication letter must be on official letterhead and be written in either English or French.Applicants will be credited with their foreign licensed driving experience as certified on the authentication letter.Credited licensed driving experience will be applied toward the G2 12-month waiting period prior to taking the G2 road test.If applicants do not provide a letter of authentication, applicants must fulfill the 12-month mandaÂtory waiting period prior to taking the G2 road test.
Applicants declaring a minimum of 24 months licensed driving experience within the preceding three years:
To obtain credit for more than 12 months licensed driving experience, applicants are required to obtain written authentication of their foreign licenseddriving experience from the originating licensing agency, or from the embassy, consulate or high commissioners' offices representing thejurisdiction. The authentication letter must be on official letterhead and be written in either English or French.Applicants will be credited with their foreign licensed driving experience as certified on the authentication letter.Applicants have, pending a letter of authentication of a minimum of 24 months of foreign licensed driving experience, the option of attempting the G1or G2 exit road tests (mandatory waiting times are waived). If the applicant chooses to attempt the G1 road test and successfully completes it, they will then be eligible to attempt the G2 road test.Upon successfully passing the G2 exit road test, applicants will be issued a G licence.If applicants do not provide a letter of authentication, they must pass the G1 road test and fulfill the 12-month waiting period prior to taking the G2road test.
Who does the policy affect?The policy applies to all applicants coming from either a foreign jurisdiction that does not have a driver's-licence reciprocal agreement with Ontario, or aU.S. state that is not part of the Inter-provincial Record Exchange.
This policy does not apply to drivers from the following jurisdictions:
Canadian provinces and territoriesCanadian Forces EuropeU.S. statesAustralia, Austria, Belgium, France, Great Britain, Germany, Isle of Man, Japan, Korea and Switzerland
Motorcycle licence exchangesExchange agreements apply to licensed motorcycle drivers from Canada, the United States, Australia and Switzerland. If you have less than two years ofdriving experience, you may get credit for your experience and enter Level Two of the graduated licensing system. Once you have a total of two years ofdriving experience, you may take the Level Two road test to earn full driving privileges.

There is no exchange agreement for motorcycle drivers from Austria, Belgium, France, Germany, Great Britain, the Isle of Man, Japan and Korea.However, credit for holding a motorcycle licence from one of these countries will be granted for previous motorcycle experience when applying for a ClassM motorcycle licence in Ontario.
If you hold a motorcycle licence from another Canadian jurisdiction that is equivalent to Ontario's restricted Class M licence, you will be able to exchangeyour licence for a restricted Class M Ontario licence.
Driving customs vary from place to place. That is why experienced drivers from other countries should familiarize themselves with Ontario's laws. TheOfficial MTO Driver's Handbook and the Ministry of Transportation website are good resources.
Could You Pass?The rest of this handbook gives you information you need to pass your tests and to keep your driving privileges once you get your licence. The written testmay ask you about:
SeatbeltsTraffic signs and lightsEmergency vehiclesHow to use headlightsSpeed limitsGetting on or off a freewayWhat drivers must do when they meet streetcars and school busesDriver licence suspensionsThe demerit point systemPassing other vehiclesCollision reportingSharing the road with other road usersRules of the road
The road tests will test how well you use your knowledge while driving. You will be tested on:
Starting, stopping and turningTraffic signs and lightsPassing vehicles, including bicycles, and driving in passing lanesTravelling through controlled and uncontrolled intersectionsParallel parking and reversingForeseeing hazardous conditions and being ready for themOther safe driving practices
Make sure you know the information in this handbook before you take these tests. To see sample test questions that could appear on the knowledge test,click here.
Choosing a driving schoolAs a new driver, your choice of professional driving instruction may be the best way to put yourself safely in the driver's seat.
A beginner driver education (BDE) course in a driving school that has been approved by the provincial government can teach you the skills and attitudesyou need to be a safe and responsible driver. The BDE course may also make you eligible to take your road test sooner and allow you to save money oninsurance premiums.
As well as teaching the basics, driver training emphasizes strategic driving techniques, positive driving attitudes and behaviour, avoiding driverdistractions, risk perception and management, freeway driving, night driving and driving in adverse conditions. Most programs are designed for new drivers,but many driving schools also provide courses and services to upgrade your skills.
If you graduate from an approved BDE course, this will be noted in your driver's licence history, and will reduce the time you must spend at Level 1 by fourmonths. It may also bring you savings on your car insurance.
All ministry-licenced driving schools offer in-class and in-car training for a fee. All lessons are taught by a ministry-licensed driving instructor.
Ministry-approved BDE courses, offered by driving schools, must last a minimum of 40 hours. This may consist of at least 20 hours in-class, 10 hours in-vehicle and 10 hours of flexible instruction that may include the following:
Classroom driving instruction.Computer-based instruction.In-vehicle instruction.Driving simulator instruction.Home links (homework).
The ministry licenses all driving schools offering a BDE course in Ontario. Licences are renewed every three years, if driving schools continue to meetlegislative and program requirements. Only licensed instructors working for licensed schools can teach the BDE course.
All ministry-approved driving schools are listed on the ministry's website under www.mto.gov.on.ca/english/dandv/driver/gradu/approve.shtml.
Note: The ministry also lists revoked driving schools that are not on the list of approved schools. Go towww.mto.gov.on.ca/english/dandv/driver/gradu/revoked.shtml.
Look at the website for an active ministry-approved driving school that offers high-quality instruction and a comfortable learning environment. Please makesure the school offers a ministry-approved BDE course of a minimum of 40 hours. The school should also be equipped with up-to-date videotapes, DVDs,projectors, overheads, computers, and other audio-visual aids.

Being a safe and responsible driver takes a combination of knowledge, skill and attitude.
To begin, you must know the traffic laws and driving practices that help traffic move safely. Breaking these “rules of the road†is the major cause ofcollisions.
Traffic laws are made by federal, provincial and municipal governments, and police from each level can enforce them. If you break a traffic law, you maybe fined, sent to jail or lose your driver's licence. If you get caught driving while your licence is suspended, your vehicle may be impounded.
But you need to do more than just obey the rules. You must care about the safety of others on the road. Everyone is responsible for avoiding collisions.Even if someone else does something wrong, you may be found responsible for a collision if you could have done something to avoid it.
Because drivers have to co-operate to keep traffic moving safely, you must also be predictable, doing what other people using the road expect you to do.And you must be courteous. Courteous driving means giving other drivers space to change lanes, not cutting them off and signalling your turns and lanechanges properly.
You must be able to see dangerous situations before they happen and to respond quickly and effectively to prevent them. This is called defensive orstrategic driving. There are collision avoidance courses available where you can practice these techniques.
Defensive driving is based on three ideas: visibility, space and communication.
Visibility is about seeingand being seen. You should always be aware of traffic in front, behind and beside you. Keep your eyes constantly moving,scanning the road ahead and to the side and checking your mirrors every five seconds or so. The farther ahead you look, the less likely you will besurprised, and you will have time to avoid any hazards. Make sure other drivers can see you by using your signal lights as required.
Managing the space around your vehicle lets you see and be seen and gives you time and space to avoid a collision. Leave a cushion of space ahead,behind and to both sides. Because the greatest risk of a collision is in front of you, stay well back.
Communicate with other road users to make sure they see you and know what you are doing. Make eye contact with pedestrians, cyclists and drivers atintersections and signal whenever you want to slow down, stop, turn or change lanes. If you need to get another person's attention, use your horn.
To help you choose the best driving school and course for you, please use the following checklist:
Course information packagePersonalized programAdequacy of classroom facilities and related amenitiesLow student/teacher ratioAudiovisual equipmentIn-class topics coveredIn-vehicle topics coveredFlexible instruction coveredInstructor qualifications and experienceRegular instructor upgradingStudent progress and evaluation reportsMinimum 20 hours of classroom instruction, 10 hours behind-the-wheel instruction and 10 hours of flexible instructionModern training materialsUse of vehicle for road testTuition receiptsClear school-contract statements regarding the cost of every aspect of the course, including use of vehicle for road test and any subsequent roadtestTestimonials/references - history of excellent teaching, proper treatment and respect of all students with no discrimination of any type (see theOntario Human Rights Code)Number of years in businessConsumer protection insurance
Chapter 1 - SummaryBy the end of this chapter, you should know:
The legal requirements you must meet to obtain a driver's licenceThe different licence classifications and what type of vehicle they permit you to driveThe identification you need to provide when applying for a driver's licenceThe restrictions and testing requirements under the graduated licensing system
Safe and Responsible Driving
In this chapter
Getting ready to driveDriving alongSharing the road with other road usersDriving through intersectionsStoppingChanging directionsChanging positionsParking along roadwaysFreeway drivingDealing with particular situationsDriving at night and in bad weatherDealing with emergenciesDriving efficiently

Get to know your vehicle before you drive it. There are many types of vehicles available today with many differentcharacteristics, including fuel ignition systems, anti-lock brakes, four-wheel drive, and systems for traction control andstability control. Check the vehicle owner's manual. For driving in difficult situations and conditions, see the section ondealing with particular situations.
Make sure you know where all the controls and instruments are and what they do. Check that all warning lights andgauges work. Watch for a warning light that stays on after you drive away; it could mean a serious problem with yourvehicle.
Get to know the controls well enough to turn on wipers and washers, headlights, high beams, heater and defrosterwithout having to look. Learning to use these essential controls without taking your eyes off the road is an important partof driving.
Diagram 2-1
Make sure you sit properly behind the wheel. You should sit high enough in the driver's seat to see over the steeringwheel and hood. You should be able to see the ground four metres in front of the vehicle. Use a firm cushion if needed.
Be sure that you are sitting straight upright in the seat with your elbows slightly bent. Adjust the seat so your feet reachthe pedals easily. To check your position, try placing your feet flat on the floor under the brake pedal. If you can do thiswithout stretching, you are seated properly. This keeps you in the proper, upright sitting position and gives you morestability when manoeuvring your vehicle.
If your vehicle has an adjustable headrest, you should make sure it is at the right height. The back of your head shouldbe directly in front of the middle of the headrest to protect you in a collision.
Check that you have enough room in the front seat to drive properly and safely. Do not overcrowd your driving spacewith passengers or property.
Diagram 2-2
Check and adjust your mirrors and find your blind spots, the area on each side of your vehicle where you cannot see.You may not see people or cyclists when they are in these spots. On some vehicles the blind spot is so large that avehicle could be there and you would not see it.
Adjust your mirrors so that there are as few blind spots as possible. Blind spots in most vehicles are to the back left andback right of the vehicle. To reduce the blind spots even more, position the interior mirror so that the centre of the mirrorshows the centre of the rear window. You should be able to see directly behind the car when the interior mirror isproperly adjusted. Position the left outside mirror by leaning towards the window and moving the mirror so that you canjust see the rear of your car. Position the right outside mirror by leaning to the centre of the vehicle and moving the
I. Getting ready to driveBefore you drive, make sure you are comfortable with your physical, mental and emotional state, your vehicle and the conditions in which you will bedriving. If you have doubts about any of them, don't drive.
Your ability to drive can change from one day to the next. Illness, fatigue, prescription and over-the-counter drugs, stress and your mental or emotionalstate can greatly diminish your ability to operate a motor vehicle. You should consider these factors before you begin driving, and you should not operate amotor vehicle when you are not fit to do so.
I. Getting ready to driveBe physically and mentally alert
You must be in good physical and mental condition to drive. Don't drive when you are sick or injured or when you have been drinking alcohol or taking anydrug or medication that may reduce your ability to drive.
Don't drive when you are tired. You might fall asleep at the wheel, risking the lives of others on the road. Even if you don't fall asleep, fatigue affects yourdriving ability. Your thinking slows down and you miss seeing things. In an emergency, you may make the wrong decision or you may not make the rightdecision fast enough.
Don't drive when you are upset or angry. Strong emotions can reduce your ability to think and react quickly.
I. Getting ready to driveKnow your vehicle
I. Getting ready to driveGet into position
I. Getting ready to driveKeep a clear view
Keep a clear view when driving. Do not put anything in your windows that will block your view. The windows of your vehicle must not be coated with anymaterial that keeps you from seeing out in any direction. Neither should the windshield or front door windows be coated to keep someone from seeinginside the vehicle.
I. Getting ready to driveFind your blind spots

mirror so that you can again just see the rear of your car. Avoid overlap in what you can see in your mirrors. Becauseyour side mirrors show only narrow angles of view, turning your head to do shoulder checks is the only way to makesure there is nothing in your blind spots.
You should know the blind spots on your own vehicle. You can learn where and how large they are by having someonewalk around your car and watching the person in the mirrors.
Diagram 2-3
The proper use of a seatbelt can save your life. Even a small increase in the number of people who wear their seatbeltscan save many lives.
You must use your seatbelt every time you travel in any vehicle equipped with seatbelts. All passengers must bebuckled up in their own seatbelt, child car seat or booster seat.
Drivers who do not buckle up can be fined up to $1,000 and will be given two demerit points. Drivers may also be finedand receive demerit points if they fail to ensure that all passengers under 16 years of age are properly buckled in aseatbelt, child car seat or booster seat. Level One (G1) drivers are only allowed to have his or her accompanying driveras a front-seat passenger, and must have a seatbelt for him or her. Novice drivers must have a seatbelt for everypassenger. Drivers who do not ensure there is a working seatbelt for every passenger can lose their licence for at least30 days.
Seatbelts should be worn snugly enough to keep you in your seatduring a collision. Never put more than one person intoa seatbelt; this can cause serious injury or even death in a collision. Wear the shoulder strap over your shoulder, neverunder your arm or behind your back. The lap belt should be worn low over the hips, not against the stomach.
Use your seatbelt always, even when you are sitting in a position with an active airbag. Airbags do not replaceseatbelts. In a collision, your seatbelt will keep you in position so that the airbag can protect you.
Note: The safest place a passenger can travel is inside a vehicle, properly buckled in. It is not safe to travel outside avehicle, such as in the back of a pickup truck, or in a trailer that is being towed. It is important for passengers to besecured within a to avoid being thrown from the vehicle during a collision.
For more information on seatbelts, visit www.ontario.ca.
Diagram 2-4
To be safely protected in a vehicle, children must be properly secured in a child car seat, booster seat or seatbelt,depending on their height, weight and/or age. Research shows that a correctly used child car seat can reduce thelikelihood of injury or death by 75 per cent.
As a driver, you are responsible for ensuring that all passengers under 16 years of age are properly buckled into aseatbelt, child car seat or booster seat. The fine for not using a child car seat or booster seat as required by law is up to$1,000 plus two demerit points on conviction. In Ontario, all drivers are required to use proper child car seats andbooster seats when transporting young children.
Child car seats must meet Canadian Motor Vehicle Safety Standards. Buckles and straps must be fastened accordingto the manufacturer's instructions. Newer vehicles that come equipped with a lower universal anchorage system (UAS)for securing a child car seat do not require the use of a seatbelt. A booster seat requires a lap and shoulder beltcombination.
Infants who weigh less than 9 kilograms (20 lbs.) must be buckled into a rear-facing child car seat attached to thevehicle by a seatbelt or the UAS strap. A rear-facing child car seat is always best installed in the back seat. Never put arear-facing child car seat in a seating position that has an active airbag. If the airbag inflates, it could seriously injure thechild.
Toddlers 9 to 18 kilograms (20 to 40 lbs.) must be buckled into a child car seat attached to the vehicle by a seatbelt or aUAS strap; the seat's tether strap must also be attached to the vehicle's tether anchor. Children weighing more than 9kilograms (20 lbs.) may remain in a rear-facing child car seat if it is designed to accommodate the child's height andweight. Always follow the manufacturer's instructions when installing a child car seat in your vehicle.
Booster seats provide 60 per cent more protection than seatbelts alone. These must be used by pre-school and primary-grade-aged children who have outgrown their forward-facing childcar seat, are under the age of eight and weigh 18kilograms (40 lbs.) or more but less than 36 kilograms (80 lbs.), and who are less than 145 centimetres (4 feet, 9 inches)tall. Booster seats raise a child so that the adult seatbelt works more effectively. The child's head must be supported bythe top of the booster, vehicle seat or headrest. You must use a booster seat with a lap/shoulder belt. The lap/shoulderbelt should be worn so that the shoulder belt fits closely against the body, over the shoulder and across the centre of thechest and the lap belt sits firmly against the body and across the hips. Always follow the manufacturer's instructionswhen installing a booster seat in your vehicle, and secure the booster seat with a seatbelt when a child is not travellingin it, or remove it from the vehicle.
If your vehicle has lap belts only, secure the child by the lap belt only. Never use a lap belt alone with a booster seat.
Diagram 2-5
I. Getting ready to driveFasten your seatbelt
I. Getting ready to driveChild safety

Children may begin wearing a seatbelt once they are able to wear it properly (a lap belt flat across the hips, shoulder beltacross the centre of the chest and over the shoulder), and if any one of the following criteria is met:
The child turns eight years old.The child weighs 36 kilograms (80 lbs.) or more.The child is 145 centimetres (4 feet 9 inches) tall or taller.
Do not place a child in a seating position in front of an air bag that is not turned off. The safest place for a child underage 13 is in the back seat.
Always secure loose objects in the vehicle with cargo nets or straps, or move them to the trunk to prevent them frominjuring passengers in a collision or sudden stop.
Correct installation of a child car seat is important for ensuring a child's safety. Your local public health unit is a goodresource for finding out how to properly install a child car seat, or visit a local car seat clinic where certified technicianswill help you install the seat.
For more information on child car seats visit www.ontario.ca/transportation.
Note: Be careful if buying a used child car seat. Considerations should include ensuring the child car seat comes withcomplete manufacturer's instructions and all necessary equipment; does not show signs of deterioration or damage; hasnever been in a collision; is not under recall; and has not exceeded its useful life expectancy as determined by themanufacturer.
Seatbelts and child car seats save lives
Seatbelts and child car seats reduce the risk of injury or death in collisions.
Seatbelts help keep you inside and in control of the vehicle during a collision. People who are thrown from avehicle have a much lower chance of surviving a collision.Seatbelts keep your head and body from hitting the inside of the vehicle or another person in the vehicle. When avehicle hits a solid object, the people inside keep moving until something stops them. If you are not wearing yourseatbelt, the steering wheel, windshield, dashboard or another person might be what stops you. This “humancollision†often causes serious injury.Fire or sinking in water is rare in collisions. If it does happen, seatbelts help keep you conscious, giving you achance to get out of the vehicle.In a sudden stop or swerve, no one can hold onto a child who is not in a seatbelt or child car seat. Infants orchildren who are not properly restrained can be thrown against the vehicle's interior, collide with other people orbe ejected.When using a child car seat, make sure that the seat is tightly secured by the vehicle seatbelt or by the universalanchorage system (UAS) strap, and for a forward-facing car seat, ensure the tether strap is also used. Wheninstalling the child car seat, press one knee into the seat and use your body weight to push it into the vehicleseat, then tighten the seatbelt or the car-seat UAS strap as much as possible. The installed child car seat shouldmove no more than 2.5 centimetres (1 inch) where the seatbelt or UAS strap is routed through the child car seat.Use a locking clip where needed to ensure the seatbelt stays locked into position and will not loosen during acollision. Refer to your vehicle owner's manual to see if you will need to use a locking clip.If a rear-facing child car seat does not rest at the proper 45-degree angle, you can prop up the base of the seatwith a towel or a Styrofoam bar (“pool noodleâ€). Eighty per cent of the base of a forward-facing car seatshould be firmly supported by the vehicle seat.
Headlights enable you to see the roadway in front of your vehicle when visibility is poor, as well as making your vehiclevisible to others. Your vehicle's headlights must shine a white light that can be seen at least 150 metres in front and isstrong enough to light up objects 110 metres away. You must also have red rear lights that can be seen 150 metresaway and a white light lighting the rear licence plate when headlights are on. Headlights are equipped with the option touse a high beam to enhance vision further down the roadway and the use of a low beam when you are near othervehicles to minimize the glare of your headlights onto others. When you use high-beam headlights, remember to switchto low beams within 150 metres of an oncoming vehicle. Use your low beams when you are less than 60 metres behindanother vehicle unless you are passing it. These rules apply to all roads, including divided ones.
Turning your headlights on activates other required light systems, such as your parking lights, tail lights and rear-licenceplate light. Daytime running lights, which are often another mode of your headlights or can be a separate lighting system,are specifically designed to make your vehicle more visible during times of good light conditions, and are automaticallyactivated when your vehicle is in operation and your headlight switch is turned to off.
When driving your vehicle, headlights are required to be turned on between one-half hour before sunset and one-half hourafter sunrise, and any other time of poor light conditions, such as fog, snow or rain, which keeps you from clearly seeingpeople or vehicles less than 150 metres away. Please see the section on driving at night and in bad weather. Don't drivewith only one headlight or with lights that are not aimed properly. Have your full lighting system checked regularly, keepthem clean, and replace burned-out bulbs as soon as possible.
Parking lights are only for parking. In low light, use your headlights, not parking lights.
Diagram 2-6 - Highbeams
I. Getting ready to driveTurn on headlights at night and in poor conditions

Your daytime running lights are not to be used as headlights during poor lighting conditions. They provide aninappropriate form of light that may cast glare onto others or deactivate other required light systems, such as tail lights.Daytime running lights are only to be used during good light conditions to enhance the visibility of your vehicle. If yourvehicle is not equipped with daytime running lights, you should turn your headlights on to provide similar visualenhancement.
Driving with your vehicle's full lighting system set to automatic is recommended, if your vehicle is equipped with thisoption. This will better ensure that the appropriate lighting system is being used. You should also monitor the activationand operation of your vehicle's full lighting system at all times to ensure that appropriate lighting is being provided. Diagram 2-7 - Lowbeams
Signals tell other drivers what you want to do, alerting them to your intention to turn or stop.
Use your turn signals and brake lights to signal before stopping, slowing down, turning, changing lanes, leaving the roador moving out from a parked position. Give the correct signal well before taking the action and make sure other driverscan see it. Check that the way is clear before you act, just signalling is not enough. Follow the rules for turns, whetherleft or right, on lane changes and on yields to other vehicles and pedestrians.
If your turn signals and brake lights are not working, use hand and arm signals. The pictures on the previous page showhow to make hand and arm signals. When watching for signals made by others, remember that cyclists may signal rightturns by holding their right arms straight out.
After signalling, move only when it is safe to do so.
Diagram 2-8
I. Getting ready to driveChapter 2, section I - Summary
By the end of this section, you should know:
The concepts of safe and responsible and defensive drivingFactors that may affect your physical and mental readiness to driveHow to familiarize yourself with your vehicle's controls and how to set your seating positionThe legal requirements surrounding seatbelts, booster seats, and child car seatsHow and when to use your vehicle's lighting system
II. Driving alongAlways be aware of traffic around you as you drive. Develop a routine for looking ahead, behind and from side to side. Check your mirrors every fiveseconds or so, and check your blind spots by turning your head to look over your shoulder. Keep other drivers out of your blind spot by changing yourspeed and don't drive in other vehicles' blind spots. This is especially true when driving around large commercial vehicles, as they typically have largeblind spots to the sides and back. Be extra careful at dusk and dawn when everyone has difficulty adjusting to the changing light.
Keep a cushion of space around your vehicle and be prepared for the unexpected. Anticipate other drivers movements and make allowances for everypossible error. Look well ahead and watch for people in parked vehicles, they may be about to pull out in front of you or to open a door. Watch for smallervehicles, bicycles and pedestrians.
II. Driving alongSteer smoothly
All steering should be smooth and precise. You should do most steering and lane changes without taking either hand off the wheel. You must be able tosteer in a straight line while shifting gears, adjusting controls or checking your blind spot.
Picture the steering wheel as a clock and place your hands at nine o'clock and three o'clock.
II. Driving alongUse of turn signals and brake lights
II. Driving alongKeep right
Keep to the right of the road or in the right-hand lane on multi-lane roads unless you want to turn left or pass another vehicle. This is especially important ifyou are driving more slowly than other vehicles.

II. Driving alongObey speed limits
Obey the maximum speed limit posted on signs along the road, but always drive at a speed that will let you stop safely. This means driving below themaximum speed in bad weather, in heavy traffic or in construction zones. School zones and construction zones often have lower speed limits to protectchildren and those who work on or near the road.
Where there are no posted speed limits, the maximum speed is 50 km/h in cities, towns and villages, and 80 km/h elsewhere.
Cruise control is a driver aid that can improve fuel economy and prevent you from inadvertently exceeding the speed limit. However, there are somecircumstances in which cruise control should not be used, such as adverse driving conditions (wet, icy or slippery roads), in heavy traffic or when you arefeeling fatigued.
Speed measuring warning devices are illegal. If you get caught driving with such a device, you will be fined and accumulate demerit points.
II. Driving alongObey police
When police officers are directing traffic, you must follow their directions, even if the directions are different from traffic lights or signs.
When a police officer signals you to pull your vehicle over, you must pull over as far to the right as you safely can and come to a complete stop. Stay inyour vehicle and wait for the police officer. You must immediately, upon the police officer's request, surrender your driver's licence, vehicle permit (or copy)and insurance. Contrary to popular belief, you do not have 24 hours to present these documents. If you do not obey a police officer's direction to pull over,you risk being fined (up to $25,000), having your licence suspended or even serving time in prison.
II. Driving alongMaintaining space
As a general rule, drive at the same speed as traffic around you without going over the speed limit. Leave a cushion of space around your vehicle to letother drivers see you and to avoid a collision.
Whenever you follow another vehicle, you need enough space to stop safely if the other vehicle brakes suddenly. A safe following distance is at least twoseconds behind the vehicle in front of you. This lets you see around the vehicle ahead and gives you enough distance to stop suddenly.
Do not block the normal and reasonable movement of traffic.
Diagram 2-9
To give yourself a two-second space, follow these steps:
1. Pick a marker on the road ahead, such as a road sign or telephone pole.2. When the rear of the vehicle ahead passes the marker, count "one thousand and one, one thousand and two".3. When the front of your vehicle reaches the marker, stop counting. If you reach the marker before you count "one thousand and two," you arefollowing too closely.
Remember that the two-second rule gives a minimum following distance. It applies only to ideal driving conditions. You will need extra space in certainsituations, such as bad weather, when following motorcycles or large trucks, or when carrying a heavy load.
II. Driving alongChapter 2, section II - Summary
By the end of this section you should know:
How to steer and use your vehicle's signalling system and hand signalsThe importance of maintaining space and how to measure following distanceWhere to position your vehicle on the road and to obey speed limits and police

Avoid obstacles such as puddles, ice, sand, debris, rutted or grooved pavement, potholes and sewer gratesCross railway or streetcar tracks at a 90° angleDiscourage passing where the lane is too narrow to be shared safelyA bike lane may exist adjacent to parking bays (See Diagram 2-10)
Diagram 2-10
When passing a cyclist, drivers of motor vehicles are required to maintain a minimum distance of one metre, wherepractical between their vehicle and the cyclist. (See Diagram 2-11.) Failure to do so may result in a fine in the range of$60 to $500 and an additional two demerit points on the driver’s record. Whenever possible, you should change lanes topass.
Do not follow too closely behind cyclists. They do not have brake lights to warn you when they are slowing or stopping.
Intersections - To avoid collisions with bicyclists at intersections, remember the following:Diagram 2-11
Do not sound your horn unnecessarily when you are overtaking a cyclist. It may frighten them and cause them to losecontrol. If you feel that you must use your horn, tap it quickly and lightly while you are still some distance away from thecyclist.
Bike lanes are reserved for cyclists. They are typically marked by a solid white line. Sometimes you will need to enteror cross a bike lane to turn right at a corner or driveway. (See Diagram 2-12) Take extra care when you do this. Enterthe bike lane only after ensuring that you can do so safely, and then make the turn.
Watch for cyclists' hand signals. A cyclist may indicate a right-hand turn by extending their right arm.
Try to make eye contact when possible with cyclists.
Diagram 2-12
III. Sharing the road with other road usersOntario's roads accommodate a variety of road users, including pedestrians, motorcycles, limited-speed motorcycles, mopeds, bicycles, large trucks,buses and farm machinery. Be aware of other road users, the speed at which they travel and the space they occupy on the road.
III. Sharing the road with other road usersSharing the road with pedestrians
Pay special attention to pedestrians, whether they are crossing roads in traffic, walking or jogging alongside roads, or using crosswalks or crossovers(generally known as crossings). Watch for children. Drive slowly and cautiously through school zones, residential areas and any other area where childrenmay be walking or playing. You never know when a child might dart out from between parked cars or try to cross a street without checking for oncomingtraffic. Be extra cautious at twilight when children may still be playing outside, but are very difficult to see. Watch out for Community Safety Zone signs asthey indicate areas where the community has identified that there is a special risk to pedestrians.
Seniors or pedestrians with disabilities need extra caution and courtesy from drivers, as they may be slow in crossing the road. Be alert for pedestrianswho are blind, with a visual or hearing disability, people who use wheelchairs or people walking slowly due to some other physical disabilities, and givethem appropriate consideration. Pedestrians who are blind or with a visual disability may use a white cane or guide dog to help them travel safely alongsidewalks and across intersections. Drivers of hybrid vehicles should be aware that vision impaired persons often rely on hearing the sound of an enginebefore entering an intersection. Be aware that when you are slowing or stopping, your vehicle makes little or no discernible noise, extra caution is required.Caution signs are posted in some areas where there is a special need for drivers to be alert.
People operating mobility devices (motorized wheelchair and medical scooters) are treated the same way as pedestrians. Usually these operators willtravel along a sidewalk but, if there is no sidewalk available, persons using a mobility device should travel, like pedestrians, along the left shoulder of theroadway facing oncoming traffic.
Some streetcar stops have a special safety island or zone for passengers getting on and off. Pass these safety islands and zones at a reasonable speed.Always be ready in case pedestrians make sudden or unexpected moves.
III. Sharing the road with other road usersSharing the road with cyclists
Bicycles and mopeds travelling at a lower speed than other traffic are expected to ride about one metre from the curb or parked cars, or as close aspractical to the right-hand edge of the road when there is no curb. However, they can use any part of the lane if necessary for safety, such as to:
Cyclists are not required to ride close to the right edge of the road when they are travelling at or faster than the normal speed of traffic at that time andplace, or when they are turning left, or getting in position to turn left. (Cyclists are permitted to make a left turn from a left-turn lane, where one isavailable.)
When turning right, signal and check your mirrors and the blind spot to your right to make sure you do not cut off a cyclist.When turning left, you must stop and wait for oncoming bicycles to pass before turning.When driving through an intersection, be careful to scan for cyclists waiting to turn left.

Bike boxes help prevent collisions between motorists and bicycles at intersections. It is typically a painted box on theroad with a white bicycle symbol inside. Bicycle lanes approaching and leaving the box may also be painted. As adriver, you must stop for a traffic signal behind the bike box. Do not stop in the box. See (Diagram 2-13)
Sharrows A bicycle sharrow, two chevrons painted above a bicycle symbol on the road, indicates the lane is shared.Vehicle or bicycle traffic may be in the lane. Although you should always keep on the lookout for bicyclists, this servesas an additional warning to watch for them in the lane. See (Diagram 2-14)
Diagram 2-13
Children riding bicycles on the street may lack the necessary training and skills for safe cycling. They may not beaware of all the dangers or the rules of the road. Watch for children on oversized bicycles, as they may not have theability to control it. When parked on the side of the roadway, look behind you and check your mirrors and blind spots fora passing cyclist before opening a door.
Diagram 2-14
III. Sharing the road with other road usersSharing the road with motorcycles and limited-speed motorcycles
Motorcycles, limited-speed motorÂcycles, mopeds and bicycles are harder to see because of their size. Drivers of these vehicles may make suddenmoves because of uneven road surfaces or poor weather conditions. Because they are less protected, they are more likely to be injured in a collision.
Motorcycles use a full lane; treat them like other vehicles when driving. Since many motorcycle turn signals do not automatically shut off, be careful whenturning left in front of an oncoming motorcycle with its turn signal on. Make sure the motorcyclist is actually turning; he or she may have just forgotten toswitch off the turn signal.
III. Sharing the road with other road usersSharing the road with large commercial vehicles
It is extremely important to know how to drive safely when sharing the road with large commercial vehicles such as tractor-trailers and buses. Recent datashow that the majority of fatalities resulting from collisions involving large commercial trucks are not the result of the truck driver's actions, but of the otherdriver's actions. Therefore, sharing the road with large commercial vehicles means you must always be aware of a large vehicle's capabilities andlimitations, such as of the following:
1. Blind Spots - Large commercial vehicles have big blind spots on both sides. Avoid tailgating a large vehicle. The driver cannot see you if you aredirectly behind. If the vehicle stops suddenly, you have no place to go. Remember that if you can't see the driver's face in the large vehicle's side-viewmirror, the driver cannot see you.
Diagram 2-15
2. Stopping Distance - Large commercial vehicles require a much longer distance to stop than smaller vehicles. When passing a large vehicle, do not cutin front closely. Not only is this discourteous, it is dangerous; it reduces the space cushion large vehicles require in order to stop safely. Allow more roomwhen passing a large vehicle.
Diagram 2-16
3. Wide Turns - When making a right turn, a large vehicle may need to first swing wide to the left and around, in order to avoid hitting the right curb. If alarge vehicle in front of you is making a right turn, do not move up into the space that opens up in the right lane; you are putting yourself into a verydangerous position. Once the front of the vehicle has cleared the corner, the rest will move partially back into the right lane. If you are in that lane, yourvehicle will be squeezed between the trailer and the curb. Stay well back until the truck has completely cleared the lane.
This situation can occur on expressway off-ramps that have two left turning lanes. Do not drive up into the left lane when a large vehicle is making a leftturn in front of you. Stay well back until the truck has cleared the left turn, or else you may get squeezed between the truck and the curb.
4. Rolling Back - Leave plenty of room if you are stopped behind a large vehicle. When the driver of a large vehicle releases the brakes after being

A: Mid-block indented baysB: An indentation before an intersectionC: An indentation after an intersectionD: Bus stops between legally parked cars
Diagram 2-17
Be alert as you come to intersections and look carefully for pedestrians, cyclists, other motor vehicles, yield signs, stopsigns and traffic lights. Be sure to scan any sidewalks and paths/trails as well as the roadways. Bear in mind thatchildren are often unaware of traffic laws and also that cycling on the sidewalk may be permitted by local bylaw.
There are two main types of intersections: controlled and uncontrolled.
stopped, the vehicle may roll back.
5. Spray - In bad weather, large vehicles are capable of spraying up large amounts of mud, snow and debris, which could land on your windshield andtemporarily block your vision.
6. Turbulence - Due to various factors such as air pressure and airflow, a large vehicle can create heavy air turbulence. This may affect your ability tocontrol your vehicle when passing a large one.
III. Sharing the road with other road usersSharing the road with municipal buses
Many municipal roadways have special indented stopping areas for municipal buses, called bus bays, where passengers can get on and off. There arethree types of bus bays:
Mid-block indented baysIndentations immediately before and after intersectionsBus-stop areas between two designated parking areas
When a bus in a bus bay begins flashing its left-turn signals, indicating that it is ready to leave the bus bay, and you are approaching in the lane adjacent tothe bus bay, you must allow the bus to re-enter traffic.
III. Sharing the road with other road usersSharing the road with farm machinery
Farm machinery moves quite slowly compared to other road users. Most tractors and combines have a maxi-mum speed of 40 km/h, but travel at lessthan 40 km/h when towing implements or wagons. Farm machinery is often oversized, wide or long or both, making it difficult for the driver to see vehiclescoming up from behind. Farmers often turn directly into fields rather than roads or lanes, or move from lane to lane. Remember that it is common forfarmers to be on the roads after dark during peak planting and harvesting seasons.
Farm machinery on the road must display an orange and red slow-moving sign on the rear of the vehicle. The sign warns other drivers that the is travellingat 40 km/h or less. If you see one of these signs, slow down and be cautious. Stay well back and do not pass until it is safe to do so.
III. Sharing the road with other road usersSharing the road with horse-drawn vehicles
Horse-drawn vehicles are one of the slowest moving of all road users. These vehicles range from two-person carts to open or closed buggies carrying upto eight people, and large, wide farm wagons used to carry crops, equipment and other goods. These vehicles will travel primarily on the shoulder ofroadways, but may straddle or enter the paved lane where shoulders are narrow or no shoulder exists - such as bridge crossings. Remember that it iscommon to see horse-drawn vehicles throughout southwestern Ontario and increasingly in eastern and northern Ontario.
Horse-drawn vehicles on the road must display an orange and red slow-moving sign on the rear of the buggy. In addition, many buggies have highlyreflective tape affixed to the side and rear of the vehicle. The sign warns other drivers that this vehicle is travelling at 40km/h or less, and the reflectivetape illuminates as headlights hit the buggy. If you see a horse-drawn vehicle, slow down and be very cautious. Maintain a safe following distance andonly pass when it is safe to do so. When approaching a horse-drawn vehicle travelling in the opposite direction, move to the far right of your lane. Whenpassing, give as much distance between you and them as possible. Passing too closely could scare or startle the horse, causing it to change directionsuddenly on the roadway.
III. Sharing the road with other road usersChapter 2, section III - Summary
By the end of this section, you should know:
The importance of sharing the road with other road users, especially large vehicles, cyclists and pedestriansHow to share the road with other road users safely and appropriately
IV. Driving through intersections

Diagram 2-18
Controlled intersections have traffic lights, yield signs or stop signs to control traffic (Diagram 2-19).
At a controlled intersection where you face a green light, drive carefully through the intersection at a steady speed. If thelight has been green for a while, be prepared to stop when it turns yellow. However, if you are already so close that youcannot stop safely, drive through the intersection with caution. Where you face a red light, come to a complete stop andwait until the light turns green.
Diagram 2-19
There are times when you must yield the right-of-way. This means you must let another driver go first. Here are somerules about when you must yield the right-of-way.
At an intersection without signs or lights, you must yield the right-of-way to a vehicle approaching the intersection beforeyou, and if you arrive at the same time, the vehicle approaching from the right has the right-of-way (Diagram 2-18).
Diagram 2-18
At an intersection with stop signs at all corners, you must yield the right-of-way to the first vehicle to come to acomplete stop. If two vehicles stop at the same time, the vehicle on the left must yield to the vehicle on the right(Diagram 2-19).
Diagram 2-19
At any intersection where you want to turn left or right, you must yield the right-of-way. If you are turning left, you mustwait for approaching traffic to pass or turn and for pedestrians in or approaching your path to cross. If you are turningright, you must wait for pedestrians to cross if they are in or approaching your path (Diagram 2-20). You should alsocheck your blind spot for cyclists approaching from behind, particularly in a bike lane to your right, on a sidewalk or atrail. A yield sign means you must slow down or stop if necessary and yield the right-of-way to traffic in the intersectionor on the intersecting road.
Diagram 2-20
When entering a road from a private road or driveway, you must yield to vehicles on the road and pedestrians on thesidewalk (Diagram 2-21).
Diagram 2-21
You must yield the right-of-way and wait for pedestrians to completely cross the road at specially marked pedestriancrossings or crossovers (Diagram 2-22) and school crossings with crossing guards.
Remember, signalling does not give you the right-of-way. You must make sure the way is clear.
IV. Driving through intersectionsControlled intersections
When you approach an intersection on a main road, and the intersection is blocked with traffic, stop before entering the intersection and wait until the trafficahead moves on. This does not apply if you are turning left or right.
At a controlled intersection where you face a yield sign, slow down or stop if necessary and wait until the way is clear before driving through theintersection.
At a controlled intersection where you face a stop sign, come to a complete stop. Drive through the intersection only when the way is clear (Diagram 2-19).
IV. Driving through intersectionsUncontrolled intersections
Uncontrolled intersections have no signs or traffic lights. They are usually found in areas where there is not much traffic. Be extra careful around theseintersections. If two vehicles come to an uncontrolled intersection from different roads at the same time, the driver on the left must let the driver on theright go first. This is called yielding the right-of-way.
IV. Driving through intersectionsYielding the right-of-way

Diagram 2-22
You must come to a complete stop for all stop signs and red traffic lights. Stop at the stop line if it is marked on thepavement (Diagram 2-23).
Diagram 2-23
If there is no stop line, stop at the crosswalk, marked or not. If there is no crosswalk, stop at the edge of the sidewalk.If there is no sidewalk, stop at the edge of the intersection (Diagram 2-24). Wait until the way is clear before entering theintersection.
Diagram 2-24
IV. Driving through intersectionsChapter 2, section IV - Summary
By the end of this section you should know:
The difference between controlled and uncontrolled intersections and how to safely navigate themThe concept of right-of-way and common situations where you must yield to other road users
V. StoppingKnowing how to stop safely and properly is an important driving skill. Safe and responsible drivers see stops ahead, check their mirrors, begin brakingearly and stop smoothly. Braking is easier when you sit properly. Use your right foot for both brake and gas pedals so you won't step on both pedals at thesame time or activate your brake lights unnecessarily. Press the brake pedal firmly and evenly.
In a vehicle with manual transmission, try shifting into a lower gear going down long, steep hills. This will help control your speed and you won't have tobrake as sharply. Downshift before starting downhill since it may not be possible once you are going downhill. As a guide, you should be in the same geargoing downhill as uphill.
V. StoppingStopping at railway crossings
All railway crossings on public roads in Ontario are marked with large red and white “X†signs. Watch for these signs and be prepared to stop. Youmay also see yellow advance warning signs and large “X†pavement markings ahead of railway crossings. Some railway crossings have flashingsignal lights and some use gates or barriers to keep drivers from crossing the tracks when a train is coming. Some less-travelled crossings have stopsigns posted. Remember it can take up to two kilometres for a train to stop under full emergency braking. On private roads, railway crossings may not bemarked, so watch carefully.
Diagram 2-25
When you come to a railway crossing, remember:
Slow down, listen and look both ways to make sure the way is clear before crossing the tracks.If a train is coming, stop at least five metres from the nearest rail or gate. Do not cross the track until you are sure the train or trains have passed.Never race a train to a crossing.If there are signal lights, wait until they stop flashing and, if the crossing has a gate or barrier, wait until it rises before you cross the tracks.Never drive around, under or through a railway gate or barrier while it is down, being lowered or being raised. It is illegal and dangerous.
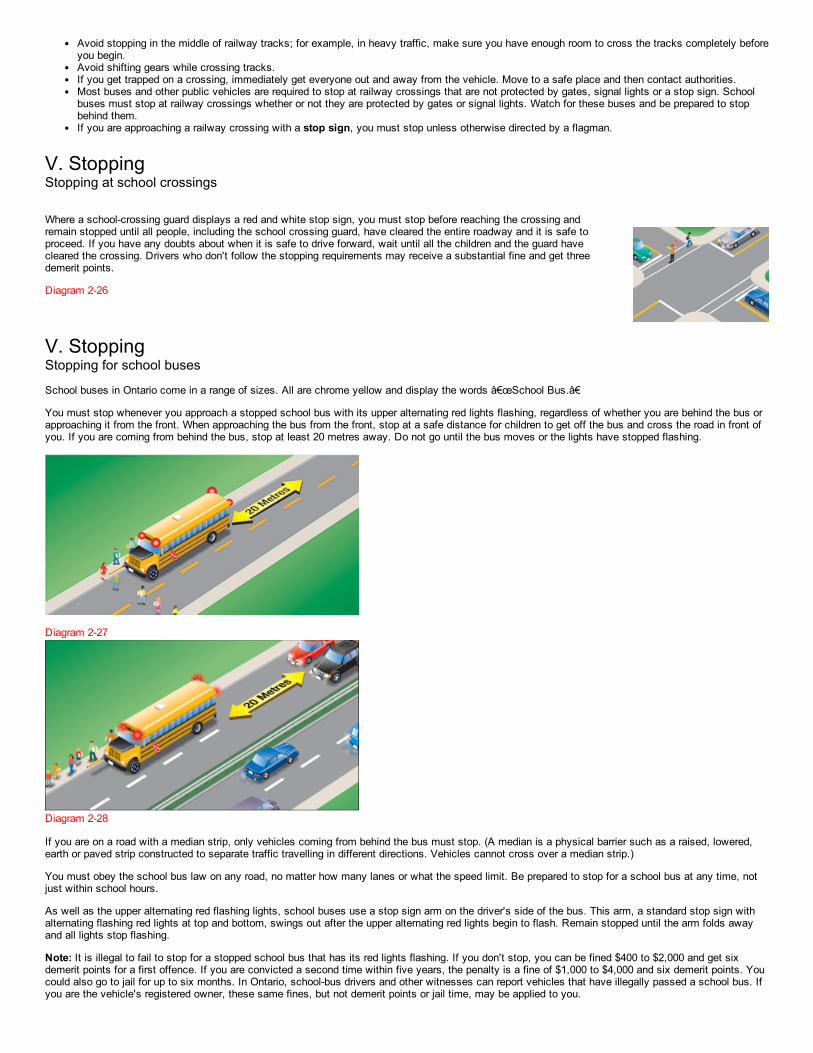
Where a school-crossing guard displays a red and white stop sign, you must stop before reaching the crossing andremain stopped until all people, including the school crossing guard, have cleared the entire roadway and it is safe toproceed. If you have any doubts about when it is safe to drive forward, wait until all the children and the guard havecleared the crossing. Drivers who don't follow the stopping requirements may receive a substantial fine and get threedemerit points.
Avoid stopping in the middle of railway tracks; for example, in heavy traffic, make sure you have enough room to cross the tracks completely beforeyou begin.Avoid shifting gears while crossing tracks.If you get trapped on a crossing, immediately get everyone out and away from the vehicle. Move to a safe place and then contact authorities.Most buses and other public vehicles are required to stop at railway crossings that are not protected by gates, signal lights or a stop sign. Schoolbuses must stop at railway crossings whether or not they are protected by gates or signal lights. Watch for these buses and be prepared to stopbehind them.If you are approaching a railway crossing with a stop sign, you must stop unless otherwise directed by a flagman.
V. StoppingStopping at school crossings
Diagram 2-26
V. StoppingStopping for school buses
School buses in Ontario come in a range of sizes. All are chrome yellow and display the words “School Bus.â€
You must stop whenever you approach a stopped school bus with its upper alternating red lights flashing, regardless of whether you are behind the bus orapproaching it from the front. When approaching the bus from the front, stop at a safe distance for children to get off the bus and cross the road in front ofyou. If you are coming from behind the bus, stop at least 20 metres away. Do not go until the bus moves or the lights have stopped flashing.
Diagram 2-27
Diagram 2-28
If you are on a road with a median strip, only vehicles coming from behind the bus must stop. (A median is a physical barrier such as a raised, lowered,earth or paved strip constructed to separate traffic travelling in different directions. Vehicles cannot cross over a median strip.)
You must obey the school bus law on any road, no matter how many lanes or what the speed limit. Be prepared to stop for a school bus at any time, notjust within school hours.
As well as the upper alternating red flashing lights, school buses use a stop sign arm on the driver's side of the bus. This arm, a standard stop sign withalternating flashing red lights at top and bottom, swings out after the upper alternating red lights begin to flash. Remain stopped until the arm folds awayand all lights stop flashing.
Note: It is illegal to fail to stop for a stopped school bus that has its red lights flashing. If you don't stop, you can be fined $400 to $2,000 and get sixdemerit points for a first offence. If you are convicted a second time within five years, the penalty is a fine of $1,000 to $4,000 and six demerit points. Youcould also go to jail for up to six months. In Ontario, school-bus drivers and other witnesses can report vehicles that have illegally passed a school bus. Ifyou are the vehicle's registered owner, these same fines, but not demerit points or jail time, may be applied to you.

Unless signs or pavement markings tell you not to, always begin and end a right turn close to the right side of the road.
Watch for school buses near railway crossings. All school buses must stop at all railway crossings. The upper alternating red lights are not used for thesestops, so be alert.
V. StoppingStopping for pedestrian crossovers
Diagram 2-29
Pedestrian crossovers (also commonly called crosswalks) are designated areas that allow pedestrians to safely cross roads where there are no trafficlights. Always watch for pedestrians and people using wheelchairs at these crossings.
Pedestrians may push a button to make the overhead yellow lights flash to warn drivers that they will be crossing. Pedestrians should point or make anindication to drivers that they want to cross before entering the roadway (try making eye contact when possible). Drivers including cyclists must yield theright-of-way to pedestrians in the crossover. Once people have cleared the entire roadway, and no other pedestrians are approaching, you may proceedwith caution when it is safe. You must not pass any vehicle within 30 metres of a pedestrian crossover.
V. StoppingChapter 2, section V - Summary
By the end of this section, you should know:
Where to position your vehicle when stopping at stop lights and stop signsThe importance of stopping at railway crossings and how to position your vehicle to stop for themHow and when to stop for school crossings and school busesHow and when to stop for pedestrian crossovers
VI. Changing directionsBefore you turn a corner, back up, change lanes or turn around, you need to know what is beside and behind you. Always check your mirrors and over yourshoulder to make sure the way is clear and you have enough space to complete the move safely.
VI. Changing directionsTurning a corner
To turn a corner, signal well before the turn. When the way is clear, move into the proper lane, either the far right lane for a right turn or the far left lane inyour direction for a left turn. Signal your turn and look from side to side and check your blind spots to make sure the way is clear.
Slow down before you enter the turn; the sharper the turn, the slower you should go. To keep full control of the vehicle, finish braking before you turn thesteering wheel.
For a sharp turn, turn the steering wheel with one hand and crossthe other hand over it. Grip the wheel on the other side and continue turning. This is called“hand over hand steering.†When you have completed the turn, relax your grip on the steering wheel and let it slip or gently feed it through your handsto return to the straight-ahead position. Do not turn the steering wheel with one finger or the flat palm of your hand. Gradually increase speed as youcomplete the turn.
Remember, drivers often lose control of vehicles and skid because they try to do more than one thing at a time. Try not to brake and steer at the sametime.
VI. Changing directionsRight turns

To make a right turn, signal well before the turn and move into the right-hand lane when the way is clear. If the right-hand lane is not marked, keep as far to the right of the road as possible. Look ahead, left, right and left again beforestarting to turn. If you have not seen any smaller vehicles or pedestrians, check your right rear blind spot. Let cyclists,limited-speed motorcycles, or moped riders go through the intersection before you turn. When it is safe, complete yourturn into the right-hand lane of the road you are entering.
Diagram 2-30
Diagram 2-31: Two-way road to a two-way road.
Turn from the lane closest to the centre line to the lane right of the centre line, following a smooth arc. Then, when youcan, move into the right curb lane.
Diagram 2-31
Diagram 2-32: Two-way road to a one-way road.
Turn from the lane closest to the centre line to the left curb lane.Diagram 2-32
Diagram 2-33: One-way road to a two-way road.
Turn from the left curb lane to the lane just right of the centre line. Then, when you can, move into the right curb lane.Diagram 2-33
Diagram 2-34: One-way road to a one-way road.
Turn from the left curb lane to the left curb lane.Diagram 2-34
Some roads have special lanes for vehicles turning left (Diagram 2-35). At an intersection where left-turn lanes aremarked on the pavement, make your turn from the marked lane. Keep this lane position as you turn onto the other road.
VI. Changing directionsRight turn on a red light
Unless a sign tells you not to, you may make a right turn facing a red light as long as you first come to a complete stop and wait until the way is clear.Remember to signal your turn and yield to pedestrians and others using the road.
VI. Changing directionsLeft turns
Unless signs or pavement markings tell you not to, always begin and end a left turn in the far left lane in your direction.
To make a left turn, signal well before the turn and move into the far left lane when the way is clear. Look ahead, behind, left, right and left again andcheck your blind spots. Make your turn when the way is clear.
When you are stopped at an intersection waiting for approaching traffic to clear, don't turn your steering wheel to the left until you can complete the turn.With your wheels turned to the left, your vehicle could be pushed into the path of oncoming traffic.
When two vehicles coming from opposite directions meet in an intersection waiting to turn left, each should turn to the left of the other after yielding theright-of-way to pedestrians and oncoming traffic.
Motorcycles, bicycles, limited-speed motorcycles and mopeds turn left at intersections in the same way as larger vehicles. If you are making a left turnbehind one of these vehicles, do not pull up beside it to make your turn at the same time. Stay behind and turn when the way is clear. Wait for the smallervehicle to move right before you pass.
The following diagrams show you the correct way to turn left on different types of roads:
VI. Changing directionsLeft-turn lanes

Diagram 2-35
The centre lane of some roads is used as a two-way left-turn lane (Diagram 2-36). This lets left-turning vehicles fromboth directions wait for a chance to turn without holding up traffic. To use a two-way, left-turn lane, follow these steps:
1. Signal and move into the centre lane shortly before your turn. Slow down.2. Carefully move forward to a spot opposite the road or driveway where you want to turn.3. Make your turn when the way is clear.
Remember that vehicles from the opposite direction also use this lane to turn left. As they wait in front of you, it may behard for you to see oncoming traffic. Only go when you are sure the way is clear. These left-turn lanes are not to beused for passing.
Diagram 2-36
Diagram 2-37
As you approach the roundabout, look for signage to choose your exit. Choose which lane to use as you wouldfor any other intersection (See Diagram 2-37). Use the left lane to turn left or to go straight. Use the right lane toturn right or to go straight. (See Diagram 2-38). Do not enter a roundabout from the right lane if you want to turnleft. Cyclists generally keep to the centre of the appropriate lane, or dismount and use the roundabout as apedestrian would. (See Diagram 2-39.)Slow down and watch for pedestrians on the approach to the yield line at the entrance of the roundabout. Stay inyour lane.
Diagram 2-38
Entering:
Visual checks: Do visual checks of all vehicles already in the roundabout and those waiting to enter (includingcyclists). Look left: Traffic in the roundabout has the right-of-way. When preparing to enter the roundabout, pay special
VI. Changing directionsLeft turn on a red light
You may turn left from a one-way road to a one-way road on a red light after coming to a complete stop and making sure the way is clear. Yield topedestrians and traffic.
VI. Changing directionsDriving through roundabouts
Approaching:

attention to the vehicles to your left. Adjust your speed or stop at the yield sign if necessary. Adequate gap: Watch for a safe opportunity to enter the roundabout. Enter when there is an adequate gap in thecirculating traffic flow. Don't enter directly beside another already in the roundabout, as that may be exiting at thenext exit. Travel counter-clockwise: Once in the roundabout, always keep to the right of the central island and travel in acounter-clockwise direction.Keep moving: Once you are in the roundabout, do not stop except to avoid a collision; you have the right-of-wayover entering traffic. Do not change lanes while in the roundabout. If in the inside lane and you miss your exit,you must continue around until you meet your exit again.
Diagram 2-39
Exiting:
Signal: Be sure to signal your exit and watch for pedestrians. Maintain your lane: Stay to the left if you entered from the left lane, or stay to the right if you entered from theright lane.Maintain your position: Maintain your position relative to other vehicles. Signal intent to exit: Once you have passed the exit before the one you want, use your right-turn signal.Left lane exit: If exiting from the left lane, watch out for vehicles on the right that continue to circulate around theroundabout.
Diagram 2-40
Consider large vehicles
Allow extra room alongside large vehicles (trucks and buses). Large vehicles may have to swing wide on the approachor within the roundabout. Give them plenty of room. See (Diagram 2-41)
Diagram 2-41
While firmly holding the steering wheel, put the gear selector in reverse and turn sideways in your seat to look over yourshoulder in the direction you are moving. If you are reversing straight back or to the right, turn your body and head to theright and look back over your right shoulder (Diagram 2-42).
Diagram 2-42
VI. Changing directionsDealing with particular situations at a roundabout
Pull over for emergency vehicles
If you are in a roundabout when an emergency vehicle approaches, exit at your intended exit and proceed beyond the traffic island before pulling over. Ifyou have not entered the roundabout yet, pull over to the right if possible and wait until the emergency vehicle has passed.
Driving a large vehicle in a roundabout
A driver negotiating a roundabout in a large vehicle (such as a truck or bus) may need to use the full width of the roadway, including the apron (a mountableportion of the centre island adjacent to the roadway) if provided. Prior to entering the roundabout, the vehicle may need to occupy both lanes. Give largevehicles plenty of room to manoeuvre.
Note: In some areas of Ontario, older “traffic circles†exist. They are larger than roundabouts, allowing higher speeds, and force traffic to merge andweave. Modern roundabouts have a smaller inscribed circle diameter and use splitter islands (to deflect traffic) at the entry points to slow traffic speeds, orto provide pedestrian refuge. The entry is also controlled by the “yield to the left†principle; for example, cars circulating within the roundabout havethe right-of-way over entering vehicles.
VI. Changing directionsBacking up
Take extra care and move slowly when backing up (reversing) your vehicle. Before you begin, check that the way is clear behind you. Be especiallycareful to look for children and cyclists.

If you are reversing to the left, turn your body and head to the left and look over your left shoulder (Diagram 2-43).Always check the opposite shoulder as well. If you are turning as you reverse, check that the front end of your vehicledoes not hit anything.
You don't have to wear a seatbelt while backing up. If you need to remove your seatbelt to turn your body to seeproperly when reversing, do so. But don't forget to buckle up again before moving forward.
Diagram 2-43
On narrow roads you need to make a three-point turn to change directions. As shown in Diagram 2-44, a three-point turnstarts from the far right side of the road. Make sure you do not make a three-point turn on a curve in the road, on or neara railway crossing or hilltop, or near a bridge or tunnel that blocks your view.
Signal for a left turn. When the way is clear in both directions, move forward, turning the steering wheel sharply lefttowards the curb on the far side of the road. When you have reached the left side of the road, stop. Shift the vehicle intoreverse. Signal a right turn. After checking that the way is still clear, turn the steering wheel sharply to the right, whilebacking up slowly to the other side of the road. Stop. Shift to forward gear and check traffic. When the way is clear,drive forward.
Diagram 2-44
It is illegal to drive in reverse on a divided road that has a speed limit of more than 80 km/h. This applies to the travelled section of the road and theshoulder. The only exception to this rule is if you are trying to help someone in trouble.
VI. Changing directionsTurning around
You may need to turn around when driving if you miss a turn or go too far along a road. There are several ways to do this safely.
The simplest and safest way is to drive around the block, but there may be times when this is not possible. In such cases, a U-turn or a three-point turnmay be necessary.
VI. Changing directionsU-turn
Before you make a U-turn, check to make sure there is no sign saying not to.
To make a U-turn safely, you must be able to see well in both directions. It is illegal to make a U-turn on a curve in the road, on or near a railway crossingor hilltop, or near a bridge or tunnel that blocks your view. Never make a U-turn unless you can see at least 150 metres in both directions.
To make a U-turn, signal for a right turn, check your mirror and over your shoulder and pull over to the right side of the road. Stop. Signal a left turn andwhen traffic is clear in both directions, move forward and turn quickly and sharply into the opposite lane. Check for traffic as you turn.
VI. Changing directionsThree-point turn
VI. Changing directionsChapter 2, Section VI - Summary
By the end of this section, you should know:
How to properly turn left or right at intersectionsThe rules surrounding turns onto and from one way streetsHow to navigate a roundaboutWhere to look and how to manoeuvre your vehicle when backing upMethods of turning your vehicle around to travel back in the opposite direction (U-turns, three-point turns)
VII. Changing positionsChanging your position on the road involves changing lanes or overtaking and passing another vehicle. Before beginning, be sure you have enough spaceand time to complete the move safely.

Changing lanes is a movement from one lane to another on roads with two or more lanes in the same direction. You mayhave to change lanes to overtake another vehicle, to avoid a parked vehicle or when the vehicle ahead slows to turn atan intersection.
Never change lanes without giving the proper signal and looking to make sure the move can be made safely.
Here are the steps for making a lane change:
1. Check your mirrors for a space in traffic where you can enter safely.2. Check your blind spot by looking over your shoulder in the direction of the lane change. Be especiallycareful to check for bicycles and other small vehicles. Signal that you want to move left or right.
3. Check again to make sure the way is clear and that no one is coming too fast from behind or from twolanes over on a multi-lane road.
4. Steer gradually into the new lane. Do not slow down, maintain the same speed or gently increase it.
Never make sudden lane changes by cutting in front of another vehicle, including bicycles. Other drivers expect you tostay in the lane you are already in. Even if you signal, they expect you to yield the right-of-way.
Avoid unnecessary lane changes or weaving from lane to lane. You are more likely to cause a collision, especially inheavy traffic or bad weather. Don't change lanes in or near an intersection. Remember that spending a few secondsbehind another vehicle is often safer than going around it. Diagram 2-45
Here are the steps for passing a vehicle:
1. Use your left-turn signal to show that you want to pass and check that the way is clear ahead and behind beforemoving into the passing lane.
2. Watch for bicycles and small vehicles that may be hidden from view in front of the vehicle you are about to pass.Also watch for vehicles that may be turning left in front of you and vehicles or pedestrians entering the road fromanother road or driveway.
3. Change lanes only after signalling. After overtaking, signal that you want to move back into the lane you startedfrom, and when you can see the entire front of the vehicle you are passing in your inside mirror, make the lanechange. Be careful not to cut off a vehicle by suddenly moving in front of it.
4. If the vehicle you are passing speeds up, do not race. Go back to your original lane. And do not speed up whenanother driver is trying to pass you. It is unlawful and dangerous.
Diagram 2-46
Passing within 30 metres of a pedestrian crossover is not permitted. Passing left of a centreline is not permitted 30metres from a bridge, viaduct or tunnel. Don't attempt to pass when approaching the crest of a hill or on a curve whereyour vision of oncoming traffic is obstructed and there is not enough clear distance ahead to pass in safety.
When passing parked vehicles, watch carefully for people suddenly opening doors or for doors opened to load andunload.
Motorcycles, bicycles, limited-speed motorcycles and mopeds often need to pull to the left or right side of their lane toavoid dangerous road conditions or to be seen by other drivers. Do not take this as an invitation to pass in the samelane. If you do want to pass these vehicles, do so by changing lanes.
When faster traffic wants to pass you, move to the right and let it pass in safety. When being passed on an undividedroad where the passing driver has pulled into the opposite lane, pay attention to oncoming traffic and move closer to theright side of the lane. Be prepared to slow down to let the passing driver get in front of you more quickly to prevent acollision.
On many high-speed roads with three or more lanes in each direction, trucks are not allowed to drive in the far left-handlane. This means that the lane next to it is the truck passing lane. If you are in this lane and a truck wants to pass,move into the right-hand lane as soon as you can.
VII. Changing positionsChanging lanes
VII. Changing positionsPassing
Passing is changing lanes to move past a slower vehicle. While all public roads have speed limits, not all vehicles travel at the same speed. For example,cyclists, road service vehicles and drivers ahead that are preparing to turn are usually slower than the through traffic. You may want to pass some slow-moving vehicles when you are following them.
Never overtake and pass another vehicle unless you are sure you can do so without danger to yourself or others. Don't pass moving snow plows underany conditions. If in doubt, do not pass.

Diagram 2-47
VII. Changing positionsPassing at night
Be very careful when you pass other vehicles at night. If you have to pass and the way is clear, follow these steps:
1. Switch your headlights to low beams as you approach a vehicle from behind.2. Signal, check your mirrors and blind spot, and pull out to pass. As you move alongside the vehicle you are passing, switch on your highbeams. This will let you see more of the road ahead.
3. When you can see all of the front of the vehicle you are passing in your rear view mirror, you are far enough ahead to pull back into the rightlane. Remember to signal.
VII. Changing positionsPassing and climbing lanes
Diagram 2-48
Some roads have special passing or climbing lanes. These lanes let slower vehicles move into the right-hand lane so that faster ones can pass safely inthe left lane.
An advance sign tells drivers they will soon have a chance to pass. Another sign warns when the lane is ending so drivers in the right-hand lane can beginto merge safely with traffic in the left-hand lane.
VII. Changing positionsPassing on the shoulder
You may drive on the right shoulder only to pass a vehicle turning left and only if the shoulder is paved. You may not pass on the left shoulder, paved ornot.
VII. Changing positionsPassing on the right
Most passing is done on the left. You may pass on the right on multi-lane or one-way roads and when overtaking a streetcar or a left-turning vehicle.
Passing on the right can be more dangerous than passing on the left. If you are driving in the left most lane with a slower vehicle in front of you, wait forthe vehicle to move to the right. Do not suddenly change lanes and pass on the right; the driver in front may realize you want to pass and move to the rightat the same time you do.
Changing positionsPassing streetcars
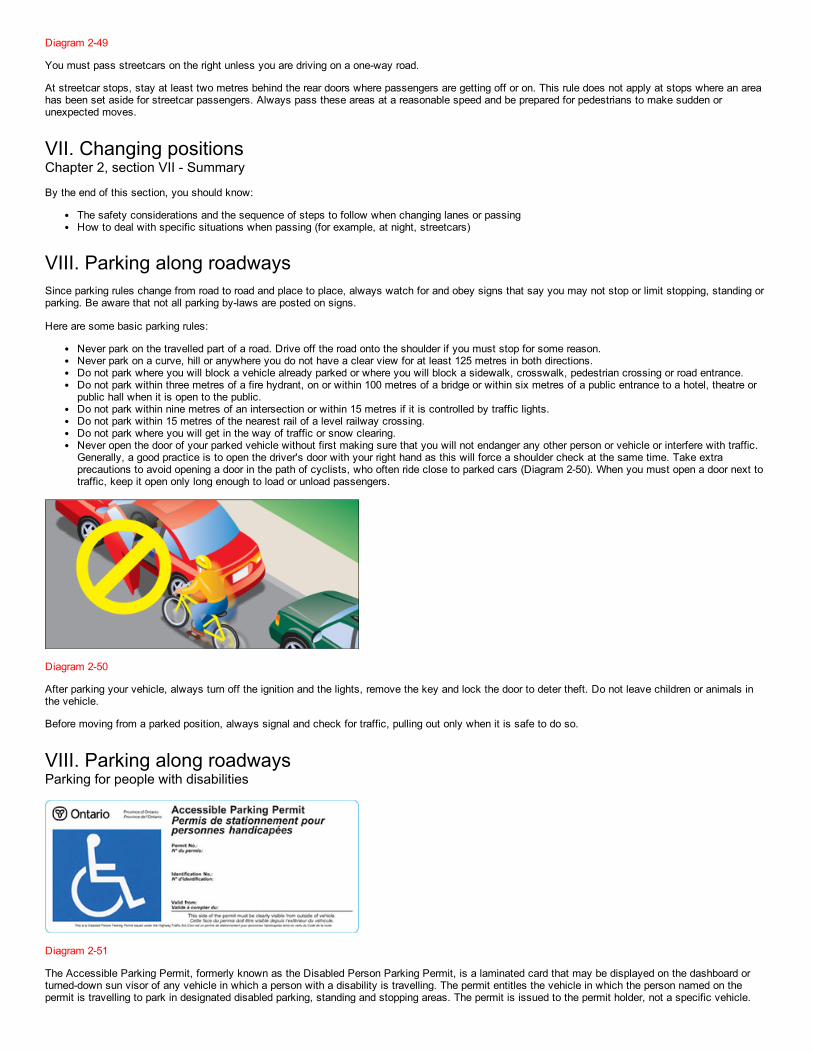
Diagram 2-49
You must pass streetcars on the right unless you are driving on a one-way road.
At streetcar stops, stay at least two metres behind the rear doors where passengers are getting off or on. This rule does not apply at stops where an areahas been set aside for streetcar passengers. Always pass these areas at a reasonable speed and be prepared for pedestrians to make sudden orunexpected moves.
VII. Changing positionsChapter 2, section VII - Summary
By the end of this section, you should know:
The safety considerations and the sequence of steps to follow when changing lanes or passingHow to deal with specific situations when passing (for example, at night, streetcars)
VIII. Parking along roadwaysSince parking rules change from road to road and place to place, always watch for and obey signs that say you may not stop or limit stopping, standing orparking. Be aware that not all parking by-laws are posted on signs.
Here are some basic parking rules:
Never park on the travelled part of a road. Drive off the road onto the shoulder if you must stop for some reason.Never park on a curve, hill or anywhere you do not have a clear view for at least 125 metres in both directions.Do not park where you will block a vehicle already parked or where you will block a sidewalk, crosswalk, pedestrian crossing or road entrance.Do not park within three metres of a fire hydrant, on or within 100 metres of a bridge or within six metres of a public entrance to a hotel, theatre orpublic hall when it is open to the public.Do not park within nine metres of an intersection or within 15 metres if it is controlled by traffic lights.Do not park within 15 metres of the nearest rail of a level railway crossing.Do not park where you will get in the way of traffic or snow clearing.Never open the door of your parked vehicle without first making sure that you will not endanger any other person or vehicle or interfere with traffic.Generally, a good practice is to open the driver's door with your right hand as this will force a shoulder check at the same time. Take extraprecautions to avoid opening a door in the path of cyclists, who often ride close to parked cars (Diagram 2-50). When you must open a door next totraffic, keep it open only long enough to load or unload passengers.
Diagram 2-50
After parking your vehicle, always turn off the ignition and the lights, remove the key and lock the door to deter theft. Do not leave children or animals inthe vehicle.
Before moving from a parked position, always signal and check for traffic, pulling out only when it is safe to do so.
VIII. Parking along roadwaysParking for people with disabilities
Diagram 2-51
The Accessible Parking Permit, formerly known as the Disabled Person Parking Permit, is a laminated card that may be displayed on the dashboard orturned-down sun visor of any vehicle in which a person with a disability is travelling. The permit entitles the vehicle in which the person named on thepermit is travelling to park in designated disabled parking, standing and stopping areas. The permit is issued to the permit holder, not a specific vehicle.

When parking facing downhill, turn your front wheels towards the curb or right shoulder. This will keep the vehicle fromrolling into traffic if the brakes become disengaged (Diagram 2-53 A).
Turn the steering wheel to the left so the wheels are turned towards the road if you are facing uphill with a curb. Thetires will catch the curb if it rolls backward (Diagram 2-53 B).
When facing uphill without a curb, turn the wheels sharply to the right. If the vehicle rolls, it will go off the road ratherthan into traffic (Diagram 2-53 C).
When parking on a hill, always set the parking brake and move the gear selector into park, or shift into first or reverse
People who have the old version of the permit, the Disabled Person Parking Permit, may continue to use this permit until it expires. Upon its expiry, anynew permit issued will be the Accessible Parking Permit.
The Accessible Parking Permit is issued free of charge to qualified individuals. To qualify for an Accessible Parking Permit, a licensed physician,chiropractor, nurse practitioner (extended class) physiotherapist or occupational therapist must certify that the applicant has one or more of the conditionsdetailed on the Accessible Parking Permit application form.
There are four types of Accessible Parking Permits.
A regular permit (blue) is issued to people with permanent disabilities and is valid for five years. Until 2011, all individuals will need to be re-certified before renewing their permit. After that date, only individuals whose condition is deemed “subject to change†will need to be re-certified before renewing their permit.A temporary permit (red) is issued when the disability is expected to last more than two months, but is not a permanent disability. The temporarypermit is not renewable.A traveller permit (purple) is valid for up to one year and is issued upon request to individuals who hold a valid Accessible Parking Permit and planto fly from any Ontario airport. The permit holder places the traveller permit on the dashboard or sun visor of their vehicle when leaving it parked atthe airport. The person's regular permit travels with them.A company permit (green) is valid for up to five years and is issued to companies and non-profit organizations that own or lease vehicles used totransport people with physical disabilities.
Misuse or abuse of an Accessible Parking Permit should be reported to the police. Misuse of an Accessible Parking Permit will result in fines and revokedprivileges. Accessible Parking Permit applications are available at any ServiceOntario Centre or by sending a request to the ministry at the followingaddress:
Service OntarioLicence Renewals UnitP.O. Box 9800Kingston, ON K7L 5N8
Never park in a space designated for people with disabilities unless you display an Accessible Parking Permit in the windshield of your vehicle. The permitmust belong to you or one of your passengers. This also applies to standing or stopping at curb areas reserved for picking up and dropping off passengerswith disabilities.
VIII. Parking along roadwaysParallel parking
Parallel parking means parking a vehicle with its wheels parallel and next to the curb or side of the road. Park parallel to the curb on roads where parking isallowed, unless there are signs saying that vehicles should be parked at an angle. Park on the right side of the road in the direction of traffic. Unless thereare signs saying otherwise, you can parallel park on both sides of a one-way road.
Diagram 2-52
To parallel park on the right-hand side of the road, find a space that is about one and one-half times longer than your vehicle. Check the traffic beside andbehind and signal your wish to pull over and stop. Drive alongside, or parallel to, the vehicle ahead of the empty space, leaving about a metre between thevehicles. Stop when your rear bumper is in line with the other vehicle. Follow these steps:
1. Slowly and carefully reverse into the space, turning the steering wheel fully toward the curb.2. When you can see the outside rear corner of the in front of your space, straighten your wheels as you continue to reverse.3. Turn the steering wheel fully toward the road to bring your vehicle in line with the curb.4. If your vehicle is not parallel to the curb, drive forward to straighten.5. When you are properly parked, set the parking brake and move the gear selector into park, or shift into first or reverse gear if your vehicle hasa manual transmission.
6. Turn off the engine. Remember to remove the key from the ignition. Check traffic before opening your door. Lock your vehicle.
VIII. Parking along roadwaysParking on a hill
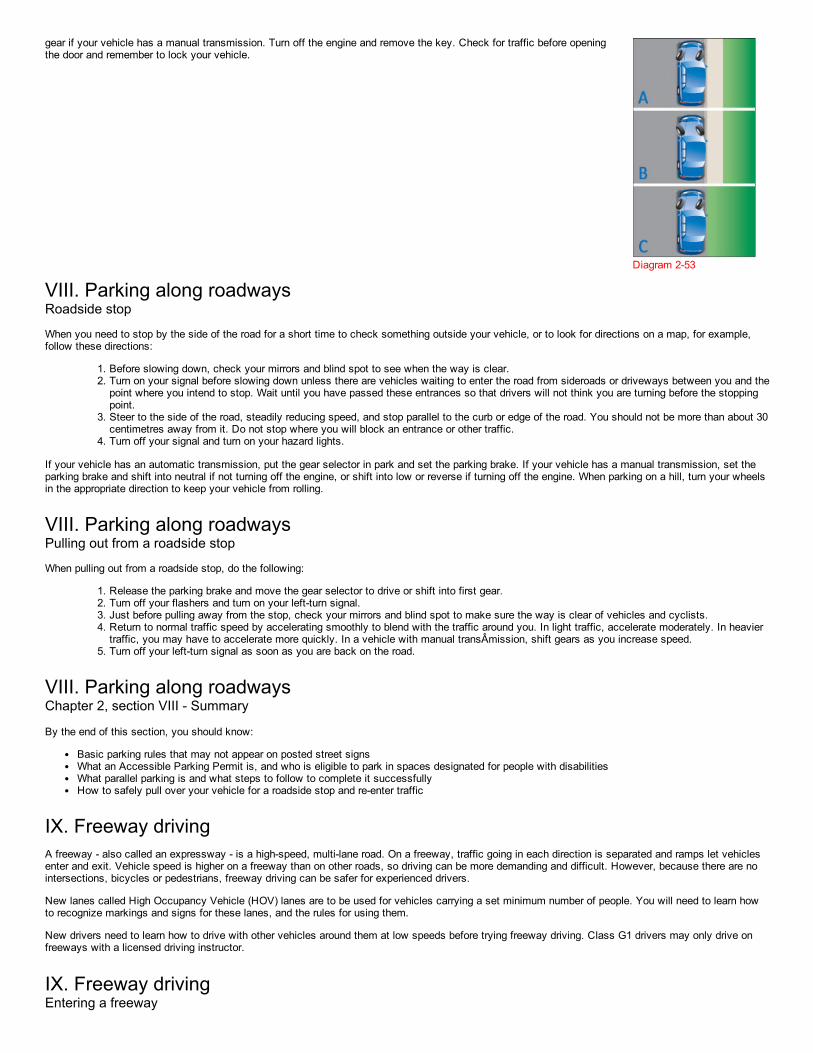
gear if your vehicle has a manual transmission. Turn off the engine and remove the key. Check for traffic before openingthe door and remember to lock your vehicle.
Diagram 2-53
VIII. Parking along roadwaysRoadside stop
When you need to stop by the side of the road for a short time to check something outside your vehicle, or to look for directions on a map, for example,follow these directions:
1. Before slowing down, check your mirrors and blind spot to see when the way is clear.2. Turn on your signal before slowing down unless there are vehicles waiting to enter the road from sideroads or driveways between you and thepoint where you intend to stop. Wait until you have passed these entrances so that drivers will not think you are turning before the stoppingpoint.
3. Steer to the side of the road, steadily reducing speed, and stop parallel to the curb or edge of the road. You should not be more than about 30centimetres away from it. Do not stop where you will block an entrance or other traffic.
4. Turn off your signal and turn on your hazard lights.
If your vehicle has an automatic transmission, put the gear selector in park and set the parking brake. If your vehicle has a manual transmission, set theparking brake and shift into neutral if not turning off the engine, or shift into low or reverse if turning off the engine. When parking on a hill, turn your wheelsin the appropriate direction to keep your vehicle from rolling.
VIII. Parking along roadwaysPulling out from a roadside stop
When pulling out from a roadside stop, do the following:
1. Release the parking brake and move the gear selector to drive or shift into first gear.2. Turn off your flashers and turn on your left-turn signal.3. Just before pulling away from the stop, check your mirrors and blind spot to make sure the way is clear of vehicles and cyclists.4. Return to normal traffic speed by accelerating smoothly to blend with the traffic around you. In light traffic, accelerate moderately. In heaviertraffic, you may have to accelerate more quickly. In a vehicle with manual transÂmission, shift gears as you increase speed.
5. Turn off your left-turn signal as soon as you are back on the road.
VIII. Parking along roadwaysChapter 2, section VIII - Summary
By the end of this section, you should know:
Basic parking rules that may not appear on posted street signsWhat an Accessible Parking Permit is, and who is eligible to park in spaces designated for people with disabilitiesWhat parallel parking is and what steps to follow to complete it successfullyHow to safely pull over your vehicle for a roadside stop and re-enter traffic
IX. Freeway drivingA freeway - also called an expressway - is a high-speed, multi-lane road. On a freeway, traffic going in each direction is separated and ramps let vehiclesenter and exit. Vehicle speed is higher on a freeway than on other roads, so driving can be more demanding and difficult. However, because there are nointersections, bicycles or pedestrians, freeway driving can be safer for experienced drivers.
New lanes called High Occupancy Vehicle (HOV) lanes are to be used for vehicles carrying a set minimum number of people. You will need to learn howto recognize markings and signs for these lanes, and the rules for using them.
New drivers need to learn how to drive with other vehicles around them at low speeds before trying freeway driving. Class G1 drivers may only drive onfreeways with a licensed driving instructor.
IX. Freeway drivingEntering a freeway

There are usually two parts to a freeway entrance: an entrance ramp and an acceleration lane.
As you move along the freeway entrance ramp, look ahead and check your mirrors and blind spots to assess the traffic to see where you will move intothe nearest freeway lane.
As you leave the ramp you enter the acceleration lane. In the acceleration lane, drivers increase their speed to the speed of traffic on the freeway beforethey merge with it. Signal and increase your speed to merge smoothly with traffic. Freeway drivers should move over, if it is safe to do so, leaving room formerging vehicles.
A few entrance ramps join the freeway on the left. This means you enter the fastest lane of traffic first. Use the acceleration lane to match your speed tothe traffic, increasing your speed more quickly.
Diagram 2-54
IX. Freeway drivingDriving along a freeway
Once on the freeway, a safe driver travels at a steady speed, looking forward and anticipating what's going to happen on the road ahead. Traffic shouldkeep to the right, using the left lanes for passing.
As in city driving, your eyes should be constantly moving, scanning the road ahead, to each side and behind. Look ahead to where you are going to be inthe next 15 to 20 seconds, or as far ahead as you can see, when you travel at faster speeds. Remember to keep scanning and check your mirrorsfrequently.
Stay clear of large vehicles. Because of their size, they block your view more than other vehicles. Leave space around your vehicle. This will let you seeclearly in every direction and will give you time and space to react. Click here for following distances.
Be careful not to cut off any vehicle, large or small, when making a lane change or joining the flow of traffic. It is dangerous and illegal for a slower movingvehicle to cut in front of a faster moving vehicle.
Use the far left lane of a multi-lane freeway to pass traffic moving slower than the speed limit, but don't stay there. Drive in the right-hand lane whenpossible. On many freeways with three or more lanes in each direction, large trucks cannot travel in the far left lane and must use the lane to the right forpassing. Get into the habit of driving in the right lane, leaving the other lanes clear for passing.
IX. Freeway drivingLeaving a freeway
There are usually three parts to a freeway exit: a deceleration lane for slowing down that leads drivers out of the main flow of traffic, an exit ramp and anintersection with a stop sign, yield sign or traffic light. When leaving the freeway, signal that you want to move into the deceleraÂtion lane, but do not slowdown. When you are in the lane, reduce your speed gradually to the speed shown for the exit ramp. Check your speedometer to make sure you are goingslowly enough. You may not realize how fast you are going because you are used to the high speed of the freeway. Losing your ability to judge your speedaccurately is sometimes called speed adaptation or velocitization. It is a special danger when leaving a freeway. Be prepared to stop at the end of the exitramp.
Signs telling you that there are freeway exits ahead are far enough in advance for you to make any lane changes safely. If you miss an exit, do not stop orreverse on the freeway. Take the next exit.
Diagram 2-55
IX. Freeway drivingHigh Occupancy Vehicle (HOV) Lane
A High-Occupancy Vehicle (HOV) lane is a specially designed lane that is designated for use by certain types of vehicles with a specified number ofoccupants. It can offer travel-time savings to those who choose to carpool or take transit. HOV lanes can move a greater number of people than a generaltraffic lane, and encourage carpooling and transit use by providing travel-time savings and a more reliable trip time. HOV lanes are open 24 hours a day,

seven days a week.
HOV lanes benefit all drivers, not only those who carpool, in the following ways:
Improves highway infrastructure by moving more people in fewer carsReduces the number of vehicles on the roadReduces overall emissions and improves air quality
HOV lanes on provincial highways are reserved for vehicles carrying at least two people (for example, a driver plus at least one passenger in any of thefollowing passenger vehicles: cars, minivans, motorcycles, pickup trucks and buses).
The HOV lane is separated from the other general traffic lanes by a striped buffer zone. It is illegal and unsafe to cross the striped buffer pavementmarkings.Certain vehicles are exempt from the HOV lane rules. Buses can use an HOV lane at any time, regardless of the number of occupants. Emergencyvehicles such as police, fire and ambulance are also exempt from the restrictions.If you use the HOV lanes improperly, you can be stopped and ticketed by a police officer. You will be required to re-enter the general lanes at thenext entry/exit zone.Commercial motor vehicles must have two or more persons in the vehicle and be less than 6.5 metres in total length to be in the HOV lane. Single-occupant taxis and airport limousines are permitted in the HOV lane until June 30, 2016. Vehicles with the “Green†licence plate are permittedin the HOV lane with any number of occupants until June 30, 2016. Green plates are available for eligible plug-in hybrid electric vehicles and fullbattery electric vehicles. Please consult the Ministry of Transportation website for more details.
IX. Freeway drivingChapter 2, section IX - Summary
By the end of this section, you should know:
What a freeway is and which road users can and cannot use themSafe practices to follow when entering, driving along or exiting a freewayWhat provincial freeway HOV lanes are and who can use them
Dealing with particular situationsSanctions - dangerous behavioursNovice driver escalating sanctionsAggressive driving and road rageStreet racingDrowsy drivingWorkers on the roadAnimals on the roadCellular phonesDriver distractionsEmergency vehiclesReacting to an approaching emergency vehicleReacting to a stopped emergency vehicle or tow truck
X. Dealing with particular situationsSanctions - dangerous behaviours
Our government is committed to protecting Ontarians from individuals who choose to engage in street racing, driving contests or driving stunts. Driverswho are involved in street racing or aggressive-driving behaviours can face tough sanctions:
An immediate seven-day licence suspension and seven-day vehicle impoundment at roadside when a police officer has reasonable and probablegrounds to believe the offence was committed
If convicted:
Fines from $2,000 to $10,000Courts can impose a driver licence suspension of up to 10 years for a second conviction within 10 yearsThe accumulation of six demerit points, a maximum licence suspension of two years for a first conviction and a maximum six months in jail.
The use of a connected nitrous oxide system while driving on a highway is prohibited, and the definition of a “stunt†includes speeding at 50 km/h ormore above the posted limit.
The risk of a fatality or serious injury is almost five times greater for vehicles crashing at 50 km/h or more above the posted limit on a highway with aposted limit of 100 km/h. The increase in risk is even greater on roads with lower posted limits. For example, on roads with a posted limit of 60 km/h orless, the risk of a fatality or serious injury is almost eight times greater for vehicles colliding at 50 km/h or more above the posted limit.
Other dangerous behaviours are also now defined as stunts: driving in such a way that prevents another vehicle from passing, intentionally cutting offanother vehicle, or intentionally driving too close to another vehicle, pedestrian or fixed object.
For information on the regulation, you can visit the following website www.search.elaws.gov.on.ca/en and search under current consolidated law forHighway Traffic Act - O. Reg. 339/94
X. Dealing with particular situationsNovice driver escalating sanctions

Escalating sanctions for novice drivers would apply if any of the following occurrences have taken place within a five-year period:
Any combination of repeat violations of G1/G2/M1/M2 restrictionsConvictions for individual HTA offences carrying four or more demerit pointsCourt-ordered licence suspensions for HTA convictions that would have otherwise resulted in four or more demerit points.
Escalating sanctions for hybrid drivers would apply if there is any combination of repeat violations of their novice licence (G1/G2/M1/M2) conditions withina five-year period.
The penalties under escalating sanctions for novice and hybrid drivers are:
30-day licence suspension for the first occurrence90-day licence suspension for the second occurrenceLicence cancellation and a requirement to re-apply for a G1/M1 after the third occurrence. Any fees paid, credit received for time spent in theprogram or BDE credit would be forfeited when the licence is cancelled. Please note that in the case of a hybrid driver, only the novice-class licenceis cancelled on the third occasion; their full-class licence is maintained.
A reinstatement fee is also imposed on first- and second-occurrence drivers.
Note: Escalating sanctions do not apply in situations where a driver is convicted of an offence resulting in four or more demerit points (or receives a court-ordered suspension for an offence that would have resulted in four or more demerit points) and has one of the following hybrid licence combinations:
(a) A G1 or G2 with a Class M licence
(b) An M1 or M2 with a Class A, B, C, D, E, F or G licence
Forfeited Fees:
If you prepaid any examination fees and are convicted for a third occurrence under escalating sanctions all your pre-paid fees will be lost. You will berequired to pay all fees once you re-enter into the GLS program.
Note: If you are a novice driver and are convicted of violating any novice condition, an offence that is associated with 4 or more demerit points or receive acourt-ordered suspension for an offence that would have resulted in 4 or more demerit points, you will receive the appropriate penalty and novice driverescalating sanction licence suspension. However, the demerit points will be recorded as zero on your record, and will not be counted towards theaccumulated demerit point system.
X. Dealing with particular situationsAggressive driving and road rage
Aggressive-driving behaviours, such as tailgating, speeding, failing to yield the right-of-way and cutting in front of someone too closely, may cause otherdrivers to become frustrated and angry and lead to a road-rage conflict between drivers. An angry driver may attempt dangerous retaliatory action. Avoidbecoming angry on the road by following these tips:
Know the warning signs of stress and combat them by getting fresh air, breathing deeply and slowly, and listening to relaxing music.Make a conscious decision not to take your problems with you when driving.If you are on a long trip, take a break from driving every few hours.Don't compete with another driver, or retaliate for what you believe to be inconsiderate behaviour.If someone else's driving annoys you, don't try to “educate†the person. Leave traffic enforcement to the police.Don't take other drivers' mistakes or behaviours personally.Avoid honking your horn at other drivers, unless absolutely necessary. A light tap on the horn is usually sufficient.
Remember that if you drive responsibly and courteously, you are less likely to spark a road rage situation.
Plan your route in advance. Some of the most erratic and inconsiderate driving occurs when a driver is lost.Drive in a courteous and considÂerate manner.Yield the right-of-way when it is courteous to do so.Be polite and let other drivers in front of you when they are signalling that they would like to do so.If you make a mistake while driving, indicate that you are sorry. An apology can greatly reduce the risk of conflict.Don't return aggression. Avoid eye contact and do not gesture back. Keep away from erratic drivers.
If you are in a situation in which you feel threatened by another driver, do the following:
Stay in your vehicle and lock the doors.If you have a cell phone, call police.Use your horn and signals to attract attention.If you believe you are being followed, do not drive home. Drive to a police station or a busy public place.
X. Dealing with particular situationsStreet racing
Street racing is one of the most serious and reckless forms of aggressive driving. It shows a callous disregard for other drivers and road users, and it putseveryone on the road at serious risk of injury or death. Street racers run the risk of being charged under the Criminal Code of Canada.
X. Dealing with particular situationsDrowsy driving
Drowsiness has been identified as a causal factor in a growing number of collisions resulting in injury and fatality. Tired drivers can be as impaired as

drunk drivers. They have a slower reaction time and are less alert.
Studies have shown that collisions involving drowsiness tend to occur during late night/early morning hours (between 2 a.m. and 6 a.m.) or late afternoon(between 2 p.m. and 4 p.m.). Studies also indicate that shift workers, people with undiagnosed or untreated sleep disorders, and commercial-vehicleoperators, are at greater risk for such collisions.
Always avoid driving when you are feeling drowsy. Scientific research confirms that you can fall asleep without actually being aware of it. Here are eightimportant warning signs that your drowsiness is serious enough to place you at risk:
You have difficulty keeping your eyes open.Your head keeps tilting forward despite your efforts to keep your eyes on the road.Your mind keeps wandering and you can't seem to concentrate.You yawn frequently.You can't remember details about the last few kilometres you have travelled.You are missing traffic lights and signals.Your vehicle drifts into the next lane and you have to jerk it back into your lane.You have drifted off the road and narrowly avoided a crash.
If you have one of these symptoms, you may be in danger of falling asleep. Pull off the road and park your vehicle in a safe, secure place. Use well-lit reststops or truck stops on busy roads. Lock your doors, roll up your windows and take a nap.
Stimulants are never a substitute for sleep. Drinks containing caffeine can help you feel more alert but, if you are sleep deprived, the effects wear offquickly. The same is true of turning up the volume of your radio or CD player and opening the window. You cannot trick your body into staying awake; youneed to sleep. Remember, the only safe driver is a well-rested, alert driver.
X. Dealing with particular situationsWorkers on the road
Be extra careful when driving through construction zones and areas where people are working on or near the road.
When approaching a construction zone, proceed with caution and obey all warning signs, people and/or devices that are directing traffic through the area.Often, lower speed limits are posted to increase worker safety and reflect increased road hazards, such as construction vehicles in the area, uneven orgravel surfaces, narrowed lanes and so on. In the construction zone, drive carefully and adjust your driving to suit the conditions, do not change lanes, beready for sudden stops and watch for workers and related construction vehicles and equipment on the road.
Other types of workers and vehicles may also be present on the road and pose a hazard, such as roadside assistance and disable vehicles, surveyors,road maintenance or utility workers. Always slow down and pass with caution to prevent a collision. If safe to do so, move over a lane to increase thespace between your vehicle and the hazard.
Traffic-control workers direct vehicle traffic in work zones and prevent conflicts between construction activity and traffic. Whether you are driving during theday or at night, watch for traffic-control people and follow their instructions.
Treat people working on roads with respect, and be patient if traffic is delayed. Sometimes traffic in one direction must wait while vehiÂcles from the otherdirection pass through a detour. If your lane is blocked and no one is directing traffic, yield to the driver coming from the opposite direction. When the wayis clear, move slowly and carefully around the obstacle.
Recent changes to the Highway Traffic Act have resulted in doubled fines for speeding in a construction zone when workers are present. It is also anoffence to disobey STOP or SLOW signs displayed by a traffic-control person or firefighter.
X. Dealing with particular situationsAnimals on the road
Crashes involving animals (mainly moose and deer) are a growing problem. Motor vehicle/wild animal collisions increased from 8,964 in 1999 to 12,791collisions in 2008. This represents an increase of 43 per cent over a 10-year period. Many of these collisions go unreported.
You may encounter domestic, farm or wild animals on the road anywhere in Ontario. Scan the road ahead from shoulder to shoulder. If you see an animalon or near the road, slow down and pass carefully as they may suddenly bolt onto the road. Many areas of the province have animal crossing signs whichwarn drivers of the danger of large animals (such as moose, deer or cattle) crossing the road. Be cautious when you see these signs, especially duringdusk-to-dawn hours when wild animals are most active.
To reduce your chances of hitting an animal:
Reduce speed in darkness, rain and fog. These conditions can reduce your ability to see an animal on or near the road.Travel at a safe speed and stay alert. Driver inattention and speed are common factors in animal-vehicle crashes.Watch for shining eyes at the roadside. If you do see shining eyes, slow down and be ready to stop.Keep your windshield clean and headlights properly adjusted.Use high beams whenever possible and safe to do so, and scan both sides of the road ahead.
If you see an animal:
Slow down and sound your horn.Be alert for other animals that may be with the one you've seen.Don't try to drive around the animal. Animal movements are unpredictable.If you wish to watch an animal, find a safe place to pull completely off the road and park first. Do not park on the shoulder of the road, as otherdrivers may be distracted by the animal and hit your vehicle.Stay in your vehicle; getting out increases your chance of being hit by another vehicle.If you hit a deer or moose, report it to the local police service or the Ministry of Natural Resources. Do not try to move an injured animal.

X. Dealing with particular situationsCellular phones
Cellular phones can be an important safety aid for drivers, but using a cellular phone while driving takes a driver’s attention away from the task of drivingand increases the risk of collision. Viewing display screens unrelated to driving, such as laptop computers and portable DVD players, is prohibited whiledriving. Distracted drivers are more likely to make mistakes or react too slowly. That’s why as of September 1, 2015, if convicted, a fully licenseddriver (holder of Class A, B, C, D, E, F, G) or a hybrid driver (holder of a full-class licence and a novice licence such as Class G and M1) who talks,texts, types, dials or e-mails using hand-held cellular phones and other hand-held communications and entertainment devices face fines of up to $1,000and three demerit points applied to their driver’s record under Ontario’s distracted driving law. A novice driver (subject to the graduated licensingprogram) convicted of distracted driving will be subject to escalating sanctions (30-day licence suspension for a first occurrence; 90 days for a secondoccurrence; and licence cancellation and removal from the Graduated Licensing System for a third occurrence).
Police can also charge drivers with careless driving or even dangerous driving (a criminal offence) if they do not pay full attention to the driving task. If youare convicted of careless driving, you will get six demerit points and can be fined up to $2,000, and sentenced to up to six months in jail. In some cases,your licence may be suspended for up to two years.
Make it a habit to pull over and park to use your cell phone or have a passenger take the call or let it go to voice mail. If you must use a cellular phonewhen driving, you must use it hands-free.
X. Dealing with particular situationsDriver distractions
Driving is a job that requires your full attention every time you get behind the wheel. Any secondary activity will detract from your ability to drive properlyand safely. You must reduce distractions and focus on your driving.
There are a number of possible driver distractions including:
Using devices such as GPS systems, stereos, CD and DVD players, radios, cell phones, laptops, PDAs and MP3 playersReading maps, directions or other materialGrooming (combing hair, putting on make-up or shaving)Eating or drinkingTaking notesTalking with passengersTending to children or petsAdjusting the controls in your vehicle (radio, CD player or climate control)Visual distractions outside your vehicle, such as collisions or police activity
Careless driving is a serious offence. Police can charge drivers with careless driving if drivers do not pay full attention to their driving. If you are convictedof careless driving, you will get six demerit points and can be fined up to $2,000 and sentenced to up to six months in jail. In some cases, your licencemay be suspended for up to two years.
Tips to reduce driver distractions
Attend to personal grooming and plan your route before you leave.Identify and preset your vehicle's climate control, radio and CD player.Make it a habit to pull over and park to use your cell phone, or have a passenger take the call or let it go to voice mail.Put reading material in the trunk if you are tempted to read.Do not engage in emotional or complex conversations. Stress can affect your driving performance.When you are hungry or thirsty, take a break from driving.
Remember to focus on your driving at all times. A split-second distraction behind the wheel can result in a collision.
X. Dealing with particular situationsEmergency vehicles
Emergency vehicles (police, fire, ambulance and public-utility emergency vehicles) are easily identified when responding to an emergency through their useof flashing red lights (police may also use red and blue flashing lights), a siren or bell, or alternating flashes of white light from their headlamp highbeams.Also, be aware that police, fire and ambulance services use many different types of vehicles, including bicycles, snowmobiles, all-terrain vehicles,motorcycles, buses and trucks.
X. Dealing with particular situationsReacting to an approaching emergency
When an emergency vehicle is approaching your vehicle from any direction with its flashing red or red and blue lights, or siren or bell sounding, you arerequired to bring your vehicle to an immediate stop.
When bringing your vehicle to a stop, you are required to bring your vehicle as near as is practical to the right-hand curb or edge of the roadway. When on aone-way road or divided highway having more than two lanes of traffic, move to the closest curb or edge of the roadway. Your vehicle should be parallel tothe roadway and clear of any intersections, including highway on/off ramps. Do not move onto or stop on the shoulder of the roadway, as emergencyvehicles may be travelling along it.
Use extreme caution when stopping your vehicle because other drivers may not yet be aware of or are already reacting to the approaching emergencyvehicle. Look to the front, both sides and toward the rear of your vehicle, signal your intention to pull over well in advance and begin to adjust yourvehicle's speed to merge with any traffic to the side you are pulling to. Once you have moved your vehicle to the side, brake gradually as required andbring your vehicle to a safe stop. Avoid any sudden changes in direction or excessive braking and be aware of any vehicles approaching fast to the rear of

your vehicle.
If you are in an intersection and preparing to make a turn when an emergency vehicle is approaching, you should abandon the turn and clear theintersection by proceeding straight when safe to do so, then pull to the right and stop. This will clear the intersection and minimize the possibility of acollision with the emergency vehicle should it be passing you on the side you intended to turn towards.
When the emergency vehicle has passed, check to make sure the way is clear and signal before merging back into traffic. Remain vigilant for additionalemergency vehicles, and remember it is illegal to follow within 150 metres of a fire vehicle responding to an alarm.
Note: Some firefighters and volunteer medical responders may display a flashing green light when using their own vehicles to respond to a fire or medicalemergency. Please yield the right-of-way to help them respond to an emergency call quickly and safely.
Police or other enforcement officers may require you to pull over and bring your vehicle to an immediate stop. Typically, the officer may signal thisrequirement by driving their vehicle with its emergency lights flashing and/or siren on behind your vehicle or by using hand gestures from the side of theroad. When stopping your vehicle, follow the previous procedures, except that you should bring your vehicle to a stop outside of traffic lanes and onto theshoulder of the roadway where possible, or turn and stop on a side street with less traffic if in the immediate vicinity. If the officer gives direction as towhere to stop, follow the officer's directions.
Stay alert
When you see an approaching emergency vehicle with its lights or siren on, prepare to clear the way.
React quickly but calmly. Don't slam on the brakes or pull over suddenly. Use your signals to alert other drivers you intend to pull over.Check your rearview mirrors. Look in front and on both sides of your vehicle. Allow other vehicles to also pull over. Pull to the right and graduallycome to a stop.Wait for the emergency vehicle to pass and watch for other emergency vehicles that may be responding to the same call. Check to make sure theway is clear and signal before merging back into traffic.Don't drive on or block the shoulder on freeways. Emergency vehicles will use the shoulder of the road if all lanes are blocked.
Diagram 2-56
X. Dealing with particular situationsReacting to a stopped emergency vehicle or tow truck
Diagram 2-57
When approaching any emergency vehicle that is stopped with its red, or red and blue, lights flashing or a tow truck with its amber lights flashing in thesame direction of your travel, you are required to reduce the speed of your vehicle and proceed with caution.
If your vehicle has a manual transmission, it is recommended that you use your brakes, versus shifting down to a lower gear, in order to activate your rearbrake lights and indicate to other drivers that you are slowing down.
When the roadway has two or more lanes of traffic in the same direction of your travel, you are required to move into a lane away from the emergencyvehicle or tow truck, if safe to do so, in addition to reducing the speed of your vehicle and proceeding with caution. Similar to the procedures noted above,when slowing down and moving over, look in front and on both sides of your vehicle, and check your rearview mirrors, to determine the speed of the trafficaround you and condition of the roadway. Proceed to decrease your speed similar to surrounding traffic speed, use your turn signal prior to making the lanechange, and double check your rearview mirrors and shoulder check your blind spots to ensure no other vehicles are moving into or approaching that lanetoo fast. When safe to do so, change lanes well in advance of an emergency vehicle or a stopped tow truck with its flashing amber lights. Once in thelane, brake gradually and continue to reduce the speed of your vehicle when safe to do so. Be aware of any vehicles approaching fast to the rear of your

vehicle.
Tips to remember
Stay alert. Avoid distractions. Keep the noise level down in your vehicle.Remain calm, and do not make sudden lane changes or brake excessively.Before changing direction or speed, consider road conditions, check surrounding traffic, use your mirrors, look to blind spots, and signal and brakeearly.Keep roadway shoulders, intersections and highway ramps clear for emergency-vehicle use.If your vehicle is being pulled over, in this instance, bring it to a safe stop on the shoulder of the roadway, away from traffic, following any directionsfrom the officer.
Failing to respond to an emergency vehicle
Take emergency flashing lights and sirens seriously. Proceed with caution, clear the way and bring your vehicle to a stop, where required. It's the law.Penalties and fines regarding reacting to an approaching or stopped emergency vehicle include:
First Offence: $400 to $2,000, plus three demerit points upon conviction.
Second Offence (within 5 years): $1,000 to $4,000, possible jail time up to six months and possible suspension of driver's licence for up to two years.
Please note the above law, fines and penalties are also applicable to a tow truck with its lamp producing intermittent flashes of amber light that is stoppedon a highway.
X. Dealing with particular situationsChapter 2, section X - Summary
By the end of this section, you should know:
How to manoeuvre your vehicle through construction zonesWhat to do if you encounter animals on the roadThings that may distract you when driving and how to minimize those distractionsWhat to do when you encounter an emergency vehicle
XI. Driving at night and in bad weatherAt night and in weather conditions such as rain, snow or fog, you cannot see as far ahead, even with headlights. Slow down when driving at night,especially on unlit roads and whenever weather conditions reduce your visibility.
XI. Driving at night and in bad weatherOverdriving your headlights
You are overdriving your headlights when you go so fast that your stopping distance is farther than you can see with your headlights. This is a dangerousthing to do, because you may not give yourself enough room to make a safe stop. Reflective road signs can mislead you as well, making you believe youcan see farther than you really can. This may cause you to over-drive your headlights if you are not careful (Diagram 2-58).
Diagram 2-58
XI. Driving at night and in bad weatherGlare
Glare is dazzling light that makes it hard for you to see and be aware what others around you are doing. It can be a problem on both sunny and overcastdays, depending on the angle of the sun's rays and your surroundings. Glare can also be a problem at night when you face bright headlights or see themreflected in your rear view mirror.
When meeting oncoming vehicles with bright headlights at night, look up and beyond and slightly to the right of the oncoming lights. In daytime glare, useyour sun visor or keep a pair of good quality sunglasses in your vehicle. When you enter a tunnel on a bright day, slow down to let your eyes adjust to thereduced light. Remove your sunglasses and turn on your headlights.
Cut down glare at night by following the rules of the road for vehicle lights. Use your low-beam headlights within 150 metres of an oncoming vehicle orwhen following a vehicle within 60 metres. On country roads, switch to low beams when you come to a curve or hilltop so you can see oncomingheadlights and won't blind oncoming drivers. If you can't see any headlights, switch back to high beams.

Rain makes road surfaces slippery, especially as the first drops fall. With more rain, tires make less contact with theroad. If there is too much water or if you are going too fast, your tires may ride on top of the water, like water skis. Thisis called hydroplaning. When this happens, control becomes very difficult. Make sure you have good tires with deeptread, and slow down when the road is wet.
Rain also reduces visibility. Drive slowly enough to be able to stop within the distance you can see. Make sure yourwindshield wipers are in good condition. If your wiper blades do not clean the windshield without streaking, replacethem.
In rain, try to drive on clear sections of road. Look ahead and plan your movements. Smooth steering, braking andaccelerating will reduce the chance of skids Leave more space between you and the vehicle ahead in case you have tostop. This will also help you to avoid spray from the vehicle ahead that can make it even harder to see.
Avoid driving in puddles. A puddle can hide a large pothole that could damage your vehicle or its suspension, or flatten atire. The spray of water could obstruct the vision of adjacent motorists and result in a collision, cause harm to nearbypedestrians or drown your engine, causing it to stall. Water can also make your brakes less effective.
XI. Driving at night and in bad weatherFog
Fog is a thin layer of cloud resting on the ground. Fog can reduce visibility for drivers, resulting in difficult driving conditions.
The best thing to do is to avoid driving in fog. Check weather forecasts and if there is a fog warning, delay your trip until it clears. If that is not possible oryou get caught driving in fog, there are a number of safe driving tips you should follow. If visibility is decreasing rapidly, move off the road and into a safeparking area to wait for the fog to lift.
Tips for driving safely in fog
Before you drive - and during your trip - check weather forecasts. If there is a fog warning, delay your trip until it clears. If you are caught driving in fog,follow these safe-driving tips:
DO:
Slow down gradually and drive at a speed that suits the conditions.Make sure the full lighting system of your vehicle is turned on.Use your low-beam headlights. Highbeams reflect off the moisture droplets in the fog, making it harder to see.If you have fog lights on your vehicle, use them, in addition to your lowbeams.Be patient. Avoid passing, changing lanes and crossing traffic.Use pavement markings to help guide you. Use the right edge of the road as a guide, rather than the centre line.Increase your following distance. You will need extra distance to brake safely.Look and listen for any hazards that may be ahead.Reduce the distractions in your vehicle. For example, turn off the cell phone. Your full attention is required.Watch for any electronically operated warning signs.Keep looking as far ahead as possible.Keep your windows and mirrors clean. Use your defroster and wipers to maximize your vision.If the fog is too dense to continue, pull completely off the road and try to position your vehicle in a safe parking area. Turn on your emergencyflashers, in addition to keeping on your low-beam headlights.
DON'T:
Don't stop on the travelled portion of the road. You could become the first link in a chain-reaction collision.Don't speed up suddenly, even if the fog seems to be clearing. You could find yourself suddenly back in fog.Don't speed up to pass a vehicle moving slowly or to get away from a vehicle that is following too closely.
REMEMBER:
Watch your speed. You may be going faster than you think. If so, reduce speed gradually.Leave a safe braking distance between you and the vehicle ahead.Remain calm and patient. Don't pass other vehicles or speed up suddenly.Don't stop on the road. If visibility is decreasing rapidly, pull off the road into a safe parking area and wait for the fog to lift.Use your low-beam lights.
XI. Driving at night and in bad weatherRain
Diagram 2-59
XI. Driving at night and in bad weatherFlooded roads
Avoid driving on flooded roads, water may prevent your brakes from working. If you must drive through a flooded stretch of road, test your brakes afterwardto dry them out. Test your brakes when it is safe to do so by stopping quickly and firmly at 50 km/h. Make sure the vehicle stops in a straight line, withoutpulling to one side. The brake pedal should feel firm and secure, not spongy, that's a sign of trouble. If you still feel a pulling to one side or a spongy brakepedal even after the brakes are dry, you should take the vehicle in for repair immediately.
XI. Driving at night and in bad weatherSkids

A skid may happen when one or more tires lose their grip with the road's surface. Skids most often happen on a slippery surface, such as a road that iswet, icy or covered with snow, gravel or some other loose material. Most skids result from driving too fast for road conditions. Hard braking and overlyaggressive turning or accelerating can cause your vehicle to skid andpossibly go out of control.
To avoid a skid on a slippery road, drive at a reduced speed and operate the vehicle's controls in a smooth and constrained manner. Increasing tire forces,such as by braking or accelerating while steering may push tires even closer to a skid condition. It's essential that the vehicle's speed be maintained at asafe level and that turns be made gently.
If your vehicle begins to skid, try not to panic - it is possible to maintain control of your vehicle, even in a skid. Ease off on the accelerator or brake and ona very slippery surface slip the transmission into neutral if you can. Continue to steer in the direction you wish to go. Be careful not to oversteer. Once youregain control, you can brake as needed, but very gently and smoothly.
Anti-lock braking systems (ABS)
If your vehicle is equipped with anti-lock brakes, practise emergency braking to understand how your vehicle will react. It is a good idea to practise doingthis under controlled conditions with a qualified driving instructor.
ABS is designed to sense the speed of the wheels on a vehicle during braking. An abnormal drop in wheel speed, which indicates potential wheel lock,causes the brake force to be reduced to that wheel. This is how ABS prevents tire skid and the accompanying loss of steering control. This improvesvehicle safety during heavy brake use or when braking with poor traction.
Although anti-lock braking systems help to prevent wheel lock, you should not expect the stopping distance for your vehicle to be shortened.
Drivers unfamiliar with anti-lock braking may be surprised by the pulsations that they may feel in the brake pedal when they brake hard. Make sure youknow what to expect so you will not be distracted by the pulsation or tempted to release the pedal during emergency braking manoeuvres.
Threshold braking
Threshold braking should bring you to a reasonably quick controlled stop in your own lane, even in slippery conditions. This technique is generally practisedin a vehicle that is not equipped with ABS. Brake as hard as you can until a wheel begins to lock up, then release pressure on the pedal slightly to releasethe wheel. Press down on the brake pedal, applying as much braking force as possible without inducing a skid. If you feel any of the wheels begin to lockup, release the brake pressure slightly and re-apply. Don't pump the brakes. Continue braking this way until you have slowed the vehicle to the desiredspeed.
Vehicles equipped with ABS should provide controlled braking on slippery surfaces automatically. Press the brake pedal hard and allow the system tocontrol wheel lock-up.
XI. Driving at night and in bad weatherSnow
Snow may be hard-packed and slippery as ice; rutted, full of hard tracks and gullies; or smooth and soft. Look ahead and anticipate what you must dobased on the conditions. Slow down on rutted, snowy roads. Avoid sudden steering, braking or accelerating that could cause a skid. Do not use cruisecontrol during times of snow and other inclement weather.
XI. Driving at night and in bad weatherWhiteouts
Blowing snow may create whiteouts where snow completely blocks your view of the road. When blowing snow is forecast, drive only if necessary and withextreme caution.
Tips for driving in blowing snow and whiteout conditions
Before you drive - and during your trip - check weather forecasts and road reports. If there is a weather warning, or reports of poor visibility and drivingconditions, delay your trip until conditions improve, if possible. If you get caught driving in blowing snow or a whiteout, follow these safe driving tips:
DO:
Slow down gradually and drive at a speed that suits the conditions.Make sure the full lighting system of your vehicle is turned on.Use your low-beam headlights. High beams reflect off the ice particles in the snow, making it harder to see. If you have fog lights on your vehicle,use them, in addition to your low beams.Be patient. Avoid passing, changing lanes and crossing traffic.Increase your following distance. You will need extra space to brake safely.Stay alert. Keep looking as far ahead as possible.Reduce the distractions in your vehiÂcle. Your full attention is required.Keep your windows and mirrors clean. Use defroster and wipers to maximize your vision.Try to get off the road when visibility is near zero. Pull into a safe parking area if possible.
DON'T:
Don't stop on the travelled portion of the road. You could become the first link in a chain-reaction collision.Don't attempt to pass a vehicle moving slowly or speed up to get away from a vehicle that is following too closely.
REMEMBER:
Watch your speed. You may be going faster than you think. If so, reduce speed gradually.Leave a safe braking distance between you and the vehicle ahead.Stay alert, remain calm and be patient.

If visibility is decreasing rapidly, do not stop on the road. Look for an opportunity to pull off the road into a safe parking area and wait for conditionsto improve.If you become stuck or stranded in severe weather, stay with your vehicle for warmth and safety until help arrives. Open a window slightly forventilation. Run your motor sparingly. Use your emergency flashers.Be prepared and carry a winter driving survival kit that includes items such as warm clothing, non-perishable energy foods, flashlight, shovel andblanket.It is important to look ahead and watch for clues that indicate you need to slow down and anticipate slippery road conditions.
XI. Driving at night and in bad weatherIce
As temperatures drop below freezing, wet roads become icy. Sections of road in shaded areas or on bridges and overpasses freeze first. It is important tolook ahead, slow down and anticipate ice. If the road ahead looks like black and shiny asphalt, be suspicious. It may be covered by a thin layer of iceknown as black ice. Generally, asphalt in the winter should look gray-white in colour. If you think there may be black ice ahead, slow down and be careful.
XI. Driving at night and in bad weatherSnow plows
Snow-removal vehicles on public roadways are equipped with flashing blue lights that can be seen from 150 metres.
Flashing blue lights warn you of wide and slow-moving vehicles: some snow plows have a wing that extends as far as three metres to the right of thevehicle. On freeways, several snow plows may be staggered across the road, clearing all lanes at the same time by passing a ridge of snow from plow toplow. Do not try to pass between them. This is extremely dangerous because there is not enough room to pass safely, and the ridge of wet snow canthrow your vehicle out of control.
XI. Driving at night and in bad weatherChapter 2, section XI - Summary
By the end of this section, you should know:
How to identify and manage situations where your visibility may be reducedHow weather conditions such as rain, flooded roads, snow and ice may affect your vehicle and your ability to control itWhat to do if your vehicle skids or if you encounter heavy snow, whiteouts or black iceHow to recognize and share the road with snow removal vehicles
XII. Dealing with emergenciesIf you drive often or travel alone, you need to be ready to deal with emergencies. Here are some suggestions for coping with some common roademergencies.
XII. Dealing with emergenciesIf your brakes fail
Try pumping the brake pedal to temporarily restore hydraulic brake pressure. If this does not work, apply the parking brake gently but firmly while holdingthe release button. It is a good idea for new drivers to practice a parking-brake emergency stop under controlled conditions with a qualified drivinginstructor. Total brake failure is very rare on modern vehicles. If your brakes do fail and you manage to stop, do not drive away. Call for help.
XII. Dealing with emergenciesIf your gas pedal sticks
First try to lift the pedal by slipping your foot under it. Do not reach down with your hands while the vehicle is moving. If this does not work, turn on yourhazard lights, shift to neutral and stop as soon as you safely can, preferably off the road. Turn off the ignition and do not drive away. Call for help.
XII. Dealing with emergenciesIf your headlights go out
Check the switch immediately. If the lights stay out, turn on your hazard lights and bring your vehicle to a safe stop off the road. Call for help. It isdangerous and illegal to drive at night without lights.
XII. Dealing with emergenciesIf you have trouble on a freeway
At the first sign of trouble, begin to pull over. Do not wait for your vehicle to stall on the freeway. Check your mirrors, put on your hazard lights, take yourfoot off the gas pedal and pull over to the nearest shoulder as quickly as possible. Never stop in the driving lanes.
Be careful getting out of your vehicle. If possible, leave through the door away from traffic. Do not raise the hood.
While you wait for help, stay in your vehicle with the doors locked. If someone stops to help, ask them to call the police or automobile club for you. If you

have a cellular phone, call for help yourself.
The Queen Elizabeth Way, the 400-series freeways and many other high-speed roads are patrolled by the Ontario Provincial Police. Stay with your vehicle,and help will arrive shortly.
XII. Dealing with emergenciesIf your wheels go off the pavement
Don't panic. Grip the steering wheel firmly. Take your foot off the gas pedal to slow down. Avoid heavy braking. When the vehicle is under control, steertoward the pavement. Be prepared to correct your steering and increase speed when your wheels are fully back on the pavement.
XII. Dealing with emergenciesIf a tire blows out
Blowouts can cause tremendous steering and wheel vibration, but don't be alarmed. Take your foot off the gas pedal to slow down and steer the vehiclefirmly in the direction you want to go. Bring the vehicle to a stop off the road.
XII. Dealing with emergenciesIn a collision where someone is injured
St. John Ambulance recommends that all drivers carry a well-stocked first-aid kit and know how to use it. Consider reading a book about first aid or signup for a first-aid course. It could mean the difference between life and death in a collision.
Every driver involved in a collision must stay at the scene or return to it immediately and give all possible assistance. If you are not personally involved ina collision, you should stop to offer help if police or other officials have not arrived.
In a collision with injuries, possible fuel leaks or serious vehicle damage, stay calm and follow these steps:
Call for help or have someone else call. By law, you must report any collision to the police when there are injuries or damage to vehicles or otherproperty exceeding $2,000.Turn off all engines and turn on emergency flashers. Set up warning signals or flares, or have someone warn approaching drivers.Do not let anyone smoke, light a match or put flares near any vehicle, in case of a fuel leak. If a vehicle is on fire, get the people out and make sureeveryone is well out of the way. If there is no danger of fire or explosion, leave injured people where they are until trained medical help arrives.If you are trained in first aid, treat injuries in the order of urgency, within the level of your training. For example, clear the person's airway to restorebreathing, give rescue breathing or stop bleeding by applying pressure with a clean cloth.If you are not trained in first aid, use common sense. For example, people in collisions often go into shock. Cover the person with a jacket orblanket to reduce the effects of shock.Stay with injured people until help arrives.Disabled vehicles on the road may be a danger to you and other drivers. Do what you can to make sure everyone involved in a collision is keptsafe.
XII. Dealing with emergenciesIn a collision where no one is injured
Follow these steps in a collision where there are no injuries:
1. If the vehicles are drivable, move them as far off the road as possible as this should not affect the police officer's investigation. This isespecially important on busy or high-speed roads where it may be dangerous to leave vehicles in the driving lanes. So in a minor collisionwith no injuries, if you can “Steer it, Clear itâ€. If you cannot move the vehicles off the road, set up warning signals or flares far enoughaway to give other traffic time to slow down or stop.
2. Call police (provincial or local, depending on where the collision takes place). By law, you must report any collision to the police when thereare injuries or damage to vehicles or property exceeding $2,000.
3. Give all possible help to police or anyone whose vehicle has been damaged. This includes giving police your name and address, the nameand address of the registered owner of the vehicle, the vehicle plate and permit number and the liability insurance card.
4. Get the names, addresses and phone numbers of all witnesses.5. If damage is less than $2,000, you are still required by law to exchange information with anyone whose vehicle has been damaged.However, the collision does not have to be reported to the police.
6. If you have a camera or cell phone with a camera and it is safe to do so, take photos of the collision scene.7. If your vehicle must be towed, get the name and licence number of the tow truck operator and/or company. Make sure you understand whereyour vehicle is being towed.
8. Contact your insurance company as soon as possible if you intend to make a claim.
XII. Dealing with emergenciesChapter 2, section XII - Summary
By the end of this section, you should know:
What to do in emergency situations such as vehicle component failure, driving off the pavement or vehicle trouble on a freewayThe steps to take if you are involved in a collision with or without injuries
XIII. Driving efficiently

Vehicles powered by gasoline and diesel give off air pollutants and gases such as oxides of carbon, nitrogen and sulphur, hydrocarbons and soot. Thesepollutants affect the quality of the air we breathe, our health, crop yields and even the global climate.
Hydrocarbons and oxides of nitrogen react in sunlight to form ground-level ozone, better known as smog. Smog is a major health hazard responsible forrespiratory ailments and other illnesses. Oxides of sulphur and nitrogen combine with water vapour to form acid rain, which damages our lakes, forests andcrops.
Global warming is the result of too much carbon dioxide and other gases trapping heat in our atmosphere. Global warming could cause averagetemperatures to rise, causing droughts, crop failures, lower water levels and more frequent and severe storms.
A car gives off less carbon dioxide than a larger vehicle, such as an airplane, truck, bus or train, does. However, because so many people own cars anddrive them so often, cars are responsible for nearly half the carbon dioxide produced by all forms of transportation. Vehicles that carry large numbers ofpassengers, such as buses, produce less carbon dioxide per passenger than cars.
As a driver, you can help to protect the environment from the harmful effects of driving by following these suggestions. Many of them can also save youmoney. For further information visit www.fleetsmart.gc.ca.
XIII. Driving efficientlyBefore you drive
Plan ahead. Combine several errands into one trip.Avoid driving during rush hours. Driving in off-peak times takes less time, uses less fuel and releases fewer emissions.Pay attention to smog alerts. It is especially important to follow these suggestions on days when smog is bad.For short trips, consider walking or cycling.For longer trips, public transit is an environmentally friendly alternative to driving alone.Carpool whenever possible. If you want to meet at a central location, there are free carpool lots in many parts of the province.
XIII. Driving efficientlyWhile driving
Avoid starting your vehicle unnecessarily. A large burst of pollutants is emitted when a cold engine is started.Turn off your vehicle if parked more than 10 seconds. Even in cold weather, vehicle engines warm up within 30 seconds.Obey the speed limits. Driving at high speed uses more fuel and increases your chances of a serious collision.On the freeway, use your vehicle's overdrive gear and cruise control for better fuel efficiency.Remove unnecessary weight from your vehicle, such as heavy baggage, wet snow and winter sand or salt.Maintain your vehicle's aerodynamics. Remove roof racks and compartments when not in use. At high speeds, use your vents instead of openingthe windows.Use your vehicle's air conditioning wisely. Use your windows and vents in city and stop-and-go traffic. At high speeds, using your air conditioning isusually more fuel efficient than opening your windows and reducing the vehicle's aerodynamics.Don't “top-off†the tank when refueling. Spilled fuel releases harmful vapours.
XIII. Driving efficientlyAt the garage
Regular maintenance will keep your vehicle running at maximum efficienÂcy, reducing the fuel you need to buy and the pollutants your vehicleemits.Keep your vehicle's engine well tuned. Worn spark plugs, dragging brakes, low transmission fluid or a transmission not going into high gear canincrease fuel consumption substantially.Follow the recommended maintenance schedule in your vehicle owner's manual to maximize fuel efficiency.Have any fluid leaks checked by a specialist to avoid engine damage and harming the environment.Keep your tires properly inflated to reduce your fuel bill, emissions and tire wear.Have your vehicle's alignment checked regularly to reduce uneven tire wear and fuel consumption.
(For more information on driving efficiently, see the section on maintaining your vehicle, click here).
XIII. Driving efficientlyTop 10 contributing factors to collisions on Ontario roads
The large majority of collisions are caused by a driver's condition or action. Below is a list of the top 10 human factors that contribute to collisions onOntario roads. The list is divided into the top five driver conditions and actions:
Top five driver conditions1. Inattentive driving2. Drinking and driving3. Driver fatigue4. Medical/physical disability5. Drugs and driving
Top five driver actions1. Failure to yield the right-of-way2. Following too closely3. Losing control of vehicle4. Speeding

Traffic laws include the traffic signs and lights, pedestrian signals and pavement markings that tell drivers and other road users what they must do incertain situations. This chapter shows you what many of those signs, lights and markings look like and explains what they mean to drivers.
A stop sign is eight-sided and has a red background with white letters. It means you must come to a complete stop.Stop at the stop line if it is marked on the pavement. If there is no stop line, stop at the crosswalk. If there is nocrosswalk, stop at the edge of the sidewalk. If there is no sidewalk, stop at the edge of the intersection. Wait until theway is clear before entering the intersection.
A school zone sign is five-sided and has a fluorescent yellow/green background with black symbols. It warns that youare coming to a school zone. Slow down, drive with extra caution and watch for children.
A yield sign is a triangle with a white background and a red border. It means you must let traffic in the intersection orclose to it go first. Stop if necessary and go only when the way is clear.
A railway crossing sign is X-shaped with a white background and red outline. It warns that railway tracks cross the road.Watch for this sign. Slow down and look both ways for trains. Be prepared to stop.
There are four other kinds of signs: regulatory, warning, temporary conditions and information and direction.
5. Disobeying traffic controls
Drivers are reminded that many collisions occur when the driving environment is less than optimal. Whether driving at night, during times of reducedvisibility or when road conditions are wet and slippery, drivers are encouraged to use the appropriate safe-driving tips provided in this handbook.
XIII. Driving efficiently10 ways you can help make Ontario's roads the safest in North America
1. Don't drink and drive. Don't drive when you're taking medication that will affect your driving.2. Always wear your seatbelt and make sure passengers are using the appropriate child car seat,booster seat or seatbelt.3. Obey the speed limits. Slow down when road and weather conditions are poor.4. Don't take risks: don't cut people off in traffic, make sudden lane changes or run yellow lights.5. Don't drive when you're tired, upset or sick.6. If you're in doubt, let the other driver go first - yield the right-of-way.7. Keep at least a two-second space between your vehicle and the one ahead. To check your distance: start counting when the vehicle aheadpasses a fixed object, stop counting when your vehicle reaches the same spot.
8. Cut the distractions: don't overcrowd the vehicle or play loud music.9. Always check your blind spot: look in your mirror and over your shoulder before you change lanes.10. Check traffic in all directions, including any sidewalks and paths/trails, before entering an intersection.
XIII. Driving efficientlyChapter 2, section XIII - Summary
By the end of this section, you should know:
How passenger vehicles affect the environmentWays to reduce the amount you driveWays to conserve fuel and reduce emissions when you drive
Traffic Signs and Lights
In this chapter
SignsTraffic lightsPedestrian signalsPavement markings
I. SignsTraffic signs give you important information about the law, warn you about dangerous conditions and help you find your way. Signs use different symbols,colours and shapes for easy identification.
Here are some of the many signs you will see on Ontario roads:
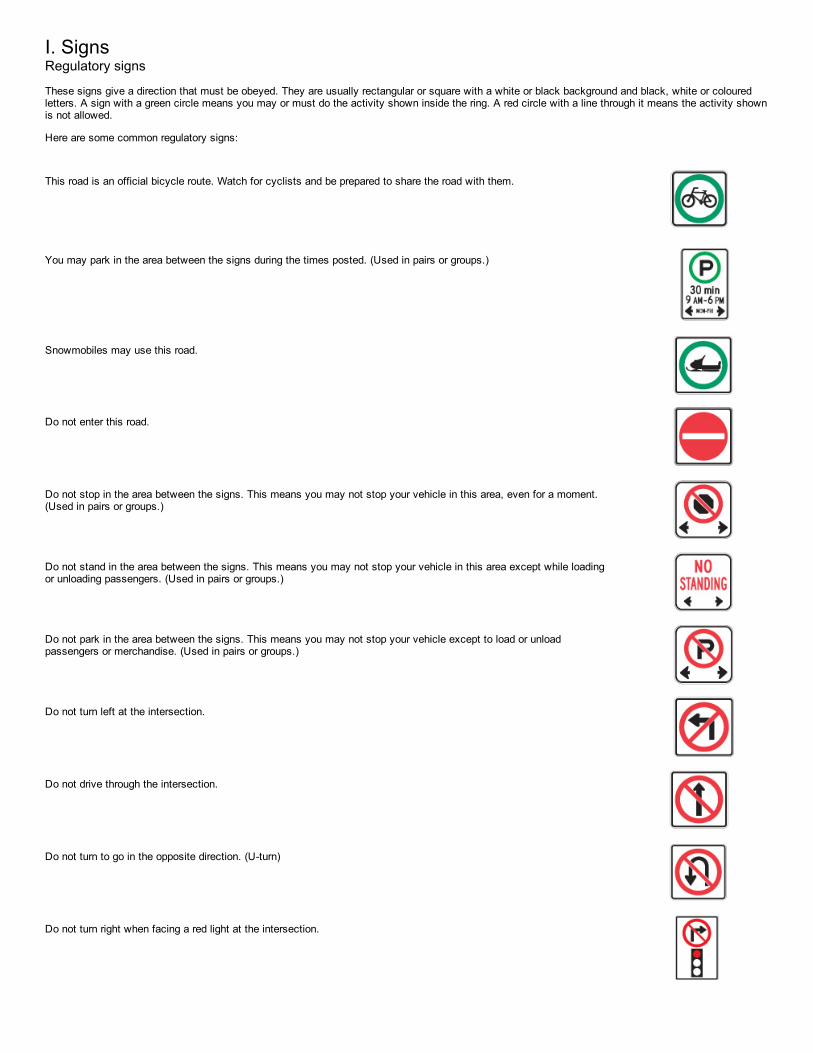
This road is an official bicycle route. Watch for cyclists and be prepared to share the road with them.
You may park in the area between the signs during the times posted. (Used in pairs or groups.)
Snowmobiles may use this road.
Do not enter this road.
Do not stop in the area between the signs. This means you may not stop your vehicle in this area, even for a moment.(Used in pairs or groups.)
Do not stand in the area between the signs. This means you may not stop your vehicle in this area except while loadingor unloading passengers. (Used in pairs or groups.)
Do not park in the area between the signs. This means you may not stop your vehicle except to load or unloadpassengers or merchandise. (Used in pairs or groups.)
Do not turn left at the intersection.
Do not drive through the intersection.
Do not turn to go in the opposite direction. (U-turn)
Do not turn right when facing a red light at the intersection.
I. SignsRegulatory signs
These signs give a direction that must be obeyed. They are usually rectangular or square with a white or black background and black, white or colouredletters. A sign with a green circle means you may or must do the activity shown inside the ring. A red circle with a line through it means the activity shownis not allowed.
Here are some common regulatory signs:

Do not turn left during the times shown.
This parking space is only for vehicles displaying a valid Accessible Parking Permit.
No bicycles allowed on this road.
No pedestrians allowed on this road.
Keep to the right of the traffic island.
Speed limit changes ahead.
Do not pass on this road.
Slow traffic on multi-lane roads must keep right.
Indicates areas where the community has identified that there is a special risk to pedestrians. Traffic related offencescommitted within the zone are subject to increased fines.
The speed limit in this zone is lower during school hours. Observe the speed limit shown when the yellow lights areflashing.
Stop for school bus when signals are flashing.
This sign is installed on multi-lane highways with no centre median divider. It informs drivers approaching from both

directions that they must stop for a school bus when its signal lights are flashing.
These signs, above the road or on the pavement before an intersection, tell drivers the direction they must travel. Forexample: the driver in lane one must turn left; the driver in lane two must turn left or go straight ahead; and the driver inlane three must turn right.
Traffic may travel in one direction only.
This is a pedestrian crossover. Be prepared to stop and yield right-of-way to pedestrians.
This sign, above the road or on the ground, means the lane is only for two-way left turns.
This sign reserves curb area for vehicles displaying a valid Accessible Person Parking Permit picking up and droppingoff passengers with disabilities.
These signs mean lanes are only for specific types of vehicles, either all the time or during certain hours. Differentsymbols are used for the different types of vehicles. They include: buses, taxis, vehicles with three or more people andbicycles.
Keep to the right lane except when passing on two-lane sections where climbing or passing lanes are provided.
This sign on the back of transit buses serves as a reminder to motorists of the law requiring vehicles approaching a busstopped at a dedicated Bus Stop to yield to the bus, once the bus has signalled its intent to return to the lane.
Road forks to the right.

Marks a zone within which school buses load or unload passengers without using the red alternating lights and stop arm.
Only public vehicles such as buses, or passenger vehicles carrying a specified minimum number of passengers, mayuse this lane.
Vehicles cannot change lanes into or out of a high-occupancy vehicle lane in this area.
Narrow bridge ahead.
Road branching off ahead.
Intersection ahead. The arrow shows which direction of traffic has the right-of-way.
Roundabout Ahead. Reduce Speed. The counter-clockwise arrows show the direction of vehicle traffic within theroundabout.
Drivers on the sideroad at the intersection ahead don't have a clear view of traffic.
Pavement narrows ahead.
I. SignsHigh Occupancy Vehicle (HOV) signs
I. SignsWarning signs
These signs warn of dangerous or unusual conditions ahead such as a curve, turn, dip or sideroad. They are usually diamond-shaped and have a yellowbackground with black letters or symbols.
Here are some common warning signs:

Slight bend or curve in the road ahead.
Posted under a curve warning, this sign shows the maximum safe speed for the curve.
Sharp bend or turn in the road ahead.
Chevron (arrowhead) signs are posted in groups to guide drivers around sharp curves in the road.
Winding road ahead.
The bridge ahead lifts or swings to let boats pass.
Paved surface ends ahead.
Bicycle crossing ahead.
Stop sign ahead. Slow down.
Share the road with oncoming traffic.
The share the road sign is used to warn motorists that they are to provide safe space on the road for cyclists and othervehicles. This sign also warns motorists and cyclists to exercise additional caution on the upcoming section of road.

Pavement is slippery when wet. Slow down and drive with caution.
Hazard close to the edge of the road. The downward lines show the side on which you may safely pass.
Divided highway begins: traffic travels in both directions on separated roads ahead. Keep to the right-hand road. Eachroad carries one-way traffic.
Right lane ends ahead. If you are in the right-hand lane, you must merge safely with traffic in the lane to the left.
Traffic lights ahead. Slow down.
Steep hill ahead. You may need to use a lower gear.
Two roads going in the same direction are about to join into one. Drivers on both roads are equally responsible for seeingthat traffic merges smoothly and safely.
Snowmobiles cross this road.
Divided highway ends: traffic travels in both directions on the same road ahead. Keep to the right-hand road.
Underpass ahead. Take care if you are driving a tall vehicle. Sign shows how much room you have.
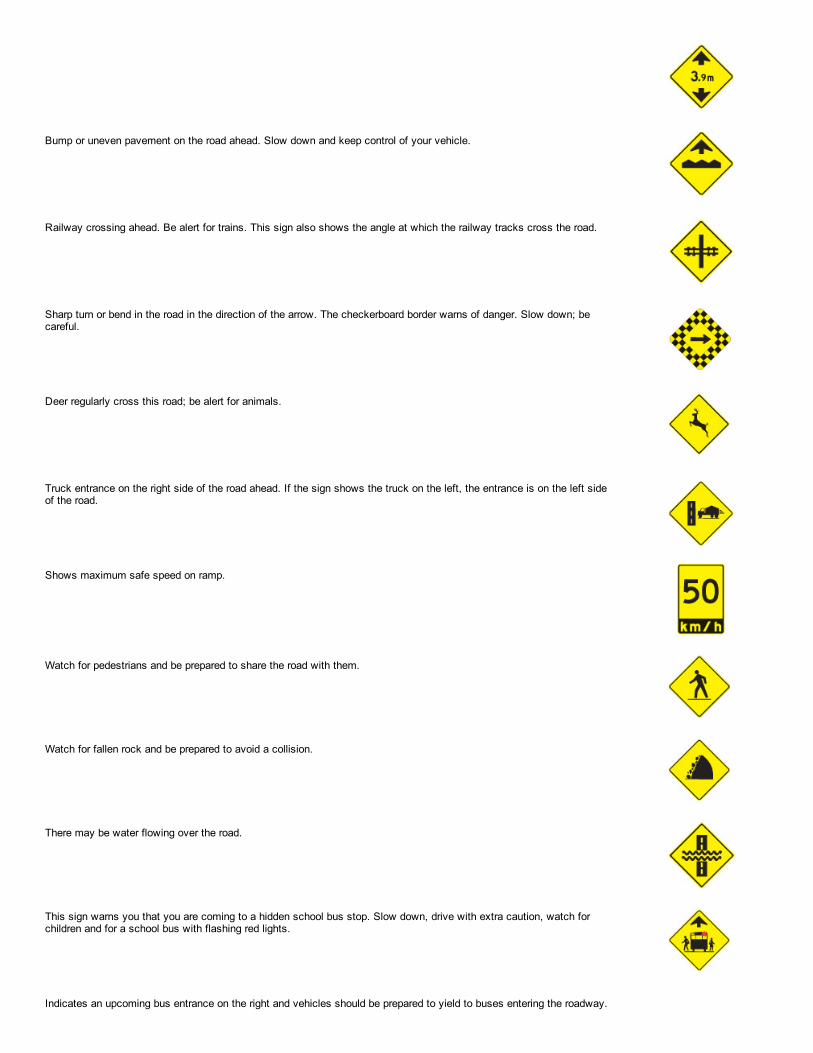
Bump or uneven pavement on the road ahead. Slow down and keep control of your vehicle.
Railway crossing ahead. Be alert for trains. This sign also shows the angle at which the railway tracks cross the road.
Sharp turn or bend in the road in the direction of the arrow. The checkerboard border warns of danger. Slow down; becareful.
Deer regularly cross this road; be alert for animals.
Truck entrance on the right side of the road ahead. If the sign shows the truck on the left, the entrance is on the left sideof the road.
Shows maximum safe speed on ramp.
Watch for pedestrians and be prepared to share the road with them.
Watch for fallen rock and be prepared to avoid a collision.
There may be water flowing over the road.
This sign warns you that you are coming to a hidden school bus stop. Slow down, drive with extra caution, watch forchildren and for a school bus with flashing red lights.
Indicates an upcoming bus entrance on the right and vehicles should be prepared to yield to buses entering the roadway.

Indicates an upcoming fire truck entrance on the right and vehicles should be prepared to yield to fire trucks entering theroadway.
These signs warn of a school crossing. Watch for children and follow the directions of the crossing guard or schoolsafety patroller.
Construction work one kilometre ahead.
Road work ahead.
Survey crew working on the road ahead.
Traffic control person ahead. Drive slowly and watch for instructions.
You are entering a construction zone. Drive with extra caution and be prepared for a lower speed limit.
Temporary detour from normal traffic route.
I. SignsTemporary condition signs
These signs warn of unusual temporary conditions such as road work zones, diversions, detours, lane closures or traffic control people on the road. Theyare usually diamond-shaped with an orange background and black letters or symbols.
Here are some common temporary condition signs:

Flashing lights on the arrows show the direction to follow.
Pavement has been milled or grooved. Your vehicle's stopping ability may be affected so obey the speed limit and drivewith extra caution. Motorcyclists may experience reduced traction on these surfaces.
Lane ahead is closed for roadwork. Obey the speed limit and merge with traffic in the open lane.
Closed lane. Adjust speed to merge with traffic in lane indicated by arrow.
Do not pass the pilot vehicle or pace vehicle bearing this sign.
Reduce speed and be prepared to stop.
Follow detour marker until you return to regular route.
Enforces doubling the HTA fines for speeding in a designated construction zone when there are workers present.
Shows directions to nearby towns and cities.
Shows the distances in kilometres to towns and cities on the road.
Various exit signs are used on freeways. In urban areas, many exit ramps have more than one lane. Overhead and
I. SignsInformation and direction signs
These signs tell you about distances and destinations. They are usually rectangular with a green background and white letters. Other signs with differentcolours guide you to facilities, services and attractions.
Here are some common information and direction signs:

ground-mounted signs help drivers choose the correct lane to exit or stay on the freeway.
Advance signs use arrows to show which lanes lead off the freeway. Signs are also posted at the exit.
Sometimes one or more lanes may lead off the freeway. The arrows matching the exit lanes are shown on the advancesign in a yellow box with the word ‘exit' under them.
Freeway interchanges or exits have numbers that correspond to the distance from the beginning of the freeway. Forexample, interchange number 204 on Highway 401 is 204 kilometres from Windsor, where the freeway begins.Distances can be calculated by subtracting one interchange number from another.
The term 'VIA' is used to describe the roads that must be followed to reach a destination.
Shows the upcoming roundabout exists and where they will take you.
These signs change according to traffic conditions to give drivers current information on delays and lane closures ahead.
Shows off-road facilities such as hospitals, airports, universities or carpool lots.
Shows route to passenger railway station.
Shows route to airport.
Shows facilities that are accessible by wheelchair.
D sign - Oversize load
Here are some other common signs:
I. SignsOther signs

The “slow-moving vehicle†sign is an orange triangle with a red border. It alerts other drivers that the vehicle aheadwill be travelling at 40 km/h or less. When on a road, farm tractors, farm implements/machinery, and vehicles notcapable of sustaining speeds over 40 km/h must display the slow moving vehicle sign. Watch for these slow movingvehicles and reduce your speed as necessary.
EDR signs are used during the unscheduled closure of a provincial highway when OPP detour all traffic off the highway.The EDR markers are located along alternative routes and provide direction to motorists around the closure and backonto the highway.
Long commercial vehicle (LCV)This placard indicates a long commercial vehicle, which is a double trailer and can be up to 40 metres in length. It isimportant to be able to recognize an LCV on the highway, based on rear signage, and anticipate both the extendedlength and limited speed when preparing to pass one on the highway.
Some informaÂtion signs include a numbering system along the bottom of the sign to assist emergency vehicles anddrivers in determining an appropriate route.
Watch for these signs when driving in designated bilingual areas. Read the messages in the language you understandbest. Bilingual messages may be together on the same sign or separate, with an English sign immediately followed by aFrench sign.
A green light means you may turn left, go straight or turn right after yielding to vehicles and pedestrians already in theintersection. When turning left or right you must yield the right-of-way to pedestrians crossing the intersection.
A yellow - or amber - light means the red light is about to appear. You must stop if you can do so safely; otherwise, gowith caution.
I. SignsEmergency response signs
I. SignsBilingual signs
I. SignsChapter 3, section I - Summary
By the end of this section, you should know:
The difference between regulatory, warning, temporary condition and information/direction signsHow to read the symbols and messages of some common signs in each category
II. Traffic lightsTraffic lights tell drivers and pedestrians what they must do at intersections and along roads. They tell road users when to stop and go, when and how toturn and when to drive with extra caution.
II. Traffic lightsGreen light
II. Traffic lightsYellow light

A red light means you must stop. Bring your vehicle to a complete stop at the stop line if it is marked on the pavement.If there is no stop line, stop at the crosswalk, marked or not. If there is no crosswalk, stop at the edge of the sidewalk.If there is no sidewalk, stop at the edge of the intersection.
Wait until the light changes to green and the intersection is clear before moving through it.
Unless a sign tells you not to, you may turn right on a red light only after coming to a complete stop and waiting until theway is clear. You may also turn left on a red light if you are moving from a one-way road onto a one-way road, but youmust come to a complete stop first and wait until the way is clear.
Flashing green lights and green arrows direct drivers who are turning.
When you face a flashing green light or a left-pointing green arrow and a green light, you may turn left, go straight aheador turn right from the proper lane. This is called an advanced green light because oncoming traffic still faces a red light.
Pedestrians must not cross on a flashing green light unless a pedestrian signal tells them to.
When a left-turn green arrow is shown with a red light, you may turn left from the left-turn lane. Vehicles turning left fromthe opposite direction may also be making left turns because they too face a left-turn green arrow.
After the left-turn green arrow, a yellow arrow may appear. This means the green light is about to appear for traffic in oneor both directions. Do not start your left turn. Stop if you can do so safely; otherwise, complete your turn with caution.
You can still turn left when the light is green, but only when the way is clear of traffic and pedestrians. If the light turnsred when you are in the intersection, complete your turn when it is safe.
II. Traffic lightsRed light
II. Traffic lightsLights and arrows to help turning vehicles
II. Traffic lightsAdvance green light or arrow
II. Traffic lightsSimultaneous left turn
Pedestrians must not cross on a left-turn green arrow unless a pedestrian signal tells them to.
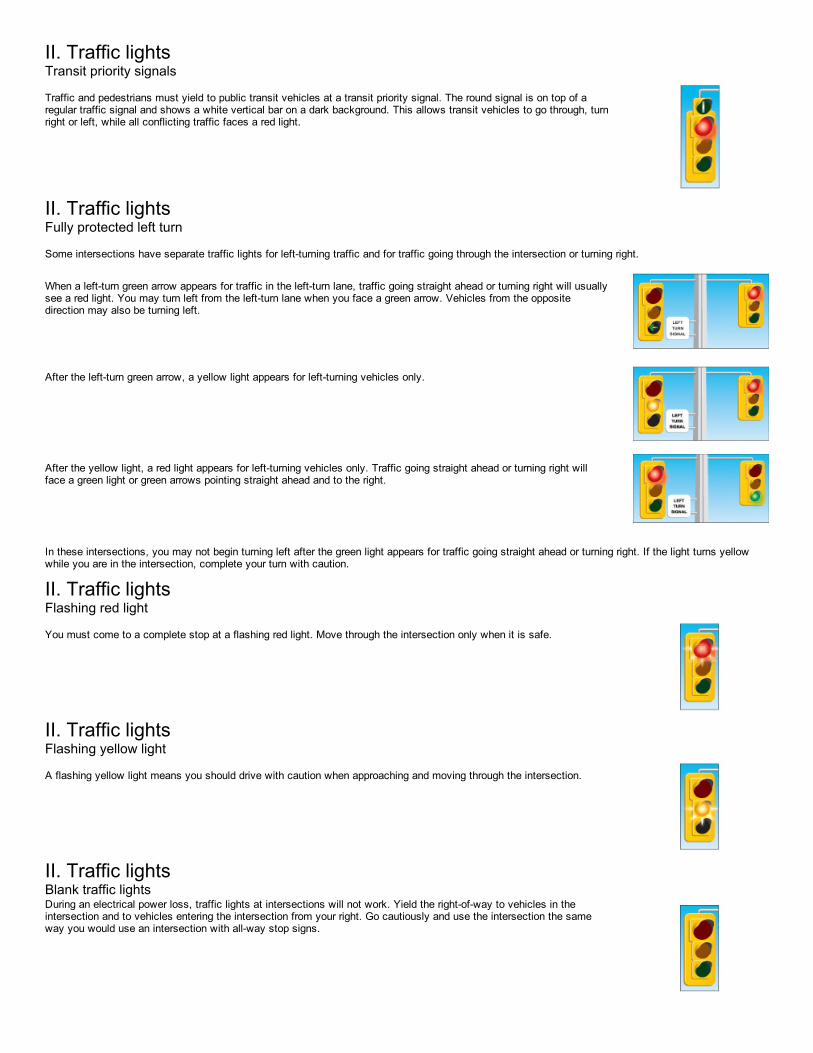
Traffic and pedestrians must yield to public transit vehicles at a transit priority signal. The round signal is on top of aregular traffic signal and shows a white vertical bar on a dark background. This allows transit vehicles to go through, turnright or left, while all conflicting traffic faces a red light.
When a left-turn green arrow appears for traffic in the left-turn lane, traffic going straight ahead or turning right will usuallysee a red light. You may turn left from the left-turn lane when you face a green arrow. Vehicles from the oppositedirection may also be turning left.
After the left-turn green arrow, a yellow light appears for left-turning vehicles only.
After the yellow light, a red light appears for left-turning vehicles only. Traffic going straight ahead or turning right willface a green light or green arrows pointing straight ahead and to the right.
You must come to a complete stop at a flashing red light. Move through the intersection only when it is safe.
A flashing yellow light means you should drive with caution when approaching and moving through the intersection.
During an electrical power loss, traffic lights at intersections will not work. Yield the right-of-way to vehicles in theintersection and to vehicles entering the intersection from your right. Go cautiously and use the intersection the sameway you would use an intersection with all-way stop signs.
II. Traffic lightsTransit priority signals
II. Traffic lightsFully protected left turn
Some intersections have separate traffic lights for left-turning traffic and for traffic going through the intersection or turning right.
In these intersections, you may not begin turning left after the green light appears for traffic going straight ahead or turning right. If the light turns yellowwhile you are in the intersection, complete your turn with caution.
II. Traffic lightsFlashing red light
II. Traffic lightsFlashing yellow light
II. Traffic lightsBlank traffic lights

Flashing red beacon
A flashing red beacon above an intersection or stop sign means you must come to a complete stop. Move through theintersection only when it is safe to do so.
Flashing yellow beacon
A flashing yellow beacon above an intersection, above a warning sign or on an obstruction in the road, warns you todrive with caution.
Pedestrian signals help pedestrians cross at intersections with traffic lights. The signal for pedestrians to walk is a whitewalking symbol. A flashing or steady orange hand symbol means pedestrians must not begin to cross.
A pedestrian facing a walk signal may cross the road in the direction of the signal. While crossing, pedestrians have theright-of-way over all vehicles.
A pedestrian facing a flashing or steady hand symbol should not begin to cross the road. Pedestrians who have alreadybegun to cross when the hand signal appears, should go as quickly as possible to a safe area. While they are crossing,pedestrians still have the right-of-way over vehicles.
II. Traffic lightsTraffic beacons
A traffic beacon is a single flashing light hung over an intersection or placed over signs or on obstacles in the road.
II. Traffic lightsChapter 3, section II - Summary
By the end of this section you should know:
The different colours and symbols that appear on traffic lights and what those meanHow to navigate turns using advanced green lights and arrowsHow to proceed when approaching flashing amber or red lightsWhat to do in situations where the traffic lights are not operating
III. Pedestrian signals
At intersections with traffic lights where there are no pedestrian signals, pedestrians facing a green light may cross. Pedestrians may not cross on aflashing green light or a left-turn green arrow.
III. Pedestrian signalsIntersection pedestrian signals
Where there are pedestrian push-buttons, a pedestrian must use the button to bring on the walk signal. Pedestrian signals give people more time to crossthan regular traffic lights. On a busy main road, an intersection pedestrian signal helps people to cross the road safely by signalling traffic to stop. Theintersection pedestrian signal has one or more crosswalks; pedestrian walk and don't walk signals; push buttons for pedestrians; and, traffic signal lightson the main road only. Stop signs control traffic on the smaller, less busy crossroad.
You must observe, obey the traffic rules and use safe driving skills to drive through these intersections. See also the section on driving throughintersections.
III. Pedestrian signalsChapter 3, section III - Summary
By the end of this section, you should know:

Yellow lines separate traffic travelling in opposite directions. White lines separate traffic travelling in the same direction.
Diagram 3-1
A solid line at the left of your lane means it is unsafe to pass. ('A' should not pass.)
Diagram 3-2
A broken line at the left of your lane means you may pass if the way is clear. ('A' may pass if there are enough brokenlines ahead to complete the pass safely.)
Diagram 3-3
What the symbols on pedestrian signals indicateWhat an intersection pedestrian signal is and what to do if you encounter one
IV. Pavement markingsPavement markings combine with road signs and traffic lights to give you important information about the direction of traffic and where you may and maynot travel. Pavement markings divide traffic lanes, show turning lanes, mark pedestrian crossings, indicate obstacles and tell you when it is not safe topass.
Broken lines that are wider and closer together than regular broken lines are called continuity lines. When you see continuity lines on your left side, itgenerally means the lane you are in is ending or exiting and that you must change lanes if you want to continue in your current direction. Continuity lineson your right mean your lane will continue unaffected.
Diagram 3-4

A stop line is a single white line painted across the road at an intersection. It shows where you must stop. If there is nostop line marked on the road, stop at the crosswalk, marked or not. If there is no crosswalk, stop at the edge of thesidewalk. If there is no sidewalk, stop at the edge of the intersection.
Diagram 3-5
A crosswalk is marked by two parallel white lines painted across the road. However, crosswalks at intersections are notalways marked. If there is no stop line, stop at the crosswalk. If there is no crosswalk, stop at the edge of the sidewalk.If there is no sidewalk, stop at the edge of the intersection.
Diagram 3-6
A white arrow painted on a lane means you may move only in the direction of the arrow.
Diagram 3-7
A pedestrian crossover is marked by two white double parallel lines across the road with an X in each lane approachingit, and overhead yellow lights. Stop before the line and yield to pedestrians.
Diagram 3-8
Ontario has a one-piece driver's licence. The licence card has a photograph and signature of the driver. All drivers in Ontario should have a one-piecelicence card.
You must carry your licence with you whenever you drive.
Two solid lines painted on the pavement guide traffic away from fixed objects such as bridge piers or concrete islands. Yellow and black markings are alsopainted on the objects themselves as warnings.
Diagram 3-9
IV. Pavement markingsChapter 3, section IV - Summary
By the end of this section, you should know:
How pavement markings are used to control trafficWhat the different colours and types of markings are used to indicate
Keeping Your Driver's Licence

In this chapter
Renewing your licenceSenior drivers age 80 or olderGraduated licensing requalificationChanging your name or addressDriver's licence lawsThe demerit point systemTable of offencesOther ways to lose your licence
Renewing your licenceYou will get a renewal application form in the mail. Take the form into any ServiceOntario Centre in the province. They are all equipped to takephotographs. You will be asked to sign the form, show identification, pay a fee and have your photograph taken. You will get a temporary licence on thespot if your application and documents are in order, and your permanent one will be mailed to you. You must carry it with you whenever you drive andproduce it when a police officer requests it.
If you do not get a renewal application form in the mail when your licence is due for renewal, call the Ministry of Transportation. You are responsible formaking sure you have a valid driver's licence. You can renew an expired car or motorcycle driver's licence within one year without taking any tests.
If your licence has been suspended, cancelled or expired for more than three years, you will be required to re-apply for a licence in Ontario and meet all therequirements of graduated licensing, including passing all the required tests.
Senior drivers age 80 or olderLicensing
If you are 80 years of age or older, you are required to renew your driver’s licence every two years. This renewal process helps keep seniors mobile andindependent longer, while helping to ensure that unsafe drivers are identified and appropriate actions are taken.
You need to undergo a driving-record review, complete a vision test and participate in a 45-minute group education session, followed by an in-classscreening component. The in-class screening component will help better assess your fitness to drive.
You may be required to pass a road test before being able to renew your licence, or you may be able to renew but will have to follow up and submitmedical information. The driver improvement counsellor at the group education session will discuss this with you.
There is no charge for any of the licence-renewal requirements. You only have to pay the licence-renewal fee.
More information that specifically addresses the concerns of senior drivers can be found at Ontario.ca/seniordriver. You can also call the Driver andVehicle Licensing Contact Centre at (416) 235-2999 or 1-800-387-3445.
How aging affects driving safety
Reduced vision - especially at nightDifficulty judging distance and speedLimited movement and range of motionSlower reaction timeDifficulty focusing attention for long periods of timeEasily distractedMore time needed to understand what you see and hearMore use of prescription and/or over-the-counter drugs that may impair your driving ability
What you can do to make your driving safer
Your health is a key factor in your ability to drive. To help you handle the demands of safe driving:
Check with your doctor or pharmacist to make sure current and new medications will not negatively affect your ability to drive. Over-the-counterdrugs and combinations of drugs can also impair your driving.Report to your doctor:
vision changes, unexplained dizziness or fainting spells;frequent, chronic or severe pain.
Avoid driving if you're experÂiencing pain. It can decrease your ability to concentrate and limit your movement behind the wheel. Have your hearing and eyes checked regularly. Peripheral vision and depth perception tend to decline over the years.Your doctor can recommend an exercise program to improve flexibility and maintain strength, which can help your ability to drive safely.Consider taking a driver's course to refresh your knowledge of the rules of the road and safe driving practices.
Ask yourself: How's my driving?
Take this test and ask yourself these questions:
Am I experiencing an increasing number of near collisions?Have I been directly involved in minor collisions?Do I have difficulty driving through intersections, judging distance or seeing pedestrians, road signs or other vehicles?Do I have difficulty concentrating while driving?Do I get lost or disoriented on familiar roads?Do I have difficulty coordinating hand and foot movements?Am I experiencing vision problems, especially at night?

Do I get nervous behind the wheel?Do other motorists frequently honk at me?Do family members express concern about my driving ability?How important is driving to me?
Your answers to these questions can help you decide whether to continue to drive, cut back to certain times such as daylight hours or stop drivingaltogether. If you have checked one or more of the warning signs and are concerned about your driving ability, talk to your doctor or family and get theiropinions.
At the group education session, you will learn more about these topics on senior driver safety.
Graduated licensing requalificationUnder graduated licensing, novice drivers (Class G1, G2, M1 and M2) progress through a two-step licensing process by completing the mandatory timeperiods for each level and passing the required road tests. Except for Class M1, novice drivers have five years to complete the graduated-licensingprocess. However, if your Class G1, G2 or M2 licence is about to expire and you have not completed the process, you can regain or retain the same classof licence by passing a test and paying the five-year licensing fee. This is called “requalification.†A notice is sent to Class G1, G2 and M2 driversbefore their licence expiry date to inform them of their options. If you do not complete the graduated-licensing process or requalify before your G1, G2 orM2 licence expires, you will not have a licence to drive, and you must reapply for a Level One licence.
Changing your name or addressYou must tell the Ministry of Transportation within six days of changing your name or address.
You will need a new licence when you change your address. You can change your address on the ServiceOntario website at www.serviceontario.ca or youcan take the change of information to a Driver and Vehicle Licence Issuing Office, or mail it to the Ministry of Transportation, P.O. Box 9200, Kingston,ON, K7L 5K4. The ministry will send you a new licence. When you get it, destroy your old licence and carry the new one with you whenever you drive.
When your name changes, you need a new licence. Take the documents you must show (see the chart on this page) and your current licence to a Driverand Vehicle Licence Issuing Office. A new photograph will be taken. You will get a temporary licence to use until your permanent licence is mailed to you.Carry it with you whenever you drive.
There is no charge for getting a new licence because you change your name or address.
The chart on this page shows the documents you will need to change the name on your driver's licence.
Driver's licence lawsIt is illegal to:
Lend your licenceLet someone else use itUse an altered licenceUse another licence as your ownHave more than one Ontario driver's licenceUse a fictitious or imitation licence
The demerit point systemThe demerit-point system encourages drivers to improve their behaviour and protects people from drivers who abuse the privilege of driving. DriversconvictÂed of driving-related offences have demerit points recorded on their records. Demerit points stay on your record for two years from the date of theoffence. If you accumulate too many demerit points, your driver's licence can be suspended.
New drivers - demerit-point system for Level One and Level Two drivers
Two or more points
You will receive a warning letter.
Six points
You may have to attend an interview to discuss your record and give reasons why your licence should not be suspended. If you do not go to the interview,your licence may be suspended.

Nine or more points
Your licence will be suspended for 60 days from the date you surrender it to the Ministry of Transportation. You can lose your licence for up to two years ifyou fail to surrender your licence. After the suspension, the number of points on your record will be reduced to four. Any extra points could again bring youto the interview level. If you reach nine points again, your licence may be suspended for six months.
As a Level One or Level Two driver, you will have your licence suspended if you accumulate nine or more demerit points during a two-year period.
Note: If you are a novice driver and are convicted of violating any novice condition, an offence that is associated with four or more demerit points orreceive a court-ordered suspension for an offence that would have resulted in four or more demerit points, you will receive the appropriate penalty andNovice Driver Escalating Sanction licence suspension. However, the demerit points will be recorded as zero on your record, and will not be countedtowards the accumulated demerit point system.
Fully licensed drivers - demerit-point system for fully licensed drivers
Six points
You will receive a warning letter recommending that you improve your driving skills.
Nine points
You may have to go to an interview to discuss your record and give reasons why your licence should not be suspended. You may also have to complete adriver re-examination. If you fail this test, your licence can be cancelled. If you fail to attend an interview, or fail to give good reasons for keeping yourlicence, your licence may be suspended.
15 points
Your licence will be suspended for 30 days from the date you hand over your licence to the Ministry of Transportation. You can lose your licence for up totwo years if you fail to surrender it. After the suspension, the number of points on your driver's record will be reduced to seven. Any extra points couldagain bring you to the interview level. If you reach 15 points again, your licence will be suspended for six months.
Table of offencesHere are the demerit points for driving offences.
Seven points
Failing to remain at the scene of a collisionFailing to stop for police
Six points
Careless drivingRacingExceeding the speed limit by 50 km/h or moreFailing to stop for a school bus
Five points
Driver of bus failing to stop at unprotected railway crossing
Four points
Exceeding the speed limit by 30 to 49 km/hFollowing too closely
Three points
Exceeding the speed limit by 16 to 29 km/hDriving through, around or under a railway crossing barrierDriving while holding or using a hand-held wireless communications/entertainment device or viewing a display screen unrelated to the driving taskFailing to yield the right-of-wayFailing to obey a stop sign, traffic light or railway crossing signalFailing to obey traffic control stop signFailing to obey traffic control slow signFailing to obey school crossing stop signFailing to obey the directions of a police officerDriving the wrong way on a divided roadFailing to report a collision to a police officerImproper driving where road is divided into lanesCrowding the driver's seatGoing the wrong way on a one-way roadDriving or operating a vehicle on a closed roadCrossing a divided road where no proper crossing is providedFailing to slow and carefully pass a stopped emergency vehicleFailing to stop at a pedestrian crossingFailing to move, where possible, into another lane when passing a stopped emergency vehicleDriving a vehicle that is equipped with or carrying a speed measuring warning device (such as a radar detector)Improper use of a high-occupancy vehicle (HOV) lane
Two points

Failing to lower headlight beamImproper opening of a vehicle doorProhibited turnsTowing people - on toboggans, bicycles, skis, for exampleFailing to obey signsFailing to share the roadImproper right turnImproper left turnFailing to signalUnnecessary slow drivingReversing on a highwayDriver failing to wear a seatbeltDriver failing to ensure infant passenger is securedDriver failing to ensure toddler passenger is securedDriver failing to ensure child is securedDriver failing to ensure passenger under 16 years is wearing seatbeltDriver failing to ensure passenger under 16 years is occupying a position with a seatbelt
Other ways to lose your licenceYour licence may also be suspended for the following reasons:
Escalating sanctionsZero Blood-Alcohol Concentration (BAC) for novice and young driversMedical suspensionDiscretionary HTA suspensionsMandatory HTA suspensionsAdministrative driver's licence suspension (ADLS)"Warn-range" suspensionNovice-driver violations
Other ways to lose your licenceEscalating sanctions
Escalating sanctions for novice drivers would apply if any of the following occurrences have taken place within a 5-year period:
Any combination of repeat violations of G1/G2/M1/M2 restrictionsConvictions for individual HTA offences carrying four or more demerit pointsCourt-ordered licence suspensions for HTA convictions that would have otherwise resulted in four or more demerit points
Escalating sanctions for hybrid drivers would apply if there is any combination of repeat violations of their novice licence (G1/G2/ M1/M2) conditions withina 5-year period.
The penalties under escalating sanctions for novice and hybrid drivers are:
30-day licence suspension for the first occurrence90-day licence suspension for the second occurrenceLicence cancellation and a requirement to re-apply for a G1/M1 after the third occurrence. Any fees paid, credit received for time spent in theprogram or BDE credit would be forfeited when the licence is cancelled. Please note that in the case of a hybrid driver, only the novice class licenceis cancelled on the third occasion, their full class licence is maintained.
A reinstatement fee is also imposed on first and second occurrence drivers.
Other ways to lose your licenceZero Blood-Alcohol Concentration (BAC) for novice and young drivers
All drivers who are 21 and under, regardless of licence class, must have a BAC level of zero when operating a motor vehicle.
If you are a novice driver and are caught with any amount of alcohol in your blood, you will receive an immediate 24-hour roadside driver licencesuspension and, if convicted, could face a fine of up to $500 and receive at least a 30-day licence suspension under the novice driver escalating sanctionsprogram.
If you are a fully licensed driver who is 21 years and under and you are caught with alcohol in your blood, you will receive a 24-hour roadside driver licencesuspension. If convicted, you could face a fine and a 30-day licence suspension.
Other ways to lose your licenceMedical suspension
By law, all doctors must report the names and addresses of everyone 16 years or older who has a condition that may affect their ability to drive safely. Forexample, addiction to alcohol or drugs are conditions that affect your ability to drive. Doctors report this information to the Ministry of Transportation and itis not given to anyone else. Your driver's licence may be suspended until new medical evidence shows that the condition does not pose a safety risk.
Other ways to lose your licence

Discretionary HTA suspensions
Your licence may be suspended by court order following conviction for the following:
If you don't tell the truth in an application, declaration, affidavit or paper required by the Highway Traffic Act, its regulations or the Ministry ofTransportationIf you don't tell the truth about vehicle liability insuranceIf you fail to insure your vehicleIf you are convicted of some driving offences, included careless driving and driving 50 km/h or more over the speed limitIf you repeatedly travel at 50km/h or more over the speed limit
Drivers can be suspended for up to 30 days for a first offence, up to 60 days for a second offence, and up to one year for a third or subsequent offencewithin a five-year period.
Other ways to lose your licenceMandatory HTA suspensions
Your licence will be suspended:
If you are convicted of failing to stop for a police officer and the court believes you wilfully avoided police during pursuit - that you tried to escapethe police, a Criminal Code offence, with a licence suspension for a minimum of five yearsIf you don't pay a traffic fine when ordered by the court
Other ways to lose your licenceAdministrative driver's licence suspension (ADLS)
Your licence will be suspended immediately for 90 days:
If your BAC is more than 80 milligrams in 100 millilitres of blood (.08)If you fail or refuse to give a breath, blood, oral fluid or urine sample when asked by policeIf you fail or refuse to perform physical co-ordination tests or to submit to a drug evaluation when required by police
This suspension takes effect while you are still at the roadside or at the police station. It is an administrative suspension and is separate from any criminalcharges or prosecution that may also take place.
An administrative monetary penalty is also imposed on drivers who receive an ADLS.
Other ways to lose your licence"Warn-range" suspension
Drivers who register a blood-alcohol concentration in the “warn range†of .05 to .08 pose an immediate danger to themselves and other road users. Ifcaught driving in the warn range, you will receive an immediate driver's licence suspension at the roadside:
For three days for a first occurrenceFor seven days for a second occurrence and you must undergo a remedial alcohol education programFor 30 days for a third or subsequent occurrence in a five-year period, and you must undergo a remedial alcohol-treatment program and have anignition interlock condition placed on your licence for six months. If you choose not to install an ignition interlock device, you must not drive until thecondition is removed from your licence.An administrative monetary penalty is also imposed on drivers suspended for registering in the warn range.
Other ways to lose your licenceNovice-driver violations
Drivers holding G1, G2, M1 or M2 licences must follow the specific rules for their class of licence. If you violate any of the graduated-licensing conditionsfor your class of licence, your licence will be suspended for 30 days. This suspension takes effect from the time you surrender your licence on or after thedate of the suspension. You can lose your licence for up to two years if you fail to hand over your licence.
Other ways to lose your licenceYour licence will be cancelled:
If you fail a driver's re-examinationIf you don't pay your reinstatement fee or administrative monetary penalty following a suspensionIf your cheque for licence fees is not honoured by your bankIf you voluntarily surrender your driver's licence to the Ministry of Transportation or it is surrendered or returned by another jurisdiction
Other ways to lose your licenceCriminal Code suspensions
You will receive a one-year licence suspension the first time you are convicted of a Criminal Code offence.
If you are convicted of a second Criminal Code offence, your licence will be suspended for three years. A third Criminal Code offence will get you a

lifetime suspension from driving with the possibility of reinstatement after 10 years only if you fulfill certain requirements. Fourth time offenders convictedof a Criminal Code offence are suspended from driving for life with no possibility of reinstatement.
Convictions will remain on your driver's record for a minimum of 10 years. The court can order a longer suspension if it believes that keeping you off theroad will improve safety.
Your licence will be suspended if you are convicted of any of the following Criminal Code offences:
Driving or having care and control of a vehicle while your ability is impaired by alcohol or drugsRefusing to submit to a breath test for alcoholFailing or refusing to provide a breath sample for roadside testingDriving or having care and control of a vehicle when your blood-alcohol concentration is more than 80 milligrams per 100 millilitres of blood (.08)Driving or having care and control of a boat, motorized or not, when your blood-alcohol concentration is more than 80 milligrams per 100 millilitres ofblood (.08)Failing to remain at the scene of a collision to escape criminal or civil liabilityDangerous drivingCausing bodily harm by criminal negligenceCausing death by criminal negligenceFailing to stop for police
Other ways to lose your licenceRemedial measures
There are several types of remedial measures. The mandatory Back on Track program is for all drivers convicted of impaired driving-related Criminal Codeoffences. For drivers who repeatedly blow in the warn range of .05 to .08, there is a mandatory alcohol education for a second suspension, which must becompleted within 120 days of the suspension, or an alcohol-treatment program for a third or subsequent suspension. This must be completed within 180days of the suspension. A driver improvement interview is required for drivers convicted of non-impaired driving-related Criminal Code offences. If yourdriver's licence has been suspended because of a Criminal Code conviction, your licence will remain suspended until you have completed the remedialrequirements.
Other ways to lose your licenceDriving under suspension
You may not drive, under any circumstances, when your licence is suspended. If you are convicted of driving while your licence is suspended for an HTAoffence you will have to pay a fine of $1,000 to $5,000 for a first offence and $2,000 to $5,000 for a subsequent offence. (A “subsequent†offence iswhen you are convicted again within five years.) The court can order you to spend up to six months in jail, or you may have to pay a fine or do both. Sixmonths will be added to your current suspension as well.
If you are found guilty of driving while your licence is suspended for a Criminal Code offence, you face a fine of $5,000 to $25,000 for a first offence and$10,000 to $50,000 for a subsequent offence within five years. You also face an additional suspension (one year for a first offence; two years for asubsequent offence) under the HTA and up to two years in prison and athree-year licence suspension under the Criminal Code.
Other ways to lose your licenceDriving while prohibited
This is a prohibition order under the Criminal Code conviction. When convicted of violation of the order, you will get a suspension of one year for a firstoffence or two years for a subsequent offence. Courts can order longer prohibition, which will be matched in length by a suspension under the HighwayTraffic Act.
Note: Suspended drivers must pay $150 to have their licence reinstated. This fee does not apply to reinstatement following a medical or administrativesuspension of your driver's licence.
Other ways to lose your licenceVehicle Impoundment Program
To counter the dangerous behaviours of impaired and suspended driving, Ontario law includes seven-day vehicle impoundments for:
Drivers operating a vehicle while under a Highway Traffic Act licence suspension (excluding suspensions for defaulted fines or medical conditions)Drivers required to have a vehicle ignition interlock device and are caught driving without such a deviceAll drivers caught with a blood-alcohol concentration over 0.08 or who fail/refuse to comply with a demand made by a police officer under theCriminal Code of Canada
If you are caught driving while your licence is suspended for a Criminal Code offence, the vehicle you are driving will be impounded for a minimum of 45days. These vehicle impoundments apply regardless of whether the vehicle is borrowed from a friend or family member, used for business or employmentpurposes, rented or leased. The owner of the vehicle must pay the towing and storage costs before the vehicle will be released. This program applies to allmotor vehicles, including passenger vehicles, motorcycles, trucks and buses.
The Vehicle Impoundment Program makes vehicle owners responsible for ensuring that anyone driving their vehicles is not suspended. People loaning orrenting their vehicles can verify that a driver's licence is valid by phone at 1-900-565-6555 or online at www.mto.gov.on.ca. You can also get a driver'sabstract at any Service Ontario centre. There is a nominal fee for each licence checked.
Other ways to lose your licenceImpaired driving

The police can stop any driver to determine if alcohol or drug testing is required. They may also do roadside spotchecks. When stopped by the police, you may be told to blow into a machine that tests your breath for alcohol, aroadside screening device, or perform physical co-ordination tests. If you fail or refuse to provide a breath sample or toperform the physical co-ordination tests, you will be charged under the Criminal Code.
If you cannot give a breath sample or it is impractical to obtain a sample of breath, the police officer can require you toprovide a blood sample instead.
If the police believe that a driver is impaired because of the consumption of a drug or a combination of alcohol and adrug, they can also require a driver to submit to a drug evaluation and then require a driver to provide blood, oral fluid orurine samples. If you fail or refuse to comply with any of these demands, you will be charged under the Criminal Code.
Driving impaired or with more than 80 milligrams of alcohol in 100 millilitres of blood (.08) is an offence under theCriminal Code. Even if your blood alcohol concentration is less than .08, you can still be charged with impaired drivingunder the Criminal Code.
You will receive an immediate 90-day administrative driver's licence suspension if your blood-alcohol concentration ismore than .08, or if you fail or refuse to provide a breath or bodily fluid sample, perform a physical co-ordination test orsubmit to an evaluation. You will also be subject to an immediate seven-day vehicle impoundment.
If you register a BAC from .05 to .08 (known as the “warn rangeâ€), you will receive an immediate driver's licencesuspension. For a first occurrence, you will be suspended for three days. For a second occurrence in a five-year period,you will be immediately suspended for seven days and you must undergo a remedial alcohol-education program. For athird or subsequent time in a five year period, you will be immediately suspended for 30 days and you must undergo aremedial alcohol-treatment program and have an ignition interlock condition placed on your licence for six months. If youchoose not to install an ignition interlock device, you must not drive until the condition is removed from your licence. Ifthere is no one else available to drive and no safe place to park your vehicle, it will be towed at your expense.
If you are 21 years of age and under and hold a full-class driver's licence, you must not drive if you have been drinkingalcohol. Your blood-alcohol level must be zero. If you are caught driving with alcohol in your blood, you will receive animmediate driver's licence suspension at the roadside for 24 hours and, if convicted, you will face a fine of up to $500and a 30-day licence suspension.
Drivers of all ages in either Level One or Level Two of Ontario's graduated-licensing system must also have a blood-alcohol level of zero when driving. New drivers caught drinking and driving will receive an immediate driver's licencesuspension at the roadside for 24 hours and, if convicted, will face a fine of up to $500 and will receive a suspensionperiod as per the Novice Driver Escalating Sanctions scheme. For the first occurrence, you will be suspended for 30days. For the second occurrence, in a five-year period, you be suspended for 90 days. For the third occurrence in a five-year period, the novice portion of your driver's licence will be cancelled, and you must reapply for a G1 licence.
Novice drivers will also be charged under the Criminal Code if their BAC exceeds .08 and will be issued a warn-rangesuspension if they register a BAC from .05 to .08.
Diagram 4-1
Impaired driving, which means driving when your ability is affected by alcohol or a drug, is a crime in Canada. Your vehicle does not even have to bemoving; you can be charged if you are impaired behind the wheel, even if you have not started to drive.
Other ways to lose your licenceAlcohol
Other ways to lose your licenceDrugs
Any drug that changes your mood or the way you see and feel about the world around you will affect the way you drive. Criminal Code and HTA sanctionsapply to drivers impaired by alcohol or a drug.
In circumstances involving possible impairment by drugs or a combination of alcohol and a drug, police can require a driver to perform physical co-ordination tests and submit to a drug evaluation, and then require a driver to provide blood, oral fluid or urine samples. If you fail or refuse to comply withany of these demands, you will be charged under the Criminal Code. You will also receive an immediate administrative driver's licence suspension, and besubject to an immediate seven-day vehicle impoundment.
Illegal drugs such as marijuana and cocaine are not the only problem. Some drugs that your doctor may prescribe for you and some over-the-counter drugscan also impair your driving. Here are some points you should remember:
If you use prescription medicines or get allergy shots, ask your doctor about side effects such as dizziness, blurred vision, nausea or drowsinessthat could affect your driving.Read the information on the package of any over-the-counter medicine you take. Any stimulant, diet pill, tranquillizer or sedative may affect yourdriving. Even allergy and cold remedies may have ingredients that could affect your driving.Drugs and any amount of alcohol together can have dangerous effects, even several days after you have taken the drug. Do not take a chance; askyour doctor or pharmacist.
Other ways to lose your licenceConsider the consequences of impaired driving
Ontario leads the way in combating drinking and driving through some of the toughest laws and programs in North America, including licence suspensions,heavy fines, vehicle impoundment, mandatory alcohol education and treatment programs, and the ignition interlock program. Depending on your number ofprior convictions, you may be fined up to $50,000, serve time in jail or lose your licence permanently.

For impaired driving that causes injury or death, the penalties are even more severe. If you are convicted of impaired driving causing bodily harm, you maybe sentenced to up to 14 years in prison. Impaired driving causing death can carry a sentence of imprisonment for life.
If you drink and drive and are involved in a collision, you may suffer serious injury or cause serious injury to someone else. Your insurance company mightnot pay for your medical or rehabilitation costs, or for the damage to your or the other person's vehicle. Your insurance costs may rise significantly. Youmay have to pay substantial legal costs as well.
If you are required to drive on the job, a licence suspension could mean losing your job.
Other ways to lose your licenceMandatory alcohol education and treatment
If you are convicted of an impaired driving-related Criminal Code offence, you must complete an alcohol-education-and-treatment program during yourlicence suspension, also referred to as a remedial measures program.
If you are convicted of a drinking-and-driving-related Criminal Code offence, you must take the impaired-driving-program called Back on Track, delivered bythe Centre for Addiction and Mental Health. The three-part program, which is available across the province, involves assessment, education or treatment,and follow-up. You must pay for the program. If you have not completed the Back on Track program by the time your Criminal Code suspension expires,your licence will be further suspended until you have completed the remedial requirements.
This program also applies to Ontario residents convicted of driving-related Criminal Code offences in any other province of Canada, or equivalent offencesin the states of Michigan and New York, as well as to out-of-province drivers who are convicted in Ontario.
If your driver's licence has been suspended for driving in the warn range of .05 to .08 for a second time in a five-year period, you must complete a remedialalcohol-education program in 120 days from the date of the suspension. For a third or subsequent occurrence of driving in the warn range, you mustcomplete a remedial alcohol treatment program within 180 days from the date of the suspension. You must pay for these remedial programs, which arealso delivered by the Centre for Addiction and Mental Health. Failure to complete the required remedial program within the specified time period will resultin a licence suspension until the remedial program is completed.
Other ways to lose your licenceDriver improvement interview
The other remedial measures program is for drivers convicted of non-drinking-and-driving related Criminal Code offences who have no previous alcohol-related convictions. You must undergo a Ministry of Transportation driver-improvement interview.
If you have not completed the driver improvement interview by the time your Criminal Code suspension expires, your licence will be further suspended untilyou have completed the remedial requirements.
This program also applies to Ontario residents convicted of driving-related Criminal Code offences in any other province of Canada, or equivalent offencesin the states of Michigan and New York, as well as to out-of-province drivers who are convicted in Ontario.
Other ways to lose your licenceIgnition interlock
An ignition interlock device is an in-car, breath-screening device. It prevents a vehicle from starting if a blood-alcohol concentration is over a pre-set limit of20 milligrams of alcohol per 100 millilitres of blood (.02).
If you are convicted of an impaired driving offence under the Criminal Code of Canada, after serving a licence suspension, completing a mandatoryremedial measures program and meeting all licensing conditions, you will be eligible to have your driver's licence back. At that time, an ignition interlockcondition is placed on your Ontario driver's licence, which means that you must install an ignition interlock device in your vehicle.
If you choose not to install a device, you must not drive until the condition is removed from your licence. Drivers caught without a required ignition interlockdevice will have their cars impounded for seven days. If you are required to complete a road test while the ignition interlock condition is on your licence,you must complete a road test in a vehicle equipped with the device.
You must apply to the Ministry of Transportation to have the condition removed from your licence. If you have completed the minimum period (one year orthree years) without any program violations such as tampering or driving without an appointment with the service provider, the ignition interlock conditionwill be removed. If you do not apply for removal of the licence condition, it will remain on your licence indefinitely.
If it is your first conviction, you may be eligible to participate in the Reduced Suspension with Ignition Interlock Conduct Review Program. This programwill allow eligible drivers to reduce their licence suspension in return for meeting specific requirements, such as the mandatory installation of an approvedignition interlock device in their vehicle.
As a vehicle owner, you must not allow a person with an ignition interlock condition to drive your vehicle or you could be convicted of an offence under theHighway Traffic Act. You can find out if a driver has an ignition interlock condition on his or her licence by accessing MTO's website atwww.mto.gov.on.ca or by calling 1-900-565-6555. There is a fee for each licence check.
If your driver's licence has been suspended for driving in the warn range of .05 to .08 for a third or subsequent time in a five-year period, you will also havean ignition interlock licence condition placed on your licence for 6 months. More information on the Program is available on the MTO website.
Other ways to lose your licenceChapter 4 - Summary
By the end of this section, you should know:
Your responsibility to maintain a valid driver's licence with the most correct and up-to-date information

All motor vehicles on Ontario roads must be registered, insured and maintained to meet certain basic safety standards. If you own a vehicle, you areresponsible for making sure it meets the requirements. People who buy and sell vehicles also have certain responsibilities.
How the demerit-point system works for new and fully licensed driversThe driving offences that result in a loss of points upon conviction.Common circumstances where your licence can be cancelled or suspendedHow alcohol and drugs affect your ability to driveThe consequences that can result from a suspended licence including reinstatement fees, remedial measures, ignition interlock, vehicleimpoundment and jail time
Your Vehicle
In this chapter
Maintaining your vehicleVehicle insurance and registrationBuying or selling a used vehicleTowingTest yourself - Sample knowledge test questions
I. Maintaining your vehicleIt is illegal to drive a vehicle in dangerous condition. But maintaining your vehicle also makes sense from an economic point of view: it can mean bettergas mileage and a better price when you sell it. Maintaining your vehicle also helps to protect the environment.
A police officer or Ministry of Transportation inspector can examine your vehicle, its equipment and any trailer attached to it, at any time. If the vehicle isfound to be unsafe, it may be taken off the road until the problem is fixed. If you refuse to allow the examination, you can be fined up to $1,000. If thevehicle is then found to be unsafe, your licence plates can be taken away.
The following driver habits and regular maintenance will help keep your vehicle fit and safe.
I. Maintaining your vehicleDriver Habits
Diagram 5-1
Driver habits are the things that you can do whenever you drive a vehicle. If you identify any concerns or deficiencies, further investigation or actions,including inspection and repair by a qualified mechanic, should be considered. The vehicle's owner manual often has detailed information on what to lookfor when inspecting your vehicle and how to address minor problems.
When approaching your vehicle look for signs of:
Fresh damageFluid leaks underneathUnder-inflated or flat tiresAjar doors, hood, trunk and fuel door/capUnsecured loadsCheck for ice, snow, or dirt that may interfere with vehicle lighting, steering, driver visibility, or become a hazard to other motorists should it comefree from your vehicle
From the driver's seat and before driving, look for:
Unobstructed visibility around entire vehicleBurned-out or dim headlampsIlluminated dashboard warning lights during engine start, then going out

The type of tires you have and the way they are made are critical for good traction, mileage and safety. Keep thesepoints in mind when you buy or replace tires, and check your vehicle owner's manual or the tire manufacturer's guide forrecommendations.
Tires must meet standards described in the Canadian Motor Vehicle Safety Act. Tires deteriorate with age, even whennot in use. Aged tires have reduced traction, are more prone to cracking and may fail unexpectedly while in use. Tiresshould not be older than 10 years. Some tire and vehicle manufacturers have issued recommendations for replacing tiresfrom six years of age. Consumers are advised to check with their tire or vehicle manufacturer for specific guidance. Theage of the tire can be determined by checking the identification number on the sidewall that begins with the letters “DOT.†The last four digits represent the week and year the tire was manufactured.
Replace tires when the tread is less than 1.5 millimetres deep or when tread-wear indicators touch the road.Vehicles that weigh more than 4,500 kilograms must replace their front tires when tread is less than threemillimetres deep.Replace tires that have bumps, bulges, knots, exposed cords or tread and sidewall cuts deep enough to exposecords.Any tire on a vehicle must not be smaller than the vehicle manufacturer's specified minimum size. And it mustnot be so large that it touches the vehicle or affects its safe operation.Use similar tires on all four wheels. Some combinations are illegal, including: radial-ply tires on the front and bias-ply or belted bias-ply on the rear; a mix of 50 or 60 series tires on the front with any other mixture on the rear; anda combination of types or sizes on the same axle, unless the types and sizes are equivalent by industrystandards. This does not apply to a single spare tire used in an emergency.Any tire with the wording “not for highway use,†“farm use only,†“competition circuit only,†“NHS,†“TG,†“SL†or any other words that mean the tire is not for use on the road must not beused on a vehicle that travels on a public highway.Winter tires or all-weather tires are not required by law. To provide the best traction during the winter season, it isrecommended that your vehicle be equipped with four winter or all-weather tires with the same tread pattern. Ifusing only two winter tires, regardless of whether the vehicle is front, rear or all-wheel drive, these should beinstalled on the rear axle for best vehicle stability in turns and during braking.If you live in northern Ontario, you can legally use studded tires on your vehicle. Research shows that studdedtires are more effective than other tires under icy conditions, particularly on wet ice. Overall, winter tires performbetter than conventional all-season tires under all winter-time conditions.Scrap tires are a serious environmental concern. Proper maintenance will extend the life of a tire and delay its
Diagram 5-2
Loose objects in the vehicle
While driving, be alert for:
Unusual engine or exhaust noisesSqueaking or grinding noises when applying the brakesDashboard warning lights coming on
When planning an extended trip, perform more detailed checks, including:
Windshield wipers and washer-fluid levelTire pressures, condition and wearAll lights workUnder the hood when the engine is cold; oil and coolant levels, obvious defects with belts, hoses, and possible leaks. Using the vehicle owner'smanual for more information on what to look forHaving your vehicle thoroughly inspected by a qualified mechanic
I. Maintaining your vehicleRegular Maintenance
In order to keep your vehicle running smoothly, vehicle manufacturers often establish a schedule for regular maintenance. Scheduling of this work isnormally based upon accumulated vehicle mileage or time intervals (whichever comes first). Further details may be found in the vehicle's owner's manual.Regular maintenance may include oil and filter change, other fluid checks and changes, air and fuel filter replacement, tire rotation and brake inspection.Periodically, more intensive mechanical servicing such as engine adjustments and timing-belt replacement may be required.
I. Maintaining your vehicleWinter maintenance
A well-maintained vehicle will generally start in all weather conditions. However, whenever possible, shelter your vehicle from direct contact with rain orsnow when it is parked because even the best maintained vehicle can't run if the engine is soaked.
Carry emergency supplies. These should include a shovel, a bag of sand or kitty litter, booster cables, emergency flares or warning lights, a blanket and achain for towing. Always carry extra windshield washer fluid in the winter and refill the container when necessary.
Cold weather puts extra strain on your vehicle's systems. With lights, heater, defroster and radio all working at once, batteries do not get a good charge atidle speed. If idling in traffic for long periods, shift to neutral and rev the engine gently. Have your battery checked and terminals cleaned at least twiceduring the winter.
Faulty exhaust systems are especially dangerous in the winter when drivers are more likely to drive with windows and vents closed. Have your exhaustchecked if it sounds noisy or rattles.
I. Maintaining your vehicleTires

disposal. Some tips for longer wear: maintain the right air pressure; inspect tires for wear; rotate tires regularly;and practise good driving habits.
II. Vehicle insurance and registrationInsuranceRegistrationNew residents
II. Vehicle insurance and registrationAuto insurance - it's the law!II. Vehicle insurance and registrationRegistration
Vehicle registration includes licence plates and a vehicle permit. Licence plates in Ontario are based on a plate-to-owner system. This means that vehiclelicence plates move with the vehicle owner, not the vehicle. When you sell or change vehicles, you must remove your plates. If you do not intend to usethem on another vehicle, you may return your plates to a ServiceOntario centre.
Your vehicle permit must have an accurate description of your vehicle. This means that, if you change your vehicle, such as the colour, you must report itat a ServiceOntario centre within six days.
If you own a vehicle and you change your name or address, you must notify the Ministry of Transportation within six days. You can do this in person at aServiceOntario centre, on the ServiceOntario website at www.serviceontario.ca, or by mail, using the change-of-information stub attached to your vehiclepermit.
II. Vehicle insurance and registrationNew residents
New Ontario residents have 30 days to register their vehicles. To get a permit and Ontario licence plates, go to a ServiceOntario centre. You must bringalong:
A safety standards certificateProof of insuranceVehicle Import Forms, if you have brought the vehicle in from another countryThe vehicle permit, or ownership, from where you used to liveProof of passing a Drive Clean vehicle emissions test, if a test is required. To find out if your vehicle needs one, visit www.driveclean.com or callthe Drive Clean Contact Centre at 1-888-758-2999. Out-of-province callers may call 1-905-440-7482 (charges apply).
III. Buying or selling a used vehicleIf you are selling a used vehicle privately in Ontario, you must buy a used vehicle information package. This applies to the private sale of any car, van,light truck, motor home, moped, limited-speed motorcycle or motorcycle. The package is available from any ServiceOntario centre or online atwww.serviceontario.ca.
The package, which the seller must show to potential buyers, is a description of the vehicle, its registration and lien history in Ontario, and the averagewholesale and retail values for its model and year. It also includes information about retail sales tax.
As well as giving the buyer the used vehicle information package, sellers must remove their licence plates, sign the vehicle transfer portion of their permitand give it to the buyer. Sellers must keep the plate portion of the permit.
The vehicle will remain registered in the seller's name until the transfer is completed. Sellers have the option to report the vehicle as “Sold†at aServiceOntario centre.
The buyer must take the package and the vehicle portion of the permit to a ServiceOntario centre to register as the new owner within six days of the sale.Failure to transfer the vehicle within six days is an offence under the Highway Traffic Act.
Before buyers can put their own plates on their new vehicle, they must have:
Their licence plates validatedThe vehicle portion of the permit issued for the vehicleTheir own licence-plate number recorded on the plate portion of the vehicle permitA valid safety standards certificateThe minimum insurance required under the Compulsory Automobile Insurance ActProof of passing a Drive Clean vehicle emissions test may be required, as used vehicles usually need a Drive Clean pass to register license platesunder the new owner. However, exemptions apply. Visit the Drive Clean website at www.driveclean.com to see if your vehicle needs a test or toview the Drive Clean emissions-test history of a vehicle.
III. Buying or selling a used vehicleSafety standards certificate
A safety standards certificate is a document that certifies a vehicle's fitness. You can buy and register a vehicle without a safety certificate, but youcannot put your own plates on the vehicle or drive it without one. Any inspection station in Ontario licensed by the Ministry of Transportation can issue asafety standards certificate, provided your vehicle passes an inspection. Many garages are licensed - look for a sign saying it is a Motor Vehicle Inspection

Under the Mandatory Vehicle Branding Program, insurers, self-insurers (fleet owners), auctioneers, importers, salvagersand anyone who deals in used vehicles are required to determine whether severely damaged and written off (“totallossâ€) vehicles they insure or obtain should be branded either “Irreparable†or “Salvage.†They must notifythe ministry of the brand through a Notification of Vehicle Brand form. The ministry applies the brand to the vehicle'sregistration information so that it will appear on the vehicle permit, vehicle abstracts and the used vehicle informationpackage for that vehicle. The brand identifies the condition of the vehicle to potential buyers. This is how the programhelps to protect consumers buying used vehicles.
If your vehicle sustains severe damage and is written off by your insurance company, they must notify you and theministry of the brand requirement. If you do not receive a claim settlement through an insurance company, you musthave the brand determined by an authorized mechanic at a Type 6 Motor Vehicle Inspection Station. The ministrywebsite has a list of these facilities; www.mto.gov.on.ca for details.
There are four brands:
A vehicle that has never had a brand applied in Ontario automatically has the brand “None†applied to itsregistration documents. However, this does not mean that the vehicle has never been damaged in a collision,was never branded in another jurisdiction or was not rebuilt prior to the mandatory branding program.The brand “Irreparable†means that damage to the vehicle was so severe that the vehicle can be used forparts or scrap only. It cannot be rebuilt, and it can never be driven in Ontario.The brand “Salvage†means that the damaged vehicle can be repaired or rebuilt. It cannot be registered as fitto drive in Ontario. Once the vehicle has been repaired or rebuilt, and if it can pass a structural inspection toministry standards, the owner can obtain a structural inspection certificate and have the vehicle branded as “Rebuilt.â€The brand “Rebuilt†means that the vehicle has been previously branded as “Salvage,†but has beenrebuilt and has passed a structural inspection to ministry standards. If the vehicle can pass a safety inspection(safety standards certificate), the owner can have it registered as fit to drive in Ontario.
Motorcycles that have been written off must be branded 'Irreparable'; they cannot be branded 'Salvage'.
Trailers, traction engines, farm tractors, motor assisted bicycles, motorized snow vehicles, street cars or motor vehicleswith a model year of 1980 or earlier are exempt from the mandatory branding program.
Station.
A safety standards certificate is valid for 36 days after the inspection. However, the certificate is not a guarantee or warranty that the vehicle will stay fitfor any period.
III. Buying or selling a used vehicleMandatory Vehicle Branding Program
III. Buying or selling a used vehicleOntario's Drive Clean program
Vehicles are a major domestic source of smog-causing emissions in Ontario. Drive Clean, administered by the Ministry of the Environment, reduces smog-causing pollutants from vehicles by testing them to identify emissions problems and requiring vehicles to be repaired.
Effective September 1, 2011, changes to the program exempted some vehicles from testing:
Vehicles are tested for registration renewal at seven years of age, instead of five.Light-duty vehicles no longer require a test for family transfers and lease buyouts by the lessee, unless the test is normally scheduled for that year.No test is required for licence renewal if your light-duty vehicle passed the test in the previous calendar year.Vehicles plated “Historic†no longer require testing.
If your vehicle registration expired before September 1, 2011, the previous rules apply.
Light-duty Vehicles (weigh less than 4,500 kilograms)
Most passenger cars, vans, and light trucks registered in the southern Ontario Drive Clean area must pass a test every two years in order to renew licenceplates. Visit the website for details on exemptions and the conditional pass.
Heavy-duty Vehicles (commercial vehicles weighing 4,500 kg or more)
Diesel trucks and buses registered anywhere in the province and non-diesel vehicles registered in the southern Ontario Drive Clean area must be testedevery year and be fully repaired. An incentive is available to encourage maintenance.
For more information about Drive Clean, visit www.driveclean.com.
IV. TowingThis chapter tells you what you need to know to tow a trailer behind a car, van or small truck in Ontario. This includes licence and registrationrequirements, trailer size and characteristics, as well as safety tips to follow when towing a trailer.
Before you attempt to tow a trailer, consider the size, power and condition of your vehicle. Make sure it is capable of towing both the trailer and the loadyou intend to carry, and that your trailer and hitch meet all the requirements described in this chapter.
Towing a trailer brings unique challenges to drivers. Almost half of the reported collisions while towing a recreational vehicle are single-vehicle collisions.Another 20 per cent involve rear-end collisions. In collisions where the driver was determined to be at fault, about 30 per cent of the drivers had “lost

control†of their vehicle.
IV. TowingLicence and permit
You must have a valid driver's licence (Class G1, G2 or G) or higher class of licence to tow a trailer with a gross vehicle weight of up to 4,600 kilograms. Ifyour trailer and load exceeds the size and weight specified in the Highway Traffic Act, you may need a higher class of licence or an oversize vehiclepermit to tow it. Oversize permits are available at some ServiceOntario centres.
It is against the law to tow more than one trailer behind non-commercial vehicles.
IV. TowingRegistering your trailer
A trailer is considered a separate vehicle. Before you can tow one on any public road, you must register it and pay a one-time registration fee at aServiceOntario centre. When you register your trailer you will receive a licence plate and vehicle permit. Attach the licence plate to the back of your trailerwhere it is clearly visible. Always carry your permit, or a copy of it, to show to a police officer when asked.
IV. TowingMake sure your trailer is in good condition
Your trailer must be in safe operating condition. If it is not, a police officer may remove your trailer from the road until it is made safe to operate.
IV. TowingBrakes
If your trailer has a gross trailer weight, vehicle and load of 1,360 kilograms or more, it must have brakes strong enough to stop and hold the trailer.
IV. TowingLights
Your trailer must have:
a white licence plate lighta red tail lighttwo red reflectors at the rear of the trailer, as far apart as possible
If your trailer is wider than 2.05 metres, it must also have:
two yellow clearance lights, one on each side at the front of the trailer, as far apart as possible, to let drivers coming toward you know the width ofyour trailertwo red clearance lights, or reflectors, one on each side at the rear of the trailer, as far apart as possible, to let drivers behind you know the width ofyour trailer
Your trailer must have mud guards, fenders and flaps or be designed in such a way that it does not spray or splash traffic travelling behind you.
If the load in your trailer blocks your vision to the rear, you must have additional mirrors that provide a clear view of the road to the rear. Load your trailercarefully so that nothing comes loose or falls off while you are moving.
IV. TowingAttaching your trailer
Your trailer must have two separate ways of attaching to your vehicle so that if one fails or comes loose, the trailer will stay attached.
If safety chains are used, they must be crossed under the tongue to prevent the tongue from dropÂping to the road if the primary hitch accidentallydisconnects. The chain hooks must have latches or devices that will not accidentally become detached.
IV. TowingNo passengers
You may not carry any person in any trailer, including a house or boat trailer, when it is being towed.
IV. TowingTrailer hitch
Use a good-quality trailer hitch. The class of trailer hitch you use depends upon the gross weight of your trailer - the gross weight being the total weight ofthe trailer and its load. Make sure you use the right trailer hitch for the weight of your trailer. It should be securely attached to your vehicle following themanufacturer's recommendations.

The hitch-ball should be installed so that when the trailer is attached and tightened, it is level with no tilting. If the hitch pulls down the rear of your vehicle,you may need to use a load-equalizing trailer hitch. You may also be able to shift some of the load in the trailer to the rear to reduce the load on the rear ofyour vehicle.
In addition to a ball and hitch, be sure to use safety chains or cables strong enough to hold the trailer and load, in case the ball and hitch accidentally comeapart.
TowingLoading your trailer
Diagram 5-4-1
When loading your trailer, strap everything down inside, as well as outside. It is an offence to have a load that may become dislodged or fall off. Do notoverload your trailer. Too much weight in the trailer can put a strain on your vehicle and damage your tires, wheel bearings and axle. When carrying a boaton a trailer, do not carry cargo in the boat unless your trailer is designed and equipped for the extra weight.
The distribution of the weight in your trailer is also very important. Generally, more of the trailer load should be in front of the trailer axle than behind it forproper hitch weight. About five to 10 per cent of the trailer's total weight should be supported on the hitch, within the weight limit marked on the hitch. Poorload balance can cause your trailer to sway or fishtail. The ball and hitch may also become separated, especially if there is too much weight in the rear ofthe trailer.
Heavy and improperly placed loads can pull down the rear of your vehicle, lifting the front end and affecting your steering, especially in wet and slipperyconditions. It may also affect the aim of your headlights so that your low beams blind approaching drivers. The alignment of your mirrors may also beaffected.
IV. TowingStarting out
Before each trip, check the trailer hitch, wheels, tires, lights, load distribution and load security to make sure they are safe. Check your tire pressure withthe trailer loaded while the tires are still cold. When you start to drive, accelerate carefully. Drive slowly and carefully.
IV. TowingCurves and turns
Stay close to the middle of your lane when taking a curve. When making a right turn, check traffic. Look in your right mirror. Signal and slow down. If theturn is sharp, move ahead until your vehicle's front wheels are well ahead of the curb before turning to the right.
When making a left turn, check traffic. Signal. Proceed slowly. When you make your turn, swing wide by driving well into the intersection before turning.
IV. TowingSlowing down and stopping
A sudden stop can cause your trailer to jackknife or slide sideways or the load to shift. To avoid sudden stops, increase the following distance betweenyou and the vehicle ahead. Keep out of the fast lanes and maintain a speed that will allow you to slow down and stop smoothly in any situation.
IV. TowingPassing
You cannot accelerate as quickly when you are towing a trailer. You also need more space because the length of your vehicle is much longer with a trailerattached. Before you pass, make sure you have enough time and room to complete the pass. Once you have passed, allow more room before you moveback to your lane. Do not cut back into the lane too soon. This can cause your trailer to sway and make it difficult to control.
IV. Towing

Being passed
If you are holding up a line of traffic, signal, pull over and let the other vehicles pass. Fast-moving trucks and buses create a strong air disturbance behindthem. If a large bus or truck passes you, the wall of wind behind it may whip your trailer to the side, pushing it out of control. When you experience this, donot brake. Carefully steer your vehicle and trailer back into position. A slight increase in speed may help.
IV. TowingBacking up
Back up very slowly and have someone outside the vehicle direct you. Use a series of small turns to steer. It is a good idea to practise this skill off theroad in an empty parking lot until you are comfortable with your ability.
To back up to the right, steer to the left. The front end of the trailer will go left, but the rear end will go right. To back up to the left, steer to the right. Thefront end of the trailer will go right, but the rear end will go left.
IV. TowingTowing disabled vehicles
If your vehicle breaks down, you should get help from a tow truck designed to tow vehicles. If you must use another vehicle to tow, use warning signals oremergency flashers and make sure you attach the vehicles securely. Someone must sit in the disabled vehicle and use the brakes to keep the tow cabletight. If the engine cannot run, don't tow vehicles that have power braking and steering. Without the engine, braking and steering is difficult and towing maylead to a collision.
Trying to start a disabled vehicle by towing is dangerous and could damage both vehicles.
IV. TowingChapter 5 - Summary
By the end of this section you should know:
The checks that need to be performed on your vehicle: daily/weekly, at its regular servicing and for its use in the winterHow to buy the right tires for your vehicle and how to know when they need replacingYour responsibility to ensure that the vehicle you are driving is properly registered and insuredInformation about buying and selling used vehicles including the safety standards certificateLicensing requirements to properly tow a trailer or disabled vehicleVehicle requirements such as brakes, lights, mirrors and trailer hitchesThe proper way to load a trailer and attach it to your vehicleDriving techniques for driving with a trailer attached
Test yourself - Sample knowledge test questionsThe following questions will give you an idea of what to expect on the knowledge test. All knowledge-test questions follow this multiple-choice format. Theanswers to these sample questions are provided at the bottom of the page.
1. To get your vehicle out of a skid, you should first:
a. Steer straight ahead.
b. Steer in the opposite direction of the skid.
c. Steer in the direction you want to go.
d. Apply brakes hard.
2. When may you lend your driver's licence?
a. In emergencies.
b. To a person learning to drive.
c. It is not permitted.
d. For identification purposes.
3. What must a driver do before entering a highway from a private road or driveway?
a. Enter or cross the highway as quickly as possible.
b. Yield right-of-way to all vehicles approaching on the highway.
c. Sound horn and proceed with caution.
d. Give hand signal then take right-of-way.
4. Never change lanes in traffic without:

Statistics show that new drivers of all ages are far more likely than experienced drivers to be involved in serious or fatal collisions.
To help new drivers develop better, safer driving habits, Ontario introduced graduated licensing in 1994 for all drivers applying for their first car ormotorcycle licence. Graduated licensing lets you gain driving skills and experience gradually, in lower-risk environments. The two-step licensing systemtakes at least 20 months to complete and includes two road tests. Passing the Level Two (G2) road test gives you full Class G driving privileges.
While the Level One road test deals with basic driving skills, the Level Two deals with advanced knowledge and skills that are generally gained with drivingexperience. When you take the test, the examiner will give you directions. As you complete the driving tasks, the examiner will watch to make sure yousuccessfully perform the actions associated with them.
The G2 road test includes a component of expressway driving. To proceed, you must complete and sign a “Declaration of Highway DrivingExperience†to ensure that you have sufficient expressway driving experience to complete this component. On the form, you will indicates how manytimes in the three months before the road test you have driven on a freeway and/or a highway with a speed limit of at least 80 km/h. You are required toindicate what was the average length of these trips (for example, under 5 kilometres, between 5 and 15 kilometres, over 15 kilometres). Freeways include:400, 401, 402, 403, 404, 405, 406, 407, 409, 410, 416, 417, 420, 427, Queen Elizabeth Way, Don Valley Parkway, Gardiner Expressway, E. C. RowExpressway and the Conestoga Parkway. If you do not have sufficient highway driving experience, the examiner must declare the road test “out-of-order†and cancel it. You will lose 50 per cent of your prepaid road-test fee. In order to reschedule, you will have to pay the 50 per cent of the road-testfee lost through the out-of-order. Make sure you obtain the required highway driving experience before rescheduling your test.
To help you prepare, this chapter tells you the various tasks and actions that you will be expected to perform in your Level Two road test. This is only aguide. For more information on the driving tasks, you should review chapters 2 and 3.
a. Looking in the rear view mirror only.
b. Giving proper signal and looking to make sure the move can be made safely.
c. Blowing your horn and looking to the rear.
d. Decreasing speed and giving correct signal.
5. When the driver of another vehicle is about to overtake and pass your vehicle, you must:
a. Speed up so that passing is not necessary.
b. Move to the left to prevent passing.
c. Signal to the other driver not to pass.
d. Move to the right and allow such vehicle to pass.
6. When you are deciding whether or not to make a U-turn, your first consideration should be to check:
a. Traffic regulations.
b. Presence of trees, fire hydrants or poles near the curb.
c. Turning radius of your car.
d. Height of curb.
7. It is more dangerous to drive at the maximum speed limit at night than during daytime as:
a. Your reaction time is slower at night.
b. You cannot see as far ahead at night.
c. Some drivers unlawfully drive with parking lights only.
d. The roadways are more apt to be slippery at night.
8. You should under all conditions drive at a speed which will allow you to:
a. Stop within 150 metres (500 feet).
b. Stop within 90 metres (300 feet).
c. Stop within 60 metres (200 feet).
d. Stop within a safe distance.
Answer Key: 1-c, 2-c, 3-b, 4-b, 5-d, 6-a, 7-b, 8-d
The Level Two Road Test
In this chapter
Left and right turnsStop intersectionThrough intersectionFreewayLane changeRoadside stopCurve

The approachThis driving task begins when the examiner tells you to make a left or right turn, and ends at the point just before youenter the intersection. Make sure you take the following actions:
Traffic check
Before slowing down, look all around you. Use your rearview and side mirrors to check traffic behind you. If you changelanes, remember to check your blind spot by looking over your shoulder.
Lane
Move into the far left or far right lane as soon as the way is clear.
Signal
Turn on your signal before slowing down for the turn, unless there are vehicles waiting to enter the road from side roadsor driveways between you and the intersection. Wait until you have passed these entrances so that drivers will not thinkyou are turning before the intersection.
Speed
Steadily reduce speed as you approach the turn. In a vehicle with manual transmission, you may downshift into a lowergear as you slow down. Do not coast with your foot on the clutch pedal.
Space
While slowing down, keep at least a two to three-second distance behind the vehicle in front of you.
If stoppedYou will need to do this driving task if you cannot complete your turn without stopping, either because the way is notclear or you face a stop sign or red traffic light. Remember to follow these actions:
Stop
Come to a complete stop. Do not let your roll forward or backward. When traffic conditions allow, move forward to checkthat the way is clear or to start the turn. If you have to stop after you have passed the stop line, do not back up.
Space
When stopped behind another vehicle at an intersection, leave enough space to pull out and pass without having to backup. Leaving this space protects you in three ways: it lets you pull around the vehicle in front if it stalls; it helps preventyou from being pushed into the vehicle ahead if you are hit from behind; and it reduces the risk of collision if the vehicleahead rolls backward or backs up.
Stop line
If you are the first vehicle approaching an intersection with a red light or stop sign, stop behind the stop line if it ismarked on the pavement. If there is no stop line, stop at the crosswalk, marked or not. If there is no crosswalk, stop atthe edge of the sidewalk. If there is no sidewalk, stop at the edge of the intersection.
Wheels
When waiting to make a left turn, keep your front wheels straight. With your wheels turned left, your vehicle could bepushed into oncoming traffic. When waiting to turn right, keep the wheels straight if there is a risk of being pushed intopedestrians crossing the intersection. At a large intersection with curved sidewalks where you are turning right, angleyour vehicle to follow the curb so that no other vehiÂcle can fit between you and the curb.
Making the turnThe driving task involves your actions as you make the turn. Remember to do the following:
Diagram 6-1-1
Business sectionResidential sectionParallel parkThree-point turn
I. Left and right turns

Traffic check
If you are stopped, waiting for a green light or for the way to be clear, keep checking traffic all around you. Just beforeentering the intersection, look left, ahead and right to check that the way is clear. If there is any doubt about the right-of-way, try to make eye contact with nearby drivers or pedestrians. If it is possible for another vehicle to overtake youwhile you are turning, check your blind spot before starting to turn. You have not properly checked traffic if anothervehicle or pedestrian has the right-of-way and must take action to avoid your vehicle.
Both hands
Use both hands to turn the steering wheel throughout the turn. You are most at risk from other traffic when turning.Using both hands on the wheel gives you maximum steering control when you need it most. An exception to this is ifyou have a disability that prevents you from using both hands.
Gears
In a vehicle with manual transmission, do not shift gears during the turn. If you need to, you may shift gears immediatelyafter the vehicle is moving but before it is well into the turn. You may also shift gears in an intersection wider than fourlanes if not doing so would slow down other traffic. Generally, not changing gears gives you more control over yourvehicle when turning.
Speed
Move ahead within four to five seconds after it is safe to start. Make the turn at a steady speed, increasing speed asyou complete the turn. Drive slowly enough to keep full control of your vehicle without slowing down other traffic.
Wide/short
Turn into the corresponding lane on the intersecting road without going over any lane markings or curbs.
Completing the turnThis driving task completes the turn. It begins when you enter the intersecting road and ends when you return to normaltraffic speed. Take the following actions:
Lane
End your turn in the lane that corresponds to the lane you turned from. If you are turning left onto a multi-lane road,return to normal traffic speed and move into the curb lane when it is safe to do so. If you are turning right onto a roadwhere the right lane is blocked with parked vehicles or cannot be used for other reasons, move directly to the nextavailable lane.
Traffic check
As you return to normal traffic speed, check your mirrors to become aware of the traffic situation on the new road.
Speed
Return to normal traffic speed by accelerating smoothly to blend with the traffic around you. In light traffic, acceleratemoderately. In heavier traffic, you may have to accelerate more quickly. In a vehicle with manual transmission, shiftgears as you increase speed.
The approachThis driving task is done at interÂsections where you must come to a stop. It begins at the point where you can see theintersection and ends just before you enter the intersection. Be sure to follow these actions:
Traffic check
Before slowing down, look all around you. Use your mirrors to check traffic behind you.
SpeedDiagram 6-2-1
II. Stop intersection

Steadily reduce speed as you approach the intersection. In a with manual transmission, you may downshift into a lowergear as you slow down. Do not coast with your foot on the clutch pedal.
Space
While slowing down, keep at least a two to three-second distance behind the in front of you.
The stopThis driving task includes the actions you take while stopped and waiting to move through the intersection. Rememberthese points:
Stop
Come to a complete stop. Do not let your roll forward or backward. When traffic conditions allow, move forward to checkthat the way is clear or start across the intersection. If you have to stop after you have passed the stop line, do not backup.
Space
When stopped behind another at the intersection, leave enough space to pull out and pass without having to back up.Leaving this space protects you in three ways: it lets you pull around the in front if it stalls; it helps prevent you frombeing pushed into the ahead if you are hit from behind; and it reduces the risk of collision if the ahead rolls backward orbacks up.
Stop line
If you are the first approaching an intersection with a red light or stop sign, stop behind the stop line if it is marked on thepavement. If there is no stop line, stop at the crosswalk, marked or not. If there is no crosswalk, stop at the edge of thesidewalk. If there is no sidewalk, stop at the edge of the intersection.
Driving throughThis task includes the actions you take as you drive through the intersection and return to normal traffic speed. Makesure to follow these actions:
Traffic check
If you are stopped, waiting for a green light or for the way to be clear, keep checking traffic all around you. Just beforeentering the intersection, look left, ahead and right to check that the way is clear. If there is any doubt about the right-of-way, try to make eye contact with nearby drivÂers or pedestrians. You have not properly checked traffic if another vehicle orpedestrian has the right-Âof-way and must take action to avoid your vehicle.
Both hands
Keep both hands on the steering wheel as you drive through the intersection. You are most at risk from other trafficwhen you are crossing the intersection. Using both hands on the wheel gives you maximum steering control when youneed it most. An exception to this is if you have a disability that prevents you from using both hands.
Gears
In a vehicle with manual transmission, do not shift gears crossing the intersection. If you need to, you may shift gearsimmediately after the vehicle is moving but before it is well into the intersection. You may also shift gears in anintersection wider than four lanes if not doing so would slow down other traffic. Generally, not changing gears gives youmore control over your vehicle.
Traffic check
As you return to normal traffic speed, check your mirrors to become aware of the traffic situation after you have gonethrough the intersection.
Speed
Move ahead within four to five seconds after it is safe to start. Return to normal traffic speed by accelerating smoothlyto blend with the traffic around you. In light traffic, accelerate moderately. In heavier traffic, you may have to acceleratemore quickly. In a vehicle with manual transmission, shift gears as you increase speed.

The approachThis driving task is done at interÂsections where you may not need to stop. It begins at the point where you can see theintersection and ends just before the entrance to the intersection. Remember to do the following:
Traffic check
As you approach the intersection, look left and right for traffic on the intersecting road. If you have to slow down for theintersection, check your mirrors for traffic behind you.
Speed
Keep at the same speed as you go through the intersection unless there is a chance traffic may cross the intersection infront of you. If so, slow down or hold your foot over the brake, ready to slow down or stop. Watch for pedestrians aboutto cross the intersection and vehicles edging into the intersection or approaching at higher speeds.
Space
Keep at least a two- to three-second distance behind the vehicle in front of you.
Driving throughThis driving task includes your actions from the time you enter the intersection until you have crossed it and arereturning to normal traffic speed. Remember these points:
Lane
Do not go over lane markings or change lanes in the intersection. If your lane is blocked by a vehicle turning left or avehicle edging into the intersection from the right, slow down or stop instead of pulling out to go around the vehicle.
Both hands
Keep both hands on the steering wheel as you drive through the intersection. You are most at risk from other trafficwhen you are crossing the intersection. Using both hands on the wheel givesyou maximum steering control when youneed it most. An exception to this is if you have a disability that prevents you from using both hands.
Gears
In a vehicle with manual transmission, do not shift gears while crossing the intersection. If you need to, you may shiftgears immediately after the is moving but before it is well into the intersection. You may also shift gears in anintersection wider than four lanes if not doing so would slow down other traffic. Generally, not changing gears gives youmore control over your vehicle.
Traffic check
If you slowed down for the intersection, check your mirrors again before returning to normal traffic speed.
Diagram 6-3-1
EnteringThis driving task begins on the entrance ramp to a freeway and ends when you have reached the speed of the traffic onthe freeway. Remember to do the following:
Traffic check
While on the ramp, as soon as you can see freeway traffic approaching from behind, check your mirrors and blind spotfor a space to merge safely. At the same time, watch any vehicles in front of you on the ramp and keep back a safe
Diagram 6-4-1
III. Through intersection
IV. Freeway

distance. Continue to divide your attention between watching in front, checking your mirrors and looking over yourshoulder to check your blind spot until you can merge safely with traffic.
Signal
If you have not done so already, turn on your signal as soon as traffic on the freeway is able to see your vehicle on theramp.
Space
While on the ramp and merging with freeway traffic, keep at least a two- to three-second distance behind the vehicle infront of you. Time your merge so you do not move in beside another vehicle or into the blind spot of another vehicle. Iftraffic is heavy or moving at such a high speed that it is difficult to keep an ideal following distance, adjust your speed toget the best spacing possible. While on the ramp and in the acceleration lane, keep inside the lane markings.
Speed
On the curve of the entrance ramp, keep your speed slow enough so that objects and people inside your vehicle are notpushed from the force created by turning the curve. While in the acceleration lane, increase your speed to match that offreeway traffic. While merging, control your speed to blend smoothly with freeway traffic.
Merge
Merge with freeway traffic in a smooth, gradual movement to the centre of the nearest freeway lane.
Cancel signal
Turn off your signal as soon as you have merged with freeway traffic.
Driving alongThis driving task checks your actions driving along the freeway (but not merging, changing lanes or exiting). Be sure toremember the following points:
Traffic check
While driving along, keep checking traffic all around you and look in your mirrors every five to 10 seconds.
Speed
Avoid exceeding the speed limit or driving unreasonably slowly. Whenever possible, drive at a steady speed. Lookahead to where you are going to be in the next 12 to 15 seconds for dangerous situations or obstacles that you canavoid by changing your speed.
Space
Always keep at least a two- to three-second distance behind the vehicle in front of you. If another vehicle follows tooclosely behind you, give yourself even more room in front or change lanes. Try to keep a space on both sides of yourvehicle, and try not to drive in the blind spots of other vehicles. Avoid driving behind large vehicles. Because of theirsize, they block your view of traffic more than other vehicles.
ExitingThis driving task begins when you are driving in the far right lane of the freeway and can see the exit you want to take. Itends when you reach the end of the exit ramp. Remember to do the following:
Traffic check
Before moving into the exit lane, look left and right and check your mirrors. If there is a lane of traffic on your right, suchas an acceleration lane from an entrance ramp or a paved shoulder, remember also to check your right blind spot.
Signal
Turn on your signal before you reach the exit lane.

Exit lane
Enter the exit lane at the beginning of the lane with a smooth, gradual movement. Stay inside the lane markings. If thereare two or more exit lanes, do not cross solid lines on the pavement to change lanes.
Speed
Do not slow down before you are completely in the exit lane. Once you are in the lane, slow gradually without causingtraffic to pile up behind you. On the curve of the exit ramp, keep your speed slow enough so that objects and peopleinside your vehicle are not pushed from the force created by turning the curve. In a vehicle with manual transmission,downshift as you reduce speed.
Space
Keep at least a two- to three-second distance behind the vehicle in front of you.
Cancel signal
Turn off your signal once you are on the exit ramp.
This driving task begins as you look for a space to change lanes and ends when you have completed the lane change.Remember to follow these actions:
Traffic check
While waiting to change lanes safely, look all around you. Divide your attention between watching in front, watching themirrors and checking your blind spot. If there is another lane beside the one you are moving into, check traffic in thatlane to avoid colliding with a vehicle moving into the lane at the same time as you do.
Signal
Turn on your signal when there is enough space for you to change lanes. After signalling, check your blind spot onemore time before starting to move into the other lane. Your signal should be on soon enough to give traffic behind youtime to react to the signal. If traffic in the lane you are moving into is heavy, you may turn on your signal before there isenough space to change lanes. This will let traffic behind you know that you are looking for a space to change lanes.
Space
Keep at least a two- to three-second distance behind the vehicle in front of you. If there is another lane beside the oneyou are moving into, be careful not to move in beside another vehicle or into the blind spot of another vehicle.
Speed
Adjust your speed to match the speed of traffic in the new lane.
Change
Change lanes with a smooth, gradual movement into the centre of the new lane.
Both hands
Keep both hands on the steering wheel as you change lanes. Using both hands on the wheel gives you maximumsteering control. An exception to this is if you have a disability that prevents you from using both hands.
Cancel signal
Turn off your signal as soon as you have changed lanes.
Diagram 6-5-1
The approachThis driving task begins when the examiner tells you to stop and ends once you have come to a stop. Make sure you
V. Lane change
VI. Roadside stop

take these actions:
Traffic check
Before slowing down, check your mirrors and scan to see if it is legal (look for signs) to make the roadside stop. Thenscan the road for traffic approaching from the front and rear of your of your vehicle. A 150-metre gap in both directionsprovides enough space to perform the move safely. If there is a chance of traffic or pedestrians overtaking you on theright, check your right blind spot just before pulling over.
Signal
Turn on your signal before slowing down unless there are vehicles waiting to enter the road from side roads or drivewaysbetween you and the point where you intend to stop. Wait until you have passed these entrances so that drivers will notthink you are turning before the stopping point.
Speed
Steadily reduce speed as you approach the stop. In a vehicle with manual transmission, you may downshift into a lowergear as you slow down. Do not coast with your foot on the clutch pedal.
Position
Stop parallel to the curb and not more than about 30 centimetres away from it. If there is no curb,stop as far as possibleoff the travelled part of the road. Do not stop where you will block an entrance or other traffic.
The stopThis driving task includes the actions you take after stopping. Remember to do the following:
Signal
Turn off your signal and turn on your hazard lights.
Park
If your vehicle has an automatic transmission, put the gear selector in park and set the parking brake. If your vehicle hasa manual transmission, set the parking brake and shift into neutral if not turning off the engine, or shift into low orreverse if turning off the engine. When parking on a hill, turn your wheels in the appropriate direction to keep your vehiclefrom rolling.
ResumeThis driving task begins when the examiner tells you to move back onto the road and ends when you have returned tonormal traffic speed. Take the following actions:
Start
Turn on the engine. Release the parking brake and select the correct gear to move back onto the road.
Signal
Turn off your hazard lights and turn on your left turn signal.
Traffic check
Just before pulling away from the stop, check your mirrors and your left blind spot.
Speed
Return to normal traffic speed by accelerating smoothly to blend with the traffic around you. In light traffic, acceleratemoderately. In heavier traffic, you may have to accelerate more quickly. In a vehicle with manual transmission, shiftgears as you increase speed.
Diagram 6-6-1

Cancel signal
Turn off your signal as soon as you are back on the road.
This driving task begins when the curve comes into sight and ends when you have gone completely around it. Followthese actions:
Speed
As you approach the curve, try to determine the safe speed for it. To do this, look for clues such as a sign that showsthe safe speed, the shape of the curve and the type of road you are driving on. Slow down to the safe speed for thecurve by the time you are 30 metres into it. In a blind curve where you cannot see all the way around it, drive moreslowly in case oncoming traffic wanders into your lane or the curve is tighter than you expected. Slow down before thestart of the curve to avoid braking in it. While in the curve, keep your speed steady and slow enough so that objectsand people inside your vehicle are not pushed from the force created by turning on the curve. Near the end of the curve,begin accelerating to return to normal speed. In a vehicle with manual transmission, do not shift gears in the curve. Notchanging gears gives you more control over your vehicle and reduces the risk of your wheels locking while downshifting.
Lane
As you enter the curve, look across or as far around it as possible. This helps you stay in a smooth line and centred inthe lane throughout the curve. If you look only at the road directly in front of you, you are likely to wander back and forthacross the lane, forcing you to constantly correct your steering.
Diagram 6-7-1
This driving task is done on straight sections of road where a number of businesses are located. Be sure to do thefollowing actions:
Traffic check
In a business area, there are many places other than intersections where vehicles or pedestrians are likely to enter theroad. These include entrances to businesses, institutions and construction sites, as well as pedestrian and railwaycrossings. At all these locations, look left and right to check for vehicles or pedestrians about to enter the road.
Mirror check
While driving along, check your mirrors every five to 10 seconds. Check your mirrors more often in heavy traffic orwhere vehicles are moving at different speeds.
Lane
Drive in the safest lane for through traffic. This is usually the curb lane. However, if the curb lane is blocked by traffic orthere are many curbside hazards, the centre lane may be a safer choice. Keep to the centre of the lane and within thelane markings. Look ahead to where you will be in the next 12 to 15 seconds for dangerous situations or obstacles thatyou can avoid by changing lanes.
Speed
Avoid exceeding the speed limit or driving unreasonably slowly. Whenever possible, drive at a steady speed. Lookahead to where you will be in the next 12 to 15 seconds for dangerous situations or obstacles that you can avoid bychanging your speed.
Space
Keep at least a two- to three-second distance behind the vehicle in front of you. Increase the distance if another vehiclefollows too closely behind you. On a multi-lane road, try to keep a space on both sides of your vehicle, and try not todrive in the blind spots of other vehicles. In slow traffic, avoid driving behind large vehicles that block your view of trafficahead of you. When you stop behind another vehicle, leave enough space to see its rear wheels or to pull around itwithout having to back up.
Diagram 6-8-1
This driving task is done on straight sections of residential or rural road. Remember these points:
Traffic check
VII. Curve
VIII. Business section
IX. Residential section

On a residential road, watch out for entrances to schools, pedestrian crossings, driveways, sidewalks and any otherlocations where there might be traffic hazards. On a rural road, watch for entrances to residences, farms, businessesand industrial sites. At all these locations, look left and right to check for vehicles or pedestrians about to enter the road.
Mirror check
While driving along, check your mirrors every five to 10 seconds. Check your mirrors more often in heavy traffic orwhere vehicles are moving at different speeds.
Lane
Keep to the centre of the lane. If there are no lane markings, keep to the centre of the travelled part of the road, awayfrom parked vehicles or pedestrians. Where you cannot see far ahead on the road because of a curve or a hill, moveright to avoid colliding with an oncoming vehicle that is over the centre line. Look ahead to where you will be in the next12 to 15 seconds for dangerous situations or obstacles that you can avoid by changing lanes.
Speed
Avoid exceeding the speed limit or driving unreasonably slowly. Whenever possible, drive at a steady speed. Lookahead to where you will be in the next 12 to 15 seconds for dangerous situations or obstacles that you can avoid bychanging your speed.
Space
Keep at least a two- to three-second distance behind the vehicle in front of you. Increase the distance if another vehiclefollows too closely behind you. In slow traffic, avoid driving behind large vehicles that block your view of traffic ahead.When you stop behind another vehicle, leave enough space to see its rear wheels or to pull around it without having toback up.
Diagram 6-9-1
The approachThis driving task begins when the examiner tells you to park and ends when you have come to a stop, ready to backinto the parking space. Remember these points:
Traffic check
Before slowing down, check your mirror for traffic behind you. Before pulling into position to back up, check your blindspot.
Signal
Turn on your signal before slowing down unless there are vehicles waiting to enter the road from side roads or drivewaysbetween you and your stopping point. Wait until you have passed these entrances so that drivers will not think you areturning before your parallel parking position.
Speed
Steadily reduce speed. In a vehicle with manual transmission, you may downshift into a lower gear as you slow down.Do not coast with your foot on the clutch pedal.
Stop
Stop beside, or parallel to, the parked vehicle (real or imagiÂnary) in front of the empty parking space. Leave at least 60centimetres between your vehicle and the parked vehicle. Stop when your vehicle is completely in front of the emptyparking space.
ParkThis driving task includes the actions you take to park in a parallel parking space. Remember to do the following:
Traffic check
Before backing up, look all around the vehicle and check your mirrors and both blind spots. Do not start reversing until
Diagram 6-10-1
X. Parallel park

the way is clear or traffic has stopped to let you park.
Back up
Begin reversing into the space, turning the steering wheel toward the curb. When your vehicle is about halfway into thespace, steer to bring your vehicle in line with the curb. Once you are in the parking space, move forward or backward tofit within the pavement markings or to allow room for the vehicle in front or behind you to pull out. Do not hit the curb ortouch another vehicle while entering your parking space. Where there is no curb, park off the travelled part of the road.
Park
If your vehicle has automatic transmission, put the gear selector in park and set the parking brake. If your vehicle hasmanual transmission, set the parking brake and shift into neutral if not turning off the engine, or shift into low or reverseif turning off the engine. When parking on a hill, turn your wheels in the appropriate direction to keep your vehicle fromrolling.
ResumeThis driving task begins when the examiner tells you to move from the parking space and ends when you have returnedto normal traffic speed. Remember these points:
Start
Turn on the engine. Release the parking brake and select the correct gear to move back onto the road.
Signal
Turn on your signal.
Traffic check
Just before pulling out of the parking spot, check your mirrors and your blind spot.
Speed
Return to normal traffic speed by accelerating smoothly to blend with the traffic around you. In light traffic, acceleratemoderately. In heavier traffic, you may have to accelerate more quickly. In a vehicle with manual transmission, shiftgears as you increase speed.
Cancel signal
Turn off your signal after you leave the parking space.
The approachThis driving task begins when the examiner tells you to stop and turn your vehicle around. It ends when you have almoststopped, ready to start the turn. Be sure to do the following:
Traffic check
Before slowing down, check traffic in front and behind you. If necessary, check your blind spot before pulling over to theright side of the road to stop.
Signal
Turn on your signal before slowing down unless there are vehicles waiting to enter the road from sideroads or drivewaysbetween you and your stopping point. Wait until you have passed these entrances so that drivÂers will not think you areturning.
Speed
Diagram 6-11-1
XI. Three-point turn

Steadily reduce speed. In a vehicle with manual transmission, you may downshift into a lower gear as you slow down.Do not coast with your foot on the clutch pedal.
Position
Stop so you are parallel to the curb and not more than 30 centimetres away. Where there is no curb, stop as far aspossible off the travelled part of the road. Do not stop where you will block an entrance or other traffic.
Turn aroundThis driving task includes the actions you take to turn around and ends when you are ready to drive away in the oppositedirection. Remember these points:
Traffic check
Check your mirrors and your blind spot just before starting the turn. Wait until the way is clear or traffic has stopped tolet you turn. Each time you stop while turning, check traffic in both directions.
Signal
Turn on your left signal before starting to turn.
Turn around
With the steering wheel turned sharply left, move slowly and smoothly across the road. When you have reached the farleft side of the road, stop and put your in reverse. With the steering wheel turned sharply right, reverse so the is facing inthe new direction. Stop and shift into forward gear to move ahead. Use the whole road to make your turn, reversing onlyonce. Do not reverse over the edge or shoulder of the road or into the curb.
ResumeThis driving task begins when you are turned around, ready to move ahead and ends when you have returned to normaltraffic speed. Make sure you take these actions:
Traffic check
Check your mirrors before increasing speed.
Speed
Return to normal traffic speed by accelerating smoothly to blend with the traffic around you. In light traffic, acceleratemoderately. In heavier traffic, you may have to accelerate more quickly. In a with manual transmission, shift gears asyou increase speed.
This handbook is only a guide. For official purposes, please refer to the Highway Traffic Act, the Motorized Snow Vehicles Act and the Off-road VehiclesAct of Ontario.
If you're taking beginner driver education, make sure it's from a ministry-approved school. You can find them atwww.mto.gov.on.ca/english/dandv/driver/gradu/approve.shtml.
For more information about driver licensing, visit www.mto.gov.on.ca.
To request a copy of this book in an alternate format, contact Publications Ontario at 1-800-668-9938 or (416) 326-5300 or visitwww.publications.serviceontario.ca.
Disponible en français. Demandez le « Guide officiel de l'automobiliste de publié par le MTO »
Driving is a privilege - not a right
Off-road Vehicles
In this chapter
IntroductionDriving a snowmobileDriving an off-road vehicle

IntroductionOff-road vehicles and snowmobiles are popular forms of recreation for many people in Ontario. They are also necessary for transportation in remote areasand in emergencies. But these vehicles are not toys. If you intend to use them, you must know how they work, how to drive them safely in differentsituations and how Ontario laws apply to them.
It is important to remember that off-road vehicles are intended for off-road use. Dirt bikes cannot be driven on public roads, although snowmobiles can be insome areas. Off-road vehicles are allowed to travel directly across some highways. However only single-rider, all-terrain vehicles can be driven on theshoulder of some provincial highways and municipal roads where bylaws permit.
This section of the handbook contains information about Ontario's laws and safe driving tips for snowmobiles and off-road vehicles. As you read,remember it is a guide only. For official purposes, please refer to the Highway Traffic Act, the Motorized Snow Vehicles Act, the Off-road Vehicles Act, theTrespass to Property Act and the Occupiers' Liability Act of Ontario. The applicable legislation can be accessed online through Ontario's e-Laws website(www.e-laws.gov.on.ca).
Note: Alcohol presents a major risk to your safety and the safety of others whether you are driving a car, motorcycle, snowmobile or off-road vehicle.Drinking affects your ability to operate your vehicle and increases your chances of having a collision.
Driving a snowmobileThis chapter tells you what you need to know to drive a motorized snow vehicle in Ontario. This includes age requirements, registration, where you canand cannot drive, safety tips, traffic signs and signals and the Snowmobiler's Code of Ethics.
I. Getting ready to drive a snowmobile What you need to drive a snowmobile in Ontario
You can drive a snowmobile if you have a valid Ontario driver's licence (any class). If you do not have a driver's licence and you are 12 years of age orolder, a valid motorized snow-vehicle operator's licence (MSVOL) will allow you to drive on trails established and maintained by a recreational organizationfor the use of snowmobiles. However, you must be 16 years of age or older and have a driver's licence or a motorized snow-vehicle operator's licence (notboth) to drive a snowmobile along or across a public road where snowmobiles are allowed.
An MSVOL is issued by the Ontario Federation of Snowmobile Clubs in co-operation with the Ministry of Transportation. You must successfully pass asnowmobile driver-training course to get a licence. (For more information on how to get a motorized snow-vehicle operator's licence, click here).
If you are a visitor to Ontario and wish to drive a snowmobile while you are here, you must have a valid licence that allows you to drive a snowmobile inyour home province, state or country.
You must carry your driver’s licence or snow-vehicle operator’s licence when you are driving your snowmobile anywhere other than on your own property.You must show it when asked by a police or conservation officer.
If your driver’s licence or snow-vehicle operator’s licence has been suspended, you may not drive any type of vehicle on or off any roads or in any publicplace.
I. Getting ready to drive a snowmobile Registering and insuring your snowmobile
Before driving a snowmobile, it must be registered with the Ministry of Transportation through a ServiceOntario centre. This applies to new or usedsnowmobiles that have never been registered, and snowmobiles previously registered in another jurisdiction. If you buy a new snowmobile, it must beregistered within six days of sale.
If you buy a new snowmobile, your dealer will register it with the Ministry of Transportation within six days of the sale. If you buy a used snowmobile thathas been previously registered, you will simply need the signed snow-vehicle permit and the bill of sale to transfer the registration into your name.
You must pay a fee to register your snowmobile. This is a one-time fee to be paid by the owner of the snowmobile. After registering, you will be given apermit and a registration number decal to display on your snowmobile.
Attach the decal to each side of your snowmobile's cowling or engine cover. It should be placed so that the start of the registration number is between 10and 15 centimetres from the rear of the cowling. If the decal cannot be placed on the cowling because of the design of the vehicle, place the decal on eachside of the tunnel, near the light reflector.
Unless you are driving your registered snowmobile on your own property or you are a resident of northern Ontario that is exempt, you must have avalidation sticker on your registration decal. You must carry your driver's licence or MSVOL and evidence of your vehicle's registration at all times andshow it to a police or conservation officer when asked.
Snowmobiles are only permitted on public highways when directly crossing. In specific circumstances, snowmobiles can operate on the non-servicedportion of some highways. Local municipalities also have authority to pass bylaws governing the use of snowmobiles on highways under their jurisdiction.
There is an annual renewal fee for the sticker. Place the sticker in the upper right corner of the decal.
You must also have liability insurance to drive your snowmobile off your own property. Carry the insurance card given to you by the insurance company forthe snowmobile, and show it when a policeor conservation officer asks for it. If someone else uses your snowmobile with your consent, you are bothresponsible for any penalties, damages or injuries that may occur.
There are separate requirements and rules regarding the operation of trail grooming equipment. Make sure you know what is required before operatinggrooming equipment.
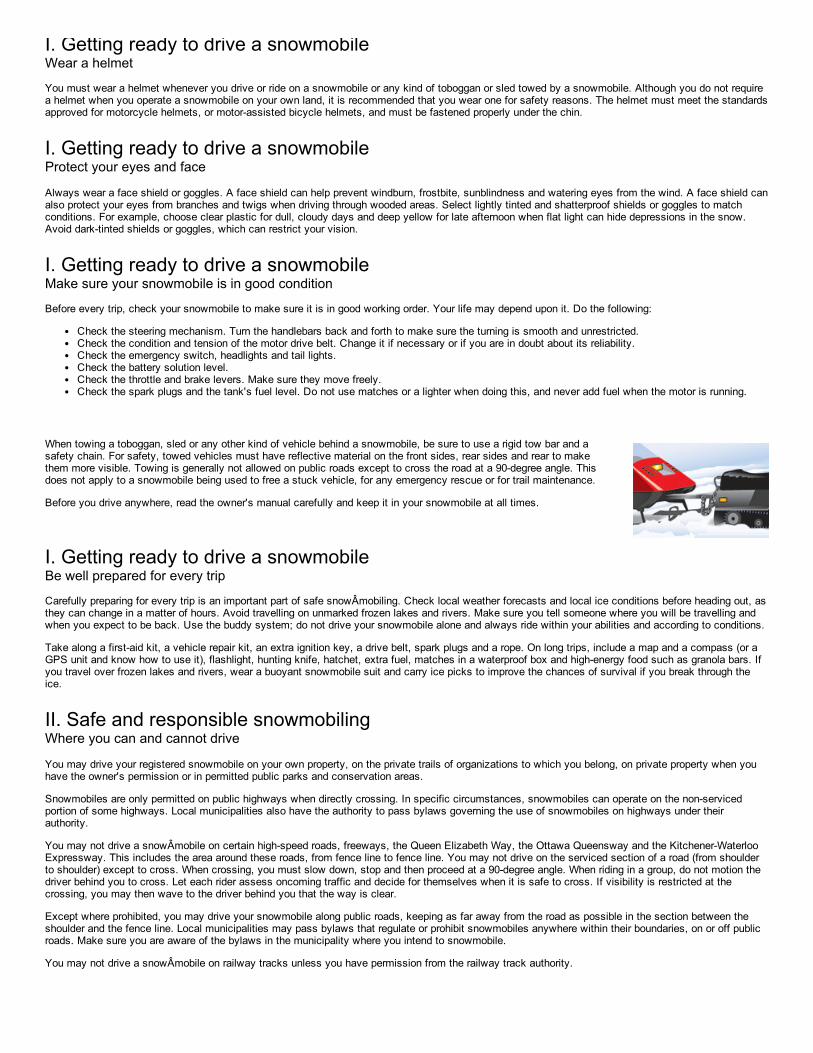
When towing a toboggan, sled or any other kind of vehicle behind a snowmobile, be sure to use a rigid tow bar and asafety chain. For safety, towed vehicles must have reflective material on the front sides, rear sides and rear to makethem more visible. Towing is generally not allowed on public roads except to cross the road at a 90-degree angle. Thisdoes not apply to a snowmobile being used to free a stuck vehicle, for any emergency rescue or for trail maintenance.
Before you drive anywhere, read the owner's manual carefully and keep it in your snowmobile at all times.
I. Getting ready to drive a snowmobile Wear a helmet
You must wear a helmet whenever you drive or ride on a snowmobile or any kind of toboggan or sled towed by a snowmobile. Although you do not requirea helmet when you operate a snowmobile on your own land, it is recommended that you wear one for safety reasons. The helmet must meet the standardsapproved for motorcycle helmets, or motor-assisted bicycle helmets, and must be fastened properly under the chin.
I. Getting ready to drive a snowmobile Protect your eyes and face
Always wear a face shield or goggles. A face shield can help prevent windburn, frostbite, sunblindness and watering eyes from the wind. A face shield canalso protect your eyes from branches and twigs when driving through wooded areas. Select lightly tinted and shatterproof shields or goggles to matchconditions. For example, choose clear plastic for dull, cloudy days and deep yellow for late afternoon when flat light can hide depressions in the snow.Avoid dark-tinted shields or goggles, which can restrict your vision.
I. Getting ready to drive a snowmobile Make sure your snowmobile is in good condition
Before every trip, check your snowmobile to make sure it is in good working order. Your life may depend upon it. Do the following:
Check the steering mechanism. Turn the handlebars back and forth to make sure the turning is smooth and unrestricted.Check the condition and tension of the motor drive belt. Change it if necessary or if you are in doubt about its reliability.Check the emergency switch, headlights and tail lights.Check the battery solution level.Check the throttle and brake levers. Make sure they move freely.Check the spark plugs and the tank's fuel level. Do not use matches or a lighter when doing this, and never add fuel when the motor is running.
I. Getting ready to drive a snowmobile Be well prepared for every trip
Carefully preparing for every trip is an important part of safe snowÂmobiling. Check local weather forecasts and local ice conditions before heading out, asthey can change in a matter of hours. Avoid travelling on unmarked frozen lakes and rivers. Make sure you tell someone where you will be travelling andwhen you expect to be back. Use the buddy system; do not drive your snowmobile alone and always ride within your abilities and according to conditions.
Take along a first-aid kit, a vehicle repair kit, an extra ignition key, a drive belt, spark plugs and a rope. On long trips, include a map and a compass (or aGPS unit and know how to use it), flashlight, hunting knife, hatchet, extra fuel, matches in a waterproof box and high-energy food such as granola bars. Ifyou travel over frozen lakes and rivers, wear a buoyant snowmobile suit and carry ice picks to improve the chances of survival if you break through theice.
II. Safe and responsible snowmobilingWhere you can and cannot drive
You may drive your registered snowmobile on your own property, on the private trails of organizations to which you belong, on private property when youhave the owner's permission or in permitted public parks and conservation areas.
Snowmobiles are only permitted on public highways when directly crossing. In specific circumstances, snowmobiles can operate on the non-servicedportion of some highways. Local municipalities also have the authority to pass bylaws governing the use of snowmobiles on highways under theirauthority.
You may not drive a snowÂmobile on certain high-speed roads, freeways, the Queen Elizabeth Way, the Ottawa Queensway and the Kitchener-WaterlooExpressway. This includes the area around these roads, from fence line to fence line. You may not drive on the serviced section of a road (from shoulderto shoulder) except to cross. When crossing, you must slow down, stop and then proceed at a 90-degree angle. When riding in a group, do not motion thedriver behind you to cross. Let each rider assess oncoming traffic and decide for themselves when it is safe to cross. If visibility is restricted at thecrossing, you may then wave to the driver behind you that the way is clear.
Except where prohibited, you may drive your snowmobile along public roads, keeping as far away from the road as possible in the section between theshoulder and the fence line. Local municipalities may pass bylaws that regulate or prohibit snowmobiles anywhere within their boundaries, on or off publicroads. Make sure you are aware of the bylaws in the municipality where you intend to snowmobile.
You may not drive a snowÂmobile on railway tracks unless you have permission from the railway track authority.

Ontario's public trails are established and maintained by many snowmobile clubs. They are patrolled by OntarioProvincial Police, municipal police, conservation officers and Snowmobile Trail Officer Patrol officers. Some clubsrequire snowmobiles to have and display a trail permit to drive on their trails. Some other clubs allow their trails to beused without a trail permit. Trails may have signs stating that a trail permit is required. If you are unsure, check with thelocal snowmobile club to find out if you need a trail permit.
For trails operated by the Ontario Federation of Snowmobile Clubs, you must have and display a trail permit. Thisincludes trails on private property, municipal property and land owned by the government. Some snowmobile-trail usergroups are exempt from the permit requirement. Those who are eligible for exemption and the documents required asproof are included in the trail-permits section of the regulations of the Motorized Snow Vehicles Act. Snowmobilers whoare exempt must carry the appropriate documents and show them when requested to do so.
For information about trails and trail permits, contact your local snowmobile club or the Ontario Federation ofSnowmobile Clubs, 501 Welham Road, Unit 9, Barrie, ON L4N 8Z6. Phone 705-739-7669; fax 705-739-5005; or e-mail at [email protected] can visit the OFSC website at www.ofsc.on.ca
II. Safe and responsible snowmobilingPublic trails
II. Safe and responsible snowmobilingDo not trespass
You are trespassing if you drive your snowmobile on private property without permission from the owner. The owner is not required to have a “NoTrespassing†sign posted. If you are driving your snowmobile on private property, you must stop and identify yourself when asked by the police, theowner of the property or a representative of the owner. If you are told to leave the property, you must do so immediately.
You may be fined up to $2,000 if you are convicted of trespassing. In addition, you may be ordered to pay damages up to $1,000. Under certaincircumstances, you may also be required to pay for the cost of prosecuting. Charges will be laid against the driver of the snowÂmobile. If the driver is notknown, the owner may be charged if the snowmobile was used with the owner's permission.
A copy of the Trespass to Property Act is available through Publications Ontario. Phone (416) 326-5300 or 1-800-668-9938. It is available over the Internetat www.publications.gov.on.ca and www.e-laws.gov.on.ca.
It is an offence under the Railway Safety Act to trespass on railway tracks.
II. Safe and responsible snowmobilingObey the speed limits
You must not drive a snowmobile faster than 20 km/h in any public park or exhibition ground, or on any road where the speed limit for other vehiÂcles is 50km/h or less. You must not drive faster than 50 km/h on snowmobile trails or on any road where the speed limit for other vehicles is more than 50 km/h.Always leave extra space between you and the snowmobile in front to give yourself more time to react to unexpected hazards and stop safely. Lower yourspeed at night and don't outrun your headlights. Reduced nighttime visibility makes hazards more difficult to spot and estimating distance is much harder.Always wear clothing with reflective markings to remain visible at night.
Municipalities may set other speed limits for snowmobiles on public roads, trails and parks within their boundaries. Check municipal bylaws.
II. Safe and responsible snowmobilingStop for police
You must come to a safe stop when requested by a police officer to do so. If you do not stop, you may have to pay a fine or go to jail, or both. If you areconvicted of failing to stop for a police officer and the court believes you wilfully avoided police during pursuit - that you tried to escape the police - yourlicence will be suspended for a minimum of five years. Your licence can be suspended for up to 10 years if anyone is killed or injured as a result ofavoiding police.
II. Safe and responsible snowmobilingReport collisions to the police
You must report to the police immediately any collision that results in injury to any person or damage to property apparently exceeding $400.
II. Safe and responsible snowmobilingDo not drink and drive
Alcohol is a major factor in snowmobile fatalities. Consuming any amount of alcohol before you ride affects your ability to make good decisions. Alcoholalso increases fatigue, slows reaction time and increases your risk of hypothermia.
It is against the law to drive a snowmobile when you are impaired by alcohol or drugs.
Drinking and driving is a deadly combination. All drivers, especially inexperienced drivers, must be able to concentrate on driving.
Consuming any amount of alcohol before you ride affects your ability to make good decisions. Even one drink can reduce your ability to concentrate andreact to things that happen suddenly when you are driving. With more alcohol in your blood, you could have trouble judging distances and your vision maybecome blurred. Factors like tiredness, your mood, and how long ago you ate and how much, can make a difference in how alcohol affects your driving

Driving a snowmobile requires the same attention and alertness that driving any other kind of vehicle does. You musthave complete control of your reflexes. If you are a beginner, practise until you can handle the basic driving skills.
Learn how to control your balance on turns by using your weight to control your movements and leaning in the directionyou want to turn. Position your body on the snowmobile in a way that will give you the most comfort and control for theconditions in which you are driving. On level ground, sit or kneel with both knees on the seat. On uneven or bumpyground, stand on the running boards with your knees slightly bent.
Always take the time to plan your route before you ride and make sure others in your group know the route as well. Ifyou must stop on the trail, always select a location where you will be visible and pull over to the right as far as possible.If you are riding in a group, you should park the snowmobiles in single file and leave the vehicles running so you arevisible at night.
On hard-packed snow or ice, reduce your speed, because stops and turns are harder to make and you will requiregreater distance to complete them. When your snowmobile is trapped in deep snow, remember to turn off the motor
ability.
The police can stop any driver to determine if alcohol or drug testing is required. They may also do roadside spot checks. When stopped by the police, youmay be told to blow into a machine that tests your breath for alcohol, a roadside screening device, or perform physical co-ordination tests. If you fail orrefuse to provide a breath sample or to perform the physical co-ordination tests, you will be charged under the Criminal Code.
If the reading on the machine shows you have been drinking, you may be taken to a police station for a breathalyzer test. The breathalyzer uses yourbreath to measure the amount of alcohol in your bloodstream.
If you cannot give a breath sample or it is impractical to obtain a sample of breath, the police officer can require you to provide a blood sample instead.
If the police believe that a driver is impaired because of the consumption of a drug or a combination of alcohol and a drug, they can also require a driver tosubmit to an evaluation and then require a driver to provide blood, oral fluid or urine samples. If you fail or refuse to comply with any of these demands, youwill be charged under the Criminal Code.
Driving impaired or with more than 80 milligrams of alcohol in 100 millilitres of blood (.08) is an offence under the Criminal Code. Even if your blood-alcoholconcentration is less than .08, you can still be charged with impaired driving under the Criminal Code.
You will receive an immediate 90-day administrative driver's licence suspension if your blood-alcohol concentration (BAC) is more than .08 or if you fail orrefuse to provide a breath or bodily fluid sample, perform a physical co-ordination test or submit to an evaluation.
If you register in the “warn range†of .05 to .08 on a roadside screening device, you will receive an immediate driver's licence suspension. For a firstoccurrence, you will be suspended for three days. For a second occurrence in a five-year period, you will be immediately suspended for seven days andyou must undergo a remedial alcohol-education program. For a third or subsequent time in a five-year period, you will be immediately suspended for 30days, and you must undergo a remedial alcohol-treatment program and have an ignition interlock condition placed on your licence for six months. If youchoose not to install an ignition interlock device, you must not drive until the condition is removed from your licence.
If you are 21 years old and under and hold a full-class driver's licence, you must not drive if you have been drinking alcohol. Your blood-alcohol level mustbe zero. If you are caught driving with alcohol in your blood, you will receive an immediate driver's licence suspension at the roadside for 24 hours and, ifconvicted, you will face a fine of $60 to $500 and a 30-day licence suspension.
Drivers of all ages in either Level One or Level Two of Ontario's graduated licensing system must also have a blood-alcohol level of zero when driving.New drivers caught drinking and driving will receive an immediate driver's licence suspension at the roadside for 24 hours and, if convicted, will face a fineof $60 to $500 and will receive a suspension period as per the Novice Driver Escalating Sanctions scheme. For the first occurrence, you will be suspendedfor 30 days. For the second occurrence, in a five-year period, you will be suspended for 90 days. For the third occurrence in a five-year period, the noviceportion of your driver's licence will be cancelled, and you must reapply for a G1 licence.
Novice drivers will also be charged under the Criminal Code if their BAC exceeds .08 and will be issued a warn-range suspension if they register between.05 and .08.
II. Safe and responsible snowmobilingDrugs
Any drug that changes your mood or the way you see and feel about the world around you will affect the way you drive. Criminal Code and HTA sanctionsapply to drivers impaired by alcohol or a drug.
In circumstances involving possible impairment by drugs or a combination of alcohol and a drug, police can require a driver to perform physical co-ordination tests and to submit to an evaluation, and then require a driver to provide blood, oral fluid or urine samples. If you fail or refuse to comply with anyof these demands, you will be charged under the Criminal Code. You will also receive an immediate 90-day administrative driver's licence suspension.Illegal drugs such as marijuana and cocaine are not the only problem. Some drugs that your doctor may prescribe for you and some over-the-counter drugscan also impair your driving.
Here are some points you should remember:
If you use prescription medicines or get allergy shots, ask your doctor about side effects such as dizziness, blurred vision, nausea or drowsinessthat could affect your driving.Read the information on the package of any over-the-counter medicine you take. Any stimulant, diet pill, tranquillizer or sedative may affect yourdriving. Even allergy and cold remedies may have ingredients that could affect your driving.Drugs and any amount of alcohol together can have dangerous effects, even several days after you have taken the drug. Do not take a chance -ask your doctor or pharmacist.
II. Safe and responsible snowmobilingPractice safe snowmobiling

before you try to get it out of the snow.
Every time you travel on ice, you are risking your safety and that of your passenger. Watch out for pressure cracks thatare much more difficult to spot at night. If you are in an unfamiliar area, ask local authorities or residents about the iceconditions, inlets, outlets, springs, fast-moving current or other hazards. Listen to local radio broadcast warnings by theOntario Provincial Police about ice conditions. If you must drive over frozen lakes or rivers, you should consider using abuoyant snowmobile suit. It might save your life.
Whenever you are driving, always watch for trails and highway, signs and obey them. Always remain on the right-handside of the trail when riding and exercise caution on hills and curves. You should always be prepared for the unexpected.Exercise caution at road and rail crossings. Trucks and trains often kick up large clouds of snow that greatly reducevisibility. Carry a cell phone with you when riding.
Left turn
Extend your left arm straight out and point in the direction of the turn.
Right turn
Raise your left arm to shoulder height with elbow bent.
Stop
Extend your right arm straight up over your head with the palm of the hand flat.
Stop
A stop sign is eight-sided and has a red background with white letters. Come to a complete stop.
III. Snowmobile signals and signsHand signals
Signals tell others what you want to do, giving them a chance to slow down, stop or prepare to turn. Use hand signals to signal before stopping, slowingdown suddenly or turning. Give the correct signal well before the action and make sure others can see it. These illustrations show nationally recognizedhand and arm signals.
Slowing
Extend your left arm out and down the side of your body. Flap your arm up and down to signal caution.
Oncoming snowmobiles
Raise your left arm to shoulder height with your elbow bent and motion left to right over your head, pointing to the right side of the trail.
Snowmobiles following
Raise left arm to shoulder height with your elbow bent. Motion front to back over your shoulder with your thumb, like a hitchhiker.
Last snowmobile in line
With elbow bent, raise your left forearm to shoulder height and clench your fist.
III. Snowmobile signals and signsTrail signs
Trail signs give you important information about what to do in certain situations. Here are some common trail signs and what they mean. Because trailsigns are not official traffic signs, they may vary in shape and colour. Watch for signs such as these and obey them.

Stop ahead
Be prepared to stop for a stop sign up ahead.
Snowmobiling permitted
A sign with a green circle means you may do the activity shown inside the ring. You may drive a snowmobile in the areawhere this sign is displayed.
Snowmobiling restricted
A sign with a red circle with a line through it means the activity shown inside the ring is not allowed. Do not drive asnowÂmobile in the area where this sign is displayed.
These signs give you information about the direction in which you should travel on the trail. Do as the sign tells you.
Snowmobiles permitted
Snowmobiles are allowed on the road or highway where this sign is displayed.
Snowmobiles restricted
Snowmobiles are not allowed on the road or highÂway where this sign is displayed.
Snowmobiles crossing
These signs warns drivers that snowmobiles are allowed to cross the road.
III. Snowmobile signals and signsDirection signs
III. Snowmobile signals and signsTraffic signs
If you are driving your snowmobile along or across any public roads, you need to be aware of traffic signs and what they mean. The following traffic signsrelate specifically to snowmobiles.
III. Snowmobile signals and signsWind-chill factor
It is important to consider the wind-chill factor when planning outdoor winter activities.

Wind-chill factor is the combined effect of wind and low temperature, which makes it feel much colder on a windy day in winter than is the actualtemperature. This is caused by the faster cooling effect of the wind. For example, if the actual temperature is -10°C and the wind speed is 40 km/h, thetemperature feels like -31°C.
You need to be aware of the wind-chill factor so that you can dress appropriately. Outer layers that are waterproof and multiple under-layers of clothingprovide added protection, and allow you to take clothing off if temperatures increase. Also, make sure that young passengers are properly dressed and thattheir hands and faces are well protected. Wearing a balaclava will reduce the risk of exposure. Prolonged exposure to cold wind-chill temperatures can leadto hypothermia.
The chart on the next page can help you calculate wind chill so you will be aware of potentially dangerous conditions.
III. Snowmobile signals and signsWind-chill calculation chart
Approximate Thresholds:
Wind-chill at or below -25°C: risk of frostbite in prolonged exposure.
Wind-chill at or below -35°C: frostbite possible in 10 minutes; warm skin, suddenly exposed. (Shorter time if skin is cool at the start.)
Wind-chill at or below -60°C: frostbite possible in less than two minutes; warm skin, suddenly exposed. (Shorter time if skin is cool at the start.)
III. Snowmobile signals and signsTake a snowmobile driver-training course
If you are between 12 and 15 years of age, or if you are 16 and older and do not have a valid Ontario driver's licence, you must successfully pass asnowmobile driver-training course to get your operator's licence. A snowmobile driver-training course can also be a valuable refresher for licensed andexperienced snowmobilers.
The course takes about six hours and is usually held over three days. It covers safe driving practices, snowmobile laws, knowledge of the snowmobile,maintenance, driving positions, survival, first aid, night driving, trail signs, clothing and storage. It also teaches safe and courteous driving habits and skillsto help you avoid collisions and property damage.
The training course is offered by the Ontario Federation of Snowmobile Clubs (OFSC) in co-operation with the Ministry of Transportation and is offered byclub instructors trained by the OFSC. For the location of the nearest OFSC member club offering the course and the cost, contact the OFSC DriverTraining Office at 501 Welham Road, Unit 9, Barrie, ON, L4N 8Z6. Phone 705-739-7669 or fax 705-739-5005. You can visit the OFSC website atwww.ofsc.on.ca.
III. Snowmobile signals and signsThe snowmobiler's code of ethics
Follow this code of ethics, and you will do your part to make snowmobiling a respectable, fun and safe winter recreation.
1. I will be a good sportsperson and conservationist. I recognize that people judge all snowmobilers by my actions. I will use my influence withother snowmobilers to promote responsible conduct.
2. I will not litter trails or camping areas. I will not pollute lakes or streams. I will carry out what I carried in.3. I will not damage living trees, shrubs or other natural features.4. I will respect other people's property and rights.5. I will lend a helping hand when I see someone in distress.

6. I will make myself and my snowmobile available to assist in search-and-rescue operations.7. I will not interfere with or harass hikers, skiers, snowshoers, people who are ice fishing or participating in other winter sports. I will respecttheir rights to enjoy recreation facilities.
8. I will know and obey all federal, provincial and local rules regulating the operation of snowmobiles in areas where I use my snowmobile.9. I will not harass wildlife. I will avoid areas posted for the protection of wildlife.10. I will not drive where snowmobiles are prohibited.
III. Snowmobile signals and signsChapter 1 - Summary
By the end of this section, you should know:
The licensing requirements to operate a snowmobile on roads and trailsThe importance of checking your snowmobile, preparing for trips and wearing proper protective gearWhere you can and cannot drive your snowmobileThe dangers of alcohol and driving on frozen lakes and riversHand signals, trail signs and traffic signs specific to snowmobiles
Off-road vehiclesOff-road vehicles (sometimes called ORVs) are any two- or three-wheeled motorized vehicles, as well as specific vehicles with four or more wheels asprescribed by regulation, intended for recreational use. Examples of off-road vehicles include all-terrain vehicles (ATVs), two-up ATVs, side-by-side ATVs,utility terrain vehicles (UTVs), amphibious ATVs, off-road motorcycles and dune buggies.
Note: Electric and motorized scooters (commonly known as go-peds) and pocket bikes (which are miniature motorcycles about two feet in height and witha speed of 70-80 km/h) are not off-road vehicles and, as such, cannot be registered as off-road vehicles. These vehicles also do not comply withmotorcycle standards and cannot be registered as motorcycles.
I. Getting ready to drive an off-road vehicleWhat you need to drive an off-road vehicle in Ontario
You must be 12 years of age or older to drive an off-road vehicle, except on land occupied by the vehicle owner or under the close supervision of an adult.Direct and close supervision by an adult is recommended.
While off-road vehicles are generally not allowed on public roads, there are some exceptions. (See the section “Where you can and cannot drive.â€)
I. Getting ready to drive an off-road vehicleRegistering and insuring your off-road vehicle
Off-road vehicles must be registered with the Ministry of Transportation at a ServiceOntario centre. This applies to both new and used vehicles. You mustbe 16 years or older to register an off-road vehicle, and you must be able to prove you own the vehicle.
If you buy a new off-road vehicle, you must get a certificate of sale from the dealer.
If you buy or transfer ownership of a used off-road vehicle, you must present the signed vehicle portion of the vehicle permit from the previous owner.
You must pay a fee to register your off-road vehicle. After regiÂstering, you will be given a vehicle permit and licence plate. You should carry the vehiclepermit at all times unless you are operating the vehicle on land occupied by the owner of the vehicle.
If you have a two- or three-wheeled vehicle, attach the licence plate to the front of the vehicle in plain view. If you have a vehicle with four or more wheels,attach the licence plate to the rear of the vehicle.
You must register your vehicle within six days of becoming the owner. If you change your address, you must notify the Ministry of Transportation withinsix days of the change. You may do this in person at a ServiceOntario centre, by mail to the Ministry of Transportation, P.O. Box 9200, Kingston, ON K7L5K4, or on the ServiceOntario website at www.serviceontario.ca.
If you are driving your off-road vehicle anywhere other than on the vehicle owner's property, you must also have vehicle liability insurance. You must carrythe insurance card with you and show it if requested by a police officer. If someone else uses your off-road vehicle with your consent, you are bothresponsible for any penalties, damages or injuries that may occur.
The following vehicles do not need to be registered as off-road vehicles: road-building machines, farm vehicles, golf carts and motorized wheelchairs. Inaddition, off-road vehicles participating in a rally or competition sponsored by a motorcycle association with more than 25 members do not need to beregistered for the event.
I. Getting ready to drive an off-road vehicleWear a helmet
You must wear a motorcycle helmet, as required by the Highway Traffic Act, whenever you drive or ride on an off-road vehicle or on any vehicle towed byan off-road vehicle. The only exception is when you operate the vehicle on the property of the vehicle owner. The helmet must meet the standardsapproved for motorcycle helmets, or motor-assisted vehicle helmets, and must be fastened properly under the chin.

Before every trip, check your vehicle to make sure it is in good working order. Your life may depend upon it. Check thevehicle thoroughly before you start to drive, including the following:
Check the brake control to make sure it moves freely. Adjust if necessary.Check that the throttle opens and closes smoothly in all steering positions.Check the condition of the tires and tire pressure.Check the fuel lines andconnections to make sure there are no leaks.Check that you have enough fuel and oil.Check that the engine is running smoothly. Make sure the is in neutral before starting the engine.Check that your lights are in good working condition.
Before you drive anywhere, read the owner's manual.
Carefully preparing for every trip is an important safety measure. Check local weather forecasts and make sure you tellsomeone where you will be travelling and when you expect to be back. Use the buddy system; drive with others, notalone. Take along a first-aid kit, a vehicle repair kit, an extra ignition key, a drive belt, spark plugs and a rope. On longtrips, include a map and a compass (or a GPS unit and know how to use it), flashlight, hunting knife, hatchet, extra fueland matches in a waterproof box.
All-terrain vehicles are off-road vehicles with the following characteristics: four wheels, all of which are in contact withthe ground; steering handlebars; and a seat designed to be straddled by the driver.
There are sections of provincial highways in Ontario where you may drive an ATV on the shoulder, provided the ATVweighs 450 kilograms or less, does not have an overall width greater than 1.35 metres (excluding mirrors), meets therequirements of the federal Motor Vehicle Safety Act and the American National Standards Institute Standard, and isdesigned to carry only a driver and no passengers. You must travel in the same direction as the traffic using that side ofthe road. If there is no shoulder, if the shoulder is obstructed or if you are crossing a level railway crossing, you maydrive your vehicle on the paved part of the highway. Keep as close as safely possible to the right of the shoulder or edgeof the highway as you can.
Where a road or highway falls under the authority of a municipality, the municipality must enact a bylaw for ATVs to be
I. Getting ready to drive an off-road vehicleProtect your face and body
Always wear a face shield or goggles. A face shield can help prevent windburn, sunblindness and watering eyes from the wind. It can also protect youreyes from branches and twigs when driving through wooded areas. Wear pants that cover your legs, a long-sleeved shirt or jacket to protect your arms andgloves. Boots should be high enough to cover your ankles. To make yourself more visible to others while driving, wear brightly coloured clothing.
I. Getting ready to drive an off-road vehicleMake sure your vehicle is in good condition
I. Getting ready to drive an off-road vehicleBe well prepared for every trip
II. Safe and responsible off-road vehicle drivingWhere you can and cannot drive
You may not drive an off-road vehicle on most public roads in Ontario. This includes the area between the boundary or property lines, including medians,shoulders and ditches.
There are some exceptions:
You may drive an off-road vehicle directly across some public roads.You may drive certain off-road vehicles with three or more wheels along some public roads when using the vehicle for farming, for licensed huntingor for the trapping of fur-bearing animals, provided that the vehicle weighs 450 kilograms or less and does not have an overall width greater than1.35 metres (excluding mirrors).You may drive an off-road vehicle within a provincial or public park if it is permitted by the park authority.Emergency personnel, such as police officers and firefighters, who are performing necessary duties in the course of their work or who areresponding to an emergency, may drive off-road vehicles on public roads.
There are also exceptions for the category of off-road vehicles known as all-terrain vehicles (ATVs).
If you do drive an off-road vehicle on or across a public road, you must be at least 16 years of age and have a valid Ontario driver's licence (Class G2, M2or higher).
You may not operate an ATV in such a way as to disrupt or destroy the natural environment, including fish habitats, property and plants or trees.
For more specific information on where you may operate off-road vehicles, and what rules you must follow when doing so, you should refer to the HighwayTraffic Act and the Off-road Vehicles Act.
II. Safe and responsible off-road vehicle drivingAll-terrain vehicles (ATVs)

allowed access to the road. If there is no bylaw in place, you cannot drive an ATV on that road. The municipality mayalso pass bylaws to decide where andwhen ATVs may be used on these local roads.
For those roads and highways where you are permitted to drive an ATV, you must obey all licensing and operationalrequirements, and your vehicle must conform to all equipment requirements, as listed in the Highway Traffic Act and theOff-road Vehicles Act. Remember the following rules:
1. You must have a valid Ontario driver's licence (G2, M2 or higher).2. You must wear a motorcycle helmet with a chin strap that is securely fastened.3. You cannot carry passengers on your vehicle.4. You must drive at speed limits lower than those posted: where the posted speed is 50km/h or less, youmust drive 20 km/h or less; where the posted speed is over 50 km/h, you must drive 50 km/h or less.
In general, ATVs are not permitted on controlled-access highways, such as the 400 series highways and most parts ofthe Trans-Canada Highway, but are allowed access to highways 500 to 899, the 7000 series highways and highwayswith low traffic volumes.
For more details about which highways ATVs may drive on, please refer to the Highway Traffic Act, Ontario Regulation316/03.
II. Safe and responsible off-road vehicle drivingObey the rules
You must stop if a police officer signals you to do so. You can also be stopped by a landowner when you are driving on private property. If signalled tostop by an authorized person, you must stop and, if asked, properly identify yourself.
Everyone who drives an off-road vehicle without care and attention or without reasonable consideration for other people and property may be charged withcareless driving. Other offences, such as dangerous driving and alcohol related offences, apply to drivers of off-road vehicles. When you drive an off-roadvehicle on a public road, the Highway Traffic Act offences also apply.
II. Safe and responsible off-road vehicle drivingReport collisions to the police
You must report to the police immediately any collision on a public highway that results in injury to any person or damage to property apparently exceeding$1,000.
II. Safe and responsible off-road vehicle drivingDo not drink and drive
It is against the law to drive an off-road vehicle when you are impaired by alcohol or drugs.
Drinking and driving is a deadly combination.
Consuming any amount of alcohol before you ride affects your ability to make good decisions. Even one drink can reduce your ability to concentrate andreact to things that happen suddenly when you are driving. With more alcohol in your blood, you could have trouble judging distances and your vision maybecome blurred. Factors like tiredness, your mood, and how long ago you ate and how much, can make a difference in how alcohol affects your drivingability.
The police can stop any driver to determine if alcohol or drug testing is required. They may also do roadside spot checks. When stopped by the police, youmay be told to blow into a machine that tests your breath for alcohol, a roadside screening device, or perform physical co-ordination tests. If you fail orrefuse to provide a breath sample or to perform the physical co-ordination tests, you will be charged under the Criminal Code.
If the reading on the machine shows you have been drinking, you may be taken to a police station for a breathalyzer test. The breathalyzer uses yourbreath to measure the amount of alcohol in your bloodstream.
If you cannot give a breath sample or it is impractical to obtain a sample of breath, the police officer can require you to provide a blood sample instead.
If the police believe that a driver is impaired because of the consumption of a drug or a combination of alcohol and a drug, they can also require a driver tosubmit to an evaluation and then require a driver to provide blood, oral fluid or urine samples. If you fail or refuse to comply with any of these demands, youwill be charged under the Criminal Code.
Driving impaired or with more than 80 milligrams of alcohol in 100 millilitres of blood (.08) is an offence under the Criminal Code. Even if your blood-alcoholconcentration (BAC) is less than .08, you can still be charged with impaired driving under the Criminal Code.
You will receive an immediate 90-day administrative driver's licence suspension if BAC is more than .08 or if you fail or refuse to provide a breath or bodilyfluid sample, perform a physical co-ordination test or submit to an evaluation.
If you register in the “warn range†of .05 to .08 on a roadside screening device, you will receive an immediate driver's licence suspension. For a firstoccurrence, you will be suspended for three days. For a second occurrence in a five-year period, you will be immediately suspended for seven days andyou must undergo a remedial alcohol-education program. For a third or subsequent time in a five-year period, you will be immediately suspended for 30days, and you must undergo a remedial alcohol-treatment program and have an ignition interlock condition placed on your licence for six months. If youchoose not to install an ignition interlock device, you must not drive until the condition is removed from your licence.
If you are 21 years old and under and hold a full-class driver's licence, you must not drive if you have been drinking alcohol. Your blood-alcohol level mustbe zero. If you are caught driving with alcohol in your blood, you will receive an immediate driver's licence suspension at the roadside for 24 hours and, ifconvicted, you will face a fine of $60 to $500 and a 30-day licence suspension.

Drivers of all ages in either Level One or Level Two of Ontario's graduated licensing system must also have a blood-alcohol level of zero when driving.New drivers caught drinking and driving will receive an immediate driver's licence suspension at the roadside for 24 hours and, if convicted, will face a fineof $60 to $500, and will receive a suspension period as per the Novice Driver Escalating Sanctions scheme. For the first occurrence, you will besuspended for 30 days. For the second occurrence, in a five-year period, you be suspended for 90 days. For the third occurrence in a five-year period, thenovice portion of your driver's licence will be cancelled, and you must reapply for a G1 licence.
Novice drivers will also be charged under the Criminal Code if their BAC exceeds .08 and will be issued a “warn range†suspension if they register aBAC from .05 to .08.
II. Safe and responsible off-road vehicle drivingDrugs
Any drug that changes your mood or the way you see and feel about the world around you will affect the way you drive. Criminal Code and HTA sanctionsapply to drivers impaired by alcohol or a drug.
In circumstances involving possible impairment by a drug or a combination of alcohol and a drug, police can require a driver to perform physical co-ordination tests and to submit to an evaluation and then require a driver to provide blood, oral fluid or urine samples. If you fail or refuse to comply with anyof these demands, you will be charged under the Criminal Code. You will also receive an immediate 90-day administrative driver's licence suspension.
Illegal drugs such as marijuana and cocaine are not the only problem. Some drugs that your doctor may prescribe for you and some over-the-counter drugscan also impair your driving. Here are some points you should remember:
If you use prescription medicines or get allergy shots, ask your doctor about side effects such as dizziness, blurred vision, nausea or drowsinessthat could affect your driving.Read the information on the package of any over-the-counter medicine you take. Any stimulant, diet pill, tranquillizer or sedative may affect yourdriving. Even allergy and cold remedies may have ingredients that could affect your driving.Drugs and any amount of alcohol together can have dangerous effects, even several days after you have taken the drug. Do not take a chance; askyour doctor or pharmacist.
II. Safe and responsible off-road vehicle drivingDo not carry passengers
Do not carry passengers on an off-road vehicle designed for one person. Carrying passengers changes the weight distribution of the vehicle and limits yourability to shift position on the vehicle for control and stability.
II. Safe and responsible off-road vehicle drivingPractice safe driving skills
Driving an off-road vehicle is different than driving any other type of vehicle, and takes more skill than you might think. Be sure to read your owner'smanual before you begin to drive.
If you are a beginner, practise driving your vehicle in an open area that is free of obstacles, until you become skilled at handling it. Choose ground that isuniform, either dirt, sand or snow. Avoid paved surfaces when driving an off-road vehicle. ATVs are designed for off-road use and are more difficult tomanoeuvre on paved surfaces. When driving, keep both feet on the footrests at all times. Do not try to stabilize a tipping vehicle by putting your foot down.You could run over your foot or leg.
Be extremely careful driving through water. Driving fast across unknown water is dangerous. Hidden rocks or holes could throw you off the vehicle andcause serious injury or drowning. First, check that the water is not too deep. Drive slowly and carefully so you can steer around rocks and other obstacles.
Always use a flag mast when driving in dunes and hills. Remember that you need a running start to climb most hills. Be extra cautious when drivingamong pedestrians, horseback riders, sunbathers or bicyclists.
Read the Snowmobiler's Code of Ethics, and follow it when driving your off-road vehicle.
II. Off-road vehiclesChapter 2 - Summary
By the end of this section, you should know:
The licensing requirements to operate an off-road vehicle on roads and trailsThe importance of checking your off-road vehicle, preparing for trips and wearing proper protective gearWhere you can and cannot drive your off-road vehicleThe dangers of alcohol and driving an off-road vehicle