sap crm groupware connector release 4.0
TRANSCRIPT
Installation Guide
SAP CRM Groupware Connector Release 4.0
Document Version 2.1.6 – December 20, 2007
Document Version 2.1.7 – December 23, 2011
© Copyright 2003 SAP AG. All rights reserved. No part of this publication may be reproduced or transmitted in any form or for any purpose without the express permission of SAP AG. The information contained herein may be changed without prior notice. Some software products marketed by SAP AG and its distributors contain proprietary software components of other software vendors. Microsoft®, WINDOWS®, NT®, EXCEL®, Word®, PowerPoint® and SQL Server® are registered trademarks of Microsoft Corporation. IBM®, DB2®, DB2 Universal Database, OS/2®, Parallel Sysplex®, MVS/ESA, AIX®, S/390®, AS/400®, OS/390®, OS/400®, iSeries, pSeries, xSeries, zSeries, z/OS, AFP, Intelligent Miner, WebSphere®, Netfinity®, Tivoli®, Informix and Informix® Dynamic Server
TM are
trademarks of IBM Corp. in USA and/or other countries. ORACLE® is a registered trademark of ORACLE Corporation. UNIX®, X/Open®, OSF/1®, and Motif ® are registered trademarks of the Open Group. LINUX is a registered trademark of Linus Torvalds and others. Citrix®, the Citrix logo, ICA®, Program Neighborhood ®, MetaFrame®, WinFrame®, VideoFrame®, MultiWin® and other Citrix product names referenced herein are trademarks of Citrix Systems, Inc. HTML, DHTML, XML, XHTML are trademarks or registered trademarks of W3C®, World Wide Web Consortium, Massachusetts Institute of Technology.
JAVA® is a registered trademark of Sun Microsystems, Inc. J2EE™ is a registered trademark of Sun Microsystems, Inc. JAVASCRIPT® is a registered trademark of Sun Microsystems, Inc., used under license for technology invented and implemented by Netscape. MarketSet and Enterprise Buyer are jointly owned trademarks of SAP AG and Commerce One. SAP, SAP Logo, R/2, R/3, mySAP, mySAP.com, xApps, mySAP Business Suite, and other SAP products and services mentioned herein as well as their respective logos are trademarks or registered trademarks of SAP AG in Germany and in several other countries all over the world. All other product and service names mentioned are the trademarks of their respective companies. Disclaimer Some components of this product are based on Java™. Any code change in these components may cause unpredictable and severe malfunctions and is therefore expressively prohibited, as is any decompilation of these components. Any Java™ Source Code delivered with this product is only to be used by SAP’s Support Services and may not be modified or altered in any way. Documentation in the SAP Service Marketplace You can find this documentation at the following Internet address: http://service.sap.com/instguides
SAP AG Neurottstraße 16 69190 Walldorf Germany T +49/18 05/34 34 24 F +49/18 05/34 34 20 www.sap.com
Typographic Conventions
Type Style Represents
Example Text Words or characters that appear on the screen. These include field names, screen titles, pushbuttons as well as menu names, paths and options.
Cross-references to other documentation
Example text Emphasized words or phrases in body text, titles of graphics and tables
EXAMPLE TEXT Names of elements in the system. These include report names, program names, transaction codes, table names, and individual key words of a programming language, when surrounded by body text, for example, SELECT and INCLUDE.
Example text Screen output. This includes file and directory names and their paths, messages, names of variables and parameters, source code as well as names of installation, upgrade and database tools.
Example text Exact user entry. These are words or characters that you enter exactly in the system as they appear in the documentation.
<Example text> Variable user entry. Pointed brackets indicate that you replace these words and characters with appropriate entries.
EXAMPLE TEXT Keys on the keyboard, for example, function keys (such as F2) or the ENTER key.
Icons
Icon Meaning
Caution
Example
Note
Recommendation
Syntax
1 Introduction
Contents 1 Introduction .................................................................................... 5
1.1 Naming Conventions......................................................................... 7 1.2 New Features ..................................................................................... 7
2 Installation – Step by Step ............................................................ 8 2.1 Installing MS Exchange Groupware Connector .............................. 8 2.2 Installing MS Exchange Groupware Connector Proxy ................... 9 2.3 Installing Lotus Domino Groupware Connector ........................... 10 2.4 Installing Lotus Domino Groupware Connector Proxy ................ 10
3 Installation Planning .................................................................... 11 3.1 Hardware and Software Requirements .......................................... 11 3.2 Required Parameters ...................................................................... 13
4 Installation Preparations ............................................................. 14 4.1 Gathering Parameters of Groupware Adapter .............................. 14 4.2 Preparing Administrative Account for MS Exchange Connector 15 4.3 Installing Microsoft Outlook ........................................................... 22 4.4 Preparing Public Folder for Storing CRM Contacts ..................... 22 4.5 Using the Contacts Folder as Address Book in the MS Outlook 24 4.6 Preparing Administrative Account for Lotus Domino Connector ................................................................................................................ 25 4.7 Preparing Database for Storing CRM Contacts ............................ 26 4.8 Preparing for Replication of Private Contacts .............................. 31 4.9 Installing Lotus Notes Client .......................................................... 32
5 Installation Process ..................................................................... 32 5.1 Installing MS Exchange Groupware Connector ............................ 32 5.2 Installing MS Exchange Groupware Connector Proxy ................. 37 5.3 Installing Lotus Domino Groupware Connector ........................... 40 5.4 Installing Lotus Domino Groupware Connector Proxy ................ 46
6 Post Installation............................................................................ 51 6.1 Running SelfTest ............................................................................. 51 6.2 Tuning the Performance ................................................................. 51
7 Additional Information ................................................................. 51 7.1 Installation Troubleshooting .......................................................... 51 7.2 Upgrading from 2.0 Release ........................................................... 53 7.3 Upgrading from 2.1 Release ........................................................... 54 7.4 Uninstalling the Groupware Connector ......................................... 54 7.5 Installing Multiple Instances of Connector ................................... 54
1 Introduction
1 Introduction Purpose This installation guide provides step-by-step instructions for installing the components of the 4.0 release of SAP CRM Groupware Connector environment. This guide also specifies the requirements for the installation and proper operation of the connectors.
The following topics are discussed:
Architecture of the Groupware Connectors
Hardware and software requirements
Preliminary actions before installing Groupware Connectors
Step-by-step installation instructions
Skill in performing typical Groupware administrative tasks is expected when preparing Groupware Servers for integration.
There are two SAP CRM Groupware Connectors available, one for the Microsoft (MS) Exchange Server and one for the Lotus Domino Server. Groupware Connectors for SAP CRM release 4.0 allow two-way replication from different SAP CRM applications to the groupware and back. The scope of the product includes replication of contacts (business partner), appointments and tasks (activity and resource planning).
Object types in different systems
SAP CRM MS Exchange Groupware Server
Lotus Domino Groupware Server
Business partner Contact Contacts folder in User’s
Mailbox (private contacts) Public folder (public contacts)
Contact (Person) User’s private contact
database (private contacts) Public contacts database
(public contacts)
Activity Management or Resource Planning
Task Tasks folder in User’s
Mailbox
To Do (Task) User’s mail database: to-do
frameset, calendar frameset
Activity Management or Resource Planning
Appointment, Meeting Calendar folder in User’s
Mailbox
Calendar Entry (Appointment) User’s mail database: calendar
frameset
Implementation Considerations Groupware Connector consists of the following components:
Groupware Connector
Groupware Connector Proxy
1 Introduction
The solution requires installation of one instance of Groupware Connector and one or more instances of Groupware Connector Proxies. The number of installed instances of Groupware Connector Proxies depends on following points:
Geographical distribution of the organization and Wide Area Network (WAN) landscape
Desired performance of the solution. See next chapter for more details.
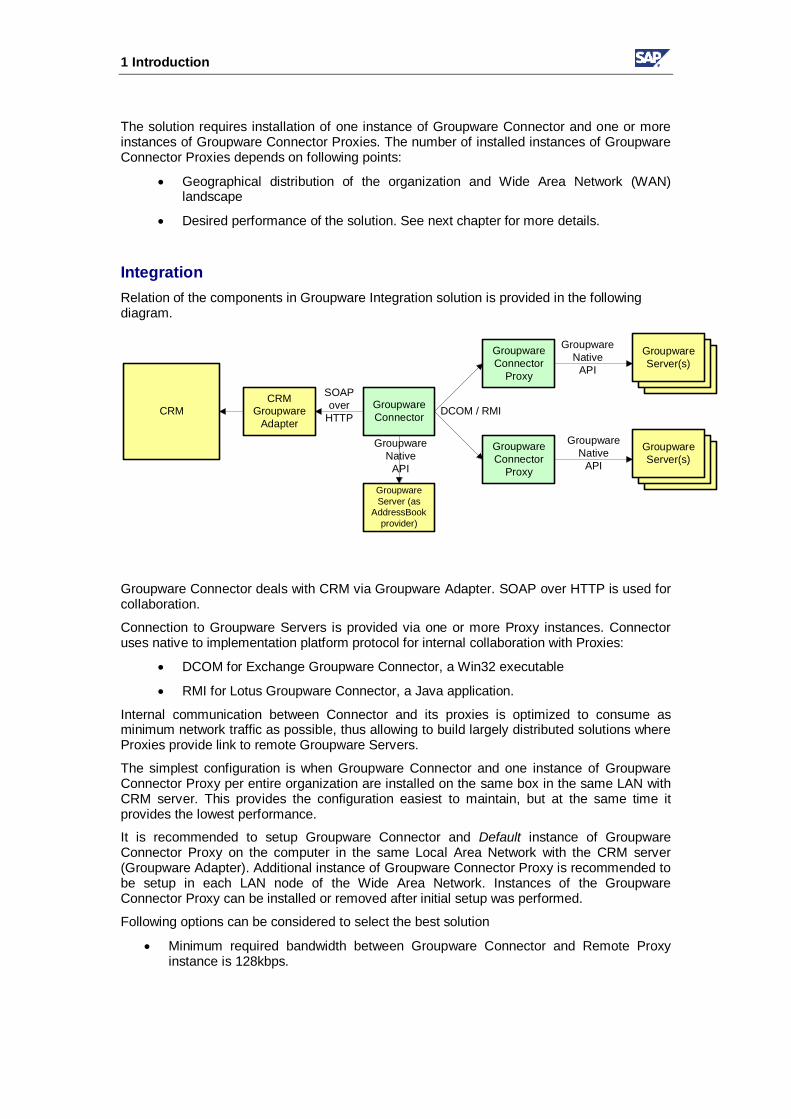
Integration Relation of the components in Groupware Integration solution is provided in the following diagram.
GroupwareServer
GroupwareServer
CRMCRM
GroupwareAdapter
GroupwareConnector
GroupwareConnector
Proxy
GroupwareConnector
Proxy
GroupwareServer(s)
GroupwareServer
GroupwareServer
GroupwareServer(s)
SOAPover
HTTP DCOM / RMI
GroupwareNative
API
GroupwareNative
API
GroupwareServer (as
AddressBookprovider)
GroupwareNative
API
Groupware Connector deals with CRM via Groupware Adapter. SOAP over HTTP is used for collaboration.
Connection to Groupware Servers is provided via one or more Proxy instances. Connector uses native to implementation platform protocol for internal collaboration with Proxies:
DCOM for Exchange Groupware Connector, a Win32 executable
RMI for Lotus Groupware Connector, a Java application.
Internal communication between Connector and its proxies is optimized to consume as minimum network traffic as possible, thus allowing to build largely distributed solutions where Proxies provide link to remote Groupware Servers.
The simplest configuration is when Groupware Connector and one instance of Groupware Connector Proxy per entire organization are installed on the same box in the same LAN with CRM server. This provides the configuration easiest to maintain, but at the same time it provides the lowest performance.
It is recommended to setup Groupware Connector and Default instance of Groupware Connector Proxy on the computer in the same Local Area Network with the CRM server (Groupware Adapter). Additional instance of Groupware Connector Proxy is recommended to be setup in each LAN node of the Wide Area Network. Instances of the Groupware Connector Proxy can be installed or removed after initial setup was performed.
Following options can be considered to select the best solution
Minimum required bandwidth between Groupware Connector and Remote Proxy instance is 128kbps.
1 Introduction
Minimum required bandwidth between Groupware Connector Proxy and remove Groupware Server is 1Mbps. (This is the case for the simplest configuration).
When using Remote Proxy in comparison to setting up the Proxy to deal with remote Groupware Servers …
o Network utilization is about 5 times less during CRM Groupware replication.
o Performance of Groupware CRM replication can be up to 100 times faster (depending on WAN bandwidth) because Remote Proxy will not utilze the network while detecting the changes.
1.1 Naming Conventions In this documentation, the following naming conventions apply:
Variables Variables Description
<SAPSID> SAP system ID in uppercase letters
<sapsid> SAP system ID in lowercase letters
<DBSID> Database system ID in uppercase letters
<dbsid> Database system ID in lowercase letters
<SAPinst_INSTDIR> Installation directory for the SAP installation tool SAPinst
<INSTDIR> Installation directory for the SAP system
<CD-DIR> Directory on which a CD is mounted
<OS> Operating system name within a path
The following examples show how the variables are used:
Log on as user <sapsid>adm and change to the directory
/usr/sap/<SAPSID>. If your SAP system ID is C11, log on as user c11adm and change to the directory /usr/sap/C11.
Change to the directory <CD-DIR>/UNIX/<OS>. If the CD is mounted on /sapcd1 and your operating system is AIX, change to /sapcd1/UNIX/AIX_64.
1.2 New Features Area Description
General In comparison to 2.0 family of groupware connector, this one includes performance improvements and internal architecture changes to handle
2 Installation – Step by Step
largely-distributed organizations in WAN environment.
2 Installation – Step by Step Purpose You use the tables in the following sections as checklists to navigate through the installation when you install your SAP system.
All necessary installation phases (planning, preparation, installation, and post-installation) are listed in these tables.
Use the links to the general descriptions of the actions and to any additional information to help you perform the actions. This prevents you from missing important information.
Prerequisites
Process Flow 1. You print out the relevant checklist:
- To install MS Exchange Groupware Connector, see table Installing MS Exchange Groupware Connector [Page 8].
- To install MS Exchange Groupware Connector Proxy, see table 2.2 Installing MS Exchange Groupware Connector Proxy [Page 9].
- To install Lotus Domino Groupware Connector, see table Installing Lotus Domino Groupware Connector [Page 10].
- To install Lotus Domino Groupware Connector Proxy, see table Installing Lotus Domino Groupware Connector Proxy [Page 10].
2. You follow the installation sequence exactly as shown in the tables.
If a step is required for your installation, you follow the link for that step to the corresponding section.
You perform the procedure described there.
After you have successfully completed the installation step, you mark the corresponding entry in the printed table with to log the progress of your installation.
You proceed with the next step listed in the table.
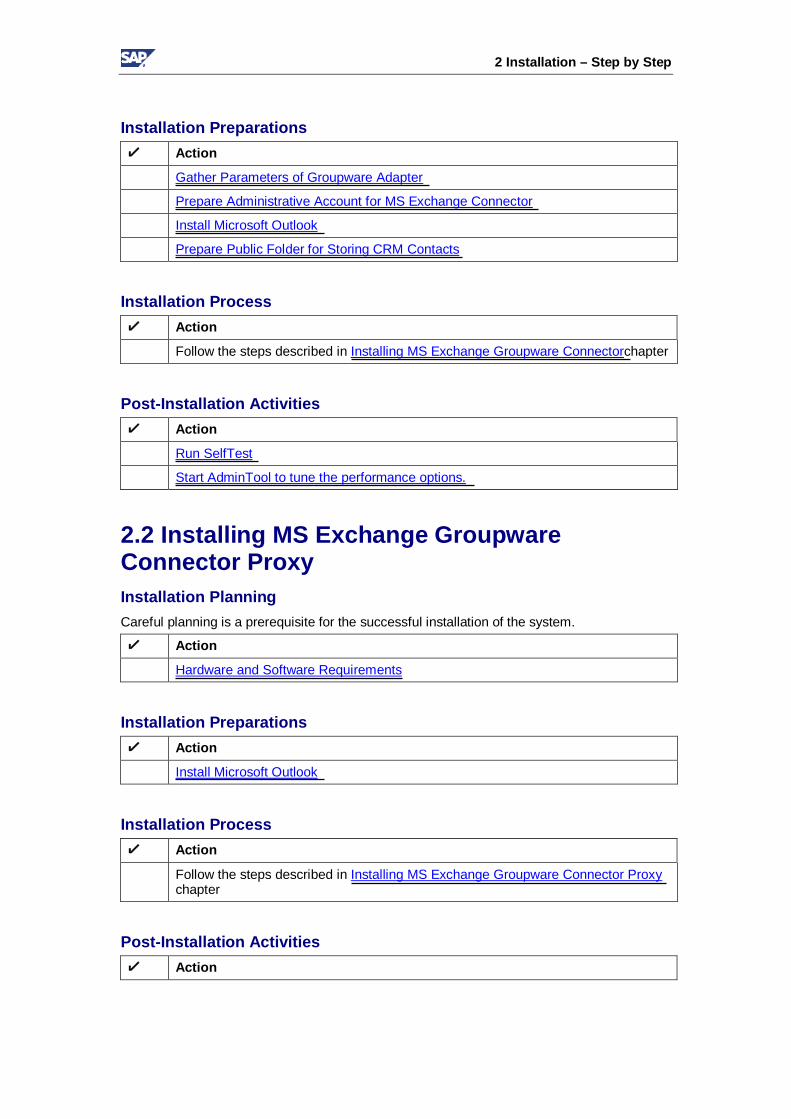
2.1 Installing MS Exchange Groupware Connector Installation Planning Careful planning is a prerequisite for the successful installation of the system.
Action
Hardware and Software Requirements
Required Parameters
2 Installation – Step by Step
Installation Preparations Action
Gather Parameters of Groupware Adapter
Prepare Administrative Account for MS Exchange Connector
Install Microsoft Outlook
Prepare Public Folder for Storing CRM Contacts
Installation Process Action
Follow the steps described in Installing MS Exchange Groupware Connectorchapter
Post-Installation Activities Action
Run SelfTest
Start AdminTool to tune the performance options.
2.2 Installing MS Exchange Groupware Connector Proxy Installation Planning Careful planning is a prerequisite for the successful installation of the system.
Action
Hardware and Software Requirements
Installation Preparations Action
Install Microsoft Outlook
Installation Process Action
Follow the steps described in Installing MS Exchange Groupware Connector Proxy chapter
Post-Installation Activities Action
2 Installation – Step by Step
None
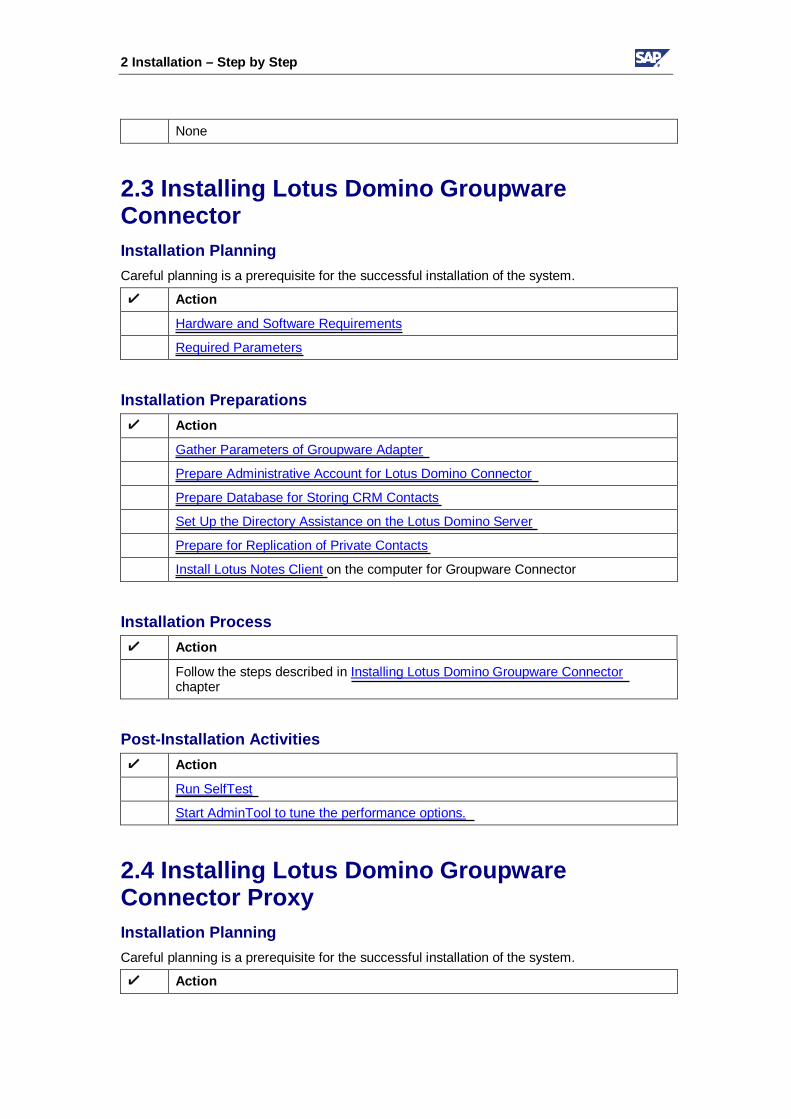
2.3 Installing Lotus Domino Groupware Connector Installation Planning Careful planning is a prerequisite for the successful installation of the system.
Action
Hardware and Software Requirements
Required Parameters
Installation Preparations Action
Gather Parameters of Groupware Adapter
Prepare Administrative Account for Lotus Domino Connector
Prepare Database for Storing CRM Contacts
Set Up the Directory Assistance on the Lotus Domino Server
Prepare for Replication of Private Contacts
Install Lotus Notes Client on the computer for Groupware Connector
Installation Process Action
Follow the steps described in Installing Lotus Domino Groupware Connector chapter
Post-Installation Activities Action
Run SelfTest
Start AdminTool to tune the performance options.
2.4 Installing Lotus Domino Groupware Connector Proxy Installation Planning Careful planning is a prerequisite for the successful installation of the system.
Action
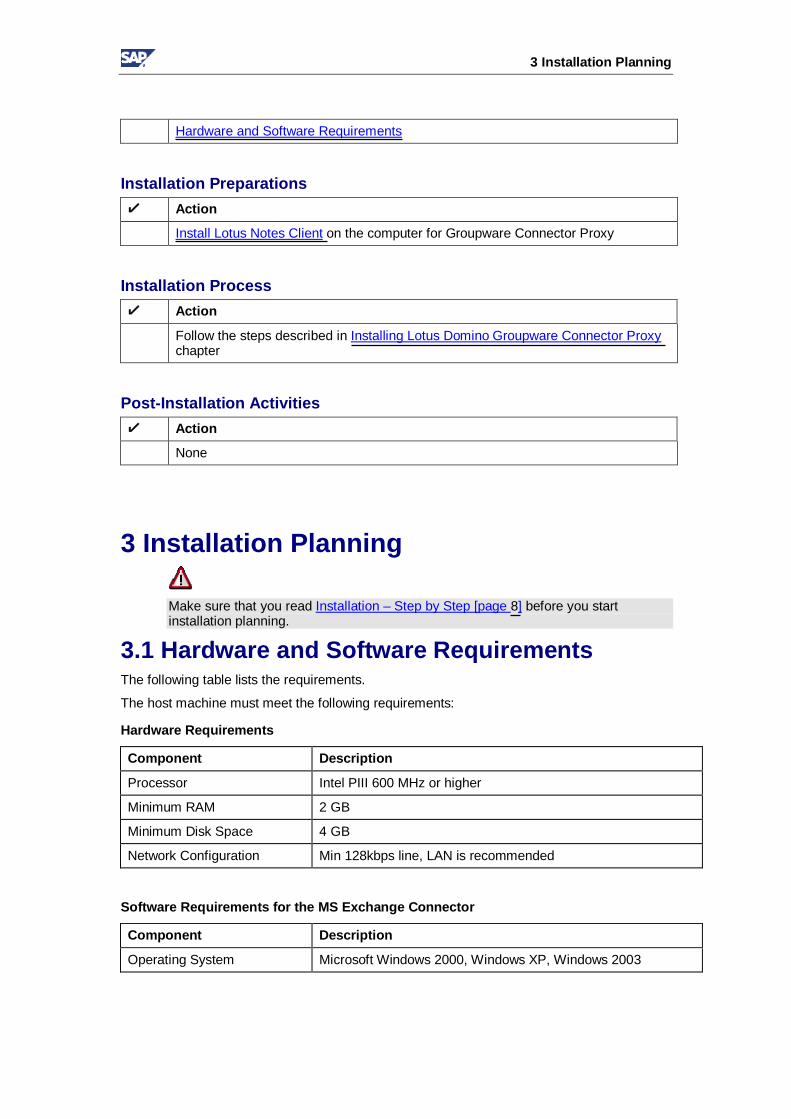
3 Installation Planning
Hardware and Software Requirements
Installation Preparations Action
Install Lotus Notes Client on the computer for Groupware Connector Proxy
Installation Process Action
Follow the steps described in Installing Lotus Domino Groupware Connector Proxy chapter
Post-Installation Activities Action
None
3 Installation Planning
Make sure that you read Installation – Step by Step [page 8] before you start installation planning.
3.1 Hardware and Software Requirements The following table lists the requirements.
The host machine must meet the following requirements:
Hardware Requirements
Component Description
Processor Intel PIII 600 MHz or higher
Minimum RAM 2 GB
Minimum Disk Space 4 GB
Network Configuration Min 128kbps line, LAN is recommended
Software Requirements for the MS Exchange Connector
Component Description
Operating System Microsoft Windows 2000, Windows XP, Windows 2003
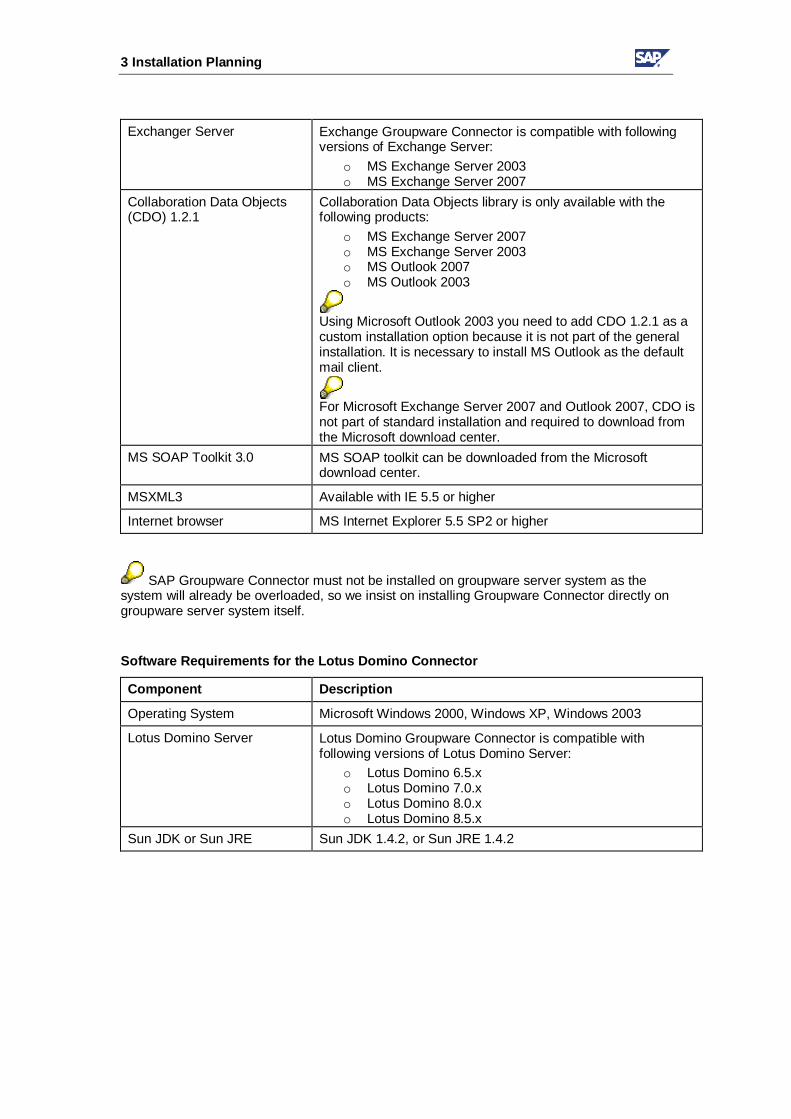
3 Installation Planning
Exchanger Server Exchange Groupware Connector is compatible with following versions of Exchange Server:
o MS Exchange Server 2003 o MS Exchange Server 2007
Collaboration Data Objects (CDO) 1.2.1
Collaboration Data Objects library is only available with the following products:
o MS Exchange Server 2007 o MS Exchange Server 2003 o MS Outlook 2007 o MS Outlook 2003
Using Microsoft Outlook 2003 you need to add CDO 1.2.1 as a custom installation option because it is not part of the general installation. It is necessary to install MS Outlook as the default mail client.
For Microsoft Exchange Server 2007 and Outlook 2007, CDO is not part of standard installation and required to download from the Microsoft download center.
MS SOAP Toolkit 3.0 MS SOAP toolkit can be downloaded from the Microsoft download center.
MSXML3 Available with IE 5.5 or higher
Internet browser MS Internet Explorer 5.5 SP2 or higher
SAP Groupware Connector must not be installed on groupware server system as the system will already be overloaded, so we insist on installing Groupware Connector directly on groupware server system itself.
Software Requirements for the Lotus Domino Connector
Component Description
Operating System Microsoft Windows 2000, Windows XP, Windows 2003
Lotus Domino Server Lotus Domino Groupware Connector is compatible with following versions of Lotus Domino Server:
o Lotus Domino 6.5.x o Lotus Domino 7.0.x o Lotus Domino 8.0.x o Lotus Domino 8.5.x
Sun JDK or Sun JRE Sun JDK 1.4.2, or Sun JRE 1.4.2
3 Installation Planning
Notes.jar You must install one of the following:
Lotus Notes 6.5 or higher
Lotus Domino Designer 6.5 or higher
Lotus Domino Administrator 6.5 or higher
The version of the products listed above should be the same as the version of the default Lotus Domino Server.
Sun Java Mail API 1.3.1 Extract the downloaded zip file into a directory on the hard disk. You will have to enter the file location during the installation process.
Javabeans Activation Framework (JAF) 1.0.2
Extract the downloaded zip file into a directory on the hard disk. You will have to enter the file location during the installation process.
Lotus Domino Server The version of the default Lotus Domino Server must be 6.5.x or higher
3.2 Required Parameters Before starting the Installation Wizard, you have to know all parameters that have to be entered during the installation procedure. These parameters are:
For configuring connection to Groupware Adapter URL (HTTP URL of the SOAP listener)
User Name
Password
Client
Language
For configuring connection to Lotus Domino Server
Global Domain Name
Server Name (Host Name for Lotus Domino)
Server Port (HTTP Server Port)
User Name (Short user name of administrative account prepared for Groupware Connector)
Password (Internet password of that account)
For configuring connection to Microsoft Exchange Server
Server Name
Domain\User Name (Administrative account prepared for Groupware Connector)
Password
For more details, refer to section Installation Preparations.

4 Installation Preparations
4 Installation Preparations 4.1 Gathering Parameters of Groupware Adapter This chapter describes how parameters, required for configuration of connection to Groupware Adapter, can be obtained.
To determine the HTTP URL of the SOAP listener, perform the following steps:
1. Obtain HTTP server Host Name and Port
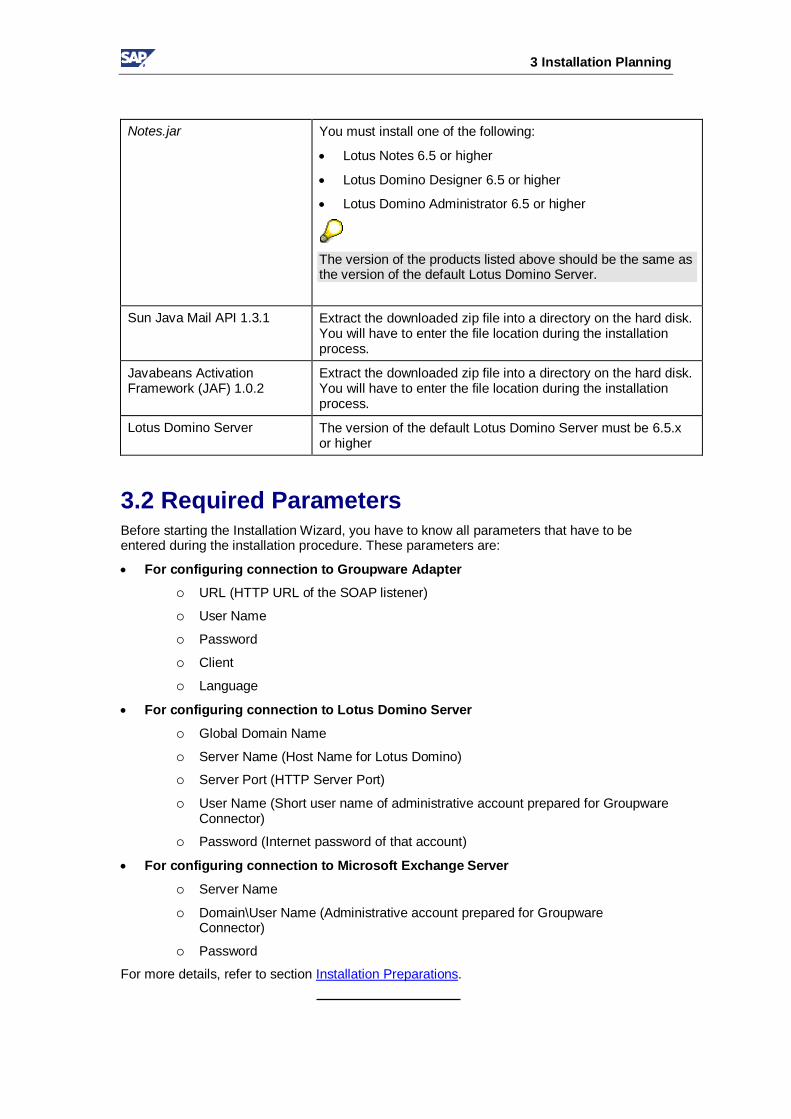
a. Enter the transaction code SMICM and choose Services.
b. On the Service Display screen, get the Host Name and the Service Name/Port for the HTTP protocol (see the figure below).
This forms the http://[Host Name]:[Service Name/Port] part of the URL address.
2. Determine the relative path of the SOAP listener:
a. Enter the transaction code SICF.
b. Expand the tree to locate the soap node (usually found in default_host sap bc soap rfc).
c. The path below the default_host node forms the rest of the URL address (sap/bc/soap/rfc), i.e. finally you get http://[Host Name]:[Service Name/Port]/sap/bc/soap/rfc
4 Installation Preparations
3. The User Name, Password, Client and Language of the CRM System should be
obtained from Administrator of the CRM System.
4.2 Preparing Administrative Account for MS Exchange Connector Exchange Groupware Connector requires administrative account with following access permissions:
Read/Write access for all mailboxes intended for replication.
Read/Write access for Public Folder intended to store Public Contacts.
4 Installation Preparations
Administrative account is used as logon information for Groupware Connector’s Windows service (see Log On tab in service properties).
The installation routine must be performed under the user account, which will be used for running the SAP CRM Exchange Connector Service. During installation user account should belong to local Administrators group. The mailbox alias used in the installation settings is recommended to correspond to the same user.
To create new account to be used as Exchange Connector’s administrative account, follow the steps below. Use these steps as checklist if you are going to use already available account:
4.2.1 Microsoft Exchange 2003 1. On computer with MS Exchange Server choose Start Programs Microsoft
Exchange Active Directory Users and Computers.
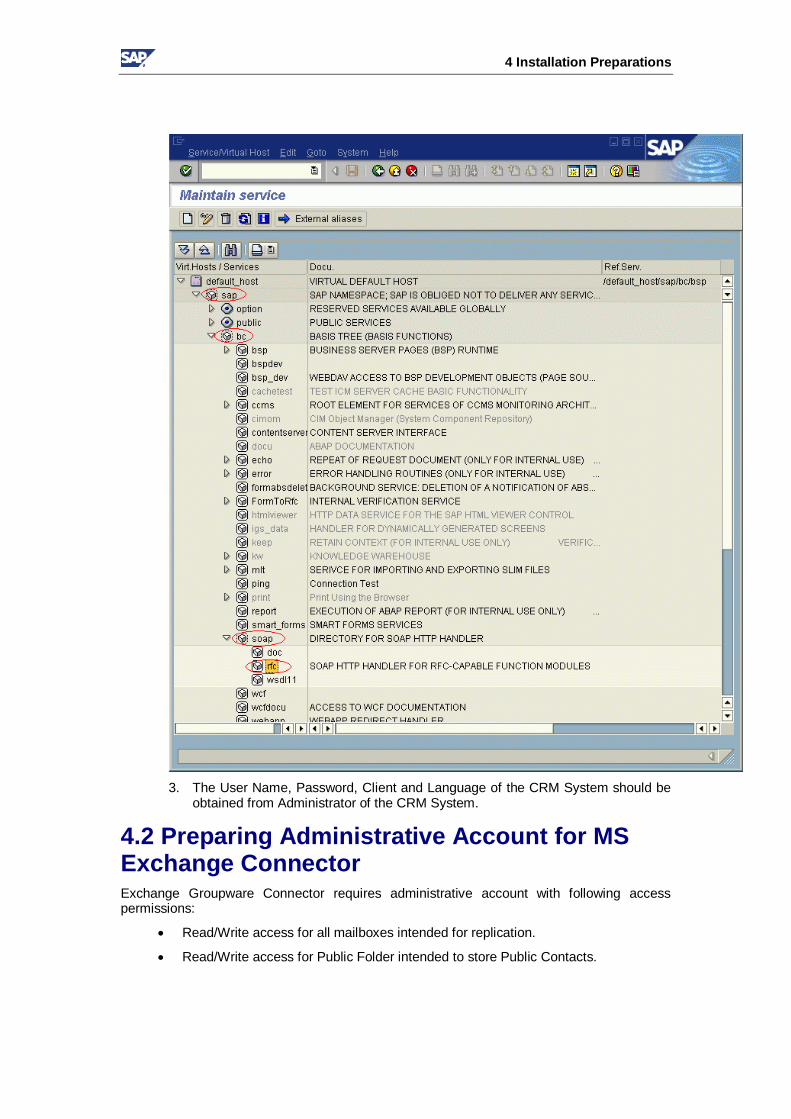
2. Check whether the Groupware administrative account exists.
3. If not, select Users folder and execute Action New User from menu.
The options displayed below will be needed later during the installation process.
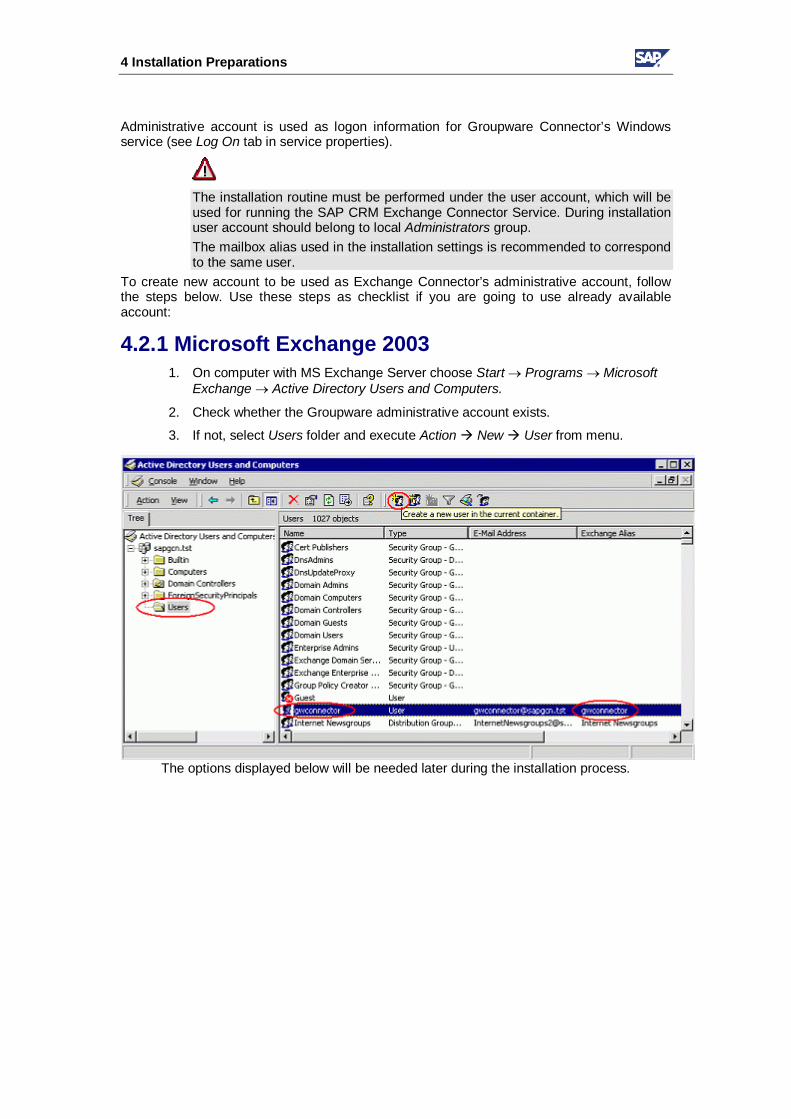
4 Installation Preparations
4. Start Exchange System Manager. In the left window locate the node that
represents your Exchange server.
Open the nodes following the path: First Organization Name Administrative Groups First Administrative Group Servers.
5. Select the target server and right-click on it.
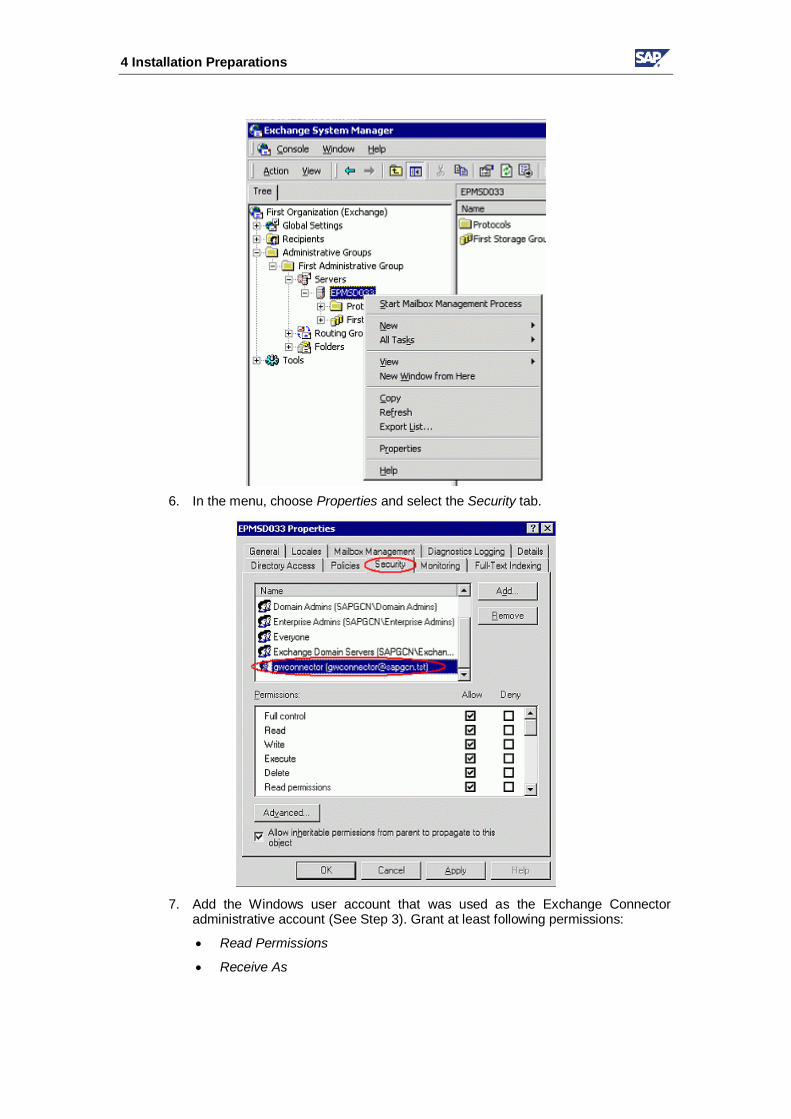
4 Installation Preparations
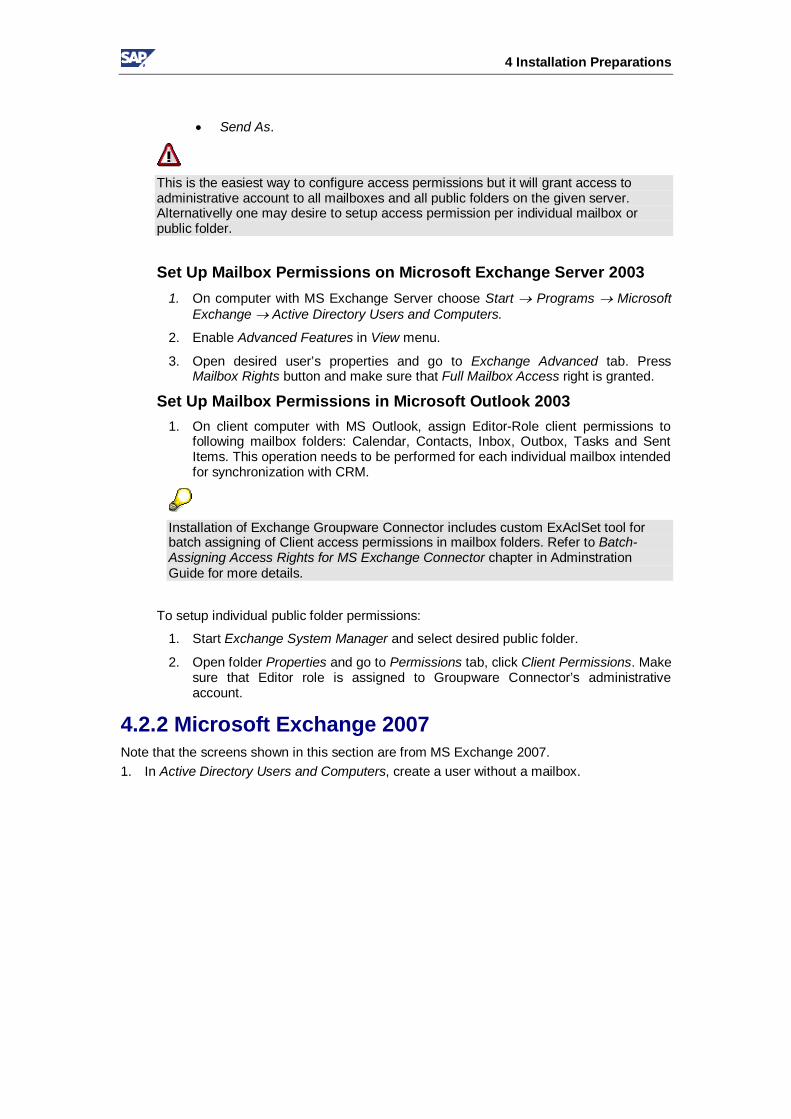
6. In the menu, choose Properties and select the Security tab.
7. Add the Windows user account that was used as the Exchange Connector
administrative account (See Step 3). Grant at least following permissions:
Read Permissions
Receive As
4 Installation Preparations
Send As.
This is the easiest way to configure access permissions but it will grant access to administrative account to all mailboxes and all public folders on the given server. Alternativelly one may desire to setup access permission per individual mailbox or public folder.
Set Up Mailbox Permissions on Microsoft Exchange Server 2003
1. On computer with MS Exchange Server choose Start Programs Microsoft Exchange Active Directory Users and Computers.
2. Enable Advanced Features in View menu.
3. Open desired user’s properties and go to Exchange Advanced tab. Press Mailbox Rights button and make sure that Full Mailbox Access right is granted.
Set Up Mailbox Permissions in Microsoft Outlook 2003 1. On client computer with MS Outlook, assign Editor-Role client permissions to
following mailbox folders: Calendar, Contacts, Inbox, Outbox, Tasks and Sent Items. This operation needs to be performed for each individual mailbox intended for synchronization with CRM.
Installation of Exchange Groupware Connector includes custom ExAclSet tool for batch assigning of Client access permissions in mailbox folders. Refer to Batch-Assigning Access Rights for MS Exchange Connector chapter in Adminstration Guide for more details.
To setup individual public folder permissions:
1. Start Exchange System Manager and select desired public folder.
2. Open folder Properties and go to Permissions tab, click Client Permissions. Make sure that Editor role is assigned to Groupware Connector’s administrative account.
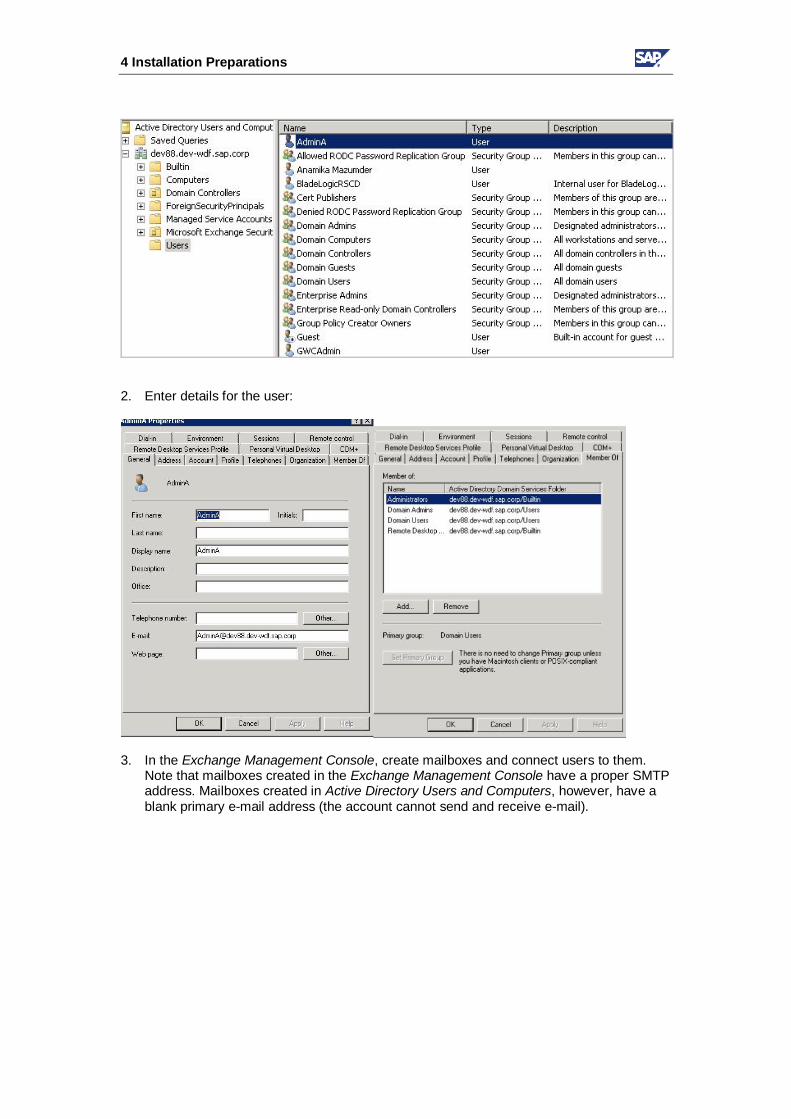
4.2.2 Microsoft Exchange 2007 Note that the screens shown in this section are from MS Exchange 2007. 1. In Active Directory Users and Computers, create a user without a mailbox.
4 Installation Preparations
2. Enter details for the user:
3. In the Exchange Management Console, create mailboxes and connect users to them.
Note that mailboxes created in the Exchange Management Console have a proper SMTP address. Mailboxes created in Active Directory Users and Computers, however, have a blank primary e-mail address (the account cannot send and receive e-mail).

4 Installation Preparations
a. Expand Recipient Configuration. b. Click the right mouse button on the Mailbox container, and choose Enable Mailbox. c. In the Exchange Mailbox wizard, choose Select, select a user, and choose Finish.
Set Up Mailbox Permissions on Microsoft Exchange Server 2007 and 2010 1. In the Exchange Management Console, expand Recipient Configuration.
2. Click on the Mailbox container, and choose Manage Send As Permission or Manage Full
Access Permission. 3. Define permissions.
Installation Guide: SAP CRM Groupware Connector
May 2005 22
Set Up Mailbox Permissions in Microsoft Outlook 2007 and 2010 On the client computer on which Microsoft Outlook is installed, assign client permissions for the Owner role to the following mailbox folders: Calendar Contacts Inbox Outbox Tasks Sent items
This operation needs to be performed for each individual mailbox intended for synchronization with SAP CRM. To set up individual public folder permissions: 1. Start the Exchange System Manager and the select desired public folder. 2. Open the folder Properties and go to the Permissions tab, click Client Permissions. Make sure that the
Owner role is assigned to groupware connector’s administrative account.
4.3 Installing Microsoft Outlook Installation of Microsoft Outlook is required when MS Exchange Groupware Connector components are installed on the different computer from MS Exchange Server. This will install required MAPI support libraries. All required MAPI libraries are already installed with MS Exchange Server.
Microsoft Outlook can be used for configuration diagnostics and troubleshooting purposes. It may be helpful to have it installed on the computer with MS Exchange Server too. When installing CDO (Collaboration Data Objects library) with MS Outlook 2003, make sure that:
The option Collaboration Data Objects should be selected during the installation:
The Corporate or Workgroup mode is selected at the startup of MS Outlook. This option can be reconfigured in already installed Ms Outlook using Tools Options Mail Services Reconfigure Mail Support
Make sure you are able to login to Groupware administrative account specified above.
NOTE: Collabaration data Objects (CDO) are no longer available with Outlook 2007 (Outlook 12) and need to be downloaded from the Microsoft download center.
4.4 Preparing Public Folder for Storing CRM Contacts This section describes how Public Folder for storing Public Contacts can be configured.
Any public folder that conforms to the following requiremens can be used to store Public Contacts:
The folder is for Contact Items
Read/Write permissions are granted to Groupware Connector administrative account.
4.4.1 Microsoft Exchange 2003 For Microsoft Outlook 2003, a public folder is automatically created when you install the Microsoft Exchange Server 2003. An SMTP address must be configured for the public folder as follows:
Installation Guide: SAP CRM Groupware Connector
May 2005 23
You need to have permission to create sub-folders in the existing public folder.
1. Start MS Outlook. (You may need to create a user mail profile for the administrative account. In this case, refer to the MS Outlook documentation on creating a new user profile.)
2. In the File menu, select New and choose Folder.
3. In the Name box, enter a folder name.
4. In the Folder contains box, select Contact items.
5. In the Select where to place the folder box, select the public folder where you want to include your new public folder.
6. Start the MS Exchange System Manager.
7. Select the created folder. It can be found under the following node: First Organization Name Administrative Groups First Administrative Group Folders Public Folders
8. Choose Action Properties.
9. Provide SMTP e-mail addresses on the E-Mail addresses property page. This e-mail address will be used to identify the public folder for Groupware Connector during the installation routine.
Make sure that Hide from Address Book is unchecked on Exchange Advanced property page.
10. Memorize the SMTP address of the public folder. You will need to enter it during the installation process.
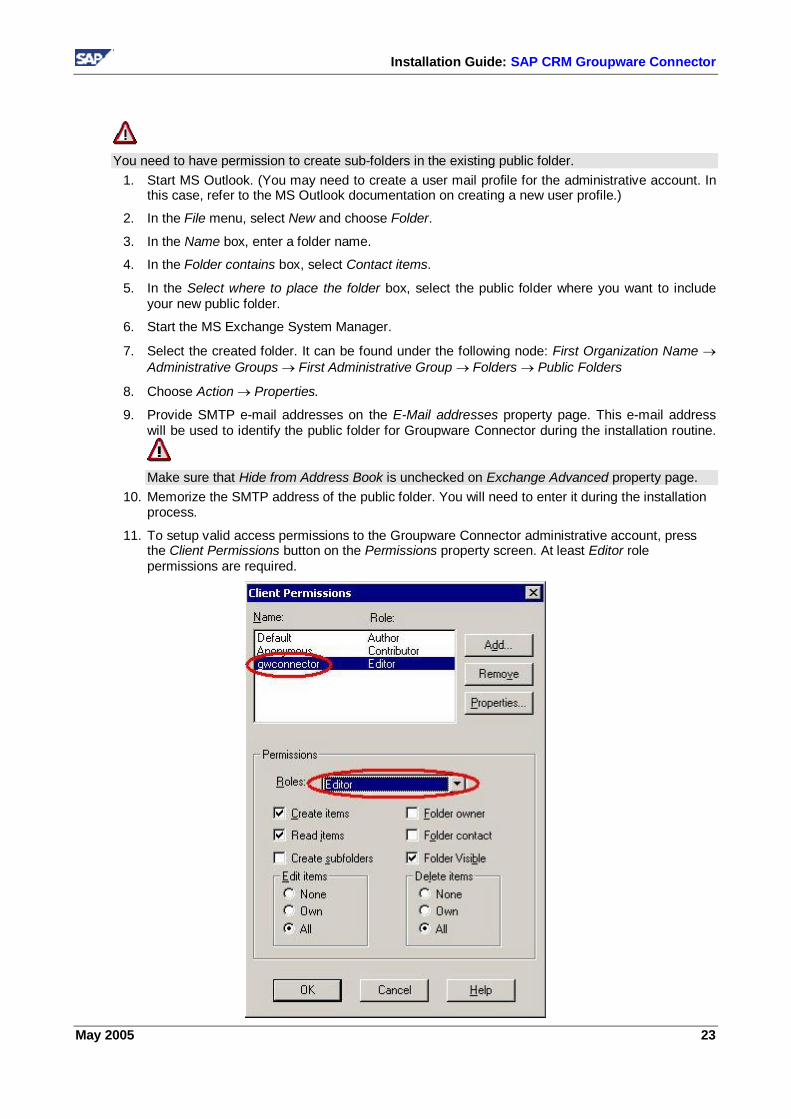
11. To setup valid access permissions to the Groupware Connector administrative account, press the Client Permissions button on the Permissions property screen. At least Editor role permissions are required.
Installation Guide: SAP CRM Groupware Connector
24 May 2005
4.4.2 Microsoft Exchange 2007 You must create at least one public folder in Microsoft Exchange Server 2007 (or specify that a public folder will be created in a later step during the installation). You need to do this even if you do not want to synchronize data with public folders. For information about creating public folders in Microsoft Exchange 2007, refer to the documentation in the Microsoft Developer Network.
4.5 Using the Contacts Folder as Address Book in the MS Outlook It is possible to use the Exchange Contacts folder as a part of the Address Book in MS Outlook.
For more details, refer to the MS Outlook Help.
Outlook Address Book is the client configuration. You will have to configure the same on every client computer. To register public folder in Outlook Address Book
1. To enable the Service, add an Outlook Address Book to the user profile.
Using Outlook 2003
a. In the Tools menu, select E-mail accounts
b. Select View or change existing directories and address books, press Next
c. Ensure Outlook Address Book is listed.
d. If not present, click Add and select Addition Address Books. Press Next and select Outlook Address Book.
e. Restart Outlook.
2. Setup the Contacts folder to be displayed in the Address Book dialog box.
a. (Using Outlook 2003) Select the Go menu and then select Folder List, if the Folder List is not visible.
b. In the Folder List, Right-click on Contacts folder you want to display in the Address Book dialog box and select Properties, go to the Outlook Address Book tab.
c. Select the Show this folder as an e-mail Address Book check box.
d. Enter the name for the Contacts folder you want to appear in the Show names from the box in the Address Book dialog box.
A Contact item must have an entry in the E-mail field or the fax phone number field to appear in the Outlook Address Book.
Installation Guide: SAP CRM Groupware Connector
May 2005 25
4.6 Preparing Administrative Account for Lotus Domino Connector Before starting the SAP Groupware Connector Installation Wizard, you need to setup administrative account.
To create new account to be used as Lotus Connector’s administrative account, follow the steps below. Use these steps as checklist if you are going to use already available account:
You may refer to Domino 5 Administration Help: Server Configuration Setting up Notes users for more details on this topic.
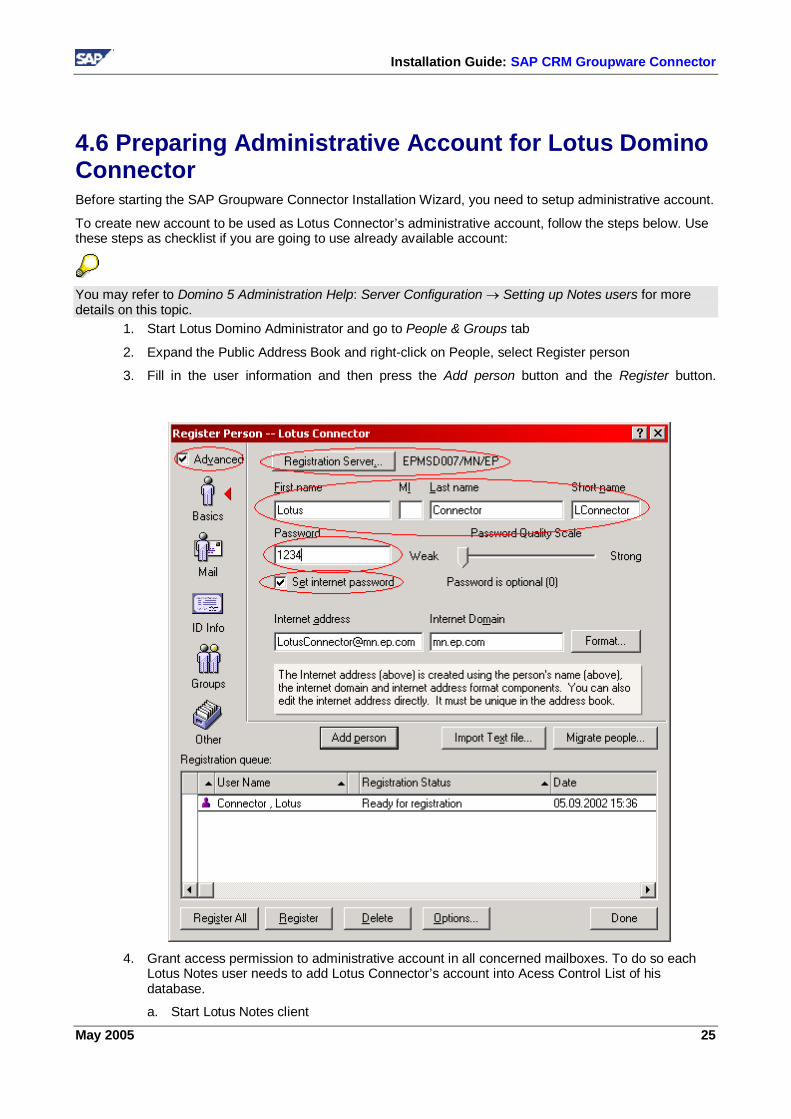
1. Start Lotus Domino Administrator and go to People & Groups tab
2. Expand the Public Address Book and right-click on People, select Register person
3. Fill in the user information and then press the Add person button and the Register button.
4. Grant access permission to administrative account in all concerned mailboxes. To do so each
Lotus Notes user needs to add Lotus Connector’s account into Acess Control List of his database.
a. Start Lotus Notes client
Installation Guide: SAP CRM Groupware Connector
26 May 2005
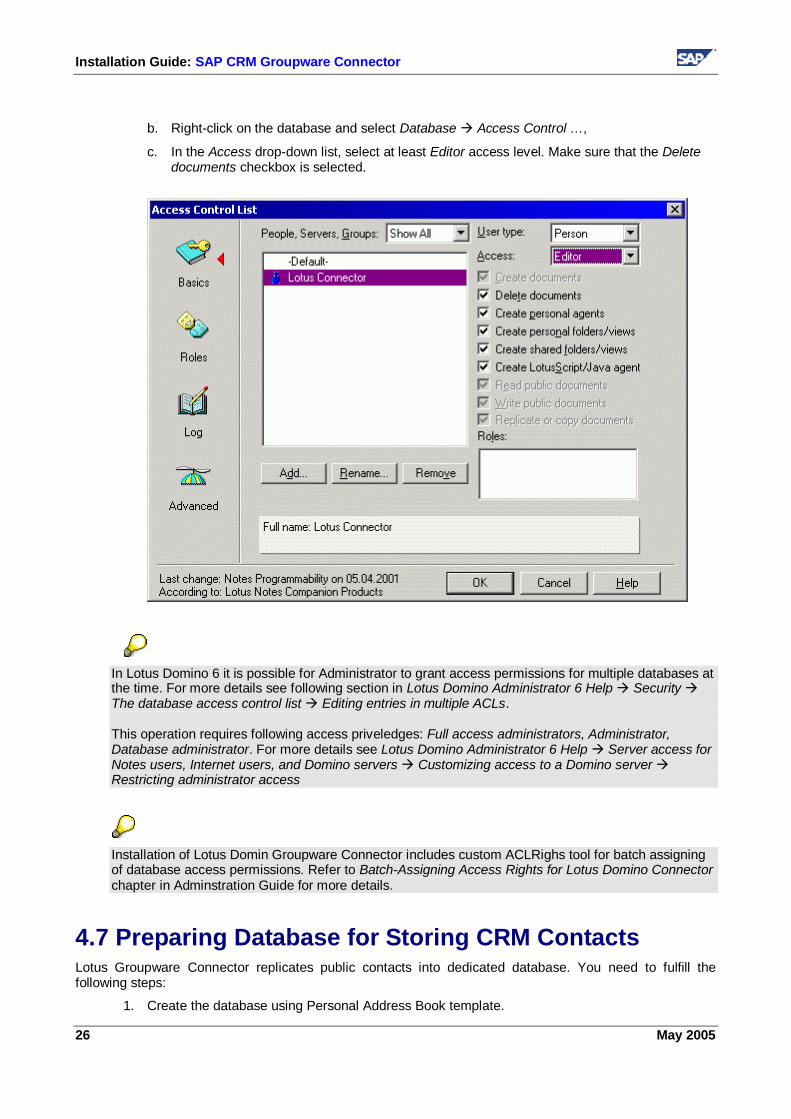
b. Right-click on the database and select Database Access Control …,
c. In the Access drop-down list, select at least Editor access level. Make sure that the Delete documents checkbox is selected.
In Lotus Domino 6 it is possible for Administrator to grant access permissions for multiple databases at the time. For more details see following section in Lotus Domino Administrator 6 Help Security The database access control list Editing entries in multiple ACLs. This operation requires following access priveledges: Full access administrators, Administrator, Database administrator. For more details see Lotus Domino Administrator 6 Help Server access for Notes users, Internet users, and Domino servers Customizing access to a Domino server Restricting administrator access
Installation of Lotus Domin Groupware Connector includes custom ACLRighs tool for batch assigning of database access permissions. Refer to Batch-Assigning Access Rights for Lotus Domino Connector chapter in Adminstration Guide for more details.
4.7 Preparing Database for Storing CRM Contacts Lotus Groupware Connector replicates public contacts into dedicated database. You need to fulfill the following steps:
1. Create the database using Personal Address Book template.
Installation Guide: SAP CRM Groupware Connector
May 2005 27
2. Register it in Public Address Book
3. Get SMTP address of the database to be used when configuring target for Public Contacts during setup routine.
To create new database
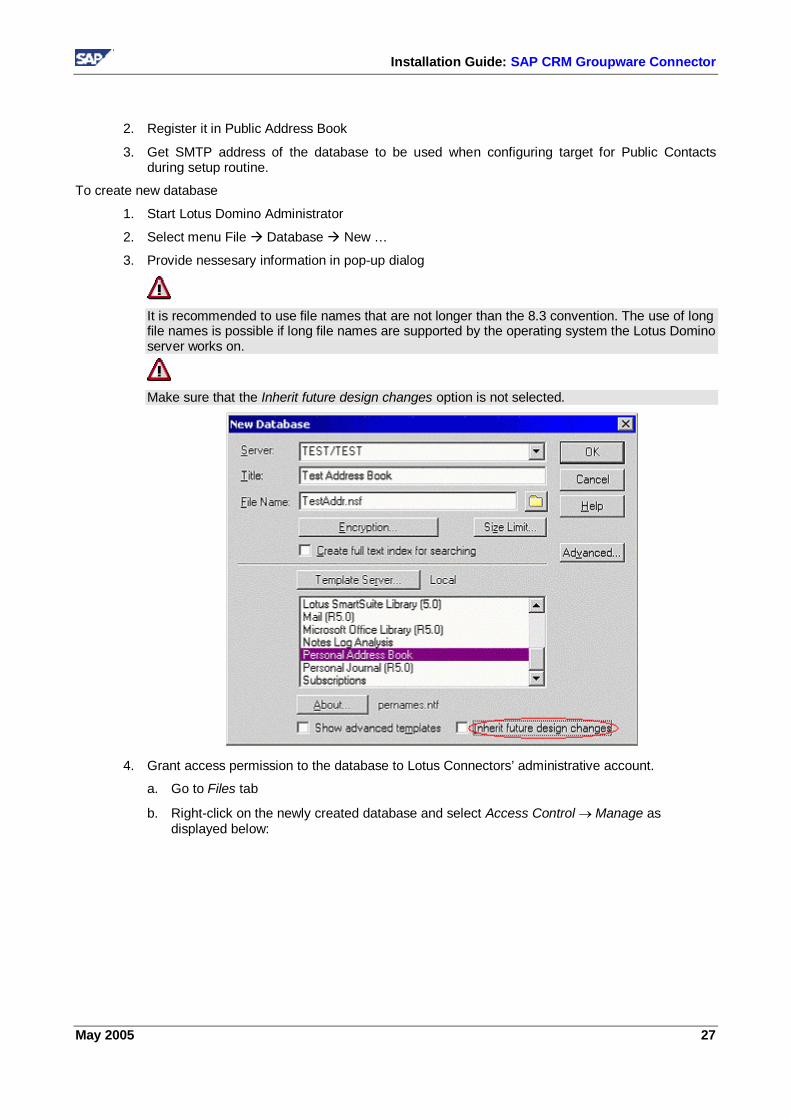
1. Start Lotus Domino Administrator
2. Select menu File Database New …
3. Provide nessesary information in pop-up dialog
It is recommended to use file names that are not longer than the 8.3 convention. The use of long file names is possible if long file names are supported by the operating system the Lotus Domino server works on.
Make sure that the Inherit future design changes option is not selected.
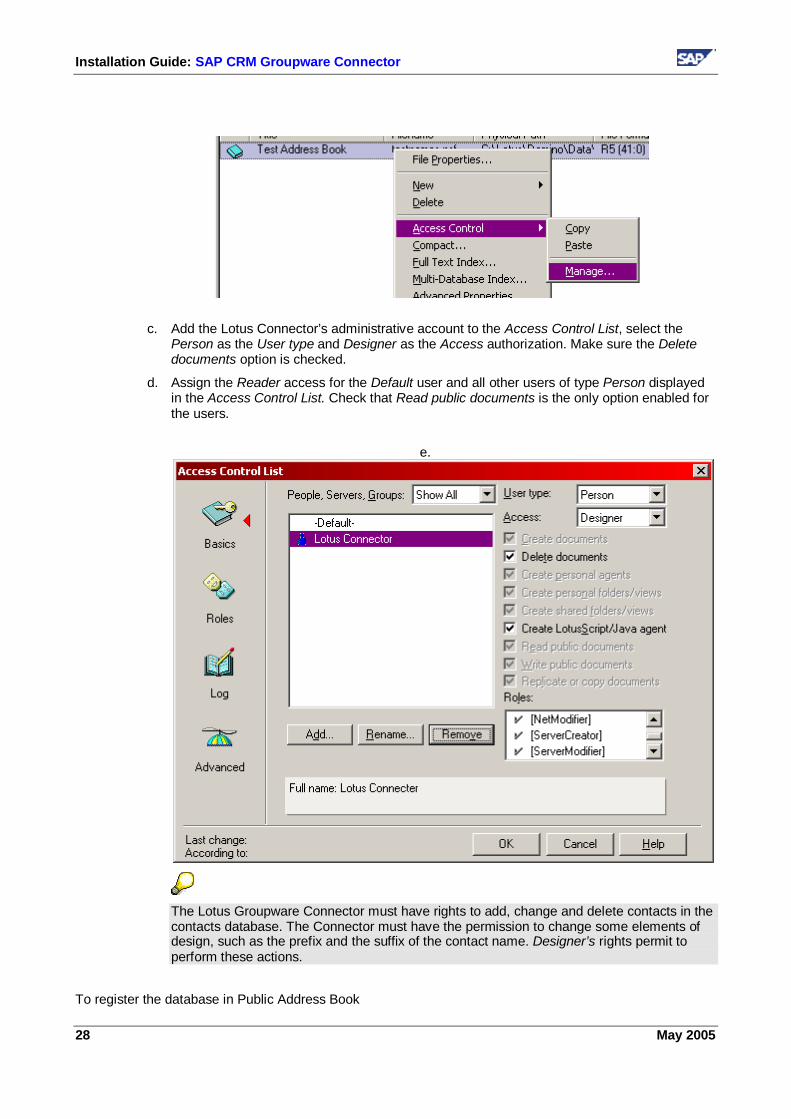
4. Grant access permission to the database to Lotus Connectors’ administrative account.
a. Go to Files tab
b. Right-click on the newly created database and select Access Control Manage as displayed below:
Installation Guide: SAP CRM Groupware Connector
28 May 2005
c. Add the Lotus Connector’s administrative account to the Access Control List, select the Person as the User type and Designer as the Access authorization. Make sure the Delete documents option is checked.
d. Assign the Reader access for the Default user and all other users of type Person displayed in the Access Control List. Check that Read public documents is the only option enabled for the users.
e.
The Lotus Groupware Connector must have rights to add, change and delete contacts in the contacts database. The Connector must have the permission to change some elements of design, such as the prefix and the suffix of the contact name. Designer’s rights permit to perform these actions.
To register the database in Public Address Book
Installation Guide: SAP CRM Groupware Connector
May 2005 29
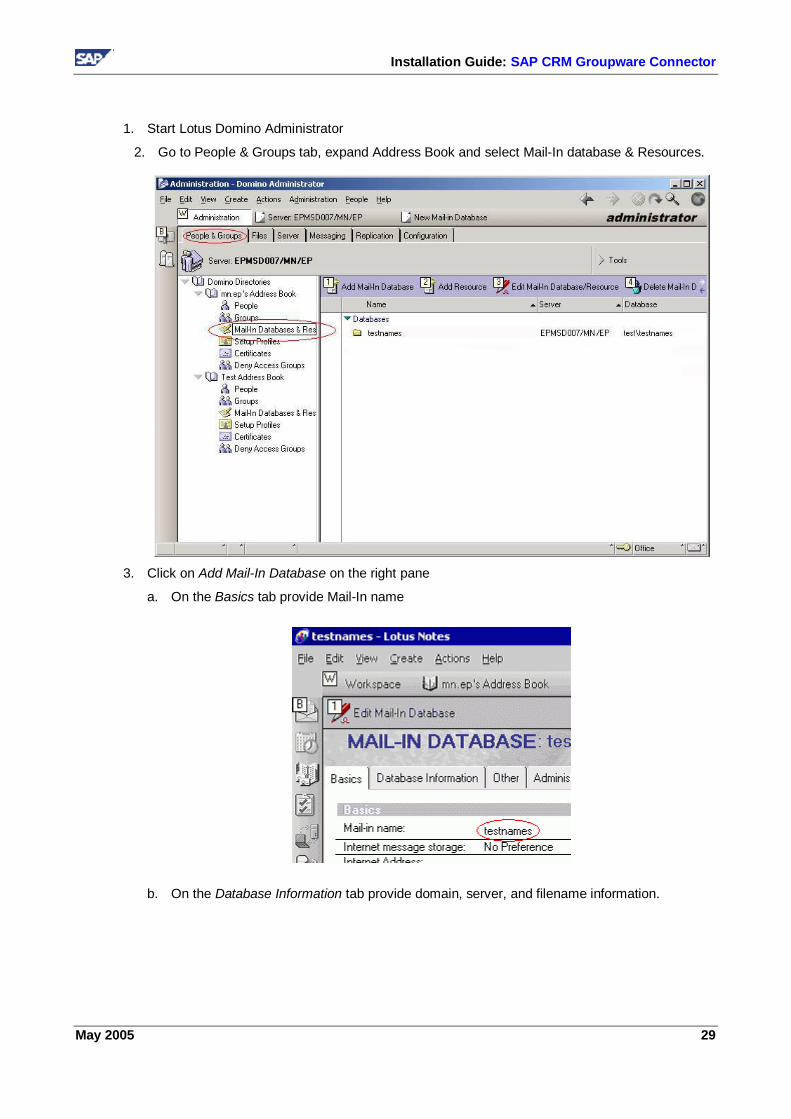
1. Start Lotus Domino Administrator
2. Go to People & Groups tab, expand Address Book and select Mail-In database & Resources.
3. Click on Add Mail-In Database on the right pane
a. On the Basics tab provide Mail-In name
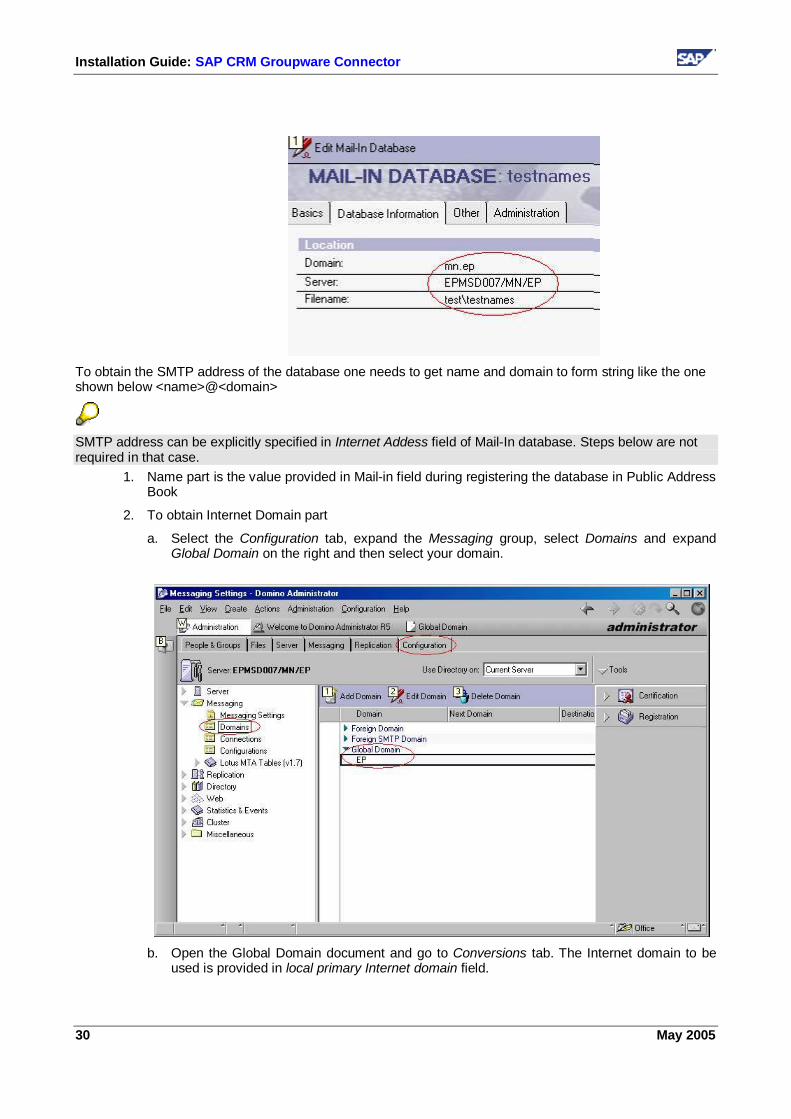
b. On the Database Information tab provide domain, server, and filename information.
Installation Guide: SAP CRM Groupware Connector
30 May 2005
To obtain the SMTP address of the database one needs to get name and domain to form string like the one shown below <name>@<domain>
SMTP address can be explicitly specified in Internet Addess field of Mail-In database. Steps below are not required in that case.
1. Name part is the value provided in Mail-in field during registering the database in Public Address Book
2. To obtain Internet Domain part
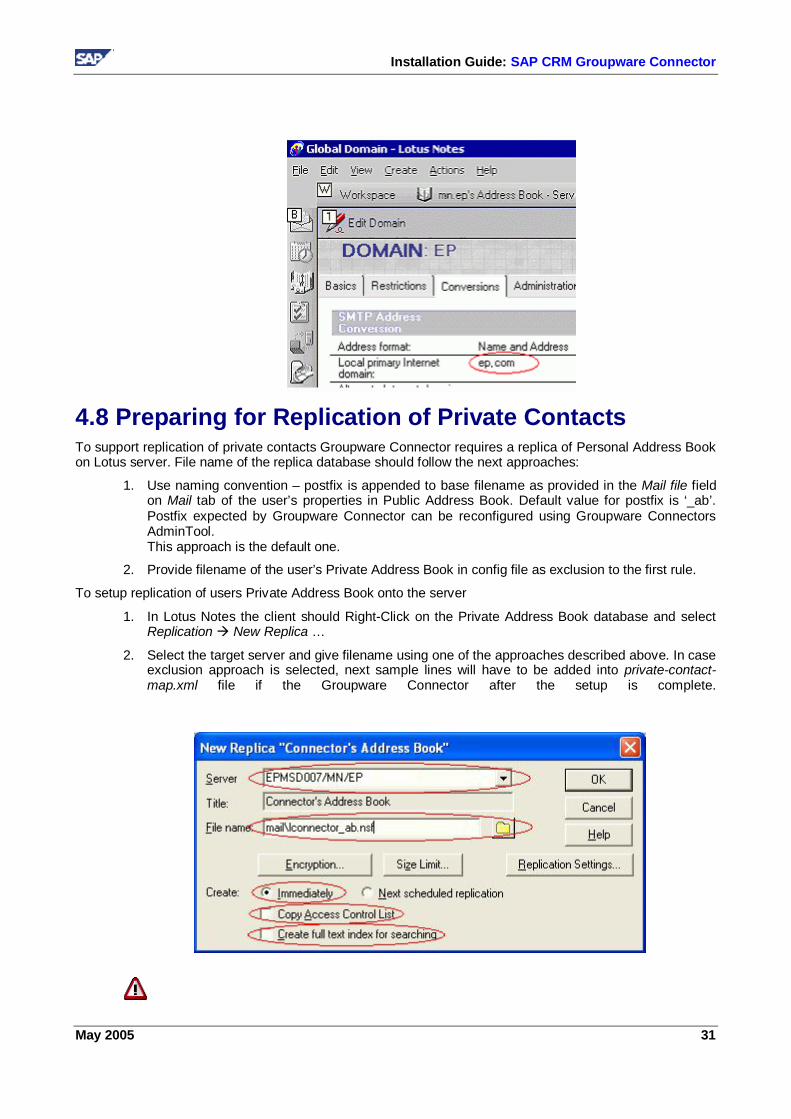
a. Select the Configuration tab, expand the Messaging group, select Domains and expand Global Domain on the right and then select your domain.
b. Open the Global Domain document and go to Conversions tab. The Internet domain to be
used is provided in local primary Internet domain field.
Installation Guide: SAP CRM Groupware Connector
May 2005 31
4.8 Preparing for Replication of Private Contacts To support replication of private contacts Groupware Connector requires a replica of Personal Address Book on Lotus server. File name of the replica database should follow the next approaches:
1. Use naming convention – postfix is appended to base filename as provided in the Mail file field on Mail tab of the user’s properties in Public Address Book. Default value for postfix is ‘_ab’. Postfix expected by Groupware Connector can be reconfigured using Groupware Connectors AdminTool. This approach is the default one.
2. Provide filename of the user’s Private Address Book in config file as exclusion to the first rule.
To setup replication of users Private Address Book onto the server
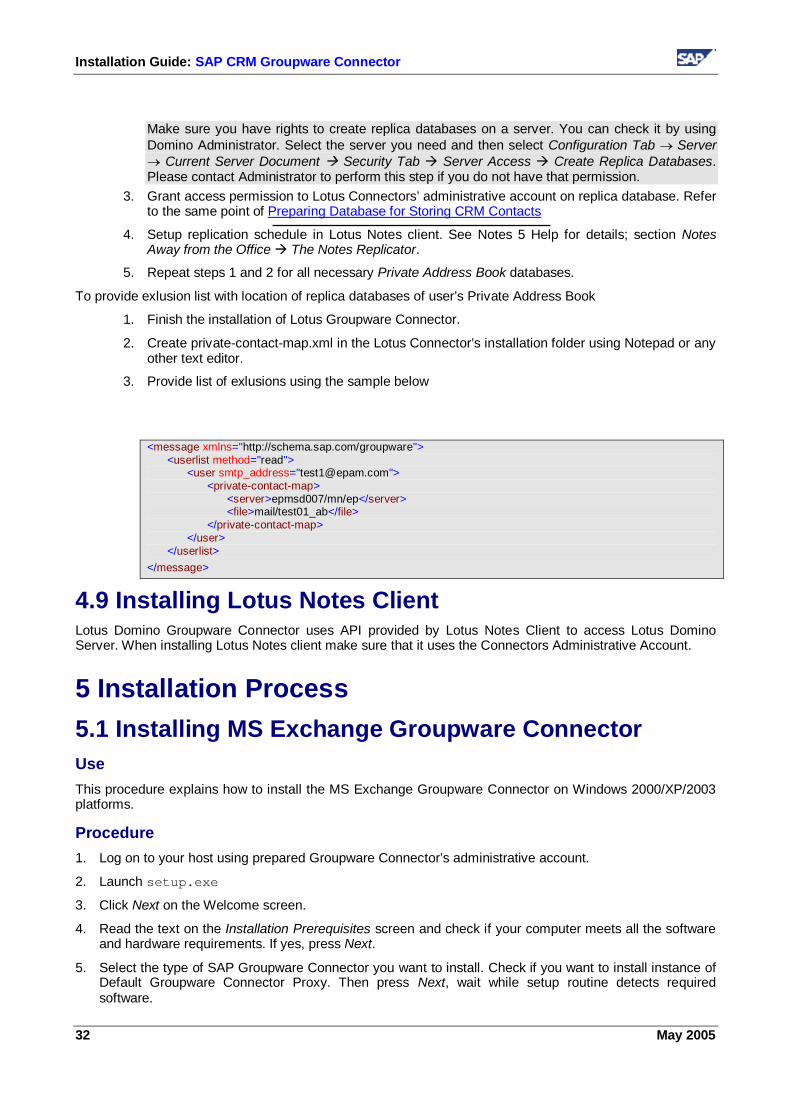
1. In Lotus Notes the client should Right-Click on the Private Address Book database and select Replication New Replica …
2. Select the target server and give filename using one of the approaches described above. In case exclusion approach is selected, next sample lines will have to be added into private-contact-map.xml file if the Groupware Connector after the setup is complete.
Installation Guide: SAP CRM Groupware Connector
32 May 2005
Make sure you have rights to create replica databases on a server. You can check it by using Domino Administrator. Select the server you need and then select Configuration Tab Server
Current Server Document Security Tab Server Access Create Replica Databases. Please contact Administrator to perform this step if you do not have that permission.
3. Grant access permission to Lotus Connectors’ administrative account on replica database. Refer to the same point of Preparing Database for Storing CRM Contacts
4. Setup replication schedule in Lotus Notes client. See Notes 5 Help for details; section Notes Away from the Office The Notes Replicator.
5. Repeat steps 1 and 2 for all necessary Private Address Book databases.
To provide exlusion list with location of replica databases of user’s Private Address Book
1. Finish the installation of Lotus Groupware Connector.
2. Create private-contact-map.xml in the Lotus Connector’s installation folder using Notepad or any other text editor.
3. Provide list of exlusions using the sample below
<message xmlns="http://schema.sap.com/groupware"> <userlist method="read"> <user smtp_address="[email protected]"> <private-contact-map> <server>epmsd007/mn/ep</server> <file>mail/test01_ab</file> </private-contact-map> </user> </userlist> </message>
4.9 Installing Lotus Notes Client Lotus Domino Groupware Connector uses API provided by Lotus Notes Client to access Lotus Domino Server. When installing Lotus Notes client make sure that it uses the Connectors Administrative Account.
5 Installation Process 5.1 Installing MS Exchange Groupware Connector Use This procedure explains how to install the MS Exchange Groupware Connector on Windows 2000/XP/2003 platforms.
Procedure 1. Log on to your host using prepared Groupware Connector’s administrative account.
2. Launch setup.exe
3. Click Next on the Welcome screen.
4. Read the text on the Installation Prerequisites screen and check if your computer meets all the software and hardware requirements. If yes, press Next.
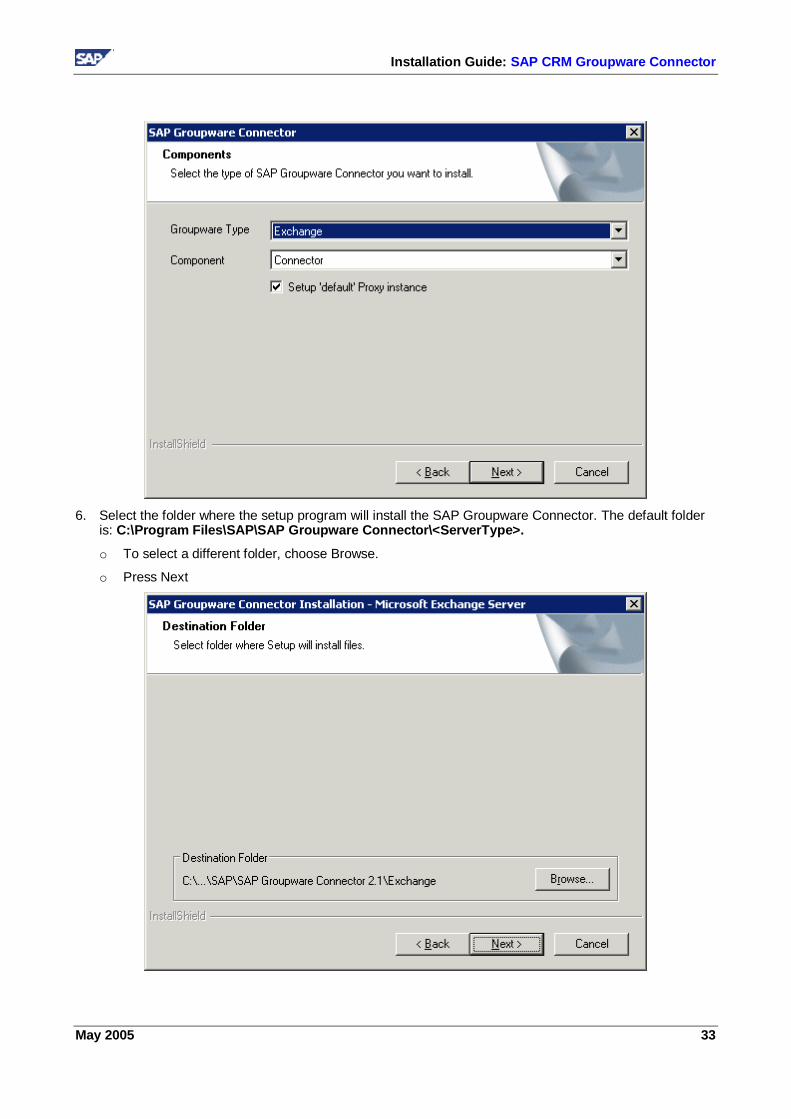
5. Select the type of SAP Groupware Connector you want to install. Check if you want to install instance of Default Groupware Connector Proxy. Then press Next, wait while setup routine detects required software.
Installation Guide: SAP CRM Groupware Connector
May 2005 33
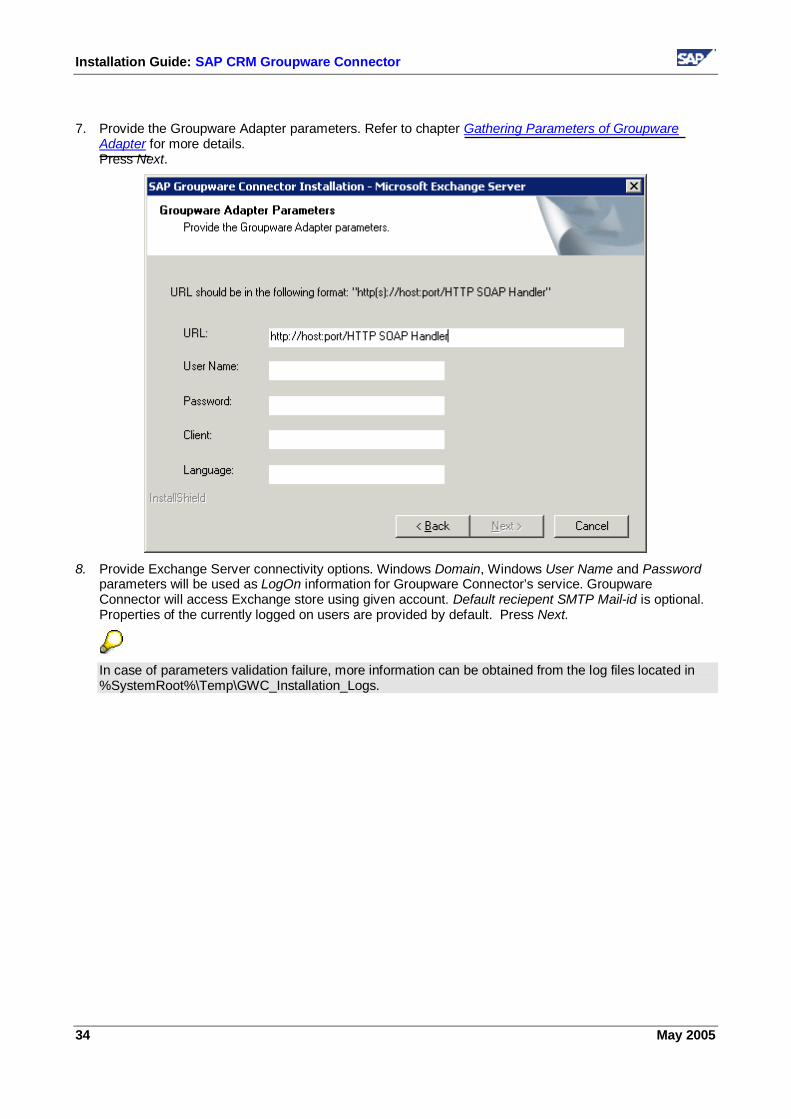
6. Select the folder where the setup program will install the SAP Groupware Connector. The default folder
is: C:\Program Files\SAP\SAP Groupware Connector\<ServerType>.
o To select a different folder, choose Browse.
o Press Next
Installation Guide: SAP CRM Groupware Connector
34 May 2005
7. Provide the Groupware Adapter parameters. Refer to chapter Gathering Parameters of Groupware Adapter for more details. Press Next.
8. Provide Exchange Server connectivity options. Windows Domain, Windows User Name and Password
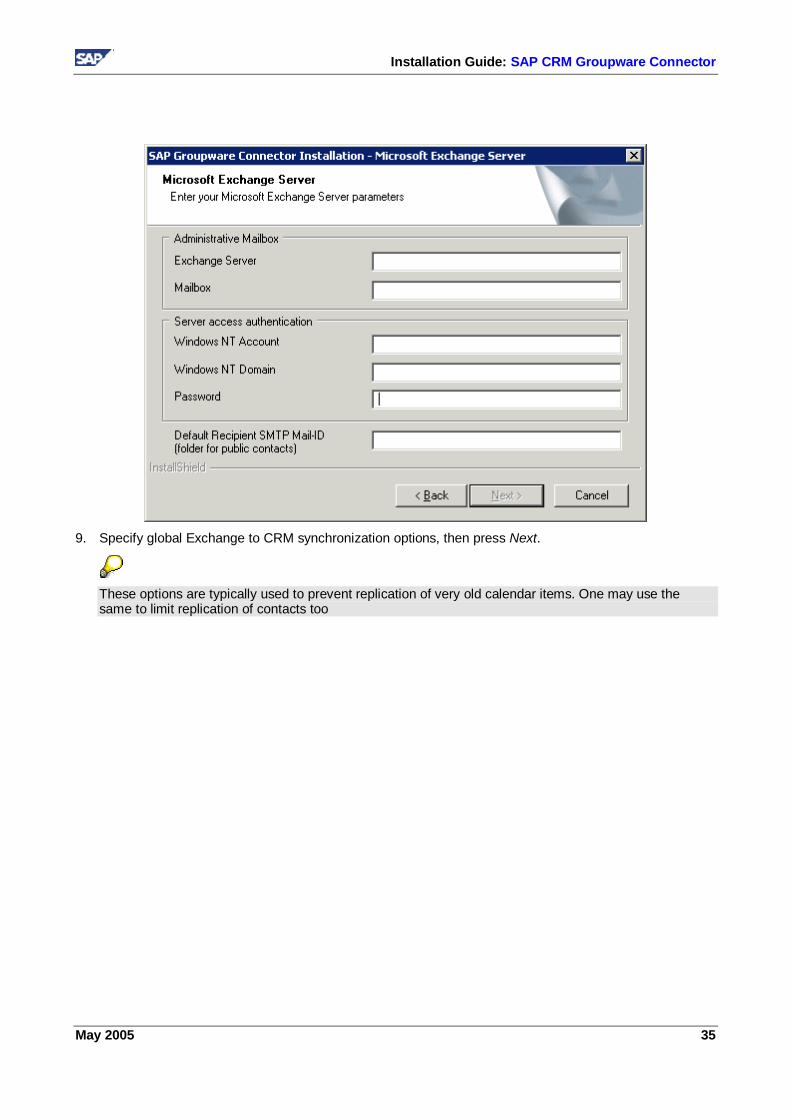
parameters will be used as LogOn information for Groupware Connector’s service. Groupware Connector will access Exchange store using given account. Default reciepent SMTP Mail-id is optional. Properties of the currently logged on users are provided by default. Press Next.
In case of parameters validation failure, more information can be obtained from the log files located in %SystemRoot%\Temp\GWC_Installation_Logs.
Installation Guide: SAP CRM Groupware Connector
May 2005 35
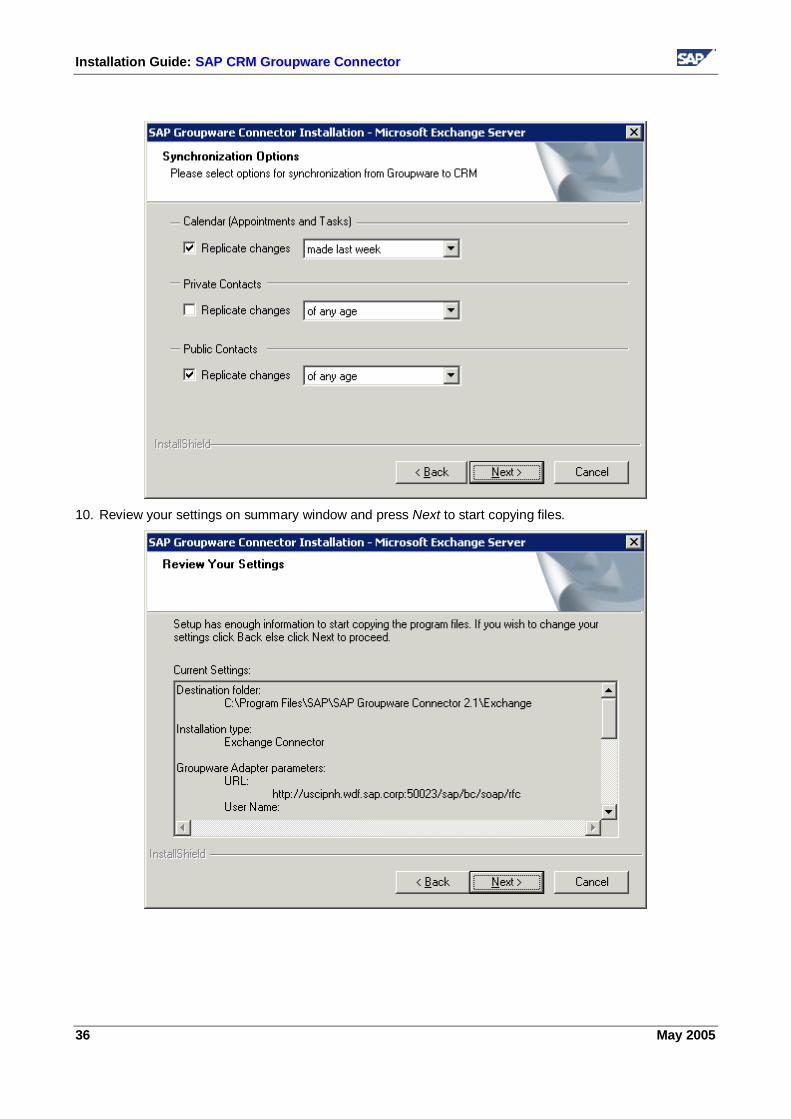
9. Specify global Exchange to CRM synchronization options, then press Next.
These options are typically used to prevent replication of very old calendar items. One may use the same to limit replication of contacts too
Installation Guide: SAP CRM Groupware Connector
36 May 2005
10. Review your settings on summary window and press Next to start copying files.
Installation Guide: SAP CRM Groupware Connector
May 2005 37
11. The installation is complete. Press Finish to exit the Wizard.
5.2 Installing MS Exchange Groupware Connector Proxy Use This procedure tells you how to install the separate MS Exchange Groupware Connector Proxy component on Windows 2000/XP/2003 platforms.
Procedure 1. Log on to your host using prepared Groupware Connector’s administrative account.
2. Launch setup.exe
3. Click Next on the Welcome screen.
4. Read the text on the Installation Prerequisites screen and check if your computer meets all the software and hardware requirements. If yes, press Next.
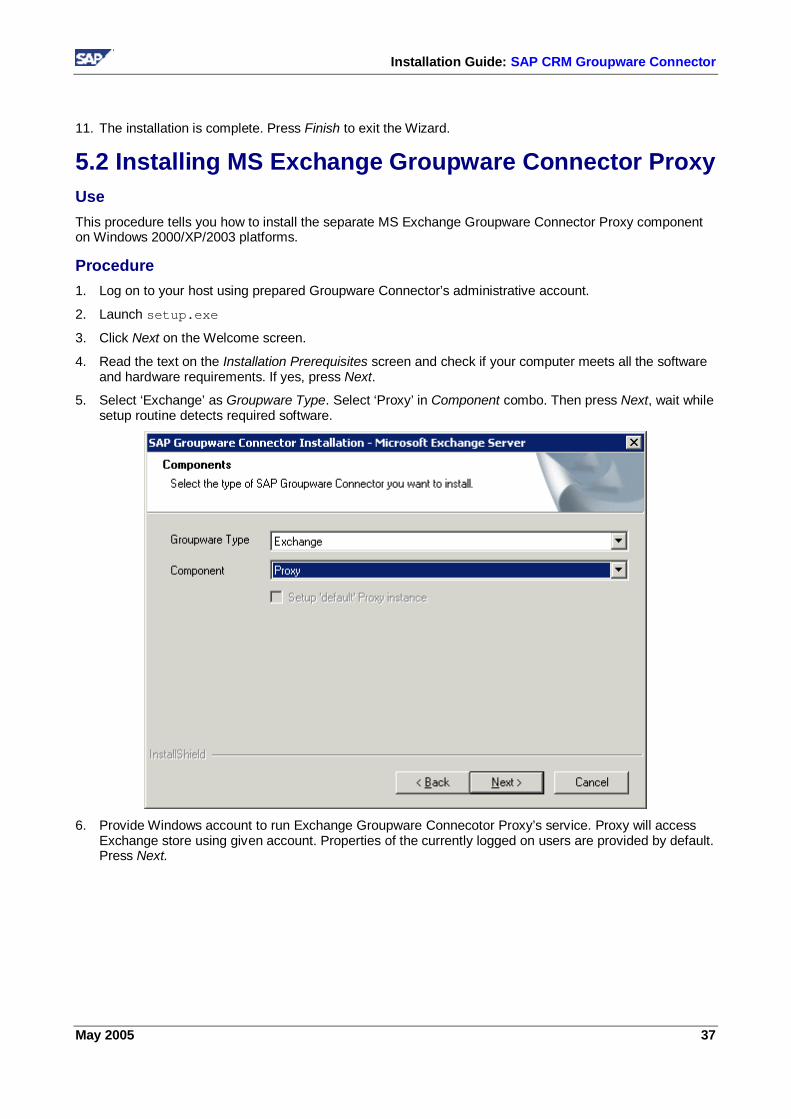
5. Select ‘Exchange’ as Groupware Type. Select ‘Proxy’ in Component combo. Then press Next, wait while setup routine detects required software.
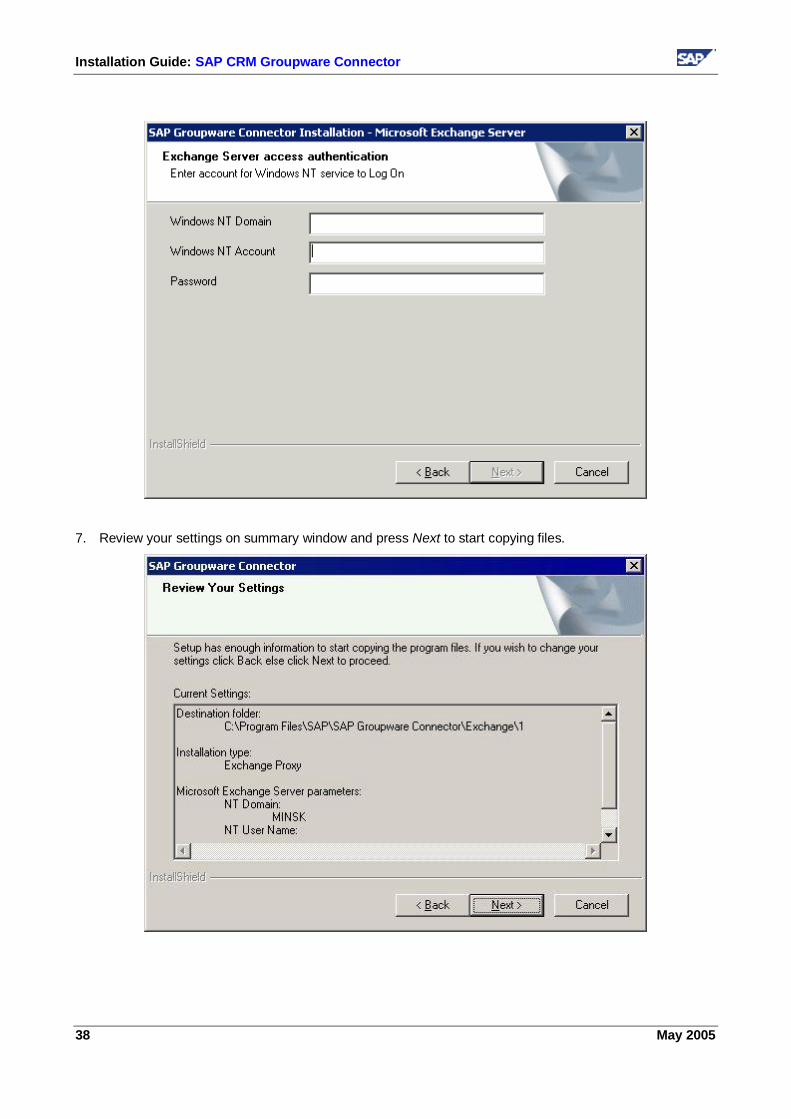
6. Provide Windows account to run Exchange Groupware Connecotor Proxy’s service. Proxy will access
Exchange store using given account. Properties of the currently logged on users are provided by default. Press Next.
Installation Guide: SAP CRM Groupware Connector
38 May 2005
7. Review your settings on summary window and press Next to start copying files.
Installation Guide: SAP CRM Groupware Connector
May 2005 39
8. Press Finish to exit the Wizard.
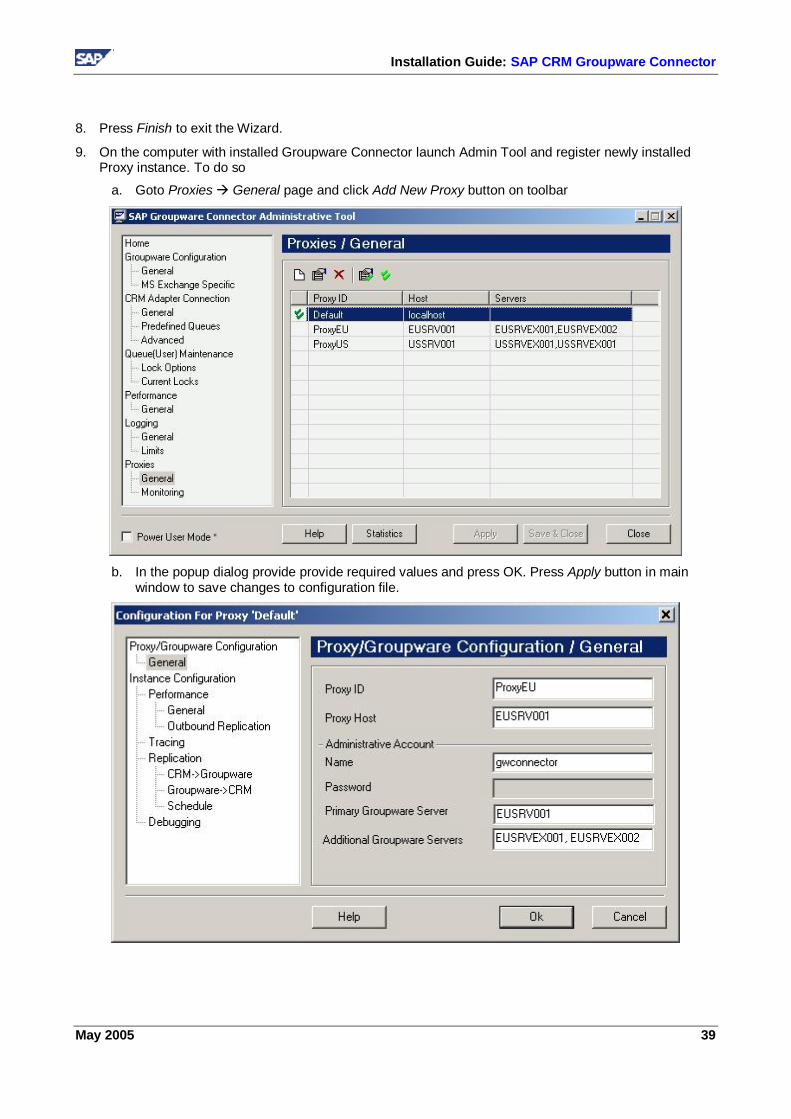
9. On the computer with installed Groupware Connector launch Admin Tool and register newly installed Proxy instance. To do so
a. Goto Proxies General page and click Add New Proxy button on toolbar
b. In the popup dialog provide provide required values and press OK. Press Apply button in main
window to save changes to configuration file.
Installation Guide: SAP CRM Groupware Connector
40 May 2005
c. It is strongly recommended to set one Proxy instance as Default. This will ensure the messages will be processed in case no explicit mapping configured for some target Exchange server.
10. The installtion and registration of new Proxy instance is complete.
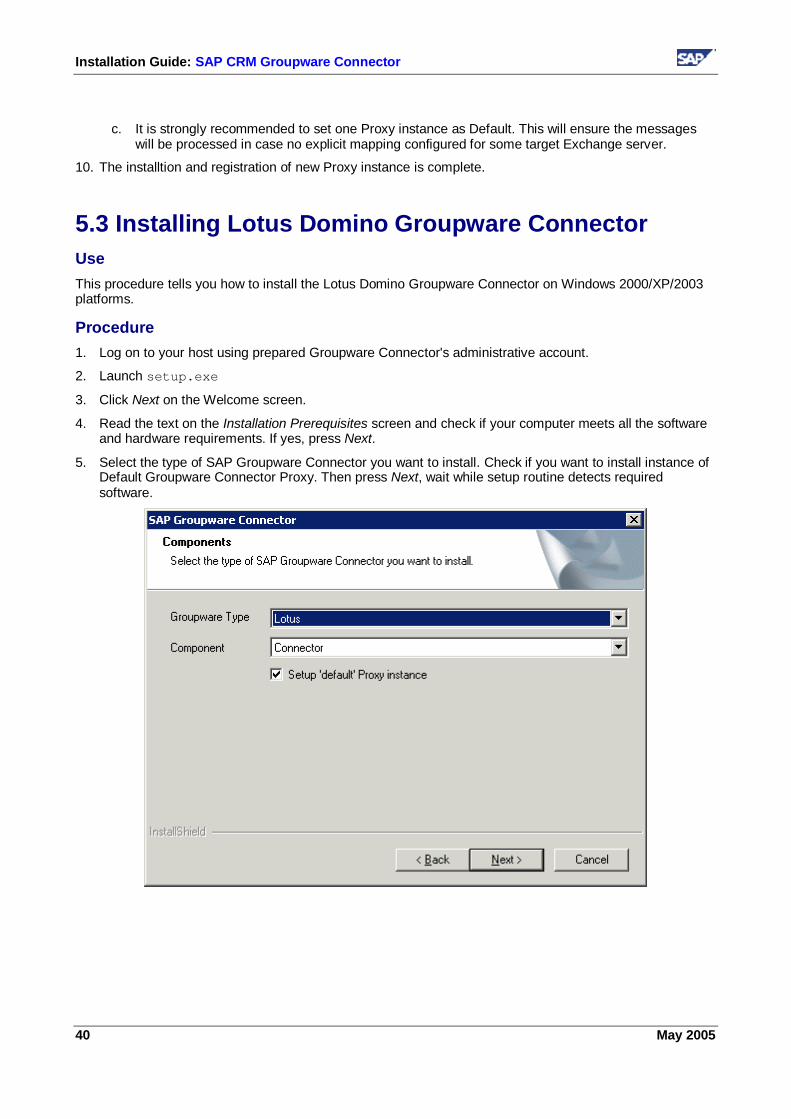
5.3 Installing Lotus Domino Groupware Connector Use This procedure tells you how to install the Lotus Domino Groupware Connector on Windows 2000/XP/2003 platforms.
Procedure 1. Log on to your host using prepared Groupware Connector's administrative account.
2. Launch setup.exe
3. Click Next on the Welcome screen.
4. Read the text on the Installation Prerequisites screen and check if your computer meets all the software and hardware requirements. If yes, press Next.
5. Select the type of SAP Groupware Connector you want to install. Check if you want to install instance of Default Groupware Connector Proxy. Then press Next, wait while setup routine detects required software.
Installation Guide: SAP CRM Groupware Connector
May 2005 41
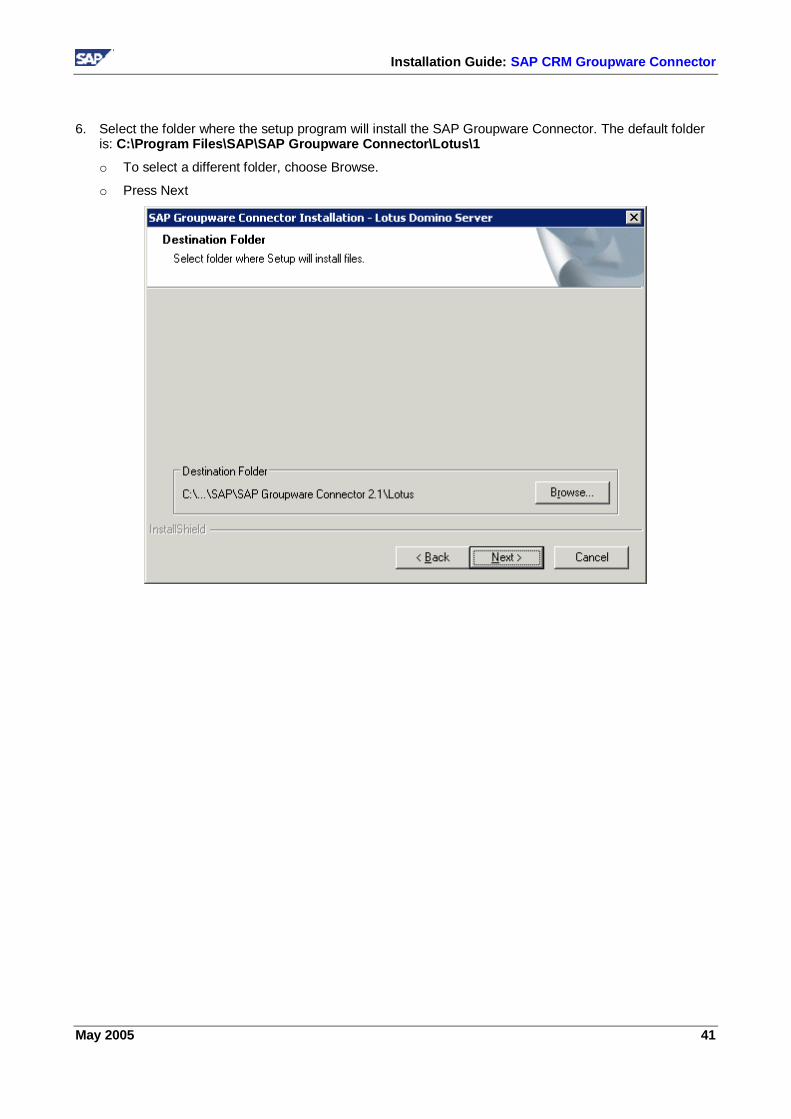
6. Select the folder where the setup program will install the SAP Groupware Connector. The default folder is: C:\Program Files\SAP\SAP Groupware Connector\Lotus\1
o To select a different folder, choose Browse.
o Press Next
Installation Guide: SAP CRM Groupware Connector
42 May 2005
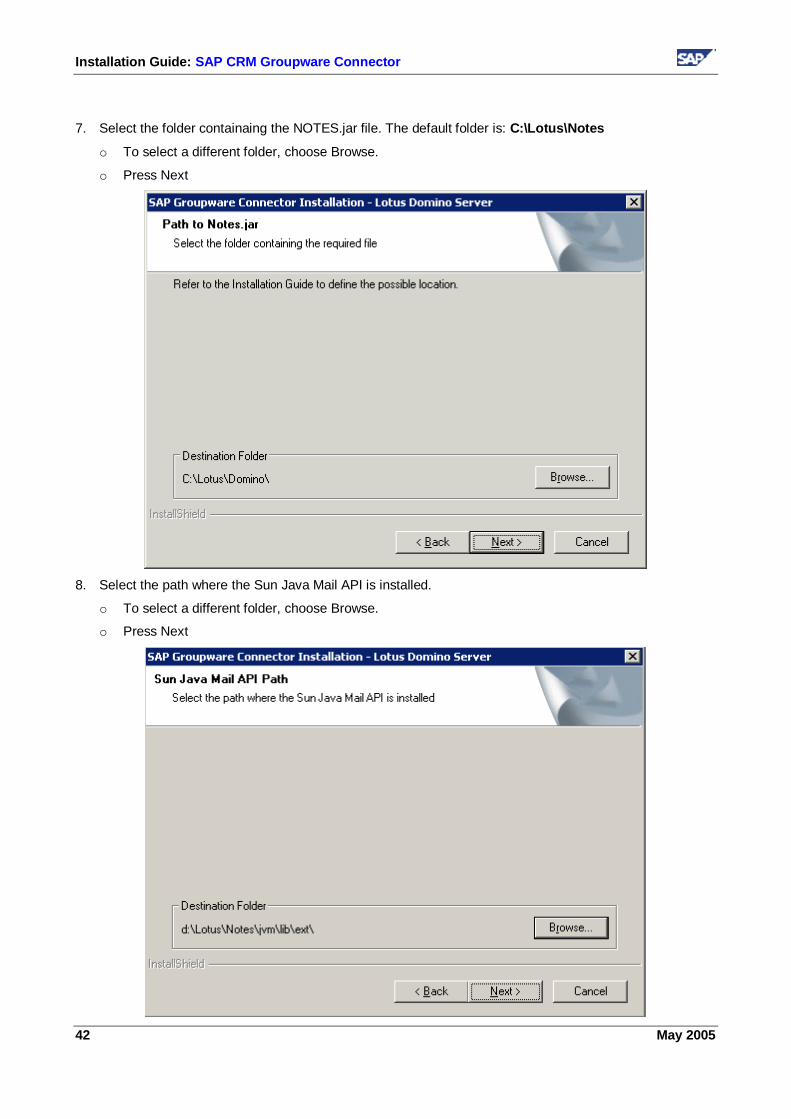
7. Select the folder containaing the NOTES.jar file. The default folder is: C:\Lotus\Notes
o To select a different folder, choose Browse.
o Press Next
8. Select the path where the Sun Java Mail API is installed.
o To select a different folder, choose Browse.
o Press Next
Installation Guide: SAP CRM Groupware Connector
May 2005 43
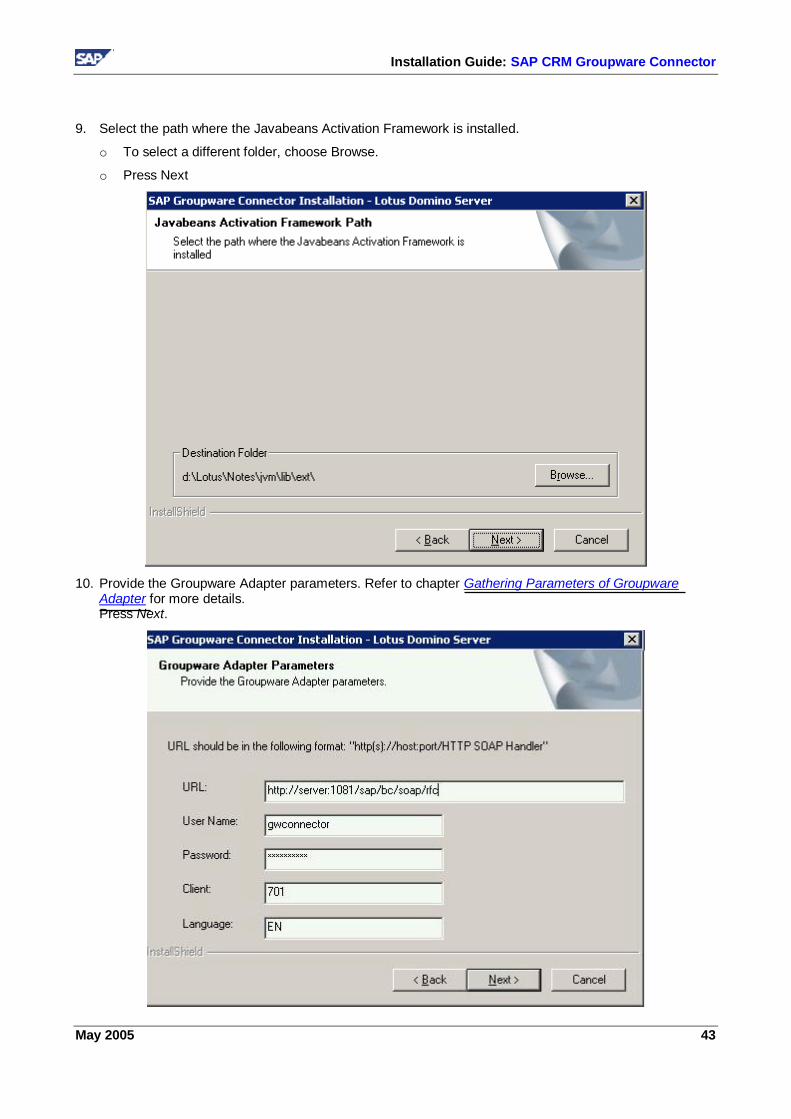
9. Select the path where the Javabeans Activation Framework is installed.
o To select a different folder, choose Browse.
o Press Next
10. Provide the Groupware Adapter parameters. Refer to chapter Gathering Parameters of Groupware
Adapter for more details. Press Next.
Installation Guide: SAP CRM Groupware Connector
44 May 2005
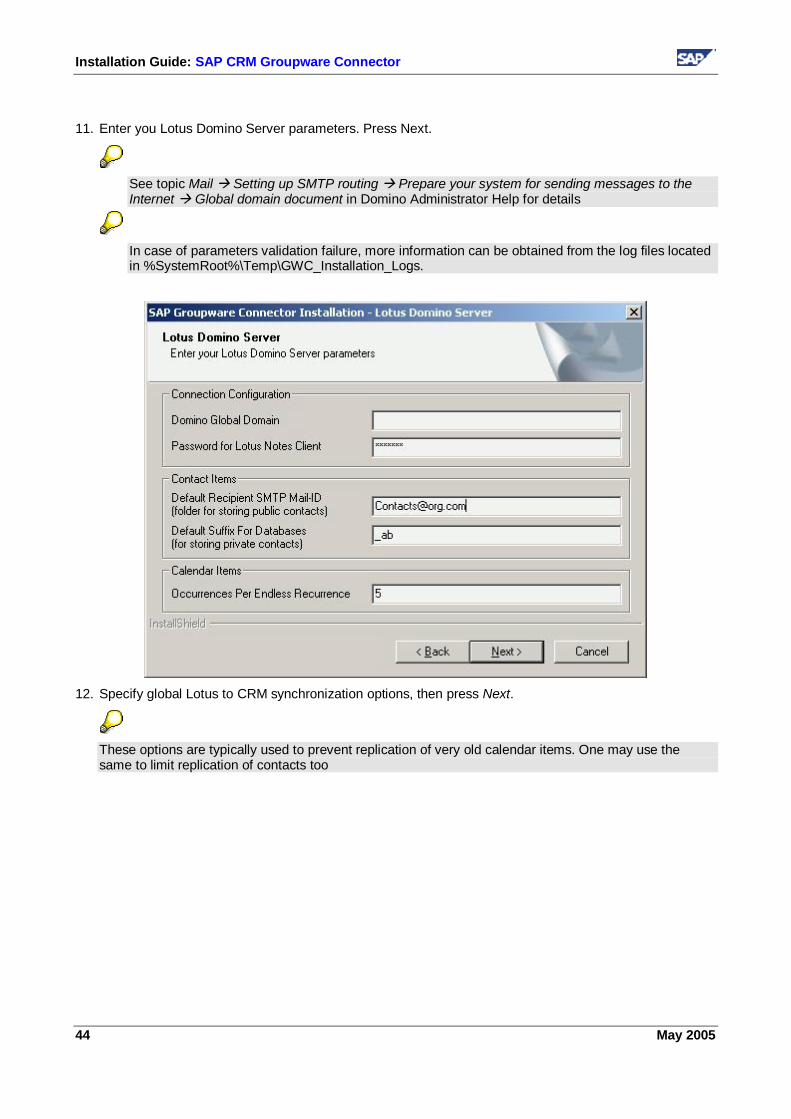
11. Enter you Lotus Domino Server parameters. Press Next.
See topic Mail Setting up SMTP routing Prepare your system for sending messages to the Internet Global domain document in Domino Administrator Help for details
In case of parameters validation failure, more information can be obtained from the log files located in %SystemRoot%\Temp\GWC_Installation_Logs.
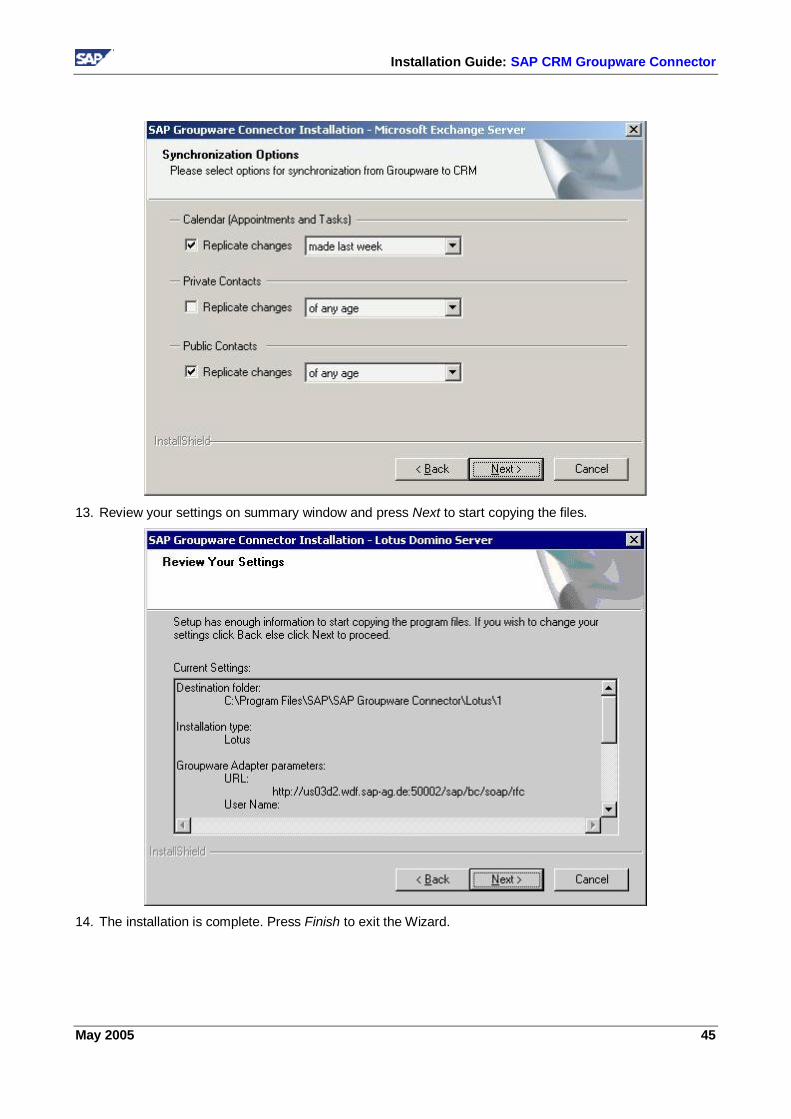
12. Specify global Lotus to CRM synchronization options, then press Next.
These options are typically used to prevent replication of very old calendar items. One may use the same to limit replication of contacts too
Installation Guide: SAP CRM Groupware Connector
May 2005 45
13. Review your settings on summary window and press Next to start copying the files.
14. The installation is complete. Press Finish to exit the Wizard.
Installation Guide: SAP CRM Groupware Connector
46 May 2005
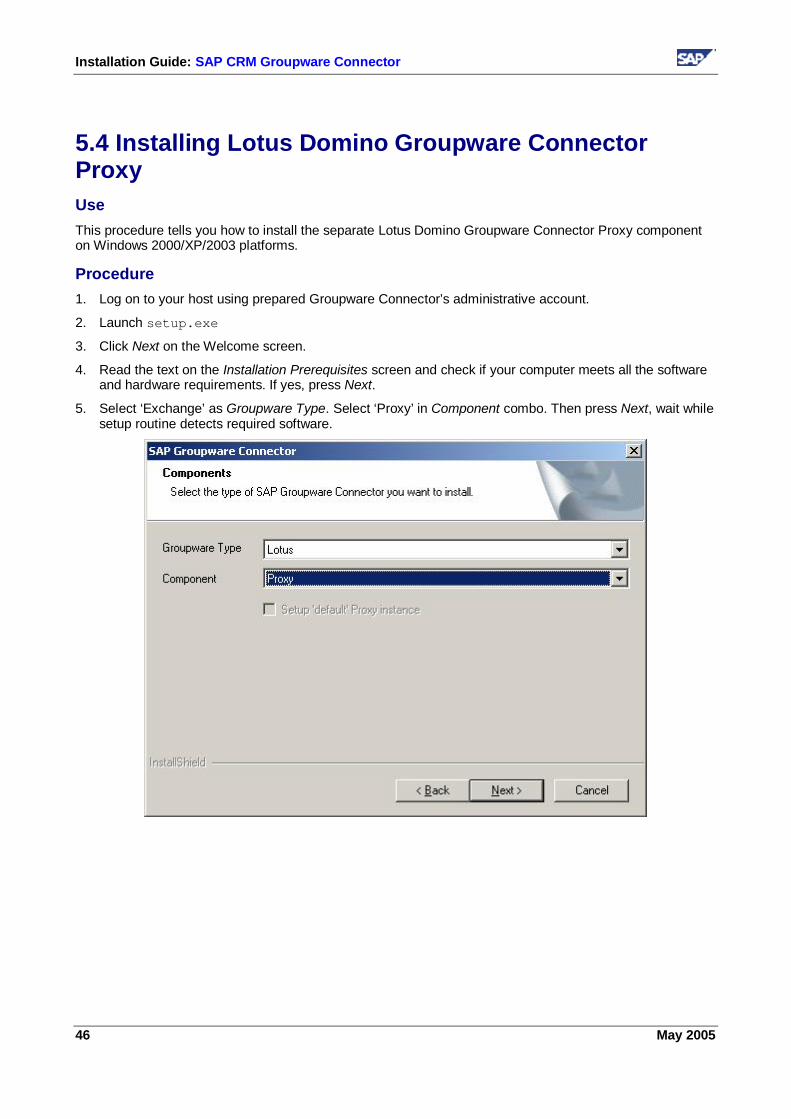
5.4 Installing Lotus Domino Groupware Connector Proxy Use This procedure tells you how to install the separate Lotus Domino Groupware Connector Proxy component on Windows 2000/XP/2003 platforms.
Procedure 1. Log on to your host using prepared Groupware Connector’s administrative account.
2. Launch setup.exe
3. Click Next on the Welcome screen.
4. Read the text on the Installation Prerequisites screen and check if your computer meets all the software and hardware requirements. If yes, press Next.
5. Select ‘Exchange’ as Groupware Type. Select ‘Proxy’ in Component combo. Then press Next, wait while setup routine detects required software.
Installation Guide: SAP CRM Groupware Connector
May 2005 47
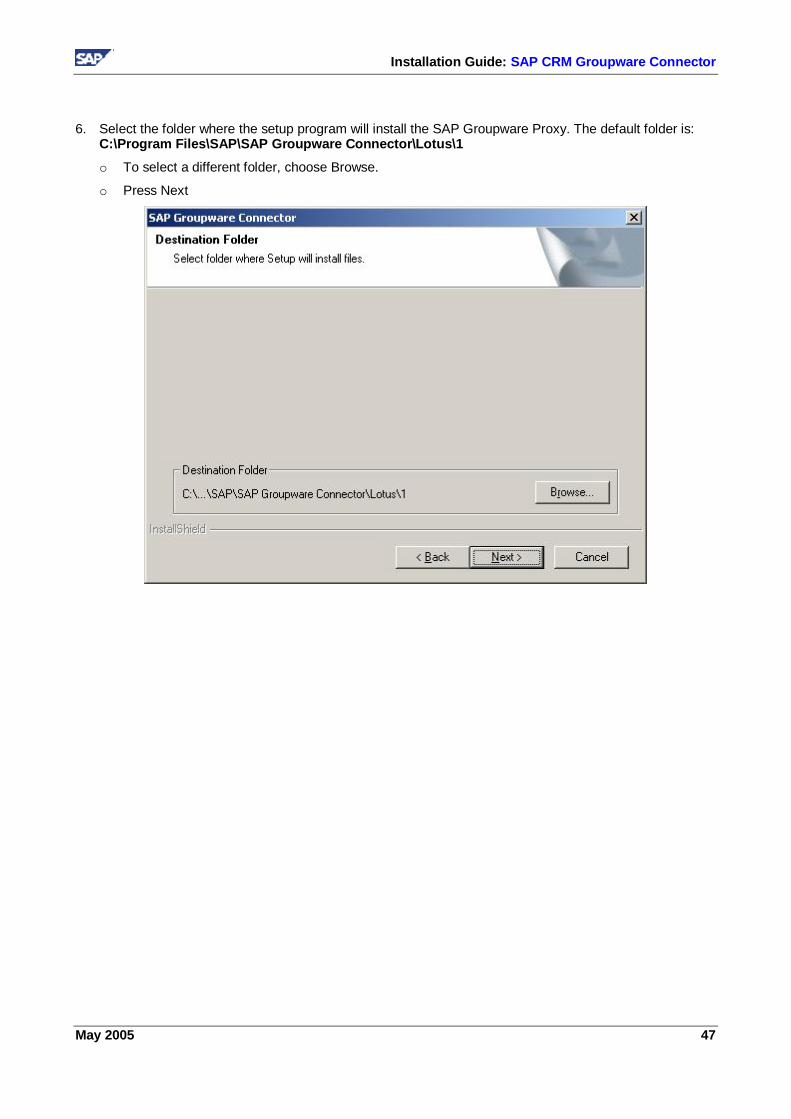
6. Select the folder where the setup program will install the SAP Groupware Proxy. The default folder is: C:\Program Files\SAP\SAP Groupware Connector\Lotus\1
o To select a different folder, choose Browse.
o Press Next
Installation Guide: SAP CRM Groupware Connector
48 May 2005
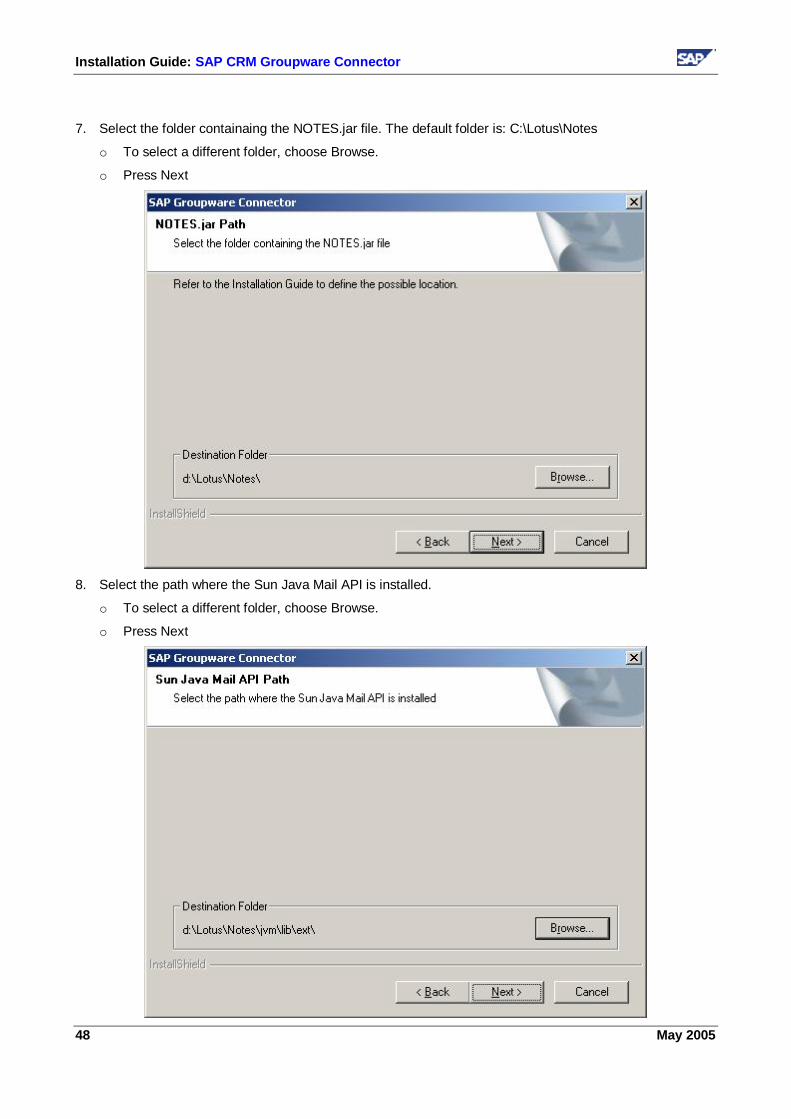
7. Select the folder containaing the NOTES.jar file. The default folder is: C:\Lotus\Notes
o To select a different folder, choose Browse.
o Press Next
8. Select the path where the Sun Java Mail API is installed.
o To select a different folder, choose Browse.
o Press Next
Installation Guide: SAP CRM Groupware Connector
May 2005 49
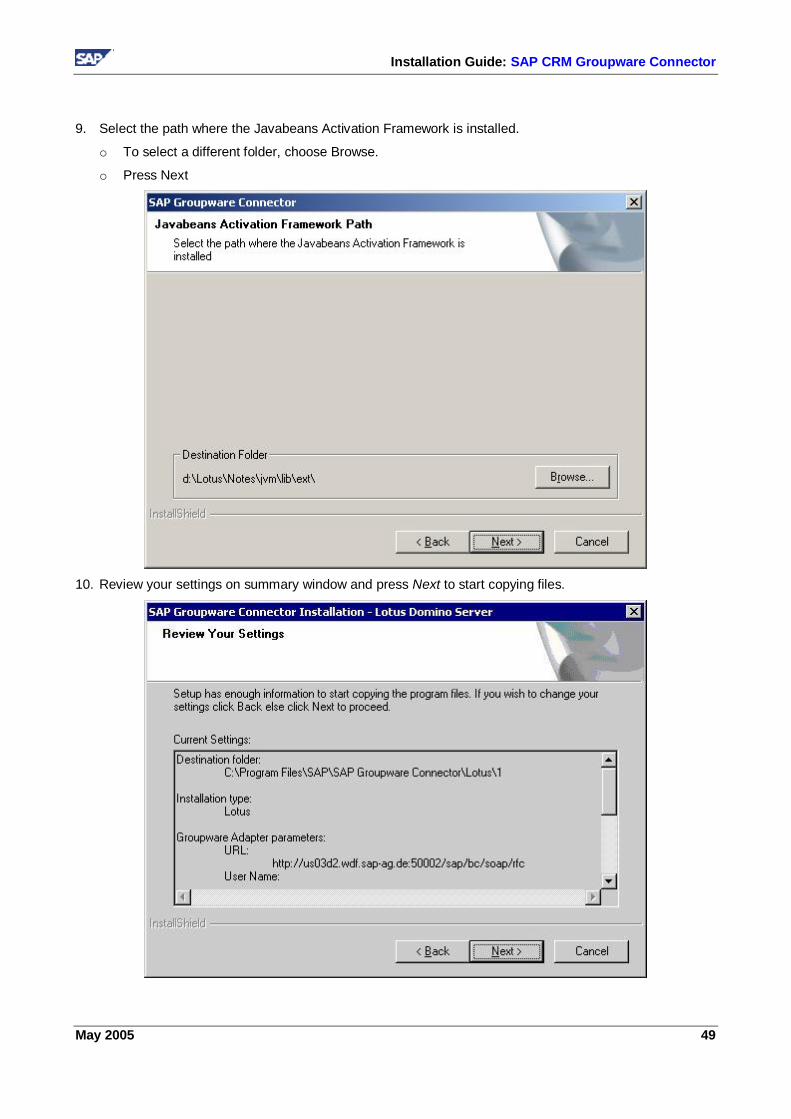
9. Select the path where the Javabeans Activation Framework is installed.
o To select a different folder, choose Browse.
o Press Next
10. Review your settings on summary window and press Next to start copying files.
Installation Guide: SAP CRM Groupware Connector
50 May 2005
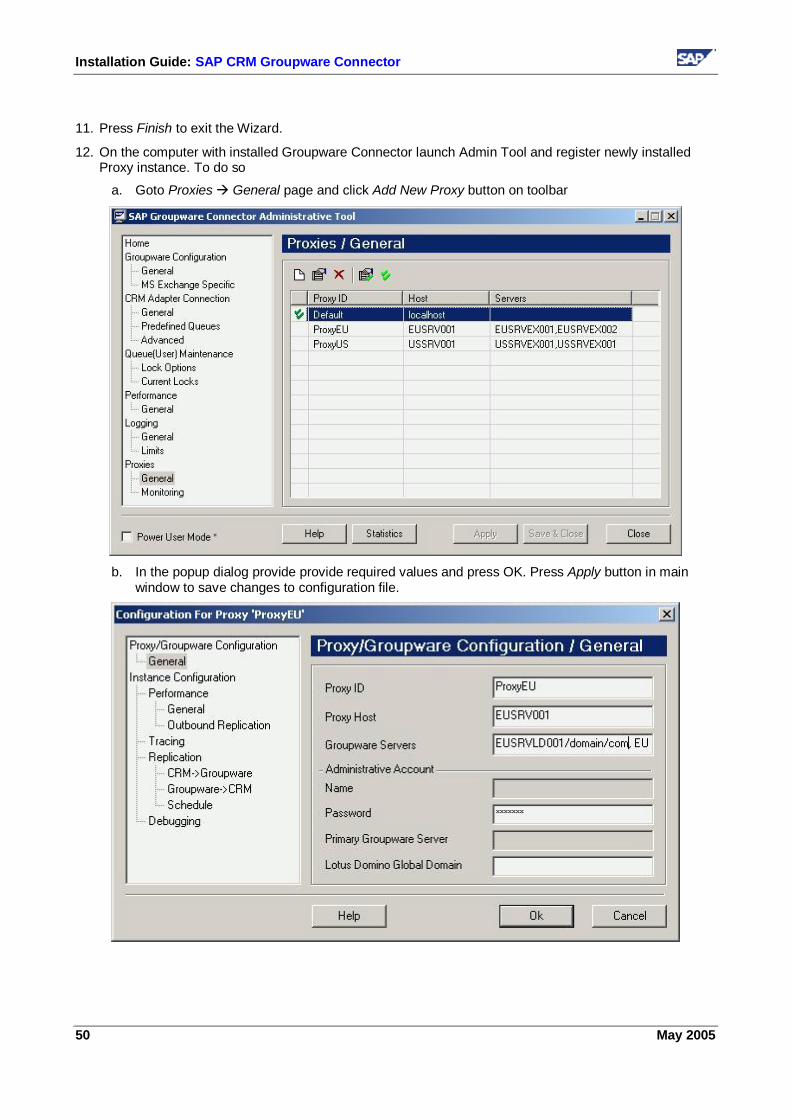
11. Press Finish to exit the Wizard.
12. On the computer with installed Groupware Connector launch Admin Tool and register newly installed Proxy instance. To do so
a. Goto Proxies General page and click Add New Proxy button on toolbar
b. In the popup dialog provide provide required values and press OK. Press Apply button in main
window to save changes to configuration file.
Installation Guide: SAP CRM Groupware Connector
May 2005 51
c. It is strongly recommended to set one Proxy instance as Default. This will ensure the messages will be processed in case no explicit mapping configured for some target Lotus Domino server.
13. The installtion and registration of new Proxy instance is complete.
6 Post Installation 6.1 Running SelfTest It is recommended to run SelfTest.cmd, located in Groupware Connector’s installation folder, after installation is complete. This will launch the connector in self-test mode. Connector will check the configuration by trying to connect to CRM Adapter, Groupware Server and so on.
Stop the Groupware Connector service before starting the self test because they use same Groupware Adapter resources and slef-test may fail.
Result of the execution will be available on Console and in log files. No ERROR messages should be logged. The last message in the output should be “Self Test Succeeded” in case of success and “Self Test Failed” in case of failure.
6.2 Tuning the Performance Launch Admin Tool to tune the performance options of Groupware Connector. Refer to Administration Guide for more details.
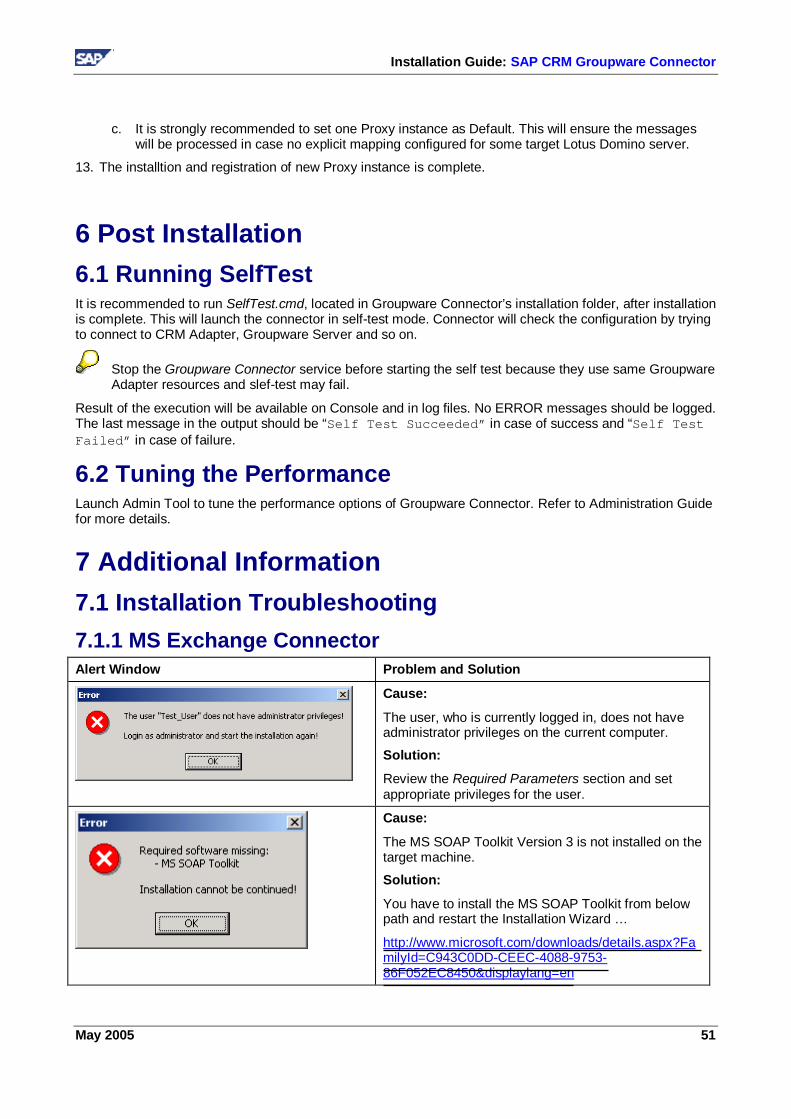
7 Additional Information 7.1 Installation Troubleshooting 7.1.1 MS Exchange Connector Alert Window Problem and Solution
Cause:
The user, who is currently logged in, does not have administrator privileges on the current computer.
Solution:
Review the Required Parameters section and set appropriate privileges for the user.
Cause:
The MS SOAP Toolkit Version 3 is not installed on the target machine.
Solution:
You have to install the MS SOAP Toolkit from below path and restart the Installation Wizard …
http://www.microsoft.com/downloads/details.aspx?FamilyId=C943C0DD-CEEC-4088-9753-86F052EC8450&displaylang=en
Installation Guide: SAP CRM Groupware Connector
52 May 2005
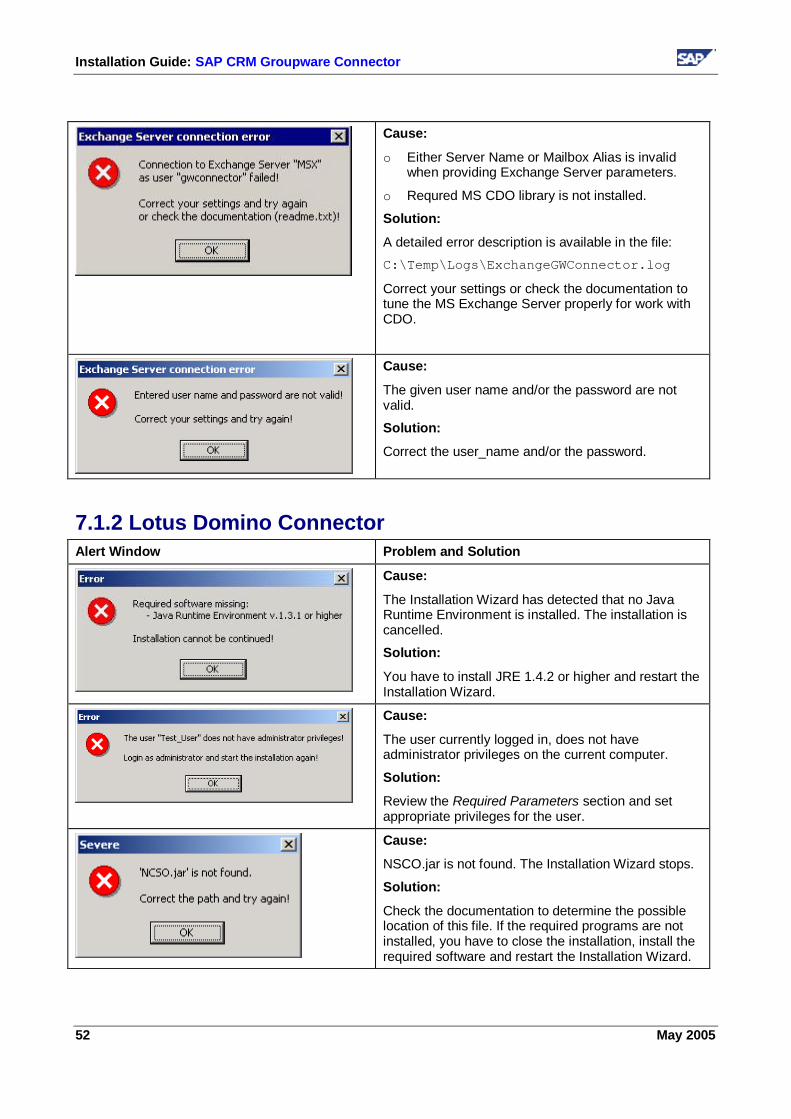
Cause:
o Either Server Name or Mailbox Alias is invalid when providing Exchange Server parameters.
o Requred MS CDO library is not installed.
Solution:
A detailed error description is available in the file: C:\Temp\Logs\ExchangeGWConnector.log
Correct your settings or check the documentation to tune the MS Exchange Server properly for work with CDO.
Cause:
The given user name and/or the password are not valid.
Solution:
Correct the user_name and/or the password.
7.1.2 Lotus Domino Connector Alert Window Problem and Solution
Cause:
The Installation Wizard has detected that no Java Runtime Environment is installed. The installation is cancelled.
Solution:
You have to install JRE 1.4.2 or higher and restart the Installation Wizard.
Cause:
The user currently logged in, does not have administrator privileges on the current computer.
Solution:
Review the Required Parameters section and set appropriate privileges for the user.
Cause:
NSCO.jar is not found. The Installation Wizard stops.
Solution:
Check the documentation to determine the possible location of this file. If the required programs are not installed, you have to close the installation, install the required software and restart the Installation Wizard.
Installation Guide: SAP CRM Groupware Connector
May 2005 53
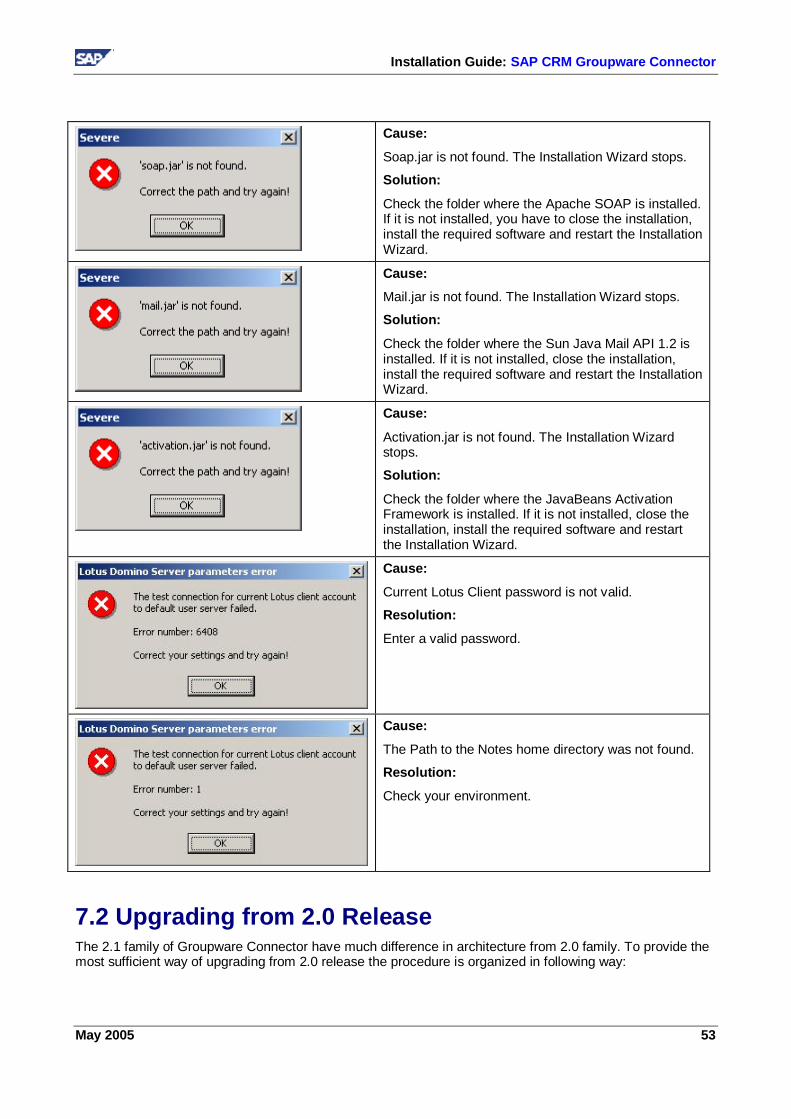
Cause:
Soap.jar is not found. The Installation Wizard stops.
Solution:
Check the folder where the Apache SOAP is installed. If it is not installed, you have to close the installation, install the required software and restart the Installation Wizard.
Cause: Mail.jar is not found. The Installation Wizard stops.
Solution:
Check the folder where the Sun Java Mail API 1.2 is installed. If it is not installed, close the installation, install the required software and restart the Installation Wizard.
Cause:
Activation.jar is not found. The Installation Wizard stops.
Solution:
Check the folder where the JavaBeans Activation Framework is installed. If it is not installed, close the installation, install the required software and restart the Installation Wizard.
Cause:
Current Lotus Client password is not valid. Resolution:
Enter a valid password.
Cause:
The Path to the Notes home directory was not found.
Resolution:
Check your environment.
7.2 Upgrading from 2.0 Release The 2.1 family of Groupware Connector have much difference in architecture from 2.0 family. To provide the most sufficient way of upgrading from 2.0 release the procedure is organized in following way:
Installation Guide: SAP CRM Groupware Connector
54 May 2005
1. Setup an instance of 4.0 release of connector. The installation routine will check the presence of 2.0 release on the same computer and will import configuration options and run-time data from previous installation. 2.0 connector will be stopped and disabled once the installation succeeded.
2. Verify success of the installation of 4.0 release.
3. Uninstall 2.0 release if verification is successful. Uninstall 4.0 release and enable Windows services of 2.0 release otherwise.
7.3 Upgrading from 2.1 Release To upgrade the 2.1 release of Groupware Connector component to new version
1. Launch the installation routine.
2. Select the option “Repair/Upgrade all installed components” and press Next.
3. Click Yes on the query for keeping configuration files if you need only rewriting of binary files. Click No to regenerate the configuration files by the values provided during the first installation.
4. Press Next to perform the upgrade procedure.
5. Press Finish to exit the installation.
7.4 Uninstalling the Groupware Connector From Windows Start menu open Settings Control Panel Add/Remove Programs. Select SAP Groupware Connector component and press Change/Remove to uninstall or modify installation.
7.5 Installing Multiple Instances of Connector For reusing same hardware when testing in different landscapes option to install multiple instances of Groupware Connector on one box is available. This will allow connecting different CRM systems to different Groupware using same hardware.
To setup additional instance of connector component launch following command line from setup folder
Setup.exe /Instance=N
where N gives the id of the instance in range 1 to 4.
Setting multiple instances of Groupware Connector components intended only for testing purposes and not supported in Production environment.
Components of Groupware Connector will talk only to the components having the same instance ID. E.g.: Groupware Connector installed with instance ID equal to 3 will connect only to Proxy instances installed with instance ID equal to 3.