multicash 4.0
TRANSCRIPT
Multicash 4.0
User Guide
2
Contents 1 Account information (passive operations) ................................................................................................................ 3
1.1 Download data from the Bank ........................................................................................................................... 3
1.2 Account information (Balances, Statements, Transactions) .............................................................................. 4
1.2.1 Balances......................................................................................................................................................... 5
1.2.2 Statements .................................................................................................................................................... 6
1.2.3 Transactions .................................................................................................................................................. 7
2 Payment orders (active operations) ........................................................................................................................ 10
2.1 Opening the payment module......................................................................................................................... 10
2.2 Entering, importing payment orders ............................................................................................................... 11
2.2.1 Import a payment file from accounting ....................................................................................................... 11
2.2.2 Entering orders manually ............................................................................................................................ 13
2.3 Creating a payment order file .......................................................................................................................... 14
2.4 Return to the basic module, send payment .................................................................................................... 15
2.5 Possible errors when sending a payment order file ........................................................................................ 17
2.6 Checking payment statuses in the payment modules ..................................................................................... 17
2.7 Difference between SEPA payments and foreign payments ........................................................................... 18
3
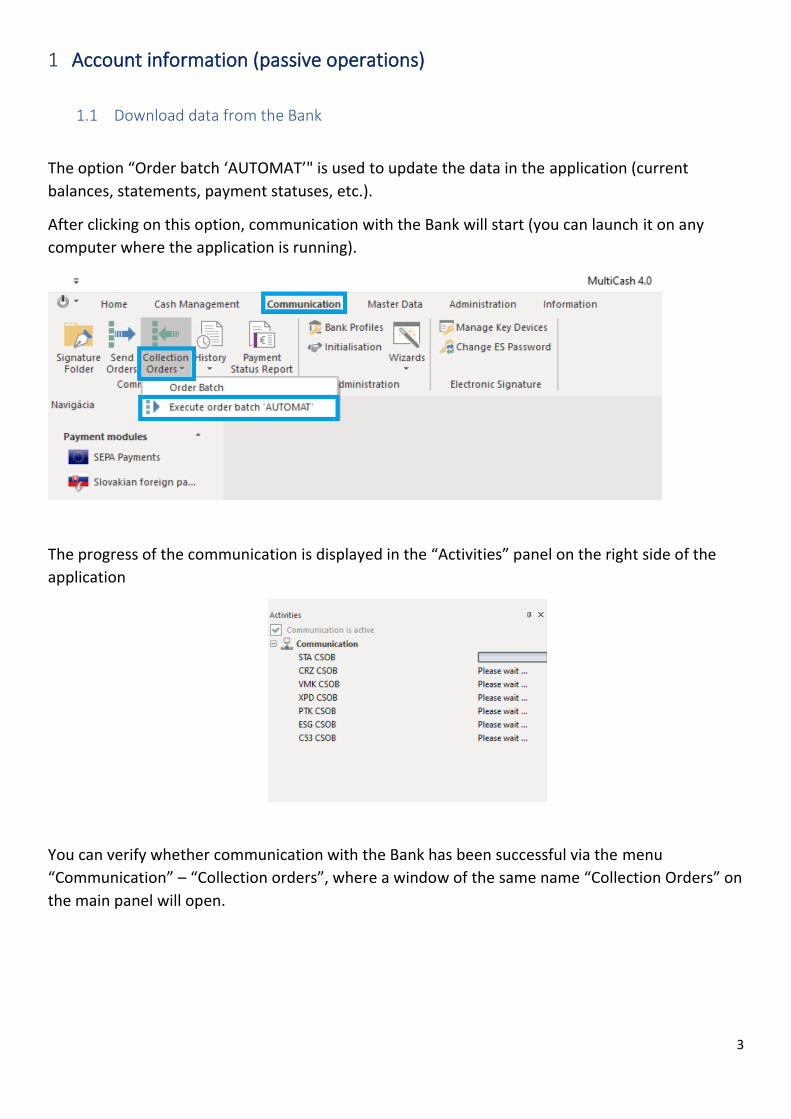
1 Account information (passive operations)
1.1 Download data from the Bank
The option “Order batch ‘AUTOMAT’" is used to update the data in the application (current
balances, statements, payment statuses, etc.).
After clicking on this option, communication with the Bank will start (you can launch it on any
computer where the application is running).
The progress of the communication is displayed in the “Activities” panel on the right side of the
application
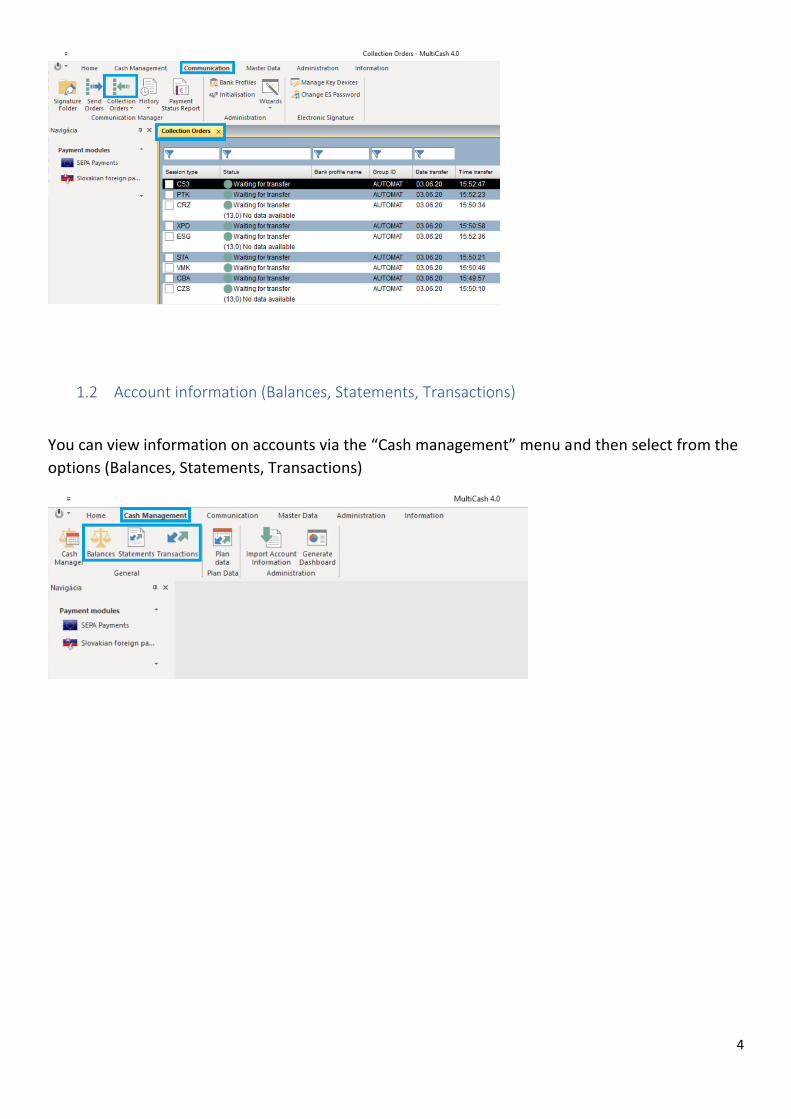
You can verify whether communication with the Bank has been successful via the menu
“Communication” – “Collection orders”, where a window of the same name “Collection Orders” on
the main panel will open.
4
1.2 Account information (Balances, Statements, Transactions)
You can view information on accounts via the “Cash management” menu and then select from the
options (Balances, Statements, Transactions)
5
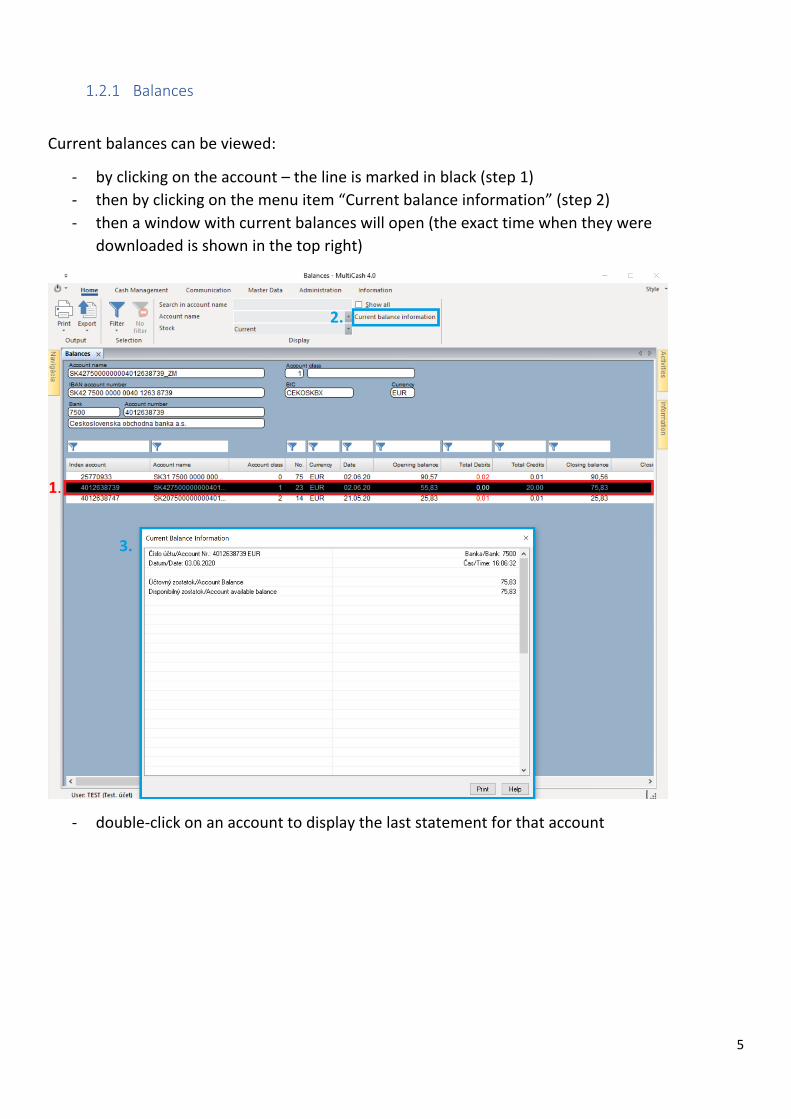
1.2.1 Balances
Current balances can be viewed:
- by clicking on the account – the line is marked in black (step 1)
- then by clicking on the menu item “Current balance information” (step 2)
- then a window with current balances will open (the exact time when they were
downloaded is shown in the top right)
- double-click on an account to display the last statement for that account
1.
2.
3.
6
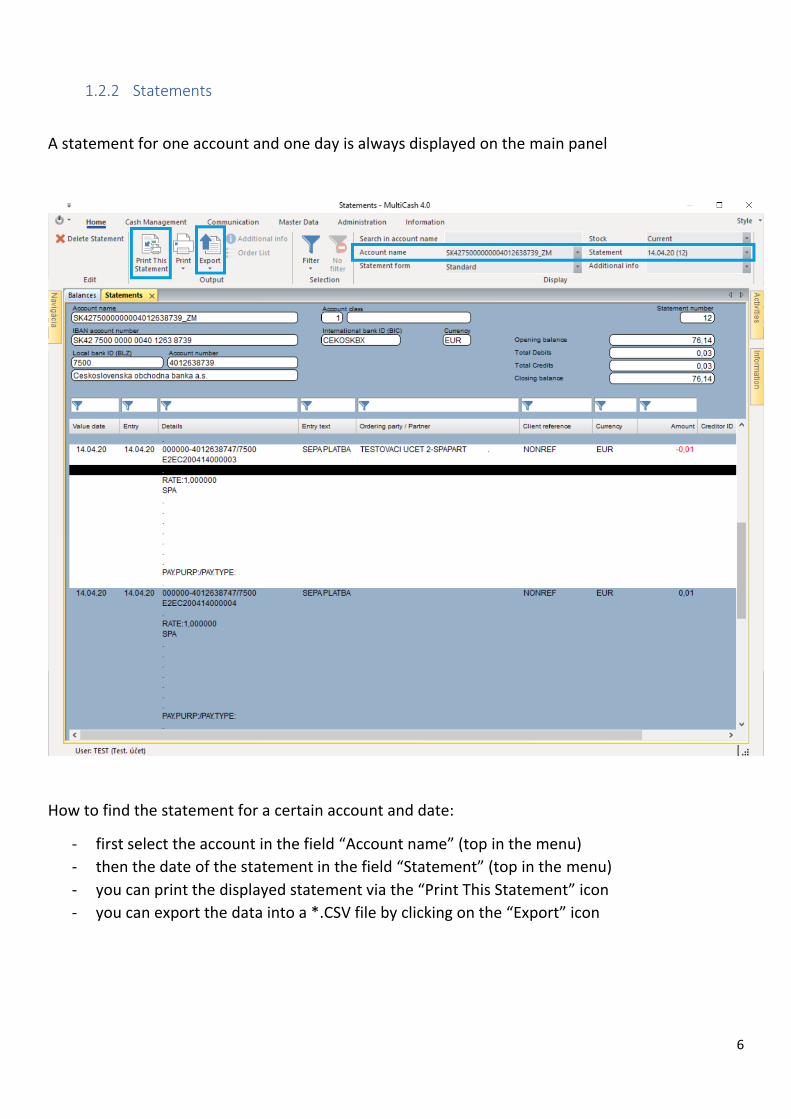
1.2.2 Statements
A statement for one account and one day is always displayed on the main panel
How to find the statement for a certain account and date:
- first select the account in the field “Account name” (top in the menu)
- then the date of the statement in the field “Statement” (top in the menu)
- you can print the displayed statement via the “Print This Statement” icon
- you can export the data into a *.CSV file by clicking on the “Export” icon
7
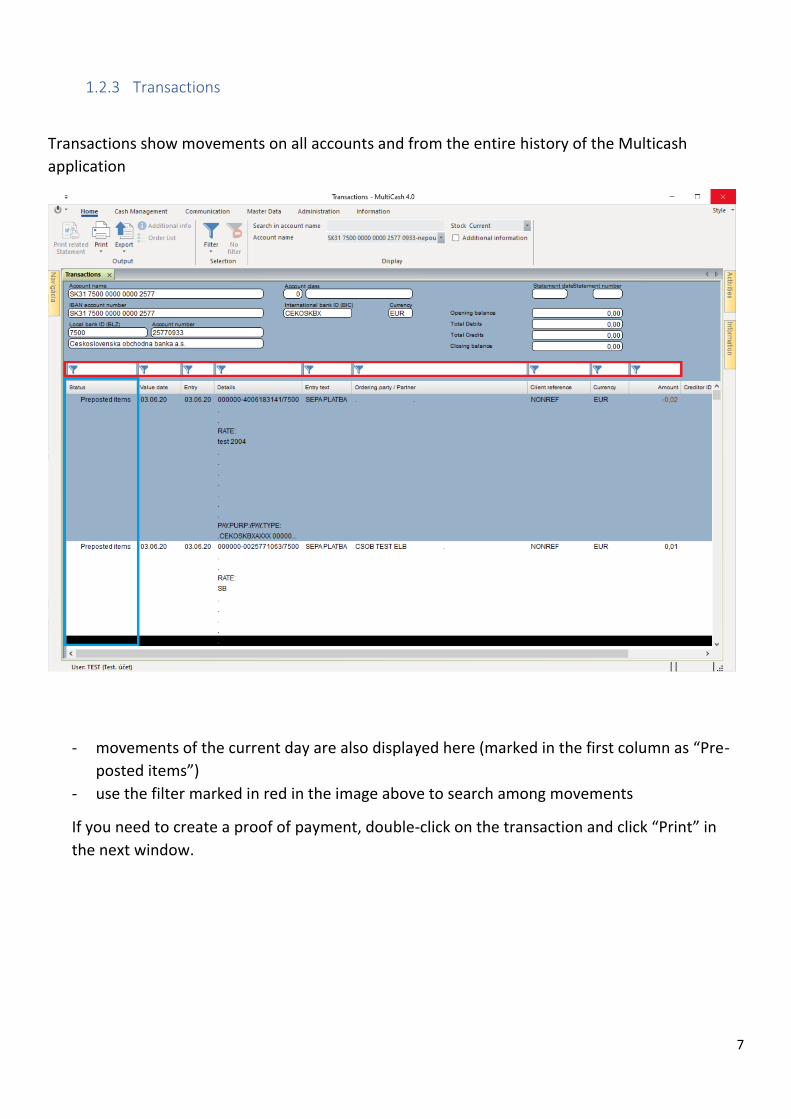
1.2.3 Transactions
Transactions show movements on all accounts and from the entire history of the Multicash
application
- movements of the current day are also displayed here (marked in the first column as “Pre-
posted items”)
- use the filter marked in red in the image above to search among movements
If you need to create a proof of payment, double-click on the transaction and click “Print” in
the next window.
8
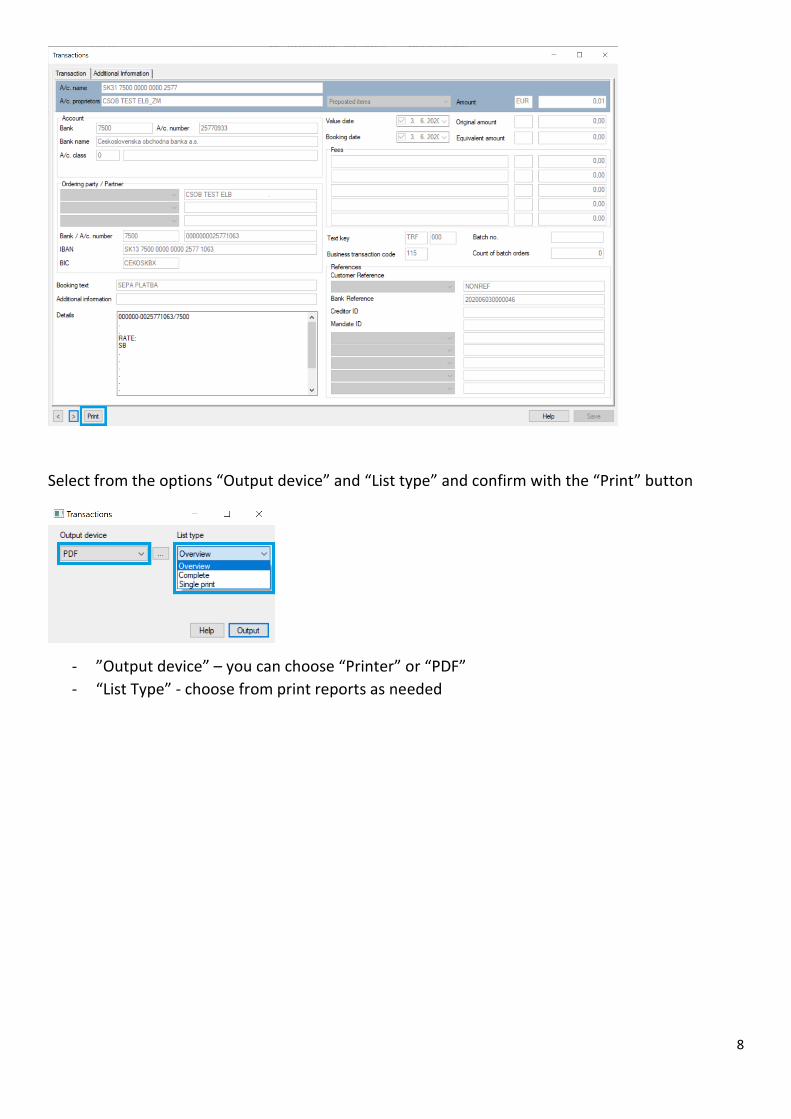
Select from the options “Output device” and “List type” and confirm with the “Print” button
- ”Output device” – you can choose “Printer” or “PDF”
- “List Type” - choose from print reports as needed

9
- you can now print out the displayed PDF
- the displayed movement does not contain any other information that the counterparty
should not see (balances, other movements)
10
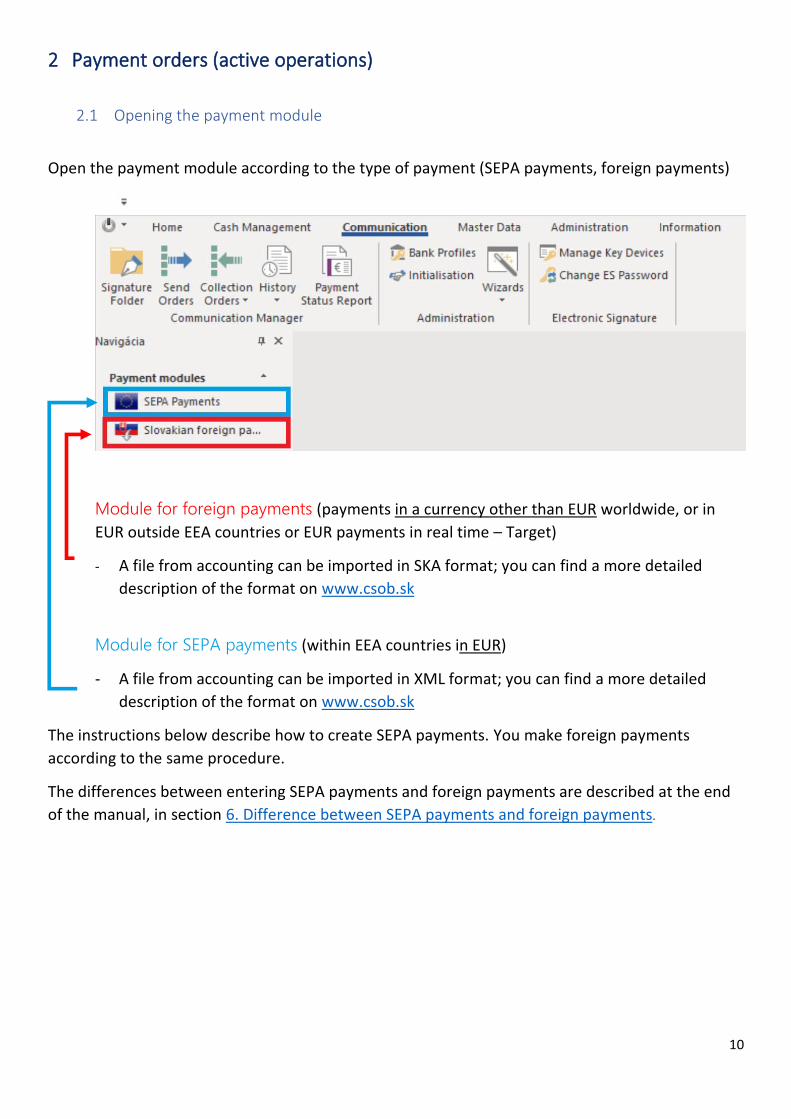
2 Payment orders (active operations)
2.1 Opening the payment module
Open the payment module according to the type of payment (SEPA payments, foreign payments)
Module for foreign payments (payments in a currency other than EUR worldwide, or in
EUR outside EEA countries or EUR payments in real time – Target)
- A file from accounting can be imported in SKA format; you can find a more detailed
description of the format on www.csob.sk
Module for SEPA payments (within EEA countries in EUR)
- A file from accounting can be imported in XML format; you can find a more detailed
description of the format on www.csob.sk
The instructions below describe how to create SEPA payments. You make foreign payments
according to the same procedure.
The differences between entering SEPA payments and foreign payments are described at the end
of the manual, in section 6. Difference between SEPA payments and foreign payments.
11
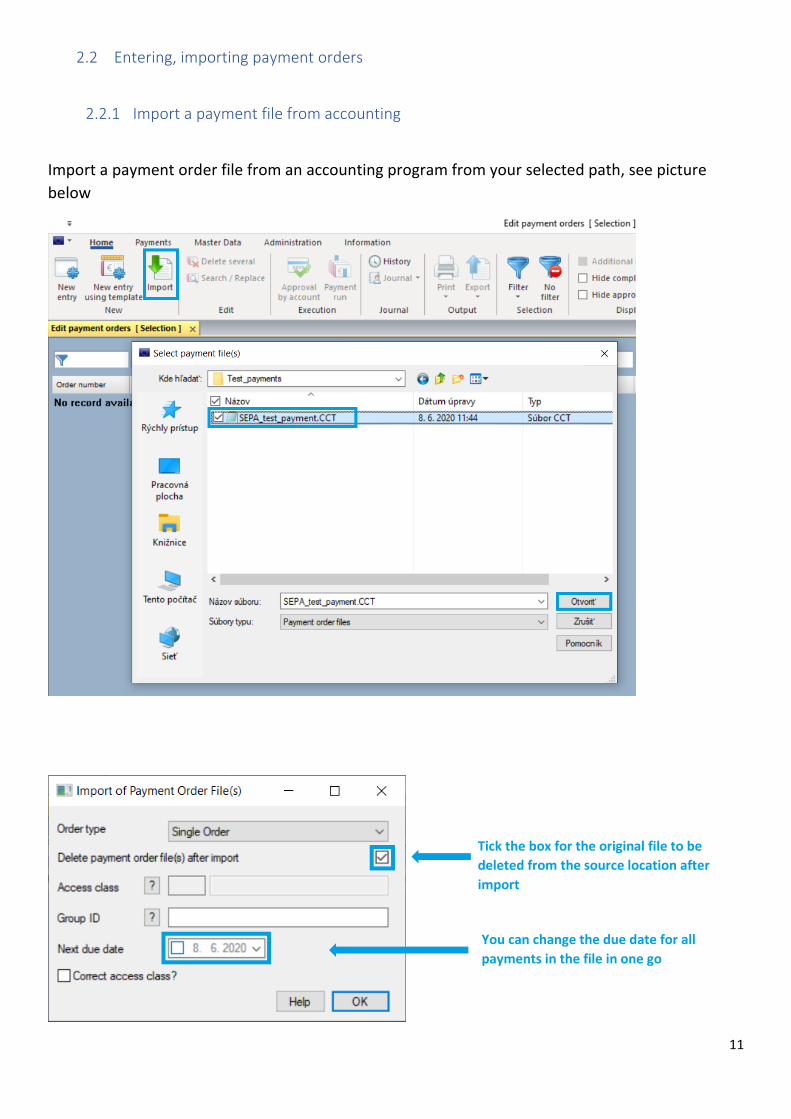
2.2 Entering, importing payment orders
2.2.1 Import a payment file from accounting
Import a payment order file from an accounting program from your selected path, see picture
below
Tick the box for the original file to be
deleted from the source location after
import
You can change the due date for all
payments in the file in one go
12
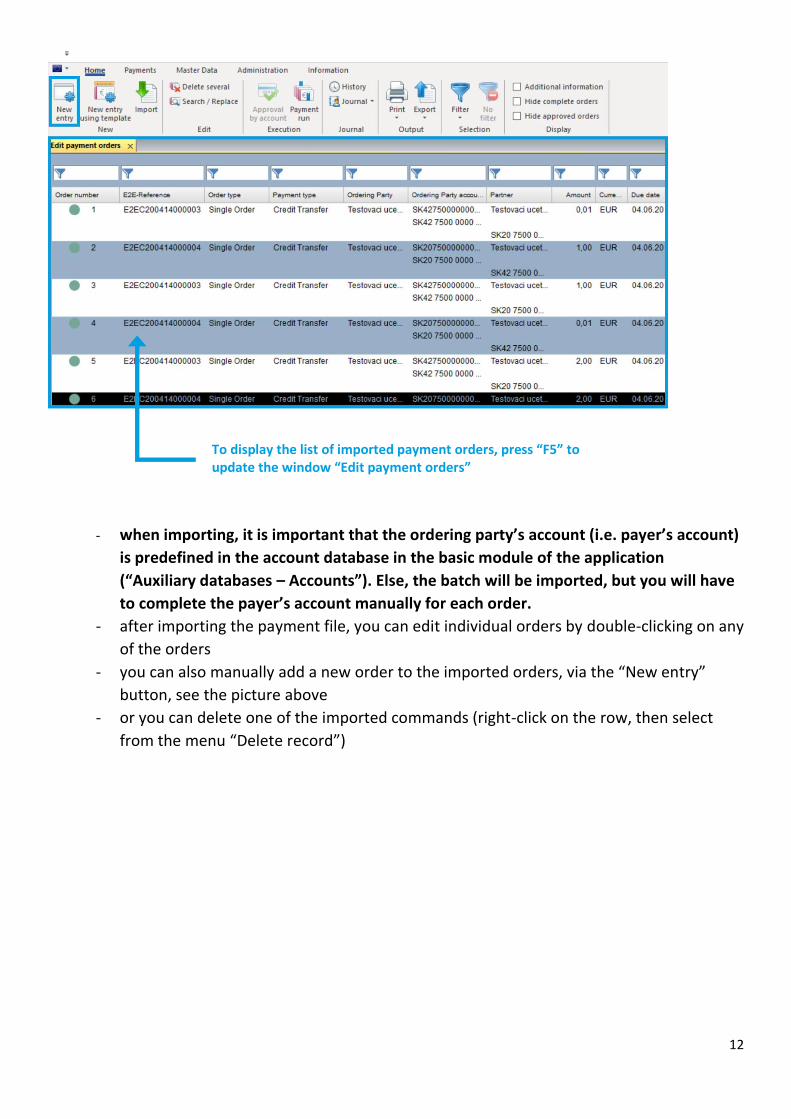
- when importing, it is important that the ordering party’s account (i.e. payer’s account)
is predefined in the account database in the basic module of the application
(“Auxiliary databases – Accounts”). Else, the batch will be imported, but you will have
to complete the payer’s account manually for each order.
- after importing the payment file, you can edit individual orders by double-clicking on any
of the orders
- you can also manually add a new order to the imported orders, via the “New entry”
button, see the picture above
- or you can delete one of the imported commands (right-click on the row, then select
from the menu “Delete record”)
To display the list of imported payment orders, press “F5” to update the window “Edit payment orders”
13
2.2.2 Entering orders manually
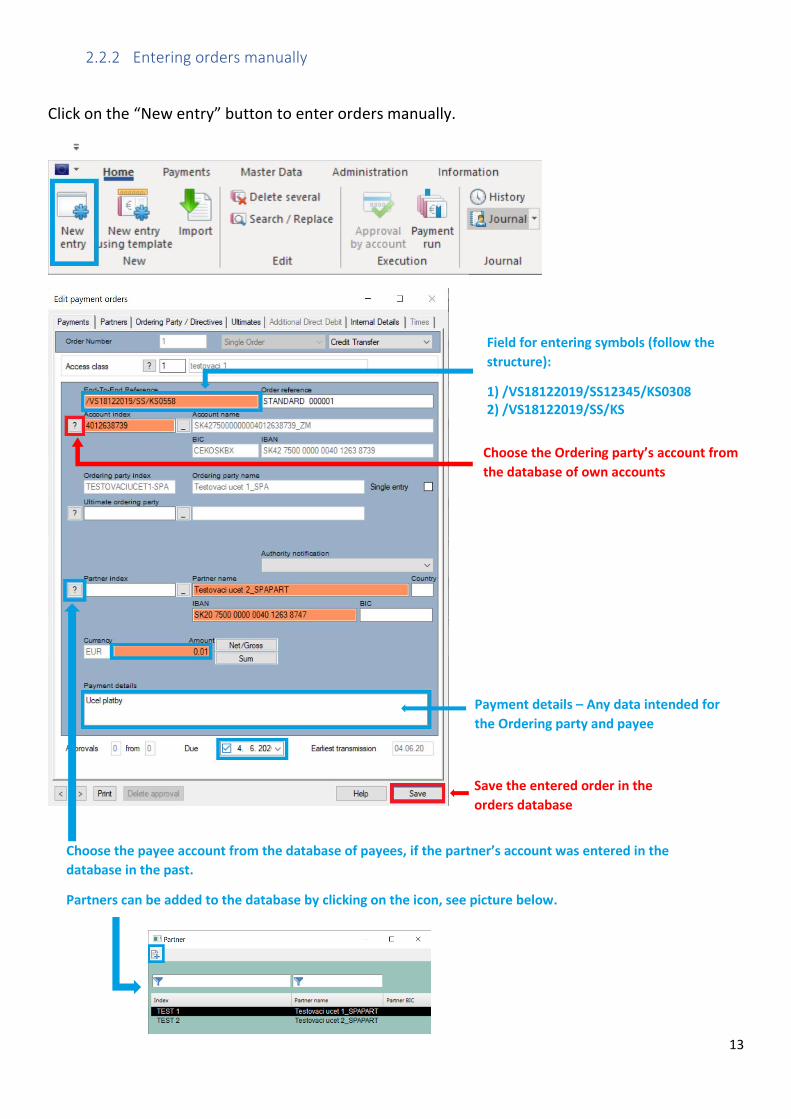
Click on the “New entry” button to enter orders manually.
Save the entered order in the
orders database
Payment details – Any data intended for
the Ordering party and payee
Choose the payee account from the database of payees, if the partner’s account was entered in the
database in the past.
Partners can be added to the database by clicking on the icon, see picture below.
Choose the Ordering party’s account from
the database of own accounts
Field for entering symbols (follow the
structure):
1) /VS18122019/SS12345/KS0308 2) /VS18122019/SS/KS
14
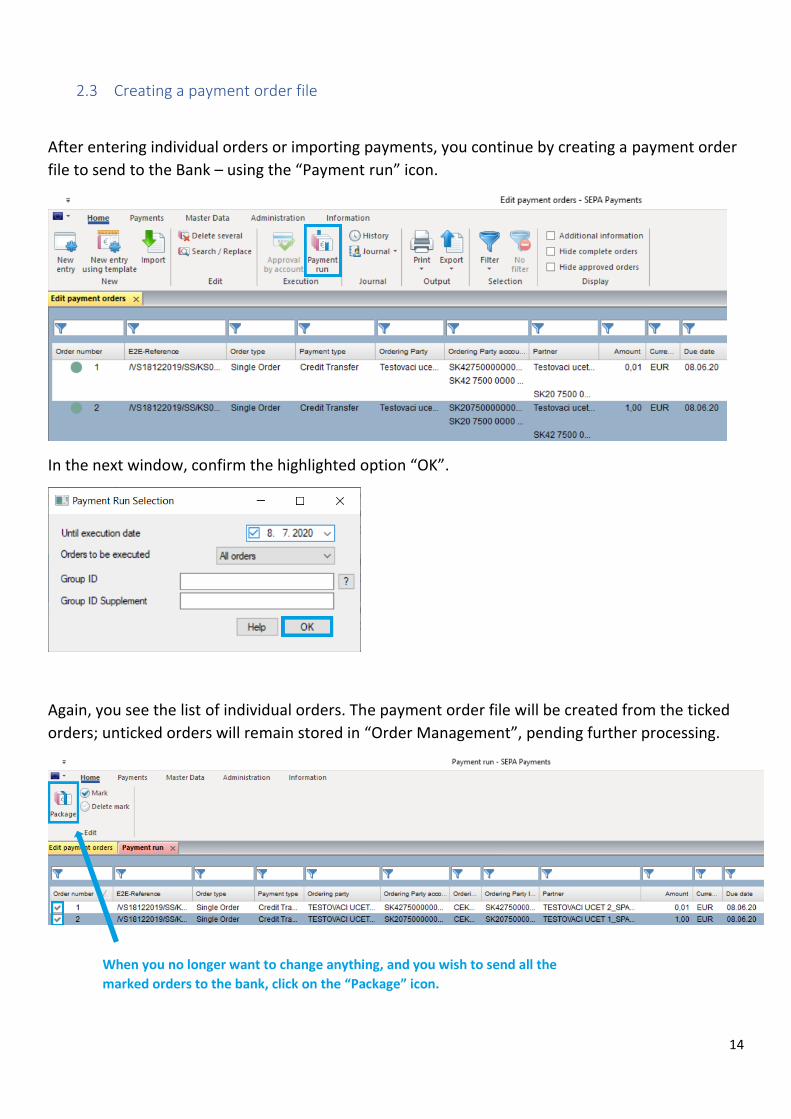
2.3 Creating a payment order file
After entering individual orders or importing payments, you continue by creating a payment order
file to send to the Bank – using the “Payment run” icon.
In the next window, confirm the highlighted option “OK”.
Again, you see the list of individual orders. The payment order file will be created from the ticked
orders; unticked orders will remain stored in “Order Management”, pending further processing.
When you no longer want to change anything, and you wish to send all the
marked orders to the bank, click on the “Package” icon.
15
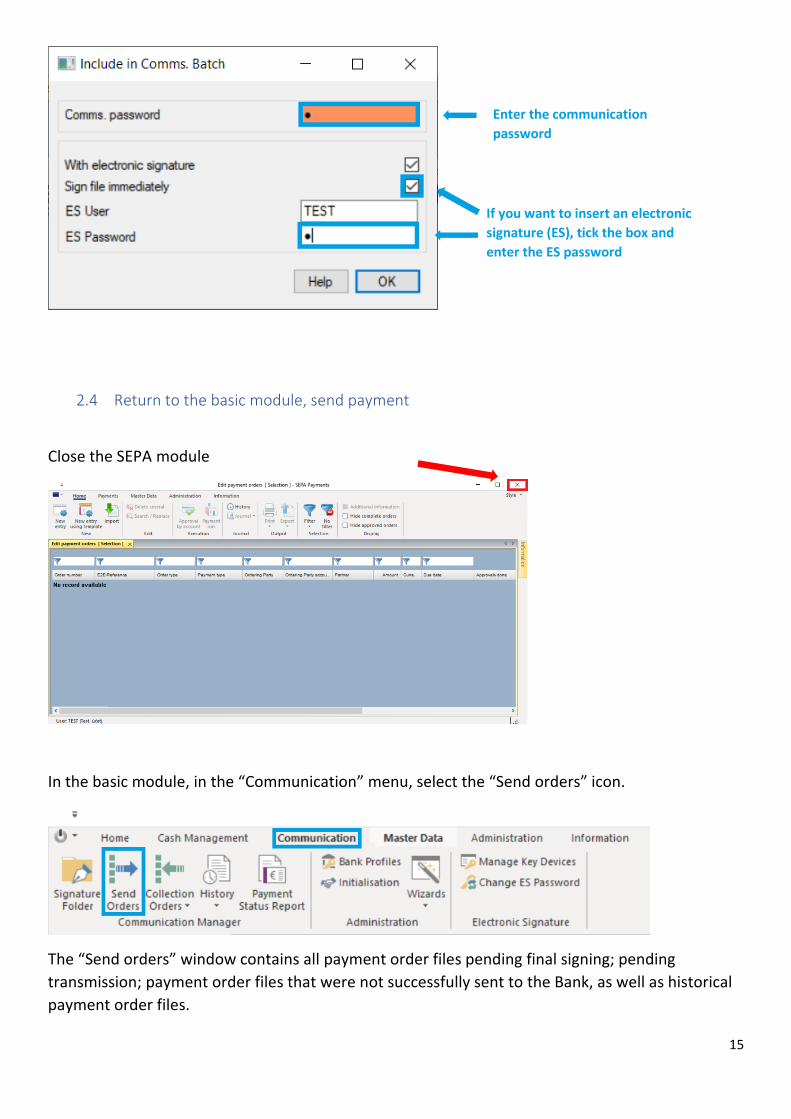
2.4 Return to the basic module, send payment
Close the SEPA module
In the basic module, in the “Communication” menu, select the “Send orders” icon.
The “Send orders” window contains all payment order files pending final signing; pending
transmission; payment order files that were not successfully sent to the Bank, as well as historical
payment order files.
Enter the communication
password
If you want to insert an electronic
signature (ES), tick the box and
enter the ES password
16
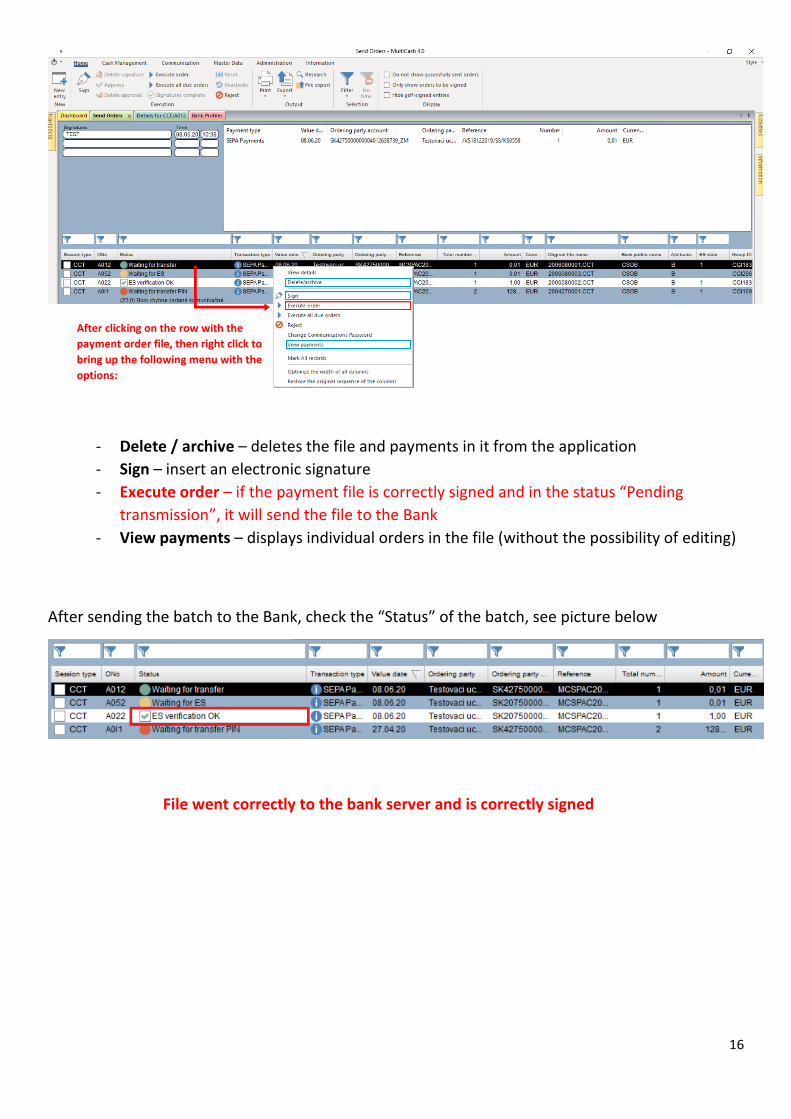
- Delete / archive – deletes the file and payments in it from the application
- Sign – insert an electronic signature
- Execute order – if the payment file is correctly signed and in the status “Pending
transmission”, it will send the file to the Bank
- View payments – displays individual orders in the file (without the possibility of editing)
After sending the batch to the Bank, check the “Status” of the batch, see picture below
After clicking on the row with the
payment order file, then right click to
bring up the following menu with the
options:
File went correctly to the bank server and is correctly signed

17
2.5 Possible errors when sending a payment order file
- Error (30.0) Public key not yet released
The initialisation letter of your electronic signature has not been delivered, or has not
yet been processed by the Bank.
- Error (23.0) An incorrect communication password was entered
You entered an incorrect communication password when creating the payment order
file. Right-click on the payment file in the Send Orders window and select “Change
communication password”. Enter the correct password and send the file to the Bank
again.
- Error (11.0) Transmission was interrupted Multicash cannot connect to the Bank. Please check your internet connection and try sending the file again.
2.6 Checking payment statuses in the payment modules
The statuses of payments are in the payment modules (SEPA, SKA) in the section “Payments
- History”, see picture below.
- Update your payment statuses by initiating communication with the Bank,
approximately 30 minutes after you sent the payments to the Bank.
- In the case of SEPA payments, only a negative status is returned from the Bank, see
picture below
18
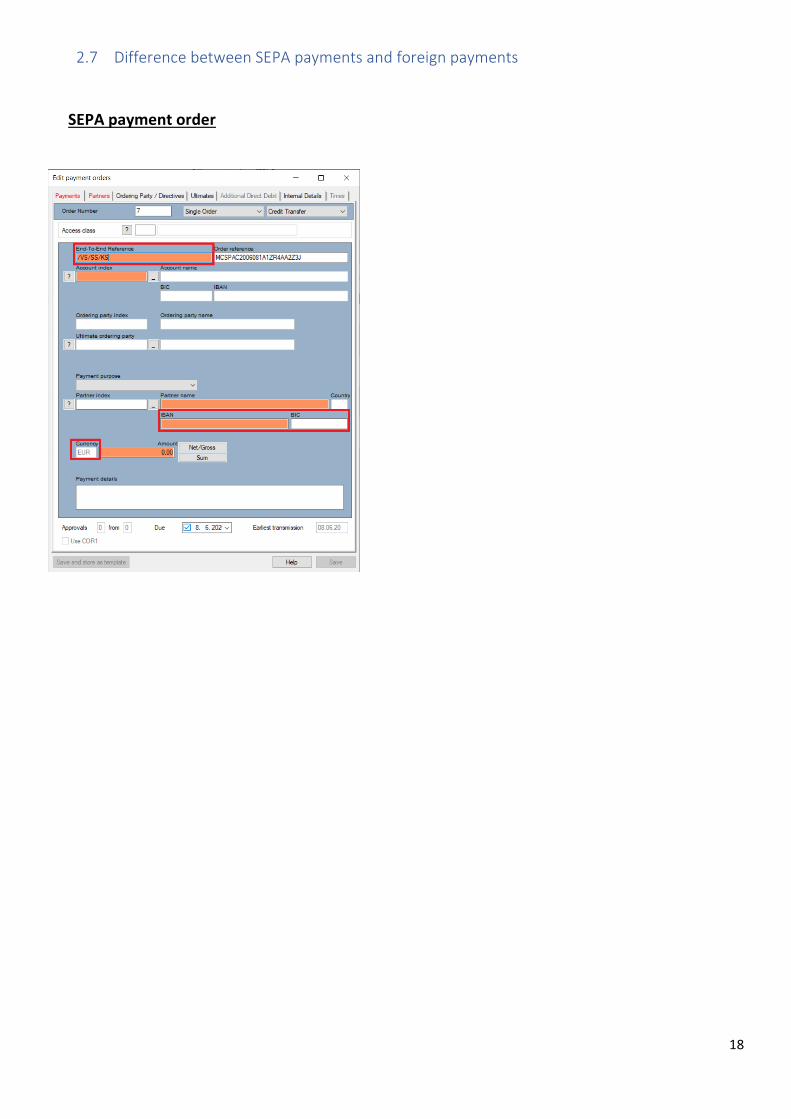
2.7 Difference between SEPA payments and foreign payments
SEPA payment order
19
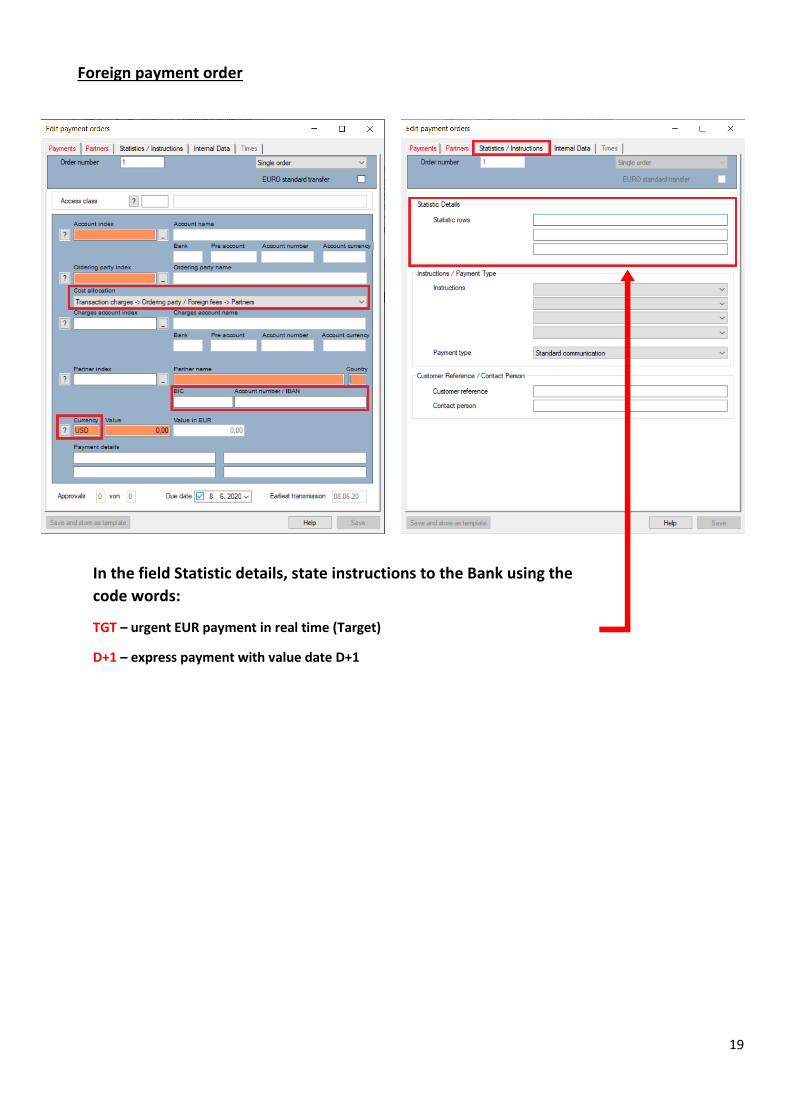
Foreign payment order
In the field Statistic details, state instructions to the Bank using the
code words:
TGT – urgent EUR payment in real time (Target)
D+1 – express payment with value date D+1