nugenesis sdms 7.1 sr6 installation guide - waters
TRANSCRIPT
NuGenesis SDMS 7.1 Service Release (SR) 7
Installation Guide
Revision A
Copyright © Waters Corporation 2010All rights reserved
Copyright notice
© 2010 WATERS CORPORATION. PRINTED IN THE UNITED STATES OF AMERICA AND IN IRELAND. ALL RIGHTS RESERVED. THIS DOCUMENT OR PARTS THEREOF MAY NOT BE REPRODUCED IN ANY FORM WITHOUT THE WRITTEN PERMISSION OF THE PUBLISHER.
The information in this document is subject to change without notice and should not be construed as a commitment by Waters Corporation. Waters Corporation assumes no responsibility for any errors that may appear in this document. This document is believed to be complete and accurate at the time of publication. In no event shall Waters Corporation be liable for incidental or consequential damages in connection with, or arising from, its use.
Trademarks
Waters, Empower, NuGenesis, and NuGenesis SDMS are registered trademarks of Waters Corporation, and NuGenesis UNIFY, NuGenesis VISION, SDMS Vision Publisher, and “THE SCIENCE OF WHAT’S POSSIBLE.” are trademarks of Waters Corporation.
Adobe, Acrobat, and Reader are registered trademarks of Adobe Systems Incorporated in the United States and/or other countries.
IBM and AIX are trademarks of International Business Machines Corporation in the United States, other countries, or both.
InstallShield is a registered trademark of Macrovision Corporation.
Java, Solaris and Sun are trademarks of Sun Microsystems, Inc.
Microsoft, Excel, Internet Explorer, Windows, Windows Server, Windows Vista, and Word are registered trademarks of Microsoft Corporation in the United States and/or other countries.
Oracle is a registered trademark, and SQL*Plus is a trademark of Oracle Corporation and/or its affiliates.
Red Hat and Red Hat Enterprise Linux are registered trademarks of Red Hat, Inc.
ServletExec is a registered trademark of New Atlanta Communications, LLC.

XML is a registered trademark of the Massachusetts Institute of Technology, European Research Consortium for Informatics and Mathematics, or Keio University on behalf of the World Wide Web Consortium.
Other registered trademarks or trademarks are the sole property of their owners.
Customer comments
Waters’ Technical Communications department invites you to tell us of any errors you encounter in this document or to suggest ideas for otherwise improving it. Please help us better understand what you expect from our documentation so that we can continuously improve its accuracy and usability.
We seriously consider every customer comment we receive. You can reach us at [email protected].
Contacting Waters
Contact Waters® with enhancement requests or technical questions regarding the use, transportation, removal, or disposal of any Waters product. You can reach us via the Internet, telephone, or conventional mail.
Waters contact information
Contacting medium InformationInternet The Waters Web site includes contact
information for Waters locations worldwide. Visit www.waters.com.
Telephone and fax From the USA or Canada, phone 800 252-HPLC, or fax 508 872 1990.For other locations worldwide, phone and fax numbers appear in the Waters Web site.
Conventional mail Waters Corporation34 Maple StreetMilford, MA 01757USA
iii
NuGenesis SDMS 7.1 Service Release (SR) 7
Audience and purposeThis document is for system administrators who must install Waters NuGenesis® SDMS® 7.1 client applications and the SDMS v7.1 Service Release 7.
This document explains how to use NuGenesis SDMS 7.1 SR 7 to perform the following tasks:
• Install the Waters NuGenesis SDMS 7.1 SR7 update on existing SDMS 7.1 Oracle® database servers, Web application servers, and client computers.
• Install the SDMS Vision Publisher 7.1 SR7 update on existing SDMS Vision Publisher database servers, Web application servers, and client computers.
• Install the SDMS 7.1 software applications on database servers, Web application servers, and client computers, and then install the SR7 update on the computers to bring the software up-to-date.
iv
Table of Contents
Copyright notice ................................................................................................... ii
Trademarks ............................................................................................................ ii
Customer comments ............................................................................................ iii
Contacting Waters ............................................................................................... iii
NuGenesis SDMS 7.1 Service Release (SR) 7 ................................................. iv Audience and purpose......................................................................................... iv
1 Installing NuGenesis SDMS 7.1 SR7 .................................................. 1-1
Purpose of NuGenesis SDMS 7.1 Service Release 7 .................................. 1-2
Installing the SR7 update on SDMS 7.1 database servers ....................... 1-4 Upgrading the Oracle database to version 10.2.0.4 ....................................... 1-4 Installing the SR7 update on the SDMS 7.1 database server ....................... 1-5
Installing the SR7 update on SDMS 7.1 Web application servers ......... 1-6 Installing the SDMS 7.1 SR7 update on Web application servers................ 1-7
Installing the SR7 update on SDMS 7.1 client computers ....................... 1-8 Installing the SDMS 7.1 SR7 update on client computers ............................ 1-9
Table of Contents v
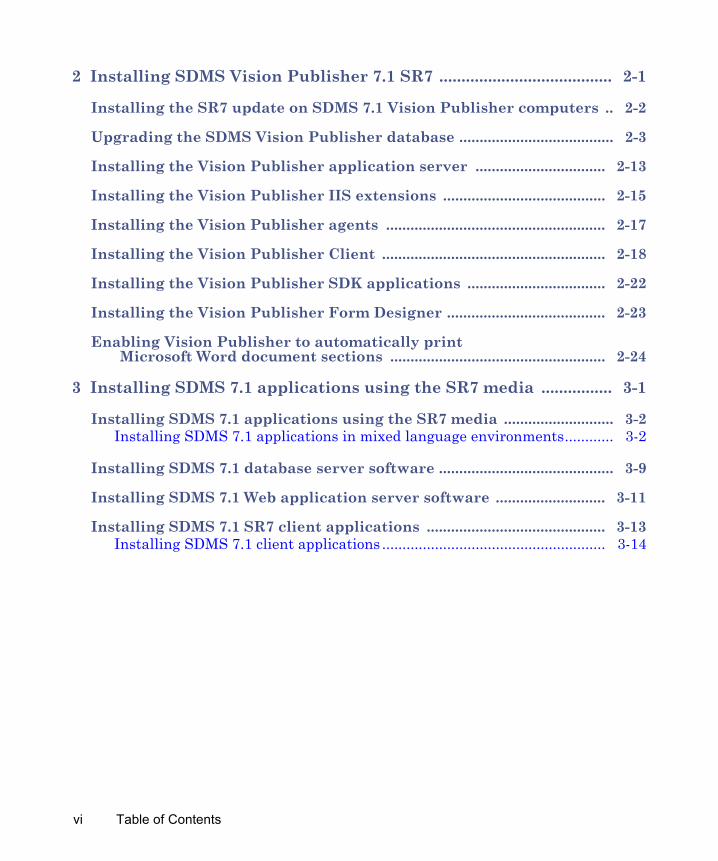
2 Installing SDMS Vision Publisher 7.1 SR7 ....................................... 2-1
Installing the SR7 update on SDMS 7.1 Vision Publisher computers .. 2-2
Upgrading the SDMS Vision Publisher database ...................................... 2-3
Installing the Vision Publisher application server ................................ 2-13
Installing the Vision Publisher IIS extensions ........................................ 2-15
Installing the Vision Publisher agents ...................................................... 2-17
Installing the Vision Publisher Client ....................................................... 2-18
Installing the Vision Publisher SDK applications .................................. 2-22
Installing the Vision Publisher Form Designer ....................................... 2-23
Enabling Vision Publisher to automatically print Microsoft Word document sections ..................................................... 2-24
3 Installing SDMS 7.1 applications using the SR7 media ................ 3-1
Installing SDMS 7.1 applications using the SR7 media ........................... 3-2 Installing SDMS 7.1 applications in mixed language environments............ 3-2
Installing SDMS 7.1 database server software ........................................... 3-9
Installing SDMS 7.1 Web application server software ........................... 3-11
Installing SDMS 7.1 SR7 client applications ............................................ 3-13 Installing SDMS 7.1 client applications ....................................................... 3-14
vi Table of Contents
1 Installing NuGenesis SDMS 7.1 SR7
This chapter explains how to install the Waters NuGenesis SDMS 7.1 SR7 update on SDMS 7.1 Oracle database servers, Web application servers, and client computers.
Contents
Topic PagePurpose of NuGenesis SDMS 7.1 Service Release 7 1-2
Installing the SR7 update on SDMS 7.1 database servers 1-4
Installing the SR7 update on SDMS 7.1 Web application servers 1-6
Installing the SR7 update on SDMS 7.1 client computers 1-8
1-1
Purpose of NuGenesis SDMS 7.1 Service Release 7
NuGenesis SDMS 7.1 Service Release 7 (SR7) contains software changes, new features, and enhancements. Before you proceed, review the release notes on the SDMS v7.1 Service Release 7 DVD.
SDMS 7.1 SR7 consists of the following DVDs and installation options:
• SDMS v7.1 Service Release 7 Oracle 10.2.0.4 Server 32 Bit DVD
• Install the SR7 update on existing 32-bit SDMS 7.1 database servers. This process includes upgrading the 32-bit Oracle database version from 10.2.0.3 to version 10.2.0.4 (see page 1-4).
• Install the full Windows® 32-bit version of the SDMS 7.1 database software on 32-bit Oracle servers. Use this installation DVD to access the software. Then follow the “Installing Oracle components” instructions (in the NuGenesis SDMS 7.1 Installation and Configuration Guide provided in the Docs folder on the SDMS v7.1 Service Release 7 DVD), and install the SR7 update on the server.
Exception: If you installed Service Release 5 on the database server, you do not need to upgrade the Oracle database or install the SR7 update on the database server.
• SDMS v7.1 Service Release 7 Oracle 10.2.0.4 Server 64 Bit dual-layer DVD
• Install the SR7 update on existing 64-bit SDMS 7.1 database servers. This process includes upgrading the 64-bit Oracle database version from 10.2.0.3 to version 10.2.0.4 (see page 1-4).
• Install the full Windows 64-bit version of the SDMS 7.1 database software on 64-bit Oracle servers. Use this installation DVD to access the software. Then follow the “Installing Oracle components” instructions (in the NuGenesis SDMS 7.1 Installation and Configuration Guide provided in the Docs folder on the SDMS v7.1 Service Release 7 DVD), and install the SR7 update.
Exception: If you installed Service Release 5 on the database server, you do not need to upgrade the Oracle database or install the SR7 update on the database server.
1-2 Installing NuGenesis SDMS 7.1 SR7
• SDMS v7.1 Service Release 7 DVD
• Install the SR7 update on existing SDMS 7.1 Web application server (see page 1-6) and client computers (see page 1-8).
• Install the full SDMS 7.1 Web server and client applications on computers. Use this installation DVD to access the software applications, but follow the installation instructions in the NuGenesis SDMS 7.1 Installation and Configuration Guide on this installation DVD, and then install the SR7 update to bring the applications up-to-date.
• SDMS v7.1 Vision Publisher Service Release 7 DVD
• Install the SR7 update on existing SDMS Vision Publisher™ 7.1 server and client computers (see page 2-2).
• SDMS v7.1 Service Release 7 All-In-One Installer DVD
• Install SDMS 7.1 client applications and the SR7 update on computers at the same time. You can install the client applications from the installation DVD, or configure setup files to deploy silent installations throughout your organization. For installation instructions, refer to the NuGenesis SDMS 7.1 Service Release (SR) 7 Client Installation Guide on this installation DVD.
Purpose of NuGenesis SDMS 7.1 Service Release 7 1-3
Installing the SR7 update on SDMS 7.1 database servers
Installing the SDMS 7.1 SR7 update on SDMS 7.1 Oracle database servers involves performing these tasks:
• Upgrading the Oracle database version, from 10.2.0.3 to version 10.2.0.4.
• Installing the SR7 update on the SDMS 7.1 database server.
Exception: If you installed Service Release 5 on the database server, you need not upgrade the Oracle database or install the SR7 update on the database server. Instead, proceed with installing the SR7 update on the SDMS 7.1 Web application server (see page 6).
Upgrading the Oracle database to version 10.2.0.4Prerequisites:
• Back up the Oracle database so that you can recover your data if problems occur during the installation. Upgrading the Oracle database to version 10.2.0.4 is a destructive upgrade.
• Work with your Waters field service engineer to convert the Oracle UTF-8 character set used for storing text in the Oracle database to the AL32UTF8 character set introduced in Oracle version 9.0.
Rationale: Because the character set conversion changes the SDMS 7.1 database, a Waters field service engineer or technical support representative must assist you with the conversion. For more information and instructions, contact Waters Technical Support.
Tip: During the installation, you might receive a warning that Microsoft has not determined that the software is compatible with your hardware. If you receive this warning, click Continue Anyway, to proceed with the installation.
1-4 Installing NuGenesis SDMS 7.1 SR7
To upgrade the Oracle database to version 10.2.0.4:
1. Determine whether you want to install the upgrade on a 32-bit or 64-bit version of the Windows operating system, and then insert one of these corresponding installation DVDs into the drive:
• SDMS v7.1 Service Release 7 Oracle 10.2.0.4 Server 32 Bit DVD
• SDMS v7.1 Service Release 7 Oracle 10.2.0.4 Server 64 Bit DVD
If the setup program does not start automatically, click Start > Run, and then type <drive>:\CDMenu.exe.
2. On the installation menu, click Upgrade 10.2.0.3 Oracle Server to 10.2.0.4.
3. Click “Update the version 10.2.0.3 Oracle Server to version 10.2.0.4”.
4. Follow the prompts to complete the installation.
These log files, summarizing the upgrade’s results, appear in the C:\NGORA10gTmp folder:
• SDMS71Upgradeto10204Pass1.log
• SDMS71Upgradeto10204Pass2.log
Installing the SR7 update on the SDMS 7.1 database server
To install the SR7 update on the SDMS 7.1 database server:
1. Insert one of these installation DVDs into the drive:
• SDMS v7.1 Service Release 7 Oracle 10.2.0.4 Server 32 Bit DVD
• SDMS v7.1 Service Release 7 Oracle 10.2.0.4 Server 64 Bit DVD
2. On the installation menu, click “Update the SDMS 7.1 Oracle server software to Service Release 5 (SR5) and higher”.
3. Follow the prompts to complete the installation.
This log file, summarizing a successful update’s results, appears in the C:\NGORA10gTmp folder: RunSR7-mm-dd-yyyy-hh-mm-ss.log.
Installing the SR7 update on SDMS 7.1 database servers 1-5
Installing the SR7 update on SDMS 7.1 Web application servers
Prerequisites:• Always use the installation DVD to install the SR7 update. Doing so
ensures that the installation package files get placed in the Web application server’s FTP folder so that you can download the SR7 update from NuGenesis VISION™ to client computers.
• Ensure that Microsoft .NET Framework 3.5 SP1 is installed. You can verify whether the software is already installed through “Add or Remove Programs” in the Windows Control Panel. If it is not installed, use the SDMS v7.1 Service Release 7 installation DVD to install it. You must install the software before you install the SR7 update on the Web application servers.
• If you use the NuGenesis SDMS SDK along with non-Waters applications to perform tasks, you can install a plug-in on the server that automatically generates a corresponding XML® file for each file that you print to a project. In the plug-in utility, you specify where to store the XML files. In the non-Waters application, you configure the application to read the XML file and then perform your tasks. When you print files to SDMS projects, you select a Web location (<server name> – NuGenesis RPC Service V7.1) in the NuGenesis UNIFY™ login dialog box to generate the corresponding XML files.
Recommendation: The XML files trigger an SDK application that is provided by Waters Technical Support. Work with your Waters field service engineer to install and configure the plug-in.
Requirement: To run the XML file plug-in utility, you must log in to the server by means of a user account that grants these privileges:
• Run SDMS Administrator (global Run Program tab)
• Edit Server Properties (global Server Admin tab)
1-6 Installing NuGenesis SDMS 7.1 SR7
To install the XML file plug-in:
1. Insert the SDMS v7.1 Service Release 7 installation DVD into the drive. If the setup program does not start automatically, click Start > Run, and then type <drive>:\Setup.exe.
2. On the installation menu, click Install NuGenesis SDMS 7.1 SR7 applications > Back End Applications > Web application server DBI plug-in for generating XML files.
3. Follow the prompts to complete the installation.
To configure the XML file plug-in:
1. Click Start > Programs > NuGenesis 7.1 > NuGenesis DBI Plug-in V7.1 and log in.
2. In the DBIPAdmin dialog box, specify where to save the XML files, and then move the server names on which to generate the XML files to the Enabled column. By default, all servers are in the Disabled column and no XML files are generated.
Installing the SDMS 7.1 SR7 update on Web application servers
To install the SDMS 7.1 SR7 update on the Web application server:
1. Insert the SDMS v7.1 Service Release 7 installation DVD into the drive.
Tip: If the setup program does not start automatically, click Start > Run, and then type <drive>:\Setup.exe.
2. On the installation menu, click “Update existing NuGenesis SDMS 7.1 Web application servers and client computers to Service Release 7 (SR7)”, and then follow the prompts to complete the installation.
3. Restart the server computer.
Installing the SR7 update on SDMS 7.1 Web application servers 1-7
Installing the SR7 update on SDMS 7.1 client computers
Prerequisites:• Ensure that Microsoft .NET Framework 3.5 SP1 is installed. You can
verify whether the software is already installed through “Add or Remove Programs” in the Windows Control Panel. If it is not installed, use the SDMS v7.1 Service Release 7 installation DVD to install the software. You must install the software before you install the SR7 update on the client computers.
• If you want to use other applications, such as Waters Empower®, to process unattended batch printing to SDMS projects, you can install an SDMS login service to automate logging in to NuGenesis UNIFY batch printers. Once installed, the service starts and runs continuously in the background to process unattended batch print jobs.
Before installing the SDMS login service, ensure that these additional prerequisites are in place:
• One or more NuGenesis UNIFY 7.1 or later printers are installed on the computer and configured for batch printing. For instructions, refer to these topics in the NuGenesis SDMS 7.1 Online Help: “Setting up your system to print to projects” and “Configuring UNIFY for batch printing”.
• The login information for each UNIFY printer is saved in the UNIFY Password Cache utility. For instructions, refer to this topic in the NuGenesis SDMS 7.1 Online Help: “Managing UNIFY login settings” and the section called “To save login information for automatic batch printing”.
To install the NuGenesis SDMS Login service:
1. Insert the SDMS v7.1 Service Release 7 installation DVD into the drive.
Tip: If the setup program does not start automatically, click Start > Run, and then type <drive>:\Setup.exe.
2. On the installation menu, click Install NuGenesis SDMS 7.1 SR7 applications > Print and File Capture applications > Service for automating NuGenesis UNIFY printer logins.
3. Follow the prompts to complete the installation.
1-8 Installing NuGenesis SDMS 7.1 SR7
Tip: If you expect to use the service to run background processing, in the Specify NuGenesis SDMS Login Service dialog box, specify the user credentials of a user authorized to run the background processing services.
To run the NuGenesis SDMS Login service:
1. On the computer desktop, double-click the PwcacheLoginAuto icon to automatically log in to the batch printers and to start the NuGenesis SDMS Login service.
Result: The NuGenesis SDMS Login service starts, and continues to refresh every hour until you stop it.
2. To view the status and properties of the service, open Windows Control Panel, click Administrative Tools > Services, and then double-click the NuGenesis SDMS Login service.
Installing the SDMS 7.1 SR7 update on client computersYou can install the SDMS 7.1 SR7 update on client computers in these ways:
• Install the update from the installation DVD.
• Download and install the update from NuGenesis VISION (after the update is applied to the Web application server).
• Run silent installations of the update from a command line. Doing so enables you to install the update on multiple computers at one time using a systems management utility tool such as Microsoft Systems Management Server (SMS). The installation runs in the background on the client computers, minimizing interruption and ensuring that consistent installation parameters get supplied throughout the installation process.
Installing the SR7 update on SDMS 7.1 client computers 1-9

To install the SDMS 7.1 SR7 update from the installation DVD:
1. Insert the SDMS v7.1 Service Release 7 installation DVD into the drive.
Tip: If the setup program does not start automatically, click Start > Run, and then type <drive>:\Setup.exe.
2. On the installation menu, click “Update existing NuGenesis SDMS 7.1 Web application servers and client computers to Service Release 7 (SR7)”.
3. Follow the prompts to complete the installation.
To download and install the SDMS 7.1 SR7 update from NuGenesis VISION:
1. On a NuGenesis SDMS Web application server that hosts the SR7 update, log in to VISION, and then click Menu > Options > Download Service Release 7.
2. Follow the onscreen instructions, and then the installation prompts to complete the installation.
Running silent installations of the SDMS 7.1 SR7 update
Running silent installations of SDMS 7.1 SR7 requires these steps:
• Downloading and generating the installation setup files.
• Running silent installations of the SR7 update.
To download and generate the SDMS 7.1 SR7 update setup files:
1. On a client computer, open Windows Explorer and create an installation folder, such as “SilentSDMS71SR7Install”, to hold the setup files.
Leave Windows Explorer open. After you generate the setup files, you must copy the files from a temporary location to this installation folder. During the process, you might be unable to minimize the installation window. If this is the case, you must find another way to switch to Windows Explorer.
2. Connect to a NuGenesis SDMS Web application server where the SR7 update is installed, log in to VISION, and then click Menu > Options > Download Service Release 7.
3. In the Download Service Release 7 dialog box, click the “Download Service Release 7” link, and then save the SDMS71_SR7.exe file to the installation folder you created in step 1.
1-10 Installing NuGenesis SDMS 7.1 SR7
4. Click Start > Run, and browse to the installation folder you created in step 1.
5. Select the SDMS71_SR7.exe file, and then click Open.
6. In the Run dialog box, at the end of the path, add a space and the characters “/r”, and then click OK.
Result: The installer decompresses the installation setup files, deposits them in the temporary location specified in the computer’s Environment Variables, and displays an InstallShield® Wizard box noting the location of the temporary folder.
7. Leave the InstallShield Wizard box open, note the location of the temporary folder, and then switch to Windows Explorer.
8. In the temporary folder, copy all of the files to the installation folder you created in step 1.
Rationale: The temporary folder containing the installation setup files exists only while the InstallShield Wizard box is displayed. If you accidentally closed the box before copying the files, repeat steps 4 through 8 to display the box again.
9. On the InstallShield Wizard box, click OK, and then click Cancel > Yes > Finish, to stop the installation of the application.
Result: The installation folder you created in step 1 contains the SDMS71_SR7.exe file you downloaded from NuGenesis VISION, a NG71SR7.iss file, and the additional setup files you generated.
Installing the SR7 update on SDMS 7.1 client computers 1-11
To run silent installations of the SDMS 7.1 SR7 update:
Use the setup files you generated and your system’s management utility to deploy the silent installations to client computers while keeping in mind this information:
• Install the NuGenesis UNIFY and NuGenesis Transfer applications before installing the SDMS 7.1 SR7 update. Otherwise, the process overwrites SR7 updates, requiring you to reapply the service release on the computer.
• In your systems management utility tool, use this command line to perform the installation, where f1 specifies the path to the NG71SR7.iss file, and f2 specifies the path in which to create the NG71SR7.log file containing the installation results:
Setup.exe /SMS /s /f1<path to the NG71SR7.iss file> /f2<path to the NG71SR7.log file>
For example,
Setup.exe /SMS /s /f1C:\SilentSDMS71SR7Install\NG71SR7.iss /f2C:\TEMP\NG71SR7.log
• After you install the SR7 update, open the log file to confirm the installation results. If the installation was successful, the log file includes the line “Status=SUCCESS” and a message stating “Installation completed successfully”. If the installation encountered problems, the log file can help you identify them.
Restart the client computers to ensure that necessary services are restarted and remaining file processing is completed successfully.
1-12 Installing NuGenesis SDMS 7.1 SR7
2 Installing SDMS Vision Publisher 7.1 SR7
This chapter explains how to install the SDMS Vision Publisher 7.1 SR7 update on SDMS Vision Publisher database servers, Web application servers, and client computers.
Contents
Topic PageInstalling the SR7 update on SDMS 7.1 Vision Publisher computers 2-2
Upgrading the SDMS Vision Publisher database 2-3
Installing the Vision Publisher application server 2-13
Installing the Vision Publisher IIS extensions 2-15
Installing the Vision Publisher agents 2-17
Installing the Vision Publisher Client 2-18
Installing the Vision Publisher SDK applications 2-22
Installing the Vision Publisher Form Designer 2-23
Enabling Vision Publisher to automatically print Microsoft Word document sections 2-24
2-1
Installing the SR7 update on SDMS 7.1 Vision Publisher computers
Installing the SDMS 7.1 SR7 update on SDMS Vision Publisher computers is a two-part process. First, you upgrade the Vision Publisher 7.1 SR6 database to SR7. Then you install SR7 versions of the application server, IIS, agents, client, SDK, and Microsoft Word® add-in, to enable automated printing of Vision Publisher document sections that contain Word content.
Restriction: Windows Vista Business and Enterprise editions with Service Pack 1 support only the Vision Publisher client, SDK applications, and the Microsoft Word add-in.
2-2 Installing SDMS Vision Publisher 7.1 SR7
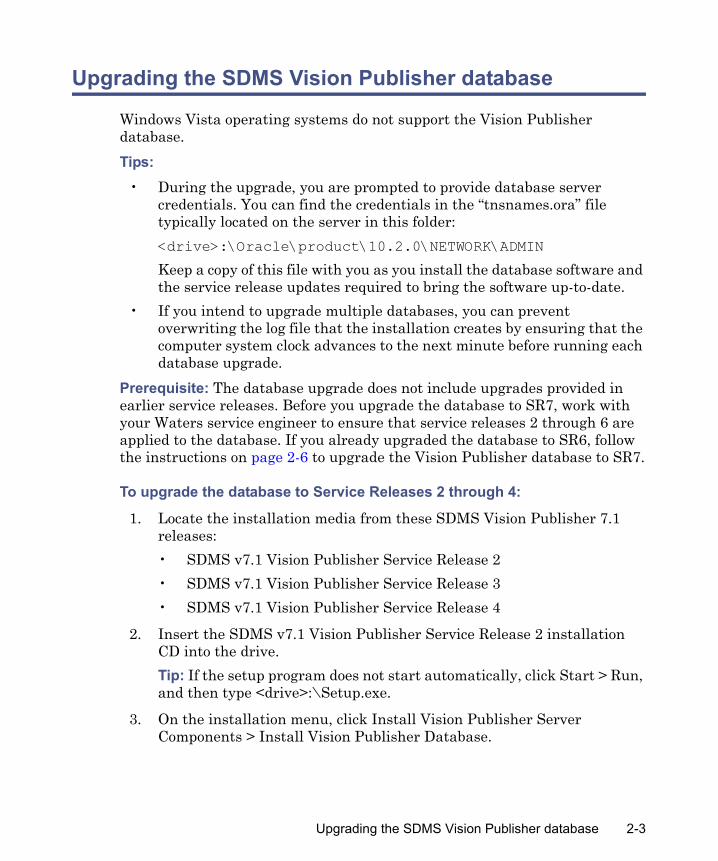
Upgrading the SDMS Vision Publisher database
Windows Vista operating systems do not support the Vision Publisher database.
Tips: • During the upgrade, you are prompted to provide database server
credentials. You can find the credentials in the “tnsnames.ora” file typically located on the server in this folder:
<drive>:\Oracle\product\10.2.0\NETWORK\ADMIN
Keep a copy of this file with you as you install the database software and the service release updates required to bring the software up-to-date.
• If you intend to upgrade multiple databases, you can prevent overwriting the log file that the installation creates by ensuring that the computer system clock advances to the next minute before running each database upgrade.
Prerequisite: The database upgrade does not include upgrades provided in earlier service releases. Before you upgrade the database to SR7, work with your Waters service engineer to ensure that service releases 2 through 6 are applied to the database. If you already upgraded the database to SR6, follow the instructions on page 2-6 to upgrade the Vision Publisher database to SR7.
To upgrade the database to Service Releases 2 through 4:
1. Locate the installation media from these SDMS Vision Publisher 7.1 releases:
• SDMS v7.1 Vision Publisher Service Release 2
• SDMS v7.1 Vision Publisher Service Release 3
• SDMS v7.1 Vision Publisher Service Release 4
2. Insert the SDMS v7.1 Vision Publisher Service Release 2 installation CD into the drive.
Tip: If the setup program does not start automatically, click Start > Run, and then type <drive>:\Setup.exe.
3. On the installation menu, click Install Vision Publisher Server Components > Install Vision Publisher Database.
Upgrading the SDMS Vision Publisher database 2-3

4. In the Windows Command Prompt window, press Enter to continue. When prompted, type these values:
• Oracle home: Type the path where the Oracle database is installed (typically <drive>:\Oracle\product\10.2.0\), and then press Enter.
Tip: Although the Command Prompt displays the path to the Oracle home in parentheses, you still must type the path at the prompt.
• Oracle service: Type the HOST name of the database server, and then press Enter.
• VP Database User: ELNPROD
• VP Database Password: ELNPROD
Command Prompt window showing a database upgraded to SR2:
Result: A log file named “Upgrade_<database HOST name>_<yyyymmdd>_<hhmm>.txt”, the result of a successful upgrade, appears in the TEMP folder specified in the environmental variables for the user account. To locate the TEMP folder, right-click My Computer, and then click Properties > Advanced > Environmental Variables.
5. Insert the SDMS v7.1 Vision Publisher Service Release 3 installation CD into the drive, and then repeat steps 3-4 to install the update.
6. Insert the SDMS v7.1 Vision Publisher Service Release 4 installation DVD into the drive, and then repeat steps 3-4 to install the update.
2-4 Installing SDMS Vision Publisher 7.1 SR7
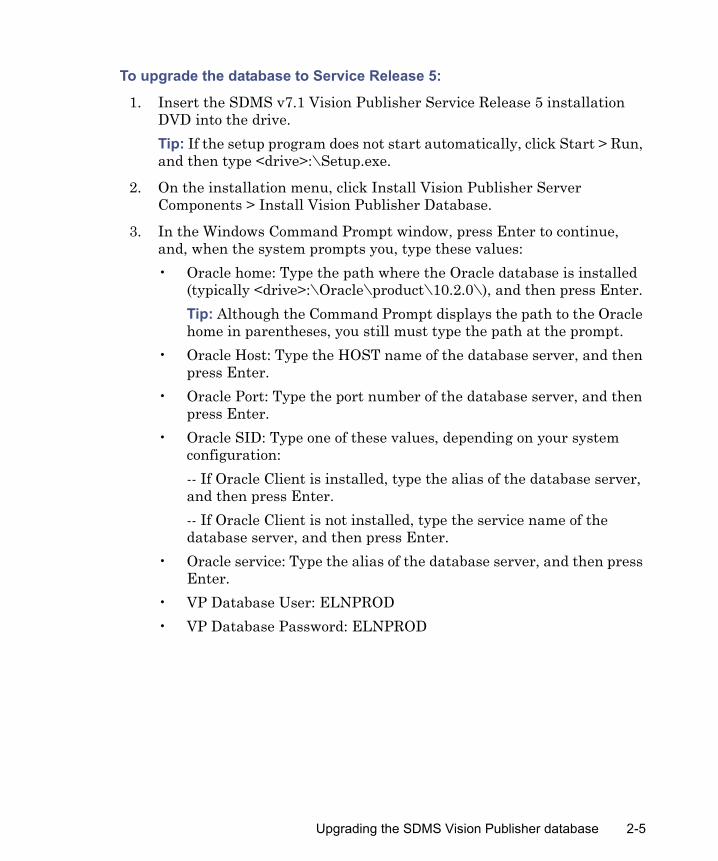
To upgrade the database to Service Release 5:
1. Insert the SDMS v7.1 Vision Publisher Service Release 5 installation DVD into the drive.
Tip: If the setup program does not start automatically, click Start > Run, and then type <drive>:\Setup.exe.
2. On the installation menu, click Install Vision Publisher Server Components > Install Vision Publisher Database.
3. In the Windows Command Prompt window, press Enter to continue, and, when the system prompts you, type these values:
• Oracle home: Type the path where the Oracle database is installed (typically <drive>:\Oracle\product\10.2.0\), and then press Enter.
Tip: Although the Command Prompt displays the path to the Oracle home in parentheses, you still must type the path at the prompt.
• Oracle Host: Type the HOST name of the database server, and then press Enter.
• Oracle Port: Type the port number of the database server, and then press Enter.
• Oracle SID: Type one of these values, depending on your system configuration:
-- If Oracle Client is installed, type the alias of the database server, and then press Enter.
-- If Oracle Client is not installed, type the service name of the database server, and then press Enter.
• Oracle service: Type the alias of the database server, and then press Enter.
• VP Database User: ELNPROD
• VP Database Password: ELNPROD
Upgrading the SDMS Vision Publisher database 2-5

Command Prompt window showing a database upgraded to SR5:
Result: A log file named “Upgrade_<database HOST name>_<yyyymmdd>_<hhmm>.txt”, the result of a successful upgrade, appears in the TEMP folder specified in the environmental variables for the user account. To locate the TEMP folder, right-click My Computer, and then click Properties > Advanced > Environmental Variables.
To upgrade the database to Service Release 6:
1. Insert the SDMS v7.1 Vision Publisher Service Release 6 installation DVD into the drive. If the setup program does not start automatically, click Start > Run, and then type <drive>:\Setup.exe.
2. On the installation menu, click Install Vision Publisher Server Components > Install Vision Publisher Database.
2-6 Installing SDMS Vision Publisher 7.1 SR7
3. In the Windows Command Prompt window, press Enter to continue. When prompted, type these values:
• Oracle home: Type the path where the Oracle database is installed (typically <drive>:\Oracle\product\10.2.0\), and then press Enter.
Tip: Although the Command Prompt displays the path to the Oracle home in parentheses, you still must type the path at the prompt.
• Oracle alias: Type one of these values, depending on your system configuration:
-- If Oracle Client is installed, type the alias of the database server, and then press Enter.
-- If Oracle Client is not installed, type the service name of the database server, and then press Enter.
• VP Database User: ELNPROD
• VP Database Password: ELNPROD
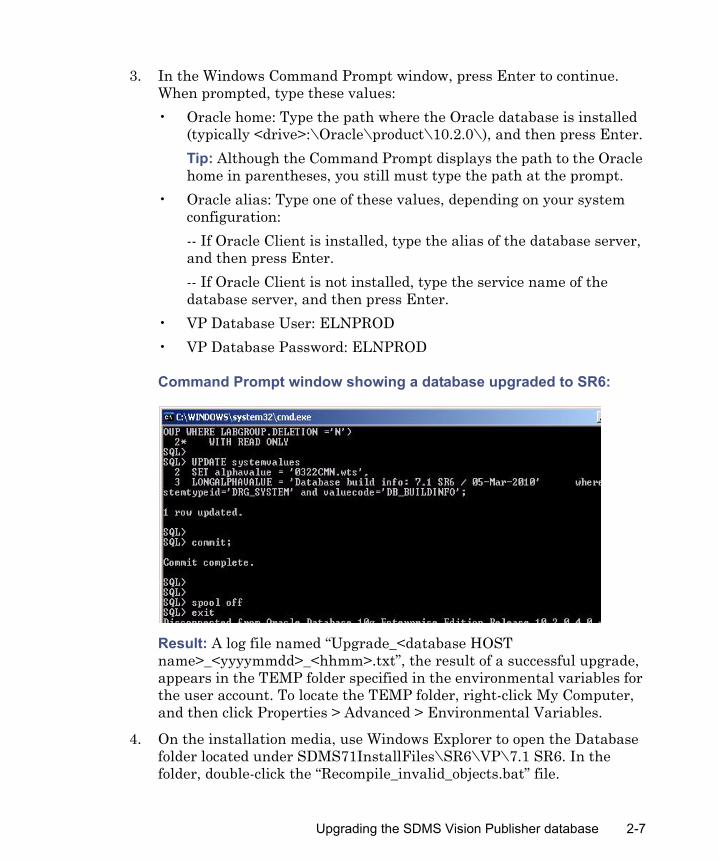
Command Prompt window showing a database upgraded to SR6:
Result: A log file named “Upgrade_<database HOST name>_<yyyymmdd>_<hhmm>.txt”, the result of a successful upgrade, appears in the TEMP folder specified in the environmental variables for the user account. To locate the TEMP folder, right-click My Computer, and then click Properties > Advanced > Environmental Variables.
4. On the installation media, use Windows Explorer to open the Database folder located under SDMS71InstallFiles\SR6\VP\7.1 SR6. In the folder, double-click the “Recompile_invalid_objects.bat” file.
Upgrading the SDMS Vision Publisher database 2-7
5. In the Windows Command Prompt window, press Enter to continue, and, when the system prompts you, type these values:
• Oracle home: Type the path where the Oracle database is installed (typically <drive>:\Oracle\product\10.2.0\), and then press Enter.
Tip: Although the Command Prompt displays the path to the Oracle home in parentheses, you still must type the path at the prompt.
• Oracle service: Type the HOST name of the database server, and then press Enter.
• Oracle DB user with SYSDBA privileges(sys): SYS
• Oracle DB password: SYSORACLE or, if you changed the default password for SYS after you installed the SDMS 7.1 Oracle database server, type the new password.
Tip: You can find the default Oracle database user credentials in the “Readme<Oracle SID>.txt” file typically located on the server in this folder:
<drive>:\Oracle\product\10.2.0\relnotes\readmes
If you suspect the default password was changed after the installation of the Oracle database, contact your database administrator or your Waters field service engineer. User Passwords can be reset in Oracle Enterprise Manager (OEM) by clicking Administration > Users, and then selecting a user and clicking Edit.
2-8 Installing SDMS Vision Publisher 7.1 SR7
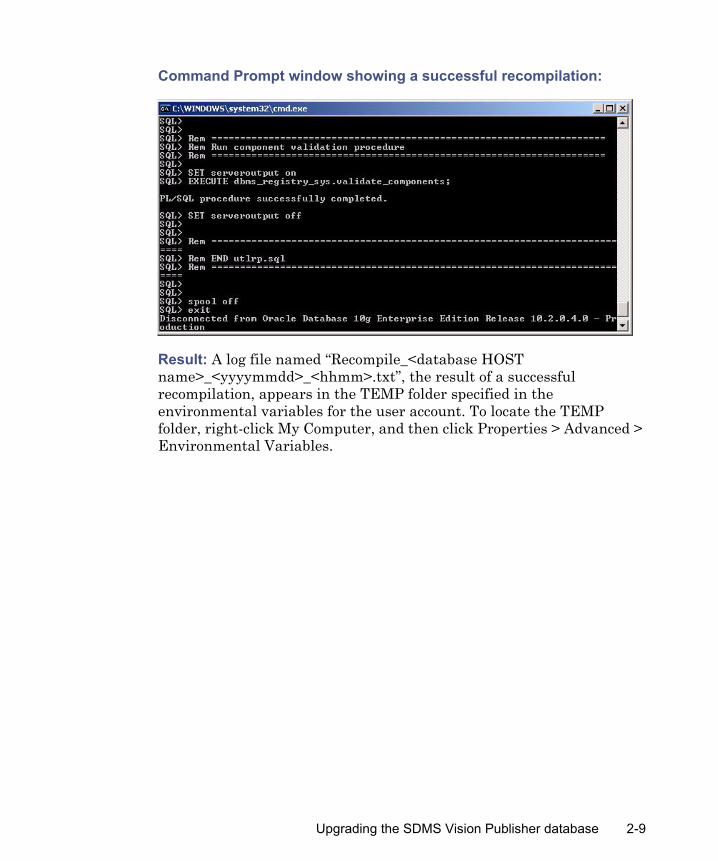
Command Prompt window showing a successful recompilation:
Result: A log file named “Recompile_<database HOST name>_<yyyymmdd>_<hhmm>.txt”, the result of a successful recompilation, appears in the TEMP folder specified in the environmental variables for the user account. To locate the TEMP folder, right-click My Computer, and then click Properties > Advanced > Environmental Variables.
Upgrading the SDMS Vision Publisher database 2-9
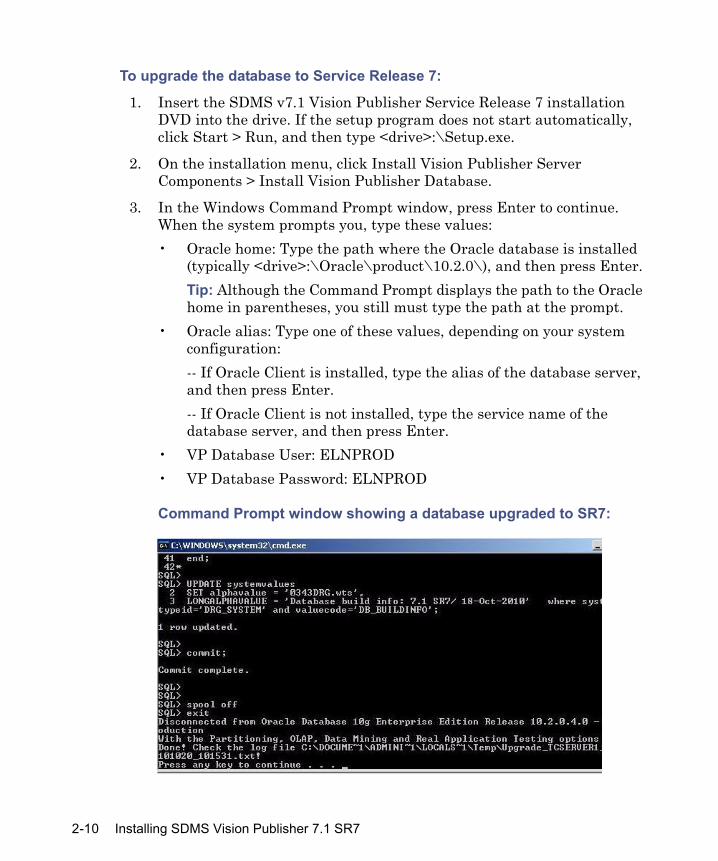
To upgrade the database to Service Release 7:
1. Insert the SDMS v7.1 Vision Publisher Service Release 7 installation DVD into the drive. If the setup program does not start automatically, click Start > Run, and then type <drive>:\Setup.exe.
2. On the installation menu, click Install Vision Publisher Server Components > Install Vision Publisher Database.
3. In the Windows Command Prompt window, press Enter to continue. When the system prompts you, type these values:
• Oracle home: Type the path where the Oracle database is installed (typically <drive>:\Oracle\product\10.2.0\), and then press Enter.
Tip: Although the Command Prompt displays the path to the Oracle home in parentheses, you still must type the path at the prompt.
• Oracle alias: Type one of these values, depending on your system configuration:
-- If Oracle Client is installed, type the alias of the database server, and then press Enter.
-- If Oracle Client is not installed, type the service name of the database server, and then press Enter.
• VP Database User: ELNPROD
• VP Database Password: ELNPROD
Command Prompt window showing a database upgraded to SR7:
2-10 Installing SDMS Vision Publisher 7.1 SR7

Result: A log file named “Upgrade_<database HOST name>_<yyyymmdd>_<hhmm>.txt”, the result of a successful upgrade, appears in the TEMP folder specified in the environmental variables for the user account. To locate the TEMP folder, right-click My Computer, and then click Properties > Advanced > Environmental Variables.
4. On the installation media, use Windows Explorer to open the Database folder located under SDMS71InstallFiles\SR7\VP\7.1 SR7. In the folder, double-click the “Recompile_invalid_objects.bat” file.
5. In the Windows Command Prompt window, press Enter to continue. When prompted, type these values:
• Oracle home: Type the path where the Oracle database is installed (typically <drive>:\Oracle\product\10.2.0\), and then press Enter.
Tip: Although the Command Prompt displays the path to the Oracle home in parentheses, you still must type the path at the prompt.
• Oracle service: Type the HOST name of the database server, and then press Enter.
• Oracle DB user with SYSDBA privileges(sys): SYS
• Oracle DB password: SYSORACLE or, if you changed the default password for SYS after you installed the SDMS 7.1 Oracle database server, type the new password.
Tip: You can find the default Oracle database user credentials in the “Readme<Oracle SID>.txt” file that is typically located on the server in this folder:
<drive>:\Oracle\product\10.2.0\relnotes\readmes
If you suspect the default password was changed after the installation of the Oracle database, contact your database administrator or your Waters field service engineer. User Passwords can be reset in Oracle Enterprise Manager (OEM) by clicking Administration > Users, and then selecting a user and clicking Edit.
Upgrading the SDMS Vision Publisher database 2-11
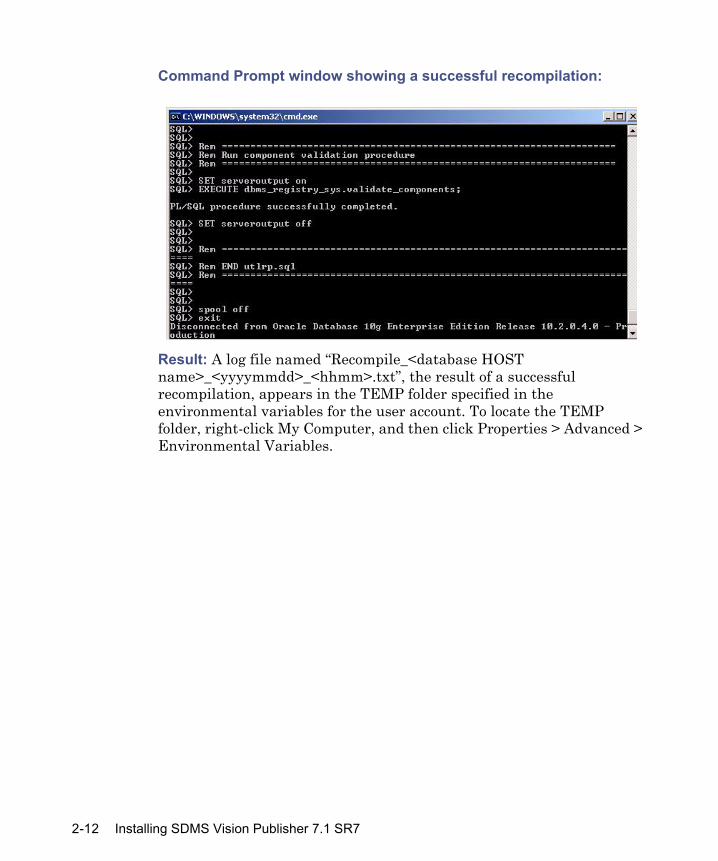
Command Prompt window showing a successful recompilation:
Result: A log file named “Recompile_<database HOST name>_<yyyymmdd>_<hhmm>.txt”, the result of a successful recompilation, appears in the TEMP folder specified in the environmental variables for the user account. To locate the TEMP folder, right-click My Computer, and then click Properties > Advanced > Environmental Variables.
2-12 Installing SDMS Vision Publisher 7.1 SR7
Installing the Vision Publisher application server
Windows Vista operating systems do not support the Vision Publisher application server.
Prerequisite: If the Vision Publisher application server is installed, uninstall it.
To uninstall the Vision Publisher application server:
1. From Windows Control Panel, click Add or Remove Programs.
2. Click Waters Vision Publisher Server <Version Number>, and then click Remove.
3. If you plan to access multiple databases from the Vision Publisher server, browse to the WatersVisionPublisher\WatersVPServer31\jboss-4.0.4\GA\server\eln\deploy folder and copy the oracle-ds.xml to another location, to serve as a backup file. After finishing the server installation, replace the new file with your backup file.
To install the Vision Publisher application server:
1. Insert the SDMS v7.1 Vision Publisher Service Release 7 installation DVD into the drive. If the setup program does not start automatically, click Start > Run, and then type <drive>:\Setup.exe.
2. On the installation menu, click Install Vision Publisher Server Components > Install Vision Publisher Server. Click Next, and then follow the prompts.
3. In the Waters Vision Publisher Server dialog box, in the Server Name box, type the HOST name for the Vision Publisher database server, and then click Next.
Result: The Oracle Database Information dialog box appears.
Installing the Vision Publisher application server 2-13
To connect to the Oracle database:
1. In the Oracle Database Information dialog box, type these values, and then click Next:
• Oracle Host: Type the HOST name of the database server.
• Oracle SID: Type the SERVICE_NAME of the database server.
2. When the system prompts you to test the database connection, click OK.
Result: A message verifies that the connection succeeded. Wait for the verification message to appear, sometimes several minutes, before you click additional buttons. If the connection fails, click Retry and verify that you entered the correct database connection information. If you entered the correct information and still cannot connect to the database, contact your Oracle database administrator or Waters Technical Support for assistance.
3. Click OK, and in the Pre-installation Summary dialog box, verify that the information is correct.
4. Click Install, and then follow the prompts to complete the installation.
2-14 Installing SDMS Vision Publisher 7.1 SR7
Installing the Vision Publisher IIS extensions
The Vision Publisher IIS extensions are not supported on Windows Vista operating systems.
Prerequisite: If Vision Publisher IIS extensions are installed, uninstall them.
To uninstall Vision Publisher IIS extensions:
1. Click Start > Programs > Waters Vision Publisher 7.1 > Configure Vision Publisher IIS Server, and then note the server settings.
Rationale: You must input them when you configure the IIS server extensions.
2. From Windows Control Panel, click Add or Remove Programs.
3. Click Waters Vision Publisher Server <Version Number> IIS, and then click Remove.
To install Vision Publisher IIS extensions:
1. Insert the SDMS v7.1 Vision Publisher Service Release 7 installation DVD into the drive.
Tip: If the setup program does not start automatically, click Start > Run, and then type <drive>:\Setup.exe.
2. On the installation menu, click Install Vision Publisher Server Components > Install Vision Publisher Web.
3. Click Next, and then follow the prompts to complete the installation.
Requirement: If the dialog box that offers the option to repair or remove the components appears, select Remove, click Next to complete the removal, and then restart the installation.
4. In the SDMS Vision Publisher - IIS Configuration dialog box, select the folder to store temporary data, or use the default setting.
Requirement: Use this folder only as a temporary folder.
5. Under Logging, select a location and name for the log file, or use the default setting.
Requirement: The log file contains important information about communication processes and errors. You must be able to refer to it when you contact Waters Technical Support with any issues.
Installing the Vision Publisher IIS extensions 2-15
6. For the Log Level, leave the setting as ERROR, and then click Next.
Result: The SDMS Vision Publisher Configuration dialog box appears, with default installation values and with SERVER1 selected.
7. To activate a server, select the associated Enabled check box, and then modify these settings:
• Label: You can type a name for the server as you want it to appear in the list of installations when you start Vision Publisher.
• Info: You can type a description of the server here for your own use.
• Server Host: Type the host name or IP address of the application server.
Tip: The host name can be a fully qualified domain name.
• Http Port: If it is not already provided, type the communication port for HTTP transfer, typically 8070. This port is provided for you.
• Https Port: If it is not already provided, type the communication port for HTTPS transfer, typically 8070. This port number is not used if it is the same as the number of the Http port.
Requirement: Ensure that no other application uses the server ports.
8. In subsequent rows, type values for all other active servers. Each active server appears in the login screen of the Vision Publisher client.
9. Click Next, select a reporting tool and PDF printer, and then follow the remaining prompts.
Tip: If a temporary folder does not exist, a message sometimes appears. If it does, click OK.
Recommendation: In the future, change these settings only when you configure another reporting tool or printer.
2-16 Installing SDMS Vision Publisher 7.1 SR7
Installing the Vision Publisher agents
You can use any of Vision Publisher’s four preconfigured agents to access external software systems. You can use those agents as templates to create new agents.
Windows Vista operating systems do not support the Vision Publisher agents.
Prerequisite: If Vision Publisher agents are installed, uninstall them.
To uninstall Vision Publisher agents:
1. In Windows Control Panel, click Add or Remove Programs.
2. Click Waters Agents, and then click Remove.
To install the Vision Publisher agents:
1. Insert the SDMS v7.1 Vision Publisher Service Release 7 installation DVD into the drive.
Tip: If the setup program does not start automatically, click Start > Run, and then type <drive>:\Setup.exe.
2. On the installation menu, click Install Vision Publisher Server Components > Install Waters Agents.
3. Click Next, and then follow the prompts.
4. In the Server Connections dialog box, specify these settings:
• Server Name: Type the host name of the database server.
• Communication Port: If you use a different port, type the port value. Otherwise, use the default value.
5. Click Next, and then follow the prompts to complete the installation.
Installing the Vision Publisher agents 2-17
Installing the Vision Publisher Client
You use the Vision Publisher Client to access the Vision Publisher application server (usually from client computers) to process, interpret, and report on information stored in the SDMS 7.1 database. For testing purposes, you can also install this application on the Vision Publisher database server.
Requirement: If you install the Vision Publisher Client on a computer that has other SDMS 7.1 SR7 client applications, you must reinstall the SDMS 7.1 SR7 update on the computer.
Prerequisites: • If Vision Publisher SDK is installed, uninstall it.
To uninstall Vision Publisher SDK:
1. From Windows Control Panel, click Add or Remove Programs.
2. Click Waters Vision Publisher <version> where <version> is the previously installed version number (for example Waters Vision Publisher 7.1 SR6).
3. If Vision Publisher SDK client components are installed, click one of the following components, depending on the version installed:
– ELNToolkitExternClientSetup
– ELNToolkitInternClientSetup
• If NuGenesis UNIFY is not installed, install it so that you can print reports to SDMS projects.
To install NuGenesis UNIFY:
1. In NuGenesis VISION, click MENU > Options > Download UNIFY.
2. Follow the steps in the Download NuGenesis UNIFY page to install a UNIFY printer.
3. To install up to 32 UNIFY printers, repeat step 2 to install each one, and assign each printer a unique name that contains up to 64 characters.
2-18 Installing SDMS Vision Publisher 7.1 SR7
• If the NuGenesis Transfer Application is not installed, install it so that you can view, print, and restore file data in projects.
Prerequisite: If you plan to install the Analytical Data Viewer (SpectrixX) application used to view converted file data, such as JCAMP-DX files in SDMS projects, ensure that Microsoft .NET Framework 2.0 or later is installed.
To install the NuGenesis Transfer Application:
1. In NuGenesis VISION, click MENU > Options > Download NuGenesis Transfer Application.
2. In the Download Transfer Application page, click Download NuGenesis Transfer Application, click Run, and then follow the prompts to complete the installation.
3. In the Choose Temporary Storage Location dialog box, browse to the NTFS drive where you created the TEMP folder, and then click OK.
4. If you want to view converted file data, such as JCAMP-DX files in SDMS projects, in the Waters Analytical Data Viewer Selections dialog box, select SpectrixX Viewer, and then click Next.
5. Follow the prompts to complete the installation.
To install Vision Publisher Client:
1. Insert the SDMS v7.1 Vision Publisher Service Release 7 installation DVD into the drive.
Tip: If the setup program does not start automatically, click Start > Run, and then type <drive>:\Setup.exe.
2. On the installation menu, click Install Vision Publisher Client Components > Install Vision Publisher Client.
3. Click Next, and then follow the prompts.
4. In the Configuration dialog box, specify the name of the IIS server (usually the name of the Vision Publisher application server), and then click Next.
Caution: Leave the IIS port number and IIS service unchanged unless you defined another virtual directory (see the virtual directory you used in “Installing the Vision Publisher IIS extensions” on page 2-15).
Installing the Vision Publisher Client 2-19
5. In the next Configuration dialog box, select the items to be verified, and then click Next.
6. Click Install, and then follow the prompts to complete the installation.
Tips:• The Vision Published Client installation includes these Vision
Publisher SDK applications:
– Vision Publisher SDK (Toolkit) Internal application. Use this toolkit only if you want to access data from Microsoft Word and Microsoft Excel® sections opened in SDMS Vision Publisher Client.
– Vision Publisher SDK (Toolkit) External application. Use this toolkit only if you want to access data from external systems, such as a Laboratory Information Management System (LIMS).
If you do not want to install the SDK applications, when you see the installation screens for each application, click Cancel, confirm your selection, and then click Close. Clicking Close does not stop the main installation process.
• If the installer detects previous versions of the SDK applications, perform one of these actions:
– To update the applications to the latest service release, click Repair.
– To uninstall the applications, click Remove.
• In the future, if you want to install the SDK applications, follow the instructions on page 2-22.
7. If you installed the Vision Publisher Client on a computer that has other SDMS 7.1 SR7 client applications, reapply the SDMS 7.1 SR7 update to the computer.
2-20 Installing SDMS Vision Publisher 7.1 SR7
To reinstall the SDMS 7.1 SR7 update:
1. Insert the SDMS v7.1 Service Release 7 installation DVD into the drive. If the setup program does not start automatically, click Start > Run, and then type <drive>:\Setup.exe.
2. On the installation menu, click “Update existing NuGenesis SDMS 7.1 Web application servers and client computers to Service Release 7 (SR7)”.
3. Follow the prompts to complete the installation.
Installing the Vision Publisher Client 2-21
Installing the Vision Publisher SDK applications
You can install these versions of the Vision Publisher SDK:
• SDMS Vision Publisher SDK - Internal. Install this version if you want to access data from Microsoft Word and Microsoft Excel® sections opened in SDMS Vision Publisher Client.
• SDMS Vision Publisher SDK. Install this version if you want to access data from external systems, such as a Laboratory Information Management System (LIMS).
Tip: The Vision Publisher Client installation includes options for installing the Vision Publisher SDK applications. If you already installed these applications, you need not reinstall them.
To install a Vision Publisher SDK application:
1. Insert the SDMS v7.1 Vision Publisher Service Release 7 installation DVD into the drive.
Tip: If the setup program does not start automatically, click Start > Run, and then type <drive>:\Setup.exe.
2. On the installation menu, click Install Vision Publisher Client Components, and then select one of these options:
• Install Vision Publisher Client SDK (Internal)
• Install Vision Publisher Client SDK
3. Click Next, and then follow the prompts to complete the installation.
2-22 Installing SDMS Vision Publisher 7.1 SR7
Installing the Vision Publisher Form Designer
You can install the SDMS Vision Publisher Form Designer to create electronic forms using Microsoft Excel embedded within Vision Publisher documents.
The SDMS 7.1 SR7 update does not include Vision Publisher Form Designer. You must purchase Vision Publisher Form Designer separately. For information, contact your Waters Service Representative.
Prerequisites:• Microsoft Excel 2003 or 2007 must be installed on the computer.
• If a previous version of Vision Publisher Form Designer is installed, uninstall it.
To uninstall Vision Publisher Form Designer:
1. From Windows Control Panel, click Add or Remove Programs.
2. Click Waters Vision Publisher Form Designer, and then click Remove.
To install Vision Publisher Form Designer:
1. Insert the SDMS v7.1 Vision Publisher Service Release 7 installation DVD into the drive.
Tip: If the setup program does not start automatically, click Start > Run, and then type <drive>:\Setup.exe.
2. On the installation menu, click Install Form Designer.
3. Follow the prompts to complete the installation.
Installing the Vision Publisher Form Designer 2-23
Enabling Vision Publisher to automatically print Microsoft Word document sections
You can enable Vision Publisher to automatically print sections containing Microsoft Word content to Vision Publisher documents whenever you close the sections. Once the sections are printed, you can view all of the associated Word content in the Vision Publisher document editor.
Enabling Vision Publisher to automatically print Word document sections requires these steps:
• Installing the Microsoft Word add-in for automatic printing on the client computer.
• Editing the section properties in Vision Publisher to enable automatic printing.
Prerequisite: Microsoft Word 2003 or 2007 must be installed on the computer.
To install the Microsoft Word add-in:
1. Insert the SDMS v7.1 Vision Publisher Service Release 7 installation DVD into the drive.
Tip: If the setup program does not start automatically, click Start > Run, and then type <drive>:\Setup.exe.
2. On the installation menu, click Install Vision Publisher Client Components > Install Word Auto Print Add-In.
3. Click Next, and then follow the prompts to complete the installation.
Tip: To determine the amount of available disk space on all drives, click Disk Cost.
To edit the section properties:
1. In Vision Publisher, double-click the section.
2. In the Section Properties Metadata, add “VP Automatic Print” with a Type of String, and assign a value of Y”.
Result: Microsoft Word duplicates these new icons:
• Enable/disable automatic printing
• Print & close - Prints and closes the document. (This icon is available only if automatic print is disabled.)
2-24 Installing SDMS Vision Publisher 7.1 SR7
3 Installing SDMS 7.1 applications using the SR7 media
This chapter explains how to use the SDMS 7.1 SR7 installation media to install SDMS 7.1 software applications on database servers, Web application servers, and client computers.
Contents
Topic PageInstalling SDMS 7.1 applications using the SR7 media 3-2
Installing SDMS 7.1 database server software 3-9
Installing SDMS 7.1 Web application server software 3-11
Installing SDMS 7.1 SR7 client applications 3-13
3-1
Installing SDMS 7.1 applications using the SR7 media
You can use the SDMS 7.1 SR7 installation media to install SDMS 7.1 software applications on database servers, Web application servers, and client computers. Afterwards, you can install the SR7 update on the computers to bring the software up-to-date.
The instructions in this chapter are limited. They explain how to use the SDMS 7.1 SR7 installation media to install the software applications. You can find comprehensive instructions on how to install and configure the SDMS 7.1 software applications in the NuGenesis SDMS 7.1 Installation and Configuration Guide in the Docs folder on the SDMS v7.1 Service Release 7 DVD.
To learn about the operating systems and third-party applications that the SDMS 7.1 SR7 update requires, refer to the “Test configurations” section in the Release Notes on the SDMS v7.1 Service Release 7 DVD.
Requirement: SDMS 7.1 installations must be performed by Waters field service engineers. Read and thoroughly understand the concepts explained in the NuGenesis SDMS 7.1 Installation and Configuration Guide so that you can assist your field service engineer during the installation. After the software applications are installed and configured, even if you are an experienced Oracle database administrator, contact Waters before you reinstall or otherwise alter the SDMS 7.1 configuration.
Installing SDMS 7.1 applications in mixed language environmentsYou can use the installation media to install SDMS 7.1 software applications on database servers, Web application servers, and client computers configured to use mixed Japanese, Korean, and Simplified Chinese (East Asian) language -English locales. Afterward, you can install the SR7 update on the computers to bring the software up-to-date.
If you do not intent to install the SDMS 7.1 applications in mixed language environments, refer to page 3-9.
With the correct East Asian-English language configuration, you can use East Asian Windows computers to capture data to projects on an East Asian database server, and then use NuGenesis VISION, installed on computers that run English Windows operating systems, to view the mixed data.
3-2 Installing SDMS 7.1 applications using the SR7 media
Restrictions:• You can combine only one East Asian language with English to form a
mixed locale environment. For example, you can work only in Japanese-English, Korean-English, or Simplified Chinese-English language environments.
• You must install file capture components to capture file data, and NuGenesis UNIFY to capture print data, on computers that run local language operating systems.
To work in mixed locales, you need these SDMS 7.1 components:
• An Oracle database server installed on the East Asian operating system.
• A Web application server and the SDMS 7.1 SR7 update configured in any combination of these ways:
• Applications installed on a computer that runs an East Asian Windows operating system.
• Applications installed on a computer that has an English Windows operating system enabled for international support and configured to communicate with the Oracle database server.
Working with multi-byte character sets
Certain fields in SDMS 7.1 and Oracle software support a limited number of characters. Although the limitation is specified in terms of characters, it is actually based on the number of bytes, the smallest unit in which the computer software represents text. English characters can be represented by a single byte, so a limitation of “nn” characters is the same as a limitation of “nn” bytes.
To represent non-English character sets, the computer needs to use more than one byte per character. As a result, when you work with multi-byte character sets, the total number of characters you can enter in a field is lower than when you work with English characters.
Computers use 2, 3, or 4 bytes to represent East Asian characters. It is therefore difficult to predict the exact limit that corresponds to English character limitations. If you use text that consists exclusively of East Asian 4-byte characters, the limit is one quarter of the English character limitation, rounded down to the whole number. Typically, the limit is between one-quarter and one-half of the English character limitation.
Installing SDMS 7.1 applications using the SR7 media 3-3
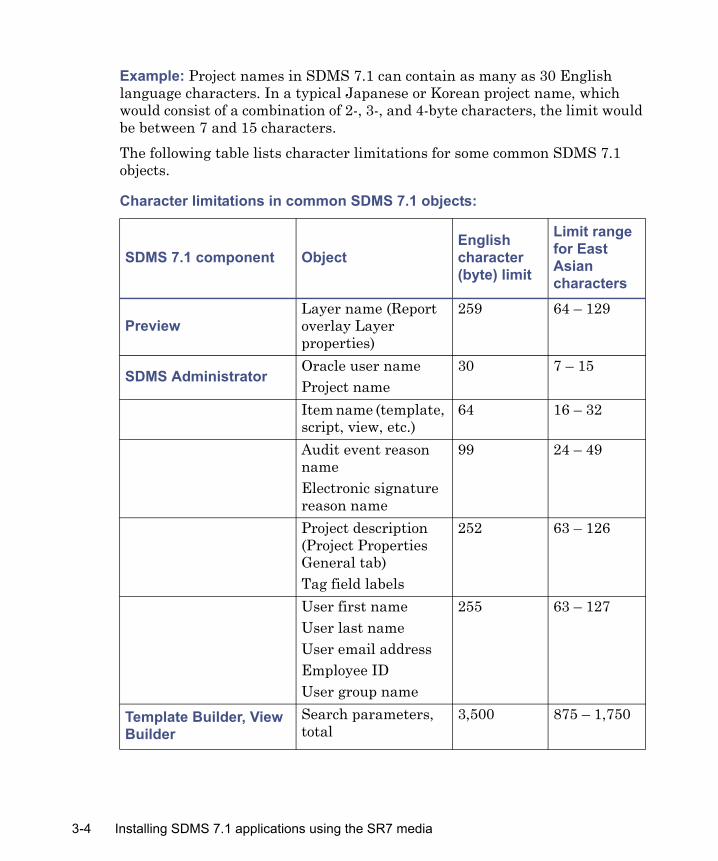
Example: Project names in SDMS 7.1 can contain as many as 30 English language characters. In a typical Japanese or Korean project name, which would consist of a combination of 2-, 3-, and 4-byte characters, the limit would be between 7 and 15 characters.
The following table lists character limitations for some common SDMS 7.1 objects.
Character limitations in common SDMS 7.1 objects:
SDMS 7.1 component ObjectEnglish character (byte) limit
Limit range for East Asian characters
PreviewLayer name (Report overlay Layer properties)
259 64 – 129
SDMS AdministratorOracle user nameProject name
30 7 – 15
Item name (template, script, view, etc.)
64 16 – 32
Audit event reason nameElectronic signature reason name
99 24 – 49
Project description (Project Properties General tab)Tag field labels
252 63 – 126
User first nameUser last nameUser email addressEmployee IDUser group name
255 63 – 127
Template Builder, View Builder
Search parameters, total
3,500 875 – 1,750
3-4 Installing SDMS 7.1 applications using the SR7 media
Language limitations for SDMS 7.1 paths
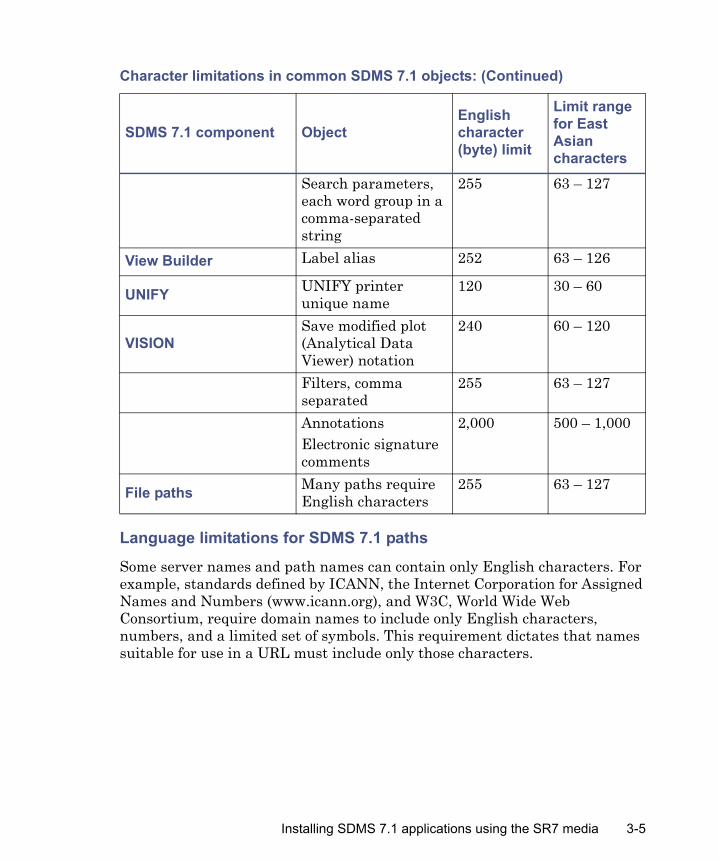
Some server names and path names can contain only English characters. For example, standards defined by ICANN, the Internet Corporation for Assigned Names and Numbers (www.icann.org), and W3C, World Wide Web Consortium, require domain names to include only English characters, numbers, and a limited set of symbols. This requirement dictates that names suitable for use in a URL must include only those characters.
Search parameters, each word group in a comma-separated string
255 63 – 127
View Builder Label alias 252 63 – 126
UNIFY UNIFY printer unique name
120 30 – 60
VISIONSave modified plot (Analytical Data Viewer) notation
240 60 – 120
Filters, comma separated
255 63 – 127
AnnotationsElectronic signature comments
2,000 500 – 1,000
File paths Many paths require English characters
255 63 – 127
Character limitations in common SDMS 7.1 objects: (Continued)
SDMS 7.1 component ObjectEnglish character (byte) limit
Limit range for East Asian characters
Installing SDMS 7.1 applications using the SR7 media 3-5
The following lists specify names, paths, and objects that must include only English characters.
• Paths that require English characters
• NuGenesis SDMS Oracle server installation path
Requirement: This includes all Oracle paths, if you customize the distribution of Oracle components as recommended in “Distributing the Oracle files” on page 2-3 of the NuGenesis SDMS 7.1 Installation and Configuration Guide.
• NuGenesis SDMS Oracle client installation path
• NuGenesis SDMS Web application server installation path
Requirement: If SDMS 7.1 components are already installed in a path that has East Asian characters, on a computer that will host Web application server components, you must remove the SDMS 7.1 components, and then install the Web application server.
• URL for Web application server
• URL for managed storage location
• Names and other objects that require English characters
• Oracle database server computer name
• NuGenesis SDMS database service name
• NuGenesis SDMS database net service name (database alias)
• NuGenesis SDMS Web application server computer name
• NuGenesis SDMS user passwords (Oracle and LDAP user passwords)
• Offline Storage Manager device volume name
• Offline Storage Manager device volume prefix
• FTP location host computer name
• LDAP server computer name (also must be on English locale)
• LDAP Organizational DN and Search DN
3-6 Installing SDMS 7.1 applications using the SR7 media
Enabling international support on Windows computers
Before you configure an English Web application server and client computer to work in a mixed locale, you must enable international support for the non-English locale on each of those computers.
On the SDMS 7.1 Web application server, enabling international support consists of these steps:
• Adding language support for the locale to install the necessary fonts and language packs.
• Adding the keyboard/IME for the locale so that you can switch between language inputs; that is, alternate between typing in English and non-English characters.
• Changing the system locale to display non-English characters correctly in the SDMS 7.1 client applications.
Tip: Keep available a copy of the Windows Server media available to use in the event that the operating system must add files not already loaded on the computer. Restart the computer to complete the process.
Adding language support on Windows computers
Add language support for the non-English locale to install the necessary fonts and language packs.
To add language support in Windows 2003 and Windows XP:
1. In Control Panel, double-click Regional and Language Options.
2. Click the Languages tab.
3. Under Supplemental language support, select Install files for East Asian languages.
Requirement: When adding Korean language support on Web application servers, also click the Advanced tab, select “Apply all settings to the current user account and to the default user profile”, and then click OK to confirm.
4. Click Apply and then click OK.
Installing SDMS 7.1 applications using the SR7 media 3-7
Adding the keyboard/IME on Windows computers
Add the keyboard/IME for the non-English locale to switch language inputs.
Result: After you add the keyboard/IME for the locale, you see an “EN” language indicator in the Windows system tray, indicating the IME for the locale is installed. Click this indicator to switch between locale inputs.
To add the keyboard/IME in Windows 2003 and Windows XP:
1. In Control Panel, double-click Regional and Language Options, and click the Languages tab.
2. Under Text services and input languages, click Details, and under Installed Services, click Add.
3. In the Add Input Language dialog box, in the Input language box, select Japanese, Korean, or Chinese (PRC).
4. In the Keyboard layout/IME box, ensure that this information is displayed, depending on the selected language:
• Japanese - Microsoft IME Standard 2002 ver. 8.1
• Korean - Korean Input System (IME 2002)
• Chinese - Chinese (Simplified) - Microsoft Pinyin IME 3.0
Changing the system locale on Windows computers
Change the system locale to install code pages and fonts for displaying non-English characters correctly in the SDMS 7.1 client applications.
Recommendation: Depending on the application you are installing, changing the locale on the computer can result in installation screens and dialog boxes appearing in the non-English language. To ensure that all of the information is displayed in English during installation, change the system locale after installing all of the SDMS 7.1 applications.
To change the system locale in Windows 2003 and Windows XP:
1. In Control Panel, double-click Regional and Language Options.
2. Click the Advanced tab, and under Language for non-Unicode programs, select the language.
3. Click OK.
3-8 Installing SDMS 7.1 applications using the SR7 media

Installing SDMS 7.1 database server software
Prerequisites:• In the NuGenesis SDMS 7.1 Installation and Configuration Guide,
review Chapter 2 “Installing Oracle components”. You can find a copy of this document in the Docs folder on the SDMS v7.1 Service Release 7 DVD.
• If you are installing the software in a mixed language environment, review the limitations for typing characters in the installation dialog boxes (see page 3-5).
• If you are installing the Oracle database software in a non-Windows environment, or in an existing schema, contact Waters Technical Support for instructions.
To install the SDMS 7.1 database server software:
1. Determine whether you are installing the components on a 32-bit or 64-bit version of the Windows operating system, and then insert one of these corresponding installation DVDs into the drive:
• SDMS v7.1 Service Release 7 Oracle 10.2.0.4 Server 32 Bit DVD
• SDMS v7.1 Service Release 7 Oracle 10.2.0.4 Server 64 Bit DVD
2. On the installation menu, click “Install NuGenesis SDMS 7.1 Oracle database server”.
3. Follow the prompts to complete the installation.
4. If you configured the Oracle software to create nightly backup versions of the database using Oracle Recovery Manager (RMAN), and you installed the Oracle database in different path than the default path (C:\oracle\product\10.2.0), increase the allocated size of the Flash Recovery Area used to store back up components from 2 gigabytes to a minimum of 200 gigabytes (or at least 2.5 times the size of the current database files).
Rationale: Doing so enables you to configure RMAN with a redundancy of 1 and provide adequate space to store the archived REDO logs.
Installing SDMS 7.1 database server software 3-9
To increase the size of the Oracle database flash recovery area:
1. Use a “sys” account as “sysdba” to log in to SQLPlus. For example:
sqlplus sys/sysoracle as sysdba
2. Type these parameters:
alter system set db_recovery_file_dest_SIZE=20G scope=both;
Requirement: Never increase the size of the area to a value greater than the total amount of available disk space. Otherwise, backups fail.
3. Restart the database.
4. Install the SR7 update to bring the software up-to-date (see page 1-4).
3-10 Installing SDMS 7.1 applications using the SR7 media
Installing SDMS 7.1 Web application server software
Prerequisites:• In the NuGenesis SDMS 7.1 Installation and Configuration Guide,
review Chapter 3 “Installing and configuring NuGenesis SDMS Web applications”. You can find a copy of this document in the Docs folder on the SDMS v7.1 Service Release 7 DVD.
• Ensure that these applications are installed:
• Microsoft Internet Information Services (IIS) 6.0 (instructions are provided in the NuGenesis SDMS 7.1 Installation and Configuration Guide).
• Windows Internet Explorer 7.0 or 8.0 to view SDMS projects over the Internet.
• If you are installing the software in a mixed language environment, perform these tasks:
• Ensure that you already have an SDMS 7.1 East Asian database server set up so that you can test the connection between the components.
• Review the limitations for typing characters in the installation dialog boxes (see page 3-5).
• Add language support for the locale to install the necessary fonts and language packs (see page 3-7).
• Add the keyboard/IME for the locale so that you can switch language inputs (see page 3-8).
• If installing on an English Windows operating system, change the system locale to install code pages and fonts for displaying non-English text correctly in those applications (see page 3-8).
• Along with the Web application server software, these third-party applications are automatically installed:
• Java Runtime Environment 1.4.2_13
• New Atlanta ServletExec 5.0.0.10
• Oracle Client 10g (10.2.0.4)
Installing SDMS 7.1 Web application server software 3-11
To install the SDMS 7.1 Web application server software:
1. Insert the SDMS v7.1 Service Release 7 installation DVD into the drive. If the setup program does not start automatically, click Start > Run, and then type <drive>:\Setup.exe.
2. On the installation menu, click Install NuGenesis SDMS 7.1 SR7 applications > Back End Applications > NuGenesis Application Server.
3. Follow the prompts to complete the installation.
4. Install the SR7 update to bring the software up-to-date (see page 1-6).
3-12 Installing SDMS 7.1 applications using the SR7 media
Installing SDMS 7.1 SR7 client applications
The SDMS 7.1 SR7 installation media provides two ways to install SDMS 7.1 SR7 client applications, depending on your software needs:
• Install client applications individually using the SDMS v7.1 Service Release 7 installation DVD. You can install these applications:
• SDMS Administrator
• Jukebox Engine
• NuGenesis UNIFYps
• SDMS Data Adapters
• File Capture
• Software Development Kit (SDK)
• Software Development Kit (SDK) - Runtime Version
• Extraction Template Builder
• NuGenesis Script Builder
Exceptions:• You download and install the NuGenesis Transfer Application (to
view and restore files in projects) and NuGenesis UNIFY (to print files to projects) from NuGenesis VISION.
• You install SDMS Vision Publisher applications from the SDMS v7.1 Vision Publisher Service Release 7 DVD.
• Install a combination of SDMS 7.1 and SDMS Vision Publisher 7.1 client applications, and the SDMS 7.1 SR7 update, at the same time using the SDMS v7.1 Service Release 7 All-In-One Installer DVD. The installer automatically installs these applications:
• NuGenesis Transfer Application
• NuGenesis UNIFY
• NuGenesis SDMS Software Development Kit (SDK) - Runtime Version
• SDMS Vision Publisher Client
• SDMS Vision Publisher SDK - External version for accessing data from external systems, such as a Laboratory Information Management System (LIMS)
Installing SDMS 7.1 SR7 client applications 3-13
• SDMS Vision Publisher SDK - Internal version for accessing data from Microsoft Word and Microsoft Excel sections opened in SDMS Vision Publisher Client
• SDMS Vision Publisher Form Designer - To create electronic forms using Microsoft Excel embedded within Vision Publisher documents
• a Microsoft Word add-in for enabling automated printing of Vision Publisher document sections containing Word content
To install client applications individually using the SDMS v7.1 Service Release 7 installation DVD, continue using this installation guide.
To install the SDMS 7.1 and SDMS Vision Publisher 7.1 client applications, and the SDMS 7.1 SR7 update at the same time, follow the instructions in the NuGenesis SDMS 7.1 Service Release (SR) 7 Client Installation Guide that is contained in the Docs folder on this installation DVD.
Installing SDMS 7.1 client applicationsPrerequisites:
• In the NuGenesis SDMS 7.1 Installation and Configuration Guide, review Chapter 4 “Installing SDMS Administrator components” and Chapter 5 “Installing NuGenesis SDMS user applications”. You can find a copy of this document in the Docs folder on the SDMS v7.1 Service Release 7 DVD.
• Ensure that Microsoft Internet Explorer 7.0 or 8.0 is installed to view SDMS projects over the Internet.
• If you are installing the software in a mixed language environment, perform these tasks:
• Ensure that you already have an SDMS 7.1 East Asian database server set up so that you can test the connection between the components.
• Review the limitations for typing characters in the installation dialog boxes (see page 3-5).
• Add language support for the locale to install the necessary fonts and language packs (see page 3-7).
• Add the keyboard/IME for the locale so that you can switch language inputs (see page 3-8).
3-14 Installing SDMS 7.1 applications using the SR7 media
• If you are installing on an English Windows operating system, change the system locale to install code pages and fonts for displaying non-English text correctly in those applications (see page 3-8).
• Install Oracle Client 10g (10.2.0.4) so that the client applications can communicate with the Oracle database server.
To install Oracle Client 10g (10.2.0.4):
1. Insert the SDMS v7.1 Service Release 7 installation DVD into the drive.
Tip: If the setup program does not start automatically, click Start > Run, and then type <drive>:\Setup.exe.
2. On the installation menu, click Install NuGenesis SDMS 7.1 SR7 applications > Back End Applications > NuGenesis SDMS Oracle Client.
3. Follow the prompts to complete the installation.
• Install one or more NuGenesis UNIFY printers so that you can print reports to SDMS projects.
To install NuGenesis UNIFY:
1. In NuGenesis VISION, click MENU > Options > Download UNIFY.
2. Follow the steps in the Download NuGenesis UNIFY page to install a UNIFY printer.
3. To install as many as 32 UNIFY printers, repeat step 2 to install each one, giving each printer a unique name that includes as many as 64 characters.
• Install the NuGenesis Transfer Application so that you can view, print, and restore file data in projects.
Prerequisite: If you plan to install the SpectrixX Viewer (Analytical Data Viewer) component which is used to view converted file data, such as JCAMP-DX files in SDMS projects, ensure that Microsoft .NET Framework 2.0 or later is installed.
Installing SDMS 7.1 SR7 client applications 3-15

To install the NuGenesis Transfer Application:
1. In NuGenesis VISION, click MENU > Options > Download NuGenesis Transfer Application.
2. In the Download Transfer Application page, click Download NuGenesis Transfer Application, click Open, and then follow the prompts to complete the installation.
3. In the Choose Temporary Storage Location dialog box, browse to the NTFS drive where you created the TEMP folder, and then click OK.
4. If you want to view converted file data such as JCAMP-DX files in SDMS projects, in the Waters Analytical Data Viewer Selections dialog box, select SpectrixX Viewer, and then click Next.
5. Follow the prompts to complete the installation.
To install the SDMS 7.1 client applications:
1. Insert the SDMS v7.1 Service Release 7 installation DVD into the drive.
Tip: If the setup program does not start automatically, click Start > Run, and then type <drive>:\Setup.exe.
2. On the installation menu, click “Install NuGenesis SDMS 7.1 SR7 applications”.
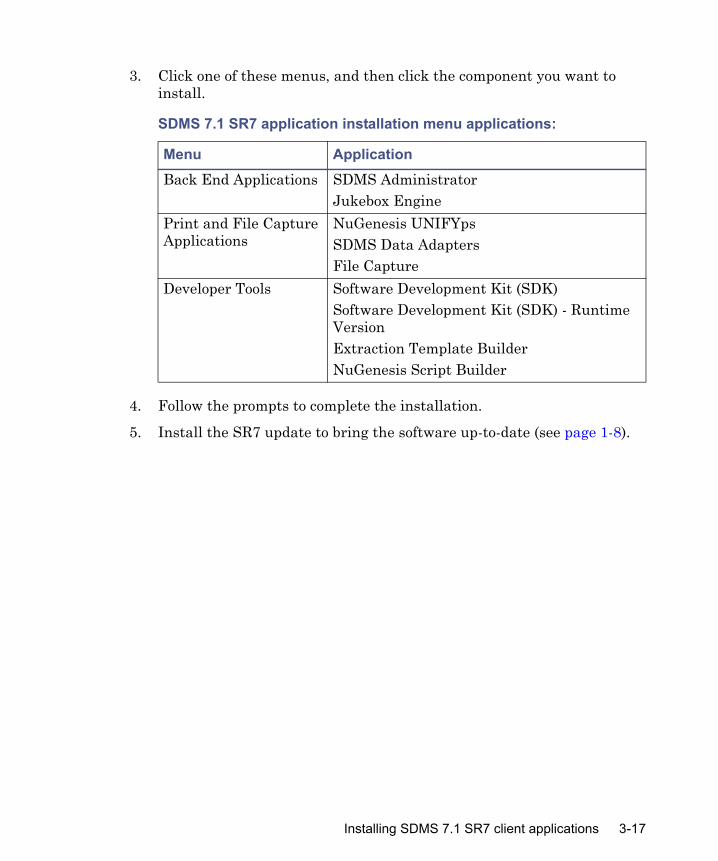
3. Click one of these menus, and then click the component you want to install.
4. Follow the prompts to complete the installation.
5. Install the SR7 update to bring the software up-to-date (see page 1-8).
SDMS 7.1 SR7 application installation menu applications:
Menu ApplicationBack End Applications SDMS Administrator
Jukebox Engine
Print and File Capture Applications
NuGenesis UNIFYpsSDMS Data AdaptersFile Capture
Developer Tools Software Development Kit (SDK)Software Development Kit (SDK) - Runtime VersionExtraction Template BuilderNuGenesis Script Builder
Installing SDMS 7.1 SR7 client applications 3-17
