managing purchase orders in solar eclipse
TRANSCRIPT

i
Managing Purchase Orders in Solar Eclipse
Release 9.0.5
Table Of Contents
ii
Disclaimer This document is for informational purposes only and is subject to change without notice. This document and its contents, including the viewpoints, dates and functional content expressed herein are believed to be accurate as of its date of publication. However, Epicor Software Corporation makes no guarantee, representations or warranties with regard to the enclosed information and specifically disclaims any applicable implied warranties, such as fitness for a particular purpose, merchantability, satisfactory quality or reasonable skill and care. As each user of Epicor software is likely to be unique in their requirements in the use of such software and their business processes, users of this document are always advised to discuss the content of this document with their Epicor account manager. All information contained herein is subject to change without notice and changes to this document since printing and other important information about the software product are made or published in release notes, and you are urged to obtain the current release notes for the software product. We welcome user comments and reserve the right to revise this publication and/or make improvements or changes to the products or programs described in this publication at any time, without notice. The usage of any Epicor software shall be pursuant to an Epicor end user license agreement and the performance of any consulting services by Epicor personnel shall be pursuant to Epicor's standard services terms and conditions. Usage of the solution(s) described in this document with other Epicor software or third party products may require the purchase of licenses for such other products. Where any software is expressed to be compliant with local laws or requirements in this document, such compliance is not a warranty and is based solely on Epicor's current understanding of such laws and requirements. All laws and requirements are subject to varying interpretations as well as to change and accordingly Epicor cannot guarantee that the software will be compliant and up to date with such changes. All statements of platform and product compatibility in this document shall be considered individually in relation to the products referred to in the relevant statement, i.e., where any Epicor software is stated to be compatible with one product and also stated to be compatible with another product, it should not be interpreted that such Epicor software is compatible with both of the products running at the same time on the same platform or environment. Additionally platform or product compatibility may require the application of Epicor or third-party updates, patches and/or service packs and Epicor has no responsibility for compatibility issues which may be caused by updates, patches and/or service packs released by third parties after the date of publication of this document. Epicor® is a registered trademark and/or trademark of Epicor Software Corporation in the United States, certain other countries and/or the EU. All other trademarks mentioned are the property of their respective owners.
Copyright © Epicor Software Corporation. All rights reserved. No part of this publication may be reproduced in any form without the prior written consent of Epicor Software Corporation. Publication Date: October 18, 2018
Managing Purchase Orders
iii
Table of Contents Purchase Orders Overview ........................................................................................................................... 1
Authorization ............................................................................................................................................ 1
Determining Priority ................................................................................................................................. 2
Accessing the Inquiry and Maintenance Windows from Purchasing ........................................................... 3
Purchase Order Entry Body Attributes ......................................................................................................... 4
Purchase Order Entry Header Attributes ...................................................................................................... 5
Purchase Order Entry Status Attributes ........................................................................................................ 7
Print Options ............................................................................................................................................. 7
Tracking Shipments .................................................................................................................................. 8
Freight Terms ............................................................................................................................................ 8
Purchase Order Entry Totals Attributes ........................................................................................................ 9
Creating Purchase Orders ........................................................................................................................... 11
Marking an Order as Exceptional ........................................................................................................... 12
Tagging a Purchase Order as Bonded ..................................................................................................... 13
Editing Purchase Orders ............................................................................................................................. 14
Releasing Purchase Orders ......................................................................................................................... 18
Drilling Into Purchase Orders Details ......................................................................................................... 20
Changing Purchase Order Entry Body Views ............................................................................................. 24
Copying Purchase Order Data to Other Order Types ................................................................................. 27
Splitting Purchase Orders Into Generations ................................................................................................ 29
Converting Purchase Orders to Bids ........................................................................................................... 30
Printing Purchase Orders ............................................................................................................................ 31
Print Styles .............................................................................................................................................. 31
Printing Direct Purchase Orders ............................................................................................................. 31
Printing Purchase Orders in Batches ........................................................................................................... 33
Inquiring About Purchase Orders ............................................................................................................... 35
Crediting and Rebilling Purchase Orders .................................................................................................... 37
Resorting Line Items on POs ...................................................................................................................... 38
Changing P/O Line Item Schedules ............................................................................................................ 39
Adding Notes and Instructions on Purchase Orders ................................................................................... 40
Adding Comments to Purchase Orders ....................................................................................................... 42
Adding Generations to Purchase Orders ..................................................................................................... 44
Overriding Drop Points on Purchase Orders ............................................................................................... 46
Table Of Contents
iv
Copying Header Information to All PO Generations .................................................................................. 47
Creating Trackers from Purchase Orders .................................................................................................... 48
Selecting Inactive Vendors for POs ............................................................................................................ 49
Adding International Taxes to Purchase Orders ......................................................................................... 50
Prepaying Vendors ...................................................................................................................................... 52
Prepaying by Credit Card ........................................................................................................................ 52
Prepaying by Manual Check ................................................................................................................... 53
Inquiring About P/O Reconciliations .......................................................................................................... 55
Combining Branches on Purchase Orders .................................................................................................. 58
Automatically Creating Central P/O Transfers ........................................................................................... 59
Allocating Centrally Purchased Material to Branches ................................................................................ 60
Receiving Material from Central P/Os with Transfers ............................................................................... 62
Purchase Order Freight Terms Guidelines .................................................................................................. 63
Selecting Vendors for the Freight Carrier on Purchase Orders ................................................................... 64
Selecting a Vendor for the Freight Carrier .............................................................................................. 64
Overriding Freight Charges on POs ............................................................................................................ 65
Editing Freight Charges on Purchase Orders .............................................................................................. 66
Editing Freight by Line Item ................................................................................................................... 66
Editing Freight by Purchase Order .......................................................................................................... 67
Pass-Along Freight Rules ........................................................................................................................... 68
Hard Tags ................................................................................................................................................ 68
Soft Tags ................................................................................................................................................. 68
Direct Orders ........................................................................................................................................... 69
Posting Legacy Purchase Orders................................................................................................................. 70
Creating Future-Dated Purchase Orders ..................................................................................................... 71
Purchasing Product Kits .............................................................................................................................. 72
How the Minimum Order Cycle Works ...................................................................................................... 73
Expanding and Contracting the Order Cycle .......................................................................................... 73
Exceeding the Vendor Target ................................................................................................................. 73
Best Cost Check in Purchase Order Entry .................................................................................................. 75
Best Cost Example .................................................................................................................................. 75
How Eclipse Determines the Best Cost in POE ...................................................................................... 76
How the System Uses Average Cost in POE .............................................................................................. 77
Changing the Price on a Purchase Order ................................................................................................ 77
How Does Average Cost Work? ............................................................................................................. 77
Managing Purchase Orders
v
Duty Drawback Rules on POs .................................................................................................................... 78
EDI Purchasing Queues .............................................................................................................................. 79
Using Primary Inventory Maintenance ....................................................................................................... 80
Suggested Purchase Orders Queue Rules and Guidelines .......................................................................... 81
Viewing Different Queues ...................................................................................................................... 81
Converting the Suggested P/O Queue ..................................................................................................... 82
Running the Suggested P/O Program.......................................................................................................... 83
Secondary Buy Lines .............................................................................................................................. 83
Package Quantities .................................................................................................................................. 83
Costs ........................................................................................................................................................ 83
Suggested P/O Error Report .................................................................................................................... 85
Displaying and Sorting the Suggested P/O Queue ...................................................................................... 86
Converting Suggested Purchase Orders to Actual Purchase Orders ........................................................... 89
Credit Holds when Converting Orders.................................................................................................... 89
Using the Convert Suggested to Actual P/O Program ............................................................................ 89
Single-branch and Multi-branch Purchase Orders .................................................................................. 91
Managing Suggestions from the Suggested P/O Detail Queue ................................................................... 92
Reviewing Purchase Order Suggestions ..................................................................................................... 95
What the Suggest P/O Audit Report Shows ............................................................................................ 96
Combining Purchase Orders from the Suggested P/O Queue ................................................................... 100
What the Suggested P/O Report Shows .................................................................................................... 102
Return on Additional Investment Overview ............................................................................................. 107
Quantity and Volume Discounts ........................................................................................................... 107
Price Adjustments ................................................................................................................................. 108
Applying ROAI Calculations to Suggested P/O ....................................................................................... 109
Expediting Purchase Orders ...................................................................................................................... 111
Reviewing the P/O Backorders Queue ...................................................................................................... 115
Viewing and Editing P/Os from the Review P/O Backorders Queue ....................................................... 116
Viewing the Purchase Order ................................................................................................................. 116
Editing the Purchase Order ................................................................................................................... 116
Setting Fixed Backorder Days .................................................................................................................. 118
Reconciling Rebate Requests .................................................................................................................... 119
Viewing and Editing Rebate Purchase Orders .......................................................................................... 121
Purging the Rebate Detail File .................................................................................................................. 122
Carrier Rebate Program Overview ............................................................................................................ 123

Table Of Contents
vi
Importing Contract Pricing for Carrier Rebates ........................................................................................ 124
Required Fields for Carrier Rebates ...................................................................................................... 124
Example Import File ............................................................................................................................. 126
Creating Carrier Rebate Import Templates ............................................................................................... 127
Verifying Your Carrier Import .............................................................................................................. 128
Sales Order Entry Rules When Using Carrier Rebates ............................................................................. 130
Index ......................................................................................................................................................... 131
1
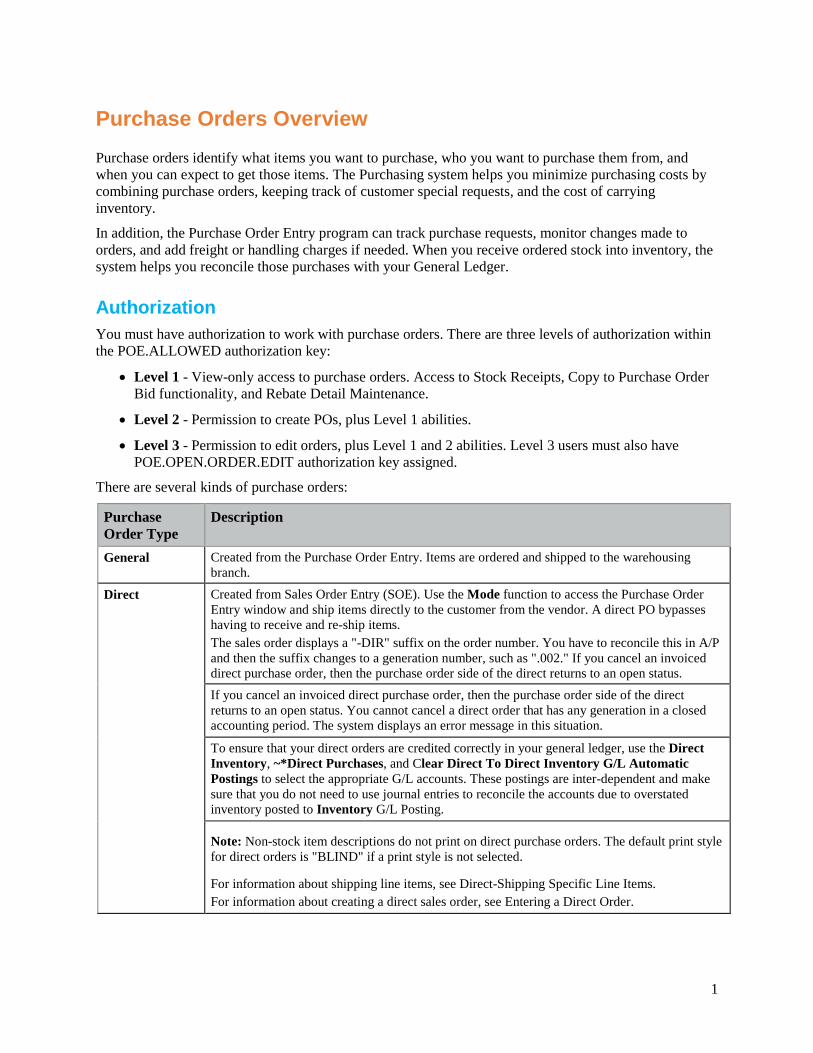
Purchase Orders Overview Purchase orders identify what items you want to purchase, who you want to purchase them from, and when you can expect to get those items. The Purchasing system helps you minimize purchasing costs by combining purchase orders, keeping track of customer special requests, and the cost of carrying inventory.
In addition, the Purchase Order Entry program can track purchase requests, monitor changes made to orders, and add freight or handling charges if needed. When you receive ordered stock into inventory, the system helps you reconcile those purchases with your General Ledger.
Authorization You must have authorization to work with purchase orders. There are three levels of authorization within the POE.ALLOWED authorization key:
• Level 1 - View-only access to purchase orders. Access to Stock Receipts, Copy to Purchase Order Bid functionality, and Rebate Detail Maintenance.
• Level 2 - Permission to create POs, plus Level 1 abilities.
• Level 3 - Permission to edit orders, plus Level 1 and 2 abilities. Level 3 users must also have POE.OPEN.ORDER.EDIT authorization key assigned.
There are several kinds of purchase orders:
Purchase Order Type
Description
General Created from the Purchase Order Entry. Items are ordered and shipped to the warehousing branch.
Direct Created from Sales Order Entry (SOE). Use the Mode function to access the Purchase Order Entry window and ship items directly to the customer from the vendor. A direct PO bypasses having to receive and re-ship items. The sales order displays a "-DIR" suffix on the order number. You have to reconcile this in A/P and then the suffix changes to a generation number, such as ".002." If you cancel an invoiced direct purchase order, then the purchase order side of the direct returns to an open status. If you cancel an invoiced direct purchase order, then the purchase order side of the direct returns to an open status. You cannot cancel a direct order that has any generation in a closed accounting period. The system displays an error message in this situation.
To ensure that your direct orders are credited correctly in your general ledger, use the Direct Inventory, ~*Direct Purchases, and Clear Direct To Direct Inventory G/L Automatic Postings to select the appropriate G/L accounts. These postings are inter-dependent and make sure that you do not need to use journal entries to reconcile the accounts due to overstated inventory posted to Inventory G/L Posting.
Note: Non-stock item descriptions do not print on direct purchase orders. The default print style for direct orders is "BLIND" if a print style is not selected.
For information about shipping line items, see Direct-Shipping Specific Line Items. For information about creating a direct sales order, see Entering a Direct Order.
Purchase Orders Overview
2
Purchase Order Type
Description
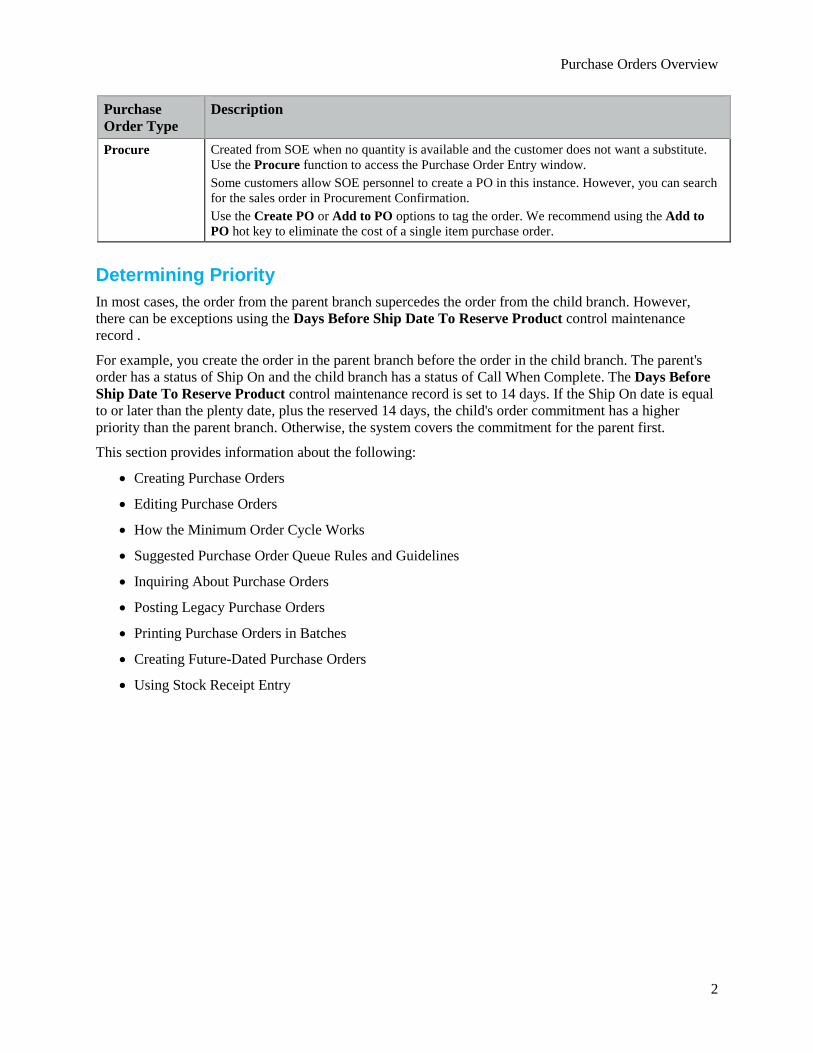
Procure Created from SOE when no quantity is available and the customer does not want a substitute. Use the Procure function to access the Purchase Order Entry window. Some customers allow SOE personnel to create a PO in this instance. However, you can search for the sales order in Procurement Confirmation. Use the Create PO or Add to PO options to tag the order. We recommend using the Add to PO hot key to eliminate the cost of a single item purchase order.
Determining Priority In most cases, the order from the parent branch supercedes the order from the child branch. However, there can be exceptions using the Days Before Ship Date To Reserve Product control maintenance record .
For example, you create the order in the parent branch before the order in the child branch. The parent's order has a status of Ship On and the child branch has a status of Call When Complete. The Days Before Ship Date To Reserve Product control maintenance record is set to 14 days. If the Ship On date is equal to or later than the plenty date, plus the reserved 14 days, the child's order commitment has a higher priority than the parent branch. Otherwise, the system covers the commitment for the parent first.
This section provides information about the following:
• Creating Purchase Orders
• Editing Purchase Orders
• How the Minimum Order Cycle Works
• Suggested Purchase Order Queue Rules and Guidelines
• Inquiring About Purchase Orders
• Posting Legacy Purchase Orders
• Printing Purchase Orders in Batches
• Creating Future-Dated Purchase Orders
• Using Stock Receipt Entry
Managing Purchase Orders
3
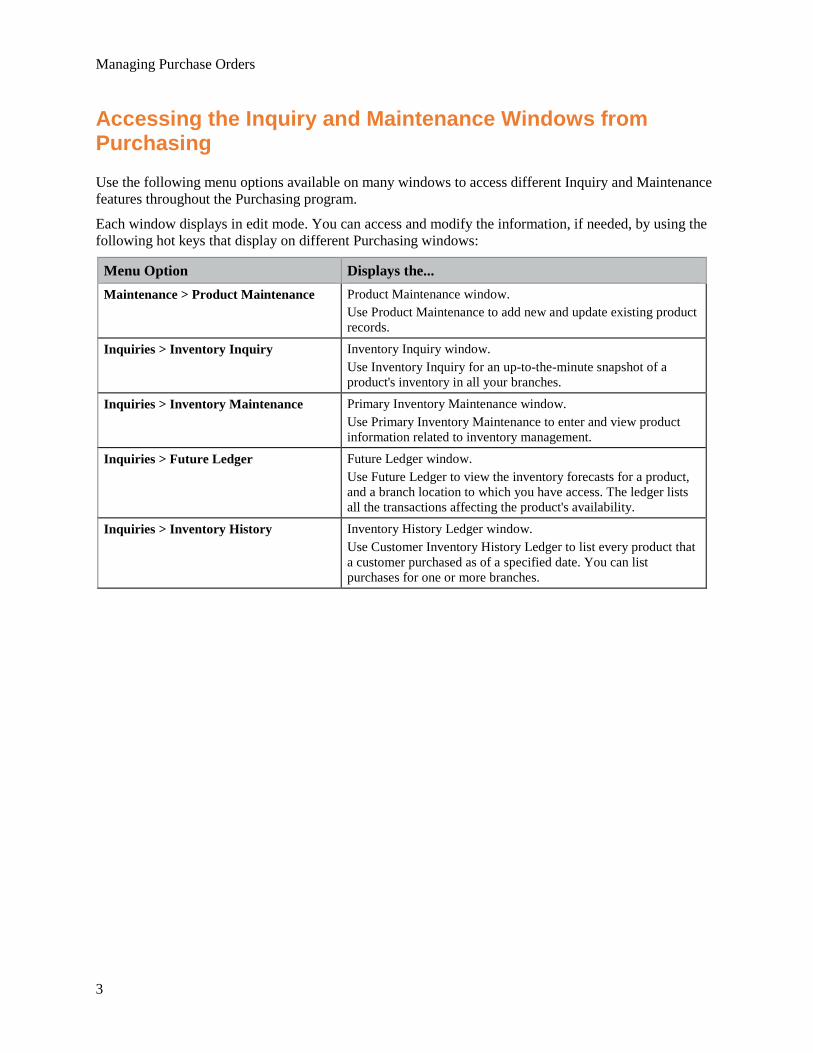
Accessing the Inquiry and Maintenance Windows from Purchasing Use the following menu options available on many windows to access different Inquiry and Maintenance features throughout the Purchasing program.
Each window displays in edit mode. You can access and modify the information, if needed, by using the following hot keys that display on different Purchasing windows:
Menu Option Displays the... Maintenance > Product Maintenance Product Maintenance window.
Use Product Maintenance to add new and update existing product records.
Inquiries > Inventory Inquiry Inventory Inquiry window. Use Inventory Inquiry for an up-to-the-minute snapshot of a product's inventory in all your branches.
Inquiries > Inventory Maintenance Primary Inventory Maintenance window. Use Primary Inventory Maintenance to enter and view product information related to inventory management.
Inquiries > Future Ledger Future Ledger window. Use Future Ledger to view the inventory forecasts for a product, and a branch location to which you have access. The ledger lists all the transactions affecting the product's availability.
Inquiries > Inventory History Inventory History Ledger window. Use Customer Inventory History Ledger to list every product that a customer purchased as of a specified date. You can list purchases for one or more branches.

Purchase Order Entry Body Attributes
4
Purchase Order Entry Body Attributes Use the Body tab to specify which products and how many to purchase. You can purchase individual products, buy lines, super buy lines, or nonstock items. Use the Purchase Order Entry Body tab for creating new purchase orders, modifying existing purchase orders, or creating post purchase orders. You can change the columns on the Body tab using the View menu option or the View Manager drop down list.
In addition, you can display the sales history continually at the bottom of the Body tab with the Show Product Sales History option. As you move through the purchase order, the history of the product displays so you can make immediate, informed decisions about your purchasing quantities.
The Body tab is used for purchase orders, stock receipt entry, and post purchase order entry. From the Body tab, you can edit orders, line items, view inquiries, change currency, search and select products, and view maintenance windows.
Note: If there is more than one buy matrix set up for a vendor that fit the requirements outlined in the purchase order, and the Auto Open Multiple Vendor Matrix Cells control maintenance record is set to Yes, then a window displays for the user to select the correct matrix to use on the purchase order.
The quantity on the Body tab is the open quantity at the time of the shipment. The first generation on the Status tab shows the total open quantity and the next generation shows what is remaining.
You must be assigned the POE.WRITER.POCOST authorization key to view costs on a purchase order if you are not the original writer on the purchase order.
Use the Require Purchase Order Entry Header Screen Entry control maintenance record to indicate if you want the Header tab to display when users exit the Purchase Order Entry Body tab.
The Status bar at the bottom of the window displays additional information about the order you are managing, such as the order number including the generation, order status, and if the order is a central purchase order.
Managing Purchase Orders
5
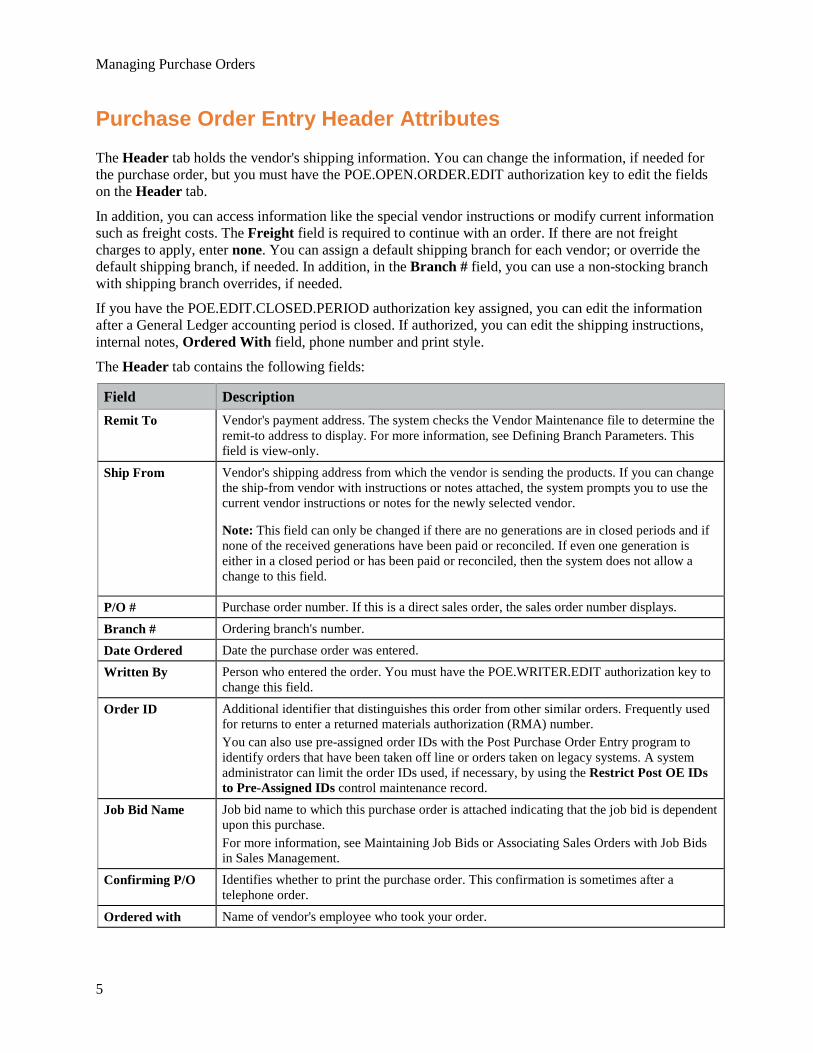
Purchase Order Entry Header Attributes The Header tab holds the vendor's shipping information. You can change the information, if needed for the purchase order, but you must have the POE.OPEN.ORDER.EDIT authorization key to edit the fields on the Header tab.
In addition, you can access information like the special vendor instructions or modify current information such as freight costs. The Freight field is required to continue with an order. If there are not freight charges to apply, enter none. You can assign a default shipping branch for each vendor; or override the default shipping branch, if needed. In addition, in the Branch # field, you can use a non-stocking branch with shipping branch overrides, if needed.
If you have the POE.EDIT.CLOSED.PERIOD authorization key assigned, you can edit the information after a General Ledger accounting period is closed. If authorized, you can edit the shipping instructions, internal notes, Ordered With field, phone number and print style.
The Header tab contains the following fields:
Field Description Remit To Vendor's payment address. The system checks the Vendor Maintenance file to determine the
remit-to address to display. For more information, see Defining Branch Parameters. This field is view-only.
Ship From Vendor's shipping address from which the vendor is sending the products. If you can change the ship-from vendor with instructions or notes attached, the system prompts you to use the current vendor instructions or notes for the newly selected vendor.
Note: This field can only be changed if there are no generations are in closed periods and if none of the received generations have been paid or reconciled. If even one generation is either in a closed period or has been paid or reconciled, then the system does not allow a change to this field.
P/O # Purchase order number. If this is a direct sales order, the sales order number displays.
Branch # Ordering branch's number. Date Ordered Date the purchase order was entered. Written By Person who entered the order. You must have the POE.WRITER.EDIT authorization key to
change this field.
Order ID Additional identifier that distinguishes this order from other similar orders. Frequently used for returns to enter a returned materials authorization (RMA) number. You can also use pre-assigned order IDs with the Post Purchase Order Entry program to identify orders that have been taken off line or orders taken on legacy systems. A system administrator can limit the order IDs used, if necessary, by using the Restrict Post OE IDs to Pre-Assigned IDs control maintenance record.
Job Bid Name Job bid name to which this purchase order is attached indicating that the job bid is dependent upon this purchase. For more information, see Maintaining Job Bids or Associating Sales Orders with Job Bids in Sales Management.
Confirming P/O Identifies whether to print the purchase order. This confirmation is sometimes after a telephone order.
Ordered with Name of vendor's employee who took your order.
Purchase Order Entry Header Attributes
6
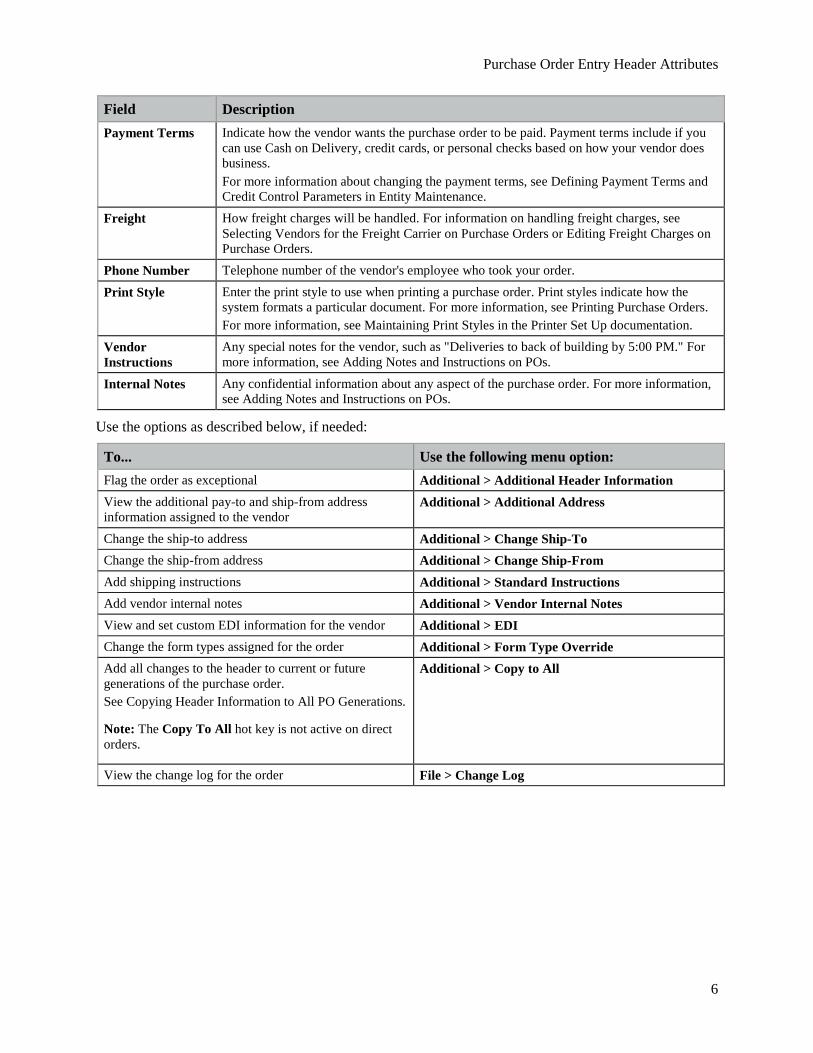
Field Description Payment Terms Indicate how the vendor wants the purchase order to be paid. Payment terms include if you
can use Cash on Delivery, credit cards, or personal checks based on how your vendor does business. For more information about changing the payment terms, see Defining Payment Terms and Credit Control Parameters in Entity Maintenance.
Freight How freight charges will be handled. For information on handling freight charges, see Selecting Vendors for the Freight Carrier on Purchase Orders or Editing Freight Charges on Purchase Orders.
Phone Number Telephone number of the vendor's employee who took your order.
Print Style Enter the print style to use when printing a purchase order. Print styles indicate how the system formats a particular document. For more information, see Printing Purchase Orders. For more information, see Maintaining Print Styles in the Printer Set Up documentation.
Vendor Instructions
Any special notes for the vendor, such as "Deliveries to back of building by 5:00 PM." For more information, see Adding Notes and Instructions on POs.
Internal Notes Any confidential information about any aspect of the purchase order. For more information, see Adding Notes and Instructions on POs.
Use the options as described below, if needed:
To... Use the following menu option: Flag the order as exceptional Additional > Additional Header Information View the additional pay-to and ship-from address information assigned to the vendor
Additional > Additional Address
Change the ship-to address Additional > Change Ship-To Change the ship-from address Additional > Change Ship-From Add shipping instructions Additional > Standard Instructions Add vendor internal notes Additional > Vendor Internal Notes View and set custom EDI information for the vendor Additional > EDI Change the form types assigned for the order Additional > Form Type Override Add all changes to the header to current or future generations of the purchase order. See Copying Header Information to All PO Generations.
Note: The Copy To All hot key is not active on direct orders.
Additional > Copy to All
View the change log for the order File > Change Log
Managing Purchase Orders
7
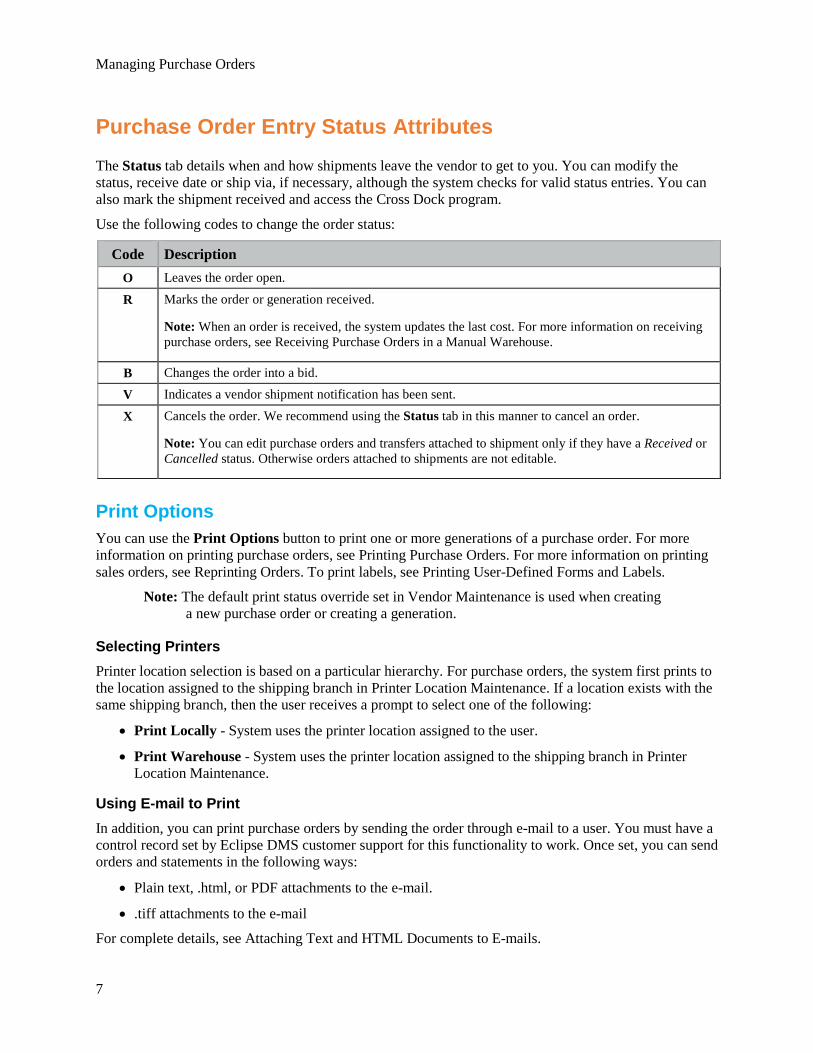
Purchase Order Entry Status Attributes The Status tab details when and how shipments leave the vendor to get to you. You can modify the status, receive date or ship via, if necessary, although the system checks for valid status entries. You can also mark the shipment received and access the Cross Dock program.
Use the following codes to change the order status:
Code Description O Leaves the order open.
R Marks the order or generation received.
Note: When an order is received, the system updates the last cost. For more information on receiving purchase orders, see Receiving Purchase Orders in a Manual Warehouse.
B Changes the order into a bid. V Indicates a vendor shipment notification has been sent.
X Cancels the order. We recommend using the Status tab in this manner to cancel an order.
Note: You can edit purchase orders and transfers attached to shipment only if they have a Received or Cancelled status. Otherwise orders attached to shipments are not editable.
Print Options You can use the Print Options button to print one or more generations of a purchase order. For more information on printing purchase orders, see Printing Purchase Orders. For more information on printing sales orders, see Reprinting Orders. To print labels, see Printing User-Defined Forms and Labels.
Note: The default print status override set in Vendor Maintenance is used when creating a new purchase order or creating a generation.
Selecting Printers Printer location selection is based on a particular hierarchy. For purchase orders, the system first prints to the location assigned to the shipping branch in Printer Location Maintenance. If a location exists with the same shipping branch, then the user receives a prompt to select one of the following:
• Print Locally - System uses the printer location assigned to the user.
• Print Warehouse - System uses the printer location assigned to the shipping branch in Printer Location Maintenance.
Using E-mail to Print In addition, you can print purchase orders by sending the order through e-mail to a user. You must have a control record set by Eclipse DMS customer support for this functionality to work. Once set, you can send orders and statements in the following ways:
• Plain text, .html, or PDF attachments to the e-mail.
• .tiff attachments to the e-mail
For complete details, see Attaching Text and HTML Documents to E-mails.
Purchase Order Entry Status Attributes
8
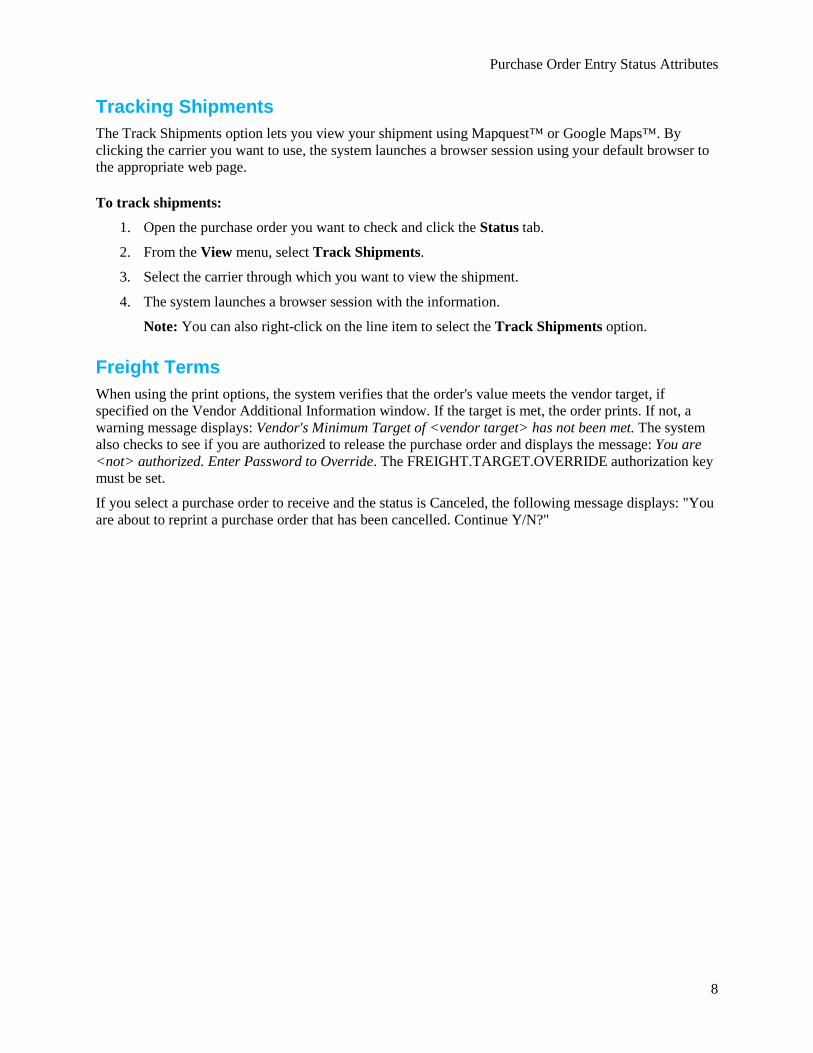
Tracking Shipments The Track Shipments option lets you view your shipment using Mapquest™ or Google Maps™. By clicking the carrier you want to use, the system launches a browser session using your default browser to the appropriate web page.
To track shipments:
1. Open the purchase order you want to check and click the Status tab.
2. From the View menu, select Track Shipments.
3. Select the carrier through which you want to view the shipment.
4. The system launches a browser session with the information.
Note: You can also right-click on the line item to select the Track Shipments option.
Freight Terms When using the print options, the system verifies that the order's value meets the vendor target, if specified on the Vendor Additional Information window. If the target is met, the order prints. If not, a warning message displays: Vendor's Minimum Target of <vendor target> has not been met. The system also checks to see if you are authorized to release the purchase order and displays the message: You are <not> authorized. Enter Password to Override. The FREIGHT.TARGET.OVERRIDE authorization key must be set.
If you select a purchase order to receive and the status is Canceled, the following message displays: "You are about to reprint a purchase order that has been cancelled. Continue Y/N?"
Managing Purchase Orders
9
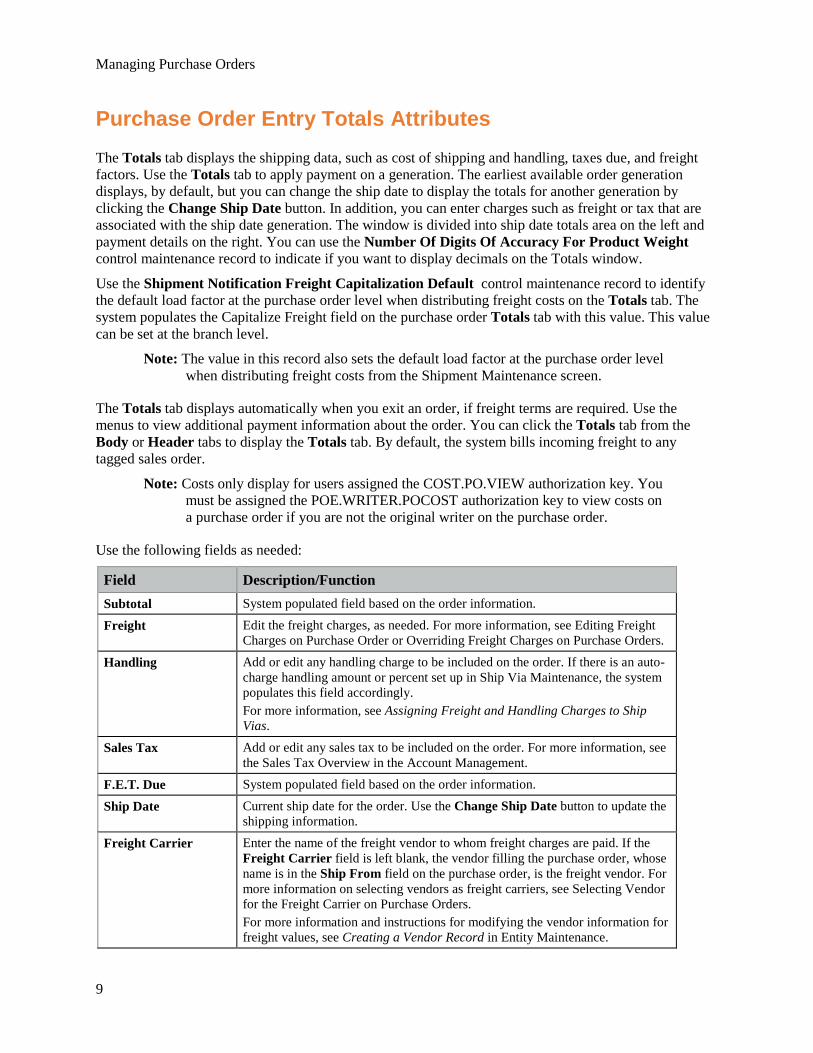
Purchase Order Entry Totals Attributes The Totals tab displays the shipping data, such as cost of shipping and handling, taxes due, and freight factors. Use the Totals tab to apply payment on a generation. The earliest available order generation displays, by default, but you can change the ship date to display the totals for another generation by clicking the Change Ship Date button. In addition, you can enter charges such as freight or tax that are associated with the ship date generation. The window is divided into ship date totals area on the left and payment details on the right. You can use the Number Of Digits Of Accuracy For Product Weight control maintenance record to indicate if you want to display decimals on the Totals window.
Use the Shipment Notification Freight Capitalization Default control maintenance record to identify the default load factor at the purchase order level when distributing freight costs on the Totals tab. The system populates the Capitalize Freight field on the purchase order Totals tab with this value. This value can be set at the branch level.
Note: The value in this record also sets the default load factor at the purchase order level when distributing freight costs from the Shipment Maintenance screen.
The Totals tab displays automatically when you exit an order, if freight terms are required. Use the menus to view additional payment information about the order. You can click the Totals tab from the Body or Header tabs to display the Totals tab. By default, the system bills incoming freight to any tagged sales order.
Note: Costs only display for users assigned the COST.PO.VIEW authorization key. You must be assigned the POE.WRITER.POCOST authorization key to view costs on a purchase order if you are not the original writer on the purchase order.
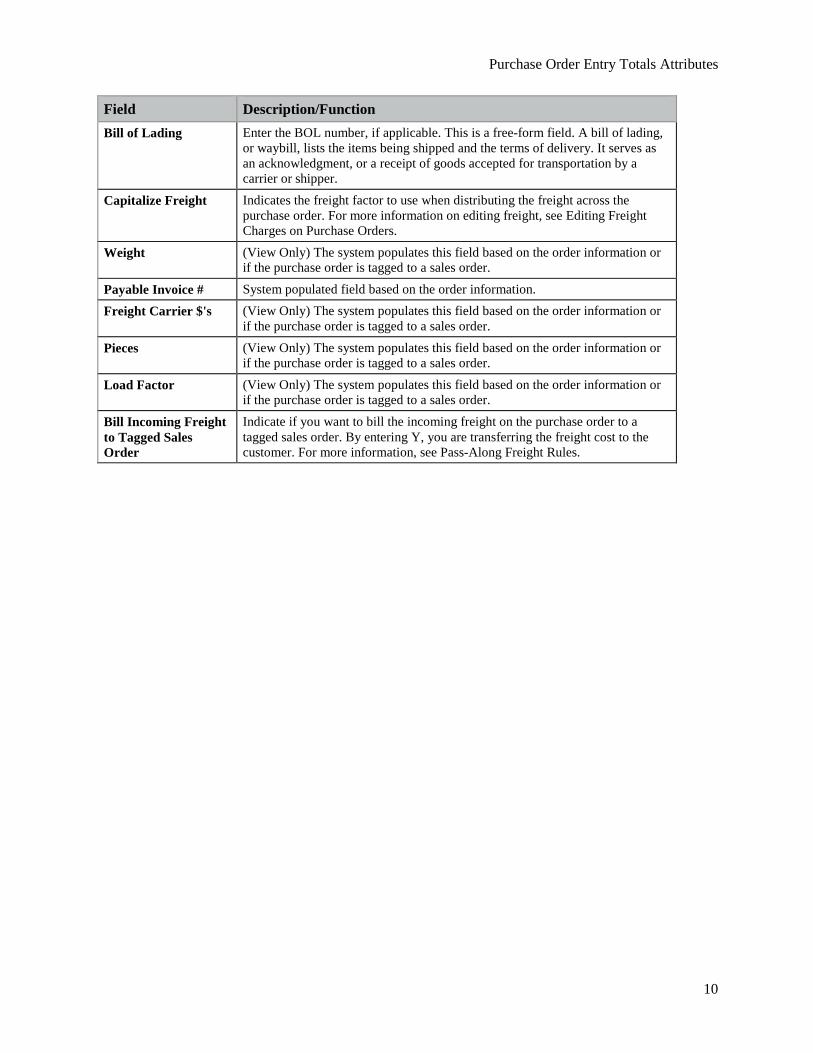
Use the following fields as needed:
Field Description/Function Subtotal System populated field based on the order information.
Freight Edit the freight charges, as needed. For more information, see Editing Freight Charges on Purchase Order or Overriding Freight Charges on Purchase Orders.
Handling Add or edit any handling charge to be included on the order. If there is an auto-charge handling amount or percent set up in Ship Via Maintenance, the system populates this field accordingly. For more information, see Assigning Freight and Handling Charges to Ship Vias.
Sales Tax Add or edit any sales tax to be included on the order. For more information, see the Sales Tax Overview in the Account Management.
F.E.T. Due System populated field based on the order information.
Ship Date Current ship date for the order. Use the Change Ship Date button to update the shipping information.
Freight Carrier Enter the name of the freight vendor to whom freight charges are paid. If the Freight Carrier field is left blank, the vendor filling the purchase order, whose name is in the Ship From field on the purchase order, is the freight vendor. For more information on selecting vendors as freight carriers, see Selecting Vendor for the Freight Carrier on Purchase Orders. For more information and instructions for modifying the vendor information for freight values, see Creating a Vendor Record in Entity Maintenance.
Purchase Order Entry Totals Attributes
10
Field Description/Function Bill of Lading Enter the BOL number, if applicable. This is a free-form field. A bill of lading,
or waybill, lists the items being shipped and the terms of delivery. It serves as an acknowledgment, or a receipt of goods accepted for transportation by a carrier or shipper.
Capitalize Freight Indicates the freight factor to use when distributing the freight across the purchase order. For more information on editing freight, see Editing Freight Charges on Purchase Orders.
Weight (View Only) The system populates this field based on the order information or if the purchase order is tagged to a sales order.
Payable Invoice # System populated field based on the order information. Freight Carrier $'s (View Only) The system populates this field based on the order information or
if the purchase order is tagged to a sales order.
Pieces (View Only) The system populates this field based on the order information or if the purchase order is tagged to a sales order.
Load Factor (View Only) The system populates this field based on the order information or if the purchase order is tagged to a sales order.
Bill Incoming Freight to Tagged Sales Order
Indicate if you want to bill the incoming freight on the purchase order to a tagged sales order. By entering Y, you are transferring the freight cost to the customer. For more information, see Pass-Along Freight Rules.
Managing Purchase Orders
11
Creating Purchase Orders Most purchase orders (P/O) are created from the Suggested P/O Queue conversion program. However, you can create a purchase order at any time for regular products, special orders, or nonstock items. You can also mark an order as exceptional.
Purchase orders can also be created from sales orders. For more information, see Creating Purchase Order Bids from Sales Orders in Sales Management.
Note: When creating a purchase order from a sales order, items with the same part number will be combined only if the cost override is identical.
The system can calculate duty for items you add to the purchase order. If a product has the Duty Harmonizing Code and Country of Manufacture set in Product Maintenance, the duty and freight amounts for that product are calculated when the product is added to a purchase order. If the product is removed from the purchase order or the quantity changed, the duty and freight amounts adjust. Use the Automatically Calculate Duty Charges For Purchase Orders control maintenance record to set this feature. If this control maintenance record is not set, then you must use the Duty option for each line item.
After you have received the products and get an invoice from the vendor. You will need to reconcile that invoice in A/P Entry with the purchase order.
Purchase orders require that you select a vendor from whom to purchase your items. The search function lets you type a portion of a vendor name to display the active vendors from whom you can purchase. For example, if you purchase from ABC Plumbing and ABC Electrical, you can type ABC in the Ship-From field and press Enter to display both vendor names. You can set up a vendor for a one-time transaction, if necessary. For one-time activation of a vendor, see Setting Vendor Branch Override Capabilities.
You can substitute products on a purchase order in the same way you substitute products on a sales order. See Adding Suggested Substitute or Add-On Products for instructions.
Note: You can purchase buy lines from purchase order entry, see Purchasing Entire Buy Lines.
To create a new purchase order:
1. From the Purchase menu, select Purchase Order Entry to display the Initial Order Entry window.
2. In the Branch field, enter the branch for which you want to create the purchase order.
3. In the Vendor / Order# field, enter the vendor name for which you want to create the purchase order.
Note: If you want to add a new vendor, click New Vendor to enter the Vendor Maintenance program.
4. Select New for a new order from the Order Selection window.
The system populates the Location field with your user location to identify the location for which the purchase order is being created.
5. Verify and update, if needed, the Required Date and Ship Date fields. The system populates these fields with the current date.
6. Click OK.
Creating Purchase Orders
12
The Purchase Order Entry window Body tab displays.
Note: The system populates the Remit To and Ship From addresses. The system checks the Vendor Maintenance file to determine the addresses to display. For more information, see Defining Branch Parameters.
7. In the Qty/Unit field enter a quantity or amount you want to order, such as 10ea or 1bx.
Note: This field displays the buy package that corresponds to the branch of the purchase order.
8. In the Product Description field select a product. You can enter a partial name and press enter for a list of matches. The remaining fields populate based on the product and view chosen. Use the View menu to select alternate fields to display.
An Inventory Adjustment window may display if your purchase order could affect inventory levels. The PIL, Demand, and Days Supply display and you can check inventory or product maintenance if needed. Click OK to return to the Body tab.
Note: If there is more than one price matrix associated with the product, the Vendor Matrix Cell Selection window displays. For more information see Creating Individual Matrix Cells.
9. Repeat steps 8 and 9 as needed to add additional products.
10. Exit the window to commit the changes.
11. If prompted, in the Freight field on the Header tab, enter or select the freight value, such as Pre-Paid or COD, and review the other Header fields for accuracy.
12. On the Status tab, confirm the status or change, if needed. The default print status override set in Vendor Maintenance is used when creating a new purchase order or creating a generation.
13. Save your changes and exit the window.
Note: The system checks that you have met the vendor target. If not, the following message displays: Vendor's Minimum Target of <vendor target> has not been met. The system also checks to see if you are authorized to release the purchase order and displays the message: You are not authorized. Enter Password to Override: The FREIGHT.TARGET.OVERRIDE authorization key must be set. Authorized users can enter their Eclipse login password to override.
Marking an Order as Exceptional If you enter a larger than average order you can flag it as exceptional. For example, if a contractor is building a apartment complex and orders all the faucets at one time and he orders 3 faucets for each of the 100 units, then you have an order for 300 faucets at once. This sale of 300 faucets would be an exceptional sale. To exclude the sale from the normal demand calculation, flag the sale as exceptional.
For more information on marking orders from Inventory Management, see Marking Purchase Orders as Exceptional.
To flag an order as exceptional:
1. From the Purchase menu, select Purchase Order Entry to display the Purchase Order Entry window.

Managing Purchase Orders
13
2. Display the purchase order.
3. Click the Header tab to display the header information.
4. From the Additional menu, select Additional Header Information to display the Additional Header Data window.
5. In the Exceptional Order field, enter Yes.
6. Click OK to save your changes.
7. Save your changes and exit the window.
Tagging a Purchase Order as Bonded Use the Additional Header window in the purchase order to mark a purchase order as bonded. The vendor does not relinquish ownership of the product to you until after the bonded date has passed. At that point, you are responsible for payment.
Entering a bonded expiration date:
1. From the Purchase menu, select Purchase Order Entry to display the Purchase Order Entry screen.
2. In the Ship From field, enter the PO number or the vendor name and press Enter.
3. Display the purchase order.
4. Click the Header tab to display the header information.
5. In the Bonded Expiration Date field, enter the date after which the bond expires and you take possession of the product.
6. Save your changes and exit the window.
Editing Purchase Orders
14
Editing Purchase Orders You can modify purchase orders as the order changes and as items are added, transferred, or received. Use the Purchase Order Entry program to update a purchase order. Display the purchase order in edit mode to access further functions. You must have permission to edit purchase orders. If you do not have authorization, the following message displays: "You are not authorized to edit the quantity."
Note: If you reduce the quantity on a purchase order and the system is enabled for Purchase Order Picking (Returns), then the system prompts you to generate a pick request.
When opening an order, if you select an order that you already have open on your computer, the system notifies you: "You are already editing order: <order number>. Press OK to continue." After clicking OK, the system brings the order to the front.
If you try to open an order you already have open on another computer, the system prompts you to confirm that you want to run more than one session. After confirmation, the system notifies you: "Order <order number> is being edited by <UserID>." For more information about multiple Solar Eclipse sessions, see Viewing and Logging Out of Multiple Solar Eclipse Sessions.
When an item is cancelled on a sales order and is tagged to a purchase order, the buyer can receive a message in the job queue by the system that the order has been cancelled along with the purchase order information. Use the Notify Buyer When Canceled Item Is On An Open Purchase Order control maintenance record to set this feature.
If the purchase order has been paid, you must have the POE.EDIT.PAID.MATRL authorization key assigned in order to change the freight vendor or bill of lading. You cannot make changes to either of these items after the purchase order has been invoiced.
Note: You cannot credit or rebill cancelled purchase order generations.
You must be assigned the POE.WRITER.POCOST authorization key to view costs on a purchase order if you are not the original writer on the purchase order.
To display a purchase order in edit mode:
1. From the Purchase menu, select Purchase Order Entry to display the Purchase Order Entry window.
2. In the Branch field, enter the branch for which you want to create the purchase order.
3. In the Vendor / Order# field, enter the vendor name for which you want to edit the purchase order.
Note: When entering vendors with large numbers of transactions, the Order Selection window displays. You can select any of the following options from this window: New, Search, Unreconciled Receivers, or a list of transactions.
4. Select the order you want to edit from the Order Selection window.
The Purchase Order Entry window displays at the Body tab for the order.
To edit a purchase order:
1. Display the purchase order you want to edit.
Managing Purchase Orders
15
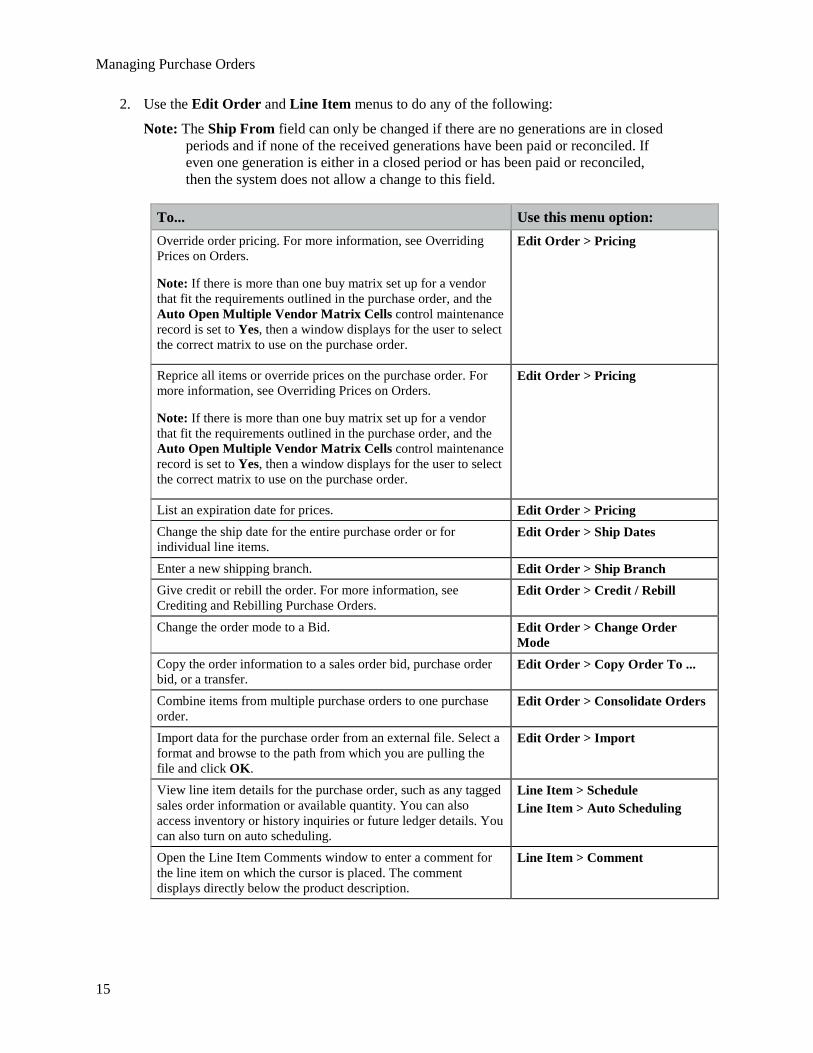
2. Use the Edit Order and Line Item menus to do any of the following:
Note: The Ship From field can only be changed if there are no generations are in closed periods and if none of the received generations have been paid or reconciled. If even one generation is either in a closed period or has been paid or reconciled, then the system does not allow a change to this field.
To... Use this menu option: Override order pricing. For more information, see Overriding Prices on Orders.
Note: If there is more than one buy matrix set up for a vendor that fit the requirements outlined in the purchase order, and the Auto Open Multiple Vendor Matrix Cells control maintenance record is set to Yes, then a window displays for the user to select the correct matrix to use on the purchase order.
Edit Order > Pricing
Reprice all items or override prices on the purchase order. For more information, see Overriding Prices on Orders.
Note: If there is more than one buy matrix set up for a vendor that fit the requirements outlined in the purchase order, and the Auto Open Multiple Vendor Matrix Cells control maintenance record is set to Yes, then a window displays for the user to select the correct matrix to use on the purchase order.
Edit Order > Pricing
List an expiration date for prices. Edit Order > Pricing Change the ship date for the entire purchase order or for individual line items.
Edit Order > Ship Dates
Enter a new shipping branch. Edit Order > Ship Branch Give credit or rebill the order. For more information, see Crediting and Rebilling Purchase Orders.
Edit Order > Credit / Rebill
Change the order mode to a Bid. Edit Order > Change Order Mode
Copy the order information to a sales order bid, purchase order bid, or a transfer.
Edit Order > Copy Order To ...
Combine items from multiple purchase orders to one purchase order.
Edit Order > Consolidate Orders
Import data for the purchase order from an external file. Select a format and browse to the path from which you are pulling the file and click OK.
Edit Order > Import
View line item details for the purchase order, such as any tagged sales order information or available quantity. You can also access inventory or history inquiries or future ledger details. You can also turn on auto scheduling.
Line Item > Schedule Line Item > Auto Scheduling
Open the Line Item Comments window to enter a comment for the line item on which the cursor is placed. The comment displays directly below the product description.
Line Item > Comment
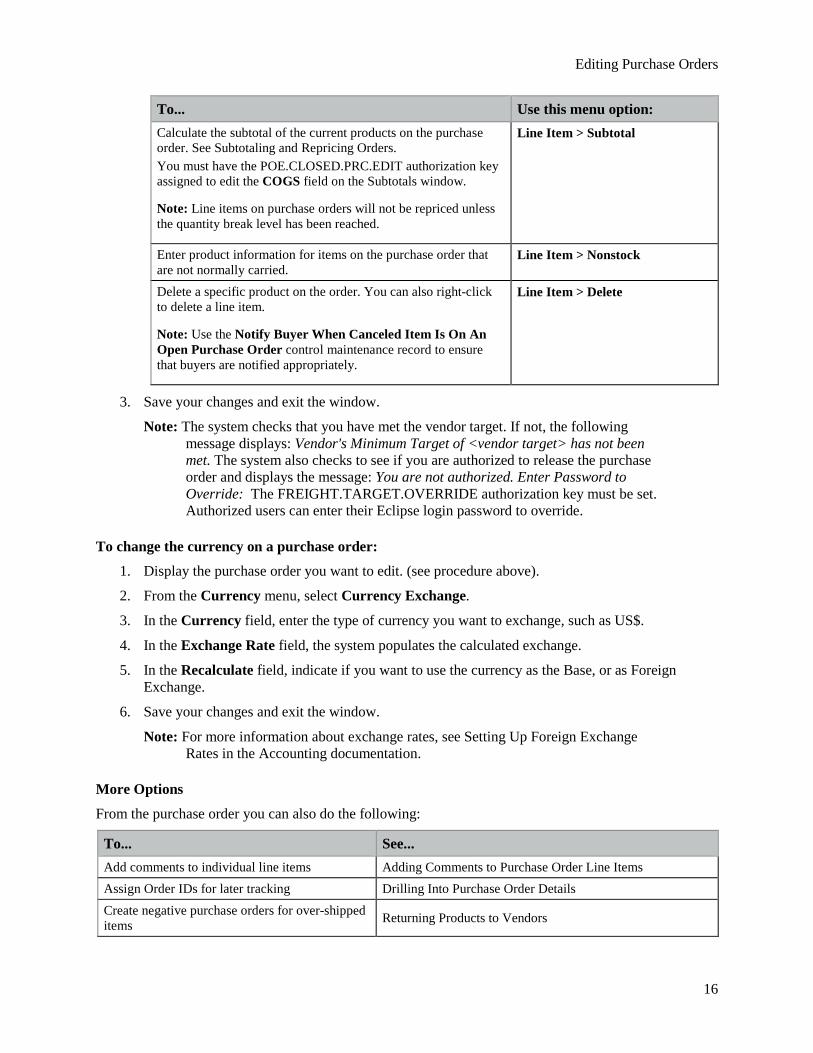
Editing Purchase Orders
16
To... Use this menu option: Calculate the subtotal of the current products on the purchase order. See Subtotaling and Repricing Orders. You must have the POE.CLOSED.PRC.EDIT authorization key assigned to edit the COGS field on the Subtotals window.
Note: Line items on purchase orders will not be repriced unless the quantity break level has been reached.
Line Item > Subtotal
Enter product information for items on the purchase order that are not normally carried.
Line Item > Nonstock
Delete a specific product on the order. You can also right-click to delete a line item.
Note: Use the Notify Buyer When Canceled Item Is On An Open Purchase Order control maintenance record to ensure that buyers are notified appropriately.
Line Item > Delete
3. Save your changes and exit the window.
Note: The system checks that you have met the vendor target. If not, the following message displays: Vendor's Minimum Target of <vendor target> has not been met. The system also checks to see if you are authorized to release the purchase order and displays the message: You are not authorized. Enter Password to Override: The FREIGHT.TARGET.OVERRIDE authorization key must be set. Authorized users can enter their Eclipse login password to override.
To change the currency on a purchase order:
1. Display the purchase order you want to edit. (see procedure above).
2. From the Currency menu, select Currency Exchange.
3. In the Currency field, enter the type of currency you want to exchange, such as US$.
4. In the Exchange Rate field, the system populates the calculated exchange.
5. In the Recalculate field, indicate if you want to use the currency as the Base, or as Foreign Exchange.
6. Save your changes and exit the window.
Note: For more information about exchange rates, see Setting Up Foreign Exchange Rates in the Accounting documentation.
More Options
From the purchase order you can also do the following:
To... See... Add comments to individual line items Adding Comments to Purchase Order Line Items
Assign Order IDs for later tracking Drilling Into Purchase Order Details
Create negative purchase orders for over-shipped items Returning Products to Vendors
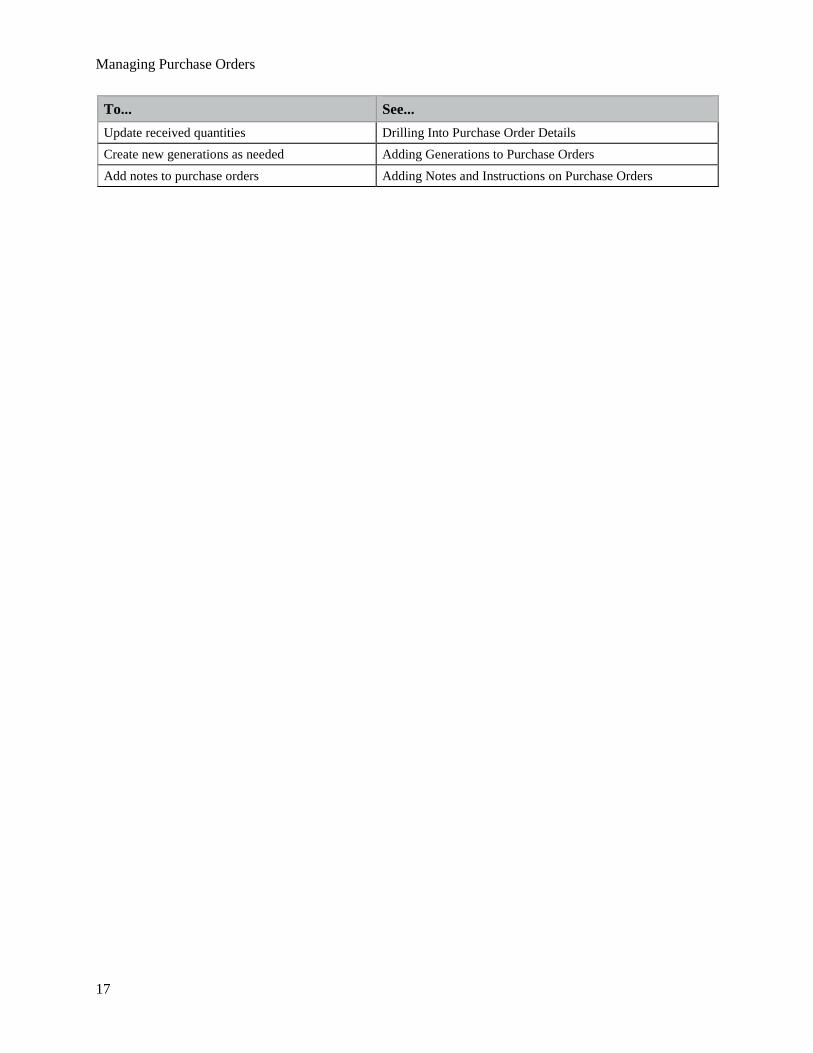
Managing Purchase Orders
17
To... See... Update received quantities Drilling Into Purchase Order Details
Create new generations as needed Adding Generations to Purchase Orders
Add notes to purchase orders Adding Notes and Instructions on Purchase Orders
Releasing Purchase Orders
18
Releasing Purchase Orders Use the PO Release Queue, the PO Expedite Queue, or the POE Status tab to evaluate purchase orders before releasing them for purchase. The system provides two levels of authorization for releasing purchase orders.
Purchasing agents can have authorization to view any purchase orders, but only release those purchase orders that have a negative quantity, called return purchase orders, or purchasing agents can have authorization to release any purchase orders in the system.
For example, your company may have three purchasing agents and a purchasing manager. The agents build and submit purchase orders daily. The purchasing manager reviews the purchase orders and determines if some purchase orders can be combined or added to purchase orders already in the system.
When purchase orders are released and invoiced, a message is appended to any associated tracker. Use the Update Associated Trackers Upon Invoicing Of Orders control maintenance record to indicate if you want messages send to those users on associated trackers.
To release a purchase order from the PO Release Queue:
1. From the Purchase > Queues menu, select P/O Release to display the PO Release Queue window.
Note: If prompted, log on to the character-based system.
2. In the Br field, enter the branch for which you want to list open purchase orders. Type all to search all branches.
3. In the Vendor field, enter the vendor name for which you want to list open purchase orders. Leave the field blank to search all vendors.
4. In the Writer field, enter the writer name if you want to search for a specific purchasing agent. Leave the field blank if you want to search all purchasing agents.
5. In the Start Date and End Date fields, indicate the time frame for which you want to search for purchase orders.
6. Press Enter to begin the search and populate the queue.
7. Enter a P for print, and F for fax, or an E for e-mail next to the purchase orders you want to release.
8. Use the Prt All hot key to print, fax, or email the purchase orders you selected in step 7.
The system prints any orders marked with P, displays the Send E-mail screen for any orders marked with an E grouped by vendor, and the Fax Memo screen for any orders marked with an F. Complete the necessary information for each to release the purchase orders.
9. Press Esc to return to a blank queue.
10. Press Esc to exit the PO Release Queue screen.
To release purchase orders from the PO Expedite Queue:
1. Display the PO Expedite Queue selecting the purchase order parameters needed.
2. In the S column, select the check box for the purchase order you want to release.
Managing Purchase Orders
19
3. Exit the window to release the purchase order.
To release purchase orders from the POE Status screen:
1. Display the purchase order you want to release.
2. Click the Status tab display the Status window.
3. In the Print field, enter one of the following:
• Y - Yes Print
• N - No Print
• F - Fax
• A - E-mail
• H - Hold for Printing
4. Exit the window to release the purchase order and return to the main menu.
Drilling Into Purchase Orders Details
20
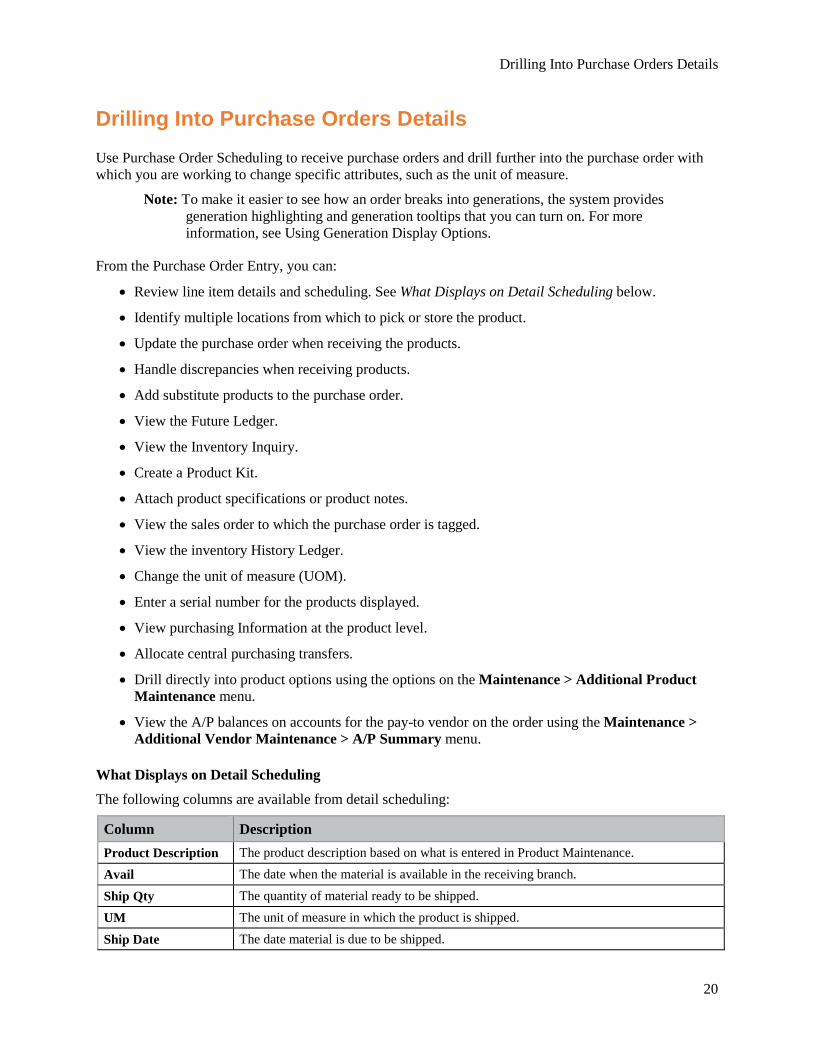
Drilling Into Purchase Orders Details Use Purchase Order Scheduling to receive purchase orders and drill further into the purchase order with which you are working to change specific attributes, such as the unit of measure.
Note: To make it easier to see how an order breaks into generations, the system provides generation highlighting and generation tooltips that you can turn on. For more information, see Using Generation Display Options.
From the Purchase Order Entry, you can:
• Review line item details and scheduling. See What Displays on Detail Scheduling below.
• Identify multiple locations from which to pick or store the product.
• Update the purchase order when receiving the products.
• Handle discrepancies when receiving products.
• Add substitute products to the purchase order.
• View the Future Ledger.
• View the Inventory Inquiry.
• Create a Product Kit.
• Attach product specifications or product notes.
• View the sales order to which the purchase order is tagged.
• View the inventory History Ledger.
• Change the unit of measure (UOM).
• Enter a serial number for the products displayed.
• View purchasing Information at the product level.
• Allocate central purchasing transfers.
• Drill directly into product options using the options on the Maintenance > Additional Product Maintenance menu.
• View the A/P balances on accounts for the pay-to vendor on the order using the Maintenance > Additional Vendor Maintenance > A/P Summary menu.
What Displays on Detail Scheduling
The following columns are available from detail scheduling:
Column Description Product Description The product description based on what is entered in Product Maintenance. Avail The date when the material is available in the receiving branch.
Ship Qty The quantity of material ready to be shipped. UM The unit of measure in which the product is shipped.
Ship Date The date material is due to be shipped.

Managing Purchase Orders
21
Column Description Status The order status. Via The current ship via on the order, such as UPS Ground.
Ship Branch The branch from which the material is being shipped. Req Date The date the material is required.
Transfer Indicates the line item is linked to a central purchase order transfer by displaying a check mark .
Note: If the material has already been received for a central purchase order transfer the Detail Scheduling tab is deactivated.
To select a substitute product:
1. From the Purchase menu, select Purchase Order Entry to display the Purchase Order Entry window.
2. Display the purchase order for which you want to use a substitute product instead of the one displayed.
3. Click Body tab.
4. Place the cursor on the line item for which you want to use a substitute product.
5. From the Line Item menu, select Substitutes to display the Substitutes / Add On Sale Items window.
6. Select the product you want to use from the list.
Note: If no substitutions are available, this window is blank.
7. From the File menu, select Substitute Item.
8. Save your changes and exit the window.
To view the sales order to which the purchase order is tagged:
1. From the Purch menu, select Purchase Order Entry to display the Purchase Order Entry window.
2. Display the purchase order to which a tag is attached that you want to view.
3. Click the Detail Scheduling tab to display the Detail Scheduling window.
4. From the Options > Line Options menu, select Schedule to display the Line Item Scheduling window.
5. In the Location/Vendor field, look for the Tagged to: information for the item, and place the cursor on that line.
Note: If the purchase order is also tagged a return on the purchasing end of the process, the system displays RETURN^ and the order number, such as: RETURN^S166181.1. The system displays the default location prior to the caret symbol using the Default Location for F, O, R Type Returns control maintenance record as reference.
6. From the Inquiries menu, select View Tag Order to view the sales order in view-only mode.
Drilling Into Purchase Orders Details
22
7. Save your changes and exit the window.
To change the unit of measure:
1. From the Purchase menu, select Purchase Order Entry to display the Purchase Order Entry window.
2. Display the purchase order for which you want to change a product's unit of measure.
3. Click the Detail Scheduling tab to display the Detail Scheduling window.
4. Highlight the line item for which you want to change the unit of measure.
5. From the Options > Line Options menu, select Schedule.
6. From the Edit menu, select Unit of Measure.
7. Edit the unit of measure, as needed, and exit the window.
8. Exit the Line Item Scheduling window.
9. Save your changes and exit the window.
To enter a serial number:
1. From the Purchase menu, select Purchase Order Entry to display the Purchase Order Entry window.
2. Display the purchase order for which you want to add a serial number.
3. Click the Detail Scheduling tab to display the Detail Scheduling window.
4. Highlight the line item for which you want to add a serial number.
5. From the Options > Line Options menu, select Schedule.
6. From the Edit menu, select Serial Numbers.
7. Enter or edit the serial number, as needed, and exit the window.
8. Exit the Line Item Scheduling window.
9. Save your changes and exit the window.
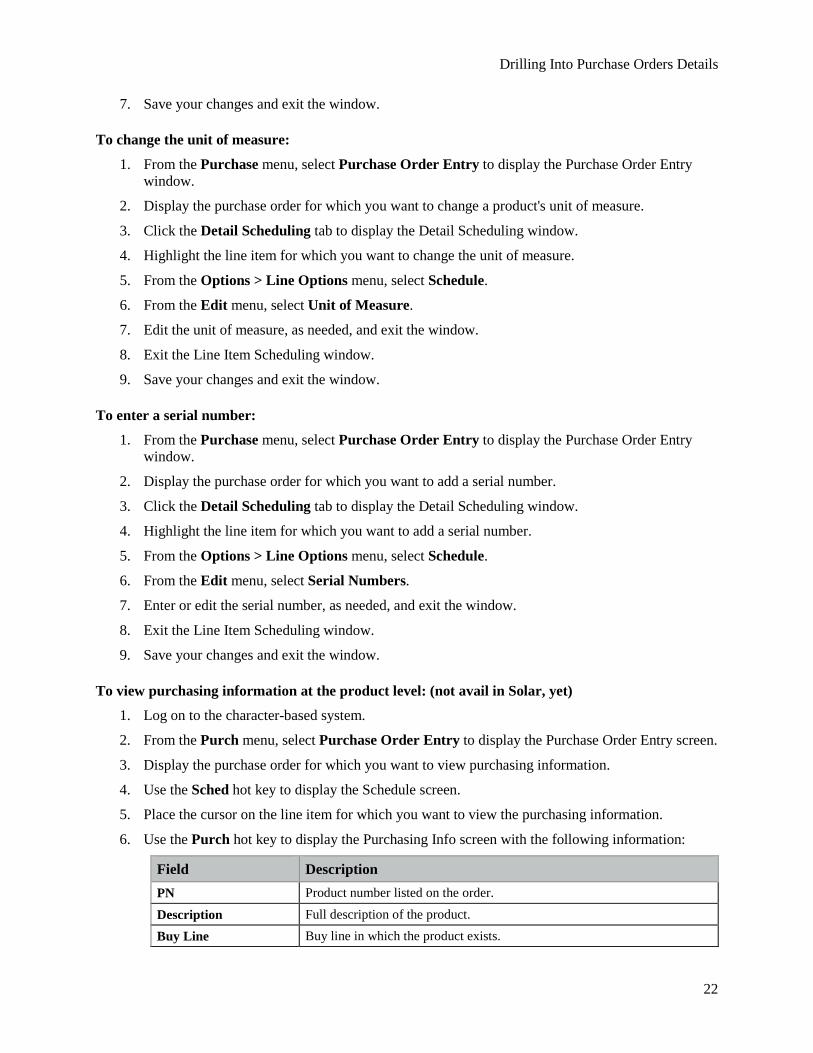
To view purchasing information at the product level: (not avail in Solar, yet)
1. Log on to the character-based system.
2. From the Purch menu, select Purchase Order Entry to display the Purchase Order Entry screen.
3. Display the purchase order for which you want to view purchasing information.
4. Use the Sched hot key to display the Schedule screen.
5. Place the cursor on the line item for which you want to view the purchasing information.
6. Use the Purch hot key to display the Purchasing Info screen with the following information:
Field Description PN Product number listed on the order.
Description Full description of the product. Buy Line Buy line in which the product exists.
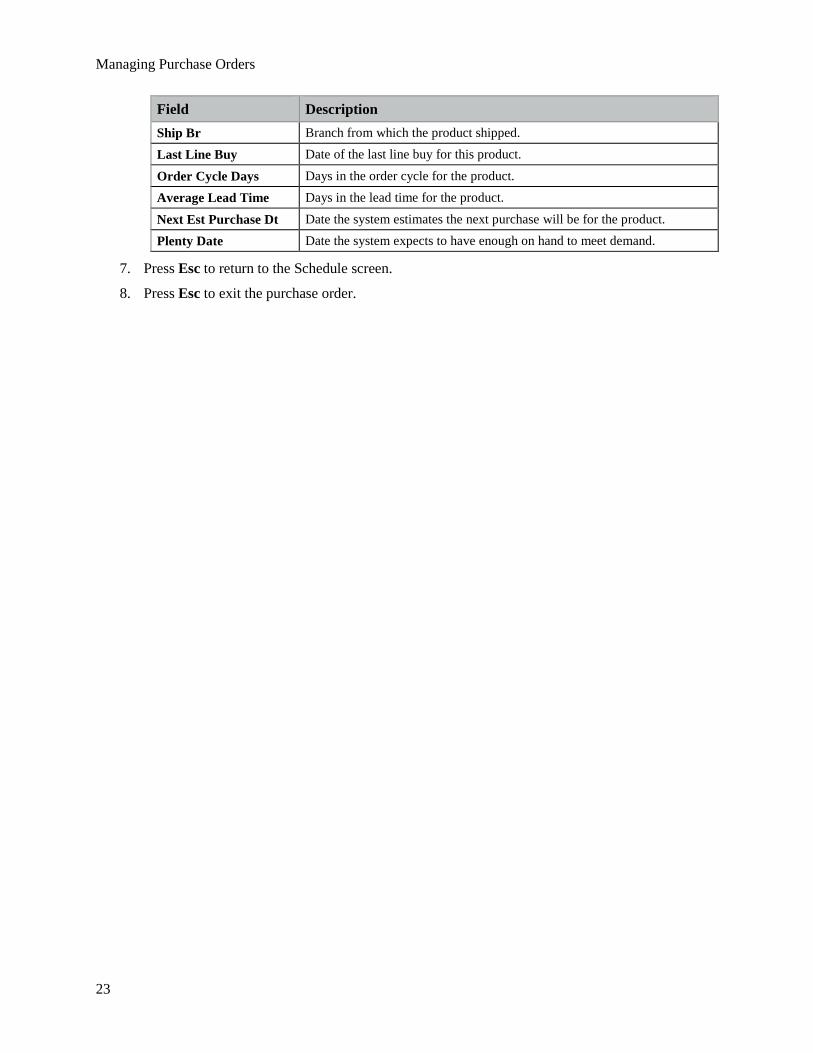
Managing Purchase Orders
23
Field Description Ship Br Branch from which the product shipped. Last Line Buy Date of the last line buy for this product.
Order Cycle Days Days in the order cycle for the product. Average Lead Time Days in the lead time for the product.
Next Est Purchase Dt Date the system estimates the next purchase will be for the product. Plenty Date Date the system expects to have enough on hand to meet demand.
7. Press Esc to return to the Schedule screen.
8. Press Esc to exit the purchase order.
Changing Purchase Order Entry Body Views
24
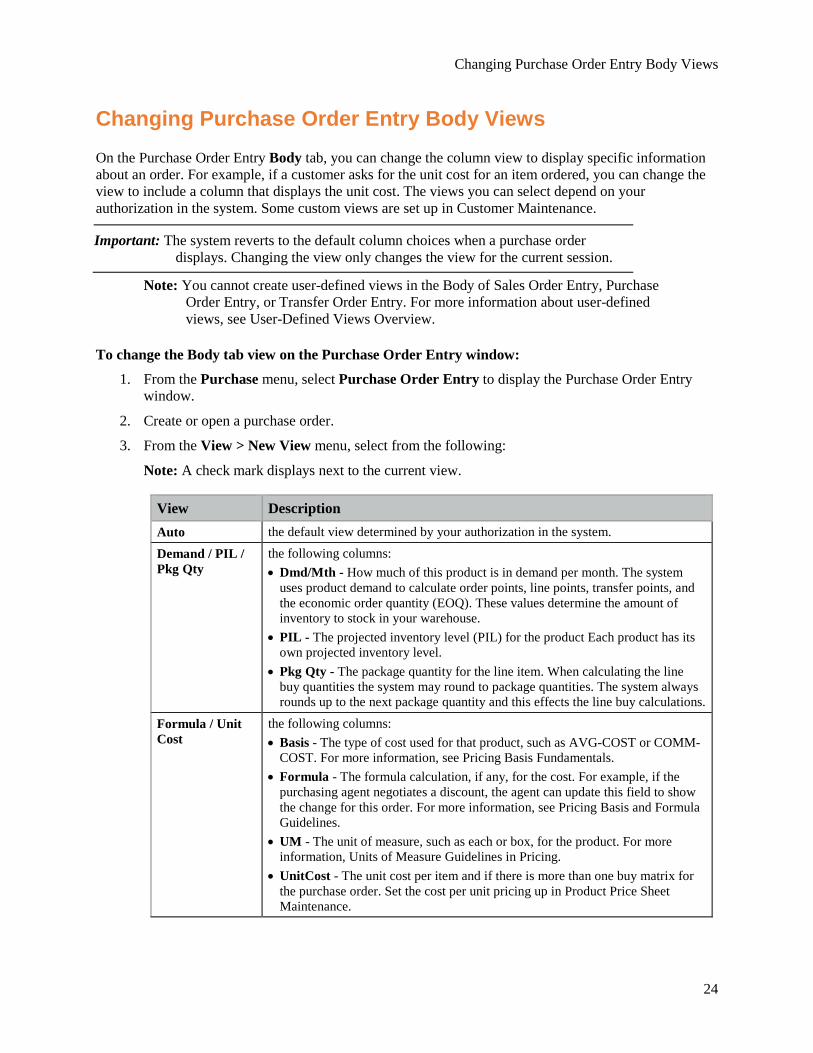
Changing Purchase Order Entry Body Views On the Purchase Order Entry Body tab, you can change the column view to display specific information about an order. For example, if a customer asks for the unit cost for an item ordered, you can change the view to include a column that displays the unit cost. The views you can select depend on your authorization in the system. Some custom views are set up in Customer Maintenance.
Important: The system reverts to the default column choices when a purchase order displays. Changing the view only changes the view for the current session.
Note: You cannot create user-defined views in the Body of Sales Order Entry, Purchase Order Entry, or Transfer Order Entry. For more information about user-defined views, see User-Defined Views Overview.
To change the Body tab view on the Purchase Order Entry window:
1. From the Purchase menu, select Purchase Order Entry to display the Purchase Order Entry window.
2. Create or open a purchase order.
3. From the View > New View menu, select from the following:
Note: A check mark displays next to the current view.
View Description Auto the default view determined by your authorization in the system. Demand / PIL / Pkg Qty
the following columns: • Dmd/Mth - How much of this product is in demand per month. The system
uses product demand to calculate order points, line points, transfer points, and the economic order quantity (EOQ). These values determine the amount of inventory to stock in your warehouse.
• PIL - The projected inventory level (PIL) for the product Each product has its own projected inventory level.
• Pkg Qty - The package quantity for the line item. When calculating the line buy quantities the system may round to package quantities. The system always rounds up to the next package quantity and this effects the line buy calculations.
Formula / Unit Cost
the following columns: • Basis - The type of cost used for that product, such as AVG-COST or COMM-
COST. For more information, see Pricing Basis Fundamentals. • Formula - The formula calculation, if any, for the cost. For example, if the
purchasing agent negotiates a discount, the agent can update this field to show the change for this order. For more information, see Pricing Basis and Formula Guidelines.
• UM - The unit of measure, such as each or box, for the product. For more information, Units of Measure Guidelines in Pricing.
• UnitCost - The unit cost per item and if there is more than one buy matrix for the purchase order. Set the cost per unit pricing up in Product Price Sheet Maintenance.
Managing Purchase Orders
25
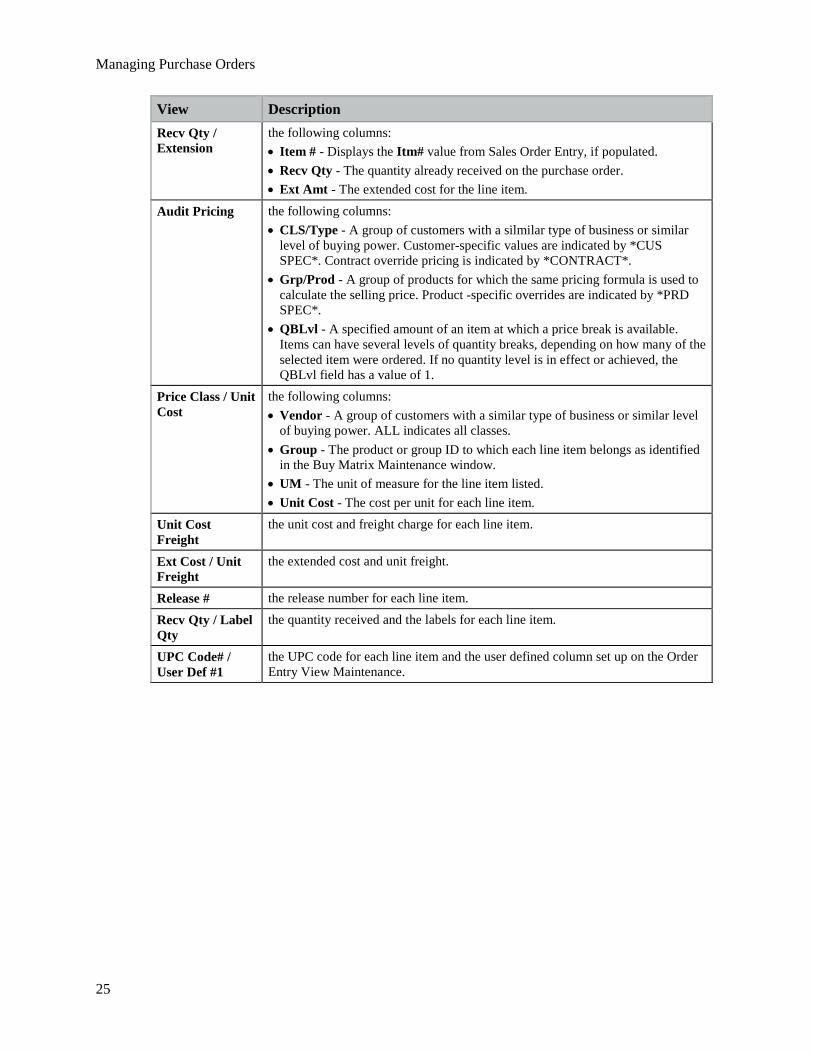
View Description Recv Qty / Extension
the following columns: • Item # - Displays the Itm# value from Sales Order Entry, if populated. • Recv Qty - The quantity already received on the purchase order. • Ext Amt - The extended cost for the line item.
Audit Pricing the following columns: • CLS/Type - A group of customers with a silmilar type of business or similar
level of buying power. Customer-specific values are indicated by *CUS SPEC*. Contract override pricing is indicated by *CONTRACT*.
• Grp/Prod - A group of products for which the same pricing formula is used to calculate the selling price. Product -specific overrides are indicated by *PRD SPEC*.
• QBLvl - A specified amount of an item at which a price break is available. Items can have several levels of quantity breaks, depending on how many of the selected item were ordered. If no quantity level is in effect or achieved, the QBLvl field has a value of 1.
Price Class / Unit Cost
the following columns: • Vendor - A group of customers with a similar type of business or similar level
of buying power. ALL indicates all classes. • Group - The product or group ID to which each line item belongs as identified
in the Buy Matrix Maintenance window. • UM - The unit of measure for the line item listed. • Unit Cost - The cost per unit for each line item.
Unit Cost Freight
the unit cost and freight charge for each line item.
Ext Cost / Unit Freight
the extended cost and unit freight.
Release # the release number for each line item. Recv Qty / Label Qty
the quantity received and the labels for each line item.
UPC Code# / User Def #1
the UPC code for each line item and the user defined column set up on the Order Entry View Maintenance.
Changing Purchase Order Entry Body Views
26
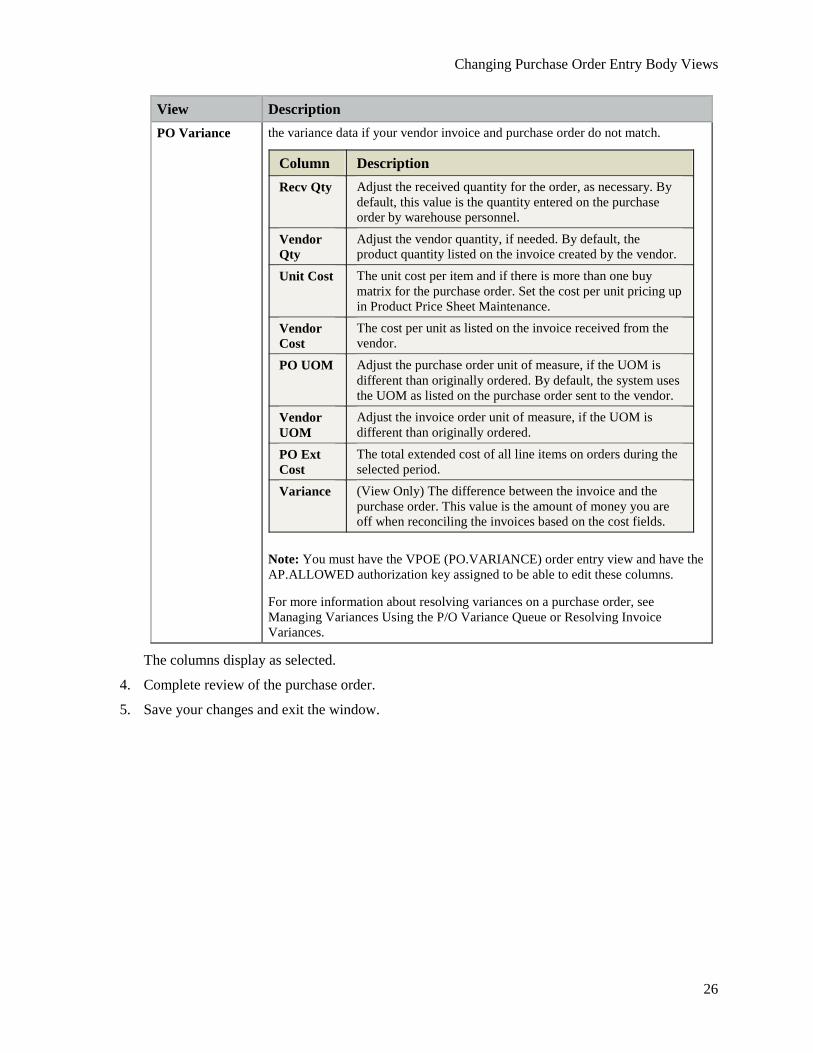
View Description PO Variance the variance data if your vendor invoice and purchase order do not match.
Column Description Recv Qty Adjust the received quantity for the order, as necessary. By
default, this value is the quantity entered on the purchase order by warehouse personnel.
Vendor Qty
Adjust the vendor quantity, if needed. By default, the product quantity listed on the invoice created by the vendor.
Unit Cost The unit cost per item and if there is more than one buy matrix for the purchase order. Set the cost per unit pricing up in Product Price Sheet Maintenance.
Vendor Cost
The cost per unit as listed on the invoice received from the vendor.
PO UOM Adjust the purchase order unit of measure, if the UOM is different than originally ordered. By default, the system uses the UOM as listed on the purchase order sent to the vendor.
Vendor UOM
Adjust the invoice order unit of measure, if the UOM is different than originally ordered.
PO Ext Cost
The total extended cost of all line items on orders during the selected period.
Variance (View Only) The difference between the invoice and the purchase order. This value is the amount of money you are off when reconciling the invoices based on the cost fields.
Note: You must have the VPOE (PO.VARIANCE) order entry view and have the AP.ALLOWED authorization key assigned to be able to edit these columns.
For more information about resolving variances on a purchase order, see Managing Variances Using the P/O Variance Queue or Resolving Invoice Variances.
The columns display as selected.
4. Complete review of the purchase order.
5. Save your changes and exit the window.
Managing Purchase Orders
27
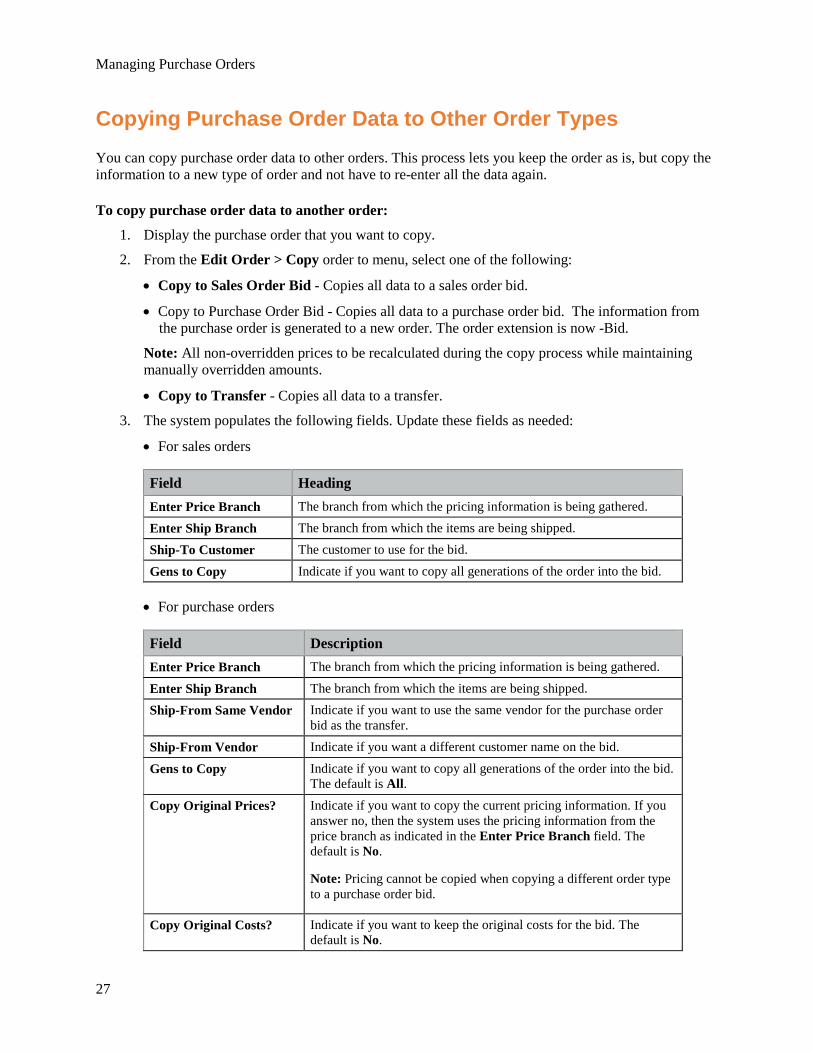
Copying Purchase Order Data to Other Order Types You can copy purchase order data to other orders. This process lets you keep the order as is, but copy the information to a new type of order and not have to re-enter all the data again.
To copy purchase order data to another order:
1. Display the purchase order that you want to copy.
2. From the Edit Order > Copy order to menu, select one of the following:
• Copy to Sales Order Bid - Copies all data to a sales order bid.
• Copy to Purchase Order Bid - Copies all data to a purchase order bid. The information from the purchase order is generated to a new order. The order extension is now -Bid.
Note: All non-overridden prices to be recalculated during the copy process while maintaining manually overridden amounts.
• Copy to Transfer - Copies all data to a transfer.
3. The system populates the following fields. Update these fields as needed:
• For sales orders
Field Heading Enter Price Branch The branch from which the pricing information is being gathered. Enter Ship Branch The branch from which the items are being shipped. Ship-To Customer The customer to use for the bid.
Gens to Copy Indicate if you want to copy all generations of the order into the bid.
• For purchase orders
Field Description Enter Price Branch The branch from which the pricing information is being gathered.
Enter Ship Branch The branch from which the items are being shipped. Ship-From Same Vendor Indicate if you want to use the same vendor for the purchase order
bid as the transfer. Ship-From Vendor Indicate if you want a different customer name on the bid.
Gens to Copy Indicate if you want to copy all generations of the order into the bid. The default is All.
Copy Original Prices? Indicate if you want to copy the current pricing information. If you answer no, then the system uses the pricing information from the price branch as indicated in the Enter Price Branch field. The default is No.
Note: Pricing cannot be copied when copying a different order type to a purchase order bid.
Copy Original Costs? Indicate if you want to keep the original costs for the bid. The default is No.
Copying Purchase Order Data to Other Order Types
28
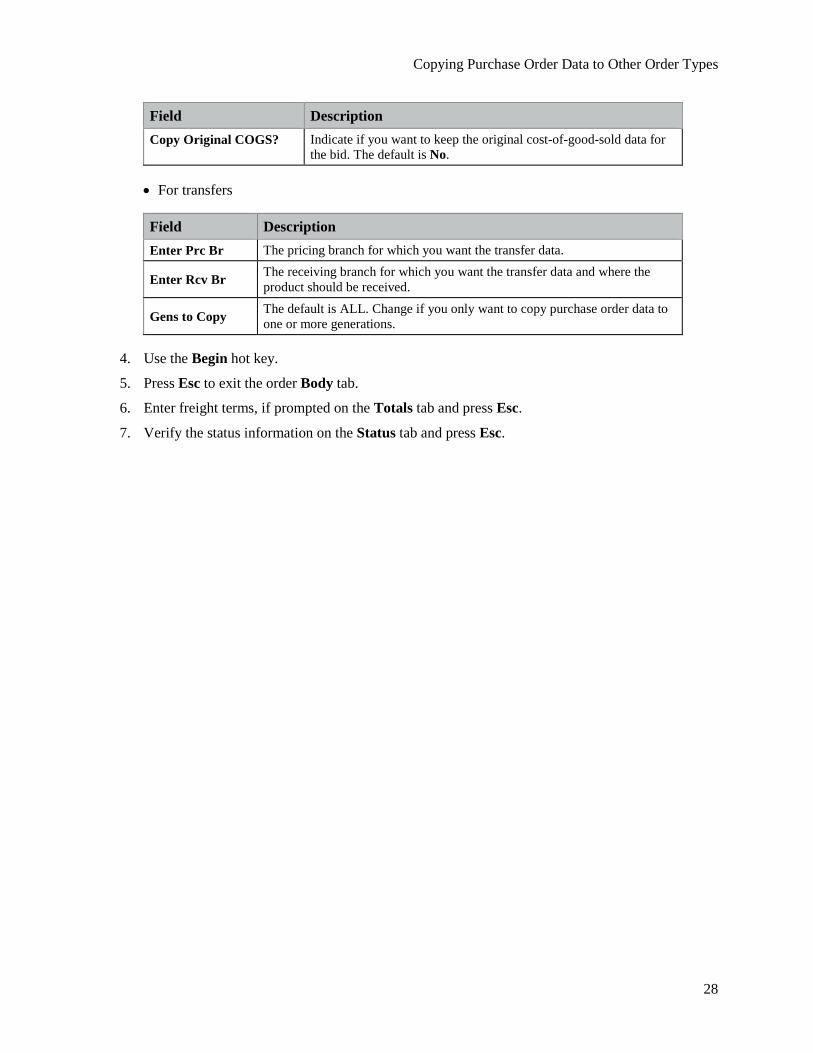
Field Description Copy Original COGS? Indicate if you want to keep the original cost-of-good-sold data for
the bid. The default is No.
• For transfers
Field Description Enter Prc Br The pricing branch for which you want the transfer data.
Enter Rcv Br The receiving branch for which you want the transfer data and where the product should be received.
Gens to Copy The default is ALL. Change if you only want to copy purchase order data to one or more generations.
4. Use the Begin hot key.
5. Press Esc to exit the order Body tab.
6. Enter freight terms, if prompted on the Totals tab and press Esc.
7. Verify the status information on the Status tab and press Esc.
Managing Purchase Orders
29
Splitting Purchase Orders Into Generations Generations on a purchase order are created when one of the following items is different for a line item:
• Ship Via
• Ship Date
• Ship Branch
Splitting a purchase order up allows you to purchase and receive individual items without having to wait for the entire purchase order.
To split a purchase order into a generation:
1. Do one of the following:
• Open the purchase order you want to split.
• Create a new purchase order with multiple line items.
2. Press Esc to view the Status window.
3. Click the Detail Scheduling tab to display the Scheduling window.
4. For any of the line items, change one of the following fields:
• Ship Qty - Adjust the quantity of items ordered.
• Ship Date - Change the shipment dates of individual items.
• Status - Update the status for individual items.
• Ship Via - Adjust the ship via for individual items.
• Ship Branch - Change the branch from which individual items are being shipped.
5. Click the Status tab.
The system displays the new generations based on the changes made on the Scheduling window.
6. Finish editing the purchase order, save your changes and exit the window.
Converting Purchase Orders to Bids
30
Converting Purchase Orders to Bids Convert purchase orders to bids to send the COGS data to your vendor without actually purchasing the items and sending them to your inventory. This process eliminates the possibility of creating a sales order against inventory that you may not have coming in. By keeping the purchase order as a bid, you can get the cost to you without committing the products to your future ledger or inventory supply.
To convert a purchase order to a bid:
1. Display the purchase order that you want to copy.
2. From the Edit Order > Change Order Mode menu, select Bid.
The system converts the purchase order and the generation extension changes to -Bid.
Note: The system prompts you to select a vendor. You can use the vendor on the original purchase order, or enter a new vendor to fulfill the order.
3. Save your changes and exit the window.
Managing Purchase Orders
31
Printing Purchase Orders You can print purchase orders from the purchase order entry Status tab. Purchase orders can be printed in hard copy, faxed, e-mailed, or added to shipping manifests. Also, you can change the print style and status or select the number of copies you want to print. To print individual order generations, print from the Status tab. You must have the POE.OPEN.ORDER.PRINT authorization key assigned to print purchase orders. If you do not have this authorization, the system keeps the print status at No when you try to print.
Note: When printing more than one copy of a purchase order, on each copy after the first, the system labels the copy as a reprint.
Print Styles Print styles indicate how the system formats a particular document. The system populates the selection list for this field through choices set up in Print Style Maintenance. Print styles are normally set up at the time of installation, but can be maintained through Print Style Maintenance. For more information, see Maintaining Print Styles in the Printer Setup documentation..
Printing Direct Purchase Orders If you are printing a direct purchase order and the authorization fails, the system sends the order to the Open Order Status Queue and the user cannot release the credit hold. The user is prompted to use Credit Override. You must have the POE.ASL.RELEASE authorization key assigned in order to print purchase orders being held for approved suppliers. For information on printing orders, see Reprinting Orders.
Note: The system checks the product file when printing. If any hazardous material is listed on the order, a HAZMAT sheet prints with the order.
To print a purchase order:
1. From the Purchase menu, select Purchase Order Entry to display the purchase Order Entry window.
2. Display the purchase order you want to print.
3. Click the Status tab.
4. From the Print menu, select Options to display the Order Reprinting Options window.
The Customer Name, Ship Via, and Manifest # fields populate with the order information.
5. In the Print Style field, enter the style that you want for the order.
6. In the Order Status field, select the order status for the order. The default is Open.
7. In the Number of Copies field, enter the number of copies you want to print.
8. In the Review Queues Status field, enter the status for which you want to print the order.
9. Use the File menu to indicate how you want to print:
• Print Order - Print the order as indicated. Printer location selection is based on a particular hierarchy. For purchase orders, the system first prints to the location assigned to the shipping branch in Printer Location Maintenance. If a location exists with the same shipping branch, then the user receives a prompt to select one of the following:
• Print Locally - System uses the printer location assigned to the user.
Printing Purchase Orders
32
• Print Warehouse - System uses the printer location assigned to the shipping branch in Printer Location Maintenance.
• Fax Order - Displays the Fax Memo window.
• Email Order - Displays the Send E-mail window. If the ship-to address is overridden, the overriding address is used. In addition, you can print purchase orders by sending the order through e-mail to a user. You must have a control record set by Eclipse DMS customer support for this functionality to work. Once set, you can send orders and statements in plain text, .html, or PDF attachments to the e-mail. In addition, you can send them as .tiff attachments to the e-mail. For complete details, see Attaching Text and HTML Documents to E-mails.
• Print Label - Displays the User Defined Document/Label Printing window.
10. Save your changes and exit the window.
To print purchase orders from the Status tab:
1. From the Purchase menu, select Purchase Order Entry to display the Purchase Order Entry window.
2. Display the transfer you want to print.
3. Click the Status tab.
4. In the Print field for the generation you want to print for shipment, select one of the following:
• Y - Print to your default printer. The system determines your printer location based on specific parameters.
Note: If the Allow Alternate Branch Bill-To Address control maintenance record is set to Yes, and you have information in the Bill-To ID field in Branch Maintenance, then the Bill-To ID prints on the purchase order, regardless of the Remit To address listed in the Header tab of the purchase order.
• N - To hold the generation for printing.
• F - Fax to your default facsimile machine.
• A - E-mail to an indicated E-mail address.
• H - Send to your hold entries.
5. Exit the Status tab.
Managing Purchase Orders
33
Printing Purchase Orders in Batches The Batch Print Purchase Orders program lets you select, preview, and batch print one or more types of purchase order transactions. This lets the purchasing agent print some or all purchase orders at one time. If a purchase order is locked for editing by a user, that purchase order will be skipped in the printing process.
Note: If direct purchase orders are included in the batch, the system verifies that customers are not beyond their credit limit. If customers are beyond their credit limit, the direct purchase order does not print.
To batch print purchase orders:
1. From the Purchase > Printing menu, select Batch Print Purchase Orders.
Note: When prompted, log on to the character-based system.
2. In the Br/Tr/All field, enter a branch or territory for which you want to print multiple purchase orders. To view all branches and territories, type All.
The system searches open items to return what is open. The document types available display as follows:
• Purchase Orders
• Direct Shipment PO
• PO Receiving Register
• Advance Ship PO
Note: The Count field shows how many of each document type are open and available for printing. When printing more than one copy of a purchase order, on each copy after the first, the system labels the copy as a reprint.
3. In the Document Types field, select the items to print. Type any letter between the parentheses. Use the Up Arrow and Down Arrow keys to move the cursor to the next field. The letter typed changes to an asterisk when you move to another field.
4. Use the Preview hot key to display the Hold Entry Pre-View screen.
5. Use the hot keys as necessary to modify the report view:
Hot Key Description Format Adjusts the column and row size.
Search Searches by word string through the document types name for a specific order. You can use this if you are looking for an order that may not be displaying in the viewable area.
Page Skip Skips to a page on the preview. Provides an alternative to having to page through to get to a listing.
Printing Purchase Orders in Batches
34
Hot Key Description Print View the Print Options screen and select the following:
• Printer • Number of pages • Page layout • Fax or Email
View Detail Opens the Purchase Order Entry or Sales Order Entry screens, depending on the document type, in view-only mode.
Edit Detail Opens the Purchase Order Entry or Sales Order Entry screens, depending on the document type, in edit mode.
6. Press Esc to exit the screen and return to the main menu.
Managing Purchase Orders
35
Inquiring About Purchase Orders Use Purchase Order Inquiry to view a list of all open purchase orders, bids, and A/P Items. The Inquiry window pulls information from the A/P and A/R system to make sure the data is current. You can scan open orders to check on expected receiving date, status, availability, or balance on the order.
In addition, Purchase Order Inquiry works with Inventory Inquiry, the Future Ledger, and the Inventory History Ledger, to provide accurate information.
You can check Orders and Bids connected to the vendor you are inquiring about. In addition, you can view the A/P Items to see if you owe a vendor.
Note: Use the Check Branch Authorization for Price Branches on Select Screens control maintenance record if you want the system to check authorization for price branch authorization in order to determine what to display.
Use the Purchase Order Reconciliation Inquiry window to view all purchase order related invoicing and payable information at a glance.
You must be assigned the POE.WRITER.POCOST authorization key to view costs on a purchase order if you are not the original writer on the purchase order.
To use the Purchase Order Inquiry window:
1. From the Purchase menu, select Purchase Order Inquiry to display the Purchase Order Inquiry window.
2. In the Vendor field, enter the vendor name for the purchase order you want to view.
3. The following fields display with information populated by the system:
Field Description Vendor Name Vendor who has open purchase order assigned to them. If an asterisk (*)
displays highlighted in red, there is more than one address for the displayed vendor.
Contact Information
First three company contacts for the vendor as listed in Vendor File Maintenance.
Address Official vendor address for the vendor displayed.
Order # An internal order number assigned to the purchase order by the system. Order ID Purchase order number for the vendor. Branch Shipping branch of the purchase order. A branch ID can be up to 4-digits.
Balance Open balance on the purchase order. Ship Date Date when products were sent from the vendor.
Avail Date Date when products, if delayed, will be available for customer purchase. Status Status of the purchase order. This field displays only when viewing open orders
or bids: O - Open, Y - Direct, and B - Bids. Ship Via This field displays only when viewing open orders or bids. Displays a Ship Via if
one was entered on the Purchase Order Entry window.
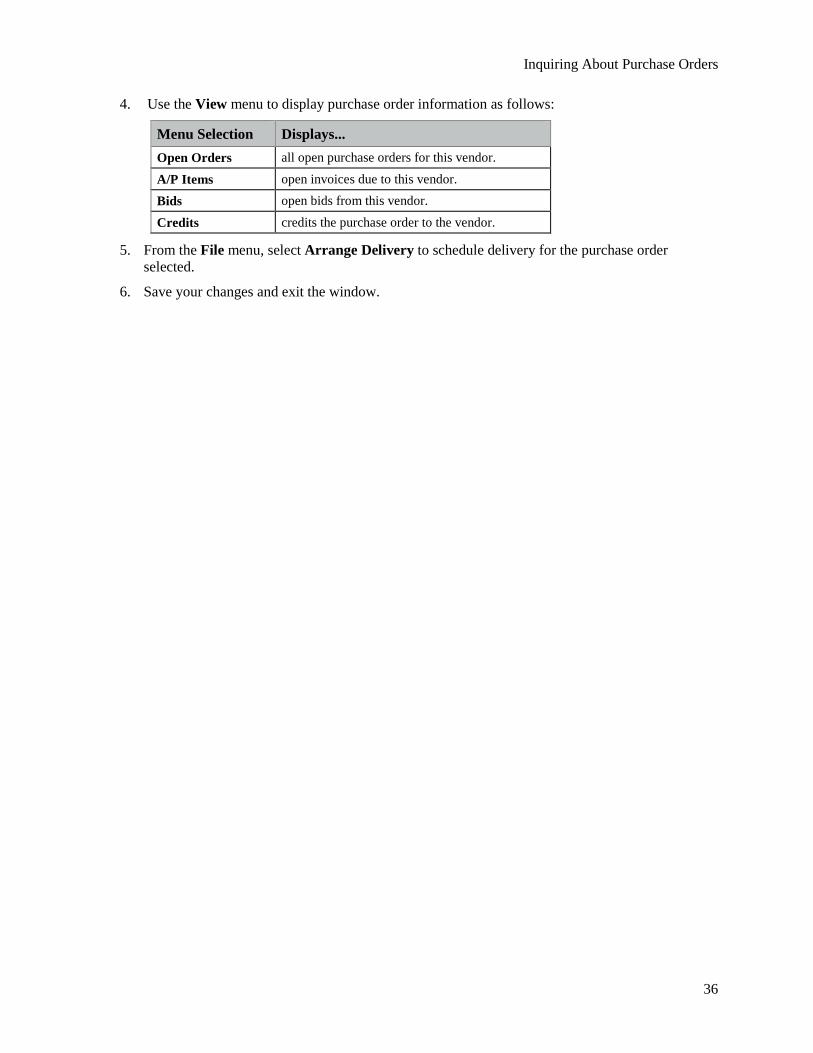
Inquiring About Purchase Orders
36
4. Use the View menu to display purchase order information as follows:
Menu Selection Displays... Open Orders all open purchase orders for this vendor.
A/P Items open invoices due to this vendor. Bids open bids from this vendor.
Credits credits the purchase order to the vendor.
5. From the File menu, select Arrange Delivery to schedule delivery for the purchase order selected.
6. Save your changes and exit the window.
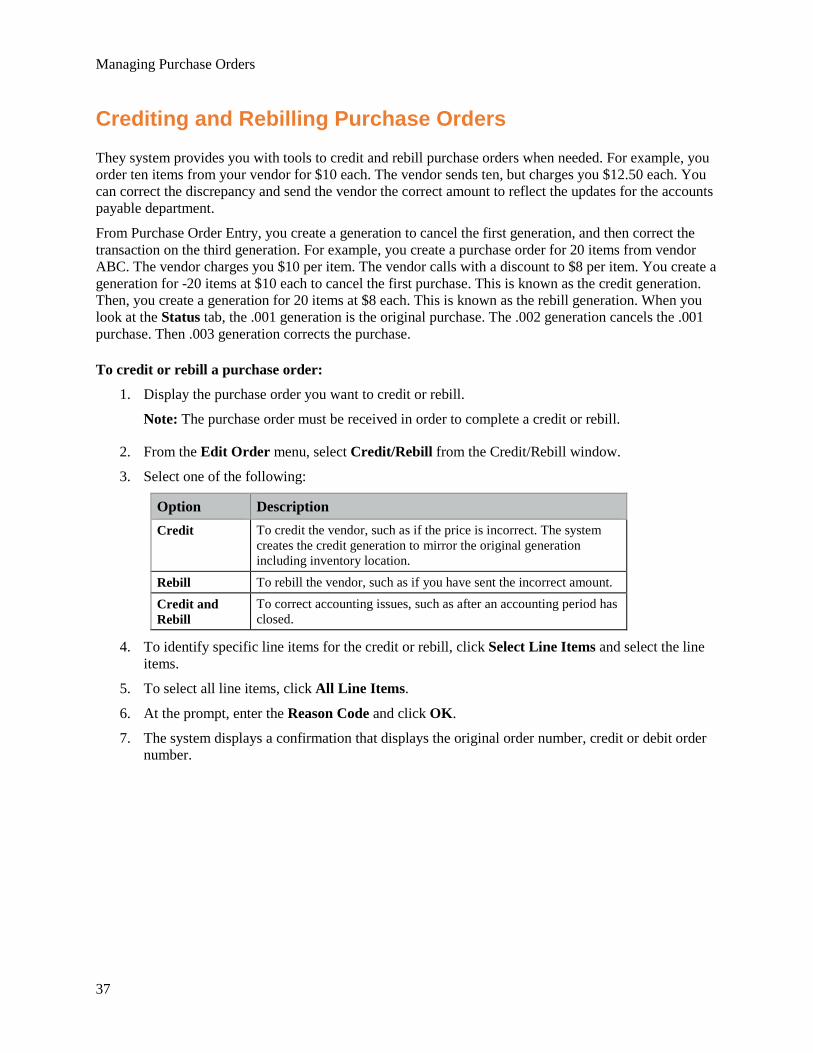
Managing Purchase Orders
37
Crediting and Rebilling Purchase Orders They system provides you with tools to credit and rebill purchase orders when needed. For example, you order ten items from your vendor for $10 each. The vendor sends ten, but charges you $12.50 each. You can correct the discrepancy and send the vendor the correct amount to reflect the updates for the accounts payable department.
From Purchase Order Entry, you create a generation to cancel the first generation, and then correct the transaction on the third generation. For example, you create a purchase order for 20 items from vendor ABC. The vendor charges you $10 per item. The vendor calls with a discount to $8 per item. You create a generation for -20 items at $10 each to cancel the first purchase. This is known as the credit generation. Then, you create a generation for 20 items at $8 each. This is known as the rebill generation. When you look at the Status tab, the .001 generation is the original purchase. The .002 generation cancels the .001 purchase. Then .003 generation corrects the purchase.
To credit or rebill a purchase order:
1. Display the purchase order you want to credit or rebill.
Note: The purchase order must be received in order to complete a credit or rebill.
2. From the Edit Order menu, select Credit/Rebill from the Credit/Rebill window.
3. Select one of the following:
Option Description Credit To credit the vendor, such as if the price is incorrect. The system
creates the credit generation to mirror the original generation including inventory location.
Rebill To rebill the vendor, such as if you have sent the incorrect amount. Credit and Rebill
To correct accounting issues, such as after an accounting period has closed.
4. To identify specific line items for the credit or rebill, click Select Line Items and select the line items.
5. To select all line items, click All Line Items.
6. At the prompt, enter the Reason Code and click OK.
7. The system displays a confirmation that displays the original order number, credit or debit order number.

Resorting Line Items on POs
38
Resorting Line Items on POs Resort line items to better view and handle purchase order that have several pages of items. Resorting line items does not change the order of receiving or the manner in which the purchase order is processed.
To resort line items:
1. From the Purchase menu, select Purchase Order Entry to display the Purchase Order Entry window.
2. Display the purchase order you want to resort.
3. From the View menu, select Resort Line Items to display the Line Item Resorting window.
4. Place the cursor in the SortBy field and select from the following:
Selection Sorts by... Subtotal Group selection of products that make up the subtotal.
Price Group groups of customers to whom you sell your products and who receive different product pricing.
Buy Group a subset of items that are purchased together.
Price Line a group of products that are priced together. Buy Line the group of products that are purchased together. Select Code products grouped together with user-defined selection codes. These
user-defined codes can be used in conjunction with other selection codes set at the product level.
Commodity Code the four-digit number that groups products together by type, such as wire or pipe. Commodity codes are usually provided by the vendor.
UPC Vendor Code the vendor-specified universal product code (UPC). Sales Budget Group items grouped together by sales budget.
5. In the Line Number and to fields, enter the line items you want to sort.
6. Click OK to sort the line items as indicated.
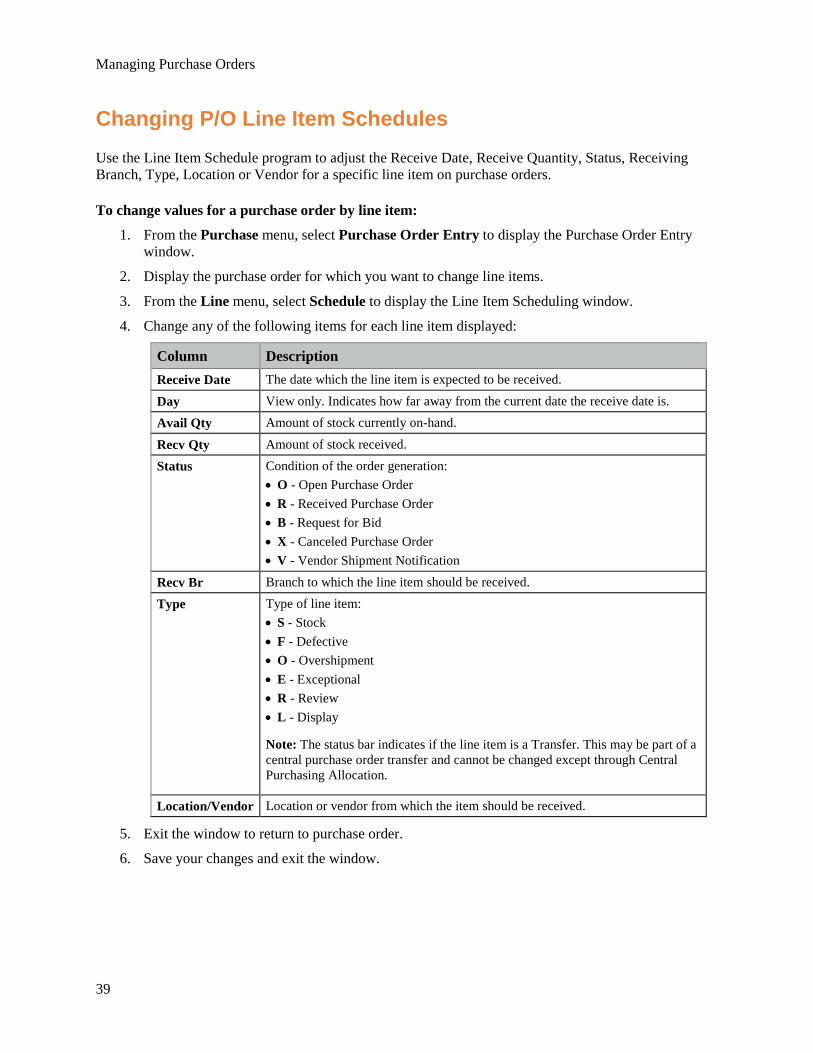
Managing Purchase Orders
39
Changing P/O Line Item Schedules Use the Line Item Schedule program to adjust the Receive Date, Receive Quantity, Status, Receiving Branch, Type, Location or Vendor for a specific line item on purchase orders.
To change values for a purchase order by line item:
1. From the Purchase menu, select Purchase Order Entry to display the Purchase Order Entry window.
2. Display the purchase order for which you want to change line items.
3. From the Line menu, select Schedule to display the Line Item Scheduling window.
4. Change any of the following items for each line item displayed:
Column Description Receive Date The date which the line item is expected to be received.
Day View only. Indicates how far away from the current date the receive date is. Avail Qty Amount of stock currently on-hand.
Recv Qty Amount of stock received. Status Condition of the order generation:
• O - Open Purchase Order • R - Received Purchase Order • B - Request for Bid • X - Canceled Purchase Order • V - Vendor Shipment Notification
Recv Br Branch to which the line item should be received. Type Type of line item:
• S - Stock • F - Defective • O - Overshipment • E - Exceptional • R - Review • L - Display
Note: The status bar indicates if the line item is a Transfer. This may be part of a central purchase order transfer and cannot be changed except through Central Purchasing Allocation.
Location/Vendor Location or vendor from which the item should be received.
5. Exit the window to return to purchase order.
6. Save your changes and exit the window.
Adding Notes and Instructions on Purchase Orders
40
Adding Notes and Instructions on Purchase Orders Use the Header screen to add notes to purchase orders for vendor-specific comments, such as Please notify upon receipt or vendor instructions, such as Deliver to the back loading dock. You can also add product specific notes, such as hazardous material (HAZMAT) criteria.
In addition, you can add reminder notes to individual line items. For example, you need to order a water heater. You can have a reminder that displays giving you the recommended parts that you need to go with the water heater. This reminder can display on the window until the next line item is entered. Use the Display Reminder Notes Until Next Product Is Entered control maintenance record to indicate if you want the reminder to display in this manner.
Note: If you can change the ship-from vendor, using the Header tab, with instructions or notes attached, the system will prompt you to use the current vendor instructions or notes for the newly selected vendor.
To add a standard vendor note:
1. From the Purchase menu, select Purchase Order Entry to display the purchase order entry window.
2. Display the purchase order for which you want to add a note.
3. Click the Header tab to display the Header window.
4. From the Additional menu, select Vendor Internal Notes to display the standard notes selections.
5. Select a note to attach to the window.
Note: If no entries are found, the message "No standard entries found." Click OK to continue. To create a new note, see Creating Vendor Notes.
6. To type a free-form note, enter the information in the Internal Notes field at the bottom of the window.
7. Save your changes and exit the window.
To add a vendor instruction:
1. From the Purchase menu, select Purchase Order Entry to display the purchase order entry window.
2. Display the purchase order for which you want to add a note.
3. Click the Header tab to display the Header window.
4. From the Additional menu, select Standard Instructions.
5. Select an instruction to attach to the window.
Note: If no entries are found, the message "No standard entries found." Click OK to continue. To create a new note, see Creating Vendor Notes.
6. To type free-form instructions, enter the information in the Internal Notes field at the bottom of the window.
7. Save your changes and exit the window.
Managing Purchase Orders
41
To add a product specific note:
1. From the Purchase menu, select Purchase Order Entry to display the purchase order entry window.
2. Display the purchase order for which you want to add a note.
3. Click the Detail Scheduling tab to display the scheduling window.
4. From the Options menu, select Schedule.
5. Highlight the product for which you want to add a note.
6. From the Edit menu, select Product Notes.
7. Select a note to attach to the window. To create a new note, see Writing User-Defined Notes.
8. Save your changes and exit the window.

Adding Comments to Purchase Orders
42
Adding Comments to Purchase Orders Use the Purchase Order Entry window to add comments for individual line items. For example, if you received an over-shipment of items, but have decided to keep the surplus in your inventory, add a comment informing accounts payable to send payment.
You can also add comments that are unattached to the line items and saved at the order level. For example, you can thank your customers for purchasing with you and include any return information they may need.
The comments added to purchase orders print on the purchase order for the warehouse agent. You can delete a line item comment if needed.
Consider the following control maintenance records when adding comments to purchase orders:
• Copy Procure Comments to P/O
• Exclude Original Sale Line Item Comment From Returned P/O
• Line Item Standard Comments
• Exclude Procure Comments From OE Group Procurements
• Copy Comments For Procured Items To Transfers
To add a comment for a P/O line item:
1. From the Purchase menu, select Purchase Order Entry to display the purchase order entry window.
2. Display the purchase order for which you want to add a comment.
3. Place the cursor on the line item for which you want to enter a comment.
4. From the Line Item menu, select Comment to display the Comments window.
5. In the Comment Type field, select the category for the comment you are entering.
Note: Selecting Replace Description inserts the product description in the comment field.
6. In the Comment field, enter any additional comment information and select File > Save.
7. Save your changes and exit the window.
The comment displays below the product description on the purchase order Body tab.
8. Save your changes and exit the window.
To add an order-level comment:
1. From the Purchase menu, select Purchase Order Entry to display the purchase order entry window.
2. Display the purchase order for which you want to add a comment.
3. From the Line Item menu, select Comment to display the Comments window.
4. In the Comment Type field, select the category for the comment you are entering.
5. In the Comment field, enter any additional comment information and select File > Save.
Managing Purchase Orders
43
The comment displays on its own line item and prints on the invoice.
6. Save your changes and exit the window.
To delete a comment for a PO line item:
1. From the Purchase menu, select Purchase Order Entry to display the purchase order entry window.
2. Display the purchase order for which you want to add a note.
3. Place the cursor on the line item for which you want to remove a comment.
4. From the Line Item menu, select Comment to display the Comments window.
5. Delete part or all of the comment.
6. Save your changes and exit the window.
The comment no longer displays below the product description on the purchase order Body tab.
7. Save your changes and exit the window.
Adding Generations to Purchase Orders
44
Adding Generations to Purchase Orders The system uses generations on a purchase order to separate how products are handled. For example, you may purchase an entire buy line from a vendor, but part of the shipment is shipped today and part is shipped in two days. Each part would be on a separate generation of the same purchase order.
Note: To make it easier to see how an order breaks into generations, the system provides generation highlighting and generation tooltips that you can turn on. For more information, see Using Generation Display Options.
The automatically creates generations for purchase orders when one of the following for any product on the order is different:
• Ship Date
• Ship Via
• Status
• Ship Br
• Part of the order is a direct
• Part of the order is a procurement
You can also create generations for purchase orders when needed. For example, if stock is damaged or you receive more stock than you ordered, then the damaged or over-shipped stock is separated on a generation. For more information about received damaged stock, see Handling Receiving Discrepancies.
To add a generation to a purchase order:
1. From the Purchase menu, select Purchase Order Entry to display the purchase order entry window.
2. Display the purchase order for which you want to add a generation.
3. Click the Detail Scheduling tab and do one of the following:
• In the Ship Date field of the line item you want to change, enter a new ship date.
• In the Shp Br field of the line item you want to change, enter a new shipping branch.
4. From the Options > Line Options menu, select Schedule.
5. In the Receive Date field of the line item you want to change, enter a new receiving date.
6. Save your changes and exit the window.
7. Click the Status tab and do one of the following:
• In the Order Status field of the line item you want to change, enter a new status.
• In the Ship Via field of the line item you want to change, enter a new ship via.
Note: If you are prompted, in the Freight field, select Allowed regardless of the original purchase order freight terms. The Copy Change to all Gens (Y/N) prompt displays. Type N.
8. If needed, create a tracker from a purchase order to send notification to the purchasing agent.
Managing Purchase Orders
45
9. Save your changes and exit the window.
Overriding Drop Points on Purchase Orders
46
Overriding Drop Points on Purchase Orders You can assign drop points on a per purchase order (P/O) basis. For example, an eight branch central P/O network is offered three drop points by the vendor. The first month, branches 1, 3, and 5 contribute the most to the central P/O, so the drop points are branches 1, 3, and 5. The second month, branches 1, 4, and 7 contribute the most and they are the drop points.
The receiving branches print the P/Os for all branches on the central P/O. User the Cross Dock program to distribute the items.
Use Drop Points Entry to override a drop point on a purchase order.
To override a drop point on a purchase order:
1. From the Purchase menu, select Purchase Order Entry to display the Purchase Order Entry window.
2. Display the purchase order you want to edit.
3. Click the Status tab.
4. From the Edit menu, select Drop Point to display the Drop Point window.
5. In the Branches on this Order field, indicate which branches you want to authorize for drop point override.
Note: If only one branch is listed, that branch must be the drop point.
6. Save your changes and exit the window.
Managing Purchase Orders
47
Copying Header Information to All PO Generations Use the Copy to All function on the purchase order entry Header tab to add changes to all generations of the purchase order.
Use the PO Header Branch Change Copy To control maintenance record to indicate if you want to copy changes to a branch in a purchase order Header tab to the price branch, copy the change to all branches or prompt the user to specify where to copy the new information. If you do not want the purchase order number copied to all generations, but you do want the release number copied to all generations, then you can set the copy mode to No and change the purchase order number. Then set the copy mode to Yes and change the release number.
To use the Copy to All function:
1. From the Purchase menu, select Purchase Order Entry to display the purchase order entry window.
2. Display the purchase order for which you want to copy information.
3. Click the Header tab.
4. From the Additional menu, select Copy to All.
5. Select one of the following:
• On - Adds changes to each current generation and any generation created later.
• Off - Does not add any changes to any generation.
• Prompt - Lets you select which changes to cascade to the other generations. You only receive the prompt dialog box if there are already generations created.
6. Save your changes and exit the window.
Creating Trackers from Purchase Orders
48
Creating Trackers from Purchase Orders From Purchase Order Entry you can create a tracker to add to a user job queue. For example, if the customer has an item on the purchase order that needs to be shipped from another location and you want to make sure the purchasing agent sees the need, create a tracker for the purchasing agent with that line item information.
For more information, see Creating Trackers from Ledger Transactions.
Managing Purchase Orders
49
Selecting Inactive Vendors for POs User Vendor Maintenance to make vendors active or inactive.
You can inactivate a vendor if your branch does not purchase from that vendor. For example, your company has branches in Orlando, FL and Atlanta, GA. The branch in Orlando inactivates vendors in Atlanta, because that branch would not normally purchase from vendors in Atlanta.
However, an inactive vendor can be used, if needed. You can activate a vendor temporarily for special circumstances. For example, if a vendor in Atlanta provides your company a discount if you purchase all your Delta faucets for the month from them, your Orlando branch can make that Atlanta vendor active for a one-time purchase.
See Setting Up Purchase Order Entry for information about the control maintenance records and authorization keys required for this procedure. You must set the Display Customers/Vendors Who Are Inactive At A Branch control maintenance record in order for the inactive vendors to display.
To select an inactive vendor:
1. From the Purchase menu, select Purchase Order Entry to display the purchase order entry window.
2. In the Branch field, enter the branch for which you want to purchase.
3. In the Vendor / Order # field, click the quick access list button.
4. From the Select field drop-down menu, select Vendors.
5. Select the vendor you want to use and press Enter.
6. From the Order Selection dialog box, select New.
7. Click OK.
8. Complete the purchase order.
9. Save your changes and exit the window.
Note: The system checks that you have met the vendor target. If not, the following message displays: Vendor's Minimum Target of <vendor target> has not been met. You are not authorized. Enter Password to Override: The FREIGHT.TARGET.OVERRIDE authorization key must be set. Authorized users can enter their Eclipse login password to override.
Adding International Taxes to Purchase Orders
50
Adding International Taxes to Purchase Orders Use Customs Drawback Information program from Purchase Order Entry to identify specific taxes for imported products. Products purchased outside your country have taxes levied due to international standards and individual countries' specifications. The system assists in ensuring that the taxes are applied in accordance with these standards and specifications.
Note: Use the Update Cost On Sales Order From Tagged Purchase Order control maintenance record to ensure that duty percentages are copied to new purchase order generations and the system calculates cost correctly.
Duty taxes can be set at the product level and are assigned in Product Maintenance or in Duty Harmonizing Code Maintenance. Duty taxes are based on the country of manufacture and the harmonizing code.
However, there may be purchase orders that require additional duty taxes. You can add duty information from Purchase Order Entry. By accessing the Customs Drawback Information window, you can view the basic freight and duty costs being applied to the purchase order. The Customs Drawback Information window contains no default settings. To apply duty taxes, you must enter the parameters.
In addition, you can add or change the following items:
• Duty harmonizing code
Note: This code causes a recalculation for the landed average cost displayed in the header window. The landed average costs is the sum of the freight amount, Currency COGS, Duty Amount, and Other Amount displayed.
• Customs entry number
• Tariff number
• Port of entry
• Date duty was paid
• Shipment date
• Manufacture country
Note: This code causes a recalculation for the landed average cost displayed in the header window. The landed average costs is the sum of the freight amount, Currency COGS, Duty Amount, and Other Amount displayed.
• Vendor name and number
• Certificate of origin
To add or change international tax information:
1. From the Purchase menu, select Purchase Order Entry to display the purchase order entry window.
2. Display the purchase order to which you want to apply international taxes.
3. From the Line Item menu, select Duty Information to display the Customs Drawback Information window.
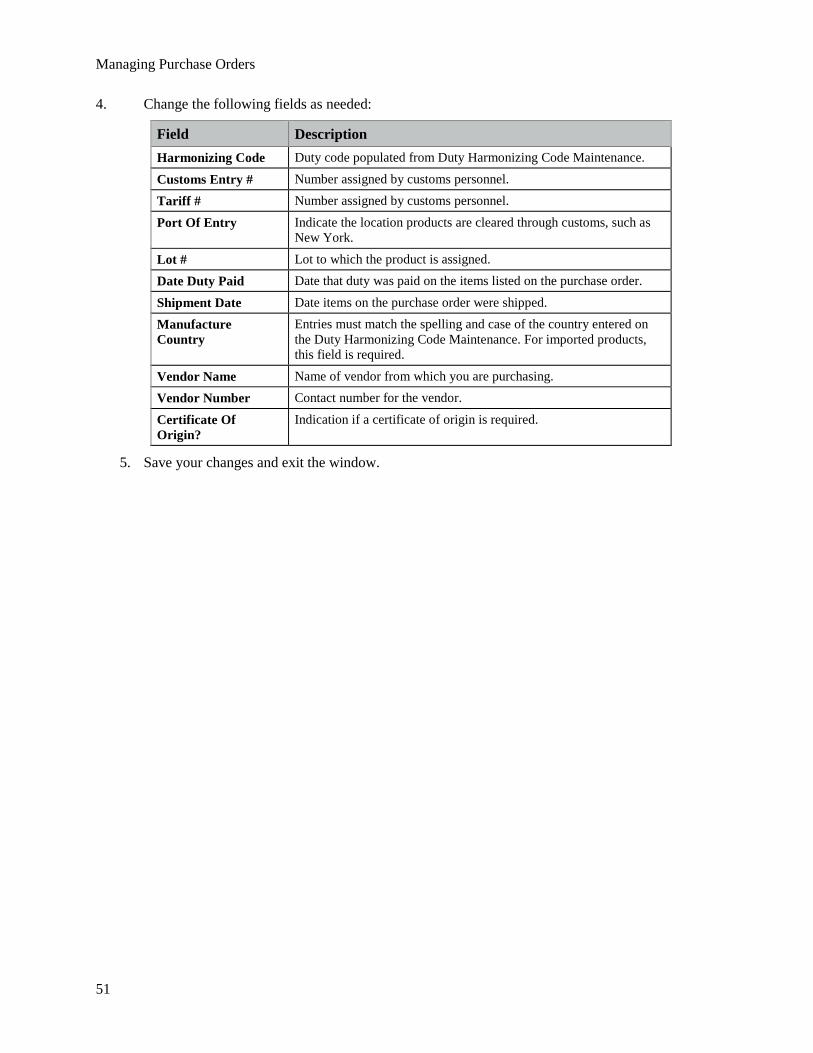
Managing Purchase Orders
51
4. Change the following fields as needed:
Field Description Harmonizing Code Duty code populated from Duty Harmonizing Code Maintenance.
Customs Entry # Number assigned by customs personnel. Tariff # Number assigned by customs personnel.
Port Of Entry Indicate the location products are cleared through customs, such as New York.
Lot # Lot to which the product is assigned. Date Duty Paid Date that duty was paid on the items listed on the purchase order.
Shipment Date Date items on the purchase order were shipped. Manufacture Country
Entries must match the spelling and case of the country entered on the Duty Harmonizing Code Maintenance. For imported products, this field is required.
Vendor Name Name of vendor from which you are purchasing. Vendor Number Contact number for the vendor.
Certificate Of Origin?
Indication if a certificate of origin is required.
5. Save your changes and exit the window.
Prepaying Vendors
52
Prepaying Vendors In some situations your vendor may require that you pay the total of a purchase order before shipping your order. You can set up the system so you can prepay your vendor either by credit card or by a manual check.
Prepaying by Credit Card Before you can prepay by credit card, you need to set up the system to accept these types of pre-payments. You need to show a debit to the prepaid account and a credit in the accrual account to keep your books in balance.
To prepay a vendor by credit card:
1. Create an accrual account in G/L Account Maintenance named Credit Card Exchange with the following fields selected:
• Liability, Capital or Revenue
• C/R Adjustment Allowed
• A/P Adjustment Allowed
• Balance Sheet
• Active
• Branch Detail
• Recalculated Exchange
For more information about creating accrual accounts, see Creating General Ledger Accounts in the General Ledger documentation.
2. Create a payable to show the following:
• A debit for the amount required to a prepaid account.
• A credit for the amount required to the accrual account.
For more information about entering payable information, see Entering Payables in the Accounts Payable documentation.
3. Send the Receiving department a message using the Job Queue requesting notification for when they receive the purchase order and therefore the goods from the vendor.
After notification of receiving the purchase order, payment is charged to the credit card set up in the system.
For more information about using the job queue to send messages and create tasks, see Creating Trackers in the User Job Queue documentation.
4. Create a payable for the vendor for $0.00.
For more information about creating payables, see Entering Payables Accounts in the Accounts Payable documentation.
5. Reconcile the purchase order.
Managing Purchase Orders
53
For more information about reconciling purchase orders, see Reconciling Purchase Orders to Invoices in the Accounts Payable documentation.
Prepaying by Manual Check After you prepay by check, you need to record the information appropriately in the system to keep track of these types of pre-payments.
Note: When entering a check number, we recommend entering a letter, such as Z, at the beginning to distinguish that this was a manual check.
1. Complete the physical check and send it to your vendor.
2. Create an asset account in G/L called Prepaid.
For more information about creating asset accounts, see Creating G/L Accounts in the General Ledger online documentation.
3. Create a payable for the vendor for the amount of the check written.
For more information about entering payable , see Entering Payables in the Accounts Payable documentation.
4. Post the amount of the check to the Prepaid account.
For more information about posting check amounts, see Posting Manual Checks in the Accounts Payable documentation.
5. Record the manual check in Manual Check Posting.
For more information about posting check amounts, see Posting Manual Checks in the Accounts Payable documentation.
6. Send the Receiving department a message using the Job Queue requesting notification for when they receive the purchase order and therefore the goods from the vendor.
For more information about using the job queue to send messages and create tasks, see Creating Trackers in the User Job Queue documentation.
7. Create a payable for the vendor for $0.00.
For more information about creating payables, see Entering Payables Accounts in the Accounts Payable documentation.
8. Reconcile the purchase order.
For more information about reconciling purchase orders, see Reconciling Purchase Orders to Invoices in the Accounts Payable documentation.
9. Credit the Prepaid account so that the Diff Amt field is $0.00.
For more information about posting to accounts, see Posting Manual Checks in the Accounts Payable documentation.
10. Process the manual check. Processing the check ensures that this payable does not display on any future check stubs for this vendor.
For more information about reconciling checks, see Reconciling Single Checks in the Accounts Payable documentation.
Prepaying Vendors
54
11. Verify the debit from the original prepaid payable offsets the credit from the adjustment payable through G/L Inquiry.
For more information about using G/L Inquiry, see Making Basic General Ledger Inquiries in the General Ledger documentation.
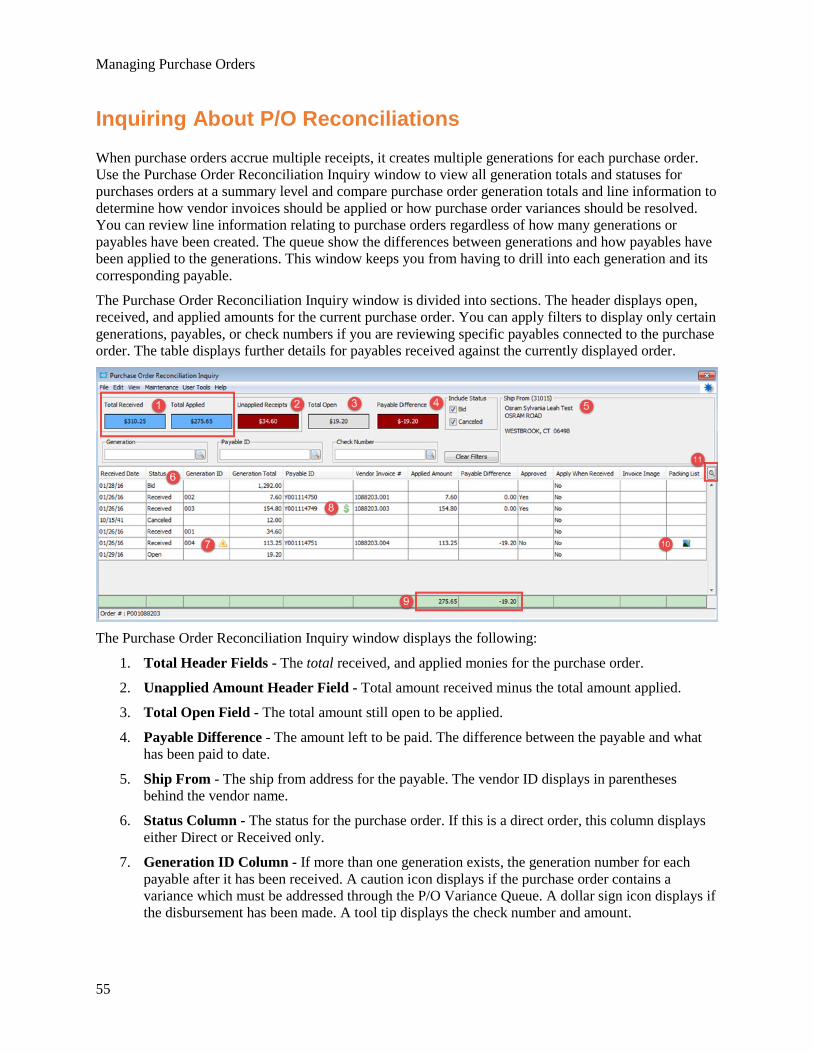
Managing Purchase Orders
55
Inquiring About P/O Reconciliations When purchase orders accrue multiple receipts, it creates multiple generations for each purchase order. Use the Purchase Order Reconciliation Inquiry window to view all generation totals and statuses for purchases orders at a summary level and compare purchase order generation totals and line information to determine how vendor invoices should be applied or how purchase order variances should be resolved. You can review line information relating to purchase orders regardless of how many generations or payables have been created. The queue show the differences between generations and how payables have been applied to the generations. This window keeps you from having to drill into each generation and its corresponding payable.
The Purchase Order Reconciliation Inquiry window is divided into sections. The header displays open, received, and applied amounts for the current purchase order. You can apply filters to display only certain generations, payables, or check numbers if you are reviewing specific payables connected to the purchase order. The table displays further details for payables received against the currently displayed order.
The Purchase Order Reconciliation Inquiry window displays the following:
1. Total Header Fields - The total received, and applied monies for the purchase order.
2. Unapplied Amount Header Field - Total amount received minus the total amount applied.
3. Total Open Field - The total amount still open to be applied.
4. Payable Difference - The amount left to be paid. The difference between the payable and what has been paid to date.
5. Ship From - The ship from address for the payable. The vendor ID displays in parentheses behind the vendor name.
6. Status Column - The status for the purchase order. If this is a direct order, this column displays either Direct or Received only.
7. Generation ID Column - If more than one generation exists, the generation number for each payable after it has been received. A caution icon displays if the purchase order contains a variance which must be addressed through the P/O Variance Queue. A dollar sign icon displays if the disbursement has been made. A tool tip displays the check number and amount.

Inquiring About P/O Reconciliations
56
8. Payable ID Column - System-assigned ID for the payable on this generation. A dollar sign displays if a check has been applied. If you hover over the icon, a tool tip displays with the check number and date it was issued.
9. Totals Fields - Running totals for Applied Amounts and Payable Difference.
10. Invoice Image and Packing List Columns - Displays an image icon if an invoice image for the generation is available to view. Double-click the image to display the invoice or packing list.
11. View Manager - Switch views the standard PO Reconciliation view or switch to a PO Variance view.
Note: Standard permissions apply when using this window. Users need COGS.EDIT and COGS.VIEW or COST.EDIT and COST.VIEW to manage information.
To inquire about P/O reconciliations:
1. Display the purchase order for which you want to inquire about reconciliations.
2. Click the Totals tab and from the Additional menu, select P/O Reconciliation Inquiry.
3. Review the current payable status with the header fields. See image above.
4. Use the Include Generation Status check boxes to indicate if you want to view Bid or Canceled generations on the purchase order.
5. Use the following filters to limit the table display to specific payables: Generation, Payable ID, or Check Number.
Note: Use the Clear Filters button to remove any limitations on the display and start again.
6. Use the table to review each payable processed for the purchase order:
Column Description Received Date Receive date of the generation.
Status Indicates if the payable has been received for this generation. If the order is a direct and has not been reconciled, this column displays Direct.
Generation ID If more than one generation exists, the generation number for each payable after it has been received. • A caution icon displays if the purchase order contains a variance
which must be addressed through the P/O Variance Queue. • A dollar sign icon displays if the disbursement has been made. A tool
tip displays the check number and amount. Generation Total Total cost for the generation.
Vendor Ext. Total The value from the P/O Variance view in the SOE Body tab entered during A/P Entry.
Variance The difference between the purchase order and the invoice. This is the same value displayed in the Purchase Order Variance Queue.
Payable ID System-assigned ID for the payable on this generation.
Vendor Invoice# The vendor-assigned invoice number for the generation.
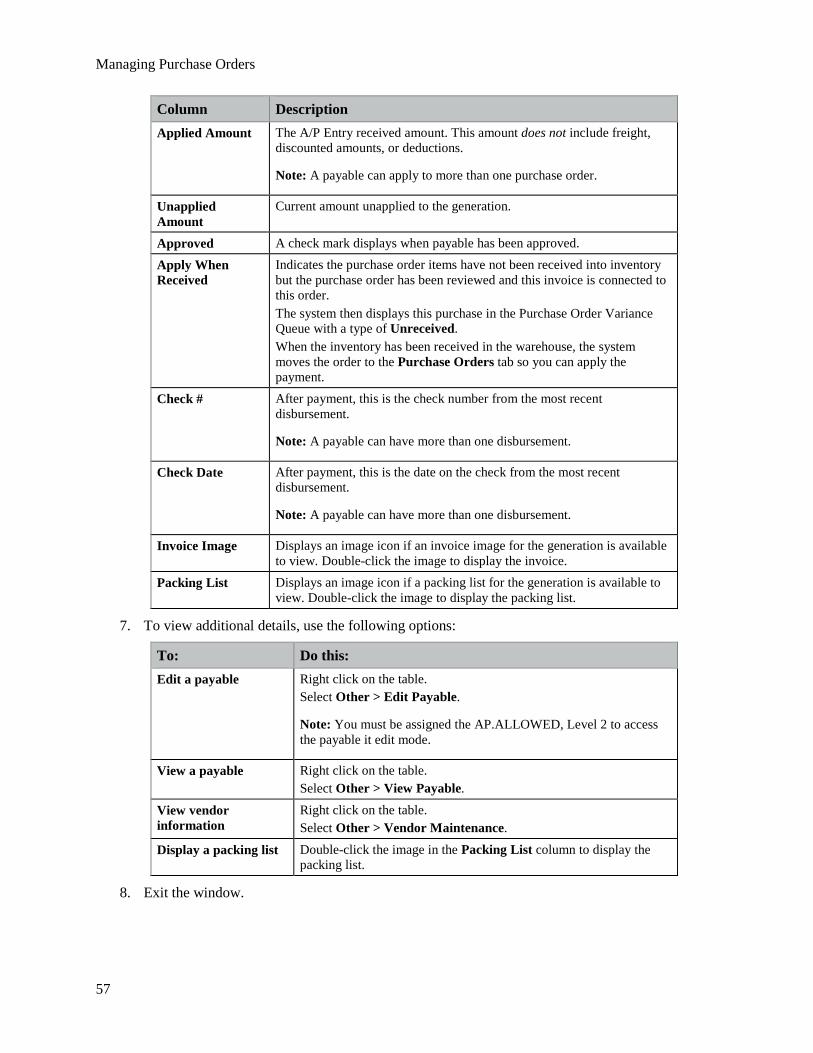
Managing Purchase Orders
57
Column Description Applied Amount The A/P Entry received amount. This amount does not include freight,
discounted amounts, or deductions.
Note: A payable can apply to more than one purchase order.
Unapplied Amount
Current amount unapplied to the generation.
Approved A check mark displays when payable has been approved. Apply When Received
Indicates the purchase order items have not been received into inventory but the purchase order has been reviewed and this invoice is connected to this order. The system then displays this purchase in the Purchase Order Variance Queue with a type of Unreceived. When the inventory has been received in the warehouse, the system moves the order to the Purchase Orders tab so you can apply the payment.
Check # After payment, this is the check number from the most recent disbursement.
Note: A payable can have more than one disbursement.
Check Date After payment, this is the date on the check from the most recent disbursement.
Note: A payable can have more than one disbursement.
Invoice Image Displays an image icon if an invoice image for the generation is available to view. Double-click the image to display the invoice.
Packing List Displays an image icon if a packing list for the generation is available to view. Double-click the image to display the packing list.
7. To view additional details, use the following options:
To: Do this: Edit a payable Right click on the table.
Select Other > Edit Payable.
Note: You must be assigned the AP.ALLOWED, Level 2 to access the payable it edit mode.
View a payable Right click on the table. Select Other > View Payable.
View vendor information
Right click on the table. Select Other > Vendor Maintenance.
Display a packing list Double-click the image in the Packing List column to display the packing list.
8. Exit the window.
Combining Branches on Purchase Orders
58
Combining Branches on Purchase Orders In a central purchasing scheme, you can combine branch needs to meet a vendor target. You can determine how each branch replenishes material. If vendors can deliver to each branch individually, you can convert the single suggested purchase order (P/O) into individual purchase orders. If vendors can deliver to only some branches individually, you can combine the suggested P/O into a single P/O and use Drop Points Maintenance to determine how the deliveries should be made. You can also print the P/O generations individually or combined by drop points. If vendors deliver only to a single branch, you can create central P/O transfers to replenish material for the remaining branches.
These flags are set per buy line within Buy Line Maintenance. Set the Combine on Central P/O flag to create a single P/O with one generation per branch when you convert the Suggested P/O.
To combine all branches' purchase orders on a single sheet:
1. From the Purchase > Maintenance, select Buy Line Maintenance to display the Buy Line Maintenance window.
2. In the Buy Line ID field, enter the buy line name and press Enter.
The buy line information displays.
3. From the Information menu, select Additional Data to display the Buy Line Additional Data window.
4. In the Combining on Central P/O field, enter Yes or No as follows:
• Yes - If you create a Suggested P/O for this buy line and there are multiple receiving branches for items on the purchase order, the system combines all the items for all the branches under one purchase order number.
• No - If you create a Suggested P/O for this buy line and there are multiple receiving branches for items on the purchase order, the system creates a separate purchase order for each branch. Each branch then has a different purchase order with a different number. This is the default.
5. If you want to automatically create transfers for central purchase order at the buy line level, set the Create Central P/O Transfers to Yes. Before setting to Yes, review the restrictions and implications for this functionality; see Automatically Creating Central P/O Transfers in this documentation.
6. Exit the window to return to Buy Line Maintenance.
7. Save your changes and exit the window.

Managing Purchase Orders
59
Automatically Creating Central P/O Transfers In a central purchasing scheme, you can use the Combine on Central P/O option from either Buy Line Maintenance or during the convert to suggested purchase order process to include all products on one purchase order. The system creates a single purchase order with a single generation for the purchasing branch.
Central purchase order transfers lets you track material from receiving at the purchasing branch through shipment to the other branches using the Create Central P/O Transfers option in conjunction with the Combine on Central P/O option in the Convert Suggested P/O to Actual P/Os window.
You can also use Central Purchasing Allocation to see the ordered and allocated quantities for each branch along with the associated transfers.
Note: You can also create central purchase order transfers on-the-fly when converting suggested purchase orders.
Transfers do not have backorders, therefore if an item is backordered by the vendor the system updates the open transfer with the correct quantity and creates a new transfer for the remaining material quantities. The purchase order and all its associated generations and transfers remain in sync through the purchasing process.
To create central P/O transfers:
1. From the Purchase > Maintenance, select Buy Line Maintenance to display the Buy Line Maintenance window.
2. In the Buy Line ID field, enter the buy line name and press Enter.
The buy line information displays.
3. From the Information menu, select Additional Data to display the Buy Line Additional Data window.
4. In the Create Central P/O Transfers field, enter Yes as follows:
• Yes - Select only if the Create Central P/O option is also set to Yes. The system automatically creates transfers to send to branches that require the material. This lets you track the material through purchasing to receiving.
• No - Normal replenishment processes in place. The system creates a central purchase order with one generation per branch. Each branch received its material at its location based on the generation quantities.
Note: The system uses the Order Status Print Status Defaults control maintenance record to determine the default print status for central purchase orders.
5. In the Use P/O Cost on Central P/O Transfers field to indicate which cost to use for the central P/Os.
Note: The system uses this setting if the Use P/O Cost on Central P/O Transfers control maintenance record is set to No.
6. Exit the window to return to Buy Line Maintenance.
7. Save your changes and exit the window.
Allocating Centrally Purchased Material to Branches
60
Allocating Centrally Purchased Material to Branches Central purchase order transfers use Central Purchasing Allocation through Purchase Order Entry to help you allocate the inventory to your other branches. You can change order quantities directing the material where you need it or update quantities during the receiving process.
When the central purchase order is created, Eclipse automatically allocates the quantities to each branch. This allocation comes from the Suggested P/O and matches the quantity suggested for each individual branch. You can change allocation amounts manually and affect future receivings of the central purchase order material. The Inventory Inquiry displays open transfer quantities, so branch personnel know to expect material.
You must have the POE.EDIT.ALLOCATION authorization key to change quantities on the Central Purchasing Allocation window. Setup automatic transfers for central purchasing through Buy Line Maintenance.
Note: Central purchase orders and transfers can only be edited in the Solar application. The system labels the orders as Central Purchase Orders and Central Transfers and alerts users that the order must be edited through Solar.
Items on central purchase orders cannot be merged with other orders.
To allocate material to different branches:
1. Display the purchase order on which you have centrally purchased material ready for allocation.
2. Highlight the line item you want to allocate.
The status bar on the bottom of the purchase order indicates if the line item is a centrally purchased generation and the drop point branch.
3. From the Line Item menu, select Central Purchasing Allocation.
4. Use the Quantity Ordered column to enter the quantities required at each branch.
Quantity amounts default to the amount originally suggested in the Suggested PO program. These quantities can be changed, but cannot exceed the original amount ordered or be below the amount that has already been shipped.
When you change the Quantity Ordered amount, the This Gen Allocation column changes to match The overall order quantity for the branch does not change.
Note: You can only change quantities if the transfers have not been shipped or received.
5. Use the View Manager to display the Detail view and check the status of the displayed transfers.
The Transfer column displays any tagged transfers that has been created. The Status column indicates where in the process the current transfer is.
6. Manage the order, as needed. For more options, see More Options for Allocating Purchases below.
7. Exit the Central Purchasing Allocation window.
Managing Purchase Orders
61
Note: Use the Detail Scheduling tab to view the Transfer column. A check mark displays if the order is linked to a central purchase order transfer. Double-click the check mark to display the Central Purchasing Allocation window.
8. Save your changes and exit the window.
More Options for Allocating Purchases
The following options are available from the Central Purchasing Allocation window:
To: Do this: change the ship date 1. From the Edit menu, select Change Ship Date.
2. Select the order generation you want to change. 3. Change the shipping date, as needed.
edit the tagged transfer for a generation
1. Select the generation you want to review. 2. From the Edit menu, select Edit Transfer Order.
Note: You can only edit an order that is in process. Cancelled or completed orders display as view only.
review order points, transfer points, or buy packages
From the Inquiry menu, select Primary Inventory Maintenance.
review commodity codes, G/L accounts, or units of measure defaults for the product
From the Inquiry menu, select Product Maintenance.
check current inventory levels for a selected product
1. Select the line item you want to check. 2. From the Inquiry menu, select Inventory Inquiry.
Receiving Material from Central P/Os with Transfers
62
Receiving Material from Central P/Os with Transfers When receiving material ordered through a central purchase order, the system automatically changes the print flag to H (Ship When Complete). By doing this, the batch print transfer phantom process recognizes the order as ready for shipment. The system marks them as shipped and prints the appropriate ship tickets.
If the vendor does not ship the full quantity on the first shipment, then as you receive material, Eclipse automatically allocates the quantities based on the percentage received versus what was ordered for each branch. The system respects buy packages and divisibility settings and updates open transfers to the new quantities.
After purchase orders have been received, the transfer status updates to the next transfer print phantom processes the transfer according to the branch-level phantom schedule. Eclipse creates new transfers for any remaining quantities and repeats the process until all items are fully received or cancelled.
Important: You must have the Order Status Print Status Defaults control maintenance record set to H for this functionality to occur. Any other print status requires manual printing of transfers.
The Detail Scheduling window indicates that line items are on central purchase orders and have linked transfers connected to them.
If there are backordered items, Eclipse automatically reallocates the material and updates each associated transfer. new transfers are created for the backordered items, which can be viewed through Central Purchasing Allocation from the open generation of the purchase order. You can also manually reallocate the material, as long as the transfers have not been shipped or received.
Note: You can receive central purchase order through the RF system. If there are backorder quantities or quantity adjustments, the linked transfers are reallocated, as needed.
Managing Purchase Orders
63
Purchase Order Freight Terms Guidelines Freight terms indicate how a vendor expects freight to be paid for freight charges, such as Prepaid or Add On. For example, if a vendor expects the freight to be "Add On" then the purchase order's grand total would include any freight charges incurred. The system populates this field with any default term from the Vendor Maintenance file.
Assign freight terms to the vendor in Vendor Maintenance. For every purchase order created for that vendor, the system assigns the default freight term to the Freight field on the Purchase Order Entry Header tab. Identify the freight restrictions you want to impose and what information is required at the time of receiving. If you leave the freight information blank in Vendor Maintenance, the system requires freight entry when the purchasing agent creates the purchase order. A message displays if required information has not been entered.
In addition, use the Vendor Freight Terms control maintenance record to identify the freight restrictions you want available for orders. These control maintenance record entries populate the valid entry selections for the Freight field on the Purchase Order Entry Header tab.
You can override a default freight term on an individual purchase order basis. The system records the change in the change log for the purchase order. You can view this log by using the Change Log option from the Purchase Order Entry Header tab. The following log displays: "Freight term <new term> now assigned. It was <old term>."
If there is not a vendor-level default freight term defined, the Freight field is blank. You must enter a valid freight term to continue. If you press Esc to exit the window without a term assigned, the following message displays: "Freight Terms Are Required" and the cursor returns to that field.
Selecting Vendors for the Freight Carrier on Purchase Orders
64
Selecting Vendors for the Freight Carrier on Purchase Orders If a purchase order is in an open General Ledger accounting period, you can edit the freight charges. You can change the value of the freight for each line item on the Body tab of the purchase order, or the value of the freight on the Totals tab of the purchase order.
If you enter a freight amount to a Freight Vendor in the Stock Receipt Entry program and the vendor has an override G/L# entered in Vendor Maintenance, then the system credits that G/L account and not the Unbilled Accounts Payable (UBAP).
Selecting a Vendor for the Freight Carrier The freight vendor to whom freight charges are paid in the Freight Carrier field on the Totals tab. If the Freight Carrier field is left blank, the vendor filling the purchase order, whose name is in the Ship From field on the P/O, is the freight vendor.
The system only allows selection from vendors that have the Freight Vendor option set in Vendor File Maintenance. In addition, set up vendors as pay-to vendors, ship-from vendors, or both. To enter a vendor in the Freight Carrier field, that vendor must be flagged as a ship-from vendor. For more information and instructions for modifying the vendor information for freight values, see Creating a Vendor Record.
Managing Purchase Orders
65
Overriding Freight Charges on POs If you override the freight charges for the line items, the Freight field on the Totals tab reflects the total freight charges.
If you override the freight charges for the Freight field on the Totals tab, the system attempts to distribute freight charges among all line items on the purchase order that have not been overridden.
The override amount is marked by an asterisk in the Freight field. The system prompts for confirmation, if the override amount is less that the previous value of the Freight field.
To override freight charges and enter a freight carrier:
1. From the Purchase menu, select Purchase Order Entry to display the Purchase Order Entry window.
2. Display the purchase order for which you want to override freight charges.
3. Click the Totals tab.
4. In the Freight field, enter freight charges.
5. In the Freight Carrier field, enter the freight carrier.
If the Freight Carrier field is left blank, the vendor filling the purchase order whose name is in the Ship From field on the P/O is the freight vendor.
6. Save your changes and exit the window.
Editing Freight Charges on Purchase Orders
66
Editing Freight Charges on Purchase Orders You can edit freight charges on a purchase order, if the purchase order is still in an open General Ledger accounting period. You can edit freight charges in two ways: by line item or by purchase order.
Freight charges of zero ($0.00) can result from items not assigned a freight factor or from items assigned a freight factor of zero. Freight charges with any other numeric value are calculated by the system using the assigned freight factor.
Editing Freight by Line Item Enter freight by individual line item from the Body tab. The Freight field on the Totals tab reflects the total freight charges. Charges apply to the extended amount, when multiple quantities of the line item are purchased. For example, five items have a freight assigned of $1.50 each. The extended amount is $7.50.
However, if there is a Bill of Lading (BOL) attached to the purchase order and the BOL is paid first, you cannot change the line item freight. You receive the following message: A Payable to the Freight Vendor on this PO exists. You are unable to edit Line Item Freight at this time.
In addition, when you add a manual freight override to a purchase order generation and that freight is capitalized, the system distributes that freight to all line items according to the capitalization method. If a line item on that generation is backordered or moved to a different scheduled generation, the system will keep the entire freight amount on the original generation. The system redistributes the freight charges to all remaining items on that generation except for non-eligible items, such as credits, miscellaneous charges, or items with a line item freight override. The total freight on the new generation contains freight that the line item carries and not any line item freight allocated from the original generation. If the moved item has a manual freight override, the system distributes that freight to all items now on the generation.
If an item with a freight override is backordered or moved to an existing generation , the freight remains on the items as long as there is one received quantity on the generation. If not, the system removes the entire line item freight override and deducts that freight amount from the total generation freight as it was added to the total generation freight when the override occurred.
Note: The system adds the backordered item to the new generation with any freight it carries according to its freight factor, but only if the capitalization method is set to freight factor.
To edit the freight charges by line item:
1. From the Purchase menu, select Purchase Order Entry to display the Purchase Order Entry window.
2. Display the purchase order for which you want to edit freight charges.
3. From the View > New View menu, select Ext Cost / Unit Freight.
4. In the Unit Freight field, enter the amount of freight per unit you want to add.
Note: A freight term set up on this maintenance window populates automatically to currently open purchase orders and direct orders for the vendor.
5. Save your changes and exit the window.
Managing Purchase Orders
67
Editing Freight by Purchase Order Enter freight by entire purchase order from the Totals tab, then the system distributes freight charges across all line items on the purchase order that have not been overridden. Use the Capitalize Freight field to tell the system how to distribute the freight across the purchase order. Overridden freight charges display with an asterisk (*).
If the override amount is less than the previous value of the freight, the system prompts you for confirmation. Otherwise, the system changes the Capitalize Freight field to Dollars and distributes the amount to all line item on the purchase order. If you want to capitalize freight by means other than dollars, change the value in the Capitalize Freight field.
To edit the freight charges by entire order:
1. From the Purchase menu, select Purchase Order Entry to display the Purchase Order Entry window.
2. Display the purchase order for which you want to edit freight charges.
3. Click the Totals tab.
4. In the Freight field, enter the total amount of freight to apply to the entire order.
5. Save your changes and exit the window.
Pass-Along Freight Rules
68
Pass-Along Freight Rules Use the pass-along freight process to pass freight expenses on to your customers. This eliminates the need to enter freight manually after reviewing the Freight Audit reports. You can pass freight charges automatically on hard or soft tagged orders and direct orders.
Before using pass-along freight, review Purchase Order Freight Term Guidelines.
When passing freight from the purchase order to the sales order, freight is added to the Totals tab on the sales order in the inbound billable or inbound expense column.
Important: The system does support the possibility of an "at" character (@) in the tag information.
Hard Tags The system creates a hard tag when a customer requests a product that has zero on-hand and you create a purchase order to procure it. A hard tag links the purchase order on which you are procuring the requested product to the sales order on which the customer is ordering the product.
Use the Default Setting For Bill Incoming Freight To Tagged Sales Order Field control maintenance record to set the default value for the Bill Incoming Freight To Tagged Sales Order field on the Purchase Order Entry Totals tab. If you set this field to yes, then the system applies any inbound freight incurred due when receiving a tagged purchase order to the customer as Inbound Freight & Billable.
By default, the COGS is updated to include both the cost of the item and the freight distributed for that item as if you were working in a landed cost environment. Use the Back Out Pass-Along Freight From COGS control maintenance record to indicate whether the system should remove the billed pass-along freight amount from COGS and/or COMM (COST). This control maintenance record is used to avoid overcharging for freight on a sales order. However, the system does not back out freight from COGS if it would take COGS below zero dollars ($0.00) or if COGS was overridden on a sell matrix. This override is usually done for rebate items and is indicated on the sales order by an exclamation point (!). In addition, the system does not back out the freight on an order until it is shipped.
Commission cost may also be updated to reflect the freight depending on how the Change Both COGS And COMM-COST On Override control maintenance record is set.
Note: This tool can be used as an incentive for sales personnel to bill customers for freight. Increased profitability on a line-item and order level basis has results in higher commissions for sales personnel.
Soft Tags The system creates a soft tag when a customer requests a product and there is not enough available to meet the need. However, because there are zero on-hand, the system suggests that you purchase more of the product. The purchase order created is not directly linked to the customer's request.
A prorated freight charge is added to the sales order for the customer to compensate for your charges. If a hard tagged item exists on the purchase order, the customer with the hard tagged item incurs one hundred percent of the cost.
For example, Customer A requests products X, Y, and Z. Product Y is not a stocked item. The customer does not want to procure it. Because there is zero on-hand, the system suggests you procure product Y. The system creates a soft tag for Customer A from the sales order to the purchase order. Customer B
Managing Purchase Orders
69
comes in after Customer A and requests product Y. Product Y is not a stocked item, but Customer B wants to procure it. The system creates a hard tag from the sales order to the purchase order because the customer does want it procured. Customer B incurs all freight costs.
Use the following control maintenance records, as needed:
• Expense Incoming Freight If Customer Is Freight In Exempt - Indicate whether the system should add the cost of incoming freight from a purchase order to a soft-tagged sales order as Expensed Incoming Freight, rather than billable incoming freight. This is applicable when customers are Inbound Freight Exempt.
• Pass Along Incoming Freight To Billable Freight Customers - Indicate whether the system should pass incoming freight costs along to customers who are not freight exempt.
• Product Ranks To Exclude From Pass-Along Incoming Freight Charges - Specify the product ranks the system should exclude from pass-along incoming freight charges. The intent of this record is to prevent freight from being passed to the customer for the shipment of material that the distributor should always have available. See Product Ranking Method and Breakpoint Rules for information on how to set up product ranks. Use this control maintenance record to prevent freight from being passed to the customer if the material should have been in stock.
• Ignore Order Date For Pass Along Freight - Indicate whether the system ignores the order date when passing along freight from a purchase order to a soft-tagged sales order. This record does not apply to hard tags. The default is No.
Direct Orders The system enters freight on direct sales orders associated with the payable based on the freight amount on the header of the A/P Entry window. If there are multiple directs reconciled to that payable, the system prorates the freight charge to the directs according to the amount in the PO Total field for each direct.
Use the Pass Along Freight To Direct Sales Orders control maintenance record to indicate whether to pass along the amount entered in the Freight Amt field in the header of the A/P Entry window for a payable to any direct sales orders that are reconciled to that payable.
If a customer is freight exempt, a note is made in the Change Log with the following message: Expense Incoming Freight changed from 0.00 to <new cost> from <order number>.
In addition, freight will not be distributed to directs if they are in closed accounting periods or if incoming freight has already been applied. If freight has been applied, the following message displays: Freight Already Exists On at Least One of the Direct Orders. Do You Wish to Override that Freight? (Y/N). If you select yes, then the system prorates the new freight amount from the Freight Amt field to the directs replacing the existing freight amount. If you select no, the system leaves the existing freight amount on the direct order.
Note: You must be assigned the COST.VIEW and COGS.VIEW authorization keys to send or print direct orders.
Posting Legacy Purchase Orders
70
Posting Legacy Purchase Orders Post Purchase Order entry accommodates a manual order entry system where orders are first logged on paper documents and might be taken through the shipping process before the transaction is logged in the computer. Often, when a company first begins using Eclipse, they use Post Purchase Order Entry for the transitional orders, but it can be used in other circumstances as needed.
For example, a sales person may be out a customer site and take an order. He logs the order on his hand-held portable device, but is not connected to the warehouse at that time. He can begin the process via phone, then return to the office and enter the purchase order information.
The Post Purchase Order Entry program gives you the opportunity to enter a batch number upon program entry. Many of the monitoring, processing, and printing programs described in the order flow of Purchase Order Entry give you the opportunity to select orders by batch number. Batch numbers are retained and modified at the individual order level.
To use Post Purchase Order Entry:
1. From the Purchase menu, select Post Purchase Order Entry to display the Post Purchase Order Entry window.
2. At the prompt, enter the batch ID for the purchase order you are entering.
3. Open a new purchase order.
Note: The Order # should be a purchase order number that has been assigned to the branch on the Pre-Assigned Order ID Maintenance window. A system administrator can limit the order IDs used, if necessary, by using the Restrict Post OE IDs To Pre-Assigned IDs control maintenance record.
You can also enter an alphanumeric number that begins with three alpha characters, such as SMB12345, if needed.
4. Complete the purchase order as you would a new order.
5. Click the Status tab and verify the information.
6. Save your changes and exit the window.

Managing Purchase Orders
71
Creating Future-Dated Purchase Orders You can issue a purchase order for stock that will be received at a future date without affecting the projected inventory level (PIL) on the inventory inquire or inventory maintenance programs. The system does not consider the stock quantities on a future-dated purchase order as part of the PIL when it generates a Suggested P/O report.
Use the Purchase Order Entry program to create a future-dated purchase order. You must enter a required date and expected date that lies outside the system calculated Plenty Date.
Plenty date formula: Order Cycle + Lead Time - Days into Order Cycle
For example, a distributor orders a product today that the manufacturer promises to deliver at a much later date. The distributor does not want the PIL to include stock on order. This type of order happens rarely and including these stock quantities distorts normal average daily demand.
To create a future-dated purchase order:
1. Create a purchase order.
2. Change the Reqd Date and Receive Date fields to dates past the Plenty Date.
3. Save your changes and exit the window.
Purchasing Product Kits
72
Purchasing Product Kits Product kits are predefined sets of components, which your company groups and sells together. Kits that are considered to be a single unit, such as a Kitchen Sink Kit, are called dynamic kits.
For example, your branch sells complete kitchen sinks. You sell them as a Kitchen Sink Kit. This kit includes the hot and cold taps, faucet, basin and all the connection washers and screws. You also purchase this kit from the vendor. Selling in kits keeps your cost down and your inventory management at a minimum. These dynamic kits are all complete and the kits count as a single unit.
List product kits on regular purchase orders as individual components. However, dynamic kits are purchased, such as the Kitchen Sink Kit, as a single unit from the vendor. The vendor ensures that all the appropriate components are shipped as part of the kit. You cannot list the individual components of dynamic kits on the purchase order, only the kit name displays.
Note: When a kit product is included on a Bill of Lading (BOL), the sum of the components' weight is used if the parent kit product has a weight of zero (0.00). If the parent kit product has a weight other than zero, than the parent weight it used.
To purchase a product kit:
1. Open a purchase order.
2. In the Qty/Unit field, enter the number of kits you want to order.
3. In the Product Description field, enter the name of the kit as you would any other product.
4. Save your changes and exit the purchase order.
To set the product kit to print components:
1. From the File menu, select Product to display the Product Maintenance window.
2. In the Product ID field, enter the product number for which you want to make a kit.
3. From the Inventory menu, select Kit Maintenance to display the Product Kit Maintenance window.
4. Click the Print Components checkbox.
5. Save your changes and exit the window.
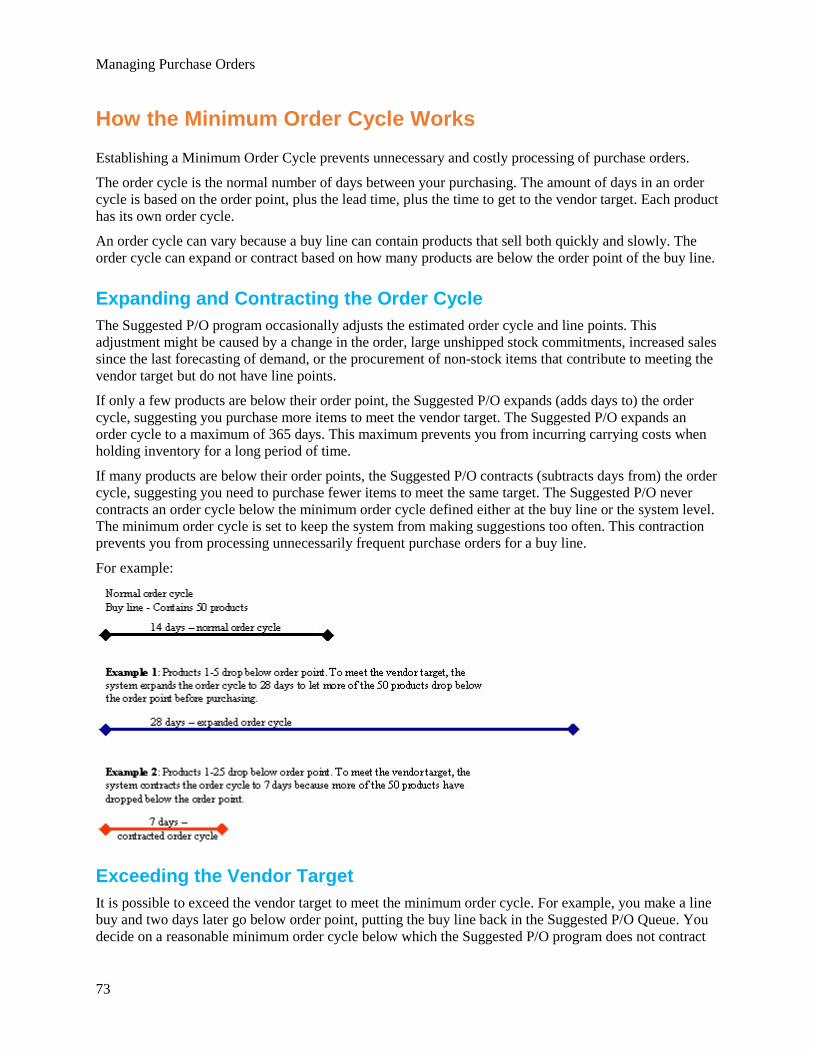
Managing Purchase Orders
73
How the Minimum Order Cycle Works Establishing a Minimum Order Cycle prevents unnecessary and costly processing of purchase orders.
The order cycle is the normal number of days between your purchasing. The amount of days in an order cycle is based on the order point, plus the lead time, plus the time to get to the vendor target. Each product has its own order cycle.
An order cycle can vary because a buy line can contain products that sell both quickly and slowly. The order cycle can expand or contract based on how many products are below the order point of the buy line.
Expanding and Contracting the Order Cycle The Suggested P/O program occasionally adjusts the estimated order cycle and line points. This adjustment might be caused by a change in the order, large unshipped stock commitments, increased sales since the last forecasting of demand, or the procurement of non-stock items that contribute to meeting the vendor target but do not have line points.
If only a few products are below their order point, the Suggested P/O expands (adds days to) the order cycle, suggesting you purchase more items to meet the vendor target. The Suggested P/O expands an order cycle to a maximum of 365 days. This maximum prevents you from incurring carrying costs when holding inventory for a long period of time.
If many products are below their order points, the Suggested P/O contracts (subtracts days from) the order cycle, suggesting you need to purchase fewer items to meet the same target. The Suggested P/O never contracts an order cycle below the minimum order cycle defined either at the buy line or the system level. The minimum order cycle is set to keep the system from making suggestions too often. This contraction prevents you from processing unnecessarily frequent purchase orders for a buy line.
For example:
Exceeding the Vendor Target It is possible to exceed the vendor target to meet the minimum order cycle. For example, you make a line buy and two days later go below order point, putting the buy line back in the Suggested P/O Queue. You decide on a reasonable minimum order cycle below which the Suggested P/O program does not contract
How the Minimum Order Cycle Works
74
to meet a vendor target. If the normal order cycle is 209 days and the minimum order cycle is 14 days and there is a run on inventory, this would cause the order cycle to contract to 12 days. The system suggests buying 14 days, even if it exceeds the vendor target.
Managing Purchase Orders
75
Best Cost Check in Purchase Order Entry Purchase Order Entry (POE) provides many checks to the database to ensure that you purchase items from your vendors using the best cost available. These checks, when set, effect any purchase order created from any of the following:
• Purchase Order Entry
• Suggested P/O Queue
• Procurement Confirmation
• Returned Goods
The system uses three control maintenance records to ensure the cost check takes place to best suit your company needs.
• Best Cost Check Through All Matrix Cells For Purchase Orders
• Best Cost Check Through All Matrix Cells For Sales Orders
• Enable Best Cost Check In Purchase Order Entry
• Auto Open Multiple Vendor Matrix Cell
Note: Best Cost Check is disabled on direct orders.
Best Cost Example Your vendor provides a discount, based on a contract, for 2" copper fittings and lets you buy them at a net cost of $.25 each. The normal cost of these fittings is $.30 each. The 2" copper fittings also are part of the COPFIT buy line. The vendor also offers a .85 multiplier, or discount, when buying any product in the COPFIT buy line. This makes the 2" copper fittings $.21 each.
By default, the system checks and uses the product-specific vendor contract first, called a buy matrix. If a buy matrix is not established for a particular vendor and product, then the system checks for an effective buy matrix for that vendor and a buy line in which the product may reside. However, if a product-specific buy matrix is established, the system uses that cost regardless of what is set at the vendor-group level.
For this reason, Eclipse has developed control maintenance records to provide the purchasing agent with the lowest possible cost for purchasing products from vendor contracts. In addition, when the parameters are set, the system can display all of the available contracts, their costs, and their contract numbers from which to select. The agent can select from this list or can override the current contract price with another effective cost in a buy matrix.
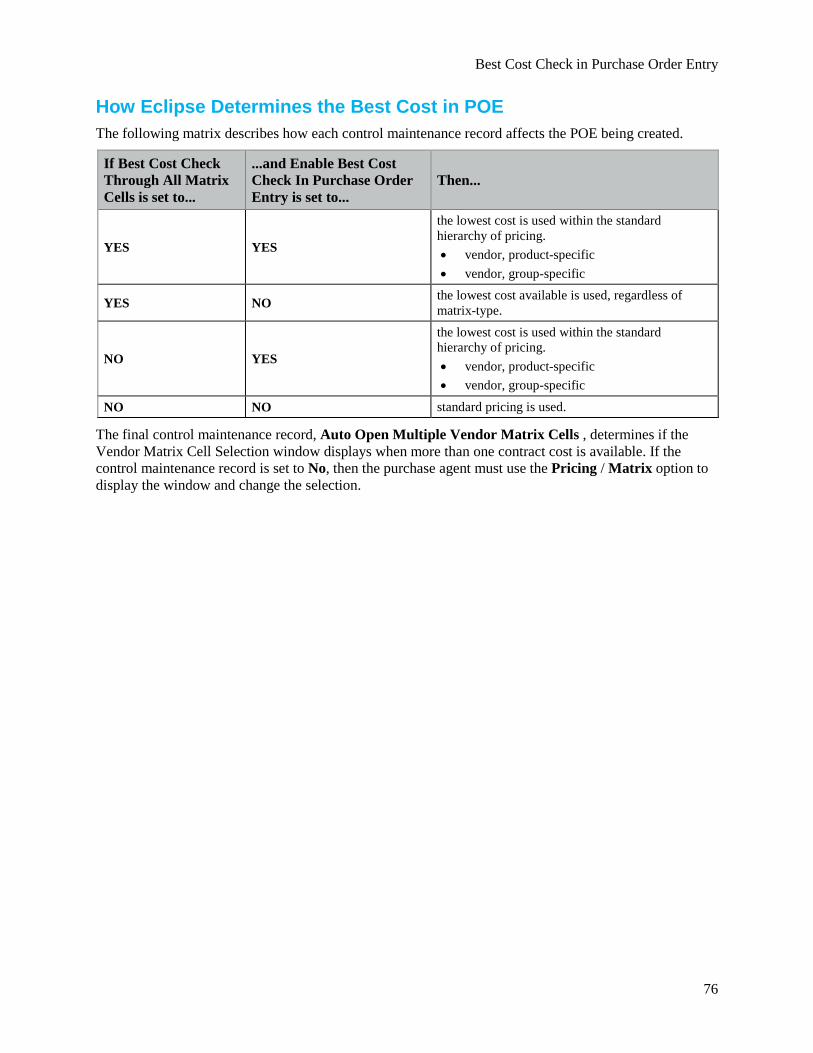
Best Cost Check in Purchase Order Entry
76
How Eclipse Determines the Best Cost in POE The following matrix describes how each control maintenance record affects the POE being created.
If Best Cost Check Through All Matrix Cells is set to...
...and Enable Best Cost Check In Purchase Order Entry is set to...
Then...
YES YES
the lowest cost is used within the standard hierarchy of pricing. • vendor, product-specific • vendor, group-specific
YES NO the lowest cost available is used, regardless of matrix-type.
NO YES
the lowest cost is used within the standard hierarchy of pricing. • vendor, product-specific • vendor, group-specific
NO NO standard pricing is used.
The final control maintenance record, Auto Open Multiple Vendor Matrix Cells , determines if the Vendor Matrix Cell Selection window displays when more than one contract cost is available. If the control maintenance record is set to No, then the purchase agent must use the Pricing / Matrix option to display the window and change the selection.
Managing Purchase Orders
77
How the System Uses Average Cost in POE A product's average cost is maintained at the branch level. The average cost is the range in which a product's price falls. A product's price can vary from branch to branch due to buying patterns and branch locations. The prices in effect at the time of purchase can also be different because of the date a vendor price change goes into effect. For example, you may receive notice that your vendor is raising the price on all faucets, but the price change will not go into effect until the first of the month. Variances in freight charges also affect the landed average cost.
Average Cost is also known as Moving Average Cost (MAC).
Changing the Price on a Purchase Order The cost of an item on a purchase order can be changed if you assign permission.
You can regulate who can change the cost of an item on a purchase order and by how much that cost can be varied. If the price change exceeds the percentage you set, either above or below the current cost, the user receives a warning message.
If the user has permission to continue, the warning is logged and the changed accepted. If the user does not have permission, a prompt displays for the user to enter a password to continue. For example, you can limit who can change prices for customers and ensure that personnel on the sales floor cannot change prices within ten percent (10%) of the original cost without checking with their supervisor.
How Does Average Cost Work? Use the Maximum Difference Percentage From Average Cost In POE control maintenance record to set the percentage allowed on the product price change.
For example, you want to make sure that if a product's price of $10.00 is changed in branch 4, that the change does not exceed five percent (5%) above or below the $10.00 price. Set the Maximum Difference Percentage From Average Cost In POE control maintenance record to five percent (5%) for branch 4. When you change the price on the purchase order to $5.00, the message "You are about to exceed the Maximum Difference Percentage from Average Cost! Continue (Y/N):" displays. Select one of the following:
• Yes - The system updates the change log file with the message and changes the cost. If you do not have the POE.MAC.OVERRIDE authorization key set, you are prompted for a password.
• No - The average cost remains and no entry is made in the change log file.
Duty Drawback Rules on POs
78
Duty Drawback Rules on POs Duty codes determine rates for products which are imported and later exported or for products which are exported and later returned to you. For example, your company is in Canada. You order 100 products from a company in the United States. They ship 50 from a warehouse in the United States and 50 from a warehouse is Japan. Products from the United States have different duty codes and charges than the 50 products received from Japan. You must compensate for this difference.
Duty codes are assigned either at the product level or the buy line level. However, purchase orders with items containing duty harmonizing codes bypass the normal freight calculation. Freight is calculated based on duty harmonizing codes for all items on the purchase order.
When a purchase order is created with more than one product on it, one of which has a duty code assigned, you must use the Customs Drawback Information window and navigate to that product. In addition, if you use the Duty Information option from the Line Item menu, the system populates the Customs Drawback Information window with the duty data found in the product file and in Duty Harmonizing Code Maintenance.
Note: The Manufacture Country is not a validated field because the country information in Duty Harmonizing Code Maintenance is user-defined and case sensitive. Therefore, if you enter England in the code maintenance, you must enter England to retrieve that code in Customs Drawback and not england.
Every purchase order receipt that has products with duty codes assigned to them requires a series of entries for each product. These entries include certificate of entry, tariff codes, port of entry, lot, duty paid, certificate of origin document and country of manufacture. If you assign a harmonizing code, then the country of manufacture is required. These details then translate to what you need to remit to the government for duty taxes owed. The system calculates the duty cost and adds this amount to the landed cost.
Note: Freight overrides at the generation level always take precedence over what is set up at the duty harmonizing code level.
Managing Purchase Orders
79
EDI Purchasing Queues The Electronic Data Interchange (EDI) provides you with options for transferring your data. The purchasing EDI queues let you track information from the vendor.
The EDI purchasing queues are as follows:
• EDI 855 P/O Acknowledgement Queue - lists the purchase orders that have been received by the vendor. See Reviewing Inbound PO Acknowledgments for more information.
• EDI 856 Advance Ship Notice Review Queue - lists the purchase orders that have items on the way to you. See Reviewing Inbound Advanced Ship Notices for more information.
• EDI 845 Contract Upload Queue - lists purchase orders that need to be reviewed by the contract department for pricing verification before processing. See Receiving 845 Pricing Authorization Acknowledgments for more information.
EDI is a companion product. All other information for EDI can be found in the documentation that shipped with the companion product.
Using Primary Inventory Maintenance
80
Using Primary Inventory Maintenance The Primary Inventory Maintenance window helps you set details for your product that influence forecasting, replenishment schedules, and purchasing information.
Note: If you are running the Eclipse Small Business edition, the information is displayed differently. For details, see Primary Inventory Maintenance for ESB.
What do you want to do? Select one of the following topics for more information about what you can do in Primary Inventory Maintenance.
• View product demand information
• Audit the demand calculation for the product at a selected branch
• Review product order points and line points
• Adjust the safety factor
• Adjust the projected gross margin
• Enter forecast parameters
• Estimate product demand at a branch
• Add service (safety) stock to a product
• Determine the availability of a product
• Enable stock/nonstock determination
• Adjust PIL information for remnants
• Set the buy package quantity and divisibility
• Set the parent order point protection percentage
• Set the min/max controls for a product.
81
Suggested Purchase Orders Queue Rules and Guidelines The Suggested Purchase Order (P/O) program automates part of the purchasing process and tells you when to buy and how much to buy. It is an electronic to-do list for the purchasing agent. The Suggested P/O queue proposes two purchase quantities. The short buy quantity brings the projected inventory levels (PIL) up to order point for the items that fell below order point. The line buy quantity either meets the vendor target or buy the calculated economic order quantity (EOQ), whichever is greater. For more details about how the system makes this calculation, see How the Minimum Order Cycle Works or How Eclipse Uses Package Quantities in Line Buy Calculations.
The Suggested P/O queue deals primarily with buy lines. Buy lines are groups of products that you purchase together to meet a vendor target. See the Buy Lines Overview for more information about how buy lines work.
The Suggested P/O program runs once a day, usually over night, unless otherwise specified through the Scheduling program. If your company is large and product movement is high, you may choose to run the program more than once per day. The Suggested P/O Queue lets you view, sort, and convert the information as best meets your business needs.
Once displayed, you can change the view of the last column on the Suggested Purchase Order Queue. Use the Change View option to display either the Total Buy or the Last Line Buy column. The default is Total Buy.
To display summary information for the Suggested P/O Queue at all times, add a Suggested P/O Queue widget to your Solar Eclipse main window. For more information, see Widgets and Menu Shortcuts Overview.
Viewing Different Queues A buy line displays on the queue if any items within that line have fallen below the order point when the Suggested P/O program runs for that line. The purchasing agent can then decide if it is best to do a short buy or a line buy. A short buy would purchase only those items that are below order point. The line buy quantity reflects all items needed to make the vendor target based on the line buy days calculation at the time the report generates. The Suggested P/O Queue helps you prioritize and sort buy lines.
You can display information on the Suggested P/O Queue differently to help distinguish which products to purchase first. You can display the products in groups: Normal, Emergency, Overdue POs, Open POs, and Select queues.
We recommend purchasing agents view the Emergency queue first. These buy lines have products on backorder to customers or negative on-hands quantity. Buy lines with zero ($0.00) carrying cost usually require a full line buy. Then review using the Select queue and select 25 hits. This process helps you replenish items that are purchased frequently first.
You can then use the Normal, Overdue, and Open queues to pick up any additional lines that need to be addressed.
Note: Use the SUGGESTED.PO.QUEUE authorization to access to work with the Suggested PO Queue.
Normal Displays all buy lines with at least one item below order point. We recommend running this queue after checking the Emergency and Overdue PO queues.

Suggested Purchase Orders Queue Rules and Guidelines
82
Emergency Displays all buy lines that need to be purchased immediately that are non-stock or stock items that are backordered. The Suggested P/O Queue displays only those items that have a negative projected inventory level (PIL ) combined in all branches. For example, if product A has a PIL of 1 in branch 2, and a PIL of 1 in branch 3, then the sum of the PILs is 0 and the item does not qualify as an Emergency buy in a central warehousing scheme.
After reviewing the Emergency queue, decide if you want to purchase from a your normal supplier if the vendor target is met, or an emergency procurement vendor.
We recommend running and converting the buy lines in this queue first, based on comments and needs for the business.
Overdue PO Displays all buy lines currently on overdue purchase orders. If you have emergency items that need to be purchased that day, and you have an overdue purchase order from your vendor, you may be able to add the emergency products to the overdue purchase order without penalty.
We recommend you run the Overdue PO queue before the Open PO queue.
Open PO Displays all buy lines that are currently on open purchase orders. If customers are inquiring if their non-stock or backordered items are in process, you can use this queue to provide them with accurate information.
We recommend you run the Open PO queue before the Select queue.
Select Displays a prompt to let you enter Rank Number, Rank, and Minimum Hits for the products you want to display. For example, you can determine how many products with only 10 hits are below order point by entering 10 in the Minimum Hits field at the prompt.
The rank number refers to the Ranking Method number is set in Product Ranking. Product Ranking compares, the activity of a product against all other products within the same price line, a group of price lines, or all price lines.
Converting the Suggested P/O Queue From the Suggested P/O Queue window, you can convert the suggestions from the queue for any view to a purchase order. After converting a suggested purchase order into an actual purchase order, you can modify it before committing or saving the order and sending the order to the vendor.
Managing Purchase Orders
83
Running the Suggested P/O Program The Suggested Purchase Order (P/O) program uses order cycle information (PILs, demand, and vendor target) to propose purchase quantities for products on Suggested P/O reports. A summary of these reports displays in the Suggested P/O Queue.
The Suggested P/O program populates the Suggested P/O Queue with a report for each buy line that has a product below its order point. The program uses the order points, line points, and surplus points of those buy lines listed in the queue to suggest the short buy or emergency buy. To meet the vendor target, the system suggests buying products back to their line points and moves the line point, based on expanding or contracting order cycles, until the vendor target is met or exceeded.
Important: The projected inventory level (PIL) listed on this report will be different from the PIL indicated on the Primary Inventory Maintenance window. This difference is because the PIL on the Suggested P/O program is calculated based on the order cycle. The PIL on the Primary Inventory Maintenance window is real-time and is calculated based on all orders coming into the system and going out.
Note: The plus sign (+) on the Suggested PO Report indicates that there is at least one warehouse in the network that has 0 on hand.
Most buy lines contain many products and due to the large number, it is difficult to know which buy lines have products below their order points. Therefore, the Suggested P/O program is most commonly run for all buy lines at once. If you run the Suggested P/O program for one buy line and no products are below order point, the system displays the message: Report Not Found.
Secondary Buy Lines Also, when suggesting a purchase order that uses a secondary buy line for a product, the system uses the secondary buy line's procurement path and not the one set up for the product's primary buy line. Override hierarchies still apply.
Note: If your company uses secondary buy lines, the processing time for this report can be longer than usual.
Package Quantities When calculating the suggestions, the system rounds package quantities at the child branch level and adds the need to the parent branch's calculation, if the Divisibility flag is set to No at the parent branch level. This ensures that the system does not suggest broken carton quantities if the purchasing branch has the Divisibility flag set to No. For example, the parent branch has the Buy Package quantity set at 100 and the Divisibility flag set to No. The child branch has the Divisibility flag set to Yes. The parent branch requires a quantity of 15. The child branch requires 9. Therefore, the total quantity needed is 24. The quantity is rounded to the package, 100, which fills the needs of both parent and child.
Costs The Suggested P/O Program displays costs for items based on the time the report is run. For example, the cost could change when running the Suggest P/O program for many branches at once. The program can take one to two minutes if there are several branches to query. If a cost has been changed while the
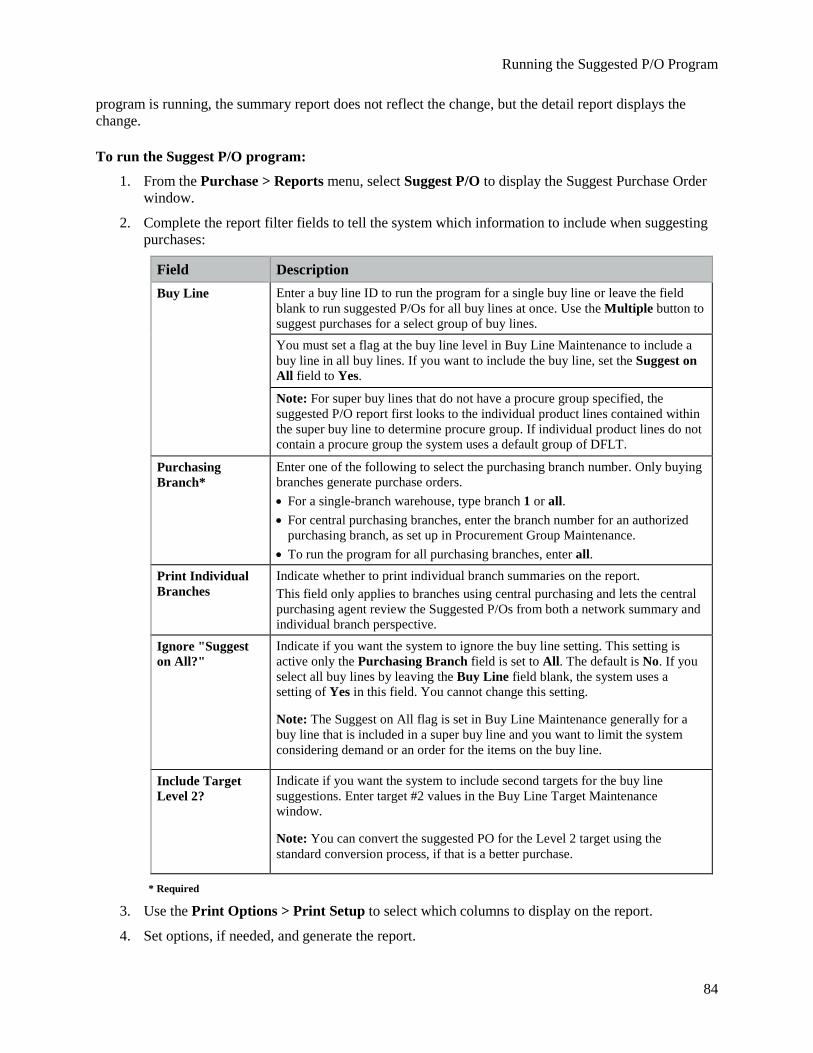
Running the Suggested P/O Program
84
program is running, the summary report does not reflect the change, but the detail report displays the change.
To run the Suggest P/O program:
1. From the Purchase > Reports menu, select Suggest P/O to display the Suggest Purchase Order window.
2. Complete the report filter fields to tell the system which information to include when suggesting purchases:
Field Description Buy Line Enter a buy line ID to run the program for a single buy line or leave the field
blank to run suggested P/Os for all buy lines at once. Use the Multiple button to suggest purchases for a select group of buy lines. You must set a flag at the buy line level in Buy Line Maintenance to include a buy line in all buy lines. If you want to include the buy line, set the Suggest on All field to Yes.
Note: For super buy lines that do not have a procure group specified, the suggested P/O report first looks to the individual product lines contained within the super buy line to determine procure group. If individual product lines do not contain a procure group the system uses a default group of DFLT.
Purchasing Branch*
Enter one of the following to select the purchasing branch number. Only buying branches generate purchase orders. • For a single-branch warehouse, type branch 1 or all. • For central purchasing branches, enter the branch number for an authorized
purchasing branch, as set up in Procurement Group Maintenance. • To run the program for all purchasing branches, enter all.
Print Individual Branches
Indicate whether to print individual branch summaries on the report. This field only applies to branches using central purchasing and lets the central purchasing agent review the Suggested P/Os from both a network summary and individual branch perspective.
Ignore "Suggest on All?"
Indicate if you want the system to ignore the buy line setting. This setting is active only the Purchasing Branch field is set to All. The default is No. If you select all buy lines by leaving the Buy Line field blank, the system uses a setting of Yes in this field. You cannot change this setting.
Note: The Suggest on All flag is set in Buy Line Maintenance generally for a buy line that is included in a super buy line and you want to limit the system considering demand or an order for the items on the buy line.
Include Target Level 2?
Indicate if you want the system to include second targets for the buy line suggestions. Enter target #2 values in the Buy Line Target Maintenance window.
Note: You can convert the suggested PO for the Level 2 target using the standard conversion process, if that is a better purchase.
* Required
3. Use the Print Options > Print Setup to select which columns to display on the report.
4. Set options, if needed, and generate the report.
Managing Purchase Orders
85
The Suggested Purchase Order window closes.
Important: If a customer who is on credit hold orders a non-stock item, the system displays an error on the Suggested P/O Report by the item alerting the purchasing agent. This alert can help keep your warehouse free of non-stock items ordered that may not get paid for.
Suggested P/O Error Report When the suggested P/O program runs, the system checks the following fields in the product file. If any of these fields have invalid data, such as a letter in the Min field, then the system creates a Suggested P/O Error Report and places it in Your Hold Files. The system creates this error report if any of the following product file fields have misinformation:
• MIN
• MAX
• Remnant Percent
• Remnant Quantity
• Order Point
• Line Point
The report helps you when you import your data into Eclipse to make sure you are mapping the correct data to the correct fields. While the Suggested P/O program continues to run, it creates this report and lists the products with bad data so you can update the information and then rerun the Suggested P/O Report.
For information about what columns are on the report and available to add to the report, see What the Suggested P/O Report Shows What the Suggested P/O Report Shows in this documentation.
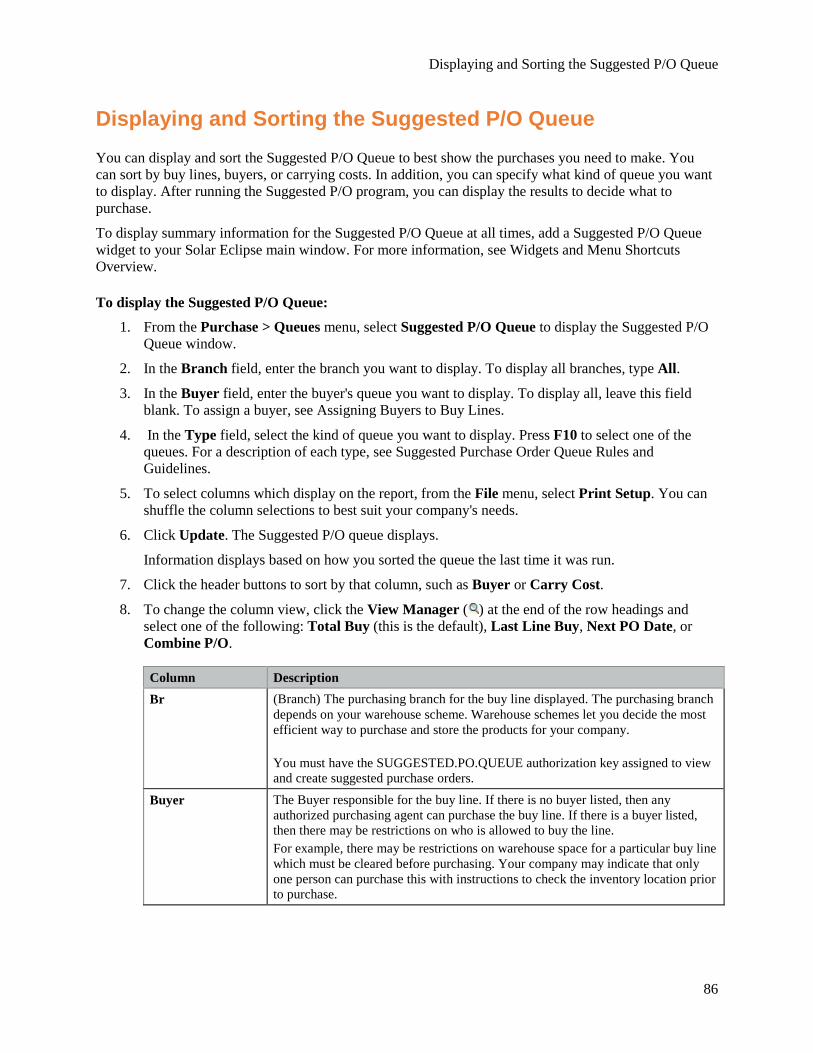
Displaying and Sorting the Suggested P/O Queue
86
Displaying and Sorting the Suggested P/O Queue You can display and sort the Suggested P/O Queue to best show the purchases you need to make. You can sort by buy lines, buyers, or carrying costs. In addition, you can specify what kind of queue you want to display. After running the Suggested P/O program, you can display the results to decide what to purchase.
To display summary information for the Suggested P/O Queue at all times, add a Suggested P/O Queue widget to your Solar Eclipse main window. For more information, see Widgets and Menu Shortcuts Overview.
To display the Suggested P/O Queue:
1. From the Purchase > Queues menu, select Suggested P/O Queue to display the Suggested P/O Queue window.
2. In the Branch field, enter the branch you want to display. To display all branches, type All.
3. In the Buyer field, enter the buyer's queue you want to display. To display all, leave this field blank. To assign a buyer, see Assigning Buyers to Buy Lines.
4. In the Type field, select the kind of queue you want to display. Press F10 to select one of the queues. For a description of each type, see Suggested Purchase Order Queue Rules and Guidelines.
5. To select columns which display on the report, from the File menu, select Print Setup. You can shuffle the column selections to best suit your company's needs.
6. Click Update. The Suggested P/O queue displays.
Information displays based on how you sorted the queue the last time it was run.
7. Click the header buttons to sort by that column, such as Buyer or Carry Cost.
8. To change the column view, click the View Manager ( ) at the end of the row headings and select one of the following: Total Buy (this is the default), Last Line Buy, Next PO Date, or Combine P/O.
Column Description Br (Branch) The purchasing branch for the buy line displayed. The purchasing branch
depends on your warehouse scheme. Warehouse schemes let you decide the most efficient way to purchase and store the products for your company. You must have the SUGGESTED.PO.QUEUE authorization key assigned to view and create suggested purchase orders.
Buyer The Buyer responsible for the buy line. If there is no buyer listed, then any authorized purchasing agent can purchase the buy line. If there is a buyer listed, then there may be restrictions on who is allowed to buy the line. For example, there may be restrictions on warehouse space for a particular buy line which must be cleared before purchasing. Your company may indicate that only one person can purchase this with instructions to check the inventory location prior to purchase.
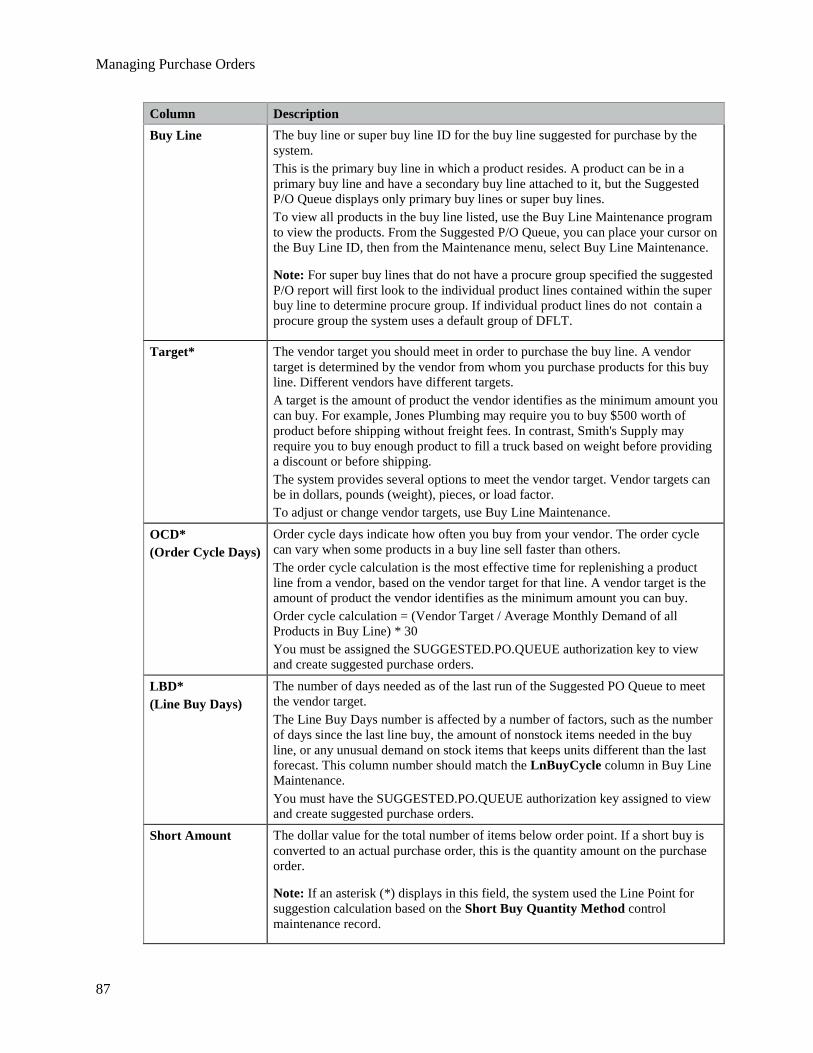
Managing Purchase Orders
87
Column Description Buy Line The buy line or super buy line ID for the buy line suggested for purchase by the
system. This is the primary buy line in which a product resides. A product can be in a primary buy line and have a secondary buy line attached to it, but the Suggested P/O Queue displays only primary buy lines or super buy lines. To view all products in the buy line listed, use the Buy Line Maintenance program to view the products. From the Suggested P/O Queue, you can place your cursor on the Buy Line ID, then from the Maintenance menu, select Buy Line Maintenance.
Note: For super buy lines that do not have a procure group specified the suggested P/O report will first look to the individual product lines contained within the super buy line to determine procure group. If individual product lines do not contain a procure group the system uses a default group of DFLT.
Target* The vendor target you should meet in order to purchase the buy line. A vendor target is determined by the vendor from whom you purchase products for this buy line. Different vendors have different targets. A target is the amount of product the vendor identifies as the minimum amount you can buy. For example, Jones Plumbing may require you to buy $500 worth of product before shipping without freight fees. In contrast, Smith's Supply may require you to buy enough product to fill a truck based on weight before providing a discount or before shipping. The system provides several options to meet the vendor target. Vendor targets can be in dollars, pounds (weight), pieces, or load factor. To adjust or change vendor targets, use Buy Line Maintenance.
OCD* (Order Cycle Days)
Order cycle days indicate how often you buy from your vendor. The order cycle can vary when some products in a buy line sell faster than others. The order cycle calculation is the most effective time for replenishing a product line from a vendor, based on the vendor target for that line. A vendor target is the amount of product the vendor identifies as the minimum amount you can buy. Order cycle calculation = (Vendor Target / Average Monthly Demand of all Products in Buy Line) * 30 You must be assigned the SUGGESTED.PO.QUEUE authorization key to view and create suggested purchase orders.
LBD* (Line Buy Days)
The number of days needed as of the last run of the Suggested PO Queue to meet the vendor target. The Line Buy Days number is affected by a number of factors, such as the number of days since the last line buy, the amount of nonstock items needed in the buy line, or any unusual demand on stock items that keeps units different than the last forecast. This column number should match the LnBuyCycle column in Buy Line Maintenance. You must have the SUGGESTED.PO.QUEUE authorization key assigned to view and create suggested purchase orders.
Short Amount The dollar value for the total number of items below order point. If a short buy is converted to an actual purchase order, this is the quantity amount on the purchase order.
Note: If an asterisk (*) displays in this field, the system used the Line Point for suggestion calculation based on the Short Buy Quantity Method control maintenance record.
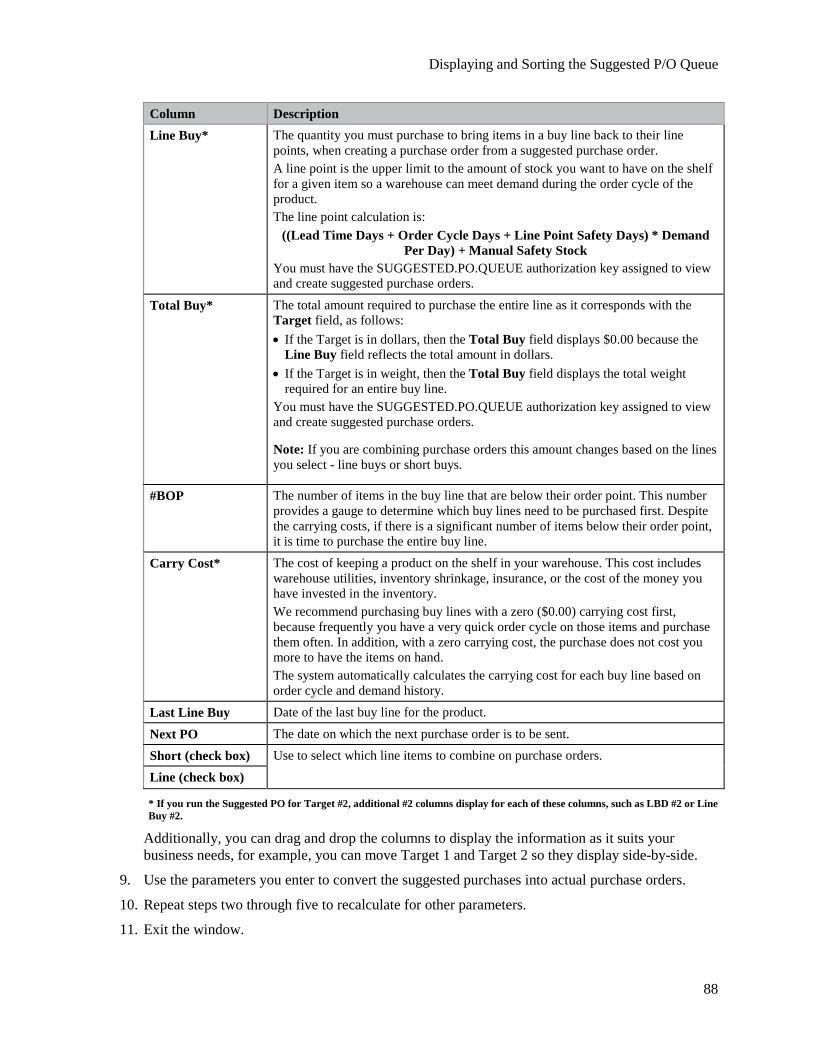
Displaying and Sorting the Suggested P/O Queue
88
Column Description Line Buy* The quantity you must purchase to bring items in a buy line back to their line
points, when creating a purchase order from a suggested purchase order. A line point is the upper limit to the amount of stock you want to have on the shelf for a given item so a warehouse can meet demand during the order cycle of the product. The line point calculation is:
((Lead Time Days + Order Cycle Days + Line Point Safety Days) * Demand Per Day) + Manual Safety Stock
You must have the SUGGESTED.PO.QUEUE authorization key assigned to view and create suggested purchase orders.
Total Buy* The total amount required to purchase the entire line as it corresponds with the Target field, as follows: • If the Target is in dollars, then the Total Buy field displays $0.00 because the
Line Buy field reflects the total amount in dollars. • If the Target is in weight, then the Total Buy field displays the total weight
required for an entire buy line. You must have the SUGGESTED.PO.QUEUE authorization key assigned to view and create suggested purchase orders.
Note: If you are combining purchase orders this amount changes based on the lines you select - line buys or short buys.
#BOP The number of items in the buy line that are below their order point. This number provides a gauge to determine which buy lines need to be purchased first. Despite the carrying costs, if there is a significant number of items below their order point, it is time to purchase the entire buy line.
Carry Cost* The cost of keeping a product on the shelf in your warehouse. This cost includes warehouse utilities, inventory shrinkage, insurance, or the cost of the money you have invested in the inventory. We recommend purchasing buy lines with a zero ($0.00) carrying cost first, because frequently you have a very quick order cycle on those items and purchase them often. In addition, with a zero carrying cost, the purchase does not cost you more to have the items on hand. The system automatically calculates the carrying cost for each buy line based on order cycle and demand history.
Last Line Buy Date of the last buy line for the product.
Next PO The date on which the next purchase order is to be sent. Short (check box) Use to select which line items to combine on purchase orders. Line (check box)
* If you run the Suggested PO for Target #2, additional #2 columns display for each of these columns, such as LBD #2 or Line Buy #2.
Additionally, you can drag and drop the columns to display the information as it suits your business needs, for example, you can move Target 1 and Target 2 so they display side-by-side.
9. Use the parameters you enter to convert the suggested purchases into actual purchase orders.
10. Repeat steps two through five to recalculate for other parameters.
11. Exit the window.
Managing Purchase Orders
89
Converting Suggested Purchase Orders to Actual Purchase Orders The Suggested Purchase Order (P/O) program provides you with options to purchase products that are needed. The system determines what displays on the Suggested P/O Queue based on the parameters you provide. You can modify the order before committing the purchase order. You can convert suggested purchase orders for buy lines, secondary buy lines, or super buy lines, as your business requires.
If you are converting purchase orders that contain consignment material, you may be prompted to confirm if it is a consignment purchase order you are creating. For more information, see Creating Consignment Purchase Orders.
Note: When converting a buy line, if the maximum days supply is exceeded by a suggested purchase order and the user is not assigned the POE.PIL.DAYS.OVRD authorization key, the system prompts for a password.
Credit Holds when Converting Orders If a customer who is on credit hold orders a non-stock item, the system displays an error on the Suggested P/O Report by the item alerting the purchasing agent. This alert can help keep your warehouse free of non-stock items ordered that may not get paid for.
Use the Disable Credit Check For Non-Stocks On Suggested P/O control maintenance record to turn off this credit check, if needed. For example, if you have a customer that regularly orders non-stock items, you can disable this check to make the ordering process quicker.
Using the Convert Suggested to Actual P/O Program You can convert Suggested P/Os to purchase orders with the Convert Suggested to Actual P/O program. When the purchase order is converted, the system records a comment in the change log to indicate if the conversion was made using the Line or Emergency option, such as "Suggested PO Converted Using the Line Buy."
Also, when suggesting a purchase order that uses a secondary buy line for a product, the system uses the secondary buy line's procurement path and not the one set up for the product's primary buy line. Override hierarchies still apply.
Note: The system uses the lead time for the buy line on the converted order.
The Convert Suggested to Actual P/O window displays the following:
• Date and time when the Suggested P/O generated
• Normal order cycle used on the Suggested P/O
• Vendor target
• Days supply being purchased
Before committing a purchase order, you can modify the purchase order in several ways, including adding or subtracting products and changing quantities. The purchase order is converted as of the current costs. If changes are made while the program is running the purchase order does not reflect the update. The Suggest PO Report lists the product detail in real-time cost. The summary on the queue uses the cached values to pull up more than one product detail on the window.
Converting Suggested Purchase Orders to Actual Purchase Orders
90
Note: You can also convert a suggested purchase order to the Transfer Surplus Queue.
To convert the Suggested P/O Queue to an actual P/O:
1. Display the Suggested P/O Queue and position the cursor on the buy line you want to convert.
2. From the Edit menu, select Convert to Actual POs.
Note: Purchase orders are displayed consecutively by PO number starting with the lowest number.
3. In the Line or Short field, select one of the following:
• Line (Target #1) - To purchase all items in the line buy for the vendor target #1 set in the Buy Line Target Maintenance.
• Line (Target #2) - To purchase all items in the line buy for the vendor target #2 set in the Buy Line Target Maintenance.
• Short - To purchase only the short buy quantities.
4. In the Vendor field, enter the vendor to whom the converted purchase order should be directed. If you enter a partial vendor name, a selection list displays with the vendors' names and addresses that are available.
5. Use the check boxes to do one of the following, if needed:
• Combine on Central Purchase Order - Combine suggestions on a single purchase order for this suggestion cycle.
• Create Central P/O Transfers - Combine suggestions and create transfers to other branches for material when its received for this suggestion cycle.
Note: If the buy line is not assigned a procurement group with a central purchasing scheme, these options have no impact on the converted P/O.
6. In the Branch and Line field, verify the branch and buy line you want to convert.
Note: For single-branch warehouses, the default is branch 1. The system checks for the most recent Suggested P/O created for that combination, and displays the generation date and time, normal order cycle days, vendor target, and the days supply in the appropriate fields on the Suggested P/O.
The following fields display with system information: Normal Cycle, Days Supply, Generated on <date> At <time>, and Target.
7. If prompted, resolve conflicts between suggested buy lines.
8. Use the Round Short to Package Qty check box to indicate if you want to round the short buy quantity to the package quantity.
9. Click OK to create an actual purchase order and display the Purchase Order Entry window, allowing you to further modify or cancel the order. For multi-branch networks, when a product is centrally purchased, but not centrally warehoused, the system generates individual, consecutively numbered purchase orders for each child branch.
Note: If there is more that one price matrix associated with the product, the Vendor Matrix Cell Selection window displays. For more information see Creating Matrix Cells In Quick Buy Matrix.
Managing Purchase Orders
91
10. Save your changes and exit the window.
To convert the Suggested P/O Queue to the Transfer Surplus Queue:
1. Display the Suggested P/O Queue and position the cursor on the buy line you want to convert.
2. From the File menu, select Transfer Queue to display the Transfer Surplus Queue.
3. At the prompt, select Current to convert only the one buy line selected or All Listed to convert all buy lines.
The queue displays with the buy line items populated.
4. Complete the transaction. For instructions, see Using the Transfer Surplus Queue.
5. Save your changes and exit the window.
To convert suggested purchases using the Detail Queue:
1. Display the Suggested P/O Queue and position the cursor on the buy line you want to convert.
2. From the File menu, select Detail Queue to display the Transfer Surplus Queue.
3. At the prompt, select Current to convert only the one buy line selected or All Listed to convert all buy lines.
The queue displays with the buy line items populated.
4. Complete the transaction. For instructions, see Managing Suggestions from the Suggested P/O Detail Queue.
5. Save your changes and exit the window.
Single-branch and Multi-branch Purchase Orders In a single-branch warehouse, the system creates one purchase order for each buy line. In a multi-branch network, one or more purchase orders generate depending upon the warehouse scheme.
In a central purchasing scheme, one branch handles purchasing for the network while each branch handles its own warehousing. You can combine branch needs to meet a vendor target. You can determine how each branch replenishes material. If vendors can deliver to each branch individually, you can convert the single suggested purchase order (P/O) into individual purchase orders. If vendors can deliver to only some branches individually, you can combine the suggested P/O into a single P/O and use Drop Points Maintenance to determine how the deliveries should be made. You can also print the P/O generations individually or combined by drop points. If vendors deliver only to a single branch, you can create central P/O transfers to replenish material for the remaining branches.
In a central warehouse scheme, the selling branches are dependent on one branch to handle all the warehousing. The warehousing branch receives one purchase order for the entire order and handles stock replenishment through transfer orders.

Managing Suggestions from the Suggested P/O Detail Queue
92
Managing Suggestions from the Suggested P/O Detail Queue The system calculates suggested purchase orders using different variables, depending on how your warehouse and buying parameters are set. Use the Detail Queue to review purchasing suggestions after running the Suggested P/O program. You can manage your suggestions, convert the actual purchase orders, review new or overdue purchase orders, or adjust and recalculate costs, as needed.
To manage suggestions from the Detail Queue:
1. Display the Suggested P/O Queue and position the cursor on the buy line you want to review.
2. From the File menu, select Detail Queue or right-click on the line item and select Detail Queue.
The system populates all the header fields based on the line item you selected in the Suggested P/O Queue.
3. In the Vendor field, select one or more vendors for which you want to filter the queue.
4. Review the displayed columns, as follows:
Column Description Product ID The ID number for the product suggested. This number is Eclipse-assigned when
entering the product into the system through Product Maintenance. For each product you can view surplus information with a detail pane at the bottom. As you scroll through products, the information changes to display the currently selected product's information. Use the Options > Show Product Detail Pane check box to display this pane if it is hidden. From this pane, you can access the new or overdue purchase orders by clicking the number to automatically view the associated purchase order.
Description The full description as listed in Product Maintenance. BuyPack The buy package quantity set up at the branch as indicated in the Additional
Inventory Parameters of the product file.
Status Current status of the product: Stock or NonStock.
Rank The most recent ranks calculated for all five ranking methods for a needed product. The higher the ranking, the more you need of it. For more information, see Product Ranking Overview and Product Ranking Information Uses in the Forecasting documentation.
LCS The lead time plus the order cycle used plus the safety stock. The system uses the LT Used and adds the LB Days calculated on the suggested purchase order. The system uses the resulting value to calculate the safety days by applying the lead time variable.
PIL The projected inventory level of the product in the branch. The amount you have on hand, minus the amount committed to orders, plus the amount coming in on transfers and purchase orders.
EOQ Economic order quantity for the product in the branch. This is the most cost-effective quantity of a product for you to purchase and hold in inventory.
Demand The monthly demand for each product listed. The system pulls the value from the branch's order point information. The system may take Trend% or Auto-Trend% values into account.
Managing Purchase Orders
93
Column Description Unit Cost* The unit cost per item and if there is more than one buy matrix for the purchase
order. Set the cost per unit pricing up in Product Price Sheet Maintenance.
Short #* The number of days needed as of the last run of the Suggested PO Queue to meet the vendor target.
Note: This is the same field as the Short Amount value in the Suggested P/O program.
Note: A note displays in red at the bottom of the window, if the system used the Line Point for suggestion calculation based on the Short Buy Quantity Method control maintenance record.
Short # $ The dollar amount it would cost to only replenish up to the vendor target. Line Qty* Line point value minus the projected inventory level (PIL). Line $ The dollar amount to buy the line as suggested up to Target #1.
Line Qty 2* Line point value minus the projected inventory level (PIL) for the second target if run for Target #2 in the Suggested P/O program.
Line 2$ The dollar amount to buy the line as suggested up to Target #2, if any.
* These fields can be edited. The system updates the corresponding fields on the Suggested P/O Queue and the associated Extended Cost. The system displays an override flag to alert the user that the value has been changed. Additionally, quantity changes are noted in the change log of the purchase order.
6. Manage any of the lines, as needed, for this queue. See More Options below.
7. Save your changes and exit the window.
More Options for the Detail Queue
The following options are available from the Detail Queue:
To... Do this: convert the suggestion to a purchase order
From the Edit menu, select Convert to Actual POs.
recalculate costs on the lines
From the Edit menu, select Recalculate Costs.
review history and ledger details
From the Inquiry menu, select one of the following: Inventory Inquiry Future Ledger History Ledger Sales History
drill into the suggested purchase order results and see how the system determined what to suggest to buy
From the Inquiry menu, select Suggested P/O Audit. For more information about the audit window, see Reviewing Purchase Order Suggestions.
review product and buy line details
From the Maintenance menu, select one of the following: Product Maintenance Product Location Maintenance Buy Line Maintenance Procure Group Maintenance
Managing Suggestions from the Suggested P/O Detail Queue
94
To... Do this: surplus details for transfers
From the Maintenance menu, select Transfer Surplus Queue. For more information about this queue, see Creating Transfers from the Transfer Surplus Queue. For each product you can view surplus information with a detail pane at the bottom. As you scroll through products, the information changes to display the currently selected product's information. Use the Options > Show Product Detail Pane check box to display this pane if it is hidden. From this pane, you can access the new or overdue purchase orders by clicking the number to automatically view the associated purchase order.
change, add, or delete columns
From the Change View menu, select User Defined View Maintenance. For information about how to use the view maintenance, see Creating User Defined Views.
Note: In Release 9.0.5, you can now add a Surplus Notes column through User-Defined View Maintenance to include in your queue.
use the Surplus Pane Use your cursor and place it on the product you want to know more about. As you arrow through the products, the notes update with information about surplus from other branches and overdue purchase orders. The Surplus Pane displays the same types of information as you would see in the Notes on the Suggested P/O Report. Since different versions display on the report, the information can display differently here as well.
update unit costs Use the Unit Cost column to change costs, if you have permission. This field can be edited and the system updates the Extended Cost. The system displays an override flag to alert the user that the value has been changed.
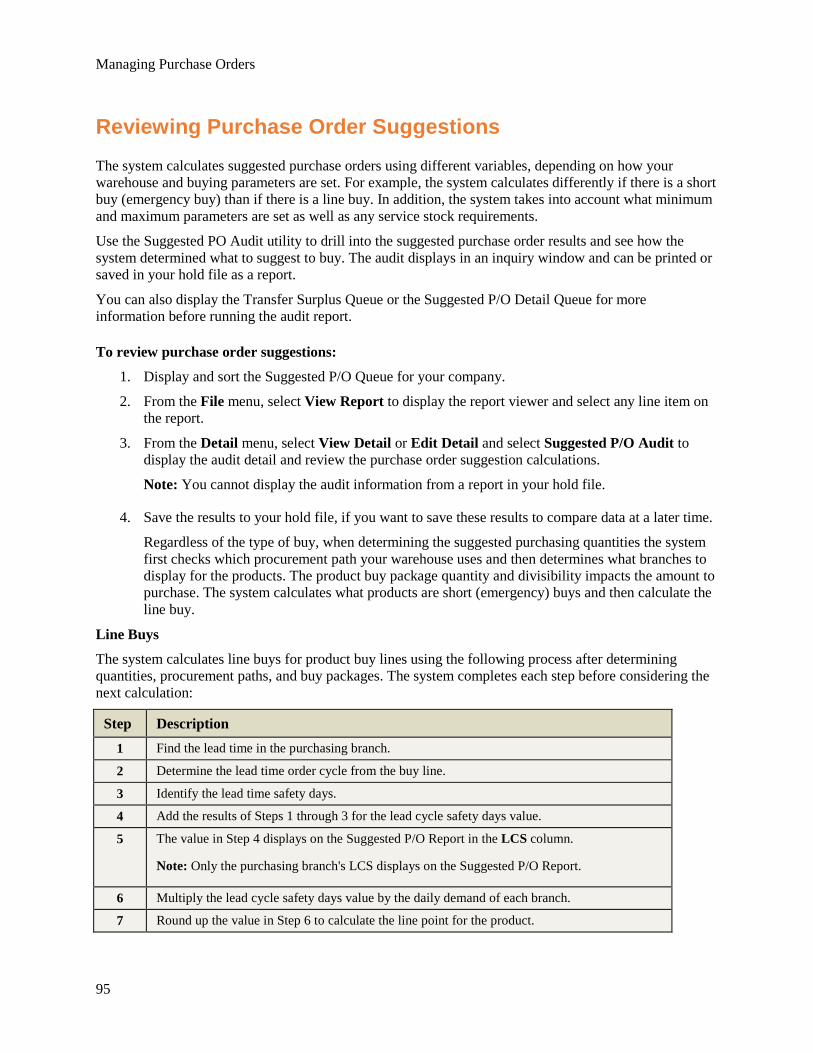
Managing Purchase Orders
95
Reviewing Purchase Order Suggestions The system calculates suggested purchase orders using different variables, depending on how your warehouse and buying parameters are set. For example, the system calculates differently if there is a short buy (emergency buy) than if there is a line buy. In addition, the system takes into account what minimum and maximum parameters are set as well as any service stock requirements.
Use the Suggested PO Audit utility to drill into the suggested purchase order results and see how the system determined what to suggest to buy. The audit displays in an inquiry window and can be printed or saved in your hold file as a report.
You can also display the Transfer Surplus Queue or the Suggested P/O Detail Queue for more information before running the audit report.
To review purchase order suggestions:
1. Display and sort the Suggested P/O Queue for your company.
2. From the File menu, select View Report to display the report viewer and select any line item on the report.
3. From the Detail menu, select View Detail or Edit Detail and select Suggested P/O Audit to display the audit detail and review the purchase order suggestion calculations.
Note: You cannot display the audit information from a report in your hold file.
4. Save the results to your hold file, if you want to save these results to compare data at a later time.
Regardless of the type of buy, when determining the suggested purchasing quantities the system first checks which procurement path your warehouse uses and then determines what branches to display for the products. The product buy package quantity and divisibility impacts the amount to purchase. The system calculates what products are short (emergency) buys and then calculate the line buy.
Line Buys
The system calculates line buys for product buy lines using the following process after determining quantities, procurement paths, and buy packages. The system completes each step before considering the next calculation:
Step Description 1 Find the lead time in the purchasing branch.
2 Determine the lead time order cycle from the buy line.
3 Identify the lead time safety days.
4 Add the results of Steps 1 through 3 for the lead cycle safety days value.
5 The value in Step 4 displays on the Suggested P/O Report in the LCS column.
Note: Only the purchasing branch's LCS displays on the Suggested P/O Report.
6 Multiply the lead cycle safety days value by the daily demand of each branch.
7 Round up the value in Step 6 to calculate the line point for the product.
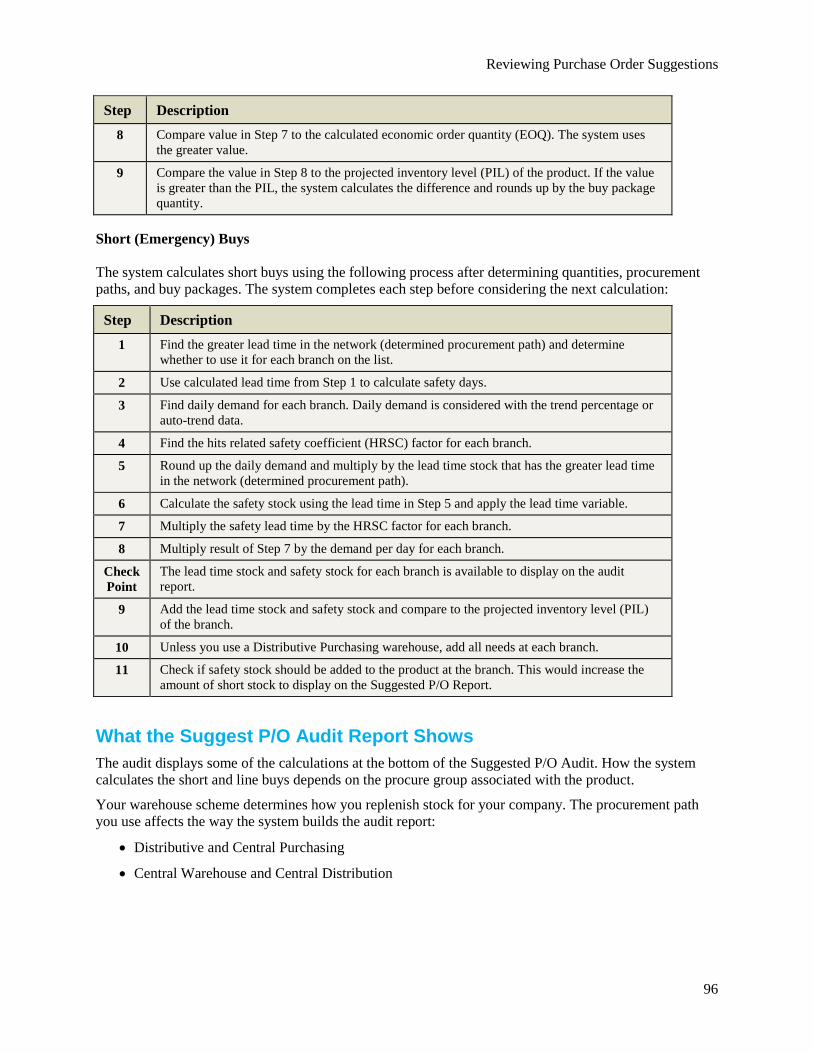
Reviewing Purchase Order Suggestions
96
Step Description 8 Compare value in Step 7 to the calculated economic order quantity (EOQ). The system uses
the greater value.
9 Compare the value in Step 8 to the projected inventory level (PIL) of the product. If the value is greater than the PIL, the system calculates the difference and rounds up by the buy package quantity.
Short (Emergency) Buys The system calculates short buys using the following process after determining quantities, procurement paths, and buy packages. The system completes each step before considering the next calculation:
Step Description 1 Find the greater lead time in the network (determined procurement path) and determine
whether to use it for each branch on the list.
2 Use calculated lead time from Step 1 to calculate safety days.
3 Find daily demand for each branch. Daily demand is considered with the trend percentage or auto-trend data.
4 Find the hits related safety coefficient (HRSC) factor for each branch.
5 Round up the daily demand and multiply by the lead time stock that has the greater lead time in the network (determined procurement path).
6 Calculate the safety stock using the lead time in Step 5 and apply the lead time variable.
7 Multiply the safety lead time by the HRSC factor for each branch.
8 Multiply result of Step 7 by the demand per day for each branch.
Check Point
The lead time stock and safety stock for each branch is available to display on the audit report.
9 Add the lead time stock and safety stock and compare to the projected inventory level (PIL) of the branch.
10 Unless you use a Distributive Purchasing warehouse, add all needs at each branch.
11 Check if safety stock should be added to the product at the branch. This would increase the amount of short stock to display on the Suggested P/O Report.
What the Suggest P/O Audit Report Shows The audit displays some of the calculations at the bottom of the Suggested P/O Audit. How the system calculates the short and line buys depends on the procure group associated with the product.
Your warehouse scheme determines how you replenish stock for your company. The procurement path you use affects the way the system builds the audit report:
• Distributive and Central Purchasing
• Central Warehouse and Central Distribution
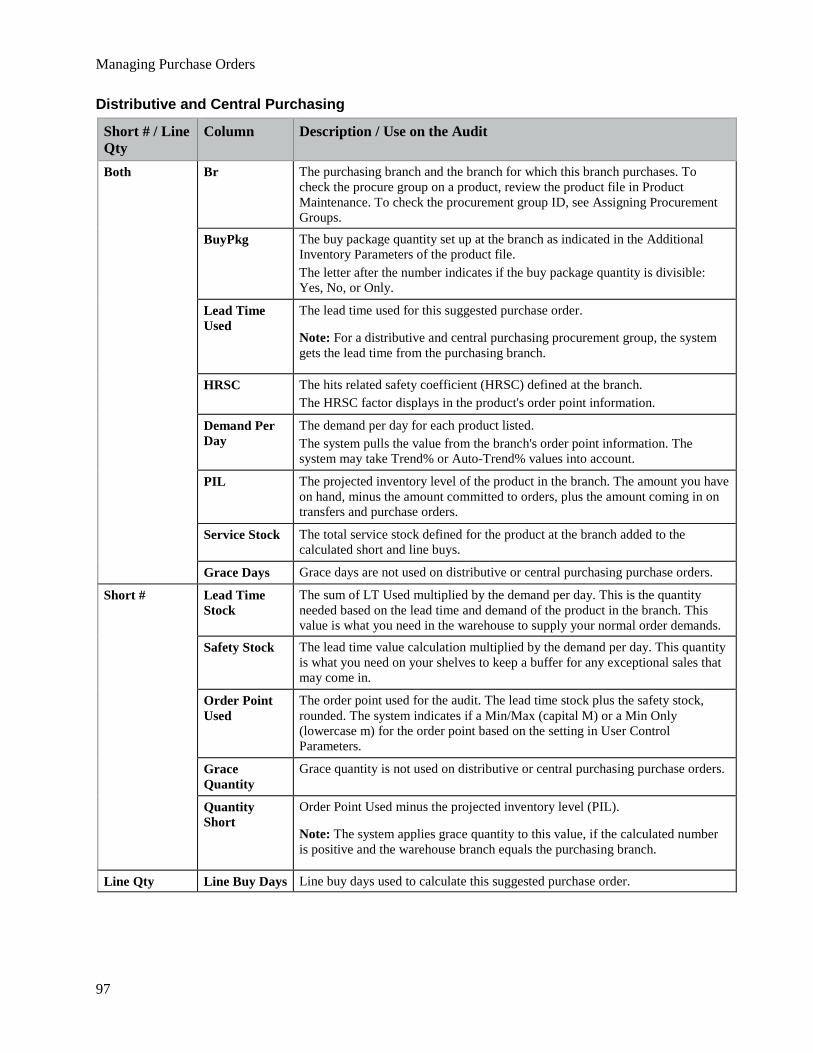
Managing Purchase Orders
97
Distributive and Central Purchasing
Short # / Line Qty
Column Description / Use on the Audit
Both Br The purchasing branch and the branch for which this branch purchases. To check the procure group on a product, review the product file in Product Maintenance. To check the procurement group ID, see Assigning Procurement Groups.
BuyPkg The buy package quantity set up at the branch as indicated in the Additional Inventory Parameters of the product file. The letter after the number indicates if the buy package quantity is divisible: Yes, No, or Only.
Lead Time Used
The lead time used for this suggested purchase order.
Note: For a distributive and central purchasing procurement group, the system gets the lead time from the purchasing branch.
HRSC The hits related safety coefficient (HRSC) defined at the branch. The HRSC factor displays in the product's order point information.
Demand Per Day
The demand per day for each product listed. The system pulls the value from the branch's order point information. The system may take Trend% or Auto-Trend% values into account.
PIL The projected inventory level of the product in the branch. The amount you have on hand, minus the amount committed to orders, plus the amount coming in on transfers and purchase orders.
Service Stock The total service stock defined for the product at the branch added to the calculated short and line buys.
Grace Days Grace days are not used on distributive or central purchasing purchase orders.
Short # Lead Time Stock
The sum of LT Used multiplied by the demand per day. This is the quantity needed based on the lead time and demand of the product in the branch. This value is what you need in the warehouse to supply your normal order demands.
Safety Stock The lead time value calculation multiplied by the demand per day. This quantity is what you need on your shelves to keep a buffer for any exceptional sales that may come in.
Order Point Used
The order point used for the audit. The lead time stock plus the safety stock, rounded. The system indicates if a Min/Max (capital M) or a Min Only (lowercase m) for the order point based on the setting in User Control Parameters.
Grace Quantity
Grace quantity is not used on distributive or central purchasing purchase orders.
Quantity Short
Order Point Used minus the projected inventory level (PIL).
Note: The system applies grace quantity to this value, if the calculated number is positive and the warehouse branch equals the purchasing branch.
Line Qty Line Buy Days Line buy days used to calculate this suggested purchase order.
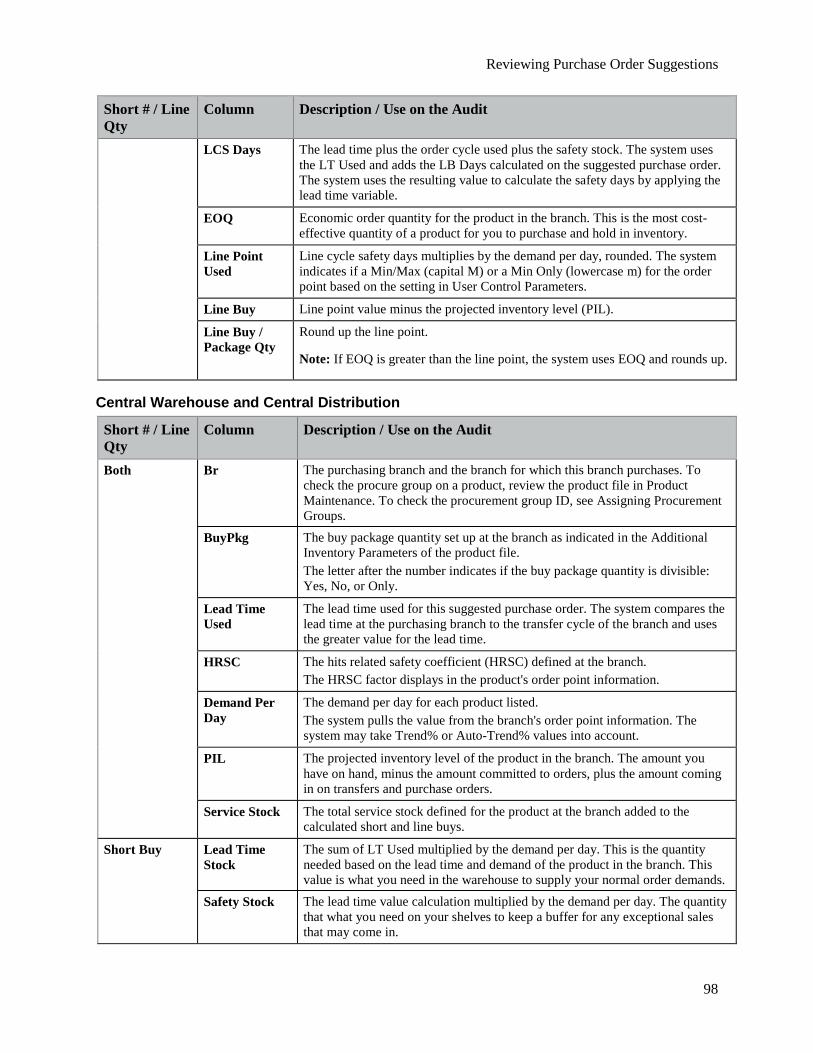
Reviewing Purchase Order Suggestions
98
Short # / Line Qty
Column Description / Use on the Audit
LCS Days The lead time plus the order cycle used plus the safety stock. The system uses the LT Used and adds the LB Days calculated on the suggested purchase order. The system uses the resulting value to calculate the safety days by applying the lead time variable.
EOQ Economic order quantity for the product in the branch. This is the most cost-effective quantity of a product for you to purchase and hold in inventory.
Line Point Used
Line cycle safety days multiplies by the demand per day, rounded. The system indicates if a Min/Max (capital M) or a Min Only (lowercase m) for the order point based on the setting in User Control Parameters.
Line Buy Line point value minus the projected inventory level (PIL).
Line Buy / Package Qty
Round up the line point.
Note: If EOQ is greater than the line point, the system uses EOQ and rounds up.
Central Warehouse and Central Distribution
Short # / Line Qty
Column Description / Use on the Audit
Both Br The purchasing branch and the branch for which this branch purchases. To check the procure group on a product, review the product file in Product Maintenance. To check the procurement group ID, see Assigning Procurement Groups.
BuyPkg The buy package quantity set up at the branch as indicated in the Additional Inventory Parameters of the product file. The letter after the number indicates if the buy package quantity is divisible: Yes, No, or Only.
Lead Time Used
The lead time used for this suggested purchase order. The system compares the lead time at the purchasing branch to the transfer cycle of the branch and uses the greater value for the lead time.
HRSC The hits related safety coefficient (HRSC) defined at the branch. The HRSC factor displays in the product's order point information.
Demand Per Day
The demand per day for each product listed. The system pulls the value from the branch's order point information. The system may take Trend% or Auto-Trend% values into account.
PIL The projected inventory level of the product in the branch. The amount you have on hand, minus the amount committed to orders, plus the amount coming in on transfers and purchase orders.
Service Stock The total service stock defined for the product at the branch added to the calculated short and line buys.
Short Buy Lead Time Stock
The sum of LT Used multiplied by the demand per day. This is the quantity needed based on the lead time and demand of the product in the branch. This value is what you need in the warehouse to supply your normal order demands.
Safety Stock The lead time value calculation multiplied by the demand per day. The quantity that what you need on your shelves to keep a buffer for any exceptional sales that may come in.
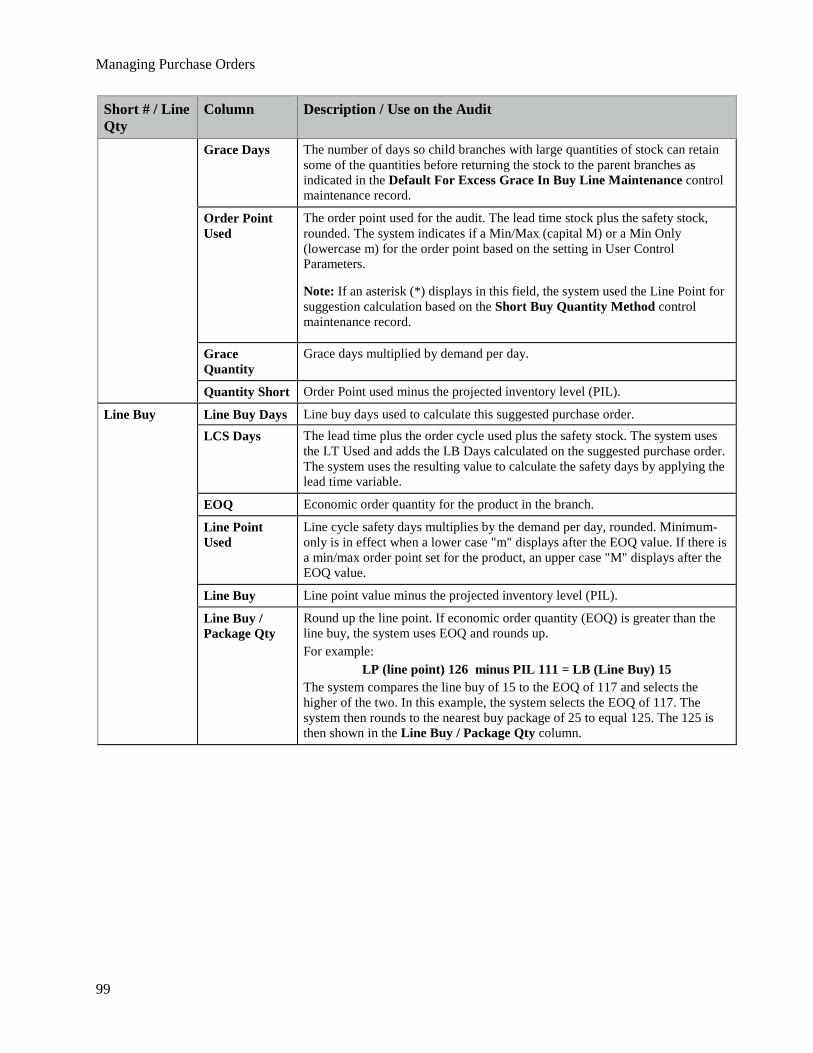
Managing Purchase Orders
99
Short # / Line Qty
Column Description / Use on the Audit
Grace Days The number of days so child branches with large quantities of stock can retain some of the quantities before returning the stock to the parent branches as indicated in the Default For Excess Grace In Buy Line Maintenance control maintenance record.
Order Point Used
The order point used for the audit. The lead time stock plus the safety stock, rounded. The system indicates if a Min/Max (capital M) or a Min Only (lowercase m) for the order point based on the setting in User Control Parameters.
Note: If an asterisk (*) displays in this field, the system used the Line Point for suggestion calculation based on the Short Buy Quantity Method control maintenance record.
Grace Quantity
Grace days multiplied by demand per day.
Quantity Short Order Point used minus the projected inventory level (PIL).
Line Buy Line Buy Days Line buy days used to calculate this suggested purchase order. LCS Days The lead time plus the order cycle used plus the safety stock. The system uses
the LT Used and adds the LB Days calculated on the suggested purchase order. The system uses the resulting value to calculate the safety days by applying the lead time variable.
EOQ Economic order quantity for the product in the branch.
Line Point Used
Line cycle safety days multiplies by the demand per day, rounded. Minimum-only is in effect when a lower case "m" displays after the EOQ value. If there is a min/max order point set for the product, an upper case "M" displays after the EOQ value.
Line Buy Line point value minus the projected inventory level (PIL).
Line Buy / Package Qty
Round up the line point. If economic order quantity (EOQ) is greater than the line buy, the system uses EOQ and rounds up. For example:
LP (line point) 126 minus PIL 111 = LB (Line Buy) 15 The system compares the line buy of 15 to the EOQ of 117 and selects the higher of the two. In this example, the system selects the EOQ of 117. The system then rounds to the nearest buy package of 25 to equal 125. The 125 is then shown in the Line Buy / Package Qty column.

Combining Purchase Orders from the Suggested P/O Queue
100
Combining Purchase Orders from the Suggested P/O Queue Through the Suggested P/O Queue you can combine suggested purchase orders together on-the-fly in order to better meet vendor targets or vendor minimum amounts. In addition, you can choose whether or not to combine the short or line quantities for each one.
Whether it is for one buy line with multiple branch purchase orders or multiple buy lines for the same branch, you can choose which suggested purchase orders to combine without having to make changes in Buy Line Maintenance. By combining P/Os through the Suggested P/O Queue, your Buy Line Maintenance settings remain the same and you can take advantage of any vendor incentives you may have received immediately without adjusting any settings that would change how the Suggested P/O runs.
Important: The system intentionally ignores any Buy Line Maintenance settings, such as the Combine P/Os flag, so the user must always select whether or not to combine on Central P/O. The selection only applies to that particular instance of combining purchase orders, due to the fact that you can combine different buy lines with different settings.
The change log reflects all changes when combining purchase orders. When viewing a purchase order that has combined suggestions on it and using a central purchase order, the system displays an indicator in the status bar.
When creating the purchase orders, the system uses the Price Branch (the branch from Suggested P/O Queue) and the Ship Branch (the warehouse branch from Procurement Group Maintenance).
To combine purchase orders:
1. Display the Suggested P/O Queue.
2. Click the View Manager ( ) and select Combine P/O.
3. Use the Short and Line check box columns to select which suggestions you want to combine.
For each suggested buy in the Suggested P/O Queue that you combine, the amount displays in the Selected column and the cumulative total displays in the status bar. The Total Buy column also dynamically updates with each selection.
When the purchase order is converted, the system records a comment in the change log to indicate if the conversion was made using the Line or Short buy option, such as "Suggested PO Converted Using the Line Buy."
4. From the Edit menu, select Convert to Actual P/Os.
5. In the Line or Short field, select which type of buy you want to make.
6. In the Vendor field, select the vendor from which you want buy material.
7. Select Combine on Central Purchase Order to indicate if you want one purchase order:
• If selected, a Branch prompt displays and one purchase order is created with a different generation for each warehouse branch. In addition, the Drop Point field activates.
• If not selected then the Branch field is disabled and a new purchase order is created for each price branch with a different generation for each warehouse branch. The purchase orders are consecutively numbered.
Managing Purchase Orders
101
Note: If combining orders from more than one branch, then the system creates a purchase order for each branch.
8. Select Create Central P/O Transfers to automatically create transfers to send to branches that require the material. This option lets you track the material through purchasing to receiving. Select only if the Create Central Purchase Order option is also set to Yes.
9. If the Drop Branch field is active, select which branch in your network or company that you want the material from the combined purchase order to be shipped to. Only branches for which you are authorized display.
10. The system populates the Branch and Line field based on your selections. You can adjust these values, as needed.
11. Use the Round Short to Package Quantity check box to indicate if you want to round the short by quantity to the package quantity.
Note: Some fields may be view-only when converting the order to ensure that accounting and inventory checks remain in tact.
12. Click OK to create the purchase order.
The system displays the new purchase order. You can edit it and verify data on the tabs, as needed.
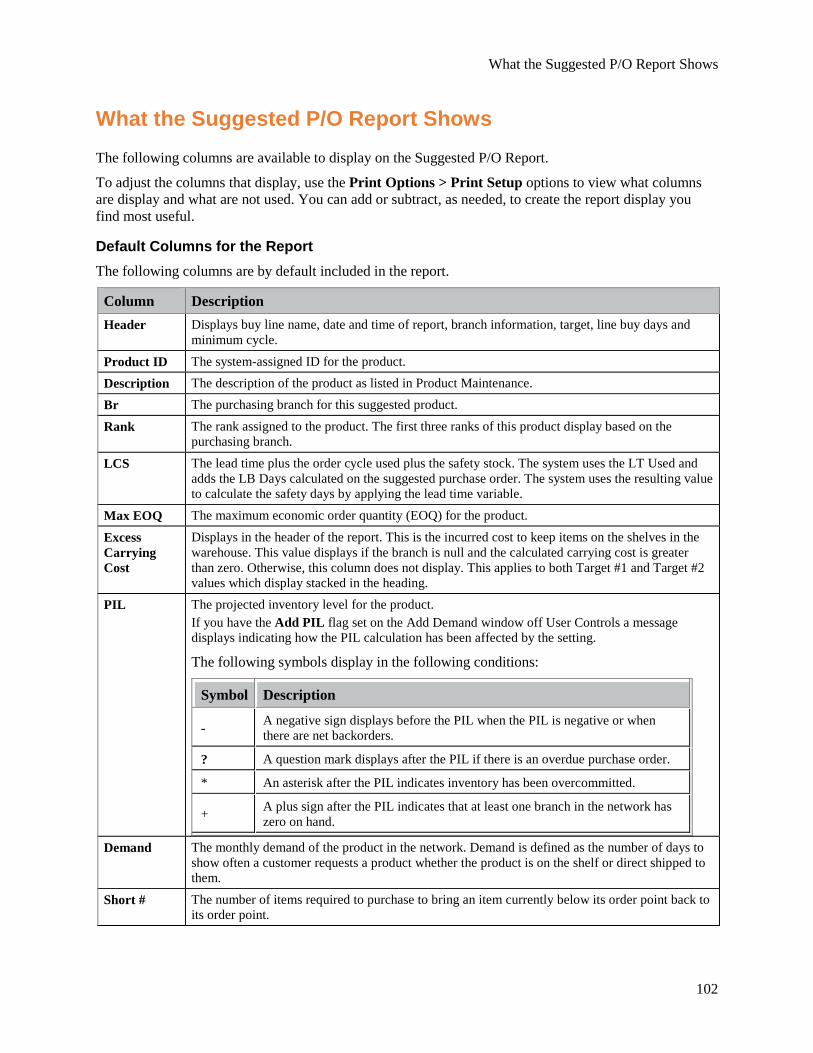
What the Suggested P/O Report Shows
102
What the Suggested P/O Report Shows The following columns are available to display on the Suggested P/O Report.
To adjust the columns that display, use the Print Options > Print Setup options to view what columns are display and what are not used. You can add or subtract, as needed, to create the report display you find most useful.
Default Columns for the Report The following columns are by default included in the report.
Column Description Header Displays buy line name, date and time of report, branch information, target, line buy days and
minimum cycle.
Product ID The system-assigned ID for the product. Description The description of the product as listed in Product Maintenance. Br The purchasing branch for this suggested product.
Rank The rank assigned to the product. The first three ranks of this product display based on the purchasing branch.
LCS The lead time plus the order cycle used plus the safety stock. The system uses the LT Used and adds the LB Days calculated on the suggested purchase order. The system uses the resulting value to calculate the safety days by applying the lead time variable.
Max EOQ The maximum economic order quantity (EOQ) for the product.
Excess Carrying Cost
Displays in the header of the report. This is the incurred cost to keep items on the shelves in the warehouse. This value displays if the branch is null and the calculated carrying cost is greater than zero. Otherwise, this column does not display. This applies to both Target #1 and Target #2 values which display stacked in the heading.
PIL The projected inventory level for the product. If you have the Add PIL flag set on the Add Demand window off User Controls a message displays indicating how the PIL calculation has been affected by the setting.
The following symbols display in the following conditions:
Symbol Description
- A negative sign displays before the PIL when the PIL is negative or when there are net backorders.
? A question mark displays after the PIL if there is an overdue purchase order.
* An asterisk after the PIL indicates inventory has been overcommitted.
+ A plus sign after the PIL indicates that at least one branch in the network has zero on hand.
Demand The monthly demand of the product in the network. Demand is defined as the number of days to show often a customer requests a product whether the product is on the shelf or direct shipped to them.
Short # The number of items required to purchase to bring an item currently below its order point back to its order point.
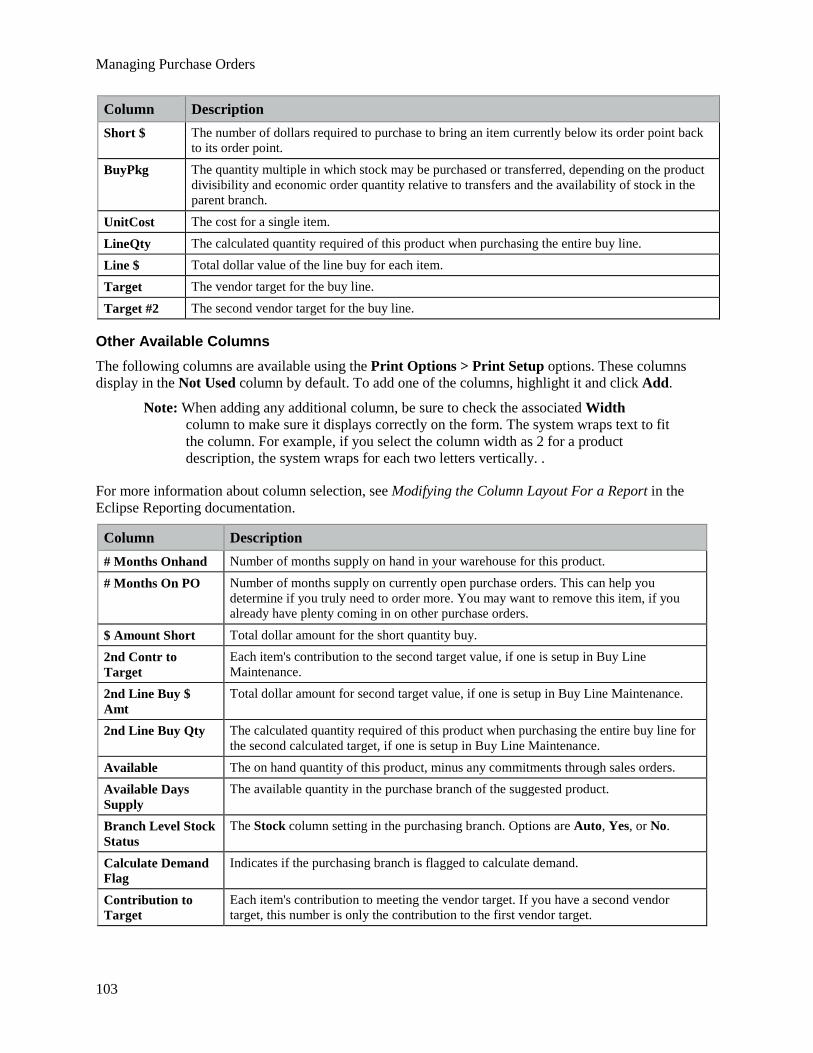
Managing Purchase Orders
103
Column Description Short $ The number of dollars required to purchase to bring an item currently below its order point back
to its order point.
BuyPkg The quantity multiple in which stock may be purchased or transferred, depending on the product divisibility and economic order quantity relative to transfers and the availability of stock in the parent branch.
UnitCost The cost for a single item.
LineQty The calculated quantity required of this product when purchasing the entire buy line. Line $ Total dollar value of the line buy for each item. Target The vendor target for the buy line.
Target #2 The second vendor target for the buy line.
Other Available Columns The following columns are available using the Print Options > Print Setup options. These columns display in the Not Used column by default. To add one of the columns, highlight it and click Add.
Note: When adding any additional column, be sure to check the associated Width column to make sure it displays correctly on the form. The system wraps text to fit the column. For example, if you select the column width as 2 for a product description, the system wraps for each two letters vertically. .
For more information about column selection, see Modifying the Column Layout For a Report in the Eclipse Reporting documentation.
Column Description # Months Onhand Number of months supply on hand in your warehouse for this product.
# Months On PO Number of months supply on currently open purchase orders. This can help you determine if you truly need to order more. You may want to remove this item, if you already have plenty coming in on other purchase orders.
$ Amount Short Total dollar amount for the short quantity buy. 2nd Contr to Target
Each item's contribution to the second target value, if one is setup in Buy Line Maintenance.
2nd Line Buy $ Amt
Total dollar amount for second target value, if one is setup in Buy Line Maintenance.
2nd Line Buy Qty The calculated quantity required of this product when purchasing the entire buy line for the second calculated target, if one is setup in Buy Line Maintenance.
Available The on hand quantity of this product, minus any commitments through sales orders. Available Days Supply
The available quantity in the purchase branch of the suggested product.
Branch Level Stock Status
The Stock column setting in the purchasing branch. Options are Auto, Yes, or No.
Calculate Demand Flag
Indicates if the purchasing branch is flagged to calculate demand.
Contribution to Target
Each item's contribution to meeting the vendor target. If you have a second vendor target, this number is only the contribution to the first vendor target.
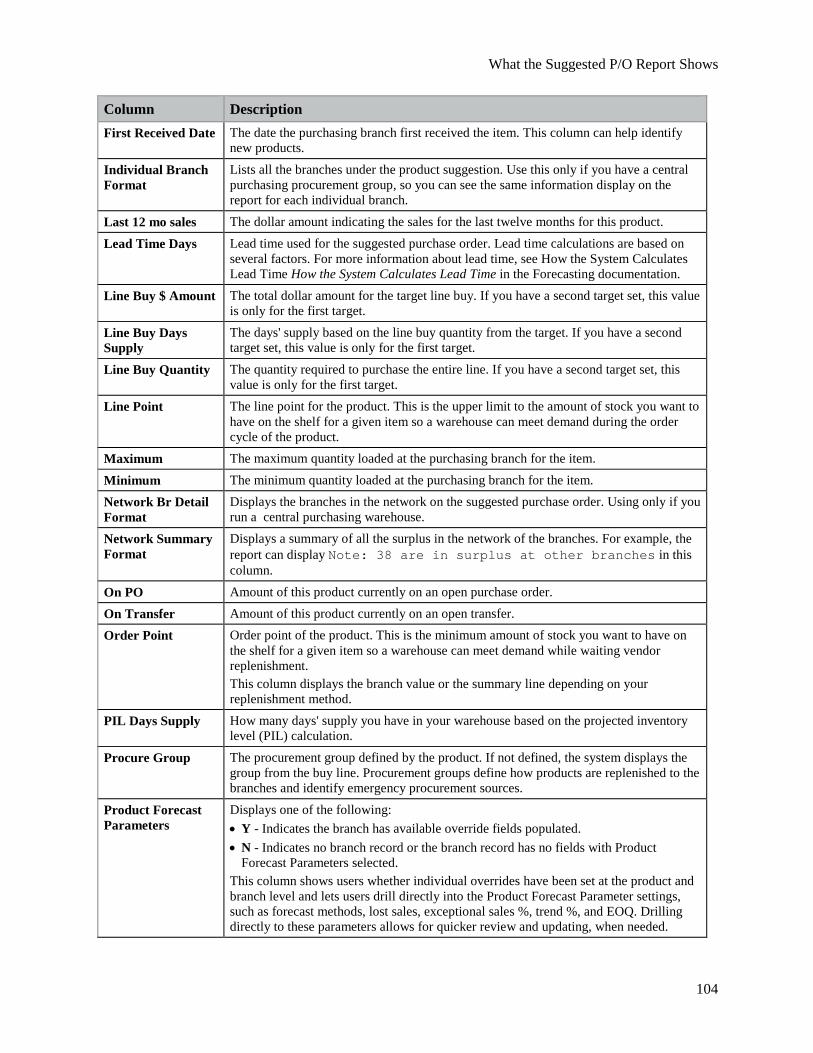
What the Suggested P/O Report Shows
104
Column Description First Received Date The date the purchasing branch first received the item. This column can help identify
new products.
Individual Branch Format
Lists all the branches under the product suggestion. Use this only if you have a central purchasing procurement group, so you can see the same information display on the report for each individual branch.
Last 12 mo sales The dollar amount indicating the sales for the last twelve months for this product.
Lead Time Days Lead time used for the suggested purchase order. Lead time calculations are based on several factors. For more information about lead time, see How the System Calculates Lead Time How the System Calculates Lead Time in the Forecasting documentation.
Line Buy $ Amount The total dollar amount for the target line buy. If you have a second target set, this value is only for the first target.
Line Buy Days Supply
The days' supply based on the line buy quantity from the target. If you have a second target set, this value is only for the first target.
Line Buy Quantity The quantity required to purchase the entire line. If you have a second target set, this value is only for the first target.
Line Point The line point for the product. This is the upper limit to the amount of stock you want to have on the shelf for a given item so a warehouse can meet demand during the order cycle of the product.
Maximum The maximum quantity loaded at the purchasing branch for the item.
Minimum The minimum quantity loaded at the purchasing branch for the item. Network Br Detail Format
Displays the branches in the network on the suggested purchase order. Using only if you run a central purchasing warehouse.
Network Summary Format
Displays a summary of all the surplus in the network of the branches. For example, the report can display Note: 38 are in surplus at other branches in this column.
On PO Amount of this product currently on an open purchase order. On Transfer Amount of this product currently on an open transfer. Order Point Order point of the product. This is the minimum amount of stock you want to have on
the shelf for a given item so a warehouse can meet demand while waiting vendor replenishment. This column displays the branch value or the summary line depending on your replenishment method.
PIL Days Supply How many days' supply you have in your warehouse based on the projected inventory level (PIL) calculation.
Procure Group The procurement group defined by the product. If not defined, the system displays the group from the buy line. Procurement groups define how products are replenished to the branches and identify emergency procurement sources.
Product Forecast Parameters
Displays one of the following: • Y - Indicates the branch has available override fields populated. • N - Indicates no branch record or the branch record has no fields with Product
Forecast Parameters selected. This column shows users whether individual overrides have been set at the product and branch level and lets users drill directly into the Product Forecast Parameter settings, such as forecast methods, lost sales, exceptional sales %, trend %, and EOQ. Drilling directly to these parameters allows for quicker review and updating, when needed.
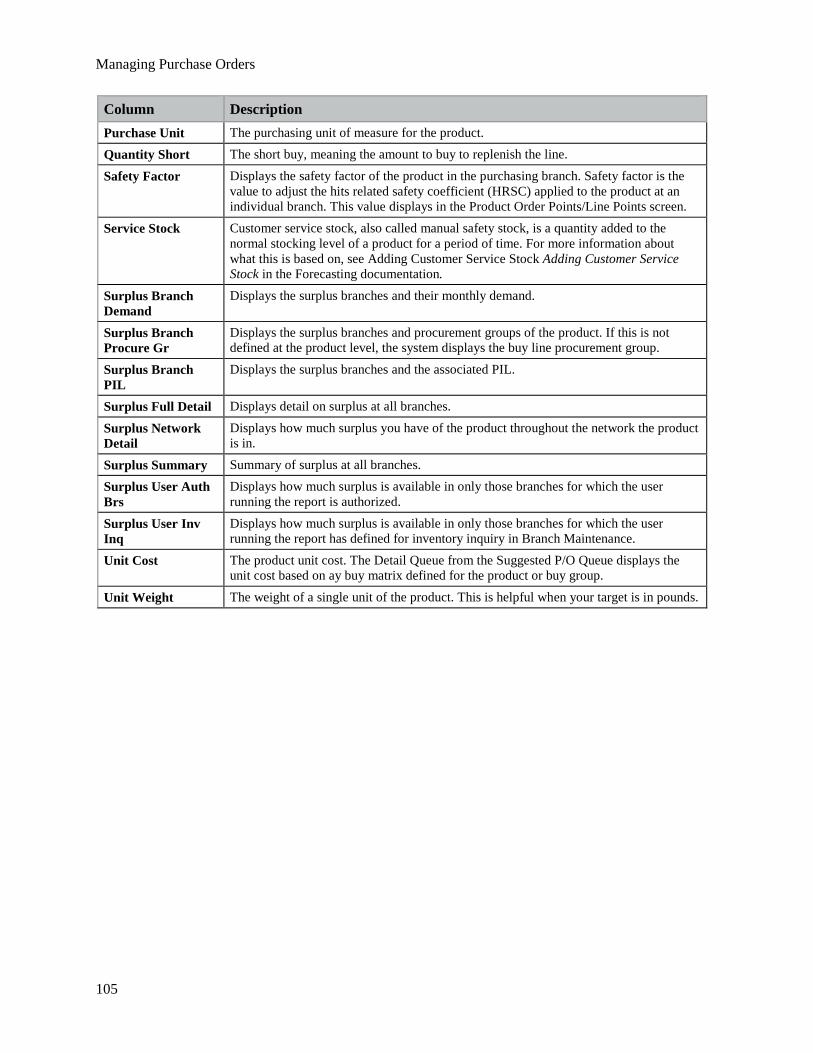
Managing Purchase Orders
105
Column Description Purchase Unit The purchasing unit of measure for the product. Quantity Short The short buy, meaning the amount to buy to replenish the line.
Safety Factor Displays the safety factor of the product in the purchasing branch. Safety factor is the value to adjust the hits related safety coefficient (HRSC) applied to the product at an individual branch. This value displays in the Product Order Points/Line Points screen.
Service Stock Customer service stock, also called manual safety stock, is a quantity added to the normal stocking level of a product for a period of time. For more information about what this is based on, see Adding Customer Service Stock Adding Customer Service Stock in the Forecasting documentation.
Surplus Branch Demand
Displays the surplus branches and their monthly demand.
Surplus Branch Procure Gr
Displays the surplus branches and procurement groups of the product. If this is not defined at the product level, the system displays the buy line procurement group.
Surplus Branch PIL
Displays the surplus branches and the associated PIL.
Surplus Full Detail Displays detail on surplus at all branches.
Surplus Network Detail
Displays how much surplus you have of the product throughout the network the product is in.
Surplus Summary Summary of surplus at all branches. Surplus User Auth Brs
Displays how much surplus is available in only those branches for which the user running the report is authorized.
Surplus User Inv Inq
Displays how much surplus is available in only those branches for which the user running the report has defined for inventory inquiry in Branch Maintenance.
Unit Cost The product unit cost. The Detail Queue from the Suggested P/O Queue displays the unit cost based on ay buy matrix defined for the product or buy group.
Unit Weight The weight of a single unit of the product. This is helpful when your target is in pounds.

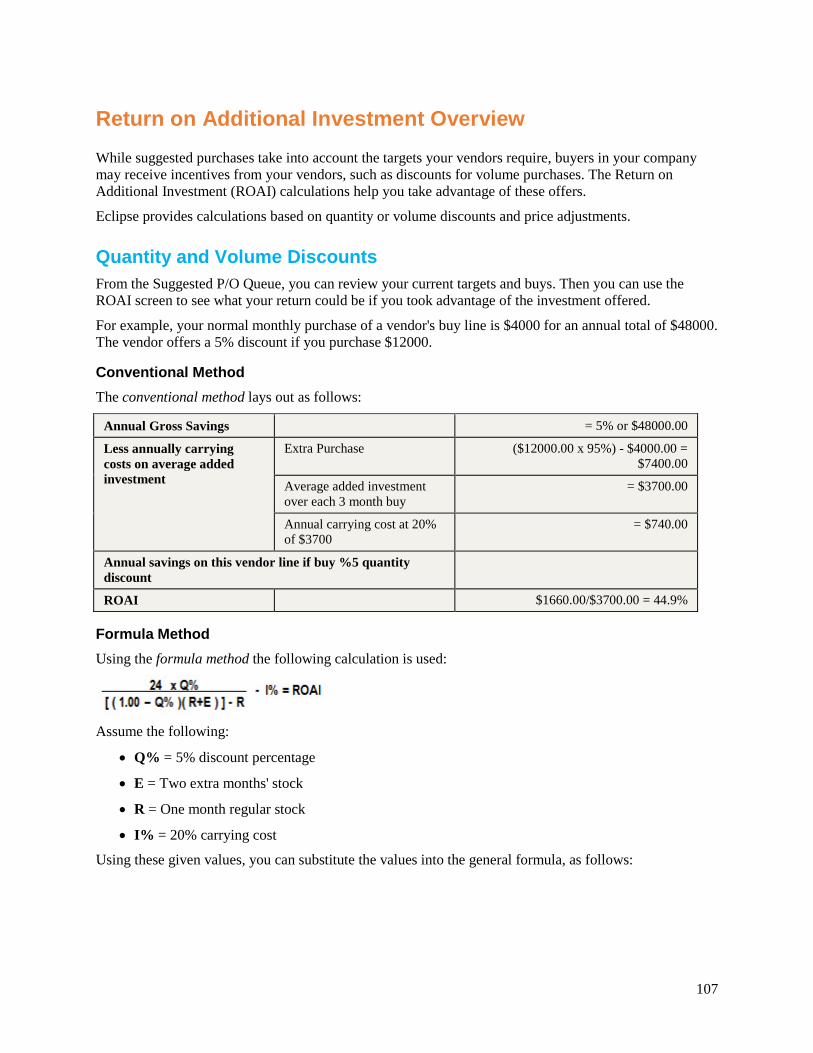
107
Return on Additional Investment Overview While suggested purchases take into account the targets your vendors require, buyers in your company may receive incentives from your vendors, such as discounts for volume purchases. The Return on Additional Investment (ROAI) calculations help you take advantage of these offers.
Eclipse provides calculations based on quantity or volume discounts and price adjustments.
Quantity and Volume Discounts From the Suggested P/O Queue, you can review your current targets and buys. Then you can use the ROAI screen to see what your return could be if you took advantage of the investment offered.
For example, your normal monthly purchase of a vendor's buy line is $4000 for an annual total of $48000. The vendor offers a 5% discount if you purchase $12000.
Conventional Method The conventional method lays out as follows:
Annual Gross Savings = 5% or $48000.00
Less annually carrying costs on average added investment
Extra Purchase ($12000.00 x 95%) - $4000.00 = $7400.00
Average added investment over each 3 month buy
= $3700.00
Annual carrying cost at 20% of $3700
= $740.00
Annual savings on this vendor line if buy %5 quantity discount
ROAI $1660.00/$3700.00 = 44.9%
Formula Method Using the formula method the following calculation is used:
Assume the following:
• Q% = 5% discount percentage
• E = Two extra months' stock
• R = One month regular stock
• I% = 20% carrying cost
Using these given values, you can substitute the values into the general formula, as follows:
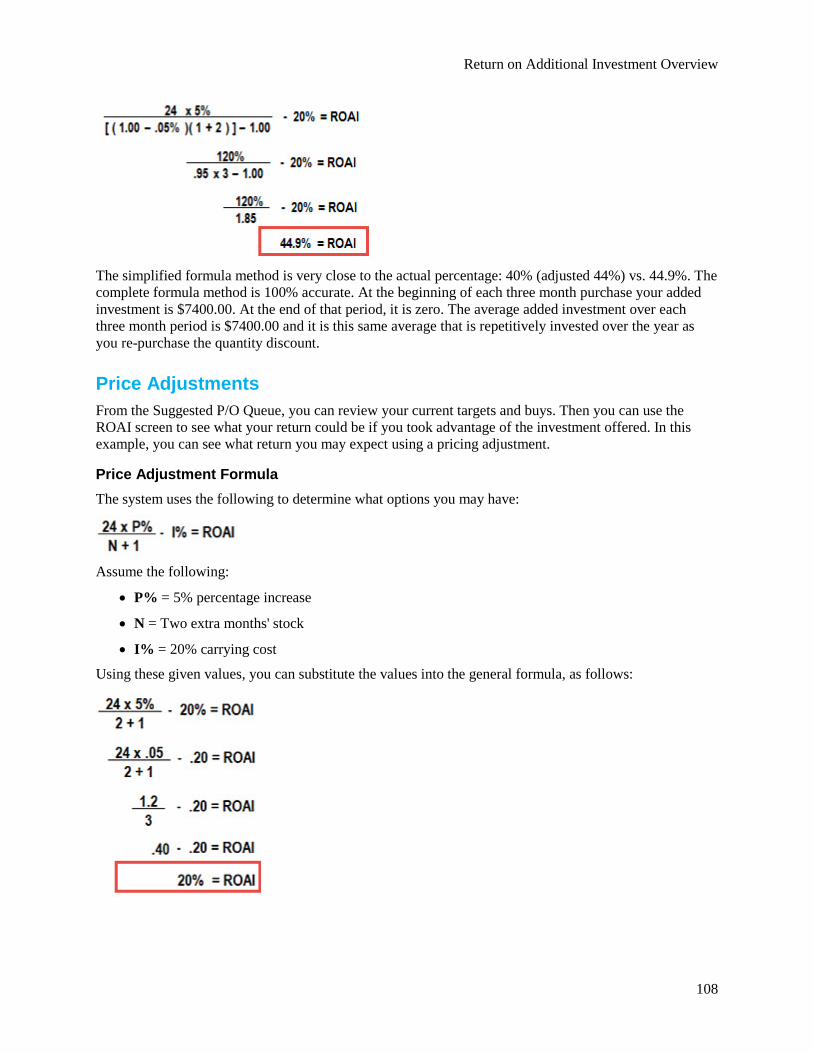
Return on Additional Investment Overview
108
The simplified formula method is very close to the actual percentage: 40% (adjusted 44%) vs. 44.9%. The complete formula method is 100% accurate. At the beginning of each three month purchase your added investment is $7400.00. At the end of that period, it is zero. The average added investment over each three month period is $7400.00 and it is this same average that is repetitively invested over the year as you re-purchase the quantity discount.
Price Adjustments From the Suggested P/O Queue, you can review your current targets and buys. Then you can use the ROAI screen to see what your return could be if you took advantage of the investment offered. In this example, you can see what return you may expect using a pricing adjustment.
Price Adjustment Formula The system uses the following to determine what options you may have:
Assume the following:
• P% = 5% percentage increase
• N = Two extra months' stock
• I% = 20% carrying cost
Using these given values, you can substitute the values into the general formula, as follows:
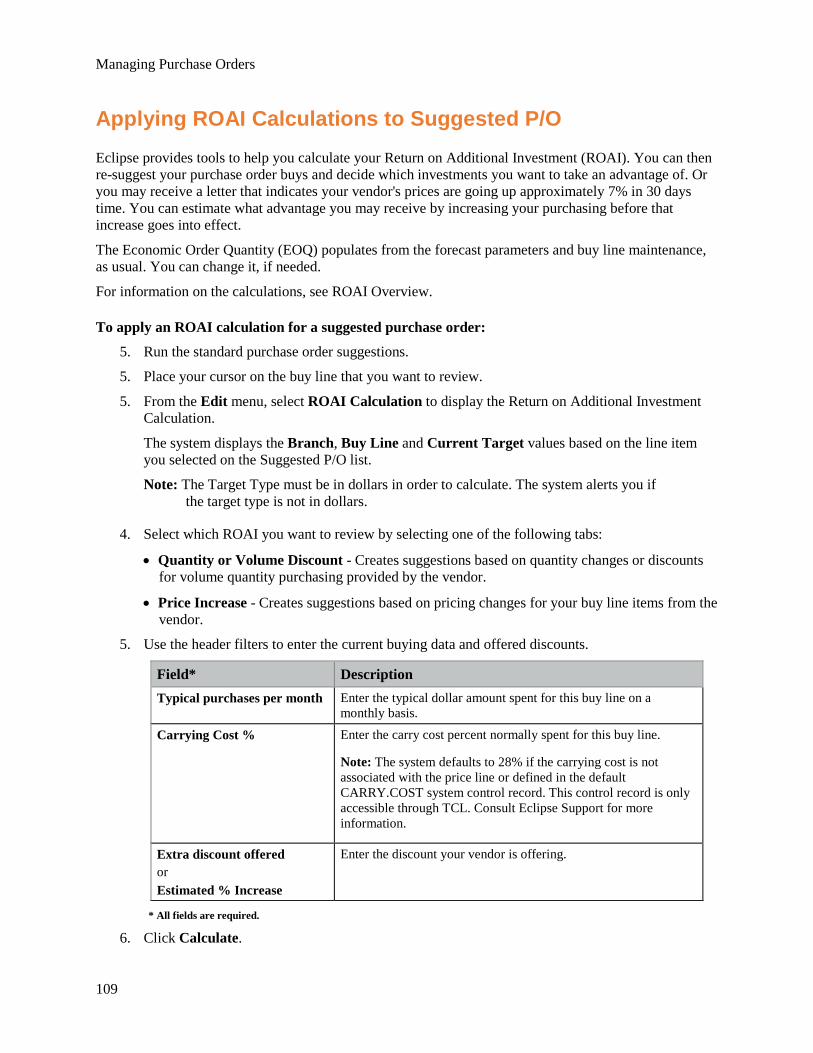
Managing Purchase Orders
109
Applying ROAI Calculations to Suggested P/O Eclipse provides tools to help you calculate your Return on Additional Investment (ROAI). You can then re-suggest your purchase order buys and decide which investments you want to take an advantage of. Or you may receive a letter that indicates your vendor's prices are going up approximately 7% in 30 days time. You can estimate what advantage you may receive by increasing your purchasing before that increase goes into effect.
The Economic Order Quantity (EOQ) populates from the forecast parameters and buy line maintenance, as usual. You can change it, if needed.
For information on the calculations, see ROAI Overview.
To apply an ROAI calculation for a suggested purchase order:
5. Run the standard purchase order suggestions.
5. Place your cursor on the buy line that you want to review.
5. From the Edit menu, select ROAI Calculation to display the Return on Additional Investment Calculation.
The system displays the Branch, Buy Line and Current Target values based on the line item you selected on the Suggested P/O list.
Note: The Target Type must be in dollars in order to calculate. The system alerts you if the target type is not in dollars.
4. Select which ROAI you want to review by selecting one of the following tabs:
• Quantity or Volume Discount - Creates suggestions based on quantity changes or discounts for volume quantity purchasing provided by the vendor.
• Price Increase - Creates suggestions based on pricing changes for your buy line items from the vendor.
5. Use the header filters to enter the current buying data and offered discounts.
Field* Description Typical purchases per month Enter the typical dollar amount spent for this buy line on a
monthly basis.
Carrying Cost % Enter the carry cost percent normally spent for this buy line.
Note: The system defaults to 28% if the carrying cost is not associated with the price line or defined in the default CARRY.COST system control record. This control record is only accessible through TCL. Consult Eclipse Support for more information.
Extra discount offered or Estimated % Increase
Enter the discount your vendor is offering.
* All fields are required.
6. Click Calculate.
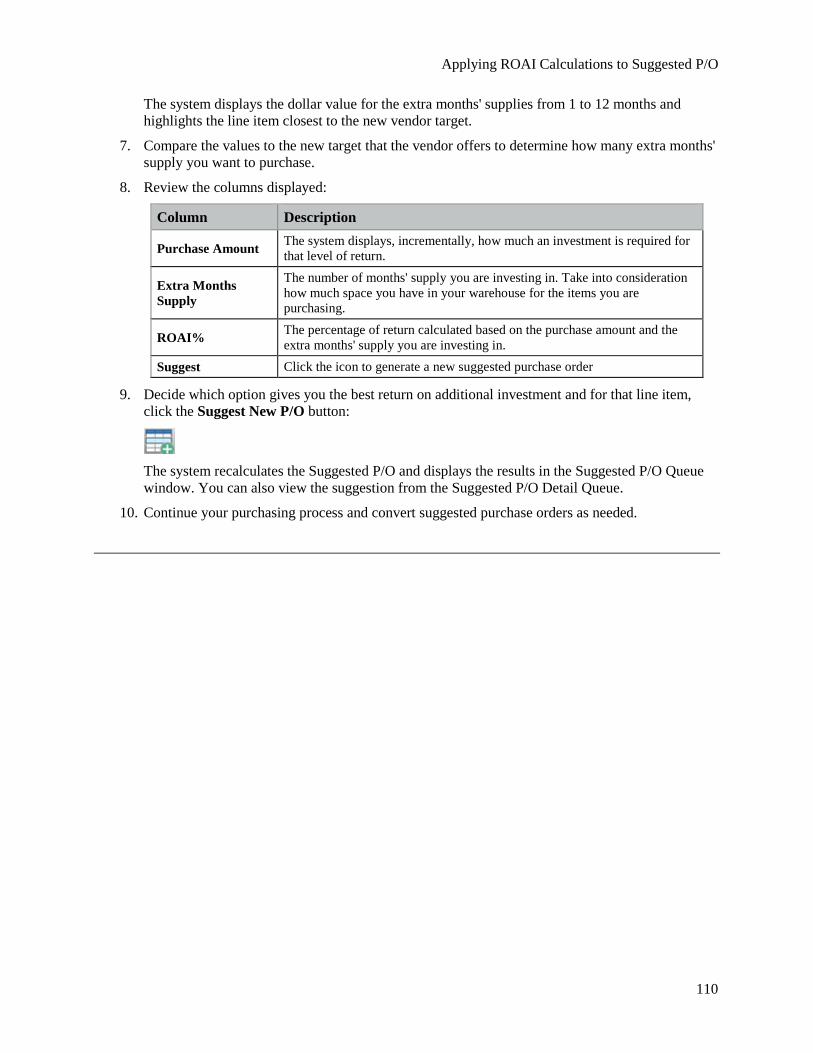
Applying ROAI Calculations to Suggested P/O
110
The system displays the dollar value for the extra months' supplies from 1 to 12 months and highlights the line item closest to the new vendor target.
7. Compare the values to the new target that the vendor offers to determine how many extra months' supply you want to purchase.
8. Review the columns displayed:
Column Description
Purchase Amount The system displays, incrementally, how much an investment is required for that level of return.
Extra Months Supply
The number of months' supply you are investing in. Take into consideration how much space you have in your warehouse for the items you are purchasing.
ROAI% The percentage of return calculated based on the purchase amount and the extra months' supply you are investing in.
Suggest Click the icon to generate a new suggested purchase order
9. Decide which option gives you the best return on additional investment and for that line item, click the Suggest New P/O button:
The system recalculates the Suggested P/O and displays the results in the Suggested P/O Queue window. You can also view the suggestion from the Suggested P/O Detail Queue.
10. Continue your purchasing process and convert suggested purchase orders as needed.
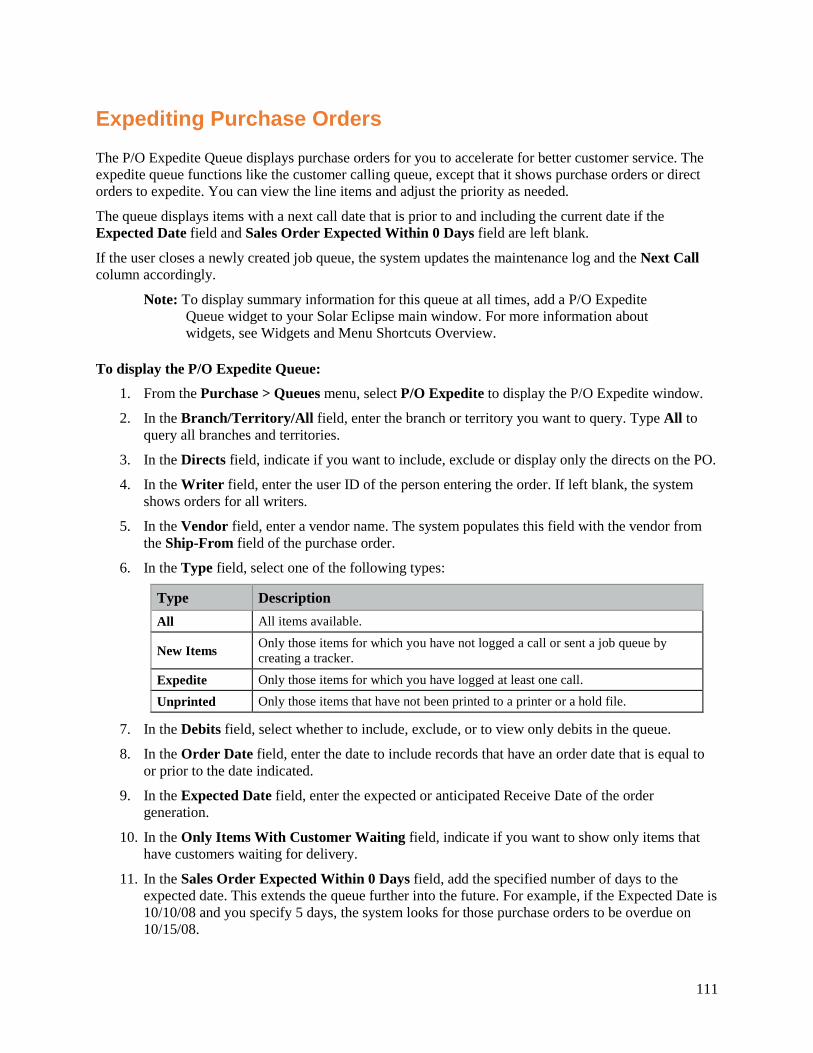
111
Expediting Purchase Orders The P/O Expedite Queue displays purchase orders for you to accelerate for better customer service. The expedite queue functions like the customer calling queue, except that it shows purchase orders or direct orders to expedite. You can view the line items and adjust the priority as needed.
The queue displays items with a next call date that is prior to and including the current date if the Expected Date field and Sales Order Expected Within 0 Days field are left blank.
If the user closes a newly created job queue, the system updates the maintenance log and the Next Call column accordingly.
Note: To display summary information for this queue at all times, add a P/O Expedite Queue widget to your Solar Eclipse main window. For more information about widgets, see Widgets and Menu Shortcuts Overview.
To display the P/O Expedite Queue:
1. From the Purchase > Queues menu, select P/O Expedite to display the P/O Expedite window.
2. In the Branch/Territory/All field, enter the branch or territory you want to query. Type All to query all branches and territories.
3. In the Directs field, indicate if you want to include, exclude or display only the directs on the PO.
4. In the Writer field, enter the user ID of the person entering the order. If left blank, the system shows orders for all writers.
5. In the Vendor field, enter a vendor name. The system populates this field with the vendor from the Ship-From field of the purchase order.
6. In the Type field, select one of the following types:
Type Description All All items available.
New Items Only those items for which you have not logged a call or sent a job queue by creating a tracker.
Expedite Only those items for which you have logged at least one call. Unprinted Only those items that have not been printed to a printer or a hold file.
7. In the Debits field, select whether to include, exclude, or to view only debits in the queue.
8. In the Order Date field, enter the date to include records that have an order date that is equal to or prior to the date indicated.
9. In the Expected Date field, enter the expected or anticipated Receive Date of the order generation.
10. In the Only Items With Customer Waiting field, indicate if you want to show only items that have customers waiting for delivery.
11. In the Sales Order Expected Within 0 Days field, add the specified number of days to the expected date. This extends the queue further into the future. For example, if the Expected Date is 10/10/08 and you specify 5 days, the system looks for those purchase orders to be overdue on 10/15/08.
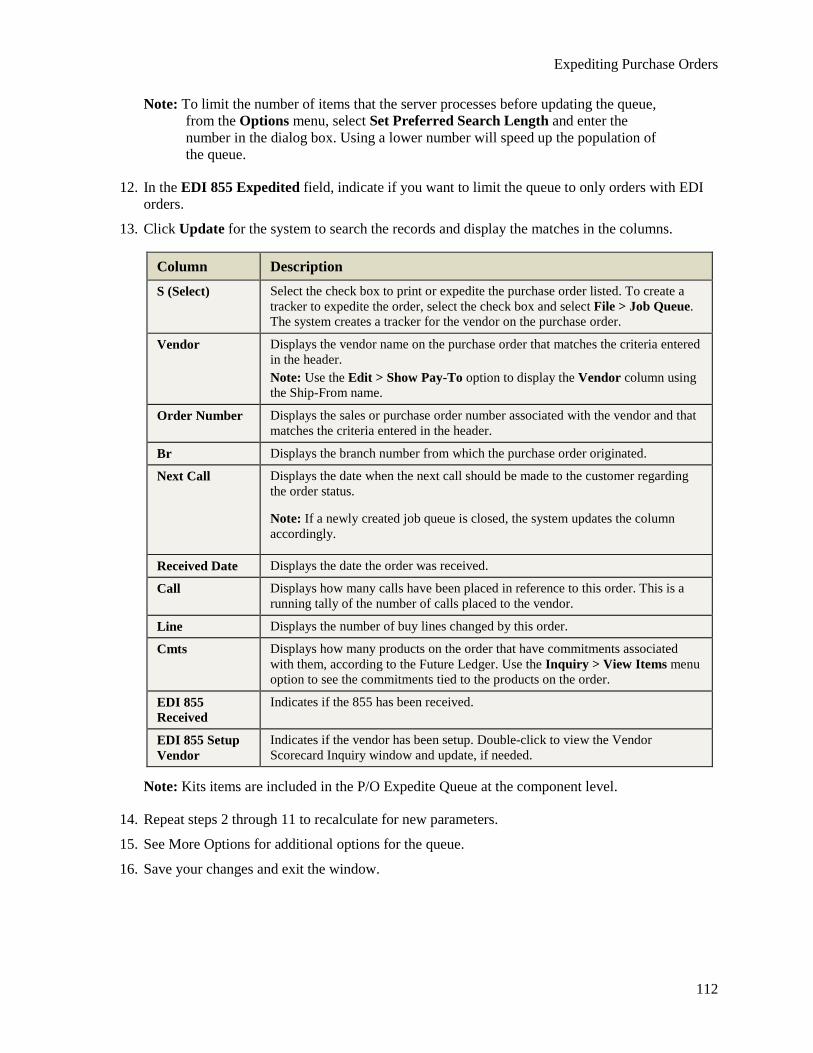
Expediting Purchase Orders
112
Note: To limit the number of items that the server processes before updating the queue, from the Options menu, select Set Preferred Search Length and enter the number in the dialog box. Using a lower number will speed up the population of the queue.
12. In the EDI 855 Expedited field, indicate if you want to limit the queue to only orders with EDI orders.
13. Click Update for the system to search the records and display the matches in the columns.
Column Description S (Select) Select the check box to print or expedite the purchase order listed. To create a
tracker to expedite the order, select the check box and select File > Job Queue. The system creates a tracker for the vendor on the purchase order.
Vendor Displays the vendor name on the purchase order that matches the criteria entered in the header. Note: Use the Edit > Show Pay-To option to display the Vendor column using the Ship-From name.
Order Number Displays the sales or purchase order number associated with the vendor and that matches the criteria entered in the header.
Br Displays the branch number from which the purchase order originated.
Next Call Displays the date when the next call should be made to the customer regarding the order status.
Note: If a newly created job queue is closed, the system updates the column accordingly.
Received Date Displays the date the order was received.
Call Displays how many calls have been placed in reference to this order. This is a running tally of the number of calls placed to the vendor.
Line Displays the number of buy lines changed by this order.
Cmts Displays how many products on the order that have commitments associated with them, according to the Future Ledger. Use the Inquiry > View Items menu option to see the commitments tied to the products on the order.
EDI 855 Received
Indicates if the 855 has been received.
EDI 855 Setup Vendor
Indicates if the vendor has been setup. Double-click to view the Vendor Scorecard Inquiry window and update, if needed.
Note: Kits items are included in the P/O Expedite Queue at the component level.
14. Repeat steps 2 through 11 to recalculate for new parameters.
15. See More Options for additional options for the queue.
16. Save your changes and exit the window.
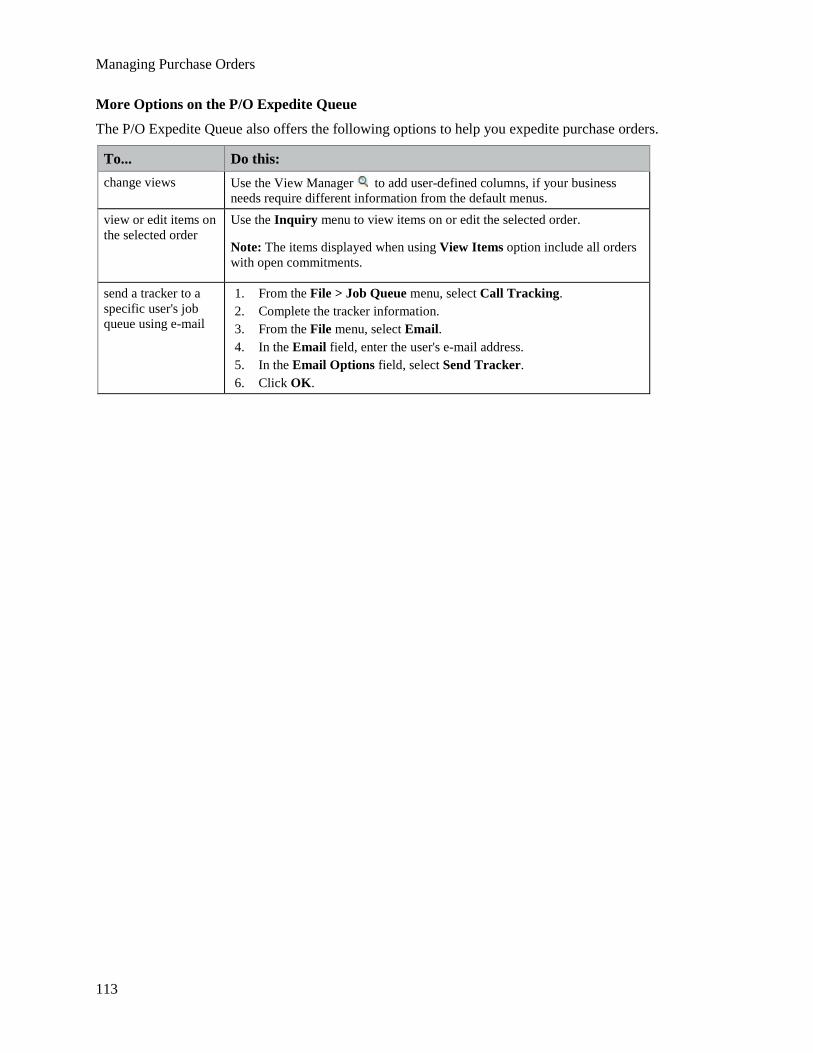
Managing Purchase Orders
113
More Options on the P/O Expedite Queue
The P/O Expedite Queue also offers the following options to help you expedite purchase orders.
To... Do this: change views Use the View Manager to add user-defined columns, if your business
needs require different information from the default menus. view or edit items on the selected order
Use the Inquiry menu to view items on or edit the selected order.
Note: The items displayed when using View Items option include all orders with open commitments.
send a tracker to a specific user's job queue using e-mail
1. From the File > Job Queue menu, select Call Tracking. 2. Complete the tracker information. 3. From the File menu, select Email. 4. In the Email field, enter the user's e-mail address. 5. In the Email Options field, select Send Tracker. 6. Click OK.

115
Reviewing the P/O Backorders Queue The Review P/O Backorders Queue displays purchase orders that contain backordered items. These are items that were not available with the original purchase order. For example, a customer ordered 25 faucets for a new building's restrooms, but only 20 are available right away from the vendor. The last five faucets are put on backorder to be delivered to you for the customer as soon as possible.
The Review P/O Backorders Queue displays the backordered items that do not have an anticipated receiving date from the vendor. If you do not assign a date to the backordered item on a purchase order, the system flags that purchase order to display in the Review P/O Backorders Queue. In the above example, if the available date is unknown for the remaining five faucets, then the purchase order displays in the Review P/O Backorders Queue.
Use the Default B/O Days For Purchase Orders control maintenance record to change the backorder days. Enter the number of days that the system adds to the receiving date for backorders. When items on a purchase order are backordered, the system looks first at the setting in the B/O Days field in Vendor Maintenance to determine how to handle the backorder. If the B/O Days field is blank, the system then looks at the setting in this control maintenance record. If it is not set, the system adds three (3) days.
Note: The status of the purchase order is retained when the purchase order displays in this queue.
This section provides information about the following:
• Displaying the Review P/O Backorders Queue
• Viewing the purchase orders from the Review P/O Backorders Queue
• Editing the purchase orders from the Review P/O Backorders Queue
• Setting fixed backorder days
Note: To display summary information for this queue at all times, add a Review P/O Backorders Queue widget to your Solar Eclipse main window.
To display the Review P/O Backorders Queue:
1. From the Purchase > Queues menu, select Review P/O Backorders to display the Review P/O Backorders window.
2. In the Branch/Territory/All field, enter a branch or territory for which you want to view the backorders. To view all branches and territories, type All.
3. In the Writer field, enter a purchasing agent ID.
You can select to see all backorders for a specific purchasing agent who enters purchase orders. For example, if a purchasing agent called to give you advance warning that a backorder would be in queue because there was not a date assigned, you could search for that agents ID to narrow the search.
4. Click Update. The Review P/O Backorders Queue displays.
Note: If there are not any backorders for the parameters you entered, the message "No items found" displays.
5. Exit the window.
Viewing and Editing P/Os from the Review P/O Backorders Queue
116
Viewing and Editing P/Os from the Review P/O Backorders Queue The Review P/O Backorders Queue provides you with two options to handle backorders. You can view the purchase order to see vendor information and original dates. You can also edit the order with more information, if needed.
Viewing the Purchase Order Use the View hot key to access the original purchase order and provides complete vendor contact information. You can investigate the availability of backordered items with the vendor. If you establish a date, then you can update the purchase order and remove it from the Review P/O Backorders Queue.
Note: If an order has a date assigned, it does not show up in the Review P/O Backorders Queue because the system determines that the order is now in process.
To view the purchase order from the Review P/O Backorders Queue:
1. From the Purchase > Queues menu, select Review P/O Backorders to display the Review P/O Backorders Queue window.
2. In the Branch/Territory/All field, enter a branch or territory for which you want to view the backorders. To view all branches and territories, type All.
3. In the Writer field, enter a purchasing agent ID.
You can select to see all backorders for a specific purchasing agent who enters purchase orders. For example, if a purchasing agent called to give you advance warning that a backorder would be in queue because there was not a date assigned, you could search for that agents ID to narrow the search.
4. Click Update. The Review P/O Backorders Queue displays.
Note: If there are not any backorders for the parameters you entered, the following message displays: No items found.
5. From the Order menu, select View Order to display the order highlighted.
6. Exit the purchase order. The status window displays in view-only mode.
7. Save your changes and exit the window.
Editing the Purchase Order You can assign the due dates from the edit mode. After a date is assigned to the backordered items, the purchase order is removed from the Review P/O Backorders Queue.
To edit the purchase order from the Review P/O Backorders Queue:
1. From the Purchase > Queues menu, select Review P/O Backorders to display the Review P/O Backorders Queue window.
2. In the Branch/Territory/All field, enter a branch or territory for which you want to view the backorders. To view all branches and territories, type All.
Managing Purchase Orders
117
3. In the Writer field, enter a purchasing agent ID.
4. You can select to see all backorders for a specific purchasing agent who enters purchase orders. For example, if a purchasing agent called to give you advance warning that a backorder would be in queue because there was not a date assigned, you could search for that agents ID to narrow the search.
5. Click Update. The Review P/O Backorders Queue displays.
Note: If there are not any backorders for the parameters you entered, the following message displays: No items found.
6. From the Order menu, select Edit Order to display the order highlighted.
7. Make changes to the appropriate field. For information on the fields, see Creating Purchase Orders.
8. Save your changes and exit the window. The status window displays in view-only mode.
9. Exit the Review P/O Backorders Queue window to return to the main menu.
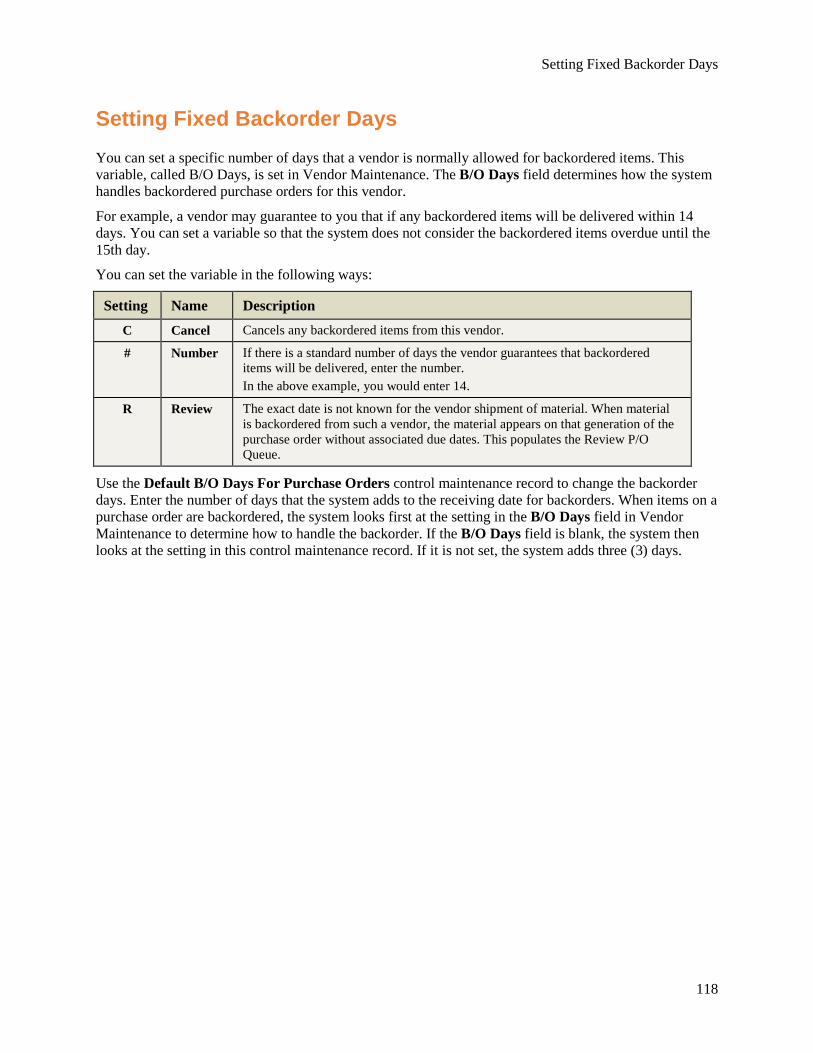
Setting Fixed Backorder Days
118
Setting Fixed Backorder Days You can set a specific number of days that a vendor is normally allowed for backordered items. This variable, called B/O Days, is set in Vendor Maintenance. The B/O Days field determines how the system handles backordered purchase orders for this vendor.
For example, a vendor may guarantee to you that if any backordered items will be delivered within 14 days. You can set a variable so that the system does not consider the backordered items overdue until the 15th day.
You can set the variable in the following ways:
Setting Name Description C Cancel Cancels any backordered items from this vendor.
# Number If there is a standard number of days the vendor guarantees that backordered items will be delivered, enter the number. In the above example, you would enter 14.
R Review The exact date is not known for the vendor shipment of material. When material is backordered from such a vendor, the material appears on that generation of the purchase order without associated due dates. This populates the Review P/O Queue.
Use the Default B/O Days For Purchase Orders control maintenance record to change the backorder days. Enter the number of days that the system adds to the receiving date for backorders. When items on a purchase order are backordered, the system looks first at the setting in the B/O Days field in Vendor Maintenance to determine how to handle the backorder. If the B/O Days field is blank, the system then looks at the setting in this control maintenance record. If it is not set, the system adds three (3) days.
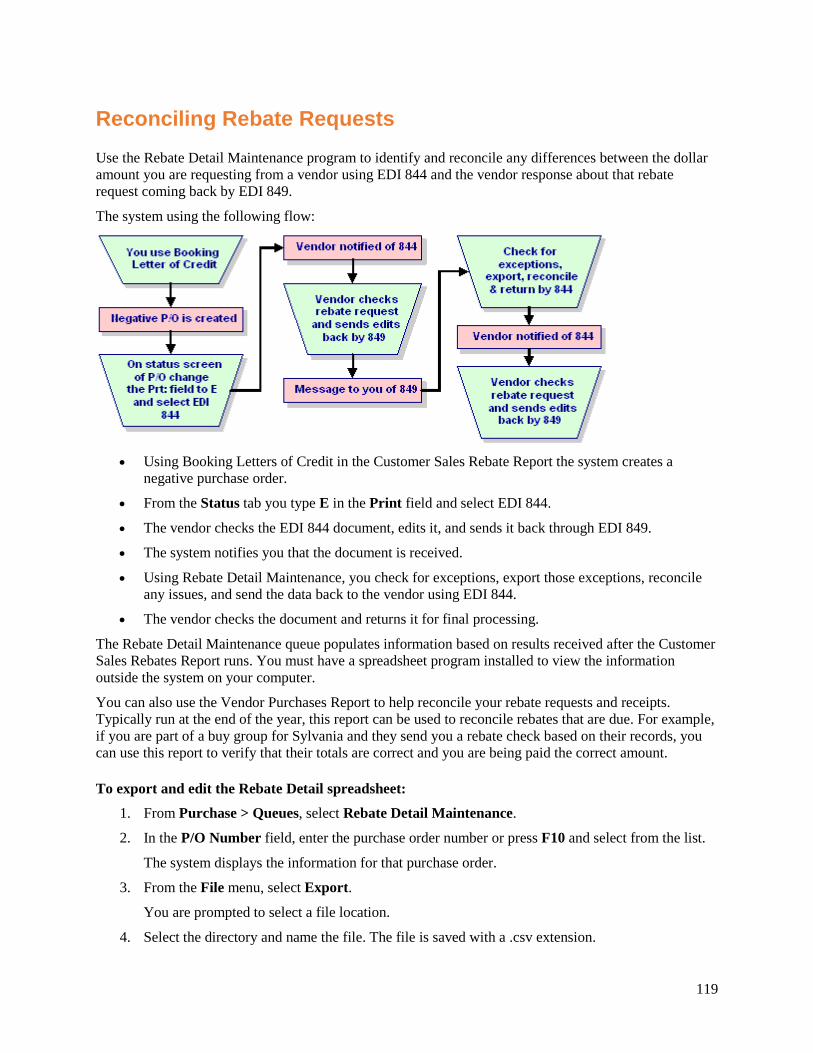
119
Reconciling Rebate Requests Use the Rebate Detail Maintenance program to identify and reconcile any differences between the dollar amount you are requesting from a vendor using EDI 844 and the vendor response about that rebate request coming back by EDI 849.
The system using the following flow:
• Using Booking Letters of Credit in the Customer Sales Rebate Report the system creates a
negative purchase order.
• From the Status tab you type E in the Print field and select EDI 844.
• The vendor checks the EDI 844 document, edits it, and sends it back through EDI 849.
• The system notifies you that the document is received.
• Using Rebate Detail Maintenance, you check for exceptions, export those exceptions, reconcile any issues, and send the data back to the vendor using EDI 844.
• The vendor checks the document and returns it for final processing.
The Rebate Detail Maintenance queue populates information based on results received after the Customer Sales Rebates Report runs. You must have a spreadsheet program installed to view the information outside the system on your computer.
You can also use the Vendor Purchases Report to help reconcile your rebate requests and receipts. Typically run at the end of the year, this report can be used to reconcile rebates that are due. For example, if you are part of a buy group for Sylvania and they send you a rebate check based on their records, you can use this report to verify that their totals are correct and you are being paid the correct amount.
To export and edit the Rebate Detail spreadsheet:
1. From Purchase > Queues, select Rebate Detail Maintenance.
2. In the P/O Number field, enter the purchase order number or press F10 and select from the list.
The system displays the information for that purchase order.
3. From the File menu, select Export.
You are prompted to select a file location.
4. Select the directory and name the file. The file is saved with a .csv extension.
Reconciling Rebate Requests
120
The file opens for you in your default spreadsheet program.
5. Save and close the file.
To import and resend the Rebate Detail spreadsheet:
1. From Purchase > Queues, select Rebate Detail Maintenance.
2. In the P/O Number field, enter the purchase order number or press F10 and select from the list.
The system displays the information for that purchase order.
3. The vendor edits the data as needed.
4. From the File menu, select Import.
5. Select the file from your directory and click OK.
6. From the File menu, select Update to update the displayed purchase order according to the file changes.
Note: From the Edit menu, select Export Exceptions to display only those purchase orders that have vendor rebate exceptions.
7. Save your changes and exit the window.
Managing Purchase Orders
121
Viewing and Editing Rebate Purchase Orders You can view and edit the purchase orders created for rebates after the Customer Sales Rebate Report runs.
To view and edit the rebate purchase order:
1. From the Purchase > Queues menu, select Rebate Detail Maintenance to display the Rebate Detail Maintenance window.
2. In the P/O Number field, enter the purchase order number you want to view or update.
3. From the Edit menu, use one of the following:
• View Order - verify the purchase order information.
• Edit Order - update the purchase order information.
4. Verify information and edit if needed.
5. Save your changes and exit the window.
Purging the Rebate Detail File
122
Purging the Rebate Detail File The Rebate Detail file holds the information collected by the Customer Sales Rebate Report. Use the Purge Rebate Detail program to remove cancelled purchase orders that were generated using the Book Letter of Credit program from the Customer Sales Rebate Report.
We recommend purging the Rebate Detail File once a month. You can set the scheduler to purge this file on a regular basis.
To purge the Rebate Detail File:
1. From the Maintenance > Merge/Purge menu, select Purge Rebate Detail File to display the Purge Rebate Detail File screen.
Note: If prompted, log on to the character-based system.
2. At the Purge Rebate Detail File as of prompt, enter the purge date. This purges the files on or before that date.
3. Use the Begin Purge hot key.
4. Press Esc to exit the screen and return to the main menu.
Managing Purchase Orders
123
Carrier Rebate Program Overview The Carrier Rebate Program provided by Eclipse allows distributors to override the contract sell prices at a higher or lower amount, but split the difference by 50%. The difference is added to the cost of goods sold (COGS).
Distributors receive spreadsheets from Carrier vendors with all the contract pricing for products with rebates. Distributors then modify the spreadsheets based on their selling markets adjusting the net sell and net COGS. They base these adjustments on the Carrier program 50% markup. Contracts are then imported into Eclipse to create contract matrix cells.
During order entry when the sell price for these carrier products are manually overridden to a price higher or lower than what is defined in the pricing matrix, the system automatically increases the costs (COGS and COMM-COST) on the sales order. Eclipse bases the increase on a rebate multiplier defined for the Carrier contract in the sell matrix. Carrier specifies a fifty percent split between the distributor and the vendor for the increased portion of the selling price for the cost increase.
For example, if the selling price is increased by $10.00, the cost is increased by $5.00. If the selling price is decreased by $10.00, the cost is decreased by $5.00.
Note: Before beginning, review settings in Carrier Rebate Setup control maintenance record which stores the required information for Carrier Corporation, such as the supplier ID and partner ID.
Use the following information to set up and use the Carrier Rebate Program:
• Importing Contract Pricing for Carrier Rebates
• Creating Carrier Rebate Import Templates
• Sales Order Entry Rules When Using Carrier Rebates
• Adding Carrier Rebate Options to the Customer Sales Rebate Report
• Running the Customer Sales Rebate Report
Importing Contract Pricing for Carrier Rebates
124
Importing Contract Pricing for Carrier Rebates After analyzing your Carrier contracts and defining the net sell and net cost of goods sold (COGS), you must break each contract into a separate spreadsheet file. For example, you can create one file for All Dealers and include all the products, net sell, net cost, original rebate and contract costs which is the cost threshold.
After separating the files, you must add the following fields to each file in order to create the sell matrix in Eclipse. You may select your own format, but use the same format for each file so you can setup a template to use for all Carrier rebates. For example, if you create a spreadsheet with Column J as the net sell, then use Column J for net sell for all your spreadsheets. Use the Sell Matrix Upload Utility to define the format.
To import contract pricing for Carrier rebates:
1. Separate your spreadsheet files into separate files using the required fields and save the files in a .csv format.
Note: To see a sample file layout, seeExample Import File at the bottom of this document.
2. Upload the file into Eclipse.
3. Create a template to be reused.
4. Verify your import using Quick Sell Matrix Maintenance.
5. Ensure the Carrier columns are added in the Customer Sales Rebate Report.
6. Review settings in Carrier Rebate Setup control maintenance record.
Required Fields for Carrier Rebates The following fields are required for sell matrix uploads:
Field Description Customer ID# The internal ID for the contract customer. Eclipse contacts are set up as customer
records. You must create a customer record for each Carrier contact.
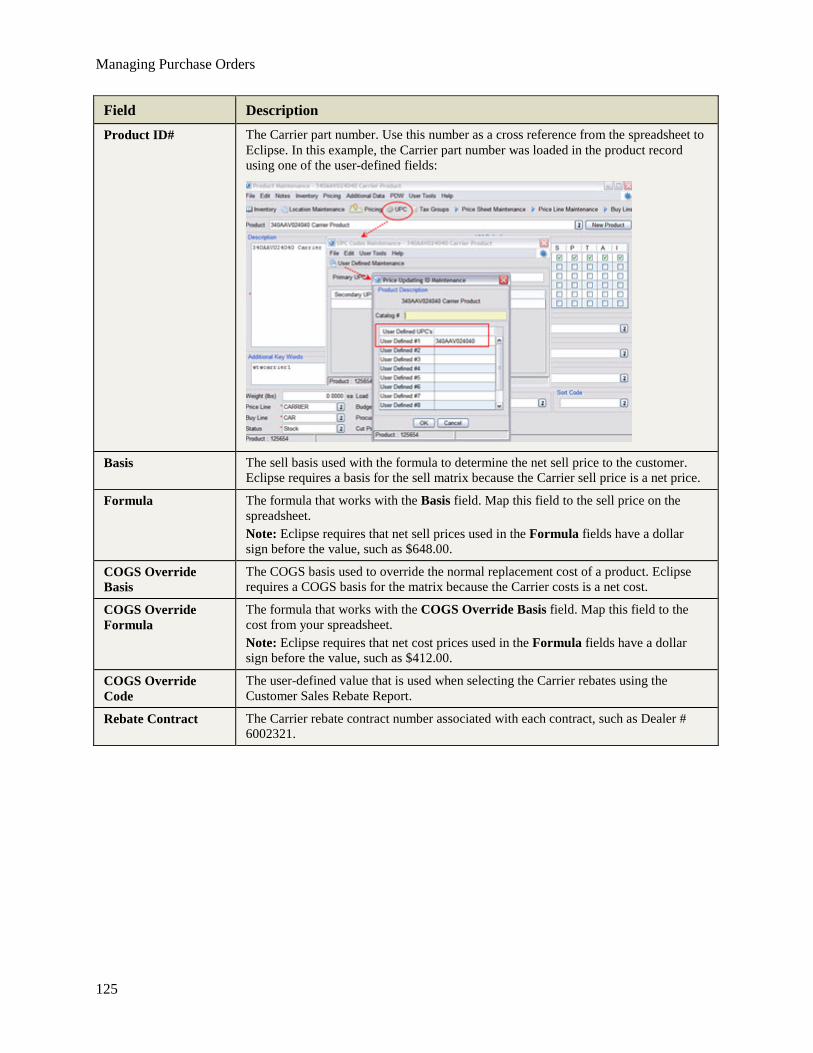
Managing Purchase Orders
125
Field Description Product ID# The Carrier part number. Use this number as a cross reference from the spreadsheet to
Eclipse. In this example, the Carrier part number was loaded in the product record using one of the user-defined fields:
Basis The sell basis used with the formula to determine the net sell price to the customer. Eclipse requires a basis for the sell matrix because the Carrier sell price is a net price.
Formula The formula that works with the Basis field. Map this field to the sell price on the spreadsheet. Note: Eclipse requires that net sell prices used in the Formula fields have a dollar sign before the value, such as $648.00.
COGS Override Basis
The COGS basis used to override the normal replacement cost of a product. Eclipse requires a COGS basis for the matrix because the Carrier costs is a net cost.
COGS Override Formula
The formula that works with the COGS Override Basis field. Map this field to the cost from your spreadsheet. Note: Eclipse requires that net cost prices used in the Formula fields have a dollar sign before the value, such as $412.00.
COGS Override Code
The user-defined value that is used when selecting the Carrier rebates using the Customer Sales Rebate Report.
Rebate Contract The Carrier rebate contract number associated with each contract, such as Dealer # 6002321.
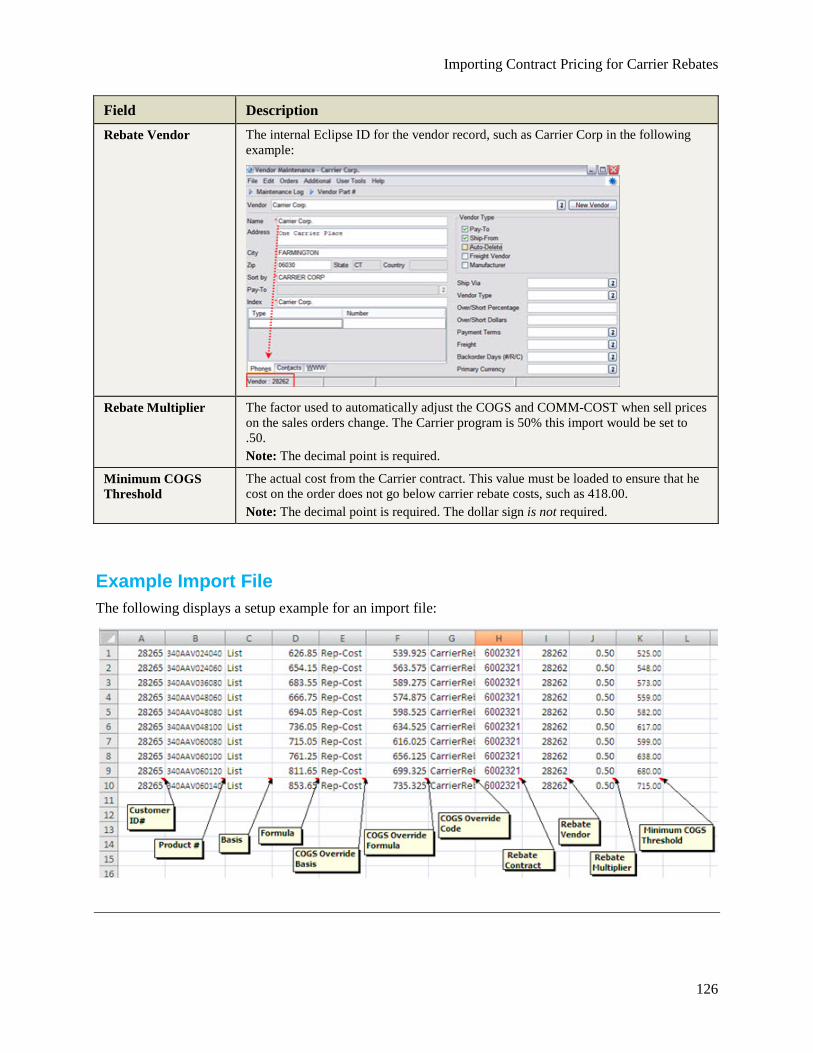
Importing Contract Pricing for Carrier Rebates
126
Field Description Rebate Vendor The internal Eclipse ID for the vendor record, such as Carrier Corp in the following
example:
Rebate Multiplier The factor used to automatically adjust the COGS and COMM-COST when sell prices on the sales orders change. The Carrier program is 50% this import would be set to .50. Note: The decimal point is required.
Minimum COGS Threshold
The actual cost from the Carrier contract. This value must be loaded to ensure that he cost on the order does not go below carrier rebate costs, such as 418.00. Note: The decimal point is required. The dollar sign is not required.
Example Import File The following displays a setup example for an import file:
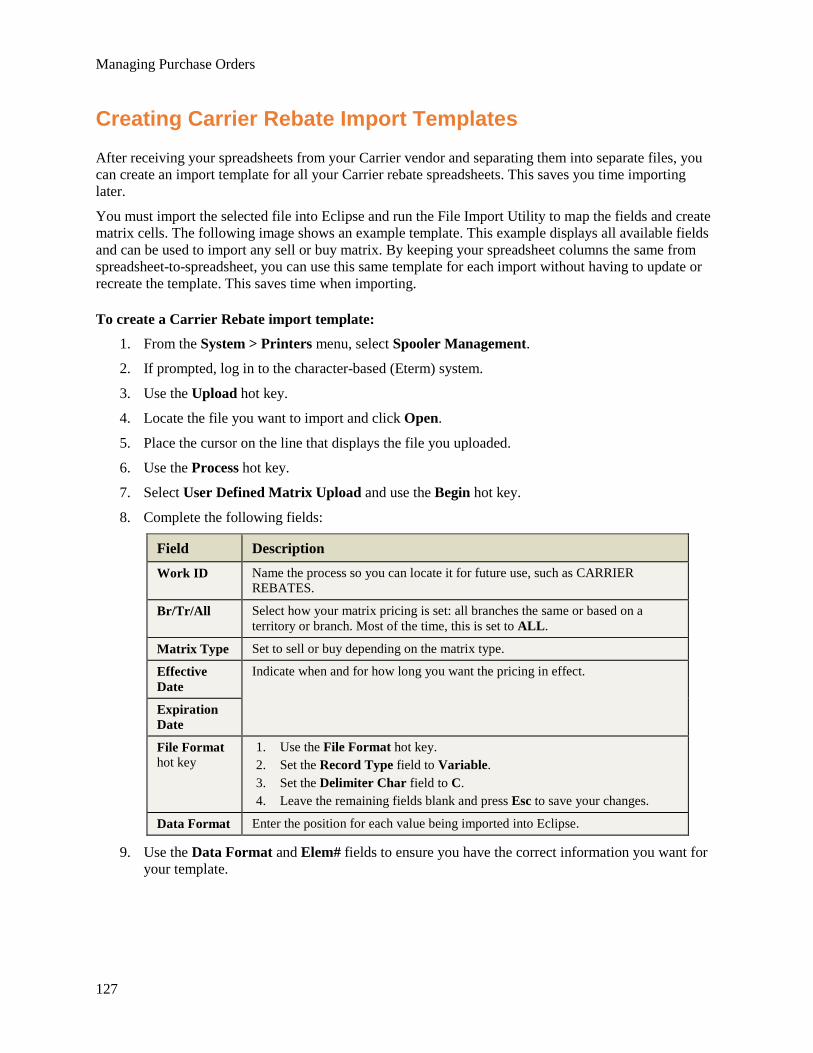
Managing Purchase Orders
127
Creating Carrier Rebate Import Templates After receiving your spreadsheets from your Carrier vendor and separating them into separate files, you can create an import template for all your Carrier rebate spreadsheets. This saves you time importing later.
You must import the selected file into Eclipse and run the File Import Utility to map the fields and create matrix cells. The following image shows an example template. This example displays all available fields and can be used to import any sell or buy matrix. By keeping your spreadsheet columns the same from spreadsheet-to-spreadsheet, you can use this same template for each import without having to update or recreate the template. This saves time when importing.
To create a Carrier Rebate import template:
1. From the System > Printers menu, select Spooler Management.
2. If prompted, log in to the character-based (Eterm) system.
3. Use the Upload hot key.
4. Locate the file you want to import and click Open.
5. Place the cursor on the line that displays the file you uploaded.
6. Use the Process hot key.
7. Select User Defined Matrix Upload and use the Begin hot key.
8. Complete the following fields:
Field Description Work ID Name the process so you can locate it for future use, such as CARRIER
REBATES.
Br/Tr/All Select how your matrix pricing is set: all branches the same or based on a territory or branch. Most of the time, this is set to ALL.
Matrix Type Set to sell or buy depending on the matrix type.
Effective Date
Indicate when and for how long you want the pricing in effect.
Expiration Date
File Format hot key
1. Use the File Format hot key. 2. Set the Record Type field to Variable. 3. Set the Delimiter Char field to C. 4. Leave the remaining fields blank and press Esc to save your changes.
Data Format Enter the position for each value being imported into Eclipse.
9. Use the Data Format and Elem# fields to ensure you have the correct information you want for your template.
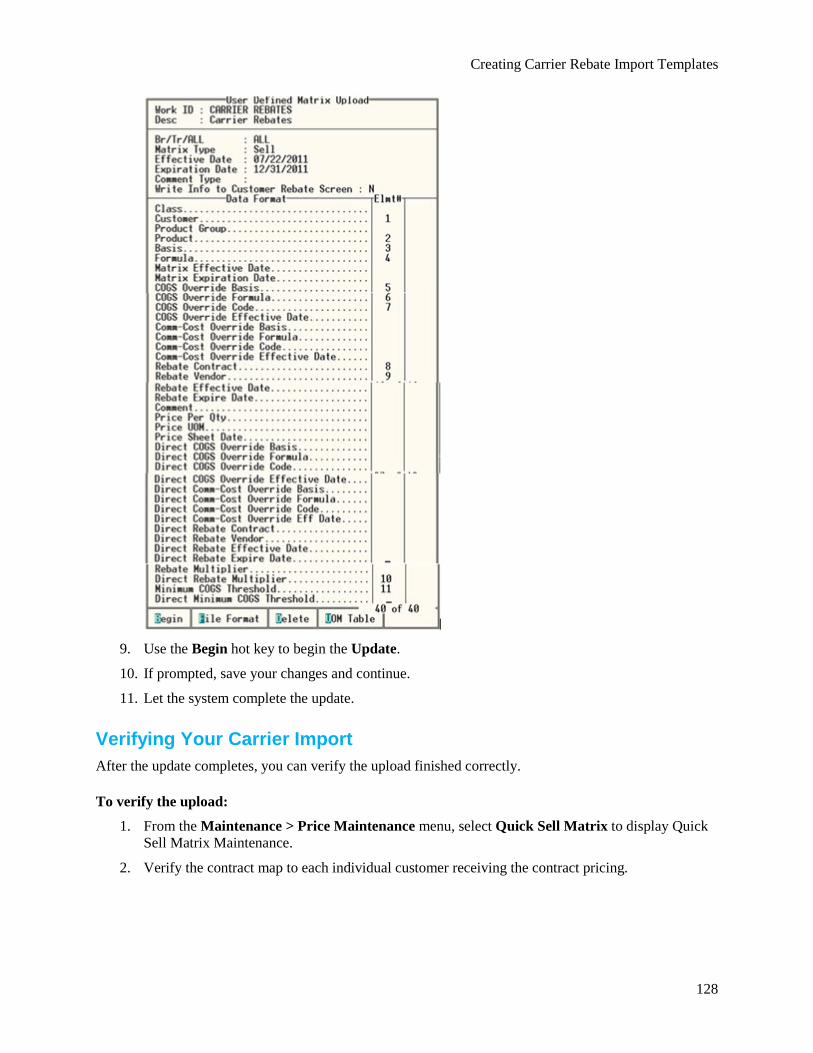
Creating Carrier Rebate Import Templates
128
9. Use the Begin hot key to begin the Update.
10. If prompted, save your changes and continue.
11. Let the system complete the update.
Verifying Your Carrier Import After the update completes, you can verify the upload finished correctly.
To verify the upload:
1. From the Maintenance > Price Maintenance menu, select Quick Sell Matrix to display Quick Sell Matrix Maintenance.
2. Verify the contract map to each individual customer receiving the contract pricing.
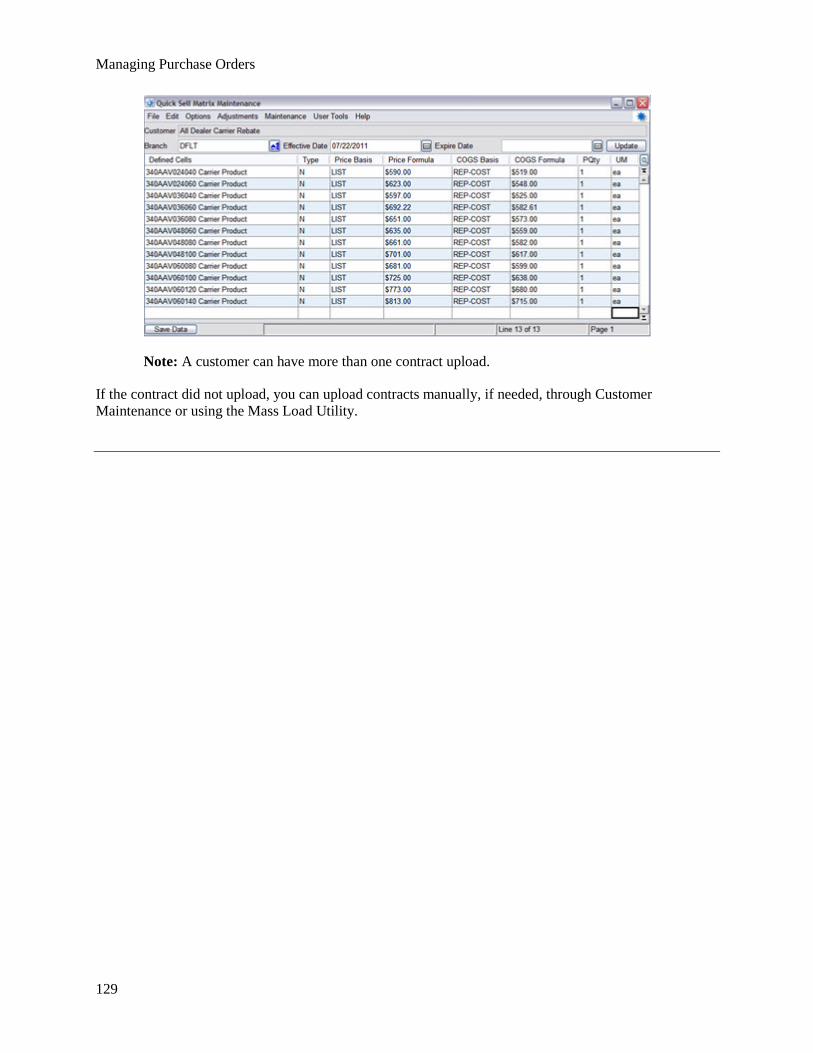
Managing Purchase Orders
129
Note: A customer can have more than one contract upload.
If the contract did not upload, you can upload contracts manually, if needed, through Customer Maintenance or using the Mass Load Utility.
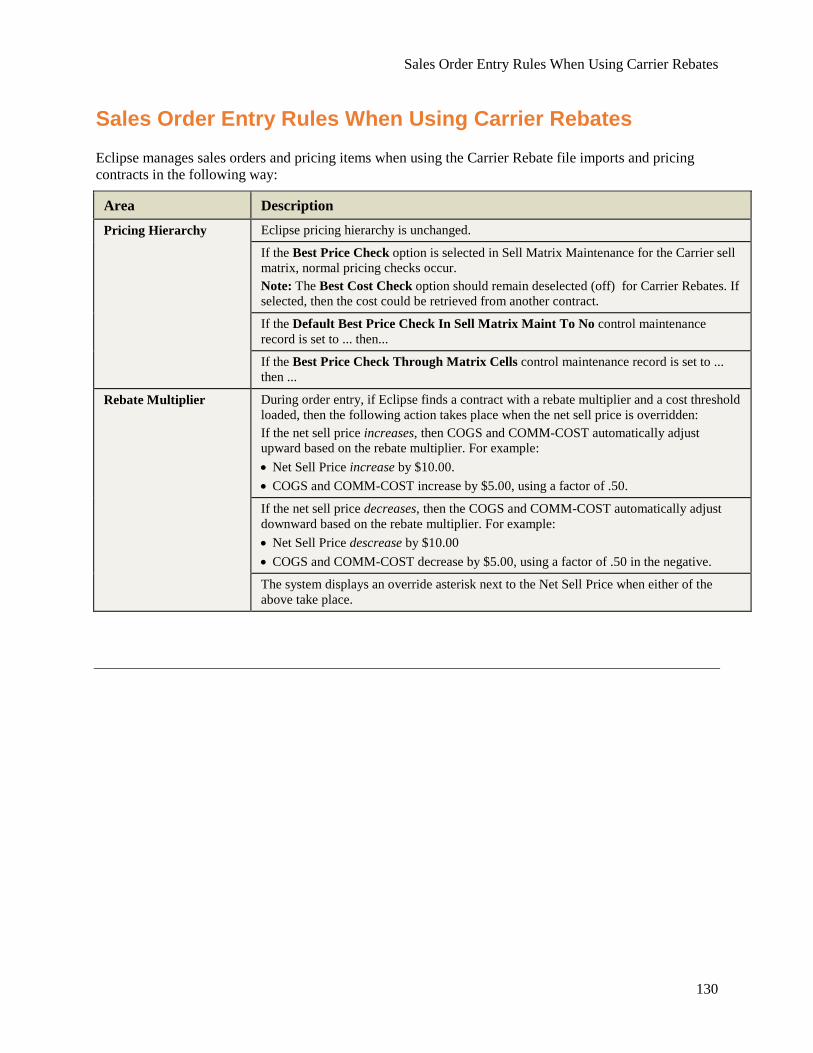
Sales Order Entry Rules When Using Carrier Rebates
130
Sales Order Entry Rules When Using Carrier Rebates Eclipse manages sales orders and pricing items when using the Carrier Rebate file imports and pricing contracts in the following way:
Area Description Pricing Hierarchy Eclipse pricing hierarchy is unchanged.
If the Best Price Check option is selected in Sell Matrix Maintenance for the Carrier sell matrix, normal pricing checks occur. Note: The Best Cost Check option should remain deselected (off) for Carrier Rebates. If selected, then the cost could be retrieved from another contract.
If the Default Best Price Check In Sell Matrix Maint To No control maintenance record is set to ... then...
If the Best Price Check Through Matrix Cells control maintenance record is set to ... then ...
Rebate Multiplier During order entry, if Eclipse finds a contract with a rebate multiplier and a cost threshold loaded, then the following action takes place when the net sell price is overridden: If the net sell price increases, then COGS and COMM-COST automatically adjust upward based on the rebate multiplier. For example: • Net Sell Price increase by $10.00. • COGS and COMM-COST increase by $5.00, using a factor of .50.
If the net sell price decreases, then the COGS and COMM-COST automatically adjust downward based on the rebate multiplier. For example: • Net Sell Price descrease by $10.00 • COGS and COMM-COST decrease by $5.00, using a factor of .50 in the negative.
The system displays an override asterisk next to the Net Sell Price when either of the above take place.
131
Index A
average cost
managing in purchasing 77
B
backorders
purchase orders
editing 116
reviewing 115
setting fixed backorder days 118
viewing 116
best cost check 75
bids
purchase orders
converting 30
copying 27
buy lines
editing 14
C
calculations
best cost check in purchasing 75
minimum order cycle 73
carrying costs
suggested P/O queue 81
central purchasing
allocating material to different branches 60
automatic transfers 59
changing quantities 60
combining branches 58
Order Status Print Status Defaults 62
reallocation 62
receiving material 62
comments
purchase order entry
adding to line items 42
adding to orders 42
customer rebate purchase orders 119
D
direct purchase orders
about 1
accessing 1
canceling 1
drop points
overriding 46
duty codes
drawback on purchase orders 78
E
EDI (electronic data interchange)
purchasing queues 79
queues
purchasing 79
F
freight charges
purchase orders
bill of lading 66
changing 66
duty drawback codes 78
freight carriers 64
freight factors 66
freight terms 63
overriding charges 65
pass-along freight 68
freight terms
guidelines 63
Status tab 8
Index
132
Totals tab 9
warning on purchase order 8
future-dated purchase orders 71
H
hard tags, purchase orders 68
M
minimum order cycle
about 73
exceeding vendor target 73
P
P/O Expedite Queue 111
P/O Reconciliation Inquiry 55
P/O Release Queue 18
pass-along freight
about 68
post entry purchase orders 70
prepaying vendors 52
procurements
product kits 72
product sales history, view in POE 4
products
purchasing
determining priority 1
kits 72
purchase orders
about 1
adding
bill-to IDs 31
bonded expiration date 13
comments to line items 42
generations 29, 44
instructions 40
notes 40
taxes 50
audit report 95
batch printing 33
bonding 13
combining branches 58
combining on-the-fly 100
copying
header information 47
PO data to other orders 27
creating 11
creating trackers from 48
currency 16
customer rebate 119, 121
detail scheduling 29
direct purchase orders
about 1
accessing 1
canceling 1
drop points
overriding 46
duty drawback codes 78
editing 14
entry windows
body 4
changing views 24
header 5
status 7
totals 9
expediting 111
freight charges
editing 66
freight carrier 64
guidelines 63
overriding 65
future-dated 71
generation totals 55
Managing Purchase Orders
133
generations 29, 44
inquiries 3, 35
international taxes 50
legacy 70
line item schedules 39
mode 27
post entries 70
printing
about 31
direct purchase orders 31
from the Status tab 32
options 7
orders 7
print styles 31
printer location selection 7, 31
via e-mail 7
reconciliations review 55
releasing 18
resorting line items 38
reviewing suggestions 95
sales history, on POE body 4
scheduling
changing unit of measure 22
entering serial numbers 22
generations 29
ship dates 29
ship quantities 29
ship vias 29
status 29
substituting products 21
tracking shipments 7
viewing purchasing information 22
shipments, tracking 8
suggestions 95
tabs
body 4
header 5
status 7
totals 9
tracking shipments 7
unapplied amounts 55
vendor notes 5
purchasing
nonstocks 89
purging
Rebate Detail file 122
Q
queues, purchasing
EDI Purchasing 79
P/O Expedite 111
P/O Release 18
Rebate Detail 119
Review P/O Backorders 115
suggested detail queue 92
suggested detail queue, columns 92
Suggested Purchase Order 86
R
Rebate Detail Queue 119
rebilling and crediting
purchase orders 37
reports
Suggested P/O Audit Report 95
return on additional investment (ROAI)
applying 109
calculations 107
overview 107
price adjustments 109
price increase 109
quantity discounts 109
Index
134
volume discounts 109
Review P/O Backorders Queue 115
ROAI (return on additional investement)
applying 109
calculations 107
overview 107
price adjustments 109
price increase 109
quantity discounts 109
volume discounts 109
S
sales inquiries
product sales history, on POE body 4
soft tags, purchase orders 68
Suggested P/O Audit Report 95
Suggested P/O Error Report 83
Suggested P/O Queue 86
Suggested P/O Report 83
suggested purchase orders
about 81
additional columns available 102
column views 86
converting
to actual purchase orders 89
to Transfer Surplus Queue 91
converting orders 92
costs 83
default columns 102
detail queue 92
detail queue column descriptions 92
error report 83
estimated order cycle 73
exceeding vendor target 73
nonstock
for customers on hold 83
package quantities 83
plus sign (+) on report 83
queue
combining POs 100
displaying 86
managing 89
return on additional investment 107
ROAI 107
sorting 86
viewing different queues 81
recommended run 81
report 83
report, column descriptions 102
running the report 83
secondary buy lines 83
single-branch to multi-branch 91
target #1 and #2 92
vendor targets 92
what the report shows 102
T
targets
for vendors
exceeding 73
transfers
suggesting 83
V
vendors
prepaying 52
purchasing
exceeding vendor target 73
inactive 49