eclipse escet™ development documentation (incubation)
TRANSCRIPT

Eclipse ESCET™ developmentdocumentation (Incubation)
Copyright (c) 2010, 2021 Contributors to the Eclipse Foundation
Version v0.4
Table of Contents1. Eclipse ESCET development . . . . . . . . . . . . . . . . . . . . . . . . . . . . . . . . . . . . . . . . . . . . . . . . . . . . . . . . . . . . . . . . 2
1.1. The Eclipse ESCET dev-list . . . . . . . . . . . . . . . . . . . . . . . . . . . . . . . . . . . . . . . . . . . . . . . . . . . . . . . . . . . . . 2
1.2. Development process. . . . . . . . . . . . . . . . . . . . . . . . . . . . . . . . . . . . . . . . . . . . . . . . . . . . . . . . . . . . . . . . . . 2
1.3. Contributing . . . . . . . . . . . . . . . . . . . . . . . . . . . . . . . . . . . . . . . . . . . . . . . . . . . . . . . . . . . . . . . . . . . . . . . . . . 7
1.4. Issue tracking. . . . . . . . . . . . . . . . . . . . . . . . . . . . . . . . . . . . . . . . . . . . . . . . . . . . . . . . . . . . . . . . . . . . . . . . 11
1.5. Development environment setup. . . . . . . . . . . . . . . . . . . . . . . . . . . . . . . . . . . . . . . . . . . . . . . . . . . . . . 12
1.6. Git repository. . . . . . . . . . . . . . . . . . . . . . . . . . . . . . . . . . . . . . . . . . . . . . . . . . . . . . . . . . . . . . . . . . . . . . . . 14
1.7. Coding standards . . . . . . . . . . . . . . . . . . . . . . . . . . . . . . . . . . . . . . . . . . . . . . . . . . . . . . . . . . . . . . . . . . . . 17
1.8. Building and testing . . . . . . . . . . . . . . . . . . . . . . . . . . . . . . . . . . . . . . . . . . . . . . . . . . . . . . . . . . . . . . . . . . 17
1.9. Release process . . . . . . . . . . . . . . . . . . . . . . . . . . . . . . . . . . . . . . . . . . . . . . . . . . . . . . . . . . . . . . . . . . . . . . 18
1.10. Third party tools . . . . . . . . . . . . . . . . . . . . . . . . . . . . . . . . . . . . . . . . . . . . . . . . . . . . . . . . . . . . . . . . . . . . 24
1.11. Upgrade instructions . . . . . . . . . . . . . . . . . . . . . . . . . . . . . . . . . . . . . . . . . . . . . . . . . . . . . . . . . . . . . . . . 25
2. Application framework. . . . . . . . . . . . . . . . . . . . . . . . . . . . . . . . . . . . . . . . . . . . . . . . . . . . . . . . . . . . . . . . . . . 28
2.1. Introduction. . . . . . . . . . . . . . . . . . . . . . . . . . . . . . . . . . . . . . . . . . . . . . . . . . . . . . . . . . . . . . . . . . . . . . . . . 28
2.2. Stand-alone execution versus Eclipse IDE . . . . . . . . . . . . . . . . . . . . . . . . . . . . . . . . . . . . . . . . . . . . . . 28
2.3. The Application class . . . . . . . . . . . . . . . . . . . . . . . . . . . . . . . . . . . . . . . . . . . . . . . . . . . . . . . . . . . . . . . . . 31
2.4. The exception framework . . . . . . . . . . . . . . . . . . . . . . . . . . . . . . . . . . . . . . . . . . . . . . . . . . . . . . . . . . . . 32
2.5. Exit codes . . . . . . . . . . . . . . . . . . . . . . . . . . . . . . . . . . . . . . . . . . . . . . . . . . . . . . . . . . . . . . . . . . . . . . . . . . . 33
2.6. The I/O framework . . . . . . . . . . . . . . . . . . . . . . . . . . . . . . . . . . . . . . . . . . . . . . . . . . . . . . . . . . . . . . . . . . . 33
2.7. The option framework . . . . . . . . . . . . . . . . . . . . . . . . . . . . . . . . . . . . . . . . . . . . . . . . . . . . . . . . . . . . . . . 35
2.8. The compiler framework . . . . . . . . . . . . . . . . . . . . . . . . . . . . . . . . . . . . . . . . . . . . . . . . . . . . . . . . . . . . . 38
2.9. How to implement your own application. . . . . . . . . . . . . . . . . . . . . . . . . . . . . . . . . . . . . . . . . . . . . . . 38
2.10. Application registration . . . . . . . . . . . . . . . . . . . . . . . . . . . . . . . . . . . . . . . . . . . . . . . . . . . . . . . . . . . . . 41
2.11. Execution . . . . . . . . . . . . . . . . . . . . . . . . . . . . . . . . . . . . . . . . . . . . . . . . . . . . . . . . . . . . . . . . . . . . . . . . . . 42
3. Multi-value Decision Diagrams library. . . . . . . . . . . . . . . . . . . . . . . . . . . . . . . . . . . . . . . . . . . . . . . . . . . . . 44
3.1. Goals . . . . . . . . . . . . . . . . . . . . . . . . . . . . . . . . . . . . . . . . . . . . . . . . . . . . . . . . . . . . . . . . . . . . . . . . . . . . . . . 44
3.2. Variables and relations . . . . . . . . . . . . . . . . . . . . . . . . . . . . . . . . . . . . . . . . . . . . . . . . . . . . . . . . . . . . . . . 44
3.3. Combining relations. . . . . . . . . . . . . . . . . . . . . . . . . . . . . . . . . . . . . . . . . . . . . . . . . . . . . . . . . . . . . . . . . . 45
3.4. Computing . . . . . . . . . . . . . . . . . . . . . . . . . . . . . . . . . . . . . . . . . . . . . . . . . . . . . . . . . . . . . . . . . . . . . . . . . . 46
3.5. Practical usage. . . . . . . . . . . . . . . . . . . . . . . . . . . . . . . . . . . . . . . . . . . . . . . . . . . . . . . . . . . . . . . . . . . . . . . 47
4. Rail diagram generator . . . . . . . . . . . . . . . . . . . . . . . . . . . . . . . . . . . . . . . . . . . . . . . . . . . . . . . . . . . . . . . . . . . 49
4.1. Introduction. . . . . . . . . . . . . . . . . . . . . . . . . . . . . . . . . . . . . . . . . . . . . . . . . . . . . . . . . . . . . . . . . . . . . . . . . 49
4.2. Examples. . . . . . . . . . . . . . . . . . . . . . . . . . . . . . . . . . . . . . . . . . . . . . . . . . . . . . . . . . . . . . . . . . . . . . . . . . . . 49
4.3. Customizing output . . . . . . . . . . . . . . . . . . . . . . . . . . . . . . . . . . . . . . . . . . . . . . . . . . . . . . . . . . . . . . . . . . 54
4.4. Lexical syntax . . . . . . . . . . . . . . . . . . . . . . . . . . . . . . . . . . . . . . . . . . . . . . . . . . . . . . . . . . . . . . . . . . . . . . . 64
4.5. Grammar . . . . . . . . . . . . . . . . . . . . . . . . . . . . . . . . . . . . . . . . . . . . . . . . . . . . . . . . . . . . . . . . . . . . . . . . . . . 66
5. SeText scanner/parser generator . . . . . . . . . . . . . . . . . . . . . . . . . . . . . . . . . . . . . . . . . . . . . . . . . . . . . . . . . . 68
5.1. SeText lexical syntax . . . . . . . . . . . . . . . . . . . . . . . . . . . . . . . . . . . . . . . . . . . . . . . . . . . . . . . . . . . . . . . . . 68
5.2. Specifying lexical syntax using SeText . . . . . . . . . . . . . . . . . . . . . . . . . . . . . . . . . . . . . . . . . . . . . . . . . 68
5.3. Regular expressions . . . . . . . . . . . . . . . . . . . . . . . . . . . . . . . . . . . . . . . . . . . . . . . . . . . . . . . . . . . . . . . . . . 70
5.4. Terminal descriptions . . . . . . . . . . . . . . . . . . . . . . . . . . . . . . . . . . . . . . . . . . . . . . . . . . . . . . . . . . . . . . . . 71
5.5. Imports . . . . . . . . . . . . . . . . . . . . . . . . . . . . . . . . . . . . . . . . . . . . . . . . . . . . . . . . . . . . . . . . . . . . . . . . . . . . . 72
5.6. Scanner hooks . . . . . . . . . . . . . . . . . . . . . . . . . . . . . . . . . . . . . . . . . . . . . . . . . . . . . . . . . . . . . . . . . . . . . . . 72
5.7. Specifying grammars using SeText . . . . . . . . . . . . . . . . . . . . . . . . . . . . . . . . . . . . . . . . . . . . . . . . . . . . 73
5.8. Parser hooks . . . . . . . . . . . . . . . . . . . . . . . . . . . . . . . . . . . . . . . . . . . . . . . . . . . . . . . . . . . . . . . . . . . . . . . . 74
5.9. Usage hints . . . . . . . . . . . . . . . . . . . . . . . . . . . . . . . . . . . . . . . . . . . . . . . . . . . . . . . . . . . . . . . . . . . . . . . . . . 76
5.10. Generated scanners/parsers . . . . . . . . . . . . . . . . . . . . . . . . . . . . . . . . . . . . . . . . . . . . . . . . . . . . . . . . . 77
5.11. Using SeText in an Eclipse Plug-in Project . . . . . . . . . . . . . . . . . . . . . . . . . . . . . . . . . . . . . . . . . . . . . 77
5.12. Limitations . . . . . . . . . . . . . . . . . . . . . . . . . . . . . . . . . . . . . . . . . . . . . . . . . . . . . . . . . . . . . . . . . . . . . . . . . 78
6. Legal . . . . . . . . . . . . . . . . . . . . . . . . . . . . . . . . . . . . . . . . . . . . . . . . . . . . . . . . . . . . . . . . . . . . . . . . . . . . . . . . . . . 79
Index . . . . . . . . . . . . . . . . . . . . . . . . . . . . . . . . . . . . . . . . . . . . . . . . . . . . . . . . . . . . . . . . . . . . . . . . . . . . . . . . . . . . . 80

This documentation concerns the development of the Eclipse SupervisoryControl Engineering Toolkit (Eclipse ESCET) open-source project.
The Eclipse ESCET project and all its tools are currently in the Incubation Phase.
Eclipse ESCET development
This manual includes information related to the development of the Eclipse ESCET toolkit as awhole, as it applies to all its languages and tools.
The following topics are discussed in more detail:
• The Eclipse ESCET dev-list
• Development process
• Contributing
• Issue tracking
• Development environment setup
• Git repository
• Coding standards
• Building and testing
• Release process
• Third party tools
• Upgrade instructions
• Legal
Common libraries and development tools
Furthermore, this manual includes information on various common libraries and developmenttools. These libraries and development tools are shared by the various end-user languages and toolsthat comprise the Eclipse ESCET toolkit.
Information on the following libraries and development tools is available:
• Application framework
• Multi-value Decision Diagrams library
• Rail diagram generator
• SeText scanner/parser generator
1. Eclipse ESCET development
1.1. The Eclipse ESCET dev-listYou can contact the Eclipse ESCET developers via the project’s 'dev' list.
• Eclipse ESCET 'dev' list
For other means to interact with the Eclipse ESCET community and its developers, see:
• Eclipse ESCET contact information
1.2. Development process
If you want to contribute to the Eclipse ESCET project, please refer to the specificcontributing information. Most of the information on this page will however alsobe applicable to and relevant for contributors, but not all of it.
The Eclipse ESCET project primarily uses GitLab for its development:
• Eclipse ESCET GitLab
1.2.1. Discussion
It is often a good idea to first discuss new ideas and features with the rest of the project developers,i.e. the project committers and the project community. Discussions can take place on the project’s'dev' list, especially for radical new ideas and new features that have not been discussed before.
1.2.2. Issue tracking
If the project committers and the community agree that it is a good idea to have the new feature, anissue should be created in the issue tracker. For improvements where extensive discussion is notexpected, as well as for obvious bugs, an issue can be created directly, without first discussing it onthe 'dev' list. The discussion can also continue in the issue itself, once the issue is created.
When creating an issue, take the following into account:
• An issue must be created in the issue tracker for all development, however small. This ensureswe can link issues can commits to keep track of everything.
• Issues are ideally kept relatively small in scope. Bigger tasks can be split up into multiple issues,and follow-up issues can be created as needed. This allows to separate concerns, and also towork in a more agile way, e.g.:
◦ Issues can be addressed more quickly.
◦ Merge requests can be reviewed more easily as they are not as big.
◦ Merge conflicts are less likely to occur, as branches are smaller and have a shorter lifespan.
• If a new feature is split up into multiple issues, the issues can be linked to each other. Issues canalso be linked together for other reasons, e.g. if an issue requires that another issue is addressedfirst. See the Linked issues section of the issue.
• Attach the appropriate predefined labels to the issue:
◦ Either something is broken ('Bug' label) or we want something more, different, better, etc('Enhancement' label). Removal of deprecated and obsolete functionality, code,documentation, etc is also considered an enhancement.
◦ Add all relevant component labels (e.g. 'Chi' and 'CIF' labels). Typically at least one such labelshould be present, but it is also possible to add multiple labels if the issue involves multiplecomponents. The components correspond to the directories in the root of our Git repository.
◦ The Eclipse ESCET project committers can add the 'Help Wanted' label to an issue to indicatethat they don’t have the time to work on the issue, and that help from the community iswanted.
◦ If you don’t have permissions to add the labels, the project committers will add them. If theyforget, you can remind them via a comment.
1.2.3. Releases and milestones
For every software version a GitLab milestone is created, to track its scope and progress. Typicallyall open issues are assigned to the current work-in-progress version. During the work on thatversion, issues that can’t be resolved before the final release of that version are moved to the nextversion.
A single GitLab milestone is used per software version. Each software version has one or moremilestone releases (M1, M2, etc), followed by one or more release candidates (RC1, RC2, etc), and iscompleted by a final release.
See also:
• Eclipse ESCET GitLab milestones
1.2.4. Working on issues
The process to work on issues is as follows:
• Unassigned issues can be picked up.
• Assign yourself to the issue when you are working on an issue, such that others won’t startworking on it as well. You then 'own' the issue and nobody should work on the issue withoutdiscussing with you first.
As a contributor, you can’t assign yourself to an issue. In that case, you can discuss with theproject committers through issue comments, and they can assign you to the issue.

• Unassign yourself if you are no longer working on an issue, don’t plan to continue, and the issueis not finished. A contributor can ask the project committers to be unassigned.
• Don’t unassign yourself after finishing the issue. It is enough to close the issue. The issue mayalso be closed automatically when an associated merge request is merged.
1.2.5. Working with branches
The Eclipse ESCET project roughly follows the GitFlow branching model. The master branch is thusfor released content only, and the current development status is captured in the develop branch.
If possible, we approach the somewhat heavy GitFlow branching model in a practical way, reducingoverhead. We may for instance skip release branches, merging develop to master directly.
When creating and working with branches, consider the following:
• Always work in a branch for the issue. Use a merge request from a feature branch to mergeyour changes to develop. Direct commits to the develop branch have been disabled.
• Ideally address each issue in a separate branch. This makes it easier to keep track of things. Italso makes it easier for reviewers.
• Branches for work on issues (feature branches) should be relatively short lived. This makes iteasier to keep the overview, allows for more agile development and faster reviews, and reducesthe chance for merge conflicts.
• The GitFlow branching model allows for sub teams that share work but don’t push that to'origin' (yet). It also allows feature branches that live only locally on a developer’s PC and not on'origin'. To be transparent, Eclipse Foundation open source projects don’t do this. We push toour GitLab server regularly, to ensure that the community can see what the project committersare working on.
• We have no strict branch naming rules. You can let GitLab create the branch for the issue. Foran issue with number #2 named 'Test', it will create a branch named 2-test. This starts with theissue number, which makes it easy to relate a branch to an issue, without having to look insidethe branch for commits (if there even are any). It also includes the issue name, which isconvenient as it indicates what the branch is about, without having to look up the issue.
• There are many ways to create a branch.
For project committers, one way to create a branch is from the GitLab issue. On the web pagefor a GitLab issue, there is a Create merge request button. Select the arrow to the right of it toshow more options. Select Create branch. Adapt the Branch name and Source as needed.Typically the defaults suffice. Click the Create branch button to create the branch.
For contributors, see the contributing section for the recommended approach.
• We prefer not to create a draft merge request with the creation of the branch, as then commitsin the branch lead to commits on the merge requests, which lead to notification emails. Instead,work in the branch until it is ready for review, and then create a merge request for it.
• The person that is assigned to an issue 'owns' that issue, and may create branches for it. They

then also 'own' those branches, and nobody should commit in those branches unless discussedwith and agreed to by the branch owner.
• A branch owner may perform a rebase on a branch. However, this should be carefullyconsidered, taking into account Git’s well-known 'Golden Rule of Rebasing'. Only perform arebase if you understand the potential pitfalls of rewriting history. Never rebase a branch that isshared with others that have been given 'permission' to work on the branch as well. Neverrebase a branch when other branches are based on it. Never rebase a branch once a mergerequest is created for it, e.g. to avoid confusion for reviewers, and to prevent rewriting historyin case a snapshot of the merge request is submitted to the Eclipse Foundation IP team as part ofa Contribution Questionnaire (CQ). A safer alternative to rebasing is merging, which leads to anextra merge commit and a more complicated history. If you fully understand rebasing andemploy it carefully, it can be a powerful to maintain a simpler and cleaner history. Rebasinglocal commits that have not yet been pushed to the remote public repository is always at yourown discretion.
1.2.6. Commits
Consider the following regarding commits:
• Project committers working on an issue in a branch must commit regularly, to allow the otherproject committers and the rest of the community to see what they’re working on. This ismandatory as per the Eclipse Foundation transparency principle.
• If a branch involves significant changes, consider using multiple commits that may be easier toreview. This is especially useful when renaming directories, files, methods, etc, or moving them.Typically renames and moves should be done in separate commits, without any other changesin them. The same goes for large scale code reformatting, whitespace changes, etc.
• As is standard for Git commits, the first line of the commit message must be a short summary,and must not exceed 72 characters.
For the Eclipse ESCET project, this line must start with the issue number, to allow GitLab to linkcommits to issues. For instance #NNN Commit summary. for issue NNN. In case a commit relates tomultiple issues, list each of them, e.g. #1 #2 Commit summary. for issues 1 and 2. Merge commitsare exempt from this rule.
• All commits must adhere to the requirements as defined by the Eclipse Foundation. See GitCommit Records in the Eclipse Foundation Project Handbook.
If you are not an Eclipse ESCET project committer with write access to our Git repository, see theinformation on contributing to the Eclipse ESCET project.
1.2.7. Merge requests
Once the work on an issue is done and pushed to a branch, it must be reviewed before it is mergedback. Reviews are done via merge requests. The process is as follows:

• Create a merge request for merging the branch. You can create a merge request from the EclipseESCET Gitlab Branches page. Select the Merge request button next to the branch to be merged.
◦ Typically a branch is created from and merged back to the develop branch, but this can bechanged if needed.
◦ Start the merge request title with the related issue number(s), to allow easier tracking ofmerge requests back to issues.
◦ If you include Closes #NNN in the description of the merge request, with NNN an issue number,that issue will automatically be closed once the merge request is merged. Use Addresses #NNNinstead, if the merge request addresses part of the issue, but work remains, to prevent theissue from being closed. Always include either of them to ensure the merge request isproperly linked to the issues it addresses. Include multiple of them if appropriate.
◦ It is not mandatory to select assignees, reviewers, etc.
• The merge request is reviewed by the (other) Eclipse ESCET project committers.
• Improvements are made as necessary, reviewed again, etc, until the branch is considered to beready to merge.
• The branch is merged and removed.
• If the branch fully addressed the associated issue or issues, it/they should be closed.
If you are not an Eclipse ESCET project committer with write access to our Git repository, see theinformation on contributing to the Eclipse ESCET project.
1.2.8. Collaborating with contributors on a merge request
During a review of a contributor’s merge request, the project committers may provide somefeedback on how to improve the contribution. While contributors could address any reviewcomments themselves, sometimes it is useful to collaborate with the project committers on acontribution.
There are two approaches to this. The first approach is simple. It has some restrictions, but sufficesin most cases. The second approach is more advanced and does not suffer from those restrictions. Itis however considerably more complex and cumbersome to apply and should thus only be used ifnecessary.
Simple approach
The first and simplest approach is to make sure Allow commits from members who can merge to thetarget branch is enabled when creating a merge request as a contributor. This way the EclipseESCET project committers get write access to the source branch of the merge request in thecontributor’s forked repository. As the contributor and project committers then all have writeaccess to the branch, it is easy to collaborate on the merge request.
Advanced approach
The simple approach is not sufficient if multiple contributors want to collaborate with the projectcommitters on a single merge request. The contributors will each have write access to their ownforked repositories, but not to the forks of the other contributors. There is no single repository
where the multiple contributors and the project committers have write access.
The second approach resolves this issue, but is much more complex and cumbersome to apply. Thesolution is for the project committers to create a new branch in the official Git repository, based ona contributor’s branch from their forked repository. The project committers can then make changesand push them to the official Git repository. Multiple contributors can then merge those changesinto their own branches in their own forked repositories. Contributors can then add their ownchanges again and push those to their own branches. The project committers can merge thosechanges into the branch on the official Git repository, make changes of their own, push thosechanges, etc. This can be repeated until the work is done and everything is in the branch used bythe project committers. The project committers can then merge their branch into the developbranch of the official Git repository, via a merge request. This process works for any number ofcontributors. Some alignment between all parties involved is typically desired to e.g. prevent mergeconflicts.
Note that you will get emails about new commits being pushed to merge requests, if you havenotifications enabled for it. For branches without merge requests there is no way to get emailsinforming about new commits being pushed. It can thus be useful to have merge requests for allbranches used by committers and contributors. Alternatively, others can be informed by postingcomments on the original merge request created by the original contributor. This can prevent anoverload of related merge requests and discussions being fragmented among them.
Fork collaboration script support
To make it easier to work with branches in forks of the official Eclipse ESCET Git repository in theEclipse Foundation GitLab, some scripts are provided:
• misc/fork-collab/fork-checkout-branch <username> <branch_name>
Use this script to fetch and checkout the remote branch named <branch_name> in the GitLab forkof user <username>.
• misc/fork-collab/fork-push-branch <username> <branch_name>
Use this script to push your local changes back to the remote branch named <branch_name> in theGitLab fork of user <username>. This assumes you have write access to the branch.
If you are not an Eclipse ESCET project committer with write access to our Git repository, see theinformation on contributing to the Eclipse ESCET project.
1.3. ContributingInterested in contributing to the Eclipse ESCET project? Contributions are always welcome!
The following information may help you get started:
• How to contribute to Eclipse ESCET
• Keeping in sync with the official Eclipse ESCET GitLab repository
• How to become a committer
1.3.1. How to contribute to Eclipse ESCET
It is often a good idea to first discuss your contribution with the project’s community andcommitters, before creating the actual code (e.g. patches), documentation, etc of your contribution.Discussions can take place via an issue in the issue tracker, or on the project’s 'dev' list.
To contribute your actual contribution, e.g. code, documentation, examples, or anything else to theproject, please make sure an issue already exists or create a new issue for it in the issue tracker.
To create issues, reply to issues, contribute patches and merge requests, etc, you need an EclipseFoundation account. It can easily be created at https://accounts.eclipse.org/user/register.
The easiest way to contribute the actual contribution, is to use GitLab:
• Create a fork of the official Eclipse ESCET GitLab repository under your own account:
◦ Navigate to https://gitlab.eclipse.org/eclipse/escet/escet.
◦ Click Sign in at the top-right of the page to sign in with your Eclipse Foundation account.
◦ Once back at https://gitlab.eclipse.org/eclipse/escet/escet, click the Fork button at the top-right of the page. This creates a fork of the official repository under your own account.
• Set up a development environment to work on your contribution:
◦ You can find your fork at https://gitlab.eclipse.org/<username>/escet, with <username>replaced by your Eclipse Foundation account username.
◦ Click the Clone button near the top-right of the page and observe the https URL.
◦ Follow the development environment setup instructions to set up a properly configureddevelopment environment. You need the https URL of your fork for this.
• Make your changes in the forked repository under your own account:
◦ If you followed the development environment setup instructions, your developmentenvironment contains a clone of your forked repository, all set up to commit and push to theupstream forked repository.
◦ Make your changes in a branch of your forked repository, rather than in develop. This allowsyou to work on multiple contributions at once. It also allows syncing back changes from theofficial Eclipse ESCET develop branch to the develop branch of your forked repository, whileyou’re working in a branch.
To create branches in your fork, navigate to https://gitlab.eclipse.org/<username>/escet/-/branches, with <username> replaced by your Eclipse Foundation account username. Thereclick New branch to create a new branch from develop.
◦ Please start each commit message with the issue number, e.g. #NNN Commit summary. for issueNNN. See our development process for more information.
• Once you’ve finished work on your contribution, create a merge request for it:
◦ Navigate to https://gitlab.eclipse.org/<username>/escet/-/branches, with <username>replaced by your Eclipse Foundation account username.
◦ Click Merge request next to the branch for which you which to create the merge request.
◦ On the New Merge Request page that is shown, click on Change branches.
◦ Change for Target branch the repository to eclipse/escet/escet (the official Eclipse ESCETGitLab repository).
◦ As target branch typically develop should be selected.
◦ Your forked repository (e.g. <username>/escet) and branch should already be selected forSource branch.
◦ Click Compare branches and continue to confirm.
◦ Select an appropriate title. Ideally it starts with the issue number, similar to the first line of acommit message.
◦ Describe your changes under Description.
◦ Make sure Allow commits from members who can merge to the target branch is enabled. Thisallows collaboration with the Eclipse ESCET committers on the merge request.
◦ You may optionally make other changes to the merge request.
◦ Click Submit merge request to submit the merge request to the Eclipse ESCET projectcommitters for review.
Before your contribution can be accepted by the project team, you must electronically sign theEclipse Contributor Agreement (ECA):
• Eclipse Contributor Agreement (ECA)
The non-committer that authored the commit, must have an Eclipse Foundation Account and musthave a signed Eclipse Contributor Agreement (ECA) on file. The name and email address of thecommits must match the corresponding information on the Eclipse Foundation Account. For moreinformation, including the specific format of commit messages, please see the Eclipse FoundationProject Handbook:
• Eclipse Foundation Project Handbook
• Git Commit Records
A contribution by a non-committer will be reviewed by the project committers. This includesadherence to the project’s coding standards. Discussions regarding the contribution will typicallytake place in the associated merge request (or issue).
Align with the project committers on who will address the review feedback. If you address thefeedback yourself, you can commit and push additional commits to the source branch of the mergerequest. These will then automatically be picked up by GitLab. Once the committers agree with thecontribution, they will merge the contribution into the project’s official Git repository.
Remember that contributions are always welcome, and contributions don’t have to be perfect. The
project’s developers can help to improve your contribution. If you need any help regarding thecontent of your contribution, the steps above, or anything else, just ask the project’s developers viathe issue or the project’s 'dev' list.
See for more information our development process.
1.3.2. Keeping in sync with the official Eclipse ESCET GitLab repository
If you’ve set up a development environment for your forked repository, it will at some point get outof sync with new developments on the official Eclipse ESCET GitLab repository. To sync thosechanges to your forked repository and to the local clone of your forked repository, follow thesesteps:
• Navigate in a command prompt or shell to your local Git clone of your forked repository. It istypically located in the git/escet directory within the directory that contains your developmentenvironment.
• Add the official Eclipse ESCET GitLab repository as upstream remote repository to your localrepository, by executing:
◦ git remote add upstream https://gitlab.eclipse.org/eclipse/escet/escet.git
• You now have upstream as a remote repository that connects to the official Eclipse ESCET GitLabrepository. You will also still have origin as a remote repository that connects to your forkedrepository on the Eclipse Foundation GitLab server. Adding the upstream remote repository is aone-time only step. The remaining steps can be repeated whenever desired, to resync yourdevelop branch to the develop branch of the official Eclipse ESCET GitLab repository.
• Locally, switch to the develop branch, by executing:
◦ git checkout develop
• Fetch all changes from the upstream repository, by executing:
◦ git fetch upstream
• Update your local develop branch with the changes from the develop branch of the upstreamrepository, by executing:
◦ git pull upstream develop
• Push the changes to your forked repository on the Eclipse Foundation GitLab server, byexecuting:
◦ git push origin develop
We recommend that you remove feature branches once your contribution has been accepted intothe official Eclipse ESCET GitLab repository’s develop branch. Then, use these steps to resync yourlocal develop branch and the develop branch of your forked repository with your own contribution.You are then back in sync and ready to start work on your next contribution. Using this process it isalso possible to work on multiple contributions at once, via separate feature branches.
1.3.3. How to become a committer
The Eclipse Foundation operates on the principle of meritocracy. Anybody can contribute to Eclipse
ESCET as a contributor. But the more that somebody contributes, the more responsibility they willearn. To earn committer status, a contributor must demonstrate that they understand theirresponsibilities, both as an Eclipse Foundation committer in general and as a committer for theproject in particular.
A contributor can be elected to become a committer. This starts with a nomination by an existingcommitter. For further details on the process, see the Committer Elections section of the EclipseFoundation Project Handbook.
Each project can define the criteria that are considered for nominations. The criteria for the EclipseESCET project are as follows:
• Demonstrate a good grasp of the Eclipse Foundation Development Process, including the EclipseFoundation Intellectual Property Policy.
• Provide several high-quality non-trivial contributions that demonstrate a good grasp of the codebase, its structure and the underlying concepts.
• Demonstrate a good grasp of the Eclipse ESCET way of working, including use of issues, mergerequests, code style, build, tests, etc.
• Demonstrate the ability to work together with the current committers and the widercommunity, in a positive, open and transparent manner.
The more of these criteria that have been shown the better, but it is not a requirement to show allof these to the same degree. In the end it is up to the existing committers to judge whether enoughmerit has been demonstrated to warrant a nomination.
The Eclipse Foundation also requires that nominations are supported by public evidence thatdemonstrates the merit. This ensures that the process of electing new committers is transparent.Furthermore, nominations and elections must be open, in that anybody that shows merit should beconsidered equally for nominations. It must definitely not be based on employment status.
Obviously, the contributor must be willing and able to become a committer, and there must be anoutlook that the contributor will remain active in the future.
For more information, see also the following blog posts:
• Barriers for Entry (Wayne Beaton, Director of Open Source Projects at Eclipse Foundation)
• Make This Person We Hired a Committer (Wayne Beaton, Director of Open Source Projects atEclipse Foundation)
1.4. Issue trackingThe Eclipse ESCET project uses GitLab to track ongoing development and issues:
• Eclipse ESCET milestones
• Eclipse ESCET issues
Be sure to search for existing issues before you create another one. Remember that contributionsare always welcome!
To contribute code (e.g. patches), documentation, or anything else, see the contributing section.
To understand how we work with issues, see our development process.
1.5. Development environment setupFollow these instructions to set up an Eclipse ESCET development environment.
To create a development environment for the first time:
• Get the Eclipse Installer:
◦ Go to https://www.eclipse.org/ in a browser.
◦ Click on the big [ Download ] button at the top right.
◦ Download Eclipse Installer, 64 bit edition, using the [ Download x86_64 ] button.
• Start the Eclipse Installer that you downloaded.
• Use the hamburger menu at the top right to switch to advanced mode.
• For Windows:
◦ When asked to keep the installer in a permanent location, choose to do so. Select a directoryof your choosing.
◦ The Eclipse installer will start automatically in advanced mode, from the new permanentlocation.
• For Linux:
◦ The Eclipse installer will restart in advanced mode.
• Continue with non-first time instructions for setting up a development environment.
To create a development environment for a non-first time:
• Ensure you are using the latest version of the Eclipse Installer:
◦ One option is to download it again, as per the 'first time' instructions above.
◦ Another option is to update your existing Eclipse Installer. In the Eclipse Installer, when inadvanced mode, click the 'Install available updates' button. This button with the two-arrowsicon is located at the bottom-left part of the window, next to the version number. Wait forthe update to complete and the Eclipse Installer to restart. If the button is disabled (grey),you are already using the latest version.
• In the first wizard window:
◦ Select Eclipse Platform from the big list at the top.
◦ Select 2021-06 for Product Version.
◦ For Java 11+ VM select JRE 11.0.12 -
http://download.eclipse.org/justj/jres/11/updates/release/11.0.12.
◦ Choose whether you want a P2 bundle pool (recommended).
◦ Click [ Next ].
• In the second wizard window:
◦ Use the green '+' icon at the top right to add the Oomph setup.
▪ For Catalog, choose Eclipse Projects.
▪ For Resource URIs, enter https://gitlab.eclipse.org/eclipse/escet/escet/-/raw/develop/org.eclipse.escet.setup and make sure there are no spaces before or afterthe URL.
▪ Click [ OK ].
◦ Check the checkbox for Eclipse ESCET, from the big list. It is under Eclipse Projects / <User>.
◦ At the bottom right, select the develop stream.
◦ Click [ Next ].
• In the third wizard window:
◦ Enable the Show all variables option to show all options.
◦ Choose a Root install folder and Installation folder name. The new development environmentwill be put at <root_installation_folder>/<installation_folder_name>.
◦ Fill in the Eclipse ESCET Git clone URL:
▪ Committers with write access to the Eclipse ESCET official GitLab repository can use thedefault URL https://gitlab.eclipse.org/eclipse/escet/escet.git.
▪ Contributors can use the same URL, but as they don’t have write access, they will not beable to push to the remote repository. They can instead make a fork of the official Gitrepository, as described in the contributing section. Then they can fill in the URL of theirclone instead, i.e. https://gitlab.eclipse.org/<username>/<cloned_repo_name>.git, with<username> replaced by their Eclipse Foundation account username, and<cloned_repo_name> replaced by the name of the cloned repistory, which defaults to escet.
◦ For Eclipse Foundation account full name fill in your full name (first and last name) matchingthe full name in your Eclipse Foundation account. This will be used as name for Git commits.
◦ For Eclipse Foundation account email address fill in the email address associated with yourEclipse Foundation account. This will be used as email for Git commits.
◦ Click [ Next ].
• In the fourth wizard window:
◦ Select [ Finish ].
• Wait for the setup to complete and the development environment to be launched.
◦ If asked, accept any licenses and certificates.
• Press [ Finish ] in the Eclipse Installer to close the Eclipse Installer.
• In the new development environment, observe Oomph executing the startup tasks (such as Gitclone, importing projects, etc). If this is not automatically shown, click the rotating arrows icon

in the status bar (bottom right) of the new development environment.
• Wait for the startup tasks to finish successfully.
• NOTE: If you don’t open the Oomph dialog, the status bar icon may disappear when the tasksare successfully completed.
If you have any issues during setting up the development environment, consider the following:
• You can set the following environment variables to force the use of IPv4, in case of any issuesaccessing/downloading remote files:
_JAVA_OPTIONS=-Djava.net.preferIPv4Stack=true_JPI_VM_OPTIONS=-Djava.net.preferIPv4Stack=true
After setting them, make sure to fully close the Eclipse Installer and then start it again, for thechanges to be picked up.
In your new development environment, consider changing the following settings:
• For the Package Explorer view:
◦ Enable the Link with Editor setting, using the icon.
◦ Enable showing resources (files/folders) with names starting with a period. Open the ViewMenu ( ) and choose Filters…. Uncheck the .* resources option and click [ OK ].
1.6. Git repositoryThe Eclipse ESCET project maintains the following source code repositories:
• https://gitlab.eclipse.org/eclipse/escet/escet.git
These can also be accessed via a web interface:
• Eclipse ESCET GitLab
The software is written in the Java programming language, as a collection of Eclipse plugins, andusing the Eclipse Modeling Framework (EMF).
For ease of programming, the Eclipse IDE is recommended. See also the section on setting up adevelopment environment.
To contribute code (e.g. patches), documentation, or anything else, see the contributing section.
The way we work with our Git repository is explained as part of our development process.
1.6.1. Repository structure
In the Eclipse ESCET source code repository (Git repository), three layers are distinguished:
• The top layer contains user-oriented languages for designing controllers. Currently there aretwo modeling languages in this layer, CIF and Chi.
The third language in the top layer is ToolDef, a cross-platform scripting language to run tests,and to automate the various tools that need to be executed while designing a controller.
• The middle layer contains developer oriented support code. It has a language of its own, namedSeText. This language implements an LALR(1) parser generator with a few twists to make it easyto use in a Java environment and to connect it to an Eclipse text editor.
The other part of the middle layer is common functionality shared between the languages.
• The bottom layer is mostly configuration to attach the software to the Eclipse platform,including build and release engineering.
This document describes the structure of the top and middle layers. For the bottom layer, standardEclipse and Maven/Tycho tools are used, which are described elsewhere.
The three layers are not further distinguished in the repository. Instead, different parts are storedin different sub-directories from the root.
1.6.2. Language directories
Each language has its own subdirectory in the root, /cif and /chi for the CIF and Chi modelinglanguages, /tooldef for the ToolDef language, and /setext for the SeText language.
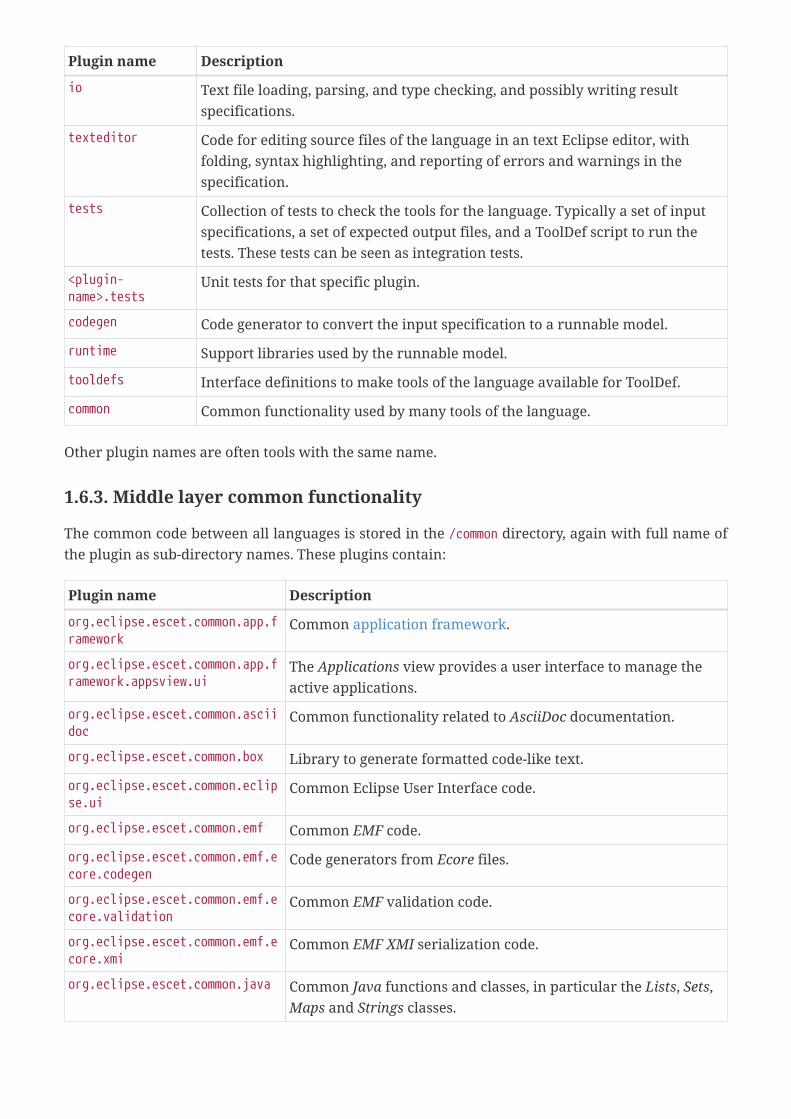
Within a language directory, a directory exists for each part of the code (often equivalent to aplugin), with the same name as the plugin. The pattern of a plugin name isorg.eclipse.escet.<language>.<plugin-name> where the plugin-name in different directories has thesame meaning. A non-exhaustive list:
Plugin name Description
documentation User-oriented documentation about the language, such as a user manual or areference manual.
metamodel Ecore metamodel back bone of the language. Model classes for the central datastructure that all tools of the language use. Often generated using modelingtools such as Sirius, but manually written classes exist as well.
metamodel.java Generated Java constructor and walker classes for the Ecore metamodel datastructure.
parser SeText input, and generated or manually written code to parse an input fileand convert it to an tree of classes that can be given to the type checker.
typechecker Implementation of the type checker to check the parsed input, and annotate itwith derived information, resulting in an model instance that can be used byall tools of the language.
Plugin name Description
io Text file loading, parsing, and type checking, and possibly writing resultspecifications.
texteditor Code for editing source files of the language in an text Eclipse editor, withfolding, syntax highlighting, and reporting of errors and warnings in thespecification.
tests Collection of tests to check the tools for the language. Typically a set of inputspecifications, a set of expected output files, and a ToolDef script to run thetests. These tests can be seen as integration tests.
<plugin-name>.tests
Unit tests for that specific plugin.
codegen Code generator to convert the input specification to a runnable model.
runtime Support libraries used by the runnable model.
tooldefs Interface definitions to make tools of the language available for ToolDef.
common Common functionality used by many tools of the language.
Other plugin names are often tools with the same name.
1.6.3. Middle layer common functionality
The common code between all languages is stored in the /common directory, again with full name ofthe plugin as sub-directory names. These plugins contain:
Plugin name Description
org.eclipse.escet.common.app.framework
Common application framework.
org.eclipse.escet.common.app.framework.appsview.ui
The Applications view provides a user interface to manage theactive applications.
org.eclipse.escet.common.asciidoc
Common functionality related to AsciiDoc documentation.
org.eclipse.escet.common.box Library to generate formatted code-like text.
org.eclipse.escet.common.eclipse.ui
Common Eclipse User Interface code.
org.eclipse.escet.common.emf Common EMF code.
org.eclipse.escet.common.emf.ecore.codegen
Code generators from Ecore files.
org.eclipse.escet.common.emf.ecore.validation
Common EMF validation code.
org.eclipse.escet.common.emf.ecore.xmi
Common EMF XMI serialization code.
org.eclipse.escet.common.java Common Java functions and classes, in particular the Lists, Sets,Maps and Strings classes.

Plugin name Description
org.eclipse.escet.common.multivaluetrees
A pure Java implementation of Multi-value Decision Diagrams(MDDs).
org.eclipse.escet.common.position.common
Common functions for (text-file) positions in source files.
org.eclipse.escet.common.position.metamodel
The Ecore metamodel for (text-file) positions in source files.
org.eclipse.escet.common.raildiagrams
Rail diagram generator. Produces syntax diagrams.
org.eclipse.escet.common.svg Common SVG library for viewing and manipulating SVG trees.
org.eclipse.escet.common.typechecker
Common type checker functionality.
1.7. Coding standardsThe Eclipse ESCET development environment has some features that allow developing high qualitycontributions:
• A Java formatter profile is included. It allows to automatically format Java code for consistencyand convenience.
• The Eclipse Checkstyle Plugin and a Checkstyle configuration are included. They can be used todetect various other issues in Java code and other files.
For all contributions to the Eclipse ESCET project, check the following:
• All Java code should be formatted using the provided formatting profile.
• All contributions should be checked using the provided Checkstyle configuration.
• All contributions should be free of warnings and errors, when working with them in the EclipseESCET development environment.
Remember that contributions are always welcome, and contributions don’t have to be perfect. Theproject’s developers can help to improve your contribution, and ensure it adheres to these codingstandards.
For any questions regarding these coding standards, please contact the project’s developers.
1.8. Building and testingThe Eclipse ESCET software can be built using Maven/Tycho. The build will build every individualplugin and feature, as well as the update site, product and all documentation. Manually run it inone of the following ways:
•

In an Eclipse-based development environment, select Run › Run Configurations… to open theRun Configurations dialog. From the list at the left, under Maven Build, select the build launchconfiguration, and click the [ Run ] button to run the build.
Additional launch configurations are available to build documentation projects separately.
• On Windows, in a command prompt, with the root of the Git repository as current directory,enter .\build.cmd and press Enter . This requires Maven to be available on your system (to be onyour PATH). Make sure to use the same Java and Maven versions as for the Eclipse-baseddevelopment environment.
• On Linux/macOS, in a shell, with the root of the Git repository as current directory, enter./build.sh and press Enter . This requires Maven to be available on your system (to be on yourPATH). Make sure to use the same Java and Maven versions as for the Eclipse-based developmentenvironment.
Builds are in certain cases also automatically executed on our build server:
• Eclipse ESCET Jenkins server
If they are not automatically executed, login to Jenkins, open the desired build and select ScanGitLab Project Now to force GitLab to scan for new branches, commits, etc.
Run tests in one of the following ways:
• As part of the build, all tests will be performed as well.
• A single test-all launch configuration to run all tests is available under the Launch Groupsection of the Run Configurations dialog.
• Launch configurations to run various subsets of the tests are also available, under the JUnit Testand JUnit Plug-in Test sections of the Run Configurations dialog.
When a tool has been updated, the test outputs may change. The expected outputs can be updatedas follows.
1. Run the integration test under the JUnit Plug-in Test section of the Run Configurations dialog (e.g.test-cif-integration).
2. If an output differs from the expected output, the output is saved with a .real postfix.
3. Run the copy all script under JUnit Plug-in Test section to replace the expected outputs with thetest outputs (e.g. test-cif-integration-copy-all).
4. Run the integration test again to ensure that all expected test outputs have been updated.
5. Before committing the changes, check whether the differences are as expected.
1.9. Release processThis page explains step by step the various processes involved from preparing for a release toactually releasing it. The following topics are covered:
• Planning for a next version
• Preparing Git repository for a next version
• Working on a release
• Preparing a release
• Performing a release
1.9.1. Planning for a next version
For a new version (not milestone or release candidate), follow these steps. Perform them well inadvance of starting work on the version, i.e. while still working on the previous version:
• Create a new release record:
◦ Go to https://projects.eclipse.org/projects/technology.escet.
◦ Log in with your Eclipse Foundation account using the link at the top-right of the page.
◦ Click the Create a new release link in the bar at the right.
◦ Set the planned release date and give the release a name, e.g. 0.1, 0.1.1 or 1.0.
◦ Click Create and edit.
◦ For Description, click the Source button in the toolbar of the editor. Then enter <p>See <ahref="https://gitlab.eclipse.org/eclipse/escet/escet/-/milestones/NNN">Eclipse ESCETGitLab vN.N issues</a> for more information.</p>. Replace NNN by the actual GitLabmilestone number to ensure a correct URL. Replace vN.N by the version, e.g. v0.1, v0.1.1 orv1.0.
◦ Change the Release type if applicable.
◦ For IP Due Diligence Type select Type A - License Compatibility Certification.
• Create a GitLab milestone:
◦ Go to https://gitlab.eclipse.org/eclipse/escet/escet/-/milestones.
◦ Sign in with your Eclipse Foundation account using the link at the top-right of the page.
◦ Click New milestone.
◦ For Title enter the version, e.g. v0.1, v0.1.1 or v1.0.
◦ For Description enter See also https://projects.eclipse.org/projects/technology.escet/releases/N.N.. Replace N.N by the actual release record version, 0.1, 0.1.1 or 1.0.
◦ For Start date select the first day after the Due date of the previous version.
◦ For End date select the same date as the planned release date of the release record.
◦ Click Create milestone.
1.9.2. Preparing Git repository for a next version
To prepare the Git repository for the next version (not a milestone or release candidate), followthese steps:
• Run in the root of the Git repository the command ./mvn_escet.sh org.eclipse.tycho:tycho-versions-plugin:set-version -DnewVersion=<new-version>, where <new-version> is replaced by
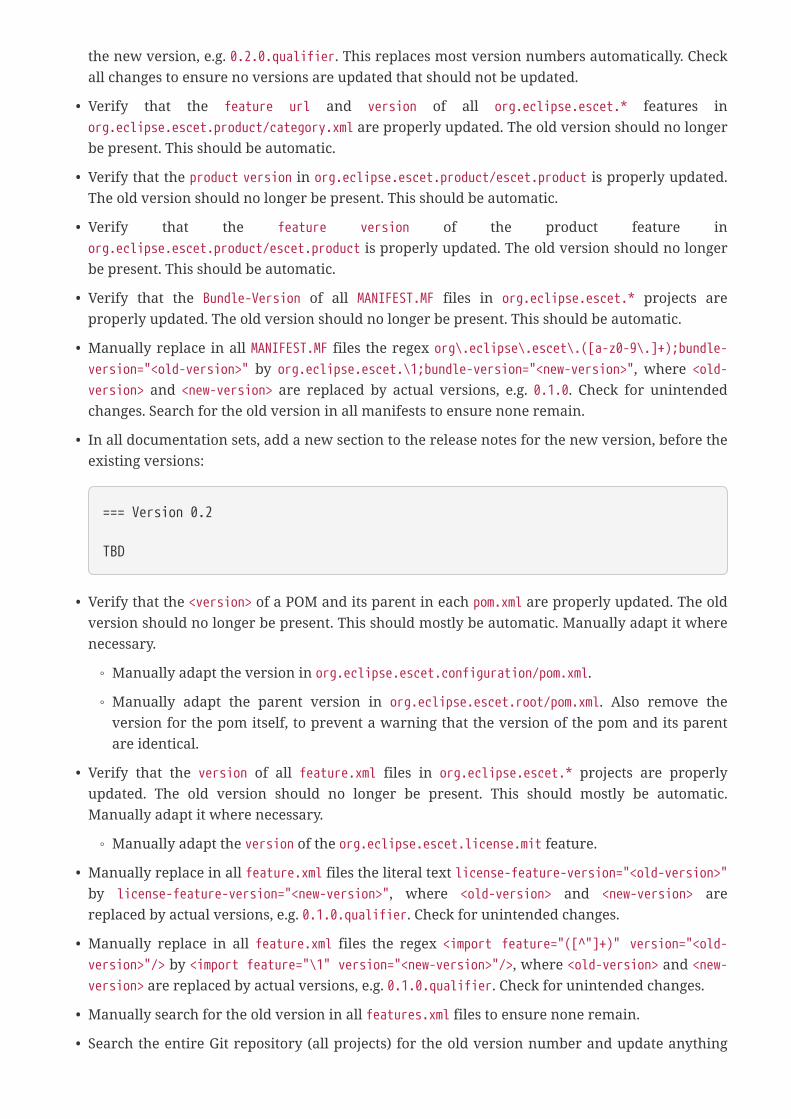
the new version, e.g. 0.2.0.qualifier. This replaces most version numbers automatically. Checkall changes to ensure no versions are updated that should not be updated.
• Verify that the feature url and version of all org.eclipse.escet.* features inorg.eclipse.escet.product/category.xml are properly updated. The old version should no longerbe present. This should be automatic.
• Verify that the product version in org.eclipse.escet.product/escet.product is properly updated.The old version should no longer be present. This should be automatic.
• Verify that the feature version of the product feature inorg.eclipse.escet.product/escet.product is properly updated. The old version should no longerbe present. This should be automatic.
• Verify that the Bundle-Version of all MANIFEST.MF files in org.eclipse.escet.* projects areproperly updated. The old version should no longer be present. This should be automatic.
• Manually replace in all MANIFEST.MF files the regex org\.eclipse\.escet\.([a-z0-9\.]+);bundle-version="<old-version>" by org.eclipse.escet.\1;bundle-version="<new-version>", where <old-version> and <new-version> are replaced by actual versions, e.g. 0.1.0. Check for unintendedchanges. Search for the old version in all manifests to ensure none remain.
• In all documentation sets, add a new section to the release notes for the new version, before theexisting versions:
=== Version 0.2
TBD
• Verify that the <version> of a POM and its parent in each pom.xml are properly updated. The oldversion should no longer be present. This should mostly be automatic. Manually adapt it wherenecessary.
◦ Manually adapt the version in org.eclipse.escet.configuration/pom.xml.
◦ Manually adapt the parent version in org.eclipse.escet.root/pom.xml. Also remove theversion for the pom itself, to prevent a warning that the version of the pom and its parentare identical.
• Verify that the version of all feature.xml files in org.eclipse.escet.* projects are properlyupdated. The old version should no longer be present. This should mostly be automatic.Manually adapt it where necessary.
◦ Manually adapt the version of the org.eclipse.escet.license.mit feature.
• Manually replace in all feature.xml files the literal text license-feature-version="<old-version>"by license-feature-version="<new-version>", where <old-version> and <new-version> arereplaced by actual versions, e.g. 0.1.0.qualifier. Check for unintended changes.
• Manually replace in all feature.xml files the regex <import feature="([^"]+)" version="<old-version>"/> by <import feature="\1" version="<new-version>"/>, where <old-version> and <new-version> are replaced by actual versions, e.g. 0.1.0.qualifier. Check for unintended changes.
• Manually search for the old version in all features.xml files to ensure none remain.
• Search the entire Git repository (all projects) for the old version number and update anything
that still requires updating.
• Test that the build works.
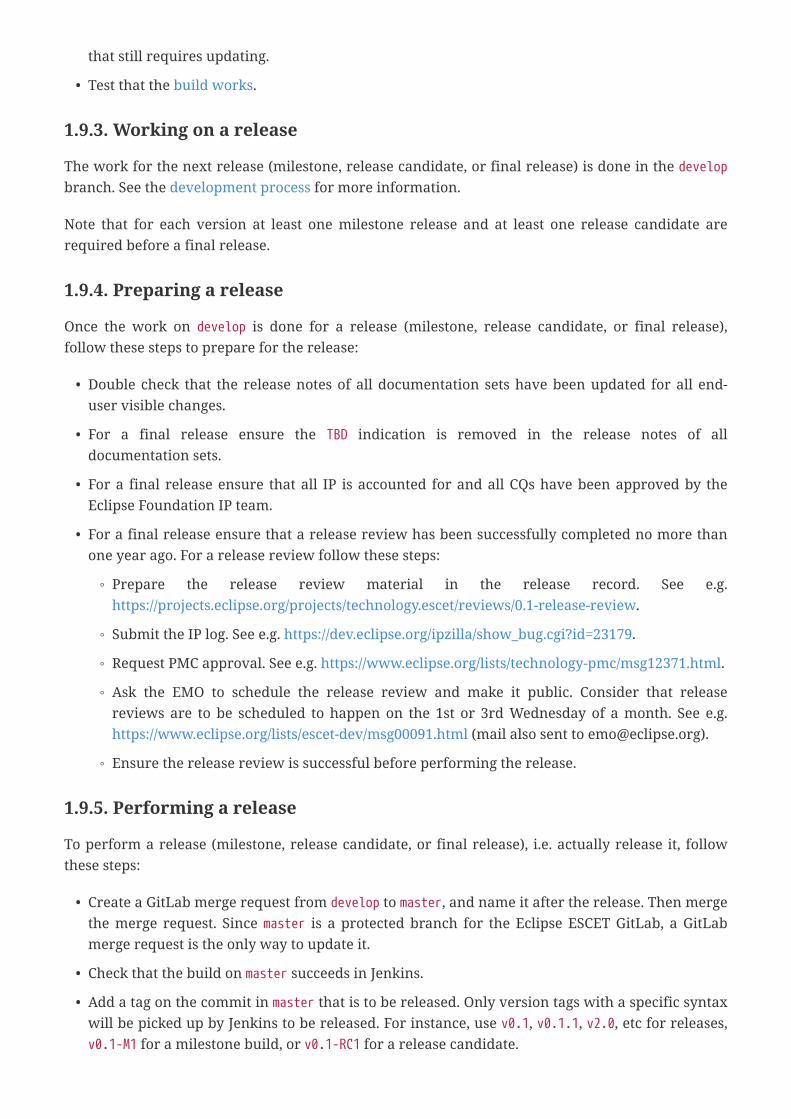
1.9.3. Working on a release
The work for the next release (milestone, release candidate, or final release) is done in the developbranch. See the development process for more information.
Note that for each version at least one milestone release and at least one release candidate arerequired before a final release.
1.9.4. Preparing a release
Once the work on develop is done for a release (milestone, release candidate, or final release),follow these steps to prepare for the release:
• Double check that the release notes of all documentation sets have been updated for all end-user visible changes.
• For a final release ensure the TBD indication is removed in the release notes of alldocumentation sets.
• For a final release ensure that all IP is accounted for and all CQs have been approved by theEclipse Foundation IP team.
• For a final release ensure that a release review has been successfully completed no more thanone year ago. For a release review follow these steps:
◦ Prepare the release review material in the release record. See e.g.https://projects.eclipse.org/projects/technology.escet/reviews/0.1-release-review.
◦ Submit the IP log. See e.g. https://dev.eclipse.org/ipzilla/show_bug.cgi?id=23179.
◦ Request PMC approval. See e.g. https://www.eclipse.org/lists/technology-pmc/msg12371.html.
◦ Ask the EMO to schedule the release review and make it public. Consider that releasereviews are to be scheduled to happen on the 1st or 3rd Wednesday of a month. See e.g.https://www.eclipse.org/lists/escet-dev/msg00091.html (mail also sent to [email protected]).
◦ Ensure the release review is successful before performing the release.
1.9.5. Performing a release
To perform a release (milestone, release candidate, or final release), i.e. actually release it, followthese steps:
• Create a GitLab merge request from develop to master, and name it after the release. Then mergethe merge request. Since master is a protected branch for the Eclipse ESCET GitLab, a GitLabmerge request is the only way to update it.
• Check that the build on master succeeds in Jenkins.
• Add a tag on the commit in master that is to be released. Only version tags with a specific syntaxwill be picked up by Jenkins to be released. For instance, use v0.1, v0.1.1, v2.0, etc for releases,v0.1-M1 for a milestone build, or v0.1-RC1 for a release candidate.
Add the tag via GitLab, at https://gitlab.eclipse.org/eclipse/escet/escet/-/tags/new. Use the Tagname also as Message and as Release notes. Make sure to select master as branch from which tocreate the tag.
• Go to https://gitlab.eclipse.org/eclipse/escet/escet/-/releases and edit the new GitLab release byclicking the Edit this release icon at the top-right of the release. Add the GitLab milestone to theGitLab release, by selecting it under Milestones. Save the changes.
• Go to Jenkins, at https://ci.eclipse.org/escet/job/ESCET%20build/. Log in to Jenkins by clicking onthe link at the top-right of the page. Select Scan GitLab Project Now to ensure Jenkins picks upthe new tag.
• Go to https://ci.eclipse.org/escet/job/ESCET%20build/view/tags/ to see the new tag on Jenkins.Manually trigger a build for the tag, by clicking the Schedule a build for … icon in the row for thetag. Jenkins will then automatically build and release a new version from that tag.
• All releases are available at https://download.eclipse.org/escet/. For a version v0.1, thedownloads will be located at https://download.eclipse.org/escet/v0.1.
Note that according to the Eclipse Foundation Wiki page IT Infrastructure Doc, "Once your filesare on the download.eclipse.org server, they are immediately available to the general public.However, for release builds, we ask that you wait at least four hours for our mirror sites to fetchthe new files before linking to them. It typically takes a day or two for all the mirror sites tosynchronize with us and get new files."
That same wiki page also notes that "Although you can link directly todownload.eclipse.org/yourfile.zip, you can also use the Find a Mirror script […]. Using thisscript allows you to view download statistics and allows users to pick a nearby mirror site fortheir download." It further indicates that "P2 repositories are not normally accessed via themirror selection script." The Find a Mirror script also transparently handles files moved fromdownload.eclipse.org to archive.eclipse.org. End users should thus be referred tohttps://eclipse.org/escet/download.html instead of to download.eclipse.org, to ensure the mirrorscript is used for faster downloads and to ensure downloads count in the download statistics.
• Jenkins will automatically push the website for the new release to the website Git repository, ina directory for the specific release. For a version v0.1, the website can be accessed athttps://eclipse.org/escet/v0.1. It may take a few minutes for the Git repository to be synced tothe webserver and for the website for the new version to become available.
• If the website for the new release is to be the standard visible website for the project (athttps://eclipse.org/escet), it has to be manually replaced. This is to ensure that a bugfixrelease for an older version doesn’t override the standard visible website. The following stepsexplain how to 'promote' a website for a specific version to become the standard visiblewebsite:
◦ Make sure you’ve uploaded your SSH public key to Eclipse Gerrit. This is a one-time onlystep. Go to https://git.eclipse.org/r/. Sign in using your Eclipse Foundation committer account.Use the gear icon at the top right to access your account settings. Under SSH Keys add yourSSH public key. Also make note of your username, Full name and Email address.
◦ Clone the Eclipes ESCET website Git repository using git clonessh://<username>@git.eclipse.org:29418/www.eclipse.org/escet.git. Make sure to replace
<username> by your Eclipse Foundation committer account username.
◦ In the cloned repository, remove all files/folders in the root of the Git repository pertainingto the current standard visible website. Be sure not to remove any of the directories withwebsites for specific releases.
◦ Copy the files/folders from the directory with the website for the release that you want tomake the standard visible website, and put them in the root of the Git repository.
◦ Add all changes to be committed, e.g. by using git add -A.
◦ Make sure to use the Full name and Email address of your Eclipse Foundation committeraccount. E.g. use git config --local user.name "<full_name>" and git config --localuser.email "<email>", replacing <full_name> and <email> by the appropriate informationmatching your Eclipse Foundation committer account.
◦ Commit the changes. Use as commit message Set standard visible website to release<version>., replacing <version> by the release version that will become the new standardvisible website. Make sure to sign off the commit to pass Eclipse Foundation automaticcommit validation. E.g. use the following to commit the changes: git commit -s -m "Setstandard visible website to release v0.1.".
◦ Push the changes to the Git server. E.g. use git push. If successful you should see the changesat the Git server’s web view, at https://git.eclipse.org/c/www.eclipse.org/escet.git/.
◦ It may take a few minutes for the Git repository to be synced to the webserver, and for thenew standard visible website to become available. The standard visible website can beaccessed at https://eclipse.org/escet. Depending on browser cache settings and otherfactors, it may be necessary to force refresh your browser for it to pick up the changes onthe server.
• Remove/archive old releases:
◦ For every release (not a milestone or release candidate), remove all milestones and releasecandidates of the previous version and older. E.g. for v0.2, remove v0.1-M1, v0.1-M2, v0.1-RC1,etc. Also archive all releases older than the current and previous release. E.g. for v0.3archive v0.1 and older, but keep v0.2.
Consider whether archiving or removing P2 update sites will lead to issues for users. See formore information the Eclipse Foundation Wiki page Moving a repo to archive.eclipse.org.
◦ Old websites can be removed in a similar way to the above instructions to change thedefault website. Only remove the directory for the milestone or release candidate.
◦ Older downloads can be archived. Go to https://download.eclipse.org/escet/. Make sureyou’re logged in. This should make check-boxes appear. Select the folders to archive andclick the Archive button. It may take a few minutes for archiving to complete.
◦ Archived downloads can be removed. Go to https://archive.eclipse.org/escet/. Make sureyou’re logged in. This should make check-boxes appear. Select the folders to delete and clickthe Delete button. It may take a few minutes for deleting to complete.
1.10. Third party toolsAs part of development for the Eclipse ESCET project, several third party tools are used. They areused to e.g. run scripts, generate files, etc.
The following third party tools are used to run scripts:
• Bash, to run .bash scripts.
• GNU utilities, to use in scripts, e.g. cat, cp, diff, dirname, find, grep, mv, readlink, rm, sed, sort andwc.
• Perl, to run .pl scripts.
• Python, version 3, to run .py scripts.
• Shell, to run .sh scripts.
• Windows command prompt, to run .cmd scripts.
The following third party tools are used to build:
• Maven, to run the main build from a console.
The following third party tools are used to generate/convert images:
• bbox_add.pl Perl script, used in conjunction with LaTeX, obtained fromhttps://www.inference.org.uk/mackay/perl/bbox_add.pl.
• eps2png Perl script, used in conjunction with LaTeX, obtained from https://metacpan.org/pod/eps2png.
• Gnuplot, to generate images.
• ImageMagic, used in conjunction with LaTeX, including convert.
• Inkscape, to convert .svg images.
• LaTeX, to generate images, including dvips, latex, pdfcrop and pdflatex.
• Make, run Makefile builds, to generate images.
• LaTeX rail package, including rail.
The following third party tools are used to build some of the documentation:
• LaTeX, including bibtex and pdflatex.
The following third party tools are used to generate test classes and package them into a JAR file,for certain tests:
• Java Development Kit (JDK), version 7 or higher, including javac and jar.
Most of these tools are not needed to run a build or run the tests, as the generated files (e.g. images)are committed into Git.
1.11. Upgrade instructionsTo upgrade to a new Eclipse Platform/IDE/SDK version:
• New development environment
◦ Set up a new development environment for the new Eclipse IDE version.
• Version updates
◦ Look up Orbit version for the new Eclipse Platform/IDE/SDK release, seehttps://download.eclipse.org/tools/orbit/downloads/.
◦ Update Oomph setup (org.eclipse.escet.setup), configuring new Eclipse IDE and Orbitversions.
◦ Update dev-env-setup.asciidoc to match new Eclipse version.
◦ Update org.eclipse.platform version for the product feature(org.eclipse.escet.product.feature/feature.xml).
◦ Update Eclipse and Orbit update site URLs in product(org.eclipse.escet.product/escet.product).
◦ Update Eclipse and Orbit update site URLs in update site(org.eclipse.escet.product/category.xml).
• Update target platform and address any issues
◦ Let Oomph regenerate the target platform, and commit any changes.
◦ Force a rebuild in Eclipse (Project › Clean…).
◦ Check workspace for any errors/warnings and address them if any.
◦ Check New and Noteworthy (release notes) of the new Eclipse version for changes and adaptas necessary.
• Java formatter profile
◦ Navigate to Window › Preferences.
◦ Ensure the Oomph preference recorder is enabled, using the corresponding button at thebottom left of the dialog.
◦ In the dialog, navigate to Java › Code Style › Formatter › Eclipse ESCET profile › Edit….
◦ Make a dummy change to the Eclipse ESCET Java formatter profile and close the profileediting dialog by clicking [ OK ].
◦ Close the preferences dialog by clicking [ Apply and Close ].
◦ An Oomph preference recorder dialog will appear that can be dismissed by clicking[ Cancel ].
◦ Repeat the previous steps to revert the dummy change until the Oomph preference recorderdialog appears again.
◦ Select the relevant preferences, note their names, and copy the values from the bottom textbox to an external text editor.
◦ Close the Oomph preference recorder dialog by clicking [ Cancel ].
◦ Open the Oomph setup (org.eclipse.escet.setup) and look for the relevant preferences.
◦ Right click such a preference and choose Show Properties View.
◦ In the properties view, get the current values of the preferences, and compare them to thenew values using your favorite diff tool.
◦ Replace the current values of the preferences by the new values.
◦ Don’t forget to save the updated Oomph setup.
◦ In case of formatting profile changes, reformat all Java code using the new formatter profile.
• Java errors/warnings settings
◦ Right click the org.eclipse.escet.common.java project in the Package Explorer view andchoose Properties.
◦ In the properties dialog, select Java Compiler › Errors/Warnings.
◦ Make a dummy change and apply it by clicking [ Apply and Close ].
◦ Click [ Yes ] when asked to Rebuild the project now to apply the changes of the Error/Warningsettings?.
◦ Revert the dummy change, using again the same steps.
◦ In case of changes to *.prefs files in the .settings directory of that project, configure thenew settings as desired.
◦ Run misc/java-code-style/copy_here.bash ../../common/org.eclipse.escet.common.java frommisc/java-code-style to copy the new settings to the central place.
◦ Run misc/java-code-style/copy_there.bash from misc/java-code-style to copy the newsettings to all relevant projects.
◦ Force a rebuild in Eclipse (Project › Clean…) and check for any warnings/errors, addressingthem if any.
• Update Maven version
◦ Check the embedded Maven version, by navigating to Run › Run Configurations…,selecting the build launch configuration under Maven Build, and observing the MavenRuntime version.
◦ Ensure the Maven version in Jenkinsfile matches the embedded Maven version.
◦ Ensure the Maven version in misc/license-check-dependencies/Jenkinsfile matches theembedded Maven version.
• Validation
◦ Run a Maven build.
◦ Ensure no errors or warnings during Maven build.
• Dependency information
◦ Run misc/license-check-dependencies/license-check-dependencies.sh and updateDEPENDENCIES.txt according to the output.
◦ Run misc/license-check-dependencies/license-check-dependencies.sh again, to ensureDEPENDENCIES.txt is up-to-date.
To upgrade to a new Tycho version:
• Update version in org.eclipse.escet.root/.mvn/extensions.xml.
• Update version in org.eclipse.escet.configuration/pom.xml.
• Check Tycho release notes for changes and adapt as necessary.
• Run a Maven build.
• Ensure no errors or warnings during Maven build.
To upgrade to a new Java version:
• For major Java versions (e.g. 11 to 12):
◦ Update Bundle-RequiredExecutionEnvironment for all plug-in manifests.
◦ Update JRE_CONTAINER in all .classpath files.
◦ Update JRE_CONTAINER in all launch configurations (.launch files).
◦ Update Java versions in org.eclipse.jdt.core.prefs files.
◦ Update osgi.requiredJavaVersion in the product (org.eclipse.escet.product/escet.product).
◦ Update Java version for executionEnvironment in org.eclipse.escet.configuration/pom.xml.
◦ Update Java version in Jenkinsfile.
◦ Update Java version in misc/license-check-dependencies/Jenkinsfile.
◦ Update Java keywords for org.eclipse.escet.common.java.JavaCodeUtils.JAVA_IDS. Updatethe keywords themselves and the field’s JavaDoc, including the link to the Java LanguageSpecification (JLS).
• For any Java versions (e.g. 11 to 12, or 11.0.1 to 11.0.2):
◦ Update the JustJ version (eclipse.justj.version.* variables) in the Oomph setup(org.eclipse.escet.setup).
◦ Regenerate the target platform file using Oomph.
◦ Update JustJ version for the product feature (org.eclipse.escet.product.feature/feature.xml).
◦ Update dev-env-setup.asciidoc to match new Java version.
◦ Force a rebuild in Eclipse (Project › Clean…) and check for any warnings/errors, addressingthem if any.
◦ Run a Maven build.
◦ Ensure no errors or warnings during Maven build.
◦ Run misc/license-check-dependencies/license-check-dependencies.sh and updateDEPENDENCIES.txt according to the output.
◦ Run misc/license-check-dependencies/license-check-dependencies.sh to ensureDEPENDENCIES.txt is up-to-date.
2. Application frameworkThe Eclipse ESCET application framework provides common functionality for applications withinthe Eclipse ESCET toolkit. The following topics explain the framework in more detail:
• Introduction
• Stand-alone execution versus Eclipse IDE
• The Application class
• The exception framework
• Exit codes
• The I/O framework
• The option framework
• The compiler framework
• How to implement your own application
• Application registration
• Execution
2.1. IntroductionThe Eclipse ESCET application framework provides common functionality for applications withinthe Eclipse ESCET toolkit. It has several goals:
• Provide a uniform end-user experience, for example in the form of uniform option dialogs.
• Hide technical details from the end user, for example in the form of crash reports and userfriendly error messages, instead of stack traces.
• Provide support for applications to run both as a stand-alone Java program (say, from thecommand line), as well as within the Eclipse environment.
• Provide the basic functionality needed by most applications, to reduce the overhead needed fordevelopers to develop an application.
The documentation for this framework describes the issues that the application frameworkattempts to solve, and the way it solves them. It also provides guidance in implementingapplications using the application framework.
2.2. Stand-alone execution versus Eclipse IDEOne of the goals of the application framework is to make it easier to allow applications to run asstand-alone Java command line applications, as well as run within the Eclipse IDE. The mainproblem faced when supporting general applications to run within Eclipse, is that such applicationsall run within the same instance of the Java Virtual Machine (JVM). In fact, a single application may
have multiple instances running at the same time, within a single instance of the IDE. The followingsections address the issues that arise when running within the IDE, and how the applicationframework handles them.
2.2.1. Application static information
Within Java programs, members can be defined with the static modifier. Since multiple instancesof an application may be running simultaneously, within a single instance of the IDE, one shouldavoid using static variables that contain information that is specific to a single instance of theapplication. For instance, assume an application that maintains an integer counter, used togenerate unique identifiers. If defined in a class as follows:
public static int count = 0;
and incremented when needed, the first instance of the application will run just fine. Variable countstarts at zero, and is incremented over and over again. When a second instance of the applicationstarts however, the static variable keeps its value, as the new application is started within the sameEclipse instance, and thus within the same JVM. The count won’t start from zero, thus leading todifferent results for the application.
The conclusion is that one should be careful to avoid static variables that hold information specificto an application instance.
2.2.2. Application options
Applications often have settings, and they are generally passed as command line arguments. GUIapplications however, often use a dialog to configure the options instead. To allow applicationswithin the application framework to work in both scenarios, all applications should use the optionframework.
See also the option framework section.
2.2.3. Stdin, stdout, and stderr
Command line applications generally obtain input from stdin, and write output to stdout and/orstderr streams. For applications running within the IDE, those streams are connected to the Eclipseapplication (IDE) as a whole, and not to the applications running within the IDE. To provide auniform I/O interface, the application framework includes an I/O framework.
See also the I/O framework section.
2.2.4. Graphical User Interfaces (GUIs) and SWT
The Eclipse IDE uses the Standard Widget Toolkit (SWT) for its graphical user interface (GUI). To becompatible with the Eclipse IDE, all GUI applications should use SWT as well. In order for GUIapplications to work seamlessly within the Eclipse IDE as well as stand-alone, the applicationframework automatically registers the main SWT display thread for stand-alone applications, anduses the Eclipse SWT display thread when running within the Eclipse IDE. This reduces the burdenof having to register the main SWT display threads, but also avoids blocking and other threadrelated issues.
Using the GUI option, the GUI can be enabled or disabled. If disabled, headless execution mode isused, which disables creation of a SWT display thread, and thus disables all GUI functionality,including the option dialog.
2.2.5. Application termination
Within Java, the System.exit method can be used to immediately terminate an application, byterminating the JVM. For applications running within the Eclipse IDE, this not only terminates theapplication, but the IDE as well. As such, the System.exit method should never be used inapplications that are intended to be executed within the IDE.
2.2.6. SIGINT
Stand-alone applications can typically be started from a the command line terminal window.Pressing Ctrl + C at such a command line terminal window terminates the currently runningapplication (on Unix-based systems, this generates a SIGINT). Applications running within theEclipse IDE however, don’t run in an actual command line terminal. Instead, they run within theIDE, and the stdin, stdout, and stderr streams are coupled to the Eclipse console view. The Eclipseconsole view does not support termination using the Ctrl + C key combination. Instead, Ctrl + C isused to copy console output to the clipboard. To remedy this situation, application frameworkapplications running within Eclipse get a Terminate button with their console within the IDE, toallow for easy termination.
Furthermore, the application framework allows termination requests via the AppEnv.terminatemethod. Application framework applications and threads should regularly call theAppEnv.isTerminationRequested method to see whether they should terminate.
See also the termination features of the Applications view.
2.2.7. Exceptions
Exceptions are Java feature that allows applications to report error conditions. Exceptions cangenerally be divided into two categories: internal errors, and end-user errors. Internal errorsshould generally not happen, and make the application crash. The application framework provides
crash reports for end users to report crashes due to internal errors. The application framework alsoprovides exception classes for end-user errors, to provide nice error messages, instead of stacktraces.
See also the exception framework section.
2.2.8. System properties
Java uses system properties (System.getProperty method etc). Those properties are global to theentire JVM, meaning they are shared between applications running within the Eclipse IDE. Theapplication framework provides functionality to maintain system properties on a per applicationbasis, turning them into application properties. All application framework applications should usethe getProp* and setProp* methods in the AppEnv class instead of the property related methods in theSystem class. This ensures that the application properties are used instead of the global systemproperties.
2.2.9. File paths and current working directory
One of the standard system properties in Java is the user.dir property, which refers to the currentworking directory, or more precisely, the directory from which the JVM was started. Java doesn’tallow changing the current working directory. The application framework however, maintains thecurrent working directory on a per application basis. Changing the current working directory isalso supported. Application framework applications should use the methods in theorg.eclipse.escet.common.app.framework.Paths class to get and set the current working directory, toresolve relative paths, etc. These methods also allow both Windows (\) and Unix (/) separators to beused in paths, on all platforms, transparently.
Furthermore, within the Eclipse IDE all projects are visible in the Project Explorer and PackageExplorer views. In order to allow importing of resources from other projects etc, it may be nice toallow end users to specify platform paths (plug-in paths or workspace paths). Eclipse ModelingFramework (EMF) URIs, besides local file system paths, provide functionality for platform URIs aswell. EMF URIs can for instance be used to load models that are instances of an Ecore. The Pathsclass mentioned above features methods to create such EMF URIs, from various sources. Thosemethods also feature smart handling of platform:/auto/... paths, an addition to platform URIs,added by the application framework. Such URIs are first resolved in the workspace, and if theycan’t be found there, they are resolved in the plug-ins. This allows for easier debugging, as theworkspace always overrides the plug-ins.
2.3. The Application classThe org.eclipse.escet.common.app.framework.Application<T> class is the main class of theapplication framework. All application should inherit from this abstract class. The genericparameter <T> is further explained in the section about the I/O framework.
The next sections introduce the specific parts of the application framework. After that, you’ll find asection on how to implement your own application, using the application framework.
2.4. The exception frameworkThe application framework contains the exception framework. Its main goal is to hide stack tracesfrom end users. Exceptions can generally be divided into two categories: internal errors, and end-user errors.
2.4.1. End-user exceptions
All exceptions that should be presented to the end user are considered end-user exceptions. Thesemessages should be written in terms that the end user should be able to understand. For end-userexceptions, the exception framework does not display stack traces (at least not by default). All end-user exceptions must implement theorg.eclipse.escet.common.app.framework.exceptions.EndUserException interface, and may inheritfrom the org.eclipse.escet.common.app.framework.exceptions.ApplicationException class. Allapplications that use the application framework must satisfy these requirements when the errormessage is to be presented to end users. It is recommended to reuse existing application frameworkexceptions whenever possible.
2.4.2. Internal exceptions
All exceptions that are not to be presented to end users are considered to be internal exceptions.Internal exceptions crash the application and are always considered to be bugs. The applicationframework generates crash reports for internal errors, so that end users can easily report them.Also, stack traces are not shown on the console. They are however present in the crash report,along with among others information about the system, the Java version used, the application thatcrashed (name, version, etc), and if the OSGi framework is running, the available plug-ins etc.
2.4.3. Chained exceptions
Java supports the concept of chained exceptions. The end-user exceptions of the applicationframework support this as well. If an uncaught end-user exception needs to be presented to the enduser, the message of the exception is printed to the console, prefixed with the ERROR: text. All thecauses of the exception are printed as well, each on a line of their own. Those messages areprefixed with the CAUSE: text. For exceptions that provide an end-user readable message, only thatmessage is printed after the CAUSE: text. For other exceptions, the simple name of the exceptionclass, enclosed in parentheses, is printed between the CAUSE: text and the exception message. Allend-user exceptions (the ones inheriting from theorg.eclipse.escet.common.app.framework.exceptions.ApplicationException class), as well as all other
exceptions explicitly designed as such (by implementing theorg.eclipse.escet.common.app.framework.exceptions.EndUserException interface) are considered toprovide readable messages. For other exceptions, it is assumed that they don’t. This includes allexceptions provided by Java itself.
2.4.4. Development mode
Developers can enable the development mode option (DevModeOption class) to always get stack tracesfor all internal exceptions (thus for crashes, but not for end-user exceptions), instead of crashreports. For more information, see the option framework section.
The development mode option is ideal for automated tests, where a stack trace on stderr is muchmore ideal than a crash report.
2.5. Exit codesApplication framework applications can terminate with the following exit codes:
• 0: Application finished without errors.
• 1: Application finished after reporting an error to the end user.
• 2: Application crashed after running out of memory.
• 3: Application crashed for any reason other than running out of memory.
Note that applications themselves should always return a zero exit code. The other exit codes aregenerated automatically by the exception framework when applicable.
Any exceptions to these rules should generally be avoided, but otherwise must be clearlydocumented for end users.
2.6. The I/O frameworkTo provide a uniform I/O interface, the application framework includes an I/O framework. Thisframework is sometimes also called the output framework, as it mainly handles output. The maingoals of this framework are:
• Provide uniform stdin, stdout, and stderr support for applications running on the commandline, or within the Eclipse IDE.
• Provide a general framework for output, based on output components that can be registeredand unregistered.

2.6.1. Output components
The I/O framework works with output components. All output that the application generates, isgiven to the output components. Each output component can decide for itself what to do with thatoutput. All applications include at least a StreamOutputComponent, that redirects stream output to theconsole. For stand-alone applications, this means redirection to stdout and stderr. For applicationrunning within the Eclipse IDE, this means redirection to a Console view.
Applications that only need to provide error, warning, normal, and debug textual output, thedefault output component interface (IOutputComponent) suffices. Applications that want to provideadditional (typed) output, should create a derived interface that inherits from IOutputComponent, andextends the interface with additional callback methods. For an example of this, see theorg.eclipse.escet.cif.simulator.output.SimulatorOutputComponent interface.
The OutputComponentBase class can be used as a base class for output components. It implements thefull IOutputComponent interface, but does nothing with the output that is generated by theapplication. Derived classes can easily override one or more methods to process output.
2.6.2. Output provider
Each instance of an application has its own output provider. The output provider keeps track of theoutput components that are registered, and allows sending of output to the output componentsthrough static methods.
If an application uses the default IOutputComponent as its output interface, an instance ofOutputProvider<IOutputComponent> can be used. This will suffice for most applications. If anextended output component interface is defined, the OutputProvider class should be extended toprovide additional static methods. For an example of this, see theorg.eclipse.escet.cif.simulator.output.SimulatorOutputComponent class.
For details on how and where to create an instance of the output provider for an application, seethe section on how to implement your own application.
2.6.3. Stdout and stderr
Command line applications generally write output to stdout and/or stderr streams. For applicationsrunning within the Eclipse IDE, those streams are connected to the Eclipse IDE as a whole, and notto the applications running within Eclipse. The I/O framework solves this issue, by providing auniform I/O interface.
The org.eclipse.escet.common.app.framework.output.OutputProvider<T> class provides several staticmethods that can be used to generate output. Several forms of output are supported by default:
• Error output is automatically generated by the exception framework, for uncaught exceptions.It is however possible to manually generate error output, by using the OutputProvider.errmethod. This could for instance be useful if multiple error messages are to be outputted.
• Warning output can be generated by applications, by using the OutputProvider.warn method. Theapplication framework counts the number of warnings generated by an application, and thecount can be retrieved using the OutputProvider.getWarningCount method.
• Normal output can be generated by applications, by using the OutputProvider.out method. Tosupport structured output, the I/O frame maintains an indentation level, which can be increasedand decreased one level at a time.
• Debug output can be generated by applications, by using the OutputProvider.dbg method. Tosupport structured output, the I/O frame maintains an indentation level, which can be increasedand decreased one level at a time.
One of the default options of the application framework is the output mode option(OutputModeOption class). It can be used to control what output gets forwarded to the outputcomponents. For performance reasons, it may be useful to query whether certain output getsforwarded. The OutputProvider class provides the dowarn, doout, and dodbg methods for this.
It should now be clear that application should never access System.out and System.err directly.Instead, they should use the output provider.
2.6.4. Stdin
There is no equivalent to the OutputProvider for stdin. Instead, use the AppEnv.getStreams() methodto obtain the streams for the current application. The AppEnv.getStreams().IN streams can be usedto read data from the stdin stream associated with the current application.
2.6.5. Buffering and flushing
The I/O framework buffers all input and output streams by default, and also automaticallyperforms line based flushing for output and error streams.
2.7. The option frameworkApplications often have settings, and they are generally passed as command line arguments. GUIapplications however, often use a dialog to configure the options instead. To allow applicationswithin the application framework to work in both scenarios, the application framework providesthe option framework.
2.7.1. The option class
All options of applications that use the application framework, should be specified as applicationframework options. Each option is a derived class of theorg.eclipse.escet.common.app.framework.options.Option<T> class. The generic type parameter <T>indicates that options are strongly typed with respect to their values.
2.7.2. Command line options and the option dialog
The option framework requires all options to work via the command line, but options can alsosupport the option dialog. It is recommended for all options to support the option dialog. The optionframework process options as follows:
• All registered options are first initialized to their default values.
• The pre-options hook for the application is fired.
• The command line options are parsed.
• If the command line options enabled the option dialog option (a standard applicationframework option that controls whether the option dialog is to be shown), the option dialog isshown. The option values as processed so far, are shown to the user in this dialog. The user canmodify the options via the dialog and choose [ OK ] to continue.
◦ If the user chose [ Cancel ] in the option dialog, terminate the application.
◦ All registered options are reset to their default values. This also clears the remainingarguments option, if any.
◦ The options set in the dialog are parsed. This overwrites the values of all options.
• The post-processing hook is fired for all options that have it.
• All option values are checked (validated).
• The post-options hook for the application is fired.
2.7.3. Option categories
Options can be ordered into categories. Categories can be combined into a hierarchical structure.This allows the option dialog to show options per category, and allows the command line helpmessage to show command line option help per category. In both cases, this adds structure to thepossibly large amount of options, and makes it easier for end users to find the option they arelooking for.
2.7.4. Instantiating options
For every option, there may be at most one instance. Therefore, never use the constructors ofoptions directly. Instead use the following:
Options.getInstance(MyOption.class)
to get an instance of an option.
2.7.5. Getting and setting option values
Applications don’t have access to the command line arguments. The option frameworkautomatically process the command line arguments based on the options registered for theapplication. Applications always retrieve the values of options through static methods defined inthe option classes.
Options are usually set via command line arguments, or via the option dialog. It is however alsopossible to set option values at run-time:
Options.set(MyOption.class, <value>);
2.7.6. Option processing order
If possible, options should not depend on the order in which they are parsed. If the value of oneoption depends on the value of another option, use the post-processing hook to achieve consistency.
2.7.7. Command line option syntax
All options have a long form (--option), optionally with a value (--option=VALUE). They can also haveshort form (-o), optionally with a value (-oVALUE or -o VALUE). All arguments that do not start with adash symbol (-) are considered to be the 'remaining arguments'. It is possible to register one optionthat processes those remaining arguments. Such special options have * as long option name.
2.7.8. Implementing your own options
Simply derive from the Option class, and study its API to implement your own options. You can alsolook at existing options for best practices. Furthermore, the option framework provides severaloptions that can be used in applications:
• BooleanOption: convenience base class for boolean options.
• FilesOption: multiple remaining arguments input file paths option.
• InputFileOption: single remaining argument input file path option.
• OutputFileOption: output file path option (--output / -o).
2.7.9. Standard options
The application framework provides several options that must be registered for every application:
• DevModeOption: option to enable/disable development mode. Developers can enable this option to

get stack traces in case of internal exceptions, instead of crash reports. See also the chapter onthe exception framework.
• HelpOption: option to show the application help text at the console.
• LicenseOption: option to print the license text of the application at the console, and terminatethe application.
• OptionDialogOption: option to show the option dialog.
• OutputModeOption: option to control the amount of output produced by the application. See alsothe I/O framework section.
• GuiOption: option to disable the GUI (enabled headless execution mode). See also the section onGUIs and SWT.
See also the section on how to implement your own application.
2.8. The compiler frameworkFor performance reasons, it can be better to generate and compile code at runtime, than to use aninterpreter. The Java compiler supports this. However, in an Eclipse/OSGi environment, someadditional effort is required to make it all work. The application framework contains a compilerframework in the org.eclipse.escet.common.app.framework.javacompiler package. It supports in-memory compilation of in-memory code, with full transparent OSGi support. That is, whether usedfrom inside the Eclipse IDE, or from a stand-alone application, the compiler framework takes careof the details. The framework supports various representations of in-memory code, and can beextended with additional representations.
The compiler framework requires the use of a Java Development Kit (JDK). A Java RuntimeEnvironment (JRE) is not sufficient.
2.9. How to implement your own applicationThis section more or less explains step by step how to implement your own application, by usingthe application framework.
• Decide whether it is enough to use the IOutputComponent interface, or that you need more. Seealso the I/O framework section.
• Create a new class, deriving from Application.
• Add a main method to your application class. For instance:
/** * Application main method. * * @param args The command line arguments supplied to the application. */public static void main(String[] args) { MyApp app = new MyApp(); app.run(args);}
This allows for standalone execution.
• Add constructors as needed. You’ll probably want to implement some or most of theconstructors provided by the Application class. In order to support standalone execution, thefollowing constructor is required:
/** Constructor for the {@link MyApp} class. */public MyApp() { // Nothing to do here.}
In order to support the ToolDef app tool, which can be used to run application frameworkapplications from ToolDef scripts, the following constructor is required:
/** * Constructor for the {@link MyApp} class. * * @param streams The streams to use for input, output, and error streams. */public MyApp(AppStreams streams) { super(streams);}
This constructor is also required by the ChildAppStarter class, to support starting oneapplication framework application from another application framework application.
• Implement the mandatory methods getAppName and getAppDescription.
• Implement mandatory method getProvider. If you use IOutputComponent, then you canimplement it as follows:
return new OutputProvider<>();
If you don’t use IOutputComponent, return a new instance of a derived class of OutputProvider thatimplements the derived interface of IOutputComponent.

• If you don’t use IOutputComponent, override the getStreamOutputComponent method, and return anew instance of a derived class of StreamOutputComponent that implements the derived interfaceof IOutputComponent. Such a class usually ignores all other output, and thus behaves exactly asStreamOutputComponent, but implements the full output interface of the application.
• Implement mandatory method getAllOptions. You’ll need to return an option category thatwraps the actual option categories of the application. Use the getGeneralOptionCategory to obtainthe default application options category, which must always be the first category of options foryour application. An example of an implementation of this method:
@Override@SuppressWarnings("rawtypes")protected OptionCategory getAllOptions() { OptionCategory generalOpts = getGeneralOptionCategory();
OptionCategory debugOpts = new OptionCategory("Debug", "Debugging options.", list(), list(Options.getInstance(DebugOption.class)));
OptionCategory options = new OptionCategory("My Application Options", "All options for My Application.", list(generalOpts, debugOpts), list());
return options;}
• Implement mandatory method runInternal with the actual application code.
• Override optional method getHelpMessageNotes if applicable.
• Override optional methods preOptions and postOptions if applicable.
• Override optional method getAppVersion if applicable.
2.9.1. The runInternal method
Some things to consider when implementing the runInternal method:
• If you want to support stand-alone execution, register all Eclipse Modeling Framework (EMF)metamodels with the EMF metamodel registry. Also register any parsers, constraints, etc. Forinstance:
if (!Platform.isRunning()) { // Register languages and parsers for stand-alone execution. LanguageRegistry.register...(...)}
• The start of the runInternal method is a good place to add output components, as all optionshave been fully processed at this point. Output components can be registered by using the
application’s output provider (though static methods).
• The code in this method and all code directly or indirectly executed by this method, shouldregularly call the AppEnv.isTerminationRequested method, to find out whether the applicationshould be terminated.
• For the return code of this method, always use value zero, to indicate successful termination.Other exit codes are automatically generated by the exception framework, if applicable. See alsothe exit codes section.
2.10. Application registrationApplications that use the application framework maintain their own data. This includes options,output components (via an output provider), streams, etc. Only a single application can beregistered for each thread. Only once the application terminates and automatically unregistersitself, can a new application register itself in that thread. To run multiple applications in parallel,simply run them on different threads.
2.10.1. Multi-threaded applications
All data stored for the application is wrapped in the AppEnvData class, and stored by the AppEnv class,on a per-thread basis. If your application uses multiple threads, you need to register each threadwith the application framework. Use the AppEnv.registerThread method for this. This methodrequires the current application environment data as parameter, which may be obtained by usingthe AppEnv.getData method. To avoid managed memory leaks, always unregister threads once theyare no longer used, by using the AppEnv.unregisterThread method.
2.10.2. Unit tests
If unit tests use methods that depend on the application being registered, then the unit test willneed to register an application. Examples of method using the application framework are methodsthat use options, or produce output via the application framework. Especially for unit tests, theAppEnv.registerSimple method can be used to register a dummy application. This method uses adefault application environment, without an actual application, registers a default stream outputprovider, sets the output mode to errors and warnings only (no normal or debug output), anddisables development mode. It can be used in a unit test class as follows:
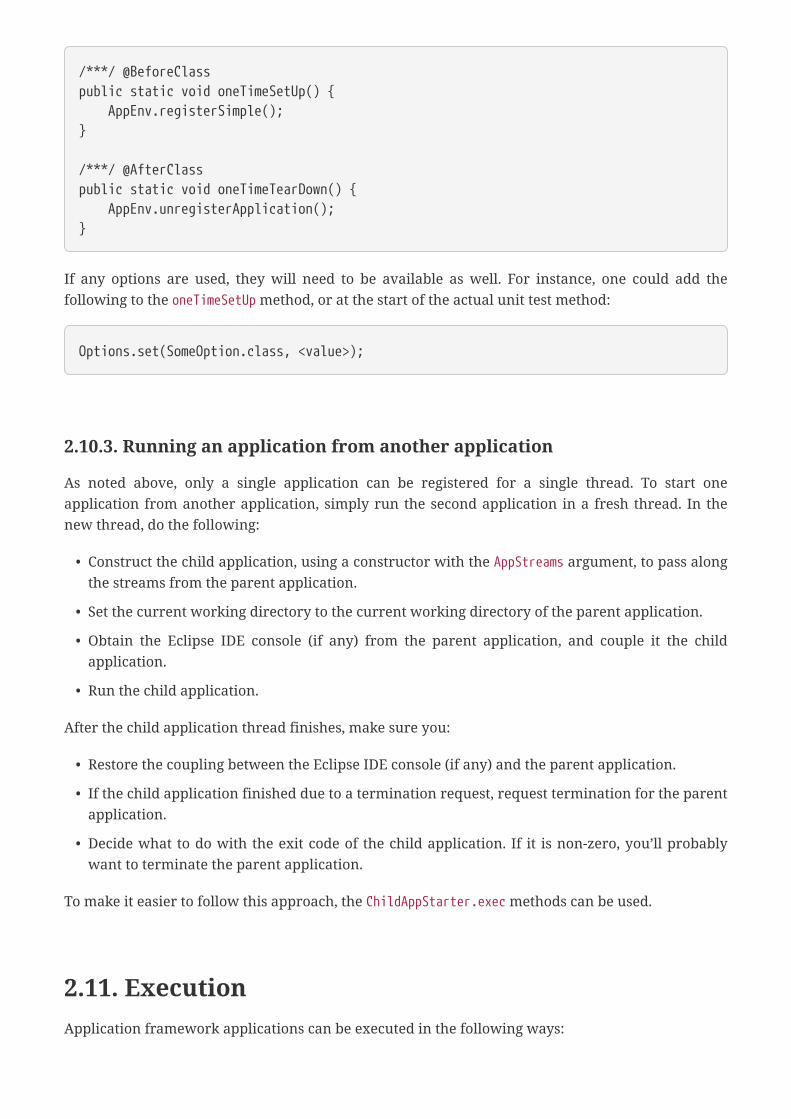
/***/ @BeforeClasspublic static void oneTimeSetUp() { AppEnv.registerSimple();}
/***/ @AfterClasspublic static void oneTimeTearDown() { AppEnv.unregisterApplication();}
If any options are used, they will need to be available as well. For instance, one could add thefollowing to the oneTimeSetUp method, or at the start of the actual unit test method:
Options.set(SomeOption.class, <value>);
2.10.3. Running an application from another application
As noted above, only a single application can be registered for a single thread. To start oneapplication from another application, simply run the second application in a fresh thread. In thenew thread, do the following:
• Construct the child application, using a constructor with the AppStreams argument, to pass alongthe streams from the parent application.
• Set the current working directory to the current working directory of the parent application.
• Obtain the Eclipse IDE console (if any) from the parent application, and couple it the childapplication.
• Run the child application.
After the child application thread finishes, make sure you:
• Restore the coupling between the Eclipse IDE console (if any) and the parent application.
• If the child application finished due to a termination request, request termination for the parentapplication.
• Decide what to do with the exit code of the child application. If it is non-zero, you’ll probablywant to terminate the parent application.
To make it easier to follow this approach, the ChildAppStarter.exec methods can be used.
2.11. ExecutionApplication framework applications can be executed in the following ways:
• As plain Java application, from the command line.
Using the GUI option, the application can be executed either with full GUI support, or asheadless application.
The OSGi framework will not be running, and the Eclipse workbench will not be available.
• As application within the Eclipse IDE, with full GUI support.
The OSGi framework will be running, and the Eclipse workbench will be available.
• As headless Eclipse application.
Using the GUI option, the application can be executed either with full GUI support, or asheadless application.
The OSGi framework will be running, but the Eclipse workbench will not be available.
The org.eclipse.escet.common.app.framework.AppEclipseApplication application can be providedto the -application command line argument of Eclipse to start any application frameworkapplication. This functionality is implemented by theorg.eclipse.escet.common.app.framework.AppEclipseApplication which provides a genericimplementation of Eclipse’s IApplication interface that supports execution of any applicationframework application.
The following command line arguments are expected:
• The name of the plug-in (OSGi bundle) that provides the application.
• The full/absolute name of the Java class that implements the application. Must extend theApplication class and have a parameterless constructor.
• The remaining command line arguments are the command line arguments for the applicationitself.
3. Multi-value Decision Diagrams libraryThis library provides a user-friendly pure Java implementation of Multi-value Decision Diagrams(MDDs).
The following topics explain the library in more detail:
• Goals
• Variables and relations
• Combining relations
• Computing
• Practical usage
3.1. GoalsDecision trees are a useful data structure to store a large amount of relations. Most softwarelibraries in this area aim for maximum storage and efficiency, implement them with binarydecision diagrams (BDDs) and leave all details of handling nodes to the end-application formaximum flexibility.
This library uses multi-value decision diagrams (MDDs) instead, and attempts to keep details ofhandling nodes away from the application programmer. The advantage of these choices is thatusing the library is simpler, in particular with variables that have more than two possible values.The downside is that this implementation is less feature rich, and is less efficient.
As a result, this library works well for applications that need to manipulate relations with manyvariables with a larger domain, where usage of the application is not expected to go near the limitsof the computer running it.
3.2. Variables and relationsThe elementary relation in a decision diagram is equality between a variable and a value in itsdomain, for example i == 5.
Normally, there is more than one variable, and relations use combined equalities throughconjunction (the and operator) and disjunction (the or operator).
Example:
X ::= (i == 5 and j == 1) or (i == 2 and j == 1)
The example shows a relation named X that holds when j is equal to 1, and i must be either 2 or 5.
The library itself provides constant relations ONE to express true (the relation that always holds),and ZERO to express false (the relation that never holds).
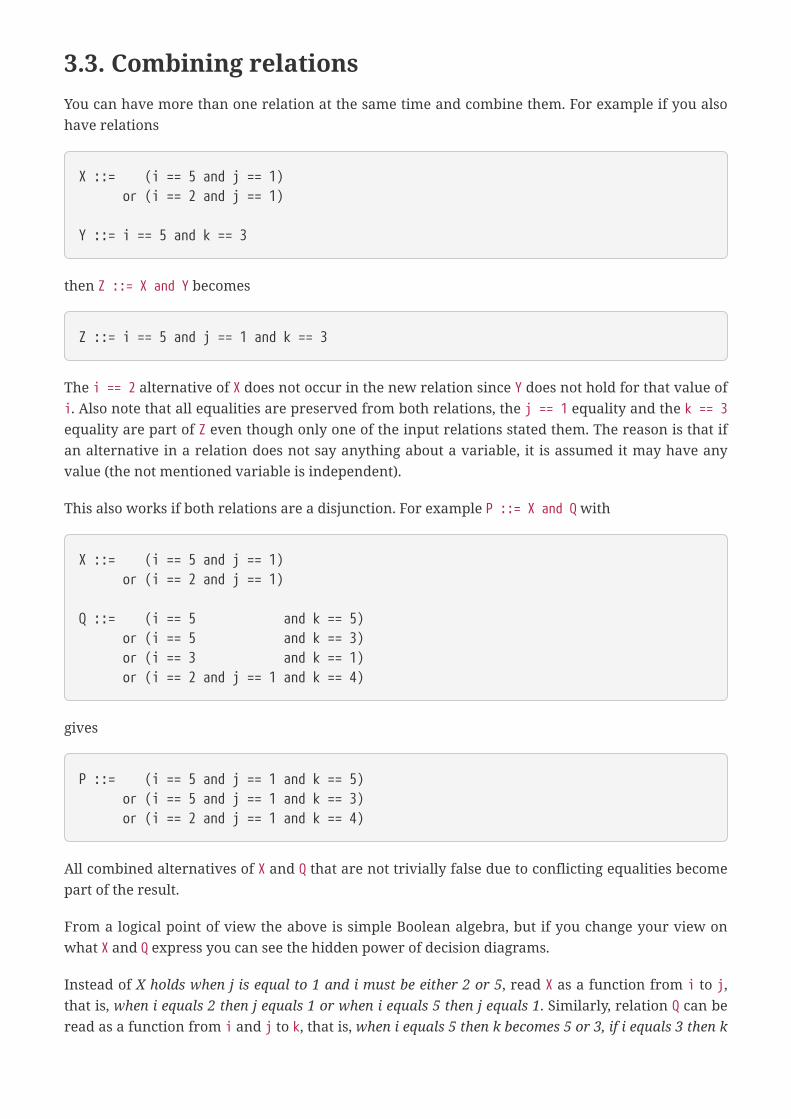
3.3. Combining relationsYou can have more than one relation at the same time and combine them. For example if you alsohave relations
X ::= (i == 5 and j == 1) or (i == 2 and j == 1)
Y ::= i == 5 and k == 3
then Z ::= X and Y becomes
Z ::= i == 5 and j == 1 and k == 3
The i == 2 alternative of X does not occur in the new relation since Y does not hold for that value ofi. Also note that all equalities are preserved from both relations, the j == 1 equality and the k == 3equality are part of Z even though only one of the input relations stated them. The reason is that ifan alternative in a relation does not say anything about a variable, it is assumed it may have anyvalue (the not mentioned variable is independent).
This also works if both relations are a disjunction. For example P ::= X and Q with
X ::= (i == 5 and j == 1) or (i == 2 and j == 1)
Q ::= (i == 5 and k == 5) or (i == 5 and k == 3) or (i == 3 and k == 1) or (i == 2 and j == 1 and k == 4)
gives
P ::= (i == 5 and j == 1 and k == 5) or (i == 5 and j == 1 and k == 3) or (i == 2 and j == 1 and k == 4)
All combined alternatives of X and Q that are not trivially false due to conflicting equalities becomepart of the result.
From a logical point of view the above is simple Boolean algebra, but if you change your view onwhat X and Q express you can see the hidden power of decision diagrams.
Instead of X holds when j is equal to 1 and i must be either 2 or 5, read X as a function from i to j,that is, when i equals 2 then j equals 1 or when i equals 5 then j equals 1. Similarly, relation Q can beread as a function from i and j to k, that is, when i equals 5 then k becomes 5 or 3, if i equals 3 then k
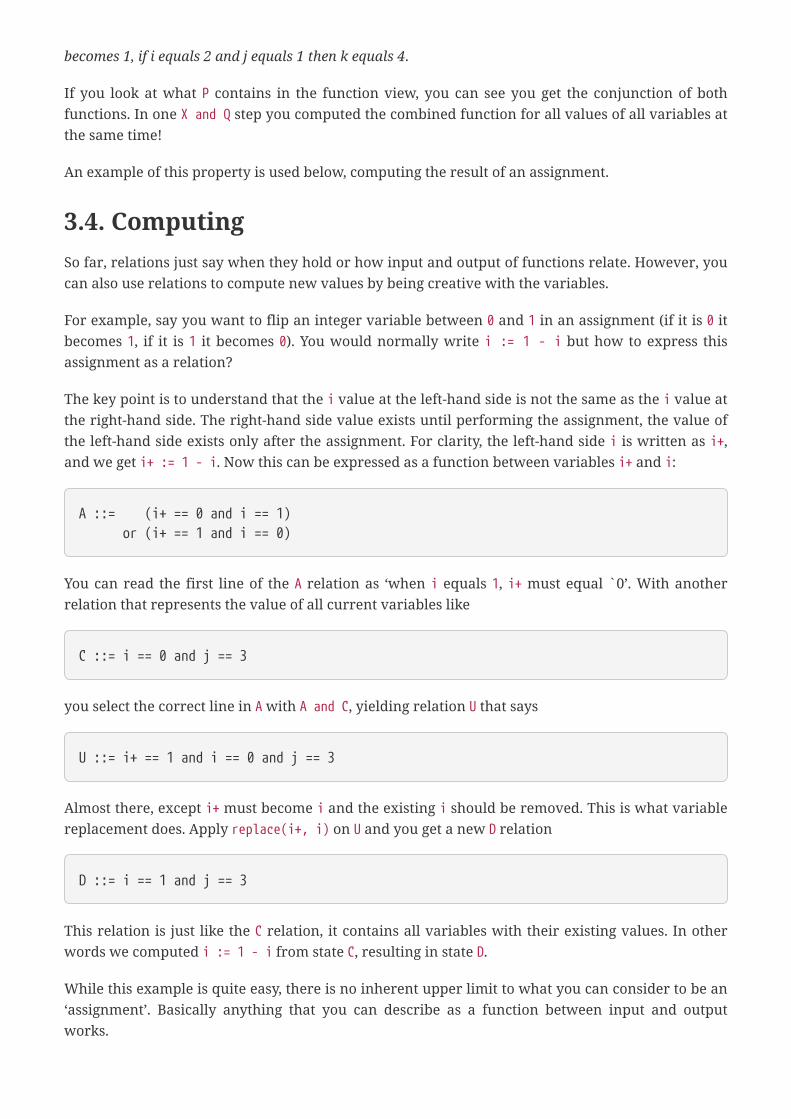
becomes 1, if i equals 2 and j equals 1 then k equals 4.
If you look at what P contains in the function view, you can see you get the conjunction of bothfunctions. In one X and Q step you computed the combined function for all values of all variables atthe same time!
An example of this property is used below, computing the result of an assignment.
3.4. ComputingSo far, relations just say when they hold or how input and output of functions relate. However, youcan also use relations to compute new values by being creative with the variables.
For example, say you want to flip an integer variable between 0 and 1 in an assignment (if it is 0 itbecomes 1, if it is 1 it becomes 0). You would normally write i := 1 - i but how to express thisassignment as a relation?
The key point is to understand that the i value at the left-hand side is not the same as the i value atthe right-hand side. The right-hand side value exists until performing the assignment, the value ofthe left-hand side exists only after the assignment. For clarity, the left-hand side i is written as i+,and we get i+ := 1 - i. Now this can be expressed as a function between variables i+ and i:
A ::= (i+ == 0 and i == 1) or (i+ == 1 and i == 0)
You can read the first line of the A relation as ‘when i equals 1, i+ must equal `0’. With anotherrelation that represents the value of all current variables like
C ::= i == 0 and j == 3
you select the correct line in A with A and C, yielding relation U that says
U ::= i+ == 1 and i == 0 and j == 3
Almost there, except i+ must become i and the existing i should be removed. This is what variablereplacement does. Apply replace(i+, i) on U and you get a new D relation
D ::= i == 1 and j == 3
This relation is just like the C relation, it contains all variables with their existing values. In otherwords we computed i := 1 - i from state C, resulting in state D.
While this example is quite easy, there is no inherent upper limit to what you can consider to be an‘assignment’. Basically anything that you can describe as a function between input and outputworks.
Thus if you construct a relation E that expresses the input - output relation of all edges of anautomaton, and you have a relation C expressing the current state, then C and E followed by replacefor all variables (assuming that E is complete for all variables), you get a new state C' containing thecombined result of taking one of the edges.
3.5. Practical usageAfter this short and possibly mind-blowing introduction on decision diagrams in particular in themulti-valued variation, below some practical information on using the common.multivaluetreeslibrary.
3.5.1. Variables
As you typically work with variables in several use-kinds, like i and i+ in the explanation above,this has to be defined first. The core functionality provided for that is incommon.multivaluetrees.VarInfoBuilder. The class is generic over the type of variables. As aconvenience, the common.multivaluetrees.SimpleVarInfoBuilder class has been created usingcommon.multivaluetrees.SimpleVarVariable variables (with a name, a lower bound, and a number ofvalid values).
After creating an instance providing the number of use-kinds that you have, add the variables asyou like. The order of adding is also the order of the variable nodes in the tree from the roottowards the bottom ONE or ZERO terminator nodes. The elementary function isaddVariable(<variable>, <use-kind>) which adds a node level for variable <variable> and usageindex <use-kind> (running from 0 to the number of use-kinds excluding the upper bound).
As you usually want to have all use-kinds for a variable, and often want them on consecutive nodelevels in the tree, addVariable(<variable>) adds all use-kinds in one call. For a list of variables,addVariablesGroupOnVariables(<list-variables>) does the same for each variable in the list. First Nuse-kinds for the first variable, then N use-kinds for the second variable, and so on. If you want thesame use-kinds near each other instead, addVariablesGroupOnUseKind(<list-variables>) exists.
Each call adds one or more VarInfo instances to the builder. A VarInfo instance is the equivalent ofe.g. i and i+ above. The VarInfoBuilder instance also stores the relation between variables and theirVarInfo instances. With a variable you can ask it for all related VarInfo instances (or just oneinstance), with a VarInfo instance you can ask for the associated variable.
3.5.2. Trees and relations
The VarInfo instances from the builder are used to construct multi-value nodes, and eventuallytrees of such nodes. This is done in the common.multivaluetrees.Tree class, the work horse in multi-value diagram computations. Constructing it is a simple Tree t = new Tree(); which gives you anempty tree.
Constructed relations in t are represented by common.multivaluetrees.Node objects. These objectsshould be considered to be read-only. They can be stored anywhere in the application. Modifying aNode object is not possible, but you can create a new (updated) object and store that.
You can read the information inside a Node. The only somewhat useful operation that you can
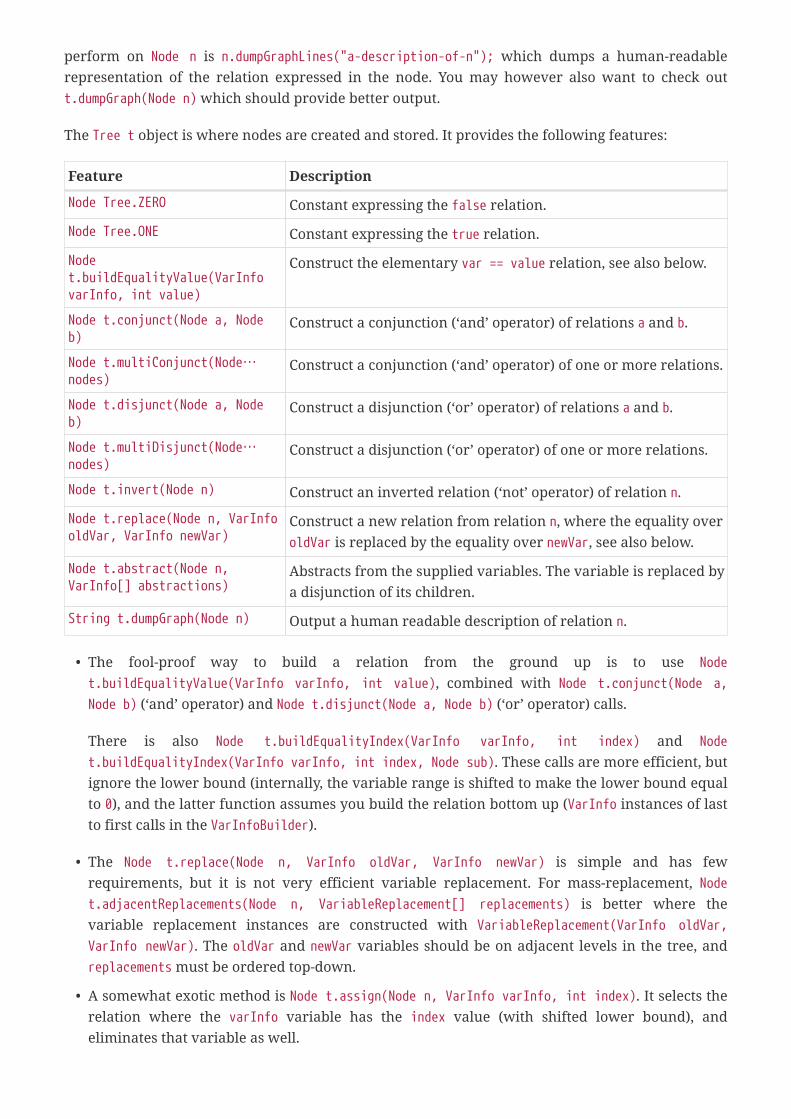
perform on Node n is n.dumpGraphLines("a-description-of-n"); which dumps a human-readablerepresentation of the relation expressed in the node. You may however also want to check outt.dumpGraph(Node n) which should provide better output.
The Tree t object is where nodes are created and stored. It provides the following features:
Feature Description
Node Tree.ZERO Constant expressing the false relation.
Node Tree.ONE Constant expressing the true relation.
Nodet.buildEqualityValue(VarInfovarInfo, int value)
Construct the elementary var == value relation, see also below.
Node t.conjunct(Node a, Nodeb)
Construct a conjunction (‘and’ operator) of relations a and b.
Node t.multiConjunct(Node…nodes)
Construct a conjunction (‘and’ operator) of one or more relations.
Node t.disjunct(Node a, Nodeb)
Construct a disjunction (‘or’ operator) of relations a and b.
Node t.multiDisjunct(Node…nodes)
Construct a disjunction (‘or’ operator) of one or more relations.
Node t.invert(Node n) Construct an inverted relation (‘not’ operator) of relation n.
Node t.replace(Node n, VarInfooldVar, VarInfo newVar)
Construct a new relation from relation n, where the equality overoldVar is replaced by the equality over newVar, see also below.
Node t.abstract(Node n,VarInfo[] abstractions)
Abstracts from the supplied variables. The variable is replaced bya disjunction of its children.
String t.dumpGraph(Node n) Output a human readable description of relation n.
• The fool-proof way to build a relation from the ground up is to use Nodet.buildEqualityValue(VarInfo varInfo, int value), combined with Node t.conjunct(Node a,Node b) (‘and’ operator) and Node t.disjunct(Node a, Node b) (‘or’ operator) calls.
There is also Node t.buildEqualityIndex(VarInfo varInfo, int index) and Nodet.buildEqualityIndex(VarInfo varInfo, int index, Node sub). These calls are more efficient, butignore the lower bound (internally, the variable range is shifted to make the lower bound equalto 0), and the latter function assumes you build the relation bottom up (VarInfo instances of lastto first calls in the VarInfoBuilder).
• The Node t.replace(Node n, VarInfo oldVar, VarInfo newVar) is simple and has fewrequirements, but it is not very efficient variable replacement. For mass-replacement, Nodet.adjacentReplacements(Node n, VariableReplacement[] replacements) is better where thevariable replacement instances are constructed with VariableReplacement(VarInfo oldVar,VarInfo newVar). The oldVar and newVar variables should be on adjacent levels in the tree, andreplacements must be ordered top-down.
• A somewhat exotic method is Node t.assign(Node n, VarInfo varInfo, int index). It selects therelation where the varInfo variable has the index value (with shifted lower bound), andeliminates that variable as well.
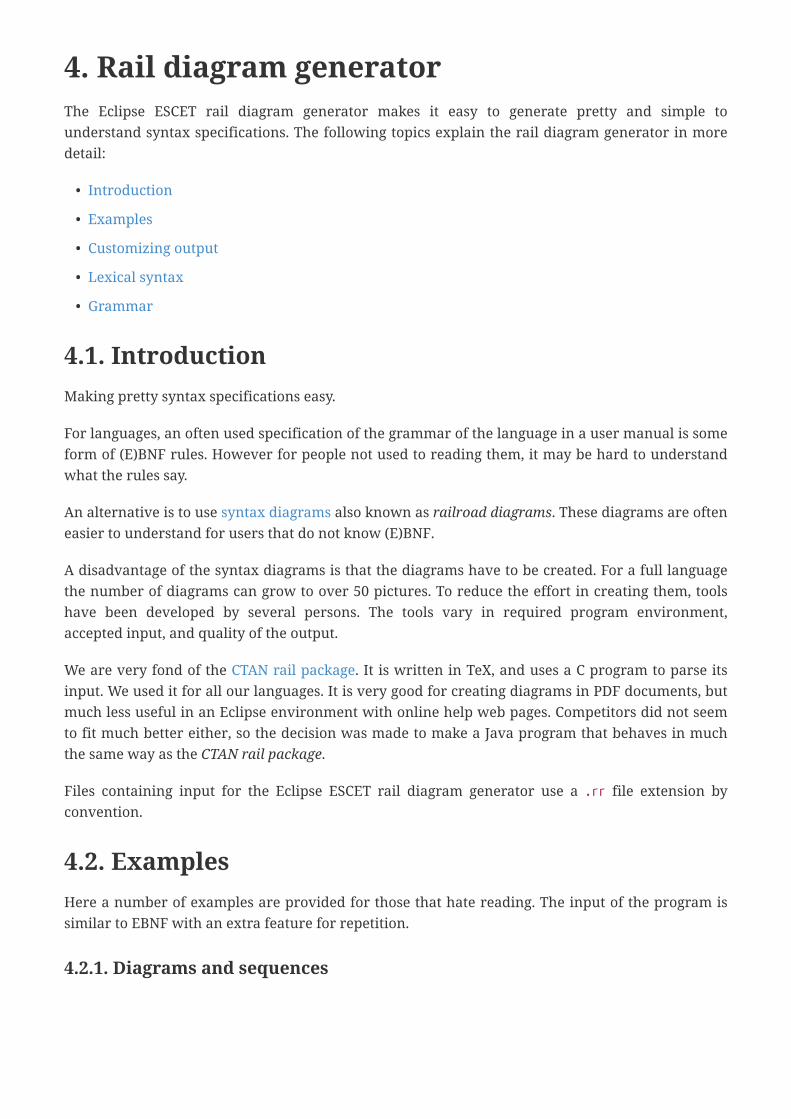
4. Rail diagram generatorThe Eclipse ESCET rail diagram generator makes it easy to generate pretty and simple tounderstand syntax specifications. The following topics explain the rail diagram generator in moredetail:
• Introduction
• Examples
• Customizing output
• Lexical syntax
• Grammar
4.1. IntroductionMaking pretty syntax specifications easy.
For languages, an often used specification of the grammar of the language in a user manual is someform of (E)BNF rules. However for people not used to reading them, it may be hard to understandwhat the rules say.
An alternative is to use syntax diagrams also known as railroad diagrams. These diagrams are ofteneasier to understand for users that do not know (E)BNF.
A disadvantage of the syntax diagrams is that the diagrams have to be created. For a full languagethe number of diagrams can grow to over 50 pictures. To reduce the effort in creating them, toolshave been developed by several persons. The tools vary in required program environment,accepted input, and quality of the output.
We are very fond of the CTAN rail package. It is written in TeX, and uses a C program to parse itsinput. We used it for all our languages. It is very good for creating diagrams in PDF documents, butmuch less useful in an Eclipse environment with online help web pages. Competitors did not seemto fit much better either, so the decision was made to make a Java program that behaves in muchthe same way as the CTAN rail package.
Files containing input for the Eclipse ESCET rail diagram generator use a .rr file extension byconvention.
4.2. ExamplesHere a number of examples are provided for those that hate reading. The input of the program issimilar to EBNF with an extra feature for repetition.
4.2.1. Diagrams and sequences
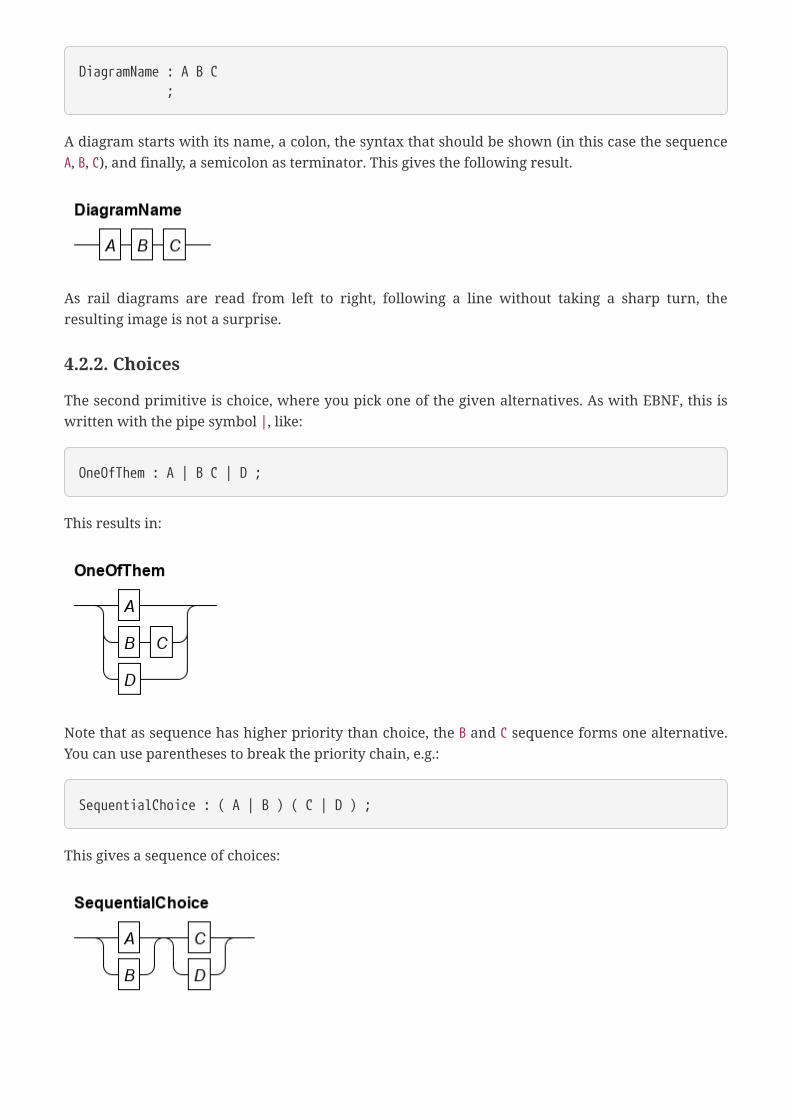
DiagramName : A B C ;
A diagram starts with its name, a colon, the syntax that should be shown (in this case the sequenceA, B, C), and finally, a semicolon as terminator. This gives the following result.
As rail diagrams are read from left to right, following a line without taking a sharp turn, theresulting image is not a surprise.
4.2.2. Choices
The second primitive is choice, where you pick one of the given alternatives. As with EBNF, this iswritten with the pipe symbol |, like:
OneOfThem : A | B C | D ;
This results in:
Note that as sequence has higher priority than choice, the B and C sequence forms one alternative.You can use parentheses to break the priority chain, e.g.:
SequentialChoice : ( A | B ) ( C | D ) ;
This gives a sequence of choices:
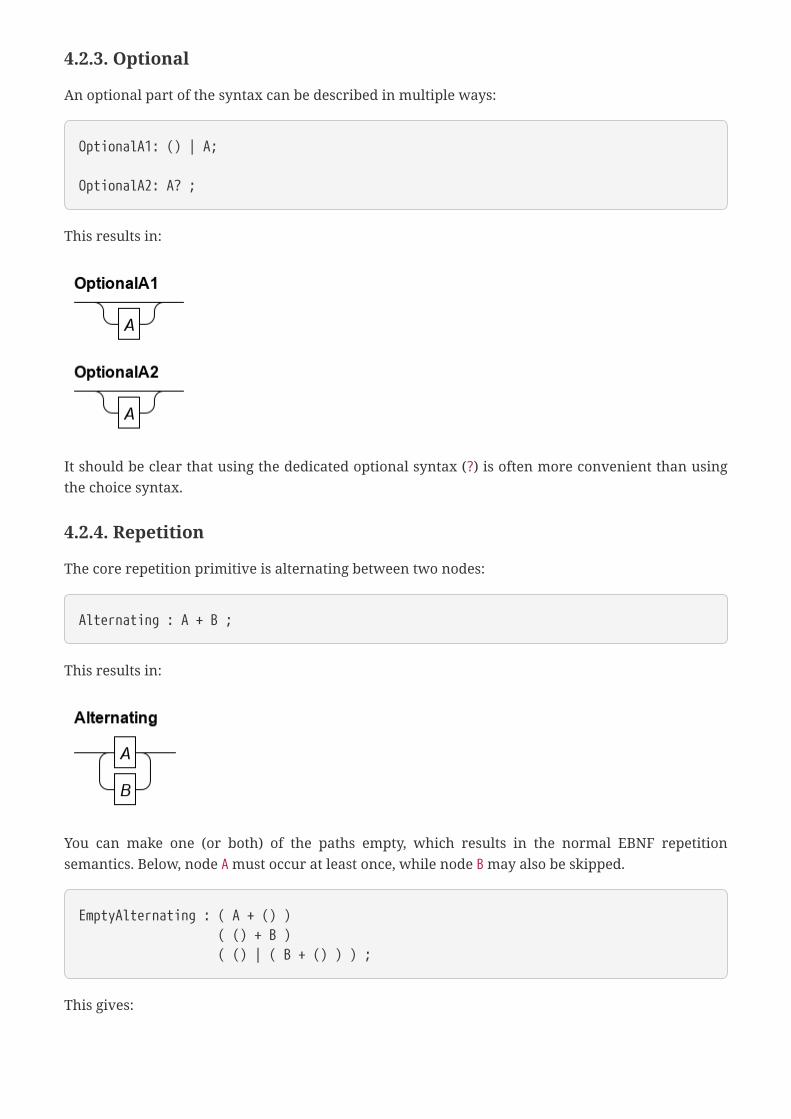
4.2.3. Optional
An optional part of the syntax can be described in multiple ways:
OptionalA1: () | A;
OptionalA2: A? ;
This results in:
It should be clear that using the dedicated optional syntax (?) is often more convenient than usingthe choice syntax.
4.2.4. Repetition
The core repetition primitive is alternating between two nodes:
Alternating : A + B ;
This results in:
You can make one (or both) of the paths empty, which results in the normal EBNF repetitionsemantics. Below, node A must occur at least once, while node B may also be skipped.
EmptyAlternating : ( A + () ) ( () + B ) ( () | ( B + () ) ) ;
This gives:
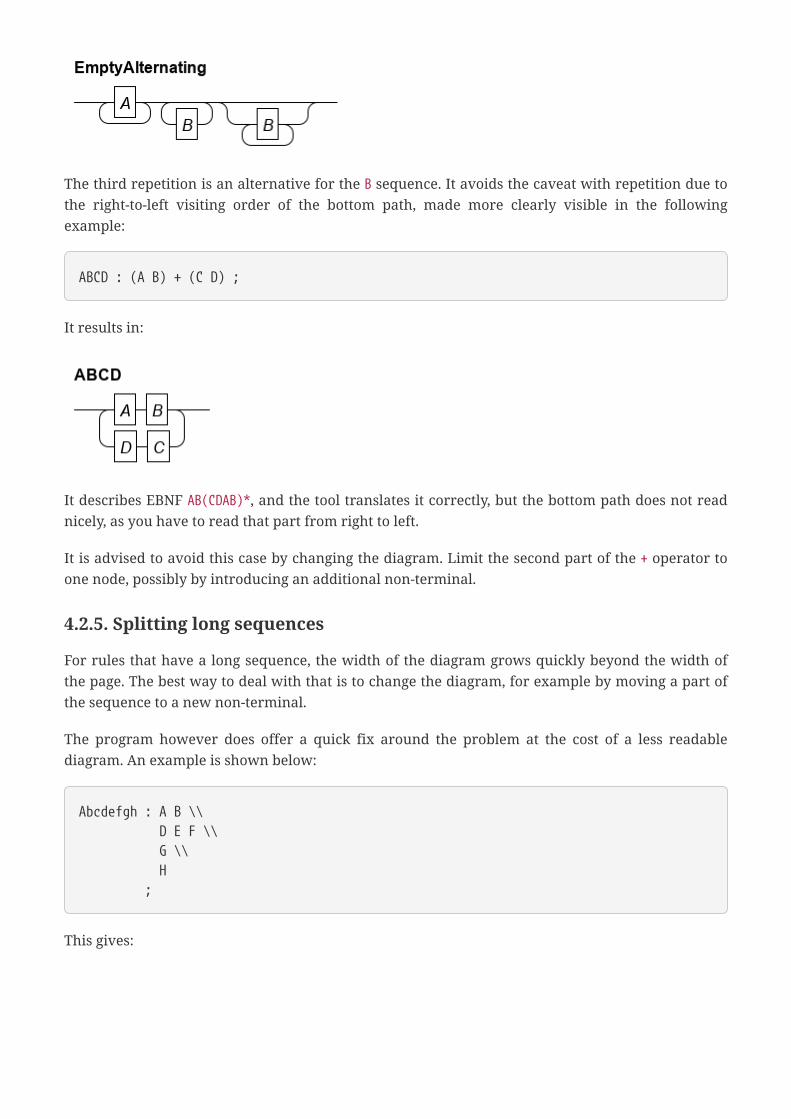
The third repetition is an alternative for the B sequence. It avoids the caveat with repetition due tothe right-to-left visiting order of the bottom path, made more clearly visible in the followingexample:
ABCD : (A B) + (C D) ;
It results in:
It describes EBNF AB(CDAB)*, and the tool translates it correctly, but the bottom path does not readnicely, as you have to read that part from right to left.
It is advised to avoid this case by changing the diagram. Limit the second part of the + operator toone node, possibly by introducing an additional non-terminal.
4.2.5. Splitting long sequences
For rules that have a long sequence, the width of the diagram grows quickly beyond the width ofthe page. The best way to deal with that is to change the diagram, for example by moving a part ofthe sequence to a new non-terminal.
The program however does offer a quick fix around the problem at the cost of a less readablediagram. An example is shown below:
Abcdefgh : A B \\ D E F \\ G \\ H ;
This gives:
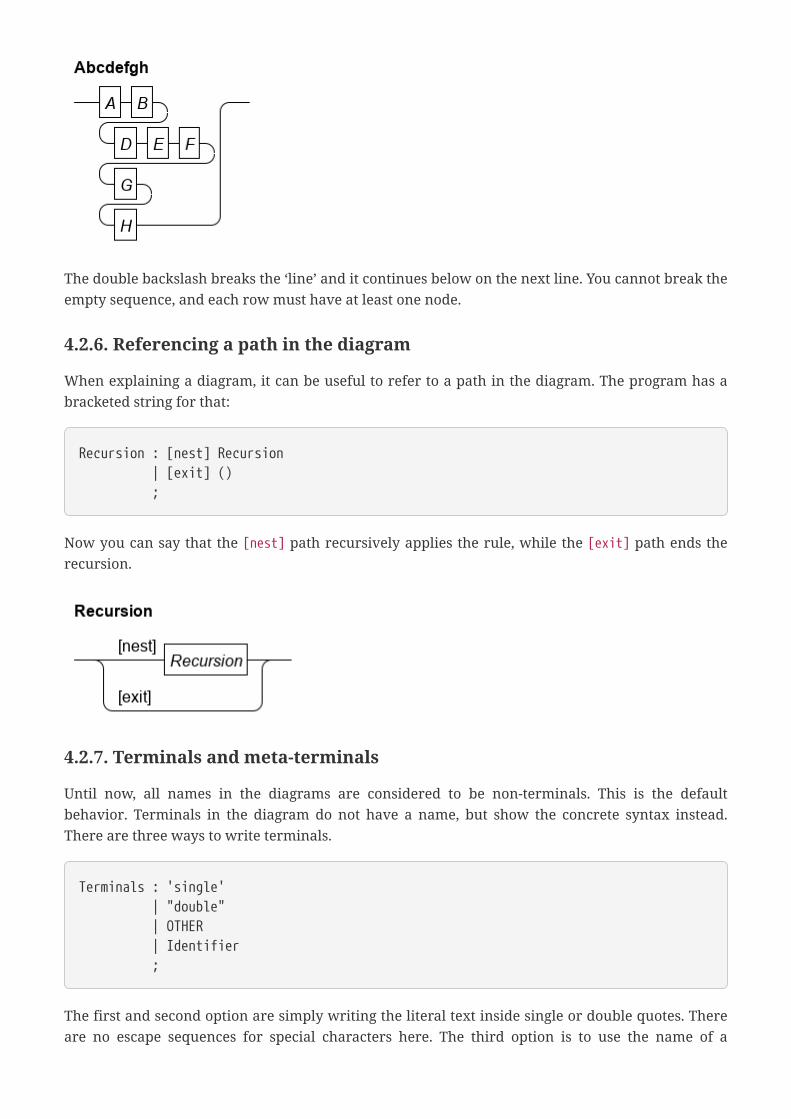
The double backslash breaks the ‘line’ and it continues below on the next line. You cannot break theempty sequence, and each row must have at least one node.
4.2.6. Referencing a path in the diagram
When explaining a diagram, it can be useful to refer to a path in the diagram. The program has abracketed string for that:
Recursion : [nest] Recursion | [exit] () ;
Now you can say that the [nest] path recursively applies the rule, while the [exit] path ends therecursion.
4.2.7. Terminals and meta-terminals
Until now, all names in the diagrams are considered to be non-terminals. This is the defaultbehavior. Terminals in the diagram do not have a name, but show the concrete syntax instead.There are three ways to write terminals.
Terminals : 'single' | "double" | OTHER | Identifier ;
The first and second option are simply writing the literal text inside single or double quotes. Thereare no escape sequences for special characters here. The third option is to use the name of a
terminal, in this case OTHER.
The Identifier alternative in the diagram is a hybrid. It represent all valid identifiers in the input.The diagram however does not state its exact syntax as with normal terminals. It is also not exactlya non-terminal. The program has a third class of tokens for these, known as meta-terminals. Itallows the designer to attach a different layout to such tokens.
The OTHER and Identifier names in the input file need a translation to displayed text. Thistranslation is specified in a properties file like:
terminal.token.OTHER: elsemeta-terminal.token.Identifier: Name
The result is shown below. By default, terminals and meta-terminals are rendered using roundedboxes. If this behavior is not desired, layout and many other settings can be overridden in theproperties file, see the Customizing output section for details.
4.3. Customizing outputThe program can take a properties file to translate terminals and non-terminals. The same file canalso contain settings to modify shape, color, fonts, and spacing of almost everything.
4.3.1. Syntax of the properties file
The properties file used by the program is a normal Java properties file. Its syntax is described inthe Java 11 API Specification.
In short:
• It is a file format that consists of lines of text.
• Empty lines are allowed and are skipped.
• Lines beginning with # or ! are considered to be comment lines and are ignored.
• Data lines contain key/value pairs.
Here, a key of a data line is a sequence of words, separated by a dot, for example,
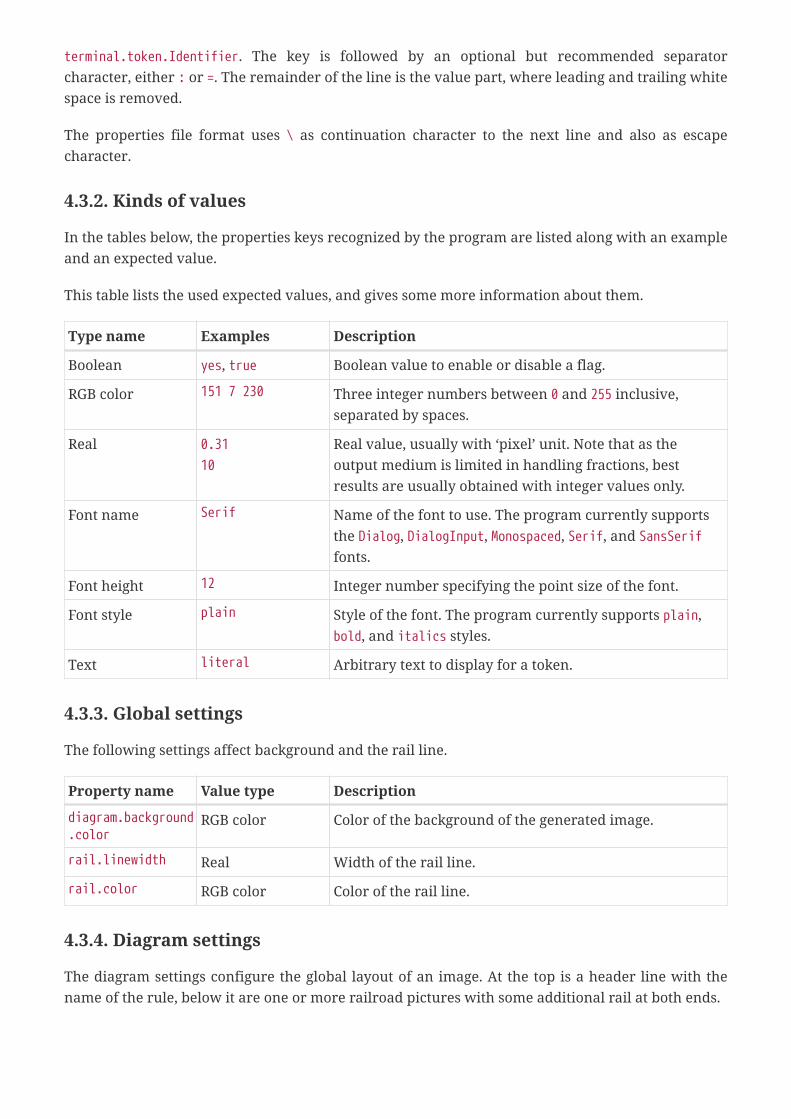
terminal.token.Identifier. The key is followed by an optional but recommended separatorcharacter, either : or =. The remainder of the line is the value part, where leading and trailing whitespace is removed.
The properties file format uses \ as continuation character to the next line and also as escapecharacter.
4.3.2. Kinds of values
In the tables below, the properties keys recognized by the program are listed along with an exampleand an expected value.
This table lists the used expected values, and gives some more information about them.
Type name Examples Description
Boolean yes, true Boolean value to enable or disable a flag.
RGB color 151 7 230 Three integer numbers between 0 and 255 inclusive,separated by spaces.
Real 0.3110
Real value, usually with ‘pixel’ unit. Note that as theoutput medium is limited in handling fractions, bestresults are usually obtained with integer values only.
Font name Serif Name of the font to use. The program currently supportsthe Dialog, DialogInput, Monospaced, Serif, and SansSeriffonts.
Font height 12 Integer number specifying the point size of the font.
Font style plain Style of the font. The program currently supports plain,bold, and italics styles.
Text literal Arbitrary text to display for a token.
4.3.3. Global settings
The following settings affect background and the rail line.
Property name Value type Description
diagram.background.color
RGB color Color of the background of the generated image.
rail.linewidth Real Width of the rail line.
rail.color RGB color Color of the rail line.
4.3.4. Diagram settings
The diagram settings configure the global layout of an image. At the top is a header line with thename of the rule, below it are one or more railroad pictures with some additional rail at both ends.
Property name Value type Description
rule.padding.top Real Amount of space above the header line.
rule.padding.left Real Amount of space left of the header line.
rule.padding.bottom Real Amount of space between the last railroadpicture and the bottom of the diagram.
rule.padding.right Real Minimum amount of space right of the headerline.
rule.diagram.padding.top Real Amount of space above each railroad picture.
rule.diagram.padding.left Real Amount of space left of each railroad picture.
rule.diagram.lead.width Real Horizontal length of the rail line before therailroad picture.
rule.diagram.trail.width Real Horizontal length of the rail line after therailroad picture.
diagram-header.text.color RGB color Color of the diagram header text.
diagram-header.text.font Font name Font of the diagram header text.
diagram-header.text.font.size Font height Font size in points of the diagram header text.
diagram-header.text.font.style Font style Style of the diagram header text.
4.3.5. Empty node
Each kind of node has a number of settings as well, starting with the simplest node, ().
Property name Value type Description
empty.width Real Horizontal length of the empty node.
4.3.6. Branch label
The bracketed string [refname] node configuration settings are listed below.
Property name Value type Description
branch-label.padding.left Real Amount of space at the left of the label text.
branch-label.padding.right Real Amount of space at the right of the label text.
branch-label.padding.top Real Amount of space above the label text.
branch-label.padding.bottom Real Amount of space between the label text and therail line.
branch-label.min-width Real Minimum horizontal length of the label node.
branch-label.text.color RGB color Color of the label text.
branch-label.text.font Font name Font used for the label text.
branch-label.text.font.size Font height Font size in pt of the label text.
Property name Value type Description
branch-label.text.font.style Font style Font style of the label text.
4.3.7. Name node
A name node is a string of text within a box. The text is often a single name, and the box may haverounded corners. At the left and right of the box, a rail line is connected.
First the configuration of the rail lines, followed by the configuration settings of the box and thetext.
Property name Value type Description
name.rail.entry.width Real Horizontal length of the rail line at the left of thebox.
name.rail.exit.width Real Horizontal length of the rail line at the right ofthe box.
There are three configurations for name and box. One for terminals, one for meta-terminals, andone for non-terminals. The structure of the settings is the same for all three, their default values area little different, in particular in choices of corner radius and font.
Terminal text and box properties
Property name Value type Description
terminal.name.padding.horizontal
Real Amount of horizontal space between the textand the box around the text.
terminal.name.padding.vertical Real Amount of vertical space between the text andthe box around the text.
terminal.corner.radius Real Radius of the corners of the box. 0 means arectangular box.
terminal.box.color RGB color Color of the line of the box.
terminal.box.linewidth Real Width of the line of the box.
terminal.text.color RGB color Color of the terminal text.
terminal.text.font Font name Font used for the terminal text.
terminal.text.font.size Font height Height of the terminal text.
terminal.text.font.style Font style Style of the terminal text.
Meta-terminal text and box properties
Property name Value type Description
meta-terminal.name.padding.horizontal
Real Amount of horizontal space between the textand the box around the text.
Property name Value type Description
meta-terminal.name.padding.vertical
Real Amount of vertical space between the text andthe box around the text.
meta-terminal.corner.radius Real Radius of the corners of the box. 0 means arectangular box.
meta-terminal.box.color RGB color Color of the line of the box.
meta-terminal.box.linewidth Real Width of the line of the box.
meta-terminal.text.color RGB color Color of the meta-terminal text.
meta-terminal.text.font Font name Font used for the meta-terminal text.
meta-terminal.text.font.size Font height Height of the meta-terminal text.
meta-terminal.text.font.style Font style Style of the meta-terminal text.
Non-terminal text and box properties
Property name Value type Description
nonterminal.name.padding.horizontal
Real Amount of horizontal space between the textand the box around the text.
nonterminal.name.padding.vertical
Real Amount of vertical space between the text andthe box around the text.
nonterminal.corner.radius Real Radius of the corners of the box. 0 means arectangular box.
nonterminal.box.color RGB color Color of the line of the box.
nonterminal.box.linewidth Real Width of the line of the box.
nonterminal.text.color RGB color Color of the non-terminal text.
nonterminal.text.font Font name Font used for the non-terminal text.
nonterminal.text.font.size Font height Height of the non-terminal text.
nonterminal.text.font.style Font style Style of the non-terminal text.
Token text translations
In the diagram input files, token names may be used, but terminals often contain other symbols.The translation between the token name and the text it should display can also be configured.
There are three groups of settings. Different settings within a group only differ in the name of thetoken that they translate. Such a name is listed here as <token-name>.
Property name Value type Description
terminal.token.<token-name>
Text The literal text to display in the diagram for terminaltoken <token-name>.
Property name Value type Description
meta-terminal.<token-name> Text The literal text to display in the diagram for meta-terminal token <token-name>.
nonterminal.token.<token-name>
Text The literal text to display in the diagram for non-terminal token <token-name>.
All tokens must have a different name. Both terminals and meta-terminals token lists are assumedto be complete. The non-terminal list is fully optional, and the default choice if a token name cannotbe found. All missing entries use the token name as their text.
Note that the property file reader applies some interpretation to the text as well so what you enterin the file may not be what you get. Please check the property file syntax section for details.
4.3.8. Sequence
A sequence connects one or more child diagram nodes in one or more rows such that they are allvisited in sequential order.
Its configuration settings cover the elements around the child nodes.
Property name Value type Description
sequence.padding.first-row.prefix
Real Amount of space before the first child at the firstrow.
sequence.padding.other-row.prefix
Real Amount of space left of the left connectingvertical line to a next row.
sequence.padding.row.suffix Real If there is more than one row, the minimalamount of space between the right vertical lineconnecting a next row, and the vertical line upto the exit.
sequence.padding.interrow Real Minimal amount of space between the bottom ofa row, and the connecting horizontal line to thenext row beneath it. Also, the minimal amountof space between the same horizontal line andthe top of the next row.
sequence.arc-radius Real Radius of the arcs connecting horizontal lineswith vertical lines.
4.3.9. Choice
The choice node expresses a choice between one of the child diagram nodes.
Its configurable properties are:
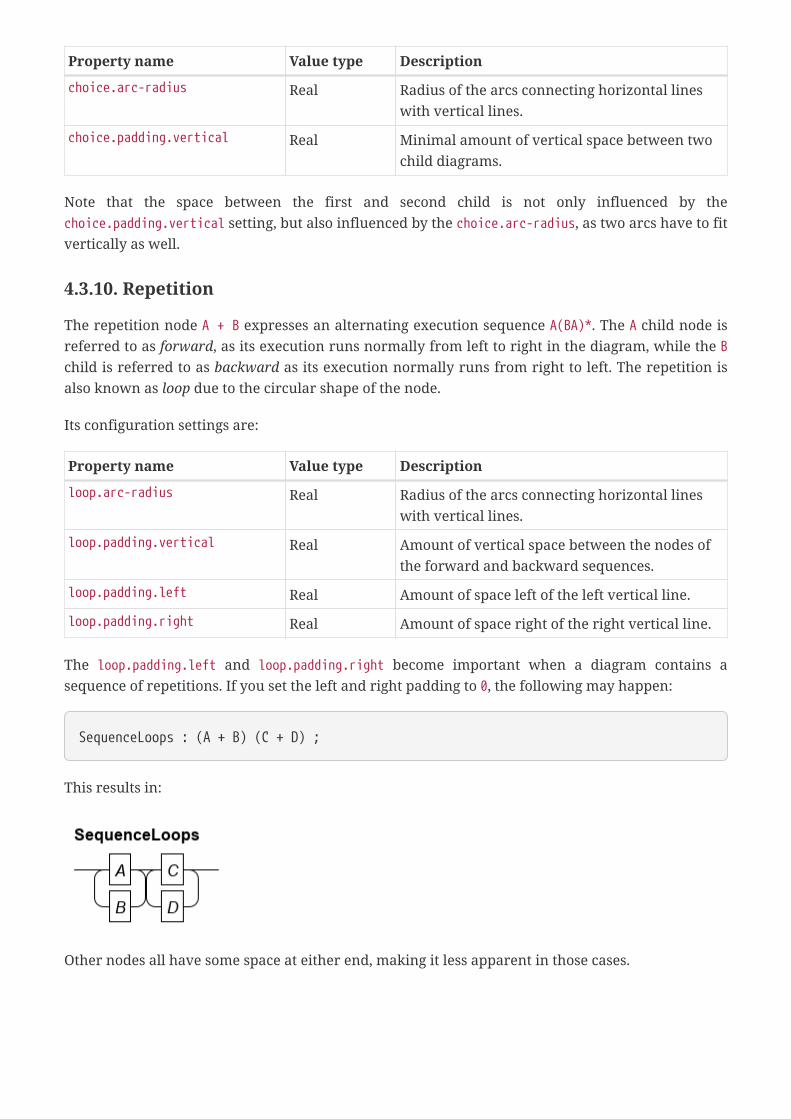
Property name Value type Description
choice.arc-radius Real Radius of the arcs connecting horizontal lineswith vertical lines.
choice.padding.vertical Real Minimal amount of vertical space between twochild diagrams.
Note that the space between the first and second child is not only influenced by thechoice.padding.vertical setting, but also influenced by the choice.arc-radius, as two arcs have to fitvertically as well.
4.3.10. Repetition
The repetition node A + B expresses an alternating execution sequence A(BA)*. The A child node isreferred to as forward, as its execution runs normally from left to right in the diagram, while the Bchild is referred to as backward as its execution normally runs from right to left. The repetition isalso known as loop due to the circular shape of the node.
Its configuration settings are:
Property name Value type Description
loop.arc-radius Real Radius of the arcs connecting horizontal lineswith vertical lines.
loop.padding.vertical Real Amount of vertical space between the nodes ofthe forward and backward sequences.
loop.padding.left Real Amount of space left of the left vertical line.
loop.padding.right Real Amount of space right of the right vertical line.
The loop.padding.left and loop.padding.right become important when a diagram contains asequence of repetitions. If you set the left and right padding to 0, the following may happen:
SequenceLoops : (A + B) (C + D) ;
This results in:
Other nodes all have some space at either end, making it less apparent in those cases.

4.3.11. Debugging
A diagram is actually a tree of simpler diagrams where at each node in the tree a set of positionequations is solved for positioning all elements in its sub-tree. This happens in two sweeps throughthe tree. First a bottom-up computation of size and relative position of elements in their sub-tree isperformed. In the second top-down sweep assignment of horizontal and vertical absolute offsets toall nodes is performed, giving all elements their final absolute position in the diagram. Output isproduced by a walk over all nodes in the tree, and copying the elements with their absolutepositions to the output.
There are several flags for generating detailed output of the above process to support debugging atseveral points in the computations.
Hierarchy
To view the tree hierarchy in the diagram, the debug.structure flag can be used.
Property name Value type Description
debug.structure Boolean Dump internal structure of the diagram.
Constraint solving
Positions are computed by solving two sets of constraint equations at each node in the tree, one forhorizontal positioning, and one for vertical positioning. The debug.equations flag shows thevariables and equations, the debug.solver shows the solving process. Due to the large number ofvariables and equations in a typical diagram, enabling these settings produces a lot of detaileddebug output.
Property name Value type Description
debug.equations Boolean Dump positioning equations for the graphicalelements.
debug.solver Boolean Dump reasoning and deciding edge positionvalues for the graphical elements.
Coordinates
To debug problems in produced output, the following flags are useful. The debug.rel_coordinatesflag shows position information at each level of the tree separately, this is mostly useful to findproblems at a single level of a diagram. The debug.abs_coordinates flag shows the same positioninformation, except all coordinates use the same top-left origin, enabling verification of positionsbetween different levels in the hierarchy.
Property name Value type Description
debug.rel_coordinates Boolean Dump coordinates of the graphical elements andchild node positions within each element.
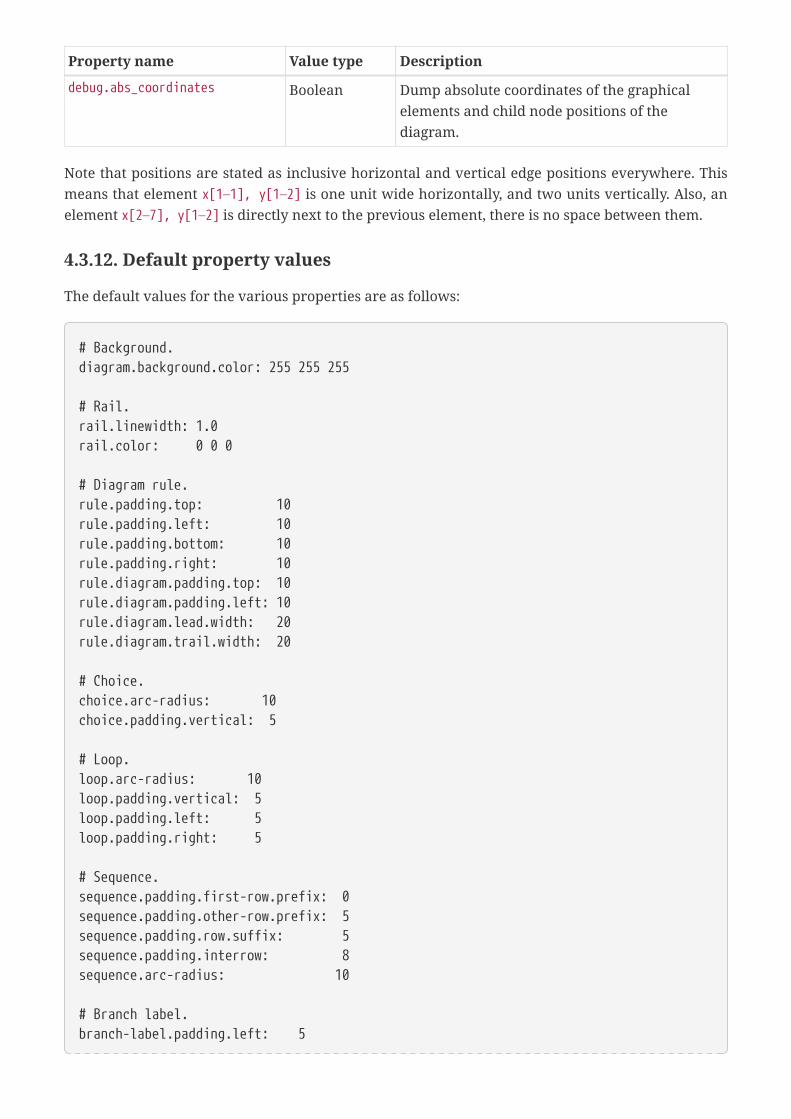
Property name Value type Description
debug.abs_coordinates Boolean Dump absolute coordinates of the graphicalelements and child node positions of thediagram.
Note that positions are stated as inclusive horizontal and vertical edge positions everywhere. Thismeans that element x[1—1], y[1—2] is one unit wide horizontally, and two units vertically. Also, anelement x[2—7], y[1—2] is directly next to the previous element, there is no space between them.
4.3.12. Default property values
The default values for the various properties are as follows:
# Background.diagram.background.color: 255 255 255
# Rail.rail.linewidth: 1.0rail.color: 0 0 0
# Diagram rule.rule.padding.top: 10rule.padding.left: 10rule.padding.bottom: 10rule.padding.right: 10rule.diagram.padding.top: 10rule.diagram.padding.left: 10rule.diagram.lead.width: 20rule.diagram.trail.width: 20
# Choice.choice.arc-radius: 10choice.padding.vertical: 5
# Loop.loop.arc-radius: 10loop.padding.vertical: 5loop.padding.left: 5loop.padding.right: 5
# Sequence.sequence.padding.first-row.prefix: 0sequence.padding.other-row.prefix: 5sequence.padding.row.suffix: 5sequence.padding.interrow: 8sequence.arc-radius: 10
# Branch label.branch-label.padding.left: 5
branch-label.padding.right: 5branch-label.padding.top: 5branch-label.padding.bottom: 5branch-label.min-width: 5branch-label.text.color: 0 0 0branch-label.text.font: SansSerifbranch-label.text.font.size: 16branch-label.text.font.style: plain
# Empty node.empty.width: 10
# Name node, width of the entry and exit connections.name.rail.entry.width: 5name.rail.exit.width: 5
# Header font and text.diagram-header.text.color: 0 0 0diagram-header.text.font: SansSerifdiagram-header.text.font.size: 16diagram-header.text.font.style: bold
# 'terminal' name properties.terminal.name.padding.horizontal: 5terminal.name.padding.vertical: 5terminal.corner.radius: 12terminal.box.color: 0 0 0terminal.box.linewidth: 1.0terminal.text.color: 0 0 0terminal.text.font: Monospacedterminal.text.font.size: 18terminal.text.font.style: plain
# 'meta-terminal' name properties.meta-terminal.name.padding.horizontal: 5meta-terminal.name.padding.vertical: 5meta-terminal.corner.radius: 12meta-terminal.box.color: 0 0 0meta-terminal.box.linewidth: 1.0meta-terminal.text.color: 0 0 0meta-terminal.text.font: SansSerifmeta-terminal.text.font.size: 16meta-terminal.text.font.style: plain
# 'nonterminal' name properties.nonterminal.name.padding.horizontal: 5nonterminal.name.padding.vertical: 5nonterminal.corner.radius: 0nonterminal.box.color: 0 0 0nonterminal.box.linewidth: 1.0nonterminal.text.color: 0 0 0
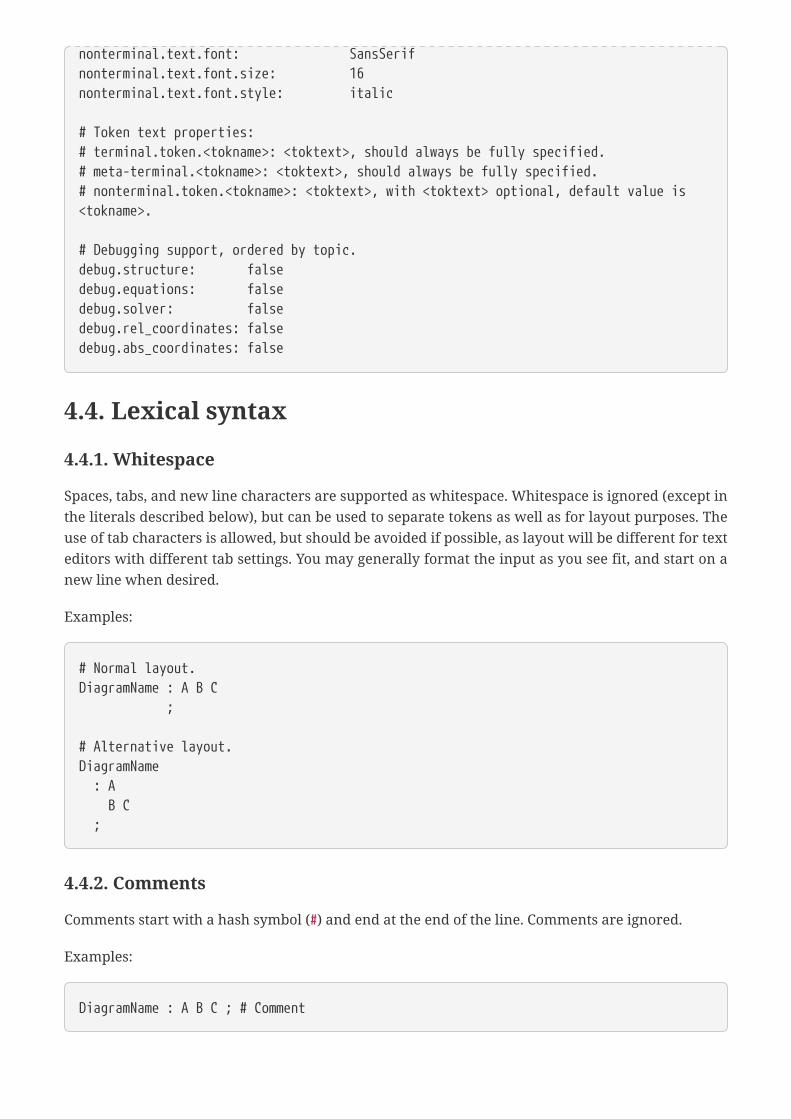
nonterminal.text.font: SansSerifnonterminal.text.font.size: 16nonterminal.text.font.style: italic
# Token text properties:# terminal.token.<tokname>: <toktext>, should always be fully specified.# meta-terminal.<tokname>: <toktext>, should always be fully specified.# nonterminal.token.<tokname>: <toktext>, with <toktext> optional, default value is<tokname>.
# Debugging support, ordered by topic.debug.structure: falsedebug.equations: falsedebug.solver: falsedebug.rel_coordinates: falsedebug.abs_coordinates: false
4.4. Lexical syntax
4.4.1. Whitespace
Spaces, tabs, and new line characters are supported as whitespace. Whitespace is ignored (except inthe literals described below), but can be used to separate tokens as well as for layout purposes. Theuse of tab characters is allowed, but should be avoided if possible, as layout will be different for texteditors with different tab settings. You may generally format the input as you see fit, and start on anew line when desired.
Examples:
# Normal layout.DiagramName : A B C ;
# Alternative layout.DiagramName : A B C ;
4.4.2. Comments
Comments start with a hash symbol (#) and end at the end of the line. Comments are ignored.
Examples:
DiagramName : A B C ; # Comment

4.4.3. Terminals
The following terminals are defined:
Identifier
An identifier. Defined by the regular expression: [\-A-Za-z0-9_]+. They thus consist of dashes (-),letters, digits and underscores (_).
Examples:
ExpressionABC_DEFABC-DEF
BracketedString
A bracketed string. Defined by the regular expression: \[([^\\\]\n]|\\[\\\]])*\]. They are thusenclosed in square brackets ([ and ]). They must be on a single line and must thus not includenew line characters (\n, Unicode U+0A). To include a closing bracket (]), it must be escaped as \].Since a backslash (\) serves as escape character, to include a backslash it must be escaped as \\.
Examples:
[literal][line-break][abc\]def][abc\\def]
SingleQuotedString
A single-quoted string literal. Defined by the regular expression: '([^\\'\n]|\\[\\'])*\'. Theseliterals are enclosed in single quotes ('). They must be on a single line and must thus not includenew line characters (\n, Unicode U+0A). To include a single quote (') in a string literal, it must beescaped as \'. Since a backslash (\) serves as escape character, to include a backslash in a stringliteral it must be escaped as \\.
Examples:
'hello world''abc\'def''abc\\def'
DoubleQuotedString
A double-quoted string literal. Defined by the regular expression: \"([^\\\"\n]|\\[\\\"])*\".These literals are enclosed in double quotes ("). They must be on a single line and must thus notinclude new line characters (\n, Unicode U+0A). To include a double quote (") in a string literal, itmust be escaped as \". Since a backslash (\) serves as escape character, to include a backslash ina string literal it must be escaped as \\.
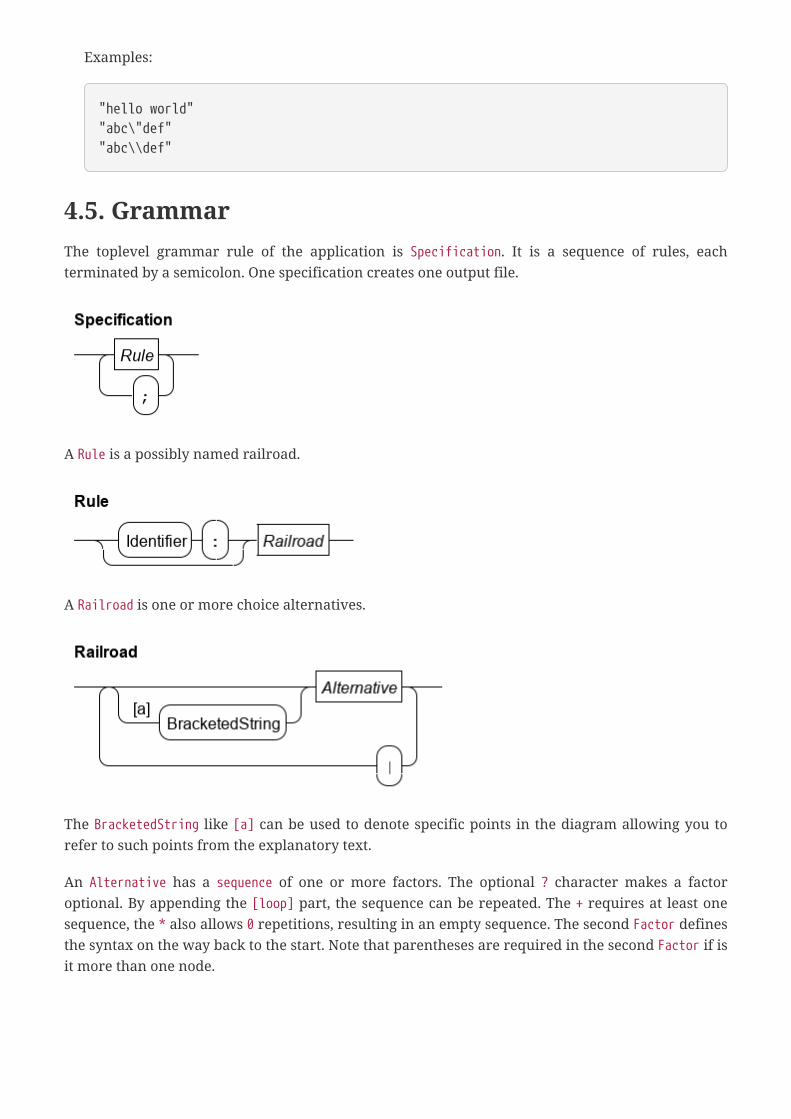
Examples:
"hello world""abc\"def""abc\\def"
4.5. GrammarThe toplevel grammar rule of the application is Specification. It is a sequence of rules, eachterminated by a semicolon. One specification creates one output file.
A Rule is a possibly named railroad.
A Railroad is one or more choice alternatives.
The BracketedString like [a] can be used to denote specific points in the diagram allowing you torefer to such points from the explanatory text.
An Alternative has a sequence of one or more factors. The optional ? character makes a factoroptional. By appending the [loop] part, the sequence can be repeated. The + requires at least onesequence, the * also allows 0 repetitions, resulting in an empty sequence. The second Factor definesthe syntax on the way back to the start. Note that parentheses are required in the second Factor if isit more than one node.
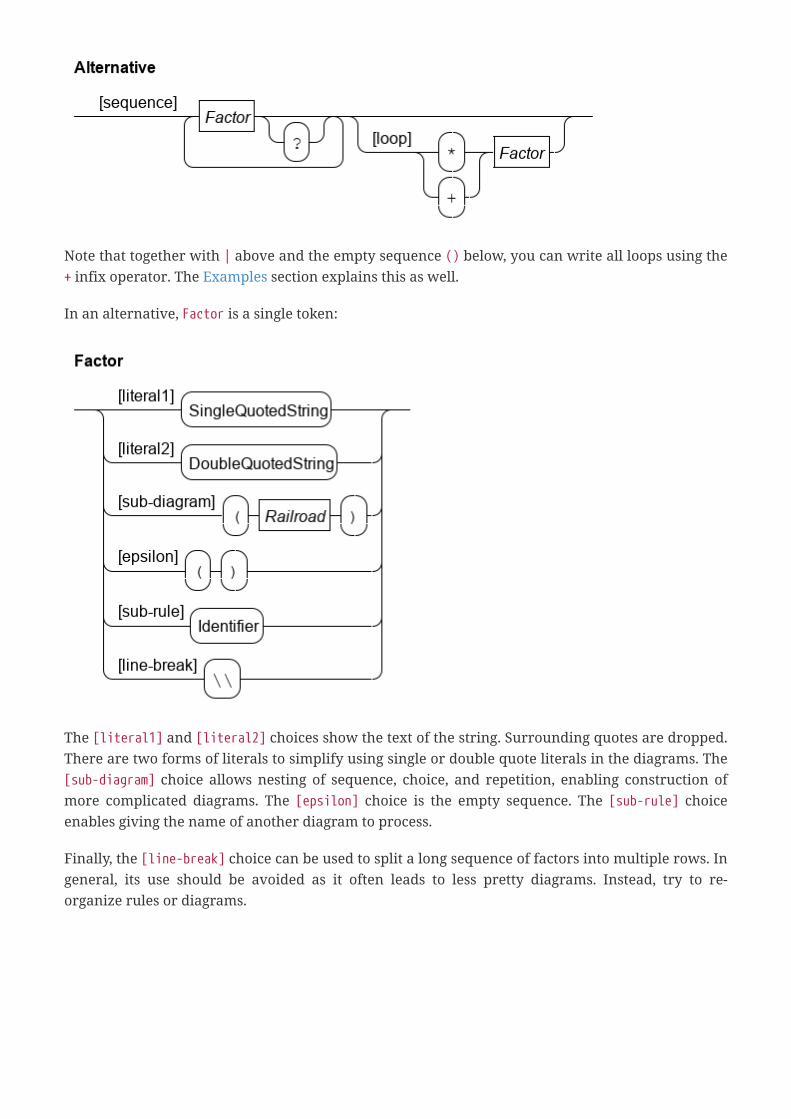
Note that together with | above and the empty sequence () below, you can write all loops using the+ infix operator. The Examples section explains this as well.
In an alternative, Factor is a single token:
The [literal1] and [literal2] choices show the text of the string. Surrounding quotes are dropped.There are two forms of literals to simplify using single or double quote literals in the diagrams. The[sub-diagram] choice allows nesting of sequence, choice, and repetition, enabling construction ofmore complicated diagrams. The [epsilon] choice is the empty sequence. The [sub-rule] choiceenables giving the name of another diagram to process.
Finally, the [line-break] choice can be used to split a long sequence of factors into multiple rows. Ingeneral, its use should be avoided as it often leads to less pretty diagrams. Instead, try to re-organize rules or diagrams.
5. SeText scanner/parser generatorSeText is a textual syntax specification language and associated scanner/parser generator. It can beused to specify the syntax of a language, and automatically generate a scanner and LALR(1)parser(s).
For the purpose of this documentation, it is assumed that the reader:
• Is familiar with scanner/parser generators (for example yacc/bison and lex/flex).
• Is familiar with scanner and LALR(1) parser technology, including regular expressions and BNFnotation.
• Understands the limitations of the LALR(1) algorithm.
The following topics explain the SeText language and tools in more detail:
• SeText lexical syntax
• Specifying lexical syntax using SeText
• Regular expressions
• Terminal descriptions
• Imports
• Scanner hooks
• Specifying grammars using SeText
• Parser hooks
• Usage hints
• Generated scanners/parsers
• Using SeText in an Eclipse Plug-in Project
• Limitations
5.1. SeText lexical syntaxSeText supports the following comments:
• Everything after // until the end of the line is a comment.
• Everything from /* up to the next */, possibly spanning multiple lines, is a comment.
SeText keywords may be used by escaping them with a $ character.
Whitespace (spaces, tabs, and new lines) are essentially ignored.
5.2. Specifying lexical syntax using SeTextTerminals can be specified as follows:
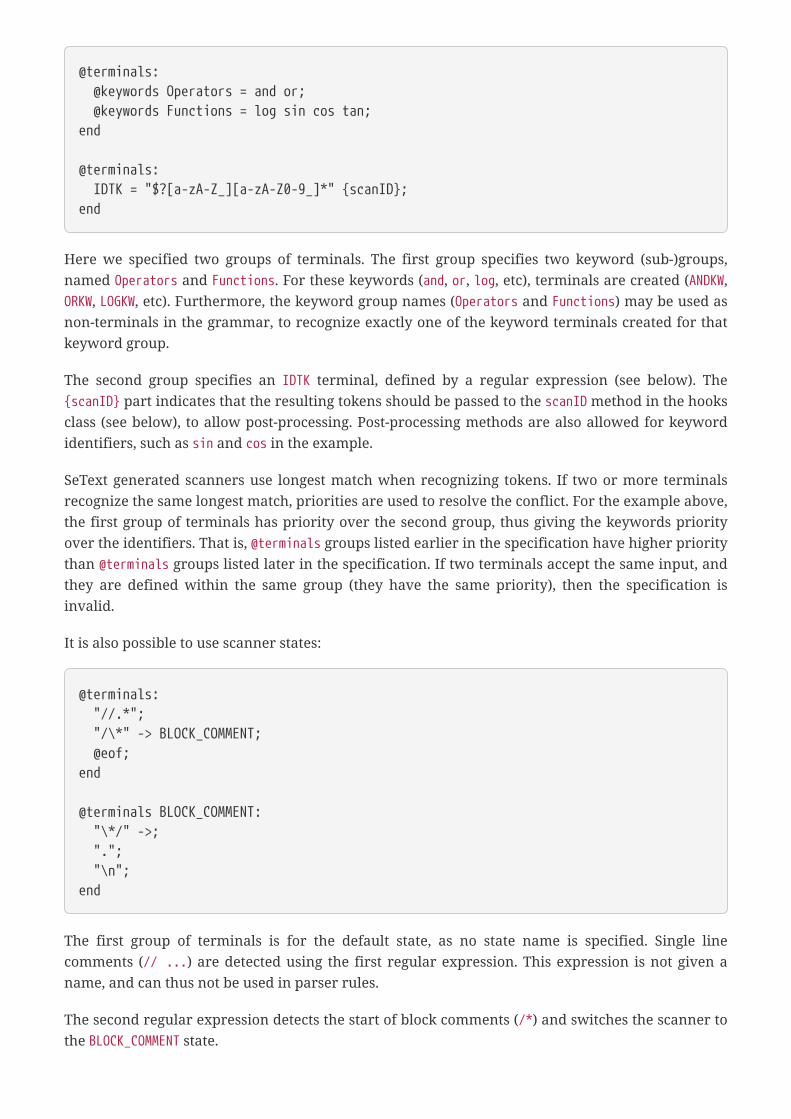
@terminals: @keywords Operators = and or; @keywords Functions = log sin cos tan;end
@terminals: IDTK = "$?[a-zA-Z_][a-zA-Z0-9_]*" {scanID};end
Here we specified two groups of terminals. The first group specifies two keyword (sub-)groups,named Operators and Functions. For these keywords (and, or, log, etc), terminals are created (ANDKW,ORKW, LOGKW, etc). Furthermore, the keyword group names (Operators and Functions) may be used asnon-terminals in the grammar, to recognize exactly one of the keyword terminals created for thatkeyword group.
The second group specifies an IDTK terminal, defined by a regular expression (see below). The{scanID} part indicates that the resulting tokens should be passed to the scanID method in the hooksclass (see below), to allow post-processing. Post-processing methods are also allowed for keywordidentifiers, such as sin and cos in the example.
SeText generated scanners use longest match when recognizing tokens. If two or more terminalsrecognize the same longest match, priorities are used to resolve the conflict. For the example above,the first group of terminals has priority over the second group, thus giving the keywords priorityover the identifiers. That is, @terminals groups listed earlier in the specification have higher prioritythan @terminals groups listed later in the specification. If two terminals accept the same input, andthey are defined within the same group (they have the same priority), then the specification isinvalid.
It is also possible to use scanner states:
@terminals: "//.*"; "/\*" -> BLOCK_COMMENT; @eof;end
@terminals BLOCK_COMMENT: "\*/" ->; "."; "\n";end
The first group of terminals is for the default state, as no state name is specified. Single linecomments (// ...) are detected using the first regular expression. This expression is not given aname, and can thus not be used in parser rules.
The second regular expression detects the start of block comments (/*) and switches the scanner tothe BLOCK_COMMENT state.
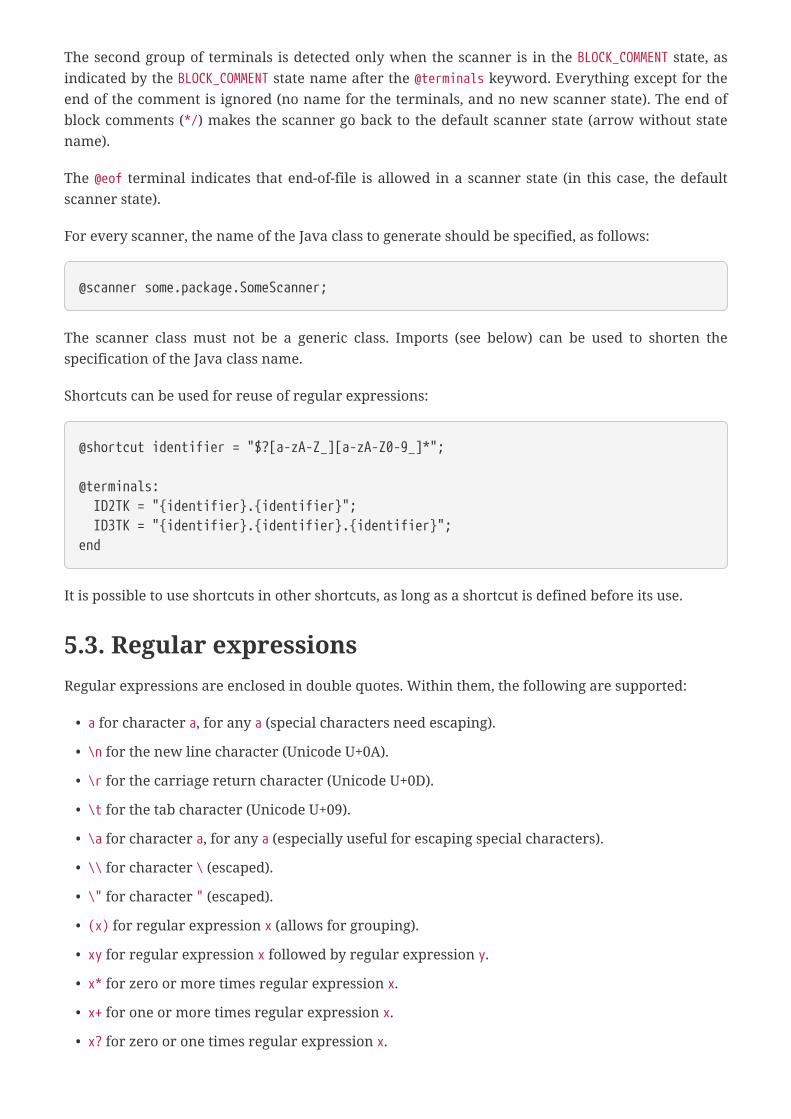
The second group of terminals is detected only when the scanner is in the BLOCK_COMMENT state, asindicated by the BLOCK_COMMENT state name after the @terminals keyword. Everything except for theend of the comment is ignored (no name for the terminals, and no new scanner state). The end ofblock comments (*/) makes the scanner go back to the default scanner state (arrow without statename).
The @eof terminal indicates that end-of-file is allowed in a scanner state (in this case, the defaultscanner state).
For every scanner, the name of the Java class to generate should be specified, as follows:
@scanner some.package.SomeScanner;
The scanner class must not be a generic class. Imports (see below) can be used to shorten thespecification of the Java class name.
Shortcuts can be used for reuse of regular expressions:
@shortcut identifier = "$?[a-zA-Z_][a-zA-Z0-9_]*";
@terminals: ID2TK = "{identifier}.{identifier}"; ID3TK = "{identifier}.{identifier}.{identifier}";end
It is possible to use shortcuts in other shortcuts, as long as a shortcut is defined before its use.
5.3. Regular expressionsRegular expressions are enclosed in double quotes. Within them, the following are supported:
• a for character a, for any a (special characters need escaping).
• \n for the new line character (Unicode U+0A).
• \r for the carriage return character (Unicode U+0D).
• \t for the tab character (Unicode U+09).
• \a for character a, for any a (especially useful for escaping special characters).
• \\ for character \ (escaped).
• \" for character " (escaped).
• (x) for regular expression x (allows for grouping).
• xy for regular expression x followed by regular expression y.
• x* for zero or more times regular expression x.
• x+ for one or more times regular expression x.
• x? for zero or one times regular expression x.
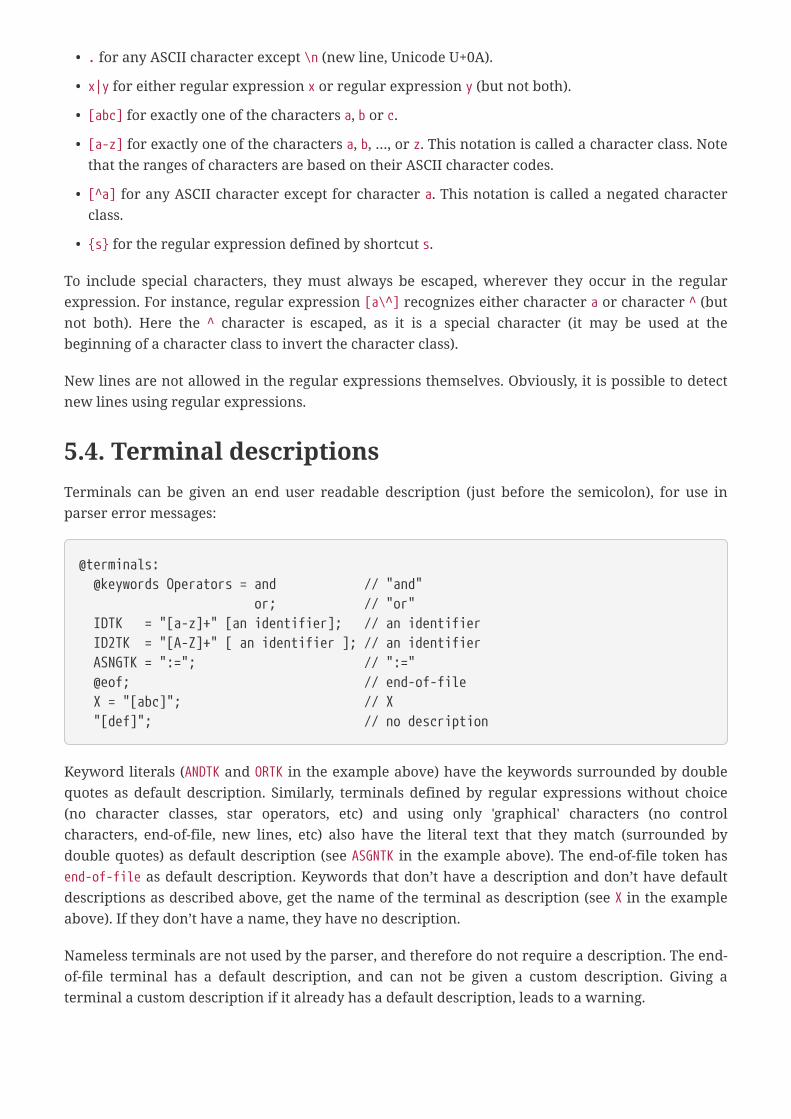
• . for any ASCII character except \n (new line, Unicode U+0A).
• x|y for either regular expression x or regular expression y (but not both).
• [abc] for exactly one of the characters a, b or c.
• [a-z] for exactly one of the characters a, b, …, or z. This notation is called a character class. Notethat the ranges of characters are based on their ASCII character codes.
• [^a] for any ASCII character except for character a. This notation is called a negated characterclass.
• {s} for the regular expression defined by shortcut s.
To include special characters, they must always be escaped, wherever they occur in the regularexpression. For instance, regular expression [a\^] recognizes either character a or character ^ (butnot both). Here the ^ character is escaped, as it is a special character (it may be used at thebeginning of a character class to invert the character class).
New lines are not allowed in the regular expressions themselves. Obviously, it is possible to detectnew lines using regular expressions.
5.4. Terminal descriptionsTerminals can be given an end user readable description (just before the semicolon), for use inparser error messages:
@terminals: @keywords Operators = and // "and" or; // "or" IDTK = "[a-z]+" [an identifier]; // an identifier ID2TK = "[A-Z]+" [ an identifier ]; // an identifier ASNGTK = ":="; // ":=" @eof; // end-of-file X = "[abc]"; // X "[def]"; // no description
Keyword literals (ANDTK and ORTK in the example above) have the keywords surrounded by doublequotes as default description. Similarly, terminals defined by regular expressions without choice(no character classes, star operators, etc) and using only 'graphical' characters (no controlcharacters, end-of-file, new lines, etc) also have the literal text that they match (surrounded bydouble quotes) as default description (see ASGNTK in the example above). The end-of-file token hasend-of-file as default description. Keywords that don’t have a description and don’t have defaultdescriptions as described above, get the name of the terminal as description (see X in the exampleabove). If they don’t have a name, they have no description.
Nameless terminals are not used by the parser, and therefore do not require a description. The end-of-file terminal has a default description, and can not be given a custom description. Giving aterminal a custom description if it already has a default description, leads to a warning.

5.5. ImportsJava classes/types can be specified in SeText specifications using their fully quantified names,optionally with generic type parameters:
java.util.Stringjava.util.Listjava.util.List<java.util.String>
but it is also possible to use imports:
@import java.util.String;@import java.util.String as string;@import java.util;@import java.util as u;
The first import imports java.util.String as String. The second imports the same type as string.The third import imports the java.util package as util. The fourth import imports that samepackage as u. After these imports, the following all refer to the java.util.String Java type/class:
java.util.Stringutil.Stringu.StringStringstring
It is also possible to import generic types, with their type parameters instantiated:
@import java.util.List<java.util.String> as stringList
allowing stringList to be used as a short form for java.util.List<java.util.String>.
Note that it is not possible to use imports to shorten other imports.
Finally, note that Java types where the first part of the identifier (the part before any dot) does notrefer to an import, are considered absolute. This means that any Java type name not containing adot, and not referring to an import, is also considered absolute, and thus refers to a class with thatname, in the default package.
5.6. Scanner hooksAs indicated above, the following SeText specification:
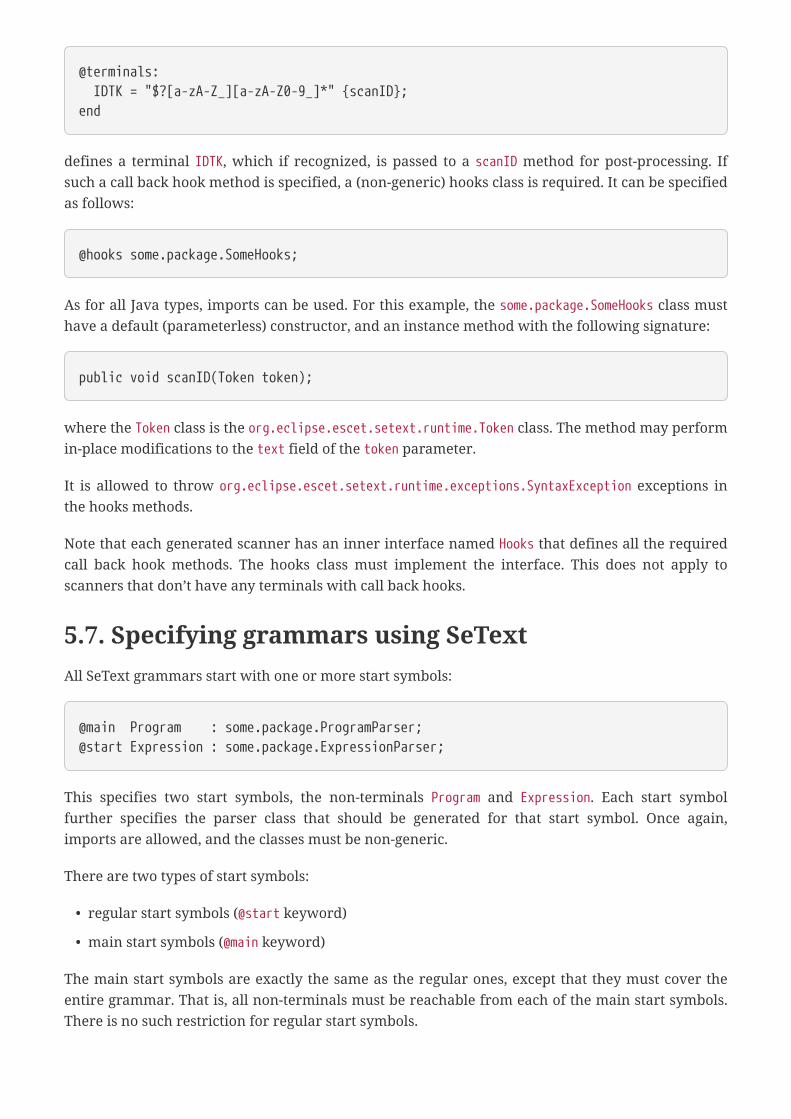
@terminals: IDTK = "$?[a-zA-Z_][a-zA-Z0-9_]*" {scanID};end
defines a terminal IDTK, which if recognized, is passed to a scanID method for post-processing. Ifsuch a call back hook method is specified, a (non-generic) hooks class is required. It can be specifiedas follows:
@hooks some.package.SomeHooks;
As for all Java types, imports can be used. For this example, the some.package.SomeHooks class musthave a default (parameterless) constructor, and an instance method with the following signature:
public void scanID(Token token);
where the Token class is the org.eclipse.escet.setext.runtime.Token class. The method may performin-place modifications to the text field of the token parameter.
It is allowed to throw org.eclipse.escet.setext.runtime.exceptions.SyntaxException exceptions inthe hooks methods.
Note that each generated scanner has an inner interface named Hooks that defines all the requiredcall back hook methods. The hooks class must implement the interface. This does not apply toscanners that don’t have any terminals with call back hooks.
5.7. Specifying grammars using SeTextAll SeText grammars start with one or more start symbols:
@main Program : some.package.ProgramParser;@start Expression : some.package.ExpressionParser;
This specifies two start symbols, the non-terminals Program and Expression. Each start symbolfurther specifies the parser class that should be generated for that start symbol. Once again,imports are allowed, and the classes must be non-generic.
There are two types of start symbols:
• regular start symbols (@start keyword)
• main start symbols (@main keyword)
The main start symbols are exactly the same as the regular ones, except that they must cover theentire grammar. That is, all non-terminals must be reachable from each of the main start symbols.There is no such restriction for regular start symbols.

The non-terminals and rules (or productions) can be specified using a BNF like syntax, as follows:
{java.util.List<some.package.SomeClass>}NonTerm : /* empty */ | NonTerm2 | NonTerm NonTerm2 | NonTerm3 @PLUSTK NonTerm3 SEMICOLTK ;
This example specifies a non-terminal named NonTerm. Once reduced, the call back hooks for thisnon-terminal must result in a Java object of type java.util.List<some.package.SomeClass>. Here,both generic types and imports are allowed.
The non-terminal is defined by four rules (or productions). The first rule is empty, as clarified bythe comment. The comment is obviously not required. The second rule consists of a single non-terminal NonTerm2, etc.
Each non-terminal rule gives rise to a call back hook method. The parameters of that method aredetermined by the symbols that make up that rule. That is, all non-terminal are always passed tothe call back hook method. Terminals are only passed to the method if they are prefixed with a @character.
5.8. Parser hooksFor parsers, a hooks class must always be specified. The scanner and all parsers share a single (non-generic) hooks class. The following specification (from which we omit the scanner part):
@hooks some.package.SomeHooks;
@import some.package.ast;
@main Expression : some.package.ExpressionParser;
{ast.Expression}Expression : /* empty */ | Expression @PLUSTK Literal | Expression MINUSTK Literal ;
{ast.Literal}Literal : @IDTK | PITK ;
requires a some.package.SomeHooks Java class, with a default (parameterless) constructor, and fivemethods, with the following signatures:
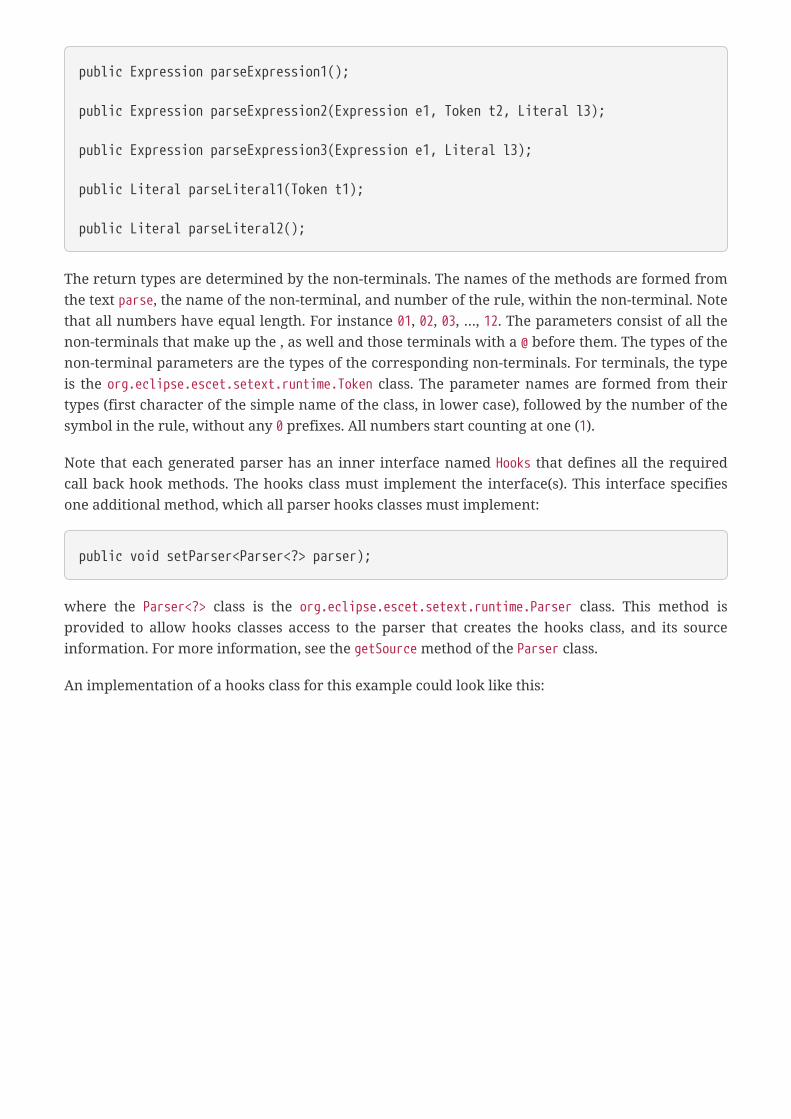
public Expression parseExpression1();
public Expression parseExpression2(Expression e1, Token t2, Literal l3);
public Expression parseExpression3(Expression e1, Literal l3);
public Literal parseLiteral1(Token t1);
public Literal parseLiteral2();
The return types are determined by the non-terminals. The names of the methods are formed fromthe text parse, the name of the non-terminal, and number of the rule, within the non-terminal. Notethat all numbers have equal length. For instance 01, 02, 03, …, 12. The parameters consist of all thenon-terminals that make up the , as well and those terminals with a @ before them. The types of thenon-terminal parameters are the types of the corresponding non-terminals. For terminals, the typeis the org.eclipse.escet.setext.runtime.Token class. The parameter names are formed from theirtypes (first character of the simple name of the class, in lower case), followed by the number of thesymbol in the rule, without any 0 prefixes. All numbers start counting at one (1).
Note that each generated parser has an inner interface named Hooks that defines all the requiredcall back hook methods. The hooks class must implement the interface(s). This interface specifiesone additional method, which all parser hooks classes must implement:
public void setParser<Parser<?> parser);
where the Parser<?> class is the org.eclipse.escet.setext.runtime.Parser class. This method isprovided to allow hooks classes access to the parser that creates the hooks class, and its sourceinformation. For more information, see the getSource method of the Parser class.
An implementation of a hooks class for this example could look like this:
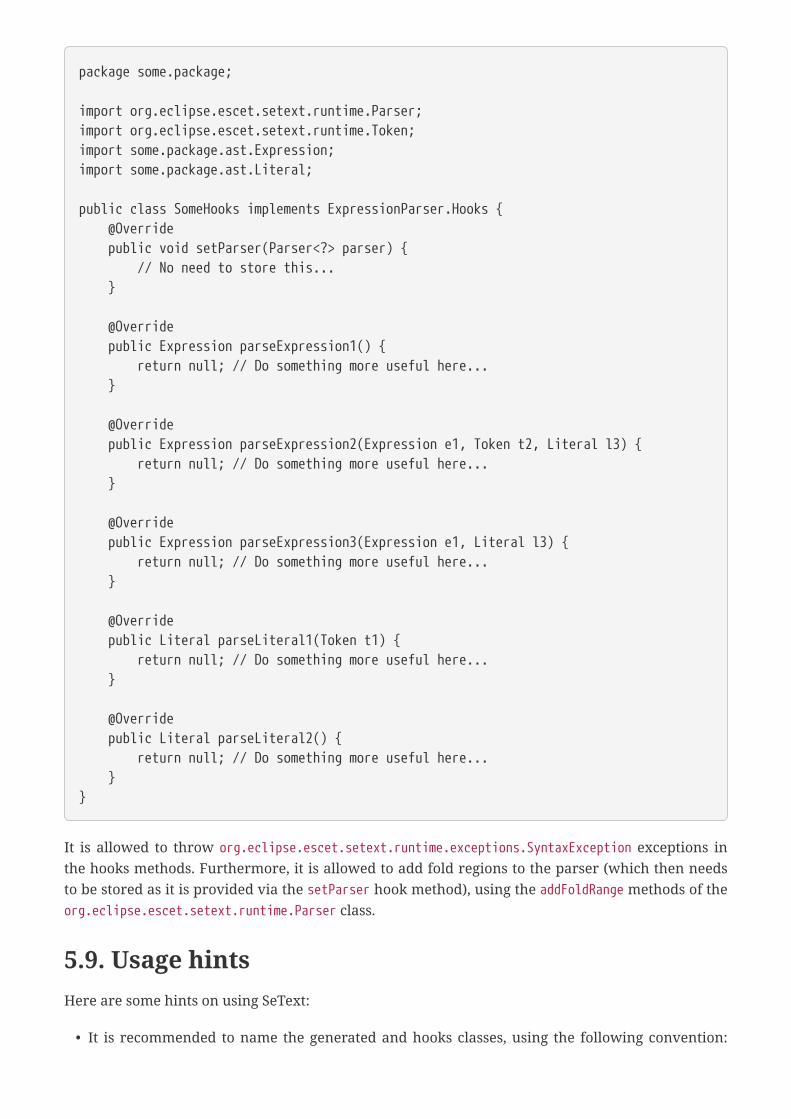
package some.package;
import org.eclipse.escet.setext.runtime.Parser;import org.eclipse.escet.setext.runtime.Token;import some.package.ast.Expression;import some.package.ast.Literal;
public class SomeHooks implements ExpressionParser.Hooks { @Override public void setParser(Parser<?> parser) { // No need to store this... }
@Override public Expression parseExpression1() { return null; // Do something more useful here... }
@Override public Expression parseExpression2(Expression e1, Token t2, Literal l3) { return null; // Do something more useful here... }
@Override public Expression parseExpression3(Expression e1, Literal l3) { return null; // Do something more useful here... }
@Override public Literal parseLiteral1(Token t1) { return null; // Do something more useful here... }
@Override public Literal parseLiteral2() { return null; // Do something more useful here... }}
It is allowed to throw org.eclipse.escet.setext.runtime.exceptions.SyntaxException exceptions inthe hooks methods. Furthermore, it is allowed to add fold regions to the parser (which then needsto be stored as it is provided via the setParser hook method), using the addFoldRange methods of theorg.eclipse.escet.setext.runtime.Parser class.
5.9. Usage hintsHere are some hints on using SeText:
• It is recommended to name the generated and hooks classes, using the following convention:
XyzScanner, XyzParser, XyzHooks, for the scanner, parser, and hooks classes of a language Xyz orXYZ. For parsers for a part of a language, it is recommended to name the generated parsersXyzPartParser, for non-terminal Part of language Xyz or XYZ. Following these namingconventions ensures consistency in the naming of the classes.
• It is recommended to import the packages that contain the classes used as the types of the non-terminals. For instance, import the expressions package some.long.package.name.expressions asexpressions or exprs, and then use {exprs.SomeClass} as the type for a non-terminal, instead of{some.long.package.name.expressions.SomeClass}. Importing the package instead of theindividual classes reduces the number of imports, and also avoids conflicts between non-terminals names and class names. For standard Java types, however, it is recommended toimport the full type. For instance, import java.lang.String or java.util.List.
5.10. Generated scanners/parsersThe generated scanners and parsers depend on the org.eclipse.escet.setext.runtime andorg.eclipse.escet.common.java plug-ins. Generated scanners and parsers inherit from theorg.eclipse.escet.setext.runtime.Scanner class and org.eclipse.escet.setext.runtime.Parser classrespectively. Look at those classes for the public API of generated scanners/parsers, as it should befairly self-explanatory.
Besides the scanner and parser(s), debug output is generated from which the scanner and parser(s)can be analyzed. In particular, the debug output for the parsers makes it possible to find out thedetails about conflicts in the grammar. Furthermore, a skeleton is generated for the hooks class.
5.11. Using SeText in an Eclipse Plug-in ProjectFor a new language, follow these steps:
• Create a Plug-in Project in Eclipse.
• Add the org.eclipse.escet.common.java and org.eclipse.escet.setext.runtime plug-ins to theRequired plug-ins in the project’s manifest. Also add any plug-ins that define the classes that youwill be referring to in the SeText specification.
• Create the Java package where your scanner, parser(s) and hooks classes are to be stored.
• Create a text file ending with .setext in that same package. Fill the specification, and save it.
• Right click the file in the Project Explorer or Package Explorer, and choose the GenerateParser(s) action. Alternatively, right click the text editor for the SeText specification and choosethe same action.
• Observe how the files are generated. Make sure the console is free of warnings and errors.
• Copy the hooks class skeleton (extension .skeleton to extension .java), and implement thehooks.
• You are ready to use the scanner and parser(s).
After changes to the SeText specification:
• Regenerate the code, as before.
• If a Hooks interface has changed, update the hooks class.
• You are ready to use the modified scanner and parser(s).
It may be a good idea to put the .skeleton file in a version control system. That way, afterregeneration, you can ask for a diff. You then know what has changed, and how you need to updatethe hooks class.
Also note that if a generated Hooks interface changes after a regeneration, Java will report errors formethods not yet present in the hook class. Similarly, Java will complain about changed methodsignatures, and methods that no longer exist in the Hooks interface (and thus have invalid @Overrideannotations in the hooks class).
5.12. LimitationsThe following limitations currently apply:
• SeText only allows for the specification of scanners that accept ASCII input.
• SeText currently assumes UTF-8 encoded files. If the input file is actually encoded using adifferent encoding, scanner exceptions may indicate the wrong character.
• SeText does not support grammars with conflicts (shift/reduce, reduce/reduce, accept/reduce).

6. LegalThe material in this documentation is Copyright (c) 2010, 2021 Contributors to the EclipseFoundation.
Eclipse ESCET and ESCET are trademarks of the Eclipse Foundation. Eclipse, and the Eclipse Logoare registered trademarks of the Eclipse Foundation. Other names may be trademarks of theirrespective owners.
License
The Eclipse Foundation makes available all content in this document ("Content"). Unless otherwiseindicated below, the Content is provided to you under the terms and conditions of the MIT License.A copy of the MIT License is available at https://opensource.org/licenses/MIT. For purposes of theMIT License, "Software" will mean the Content.
If you did not receive this Content directly from the Eclipse Foundation, the Content is beingredistributed by another party ("Redistributor") and different terms and conditions may apply toyour use of any object code in the Content. Check the Redistributor’s license that was provided withthe Content. If no such license exists, contact the Redistributor. Unless otherwise indicated below,the terms and conditions of the MIT License still apply to any source code in the Content and suchsource code may be obtained at https://www.eclipse.org.
IndexA
Application, 31application
exceptions, 30execution, 42I/O, 33IDE, 28implement, 38multi-threading, 41options, 29, 35paths, 31properties, 31registration, 41running, 42stand-alone, 28termination, 30testing, 41thread, 41working directory, 31
B
branch, 4build, 17
C
Checkstyle, 17commit, 5compiler, 38contributing, 7
D
developmentenvironment, 12process, 2
E
ECA, 9EMF, 14exception, 32
cause, 32chained, 32end-user, 32internal, 32
exit code, 33
F
formatting, 17
G
Gitrepository, 14
GitFlow, 4GitLab, 11gui, 29
I
I/O, 33input
stdin, 35installer, 12issue, 2
create, 11issues, 11
J
Java, 14Jenkins, 17JUnit, 17
L
legal, 78
M
Maven, 17merge request, 5milestone, 3
O
oomph, 12setup, 12
optioncategory, 36class, 35command line, 36development mode, 33, 37dialog, 36, 37get, 36gui, 37help, 37implement, 37
instance, 36license, 37order, 37output mode, 37processing, 36set, 36standard, 37syntax, 37
outputcomponent, 33provider, 34stderr, 34stdout, 34
P
patches, 7
R
release, 3
S
SIGINT, 30static, 29stderr, 29stdin, 29stout, 29swt, 29
T
test, 17Tycho, 17