solar eclipse purchasing - install solar eclipse
TRANSCRIPT
Solar Eclipse Purchasing Release 8.7.9
Disclaimer This document is for informational purposes only and is subject to change without notice. This document and its contents, including the viewpoints, dates and functional content expressed herein are believed to be accurate as of its date of publication. However, Epicor Software Corporation makes no guarantee, representations or warranties with regard to the enclosed information and specifically disclaims any applicable implied warranties, such as fitness for a particular purpose, merchantability, satisfactory quality or reasonable skill and care. As each user of Epicor software is likely to be unique in their requirements in the use of such software and their business processes, users of this document are always advised to discuss the content of this document with their Epicor account manager. All information contained herein is subject to change without notice and changes to this document since printing and other important information about the software product are made or published in release notes, and you are urged to obtain the current release notes for the software product. We welcome user comments and reserve the right to revise this publication and/or make improvements or changes to the products or programs described in this publication at any time, without notice. The usage of any Epicor software shall be pursuant to an Epicor end user license agreement and the performance of any consulting services by Epicor personnel shall be pursuant to Epicor's standard services terms and conditions. Usage of the solution(s) described in this document with other Epicor software or third party products may require the purchase of licenses for such other products. Where any software is expressed to be compliant with local laws or requirements in this document, such compliance is not a warranty and is based solely on Epicor's current understanding of such laws and requirements. All laws and requirements are subject to varying interpretations as well as to change and accordingly Epicor cannot guarantee that the software will be compliant and up to date with such changes. All statements of platform and product compatibility in this document shall be considered individually in relation to the products referred to in the relevant statement, i.e., where any Epicor software is stated to be compatible with one product and also stated to be compatible with another product, it should not be interpreted that such Epicor software is compatible with both of the products running at the same time on the same platform or environment. Additionally platform or product compatibility may require the application of Epicor or third-party updates, patches and/or service packs and Epicor has no responsibility for compatibility issues which may be caused by updates, patches and/or service packs released by third parties after the date of publication of this document. Epicor® is a registered trademark and/or trademark of Epicor Software Corporation in the United States, certain other countries and/or the EU. All other trademarks mentioned are the property of their respective owners.
Epicor Eclipse Rel. 8.7.9 Online Help Documentation
Copyright © Epicor Software Corporation 2014. All rights reserved. No part of this publication may be reproduced in any form without the prior written consent of Epicor Software Corporation. Publication Date: June 25, 2014
iii
Table of Contents Purchasing Overview .................................................................................................................................... 1
Warehouse Schemes Principles .................................................................................................................... 2
Distributive Purchasing ............................................................................................................................. 2
Central Purchasing .................................................................................................................................... 2
Central Warehousing ................................................................................................................................ 3
Central Distribution .................................................................................................................................. 4
Defining Warehouse Schemes .................................................................................................................. 4
For Example .............................................................................................................................................. 5
Purchasing Processes .................................................................................................................................... 6
Setup Requirements for Purchase Order Entry ............................................................................................. 7
Control Maintenance Records ................................................................................................................... 7
POE Best Cost Check ........................................................................................................................... 8
POE Prompts ......................................................................................................................................... 8
POE Returns .......................................................................................................................................... 8
Authorization Keys ................................................................................................................................... 8
Setup Requirements for POE Substitutes .................................................................................................... 10
Control Maintenance Records ................................................................................................................. 10
Setup Requirements for Projected Inventory Level .................................................................................... 11
Authorization Keys ................................................................................................................................. 11
Setup Requirements for Minimum Order Cycle Days ................................................................................ 12
Control Maintenance Records ................................................................................................................. 12
Authorization Keys ................................................................................................................................. 12
Setup Requirements for Procurement ......................................................................................................... 13
Control Maintenance Records ................................................................................................................. 13
Specific Records for Purchase Order Entry ........................................................................................ 13
Specific Records for Sales Order Entry .............................................................................................. 13
Authorization Keys ................................................................................................................................. 14
Accessible Branches ............................................................................................................................... 14
File Maintenance ................................................................................................................................. 14
Procurement Group Maintenance ....................................................................................................... 14
Vendor Maintenance ........................................................................................................................... 14
Setup Requirements for Consignments ....................................................................................................... 15
Control Maintenance Records ................................................................................................................. 15
Solar Eclipse Purchasing
iv
Additional Vendor Setup ........................................................................................................................ 15
Setup Requirements for Buy Line Maintenance ......................................................................................... 16
Control Maintenance Records ................................................................................................................. 16
Authorization Keys ................................................................................................................................. 16
Setup Requirements for Returned Goods .................................................................................................... 17
Control Maintenance Records ................................................................................................................. 17
Authorization Keys ................................................................................................................................. 18
Buy Lines Overview ................................................................................................................................... 19
About Buy Lines ..................................................................................................................................... 19
Creating Buy Lines ..................................................................................................................................... 21
Deleting a Buy Line ................................................................................................................................ 23
Creating Super Buy Lines ........................................................................................................................... 24
Resequencing Buy Lines ............................................................................................................................. 25
Running the Resequence Program .......................................................................................................... 25
Calculated Buy Line Values ....................................................................................................................... 27
Recalculating for Secondary Buy Lines ...................................................................................................... 28
Secondary Buy Line Example................................................................................................................. 28
Recalculating and Adding Secondary Buy Lines.................................................................................... 29
Purchasing Entire Buy Lines ...................................................................................................................... 30
Maintaining Buy Lines ............................................................................................................................... 31
Entering and Viewing Buy Line Information ......................................................................................... 31
Using the Information Menu ................................................................................................................... 32
Limiting Access to Buy Line Maintenance ................................................................................................. 34
Defining Buy Line Authorization Levels ................................................................................................ 34
Setting the Nonstock Product Default for Buy Lines.................................................................................. 36
Displaying the Buy Line Maintenance Change Log ................................................................................... 37
How Eclipse Uses Package Quantities in Line Buy Calculations ............................................................... 38
Example 1 ............................................................................................................................................... 38
Example 2 ............................................................................................................................................... 39
Example 3 ............................................................................................................................................... 40
Example 4 ............................................................................................................................................... 41
Identifying Procurement Buyers for Buy Lines .......................................................................................... 43
Procurement Group and Buy Line Hierarchy ............................................................................................. 44
Entering Lead Time Information for Buy Lines ......................................................................................... 45
Setting Up Minimum Order Cycle Days for Buy Lines ............................................................................. 46
Table Of Contents
v
Buy Line Example Setup ............................................................................................................................ 47
Buy Lines and Vendors ........................................................................................................................... 47
Buy Lines and Procurement Groups ....................................................................................................... 47
Defining Freight Factor Defaults for Products in Buy Lines ...................................................................... 48
Defining Hits Parameters for Buy Lines ..................................................................................................... 49
Defining the Maximum Days Supply for Buy Lines .................................................................................. 50
Setting Forecast Parameters for Buy Lines ................................................................................................. 51
Setting the Nonstock Product Default for Buy Lines.................................................................................. 53
Limiting Transfer Returns for Buy Lines ................................................................................................... 54
Overriding Buy Line Lead Times ............................................................................................................... 55
Overriding the Plenty Date for Buy Lines .................................................................................................. 56
Assigning Vendors to Buy Lines ................................................................................................................ 57
Defining Vendor Freight Terms .................................................................................................................. 58
Identifying Vendors for Resupplying a Buy Line ....................................................................................... 59
Setting Up Emergency Vendors for Branches ............................................................................................ 60
Specifying the Vendor Target for Buy Lines .............................................................................................. 61
Entering Return Policies for Buy Lines ...................................................................................................... 63
Identifying Warranty Information for Buy Lines ....................................................................................... 64
Replenishing Child Branches ...................................................................................................................... 65
Replenishment Example 1 ...................................................................................................................... 65
Replenishment Example 2 ...................................................................................................................... 66
Assigning Buyers to Buy Lines .................................................................................................................. 67
How Drop Points Maintenance Works in Purchasing................................................................................. 68
Order Entry Restrictions ......................................................................................................................... 68
How Transfer Excess Grace Days Work .................................................................................................... 69
Stock/Nonstock Determination and Branch Replenishment ....................................................................... 70
Top-Down Stock/Nonstock Determination and Branch Replenishment ................................................ 70
Bottom-Up Stock/Nonstock Determination and Branch Replenishment ................................................ 70
Purchase Orders Overview ......................................................................................................................... 72
Authorization .......................................................................................................................................... 72
Determining Priority ............................................................................................................................... 73
Accessing the Inquiry and Maintenance Windows from Purchasing ......................................................... 74
Purchase Order Entry Body Attributes ....................................................................................................... 75
Purchase Order Entry Header Attributes .................................................................................................... 76
Purchase Order Entry Status Attributes ...................................................................................................... 78
Solar Eclipse Purchasing
vi
Print Options ........................................................................................................................................... 78
Selecting Printers ................................................................................................................................ 78
Using E-mail to Print .......................................................................................................................... 78
Tracking Shipments ................................................................................................................................ 79
Freight Terms .......................................................................................................................................... 79
Purchase Order Entry Totals Attributes ...................................................................................................... 80
Creating Purchase Orders ........................................................................................................................... 82
Marking an Order as Exceptional ........................................................................................................... 83
Tagging a Purchase Order as Bonded ..................................................................................................... 84
Editing Purchase Orders ............................................................................................................................. 85
Releasing Purchase Orders ......................................................................................................................... 89
Drilling Into Purchase Orders Details ......................................................................................................... 91
Changing Purchase Order Entry Body Views ............................................................................................. 94
Copying Purchase Order Data to Other Order Types ................................................................................. 97
Splitting Purchase Orders Into Generations ................................................................................................ 99
Converting Purchase Orders to Bids ......................................................................................................... 100
Printing Purchase Orders .......................................................................................................................... 101
Print Styles ............................................................................................................................................ 101
Printing Direct Purchase Orders ........................................................................................................... 101
Printing Purchase Orders in Batches ......................................................................................................... 103
Inquiring About Purchase Orders ............................................................................................................. 105
Crediting and Rebilling Purchase Orders .................................................................................................. 107
Resorting Line Items on POs .................................................................................................................... 108
Changing P/O Line Item Schedules .......................................................................................................... 109
Combining Branches on Purchase Orders ................................................................................................ 110
Adding Notes and Instructions on Purchase Orders ................................................................................. 111
Adding Comments to Purchase Orders ..................................................................................................... 113
Adding Generations to Purchase Orders ................................................................................................... 115
Overriding Drop Points on Purchase Orders ............................................................................................. 117
Copying Header Information to All PO Generations ................................................................................ 118
Creating Trackers from Purchase Orders .................................................................................................. 119
Selecting Inactive Vendors for POs .......................................................................................................... 120
Adding International Taxes to Purchase Orders ....................................................................................... 121
Prepaying Vendors .................................................................................................................................... 123
Prepaying by Credit Card ...................................................................................................................... 123
Table Of Contents
vii
Prepaying by Manual Check ................................................................................................................. 124
Purchase Order Freight Terms Guidelines ................................................................................................ 126
Selecting Vendors for the Freight Carrier on Purchase Orders ................................................................. 127
Selecting a Vendor for the Freight Carrier ............................................................................................ 127
Overriding Freight Charges on POs .......................................................................................................... 128
Editing Freight Charges on Purchase Orders ............................................................................................ 129
Editing Freight by Line Item ................................................................................................................. 129
Editing Freight by Purchase Order ........................................................................................................ 130
Pass-Along Freight Rules ......................................................................................................................... 131
Hard Tags .............................................................................................................................................. 131
Soft Tags ............................................................................................................................................... 131
Direct Orders ......................................................................................................................................... 132
Posting Legacy Purchase Orders............................................................................................................... 133
Creating Future-Dated Purchase Orders ................................................................................................... 134
Purchasing Product Kits ............................................................................................................................ 135
How the Minimum Order Cycle Works .................................................................................................... 136
Expanding and Contracting the Order Cycle ........................................................................................ 136
Exceeding the Vendor Target ............................................................................................................... 136
Best Cost Check in Purchase Order Entry ................................................................................................ 138
Best Cost Example ................................................................................................................................ 138
How Eclipse Determines the Best Cost in POE .................................................................................... 139
How the System Uses Average Cost in POE ............................................................................................ 140
Changing the Price on a Purchase Order .............................................................................................. 140
How Does Average Cost Work? ........................................................................................................... 140
Duty Drawback Rules on POs .................................................................................................................. 141
EDI Purchasing Queues ............................................................................................................................ 142
Suggested Purchase Orders Queue Rules and Guidelines ........................................................................ 143
Viewing Different Queues .................................................................................................................... 143
Normal .............................................................................................................................................. 143
Emergency ........................................................................................................................................ 144
Overdue PO ....................................................................................................................................... 144
Open PO ............................................................................................................................................ 144
Select ................................................................................................................................................. 144
Converting the Suggested P/O Queue ................................................................................................... 144
Running the Suggested P/O Program........................................................................................................ 145
Solar Eclipse Purchasing
viii
Secondary Buy Lines ............................................................................................................................ 145
Package Quantities ................................................................................................................................ 145
Costs ...................................................................................................................................................... 145
Suggested P/O Error Report .................................................................................................................. 147
Displaying and Sorting the Suggested P/O Queue .................................................................................... 148
Converting Suggested Purchase Orders to Actual Purchase Orders ......................................................... 151
Credit Holds when Converting Orders.................................................................................................. 151
Using the Convert Suggested to Actual P/O Program .......................................................................... 151
Single-branch and Multi-branch Purchase Orders ................................................................................ 153
Managing Suggestions from the Suggested P/O Detail Queue ................................................................. 154
Reviewing Purchase Order Suggestions ................................................................................................... 156
What the Suggest P/O Audit Report Shows .......................................................................................... 157
Distributive and Central Purchasing ................................................................................................. 158
Central Warehouse and Central Distribution .................................................................................... 159
Combining Purchase Orders from the Suggested P/O Queue ................................................................... 161
What the Suggested P/O Report Shows .................................................................................................... 163
Default Columns for the Report ........................................................................................................ 163
Other Available Columns.................................................................................................................. 164
Return on Additional Investment Overview ............................................................................................. 167
Quantity and Volume Discounts ........................................................................................................... 167
Conventional Method ........................................................................................................................ 167
Formula Method ................................................................................................................................ 167
Price Adjustments ................................................................................................................................. 168
Applying ROAI Calculations to Suggested P/O ....................................................................................... 169
Expediting Purchase Orders ...................................................................................................................... 171
Reconciling Rebate Requests .................................................................................................................... 173
Viewing and Editing Rebate Purchase Orders .......................................................................................... 175
Purging the Rebate Detail File .................................................................................................................. 176
Vendor Consignments Overview .............................................................................................................. 177
Receiving Vendor Consignments.............................................................................................................. 178
Using the P/O Receiver Report ............................................................................................................. 178
How Consignments Affect Reports .......................................................................................................... 179
Branch Consignment Usage Report ...................................................................................................... 179
Inventory Valuation Report .................................................................................................................. 179
Item Sales Report .................................................................................................................................. 179
Table Of Contents
ix
Product Sales Report ............................................................................................................................. 179
Crediting Vendor Consignments ............................................................................................................... 180
Consigning Vendor Consigned Items to Customers ................................................................................. 181
Breaking Consignment Container Quantities ........................................................................................... 182
Viewing Consignments in the Inventory History Ledger ......................................................................... 183
Reviewing the P/O Backorders Queue ...................................................................................................... 184
Viewing and Editing P/Os from the Review P/O Backorders Queue ....................................................... 185
Viewing the Purchase Order ................................................................................................................. 185
Editing the Purchase Order ................................................................................................................... 185
Setting Fixed Backorder Days .................................................................................................................. 187
Controlling Material Returns .................................................................................................................... 188
Returned Goods Queue Overview ............................................................................................................ 190
Displaying the Returned Goods Queue ..................................................................................................... 191
Sorting and Changing Views on the Returned Goods Queue ................................................................... 193
Changing the view on the Returned Goods Queue ............................................................................... 193
Returning Products to Vendors ................................................................................................................. 195
Creating Return POs ............................................................................................................................. 195
Returning Items to a Branch ................................................................................................................. 195
Returning Items to a Vendor ................................................................................................................. 196
Creating Return Purchase Orders .............................................................................................................. 197
Specifying a Branch for Returned Items ............................................................................................... 198
Determining the Economic Return Amount ............................................................................................. 199
Returning Overstock to Vendors Overview .............................................................................................. 201
Suggesting Return P/Os for Overstock ..................................................................................................... 202
Working with the Suggested Return P/O Queue ...................................................................................... 203
Converting Suggested Returns into Actual Return P/Os .......................................................................... 205
Returned Material Workflows Overview .................................................................................................. 206
Customer and Vendor Return Allowed Both Set to Always ..................................................................... 207
Customer Return Allowed Set to Always and Vendor Return Allowed Set to RGA ............................... 208
Customer Return Allowed Set to Always and Vendor Return Allowed Set to Never .............................. 209
Customer Return Allowed Set to Defective and Vendor Return Allowed Set to Always ........................ 210
Customer Return Allowed Set to Defective and Vendor Return Allowed Set to RGA ............................ 211
Customer Return Allowed Set to Defective and Vendor Return Allowed Set to Never........................... 212
Customer Return Allowed Set to Never and Vendor Return Allowed Set to Always .............................. 213
Customer Return Allowed Set to Never and Vendor Return Allowed Set to RGA .................................. 214

Solar Eclipse Purchasing
x
Customer and Vendor Return Allowed Both Set to Never ....................................................................... 215
Procuring Products .................................................................................................................................... 216
Valid Vendor Types .................................................................................................................................. 217
Procurement Groups Overview ................................................................................................................. 218
Procurement Group Maintenance ............................................................................................................. 220
Entering and Viewing Procurement Group Information ....................................................................... 220
Creating and Deleting Procurement Groups ............................................................................................. 222
Deleting a Procurement Group ............................................................................................................. 223
Assigning Procurement Groups to Products and Buy Lines ..................................................................... 224
Assigning the Product Level ................................................................................................................. 224
Assigning the Buy Line Level .............................................................................................................. 224
Adding New Branch Settings to Procurement Groups ............................................................................. 225
Setting Up Transfer Branches for Procurement ........................................................................................ 226
Assigning Master Groups in Procurement Group Maintenance ............................................................... 227
Master Group Example ......................................................................................................................... 227
Viewing the Procurement Group Maintenance Log ................................................................................. 229
Procurement Confirmation Overview ....................................................................................................... 230
Creating P/Os from the Procurement Confirmation Queue ...................................................................... 232
Changing Procurement Vendors ............................................................................................................... 234
Measuring Vendor Performance Overview .............................................................................................. 235
Building the Vendor Scorecard File .......................................................................................................... 236
Building the Main Vendor Scorecard File ............................................................................................ 236
Reloading Build Data ............................................................................................................................ 237
Purging the Vendor Scorecard File ........................................................................................................... 239
Running the Vendor Scorecard File Report .............................................................................................. 240
Viewing Summary Vendor Scorecard Information .................................................................................. 242
What the Inquiry Shows ........................................................................................................................ 243
Trending Summary Vendor Scorecard Information ................................................................................. 246
Logging Vendor Shipping Inaccuracies .................................................................................................... 247
Purchasing Reports Overview ................................................................................................................... 248
Running the Suggested P/O Program........................................................................................................ 249
Secondary Buy Lines ............................................................................................................................ 249
Package Quantities ................................................................................................................................ 249
Costs ...................................................................................................................................................... 249
Suggested P/O Error Report .................................................................................................................. 251
Table Of Contents
xi
Reprinting Suggested P/O Reports ........................................................................................................... 252
Running the Open Purchase Orders Report .............................................................................................. 253
Running the Overdue Purchase Orders Report ......................................................................................... 254
Running the Purchase Order Receiver Report .......................................................................................... 256
Running the Stock Receipts Report .......................................................................................................... 259
Running the Inventory Valuation Report .................................................................................................. 260
Running the Aged Inventory Report ......................................................................................................... 265
Running the Product Sales History Report ............................................................................................... 268
Running the Purchase Price Overrides Report .......................................................................................... 270
About the PO Reconciliation Report ........................................................................................................ 271
Running the Product Backorder Report .................................................................................................... 272
Running the Canceled PO Report ............................................................................................................. 274
Running the Freight Audit Report ............................................................................................................ 275
What the Report Shows ........................................................................................................................ 276
Running the Purchase Variance Report .................................................................................................... 277
Running the Product Out of Stock Tracking Report ................................................................................. 278
Index ......................................................................................................................................................... 281

© 2014 Epicor Software Corporation. All rights reserved. 1
Purchasing Overview Your inventory is your most valuable asset. In hard-goods distribution, making a profit relies on the ability to balance inventory costs with customer service. In conjunction with Inventory Management, Eclipse Purchasing provides you with the necessary programs to control your inventory investments by using in-depth forecasting and product demand calculations to help you meet customer demand. For more information, see Suggested Purchase Orders Queue Rules and Guidelines and Creating and Managing Procurement Groups.
We provide task automation features to optimize your buying power. You can monitor your products as they sell so you can replenish your product supply in various branches and use buy lines to manage your product purchases. Also, we provide options to procure from branch to branch and manage surplus stock. You can manage transfers based on committed sales. For more information, see Creating and Managing Buy Lines and Understanding How Transfers Work.
The system helps you group your products so you can purchase them together and satisfy your vendors' requirements. You can also rank your products, which enables you to analyze sales-related data properly and run reports on your purchasing activities. For more information, see Product Ranking Information Uses and Product Ranking Method and Breakpoint Rules.
You can calculate product demand using seasonal factors, raw hits, and multiple sales parameters. Exclude exceptional sales as needed, and compensate for lost sales or changing customer demand. You can create flexible procurement schemes for both distributive and centralized purchasing and warehousing that let you respond effectively to demand. For more information, see Calculating the Demand of Products.
Purchasing helps you manage your inventory using variable methods such as economic order quantity (EOQ), Min/Max, Order Points, and Line Points. It also provides automatic stock and non-stock determination based on branch or network hits. Eclipse Purchasing balances buying opportunities with carrying costs using the suggested purchase order program to consider vendor targets, line buy discounts, and promotions. For more information, see Suggested Purchase Orders Queue Rules and Guidelines and Displaying and Sorting the Suggested P/O Queue.
You can view inventory commitments and replenishment schedules in a future ledger and manage automatic transfers based on days supply, fulfillment requirements, and surplus inventory. Handle returned goods and warranties for products received from customers and vendors. For more information, see Returned Goods Queue, Returning Products, and Replenishing Child Branches.
Solar Eclipse Purchasing Rel. 8.7.9
2 © 2014 Epicor Software Corporation. All rights reserved.
Warehouse Schemes Principles Eclipse uses four different warehouse schemes:
• Distributive Purchasing
• Central Purchasing
• Central Warehousing
• Central Distribution
Warehouse schemes let you decide the most efficient way to purchase and store the products for your company. For example, if you have a small company it may be more cost effective for each branch to purchase and store its own products. However, if you have a large company with many branches, it might be better to have a central warehouse scheme and store all surplus products in one branch and ship only those items that are needed to the branches.
Rules for defining warehouse schemes and an example are provided below.
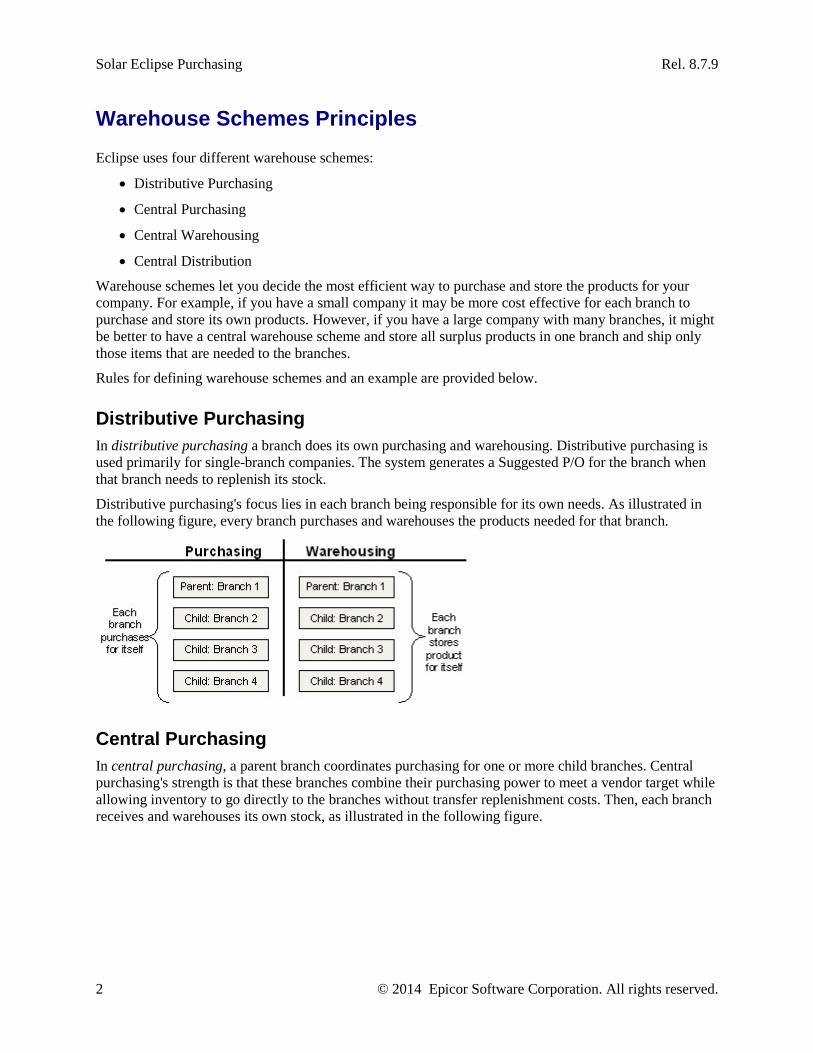
Distributive Purchasing In distributive purchasing a branch does its own purchasing and warehousing. Distributive purchasing is used primarily for single-branch companies. The system generates a Suggested P/O for the branch when that branch needs to replenish its stock.
Distributive purchasing's focus lies in each branch being responsible for its own needs. As illustrated in the following figure, every branch purchases and warehouses the products needed for that branch.
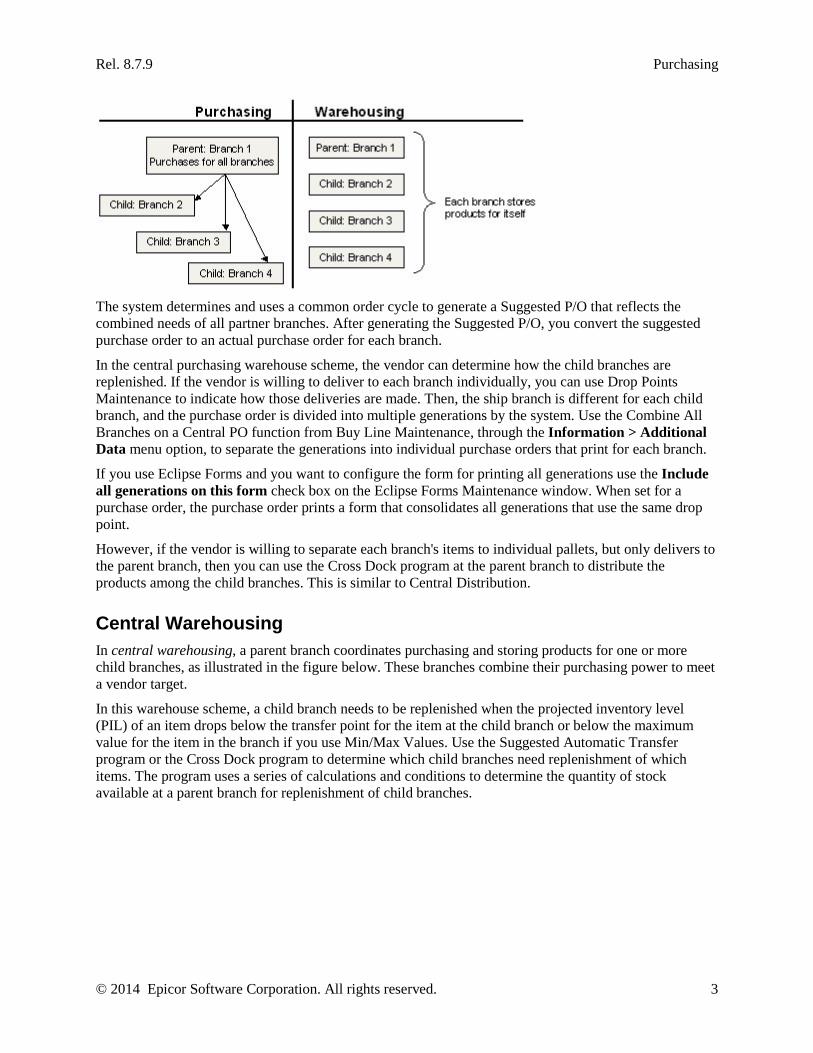
Central Purchasing In central purchasing, a parent branch coordinates purchasing for one or more child branches. Central purchasing's strength is that these branches combine their purchasing power to meet a vendor target while allowing inventory to go directly to the branches without transfer replenishment costs. Then, each branch receives and warehouses its own stock, as illustrated in the following figure.
Rel. 8.7.9 Purchasing
© 2014 Epicor Software Corporation. All rights reserved. 3
The system determines and uses a common order cycle to generate a Suggested P/O that reflects the combined needs of all partner branches. After generating the Suggested P/O, you convert the suggested purchase order to an actual purchase order for each branch.
In the central purchasing warehouse scheme, the vendor can determine how the child branches are replenished. If the vendor is willing to deliver to each branch individually, you can use Drop Points Maintenance to indicate how those deliveries are made. Then, the ship branch is different for each child branch, and the purchase order is divided into multiple generations by the system. Use the Combine All Branches on a Central PO function from Buy Line Maintenance, through the Information > Additional Data menu option, to separate the generations into individual purchase orders that print for each branch.
If you use Eclipse Forms and you want to configure the form for printing all generations use the Include all generations on this form check box on the Eclipse Forms Maintenance window. When set for a purchase order, the purchase order prints a form that consolidates all generations that use the same drop point.
However, if the vendor is willing to separate each branch's items to individual pallets, but only delivers to the parent branch, then you can use the Cross Dock program at the parent branch to distribute the products among the child branches. This is similar to Central Distribution.
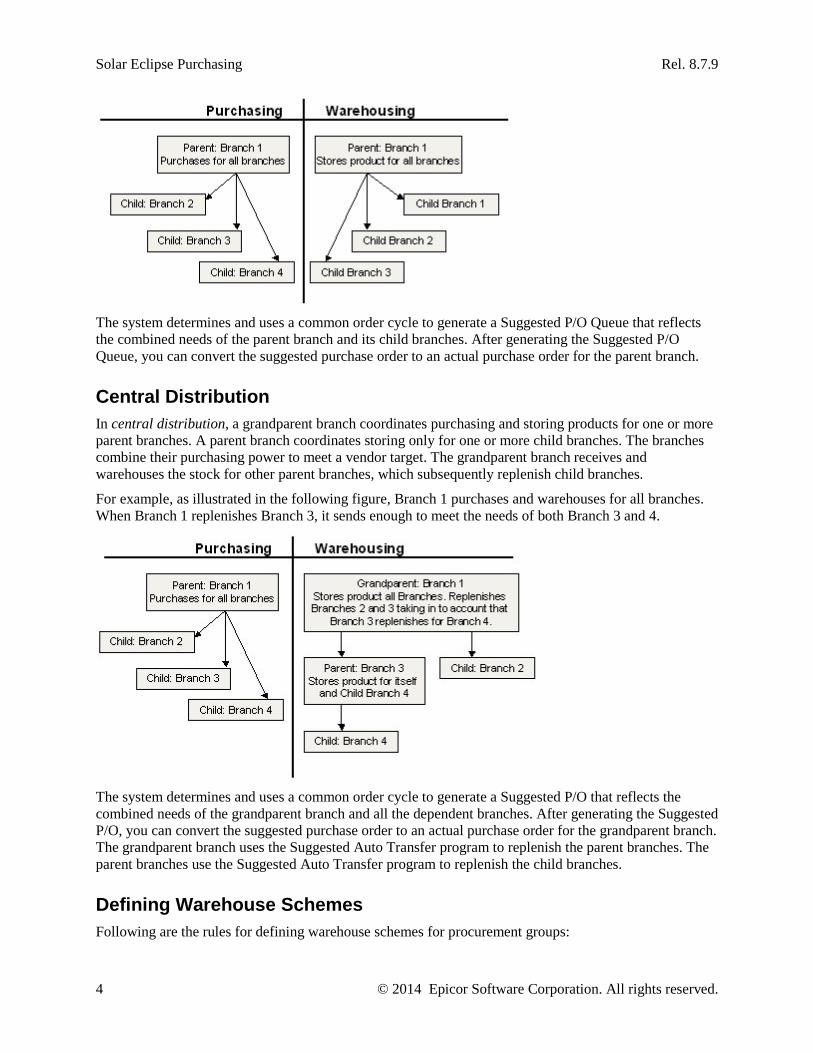
Central Warehousing In central warehousing, a parent branch coordinates purchasing and storing products for one or more child branches, as illustrated in the figure below. These branches combine their purchasing power to meet a vendor target.
In this warehouse scheme, a child branch needs to be replenished when the projected inventory level (PIL) of an item drops below the transfer point for the item at the child branch or below the maximum value for the item in the branch if you use Min/Max Values. Use the Suggested Automatic Transfer program or the Cross Dock program to determine which child branches need replenishment of which items. The program uses a series of calculations and conditions to determine the quantity of stock available at a parent branch for replenishment of child branches.
Solar Eclipse Purchasing Rel. 8.7.9
4 © 2014 Epicor Software Corporation. All rights reserved.
The system determines and uses a common order cycle to generate a Suggested P/O Queue that reflects the combined needs of the parent branch and its child branches. After generating the Suggested P/O Queue, you can convert the suggested purchase order to an actual purchase order for the parent branch.
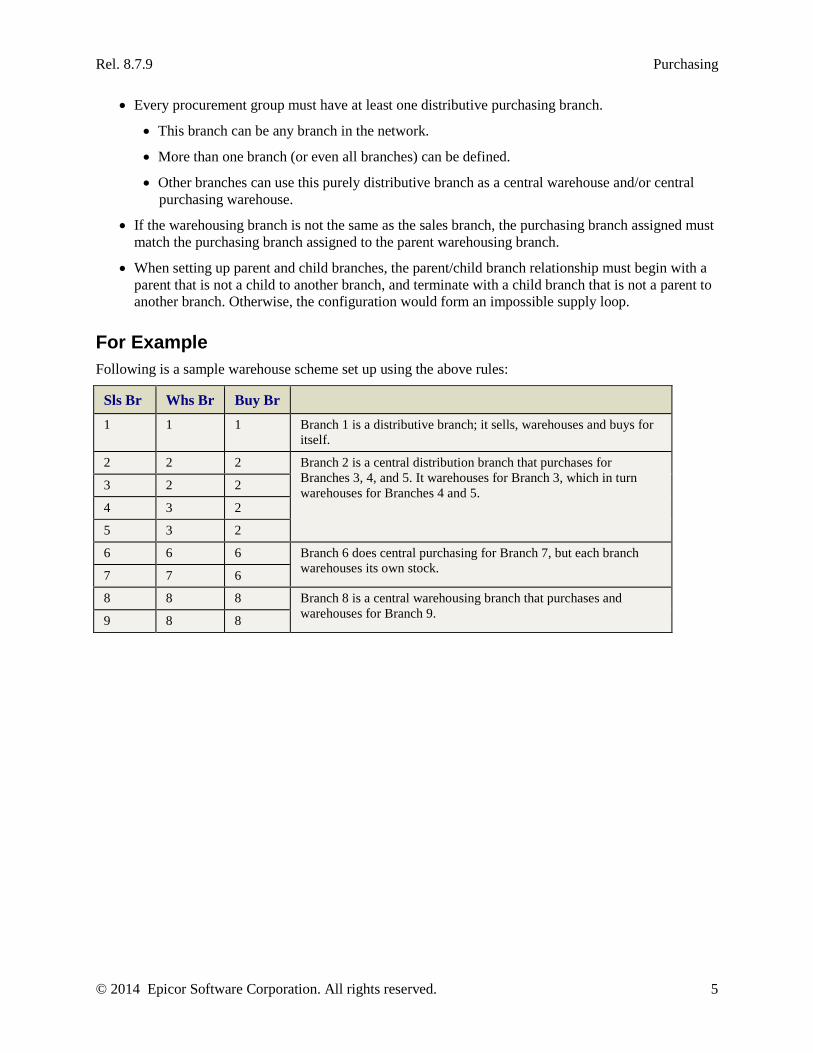
Central Distribution In central distribution, a grandparent branch coordinates purchasing and storing products for one or more parent branches. A parent branch coordinates storing only for one or more child branches. The branches combine their purchasing power to meet a vendor target. The grandparent branch receives and warehouses the stock for other parent branches, which subsequently replenish child branches.
For example, as illustrated in the following figure, Branch 1 purchases and warehouses for all branches. When Branch 1 replenishes Branch 3, it sends enough to meet the needs of both Branch 3 and 4.
The system determines and uses a common order cycle to generate a Suggested P/O that reflects the combined needs of the grandparent branch and all the dependent branches. After generating the Suggested P/O, you can convert the suggested purchase order to an actual purchase order for the grandparent branch. The grandparent branch uses the Suggested Auto Transfer program to replenish the parent branches. The parent branches use the Suggested Auto Transfer program to replenish the child branches.
Defining Warehouse Schemes Following are the rules for defining warehouse schemes for procurement groups:
Rel. 8.7.9 Purchasing
© 2014 Epicor Software Corporation. All rights reserved. 5
• Every procurement group must have at least one distributive purchasing branch.
• This branch can be any branch in the network.
• More than one branch (or even all branches) can be defined.
• Other branches can use this purely distributive branch as a central warehouse and/or central purchasing warehouse.
• If the warehousing branch is not the same as the sales branch, the purchasing branch assigned must match the purchasing branch assigned to the parent warehousing branch.
• When setting up parent and child branches, the parent/child branch relationship must begin with a parent that is not a child to another branch, and terminate with a child branch that is not a parent to another branch. Otherwise, the configuration would form an impossible supply loop.
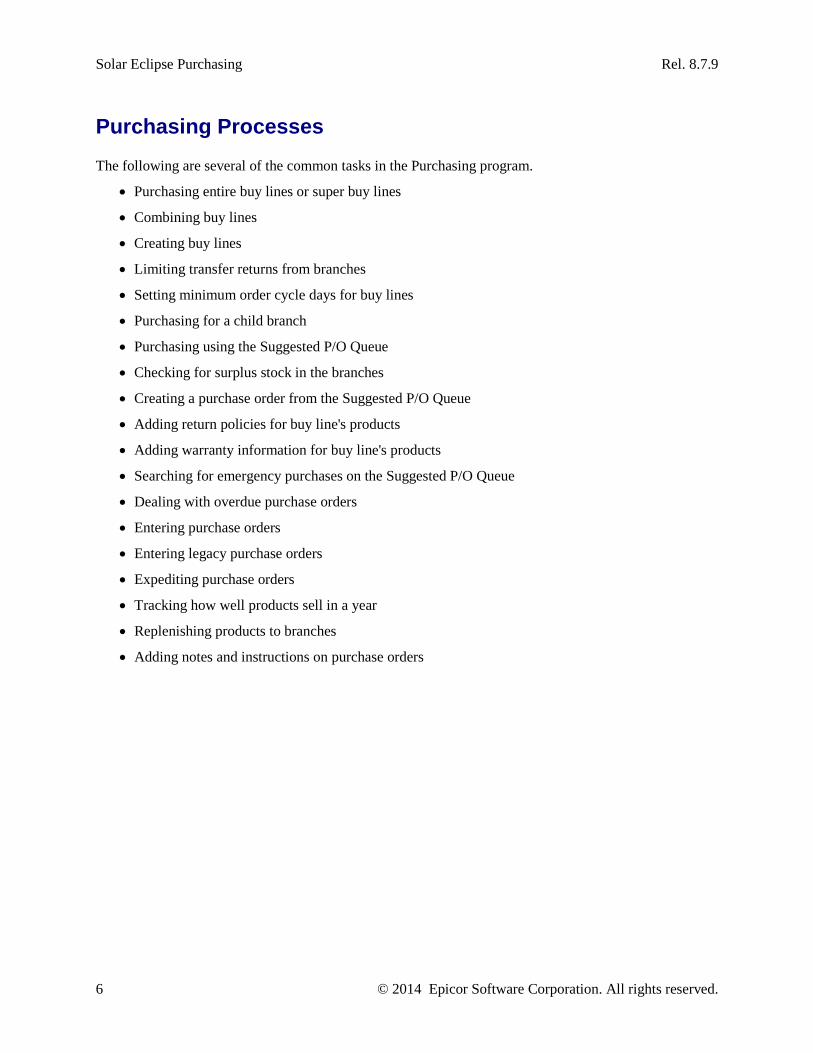
For Example Following is a sample warehouse scheme set up using the above rules:
Sls Br Whs Br Buy Br 1 1 1 Branch 1 is a distributive branch; it sells, warehouses and buys for
itself.
2 2 2 Branch 2 is a central distribution branch that purchases for Branches 3, 4, and 5. It warehouses for Branch 3, which in turn warehouses for Branches 4 and 5. 3 2 2
4 3 2
5 3 2
6 6 6 Branch 6 does central purchasing for Branch 7, but each branch warehouses its own stock. 7 7 6
8 8 8 Branch 8 is a central warehousing branch that purchases and warehouses for Branch 9. 9 8 8
Solar Eclipse Purchasing Rel. 8.7.9
6 © 2014 Epicor Software Corporation. All rights reserved.
Purchasing Processes The following are several of the common tasks in the Purchasing program.
• Purchasing entire buy lines or super buy lines
• Combining buy lines
• Creating buy lines
• Limiting transfer returns from branches
• Setting minimum order cycle days for buy lines
• Purchasing for a child branch
• Purchasing using the Suggested P/O Queue
• Checking for surplus stock in the branches
• Creating a purchase order from the Suggested P/O Queue
• Adding return policies for buy line's products
• Adding warranty information for buy line's products
• Searching for emergency purchases on the Suggested P/O Queue
• Dealing with overdue purchase orders
• Entering purchase orders
• Entering legacy purchase orders
• Expediting purchase orders
• Tracking how well products sell in a year
• Replenishing products to branches
• Adding notes and instructions on purchase orders
Rel. 8.7.9 Purchasing
© 2014 Epicor Software Corporation. All rights reserved. 7
Setup Requirements for Purchase Order Entry Following are the control maintenance records and authorization keys used for Purchase Order Entry.
Note: You can set up a vendor for a one-time transaction, if necessary. For one-time activation of a vendor, see Setting Vendor Branch Override Capabilities.
Control Maintenance Records Set the following control maintenance records:
• Allow Alternate Branch Bill-To Address
• Auto Open Multiple Vendor Matrix Cells
• Automatically Calculate Duty Charges For Purchase Orders
• Change Both COGS And COMM-COST On Override
• Check Customer Credit On Procurement
• Commit Qty From Display Location
• Confirm Override Of Print Status 'E' On Purchase Orders
• Copy Procure Comments to P/O
• PO Header Branch Change Copy To
• Days Before Ship Date To Reserve Product
• Default Br Stock Value When A Product Becomes Active
• Default P/O Procurement Confirmation Queue Sort
• Default Ship Via For Purchase Orders
• Direct COGS Always Vendor Price
• Display Customers/Vendors Who Are Inactive At A Branch - for activating inactive vendors only.
• Exclude Original Sale Line Item Comment From Returned P/O
• Forecast Parameters for Demand Calculation
• Include Directs In Vendor Target Check When Printing A P/O
• Include Item With Zero Average Cost In Average Cost Calculation
• Include Tagged Quantities With Cost Calculations
• Job Queue Default Comment for P/O Expedite Queue
• Label Printing Default Print Selection For POE
• Line Item Standard Comments
• Maximum Difference Percentage from Average Cost in POE - for enabling MAC only.
• New Nonstock Buy Line Default
• Notify Buyer When Canceled Item Is On An Open Purchase Order

Solar Eclipse Purchasing Rel. 8.7.9
8 © 2014 Epicor Software Corporation. All rights reserved.
• OE Warn If Procuring From Vendor Consignment
• PO Header Branch Change Copy To
• Print P/O Receiver Instead of Receiving Register
• Procure Comments
• Prompt For Lot ID On Process Of P/O
• Prompt For Serial Number Entry During Processing
• Re-sort Purchase Items When Closed For Branch
• Require Purchase Order Entry Header Screen Entry
• Set Br/Tr "Suggest On All" Flag To "No" For Lines In Super Buy Lines
• Shipping Branch Override for POE
• Update Associated Trackers Upon Invoicing Of Orders
• Use Vendor Print Status Override On The P/O Side Of A Direct
• Valid Vendor ASL Types
• Vendor Freight Terms Maintenance
POE Best Cost Check • Auto Open Multiple Vendor Matrix Cells
• Best Cost Check Through All Matrix Cells For Purchase Orders
• Enable Best Cost Check In Purchase Order Entry
POE Prompts • Prompt For Lot ID On Process of P/O
• Prompt For Serial Numbers When Processing Any Type Of Order
POE Returns • Append Return Comments To Return Goods Queue And Rtrn Gds PO
• Return Goods Queue Default Select Option
Authorization Keys Assign the following authorization keys:
• FREIGHT.TARGET.OVERRIDE
• POE.ALLOWED
• POE.ASL.RELEASE
• POE.BID.PRC.EDIT
• POE.CLOSED.CHANGE.VENDOR
• POE.CLOSED.ORDER.CANCEL
Rel. 8.7.9 Purchasing
© 2014 Epicor Software Corporation. All rights reserved. 9
• POE.CLOSED.ORDER.EDIT
• POE.CLOSED.ORDER.OPEN
• POE.CLOSED.PRC.EDIT
• POE.CLOSED.QTY.EDIT
• POE.CONSIGNMENT.ALLOWED - for consignment purchase order approval only.
• POE.CREDIT.QTY
• POE.CREDIT.REBILL
• POE.EDIT.CLOSED.PERIOD
• POE.EDIT.PAID.MATRL - for editing purchase orders after the material side has been paid.
• POE.EDIT.VIEW.ONLY.NOTES
• POE.MAC.OVERRIDE - for enabling MAC only.PROCUREMENT.CONFIRM
• POE.OPEN.ORDER.EDIT
• POE.OPEN.ORDER.PRINT
• POE.OPEN.PRC.EDIT
• POE.OPEN.QTY.EDIT
• POE.ORDER.TO.BID
• POE.RETURN.COST.EDIT
• POE.SCHEDULE
• PROCURE.GROUP.MAINT
• PROCUREMENT.CONFIRM
• SOE.CREDIT.RELEASE - for releasing purchase orders on credit hold
• SUGGESTED.PO.QUEUE
• SYS.ACTIVITY.CMT.EDIT
• VEN.DR.AUTH.ONETIME
• VEND.BR.AUTH.OVRD
Solar Eclipse Purchasing Rel. 8.7.9
10 © 2014 Epicor Software Corporation. All rights reserved.
Setup Requirements for POE Substitutes Following are the control maintenance records used for POE Substitutes in the Purchasing program.
Control Maintenance Records Set the following control maintenance records:
• Auto Open Substitute Window For Items W/O Avail In POE
• Default B/O Days For Purchase Orders
• Default Setting For Bill Incoming Freight To Tagged Sales Order
• Print Committed Sales Orders On Shipment Receiver
• Purchase Order Freight Capitalization Default
• Require Purchase Order Entry Header Screen Entry
• Shipment Notification Freight Capitalization Default
Rel. 8.7.9 Purchasing
© 2014 Epicor Software Corporation. All rights reserved. 11
Setup Requirements for Projected Inventory Level Following are the authorization keys used for Projected Inventory Level in the Purchasing program.
Authorization Keys Assign the following authorization keys:
• AOE.PIL.DAYS.OVRD
• POE.PIL.DAYS.OVRD
• SOE.PIL.DAYS.OVRD
• TOE.PIL.DAYS.OVRD
Solar Eclipse Purchasing Rel. 8.7.9
12 © 2014 Epicor Software Corporation. All rights reserved.
Setup Requirements for Minimum Order Cycle Days Following are the control maintenance records and authorization keys used for Minimum Order Cycle Days in the Purchasing program.
Control Maintenance Records Set the following control maintenance records:
• Minimum Order Cycle Days For Suggested P/O
Authorization Keys Assign the following authorization keys:
• BUYLINE.MAINT
Rel. 8.7.9 Purchasing
© 2014 Epicor Software Corporation. All rights reserved. 13
Setup Requirements for Procurement Following are the control maintenance records and authorization keys used for Procurement, along with additional setup requirements.
Control Maintenance Records Set the following control maintenance records:
• Default P/O Procurement Confirmation Queue Sort
• Default Lead Time Days for Branch Procurement
• Exclude Procure Comments From OE Group Procurements
• Procure Items On Original Ship Date
• Procure Comment
• New Nonstock Procure Group Default
Specific Records for Purchase Order Entry Set the following control maintenance records for the Procurement functionality within Purchase Order Entry:
• Allow Procurement from Unauthorized Vendor Branches
• Check Customer Credit On Procurement
• Copy Comments For Procured Items To Transfers
Specific Records for Sales Order Entry Set the following control maintenance records Procurement functionality within Sales Order Entry:
• Branch That Controls Branch That Receives Credit For The Sale
• Branch That Receives Credit For The Sale
• Change Both COGS And COMM-COST On Override
• Change Ship Date If Required Date Edited On Schedule Screens
• Create Log Entry When A Transfer Is Shipped Incomplete
• Default Ship Via For Purchase Orders
• Default Ship Via For Transfers
• Order Status Print Status Defaults
• Prevent Cost Update On Order From Tagged Order If Matrix Override
• Update Cost On Sales Order From Tagged Purchase Order
• Update Cost On Sales Order From Tagged Transfer Order
• User To Get Tracker When A Tag is Broken
Solar Eclipse Purchasing Rel. 8.7.9
14 © 2014 Epicor Software Corporation. All rights reserved.
Authorization Keys Assign the following authorization keys:
• POE.ALLOWED
• PROCURE.GROUP.MAINT
• PROCUREMENT
• PROCUREMENT.ALL.BRS
• PROCUREMENT.CONFIRM
• PROCUREMENT.OVERRIDE.AVL
• SUGGESTED.PO.QUEUE
Accessible Branches Use the Accessible Branches screen to establish the branches and territories each user has access to, including:
• Home Branch
• Home Territory
• Inventory Inquiry Territory
• Branches
File Maintenance Use the Procure Group field on the Product Maintenance window to specify the procurement group for a product. A procurement group can include various branches and vendors that you procure from when needed. Since a procurement group frequently applies to an entire line, you can use the system's mass load feature to set a group for numerous products. If no procurement group exists for the product, or the buy line, the system uses the DFLT procurement group created during installation.
Procurement Group Maintenance Use the Procurement Group Maintenance window to create or edit procurement groups. Use this window to specify the various branches and vendors that can be used for emergency procurements.
Vendor Maintenance Many companies use the Vendor Maintenance window to create Buyer Locate vendors that can be included in a procurement group. An order taker uses these vendors to communicate urgency to a buyer. A buyer, in turn, sees the Buyer Locate vendor in the Procurement Confirmation queue and buys accordingly.
When creating these vendors, use descriptive names that demonstrate the appropriate urgency to a buyer. Some examples of Buyer Locate vendors might include "Buyer Locate in Two Days" or "Buyer Procure."
Rel. 8.7.9 Purchasing
© 2014 Epicor Software Corporation. All rights reserved. 15
Setup Requirements for Consignments Following are the control maintenance records for consignment transactions, along with Additional Vendor Setup requirements.
Control Maintenance Records Set the following control maintenance records:
• Allow Customer Consignment From Multiple Branches
• Default Vendor Consignment On Transfers
Additional Vendor Setup To identify a vendor as a consignment vendor, set the Consignment Inventory field on the Vendor Maintenance window to Yes. For more information, see Entering Miscellaneous Vendor Information.
In addition, you need to indicate how the vendor wants to handle consignments in transfers. Select one of the following:
• No Transfers - The vendor requires that consignment inventory remain in the warehousing branch indicated in the contract.
• Consigned to Inventory - The vendor requires that you purchase any consigned inventory items that you move to another branch in your company.
• Consigned to Consigned - The vendor allows you to move consigned inventory to any branch in your company as needed.
Solar Eclipse Purchasing Rel. 8.7.9
16 © 2014 Epicor Software Corporation. All rights reserved.
Setup Requirements for Buy Line Maintenance Following are the authorization keys used for Buy Line Maintenance.
Control Maintenance Records Set the following control maintenance records:
• Buy Line Maintenance Authorization Levels
• Default For Excess Grace In Buy Line Maint
• Default Lead Time Days If Product And Buy Line Have None
• Default Lead Time Factor If Product And Buy Line Have None
• New Nonstock Buy Line Default
• Set Br/Tr "Suggest On All" Flag To "N" For Lines In Super Buy Line
Authorization Keys Assign the following authorization keys:
• BUYLINE.MAINT
• BUYLINE.MAINT.LEVEL
• VALID.BLINES
Rel. 8.7.9 Purchasing
© 2014 Epicor Software Corporation. All rights reserved. 17
Setup Requirements for Returned Goods Following are the authorization keys used for Returned Goods Maintenance and handling Return Policies:
Control Maintenance Records Review the following control maintenance records:
• Append Return Comments To Product Description
• Append Return Comments To Returns Goods Queue And Rtrn Gds PO
• Check History On Sales Order Returns With
• Cut Product Return Branch View Lot
• Default Handling Charges For Returns
• Default Location For F, O, R Type Returns
• Default Location For S Type Returns
• Default Return Goods Quantity Types
• Display Availability On Product Return Page in WOE
• Display Inventory History If No Order # Entered For Returned
• Eclipse Forms - Footer Font Size For Return Goods
• Eclipse Forms - Footer Message For Return Goods
• Exclude Original Sale Line Item Comment From Returned P/O
• Exclude SOE Returns from PIL Check
• Include Original Customer P/O # In SOE Return Comment
• Maximum Days Allowed For Returns On Nonstock Items
• Maximum Days Allowed For Returns On Stock Items
• Post Shipping Freight On Return P/Os (StarShip)
• Prompt For Serial Numbers On Return Sales Order For O Type
• Require Reason For Return Code
• Restrict Quantities On Return Orders To Package Quantity
• Return Goods Standard Comments
• Return Items Affect The Required Deposit
• SOE Return/Credit Default Parameters
• Sales Order Entry Return Setup
• Types That Can Be Returned Any Time
• Use Tax Rate From Original Sale Order For Returns
Solar Eclipse Purchasing Rel. 8.7.9
18 © 2014 Epicor Software Corporation. All rights reserved.
• Valid Reason For Return Codes
• WOE Return Policy Content
Authorization Keys Review the following authorization keys:
• SOE.ALLOW.NONRETURN
• SOE.CREDIT.QTY
• POE.RETURN.COST.EDIT
• SOE.RETURN.PROCESS
• SOE.RGA.REQUIRED
• SOE.NONRETURN.PROCESS
• OVERRIDE.RETURN.PAYMENT
Rel. 8.7.9 Purchasing
© 2014 Epicor Software Corporation. All rights reserved. 19
Buy Lines Overview Buy lines are used throughout the Purchasing program to help you keep track of and replenish your inventory. Buy lines are groups of products that you buy together to meet a vendor target. For example, you can create buy lines with fast moving or slow moving products.
The parameters you set are used to help you determine if you need to keep or procure stock for your company. These parameters also populate the Suggested Purchase Order Queue.
About Buy Lines The Purchasing program uses different of buy line types: primary buy lines and super buy lines.
The primary buy line is the main buy line in which a product resides. A product can be in a primary buy line and have a secondary buy line attached to it. Secondary buy lines help you meet a vendor target more quickly. For more information, see Recalculating for Secondary Buy Lines or to assign a secondary buy line at the product level, see Assigning Secondary Buy Lines for Products.
A super buy line is a buy line made up of other buy lines. Super buy lines let you take advantage of specials provided by your vendors. A vendor can replenish items in multiple buy lines. Super buy lines are created and maintained just like primary buy lines.
If the Set Br/Tr "Suggest On All" Flag to "N" For Lines In A Super Buy Line control maintenance record is set to Yes, then users cannot change the Suggest On All settings associated with the super buy line. If set to No, the system sets the Suggest On All field to No for all territories and null for all branches associated with the buy line, regardless of which ones are associated with the super buy line.
You can merge the buy lines into a super buy line with a new vendor target. The system recalculates the line buy days supply for all the items based on the new target. For example, a vendor may send you notice that if you buy $1000 of copper fixtures by the end of the week, there is a 10% discount. You can combine different copper fixture buy lines to meet that vendor target more quickly. For more information, see Creating Super Buy Lines.
The following are primary terms used in dealing with buy lines:
Term Description Buy lines Groups of products that you buy together to meet vendor targets.
Vendor target The amount of product the vendor identifies as the minimum amount you can buy. For example, Jones Plumbing may require you to buy $500 worth of product before shipping without freight fees. In contrast, Smith's Supply may require you to buy enough product to fill a truck based on load factor before providing a discount. The system provides several options to meet the vendor target. Vendor targets can be in dollars, pounds (weight), pieces, or load factor.
Projected inventory level
The amount you physically have on hand, minus the amount committed to orders, plus the amount coming in on transfers and purchase orders (see the formula). Each product has its own projected inventory level (PIL).
Note: The system maintains branch priorities when there are multiple parent branches whose PIL can meet the child's needs.
Solar Eclipse Purchasing Rel. 8.7.9
20 © 2014 Epicor Software Corporation. All rights reserved.
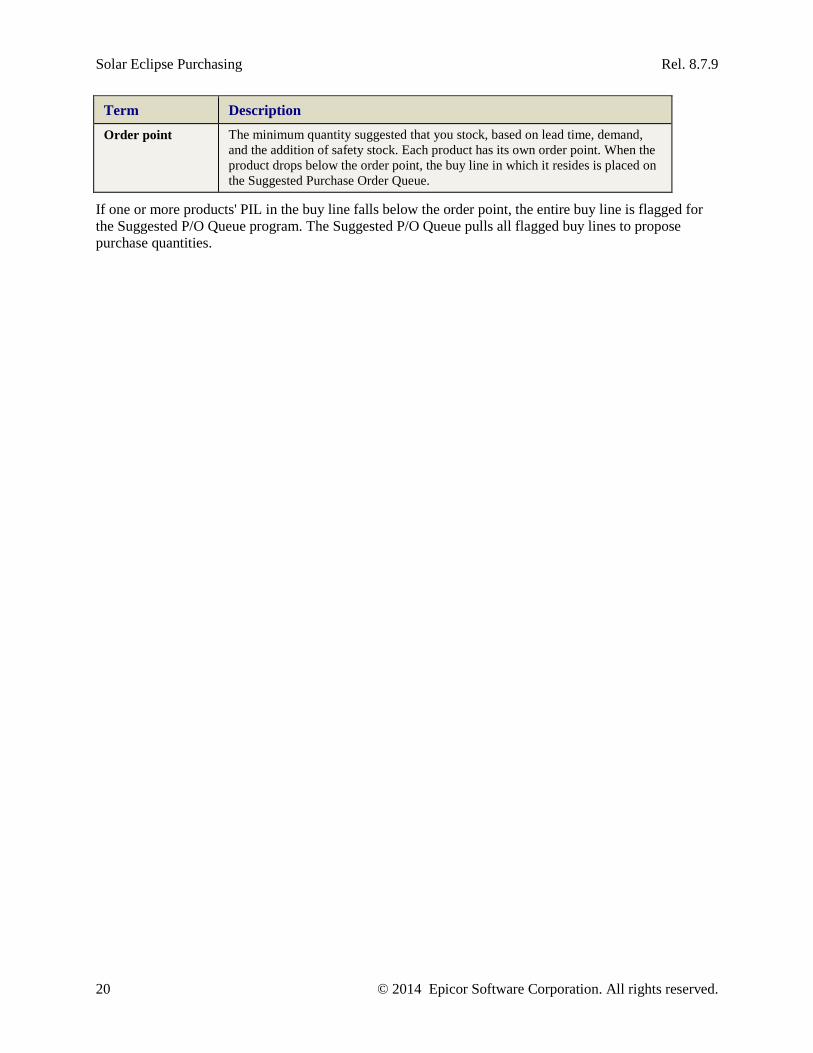
Term Description Order point The minimum quantity suggested that you stock, based on lead time, demand,
and the addition of safety stock. Each product has its own order point. When the product drops below the order point, the buy line in which it resides is placed on the Suggested Purchase Order Queue.
If one or more products' PIL in the buy line falls below the order point, the entire buy line is flagged for the Suggested P/O Queue program. The Suggested P/O Queue pulls all flagged buy lines to propose purchase quantities.
Rel. 8.7.9 Purchasing
© 2014 Epicor Software Corporation. All rights reserved. 21
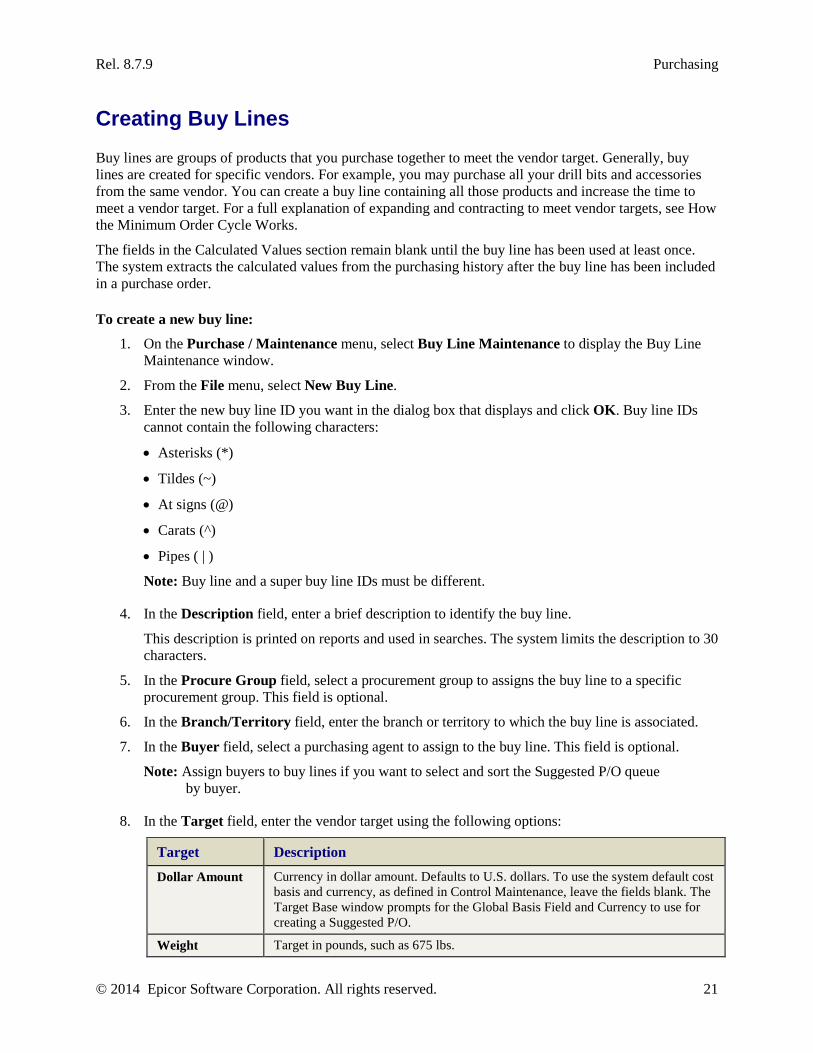
Creating Buy Lines Buy lines are groups of products that you purchase together to meet the vendor target. Generally, buy lines are created for specific vendors. For example, you may purchase all your drill bits and accessories from the same vendor. You can create a buy line containing all those products and increase the time to meet a vendor target. For a full explanation of expanding and contracting to meet vendor targets, see How the Minimum Order Cycle Works.
The fields in the Calculated Values section remain blank until the buy line has been used at least once. The system extracts the calculated values from the purchasing history after the buy line has been included in a purchase order.
To create a new buy line:
1. On the Purchase / Maintenance menu, select Buy Line Maintenance to display the Buy Line Maintenance window.
2. From the File menu, select New Buy Line.
3. Enter the new buy line ID you want in the dialog box that displays and click OK. Buy line IDs cannot contain the following characters:
• Asterisks (*)
• Tildes (~)
• At signs (@)
• Carats (^)
• Pipes ( | )
Note: Buy line and a super buy line IDs must be different.
4. In the Description field, enter a brief description to identify the buy line.
This description is printed on reports and used in searches. The system limits the description to 30 characters.
5. In the Procure Group field, select a procurement group to assigns the buy line to a specific procurement group. This field is optional.
6. In the Branch/Territory field, enter the branch or territory to which the buy line is associated.
7. In the Buyer field, select a purchasing agent to assign to the buy line. This field is optional.
Note: Assign buyers to buy lines if you want to select and sort the Suggested P/O queue by buyer.
8. In the Target field, enter the vendor target using the following options:
Target Description Dollar Amount Currency in dollar amount. Defaults to U.S. dollars. To use the system default cost
basis and currency, as defined in Control Maintenance, leave the fields blank. The Target Base window prompts for the Global Basis Field and Currency to use for creating a Suggested P/O.
Weight Target in pounds, such as 675 lbs.
Solar Eclipse Purchasing Rel. 8.7.9
22 © 2014 Epicor Software Corporation. All rights reserved.
Target Description Pieces Whole number of items, such as 300 each.
Load Factor Target in cubic feet, such as 100 ft.
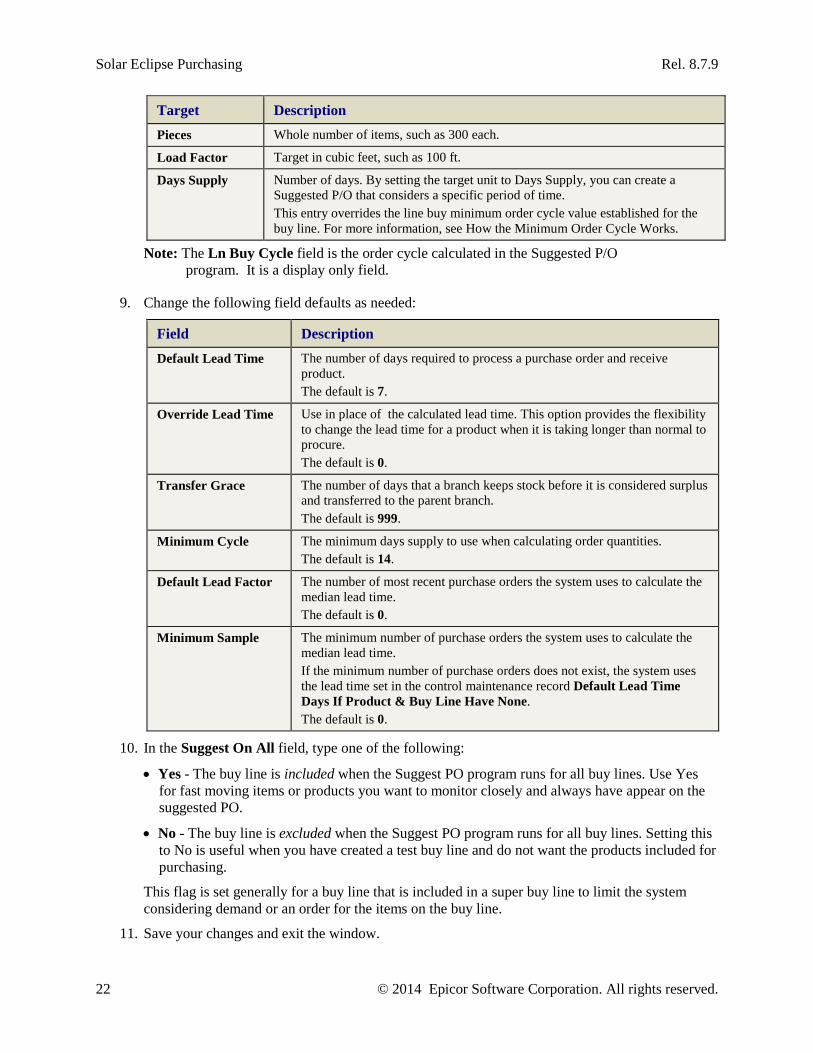
Days Supply Number of days. By setting the target unit to Days Supply, you can create a Suggested P/O that considers a specific period of time. This entry overrides the line buy minimum order cycle value established for the buy line. For more information, see How the Minimum Order Cycle Works.
Note: The Ln Buy Cycle field is the order cycle calculated in the Suggested P/O program. It is a display only field.
9. Change the following field defaults as needed:
Field Description Default Lead Time The number of days required to process a purchase order and receive
product. The default is 7.
Override Lead Time Use in place of the calculated lead time. This option provides the flexibility to change the lead time for a product when it is taking longer than normal to procure. The default is 0.
Transfer Grace The number of days that a branch keeps stock before it is considered surplus and transferred to the parent branch. The default is 999.
Minimum Cycle The minimum days supply to use when calculating order quantities. The default is 14.
Default Lead Factor The number of most recent purchase orders the system uses to calculate the median lead time. The default is 0.
Minimum Sample The minimum number of purchase orders the system uses to calculate the median lead time. If the minimum number of purchase orders does not exist, the system uses the lead time set in the control maintenance record Default Lead Time Days If Product & Buy Line Have None. The default is 0.
10. In the Suggest On All field, type one of the following:
• Yes - The buy line is included when the Suggest PO program runs for all buy lines. Use Yes for fast moving items or products you want to monitor closely and always have appear on the suggested PO.
• No - The buy line is excluded when the Suggest PO program runs for all buy lines. Setting this to No is useful when you have created a test buy line and do not want the products included for purchasing.
This flag is set generally for a buy line that is included in a super buy line to limit the system considering demand or an order for the items on the buy line.
11. Save your changes and exit the window.
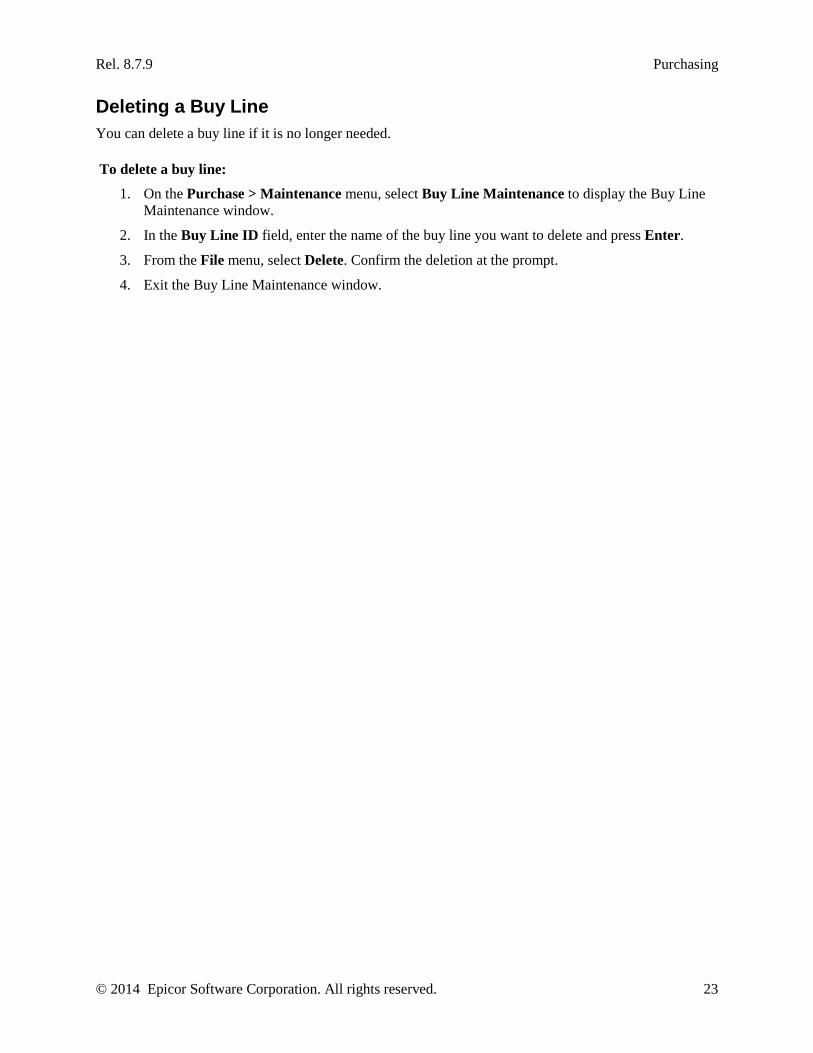
Rel. 8.7.9 Purchasing
© 2014 Epicor Software Corporation. All rights reserved. 23
Deleting a Buy Line You can delete a buy line if it is no longer needed.
To delete a buy line:
1. On the Purchase > Maintenance menu, select Buy Line Maintenance to display the Buy Line Maintenance window.
2. In the Buy Line ID field, enter the name of the buy line you want to delete and press Enter.
3. From the File menu, select Delete. Confirm the deletion at the prompt.
4. Exit the Buy Line Maintenance window.
Solar Eclipse Purchasing Rel. 8.7.9
24 © 2014 Epicor Software Corporation. All rights reserved.
Creating Super Buy Lines A super buy line is a buy line made up of other buy lines. Super buy lines let you take advantage of specials provided by your vendors. You merge existing buy lines into a single buy line for a vendor who can replenish all items in all of the included buy lines. You create a new buy line with a new target.
For example, you buy screws (SCR buy line), washers (WSH buy line), and nails (NAIL buy line) from different vendors. However, you discover that you could purchase all three from the same vendor at a different target. You create a super buy line (MET) selecting SCR, WSH, and NAIL to make up the new buy line. With all three buy lines together, you can meet the vendor target more quickly and only have to cut one purchase order – saving time and money.
Note: For super buy lines that do not have a procure group specified the suggested P/O report will first look to the individual product lines contained within the super buy line to determine procure group. If individual product lines do not contain a procure group the system uses a default group of DFLT.
Before creating a super buy line, identify the buy lines you want to group together.
To create a super buy line:
1. From the Purchase > Maintenance menu, select Buy Line Maintenance to display the Buy Line Maintenance window.
2. From the File menu, select New Buy Line.
3. In the Buy Line ID field, enter the name of the super buy line in the field provided. The name must be unique and is limited to eight characters.
Note: Buy line and a super buy line IDs must be different.
4. In the Description field, enter a short description of the super buy line. The system limits the description to 30 characters.
5. From the Information menu, select Super Buy Lines. The Super Buy Line window displays.
6. Enter the buy lines that you want to group together for the super buy line.
7. Save your changes and exit the window.
Rel. 8.7.9 Purchasing
© 2014 Epicor Software Corporation. All rights reserved. 25
Resequencing Buy Lines Products are initially sequenced within a buy line according to the order in which they are created. When searching for a buy line in order entry transaction, the products display in a list from which to make selections. This list is sorted by product number. The Resequence Buy Line program lets you rearrange the sort sequence of the products in a buy line. For example, you have new models of products. You insert the new products and then resequence the buy line.
After resequencing, if you use the slash buy line feature (//buy line name) in Purchase Order Entry and other programs to display the products in a buy line, the products display in the resequenced order.
To access the product record for an item in the buy line, select the item, right-click, and select Product Maintenance.
Running the Resequence Program Run the resequence program after creating or adding new products to a buy line. Resequencing time depends on the amount of products in that buy line.
To resequence a buy line:
1. From the Purchase > Maintenance menu, select Resequence Buy Line to display the Resequence Buy Line window.
2. In the Buy Line field, enter the name of the buy line you want to update and press Enter.
3. From the Edit menu, as follows:
Menu selection... To... Edit > Find search for a product the buy line
Edit > Move Row adjust a product's position in the buy line
Edit > Insert Row add an item to the buy line
4. From the File menu, select Sort to sort by the following:
Sort By Option Displays the products... Sort by in order according to the number in the Sort Code field in each product’s product
record.
Alpha using a left justified sort with numbers coming before letters, and with upper case letters coming before lower case letters.
Numeric using a right justified sort of the entire product description no matter how long it is. Only do a numeric sort of the products if the description of every product in the line is limited to the first line and consists only of a manufacturer's part number.
'Like' Products according to similar product descriptions.
Keyword #1 according to the first entry in the Additional Key Words field in Product Maintenance. Products not assigned additional keywords appear before those that do have assigned keywords.
Keyword #2 according to the second entry in the Additional Key Words field in Product Maintenance. Products not assigned additional keywords appear before those that do have assigned keywords.
Solar Eclipse Purchasing Rel. 8.7.9
26 © 2014 Epicor Software Corporation. All rights reserved.
5. Exit the window to complete the resequence.
Rel. 8.7.9 Purchasing
© 2014 Epicor Software Corporation. All rights reserved. 27
Calculated Buy Line Values Buy Line Maintenance displays the following calculated values, based on the current information for the selected buy line. These calculated fields are not populated until the buy line has been used at least one time.
Field Description Line Buy Order Cycle
Displays the current order cycle calculated for the buy line when you run a Suggested P/O. You can force an order cycle by entering "days supply" as the vendor target in the Target Unit field. For more information, see How the Minimum Order Cycle Works.
Target The amount of product the vendor identifies as the minimum amount you can buy. Vendor targets are measured in pieces, pounds, dollars, or load factors according to the parameters set. For more information, see Specifying the Vendor Target for Buy Lines.
Default Lead Time The number of days it takes a vendor to supply stock, from the date of a submitted purchase order to the date of received shipment from the date of the purchase order to the receipt date. For more information, see Entering Lead Time Information for Buy Lines.
Override Lead Time Parameter you set to supersede the product or buy line lead time. Used with super buy lines. For more information, see Entering Lead Time Information for Buy Lines.
Minimum Order Cycle
The order cycle is the normal number of days between your purchasing. The amount of days in an order cycle is based on the order point, plus the lead time, plus the time to get to the vendor target. Each product has its own order cycle. For more information, see How the Minimum Order Cycle Works.
Default Lead Factor The number of most-recent stock receipts that the system should examine to calculate the median lead time for the buy line. For more information, see How the System Calculates Lead Time. Use the Override Lead Time field to supersede the product's lead time. For more information, see Entering Lead Time Information for Buy Lines.
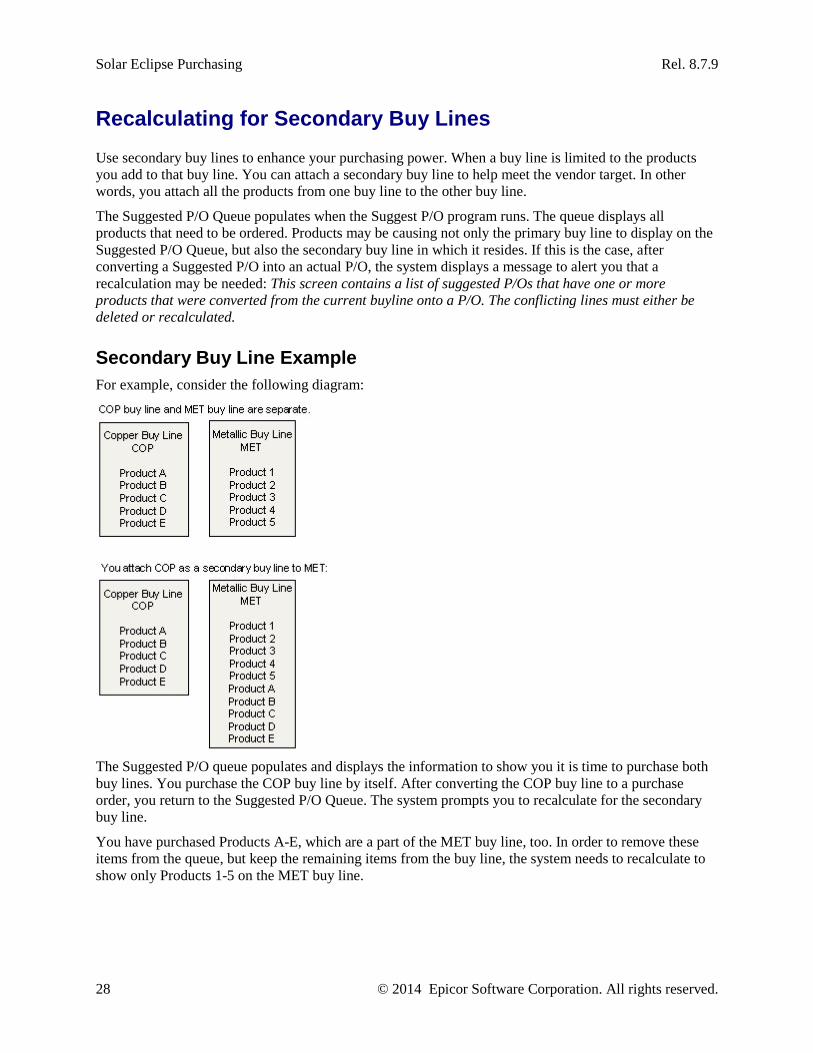
Solar Eclipse Purchasing Rel. 8.7.9
28 © 2014 Epicor Software Corporation. All rights reserved.
Recalculating for Secondary Buy Lines Use secondary buy lines to enhance your purchasing power. When a buy line is limited to the products you add to that buy line. You can attach a secondary buy line to help meet the vendor target. In other words, you attach all the products from one buy line to the other buy line.
The Suggested P/O Queue populates when the Suggest P/O program runs. The queue displays all products that need to be ordered. Products may be causing not only the primary buy line to display on the Suggested P/O Queue, but also the secondary buy line in which it resides. If this is the case, after converting a Suggested P/O into an actual P/O, the system displays a message to alert you that a recalculation may be needed: This screen contains a list of suggested P/Os that have one or more products that were converted from the current buyline onto a P/O. The conflicting lines must either be deleted or recalculated.
Secondary Buy Line Example For example, consider the following diagram:
The Suggested P/O queue populates and displays the information to show you it is time to purchase both buy lines. You purchase the COP buy line by itself. After converting the COP buy line to a purchase order, you return to the Suggested P/O Queue. The system prompts you to recalculate for the secondary buy line.
You have purchased Products A-E, which are a part of the MET buy line, too. In order to remove these items from the queue, but keep the remaining items from the buy line, the system needs to recalculate to show only Products 1-5 on the MET buy line.
Rel. 8.7.9 Purchasing
© 2014 Epicor Software Corporation. All rights reserved. 29
Recalculating and Adding Secondary Buy Lines After you commit the P/O and return to the Suggested P/O Queue, the system displays the message: "This window contains a list of Suggested P/Os that have one or more products that were converted from the current buy line onto a P/O. The conflicting lines must either be deleted or recalculated. Press <enter> to continue."
To recalculate the Suggested P/O Queue for a secondary buy line change:
1. From the Purchase > Queues, select Suggested P/O to display the Suggested P/O Queue window.
2. Place the cursor on the buy line you want to recalculate.
3. From the Edit menu, select Recalculate. The Suggested Purchase Order prompt displays.
Note: If the buy line you select no longer qualifies under the Type that you selected due to a purchase a message displays indicating that the buy line information has changed.
4. Verify the information for the buy line.
5. Do one of the following to run the recalculation:
• Use the Print and Hold buttons
• From the File menu, select Begin (No Print)
6. Save your changes and exit the window.
To add a secondary buy line to an existing buy line:
1. From the Maintenance menu, select Product to display the Product Maintenance window.
2. Display the product you want to add to a secondary buy line.
3. From the Additional Data menu, select Secondary Buy Lines. The Secondary Buy Lines window displays.
4. In the Buy Line field, enter the Buy Lines to which you want to add this product.
5. In the Buy Package (ea) field, indicate that package quantity.
6. In the Divisible field, indicate if the package is divisible.
7. Save your changes and exit the window.
Solar Eclipse Purchasing Rel. 8.7.9
30 © 2014 Epicor Software Corporation. All rights reserved.
Purchasing Entire Buy Lines Depending on your needs you can purchase buy lines in one of two ways. You can use the Suggested P/O Queue and convert to an actual purchase order, or you can use the Purchase Order Entry window and use the Product Family Selection window.
For example, you may have a buy line that contains 20 products, and 18 of the products are fast moving items. If that buy line appears on the Suggested P/O Queue, then you know that purchasing this buy line meets a vendor target. You can then convert this buy line to a purchase order from the Suggested P/O Queue.
However, you may have another buy line that contains 20 products, but 10 of the products are slow moving items. You know you only purchase those items once every six months. You have set yourself a reminder to purchase. You can make the purchase from the Purchase Order Entry window and order only those 10 items off the reorder pad. This purchase does not have to meet a vendor target because you are not purchasing from the Suggested P/O Queue.
To purchase a buy line from the Suggested P/O Queue:
1. From the Purchase > Queues menu, select Suggested P/O to display the Suggested P/O Queue window.
2. Display the queue for the branch.
3. Place the cursor next on the buy line you want to purchase.
4. From the File menu, select Convert to Actual POs.
The Convert Suggested to Actual P/O window displays. The Branch and Line fields populate.
5. In the Line or Emergency field, type L to show all items in the line buy or E to show only short products.
6. In the Vendor field, enter the vendor to whom to direct the converted purchase order.
7. In the Round Short to Package Quantity field, indicate if you want the system to round to package quantity.
8. Click OK to create an actual purchase order and display the Purchase Order Entry window and further modify or cancel the order.
For multi-branch networks, when a product is centrally purchased, but not centrally warehoused, the system generates individual, consecutively numbered purchase orders for each child branch.
9. Save your changes and exit the window.
Rel. 8.7.9 Purchasing
© 2014 Epicor Software Corporation. All rights reserved. 31
Maintaining Buy Lines Buy lines group together those products that meet a vendor target and qualify the purchasing branch for a line buy. Use the Buy Line Maintenance window and menu options to configure buy lines. By default, the system lists the specific branch and territory settings that have been entered for that buy line. For example, you may only have settings added for branches 1 and 3, but nothing non-standard for branch 2, so branch 2 does not display.
Use the Toggle Hierarchy option to display branches in the hierarchy list. The system prompts you to enter the branch for which you want to view the hierarchy. The Control line at the bottom of the Br/Terr column indicates the default values that each branch or territory inherits and uses unless otherwise specified. If the system does not have specific settings in the territories for this buy line containing the branch for a given parameter, the system uses the values listed in the Control settings. If branch hierarchies are being used, the system does not allow changes to the Control settings from Inventory Maintenance.
To display a buy line on the Buy Line Maintenance screen:
1. From the Purchase > Maintenance menu, select Buy Line Maintenance to display the Buy Line Maintenance window.
2. In the Buy Line ID field, enter the buy line name and press Enter.
The buy line information displays.
3. To display a different buy line, replace the buy line name with a new buy line name in the Buy Line ID field and press Enter.
4. To view the hierarchy, from the File menu, select Toggle Hierarchy and select the branch for which you want to view the hierarchy.
5. Exit the window.
Entering and Viewing Buy Line Information The Buy Line Maintenance window contains fields for entering data used for reports and calculations and for displaying system-calculated data. If no value is specified for a field, some of the fields on the window use system-defined defaults provided in parentheses.
If you make changes at the branch level, you should reflect these changes in File Definition Maintenance.
You can override the defaults on the Buy Line Maintenance window by entering values in the fields. You can also limit access to the fields for this window. See Limiting Access to Buy Line Maintenance.
The following topics are related to using the fields on the window:
Related Fields Topics Buy Line ID Creating Buy Lines
Deleting Buy Lines Description
Procure Group Creating and Deleting Procurement Groups Assigning Buy Lines to Procurement Groups
Branch or Territory Displays available branches and territories for the displayed information.
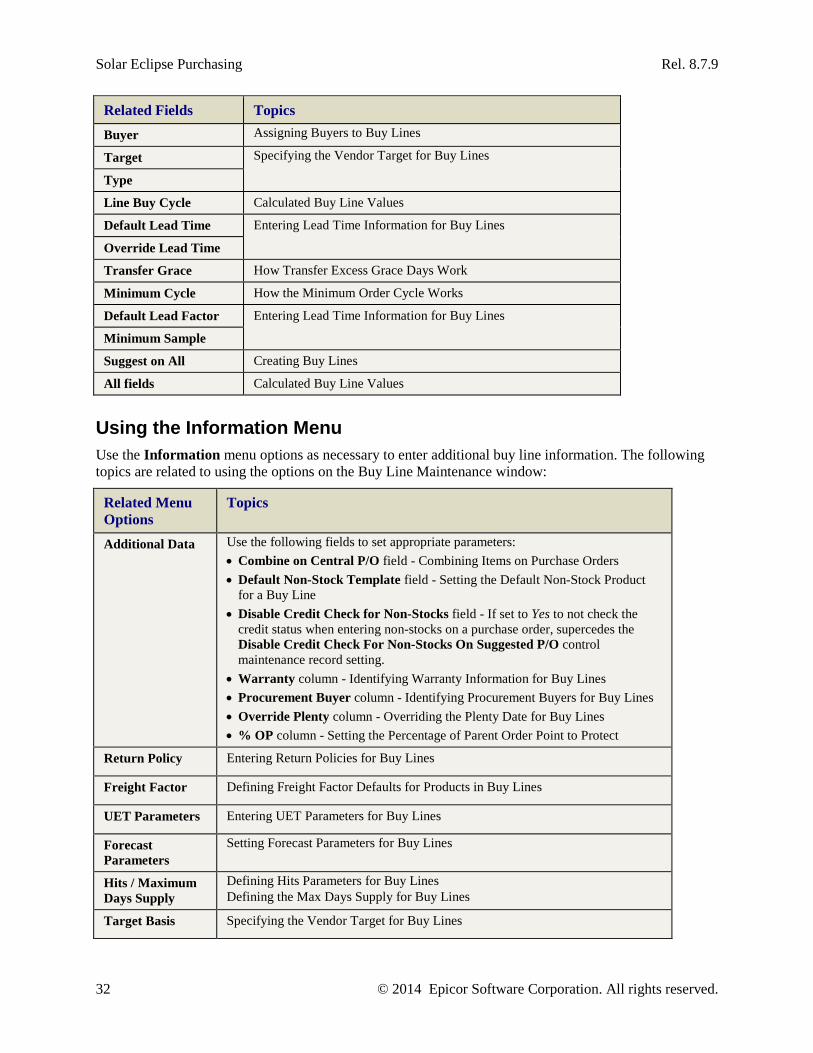
Solar Eclipse Purchasing Rel. 8.7.9
32 © 2014 Epicor Software Corporation. All rights reserved.
Related Fields Topics Buyer Assigning Buyers to Buy Lines
Target Specifying the Vendor Target for Buy Lines
Type
Line Buy Cycle Calculated Buy Line Values
Default Lead Time Entering Lead Time Information for Buy Lines
Override Lead Time
Transfer Grace How Transfer Excess Grace Days Work
Minimum Cycle How the Minimum Order Cycle Works
Default Lead Factor Entering Lead Time Information for Buy Lines
Minimum Sample
Suggest on All Creating Buy Lines
All fields Calculated Buy Line Values
Using the Information Menu Use the Information menu options as necessary to enter additional buy line information. The following topics are related to using the options on the Buy Line Maintenance window:
Related Menu Options
Topics
Additional Data Use the following fields to set appropriate parameters: • Combine on Central P/O field - Combining Items on Purchase Orders • Default Non-Stock Template field - Setting the Default Non-Stock Product
for a Buy Line • Disable Credit Check for Non-Stocks field - If set to Yes to not check the
credit status when entering non-stocks on a purchase order, supercedes the Disable Credit Check For Non-Stocks On Suggested P/O control maintenance record setting.
• Warranty column - Identifying Warranty Information for Buy Lines • Procurement Buyer column - Identifying Procurement Buyers for Buy Lines • Override Plenty column - Overriding the Plenty Date for Buy Lines • % OP column - Setting the Percentage of Parent Order Point to Protect
Return Policy Entering Return Policies for Buy Lines
Freight Factor Defining Freight Factor Defaults for Products in Buy Lines
UET Parameters Entering UET Parameters for Buy Lines
Forecast Parameters
Setting Forecast Parameters for Buy Lines
Hits / Maximum Days Supply
Defining Hits Parameters for Buy Lines Defining the Max Days Supply for Buy Lines
Target Basis Specifying the Vendor Target for Buy Lines
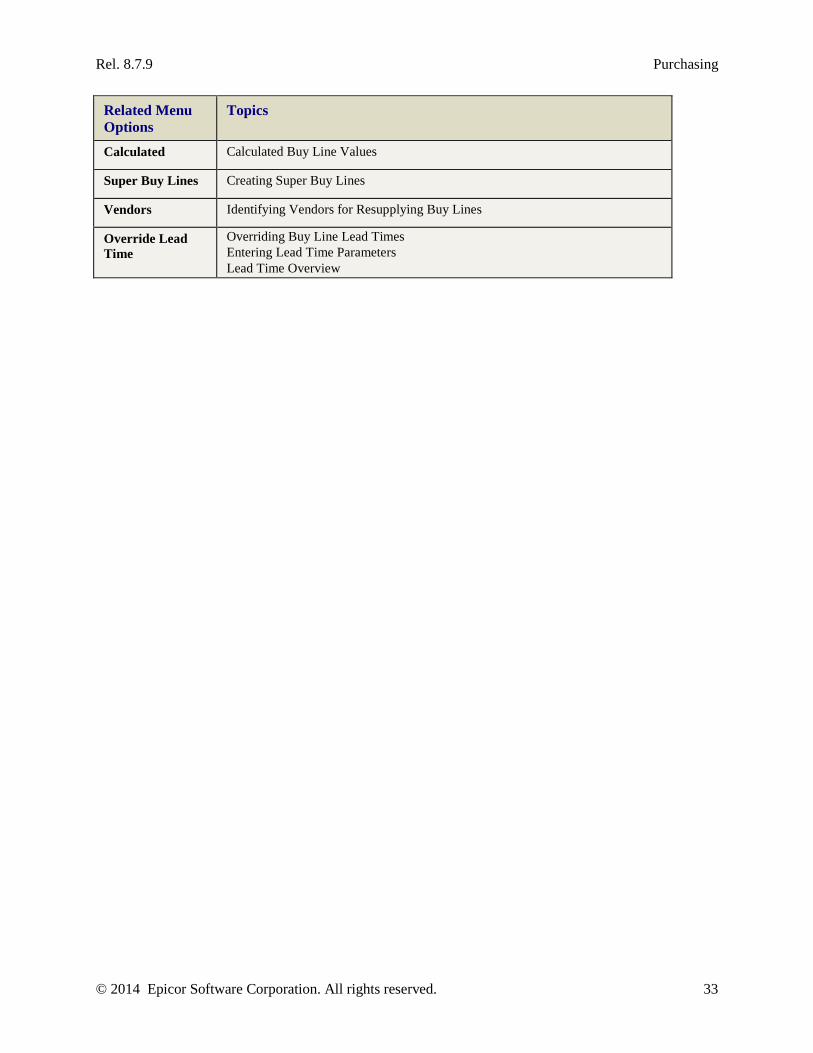
Rel. 8.7.9 Purchasing
© 2014 Epicor Software Corporation. All rights reserved. 33
Related Menu Options
Topics
Calculated Calculated Buy Line Values
Super Buy Lines Creating Super Buy Lines
Vendors Identifying Vendors for Resupplying Buy Lines
Override Lead Time
Overriding Buy Line Lead Times Entering Lead Time Parameters Lead Time Overview
Solar Eclipse Purchasing Rel. 8.7.9
34 © 2014 Epicor Software Corporation. All rights reserved.
Limiting Access to Buy Line Maintenance Use authorization keys and control maintenance records to limit users' access to Buy Line Maintenance. When a user displays the Buy Line Maintenance window, the system checks the user file in User Maintenance to verify that the user has permission to view the window. Then, the system checks the level for which the user has access.
For example, you have two employees. One uses Buy Line Maintenance to verify data and one uses buy line maintenance to manage lead times. Employee 1 is granted an access level to view data only. Employee 2 is granted permission to view all fields and edit lead time fields.
To limit Buy Line Maintenance access:
1. From the System > System Files > User Control menu, select User Maintenance to display the User Maintenance window.
2. In the User field, enter the user for which you want to limit access.
3. From the Maintenance menu, select Authorization Keys to display the Authorization Key/Template Maintenance window.
4. In the Available Keys column, place the cursor on the BUYLINE.MAINT authorization key and click Assign.
The authorization key moves to the Assigned Keys column.
5. In the Auth Level column and enter the level you want to assign:
• Level 1 - Allows access in view-only mode.
• Level 2 - Allows access to edit buy lines listed in the VALID.BLINES authorization key.
• Level 3 - Allows access to edit all buy lines.
6. In the Available Keys column, place the cursor on the BUYLINE.MAINT.LEVEL authorization key and click Assign.
The authorization key moves to the Assigned Keys column.
7. Tab to the Auth Level column and enter the lever you want to assign. Access can be 0 (view only) to 99. This number corresponds to the assignments for the Buy Line Maintenance Authorization Levels control maintenance record. See Defining Buy Line Authorization Levels.
8. Save your changes and exit the window.
Defining Buy Line Authorization Levels Use the Buy Line Maintenance Authorization Levels control maintenance record to further define access for users at the field level.
To limit access to Buy Line Maintenance fields:
1. Assign the Buy Line Maintenance authorization keys.
2. From the System > System Files menu, select Control Maintenance.
3. In the Keyword field, enter Buy Line Maint.
Rel. 8.7.9 Purchasing
© 2014 Epicor Software Corporation. All rights reserved. 35
4. Select Buy Line Maintenance Authorization Levels to display the Auth Levels Required to Edit Buy Line Maintenance window.
5. For each field description, indicate the level of access required for editing that field.
For example, you only want purchasing agents to override lead time parameters. You assign this field a level of 90. Any user with a level less than 90 on the BUYLINE.MAINT.LEVEL authorization key will not be able to access the Override Lead Time field for editing.
6. Save your changes and exit the window.
Solar Eclipse Purchasing Rel. 8.7.9
36 © 2014 Epicor Software Corporation. All rights reserved.
Setting the Nonstock Product Default for Buy Lines Branch stock flags determine whether a product is a known stock item that should always be restocked or a known non-stock item that should not be restocked. You can set branch stock flags manually or by the system. The system determines if a product is a stock or nonstock item, based on the number of hits the product receives. See Defining Hits Parameters for a Buy Line for more information on hits.
You can set a default nonstock product at the buy line level. When you create a new product in Product Maintenance and the product needs to be added to the buy line, you can decide which product template to use when assigning a product.
To set the default nonstock product for a buy line:
1. From the Purchase > Maintenance menu, select Buy Line Maintenance to display the Buy Line Maintenance window.
2. In the Buy Line ID field, enter the buy line to which you want to set the default product template and press Enter.
3. From the Information menu, select Default Nonstock Template to display the Default Nonstock Template entry window.
4. Enter the product to use for the template.
5. Save your changes and exit the window.
Rel. 8.7.9 Purchasing
© 2014 Epicor Software Corporation. All rights reserved. 37
Displaying the Buy Line Maintenance Change Log Use Buy Line Maintenance to view the Buy Line Maintenance Change Log. The Buy Line Maintenance Change Log records all changes, both branch-specific and non-branch specific, to any of the fields on the Buy Line Maintenance window. The system also creates a log entry when a change is made that affects the branch level records. If several changes are made to a buy line record, the user is prompted once upon exiting the window to enter a reason for the change. The reason entered is recorded for each change in the change log.
If a change on the Buy Line Maintenance window is branch-specific, the system displays the log entry preceded by "BR:" followed by the branch ID where the change was made and the log entry. For example, if the buyer for branch 3 was changed from IRISM to DAWNM, and the Maint Logging field in File Definition Maintenance for the file was set to "3-Attr W/ Old Value," then the entry in the Change Log would display as follows: "BR:3; BUYER: IRISM."
You can define the maintenance logging settings for any file using File Definition Maintenance.
To define information for branch-specific changes in Buy Line Maintenance, modify the maintenance logging settings for BUY.LINE.BR. For more information, see File Definition Maintenance.
To define information for non-branch specific changes in Procure Group Maintenance, modify the maintenance logging settings for BUY.LINE. For more information, see File Definition Maintenance.
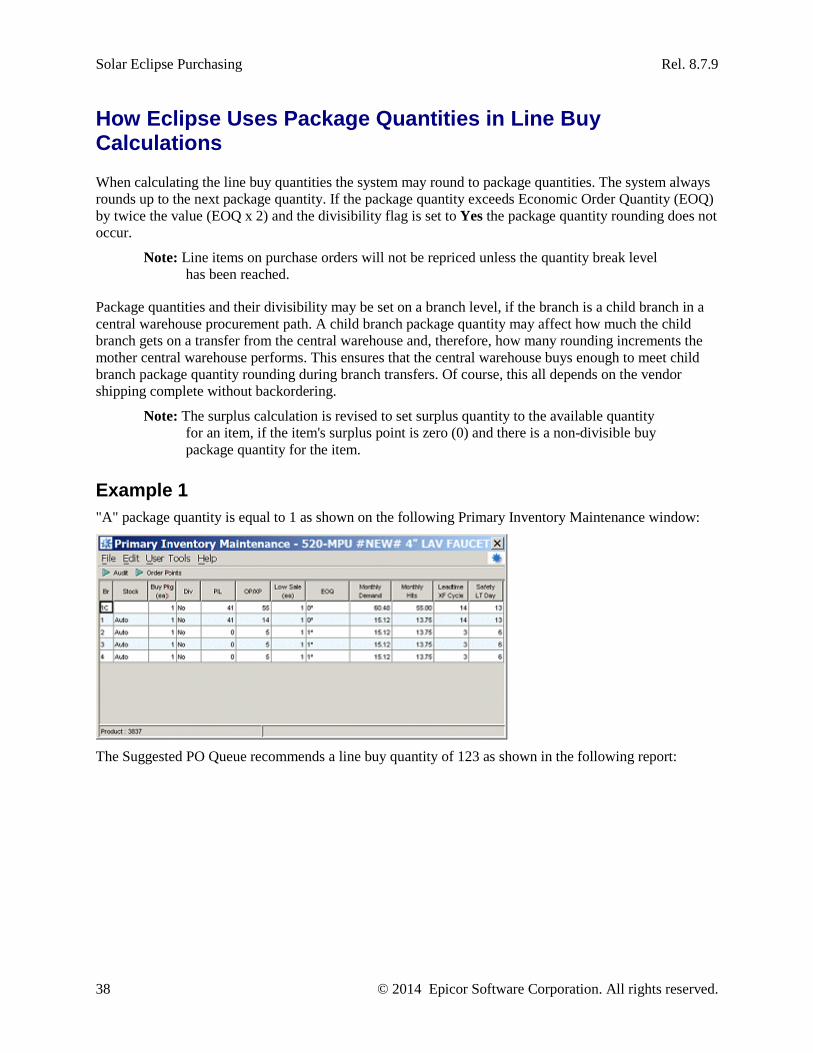
Solar Eclipse Purchasing Rel. 8.7.9
38 © 2014 Epicor Software Corporation. All rights reserved.
How Eclipse Uses Package Quantities in Line Buy Calculations When calculating the line buy quantities the system may round to package quantities. The system always rounds up to the next package quantity. If the package quantity exceeds Economic Order Quantity (EOQ) by twice the value (EOQ x 2) and the divisibility flag is set to Yes the package quantity rounding does not occur.
Note: Line items on purchase orders will not be repriced unless the quantity break level has been reached.
Package quantities and their divisibility may be set on a branch level, if the branch is a child branch in a central warehouse procurement path. A child branch package quantity may affect how much the child branch gets on a transfer from the central warehouse and, therefore, how many rounding increments the mother central warehouse performs. This ensures that the central warehouse buys enough to meet child branch package quantity rounding during branch transfers. Of course, this all depends on the vendor shipping complete without backordering.
Note: The surplus calculation is revised to set surplus quantity to the available quantity for an item, if the item's surplus point is zero (0) and there is a non-divisible buy package quantity for the item.
Example 1 "A" package quantity is equal to 1 as shown on the following Primary Inventory Maintenance window:
The Suggested PO Queue recommends a line buy quantity of 123 as shown in the following report:
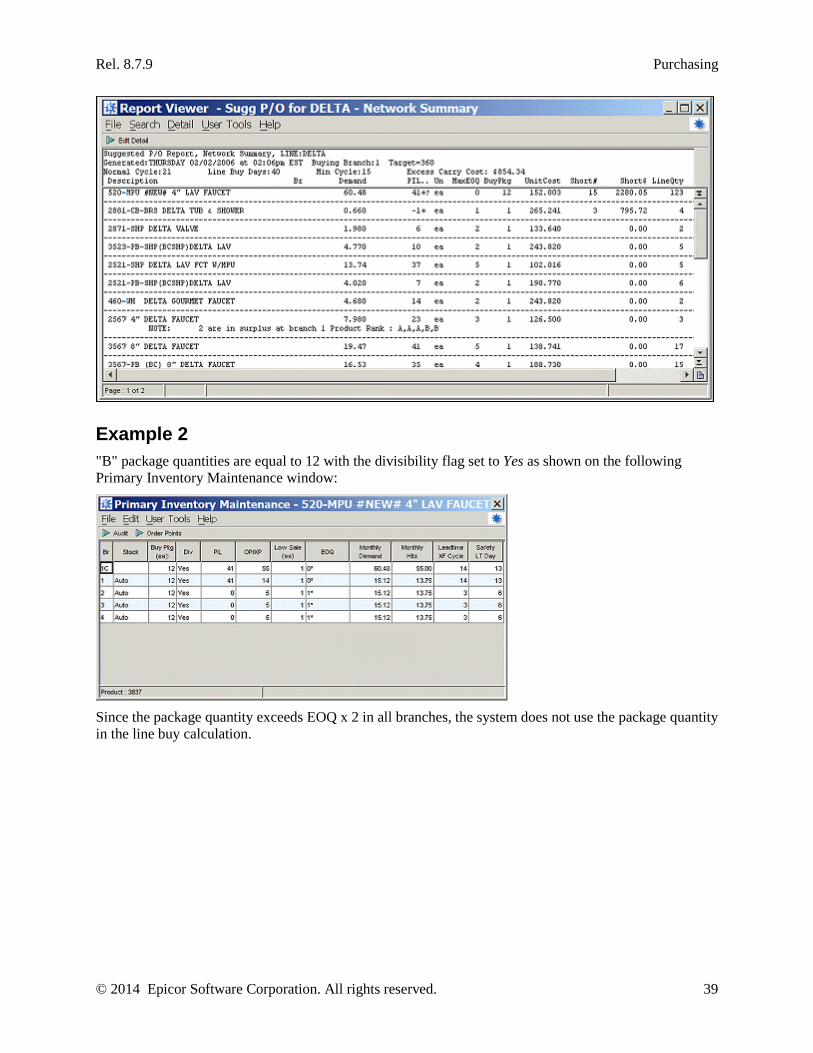
Rel. 8.7.9 Purchasing
© 2014 Epicor Software Corporation. All rights reserved. 39
Example 2 "B" package quantities are equal to 12 with the divisibility flag set to Yes as shown on the following Primary Inventory Maintenance window:
Since the package quantity exceeds EOQ x 2 in all branches, the system does not use the package quantity in the line buy calculation.
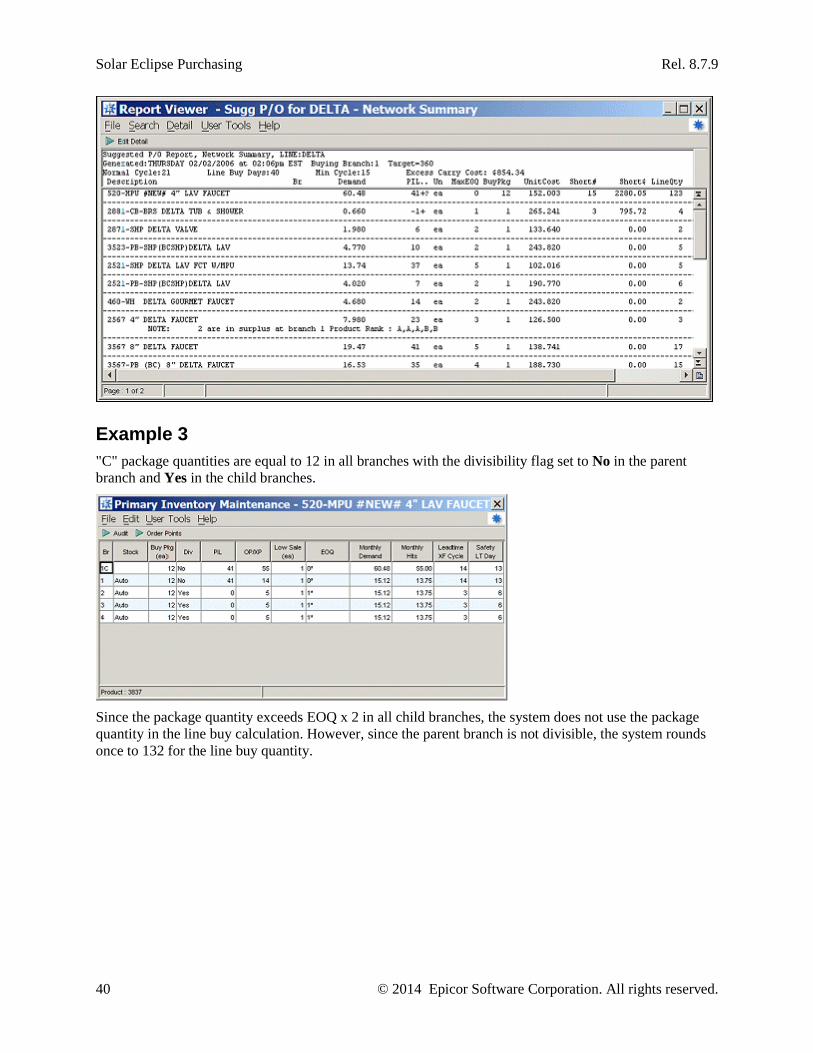
Solar Eclipse Purchasing Rel. 8.7.9
40 © 2014 Epicor Software Corporation. All rights reserved.
Example 3 "C" package quantities are equal to 12 in all branches with the divisibility flag set to No in the parent branch and Yes in the child branches.
Since the package quantity exceeds EOQ x 2 in all child branches, the system does not use the package quantity in the line buy calculation. However, since the parent branch is not divisible, the system rounds once to 132 for the line buy quantity.
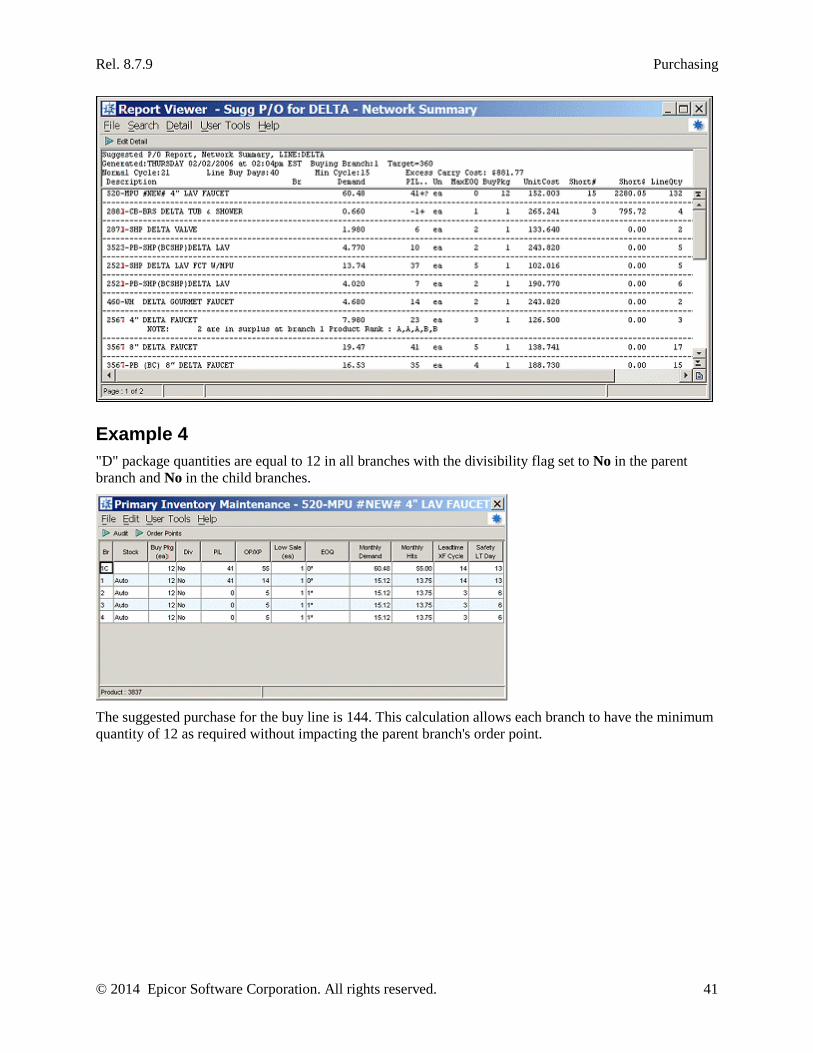
Rel. 8.7.9 Purchasing
© 2014 Epicor Software Corporation. All rights reserved. 41
Example 4 "D" package quantities are equal to 12 in all branches with the divisibility flag set to No in the parent branch and No in the child branches.
The suggested purchase for the buy line is 144. This calculation allows each branch to have the minimum quantity of 12 as required without impacting the parent branch's order point.

Solar Eclipse Purchasing Rel. 8.7.9
42 © 2014 Epicor Software Corporation. All rights reserved.
Rel. 8.7.9 Purchasing
© 2014 Epicor Software Corporation. All rights reserved. 43
Identifying Procurement Buyers for Buy Lines You can assign a procurement buyer to any buy line for any branch or territory in the company. If a procurement buyer is not assigned to a buy line, you can display the sales orders with procured items from the buy line in the Procurement Confirmation Queue using the regular buyer for the buy line.
As with other program settings, the system looks to the branch level to apply the setting. You can identify a procurement buyer for a branch or a territory.
To associate a procurement buyer with a buy line:
1. From the Purchase > Maintenance menu, select Buy Line Maintenance to display the Buy Line Maintenance window.
2. Display the buy line to which you want to assign a procurement buyer.
3. From the Information menu, select Additional Data to display the additional data parameters.
4. From the File menu, select Toggle Hierarchy to specify a branch or territory.
5. Enter the branch number in the dialog box.
6. In the Procurement Buyer field, enter the user ID you want.
7. Save your changes and exit the window.
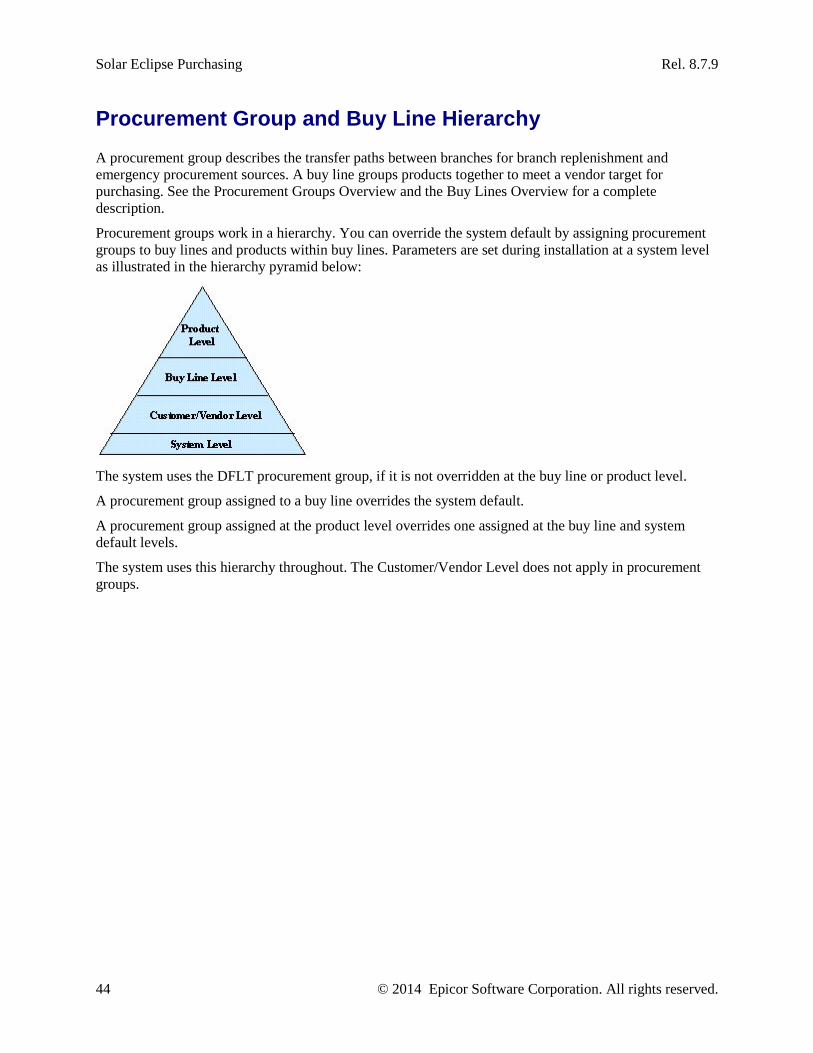
Solar Eclipse Purchasing Rel. 8.7.9
44 © 2014 Epicor Software Corporation. All rights reserved.
Procurement Group and Buy Line Hierarchy A procurement group describes the transfer paths between branches for branch replenishment and emergency procurement sources. A buy line groups products together to meet a vendor target for purchasing. See the Procurement Groups Overview and the Buy Lines Overview for a complete description.
Procurement groups work in a hierarchy. You can override the system default by assigning procurement groups to buy lines and products within buy lines. Parameters are set during installation at a system level as illustrated in the hierarchy pyramid below:
The system uses the DFLT procurement group, if it is not overridden at the buy line or product level.
A procurement group assigned to a buy line overrides the system default.
A procurement group assigned at the product level overrides one assigned at the buy line and system default levels.
The system uses this hierarchy throughout. The Customer/Vendor Level does not apply in procurement groups.
Rel. 8.7.9 Purchasing
© 2014 Epicor Software Corporation. All rights reserved. 45
Entering Lead Time Information for Buy Lines The system uses lead time information for determining the average lead time for the buy line, lead factor, and minimum lead samples. The system default values display in parentheses.
The lead time is the number of days it takes a vendor to supply stock, from the date of a submitted purchase order to the date of received shipment. The system calculates the median lead time days using the lead time factor for each product that makes up the buy line. You can use the median lead time or override the lead time for a buy line based on your knowledge of the products that make up that buy line. The lead time you enter to bypass the system lead time overrides any lead time set at the product level. The lead times set at the product level remain on the system, but are not used while the override lead time is set.
Seasonal products use a calculated lead time for that season.
To change the default lead time information for a buy line:
1. From the Purchase > Maintenance menu, select Buy Line Maintenance to display the Buy Line Maintenance window.
2. In the Default Lead Time field, enter the number of days it takes for stock to arrive at the warehouse, from placement of a purchase order to the receipt of new products.
3. In the Override Lead Time field, enter the number of lead time days to use in place of any calculated or user-defined lead time for all products within this buy line. This field is optional.
4. In the Default Lead Factor field, enter the number of most-recent stock receipts that the system should examine to calculate the median lead time for this buy line.
5. In the Minimum Sample field, enter the minimum number of most-recent purchase orders that the system should examine to determine the lead time for products in the buy line. This factor works with the default lead factor entered in the Default Lead Factor field to create a time period for estimating the lead time days for a product.
If the product has not been received on this number of purchase orders, the system uses the value specified in the Default Lead Time Days If Product And Buy Line Have None control maintenance record to determine the lead time for the product.
Note: The minimum lead samples factor in this field only applies if one is not set at the product level. This factor displays in the Minimum Lead Factor column on the Forecast Parameters Maintenance window.
6. Save your changes and exit the window
Solar Eclipse Purchasing Rel. 8.7.9
46 © 2014 Epicor Software Corporation. All rights reserved.
Setting Up Minimum Order Cycle Days for Buy Lines The Suggested P/O calculations expand or contract to meet the vendor target. If the order cycle contracts to less than the minimum order cycle days set at the buy line level, the Suggested P/O uses the minimum order cycle days instead. A minimum order cycle prevents you from issuing purchase orders so often that it becomes counter-productive. If a minimum order cycle is not set at the buy line level, the Suggested P/O uses the minimum order cycle days specified at the system level. For more information about the minimum order cycle, see How the Minimum Order Cycle Works.
For multiple branch companies, the minimum order cycle of buy lines being transferred to child branches should be equal to or greater than the minimum transfer cycle. Otherwise child branches will not receive sufficient stock when the Suggested P/O program contracts the estimated order cycle days below the minimum order cycle.
To set the minimum order cycle days at the buy line level:
1. From the Purchase > Maintenance menu, select Buy Line Maintenance to display the Buy Line Maintenance window.
2. In the Buy Line ID field, enter a buy line name and press Enter.
The buy line details display. The control line that displays shows the settings at the control maintenance level. All branches inherit these settings, unless otherwise overridden. Branches that have overriding information display with an asterisk (*) in the field that has been changed.
3. From the File menu, select Toggle Hierarchy and enter the branch you want to change and the territories to which it is assigned.
4. In the Minimum Cycle field, enter the minimum number of days to use as the order cycle.
If no value is specified at the buy line level, the system uses the Minimum Order Cycle Days For Suggested P/O control maintenance record. This value is displayed in the Control line.
5. From the File menu, select Save to save your changes and return to the previous window.
6. Save your changes and exit the window.
Rel. 8.7.9 Purchasing
© 2014 Epicor Software Corporation. All rights reserved. 47
Buy Line Example Setup You are creating a buy line for your copper tubing products. First, you use Buy Line Maintenance to create a new buy line named "COPTUB" for your purchasing branch. Minimally, you need to specify a vendor target unit (dollars, weight, pieces, or load factor) and a vendor target corresponding to the target unit. You select 18,000 pounds for the vendor target.
For your reference, identify the vendor corresponding to the buy line target. The order that you search for vendors determines the order in which they appear in this vendor list. For your reference, you also need to indicate other vendors that can replenish these products in an emergency. When you create a suggested purchase order, the system prompts whether you are purchasing all products in a buy line or just those products below order point. If you purchase all products, you must specify the vendor associated with the vendor target for the buy line. If you purchase just those products below order point, you must specify an emergency procurement vendor
If you have multiple purchasing agents and assign buy lines to individual buyers, you need to specify a buyer for the buy line.
The system uses the defaults for determining the average lead time for the buy line. In addition, the buy line uses system defaults for return transfer grace days, minimum order cycle, default lead factor, and minimum lead samples. Also by default, the system includes this buy line when you create suggested purchase orders for all buy lines.
After setting up a basic buy line, go to Product Maintenance and assign this buy line to all of your copper tubing products.
After assigning products to the buy line, you can now run the Suggest P/O program for the buy line.
Buy Lines and Vendors You create buy lines for vendors and their targets. That is, you always buy your copper tubing products from your copper tubing vendor. The Suggest P/O program assumes that you are either purchasing the entire buy line or only buying short quantities. The program does not assume that you are purchasing your copper tubing products from your normal copper tubing vendor. You specify a vendor upon converting the suggested purchase order to an actual purchase order.
Buy Lines and Procurement Groups Use procurement groups to procure an item that is out of stock. Procurement groups do not affect the creation of a suggested purchase order. You can specify a procurement group at a buy line level when a procurement group can provide all the products in a buy line. On the other hand, you can assign procurement groups at the product level. Procurement groups assigned at the product level take precedent over those specified at the buy line level.
Therefore, consider the COPTUB buy line you set up to purchase your copper tubing products. Within that buy line, you have divided these products into two procurement groups: COPFAST for fast-moving products, and COPSLOW for slow-moving products. COPFAST might be available from all branches within your company because each warehouse stocks products. That is, the COPFAST procurement group is defined as a Distributive Purchasing group. On the other hand, COPSLOW might be available from few branches, because it is centrally warehoused.
Solar Eclipse Purchasing Rel. 8.7.9
48 © 2014 Epicor Software Corporation. All rights reserved.
Defining Freight Factor Defaults for Products in Buy Lines A freight factor indicates how the vendor addresses the items on the purchase order. Some vendors go strictly by cost and the freight factor would remain Dollars. Some vendors are concerned about weight or amount of the shipment and would therefore use Weight or Pieces as the freight factor. The system uses a default factor to estimate freight charges when the actual amount is not known at the time of purchase order creation. For example, you want to charge freight on all shipments. However, you do not want to enter freight charges for each purchase order, but you do not want a shipment to go out without a freight charge. You can set up a default freight charge of $20. This way, if a shipment charge does not get calculated, you still collect some compensation. You can define a default freight factor at the buy line or the product level.
The system multiplies the freight factor by the item’s average cost to produce an estimated freight charge for the line item. You can override the estimated freight charge after a purchase order is created, after the actual freight charges are known either from the freight carrier or the bill of lading. You can override freight charges for individual products, or distribute a lump charge across all line items on the purchase order.
To define a default freight factor for a buy line:
1. From the Purchase > Maintenance menu, select Buy Line Maintenance to display the Buy Line Maintenance window.
2. In the Buy Line ID field, enter a buy line name and press Enter.
3. From the Information menu, select Freight Factor to display the Freight Factor Maintenance window.
Note: The Freight Factor field cannot contain more than two integers and four decimal point integers.
4. For each branch or territory, specify an estimated freight charge for the products in this buy line as a percentage of the purchase price. The system uses this charge when the actual freight charge is not known at time the of purchase order creation. After entering a number, the system appends a % sign to the number in the Factor column. For example, if you enter 2 the system displays 2.0000%.
Note: An asterisk (*) indicates an override at the branch level.
5. Exit the window to save your changes and return to the Buy Line Maintenance window.
6. Save your changes and exit the window.
Rel. 8.7.9 Purchasing
© 2014 Epicor Software Corporation. All rights reserved. 49
Defining Hits Parameters for Buy Lines The Purchasing program uses Hits Control Maintenance to define system-default, hits-related inventory parameters.
A hit is the sale of a product. This is not necessarily the quantity sold. For example, a product has five hits. You have sold it in five instances. The first three instances the customer bought one of the product. The last two instances the customer bought five of the products. In total, you sold 13 items in five hits.
Use the Hits Control Maintenance window to specify the central warehouse type for branches in a multi-branch network. Set up your warehouse as either a Top-Down or Bottom-Up warehouse. A Top-Down warehouse replenishes products for the parent branch before replenishing the child branches. A Bottom-Up warehouse replenishes the child branches before the parent branch. For example, if one of your child branches sells a particular item more than any other branch, you can use the Bottom-Up warehouse setup to ensure that the child branch always has that item available.
When defining branch and network hits, the system uses the number of hits identified to determine when to consider a product to be a stock keeping product. For example, you normally sell Product A three times in a six-month period. Consequently, you have three hits on the product in 90 days. However, you determine that if Product A gets six hits in a six-month period, it should be kept in stock.
Hits parameters are assigned at three levels:
• Control - Applies to all products unless overridden by a price line or product level forecast parameters.
• Buy Line - Applies to all products assigned to the designated buy line and overrides the company default parameters.
• Product - Applies to the product and overrides the buy line and company default parameters.
To define the default hits and central warehouse type for a buy line:
1. From the Purchase > Maintenance menu, select Buy Line Maintenance to display the Buy Line Maintenance window.
2. In the Buy Line ID field, enter a buy line ID and press Enter.
The fields populate with the buy line information.
3. From the Information menu, select Hits / Maximum Days Supply to display the Hits Control Maintenance window.
4. In the Central Warehouse Type field, enter Top-Down or Bottom-Up.
5. In the Branch Hits field, enter the number of hits for each branch that you want before considering a product to be a stock item.
6. In the Network Hits field, enter the number of hits you want to reach before considering a product to be a stock item.
7. In the Max Days Supply field, enter the number of days to which you want to limit the hits. For example, you only want to track hits for 90 days.
8. Save your changes and exit the window.
Solar Eclipse Purchasing Rel. 8.7.9
50 © 2014 Epicor Software Corporation. All rights reserved.
Defining the Maximum Days Supply for Buy Lines Use the Maximum Days Supply screen to define the maximum number of days supply of a product that your company allows to be stocked in the warehouse. The system uses the following calculation:
Max Days Supply = product's projected inventory level (PIL) / demand per day.
Maximum Days Supply is defined at three levels:
• System - Applies to all products, unless overridden at the buy line level. The Maximum Days Supply control maintenance record defines the default maximum days supply for each branch at this level.
• Buy Line - Applies to all products assigned to the designated buy line and overrides the system default.
• Product - Applies to the designated product and overrides the buy line and system defaults. The maximum days supply checking logic does not apply to "Misc Charge" products.
When an item is added to an order, the system checks the Projected Inventory Level (PIL). If the days supply number is exceeded during order entry, the system displays a warning.
• If you have been assigned the appropriate PIL override authorization key, the message displays a Continue (Y/N) prompt.
• If you do not have the appropriate authorization, the message prompts you to enter the password of another user who is authorized to override the maximum days supply limit.
If an item is removed, or an order deleted, the system compares the PIL at the time of the removal or deletion to the stored PIL. If the removal or deletion does not make the PIL higher than it was at the time of the addition, no Maximum Days Supply warning displays.
Note: The PIL calculation does not include exceptional purchase orders or purchase orders that have a date past the plenty date.
To define the maximum days supply for a buy line:
1. From the Purchase > Maintenance menu, select Buy Line Maintenance to display the Buy Line Maintenance window.
2. From the Information menu, select Hits / Maximum Days Supply to display the Maximum Days Supply window.
3. For each branch, enter the maximum number of days supply of a product in this buy line that your company allows to be stocked in the warehouse via adjustments, purchase order entry, sales order entry, or transfer order entry.
4. Save your changes and exit the window.
Rel. 8.7.9 Purchasing
© 2014 Epicor Software Corporation. All rights reserved. 51
Setting Forecast Parameters for Buy Lines The system forecasts product demand for both seasonal and non-seasonal products. You have the flexibility of setting your own forecast parameters.
Your company may have items that are seasonal or non-seasonal. For example, a branch in the Mid-West may have specific heating elements only carried in winter months. These are seasonal items. The demand for these types of items is calculated differently; however, you set the forecast parameters in the same way.
Forecast parameters are assigned at the following levels:
• Control - Applies to all products unless overridden by a price line or product level forecast parameters.
• Buy Line - Applies to all products assigned to the designated buy line and overrides the company default parameters.
• Product - Applies to the product and overrides the buy line and company default parameters. If a parameter is not set at the product level, the system uses the buy line level parameter.
• Branch / Territory - Applies to the individual branch or territory and is used if there is no setting at the Buy Line Maintenance level. Default settings for the branch are determined in the Forecast Parameters For Demand Calculation control maintenance record.
For seasonal items that have the Auto Trend flag set to yes, you can use Auto Trend on the Forecast Parameters window to display the maximum decrease percent and maximum increase percent. For more information, see Entering Forecast Product Parameters.
To enter forecast parameters at the buy line level:
1. From the Purchase > Maintenance menu, select Buy Line Maintenance to display the Buy Line Maintenance window.
2. In the Buy Line ID field, enter a buy line you want to display.
3. From the Information menu, select Forecast Parameters to display the BuyLine Forecast Parameters window.
This window is view-only.
4. From the File menu, select Forecast Parameters.
5. Change or update the appropriate fields:
Field Description Branch The branch which uses the specified item's demand forecast parameters.
Hits (Regular) The number of hits for a regular stock item used with the regular minimum and maximum days to determine how many days of sales history to use to determine demand.
Minimum Days (Regular)
The minimum number of days used with the number of hits for a regular stock item to determine how many days of sales history to use to determine demand.
Maximum Days (Regular)
The maximum number of days used with the number of hits for a regular stock item to determine how many days of sales history to use to determine demand.
Solar Eclipse Purchasing Rel. 8.7.9
52 © 2014 Epicor Software Corporation. All rights reserved.
Field Description Hits (Seasonal) The number of hits for a seasonal stock item used with the seasonal minimum
and maximum days to determine how many days of sales history to use to determine demand.
Minimum Days (Seasonal)
The minimum number of days used with the number of hits for a seasonal stock item to determine how many days of sales history to use to determine demand.
Maximum Days (Seasonal)
The maximum number of days used with the number of hits for a seasonal stock item to determine how many days of sales history to use to determine demand.
Auto Trend Indicates whether a trend calculation is enabled for products using seasonal forecasting at the branch. Set the Auto Trend at the product, buy line, or control file level.
Include Directs Indicates whether to include direct shipments from the vendor in demand calculations. Set the Include Directs parameter at the product, buy line, or control file level.
6. Save your changes and exit the window.
Rel. 8.7.9 Purchasing
© 2014 Epicor Software Corporation. All rights reserved. 53
Setting the Nonstock Product Default for Buy Lines Branch stock flags determine whether a product is a known stock item that should always be restocked or a known non-stock item that should not be restocked. You can set branch stock flags manually or by the system. The system determines if a product is a stock or nonstock item, based on the number of hits the product receives. See Defining Hits Parameters for a Buy Line for more information on hits.
You can set a default nonstock product at the buy line level. When you create a new product in Product Maintenance and the product needs to be added to the buy line, you can decide which product template to use when assigning a product.
To set the default nonstock product for a buy line:
1. From the Purchase > Maintenance menu, select Buy Line Maintenance to display the Buy Line Maintenance window.
2. In the Buy Line ID field, enter the buy line to which you want to set the default product template and press Enter.
3. From the Information menu, select Default Nonstock Template to display the Default Nonstock Template entry window.
4. Enter the product to use for the template.
5. Save your changes and exit the window.
Solar Eclipse Purchasing Rel. 8.7.9
54 © 2014 Epicor Software Corporation. All rights reserved.
Limiting Transfer Returns for Buy Lines One way to limit the quantities of stock being returned from child branches to parent branches is by specifying a number of transfer excess grace days. Transfer excess grace days are the number of days supply, in addition to the normal transfer cycle of a branch, that the branch may retain stock before the stock is considered surplus.
When you run the Suggested Auto Transfer program, it creates a report that lists the stock and non-stock items in surplus in the child branches what should be returned to the parent branch.
Use the Suggested Auto Transfer program is used to avoid overwhelming the supplying branch and the transfer delivery system with excessive stock. It lets child branches with large quantities of surplus stock hold onto some of the surplus stock before returning it to the parent branch. To gradually send surplus back to the central warehouse for liquidation, start with a high number of excess grace days and over time reduce the number.
You can set transfer excess grace days at the buy line or system level. Set the default number in the Default For Excess Grace In Buy Line Maint control maintenance record. The system uses this number if no setting has been entered in the buy line.
To enter transfer excess grace days for a buy line:
1. On the Purchase > Maintenance menu, select Buy Line Maintenance to display the Buy Line Maintenance window.
2. In the Buy Line ID field, enter the buy line for which you want to change the excess grace days.
3. In the Transfer Grace field, enter the additional number of days-worth of demand that a child branch can hold onto stock before it is considered surplus for a return transfer to the parent branch. To exempt the surplus stock in the buy line from a transfer, enter 999.
4. Save your changes and exit the window.
Rel. 8.7.9 Purchasing
© 2014 Epicor Software Corporation. All rights reserved. 55
Overriding Buy Line Lead Times Normally, the system uses a median calculation to determine the lead time for products. For more information, see How the System Calculates Lead Time.
However, there are circumstances in which the lead time must be manually adjusted. For example, a storm comes through the city where your manufacturing supplier has a factory. The building and several machines are damaged. The supplier tells you that the products' lead times will be pushed out three weeks until repairs can be made. Use the Override Lead Time Maintenance window to adjust the lead time and enter an expiration date. The override is in effect until the expiration date is met.
To override the buy line lead times:
1. From Purchase > Maintenance menu, select Buy Line Maintenance to display the Buy Line Maintenance window.
2. In the Buy Line ID field, enter the buy line whose lead times you want to override.
3. From the Information menu, select Override Lead Time to display the Override Lead Time Maintenance window.
4. Place the cursor on the Branch / Territory that you need to change. Use Control if the change affects all branches.
5. In the Override Lead Time Days field, enter the number of lead time days you want to use.
6. In the Expiration Date field, enter the date that the lead time you have entered expires.
7. Save your changes and return to the Buy Line Maintenance window.
8. Save your changes and exit the window.
Solar Eclipse Purchasing Rel. 8.7.9
56 © 2014 Epicor Software Corporation. All rights reserved.
Overriding the Plenty Date for Buy Lines Use Buy Line Maintenance to override the plenty date at the buy line level. For example, you have a buy line that does not have a vendor target. Regardless of how much you purchase, your vendor for this buy line offers no discount. However, this is a buy line with products that you purchase on a weekly basis and every week the buy line displays on the Suggested P/O Queue. Based on normal calculations, the system projects the plenty date for 21 days based on a 7 day lead time and a 14 day supply. However, you know that you order weekly and therefore the 21 days is not accurate if a customer orders the one item that is below order point, and you know you will get an order filled within 7 days. You can override the plenty date at the buy line level to give your customers a more accurate time frame when products will be available.
When there is an override entered on the plenty date and that date has not expired then the system uses the following calculation:
Plenty Date = Today + (Override Plenty Days - Days Since Last Line Buy).
Note: If there is no expire date set, but there are override plenty days, the system always uses the override.
To override the plenty date for a buy line:
1. From the Purchase > Maintenance menu, select Buy Line Maintenance to display the Buy Line Maintenance window.
2. In the Buy Line ID field, enter the ID for the buy line for which you want to override the plenty date and press Enter.
3. From the Information menu, select Additional Data to display the Additional Buy Line Data window.
4. In the Override Plenty Days field, enter the number of days by which you want to override the current plenty days calculation.
If you select Use Average Lead Time, the system calculates the override plenty date based on the lead time for the entire buy line.
5. In the Expire Date field, enter the date on which you want the override to expire.
6. Save your changes and exit the window.
Rel. 8.7.9 Purchasing
© 2014 Epicor Software Corporation. All rights reserved. 57
Assigning Vendors to Buy Lines Use Buyline Vendor Maintenance to identify vendors who you use to replenish your buy lines. Identify vendors who will replenish the entire buy line or individual branches. Also use this screen to flag vendors for analyzing performance information using the vendor scorecard.
Vendors identified in Buyline Vendor Maintenance are used in Emergency Vendor Maintenance to replenish stock in an emergency.
To assign vendors to buy lines:
1. From the Purchase > Maintenance menu, select Buy Line Maintenance to display the Buy Line Maintenance window.
2. In the Buy Line ID field, enter the buy line for which you want to assign vendors.
3. From the Information menu, select Vendors to display the Buyline Vendor Maintenance window.
4. From the File menu, select Edit Vendors to display the Buyline Vendor Types window.
5. On a blank line in the Vendor field, enter the vendor name you want to assign.
6. In the Type field, enter the type of vendor you are assigning: Line, Emergency or Both.
7. In the ScoreCard field, select the check box next to the single vendor that you want to include in the vendor scorecard build. You can only include one vendor per branch per buy line.
Important: Selecting this check box creates a link between vendors and products through the buy line and is used for gathering inventory metrics in the vendor scorecard. We recommend that you enter the ship-from vendor as the scorecard vendor. This allows you to gather metrics at a ship-from level in the Vendor Scorecard Inquiry. For more information, see Building the Vendor Scorecard File.
8. Click OK to save your changes.
9. Save your changes and exit the window.
Solar Eclipse Purchasing Rel. 8.7.9
58 © 2014 Epicor Software Corporation. All rights reserved.
Defining Vendor Freight Terms Use the Vendor Freight Terms control maintenance record to identify the freight restrictions you want available for orders. The system validates these control maintenance record entries against the available Freight field entries on the Purchase Order Entry window. The freight terms listed in the control maintenance record define what displays when using the F10 short cut to view freight term IDs. You can identify the freight restrictions you want to impose and what information is required at the time of receiving. If you leave the freight information blank in Vendor Maintenance, the system requires freight entry when the purchasing agent creates the purchase order. A message displays if required information has not been entered.
Note: A freight term set up on this maintenance window populates automatically to currently open purchase orders and direct orders for the vendor.
To create a vendor freight term:
1. From the System > System Files menu, select Control Maintenance to display the Control Maintenance window.
2. Type Vendor Freight Terms and press Enter.
3. If the Vendor Freight Terms window does not display, select Vendor Freight Terms from the list.
4. In the Term ID field, enter a name for the term you are creating.
The system does not restrict the term ID. You can create a name, but it should be meaningful enough that you know which restriction applies to that ID. For example, you can create and ID called "NO FREIGHT" indicating that this vendor's restriction is "Do Not Allow Freight."
5. In the Freight Restrictions field, press F10 and indicate which restriction applies to the ID you are creating. For a description of the restrictions, see the Vendor Freight Terms control maintenance record description.
6. Press Esc to save the record.
Rel. 8.7.9 Purchasing
© 2014 Epicor Software Corporation. All rights reserved. 59
Identifying Vendors for Resupplying a Buy Line You can create a list of vendors that are able to supply products in an emergency situation.
Use the Vendor option to identify the vendor corresponding to the buy line target and other vendors that can replenish these products in an emergency.
When converting a suggested purchase order to an actual purchase order, you can use any vendor currently on file in the system, although only one vendor displays in the column. It is an optional field and is provided for reference.
To create a list of vendors that can resupply a buy line:
1. On the Purchase > Maintenance menu, select Buy Line Maintenance to display the Buy Line Maintenance window.
2. From the Information menu, select Vendor to display the Buyline Vendor Maintenance window.
3. Verify the names of the available vendors for each branch.
4. From the File menu, select Edit Vendors to assign the vendor a type. Indicate if the vendor is an emergency vendor, line buy vendor, or both.
This entry populates the Line or Emergency field on the Convert to Suggested to Actual P/O window. See Working with Suggested Purchase Orders.
5. From the File menu, select Toggle Hierarchy to change the hierarchy display.
6. Exit the window.
7. Save your changes and exit the window.
Solar Eclipse Purchasing Rel. 8.7.9
60 © 2014 Epicor Software Corporation. All rights reserved.
Setting Up Emergency Vendors for Branches Use Procurement Group Maintenance to identify vendors from whom each branch can procure emergency stock. Typically, emergency vendor are based on location. This identification allows Sales Order Entry personnel to schedule purchase orders for back-ordered items.
To identify emergency procurement vendors for a branch:
1. From the Purchase > Maintenance menu, select Procurement Group Maintenance to display the Procurement Group Maintenance window.
2. In the Group ID field, enter the ID of the procure group for which you want to set up emergency vendors and press Enter to display the group.
3. From the Information menu, select Vendors to display the Emergency Procure Vendors window.
4. Place the cursor on a blank line and enter the vendor name you want to use for emergency purchasing:
• *BUYLINE* - Lists any emergency vendors identified for the buy line. Vendors display in the order that they display in Procurement Group Maintenance. See Assigning Vendors to Buy Lines to set up vendors in for a buy line.
• *ANY* - Lists all vendors outside the normal replenishment vendors.
Note: You cannot list an emergency vendor in the Emergency Procure Vendors field more than once. If the vendor you enter is already in the list, the system displays a message prompting you to press Enter and indicate a different vendor.
5. In the Default Lead Time field, enter the number of days you want to use for lead time.
6. Click OK to save your changes.
7. Save your changes and exit the window.
Note: If the Exclude From Ship-To/Ship-From Selection If Excluded From Index control maintenance record is set to Yes and the Exclude from Index parameter is set to No, then the vendor does not display in the selection list for emergency vendors. See Vendor Maintenance for a complete description.
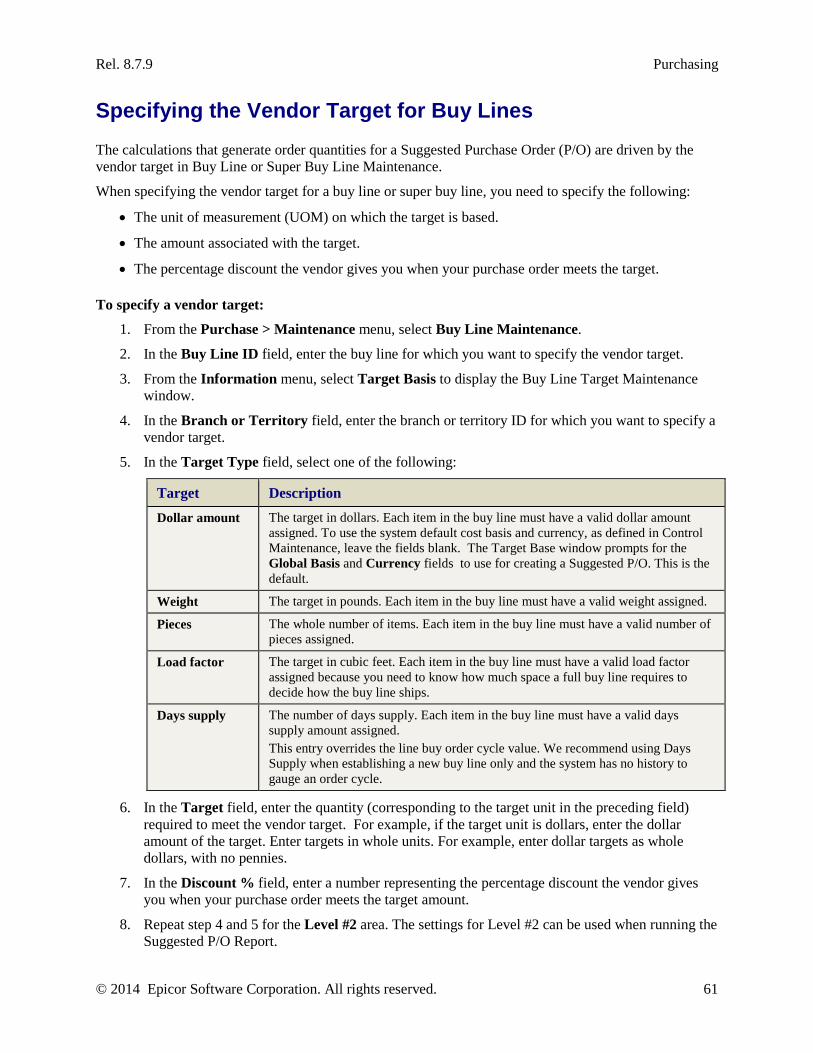
Rel. 8.7.9 Purchasing
© 2014 Epicor Software Corporation. All rights reserved. 61
Specifying the Vendor Target for Buy Lines The calculations that generate order quantities for a Suggested Purchase Order (P/O) are driven by the vendor target in Buy Line or Super Buy Line Maintenance.
When specifying the vendor target for a buy line or super buy line, you need to specify the following:
• The unit of measurement (UOM) on which the target is based.
• The amount associated with the target.
• The percentage discount the vendor gives you when your purchase order meets the target.
To specify a vendor target:
1. From the Purchase > Maintenance menu, select Buy Line Maintenance.
2. In the Buy Line ID field, enter the buy line for which you want to specify the vendor target.
3. From the Information menu, select Target Basis to display the Buy Line Target Maintenance window.
4. In the Branch or Territory field, enter the branch or territory ID for which you want to specify a vendor target.
5. In the Target Type field, select one of the following:
Target Description Dollar amount The target in dollars. Each item in the buy line must have a valid dollar amount
assigned. To use the system default cost basis and currency, as defined in Control Maintenance, leave the fields blank. The Target Base window prompts for the Global Basis and Currency fields to use for creating a Suggested P/O. This is the default.
Weight The target in pounds. Each item in the buy line must have a valid weight assigned.
Pieces The whole number of items. Each item in the buy line must have a valid number of pieces assigned.
Load factor The target in cubic feet. Each item in the buy line must have a valid load factor assigned because you need to know how much space a full buy line requires to decide how the buy line ships.
Days supply The number of days supply. Each item in the buy line must have a valid days supply amount assigned. This entry overrides the line buy order cycle value. We recommend using Days Supply when establishing a new buy line only and the system has no history to gauge an order cycle.
6. In the Target field, enter the quantity (corresponding to the target unit in the preceding field) required to meet the vendor target. For example, if the target unit is dollars, enter the dollar amount of the target. Enter targets in whole units. For example, enter dollar targets as whole dollars, with no pennies.
7. In the Discount % field, enter a number representing the percentage discount the vendor gives you when your purchase order meets the target amount.
8. Repeat step 4 and 5 for the Level #2 area. The settings for Level #2 can be used when running the Suggested P/O Report.
Solar Eclipse Purchasing Rel. 8.7.9
62 © 2014 Epicor Software Corporation. All rights reserved.
9. In the Target Basis field, indicate the target base you want to use, such as DFLT-COST.
10. In the Currency field, indicate if a specific currency is used.
11. Save your changes and exit the window.
Rel. 8.7.9 Purchasing
© 2014 Epicor Software Corporation. All rights reserved. 63
Entering Return Policies for Buy Lines Use the Buy Line Maintenance window to record the vendor return policy information. You can associate vendor return days and policy with products in an entire buy line for each branch. The system uses the vendor return days with the products last receipt date to calculate an estimates return date. That date represents when material for that buy line should be returned back to the vendor without incurring re-stocking charges. The date displays on the Product Lifecycle Queue and the return policy displays in the Returned Goods Verification Queue.
Use vendor return policy comments to enter required vendor information or reminders about specific warranty information. The comment displays in the Returned Goods Verification window. If you have predefined comments using the Return Goods Standard Comments control maintenance record, your Return Policy text displays below the predefined comments. Any comment can be manually changed in the Returned Goods Verification window.
Note: We recommend reviewing the return goods control maintenance records before using return policies.
To enter a return policy for a buy line:
1. On the Purchase > Maintenance menu, select Buy Line Maintenance to display the Buy Line Maintenance window.
2. In the Buy Line ID field, enter the ID for the designated buy line.
3. From the Information menu, select Return Policy Maintenance to display the Return Policy Message window.
4. From the File menu, select Insert Branch.
5. In the Branch/Terr field, enter the branch for which you want to create a return policy.
6. In the Return Days field, enter the number of days the vendor allows returns for items in the buy line.
7. In the Return Policy field, enter the return policy in the text, such as "RMA is required if returning to Oatey Corp." This field has a 35-character limit.
The text entered here displays as view-only on the Return Goods Verification window. It does not display with the product, Return Goods Queue or on a return purchase order.
8. In the Return Comments field, enter any additional comments you want to display on the Return Goods Verification window for your return. Return comments can be edited from the verification window, if needed.
Note: The system uses the text as entered. All carriage returns are respected regardless of screen real estate to display the message. If your message does not display as anticipated, check your formatting in this field.
9. Save your changes and exit the window.
Solar Eclipse Purchasing Rel. 8.7.9
64 © 2014 Epicor Software Corporation. All rights reserved.
Identifying Warranty Information for Buy Lines Some products carry warranties. If you sell a product that carries a warranty and a customer returns that product to you, you must collect specific information to obtain a refund from the manufacturer. You can use a default warranty information window or a user-defined window to gather the appropriate information. Each user-defined window is tailored to the warranty information required for the products in a buy line.
To link a buy line to a user-defined Warranty Information screen:
1. On the Purchase > Maintenance menu, select Buy Line Maintenance to display the Buy Line Maintenance window.
2. In the Buy Line ID field, enter the buy line for which you want to add warranty information.
3. From the Information menu, select Additional Data to display the Buy Line Additional Data window.
4. From the File menu, select Insert Branch.
5. In the Warranty field, enter the warranty ID you want to use for products in this buy line.
6. Save your changes and exit the window.
Note: If you do not identify Warranty Information for this buy line, the system uses the warranty identified in the Default Warranty Information Screen control maintenance record.
Rel. 8.7.9 Purchasing
© 2014 Epicor Software Corporation. All rights reserved. 65
Replenishing Child Branches The Suggest P/O program has two different ways of determining when a parent branch needs to make a purchase to meet a child branch's needs. The method used depends on the parent branch's lead time and the child branch's Transfer Cycle Days.
The other calculation that is prevalent throughout the Purchasing process is the projected inventory level or PIL. The PIL is the quantity of a product used for predicting purchasing needs. The amount you physically have on hand, minus the amount committed to orders, plus the amount coming in on transfers and purchase orders. Each product has its own projected inventory level.
PIL = ((available on hand/committed) + on transfer + on purchase order + in process/work)
Note: If the Exclude SOE Returns From PIL Check control maintenance record is set to Yes, then return items on a sales order are excluded from the PIL check at the time of order status change on the Status tab.
This section describes two examples each showing one of the methods:
• If the parent branch's lead time is less than the child branch's transfer cycle days, then to meet the child branch's needs the parent branch must purchase enough to meet the child branch's transfer cycle days.
• If the parent branch's lead time is greater than the child branch's transfer cycle days, then to meet the child branch's needs the parent branch must purchase enough to meet the parent branch's lead time requirements.
Regardless of the method used, the Suggest P/O program uses two constants: the child branch's demand and the child branch's hit-related safety coefficient (HRSC).
The standard surplus point is defined as the point at which the stock level for inventory is greater than the economic order quantity plus the line point rounded to package quantity.
The surplus point calculation for the parent in a grandparent/parent/child warehouse scheme is as follows:
Parent Surplus Point = ((Lead Time plus Cycle Days plus Safety Days (LCS) of grandparent )multiplied by the Combined Demand per Day (DMD.day) of parent and any child branches) plus Economic Order Quantity (EOQ) of parent and any child branches.
Abbreviated: (LCS x DMD.day) + EOQ
Note: For new product minimum and maximum settings, see Setting Minimum and Maximum Stocking Levels for New Products.
Replenishment Example 1 In the following example, assume that the parent branch's projected inventory level equals the order point.
BR#1: PIL = OP
In other words, the parent branch has nothing to spare, but also has no needs. The only thing the Suggest P/O program needs to determine in the example is how much to buy for the child branch.
Premise: When the parent branch's lead time is less than the child branch's transfer cycle days, to meet the child branch's needs the parent branch has to buy enough to meet the child branch's transfer cycle days.
Solar Eclipse Purchasing Rel. 8.7.9
66 © 2014 Epicor Software Corporation. All rights reserved.
The transfer cycle days of the child branch is 90. This number exceeds the parent branch, which is 30. The child branch's short quantity trigger is based on its transfer point. The parent's lead time is not used because the child branch's need is more.
Parent Branch's PIL 24
Parent Branch's Order Point 24
Child Branch's PIL 11
Child Branch's Transfer Point 92
The parent branch must buy 81 to meet the transfer point of the child branch.
Child Branch's Transfer Point minus the Child Branch's PIL: 92 - 11 = 81
Replenishment Example 2 In the following example, assume that the parent branch's projected inventory level equals the order point.
BR#1: PIL = OP
In other words, the parent branch has nothing to spare, but also has no needs. The only thing the Suggest P/O program needs to determine in the example is how much to buy for the child branch.
Premise: If the parent branch's lead time is greater than the child branch's transfer cycle days, then to meet the child branch's needs the parent branch must purchase enough to meet the parent branch's lead time requirements.
The parent branch's lead time is 30. This lead time is greater than the child branches transfer cycle days, which is 14. The parent branch's lead time is used to establish the child branch's order point, which is then used to calculate the amount to buy.
Parent branch's lead time is multiplied by the child branch's demand per day. The result is added to the child branch's safety stock multiplied by the child branch's demand per day. This is equal to the child branch's order point, as shown below:
(30 x 0.751) + (19 x 0.751) = 37
Child branch's order point minus the child branch's PIL equals the amount the parent branch needs to purchase.
Parent Branch's PIL 24
Parent Branch's Order Point 24
Child Branch's Lead Time 30
Child Branch's Demand Per Day 0.751
Child Branch's HRSC 0.62
Child Branch's Order Point minus the Child Branch's PIL: 37 - 11 = 26
Rel. 8.7.9 Purchasing
© 2014 Epicor Software Corporation. All rights reserved. 67
Assigning Buyers to Buy Lines Assign a buyer to a buy line or super buy line to select and sort the Suggested P/O Queue by buyer.
This is the user ID or other identifier of the person authorized to buy for this buy line. This field may appear on Report Writer reports. Assigning a buyer to a buy line lets you select and sort the Suggested P/O Queue by buyer.
Note: You must have Level 2 or higher assigned in the BUYLINE.MAINT authorization key to change buy line information.
To assign a buyer to a buy line:
1. From the Purchase > Maintenance menu, select Buy Line Maintenance to display the Buy Line Maintenance window.
2. In the Buy Line field, enter the name of the buy line you want to update and press Enter.
3. In the Buyer field, enter the user ID of the purchasing agent for the buy line.
4. Save your changes and exit the window.
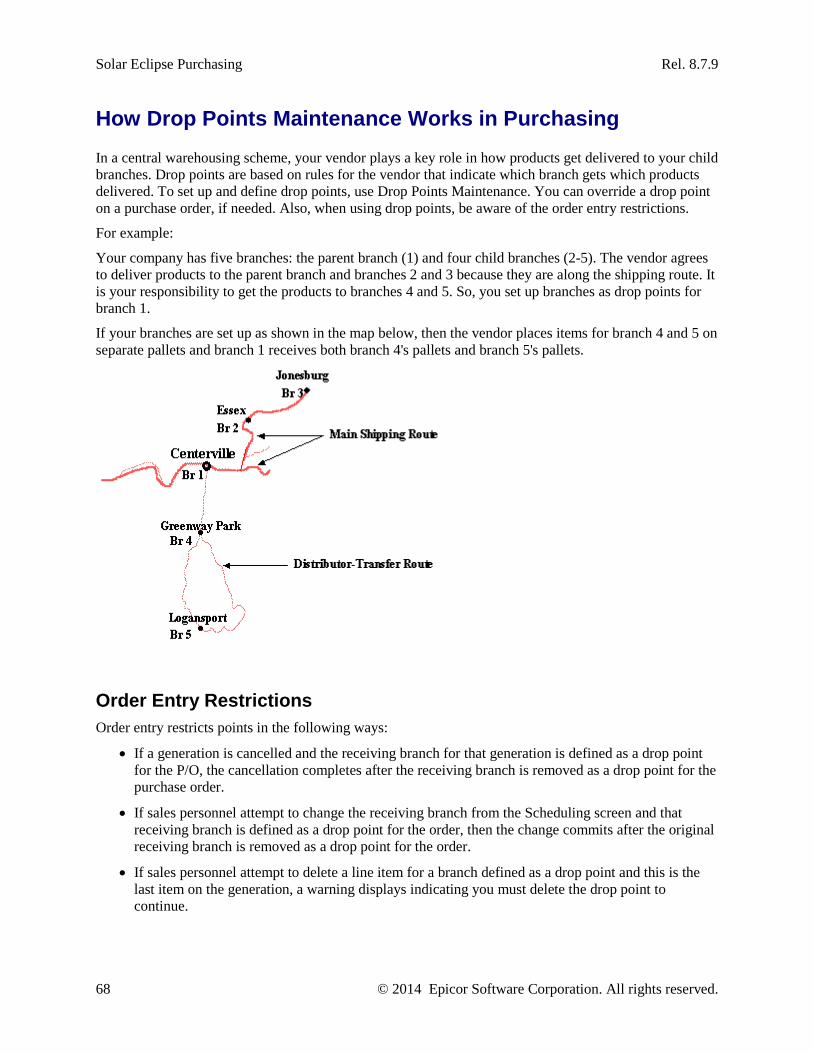
Solar Eclipse Purchasing Rel. 8.7.9
68 © 2014 Epicor Software Corporation. All rights reserved.
How Drop Points Maintenance Works in Purchasing In a central warehousing scheme, your vendor plays a key role in how products get delivered to your child branches. Drop points are based on rules for the vendor that indicate which branch gets which products delivered. To set up and define drop points, use Drop Points Maintenance. You can override a drop point on a purchase order, if needed. Also, when using drop points, be aware of the order entry restrictions.
For example:
Your company has five branches: the parent branch (1) and four child branches (2-5). The vendor agrees to deliver products to the parent branch and branches 2 and 3 because they are along the shipping route. It is your responsibility to get the products to branches 4 and 5. So, you set up branches as drop points for branch 1.
If your branches are set up as shown in the map below, then the vendor places items for branch 4 and 5 on separate pallets and branch 1 receives both branch 4's pallets and branch 5's pallets.
Order Entry Restrictions Order entry restricts points in the following ways:
• If a generation is cancelled and the receiving branch for that generation is defined as a drop point for the P/O, the cancellation completes after the receiving branch is removed as a drop point for the purchase order.
• If sales personnel attempt to change the receiving branch from the Scheduling screen and that receiving branch is defined as a drop point for the order, then the change commits after the original receiving branch is removed as a drop point for the order.
• If sales personnel attempt to delete a line item for a branch defined as a drop point and this is the last item on the generation, a warning displays indicating you must delete the drop point to continue.
Rel. 8.7.9 Purchasing
© 2014 Epicor Software Corporation. All rights reserved. 69
How Transfer Excess Grace Days Work Use transfer excess days to limit the quantities of stock being returned from child branches to the parent branch. Grace days provide a buffer so child branches with large quantities of surplus stock can retain some the stock before returning the stock to the parent branch. The transfer days increase the surplus point, so that a larger quantity remains in the branch. Over time, the grace days are reduced, permitting over-stocked branches to gradually send surplus back to the central warehouse.
For example, a child branch has a surplus point of 297 items, due to 260 transfer grace days. If the projected inventory level (PIL) at the child branch is 126 items, this branch is considered to be in surplus. However, if the transfer grace days were eliminated from the calculation, the child branch's surplus point would drop to 26 and the branch would be in surplus by 100 items.
To prevent the normal return transfer program from retrieving the surplus stock, set the transfer grace days to 999 and the system marks the items as reserved and will not suggest a transfer. In essence, this setting disables the return from a child branch to the parent branch even in emergency situations. Use this setting for products or lines that you do not want returned to the parent branch.
Setting the transfer grace days to 999 can also affect order quantities on the Suggested P/O Queue, because the system does not expect a surplus stock marked with a transfer grace days of 999 to be returned to the parent branch. The Suggest PO program runs as if the surplus stock will be returned to the parent branch by normal return transfer. When you set the transfer grace days for a product to 999, the program proceeds as if there was no surplus stock item available for return back to the parent branch. The item, therefore, may display on the Suggested P/O Queue for the parent branch to purchase.
Change the transfer excess days using the Default For Excess Grace In Buy Line Maint control maintenance record. You can specify the transfer grace days at the buy line or system level.
Solar Eclipse Purchasing Rel. 8.7.9
70 © 2014 Epicor Software Corporation. All rights reserved.
Stock/Nonstock Determination and Branch Replenishment The system counts the number of hits the product has to date and compares this number to the Minimum Hits control maintenance record. If the product has less than the value set in the Minimum Hits control maintenance record, the product is considered a nonstock.
The system then checks the Hits Control Maintenance parameters set at the system, buy line or product level and the central warehouse type. These parameters define the minimum number of hits a product needs at a branch or in a multi-branch network to be a stock item.
In a multi-branch network, a product could be a nonstock and a stock item at the same time. A product might have so few hits at any individual branch that the system would consider it a nonstock item. However, a product might have enough hits within the total branch network to qualify it as a stock item. Conversely, an item might have enough hits at an individual branch to be a stock item, but not enough hits within the branch network to be a stock item.
The central warehouse type determines whether the central warehouse dictates stock/nonstock determination from the top down, or the needs of the child branches dictate from the bottom up.
Note: Branch network hits and central warehouse type do not apply to single-branch warehouses.
Top-Down Stock/Nonstock Determination and Branch Replenishment A top-down central warehouse replenishes products for itself before replenishing the child branches.
To determine whether a product is a stock or nonstock item in a top-down central warehouse scheme, the system checks for activity at the branch level first and then the network level. The activity is measured against the parameters set in the Br Hits and Network Hits fields on the Hits Control Maintenance window.
• If the hits for an item in the branch are greater than or equal to the Br Hits value, the item is considered a stock-keeping item in that branch.
• If an item's hits in the branch are less than the Br Hits value, the system checks for activity at the network level:
• If an item's total hits for all branches in the network are less than the Network Hits value, the item is considered a nonstock in the network, although it might be a stock item at an individual branch.
• If an item's total hits for all branches are greater than or equal to the Network Hits value, and the central warehouse type is top-down, the item's demand in each branch is applied to the demand of the purchasing branch.
The central warehouse (the purchasing branch) transfers stock to a child branch (the selling branch) whenever the child branch reports a committed sale.
Bottom-Up Stock/Nonstock Determination and Branch Replenishment A bottom-up central warehouse replenishes products for the child branches before replenishing itself.
To determine whether a product is a stock or nonstock item in a bottom-up central warehouse scheme, the system checks for activity at the branch level first and then the network level. The activity is measured
Rel. 8.7.9 Purchasing
© 2014 Epicor Software Corporation. All rights reserved. 71
against the parameters set in the Br Hits and Network Hits fields on the Hits Control Maintenance window.
• If the hits for an item in the branch are greater than or equal to the Br Hits level, the item is considered a stock-keeping item in that branch.
• If an item's hits in the branch are less than the Br Hits level, the system checks for activity at the network level:
• If an item's total hits for all branches in the network are less than the Network Hits level, the item is considered a nonstock in the network, although it might be a stock item at an individual branch.
• If an item's total hits for all branches are greater than or equal to the Network Hits level and the central warehouse type is bottom-up, the item is considered a stock-keeping item for the network and in any branch that had one or more hits.
The branch is replenished according to the greater of its transfer point or its economic order quantity (EOQ), rounded to package quantity.
Solar Eclipse Purchasing Rel. 8.7.9
72 © 2014 Epicor Software Corporation. All rights reserved.
Purchase Orders Overview Purchase orders identify what items you want to purchase, who you want to purchase them from, and when you can expect to get those items. The Purchasing system helps you minimize purchasing costs by combining purchase orders, keeping track of customer special requests, and the cost of carrying inventory.
In addition, the Purchase Order Entry program can track purchase requests, monitor changes made to orders, and add freight or handling charges if needed. When you receive ordered stock into inventory, the system helps you reconcile those purchases with your General Ledger.
Authorization You must have authorization to work with purchase orders. There are three levels of authorization within the POE.ALLOWED authorization key:
• Level 1 - View-only access to purchase orders. Access to Stock Receipts, Copy to Purchase Order Bid functionality, and Rebate Detail Maintenance.
• Level 2 - Permission to create POs, plus Level 1 abilities.
• Level 3 - Permission to edit orders, plus Level 1 and 2 abilities. Level 3 users must also have POE.OPEN.ORDER.EDIT authorization key assigned.
There are several kinds of purchase orders:
Purchase Order Type
Description
General Created from the Purchase Order Entry. Items are ordered and shipped to the warehousing branch.
Direct Created from Sales Order Entry (SOE). Use the Mode function to access the Purchase Order Entry window and ship items directly to the customer from the vendor. A direct PO bypasses having to receive and re-ship items. The sales order displays a "-DIR" suffix on the order number. You have to reconcile this in A/P and then the suffix changes to a generation number, such as ".002." If you cancel an invoiced direct purchase order, then the purchase order side of the direct returns to an open status.
If you cancel an invoiced direct purchase order, then the purchase order side of the direct returns to an open status. You cannot cancel a direct order that has any generation in a closed accounting period. The system displays an error message in this situation.
To ensure that your direct orders are credited correctly in your general ledger, use the Direct Inventory, ~*Direct Purchases, and Clear Direct To Direct Inventory G/L Automatic Postings to select the appropriate G/L accounts. These postings are inter-dependent and make sure that you do not need to use journal entries to reconcile the accounts due to overstated inventory posted to Inventory G/L Posting.
Note: Non-stock item descriptions do not print on direct purchase orders. The default print style for direct orders is "BLIND" if a print style is not selected.
For information about shipping line items, see Direct-Shipping Specific Line Items. For information about creating a direct sales order, see Entering a Direct Order.
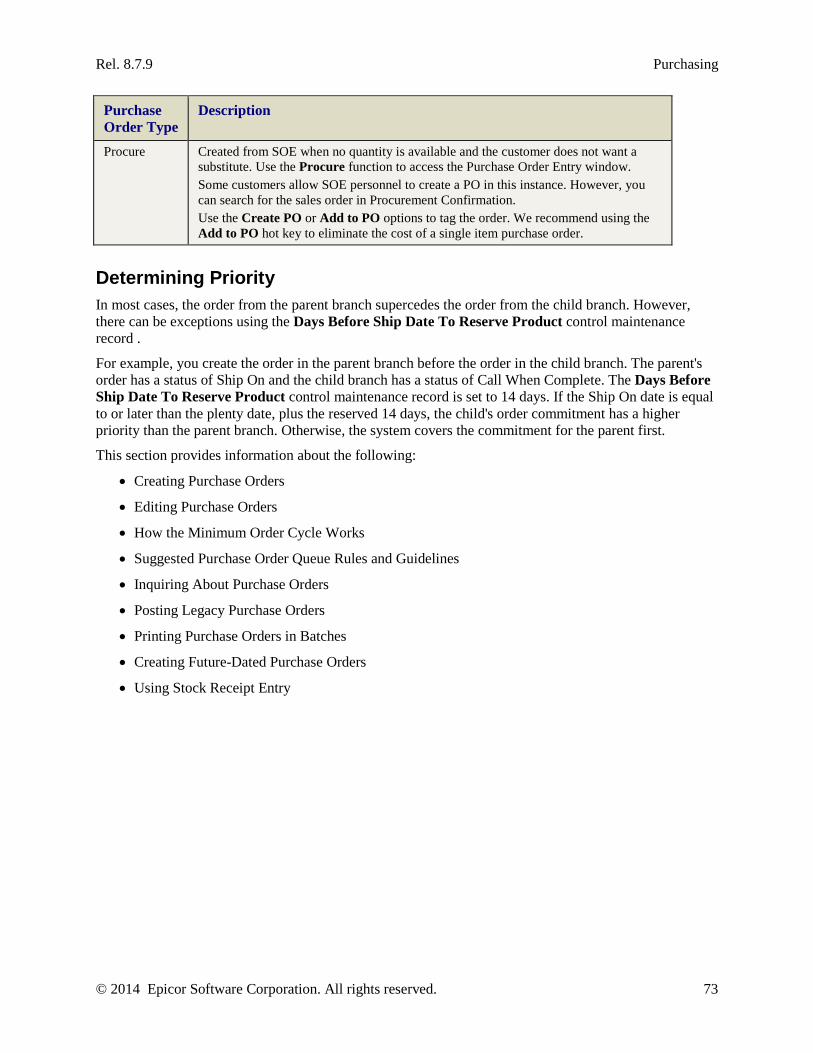
Rel. 8.7.9 Purchasing
© 2014 Epicor Software Corporation. All rights reserved. 73
Purchase Order Type
Description
Procure Created from SOE when no quantity is available and the customer does not want a substitute. Use the Procure function to access the Purchase Order Entry window. Some customers allow SOE personnel to create a PO in this instance. However, you can search for the sales order in Procurement Confirmation. Use the Create PO or Add to PO options to tag the order. We recommend using the Add to PO hot key to eliminate the cost of a single item purchase order.
Determining Priority In most cases, the order from the parent branch supercedes the order from the child branch. However, there can be exceptions using the Days Before Ship Date To Reserve Product control maintenance record .
For example, you create the order in the parent branch before the order in the child branch. The parent's order has a status of Ship On and the child branch has a status of Call When Complete. The Days Before Ship Date To Reserve Product control maintenance record is set to 14 days. If the Ship On date is equal to or later than the plenty date, plus the reserved 14 days, the child's order commitment has a higher priority than the parent branch. Otherwise, the system covers the commitment for the parent first.
This section provides information about the following:
• Creating Purchase Orders
• Editing Purchase Orders
• How the Minimum Order Cycle Works
• Suggested Purchase Order Queue Rules and Guidelines
• Inquiring About Purchase Orders
• Posting Legacy Purchase Orders
• Printing Purchase Orders in Batches
• Creating Future-Dated Purchase Orders
• Using Stock Receipt Entry
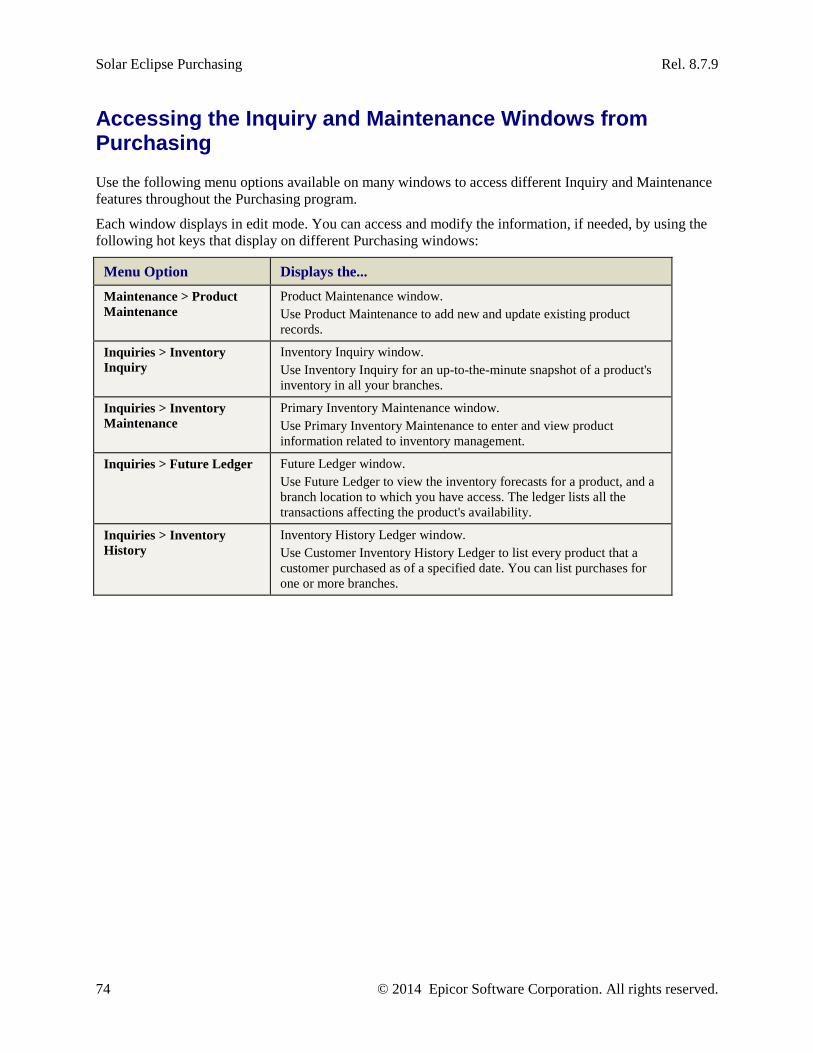
Solar Eclipse Purchasing Rel. 8.7.9
74 © 2014 Epicor Software Corporation. All rights reserved.
Accessing the Inquiry and Maintenance Windows from Purchasing Use the following menu options available on many windows to access different Inquiry and Maintenance features throughout the Purchasing program.
Each window displays in edit mode. You can access and modify the information, if needed, by using the following hot keys that display on different Purchasing windows:
Menu Option Displays the... Maintenance > Product Maintenance
Product Maintenance window. Use Product Maintenance to add new and update existing product records.
Inquiries > Inventory Inquiry
Inventory Inquiry window. Use Inventory Inquiry for an up-to-the-minute snapshot of a product's inventory in all your branches.
Inquiries > Inventory Maintenance
Primary Inventory Maintenance window. Use Primary Inventory Maintenance to enter and view product information related to inventory management.
Inquiries > Future Ledger Future Ledger window. Use Future Ledger to view the inventory forecasts for a product, and a branch location to which you have access. The ledger lists all the transactions affecting the product's availability.
Inquiries > Inventory History
Inventory History Ledger window. Use Customer Inventory History Ledger to list every product that a customer purchased as of a specified date. You can list purchases for one or more branches.
Rel. 8.7.9 Purchasing
© 2014 Epicor Software Corporation. All rights reserved. 75
Purchase Order Entry Body Attributes Use the Body tab to specify which products and how many to purchase. You can purchase individual products, buy lines, super buy lines, or nonstock items. Use the Purchase Order Entry Body tab for creating new purchase orders, modifying existing purchase orders, or creating post purchase orders. You can change the columns on the Body tab using the View menu option.
In addition, you can display the sales history continually at the bottom of the Body tab with the Show Product Sales History option. As you move through the purchase order, the history of the product displays so you can make immediate, informed decisions about your purchasing quantities.
The Body tab is used for purchase orders, stock receipt entry, and post purchase order entry. From the Body tab, you can edit orders, line items, view inquiries, change currency, search and select products, and view maintenance windows.
Note: If there is more than one buy matrix set up for a vendor that fit the requirements outlined in the purchase order, and the Auto Open Multiple Vendor Matrix Cells control maintenance record is set to Yes, then a window displays for the user to select the correct matrix to use on the purchase order.
The quantity on the Body tab is the open quantity at the time of the shipment. The first generation on the Status tab shows the total open quantity and the next generation shows what is remaining.
Use the Require Purchase Order Entry Header Screen Entry control maintenance record to indicate if you want the Header tab to display when users exit the Purchase Order Entry Body tab.
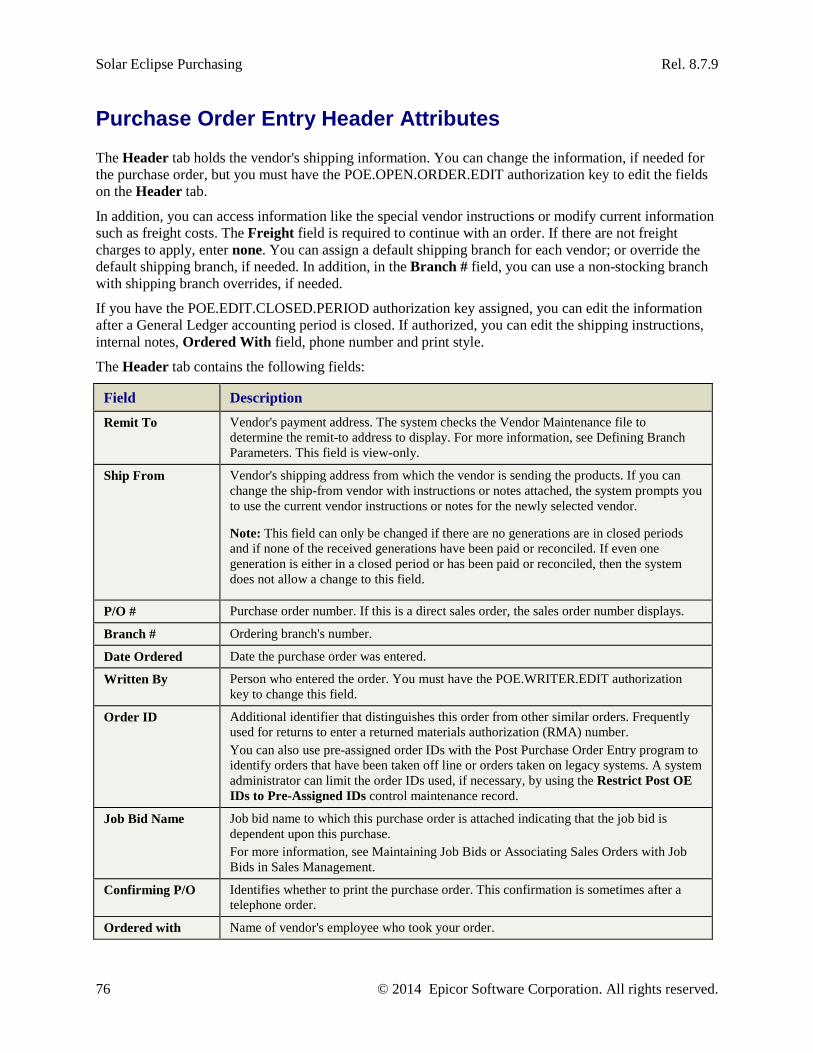
Solar Eclipse Purchasing Rel. 8.7.9
76 © 2014 Epicor Software Corporation. All rights reserved.
Purchase Order Entry Header Attributes The Header tab holds the vendor's shipping information. You can change the information, if needed for the purchase order, but you must have the POE.OPEN.ORDER.EDIT authorization key to edit the fields on the Header tab.
In addition, you can access information like the special vendor instructions or modify current information such as freight costs. The Freight field is required to continue with an order. If there are not freight charges to apply, enter none. You can assign a default shipping branch for each vendor; or override the default shipping branch, if needed. In addition, in the Branch # field, you can use a non-stocking branch with shipping branch overrides, if needed.
If you have the POE.EDIT.CLOSED.PERIOD authorization key assigned, you can edit the information after a General Ledger accounting period is closed. If authorized, you can edit the shipping instructions, internal notes, Ordered With field, phone number and print style.
The Header tab contains the following fields:
Field Description Remit To Vendor's payment address. The system checks the Vendor Maintenance file to
determine the remit-to address to display. For more information, see Defining Branch Parameters. This field is view-only.
Ship From Vendor's shipping address from which the vendor is sending the products. If you can change the ship-from vendor with instructions or notes attached, the system prompts you to use the current vendor instructions or notes for the newly selected vendor.
Note: This field can only be changed if there are no generations are in closed periods and if none of the received generations have been paid or reconciled. If even one generation is either in a closed period or has been paid or reconciled, then the system does not allow a change to this field.
P/O # Purchase order number. If this is a direct sales order, the sales order number displays.
Branch # Ordering branch's number.
Date Ordered Date the purchase order was entered.
Written By Person who entered the order. You must have the POE.WRITER.EDIT authorization key to change this field.
Order ID Additional identifier that distinguishes this order from other similar orders. Frequently used for returns to enter a returned materials authorization (RMA) number. You can also use pre-assigned order IDs with the Post Purchase Order Entry program to identify orders that have been taken off line or orders taken on legacy systems. A system administrator can limit the order IDs used, if necessary, by using the Restrict Post OE IDs to Pre-Assigned IDs control maintenance record.
Job Bid Name Job bid name to which this purchase order is attached indicating that the job bid is dependent upon this purchase. For more information, see Maintaining Job Bids or Associating Sales Orders with Job Bids in Sales Management.
Confirming P/O Identifies whether to print the purchase order. This confirmation is sometimes after a telephone order.
Ordered with Name of vendor's employee who took your order.
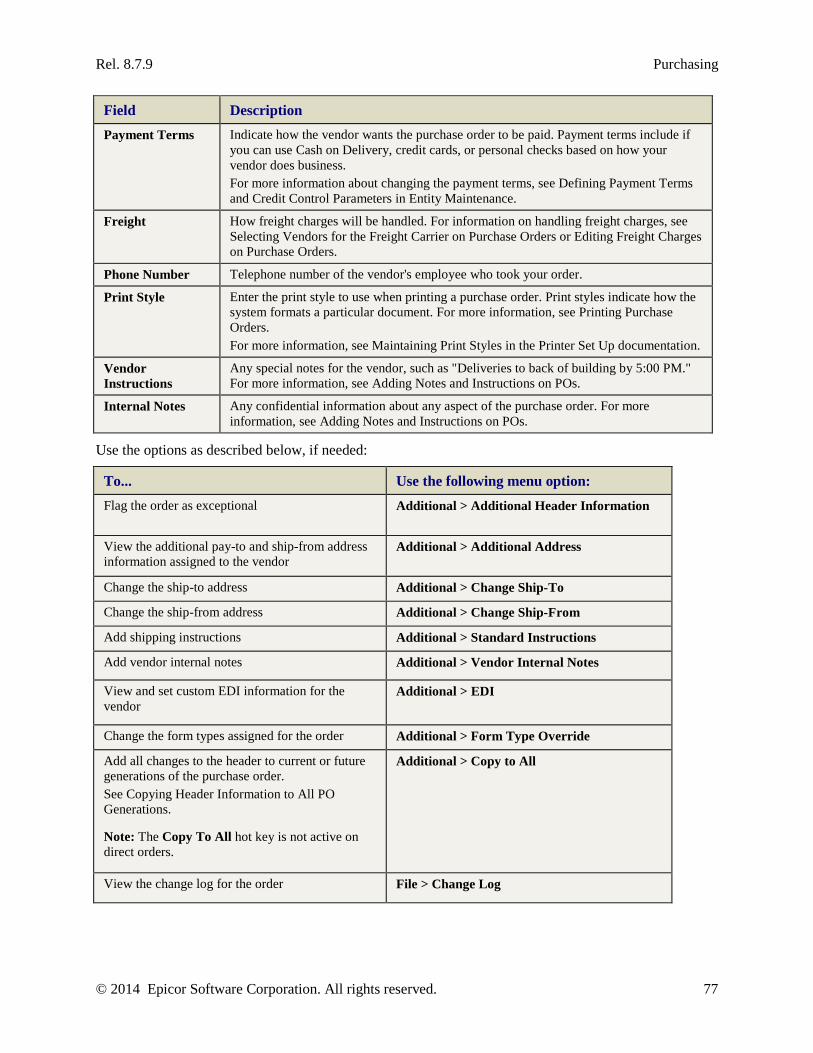
Rel. 8.7.9 Purchasing
© 2014 Epicor Software Corporation. All rights reserved. 77
Field Description Payment Terms Indicate how the vendor wants the purchase order to be paid. Payment terms include if
you can use Cash on Delivery, credit cards, or personal checks based on how your vendor does business. For more information about changing the payment terms, see Defining Payment Terms and Credit Control Parameters in Entity Maintenance.
Freight How freight charges will be handled. For information on handling freight charges, see Selecting Vendors for the Freight Carrier on Purchase Orders or Editing Freight Charges on Purchase Orders.
Phone Number Telephone number of the vendor's employee who took your order.
Print Style Enter the print style to use when printing a purchase order. Print styles indicate how the system formats a particular document. For more information, see Printing Purchase Orders. For more information, see Maintaining Print Styles in the Printer Set Up documentation.
Vendor Instructions
Any special notes for the vendor, such as "Deliveries to back of building by 5:00 PM." For more information, see Adding Notes and Instructions on POs.
Internal Notes Any confidential information about any aspect of the purchase order. For more information, see Adding Notes and Instructions on POs.
Use the options as described below, if needed:
To... Use the following menu option: Flag the order as exceptional Additional > Additional Header Information
View the additional pay-to and ship-from address information assigned to the vendor
Additional > Additional Address
Change the ship-to address Additional > Change Ship-To
Change the ship-from address Additional > Change Ship-From
Add shipping instructions Additional > Standard Instructions
Add vendor internal notes Additional > Vendor Internal Notes
View and set custom EDI information for the vendor
Additional > EDI
Change the form types assigned for the order Additional > Form Type Override
Add all changes to the header to current or future generations of the purchase order. See Copying Header Information to All PO Generations.
Note: The Copy To All hot key is not active on direct orders.
Additional > Copy to All
View the change log for the order File > Change Log

Solar Eclipse Purchasing Rel. 8.7.9
78 © 2014 Epicor Software Corporation. All rights reserved.
Purchase Order Entry Status Attributes The Status tab details when and how shipments leave the vendor to get to you. You can modify the status, receive date or ship via, if necessary, although the system checks for valid status entries. You can also mark the shipment received and access the Cross Dock program.
Use the following codes to change the order status:
• O - Leaves the order open.
• R - Marks the order or generation received.
Note: When an order is received, the system updates the last cost. For more information on receiving purchase orders, see Receiving Purchase Orders in a Manual Warehouse.
• B - Changes the order into a bid.
• V - Indicates a vendor shipment notification has been sent.
• X - Cancels the order. We recommend using the Status tab in this manner to cancel an order.
Note: You can edit purchase orders and transfers attached to shipment only if they have a Received or Cancelled status. Otherwise orders attached to shipments are not editable.
Print Options You can use the Print Options button to print one or more generations of a purchase order. For more information on printing purchase orders, see Printing Purchase Orders. For more information on printing sales orders, see Reprinting Orders. To print labels, see Printing User-Defined Forms and Labels.
Note: The default print status override set in Vendor Maintenance is used when creating a new purchase order or creating a generation.
Selecting Printers Printer location selection is based on a particular hierarchy. For purchase orders, the system first prints to the location assigned to the shipping branch in Printer Location Maintenance. If a location exists with the same shipping branch, then the user receives a prompt to select one of the following:
• Print Locally - System uses the printer location assigned to the user.
• Print Warehouse - System uses the printer location assigned to the shipping branch in Printer Location Maintenance.
Using E-mail to Print In addition, you can print purchase orders by sending the order through e-mail to a user. You must have a control record set by Eclipse DMS customer support for this functionality to work. Once set, you can send orders and statements in the following ways:
• Plain text, .html, or PDF attachments to the e-mail.
• .tiff attachments to the e-mail
For complete details, see Attaching Text and HTML Documents to E-mails.
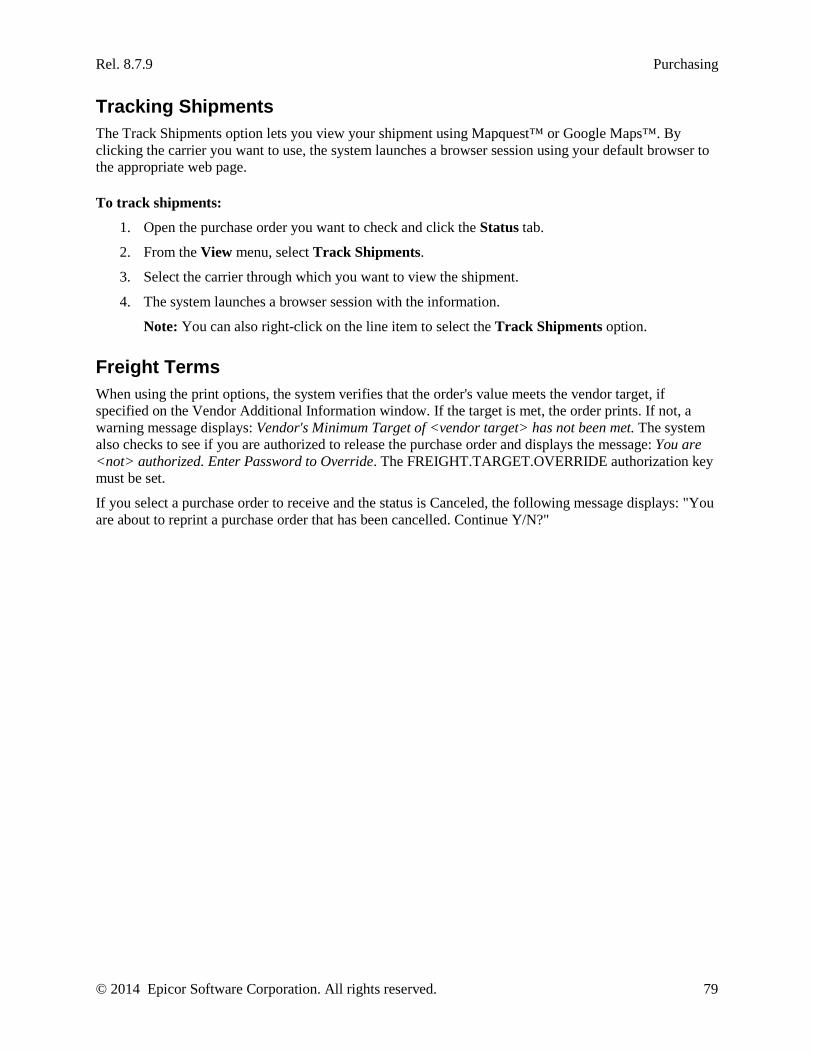
Rel. 8.7.9 Purchasing
© 2014 Epicor Software Corporation. All rights reserved. 79
Tracking Shipments The Track Shipments option lets you view your shipment using Mapquest™ or Google Maps™. By clicking the carrier you want to use, the system launches a browser session using your default browser to the appropriate web page.
To track shipments:
1. Open the purchase order you want to check and click the Status tab.
2. From the View menu, select Track Shipments.
3. Select the carrier through which you want to view the shipment.
4. The system launches a browser session with the information.
Note: You can also right-click on the line item to select the Track Shipments option.
Freight Terms When using the print options, the system verifies that the order's value meets the vendor target, if specified on the Vendor Additional Information window. If the target is met, the order prints. If not, a warning message displays: Vendor's Minimum Target of <vendor target> has not been met. The system also checks to see if you are authorized to release the purchase order and displays the message: You are <not> authorized. Enter Password to Override. The FREIGHT.TARGET.OVERRIDE authorization key must be set.
If you select a purchase order to receive and the status is Canceled, the following message displays: "You are about to reprint a purchase order that has been cancelled. Continue Y/N?"
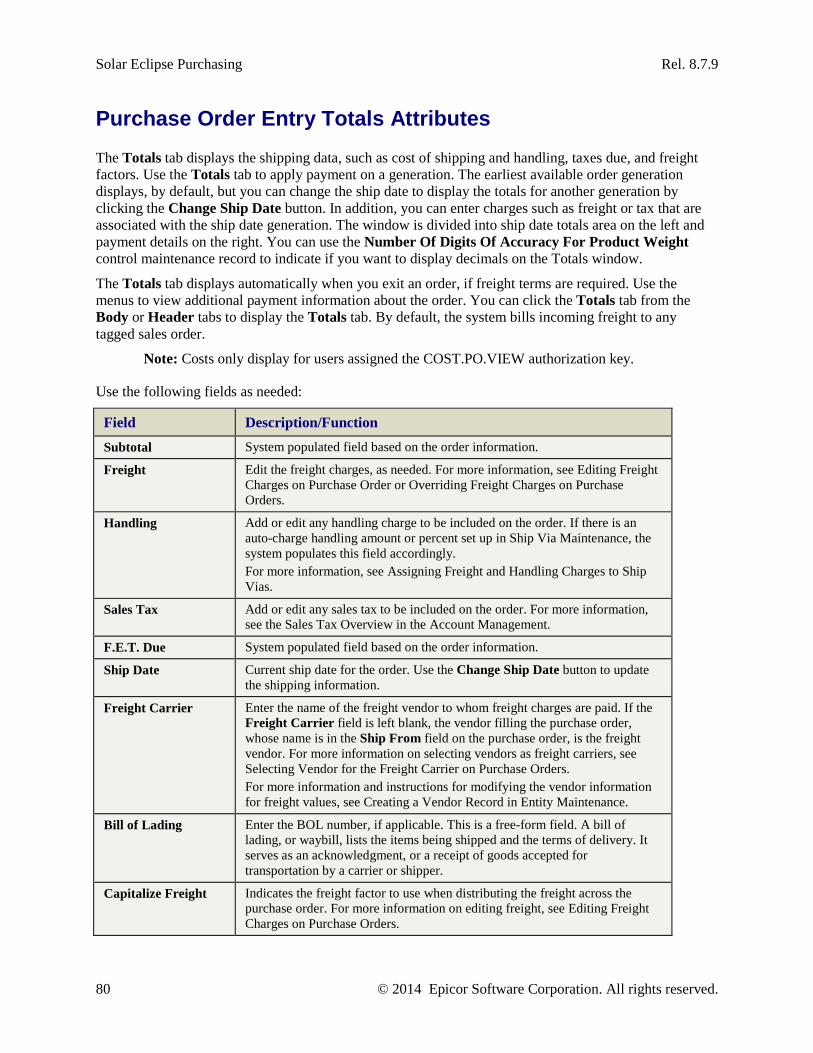
Solar Eclipse Purchasing Rel. 8.7.9
80 © 2014 Epicor Software Corporation. All rights reserved.
Purchase Order Entry Totals Attributes The Totals tab displays the shipping data, such as cost of shipping and handling, taxes due, and freight factors. Use the Totals tab to apply payment on a generation. The earliest available order generation displays, by default, but you can change the ship date to display the totals for another generation by clicking the Change Ship Date button. In addition, you can enter charges such as freight or tax that are associated with the ship date generation. The window is divided into ship date totals area on the left and payment details on the right. You can use the Number Of Digits Of Accuracy For Product Weight control maintenance record to indicate if you want to display decimals on the Totals window.
The Totals tab displays automatically when you exit an order, if freight terms are required. Use the menus to view additional payment information about the order. You can click the Totals tab from the Body or Header tabs to display the Totals tab. By default, the system bills incoming freight to any tagged sales order.
Note: Costs only display for users assigned the COST.PO.VIEW authorization key.
Use the following fields as needed:
Field Description/Function Subtotal System populated field based on the order information.
Freight Edit the freight charges, as needed. For more information, see Editing Freight Charges on Purchase Order or Overriding Freight Charges on Purchase Orders.
Handling Add or edit any handling charge to be included on the order. If there is an auto-charge handling amount or percent set up in Ship Via Maintenance, the system populates this field accordingly. For more information, see Assigning Freight and Handling Charges to Ship Vias.
Sales Tax Add or edit any sales tax to be included on the order. For more information, see the Sales Tax Overview in the Account Management.
F.E.T. Due System populated field based on the order information.
Ship Date Current ship date for the order. Use the Change Ship Date button to update the shipping information.
Freight Carrier Enter the name of the freight vendor to whom freight charges are paid. If the Freight Carrier field is left blank, the vendor filling the purchase order, whose name is in the Ship From field on the purchase order, is the freight vendor. For more information on selecting vendors as freight carriers, see Selecting Vendor for the Freight Carrier on Purchase Orders. For more information and instructions for modifying the vendor information for freight values, see Creating a Vendor Record in Entity Maintenance.
Bill of Lading Enter the BOL number, if applicable. This is a free-form field. A bill of lading, or waybill, lists the items being shipped and the terms of delivery. It serves as an acknowledgment, or a receipt of goods accepted for transportation by a carrier or shipper.
Capitalize Freight Indicates the freight factor to use when distributing the freight across the purchase order. For more information on editing freight, see Editing Freight Charges on Purchase Orders.
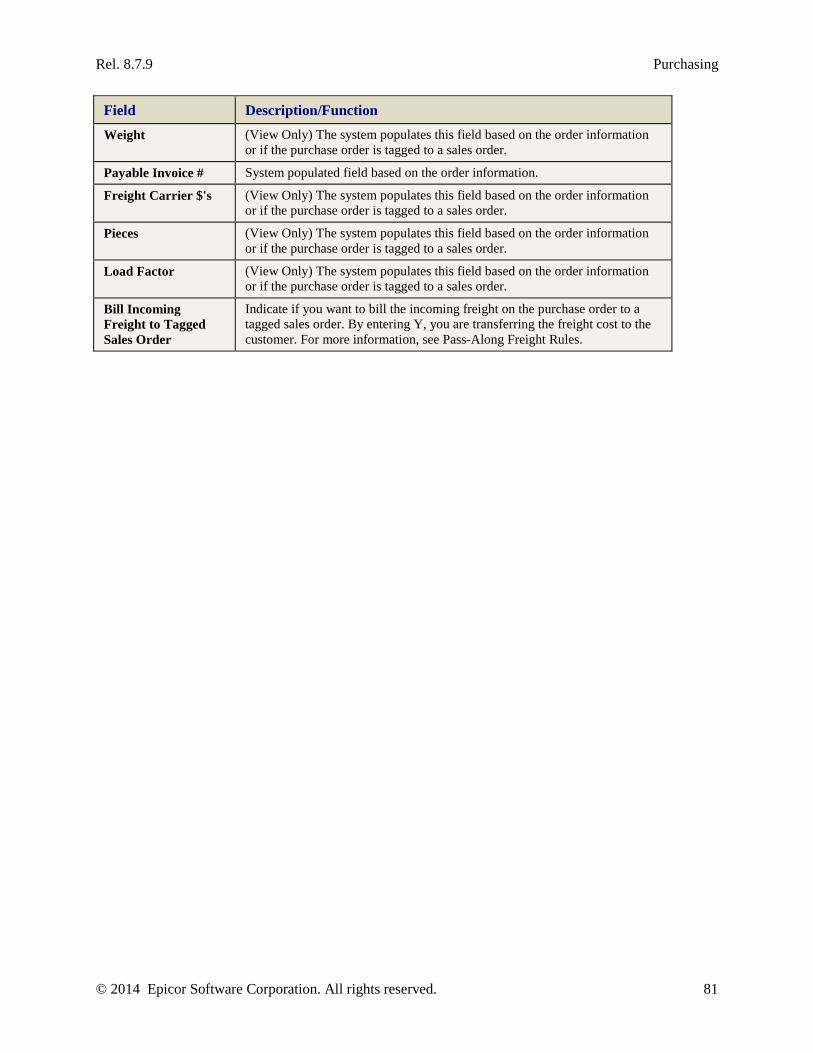
Rel. 8.7.9 Purchasing
© 2014 Epicor Software Corporation. All rights reserved. 81
Field Description/Function Weight (View Only) The system populates this field based on the order information
or if the purchase order is tagged to a sales order.
Payable Invoice # System populated field based on the order information.
Freight Carrier $'s (View Only) The system populates this field based on the order information or if the purchase order is tagged to a sales order.
Pieces (View Only) The system populates this field based on the order information or if the purchase order is tagged to a sales order.
Load Factor (View Only) The system populates this field based on the order information or if the purchase order is tagged to a sales order.
Bill Incoming Freight to Tagged Sales Order
Indicate if you want to bill the incoming freight on the purchase order to a tagged sales order. By entering Y, you are transferring the freight cost to the customer. For more information, see Pass-Along Freight Rules.
Solar Eclipse Purchasing Rel. 8.7.9
82 © 2014 Epicor Software Corporation. All rights reserved.
Creating Purchase Orders Most purchase orders (P/O) are created from the Suggested P/O Queue conversion program. However, you can create a purchase order at any time for regular products, special orders, or nonstock items. You can also mark an order as exceptional.
Purchase orders can also be created from sales orders. For more information, see Creating Purchase Order Bids from Sales Orders in Sales Management.
Note: When creating a purchase order from a sales order, items with the same part number will be combined only if the cost override is identical.
The system can calculate duty for items you add to the purchase order. If a product has the Duty Harmonizing Code and Country of Manufacture set in Product Maintenance, the duty and freight amounts for that product are calculated when the product is added to a purchase order. If the product is removed from the purchase order or the quantity changed, the duty and freight amounts adjust. Use the Automatically Calculate Duty Charges For Purchase Orders control maintenance record to set this feature. If this control maintenance record is not set, then you must use the Duty option for each line item.
After you have received the products and get an invoice from the vendor. You will need to reconcile that invoice in A/P Entry with the purchase order.
Purchase orders require that you select a vendor from whom to purchase your items. The search function lets you type a portion of a vendor name to display the active vendors from whom you can purchase. For example, if you purchase from ABC Plumbing and ABC Electrical, you can type ABC in the Ship-From field and press Enter to display both vendor names. You can set up a vendor for a one-time transaction, if necessary. For one-time activation of a vendor, see Setting Vendor Branch Override Capabilities.
You can substitute products on a purchase order in the same way you substitute products on a sales order. See Adding Suggested Substitute or Add-On Products for instructions.
Note: You can purchase buy lines from purchase order entry, see Purchasing Entire Buy Lines.
To create a new purchase order:
1. From the Purchase menu, select Purchase Order Entry to display the Initial Order Entry window.
2. In the Branch field, enter the branch for which you want to create the purchase order.
3. In the Vendor / Order# field, enter the vendor name for which you want to create the purchase order.
Note: If you want to add a new vendor, click New Vendor to enter the Vendor Maintenance program.
4. Select New for a new order from the Order Selection window.
The system populates the Location field with your user location to identify the location for which the purchase order is being created.
5. Verify and update, if needed, the Required Date and Ship Date fields. The system populates these fields with the current date.
6. Click OK.
Rel. 8.7.9 Purchasing
© 2014 Epicor Software Corporation. All rights reserved. 83
The Purchase Order Entry window Body tab displays.
Note: The system populates the Remit To and Ship From addresses. The system checks the Vendor Maintenance file to determine the addresses to display. For more information, see Defining Branch Parameters.
7. In the Qty/Unit field enter a quantity or amount you want to order, such as 10ea or 1bx.
Note: This field displays the buy package that corresponds to the branch of the purchase order.
8. In the Product Description field select a product. You can enter a partial name and press enter for a list of matches. The remaining fields populate based on the product and view chosen. Use the View menu to select alternate fields to display.
An Inventory Adjustment window may display if your purchase order could affect inventory levels. The PIL, Demand, and Days Supply display and you can check inventory or product maintenance if needed. Click OK to return to the Body tab.
Note: If there is more than one price matrix associated with the product, the Vendor Matrix Cell Selection window displays. For more information see Creating Individual Matrix Cells.
9. Repeat steps 8 and 9 as needed to add additional products.
10. Exit the window to commit the changes.
11. If prompted, in the Freight field on the Header tab, enter or select the freight value, such as Pre-Paid or COD, and review the other Header fields for accuracy.
12. On the Status tab, confirm the status or change, if needed. The default print status override set in Vendor Maintenance is used when creating a new purchase order or creating a generation.
13. Save your changes and exit the window.
Note: The system checks that you have met the vendor target. If not, the following message displays: Vendor's Minimum Target of <vendor target> has not been met. The system also checks to see if you are authorized to release the purchase order and displays the message: You are not authorized. Enter Password to Override: The FREIGHT.TARGET.OVERRIDE authorization key must be set. Authorized users can enter their Eclipse login password to override.
Marking an Order as Exceptional If you enter a larger than average order you can flag it as exceptional. For example, if a contractor is building a apartment complex and orders all the faucets at one time and he orders 3 faucets for each of the 100 units, then you have an order for 300 faucets at once. This sale of 300 faucets would be an exceptional sale. To exclude the sale from the normal demand calculation, flag the sale as exceptional.
For more information on marking orders from Inventory Management, see Marking Purchase Orders as Exceptional.
To flag an order as exceptional:
1. From the Purchase menu, select Purchase Order Entry to display the Purchase Order Entry window.
Solar Eclipse Purchasing Rel. 8.7.9
84 © 2014 Epicor Software Corporation. All rights reserved.
2. Display the purchase order.
3. Click the Header tab to display the header information.
4. From the Additional menu, select Additional Header Information to display the Additional Header Data window.
5. In the Exceptional Order field, enter Yes.
6. Click OK to save your changes.
7. Save your changes and exit the window.
Tagging a Purchase Order as Bonded Use the Additional Header window in the purchase order to mark a purchase order as bonded. The vendor does not relinquish ownership of the product to you until after the bonded date has passed. At that point, you are responsible for payment.
Entering a bonded expiration date:
1. From the Purchase menu, select Purchase Order Entry to display the Purchase Order Entry screen.
2. In the Ship From field, enter the PO number or the vendor name and press Enter.
3. Display the purchase order.
4. Click the Header tab to display the header information.
5. In the Bonded Expiration Date field, enter the date after which the bond expires and you take possession of the product.
6. Save your changes and exit the window.
Rel. 8.7.9 Purchasing
© 2014 Epicor Software Corporation. All rights reserved. 85
Editing Purchase Orders You can modify purchase orders as the order changes and as items are added, transferred, or received. Use the Purchase Order Entry program to update a purchase order. Display the purchase order in edit mode to access further functions. You must have permission to edit purchase orders. If you do not have authorization, the following message displays: "You are not authorized to edit the quantity."
Note: If you reduce the quantity on a purchase order and the system is enabled for Purchase Order Picking (Returns), then the system prompts you to generate a pick request.
When opening an order, if you select an order that you already have open on your computer, the system notifies you: "You are already editing order: <order number>. Press OK to continue." After clicking OK, the system brings the order to the front.
If you try to open an order you already have open on another computer, the system prompts you to confirm that you want to run more than one session. After confirmation, the system notifies you: "Order <order number> is being edited by <UserID>." For more information about multiple Solar Eclipse sessions, see Viewing and Logging Out of Multiple Solar Eclipse Sessions.
When an item is cancelled on a sales order and is tagged to a purchase order, the buyer can receive a message in the job queue by the system that the order has been cancelled along with the purchase order information. Use the Notify Buyer When Canceled Item Is On An Open Purchase Order control maintenance record to set this feature.
If the purchase order has been paid, you must have the POE.EDIT.PAID.MATRL authorization key assigned in order to change the freight vendor or bill of lading. You cannot make changes to either of these items after the purchase order has been invoiced.
Note: You cannot credit or rebill cancelled purchase order generations.
To display a purchase order in edit mode:
1. From the Purchase menu, select Purchase Order Entry to display the Purchase Order Entry window.
2. In the Branch field, enter the branch for which you want to create the purchase order.
3. In the Vendor / Order# field, enter the vendor name for which you want to edit the purchase order.
Note: When entering vendors with large numbers of transactions, the Order Selection window displays. You can select any of the following options from this window: New, Search, Unreconciled Receivers, or a list of transactions.
4. Select the order you want to edit from the Order Selection window.
The Purchase Order Entry window displays at the Body tab for the order.
To edit a purchase order:
1. Display the purchase order you want to edit.
2. Use the Edit Order and Line Item menus to do any of the following:
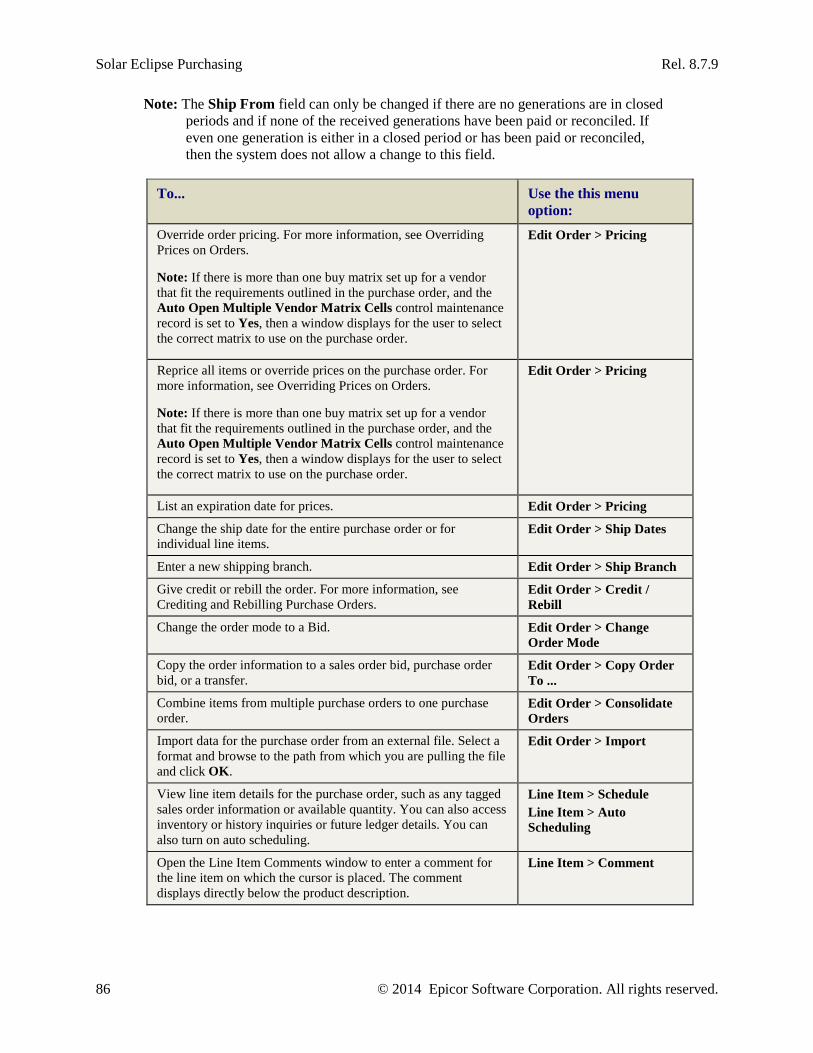
Solar Eclipse Purchasing Rel. 8.7.9
86 © 2014 Epicor Software Corporation. All rights reserved.
Note: The Ship From field can only be changed if there are no generations are in closed periods and if none of the received generations have been paid or reconciled. If even one generation is either in a closed period or has been paid or reconciled, then the system does not allow a change to this field.
To... Use the this menu option:
Override order pricing. For more information, see Overriding Prices on Orders.
Note: If there is more than one buy matrix set up for a vendor that fit the requirements outlined in the purchase order, and the Auto Open Multiple Vendor Matrix Cells control maintenance record is set to Yes, then a window displays for the user to select the correct matrix to use on the purchase order.
Edit Order > Pricing
Reprice all items or override prices on the purchase order. For more information, see Overriding Prices on Orders.
Note: If there is more than one buy matrix set up for a vendor that fit the requirements outlined in the purchase order, and the Auto Open Multiple Vendor Matrix Cells control maintenance record is set to Yes, then a window displays for the user to select the correct matrix to use on the purchase order.
Edit Order > Pricing
List an expiration date for prices. Edit Order > Pricing
Change the ship date for the entire purchase order or for individual line items.
Edit Order > Ship Dates
Enter a new shipping branch. Edit Order > Ship Branch
Give credit or rebill the order. For more information, see Crediting and Rebilling Purchase Orders.
Edit Order > Credit / Rebill
Change the order mode to a Bid. Edit Order > Change Order Mode
Copy the order information to a sales order bid, purchase order bid, or a transfer.
Edit Order > Copy Order To ...
Combine items from multiple purchase orders to one purchase order.
Edit Order > Consolidate Orders
Import data for the purchase order from an external file. Select a format and browse to the path from which you are pulling the file and click OK.
Edit Order > Import
View line item details for the purchase order, such as any tagged sales order information or available quantity. You can also access inventory or history inquiries or future ledger details. You can also turn on auto scheduling.
Line Item > Schedule Line Item > Auto Scheduling
Open the Line Item Comments window to enter a comment for the line item on which the cursor is placed. The comment displays directly below the product description.
Line Item > Comment
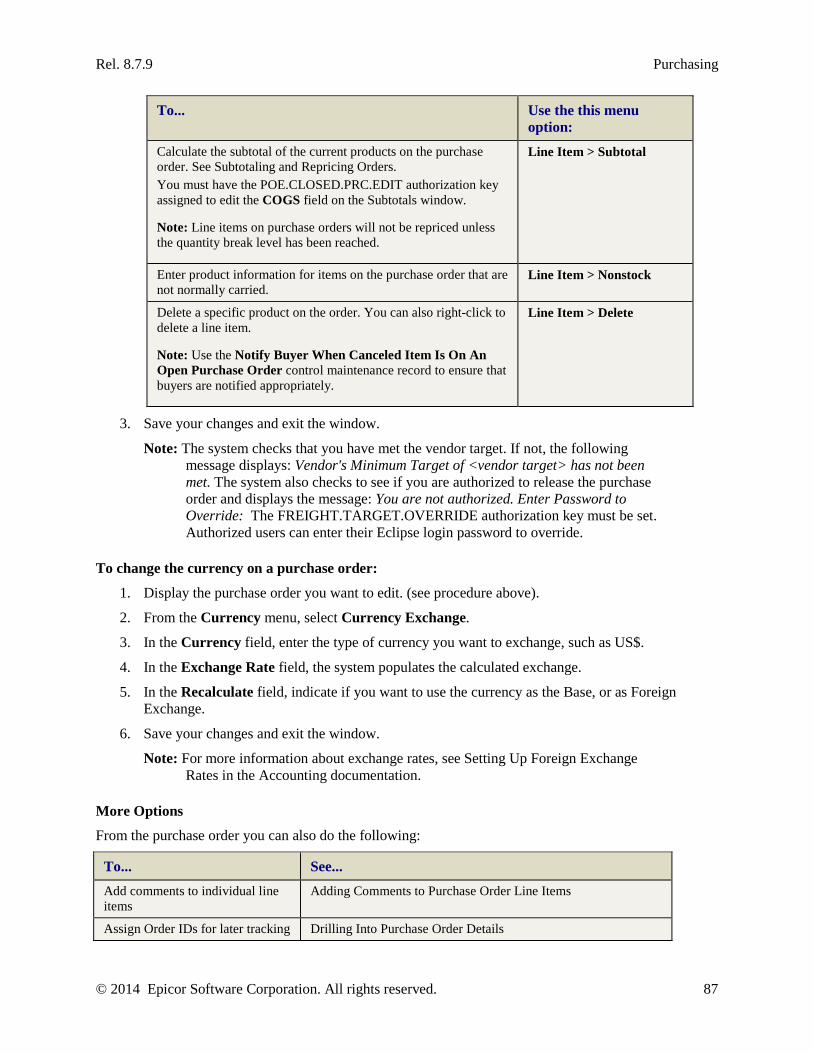
Rel. 8.7.9 Purchasing
© 2014 Epicor Software Corporation. All rights reserved. 87
To... Use the this menu option:
Calculate the subtotal of the current products on the purchase order. See Subtotaling and Repricing Orders. You must have the POE.CLOSED.PRC.EDIT authorization key assigned to edit the COGS field on the Subtotals window.
Note: Line items on purchase orders will not be repriced unless the quantity break level has been reached.
Line Item > Subtotal
Enter product information for items on the purchase order that are not normally carried.
Line Item > Nonstock
Delete a specific product on the order. You can also right-click to delete a line item.
Note: Use the Notify Buyer When Canceled Item Is On An Open Purchase Order control maintenance record to ensure that buyers are notified appropriately.
Line Item > Delete
3. Save your changes and exit the window.
Note: The system checks that you have met the vendor target. If not, the following message displays: Vendor's Minimum Target of <vendor target> has not been met. The system also checks to see if you are authorized to release the purchase order and displays the message: You are not authorized. Enter Password to Override: The FREIGHT.TARGET.OVERRIDE authorization key must be set. Authorized users can enter their Eclipse login password to override.
To change the currency on a purchase order:
1. Display the purchase order you want to edit. (see procedure above).
2. From the Currency menu, select Currency Exchange.
3. In the Currency field, enter the type of currency you want to exchange, such as US$.
4. In the Exchange Rate field, the system populates the calculated exchange.
5. In the Recalculate field, indicate if you want to use the currency as the Base, or as Foreign Exchange.
6. Save your changes and exit the window.
Note: For more information about exchange rates, see Setting Up Foreign Exchange Rates in the Accounting documentation.
More Options
From the purchase order you can also do the following:
To... See... Add comments to individual line items
Adding Comments to Purchase Order Line Items
Assign Order IDs for later tracking Drilling Into Purchase Order Details
Solar Eclipse Purchasing Rel. 8.7.9
88 © 2014 Epicor Software Corporation. All rights reserved.
To... See... Create negative purchase orders for over-shipped items
Returning Products to Vendors
Update received quantities Drilling Into Purchase Order Details
Create new generations as needed Adding Generations to Purchase Orders
Add notes to purchase orders Adding Notes and Instructions on Purchase Orders
Rel. 8.7.9 Purchasing
© 2014 Epicor Software Corporation. All rights reserved. 89
Releasing Purchase Orders Use the PO Release Queue, the PO Expedite Queue, or the POE Status tab to evaluate purchase orders before releasing them for purchase. The system provides two levels of authorization for releasing purchase orders.
Purchasing agents can have authorization to view any purchase orders, but only release those purchase orders that have a negative quantity, called return purchase orders, or purchasing agents can have authorization to release any purchase orders in the system.
For example, your company may have three purchasing agents and a purchasing manager. The agents build and submit purchase orders daily. The purchasing manager reviews the purchase orders and determines if some purchase orders can be combined or added to purchase orders already in the system.
When purchase orders are released and invoiced, a message is appended to any associated tracker. Use the Update Associated Trackers Upon Invoicing Of Orders control maintenance record to indicate if you want messages send to those users on associated trackers.
To release a purchase order from the PO Release Queue:
1. From the Purchase > Queues menu, select P/O Release to display the PO Release Queue window.
Note: If prompted, log on to the character-based system.
2. In the Br field, enter the branch for which you want to list open purchase orders. Type all to search all branches.
3. In the Vendor field, enter the vendor name for which you want to list open purchase orders. Leave the field blank to search all vendors.
4. In the Writer field, enter the writer name if you want to search for a specific purchasing agent. Leave the field blank if you want to search all purchasing agents.
5. In the Start Date and End Date fields, indicate the time frame for which you want to search for purchase orders.
6. Press Enter to begin the search and populate the queue.
7. Enter a P for print, and F for fax, or an E for e-mail next to the purchase orders you want to release.
8. Use the Prt All hot key to print, fax, or email the purchase orders you selected in step 7.
The system prints any orders marked with P, displays the Send E-mail screen for any orders marked with an E grouped by vendor, and the Fax Memo screen for any orders marked with an F. Complete the necessary information for each to release the purchase orders.
9. Press Esc to return to a blank queue.
10. Press Esc to exit the PO Release Queue screen.
To release purchase orders from the PO Expedite Queue:
1. Display the PO Expedite Queue selecting the purchase order parameters needed.
2. In the S column, select the check box for the purchase order you want to release.
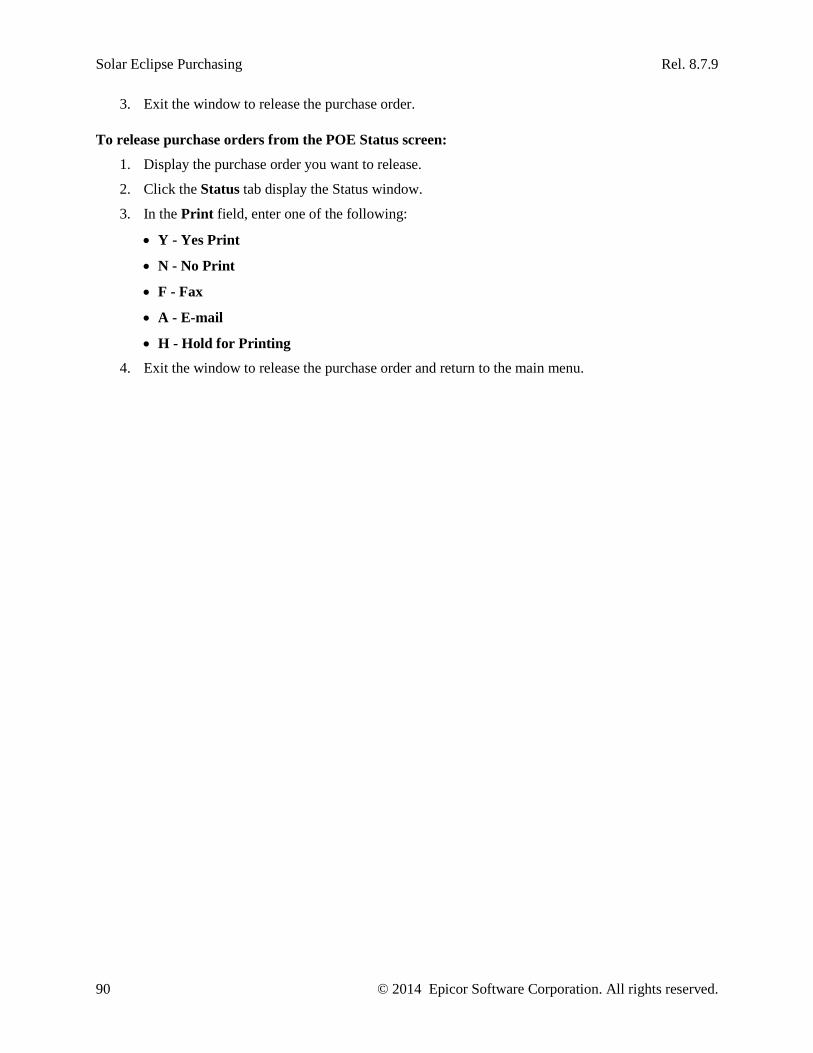
Solar Eclipse Purchasing Rel. 8.7.9
90 © 2014 Epicor Software Corporation. All rights reserved.
3. Exit the window to release the purchase order.
To release purchase orders from the POE Status screen:
1. Display the purchase order you want to release.
2. Click the Status tab display the Status window.
3. In the Print field, enter one of the following:
• Y - Yes Print
• N - No Print
• F - Fax
• A - E-mail
• H - Hold for Printing
4. Exit the window to release the purchase order and return to the main menu.
Rel. 8.7.9 Purchasing
© 2014 Epicor Software Corporation. All rights reserved. 91
Drilling Into Purchase Orders Details Use Purchase Order Scheduling to receive purchase orders and drill further into the purchase order with which you are working to change specific attributes, such as the unit of measure.
Note: To make it easier to see how an order breaks into generations, the system provides generation highlighting and generation tooltips that you can turn on. For more information, see Using Generation Display Options.
From the Purchase Order Entry, you can:
• Identify multiple locations from which to pick or store the product.
• Update the purchase order when receiving the products.
• Handle discrepancies when receiving products.
• Add substitute products to the purchase order.
• View the Future Ledger.
• View the Inventory Inquiry.
• Create a Product Kit.
• Attach product specifications or product notes.
• View the sales order to which the purchase order is tagged.
• View the inventory History Ledger.
• Change the unit of measure (UOM).
• Enter a serial number for the products displayed.
• View purchasing Information at the product level.
• Drill directly into product options using the options on the Maintenance > Additional Product Maintenance menu.
• View the A/P balances on accounts for the pay-to vendor on the order using the Maintenance > Additional Vendor Maintenance > A/P Summary menu.
To select a substitute product:
1. From the Purchase menu, select Purchase Order Entry to display the Purchase Order Entry window.
2. Display the purchase order for which you want to use a substitute product instead of the one displayed.
3. Click Body tab.
4. Place the cursor on the line item for which you want to use a substitute product.
5. From the Line Item menu, select Substitutes to display the Substitutes / Add On Sale Items window.
6. Select the product you want to use from the list.
Note: If no substitutions are available, this window is blank.
Solar Eclipse Purchasing Rel. 8.7.9
92 © 2014 Epicor Software Corporation. All rights reserved.
7. From the File menu, select Substitute Item.
8. Save your changes and exit the window.
To view the sales order to which the purchase order is tagged:
1. From the Purch menu, select Purchase Order Entry to display the Purchase Order Entry window.
2. Display the purchase order to which a tag is attached that you want to view.
3. Click the Detail Scheduling tab to display the Detail Scheduling window.
4. From the Options > Line Options menu, select Schedule to display the Line Item Scheduling window.
5. In the Location/Vendor field, look for the Tagged to: information for the item, and place the cursor on that line.
6. From the Inquiries menu, select View Tag Order to view the sales order in view-only mode.
7. Save your changes and exit the window.
To change the unit of measure:
1. From the Purchase menu, select Purchase Order Entry to display the Purchase Order Entry window.
2. Display the purchase order for which you want to change a product's unit of measure.
3. Click the Detail Scheduling tab to display the Detail Scheduling window.
4. Highlight the line item for which you want to change the unit of measure.
5. From the Options > Line Options menu, select Schedule.
6. From the Edit menu, select Unit of Measure.
7. Edit the unit of measure, as needed, and exit the window.
8. Exit the Line Item Scheduling window.
9. Save your changes and exit the window.
To enter a serial number:
1. From the Purchase menu, select Purchase Order Entry to display the Purchase Order Entry window.
2. Display the purchase order for which you want to add a serial number.
3. Click the Detail Scheduling tab to display the Detail Scheduling window.
4. Highlight the line item for which you want to add a serial number.
5. From the Options > Line Options menu, select Schedule.
6. From the Edit menu, select Serial Numbers.
7. Enter or edit the serial number, as needed, and exit the window.
8. Exit the Line Item Scheduling window.
9. Save your changes and exit the window.
Rel. 8.7.9 Purchasing
© 2014 Epicor Software Corporation. All rights reserved. 93
To view purchasing information at the product level: (not avail in Solar, yet)
1. Log on to the character-based system.
2. From the Purch menu, select Purchase Order Entry to display the Purchase Order Entry screen.
3. Display the purchase order for which you want to view purchasing information.
4. Use the Sched hot key to display the Schedule screen.
5. Place the cursor on the line item for which you want to view the purchasing information.
6. Use the Purch hot key to display the Purchasing Info screen with the following information:
Field Description PN Product number listed on the order.
Description Full description of the product.
Buy Line Buy line in which the product exists.
Ship Br Branch from which the product shipped.
Last Line Buy Date of the last line buy for this product.
Order Cycle Days Days in the order cycle for the product.
Average Lead Time Days in the lead time for the product.
Next Est Purchase Dt Date the system estimates the next purchase will be for the product.
Plenty Date Date the system expects to have enough on hand to meet demand.
7. Press Esc to return to the Schedule screen.
8. Press Esc to exit the purchase order.
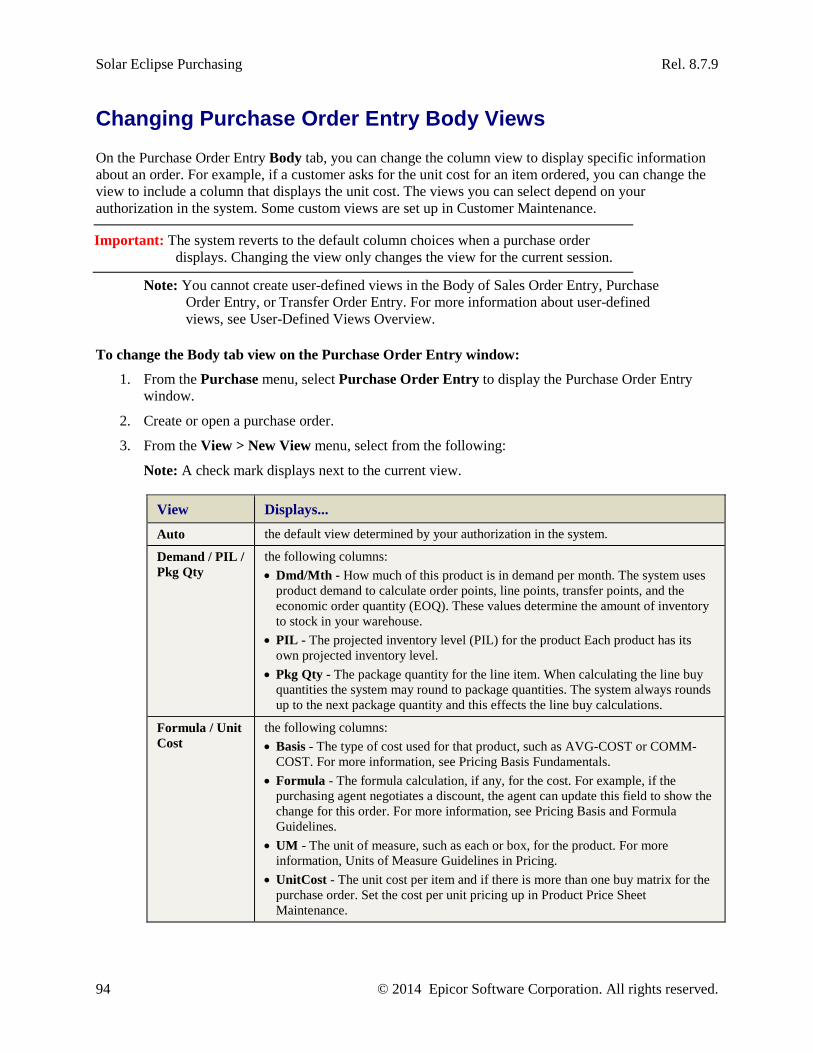
Solar Eclipse Purchasing Rel. 8.7.9
94 © 2014 Epicor Software Corporation. All rights reserved.
Changing Purchase Order Entry Body Views On the Purchase Order Entry Body tab, you can change the column view to display specific information about an order. For example, if a customer asks for the unit cost for an item ordered, you can change the view to include a column that displays the unit cost. The views you can select depend on your authorization in the system. Some custom views are set up in Customer Maintenance.
Important: The system reverts to the default column choices when a purchase order displays. Changing the view only changes the view for the current session.
Note: You cannot create user-defined views in the Body of Sales Order Entry, Purchase Order Entry, or Transfer Order Entry. For more information about user-defined views, see User-Defined Views Overview.
To change the Body tab view on the Purchase Order Entry window:
1. From the Purchase menu, select Purchase Order Entry to display the Purchase Order Entry window.
2. Create or open a purchase order.
3. From the View > New View menu, select from the following:
Note: A check mark displays next to the current view.
View Displays... Auto the default view determined by your authorization in the system.
Demand / PIL / Pkg Qty
the following columns: • Dmd/Mth - How much of this product is in demand per month. The system uses
product demand to calculate order points, line points, transfer points, and the economic order quantity (EOQ). These values determine the amount of inventory to stock in your warehouse.
• PIL - The projected inventory level (PIL) for the product Each product has its own projected inventory level.
• Pkg Qty - The package quantity for the line item. When calculating the line buy quantities the system may round to package quantities. The system always rounds up to the next package quantity and this effects the line buy calculations.
Formula / Unit Cost
the following columns: • Basis - The type of cost used for that product, such as AVG-COST or COMM-
COST. For more information, see Pricing Basis Fundamentals. • Formula - The formula calculation, if any, for the cost. For example, if the
purchasing agent negotiates a discount, the agent can update this field to show the change for this order. For more information, see Pricing Basis and Formula Guidelines.
• UM - The unit of measure, such as each or box, for the product. For more information, Units of Measure Guidelines in Pricing.
• UnitCost - The unit cost per item and if there is more than one buy matrix for the purchase order. Set the cost per unit pricing up in Product Price Sheet Maintenance.
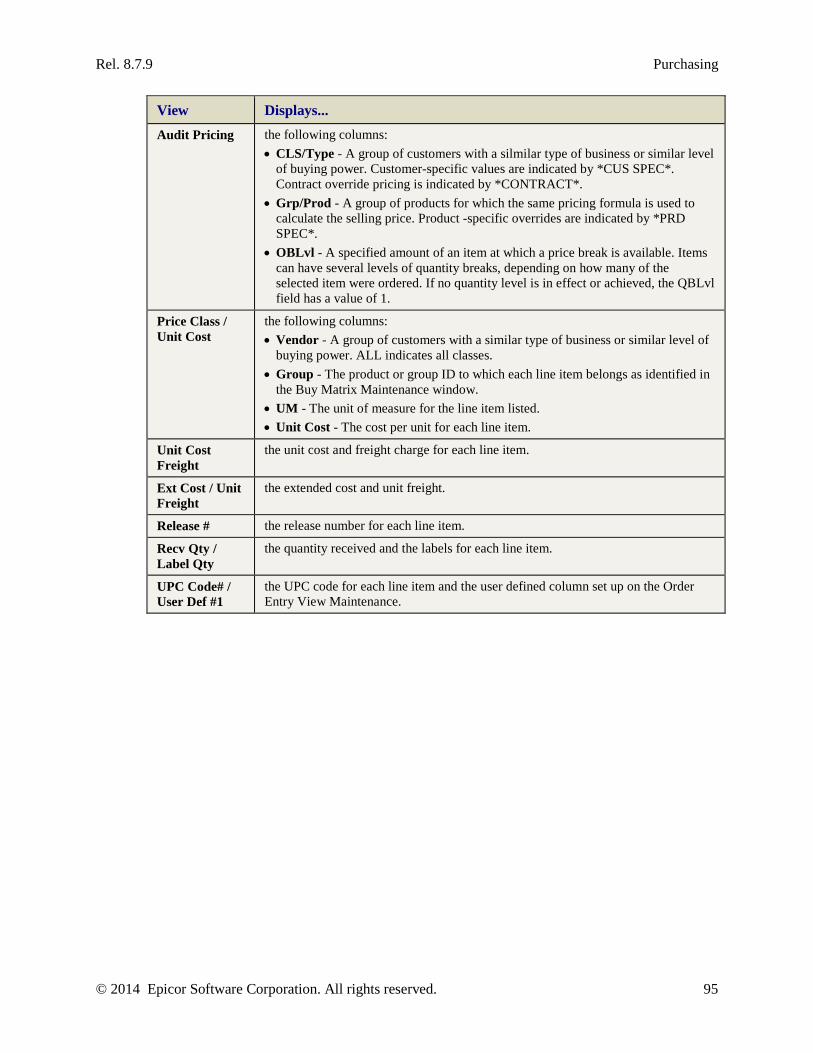
Rel. 8.7.9 Purchasing
© 2014 Epicor Software Corporation. All rights reserved. 95
View Displays... Audit Pricing the following columns:
• CLS/Type - A group of customers with a silmilar type of business or similar level of buying power. Customer-specific values are indicated by *CUS SPEC*. Contract override pricing is indicated by *CONTRACT*.
• Grp/Prod - A group of products for which the same pricing formula is used to calculate the selling price. Product -specific overrides are indicated by *PRD SPEC*.
• OBLvl - A specified amount of an item at which a price break is available. Items can have several levels of quantity breaks, depending on how many of the selected item were ordered. If no quantity level is in effect or achieved, the QBLvl field has a value of 1.
Price Class / Unit Cost
the following columns: • Vendor - A group of customers with a similar type of business or similar level of
buying power. ALL indicates all classes. • Group - The product or group ID to which each line item belongs as identified in
the Buy Matrix Maintenance window. • UM - The unit of measure for the line item listed. • Unit Cost - The cost per unit for each line item.
Unit Cost Freight
the unit cost and freight charge for each line item.
Ext Cost / Unit Freight
the extended cost and unit freight.
Release # the release number for each line item.
Recv Qty / Label Qty
the quantity received and the labels for each line item.
UPC Code# / User Def #1
the UPC code for each line item and the user defined column set up on the Order Entry View Maintenance.
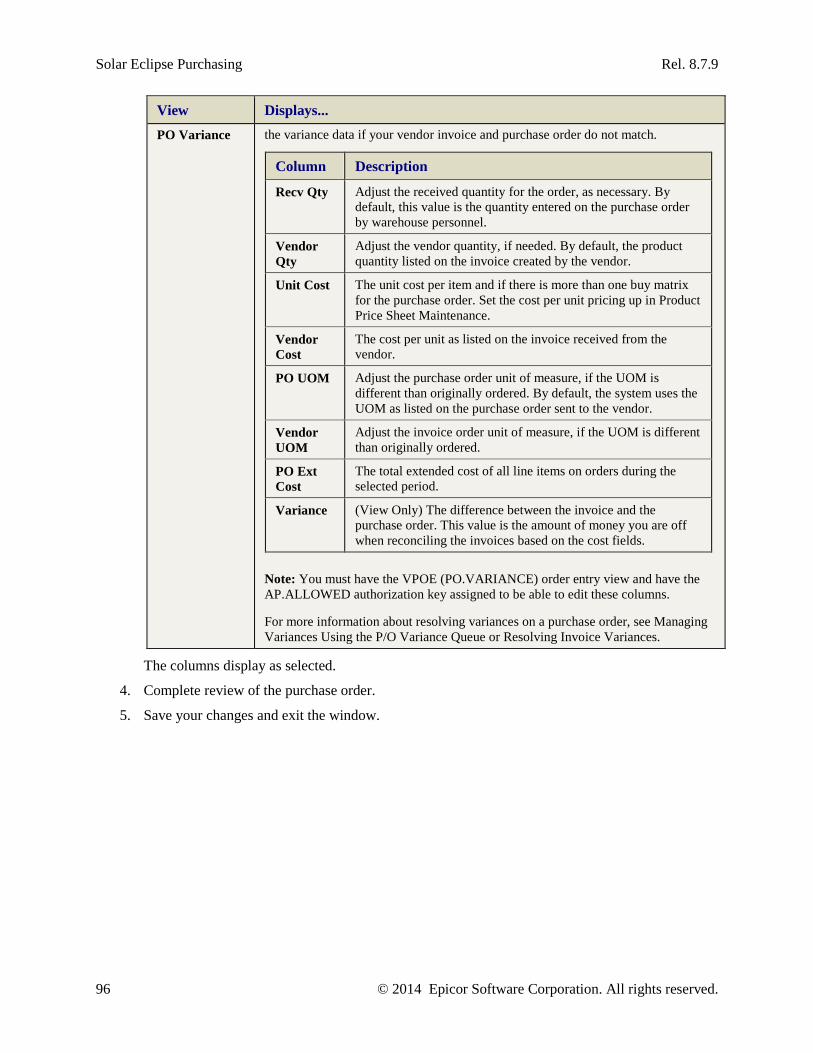
Solar Eclipse Purchasing Rel. 8.7.9
96 © 2014 Epicor Software Corporation. All rights reserved.
View Displays... PO Variance the variance data if your vendor invoice and purchase order do not match.
Column Description
Recv Qty Adjust the received quantity for the order, as necessary. By default, this value is the quantity entered on the purchase order by warehouse personnel.
Vendor Qty
Adjust the vendor quantity, if needed. By default, the product quantity listed on the invoice created by the vendor.
Unit Cost The unit cost per item and if there is more than one buy matrix for the purchase order. Set the cost per unit pricing up in Product Price Sheet Maintenance.
Vendor Cost
The cost per unit as listed on the invoice received from the vendor.
PO UOM Adjust the purchase order unit of measure, if the UOM is different than originally ordered. By default, the system uses the UOM as listed on the purchase order sent to the vendor.
Vendor UOM
Adjust the invoice order unit of measure, if the UOM is different than originally ordered.
PO Ext Cost
The total extended cost of all line items on orders during the selected period.
Variance (View Only) The difference between the invoice and the purchase order. This value is the amount of money you are off when reconciling the invoices based on the cost fields.
Note: You must have the VPOE (PO.VARIANCE) order entry view and have the AP.ALLOWED authorization key assigned to be able to edit these columns.
For more information about resolving variances on a purchase order, see Managing Variances Using the P/O Variance Queue or Resolving Invoice Variances.
The columns display as selected.
4. Complete review of the purchase order.
5. Save your changes and exit the window.

Rel. 8.7.9 Purchasing
© 2014 Epicor Software Corporation. All rights reserved. 97
Copying Purchase Order Data to Other Order Types You can copy purchase order data to other orders. This process lets you keep the order as is, but copy the information to a new type of order and not have to re-enter all the data again.
To copy purchase order data to another order:
1. Display the purchase order that you want to copy.
2. From the Edit Order > Copy order to menu, select one of the following:
• Copy to Sales Order Bid - Copies all data to a sales order bid.
• Copy to Purchase Order Bid - Copies all data to a purchase order bid. The information from the purchase order is generated to a new order. The order extension is now -Bid.
Note: All non-overridden prices to be recalculated during the copy process while maintaining manually overridden amounts.
• Copy to Transfer - Copies all data to a transfer.
3. The system populates the following fields. Update these fields as needed:
• For sales orders
Field Heading Enter Price Branch The branch from which the pricing information is being
gathered.
Enter Ship Branch The branch from which the items are being shipped.
Ship-To Customer The customer to use for the bid.
Gens to Copy Indicate if you want to copy all generations of the order into the bid.
• For purchase orders
Field Description Enter Price Branch The branch from which the pricing information is being
gathered.
Enter Ship Branch The branch from which the items are being shipped.
Ship-From Same Vendor Indicate if you want to use the same vendor for the purchase order bid as the transfer.
Ship-From Vendor Indicate if you want a different customer name on the bid.
Gens to Copy Indicate if you want to copy all generations of the order into the bid. The default is All.
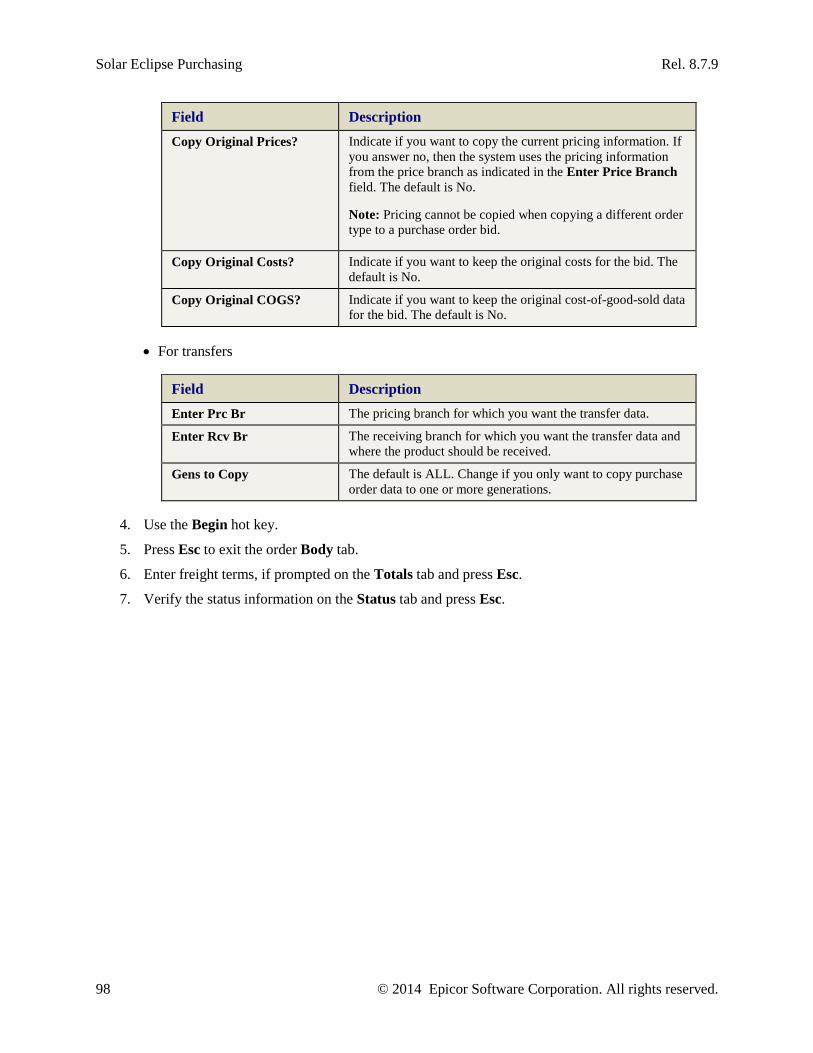
Solar Eclipse Purchasing Rel. 8.7.9
98 © 2014 Epicor Software Corporation. All rights reserved.
Field Description Copy Original Prices? Indicate if you want to copy the current pricing information. If
you answer no, then the system uses the pricing information from the price branch as indicated in the Enter Price Branch field. The default is No.
Note: Pricing cannot be copied when copying a different order type to a purchase order bid.
Copy Original Costs? Indicate if you want to keep the original costs for the bid. The default is No.
Copy Original COGS? Indicate if you want to keep the original cost-of-good-sold data for the bid. The default is No.
• For transfers
Field Description Enter Prc Br The pricing branch for which you want the transfer data.
Enter Rcv Br The receiving branch for which you want the transfer data and where the product should be received.
Gens to Copy The default is ALL. Change if you only want to copy purchase order data to one or more generations.
4. Use the Begin hot key.
5. Press Esc to exit the order Body tab.
6. Enter freight terms, if prompted on the Totals tab and press Esc.
7. Verify the status information on the Status tab and press Esc.
Rel. 8.7.9 Purchasing
© 2014 Epicor Software Corporation. All rights reserved. 99
Splitting Purchase Orders Into Generations Generations on a purchase order are created when one of the following items is different for a line item:
• Ship Via
• Ship Date
• Ship Branch
Splitting a purchase order up allows you to purchase and receive individual items without having to wait for the entire purchase order.
To split a purchase order into a generation:
1. Do one of the following:
• Open the purchase order you want to split.
• Create a new purchase order with multiple line items.
2. Press Esc to view the Status window.
3. Click the Detail Scheduling tab to display the Scheduling window.
4. For any of the line items, change one of the following fields:
• Ship Qty - Adjust the quantity of items ordered.
• Ship Date - Change the shipment dates of individual items.
• Status - Update the status for individual items.
• Ship Via - Adjust the ship via for individual items.
• Ship Branch - Change the branch from which individual items are being shipped.
5. Click the Status tab.
The system displays the new generations based on the changes made on the Scheduling window.
6. Finish editing the purchase order, save your changes and exit the window.
Solar Eclipse Purchasing Rel. 8.7.9
100 © 2014 Epicor Software Corporation. All rights reserved.
Converting Purchase Orders to Bids Convert purchase orders to bids to send the COGS data to your vendor without actually purchasing the items and sending them to your inventory. This process eliminates the possibility of creating a sales order against inventory that you may not have coming in. By keeping the purchase order as a bid, you can get the cost to you without committing the products to your future ledger or inventory supply.
To convert a purchase order to a bid:
1. Display the purchase order that you want to copy.
2. From the Edit Order > Change Order Mode menu, select Bid.
The system converts the purchase order and the generation extension changes to -Bid.
Note: The system prompts you to select a vendor. You can use the vendor on the original purchase order, or enter a new vendor to fulfill the order.
3. Save your changes and exit the window.
Rel. 8.7.9 Purchasing
© 2014 Epicor Software Corporation. All rights reserved. 101
Printing Purchase Orders You can print purchase orders from the purchase order entry Status tab. Purchase orders can be printed in hard copy, faxed, e-mailed, or added to shipping manifests. Also, you can change the print style and status or select the number of copies you want to print. To print individual order generations, print from the Status tab. You must have the POE.OPEN.ORDER.PRINT authorization key assigned to print purchase orders. If you do not have this authorization, the system keeps the print status at No when you try to print.
Note: When printing more than one copy of a purchase order, on each copy after the first, the system labels the copy as a reprint.
Print Styles Print styles indicate how the system formats a particular document. The system populates the selection list for this field through choices set up in Print Style Maintenance. Print styles are normally set up at the time of installation, but can be maintained through Print Style Maintenance. For more information, see Maintaining Print Styles in the Printer Setup documentation..
Printing Direct Purchase Orders If you are printing a direct purchase order and the authorization fails, the system sends the order to the Open Order Status Queue and the user cannot release the credit hold. The user is prompted to use Credit Override. You must have the POE.ASL.RELEASE authorization key assigned in order to print purchase orders being held for approved suppliers. For information on printing orders, see Reprinting Orders.
Note: The system checks the product file when printing. If any hazardous material is listed on the order, a HAZMAT sheet prints with the order.
To print a purchase order:
1. From the Purchase menu, select Purchase Order Entry to display the purchase Order Entry window.
2. Display the purchase order you want to print.
3. Click the Status tab.
4. From the Print menu, select Options to display the Order Reprinting Options window.
The Customer Name, Ship Via, and Manifest # fields populate with the order information.
5. In the Print Style field, enter the style that you want for the order.
6. In the Order Status field, select the order status for the order. The default is Open.
7. In the Number of Copies field, enter the number of copies you want to print.
8. In the Review Queues Status field, enter the status for which you want to print the order.
9. Use the File menu to indicate how you want to print:
• Print Order - Print the order as indicated. Printer location selection is based on a particular hierarchy. For purchase orders, the system first prints to the location assigned to the shipping branch in Printer Location Maintenance. If a location exists with the same shipping branch, then the user receives a prompt to select one of the following:
• Print Locally - System uses the printer location assigned to the user.
Solar Eclipse Purchasing Rel. 8.7.9
102 © 2014 Epicor Software Corporation. All rights reserved.
• Print Warehouse - System uses the printer location assigned to the shipping branch in Printer Location Maintenance.
• Fax Order - Displays the Fax Memo window.
• Email Order - Displays the Send E-mail window. If the ship-to address is overridden, the overriding address is used. In addition, you can print purchase orders by sending the order through e-mail to a user. You must have a control record set by Eclipse DMS customer support for this functionality to work. Once set, you can send orders and statements in plain text, .html, or PDF attachments to the e-mail. In addition, you can send them as .tiff attachments to the e-mail. For complete details, see Attaching Text and HTML Documents to E-mails.
• Print Label - Displays the User Defined Document/Label Printing window.
10. Save your changes and exit the window.
To print purchase orders from the Status tab:
1. From the Purchase menu, select Purchase Order Entry to display the Purchase Order Entry window.
2. Display the transfer you want to print.
3. Click the Status tab.
4. In the Print field for the generation you want to print for shipment, select one of the following:
• Y - Print to your default printer. The system determines your printer location based on specific parameters.
Note: If the Allow Alternate Branch Bill-To Address control maintenance record is set to Yes, and you have information in the Bill-To ID field in Branch Maintenance, then the Bill-To ID prints on the purchase order, regardless of the Remit To address listed in the Header tab of the purchase order.
• N - To hold the generation for printing.
• F - Fax to your default facsimile machine.
• A - E-mail to an indicated E-mail address.
• H - Send to your hold entries.
5. Exit the Status tab.
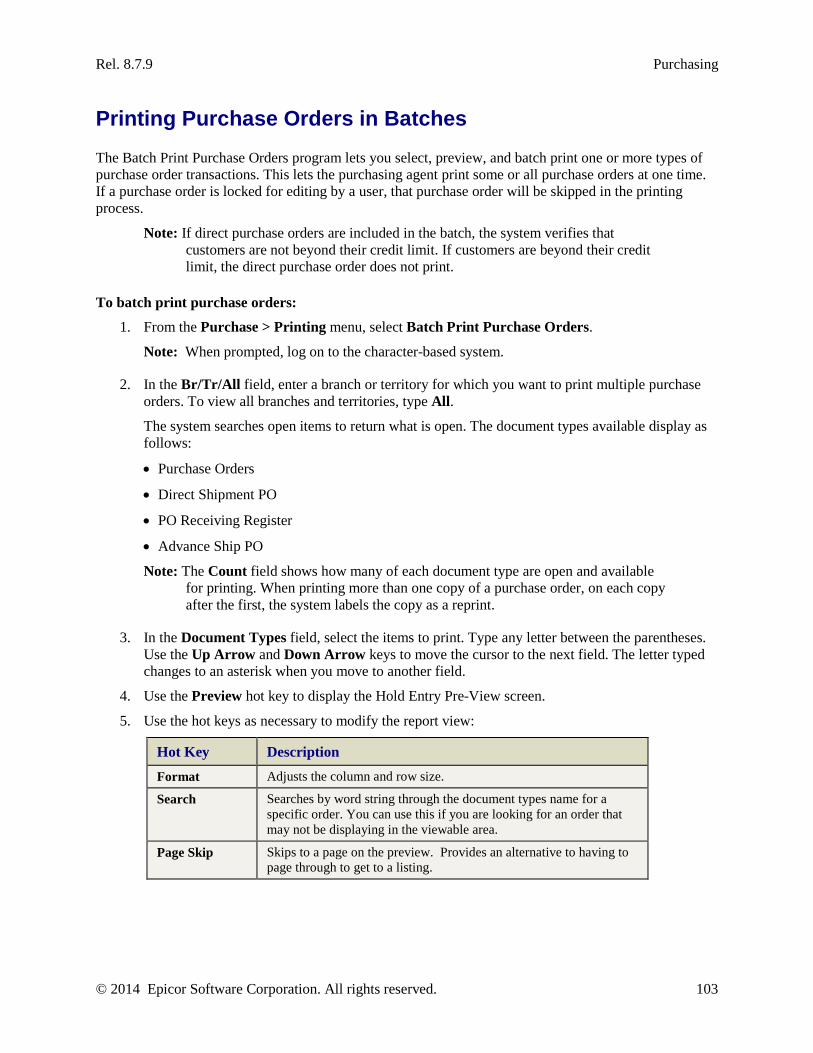
Rel. 8.7.9 Purchasing
© 2014 Epicor Software Corporation. All rights reserved. 103
Printing Purchase Orders in Batches The Batch Print Purchase Orders program lets you select, preview, and batch print one or more types of purchase order transactions. This lets the purchasing agent print some or all purchase orders at one time. If a purchase order is locked for editing by a user, that purchase order will be skipped in the printing process.
Note: If direct purchase orders are included in the batch, the system verifies that customers are not beyond their credit limit. If customers are beyond their credit limit, the direct purchase order does not print.
To batch print purchase orders:
1. From the Purchase > Printing menu, select Batch Print Purchase Orders.
Note: When prompted, log on to the character-based system.
2. In the Br/Tr/All field, enter a branch or territory for which you want to print multiple purchase orders. To view all branches and territories, type All.
The system searches open items to return what is open. The document types available display as follows:
• Purchase Orders
• Direct Shipment PO
• PO Receiving Register
• Advance Ship PO
Note: The Count field shows how many of each document type are open and available for printing. When printing more than one copy of a purchase order, on each copy after the first, the system labels the copy as a reprint.
3. In the Document Types field, select the items to print. Type any letter between the parentheses. Use the Up Arrow and Down Arrow keys to move the cursor to the next field. The letter typed changes to an asterisk when you move to another field.
4. Use the Preview hot key to display the Hold Entry Pre-View screen.
5. Use the hot keys as necessary to modify the report view:
Hot Key Description Format Adjusts the column and row size.
Search Searches by word string through the document types name for a specific order. You can use this if you are looking for an order that may not be displaying in the viewable area.
Page Skip Skips to a page on the preview. Provides an alternative to having to page through to get to a listing.
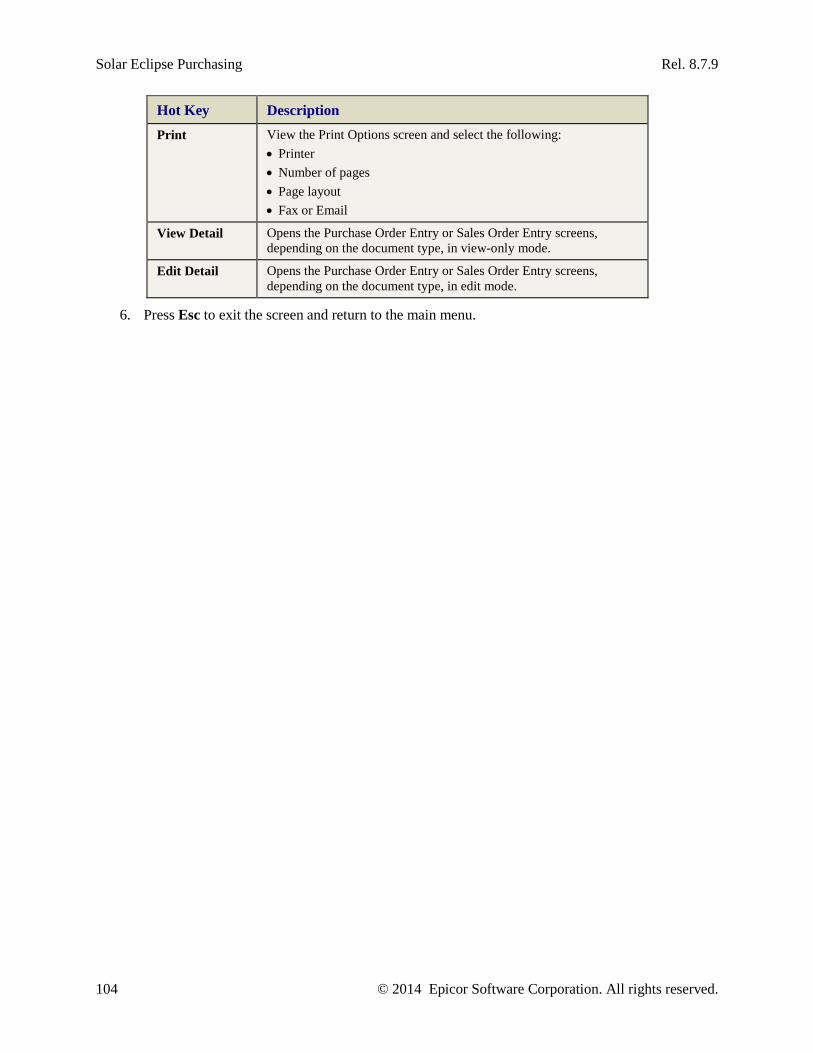
Solar Eclipse Purchasing Rel. 8.7.9
104 © 2014 Epicor Software Corporation. All rights reserved.
Hot Key Description Print View the Print Options screen and select the following:
• Printer • Number of pages • Page layout • Fax or Email
View Detail Opens the Purchase Order Entry or Sales Order Entry screens, depending on the document type, in view-only mode.
Edit Detail Opens the Purchase Order Entry or Sales Order Entry screens, depending on the document type, in edit mode.
6. Press Esc to exit the screen and return to the main menu.
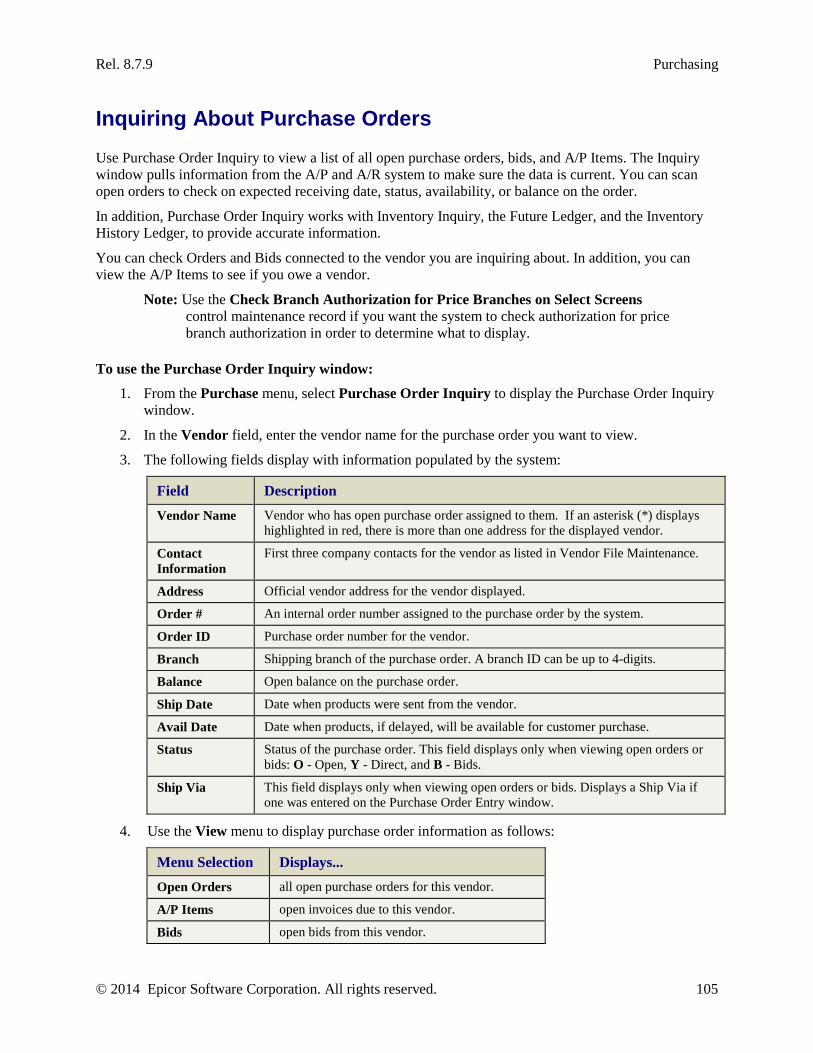
Rel. 8.7.9 Purchasing
© 2014 Epicor Software Corporation. All rights reserved. 105
Inquiring About Purchase Orders Use Purchase Order Inquiry to view a list of all open purchase orders, bids, and A/P Items. The Inquiry window pulls information from the A/P and A/R system to make sure the data is current. You can scan open orders to check on expected receiving date, status, availability, or balance on the order.
In addition, Purchase Order Inquiry works with Inventory Inquiry, the Future Ledger, and the Inventory History Ledger, to provide accurate information.
You can check Orders and Bids connected to the vendor you are inquiring about. In addition, you can view the A/P Items to see if you owe a vendor.
Note: Use the Check Branch Authorization for Price Branches on Select Screens control maintenance record if you want the system to check authorization for price branch authorization in order to determine what to display.
To use the Purchase Order Inquiry window:
1. From the Purchase menu, select Purchase Order Inquiry to display the Purchase Order Inquiry window.
2. In the Vendor field, enter the vendor name for the purchase order you want to view.
3. The following fields display with information populated by the system:
Field Description Vendor Name Vendor who has open purchase order assigned to them. If an asterisk (*) displays
highlighted in red, there is more than one address for the displayed vendor.
Contact Information
First three company contacts for the vendor as listed in Vendor File Maintenance.
Address Official vendor address for the vendor displayed.
Order # An internal order number assigned to the purchase order by the system.
Order ID Purchase order number for the vendor.
Branch Shipping branch of the purchase order. A branch ID can be up to 4-digits.
Balance Open balance on the purchase order.
Ship Date Date when products were sent from the vendor.
Avail Date Date when products, if delayed, will be available for customer purchase.
Status Status of the purchase order. This field displays only when viewing open orders or bids: O - Open, Y - Direct, and B - Bids.
Ship Via This field displays only when viewing open orders or bids. Displays a Ship Via if one was entered on the Purchase Order Entry window.
4. Use the View menu to display purchase order information as follows:
Menu Selection Displays... Open Orders all open purchase orders for this vendor.
A/P Items open invoices due to this vendor.
Bids open bids from this vendor.
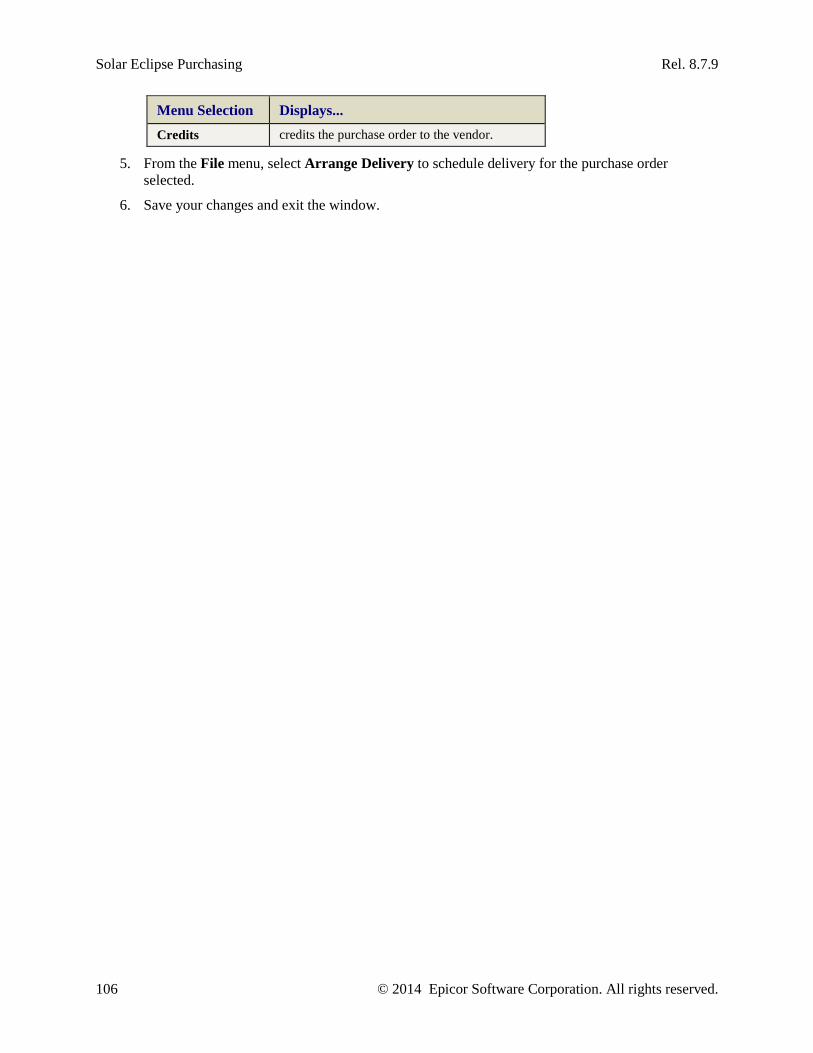
Solar Eclipse Purchasing Rel. 8.7.9
106 © 2014 Epicor Software Corporation. All rights reserved.
Menu Selection Displays... Credits credits the purchase order to the vendor.
5. From the File menu, select Arrange Delivery to schedule delivery for the purchase order selected.
6. Save your changes and exit the window.
Rel. 8.7.9 Purchasing
© 2014 Epicor Software Corporation. All rights reserved. 107
Crediting and Rebilling Purchase Orders They system provides you with tools to credit and rebill purchase orders when needed. For example, you order ten items from your vendor for $10 each. The vendor sends ten, but charges you $12.50 each. You can correct the discrepancy and send the vendor the correct amount to reflect the updates for the accounts payable department.
From Purchase Order Entry, you create a generation to cancel the first generation, and then correct the transaction on the third generation. For example, you create a purchase order for 20 items from vendor ABC. The vendor charges you $10 per item. The vendor calls with a discount to $8 per item. You create a generation for -20 items at $10 each to cancel the first purchase. This is known as the credit generation. Then, you create a generation for 20 items at $8 each. This is known as the rebill generation. When you look at the Status tab, the .001 generation is the original purchase. The .002 generation cancels the .001 purchase. Then .003 generation corrects the purchase.
To credit or rebill a purchase order:
1. Display the purchase order you want to credit or rebill.
Note: The purchase order must be received in order to complete a credit or rebill.
2. From the Edit Order menu, select Credit/Rebill from the Credit/Rebill window.
3. Select one of the following:
• Credit - To credit the vendor, such as if the price is incorrect. The system creates the credit generation to mirror the original generation including inventory location.
• Rebill - To rebill the vendor, such as if you have sent the incorrect amount.
• Credit and Rebill - To correct accounting issues, such as after an accounting period has closed.
4. To identify specific line items for the credit or rebill, click Select Line Items and select the line items.
5. To select all line items, click All Line Items.
6. At the prompt, enter the Reason Code and click OK.
7. The system displays a confirmation that displays the original order number, credit or debit order number.
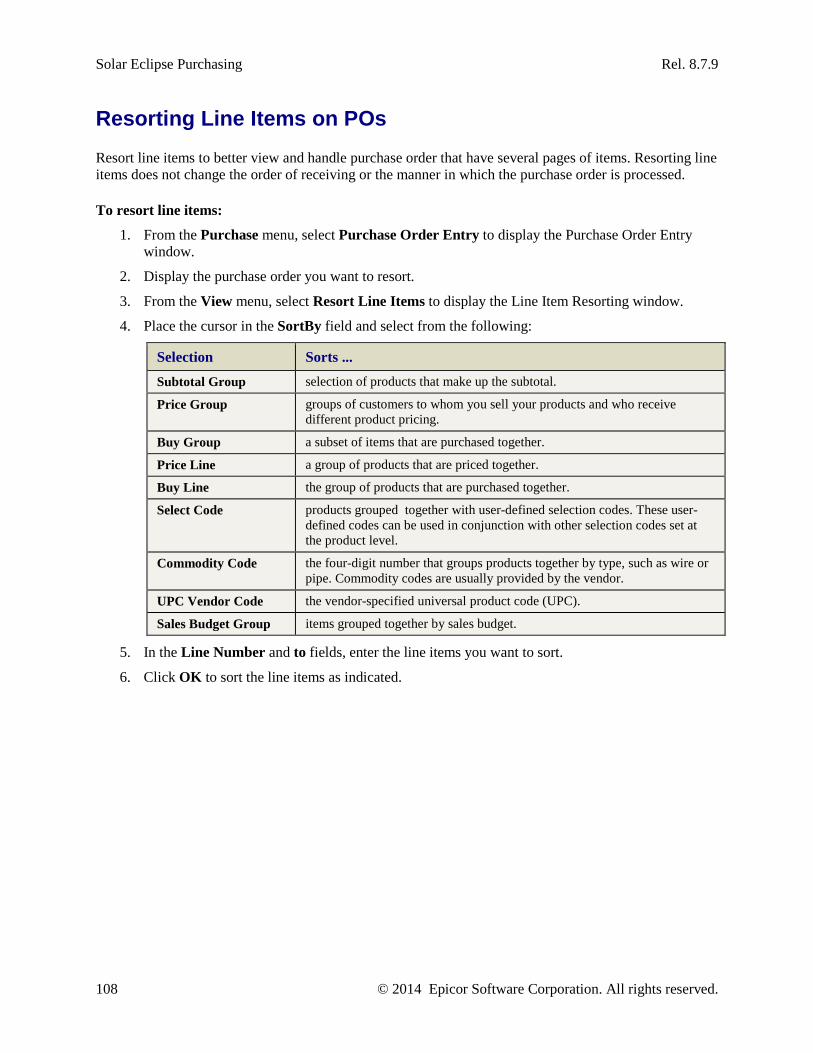
Solar Eclipse Purchasing Rel. 8.7.9
108 © 2014 Epicor Software Corporation. All rights reserved.
Resorting Line Items on POs Resort line items to better view and handle purchase order that have several pages of items. Resorting line items does not change the order of receiving or the manner in which the purchase order is processed.
To resort line items:
1. From the Purchase menu, select Purchase Order Entry to display the Purchase Order Entry window.
2. Display the purchase order you want to resort.
3. From the View menu, select Resort Line Items to display the Line Item Resorting window.
4. Place the cursor in the SortBy field and select from the following:
Selection Sorts ... Subtotal Group selection of products that make up the subtotal.
Price Group groups of customers to whom you sell your products and who receive different product pricing.
Buy Group a subset of items that are purchased together.
Price Line a group of products that are priced together.
Buy Line the group of products that are purchased together.
Select Code products grouped together with user-defined selection codes. These user-defined codes can be used in conjunction with other selection codes set at the product level.
Commodity Code the four-digit number that groups products together by type, such as wire or pipe. Commodity codes are usually provided by the vendor.
UPC Vendor Code the vendor-specified universal product code (UPC).
Sales Budget Group items grouped together by sales budget.
5. In the Line Number and to fields, enter the line items you want to sort.
6. Click OK to sort the line items as indicated.
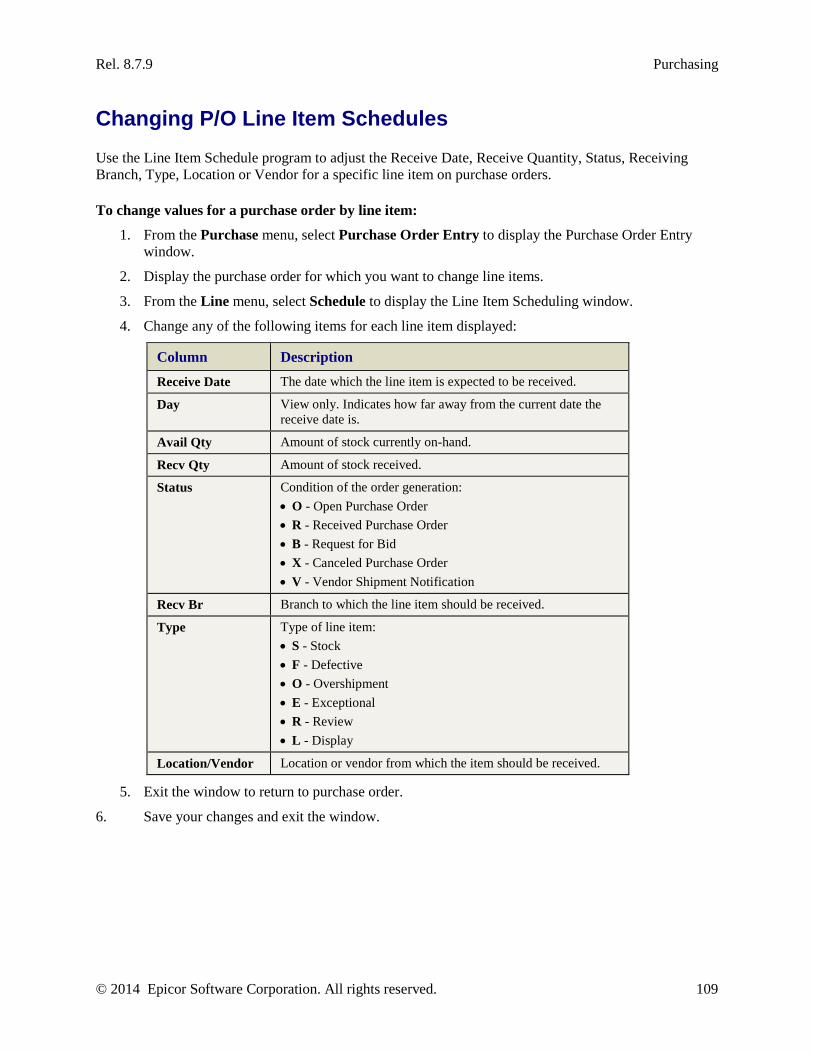
Rel. 8.7.9 Purchasing
© 2014 Epicor Software Corporation. All rights reserved. 109
Changing P/O Line Item Schedules Use the Line Item Schedule program to adjust the Receive Date, Receive Quantity, Status, Receiving Branch, Type, Location or Vendor for a specific line item on purchase orders.
To change values for a purchase order by line item:
1. From the Purchase menu, select Purchase Order Entry to display the Purchase Order Entry window.
2. Display the purchase order for which you want to change line items.
3. From the Line menu, select Schedule to display the Line Item Scheduling window.
4. Change any of the following items for each line item displayed:
Column Description Receive Date The date which the line item is expected to be received.
Day View only. Indicates how far away from the current date the receive date is.
Avail Qty Amount of stock currently on-hand.
Recv Qty Amount of stock received.
Status Condition of the order generation: • O - Open Purchase Order • R - Received Purchase Order • B - Request for Bid • X - Canceled Purchase Order • V - Vendor Shipment Notification
Recv Br Branch to which the line item should be received.
Type Type of line item: • S - Stock • F - Defective • O - Overshipment • E - Exceptional • R - Review • L - Display
Location/Vendor Location or vendor from which the item should be received.
5. Exit the window to return to purchase order.
6. Save your changes and exit the window.
Solar Eclipse Purchasing Rel. 8.7.9
110 © 2014 Epicor Software Corporation. All rights reserved.
Combining Branches on Purchase Orders In a central purchasing scheme purchase orders are printed on the same sheet because one branch orders for all branches and meet your vendor target more quickly. You can choose to print central purchasing purchase orders as separate sheets, but use the same purchase order number. With this printing format, each branch's purchases print on a separate sheet even though they are all on one purchase order. This functionality works with the drop points functionality. You are printing separate sheets for ease of delivering products to your branches. Each branch would receive an individual copy of the purchase order with only the items for that branch listed.
The flag is set per buy line within Buy Line Maintenance. Set the Combine on Central P/O flag to select how to print the purchase orders for a buy line.
To combine all branches' purchase orders on a single sheet:
1. From the Purchase > Maintenance, select Buy Line Maintenance to display the Buy Line Maintenance window.
2. In the Buy Line ID field, enter the buy line name and press Enter.
The buy line information displays.
3. From the Information menu, select Additional Data to display the Buy Line Additional Data window.
4. In the Combining on Central P/O field, enter Yes or No as follows:
• Yes - If you create a Suggested P/O for this buy line and there are multiple receiving branches for items on the purchase order, the system combines all the items for all the branches under one purchase order number.
• No - If you create a Suggested P/O for this buy line and there are multiple receiving branches for items on the purchase order, the system creates a separate purchase order for each branch. Each branch then has a different purchase order with a different number. This is the default.
5. Exit the window to return to Buy Line Maintenance.
6. Save your changes and exit the window.

Rel. 8.7.9 Purchasing
© 2014 Epicor Software Corporation. All rights reserved. 111
Adding Notes and Instructions on Purchase Orders Use the Header screen to add notes to purchase orders for vendor-specific comments, such as Please notify upon receipt or vendor instructions, such as Deliver to the back loading dock You can also add product specific notes, such as hazardous material (HAZMAT) criteria.
In addition, you can add reminder notes to individual line items. For example, you need to order a water heater. You can have a reminder that displays giving you the recommended parts that you need to go with the water heater. This reminder can display on the window until the next line item is entered. Use the Display Reminder Notes Until Next Product Is Entered control maintenance record to indicate if you want the reminder to display in this manner.
Note: If you can change the ship-from vendor, using the Header tab, with instructions or notes attached, the system will prompt you to use the current vendor instructions or notes for the newly selected vendor.
To add a standard vendor note:
1. From the Purchase menu, select Purchase Order Entry to display the purchase order entry window.
2. Display the purchase order for which you want to add a note.
3. Click the Header tab to display the Header window.
4. From the Additional menu, select Vendor Internal Notes to display the standard notes selections.
5. Select a note to attach to the window.
Note: If no entries are found, the message "No standard entries found." Click OK to continue. To create a new note, see Creating Vendor Notes.
6. To type a free-form note, enter the information in the Internal Notes field at the bottom of the window.
7. Save your changes and exit the window.
To add a vendor instruction:
1. From the Purchase menu, select Purchase Order Entry to display the purchase order entry window.
2. Display the purchase order for which you want to add a note.
3. Click the Header tab to display the Header window.
4. From the Additional menu, select Standard Instructions.
5. Select an instruction to attach to the window.
Note: If no entries are found, the message "No standard entries found." Click OK to continue. To create a new note, see Creating Vendor Notes.
6. To type free-form instructions, enter the information in the Internal Notes field at the bottom of the window.
7. Save your changes and exit the window.
Solar Eclipse Purchasing Rel. 8.7.9
112 © 2014 Epicor Software Corporation. All rights reserved.
To add a product specific note:
1. From the Purchase menu, select Purchase Order Entry to display the purchase order entry window.
2. Display the purchase order for which you want to add a note.
3. Click the Detail Scheduling tab to display the scheduling window.
4. From the Options menu, select Schedule.
5. Highlight the product for which you want to add a note.
6. From the Edit menu, select Product Notes.
7. Select a note to attach to the window. To create a new note, see Writing User-Defined Notes.
8. Save your changes and exit the window.
Rel. 8.7.9 Purchasing
© 2014 Epicor Software Corporation. All rights reserved. 113
Adding Comments to Purchase Orders Use the Purchase Order Entry window to add comments for individual line items. For example, if you received an over-shipment of items, but have decided to keep the surplus in your inventory, add a comment informing accounts payable to send payment.
You can also add comments that are unattached to the line items and saved at the order level. For example, you can thank your customers for purchasing with you and include any return information they may need.
The comments added to purchase orders print on the purchase order for the warehouse agent. You can delete a line item comment if needed.
Consider the following control maintenance records when adding comments to purchase orders:
• Copy Procure Comments to P/O
• Exclude Original Sale Line Item Comment From Returned P/O
• Line Item Standard Comments
• Exclude Procure Comments From OE Group Procurements
• Copy Comments For Procured Items To Transfers
To add a comment for a P/O line item:
1. From the Purchase menu, select Purchase Order Entry to display the purchase order entry window.
2. Display the purchase order for which you want to add a comment.
3. Place the cursor on the line item for which you want to enter a comment.
4. From the Line Item menu, select Comment to display the Comments window.
5. In the Comment Type field, select the category for the comment you are entering.
Note: Selecting Replace Description inserts the product description in the comment field.
6. In the Comment field, enter any additional comment information and select File > Save.
7. Save your changes and exit the window.
The comment displays below the product description on the purchase order Body tab.
8. Save your changes and exit the window.
To add an order-level comment:
1. From the Purchase menu, select Purchase Order Entry to display the purchase order entry window.
2. Display the purchase order for which you want to add a comment.
3. From the Line Item menu, select Comment to display the Comments window.
4. In the Comment Type field, select the category for the comment you are entering.
5. In the Comment field, enter any additional comment information and select File > Save.
Solar Eclipse Purchasing Rel. 8.7.9
114 © 2014 Epicor Software Corporation. All rights reserved.
The comment displays on its own line item and prints on the invoice.
6. Save your changes and exit the window.
To delete a comment for a PO line item:
1. From the Purchase menu, select Purchase Order Entry to display the purchase order entry window.
2. Display the purchase order for which you want to add a note.
3. Place the cursor on the line item for which you want to remove a comment.
4. From the Line Item menu, select Comment to display the Comments window.
5. Delete part or all of the comment.
6. Save your changes and exit the window.
The comment no longer displays below the product description on the purchase order Body tab.
7. Save your changes and exit the window.
Rel. 8.7.9 Purchasing
© 2014 Epicor Software Corporation. All rights reserved. 115
Adding Generations to Purchase Orders The system uses generations on a purchase order to separate how products are handled. For example, you may purchase an entire buy line from a vendor, but part of the shipment is shipped today and part is shipped in two days. Each part would be on a separate generation of the same purchase order.
Note: To make it easier to see how an order breaks into generations, the system provides generation highlighting and generation tooltips that you can turn on. For more information, see Using Generation Display Options.
The automatically creates generations for purchase orders when one of the following for any product on the order is different:
• Ship Date
• Ship Via
• Status
• Ship Br
• Part of the order is a direct
• Part of the order is a procurement
You can also create generations for purchase orders when needed. For example, if stock is damaged or you receive more stock than you ordered, then the damaged or over-shipped stock is separated on a generation. For more information about received damaged stock, see Handling Receiving Discrepancies.
To add a generation to a purchase order:
1. From the Purchase menu, select Purchase Order Entry to display the purchase order entry window.
2. Display the purchase order for which you want to add a generation.
3. Click the Detail Scheduling tab and do one of the following:
• In the Ship Date field of the line item you want to change, enter a new ship date.
• In the Shp Br field of the line item you want to change, enter a new shipping branch.
4. From the Options > Line Options menu, select Schedule.
5. In the Receive Date field of the line item you want to change, enter a new receiving date.
6. Save your changes and exit the window.
7. Click the Status tab and do one of the following:
• In the Order Status field of the line item you want to change, enter a new status.
• In the Ship Via field of the line item you want to change, enter a new ship via.
Note: If you are prompted, in the Freight field, select Allowed regardless of the original purchase order freight terms. The Copy Change to all Gens (Y/N) prompt displays. Type N.
8. If needed, create a tracker from a purchase order to send notification to the purchasing agent.
Solar Eclipse Purchasing Rel. 8.7.9
116 © 2014 Epicor Software Corporation. All rights reserved.
9. Save your changes and exit the window.
Rel. 8.7.9 Purchasing
© 2014 Epicor Software Corporation. All rights reserved. 117
Overriding Drop Points on Purchase Orders You can assign drop points on a per purchase order (P/O) basis. For example, an eight branch central P/O network is offered three drop points by the vendor. The first month, branches 1, 3, and 5 contribute the most to the central P/O, so the drop points are branches 1, 3, and 5. The second month, branches 1, 4, and 7 contribute the most and they are the drop points.
The receiving branches print the P/Os for all branches on the central P/O. User the Cross Dock program to distribute the items.
Use Drop Points Entry to override a drop point on a purchase order.
To override a drop point on a purchase order:
1. From the Purchase menu, select Purchase Order Entry to display the Purchase Order Entry window.
2. Display the purchase order you want to edit.
3. Click the Status tab.
4. From the Edit menu, select Drop Point to display the Drop Point window.
5. In the Branches on this Order field, indicate which branches you want to authorize for drop point override.
Note: If only one branch is listed, that branch must be the drop point.
6. Save your changes and exit the window.
Solar Eclipse Purchasing Rel. 8.7.9
118 © 2014 Epicor Software Corporation. All rights reserved.
Copying Header Information to All PO Generations Use the Copy to All function on the purchase order entry Header tab to add changes to all generations of the purchase order.
Use the PO Header Branch Change Copy To control maintenance record to indicate if you want to copy changes to a branch in a purchase order Header tab to the price branch, copy the change to all branches or prompt the user to specify where to copy the new information. If you do not want the purchase order number copied to all generations, but you do want the release number copied to all generations, then you can set the copy mode to No and change the purchase order number. Then set the copy mode to Yes and change the release number.
To use the Copy to All function:
1. From the Purchase menu, select Purchase Order Entry to display the purchase order entry window.
2. Display the purchase order for which you want to copy information.
3. Click the Header tab.
4. From the Additional menu, select Copy to All.
5. Select one of the following:
• On - Adds changes to each current generation and any generation created later.
• Off - Does not add any changes to any generation.
• Prompt - Lets you select which changes to cascade to the other generations. You only receive the prompt dialog box if there are already generations created.
6. Save your changes and exit the window.
Rel. 8.7.9 Purchasing
© 2014 Epicor Software Corporation. All rights reserved. 119
Creating Trackers from Purchase Orders From Purchase Order Entry you can create a tracker to add to a user job queue. For example, if the customer has an item on the purchase order that needs to be shipped from another location and you want to make sure the purchasing agent sees the need, create a tracker for the purchasing agent with that line item information.
For more information, see Creating Trackers from Ledger Transactions.
Solar Eclipse Purchasing Rel. 8.7.9
120 © 2014 Epicor Software Corporation. All rights reserved.
Selecting Inactive Vendors for POs User Vendor Maintenance to make vendors active or inactive.
You can inactivate a vendor if your branch does not purchase from that vendor. For example, your company has branches in Orlando, FL and Atlanta, GA. The branch in Orlando inactivates vendors in Atlanta, because that branch would not normally purchase from vendors in Atlanta.
However, an inactive vendor can be used, if needed. You can activate a vendor temporarily for special circumstances. For example, if a vendor in Atlanta provides your company a discount if you purchase all your Delta faucets for the month from them, your Orlando branch can make that Atlanta vendor active for a one-time purchase.
See Setting Up Purchase Order Entry for information about the control maintenance records and authorization keys required for this procedure. You must set the Display Customers/Vendors Who Are Inactive At A Branch control maintenance record in order for the inactive vendors to display.
To select an inactive vendor:
1. From the Purchase menu, select Purchase Order Entry to display the purchase order entry window.
2. In the Branch field, enter the branch for which you want to purchase.
3. In the Vendor / Order # field, click the quick access list button.
4. From the Select field drop-down menu, select Vendors.
5. Select the vendor you want to use and press Enter.
6. From the Order Selection dialog box, select New.
7. Click OK.
8. Complete the purchase order.
9. Save your changes and exit the window.
Note: The system checks that you have met the vendor target. If not, the following message displays: Vendor's Minimum Target of <vendor target> has not been met. You are not authorized. Enter Password to Override: The FREIGHT.TARGET.OVERRIDE authorization key must be set. Authorized users can enter their Eclipse login password to override.
Rel. 8.7.9 Purchasing
© 2014 Epicor Software Corporation. All rights reserved. 121
Adding International Taxes to Purchase Orders Use Customs Drawback Information program from Purchase Order Entry to identify specific taxes for imported products. Products purchased outside your country have taxes levied due to international standards and individual countries' specifications. The system assists in ensuring that the taxes are applied in accordance with these standards and specifications.
Note: Use the Update Cost On Sales Order From Tagged Purchase Order control maintenance record to ensure that duty percentages are copied to new purchase order generations and the system calculates cost correctly.
Duty taxes can be set at the product level and are assigned in Product Maintenance or in Duty Harmonizing Code Maintenance. Duty taxes are based on the country of manufacture and the harmonizing code.
However, there may be purchase orders that require additional duty taxes. You can add duty information from Purchase Order Entry. By accessing the Customs Drawback Information window, you can view the basic freight and duty costs being applied to the purchase order. The Customs Drawback Information window contains no default settings. To apply duty taxes, you must enter the parameters.
In addition, you can add or change the following items:
• Duty harmonizing code
Note: This code causes a recalculation for the landed average cost displayed in the header window. The landed average costs is the sum of the freight amount, Currency COGS, Duty Amount, and Other Amount displayed.
• Customs entry number
• Tariff number
• Port of entry
• Date duty was paid
• Shipment date
• Manufacture country
Note: This code causes a recalculation for the landed average cost displayed in the header window. The landed average costs is the sum of the freight amount, Currency COGS, Duty Amount, and Other Amount displayed.
• Vendor name and number
• Certificate of origin
To add or change international tax information:
1. From the Purchase menu, select Purchase Order Entry to display the purchase order entry window.
2. Display the purchase order to which you want to apply international taxes.
3. From the Line Item menu, select Duty Information to display the Customs Drawback Information window.
Solar Eclipse Purchasing Rel. 8.7.9
122 © 2014 Epicor Software Corporation. All rights reserved.
4. Change the following fields as needed:
Field Description Harmonizing Code Duty code populated from Duty Harmonizing Code Maintenance.
Customs Entry # Number assigned by customs personnel.
Tariff # Number assigned by customs personnel.
Port Of Entry Indicate the location products are cleared through customs, such as New York.
Lot # Lot to which the product is assigned.
Date Duty Paid Date that duty was paid on the items listed on the purchase order.
Shipment Date Date items on the purchase order were shipped.
Manufacture Country Entries must match the spelling and case of the country entered on the Duty Harmonizing Code Maintenance. For imported products, this field is required.
Vendor Name Name of vendor from which you are purchasing.
Vendor Number Contact number for the vendor.
Certificate Of Origin? Indication if a certificate of origin is required.
5. Save your changes and exit the window.
Rel. 8.7.9 Purchasing
© 2014 Epicor Software Corporation. All rights reserved. 123
Prepaying Vendors In some situations your vendor may require that you pay the total of a purchase order before shipping your order. You can set up the system so you can prepay your vendor either by credit card or by a manual check.
Prepaying by Credit Card Before you can prepay by credit card, you need to set up the system to accept these types of pre-payments. You need to show a debit to the prepaid account and a credit in the accrual account to keep your books in balance.
To prepay a vendor by credit card:
1. Create an accrual account in G/L Account Maintenance named Credit Card Exchange with the following fields selected:
• Liability, Capital or Revenue
• C/R Adjustment Allowed
• A/P Adjustment Allowed
• Balance Sheet
• Active
• Branch Detail
• Recalculated Exchange
For more information about creating accrual accounts, see Creating General Ledger Accounts in the General Ledger documentation.
2. Create a payable to show the following:
• A debit for the amount required to a prepaid account.
• A credit for the amount required to the accrual account.
For more information about entering payable information, see Entering Payables in the Accounts Payable documentation.
3. Send the Receiving department a message using the Job Queue requesting notification for when they receive the purchase order and therefore the goods from the vendor.
After notification of receiving the purchase order, payment is charged to the credit card set up in the system.
For more information about using the job queue to send messages and create tasks, see Creating Trackers in the User Job Queue documentation.
4. Create a payable for the vendor for $0.00.
For more information about creating payables, see Entering Payables Accounts in the Accounts Payable documentation.
5. Reconcile the purchase order.
Solar Eclipse Purchasing Rel. 8.7.9
124 © 2014 Epicor Software Corporation. All rights reserved.
For more information about reconciling purchase orders, see Reconciling Purchase Orders to Invoices in the Accounts Payable documentation.
Prepaying by Manual Check After you prepay by check, you need to record the information appropriately in the system to keep track of these types of pre-payments.
Note: When entering a check number, we recommend entering a letter, such as Z, at the beginning to distinguish that this was a manual check.
1. Complete the physical check and send it to your vendor.
2. Create an asset account in G/L called Prepaid.
For more information about creating asset accounts, see Creating G/L Accounts in the General Ledger online documentation.
3. Create a payable for the vendor for the amount of the check written.
For more information about entering payable , see Entering Payables in the Accounts Payable documentation.
4. Post the amount of the check to the Prepaid account.
For more information about posting check amounts, see Posting Manual Checks in the Accounts Payable documentation.
5. Record the manual check in Manual Check Posting.
For more information about posting check amounts, see Posting Manual Checks in the Accounts Payable documentation.
6. Send the Receiving department a message using the Job Queue requesting notification for when they receive the purchase order and therefore the goods from the vendor.
For more information about using the job queue to send messages and create tasks, see Creating Trackers in the User Job Queue documentation.
7. Create a payable for the vendor for $0.00.
For more information about creating payables, see Entering Payables Accounts in the Accounts Payable documentation.
8. Reconcile the purchase order.
For more information about reconciling purchase orders, see Reconciling Purchase Orders to Invoices in the Accounts Payable documentation.
9. Credit the Prepaid account so that the Diff Amt field is $0.00.
For more information about posting to accounts, see Posting Manual Checks in the Accounts Payable documentation.
10. Process the manual check. Processing the check ensures that this payable does not display on any future check stubs for this vendor.
For more information about reconciling checks, see Reconciling Single Checks in the Accounts Payable documentation.
Rel. 8.7.9 Purchasing
© 2014 Epicor Software Corporation. All rights reserved. 125
11. Verify the debit from the original prepaid payable offsets the credit from the adjustment payable through G/L Inquiry.
For more information about using G/L Inquiry, see Making Basic General Ledger Inquiries in the General Ledger documentation.
Solar Eclipse Purchasing Rel. 8.7.9
126 © 2014 Epicor Software Corporation. All rights reserved.
Purchase Order Freight Terms Guidelines Freight terms indicate how a vendor expects freight to be paid for freight charges, such as Prepaid or Add On. For example, if a vendor expects the freight to be "Add On" then the purchase order's grand total would include any freight charges incurred. The system populates this field with any default term from the Vendor Maintenance file.
Assign freight terms to the vendor in Vendor Maintenance. For every purchase order created for that vendor, the system assigns the default freight term to the Freight field on the Purchase Order Entry Header tab. Identify the freight restrictions you want to impose and what information is required at the time of receiving. If you leave the freight information blank in Vendor Maintenance, the system requires freight entry when the purchasing agent creates the purchase order. A message displays if required information has not been entered.
In addition, use the Vendor Freight Terms control maintenance record to identify the freight restrictions you want available for orders. These control maintenance record entries populate the valid entry selections for the Freight field on the Purchase Order Entry Header tab.
You can override a default freight term on an individual purchase order basis. The system records the change in the change log for the purchase order. You can view this log by using the Change Log option from the Purchase Order Entry Header tab. The following log displays: "Freight term <new term> now assigned. It was <old term>."
If there is not a vendor-level default freight term defined, the Freight field is blank. You must enter a valid freight term to continue. If you press Esc to exit the window without a term assigned, the following message displays: "Freight Terms Are Required" and the cursor returns to that field.
Rel. 8.7.9 Purchasing
© 2014 Epicor Software Corporation. All rights reserved. 127
Selecting Vendors for the Freight Carrier on Purchase Orders If a purchase order is in an open General Ledger accounting period, you can edit the freight charges. You can change the value of the freight for each line item on the Body tab of the purchase order, or the value of the freight on the Totals tab of the purchase order.
If you enter a freight amount to a Freight Vendor in the Stock Receipt Entry program and the vendor has an override G/L# entered in Vendor Maintenance, then the system credits that G/L account and not the Unbilled Accounts Payable (UBAP).
Selecting a Vendor for the Freight Carrier The freight vendor to whom freight charges are paid in the Freight Carrier field on the Totals tab. If the Freight Carrier field is left blank, the vendor filling the purchase order, whose name is in the Ship From field on the P/O, is the freight vendor.
The system only allows selection from vendors that have the Freight Vendor option set in Vendor File Maintenance. In addition, set up vendors as pay-to vendors, ship-from vendors, or both. To enter a vendor in the Freight Carrier field, that vendor must be flagged as a ship-from vendor. For more information and instructions for modifying the vendor information for freight values, see Creating a Vendor Record.
Solar Eclipse Purchasing Rel. 8.7.9
128 © 2014 Epicor Software Corporation. All rights reserved.
Overriding Freight Charges on POs If you override the freight charges for the line items, the Freight field on the Totals tab reflects the total freight charges.
If you override the freight charges for the Freight field on the Totals tab, the system attempts to distribute freight charges among all line items on the purchase order that have not been overridden.
The override amount is marked by an asterisk in the Freight field. The system prompts for confirmation, if the override amount is less that the previous value of the Freight field.
To override freight charges and enter a freight carrier:
1. From the Purchase menu, select Purchase Order Entry to display the Purchase Order Entry window.
2. Display the purchase order for which you want to override freight charges.
3. Click the Totals tab.
4. In the Freight field, enter freight charges.
5. In the Freight Carrier field, enter the freight carrier.
If the Freight Carrier field is left blank, the vendor filling the purchase order whose name is in the Ship From field on the P/O is the freight vendor.
6. Save your changes and exit the window.
Rel. 8.7.9 Purchasing
© 2014 Epicor Software Corporation. All rights reserved. 129
Editing Freight Charges on Purchase Orders You can edit freight charges on a purchase order, if the purchase order is still in an open General Ledger accounting period. You can edit freight charges in two ways: by line item or by purchase order.
Freight charges of zero ($0.00) can result from items not assigned a freight factor or from items assigned a freight factor of zero. Freight charges with any other numeric value are calculated by the system using the assigned freight factor.
Editing Freight by Line Item Enter freight by individual line item from the Body tab. The Freight field on the Totals tab reflects the total freight charges. Charges apply to the extended amount, when multiple quantities of the line item are purchased. For example, five items have a freight assigned of $1.50 each. The extended amount is $7.50.
However, if there is a Bill of Lading (BOL) attached to the purchase order and the BOL is paid first, you cannot change the line item freight. You receive the following message: A Payable to the Freight Vendor on this PO exists. You are unable to edit Line Item Freight at this time.
In addition, when you add a manual freight override to a purchase order generation and that freight is capitalized, the system distributes that freight to all line items according to the capitalization method. If a line item on that generation is backordered or moved to a different scheduled generation, the system will keep the entire freight amount on the original generation. The system redistributes the freight charges to all remaining items on that generation except for non-eligible items, such as credits, miscellaneous charges, or items with a line item freight override. The total freight on the new generation contains freight that the line item carries and not any line item freight allocated from the original generation. If the moved item has a manual freight override, the system distributes that freight to all items now on the generation.
If an item with a freight override is backordered or moved to an existing generation , the freight remains on the items as long as there is one received quantity on the generation. If not, the system removes the entire line item freight override and deducts that freight amount from the total generation freight as it was added to the total generation freight when the override occurred.
Note: The system adds the backordered item to the new generation with any freight it carries according to its freight factor, but only if the capitalization method is set to freight factor.
To edit the freight charges by line item:
1. From the Purchase menu, select Purchase Order Entry to display the Purchase Order Entry window.
2. Display the purchase order for which you want to edit freight charges.
3. From the View > New View menu, select Ext Cost / Unit Freight.
4. In the Unit Freight field, enter the amount of freight per unit you want to add.
Note: A freight term set up on this maintenance window populates automatically to currently open purchase orders and direct orders for the vendor.
5. Save your changes and exit the window.
Solar Eclipse Purchasing Rel. 8.7.9
130 © 2014 Epicor Software Corporation. All rights reserved.
Editing Freight by Purchase Order Enter freight by entire purchase order from the Totals tab, then the system distributes freight charges across all line items on the purchase order that have not been overridden. Use the Capitalize Freight field to tell the system how to distribute the freight across the purchase order. Overridden freight charges display with an asterisk (*).
If the override amount is less than the previous value of the freight, the system prompts you for confirmation. Otherwise, the system changes the Capitalize Freight field to Dollars and distributes the amount to all line item on the purchase order. If you want to capitalize freight by means other than dollars, change the value in the Capitalize Freight field.
To edit the freight charges by entire order:
1. From the Purchase menu, select Purchase Order Entry to display the Purchase Order Entry window.
2. Display the purchase order for which you want to edit freight charges.
3. Click the Totals tab.
4. In the Freight field, enter the total amount of freight to apply to the entire order.
5. Save your changes and exit the window.
Rel. 8.7.9 Purchasing
© 2014 Epicor Software Corporation. All rights reserved. 131
Pass-Along Freight Rules Use the pass-along freight process to pass freight expenses on to your customers. This eliminates the need to enter freight manually after reviewing the Freight Audit reports. You can pass freight charges automatically on hard or soft tagged orders and direct orders.
Before using pass-along freight, review Purchase Order Freight Term Guidelines.
When passing freight from the purchase order to the sales order, freight is added to the Totals tab on the sales order in the inbound billable or inbound expense column.
Important: The system does support the possibility of an "at" character (@) in the tag information.
Hard Tags The system creates a hard tag when a customer requests a product that has zero on-hand and you create a purchase order to procure it. A hard tag links the purchase order on which you are procuring the requested product to the sales order on which the customer is ordering the product.
Use the Default Setting For Bill Incoming Freight To Tagged Sales Order Field control maintenance record to set the default value for the Bill Incoming Freight To Tagged Sales Order field on the Purchase Order Entry Totals tab. If you set this field to yes, then the system applies any inbound freight incurred due when receiving a tagged purchase order to the customer as Inbound Freight & Billable.
By default, the COGS is updated to include both the cost of the item and the freight distributed for that item as if you were working in a landed cost environment. Use the Back Out Pass-Along Freight From COGS control maintenance record to indicate whether the system should remove the billed pass-along freight amount from COGS and/or COMM (COST). This control maintenance record is used to avoid overcharging for freight on a sales order. However, the system does not back out freight from COGS if it would take COGS below zero dollars ($0.00) or if COGS was overridden on a sell matrix. This override is usually done for rebate items and is indicated on the sales order by an exclamation point (!). In addition, the system does not back out the freight on an order until it is shipped.
Commission cost may also be updated to reflect the freight depending on how the Change Both COGS And COMM-COST On Override control maintenance record is set.
Note: This tool can be used as an incentive for sales personnel to bill customers for freight. Increased profitability on a line-item and order level basis has results in higher commissions for sales personnel.
Soft Tags The system creates a soft tag when a customer requests a product and there is not enough available to meet the need. However, because there are zero on-hand, the system suggests that you purchase more of the product. The purchase order created is not directly linked to the customer's request.
A prorated freight charge is added to the sales order for the customer to compensate for your charges. If a hard tagged item exists on the purchase order, the customer with the hard tagged item incurs one hundred percent of the cost.
For example, Customer A requests products X, Y, and Z. Product Y is not a stocked item. The customer does not want to procure it. Because there is zero on-hand, the system suggests you procure product Y.
Solar Eclipse Purchasing Rel. 8.7.9
132 © 2014 Epicor Software Corporation. All rights reserved.
The system creates a soft tag for Customer A from the sales order to the purchase order. Customer B comes in after Customer A and requests product Y. Product Y is not a stocked item, but Customer B wants to procure it. The system creates a hard tag from the sales order to the purchase order because the customer does want it procured. Customer B incurs all freight costs.
Use the following control maintenance records, as needed:
• Expense Incoming Freight If Customer Is Freight In Exempt - Indicate whether the system should add the cost of incoming freight from a purchase order to a soft-tagged sales order as Expensed Incoming Freight, rather than billable incoming freight. This is applicable when customers are Inbound Freight Exempt.
• Pass Along Incoming Freight To Billable Freight Customers - Indicate whether the system should pass incoming freight costs along to customers who are not freight exempt.
• Product Ranks To Exclude From Pass-Along Incoming Freight Charges - Specify the product ranks the system should exclude from pass-along incoming freight charges. The intent of this record is to prevent freight from being passed to the customer for the shipment of material that the distributor should always have available. See Product Ranking Method and Breakpoint Rules for information on how to set up product ranks. Use this control maintenance record to prevent freight from being passed to the customer if the material should have been in stock.
• Ignore Order Date For Pass Along Freight - Indicate whether the system ignores the order date when passing along freight from a purchase order to a soft-tagged sales order. This record does not apply to hard tags. The default is No.
Direct Orders The system enters freight on direct sales orders associated with the payable based on the freight amount on the header of the A/P Entry window. If there are multiple directs reconciled to that payable, the system prorates the freight charge to the directs according to the amount in the PO Total field for each direct.
Use the Pass Along Freight To Direct Sales Orders control maintenance record to indicate whether to pass along the amount entered in the Freight Amt field in the header of the A/P Entry window for a payable to any direct sales orders that are reconciled to that payable.
If a customer is freight exempt, a note is made in the Change Log with the following message: Expense Incoming Freight changed from 0.00 to <new cost> from <order number>.
In addition, freight will not be distributed to directs if they are in closed accounting periods or if incoming freight has already been applied. If freight has been applied, the following message displays: Freight Already Exists On at Least One of the Direct Orders. Do You Wish to Override that Freight? (Y/N). If you select yes, then the system prorates the new freight amount from the Freight Amt field to the directs replacing the existing freight amount. If you select no, the system leaves the existing freight amount on the direct order.
Note: You must be assigned the COST.VIEW and COGS.VIEW authorization keys to send or print direct orders.
Rel. 8.7.9 Purchasing
© 2014 Epicor Software Corporation. All rights reserved. 133
Posting Legacy Purchase Orders Post Purchase Order entry accommodates a manual order entry system where orders are first logged on paper documents and might be taken through the shipping process before the transaction is logged in the computer. Often, when a company first begins using Eclipse, they use Post Purchase Order Entry for the transitional orders, but it can be used in other circumstances as needed.
For example, a sales person may be out a customer site and take an order. He logs the order on his hand-held portable device, but is not connected to the warehouse at that time. He can begin the process via phone, then return to the office and enter the purchase order information.
The Post Purchase Order Entry program gives you the opportunity to enter a batch number upon program entry. Many of the monitoring, processing, and printing programs described in the order flow of Purchase Order Entry give you the opportunity to select orders by batch number. Batch numbers are retained and modified at the individual order level.
To use Post Purchase Order Entry:
1. From the Purchase menu, select Post Purchase Order Entry to display the Post Purchase Order Entry window.
2. At the prompt, enter the batch ID for the purchase order you are entering.
3. Open a new purchase order.
Note: The Order # should be a purchase order number that has been assigned to the branch on the Pre-Assigned Order ID Maintenance window. A system administrator can limit the order IDs used, if necessary, by using the Restrict Post OE IDs To Pre-Assigned IDs control maintenance record.
You can also enter an alphanumeric number that begins with three alpha characters, such as SMB12345, if needed.
4. Complete the purchase order as you would a new order.
5. Click the Status tab and verify the information.
6. Save your changes and exit the window.
Solar Eclipse Purchasing Rel. 8.7.9
134 © 2014 Epicor Software Corporation. All rights reserved.
Creating Future-Dated Purchase Orders You can issue a purchase order for stock that will be received at a future date without affecting the projected inventory level (PIL) on the inventory inquire or inventory maintenance programs. The system does not consider the stock quantities on a future-dated purchase order as part of the PIL when it generates a Suggested P/O report.
Use the Purchase Order Entry program to create a future-dated purchase order. You must enter a required date and expected date that lies outside the system calculated Plenty Date.
Plenty date formula: Order Cycle + Lead Time - Days into Order Cycle
For example, a distributor orders a product today that the manufacturer promises to deliver at a much later date. The distributor does not want the PIL to include stock on order. This type of order happens rarely and including these stock quantities distorts normal average daily demand.
To create a future-dated purchase order:
1. Create a purchase order.
2. Change the Reqd Date and Receive Date fields to dates past the Plenty Date.
3. Save your changes and exit the window.
Rel. 8.7.9 Purchasing
© 2014 Epicor Software Corporation. All rights reserved. 135
Purchasing Product Kits Product kits are predefined sets of components, which your company groups and sells together. Kits that are considered to be a single unit, such as a Kitchen Sink Kit, are called dynamic kits.
For example, your branch sells complete kitchen sinks. You sell them as a Kitchen Sink Kit. This kit includes the hot and cold taps, faucet, basin and all the connection washers and screws. You also purchase this kit from the vendor. Selling in kits keeps your cost down and your inventory management at a minimum. These dynamic kits are all complete and the kits count as a single unit.
List product kits on regular purchase orders as individual components. However, dynamic kits are purchased, such as the Kitchen Sink Kit, as a single unit from the vendor. The vendor ensures that all the appropriate components are shipped as part of the kit. You cannot list the individual components of dynamic kits on the purchase order, only the kit name displays.
Note: When a kit product is included on a Bill of Lading (BOL), the sum of the components' weight is used if the parent kit product has a weight of zero (0.00). If the parent kit product has a weight other than zero, than the parent weight it used.
To purchase a product kit:
1. Open a purchase order.
2. In the Qty/Unit field, enter the number of kits you want to order.
3. In the Product Description field, enter the name of the kit as you would any other product.
4. Save your changes and exit the purchase order.
To set the product kit to print components:
1. From the File menu, select Product to display the Product Maintenance window.
2. In the Product ID field, enter the product number for which you want to make a kit.
3. From the Inventory menu, select Kit Maintenance to display the Product Kit Maintenance window.
4. Click the Print Components checkbox.
5. Save your changes and exit the window.
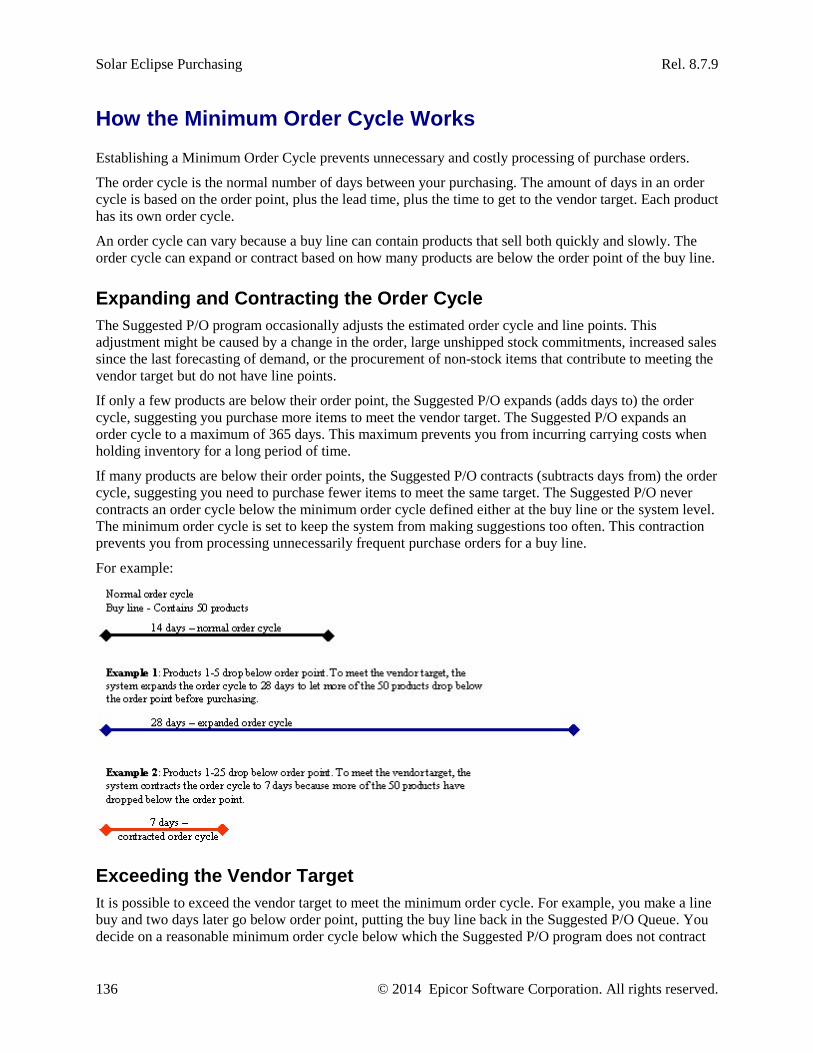
Solar Eclipse Purchasing Rel. 8.7.9
136 © 2014 Epicor Software Corporation. All rights reserved.
How the Minimum Order Cycle Works Establishing a Minimum Order Cycle prevents unnecessary and costly processing of purchase orders.
The order cycle is the normal number of days between your purchasing. The amount of days in an order cycle is based on the order point, plus the lead time, plus the time to get to the vendor target. Each product has its own order cycle.
An order cycle can vary because a buy line can contain products that sell both quickly and slowly. The order cycle can expand or contract based on how many products are below the order point of the buy line.
Expanding and Contracting the Order Cycle The Suggested P/O program occasionally adjusts the estimated order cycle and line points. This adjustment might be caused by a change in the order, large unshipped stock commitments, increased sales since the last forecasting of demand, or the procurement of non-stock items that contribute to meeting the vendor target but do not have line points.
If only a few products are below their order point, the Suggested P/O expands (adds days to) the order cycle, suggesting you purchase more items to meet the vendor target. The Suggested P/O expands an order cycle to a maximum of 365 days. This maximum prevents you from incurring carrying costs when holding inventory for a long period of time.
If many products are below their order points, the Suggested P/O contracts (subtracts days from) the order cycle, suggesting you need to purchase fewer items to meet the same target. The Suggested P/O never contracts an order cycle below the minimum order cycle defined either at the buy line or the system level. The minimum order cycle is set to keep the system from making suggestions too often. This contraction prevents you from processing unnecessarily frequent purchase orders for a buy line.
For example:
Exceeding the Vendor Target It is possible to exceed the vendor target to meet the minimum order cycle. For example, you make a line buy and two days later go below order point, putting the buy line back in the Suggested P/O Queue. You decide on a reasonable minimum order cycle below which the Suggested P/O program does not contract
Rel. 8.7.9 Purchasing
© 2014 Epicor Software Corporation. All rights reserved. 137
to meet a vendor target. If the normal order cycle is 209 days and the minimum order cycle is 14 days and there is a run on inventory, this would cause the order cycle to contract to 12 days. The system suggests buying 14 days, even if it exceeds the vendor target.
Solar Eclipse Purchasing Rel. 8.7.9
138 © 2014 Epicor Software Corporation. All rights reserved.
Best Cost Check in Purchase Order Entry Purchase Order Entry (POE) provides many checks to the database to ensure that you purchase items from your vendors using the best cost available. These checks, when set, effect any purchase order created from any of the following:
• Purchase Order Entry
• Suggested P/O Queue
• Procurement Confirmation
• Returned Goods
The system uses three control maintenance records to ensure the cost check takes place to best suit your company needs.
• Best Cost Check Through All Matrix Cells For Purchase Orders
• Best Cost Check Through All Matrix Cells For Sales Orders
• Enable Best Cost Check In Purchase Order Entry
• Auto Open Multiple Vendor Matrix Cell
Note: Best Cost Check is disabled on direct orders.
Best Cost Example Your vendor provides a discount, based on a contract, for 2" copper fittings and lets you buy them at a net cost of $.25 each. The normal cost of these fittings is $.30 each. The 2" copper fittings also are part of the COPFIT buy line. The vendor also offers a .85 multiplier, or discount, when buying any product in the COPFIT buy line. This makes the 2" copper fittings $.21 each.
By default, the system checks and uses the product-specific vendor contract first, called a buy matrix. If a buy matrix is not established for a particular vendor and product, then the system checks for an effective buy matrix for that vendor and a buy line in which the product may reside. However, if a product-specific buy matrix is established, the system uses that cost regardless of what is set at the vendor-group level.
For this reason, Eclipse has developed control maintenance records to provide the purchasing agent with the lowest possible cost for purchasing products from vendor contracts. In addition, when the parameters are set, the system can display all of the available contracts, their costs, and their contract numbers from which to select. The agent can select from this list or can override the current contract price with another effective cost in a buy matrix.
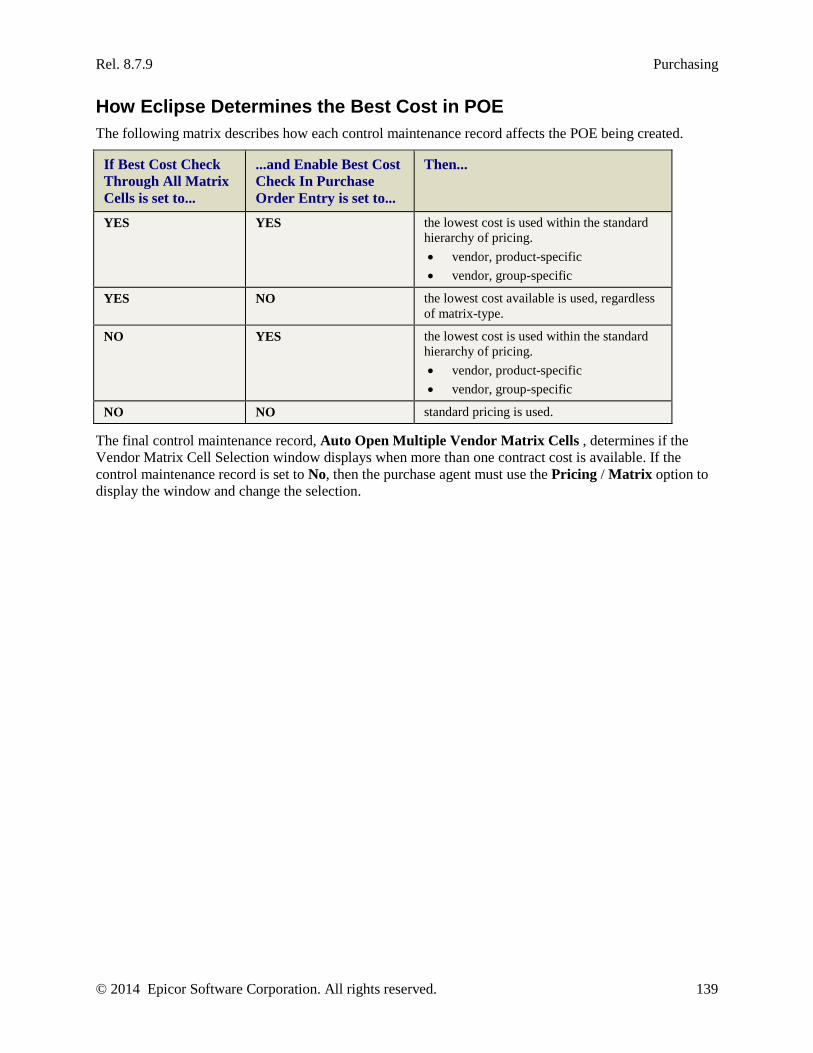
Rel. 8.7.9 Purchasing
© 2014 Epicor Software Corporation. All rights reserved. 139
How Eclipse Determines the Best Cost in POE The following matrix describes how each control maintenance record affects the POE being created.
If Best Cost Check Through All Matrix Cells is set to...
...and Enable Best Cost Check In Purchase Order Entry is set to...
Then...
YES YES the lowest cost is used within the standard hierarchy of pricing. • vendor, product-specific • vendor, group-specific
YES NO the lowest cost available is used, regardless of matrix-type.
NO YES the lowest cost is used within the standard hierarchy of pricing. • vendor, product-specific • vendor, group-specific
NO NO standard pricing is used.
The final control maintenance record, Auto Open Multiple Vendor Matrix Cells , determines if the Vendor Matrix Cell Selection window displays when more than one contract cost is available. If the control maintenance record is set to No, then the purchase agent must use the Pricing / Matrix option to display the window and change the selection.

Solar Eclipse Purchasing Rel. 8.7.9
140 © 2014 Epicor Software Corporation. All rights reserved.
How the System Uses Average Cost in POE A product's average cost is maintained at the branch level. The average cost is the range in which a product's price falls. A product's price can vary from branch to branch due to buying patterns and branch locations. The prices in effect at the time of purchase can also be different because of the date a vendor price change goes into effect. For example, you may receive notice that your vendor is raising the price on all faucets, but the price change will not go into effect until the first of the month. Variances in freight charges also affect the landed average cost.
Average Cost is also known as Moving Average Cost (MAC).
Changing the Price on a Purchase Order The cost of an item on a purchase order can be changed if you assign permission.
You can regulate who can change the cost of an item on a purchase order and by how much that cost can be varied. If the price change exceeds the percentage you set, either above or below the current cost, the user receives a warning message.
If the user has permission to continue, the warning is logged and the changed accepted. If the user does not have permission, a prompt displays for the user to enter a password to continue. For example, you can limit who can change prices for customers and ensure that personnel on the sales floor cannot change prices within ten percent (10%) of the original cost without checking with their supervisor.
How Does Average Cost Work? Use the Maximum Difference Percentage From Average Cost In POE control maintenance record to set the percentage allowed on the product price change.
For example, you want to make sure that if a product's price of $10.00 is changed in branch 4, that the change does not exceed five percent (5%) above or below the $10.00 price. Set the Maximum Difference Percentage From Average Cost In POE control maintenance record to five percent (5%) for branch 4. When you change the price on the purchase order to $5.00, the message "You are about to exceed the Maximum Difference Percentage from Average Cost! Continue (Y/N):" displays. Select one of the following:
• Yes - The system updates the change log file with the message and changes the cost. If you do not have the POE.MAC.OVERRIDE authorization key set, you are prompted for a password.
• No - The average cost remains and no entry is made in the change log file.

Rel. 8.7.9 Purchasing
© 2014 Epicor Software Corporation. All rights reserved. 141
Duty Drawback Rules on POs Duty codes determine rates for products which are imported and later exported or for products which are exported and later returned to you. For example, your company is in Canada. You order 100 products from a company in the United States. They ship 50 from a warehouse in the United States and 50 from a warehouse is Japan. Products from the United States have different duty codes and charges than the 50 products received from Japan. You must compensate for this difference.
Duty codes are assigned either at the product level or the buy line level. However, purchase orders with items containing duty harmonizing codes bypass the normal freight calculation. Freight is calculated based on duty harmonizing codes for all items on the purchase order.
When a purchase order is created with more than one product on it, one of which has a duty code assigned, you must use the Customs Drawback Information window and navigate to that product. In addition, if you use the Duty Information option from the Line Item menu, the system populates the Customs Drawback Information window with the duty data found in the product file and in Duty Harmonizing Code Maintenance.
Note: The Manufacture Country is not a validated field because the country information in Duty Harmonizing Code Maintenance is user-defined and case sensitive. Therefore, if you enter England in the code maintenance, you must enter England to retrieve that code in Customs Drawback and not england.
Every purchase order receipt that has products with duty codes assigned to them requires a series of entries for each product. These entries include certificate of entry, tariff codes, port of entry, lot, duty paid, certificate of origin document and country of manufacture. If you assign a harmonizing code, then the country of manufacture is required. These details then translate to what you need to remit to the government for duty taxes owed. The system calculates the duty cost and adds this amount to the landed cost.
Note: Freight overrides at the generation level always take precedence over what is set up at the duty harmonizing code level.
Solar Eclipse Purchasing Rel. 8.7.9
142 © 2014 Epicor Software Corporation. All rights reserved.
EDI Purchasing Queues The Electronic Data Interchange (EDI) provides you with options for transferring your data. The purchasing EDI queues let you track information from the vendor.
The EDI purchasing queues are as follows:
• EDI 855 P/O Acknowledgement Queue - lists the purchase orders that have been received by the vendor. See Reviewing Inbound PO Acknowledgments for more information.
• EDI 856 Advance Ship Notice Review Queue - lists the purchase orders that have items on the way to you. See Reviewing Inbound Advanced Ship Notices for more information.
• EDI 845 Contract Upload Queue - lists purchase orders that need to be reviewed by the contract department for pricing verification before processing. See Receiving 845 Pricing Authorization Acknowledgments for more information.
EDI is a companion product. All other information for EDI can be found in the documentation that shipped with the companion product.
Rel. 8.7.9 Purchasing
© 2014 Epicor Software Corporation. All rights reserved. 143
Suggested Purchase Orders Queue Rules and Guidelines The Suggested Purchase Order (P/O) program automates part of the purchasing process and tells you when to buy and how much to buy. It is an electronic to-do list for the purchasing agent. The Suggested P/O queue proposes two purchase quantities. The short buy quantity brings the projected inventory levels (PIL) up to order point for the items that fell below order point. The line buy quantity either meets the vendor target or buy the calculated economic order quantity (EOQ), whichever is greater. For more details about how the system makes this calculation, see How the Minimum Order Cycle Works or How Eclipse Uses Package Quantities in Line Buy Calculations.
The Suggested P/O queue deals primarily with buy lines. Buy lines are groups of products that you purchase together to meet a vendor target. See the Buy Lines Overview for more information about how buy lines work.
The Suggested P/O program runs once a day, usually over night, unless otherwise specified through the Scheduling program. If your company is large and product movement is high, you may choose to run the program more than once per day. The Suggested P/O Queue lets you view, sort, and convert the information as best meets your business needs.
Once displayed, you can change the view of the last column on the Suggested Purchase Order Queue. Use the Change View option to display either the Total Buy or the Last Line Buy column. The default is Total Buy.
To display summary information for the Suggested P/O Queue at all times, add a Suggested P/O Queue widget to your Solar Eclipse main window. For more information, see Widgets and Menu Shortcuts Overview.
Viewing Different Queues A buy line displays on the queue if any items within that line have fallen below the order point when the Suggested P/O program runs for that line. The purchasing agent can then decide if it is best to do a short buy or a line buy. A short buy would purchase only those items that are below order point. The line buy quantity reflects all items needed to make the vendor target based on the line buy days calculation at the time the report generates. The Suggested P/O Queue helps you prioritize and sort buy lines.
You can display information on the Suggested P/O Queue differently to help distinguish which products to purchase first. You can display the products in groups: Normal, Emergency, Overdue POs, Open POs, and Select queues.
We recommend purchasing agents view the Emergency queue first. These buy lines have products on backorder to customers or negative on-hands quantity. Buy lines with zero ($0.00) carrying cost usually require a full line buy. Then review using the Select queue and select 25 hits. This process helps you replenish items that are purchased frequently first.
You can then use the Normal, Overdue, and Open queues to pick up any additional lines that need to be addressed.
Note: Use the SUGGESTED.PO.QUEUE authorization to access to work with the Suggested PO Queue.
Normal Displays all buy lines with at least one item below order point. We recommend running this queue after checking the Emergency and Overdue PO queues.
Solar Eclipse Purchasing Rel. 8.7.9
144 © 2014 Epicor Software Corporation. All rights reserved.
Emergency Displays all buy lines that need to be purchased immediately that are non-stock or stock items that are backordered. The Suggested P/O Queue displays only those items that have a negative projected inventory level (PIL ) combined in all branches. For example, if product A has a PIL of 1 in branch 2, and a PIL of 1 in branch 3, then the sum of the PILs is 0 and the item does not qualify as an Emergency buy in a central warehousing scheme.
After reviewing the Emergency queue, decide if you want to purchase from a your normal supplier if the vendor target is met, or an emergency procurement vendor.
We recommend running and converting the buy lines in this queue first, based on comments and needs for the business.
Overdue PO Displays all buy lines currently on overdue purchase orders. If you have emergency items that need to be purchased that day, and you have an overdue purchase order from your vendor, you may be able to add the emergency products to the overdue purchase order without penalty.
We recommend you run the Overdue PO queue before the Open PO queue.
Open PO Displays all buy lines that are currently on open purchase orders. If customers are inquiring if their non-stock or backordered items are in process, you can use this queue to provide them with accurate information.
We recommend you run the Open PO queue before the Select queue.
Select Displays a prompt to let you enter Rank Number, Rank, and Minimum Hits for the products you want to display. For example, you can determine how many products with only 10 hits are below order point by entering 10 in the Minimum Hits field at the prompt.
The rank number refers to the Ranking Method number is set in Product Ranking. Product Ranking compares, the activity of a product against all other products within the same price line, a group of price lines, or all price lines.
Converting the Suggested P/O Queue From the Suggested P/O Queue window, you can convert the suggestions from the queue for any view to a purchase order. After converting a suggested purchase order into an actual purchase order, you can modify it before committing or saving the order and sending the order to the vendor.
Rel. 8.7.9 Purchasing
© 2014 Epicor Software Corporation. All rights reserved. 145
Running the Suggested P/O Program The Suggested Purchase Order (P/O) program uses order cycle information (PILs, demand, and vendor target) to propose purchase quantities for products on Suggested P/O reports. A summary of these reports displays in the Suggested P/O Queue.
The Suggested P/O program populates the Suggested P/O Queue with a report for each buy line that has a product below its order point. The program uses the order points, line points, and surplus points of those buy lines listed in the queue to suggest the short buy or emergency buy. To meet the vendor target, the system suggests buying products back to their line points and moves the line point, based on expanding or contracting order cycles, until the vendor target is met or exceeded.
Important: The projected inventory level (PIL) listed on this report will be different from the PIL indicated on the Primary Inventory Maintenance window. This difference is because the PIL on the Suggested P/O program is calculated based on the order cycle. The PIL on the Primary Inventory Maintenance window is real-time and is calculated based on all orders coming into the system and going out.
Note: The plus sign (+) on the Suggested PO Report indicates that there is at least one warehouse in the network that has 0 on hand.
Most buy lines contain many products and due to the large number, it is difficult to know which buy lines have products below their order points. Therefore, the Suggested P/O program is most commonly run for all buy lines at once. If you run the Suggested P/O program for one buy line and no products are below order point, the system displays the message: Report Not Found.
Secondary Buy Lines Also, when suggesting a purchase order that uses a secondary buy line for a product, the system uses the secondary buy line's procurement path and not the one set up for the product's primary buy line. Override hierarchies still apply.
Note: If your company uses secondary buy lines, the processing time for this report can be longer than usual.
Package Quantities When calculating the suggestions, the system rounds package quantities at the child branch level and adds the need to the parent branch's calculation, if the Divisibility flag is set to No at the parent branch level. This ensures that the system does not suggest broken carton quantities if the purchasing branch has the Divisibility flag set to No. For example, the parent branch has the Buy Package quantity set at 100 and the Divisibility flag set to No. The child branch has the Divisibility flag set to Yes. The parent branch requires a quantity of 15. The child branch requires 9. Therefore, the total quantity needed is 24. The quantity is rounded to the package, 100, which fills the needs of both parent and child.
Costs The Suggested P/O Program displays costs for items based on the time the report is run. For example, the cost could change when running the Suggest P/O program for many branches at once. The program can take one to two minutes if there are several branches to query. If a cost has been changed while the

Solar Eclipse Purchasing Rel. 8.7.9
146 © 2014 Epicor Software Corporation. All rights reserved.
program is running, the summary report does not reflect the change, but the detail report displays the change.
To run the Suggest P/O program:
1. From the Purchase > Reports menu, select Suggest P/O to display the Suggest Purchase Order window.
2. Complete the report filter fields to tell the system which information to include when suggesting purchases:
Field Description Buy Line Enter a buy line ID to run the program for a single buy line or leave the field blank to
run suggested P/Os for all buy lines at once. Use the Multiple button to suggest purchases for a select group of buy lines.
You must set a flag at the buy line level in Buy Line Maintenance to include a buy line in all buy lines. If you want to include the buy line, set the Suggest on All field to Yes.
Note: For super buy lines that do not have a procure group specified, the suggested P/O report first looks to the individual product lines contained within the super buy line to determine procure group. If individual product lines do not contain a procure group the system uses a default group of DFLT.
Purchasing Branch
enter one of the following to select the purchasing branch number. Only buying branches generate purchase orders. • For a single-branch warehouse, type branch 1 or all. • For central purchasing branches, enter the branch number for an authorized
purchasing branch, as set up in Procurement Group Maintenance. • To run the program for all purchasing branches, enter all.
Print Individual Branches
Indicate whether to print individual branch summaries on the report. This field only applies to branches using central purchasing and lets the central purchasing agent review the Suggested P/Os from both a network summary and individual branch perspective.
Ignore "Suggest on All?"
Indicate if you want the system to ignore the buy line setting. This setting is active only the Purchasing Branch field is set to All. The default is No. If you select all buy lines by leaving the Buy Line field blank, the system uses a setting of Yes in this field. You cannot change this setting.
Note: The Suggest on All flag is set in Buy Line Maintenance generally for a buy line that is included in a super buy line and you want to limit the system considering demand or an order for the items on the buy line.
Include Target Level 2?
Indicate if you want the system to include second targets for the buy line suggestions. Enter target #2 values in the Buy Line Target Maintenance window.
Note: You can convert the suggested PO for the Level 2 target using the standard conversion process, if that is a better purchase.
3. Use the Print Options > Print Setup to select which columns to display on the report.
4. Set options, if needed, and generate the report.
Rel. 8.7.9 Purchasing
© 2014 Epicor Software Corporation. All rights reserved. 147
The Suggested Purchase Order window closes.
Important: If a customer who is on credit hold orders a non-stock item, the system displays an error on the Suggested P/O Report by the item alerting the purchasing agent. This alert can help keep your warehouse free of non-stock items ordered that may not get paid for.
Suggested P/O Error Report When the suggested P/O program runs, the system checks the following fields in the product file. If any of these fields have invalid data, such as a letter in the Min field, then the system creates a Suggested P/O Error Report and places it in Your Hold Files. The system creates this error report if any of the following product file fields have misinformation:
• MIN
• MAX
• Remnant Percent
• Remnant Quantity
• Order Point
• Line Point
The report helps you when you import your data into Eclipse to make sure you are mapping the correct data to the correct fields. While the Suggested P/O program continues to run, it creates this report and lists the products with bad data so you can update the information and then rerun the Suggested P/O Report.
For information about what columns are on the report and available to add to the report, see What the Suggested P/O Report Shows What the Suggested P/O Report Shows in this documentation.
Solar Eclipse Purchasing Rel. 8.7.9
148 © 2014 Epicor Software Corporation. All rights reserved.
Displaying and Sorting the Suggested P/O Queue You can display and sort the Suggested P/O Queue to best show the purchases you need to make. You can sort by buy lines, buyers, or carrying costs. In addition, you can specify what kind of queue you want to display. After running the Suggested P/O program, you can display the results to decide what to purchase.
To display summary information for the Suggested P/O Queue at all times, add a Suggested P/O Queue widget to your Solar Eclipse main window. For more information, see Widgets and Menu Shortcuts Overview.
To display the Suggested P/O Queue:
1. From the Purchase > Queues menu, select Suggested P/O Queue to display the Suggested P/O Queue window.
2. In the Branch field, enter the branch you want to display. To display all branches, type All.
3. In the Buyer field, enter the buyer's queue you want to display. To display all, leave this field blank. To assign a buyer, see Assigning Buyers to Buy Lines.
4. In the Type field, select the kind of queue you want to display. Press F10 to select one of the queues. For a description of each type, see Suggested Purchase Order Queue Rules and Guidelines.
5. To select columns which display on the report, from the File menu, select Print Setup. You can shuffle the column selections to best suit your company's needs.
6. Click Update. The Suggested P/O queue displays.
Information displays based on how you sorted the queue the last time it was run.
7. Click the header buttons to sort by that column, such as Buyer or Carry Cost.
8. To change the column view, click the View Manager ( ) at the end of the row headings and select one of the following: Total Buy (this is the default), Last Line Buy, Next PO Date, or Combine P/O.
Column Description Br (Branch) The purchasing branch for the buy line displayed. The purchasing
branch depends on your warehouse scheme. Warehouse schemes let you decide the most efficient way to purchase and store the products for your company. You must have the SUGGESTED.PO.QUEUE authorization key assigned to view and create suggested purchase orders.
Buyer The Buyer responsible for the buy line. If there is no buyer listed, then any authorized purchasing agent can purchase the buy line. If there is a buyer listed, then there may be restrictions on who is allowed to buy the line. For example, there may be restrictions on warehouse space for a particular buy line which must be cleared before purchasing. Your company may indicate that only one person can purchase this with instructions to check the inventory location prior to purchase.
Rel. 8.7.9 Purchasing
© 2014 Epicor Software Corporation. All rights reserved. 149
Column Description Buy Line The buy line or super buy line ID for the buy line suggested for purchase by the
system. This is the primary buy line in which a product resides. A product can be in a primary buy line and have a secondary buy line attached to it, but the Suggested P/O Queue displays only primary buy lines or super buy lines. To view all products in the buy line listed, use the Buy Line Maintenance program to view the products. From the Suggested P/O Queue, you can place your cursor on the Buy Line ID, then from the Maintenance menu, select Buy Line Maintenance.
Note: For super buy lines that do not have a procure group specified the suggested P/O report will first look to the individual product lines contained within the super buy line to determine procure group. If individual product lines do not contain a procure group the system uses a default group of DFLT.
Target* The vendor target you should meet in order to purchase the buy line. A vendor target is determined by the vendor from whom you purchase products for this buy line. Different vendors have different targets. A target is the amount of product the vendor identifies as the minimum amount you can buy. For example, Jones Plumbing may require you to buy $500 worth of product before shipping without freight fees. In contrast, Smith's Supply may require you to buy enough product to fill a truck based on weight before providing a discount or before shipping. The system provides several options to meet the vendor target. Vendor targets can be in dollars, pounds (weight), pieces, or load factor. To adjust or change vendor targets, use Buy Line Maintenance.
OCD* (Order Cycle Days)
Order cycle days indicate how often you buy from your vendor. The order cycle can vary when some products in a buy line sell faster than others. The order cycle calculation is the most effective time for replenishing a product line from a vendor, based on the vendor target for that line. A vendor target is the amount of product the vendor identifies as the minimum amount you can buy. Order cycle calculation = (Vendor Target / Average Monthly Demand of all Products in Buy Line) * 30 You must be assigned the SUGGESTED.PO.QUEUE authorization key to view and create suggested purchase orders.
LBD* (Line Buy Days)
The number of days needed as of the last run of the Suggested PO Queue to meet the vendor target. The Line Buy Days number is affected by a number of factors, such as the number of days since the last line buy, the amount of nonstock items needed in the buy line, or any unusual demand on stock items that keeps units different than the last forecast. This column number should match the LnBuyCycle column in Buy Line Maintenance. You must have the SUGGESTED.PO.QUEUE authorization key assigned to view and create suggested purchase orders.
Short Amount The number of days needed as of the last run of the Suggested PO Queue to meet the vendor target.

Solar Eclipse Purchasing Rel. 8.7.9
150 © 2014 Epicor Software Corporation. All rights reserved.
Column Description Line Buy* The quantity you must purchase to bring items in a buy line back to their line
points, when creating a purchase order from a suggested purchase order. A line point is the upper limit to the amount of stock you want to have on the shelf for a given item so a warehouse can meet demand during the order cycle of the product. The line point calculation is: ((Lead Time Days + Order Cycle Days + Line Point Safety Days) * Demand Per Day) + Manual Safety Stock You must have the SUGGESTED.PO.QUEUE authorization key assigned to view and create suggested purchase orders.
Total Buy* The total amount required to purchase the entire line as it corresponds with the Target field, as follows: • If the Target is in dollars, then the Total Buy field displays $0.00 because the
Line Buy field reflects the total amount in dollars. • If the Target is in weight, then the Total Buy field displays the total weight
required for an entire buy line. You must have the SUGGESTED.PO.QUEUE authorization key assigned to view and create suggested purchase orders.
Note: If you are combining purchase orders this amount changes based on the lines you select - line buys or short buys.
#BOP The number of items in the buy line that are below their order point. This number provides a gauge to determine which buy lines need to be purchased first. Despite the carrying costs, if there is a significant number of items below their order point, it is time to purchase the entire buy line.
Carry Cost* The cost of keeping a product on the shelf in your warehouse. This cost includes warehouse utilities, inventory shrinkage, insurance, or the cost of the money you have invested in the inventory. We recommend purchasing buy lines with a zero ($0.00) carrying cost first, because frequently you have a very quick order cycle on those items and purchase them often. In addition, with a zero carrying cost, the purchase does not cost you more to have the items on hand. The system automatically calculates the carrying cost for each buy line based on order cycle and demand history.
Last Line Buy Date of the last buy line for the product.
Next PO The date on which the next purchase order is to be sent.
Short (check box) Use to select which line items to combine on purchase orders.
Line (check box)
* If you run the Suggested PO for Target #2, additional #2 columns display for each of these columns, such as LBD #2 or Line Buy #2.
Additionally, you can drag and drop the columns to display the information as it suits your business needs, for example, you can move Target 1 and Target 2 so they display side-by-side.
9. Use the parameters you enter to convert the suggested purchases into actual purchase orders.
10. Repeat steps two through five to recalculate for other parameters.
11. Exit the window.
Rel. 8.7.9 Purchasing
© 2014 Epicor Software Corporation. All rights reserved. 151
Converting Suggested Purchase Orders to Actual Purchase Orders The Suggested Purchase Order (P/O) program provides you with options to purchase products that are needed. The system determines what displays on the Suggested P/O Queue based on the parameters you provide. You can modify the order before committing the purchase order.
If you are converting purchase orders that contain consignment material, you may be prompted to confirm if it is a consignment purchase order you are creating. For more information, see Creating Consignment Purchase Orders.
Note: When converting a buy line, if the maximum days supply is exceeded by a suggested purchase order and the user is not assigned the POE.PIL.DAYS.OVRD authorization key, the system prompts for a password.
Credit Holds when Converting Orders If a customer who is on credit hold orders a non-stock item, the system displays an error on the Suggested P/O Report by the item alerting the purchasing agent. This alert can help keep your warehouse free of non-stock items ordered that may not get paid for.
Use the Disable Credit Check For Non-Stocks On Suggested P/O control maintenance record to turn off this credit check, if needed. For example, if you have a customer that regularly orders non-stock items, you can disable this check to make the ordering process quicker.
Using the Convert Suggested to Actual P/O Program You can convert Suggested P/Os to purchase orders with the Convert Suggested to Actual P/O program. When the purchase order is converted, the system records a comment in the change log to indicate if the conversion was made using the Line or Emergency option, such as "Suggested PO Converted Using the Line Buy."
Also, when suggesting a purchase order that uses a secondary buy line for a product, the system uses the secondary buy line's procurement path and not the one set up for the product's primary buy line. Override hierarchies still apply.
Note: The system uses the lead time for the buy line on the converted order.
The Convert Suggested to Actual P/O window displays the following:
• Date and time when the Suggested P/O generated
• Normal order cycle used on the Suggested P/O
• Vendor target
• Days supply being purchased
Before committing a purchase order, you can modify the purchase order in several ways, including adding or subtracting products and changing quantities. The purchase order is converted as of the current costs. If changes are made while the program is running the purchase order does not reflect the update. The Suggest PO Report lists the product detail in real-time cost. The summary on the queue uses the cached values to pull up more than one product detail on the window.
Solar Eclipse Purchasing Rel. 8.7.9
152 © 2014 Epicor Software Corporation. All rights reserved.
Note: You can also convert a suggested purchase order to the Transfer Surplus Queue.
To convert the Suggested P/O Queue to an actual P/O:
1. Display the Suggested P/O Queue and position the cursor on the buy line you want to convert.
2. From the Edit menu, select Convert to Actual POs.
Note: Purchase orders are displayed consecutively by PO number starting with the lowest number.
3. In the Line or Short field, select one of the following:
• Line (Target #1) - To purchase all items in the line buy for the vendor target #1 listed in the ...
• Line (Target #2) - To purchase all items in the line buy for the vendor target #2 listed in the ...
• Short - To purchase only the short buy quantities.
3. In the Vendor field, enter the vendor to whom the converted purchase order should be directed. If you enter a partial vendor name, a selection list displays with the vendors' names and addresses that are available.
4. In the Branch and Line field, verify the branch and buy line you want to convert.
Note: For single-branch warehouses, the default is branch 1. The system checks for the most recent Suggested P/O created for that combination, and displays the generation date and time, normal order cycle days, vendor target, and the days supply in the appropriate fields on the Suggested P/O.
The following fields display with system information: Normal Cycle, Days Supply, Generated on <date> At <time>, and Target.
6. If prompted, resolve conflicts between suggested buy lines.
7. Use the Round Short to Package Qty check box to indicate if you want to round the short buy quantity to the package quantity.
8. Click OK to create an actual purchase order and display the Purchase Order Entry window, allowing you to further modify or cancel the order. For multi-branch networks, when a product is centrally purchased, but not centrally warehoused, the system generates individual, consecutively numbered purchase orders for each child branch.
Note: If there is more that one price matrix associated with the product, the Vendor Matrix Cell Selection window displays. For more information see Creating Matrix Cells In Quick Buy Matrix.
8. Save your changes and exit the window.
To convert the Suggested P/O Queue to the Transfer Surplus Queue:
1. Display the Suggested P/O Queue and position the cursor on the buy line you want to convert.
2. From the File menu, select Transfer Queue to display the Transfer Surplus Queue.
3. At the prompt, select Current to convert only the one buy line selected or All Listed to convert all buy lines.
Rel. 8.7.9 Purchasing
© 2014 Epicor Software Corporation. All rights reserved. 153
The queue displays with the buy line items populated.
4. Complete the transaction. For instructions, see Using the Transfer Surplus Queue.
5. Save your changes and exit the window.
To convert suggested purchases using the Detail Queue:
1. Display the Suggested P/O Queue and position the cursor on the buy line you want to convert.
2. From the File menu, select Detail Queue to display the Transfer Surplus Queue.
3. At the prompt, select Current to convert only the one buy line selected or All Listed to convert all buy lines.
The queue displays with the buy line items populated.
4. Complete the transaction. For instructions, see Managing Suggestions from the Suggested P/O Detail Queue.
5. Save your changes and exit the window.
Single-branch and Multi-branch Purchase Orders In a single-branch warehouse, the system creates one purchase order for each buy line. In a multi-branch network, one or more purchase orders generate depending upon the warehouse scheme.
In a central purchasing scheme, one branch handles purchasing for the network while each branch handles its own warehousing. Each warehousing branch receives its own purchase order for the stock ordered by the purchasing warehouse.
In a central warehouse scheme, the selling branches are dependent on one branch to handle all the warehousing. The warehousing branch receives one purchase order for the entire order and handles stock replenishment through transfer orders.
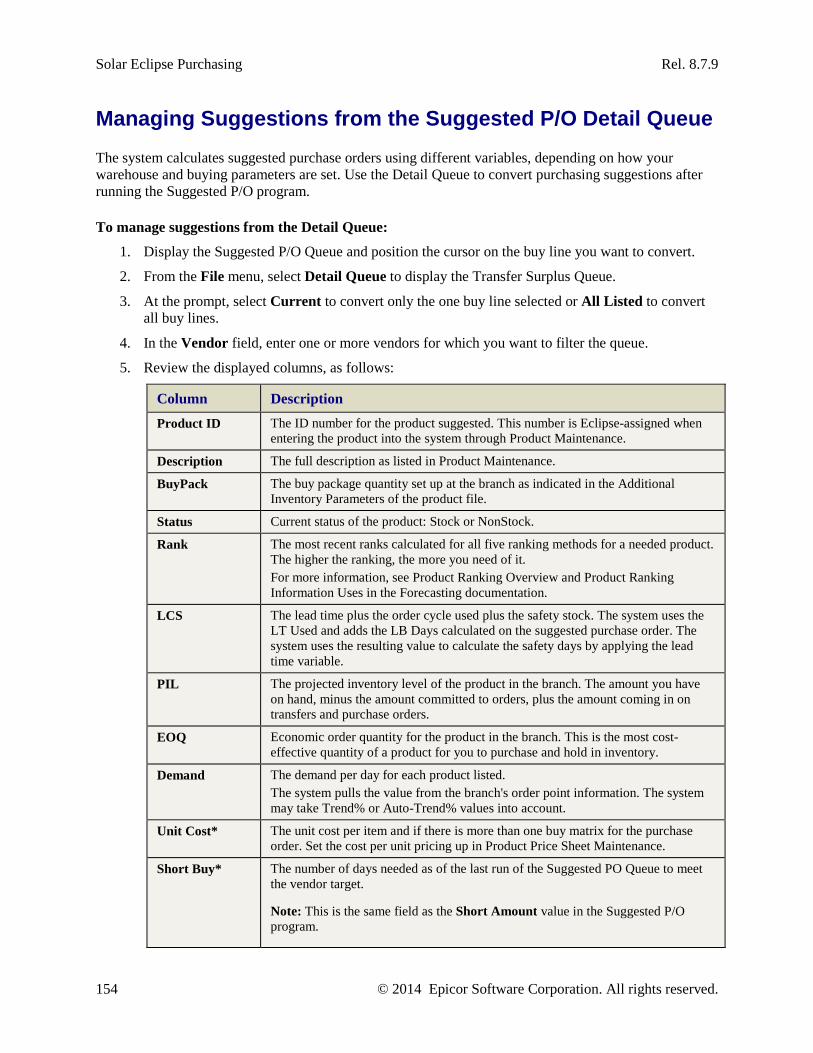
Solar Eclipse Purchasing Rel. 8.7.9
154 © 2014 Epicor Software Corporation. All rights reserved.
Managing Suggestions from the Suggested P/O Detail Queue The system calculates suggested purchase orders using different variables, depending on how your warehouse and buying parameters are set. Use the Detail Queue to convert purchasing suggestions after running the Suggested P/O program.
To manage suggestions from the Detail Queue:
1. Display the Suggested P/O Queue and position the cursor on the buy line you want to convert.
2. From the File menu, select Detail Queue to display the Transfer Surplus Queue.
3. At the prompt, select Current to convert only the one buy line selected or All Listed to convert all buy lines.
4. In the Vendor field, enter one or more vendors for which you want to filter the queue.
5. Review the displayed columns, as follows:
Column Description Product ID The ID number for the product suggested. This number is Eclipse-assigned when
entering the product into the system through Product Maintenance.
Description The full description as listed in Product Maintenance.
BuyPack The buy package quantity set up at the branch as indicated in the Additional Inventory Parameters of the product file.
Status Current status of the product: Stock or NonStock.
Rank The most recent ranks calculated for all five ranking methods for a needed product. The higher the ranking, the more you need of it. For more information, see Product Ranking Overview and Product Ranking Information Uses in the Forecasting documentation.
LCS The lead time plus the order cycle used plus the safety stock. The system uses the LT Used and adds the LB Days calculated on the suggested purchase order. The system uses the resulting value to calculate the safety days by applying the lead time variable.
PIL The projected inventory level of the product in the branch. The amount you have on hand, minus the amount committed to orders, plus the amount coming in on transfers and purchase orders.
EOQ Economic order quantity for the product in the branch. This is the most cost-effective quantity of a product for you to purchase and hold in inventory.
Demand The demand per day for each product listed. The system pulls the value from the branch's order point information. The system may take Trend% or Auto-Trend% values into account.
Unit Cost* The unit cost per item and if there is more than one buy matrix for the purchase order. Set the cost per unit pricing up in Product Price Sheet Maintenance.
Short Buy* The number of days needed as of the last run of the Suggested PO Queue to meet the vendor target.
Note: This is the same field as the Short Amount value in the Suggested P/O program.
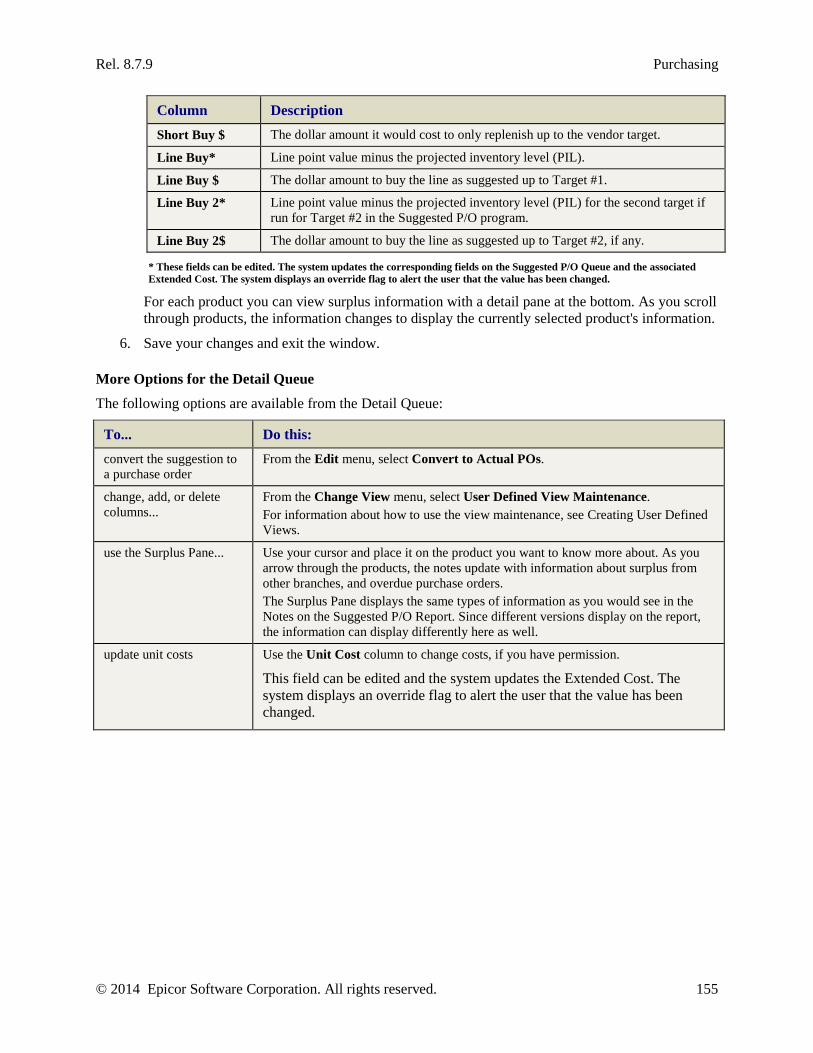
Rel. 8.7.9 Purchasing
© 2014 Epicor Software Corporation. All rights reserved. 155
Column Description Short Buy $ The dollar amount it would cost to only replenish up to the vendor target.
Line Buy* Line point value minus the projected inventory level (PIL).
Line Buy $ The dollar amount to buy the line as suggested up to Target #1.
Line Buy 2* Line point value minus the projected inventory level (PIL) for the second target if run for Target #2 in the Suggested P/O program.
Line Buy 2$ The dollar amount to buy the line as suggested up to Target #2, if any.
* These fields can be edited. The system updates the corresponding fields on the Suggested P/O Queue and the associated Extended Cost. The system displays an override flag to alert the user that the value has been changed.
For each product you can view surplus information with a detail pane at the bottom. As you scroll through products, the information changes to display the currently selected product's information.
6. Save your changes and exit the window.
More Options for the Detail Queue
The following options are available from the Detail Queue:
To... Do this: convert the suggestion to a purchase order
From the Edit menu, select Convert to Actual POs.
change, add, or delete columns...
From the Change View menu, select User Defined View Maintenance. For information about how to use the view maintenance, see Creating User Defined Views.
use the Surplus Pane... Use your cursor and place it on the product you want to know more about. As you arrow through the products, the notes update with information about surplus from other branches, and overdue purchase orders. The Surplus Pane displays the same types of information as you would see in the Notes on the Suggested P/O Report. Since different versions display on the report, the information can display differently here as well.
update unit costs Use the Unit Cost column to change costs, if you have permission.
This field can be edited and the system updates the Extended Cost. The system displays an override flag to alert the user that the value has been changed.
Solar Eclipse Purchasing Rel. 8.7.9
156 © 2014 Epicor Software Corporation. All rights reserved.
Reviewing Purchase Order Suggestions The system calculates suggested purchase orders using different variables, depending on how your warehouse and buying parameters are set. For example, the system calculates differently if there is a short buy (emergency buy) than if there is a line buy. In addition, the system takes into account what minimum and maximum parameters are set as well as any service stock requirements.
Use the Suggested PO Audit utility to drill into the suggested purchase order results and see how the system determined what to suggest to buy. The audit displays in an inquiry window and can be printed or saved in your hold file as a report.
You can also display the Transfer Surplus Queue or the Suggested P/O Detail Queue for more information before running the audit report.
To review purchase order suggestions:
1. Display and sort the Suggested P/O Queue for your company.
2. From the File menu, select View Report to display the report viewer and select any line item on the report.
3. From the Detail menu, select View Detail or Edit Detail and select Suggested P/O Audit to display the audit detail and review the purchase order suggestion calculations.
Note: You cannot display the audit information from a report in your hold file.
4. Save the results to your hold file, if you want to save these results to compare data at a later time.
Regardless of the type of buy, when determining the suggested purchasing quantities the system first checks which procurement path your warehouse uses and then determines what branches to display for the products. The product buy package quantity and divisibility impacts the amount to purchase. The system calculates what products are short (emergency) buys and then calculate the line buy.
Line Buys
The system calculates line buys for product buy lines using the following process after determining quantities, procurement paths, and buy packages. The system completes each step before considering the next calculation:
Step Description 1 Find the lead time in the purchasing branch.
2 Determine the lead time order cycle from the buy line.
3 Identify the lead time safety days.
4 Add the results of Steps 1 through 3 for the lead cycle safety days value.
5 The value in Step 4 displays on the Suggested P/O Report in the LCS column.
Note: Only the purchasing branch's LCS displays on the Suggested P/O Report.
6 Multiply the lead cycle safety days value by the daily demand of each branch.
7 Round up the value in Step 6 to calculate the line point for the product.

Rel. 8.7.9 Purchasing
© 2014 Epicor Software Corporation. All rights reserved. 157
Step Description 8 Compare value in Step 7 to the calculated economic order quantity (EOQ). The system uses
the greater value.
9 Compare the value in Step 8 to the projected inventory level (PIL) of the product. If the value is greater than the PIL, the system calculates the difference and rounds up by the buy package quantity.
Short (Emergency) Buys The system calculates short buys using the following process after determining quantities, procurement paths, and buy packages. The system completes each step before considering the next calculation:
Step Description 1 Find the greater lead time in the network (determined procurement path) and determine
whether to use it for each branch on the list.
2 Use calculated lead time from Step 1 to calculate safety days.
3 Find daily demand for each branch. Daily demand is considered with the trend percentage or auto-trend data.
4 Find the hits related safety coefficient (HRSC) factor for each branch.
5 Round up the daily demand and multiply by the lead time stock that has the greater lead time in the network (determined procurement path).
6 Calculate the safety stock using the lead time in Step 5 and apply the lead time variable.
7 Multiply the safety lead time by the HRSC factor for each branch.
8 Multiply result of Step 7 by the demand per day for each branch.
Check Point
The lead time stock and safety stock for each branch is available to display on the audit report.
9 Add the lead time stock and safety stock and compare to the projected inventory level (PIL) of the branch.
10 Unless you use a Distributive Purchasing warehouse, add all needs at each branch.
11 Check if safety stock should be added to the product at the branch. This would increase the amount of short stock to display on the Suggested P/O Report.
What the Suggest P/O Audit Report Shows The audit displays some of the calculations at the bottom of the Suggested P/O Audit. How the system calculates the short and line buys depends on the procure group associated with the product.
Your warehouse scheme determines how you replenish stock for your company. The procurement path you use affects the way the system builds the audit report:
• Distributive and Central Purchasing
• Central Warehouse and Central Distribution
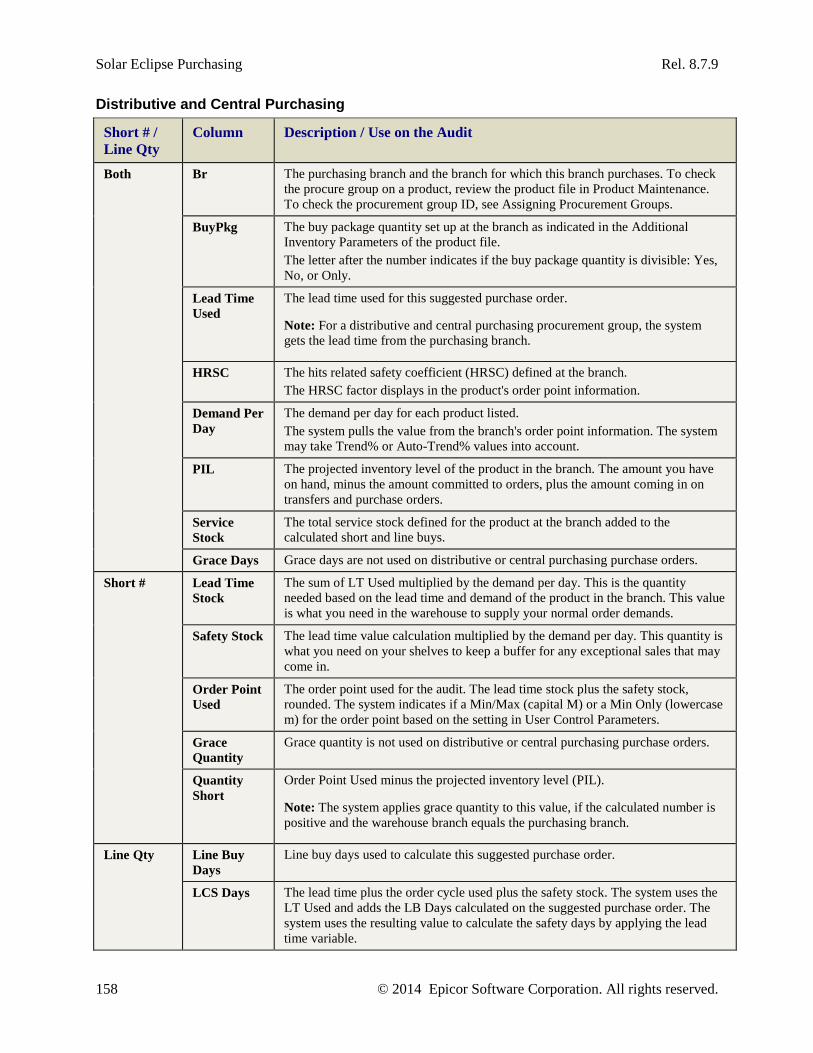
Solar Eclipse Purchasing Rel. 8.7.9
158 © 2014 Epicor Software Corporation. All rights reserved.
Distributive and Central Purchasing
Short # / Line Qty
Column Description / Use on the Audit
Both Br The purchasing branch and the branch for which this branch purchases. To check the procure group on a product, review the product file in Product Maintenance. To check the procurement group ID, see Assigning Procurement Groups.
BuyPkg The buy package quantity set up at the branch as indicated in the Additional Inventory Parameters of the product file. The letter after the number indicates if the buy package quantity is divisible: Yes, No, or Only.
Lead Time Used
The lead time used for this suggested purchase order.
Note: For a distributive and central purchasing procurement group, the system gets the lead time from the purchasing branch.
HRSC The hits related safety coefficient (HRSC) defined at the branch. The HRSC factor displays in the product's order point information.
Demand Per Day
The demand per day for each product listed. The system pulls the value from the branch's order point information. The system may take Trend% or Auto-Trend% values into account.
PIL The projected inventory level of the product in the branch. The amount you have on hand, minus the amount committed to orders, plus the amount coming in on transfers and purchase orders.
Service Stock
The total service stock defined for the product at the branch added to the calculated short and line buys.
Grace Days Grace days are not used on distributive or central purchasing purchase orders.
Short # Lead Time Stock
The sum of LT Used multiplied by the demand per day. This is the quantity needed based on the lead time and demand of the product in the branch. This value is what you need in the warehouse to supply your normal order demands.
Safety Stock The lead time value calculation multiplied by the demand per day. This quantity is what you need on your shelves to keep a buffer for any exceptional sales that may come in.
Order Point Used
The order point used for the audit. The lead time stock plus the safety stock, rounded. The system indicates if a Min/Max (capital M) or a Min Only (lowercase m) for the order point based on the setting in User Control Parameters.
Grace Quantity
Grace quantity is not used on distributive or central purchasing purchase orders.
Quantity Short
Order Point Used minus the projected inventory level (PIL).
Note: The system applies grace quantity to this value, if the calculated number is positive and the warehouse branch equals the purchasing branch.
Line Qty Line Buy Days
Line buy days used to calculate this suggested purchase order.
LCS Days The lead time plus the order cycle used plus the safety stock. The system uses the LT Used and adds the LB Days calculated on the suggested purchase order. The system uses the resulting value to calculate the safety days by applying the lead time variable.
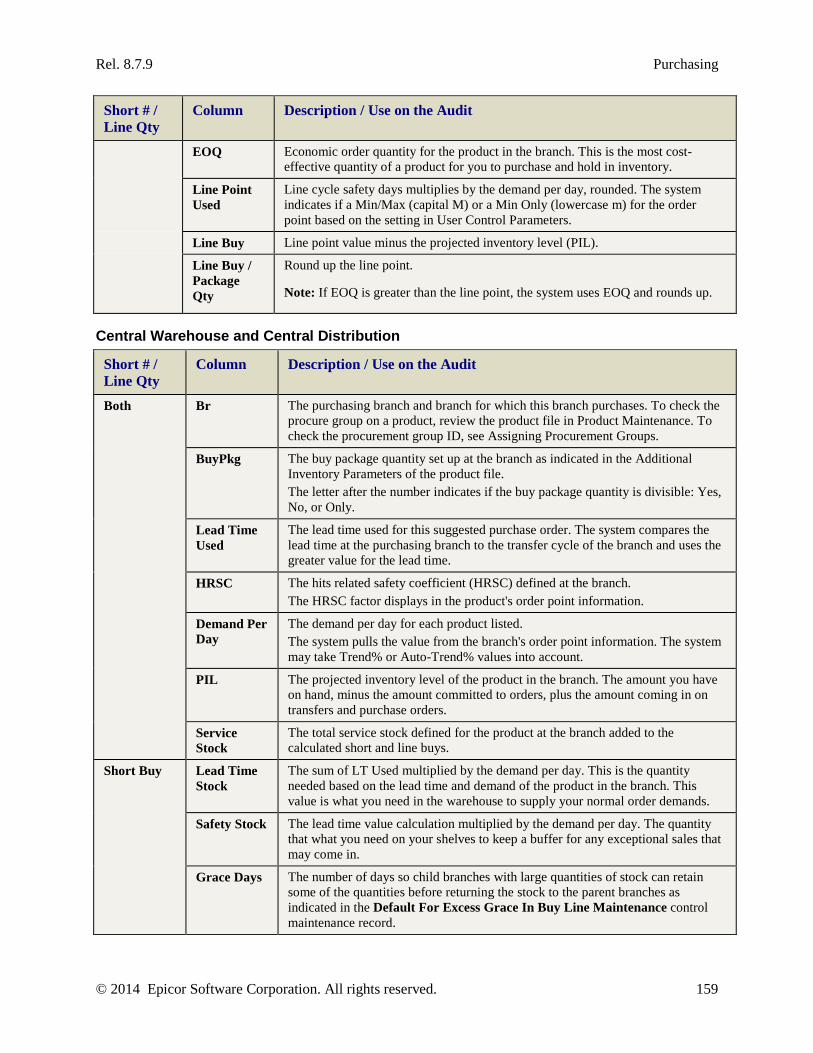
Rel. 8.7.9 Purchasing
© 2014 Epicor Software Corporation. All rights reserved. 159
Short # / Line Qty
Column Description / Use on the Audit
EOQ Economic order quantity for the product in the branch. This is the most cost-effective quantity of a product for you to purchase and hold in inventory.
Line Point Used
Line cycle safety days multiplies by the demand per day, rounded. The system indicates if a Min/Max (capital M) or a Min Only (lowercase m) for the order point based on the setting in User Control Parameters.
Line Buy Line point value minus the projected inventory level (PIL).
Line Buy / Package Qty
Round up the line point.
Note: If EOQ is greater than the line point, the system uses EOQ and rounds up.
Central Warehouse and Central Distribution
Short # / Line Qty
Column Description / Use on the Audit
Both Br The purchasing branch and branch for which this branch purchases. To check the procure group on a product, review the product file in Product Maintenance. To check the procurement group ID, see Assigning Procurement Groups.
BuyPkg The buy package quantity set up at the branch as indicated in the Additional Inventory Parameters of the product file. The letter after the number indicates if the buy package quantity is divisible: Yes, No, or Only.
Lead Time Used
The lead time used for this suggested purchase order. The system compares the lead time at the purchasing branch to the transfer cycle of the branch and uses the greater value for the lead time.
HRSC The hits related safety coefficient (HRSC) defined at the branch. The HRSC factor displays in the product's order point information.
Demand Per Day
The demand per day for each product listed. The system pulls the value from the branch's order point information. The system may take Trend% or Auto-Trend% values into account.
PIL The projected inventory level of the product in the branch. The amount you have on hand, minus the amount committed to orders, plus the amount coming in on transfers and purchase orders.
Service Stock
The total service stock defined for the product at the branch added to the calculated short and line buys.
Short Buy Lead Time Stock
The sum of LT Used multiplied by the demand per day. This is the quantity needed based on the lead time and demand of the product in the branch. This value is what you need in the warehouse to supply your normal order demands.
Safety Stock The lead time value calculation multiplied by the demand per day. The quantity that what you need on your shelves to keep a buffer for any exceptional sales that may come in.
Grace Days The number of days so child branches with large quantities of stock can retain some of the quantities before returning the stock to the parent branches as indicated in the Default For Excess Grace In Buy Line Maintenance control maintenance record.
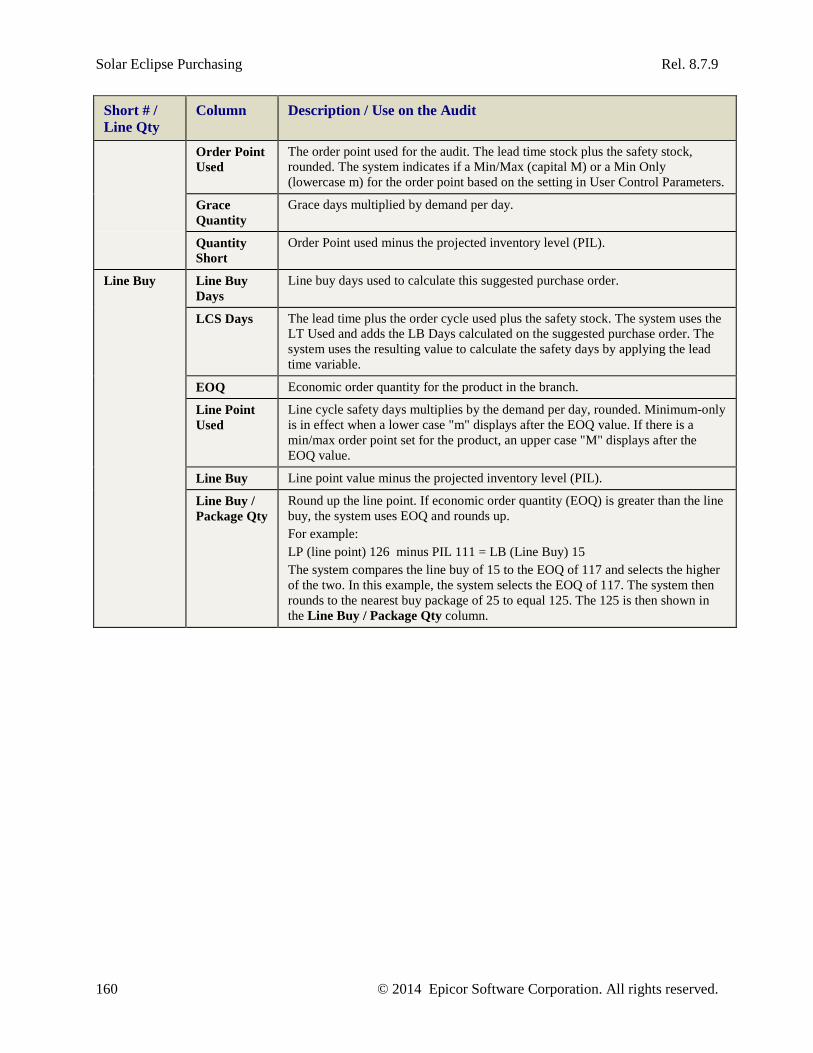
Solar Eclipse Purchasing Rel. 8.7.9
160 © 2014 Epicor Software Corporation. All rights reserved.
Short # / Line Qty
Column Description / Use on the Audit
Order Point Used
The order point used for the audit. The lead time stock plus the safety stock, rounded. The system indicates if a Min/Max (capital M) or a Min Only (lowercase m) for the order point based on the setting in User Control Parameters.
Grace Quantity
Grace days multiplied by demand per day.
Quantity Short
Order Point used minus the projected inventory level (PIL).
Line Buy Line Buy Days
Line buy days used to calculate this suggested purchase order.
LCS Days The lead time plus the order cycle used plus the safety stock. The system uses the LT Used and adds the LB Days calculated on the suggested purchase order. The system uses the resulting value to calculate the safety days by applying the lead time variable.
EOQ Economic order quantity for the product in the branch.
Line Point Used
Line cycle safety days multiplies by the demand per day, rounded. Minimum-only is in effect when a lower case "m" displays after the EOQ value. If there is a min/max order point set for the product, an upper case "M" displays after the EOQ value.
Line Buy Line point value minus the projected inventory level (PIL).
Line Buy / Package Qty
Round up the line point. If economic order quantity (EOQ) is greater than the line buy, the system uses EOQ and rounds up. For example: LP (line point) 126 minus PIL 111 = LB (Line Buy) 15 The system compares the line buy of 15 to the EOQ of 117 and selects the higher of the two. In this example, the system selects the EOQ of 117. The system then rounds to the nearest buy package of 25 to equal 125. The 125 is then shown in the Line Buy / Package Qty column.
Rel. 8.7.9 Purchasing
© 2014 Epicor Software Corporation. All rights reserved. 161
Combining Purchase Orders from the Suggested P/O Queue Through the Suggested P/O Queue you can combine suggested purchase orders together on-the-fly in order to better meet vendor targets or vendor minimum amounts. In addition, you can choose whether or not to combine the short or line quantities for each one.
Whether it is for one buy line with multiple branch purchase orders or multiple buy lines for the same branch, you can choose which suggested purchase orders to combine without having to make changes in Buy Line Maintenance. By combining P/Os through the Suggested P/O Queue, your Buy Line Maintenance settings remain the same and you can take advantage of any vendor incentives you may have received immediately without adjusting any settings that would change how the Suggested P/O runs.
Important: The system intentionally ignores any Buy Line Maintenance settings, such as the Combine P/Os flag, so the user must always select whether or not to combine on Central P/O. The selection only applies to that particular instance of combining purchase orders, due to the fact that you can combine different buy lines with different settings.
The change log reflects all changes when combining purchase orders. When viewing a purchase order that has combined suggestions on it and using a central purchase order, the system displays an indicator in the status bar.
When creating the purchase orders, the system uses the Price Branch (the branch from Suggested P/O Queue) and the Ship Branch (the warehouse branch from Procurement Group Maintenance).
To combine purchase orders:
1. Display the Suggested P/O Queue.
2. Click the View Manager ( ) and select Combine P/O.
3. Use the Short and Line check box columns to select which suggestions you want to combine.
For each suggested buy in the Suggested P/O Queue that you combine, the amount displays in the Selected column and the cumulative total displays in the status bar. The Total Buy column also dynamically updates with each selection.
4. From the Edit menu, select Convert to Actual P/Os.
5. At the Do you want to combine selected P/Os? prompt, click Yes.
The system populates the Line or Short field with *Multiple* to indicate there is more than one line included on the purchase order. These fields are now view-only.
6. Use the Combine on Central Purchase Order to indicate if you want one purchase order:
• If selected, a Branch prompt displays and one purchase order is created with a different generation for each warehouse branch. In addition, the Drop Point field activates.
• If not selected then the Branch field is disabled and a new purchase order is created for each price branch with a different generation for each warehouse branch. The purchase orders are consecutively numbered.
Note: If combining orders from more than one branch, then the system creates a purchase order for each branch.
Solar Eclipse Purchasing Rel. 8.7.9
162 © 2014 Epicor Software Corporation. All rights reserved.
7. If the Drop Branch field is active, select which branch in your network or company that you want the material from the combined purchase order to be shipped to. For more information about drop points, see How Drop Points Maintenance Works in Purchasing in this documentation.
8. Use the Round Short to Package Quantity check box to indicate if you want to round the short by quantity to the package quantity.
Note: Some fields may be view-only when converting the order to ensure that accounting and inventory checks remain in tact.
9. Click OK to create the purchase order.
The system displays the new purchase order. You can edit it and verify data on the tabs, as needed.
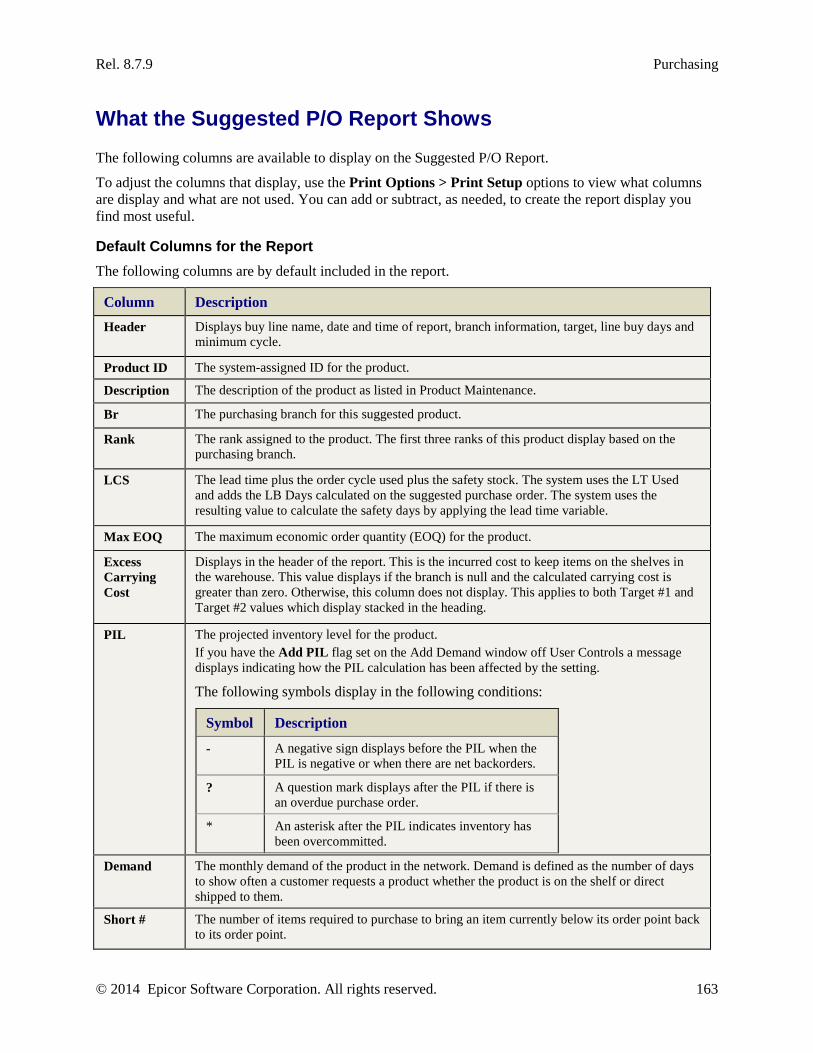
Rel. 8.7.9 Purchasing
© 2014 Epicor Software Corporation. All rights reserved. 163
What the Suggested P/O Report Shows The following columns are available to display on the Suggested P/O Report.
To adjust the columns that display, use the Print Options > Print Setup options to view what columns are display and what are not used. You can add or subtract, as needed, to create the report display you find most useful.
Default Columns for the Report The following columns are by default included in the report.
Column Description Header Displays buy line name, date and time of report, branch information, target, line buy days and
minimum cycle.
Product ID The system-assigned ID for the product.
Description The description of the product as listed in Product Maintenance.
Br The purchasing branch for this suggested product.
Rank The rank assigned to the product. The first three ranks of this product display based on the purchasing branch.
LCS The lead time plus the order cycle used plus the safety stock. The system uses the LT Used and adds the LB Days calculated on the suggested purchase order. The system uses the resulting value to calculate the safety days by applying the lead time variable.
Max EOQ The maximum economic order quantity (EOQ) for the product.
Excess Carrying Cost
Displays in the header of the report. This is the incurred cost to keep items on the shelves in the warehouse. This value displays if the branch is null and the calculated carrying cost is greater than zero. Otherwise, this column does not display. This applies to both Target #1 and Target #2 values which display stacked in the heading.
PIL The projected inventory level for the product. If you have the Add PIL flag set on the Add Demand window off User Controls a message displays indicating how the PIL calculation has been affected by the setting.
The following symbols display in the following conditions:
Symbol Description
- A negative sign displays before the PIL when the PIL is negative or when there are net backorders.
? A question mark displays after the PIL if there is an overdue purchase order.
* An asterisk after the PIL indicates inventory has been overcommitted.
Demand The monthly demand of the product in the network. Demand is defined as the number of days to show often a customer requests a product whether the product is on the shelf or direct shipped to them.
Short # The number of items required to purchase to bring an item currently below its order point back to its order point.

Solar Eclipse Purchasing Rel. 8.7.9
164 © 2014 Epicor Software Corporation. All rights reserved.
Column Description Short $ The number of dollars required to purchase to bring an item currently below its order point
back to its order point.
BuyPkg The quantity multiple in which stock may be purchased or transferred, depending on the product divisibility and economic order quantity relative to transfers and the availability of stock in the parent branch.
UnitCost The cost for a single item.
LineQty The calculated quantity required of this product when purchasing the entire buy line.
Line $ Total dollar value of the line buy for each item.
Target The vendor target for the buy line.
Target #2 The second vendor target for the buy line.
Other Available Columns The following columns are available using the Print Options > Print Setup options. These columns display in the Not Used column by default. To add one of the columns, highlight it and click Add.
Note: When adding any additional column, be sure to check the associated Width column to make sure it displays correctly on the form. The system wraps text to fit the column. For example, if you select the column width as 2 for a product description, the system wraps for each two letters vertically. .
For more information about column selection, see Modifying the Column Layout For a Report in the Eclipse Reporting documentation.
Column Description # Months Onhand Number of months supply on hand in your warehouse for this product.
# Months On PO Number of months supply on currently open purchase orders. This can help you determine if you truly need to order more. You may want to remove this item, if you already have plenty coming in on other purchase orders.
$ Amount Short Total dollar amount for the short quantity buy.
2nd Contr to Target Each item's contribution to the second target value, if one is setup in Buy Line Maintenance.
2nd Line Buy $ Amt Total dollar amount for second target value, if one is setup in Buy Line Maintenance.
2nd Line Buy Qty The calculated quantity required of this product when purchasing the entire buy line for the second calculated target, if one is setup in Buy Line Maintenance.
Available The on hand quantity of this product, minus any commitments through sales orders.
Available Days Supply The available quantity in the purchase branch of the suggested product.
Branch Level Stock Status
The Stock column setting in the purchasing branch. Options are Auto, Yes, or No.
Calculate Demand Flag Indicates if the purchasing branch is flagged to calculate demand.
Contribution to Target Each item's contribution to meeting the vendor target. If you have a second vendor target, this number is only the contribution to the first vendor target.
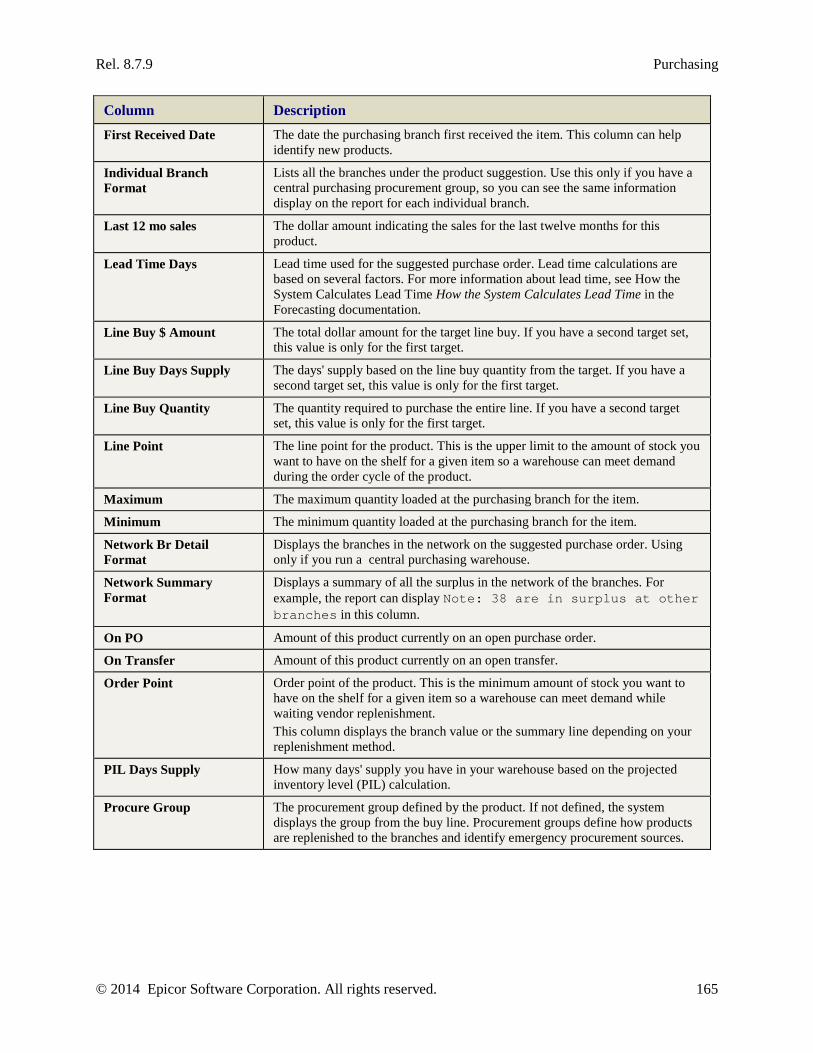
Rel. 8.7.9 Purchasing
© 2014 Epicor Software Corporation. All rights reserved. 165
Column Description First Received Date The date the purchasing branch first received the item. This column can help
identify new products.
Individual Branch Format
Lists all the branches under the product suggestion. Use this only if you have a central purchasing procurement group, so you can see the same information display on the report for each individual branch.
Last 12 mo sales The dollar amount indicating the sales for the last twelve months for this product.
Lead Time Days Lead time used for the suggested purchase order. Lead time calculations are based on several factors. For more information about lead time, see How the System Calculates Lead Time How the System Calculates Lead Time in the Forecasting documentation.
Line Buy $ Amount The total dollar amount for the target line buy. If you have a second target set, this value is only for the first target.
Line Buy Days Supply The days' supply based on the line buy quantity from the target. If you have a second target set, this value is only for the first target.
Line Buy Quantity The quantity required to purchase the entire line. If you have a second target set, this value is only for the first target.
Line Point The line point for the product. This is the upper limit to the amount of stock you want to have on the shelf for a given item so a warehouse can meet demand during the order cycle of the product.
Maximum The maximum quantity loaded at the purchasing branch for the item.
Minimum The minimum quantity loaded at the purchasing branch for the item.
Network Br Detail Format
Displays the branches in the network on the suggested purchase order. Using only if you run a central purchasing warehouse.
Network Summary Format
Displays a summary of all the surplus in the network of the branches. For example, the report can display Note: 38 are in surplus at other branches in this column.
On PO Amount of this product currently on an open purchase order.
On Transfer Amount of this product currently on an open transfer.
Order Point Order point of the product. This is the minimum amount of stock you want to have on the shelf for a given item so a warehouse can meet demand while waiting vendor replenishment. This column displays the branch value or the summary line depending on your replenishment method.
PIL Days Supply How many days' supply you have in your warehouse based on the projected inventory level (PIL) calculation.
Procure Group The procurement group defined by the product. If not defined, the system displays the group from the buy line. Procurement groups define how products are replenished to the branches and identify emergency procurement sources.
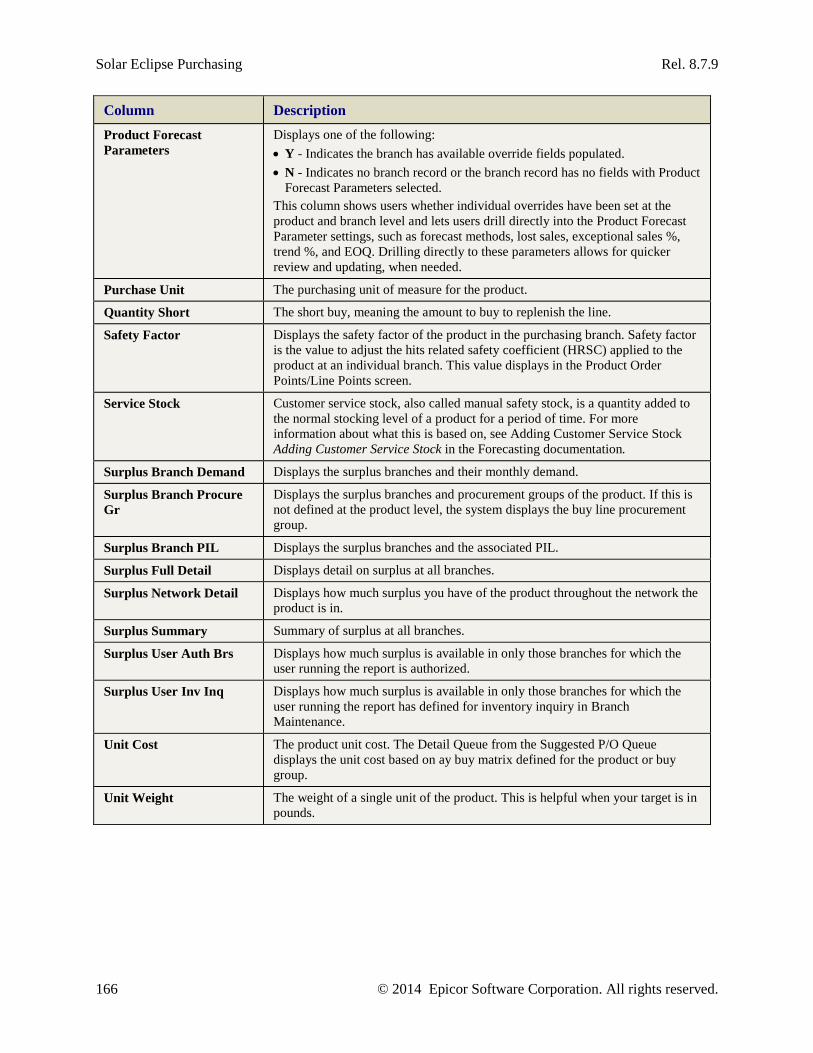
Solar Eclipse Purchasing Rel. 8.7.9
166 © 2014 Epicor Software Corporation. All rights reserved.
Column Description Product Forecast Parameters
Displays one of the following: • Y - Indicates the branch has available override fields populated. • N - Indicates no branch record or the branch record has no fields with Product
Forecast Parameters selected. This column shows users whether individual overrides have been set at the product and branch level and lets users drill directly into the Product Forecast Parameter settings, such as forecast methods, lost sales, exceptional sales %, trend %, and EOQ. Drilling directly to these parameters allows for quicker review and updating, when needed.
Purchase Unit The purchasing unit of measure for the product.
Quantity Short The short buy, meaning the amount to buy to replenish the line.
Safety Factor Displays the safety factor of the product in the purchasing branch. Safety factor is the value to adjust the hits related safety coefficient (HRSC) applied to the product at an individual branch. This value displays in the Product Order Points/Line Points screen.
Service Stock Customer service stock, also called manual safety stock, is a quantity added to the normal stocking level of a product for a period of time. For more information about what this is based on, see Adding Customer Service Stock Adding Customer Service Stock in the Forecasting documentation.
Surplus Branch Demand Displays the surplus branches and their monthly demand.
Surplus Branch Procure Gr
Displays the surplus branches and procurement groups of the product. If this is not defined at the product level, the system displays the buy line procurement group.
Surplus Branch PIL Displays the surplus branches and the associated PIL.
Surplus Full Detail Displays detail on surplus at all branches.
Surplus Network Detail Displays how much surplus you have of the product throughout the network the product is in.
Surplus Summary Summary of surplus at all branches.
Surplus User Auth Brs Displays how much surplus is available in only those branches for which the user running the report is authorized.
Surplus User Inv Inq Displays how much surplus is available in only those branches for which the user running the report has defined for inventory inquiry in Branch Maintenance.
Unit Cost The product unit cost. The Detail Queue from the Suggested P/O Queue displays the unit cost based on ay buy matrix defined for the product or buy group.
Unit Weight The weight of a single unit of the product. This is helpful when your target is in pounds.
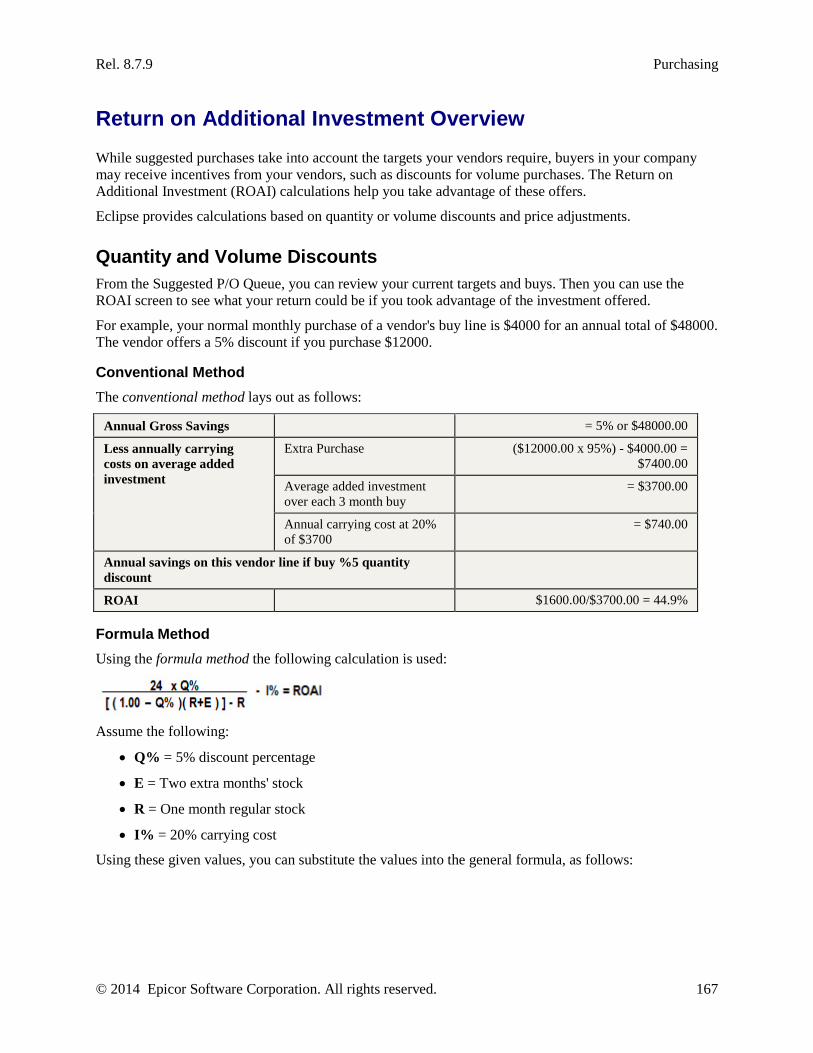
Rel. 8.7.9 Purchasing
© 2014 Epicor Software Corporation. All rights reserved. 167
Return on Additional Investment Overview While suggested purchases take into account the targets your vendors require, buyers in your company may receive incentives from your vendors, such as discounts for volume purchases. The Return on Additional Investment (ROAI) calculations help you take advantage of these offers.
Eclipse provides calculations based on quantity or volume discounts and price adjustments.
Quantity and Volume Discounts From the Suggested P/O Queue, you can review your current targets and buys. Then you can use the ROAI screen to see what your return could be if you took advantage of the investment offered.
For example, your normal monthly purchase of a vendor's buy line is $4000 for an annual total of $48000. The vendor offers a 5% discount if you purchase $12000.
Conventional Method The conventional method lays out as follows:
Annual Gross Savings = 5% or $48000.00
Less annually carrying costs on average added investment
Extra Purchase ($12000.00 x 95%) - $4000.00 = $7400.00
Average added investment over each 3 month buy
= $3700.00
Annual carrying cost at 20% of $3700
= $740.00
Annual savings on this vendor line if buy %5 quantity discount
ROAI $1600.00/$3700.00 = 44.9%
Formula Method Using the formula method the following calculation is used:
Assume the following:
• Q% = 5% discount percentage
• E = Two extra months' stock
• R = One month regular stock
• I% = 20% carrying cost
Using these given values, you can substitute the values into the general formula, as follows:

Solar Eclipse Purchasing Rel. 8.7.9
168 © 2014 Epicor Software Corporation. All rights reserved.
The simplified formula method is very close to the actual percentage: 40% (adjusted 44%) vs. 44.9%. The complete formula method is 100% accurate. At the beginning of each three month purchase your added investment is $7400.00. At the end of that period, it is zero. The average added investment over each three month period is $7400.00 and it is this same average that is repetitively invested over the year as you re-purchase the quantity discount.
Price Adjustments From the Suggested P/O Queue, you can review your current targets and buys. Then you can use the ROAI screen to see what your return could be if you took advantage of the investment offered. In this example, you can see what return you may expect using a pricing adjustment.
Price Adjustment Formula
The system uses the following to determine what options you may have:
Assume the following:
• P% = 5% percentage increase
• N = Two extra months' stock
• I% = 20% carrying cost
Using these given values, you can substitute the values into the general formula, as follows:
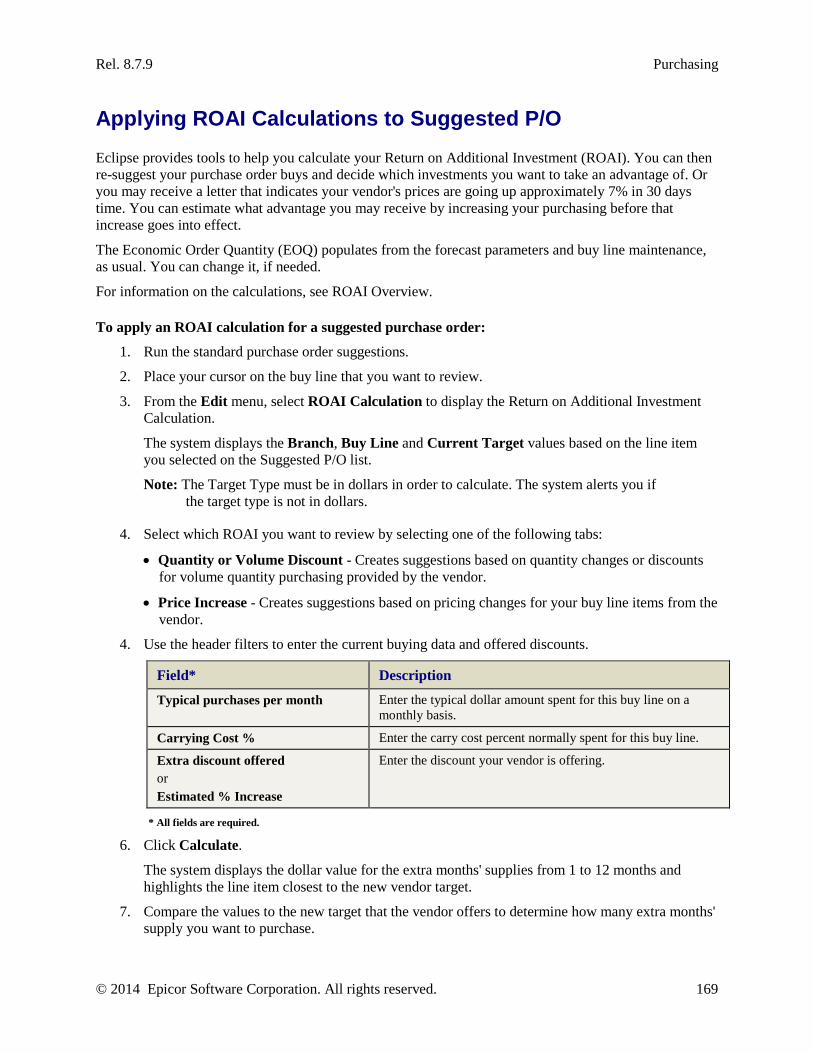
Rel. 8.7.9 Purchasing
© 2014 Epicor Software Corporation. All rights reserved. 169
Applying ROAI Calculations to Suggested P/O Eclipse provides tools to help you calculate your Return on Additional Investment (ROAI). You can then re-suggest your purchase order buys and decide which investments you want to take an advantage of. Or you may receive a letter that indicates your vendor's prices are going up approximately 7% in 30 days time. You can estimate what advantage you may receive by increasing your purchasing before that increase goes into effect.
The Economic Order Quantity (EOQ) populates from the forecast parameters and buy line maintenance, as usual. You can change it, if needed.
For information on the calculations, see ROAI Overview.
To apply an ROAI calculation for a suggested purchase order:
1. Run the standard purchase order suggestions.
2. Place your cursor on the buy line that you want to review.
3. From the Edit menu, select ROAI Calculation to display the Return on Additional Investment Calculation.
The system displays the Branch, Buy Line and Current Target values based on the line item you selected on the Suggested P/O list.
Note: The Target Type must be in dollars in order to calculate. The system alerts you if the target type is not in dollars.
4. Select which ROAI you want to review by selecting one of the following tabs:
• Quantity or Volume Discount - Creates suggestions based on quantity changes or discounts for volume quantity purchasing provided by the vendor.
• Price Increase - Creates suggestions based on pricing changes for your buy line items from the vendor.
4. Use the header filters to enter the current buying data and offered discounts.
Field* Description Typical purchases per month Enter the typical dollar amount spent for this buy line on a
monthly basis.
Carrying Cost % Enter the carry cost percent normally spent for this buy line.
Extra discount offered or Estimated % Increase
Enter the discount your vendor is offering.
* All fields are required.
6. Click Calculate.
The system displays the dollar value for the extra months' supplies from 1 to 12 months and highlights the line item closest to the new vendor target.
7. Compare the values to the new target that the vendor offers to determine how many extra months' supply you want to purchase.
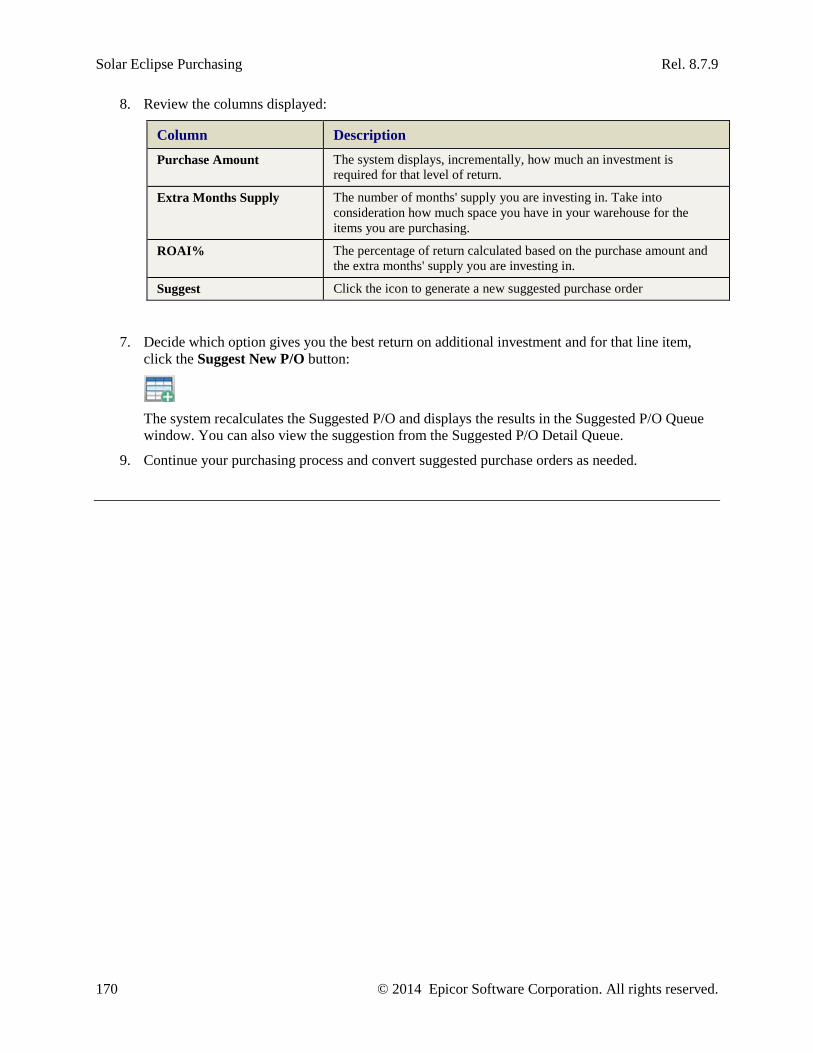
Solar Eclipse Purchasing Rel. 8.7.9
170 © 2014 Epicor Software Corporation. All rights reserved.
8. Review the columns displayed:
Column Description Purchase Amount The system displays, incrementally, how much an investment is
required for that level of return.
Extra Months Supply The number of months' supply you are investing in. Take into consideration how much space you have in your warehouse for the items you are purchasing.
ROAI% The percentage of return calculated based on the purchase amount and the extra months' supply you are investing in.
Suggest Click the icon to generate a new suggested purchase order
7. Decide which option gives you the best return on additional investment and for that line item, click the Suggest New P/O button:
The system recalculates the Suggested P/O and displays the results in the Suggested P/O Queue window. You can also view the suggestion from the Suggested P/O Detail Queue.
9. Continue your purchasing process and convert suggested purchase orders as needed.
Rel. 8.7.9 Purchasing
© 2014 Epicor Software Corporation. All rights reserved. 171
Expediting Purchase Orders The P/O Expedite Queue displays purchase orders for you to accelerate for better customer service. The expedite queue functions like the customer calling queue, except that it shows purchase orders or direct orders to expedite. You can view the line items and adjust the priority as needed.
The queue displays items with a next call date that is prior to and including the current date if the Expected Date field and Sales Order Expected Within 0 Days field are left blank.
If the user closes a newly created job queue, the system updates the maintenance log and the Next Call column accordingly.
Note: To display summary information for this queue at all times, add a P/O Expedite Queue widget to your Solar Eclipse main window. For more information about widgets, see Widgets and Menu Shortcuts Overview.
To display the P/O Expedite Queue:
1. From the Purchase > Queues menu, select P/O Expedite to display the P/O Expedite window.
2. In the Branch/Territory/All field, enter the branch or territory you want to query. Type All to query all branches and territories.
3. In the Directs field, indicate if you want to include, exclude or display only the directs on the PO.
4. In the Writer field, enter the user ID of the person entering the order. If left blank, the system shows orders for all writers.
5. In the Vendor field, enter a vendor name. The system populates this field with the vendor from the Ship-From field of the purchase order.
6. In the Type field, select one of the following types:
Type Description All All items available.
New Items Only those items for which you have not logged a call or sent a job queue by creating a tracker.
Expedite Only those items for which you have logged at least one call.
Unprinted Only those items that have not been printed to a printer or a hold file.
7. In the Debits field, select whether to include, exclude, or to view only debits in the queue.
8. In the Order Date field, enter the date to include records that have an order date that is equal to or prior to the date indicated.
9. In the Expected Date field, enter the expected or anticipated Receive Date of the order generation.
10. In the Only Items With Customer Waiting field, indicate if you want to show only items that have customers waiting for delivery.
11. In the Sales Order Expected Within 0 Days field, add the specified number of days to the expected date. This extends the queue further into the future. For example, if the Expected Date is 10/10/08 and you specify 5 days, the system looks for those purchase orders to be overdue on 10/15/08.
Solar Eclipse Purchasing Rel. 8.7.9
172 © 2014 Epicor Software Corporation. All rights reserved.
Note: To limit the number of items that the server processes before updating the queue, from the Options menu, select Set Preferred Search Length and enter the number in the dialog box. Using a lower number will speed up the population of the queue.
12. Click Update for the system to search the records and display the matches in the following columns:
Column Description S Select the check box to print or expedite the purchase order listed. To create a
tracker to expedite the order, select the check box and select File > Job Queue. The system creates a tracker for the vendor on the purchase order.
Vendor Displays the vendor name on the purchase order that matches the criteria entered in the header. Note: Use the Edit > Show Pay-To option to display the Vendor column using the Ship-From name.
Order Number Displays the order number associated with the vendor and that matches the criteria entered in the header.
Br Displays the branch number from which the purchase order originated.
Next Call Displays the date when the next call should be made to the customer regarding the order status.
Note: If a newly created job queue is closed, the system updates the column accordingly.
Received Date Displays the date the order was received.
Call Displays how many calls have been placed in reference to this order. This is a running tally of the number of calls placed to the vendor.
Line Displays the number of buy lines changed by this order.
Cmts Displays how many products on the order that have commitments associated with them, according to the Future Ledger. Use the Inquiry > View Items menu option to see the commitments tied to the products on the order.
Note: Kits items are included in the P/O Expedite Queue at the component level.
13. Repeat steps 2 through 11 to recalculate for new parameters.
14. Use the Inquiry menu to view items on or edit the selected order.
Note: The items displayed when using View Items option include all orders with open commitments.
15. Save your changes and exit the window.
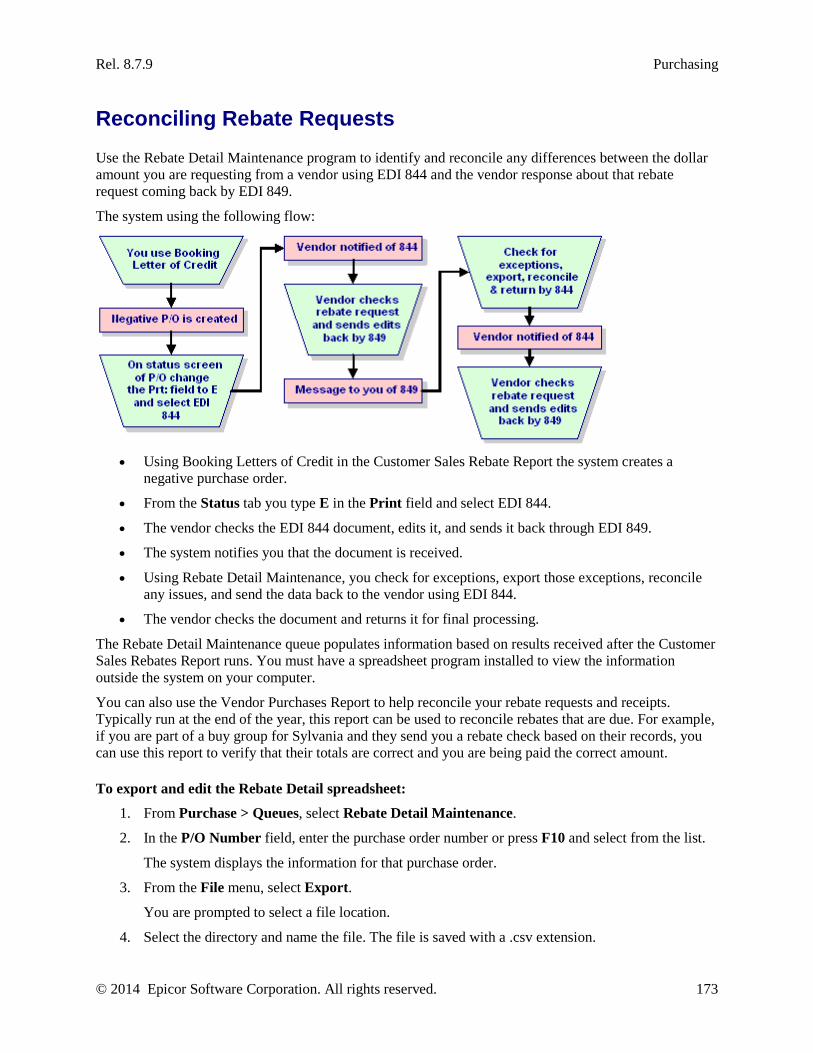
Rel. 8.7.9 Purchasing
© 2014 Epicor Software Corporation. All rights reserved. 173
Reconciling Rebate Requests Use the Rebate Detail Maintenance program to identify and reconcile any differences between the dollar amount you are requesting from a vendor using EDI 844 and the vendor response about that rebate request coming back by EDI 849.
The system using the following flow:
• Using Booking Letters of Credit in the Customer Sales Rebate Report the system creates a
negative purchase order.
• From the Status tab you type E in the Print field and select EDI 844.
• The vendor checks the EDI 844 document, edits it, and sends it back through EDI 849.
• The system notifies you that the document is received.
• Using Rebate Detail Maintenance, you check for exceptions, export those exceptions, reconcile any issues, and send the data back to the vendor using EDI 844.
• The vendor checks the document and returns it for final processing.
The Rebate Detail Maintenance queue populates information based on results received after the Customer Sales Rebates Report runs. You must have a spreadsheet program installed to view the information outside the system on your computer.
You can also use the Vendor Purchases Report to help reconcile your rebate requests and receipts. Typically run at the end of the year, this report can be used to reconcile rebates that are due. For example, if you are part of a buy group for Sylvania and they send you a rebate check based on their records, you can use this report to verify that their totals are correct and you are being paid the correct amount.
To export and edit the Rebate Detail spreadsheet:
1. From Purchase > Queues, select Rebate Detail Maintenance.
2. In the P/O Number field, enter the purchase order number or press F10 and select from the list.
The system displays the information for that purchase order.
3. From the File menu, select Export.
You are prompted to select a file location.
4. Select the directory and name the file. The file is saved with a .csv extension.
Solar Eclipse Purchasing Rel. 8.7.9
174 © 2014 Epicor Software Corporation. All rights reserved.
The file opens for you in your default spreadsheet program.
5. Save and close the file.
To import and resend the Rebate Detail spreadsheet:
1. From Purchase > Queues, select Rebate Detail Maintenance.
2. In the P/O Number field, enter the purchase order number or press F10 and select from the list.
The system displays the information for that purchase order.
3. The vendor edits the data as needed.
4. From the File menu, select Import.
5. Select the file from your directory and click OK.
6. From the File menu, select Update to update the displayed purchase order according to the file changes.
Note: From the Edit menu, select Export Exceptions to display only those purchase orders that have vendor rebate exceptions.
7. Save your changes and exit the window.
Rel. 8.7.9 Purchasing
© 2014 Epicor Software Corporation. All rights reserved. 175
Viewing and Editing Rebate Purchase Orders You can view and edit the purchase orders created for rebates after the Customer Sales Rebate Report runs.
To view and edit the rebate purchase order:
1. From the Purchase > Queues menu, select Rebate Detail Maintenance to display the Rebate Detail Maintenance window.
2. In the P/O Number field, enter the purchase order number you want to view or update.
3. From the Edit menu, use one of the following:
• View Order - verify the purchase order information.
• Edit Order - update the purchase order information.
4. Verify information and edit if needed.
5. Save your changes and exit the window.
Solar Eclipse Purchasing Rel. 8.7.9
176 © 2014 Epicor Software Corporation. All rights reserved.
Purging the Rebate Detail File The Rebate Detail file holds the information collected by the Customer Sales Rebate Report. Use the Purge Rebate Detail program to remove cancelled purchase orders that were generated using the Book Letter of Credit program from the Customer Sales Rebate Report.
We recommend purging the Rebate Detail File once a month. You can set the scheduler to purge this file on a regular basis.
To purge the Rebate Detail File:
1. From the Maintenance > Merge/Purge menu, select Purge Rebate Detail File to display the Purge Rebate Detail File screen.
Note: If prompted, log on to the character-based system.
2. At the Purge Rebate Detail File as of prompt, enter the purge date. This purges the files on or before that date.
3. Use the Begin Purge hot key.
4. Press Esc to exit the screen and return to the main menu.
Rel. 8.7.9 Purchasing
© 2014 Epicor Software Corporation. All rights reserved. 177
Vendor Consignments Overview Use the vendor consignment functionality to warehouse items for your vendor. The vendor still owns the consigned items; however, the consigned items are stored at your warehouse because the vendor's warehouse space may be limited. This reduces the carrying cost for the vendor. As a distributor, this relationship increases your stock availability without additional cost to you. You are billed for the items only when they are sold.
Note: Not all the vendor consignment functionality has not been incorporated into Solar Eclipse as of this release. Use the character-based system to access the queues and screens described in this section when displayed.
As you sell items from your warehouse, the system depletes your normal inventory before taking items from the consignment stock. The system must take the stock location to zero before taking the remaining balance from the consignment location.
For example, you have 20 widgets in your normal inventory and 10 consigned widgets from your vendor. Two customers come in. The first customer buys 15 widgets. The system pulls the widgets from your inventory. After the sale, your inventory is now at five normal widgets and 10 consigned widgets. The second customer buys 10 widgets. The system pulls the widgets first from your normal inventory and then from the consigned inventory. After the sale, your inventory is now at zero normal widgets and five consigned widgets.
Note: The system does not support kits in the vendor consignment program.
As in normal transactions, if the widgets are below order point, the system places the buy line in which your widgets live on the Suggested Purchase Order Queue so that you can replenish those items. The sale of vendor consigned inventory to a customer contributes to the forecasted demand. Therefore, order points, line points, and economic order quantities accrue and allow these items to be evaluated for automated purchasing and transfers.
Note: The G/L postings take the appropriate amount for the stock material out of inventory and the appropriate amount for the consignment material out of consignment inventory.
The vendor must be set up as a consignment vendor in Vendor Maintenance. For more information, see Additional Vendor Setup.
For information on creating purchase orders for consignment material, see Creating Consignment Purchase Orders.
Solar Eclipse Purchasing Rel. 8.7.9
178 © 2014 Epicor Software Corporation. All rights reserved.
Receiving Vendor Consignments When receiving consignments from a vendor you must receive all items on the order into consignment inventory or regular stock. You cannot split the order between consignments and regular stock. The process for receiving consignment stock is the same as the process for receiving normal stock. However, consignment stock is typically stored in its own location.
For information about receiving stock in a manual warehouse, see the following:
• Receiving Consignment Purchase Orders
• Receiving Purchase Orders in a Manual Warehouse
• Receiving Transfers
For information about receiving stock in an RF warehouse, see RF Receiving Process Overview.
For information about location maintenance to indicate where consignment stock will be located in your warehouse, see Defining Product Locations and RF Location Maintenance Overview.
Using the P/O Receiver Report Use the P/O Receiver Report to view items that are vendor consigned. When the report runs, vendor consigned items are marked with an asterisk (*).
For complete information about the report, see Running the P/O Receiver Report.
Rel. 8.7.9 Purchasing
© 2014 Epicor Software Corporation. All rights reserved. 179
How Consignments Affect Reports Use the following reports to determine how consignments affect your inventory.
Branch Consignment Usage Report The Branch Consignment Usage Report shows a summary of usage when consignment inventory is set up as a separate branch. The report selects all products for which there is an on-hand balance during the period specified and reports product usage. For complete information on generating this report, see Running the Branch Consignment Usage Report.
Inventory Valuation Report Use the Inventory Valuation Report for summary or detailed reporting on the value of the products in a price line, a series of price lines, or all price lines within one or more branches.
You can run this report for material that is both vendor consigned and customer consigned. Use the Additional Consigned Product Selection area on this report window to include specific consignment data. For complete information on generating this report, see Running the Inventory Valuation Report.
Item Sales Report The Item Sales Report allows for detailed or summary analysis of profitability in a number of ways. You can specify your needs for exception reporting to run your business on a management by priority basis. For example, if you ran a sales promotion on a group of selected items, you could use this report to evaluate whether the promotion was a success. However, material that has been both vendor consigned and customer consigned does not display as a sale if the vendor is flagged to allow consignment transfers. For complete information on generating this report, see Running the Item Sales Report.
Product Sales Report Use the Product Sales Report to display product sales information. The report displays a detail listing of invoices by ship-to customer for pricing branches.
Material that has been both vendor consigned and customer consigned does not display as a sale if the vendor is flagged to allow consignment transfers. Use the Include/ Exclude options on this report to run the report with consignment information. For complete information on generating this report, see Running the Product Sales Report.
Solar Eclipse Purchasing Rel. 8.7.9
180 © 2014 Epicor Software Corporation. All rights reserved.
Crediting Vendor Consignments You can credit and rebill consignments as you would any other stock. The concept is the same although the process is different. G/L postings credit consigned inventory and debit purchases.
For vendor consignments, when you create a credit-only vendor consigned purchase order, the system removes material from consigned inventory and location, not stock inventory. In addition, when you create a vendor-consigned purchase order credit/rebill, the system removes the material from consigned inventory and the location on the credit generation and places it back into consignment inventory on the rebill generation. If the user opens the receipt and receives the items, the items go back into normal warehouse flow. For a non-RF environment, the stock goes to into the primary location for receiving. In an RF environment, the stock goes to In-Process for normal receiving.

Rel. 8.7.9 Purchasing
© 2014 Epicor Software Corporation. All rights reserved. 181
Consigning Vendor Consigned Items to Customers With a vendor's permission, you can consign vendor consigned items to a customer. The vendor still owns the material and is not paid for that material until it sells at the customer site. Consigning stock to your customer optimizes your turns of the material and service level results based on warehouse space and investment costs.
When vendor consigned material is consigned to a customer, the system shows the material located at the customer site, but also indicates that the material is vendor consigned. In addition, the G/L posting changes. If you bill the customer for vendor consigned material, the G/L posting credits consigned inventory rather than stock inventory.
When you send items to a customer site, all the material must be received by the customer as consignment items. After the customer sells the material you bill the customer for those items. You also report to your vendor that the items sold and the vendor bills you.
Use the Enable Vendor/Customer Consignment control maintenance record to allow using consignment stock to replenish customer consignment sites. In addition, you must set the Consignment Inventory field to Yes and the Consignment Transfers field to Consignment to Consignment in Vendor Maintenance. For more information on setting up vendor, see Setup Requirements for Consignments.
Solar Eclipse Purchasing Rel. 8.7.9
182 © 2014 Epicor Software Corporation. All rights reserved.
Breaking Consignment Container Quantities If a vendor consigns items to you in containers, they will bill you for the whole container once you sell a portion of the container. When this occurs, the system changes the status of the remaining items from consigned to stock. The next time you sell the item, the system depletes the stock inventory before using items from the next container.
For example, a vendor sends three cases and each case contains 100 items. You sell a quantity of two items out of one of the containers, leaving 98 in the container. When the vendor representative performs a cycle count and determines that one case is broken, the vendor bills for the entire case. Upon receipt of the invoice, you pay for 100 and then change the remaining 98 items from the case of vendor consignment from consignment to stock. You then have 200 consignment items and 98 stock items. The next time you sell an item, the system depletes the stock inventory before using consignment items.
Rel. 8.7.9 Purchasing
© 2014 Epicor Software Corporation. All rights reserved. 183
Viewing Consignments in the Inventory History Ledger Use the Inventory History Ledger to view consignment transactions. The ledger shows how the system is using stock items before consignment items and that the system has the orders tagged as containing consignment stock. The Inventory History Ledger shows a snapshot of how sales affect your inventory and tracks movement of items from consignment stock to regular stock.
From a purchase order, use the Inventory History Ledger to view that the system removes products from stock before using consignment stock. The stock type displays as VCnsgn. This type indicates that the items are being removed out of consignment stock. Verify by checking that the Out column lists the correct amount of consignment stock and that the On Hand column remains unchanged. If you have an order that takes your inventory to zero and uses partial consignment stock, the order number is listed twice. The first occurrence of the order indicates how much of the order is stock and how much the order reduced the amount on hand. The second occurrence of the order indicates how much consignment stock is used.
To view consignments from the Inventory History Ledger:
1. Display the purchase order which contains the consignments you want to view.
2. Highlight the line item on which you want to view history.
3. From the Inquiries menu, select one of the following:
• Vendor Inventory History - Shows only the history for the vendor from which you are purchasing the line item.
• Inventory History - Shows the history for the entire order regardless of vendor.
4. Save your changes and exit the window.

Solar Eclipse Purchasing Rel. 8.7.9
184 © 2014 Epicor Software Corporation. All rights reserved.
Reviewing the P/O Backorders Queue The Review P/O Backorders Queue displays purchase orders that contain backordered items. These are items that were not available with the original purchase order. For example, a customer ordered 25 faucets for a new building's restrooms, but only 20 are available right away from the vendor. The last five faucets are put on backorder to be delivered to you for the customer as soon as possible.
The Review P/O Backorders Queue displays the backordered items that do not have an anticipated receiving date from the vendor. If you do not assign a date to the backordered item on a purchase order, the system flags that purchase order to display in the Review P/O Backorders Queue. In the above example, if the available date is unknown for the remaining five faucets, then the purchase order displays in the Review P/O Backorders Queue.
Use the Default B/O Days For Purchase Orders control maintenance record to change the backorder days. Enter the number of days that the system adds to the receiving date for backorders. When items on a purchase order are backordered, the system looks first at the setting in the B/O Days field in Vendor Maintenance to determine how to handle the backorder. If the B/O Days field is blank, the system then looks at the setting in this control maintenance record. If it is not set, the system adds three (3) days.
Note: The status of the purchase order is retained when the purchase order displays in this queue.
This section provides information about the following:
• Displaying the Review P/O Backorders Queue
• Viewing the purchase orders from the Review P/O Backorders Queue
• Editing the purchase orders from the Review P/O Backorders Queue
• Setting fixed backorder days
Note: To display summary information for this queue at all times, add a Review P/O Backorders Queue widget to your Solar Eclipse main window.
To display the Review P/O Backorders Queue:
1. From the Purchase > Queues menu, select Review P/O Backorders to display the Review P/O Backorders window.
2. In the Branch/Territory/All field, enter a branch or territory for which you want to view the backorders. To view all branches and territories, type All.
3. In the Writer field, enter a purchasing agent ID.
You can select to see all backorders for a specific purchasing agent who enters purchase orders. For example, if a purchasing agent called to give you advance warning that a backorder would be in queue because there was not a date assigned, you could search for that agents ID to narrow the search.
4. Click Update. The Review P/O Backorders Queue displays.
Note: If there are not any backorders for the parameters you entered, the message "No items found" displays.
5. Exit the window.

Rel. 8.7.9 Purchasing
© 2014 Epicor Software Corporation. All rights reserved. 185
Viewing and Editing P/Os from the Review P/O Backorders Queue The Review P/O Backorders Queue provides you with two options to handle backorders. You can view the purchase order to see vendor information and original dates. You can also edit the order with more information, if needed.
Viewing the Purchase Order Use the View hot key to access the original purchase order and provides complete vendor contact information. You can investigate the availability of backordered items with the vendor. If you establish a date, then you can update the purchase order and remove it from the Review P/O Backorders Queue.
Note: If an order has a date assigned, it does not show up in the Review P/O Backorders Queue because the system determines that the order is now in process.
To view the purchase order from the Review P/O Backorders Queue:
1. From the Purchase > Queues menu, select Review P/O Backorders to display the Review P/O Backorders Queue window.
2. In the Branch/Territory/All field, enter a branch or territory for which you want to view the backorders. To view all branches and territories, type All.
3. In the Writer field, enter a purchasing agent ID.
You can select to see all backorders for a specific purchasing agent who enters purchase orders. For example, if a purchasing agent called to give you advance warning that a backorder would be in queue because there was not a date assigned, you could search for that agents ID to narrow the search.
4. Click Update. The Review P/O Backorders Queue displays.
Note: If there are not any backorders for the parameters you entered, the following message displays: No items found.
5. From the Order menu, select View Order to display the order highlighted.
6. Exit the purchase order. The status window displays in view-only mode.
7. Save your changes and exit the window.
Editing the Purchase Order You can assign the due dates from the edit mode. After a date is assigned to the backordered items, the purchase order is removed from the Review P/O Backorders Queue.
To edit the purchase order from the Review P/O Backorders Queue:
1. From the Purchase > Queues menu, select Review P/O Backorders to display the Review P/O Backorders Queue window.
2. In the Branch/Territory/All field, enter a branch or territory for which you want to view the backorders. To view all branches and territories, type All.

Solar Eclipse Purchasing Rel. 8.7.9
186 © 2014 Epicor Software Corporation. All rights reserved.
3. In the Writer field, enter a purchasing agent ID.
4. You can select to see all backorders for a specific purchasing agent who enters purchase orders. For example, if a purchasing agent called to give you advance warning that a backorder would be in queue because there was not a date assigned, you could search for that agents ID to narrow the search.
5. Click Update. The Review P/O Backorders Queue displays.
Note: If there are not any backorders for the parameters you entered, the following message displays: No items found.
6. From the Order menu, select Edit Order to display the order highlighted.
7. Make changes to the appropriate field. For information on the fields, see Creating Purchase Orders.
8. Save your changes and exit the window. The status window displays in view-only mode.
9. Exit the Review P/O Backorders Queue window to return to the main menu.
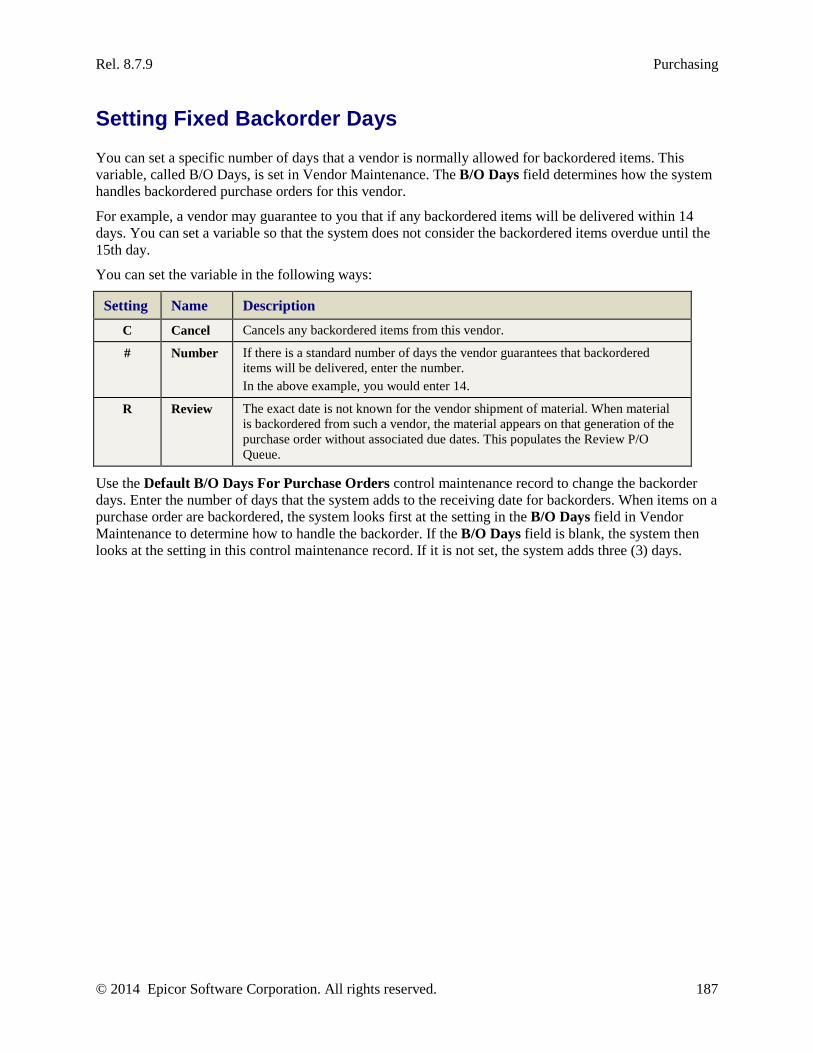
Rel. 8.7.9 Purchasing
© 2014 Epicor Software Corporation. All rights reserved. 187
Setting Fixed Backorder Days You can set a specific number of days that a vendor is normally allowed for backordered items. This variable, called B/O Days, is set in Vendor Maintenance. The B/O Days field determines how the system handles backordered purchase orders for this vendor.
For example, a vendor may guarantee to you that if any backordered items will be delivered within 14 days. You can set a variable so that the system does not consider the backordered items overdue until the 15th day.
You can set the variable in the following ways:
Setting Name Description C Cancel Cancels any backordered items from this vendor.
# Number If there is a standard number of days the vendor guarantees that backordered items will be delivered, enter the number. In the above example, you would enter 14.
R Review The exact date is not known for the vendor shipment of material. When material is backordered from such a vendor, the material appears on that generation of the purchase order without associated due dates. This populates the Review P/O Queue.
Use the Default B/O Days For Purchase Orders control maintenance record to change the backorder days. Enter the number of days that the system adds to the receiving date for backorders. When items on a purchase order are backordered, the system looks first at the setting in the B/O Days field in Vendor Maintenance to determine how to handle the backorder. If the B/O Days field is blank, the system then looks at the setting in this control maintenance record. If it is not set, the system adds three (3) days.
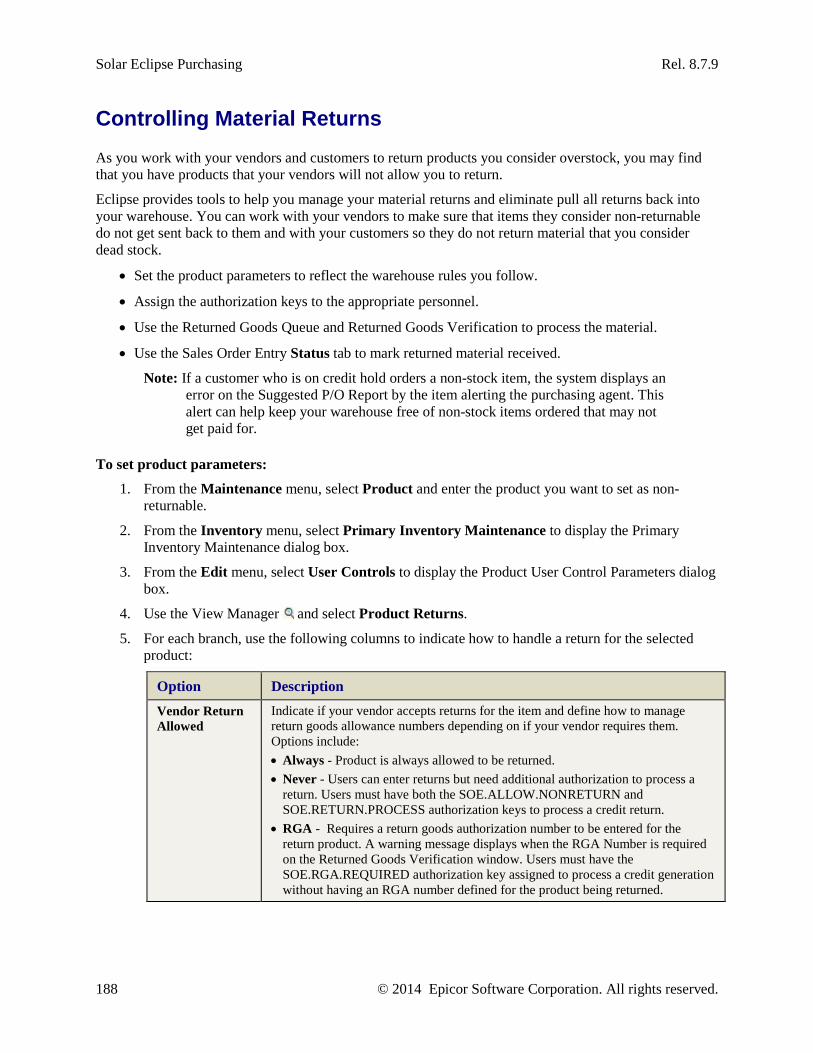
Solar Eclipse Purchasing Rel. 8.7.9
188 © 2014 Epicor Software Corporation. All rights reserved.
Controlling Material Returns As you work with your vendors and customers to return products you consider overstock, you may find that you have products that your vendors will not allow you to return.
Eclipse provides tools to help you manage your material returns and eliminate pull all returns back into your warehouse. You can work with your vendors to make sure that items they consider non-returnable do not get sent back to them and with your customers so they do not return material that you consider dead stock.
• Set the product parameters to reflect the warehouse rules you follow.
• Assign the authorization keys to the appropriate personnel.
• Use the Returned Goods Queue and Returned Goods Verification to process the material.
• Use the Sales Order Entry Status tab to mark returned material received.
Note: If a customer who is on credit hold orders a non-stock item, the system displays an error on the Suggested P/O Report by the item alerting the purchasing agent. This alert can help keep your warehouse free of non-stock items ordered that may not get paid for.
To set product parameters:
1. From the Maintenance menu, select Product and enter the product you want to set as non-returnable.
2. From the Inventory menu, select Primary Inventory Maintenance to display the Primary Inventory Maintenance dialog box.
3. From the Edit menu, select User Controls to display the Product User Control Parameters dialog box.
4. Use the View Manager and select Product Returns.
5. For each branch, use the following columns to indicate how to handle a return for the selected product:
Option Description Vendor Return Allowed
Indicate if your vendor accepts returns for the item and define how to manage return goods allowance numbers depending on if your vendor requires them. Options include: • Always - Product is always allowed to be returned. • Never - Users can enter returns but need additional authorization to process a
return. Users must have both the SOE.ALLOW.NONRETURN and SOE.RETURN.PROCESS authorization keys to process a credit return.
• RGA - Requires a return goods authorization number to be entered for the return product. A warning message displays when the RGA Number is required on the Returned Goods Verification window. Users must have the SOE.RGA.REQUIRED authorization key assigned to process a credit generation without having an RGA number defined for the product being returned.
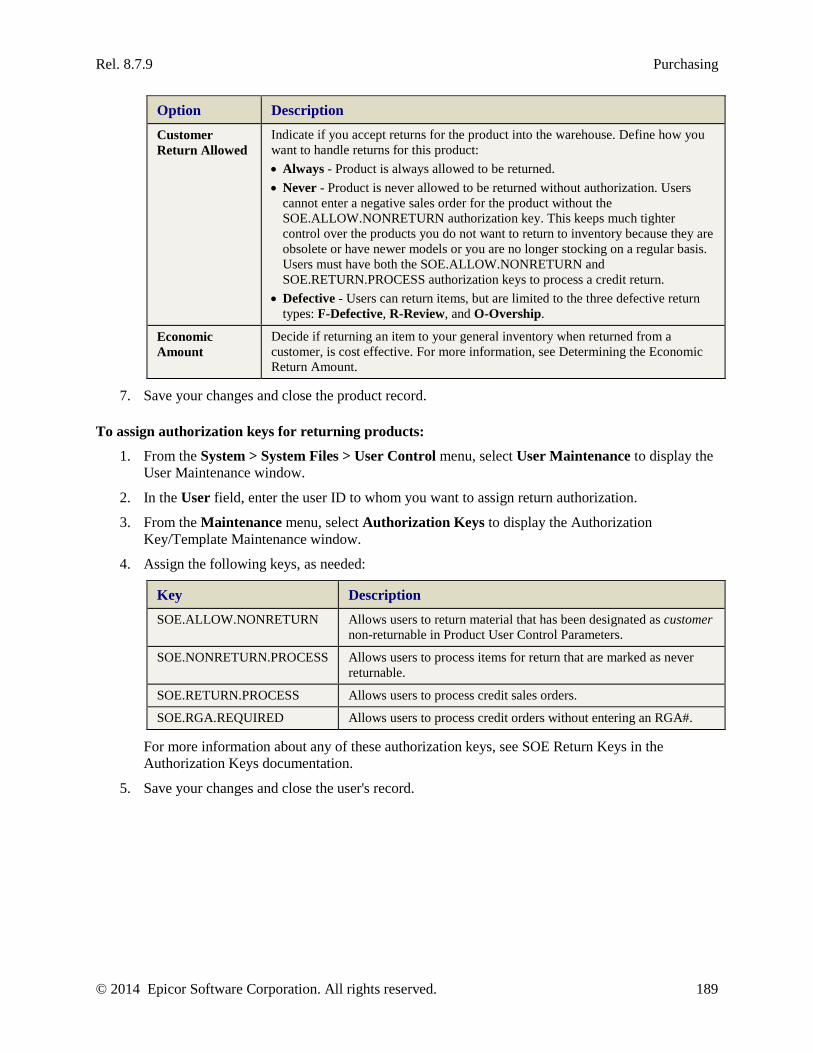
Rel. 8.7.9 Purchasing
© 2014 Epicor Software Corporation. All rights reserved. 189
Option Description Customer Return Allowed
Indicate if you accept returns for the product into the warehouse. Define how you want to handle returns for this product: • Always - Product is always allowed to be returned. • Never - Product is never allowed to be returned without authorization. Users
cannot enter a negative sales order for the product without the SOE.ALLOW.NONRETURN authorization key. This keeps much tighter control over the products you do not want to return to inventory because they are obsolete or have newer models or you are no longer stocking on a regular basis. Users must have both the SOE.ALLOW.NONRETURN and SOE.RETURN.PROCESS authorization keys to process a credit return.
• Defective - Users can return items, but are limited to the three defective return types: F-Defective, R-Review, and O-Overship.
Economic Amount
Decide if returning an item to your general inventory when returned from a customer, is cost effective. For more information, see Determining the Economic Return Amount.
7. Save your changes and close the product record.
To assign authorization keys for returning products:
1. From the System > System Files > User Control menu, select User Maintenance to display the User Maintenance window.
2. In the User field, enter the user ID to whom you want to assign return authorization.
3. From the Maintenance menu, select Authorization Keys to display the Authorization Key/Template Maintenance window.
4. Assign the following keys, as needed:
Key Description SOE.ALLOW.NONRETURN Allows users to return material that has been designated as customer
non-returnable in Product User Control Parameters.
SOE.NONRETURN.PROCESS Allows users to process items for return that are marked as never returnable.
SOE.RETURN.PROCESS Allows users to process credit sales orders.
SOE.RGA.REQUIRED Allows users to process credit orders without entering an RGA#.
For more information about any of these authorization keys, see SOE Return Keys in the Authorization Keys documentation.
5. Save your changes and close the user's record.
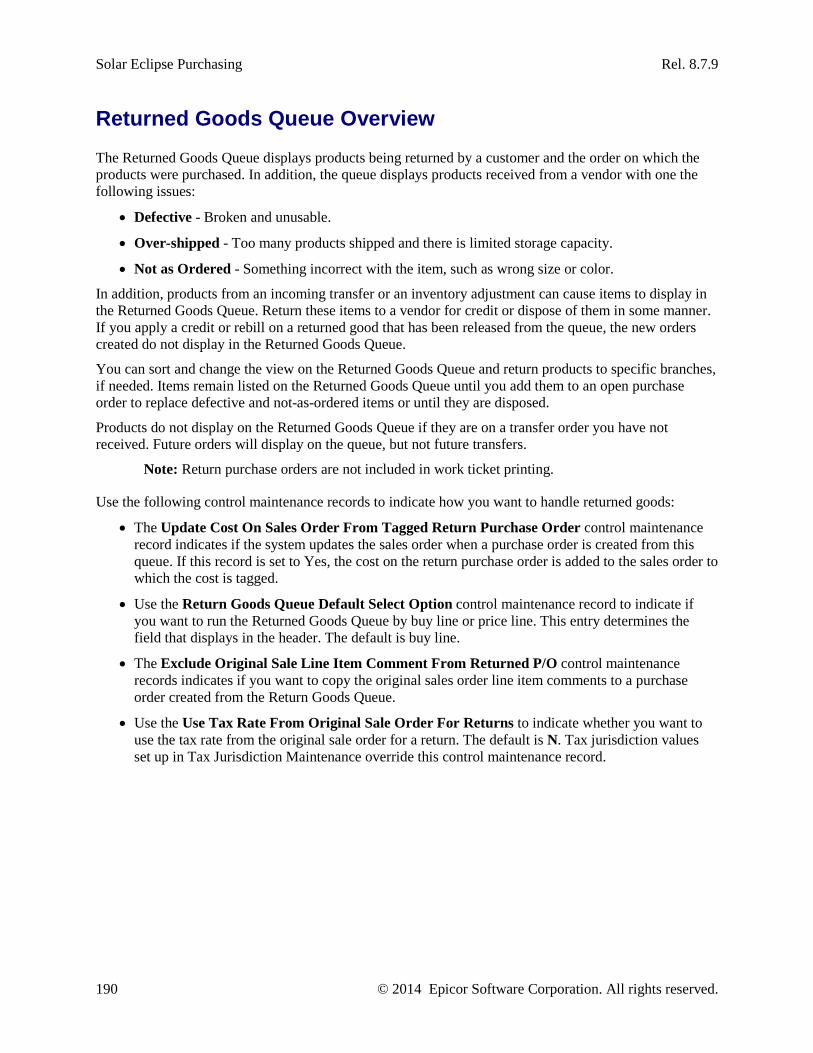
Solar Eclipse Purchasing Rel. 8.7.9
190 © 2014 Epicor Software Corporation. All rights reserved.
Returned Goods Queue Overview The Returned Goods Queue displays products being returned by a customer and the order on which the products were purchased. In addition, the queue displays products received from a vendor with one the following issues:
• Defective - Broken and unusable.
• Over-shipped - Too many products shipped and there is limited storage capacity.
• Not as Ordered - Something incorrect with the item, such as wrong size or color.
In addition, products from an incoming transfer or an inventory adjustment can cause items to display in the Returned Goods Queue. Return these items to a vendor for credit or dispose of them in some manner. If you apply a credit or rebill on a returned good that has been released from the queue, the new orders created do not display in the Returned Goods Queue.
You can sort and change the view on the Returned Goods Queue and return products to specific branches, if needed. Items remain listed on the Returned Goods Queue until you add them to an open purchase order to replace defective and not-as-ordered items or until they are disposed.
Products do not display on the Returned Goods Queue if they are on a transfer order you have not received. Future orders will display on the queue, but not future transfers.
Note: Return purchase orders are not included in work ticket printing.
Use the following control maintenance records to indicate how you want to handle returned goods:
• The Update Cost On Sales Order From Tagged Return Purchase Order control maintenance record indicates if the system updates the sales order when a purchase order is created from this queue. If this record is set to Yes, the cost on the return purchase order is added to the sales order to which the cost is tagged.
• Use the Return Goods Queue Default Select Option control maintenance record to indicate if you want to run the Returned Goods Queue by buy line or price line. This entry determines the field that displays in the header. The default is buy line.
• The Exclude Original Sale Line Item Comment From Returned P/O control maintenance records indicates if you want to copy the original sales order line item comments to a purchase order created from the Return Goods Queue.
• Use the Use Tax Rate From Original Sale Order For Returns to indicate whether you want to use the tax rate from the original sale order for a return. The default is N. Tax jurisdiction values set up in Tax Jurisdiction Maintenance override this control maintenance record.
Rel. 8.7.9 Purchasing
© 2014 Epicor Software Corporation. All rights reserved. 191
Displaying the Returned Goods Queue You can display the products returned to your company by customers or vendors. The Returned Goods Queue displays these items to assist you in your analysis and handling of these items.
Note: Purchase orders that have in-process quantities do not display on the Returned Goods Queue.
Use the Return Goods Queue Default Select Option control maintenance record to indicate if you want to run the Returned Goods Queue by buy line or price line. This entry determines the field that displays in the header. The default is buy line.
Use the Use Tax Rate From Original Sale Order For Returns to indicate whether you want to use the tax rate from the original sale order for a return. The default is N. Tax jurisdiction values set up in Tax Jurisdiction Maintenance override this control maintenance record.
To verify returned goods, see Verifying Returned Products in the Sales Management documentation.
To display the Returned Goods Queue:
1. From the Purchase > Queues menu, select Returned Goods to display the Returned Goods Queue window.
2. In the Branch field, enter the branch number for which you want to display returned products.
3. In the Price Line field, enter a price line ID or select from a list of price lines. Leave the field blank to run for all price lines.
4. In the Buy Line field, enter a buy line ID or select from a list of buy lines. Leave the field blank to run for all buy lines.
5. In the Buyer field, enter the buyer ID for which to run the queue or select from a list of buyers. Leave the field blank to run for all buyers.
6. In the Type area, select a type to display. Use product types to decide what happens to the returned goods in the Returned Goods Queue after you accept the return. You have the following types from which to choose. The system selects all check boxes as the default.
Note: The system does not check the projected inventory level (PIL) unless the Type is Stock.
Type Description Review Item must be examined before returning the item to inventory.
Defective Item cannot be returned to inventory.
Note: If the default return type is Defective, then the system does not check the projected inventory level (PIL).
Overship Returned to inventory, but the on-hand quantity is not affected until the decision is made by the purchasing agent to keep the extra inventory shipped. If the inventory is kept, the purchasing agent changes the Type to S for Stock on the purchase order.
Note: To limit the number of items that the server processes before updating the queue, from the Options menu, select Set Preferred Search Length and enter the
Solar Eclipse Purchasing Rel. 8.7.9
192 © 2014 Epicor Software Corporation. All rights reserved.
number in the dialog box. Using a lower number speeds up the population of the queue.
7. Click Update and the queue populates. If no products were returned, the following message displays: No items found.
8. Click the column headers to sort the queue information.
9. Use the Change View menu to view other column displays.
10. Use the Edit menu to do one of the following:
• Return to vendor
• Return to branch
• Create return order
• Add to purchase order
• Enter return information
11. Exit the Return Goods Queue window.
Rel. 8.7.9 Purchasing
© 2014 Epicor Software Corporation. All rights reserved. 193
Sorting and Changing Views on the Returned Goods Queue You can sort the Returned Goods Queue to better evaluate the data displayed. You can sort by any of the following: Buy Line, Return Code (Type), Sales Order Number or Ship Date.
To sort the Returned Goods Queue:
1. Display the Returned Goods Queue.
2. Click the column heading by which you want to sort the queue. By default, the system sorts the queue by Buy Line.
3. Exit the window.
Changing the view on the Returned Goods Queue Indicate if you want to include or exclude the ship date for each order generation on the Returned Goods Queue. The queue defaults to excluding the ship date from view.
To change the view on the Returned Goods Queue:
1. Display the Returned Goods Queue.
2. Use the Change View menu to select one of the following views: Buy Line, Price Line, and Return Code.
Each view displays the order number (Order #), return quantity (Return Qty), return type, product description, and return to vendor. In addition, each view gives you the following information in view-only mode:
Note: Double click any line to display Inventory Adjustment Entry.
View Columns Displayed Description Buy Line Ship Date Displays the ship date of the returned order.
Customer PO# Displays the customer's purchase order number, if applicable. Click the column heading to sort by this column.
Note: Double-click this field to open the associated order in view-only mode.
Buy Line Displays the buy line that contains the line item product.
Price Line Customer PO# Displays the customer's purchase order number, if applicable. You can sort by this column by clicking the column header.
Note: Double-click this field to open the associated order in view-only mode.
Price Line Displays the price line that contains the line item product.
Return Code Ship Date Displays the ship date of the returned order.
Solar Eclipse Purchasing Rel. 8.7.9
194 © 2014 Epicor Software Corporation. All rights reserved.
View Columns Displayed Description Customer PO# Displays the customer's purchase order number, if
applicable. You can sort by this column by clicking the column header.
Note: Double-click this field to open the associated order in view-only mode.
Return Code The expanded code for the displayed Return Type, such as Defective for F.
Is Economic Displays a green check mark if the system, based on your settings, recommends returning the item to inventory or displays a red X to indicate that the system recommends disposing of the item.
Warranty Tag (For Johnstone sites only) Displays the warranty information, if any, from the sales order.
Vendor Return Status
Displays the setting in the Vendor Return Allowed field in Product Maintenance from Product User Control Parameters window.
Returned Indicate if the item has been returned.
RGA Number The returned goods verification (RGA) code or number required to return the material.
If the RGA code is required and you have the SOE.RGA.REQUIRED authorization key, you can continue the return process without the RGA code.
Material Received Displays a green check mark if the material has already been received in the warehouse. This is selected when a user selects the Material Received check box in the Sales Order Entry Status tab.
2. Use the Order Types menu to select one of the following order types to view: Open, Closed or Both. By default the system displays both order types.
3. Exit the window.
Rel. 8.7.9 Purchasing
© 2014 Epicor Software Corporation. All rights reserved. 195
Returning Products to Vendors Review the records of returned products in the Returned Goods Queue. When products are returned to vendors, you create return purchase orders. Return purchase orders contain negative quantities to show what items are being returned to the vendor and should be invoiced. In addition, you can specify which vendor or branch receives the products that are being returned.
To edit costs on a negative purchase order you must have authorization.
Note: If you are returning products in an RF environment, see Handling Return Purchase Orders in RF.
Important: Quantity types for kit components only update automatically on the order and the Returned Goods Queue, if the order is in an Open status. Otherwise, you must manually update kit components quantity types.
Creating Return POs Use the Returned Goods Queue to create return purchase orders for the products listed.
To create a return purchase order:
1. Display the Returned Goods Queue.
2. Select the items for which you want to return.
3. In the Return To field, enter the vendor to which you want to return the items.
4. From the Edit menu, select Create Purchase Order.
5. Verify the purchase order displays with a negative quantity.
Note: If there is more that one price matrix associated with the product, the Vendor Matrix Cell Selection screen displays. For more information, see Creating Individual Matrix Cells.
6. Exit the Purchase Order Entry window.
7. Exit the Return Goods Queue window.
Returning Items to a Branch You can specify the branches that receive the products when they are returned to inventory.
To specify a branch for returned items:
1. Display the Returned Goods Queue.
2. Select the order with items for which you want to specify a return branch.
3. From the Edit menu, select Return to Br.
4. Enter the branch number and the branch number displays in the Return To field.
5. Exit the Purchase Order Entry window.
Solar Eclipse Purchasing Rel. 8.7.9
196 © 2014 Epicor Software Corporation. All rights reserved.
6. Exit the Return Goods Queue window.
Returning Items to a Vendor You can identify which vendor receives the returned products and then print the purchase order to send.
To enter a vendor for returned items:
1. Display the Returned Goods Queue.
2. Select the order with items for which you want to specify a return branch.
3. From the Edit menu, select Return.
4. Enter the vendor name and the name displays in the Return To field.
5. Exit the Purchase Order Entry window.
6. Exit the Return Goods Queue window.
Rel. 8.7.9 Purchasing
© 2014 Epicor Software Corporation. All rights reserved. 197
Creating Return Purchase Orders Return purchase orders are created as a new generation of the original purchase order.
Use the Returned Goods Queue to create return purchase orders. The record of returned products is reviewed in the Returned Goods Queue.
Note: The system checks the product file when printing. If any hazardous material is listed on the order, a HAZMAT sheet prints with the order.
To create a return purchase order:
1. Display the Returned Goods Queue.
2. Click the order that contains the items for which you want to return.
3. In the Return-To field, enter the vendor to whom you are returning the ordered items.
4. Use the Edit menu to do the following:
Option Description Edit > Return Displays a prompt to enter the vendor to whom you want to return the items.
Edit > Return To Displays a prompt to enter a branch to which you want to return the items. For more information, see Specifying a Branch for Returned Items.
Edit > Create Purchase Order
Creates a new purchase order for the vendor in the Return To column. You can combine multiple returned products on the same PO for each vendor.
Edit > Add To Select an open purchase order on which to put the return item.
5. Use the Edit Order menu, select Ship Dates and select new.
6. In the New Required Date field, enter the date which the order is due to be returned.
7. In the New Receive Date field, enter the current date.
8. In the New Receive Branch field, enter the branch which should receive the material.
9. In the New Ship Status field, type O and click OK to create the new generation.
10. The system displays a blank purchase order.
11. In the Qty and Description fields, verify the negative product quantity and product.
Note: If there is more than one price matrix associated with the product, the Vendor Matrix Cell Selection window displays. Place the cursor on the matrix cell you want to use and use the Use Cell Matrix hot key to make the selection. For more information see Creating Individual Matrix Cells.
12. Save your order and exit the window.
13. Use the Edit > Return Information option to display the Return Goods Verification window. Enter the details regarding the returned goods. The comments are added to the packing slip, such as the vendor's return goods authorization code.
Note: If an RGA number is required, the system displays a warning message. You must be assigned the SOE.RGA.REQUIRED authorization key to process a return without the RGA number.
Solar Eclipse Purchasing Rel. 8.7.9
198 © 2014 Epicor Software Corporation. All rights reserved.
14. Save your changes and exit the window.
Specifying a Branch for Returned Items You can specify the branches that received the products when they are returned to inventory.
To specify a branch for returned items:
1. Display the Returned Goods Queue.
2. Move the cursor to the items for which you want to specify a return branch.
3. Use the Return to Br hot key.
4. Enter the branch number and press Enter. The branch number displays in the Return To field.
5. Press Enter to commit the returned item to that branch number.
6. Press Esc to return to a blank Returned Good Queue window.
7. Press Esc to return to the main menu.
Rel. 8.7.9 Purchasing
© 2014 Epicor Software Corporation. All rights reserved. 199
Determining the Economic Return Amount Based on the processing costs in your warehouse, you can decide if returning an item to your general inventory when returned from a customer, is cost effective. You set an economic return amount either by price line or by product. If the value of the item being returned falls short or below this amount, the system recommends the item not be returned to inventory because the processing costs outweigh the actual value of the item.
If the cost is greater than or equal to the economic return amount, the system indicates that it is economical, or in your best business interest, to return the product to your normal warehouse stock. Otherwise, the system indicates that you should not return to the item inventory.
Using your purchasing experience, you can set up the economic return information at either the product or the price line level. The system checks settings at the price line level first and if none are set, checks the product level. Settings in Product Price Maintenance take precedence over data entered in Price Line Branch Data Maintenance.
Use the Returned Goods Queue to evaluate whether to keep the item or dispose of it. In the Return Code view of the queue in the Is Economic field, the system displays a green check mark if the product meets the requirements for keeping it in stock or a red X if it does not meet the requirements, and that you should not return to the item inventory.
To set up economic return information at the price line level:
1. From the Maintenance > Price Maintenance menu, select Price Line to display the Price Line Maintenance window and display the price line.
2. From the Edit menu, select Branch Data to display the Price Line Branch Data Maintenance window.
3. Find the branch or territory for which you want to set an economic amount for the price line.
To set the same economic amount for all, find ALL at the bottom of the table. Use the Edit > Toggle Hierarchy option if ALL does not display.
4. In the Economic Amount column, enter the amount below which the system recommends not returning items to inventory.
5. Save your changes and return to the Price Line Maintenance window.
To set up economic return information at the product level:
1. From the Maintenance menu, select Product to display the Product Maintenance window and display the product.
2. From the Inventory menu, select Primary Inventory Maintenance to display the Primary Inventory Maintenance window.
3. From the Edit menu, select User Controls to display the Product User Control Parameters window.
4. Do one of the following:
• From the File menu, select Hierarchy to display the Product User Control Parameters dialog box. In the Enter hierarchy branch field, enter the branch or territory ID.
• From the File menu, select Add Branch. In the Enter Branch, Territory or All field, enter the branch or territory ID you want to view.

Solar Eclipse Purchasing Rel. 8.7.9
200 © 2014 Epicor Software Corporation. All rights reserved.
To set the same economic amount for all, find ALL at the bottom of the table. Use the Edit > Toggle Hierarchy option if ALL does not display.
5. In the Economic Amount column, enter the amount below which the system recommends not returning items to inventory.
6. Save your changes and return to the Price Line Maintenance window and save the price line.
Rel. 8.7.9 Purchasing
© 2014 Epicor Software Corporation. All rights reserved. 201
Returning Overstock to Vendors Overview Carrying overstock in your warehouse costs you valuable space and money. Using the Suggested Return P/O process, you can determine which products in your overstock inventory you can return to your vendor for credit, and create return purchase orders for those products. As you review your overstock inventory and have conversations with your vendors regarding return policies, you can also flag individual products to indicate that you cannot return that product to your vendor, saving you time in the future when reviewing which products you can return.
If you use the Vendor Scorecard and have built a Vendor Scorecard file, the system uses the same overstock days in that file to determine which products are considered overstock. If you have not run a Vendor Scorecard build, the default overstock days is 90. For more information about the Vendor Scorecard, see Measuring Vendor Performance Overview.
You can review the suggested returns purchase orders as a report or in the Suggested Return P/Os Queue. From this queue, you can convert the suggested return orders into actual return purchase orders to initiate the return process. Suggesting purchase orders populates the Suggested Return P/O Queue for each buy line that has products that are considered overstock.
See the following topics to suggest return purchase orders for your overstock inventory:
• Suggesting Return P/Os for Overstock
• Working with the Suggested Return P/O Queue
• Converting Suggested Returns into Actual Return P/Os
• Setting Products as Non-Returnable
Solar Eclipse Purchasing Rel. 8.7.9
202 © 2014 Epicor Software Corporation. All rights reserved.
Suggesting Return P/Os for Overstock Use the Suggested Return P/O process to determine which products in your overstock inventory you can return to your vendor for credit. If you use the Vendor Scorecard and have built a Vendor Scorecard file, the system uses the same overstock days used to build that file to determine which products are considered overstock. If you have not run a Vendor Scorecard build, the default overstock days is 90. For more information about the Vendor Scorecard, see Measuring Vendor Performance Overview.
The Suggested Return P/Os process populates the Suggested Return P/O Queue with each buy line that contains products that are considered overstock. You can also create a report and e-mail, fax, print, or send it to your Hold file that provides the contents of the queue.
The overstock quantity takes into consideration products that have future committed sales. For example, if you have 10 of a product to return, but 4 are on an open sales order that will ship on a future date, only 6 of the product are shown as overstock.
To suggest return P/Os from your overstock products:
1. From the Purchase > Reports menu, select Suggested Return P/O to display the Suggested Return Purchase Order window.
2. In the Buy Line field, one or more buy lines to suggest returns for overstock products in a single buy line. Leave the field blank to suggest returns for overstock products in all your buy lines.
Note: If you use the Vendor Scorecard and have built a Vendor Scorecard file, the system uses the overstock days used to build that file to determine which products are considered overstock. If you have not run a Vendor Scorecard build, the default overstock days is 90.
3. In the Purchasing Branch field, enter the purchasing branch or territory for which to suggest returns. Only branches that purchase products generate return purchase orders.
For central purchasing branches, enter the branch number for an authorized purchasing branch as set in Procurement Group Maintenance.
4. In the Return Product Calculation area, select Days Supply or Surplus Point.
If you select Days Demand, use the Number of Days field to enter how many days you want to use for the calculation.
5. Set options, if needed, and generate the report.
To populate the Suggested Return P/O Queue without generating a report, select File > Begin.
If you create a report, it contains additional information about each product suggested for return. You can also generate this report from the Suggested Return P/O Queue using the File > View Report or File > Print Report options.
Rel. 8.7.9 Purchasing
© 2014 Epicor Software Corporation. All rights reserved. 203
Working with the Suggested Return P/O Queue After you populate the Suggested Return P/O Queue, display the queue's contents to show the overstock products that you can potentially return to your vendors. In addition, you can filter the queue to include only products that are returnable, and not those that are set as non-returnable. You can also view or print the Suggested Return P/O Report directly from the queue for insight in to which products in a buy line have overstock that you can return to the vendor.
Using the queue helps you to work with your vendors and to decide which products you want to return, and convert the suggested returns into actual return purchase orders.
To display the Suggested Return P/O Queue:
1. From the Purchase > Queues menu, select Suggested Return P/O Queue to display the Suggested Return P/O Queue window.
2. In the Branch field, enter the branch you want to display. To display all branches, type All.
3. In the Buyer field, enter the buyer's queue you want to display. To display all, leave this field blank. To assign a buyer, see Assigning Buyers to Buy Lines.
4. Select the Non-Returnable Products check box to include the products that you have marked as non-returnable in Product Maintenance. Leave this check box deselected to review the queue without the non-returnable products.
5. Click Update to display the overstock products that meet your selection criteria.
Field Description Br The purchasing branch for the buy line.
Buyer The user assigned to purchase products for the buy line.
Buy Line The buy line that contains products included in the overstock inventory. If you use the Vendor Scorecard and have built a Vendor Scorecard file, the system uses the overstock days used to build that file to determine which products are considered overstock. If you have not run a Vendor Scorecard build, the default overstock days is 90.
Return Qty The total number of items suggested for return in the buy line.
Return Amount The total dollar amount of the returnable items in the buy line.
6. To view information about the products in the buy line, select the buy line and select File > View Report or File > Print Report to display the Suggested Return P/O Report. Use the Suggested Return P/O Report to gather insight in to which products in a buy line have overstock that you can return to the vendor. For each product in the selected buy line for the branch displayed in the queue, the report shows the following information:
Field Description Prod ID The Eclipse ID assigned to the product in Product Maintenance. Click
the ID to display the product record.
Description The product included in the buy line.
Onhand The total amount of the product that you currently have in sock and tagged to future orders.
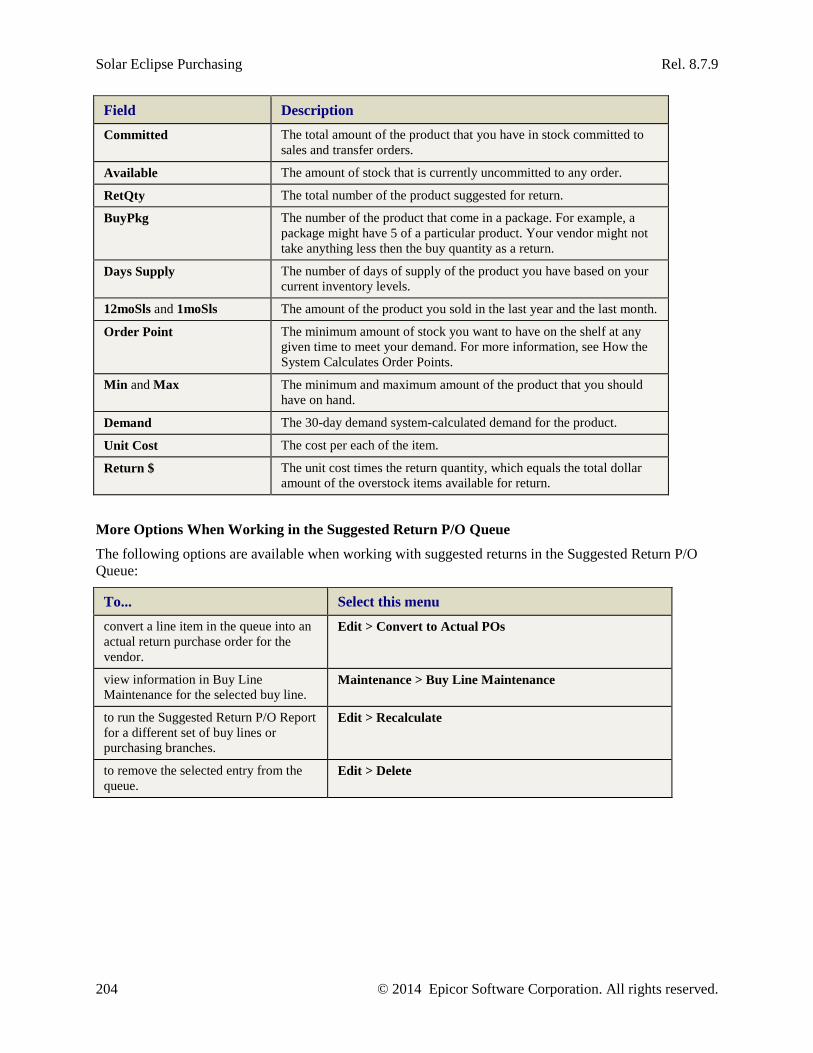
Solar Eclipse Purchasing Rel. 8.7.9
204 © 2014 Epicor Software Corporation. All rights reserved.
Field Description Committed The total amount of the product that you have in stock committed to
sales and transfer orders.
Available The amount of stock that is currently uncommitted to any order.
RetQty The total number of the product suggested for return.
BuyPkg The number of the product that come in a package. For example, a package might have 5 of a particular product. Your vendor might not take anything less then the buy quantity as a return.
Days Supply The number of days of supply of the product you have based on your current inventory levels.
12moSls and 1moSls The amount of the product you sold in the last year and the last month.
Order Point The minimum amount of stock you want to have on the shelf at any given time to meet your demand. For more information, see How the System Calculates Order Points.
Min and Max The minimum and maximum amount of the product that you should have on hand.
Demand The 30-day demand system-calculated demand for the product.
Unit Cost The cost per each of the item.
Return $ The unit cost times the return quantity, which equals the total dollar amount of the overstock items available for return.
More Options When Working in the Suggested Return P/O Queue
The following options are available when working with suggested returns in the Suggested Return P/O Queue:
To... Select this menu convert a line item in the queue into an actual return purchase order for the vendor.
Edit > Convert to Actual POs
view information in Buy Line Maintenance for the selected buy line.
Maintenance > Buy Line Maintenance
to run the Suggested Return P/O Report for a different set of buy lines or purchasing branches.
Edit > Recalculate
to remove the selected entry from the queue.
Edit > Delete
Rel. 8.7.9 Purchasing
© 2014 Epicor Software Corporation. All rights reserved. 205
Converting Suggested Returns into Actual Return P/Os The Suggested Return P/Os process populates the Suggested Return P/O Queue for each buy line you run the process for that has products that are considered overstock.
Note: You can also create a report that contains the contents of the queue and e-mail, fax, print, or send it to your Hold file.
Use the Suggested Return P/O Queue to review the overstock products, and to convert the suggested purchase orders into actual return purchase orders. Returns are negative purchase orders. Using this process always creates a new return purchase order.
Note: The overstock quantity takes into consideration products that have future committed sales. For example, if you have 10 of a product to return, but 4 are on an open sales order that will ship on a future date, only 6 of the product are shown as overstock.
To convert a suggested return into an actual return purchase order:
1. Display the Suggested Return P/O Queue and select the buy line you want to convert into an actual return purchase order.
2. From the Edit menu, select Convert to Actual POs to display the Convert Suggested to Actual Return P/O window.
The system populates Branch and Line fields with the branch and buy line information from the Suggested Return P/O Queue window, however, you can update them if necessary.
3. In the Vendor field, select the vendor to which you are returning the items in the buy line.
4. Select the Include Non-Returnable Products check box to include the products within the buy line that are set as non-returnable. This field defaults to deselected so non-returnable products are not included in the return purchase order.
5. Click OK to create an actual purchase order and display the Purchase Order Entry window, allowing you to further modify or cancel the order.
6. Modify the order as necessary, and process the order.
Solar Eclipse Purchasing Rel. 8.7.9
206 © 2014 Epicor Software Corporation. All rights reserved.
Returned Material Workflows Overview The following authorization keys can be used in combinations to ensure that you are handling returns how you need to for your warehouse setup.
• SOE.ALLOW.NONRETURN
• SOE.NONRETURN.PROCESS
• SOE.RETURN.PROCESS
• SOE.RGA.REQUIRED
See the following workflows to review how these authorization keys work together with the Customer Return Allowed and Vendor Return Allowed columns in the User Controls window in Product Maintenance > Inventory Maintenance window.
• Customer and Vendor Return Allowed Set to Always
• Customer Return Allowed Set to Always, Vendor Return Allowed Set to RGA
• Customer Return Allowed Set to Always, Vendor Return Allowed Set to Never
• Customer Return Allowed Set to Defective, Vendor Return Allowed Set to Always
• Customer Return Allowed Set to Defective, Vendor Return Allowed Set to RGA
• Customer Return Allowed Set to Defective, Vendor Return Allowed Set to Never
• Customer Return Allowed Set to Never, Vendor Return Allowed Set to Always
• Customer Return Allowed Set to Never, Vendor Return Allowed Set to RGA
• Customer and Vendor Return Allowed Set to Never
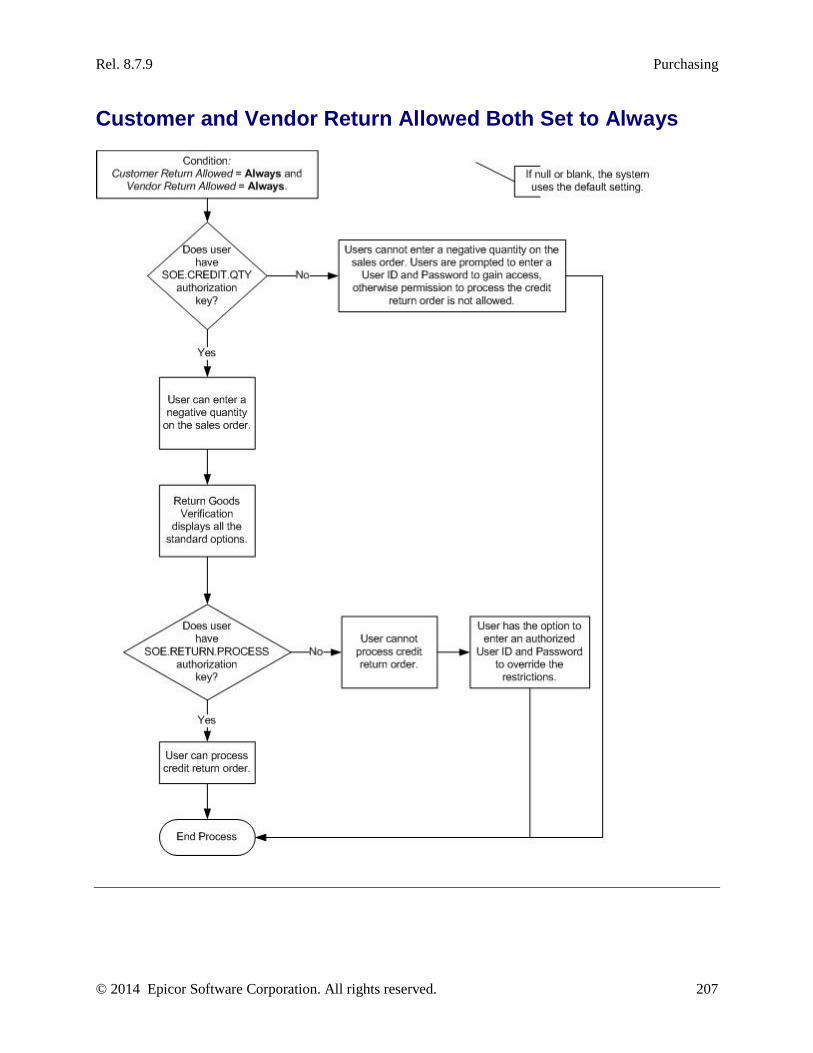
Rel. 8.7.9 Purchasing
© 2014 Epicor Software Corporation. All rights reserved. 207
Customer and Vendor Return Allowed Both Set to Always

Solar Eclipse Purchasing Rel. 8.7.9
208 © 2014 Epicor Software Corporation. All rights reserved.
Customer Return Allowed Set to Always and Vendor Return Allowed Set to RGA
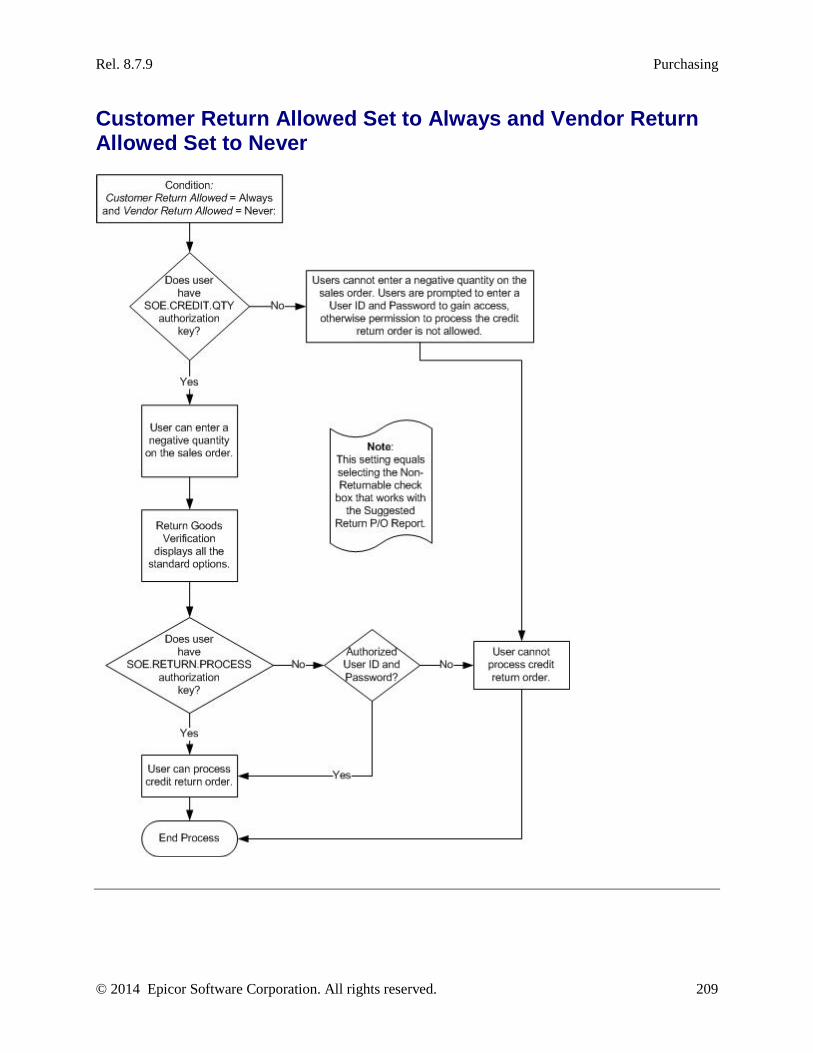
Rel. 8.7.9 Purchasing
© 2014 Epicor Software Corporation. All rights reserved. 209
Customer Return Allowed Set to Always and Vendor Return Allowed Set to Never
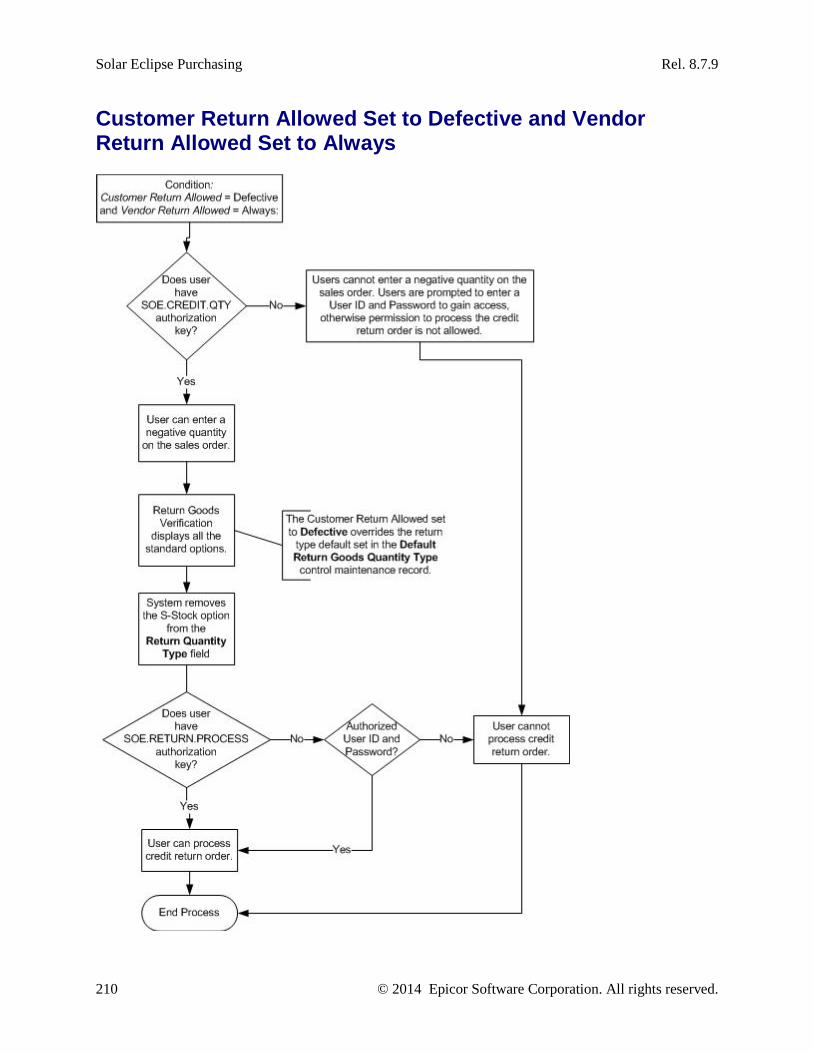
Solar Eclipse Purchasing Rel. 8.7.9
210 © 2014 Epicor Software Corporation. All rights reserved.
Customer Return Allowed Set to Defective and Vendor Return Allowed Set to Always
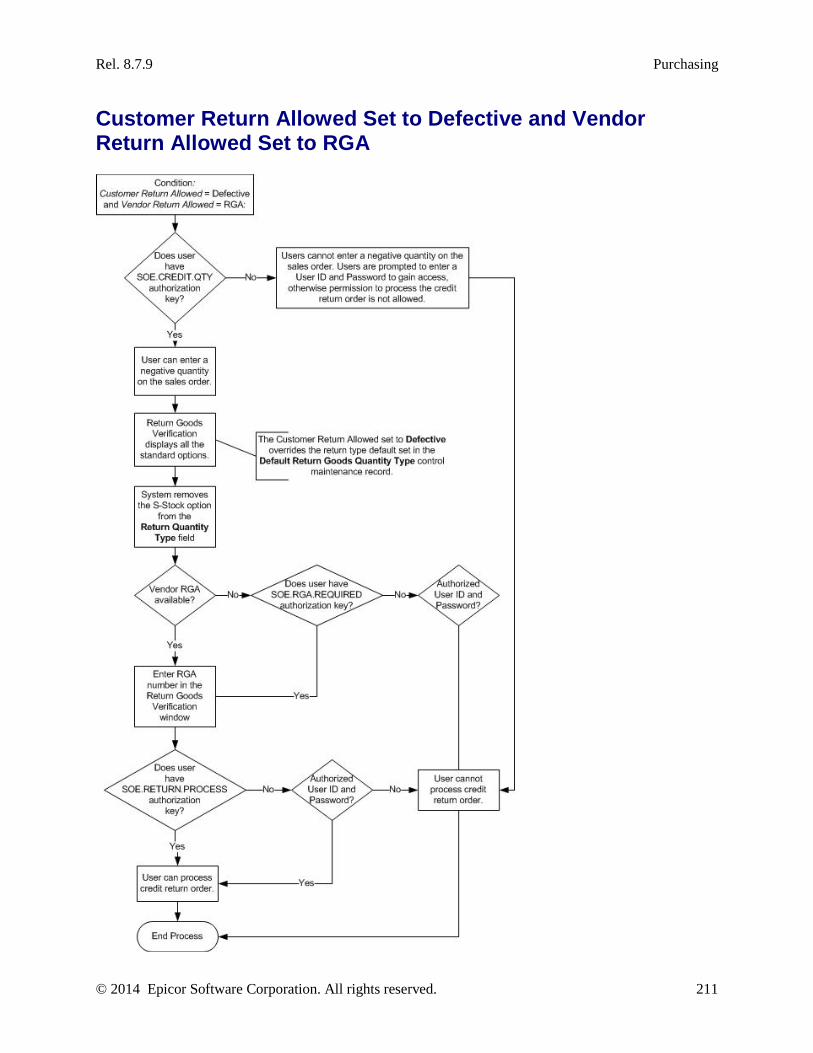
Rel. 8.7.9 Purchasing
© 2014 Epicor Software Corporation. All rights reserved. 211
Customer Return Allowed Set to Defective and Vendor Return Allowed Set to RGA
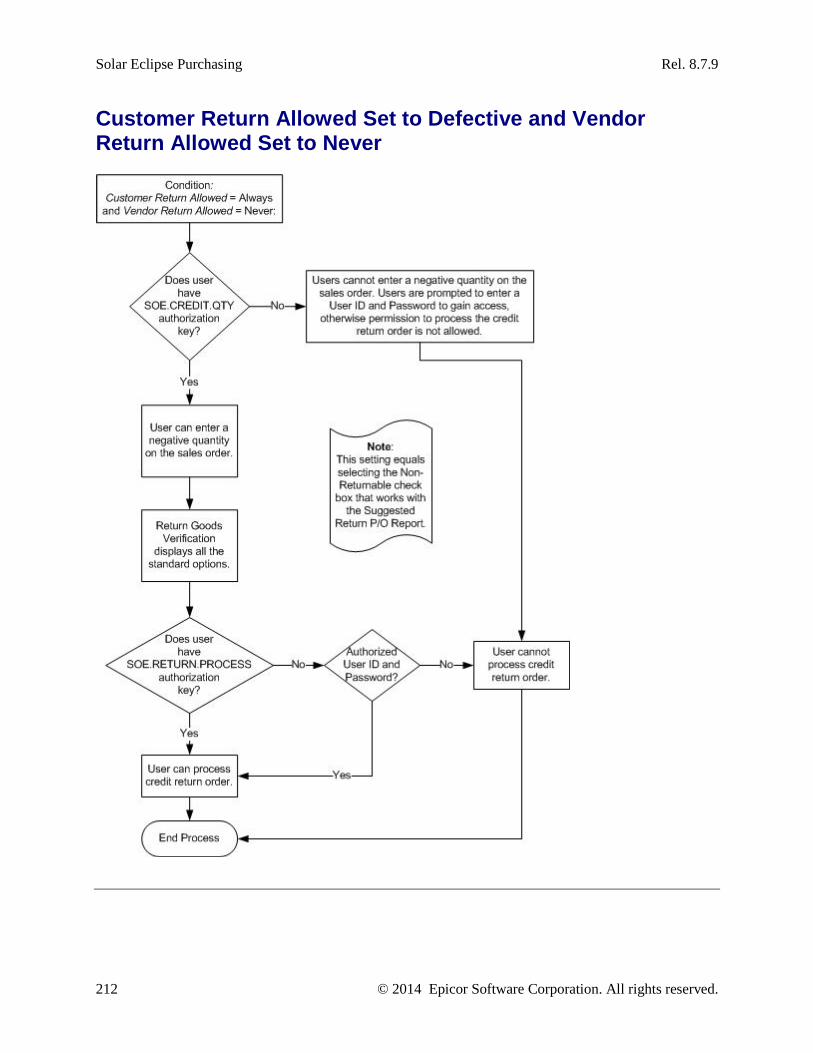
Solar Eclipse Purchasing Rel. 8.7.9
212 © 2014 Epicor Software Corporation. All rights reserved.
Customer Return Allowed Set to Defective and Vendor Return Allowed Set to Never
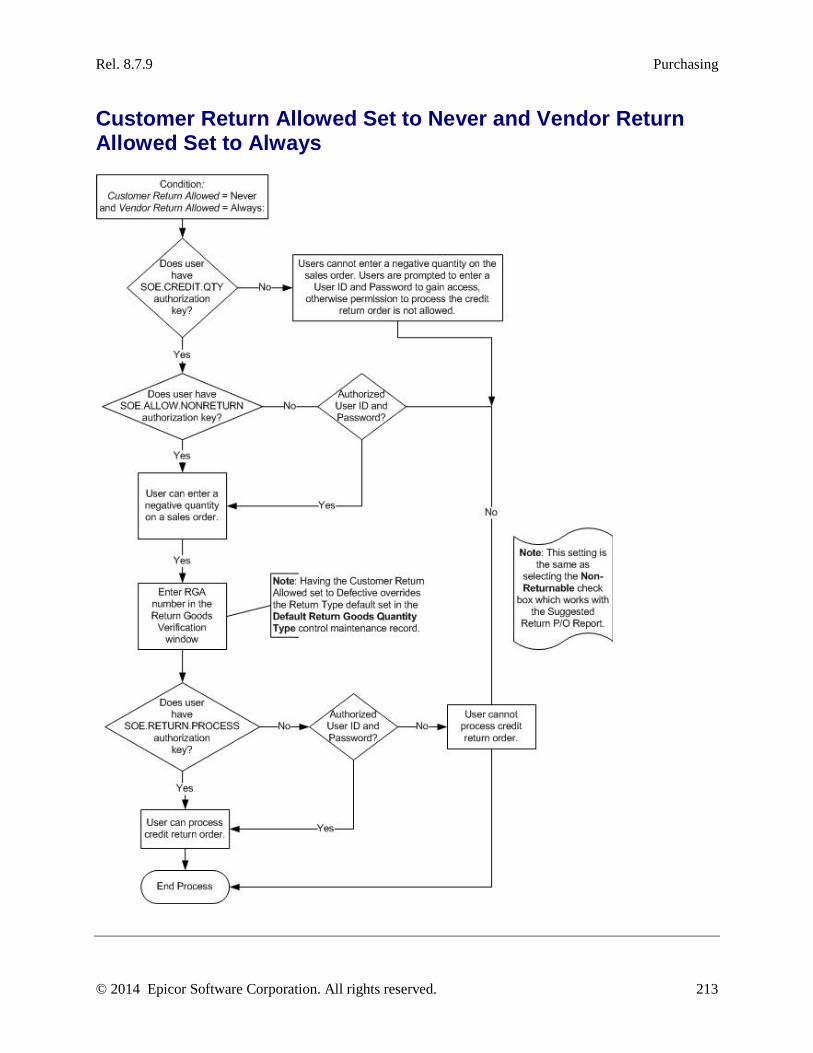
Rel. 8.7.9 Purchasing
© 2014 Epicor Software Corporation. All rights reserved. 213
Customer Return Allowed Set to Never and Vendor Return Allowed Set to Always
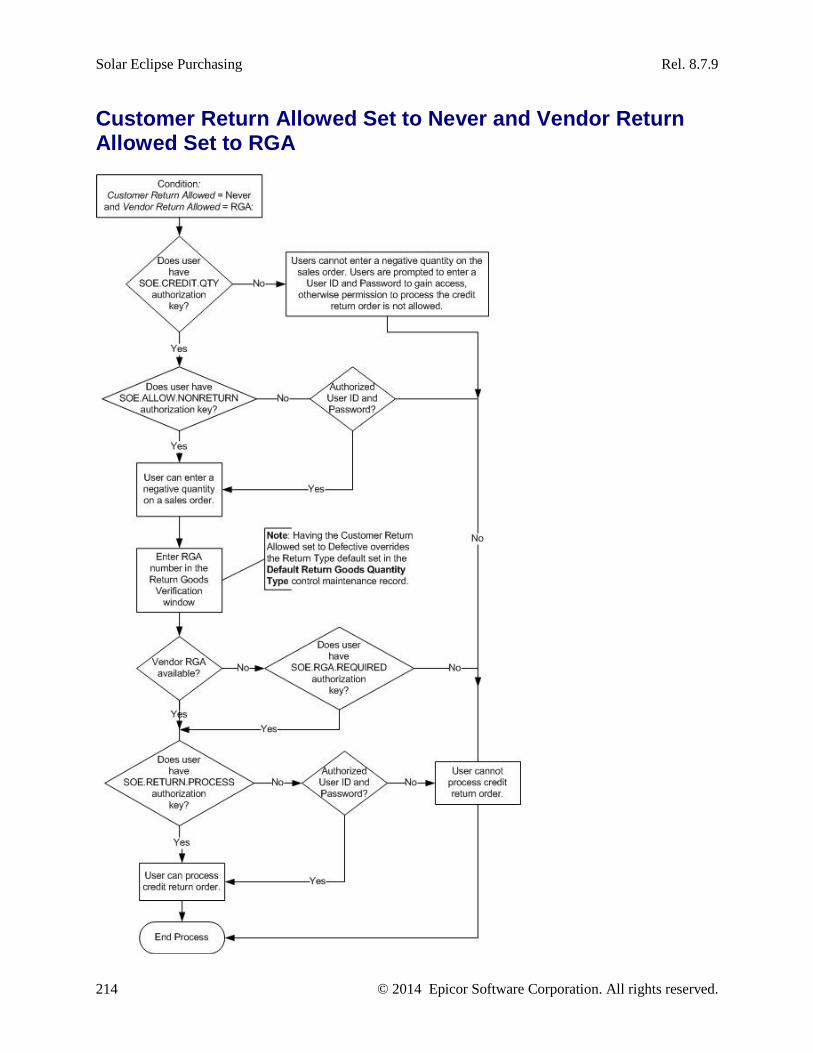
Solar Eclipse Purchasing Rel. 8.7.9
214 © 2014 Epicor Software Corporation. All rights reserved.
Customer Return Allowed Set to Never and Vendor Return Allowed Set to RGA
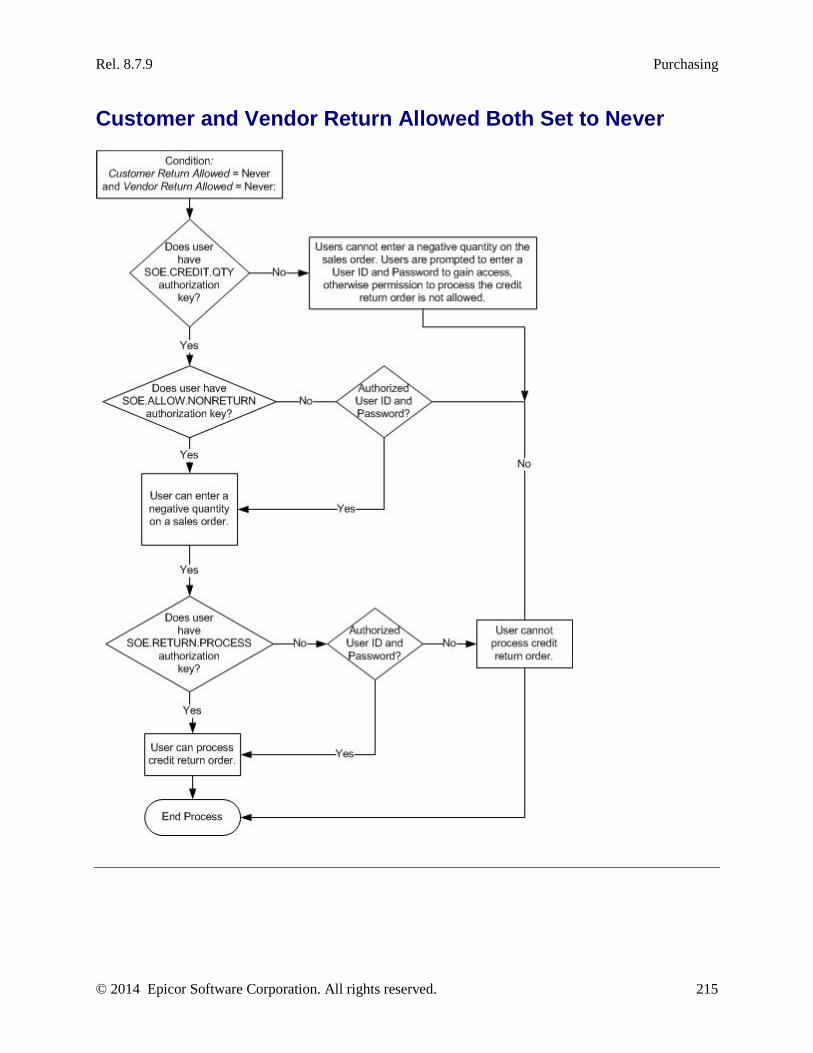
Rel. 8.7.9 Purchasing
© 2014 Epicor Software Corporation. All rights reserved. 215
Customer and Vendor Return Allowed Both Set to Never
Solar Eclipse Purchasing Rel. 8.7.9
216 © 2014 Epicor Software Corporation. All rights reserved.
Procuring Products The Procurement program helps you serve your customers by providing a way to get products for customers that cannot wait for a typical backorder.
Depending on how you grant permission to your warehouse employees, they can procure items through the sales order. For more information about procuring items through the sales order, see the following topics in Sales Management:
• Product Procurement Overview
• Procuring Single Products
• Procuring Multiple Products
• Changing an Order's Shipping Branch
• Creating Transfer Orders from Sales Orders
If you require that purchasing agents procure items, then they use the procurement confirmation window to consolidate products, as needed, on the purchase orders. For more information on using the procurement confirmation screen, see the following:
• Procurement Confirmation Overview
• How to Use the Procurement Confirmation Queue
• Creating P/Os from the Procurement Confirmation Queue
• Changing the Procurement Vendor
Rel. 8.7.9 Purchasing
© 2014 Epicor Software Corporation. All rights reserved. 217
Valid Vendor Types When procuring using the Procure option from Sales Order Entry, you can identify ahead of time valid users from which to select.
Use the Valid Vendor ASL Types control maintenance record to define codes used to identify whether a vendor is on an approved supplier list. Once defined, you can assign codes to vendors in Vendor Maintenance and create vendor supplier lists for customers in Customer Maintenance.
When this connection is set, customers can then only procure from vendors on the approved list. If a customer tries to procure from a vendor not on the list, that customer's print status is changed to print hold.
When a purchase order is placed with an unapproved supplier, it is placed on hold. Users assigned the POE.ASL.RELEASE authorization key can release the hold.
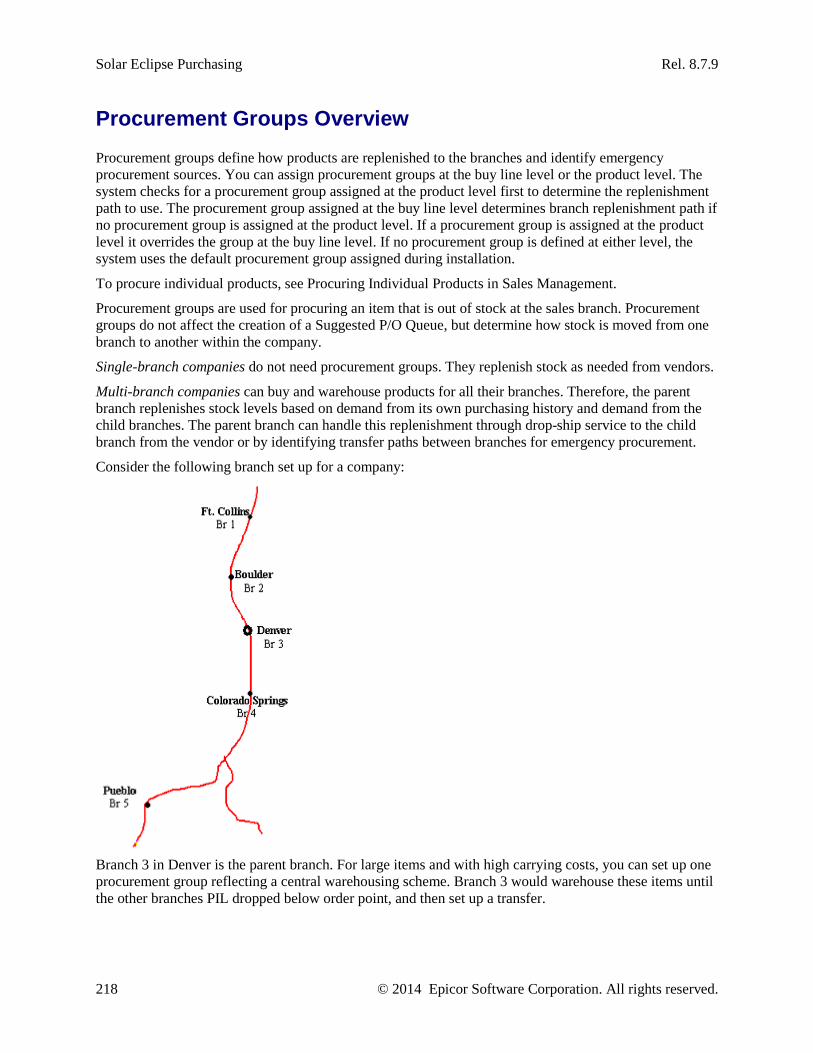
Solar Eclipse Purchasing Rel. 8.7.9
218 © 2014 Epicor Software Corporation. All rights reserved.
Procurement Groups Overview Procurement groups define how products are replenished to the branches and identify emergency procurement sources. You can assign procurement groups at the buy line level or the product level. The system checks for a procurement group assigned at the product level first to determine the replenishment path to use. The procurement group assigned at the buy line level determines branch replenishment path if no procurement group is assigned at the product level. If a procurement group is assigned at the product level it overrides the group at the buy line level. If no procurement group is defined at either level, the system uses the default procurement group assigned during installation.
To procure individual products, see Procuring Individual Products in Sales Management.
Procurement groups are used for procuring an item that is out of stock at the sales branch. Procurement groups do not affect the creation of a Suggested P/O Queue, but determine how stock is moved from one branch to another within the company.
Single-branch companies do not need procurement groups. They replenish stock as needed from vendors.
Multi-branch companies can buy and warehouse products for all their branches. Therefore, the parent branch replenishes stock levels based on demand from its own purchasing history and demand from the child branches. The parent branch can handle this replenishment through drop-ship service to the child branch from the vendor or by identifying transfer paths between branches for emergency procurement.
Consider the following branch set up for a company:
Branch 3 in Denver is the parent branch. For large items and with high carrying costs, you can set up one procurement group reflecting a central warehousing scheme. Branch 3 would warehouse these items until the other branches PIL dropped below order point, and then set up a transfer.

Rel. 8.7.9 Purchasing
© 2014 Epicor Software Corporation. All rights reserved. 219
In addition, for items that have low or no carrying costs and are sold frequently, you can set up a procurement group reflecting a distributive warehousing scheme. Each branch would receive items to replenish their stock according to their demand and PIL.
Finally, larger items with higher carrying costs that are needed at each branch and yet costly to ship, you can set up a procurement group reflecting a central distribution warehousing scheme. Branch 3 would receive all the product in this category. Branch 3 would ship products for both branches 1 and 2 to branch 2 and products for branches 4 and 5 to branch 4. From there, branch 2 would ship to branch 1 and branch 4 would ship to branch 5. This lowers the shipping costs.
This section provides information about the following:
• Creating Procurement Groups
• Assigning Procurement Groups
• Assigning Master Groups in Procurement Group Maintenance
• Setting Up Transfer Branches for Procurement
• Adding New Branch Settings to Procurement Groups
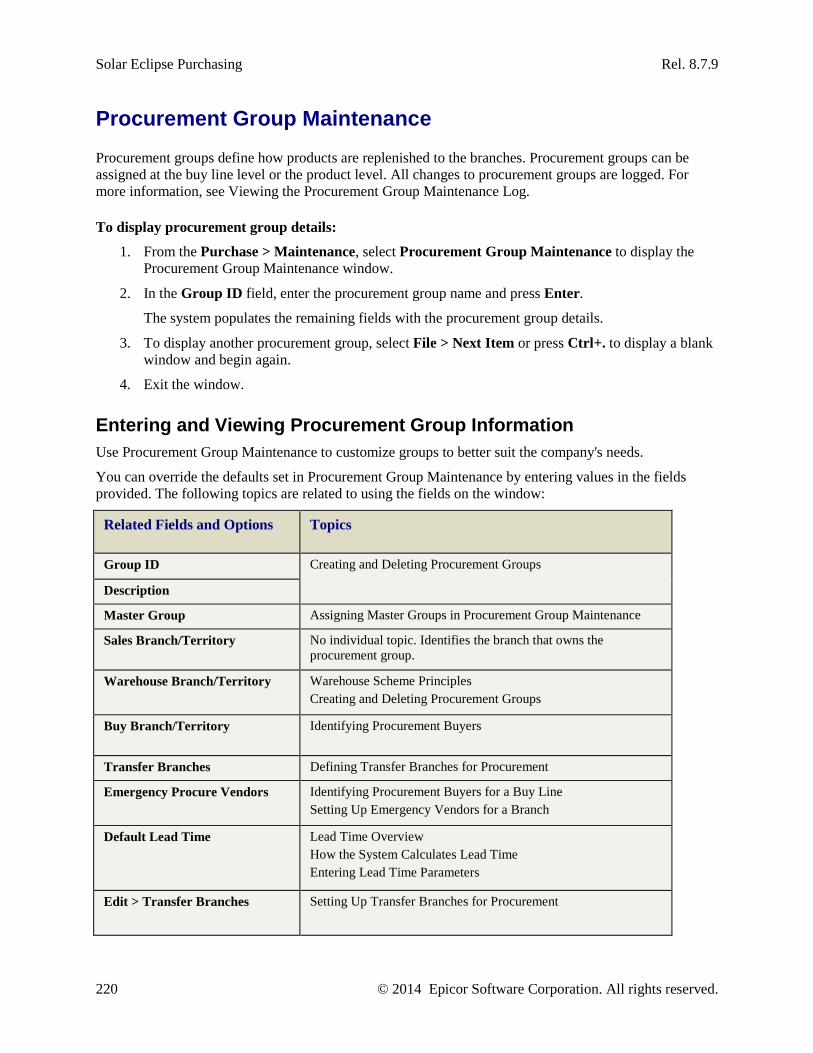
Solar Eclipse Purchasing Rel. 8.7.9
220 © 2014 Epicor Software Corporation. All rights reserved.
Procurement Group Maintenance Procurement groups define how products are replenished to the branches. Procurement groups can be assigned at the buy line level or the product level. All changes to procurement groups are logged. For more information, see Viewing the Procurement Group Maintenance Log.
To display procurement group details:
1. From the Purchase > Maintenance, select Procurement Group Maintenance to display the Procurement Group Maintenance window.
2. In the Group ID field, enter the procurement group name and press Enter.
The system populates the remaining fields with the procurement group details.
3. To display another procurement group, select File > Next Item or press Ctrl+. to display a blank window and begin again.
4. Exit the window.
Entering and Viewing Procurement Group Information Use Procurement Group Maintenance to customize groups to better suit the company's needs.
You can override the defaults set in Procurement Group Maintenance by entering values in the fields provided. The following topics are related to using the fields on the window:
Related Fields and Options Topics
Group ID Creating and Deleting Procurement Groups
Description
Master Group Assigning Master Groups in Procurement Group Maintenance
Sales Branch/Territory No individual topic. Identifies the branch that owns the procurement group.
Warehouse Branch/Territory Warehouse Scheme Principles Creating and Deleting Procurement Groups
Buy Branch/Territory Identifying Procurement Buyers
Transfer Branches Defining Transfer Branches for Procurement
Emergency Procure Vendors Identifying Procurement Buyers for a Buy Line Setting Up Emergency Vendors for a Branch
Default Lead Time Lead Time Overview How the System Calculates Lead Time Entering Lead Time Parameters
Edit > Transfer Branches Setting Up Transfer Branches for Procurement
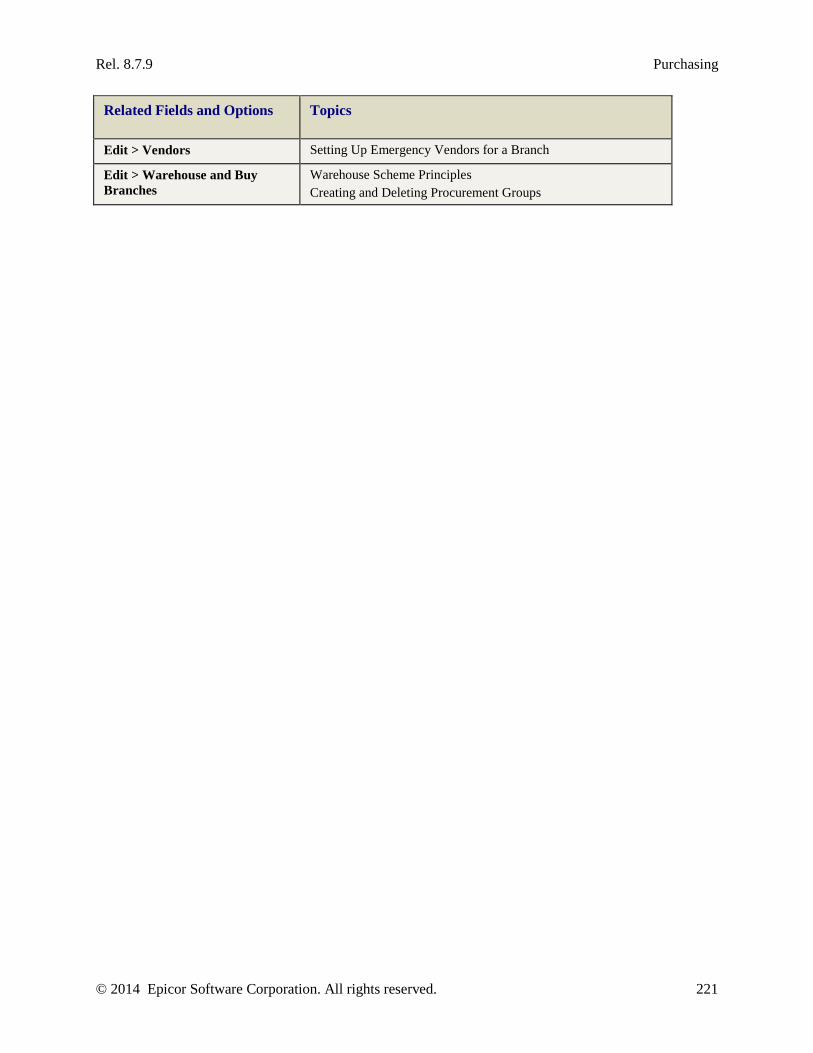
Rel. 8.7.9 Purchasing
© 2014 Epicor Software Corporation. All rights reserved. 221
Related Fields and Options Topics
Edit > Vendors Setting Up Emergency Vendors for a Branch
Edit > Warehouse and Buy Branches
Warehouse Scheme Principles Creating and Deleting Procurement Groups

Solar Eclipse Purchasing Rel. 8.7.9
222 © 2014 Epicor Software Corporation. All rights reserved.
Creating and Deleting Procurement Groups Procurement groups define how products are replenished to the branches. You can create procurement groups on the Procurement Group Maintenance window. When creating a new procurement group, the system populates the window with the description and other data from the previously displayed group. You can use this feature as a shortcut when creating multiple procurement groups that use the same warehouse schemes.
Enter sales, warehouse, and buying branch information to describe the warehouse schemes used to replenish the products. Do not leave any columns blank.
You can delete procurement groups if they are no longer needed.
To create a procurement group:
1. From the Purchase > Maintenance menu, select Procurement Group Maintenance to display the Procurement Group Maintenance window.
2. From the File menu, select New Procurement Group.
3. In the Enter new procure group ID dialog box, enter a new ID up to 12 characters and click OK.
4. In the Description field, enter a short description. This description prints on reports and is used in searches.
5. If you want to enter a master group to associate with the procurement group, enter the master group name in the Master Group field.
6. From the File menu, select Insert Branch.
7. In the Enter new branch or territory dialog box, enter the branch or territory ID and click OK.
The system populates the Sales Branch/Territory field.
8. In the Warehouse Branch/Territory field, enter the branch that warehouses the products for each sales branch.
9. In the Buy Branch/Territory field, enter the branch that purchases the products for each sales branch.
10. Use the following options as needed:
Option Description Edit > Transfer Branches Define the transfer branches for the procure group, if your
company uses central warehousing. See Setting Up Transfer Branches for Procurement
Edit > Vendors Identify the emergency procurement vendors for the procurement group. See Setting Up Emergency Vendors for a Branch
Note: A vendor must exist in Vendor Maintenance before it can be updated.
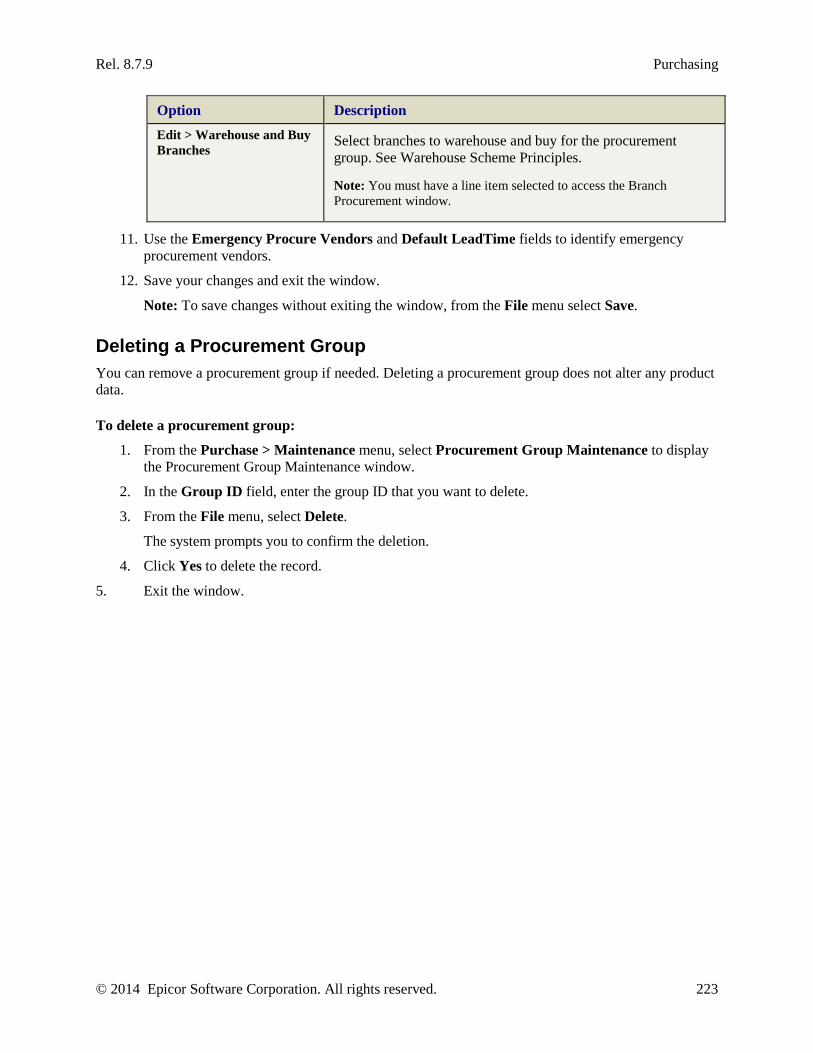
Rel. 8.7.9 Purchasing
© 2014 Epicor Software Corporation. All rights reserved. 223
Option Description Edit > Warehouse and Buy Branches
Select branches to warehouse and buy for the procurement group. See Warehouse Scheme Principles.
Note: You must have a line item selected to access the Branch Procurement window.
11. Use the Emergency Procure Vendors and Default LeadTime fields to identify emergency procurement vendors.
12. Save your changes and exit the window.
Note: To save changes without exiting the window, from the File menu select Save.
Deleting a Procurement Group You can remove a procurement group if needed. Deleting a procurement group does not alter any product data.
To delete a procurement group:
1. From the Purchase > Maintenance menu, select Procurement Group Maintenance to display the Procurement Group Maintenance window.
2. In the Group ID field, enter the group ID that you want to delete.
3. From the File menu, select Delete.
The system prompts you to confirm the deletion.
4. Click Yes to delete the record.
5. Exit the window.
Solar Eclipse Purchasing Rel. 8.7.9
224 © 2014 Epicor Software Corporation. All rights reserved.
Assigning Procurement Groups to Products and Buy Lines Each product belongs to a procurement group that determines branch replenishment paths.
Procurement groups are assigned at three levels: product, buy line, and default. These levels are used in a hierarchy. If the system looks for a product's procurement group, it searches at the product level first. If none is defined, it searches the buy line level. If none is defined at the buy line level, it searches for the system default.
Individual products in the same buy line do not have to be in the same procurement group. For example, in one buy line you can assign fast moving products to one procurement group and slow moving products to another procurement group.
The default level is defined during system installation and applies to all products unless overridden by a price line or product level procurement group.
Assigning the Product Level The product level applies to a product and overrides the buy line and default procurement groups. Before you can assign procurement information you must create the procurement group.
To assign procurement information to a product:
1. From the Maintenance menu, select Product to display the Product Maintenance window.
2. In the Product ID field, enter the product name or number and press Enter.
3. In the Procure Group field, enter the procurement group to assign to the product.
4. Save your changes and exit the window.
Assigning the Buy Line Level The Buy Line level applies to all products assigned to a buy line and overrides the default procurement group. Before you can assign procurement information you must create the procurement group.
For super buy lines that do not have a procure group specified the suggested P/O report will first look to the individual product lines contained within the super buy line to determine procure group. If individual product lines do not contain a procure group the system uses a default group of DFLT.
To assign procurement information to a buy line:
1. From the Purchase > Maintenance menu, select Buy Line Maintenance to display the Buy Line Maintenance window.
2. In the Buy Line ID field, enter the buy line and press Enter.
3. In the Procure Group field, enter the procurement group to assign to the buy line.
4. Save your changes and exit the window.
Rel. 8.7.9 Purchasing
© 2014 Epicor Software Corporation. All rights reserved. 225
Adding New Branch Settings to Procurement Groups You can add new branch settings to existing procurement groups when branches are added to your company. For example, currently your company has three branches. The company then opens a fourth branch. Instead of creating an identical procurement group for Branch 4 and updating the setting for each of the other groups, you can add the new branch settings to the existing procurement group. The new branch then inherits all the parameters for that group.
In addition, you can add the new branch to several procurement groups to increase opportunities for meeting the vendor target. The branch must be defined in Branch Maintenance before you can add it to a procurement group.
To add a new branch to an procurement group:
1. From the Purchase > Maintenance menu, select Procure Group Branch Copy to display the Procurement Group Branch Copy window.
2. In the Procure Group field, enter the ID of the procurement group to which you are adding the new branch.
3. From the File menu, select Insert New Branch.
4. In the Enter new branch or territory dialog box, enter the new ID and click OK.
5. From the Edit menu, select Transfer Branches.
6. In the Procure Group Territory Branches dialog box, enter the branches and territories that can replenish this branch. These branches and territories are listed in the Transfer Branches field on the Procurement Maintenance window.
7. From the Edit menu, select Vendors.
8. In the Vendors dialog box, enter the branches and territories that can replenish this branch. These vendors are listed in the Emergency Procure Vendors field on the Procurement Maintenance window.
9. From the Edit menu, select Warehouse > Buy Branch.
10. In the Warehouse > Buy Branch dialog box, enter the branches and territories that can replenish this branch. These branches are listed in the Warehouse Branch/Territory and Buy Branch/Territory fields on the Procurement Maintenance window.
11. Save your changes and exit the window.
Solar Eclipse Purchasing Rel. 8.7.9
226 © 2014 Epicor Software Corporation. All rights reserved.
Setting Up Transfer Branches for Procurement You can identify branches that can supply stock to other branches within the company in emergency situations. Usually you base the selection of these branches on distance. Use Procurement Group Maintenance to identify the branches in your company that can help supply another branch when an emergency procurement is needed.
In addition, you can procure an out of stock item from a branch that does not have availability. For example, you have six branches in your company. Branches 4 and 5 are the only branches that carry Product Z. Both branches are out, but Branch 2 has a customer who wants one. You can procure from Branch 4 or 5 even though the availability is 0. Use Procurement Group Branches to indicate procurement is allowed. These unavailable items can be viewed on the Transfer Procurement Confirmation window.
When you enter an item assigned to this procurement group on an order and the item is not available, the existence of any transfer branch for the designated sales branch causes PROCURE to highlight in red in sales order entry. This alerts you to procure the item from one of the transfer branches, using the Order Entry Schedule window.
To setup transfer branches for procurement:
1. From the Purchase > Maintenance menu, select Procurement Group Maintenance to display the Procurement Group Maintenance window.
2. In the Group ID field, enter the group ID for which you want to add transfer branches.
3. From the Edit menu, select Transfer Branches to display the Procurement Group Branches window for that branch.
4. In the Branch field, enter the other branches that can transfer stock to that branch.
5. Click OK to add the branches.
6. In the Ignore Availability column, indicate if you want the system to ignore availability during the procurement process and if you want to be able to procure even if availability is at 0.
Note: The system lists both the branches in which the branches display on the Transfer Branch window for the procure group in the Order column and the branches according to the amount of surplus stock they have. The branch with the most surplus is listed first in the Surplus column.
7. Repeat this procedure for each branch in your company that needs transfer branches identified.
Note: You can press the Space Bar to remove a branch, therefore deleting that branch.
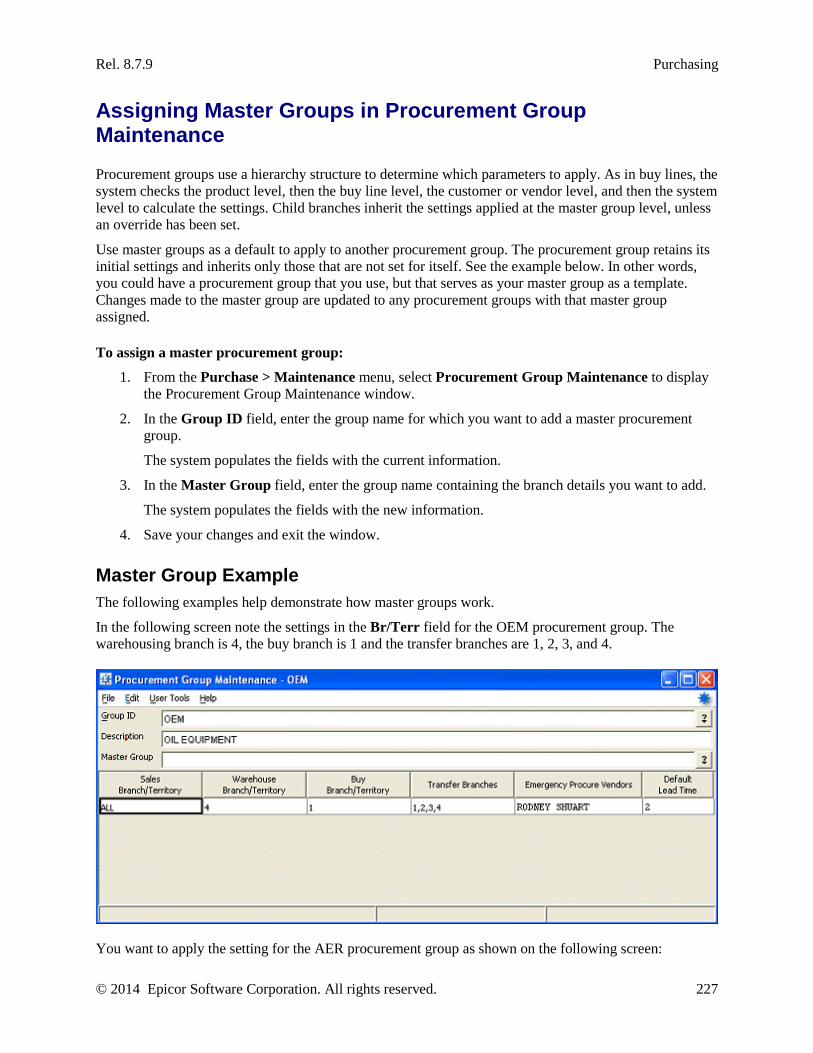
Rel. 8.7.9 Purchasing
© 2014 Epicor Software Corporation. All rights reserved. 227
Assigning Master Groups in Procurement Group Maintenance Procurement groups use a hierarchy structure to determine which parameters to apply. As in buy lines, the system checks the product level, then the buy line level, the customer or vendor level, and then the system level to calculate the settings. Child branches inherit the settings applied at the master group level, unless an override has been set.
Use master groups as a default to apply to another procurement group. The procurement group retains its initial settings and inherits only those that are not set for itself. See the example below. In other words, you could have a procurement group that you use, but that serves as your master group as a template. Changes made to the master group are updated to any procurement groups with that master group assigned.
To assign a master procurement group:
1. From the Purchase > Maintenance menu, select Procurement Group Maintenance to display the Procurement Group Maintenance window.
2. In the Group ID field, enter the group name for which you want to add a master procurement group.
The system populates the fields with the current information.
3. In the Master Group field, enter the group name containing the branch details you want to add.
The system populates the fields with the new information.
4. Save your changes and exit the window.
Master Group Example The following examples help demonstrate how master groups work.
In the following screen note the settings in the Br/Terr field for the OEM procurement group. The warehousing branch is 4, the buy branch is 1 and the transfer branches are 1, 2, 3, and 4.
You want to apply the setting for the AER procurement group as shown on the following screen:
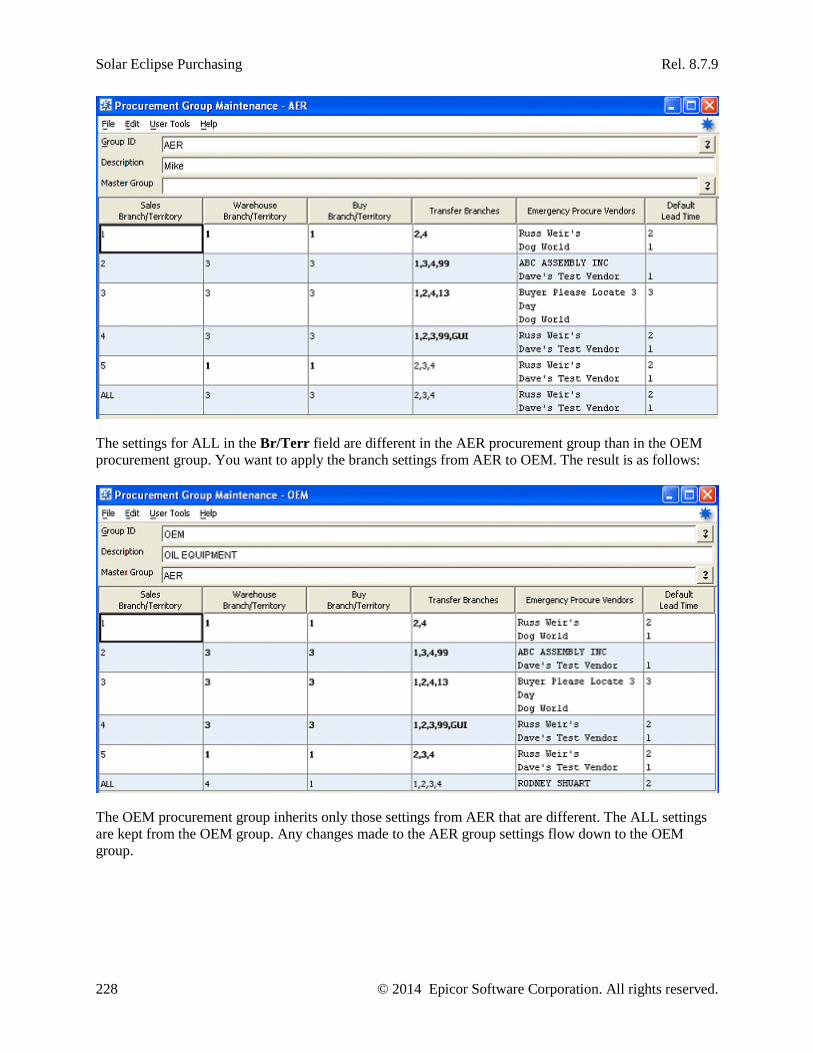
Solar Eclipse Purchasing Rel. 8.7.9
228 © 2014 Epicor Software Corporation. All rights reserved.
The settings for ALL in the Br/Terr field are different in the AER procurement group than in the OEM procurement group. You want to apply the branch settings from AER to OEM. The result is as follows:
The OEM procurement group inherits only those settings from AER that are different. The ALL settings are kept from the OEM group. Any changes made to the AER group settings flow down to the OEM group.
Rel. 8.7.9 Purchasing
© 2014 Epicor Software Corporation. All rights reserved. 229
Viewing the Procurement Group Maintenance Log The system stores data for procurement groups in the maintenance log. Use the Log hot key from the Procurement Group Maintenance window to view the data.
To view the log data for procurement groups:
1. From the Purchase > Maintenance menu, select Procurement Group Maintenance to display the Procurement Group Maintenance window.
2. In the Group ID field, enter the ID for the procurement group for which you want to view the log.
3. From the File menu, select Maintenance Log to display the Maintenance Log Viewing window.
By default the description field displays the first line of the comment.
4. From the View menu, select Expand or Synopsis to view the entire comment description or the abbreviated format.
5. Use the Select menu to search the comments.
6. Save your changes and exit the window.
Solar Eclipse Purchasing Rel. 8.7.9
230 © 2014 Epicor Software Corporation. All rights reserved.
Procurement Confirmation Overview Use the Procurement Confirmation Queue to track procurement requests from Sales Order Entry personnel. These requests do not show up on the Suggested P/O Queue. Anything procured should be tagged to a sales order. The system checks the customer's credit standing and will not create a purchase order if the customer is on credit hold. The hold must be released before the system creates transaction.
In Solar, the Default P/O Procurement Confirmation Queue Sort control maintenance record determines how the items display in this queue. You can change to the order of these items by sorting on the individual columns of the table, or by using the Change View menu option.
If the Sales Order Entry personnel need the purchasing agent to procure quickly, then the purchasing agent can use the Procurement Confirmation Report to modify a current Suggested P/O to include the procurement request. In addition, if authorized, the sales personnel can procure by creating a purchase order from the sales order. For more information, see Procuring Multiple Products.
The Procurement Confirmation Queue notifies the purchasing agent of non-stock or emergency items to be procured. You need to create procurement vendors that let you notify the purchasing agent that special attention is needed. Procurement vendors are non-vendor names such as "Buyer Please Locate Today" or "Buyer Please Locate 2nd Day Ground" that alert the purchasing agent of special circumstances attached to the non-stock item.
When transfers containing cut products have work orders created for them, the work orders automatically and immediately process if the ship via on the shipping generation of the transfer is an auto-process ship via. A work ticket prints for the processed work order. The associated transfer’s shipping generation remains in an open status.
Note: If an item is not procured because of a credit hold from the Procurement Confirmation Queue, the system does not include the item on the Open Order Status Review Queue. For more information, see Reviewing the Status of Open Sales Orders.
From the Procurement Confirmation Queue you can:
• Create purchase orders.
• Add items to purchase orders.
• Change procurement vendors.
To display summary information for this queue at all times, add a Procurement Confirmation Queue widget to the Solar Eclipse main window. For more information about widgets, see Widgets and Menu Shortcuts Overview.
To display the Procurement Confirmation Queue:
1. From the Purchase > Queues menu, select Procurement Confirmation to display the Procurement Confirmation window.
2. In the Branch field, enter the branch number you for which want to display the queue. To view procurement confirmation for all branches, type All.
3. In the Selected Items field, select: All, Printed, or Unprinted.
Note: Printed lists those items that have been printed for procurement. Unprinted lists only the items that are new in the queue since it was last printed.
Rel. 8.7.9 Purchasing
© 2014 Epicor Software Corporation. All rights reserved. 231
4. In the Buyer ID field, enter a purchasing agent ID. This choice displays procurement assigned only to by that purchasing agent. If left blank, then all queues display.
Note: To create a Procurement Buyer, see Identifying Procurement Buyers for a Buy Line.
5. Click Update. The current procurements display.
If no procurements are entered, the following message displays: No Items Found.
Note: Use the Options > Priority Color Maintenance menu to define your priority color display.
6. Use the Line Items menu to do the following:
• View the purchase order.
• Edit the purchase order.
• Create a new purchase order.
• Add the line items to another purchase order.
• Select or deselect line items.
7. Click the column headers to sort by that column information.
8. Save your changes and exit the window.
Solar Eclipse Purchasing Rel. 8.7.9
232 © 2014 Epicor Software Corporation. All rights reserved.
Creating P/Os from the Procurement Confirmation Queue Use the Procurement Confirmation Queue to add the items listed to existing purchase orders. You can create an individual purchase order for a procurement request or you can add items to existing purchase orders. Adding items to a purchase order eliminates some of the cost of a non-stock order or purchase request. For example, a purchasing agent may already have a purchase order open and set for a particular vendor. If you have a request that can be processed on this order, the company saves the cost of opening a new order. This savings includes the time to open a new order, the physical cost involved, and the shipping and handling charges related to the order.
If the quantities ordered are less than the buy package quantity as set on the Primary Inventory Maintenance window, then the purchase order is not rounded to buy package quantity. For example, product A has 4 items in a case, which is the buy package. You require that when procured, product A must be ordered in case per the buy package quantity and unit of measure. If you create a purchase order with 2 each of product A, then the purchase order quantity stays at 2 each. If you create a purchase order with 4 each of product A, then the purchase order quantity converts to the buy package quantity of a case.
To add a purchase request to a purchase order, a current purchase order must exist for that vendor in that branch.
You can ensure that a purchase order for a vendor that has exceeded their credit limit is not created. To do this, the Check Customer Credit On Procurement control maintenance record must be set to Yes. If this record is set, then before a purchase order is created from Procurement Confirmation, the system verifies that the vendor has credit approval in the system before allowing a purchase order to be entered. If the user has authorization, the system does one of the following:
• Notifies you that the order cannot be released
• Allows you to release the order
• Prompts you for a password in order to release the order.
If released from credit hold, the release and user ID are recorded in the change log.
If a purchase order is created from the Procurement Confirmation Queue and that purchase order is canceled, the ship via defaults set by the Default Ship Via For Purchase Orders control maintenance record. If the control maintenance record is not set or null, the system uses the ship via set in Vendor Maintenance.
Use the Commit Qty From Display Location control maintenance record to indicate whether users can commit products from a display location to a sales order.
To create a purchase order for procurement request:
1. From the Purchase > Queues menu, select Procurement Confirmation to display the Procurement Confirmation Queue window.
2. Display the queue with the parameters you want.
3. Select the item for which you want to create a purchase order.
4. From the Line Items menu, select Create P/O.
The system creates the P/O with the procurement request and the procurement item moves from the list.
Rel. 8.7.9 Purchasing
© 2014 Epicor Software Corporation. All rights reserved. 233
Note: If there is more than one price matrix associated with the product, the Vendor Matrix Cell Selection window displays. For more information see Creating Buy Matrix Cells.
5. At the dialog box, indicate if you want to combine all items on the purchase order for the vendor.
6. Edit the purchase order as needed.
7. Save your changes and exit the window.
To add a purchase request to a purchase order:
1. From the Purchase > Queues menu, select Procurement Confirmation to display the Procurement Confirmation Queue window.
2. Display the queue with the parameters you want.
3. Select the item you want to add to an existing purchase order.
4. From the Line Items menu, select Add to PO hot key to display the list of open P/Os.
Note: If you receive a warning message, check your permission level for the PROCUREMENT.CONFIRM authorization key. You must have permission to add a procured item to an existing purchase order.
5. At the dialog box, select the purchase order to which you want to add the purchase request.
The system adds the item to the purchase order and displays the Purchase Order Entry window.
6. Verify the purchase order was updated with the item.
7. Click the Status tab to update the status.
8. Save your changes and exit the window.
Solar Eclipse Purchasing Rel. 8.7.9
234 © 2014 Epicor Software Corporation. All rights reserved.
Changing Procurement Vendors Use the Procurement Confirmation Queue to verify the sales order, quantity, items, and the vendor from which you are procuring your items. If the vendor is incorrect, you can update it on the Procurement Confirmation window.
The sales order must be available for you to be able to make the changes. If another user is viewing or making changes to the order, you receive error messages. If the order is open by another user, you receive the following message: Order <number> is being editing by <User ID>. This change will not take effect until the order is unlocked. Press <Enter> to Continue.
In addition, if the sales order is still open when you use Create PO function, you receive the following message: Procurement ID for <sales order> has been changed. Cannot update. Press Enter to Continue.
To change a procurement vendor:
1. Display the Procurement Confirmation Queue.
2. Select the order for which you want to change the vendor and place the cursor in the Procure From field.
3. Delete the current vendor's name and enter the new vendor name.
4. Exit the window to commit the change.
Rel. 8.7.9 Purchasing
© 2014 Epicor Software Corporation. All rights reserved. 235
Measuring Vendor Performance Overview The National Association of Electrical Distributors (NAED) in association with the National Electrical Manufacturers Association (NEMA) have teamed up in an effort to gather standard metrics, or scorecards, that you can use to objectively measure their vendors' performances. Use the vendor scorecard to gather metrics for both NAED and non-NAED vendors. These metrics, such as average lead time and average shipments, can help you negotiate with your vendors and improve your own customer service.
If you are an NAED member, you can use the scorecard to gather the metrics about your vendors and send the information directly to NAED.
Important: If you have upgraded to Release 8.6.9 or later and have a build file created in a previous release, you must purge your old file and create a new file prior to using the vendor scorecard.
To use the vendor scorecard, see the following topics:
• Building the Vendor Scorecard File
• Running the Vendor Scorecard File Report
• Logging Vendor Shipping Inaccuracies
• Viewing Summary Vendor Scorecard Information
Solar Eclipse Purchasing Rel. 8.7.9
236 © 2014 Epicor Software Corporation. All rights reserved.
Building the Vendor Scorecard File
Important: If you have upgraded to Release 8.6.9 or later and have a build file created in a previous release, you must purge your old file and create a new file prior to using the vendor scorecard.
Before you run the Vendor Scorecard File Report or view summary vendor scorecard information, build the scorecard file for the specific parameters you are interested in viewing. You can schedule the scorecard to build on a regular basis using the Phantom Scheduler.
Note: The system automatically schedules the scorecard file to build during off hours. If the build does not complete prior to the phantom stop time, the system stops building the file, and resumes again during off hours.
For purchasing metrics, the vendor scorecard file includes only purchase orders and direct sales orders that are completely received in the system. The scorecard excludes purchase orders that contain one or more credit items, as well as purchase orders that are marked as exceptional.
Depending on the volume of purchase orders and direct orders in your system, the amount of data that the system analyzes to build the report can be quite large. For this reason, we recommend that you build the scorecard file once a month, or at least quarterly, and use the reload options to gather data in the most efficient manner after you build the main file. We also recommend that you schedule the process to run during non-work hours.
Important: If you want to save data from a previous file, save the reports you have run on previous files to your computer prior to building a new vendor scorecard file.
Building the Main Vendor Scorecard File To use the vendor score card, you must first build the main vendor scorecard file for the select buy lines you want to analyze. After you build the main file, you can reload data and supplement the main file's data.
If you have successfully built a vendor scorecard file, when you open the Vendor Scorecard File Build window, the Main Build Information section is disabled. You can reload the data, add vendors and buy lines to the existing data, or purge the scorecard file.
Note: If you do not see the buy lines listed as expected, we recommend reviewing how your buy lines are set up in Assigning Vendors to Buy Lines. The Type field should be set to either Line, Both, or the ScoreCard check box should be selected.
To build the main vendor scorecard file:
1. From the Reports > End of Month Reports > Vendor Scorecard menu, select Vendor Scorecard File Build to display the Vendor Scorecard File Build window.
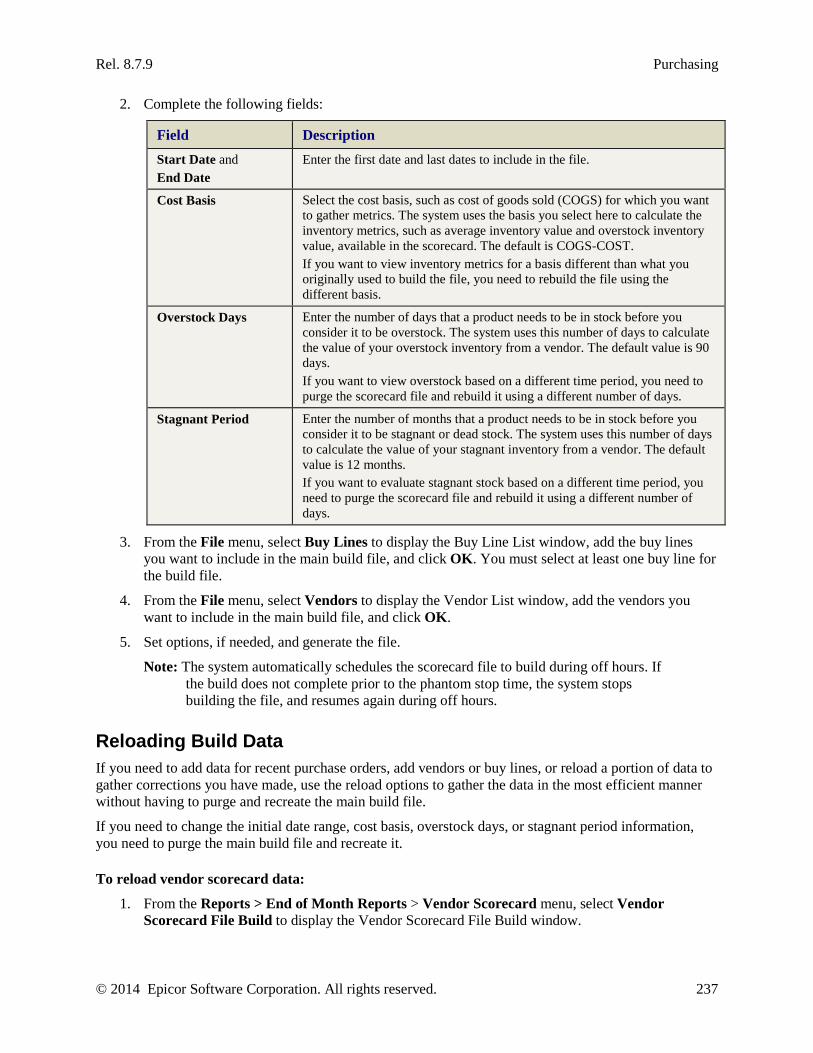
Rel. 8.7.9 Purchasing
© 2014 Epicor Software Corporation. All rights reserved. 237
2. Complete the following fields:
Field Description Start Date and End Date
Enter the first date and last dates to include in the file.
Cost Basis Select the cost basis, such as cost of goods sold (COGS) for which you want to gather metrics. The system uses the basis you select here to calculate the inventory metrics, such as average inventory value and overstock inventory value, available in the scorecard. The default is COGS-COST. If you want to view inventory metrics for a basis different than what you originally used to build the file, you need to rebuild the file using the different basis.
Overstock Days Enter the number of days that a product needs to be in stock before you consider it to be overstock. The system uses this number of days to calculate the value of your overstock inventory from a vendor. The default value is 90 days. If you want to view overstock based on a different time period, you need to purge the scorecard file and rebuild it using a different number of days.
Stagnant Period Enter the number of months that a product needs to be in stock before you consider it to be stagnant or dead stock. The system uses this number of days to calculate the value of your stagnant inventory from a vendor. The default value is 12 months. If you want to evaluate stagnant stock based on a different time period, you need to purge the scorecard file and rebuild it using a different number of days.
3. From the File menu, select Buy Lines to display the Buy Line List window, add the buy lines you want to include in the main build file, and click OK. You must select at least one buy line for the build file.
4. From the File menu, select Vendors to display the Vendor List window, add the vendors you want to include in the main build file, and click OK.
5. Set options, if needed, and generate the file.
Note: The system automatically schedules the scorecard file to build during off hours. If the build does not complete prior to the phantom stop time, the system stops building the file, and resumes again during off hours.
Reloading Build Data If you need to add data for recent purchase orders, add vendors or buy lines, or reload a portion of data to gather corrections you have made, use the reload options to gather the data in the most efficient manner without having to purge and recreate the main build file.
If you need to change the initial date range, cost basis, overstock days, or stagnant period information, you need to purge the main build file and recreate it.
To reload vendor scorecard data:
1. From the Reports > End of Month Reports > Vendor Scorecard menu, select Vendor Scorecard File Build to display the Vendor Scorecard File Build window.
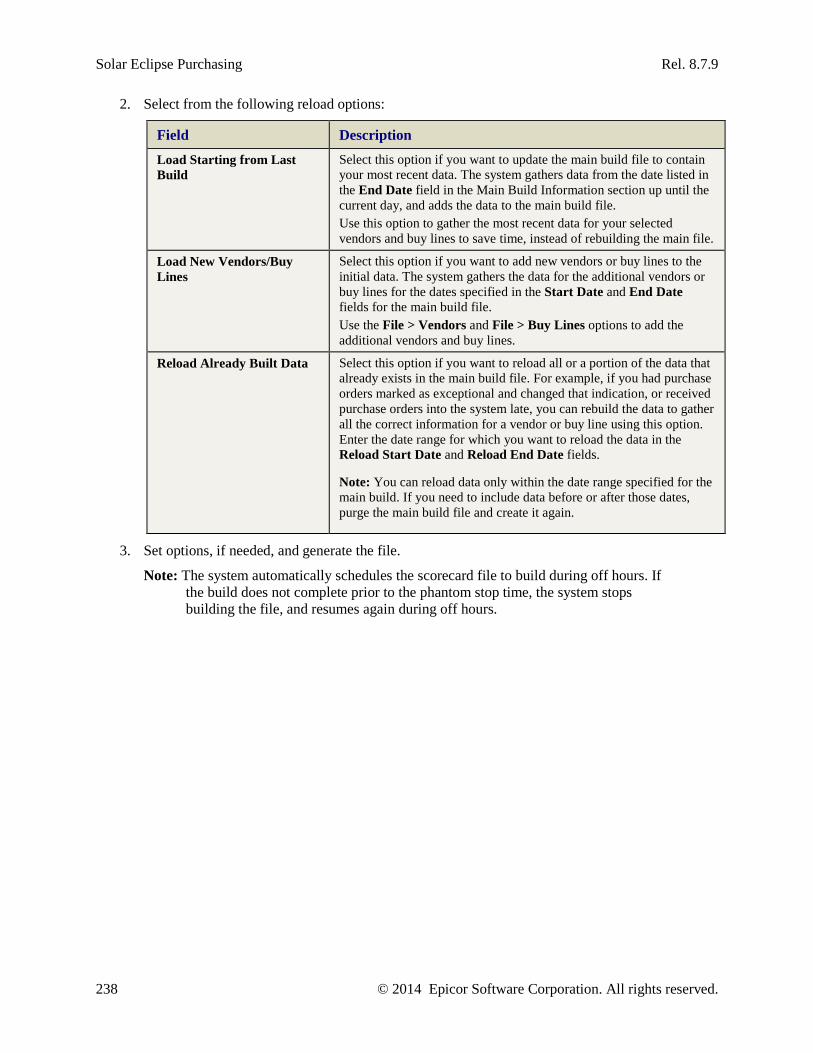
Solar Eclipse Purchasing Rel. 8.7.9
238 © 2014 Epicor Software Corporation. All rights reserved.
2. Select from the following reload options:
Field Description Load Starting from Last Build
Select this option if you want to update the main build file to contain your most recent data. The system gathers data from the date listed in the End Date field in the Main Build Information section up until the current day, and adds the data to the main build file. Use this option to gather the most recent data for your selected vendors and buy lines to save time, instead of rebuilding the main file.
Load New Vendors/Buy Lines
Select this option if you want to add new vendors or buy lines to the initial data. The system gathers the data for the additional vendors or buy lines for the dates specified in the Start Date and End Date fields for the main build file. Use the File > Vendors and File > Buy Lines options to add the additional vendors and buy lines.
Reload Already Built Data Select this option if you want to reload all or a portion of the data that already exists in the main build file. For example, if you had purchase orders marked as exceptional and changed that indication, or received purchase orders into the system late, you can rebuild the data to gather all the correct information for a vendor or buy line using this option. Enter the date range for which you want to reload the data in the Reload Start Date and Reload End Date fields.
Note: You can reload data only within the date range specified for the main build. If you need to include data before or after those dates, purge the main build file and create it again.
3. Set options, if needed, and generate the file.
Note: The system automatically schedules the scorecard file to build during off hours. If the build does not complete prior to the phantom stop time, the system stops building the file, and resumes again during off hours.
Rel. 8.7.9 Purchasing
© 2014 Epicor Software Corporation. All rights reserved. 239
Purging the Vendor Scorecard File As work with your vendor scorecard and measure the performance of your vendors, you may find that you have built the vendor scorecard file for the wrong dates or for the wrong date ranges for stagnant and overstock inventory. However, you can purge the existing scorecard file and rebuild it containing the data for the correct dates. In addition, as new metrics are added to the scorecard in future Eclipse releases, you might need to purge your existing scorecard file and create a fresh file to report on the new metrics.
Important: Purging the vendor scorecard file deletes all the existing data from the file and requires you to rebuild it. If you want to save data from the file, save the reports you have run prior to running the purge.
To purge the vendor scorecard file:
1. From the Reports > End of Month Reports > Vendor Scorecard menu, select Vendor Scorecard File Build to display the Vendor Scorecard File Build window.
2. From the File menu, select Purge and click Yes at the prompt.
Click No at the prompt to return to the Vendor Scorecard File Build window without purging the data.
Solar Eclipse Purchasing Rel. 8.7.9
240 © 2014 Epicor Software Corporation. All rights reserved.
Running the Vendor Scorecard File Report After you build the vendor scorecard file, you can run reports on the data the system gathered. From the report, you can drill into purchase orders to review order and line item data. You can also drill into orders to log shipping inaccuracy codes for specific line items. If you are a member of the National Association of Electrical Distributors (NAED), you can run the report and print or download the results to send to NAED.
If you prefer to view a single vendor's scorecard data online in a summary inquiry window without the individual purchase order detail, see Viewing Summary Vendor Scorecard Information.
The vendor scorecard includes only purchase orders, direct sales orders, and procurements that are completely received in the system. The scorecard excludes purchase orders that contain one or more credit items, as well as purchase orders that are marked as exceptional.
The report shows the same metrics as the inquiry screen. For more information, see Viewing Summary Vendor Scorecard Information.
To run the Vendor Scorecard File Report:
1. From the Reports > End of Month Reports > Vendor Scorecard menu, select Vendor Scorecard Report to display the Vendor Scorecard File Report/Download window.
2. In the Branch field, enter the shipping branch, branches, or territories for which you want to run the report.
3. In the Start Date and End Date field, enter the first and last date in the range of dates for which to select purchase orders, directs, and procurements to include in the report.
4. In the Vendor field, enter or select the vendor you want to include in the report.
To include more than one vendor in the report, click the Multi button and enter all the vendors you want to include. Leave this field blank to include all vendors in the report. To run the report for all vendors assigned to buy lines as Vendor Scorecard vendors, leave this field blank. For more information about assigning Vendor Scorecard vendors to a buy line, see Assigning Vendors to Buy Lines.
5. In the Include area, select which order types to include in the report.
Field Description Stock POs Includes stock purchase orders in the report. The report includes only
purchase orders that are completely received in the system, and excludes purchase orders that contain credit items, and orders flagged as exceptional. To run the report for only stock purchase orders, select this check box and deselect the others in this area.
Directs Includes direct orders in the report. The report includes only direct orders that are completely received in the system, and excludes directs that contain credit items, and orders flagged as exceptional. To run the report for only directs, select this check box and deselect the others in this area.
Rel. 8.7.9 Purchasing
© 2014 Epicor Software Corporation. All rights reserved. 241
Field Description Procurements Includes procurement purchase orders in the report. The report includes only
procurements that are completely received in the system, and excludes any procurements with credit items, and orders flagged as exceptional. To run the report for only procurements, select this check box and deselect the others in this area.
6. In the Options area, select additional options for data in the report.
Field Description Show Inventory Metrics Select this check box to include average, overstock, stagnant, and
inventory turns information for each vendor in the report. Use the options in the Inventory Metrics section to change the date as of which the metrics are calculated, and to select the inventory types to include.
Show PO Detail Select this check box to break down data by individual purchase order for each vendor included in the report. To report only on the summary information without the detail, deselect this check box.
Page Break on Vendor Select this check box to insert a page break after each vendor. Deselect the check box to use natural page breaks in the report and to not separate each vendor's data with a page break.
7. Set Options, if needed, and run the report.
Solar Eclipse Purchasing Rel. 8.7.9
242 © 2014 Epicor Software Corporation. All rights reserved.
Viewing Summary Vendor Scorecard Information After you build the vendor scorecard file, you can inquire about a single vendor's high level scorecard without running a detailed report. If you prefer to view a scorecard data with individual purchase order detail, or a scorecard with data for more than one vendor, see Running the Vendor Scorecard File Report. If you prefer to view the vendor scorecard metrics in graph form, see Trending Summary Vendor Scorecard Information.
For purchasing metrics, the vendor scorecard includes only purchase orders and direct sales orders that are completely received in the system. The scorecard excludes purchase orders that contain one or more credit items, as well as purchase orders that are marked as exceptional.
See the What the Inquiry Shows section for a description of the metrics included in the summary.
Note: If you want to evaluate inventory metrics using a different cost basis, number of overstock days, or stagnant inventory days, you need to purge and rebuild the vendor scorecard file.
To inquire about a vendor's performance:
1. From the Reports > End of Month Reports > Vendor Scorecard menu, select Vendor Scorecard Inquiry to display the Vendor Scorecard Inquiry window.
2. In the Vendor field, enter the vendor for which you want to view summary information.
If there is more than one ship-from vendors linked to a pay-to vendor, enter the pay-to vendor to see all the purchase order data for all the associated ship-from vendors. To see data for only one ship-from vendor, enter that vendor in this field.
The inventory metrics report on products that are associated with the vendor you enter in this field. You can select one vendor to associate with a buy line. If you enter a pay-to vendor in the inquiry window, the inventory metrics are calculated for products linked to the pay-to vendor ship-from vendors under that pay-to vendor. To see inventory metrics for only products linked to a ship from, enter that ship-from vendor in this field.
Note: If you associate a pay-to vendor with a buy line, and enter a ship-from vendor in the inquiry window, the inventory metrics do not include that buy line.
3. In the Branch field, enter the shipping branch, branches, or territories for which want to view vendor data.
4. In the Start Date and End Date fields, enter the first date and last date in the range of dates for which to select purchase orders, directs, and procurements to include in the summary.
If you enter an end date that is later than the end date you used when you built the scorecard file, the inquiry shows only data up to the last date available in the file.
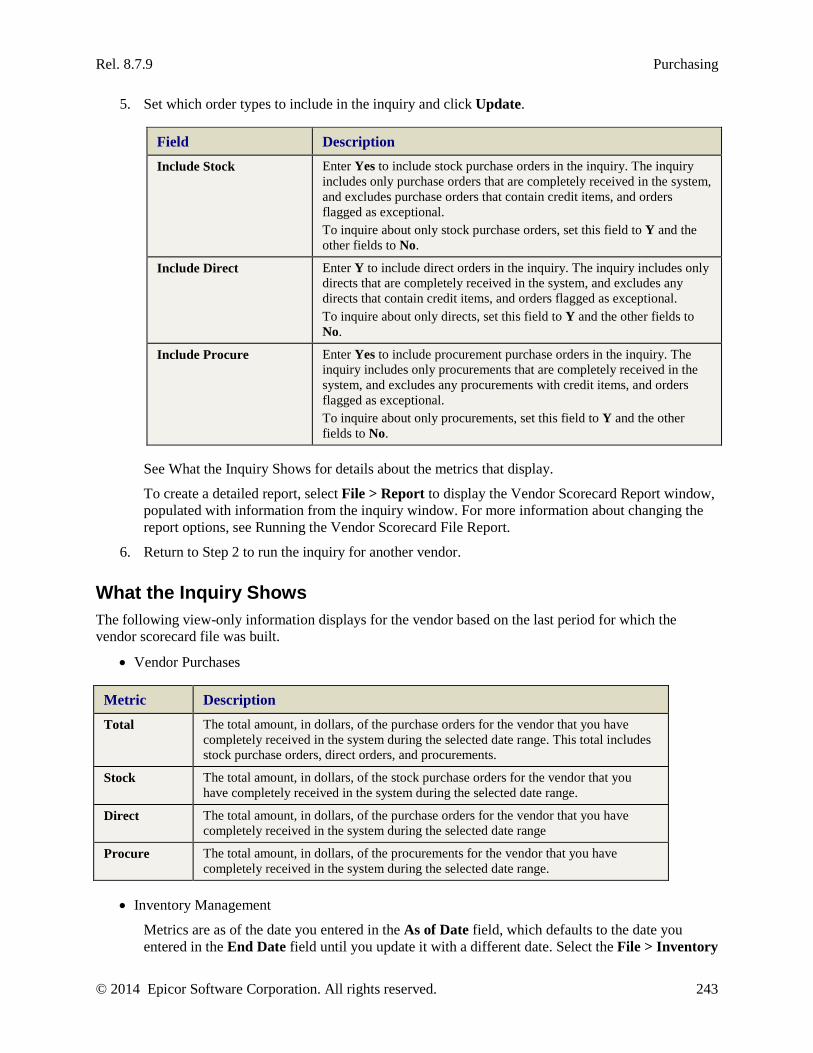
Rel. 8.7.9 Purchasing
© 2014 Epicor Software Corporation. All rights reserved. 243
5. Set which order types to include in the inquiry and click Update.
Field Description Include Stock Enter Yes to include stock purchase orders in the inquiry. The inquiry
includes only purchase orders that are completely received in the system, and excludes purchase orders that contain credit items, and orders flagged as exceptional. To inquire about only stock purchase orders, set this field to Y and the other fields to No.
Include Direct Enter Y to include direct orders in the inquiry. The inquiry includes only directs that are completely received in the system, and excludes any directs that contain credit items, and orders flagged as exceptional. To inquire about only directs, set this field to Y and the other fields to No.
Include Procure Enter Yes to include procurement purchase orders in the inquiry. The inquiry includes only procurements that are completely received in the system, and excludes any procurements with credit items, and orders flagged as exceptional. To inquire about only procurements, set this field to Y and the other fields to No.
See What the Inquiry Shows for details about the metrics that display.
To create a detailed report, select File > Report to display the Vendor Scorecard Report window, populated with information from the inquiry window. For more information about changing the report options, see Running the Vendor Scorecard File Report.
6. Return to Step 2 to run the inquiry for another vendor.
What the Inquiry Shows The following view-only information displays for the vendor based on the last period for which the vendor scorecard file was built.
• Vendor Purchases
Metric Description Total The total amount, in dollars, of the purchase orders for the vendor that you have
completely received in the system during the selected date range. This total includes stock purchase orders, direct orders, and procurements.
Stock The total amount, in dollars, of the stock purchase orders for the vendor that you have completely received in the system during the selected date range.
Direct The total amount, in dollars, of the purchase orders for the vendor that you have completely received in the system during the selected date range
Procure The total amount, in dollars, of the procurements for the vendor that you have completely received in the system during the selected date range.
• Inventory Management
Metrics are as of the date you entered in the As of Date field, which defaults to the date you entered in the End Date field until you update it with a different date. Select the File > Inventory
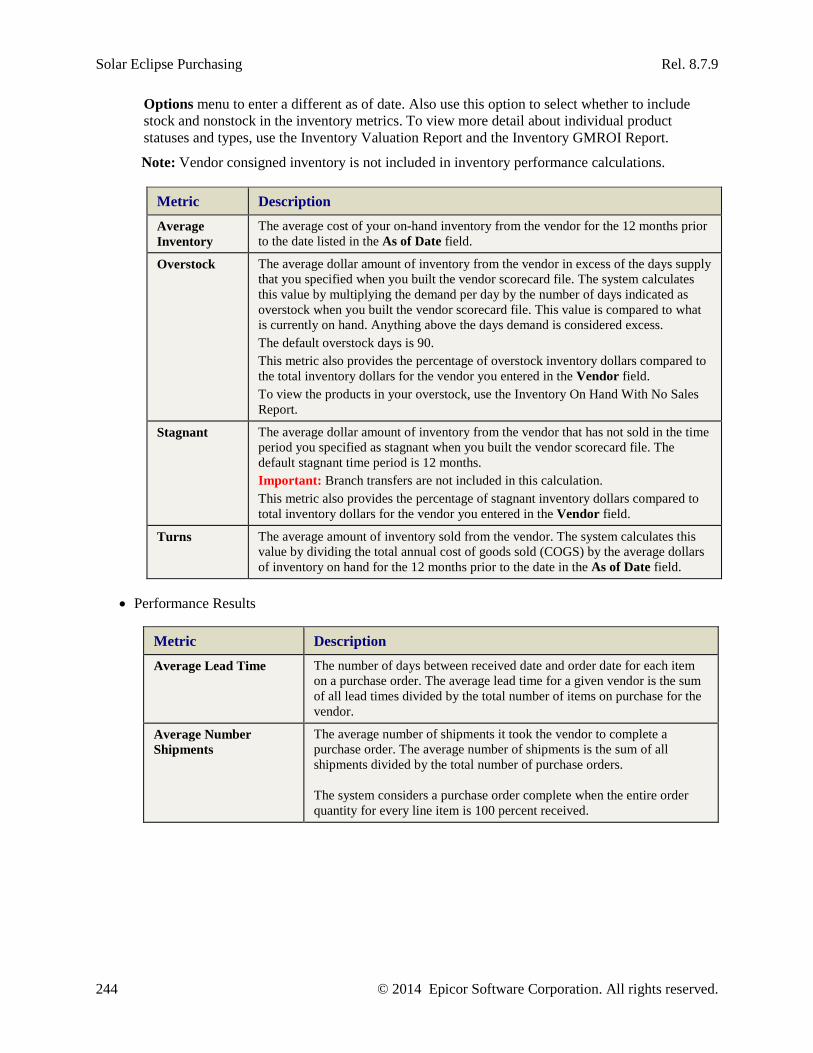
Solar Eclipse Purchasing Rel. 8.7.9
244 © 2014 Epicor Software Corporation. All rights reserved.
Options menu to enter a different as of date. Also use this option to select whether to include stock and nonstock in the inventory metrics. To view more detail about individual product statuses and types, use the Inventory Valuation Report and the Inventory GMROI Report.
Note: Vendor consigned inventory is not included in inventory performance calculations.
Metric Description Average Inventory
The average cost of your on-hand inventory from the vendor for the 12 months prior to the date listed in the As of Date field.
Overstock The average dollar amount of inventory from the vendor in excess of the days supply that you specified when you built the vendor scorecard file. The system calculates this value by multiplying the demand per day by the number of days indicated as overstock when you built the vendor scorecard file. This value is compared to what is currently on hand. Anything above the days demand is considered excess. The default overstock days is 90. This metric also provides the percentage of overstock inventory dollars compared to the total inventory dollars for the vendor you entered in the Vendor field. To view the products in your overstock, use the Inventory On Hand With No Sales Report.
Stagnant The average dollar amount of inventory from the vendor that has not sold in the time period you specified as stagnant when you built the vendor scorecard file. The default stagnant time period is 12 months. Important: Branch transfers are not included in this calculation. This metric also provides the percentage of stagnant inventory dollars compared to total inventory dollars for the vendor you entered in the Vendor field.
Turns The average amount of inventory sold from the vendor. The system calculates this value by dividing the total annual cost of goods sold (COGS) by the average dollars of inventory on hand for the 12 months prior to the date in the As of Date field.
• Performance Results
Metric Description Average Lead Time The number of days between received date and order date for each item
on a purchase order. The average lead time for a given vendor is the sum of all lead times divided by the total number of items on purchase for the vendor.
Average Number Shipments
The average number of shipments it took the vendor to complete a purchase order. The average number of shipments is the sum of all shipments divided by the total number of purchase orders. The system considers a purchase order complete when the entire order quantity for every line item is 100 percent received.
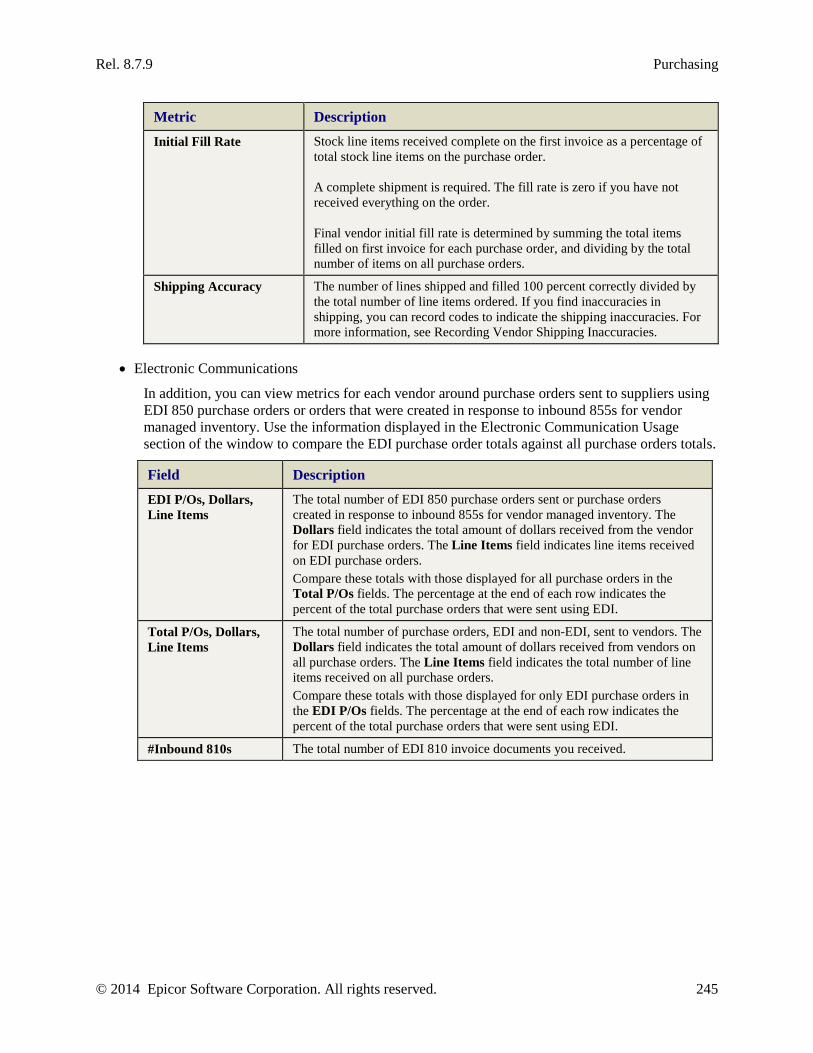
Rel. 8.7.9 Purchasing
© 2014 Epicor Software Corporation. All rights reserved. 245
Metric Description Initial Fill Rate Stock line items received complete on the first invoice as a percentage of
total stock line items on the purchase order. A complete shipment is required. The fill rate is zero if you have not received everything on the order. Final vendor initial fill rate is determined by summing the total items filled on first invoice for each purchase order, and dividing by the total number of items on all purchase orders.
Shipping Accuracy The number of lines shipped and filled 100 percent correctly divided by the total number of line items ordered. If you find inaccuracies in shipping, you can record codes to indicate the shipping inaccuracies. For more information, see Recording Vendor Shipping Inaccuracies.
• Electronic Communications
In addition, you can view metrics for each vendor around purchase orders sent to suppliers using EDI 850 purchase orders or orders that were created in response to inbound 855s for vendor managed inventory. Use the information displayed in the Electronic Communication Usage section of the window to compare the EDI purchase order totals against all purchase orders totals.
Field Description EDI P/Os, Dollars, Line Items
The total number of EDI 850 purchase orders sent or purchase orders created in response to inbound 855s for vendor managed inventory. The Dollars field indicates the total amount of dollars received from the vendor for EDI purchase orders. The Line Items field indicates line items received on EDI purchase orders. Compare these totals with those displayed for all purchase orders in the Total P/Os fields. The percentage at the end of each row indicates the percent of the total purchase orders that were sent using EDI.
Total P/Os, Dollars, Line Items
The total number of purchase orders, EDI and non-EDI, sent to vendors. The Dollars field indicates the total amount of dollars received from vendors on all purchase orders. The Line Items field indicates the total number of line items received on all purchase orders. Compare these totals with those displayed for only EDI purchase orders in the EDI P/Os fields. The percentage at the end of each row indicates the percent of the total purchase orders that were sent using EDI.
#Inbound 810s The total number of EDI 810 invoice documents you received.
Solar Eclipse Purchasing Rel. 8.7.9
246 © 2014 Epicor Software Corporation. All rights reserved.
Trending Summary Vendor Scorecard Information After you build the vendor scorecard file, you can inquire and view a vendor's high level scorecard in graph form, which establishes a visual trend for the vendor's performance. If you prefer to view a scorecard data with individual purchase order detail, or a scorecard with data for more than one vendor, see Running the Vendor Scorecard File Report.
For information about the metrics that display for each vendor, see the What the Inquiry Shows.
Note: If you want to evaluate inventory metrics using a different cost basis, number of overstock days, or stagnant inventory days, you need to purge and rebuild the vendor scorecard file.
To trend the summary vendor scorecard information:
1. From the Reports > End of Month Reports > Vendor Scorecard menu, select Vendor Scorecard Inquiry to display the Vendor Scorecard Inquiry window.
2. Complete the selection fields to gather data about the vendor's performance.
3. Click the graph icon next to the metric you want to display in graph format.
The system displays the graph in a separate window. Use the data selection options, which are the same options used in the Vendor Scorecard Inquiry, at the top of the window display different information in the graph.

Rel. 8.7.9 Purchasing
© 2014 Epicor Software Corporation. All rights reserved. 247
Logging Vendor Shipping Inaccuracies For any line item on a purchase order or direct sales order, you can enter any combination of the following shipping inaccuracy codes to indicate a shipping inaccuracy or discrepancy for the line item:
• Carrier Claims - The item was lost or damaged after it left the vendor on its way to you.
• Wrong Quantity - The vendor shipped too many or not enough of the product.
• Wrong Part Number - The vendor shipped a product with a different part number than what you indicated on the order.
• Item Not on P/O - The vendor shipped an item that was not on the order.
• Packing List Error - Any packing list error, or no packing list included with the shipment.
If you are viewing the Vendor Scorecard File Report from your Hold file, you can drill directly into the purchase orders or direct sales orders to which you want to add shipping inaccuracy codes.
To log a vendor shipping inaccuracy:
1. From a purchase order or a direct sales order, select the line item for which you want to record a shipping inaccuracy code and press Shift F6.
2. Select Vendor Scorecard Shipping Inaccuracy Entry to display the Vendor Scorecard Shipping Inaccuracies Entry window.
The system populates the header fields in the window.
Field Description Vendor The vendor to which you submitted the purchase order.
Order # The purchase order or direct sales order number.
Date, Time The date and time you pressed Shift F6 from the purchase order or direct sales to log the shipping inaccuracy.
Product # The product part number or product description in the line item for which you are logging the shipping inaccuracy.
Branch The branch to which the vendor shipped the line item.
3. In the Code field, select the code that applies to the shipping inaccuracy for the line item.
Move your cursor to a new line and enter multiple codes, as needed.
4. Save your changes and close the window.
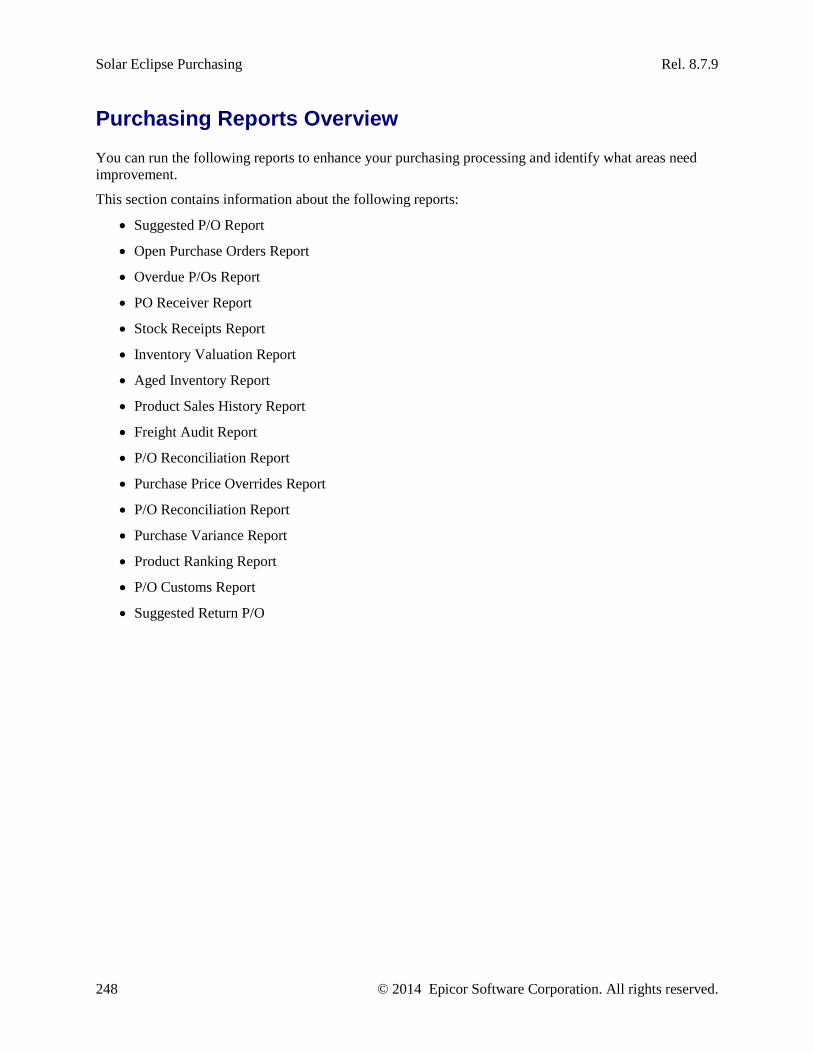
Solar Eclipse Purchasing Rel. 8.7.9
248 © 2014 Epicor Software Corporation. All rights reserved.
Purchasing Reports Overview You can run the following reports to enhance your purchasing processing and identify what areas need improvement.
This section contains information about the following reports:
• Suggested P/O Report
• Open Purchase Orders Report
• Overdue P/Os Report
• PO Receiver Report
• Stock Receipts Report
• Inventory Valuation Report
• Aged Inventory Report
• Product Sales History Report
• Freight Audit Report
• P/O Reconciliation Report
• Purchase Price Overrides Report
• P/O Reconciliation Report
• Purchase Variance Report
• Product Ranking Report
• P/O Customs Report
• Suggested Return P/O

Rel. 8.7.9 Purchasing
© 2014 Epicor Software Corporation. All rights reserved. 249
Running the Suggested P/O Program The Suggested Purchase Order (P/O) program uses order cycle information (PILs, demand, and vendor target) to propose purchase quantities for products on Suggested P/O reports. A summary of these reports displays in the Suggested P/O Queue.
The Suggested P/O program populates the Suggested P/O Queue with a report for each buy line that has a product below its order point. The program uses the order points, line points, and surplus points of those buy lines listed in the queue to suggest the short buy or emergency buy. To meet the vendor target, the system suggests buying products back to their line points and moves the line point, based on expanding or contracting order cycles, until the vendor target is met or exceeded.
Important: The projected inventory level (PIL) listed on this report will be different from the PIL indicated on the Primary Inventory Maintenance window. This difference is because the PIL on the Suggested P/O program is calculated based on the order cycle. The PIL on the Primary Inventory Maintenance window is real-time and is calculated based on all orders coming into the system and going out.
Note: The plus sign (+) on the Suggested PO Report indicates that there is at least one warehouse in the network that has 0 on hand.
Most buy lines contain many products and due to the large number, it is difficult to know which buy lines have products below their order points. Therefore, the Suggested P/O program is most commonly run for all buy lines at once. If you run the Suggested P/O program for one buy line and no products are below order point, the system displays the message: Report Not Found.
Secondary Buy Lines Also, when suggesting a purchase order that uses a secondary buy line for a product, the system uses the secondary buy line's procurement path and not the one set up for the product's primary buy line. Override hierarchies still apply.
Note: If your company uses secondary buy lines, the processing time for this report can be longer than usual.
Package Quantities When calculating the suggestions, the system rounds package quantities at the child branch level and adds the need to the parent branch's calculation, if the Divisibility flag is set to No at the parent branch level. This ensures that the system does not suggest broken carton quantities if the purchasing branch has the Divisibility flag set to No. For example, the parent branch has the Buy Package quantity set at 100 and the Divisibility flag set to No. The child branch has the Divisibility flag set to Yes. The parent branch requires a quantity of 15. The child branch requires 9. Therefore, the total quantity needed is 24. The quantity is rounded to the package, 100, which fills the needs of both parent and child.
Costs The Suggested P/O Program displays costs for items based on the time the report is run. For example, the cost could change when running the Suggest P/O program for many branches at once. The program can take one to two minutes if there are several branches to query. If a cost has been changed while the
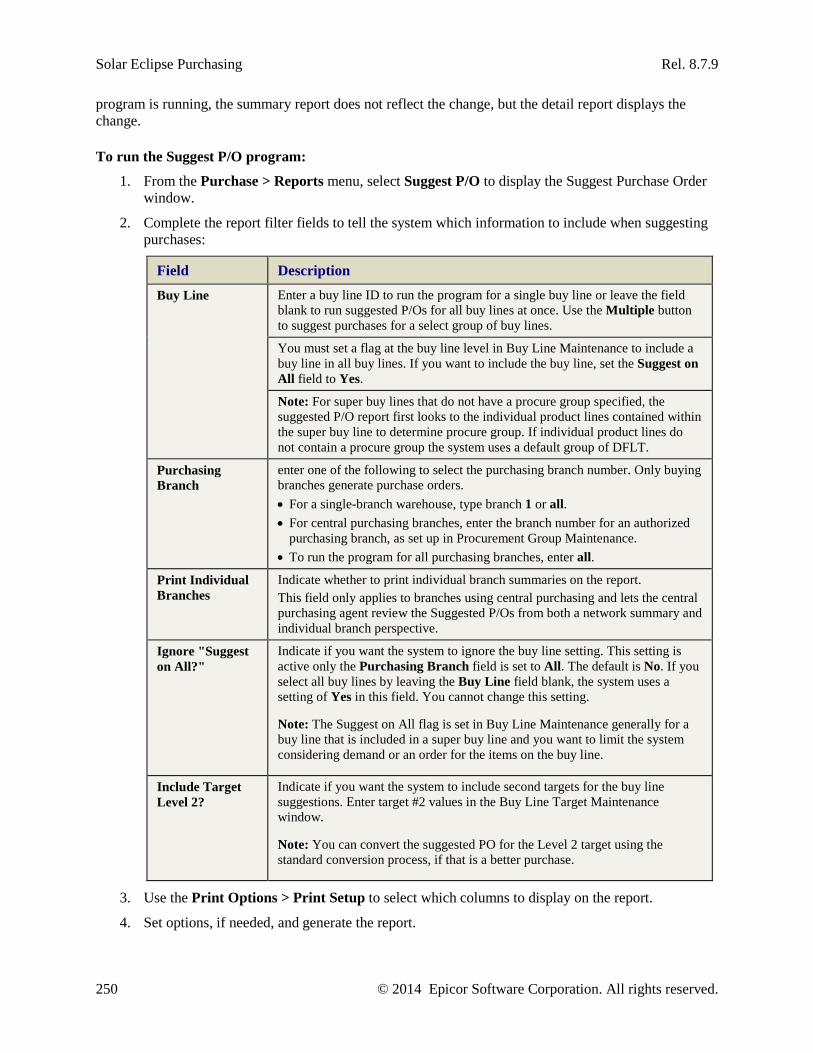
Solar Eclipse Purchasing Rel. 8.7.9
250 © 2014 Epicor Software Corporation. All rights reserved.
program is running, the summary report does not reflect the change, but the detail report displays the change.
To run the Suggest P/O program:
1. From the Purchase > Reports menu, select Suggest P/O to display the Suggest Purchase Order window.
2. Complete the report filter fields to tell the system which information to include when suggesting purchases:
Field Description Buy Line Enter a buy line ID to run the program for a single buy line or leave the field
blank to run suggested P/Os for all buy lines at once. Use the Multiple button to suggest purchases for a select group of buy lines.
You must set a flag at the buy line level in Buy Line Maintenance to include a buy line in all buy lines. If you want to include the buy line, set the Suggest on All field to Yes.
Note: For super buy lines that do not have a procure group specified, the suggested P/O report first looks to the individual product lines contained within the super buy line to determine procure group. If individual product lines do not contain a procure group the system uses a default group of DFLT.
Purchasing Branch
enter one of the following to select the purchasing branch number. Only buying branches generate purchase orders. • For a single-branch warehouse, type branch 1 or all. • For central purchasing branches, enter the branch number for an authorized
purchasing branch, as set up in Procurement Group Maintenance. • To run the program for all purchasing branches, enter all.
Print Individual Branches
Indicate whether to print individual branch summaries on the report. This field only applies to branches using central purchasing and lets the central purchasing agent review the Suggested P/Os from both a network summary and individual branch perspective.
Ignore "Suggest on All?"
Indicate if you want the system to ignore the buy line setting. This setting is active only the Purchasing Branch field is set to All. The default is No. If you select all buy lines by leaving the Buy Line field blank, the system uses a setting of Yes in this field. You cannot change this setting.
Note: The Suggest on All flag is set in Buy Line Maintenance generally for a buy line that is included in a super buy line and you want to limit the system considering demand or an order for the items on the buy line.
Include Target Level 2?
Indicate if you want the system to include second targets for the buy line suggestions. Enter target #2 values in the Buy Line Target Maintenance window.
Note: You can convert the suggested PO for the Level 2 target using the standard conversion process, if that is a better purchase.
3. Use the Print Options > Print Setup to select which columns to display on the report.
4. Set options, if needed, and generate the report.

Rel. 8.7.9 Purchasing
© 2014 Epicor Software Corporation. All rights reserved. 251
The Suggested Purchase Order window closes.
Important: If a customer who is on credit hold orders a non-stock item, the system displays an error on the Suggested P/O Report by the item alerting the purchasing agent. This alert can help keep your warehouse free of non-stock items ordered that may not get paid for.
Suggested P/O Error Report When the suggested P/O program runs, the system checks the following fields in the product file. If any of these fields have invalid data, such as a letter in the Min field, then the system creates a Suggested P/O Error Report and places it in Your Hold Files. The system creates this error report if any of the following product file fields have misinformation:
• MIN
• MAX
• Remnant Percent
• Remnant Quantity
• Order Point
• Line Point
The report helps you when you import your data into Eclipse to make sure you are mapping the correct data to the correct fields. While the Suggested P/O program continues to run, it creates this report and lists the products with bad data so you can update the information and then rerun the Suggested P/O Report.
For information about what columns are on the report and available to add to the report, see What the Suggested P/O Report Shows What the Suggested P/O Report Shows in this documentation.
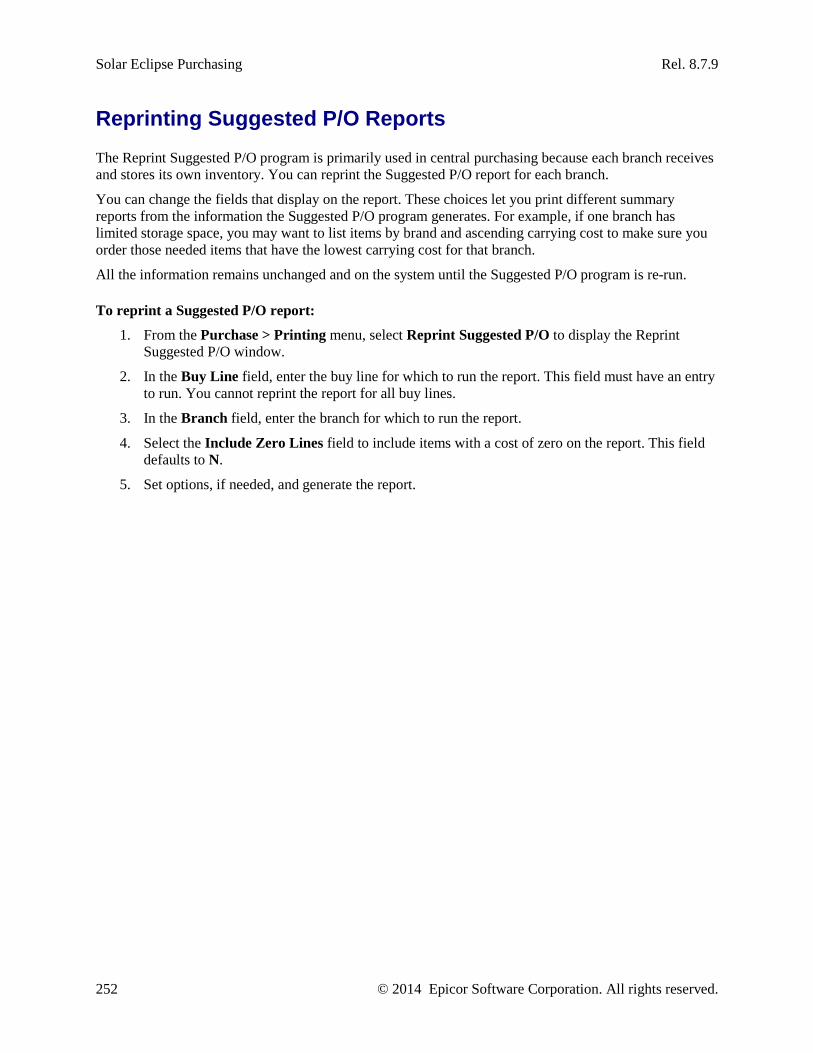
Solar Eclipse Purchasing Rel. 8.7.9
252 © 2014 Epicor Software Corporation. All rights reserved.
Reprinting Suggested P/O Reports The Reprint Suggested P/O program is primarily used in central purchasing because each branch receives and stores its own inventory. You can reprint the Suggested P/O report for each branch.
You can change the fields that display on the report. These choices let you print different summary reports from the information the Suggested P/O program generates. For example, if one branch has limited storage space, you may want to list items by brand and ascending carrying cost to make sure you order those needed items that have the lowest carrying cost for that branch.
All the information remains unchanged and on the system until the Suggested P/O program is re-run.
To reprint a Suggested P/O report:
1. From the Purchase > Printing menu, select Reprint Suggested P/O to display the Reprint Suggested P/O window.
2. In the Buy Line field, enter the buy line for which to run the report. This field must have an entry to run. You cannot reprint the report for all buy lines.
3. In the Branch field, enter the branch for which to run the report.
4. Select the Include Zero Lines field to include items with a cost of zero on the report. This field defaults to N.
5. Set options, if needed, and generate the report.
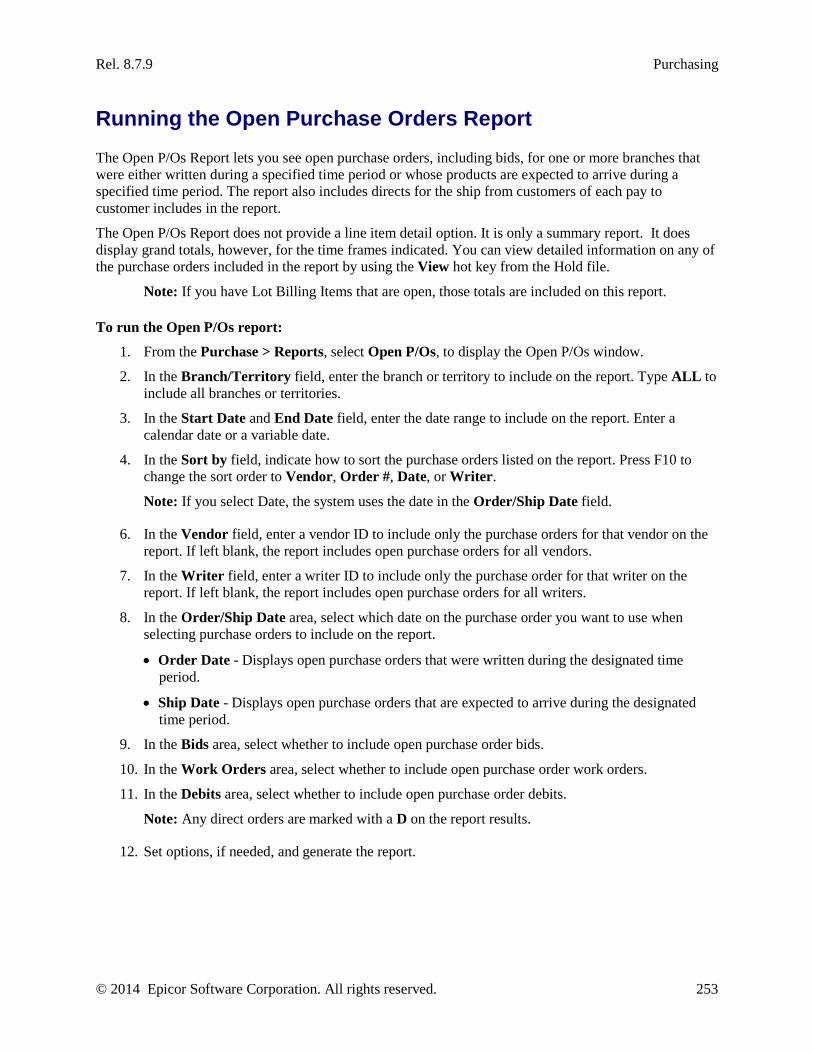
Rel. 8.7.9 Purchasing
© 2014 Epicor Software Corporation. All rights reserved. 253
Running the Open Purchase Orders Report The Open P/Os Report lets you see open purchase orders, including bids, for one or more branches that were either written during a specified time period or whose products are expected to arrive during a specified time period. The report also includes directs for the ship from customers of each pay to customer includes in the report.
The Open P/Os Report does not provide a line item detail option. It is only a summary report. It does display grand totals, however, for the time frames indicated. You can view detailed information on any of the purchase orders included in the report by using the View hot key from the Hold file.
Note: If you have Lot Billing Items that are open, those totals are included on this report.
To run the Open P/Os report:
1. From the Purchase > Reports, select Open P/Os, to display the Open P/Os window.
2. In the Branch/Territory field, enter the branch or territory to include on the report. Type ALL to include all branches or territories.
3. In the Start Date and End Date field, enter the date range to include on the report. Enter a calendar date or a variable date.
4. In the Sort by field, indicate how to sort the purchase orders listed on the report. Press F10 to change the sort order to Vendor, Order #, Date, or Writer.
Note: If you select Date, the system uses the date in the Order/Ship Date field.
6. In the Vendor field, enter a vendor ID to include only the purchase orders for that vendor on the report. If left blank, the report includes open purchase orders for all vendors.
7. In the Writer field, enter a writer ID to include only the purchase order for that writer on the report. If left blank, the report includes open purchase orders for all writers.
8. In the Order/Ship Date area, select which date on the purchase order you want to use when selecting purchase orders to include on the report.
• Order Date - Displays open purchase orders that were written during the designated time period.
• Ship Date - Displays open purchase orders that are expected to arrive during the designated time period.
9. In the Bids area, select whether to include open purchase order bids.
10. In the Work Orders area, select whether to include open purchase order work orders.
11. In the Debits area, select whether to include open purchase order debits.
Note: Any direct orders are marked with a D on the report results.
12. Set options, if needed, and generate the report.
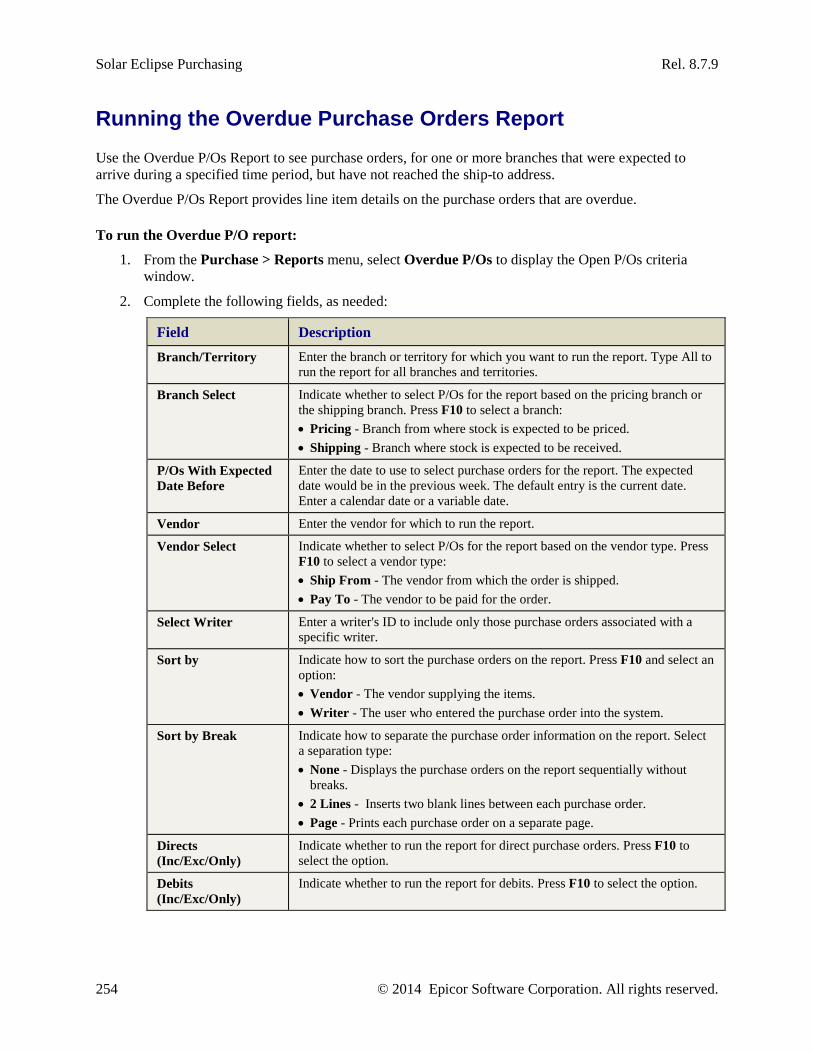
Solar Eclipse Purchasing Rel. 8.7.9
254 © 2014 Epicor Software Corporation. All rights reserved.
Running the Overdue Purchase Orders Report Use the Overdue P/Os Report to see purchase orders, for one or more branches that were expected to arrive during a specified time period, but have not reached the ship-to address.
The Overdue P/Os Report provides line item details on the purchase orders that are overdue.
To run the Overdue P/O report:
1. From the Purchase > Reports menu, select Overdue P/Os to display the Open P/Os criteria window.
2. Complete the following fields, as needed:
Field Description Branch/Territory Enter the branch or territory for which you want to run the report. Type All to
run the report for all branches and territories.
Branch Select Indicate whether to select P/Os for the report based on the pricing branch or the shipping branch. Press F10 to select a branch: • Pricing - Branch from where stock is expected to be priced. • Shipping - Branch where stock is expected to be received.
P/Os With Expected Date Before
Enter the date to use to select purchase orders for the report. The expected date would be in the previous week. The default entry is the current date. Enter a calendar date or a variable date.
Vendor Enter the vendor for which to run the report.
Vendor Select Indicate whether to select P/Os for the report based on the vendor type. Press F10 to select a vendor type: • Ship From - The vendor from which the order is shipped. • Pay To - The vendor to be paid for the order.
Select Writer Enter a writer's ID to include only those purchase orders associated with a specific writer.
Sort by Indicate how to sort the purchase orders on the report. Press F10 and select an option: • Vendor - The vendor supplying the items. • Writer - The user who entered the purchase order into the system.
Sort by Break Indicate how to separate the purchase order information on the report. Select a separation type: • None - Displays the purchase orders on the report sequentially without
breaks. • 2 Lines - Inserts two blank lines between each purchase order. • Page - Prints each purchase order on a separate page.
Directs (Inc/Exc/Only)
Indicate whether to run the report for direct purchase orders. Press F10 to select the option.
Debits (Inc/Exc/Only)
Indicate whether to run the report for debits. Press F10 to select the option.
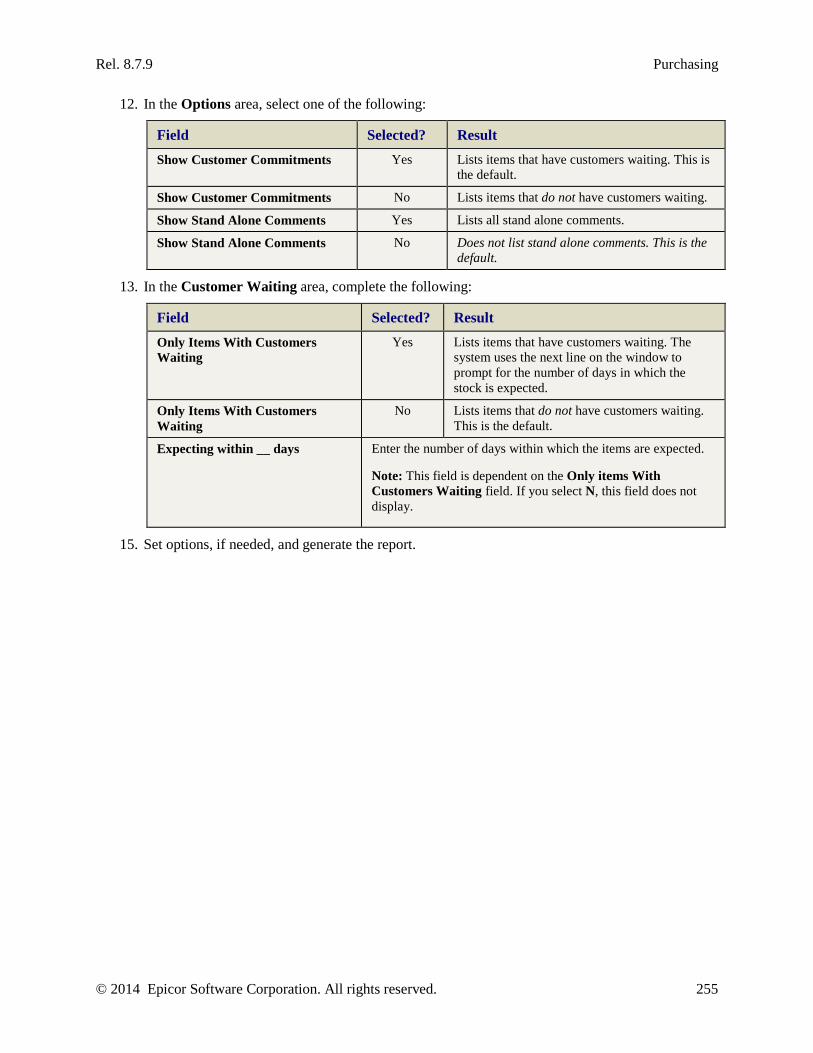
Rel. 8.7.9 Purchasing
© 2014 Epicor Software Corporation. All rights reserved. 255
12. In the Options area, select one of the following:
Field Selected? Result Show Customer Commitments Yes Lists items that have customers waiting. This is
the default.
Show Customer Commitments No Lists items that do not have customers waiting.
Show Stand Alone Comments Yes Lists all stand alone comments.
Show Stand Alone Comments No Does not list stand alone comments. This is the default.
13. In the Customer Waiting area, complete the following:
Field Selected? Result Only Items With Customers Waiting
Yes Lists items that have customers waiting. The system uses the next line on the window to prompt for the number of days in which the stock is expected.
Only Items With Customers Waiting
No Lists items that do not have customers waiting. This is the default.
Expecting within __ days Enter the number of days within which the items are expected.
Note: This field is dependent on the Only items With Customers Waiting field. If you select N, this field does not display.
15. Set options, if needed, and generate the report.
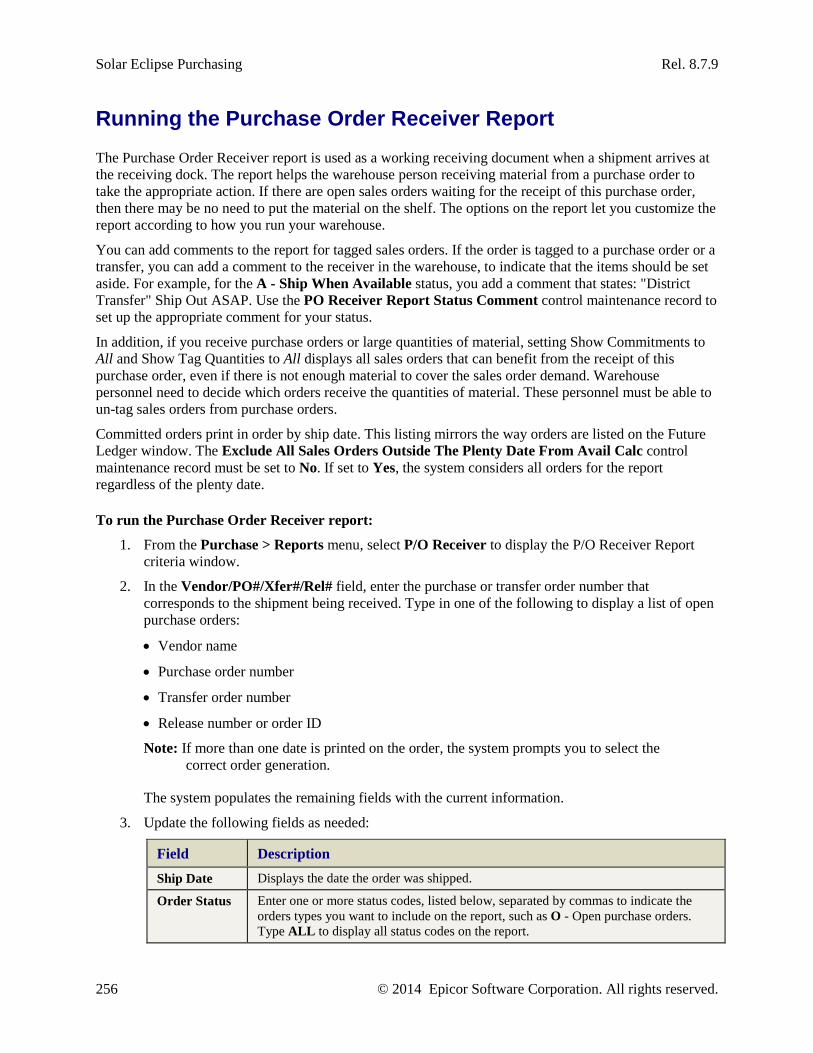
Solar Eclipse Purchasing Rel. 8.7.9
256 © 2014 Epicor Software Corporation. All rights reserved.
Running the Purchase Order Receiver Report The Purchase Order Receiver report is used as a working receiving document when a shipment arrives at the receiving dock. The report helps the warehouse person receiving material from a purchase order to take the appropriate action. If there are open sales orders waiting for the receipt of this purchase order, then there may be no need to put the material on the shelf. The options on the report let you customize the report according to how you run your warehouse.
You can add comments to the report for tagged sales orders. If the order is tagged to a purchase order or a transfer, you can add a comment to the receiver in the warehouse, to indicate that the items should be set aside. For example, for the A - Ship When Available status, you add a comment that states: "District Transfer" Ship Out ASAP. Use the PO Receiver Report Status Comment control maintenance record to set up the appropriate comment for your status.
In addition, if you receive purchase orders or large quantities of material, setting Show Commitments to All and Show Tag Quantities to All displays all sales orders that can benefit from the receipt of this purchase order, even if there is not enough material to cover the sales order demand. Warehouse personnel need to decide which orders receive the quantities of material. These personnel must be able to un-tag sales orders from purchase orders.
Committed orders print in order by ship date. This listing mirrors the way orders are listed on the Future Ledger window. The Exclude All Sales Orders Outside The Plenty Date From Avail Calc control maintenance record must be set to No. If set to Yes, the system considers all orders for the report regardless of the plenty date.
To run the Purchase Order Receiver report:
1. From the Purchase > Reports menu, select P/O Receiver to display the P/O Receiver Report criteria window.
2. In the Vendor/PO#/Xfer#/Rel# field, enter the purchase or transfer order number that corresponds to the shipment being received. Type in one of the following to display a list of open purchase orders:
• Vendor name
• Purchase order number
• Transfer order number
• Release number or order ID
Note: If more than one date is printed on the order, the system prompts you to select the correct order generation.
The system populates the remaining fields with the current information.
3. Update the following fields as needed:
Field Description Ship Date Displays the date the order was shipped.
Order Status Enter one or more status codes, listed below, separated by commas to indicate the orders types you want to include on the report, such as O - Open purchase orders. Type ALL to display all status codes on the report.
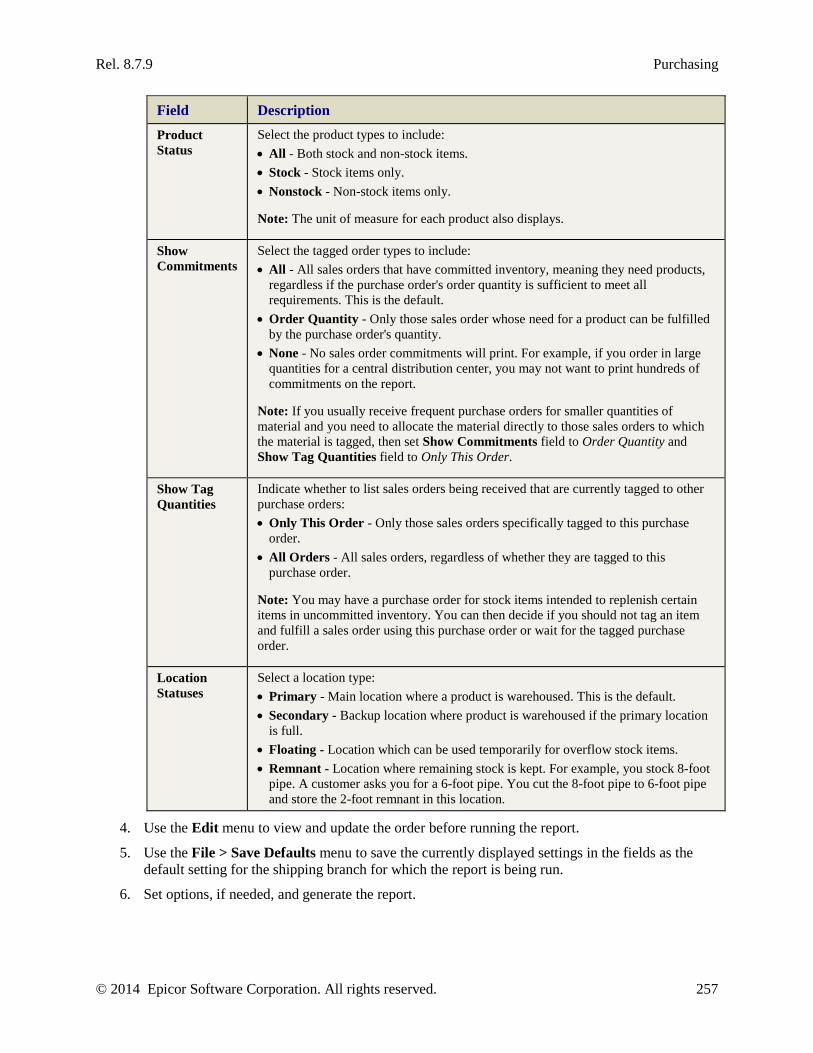
Rel. 8.7.9 Purchasing
© 2014 Epicor Software Corporation. All rights reserved. 257
Field Description Product Status
Select the product types to include: • All - Both stock and non-stock items. • Stock - Stock items only. • Nonstock - Non-stock items only.
Note: The unit of measure for each product also displays.
Show Commitments
Select the tagged order types to include: • All - All sales orders that have committed inventory, meaning they need products,
regardless if the purchase order's order quantity is sufficient to meet all requirements. This is the default.
• Order Quantity - Only those sales order whose need for a product can be fulfilled by the purchase order's quantity.
• None - No sales order commitments will print. For example, if you order in large quantities for a central distribution center, you may not want to print hundreds of commitments on the report.
Note: If you usually receive frequent purchase orders for smaller quantities of material and you need to allocate the material directly to those sales orders to which the material is tagged, then set Show Commitments field to Order Quantity and Show Tag Quantities field to Only This Order.
Show Tag Quantities
Indicate whether to list sales orders being received that are currently tagged to other purchase orders: • Only This Order - Only those sales orders specifically tagged to this purchase
order. • All Orders - All sales orders, regardless of whether they are tagged to this
purchase order.
Note: You may have a purchase order for stock items intended to replenish certain items in uncommitted inventory. You can then decide if you should not tag an item and fulfill a sales order using this purchase order or wait for the tagged purchase order.
Location Statuses
Select a location type: • Primary - Main location where a product is warehoused. This is the default. • Secondary - Backup location where product is warehoused if the primary location
is full. • Floating - Location which can be used temporarily for overflow stock items. • Remnant - Location where remaining stock is kept. For example, you stock 8-foot
pipe. A customer asks you for a 6-foot pipe. You cut the 8-foot pipe to 6-foot pipe and store the 2-foot remnant in this location.
4. Use the Edit menu to view and update the order before running the report.
5. Use the File > Save Defaults menu to save the currently displayed settings in the fields as the default setting for the shipping branch for which the report is being run.
6. Set options, if needed, and generate the report.
Solar Eclipse Purchasing Rel. 8.7.9
258 © 2014 Epicor Software Corporation. All rights reserved.
Note: If you select a purchase order to receive and the status is Cancelled, the following message displays: You are about to reprint a purchase order that has been cancelled. Continue Y/N?
Rel. 8.7.9 Purchasing
© 2014 Epicor Software Corporation. All rights reserved. 259
Running the Stock Receipts Report The Stock Receipts Report provides a detailed list of the items that have been received via purchase orders into one or more branches of the company for a designated time period. Run this report for a one-day period as a review tool to see what came in that day.
Your authorization level on the POE.ALLOWED authorization key determines if you can view, edit, or create new orders from the Stock Receipts program.
For example, a purchasing manager may run a Stock Receipts report to reconcile a set of overdue purchase orders.
To run the Stock Receipts report:
1. From the Purchase > Reports, select Stock Receipts, to display the P/O Receiver Report criteria window.
2. In the Branch/Territory field, enter the branch or territory to include on the report. Type ALL to include all branches and territories.
3. In the Start Date field, enter the beginning date to include on the report. You can enter a calendar date or a variable date.
4. In the End Date field, enter the ending date to include on the report. The system populates this field with the date in the Start Date field. You can enter a calendar date or a variable date.
5. In the Batch field, enter the batch number if stock receipts are entered into the system in batches. The system populates this field with ALL.
Note: Batch loading of stock receipts is not often used because most information is processed in real time.
6. In the Vendor field, enter a vendor name to include only receipts from a specific vendor. If left blank, the report includes receipts from all vendors.
7. In the Unreconciled Only field, indicate whether to include items that have not been reconciled against an invoice that has been received in accounts payable. Clicking the check box lists all stock receipts on the report.
8. In the Branch area, indicate the branch type for which you are running the report.
9. In the Unit of Measure Display area, indicate how the report should show the cost associated with each unit of measure (UOM). Select one of the following:
• Lowest - Displays the lowest to highest UOM.
• Ordered - Displays the items in the order they were processed.
10. Set options, if needed, and generate the report.
Solar Eclipse Purchasing Rel. 8.7.9
260 © 2014 Epicor Software Corporation. All rights reserved.
Running the Inventory Valuation Report Use the Inventory Valuation Report to generate a report, either summary or detailed, that displays the value of the products in a price line, a series of price lines, or all price lines within one or more branches.
For auditing purposes, run the Inventory Valuation Report twice. Run it once, to include those items with a negative on-hand quantity and allow for immediate correction. A negative on-hand quantity typically occurs because users are allowed to over-commit stock. It may be a case where product A was substituted for product B and product A has been driven into a negative quantity level. Run it a second time, to include all items by excluding those items with an on-hand quantity of zero, or to include only those items whose extended on-hand value exceeds a certain amount.
This report also looks at the REP-COST when the AVG-COST of an item is $0.00. In addition, it historically monitors moving average cost. You can indicate if you want to display items with a zero dollar average cost for moving average cost to display as $0.00. Products with a status of LotItem are not included in the report.
Note: If you run this report frequently, you can save your selections and associate those settings with your user ID. Use the File > Save Settings option to use this feature. When you run the report again, the system displays the selections you made the last time. If there is no default or saved setting, the field is blank. For more information, see How the System Saves Settings on Reports.
If you use the dynamic kit functionality, this report excludes dynamic kit quantities when the items are picked at the component locations. The system calculates the kits when picked as a kit.
To run the Inventory Valuation Report:
1. From the Purchase > Reports menu, select Inventory Valuation, to display the Inventory Valuation criteria window.
2. Select the column layout you plan to use for the report. You can select a different layout prior to running the report using the Switch Column Layout icon in the toolbar or the File > Switch Column Layout menu option.
The Inventory Valuation Report requires that you select a column layout before completing the other fields. If the FIFO-COST column is included in the layout, the prompts for completing the report change. For more information about defining column layouts, see Modifying Column Layouts for Reports in the Solar Eclipse Reporting documentation.
The selected layout displays in the window title bar.
3. Select the product information for which you want to run the report on the Product Selection tab.
Field / Area Description Branch Enter the branch for which you want to run the report. Type ALL to run the
report for all branches.
Note: This report normally runs for a single branch. If run for more than one branch, we recommend running it in summary format only due to processing time, however, you can enter multiple branches separated by commas to run it for more than one branch, such as 1,2,3.
Rel. 8.7.9 Purchasing
© 2014 Epicor Software Corporation. All rights reserved. 261
Field / Area Description As of Date Enter the date by which you want to run the report. By default the system
populates this field with the current date.
Note: If this field is set to the current date, the Show $0 Average Costs check box is selected and there is no pricing information in the product file, then the system displays a $0.00 cost on the report and uses any current average cost data available. If this field is set to a date in the past, the Show $0 Average Costs check box is selected, and there is no pricing information found in the product file, then average cost information does not apply and the system uses $0.00.
Select by Select one of the following: Price Line, Buy Line, Buy Group, Sell Group, Product or Product Lifecycle.
Note: Any tildes (~) in product descriptions are removed from the description in the report output so your report sorts properly.
The selection field activates after you populate the Select By field, enter a specific entity. Use the Multi button to choose more than one selection for the report, such as two buy lines, or three price lines. Leave the field blank to include all values. For example, if you selected Price Line in the Select By field, leave this field blank to include all price lines in the report. Note: If you select Buy Line or Sell Group, the system does not respect multiple groups, but only checks the first group in the multiple list.
Cost As of Date Enter the beginning date to reference for the valuation. Enter a calendar date or a system variable date. The system populates this field by default with the current date.
Use the File > Report Column Selection to add any additional cost basis fields, such as DFLT-COST or COMM-COSTS. By default, the system adds COGS-COST and Ext COGS-COST.
Quantity Types (Blank = All)
indicate whether to run the report for one or more types of products. If left blank, the report includes all product types. To select more than one, use the Multi button.
Inventory Accounts to Include
Select the inventory accounts for products to display. The default account is the primary inventory account. Use the Multi button to select multiple accounts.
Nonstocks Indicate whether to include non-stock products on the selected lines.
Negative Onhands
Indicate whether to run the inventory valuation report for only items with a negative on-hand quantity.
Zero Onhands Indicate whether to include or exclude from the report all items whose on-hand quantities are zero. If you are running the report for customer or vendor consignments, select to include products whose on-hand quantities are zero to get an accurate view of consignment inventory. When you select to exclude products, the system is checking only regular stock that is on hand. Items that have no regular stock on hand, but have customer consignment stock are only included in the report when select Include in this field.
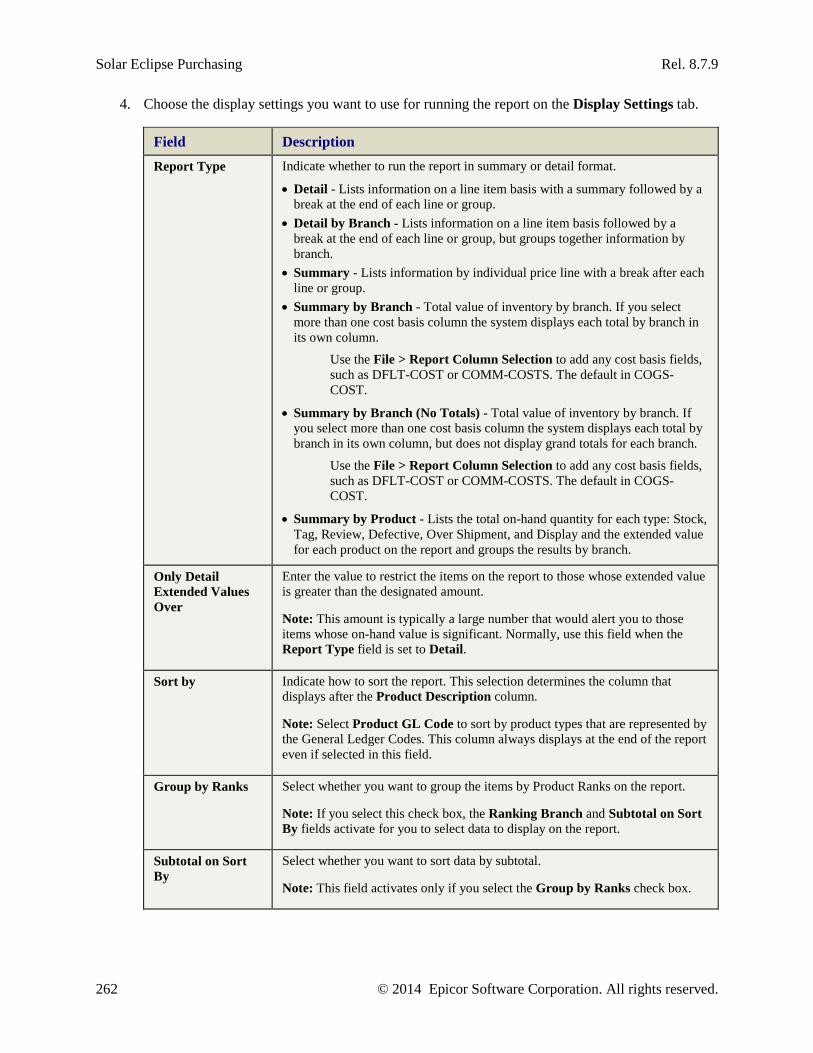
Solar Eclipse Purchasing Rel. 8.7.9
262 © 2014 Epicor Software Corporation. All rights reserved.
4. Choose the display settings you want to use for running the report on the Display Settings tab.
Field Description Report Type Indicate whether to run the report in summary or detail format.
• Detail - Lists information on a line item basis with a summary followed by a break at the end of each line or group.
• Detail by Branch - Lists information on a line item basis followed by a break at the end of each line or group, but groups together information by branch.
• Summary - Lists information by individual price line with a break after each line or group.
• Summary by Branch - Total value of inventory by branch. If you select more than one cost basis column the system displays each total by branch in its own column.
Use the File > Report Column Selection to add any cost basis fields, such as DFLT-COST or COMM-COSTS. The default in COGS-COST.
• Summary by Branch (No Totals) - Total value of inventory by branch. If you select more than one cost basis column the system displays each total by branch in its own column, but does not display grand totals for each branch.
Use the File > Report Column Selection to add any cost basis fields, such as DFLT-COST or COMM-COSTS. The default in COGS-COST.
• Summary by Product - Lists the total on-hand quantity for each type: Stock, Tag, Review, Defective, Over Shipment, and Display and the extended value for each product on the report and groups the results by branch.
Only Detail Extended Values Over
Enter the value to restrict the items on the report to those whose extended value is greater than the designated amount.
Note: This amount is typically a large number that would alert you to those items whose on-hand value is significant. Normally, use this field when the Report Type field is set to Detail.
Sort by Indicate how to sort the report. This selection determines the column that displays after the Product Description column.
Note: Select Product GL Code to sort by product types that are represented by the General Ledger Codes. This column always displays at the end of the report even if selected in this field.
Group by Ranks Select whether you want to group the items by Product Ranks on the report.
Note: If you select this check box, the Ranking Branch and Subtotal on Sort By fields activate for you to select data to display on the report.
Subtotal on Sort By
Select whether you want to sort data by subtotal.
Note: This field activates only if you select the Group by Ranks check box.

Rel. 8.7.9 Purchasing
© 2014 Epicor Software Corporation. All rights reserved. 263
Field Description Show $0 Average Costs
Indicate if you want to display items with a zero dollar average cost for moving average cost to display as $0.00. This setting behaves differently based on the Cost As of Date: • Cost As of Date is Today, and this check box is not selected- The system
looks at the historical data as of today, and returns the current average cost if found. If the returned cost is $0, then the system checks the current average cost and returns that. If that is also $0, the system returns the Default Cost. Default Cost uses the Basis set up in Price Line Maintenance for global DFLT-COST.
• Cost As of Date is Today, and this check box is selected – The system looks at the historical data as of today, and returns the current average cost if found. If the returned cost is $0, then the system checks the current average cost and returns that. If that is also $0, the system returns the Default Cost. Default Cost uses the Basis set up in Price Line Maintenance for global DFLT-COST. .- The system looks at the historical data as of today, and returns the current average cost. If the returned cost is $0, then the system checks the current average cost and returns that. If that cost is also $0, the system uses $0.00.
• Cost As of Date is in the past, and this check box is not selected – The system looks at the historical data as of today, and returns the current average cost if found. If the returned cost is $0, then the system checks the current average cost and returns that. If that is also $0, the system returns the Default Cost. Default Cost uses the Basis set up in Price Line Maintenance for global DFLT-COST. .- The system looks at the historical data using the Cost As of Date. If the cost is $0, the system returns the current average cost if it can determine it, if not it returns the Default Cost. Default Cost uses the Basis set up in Price Line Maintenance for global DFLT-COST.
• Cost As of Date is in the past, and this check box is selected – The system looks at the historical data as of today, and returns the current average cost if found. If the returned cost is $0, then the system checks the current average cost and returns that. If that is also $0, the system returns the Default Cost. Default Cost uses the Basis set up in Price Line Maintenance for global DFLT-COST. .- The system looks at the historical data using the Cost As of Date. If the cost is $0, the system returns $0. When the Cost As of Date is in the past, the system relies on historical data only, and does not check current average cost.
Note: If the Show $0 Average Cost check box is selected and there is no pricing information as of the date requested, the system uses the current cost.
Use P/O Cost for Tagged Items
Select to have tagged inventory valued using the associated purchase order costs. If the tag is broken, then the system determines the tagged inventory value using the associated cost with the cost-basis entered. This option is not activated with FIFO-COST. If you leave this deselected, the system uses the average cost associated with the item.
Note: If tagged items are listed on the report, the unit of measure and quantity for those items display.
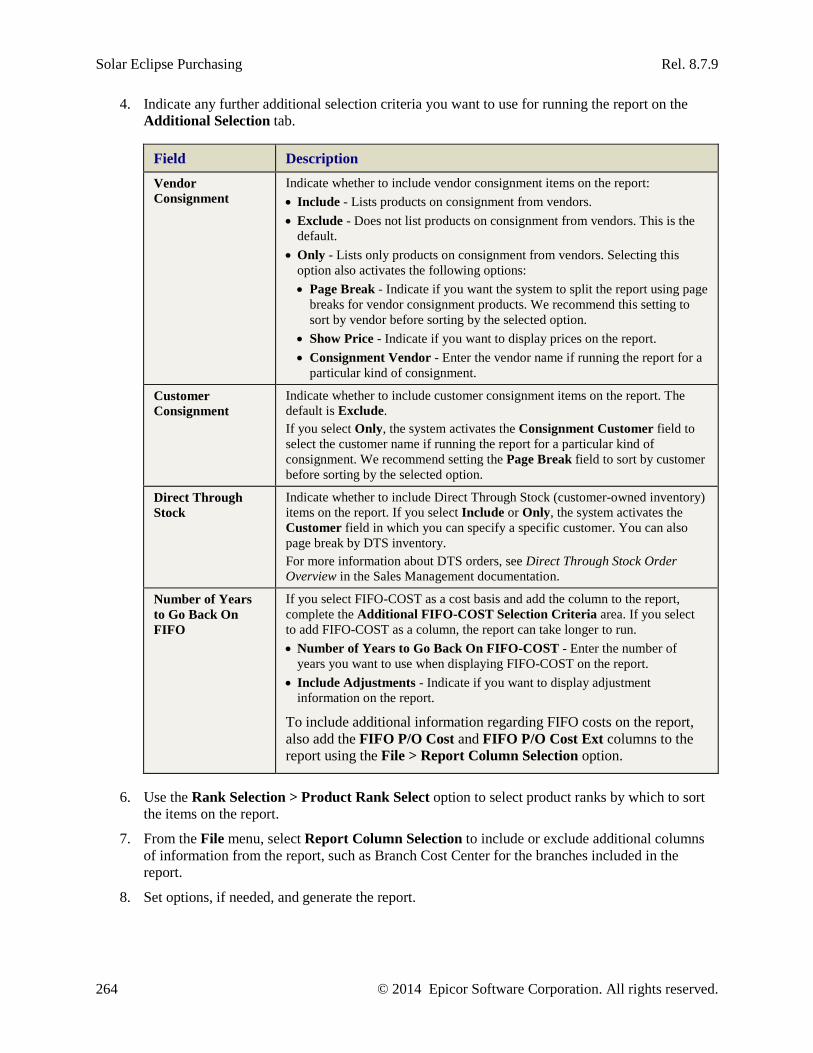
Solar Eclipse Purchasing Rel. 8.7.9
264 © 2014 Epicor Software Corporation. All rights reserved.
4. Indicate any further additional selection criteria you want to use for running the report on the Additional Selection tab.
Field Description Vendor Consignment
Indicate whether to include vendor consignment items on the report: • Include - Lists products on consignment from vendors. • Exclude - Does not list products on consignment from vendors. This is the
default. • Only - Lists only products on consignment from vendors. Selecting this
option also activates the following options: • Page Break - Indicate if you want the system to split the report using page
breaks for vendor consignment products. We recommend this setting to sort by vendor before sorting by the selected option.
• Show Price - Indicate if you want to display prices on the report. • Consignment Vendor - Enter the vendor name if running the report for a
particular kind of consignment.
Customer Consignment
Indicate whether to include customer consignment items on the report. The default is Exclude. If you select Only, the system activates the Consignment Customer field to select the customer name if running the report for a particular kind of consignment. We recommend setting the Page Break field to sort by customer before sorting by the selected option.
Direct Through Stock
Indicate whether to include Direct Through Stock (customer-owned inventory) items on the report. If you select Include or Only, the system activates the Customer field in which you can specify a specific customer. You can also page break by DTS inventory. For more information about DTS orders, see Direct Through Stock Order Overview in the Sales Management documentation.
Number of Years to Go Back On FIFO
If you select FIFO-COST as a cost basis and add the column to the report, complete the Additional FIFO-COST Selection Criteria area. If you select to add FIFO-COST as a column, the report can take longer to run. • Number of Years to Go Back On FIFO-COST - Enter the number of
years you want to use when displaying FIFO-COST on the report. • Include Adjustments - Indicate if you want to display adjustment
information on the report.
To include additional information regarding FIFO costs on the report, also add the FIFO P/O Cost and FIFO P/O Cost Ext columns to the report using the File > Report Column Selection option.
6. Use the Rank Selection > Product Rank Select option to select product ranks by which to sort the items on the report.
7. From the File menu, select Report Column Selection to include or exclude additional columns of information from the report, such as Branch Cost Center for the branches included in the report.
8. Set options, if needed, and generate the report.
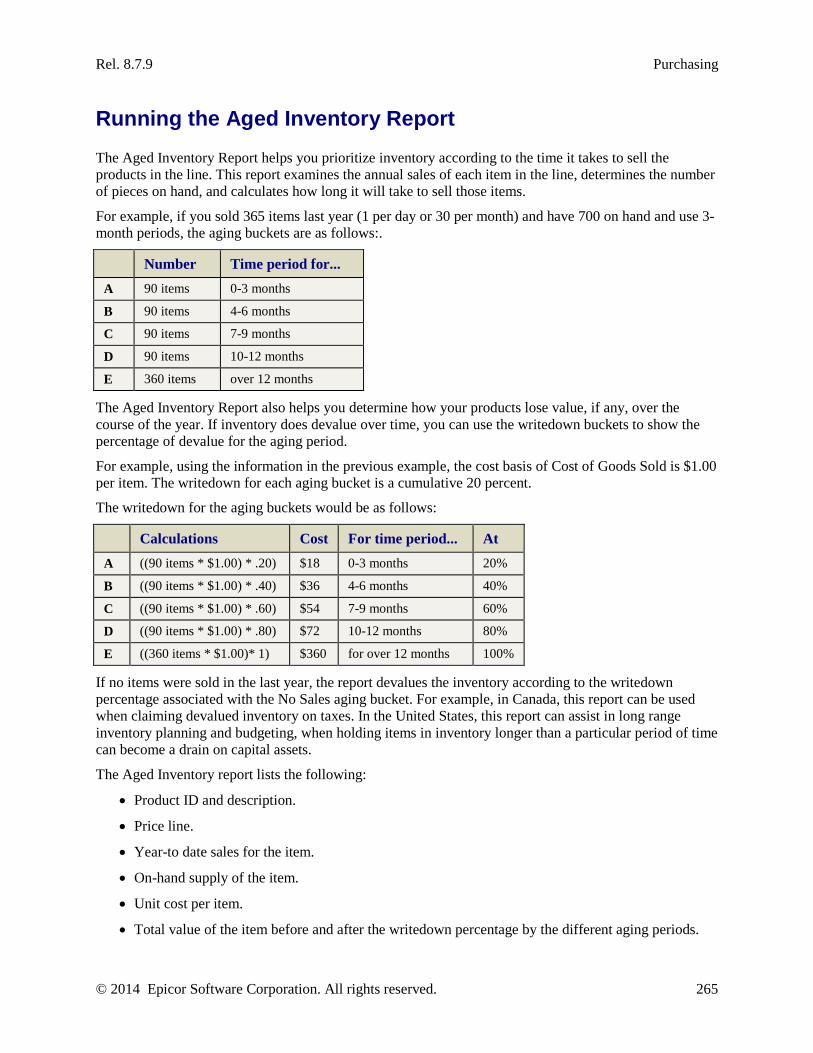
Rel. 8.7.9 Purchasing
© 2014 Epicor Software Corporation. All rights reserved. 265
Running the Aged Inventory Report The Aged Inventory Report helps you prioritize inventory according to the time it takes to sell the products in the line. This report examines the annual sales of each item in the line, determines the number of pieces on hand, and calculates how long it will take to sell those items.
For example, if you sold 365 items last year (1 per day or 30 per month) and have 700 on hand and use 3-month periods, the aging buckets are as follows:.
Number Time period for... A 90 items 0-3 months
B 90 items 4-6 months
C 90 items 7-9 months
D 90 items 10-12 months
E 360 items over 12 months
The Aged Inventory Report also helps you determine how your products lose value, if any, over the course of the year. If inventory does devalue over time, you can use the writedown buckets to show the percentage of devalue for the aging period.
For example, using the information in the previous example, the cost basis of Cost of Goods Sold is $1.00 per item. The writedown for each aging bucket is a cumulative 20 percent.
The writedown for the aging buckets would be as follows:
Calculations Cost For time period... At A ((90 items * $1.00) * .20) $18 0-3 months 20%
B ((90 items * $1.00) * .40) $36 4-6 months 40%
C ((90 items * $1.00) * .60) $54 7-9 months 60%
D ((90 items * $1.00) * .80) $72 10-12 months 80%
E ((360 items * $1.00)* 1) $360 for over 12 months 100%
If no items were sold in the last year, the report devalues the inventory according to the writedown percentage associated with the No Sales aging bucket. For example, in Canada, this report can be used when claiming devalued inventory on taxes. In the United States, this report can assist in long range inventory planning and budgeting, when holding items in inventory longer than a particular period of time can become a drain on capital assets.
The Aged Inventory report lists the following:
• Product ID and description.
• Price line.
• Year-to date sales for the item.
• On-hand supply of the item.
• Unit cost per item.
• Total value of the item before and after the writedown percentage by the different aging periods.
Solar Eclipse Purchasing Rel. 8.7.9
266 © 2014 Epicor Software Corporation. All rights reserved.
• Years supply of the item in inventory.
• Grand totals by price line and by all price lines.
To run the Aged Inventory report:
1. From the Purchase > Reports menu, select Aged Inventory to display the Inventory Valuation window.
2. In the Branch/Territory field, enter the branch or territory for which you want to run the report. Type ALL to include all branches and territories.
3. In the As of Date field, enter the date from which you want the inventory aged. The system populates the field with the current date.
4. In the Price Line field, indicate the price lines to include on the report. Do one of the following:
• Enter the price line name to run the report for a single price line.
• Leave the field blank to run the report for all prices lines.
• Use the Multi button to choose more than one price line. *Multiple* displays in the field.
5. In the Cost Basis field, enter the cost basis to use for valuing inventory. The system populates this field, with Cost of Goods Sold - Cost (COGS-COST).
6. In the Nonstock field, indicate whether to include non-stocks in the reports:
• Include - Prints non-stocks on the report.
• Exclude - Does not print non-stocks on the report.
• Only - Selects only non-stocks for the report.
7. In the Number of Recent Days to Exclude Items Created field, enter the number of days you want to limit the report to for product recently added to your product file, such as 180 to exclude new products added to your product file in the last six months. The system uses the XYZ date for this field.
8. In the Number of Recent Days to Exclude First Received field, enter the number of days you want to exclude inventory that has been received for the first time, such as 90 to exclude any products received in the last three months. The system will not include items that are onhand or sold if any branch meets this cutoff date.
9. Select the Exclude zero on-hand quantities check box, if you want to exclude products with zero on-hand quantities on the reports. The default is Yes.
10. In the Exclude Level area, select how the Exclude First Received in last field looks at items first received:
• Branch - Reports on the first receiver per branch.
• Product - Reports on the items received for the first time within the number of days you specify in the Exclude First Received in last field.
11. In the Writedown area, use the table to enter:
• Percentages that the value of the products in the specified price lines is reduced over the specified period of months. For example, if product is on the shelf for more than 6 months, the value can decrease by 25%.
Rel. 8.7.9 Purchasing
© 2014 Epicor Software Corporation. All rights reserved. 267
• Default periods for this run of the report. For example, you can change the breakdown of months from 0 - 3 months to 0 - 6 months for the first writedown bucket.
• Percentage beyond a period of months: type OVER in a From field and the corresponding month in the related To field.
Note: If writedown buckets are not used on the report, 0% is applied to the unused buckets.
12. Set options, if needed, and generate the report.
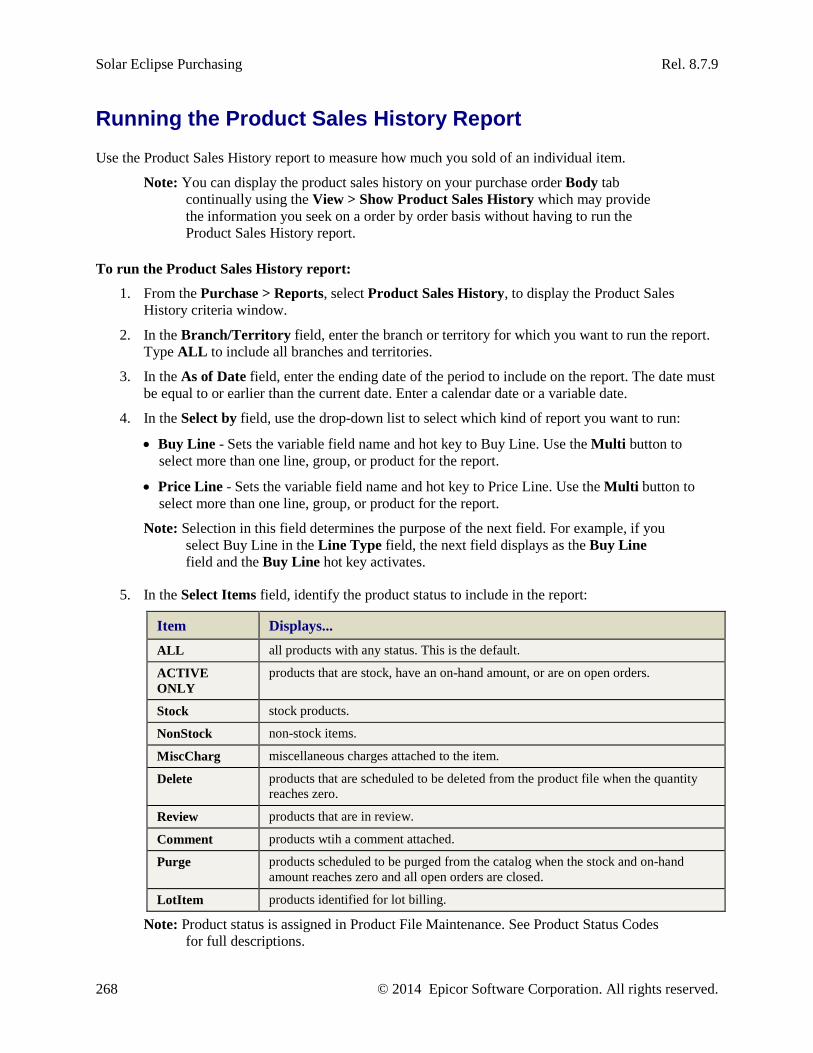
Solar Eclipse Purchasing Rel. 8.7.9
268 © 2014 Epicor Software Corporation. All rights reserved.
Running the Product Sales History Report Use the Product Sales History report to measure how much you sold of an individual item.
Note: You can display the product sales history on your purchase order Body tab continually using the View > Show Product Sales History which may provide the information you seek on a order by order basis without having to run the Product Sales History report.
To run the Product Sales History report:
1. From the Purchase > Reports, select Product Sales History, to display the Product Sales History criteria window.
2. In the Branch/Territory field, enter the branch or territory for which you want to run the report. Type ALL to include all branches and territories.
3. In the As of Date field, enter the ending date of the period to include on the report. The date must be equal to or earlier than the current date. Enter a calendar date or a variable date.
4. In the Select by field, use the drop-down list to select which kind of report you want to run:
• Buy Line - Sets the variable field name and hot key to Buy Line. Use the Multi button to select more than one line, group, or product for the report.
• Price Line - Sets the variable field name and hot key to Price Line. Use the Multi button to select more than one line, group, or product for the report.
Note: Selection in this field determines the purpose of the next field. For example, if you select Buy Line in the Line Type field, the next field displays as the Buy Line field and the Buy Line hot key activates.
5. In the Select Items field, identify the product status to include in the report:
Item Displays... ALL all products with any status. This is the default.
ACTIVE ONLY
products that are stock, have an on-hand amount, or are on open orders.
Stock stock products.
NonStock non-stock items.
MiscCharg miscellaneous charges attached to the item.
Delete products that are scheduled to be deleted from the product file when the quantity reaches zero.
Review products that are in review.
Comment products wtih a comment attached.
Purge products scheduled to be purged from the catalog when the stock and on-hand amount reaches zero and all open orders are closed.
LotItem products identified for lot billing.
Note: Product status is assigned in Product File Maintenance. See Product Status Codes for full descriptions.
Rel. 8.7.9 Purchasing
© 2014 Epicor Software Corporation. All rights reserved. 269
5. In the Break on Line area, indicate how to separate prices lines or buy lines on the report to make it more readable:
• Yes - Inserts a blank line between price lines or buy lines on the report.
• No - Prints with no spacing between the price lines or buy lines on the report.
• Page - Prints the data for each price line or buy line on a separate page.
7. In the Double Space area, indicate whether to insert a blank line between every product in every price line includes in the report.
8. In the Show Kits area, indicate whether to show kits on the report. The kit components are always listed at the top of the report.
9. In the Sum Branch Quantities area, indicate whether to print combined totals, if the report included more than one branch, for each product in every included price line:
• Yes - Prints only combined totals for each product in every included price line.
• No - Prints detailed branch totals without a combined total for each product in every included price line.
10. In the Show Future Ledger field, indicate whether to show the sales commitments on the report.
Note: If you select Include, there is no display limit and the system shows all future orders.
11. In the Show Items w/ Sales Only field, indicate whether to show only items with sales on the report.
12. In the Sort By Order Point field, indicate if you want to sort product sales history by order point.
13. In the Directs field, indicate if you want to have direct orders listed on the report.
14. Set options, if needed, and generate the report.
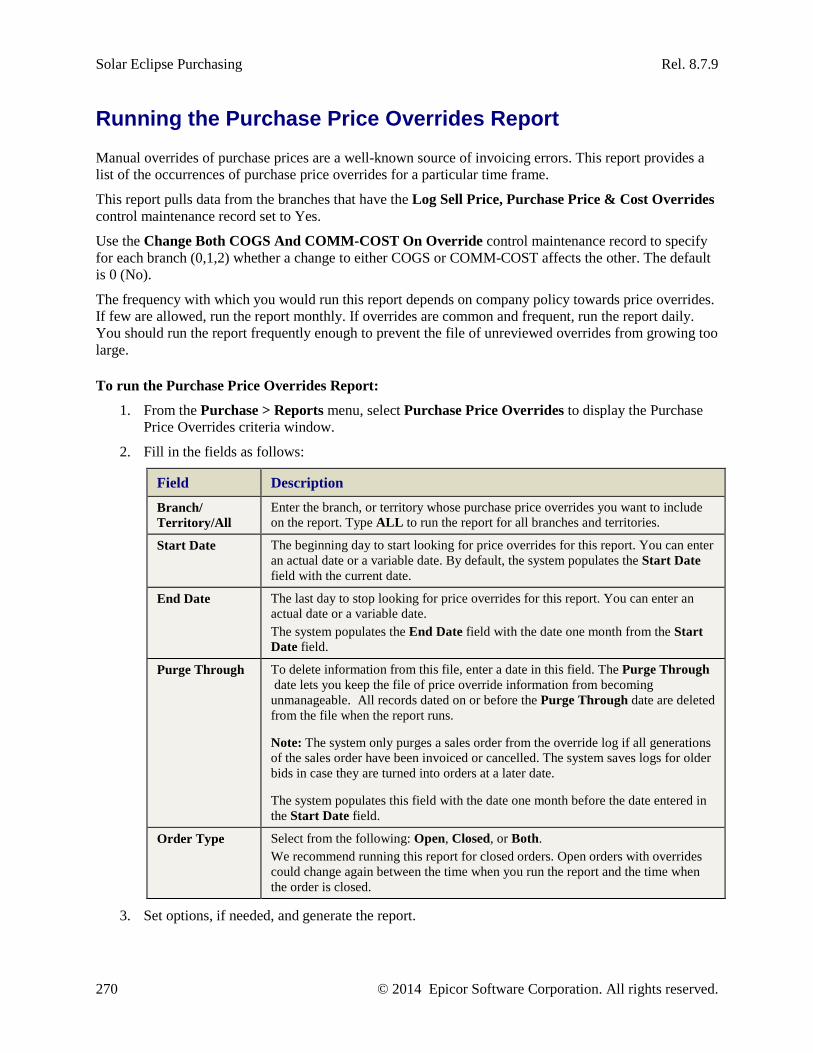
Solar Eclipse Purchasing Rel. 8.7.9
270 © 2014 Epicor Software Corporation. All rights reserved.
Running the Purchase Price Overrides Report Manual overrides of purchase prices are a well-known source of invoicing errors. This report provides a list of the occurrences of purchase price overrides for a particular time frame.
This report pulls data from the branches that have the Log Sell Price, Purchase Price & Cost Overrides control maintenance record set to Yes.
Use the Change Both COGS And COMM-COST On Override control maintenance record to specify for each branch (0,1,2) whether a change to either COGS or COMM-COST affects the other. The default is 0 (No).
The frequency with which you would run this report depends on company policy towards price overrides. If few are allowed, run the report monthly. If overrides are common and frequent, run the report daily. You should run the report frequently enough to prevent the file of unreviewed overrides from growing too large.
To run the Purchase Price Overrides Report:
1. From the Purchase > Reports menu, select Purchase Price Overrides to display the Purchase Price Overrides criteria window.
2. Fill in the fields as follows:
Field Description Branch/ Territory/All
Enter the branch, or territory whose purchase price overrides you want to include on the report. Type ALL to run the report for all branches and territories.
Start Date The beginning day to start looking for price overrides for this report. You can enter an actual date or a variable date. By default, the system populates the Start Date field with the current date.
End Date The last day to stop looking for price overrides for this report. You can enter an actual date or a variable date. The system populates the End Date field with the date one month from the Start Date field.
Purge Through To delete information from this file, enter a date in this field. The Purge Through date lets you keep the file of price override information from becoming unmanageable. All records dated on or before the Purge Through date are deleted from the file when the report runs.
Note: The system only purges a sales order from the override log if all generations of the sales order have been invoiced or cancelled. The system saves logs for older bids in case they are turned into orders at a later date.
The system populates this field with the date one month before the date entered in the Start Date field.
Order Type Select from the following: Open, Closed, or Both. We recommend running this report for closed orders. Open orders with overrides could change again between the time when you run the report and the time when the order is closed.
3. Set options, if needed, and generate the report.
Rel. 8.7.9 Purchasing
© 2014 Epicor Software Corporation. All rights reserved. 271
About the PO Reconciliation Report This report provides a way to verify whether there is a discrepancy between the cost of a product at the time the purchase order was entered (or the price negotiated) and the cost of the product charged by the vendor on the received date. To resolve purchase order quantity variances, use the Purchase Order Variance Queue.
The report lets you reconcile purchase orders without editing the purchase order. If the payable amount and the purchase order amount do not match, the invoice can be flagged as Unreconciled or Disputed.
Run a P/O Reconciliation Report to list all of the details of both vendors' invoices and the associated purchase orders, including line item data for payables.
To run the PO Reconciliation Report, see P/O Reconciliation Report in Accounts Payable.
Solar Eclipse Purchasing Rel. 8.7.9
272 © 2014 Epicor Software Corporation. All rights reserved.
Running the Product Backorder Report Use the Product Backorder Report to determine which sales orders, purchase orders, or transfer orders may not meet the expected date due to the backordered items. Run the report by selecting one or more price lines to query. The report displays each product and the orders for which it is backordered.
First, the report displays the product description, price line, default branch, and product number. These line items are preceded by three asterisks.
Next, the report displays the order number, the customer or vendor name, the ship date, quantity, type, amount available, and sell price for the items on each order.
To run the Product Backorder Report:
1. From the Purchase > Reports, select Product Backorder Report to display the Product Backorder Report window.
2. In the Branch/Territory field, enter the branch or territory you want to analyze. Type All to check all branches and territories.
3. In the Price Line field, enter a price line ID to limit the report to products from that price line. If left blank, the report includes products from all price lines. Use the Multi option to enter a list of price lines. This list lets you analyze several price lines without selecting ALL. If multiple price lines are specified, *Multiple* displays in the Price Line field.
4. In the Price Line Break (Y/N/P) area, select from the following to separate price lines on the report for readability:
• Yes - Inserts a blank line between price lines or buy lines on the report. Select Y if you are working with multiple lines and will not use the report in a fax document for expediting.
• No - The report prints with no spacing between price lines or buy lines. Select N or Y if you are working in a single price line or multiple price lines that share one buy line.
• Page - The data for each price line or buy line prints at the top of a new page. Select P if you are working with multiple price lines and want to use the report in a fax to the vendor for expediting.
5. In the Overcommited area, select one of the following:
• All - Indicate whether you want to see all orders that are not yet invoiced, or just the orders that are backordered to cover the overcommitments.
• As of Ship Date - Displays only the backorders on which the writer set the ship date on the order before the next expected receipt date of the material or before the earliest date. This selection restricts the report information to the commitments that may not be met without action from a purchasing agent.
• As of Today - Displays products that are currently on open sales orders, and are backordered based on the current on-hand quantities. Even if a product is currently on a purchase order that is scheduled to be received before the ship date of the sales order, the product displays on the report.
Note: An overcommitment occurs when quantities are greater than the sum of either what is on hand or the quantity that is coming into stock.
Rel. 8.7.9 Purchasing
© 2014 Epicor Software Corporation. All rights reserved. 273
6. In the Non-Stocks area, indicate whether to include nonstocks in the report:
Note: The Only selection comes into play if you treat expediting on nonstock items differently than on stock items. Some companies keep nonstock purchase orders separate from stock purchase orders and other companies let the purchasing logic expedite stock and sales personnel expedite nonstocks.
7. In the Include Negative On-Hands Without Future Commitments (Y/N) field, indicate if you want to include the negative on-hand inventory. If you select Yes, the system prints the product information even if there are no pending orders. If you select No, the system prints the product information only if there are pending orders for the product.
8. Set options, if needed, and generate the report.
Solar Eclipse Purchasing Rel. 8.7.9
274 © 2014 Epicor Software Corporation. All rights reserved.
Running the Canceled PO Report The Canceled PO Report shows all the canceled purchase orders for a designated time period. This report lets you search through canceled purchase orders as a way of verification.
For example, a customer orders a non-stock item, such as a special bathtub. A week later, the customer cancels the order to get a stocked bathtub instead. A month later, the special bathtub shows up on the receiving dock. You remember it being ordered and canceled the previous month. The Canceled PO Report lets you search through all the canceled purchase orders from the previous month to identify the discrepancy and correct the error.
For another example, a purchasing agent is working with a particular customer who has not received the material. The purchasing agent is concerned that the purchase order was canceled by mistake. The purchasing agent can run the Canceled PO Report for the time period when the customer placed the order to see if it was canceled inadvertently.
Note: You cannot credit or rebill cancelled purchase order generations.
To run the Canceled PO Report:
1. From the Purchase > Reports, select Canceled PO Report, to display the Canceled PO Report criteria window.
2. Fill in the fields as follows:
Field Description Branch/Territory Enter the branch or territory you want to analyze. You can enter ALL to check all
branches and territories.
Start Date Enter the beginning date to include in the report. You can enter an actual date or a variable date.
End Date Enter the ending date to include in the report. You can enter an actual date or a variable date. The system automatically populates this field with the date you entered in the Start Date field.
Sort By Select one of the following to sort the report information: • Vend - Alphabetically by vendor name. • Ord# - Numerically by order number. • Date - From the oldest to the most recent order.
P/O Type Select one of the following to include in the report: Invoices, Orders, or Both.
3. Set options, if needed, and generate the report.
Rel. 8.7.9 Purchasing
© 2014 Epicor Software Corporation. All rights reserved. 275
Running the Freight Audit Report Use the Freight Audit Report daily to review freight charges for tagged sales orders. You can pass these freight charges on to your customer.
When you enter A/P items, there is a column for freight. If the item that you reconcile against a purchase order is a tagged sale, the system reviews the order to see if freight has been charged on the sale.
The Freight Audit Report reviews the items in the following order:
1. Accounts payable for a freight charge
2. The purchase order to find the number of the tagged sales order
3. Verifies whether the item has been billed with a freight charge included
If the amount equals zero, you can check the purchase order's received date and verify the freight amount that was charged equals the amount on the Incoming Freight Audit report. If it did, then the user can go to the sales order and add the freight amount to that sales order.
To run the Freight Audit Report:
1. From the Purchase > Reports menu, select Freight Audit Report, to display the Freight Audit Report criteria window.
2. In the Branch/Territory field, enter the branch to include on the report. Type ALL to include all branches.
3. In the Start Date field, enter the beginning date of the period to include on the report. Enter a calendar date or a variable date.
4. In the End Date field, enter the ending date of the period to include on the report. Enter a calendar date or a variable date.
The system populates the field with the date entered in the Start Date field.
5. In the Freight field, indicate if you want to include all freight in the following:
• All - The amount in the Frt Amount column includes both incoming freight charges on the purchase order and outgoing freight costs on the associated sales order.
• In Only - The amount in the Frt Amount column includes only incoming freight charges on the purchase order.
6. In the Directs field, indicate if you want to include, exclude or print the report for only direct orders.
7. In the Paid Activity Only field, type Yes, if you want to run the report for only purchase orders that have been applied to approved payables. The default is No.
8. In the Selection Date field, indicate how you want to limit the report.
This field activates only if the Paid Activity Only field is set to Yes.
• Receive Date - Selects only purchase orders that have been received within the date range specified.
• Payable Date - Selects only purchase orders that have a payable date within the date range specified.

Solar Eclipse Purchasing Rel. 8.7.9
276 © 2014 Epicor Software Corporation. All rights reserved.
9. Set options, if needed, and generate the report.
What the Report Shows The Freight Audit report displays the following:
Column Description PO# Purchase order number for received purchase orders.
RecvDate Date the purchase order was marked received on its Status tab.
Frt Amount Amount of freight charged on the purchase order.
Tagged SO# Corresponding sales order tagged to the purchase order.
ShipDate Date the products on the purchase order shipped from the vendor.
Shp Qty Amount of products shipped from the vendor.
Product Product ID.
Exempt Populated with Yes or No, depending on the setting for the Frt Out Exempt (Y/N) field in Customer Maintenance for the customer on the tagged sales order. Also is effected by the Freight Out Exempt (Y/N) field on the Sales Order Entry Header tab.
Frt Billed Amount billed for the products shipped.
Frt Expnsd The amount of freight-in on the purchase order.
$Diff The difference between the amount in the Frt Amount column and the combines amounts from the Frt Billed and Frt Expnsd columns.
Order Total Total for the purchase order.
GP% Gross Profit percentage for the purchase order.
Rel. 8.7.9 Purchasing
© 2014 Epicor Software Corporation. All rights reserved. 277
Running the Purchase Variance Report Use the Purchase Variance Report to see if there are any pricing variances from when a purchase is written and when you got billed by your vendor. The Variance column on the report displays the difference between the two costs so that you can accurately relate to your vendor any changes in pricing.
Note: To resolve purchase order quantity variances, use the Purchase Order Variance Queue.
To run the Purchase Variance Report:
1. From the Purchase > Reports menu, select Purchase Variance Report to display the Purchase Variance Report window.
2. In the Branch/Territory/All field, enter the branch or territories for which you want to run the report and press Enter.
3. In the Start Date and End Date fields, enter the date range for which you want the system to begin to pull data for the report.
4. In the Batch field, enter any batch ID that you would like to run for this report. The default is ALL.
5. In the Vendor field, enter any vendor ID that you would like to run for this report. Leave the field blank to run for all vendors.
6. Use the Unreconciled Only check box to select if you want to run the report for only unreconciled purchase orders. By default, the check box is deselected.
7. In the Summary / Detail field, indicate which kind of report you want by selecting one of the following:
• Summary - Displays the following columns: P/O#, Vendor Name, RepCost, PO-Cost, and Variance. Variance displays the difference between the RepCost and the PO-Cost. This is the default.
• Detail - Displays all the summary information, but also adds the following columns: Writer, Type, Quantity, and Product Description.
6. Set options, if needed, and generate the report.
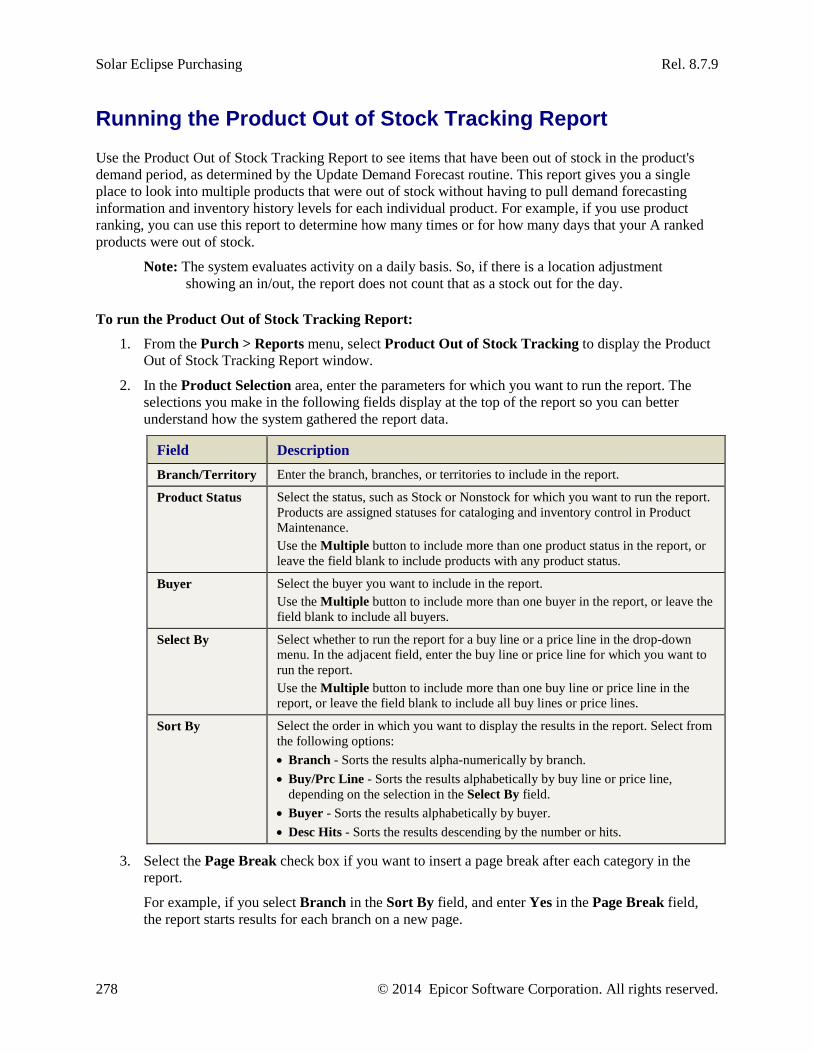
Solar Eclipse Purchasing Rel. 8.7.9
278 © 2014 Epicor Software Corporation. All rights reserved.
Running the Product Out of Stock Tracking Report Use the Product Out of Stock Tracking Report to see items that have been out of stock in the product's demand period, as determined by the Update Demand Forecast routine. This report gives you a single place to look into multiple products that were out of stock without having to pull demand forecasting information and inventory history levels for each individual product. For example, if you use product ranking, you can use this report to determine how many times or for how many days that your A ranked products were out of stock.
Note: The system evaluates activity on a daily basis. So, if there is a location adjustment showing an in/out, the report does not count that as a stock out for the day.
To run the Product Out of Stock Tracking Report:
1. From the Purch > Reports menu, select Product Out of Stock Tracking to display the Product Out of Stock Tracking Report window.
2. In the Product Selection area, enter the parameters for which you want to run the report. The selections you make in the following fields display at the top of the report so you can better understand how the system gathered the report data.
Field Description Branch/Territory Enter the branch, branches, or territories to include in the report.
Product Status Select the status, such as Stock or Nonstock for which you want to run the report. Products are assigned statuses for cataloging and inventory control in Product Maintenance. Use the Multiple button to include more than one product status in the report, or leave the field blank to include products with any product status.
Buyer Select the buyer you want to include in the report. Use the Multiple button to include more than one buyer in the report, or leave the field blank to include all buyers.
Select By Select whether to run the report for a buy line or a price line in the drop-down menu. In the adjacent field, enter the buy line or price line for which you want to run the report. Use the Multiple button to include more than one buy line or price line in the report, or leave the field blank to include all buy lines or price lines.
Sort By Select the order in which you want to display the results in the report. Select from the following options: • Branch - Sorts the results alpha-numerically by branch. • Buy/Prc Line - Sorts the results alphabetically by buy line or price line,
depending on the selection in the Select By field. • Buyer - Sorts the results alphabetically by buyer. • Desc Hits - Sorts the results descending by the number or hits.
3. Select the Page Break check box if you want to insert a page break after each category in the report.
For example, if you select Branch in the Sort By field, and enter Yes in the Page Break field, the report starts results for each branch on a new page.
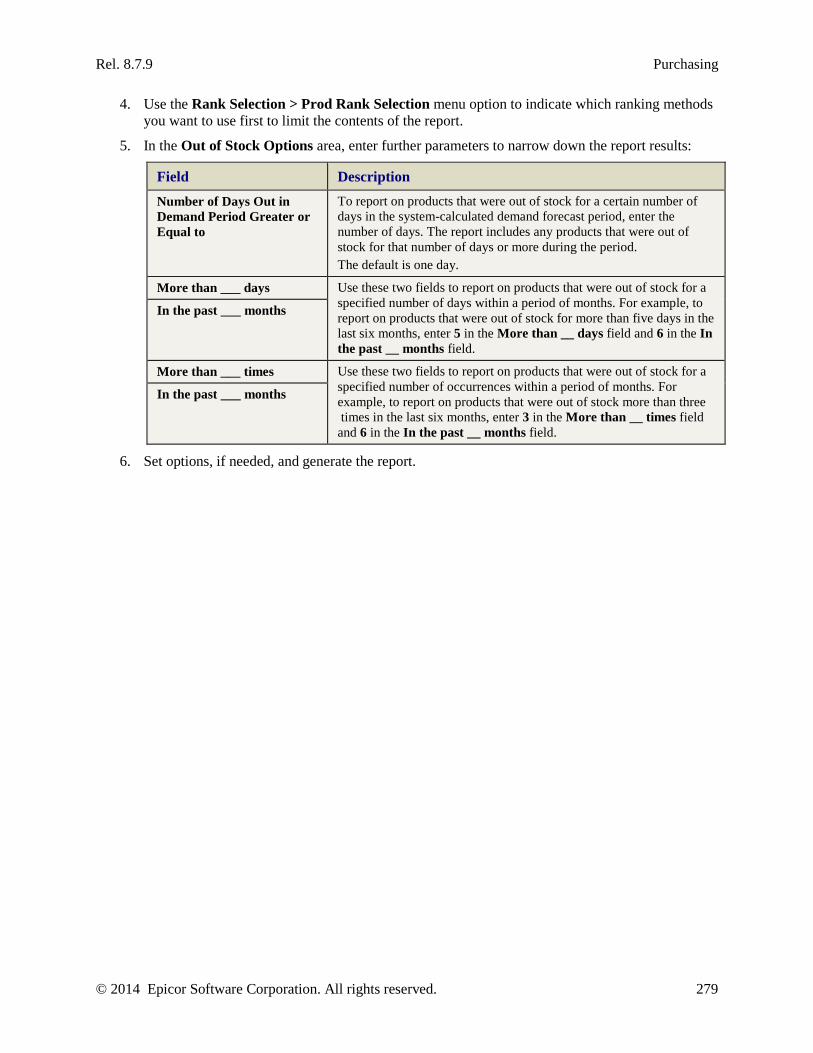
Rel. 8.7.9 Purchasing
© 2014 Epicor Software Corporation. All rights reserved. 279
4. Use the Rank Selection > Prod Rank Selection menu option to indicate which ranking methods you want to use first to limit the contents of the report.
5. In the Out of Stock Options area, enter further parameters to narrow down the report results:
Field Description Number of Days Out in Demand Period Greater or Equal to
To report on products that were out of stock for a certain number of days in the system-calculated demand forecast period, enter the number of days. The report includes any products that were out of stock for that number of days or more during the period. The default is one day.
More than ___ days Use these two fields to report on products that were out of stock for a specified number of days within a period of months. For example, to report on products that were out of stock for more than five days in the last six months, enter 5 in the More than __ days field and 6 in the In the past __ months field.
In the past ___ months
More than ___ times Use these two fields to report on products that were out of stock for a specified number of occurrences within a period of months. For example, to report on products that were out of stock more than three times in the last six months, enter 3 in the More than __ times field and 6 in the In the past __ months field.
In the past ___ months
6. Set options, if needed, and generate the report.

© 2014 Epicor Software Corporation. All rights reserved. 281
Index
A
Aged Inventory Report .................................. 265
average cost
managing in purchasing ............................. 140
B
baby branches
replenishing .................................................. 65
backorders
purchase orders
editing .................................................... 185
reviewing................................................ 184
setting fixed backorder days .................. 187
viewing ................................................... 185
best cost check ............................................... 138
bids
purchase orders
converting .............................................. 100
copying ..................................................... 97
buy lines
about ............................................................. 19
calculated values .......................................... 27
creating ................................................... 21, 24
default nonstock product ........................ 36, 53
deleting ......................................................... 23
editing .............................................. 48, 61, 85
example ........................................................ 47
forecasting parameters ................................. 51
freight factor................................................. 48
hit parameters ............................................... 49
lead time
entering .................................................... 45
overriding ................................................. 55
maintenance
about ........................................................ 31
change log ................................................ 37
limiting user access .................................. 34
overriding
lead times ................................................. 55
plenty date ................................................ 56
purchasing .................................................... 30
recalculating ................................................. 28
resequencing ................................................ 25
resupplying ...................................... 50, 59, 65
return policies .............................................. 63
secondary ..................................................... 19
super ............................................................ 24
transfer returns for ....................................... 54
vendors for replenishment ............... 57, 60, 67
warranty information ................................... 64
C
calculations
best cost check in purchasing .................... 138
buy line values
about ........................................................ 27
with package quantities............................ 38
minimum order cycle ................................. 136
secondary buy lines ..................................... 28
surplus point ................................................ 65
transfer excess grace days ............................ 69
Canceled P/O Report ..................................... 274
carrying costs
suggested P/O queue .................................. 143
central distribution
about .............................................................. 4
Solar Eclipse Purchasing Rel. 8.7.9
282 © 2014 Epicor Software Corporation. All rights reserved.
central purchasing
about ............................................................... 2
central warehousing
about ............................................................... 3
child branches
replenishing .................................................. 65
comments
purchase order entry
adding to line items ................................ 113
adding to orders ...................................... 113
consignments
vendor
inventory history .................................... 183
receiving ................................................. 178
setting up .................................................. 15
consignments, vendor
about ........................................................... 177
breaking container quantities ..................... 182
crediting ..................................................... 180
on Inventory Valuation Report .................. 260
on reports ................................................... 179
vendor items to customers ......................... 181
customer rebate purchase orders .................... 173
D
direct purchase orders
about ............................................................. 72
accessing ...................................................... 72
canceling ...................................................... 72
distributive purchasing
about ............................................................... 2
drop points
maintenance ................................................. 68
overriding ................................................... 117
duty codes
drawback on purchase orders ..................... 141
E
EDI (electronic data interchange)
purchasing queues ...................................... 142
queues
purchasing .............................................. 142
emergency vendors for procurement
assigning vendors to buy lines ..................... 57
setting up...................................................... 60
transfer branches ........................................ 226
F
forecasting
buy line parameters ...................................... 51
Freight Audit Report ...................................... 275
freight charges
purchase orders
bill of lading ........................................... 129
changing ................................................. 129
duty drawback codes.............................. 141
freight carriers ........................................ 127
freight factors ......................................... 129
freight terms ........................................... 126
overriding charges ................................. 128
pass-along freight................................... 131
freight factors for products .............................. 48
freight terms
defining ........................................................ 58
guidelines ................................................... 126
Status tab...................................................... 79
Totals tab ..................................................... 80
warning on purchase order........................... 79
future-dated purchase orders.......................... 134
G
grace days, excess
about ............................................................ 54
setting........................................................... 69
Index
© 2014 Epicor Software Corporation. All rights reserved. 283
H
hard tags, purchase orders .............................. 131
I
inventory valuation
report .......................................................... 260
M
master procurement groups ............................ 227
minimum order cycle
about ........................................................... 136
exceeding vendor target ............................. 136
setting for a buy line .................................... 46
setting up ...................................................... 12
N
non-returnable products ................................. 188
O
Open Purchase Orders Report ........................ 253
Overdue P/O Report ....................................... 254
overstock, returning
converting suggested P/Os ......................... 205
Suggested Return P/O Queue ..................... 203
suggesting P/Os .......................................... 202
P
P/O Expedite Queue ....................................... 171
P/O Receiver Report ...................................... 256
P/O Reconciliation Report ............................. 271
P/O Release Queue .......................................... 89
package quantities
purchase orders ............................................ 38
pass-along freight
about ........................................................... 131
PIL (projected inventory level)
calculation .................................................... 65
in replenishment ........................................... 65
in supplying buy lines .................................. 50
max days supply .......................................... 50
setting up...................................................... 11
plenty date
overriding for buy lines ............................... 56
post entry purchase orders ............................. 133
prepaying vendors .......................................... 123
Procurement Confirmation Queue ................. 230
procurements
confirmation
about ...................................................... 230
changing vendors ................................... 234
creating purchase orders ........................ 232
queue ...................................................... 230
emergency vendors ...................................... 59
groups
about ...................................................... 218
assignments ............................................ 224
creating and deleting .............................. 222
hierarchy .................................................. 44
maintenance ........................................... 220
maintenance log viewing ....................... 229
master ..................................................... 227
identifying buyers ........................................ 43
new branch settings ................................... 225
product kits ................................................ 135
setting up...................................................... 13
transfer branches ........................................ 226
vendors............................................... 217, 230
Product Backorder Report ............................. 272
Product Out of Stock Tracking Report .......... 278
Product Sales History Report......................... 268
product sales history, view in POE .................. 75
products
non-returnable ............................................ 188
purchasing
Solar Eclipse Purchasing Rel. 8.7.9
284 © 2014 Epicor Software Corporation. All rights reserved.
about ........................................................... 1
creating return purchase orders .............. 197
determining priority ................................. 72
kits .......................................................... 135
non-seasonal ............................................. 51
replenishing .............................................. 65
Returned Goods Queue .................. 191, 193
returning products to vendors ................ 195
seasonal .................................................... 51
substituting ............................................... 10
variations ................................................ 277
projected inventory level (PIL)
calculation .................................................... 65
in replenishment ........................................... 65
in supplying buy lines .................................. 50
max days supply ........................................... 50
setting up ...................................................... 11
purchase orders
about ............................................................. 72
adding
bill-to IDs ............................................... 101
bonded expiration date ............................. 84
comments to line items .......................... 113
generations ....................................... 99, 115
instructions ............................................. 111
notes ....................................................... 111
taxes ....................................................... 121
audit report ................................................. 156
batch printing ............................................. 103
bonding ........................................................ 84
combining branches ................................... 110
copying
header information ................................. 118
PO data to other orders............................. 97
creating ......................................................... 82
creating trackers from ................................ 119
currency ....................................................... 87
customer rebate .................................. 173, 175
detail scheduling .......................................... 99
direct purchase orders
about ........................................................ 72
accessing .................................................. 72
canceling .................................................. 72
drop points
maintenance ............................................. 68
overriding ............................................... 117
duty drawback codes ................................. 141
editing .......................................................... 85
entry windows
body ......................................................... 75
changing views ........................................ 94
header ....................................................... 76
status ........................................................ 78
totals......................................................... 80
expediting .................................................. 171
freight charges
editing .................................................... 129
freight carrier ......................................... 127
guidelines ............................................... 126
overriding ............................................... 128
future-dated ................................................ 134
generations ........................................... 99, 115
inquiries ............................................... 74, 105
international taxes ...................................... 121
legacy ......................................................... 133
line item schedules ..................................... 109
mode ............................................................ 97
package quantities ........................................ 38
post entries ................................................. 133
printing
Index
© 2014 Epicor Software Corporation. All rights reserved. 285
about ....................................................... 101
direct purchase orders ............................ 101
from the Status tab ................................. 102
options ...................................................... 78
orders........................................................ 78
print styles .............................................. 101
printer location selection .................. 78, 101
via e-mail ................................................. 78
processes ........................................................ 6
releasing ....................................................... 89
resorting line items ..................................... 108
returns
creating return PO .................................. 197
Returned Goods Queue .......................... 190
returning products .................................. 195
reviewing suggestions ................................ 156
sales history, on POE body .......................... 75
scheduling
changing unit of measure ......................... 92
entering serial numbers ............................ 92
generations ............................................... 99
ship dates .................................................. 99
ship quantities .......................................... 99
ship vias ................................................... 99
status ........................................................ 99
substituting products ................................ 91
tracking shipments ................................... 78
viewing purchasing information .............. 93
setting up ........................................................ 7
shipments, tracking ...................................... 79
substitutes ..................................................... 10
suggestions ................................................. 156
tabs
body.......................................................... 75
header ....................................................... 76
status ........................................................ 78
totals......................................................... 80
tracking shipments ....................................... 78
vendor notes ................................................. 76
Purchase Price Overrides Report ................... 270
Purchase Variance Report.............................. 277
purchasing
about .............................................................. 1
authorization .................................................. 7
nonstocks ................................................... 151
processes ........................................................ 6
reports ........................................................ 248
purging
Rebate Detail file ....................................... 176
Q
queues, purchasing
EDI Purchasing .......................................... 142
P/O Expedite .............................................. 171
P/O Release.................................................. 89
Procurement Confirmation ........................ 230
Rebate Detail ............................................. 173
Returned Goods ......................................... 191
Review P/O Backorders ............................. 184
suggested detail queue ............................... 154
suggested detail queue, columns................ 154
Suggested Purchase Order ......................... 148
Suggested Return P/O ................................ 203
R
Rebate Detail Queue ...................................... 173
rebilling and crediting
purchase orders .......................................... 107
reports
Suggested P/O Audit Report ...................... 156
reports, purchasing
about .......................................................... 248
Solar Eclipse Purchasing Rel. 8.7.9
286 © 2014 Epicor Software Corporation. All rights reserved.
Aged Inventory .......................................... 265
Canceled P/O ............................................. 274
Freight Audit .............................................. 275
Inventory Valuation ................................... 260
Open P/O .................................................... 253
Overdue P/O............................................... 254
P/O Receiver .............................................. 256
P/O Reconciliation ..................................... 271
Product Backorder ..................................... 272
Product Out of Stock Tracking .................. 278
Product Sales History ................................. 268
Purchase Price Override ............................. 270
Purchase Variance ...................................... 277
Stock Receipts ............................................ 259
return on additional investment (ROAI)
applying ..................................................... 169
calculations ................................................ 167
overview ..................................................... 167
price adjustments ....................................... 169
price increase ............................................. 169
quantity discounts ...................................... 169
volume discounts ....................................... 169
return policy for buy lines ................................ 63
Returned Goods Queue .................................. 191
returns
products to vendors
creating return purchase orders .............. 197
returned goods queue ..................... 191, 193
Review P/O Backorders Queue...................... 184
ROAI (return on additional investement)
applying ..................................................... 169
calculations ................................................ 167
overview ..................................................... 167
price adjustments ....................................... 169
price increase ............................................. 169
quantity discounts ...................................... 169
volume discounts ....................................... 169
S
sales inquiries
product sales history, on POE body ............. 75
secondary buy lines
about ............................................................ 19
recalculating ................................................. 28
shipping inaccuracies
logging ....................................................... 247
soft tags, purchase orders ............................... 131
Stock Receipts Report ................................... 259
Suggested P/O Audit Report .......................... 156
Suggested P/O Error Report .................. 145, 249
Suggested P/O Queue .................................... 148
Suggested P/O Report ............................ 145, 249
suggested purchase orders
about .......................................................... 143
additional columns available ..................... 163
column views ............................................. 148
converting
to actual purchase orders ....................... 151
to Transfer Surplus Queue ..................... 152
converting orders ....................................... 154
costs ................................................... 145, 249
default columns .......................................... 163
detail queue ................................................ 154
detail queue column descriptions ............... 154
error report ......................................... 145, 249
estimated order cycle ................................. 136
exceeding vendor target ............................. 136
nonstock
disable credit check................................ 32
for customers on hold .................... 145, 249
package quantities .............................. 145, 249
Index
© 2014 Epicor Software Corporation. All rights reserved. 287
plus sign (+) on report ........................ 145, 249
queue
combining POs ....................................... 161
displaying ............................................... 148
managing ................................................ 151
return on additional investment .............. 167
ROAI ...................................................... 167
sorting .................................................... 148
viewing different queues ........................ 143
recommended run ....................................... 143
report .......................................... 145, 249, 252
report, column descriptions ........................ 163
returning overstock ............................ 202, 203
returning stock ........................................... 205
running the report ............................... 145, 249
secondary buy lines ............................ 145, 249
single-branch to multi-branch .................... 153
target #1 and #2 .......................................... 154
vendor targets ............................................. 154
what the report shows ................................ 163
Suggested Return P/O Queue ......................... 203
Suggested Return P/O Report ................ 202, 203
suggested return purchase orders
converting into actual ................................. 205
queue .......................................................... 203
suggesting .................................................. 202
super buy lines ................................................. 19
surplus point ..................................................... 65
T
targets
for vendors
about ......................................................... 19
exceeding ............................................... 136
transfers
branches for procurement .......................... 226
excess grace days
about ........................................................ 69
suggesting .......................................... 145, 249
V
valued inventory, reports ............................... 260
vendor consignments
about .......................................................... 177
breaking container quantities ..................... 182
crediting ..................................................... 180
inventory history ........................................ 183
on reports ................................................... 179
receiving .................................................... 178
vendor items to customers ......................... 181
vendor performance ............................... 242, 246
about .......................................................... 235
building scorecard file ............................... 236
purging scorecard file ................................ 239
shipping inaccuracies ................................. 247
Vendor Scorecard File Report ................... 240
vendor scorecard
about .......................................................... 235
building ...................................................... 236
graphing ..................................................... 246
inquiry ................................................ 242, 246
purging ....................................................... 239
report .......................................................... 240
shipping inaccuracies ................................. 247
Vendor Scorecard File Report ....................... 240
vendors
performance data ............... 235, 236, 239, 240
prepaying ................................................... 123
procurement ............................................... 230
purchasing
emergency ................................................ 60
exceeding vendor target ......................... 136
Solar Eclipse Purchasing Rel. 8.7.9
288 © 2014 Epicor Software Corporation. All rights reserved.
inactive ................................................... 120
scorecard
about ....................................................... 235
building file ............................................ 236
graphing ................................................. 246
purging file ............................................. 239
report ...................................................... 240
shipping inaccuracies ............................. 247
viewing .......................................... 242, 246
W
warehouse schemes
about .............................................................. 2
bottom-up..................................................... 49
hits parameters ............................................. 49
top-down ...................................................... 49
warranty information buy lines ........................ 64