fortimail install guide - citeseerx
TRANSCRIPT

www.fortinet.com
FortiMailVersion 3.0 MR4
I n s t a l l G u i d e
FortiMail Install Guide
Version 3.0 MR4
January 9, 2009
06-343-88550-20090109
© Copyright 2009 Fortinet, Inc. All rights reserved. No part of this publication including text, examples, diagrams or illustrations may be reproduced, transmitted, or translated in any form or by any means, electronic, mechanical, manual, optical or otherwise, for any purpose, without prior written permission of Fortinet, Inc.
TrademarksDynamic Threat Prevention System (DTPS), APSecure, FortiASIC, FortiBIOS, FortiBridge, FortiClient, FortiGate®, FortiGate Unified Threat Management System, FortiGuard®, FortiGuard-Antispam, FortiGuard-Antivirus, FortiGuard-Intrusion, FortiGuard-Web, FortiLog, FortiAnalyzer, FortiManager, Fortinet®, FortiOS, FortiPartner, FortiProtect, FortiReporter, FortiResponse, FortiShield, FortiVoIP, and FortiWiFi are trademarks of Fortinet, Inc. in the United States and/or other countries. The names of actual companies and products mentioned herein may be the trademarks of their respective owners.
Regulatory complianceFCC Class A Part 15 CSA/CUS
! CAUTION: Risk of Explosion if Battery is replaced by an Incorrect Type. Dispose of Used Batteries According to the Instructions.
Contents
ContentsIntroduction ........................................................................................ 7
Registering your FortiMail unit......................................................................... 7
Customer service and technical support ........................................................ 7
About FortiMail units......................................................................................... 8FortiMail-100 ................................................................................................. 8FortiMail-400 ................................................................................................. 8FortiMail-2000A............................................................................................. 8FortiMail-4000A............................................................................................. 8
About this document......................................................................................... 9Document conventions.................................................................................. 9
FortiMail documentation ................................................................................. 10Comments on FortiMail technical documentation ...................................... 11
Key concepts.................................................................................... 13Email protocols................................................................................................ 13
SMTP .......................................................................................................... 13POP3........................................................................................................... 14IMAP ........................................................................................................... 14HTTP and HTTPS ....................................................................................... 14
Client-server connections in SMTP ............................................................... 15MTA............................................................................................................. 15MUA ............................................................................................................ 15Incoming vs. outgoing directionality ............................................................ 15
The role of DNS in email delivery................................................................... 16MX record.................................................................................................... 17A record....................................................................................................... 18Reverse DNS record ................................................................................... 18
FortiMail web-based manager modes............................................................ 19
FortiMail operation modes.............................................................................. 19
FortiMail high availability modes ................................................................... 20
Physical installation......................................................................... 21Environmental specifications......................................................................... 21
Cautions and warnings ................................................................................... 21Grounding ................................................................................................... 21Rack mount instructions.............................................................................. 22
Mounting the FortiMail unit............................................................................. 22FortiMail-100 ............................................................................................... 22FortiMail-400 ............................................................................................... 22FortiMail-2000A and FortiMail-4000A ......................................................... 23
FortiMail Version 3.0 MR4 Install Guide06-343-88550-20090109 3

4
Contents
Powering on the FortiMail unit ....................................................................... 26FortiMail-100 ............................................................................................... 26FortiMail-400 ............................................................................................... 26FortiMail-2000A and FortiMail-4000A ......................................................... 27Connecting to the network .......................................................................... 27
Turning off the FortiMail unit.......................................................................... 27
Connecting to the FortiMail unit .................................................................... 28Web-based manager .................................................................................. 28Command line interface .............................................................................. 29LCD front control buttons ............................................................................ 29
Updating the firmware ..................................................................... 31Testing new firmware before installing it...................................................... 31
Installing firmware........................................................................................... 33
Installing backup firmware ............................................................................. 35
Restoring firmware.......................................................................................... 37
Choosing the operation mode ........................................................ 39Characteristics of gateway mode .................................................................. 40
Characteristics of transparent mode............................................................. 40
Characteristics of server mode...................................................................... 41
Configuring the operation mode.................................................................... 42
Quick Start Wizard ........................................................................... 45Step 1: Changing the “admin” password...................................................... 45
Step 2: Configuring the network settings and system time ........................ 46
Step 3: Configuring local host settings......................................................... 48
Step 4: Adding protected domains ................................................................ 50
Step 5: Configuring incoming antispam and antivirus settings ................. 53
Step 6: Configuring access control rules and outgoing antispam and antivirus settings............................................................................................. 54
Step 7: Reviewing and saving the configuration.......................................... 57
Continuing the installation ............................................................................. 58
Connecting to FortiGuard services................................................ 59Configuring scheduled updates..................................................................... 62
Configuring push updates.............................................................................. 63
Manually requesting updates ......................................................................... 65
FortiMail Version 3.0 MR4 Install Guide06-343-88550-20090109

Contents
Gateway mode deployment............................................................. 67Configuring DNS records................................................................................ 67
Configuring DNS records for the protected domains .................................. 67Configuring DNS records for the FortiMail unit itself ................................... 68Configuring a private DNS server ............................................................... 70
Example 1: FortiMail unit behind a firewall ................................................... 71Configuring the firewall................................................................................ 72Configuring the MUAs ................................................................................. 76Testing the installation ................................................................................ 77
Example 2: FortiMail unit in front of a firewall .............................................. 77Configuring the firewall................................................................................ 78Configuring the MUAs ................................................................................. 83Testing the installation ................................................................................ 83
Example 3: FortiMail unit in DMZ ................................................................... 83Configuring the firewall................................................................................ 84Configuring the MUAs ................................................................................. 91Testing the installation ................................................................................ 91
Transparent mode deployment....................................................... 93Configuring DNS records................................................................................ 93
Configuring DNS records for the FortiMail unit itself ................................... 93Configuring a private DNS server ............................................................... 95
Example 1: FortiMail unit in front of an email server ................................... 96Configuring the protected domains ............................................................. 97Configuring the proxies ............................................................................... 98Testing the installation ................................................................................ 99
Example 2: FortiMail unit in front of an email hub ....................................... 99Configuring the protected domains ........................................................... 100Configuring the proxies ............................................................................. 102Testing the installation .............................................................................. 102
Server mode deployment .............................................................. 103Configuring DNS records.............................................................................. 103
Configuring DNS records for protected domains ...................................... 103Configuring DNS records for the FortiMail unit itself ................................. 104Configuring a private DNS server ............................................................. 106
Example 1: FortiMail unit behind a firewall ................................................. 106Configuring the firewall.............................................................................. 107Configuring the email user accounts......................................................... 111Configuring the MUAs ............................................................................... 111Testing the installation .............................................................................. 112
FortiMail Version 3.0 MR4 Install Guide06-343-88550-20090109 5

6
Contents
Example 2: FortiMail unit in front of a firewall............................................ 112Configuring the firewall ............................................................................. 113Configuring the email user accounts......................................................... 115Configuring the MUAs............................................................................... 115Testing the installation .............................................................................. 115
Example 3: FortiMail unit in DMZ................................................................. 116Configuring the firewall ............................................................................. 117Configuring the email user accounts......................................................... 121Configuring the MUAs............................................................................... 122Testing the installation .............................................................................. 122
Testing the installation.................................................................. 123Troubleshooting tools................................................................................... 125
Ping and traceroute................................................................................... 125Nslookup ................................................................................................... 126Telnet connections to the SMTP port number .......................................... 127Log messages........................................................................................... 129Greylist and sender reputation displays.................................................... 130Mail queues and quarantines.................................................................... 130Packet capture .......................................................................................... 131
Index................................................................................................ 135
FortiMail Version 3.0 MR4 Install Guide06-343-88550-20090109

Introduction Registering your FortiMail unit
IntroductionWelcome, and thank you for selecting Fortinet products for your network protection.
The FortiMail Secure Messaging Platform is an integrated hardware and software solution that provides powerful and flexible antispam, antivirus, email archiving and logging capabilities to incoming and outgoing email traffic. The FortiMail unit has reliable and high performance features for detecting and blocking spam messages and malicious attachments.
Built on the Fortinet award winning FortiOS™ and FortiASIC™ technology, the FortiMail antivirus technology extends full content inspection capabilities to detect the most advanced email threats.
This document will assist you in physically connecting and performing required configuration to achieve a basic FortiMail installation.
Registering your FortiMail unitBefore you begin, take a moment to register your Fortinet product at the Fortinet Technical Support web site, https://support.fortinet.com.Many Fortinet customer services, such as firmware updates, technical support, and FortiGuard Antivirus and other FortiGuard services, require product registration.For more information, see the Fortinet Knowledge Center article Registration Frequently Asked Questions.
Customer service and technical supportFortinet Technical Support provides services designed to make sure that your Fortinet products install quickly, configure easily, and operate reliably in your network. To learn about the technical support services that Fortinet provides, visit the Fortinet Technical Support web site at https://support.fortinet.com.You can dramatically improve the time that it takes to resolve your technical support ticket by providing your configuration file, a network diagram, and other specific information. For a list of required information, see the Fortinet Knowledge Center article What does Fortinet Technical Support require in order to best assist the customer?
FortiMail Version 3.0 MR4 Install Guide06-343-88550-20090109 7

8
About FortiMail units Introduction
About FortiMail unitsThe FortiMail family of appliances are designed for any business size and requirement, from a Small Business or Small Office Home Office (SOHO) to larger businesses, and deliver the same enterprise-class network-based antivirus and antispam features.
FortiMail is an email security system that provides multi-layered protection against blended threats comprised of spam, viruses, worms and spyware.
To ensure up-to-date email protection, FortiMail relies on FortiGuard™ Antivirus and FortiGuard Antispam security subscription services that are powered by a worldwide 24x7 Global Threat Research Team. FortiMail provides bidirectional email routing, virtualization and archiving capabilities with a lower total cost of ownership.
FortiMail-100The FortiMail-100 is an easy-to-deploy and easy-to-administer solution that delivers exceptional value and performance for small office, home office and branch office applications. The FortiMail-100 delivers reliable and high performance features to detect, tag, and block spam messages and their malicious attachments.
FortiMail-400The FortiMail-400 is optimized for medium sized enterprise customers, delivering a wealth of reliable and high performance features to detect, tag, and block spam messages and their malicious attachments. The FortiMail-400 features a high-performance hardened operating system with RAID storage system for redundancy and supports a rich set of multi-layered spam detection and filtering technologies with global and per-user spam policies for maximum configuration flexibility.
FortiMail-2000AFor larger installations where higher performance and better reliability is required, the FortiMail-2000A system provides the same software features as the FortiMail-400, but with a modular chassis with hot swappable components. Ideal for the most demanding email infrastructures, the FortiMail-2000A system delivers high performance for large enterprises and service providers, which includes the performance capability to scan 6.8 million emails per day, with six hot swappable disk drives with RAID for disk redundancy, and redundant power supplies and fans. Four 10/100/1000 Base-T interfaces, provides the flexibility to connect into many corporate or service provider environments.
FortiMail-4000AFor larger installations where higher performance and better reliability is required, the FortiMail-4000A system provides the same software features as the FortiMail-2000A. Ideal for the most demanding email infrastructures, the FortiMail-4000A system delivers high performance for large enterprises and service providers, which includes the performance capability to scan 6.8 million emails per day, with 12 hot swappable disk drives with RAID for disk redundancy, and redundant power supplies. Two 10/100/1000 Base-T interfaces, provides the flexibility to connect into many corporate or service provider environments.
FortiMail Version 3.0 MR4 Install Guide06-343-88550-20090109
Introduction About this document
About this documentThis document explains how to install and configure your FortiMail unit onto your network.
This document contains the following chapters:
• Key concepts – Describes the three modes you can select from to operate the FortiMail unit and briefly describes some email terminology for administrators and users new to email administration and setup.
• Physical installation – Describes setting up and powering on a FortiMail unit, as well as connecting to the web-based manager or CLI for the first time.
• Updating the firmware – Describes how to test, install, and restore FortiMail firmware.
• Choosing the operation mode – Describes how to choose and set the operation mode of the FortiMail unit.
• Quick Start Wizard – Describes how to use the Quick Start Wizard to complete basic first-time configuration.
• Connecting to FortiGuard services – Describes how to connect the FortiMail unit to the Fortinet Distribution Network (FDN) to obtain up-to-date spam and virus definitions, ensuring that your protection is current.
• Gateway mode deployment – Describes configuration required in addition to the Quick Start Wizard for example topologies when the FortiMail unit is operating in gateway mode.
• Transparent mode deployment – Describes configuration required in addition to the Quick Start Wizard for example topologies when the FortiMail unit is operating in transparent mode.
• Server mode deployment – Describes configuration required in addition to the Quick Start Wizard for example topologies when the FortiMail unit is operating in server mode.
• Testing the installation – Describes how to test the deployment of your FortiMail unit for configuration errors.
Document conventionsThe following document conventions are used in this guide:
• In the examples, private IP addresses are used for both private and public IP addresses.
• Notes and Cautions are used to provide important information:
Note: Highlights useful additional information.
! Caution: Warns you about commands or procedures that could have unexpected or undesirable results including loss of data or damage to equipment.
FortiMail Version 3.0 MR4 Install Guide06-343-88550-20090109 9
10
FortiMail documentation Introduction
Typographic conventionsFortiMail documentation uses the following typographical conventions:
FortiMail documentationYou can find FortiMail documentation from the following resources:
Online Help• FortiMail online help
Provides a searchable version of the FortiMail Administration Guide in HTML format. You can access online help from the web-based manager as you work.
• FortiMail webmail online helpDescribes how to use the FortiMail web-based email client, including: how to send and receive email; how to add, import, and export addresses; how to configure message display preferences; and how to manage quarantined email. You can access online help when using FortiMail webmail.
Fortinet Documentation CDAll Fortinet documentation is available on the Fortinet Tools and Documentation CD shipped with your Fortinet product. The documents on this CD are current at shipping time. The CD contains the following documents:
• FortiMail QuickStart GuideProvides basic information about connecting and installing a FortiMail unit. A separate guide is available for each FortiMail model.
• FortiMail Install GuideDescribes how to set up the FortiMail unit in transparent, gateway, or server mode.
• FortiMail Administration GuideThis document. Introduces the product and describes how to configure and manage a FortiMail unit, including how to create profiles and policies, configure antispam and antivirus filters, create user accounts, configure email archiving, and set up logging and reporting.
• FortiMail CLI ReferenceDescribes how to use the FortiMail CLI and contains a reference of all FortiMail CLI commands.
Convention ExampleKeyboard input In the Host Name field, type a name for the remote server (for
example, Central_Office_1).
CLI command syntax execute restore image <name_str> <tftp_ipv4>
Document names FortiMail Administration Guide
Menu commands Go to Mail Settings > Domains and select Create New.
Program output Welcome!
Variables <address_ipv4>
FortiMail Version 3.0 MR4 Install Guide06-343-88550-20090109
Introduction FortiMail documentation
Fortinet Documentation Web SiteGo to http://docs.fortinet.com to get up-to-date FortiMail documentation.
Fortinet Knowledge CenterGo to http://kc.fortinet.com to find more FortiMail related documents:
• FortiMail Log Message ReferenceDescribes the structure of FortiMail log messages and provides information about the log messages that are generated by FortiMail units.
• Other troubleshooting and how-to articles, FAQs, technical notes, and more.
Comments on FortiMail technical documentation Please send information about any errors or omissions in this or any FortiMail technical documentation to [email protected].
FortiMail Version 3.0 MR4 Install Guide06-343-88550-20090109 11

12
FortiMail documentation Introduction
FortiMail Version 3.0 MR4 Install Guide06-343-88550-20090109
Key concepts Email protocols
Key conceptsThis chapter defines basic email and FortiMail concepts and terms.
If you are new to FortiMail units, or new to email systems, this chapter can help you to quickly understand this document and your FortiMail unit.
This chapter contains the following sections:
• Email protocols• Client-server connections in SMTP• The role of DNS in email delivery• FortiMail web-based manager modes• FortiMail operation modes• FortiMail high availability modes
Email protocolsThere are multiple prevalent standard email protocols.
SMTPSimple Mail Transfer Protocol (SMTP) is the standard protocol for sending email between:
• two mail transfer agents (MTA)• a mail user agent (MUA) and an MTA
SMTP communications typically occur on TCP port number 25.
When an email user sends an email, their MUA uses SMTP to send the email to an MTA, which is often their email server. The MTA then uses SMTP to directly or indirectly deliver the email to the destination email server that hosts email for the recipient email user.
When an MTA connects to the destination email server, it determines whether the recipient exists on the destination email server. If the recipient email address is legitimate, then the MTA delivers the email to the email server, from which email users can then use a protocol such as POP3 or IMAP to retrieve the email. If the recipient email address does not exist, the MTA typically sends a separate email message to the sender, notifying them of delivery failure.
While the basic protocol of SMTP is simple, many SMTP servers support a number of protocol extensions for features such as authentication, encryption, multipart messages and attachments, and may be referred to as extended SMTP (ESMTP) servers.
FortiMail units can scan SMTP traffic for spam and viruses, and support several SMTP extensions. For details, see the Fortinet Knowledge Center article Supported SMTP-related RFCs.
Note: For definitions of MTA and MUA, see “Client-server connections in SMTP” on page 15.
FortiMail Version 3.0 MR4 Install Guide06-343-88550-20090109 13
14
Email protocols Key concepts
POP3Post Office Protocol version 3 (POP3) is a standard protocol used by email clients to retrieve email that has been delivered to and stored on an email server.
POP3 communications typically occur on TCP port number 110.
Unlike IMAP, after a POP3 client downloads an email to the email user’s computer, a copy of the email usually does not remain on the email server’s hard disk. The advantage of this is that it frees hard disk space on the server. The disadvantage of this is that downloaded email usually resides on only one personal computer. Unless all of their POP3 clients are always configured to leave copies of email on the server, email users who use multiple computers to view email, such as both a desktop and laptop, will not be able to view from one computer any of the email previously downloaded to another computer.
FortiMail units do not scan POP3 traffic for spam and viruses, but may use POP3 when operating in server mode, when an email user retrieves their email. For more information on server mode, see “FortiMail operation modes” on page 19.
IMAPInternet Message Access Protocol (IMAP) is a standard protocol used by email clients to retrieve email that has been delivered to and stored on an email server.
IMAP communications typically occur on TCP port number 143.
Unless configured for offline availability, IMAP clients typically initially download only the message header. They download the message body and attachments only when the email user selects to read the email.
Unlike POP3, when an IMAP client downloads an email to the email user’s computer, a copy of the email remains on the email server’s hard disk. The advantage of this is that it enables email users to view email from more than one computer. This is especially useful in situations where more than one person may need to view an inbox, such where all members of a department monitor a collective inbox. The disadvantage of this is that, unless email users delete email, IMAP may more rapidly consume the server’s hard disk space.
FortiMail units do not scan IMAP traffic for spam and viruses, but may use IMAP when operating in server mode, when an email user retrieves their email. For more information on server mode, see “FortiMail operation modes” on page 19.
HTTP and HTTPSSecured and non-secured HyperText Transfer Protocols (HTTP/HTTPS), while not strictly for the transport of email, are often used by webmail applications to view email that is stored remotely.
HTTP communications typically occur on TCP port number 80; HTTPS communications typically occur on TCP port number 443.
FortiMail units do not scan HTTP or HTTPS traffic for spam or viruses, but use them to display quarantines and, if the FortiMail unit is operating in server mode, FortiMail webmail. For more information on server mode, see “FortiMail operation modes” on page 19.
FortiMail Version 3.0 MR4 Install Guide06-343-88550-20090109
Key concepts Client-server connections in SMTP
Client-server connections in SMTPClient-server connections and connection directionality in SMTP differ from how you may be familiar with them in other protocols.
For example, in the SMTP protocol, an SMTP client connects to an SMTP server. This seems consistent with the traditional client-server model of communications. However, due to the notion of relay in SMTP, the SMTP client may be either:
• an email application on a user’s personal computer• another SMTP server that acts as a delivery agent for the email user, relaying
the email to its destination email server
The placement of clients and servers within your network topology may affect the operation mode you choose when installing a FortiMail unit. If your FortiMail unit will be operating in gateway mode or server mode, SMTP clients — including SMTP servers connecting as clients — must be configured to connect to the FortiMail unit.
Terms such as MTA and MUA describe server and client relationships specific to email protocols.
MTAA Mail Transfer Agent (MTA) is an SMTP server that relays email messages to another SMTP server.
FortiMail units operating in gateway mode function as an MTA. FortiMail units operating in server mode function as an MTA and full (SMTP, IMAP, POP3, webmail) email server.
In order to deliver email, unless the email is incoming and the email server has no domain name and is accessed by IP address only, MTAs must query a DNS server for the MX record and the corresponding A record. For more information, see “The role of DNS in email delivery” on page 16.
MUAA Mail User Agent (MUA), or email client, is software such as Microsoft Outlook that enables users to send and receive email.
FortiMail units support SMTP connections for sending of email by a MUA.
FortiMail units operating in server mode support POP3 and IMAP connections for retrieval of email by a MUA. For email users that prefer to use their web browsers to send and retrieve email instead of a traditional MUA, FortiMail units operating in server mode also provide FortiMail webmail.
Incoming vs. outgoing directionalityMany FortiMail features such as proxies and policies act upon the directionality of an SMTP connection or email message. Rather than being based upon origin, incoming or outgoing directionality is determined by whether the destination is a protected domain.
Note: For more information on gateway mode and server mode, see “FortiMail operation modes” on page 19.
FortiMail Version 3.0 MR4 Install Guide06-343-88550-20090109 15
16
The role of DNS in email delivery Key concepts
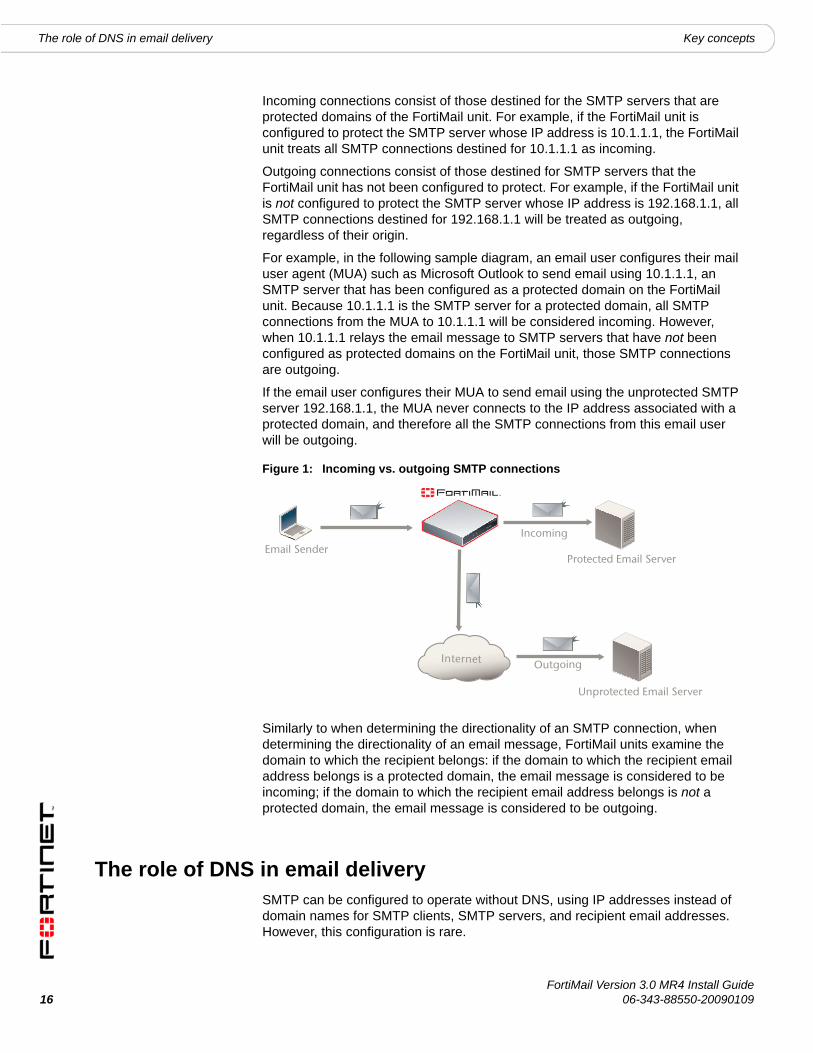
Incoming connections consist of those destined for the SMTP servers that are protected domains of the FortiMail unit. For example, if the FortiMail unit is configured to protect the SMTP server whose IP address is 10.1.1.1, the FortiMail unit treats all SMTP connections destined for 10.1.1.1 as incoming.
Outgoing connections consist of those destined for SMTP servers that the FortiMail unit has not been configured to protect. For example, if the FortiMail unit is not configured to protect the SMTP server whose IP address is 192.168.1.1, all SMTP connections destined for 192.168.1.1 will be treated as outgoing, regardless of their origin.
For example, in the following sample diagram, an email user configures their mail user agent (MUA) such as Microsoft Outlook to send email using 10.1.1.1, an SMTP server that has been configured as a protected domain on the FortiMail unit. Because 10.1.1.1 is the SMTP server for a protected domain, all SMTP connections from the MUA to 10.1.1.1 will be considered incoming. However, when 10.1.1.1 relays the email message to SMTP servers that have not been configured as protected domains on the FortiMail unit, those SMTP connections are outgoing.
If the email user configures their MUA to send email using the unprotected SMTP server 192.168.1.1, the MUA never connects to the IP address associated with a protected domain, and therefore all the SMTP connections from this email user will be outgoing.
Figure 1: Incoming vs. outgoing SMTP connections
Similarly to when determining the directionality of an SMTP connection, when determining the directionality of an email message, FortiMail units examine the domain to which the recipient belongs: if the domain to which the recipient email address belongs is a protected domain, the email message is considered to be incoming; if the domain to which the recipient email address belongs is not a protected domain, the email message is considered to be outgoing.
The role of DNS in email deliverySMTP can be configured to operate without DNS, using IP addresses instead of domain names for SMTP clients, SMTP servers, and recipient email addresses. However, this configuration is rare.
Email Sender
Internet
Unprotected Email Server
Protected Email Server
Incoming
Outgoing
FortiMail Version 3.0 MR4 Install Guide06-343-88550-20090109
Key concepts The role of DNS in email delivery
SMTP as it is typically used relies upon DNS to determine the mail gateway server for a domain name, and to resolve domain names into IP addresses. As such, you usually must configure email servers and FortiMail units to be able to query a DNS server.
In addition, you may also be required to configure the DNS server with an MX record, an A record, and a reverse DNS record for protected domain names and for the domain name of the FortiMail unit itself.
MX recordMail Exchanger (MX) records are configured on a DNS server. MX records for a domain name indicate designated email servers or email gateways that deliver email to that domain, and their order of preference. In their most simple form, MX records use the following format:
example.com IN MX 10 mail.example.com
where:
• example.com is the name of the domain• IN indicates the Internet protocol class• MX indicates that the DNS resource record is of the MX type• 10 indicates the order of preference (greater values indicate lower preference)• mail.example.com is the host name of an email server or gateway
When an email client sends an email, the sender’s MTA queries a DNS server for the MX record of the domain name in the recipient’s email address. To resolve the host name of the MTA referenced by the MX record, it then queries for the A record of the destination MTA. That A record provides the IP address of the email server or gateway. The sender’s MTA then attempts to deliver the email to that IP address.
For example, if the recipient email address is [email protected], in order to deliver the email, the sender’s MTA would query the MX and A records to determine the IP address of the email gateway of example.com.
Often, the domain name and/or IP address of the email domain is different from that of its email server or gateway. The fully qualified domain name (FQDN) of an email server or gateway may be a subdomain or another domain name entirely, such as that of the MTA of an Internet service provider (ISP). For example, the email gateways for the email domain example.com could be mail1.example.com and mail2.example.com, or mail.isp.example.net.
If your FortiMail unit will operate in transparent mode, no MX record changes are required.
If your FortiMail unit will operate in gateway mode or server mode, you must configure the public DNS server for your domain name with an MX record that refers to the FortiMail unit which will operate as the email gateway, such as:
example.com IN MX 10 fortimail.example.com
FortiMail Version 3.0 MR4 Install Guide06-343-88550-20090109 17

18
The role of DNS in email delivery Key concepts
Exceptions include if you are configuring a private DNS server for use with the “Use MX Record” option (see “Use MX Record” on page 52). In that case, rather than referencing the FortiMail unit as the mail gateway and being used by external SMTP servers to route mail, the MX record references the protected SMTP server and is used by the FortiMail unit to define the SMTP servers for the protected domain.
A recordA records are configured on a DNS server. A records indicate the IP address to which a host name resolves. In their most simple form, A records use the following format:
mail IN A 192.168.1.10
where:
• mail is the name of the host• IN indicates the Internet protocol class• A indicates that the DNS resource record is of the IPv4 address type• 192.168.1.10 indicates the IP address that hosts the domain name
When an email client sends an email, the sender’s MTA queries a DNS server for the MX record of the domain name in the recipient’s email address. To resolve the host name of the MTA referenced by the MX record, it then queries for the A record of the destination MTA. That A record provides the IP address of the email server or gateway. The sender’s MTA then attempts to deliver the email to that IP address.
You must configure the public DNS server for your host names with an A record to resolve the host names referenced in MX records, and the host name of the FortiMail unit, if any. For example, if an MX record is:
example.com IN MX 10 fortimail.example.com
the required A record in the example.com zone file might be:
fortimail IN A 192.168.1.15
Reverse DNS recordBecause the SMTP protocol does not strictly require SMTP clients to use their own domain name during the SMTP greeting, it is possible to spoof the origin domain. In an attempt to bypass antispam measures against domain names known to be associated with spam, spammers often exploit that aspect of SMTP by pretending to send email from legitimate domains.
!Caution: If your FortiMail unit will operate in gateway mode or server mode, configure the MX record to refer to the FortiMail unit, and remove other MX records. If you do not configure the MX record to refer to the FortiMail unit, or if other MX records exist that do not refer to the FortiMail unit, external MTAs may not be able to deliver email to or through the FortiMail unit, or may be able to bypass the FortiMail unit. If you have configured secondary MX records for failover reasons, consider configuring FortiMail high availability (HA) instead. For details, see “FortiMail high availability modes” on page 20.
Note: For more information on gateway mode and server mode, see “FortiMail operation modes” on page 19.
FortiMail Version 3.0 MR4 Install Guide06-343-88550-20090109
Key concepts FortiMail web-based manager modes
For example, the spammer spam.example.com might initiate an SMTP session with the command:
EHLO nonspam.example.edu
To prevent this form of attack, many SMTP servers query reverse DNS records to verify that the domain name provided in the SMTP greeting genuinely matches the IP address of the connecting SMTP client.
You should configure the public DNS server for your protected domain names with a reverse DNS record to resolve the IP addresses of your protected SMTP servers and/or FortiMail unit into domain names.
For example, if the outgoing MTA for example.com is the FortiMail unit, fortimail.example.com, and the public network IP address of the FortiMail unit is 10.10.10.1, a public DNS server’s reverse DNS zone file for the 10.10.10.0/24 subnet might contain:
1 IN PTR fortimail.example.com.
where fortimail.example.com is the FQDN of the FortiMail unit.
FortiMail web-based manager modesThe web-based manager has two modes: basic mode and advanced mode.
• Basic mode: Provides easy navigation using a simplified set of menu options that allow for many typical FortiMail unit configurations, and includes the Quick Start Wizard.
• Advanced mode: Provides the full set of menu options which allows you to achieve more complex configurations, but does not include the Quick Start Wizard.
Unless otherwise specified, this document describes setup of the FortiMail unit using the basic mode of the web-based manager.
For more information on basic mode, advanced mode, the Quick Start Wizard, or configuring your FortiMail unit using either mode of the web-based manager, see the FortiMail Administration Guide.
FortiMail operation modesFortiMail units can run in one of three operation modes: gateway mode, transparent mode, and server mode.
• Gateway mode: The FortiMail unit acts as a mail transfer agent (MTA), or email gateway, relaying email to and from the email servers that it protects. It does not locally store email unless queued or quarantined.
• Transparent mode: The FortiMail unit transparently proxies email traffic to and from the email servers that it protects. It does not locally store email unless queued or quarantined.
• Server mode: The FortiMail unit operates as a stand-alone email server and MTA. The FortiMail unit locally stores email for delivery to its email users. Email users can access their email using FortiMail webmail, POP3, or IMAP.
FortiMail Version 3.0 MR4 Install Guide06-343-88550-20090109 19

20
FortiMail high availability modes Key concepts
All operation modes can scan email traffic for viruses and spam, and can quarantine suspicious email and attachments.
For more information on the differences between operation modes and configuring the operation mode, see “Choosing the operation mode” on page 39.
FortiMail high availability modesFortiMail units can be configured to operate in high availability (HA) clusters. FortiMail HA has two modes: active-passive and config-only.
• Active-passive HA: Two FortiMail units operate as an HA cluster, synchronizing both configuration and data, providing failover protection.
• Config-only HA: Up to 25 FortiMail units use an identical configuration, but do not synchronize data, and therefore operate as independent FortiMail units.
Fortinet recommends HA to achieve uninterrupted service.
For more information on HA, see the FortiMail Administration Guide.
FortiMail Version 3.0 MR4 Install Guide06-343-88550-20090109
Physical installation Environmental specifications
Physical installationThis chapter provides information on mounting and connecting the FortiMail unit to your network. This chapter includes the following topics:
• Environmental specifications• Cautions and warnings• Mounting the FortiMail unit• Powering on the FortiMail unit• Turning off the FortiMail unit• Connecting to the FortiMail unit
Environmental specifications• Operating temperature: 32 to 104°F (0 to 40°C)
If you install the FortiMail unit in a closed or multi-unit rack assembly, the operating ambient temperature of the rack environment may be greater than room ambient temperature. Therefore, make sure to install the equipment in an environment compatible with the manufacturer's maximum rated ambient temperature.
• Storage temperature: -13 to 158°F (-25 to 70°C)• Humidity: 5 to 90% non-condensing• Air flow: For rack installation, make sure that the amount of air flow required for
safe operation of the equipment is not compromised.For free-standing installation, make sure that the FortiMail unit has sufficient clearance on each side to allow for adequate air flow and cooling.
Cautions and warningsReview the following cautions before installing your FortiMail unit.
Grounding• Ensure the FortiMail unit is connected and properly grounded to a lightning
and surge protector. WAN or LAN connections that enter the premises from outside the building should be connected to an Ethernet CAT5 (10/100 Mb/s) surge protector.
• Shielded Twisted Pair (STP) Ethernet cables should be used whenever possible rather than Unshielded Twisted Pair (UTP).
• Do not connect or disconnect cables during lightning activity to avoid damage to the FortiMail unit or personal injury.
FortiMail Version 3.0 MR4 Install Guide06-343-88550-20090109 21

22
Mounting the FortiMail unit Physical installation
Rack mount instructionsElevated Operating Ambient - If installed in a closed or multi-unit rack assembly, the operating ambient temperature of the rack environment may be greater than room ambient temperature. Therefore, consideration should be given to installing the equipment in an environment compatible with the maximum ambient temperature (Tma) specified by the manufacturer.
Reduced Air Flow - Installation of the equipment in a rack should be such that the amount of air flow required for safe operation of the equipment is not compromised.
Mechanical Loading - Mounting of the equipment in the rack should be such that a hazardous condition is not achieved due to uneven mechanical loading.
Circuit Overloading - Consideration should be given to the connection of the equipment to the supply circuit and the effect that overloading of the circuits might have on overcurrent protection and supply wiring. Appropriate consideration of equipment nameplate ratings should be used when addressing this concern.
Reliable Earthing - Reliable earthing of rack-mounted equipment should be maintained.
Particular attention should be given to supply connections other than direct connections to the branch circuit (e.g. use of power strips).
If required to fit into a rack unit, remove the rubber feet from the bottom of the FortiMail unit.
Mounting the FortiMail unit
FortiMail-100Adhere the rubber feet included in the package to the underside of the FortiMail unit, near the corners of the unit if not already attached.
Place the FortiMail unit on any flat, stable surface. Ensure the FortiMail unit has sufficient clearance on each side to ensure adequate airflow for cooling.
If you remove the rubber feet, you can alternatively mount the FortiMail unit in a 2U-tall space in any standard 19-inch rack unit.
FortiMail-400The FortiMail unit can be placed on any flat surface, or mounted in a standard 19-inch rack unit.
When placing the FortiMail unit on any flat, stable surface, ensure the FortiMail unit has sufficient clearance on each side to ensure adequate airflow for cooling.
For rack mounting, use the mounting brackets and screws included with the FortiMail unit.
! Caution: To avoid personal injury, you may require two or more people to mount the FortiMail unit in the rack.
FortiMail Version 3.0 MR4 Install Guide06-343-88550-20090109
Physical installation Mounting the FortiMail unit
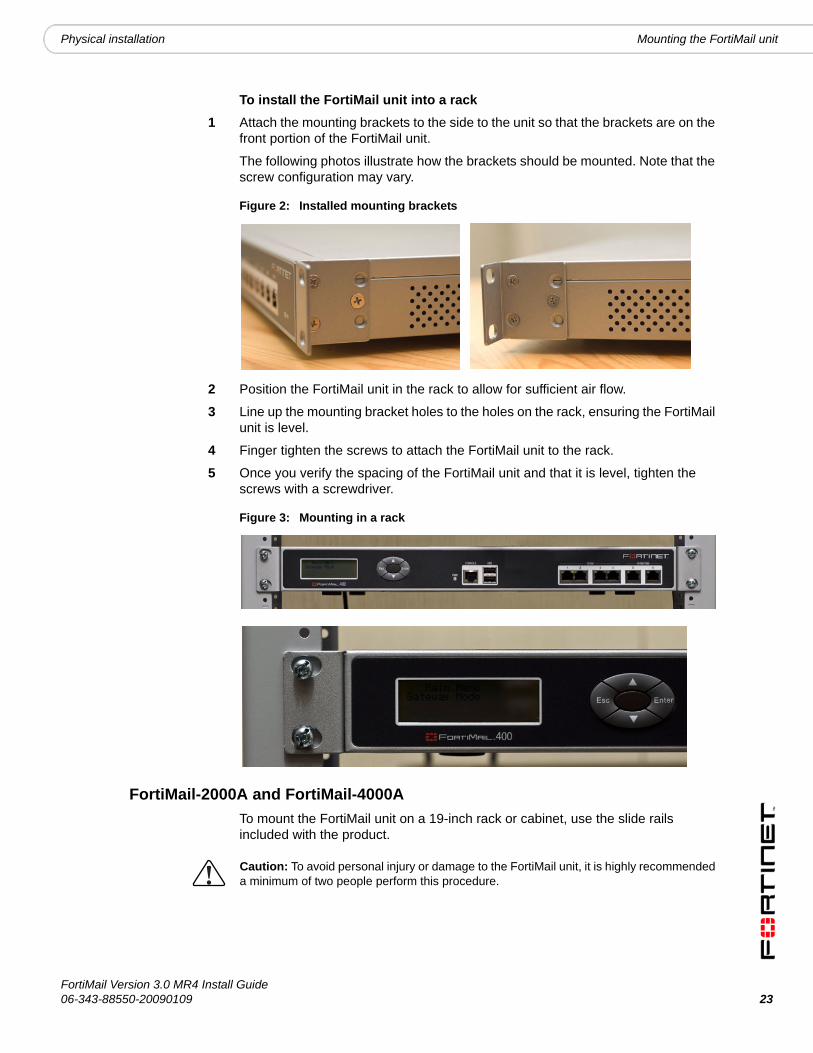
To install the FortiMail unit into a rack1 Attach the mounting brackets to the side to the unit so that the brackets are on the
front portion of the FortiMail unit.
The following photos illustrate how the brackets should be mounted. Note that the screw configuration may vary.
Figure 2: Installed mounting brackets
2 Position the FortiMail unit in the rack to allow for sufficient air flow.
3 Line up the mounting bracket holes to the holes on the rack, ensuring the FortiMail unit is level.
4 Finger tighten the screws to attach the FortiMail unit to the rack.
5 Once you verify the spacing of the FortiMail unit and that it is level, tighten the screws with a screwdriver.
Figure 3: Mounting in a rack
FortiMail-2000A and FortiMail-4000ATo mount the FortiMail unit on a 19-inch rack or cabinet, use the slide rails included with the product.
! Caution: To avoid personal injury or damage to the FortiMail unit, it is highly recommended a minimum of two people perform this procedure.
FortiMail Version 3.0 MR4 Install Guide06-343-88550-20090109 23

24
Mounting the FortiMail unit Physical installation
Mounting requires three steps:
• disassembling the slide rail from the slide housing• attaching the slide rail to the sides of the FortiMail unit• mounting the FortiMail unit to the rack or cabinet.
Disassembling the slide railThe slide rail assembly has two moving rails within the housing. You need to remove the innermost rail. This rail will attach to the sides of the FortiMail unit.
Figure 4: FortiMail side rail
To remove the side rail1 Open the slide rails package and remove the rails.
2 Extend the slide rail and locate the slide rail lock.
Rail housing Sliding Rail
Rail Lock
FortiMail Version 3.0 MR4 Install Guide06-343-88550-20090109

Physical installation Mounting the FortiMail unit
3 Push down on the lock while pulling the rail completely out of the slide rail assembly.
4 Repeat these steps for the other slide rail assembly.
You will attach this part to the side of the FortiMail unit.
Attaching the slide rail to the FortiMail unitAttach the disconnected slide rails from the previous step to the sides of the FortiMail unit. Use the screws provided with the slide rail package, being sure to securely fasten the rail to the FortiMail chassis.
Mounting the FortiMail unitMounting the FortiMail-2000A or FortiMail-4000A is a two step process. First, you must attached the slide rail housing to the rack or cabinet, then insert the FortiMail unit.
FortiMail Version 3.0 MR4 Install Guide06-343-88550-20090109 25
26
Powering on the FortiMail unit Physical installation
To mount the FortiMail unit1 Mount the slide rail housing to the rack or cabinet frame. Adjust the outside
L-shaped brackets for a proper fit. Ensure that both housings are on the same level to ensure the FortiMail unit can easily glide into place and is level.
2 Use the screws and additional L-brackets if required to securely fasten the housing.
3 Position the FortiMail unit so that the back of the unit is facing the rack, and the slide rails affixed in the previous step line up with the slide rail housing.
4 Gently push the FortiMail unit into the rack or cabinet. You will hear a click when the slide rail lock has been engaged.
5 Push the FortiMail unit until it is fully inserted into the rack.
Powering on the FortiMail unit
FortiMail-100The FortiMail-100 does not have a power switch.
To power on the FortiMail unit 1 Connect the AC adapter to the power connection at the back of the FortiMail unit.
2 Connect the AC adapter to the power cable.
3 Connect the power cable to a power outlet.
The FortiMail unit starts and the Power and Status LEDs light up. The Status LEDs flash while the FortiMail unit starts up, and remain lit when the system is running.
FortiMail-400Use the following steps to connect the power supply to the FortiMail unit.
To power on the FortiMail unit1 Ensure the power switch, located at the back of the FortiMail unit is in the off
position, indicated by the “O”.
2 Connect the power cord at the back of the FortiMail unit.
3 Connect the power cable to a power outlet.
4 Set the power switch on the back left of the FortiMail unit to the on position indicated by the “I”.
After a few seconds, SYSTEM STARTING appears on the LCD. The main menu setting appears on the LCD when the system is running.
FortiMail Version 3.0 MR4 Install Guide06-343-88550-20090109
Physical installation Turning off the FortiMail unit
FortiMail-2000A and FortiMail-4000AThe FortiMail unit does not have an on/off switch.
To power on the FortiMail unit 1 Connect the two power cables to the power connections on the back of the
FortiMail unit.
2 Connect the two power cables to power outlets.
Each power cable should be connected to a different power source. If one power source fails, the other may still be operative.
After a few seconds, SYSTEM STARTING appears on the LCD. The main menu setting appears on the LCD when the system is running.
The FortiMail unit starts and the Power and Status LEDs light up. The Status LEDs flash while the FortiMail unit starts up, and remain lit when the system is running.
Connecting to the networkUntil the FortiMail unit is configured with an IP address and other settings in the Quick Start Wizard required to connect to your network, you may prefer to connect the FortiMail unit directly to your management computer, or through a switch, in a peer network that is isolated from your overall network. However, isolation is not required.
Using the supplied Ethernet cable, connect one end of the cable to port 1 on the FortiMail unit; connect the other end of the cable to the router, switch, or directly to your management computer.
Turning off the FortiMail unitAlways shut down the FortiMail unit properly before turning off the power switch to avoid potential hardware problems. This enables the hard drives to spin down and park correctly and avoid losing data.
To power off the FortiMail unit 1 From the web-based manager, go to Management > Status in the basic
management mode, or System > Status in the advanced management mode.
2 In the System Command display, select Shutdown.
3 Turn off and/or Disconnect the power cables from the power supply.
Note: If only one power supply is connected, an audible alarm sounds to indicate a failed power supply. Press the red alarm cancel button on the rear panel next to the power supply to stop the alarm.
Note: If you will upgrade the FortiMail firmware and configure the FortiMail unit while it is isolated from your overall network, download the FortiMail firmware to your management computer before disconnecting it from your overall network. For details, see “Updating the firmware” on page 31.
FortiMail Version 3.0 MR4 Install Guide06-343-88550-20090109 27
28
Connecting to the FortiMail unit Physical installation
Connecting to the FortiMail unitThere are three methods of connecting and configuring fundamental settings such as IP addresses:
• the web-based manager• the command line interface (CLI)• the front control buttons and LCD (FortiMail-400 and FortiMail-2000A)
Web-based managerYou can configure and manage the FortiMail unit using HTTP or a secure HTTPS connection from any computer using a recent browser.
You can use the web-based manager to configure most FortiMail settings, and monitor the status of the FortiMail unit.
Use the following procedure to connect to the web-based manager for the first time. Configuration changes made with the web-based manager are effective immediately, without interrupting service.
To connect to the web-based manager, you require:
• a computer with an Ethernet connection• any recent version of most popular web browser• a crossover Ethernet cable or an Ethernet hub with two Ethernet cables
To connect to the web-based manager1 Set the IP address of the computer with an Ethernet connection to the static IP
address 192.168.1.2 with a netmask of 255.255.255.0.
2 Using the crossover cable or the Ethernet hub and cables, connect the internal interface of the FortiMail unit to the computer Ethernet connection.
3 Start the web browser and browse to the address https://192.168.1.99/admin. (remember to include the “s” in https://)
To support a secure HTTPS authentication method, the FortiMail unit ships with a self-signed security certificate, and is offered to remote clients whenever they initiate a HTTPS connection to the FortiMail unit. When you connect, the FortiMail unit displays two security warnings in the browser.
The first warning prompts you to accept and optionally install the FortiMail unit’s self-signed security certificate. If you do not accept the certificate, the FortiMail unit refuses the connection. If you accept the certificate, the FortiMail login page appears. The credentials entered are encrypted before they are sent to the FortiMail unit. If you choose to accept the certificate permanently, the warning is not displayed again.
Just before the FortiMail login page is displayed, a second warning informs you that the FortiMail certificate distinguished name differs from the original request. This warning occurs because the FortiMail unit redirects the connection. This is an informational message. Select OK to continue logging in.
4 Type admin in the Name field and select Login.
FortiMail Version 3.0 MR4 Install Guide06-343-88550-20090109

Physical installation Connecting to the FortiMail unit
Command line interfaceYou can access the FortiMail command line interface (CLI) by connecting a management computer serial port to the FortiMail serial console connector. You can also use Telnet or an SSH connection to connect to the CLI from any network that is connected to the FortiMail unit, including the Internet.
As an alternative to the web-based manager, you can install and configure the FortiMail unit using the CLI. Configuration changes made with the CLI are effective immediately, without interrupting service.
To connect to the FortiMail CLI you require:
• a computer with an available communications port• the DB-9 or RJ-45 to DB-9 cable included in your FortiMail package• terminal emulation software such as HyperTerminal for Microsoft Windows
To connect to the CLI1 Connect the console cable to the communications port of your computer and to
the FortiMail console port.
2 Start HyperTerminal, enter a name for the connection and select OK.
3 Configure HyperTerminal to connect directly to the communications (COM) port on your computer and select OK.
4 Select the following port settings and select OK:
5 Press Enter to connect to the FortiMail CLI.
The login prompt appears.
6 Type admin and press Enter twice.
The following prompt is displayed:
Welcome!
Type ? to list available commands. For information about how to use the CLI, see the FortiMail CLI Reference.
LCD front control buttonsYou can use the front control buttons and LCD on the FortiMail-400 and FortiMail-2000 to configure IP addresses, default gateways and switch operating modes. The LCD shows you what mode you are in without having to go to the command line interface or the web-based manager.
This configuration method provides an easy and fast method to configure your FortiMail unit. You can configure:
• IP addresses and netmasks
Note: The following procedure uses Microsoft Windows HyperTerminal software. You can apply these steps to any terminal emulation program.
Bits per second 9600
Data bits 8
Parity None
Stop bits 1
Flow control None
FortiMail Version 3.0 MR4 Install Guide06-343-88550-20090109 29
30
Connecting to the FortiMail unit Physical installation
• default gateways• operating modes• restore factory default settings
The front control buttons control how you enter and exit the different menus when configuring the different ports and interfaces. The front control buttons also enables you to increase or decrease each number for configuring IP addresses, default gateway addresses, or netmasks. The following table defines each button and what it does when configuring the basic settings of your FortiMail unit. Table 1: Front control button definitions
Enter Enables you to move forward through the configuration process.
Esc Enables you to move backward, or exit out of the menu you are in.
Up Allows you to increase the number for an IP address, default gateway address or netmask.
Down Allows you to decrease the number for an IP address, default gateway address or netmask.
FortiMail Version 3.0 MR4 Install Guide06-343-88550-20090109
Updating the firmware Testing new firmware before installing it
Updating the firmwareFortinet periodically releases FortiMail firmware updates to include enhancements and address issues. After you have registered your FortiMail unit, FortiMail firmware is available for download at http://support.fortinet.com.
Installing new firmware can introduce new features and overwrites antivirus and antispam packages using the versions of the packages that were current at the time that the firmware image was built. To avoid repeat configuration and updates, update the firmware before configuring the FortiMail unit and/or updating your FortiGuard Antivirus and FortiGuard Antispam packages.
For information specific to the firmware release version, see the Release Notes available with that release.
This chapter includes the following topics:
• Testing new firmware before installing it• Installing firmware• Installing backup firmware• Restoring firmware
Testing new firmware before installing itYou can test a new firmware image by temporarily running it from memory, without saving it to disk. By keeping your existing firmware on disk, if the evaluation fails, you do not have to re-install your previous firmware. Instead, you can quickly revert to your existing firmware by simply rebooting the FortiMail unit.
To test a new firmware image1 Connect your management computer to the FortiMail console port using a RJ-45
to DB-9 serial cable or a null-modem cable.
2 Initiate a connection from your management computer to the CLI of the FortiMail unit.
For details, see “Command line interface” on page 29.
3 Connect port1 of the FortiMail unit directly or to the same subnet as a TFTP server.
4 Copy the new firmware image file to the root directory of the TFTP server.
Note: In addition to major releases that contain new features, Fortinet releases patch releases that resolve specific issues without containing new features and/or changes to existing features. It is recommended to download and install patch releases as soon as they are available.
FortiMail Version 3.0 MR4 Install Guide06-343-88550-20090109 31
32
Testing new firmware before installing it Updating the firmware
5 Verify that the TFTP server is currently running, and that the FortiMail unit can reach the TFTP server.
To use the FortiMail CLI to verify connectivity, enter the following command:
execute ping 192.168.1.168
where 192.168.1.168 is the IP address of the TFTP server.
6 Enter the following command to restart the FortiMail unit:
execute reboot
7 As the FortiMail units starts, a series of system startup messages are displayed.Press any key to display configuration menu........
8 Immediately press a key to interrupt the system startup.
If you successfully interrupt the startup process, the following messages appears:[G]: Get firmware image from TFTP server.[F]: Format boot device.[B]: Boot with backup firmware and set as default.[I]: Configuration and information.[Q]: Quit menu and continue to boot with default firmware.[H]: Display this list of options.
Enter G,F,B,I,Q,or H:
9 Type G to get the firmware image from the TFTP server.
The following message appears:Enter TFTP server address [192.168.1.168]:
10 Type the IP address of the TFTP server and press Enter.
The following message appears:Enter Local Address [192.168.1.188]:
11 Type a temporary IP address that can be used by the FortiMail unit to connect to the TFTP server.
The following message appears:Enter File Name [image.out]:
12 Type the firmware image file name and press Enter.
The FortiMail unit downloads the firmware image file from the TFTP server and displays a message similar to the following:
Save as Default firmware/Backup firmware/Run image without saving:[D/B/R]
13 Type R.
The FortiMail image is loaded into memory and uses the current configuration, without saving the new firmware image to disk.
14 To verify that the new firmware image has been loaded, log in to the CLI and type:
get system status
Note: You have only 3 seconds to press a key. If you do not press a key soon enough, the FortiMail unit reboots and you must log in and repeat the execute reboot command.
FortiMail Version 3.0 MR4 Install Guide06-343-88550-20090109

Updating the firmware Installing firmware
15 Test the new firmware image.• If the new firmware image operates successfully, you can install it to disk,
overwriting the existing firmware, using the procedure “Installing firmware” on page 33.
• If the new firmware image does not operate successfully, reboot the FortiMail unit to discard the temporary firmware and resume operation using the existing firmware.
Installing firmwareYou can use either the web-based manager or the CLI to upgrade or downgrade the firmware of the FortiMail unit.
Administrators whose Domain is “system”, such as the “admin” administrator, can change the FortiMail firmware. Firmware changes are either:
• an upgrade to a newer version• a reversion to an earlier version
The firmware version number is used to determine if you are upgrading or reverting your firmware image. For example, if your current firmware version is “FortiMail-400 3.00,build288,080327”, changing to “FortiMail-400 3.00,build266,071209”, an earlier build number and date, indicates you are reverting.
To install firmware using the web-based manager1 Log in to the Fortinet Technical Support web site, https://support.fortinet.com/.
2 Download the firmware image file to your management computer.
3 Log in to the web-based manager as the “admin” administrator, or an administrator account that has system configuration read and write privileges.
4 In the advanced management mode, go to System > Status > Status.
If this menu option does not appear, first select Advanced >> to switch to the advanced mode of the web-based manager.
5 In the System Information area, in the Firmware Version row, select Update.
6 Select Browse to locate and select the firmware file that you want to install, then select OK.
7 Select OK.
The FortiMail unit downloads the firmware image file from the TFTP server. The FortiMail unit installs the firmware and restarts. Time required varies by the size of the file and the speed of your network connection.
If you are downgrading the firmware to a previous version, the FortiMail unit reverts the configuration to default values for that version of the firmware. You must either reconfigure the FortiMail unit or restore the configuration file.
!Caution: Reverting to an earlier firmware version could reset the configuration, including the IP addresses of network interfaces. For information on reconnecting to a FortiMail unit whose network interface configuration has been reset, see “Connecting to the FortiMail unit” on page 28.
FortiMail Version 3.0 MR4 Install Guide06-343-88550-20090109 33
34
Installing firmware Updating the firmware
8 To verify that the firmware was successfully installed, log in to the web-based manager and go to System > Status > Status. Text appearing in the Firmware Version row indicates the currently installed firmware version.
To install firmware using the CLI1 Log in to the Fortinet Technical Support web site, https://support.fortinet.com/.
2 Download the firmware image file to your management computer.
3 Connect your management computer to the FortiMail console port using a RJ-45 to DB-9 serial cable or a null-modem cable.
4 Initiate a connection from your management computer to the CLI of the FortiMail unit, and log in as the “admin” administrator, or an administrator account that has system configuration read and write privileges.
For details, see “Command line interface” on page 29.
5 Connect port1 of the FortiMail unit directly or to the same subnet as a TFTP server.
6 Copy the new firmware image file to the root directory of the TFTP server.
7 Verify that the TFTP server is currently running, and that the FortiMail unit can reach the TFTP server.
To use the FortiMail CLI to verify connectivity, enter the following command:
execute ping 192.168.1.168
where 192.168.1.168 is the IP address of the TFTP server.
8 Enter the following command to download the firmware image from the TFTP server to the FortiMail unit:
execute restore image <name_str> <tftp_ipv4>
where <name_str> is the name of the firmware image file and <tftp_ipv4> is the IP address of the TFTP server. For example, if the firmware image file name is image.out and the IP address of the TFTP server is 192.168.1.168, enter:
execute restore image.out 192.168.1.168
One of the following message appears:
This operation will replace the current firmware version!Do you want to continue? (y/n)
or:
Get image from tftp server OK.Check image OK.This operation will downgrade the current firmware version!Do you want to continue? (y/n)
9 Type y.
The FortiMail unit downloads the firmware image file from the TFTP server. The FortiMail unit installs the firmware and restarts. Time required varies by the size of the file and the speed of your network connection.
If you are downgrading the firmware to a previous version, the FortiMail unit reverts the configuration to default values for that version of the firmware. You must either reconfigure the FortiMail unit or restore the configuration file.
FortiMail Version 3.0 MR4 Install Guide06-343-88550-20090109

Updating the firmware Installing backup firmware
10 To verify that the firmware was successfully installed, log in to the CLI and type:
get system status
11 Update the FortiGuard Antivirus definitions.
Installing backup firmwareYou can install backup firmware which can be loaded if the primary firmware fails.
To install backup firmware1 Log in to the Fortinet Technical Support web site, https://support.fortinet.com/.
2 Download the firmware image file to your management computer.
3 Connect your management computer to the FortiMail console port using a RJ-45 to DB-9 serial cable or a null-modem cable.
4 Initiate a connection from your management computer to the CLI of the FortiMail unit, and log in as the “admin” administrator, or an administrator account that has system configuration read and write privileges.
For details, see “Command line interface” on page 29.
5 Connect port1 of the FortiMail unit directly or to the same subnet as a TFTP server.
6 Copy the new firmware image file to the root directory of the TFTP server.
7 Verify that the TFTP server is currently running, and that the FortiMail unit can reach the TFTP server.
To use the FortiMail CLI to verify connectivity, enter the following command:
execute ping 192.168.1.168
where 192.168.1.168 is the IP address of the TFTP server.
8 Enter the following command to restart the FortiMail unit:
execute reboot
9 As the FortiMail units starts, a series of system startup messages are displayed.Press any key to display configuration menu........
10 Immediately press a key to interrupt the system startup.
Note: Installing firmware replaces the current antivirus definitions with those included with the firmware release that you are installing. After you install the new firmware, make sure that your FortiGuard Antivirus definitions are up-to-date. For more information, see “Configuring scheduled updates” on page 62.
Note: You have only 3 seconds to press a key. If you do not press a key soon enough, the FortiMail unit reboots and you must log in and repeat the execute reboot command.
FortiMail Version 3.0 MR4 Install Guide06-343-88550-20090109 35
36
Installing backup firmware Updating the firmware
If you successfully interrupt the startup process, the following messages appears:[G]: Get firmware image from TFTP server.[F]: Format boot device.[B]: Boot with backup firmware and set as default.[I]: Configuration and information.[Q]: Quit menu and continue to boot with default firmware.[H]: Display this list of options.
Enter G,F,B,I,Q,or H:
11 Type G to get the firmware image from the TFTP server.
The following message appears:Enter TFTP server address [192.168.1.168]:
12 Type the IP address of the TFTP server and press Enter.
The following message appears:Enter Local Address [192.168.1.188]:
13 Type a temporary IP address that can be used by the FortiMail unit to connect to the TFTP server.
The following message appears:Enter File Name [image.out]:
14 Type the firmware image file name and press Enter.
The FortiMail unit downloads the firmware image file from the TFTP server and displays a message similar to the following:
Save as Default firmware/Backup firmware/Run image without saving:[D/B/R]
15 Type B.
The FortiMail unit saves the backup firmware image and restarts. When the FortiMail unit restarts, it is running the primary firmware.
To use backup firmware as the primary firmware1 Connect your management computer to the FortiMail console port using a RJ-45
to DB-9 serial cable or a null-modem cable.
2 Initiate a connection from your management computer to the CLI of the FortiMail unit, and log in as the “admin” administrator, or an administrator account that has system configuration read and write privileges.
For details, see “Command line interface” on page 29.
3 Enter the following command to restart the FortiMail unit:
execute reboot
4 As the FortiMail units starts, a series of system startup messages are displayed.Press any key to display configuration menu........
Immediately press a key to interrupt the system startup.
Note: You have only 3 seconds to press a key. If you do not press a key soon enough, the FortiMail unit reboots and you must log in and repeat the execute reboot command.
FortiMail Version 3.0 MR4 Install Guide06-343-88550-20090109
Updating the firmware Restoring firmware
If you successfully interrupt the startup process, the following messages appears:[G]: Get firmware image from TFTP server.[F]: Format boot device.[B]: Boot with backup firmware and set as default.[I]: Configuration and information.[Q]: Quit menu and continue to boot with default firmware.[H]: Display this list of options.
Enter G,F,B,I,Q,or H:
5 Type B to reboot and use the backup firmware.
Restoring firmwareIf you are unable to connect to the FortiMail unit using the web-based manager or the CLI, or if you want to install firmware without preserving any existing configuration, you can restore the firmware.
To restore the firmware1 Connect your management computer to the FortiMail console port using a RJ-45
to DB-9 serial cable or a null-modem cable.
2 Initiate a connection from your management computer to the CLI of the FortiMail unit, and log in as the “admin” administrator, or an administrator account that has system configuration read and write privileges.
For details, see “Command line interface” on page 29.
3 Connect port1 of the FortiMail unit directly or to the same subnet as a TFTP server.
4 Copy the new firmware image file to the root directory of the TFTP server.
5 Verify that the TFTP server is currently running, and that the FortiMail unit can reach the TFTP server.
To use the FortiMail CLI to verify connectivity, enter the following command:
execute ping 192.168.1.168
where 192.168.1.168 is the IP address of the TFTP server.
6 Enter the following command to restart the FortiMail unit:
execute reboot
!Caution: Back up your configuration before beginning this procedure, if possible. Restoring firmware resets the configuration, including the IP addresses of network interfaces. For information on reconnecting to a FortiMail unit whose network interface configuration has been reset, see “Connecting to the FortiMail unit” on page 28.
!Caution: If you are reverting to a previous FortiMail version (for example, reverting from v3.0 to v2.80), you might not be able to restore your previous configuration from the backup configuration file.
FortiMail Version 3.0 MR4 Install Guide06-343-88550-20090109 37
38
Restoring firmware Updating the firmware
7 As the FortiMail units starts, a series of system startup messages are displayed.Press any key to display configuration menu........
8 Immediately press a key to interrupt the system startup.
If you successfully interrupt the startup process, the following messages appears:[G]: Get firmware image from TFTP server.[F]: Format boot device.[B]: Boot with backup firmware and set as default.[I]: Configuration and information.[Q]: Quit menu and continue to boot with default firmware.[H]: Display this list of options.
Enter G,F,B,I,Q,or H:
9 Type G to get the firmware image from the TFTP server.
The following message appears:Enter TFTP server address [192.168.1.168]:
10 Type the IP address of the TFTP server and press Enter.
The following message appears:Enter Local Address [192.168.1.188]:
11 Type a temporary IP address that can be used by the FortiMail unit to connect to the TFTP server.
The following message appears:Enter File Name [image.out]:
12 Type the firmware image file name and press Enter.
The FortiMail unit downloads the firmware image file from the TFTP server and displays a message similar to the following:
Save as Default firmware/Backup firmware/Run image without saving:[D/B/R]
13 Type D.
The FortiMail unit downloads the firmware image file from the TFTP server. The FortiMail unit installs the firmware and restarts. Time required varies by the size of the file and the speed of your network connection.
The FortiMail unit reverts the configuration to default values for that version of the firmware.
Note: You have only 3 seconds to press a key. If you do not press a key soon enough, the FortiMail unit reboots and you must log in and repeat the execute reboot command.
Note: Installing firmware replaces the current FortiGuard Antivirus definitions with the definitions included with the firmware release you are installing. After you install new firmware, update the antivirus definitions. For details, see “Configuring scheduled updates” on page 62.
FortiMail Version 3.0 MR4 Install Guide06-343-88550-20090109

Choosing the operation mode
Choosing the operation modeOnce the FortiMail unit is mounted and powered on, and you have connected to either the FortiMail unit’s web-based manager or CLI, you can configure the operation mode of the FortiMail unit.
FortiMail units can run in one of three operation modes: gateway mode, transparent mode, and server mode. Requirements of each operation mode vary.
In addition, some FortiMail features are specific to the operation mode. As a result, changing the operation mode may reset your FortiMail configuration.
You will usually choose the operation mode that is appropriate for your topology and requirements and configure the operation mode only once, during installation, before using the Quick Start Wizard.
This section describes each operation mode, assisting you in choosing the operation mode that best suits your requirements.
This section contains the following topics:
• Characteristics of gateway mode• Characteristics of transparent mode• Characteristics of server mode• Configuring the operation mode
Table 2: Comparison of gateway, transparent, and server mode of operation
Gateway Transparent ServerSMTP role MTA/relay Transparent
proxyServer
FortiMail unit is hidden No Yes No
Email user accounts Preferences and per-recipient quarantine only
Preferences and per-recipient quarantine only
Yes
Requires DNS record change Yes No Yes
May require changes to SMTP client configurations or other infrastructure
Yes No Yes
Requires FortiMail unit located between external MTAs and protected email server(s)
No Yes N/A(FortiMail unit acts as email server)
Protected email server(s) Separate Separate Integrated(FortiMail unit acts as email server)
FortiMail Version 3.0 MR4 Install Guide06-343-88550-20090109 39
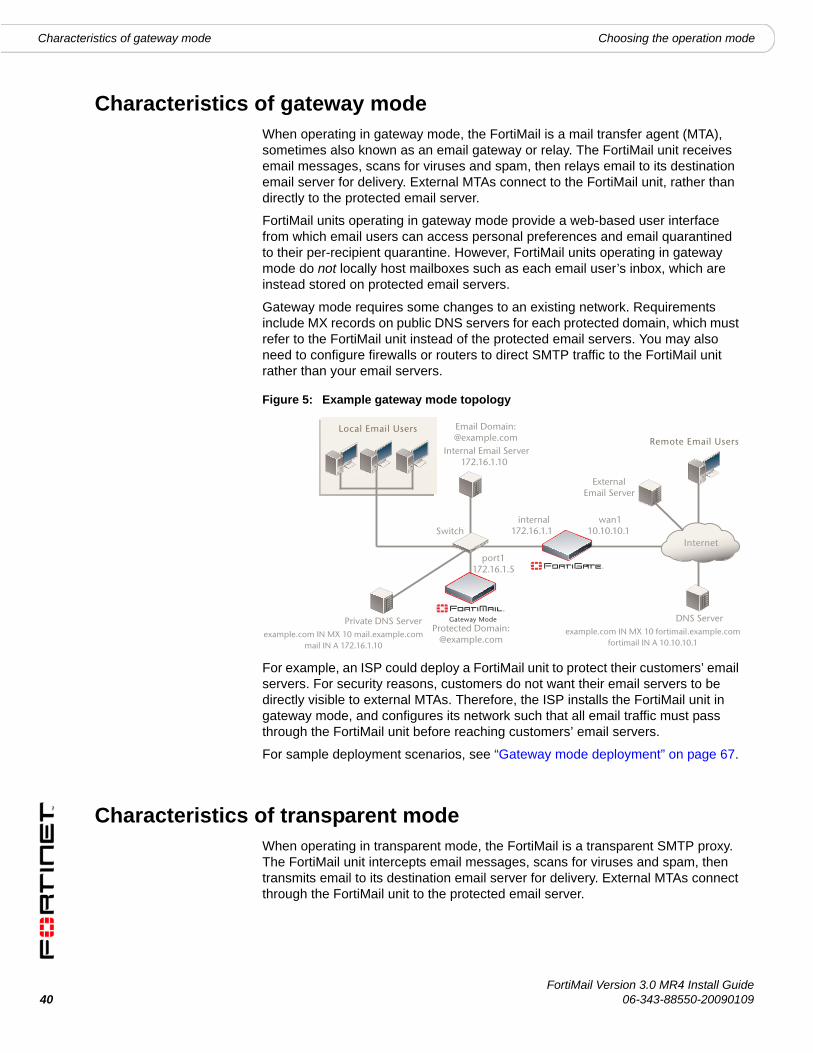
40
Characteristics of gateway mode Choosing the operation mode
Characteristics of gateway modeWhen operating in gateway mode, the FortiMail is a mail transfer agent (MTA), sometimes also known as an email gateway or relay. The FortiMail unit receives email messages, scans for viruses and spam, then relays email to its destination email server for delivery. External MTAs connect to the FortiMail unit, rather than directly to the protected email server.
FortiMail units operating in gateway mode provide a web-based user interface from which email users can access personal preferences and email quarantined to their per-recipient quarantine. However, FortiMail units operating in gateway mode do not locally host mailboxes such as each email user’s inbox, which are instead stored on protected email servers.
Gateway mode requires some changes to an existing network. Requirements include MX records on public DNS servers for each protected domain, which must refer to the FortiMail unit instead of the protected email servers. You may also need to configure firewalls or routers to direct SMTP traffic to the FortiMail unit rather than your email servers.
Figure 5: Example gateway mode topology
For example, an ISP could deploy a FortiMail unit to protect their customers’ email servers. For security reasons, customers do not want their email servers to be directly visible to external MTAs. Therefore, the ISP installs the FortiMail unit in gateway mode, and configures its network such that all email traffic must pass through the FortiMail unit before reaching customers’ email servers.
For sample deployment scenarios, see “Gateway mode deployment” on page 67.
Characteristics of transparent modeWhen operating in transparent mode, the FortiMail is a transparent SMTP proxy. The FortiMail unit intercepts email messages, scans for viruses and spam, then transmits email to its destination email server for delivery. External MTAs connect through the FortiMail unit to the protected email server.
External Email Server
Local Email Users Remote Email Users
DNS Server
Internal Email Server 172.16.1.10
Internet Switch
internal 172.16.1.1
wan1 10.10.10.1
Protected Domain:@example.com
Email Domain: @example.com
example.com IN MX 10 fortimail.example.comfortimail IN A 10.10.10.1
port1172.16.1.5
Gateway ModePrivate DNS Serverexample.com IN MX 10 mail.example.com
mail IN A 172.16.1.10
FortiMail Version 3.0 MR4 Install Guide06-343-88550-20090109
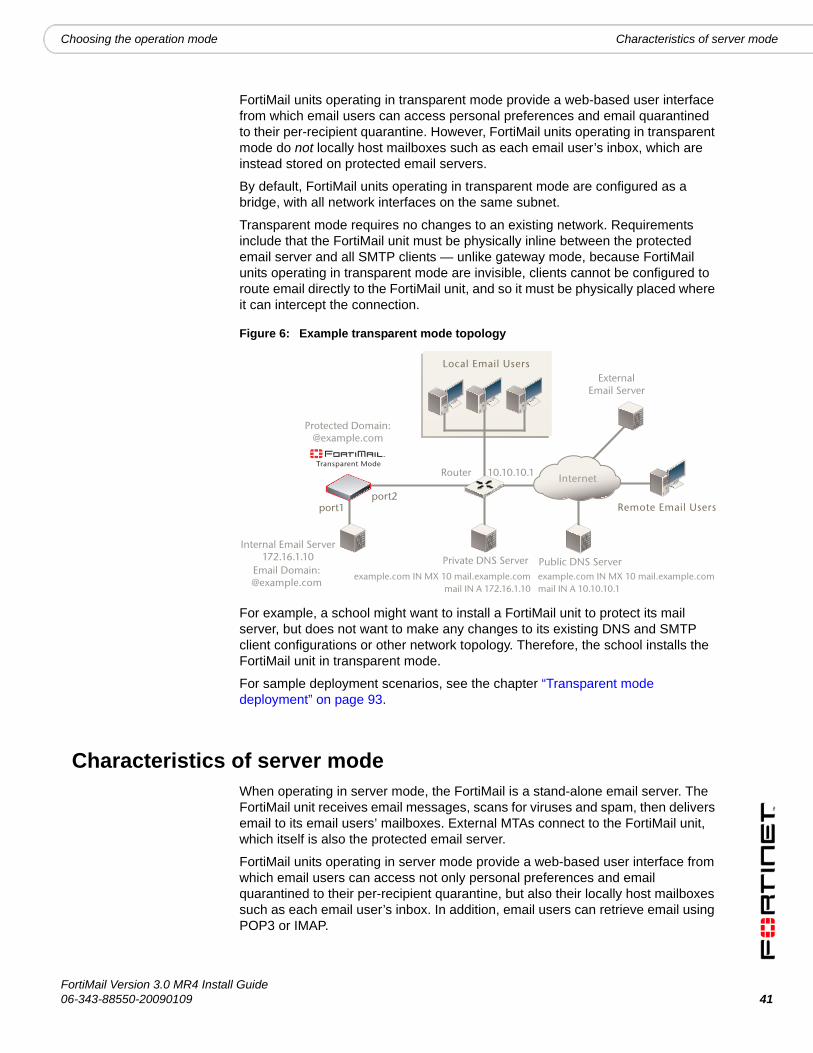
Choosing the operation mode Characteristics of server mode
FortiMail units operating in transparent mode provide a web-based user interface from which email users can access personal preferences and email quarantined to their per-recipient quarantine. However, FortiMail units operating in transparent mode do not locally host mailboxes such as each email user’s inbox, which are instead stored on protected email servers.
By default, FortiMail units operating in transparent mode are configured as a bridge, with all network interfaces on the same subnet.
Transparent mode requires no changes to an existing network. Requirements include that the FortiMail unit must be physically inline between the protected email server and all SMTP clients — unlike gateway mode, because FortiMail units operating in transparent mode are invisible, clients cannot be configured to route email directly to the FortiMail unit, and so it must be physically placed where it can intercept the connection.
Figure 6: Example transparent mode topology
For example, a school might want to install a FortiMail unit to protect its mail server, but does not want to make any changes to its existing DNS and SMTP client configurations or other network topology. Therefore, the school installs the FortiMail unit in transparent mode.
For sample deployment scenarios, see the chapter “Transparent mode deployment” on page 93.
Characteristics of server modeWhen operating in server mode, the FortiMail is a stand-alone email server. The FortiMail unit receives email messages, scans for viruses and spam, then delivers email to its email users’ mailboxes. External MTAs connect to the FortiMail unit, which itself is also the protected email server.
FortiMail units operating in server mode provide a web-based user interface from which email users can access not only personal preferences and email quarantined to their per-recipient quarantine, but also their locally host mailboxes such as each email user’s inbox. In addition, email users can retrieve email using POP3 or IMAP.
External Email Server
Local Email Users
Internet Transparent Mode
Remote Email Users
Router
port2 port1
Internal Email Server172.16.1.10
Protected Domain: @example.com
Email Domain:@example.com
Public DNS Serverexample.com IN MX 10 mail.example.commail IN A 10.10.10.1
Private DNS Serverexample.com IN MX 10 mail.example.com
mail IN A 172.16.1.10
10.10.10.1
FortiMail Version 3.0 MR4 Install Guide06-343-88550-20090109 41

42
Configuring the operation mode Choosing the operation mode
Server mode requires some changes to an existing network. Requirements include MX records on public DNS servers for each protected domain, which must refer to the FortiMail unit. You may also need to configure firewalls or routers to direct SMTP traffic to the FortiMail unit.
Figure 7: Example server mode topology
For example, a company might be creating a network, and does not have an existing email server. The company wants the convenience of managing both their email server and email security on one network device. Therefore, the company deploys the FortiMail unit in server mode.
For sample deployment scenarios, see the chapter “Server mode deployment” on page 103.
Configuring the operation modeBy default, FortiMail units operate in gateway mode. If you do not want your FortiMail unit to operate in gateway mode, before configuring the FortiMail unit or using the Quick Start Wizard, select the operation mode.
To select the operation mode1 Go to Management > Status.
If this menu path is not available, first select Basic >> to switch to the basic mode of the web-based manager.
2 In the System Information area, in the Operation Mode row, select Change.
3 From Operation Mode, select either Gateway, Server, or Transparent.
4 Select OK.
A confirmation dialog appears, warning you that many settings will revert to their default value for the version of your FortiMail unit’s firmware.
External Email Server
Local Email Users
Remote Email Users
Public DNS Server
Internet
dmz 192.168.1.1
wan1 10.10.10.1
port1 192.168.1.5
internal 172.16.1.1 (virtual IP:
172.16.1.2)
Email Domain:@example.com
example.com IN MX 10 fortimail.example.comfortimail IN A 10.10.10.1
Server Mode
Private DNS Server
FortiMail Version 3.0 MR4 Install Guide06-343-88550-20090109
Choosing the operation mode Configuring the operation mode
5 Select OK.
The FortiMail unit changes the operation mode and restarts. When it has completely restarted, reconnect to the web-based manager of the FortiMail unit to continue the installation.
FortiMail Version 3.0 MR4 Install Guide06-343-88550-20090109 43

44
Configuring the operation mode Choosing the operation mode
FortiMail Version 3.0 MR4 Install Guide06-343-88550-20090109
Quick Start Wizard Step 1: Changing the “admin” password
Quick Start WizardThe Quick Start Wizard leads you through required configuration steps, helping you to quickly set up your FortiMail unit.
All settings configured by the Quick Start Wizard can also be configured through the basic and advanced modes of the web-based manager. However, the Quick Start Wizard presents each setting in the necessary order, and contains descriptions to assist you in configuring each setting. These descriptions are not available in either the basic mode or advanced mode of the web-based manager.
To begin the Quick Start Wizard, go to Quick Start >>. If this menu path is not available, first select Basic >> to switch to the basic mode of the web-based manager.
The following topics describe steps when using in the Quick Start Wizard:
• Step 1: Changing the “admin” password• Step 2: Configuring the network settings and system time• Step 3: Configuring local host settings• Step 4: Adding protected domains• Step 5: Configuring incoming antispam and antivirus settings• Step 6: Configuring access control rules and outgoing antispam and antivirus
settings• Step 7: Reviewing and saving the configuration• Continuing the installation
Step 1: Changing the “admin” passwordStep 1 of the Quick Start Wizard configures the password of the default and most privileged administrator account, “admin”, which, by default, has no password. For security reasons, you should provide a password for the “admin” administrator account.
To proceed to Step 2: Configuring the network settings and system time, select Next >.
!Caution: Before running the Quick Start Wizard, select the operation mode of the FortiMail unit, such as gateway mode, transparent mode, or server mode. Failure to select the operation mode before running the Quick Start Wizard may require you to run the Quick Start Wizard again after changing the operation mode, as changing the operation mode may reset or change part of the configuration performed by the Quick Start Wizard. For more information on selecting the operation mode, see “Choosing the operation mode” on page 39.
! Caution: Failure to configure a strong administrator password could compromise the security of your FortiMail unit.
FortiMail Version 3.0 MR4 Install Guide06-343-88550-20090109 45

46
Step 2: Configuring the network settings and system time Quick Start Wizard
Figure 8: Quick Start Wizard: Step 1
Step 2: Configuring the network settings and system timeStep 2 of the Quick Start Wizard configures basic system time and network settings.
Available settings vary by whether or not the FortiMail unit is operating in transparent mode.
To proceed to Step 3: Configuring local host settings, select Next >.
Figure 9: Quick Start Wizard: Step 2 (gateway mode or server mode)
FortiMail Version 3.0 MR4 Install Guide06-343-88550-20090109

Quick Start Wizard Step 2: Configuring the network settings and system time
Figure 10: Quick Start Wizard: Step 2 (transparent mode)
Port1IP Address Enter the IP address of the port1 network
interface, such as 192.168.1.99.This option does not appear if the FortiMail unit is operating in transparent mode.
Netmask Enter the netmask of the port1 network interface, such as 255.255.255.0.This option does not appear if the FortiMail unit is operating in transparent mode.
Management IPIP Address Enter the IP address which FortiMail
administrators will use to access the web-based manager and CLI through port1 and other bridging network interfaces, and which the FortiMail unit will use when connecting to the Fortinet Distribution Network (FDN), such as 192.168.1.99. For details on the management IP, see the FortiMail Administration Guide.This option appears only if the FortiMail unit is operating in transparent mode.
Netmask Enter the netmask of the management IP address, such as 255.255.255.0.This option appears only if the FortiMail unit is operating in transparent mode.
DNSPrimary DNS Enter the IP address of the primary server to
which the FortiMail unit will make DNS queries.Caution: Verify connectivity with the DNS servers. Failure to verify connectivity could result in many issues, including the inability of the FortiMail unit to process email.
Secondary DNS Enter the IP address of the secondary server to which the FortiMail unit will make DNS queries.
FortiMail Version 3.0 MR4 Install Guide06-343-88550-20090109 47

48
Step 3: Configuring local host settings Quick Start Wizard
Step 3: Configuring local host settingsStep 3 of the Quick Start Wizard configures the fully qualified domain name (FQDN) of the FortiMail unit, its listening port numbers, and whether to use SSL/TLS with SMTP clients that request secure connections.
You usually should configure the FortiMail unit with a local domain name that is different from that of protected email servers, such as mail.example.com for the FortiMail unit and server.mail.example.com for the protected email server. The local domain name of the FortiMail unit will be used in many features such as email quarantine, Bayesian database training, spam report, and delivery status notification (DSN) email messages, and if the FortiMail unit uses the same domain name as your mail server, it may become difficult to distinguish email messages that originate from the FortiMail unit.
To proceed to Step 4: Adding protected domains, select Next >.
Default GatewayIP Address Enter the IP address of the default gateway
router.
Time SettingsTime Zone Select the time zone of the FortiMail unit.
Set Time Select to manually set the system time, then select the:• Second
• Minute
• Hour
• Day
• Month
• Year
Automatically synchronize system time using the Network Time Protocol (NTP) server
Select to automatically set the system time by periodically synchronizing with an NTP server, then configure the NTP Server Name/IP.
NTP Server Name/IP If you have selected to automatically synchronize the system time with an NTP server, enter the domain name or IP address of an NTP server. For a list of public NTP servers, see http://www.ntp.org/.Note: Verify connectivity with the NTP server. Failure to set the correct time could result in issues such as inaccurate log message times and inability to make secure connections, including downloading FortiGuard Antivirus updates from the FDN.
Note: The local domain name should be globally DNS-resolvable only if the FortiMail unit is used as a relay server for outgoing email.
FortiMail Version 3.0 MR4 Install Guide06-343-88550-20090109
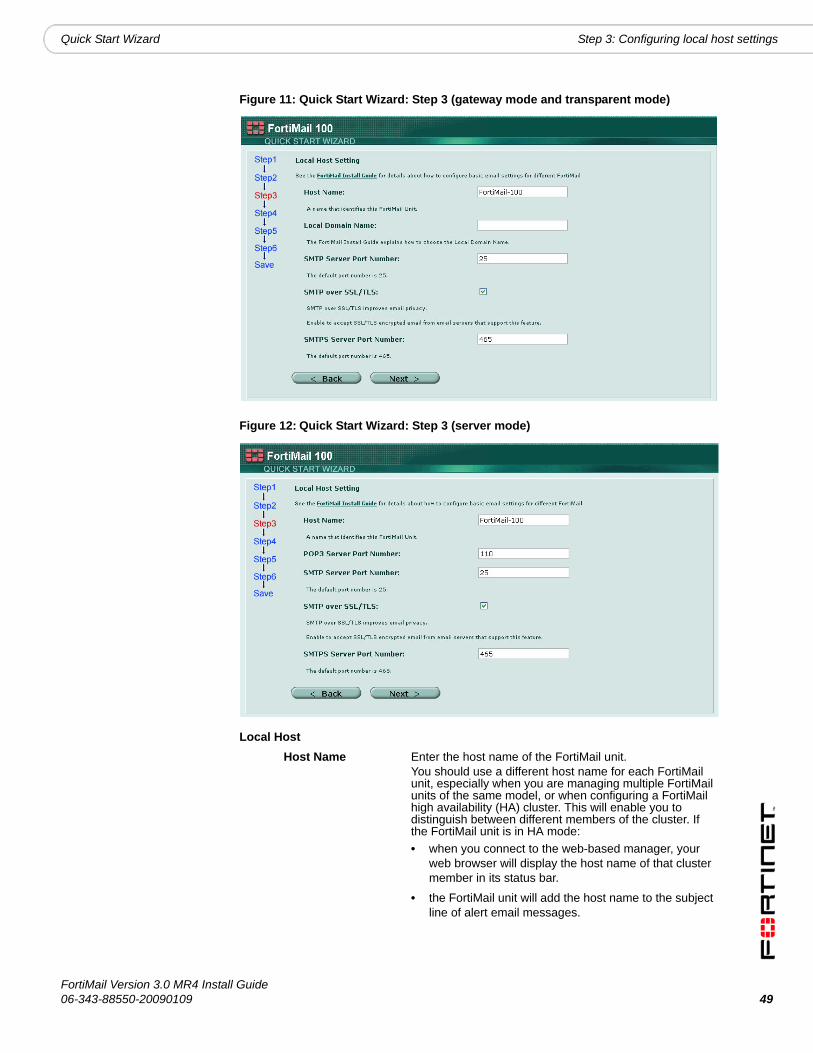
Quick Start Wizard Step 3: Configuring local host settings
Figure 11: Quick Start Wizard: Step 3 (gateway mode and transparent mode)
Figure 12: Quick Start Wizard: Step 3 (server mode)
Local HostHost Name Enter the host name of the FortiMail unit.
You should use a different host name for each FortiMail unit, especially when you are managing multiple FortiMail units of the same model, or when configuring a FortiMail high availability (HA) cluster. This will enable you to distinguish between different members of the cluster. If the FortiMail unit is in HA mode:• when you connect to the web-based manager, your
web browser will display the host name of that cluster member in its status bar.
• the FortiMail unit will add the host name to the subject line of alert email messages.
FortiMail Version 3.0 MR4 Install Guide06-343-88550-20090109 49

50
Step 4: Adding protected domains Quick Start Wizard
Step 4: Adding protected domainsStep 4 of the Quick Start Wizard configures the protected domains.
Protected domains define connections and email messages for which the FortiMail unit can performs protective email processing by describing both:
• the IP address of an SMTP server• the domain name portion (the portion which follows the “@” symbol) of
recipient email addresses in the envelope
both of which the FortiMail unit compares to connections and email messages when looking for traffic that involves the protected domain.
For example, if you wanted to scan email fro email addresses such as [email protected] that are hosted on the SMTP server 10.10.10.10, you would configure a protected domain of example.com whose SMTP server is 10.10.10.10.
You must configure at least one protected domain. FortiMail units can be configured to protect one or more email domains that are hosted on one or more email servers.
To proceed to Step 5: Configuring incoming antispam and antivirus settings, select Next >.
Local Domain Name Enter the local domain name to which the FortiMail unit belongs.The FortiMail unit’s fully qualified domain name (FQDN) is in the format:<Host Name>.<Local Domain Name>This option does not appear if the FortiMail unit is operating in server mode.Note: The Local Domain Name can be a subdomain of an internal domain if the MX record for the domain on the DNS server can direct the mail destined for the subdomain to the intended FortiMail unit.
POP3 Server Port Number
Enter the port number on which the FortiMail unit’s POP3 server will listen for POP3 connections. The default port number is 110.This option is available only if the FortiMail unit is operating in server mode.
SMTP Server Port Number
Enter the port number on which the FortiMail unit’s SMTP server will listen for SMTP connections. The default port number is 25.
SMTP over SSL/TLS Enable to allow SSL- and TLS-secured connections from servers and clients requesting SSL/TLS.When disabled, SMTP connections with the FortiMail unit’s SMTP server will occur as clear text, unencrypted.This option must be enabled to use SMTPS.
SMTPS Server Port Number
Enter the port number on which the FortiMail unit’s SMTP server listens for secure SMTP connections. The default port number is 465.This option is unavailable if SMTP over SSL/TLS is disabled.
FortiMail Version 3.0 MR4 Install Guide06-343-88550-20090109

Quick Start Wizard Step 4: Adding protected domains
Figure 13: Quick Start Wizard: Step 4 (gateway mode and transparent mode)
Figure 14: Quick Start Wizard: Step 4 (server mode)
To add a protected domain1 Select Add Domain.
A dialog appears that enables you to configure the protected domain. Its appearance varies by the operating mode of the FortiMail unit.
FortiMail Version 3.0 MR4 Install Guide06-343-88550-20090109 51

52
Step 4: Adding protected domains Quick Start Wizard
Figure 15: Quick Start Wizard: Step 4 dialog (gateway mode and transparent mode)
Figure 16: Quick Start Wizard: Step 4 dialog (server mode)
2 Configure the following, then select OK:
Domain FQDN Enter the fully qualified domain name (FQDN) of the protected domain.For example, if you want to protect email addresses such as [email protected], you would enter the protected domain name example.com.
Use MX Record(transparent mode and gateway mode only)
Select to enable the FortiMail unit to query the DNS server’s MX record for the FQDN or IP address of the SMTP server for this domain name, instead of manually defining the SMTP server in the fields SMTP Server and Fallback MX Host.Note: If enabled, you may also be required to configure the FortiMail unit to use a private DNS server whose MX and/or A records differ from that of a public DNS server. Requirements vary by the topology of your network and by the operating mode of the FortiMail unit. For details, see “Configuring DNS records” on page 67 (gateway mode) or “Configuring DNS records” on page 93 (transparent mode).
FortiMail Version 3.0 MR4 Install Guide06-343-88550-20090109
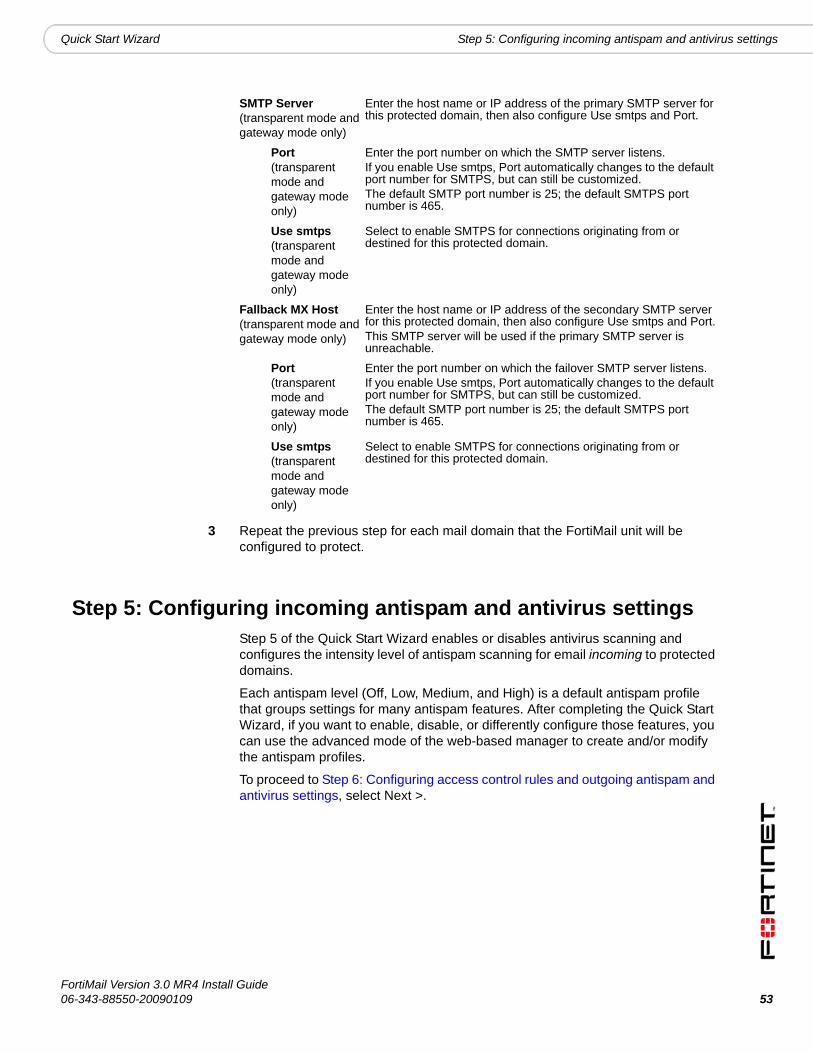
Quick Start Wizard Step 5: Configuring incoming antispam and antivirus settings
3 Repeat the previous step for each mail domain that the FortiMail unit will be configured to protect.
Step 5: Configuring incoming antispam and antivirus settingsStep 5 of the Quick Start Wizard enables or disables antivirus scanning and configures the intensity level of antispam scanning for email incoming to protected domains.
Each antispam level (Off, Low, Medium, and High) is a default antispam profile that groups settings for many antispam features. After completing the Quick Start Wizard, if you want to enable, disable, or differently configure those features, you can use the advanced mode of the web-based manager to create and/or modify the antispam profiles.
To proceed to Step 6: Configuring access control rules and outgoing antispam and antivirus settings, select Next >.
SMTP Server(transparent mode and gateway mode only)
Enter the host name or IP address of the primary SMTP server for this protected domain, then also configure Use smtps and Port.
Port(transparent mode and gateway mode only)
Enter the port number on which the SMTP server listens.If you enable Use smtps, Port automatically changes to the default port number for SMTPS, but can still be customized.The default SMTP port number is 25; the default SMTPS port number is 465.
Use smtps(transparent mode and gateway mode only)
Select to enable SMTPS for connections originating from or destined for this protected domain.
Fallback MX Host(transparent mode and gateway mode only)
Enter the host name or IP address of the secondary SMTP server for this protected domain, then also configure Use smtps and Port.This SMTP server will be used if the primary SMTP server is unreachable.
Port(transparent mode and gateway mode only)
Enter the port number on which the failover SMTP server listens.If you enable Use smtps, Port automatically changes to the default port number for SMTPS, but can still be customized.The default SMTP port number is 25; the default SMTPS port number is 465.
Use smtps(transparent mode and gateway mode only)
Select to enable SMTPS for connections originating from or destined for this protected domain.
FortiMail Version 3.0 MR4 Install Guide06-343-88550-20090109 53
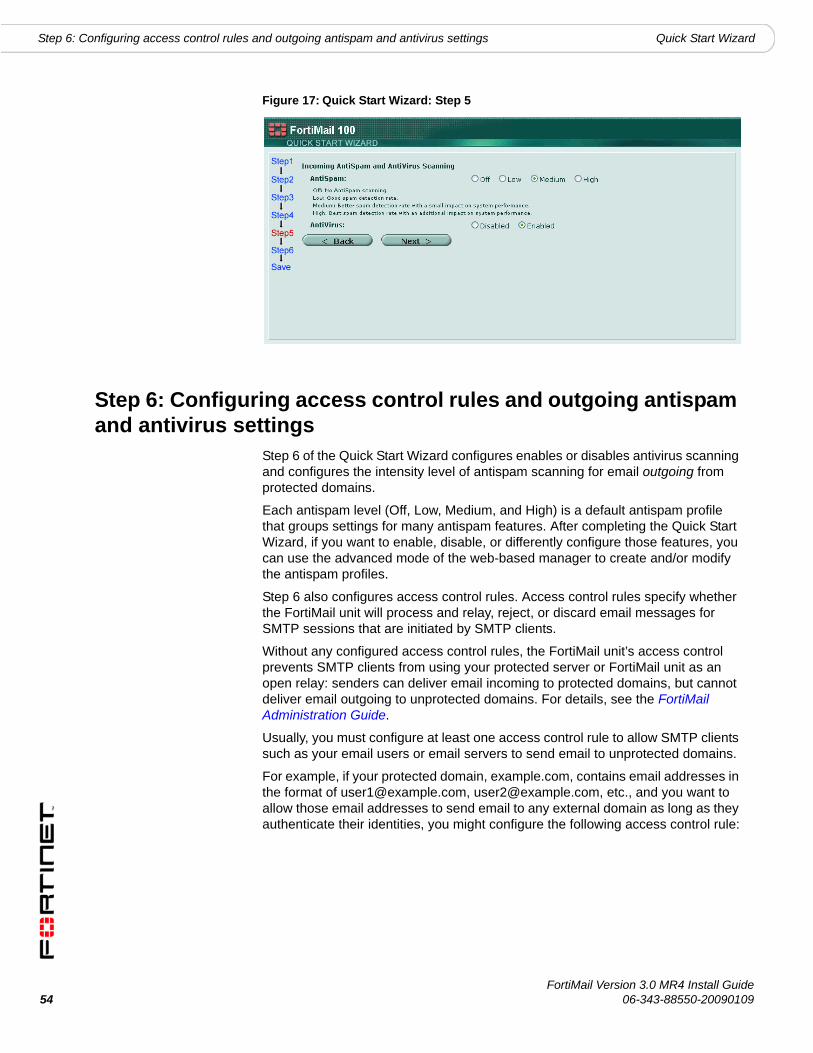
54
Step 6: Configuring access control rules and outgoing antispam and antivirus settings Quick Start Wizard
Figure 17: Quick Start Wizard: Step 5
Step 6: Configuring access control rules and outgoing antispam and antivirus settings
Step 6 of the Quick Start Wizard configures enables or disables antivirus scanning and configures the intensity level of antispam scanning for email outgoing from protected domains.
Each antispam level (Off, Low, Medium, and High) is a default antispam profile that groups settings for many antispam features. After completing the Quick Start Wizard, if you want to enable, disable, or differently configure those features, you can use the advanced mode of the web-based manager to create and/or modify the antispam profiles.
Step 6 also configures access control rules. Access control rules specify whether the FortiMail unit will process and relay, reject, or discard email messages for SMTP sessions that are initiated by SMTP clients.
Without any configured access control rules, the FortiMail unit’s access control prevents SMTP clients from using your protected server or FortiMail unit as an open relay: senders can deliver email incoming to protected domains, but cannot deliver email outgoing to unprotected domains. For details, see the FortiMail Administration Guide.
Usually, you must configure at least one access control rule to allow SMTP clients such as your email users or email servers to send email to unprotected domains.
For example, if your protected domain, example.com, contains email addresses in the format of [email protected], [email protected], etc., and you want to allow those email addresses to send email to any external domain as long as they authenticate their identities, you might configure the following access control rule:
FortiMail Version 3.0 MR4 Install Guide06-343-88550-20090109

Quick Start Wizard Step 6: Configuring access control rules and outgoing antispam and antivirus settings
To proceed to Step 7: Reviewing and saving the configuration, select Next >.
Figure 18: Quick Start Wizard: Step 6
To add an access control rule1 Select Add Access.
A dialog appears, enabling you to create an access control rule.
Table 3: Example access control rule
Sender Pattern user*@example.com
Recipient Pattern *
Sender IP/Netmask 0.0.0.0/0
Reverse DNS Pattern *
Authentication Status authenticated
Action RELAY
Note: Access control rules can also match SMTP sessions based upon the use of TLS. To configure access control rules with TLS, after using the Quick Start Wizard, use the advanced mode of the web-based manager to create TLS profiles and select them in access control rules. For details, see the FortiMail Administration Guide.
FortiMail Version 3.0 MR4 Install Guide06-343-88550-20090109 55
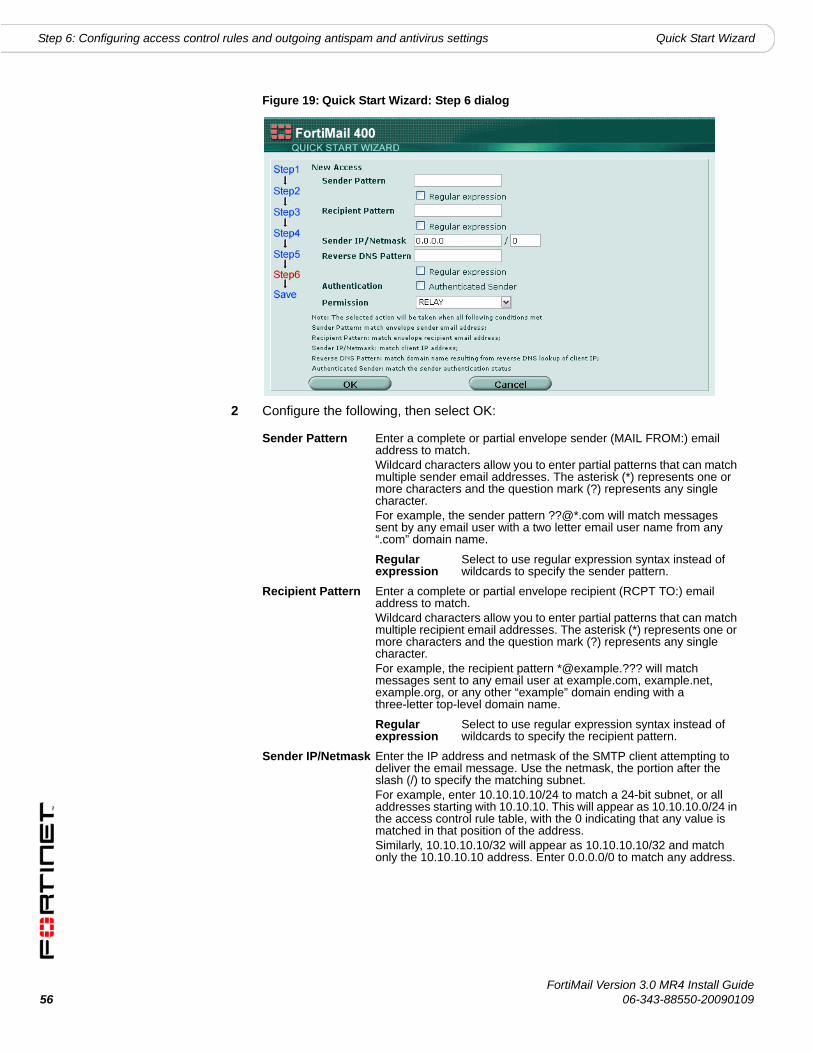
56
Step 6: Configuring access control rules and outgoing antispam and antivirus settings Quick Start Wizard
Figure 19: Quick Start Wizard: Step 6 dialog
2 Configure the following, then select OK:
Sender Pattern Enter a complete or partial envelope sender (MAIL FROM:) email address to match.Wildcard characters allow you to enter partial patterns that can match multiple sender email addresses. The asterisk (*) represents one or more characters and the question mark (?) represents any single character.For example, the sender pattern ??@*.com will match messages sent by any email user with a two letter email user name from any “.com” domain name.
Regular expression
Select to use regular expression syntax instead of wildcards to specify the sender pattern.
Recipient Pattern Enter a complete or partial envelope recipient (RCPT TO:) email address to match.Wildcard characters allow you to enter partial patterns that can match multiple recipient email addresses. The asterisk (*) represents one or more characters and the question mark (?) represents any single character.For example, the recipient pattern *@example.??? will match messages sent to any email user at example.com, example.net, example.org, or any other “example” domain ending with a three-letter top-level domain name.
Regular expression
Select to use regular expression syntax instead of wildcards to specify the recipient pattern.
Sender IP/Netmask Enter the IP address and netmask of the SMTP client attempting to deliver the email message. Use the netmask, the portion after the slash (/) to specify the matching subnet.For example, enter 10.10.10.10/24 to match a 24-bit subnet, or all addresses starting with 10.10.10. This will appear as 10.10.10.0/24 in the access control rule table, with the 0 indicating that any value is matched in that position of the address.Similarly, 10.10.10.10/32 will appear as 10.10.10.10/32 and match only the 10.10.10.10 address. Enter 0.0.0.0/0 to match any address.
FortiMail Version 3.0 MR4 Install Guide06-343-88550-20090109

Quick Start Wizard Step 7: Reviewing and saving the configuration
3 Repeat the previous step for any additional access control rules.
Step 7: Reviewing and saving the configurationReview the configuration. If it is correct, select Save.
A dialog will appear, enabling you to download a backup copy of the current configuration before saving the settings that you configured during the Quick Start Wizard.
Reverse DNS Pattern
Enter a pattern to compare to the result of a reverse DNS look-up of the IP address of the SMTP client delivering the email message.Because domain names in the SMTP session are self-reported by the connecting SMTP server and easy to fake, the FortiMail unit does not trust the domain name that an SMTP server reports. Instead, the FortiMail does a DNS lookup using the SMTP server’s IP address. The resulting domain name is compared to the reverse DNS pattern for a match. If the reverse DNS query fails, the access control rule match will also fail. If no other access control rule matches, the connection will be rejected with SMTP reply code 550 (Relaying denied).Wildcard characters allow you to enter partial patterns that can match multiple reverse DNS lookup results. An asterisk (*) represents one or more characters; a question mark (?) represents any single character.For example, the recipient pattern mail*.com will match messages delivered by an SMTP server whose domain name starts with “mail” and ends with “.com”.Note: Reverse DNS queries for access control rules require that the domain name be a valid top level domain (TLD). For example, “.lab” is not a valid top level domain name, and thus the FortiMail unit cannot successfully perform a reverse DNS query for it.
Regular expression
Select to use regular expression syntax instead of wildcards to specify the reverse DNS pattern.
Authentication Status
Select whether or not to match this access control rule based upon client authentication.• any: Match or do not match this access control rule regardless of
whether the client has authenticated with the FortiMail unit.
• authenticated: Match this access control rule only for clients that have authenticated with the FortiMail unit.
Action Select the action that the FortiMail unit will perform for SMTP sessions matching this access control rule.• BYPASS: The FortiMail unit will deliver the email message, but, if
the sender or recipient belongs to a protected domain, will bypass all antispam profile processing. Antivirus, content and other scans will still be performed on the email message.
• RELAY: The FortiMail unit will deliver the email message and process it normally, with all configured scans.
• REJECT: The FortiMail unit rejects delivery of the email message. The FortiMail unit returns a rejection response to the client attempting to deliver the email message.
• DISCARD: The FortiMail unit accepts the email message but silently deletes it without delivery. The FortiMail unit does not inform the client.
FortiMail Version 3.0 MR4 Install Guide06-343-88550-20090109 57
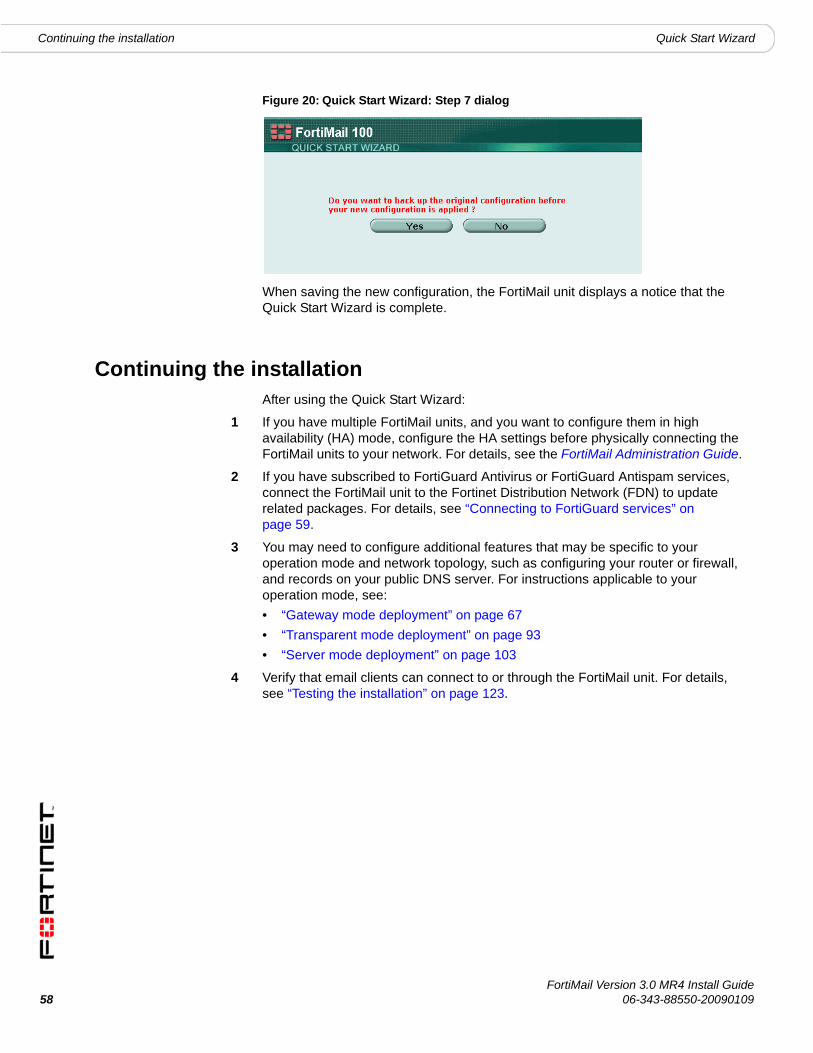
58
Continuing the installation Quick Start Wizard
Figure 20: Quick Start Wizard: Step 7 dialog
When saving the new configuration, the FortiMail unit displays a notice that the Quick Start Wizard is complete.
Continuing the installationAfter using the Quick Start Wizard:
1 If you have multiple FortiMail units, and you want to configure them in high availability (HA) mode, configure the HA settings before physically connecting the FortiMail units to your network. For details, see the FortiMail Administration Guide.
2 If you have subscribed to FortiGuard Antivirus or FortiGuard Antispam services, connect the FortiMail unit to the Fortinet Distribution Network (FDN) to update related packages. For details, see “Connecting to FortiGuard services” on page 59.
3 You may need to configure additional features that may be specific to your operation mode and network topology, such as configuring your router or firewall, and records on your public DNS server. For instructions applicable to your operation mode, see:• “Gateway mode deployment” on page 67• “Transparent mode deployment” on page 93• “Server mode deployment” on page 103
4 Verify that email clients can connect to or through the FortiMail unit. For details, see “Testing the installation” on page 123.
FortiMail Version 3.0 MR4 Install Guide06-343-88550-20090109
Connecting to FortiGuard services
Connecting to FortiGuard servicesAfter the FortiMail unit is physically installed and configured to operate in your network, if you have subscribed to FortiGuard Antivirus and/or FortiGuard Antispam services, connect the FortiMail unit to the Fortinet Distribution Network (FDN).
Connecting your FortiMail unit to the FDN or override server ensures that your FortiMail unit can:
• download up-to-date FortiGuard Antivirus and FortiGuard Antispam definition and engine packages
• query the FDN for blacklisted servers and other real-time information during FortiGuard Antispam scans, if configured
in order to scan email using the most up-to-date protection.
The FDN is a world-wide network of Fortinet Distribution Servers (FDS). When a FortiMail unit connects to the FDN to download FortiGuard engine and definition updates, by default, it connects to the nearest FDS based on the current time zone setting. You can override the FDS to which the FortiMail unit connects.
Your FortiMail unit may be able to connect using the default settings. However, you should confirm this by verifying connectivity.
To verify scheduled update connectivityBefore performing this procedure, if your FortiGate unit connects to the Internet using a proxy, use the CLI command set system autoupdate tunneling to enable the FortiGate unit to connect to the FDN through the proxy. For more information, see the FortiMail CLI Reference.
1 Go to System > Update > Update.
If this menu option does not appear, first select Advanced >> to switch to the advanced mode of the web-based manager.
2 If you want your FortiMail unit to connect to a specific FDS other than the default for its time zone, enable “Use override server address”, enter the fully qualified domain name (FQDN) or IP address of the FDS.
3 Select Apply.
4 Select Refresh.
A dialog appears, notifying you that the process could take a few minutes.
Note: FortiMail units use multiple connection types with the FDN. To completely verify connectivity, you should test each connection type by performing both of the following procedures.
Note: You must first register the FortiMail unit with the Fortinet Technical Support web site, https://support.fortinet.com/, to receive service from the FDN. The FortiMail unit must also have a valid Fortinet Technical Support contract which includes service subscriptions, and be able to connect to the FDN or the FDS that you will configure to override the default FDS addresses. For port numbers required for license validation and update connections, see the Fortinet Knowledge Center article FortiMail Traffic Types and TCP/UDP Ports.
FortiMail Version 3.0 MR4 Install Guide06-343-88550-20090109 59

60
Connecting to FortiGuard services
5 Select OK.
The FortiMail unit tests the connection to the FDN and, if any, the override server. Time required varies by the speed of the FortiMail unit’s network connection, and the number of timeouts that occur before the connection attempt is successful or the FortiMail unit determines that it cannot connect. When the connection test completes, the page refreshes. Test results are displayed in the “FortiGuard Distribution Network” field.• available: The FortiMail unit successfully connected to the FDN or override
server. • not available: The FortiMail unit could not connect to the FDN or override
server, and will not be able to download updates from it. For CLI commands that may be able to assist you in troubleshooting, see “To verify rating query connectivity” on page 60.
When successful connectivity has been verified, continue by configuring the FortiMail unit to receive engine and definition updates from the FDN or override server using one or more of the following methods:• scheduled updates (see “Configuring scheduled updates” on page 62)• push updates (see “Configuring push updates” on page 63)• manually initiated updates (see “Manually requesting updates” on page 65)
To verify rating query connectivity1 Go to AntiSpam > FortiGuard-AntiSpam > FortiGuard-AntiSpam.
If this menu option does not appear, first select Advanced >> to switch to the advanced mode of the web-based manager.
2 Verify that the Enable Service checkbox is selected.
3 In the Status row, select “check status”.
The FortiMail unit queries the DNS server to resolve the FortiGuard Antispam domain name, then connects to the FDN license server to obtain the license status. If the connection is successful:• License Type is “Contract”• Expiration contains the expiry date of your FortiGuard Antispam license
FortiMail Version 3.0 MR4 Install Guide06-343-88550-20090109

Connecting to FortiGuard services
Figure 21: Verifying the FortiGuard Antispam license and rating query connectivity
If the FortiMail unit can reach the DNS server, but cannot successfully resolve the domain name of the FDS, a message appears notifying you that a DNS error has occurred.
Figure 22: DNS error when resolving the FortiGuard Antispam domain name
Verify that the DNS servers contain A records to resolve antispam.fortigate.com and other FDN servers. You may be able to obtain additional insight into the cause of the query failure by manually performing a DNS query from the FortiMail unit using the following CLI command:
execute nslookup host antispam.fortigate.com
If the FortiMail unit cannot successfully connect, or if your FortiGuard Antispam license does not exist or is expired, a message appears notifying you that a connection error has occurred.
Figure 23: Connection error when verifying FortiGuard Antispam rating query connectivity
FortiMail Version 3.0 MR4 Install Guide06-343-88550-20090109 61
62
Configuring scheduled updates Connecting to FortiGuard services
Verify that:• your FortiGuard Antispam license is valid and currently active• the default route (located in System > Network > Routing) is correctly
configured• the FortiMail unit can connect to the DNS servers you configured during the
Quick Start Wizard (located in System > Network > DNS), and to the FDN servers
• firewalls between the FortiMail unit and the Internet or override server allow FDN traffic (For configuration examples specific to your operation mode, see “Gateway mode deployment” on page 67, “Transparent mode deployment” on page 93, or “Server mode deployment” on page 103.)
You may be able to obtain additional insight into the point of the connection failure by tracing the connection using the following CLI command:
execute traceroute <address_ipv4>
where <address_ipv4> is the IP address of the DNS server or FDN server.
When query connectivity is successful, antispam profiles can use the “FortiGuard-AntiSpam scan” option.
You can use the antispam log to monitor for subsequent query connectivity interruptions. When sending email through the FortiMail unit that matches a policy and profile where the “FortiGuard-AntiSpam scan” option is enabled, if the FortiMail cannot connect to the FDN and/or its license is not valid, and if Information-level logging is enabled, the FortiMail unit records a log message in the antispam log (located in Log & Report > Logging > AntiSpam) whose Message field is:
FortiGuard-Antispam: No Answer from server.
Figure 24: Antispam log when FortiGuard Antispam query fails
Verify that the FortiGuard Antispam license is still valid, and that network connectivity has not been disrupted for UDP port 8889 traffic from the FortiMail unit to the Internet.
Configuring scheduled updates You can configure the FortiMail unit to periodically request FortiGuard Antivirus and FortiGuard Antispam engine and definition updates from the FDN or override server.
You can use push updates or manually initiate updates as alternatives or in conjunction with scheduled updates. If protection from the latest viral threats is a high priority, you could configure both scheduled updates and push updates, using scheduled updates as a failover method to increase the likelihood that the FortiMail unit will still periodically retrieve updates if connectivity is interrupted
FortiMail Version 3.0 MR4 Install Guide06-343-88550-20090109
Connecting to FortiGuard services Configuring push updates
during a push notification. While using only scheduled updates could potentially leave your network vulnerable to a new virus, it minimizes short disruptions to antivirus scans that can occur if the FortiMail unit applies push updates during peak volume times. For additional/alternative update methods, see “Configuring push updates” on page 63 and “Manually requesting updates” on page 65.
For example, you might schedule updates every night at 2 AM or weekly on Sunday, when email traffic volume is light.
Before configuring scheduled updates, first verify that the FortiMail unit can connect to the FDN or override server. For details, see “To verify scheduled update connectivity” on page 59.
To configure scheduled updates 1 Go to System > Update > Update.
If this menu option does not appear, first select Advanced >> to switch to the advanced mode of the web-based manager.
2 Select Scheduled Update.
3 Configure one of the following:
4 Select Apply.
The FortiMail unit starts the next scheduled update according to the configured update schedule. If you have enabled logging, when the FortiMail unit requests a scheduled update, the event is recorded in the event log.
Configuring push updatesYou can configure the FortiMail unit to receive push updates from the FDN or override server.
When push updates are configured, the FortiMail unit first notifies the FDN of its IP address, or the IP address and port number override. (If your FortiMail unit’s IP address changes, including if it is configured with DHCP, the FortiMail unit automatically notifies the FDN of the new IP address.) As soon as new FortiGuard Antivirus and FortiGuard Antispam packages become available, the FDN sends an update availability notification to that IP address and port number. Within 60 seconds, the FortiMail unit then requests the package update as if it were a scheduled or manually initiated update.
Every Select to request updates once per interval, then configure the number of hours and minutes between each request.
Daily Select to request updates once a day, then configure the time of day.
Weekly Select to request updates once a week, then configure the day of the week and the time of day.
Note: Updating FortiGuard Antivirus definitions can cause a short disruption in traffic currently being scanned while the FortiMail unit applies the new signature database. To minimize disruptions, update when traffic is light, such as during the night.
FortiMail Version 3.0 MR4 Install Guide06-343-88550-20090109 63

64
Configuring push updates Connecting to FortiGuard services
You can use scheduled updates or manually initiate updates as alternatives or in conjunction with push updates. If protection from the latest viral threats is a high priority, you could configure both scheduled updates and push updates, using scheduled updates as a failover method to increase the likelihood that the FortiMail unit will still periodically retrieve updates if connectivity is interrupted during a push notification. Using push updates, however, can potentially cause short disruptions to antivirus scans that can occur if the FortiMail unit applies push updates during peak volume times. For additional/alternative update methods, see “Configuring scheduled updates” on page 62 and “Manually requesting updates” on page 65.
Before configuring push updates, first verify that the FortiMail unit can connect to the FDN or override server. For details, see “To verify scheduled update connectivity” on page 59.
To configure push updates1 Go to System > Update > Update.
If this menu option does not appear, first select Advanced >> to switch to the advanced mode of the web-based manager.
2 Select Allow Push Update.
3 If the FortiMail unit is behind a firewall or router performing NAT, enable “Use override push IP” and enter the external IP address and port number of the NAT device.
You must also configure the NAT device with port forwarding or a virtual IP to forward push notifications (UDP port 9443) to the FortiMail unit. For example, if the FortiMail unit is behind a FortiGate unit, configure the FortiGate unit with a virtual IP that forwards push notifications from its external network interface to the private network IP address of the FortiMail unit. Then, on the FortiMail unit, configure “Use override push IP” with the IP address and port number of that virtual IP. For details on configuring virtual IPs and/or port forwarding, see the documentation for the NAT device.
If you do not enable “Use override push IP”, the FDN will send push notifications to the IP address of the FortiMail unit, which must be a public network IP address routable from the Internet.
4 Select Apply.
The FortiMail unit notifies the FDN of its IP address or, if configured, the override push IP. When an update is available, the FDN will send push notifications to this IP address and port number.
5 Select Refresh.
A dialog appears, notifying you that the process could take a few minutes.
Note: Push updates require that the external IP address of the NAT device is not dynamic (such as an IP address automatically configured using DHCP). If dynamic, when the IP address changes, the override push IP will become out-of-date, causing subsequent push updates to fail.
FortiMail Version 3.0 MR4 Install Guide06-343-88550-20090109
Connecting to FortiGuard services Manually requesting updates
6 Select OK.
The FDN tests the connection to the FortiMail unit. Time required varies by the speed of the FortiMail unit’s network connection, and the number of timeouts that occur before the connection attempt is successful or the FortiMail unit determines that it cannot connect. When the connection test completes, the page refreshes. Test results are displayed in the “Push Update” field.• available: The FDN successfully connected to the FortiMail unit. • not available: The FDN could not connect to the FortiMail unit, and will not be
able to send push notifications to it. Verify that intermediary firewalls and routers do not block push notification traffic (UDP port 9443). If the FortiMail unit is behind a NAT device, verify that you have enabled and configured “Use override push IP”, and that the NAT device is configured to forward push notifications to the FortiMail unit.
Manually requesting updatesYou can manually trigger the FortiMail unit to connect to the FDN or override server to request available updates for its FortiGuard Antivirus and FortiGuard Antispam packages.
You can manually initiate updates as an alternative or in addition to other update methods. For details, see “Configuring push updates” on page 63 and “Configuring scheduled updates” on page 62.
To manually request updatesBefore manually initiating an update, first verify that the FortiMail unit can connect to the FDN or override server. For details, see “To verify scheduled update connectivity” on page 59.
1 Go to System > Update.
If this menu option does not appear, first select Advanced >> to switch to the advanced mode of the web-based manager.
2 Select Update Now.
The web-based manager displays a message similar to the following:
Your update request has been sent. Your database will be updated in a few minutes. Please check your update page for the status of the update.
3 Select RETURN.
4 After a few minutes, select the Update tab to refresh the page, or go to System > Status.
If an update was available, new version numbers appear for the packages that were updated. If you have enabled logging, messages are recorded to the event log indicating whether the update was successful or not.
Note: Updating FortiGuard Antivirus definitions can cause a short disruption in traffic currently being scanned while the FortiMail unit applies the new signature database. To minimize disruptions, update when traffic is light, such as during the night.
FortiMail Version 3.0 MR4 Install Guide06-343-88550-20090109 65

66
Manually requesting updates Connecting to FortiGuard services
FortiMail Version 3.0 MR4 Install Guide06-343-88550-20090109

Gateway mode deployment Configuring DNS records
Gateway mode deploymentAfter completing the Quick Start Wizard, you may be required to configure some items that are specific to your network topology or the operation mode of your FortiMail unit.
This chapter contains examples of how to deploy a FortiMail unit operating in gateway mode.
This chapter includes the following sections:
• Configuring DNS records• Example 1: FortiMail unit behind a firewall• Example 2: FortiMail unit in front of a firewall• Example 3: FortiMail unit in DMZ
Configuring DNS recordsYou must configure public DNS records for the protected domains and for the FortiMail unit itself.
For performance reasons, and to support some configuration options, you may also want to provide a private DNS server for use exclusively by the FortiMail unit.
This section includes the following:
• Configuring DNS records for the protected domains• Configuring DNS records for the FortiMail unit itself• Configuring a private DNS server
Configuring DNS records for the protected domainsRegardless of your private network topology, in order for external MTAs to deliver email through the FortiMail unit, you must configure the public MX record for each protected domain to indicate that the FortiMail unit is its email gateway.
For example, if the fully qualified domain name (FQDN) of the FortiMail unit is fortimail.example.com, and example.com is a protected domain, the MX record for example.com would be:
example.com IN MX 10 fortimail.example.com
An A record must also exist to resolve the host name of the FortiMail unit into an IP address.
!Caution: If your FortiMail unit will operate in gateway mode or server mode, configure the MX record to refer to the FortiMail unit, and remove other MX records. If you fail to do so, external MTAs may not be able to deliver email to or through the FortiMail unit, or may be able to bypass the FortiMail unit by using the other MX records. If you have configured secondary MX records for failover reasons, consider configuring FortiMail high availability (HA) instead. For details, see “FortiMail high availability modes” on page 20.
FortiMail Version 3.0 MR4 Install Guide06-343-88550-20090109 67

68
Configuring DNS records Gateway mode deployment
For example, if the MX record indicates that fortimail.example.com is the email gateway for a domain, you must also configure an A record in the example.com zone file to resolve fortimail.example.com into a public IP address:
fortimail IN A 10.10.10.1
where 10.10.10.1 is either the public IP address of the FortiMail unit, or a virtual IP address on a firewall or router that maps to the private IP address of the FortiMail unit.
If your FortiMail unit will relay outgoing email, you should also configure the public reverse DNS record. The public IP address of the FortiMail unit, or the virtual IP address on a firewall or router that maps to the private IP address of the FortiMail unit, should be globally resolvable into the FortiMail unit’s FQDN. If it is not, reverse DNS lookups by external SMTP servers will fail.
For example, if the public network IP address of the FortiMail unit is 10.10.10.1, a public DNS server’s reverse DNS zone file for the 10.10.10.0/24 subnet might contain:
1 IN PTR fortimail.example.com.
where fortimail.example.com is the FQDN of the FortiMail unit.
Configuring DNS records for the FortiMail unit itselfIn addition to that of protected domains, the FortiMail unit must be able to receive web connections, and send and receive email, for its own domain name. Dependent features include:
• delivery status notification (DSN) email• spam reports• email users’ access to their per-recipient quarantines• FortiMail administrators’ access to the web-based manager by domain name• alert email• report generation notification email
For this reason, you should also configure public DNS records for the FortiMail unit itself.
Appropriate records vary by whether or not “Web Release Host Name/IP” (located in AntiSpam > Quarantine > Spam Report in the advanced mode of the web-based manager) is configured:
• Case 1: Web Release Host Name/IP is empty/default• Case 2: Web Release Host Name/IP is configured
Case 1: Web Release Host Name/IP is empty/defaultBy default (that is, if “Web Release Host Name/IP” is unconfigured), the web release/delete links that appear in spam reports will use the fully qualified domain name (FQDN) of the FortiMail unit.
Note: For more information on MX and A records, see “The role of DNS in email delivery” on page 16.
FortiMail Version 3.0 MR4 Install Guide06-343-88550-20090109

Gateway mode deployment Configuring DNS records
For example, if the FortiMail unit’s host name is fortimail, and its local domain name is example.net, resulting in the FQDN fortimail.example.net, a spam report’s default web release link might look like (FQDN highlighted in bold):
https://fortimail.example.net/releasecontrol?release=0%3Auser2%40example.com%3AMTIyMDUzOTQzOC43NDJfNjc0MzE1LkZvcnRpTWFpbC00MDAsI0YjUyM2NTkjRSxVMzoyLA%3D%3D%3Abf3db63dab53a291ab53a291ab53a291
In the DNS configuration to support this and the other DNS-dependent features, you would configure the following three records:
example.net IN MX 10 fortimail.example.net
fortimail IN A 10.10.10.1
1 IN PTR fortimail.example.net.
where:
• example.net is the local domain name to which the FortiMail unit belongs; in the MX record, it is the local domain for which the FortiMail is the mail gateway
• fortimail.example.net is the FQDN of the FortiMail unit• fortimail is the host name of the FortiMail unit; in the A record of the zone
file for example.net, it resolves to the IP address of the FortiMail unit for the purpose of administrators’ access to the web-based manager, email users’ access to their per-recipient quarantines, to resolve the FQDN referenced in the MX record when email users send Bayesian and quarantine control email to the FortiMail unit, and to resolve to the IP address of the FortiMail unit for the purpose of the web release/delete hyperlinks in the spam report
• 10.10.10.1 is the public IP address of the FortiMail unit
Case 2: Web Release Host Name/IP is configuredYou could configure “Web Release Host Name/IP” to use an alternative fully qualified domain name (FQDN) such as webrelease.example.info instead of the configured FQDN, resulting in the following web release link (web release FQDN highlighted in bold):
https://webrelease.example.info/releasecontrol?release=0%3Auser2%40example.com%3AMTIyMDUzOTQzOC43NDJfNjc0MzE1LkZvcnRpTWFpbC00MDAsI0YjUyM2NTkjRSxVMzoyLA%3D%3D%3Abf3db63dab53a291ab53a291ab53a291
Then, in the DNS configuration to support this and the other DNS-dependent features, you would configure the following MX record, A records, and PTR record (unlike “Case 1: Web Release Host Name/IP is empty/default” on page 68, in this case, two A records are required; the difference is highlighted in bold):
example.net IN MX 10 fortimail.example.net
fortimail IN A 10.10.10.1
webrelease IN A 10.10.10.1
1 IN PTR fortimail.example.net.
where:
• example.net is the local domain name to which the FortiMail unit belongs;in the MX record, it is the local domain for which the FortiMail is the mail gateway
• fortimail.example.net is the FQDN of the FortiMail unit
FortiMail Version 3.0 MR4 Install Guide06-343-88550-20090109 69

70
Configuring DNS records Gateway mode deployment
• fortimail is the host name of the FortiMail unit; in the A record of the zone file for example.net, it resolves to the IP address of the FortiMail unit for the purpose of administrators’ access to the web-based manager and to resolve the FQDN referenced in the MX record when email users send Bayesian and quarantine control email to the FortiMail unit
• webrelease is the web release host name; in the A record of the zone file for example.info, it resolves to the IP address of the FortiMail unit for the purpose of the web release/delete hyperlinks in the spam report
• 10.10.10.1 is the public IP address of the FortiMail unit
Configuring a private DNS serverIn addition to the public DNS server, consider providing a private DNS server on your local network to improve performance with features that use DNS queries.
Figure 25: Public and private DNS servers (gateway mode)
In some situations, a private DNS server may be required. A private DNS server is required if you enable the “Use MX Record” option (see “Use MX Record” on page 52). Because gateway mode requires that public DNS servers have an MX record that routes mail to the FortiMail unit, but “Use MX Record” requires an MX record that references the protected SMTP server, if you enable that option, you must configure the records of the private DNS server and public DNS server differently.
For example, if both a FortiMail unit (fortimail.example.com) operating in gateway mode and the SMTP server reside on your private network behind a router or firewall as illustrated in Figure 25 on page 70, and the “Use MX Record” option is enabled, Table 4 on page 70 illustrates differences between the public and private DNS servers for the authoritative DNS records of example.com.
Table 4: Public vs. private DNS records when “Use MX Record” is enabled
Private DNS server Public DNS serverexample.com IN MX 10 mail.example.com
example.com IN MX 10 fortimail.example.com
mail IN A 172.16.1.10 fortimail IN A 10.10.10.1
1 IN PTR fortimail.example.com
External Email Server
Local Email Users Remote Email Users
Public DNS Server
Internal Email Server 172.16.1.10
Internet Switch
internal 172.16.1.1
wan1 10.10.10.1
port1172.16.1.5
Protected Domain:@example.com
Email Domain: @example.com
example.com IN MX 10 fortimail.example.comfortimail IN A 10.10.10.1
Gateway ModePrivate DNS Serverexample.com IN MX 10 mail.example.com
mail IN A 172.16.1.10
FortiMail Version 3.0 MR4 Install Guide06-343-88550-20090109

Gateway mode deployment Example 1: FortiMail unit behind a firewall
If you choose to add a private DNS server, to configure the FortiMail unit to use it, go to System > Network > DNS in the advanced mode of the web-based manager.
Example 1: FortiMail unit behind a firewallIn this example, a FortiMail unit operating in gateway mode, a protected email server, a private DNS server, and email users’ computers are all positioned within a private network, behind a firewall. Remote email users’ computers and external email servers are located on the Internet, outside of the network protected by the firewall. The FortiMail unit protects accounts for email addresses ending in “@example.com”, which are hosted on the local email server.
Figure 26: FortiMail unit behind a NAT device
The private DNS server has been configured to locally replicate records from public DNS servers for most domains, with the exception of records for protected domains, which instead have been configured differently locally in order to support the “Use MX Record” option.
The FortiMail unit has been configured to query the private DNS server, and also been configured with an access control rule that allows local and remote email users to send email to unprotected domains if they first authenticate:
Sender Pattern Enter *@example.com.
Recipient Pattern Enter *.
Sender IP/Netmask Enter 0.0.0.0/0 to match any address.
Reverse DNS Pattern
Enter *.
Authentication Status
Select “authenticated”.
TLS Select “< none >”.
Action Select RELAY.
External Email Server
Local Email Users Remote Email Users
DNS Server
Internal Email Server 172.16.1.10
Internet Switch
internal 172.16.1.1
wan1 10.10.10.1
Protected Domain:@example.com
Email Domain: @example.com
example.com IN MX 10 fortimail.example.comfortimail IN A 10.10.10.1
port1172.16.1.5
Gateway ModePrivate DNS Serverexample.com IN MX 10 mail.example.com
mail IN A 172.16.1.10
FortiMail Version 3.0 MR4 Install Guide06-343-88550-20090109 71
72
Example 1: FortiMail unit behind a firewall Gateway mode deployment
To deploy the FortiMail unit behind a NAT device such as a firewall or router, you must complete the following:
• Configuring the firewall• Configuring the MUAs• Testing the installation
Configuring the firewallWith the FortiMail unit behind a FortiGate unit, you must configure firewall policies to allow traffic between the internal network and the Internet.
To create the required policies, complete the following:
• Configuring the firewall address• Configuring the service groups• Configuring the virtual IPs• Configuring the firewall policies
Configuring the firewall addressIn order to create the outgoing firewall policy that governs the IP address of the FortiMail unit, you must first define the IP address of the FortiMail unit by creating a firewall address entry.
To add a firewall address for the FortiMail unit1 Go to Firewall > Address > Address.
2 Select Create New.
3 Complete the following:
4 Select OK.
Configuring the service groupsIn order to create firewall policies that govern only email and FortiMail-related traffic, you must first create groups of services that define protocols and port numbers used in that traffic.
Because FortiGuard-related services for FortiMail units are not predefined, you must define them before you can create a service group that contains those services.
Note: This example assumes you have already completed the Quick Start Wizard and configured records on the DNS server for each protected domain. For details, see “Quick Start Wizard” on page 45 and “Configuring DNS records” on page 67.
Note: The following procedures use a FortiGate unit running FortiOS v3.0 MR7. If you are using a different firewall appliance, consult the appliance’s documentation for completing similar configurations.
Name Enter a name to identify the firewall address entry, such as FortiMail_address.
Type Select Subnet/IP Range.
Subnet /IP Range Enter 172.16.1.5.
Interface Select internal.
FortiMail Version 3.0 MR4 Install Guide06-343-88550-20090109

Gateway mode deployment Example 1: FortiMail unit behind a firewall
To add a custom service for FortiGuard Antivirus push updates1 Go to Firewall > Service > Custom.
2 Select Create New.
3 Configure the following:
4 Select OK.
To add a custom service for FortiGuard Antispam rating queries1 Go to Firewall > Service > Custom.
2 Select Create New.
3 Configure the following:
4 Select OK.
To add a service group for incoming FortiMail traffic1 Go to Firewall > Service > Group.
2 Select Create New.
3 In Group Name, enter a name to identify the service group entry, such as FortiMail_incoming_services.
4 In the Available Services area, select HTTP, HTTPS, SMTP, and your custom service for FortiGuard Antivirus push updates, FortiMail_antivirus_push_updates, then select the right arrow to move them to the Members area.
5 Select OK.
To add a service group for outgoing FortiMail traffic1 Go to Firewall > Service > Group.
2 Select Create New.
Note: For more information on protocols and port numbers used by FortiMail units, see the Fortinet Knowledge Center article FortiMail Traffic Types and TCP/UDP Ports.
Name Enter a name to identify the custom service entry, such as FortiMail_antivirus_push_updates.
Protocol Type Select TCP/UDP.
Protocol Select UDP.
Destination PortLow Enter 9443.
High Enter 9443.
Name Enter a name to identify the custom service entry, such as FortiMail_antispam_rating_queries.
Protocol Type Select TCP/UDP.
Protocol Select UDP.
Destination PortLow Enter 8889.
High Enter 8889.
FortiMail Version 3.0 MR4 Install Guide06-343-88550-20090109 73

74
Example 1: FortiMail unit behind a firewall Gateway mode deployment
3 In Group Name, enter a name to identify the service group entry, such as FortiMail_outgoing_services.
4 In the Available Services area, select DNS, NTP, HTTPS, SMTP, and your custom service for FortiGuard Antispam rating queries, FortiMail_antispam_rating_queries, then select the right arrow to move them to the Members area.
5 Select OK.
To add a service group for email user traffic1 Go to Firewall > Service > Group.
2 Select Create New.
3 In Group Name, enter a name to identify the service group entry, such as PO3_IMAP_services.
4 In the Available Services area, select POP3 and IMAP, then select the right arrow to move them to the Members area.
5 Select OK.
Configuring the virtual IPsIn order to create the firewall policy that forwards email-related traffic to the FortiMail unit, you must first define a static NAT mapping from a public IP address on the FortiGate unit to the private IP address of the FortiMail unit by creating a virtual IP entry.
Similarly, in order to create the firewall policy that forwards POP3/IMAP-related traffic to the protected email server, you must first define a static NAT mapping from a public IP address on the FortiGate unit to the private IP address of the protected email server by creating a virtual IP entry.
To add a virtual IP for the FortiMail unit1 Go to Firewall > Virtual IP > Virtual IP.
2 Select Create New.
3 Complete the following:
4 Select OK.
To add a virtual IP for the protected email server1 Go to Firewall > Virtual IP > Virtual IP.
Note: To add virtual IPs, the FortiGate unit must be operating in NAT mode. For more information, see the FortiGate Administration Guide.
Name Enter a name to identify the virtual IP entry, such as FortiMail_VIP.
External Interface Select wan1.
Type Select Static NAT.
External IP Address/Range
Enter 10.10.10.1.
Mapped IP Address/Range
Enter 172.16.1.5.
FortiMail Version 3.0 MR4 Install Guide06-343-88550-20090109

Gateway mode deployment Example 1: FortiMail unit behind a firewall
2 Select Create New.
3 Complete the following:
4 Select OK.
Configuring the firewall policiesFirst, create a firewall policy that allows incoming FortiMail services that are received at the virtual IP address, then applies a static NAT when forwarding the traffic to the private network IP address of the FortiMail unit.
Second, create a firewall policy that allows outgoing email and other FortiMail connections from the FortiMail unit to the Internet.
Last, create a firewall policy that allows incoming POP3 and IMAP traffic that is received at the virtual IP address, then applies a static NAT when forwarding the traffic to the private network IP address of the protected email server.
To add the Internet-to-FortiMail policy1 Go to Firewall > Policy > Policy.
2 Select Create New.
3 Complete the following:
4 Select NAT.
5 Select OK.
To add the FortiMail-to-Internet policy1 Go to Firewall > Policy > Policy.
2 Select Create New.
3 Complete the following:
Name Enter a name to identify the virtual IP entry, such as protected_email_server_VIP.
External Interface Select wan1.
Type Select Static NAT.
External IP Address/Range
Enter 10.10.10.1.
Mapped IP Address/Range
Enter 172.16.1.10.
Source Interface/zone Select wan1.
Source Address Name
Select “all”.
Destination Interface/zone
Select internal.
Destination Address Name
Select FortiMail_VIP.
Schedule Select ALWAYS.
Service Select FortiMail_incoming_services.
Action Select ACCEPT.
FortiMail Version 3.0 MR4 Install Guide06-343-88550-20090109 75

76
Example 1: FortiMail unit behind a firewall Gateway mode deployment
4 Select NAT.
5 Select OK.
To add the Internet-to-email-server policy1 Go to Firewall > Policy > Policy.
2 Select Create New.
3 Complete the following:
4 Select NAT.
5 Select OK.
Configuring the MUAsConfigure the email clients of local and remote email users to use the FortiMail unit as their outgoing mail (SMTP) server/MTA. For local email users, this is the private network IP address of the FortiMail unit, 172.16.1.5; for remote email users, this is the virtual IP on the FortiGate unit that maps to the FortiMail unit, 10.10.10.1 or fortimail.example.com.
If you do not configure the email clients to send email through the FortiMail unit, incoming email delivered to your protected email server can be scanned, but email outgoing from your email users cannot.
Also configure email clients to authenticate with the email user’s user name and password for outgoing mail. The user name is the email user’s entire email address, including the domain name portion, such as [email protected].
If you do not configure the email clients to authenticate, email destined for other email users in the protected domain may be accepted, but email outgoing to unprotected domains will be denied by the access control rule.
Source Interface/zone Select internal.
Source Address Name
Select FortiMail_address.
Destination Interface/zone
Select wan1.
Destination Address Name
Select “all”.
Schedule Select ALWAYS.
Service Select FortiMail_outgoing_services.
Action Select ACCEPT.
Source Interface/zone Select wan1.
Source Address Name
Select “all”.
Destination Interface/zone
Select internal.
Destination Address Name
Select protected_email_server_VIP.
Schedule Select ALWAYS.
Service Select PO3_IMAP_services.
Action Select ACCEPT.
FortiMail Version 3.0 MR4 Install Guide06-343-88550-20090109
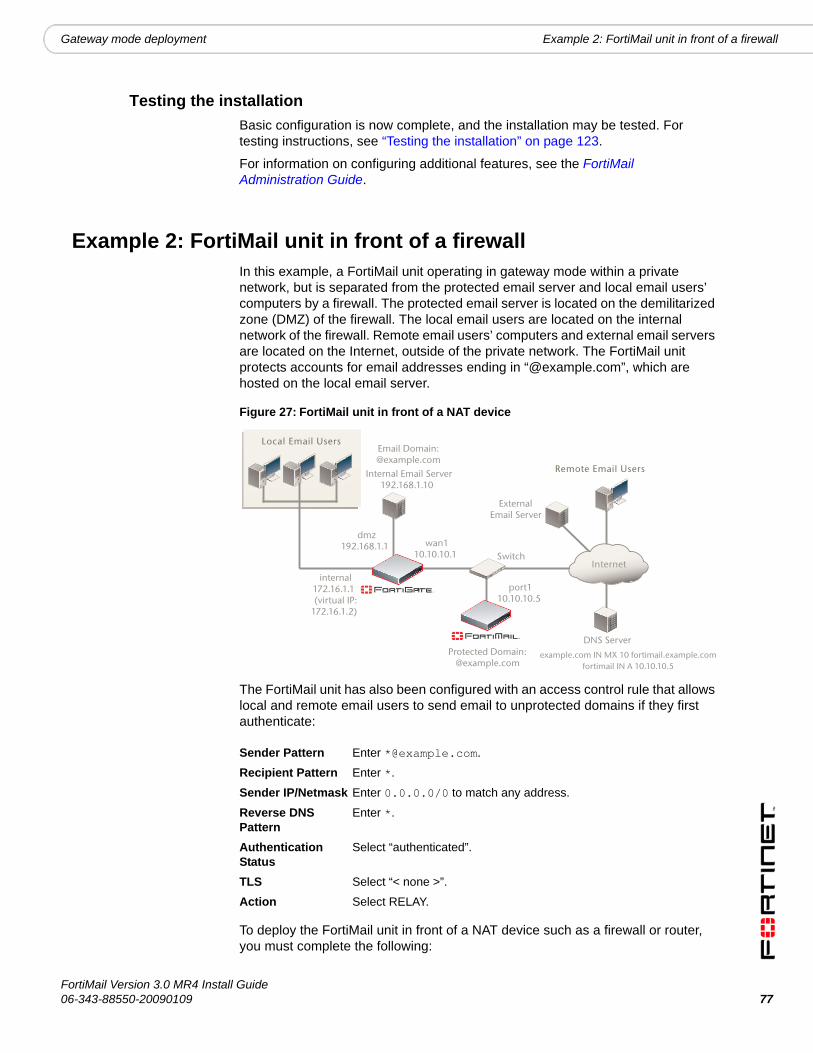
Gateway mode deployment Example 2: FortiMail unit in front of a firewall
Testing the installationBasic configuration is now complete, and the installation may be tested. For testing instructions, see “Testing the installation” on page 123.
For information on configuring additional features, see the FortiMail Administration Guide.
Example 2: FortiMail unit in front of a firewallIn this example, a FortiMail unit operating in gateway mode within a private network, but is separated from the protected email server and local email users’ computers by a firewall. The protected email server is located on the demilitarized zone (DMZ) of the firewall. The local email users are located on the internal network of the firewall. Remote email users’ computers and external email servers are located on the Internet, outside of the private network. The FortiMail unit protects accounts for email addresses ending in “@example.com”, which are hosted on the local email server.
Figure 27: FortiMail unit in front of a NAT device
The FortiMail unit has also been configured with an access control rule that allows local and remote email users to send email to unprotected domains if they first authenticate:
To deploy the FortiMail unit in front of a NAT device such as a firewall or router, you must complete the following:
Sender Pattern Enter *@example.com.
Recipient Pattern Enter *.
Sender IP/Netmask Enter 0.0.0.0/0 to match any address.
Reverse DNS Pattern
Enter *.
Authentication Status
Select “authenticated”.
TLS Select “< none >”.
Action Select RELAY.
External Email Server
Local Email Users
Remote Email Users
DNS Server
Internet Switch
Internal Email Server 192.168.1.10
wan1 10.10.10.1
port1 10.10.10.5
Protected Domain: @example.com
Email Domain: @example.com
example.com IN MX 10 fortimail.example.comfortimail IN A 10.10.10.5
internal 172.16.1.1 (virtual IP:
172.16.1.2)
dmz 192.168.1.1
FortiMail Version 3.0 MR4 Install Guide06-343-88550-20090109 77

78
Example 2: FortiMail unit in front of a firewall Gateway mode deployment
• Configuring the firewall• Configuring the MUAs• Testing the installation
Configuring the firewallWith the FortiMail unit in front of a FortiGate unit, the internal network located behind the FortiGate unit, and the protected email server located on the DMZ, you must configure firewall policies to allow traffic:
• between the internal network and the FortiMail unit• between the internal network and protected email server• between the protected email server and the FortiMail unit• between the protected email server and the Internet
To create the required policies, complete the following:
• Configuring the firewall addresses• Configuring the service groups• Configuring the virtual IPs• Configuring the firewall policies
Configuring the firewall addressesIn order to create the firewall policies that governs traffic from the IP addresses of local email users, the protected email server, and the IP address of the FortiMail unit, you must first define the IP addresses of those hosts by creating firewall address entries.
To add a firewall address for local email users1 Go to Firewall > Address > Address.
2 Select Create New.
3 Complete the following:
4 Select OK.
Note: This example assumes you have already completed the Quick Start Wizard and configured records on the DNS server for each protected domain. For details, see “Quick Start Wizard” on page 45 and “Configuring DNS records” on page 67.
Note: The following procedures use a FortiGate unit running FortiOS v3.0 MR7. If you are using a different firewall appliance, consult the appliance’s documentation for completing similar configurations.
Name Enter a name to identify the firewall address entry, such as local_email_users_address.
Type Select Subnet/IP Range.
Subnet /IP Range Enter 172.16.1.0/24.
Interface Select internal.
FortiMail Version 3.0 MR4 Install Guide06-343-88550-20090109
Gateway mode deployment Example 2: FortiMail unit in front of a firewall
To add a firewall address for the protected email server1 Go to Firewall > Address > Address.
2 Select Create New.
3 Complete the following:
4 Select OK.
To add a firewall address for the FortiMail unit1 Go to Firewall > Address > Address.
2 Select Create New.
3 Complete the following:
4 Select OK.
Configuring the service groupsIn order to create firewall policies that governs email and FortiMail-related traffic, you must first create service groups that contain services that define protocols and port numbers used in that traffic.
To add a service group for internal email user and protected server traffic to the FortiMail unit
1 Go to Firewall > Service > Group.
2 Select Create New.
3 In Group Name, enter a name to identify the service group entry, such as SMTP_quar_services.
4 In the Available Services area, select HTTP, HTTPS, and SMTP, then select the right arrow to move them to the Members area.
5 Select OK.
To add a service group for POP3 and IMAP traffic to the protected email server
1 Go to Firewall > Service > Group.
2 Select Create New.
3 In Group Name, enter a name to identify the service group entry, such as PO3_IMAP_services.
Name Enter a name to identify the firewall address entry, such as protected_email_server_address.
Type Select Subnet/IP Range.
Subnet /IP Range Enter 192.168.1.10/32.
Interface Select dmz.
Name Enter a name to identify the firewall address entry, such as FortiMail_address.
Type Select Subnet/IP Range.
Subnet /IP Range Enter 10.10.10.5/32.
Interface Select wan1.
FortiMail Version 3.0 MR4 Install Guide06-343-88550-20090109 79
80
Example 2: FortiMail unit in front of a firewall Gateway mode deployment
4 In the Available Services area, select POP3 and IMAP, then select the right arrow to move them to the Members area.
5 Select OK.
Configuring the virtual IPsIn order to create the firewall policies that forward from the FortiMail unit and local and remote email users to the protected email server, you must first define static NAT mappings from a public IP address on the FortiGate unit to the IP address of the protected email server, and from an internal IP address on the FortiGate unit to the IP address of the protected email server, by creating virtual IP entries.
To add a wan1 virtual IP for the protected email server1 Go to Firewall > Virtual IP > Virtual IP.
2 Select Create New.
3 Complete the following:
4 Select OK.
To add an internal virtual IP for the protected email server1 Go to Firewall > Virtual IP > Virtual IP.
2 Select Create New.
3 Complete the following:
4 Select OK.
Configuring the firewall policiesCreate the following firewall policies:
• Allow SMTP connections from the protected email server to the FortiMail unit.
Note: To add virtual IPs, the FortiGate unit must be operating in NAT mode. For more information, see the FortiGate Administration Guide.
Name Enter a name to identify the virtual IP entry, such as protected_email_server_VIP_wan1.
External Interface Select wan1.
Type Select Static NAT.
External IP Address/Range
Enter 10.10.10.1.
Mapped IP Address/Range
Enter 192.168.1.10.
Name Enter a name to identify the virtual IP entry, such as protected_email_server_VIP_internal.
External Interface Select internal.
Type Select Static NAT.
External IP Address/Range
Enter 172.16.1.2.
Mapped IP Address/Range
Enter 192.168.1.10.
FortiMail Version 3.0 MR4 Install Guide06-343-88550-20090109

Gateway mode deployment Example 2: FortiMail unit in front of a firewall
• Allow SMTP_quar_services from the local email users to the FortiMail unit.• allow SMTP connections that are received at the wan1 virtual IP address from
the FortiMail unit, then apply a static NAT when forwarding the traffic to the private network IP address of the protected email server.
• Allow PO3_IMAP_services that are received at the internal virtual IP address, then apply a static NAT when forwarding the traffic to the private network IP address of the protected email server.
• Allow PO3_IMAP_services that are received at the wan1 virtual IP address, then apply a static NAT when forwarding the traffic to the private network IP address of the protected email server.
To add the email-server-to-FortiMail policy1 Go to Firewall > Policy > Policy.
2 Select Create New.
3 Complete the following:
4 Select NAT.
5 Select OK.
To add the local-users-to-FortiMail policy1 Go to Firewall > Policy > Policy.
2 Select Create New.
3 Complete the following:
4 Select NAT.
5 Select OK.
Source Interface/zone Select dmz.
Source Address Name
Select protected_email_server_address.
Destination Interface/zone
Select wan1.
Destination Address Name
Select FortiMail_address.
Schedule Select ALWAYS.
Service Select SMTP.
Action Select ACCEPT.
Source Interface/zone Select internal.
Source Address Name
Select local_email_users_address.
Destination Interface/zone
Select wan1.
Destination Address Name
Select FortiMail_address.
Schedule Select ALWAYS.
Service Select SMTP_quar_services.
Action Select ACCEPT.
FortiMail Version 3.0 MR4 Install Guide06-343-88550-20090109 81

82
Example 2: FortiMail unit in front of a firewall Gateway mode deployment
To add the FortiMail-to-email-server policy1 Go to Firewall > Policy > Policy.
2 Select Create New.
3 Complete the following:
4 Select NAT.
5 Select OK.
To add the local-users-to-email-server policy1 Go to Firewall > Policy > Policy.
2 Select Create New.
3 Complete the following:
4 Select NAT.
5 Select OK.
To add the remote-users-to-email-server policy1 Go to Firewall > Policy > Policy.
2 Select Create New.
3 Complete the following:
Source Interface/zone Select wan1.
Source Address Name
Select FortiMail_address.
Destination Interface/zone
Select wan1.
Destination Address Name
Select protected_email_server_VIP_wan1.
Schedule Select ALWAYS.
Service Select SMTP.
Action Select ACCEPT.
Source Interface/zone Select internal.
Source Address Name
Select local_email_users_address.
Destination Interface/zone
Select internal.
Destination Address Name
Select protected_email_server_VIP_internal.
Schedule Select ALWAYS.
Service Select PO3_IMAP_services.
Action Select ACCEPT.
Source Interface/zone Select wan1.
Source Address Name
Select “all”.
Destination Interface/zone
Select dmz.
FortiMail Version 3.0 MR4 Install Guide06-343-88550-20090109

Gateway mode deployment Example 3: FortiMail unit in DMZ
4 Select NAT.
5 Select OK.
Configuring the MUAsConfigure the email clients of local and remote email users to use the FortiMail unit as their outgoing mail (SMTP) server/MTA. For both local and remote email users, this is 10.10.10.5 or fortimail.example.com.
If you do not configure the email clients to send email through the FortiMail unit, incoming email delivered to your protected email server can be scanned, but email outgoing from your email users cannot.
Also configure email clients to authenticate with the email user’s user name and password for outgoing mail. The user name is the email user’s entire email address, including the domain name portion, such as [email protected].
If you do not configure the email clients to authenticate, email destined for other email users in the protected domain may be accepted, but email outgoing to unprotected domains will be denied by the access control rule.
Testing the installationBasic configuration is now complete, and the installation may be tested. For testing instructions, see “Testing the installation” on page 123.
For information on configuring additional features, see the FortiMail Administration Guide.
Example 3: FortiMail unit in DMZIn this example, a FortiMail unit operating in gateway mode, a protected email server, and email users’ computers are all positioned within a private network, behind a firewall. However, the FortiMail unit is located in the demilitarized zone (DMZ) of the firewall, separated from the local email users and the protected email server, which are located on the internal network of the firewall. Remote email users’ computers and external email servers are located on the Internet, outside of the network protected by the firewall. The FortiMail unit protects accounts for email addresses ending in “@example.com”, which are hosted on the local email server.
Destination Address Name
Select protected_email_server_VIP_wan1.
Schedule Select ALWAYS.
Service Select PO3_IMAP_services.
Action Select ACCEPT.
FortiMail Version 3.0 MR4 Install Guide06-343-88550-20090109 83

84
Example 3: FortiMail unit in DMZ Gateway mode deployment
Figure 28: FortiMail unit in DMZ
The FortiMail unit has also been configured with an access control rule that allows local and remote email users to send email to unprotected domains if they first authenticate:
To deploy the FortiMail unit in the DMZ of a firewall, you must complete the following:
• Configuring the firewall• Configuring the MUAs• Testing the installation
Configuring the firewallWith the FortiMail unit in front of a FortiGate unit, and local email users and protected email server located behind the FortiGate unit on its internal network, you must configure firewall policies to allow traffic:
• between the internal network and the FortiMail unit• between the protected email server and the Internet• between the FortiMail unit and the Internet
To create the required policies, complete the following:
Sender Pattern Enter *@example.com.
Recipient Pattern Enter *.
Sender IP/Netmask Enter 0.0.0.0/0 to match any address.
Reverse DNS Pattern
Enter *.
Authentication Status
Select “authenticated”.
TLS Select “< none >”.
Action Select RELAY.
External Email Server
Remote Email Users
DNS Server
Internet
Switch
Local Email Users Internal Email Server
172.16.1.10
dmz 192.168.1.1 (virtual IP:
192.168.1.2)
wan1 10.10.10.1
port1 192.168.1.5
Protected Domain: @example.com
Email Domain: @example.com
example.com IN MX 10 fortimail.example.comfortimail IN A 10.10.10.1
internal 172.16.1.1 (virtual IP:
172.16.1.2)
Note: This example assumes you have already completed the Quick Start Wizard and configured records on the DNS server for each protected domain. For details, see “Quick Start Wizard” on page 45 and “Configuring DNS records” on page 67.
FortiMail Version 3.0 MR4 Install Guide06-343-88550-20090109
Gateway mode deployment Example 3: FortiMail unit in DMZ
• Configuring the firewall addresses• Configuring the service groups• Configuring the virtual IPs• Configuring the firewall policies
Configuring the firewall addressesIn order to create the firewall policies that governs traffic from the IP addresses of local email users and the protected email server, and the IP address of the FortiMail unit, you must first define the IP addresses of those hosts by creating firewall address entries.
To add a firewall address for local email users1 Go to Firewall > Address > Address.
2 Select Create New.
3 Complete the following:
4 Select OK.
To add a firewall address for the FortiMail unit1 Go to Firewall > Address > Address.
2 Select Create New.
3 Complete the following:
4 Select OK.
Configuring the service groupsIn order to create firewall policies that govern only email and FortiMail-related traffic, you must first create groups of services that define protocols and port numbers used in that traffic.
Because FortiGuard-related services for FortiMail units are not predefined, you must define them before you can create a service group that contains those services.
Note: The following procedures use a FortiGate unit running FortiOS v3.0 MR7. If you are using a different firewall appliance, consult the appliance’s documentation for completing similar configurations.
Name Enter a name to identify the firewall address entry, such as local_email_users_address.
Type Select Subnet/IP Range.
Subnet /IP Range Enter 172.16.1.0/24.
Interface Select internal.
Name Enter a name to identify the firewall address entry, such as FortiMail_address.
Type Select Subnet/IP Range.
Subnet /IP Range Enter 192.168.1.5/32.
Interface Select dmz.
FortiMail Version 3.0 MR4 Install Guide06-343-88550-20090109 85

86
Example 3: FortiMail unit in DMZ Gateway mode deployment
To add a custom service for FortiGuard Antivirus push updates1 Go to Firewall > Service > Custom.
2 Select Create New.
3 Configure the following:
4 Select OK.
To add a custom service for FortiGuard Antispam rating queries1 Go to Firewall > Service > Custom.
2 Select Create New.
3 Configure the following:
4 Select OK.
To add a service group for remote incoming FortiMail traffic1 Go to Firewall > Service > Group.
2 Select Create New.
3 In Group Name, enter a name to identify the service group entry, such as FortiMail_incoming_services.
4 In the Available Services area, select HTTP, HTTPS, SMTP, and your custom service for FortiGuard Antivirus push updates, FortiMail_antivirus_push_updates, then select the right arrow to move them to the Members area.
5 Select OK.
To add a service group for outgoing FortiMail traffic1 Go to Firewall > Service > Group.
2 Select Create New.
Note: For more information on protocols and port numbers used by FortiMail units, see the Fortinet Knowledge Center article FortiMail Traffic Types and TCP/UDP Ports.
Name Enter a name to identify the custom service entry, such as FortiMail_antivirus_push_updates.
Protocol Type Select TCP/UDP.
Protocol Select UDP.
Destination PortLow Enter 9443.
High Enter 9443.
Name Enter a name to identify the custom service entry, such as FortiMail_antispam_rating_queries.
Protocol Type Select TCP/UDP.
Protocol Select UDP.
Destination PortLow Enter 8889.
High Enter 8889.
FortiMail Version 3.0 MR4 Install Guide06-343-88550-20090109

Gateway mode deployment Example 3: FortiMail unit in DMZ
3 In Group Name, enter a name to identify the service group entry, such as FortiMail_outgoing_services.
4 In the Available Services area, select DNS, NTP, HTTPS, SMTP, and your custom service for FortiGuard Antispam rating queries, FortiMail_antispam_rating_queries, then select the right arrow to move them to the Members area.
5 Select OK.
To add a service group for internal email user traffic to the FortiMail unit1 Go to Firewall > Service > Group.
2 Select Create New.
3 In Group Name, enter a name to identify the service group entry, such as SMTP_quar_services.
4 In the Available Services area, select HTTP, HTTPS, and SMTP, then select the right arrow to move them to the Members area.
5 Select OK.
To add a service group for POP3 and IMAP traffic to the protected email server
1 Go to Firewall > Service > Group.
2 Select Create New.
3 In Group Name, enter a name to identify the service group entry, such as PO3_IMAP_services.
4 In the Available Services area, select POP3 and IMAP, then select the right arrow to move them to the Members area.
5 Select OK.
Configuring the virtual IPsIn order to create the firewall policy that forwards email-related traffic to the FortiMail unit, you must first define a static NAT mapping from a public IP address on the FortiGate unit to the IP address of the FortiMail unit by creating a virtual IP entry.
You must also create virtual IPs to define static NAT mappings:
• from a public IP address on the FortiGate unit to the IP address of the protected email server
• from an IP address on the internal network of the FortiGate unit to the IP address of the FortiMail unit
• from an IP address on the DMZ of the FortiGate unit to the IP address of the protected email server
To add a wan1 virtual IP for the FortiMail unit1 Go to Firewall > Virtual IP > Virtual IP.
2 Select Create New.
Note: To add virtual IPs, the FortiGate unit must be operating in NAT mode. For more information, see the FortiGate Administration Guide.
FortiMail Version 3.0 MR4 Install Guide06-343-88550-20090109 87

88
Example 3: FortiMail unit in DMZ Gateway mode deployment
3 Complete the following:
4 Select OK.
To add a wan1 virtual IP for the protected email server1 Go to Firewall > Virtual IP > Virtual IP.
2 Select Create New.
3 Complete the following:
4 Select OK.
To add a internal virtual IP for the FortiMail unit1 Go to Firewall > Virtual IP > Virtual IP.
2 Select Create New.
3 Complete the following:
4 Select OK.
To add a dmz virtual IP for the protected email server1 Go to Firewall > Virtual IP > Virtual IP.
2 Select Create New.
3 Complete the following:
Name Enter a name to identify the virtual IP entry, such as FortiMail_VIP_wan1.
External Interface Select wan1.
Type Select Static NAT.
External IP Address/Range
Enter 10.10.10.1.
Mapped IP Address/Range
Enter 192.168.1.5.
Name Enter a name to identify the virtual IP entry, such as protected_email_server_VIP_wan1.
External Interface Select wan1.
Type Select Static NAT.
External IP Address/Range
Enter 10.10.10.1.
Mapped IP Address/Range
Enter 172.16.1.10.
Name Enter a name to identify the virtual IP entry, such as FortiMail_VIP_internal.
External Interface Select internal.
Type Select Static NAT.
External IP Address/Range
Enter 172.16.1.2.
Mapped IP Address/Range
Enter 192.168.1.5.
FortiMail Version 3.0 MR4 Install Guide06-343-88550-20090109

Gateway mode deployment Example 3: FortiMail unit in DMZ
4 Select OK.
Configuring the firewall policiesCreate the following firewall policies:
• Allow SMTP_quar_services that are received at the internal virtual IP address, then apply a static NAT when forwarding the traffic to the private network IP address of the FortiMail unit.
• Allow FortiMail_incoming_services that are received at the wan1 virtual IP address that maps to the FortiMail unit, then apply a static NAT when forwarding the traffic to the private network IP address of the FortiMail unit.
• Allow FortiMail_outgoing_services from the FortiMail unit to the Internet.• Allow SMTP traffic that is received at the DMZ virtual IP address, then apply a
static NAT when forwarding the traffic to the private network IP address of the protected email server.
• Allow PO3_IMAP_services that are received at the wan1 virtual IP address that maps to the protected email server, then apply a static NAT when forwarding the traffic to the private network IP address of the protected email server.
To add the internal-to-FortiMail policy1 Go to Firewall > Policy > Policy.
2 Select Create New.
3 Complete the following:
4 Select NAT.
5 Select OK.
Name Enter a name to identify the virtual IP entry, such as protected_email_server_VIP_dmz.
External Interface Select dmz.
Type Select Static NAT.
External IP Address/Range
Enter 192.168.1.2.
Mapped IP Address/Range
Enter 172.16.1.10.
Source Interface/zone Select internal.
Source Address Name
Select internal_address.
Destination Interface/zone
Select dmz.
Destination Address Name
Select FortiMail_VIP_internal.
Schedule Select ALWAYS.
Service Select SMTP_quar_services.
Action Select ACCEPT.
FortiMail Version 3.0 MR4 Install Guide06-343-88550-20090109 89

90
Example 3: FortiMail unit in DMZ Gateway mode deployment
To add the Internet-to-FortiMail unit policy1 Go to Firewall > Policy > Policy.
2 Select Create New.
3 Complete the following:
4 Select NAT.
5 Select OK.
To add the FortiMail-to-Internet policy1 Go to Firewall > Policy > Policy.
2 Select Create New.
3 Complete the following:
4 Select NAT.
5 Select OK.
To add the FortiMail-to-email-server policy1 Go to Firewall > Policy > Policy.
2 Select Create New.
3 Complete the following:
Source Interface/zone Select wan1.
Source Address Name
Select “all”.
Destination Interface/zone
Select dmz.
Destination Address Name
Select FortiMail_VIP_wan1.
Schedule Select ALWAYS.
Service Select FortiMail_incoming_services.
Action Select ACCEPT.
Source Interface/zone Select dmz.
Source Address Name
Select FortiMail_address.
Destination Interface/zone
Select wan1.
Destination Address Name
Select “all”.
Schedule Select ALWAYS.
Service Select FortiMail_outgoing_services.
Action Select ACCEPT.
Source Interface/zone Select dmz.
Source Address Name
Select FortiMail_address.
Destination Interface/zone
Select internal.
FortiMail Version 3.0 MR4 Install Guide06-343-88550-20090109

Gateway mode deployment Example 3: FortiMail unit in DMZ
4 Select NAT.
5 Select OK.
To add the remote-users-to-email-server policy1 Go to Firewall > Policy > Policy.
2 Select Create New.
3 Complete the following:
4 Select NAT.
5 Select OK.
Configuring the MUAsConfigure the email clients of local and remote email users to use the FortiMail unit as their outgoing mail (SMTP) server/MTA. For local email users, this is 172.16.1.2, the virtual IP on the internal network interface of the FortiGate unit that is mapped to the IP address of the FortiMail unit; for remote email users, this is 10.10.10.1 or fortimail.example.com, the virtual IP on the wan1 network interface of the FortiGate unit that is mapped to the FortiMail unit.
If you do not configure the email clients to send email through the FortiMail unit, incoming email delivered to your protected email server can be scanned, but email outgoing from your email users cannot.
Also configure email clients to authenticate with the email user’s user name and password for outgoing mail. The user name is the email user’s entire email address, including the domain name portion, such as [email protected].
If you do not configure the email clients to authenticate, email destined for other email users in the protected domain may be accepted, but email outgoing to unprotected domains will be denied by the access control rule.
Testing the installationBasic configuration is now complete, and the installation may be tested. For testing instructions, see “Testing the installation” on page 123.
Destination Address Name
Select protected_email_server_VIP_dmz.
Schedule Select ALWAYS.
Service Select SMTP.
Action Select ACCEPT.
Source Interface/zone Select wan1.
Source Address Name
Select “all”.
Destination Interface/zone
Select internal.
Destination Address Name
Select protected_email_server_VIP_wan1.
Schedule Select ALWAYS.
Service Select PO3_IMAP_services.
Action Select ACCEPT.
FortiMail Version 3.0 MR4 Install Guide06-343-88550-20090109 91

92
Example 3: FortiMail unit in DMZ Gateway mode deployment
For information on configuring additional features, see the FortiMail Administration Guide.
FortiMail Version 3.0 MR4 Install Guide06-343-88550-20090109

Transparent mode deployment Configuring DNS records
Transparent mode deploymentAfter completing the Quick Start Wizard, you may be required to configure some items that are specific to your network topology or the operation mode of your FortiMail unit.
This chapter contains examples of how to deploy a FortiMail unit that is operating in transparent mode.
This chapter includes the following:
• Configuring DNS records• Example 1: FortiMail unit in front of an email server• Example 2: FortiMail unit in front of an email hub
Configuring DNS recordsIf the FortiMail unit is operating in transparent mode, in most cases, configuring DNS records for protected domain names is not required. However, you must configure public DNS records for the FortiMail unit itself.
For performance reasons, and to support some configuration options, you may also want to provide a private DNS server for use exclusively by the FortiMail unit.
This section includes the following:
• Configuring DNS records for the FortiMail unit itself• Configuring a private DNS server
Configuring DNS records for the FortiMail unit itselfIn addition to that of protected domains, the FortiMail unit must be able to receive web connections, and send and receive email, for its own domain name. Dependent features include:
• delivery status notification (DSN) email• spam reports• email users’ access to their per-recipient quarantines• FortiMail administrators’ access to the web-based manager by domain name• alert email• report generation notification email
For this reason, you should also configure public DNS records for the FortiMail unit itself.
Appropriate records vary by whether or not “Web Release Host Name/IP” (located in AntiSpam > Quarantine > Spam Report in the advanced mode of the web-based manager) is configured:
• Case 1: Web Release Host Name/IP is empty/default• Case 2: Web Release Host Name/IP is configured
FortiMail Version 3.0 MR4 Install Guide06-343-88550-20090109 93

94
Configuring DNS records Transparent mode deployment
Case 1: Web Release Host Name/IP is empty/defaultBy default (that is, if “Web Release Host Name/IP” is unconfigured), the web release/delete links that appear in spam reports will use the fully qualified domain name (FQDN) of the FortiMail unit.
For example, if the FortiMail unit’s host name is fortimail, and its local domain name is example.net, resulting in the FQDN fortimail.example.net, a spam report’s default web release link might look like (FQDN highlighted in bold):
https://fortimail.example.net/releasecontrol?release=0%3Auser2%40example.com%3AMTIyMDUzOTQzOC43NDJfNjc0MzE1LkZvcnRpTWFpbC00MDAsI0YjUyM2NTkjRSxVMzoyLA%3D%3D%3Abf3db63dab53a291ab53a291ab53a291
In the DNS configuration to support this and the other DNS-dependent features, you would configure the following three records:
example.net IN MX 10 fortimail.example.net
fortimail IN A 10.10.10.1
1 IN PTR fortimail.example.net.
where:
• example.net is the local domain name to which the FortiMail unit belongs; in the MX record, it is the local domain for which the FortiMail is the mail gateway
• fortimail.example.net is the FQDN of the FortiMail unit• fortimail is the host name of the FortiMail unit; in the A record of the zone
file for example.net, it resolves to the IP address of the FortiMail unit for the purpose of administrators’ access to the web-based manager, email users’ access to their per-recipient quarantines, to resolve the FQDN referenced in the MX record when email users send Bayesian and quarantine control email to the FortiMail unit, and to resolve to the IP address of the FortiMail unit for the purpose of the web release/delete hyperlinks in the spam report
• 10.10.10.1 is the public IP address of the FortiMail unit
Case 2: Web Release Host Name/IP is configuredYou could configure “Web Release Host Name/IP” to use an alternative fully qualified domain name (FQDN) such as webrelease.example.info instead of the configured FQDN, resulting in the following web release link (web release FQDN highlighted in bold):
https://webrelease.example.info/releasecontrol?release=0%3Auser2%40example.com%3AMTIyMDUzOTQzOC43NDJfNjc0MzE1LkZvcnRpTWFpbC00MDAsI0YjUyM2NTkjRSxVMzoyLA%3D%3D%3Abf3db63dab53a291ab53a291ab53a291
Then, in the DNS configuration to support this and the other DNS-dependent features, you would configure the following MX record, A records, and PTR record (unlike “Case 1: Web Release Host Name/IP is empty/default” on page 94, in this case, two A records are required; the difference is highlighted in bold):
example.net IN MX 10 fortimail.example.net
fortimail IN A 10.10.10.1
webrelease IN A 10.10.10.1
1 IN PTR fortimail.example.net.
FortiMail Version 3.0 MR4 Install Guide06-343-88550-20090109

Transparent mode deployment Configuring DNS records
where:
• example.net is the local domain name to which the FortiMail unit belongs;in the MX record, it is the local domain for which the FortiMail is the mail gateway
• fortimail.example.net is the FQDN of the FortiMail unit• fortimail is the host name of the FortiMail unit; in the A record of the zone
file for example.net, it resolves to the IP address of the FortiMail unit for the purpose of administrators’ access to the web-based manager and to resolve the FQDN referenced in the MX record when email users send Bayesian and quarantine control email to the FortiMail unit
• webrelease is the web release host name; in the A record of the zone file for example.info, it resolves to the IP address of the FortiMail unit for the purpose of the web release/delete hyperlinks in the spam report
• 10.10.10.1 is the public IP address of the FortiMail unit
Configuring a private DNS serverConsider providing a private DNS server on your local network to improve performance with features that use DNS queries.
Figure 29: Public and private DNS servers (transparent mode)
In some situations, a private DNS server may be required. If:
• you configure the FortiMail unit to use a private DNS server, and• both the FortiMail unit and the protected SMTP server reside on the internal
network, with private network IP addresses, and• you enable the “Use MX Record” option (see “Use MX Record” on page 52)
you should configure the A records on the private DNS server and public DNS server differently: the private DNS server must resolve to the domain names of the SMTP servers into private IP addresses, while the public DNS server must resolve them into public IP addresses.
For example, if both a FortiMail unit (fortimail.example.com) operating in transparent mode and the SMTP server reside on your private network behind a router or firewall as illustrated in Figure 29 on page 95, and the “Use MX Record” option is enabled, Table 5 on page 96 illustrates differences between the public and private DNS servers for the authoritative DNS records of example.com.
External Email Server
Local Email Users
Internet Transparent Mode
Remote Email Users
Router
port2 port1
Internal Email Server172.16.1.10
Protected Domain: @example.com
Email Domain:@example.com
Public DNS Serverexample.com IN MX 10 mail.example.commail IN A 10.10.10.1
Private DNS Serverexample.com IN MX 10 mail.example.com
mail IN A 172.16.1.10
10.10.10.1
FortiMail Version 3.0 MR4 Install Guide06-343-88550-20090109 95

96
Example 1: FortiMail unit in front of an email server Transparent mode deployment
If you choose to add a private DNS server, to configure the FortiMail unit to use it, go to System > Network > DNS in the advanced mode of the web-based manager.
Example 1: FortiMail unit in front of an email serverIn this example, a FortiMail unit operating in transparent mode is positioned in front of one email server.
Figure 30: Transparent mode deployment to protect an email server
The FortiMail unit has also been configured with an access control rule that allows local and remote email users to send email to unprotected domains if they first authenticate:
Table 5: Public vs. private DNS records when “Use MX Record” is enabled
Private DNS server Public DNS serverexample.com IN MX 10 mail.example.com
example.com IN MX 10 mail.example.com
mail IN A 172.16.1.10 mail IN A 10.10.10.1
1 IN PTR fortimail.example.com
Note: This example assumes that the FortiMail unit is protecting a single email server. If your FortiMail unit is protecting multiple email servers and they are not on the same subnet, you must first remove some network interfaces from the bridge and configure static routes. For details, see the FortiMail Administration Guide.
Sender Pattern Enter *@example.com.
Recipient Pattern Enter *.
Sender IP/Netmask Enter 0.0.0.0/0 to match any address.
External Email Server
Local Email Users
Internet Transparent Mode
Remote Email Users
Router
port2 port1
Internal Email Server172.16.1.10
Protected Domain: @example.com
Email Domain:@example.com
Public DNS Serverexample.com IN MX 10 mail.example.commail IN A 10.10.10.1
Private DNS Serverexample.com IN MX 10 mail.example.com
mail IN A 172.16.1.10
10.10.10.1
FortiMail Version 3.0 MR4 Install Guide06-343-88550-20090109
Transparent mode deployment Example 1: FortiMail unit in front of an email server
To deploy the FortiMail unit in front of an email server, you must complete the following:
• Configuring the protected domains• Configuring the proxies• Testing the installation
Configuring the protected domainsWhen configuring the protected domain, you can select Transparent Mode Options to hide the existence of the FortiMail unit.
For information on additional protected domain options, see the FortiMail Administration Guide.
To configure the transparent mode options of the protected domain1 Go to Mail Settings > Domains > Domains.
If this menu path is not available, first select Advanced >> to switch to the advanced mode of the web-based manager.
2 In the row corresponding to the protected domain, select Edit.
3 Configure the following:
Reverse DNS Pattern
Enter *.
Authentication Status
Select “authenticated”.
TLS Select “< none >”.
Action Select RELAY.
Note: This example assumes you have already completed the Quick Start Wizard. For details, see “Quick Start Wizard” on page 45.
Transparent Mode OptionsThis server is on(transparent mode only)
Select the network interface (port) to which the protected SMTP server is connected.Note: Selecting the wrong network interface will result in the FortiMail sending email traffic to the wrong network interface.
FortiMail Version 3.0 MR4 Install Guide06-343-88550-20090109 97
98
Example 1: FortiMail unit in front of an email server Transparent mode deployment
4 Select OK.
Configuring the proxiesIn transparent mode, the SMTP proxy settings determine whether email is dropped, passed through, or proxied. These settings apply to all email except those destined for the FortiMail unit itself, such as email from users requesting deletion or release of quarantined email.
Email can be scanned only if they are proxied. The FortiMail unit receives the email, scans it and (if the email passes the scan) relays it to the email server.
You configure proxy operation separately for incoming and outgoing email traffic. Regardless of the destination email address, email passing from the network to the back end email server is considered incoming and email passing from the back end email server to the network is considered outgoing.
For a typical transparent mode installation, the default proxy options are appropriate. Should you need to modify the proxies, go to Mail Settings > Proxies to configure the email connections through the ports. For details on the proxy settings, see the FortiMail Administration Guide.
Hide the transparent box(transparent mode only)
When enabled, the EHLO field of “Received:” message headers of outgoing email messages will not contain the domain name of the FortiMail unit; instead, it will contain the IP address of the SMTP server that was sending the email message, masking the existence of the FortiMail unit.When disabled, the FortiMail unit’s domain name appears in the EHLO field of “Received:” message headers.For example, the SMTP server associated with a protected domain might have the IP address 172.168.1.1, and the FortiMail unit might have the domain name fortimail.example.com. If the option is enabled, the message header would contain (difference highlighted in bold):Received: from 192.168.1.1 (EHLO 172.16.1.1) (192.168.1.1) by smtp.external.example.com with SMTP; Fri, 24 Jul 2008 07:12:40 -0800Received: from smtpa ([172.16.1.2]) by [172.16.1.1] with SMTP id kAOFESEN001901 for <[email protected]>; Fri, 24 Jul 2008 15:14:28 GMTBut if the option is disabled, the message headers would contain:Received: from 192.168.1.1 (EHLO fortimail.example.com) (192.168.1.1) by smtp.external.example.com with SMTP; Fri, 24 Jul 2008 07:17:45 -0800Received: from smtpa ([172.16.1.2]) by fortimail.example.com with SMTP id kAOFJl4j002011 for <[email protected]>; Fri, 24 Jul 2008 15:19:47 GMT
Use this domain’s SMTP server to deliver the mail(transparent mode only)
Select to relay mail to the SMTP server for this protected domain for delivery, rather than delivering the email using the FortiMail unit itself.
Note: For information on determining directionality, see “Incoming vs. outgoing directionality” on page 15.
FortiMail Version 3.0 MR4 Install Guide06-343-88550-20090109

Transparent mode deployment Example 2: FortiMail unit in front of an email hub
To configure SMTP proxy settings1 Go to Mail Settings > Proxies.
If this menu path is not available, first select Advanced >> to switch to the advanced mode of the web-based manager.
2 Configure the following:
3 Select Apply.
Testing the installationBasic configuration is now complete, and the installation may be tested. For testing instructions, see “Testing the installation” on page 123.
For information on configuring additional features, see the FortiMail Administration Guide.
Example 2: FortiMail unit in front of an email hubIn this example, a FortiMail unit operating in transparent mode is positioned between an email gateway and other internal email servers.
When sending email with external recipients, the email servers (Relay A and Relay B) in each WAN location are required to deliver through the main email server, which encrypts outgoing SMTP connections. The firewall will only allow SMTP traffic from the main email server.
Port 1Incoming SMTP connections are passed through
Outgoing SMTP connections are passed through
Local SMTP connections are allowed
Port 2Incoming SMTP connections are proxied
Outgoing SMTP connections are proxied
Local SMTP connections are not allowed
FortiMail Version 3.0 MR4 Install Guide06-343-88550-20090109 99

100
Example 2: FortiMail unit in front of an email hub Transparent mode deployment
Figure 31: Transparent mode deployment to protect an email hub
The FortiMail unit has also been configured with an access control rule that allows local and remote email users to send email to unprotected domains if they first authenticate:
To deploy the FortiMail unit in front of one or more email servers, you must complete the following:
• Configuring the protected domains• Configuring the proxies• Testing the installation
Configuring the protected domainsWhen configuring the protected domain, you can select Transparent Mode Options to hide the existence of the FortiMail unit.
Sender Pattern Enter *@example.com.
Recipient Pattern Enter *.
Sender IP/Netmask Enter 0.0.0.0/0 to match any address.
Reverse DNS Pattern
Enter *.
Authentication Status
Select “authenticated”.
TLS Select “< none >”.
Action Select RELAY.
ExternalEmail Server
Local Email Users
Remote Email Users
Main Internal Email Server172.16.1.10
Router
port1port2
Internal SMTPRelay BInternal SMTP
Relay A
InternetWAN
Protected Domain:@example.comEmail Domain:
@example.com
Note: This example assumes you have already completed the Quick Start Wizard. For details, see “Quick Start Wizard” on page 45.
FortiMail Version 3.0 MR4 Install Guide06-343-88550-20090109

Transparent mode deployment Example 2: FortiMail unit in front of an email hub
For information on additional protected domain options, see the FortiMail Administration Guide.
To configure a protected domain1 Go to Mail Settings > Domains > Domains.
If this menu path is not available, first select Advanced >> to switch to the advanced mode of the web-based manager.
2 In the row corresponding to the protected domain, select Edit.
3 Configure the following:
4 Select OK.
Transparent Mode OptionsThis server is on(transparent mode only)
Select the network interface (port) to which the protected SMTP server is connected.Note: Selecting the wrong network interface will result in the FortiMail sending email traffic to the wrong network interface.
Hide the transparent box(transparent mode only)
When enabled, the EHLO field of “Received:” message headers of outgoing email messages will not contain the domain name of the FortiMail unit; instead, it will contain the IP address of the SMTP server that was sending the email message, masking the existence of the FortiMail unit.When disabled, the FortiMail unit’s domain name appears in the EHLO field of “Received:” message headers.For example, the SMTP server associated with a protected domain might have the IP address 172.168.1.1, and the FortiMail unit might have the domain name fortimail.example.com. If the option is enabled, the message header would contain (difference highlighted in bold):Received: from 192.168.1.1 (EHLO 172.16.1.1) (192.168.1.1) by smtp.external.example.com with SMTP; Fri, 24 Jul 2008 07:12:40 -0800Received: from smtpa ([172.16.1.2]) by [172.16.1.1] with SMTP id kAOFESEN001901 for <[email protected]>; Fri, 24 Jul 2008 15:14:28 GMTBut if the option is disabled, the message headers would contain:Received: from 192.168.1.1 (EHLO fortimail.example.com) (192.168.1.1) by smtp.external.example.com with SMTP; Fri, 24 Jul 2008 07:17:45 -0800Received: from smtpa ([172.16.1.2]) by fortimail.example.com with SMTP id kAOFJl4j002011 for <[email protected]>; Fri, 24 Jul 2008 15:19:47 GMT
Use this domain’s SMTP server to deliver the mail(transparent mode only)
Select to relay mail to the SMTP server for this protected domain for delivery, rather than delivering the email using the FortiMail unit itself.
FortiMail Version 3.0 MR4 Install Guide06-343-88550-20090109 101

102
Example 2: FortiMail unit in front of an email hub Transparent mode deployment
Configuring the proxiesIn transparent mode, the SMTP proxy settings determine whether email is dropped, passed through, or proxied. These settings apply to all email except those destined for the FortiMail unit itself, such as email from users requesting deletion or release of quarantined email.
Email can be scanned only if they are proxied. The FortiMail unit receives the email, scans it and (if the email passes the scan) relays it to the email server.
You configure proxy operation separately for incoming and outgoing email traffic. Regardless of the destination email address, email passing from the network to the back end email server is considered incoming and email passing from the back end email server to the network is considered outgoing.
To configure SMTP proxy settings1 Go to Mail Settings > Proxies.
If this menu path is not available, first select Advanced >> to switch to the advanced mode of the web-based manager.
2 Configure the following:
3 Select Apply.
Testing the installationBasic configuration is now complete, and the installation may be tested. For testing instructions, see “Testing the installation” on page 123.
For information on configuring additional features, see the FortiMail Administration Guide.
Note: For information on determining directionality, see “Incoming vs. outgoing directionality” on page 15.
Port 1Incoming SMTP connections are passed through
Outgoing SMTP connections are passed through
Local SMTP connections are allowed
Port 2Incoming SMTP connections are proxied
Outgoing SMTP connections are proxied
Local SMTP connections are not allowed
FortiMail Version 3.0 MR4 Install Guide06-343-88550-20090109
Server mode deployment Configuring DNS records
Server mode deploymentAfter completing the Quick Start Wizard, you may be required to configure some items that are specific to your network topology or the operation mode of your FortiMail unit.
This chapter contains examples of how to deploy a FortiMail unit that is operating in server mode.
This chapter includes the following:
• Configuring DNS records• Example 1: FortiMail unit behind a firewall• Example 2: FortiMail unit in front of a firewall• Example 3: FortiMail unit in DMZ
Configuring DNS recordsYou must configure public DNS records for the protected domains and for the FortiMail unit itself.
For performance reasons, you may also want to provide a private DNS server for use exclusively by the FortiMail unit.
This section includes the following:
• Configuring DNS records for protected domains• Configuring DNS records for the FortiMail unit itself• Configuring a private DNS server
Configuring DNS records for protected domainsRegardless of your private network topology, in order for external MTAs to deliver email to the FortiMail unit, you must configure the public MX record for each protected domain to indicate that the FortiMail unit is its email server.
For example, if the fully qualified domain name (FQDN) of the FortiMail unit is fortimail.example.com, and example.com is a protected domain, the MX record for example.com would be:
example.com IN MX 10 fortimail.example.com
An A record must also exist to resolve the domain name of the FortiMail unit into an IP address.
!Caution: If your FortiMail unit will operate in gateway mode or server mode, configure the MX record to refer to the FortiMail unit, and remove other MX records. If you fail to do so, external MTAs may not be able to deliver email to or through the FortiMail unit, or may be able to bypass the FortiMail unit by using the other MX records. If you have configured secondary MX records for failover reasons, consider configuring FortiMail high availability (HA) instead. For details, see “FortiMail high availability modes” on page 20.
FortiMail Version 3.0 MR4 Install Guide06-343-88550-20090109 103

104
Configuring DNS records Server mode deployment
For example, if the MX record indicates that fortimail.example.com is the email gateway for a domain, you must also configure an A record in the example.com zone file to resolve fortimail.example.com into a public IP address:
fortimail IN A 10.10.10.1
where 10.10.10.1 is either the public IP address of the FortiMail unit, or a virtual IP address on a firewall or router that maps to the private IP address of the FortiMail unit.
If your FortiMail unit will relay outgoing email, you should also configure the public reverse DNS record. The public IP address of the FortiMail unit, or the virtual IP address on a firewall or router that maps to the private IP address of the FortiMail unit, should be globally resolvable into the FortiMail unit’s FQDN. If it is not, reverse DNS lookups by external SMTP servers will fail.
For example, if the public network IP address of the FortiMail unit is 10.10.10.1, a public DNS server’s reverse DNS zone file for the 10.10.10.0/24 subnet might contain:
1 IN PTR fortimail.example.com.
where fortimail.example.com is the FQDN of the FortiMail unit.
Configuring DNS records for the FortiMail unit itselfIn addition to that of protected domains, the FortiMail unit must be able to receive web connections, and send and receive email, for its own domain name. Dependent features include:
• delivery status notification (DSN) email• spam reports• email users’ access to their per-recipient quarantines• FortiMail administrators’ access to the web-based manager by domain name• alert email• report generation notification email
For this reason, you should also configure public DNS records for the FortiMail unit itself.
Appropriate records vary by whether or not “Web Release Host Name/IP” (located in AntiSpam > Quarantine > Spam Report in the advanced mode of the web-based manager) is configured:
• Case 1: Web Release Host Name/IP is empty/default• Case 2: Web Release Host Name/IP is configured
Case 1: Web Release Host Name/IP is empty/defaultBy default (that is, if “Web Release Host Name/IP” is unconfigured), the web release/delete links that appear in spam reports will use the fully qualified domain name (FQDN) of the FortiMail unit.
Note: For more information on MX and A records, see “The role of DNS in email delivery” on page 16.
FortiMail Version 3.0 MR4 Install Guide06-343-88550-20090109
Server mode deployment Configuring DNS records
For example, if the FortiMail unit’s host name is fortimail, and its local domain name is example.net, resulting in the FQDN fortimail.example.net, a spam report’s default web release link might look like (FQDN highlighted in bold):
https://fortimail.example.net/releasecontrol?release=0%3Auser2%40example.com%3AMTIyMDUzOTQzOC43NDJfNjc0MzE1LkZvcnRpTWFpbC00MDAsI0YjUyM2NTkjRSxVMzoyLA%3D%3D%3Abf3db63dab53a291ab53a291ab53a291
In the DNS configuration to support this and the other DNS-dependent features, you would configure the following three records:
example.net IN MX 10 fortimail.example.net
fortimail IN A 10.10.10.1
1 IN PTR fortimail.example.net.
where:
• example.net is the local domain name to which the FortiMail unit belongs; in the MX record, it is the local domain for which the FortiMail is the mail gateway
• fortimail.example.net is the FQDN of the FortiMail unit• fortimail is the host name of the FortiMail unit; in the A record of the zone
file for example.net, it resolves to the IP address of the FortiMail unit for the purpose of administrators’ access to the web-based manager, email users’ access to their per-recipient quarantines, to resolve the FQDN referenced in the MX record when email users send Bayesian and quarantine control email to the FortiMail unit, and to resolve to the IP address of the FortiMail unit for the purpose of the web release/delete hyperlinks in the spam report
• 10.10.10.1 is the public IP address of the FortiMail unit
Case 2: Web Release Host Name/IP is configuredYou could configure “Web Release Host Name/IP” to use an alternative fully qualified domain name (FQDN) such as webrelease.example.info instead of the configured FQDN, resulting in the following web release link (web release FQDN highlighted in bold):
https://webrelease.example.info/releasecontrol?release=0%3Auser2%40example.com%3AMTIyMDUzOTQzOC43NDJfNjc0MzE1LkZvcnRpTWFpbC00MDAsI0YjUyM2NTkjRSxVMzoyLA%3D%3D%3Abf3db63dab53a291ab53a291ab53a291
Then, in the DNS configuration to support this and the other DNS-dependent features, you would configure the following MX record, A records, and PTR record (unlike “Case 1: Web Release Host Name/IP is empty/default” on page 104, in this case, two A records are required; the difference is highlighted in bold):
example.net IN MX 10 fortimail.example.net
fortimail IN A 10.10.10.1
webrelease IN A 10.10.10.1
1 IN PTR fortimail.example.net.
where:
• example.net is the local domain name to which the FortiMail unit belongs;in the MX record, it is the local domain for which the FortiMail is the mail gateway
• fortimail.example.net is the FQDN of the FortiMail unit
FortiMail Version 3.0 MR4 Install Guide06-343-88550-20090109 105
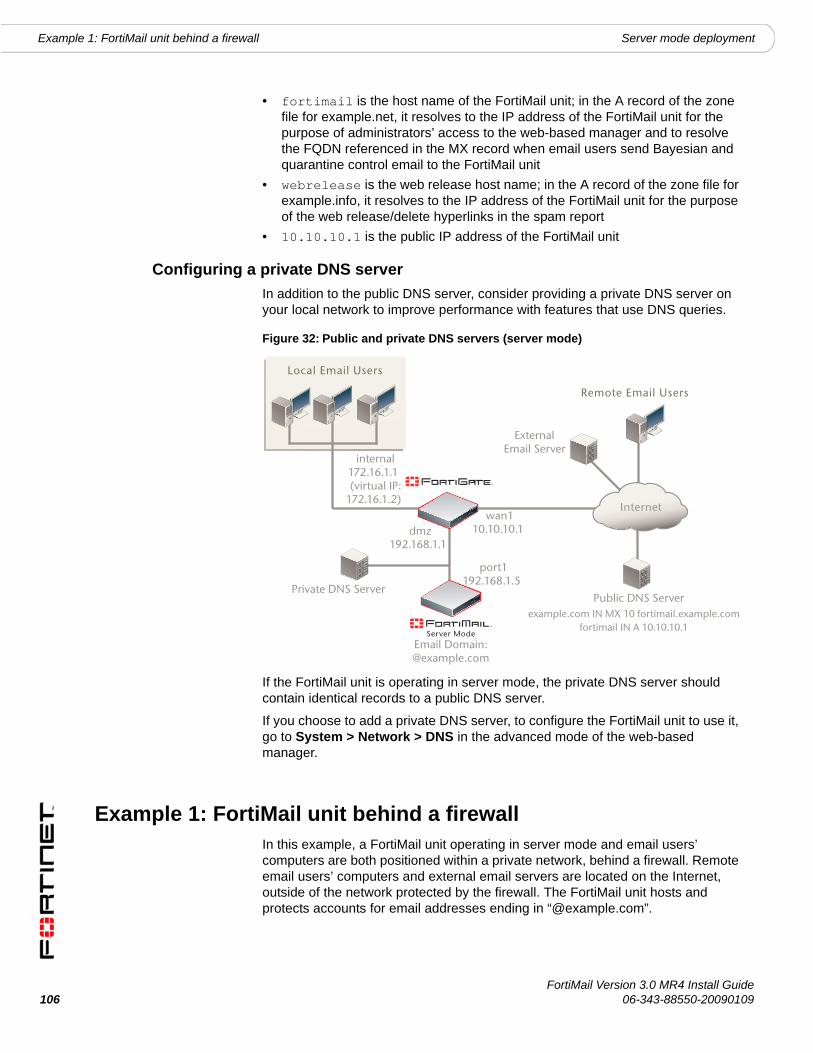
106
Example 1: FortiMail unit behind a firewall Server mode deployment
• fortimail is the host name of the FortiMail unit; in the A record of the zone file for example.net, it resolves to the IP address of the FortiMail unit for the purpose of administrators’ access to the web-based manager and to resolve the FQDN referenced in the MX record when email users send Bayesian and quarantine control email to the FortiMail unit
• webrelease is the web release host name; in the A record of the zone file for example.info, it resolves to the IP address of the FortiMail unit for the purpose of the web release/delete hyperlinks in the spam report
• 10.10.10.1 is the public IP address of the FortiMail unit
Configuring a private DNS serverIn addition to the public DNS server, consider providing a private DNS server on your local network to improve performance with features that use DNS queries.
Figure 32: Public and private DNS servers (server mode)
If the FortiMail unit is operating in server mode, the private DNS server should contain identical records to a public DNS server.
If you choose to add a private DNS server, to configure the FortiMail unit to use it, go to System > Network > DNS in the advanced mode of the web-based manager.
Example 1: FortiMail unit behind a firewallIn this example, a FortiMail unit operating in server mode and email users’ computers are both positioned within a private network, behind a firewall. Remote email users’ computers and external email servers are located on the Internet, outside of the network protected by the firewall. The FortiMail unit hosts and protects accounts for email addresses ending in “@example.com”.
External Email Server
Local Email Users
Remote Email Users
Public DNS Server
Internet
dmz 192.168.1.1
wan1 10.10.10.1
port1 192.168.1.5
internal 172.16.1.1 (virtual IP:
172.16.1.2)
Email Domain:@example.com
example.com IN MX 10 fortimail.example.comfortimail IN A 10.10.10.1
Server Mode
Private DNS Server
FortiMail Version 3.0 MR4 Install Guide06-343-88550-20090109
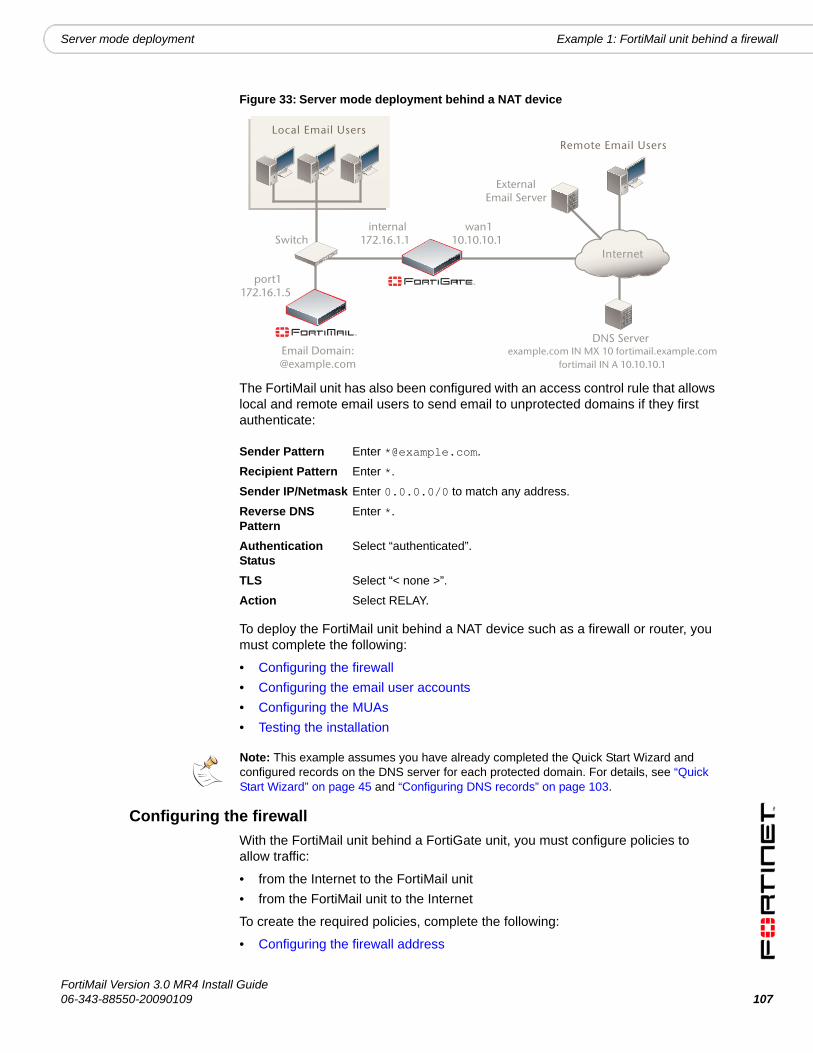
Server mode deployment Example 1: FortiMail unit behind a firewall
Figure 33: Server mode deployment behind a NAT device
The FortiMail unit has also been configured with an access control rule that allows local and remote email users to send email to unprotected domains if they first authenticate:
To deploy the FortiMail unit behind a NAT device such as a firewall or router, you must complete the following:
• Configuring the firewall• Configuring the email user accounts• Configuring the MUAs• Testing the installation
Configuring the firewallWith the FortiMail unit behind a FortiGate unit, you must configure policies to allow traffic:
• from the Internet to the FortiMail unit• from the FortiMail unit to the Internet
To create the required policies, complete the following:
• Configuring the firewall address
Sender Pattern Enter *@example.com.
Recipient Pattern Enter *.
Sender IP/Netmask Enter 0.0.0.0/0 to match any address.
Reverse DNS Pattern
Enter *.
Authentication Status
Select “authenticated”.
TLS Select “< none >”.
Action Select RELAY.
External Email Server
Local Email Users
DNS Server
Internet Switch
internal 172.16.1.1
wan1 10.10.10.1
Remote Email Users
port1 172.16.1.5
Email Domain: @example.com
example.com IN MX 10 fortimail.example.comfortimail IN A 10.10.10.1
Note: This example assumes you have already completed the Quick Start Wizard and configured records on the DNS server for each protected domain. For details, see “Quick Start Wizard” on page 45 and “Configuring DNS records” on page 103.
FortiMail Version 3.0 MR4 Install Guide06-343-88550-20090109 107
108
Example 1: FortiMail unit behind a firewall Server mode deployment
• Configuring the service groups• Configuring the virtual IPs• Configuring the firewall policies
Configuring the firewall addressIn order to create the outgoing firewall policy that governs the IP address of the FortiMail unit, you must first define the IP address of the FortiMail unit by creating a firewall address entry.
To add a firewall address for the FortiMail unit1 Go to Firewall > Address > Address.
2 Select Create New.
3 Complete the following:
4 Select OK.
Configuring the service groupsIn order to create firewall policies that govern only FortiMail-related traffic, you must first create groups of services that define protocols and port numbers used in that traffic.
Because FortiGuard-related services for FortiMail units are not predefined, you must define them before you can create a service group that contains those services.
To add a custom service for FortiGuard Antivirus push updates1 Go to Firewall > Service > Custom.
2 Select Create New.
3 Configure the following:
Note: The following procedures use a FortiGate unit running FortiOS v3.0 MR7. If you are using a different firewall appliance, consult the appliance’s documentation for completing similar configurations.
Name Enter a name to identify the firewall address entry, such as FortiMail_address.
Type Select Subnet/IP Range.
Subnet /IP Range Enter 172.16.1.5.
Interface Select internal.
Note: For more information on protocols and port numbers used by FortiMail units, see the Fortinet Knowledge Center article FortiMail Traffic Types and TCP/UDP Ports.
Name Enter a name to identify the custom service entry, such as FortiMail_antivirus_push_updates.
Protocol Type Select TCP/UDP.
Protocol Select UDP.
Destination Port
FortiMail Version 3.0 MR4 Install Guide06-343-88550-20090109

Server mode deployment Example 1: FortiMail unit behind a firewall
4 Select OK.
To add a custom service for FortiGuard Antispam rating queries1 Go to Firewall > Service > Custom.
2 Select Create New.
3 Configure the following:
4 Select OK.
To add a service group for incoming FortiMail traffic1 Go to Firewall > Service > Group.
2 Select Create New.
3 In Group Name, enter a name to identify the service group entry, such as FortiMail_incoming_services.
4 In the Available Services area, select HTTP, HTTPS, SMTP, POP3, IMAP, and your custom service for FortiGuard Antivirus push updates, FortiMail_antivirus_push_updates, then select the right arrow to move them to the Members area.
5 Select OK.
To add a service group for outgoing FortiMail traffic1 Go to Firewall > Service > Group.
2 Select Create New.
3 In Group Name, enter a name to identify the service group entry, such as FortiMail_outgoing_services.
4 In the Available Services area, select DNS, NTP, HTTPS, SMTP, and your custom service for FortiGuard Antispam rating queries, FortiMail_antispam_rating_queries, then select the right arrow to move them to the Members area.
5 Select OK.
Configuring the virtual IPsIn order to create the firewall policy that forwards email-related traffic to the FortiMail unit, you must first define a static NAT mapping from a public IP address on the FortiGate unit to the IP address of the FortiMail unit by creating a virtual IP entry.
Low Enter 9443.
High Enter 9443.
Name Enter a name to identify the custom service entry, such as FortiMail_antispam_rating_queries.
Protocol Type Select TCP/UDP.
Protocol Select UDP.
Destination PortLow Enter 8889.
High Enter 8889.
FortiMail Version 3.0 MR4 Install Guide06-343-88550-20090109 109
110
Example 1: FortiMail unit behind a firewall Server mode deployment
To add a virtual IP for the FortiMail unit1 Go to Firewall > Virtual IP > Virtual IP.
2 Select Create New.
3 Complete the following:
4 Select OK.
Configuring the firewall policiesFirst, create a firewall policy that allows incoming email and other FortiMail services that are received at the virtual IP address, then applies a static NAT when forwarding the traffic to the private network IP address of the FortiMail unit.
Second, create a firewall policy that allows outgoing email and other connections from the FortiMail unit to the Internet.
To add the Internet-to-FortiMail policy1 Go to Firewall > Policy > Policy.
2 Select Create New.
3 Complete the following:
4 Select NAT.
5 Select OK.
To add the FortiMail-to-Internet policy1 Go to Firewall > Policy > Policy.
Note: To add virtual IPs, the FortiGate unit must be operating in NAT mode. For more information, see the FortiGate Administration Guide.
Name Enter a name to identify the virtual IP entry, such as FortiMail_VIP.
External Interface Select wan1.
Type Select Static NAT.
External IP Address/Range
Enter 10.10.10.1.
Mapped IP Address/Range
Enter 172.16.1.5.
Source Interface/zone Select wan1.
Source Address Name
Select “all”.
Destination Interface/zone
Select internal.
Destination Address Name
Select FortiMail_VIP.
Schedule Select ALWAYS.
Service Select FortiMail_incoming_services.
Action Select ACCEPT.
FortiMail Version 3.0 MR4 Install Guide06-343-88550-20090109
Server mode deployment Example 1: FortiMail unit behind a firewall
2 Select Create New.
3 Complete the following:
4 Select NAT.
5 Select OK.
Configuring the email user accountsCreate email user accounts for each protected domain on the FortiMail unit.
You may choose to create additional email user accounts later, but you should create at least one email user account for each protected domain that you can use in order to verify connectivity for the domain.
To add an email user1 Go to Settings > User > User.
If this menu path is not available, first select Basic >> to switch to the basic mode of the web-based manager.
2 From Show Users Of Domain, select example.com.
3 Select Create New.
4 In User Name, enter the user name portion, such as user1, of the email address that will be locally deliverable on the FortiMail unit ([email protected]).
5 Select Password, then enter the password for this email account.
6 In Display Name, enter the name of the user as it should appear in a MUA, such as “Test User 1”.
7 Select OK.
Configuring the MUAsConfigure the email clients of local and remote email users to use the FortiMail unit as their outgoing mail server (SMTP)/MTA. For local email users, this is the private network IP address of the FortiMail unit, 172.16.1.5; for remote email users, this is the virtual IP on the FortiGate unit that maps to the FortiMail unit, 10.10.10.1 or fortimail.example.com.
If you do not configure the email clients to send email through the FortiMail unit, incoming email can be scanned, but outgoing email cannot.
Also configure email clients to authenticate with the email user’s user name and password for outgoing mail. The user name is the email user’s entire email address, including the domain name portion, such as [email protected].
Source Interface/zone Select internal.
Source Address Name
Select FortiMail_address.
Destination Interface/zone
Select wan1.
Destination Address Name
Select “all”.
Schedule Select ALWAYS.
Service Select FortiMail_outgoing_services.
Action Select ACCEPT.
FortiMail Version 3.0 MR4 Install Guide06-343-88550-20090109 111
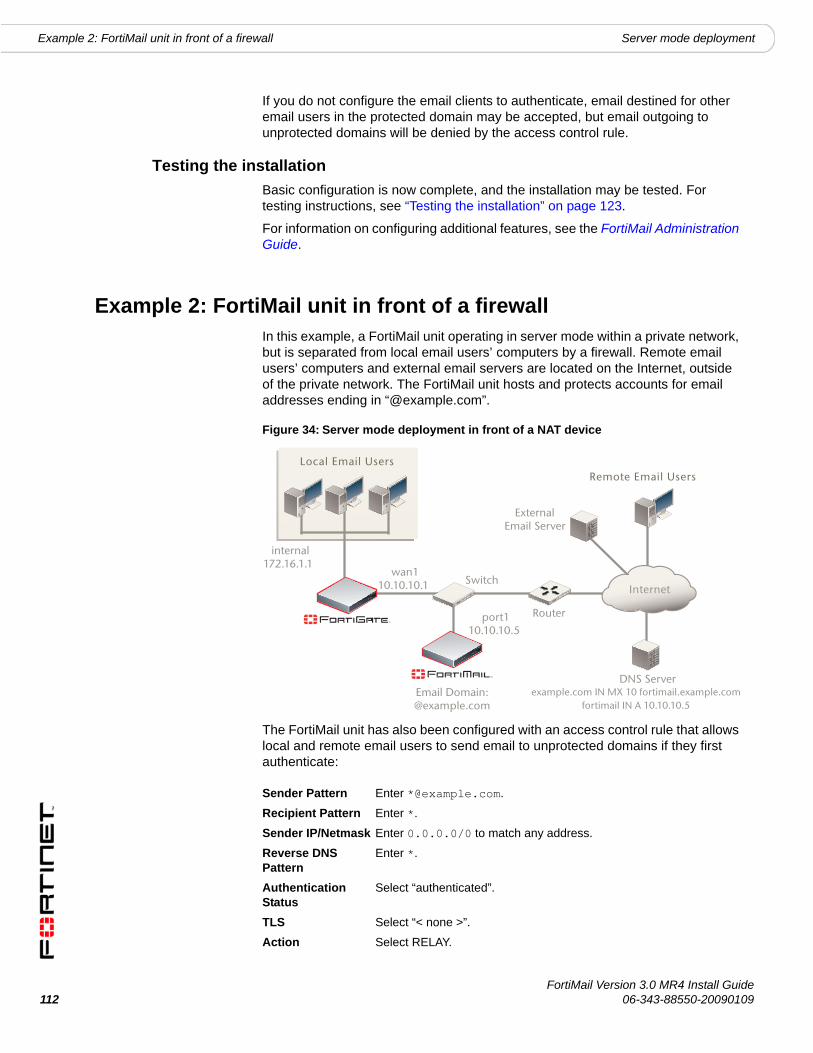
112
Example 2: FortiMail unit in front of a firewall Server mode deployment
If you do not configure the email clients to authenticate, email destined for other email users in the protected domain may be accepted, but email outgoing to unprotected domains will be denied by the access control rule.
Testing the installationBasic configuration is now complete, and the installation may be tested. For testing instructions, see “Testing the installation” on page 123.
For information on configuring additional features, see the FortiMail Administration Guide.
Example 2: FortiMail unit in front of a firewallIn this example, a FortiMail unit operating in server mode within a private network, but is separated from local email users’ computers by a firewall. Remote email users’ computers and external email servers are located on the Internet, outside of the private network. The FortiMail unit hosts and protects accounts for email addresses ending in “@example.com”.
Figure 34: Server mode deployment in front of a NAT device
The FortiMail unit has also been configured with an access control rule that allows local and remote email users to send email to unprotected domains if they first authenticate:
Sender Pattern Enter *@example.com.
Recipient Pattern Enter *.
Sender IP/Netmask Enter 0.0.0.0/0 to match any address.
Reverse DNS Pattern
Enter *.
Authentication Status
Select “authenticated”.
TLS Select “< none >”.
Action Select RELAY.
External Email Server
Local Email Users Remote Email Users
Router
DNS Server
Internet Switch
internal 172.16.1.1
wan1 10.10.10.1
port1 10.10.10.5
Email Domain: @example.com
example.com IN MX 10 fortimail.example.comfortimail IN A 10.10.10.5
FortiMail Version 3.0 MR4 Install Guide06-343-88550-20090109
Server mode deployment Example 2: FortiMail unit in front of a firewall
To deploy the FortiMail unit in front of a NAT device such as a firewall or router, you must complete the following:
• Configuring the firewall• Configuring the email user accounts• Configuring the MUAs• Testing the installation
Configuring the firewallWith the FortiMail unit in front of a FortiGate unit which is between the FortiMail unit and local email users, you must configure a policy to allow from local email users to the FortiMail unit.
To create the required policies, complete the following:
• Configuring the firewall addresses• Configuring the service group• Configuring the firewall policy
Configuring the firewall addressesIn order to create the outgoing firewall policy that governs traffic from the IP addresses of local email users to the IP address of the FortiMail unit, you must first define the IP addresses of the local email users and the FortiMail unit by creating firewall address entries.
To add a firewall address for local email users1 Go to Firewall > Address > Address.
2 Select Create New.
3 Complete the following:
4 Select OK.
Note: This example assumes you have already completed the Quick Start Wizard and configured records on the DNS server for each protected domain. For details, see “Quick Start Wizard” on page 45 and “Configuring DNS records” on page 103.
Note: The following procedures use a FortiGate unit running FortiOS v3.0 MR7. If you are using a different firewall appliance, consult the appliance’s documentation for completing similar configurations.
Name Enter a name to identify the firewall address entry, such as local_email_users_address.
Type Select Subnet/IP Range.
Subnet /IP Range Enter 172.16.1.0/24.
Interface Select internal.
FortiMail Version 3.0 MR4 Install Guide06-343-88550-20090109 113
114
Example 2: FortiMail unit in front of a firewall Server mode deployment
To add a firewall address for the FortiMail unit1 Go to Firewall > Address > Address.
2 Select Create New.
3 Complete the following:
4 Select OK.
Configuring the service groupIn order to create a firewall policy that governs only FortiMail-related traffic, you must first a create service group that contains services that define protocols and port numbers used in that traffic.
To add a service group for email user traffic to the FortiMail unit1 Go to Firewall > Service > Group.
2 Select Create New.
3 In Group Name, enter a name to identify the service group entry, such as local_email_users_services.
4 In the Available Services area, select HTTP, HTTPS, SMTP, POP3, and IMAP, then select the right arrow to move them to the Members area.
5 Select OK.
Configuring the firewall policyCreate a firewall policy that allows outgoing email and other FortiMail connections from the local email users to the FortiMail unit.
To add the internal-to-FortiMail policy1 Go to Firewall > Policy > Policy.
2 Select Create New.
3 Complete the following:
Name Enter a name to identify the firewall address entry, such as FortiMail_address.
Type Select Subnet/IP Range.
Subnet /IP Range Enter 10.10.10.5/32.
Interface Select wan1.
Source Interface/zone Select internal.
Source Address Name
Select local_email_users_address.
Destination Interface/zone
Select wan1.
Destination Address Name
Select FortiMail_address.
Schedule Select ALWAYS.
Service Select local_email_users_services.
Action Select ACCEPT.
FortiMail Version 3.0 MR4 Install Guide06-343-88550-20090109

Server mode deployment Example 2: FortiMail unit in front of a firewall
4 Select NAT.
5 Select OK.
Configuring the email user accountsCreate email user accounts for each protected domain on the FortiMail unit.
You may choose to create additional email user accounts later, but you should create at least one email user account for each protected domain in order to verify connectivity for the domain.
To add an email user1 Go to Settings > User > User.
If this menu path is not available, first select Basic >> to switch to the basic mode of the web-based manager.
2 From Show Users Of Domain, select example.com.
3 Select Create New.
4 In User Name, enter the user name portion, such as user1, of the email address that will be locally deliverable on the FortiMail unit ([email protected]).
5 Select Password, then enter the password for this email account.
6 In Display Name, enter the name of the user as it should appear in a MUA, such as “Test User 1”.
7 Select OK.
Configuring the MUAsConfigure the email clients of local and remote email users to use the FortiMail unit as their outgoing mail server (SMTP)/MTA. For local email users, this is the virtual IP address on the FortiGate unit that maps to the FortiMail unit, 172.16.1.2; for remote email users, this is the public IP address of the FortiMail unit, 10.10.10.5 or fortimail.example.com.
If you do not configure the email clients to send email through the FortiMail unit, incoming email can be scanned, but outgoing email cannot.
Also configure email clients to authenticate with the email user’s user name and password for outgoing mail. The user name is the email user’s entire email address, including the domain name portion, such as [email protected].
If you do not configure the email clients to authenticate, email destined for other email users in the protected domain may be accepted, but email outgoing to unprotected domains will be denied by the access control rule.
Testing the installationBasic configuration is now complete, and the installation may be tested. For testing instructions, see “Testing the installation” on page 123.
For information on configuring additional features, see the FortiMail Administration Guide.
FortiMail Version 3.0 MR4 Install Guide06-343-88550-20090109 115

116
Example 3: FortiMail unit in DMZ Server mode deployment
Example 3: FortiMail unit in DMZIn this example, a FortiMail unit operating in server mode within the demilitarized zone (DMZ), protected by a firewall but also separated from local email users’ computers by it. Remote email users’ computers and external email servers are located on the Internet, outside of the private network. The FortiMail unit hosts and protects accounts for email addresses ending in “@example.com”.
Figure 35: Server mode deployment in a DMZ
The FortiMail unit has also been configured with an access control rule that allows local and remote email users to send email to unprotected domains if they first authenticate:
To deploy the FortiMail unit in the DMZ of a NAT device such as a firewall or router, you must complete the following:
• Configuring the firewall• Configuring the email user accounts• Configuring the MUAs• Testing the installation
Sender Pattern Enter *@example.com.
Recipient Pattern Enter *.
Sender IP/Netmask Enter 0.0.0.0/0 to match any address.
Reverse DNS Pattern
Enter *.
Authentication Status
Select “authenticated”.
TLS Select “< none >”.
Action Select RELAY.
External Email Server
Local Email Users
Remote Email Users
Public DNS Server
Internet
dmz 192.168.1.1
wan1 10.10.10.1
port1 192.168.1.5
internal 172.16.1.1 (virtual IP:
172.16.1.2)
Email Domain:@example.com
example.com IN MX 10 fortimail.example.comfortimail IN A 10.10.10.1
Server Mode
Private DNS Server
FortiMail Version 3.0 MR4 Install Guide06-343-88550-20090109

Server mode deployment Example 3: FortiMail unit in DMZ
Configuring the firewallWith the FortiMail unit located in the DMZ of a FortiGate unit which is between the FortiMail unit and local email users, you must configure policies to allow traffic:
• from local email users to the FortiMail unit• from the FortiMail unit to the Internet• from the Internet to the FortiMail unit
To create the required policies, complete the following:
• Configuring the firewall addresses• Configuring the service groups• Configuring the virtual IPs• Configuring the firewall policies
Configuring the firewall addressesIn order to create the firewall policies that govern traffic to and from the IP addresses of local email users and the IP address of the FortiMail unit, you must first define the IP addresses of the local email users and the IP address of the FortiMail unit by creating firewall address entries.
To add a firewall address for the FortiMail unit1 Go to Firewall > Address > Address.
2 Select Create New.
3 Complete the following:
4 Select OK.
To add a firewall address for local email users1 Go to Firewall > Address > Address.
2 Select Create New.
3 Complete the following:
Note: This example assumes you have already completed the Quick Start Wizard and configured records on the DNS server for each protected domain. For details, see “Quick Start Wizard” on page 45 and “Configuring DNS records” on page 103.
Note: The following procedures use a FortiGate unit running FortiOS v3.0 MR7. If you are using a different firewall appliance, consult the appliance’s documentation for completing similar configurations.
Name Enter a name to identify the firewall address entry, such as FortiMail_address.
Type Select Subnet/IP Range.
Subnet /IP Range Enter 192.168.1.5.
Interface Select dmz.
Name Enter a name to identify the firewall address entry, such as local_email_users_address.
Type Select Subnet/IP Range.
FortiMail Version 3.0 MR4 Install Guide06-343-88550-20090109 117

118
Example 3: FortiMail unit in DMZ Server mode deployment
4 Select OK.
Configuring the service groupsIn order to create firewall policies that govern only FortiMail-related traffic, you must first create groups of services that define protocols and port numbers used in that traffic.
Because FortiGuard-related services for FortiMail units are not predefined, you must define them before you can create a service group that contains those services.
To add a custom service for FortiGuard Antivirus push updates1 Go to Firewall > Service > Custom.
2 Select Create New.
3 Configure the following:
4 Select OK.
To add a custom service for FortiGuard Antispam rating queries1 Go to Firewall > Service > Custom.
2 Select Create New.
3 Configure the following:
4 Select OK.
To add a service group for incoming FortiMail traffic1 Go to Firewall > Service > Group.
Subnet /IP Range Enter 172.168.1.0/24.
Interface Select internal.
Note: For more information on protocols and port numbers used by FortiMail units, see the Fortinet Knowledge Center article FortiMail Traffic Types and TCP/UDP Ports.
Name Enter a name to identify the custom service entry, such as FortiMail_antivirus_push_updates.
Protocol Type Select TCP/UDP.
Protocol Select UDP.
Destination PortLow Enter 9443.
High Enter 9443.
Name Enter a name to identify the custom service entry, such as FortiMail_antispam_rating_queries.
Protocol Type Select TCP/UDP.
Protocol Select UDP.
Destination PortLow Enter 8889.
High Enter 8889.
FortiMail Version 3.0 MR4 Install Guide06-343-88550-20090109
Server mode deployment Example 3: FortiMail unit in DMZ
2 Select Create New.
3 In Group Name, enter a name to identify the service group entry, such as FortiMail_incoming_services.
4 In the Available Services area, select HTTP, HTTPS, SMTP, POP3, IMAP, and your custom service for FortiGuard Antivirus push updates, FortiMail_antivirus_push_updates, then select the right arrow to move them to the Members area.
5 Select OK.
To add a service group for outgoing FortiMail traffic1 Go to Firewall > Service > Group.
2 Select Create New.
3 In Group Name, enter a name to identify the service group entry, such as FortiMail_outgoing_services.
4 In the Available Services area, select DNS, NTP, HTTPS, SMTP, and your custom service for FortiGuard Antispam rating queries, FortiMail_antispam_rating_queries, then select the right arrow to move them to the Members area.
5 Select OK.
To add a service group for email user traffic to the FortiMail unit1 Go to Firewall > Service > Group.
2 Select Create New.
3 In Group Name, enter a name to identify the service group entry, such as local_email_users_services.
4 In the Available Services area, select HTTP, HTTPS, SMTP, POP3, and IMAP, then select the right arrow to move them to the Members area.
5 Select OK.
Configuring the virtual IPsIn order to create the firewall policies that forward email-related traffic to the FortiMail unit from the internal network and from the Internet, you must first define two static NAT mappings:
• from a public IP address on the FortiGate unit to the IP address of the FortiMail unit
• from a virtual IP address on the 172.16.1.* network to the IP address of the FortiMail unit
by creating a virtual IP entries.
To add a wan1 virtual IP for the FortiMail unit1 Go to Firewall > Virtual IP > Virtual IP.
2 Select Create New.
3 Complete the following:
FortiMail Version 3.0 MR4 Install Guide06-343-88550-20090109 119

120
Example 3: FortiMail unit in DMZ Server mode deployment
4 Select OK.
To add an internal virtual IP for the FortiMail unit1 Go to Firewall > Virtual IP > Virtual IP.
2 Select Create New.
3 Complete the following:
4 Select OK.
Configuring the firewall policiesFirst, create a firewall policy that allows incoming email and other FortiMail services that are received at the virtual IP address, then applies a static NAT when forwarding the traffic to the private network IP address of the FortiMail unit.
Second, create a firewall policy that allows outgoing email and other FortiMail connections from the FortiMail unit to the Internet.
Last, create a firewall policy that allows outgoing email and other FortiMail connections from the local email users to the FortiMail unit.
To add the Internet-to-FortiMail policy1 Go to Firewall > Policy > Policy.
2 Select Create New.
3 Complete the following:
Name Enter a name to identify the virtual IP entry, such as FortiMail_VIP_wan1.
External Interface Select wan1.
Type Select Static NAT.
External IP Address/Range
Enter 10.10.10.1.
Mapped IP Address/Range
Enter 192.168.1.5.
Name Enter a name to identify the virtual IP entry, such as FortiMail_VIP_internal.
External Interface Select internal.
Type Select Static NAT.
External IP Address/Range
Enter 172.168.1.2.
Mapped IP Address/Range
Enter 192.168.1.5.
Source Interface/zone Select wan1.
Source Address Name
Select “all”.
Destination Interface/zone
Select dmz.
Destination Address Name
Select FortiMail_VIP_wan1.
Schedule Select ALWAYS.
FortiMail Version 3.0 MR4 Install Guide06-343-88550-20090109
Server mode deployment Example 3: FortiMail unit in DMZ
4 Select NAT.
5 Select OK.
To add the FortiMail-to-Internet policy1 Go to Firewall > Policy > Policy.
2 Select Create New.
3 Complete the following:
4 Select NAT.
5 Select OK.
To add the internal-to-FortiMail policy1 Go to Firewall > Policy > Policy.
2 Select Create New.
3 Complete the following:
4 Select NAT.
5 Select OK.
Configuring the email user accountsCreate email user accounts for each protected domain on the FortiMail unit.
Service Select FortiMail_incoming_services.
Action Select ACCEPT.
Source Interface/zone Select dmz.
Source Address Name
Select FortiMail_address.
Destination Interface/zone
Select wan1.
Destination Address Name
Select “all”.
Schedule Select ALWAYS.
Service Select FortiMail_outgoing_services.
Action Select ACCEPT.
Source Interface/zone Select internal.
Source Address Name
Select local_email_users_address.
Destination Interface/zone
Select dmz.
Destination Address Name
Select FortiMail_VIP_internal.
Schedule Select ALWAYS.
Service Select local_email_users_services.
Action Select ACCEPT.
FortiMail Version 3.0 MR4 Install Guide06-343-88550-20090109 121
122
Example 3: FortiMail unit in DMZ Server mode deployment
You may choose to create additional email user accounts later, but you should create at least one email user account for each protected domain in order to verify connectivity for the domain.
To add an email user1 Go to Settings > User > User.
If this menu path is not available, first select Basic >> to switch to the basic mode of the web-based manager.
2 From Show Users Of Domain, select example.com.
3 Select Create New.
4 In User Name, enter the user name portion, such as user1, of the email address that will be locally deliverable on the FortiMail unit ([email protected]).
5 Select Password, then enter the password for this email account.
6 In Display Name, enter the name of the user as it should appear in a MUA, such as “Test User 1”.
7 Select OK.
Configuring the MUAsConfigure the email clients of local and remote email users to use the FortiMail unit as their outgoing mail server (SMTP)/MTA. For local email users, this is the virtual IP address on the internal network interface of the FortiGate unit that maps to the FortiMail unit, 172.16.1.2; for remote email users, this is the virtual IP address on the wan1 network interface of the FortiGate unit that maps to the FortiMail unit, 10.10.10.1 or fortimail.example.com.
If you do not configure the email clients to send email through the FortiMail unit, incoming email can be scanned, but outgoing email cannot.
Also configure email clients to authenticate with the email user’s user name and password for outgoing mail. The user name is the email user’s entire email address, including the domain name portion, such as [email protected].
If you do not configure the email clients to authenticate, email destined for other email users in the protected domain may be accepted, but email outgoing to unprotected domains will be denied by the access control rule.
Testing the installationBasic configuration is now complete, and the installation may be tested. For testing instructions, see “Testing the installation” on page 123.
For information on configuring additional features, see the FortiMail Administration Guide.
FortiMail Version 3.0 MR4 Install Guide06-343-88550-20090109
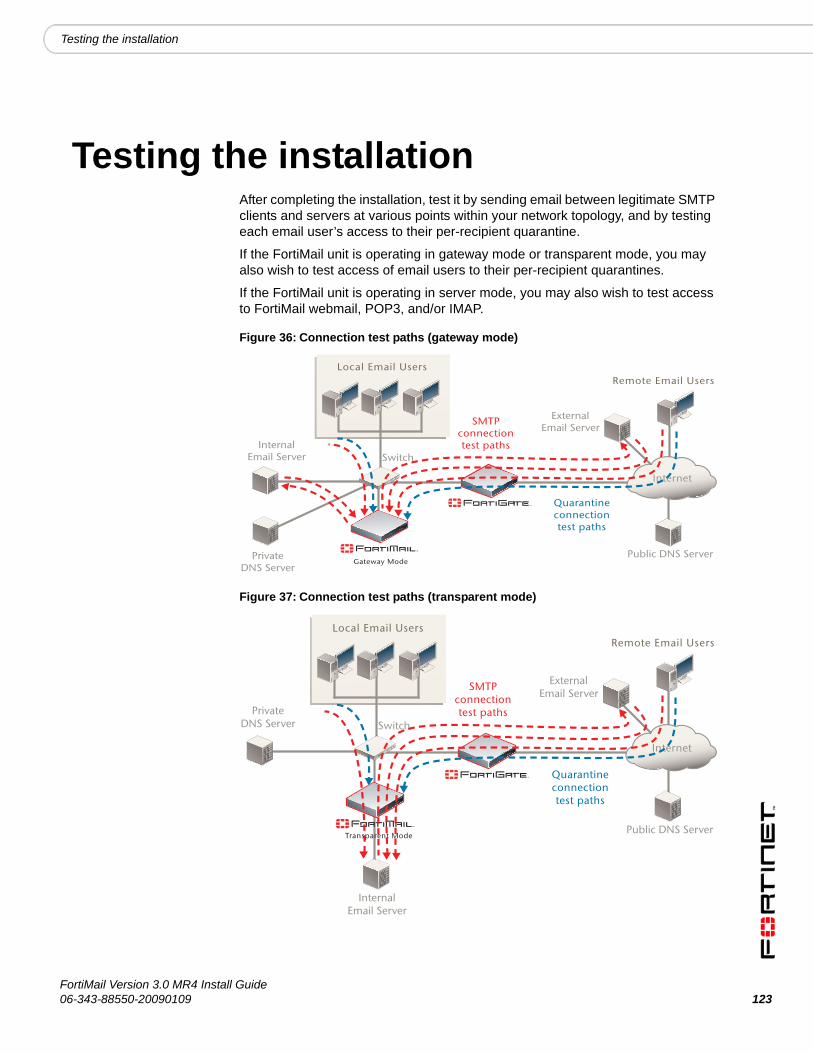
Testing the installation
Testing the installationAfter completing the installation, test it by sending email between legitimate SMTP clients and servers at various points within your network topology, and by testing each email user’s access to their per-recipient quarantine.
If the FortiMail unit is operating in gateway mode or transparent mode, you may also wish to test access of email users to their per-recipient quarantines.
If the FortiMail unit is operating in server mode, you may also wish to test access to FortiMail webmail, POP3, and/or IMAP.
Figure 36: Connection test paths (gateway mode)
Figure 37: Connection test paths (transparent mode)
External Email Server
Local Email Users
Public DNS Server
Internet
Switch
Remote Email Users
SMTPconnectiontest paths
Quarantineconnectiontest paths
InternalEmail Server
PrivateDNS Server
Gateway Mode
External Email Server
Local Email Users
Public DNS Server
Internet
Switch
Remote Email Users
SMTPconnectiontest paths
Quarantineconnectiontest paths
InternalEmail Server
PrivateDNS Server
Transparent Mode
FortiMail Version 3.0 MR4 Install Guide06-343-88550-20090109 123
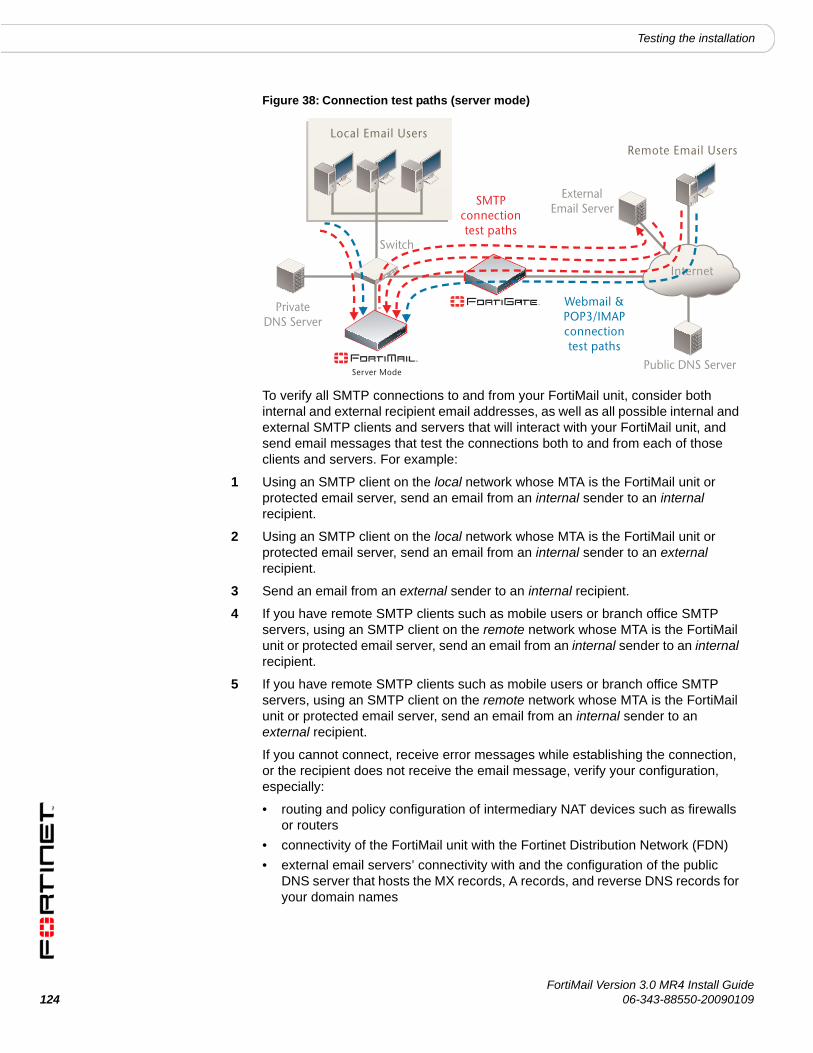
124
Testing the installation
Figure 38: Connection test paths (server mode)
To verify all SMTP connections to and from your FortiMail unit, consider both internal and external recipient email addresses, as well as all possible internal and external SMTP clients and servers that will interact with your FortiMail unit, and send email messages that test the connections both to and from each of those clients and servers. For example:
1 Using an SMTP client on the local network whose MTA is the FortiMail unit or protected email server, send an email from an internal sender to an internal recipient.
2 Using an SMTP client on the local network whose MTA is the FortiMail unit or protected email server, send an email from an internal sender to an external recipient.
3 Send an email from an external sender to an internal recipient.
4 If you have remote SMTP clients such as mobile users or branch office SMTP servers, using an SMTP client on the remote network whose MTA is the FortiMail unit or protected email server, send an email from an internal sender to an internal recipient.
5 If you have remote SMTP clients such as mobile users or branch office SMTP servers, using an SMTP client on the remote network whose MTA is the FortiMail unit or protected email server, send an email from an internal sender to an external recipient.
If you cannot connect, receive error messages while establishing the connection, or the recipient does not receive the email message, verify your configuration, especially:
• routing and policy configuration of intermediary NAT devices such as firewalls or routers
• connectivity of the FortiMail unit with the Fortinet Distribution Network (FDN)• external email servers’ connectivity with and the configuration of the public
DNS server that hosts the MX records, A records, and reverse DNS records for your domain names
External Email Server
Local Email Users
Public DNS Server
Internet
Switch
Remote Email Users
SMTPconnectiontest paths
Webmail &POP3/IMAPconnectiontest paths
PrivateDNS Server
Server Mode
FortiMail Version 3.0 MR4 Install Guide06-343-88550-20090109
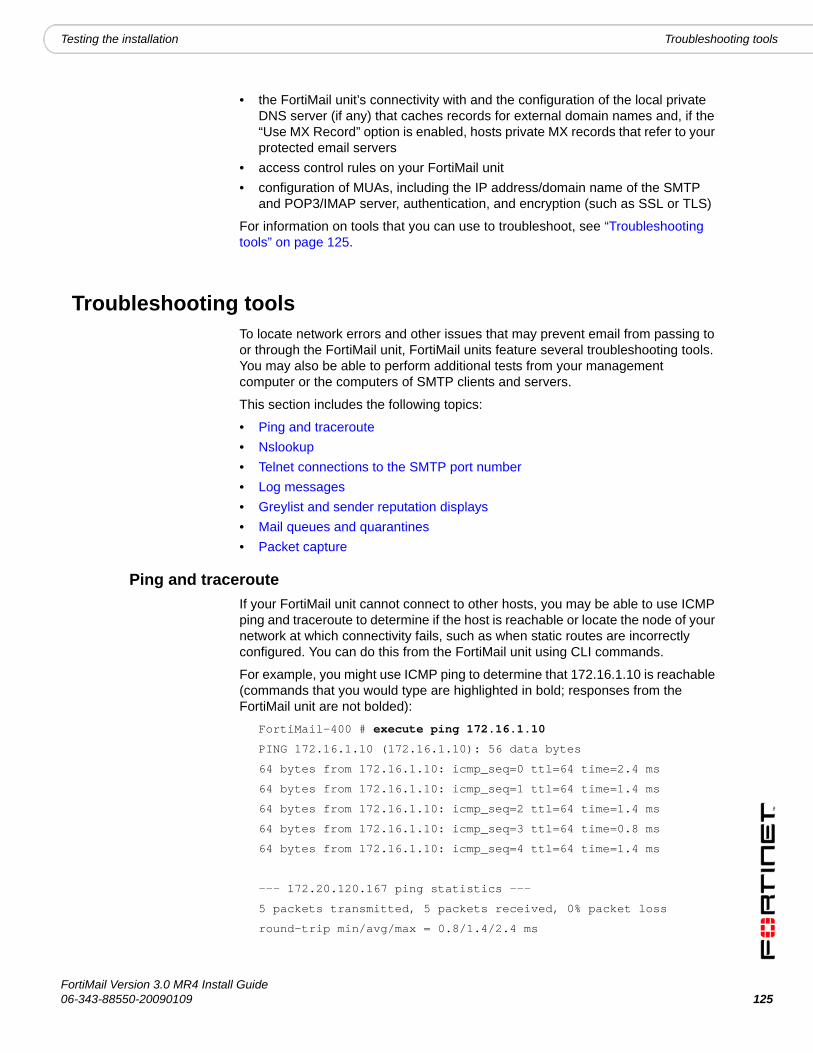
Testing the installation Troubleshooting tools
• the FortiMail unit’s connectivity with and the configuration of the local private DNS server (if any) that caches records for external domain names and, if the “Use MX Record” option is enabled, hosts private MX records that refer to your protected email servers
• access control rules on your FortiMail unit• configuration of MUAs, including the IP address/domain name of the SMTP
and POP3/IMAP server, authentication, and encryption (such as SSL or TLS)
For information on tools that you can use to troubleshoot, see “Troubleshooting tools” on page 125.
Troubleshooting toolsTo locate network errors and other issues that may prevent email from passing to or through the FortiMail unit, FortiMail units feature several troubleshooting tools. You may also be able to perform additional tests from your management computer or the computers of SMTP clients and servers.
This section includes the following topics:
• Ping and traceroute• Nslookup• Telnet connections to the SMTP port number• Log messages• Greylist and sender reputation displays• Mail queues and quarantines• Packet capture
Ping and tracerouteIf your FortiMail unit cannot connect to other hosts, you may be able to use ICMP ping and traceroute to determine if the host is reachable or locate the node of your network at which connectivity fails, such as when static routes are incorrectly configured. You can do this from the FortiMail unit using CLI commands.
For example, you might use ICMP ping to determine that 172.16.1.10 is reachable (commands that you would type are highlighted in bold; responses from the FortiMail unit are not bolded):
FortiMail-400 # execute ping 172.16.1.10
PING 172.16.1.10 (172.16.1.10): 56 data bytes
64 bytes from 172.16.1.10: icmp_seq=0 ttl=64 time=2.4 ms
64 bytes from 172.16.1.10: icmp_seq=1 ttl=64 time=1.4 ms
64 bytes from 172.16.1.10: icmp_seq=2 ttl=64 time=1.4 ms
64 bytes from 172.16.1.10: icmp_seq=3 ttl=64 time=0.8 ms
64 bytes from 172.16.1.10: icmp_seq=4 ttl=64 time=1.4 ms
--- 172.20.120.167 ping statistics ---
5 packets transmitted, 5 packets received, 0% packet loss
round-trip min/avg/max = 0.8/1.4/2.4 ms
FortiMail Version 3.0 MR4 Install Guide06-343-88550-20090109 125
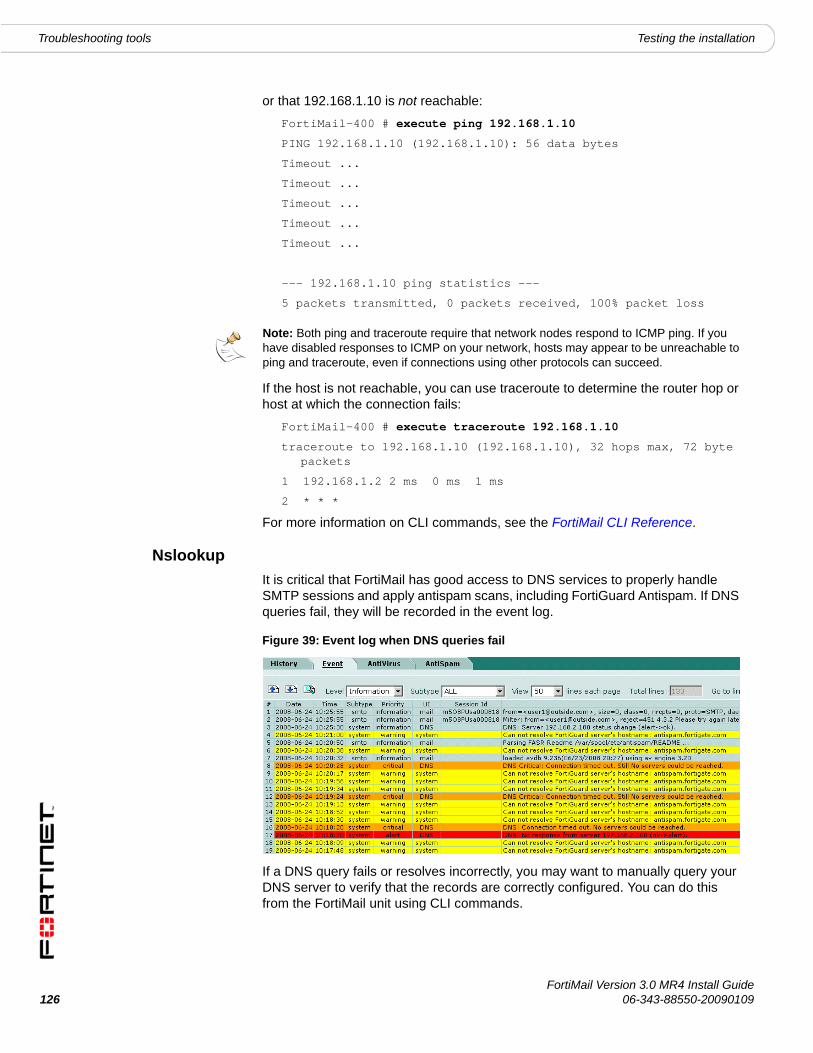
126
Troubleshooting tools Testing the installation
or that 192.168.1.10 is not reachable:FortiMail-400 # execute ping 192.168.1.10
PING 192.168.1.10 (192.168.1.10): 56 data bytes
Timeout ...
Timeout ...
Timeout ...
Timeout ...
Timeout ...
--- 192.168.1.10 ping statistics ---
5 packets transmitted, 0 packets received, 100% packet loss
If the host is not reachable, you can use traceroute to determine the router hop or host at which the connection fails:
FortiMail-400 # execute traceroute 192.168.1.10
traceroute to 192.168.1.10 (192.168.1.10), 32 hops max, 72 byte packets
1 192.168.1.2 2 ms 0 ms 1 ms
2 * * *
For more information on CLI commands, see the FortiMail CLI Reference.
NslookupIt is critical that FortiMail has good access to DNS services to properly handle SMTP sessions and apply antispam scans, including FortiGuard Antispam. If DNS queries fail, they will be recorded in the event log.
Figure 39: Event log when DNS queries fail
If a DNS query fails or resolves incorrectly, you may want to manually query your DNS server to verify that the records are correctly configured. You can do this from the FortiMail unit using CLI commands.
Note: Both ping and traceroute require that network nodes respond to ICMP ping. If you have disabled responses to ICMP on your network, hosts may appear to be unreachable to ping and traceroute, even if connections using other protocols can succeed.
FortiMail Version 3.0 MR4 Install Guide06-343-88550-20090109

Testing the installation Troubleshooting tools
For example, you might query for the mail gateway of the domain example.com (commands that you would type are highlighted in bold; responses from the FortiMail unit are not bolded):
FortiMail-400 # execute nslookup mx example.com
example.com mail exchanger = 10 mail.example.com.
or query to resolve mail.example.com and antispam.fortigate.com (the domain name of a FortiGuard Distribution Network server) into IP addresses:
FortiMail-400 # execute nslookup host mail.example.com
Name: mail.example.com
Address: 192.168.1.10
FortiMail-400 # execute nslookup host antispam.fortigate.com
Name: antispam.fortigate.com
Address: 212.95.252.120
Name: antispam.fortigate.com
Address: 72.15.145.66
Name: antispam.fortigate.com
Address: 69.90.198.55
For more information on CLI commands, see the FortiMail CLI Reference.
Telnet connections to the SMTP port numberInstead of using an SMTP client to verify SMTP connections, you can manually establish SMTP connections by using a Telnet client. Especially if your SMTP client or SMTP server is unable to establish a connection, manually attempting the connection may provide you with SMTP error codes or other insight into why the connection is failing.
If extended SMTP error codes have been installed and enabled on the target SMTP server, a manual Telnet connection may enable you to view additional error descriptions. For example, the enhanced error code 4.3.2 Please Try Again Later may notify you that a temporary condition exists preventing delivery, such as greylisting or service unavailability, and that the SMTP client should try delivery again later.
Note: Like verifying DNS connectivity and configuration from the FortiMail unit, you may also be able to verify DNS connectivity and configuration from protected and external mail servers using similar commands. This can be necessary if the devices are configured to use different DNS servers. For details, see the documentation for those mail servers.
Table 6: Some common SMTP error codes
SMTP error code number
Description
500 Syntax error, command unrecognized
501 Syntax error in parameters or arguments
502 Command not implemented (such as for ESMTP and other SMTP protocol extensions that are not enabled/installed on the SMTP server)
503 Bad sequence of commands
FortiMail Version 3.0 MR4 Install Guide06-343-88550-20090109 127

128
Troubleshooting tools Testing the installation
How you should establish the connection depends on the origin and destination of the SMTP connection that you want to test, either:
• from the FortiMail unit to an SMTP server• to or through the FortiMail unit
From the FortiMail unit to an SMTP serverIf you are not sure if the FortiMail unit can use SMTP to reach an SMTP server, you might use the execute telnettest <fqdn_str>:<port_int> CLI command.
For example, to test SMTP connectivity with mail.example.com on the standard SMTP port number, 25 (commands that you would type are highlighted in bold; responses from the FortiMail unit are not bolded):
FortiMail-400 # execute telnettest mail.example.com:25
Connecting to remote host succeeded.
To or through the FortiMail unitIf you are not sure if a MUA can use SMTP to reach a FortiMail unit that is operating in gateway mode or server mode, or not sure which SMTP commands the FortiMail unit has been configured to accept, from the email user’s computer or an external SMTP server, you might open a command prompt and use the command line Telnet client.
For example, to send a test email message (commands that you would type are highlighted in bold; responses from the FortiMail unit are not bolded):
$ telnet fortimail.example.com 25
Trying fortimail.example.com...
Connected to fortimail.example.com.
Escape character is '^]'.
220 fortimail.example.com ESMTP Smtpd; Mon, 6 Oct 2008 14:47:32 -0400
EHLO mail.example.com
250-fortimail.example.com Hello [172.16.1.10], pleased to meet you
250-ENHANCEDSTATUSCODES
250-PIPELINING
250-8BITMIME
250-SIZE 10485760
250-DSN
250-AUTH LOGIN PLAIN DIGEST-MD5 CRAM-MD5
250-DELIVERBY
250 HELP
MAIL FROM: [email protected]
250 2.1.0 [email protected]... Sender ok
FortiMail Version 3.0 MR4 Install Guide06-343-88550-20090109
Testing the installation Troubleshooting tools
RCPT TO: [email protected]
250 2.1.5 [email protected]... Recipient ok
DATA
354 Enter mail, end with "." on a line by itself
Subject: TEST
This is a test email message.
.
250 2.0.0 m96IlWkF001390 Message accepted for delivery
QUIT
221 2.0.0 fortimail.example.com closing connection
Connection closed by foreign host.
$
where:
• fortimail.example.com is the fully qualified domain name (FQDN) of your FortiMail unit
• the FortiMail unit is listening for SMTP connections on the default SMTP port number, 25
• mail.example.com is the fully qualified domain name (FQDN) of a protected email server from which you are connecting, whose domain name resolves to the IP address 172.16.1.10
• [email protected] is a email address of an sender that is internal to your protected domain, internal.example.com
• [email protected] is a email address of an recipient that is external to your protected domain
Log messagesLog messages often contain clues that can aid you in determining the cause of a problem. FortiMail units can record log messages when errors occur that cause failures, upon significant changes, and upon processing events.
Depending on the type, log messages may appear in either the history, event, antivirus, or antispam logs. For example, to determine when and why an email was quarantined, you might examine the Classifier and Disposition fields in the history log; to determine if a FortiGuard-AntiSpam scan query was able to reach the FDN, you might examine the Message field in the antispam log.
During troubleshooting, you may find it useful to reduce the logging severity threshold for more verbose logs, to include more information on less severe events.
FortiMail Version 3.0 MR4 Install Guide06-343-88550-20090109 129
130
Troubleshooting tools Testing the installation
For example, when the FortiMail unit cannot reach the FDN or override server for FortiGuard Antispam queries, the associated log message in the antispam log has a severity level of Notification. If your severity threshold is currently greater than Notification (such as Warning or Error), the FortiMail unit will not record that log message, and you will not be notified of the error. Often this error might occur due to temporary connectivity problems, and is not critical. However, if you are frequently encountering this issue, you may want to lower the severity threshold to determine how often the issue is occurring and whether the cause of the problem is persistent.
Similar to how the FortiMail unit will not record log messages below the severity threshold, if the FortiMail unit is not enabled to record event, history, antivirus, and antispam log messages, you will not be able to analyze the log messages for events of that type. During troubleshooting, be sure that log messages are enabled for the type of event that you want to analyze.
To configure the severity threshold, go to Log & Report > Log Setting > Log Setting. To enable logging of different types of events, select Config Policy on that page.
Greylist and sender reputation displaysIf an SMTP client is unable to send email despite being able to initiate SMTP connections to or through the FortiMail unit, and is receiving SMTP error codes that indicate temporary failure or permanent rejection, verify that the SMTP client has not been temporarily blocked by the greylist or sender reputation features.
To view the lists of SMTP clients and their statuses with those features, go to AntiSpam > Greylist > Display and AntiSpam > Sender Reputation > Display, respectively.
Mail queues and quarantinesIf email has not successfully passed to or through the FortiMail unit, but you have been able to successfully initiate the SMTP connection and send the email and have not received any SMTP error codes, verify that delivery has not been delayed and that the email message has not been quarantined.
To view the mail queues, go to Mail Settings > Mail Queue, then select a mail queue tab. To view the per-recipient or system quarantine, go to AntiSpam > Quarantine, then select either the Recipients or System Quarantine tab.
Note: If this menu path is not available, first select Advanced >> to switch to the advanced mode of the web-based manager.
Note: If these menu paths are not available, first select Advanced >> to switch to the advanced mode of the web-based manager.
Note: If these menu paths are not available, first select Advanced >> to switch to the advanced mode of the web-based manager.
FortiMail Version 3.0 MR4 Install Guide06-343-88550-20090109

Testing the installation Troubleshooting tools
Packet capturePacket capture, also known as sniffing, records some or all of the packets seen by a network interface. By recording packets, you can trace connection states to the exact point at which they fail, which may help you to diagnose some types of problems that are otherwise difficult to detect.
FortiMail units have a built-in sniffer. Packet capture on FortiMail units is similar to that of FortiGate units. To use the built-in sniffer, connect to the CLI and enter the following command:
diagnose sniffer interfaces <interface_str> '<filter_str>' verbose <verboselevel_int>
where:
• <interface_str> is the name of a network interface, such as port1• '<filter_str>' is the sniffer filter that specifies which protocols and port
numbers that you do or do not want to capture, such as 'tcp port 25'• <verboselevel_int> is an integer indicating the depth of packet headers
and payloads to display: 1 for header only, 2 for IP header and payload, or 3 for Ethernet header and payload
This command prints packet capture output to your CLI display until you stop it by pressing Ctrl + C.
For example, you might selectively capture packets for FortiGuard Antispam queries occurring through port1 (commands that you would type are highlighted in bold; responses from the FortiMail unit are not bolded):
FortiMail-400 # diag sniffer int port1 'udp port 8889' verbose 3
2.685841 172.16.1.10.47319 -> 212.95.252.120.8889: udp 64
0x0000 0009 0f84 27fe 0009 0f15 02e8 0800 4500....'.........E.
0x0010 005c 0000 4000 4011 44ff ac14 78a5 d45f.\..@[email protected].._
0x0020 fc78 b8d7 22b9 0048 9232 6968 726a b3c5.x.."..H.2ihrj..
0x0030 776c 2d2f 5a5f 545e 4555 5b5f 425b 545fwl-/Z_T^EU[_B[T_
0x0040 4559 6b6a 776b 646e 776c 6b6a 772b 646eEYkjwkdnwlkjw+dn
0x0050 776c 6b6a 776b 646e 776c 6b6a 776b 86a9wlkjwkdnwlkjwk..
0x0060 db73 21e1 5622 c618 7d6c .s!.V"..}l
Instead of reading packet capture output directly in your CLI display, you usually should save the output to a plain text file using your CLI client. Saving the output provides several advantages. Packets can arrive more rapidly than you may be able to read them in the buffer of your CLI display, and many protocols transfer data using encodings other than US-ASCII. It is usually preferable to analyze the output by loading it into in a network protocol analyzer application such as Wireshark (http://www.wireshark.org/).
For example, if you are using Microsoft HyperTerminal to save the sniffer output:
1 Type the sniffer CLI command, such as:
diag sniffer int port1 'tcp port 143' verbose 3
Note: Packet capture can be very resource intensive. To minimize the performance impact on your FortiMail unit, use packet capture only during periods of minimal traffic, with a serial console CLI connection rather than a Telnet or SSH CLI connection, and be sure to stop the command when you are finished.
FortiMail Version 3.0 MR4 Install Guide06-343-88550-20090109 131
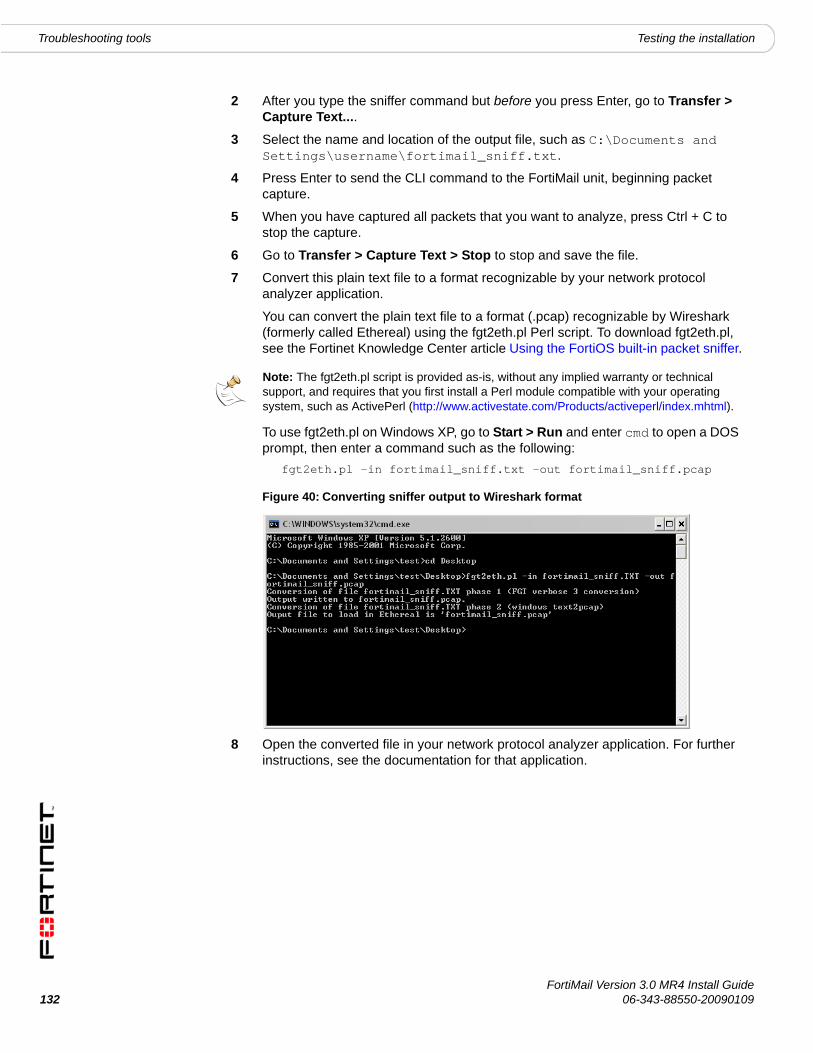
132
Troubleshooting tools Testing the installation
2 After you type the sniffer command but before you press Enter, go to Transfer > Capture Text....
3 Select the name and location of the output file, such as C:\Documents and Settings\username\fortimail_sniff.txt.
4 Press Enter to send the CLI command to the FortiMail unit, beginning packet capture.
5 When you have captured all packets that you want to analyze, press Ctrl + C to stop the capture.
6 Go to Transfer > Capture Text > Stop to stop and save the file.
7 Convert this plain text file to a format recognizable by your network protocol analyzer application.
You can convert the plain text file to a format (.pcap) recognizable by Wireshark (formerly called Ethereal) using the fgt2eth.pl Perl script. To download fgt2eth.pl, see the Fortinet Knowledge Center article Using the FortiOS built-in packet sniffer.
To use fgt2eth.pl on Windows XP, go to Start > Run and enter cmd to open a DOS prompt, then enter a command such as the following:
fgt2eth.pl -in fortimail_sniff.txt -out fortimail_sniff.pcap
Figure 40: Converting sniffer output to Wireshark format
8 Open the converted file in your network protocol analyzer application. For further instructions, see the documentation for that application.
Note: The fgt2eth.pl script is provided as-is, without any implied warranty or technical support, and requires that you first install a Perl module compatible with your operating system, such as ActivePerl (http://www.activestate.com/Products/activeperl/index.mhtml).
FortiMail Version 3.0 MR4 Install Guide06-343-88550-20090109

Testing the installation Troubleshooting tools
Figure 41: Viewing sniffer output in Wireshark
For additional information on packet capture, see the Fortinet Knowledge Center article Using the FortiOS built-in packet sniffer.
For more information on CLI commands, see the FortiMail CLI Reference.
FortiMail Version 3.0 MR4 Install Guide06-343-88550-20090109 133

134
Troubleshooting tools Testing the installation
FortiMail Version 3.0 MR4 Install Guide06-343-88550-20090109
Index
FortiMail 06-343-88
IndexAA
record 15, 17, 18access control rule 54active-passive 20advanced mode 19, 45air flow 21ambient temperature 21antispam 20, 53, 54antivirus 20, 53, 54
Bbasic mode 19, 45Bayesian database training 48
Ccertificate, security 28cluster 20comments, documentation 11conventions, documentation 9customer service 7
Ddefault
operation mode 42route 48
demilitarized zone (DMZ) 77, 83, 116DNS 15, 17, 18, 47, 52, 124DNS-resolvable 48documentation
commenting on 11conventions 9FortiMail 10
domain namelocal 50
downgrade 33DSN notifications 48
EEHLO 98, 101email
gateway 19email access
configuring 54email gateway 40extended SMTP (ESMTP) 13
Ffailover 53
firmwaredowngrade 33install, backup firmware image 35testing new firmware 31upgrade 33
FortiGuardpush updates 63scheduling updates 62
FortiGuard Antispam 59FortiGuard Antivirus 59FortiMail firmware 33Fortinet
customer service 7Fortinet Distribution Network (FDN) 9, 47, 48, 58, 59,124Fortinet Distribution Server (FDS) 59Fortinet Technical Support 59fully qualified domain name (FQDN) 17, 48, 50, 52
Ggateway mode 9, 15, 17, 18, 19, 39, 40, 42, 67, 103
example 67gateway, email 40gateway, router 48
Hhigh availability (HA) 18, 20, 49, 67, 103
active-passive 20config-only 20
host name 49, 53HTTP 14HTTPS 14humidity 21
IIMAP 13, 14, 15, 19
Llicense validation 59local domain name 50
Mmail exchanger (MX)
failover 53primary 53record 15, 17, 18, 52, 67, 103
mail transfer agent (MTA) 13, 15, 19, 40mail user
adding 111, 115, 122mail user agent (MUA) 13, 15, 16
Version 3.0 MR4 Install Guide550-20090109 135

136
Index
modeadvanced 19, 45basic 19, 45default operation mode 42gateway 9, 15, 17, 18, 19, 39, 40, 42, 67, 103operation 19, 39, 42, 45, 58, 67, 93, 103server 9, 14, 15, 17, 18, 19, 39, 67, 103transparent 9, 17, 19, 39, 47web-based manager 19, 45
Nnetwork interface
of management IP 47of proxies 97, 101port1 47
network topology 15, 58, 67, 93, 103NTP 48
Oopen relay 54operating temperature 21operation mode 19, 39, 42, 45, 58, 67, 93, 103
default 42outbound relay server 48
PPOP3 13, 14, 15, 19, 50port number 13, 14, 50, 59port1 47protected domain 50push updates 63
Qquarantine 20
display 14Quick Start Wizard 9, 19, 39, 42, 45, 67, 93, 103
Rregistering FortiMail unit 7relay 15route, default 48
Sscheduling updates 62
secure SMTP 50security certificate 28server mode 9, 14, 15, 17, 18, 19, 39, 67, 103
email user 111, 115, 122example 103
SMTP 13, 15, 50client, definition of 15reply code 550 57
SMTPS 50, 53spam 20spam reports 48SSL 48, 50status bar 49system time 46
Ttechnical support 7Telnet 127test
configuration 123time zone 48, 59time, system 46time, sytem 48TLD 57TLS 48, 50, 55transparent mode 9, 17, 19, 39, 47
example 93transparent proxy 19
Uunprotected domain 54upgrade 33
FortiGuard Antivirus and FortiGuard Antispam 59
Vverify
configuration 123, 124virus 20
Wweb-based manager
mode 19webmail 14, 15, 19
FortiMail Version 3.0 MR4 Install Guide06-343-88550-20090109

www.fortinet.com

www.fortinet.com