daos remote access
TRANSCRIPT
DAOS Remote Access
Table of ContentsLocal Computer Setup . . . . . . . . . . . . . . . . . . . . . . . . . . . . . . . . . . . . . . . . . . . . . . . . . . . . . . . . . . . . . . . . . . . . . . . 2
Windows . . . . . . . . . . . . . . . . . . . . . . . . . . . . . . . . . . . . . . . . . . . . . . . . . . . . . . . . . . . . . . . . . . . . . . . . . . . . . . . . 2
Linux . . . . . . . . . . . . . . . . . . . . . . . . . . . . . . . . . . . . . . . . . . . . . . . . . . . . . . . . . . . . . . . . . . . . . . . . . . . . . . . . . . . . 3
Acquisition Computer Setup . . . . . . . . . . . . . . . . . . . . . . . . . . . . . . . . . . . . . . . . . . . . . . . . . . . . . . . . . . . . . . . . . 4
NOAA Key Addition . . . . . . . . . . . . . . . . . . . . . . . . . . . . . . . . . . . . . . . . . . . . . . . . . . . . . . . . . . . . . . . . . . . . . . . 4
Manual Key Addition . . . . . . . . . . . . . . . . . . . . . . . . . . . . . . . . . . . . . . . . . . . . . . . . . . . . . . . . . . . . . . . . . . . . . 5
Basic Remote Access. . . . . . . . . . . . . . . . . . . . . . . . . . . . . . . . . . . . . . . . . . . . . . . . . . . . . . . . . . . . . . . . . . . . . . . . . 6
Windows Setup. . . . . . . . . . . . . . . . . . . . . . . . . . . . . . . . . . . . . . . . . . . . . . . . . . . . . . . . . . . . . . . . . . . . . . . . . . . 6
Linux Setup . . . . . . . . . . . . . . . . . . . . . . . . . . . . . . . . . . . . . . . . . . . . . . . . . . . . . . . . . . . . . . . . . . . . . . . . . . . . . . 8
Usage . . . . . . . . . . . . . . . . . . . . . . . . . . . . . . . . . . . . . . . . . . . . . . . . . . . . . . . . . . . . . . . . . . . . . . . . . . . . . . . . . . . . 8
Remote Desktop Access . . . . . . . . . . . . . . . . . . . . . . . . . . . . . . . . . . . . . . . . . . . . . . . . . . . . . . . . . . . . . . . . . . . . . 10
Windows Setup. . . . . . . . . . . . . . . . . . . . . . . . . . . . . . . . . . . . . . . . . . . . . . . . . . . . . . . . . . . . . . . . . . . . . . . . . . 10
Linux Setup . . . . . . . . . . . . . . . . . . . . . . . . . . . . . . . . . . . . . . . . . . . . . . . . . . . . . . . . . . . . . . . . . . . . . . . . . . . . . 12
Automation . . . . . . . . . . . . . . . . . . . . . . . . . . . . . . . . . . . . . . . . . . . . . . . . . . . . . . . . . . . . . . . . . . . . . . . . . . . . . 12
Remote access to a DAOS system is available using SSH with pre-shared publickeys. No other access methods are supported, but various remote desktops canbe tunneled over the SSH connection.
1
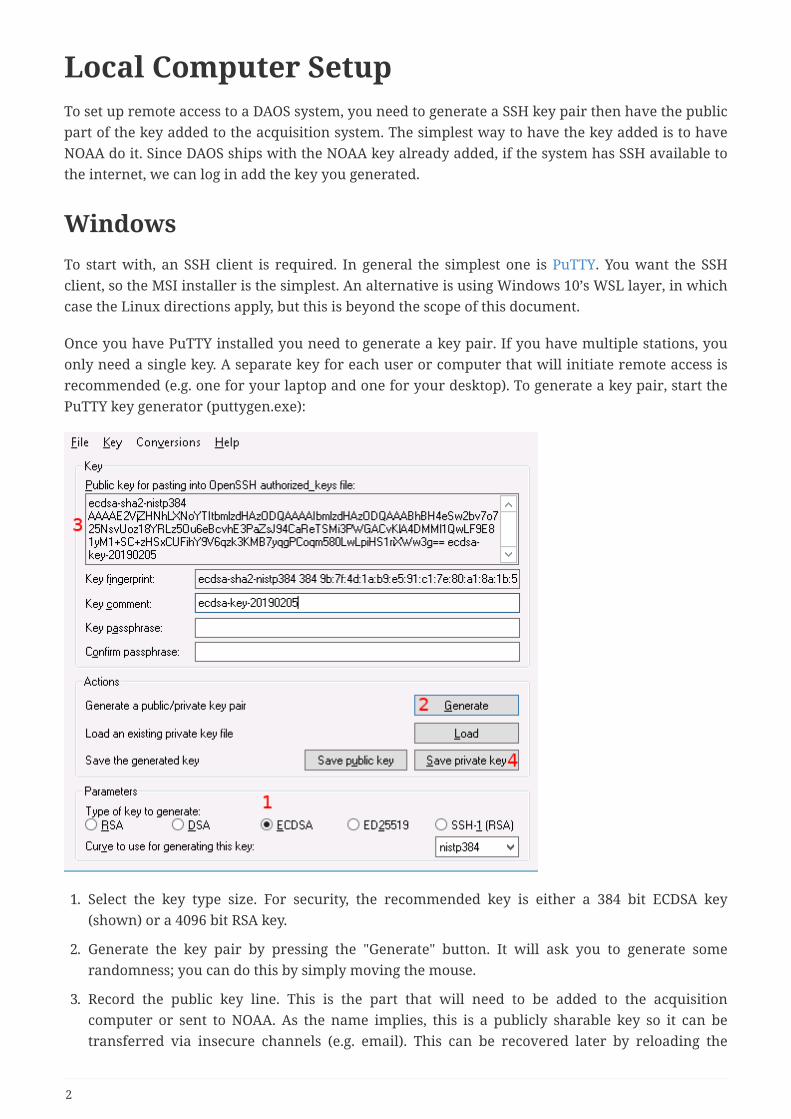
Local Computer SetupTo set up remote access to a DAOS system, you need to generate a SSH key pair then have the publicpart of the key added to the acquisition system. The simplest way to have the key added is to haveNOAA do it. Since DAOS ships with the NOAA key already added, if the system has SSH available tothe internet, we can log in add the key you generated.
WindowsTo start with, an SSH client is required. In general the simplest one is PuTTY. You want the SSHclient, so the MSI installer is the simplest. An alternative is using Windows 10’s WSL layer, in whichcase the Linux directions apply, but this is beyond the scope of this document.
Once you have PuTTY installed you need to generate a key pair. If you have multiple stations, youonly need a single key. A separate key for each user or computer that will initiate remote access isrecommended (e.g. one for your laptop and one for your desktop). To generate a key pair, start thePuTTY key generator (puttygen.exe):
1. Select the key type size. For security, the recommended key is either a 384 bit ECDSA key(shown) or a 4096 bit RSA key.
2. Generate the key pair by pressing the "Generate" button. It will ask you to generate somerandomness; you can do this by simply moving the mouse.
3. Record the public key line. This is the part that will need to be added to the acquisitioncomputer or sent to NOAA. As the name implies, this is a publicly sharable key so it can betransferred via insecure channels (e.g. email). This can be recovered later by reloading the
2

private key.
4. Save the private key on your computer. You will need this key to actually initiate remote access,so be sure to save it somewhere it will not be lost. By default PuTTY will suggest saving it in yourDocuments folder, which should be fine as long as you make sure not to accidentally delete ormove it.
The key comment and pass phrase are optional. However it is a good idea to set the comment tosomething that identifies what the key is used for. For example "work-desktop" is a reasonable keycomment. The passphrase can add additional security (you will be prompted for it at every login),but it is not required: authentication is accomplished with the key alone.
LinuxIf you already have an SSH key pair generated the public key should be found in~/.ssh/id_ecdsa.pub or ~/.ssh/id_rsa.pub. To generate a new key pair, use the ssh-keygen command:
ssh-keygen -t ecdsa -b 384
After that the public key can be found in ~/.ssh/id_ecdsa.pub and the private key will be loaded ondemand.
3
Acquisition Computer SetupOnce you have a SSH key pair, the public key needs to be added to the acquisition computer’sauthorization. The simplest and strongly recommended way of doing this is to have NOAA changethe authorization. However, this requires that remote access works from NOAA as well. In mostcases enabling your own remote access will also allow NOAA access as well. In addition, westrongly recommend allowing NOAA remote access for diagnostics. So unless you are required toexplicitly forbid it, we recommend simply allowing all remote access: your own and NOAA’s.
The only requirement for general remote access is that SSH is routable to the acquisition computer.More specifically, there needs to be a way to connect to an public IP address and have thatconnection reach port 22 on the acquisition computer.
• If the computer is directly exposed to the internet, then no changes need to be made.
• The simplest case is that there is simply another local firewall (in addition to the one on theacquisition computer itself), that just needs port 22 allowed.
• The next case is that the port needs to be forwarded on the router. This generally involves twosteps:
1. First, make sure the acquisition computer is assigned a static IP address on the internalnetwork. This can either be done by simply setting its networking to a static IP or bychanging the DHCP for the network to always assign a fixed IP address to the MAC addressof the computer.
2. Next, configure port forwarding of an external port to the static IP address port 22 (SSH). Itis simplest if you can forward port 22 external to port 22 internal, but if port 22 external isnot available another number can be used. If this is the case, that port number will have tobe supplied when making remote the connection.
Once there is a way of accessing SSH on the acquisition computer, you only need the public IPaddress and the port number (if non-standard). As part of the daily diagnostics the public IPaddress is sent to NOAA, so we can generally confirm this with you if required.
NOAA Key AdditionThe recommended way of adding the key is completing the above so that general remote accessworks. Then you can simply email us the public key and we can add it.
DO NOT EMAIL THE PRIVATE KEY
The private key (the ".ppk" file) is considered compromised if exposed to the public. So it shouldnever be transferred by an insecure channel. Additionally, it is NOT required by NOAA to add youraccess, so it should never be sent.
The public key is the text that starts with "ecdsa-sha2-nistp384" or "ssh-rsa" followed by a largeblock of base 64 characters.
4
Manual Key AdditionIt is strongly recommended that you simply have NOAA add the key for you. If you do not haveadditional firewall requirements, the above (i.e., requirements described in the AcquisitionComputer Setup section) should allow NOAA access on its own.
However, to add the public key yourself you only need to append it to ~/.ssh/authorized_keys onthe acquisition computer. So, you will need shell access to the acquisition computer to begin with. Ifthis is the first key, you will likely need physical access to the computer. For adding subsequentkeys, you can do this by using an existing key to log in.
As noted above, you only need the public key component here.
Simply open the authorized keys file in a text editor and add the new key to the end:
mousepad ~/.ssh/authorized_keys
For remote access, you will likely want to use a terminal text editor:
nano ~/.ssh/authorized_keys
Use CTRL-O to save and CTRL-X to quit.
In both cases, be sure that there are no line breaks in the text you paste. That is, the key must be asingle line starting with the "ecdsa-sha2-nistp384" or "ssh-rsa" and ending with the key commenttext.
The NOAA key should already be listed as the first line. Simply copy-paste the public key fromabove as a line at the bottom then save the file.
5
Basic Remote AccessThe simplest and lowest bandwidth form of remote access is direct SSH terminal access. Thisprovides only a the Linux terminal on the acquisition computer.
Windows SetupWindows remote access requires an SSH client. This is party of PuTTY, so you should already have itfrom the above. Start PuTTY with no suffix (putty.exe).
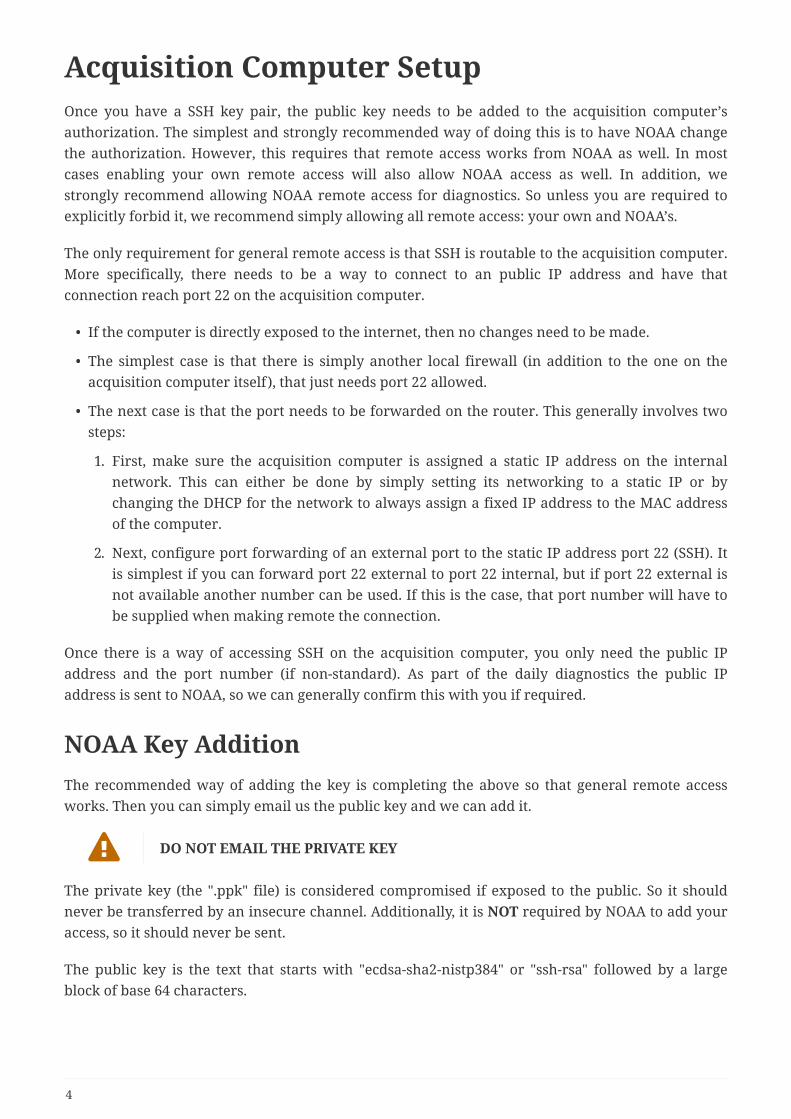
1. Select the "Data" category under the "Connection" heading on the left hand panel (you may haveto scroll down).
2. Enter "aerosol" as the auto-login user name.
6
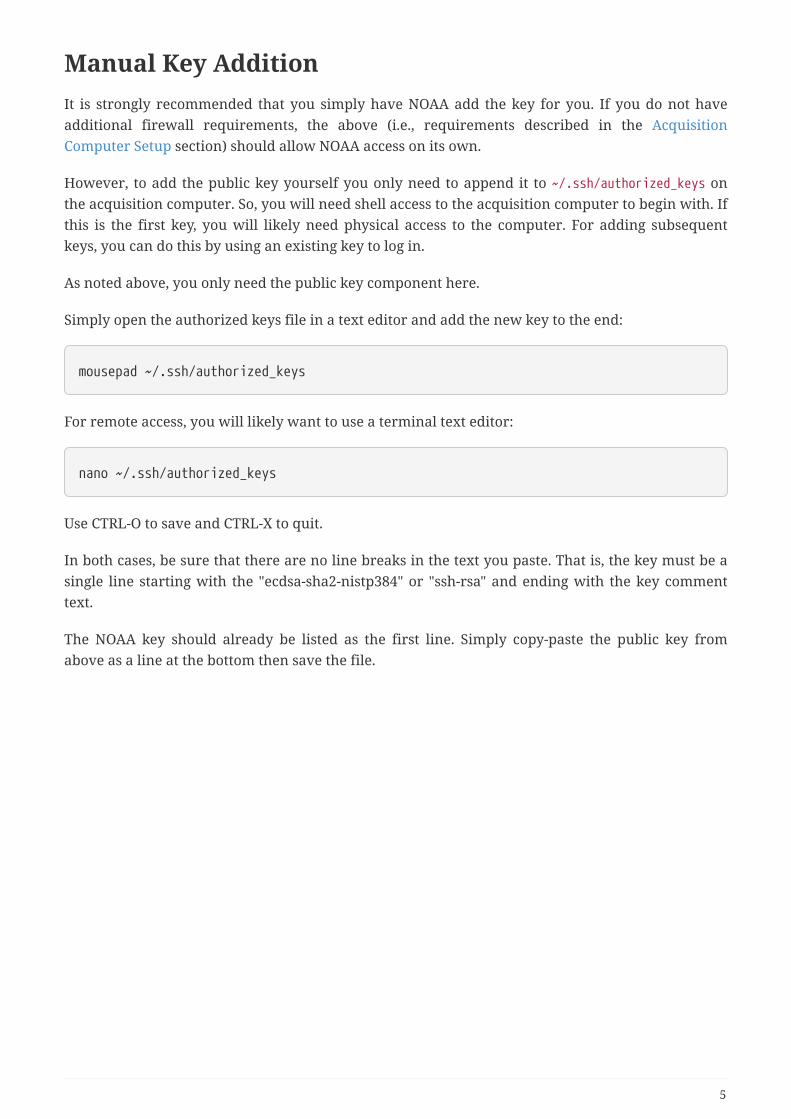
1. Select the "Auth" category under the "Connection" and "SSH" headings on the left hand panel.
2. Use the "Browse" button to locate the private key you created originally.
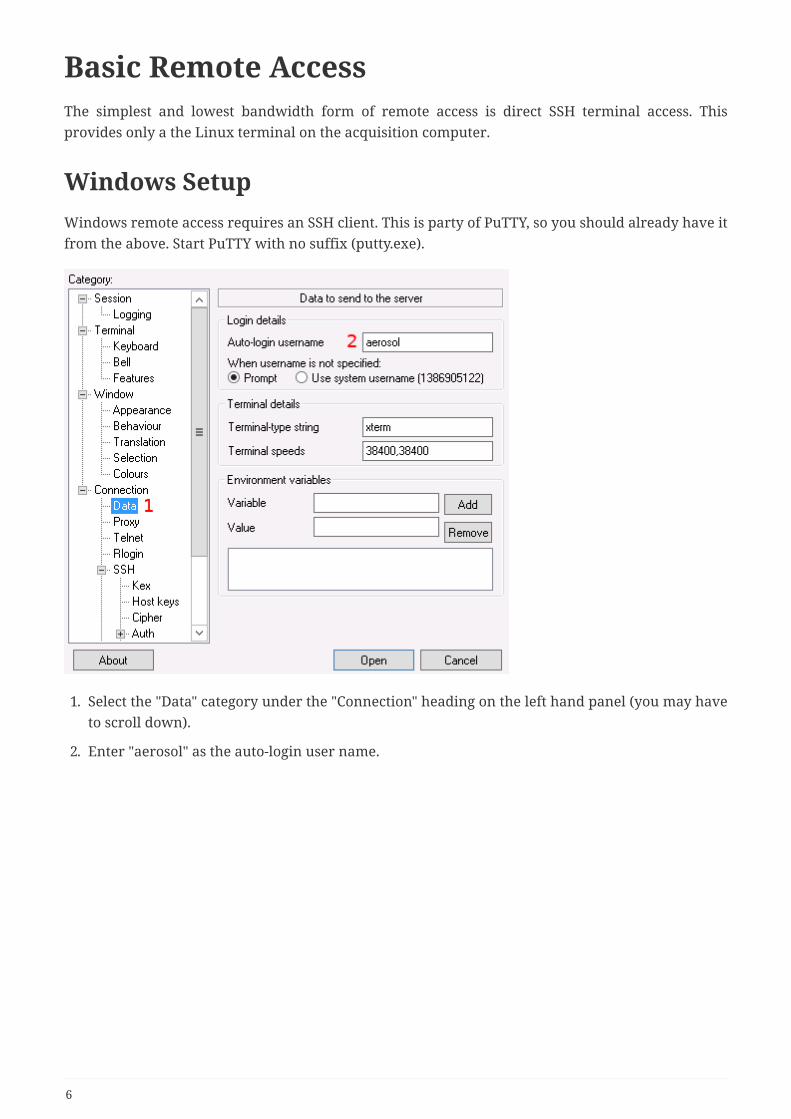
1. Switch back to the "Session" category in the top left panel.
2. Enter the IP address or host name of the acquisition computer. This needs to be the public IPaddress, not its internal private IP, if you are not on the same network as it.
7
3. Set the port if using a non-standard forwarded one. Otherwise, leave this as 22.
4. Give the session a name so it can be saved. This is used to quickly restore the parameters forlater re-use, so you don’t have to re-enter them every time.
5. Save the session. You can then later restore it by selecting the name from the list and pressingthe "Load" button.
Finally, to connect to the computer, use the "Open" button at the bottom. On the very firstconnection, you will be asked if you want to accept the remote SSH key. Once you have accepted thekey, you should not be prompted again (since the acquisition computer will not change). However,if the computer is swapped out or reinstalled, you will have to accept the SSH key change.
If you receive a message about access denied, then you likely selected the wrong (or no) SSH keypair or a key that has not yet been added to the acquisition computer.
Linux SetupIn general to connect from Linux, all you will need is a simple SSH command, assuming that youhave added your default SSH key pair:
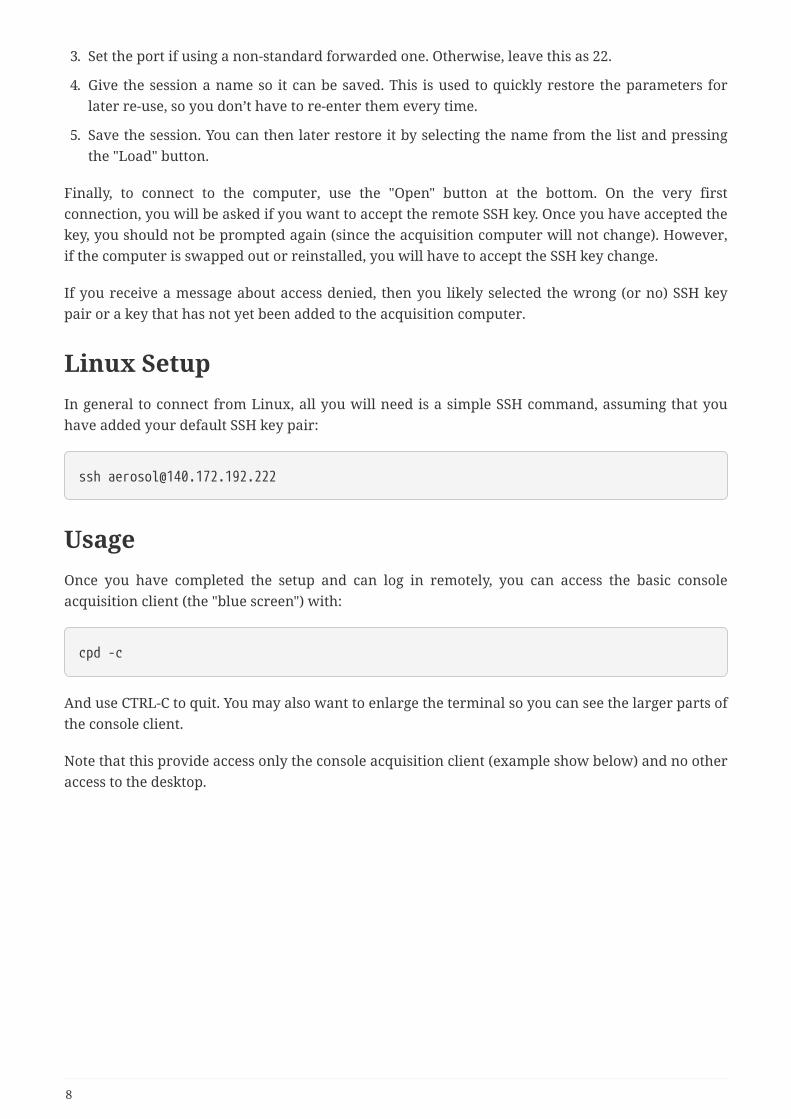
UsageOnce you have completed the setup and can log in remotely, you can access the basic consoleacquisition client (the "blue screen") with:
cpd -c
And use CTRL-C to quit. You may also want to enlarge the terminal so you can see the larger parts ofthe console client.
Note that this provide access only the console acquisition client (example show below) and no otheraccess to the desktop.
8
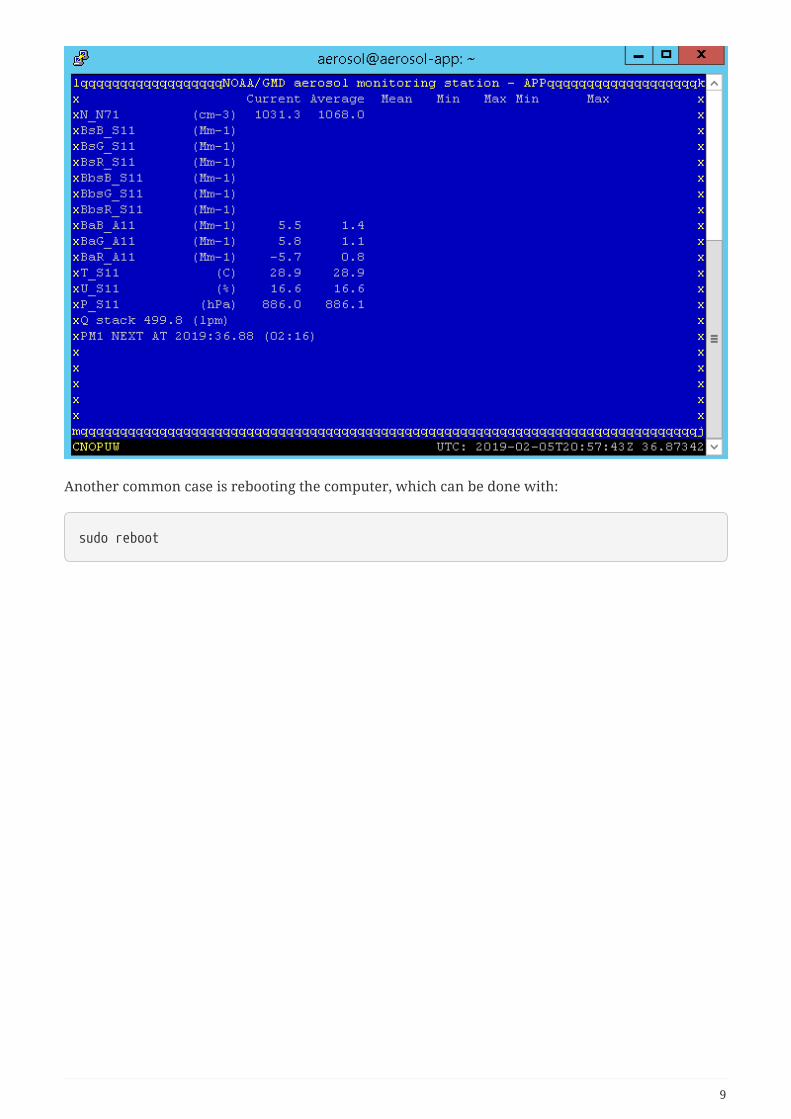
Another common case is rebooting the computer, which can be done with:
sudo reboot
9
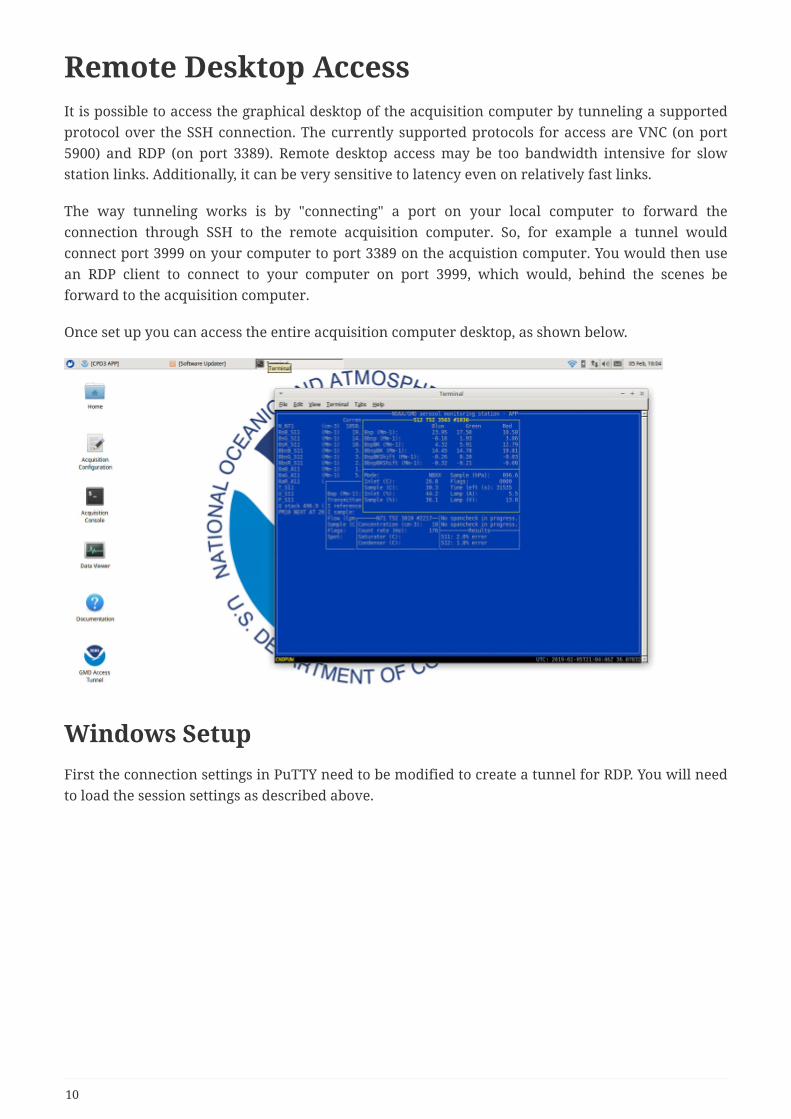
Remote Desktop AccessIt is possible to access the graphical desktop of the acquisition computer by tunneling a supportedprotocol over the SSH connection. The currently supported protocols for access are VNC (on port5900) and RDP (on port 3389). Remote desktop access may be too bandwidth intensive for slowstation links. Additionally, it can be very sensitive to latency even on relatively fast links.
The way tunneling works is by "connecting" a port on your local computer to forward theconnection through SSH to the remote acquisition computer. So, for example a tunnel wouldconnect port 3999 on your computer to port 3389 on the acquistion computer. You would then usean RDP client to connect to your computer on port 3999, which would, behind the scenes beforward to the acquisition computer.
Once set up you can access the entire acquisition computer desktop, as shown below.
Windows SetupFirst the connection settings in PuTTY need to be modified to create a tunnel for RDP. You will needto load the session settings as described above.
10
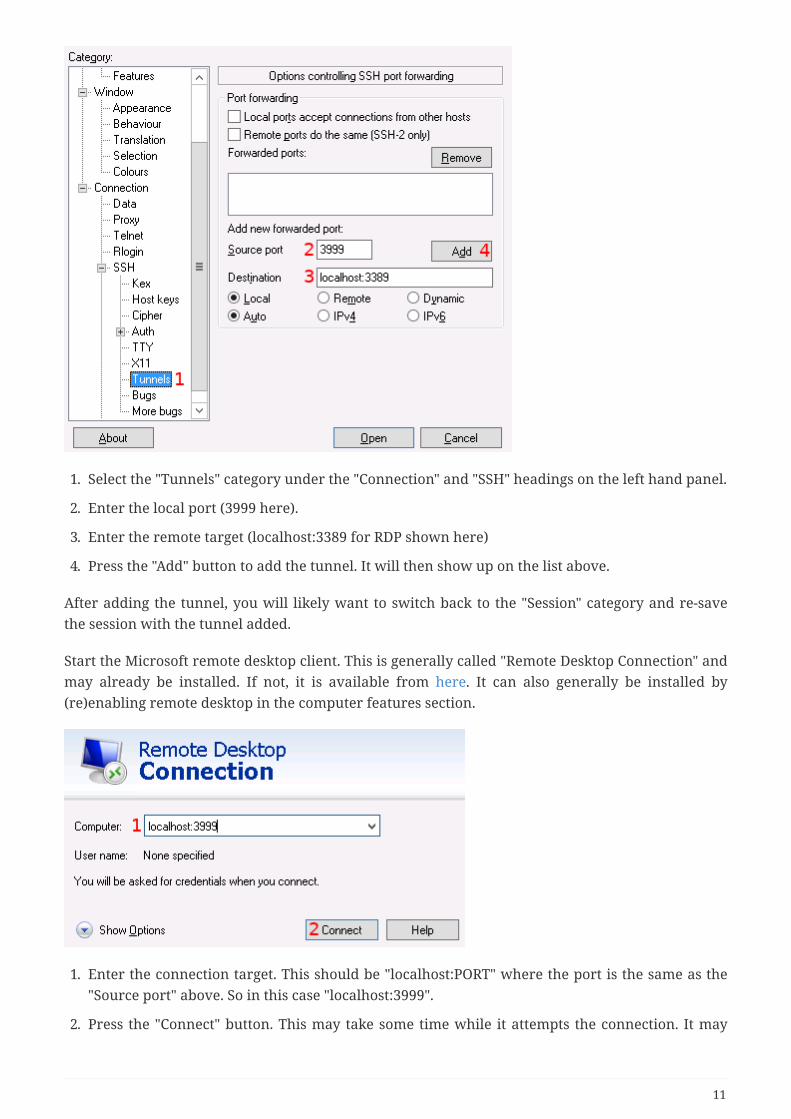
1. Select the "Tunnels" category under the "Connection" and "SSH" headings on the left hand panel.
2. Enter the local port (3999 here).
3. Enter the remote target (localhost:3389 for RDP shown here)
4. Press the "Add" button to add the tunnel. It will then show up on the list above.
After adding the tunnel, you will likely want to switch back to the "Session" category and re-savethe session with the tunnel added.
Start the Microsoft remote desktop client. This is generally called "Remote Desktop Connection" andmay already be installed. If not, it is available from here. It can also generally be installed by(re)enabling remote desktop in the computer features section.
1. Enter the connection target. This should be "localhost:PORT" where the port is the same as the"Source port" above. So in this case "localhost:3999".
2. Press the "Connect" button. This may take some time while it attempts the connection. It may
11
also prompt you that the connection is insecure: this is expected since it does not know aboutthe SSH connection that provides the actual security.
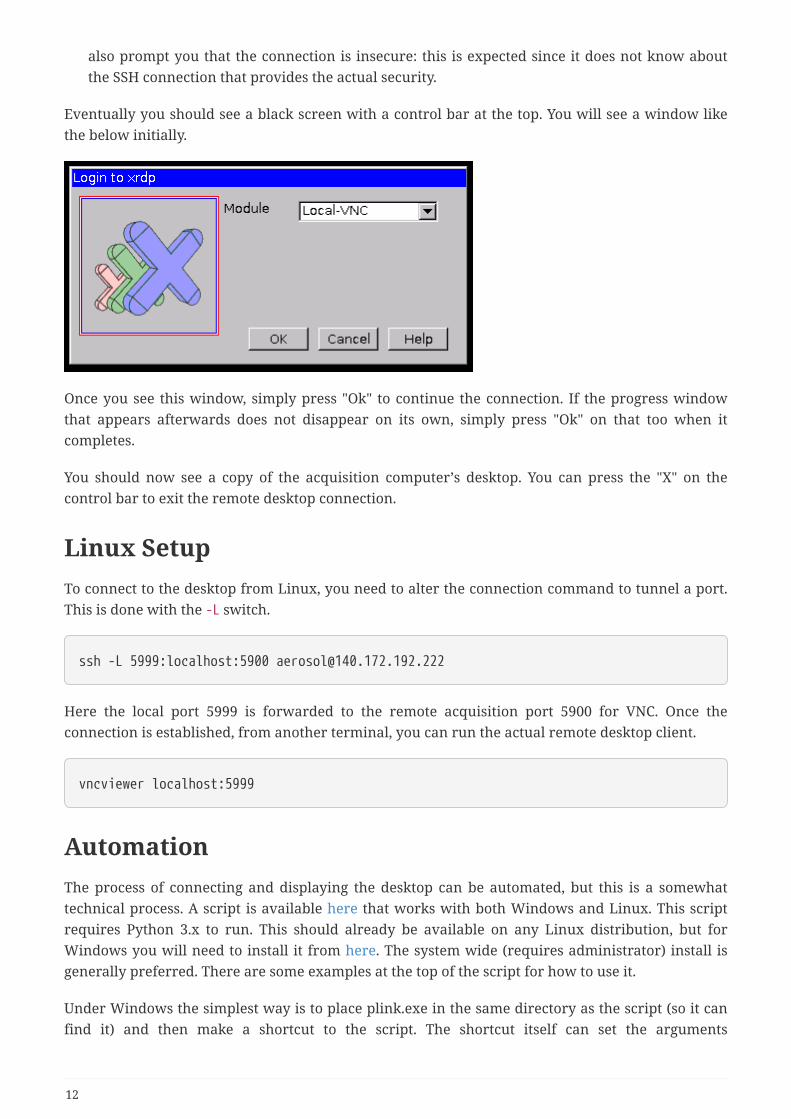
Eventually you should see a black screen with a control bar at the top. You will see a window likethe below initially.
Once you see this window, simply press "Ok" to continue the connection. If the progress windowthat appears afterwards does not disappear on its own, simply press "Ok" on that too when itcompletes.
You should now see a copy of the acquisition computer’s desktop. You can press the "X" on thecontrol bar to exit the remote desktop connection.
Linux SetupTo connect to the desktop from Linux, you need to alter the connection command to tunnel a port.This is done with the -L switch.
ssh -L 5999:localhost:5900 [email protected]
Here the local port 5999 is forwarded to the remote acquisition port 5900 for VNC. Once theconnection is established, from another terminal, you can run the actual remote desktop client.
vncviewer localhost:5999
AutomationThe process of connecting and displaying the desktop can be automated, but this is a somewhattechnical process. A script is available here that works with both Windows and Linux. This scriptrequires Python 3.x to run. This should already be available on any Linux distribution, but forWindows you will need to install it from here. The system wide (requires administrator) install isgenerally preferred. There are some examples at the top of the script for how to use it.
Under Windows the simplest way is to place plink.exe in the same directory as the script (so it canfind it) and then make a shortcut to the script. The shortcut itself can set the arguments
12
appropriately. For example:
"C:\Users\av\connectforward.pyw" 3389 "mstsc /v:${HOST}:${PORT} /f" "" -i demo.ppk -laerosol -P 22 140.172.192.222
In addition, changing the script extension from ".py" to ".pyw" as shown above prevents it fromshowing a terminal window.
13