privileged remote access jumpoint guide - beyondtrust
TRANSCRIPT
Privileged Remote AccessJumpoint Guide
©2003-2021 BeyondTrust Corporation. All Rights Reserved. Other trademarks identified on this page are owned by their respective owners. BeyondTrust is not a chartered bank or trust company, ordepository institution. It is not authorized to accept deposits or trust accounts and is not licensed or regulated by any state or federal banking authority.
TC:1/20/2022
Table of Contents
Privileged Remote Access Jumpoint Guide: Unattended Access to Computers in a Network 4
Recommended Steps for Implementing Jump Technology 5
Use Jump Item Roles to Configure Permission Sets for Jump Items 6
Create Jump Policies to Control Access to Jump Items 7
Use Jump Groups to Configure Which Users Can Access Which Jump Items 10
Requirements and Considerations to Install a PRA Jumpoint 11
Prerequisites 11
Considerations 11
Security 11
File/Print Sharing 12
BeyondTrust Considerations 12
Jumpoint Requirements 12
Remote Jump Sessions – Host System Requirements 12
Remote/Local Jump Sessions – Target System Requirements 13
RDP Sessions – Host System Requirements 13
RDP Sessions – Target System Requirements 13
VNC Sessions – Host System Requirements 13
VNC – Target System Requirements 14
Protocol Tunnel Jump Sessions - Host System Requirements 14
Protocol Tunnel Jump Sessions - Target System Requirements 14
Shell Jump Sessions – Host System Requirements 14
Shell Jump Sessions – Target System Requirements 14
Web Jump Sessions - Host System Requirements 14
Web Jump Sessions - Target System Requirements 15
Configure and Install a Jumpoint for Windows Systems 16
Configure 16
Download 17
Install 18
Deploy Behind Proxy 19
Configure Windows Jumpoint as a Proxy Server 21
SALES: www.beyondtrust.com/contact SUPPORT: www.beyondtrust.com/support DOCUMENTATION: www.beyondtrust.com/docs 2©2003-2021 BeyondTrust Corporation. All Rights Reserved. Other trademarks identified on this page are owned by their respective owners. BeyondTrust is not a chartered bank or trust company, ordepository institution. It is not authorized to accept deposits or trust accounts and is not licensed or regulated by any state or federal banking authority.
TC: 1/20/2022
PRIVILEGED REMOTE ACCESS
JUMPOINT GUIDE
This page needed for table ofcontents. Do not delete.
Clustered Jumpoint Setup: Add Nodes 21
Configure and Install a Jumpoint for Linux Systems 23
Configure 23
Download 24
Install 24
Clustered Jumpoint Setup: Add Nodes 25
Configure Linux Jumpoint as a Proxy Server 26
Use a Jump Shortcut to Jump to a Remote System 28
Local Jump Shortcuts 38
Remote Jump Shortcuts 40
Remote Desktop Protocol Shortcuts 42
VNC Shortcuts 46
Shell Jump Shortcuts 48
Protocol Tunnel Jump Shortcuts 51
Use Web Jump to Access Web Services 52
Create a Web Jump Shortcut 52
Use a Web Jump Shortcut 54
Use Credential Injection 55
Use Cases for Implementing Jump Items 56
Basic Use Case 56
Advanced Use Case 58
Appendix: Require a Ticket ID for Jump Item Access 64
What Users See 64
How It Works 64
Create a Jump Policy Requiring Ticket ID Approval 64
Connect External Ticket ID System to Jump Policies 65
API Approval Request 66
API Approval Reponse 67
Error Messages 67
Appendix: PRA Jumpoint Error Message Reference 69
SALES: www.beyondtrust.com/contact SUPPORT: www.beyondtrust.com/support DOCUMENTATION: www.beyondtrust.com/docs 3©2003-2021 BeyondTrust Corporation. All Rights Reserved. Other trademarks identified on this page are owned by their respective owners. BeyondTrust is not a chartered bank or trust company, ordepository institution. It is not authorized to accept deposits or trust accounts and is not licensed or regulated by any state or federal banking authority.
TC: 1/20/2022
PRIVILEGED REMOTE ACCESS
JUMPOINT GUIDE
This page needed for table ofcontents. Do not delete.
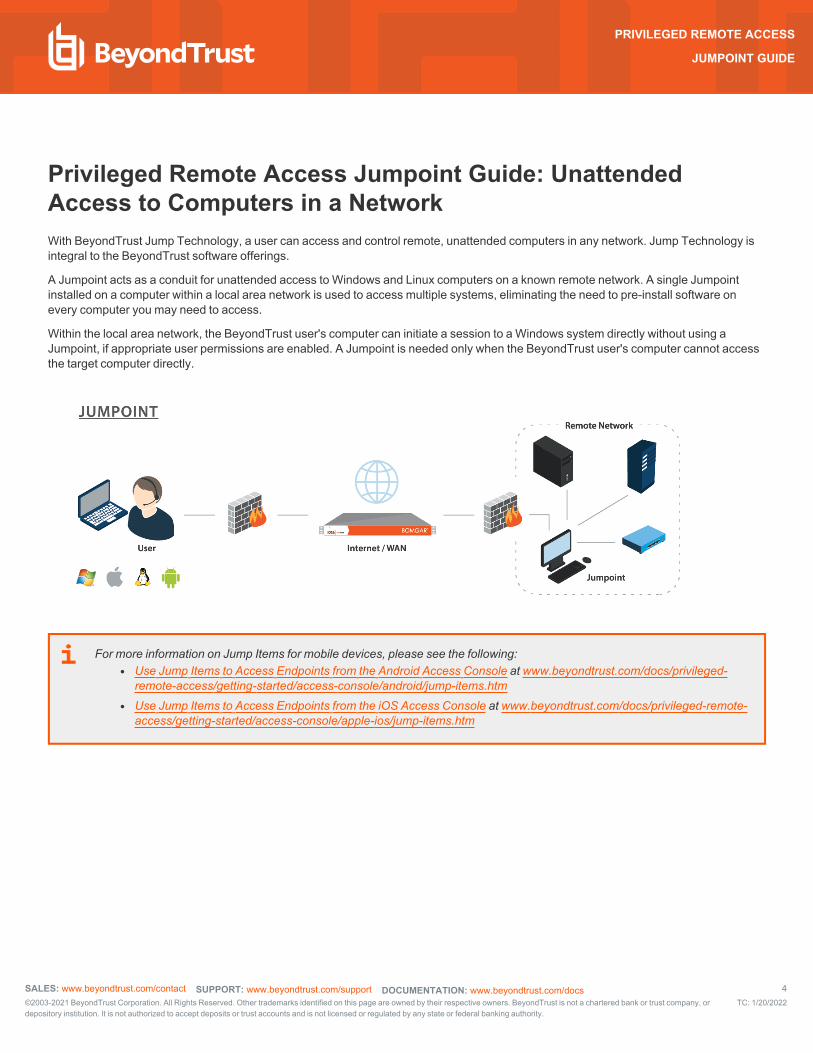
Privileged Remote Access Jumpoint Guide: Unattended Access to Computers in a NetworkWith BeyondTrust Jump Technology, a user can access and control remote, unattended computers in any network. Jump Technology is integral to the BeyondTrust software offerings.
A Jumpoint acts as a conduit for unattended access to Windows and Linux computers on a known remote network. A single Jumpoint installed on a computer within a local area network is used to access multiple systems, eliminating the need to pre-install software on every computer you may need to access.
Within the local area network, the BeyondTrust user's computer can initiate a session to a Windows system directly without using a Jumpoint, if appropriate user permissions are enabled. A Jumpoint is needed only when the BeyondTrust user's computer cannot access the target computer directly.
For more information on Jump Items for mobile devices, please see the following: l Use Jump Items to Access Endpoints from the Android Access Console at www.beyondtrust.com/docs/privileged-
remote-access/getting-started/access-console/android/jump-items.htm l Use Jump Items to Access Endpoints from the iOS Access Console at www.beyondtrust.com/docs/privileged-remote-
access/getting-started/access-console/apple-ios/jump-items.htm
SALES: www.beyondtrust.com/contact SUPPORT: www.beyondtrust.com/support DOCUMENTATION: www.beyondtrust.com/docs 4©2003-2021 BeyondTrust Corporation. All Rights Reserved. Other trademarks identified on this page are owned by their respective owners. BeyondTrust is not a chartered bank or trust company, ordepository institution. It is not authorized to accept deposits or trust accounts and is not licensed or regulated by any state or federal banking authority.
TC: 1/20/2022
PRIVILEGED REMOTE ACCESS
JUMPOINT GUIDE
Recommended Steps for Implementing Jump TechnologyWhen working with Jump Technology, there are a lot of moving parts. Here is a recommended order of implementation to make full use of your software.
1. Add Jump Item Roles. Jump Item Roles determine how users are allowed to interact with Jump Items. These roles are applied to users by means of individual account settings, group policies, or when added to Jump Groups.
2. Add Jump Policies. Jump Policies are used to control when certain Jump Items can be accessed by implementing schedules, sending email notifications when a Jump Item is accessed, or requiring approval or user entry of a ticket system ID before a Jump Item may be accessed. Jump Policies are applied to Jump Items upon creation and can be modified from the access console. Additionally, Jump Policies can be applied to users when associating a user or group policy with a Jump Group.
3. Add Jump Groups. A Jump Group is a way to organize Jump Items, granting members varying levels of access to those items. Users are assigned to Jump Groups either individually or by means of group policy.
4. Deploy Jump Items. This step can be performed in several ways.
a. Deploy Jumpoints. Jump Shortcuts allow you to access Windows systems on an accessible network. If you plan to use Jump Shortcuts on only your local area network, you do not need a Jumpoint. If you plan to use Jump Shortcuts on remote networks, you must install a Jumpoint. Only users who are added to the Jumpoint can use it to access systems on the remote network. Users are assigned to Jumpoints either individually or by means of group policy.
b. Deploy Jump Shortcuts in Bulk.When creating a large number of Jump shortcuts, it may be easier to import them via a spreadsheet than to add them one by one in the access console. From /login > Jump > Jump Shortcuts, download a CSV template for each type of Jump Shortcut you wish to import. Enter the information for the shortcuts, being sure to set the Jump Group and Jump Policy, and then upload the completed CSV files.
c. Deploy Jump Shortcuts One by One. When creating only a few Jump Shortcuts, it may be quicker to deploy them from the access console. In the Jump interface of the access console, click the Create button. Select the type of Jump Shortcut you wish to create, and enter the details, being sure to set the Jump Group and Jump Policy.
For more information about Jump Item Roles, Jump Policies, Jump Groups, deploying Jumpoints, and using Jump Shortcuts, please see the following:
l "Use Jump Item Roles to Configure Permission Sets for Jump Items" on page 6 l "Create Jump Policies to Control Access to Jump Items" on page 7 l "Use Jump Groups to Configure Which Users Can Access Which Jump Items" on page 10 l "Requirements and Considerations to Install a PRA Jumpoint" on page 11 l "Configure and Install a Jumpoint for Windows Systems" on page 16 l "Configure and Install a Jumpoint for Linux Systems" on page 23 l "Use a Jump Shortcut to Jump to a Remote System" on page 28 l "Local Jump Shortcuts" on page 38 l "Remote Jump Shortcuts" on page 40 l "Remote Desktop Protocol Shortcuts" on page 42 l "VNC Shortcuts" on page 46 l "Shell Jump Shortcuts" on page 48 l "Protocol Tunnel Jump Shortcuts" on page 51 l "Use Web Jump to Access Web Services" on page 52
SALES: www.beyondtrust.com/contact SUPPORT: www.beyondtrust.com/support DOCUMENTATION: www.beyondtrust.com/docs 5©2003-2021 BeyondTrust Corporation. All Rights Reserved. Other trademarks identified on this page are owned by their respective owners. BeyondTrust is not a chartered bank or trust company, ordepository institution. It is not authorized to accept deposits or trust accounts and is not licensed or regulated by any state or federal banking authority.
TC: 1/20/2022
PRIVILEGED REMOTE ACCESS
JUMPOINT GUIDE
Use Jump Item Roles to Configure Permission Sets for Jump ItemsA Jump Item Role is a predefined set of permissions regarding Jump Item management and usage. Jump Item Roles are applied to users either from the Jump > Jump Groups page or from the Users & Security > Group Policies page.
If more than one role is assigned to a user, then the most specific role for a user is always used. The order of specificity for Jump Item Roles, from most specific to least specific, is:
l The role assigned to the relationship between a user and a Jump Group on the Jump > Jump Groups page. l The role assigned to the relationship between a user and a Jump Group on the Users & Security > Group Policies page. l The Jump Item Roles configured for a user on the Users & Security > Users page or the Users & Security > Group Policies
page.
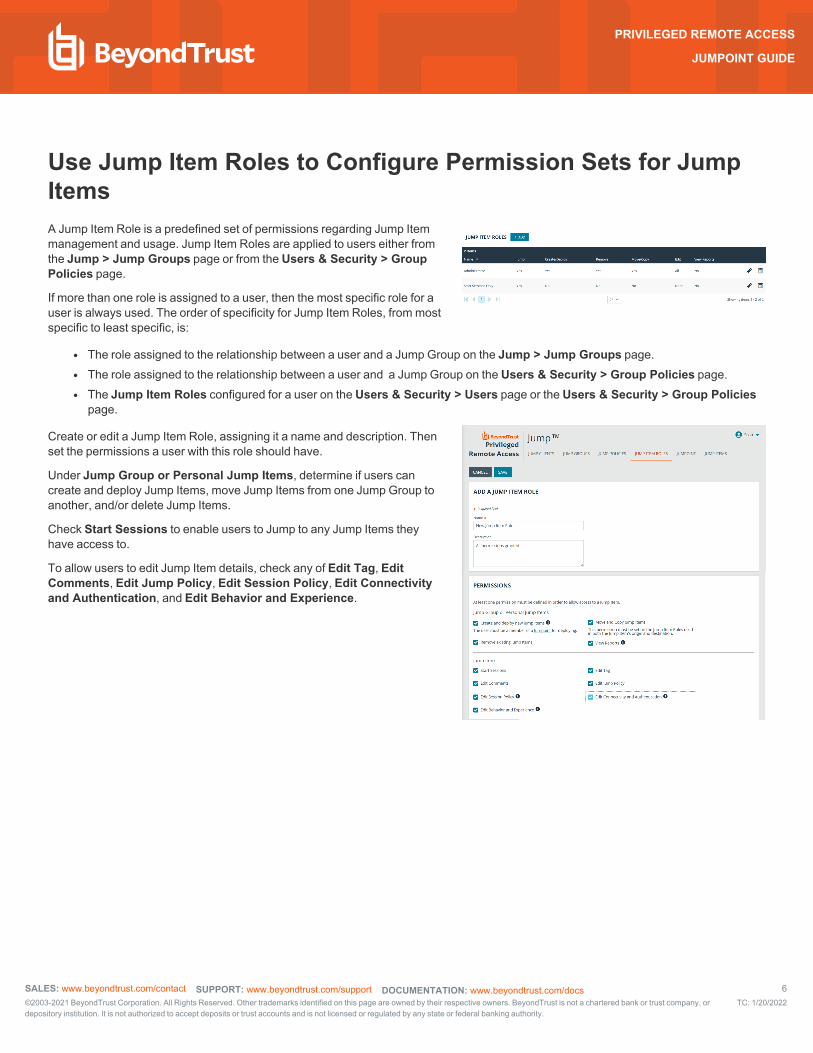
Create or edit a Jump Item Role, assigning it a name and description. Then set the permissions a user with this role should have.
Under Jump Group or Personal Jump Items, determine if users can create and deploy Jump Items, move Jump Items from one Jump Group to another, and/or delete Jump Items.
Check Start Sessions to enable users to Jump to any Jump Items they have access to.
To allow users to edit Jump Item details, check any of Edit Tag, Edit Comments, Edit Jump Policy, Edit Session Policy, Edit Connectivity and Authentication, and Edit Behavior and Experience.
SALES: www.beyondtrust.com/contact SUPPORT: www.beyondtrust.com/support DOCUMENTATION: www.beyondtrust.com/docs 6©2003-2021 BeyondTrust Corporation. All Rights Reserved. Other trademarks identified on this page are owned by their respective owners. BeyondTrust is not a chartered bank or trust company, ordepository institution. It is not authorized to accept deposits or trust accounts and is not licensed or regulated by any state or federal banking authority.
TC: 1/20/2022
PRIVILEGED REMOTE ACCESS
JUMPOINT GUIDE
Create Jump Policies to Control Access to Jump ItemsTo control access to particular Jump Items, create Jump Policies. Jump Policies are used to control when certain Jump Items can be accessed by implementing schedules, sending email notifications when a Jump Item is accessed, or requiring approval or user entry of a ticket system ID before a Jump Item may be accessed. A Jump Policy can be applied to Jump Clients as well as to Jump shortcuts.
Create a Jump Policy
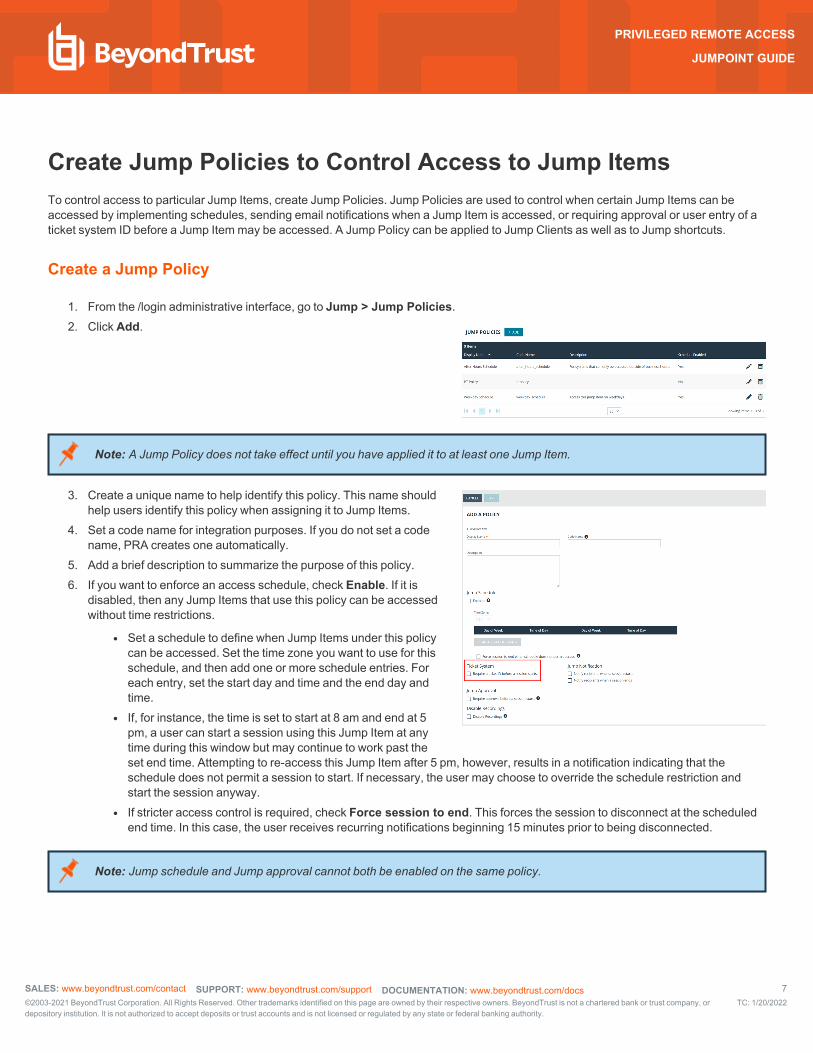
1. From the /login administrative interface, go to Jump > Jump Policies. 2. Click Add.
Note: A Jump Policy does not take effect until you have applied it to at least one Jump Item.
3. Create a unique name to help identify this policy. This name should help users identify this policy when assigning it to Jump Items.
4. Set a code name for integration purposes. If you do not set a code name, PRA creates one automatically.
5. Add a brief description to summarize the purpose of this policy. 6. If you want to enforce an access schedule, check Enable. If it is
disabled, then any Jump Items that use this policy can be accessed without time restrictions.
l Set a schedule to define when Jump Items under this policy can be accessed. Set the time zone you want to use for this schedule, and then add one or more schedule entries. For each entry, set the start day and time and the end day and time.
l If, for instance, the time is set to start at 8 am and end at 5 pm, a user can start a session using this Jump Item at any time during this window but may continue to work past the set end time. Attempting to re-access this Jump Item after 5 pm, however, results in a notification indicating that the schedule does not permit a session to start. If necessary, the user may choose to override the schedule restriction and start the session anyway.
l If stricter access control is required, check Force session to end. This forces the session to disconnect at the scheduled end time. In this case, the user receives recurring notifications beginning 15 minutes prior to being disconnected.
Note: Jump schedule and Jump approval cannot both be enabled on the same policy.
SALES: www.beyondtrust.com/contact SUPPORT: www.beyondtrust.com/support DOCUMENTATION: www.beyondtrust.com/docs 7©2003-2021 BeyondTrust Corporation. All Rights Reserved. Other trademarks identified on this page are owned by their respective owners. BeyondTrust is not a chartered bank or trust company, ordepository institution. It is not authorized to accept deposits or trust accounts and is not licensed or regulated by any state or federal banking authority.
TC: 1/20/2022
PRIVILEGED REMOTE ACCESS
JUMPOINT GUIDE
7. You may choose to trigger an email notification whenever a session starts or ends with a Jump Item that uses this policy.
l Check Notify recipients when a session starts to send an email at the beginning of a session. When a user attempts to start a session with a Jump Item that uses this policy, a prompt states that a notification email will be sent and asks if the user would like to start the session anyway.
l Check Notify recipients when a session ends to send an email at the end of a session. When a user attempts to start a session with a Jump Item that uses this policy, a prompt states that a notification email will be sent at the end of the session and asks if the user would like to start the session anyway.
l Enter one or more email addresses to which emails should be sent. Separate addresses with a space. This feature requires a valid SMTP configuration for your B Series Appliance, set up on the /login > Management > Email Configuration page.
l Enter the name of the email recipient. This name appears on the prompt the user receives prior to a session with a Jump Item that uses this policy.
l If more than one language is enabled on this site, set the language in which to send emails.
8. If you check Require a ticket ID before a session starts, a valid ticket ID from your external ticket ID approval process must be entered by the user whenever a session is attempted with any Jump Item that uses this Jump Policy. When a user attempts to start a session with a Jump Item that uses this policy, a configurable dialog prompts the user to enter the approved ticket ID from your external ITSM or ticket ID system.
9. If you check Require approval before a session starts, an approval email is sent to the designated recipients whenever a session is attempted with any Jump Item that uses this Jump Policy. When a user attempts to start a session with a Jump Item that uses this policy, a dialog prompts the user to enter a request reason and the time and duration for the request.
l Set the maximum length of time for which a user can request access to a Jump Item that uses this policy. The user can request a shorter length of access but no longer than that set here.
l When approval has been granted to a Jump Item, that Jump Item becomes available either to any user who can see and request access to that Jump Item or only to the user who requested access.
l Enter one or more email addresses to which emails should be sent. Separate addresses with a space. This feature requires a valid SMTP configuration for your B Series Appliance, set up on the /login > Management > Email Configuration page.
l Enter the name of the email recipient. This name appears on the prompt the user receives prior to a session with a Jump Item that uses this policy.
l If more than one language is enabled on this site, set the language in which to send emails.
Note: Jump schedule and Jump approval cannot both be enabled on the same policy.
10. If you check Disable Session Recordings, sessions started with this Jump Policy are not recorded, even if recordings are enabled on the Configuration > Options page. This affects screen sharing recordings, protocol tunnel Jump recordings, and command shell recordings.
11. When you are finished configuring this Jump Policy, click Save.
Note: If you have more than one language enabled on your site, you can select the language you want to use on the screens below from the dropdown menu. Fields that display the language globe icon can display content in the language you select.
SALES: www.beyondtrust.com/contact SUPPORT: www.beyondtrust.com/support DOCUMENTATION: www.beyondtrust.com/docs 8©2003-2021 BeyondTrust Corporation. All Rights Reserved. Other trademarks identified on this page are owned by their respective owners. BeyondTrust is not a chartered bank or trust company, ordepository institution. It is not authorized to accept deposits or trust accounts and is not licensed or regulated by any state or federal banking authority.
TC: 1/20/2022
PRIVILEGED REMOTE ACCESS
JUMPOINT GUIDE
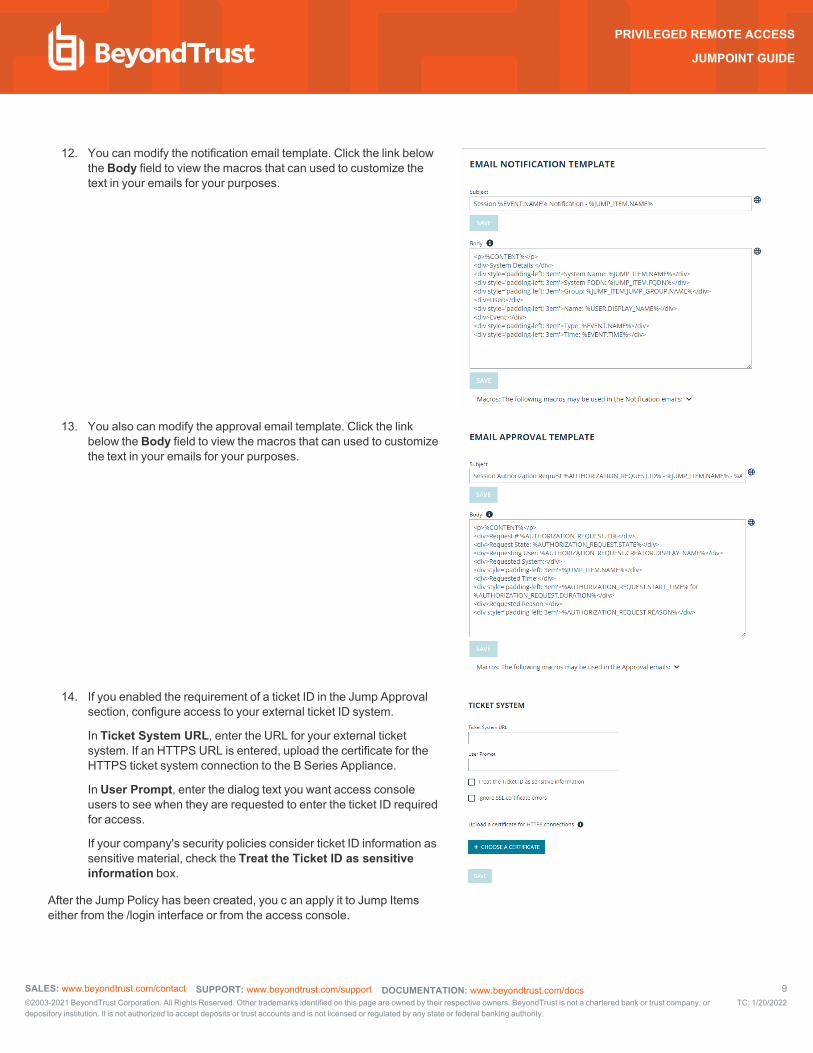
12. You can modify the notification email template. Click the link below the Body field to view the macros that can used to customize the text in your emails for your purposes.
13. You also can modify the approval email template. Click the link below the Body field to view the macros that can used to customize the text in your emails for your purposes.
14. If you enabled the requirement of a ticket ID in the Jump Approval section, configure access to your external ticket ID system.
In Ticket System URL, enter the URL for your external ticket system. If an HTTPS URL is entered, upload the certificate for the HTTPS ticket system connection to the B Series Appliance.
In User Prompt, enter the dialog text you want access console users to see when they are requested to enter the ticket ID required for access.
If your company's security policies consider ticket ID information as sensitive material, check the Treat the Ticket ID as sensitive information box.
After the Jump Policy has been created, you c an apply it to Jump Items either from the /login interface or from the access console.
SALES: www.beyondtrust.com/contact SUPPORT: www.beyondtrust.com/support DOCUMENTATION: www.beyondtrust.com/docs 9©2003-2021 BeyondTrust Corporation. All Rights Reserved. Other trademarks identified on this page are owned by their respective owners. BeyondTrust is not a chartered bank or trust company, ordepository institution. It is not authorized to accept deposits or trust accounts and is not licensed or regulated by any state or federal banking authority.
TC: 1/20/2022
PRIVILEGED REMOTE ACCESS
JUMPOINT GUIDE
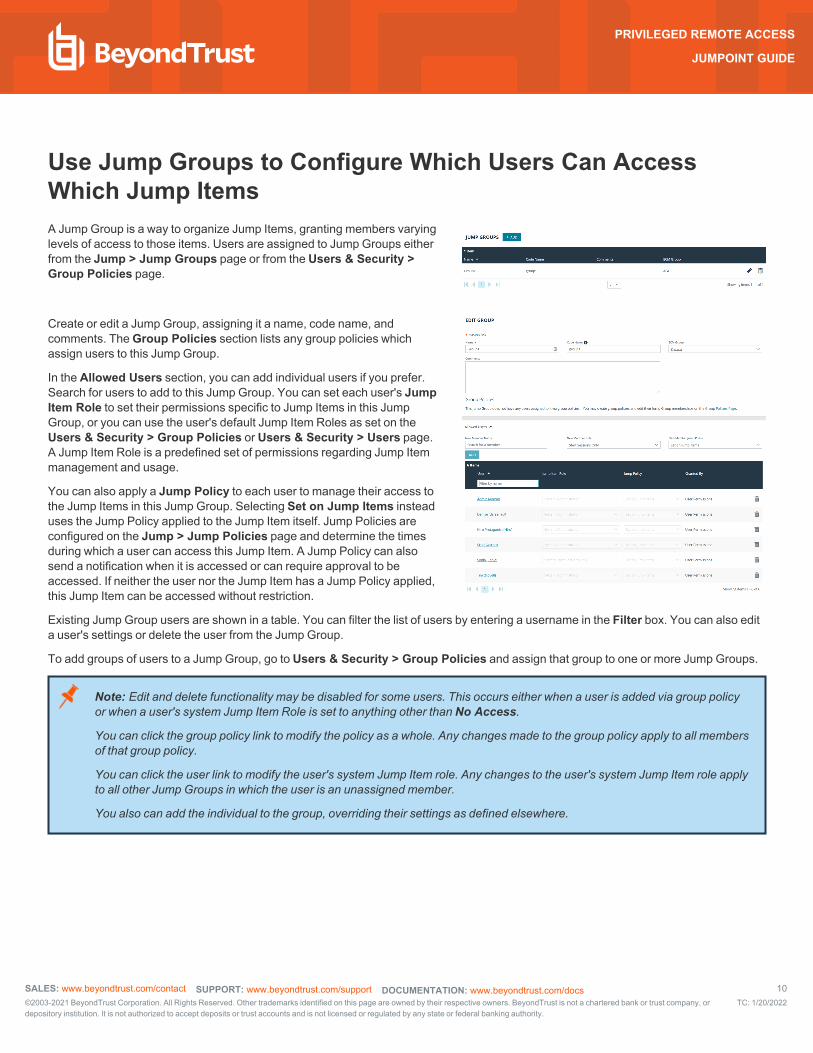
Use Jump Groups to Configure Which Users Can Access Which Jump ItemsA Jump Group is a way to organize Jump Items, granting members varying levels of access to those items. Users are assigned to Jump Groups either from the Jump > Jump Groups page or from the Users & Security > Group Policies page.
Create or edit a Jump Group, assigning it a name, code name, and comments. The Group Policies section lists any group policies which assign users to this Jump Group.
In the Allowed Users section, you can add individual users if you prefer. Search for users to add to this Jump Group. You can set each user's Jump Item Role to set their permissions specific to Jump Items in this Jump Group, or you can use the user's default Jump Item Roles as set on the Users & Security > Group Policies or Users & Security > Users page. A Jump Item Role is a predefined set of permissions regarding Jump Item management and usage.
You can also apply a Jump Policy to each user to manage their access to the Jump Items in this Jump Group. Selecting Set on Jump Items instead uses the Jump Policy applied to the Jump Item itself. Jump Policies are configured on the Jump > Jump Policies page and determine the times during which a user can access this Jump Item. A Jump Policy can also send a notification when it is accessed or can require approval to be accessed. If neither the user nor the Jump Item has a Jump Policy applied, this Jump Item can be accessed without restriction.
Existing Jump Group users are shown in a table. You can filter the list of users by entering a username in the Filter box. You can also edit a user's settings or delete the user from the Jump Group.
To add groups of users to a Jump Group, go to Users & Security > Group Policies and assign that group to one or more Jump Groups.
Note: Edit and delete functionality may be disabled for some users. This occurs either when a user is added via group policy or when a user's system Jump Item Role is set to anything other than No Access.
You can click the group policy link to modify the policy as a whole. Any changes made to the group policy apply to all members of that group policy.
You can click the user link to modify the user's system Jump Item role. Any changes to the user's system Jump Item role apply to all other Jump Groups in which the user is an unassigned member.
You also can add the individual to the group, overriding their settings as defined elsewhere.
SALES: www.beyondtrust.com/contact SUPPORT: www.beyondtrust.com/support DOCUMENTATION: www.beyondtrust.com/docs 10©2003-2021 BeyondTrust Corporation. All Rights Reserved. Other trademarks identified on this page are owned by their respective owners. BeyondTrust is not a chartered bank or trust company, ordepository institution. It is not authorized to accept deposits or trust accounts and is not licensed or regulated by any state or federal banking authority.
TC: 1/20/2022
PRIVILEGED REMOTE ACCESS
JUMPOINT GUIDE
Requirements and Considerations to Install a PRA JumpointA Jumpoint-facilitated BeyondTrust session involves three computers:
1. The BeyondTrust user's system 2. A Windows computer that hosts the Jumpoint 3. The unattended Windows computer targeted for remote control
Prerequisites l The administrator deploying the Jumpoint must have administrative rights on the computer hosting the Jumpoint. l The BeyondTrust user must have administrative rights to the target computer. l In the BeyondTrust administrative interface, one or both of the following conditions must be true:
o The user must have the account permission Allowed Jump Methods: Local Jump on the local network. o The user must have the account permission Allowed Jump Methods: Remote Jump via a Jumpoint and must be
granted access to one or more Jumpoints, either individually or via group policy.
ConsiderationsThe main objective of any BeyondTrust administrator should be to ensure the integrity of the BeyondTrust deployment. The simpler and more clear-cut a BeyondTrust deployment is, the easier it is to maintain a level of integrity that is in line with your company's security objectives. Specifically when deploying a Jumpoint on a remote network, another layer of complexity is introduced to your deployment. Therefore, BeyondTrust recommends using a dedicated resource for a Jumpoint in order to decrease any potential security risks, increase availability, and reduce management complexity. A dedicated resource is most often a virtual machine or sometimes a physical machine with the sole purpose of hosting the Jumpoint.
If a dedicated resource is not readily available, there are several factors to take into consideration before deciding to use a shared resource as a Jumpoint host. When using a shared resource, the BeyondTrust administrator must be aware of everything for which the shared resource is used. For example, the BeyondTrust administrator would need to identify and control any unwanted changes to or repurposing of the resource by other groups, especially in large organizations.
There are many other variables that are unique to any given network or business environment. The questions below are provided to encourage a proactive approach before pursuing the use of a shared resource as a Jumpoint host. BeyondTrust encourages adding your own list of pros and cons before deploying a Jumpoint on a shared resource.
Security
l Who has access to this resource? l Are file shares accessible on this resource? l Are there group policies in place that may restrict Jumpoint functionality? l What is the risk of virus infection or malware due to multi-user access? l What is the risk of another user's changing the system permissions or deleting needed files?
SALES: www.beyondtrust.com/contact SUPPORT: www.beyondtrust.com/support DOCUMENTATION: www.beyondtrust.com/docs 11©2003-2021 BeyondTrust Corporation. All Rights Reserved. Other trademarks identified on this page are owned by their respective owners. BeyondTrust is not a chartered bank or trust company, ordepository institution. It is not authorized to accept deposits or trust accounts and is not licensed or regulated by any state or federal banking authority.
TC: 1/20/2022
PRIVILEGED REMOTE ACCESS
JUMPOINT GUIDE
File/Print Sharing
l What other programs will be competing for resources such as disk space, processor availability, bandwidth, and disk access? l Will the resource be available at all times? How critical is on-demand access? l What is the risk of permission modification on file shares? l Will this resource be used frequently for print jobs? Large or frequent print jobs can consume a large amount of resources,
adversely affecting Jumpoint performance.
BeyondTrust Considerations
l How critical is availability? What is the risk of the Jumpoint not being available? l How frequently will this Jumpoint be used? l What is the potential number of Jump sessions that will need to be run through this Jumpoint at the same time? l Will shared responsibility of this resource across different departments increase complexity?
Jumpoint Requirements
Remote Jump Sessions – Host System Requirements
1. An average server class machine with the following specs can support up to 25 concurrent sessions of any type:
l Windows Server 2008 SP2+ l 2 cores @ 2.8Ghz l 8GB of RAM
2. Admin rights on the remote system must use either a domain admin user or, in the case of a workgroup environment, a local admin user.
3. The host must be a member of the respective Active Directory domain.
l By default, the Jumpoint runs under the local system account. In certain environments, this may need to be changed to a domain account that has local admin rights on the target computer(s).
l If this account is changed, then the following steps must first be taken:
a. Log onto the Jumpoint host system as an administrator. b. Stop the BeyondTrust Jumpoint service using services.msc. c. Navigate to C:\ProgramData\Bomgar\Jumpoint\hostname or C:\Users\All Users\Application
Data\Bomgar\Jumpoint\hostname (depends on Windows version). d. Open the properties for bomgar.ini and go to the Security tab. Click Continue to view the security properties. e. Select the Users or Everyone group (depends on Windows version). f. Uncheck the Read permission in the Deny column.
g. Apply the changes. h. The Jumpoint may now be safely changed to be under a different account. i. Restart the Jumpoint service using services.msc.
4. File sharing must be turned on, specifically IPC$ and ADMIN$.
SALES: www.beyondtrust.com/contact SUPPORT: www.beyondtrust.com/support DOCUMENTATION: www.beyondtrust.com/docs 12©2003-2021 BeyondTrust Corporation. All Rights Reserved. Other trademarks identified on this page are owned by their respective owners. BeyondTrust is not a chartered bank or trust company, ordepository institution. It is not authorized to accept deposits or trust accounts and is not licensed or regulated by any state or federal banking authority.
TC: 1/20/2022
PRIVILEGED REMOTE ACCESS
JUMPOINT GUIDE
5. The Remote Registry service must be running (check using services.msc). 6. The Jumpoint host system must be on the same network as the target system.
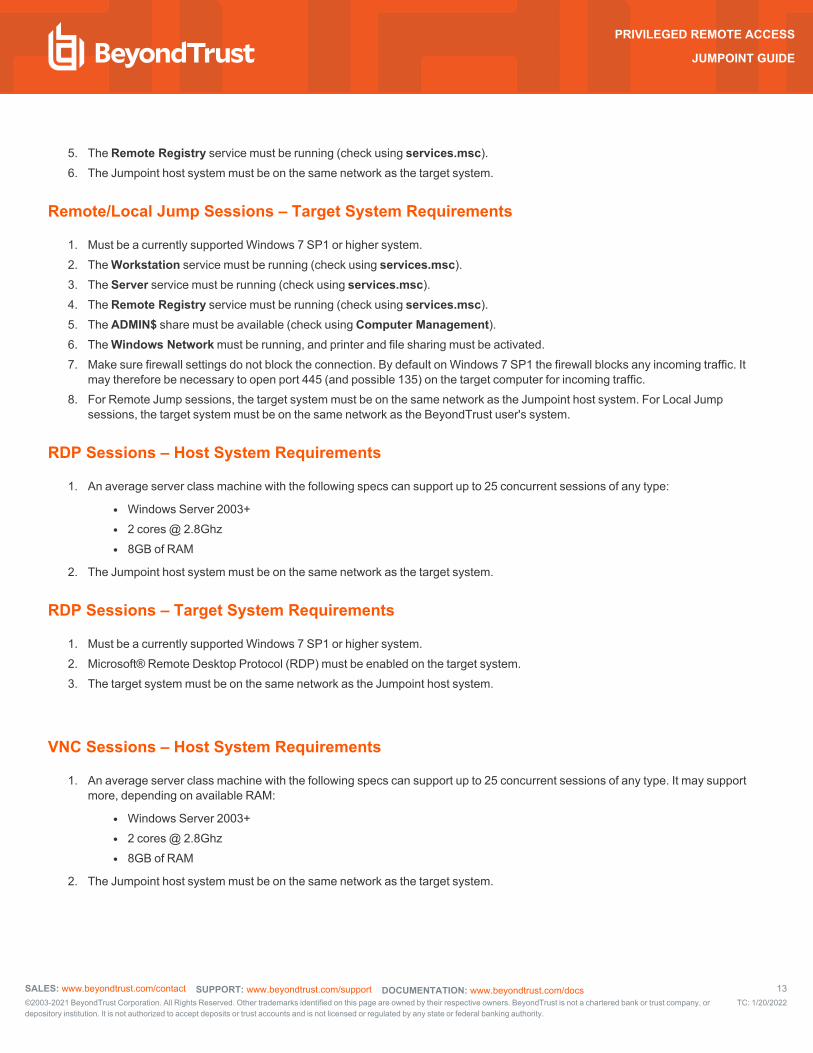
Remote/Local Jump Sessions – Target System Requirements
1. Must be a currently supported Windows 7 SP1 or higher system. 2. The Workstation service must be running (check using services.msc). 3. The Server service must be running (check using services.msc). 4. The Remote Registry service must be running (check using services.msc). 5. The ADMIN$ share must be available (check using Computer Management). 6. The Windows Network must be running, and printer and file sharing must be activated. 7. Make sure firewall settings do not block the connection. By default on Windows 7 SP1 the firewall blocks any incoming traffic. It
may therefore be necessary to open port 445 (and possible 135) on the target computer for incoming traffic. 8. For Remote Jump sessions, the target system must be on the same network as the Jumpoint host system. For Local Jump
sessions, the target system must be on the same network as the BeyondTrust user's system.
RDP Sessions – Host System Requirements
1. An average server class machine with the following specs can support up to 25 concurrent sessions of any type:
l Windows Server 2003+ l 2 cores @ 2.8Ghz l 8GB of RAM
2. The Jumpoint host system must be on the same network as the target system.
RDP Sessions – Target System Requirements
1. Must be a currently supported Windows 7 SP1 or higher system. 2. Microsoft® Remote Desktop Protocol (RDP) must be enabled on the target system. 3. The target system must be on the same network as the Jumpoint host system.
VNC Sessions – Host System Requirements
1. An average server class machine with the following specs can support up to 25 concurrent sessions of any type. It may support more, depending on available RAM:
l Windows Server 2003+ l 2 cores @ 2.8Ghz l 8GB of RAM
2. The Jumpoint host system must be on the same network as the target system.
SALES: www.beyondtrust.com/contact SUPPORT: www.beyondtrust.com/support DOCUMENTATION: www.beyondtrust.com/docs 13©2003-2021 BeyondTrust Corporation. All Rights Reserved. Other trademarks identified on this page are owned by their respective owners. BeyondTrust is not a chartered bank or trust company, ordepository institution. It is not authorized to accept deposits or trust accounts and is not licensed or regulated by any state or federal banking authority.
TC: 1/20/2022
PRIVILEGED REMOTE ACCESS
JUMPOINT GUIDE
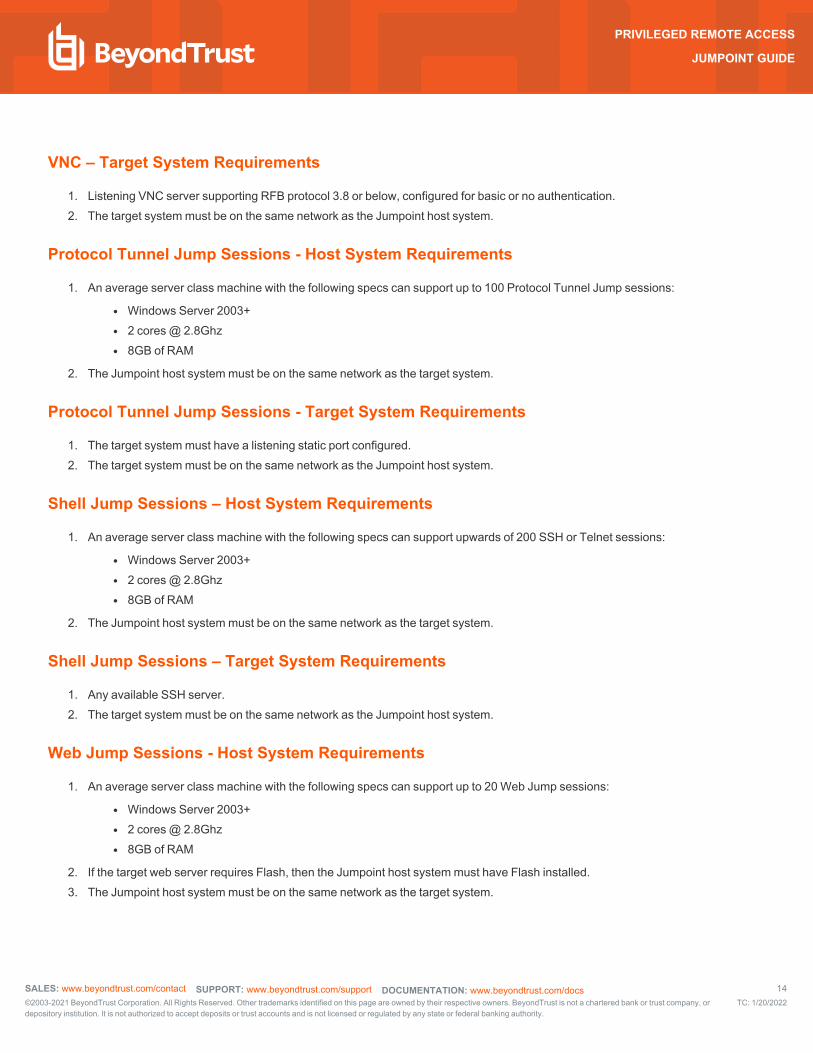
VNC – Target System Requirements
1. Listening VNC server supporting RFB protocol 3.8 or below, configured for basic or no authentication. 2. The target system must be on the same network as the Jumpoint host system.
Protocol Tunnel Jump Sessions - Host System Requirements
1. An average server class machine with the following specs can support up to 100 Protocol Tunnel Jump sessions:
l Windows Server 2003+ l 2 cores @ 2.8Ghz l 8GB of RAM
2. The Jumpoint host system must be on the same network as the target system.
Protocol Tunnel Jump Sessions - Target System Requirements
1. The target system must have a listening static port configured. 2. The target system must be on the same network as the Jumpoint host system.
Shell Jump Sessions – Host System Requirements
1. An average server class machine with the following specs can support upwards of 200 SSH or Telnet sessions:
l Windows Server 2003+ l 2 cores @ 2.8Ghz l 8GB of RAM
2. The Jumpoint host system must be on the same network as the target system.
Shell Jump Sessions – Target System Requirements
1. Any available SSH server. 2. The target system must be on the same network as the Jumpoint host system.
Web Jump Sessions - Host System Requirements
1. An average server class machine with the following specs can support up to 20 Web Jump sessions:
l Windows Server 2003+ l 2 cores @ 2.8Ghz l 8GB of RAM
2. If the target web server requires Flash, then the Jumpoint host system must have Flash installed. 3. The Jumpoint host system must be on the same network as the target system.
SALES: www.beyondtrust.com/contact SUPPORT: www.beyondtrust.com/support DOCUMENTATION: www.beyondtrust.com/docs 14©2003-2021 BeyondTrust Corporation. All Rights Reserved. Other trademarks identified on this page are owned by their respective owners. BeyondTrust is not a chartered bank or trust company, ordepository institution. It is not authorized to accept deposits or trust accounts and is not licensed or regulated by any state or federal banking authority.
TC: 1/20/2022
PRIVILEGED REMOTE ACCESS
JUMPOINT GUIDE
Web Jump Sessions - Target System Requirements
1. Any available web server. 2. The target system must be on the same network as the Jumpoint host system.
SALES: www.beyondtrust.com/contact SUPPORT: www.beyondtrust.com/support DOCUMENTATION: www.beyondtrust.com/docs 15©2003-2021 BeyondTrust Corporation. All Rights Reserved. Other trademarks identified on this page are owned by their respective owners. BeyondTrust is not a chartered bank or trust company, ordepository institution. It is not authorized to accept deposits or trust accounts and is not licensed or regulated by any state or federal banking authority.
TC: 1/20/2022
PRIVILEGED REMOTE ACCESS
JUMPOINT GUIDE
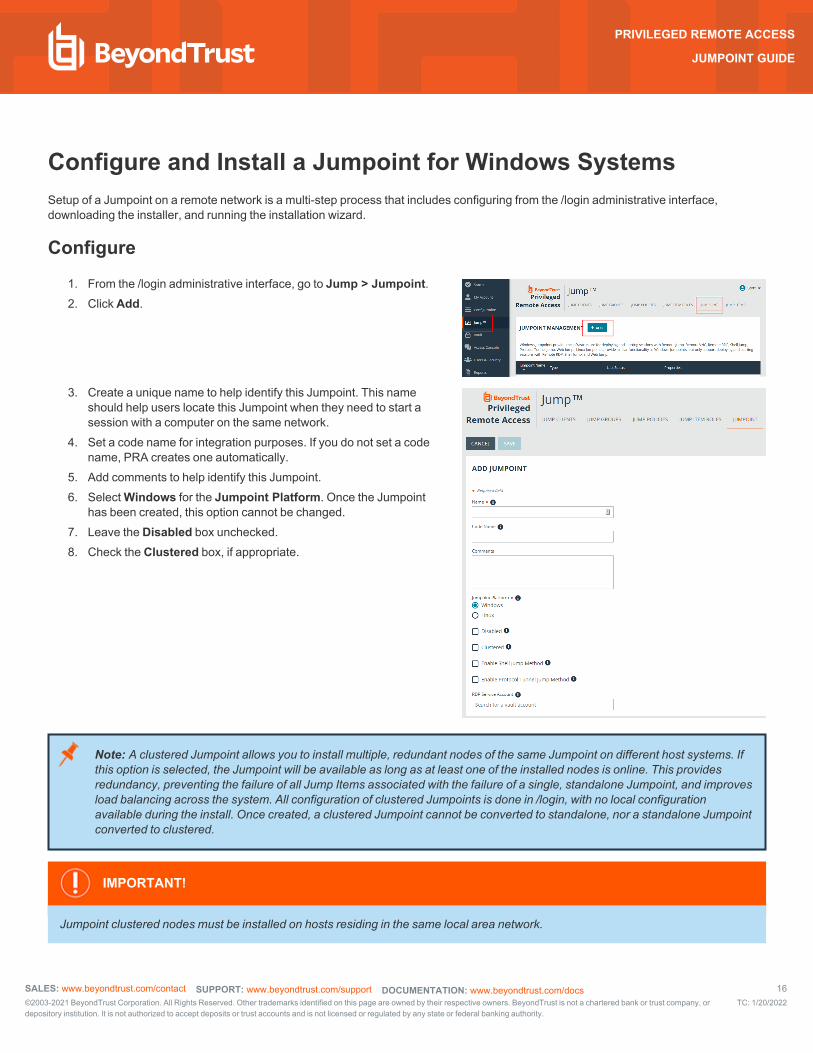
Configure and Install a Jumpoint for Windows SystemsSetup of a Jumpoint on a remote network is a multi-step process that includes configuring from the /login administrative interface, downloading the installer, and running the installation wizard.
Configure
1. From the /login administrative interface, go to Jump > Jumpoint. 2. Click Add.
3. Create a unique name to help identify this Jumpoint. This name should help users locate this Jumpoint when they need to start a session with a computer on the same network.
4. Set a code name for integration purposes. If you do not set a code name, PRA creates one automatically.
5. Add comments to help identify this Jumpoint. 6. Select Windows for the Jumpoint Platform. Once the Jumpoint
has been created, this option cannot be changed. 7. Leave the Disabled box unchecked. 8. Check the Clustered box, if appropriate.
Note: A clustered Jumpoint allows you to install multiple, redundant nodes of the same Jumpoint on different host systems. If this option is selected, the Jumpoint will be available as long as at least one of the installed nodes is online. This provides redundancy, preventing the failure of all Jump Items associated with the failure of a single, standalone Jumpoint, and improves load balancing across the system. All configuration of clustered Jumpoints is done in /login, with no local configuration available during the install. Once created, a clustered Jumpoint cannot be converted to standalone, nor a standalone Jumpoint converted to clustered.
IMPORTANT!
Jumpoint clustered nodes must be installed on hosts residing in the same local area network.
SALES: www.beyondtrust.com/contact SUPPORT: www.beyondtrust.com/support DOCUMENTATION: www.beyondtrust.com/docs 16©2003-2021 BeyondTrust Corporation. All Rights Reserved. Other trademarks identified on this page are owned by their respective owners. BeyondTrust is not a chartered bank or trust company, ordepository institution. It is not authorized to accept deposits or trust accounts and is not licensed or regulated by any state or federal banking authority.
TC: 1/20/2022
PRIVILEGED REMOTE ACCESS
JUMPOINT GUIDE
9. If you want users to be able to connect to SSH-enabled and Telnet-enabled network devices through this Jumpoint, check Enable Shell Jump Method.
10. If Enable Protocol Tunnel Jump Method is checked, users may make TCP connections from their systems to remote endpoints through this Jumpoint.
11. From the Jumpoint edit page, you may authorize users to start sessions through this Jumpoint. After you have created the Jumpoint, you can also grant access to groups of users from Users & Security > Group Policies.
12. Save the configuration. Your new Jumpoint should now appear in the list of configured Jumpoints.
Note: Once you have installed the Jumpoint, PRA populates the table with the hostname of the system it is installed on, as well as with that system's public and private IP addresses. This information can help you locate the Jumpoint's host system in case you need to change the Jumpoint's configuration.
DownloadNow that your Jumpoint is configured, you need to install the Jumpoint on a single system in the remote network you wish to access. This system serves as the gateway for Jump sessions with other computers on the remote network. You can either install the Jumpoint directly on the host or email the installer to a user at the remote system. If this is to be a clustered Jumpoint, you can add nodes later.
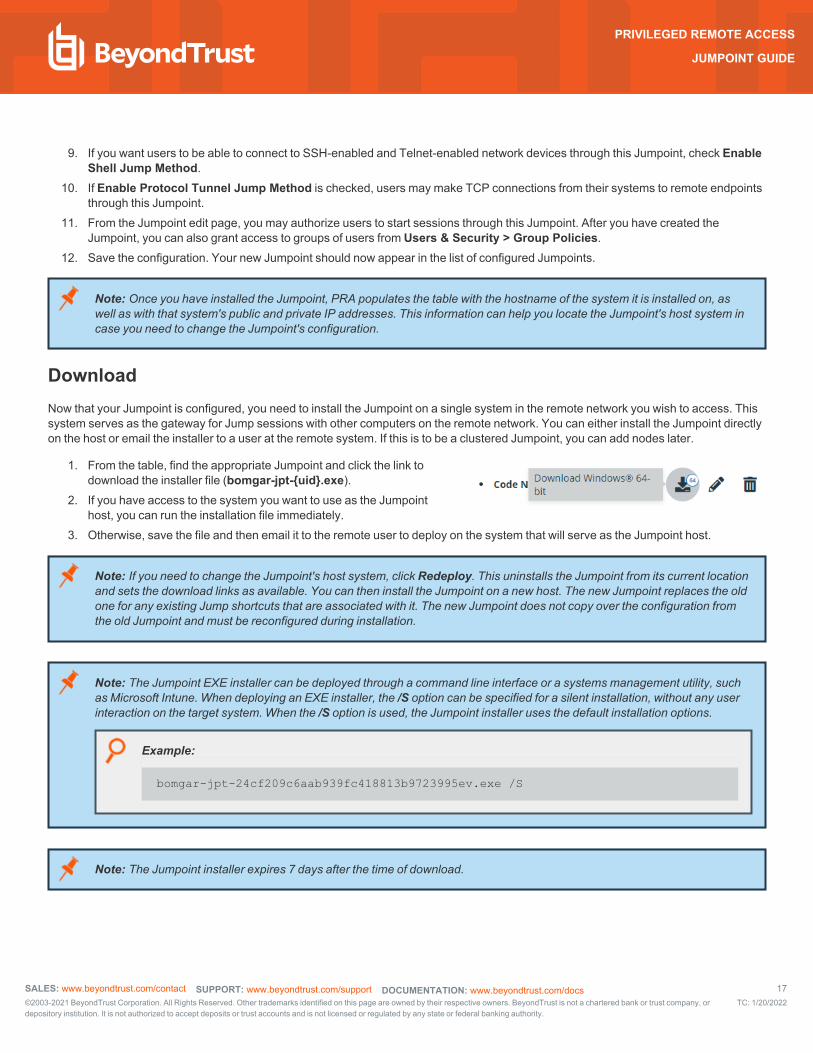
1. From the table, find the appropriate Jumpoint and click the link to download the installer file (bomgar-jpt-{uid}.exe).
2. If you have access to the system you want to use as the Jumpoint host, you can run the installation file immediately.
3. Otherwise, save the file and then email it to the remote user to deploy on the system that will serve as the Jumpoint host.
Note: If you need to change the Jumpoint's host system, click Redeploy. This uninstalls the Jumpoint from its current location and sets the download links as available. You can then install the Jumpoint on a new host. The new Jumpoint replaces the old one for any existing Jump shortcuts that are associated with it. The new Jumpoint does not copy over the configuration from the old Jumpoint and must be reconfigured during installation.
Note: The Jumpoint EXE installer can be deployed through a command line interface or a systems management utility, such as Microsoft Intune. When deploying an EXE installer, the /S option can be specified for a silent installation, without any user interaction on the target system. When the /S option is used, the Jumpoint installer uses the default installation options.
Example:
bomgar-jpt-24cf209c6aab939fc418813b9723995ev.exe /S
Note: The Jumpoint installer expires 7 days after the time of download.
SALES: www.beyondtrust.com/contact SUPPORT: www.beyondtrust.com/support DOCUMENTATION: www.beyondtrust.com/docs 17©2003-2021 BeyondTrust Corporation. All Rights Reserved. Other trademarks identified on this page are owned by their respective owners. BeyondTrust is not a chartered bank or trust company, ordepository institution. It is not authorized to accept deposits or trust accounts and is not licensed or regulated by any state or federal banking authority.
TC: 1/20/2022
PRIVILEGED REMOTE ACCESS
JUMPOINT GUIDE
Install
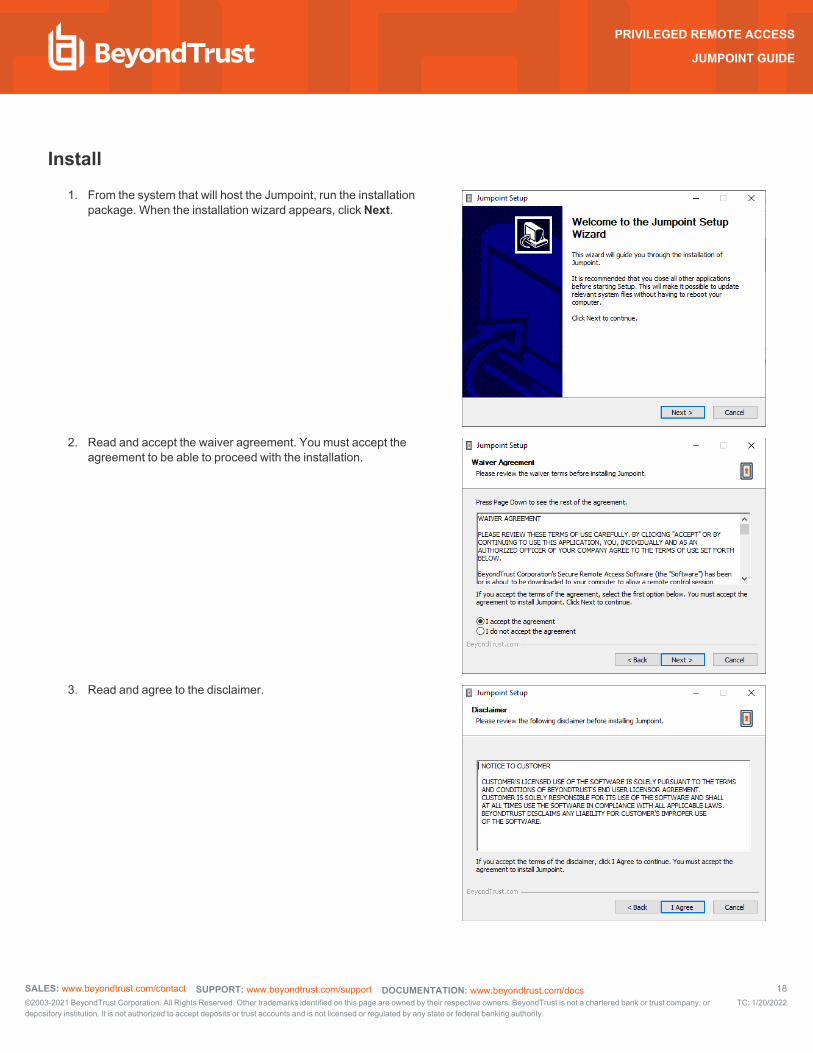
1. From the system that will host the Jumpoint, run the installation package. When the installation wizard appears, click Next.
2. Read and accept the waiver agreement. You must accept the agreement to be able to proceed with the installation.
3. Read and agree to the disclaimer.
SALES: www.beyondtrust.com/contact SUPPORT: www.beyondtrust.com/support DOCUMENTATION: www.beyondtrust.com/docs 18©2003-2021 BeyondTrust Corporation. All Rights Reserved. Other trademarks identified on this page are owned by their respective owners. BeyondTrust is not a chartered bank or trust company, ordepository institution. It is not authorized to accept deposits or trust accounts and is not licensed or regulated by any state or federal banking authority.
TC: 1/20/2022
PRIVILEGED REMOTE ACCESS
JUMPOINT GUIDE
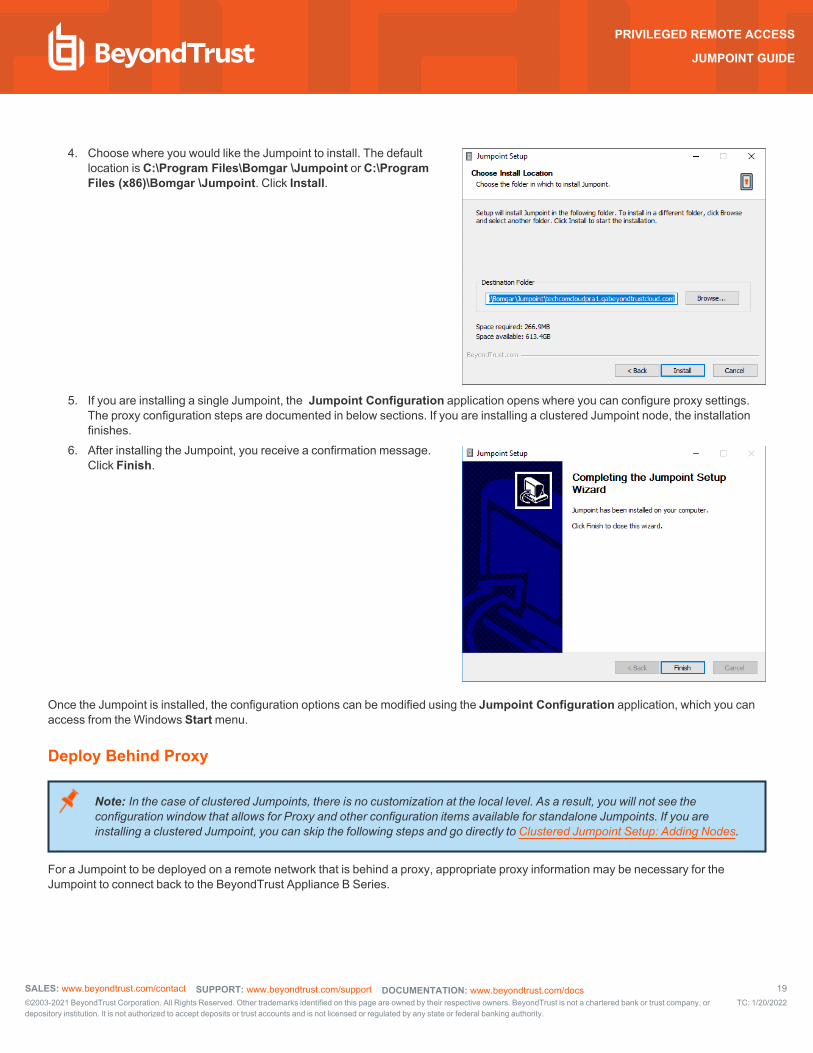
4. Choose where you would like the Jumpoint to install. The default location is C:\Program Files\Bomgar \Jumpoint or C:\Program Files (x86)\Bomgar \Jumpoint. Click Install.
5. If you are installing a single Jumpoint, the Jumpoint Configuration application opens where you can configure proxy settings. The proxy configuration steps are documented in below sections. If you are installing a clustered Jumpoint node, the installation finishes.
6. After installing the Jumpoint, you receive a confirmation message. Click Finish.
Once the Jumpoint is installed, the configuration options can be modified using the Jumpoint Configuration application, which you can access from the Windows Start menu.
Deploy Behind Proxy
Note: In the case of clustered Jumpoints, there is no customization at the local level. As a result, you will not see the configuration window that allows for Proxy and other configuration items available for standalone Jumpoints. If you are installing a clustered Jumpoint, you can skip the following steps and go directly to Clustered Jumpoint Setup: Adding Nodes.
For a Jumpoint to be deployed on a remote network that is behind a proxy, appropriate proxy information may be necessary for the Jumpoint to connect back to the BeyondTrust Appliance B Series.
SALES: www.beyondtrust.com/contact SUPPORT: www.beyondtrust.com/support DOCUMENTATION: www.beyondtrust.com/docs 19©2003-2021 BeyondTrust Corporation. All Rights Reserved. Other trademarks identified on this page are owned by their respective owners. BeyondTrust is not a chartered bank or trust company, ordepository institution. It is not authorized to accept deposits or trust accounts and is not licensed or regulated by any state or federal banking authority.
TC: 1/20/2022
PRIVILEGED REMOTE ACCESS
JUMPOINT GUIDE
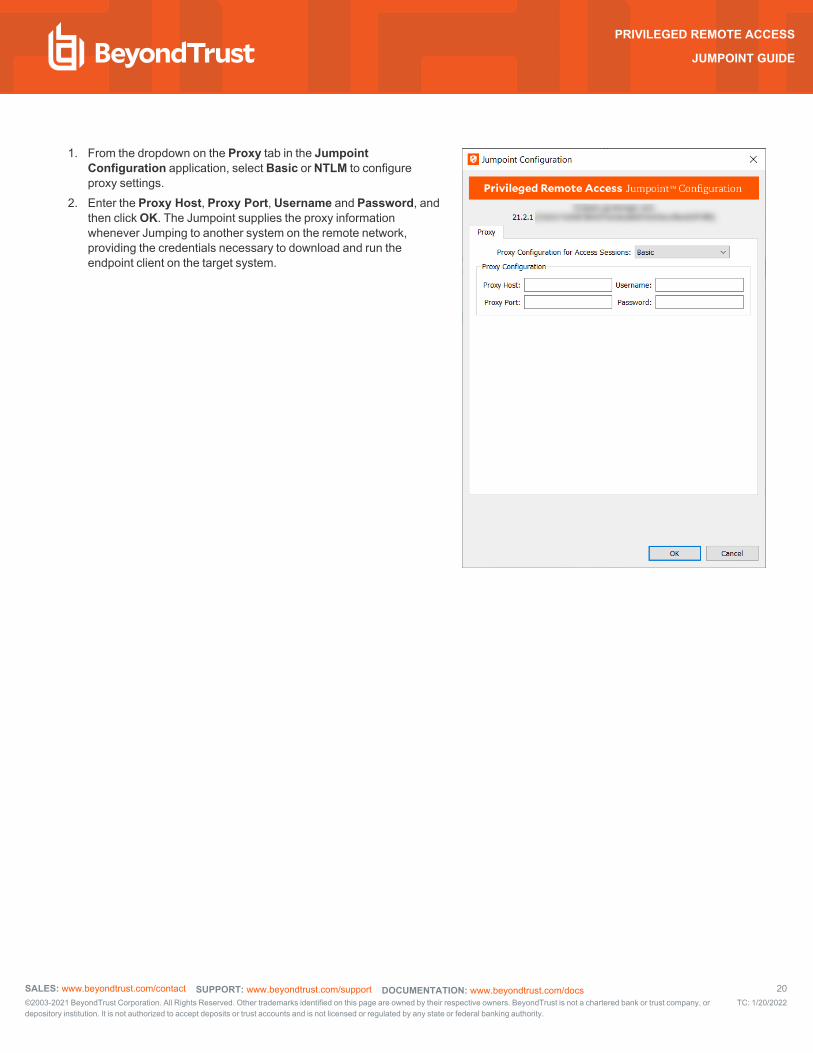
1. From the dropdown on the Proxy tab in the Jumpoint Configuration application, select Basic or NTLM to configure proxy settings.
2. Enter the Proxy Host, Proxy Port, Username and Password, and then click OK. The Jumpoint supplies the proxy information whenever Jumping to another system on the remote network, providing the credentials necessary to download and run the endpoint client on the target system.
SALES: www.beyondtrust.com/contact SUPPORT: www.beyondtrust.com/support DOCUMENTATION: www.beyondtrust.com/docs 20©2003-2021 BeyondTrust Corporation. All Rights Reserved. Other trademarks identified on this page are owned by their respective owners. BeyondTrust is not a chartered bank or trust company, ordepository institution. It is not authorized to accept deposits or trust accounts and is not licensed or regulated by any state or federal banking authority.
TC: 1/20/2022
PRIVILEGED REMOTE ACCESS
JUMPOINT GUIDE
Configure Windows Jumpoint as a Proxy Server
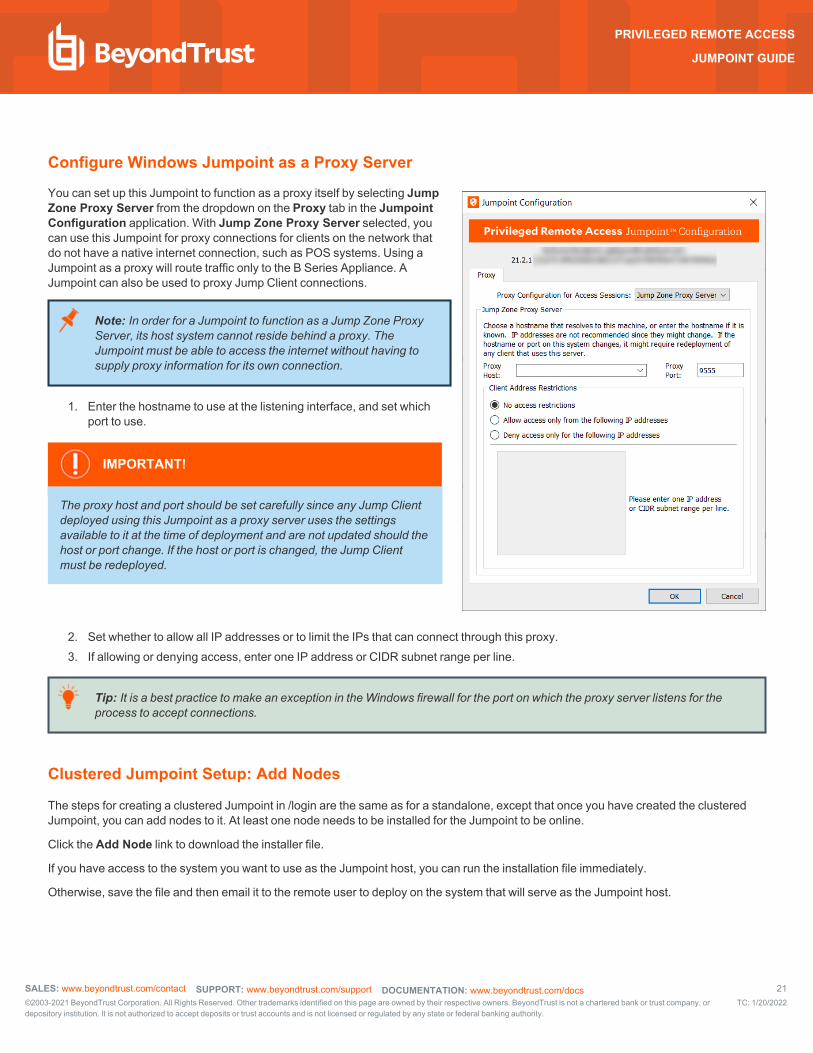
You can set up this Jumpoint to function as a proxy itself by selecting Jump Zone Proxy Server from the dropdown on the Proxy tab in the Jumpoint Configuration application. With Jump Zone Proxy Server selected, you can use this Jumpoint for proxy connections for clients on the network that do not have a native internet connection, such as POS systems. Using a Jumpoint as a proxy will route traffic only to the B Series Appliance. A Jumpoint can also be used to proxy Jump Client connections.
Note: In order for a Jumpoint to function as a Jump Zone Proxy Server, its host system cannot reside behind a proxy. The Jumpoint must be able to access the internet without having to supply proxy information for its own connection.
1. Enter the hostname to use at the listening interface, and set which port to use.
IMPORTANT!
The proxy host and port should be set carefully since any Jump Client deployed using this Jumpoint as a proxy server uses the settings available to it at the time of deployment and are not updated should the host or port change. If the host or port is changed, the Jump Client must be redeployed.
2. Set whether to allow all IP addresses or to limit the IPs that can connect through this proxy. 3. If allowing or denying access, enter one IP address or CIDR subnet range per line.
Tip: It is a best practice to make an exception in the Windows firewall for the port on which the proxy server listens for the process to accept connections.
Clustered Jumpoint Setup: Add Nodes
The steps for creating a clustered Jumpoint in /login are the same as for a standalone, except that once you have created the clustered Jumpoint, you can add nodes to it. At least one node needs to be installed for the Jumpoint to be online.
Click the Add Node link to download the installer file.
If you have access to the system you want to use as the Jumpoint host, you can run the installation file immediately.
Otherwise, save the file and then email it to the remote user to deploy on the system that will serve as the Jumpoint host.
SALES: www.beyondtrust.com/contact SUPPORT: www.beyondtrust.com/support DOCUMENTATION: www.beyondtrust.com/docs 21©2003-2021 BeyondTrust Corporation. All Rights Reserved. Other trademarks identified on this page are owned by their respective owners. BeyondTrust is not a chartered bank or trust company, ordepository institution. It is not authorized to accept deposits or trust accounts and is not licensed or regulated by any state or federal banking authority.
TC: 1/20/2022
PRIVILEGED REMOTE ACCESS
JUMPOINT GUIDE
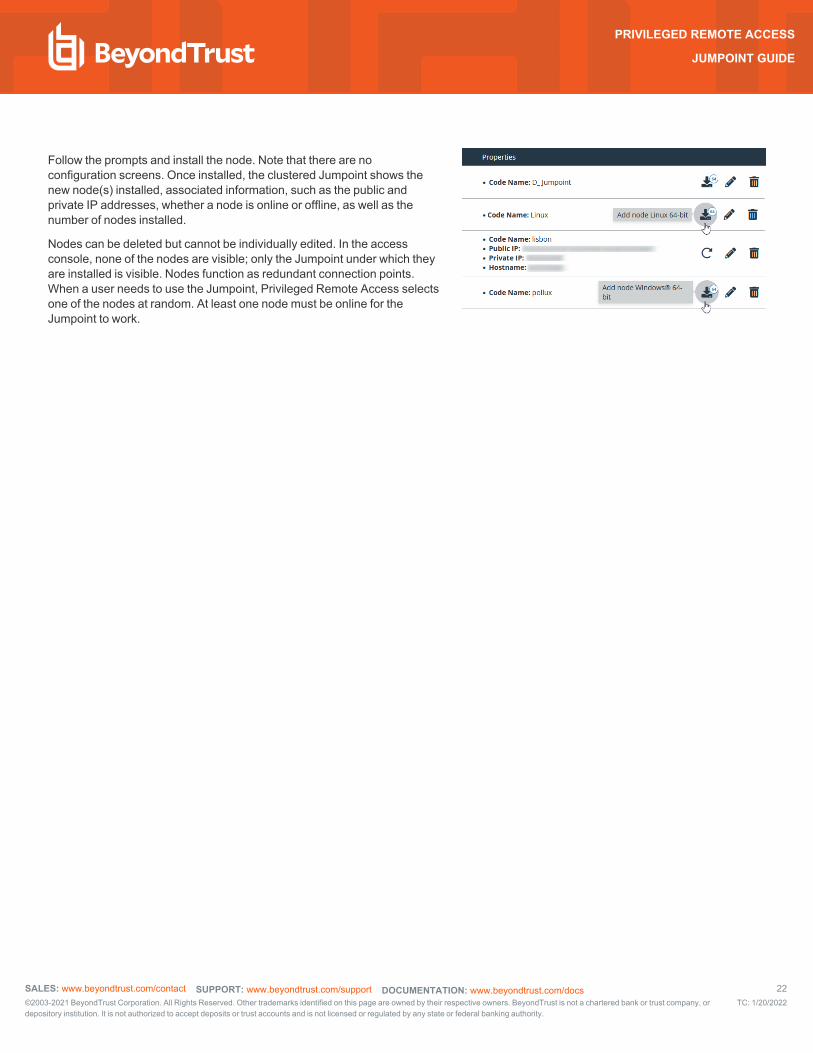
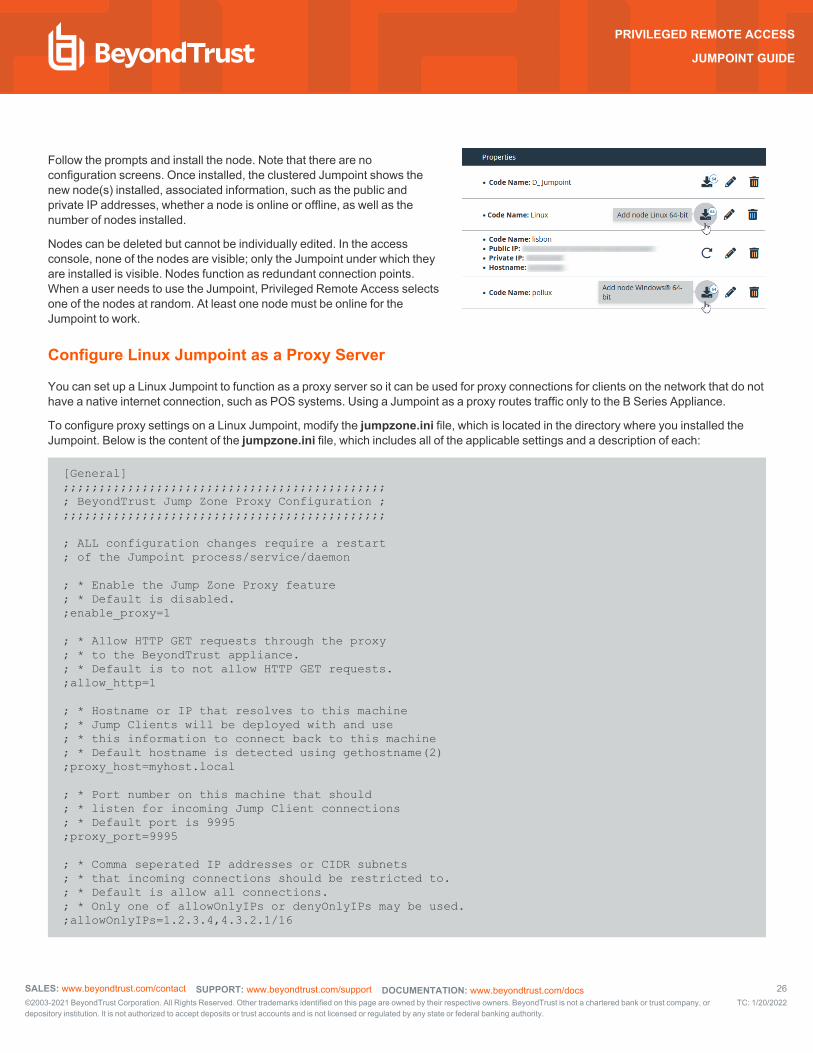
Follow the prompts and install the node. Note that there are no configuration screens. Once installed, the clustered Jumpoint shows the new node(s) installed, associated information, such as the public and private IP addresses, whether a node is online or offline, as well as the number of nodes installed.
Nodes can be deleted but cannot be individually edited. In the access console, none of the nodes are visible; only the Jumpoint under which they are installed is visible. Nodes function as redundant connection points. When a user needs to use the Jumpoint, Privileged Remote Access selects one of the nodes at random. At least one node must be online for the Jumpoint to work.
SALES: www.beyondtrust.com/contact SUPPORT: www.beyondtrust.com/support DOCUMENTATION: www.beyondtrust.com/docs 22©2003-2021 BeyondTrust Corporation. All Rights Reserved. Other trademarks identified on this page are owned by their respective owners. BeyondTrust is not a chartered bank or trust company, ordepository institution. It is not authorized to accept deposits or trust accounts and is not licensed or regulated by any state or federal banking authority.
TC: 1/20/2022
PRIVILEGED REMOTE ACCESS
JUMPOINT GUIDE
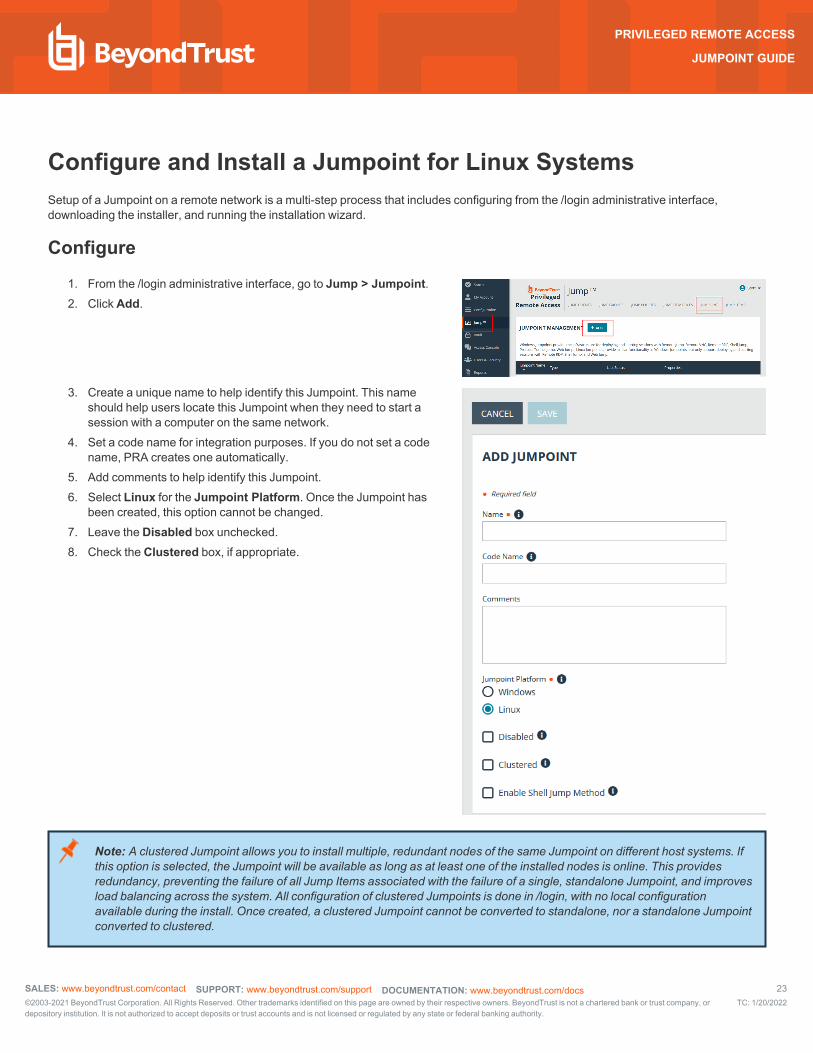
Configure and Install a Jumpoint for Linux SystemsSetup of a Jumpoint on a remote network is a multi-step process that includes configuring from the /login administrative interface, downloading the installer, and running the installation wizard.
Configure
1. From the /login administrative interface, go to Jump > Jumpoint. 2. Click Add.
3. Create a unique name to help identify this Jumpoint. This name should help users locate this Jumpoint when they need to start a session with a computer on the same network.
4. Set a code name for integration purposes. If you do not set a code name, PRA creates one automatically.
5. Add comments to help identify this Jumpoint. 6. Select Linux for the Jumpoint Platform. Once the Jumpoint has
been created, this option cannot be changed. 7. Leave the Disabled box unchecked. 8. Check the Clustered box, if appropriate.
Note: A clustered Jumpoint allows you to install multiple, redundant nodes of the same Jumpoint on different host systems. If this option is selected, the Jumpoint will be available as long as at least one of the installed nodes is online. This provides redundancy, preventing the failure of all Jump Items associated with the failure of a single, standalone Jumpoint, and improves load balancing across the system. All configuration of clustered Jumpoints is done in /login, with no local configuration available during the install. Once created, a clustered Jumpoint cannot be converted to standalone, nor a standalone Jumpoint converted to clustered.
SALES: www.beyondtrust.com/contact SUPPORT: www.beyondtrust.com/support DOCUMENTATION: www.beyondtrust.com/docs 23©2003-2021 BeyondTrust Corporation. All Rights Reserved. Other trademarks identified on this page are owned by their respective owners. BeyondTrust is not a chartered bank or trust company, ordepository institution. It is not authorized to accept deposits or trust accounts and is not licensed or regulated by any state or federal banking authority.
TC: 1/20/2022
PRIVILEGED REMOTE ACCESS
JUMPOINT GUIDE
Note: Linux Jumpoints can only be used for RDP and SSH/Telnet sessions, allowing for credential injection from user or vault, as well as RemoteApp functionality and Shell Jump filtering. Clustered Jumpoints can only add new nodes of the same OS. You cannot mix Windows and Linux nodes.
IMPORTANT!
Jumpoint clustered nodes must be installed on hosts residing in the same local area network.
9. If you want users to be able to connect to SSH-enabled and Telnet-enabled network devices through this Jumpoint, check Enable Shell Jump Method.
10. From the Jumpoint edit page, you may authorize users to start sessions through this Jumpoint. After you have created the Jumpoint, you can also grant access to groups of users from Users & Security > Group Policies.
11. Save the configuration. Your new Jumpoint should now appear in the list of configured Jumpoints.
Note: Once you have installed the Jumpoint, PRA populates the table with the hostname of the system it is installed on, as well as with that system's public and private IP addresses. This information can help you locate the Jumpoint's host system in case you need to change the Jumpoint's configuration.
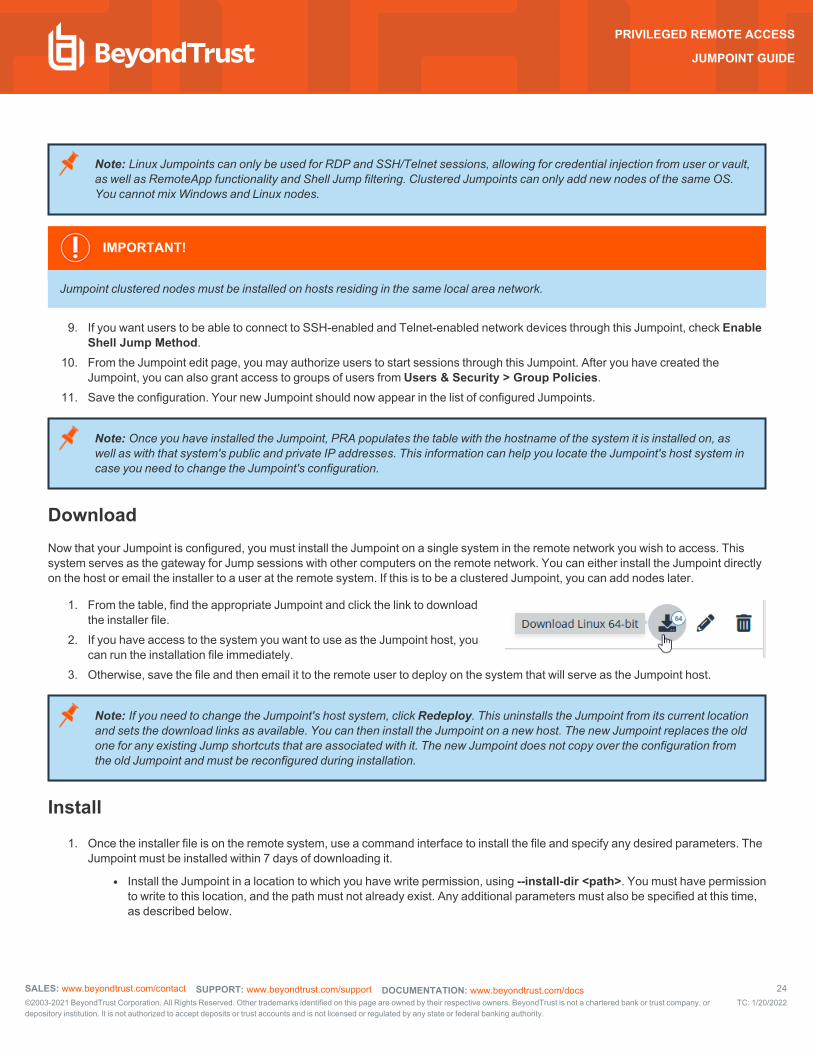
DownloadNow that your Jumpoint is configured, you must install the Jumpoint on a single system in the remote network you wish to access. This system serves as the gateway for Jump sessions with other computers on the remote network. You can either install the Jumpoint directly on the host or email the installer to a user at the remote system. If this is to be a clustered Jumpoint, you can add nodes later.
1. From the table, find the appropriate Jumpoint and click the link to download the installer file.
2. If you have access to the system you want to use as the Jumpoint host, you can run the installation file immediately.
3. Otherwise, save the file and then email it to the remote user to deploy on the system that will serve as the Jumpoint host.
Note: If you need to change the Jumpoint's host system, click Redeploy. This uninstalls the Jumpoint from its current location and sets the download links as available. You can then install the Jumpoint on a new host. The new Jumpoint replaces the old one for any existing Jump shortcuts that are associated with it. The new Jumpoint does not copy over the configuration from the old Jumpoint and must be reconfigured during installation.
Install
1. Once the installer file is on the remote system, use a command interface to install the file and specify any desired parameters. The Jumpoint must be installed within 7 days of downloading it.
l Install the Jumpoint in a location to which you have write permission, using --install-dir <path>. You must have permission to write to this location, and the path must not already exist. Any additional parameters must also be specified at this time, as described below.
SALES: www.beyondtrust.com/contact SUPPORT: www.beyondtrust.com/support DOCUMENTATION: www.beyondtrust.com/docs 24©2003-2021 BeyondTrust Corporation. All Rights Reserved. Other trademarks identified on this page are owned by their respective owners. BeyondTrust is not a chartered bank or trust company, ordepository institution. It is not authorized to accept deposits or trust accounts and is not licensed or regulated by any state or federal banking authority.
TC: 1/20/2022
PRIVILEGED REMOTE ACCESS
JUMPOINT GUIDE
sh ./bomgar-jpt-{uid}.bin --install-dir /home/username/jumpoint
l If you wish to install under a specific user context, you can pass the --user <username> argument. The user must exist and have rights to the directory where the Jumpoint is being installed. If you do not pass this argument, the Jumpoint installs under the user context that is currently running.
sh ./bomgar-jpt-{uid}.bin --install-dir /home/username/jumpoint --user jsmith
IMPORTANT!
We do not recommend installing the Jumpoint under the root context. If you attempt to install when the current user is root, you receive a warning message and are required to pass --user <username> to explicitly specify the user that the process.
2. After installing the Jumpoint, you must start its process.
/home/username/jumpoint/init-script start
This init script also accepts the stop, restart, and status arguments. You can use ./init-script status to make sure the Jumpoint is running.
IMPORTANT!
You must also arrange for init-script start to run at boot in order for the Jumpoint to remain available whenever the system restarts.
3. To remove the files, use the uninstall.sh script included in the installation
Clustered Jumpoint Setup: Add Nodes
The steps for creating a clustered Jumpoint in /login are the same as for a standalone, except that once you have created the clustered Jumpoint, you can add nodes to it. At least one node needs to be installed for the Jumpoint to be online.
Click the Add Node link to download the installer file.
If you have access to the system you want to use as the Jumpoint host, you can run the installation file immediately.
Otherwise, save the file and then email it to the remote user to deploy on the system that will serve as the Jumpoint host.
SALES: www.beyondtrust.com/contact SUPPORT: www.beyondtrust.com/support DOCUMENTATION: www.beyondtrust.com/docs 25©2003-2021 BeyondTrust Corporation. All Rights Reserved. Other trademarks identified on this page are owned by their respective owners. BeyondTrust is not a chartered bank or trust company, ordepository institution. It is not authorized to accept deposits or trust accounts and is not licensed or regulated by any state or federal banking authority.
TC: 1/20/2022
PRIVILEGED REMOTE ACCESS
JUMPOINT GUIDE
Follow the prompts and install the node. Note that there are no configuration screens. Once installed, the clustered Jumpoint shows the new node(s) installed, associated information, such as the public and private IP addresses, whether a node is online or offline, as well as the number of nodes installed.
Nodes can be deleted but cannot be individually edited. In the access console, none of the nodes are visible; only the Jumpoint under which they are installed is visible. Nodes function as redundant connection points. When a user needs to use the Jumpoint, Privileged Remote Access selects one of the nodes at random. At least one node must be online for the Jumpoint to work.
Configure Linux Jumpoint as a Proxy Server
You can set up a Linux Jumpoint to function as a proxy server so it can be used for proxy connections for clients on the network that do not have a native internet connection, such as POS systems. Using a Jumpoint as a proxy routes traffic only to the B Series Appliance.
To configure proxy settings on a Linux Jumpoint, modify the jumpzone.ini file, which is located in the directory where you installed the Jumpoint. Below is the content of the jumpzone.ini file, which includes all of the applicable settings and a description of each:
[General] ;;;;;;;;;;;;;;;;;;;;;;;;;;;;;;;;;;;;;;;;;;;;; ; BeyondTrust Jump Zone Proxy Configuration ; ;;;;;;;;;;;;;;;;;;;;;;;;;;;;;;;;;;;;;;;;;;;;; ; ALL configuration changes require a restart ; of the Jumpoint process/service/daemon ; * Enable the Jump Zone Proxy feature ; * Default is disabled. ;enable_proxy=1 ; * Allow HTTP GET requests through the proxy ; * to the BeyondTrust appliance. ; * Default is to not allow HTTP GET requests. ;allow_http=1 ; * Hostname or IP that resolves to this machine ; * Jump Clients will be deployed with and use ; * this information to connect back to this machine ; * Default hostname is detected using gethostname(2) ;proxy_host=myhost.local ; * Port number on this machine that should ; * listen for incoming Jump Client connections ; * Default port is 9995 ;proxy_port=9995 ; * Comma seperated IP addresses or CIDR subnets ; * that incoming connections should be restricted to. ; * Default is allow all connections. ; * Only one of allowOnlyIPs or denyOnlyIPs may be used. ;allowOnlyIPs=1.2.3.4,4.3.2.1/16
SALES: www.beyondtrust.com/contact SUPPORT: www.beyondtrust.com/support DOCUMENTATION: www.beyondtrust.com/docs 26©2003-2021 BeyondTrust Corporation. All Rights Reserved. Other trademarks identified on this page are owned by their respective owners. BeyondTrust is not a chartered bank or trust company, ordepository institution. It is not authorized to accept deposits or trust accounts and is not licensed or regulated by any state or federal banking authority.
TC: 1/20/2022
PRIVILEGED REMOTE ACCESS
JUMPOINT GUIDE
; * Comma seperated IP addresses or CIDR subnets ; * that should be denied incoming connections. ; * Default is allow all connections. ; * Only one of allowOnlyIPs or denyOnlyIPs may be used. ;denyOnlyIPs=1.2.3.4,4.3.2.1/16
Note: In order for a Jumpoint to function as a Jump Zone Proxy Server, its host system cannot reside behind a proxy. The Jumpoint must be able to access the Internet without having to supply proxy information for its own connection.
IMPORTANT!
The proxy host and port should be set carefully since any Jump Client deployed using this Jumpoint as a proxy server uses the settings available to it at the time of deployment and are not updated should the host or port change. If the host or port is changed, the Jump Client must be redeployed.
Tip: It is a best practice to make an exception in the firewall for the port on which the proxy server listens for the process to accept connections.
SALES: www.beyondtrust.com/contact SUPPORT: www.beyondtrust.com/support DOCUMENTATION: www.beyondtrust.com/docs 27©2003-2021 BeyondTrust Corporation. All Rights Reserved. Other trademarks identified on this page are owned by their respective owners. BeyondTrust is not a chartered bank or trust company, ordepository institution. It is not authorized to accept deposits or trust accounts and is not licensed or regulated by any state or federal banking authority.
TC: 1/20/2022
PRIVILEGED REMOTE ACCESS
JUMPOINT GUIDE
Use a Jump Shortcut to Jump to a Remote SystemOnce a Jumpoint has been installed on a remote network, permitted users can use the Jumpoint to initiate sessions with Windows computers on that same network, even if those computers are unattended. Additionally, a permitted user can Jump to computers on the same network segment as their local system, even without a Jumpoint.
Through a Jumpoint, Jump shortcuts can be created to:
l start a standard access session l start a Remote Desktop Protocol session with Windows or Linux systems l Jump to a web site on a remote browser l Shell Jump to an SSH-enabled or Telnet-enabled network device l connect to a VNC server l to make a TCP connection through a Protocol Tunnel Jump
You can add Jump shortcuts one by one from the access console, as detailed in "Local Jump Shortcuts" on page 38, "Remote Jump Shortcuts" on page 40, "Remote Desktop Protocol Shortcuts" on page 42, "VNC Shortcuts" on page 46, "Use Web Jump to Access Web Services" on page 52, "Shell Jump Shortcuts" on page 48, and "Protocol Tunnel Jump Shortcuts" on page 51.
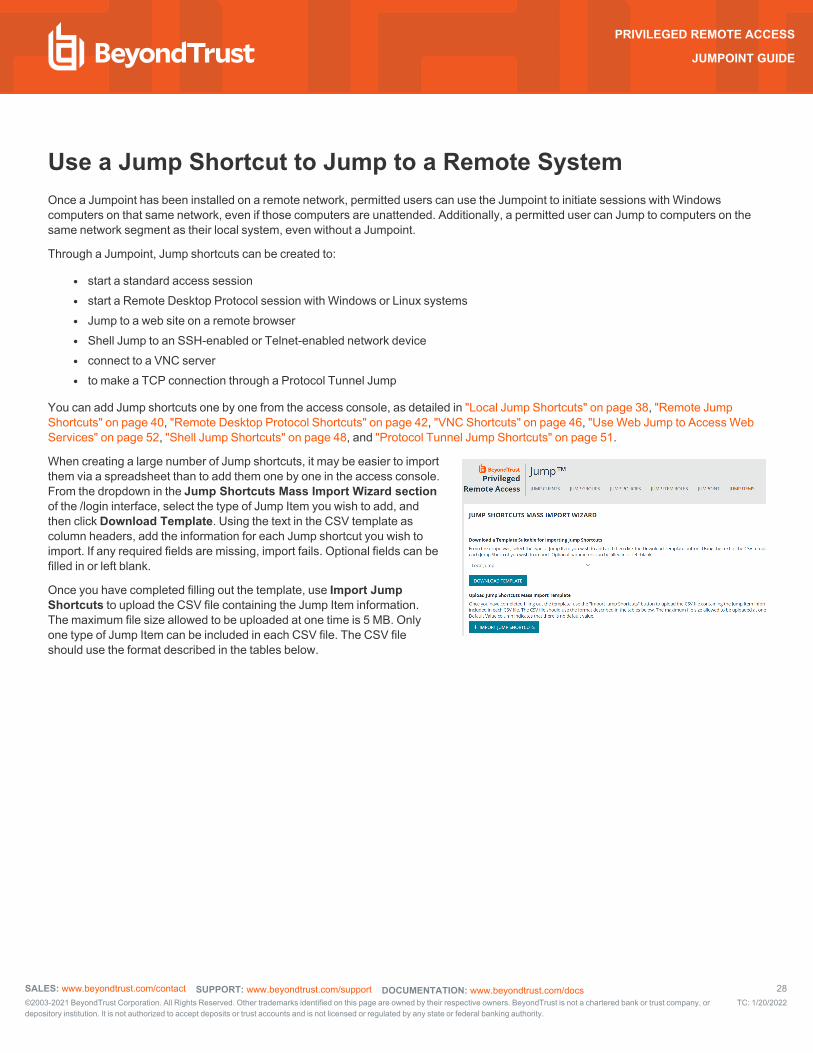
When creating a large number of Jump shortcuts, it may be easier to import them via a spreadsheet than to add them one by one in the access console. From the dropdown in the Jump Shortcuts Mass Import Wizard section of the /login interface, select the type of Jump Item you wish to add, and then click Download Template. Using the text in the CSV template as column headers, add the information for each Jump shortcut you wish to import. If any required fields are missing, import fails. Optional fields can be filled in or left blank.
Once you have completed filling out the template, use Import Jump Shortcuts to upload the CSV file containing the Jump Item information. The maximum file size allowed to be uploaded at one time is 5 MB. Only one type of Jump Item can be included in each CSV file. The CSV file should use the format described in the tables below.
SALES: www.beyondtrust.com/contact SUPPORT: www.beyondtrust.com/support DOCUMENTATION: www.beyondtrust.com/docs 28©2003-2021 BeyondTrust Corporation. All Rights Reserved. Other trademarks identified on this page are owned by their respective owners. BeyondTrust is not a chartered bank or trust company, ordepository institution. It is not authorized to accept deposits or trust accounts and is not licensed or regulated by any state or federal banking authority.
TC: 1/20/2022
PRIVILEGED REMOTE ACCESS
JUMPOINT GUIDE

If a Jump Policy is applied to the Jump Item, that policy affects how and/or when a Jump Item may be accessed.
Authorization
If a Jump Policy requires authorization before the Jump can be performed, a dialog opens. In the dialog, enter the reason you need to access this Jump Item. Then enter the date and time at which you wish authorization to begin, as well as how long you require access to the Jump Item. Both the request reason and the request time are visible to the approver and help them decide whether to approve or deny access.
When you click OK, an email is sent to the addresses defined as approvers for this policy. This email contains a URL where an approver can see the request, add comments, and either approve or deny the request.
If a request was approved by one person, a second can access the URL to override approval and deny the request. If a request was denied, then any other approvers accessing the site can see the details but cannot override the denied status. If a user has already joined an approved session, that access cannot be denied. Although other approvers can see the email address of the person who approved or denied the request, the requester cannot. Based on the Jump Policy settings, an approved request grants access either to any user who can see and request access to that Jump Client or only to the user who requested access.
In the Jump interface, the Jump Item's details pane displays the status of any authorization requests as either pending, approved, approved only for a different user, or denied. When an approver responds to a request, a pop-up notification appears on the requester's screen alerting them that access has been either approved or denied. If the requester has a configured email address, an email notification is also sent to the requester.
When a user Jumps to a Jump Item which has been approved for access, a notification alerts the user to any comments left by the approver.
When approval has been granted to a Jump Item, that Jump Item becomes available either to any user who can see and request access to that Jump Item or only to the user who requested access. This is determined by the Jump Policy.
SALES: www.beyondtrust.com/contact SUPPORT: www.beyondtrust.com/support DOCUMENTATION: www.beyondtrust.com/docs 29©2003-2021 BeyondTrust Corporation. All Rights Reserved. Other trademarks identified on this page are owned by their respective owners. BeyondTrust is not a chartered bank or trust company, ordepository institution. It is not authorized to accept deposits or trust accounts and is not licensed or regulated by any state or federal banking authority.
TC: 1/20/2022
PRIVILEGED REMOTE ACCESS
JUMPOINT GUIDE
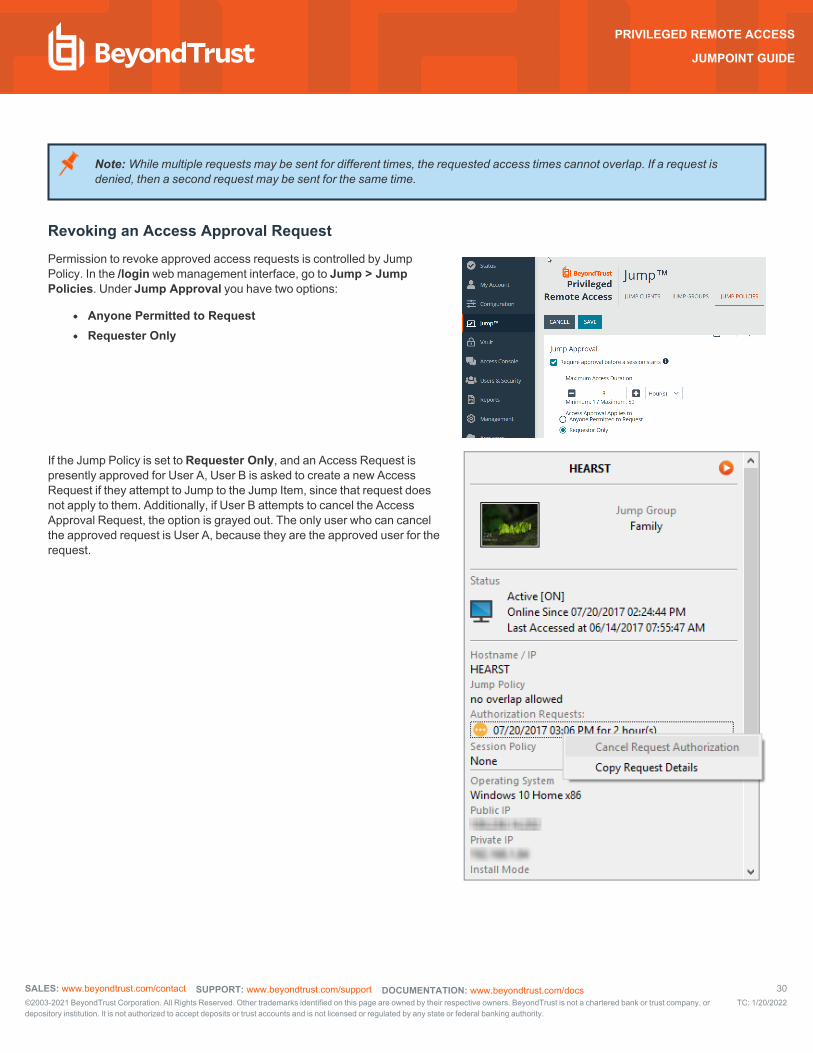
Note: While multiple requests may be sent for different times, the requested access times cannot overlap. If a request is denied, then a second request may be sent for the same time.
Revoking an Access Approval RequestPermission to revoke approved access requests is controlled by Jump Policy. In the /login web management interface, go to Jump > Jump Policies. Under Jump Approval you have two options:
l Anyone Permitted to Request l Requester Only
If the Jump Policy is set to Requester Only, and an Access Request is presently approved for User A, User B is asked to create a new Access Request if they attempt to Jump to the Jump Item, since that request does not apply to them. Additionally, if User B attempts to cancel the Access Approval Request, the option is grayed out. The only user who can cancel the approved request is User A, because they are the approved user for the request.
SALES: www.beyondtrust.com/contact SUPPORT: www.beyondtrust.com/support DOCUMENTATION: www.beyondtrust.com/docs 30©2003-2021 BeyondTrust Corporation. All Rights Reserved. Other trademarks identified on this page are owned by their respective owners. BeyondTrust is not a chartered bank or trust company, ordepository institution. It is not authorized to accept deposits or trust accounts and is not licensed or regulated by any state or federal banking authority.
TC: 1/20/2022
PRIVILEGED REMOTE ACCESS
JUMPOINT GUIDE
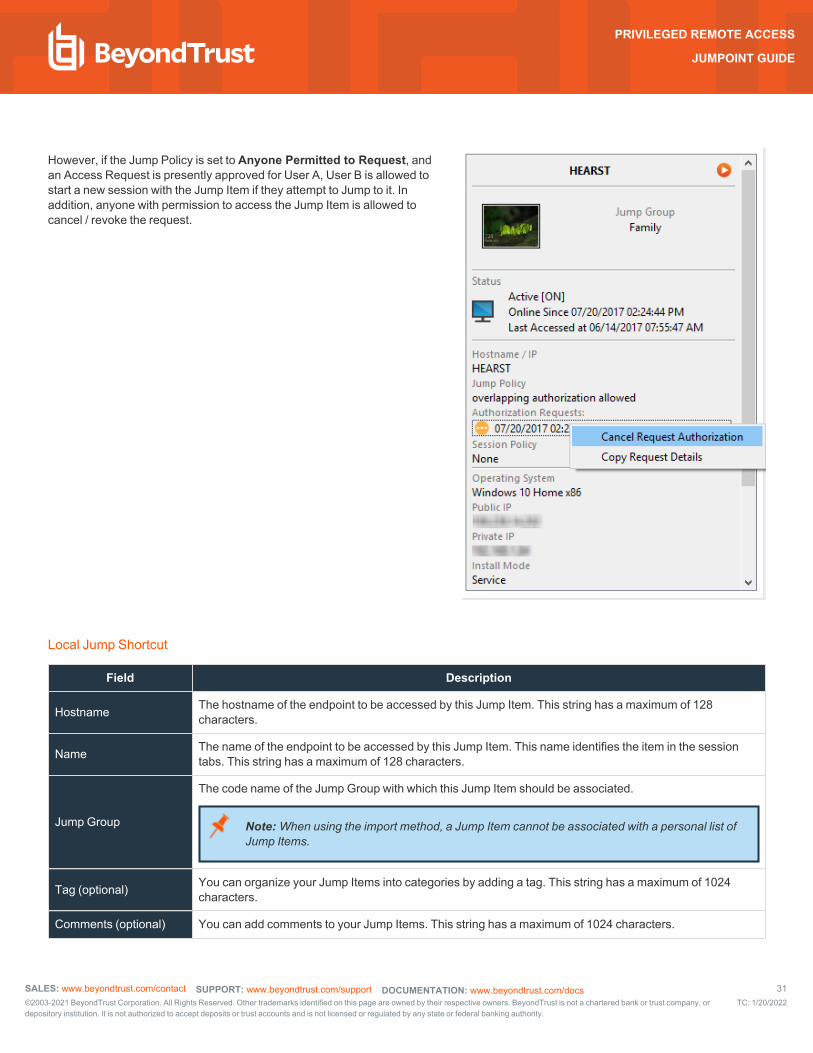
However, if the Jump Policy is set to Anyone Permitted to Request, and an Access Request is presently approved for User A, User B is allowed to start a new session with the Jump Item if they attempt to Jump to it. In addition, anyone with permission to access the Jump Item is allowed to cancel / revoke the request.
Local Jump Shortcut
Field Description
Hostname The hostname of the endpoint to be accessed by this Jump Item. This string has a maximum of 128 characters.
Name The name of the endpoint to be accessed by this Jump Item. This name identifies the item in the session tabs. This string has a maximum of 128 characters.
Jump Group
The code name of the Jump Group with which this Jump Item should be associated.
Note: When using the import method, a Jump Item cannot be associated with a personal list of Jump Items.
Tag (optional) You can organize your Jump Items into categories by adding a tag. This string has a maximum of 1024 characters.
Comments (optional) You can add comments to your Jump Items. This string has a maximum of 1024 characters.
SALES: www.beyondtrust.com/contact SUPPORT: www.beyondtrust.com/support DOCUMENTATION: www.beyondtrust.com/docs 31©2003-2021 BeyondTrust Corporation. All Rights Reserved. Other trademarks identified on this page are owned by their respective owners. BeyondTrust is not a chartered bank or trust company, ordepository institution. It is not authorized to accept deposits or trust accounts and is not licensed or regulated by any state or federal banking authority.
TC: 1/20/2022
PRIVILEGED REMOTE ACCESS
JUMPOINT GUIDE
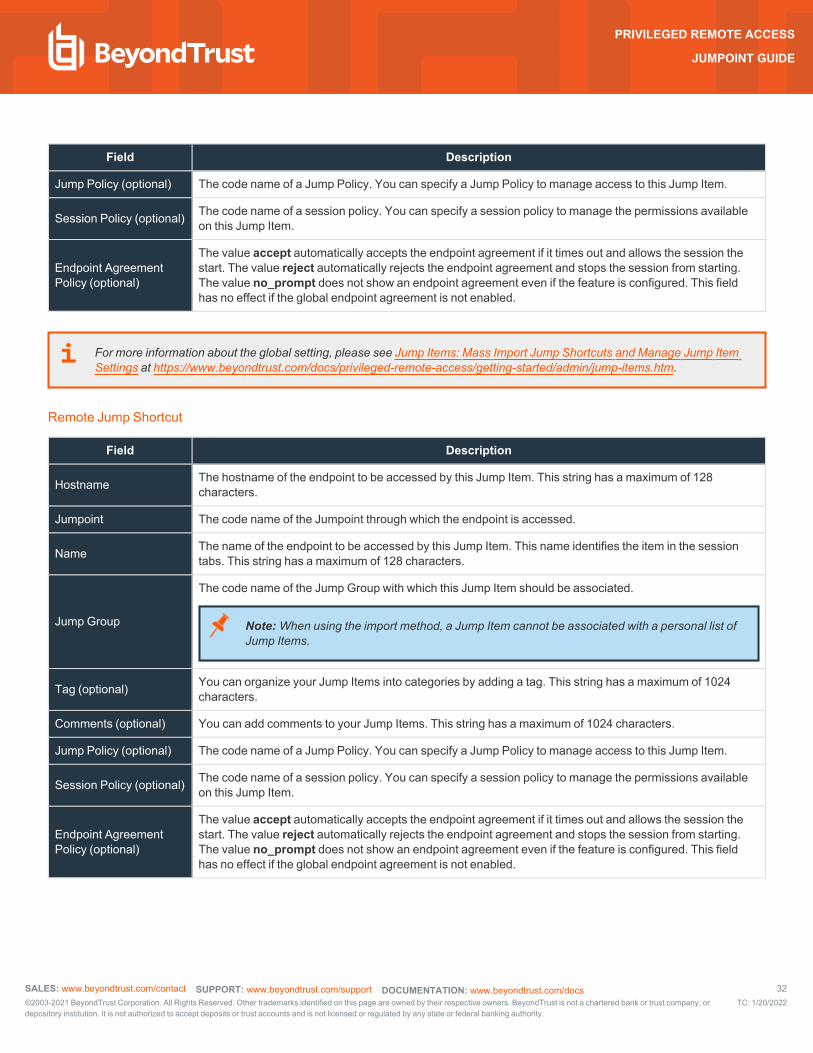
Field Description
Jump Policy (optional) The code name of a Jump Policy. You can specify a Jump Policy to manage access to this Jump Item.
Session Policy (optional) The code name of a session policy. You can specify a session policy to manage the permissions available on this Jump Item.
Endpoint Agreement Policy (optional)
The value accept automatically accepts the endpoint agreement if it times out and allows the session the start. The value reject automatically rejects the endpoint agreement and stops the session from starting. The value no_prompt does not show an endpoint agreement even if the feature is configured. This field has no effect if the global endpoint agreement is not enabled.
For more information about the global setting, please see Jump Items: Mass Import Jump Shortcuts and Manage Jump Item Settings at https://www.beyondtrust.com/docs/privileged-remote-access/getting-started/admin/jump-items.htm.
Remote Jump Shortcut
Field Description
Hostname The hostname of the endpoint to be accessed by this Jump Item. This string has a maximum of 128 characters.
Jumpoint The code name of the Jumpoint through which the endpoint is accessed.
Name The name of the endpoint to be accessed by this Jump Item. This name identifies the item in the session tabs. This string has a maximum of 128 characters.
Jump Group
The code name of the Jump Group with which this Jump Item should be associated.
Note: When using the import method, a Jump Item cannot be associated with a personal list of Jump Items.
Tag (optional) You can organize your Jump Items into categories by adding a tag. This string has a maximum of 1024 characters.
Comments (optional) You can add comments to your Jump Items. This string has a maximum of 1024 characters.
Jump Policy (optional) The code name of a Jump Policy. You can specify a Jump Policy to manage access to this Jump Item.
Session Policy (optional) The code name of a session policy. You can specify a session policy to manage the permissions available on this Jump Item.
Endpoint Agreement Policy (optional)
The value accept automatically accepts the endpoint agreement if it times out and allows the session the start. The value reject automatically rejects the endpoint agreement and stops the session from starting. The value no_prompt does not show an endpoint agreement even if the feature is configured. This field has no effect if the global endpoint agreement is not enabled.
SALES: www.beyondtrust.com/contact SUPPORT: www.beyondtrust.com/support DOCUMENTATION: www.beyondtrust.com/docs 32©2003-2021 BeyondTrust Corporation. All Rights Reserved. Other trademarks identified on this page are owned by their respective owners. BeyondTrust is not a chartered bank or trust company, ordepository institution. It is not authorized to accept deposits or trust accounts and is not licensed or regulated by any state or federal banking authority.
TC: 1/20/2022
PRIVILEGED REMOTE ACCESS
JUMPOINT GUIDE
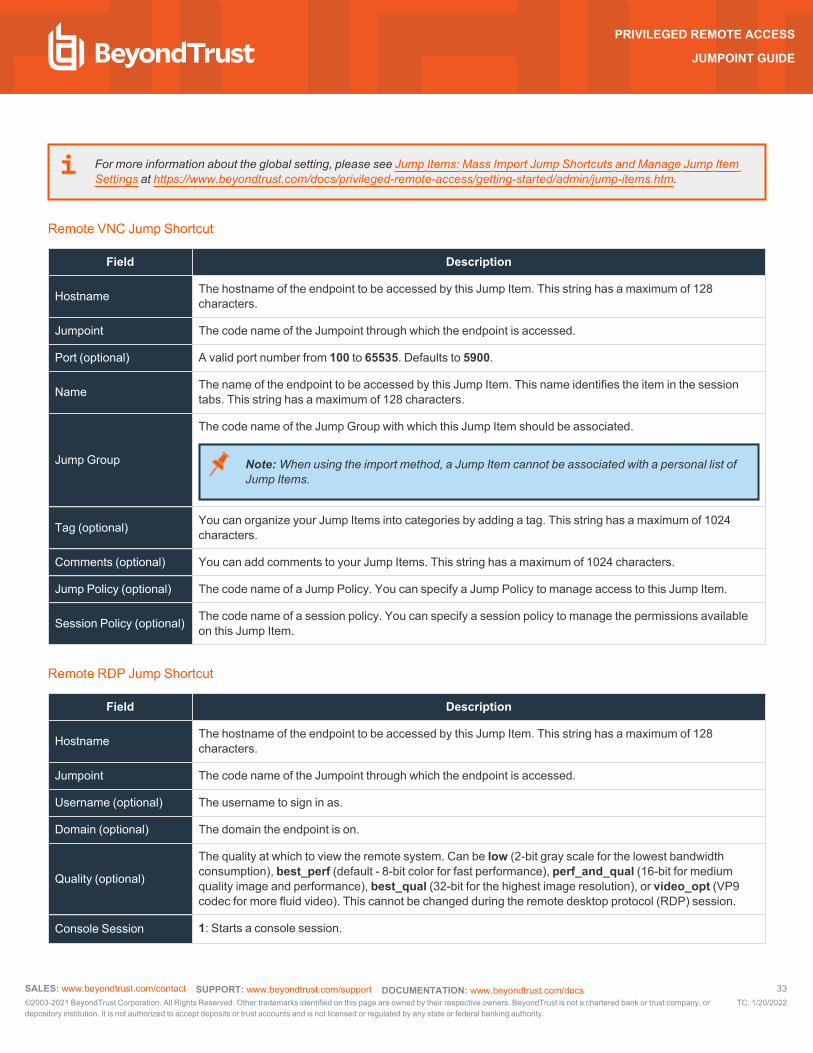
For more information about the global setting, please see Jump Items: Mass Import Jump Shortcuts and Manage Jump Item Settings at https://www.beyondtrust.com/docs/privileged-remote-access/getting-started/admin/jump-items.htm.
Remote VNC Jump Shortcut
Field Description
Hostname The hostname of the endpoint to be accessed by this Jump Item. This string has a maximum of 128 characters.
Jumpoint The code name of the Jumpoint through which the endpoint is accessed.
Port (optional) A valid port number from 100 to 65535. Defaults to 5900.
Name The name of the endpoint to be accessed by this Jump Item. This name identifies the item in the session tabs. This string has a maximum of 128 characters.
Jump Group
The code name of the Jump Group with which this Jump Item should be associated.
Note: When using the import method, a Jump Item cannot be associated with a personal list of Jump Items.
Tag (optional) You can organize your Jump Items into categories by adding a tag. This string has a maximum of 1024 characters.
Comments (optional) You can add comments to your Jump Items. This string has a maximum of 1024 characters.
Jump Policy (optional) The code name of a Jump Policy. You can specify a Jump Policy to manage access to this Jump Item.
Session Policy (optional) The code name of a session policy. You can specify a session policy to manage the permissions available on this Jump Item.
Remote RDP Jump Shortcut
Field Description
Hostname The hostname of the endpoint to be accessed by this Jump Item. This string has a maximum of 128 characters.
Jumpoint The code name of the Jumpoint through which the endpoint is accessed.
Username (optional) The username to sign in as.
Domain (optional) The domain the endpoint is on.
Quality (optional)
The quality at which to view the remote system. Can be low (2-bit gray scale for the lowest bandwidth consumption), best_perf (default - 8-bit color for fast performance), perf_and_qual (16-bit for medium quality image and performance), best_qual (32-bit for the highest image resolution), or video_opt (VP9 codec for more fluid video). This cannot be changed during the remote desktop protocol (RDP) session.
Console Session 1: Starts a console session.
SALES: www.beyondtrust.com/contact SUPPORT: www.beyondtrust.com/support DOCUMENTATION: www.beyondtrust.com/docs 33©2003-2021 BeyondTrust Corporation. All Rights Reserved. Other trademarks identified on this page are owned by their respective owners. BeyondTrust is not a chartered bank or trust company, ordepository institution. It is not authorized to accept deposits or trust accounts and is not licensed or regulated by any state or federal banking authority.
TC: 1/20/2022
PRIVILEGED REMOTE ACCESS
JUMPOINT GUIDE
Field Description
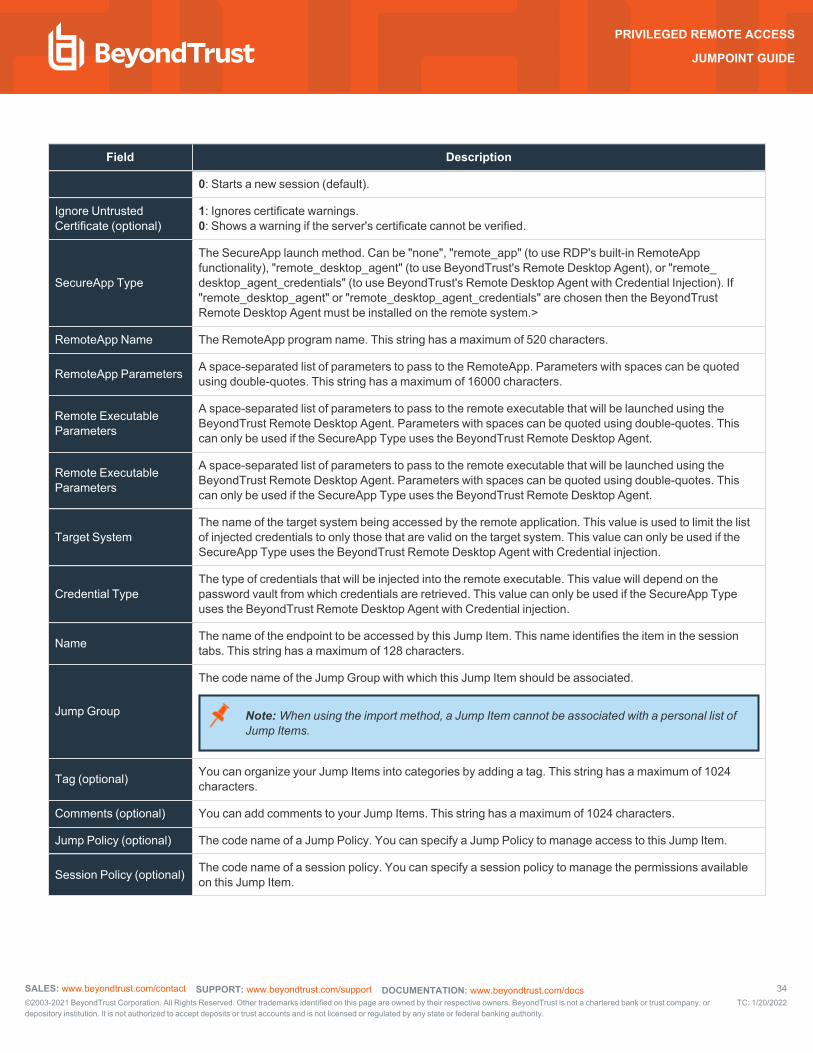
0: Starts a new session (default).
Ignore Untrusted Certificate (optional)
1: Ignores certificate warnings.0: Shows a warning if the server's certificate cannot be verified.
SecureApp Type
The SecureApp launch method. Can be "none", "remote_app" (to use RDP's built-in RemoteApp functionality), "remote_desktop_agent" (to use BeyondTrust's Remote Desktop Agent), or "remote_desktop_agent_credentials" (to use BeyondTrust's Remote Desktop Agent with Credential Injection). If "remote_desktop_agent" or "remote_desktop_agent_credentials" are chosen then the BeyondTrust Remote Desktop Agent must be installed on the remote system.>
RemoteApp Name The RemoteApp program name. This string has a maximum of 520 characters.
RemoteApp Parameters A space-separated list of parameters to pass to the RemoteApp. Parameters with spaces can be quoted using double-quotes. This string has a maximum of 16000 characters.
Remote Executable Parameters
A space-separated list of parameters to pass to the remote executable that will be launched using the BeyondTrust Remote Desktop Agent. Parameters with spaces can be quoted using double-quotes. This can only be used if the SecureApp Type uses the BeyondTrust Remote Desktop Agent.
Target SystemThe name of the target system being accessed by the remote application. This value is used to limit the list of injected credentials to only those that are valid on the target system. This value can only be used if the SecureApp Type uses the BeyondTrust Remote Desktop Agent with Credential injection.
Credential TypeThe type of credentials that will be injected into the remote executable. This value will depend on the password vault from which credentials are retrieved. This value can only be used if the SecureApp Type uses the BeyondTrust Remote Desktop Agent with Credential injection.
Name The name of the endpoint to be accessed by this Jump Item. This name identifies the item in the session tabs. This string has a maximum of 128 characters.
Jump Group
The code name of the Jump Group with which this Jump Item should be associated.
Note: When using the import method, a Jump Item cannot be associated with a personal list of Jump Items.
Tag (optional) You can organize your Jump Items into categories by adding a tag. This string has a maximum of 1024 characters.
Comments (optional) You can add comments to your Jump Items. This string has a maximum of 1024 characters.
Jump Policy (optional) The code name of a Jump Policy. You can specify a Jump Policy to manage access to this Jump Item.
Session Policy (optional) The code name of a session policy. You can specify a session policy to manage the permissions available on this Jump Item.
SALES: www.beyondtrust.com/contact SUPPORT: www.beyondtrust.com/support DOCUMENTATION: www.beyondtrust.com/docs 34©2003-2021 BeyondTrust Corporation. All Rights Reserved. Other trademarks identified on this page are owned by their respective owners. BeyondTrust is not a chartered bank or trust company, ordepository institution. It is not authorized to accept deposits or trust accounts and is not licensed or regulated by any state or federal banking authority.
TC: 1/20/2022
PRIVILEGED REMOTE ACCESS
JUMPOINT GUIDE
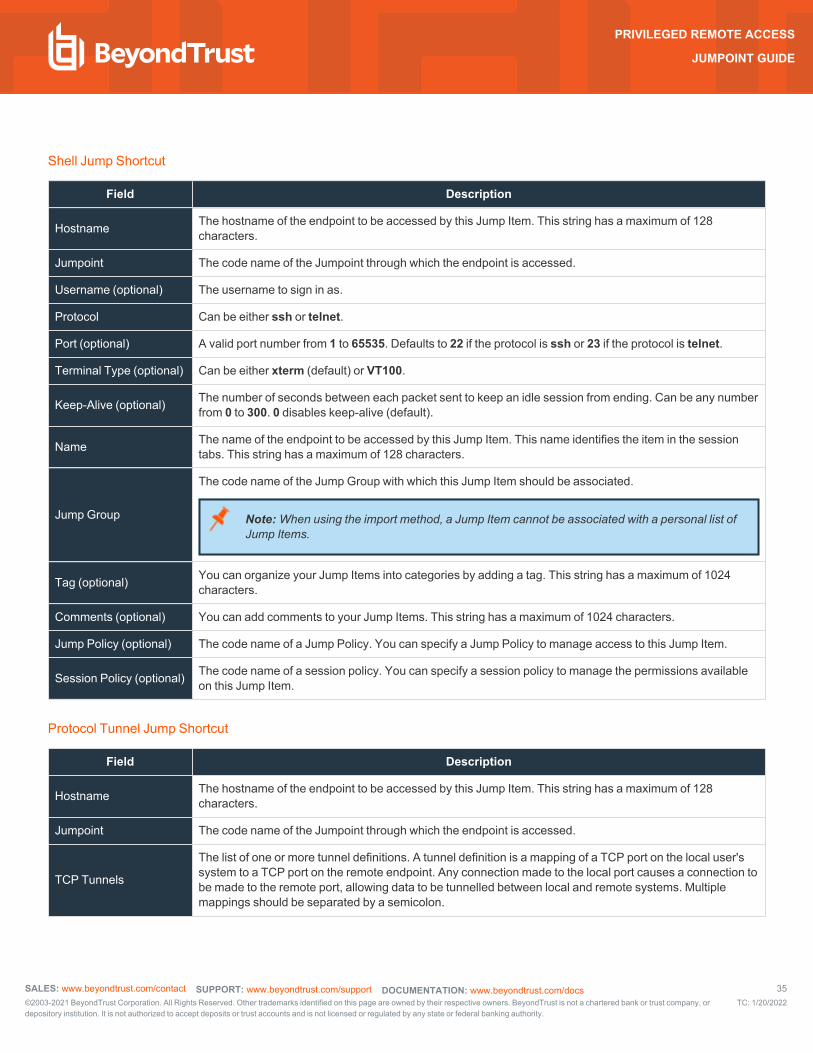
Shell Jump Shortcut
Field Description
Hostname The hostname of the endpoint to be accessed by this Jump Item. This string has a maximum of 128 characters.
Jumpoint The code name of the Jumpoint through which the endpoint is accessed.
Username (optional) The username to sign in as.
Protocol Can be either ssh or telnet.
Port (optional) A valid port number from 1 to 65535. Defaults to 22 if the protocol is ssh or 23 if the protocol is telnet.
Terminal Type (optional) Can be either xterm (default) or VT100.
Keep-Alive (optional) The number of seconds between each packet sent to keep an idle session from ending. Can be any number from 0 to 300. 0 disables keep-alive (default).
Name The name of the endpoint to be accessed by this Jump Item. This name identifies the item in the session tabs. This string has a maximum of 128 characters.
Jump Group
The code name of the Jump Group with which this Jump Item should be associated.
Note: When using the import method, a Jump Item cannot be associated with a personal list of Jump Items.
Tag (optional) You can organize your Jump Items into categories by adding a tag. This string has a maximum of 1024 characters.
Comments (optional) You can add comments to your Jump Items. This string has a maximum of 1024 characters.
Jump Policy (optional) The code name of a Jump Policy. You can specify a Jump Policy to manage access to this Jump Item.
Session Policy (optional) The code name of a session policy. You can specify a session policy to manage the permissions available on this Jump Item.
Protocol Tunnel Jump Shortcut
Field Description
Hostname The hostname of the endpoint to be accessed by this Jump Item. This string has a maximum of 128 characters.
Jumpoint The code name of the Jumpoint through which the endpoint is accessed.
TCP Tunnels
The list of one or more tunnel definitions. A tunnel definition is a mapping of a TCP port on the local user's system to a TCP port on the remote endpoint. Any connection made to the local port causes a connection to be made to the remote port, allowing data to be tunnelled between local and remote systems. Multiple mappings should be separated by a semicolon.
SALES: www.beyondtrust.com/contact SUPPORT: www.beyondtrust.com/support DOCUMENTATION: www.beyondtrust.com/docs 35©2003-2021 BeyondTrust Corporation. All Rights Reserved. Other trademarks identified on this page are owned by their respective owners. BeyondTrust is not a chartered bank or trust company, ordepository institution. It is not authorized to accept deposits or trust accounts and is not licensed or regulated by any state or federal banking authority.
TC: 1/20/2022
PRIVILEGED REMOTE ACCESS
JUMPOINT GUIDE
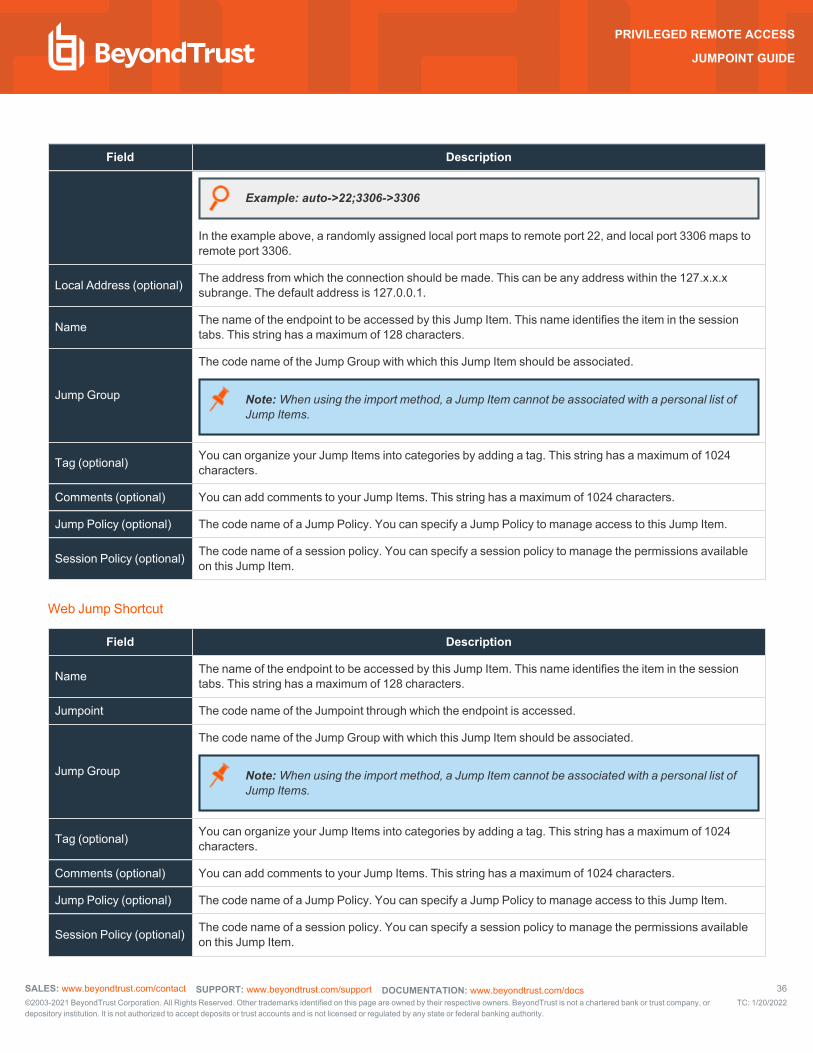
Field Description
Example: auto->22;3306->3306
In the example above, a randomly assigned local port maps to remote port 22, and local port 3306 maps to remote port 3306.
Local Address (optional) The address from which the connection should be made. This can be any address within the 127.x.x.x subrange. The default address is 127.0.0.1.
Name The name of the endpoint to be accessed by this Jump Item. This name identifies the item in the session tabs. This string has a maximum of 128 characters.
Jump Group
The code name of the Jump Group with which this Jump Item should be associated.
Note: When using the import method, a Jump Item cannot be associated with a personal list of Jump Items.
Tag (optional) You can organize your Jump Items into categories by adding a tag. This string has a maximum of 1024 characters.
Comments (optional) You can add comments to your Jump Items. This string has a maximum of 1024 characters.
Jump Policy (optional) The code name of a Jump Policy. You can specify a Jump Policy to manage access to this Jump Item.
Session Policy (optional) The code name of a session policy. You can specify a session policy to manage the permissions available on this Jump Item.
Web Jump Shortcut
Field Description
Name The name of the endpoint to be accessed by this Jump Item. This name identifies the item in the session tabs. This string has a maximum of 128 characters.
Jumpoint The code name of the Jumpoint through which the endpoint is accessed.
Jump Group
The code name of the Jump Group with which this Jump Item should be associated.
Note: When using the import method, a Jump Item cannot be associated with a personal list of Jump Items.
Tag (optional) You can organize your Jump Items into categories by adding a tag. This string has a maximum of 1024 characters.
Comments (optional) You can add comments to your Jump Items. This string has a maximum of 1024 characters.
Jump Policy (optional) The code name of a Jump Policy. You can specify a Jump Policy to manage access to this Jump Item.
Session Policy (optional) The code name of a session policy. You can specify a session policy to manage the permissions available on this Jump Item.
SALES: www.beyondtrust.com/contact SUPPORT: www.beyondtrust.com/support DOCUMENTATION: www.beyondtrust.com/docs 36©2003-2021 BeyondTrust Corporation. All Rights Reserved. Other trademarks identified on this page are owned by their respective owners. BeyondTrust is not a chartered bank or trust company, ordepository institution. It is not authorized to accept deposits or trust accounts and is not licensed or regulated by any state or federal banking authority.
TC: 1/20/2022
PRIVILEGED REMOTE ACCESS
JUMPOINT GUIDE
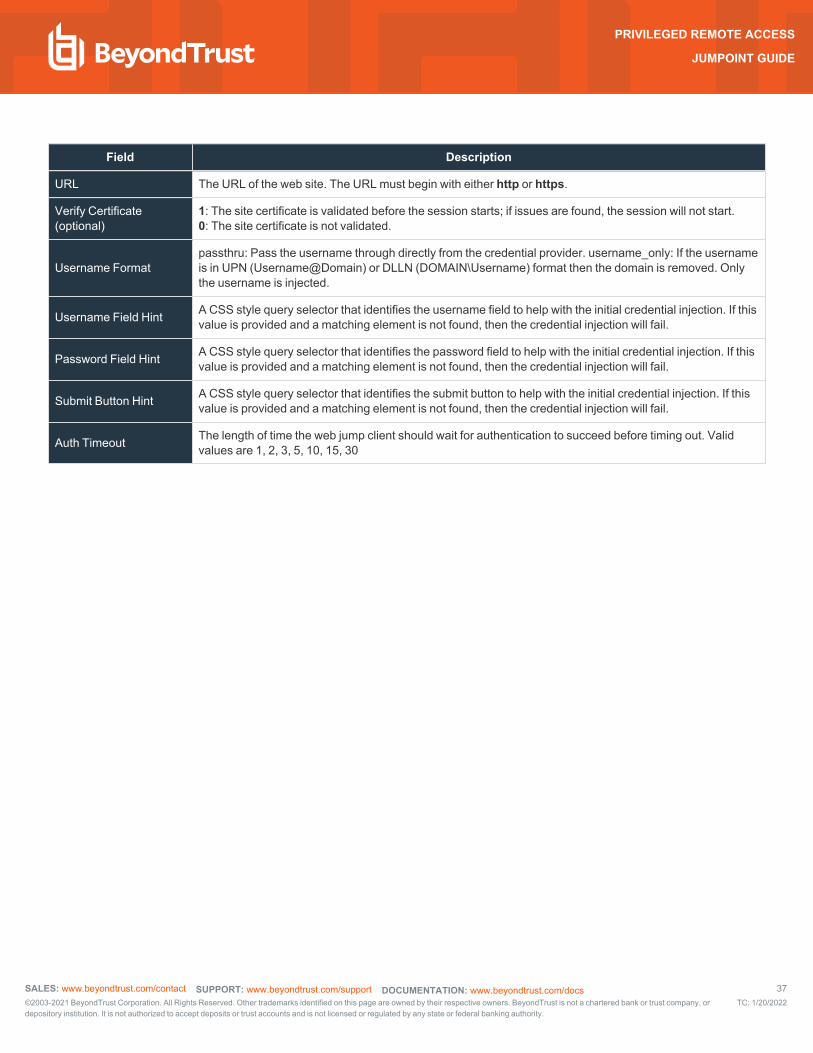
Field Description
URL The URL of the web site. The URL must begin with either http or https.
Verify Certificate (optional)
1: The site certificate is validated before the session starts; if issues are found, the session will not start.0: The site certificate is not validated.
Username Formatpassthru: Pass the username through directly from the credential provider. username_only: If the username is in UPN (Username@Domain) or DLLN (DOMAIN\Username) format then the domain is removed. Only the username is injected.
Username Field Hint A CSS style query selector that identifies the username field to help with the initial credential injection. If this value is provided and a matching element is not found, then the credential injection will fail.
Password Field Hint A CSS style query selector that identifies the password field to help with the initial credential injection. If this value is provided and a matching element is not found, then the credential injection will fail.
Submit Button Hint A CSS style query selector that identifies the submit button to help with the initial credential injection. If this value is provided and a matching element is not found, then the credential injection will fail.
Auth Timeout The length of time the web jump client should wait for authentication to succeed before timing out. Valid values are 1, 2, 3, 5, 10, 15, 30
SALES: www.beyondtrust.com/contact SUPPORT: www.beyondtrust.com/support DOCUMENTATION: www.beyondtrust.com/docs 37©2003-2021 BeyondTrust Corporation. All Rights Reserved. Other trademarks identified on this page are owned by their respective owners. BeyondTrust is not a chartered bank or trust company, ordepository institution. It is not authorized to accept deposits or trust accounts and is not licensed or regulated by any state or federal banking authority.
TC: 1/20/2022
PRIVILEGED REMOTE ACCESS
JUMPOINT GUIDE
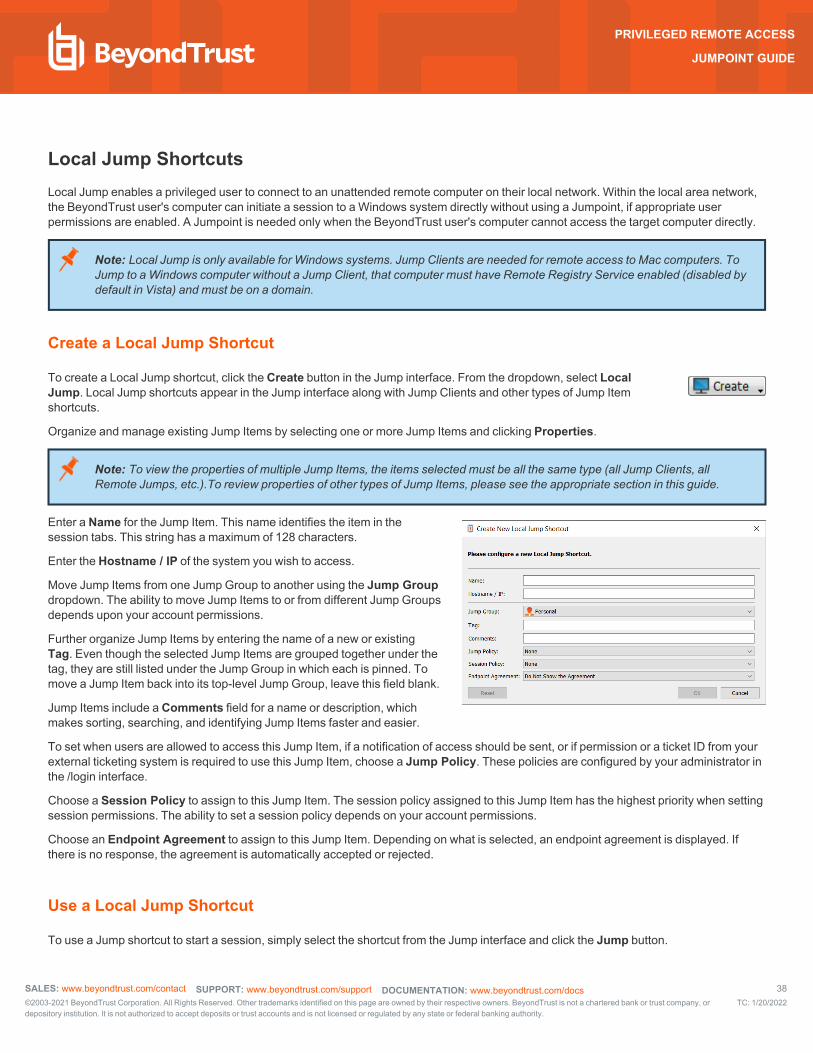
Local Jump ShortcutsLocal Jump enables a privileged user to connect to an unattended remote computer on their local network. Within the local area network, the BeyondTrust user's computer can initiate a session to a Windows system directly without using a Jumpoint, if appropriate user permissions are enabled. A Jumpoint is needed only when the BeyondTrust user's computer cannot access the target computer directly.
Note: Local Jump is only available for Windows systems. Jump Clients are needed for remote access to Mac computers. To Jump to a Windows computer without a Jump Client, that computer must have Remote Registry Service enabled (disabled by default in Vista) and must be on a domain.
Create a Local Jump Shortcut
To create a Local Jump shortcut, click the Create button in the Jump interface. From the dropdown, select Local Jump. Local Jump shortcuts appear in the Jump interface along with Jump Clients and other types of Jump Item shortcuts.
Organize and manage existing Jump Items by selecting one or more Jump Items and clicking Properties.
Note: To view the properties of multiple Jump Items, the items selected must be all the same type (all Jump Clients, all Remote Jumps, etc.).To review properties of other types of Jump Items, please see the appropriate section in this guide.
Enter a Name for the Jump Item. This name identifies the item in the session tabs. This string has a maximum of 128 characters.
Enter the Hostname / IP of the system you wish to access.
Move Jump Items from one Jump Group to another using the Jump Group dropdown. The ability to move Jump Items to or from different Jump Groups depends upon your account permissions.
Further organize Jump Items by entering the name of a new or existing Tag. Even though the selected Jump Items are grouped together under the tag, they are still listed under the Jump Group in which each is pinned. To move a Jump Item back into its top-level Jump Group, leave this field blank.
Jump Items include a Comments field for a name or description, which makes sorting, searching, and identifying Jump Items faster and easier.
To set when users are allowed to access this Jump Item, if a notification of access should be sent, or if permission or a ticket ID from your external ticketing system is required to use this Jump Item, choose a Jump Policy. These policies are configured by your administrator in the /login interface.
Choose a Session Policy to assign to this Jump Item. The session policy assigned to this Jump Item has the highest priority when setting session permissions. The ability to set a session policy depends on your account permissions.
Choose an Endpoint Agreement to assign to this Jump Item. Depending on what is selected, an endpoint agreement is displayed. If there is no response, the agreement is automatically accepted or rejected.
Use a Local Jump Shortcut
To use a Jump shortcut to start a session, simply select the shortcut from the Jump interface and click the Jump button.
SALES: www.beyondtrust.com/contact SUPPORT: www.beyondtrust.com/support DOCUMENTATION: www.beyondtrust.com/docs 38©2003-2021 BeyondTrust Corporation. All Rights Reserved. Other trademarks identified on this page are owned by their respective owners. BeyondTrust is not a chartered bank or trust company, ordepository institution. It is not authorized to accept deposits or trust accounts and is not licensed or regulated by any state or federal banking authority.
TC: 1/20/2022
PRIVILEGED REMOTE ACCESS
JUMPOINT GUIDE
A dialog box opens for you to enter administrative credentials to the remote computer in order to complete the Jump. The administrative rights must be either a local administrator on the remote system or a domain administrator.
The client files are pushed to the remote system, and a session attempts to start.
Note: Jump Items can be set to allow multiple users to simultaneously access the same Jump Item. If set to Join Existing Session, other users are able to join a session already underway. The original owner of the session receives a note indicating another user has joined the session, but is not allowed to deny them access. For more information on simultaneous Jumps, please see Jump Item Settings at www.beyondtrust.com/docs/privileged-remote-access/getting-started/admin/jump-items.htm.
SALES: www.beyondtrust.com/contact SUPPORT: www.beyondtrust.com/support DOCUMENTATION: www.beyondtrust.com/docs 39©2003-2021 BeyondTrust Corporation. All Rights Reserved. Other trademarks identified on this page are owned by their respective owners. BeyondTrust is not a chartered bank or trust company, ordepository institution. It is not authorized to accept deposits or trust accounts and is not licensed or regulated by any state or federal banking authority.
TC: 1/20/2022
PRIVILEGED REMOTE ACCESS
JUMPOINT GUIDE
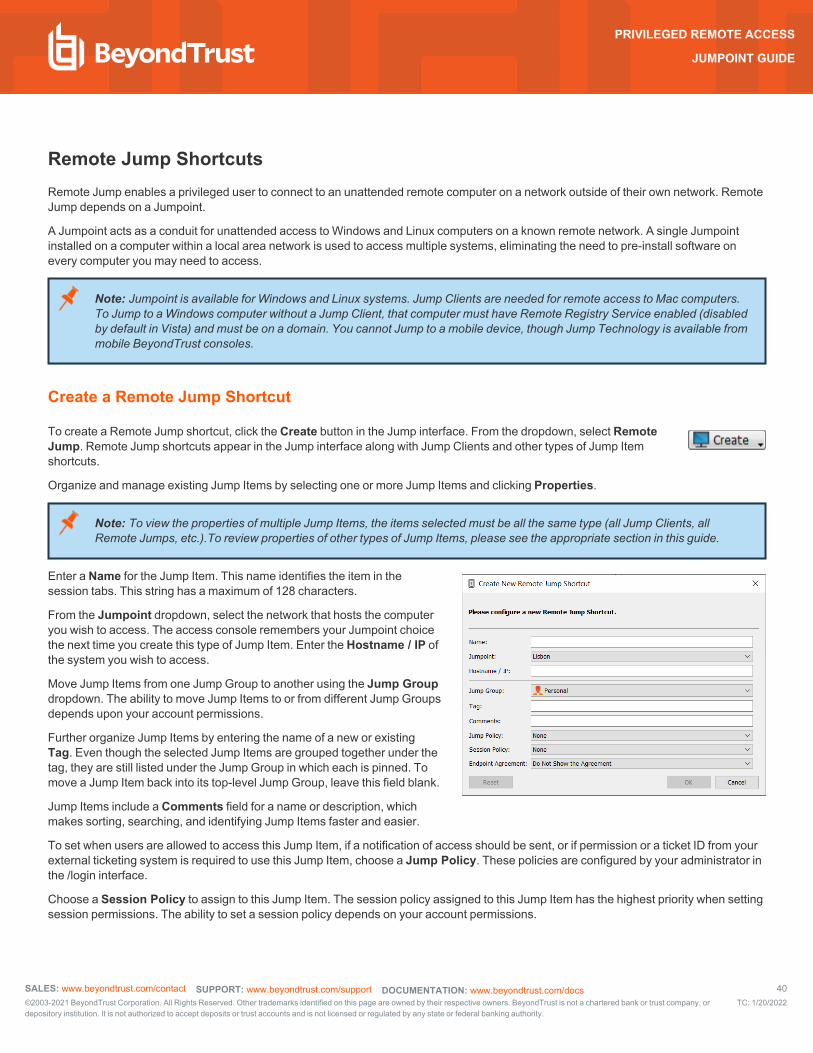
Remote Jump ShortcutsRemote Jump enables a privileged user to connect to an unattended remote computer on a network outside of their own network. Remote Jump depends on a Jumpoint.
A Jumpoint acts as a conduit for unattended access to Windows and Linux computers on a known remote network. A single Jumpoint installed on a computer within a local area network is used to access multiple systems, eliminating the need to pre-install software on every computer you may need to access.
Note: Jumpoint is available for Windows and Linux systems. Jump Clients are needed for remote access to Mac computers. To Jump to a Windows computer without a Jump Client, that computer must have Remote Registry Service enabled (disabled by default in Vista) and must be on a domain. You cannot Jump to a mobile device, though Jump Technology is available from mobile BeyondTrust consoles.
Create a Remote Jump Shortcut
To create a Remote Jump shortcut, click the Create button in the Jump interface. From the dropdown, select Remote Jump. Remote Jump shortcuts appear in the Jump interface along with Jump Clients and other types of Jump Item shortcuts.
Organize and manage existing Jump Items by selecting one or more Jump Items and clicking Properties.
Note: To view the properties of multiple Jump Items, the items selected must be all the same type (all Jump Clients, all Remote Jumps, etc.).To review properties of other types of Jump Items, please see the appropriate section in this guide.
Enter a Name for the Jump Item. This name identifies the item in the session tabs. This string has a maximum of 128 characters.
From the Jumpoint dropdown, select the network that hosts the computer you wish to access. The access console remembers your Jumpoint choice the next time you create this type of Jump Item. Enter the Hostname / IP of the system you wish to access.
Move Jump Items from one Jump Group to another using the Jump Group dropdown. The ability to move Jump Items to or from different Jump Groups depends upon your account permissions.
Further organize Jump Items by entering the name of a new or existing Tag. Even though the selected Jump Items are grouped together under the tag, they are still listed under the Jump Group in which each is pinned. To move a Jump Item back into its top-level Jump Group, leave this field blank.
Jump Items include a Comments field for a name or description, which makes sorting, searching, and identifying Jump Items faster and easier.
To set when users are allowed to access this Jump Item, if a notification of access should be sent, or if permission or a ticket ID from your external ticketing system is required to use this Jump Item, choose a Jump Policy. These policies are configured by your administrator in the /login interface.
Choose a Session Policy to assign to this Jump Item. The session policy assigned to this Jump Item has the highest priority when setting session permissions. The ability to set a session policy depends on your account permissions.
SALES: www.beyondtrust.com/contact SUPPORT: www.beyondtrust.com/support DOCUMENTATION: www.beyondtrust.com/docs 40©2003-2021 BeyondTrust Corporation. All Rights Reserved. Other trademarks identified on this page are owned by their respective owners. BeyondTrust is not a chartered bank or trust company, ordepository institution. It is not authorized to accept deposits or trust accounts and is not licensed or regulated by any state or federal banking authority.
TC: 1/20/2022
PRIVILEGED REMOTE ACCESS
JUMPOINT GUIDE
Choose an Endpoint Agreement to assign to this Jump Item. Depending on what is selected, an endpoint agreement is displayed. If there is no response, the agreement is automatically accepted or rejected.
Use a Remote Jump Shortcut
To use a Jump shortcut to start a session, simply select the shortcut from the Jump interface and click the Jump button.
A dialog box opens for you to enter administrative credentials to the remote computer in order to complete the Jump. The administrative rights must be either a local administrator on the remote system or a domain administrator.
The client files are pushed to the remote system, and a session attempts to start.
Note: Jump Items can be set to allow multiple users to simultaneously access the same Jump Item. If set to Join Existing Session, other users are able to join a session already underway. The original owner of the session receives a note indicating another user has joined the session, but is not allowed to deny them access. For more information on simultaneous Jumps, please see Jump Item Settings at www.beyondtrust.com/docs/privileged-remote-access/getting-started/admin/jump-items.htm.
SALES: www.beyondtrust.com/contact SUPPORT: www.beyondtrust.com/support DOCUMENTATION: www.beyondtrust.com/docs 41©2003-2021 BeyondTrust Corporation. All Rights Reserved. Other trademarks identified on this page are owned by their respective owners. BeyondTrust is not a chartered bank or trust company, ordepository institution. It is not authorized to accept deposits or trust accounts and is not licensed or regulated by any state or federal banking authority.
TC: 1/20/2022
PRIVILEGED REMOTE ACCESS
JUMPOINT GUIDE

Remote Desktop Protocol ShortcutsUse BeyondTrust to start a Remote Desktop Protocol (RDP) session with remote Windows and Linux systems. Because remote desktop protocol sessions are proxied through a Jumpoint and converted to BeyondTrust sessions, users can share or transfer sessions, and sessions can be automatically audited and recorded as your administrator has defined for your site. To use RDP through BeyondTrust, you must have access to a Jumpoint and must have the user account permission Allowed Jump Methods: RDP via a Jumpoint.
Create an RDP Shortcut
To create a Microsoft Remote Desktop Protocol shortcut, click the Create button in the Jump interface. From the dropdown, select Remote RDP. RDP shortcuts appear in the Jump interface along with Jump Clients and other types of Jump Item shortcuts.
Organize and manage existing Jump Items by selecting one or more Jump Items and clicking Properties.
Note: To view the properties of multiple Jump Items, the items selected must be all the same type (all Jump Clients, all Remote Jumps, etc.).To review properties of other types of Jump Items, please see the appropriate section in this guide.
Enter a Name for the Jump Item. This name identifies the item in the session tabs. This string has a maximum of 128 characters.
From the Jumpoint dropdown, select the network that hosts the computer you wish to access. The access console remembers your Jumpoint choice the next time you create this type of Jump Item. Enter the Hostname / IP of the system you wish to access.
Provide the Username to sign in as, along with the Domain.
Select the Quality at which to view the remote screen. This cannot be changed during the remote desktop protocol (RDP) session. Select the color optimization mode to view the remote screen. If you are going to be primarily sharing video, select Video Optimized; otherwise, select Black and White (uses less bandwidth), Few Colors, More Colors, or Full Color (uses more bandwidth). Both Video Optimized and Full Color modes allow you to view the actual desktop wallpaper.
To start a console session rather than a new session, check the Console Session box.
If the server's certificate cannot be verified, you receive a certificate warning. Checking Ignore Untrusted Certificate allows you to connect to the remote system without seeing this message.
Note: When RemoteApp or BeyondTrust Remote Desktop Agent is selected in the SecureApp section, the Console Session checkbox is unchecked. Remote applications cannot run in a console session on a RDP server.
To get more detailed information on the RDP session, check Session Forensics. For this feature to work, you must select an RDP Service Account for the Jumpoint being used. When checking this setting, the following reminder displays:
Enabling this feature requires the RDP server to be configured to receive the monitoring agent and an RDP Service Account to be configured with this Jumpoint If these requirements are not met, all attempts to start a session will fail.
SALES: www.beyondtrust.com/contact SUPPORT: www.beyondtrust.com/support DOCUMENTATION: www.beyondtrust.com/docs 42©2003-2021 BeyondTrust Corporation. All Rights Reserved. Other trademarks identified on this page are owned by their respective owners. BeyondTrust is not a chartered bank or trust company, ordepository institution. It is not authorized to accept deposits or trust accounts and is not licensed or regulated by any state or federal banking authority.
TC: 1/20/2022
PRIVILEGED REMOTE ACCESS
JUMPOINT GUIDE
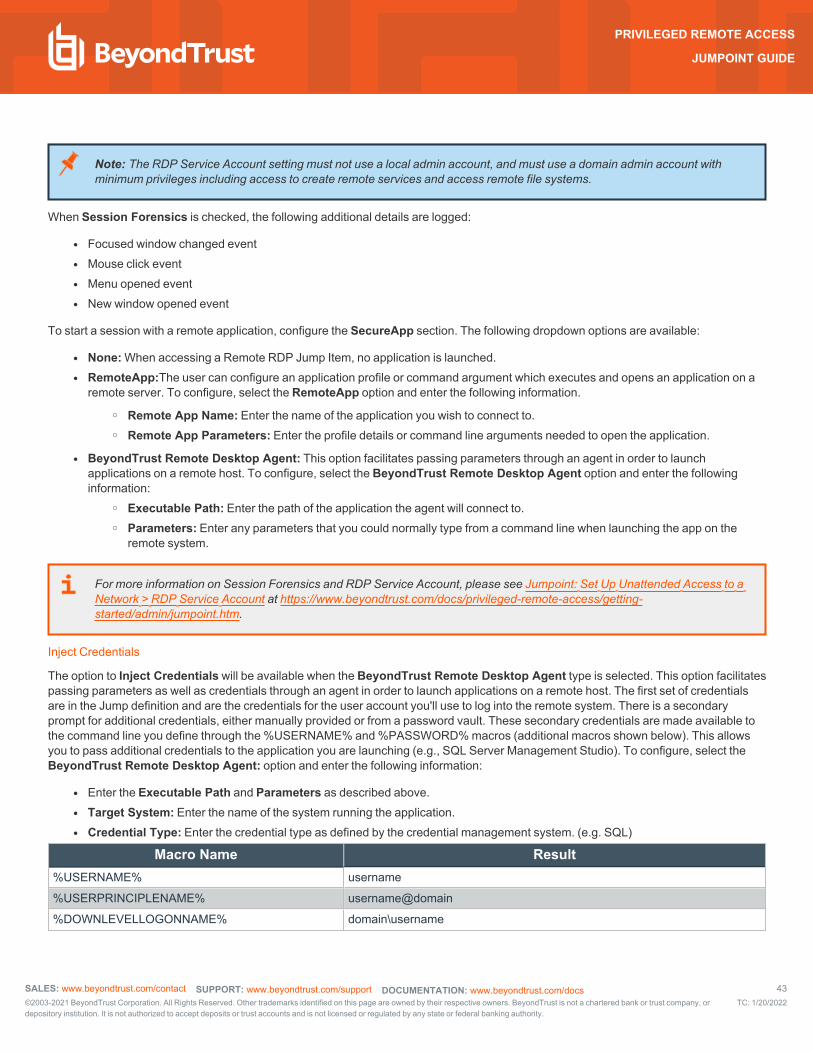
Note: The RDP Service Account setting must not use a local admin account, and must use a domain admin account with minimum privileges including access to create remote services and access remote file systems.
When Session Forensics is checked, the following additional details are logged:
l Focused window changed event l Mouse click event l Menu opened event l New window opened event
To start a session with a remote application, configure the SecureApp section. The following dropdown options are available:
l None: When accessing a Remote RDP Jump Item, no application is launched. l RemoteApp:The user can configure an application profile or command argument which executes and opens an application on a
remote server. To configure, select the RemoteApp option and enter the following information.
o Remote App Name: Enter the name of the application you wish to connect to. o Remote App Parameters: Enter the profile details or command line arguments needed to open the application.
l BeyondTrust Remote Desktop Agent: This option facilitates passing parameters through an agent in order to launch applications on a remote host. To configure, select the BeyondTrust Remote Desktop Agent option and enter the following information:
o Executable Path: Enter the path of the application the agent will connect to. o Parameters: Enter any parameters that you could normally type from a command line when launching the app on the
remote system.
For more information on Session Forensics and RDP Service Account, please see Jumpoint: Set Up Unattended Access to a Network > RDP Service Account at https://www.beyondtrust.com/docs/privileged-remote-access/getting-started/admin/jumpoint.htm.
Inject Credentials
The option to Inject Credentials will be available when the BeyondTrust Remote Desktop Agent type is selected. This option facilitates passing parameters as well as credentials through an agent in order to launch applications on a remote host. The first set of credentials are in the Jump definition and are the credentials for the user account you'll use to log into the remote system. There is a secondary prompt for additional credentials, either manually provided or from a password vault. These secondary credentials are made available to the command line you define through the %USERNAME% and %PASSWORD% macros (additional macros shown below). This allows you to pass additional credentials to the application you are launching (e.g., SQL Server Management Studio). To configure, select the BeyondTrust Remote Desktop Agent: option and enter the following information:
l Enter the Executable Path and Parameters as described above. l Target System: Enter the name of the system running the application. l Credential Type: Enter the credential type as defined by the credential management system. (e.g. SQL)
Macro Name Result%USERNAME% username
%USERPRINCIPLENAME% username@domain
%DOWNLEVELLOGONNAME% domain\username
SALES: www.beyondtrust.com/contact SUPPORT: www.beyondtrust.com/support DOCUMENTATION: www.beyondtrust.com/docs 43©2003-2021 BeyondTrust Corporation. All Rights Reserved. Other trademarks identified on this page are owned by their respective owners. BeyondTrust is not a chartered bank or trust company, ordepository institution. It is not authorized to accept deposits or trust accounts and is not licensed or regulated by any state or federal banking authority.
TC: 1/20/2022
PRIVILEGED REMOTE ACCESS
JUMPOINT GUIDE
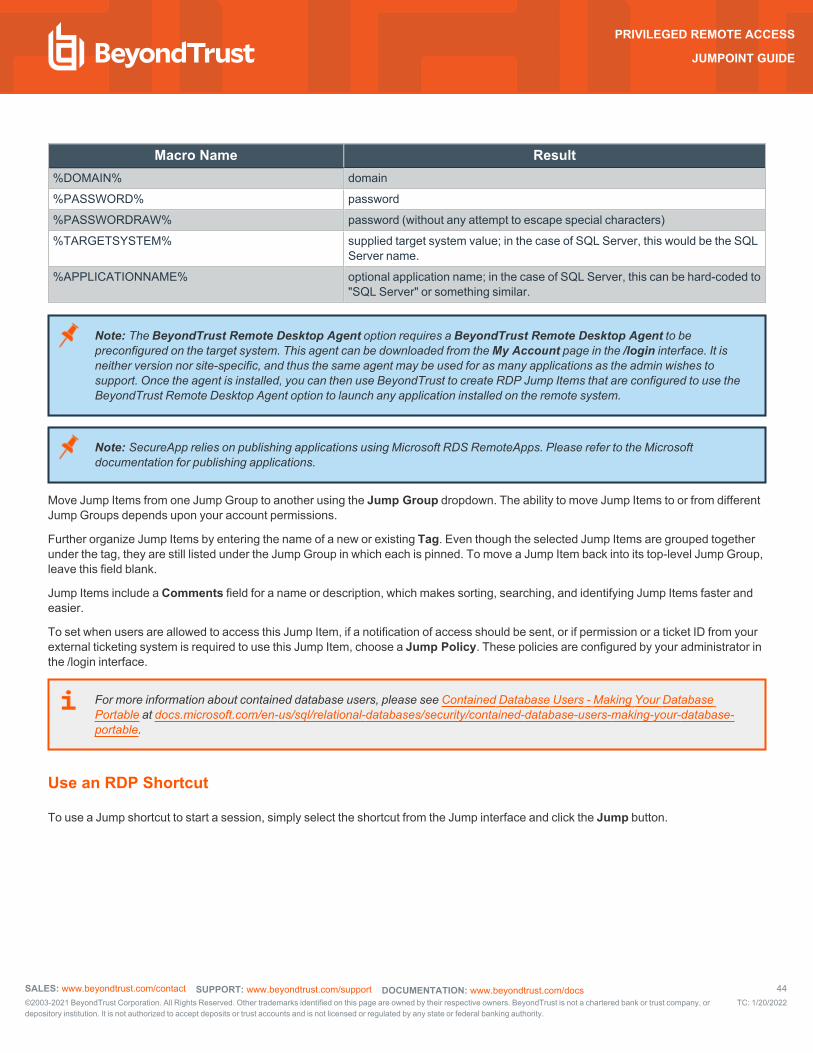
Macro Name Result%DOMAIN% domain
%PASSWORD% password
%PASSWORDRAW% password (without any attempt to escape special characters)
%TARGETSYSTEM% supplied target system value; in the case of SQL Server, this would be the SQL Server name.
%APPLICATIONNAME% optional application name; in the case of SQL Server, this can be hard-coded to "SQL Server" or something similar.
Note: The BeyondTrust Remote Desktop Agent option requires a BeyondTrust Remote Desktop Agent to be preconfigured on the target system. This agent can be downloaded from the My Account page in the /login interface. It is neither version nor site-specific, and thus the same agent may be used for as many applications as the admin wishes to support. Once the agent is installed, you can then use BeyondTrust to create RDP Jump Items that are configured to use the BeyondTrust Remote Desktop Agent option to launch any application installed on the remote system.
Note: SecureApp relies on publishing applications using Microsoft RDS RemoteApps. Please refer to the Microsoft documentation for publishing applications.
Move Jump Items from one Jump Group to another using the Jump Group dropdown. The ability to move Jump Items to or from different Jump Groups depends upon your account permissions.
Further organize Jump Items by entering the name of a new or existing Tag. Even though the selected Jump Items are grouped together under the tag, they are still listed under the Jump Group in which each is pinned. To move a Jump Item back into its top-level Jump Group, leave this field blank.
Jump Items include a Comments field for a name or description, which makes sorting, searching, and identifying Jump Items faster and easier.
To set when users are allowed to access this Jump Item, if a notification of access should be sent, or if permission or a ticket ID from your external ticketing system is required to use this Jump Item, choose a Jump Policy. These policies are configured by your administrator in the /login interface.
For more information about contained database users, please see Contained Database Users - Making Your Database Portable at docs.microsoft.com/en-us/sql/relational-databases/security/contained-database-users-making-your-database-portable.
Use an RDP Shortcut
To use a Jump shortcut to start a session, simply select the shortcut from the Jump interface and click the Jump button.
SALES: www.beyondtrust.com/contact SUPPORT: www.beyondtrust.com/support DOCUMENTATION: www.beyondtrust.com/docs 44©2003-2021 BeyondTrust Corporation. All Rights Reserved. Other trademarks identified on this page are owned by their respective owners. BeyondTrust is not a chartered bank or trust company, ordepository institution. It is not authorized to accept deposits or trust accounts and is not licensed or regulated by any state or federal banking authority.
TC: 1/20/2022
PRIVILEGED REMOTE ACCESS
JUMPOINT GUIDE
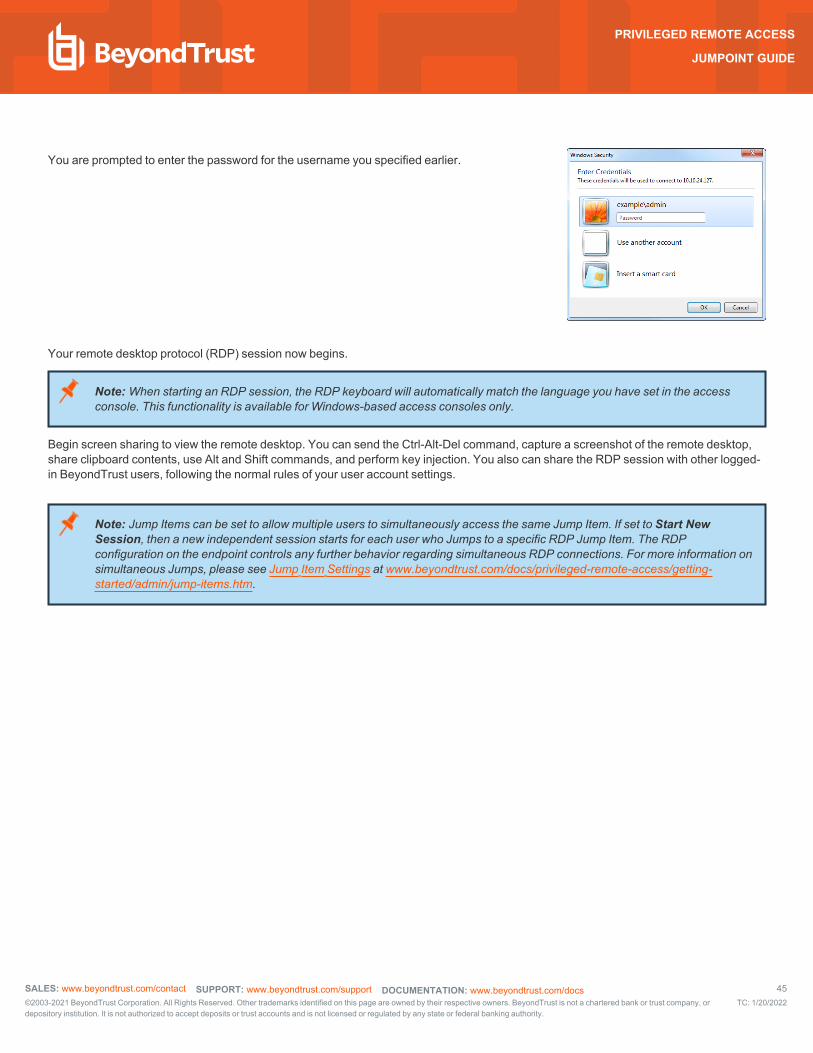
You are prompted to enter the password for the username you specified earlier.
Your remote desktop protocol (RDP) session now begins.
Note: When starting an RDP session, the RDP keyboard will automatically match the language you have set in the access console. This functionality is available for Windows-based access consoles only.
Begin screen sharing to view the remote desktop. You can send the Ctrl-Alt-Del command, capture a screenshot of the remote desktop, share clipboard contents, use Alt and Shift commands, and perform key injection. You also can share the RDP session with other logged-in BeyondTrust users, following the normal rules of your user account settings.
Note: Jump Items can be set to allow multiple users to simultaneously access the same Jump Item. If set to Start New Session, then a new independent session starts for each user who Jumps to a specific RDP Jump Item. The RDP configuration on the endpoint controls any further behavior regarding simultaneous RDP connections. For more information on simultaneous Jumps, please see Jump Item Settings at www.beyondtrust.com/docs/privileged-remote-access/getting-started/admin/jump-items.htm.
SALES: www.beyondtrust.com/contact SUPPORT: www.beyondtrust.com/support DOCUMENTATION: www.beyondtrust.com/docs 45©2003-2021 BeyondTrust Corporation. All Rights Reserved. Other trademarks identified on this page are owned by their respective owners. BeyondTrust is not a chartered bank or trust company, ordepository institution. It is not authorized to accept deposits or trust accounts and is not licensed or regulated by any state or federal banking authority.
TC: 1/20/2022
PRIVILEGED REMOTE ACCESS
JUMPOINT GUIDE
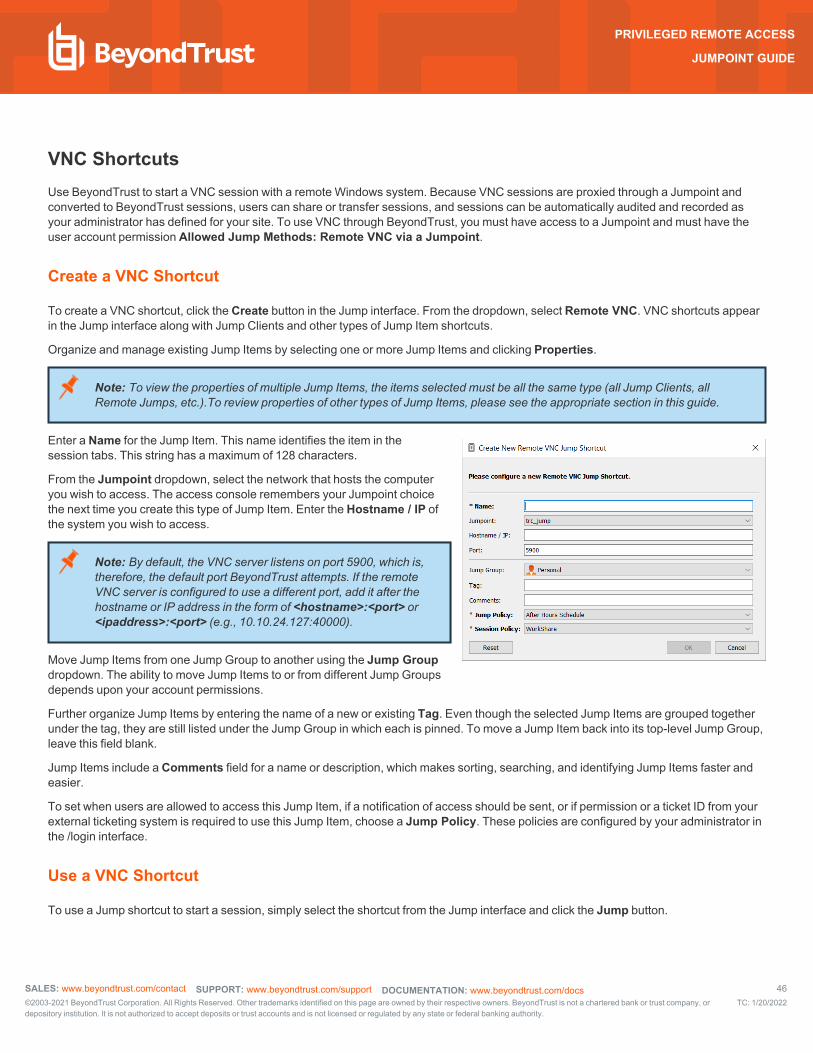
VNC ShortcutsUse BeyondTrust to start a VNC session with a remote Windows system. Because VNC sessions are proxied through a Jumpoint and converted to BeyondTrust sessions, users can share or transfer sessions, and sessions can be automatically audited and recorded as your administrator has defined for your site. To use VNC through BeyondTrust, you must have access to a Jumpoint and must have the user account permission Allowed Jump Methods: Remote VNC via a Jumpoint.
Create a VNC Shortcut
To create a VNC shortcut, click the Create button in the Jump interface. From the dropdown, select Remote VNC. VNC shortcuts appear in the Jump interface along with Jump Clients and other types of Jump Item shortcuts.
Organize and manage existing Jump Items by selecting one or more Jump Items and clicking Properties.
Note: To view the properties of multiple Jump Items, the items selected must be all the same type (all Jump Clients, all Remote Jumps, etc.).To review properties of other types of Jump Items, please see the appropriate section in this guide.
Enter a Name for the Jump Item. This name identifies the item in the session tabs. This string has a maximum of 128 characters.
From the Jumpoint dropdown, select the network that hosts the computer you wish to access. The access console remembers your Jumpoint choice the next time you create this type of Jump Item. Enter the Hostname / IP of the system you wish to access.
Note: By default, the VNC server listens on port 5900, which is, therefore, the default port BeyondTrust attempts. If the remote VNC server is configured to use a different port, add it after the hostname or IP address in the form of <hostname>:<port> or <ipaddress>:<port> (e.g., 10.10.24.127:40000).
Move Jump Items from one Jump Group to another using the Jump Group dropdown. The ability to move Jump Items to or from different Jump Groups depends upon your account permissions.
Further organize Jump Items by entering the name of a new or existing Tag. Even though the selected Jump Items are grouped together under the tag, they are still listed under the Jump Group in which each is pinned. To move a Jump Item back into its top-level Jump Group, leave this field blank.
Jump Items include a Comments field for a name or description, which makes sorting, searching, and identifying Jump Items faster and easier.
To set when users are allowed to access this Jump Item, if a notification of access should be sent, or if permission or a ticket ID from your external ticketing system is required to use this Jump Item, choose a Jump Policy. These policies are configured by your administrator in the /login interface.
Use a VNC Shortcut
To use a Jump shortcut to start a session, simply select the shortcut from the Jump interface and click the Jump button.
SALES: www.beyondtrust.com/contact SUPPORT: www.beyondtrust.com/support DOCUMENTATION: www.beyondtrust.com/docs 46©2003-2021 BeyondTrust Corporation. All Rights Reserved. Other trademarks identified on this page are owned by their respective owners. BeyondTrust is not a chartered bank or trust company, ordepository institution. It is not authorized to accept deposits or trust accounts and is not licensed or regulated by any state or federal banking authority.
TC: 1/20/2022
PRIVILEGED REMOTE ACCESS
JUMPOINT GUIDE
When establishing the connection to the VNC server, the system tries to determine if there are any credentials associated. If so, it prompts you to enter them.
Your VNC session now begins. Begin screen sharing to view the remote desktop. You can send the Ctrl-Alt-Del command, capture a screenshot of the remote desktop, and share clipboard text contents. You also can share, transfer or record the VNC session, following the normal rules of your user account settings.
Note: Jump Items can be set to allow multiple users to simultaneously access the same Jump Item. If set to Join Existing Session, other users are able to join a session already underway. The original owner of the session receives a note indicating another user has joined the session, but is not allowed to deny them access. For more information on simultaneous Jumps, please see Jump Item Settings at www.beyondtrust.com/docs/privileged-remote-access/getting-started/admin/jump-items.htm.
SALES: www.beyondtrust.com/contact SUPPORT: www.beyondtrust.com/support DOCUMENTATION: www.beyondtrust.com/docs 47©2003-2021 BeyondTrust Corporation. All Rights Reserved. Other trademarks identified on this page are owned by their respective owners. BeyondTrust is not a chartered bank or trust company, ordepository institution. It is not authorized to accept deposits or trust accounts and is not licensed or regulated by any state or federal banking authority.
TC: 1/20/2022
PRIVILEGED REMOTE ACCESS
JUMPOINT GUIDE
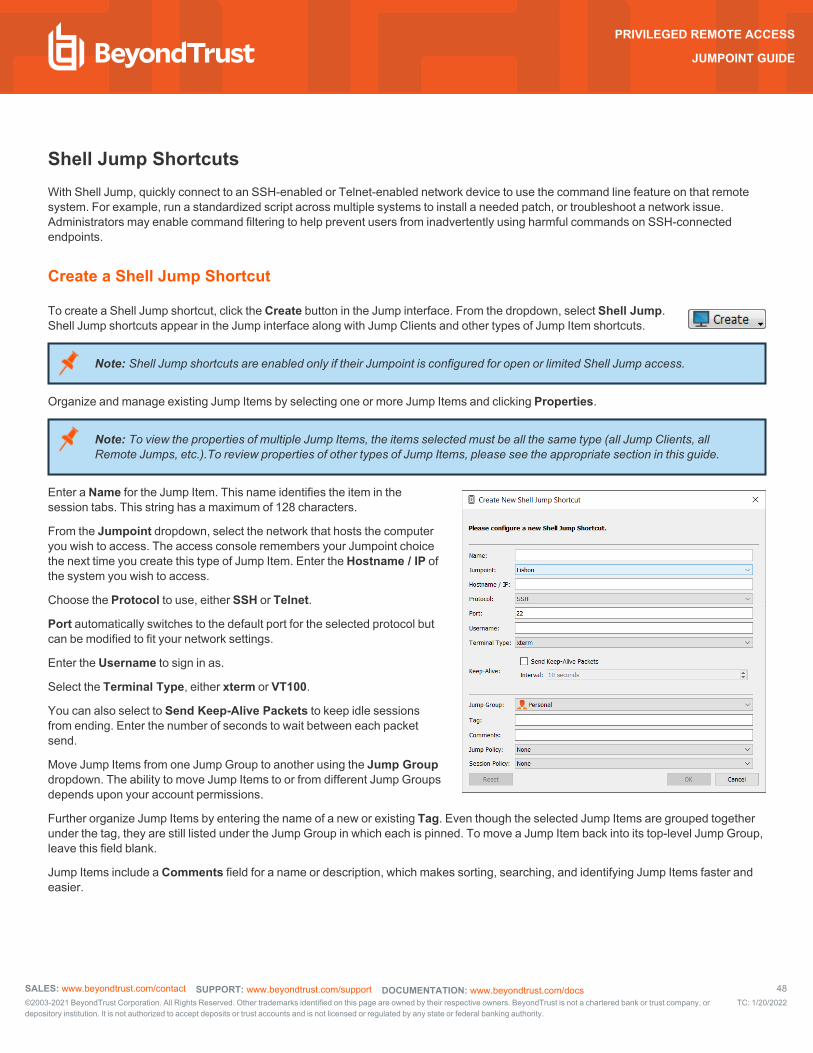
Shell Jump ShortcutsWith Shell Jump, quickly connect to an SSH-enabled or Telnet-enabled network device to use the command line feature on that remote system. For example, run a standardized script across multiple systems to install a needed patch, or troubleshoot a network issue. Administrators may enable command filtering to help prevent users from inadvertently using harmful commands on SSH-connected endpoints.
Create a Shell Jump Shortcut
To create a Shell Jump shortcut, click the Create button in the Jump interface. From the dropdown, select Shell Jump. Shell Jump shortcuts appear in the Jump interface along with Jump Clients and other types of Jump Item shortcuts.
Note: Shell Jump shortcuts are enabled only if their Jumpoint is configured for open or limited Shell Jump access.
Organize and manage existing Jump Items by selecting one or more Jump Items and clicking Properties.
Note: To view the properties of multiple Jump Items, the items selected must be all the same type (all Jump Clients, all Remote Jumps, etc.).To review properties of other types of Jump Items, please see the appropriate section in this guide.
Enter a Name for the Jump Item. This name identifies the item in the session tabs. This string has a maximum of 128 characters.
From the Jumpoint dropdown, select the network that hosts the computer you wish to access. The access console remembers your Jumpoint choice the next time you create this type of Jump Item. Enter the Hostname / IP of the system you wish to access.
Choose the Protocol to use, either SSH or Telnet.
Port automatically switches to the default port for the selected protocol but can be modified to fit your network settings.
Enter the Username to sign in as.
Select the Terminal Type, either xterm or VT100.
You can also select to Send Keep-Alive Packets to keep idle sessions from ending. Enter the number of seconds to wait between each packet send.
Move Jump Items from one Jump Group to another using the Jump Group dropdown. The ability to move Jump Items to or from different Jump Groups depends upon your account permissions.
Further organize Jump Items by entering the name of a new or existing Tag. Even though the selected Jump Items are grouped together under the tag, they are still listed under the Jump Group in which each is pinned. To move a Jump Item back into its top-level Jump Group, leave this field blank.
Jump Items include a Comments field for a name or description, which makes sorting, searching, and identifying Jump Items faster and easier.
SALES: www.beyondtrust.com/contact SUPPORT: www.beyondtrust.com/support DOCUMENTATION: www.beyondtrust.com/docs 48©2003-2021 BeyondTrust Corporation. All Rights Reserved. Other trademarks identified on this page are owned by their respective owners. BeyondTrust is not a chartered bank or trust company, ordepository institution. It is not authorized to accept deposits or trust accounts and is not licensed or regulated by any state or federal banking authority.
TC: 1/20/2022
PRIVILEGED REMOTE ACCESS
JUMPOINT GUIDE
To set when users are allowed to access this Jump Item, if a notification of access should be sent, or if permission or a ticket ID from your external ticketing system is required to use this Jump Item, choose a Jump Policy. These policies are configured by your administrator in the /login interface.
Choose a Session Policy to assign to this Jump Item. The session policy assigned to this Jump Item has the highest priority when setting session permissions. The ability to set a session policy depends on your account permissions.
Use a Shell Jump Shortcut
To use a Shell Jump shortcut to start a session, simply select the shortcut from the Jump interface and click the Jump button.
If attempting to Shell Jump to an SSH device without a cached host key, you receive an alert that the server's host key is not cached and that there is no guarantee that the server is the computer you think it is.
If you choose Save Key and Connect, then the key is cached on the Jumpoint's host system so that future attempts to Shell Jump to this system do not result in this prompt. Connect Only starts the session without caching the key, and Abort ends the Shell Jump session.
When you Shell Jump to a remote device, a command shell session immediately starts with that device. If you are Shell Jumping to a provisioned SSH device with an unencrypted key or with an encrypted key whose password has been cached, you are not prompted for a password. Otherwise, you are required to enter a password. You can then send commands to the remote system.
Administrators may configure command filtering on Shell Jump items to block some commands and allow others, in an effort to prevent the user from inadvertently using a command that may cause undesireable results. In the event a user attempts to use a command that matches an expression that is not allowed, they will receive a prompt and will not be allowed to execute the command.
Note: BeyondTrust's command filter uses extended regular expressions, which are not to be confused with egrep. For more information, please see details at docs.microsoft.com/en-us/cpp/standard-library/regular-expressions-cpp.
Configure Shell Prompt Filtering:
1. Log into the /login interface as a user with permissions to configure Jump Items and Session Policies. 2. Browse to Jump > Jump Items and scroll down to the Shell Jump Filtering section. 3. In the Recognized Shell Prompts text box, enter regexes to match the command shell prompts found on your endpoint systems,
one per line.
Note: Line breaks, or newlines, are not allowed within the command prompt patterns entered. If an endpoint system uses a multi-line prompt, enter an expression that matches only the final line of the prompt in the text box.
4. Click Save.
Note: Once you have entered the regexes you wish to use, you can test a shell prompt to determine if it matches any of the regexes in the list. This allows you to test your regexes without starting a session. Enter the expression in the Shell Prompt text box and click the Check button. You will receive a notice stating whether or not the shell prompt you entered matches one of the regexes in the list.
Configure Command Filtering:
1. Browse to Users & Security > Session Policies and either create a new policy or edit an existing one.
SALES: www.beyondtrust.com/contact SUPPORT: www.beyondtrust.com/support DOCUMENTATION: www.beyondtrust.com/docs 49©2003-2021 BeyondTrust Corporation. All Rights Reserved. Other trademarks identified on this page are owned by their respective owners. BeyondTrust is not a chartered bank or trust company, ordepository institution. It is not authorized to accept deposits or trust accounts and is not licensed or regulated by any state or federal banking authority.
TC: 1/20/2022
PRIVILEGED REMOTE ACCESS
JUMPOINT GUIDE
Note: You can also configure this for users and/or group policies.
2. Locate the Command Shell settings in the Permissions section. 3. Because you will use command filtering with Shell Jump items, select the Allow radio button to allow the use of the command
shell. 4. Choose from Allow all commands, Allow the command patterns below, or Deny the command patterns below and specify
in the text box which regex patterns you wish to allow or block.
Note: Once you have entered the command patterns you wish to allow or block, you can test commands in the Command Tester text box. This allows you to test your command filters without starting a session. This allows you to test your command filters without starting a session. You will receive a notice stating whether or not the command entered would be allowed to run on the remote system based on the regexes specified in the list.
The two possible messages are:
l The entered command shall be allowed based on your selections. l The entered command shall not be allowed based on your selections.
Use Credential Injection with SUDO on a Linux Endpoint
To use credential injection with SUDO, an administrator must configure one or more functional accounts on each Linux endpoint to be accessed via Shell Jump. As the process for configuring the sudoers file is complex and varies by platform, please refer to your platform's documentation for details on completing this process. Each functional account must:
l Allow authenticating via SSH (password or SSH key) l Have the account credentials stored in the Endpoint Credential Manager l Have one or more entries in /etc/sudoers granting the functional account access to one or more commands to be executed as
root without requiring a password (NOPASSWD).
An administrator must create a Shell Jump Item for the endpoint.
Next, an administrator must configure the endpoint credential manager and/or password vault to grant users access to the appropriate functional accounts for that Jump Item.
When a user Jumps to the Shell Jump Item, they can choose from the list of functional accounts available for that endpoint. Each functional account has its own set of commands that can be executed using SUDO, as configured by the administrator on the endpoint. The credentials for the account are passed from the Endpoint Credential Manager to the endpoint.
Note: Jump Items can be set to allow multiple users to simultaneously access the same Jump Item. If set to Join Existing Session, other users are able to join a session already underway. The original owner of the session receives a note indicating another user has joined the session, but is not allowed to deny them access. For more information on simultaneous Jumps, please see Jump Item Settings at www.beyondtrust.com/docs/privileged-remote-access/getting-started/admin/jump-items.htm.
SALES: www.beyondtrust.com/contact SUPPORT: www.beyondtrust.com/support DOCUMENTATION: www.beyondtrust.com/docs 50©2003-2021 BeyondTrust Corporation. All Rights Reserved. Other trademarks identified on this page are owned by their respective owners. BeyondTrust is not a chartered bank or trust company, ordepository institution. It is not authorized to accept deposits or trust accounts and is not licensed or regulated by any state or federal banking authority.
TC: 1/20/2022
PRIVILEGED REMOTE ACCESS
JUMPOINT GUIDE
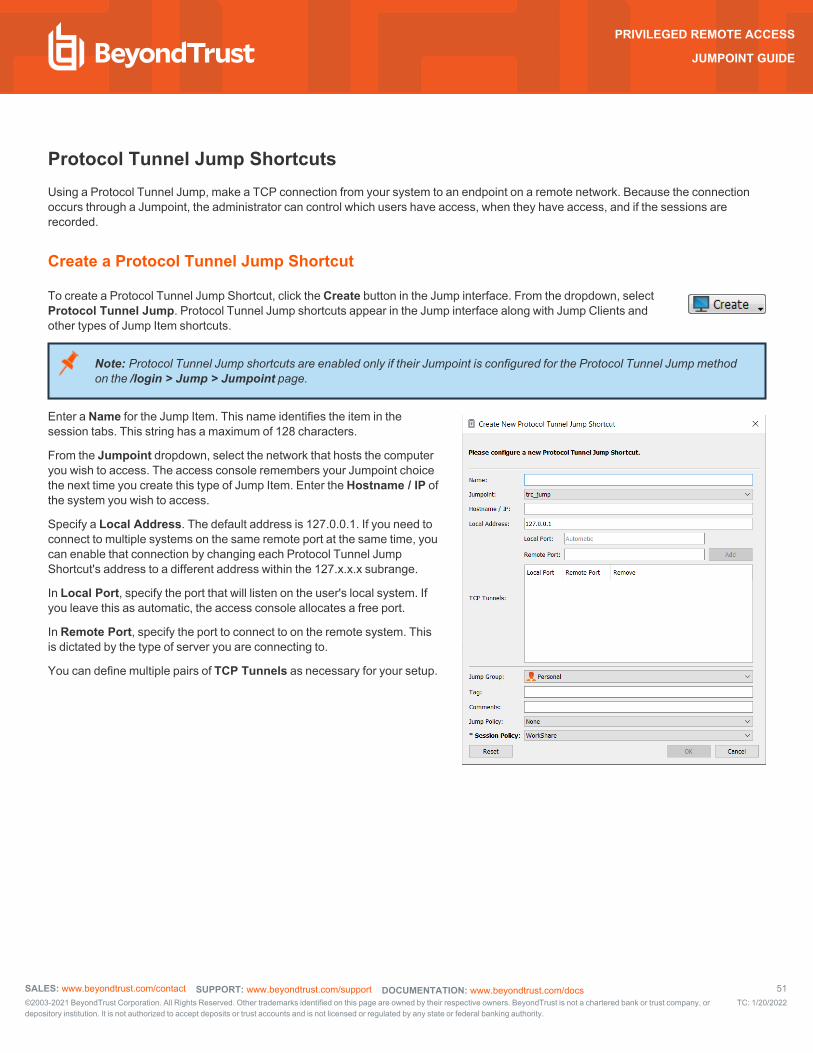
Protocol Tunnel Jump ShortcutsUsing a Protocol Tunnel Jump, make a TCP connection from your system to an endpoint on a remote network. Because the connection occurs through a Jumpoint, the administrator can control which users have access, when they have access, and if the sessions are recorded.
Create a Protocol Tunnel Jump Shortcut
To create a Protocol Tunnel Jump Shortcut, click the Create button in the Jump interface. From the dropdown, select Protocol Tunnel Jump. Protocol Tunnel Jump shortcuts appear in the Jump interface along with Jump Clients and other types of Jump Item shortcuts.
Note: Protocol Tunnel Jump shortcuts are enabled only if their Jumpoint is configured for the Protocol Tunnel Jump method on the /login > Jump > Jumpoint page.
Enter a Name for the Jump Item. This name identifies the item in the session tabs. This string has a maximum of 128 characters.
From the Jumpoint dropdown, select the network that hosts the computer you wish to access. The access console remembers your Jumpoint choice the next time you create this type of Jump Item. Enter the Hostname / IP of the system you wish to access.
Specify a Local Address. The default address is 127.0.0.1. If you need to connect to multiple systems on the same remote port at the same time, you can enable that connection by changing each Protocol Tunnel Jump Shortcut's address to a different address within the 127.x.x.x subrange.
In Local Port, specify the port that will listen on the user's local system. If you leave this as automatic, the access console allocates a free port.
In Remote Port, specify the port to connect to on the remote system. This is dictated by the type of server you are connecting to.
You can define multiple pairs of TCP Tunnels as necessary for your setup.
SALES: www.beyondtrust.com/contact SUPPORT: www.beyondtrust.com/support DOCUMENTATION: www.beyondtrust.com/docs 51©2003-2021 BeyondTrust Corporation. All Rights Reserved. Other trademarks identified on this page are owned by their respective owners. BeyondTrust is not a chartered bank or trust company, ordepository institution. It is not authorized to accept deposits or trust accounts and is not licensed or regulated by any state or federal banking authority.
TC: 1/20/2022
PRIVILEGED REMOTE ACCESS
JUMPOINT GUIDE
Use Web Jump to Access Web ServicesWith the proliferation of infrastructure components that have moved to web-based interfaces for configuration, IT administrators are faced with an increasingly complex security management situation. With privileged access to web-based resources, it is a challenge to control, audit, and enforce proper authentication without negatively affecting business productivity. IT administrators need a way to effectively control and audit resources managed via web interfaces, including:
l Externally hosted Infrastructure as a Service (IaaS) servers such as Amazon AWS, Microsoft Azure, IBM SoftLayer, and Rackspace
l Internally hosted servers managed by hypervisor software such as VMware vSphere, Citrix XenServer, and Microsoft Hyper-V l Modern core network infrastructure that leverages web-based configuration interfaces
The identity and access management capabilities vary significantly between IaaS, hypervisor providers, and core infrastructure systems, and many do not offer native multifactor authentication support, thereby missing that additional layer of security. These inconsistencies across systems create opportunities for business vulnerabilities, such as misuse of accounts and access, leading to leaks of sensitive data. BeyondTrust Web Jump is the extra layer of security for authenticating to these systems.
IMPORTANT!
Web Jump does not support Flash. Be sure to consult your hypervisor documentation and update it to a version that supports HTML5.
Note: The Web Jump Item is an add-on for Privileged Remote Access, and requires additional purchase.
Create a Web Jump Shortcut
Note: Before creating Web Jump shortcuts, ensure that your user account has the ability to access Web Jumps. This permission is set on your user account in the /login interface under Access Permissions > Jump Technology.
To create a Web Jump shortcut, click the Create button in the Jump interface. From the dropdown, select Web Jump. Web Jump shortcuts appear in the Jump interface along with Jump Clients and other types of Jump Item shortcuts.
Organize and manage existing Jump Items by selecting one or more Jump Items and clicking Properties.
Note: To view the properties of multiple Jump Items, the items selected must be all the same type (all Jump Clients, all Remote Jumps, etc.).To review properties of other types of Jump Items, please see the appropriate section in this guide.
SALES: www.beyondtrust.com/contact SUPPORT: www.beyondtrust.com/support DOCUMENTATION: www.beyondtrust.com/docs 52©2003-2021 BeyondTrust Corporation. All Rights Reserved. Other trademarks identified on this page are owned by their respective owners. BeyondTrust is not a chartered bank or trust company, ordepository institution. It is not authorized to accept deposits or trust accounts and is not licensed or regulated by any state or federal banking authority.
TC: 1/20/2022
PRIVILEGED REMOTE ACCESS
JUMPOINT GUIDE
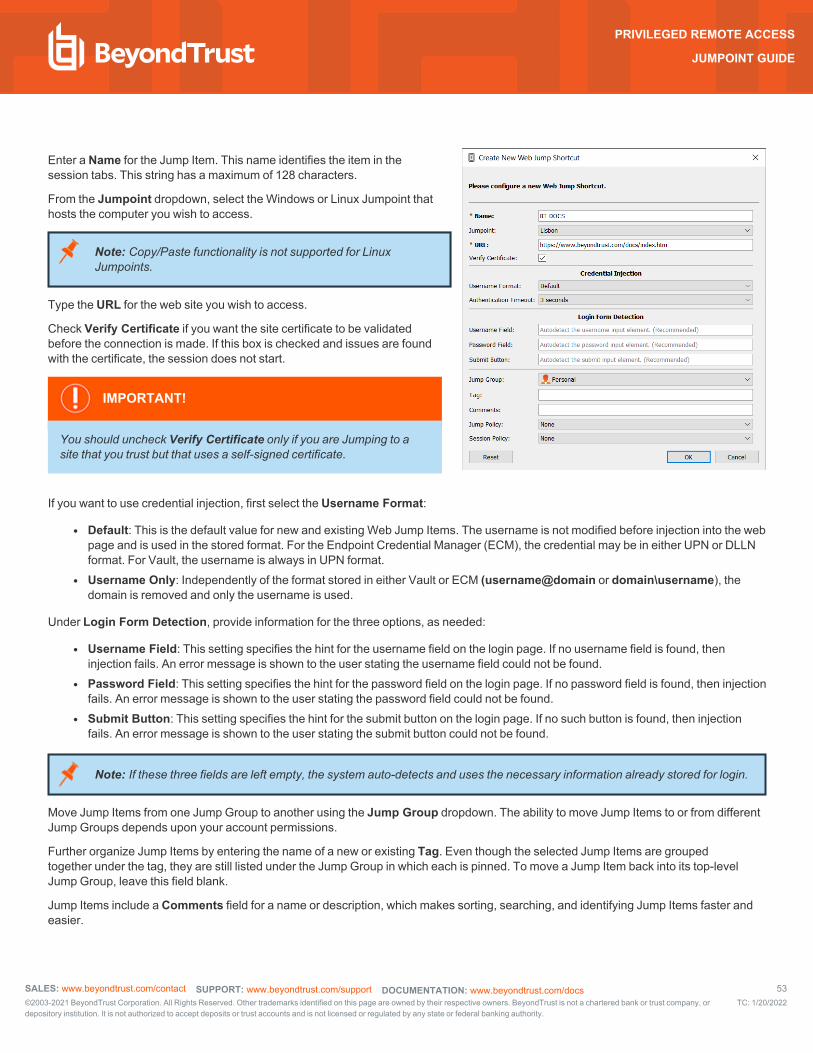
Enter a Name for the Jump Item. This name identifies the item in the session tabs. This string has a maximum of 128 characters.
From the Jumpoint dropdown, select the Windows or Linux Jumpoint that hosts the computer you wish to access.
Note: Copy/Paste functionality is not supported for Linux Jumpoints.
Type the URL for the web site you wish to access.
Check Verify Certificate if you want the site certificate to be validated before the connection is made. If this box is checked and issues are found with the certificate, the session does not start.
IMPORTANT!
You should uncheck Verify Certificate only if you are Jumping to a site that you trust but that uses a self-signed certificate.
If you want to use credential injection, first select the Username Format:
l Default: This is the default value for new and existing Web Jump Items. The username is not modified before injection into the web page and is used in the stored format. For the Endpoint Credential Manager (ECM), the credential may be in either UPN or DLLN format. For Vault, the username is always in UPN format.
l Username Only: Independently of the format stored in either Vault or ECM (username@domain or domain\username), the domain is removed and only the username is used.
Under Login Form Detection, provide information for the three options, as needed:
l Username Field: This setting specifies the hint for the username field on the login page. If no username field is found, then injection fails. An error message is shown to the user stating the username field could not be found.
l Password Field: This setting specifies the hint for the password field on the login page. If no password field is found, then injection fails. An error message is shown to the user stating the password field could not be found.
l Submit Button: This setting specifies the hint for the submit button on the login page. If no such button is found, then injection fails. An error message is shown to the user stating the submit button could not be found.
Note: If these three fields are left empty, the system auto-detects and uses the necessary information already stored for login.
Move Jump Items from one Jump Group to another using the Jump Group dropdown. The ability to move Jump Items to or from different Jump Groups depends upon your account permissions.
Further organize Jump Items by entering the name of a new or existing Tag. Even though the selected Jump Items are grouped together under the tag, they are still listed under the Jump Group in which each is pinned. To move a Jump Item back into its top-level Jump Group, leave this field blank.
Jump Items include a Comments field for a name or description, which makes sorting, searching, and identifying Jump Items faster and easier.
SALES: www.beyondtrust.com/contact SUPPORT: www.beyondtrust.com/support DOCUMENTATION: www.beyondtrust.com/docs 53©2003-2021 BeyondTrust Corporation. All Rights Reserved. Other trademarks identified on this page are owned by their respective owners. BeyondTrust is not a chartered bank or trust company, ordepository institution. It is not authorized to accept deposits or trust accounts and is not licensed or regulated by any state or federal banking authority.
TC: 1/20/2022
PRIVILEGED REMOTE ACCESS
JUMPOINT GUIDE
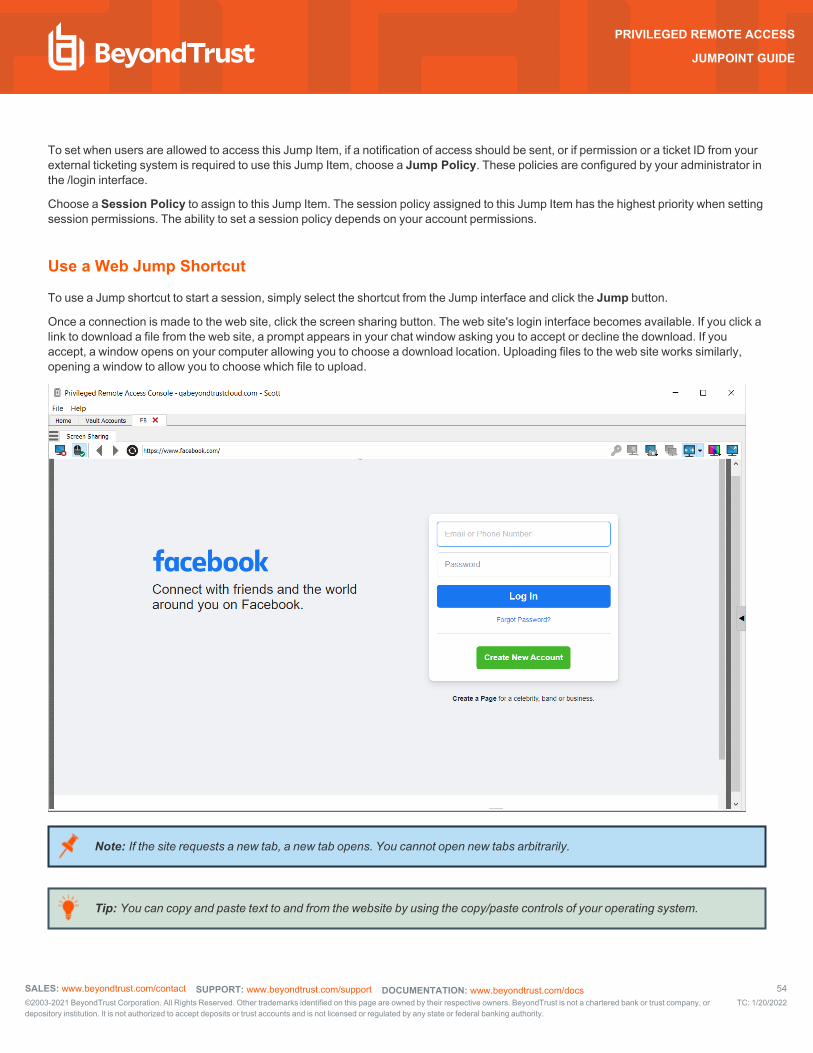
To set when users are allowed to access this Jump Item, if a notification of access should be sent, or if permission or a ticket ID from your external ticketing system is required to use this Jump Item, choose a Jump Policy. These policies are configured by your administrator in the /login interface.
Choose a Session Policy to assign to this Jump Item. The session policy assigned to this Jump Item has the highest priority when setting session permissions. The ability to set a session policy depends on your account permissions.
Use a Web Jump Shortcut
To use a Jump shortcut to start a session, simply select the shortcut from the Jump interface and click the Jump button.
Once a connection is made to the web site, click the screen sharing button. The web site's login interface becomes available. If you click a link to download a file from the web site, a prompt appears in your chat window asking you to accept or decline the download. If you accept, a window opens on your computer allowing you to choose a download location. Uploading files to the web site works similarly, opening a window to allow you to choose which file to upload.
Note: If the site requests a new tab, a new tab opens. You cannot open new tabs arbitrarily.
Tip: You can copy and paste text to and from the website by using the copy/paste controls of your operating system.
SALES: www.beyondtrust.com/contact SUPPORT: www.beyondtrust.com/support DOCUMENTATION: www.beyondtrust.com/docs 54©2003-2021 BeyondTrust Corporation. All Rights Reserved. Other trademarks identified on this page are owned by their respective owners. BeyondTrust is not a chartered bank or trust company, ordepository institution. It is not authorized to accept deposits or trust accounts and is not licensed or regulated by any state or federal banking authority.
TC: 1/20/2022
PRIVILEGED REMOTE ACCESS
JUMPOINT GUIDE
Use Credential Injection
IMPORTANT!
Credential injection is not supported for non-secure sites (non-HTTPS).
When integrating BeyondTrust PRA with a password vault system, you can seamlessly access your web site accounts without viewing the login screen or entering any credentials using credential injection.
Note: Web Jump supports multi-step authentication, in which the username and password are not requested on the same browser page. Web Jump also supports scenarios in which a user connects to an unauthenticated portion of a website, but then attempts to enter an area using basic authentication. Furthermore, Web Jump supports sites that contain CAPTCHAs, by allowing the users to complete the CAPTCHA without ending the credential injection process. Once interaction with a CAPTCHA is complete, the user clicks the key icon in the access console to complete credential injection.
Note: For seamless credential injection on a VMware console, some configuration is required. 1. Go to the computer hosting the Jumpoint.
2. Download and install the client integration plugin from the VMware URL specified above.
3. Using admin permissions, open Windows services (services.msc) on the Jumpoint host.
4. Right-click on the BeyondTrust Jumpoint and select Properties.
5. On the Log On tab under Local System account, check Allow service to interact with desktop.
6. Click OK.
7. On the user's local system - the one where the access console is installed - start a Web Jump with the VMware URL specified above.
8. Select Use Windows Credentials.
9. This causes a prompt on the Jumpoint host system to allow services to interact with an external program. Give the service permission.
10. A VMware credential injection prompt is displayed. Uncheck the box asking if you want the prompt to be displayed whenever the program is called. Click Accept.
11. You can now start Web Jumps to the VMware console using Windows credentials without a prompt.
SALES: www.beyondtrust.com/contact SUPPORT: www.beyondtrust.com/support DOCUMENTATION: www.beyondtrust.com/docs 55©2003-2021 BeyondTrust Corporation. All Rights Reserved. Other trademarks identified on this page are owned by their respective owners. BeyondTrust is not a chartered bank or trust company, ordepository institution. It is not authorized to accept deposits or trust accounts and is not licensed or regulated by any state or federal banking authority.
TC: 1/20/2022
PRIVILEGED REMOTE ACCESS
JUMPOINT GUIDE
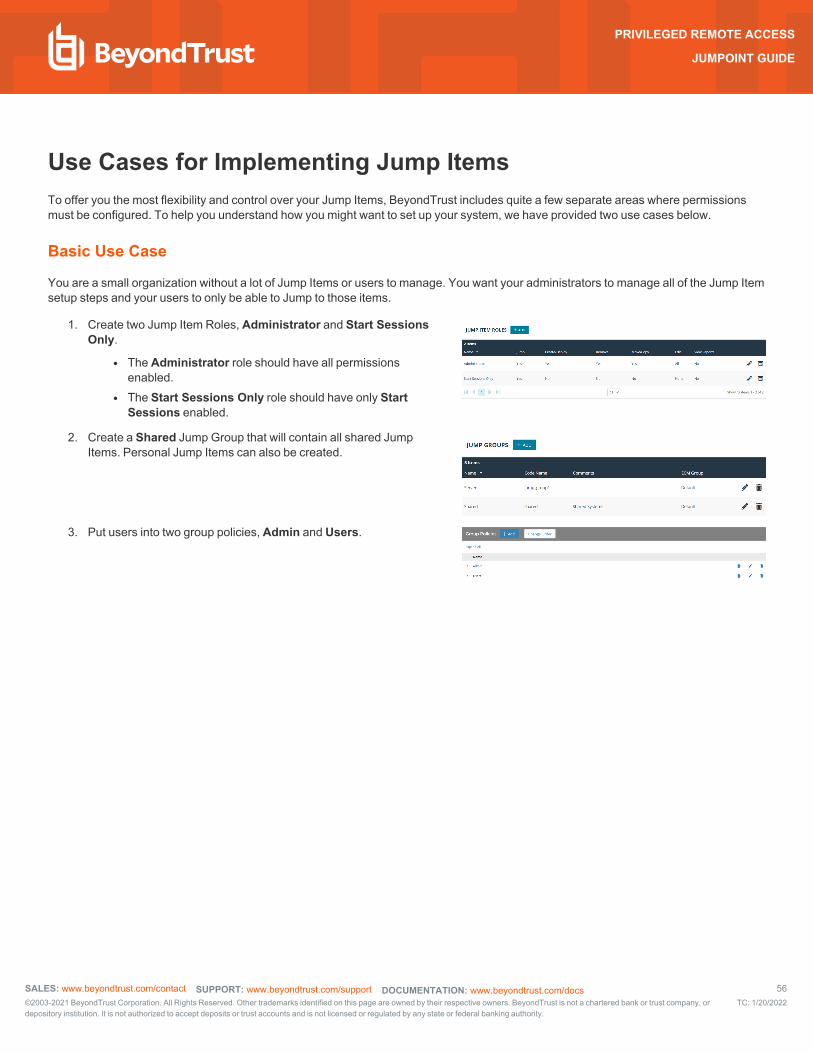
Use Cases for Implementing Jump ItemsTo offer you the most flexibility and control over your Jump Items, BeyondTrust includes quite a few separate areas where permissions must be configured. To help you understand how you might want to set up your system, we have provided two use cases below.
Basic Use Case
You are a small organization without a lot of Jump Items or users to manage. You want your administrators to manage all of the Jump Item setup steps and your users to only be able to Jump to those items.
1. Create two Jump Item Roles, Administrator and Start Sessions Only.
l The Administrator role should have all permissions enabled.
l The Start Sessions Only role should have only Start Sessions enabled.
2. Create a Shared Jump Group that will contain all shared Jump Items. Personal Jump Items can also be created.
3. Put users into two group policies, Admin and Users.
SALES: www.beyondtrust.com/contact SUPPORT: www.beyondtrust.com/support DOCUMENTATION: www.beyondtrust.com/docs 56©2003-2021 BeyondTrust Corporation. All Rights Reserved. Other trademarks identified on this page are owned by their respective owners. BeyondTrust is not a chartered bank or trust company, ordepository institution. It is not authorized to accept deposits or trust accounts and is not licensed or regulated by any state or federal banking authority.
TC: 1/20/2022
PRIVILEGED REMOTE ACCESS
JUMPOINT GUIDE
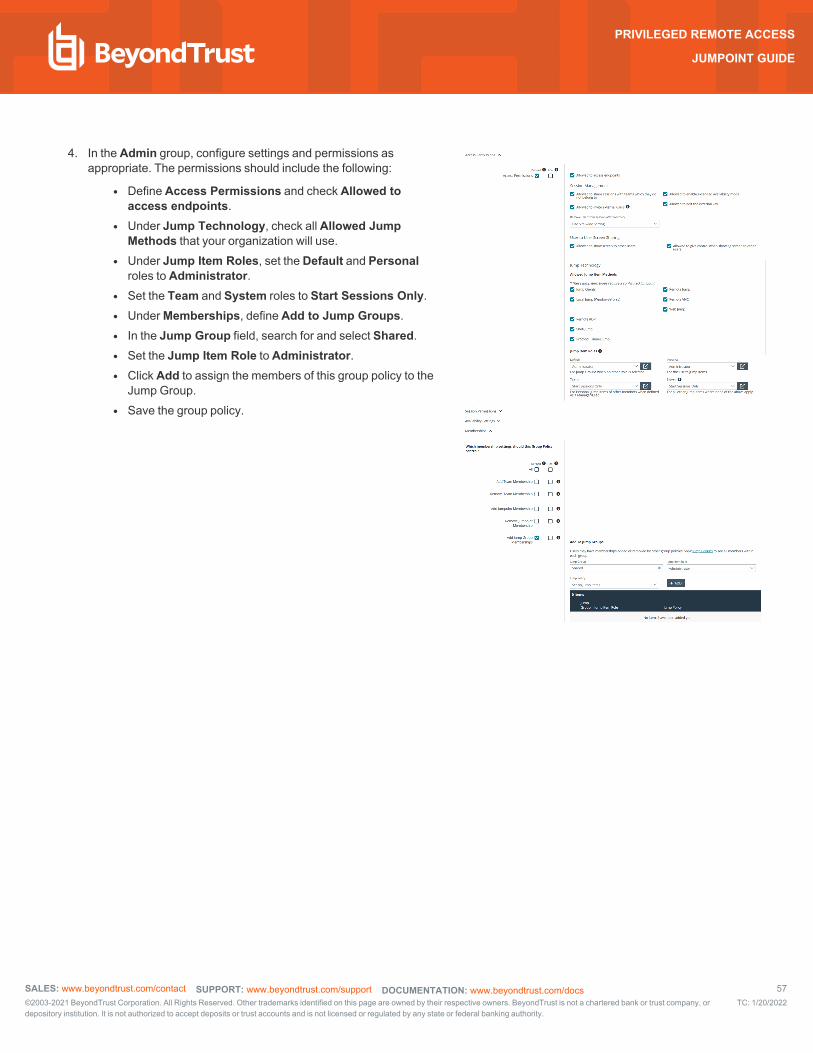
4. In the Admin group, configure settings and permissions as appropriate. The permissions should include the following:
l Define Access Permissions and check Allowed to access endpoints.
l Under Jump Technology, check all Allowed Jump Methods that your organization will use.
l Under Jump Item Roles, set the Default and Personal roles to Administrator.
l Set the Team and System roles to Start Sessions Only. l Under Memberships, define Add to Jump Groups. l In the Jump Group field, search for and select Shared. l Set the Jump Item Role to Administrator. l Click Add to assign the members of this group policy to the
Jump Group. l Save the group policy.
SALES: www.beyondtrust.com/contact SUPPORT: www.beyondtrust.com/support DOCUMENTATION: www.beyondtrust.com/docs 57©2003-2021 BeyondTrust Corporation. All Rights Reserved. Other trademarks identified on this page are owned by their respective owners. BeyondTrust is not a chartered bank or trust company, ordepository institution. It is not authorized to accept deposits or trust accounts and is not licensed or regulated by any state or federal banking authority.
TC: 1/20/2022
PRIVILEGED REMOTE ACCESS
JUMPOINT GUIDE
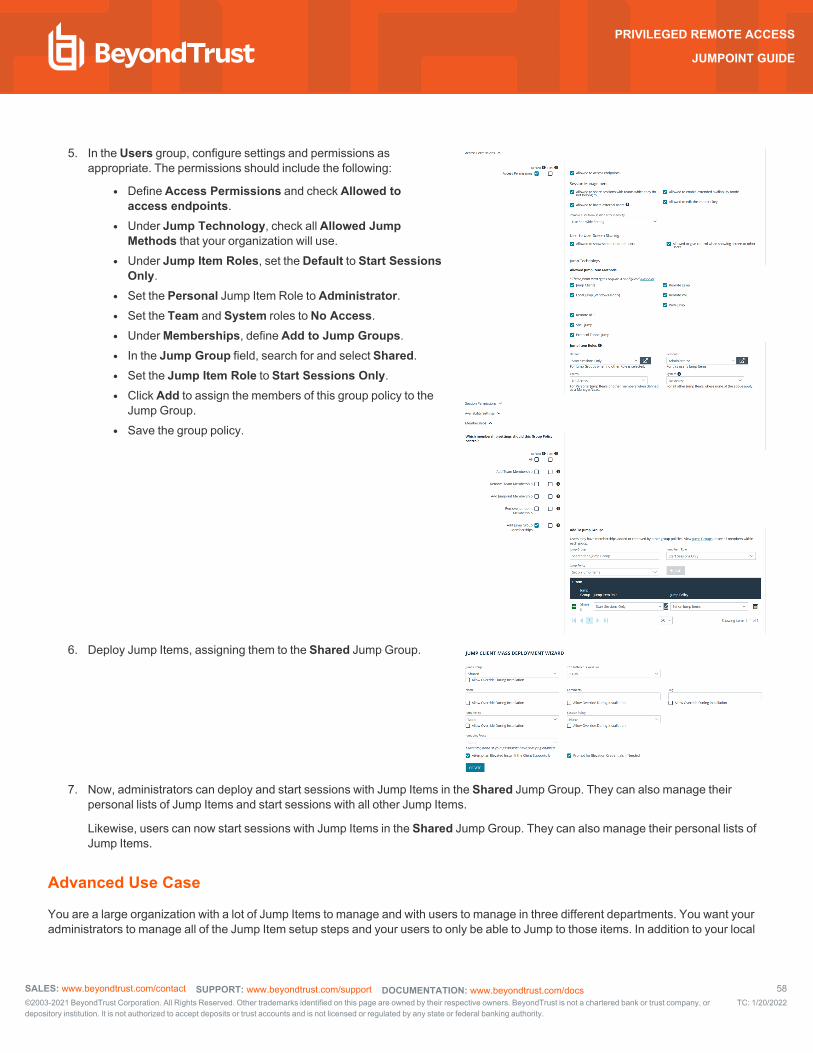
5. In the Users group, configure settings and permissions as appropriate. The permissions should include the following:
l Define Access Permissions and check Allowed to access endpoints.
l Under Jump Technology, check all Allowed Jump Methods that your organization will use.
l Under Jump Item Roles, set the Default to Start Sessions Only.
l Set the Personal Jump Item Role to Administrator. l Set the Team and System roles to No Access. l Under Memberships, define Add to Jump Groups. l In the Jump Group field, search for and select Shared. l Set the Jump Item Role to Start Sessions Only. l Click Add to assign the members of this group policy to the
Jump Group. l Save the group policy.
6. Deploy Jump Items, assigning them to the Shared Jump Group.
7. Now, administrators can deploy and start sessions with Jump Items in the Shared Jump Group. They can also manage their personal lists of Jump Items and start sessions with all other Jump Items.
Likewise, users can now start sessions with Jump Items in the Shared Jump Group. They can also manage their personal lists of Jump Items.
Advanced Use Case
You are a large organization with a lot of Jump Items to manage and with users to manage in three different departments. You want your administrators to manage all of the Jump Item setup steps and your users to only be able to Jump to those items. In addition to your local
SALES: www.beyondtrust.com/contact SUPPORT: www.beyondtrust.com/support DOCUMENTATION: www.beyondtrust.com/docs 58©2003-2021 BeyondTrust Corporation. All Rights Reserved. Other trademarks identified on this page are owned by their respective owners. BeyondTrust is not a chartered bank or trust company, ordepository institution. It is not authorized to accept deposits or trust accounts and is not licensed or regulated by any state or federal banking authority.
TC: 1/20/2022
PRIVILEGED REMOTE ACCESS
JUMPOINT GUIDE
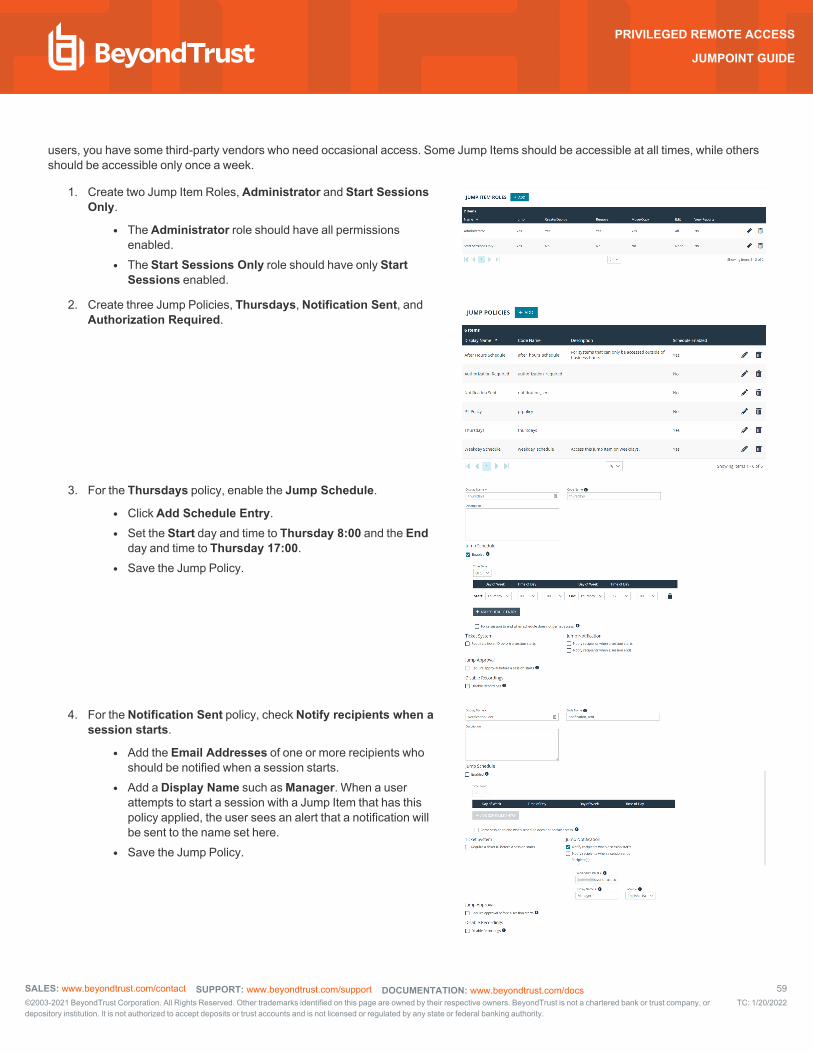
users, you have some third-party vendors who need occasional access. Some Jump Items should be accessible at all times, while others should be accessible only once a week.
1. Create two Jump Item Roles, Administrator and Start Sessions Only.
l The Administrator role should have all permissions enabled.
l The Start Sessions Only role should have only Start Sessions enabled.
2. Create three Jump Policies, Thursdays, Notification Sent, and Authorization Required.
3. For the Thursdays policy, enable the Jump Schedule.
l Click Add Schedule Entry. l Set the Start day and time to Thursday 8:00 and the End
day and time to Thursday 17:00. l Save the Jump Policy.
4. For the Notification Sent policy, check Notify recipients when a session starts.
l Add the Email Addresses of one or more recipients who should be notified when a session starts.
l Add a Display Name such as Manager. When a user attempts to start a session with a Jump Item that has this policy applied, the user sees an alert that a notification will be sent to the name set here.
l Save the Jump Policy.
SALES: www.beyondtrust.com/contact SUPPORT: www.beyondtrust.com/support DOCUMENTATION: www.beyondtrust.com/docs 59©2003-2021 BeyondTrust Corporation. All Rights Reserved. Other trademarks identified on this page are owned by their respective owners. BeyondTrust is not a chartered bank or trust company, ordepository institution. It is not authorized to accept deposits or trust accounts and is not licensed or regulated by any state or federal banking authority.
TC: 1/20/2022
PRIVILEGED REMOTE ACCESS
JUMPOINT GUIDE
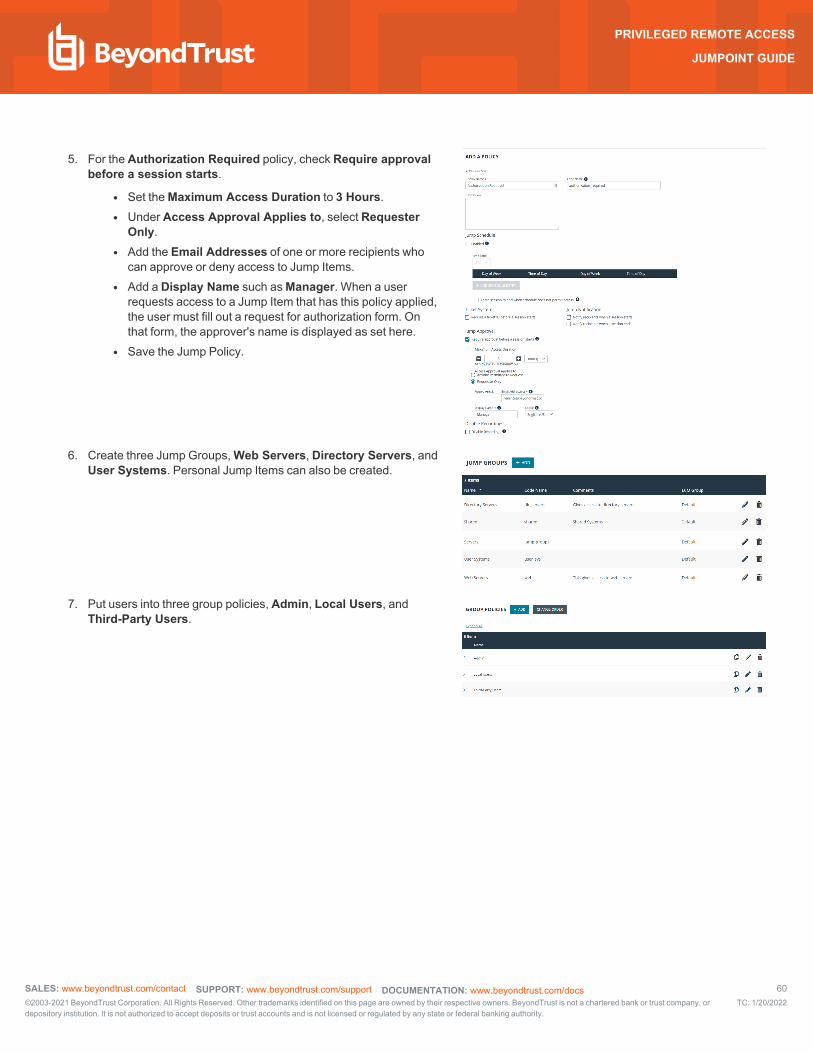
5. For the Authorization Required policy, check Require approval before a session starts.
l Set the Maximum Access Duration to 3 Hours. l Under Access Approval Applies to, select Requester
Only. l Add the Email Addresses of one or more recipients who
can approve or deny access to Jump Items. l Add a Display Name such as Manager. When a user
requests access to a Jump Item that has this policy applied, the user must fill out a request for authorization form. On that form, the approver's name is displayed as set here.
l Save the Jump Policy.
6. Create three Jump Groups, Web Servers, Directory Servers, and User Systems. Personal Jump Items can also be created.
7. Put users into three group policies, Admin, Local Users, and Third-Party Users.
SALES: www.beyondtrust.com/contact SUPPORT: www.beyondtrust.com/support DOCUMENTATION: www.beyondtrust.com/docs 60©2003-2021 BeyondTrust Corporation. All Rights Reserved. Other trademarks identified on this page are owned by their respective owners. BeyondTrust is not a chartered bank or trust company, ordepository institution. It is not authorized to accept deposits or trust accounts and is not licensed or regulated by any state or federal banking authority.
TC: 1/20/2022
PRIVILEGED REMOTE ACCESS
JUMPOINT GUIDE
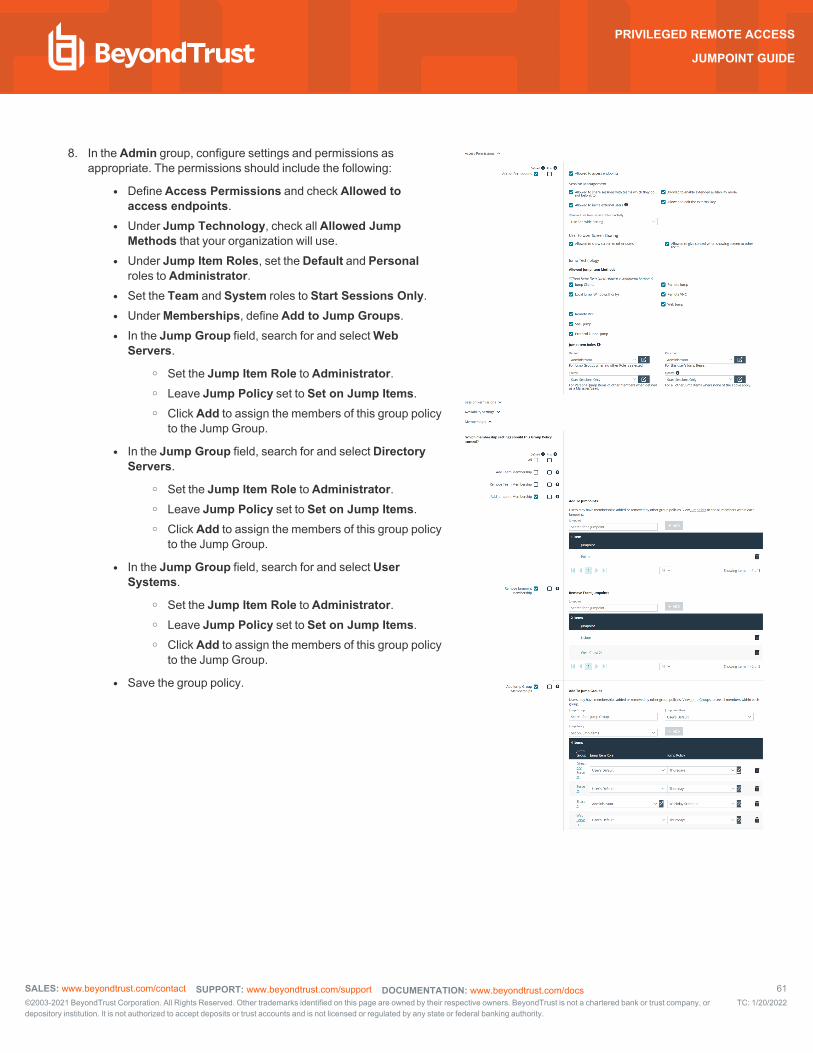
8. In the Admin group, configure settings and permissions as appropriate. The permissions should include the following:
l Define Access Permissions and check Allowed to access endpoints.
l Under Jump Technology, check all Allowed Jump Methods that your organization will use.
l Under Jump Item Roles, set the Default and Personal roles to Administrator.
l Set the Team and System roles to Start Sessions Only. l Under Memberships, define Add to Jump Groups. l In the Jump Group field, search for and select Web
Servers.
o Set the Jump Item Role to Administrator. o Leave Jump Policy set to Set on Jump Items. o Click Add to assign the members of this group policy
to the Jump Group.
l In the Jump Group field, search for and select Directory Servers.
o Set the Jump Item Role to Administrator. o Leave Jump Policy set to Set on Jump Items. o Click Add to assign the members of this group policy
to the Jump Group.
l In the Jump Group field, search for and select User Systems.
o Set the Jump Item Role to Administrator. o Leave Jump Policy set to Set on Jump Items. o Click Add to assign the members of this group policy
to the Jump Group.
l Save the group policy.
SALES: www.beyondtrust.com/contact SUPPORT: www.beyondtrust.com/support DOCUMENTATION: www.beyondtrust.com/docs 61©2003-2021 BeyondTrust Corporation. All Rights Reserved. Other trademarks identified on this page are owned by their respective owners. BeyondTrust is not a chartered bank or trust company, ordepository institution. It is not authorized to accept deposits or trust accounts and is not licensed or regulated by any state or federal banking authority.
TC: 1/20/2022
PRIVILEGED REMOTE ACCESS
JUMPOINT GUIDE
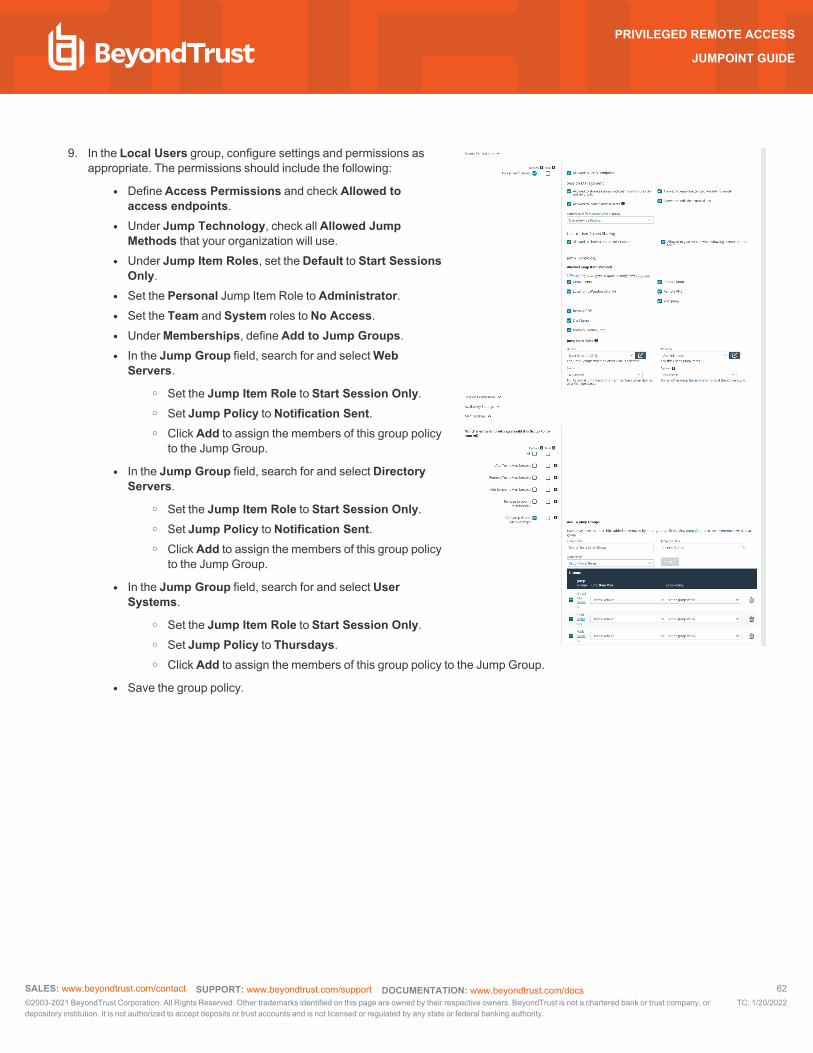
9. In the Local Users group, configure settings and permissions as appropriate. The permissions should include the following:
l Define Access Permissions and check Allowed to access endpoints.
l Under Jump Technology, check all Allowed Jump Methods that your organization will use.
l Under Jump Item Roles, set the Default to Start Sessions Only.
l Set the Personal Jump Item Role to Administrator. l Set the Team and System roles to No Access. l Under Memberships, define Add to Jump Groups. l In the Jump Group field, search for and select Web
Servers.
o Set the Jump Item Role to Start Session Only. o Set Jump Policy to Notification Sent. o Click Add to assign the members of this group policy
to the Jump Group.
l In the Jump Group field, search for and select Directory Servers.
o Set the Jump Item Role to Start Session Only. o Set Jump Policy to Notification Sent. o Click Add to assign the members of this group policy
to the Jump Group.
l In the Jump Group field, search for and select User Systems.
o Set the Jump Item Role to Start Session Only. o Set Jump Policy to Thursdays. o Click Add to assign the members of this group policy to the Jump Group.
l Save the group policy.
SALES: www.beyondtrust.com/contact SUPPORT: www.beyondtrust.com/support DOCUMENTATION: www.beyondtrust.com/docs 62©2003-2021 BeyondTrust Corporation. All Rights Reserved. Other trademarks identified on this page are owned by their respective owners. BeyondTrust is not a chartered bank or trust company, ordepository institution. It is not authorized to accept deposits or trust accounts and is not licensed or regulated by any state or federal banking authority.
TC: 1/20/2022
PRIVILEGED REMOTE ACCESS
JUMPOINT GUIDE
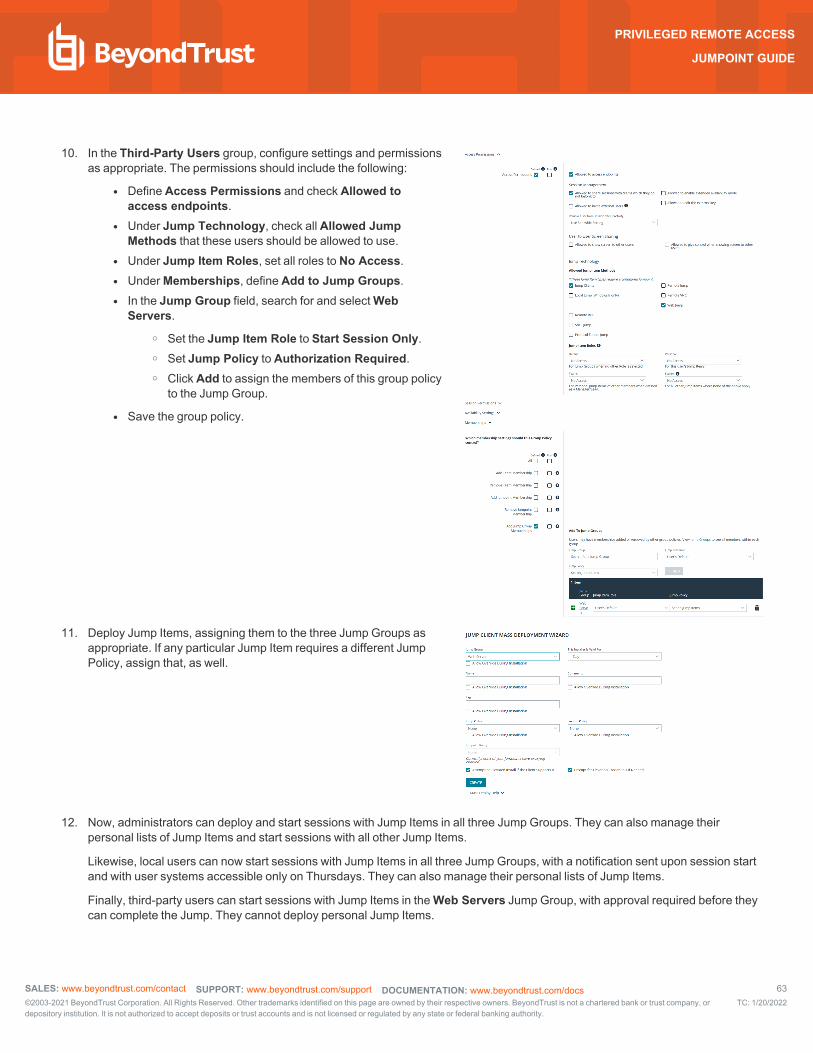
10. In the Third-Party Users group, configure settings and permissions as appropriate. The permissions should include the following:
l Define Access Permissions and check Allowed to access endpoints.
l Under Jump Technology, check all Allowed Jump Methods that these users should be allowed to use.
l Under Jump Item Roles, set all roles to No Access. l Under Memberships, define Add to Jump Groups. l In the Jump Group field, search for and select Web
Servers.
o Set the Jump Item Role to Start Session Only. o Set Jump Policy to Authorization Required. o Click Add to assign the members of this group policy
to the Jump Group.
l Save the group policy.
11. Deploy Jump Items, assigning them to the three Jump Groups as appropriate. If any particular Jump Item requires a different Jump Policy, assign that, as well.
12. Now, administrators can deploy and start sessions with Jump Items in all three Jump Groups. They can also manage their personal lists of Jump Items and start sessions with all other Jump Items.
Likewise, local users can now start sessions with Jump Items in all three Jump Groups, with a notification sent upon session start and with user systems accessible only on Thursdays. They can also manage their personal lists of Jump Items.
Finally, third-party users can start sessions with Jump Items in the Web Servers Jump Group, with approval required before they can complete the Jump. They cannot deploy personal Jump Items.
SALES: www.beyondtrust.com/contact SUPPORT: www.beyondtrust.com/support DOCUMENTATION: www.beyondtrust.com/docs 63©2003-2021 BeyondTrust Corporation. All Rights Reserved. Other trademarks identified on this page are owned by their respective owners. BeyondTrust is not a chartered bank or trust company, ordepository institution. It is not authorized to accept deposits or trust accounts and is not licensed or regulated by any state or federal banking authority.
TC: 1/20/2022
PRIVILEGED REMOTE ACCESS
JUMPOINT GUIDE
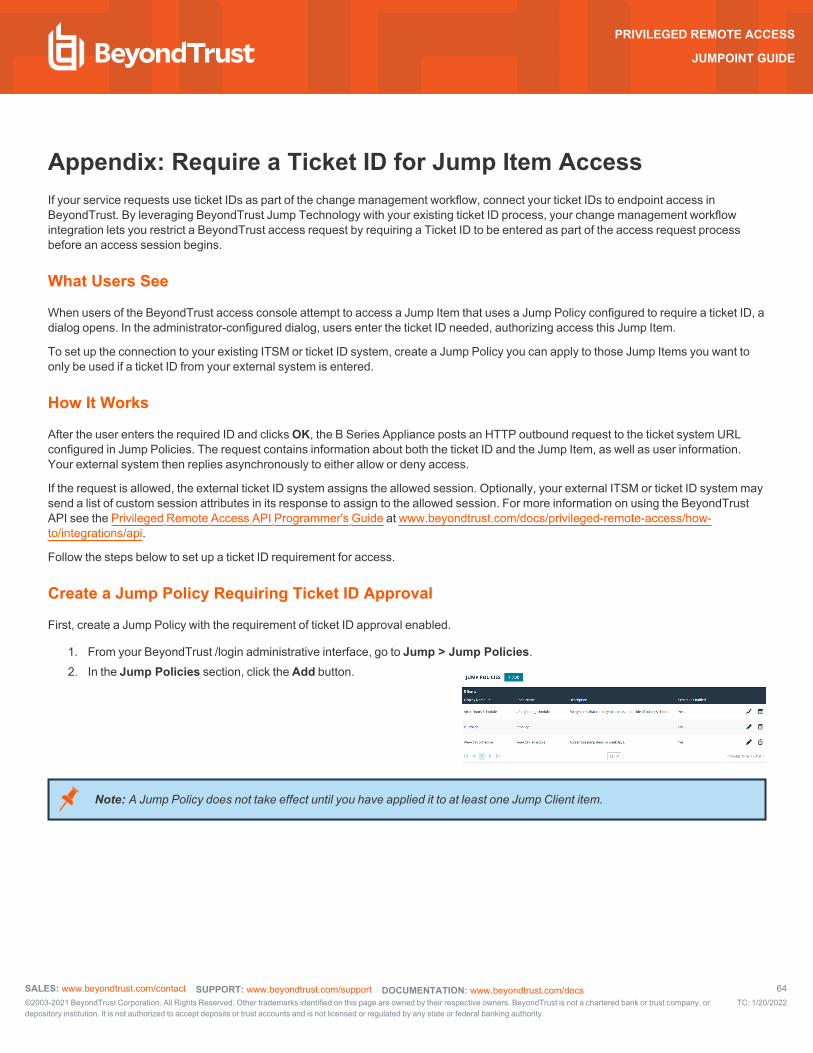
Appendix: Require a Ticket ID for Jump Item AccessIf your service requests use ticket IDs as part of the change management workflow, connect your ticket IDs to endpoint access in BeyondTrust. By leveraging BeyondTrust Jump Technology with your existing ticket ID process, your change management workflow integration lets you restrict a BeyondTrust access request by requiring a Ticket ID to be entered as part of the access request process before an access session begins.
What Users See
When users of the BeyondTrust access console attempt to access a Jump Item that uses a Jump Policy configured to require a ticket ID, a dialog opens. In the administrator-configured dialog, users enter the ticket ID needed, authorizing access this Jump Item.
To set up the connection to your existing ITSM or ticket ID system, create a Jump Policy you can apply to those Jump Items you want to only be used if a ticket ID from your external system is entered.
How It Works
After the user enters the required ID and clicks OK, the B Series Appliance posts an HTTP outbound request to the ticket system URL configured in Jump Policies. The request contains information about both the ticket ID and the Jump Item, as well as user information. Your external system then replies asynchronously to either allow or deny access.
If the request is allowed, the external ticket ID system assigns the allowed session. Optionally, your external ITSM or ticket ID system may send a list of custom session attributes in its response to assign to the allowed session. For more information on using the BeyondTrust API see the Privileged Remote Access API Programmer's Guide at www.beyondtrust.com/docs/privileged-remote-access/how-to/integrations/api.
Follow the steps below to set up a ticket ID requirement for access.
Create a Jump Policy Requiring Ticket ID Approval
First, create a Jump Policy with the requirement of ticket ID approval enabled.
1. From your BeyondTrust /login administrative interface, go to Jump > Jump Policies. 2. In the Jump Policies section, click the Add button.
Note: A Jump Policy does not take effect until you have applied it to at least one Jump Client item.
SALES: www.beyondtrust.com/contact SUPPORT: www.beyondtrust.com/support DOCUMENTATION: www.beyondtrust.com/docs 64©2003-2021 BeyondTrust Corporation. All Rights Reserved. Other trademarks identified on this page are owned by their respective owners. BeyondTrust is not a chartered bank or trust company, ordepository institution. It is not authorized to accept deposits or trust accounts and is not licensed or regulated by any state or federal banking authority.
TC: 1/20/2022
PRIVILEGED REMOTE ACCESS
JUMPOINT GUIDE
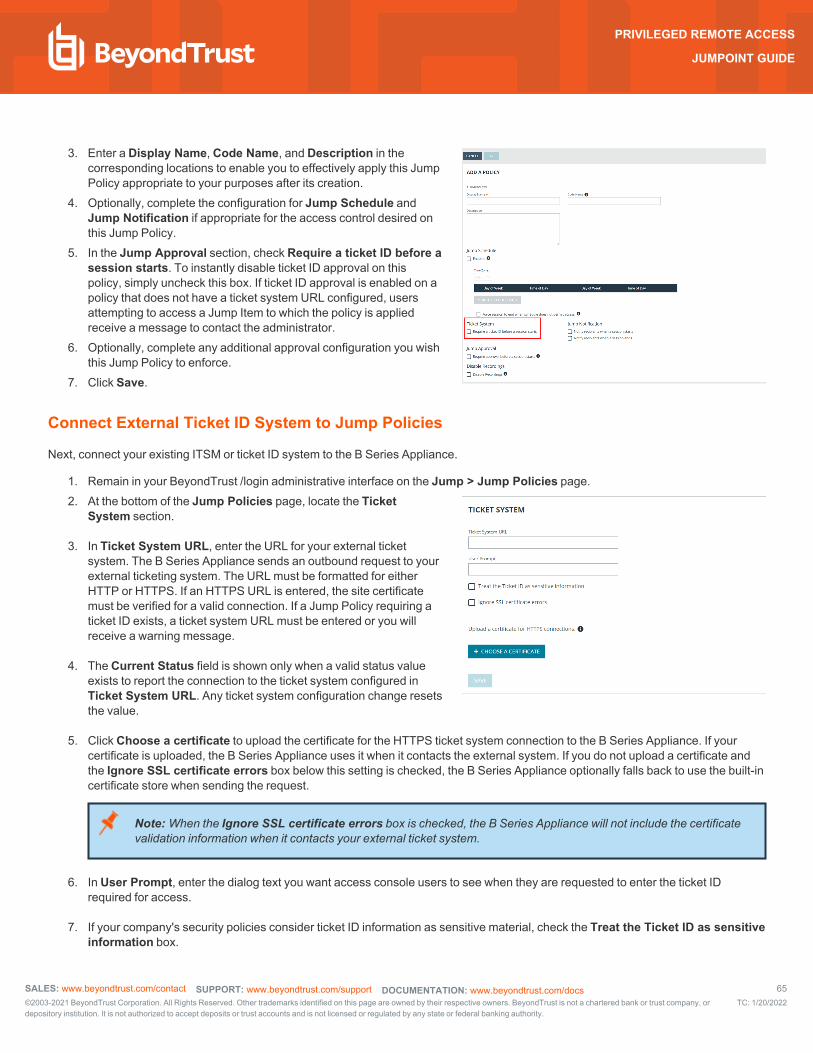
3. Enter a Display Name, Code Name, and Description in the corresponding locations to enable you to effectively apply this Jump Policy appropriate to your purposes after its creation.
4. Optionally, complete the configuration for Jump Schedule and Jump Notification if appropriate for the access control desired on this Jump Policy.
5. In the Jump Approval section, check Require a ticket ID before a session starts. To instantly disable ticket ID approval on this policy, simply uncheck this box. If ticket ID approval is enabled on a policy that does not have a ticket system URL configured, users attempting to access a Jump Item to which the policy is applied receive a message to contact the administrator.
6. Optionally, complete any additional approval configuration you wish this Jump Policy to enforce.
7. Click Save.
Connect External Ticket ID System to Jump Policies
Next, connect your existing ITSM or ticket ID system to the B Series Appliance.
1. Remain in your BeyondTrust /login administrative interface on the Jump > Jump Policies page. 2. At the bottom of the Jump Policies page, locate the Ticket
System section.
3. In Ticket System URL, enter the URL for your external ticket system. The B Series Appliance sends an outbound request to your external ticketing system. The URL must be formatted for either HTTP or HTTPS. If an HTTPS URL is entered, the site certificate must be verified for a valid connection. If a Jump Policy requiring a ticket ID exists, a ticket system URL must be entered or you will receive a warning message.
4. The Current Status field is shown only when a valid status value exists to report the connection to the ticket system configured in Ticket System URL. Any ticket system configuration change resets the value.
5. Click Choose a certificate to upload the certificate for the HTTPS ticket system connection to the B Series Appliance. If your certificate is uploaded, the B Series Appliance uses it when it contacts the external system. If you do not upload a certificate and the Ignore SSL certificate errors box below this setting is checked, the B Series Appliance optionally falls back to use the built-in certificate store when sending the request.
Note: When the Ignore SSL certificate errors box is checked, the B Series Appliance will not include the certificate validation information when it contacts your external ticket system.
6. In User Prompt, enter the dialog text you want access console users to see when they are requested to enter the ticket ID required for access.
7. If your company's security policies consider ticket ID information as sensitive material, check the Treat the Ticket ID as sensitive information box.
SALES: www.beyondtrust.com/contact SUPPORT: www.beyondtrust.com/support DOCUMENTATION: www.beyondtrust.com/docs 65©2003-2021 BeyondTrust Corporation. All Rights Reserved. Other trademarks identified on this page are owned by their respective owners. BeyondTrust is not a chartered bank or trust company, ordepository institution. It is not authorized to accept deposits or trust accounts and is not licensed or regulated by any state or federal banking authority.
TC: 1/20/2022
PRIVILEGED REMOTE ACCESS
JUMPOINT GUIDE
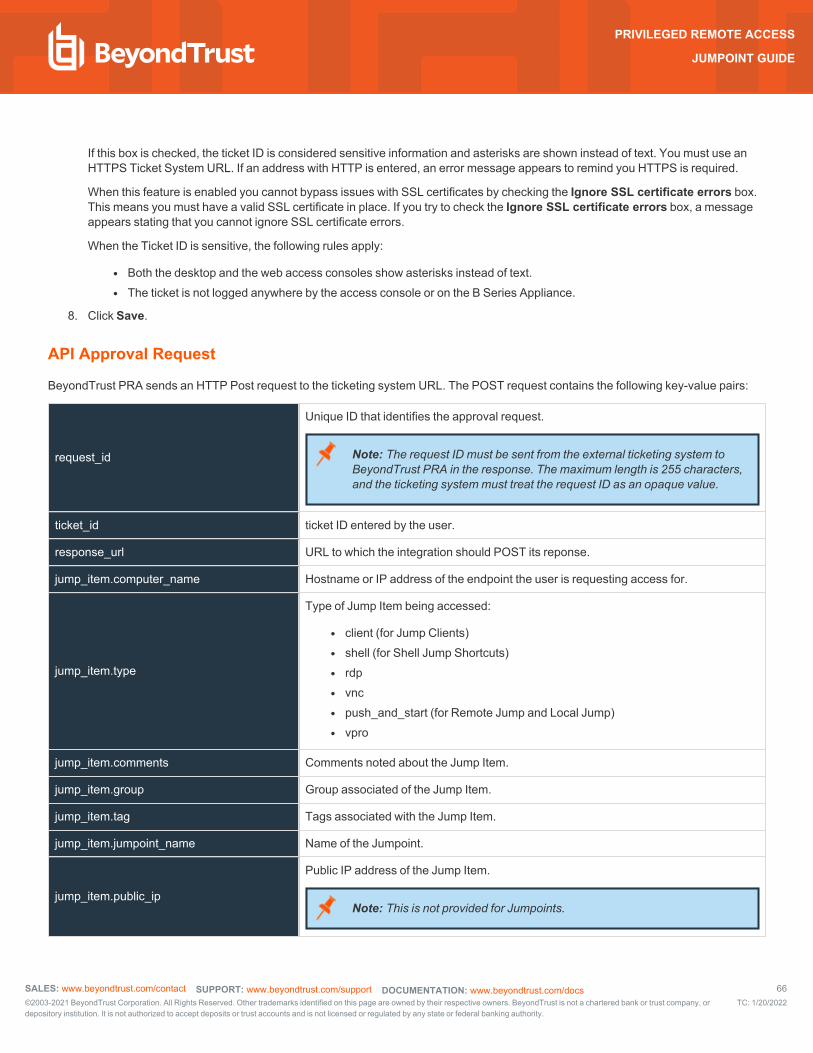
If this box is checked, the ticket ID is considered sensitive information and asterisks are shown instead of text. You must use an HTTPS Ticket System URL. If an address with HTTP is entered, an error message appears to remind you HTTPS is required.
When this feature is enabled you cannot bypass issues with SSL certificates by checking the Ignore SSL certificate errors box. This means you must have a valid SSL certificate in place. If you try to check the Ignore SSL certificate errors box, a message appears stating that you cannot ignore SSL certificate errors.
When the Ticket ID is sensitive, the following rules apply:
l Both the desktop and the web access consoles show asterisks instead of text. l The ticket is not logged anywhere by the access console or on the B Series Appliance.
8. Click Save.
API Approval Request
BeyondTrust PRA sends an HTTP Post request to the ticketing system URL. The POST request contains the following key-value pairs:
request_id
Unique ID that identifies the approval request.
Note: The request ID must be sent from the external ticketing system to BeyondTrust PRA in the response. The maximum length is 255 characters, and the ticketing system must treat the request ID as an opaque value.
ticket_id ticket ID entered by the user.
response_url URL to which the integration should POST its reponse.
jump_item.computer_name Hostname or IP address of the endpoint the user is requesting access for.
jump_item.type
Type of Jump Item being accessed:
l client (for Jump Clients) l shell (for Shell Jump Shortcuts) l rdp l vnc l push_and_start (for Remote Jump and Local Jump) l vpro
jump_item.comments Comments noted about the Jump Item.
jump_item.group Group associated of the Jump Item.
jump_item.tag Tags associated with the Jump Item.
jump_item.jumpoint_name Name of the Jumpoint.
jump_item.public_ip
Public IP address of the Jump Item.
Note: This is not provided for Jumpoints.
SALES: www.beyondtrust.com/contact SUPPORT: www.beyondtrust.com/support DOCUMENTATION: www.beyondtrust.com/docs 66©2003-2021 BeyondTrust Corporation. All Rights Reserved. Other trademarks identified on this page are owned by their respective owners. BeyondTrust is not a chartered bank or trust company, ordepository institution. It is not authorized to accept deposits or trust accounts and is not licensed or regulated by any state or federal banking authority.
TC: 1/20/2022
PRIVILEGED REMOTE ACCESS
JUMPOINT GUIDE
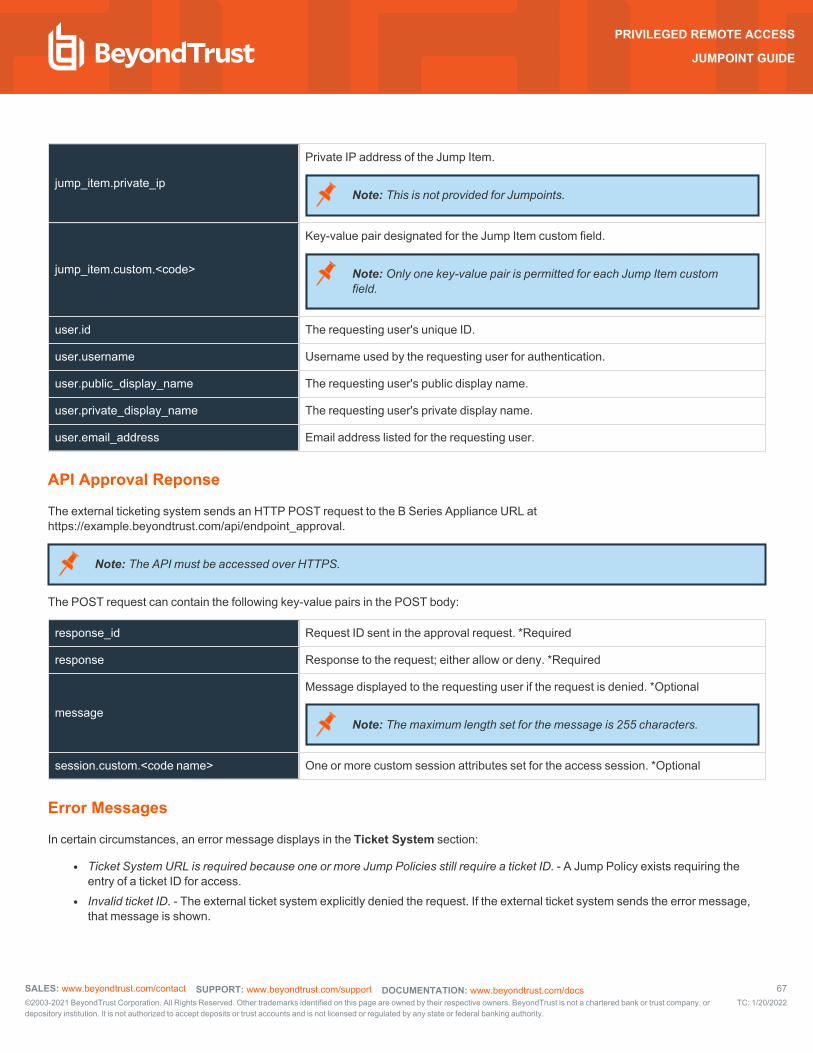
jump_item.private_ip
Private IP address of the Jump Item.
Note: This is not provided for Jumpoints.
jump_item.custom.<code>
Key-value pair designated for the Jump Item custom field.
Note: Only one key-value pair is permitted for each Jump Item custom field.
user.id The requesting user's unique ID.
user.username Username used by the requesting user for authentication.
user.public_display_name The requesting user's public display name.
user.private_display_name The requesting user's private display name.
user.email_address Email address listed for the requesting user.
API Approval Reponse
The external ticketing system sends an HTTP POST request to the B Series Appliance URL at https://example.beyondtrust.com/api/endpoint_approval.
Note: The API must be accessed over HTTPS.
The POST request can contain the following key-value pairs in the POST body:
response_id Request ID sent in the approval request. *Required
response Response to the request; either allow or deny. *Required
message
Message displayed to the requesting user if the request is denied. *Optional
Note: The maximum length set for the message is 255 characters.
session.custom.<code name> One or more custom session attributes set for the access session. *Optional
Error Messages
In certain circumstances, an error message displays in the Ticket System section:
l Ticket System URL is required because one or more Jump Policies still require a ticket ID. - A Jump Policy exists requiring the entry of a ticket ID for access.
l Invalid ticket ID. - The external ticket system explicitly denied the request. If the external ticket system sends the error message, that message is shown.
SALES: www.beyondtrust.com/contact SUPPORT: www.beyondtrust.com/support DOCUMENTATION: www.beyondtrust.com/docs 67©2003-2021 BeyondTrust Corporation. All Rights Reserved. Other trademarks identified on this page are owned by their respective owners. BeyondTrust is not a chartered bank or trust company, ordepository institution. It is not authorized to accept deposits or trust accounts and is not licensed or regulated by any state or federal banking authority.
TC: 1/20/2022
PRIVILEGED REMOTE ACCESS
JUMPOINT GUIDE
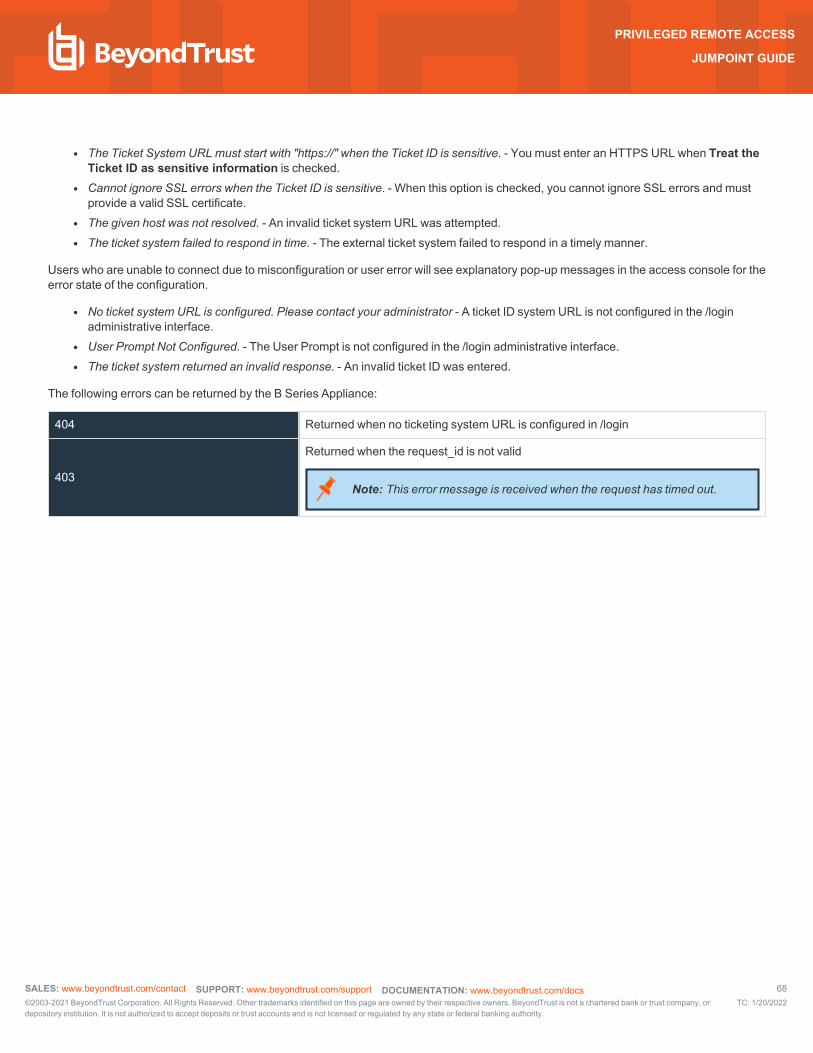
l The Ticket System URL must start with "https://" when the Ticket ID is sensitive. - You must enter an HTTPS URL when Treat the Ticket ID as sensitive information is checked.
l Cannot ignore SSL errors when the Ticket ID is sensitive. - When this option is checked, you cannot ignore SSL errors and must provide a valid SSL certificate.
l The given host was not resolved. - An invalid ticket system URL was attempted. l The ticket system failed to respond in time. - The external ticket system failed to respond in a timely manner.
Users who are unable to connect due to misconfiguration or user error will see explanatory pop-up messages in the access console for the error state of the configuration.
l No ticket system URL is configured. Please contact your administrator - A ticket ID system URL is not configured in the /login administrative interface.
l User Prompt Not Configured. - The User Prompt is not configured in the /login administrative interface. l The ticket system returned an invalid response. - An invalid ticket ID was entered.
The following errors can be returned by the B Series Appliance:
404 Returned when no ticketing system URL is configured in /login
403
Returned when the request_id is not valid
Note: This error message is received when the request has timed out.
SALES: www.beyondtrust.com/contact SUPPORT: www.beyondtrust.com/support DOCUMENTATION: www.beyondtrust.com/docs 68©2003-2021 BeyondTrust Corporation. All Rights Reserved. Other trademarks identified on this page are owned by their respective owners. BeyondTrust is not a chartered bank or trust company, ordepository institution. It is not authorized to accept deposits or trust accounts and is not licensed or regulated by any state or federal banking authority.
TC: 1/20/2022
PRIVILEGED REMOTE ACCESS
JUMPOINT GUIDE
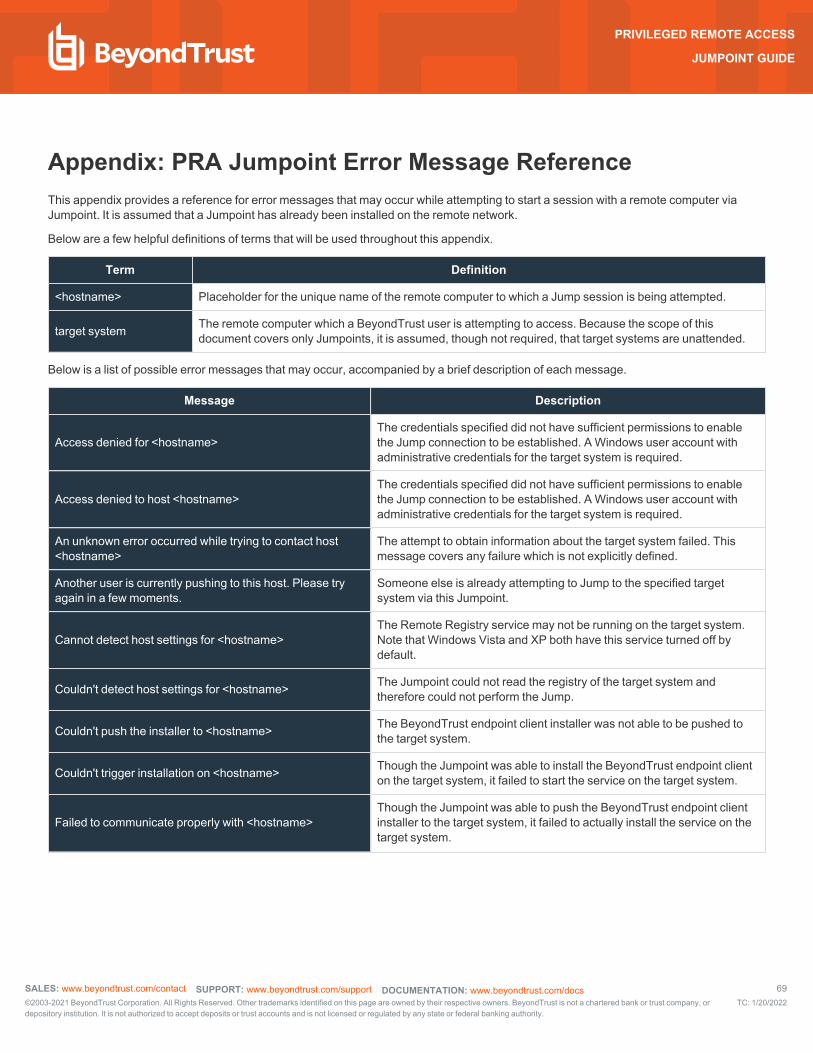
Appendix: PRA Jumpoint Error Message ReferenceThis appendix provides a reference for error messages that may occur while attempting to start a session with a remote computer via Jumpoint. It is assumed that a Jumpoint has already been installed on the remote network.
Below are a few helpful definitions of terms that will be used throughout this appendix.
Term Definition
<hostname> Placeholder for the unique name of the remote computer to which a Jump session is being attempted.
target system The remote computer which a BeyondTrust user is attempting to access. Because the scope of this document covers only Jumpoints, it is assumed, though not required, that target systems are unattended.
Below is a list of possible error messages that may occur, accompanied by a brief description of each message.
Message Description
Access denied for <hostname>The credentials specified did not have sufficient permissions to enable the Jump connection to be established. A Windows user account with administrative credentials for the target system is required.
Access denied to host <hostname>The credentials specified did not have sufficient permissions to enable the Jump connection to be established. A Windows user account with administrative credentials for the target system is required.
An unknown error occurred while trying to contact host <hostname>
The attempt to obtain information about the target system failed. This message covers any failure which is not explicitly defined.
Another user is currently pushing to this host. Please try again in a few moments.
Someone else is already attempting to Jump to the specified target system via this Jumpoint.
Cannot detect host settings for <hostname>The Remote Registry service may not be running on the target system. Note that Windows Vista and XP both have this service turned off by default.
Couldn't detect host settings for <hostname> The Jumpoint could not read the registry of the target system and therefore could not perform the Jump.
Couldn't push the installer to <hostname> The BeyondTrust endpoint client installer was not able to be pushed to the target system.
Couldn't trigger installation on <hostname> Though the Jumpoint was able to install the BeyondTrust endpoint client on the target system, it failed to start the service on the target system.
Failed to communicate properly with <hostname>Though the Jumpoint was able to push the BeyondTrust endpoint client installer to the target system, it failed to actually install the service on the target system.
SALES: www.beyondtrust.com/contact SUPPORT: www.beyondtrust.com/support DOCUMENTATION: www.beyondtrust.com/docs 69©2003-2021 BeyondTrust Corporation. All Rights Reserved. Other trademarks identified on this page are owned by their respective owners. BeyondTrust is not a chartered bank or trust company, ordepository institution. It is not authorized to accept deposits or trust accounts and is not licensed or regulated by any state or federal banking authority.
TC: 1/20/2022
PRIVILEGED REMOTE ACCESS
JUMPOINT GUIDE
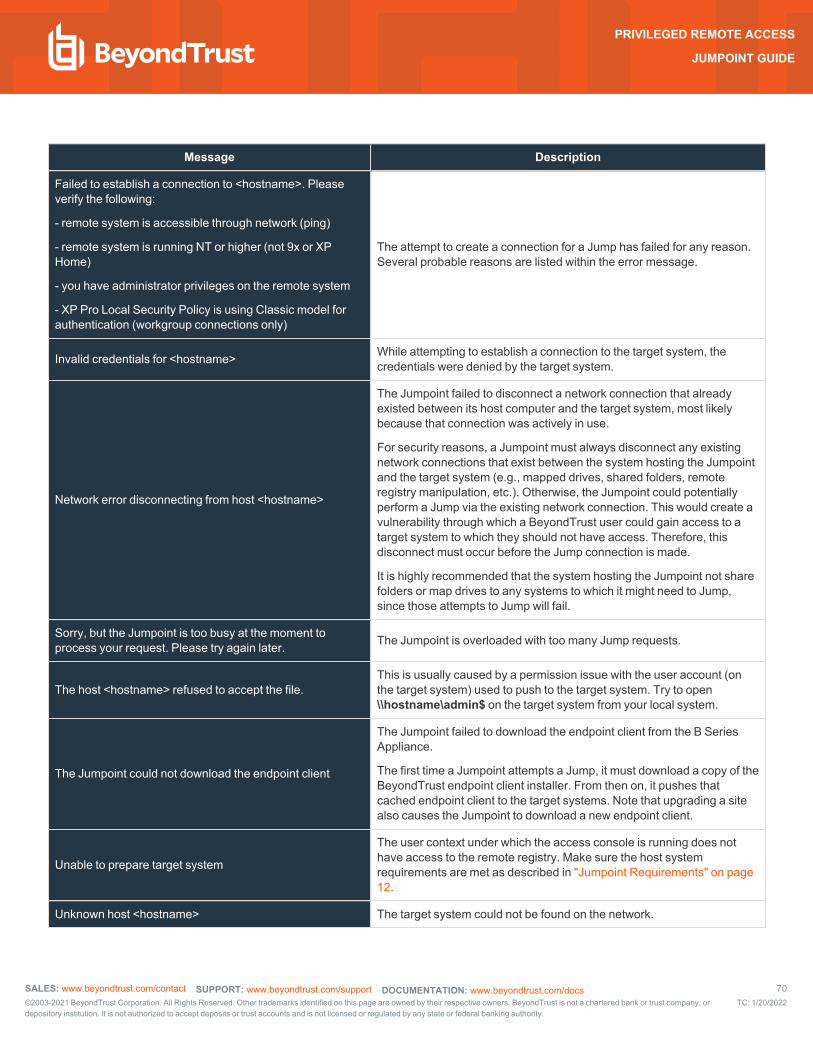
Message Description
Failed to establish a connection to <hostname>. Please verify the following:
- remote system is accessible through network (ping)
- remote system is running NT or higher (not 9x or XP Home)
- you have administrator privileges on the remote system
- XP Pro Local Security Policy is using Classic model for authentication (workgroup connections only)
The attempt to create a connection for a Jump has failed for any reason. Several probable reasons are listed within the error message.
Invalid credentials for <hostname> While attempting to establish a connection to the target system, the credentials were denied by the target system.
Network error disconnecting from host <hostname>
The Jumpoint failed to disconnect a network connection that already existed between its host computer and the target system, most likely because that connection was actively in use.
For security reasons, a Jumpoint must always disconnect any existing network connections that exist between the system hosting the Jumpoint and the target system (e.g., mapped drives, shared folders, remote registry manipulation, etc.). Otherwise, the Jumpoint could potentially perform a Jump via the existing network connection. This would create a vulnerability through which a BeyondTrust user could gain access to a target system to which they should not have access. Therefore, this disconnect must occur before the Jump connection is made.
It is highly recommended that the system hosting the Jumpoint not share folders or map drives to any systems to which it might need to Jump, since those attempts to Jump will fail.
Sorry, but the Jumpoint is too busy at the moment to process your request. Please try again later. The Jumpoint is overloaded with too many Jump requests.
The host <hostname> refused to accept the file.This is usually caused by a permission issue with the user account (on the target system) used to push to the target system. Try to open \\hostname\admin$ on the target system from your local system.
The Jumpoint could not download the endpoint client
The Jumpoint failed to download the endpoint client from the B Series Appliance.
The first time a Jumpoint attempts a Jump, it must download a copy of the BeyondTrust endpoint client installer. From then on, it pushes that cached endpoint client to the target systems. Note that upgrading a site also causes the Jumpoint to download a new endpoint client.
Unable to prepare target system
The user context under which the access console is running does not have access to the remote registry. Make sure the host system requirements are met as described in "Jumpoint Requirements" on page 12.
Unknown host <hostname> The target system could not be found on the network.
SALES: www.beyondtrust.com/contact SUPPORT: www.beyondtrust.com/support DOCUMENTATION: www.beyondtrust.com/docs 70©2003-2021 BeyondTrust Corporation. All Rights Reserved. Other trademarks identified on this page are owned by their respective owners. BeyondTrust is not a chartered bank or trust company, ordepository institution. It is not authorized to accept deposits or trust accounts and is not licensed or regulated by any state or federal banking authority.
TC: 1/20/2022
PRIVILEGED REMOTE ACCESS
JUMPOINT GUIDE