cube iq3 user guide
TRANSCRIPT
© 2004 MagicLogic Optimization Inc.
Cube-IQ Release 3.0User Guide
Cube-IQ Release 3.0The state-of-the-art in Load Planning software
All rights reserved. No parts of this work may be reproduced in any form or by any means - graphic, electronic, ormechanical, including photocopying, recording, taping, or information storage and retrieval systems - without the writtenpermission of the publisher.
Products that are referred to in this document may be either trademarks and/or registered trademarks of the respectiveowners. The publisher and the author make no claim to these trademarks.
While every precaution has been taken in the preparation of this document, the publisher and the author assume noresponsibility for errors or omissions, or for damages resulting from the use of information contained in this documentor from the use of programs and source code that may accompany it. In no event shall the publisher and the author beliable for any loss of profit or any other commercial damage caused or alleged to have been caused directly or indirectlyby this document.
Printed: September 2004 in (whereever you are located)
Cube-IQ Help
© 2004 MagicLogic Optimization Inc.
Table of Contents
Foreword 1
Part I Introduction 3
................................................................................................................................... 31 Introduction to Cube-IQ
................................................................................................................................... 32 Getting Started
................................................................................................................................... 43 About Help
................................................................................................................................... 44 Database Navigation
................................................................................................................................... 55 Main Window
................................................................................................................................... 96 Main Menu
................................................................................................................................... 127 Shortcut Keys
................................................................................................................................... 148 Units
................................................................................................................................... 159 Startup Tips
................................................................................................................................... 1510 System Requirements
................................................................................................................................... 1611 Support
Part II Options 18
................................................................................................................................... 181 Introduction
................................................................................................................................... 182 General
................................................................................................................................... 213 Reports
................................................................................................................................... 224 Loading Rules
................................................................................................................................... 235 Graphics
................................................................................................................................... 246 Manifest
................................................................................................................................... 257 Logo
................................................................................................................................... 268 Miscellaneous
Part III Containers 29
................................................................................................................................... 291 Container Data Window
................................................................................................................................... 302 Containers
................................................................................................................................... 313 Container Window Tabs
.......................................................................................................................................................... 31Data
.......................................................................................................................................................... 32Pallet Rules
.......................................................................................................................................................... 33Floor Shape and Ceiling Shape
.......................................................................................................................................................... 35Axle Weights
.......................................................................................................................................................... 36Unusable Spaces
.......................................................................................................................................................... 37Outside Dimensions
.......................................................................................................................................................... 38Drawing
................................................................................................................................... 394 Settings
.......................................................................................................................................................... 39Introduction
.......................................................................................................................................................... 40Optimizer
.......................................................................................................................................................... 41Operational
Cube-IQ HelpI
© 2004 MagicLogic Optimization Inc.
.......................................................................................................................................................... 42Loading
.......................................................................................................................................................... 44Centre of Gravity
................................................................................................................................... 445 Print Containers
Part IV Customers 47
................................................................................................................................... 471 Customer Data
Part V Packages 50
................................................................................................................................... 501 Introduction
................................................................................................................................... 532 Package Data
.......................................................................................................................................................... 53Basic data
.......................................................................................................................................................... 53Orientations
.......................................................................................................................................................... 55Stacking
.......................................................................................................................................................... 56Items
.......................................................................................................................................................... 57Filtering
.......................................................................................................................................................... 59Drawing
................................................................................................................................... 603 Packages Grid View
................................................................................................................................... 624 Stacking Codes
................................................................................................................................... 655 Print Packages
Part VI Loading 68
................................................................................................................................... 681 The Loading Operation
................................................................................................................................... 692 Load Setup Window
................................................................................................................................... 713 The Container List
................................................................................................................................... 734 The Load List
.......................................................................................................................................................... 73The Load List
.......................................................................................................................................................... 75Load List: Add Packages
.......................................................................................................................................................... 76Load List: Add Orders
.......................................................................................................................................................... 77Load List: Add New Package
.......................................................................................................................................................... 78Load List: Split Package Line
.......................................................................................................................................................... 79Load List: by Weight
.......................................................................................................................................................... 79Load List: Remove Package
................................................................................................................................... 805 Other Case Data
................................................................................................................................... 826 Loaded Containers Details
................................................................................................................................... 837 Load Details Window
................................................................................................................................... 878 Two Stage Loading
................................................................................................................................... 889 Fixing Partial Loads
Part VII Graphics 91
................................................................................................................................... 911 Graphics
Part VIII Reports 95
................................................................................................................................... 951 Reports
................................................................................................................................... 952 Preview and Toolbar
................................................................................................................................... 963 Print Dialog
IIContents
II
© 2004 MagicLogic Optimization Inc.
................................................................................................................................... 964 Load Plans
................................................................................................................................... 985 Reports - Pick Report
................................................................................................................................... 986 Reports - Not Loaded Packages
................................................................................................................................... 987 Reports - Manifests
................................................................................................................................... 998 Reports - Full Overview
................................................................................................................................... 1009 Reports - Special
Part IX Files and Database 104
................................................................................................................................... 1041 Export Data
................................................................................................................................... 1052 Import Data
................................................................................................................................... 1073 Basic Package Import
................................................................................................................................... 1084 Flexible Package Import
................................................................................................................................... 1115 Data Backup
................................................................................................................................... 1126 Tools - Check Database
................................................................................................................................... 1127 Tools - Compress Database
................................................................................................................................... 1128 Tools - Edit and Translate Tips
................................................................................................................................... 1139 Translation
Part X Help 117
................................................................................................................................... 1171 Help - About Cube-IQ
................................................................................................................................... 1172 Help - Register Cube-IQ
................................................................................................................................... 1173 Help - Register Options
................................................................................................................................... 1174 About MagicLogic
Index 118
Cube-IQ HelpIII
© 2004 MagicLogic Optimization Inc.

Cube-IQ 3.0
1Foreword
© 2004 MagicLogic Optimization Inc.
User Guide
This User Guide is a printedversion of Cube-IQ's built-in Help.
Please see also the Help / Getting Started menu,
and the Help / Shortcut Keys menu
in the system.
Cube-IQ 3.0User Guide
Part
I
Introduction 3
© 2004 MagicLogic Optimization Inc.
1 Introduction
1.1 Introduction to Cube-IQ
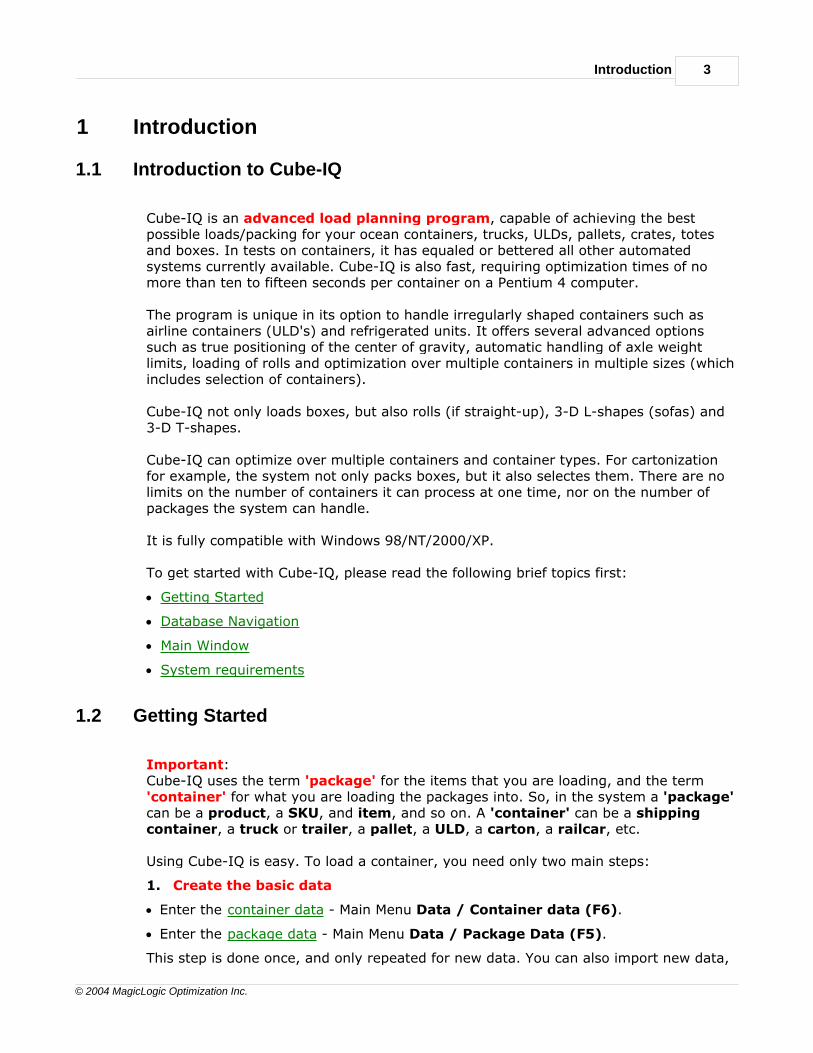
Cube-IQ is an advanced load planning program, capable of achieving the bestpossible loads/packing for your ocean containers, trucks, ULDs, pallets, crates, totesand boxes. In tests on containers, it has equaled or bettered all other automatedsystems currently available. Cube-IQ is also fast, requiring optimization times of nomore than ten to fifteen seconds per container on a Pentium 4 computer.
The program is unique in its option to handle irregularly shaped containers such asairline containers (ULD's) and refrigerated units. It offers several advanced optionssuch as true positioning of the center of gravity, automatic handling of axle weightlimits, loading of rolls and optimization over multiple containers in multiple sizes (whichincludes selection of containers).
Cube-IQ not only loads boxes, but also rolls (if straight-up), 3-D L-shapes (sofas) and3-D T-shapes.
Cube-IQ can optimize over multiple containers and container types. For cartonizationfor example, the system not only packs boxes, but it also selectes them. There are nolimits on the number of containers it can process at one time, nor on the number ofpackages the system can handle.
It is fully compatible with Windows 98/NT/2000/XP.
To get started with Cube-IQ, please read the following brief topics first:
· Getting Started
· Database Navigation
· Main Window
· System requirements
1.2 Getting Started
Important:Cube-IQ uses the term 'package' for the items that you are loading, and the term'container' for what you are loading the packages into. So, in the system a 'package'can be a product, a SKU, and item, and so on. A 'container' can be a shippingcontainer, a truck or trailer, a pallet, a ULD, a carton, a railcar, etc.
Using Cube-IQ is easy. To load a container, you need only two main steps:
1. Create the basic data
· Enter the container data - Main Menu Data / Container data (F6).
· Enter the package data - Main Menu Data / Package Data (F5).
This step is done once, and only repeated for new data. You can also import new data,
Cube-IQ Help4
© 2004 MagicLogic Optimization Inc.
for example from Excel.
2. Create and optimize a load
· Create the load data (Load / New Load menu)
· Select the available container types from a list, and enter how many are available
· Select the packages off a list, and set for each package the quantity to be loaded
· Click the 'Optimize' button.
It's as simple as that. You are now able to view and evaluate the results, and print outthe load plan that clearly shows the precise container loading sequence.
See also
Units
Database Navigation
Main Window
1.3 About Help
This Help assumes that you are familiar with using Windows (98/NT/2000/XP) to startprograms, enter information, etc. We also assume that you know how to use thestandard Windows keys, such as F1 for Help, Tab to move between fields, etc.
Cube-IQ has full context-sensitive Help in place. In any screen, the F1 key will takeyou to the appropriate section of Help.
1.4 Database Navigation
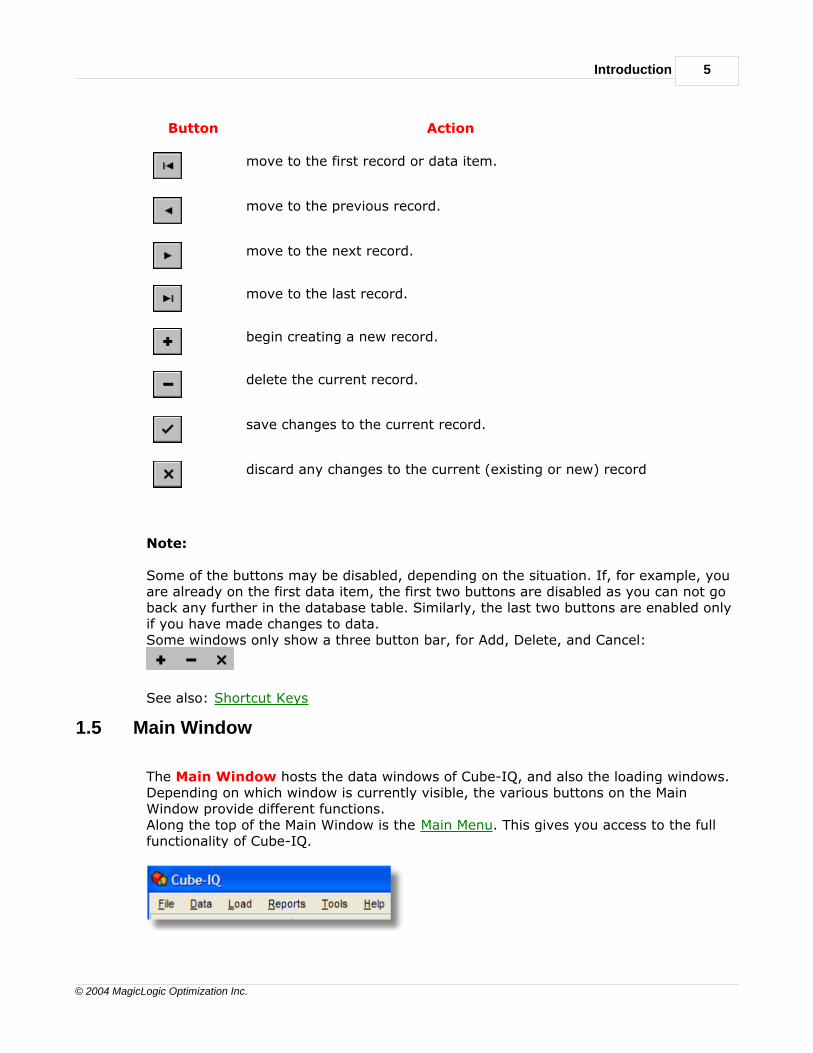
Cube-IQ utilizes a powerful database engine to store container, package and loadinginformation. To help you maintain this data, the program provides a simple interface inthe form of the 'Database Buttons' (sometimes called a 'Navigator Bar') on manyscreens, as shown here:
If you moive the mouse over a button, it will show a hint.
Introduction 5
© 2004 MagicLogic Optimization Inc.
Button Action
move to the first record or data item.
move to the previous record.
move to the next record.
move to the last record.
begin creating a new record.
delete the current record.
save changes to the current record.
discard any changes to the current (existing or new) record
Note:
Some of the buttons may be disabled, depending on the situation. If, for example, youare already on the first data item, the first two buttons are disabled as you can not goback any further in the database table. Similarly, the last two buttons are enabled onlyif you have made changes to data.Some windows only show a three button bar, for Add, Delete, and Cancel:
See also: Shortcut Keys
1.5 Main Window
The Main Window hosts the data windows of Cube-IQ, and also the loading windows.Depending on which window is currently visible, the various buttons on the MainWindow provide different functions.Along the top of the Main Window is the Main Menu. This gives you access to the fullfunctionality of Cube-IQ.
Cube-IQ Help6
© 2004 MagicLogic Optimization Inc.
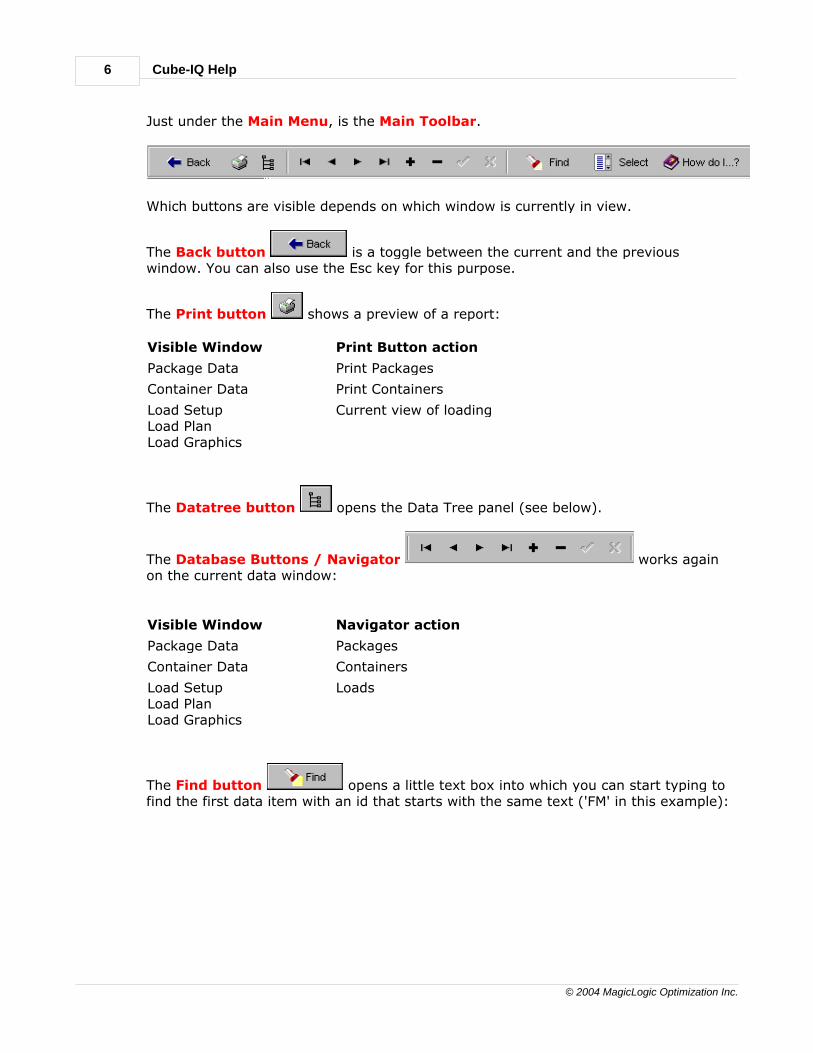
Just under the Main Menu, is the Main Toolbar.
Which buttons are visible depends on which window is currently in view.
The Back button is a toggle between the current and the previouswindow. You can also use the Esc key for this purpose.
The Print button shows a preview of a report:
Visible Window Print Button action
Package Data Print Packages
Container Data Print Containers
Load SetupLoad PlanLoad Graphics
Current view of loading
The Datatree button opens the Data Tree panel (see below).
The Database Buttons / Navigator works againon the current data window:
Visible Window Navigator action
Package Data Packages
Container Data Containers
Load SetupLoad PlanLoad Graphics
Loads
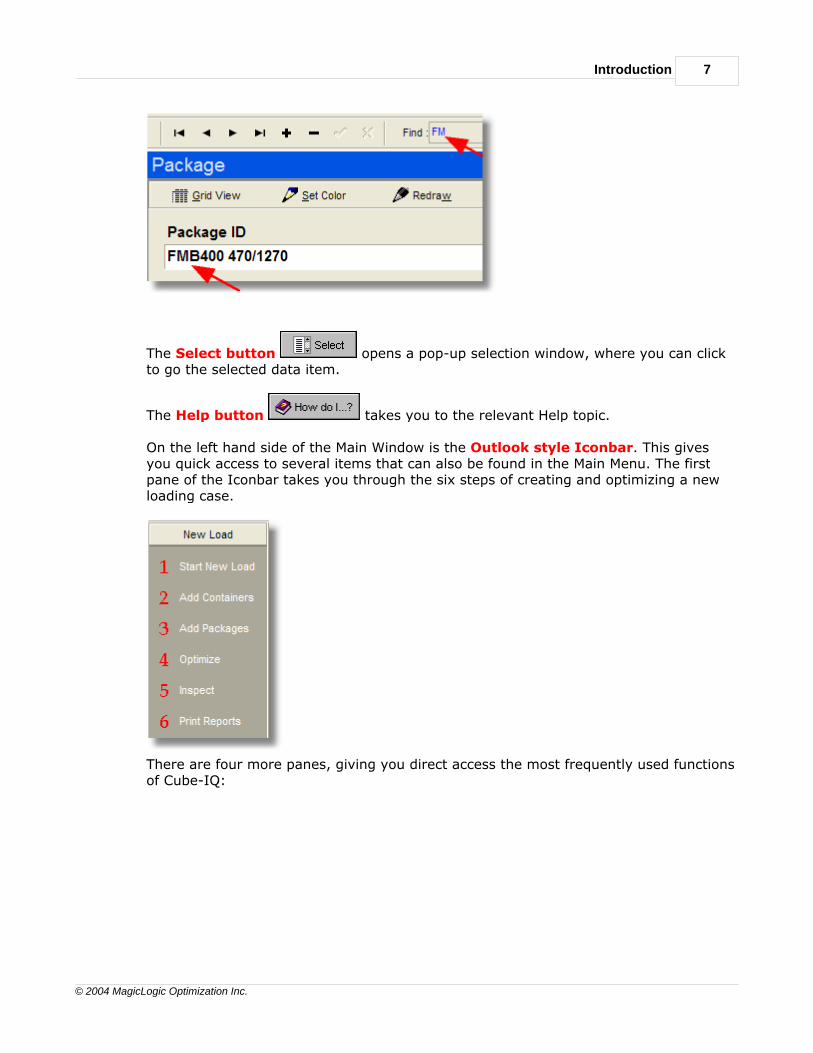
The Find button opens a little text box into which you can start typing tofind the first data item with an id that starts with the same text ('FM' in this example):
Introduction 7
© 2004 MagicLogic Optimization Inc.
The Select button opens a pop-up selection window, where you can clickto go the selected data item.
The Help button takes you to the relevant Help topic.
On the left hand side of the Main Window is the Outlook style Iconbar. This givesyou quick access to several items that can also be found in the Main Menu. The firstpane of the Iconbar takes you through the six steps of creating and optimizing a newloading case.
There are four more panes, giving you direct access the most frequently used functionsof Cube-IQ:
Cube-IQ Help8
© 2004 MagicLogic Optimization Inc.
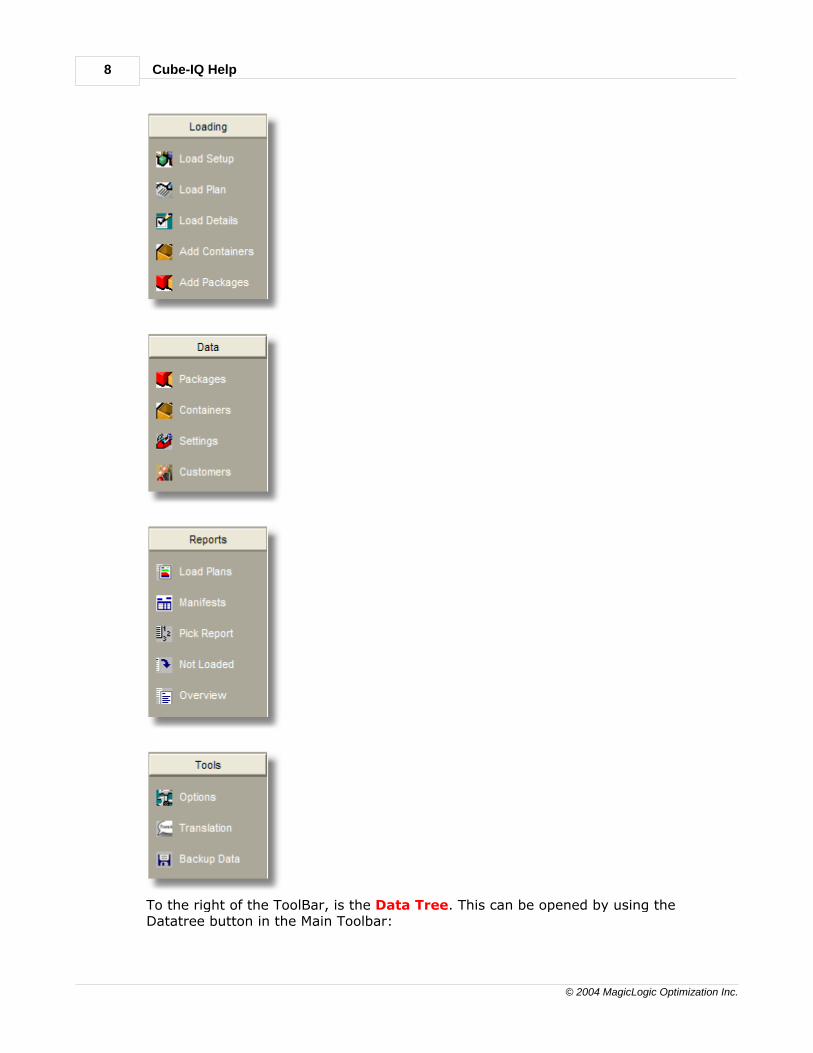
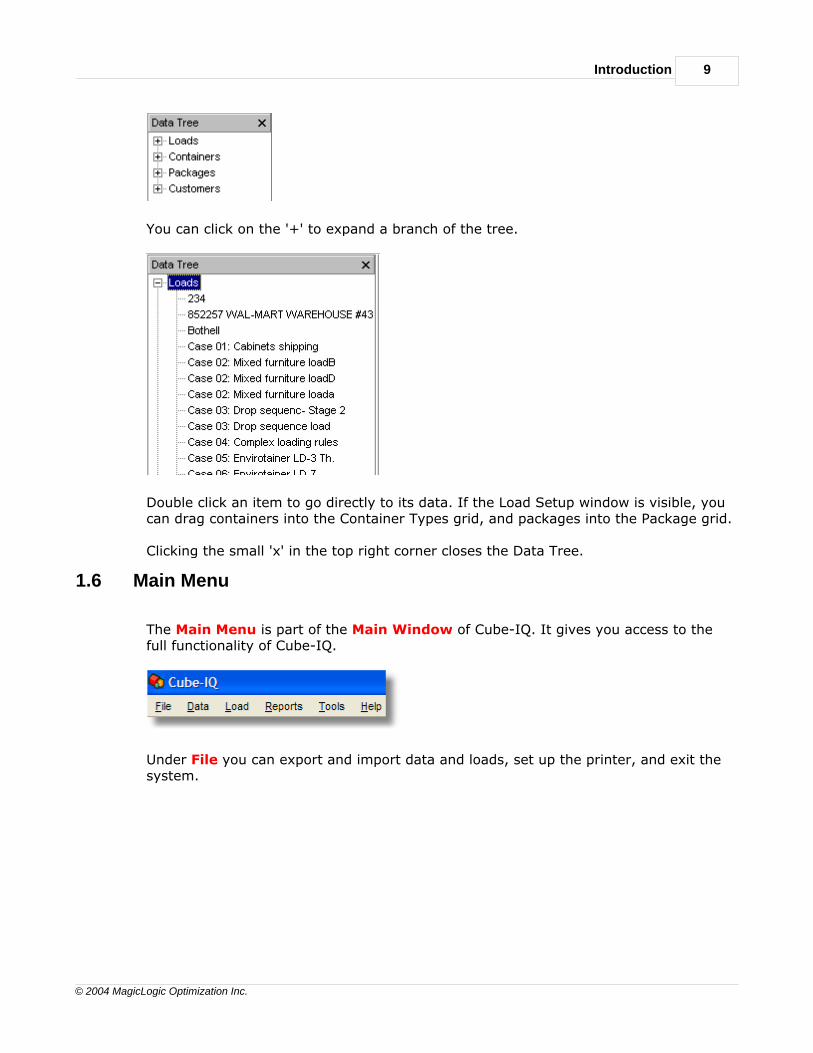
To the right of the ToolBar, is the Data Tree. This can be opened by using theDatatree button in the Main Toolbar:
Introduction 9
© 2004 MagicLogic Optimization Inc.
You can click on the '+' to expand a branch of the tree.
Double click an item to go directly to its data. If the Load Setup window is visible, youcan drag containers into the Container Types grid, and packages into the Package grid.
Clicking the small 'x' in the top right corner closes the Data Tree.
1.6 Main Menu
The Main Menu is part of the Main Window of Cube-IQ. It gives you access to thefull functionality of Cube-IQ.
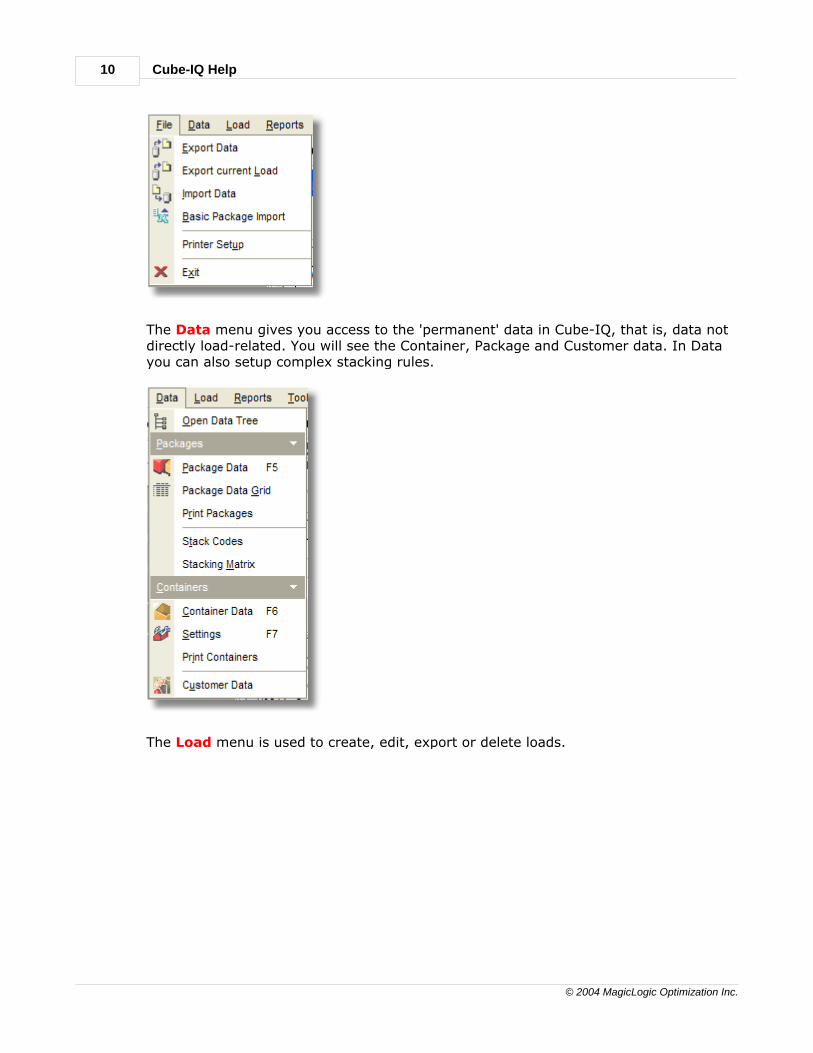
Under File you can export and import data and loads, set up the printer, and exit thesystem.
Cube-IQ Help10
© 2004 MagicLogic Optimization Inc.
The Data menu gives you access to the 'permanent' data in Cube-IQ, that is, data notdirectly load-related. You will see the Container, Package and Customer data. In Datayou can also setup complex stacking rules.
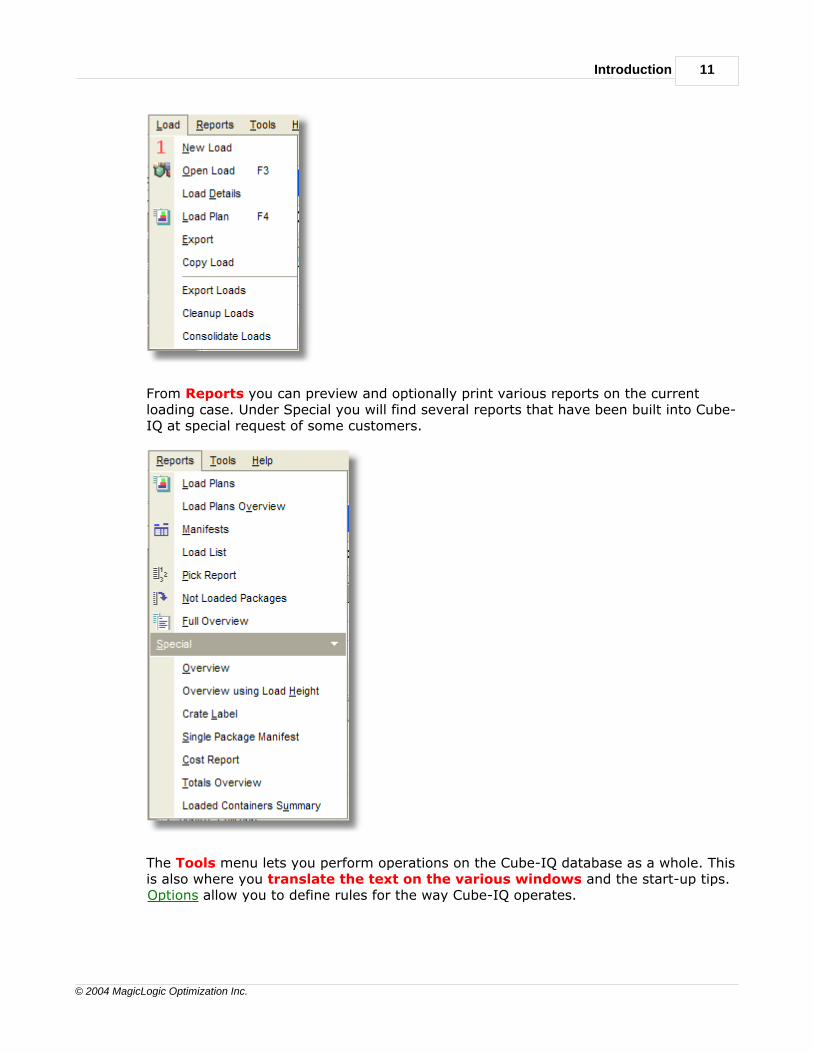
The Load menu is used to create, edit, export or delete loads.
Introduction 11
© 2004 MagicLogic Optimization Inc.
From Reports you can preview and optionally print various reports on the currentloading case. Under Special you will find several reports that have been built into Cube-IQ at special request of some customers.
The Tools menu lets you perform operations on the Cube-IQ database as a whole. Thisis also where you translate the text on the various windows and the start-up tips.Options allow you to define rules for the way Cube-IQ operates.
Cube-IQ Help12
© 2004 MagicLogic Optimization Inc.
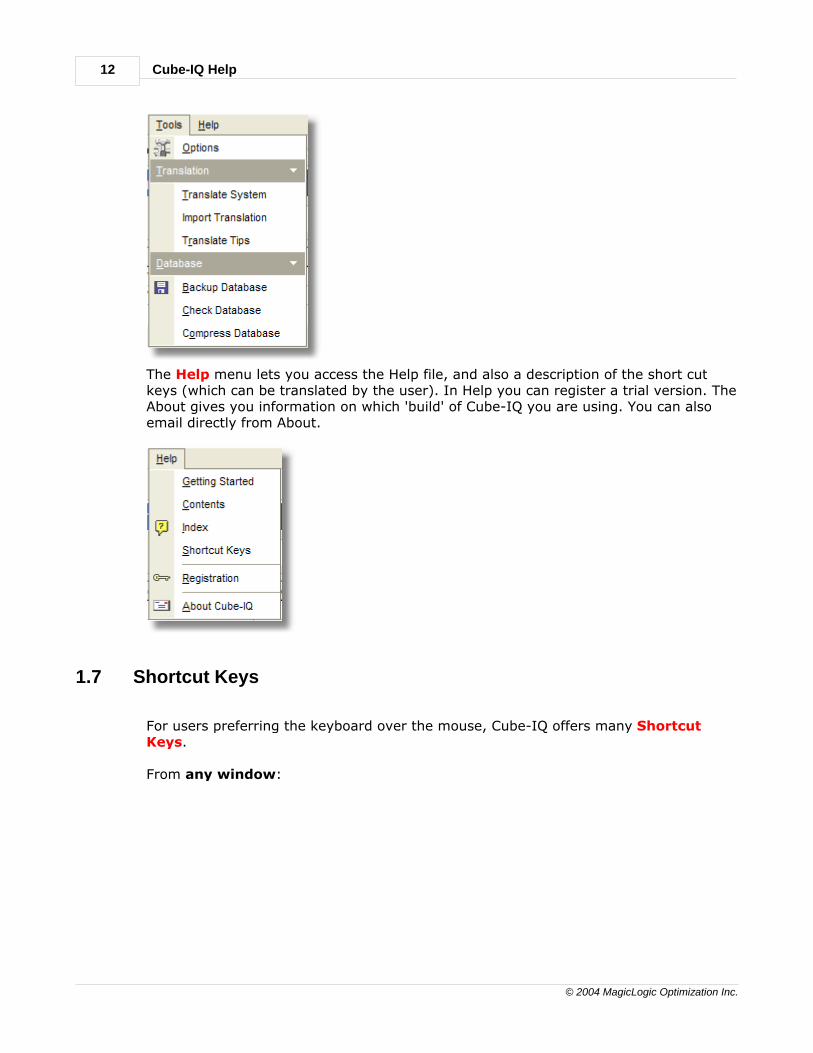
The Help menu lets you access the Help file, and also a description of the short cutkeys (which can be translated by the user). In Help you can register a trial version. TheAbout gives you information on which 'build' of Cube-IQ you are using. You can alsoemail directly from About.
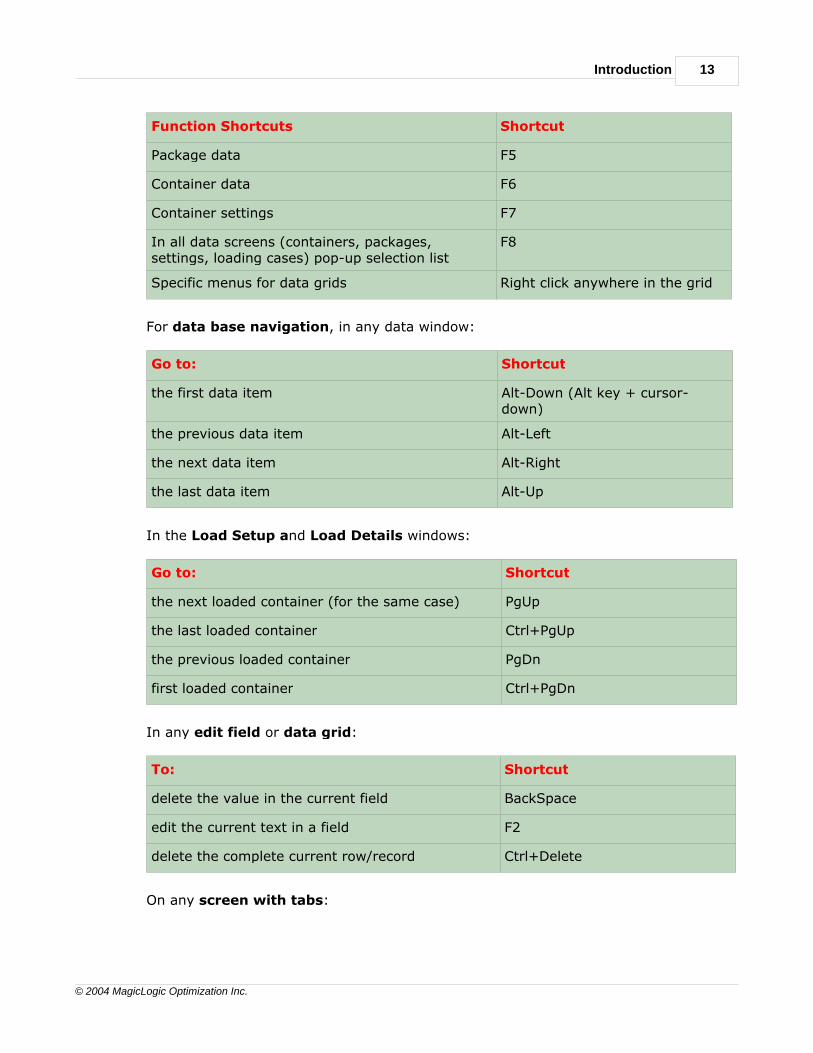
1.7 Shortcut Keys
For users preferring the keyboard over the mouse, Cube-IQ offers many ShortcutKeys.
From any window:
Introduction 13
© 2004 MagicLogic Optimization Inc.
Function Shortcuts Shortcut
Package data F5
Container data F6
Container settings F7
In all data screens (containers, packages,settings, loading cases) pop-up selection list
F8
Specific menus for data grids Right click anywhere in the grid
For data base navigation, in any data window:
Go to: Shortcut
the first data item Alt-Down (Alt key + cursor-down)
the previous data item Alt-Left
the next data item Alt-Right
the last data item Alt-Up
In the Load Setup and Load Details windows:
Go to: Shortcut
the next loaded container (for the same case) PgUp
the last loaded container Ctrl+PgUp
the previous loaded container PgDn
first loaded container Ctrl+PgDn
In any edit field or data grid:
To: Shortcut
delete the value in the current field BackSpace
edit the current text in a field F2
delete the complete current row/record Ctrl+Delete
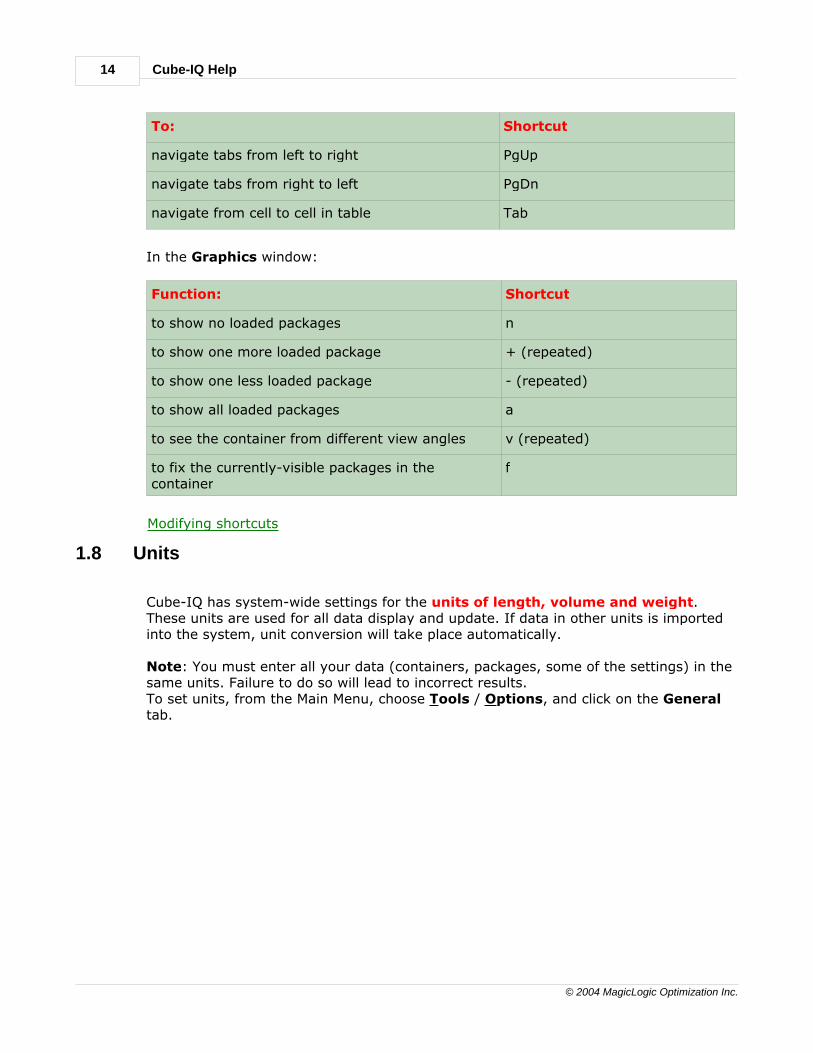
On any screen with tabs:
Cube-IQ Help14
© 2004 MagicLogic Optimization Inc.
To: Shortcut
navigate tabs from left to right PgUp
navigate tabs from right to left PgDn
navigate from cell to cell in table Tab
In the Graphics window:
Function: Shortcut
to show no loaded packages n
to show one more loaded package + (repeated)
to show one less loaded package - (repeated)
to show all loaded packages a
to see the container from different view angles v (repeated)
to fix the currently-visible packages in thecontainer
f
Modifying shortcuts
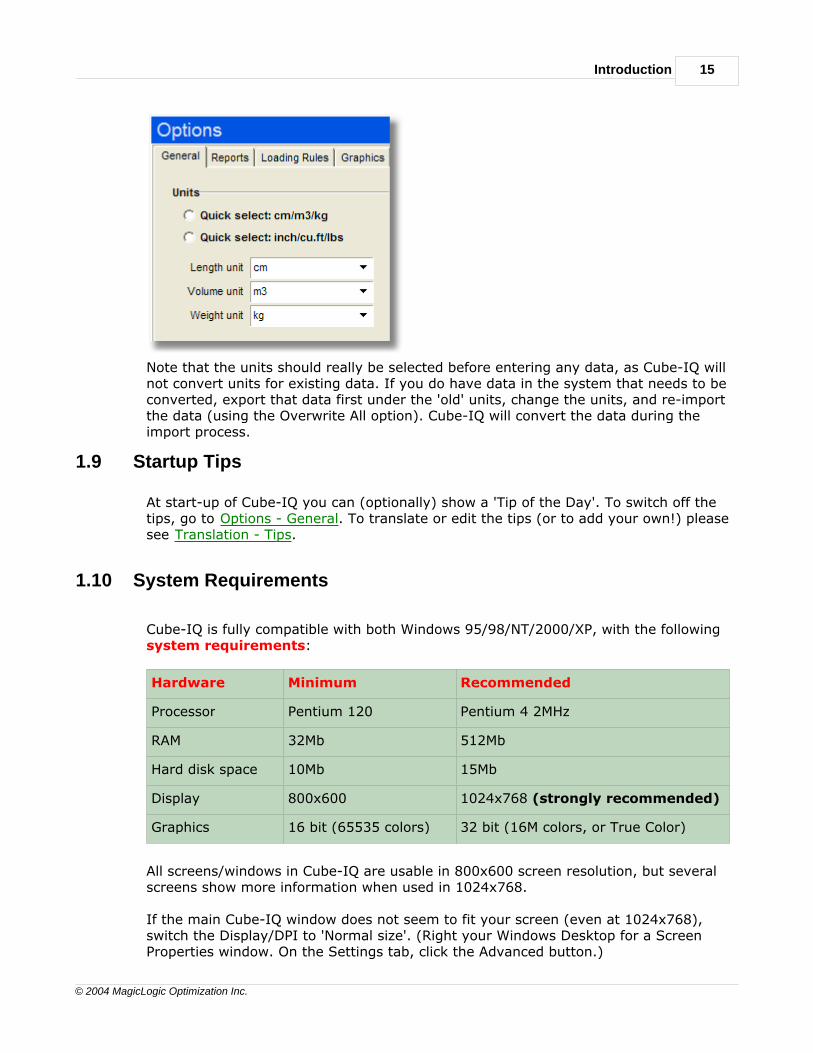
1.8 Units
Cube-IQ has system-wide settings for the units of length, volume and weight.These units are used for all data display and update. If data in other units is importedinto the system, unit conversion will take place automatically.
Note: You must enter all your data (containers, packages, some of the settings) in thesame units. Failure to do so will lead to incorrect results.To set units, from the Main Menu, choose Tools / Options, and click on the Generaltab.
Introduction 15
© 2004 MagicLogic Optimization Inc.
Note that the units should really be selected before entering any data, as Cube-IQ willnot convert units for existing data. If you do have data in the system that needs to beconverted, export that data first under the 'old' units, change the units, and re-importthe data (using the Overwrite All option). Cube-IQ will convert the data during theimport process.
1.9 Startup Tips
At start-up of Cube-IQ you can (optionally) show a 'Tip of the Day'. To switch off thetips, go to Options - General. To translate or edit the tips (or to add your own!) pleasesee Translation - Tips.
1.10 System Requirements
Cube-IQ is fully compatible with both Windows 95/98/NT/2000/XP, with the followingsystem requirements:
Hardware Minimum Recommended
Processor Pentium 120 Pentium 4 2MHz
RAM 32Mb 512Mb
Hard disk space 10Mb 15Mb
Display 800x600 1024x768 (strongly recommended)
Graphics 16 bit (65535 colors) 32 bit (16M colors, or True Color)
All screens/windows in Cube-IQ are usable in 800x600 screen resolution, but severalscreens show more information when used in 1024x768.
If the main Cube-IQ window does not seem to fit your screen (even at 1024x768),switch the Display/DPI to 'Normal size'. (Right your Windows Desktop for a ScreenProperties window. On the Settings tab, click the Advanced button.)
Cube-IQ Help16
© 2004 MagicLogic Optimization Inc.
1.11 Support
For support, please contact your supplier first. If required, you can reach MagicLogicOptimization Inc. as follows:
tel. (+1) 604-532 8662 or 866-535 5133 (Toll Free in North America)
email [email protected]
Telephone support is available 8AM-6PM, Pacific Standard Time = GMT - 8.
If you appear to have problems with a specific case, please send us the data. Thisgreatly facilitates support.
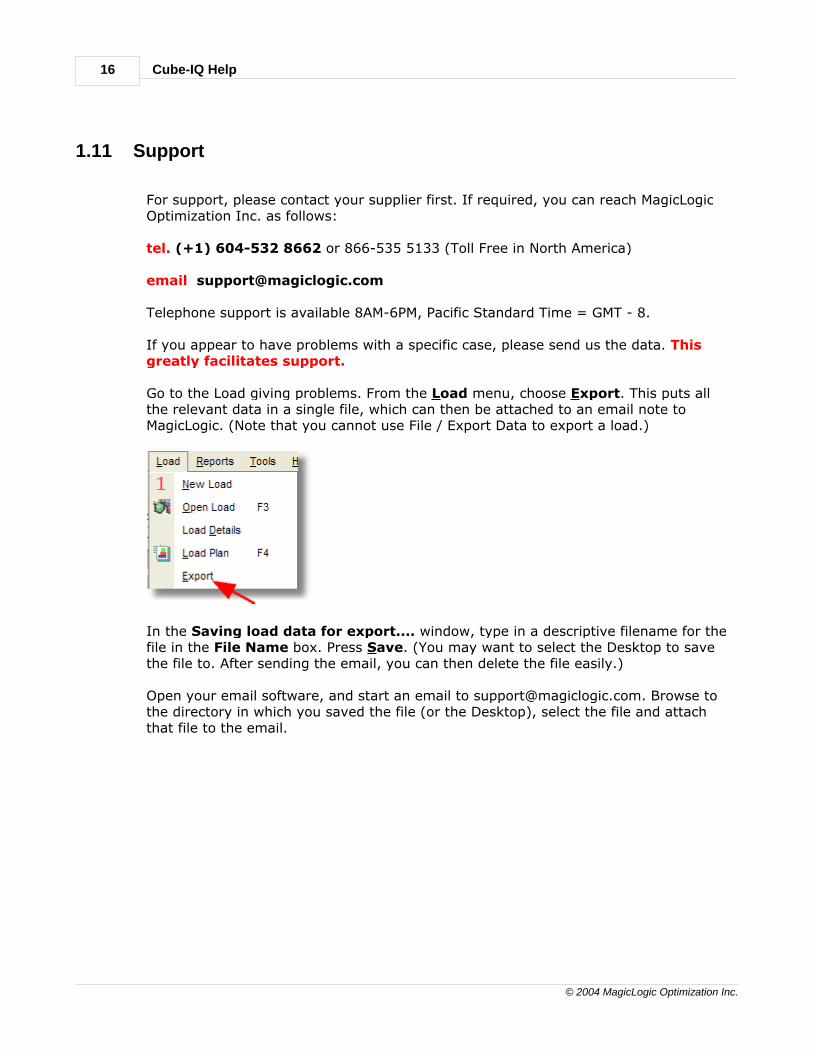
Go to the Load giving problems. From the Load menu, choose Export. This puts allthe relevant data in a single file, which can then be attached to an email note toMagicLogic. (Note that you cannot use File / Export Data to export a load.)
In the Saving load data for export.... window, type in a descriptive filename for thefile in the File Name box. Press Save. (You may want to select the Desktop to savethe file to. After sending the email, you can then delete the file easily.)
Open your email software, and start an email to [email protected]. Browse tothe directory in which you saved the file (or the Desktop), select the file and attachthat file to the email.

Cube-IQ 3.0User Guide
Part
II

Cube-IQ Help18
© 2004 MagicLogic Optimization Inc.
2 Options
2.1 Introduction
In the Main Menu, choose Tools / Options.
In this window you can enter settings for general use in the system. These settings aregrouped under several tabs. You can use PgUp/PgDn to move between the tabs. Thefollowing tabs are available:
General
Reports
Loading Rules
Graphics
Manifest
Misc.
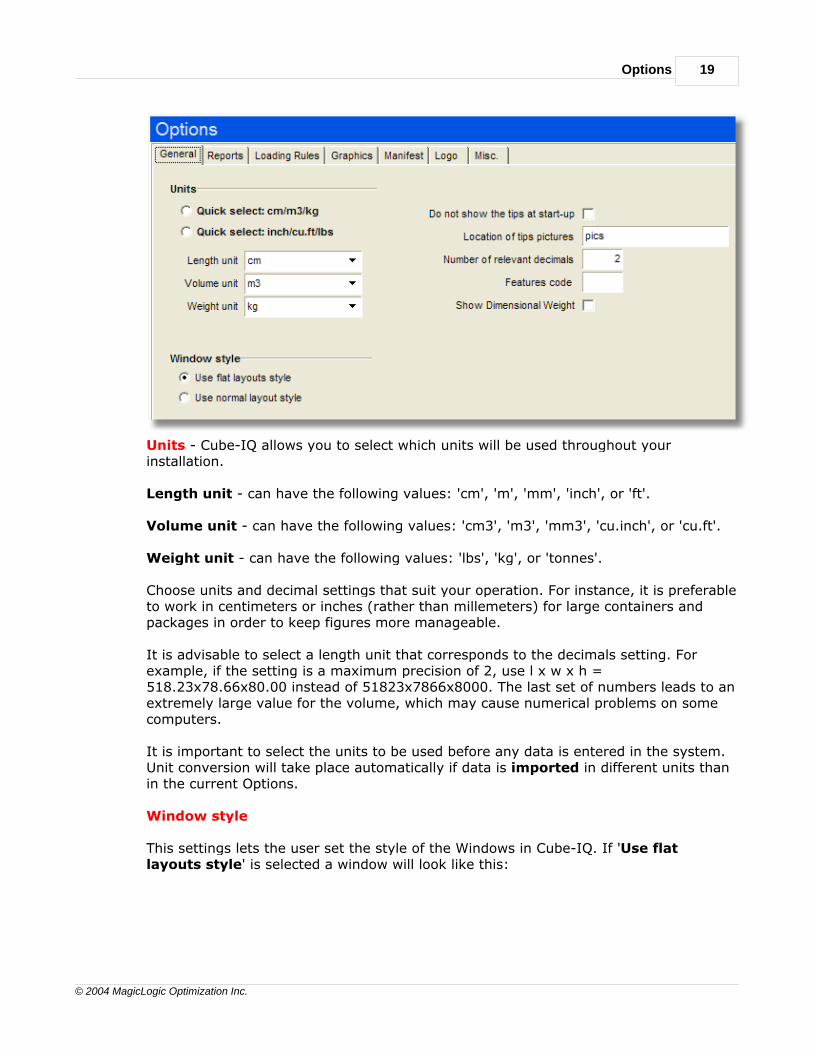
2.2 General
In the main menu, choose Tools / Options. Select the General tab.
Options 19
© 2004 MagicLogic Optimization Inc.
Units - Cube-IQ allows you to select which units will be used throughout yourinstallation.
Length unit - can have the following values: 'cm', 'm', 'mm', 'inch', or 'ft'.
Volume unit - can have the following values: 'cm3', 'm3', 'mm3', 'cu.inch', or 'cu.ft'.
Weight unit - can have the following values: 'lbs', 'kg', or 'tonnes'.
Choose units and decimal settings that suit your operation. For instance, it is preferableto work in centimeters or inches (rather than millemeters) for large containers andpackages in order to keep figures more manageable.
It is advisable to select a length unit that corresponds to the decimals setting. Forexample, if the setting is a maximum precision of 2, use l x w x h =518.23x78.66x80.00 instead of 51823x7866x8000. The last set of numbers leads to anextremely large value for the volume, which may cause numerical problems on somecomputers.
It is important to select the units to be used before any data is entered in the system.Unit conversion will take place automatically if data is imported in different units thanin the current Options.
Window style
This settings lets the user set the style of the Windows in Cube-IQ. If 'Use flatlayouts style' is selected a window will look like this:
Cube-IQ Help20
© 2004 MagicLogic Optimization Inc.
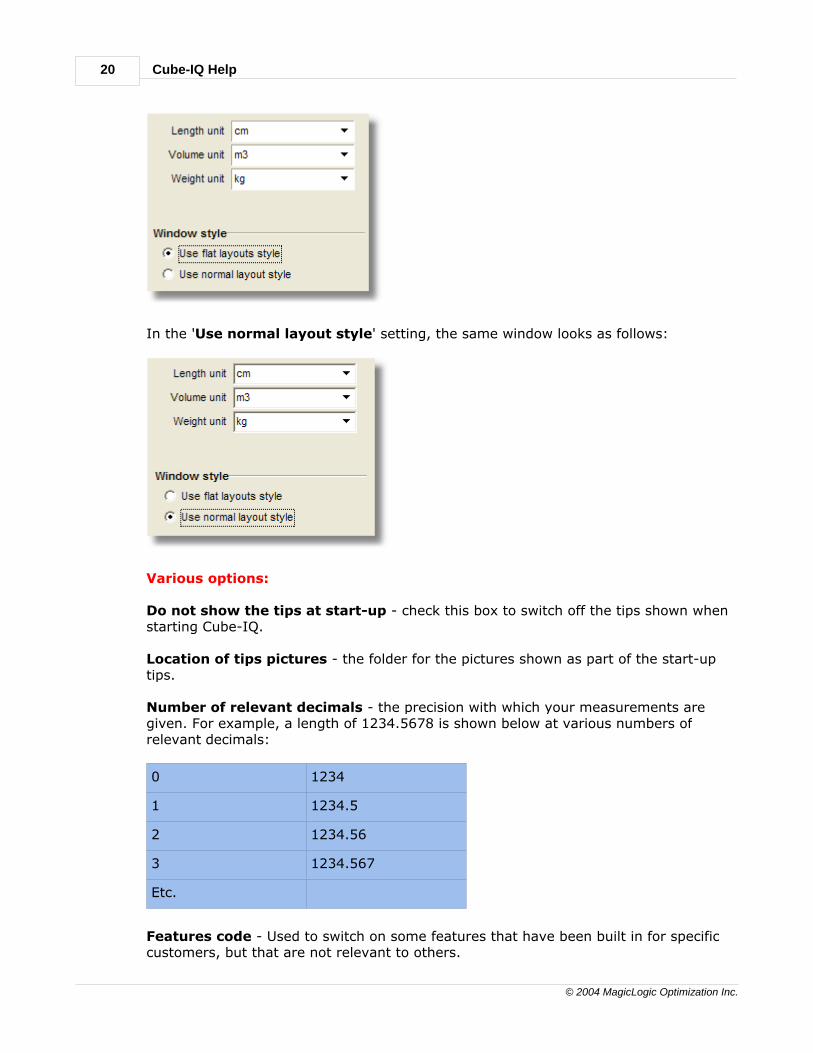
In the 'Use normal layout style' setting, the same window looks as follows:
Various options:
Do not show the tips at start-up - check this box to switch off the tips shown whenstarting Cube-IQ.
Location of tips pictures - the folder for the pictures shown as part of the start-uptips.
Number of relevant decimals - the precision with which your measurements aregiven. For example, a length of 1234.5678 is shown below at various numbers ofrelevant decimals:
0 1234
1 1234.5
2 1234.56
3 1234.567
Etc.
Features code - Used to switch on some features that have been built in for specificcustomers, but that are not relevant to others.
Options 21
© 2004 MagicLogic Optimization Inc.
Show Dimensional Weight - If checked, the system will show Dimentional Weight foreach loaded container. This is relevant only in applications for air cargo, where so-called 'dimensional weight' is used to convert 'volume' to weight', and shipment costcalculations takes place on the maximum of actual and dimensional weight.
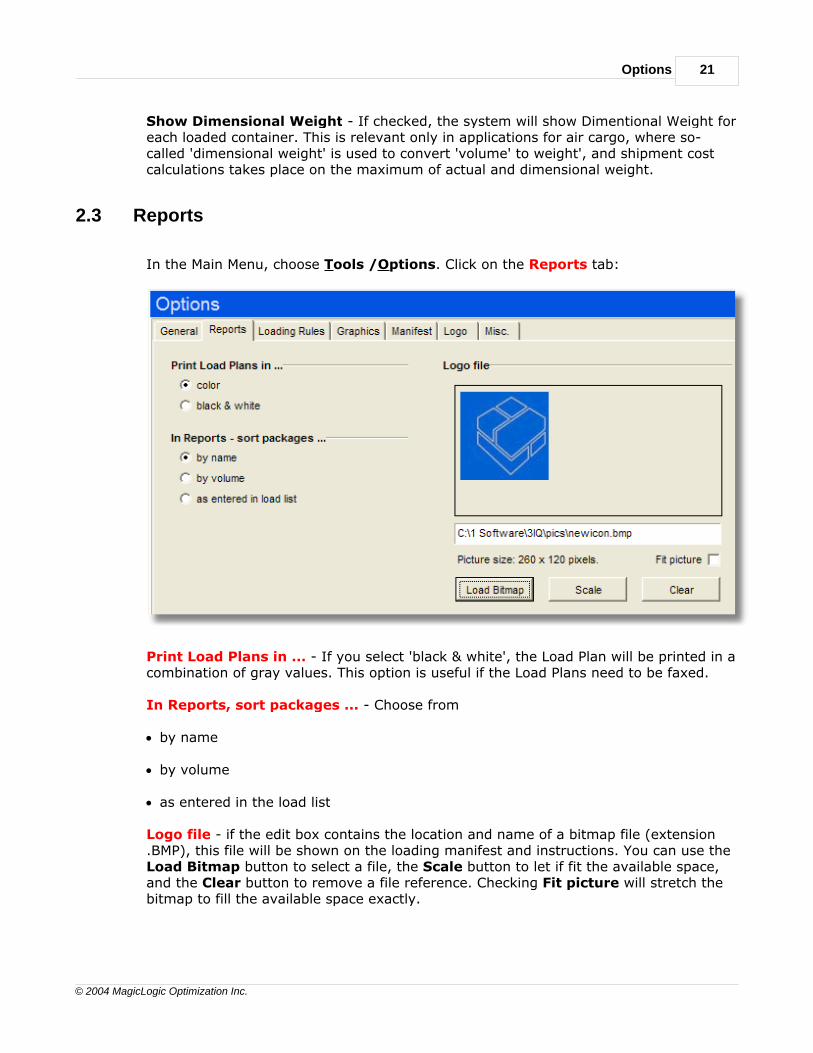
2.3 Reports
In the Main Menu, choose Tools /Options. Click on the Reports tab:
Print Load Plans in ... - If you select 'black & white', the Load Plan will be printed in acombination of gray values. This option is useful if the Load Plans need to be faxed.
In Reports, sort packages ... - Choose from
· by name
· by volume
· as entered in the load list
Logo file - if the edit box contains the location and name of a bitmap file (extension.BMP), this file will be shown on the loading manifest and instructions. You can use theLoad Bitmap button to select a file, the Scale button to let if fit the available space,and the Clear button to remove a file reference. Checking Fit picture will stretch thebitmap to fill the available space exactly.

Cube-IQ Help22
© 2004 MagicLogic Optimization Inc.
2.4 Loading Rules
In the Main Menu, choose Tools / Options. Click on the Loading Rules tab.
Rules
Maximum block dimension in load direction - is used to determine the maximumdepth dimension of blocks of packages, which will make up the loading sequence. So,this is the length-wise step size of the Load Plan.
Packages always upright on pallets - is for cases where packages can be loaded incontainers in any orientation, but if the same packages are loaded on a pallet, theyhave to be upright. This avoids the need to keep changing package data.
Pallets always upright - packages of type 'Pallet' will only be loaded straight-up,without the need to set their orientations.
Show all packages in Re-optimize - if checked, the load list for re-optimization of asingle container (using the Modify button on the Load Details Window) will show allavailable packages (even with quantity 0), if not checked, only the currently loadedpackages will be shown.
Default number of available containers - when making containers available for anewly created load, this is the number that will be made available by defaukt (and thatcan then still be chnged by the user).
Apply Package Sequence Numbers
Options 23
© 2004 MagicLogic Optimization Inc.
· over all containers, or
· to each container separately.
The difference is that 'separately' allows the system to load containers (usually of type'pallet' or 'box') in order picking sequence. If there are boxes A, B and C with sequencenumbers 1, 2, and 3 respectively, the setting 'over all containers' will lead to a loadplan where ALL A's are loaded first, then all B's, and finally all C's. If the setting is 'toeach container separately', you may find some A's, then some B's and C's loaded incontainer 1, next again some A's, then B's in container 2, and so on.
Sequence to use for multiple containers
This rule sets in which order different containers are to be used by the optimization,when doing a load inbolbing multiple container types. The choices are
Best fit sequence - in each step, all containers are loaded, and the one with thehighest utilization is selected,
Given sequence - the containers are loaded in the order given by the sequencenumbers in the table,
Largest first - in each step the largest available container is used, except in the laststep where the best fitting container is used.
Closest fit overall - the system will attempt to determine which set of containers willlead to the lowest overall container volume used.
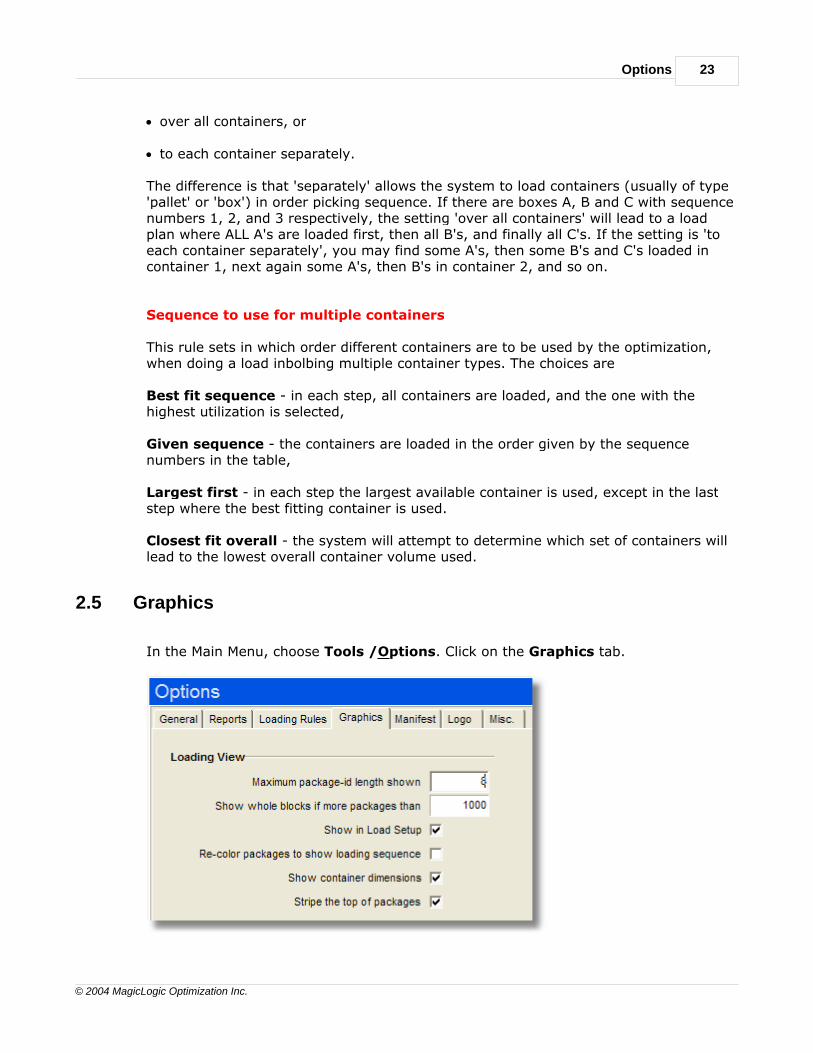
2.5 Graphics
In the Main Menu, choose Tools /Options. Click on the Graphics tab.
Cube-IQ Help24
© 2004 MagicLogic Optimization Inc.
Maximum package-id length shown - sets how many letters of the package id areshown in the Load Plan window (when the Id's button is clicked, or under the cursorwhen it is over a package).
Show whole blocks if more packages than ... - the graphics window shows eitherindividual packages, or blocks of packages. Because the showing of individual packagesmay be quite slow, you can set here above which number only whole blocks will beshown.
Show in Load Setup - When the screen resolution is 1024x768 or better, a smallversion of the load plan is shown as part of the Load Setup Window. This setting allowsusers with slow computers to switch off this feature.
Re-color packages to show loading sequence - if checked, Cube-IQ will re-colorpackages with different sequence numbers after optimization. This makes it easier tosee the load sequence in the graphics, but has the disadvantage that packages maykeep getting new colors (and may also be changed in other loads).
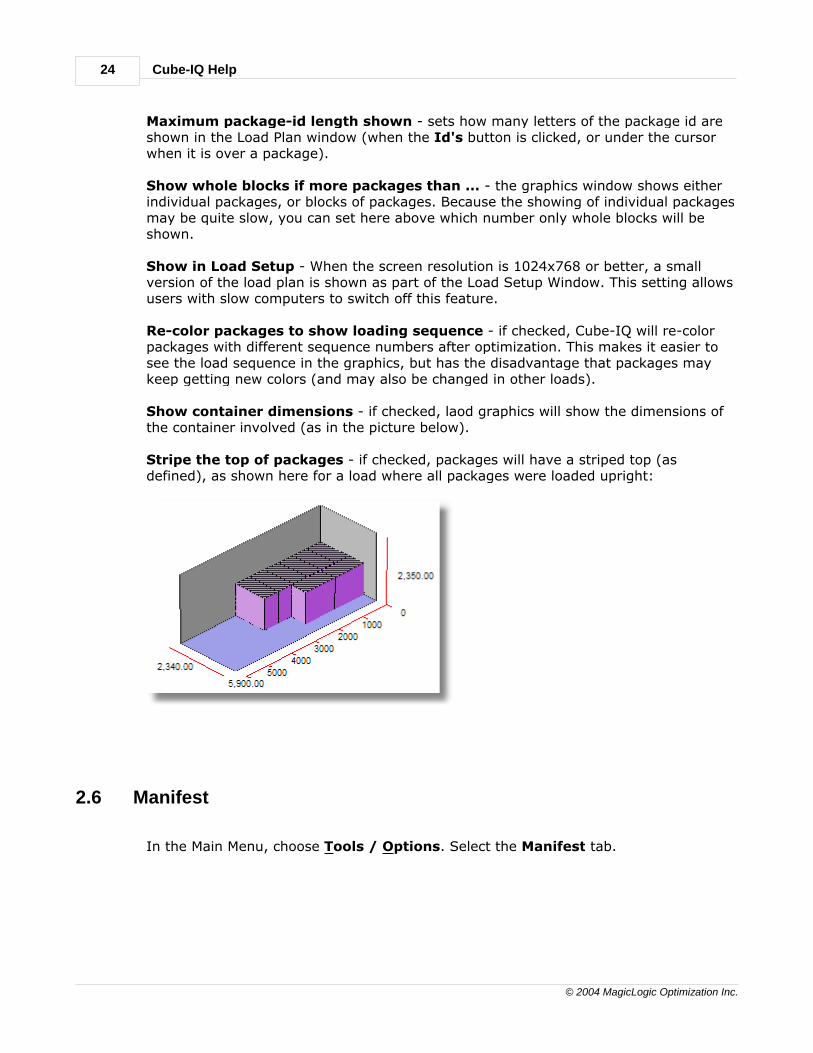
Show container dimensions - if checked, laod graphics will show the dimensions ofthe container involved (as in the picture below).
Stripe the top of packages - if checked, packages will have a striped top (asdefined), as shown here for a load where all packages were loaded upright:
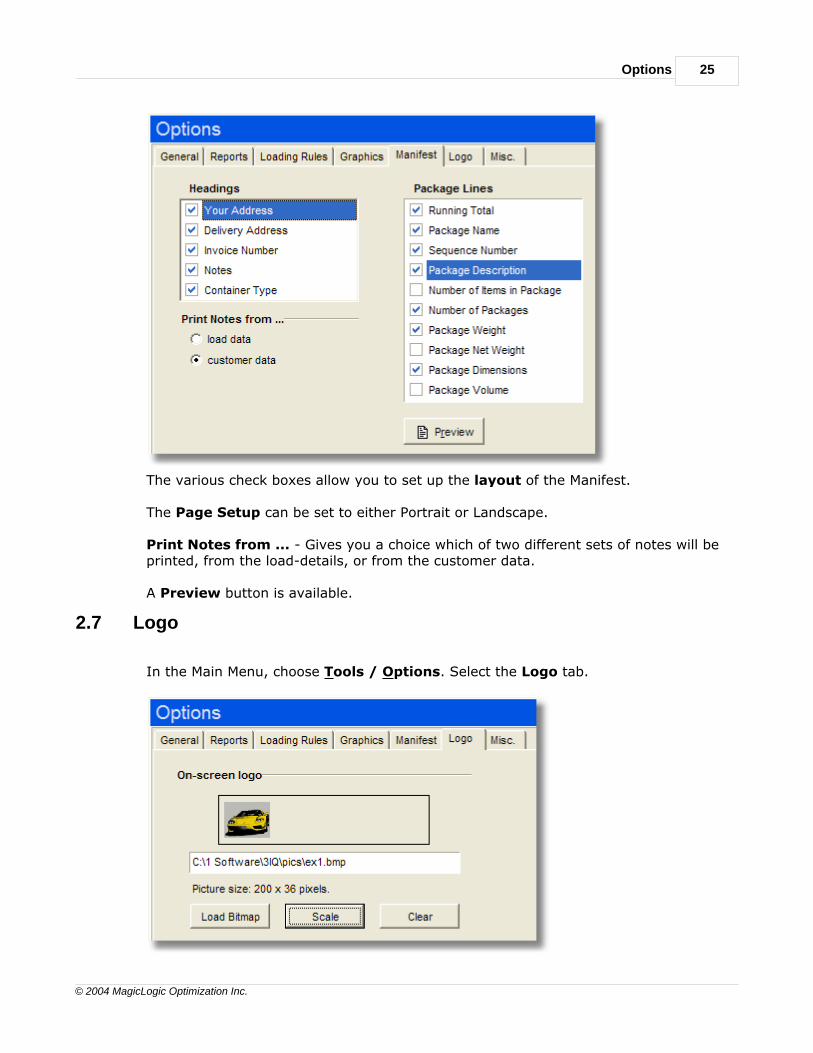
2.6 Manifest
In the Main Menu, choose Tools / Options. Select the Manifest tab.
Options 25
© 2004 MagicLogic Optimization Inc.
The various check boxes allow you to set up the layout of the Manifest.
The Page Setup can be set to either Portrait or Landscape.
Print Notes from ... - Gives you a choice which of two different sets of notes will beprinted, from the load-details, or from the customer data.
A Preview button is available.
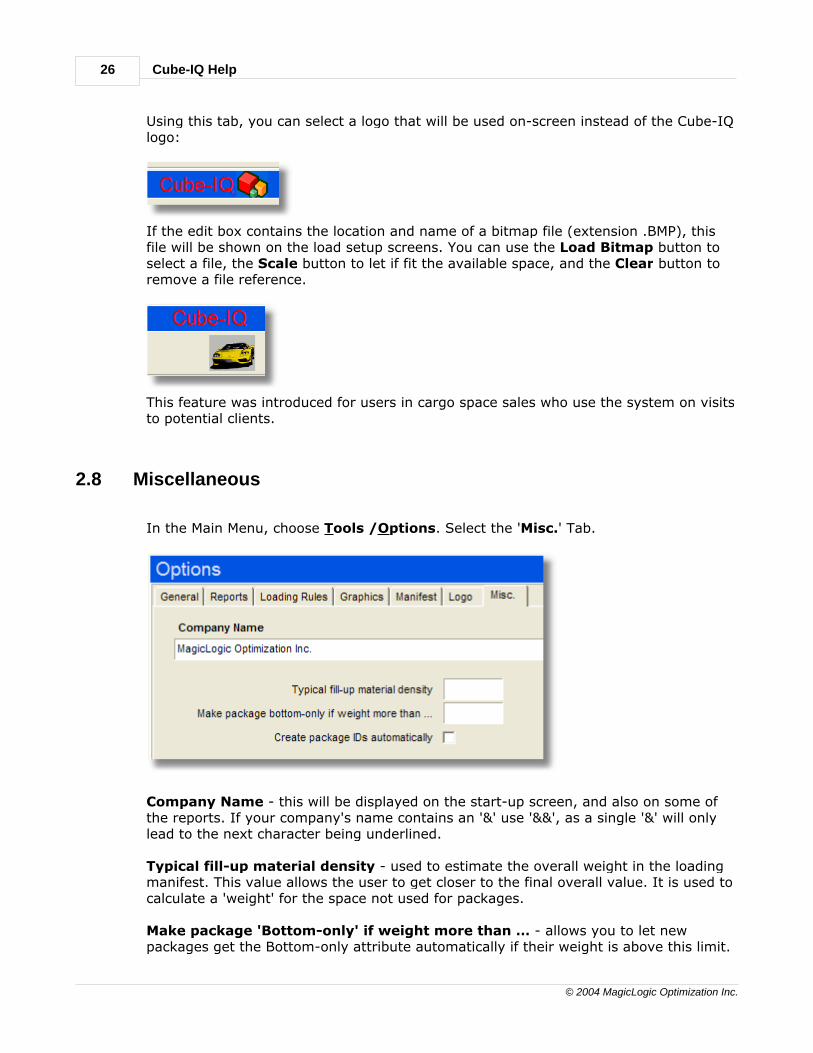
2.7 Logo
In the Main Menu, choose Tools / Options. Select the Logo tab.
Cube-IQ Help26
© 2004 MagicLogic Optimization Inc.
Using this tab, you can select a logo that will be used on-screen instead of the Cube-IQlogo:
If the edit box contains the location and name of a bitmap file (extension .BMP), thisfile will be shown on the load setup screens. You can use the Load Bitmap button toselect a file, the Scale button to let if fit the available space, and the Clear button toremove a file reference.
This feature was introduced for users in cargo space sales who use the system on visitsto potential clients.
2.8 Miscellaneous
In the Main Menu, choose Tools /Options. Select the 'Misc.' Tab.
Company Name - this will be displayed on the start-up screen, and also on some ofthe reports. If your company's name contains an '&' use '&&', as a single '&' will onlylead to the next character being underlined.
Typical fill-up material density - used to estimate the overall weight in the loadingmanifest. This value allows the user to get closer to the final overall value. It is used tocalculate a 'weight' for the space not used for packages.
Make package 'Bottom-only' if weight more than … - allows you to let newpackages get the Bottom-only attribute automatically if their weight is above this limit.

Options 27
© 2004 MagicLogic Optimization Inc.
Create Package IDs automatically - if checked, an ID will be created automaticallyfor a new package, if the ID of the current package ends on '- x', where 'x' is anumber. So, if the current package is 'Some ID -4', a new package will get a proposedID 'Some ID - 5'.
Cube-IQ 3.0User Guide
Part
III
Containers 29
© 2004 MagicLogic Optimization Inc.
3 Containers
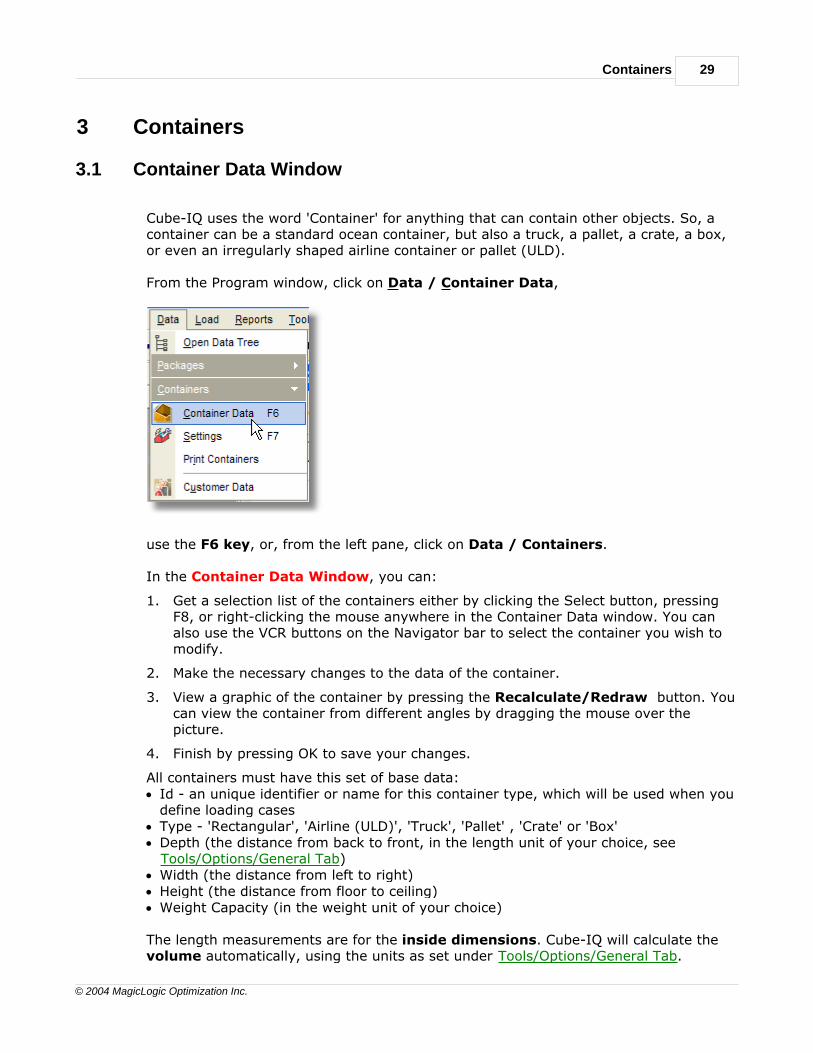
3.1 Container Data Window
Cube-IQ uses the word 'Container' for anything that can contain other objects. So, acontainer can be a standard ocean container, but also a truck, a pallet, a crate, a box,or even an irregularly shaped airline container or pallet (ULD).
From the Program window, click on Data / Container Data,
use the F6 key, or, from the left pane, click on Data / Containers.
In the Container Data Window, you can:
1. Get a selection list of the containers either by clicking the Select button, pressingF8, or right-clicking the mouse anywhere in the Container Data window. You canalso use the VCR buttons on the Navigator bar to select the container you wish tomodify.
2. Make the necessary changes to the data of the container.
3. View a graphic of the container by pressing the Recalculate/Redraw button. Youcan view the container from different angles by dragging the mouse over thepicture.
4. Finish by pressing OK to save your changes.
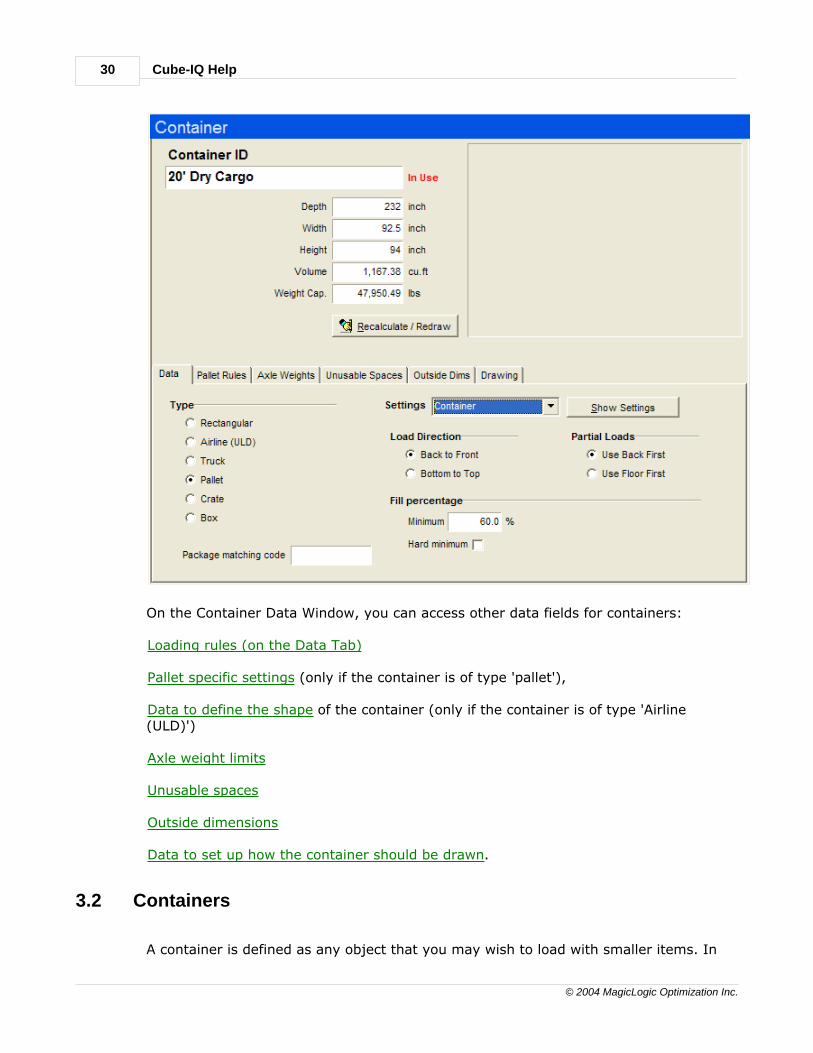
All containers must have this set of base data:· Id - an unique identifier or name for this container type, which will be used when you
define loading cases· Type - 'Rectangular', 'Airline (ULD)', 'Truck', 'Pallet' , 'Crate' or 'Box'· Depth (the distance from back to front, in the length unit of your choice, see
Tools/Options/General Tab)· Width (the distance from left to right)· Height (the distance from floor to ceiling)· Weight Capacity (in the weight unit of your choice)
The length measurements are for the inside dimensions. Cube-IQ will calculate thevolume automatically, using the units as set under Tools/Options/General Tab.
Cube-IQ Help30
© 2004 MagicLogic Optimization Inc.
On the Container Data Window, you can access other data fields for containers:
Loading rules (on the Data Tab)
Pallet specific settings (only if the container is of type 'pallet'),
Data to define the shape of the container (only if the container is of type 'Airline(ULD)')
Axle weight limits
Unusable spaces
Outside dimensions
Data to set up how the container should be drawn.
3.2 Containers
A container is defined as any object that you may wish to load with smaller items. In
Containers 31
© 2004 MagicLogic Optimization Inc.
Cube-IQ, this is either a rectangular container, or one with a (within limits) irregularlyshaped floor and/or ceiling.
Examples of rectangular containers are:
· ocean containers
· pallets
· crates
· trucks
· boxes.
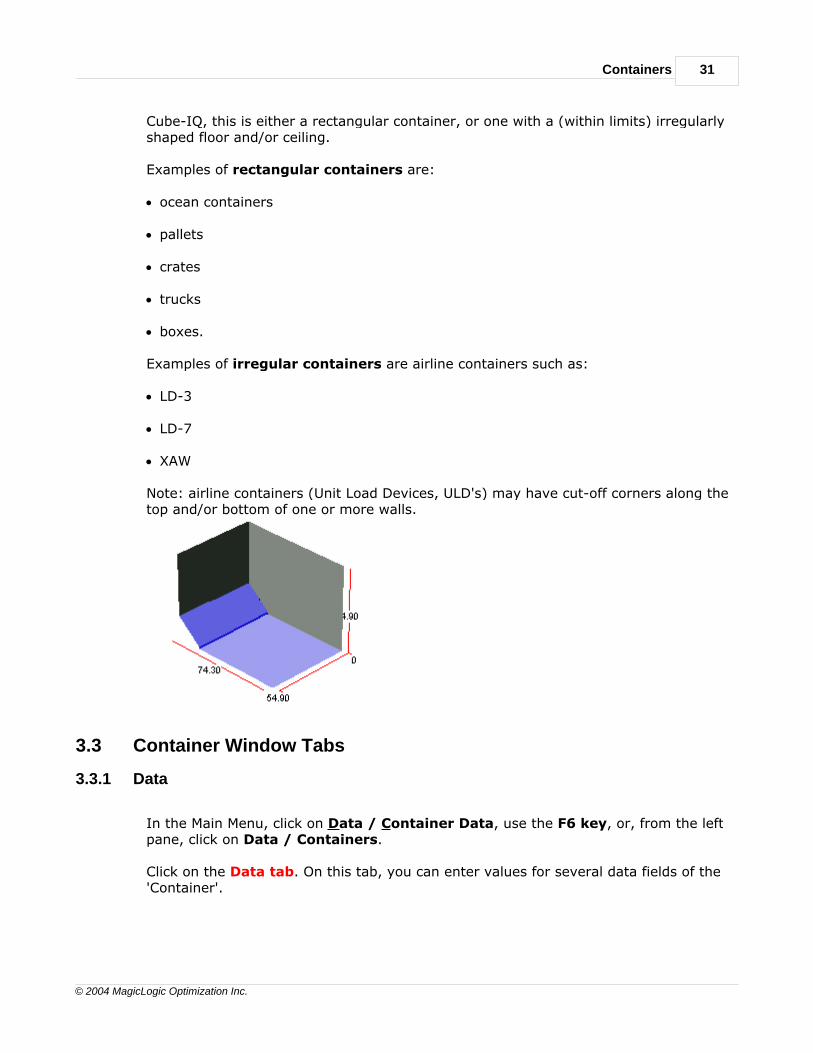
Examples of irregular containers are airline containers such as:
· LD-3
· LD-7
· XAW
Note: airline containers (Unit Load Devices, ULD's) may have cut-off corners along thetop and/or bottom of one or more walls.
3.3 Container Window Tabs
3.3.1 Data
In the Main Menu, click on Data / Container Data, use the F6 key, or, from the leftpane, click on Data / Containers.
Click on the Data tab. On this tab, you can enter values for several data fields of the'Container'.
Cube-IQ Help32
© 2004 MagicLogic Optimization Inc.
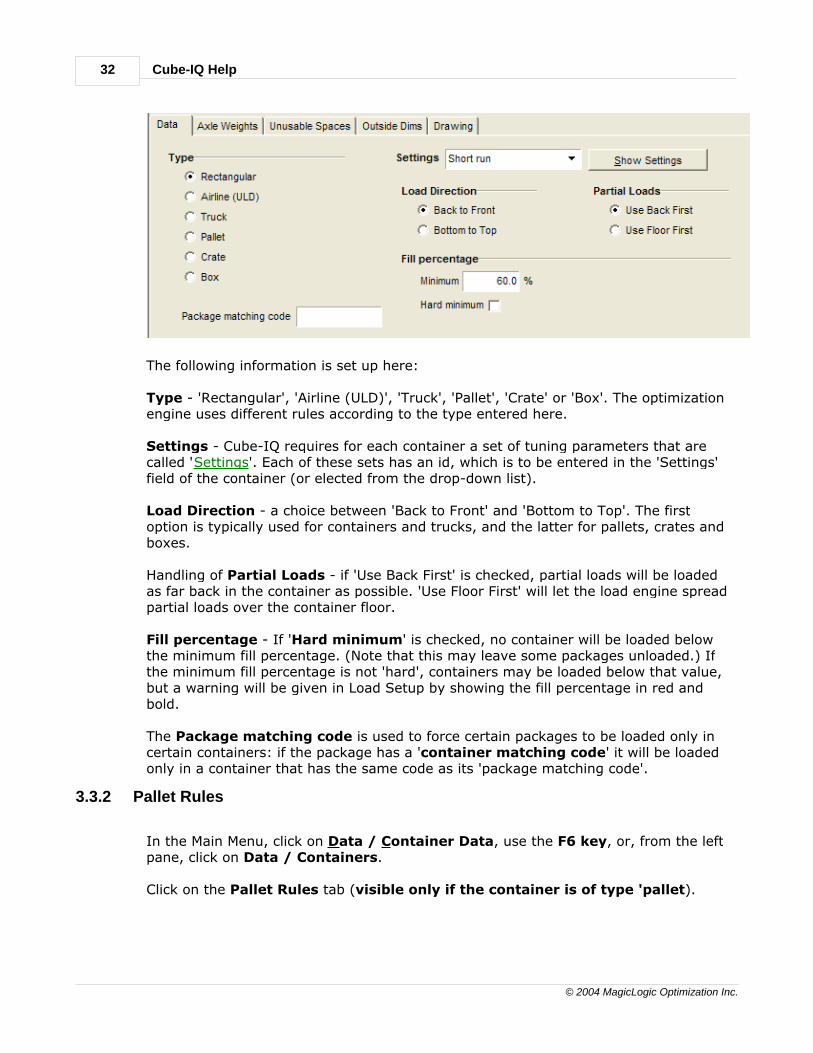
The following information is set up here:
Type - 'Rectangular', 'Airline (ULD)', 'Truck', 'Pallet', 'Crate' or 'Box'. The optimizationengine uses different rules according to the type entered here.
Settings - Cube-IQ requires for each container a set of tuning parameters that arecalled 'Settings'. Each of these sets has an id, which is to be entered in the 'Settings'field of the container (or elected from the drop-down list).
Load Direction - a choice between 'Back to Front' and 'Bottom to Top'. The firstoption is typically used for containers and trucks, and the latter for pallets, crates andboxes.
Handling of Partial Loads - if 'Use Back First' is checked, partial loads will be loadedas far back in the container as possible. 'Use Floor First' will let the load engine spreadpartial loads over the container floor.
Fill percentage - If 'Hard minimum' is checked, no container will be loaded belowthe minimum fill percentage. (Note that this may leave some packages unloaded.) Ifthe minimum fill percentage is not 'hard', containers may be loaded below that value,but a warning will be given in Load Setup by showing the fill percentage in red andbold.
The Package matching code is used to force certain packages to be loaded only incertain containers: if the package has a 'container matching code' it will be loadedonly in a container that has the same code as its 'package matching code'.
3.3.2 Pallet Rules
In the Main Menu, click on Data / Container Data, use the F6 key, or, from the leftpane, click on Data / Containers.
Click on the Pallet Rules tab (visible only if the container is of type 'pallet).
Containers 33
© 2004 MagicLogic Optimization Inc.
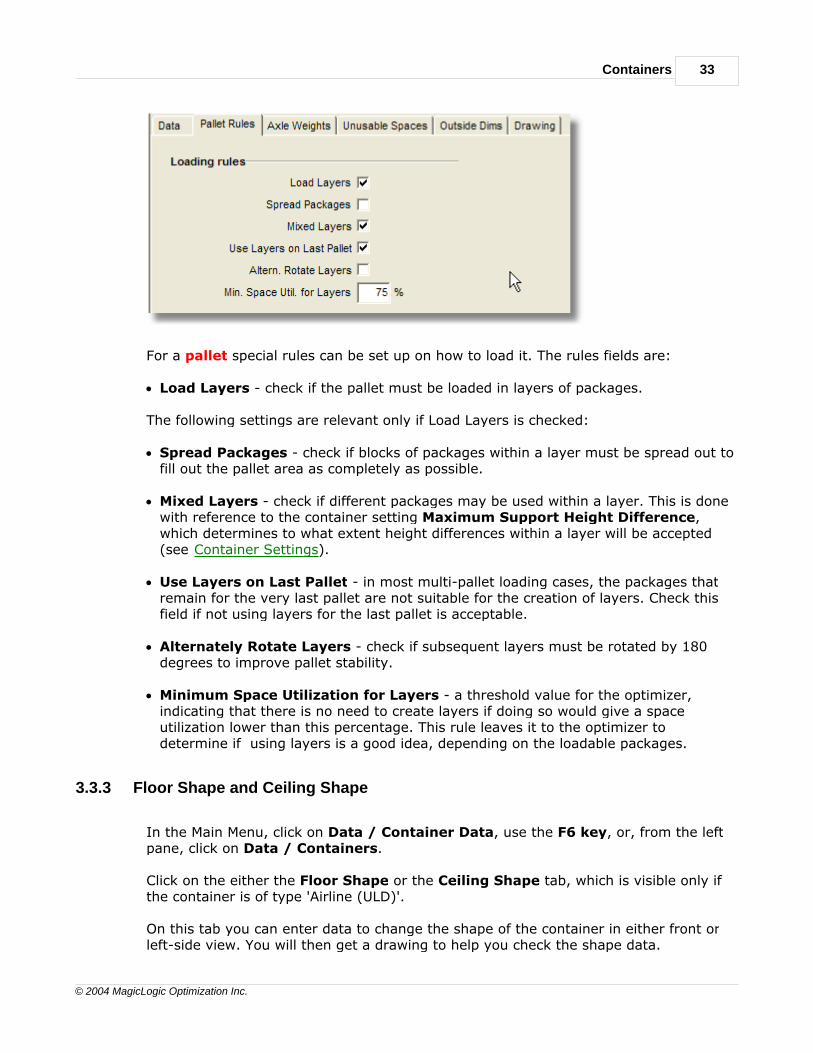
For a pallet special rules can be set up on how to load it. The rules fields are:
· Load Layers - check if the pallet must be loaded in layers of packages.
The following settings are relevant only if Load Layers is checked:
· Spread Packages - check if blocks of packages within a layer must be spread out tofill out the pallet area as completely as possible.
· Mixed Layers - check if different packages may be used within a layer. This is donewith reference to the container setting Maximum Support Height Difference,which determines to what extent height differences within a layer will be accepted(see Container Settings).
· Use Layers on Last Pallet - in most multi-pallet loading cases, the packages thatremain for the very last pallet are not suitable for the creation of layers. Check thisfield if not using layers for the last pallet is acceptable.
· Alternately Rotate Layers - check if subsequent layers must be rotated by 180degrees to improve pallet stability.
· Minimum Space Utilization for Layers - a threshold value for the optimizer,indicating that there is no need to create layers if doing so would give a spaceutilization lower than this percentage. This rule leaves it to the optimizer todetermine if using layers is a good idea, depending on the loadable packages.
3.3.3 Floor Shape and Ceiling Shape
In the Main Menu, click on Data / Container Data, use the F6 key, or, from the leftpane, click on Data / Containers.
Click on the either the Floor Shape or the Ceiling Shape tab, which is visible only ifthe container is of type 'Airline (ULD)'.
On this tab you can enter data to change the shape of the container in either front orleft-side view. You will then get a drawing to help you check the shape data.
Cube-IQ Help34
© 2004 MagicLogic Optimization Inc.
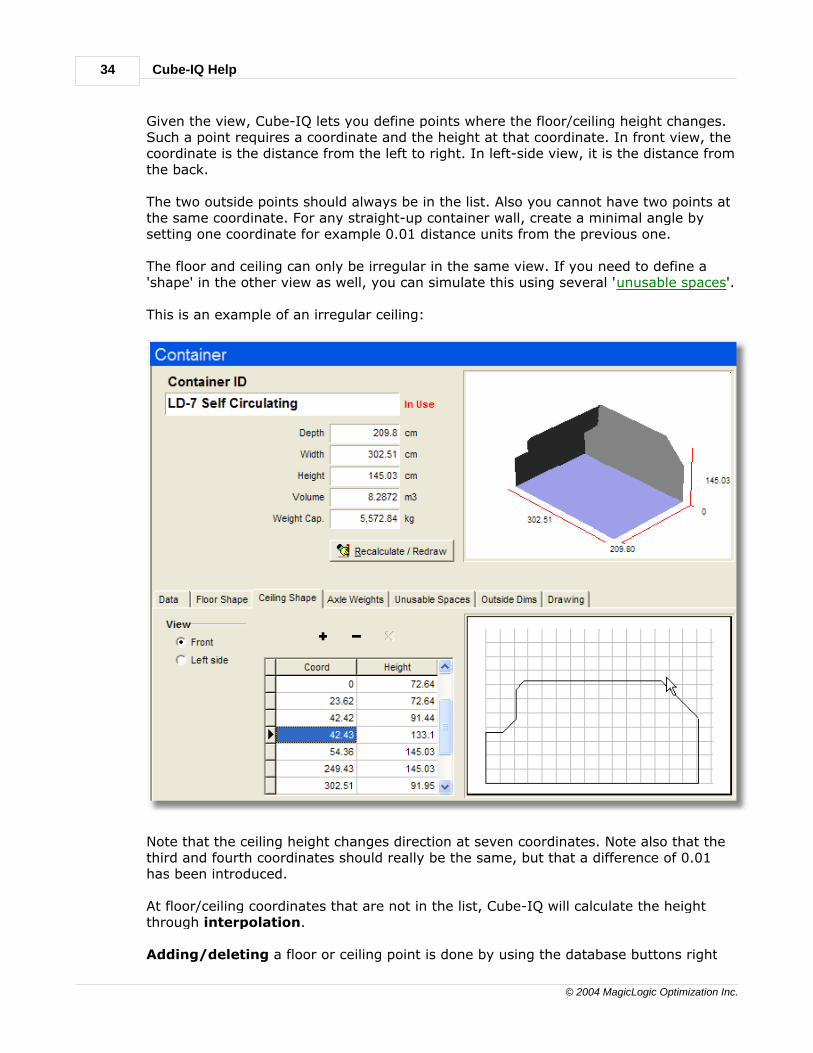
Given the view, Cube-IQ lets you define points where the floor/ceiling height changes.Such a point requires a coordinate and the height at that coordinate. In front view, thecoordinate is the distance from the left to right. In left-side view, it is the distance fromthe back.
The two outside points should always be in the list. Also you cannot have two points atthe same coordinate. For any straight-up container wall, create a minimal angle bysetting one coordinate for example 0.01 distance units from the previous one.
The floor and ceiling can only be irregular in the same view. If you need to define a'shape' in the other view as well, you can simulate this using several 'unusable spaces'.
This is an example of an irregular ceiling:
Note that the ceiling height changes direction at seven coordinates. Note also that thethird and fourth coordinates should really be the same, but that a difference of 0.01has been introduced.
At floor/ceiling coordinates that are not in the list, Cube-IQ will calculate the heightthrough interpolation.
Adding/deleting a floor or ceiling point is done by using the database buttons right
Containers 35
© 2004 MagicLogic Optimization Inc.
above the small grid. To delete you can also place the cursor in the left-most column ofthe row to be deleted, and hit Ctrl+Del (which must be followed by confirmation).
Some more explanation by example:
· A container with a sliced-off corner on one side requires minimally six height-points.
· A container with sliced-off corners on both sides requires at least eight height-points.
· Rounded corners can be described by introducing several pairs of height-points alongthe curve.
3.3.4 Axle Weights
In the Main Menu, click on Data / Container Data, use the F6 key, or, from the leftpane, click on Data / Containers.
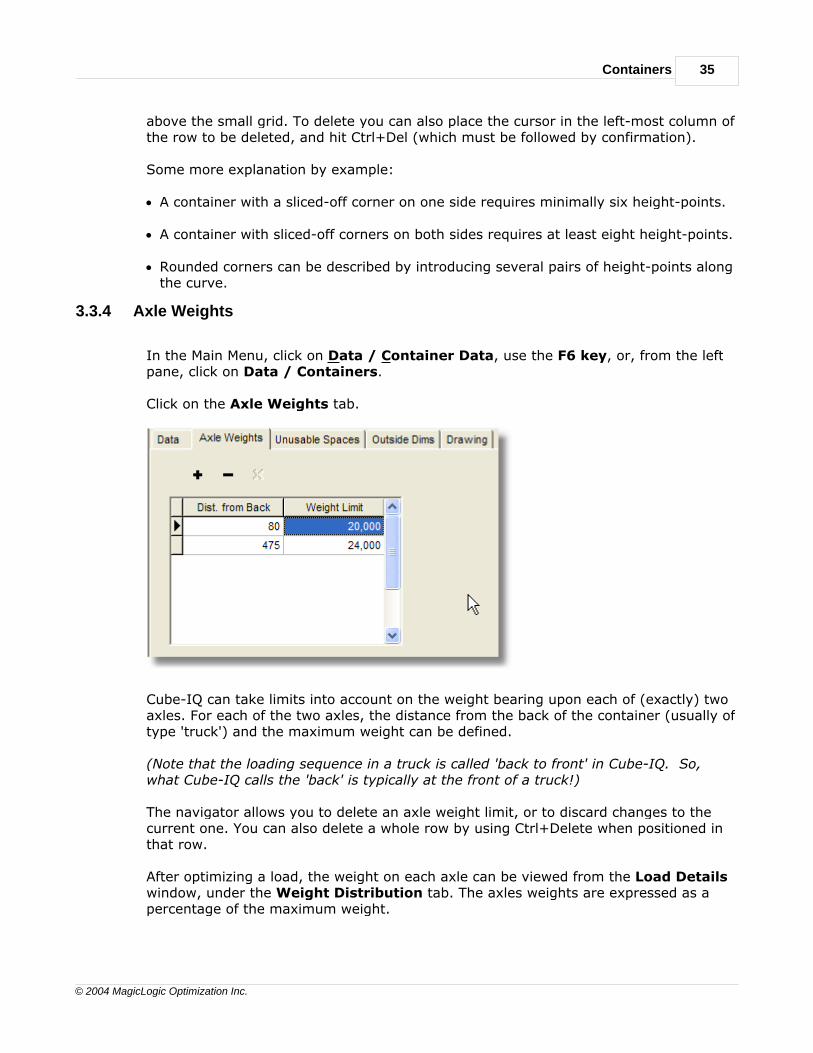
Click on the Axle Weights tab.
Cube-IQ can take limits into account on the weight bearing upon each of (exactly) twoaxles. For each of the two axles, the distance from the back of the container (usually oftype 'truck') and the maximum weight can be defined.
(Note that the loading sequence in a truck is called 'back to front' in Cube-IQ. So,what Cube-IQ calls the 'back' is typically at the front of a truck!)
The navigator allows you to delete an axle weight limit, or to discard changes to thecurrent one. You can also delete a whole row by using Ctrl+Delete when positioned inthat row.
After optimizing a load, the weight on each axle can be viewed from the Load Detailswindow, under the Weight Distribution tab. The axles weights are expressed as apercentage of the maximum weight.
Cube-IQ Help36
© 2004 MagicLogic Optimization Inc.
Instead of using axle weight limits, you can also set upa target area for the Centre of Gravity. This is done under Container Settings (F7)rather than under Container Data (F6).
3.3.5 Unusable Spaces
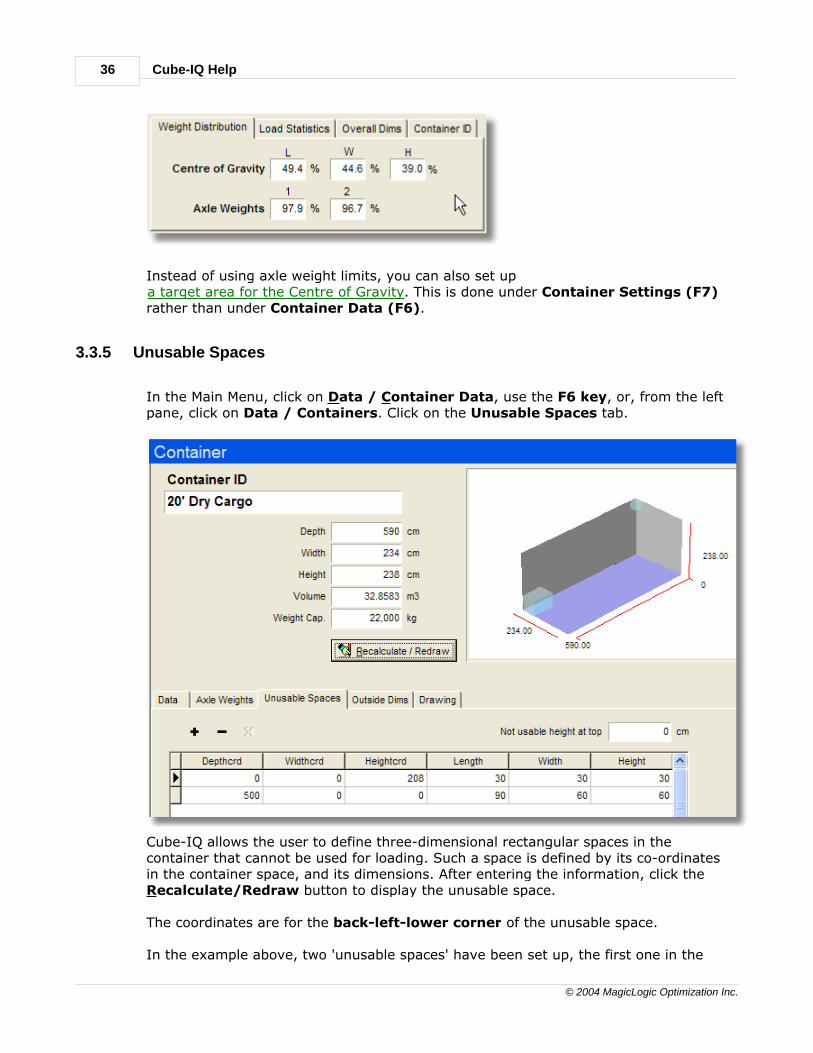
In the Main Menu, click on Data / Container Data, use the F6 key, or, from the leftpane, click on Data / Containers. Click on the Unusable Spaces tab.
Cube-IQ allows the user to define three-dimensional rectangular spaces in thecontainer that cannot be used for loading. Such a space is defined by its co-ordinatesin the container space, and its dimensions. After entering the information, click theRecalculate/Redraw button to display the unusable space.
The coordinates are for the back-left-lower corner of the unusable space.
In the example above, two 'unusable spaces' have been set up, the first one in the
Containers 37
© 2004 MagicLogic Optimization Inc.
back, left, top, and the second in the front, left, bottom of the container.
The navigator allows you to add or delete an unusable space, or to discard changes tothe current one. You can also delete a whole row by using Ctrl+Delete when positionedin that row.
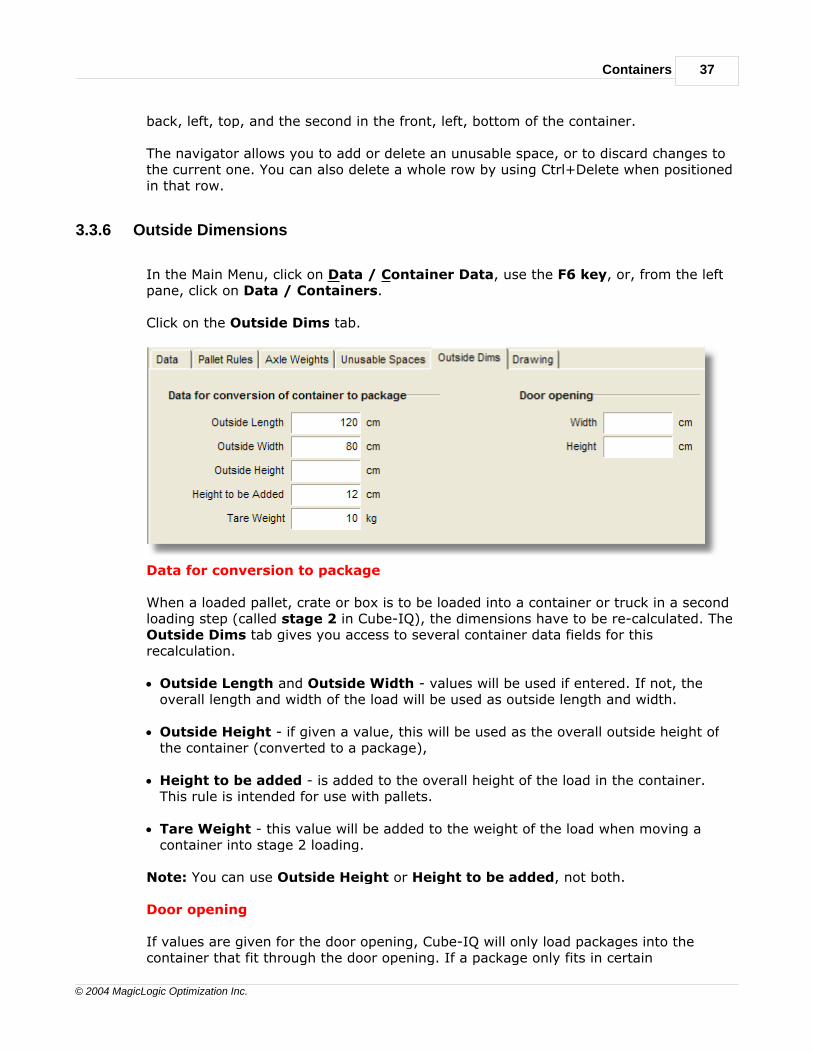
3.3.6 Outside Dimensions
In the Main Menu, click on Data / Container Data, use the F6 key, or, from the leftpane, click on Data / Containers.
Click on the Outside Dims tab.
Data for conversion to package
When a loaded pallet, crate or box is to be loaded into a container or truck in a secondloading step (called stage 2 in Cube-IQ), the dimensions have to be re-calculated. TheOutside Dims tab gives you access to several container data fields for thisrecalculation.
· Outside Length and Outside Width - values will be used if entered. If not, theoverall length and width of the load will be used as outside length and width.
· Outside Height - if given a value, this will be used as the overall outside height ofthe container (converted to a package),
· Height to be added - is added to the overall height of the load in the container.This rule is intended for use with pallets.
· Tare Weight - this value will be added to the weight of the load when moving acontainer into stage 2 loading.
Note: You can use Outside Height or Height to be added, not both.
Door opening
If values are given for the door opening, Cube-IQ will only load packages into thecontainer that fit through the door opening. If a package only fits in certain
Cube-IQ Help38
© 2004 MagicLogic Optimization Inc.
orientations, only those orientations will be considered when loading.
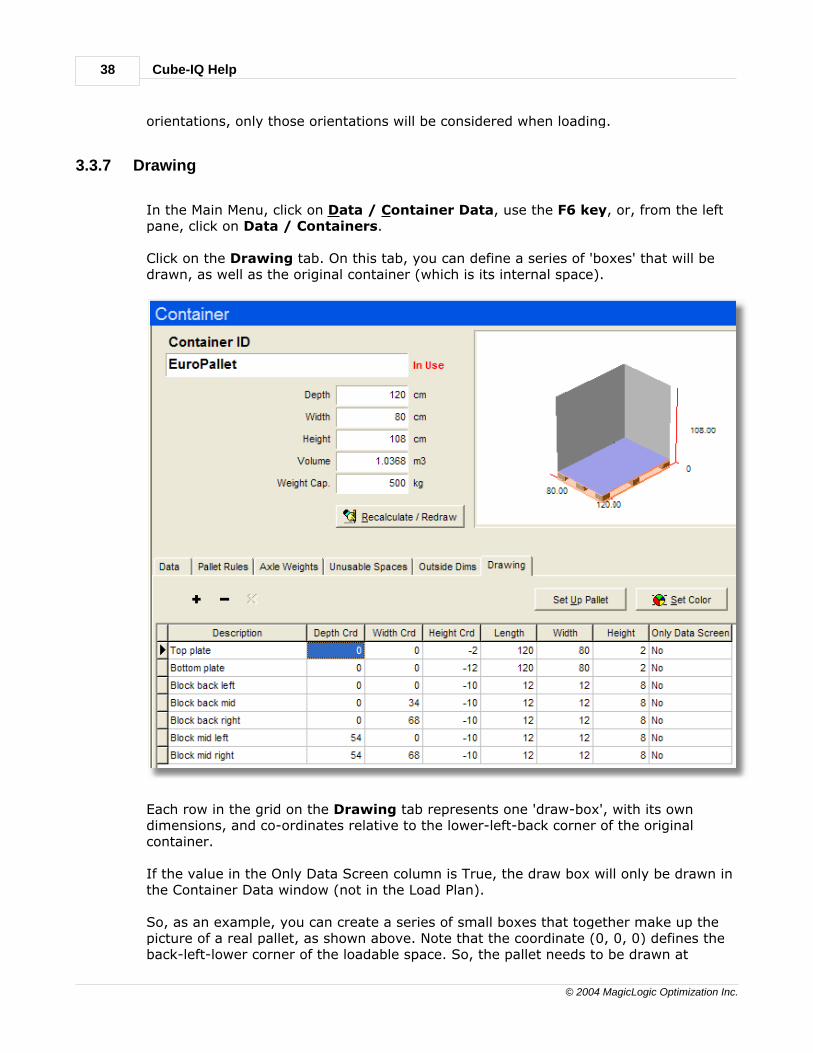
3.3.7 Drawing
In the Main Menu, click on Data / Container Data, use the F6 key, or, from the leftpane, click on Data / Containers.
Click on the Drawing tab. On this tab, you can define a series of 'boxes' that will bedrawn, as well as the original container (which is its internal space).
Each row in the grid on the Drawing tab represents one 'draw-box', with its owndimensions, and co-ordinates relative to the lower-left-back corner of the originalcontainer.
If the value in the Only Data Screen column is True, the draw box will only be drawn inthe Container Data window (not in the Load Plan).
So, as an example, you can create a series of small boxes that together make up thepicture of a real pallet, as shown above. Note that the coordinate (0, 0, 0) defines theback-left-lower corner of the loadable space. So, the pallet needs to be drawn at

Containers 39
© 2004 MagicLogic Optimization Inc.
negative height coordinates in order for it to be drawn below the loadable space.
If the container is of type 'Pallet', a button is available to set up draw-boxes for apallet automatically.
Any draw-box with a height co-ordinate greater than zero will be drawn transparently,as it is assumed to be a cover. The original loading space will be drawn in any case.
3.4 Settings
3.4.1 Introduction
In the Main Menu, choose Data / Settings (or press F7).
Here you will find a number of settings that influence the way the optimization engineof Cube-IQ finds a loading. A key requirement for a good loading solution is that eachtype of loading case is tuned uniquely. You can define named groups of settings (asSettings Id). These unique settings can then be assigned to container types in theContainer window. This is a key feature of Cube-IQ.
The picture above shows settings that go by the Id of 'Container', as the user intends
Cube-IQ Help40
© 2004 MagicLogic Optimization Inc.
to use them when loading containers. You can create as many sets of settings as youlike and give them any appropriate name.
IMPORTANT: if a setting has an absolute value (rather than a factor or a percentagevalue), it must be set in the same unit as the dimensions of the containers and thepackages. Not using the right units may lead to very strange loading results.
There are several types of settings here, grouped under tabs. The PgUp and PgDn keyslet you move between tabs.
The following groups of settings exist:
Optimizer Settings
Operational Settings
Loading Settings
Centre of Gravity Settings
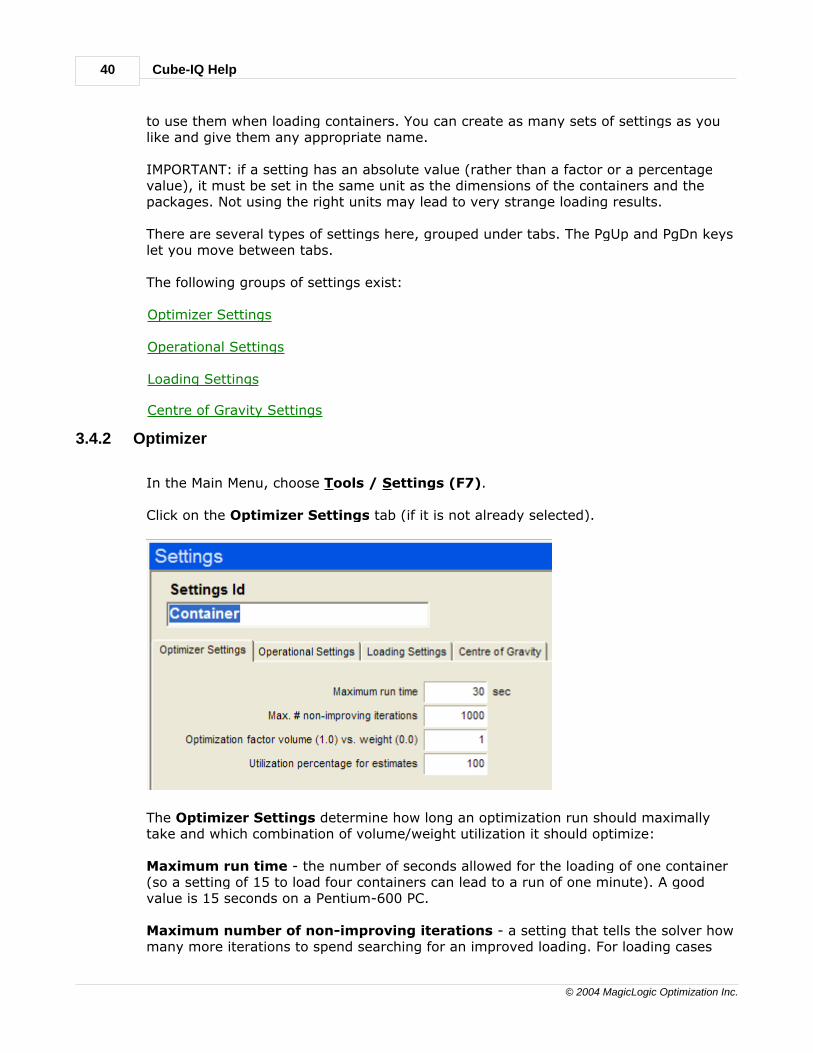
3.4.2 Optimizer
In the Main Menu, choose Tools / Settings (F7).
Click on the Optimizer Settings tab (if it is not already selected).
The Optimizer Settings determine how long an optimization run should maximallytake and which combination of volume/weight utilization it should optimize:
Maximum run time - the number of seconds allowed for the loading of one container(so a setting of 15 to load four containers can lead to a run of one minute). A goodvalue is 15 seconds on a Pentium-600 PC.
Maximum number of non-improving iterations - a setting that tells the solver howmany more iterations to spend searching for an improved loading. For loading cases
Containers 41
© 2004 MagicLogic Optimization Inc.
with a low number of packages, a value of 500 iterations is recommended, for slowoptimization runs, 50 iterations is a good value.
Optimization factor volume versus weight - if two loadings are compared, theoptimizer selects the one with the best combination of volume utilization (percentageof volume used) and weight utilization (percentage of weight capacity used). Thissetting determines how the combination of volume and weight utilization is calculated.A value of 1.0 means volume maximization only, and a value of 0.0 would meanvolume not taken into account, that is only weight optimization. However, to avoid thatvolume plays no role at all, we allow only 0.1 as a minimum value (at which valuevolume is taken into account for 10%, weight for 90%).
If weight plays in important role, optimizing over volume only may lead to somecontainers being fully loaded (maximum volume) using only light packages. Forsubsequent containers, too much weight may then be left, leading to more containersbeing used. In a case like this, a setting of for example 0.4 works fine.
Utilization percentage for estimates - on the Load Setup window, Cube-IQ canshow how many containers of the currently selected type would minimally be required.(Use the right-click pop-up menu of the Container Type grid.) The calculation uses thissetting as estimate for utilization.
3.4.3 Operational
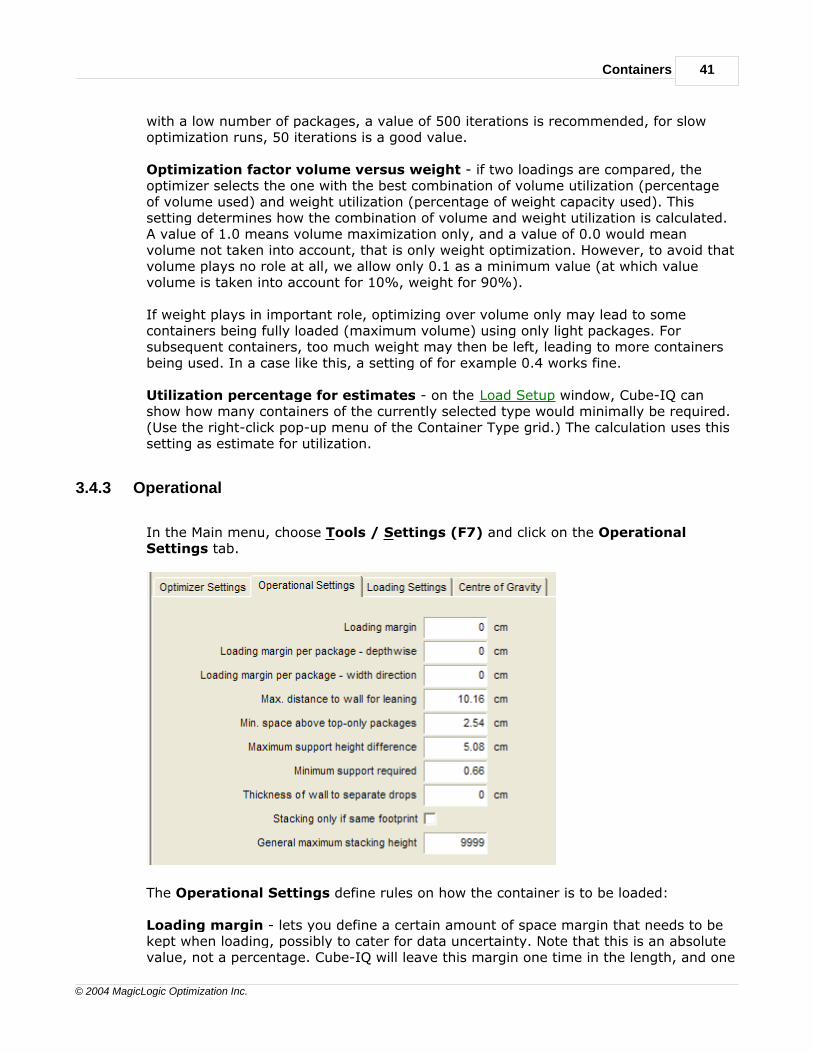
In the Main menu, choose Tools / Settings (F7) and click on the OperationalSettings tab.
The Operational Settings define rules on how the container is to be loaded:
Loading margin - lets you define a certain amount of space margin that needs to bekept when loading, possibly to cater for data uncertainty. Note that this is an absolutevalue, not a percentage. Cube-IQ will leave this margin one time in the length, and one
Cube-IQ Help42
© 2004 MagicLogic Optimization Inc.
time in the width direction, and then move the load towards the center. So, a marginof 10 will give you a space of at least 5 all the way around.
Loading margin per package - depthwise - lets you define a certain amount ofspace margin that needs to be kept between each pair of loaded packages, in theloading direction from back to front (depth-wise). Note that this is an absolute value.
Loading margin per package - width direction - lets you define a certain amountof space margin that needs to be kept between each pair of loaded packages, in theloading direction from left to right (widthwise). Again this is an absolute value.
Maximum distance to wall for leaning - Cube-IQ may use the fact that packagescan lean against a wall of the container, with this value setting the maximum distancethat a package can be from the wall to allow leaning (absolute value, illustrated in theSettings window). If a package leans against a wall, it requires support only on theother side.
Minimum space above Top Only Packages - Top-only packages may be bridged byother packages, with this value indicating the minimum distance that these bridgingpackages have to keep from the top-only package (absolute value, illustrated in theSettings window).
Maximum support height difference - Cube-IQ assumes that a package may besupported by one that is slightly lower with its top than the package is with its bottomlevel (absolute value, illustrated in the Settings window)
Minimum support required - to avoid 'floating' packages support is not only requiredon one side of the package but also at some relative distance away from that side. Thisis set with this value (as illustrated in the Settings window)
Thickness of wall to separate drops - If a value is present in this field, the systemwill not mix packages with different sequence numbers (that is, for different drops),but keep them separated by an invisible wall that has this value as its width). If mixingpackages with different sequence numbers is ok, you can leave this field blank, or usea value 0.
Stacking only if same footprint - If checked, any two boxes can be stacked only ifthey have the footprint (length and width).
General maximum stacking height - Cube-IQ will never stack more boxes than thissetting. You can leave this setting blank in order not to use it.
3.4.4 Loading
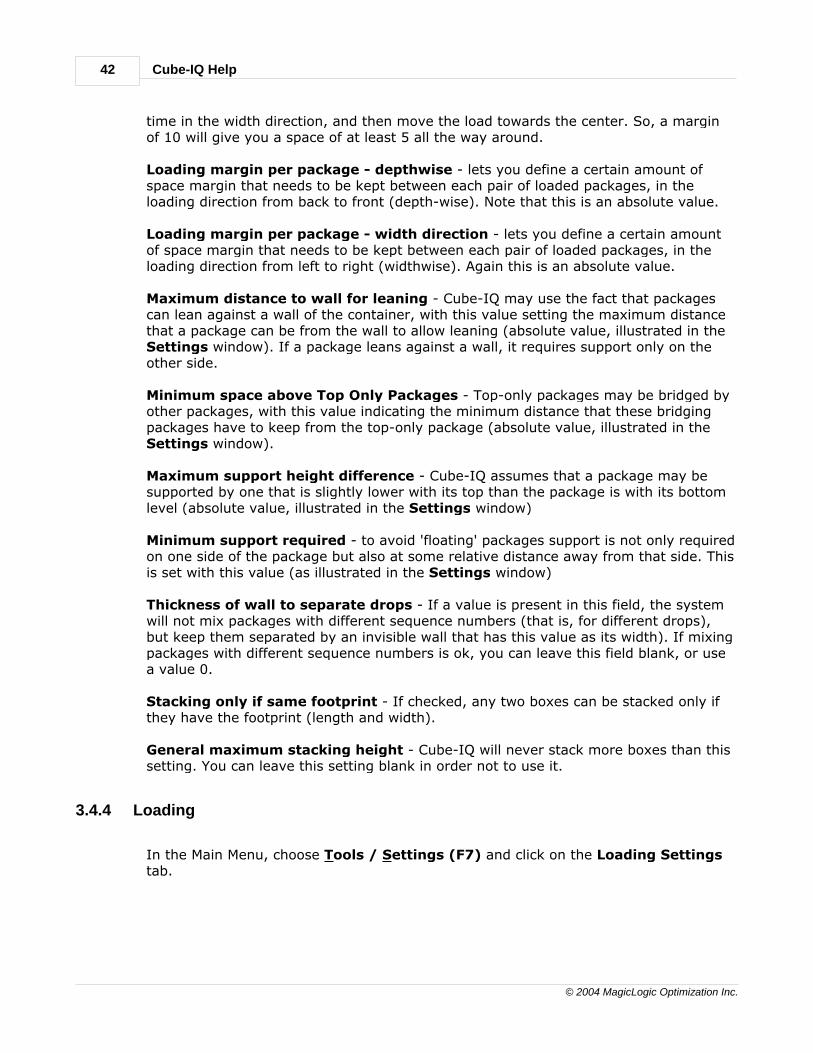
In the Main Menu, choose Tools / Settings (F7) and click on the Loading Settingstab.
Containers 43
© 2004 MagicLogic Optimization Inc.
Loading Settings concern rules on what is to be loaded and in which sequence orgrouping:
Target number of SKUs container - the optimization engine of Cube-IQ will load nomore different SKUs (package types) than this number in a single container, as long asthe volume utilization reaches at least the value of the next setting (see below). If thisutilization cannot be reached, the system will try to load one more SKU. This willcontinue until the target number is the original number plus three. From then on thesystem will simply optimize overall volume/weight without regard to how manydifferent packages are used.
Minimum utilization to check number of SKUs - minimum volume utilizationrequired to take the previous setting into account.
Target minimum number of packages per block - This is still a somewhatexperimental tuning setting. Value of 1 will give standard loading results. In cases withmany packages, values like 4, 6 or even 12 will give a more regular loading. Thisavoids the operationally undesirable loading of very small blocks of packages into smallspaces to obtain a higher space utilization. Each loaded block of packages will containat least this number of packages (if still available).
Note: Users should experiment with several values to find out what works best in theirparticular situation.
Packages with different sequence numbers can be mixed - if checked, theoptimization can combine packages with different sequence numbers in one container.This setting is typically used in palletization or cartonization, where each sequencenumber represents a customer or a drop, and packages for different customers cannotbe mixed on one pallet or on one box.
Minimum number of packages per container - this setting is useful for two-stageloading, for example boxes on pallets, and next pallets into a truck. If the value is(say) 2, there is no point in putting just these two packages on a pallet, as they mayas well be loaded separately into the truck (see the next setting).Copy unloadedpackages from Stage 1 to Stage 2 - a setting for two stage loading, say, boxes onpallets and pallets onto a truck. If checked, not just the loaded pallets are madeavailable for loading in Stage 2, but also all boxes that were not loaded in Stage 1.
Cube-IQ Help44
© 2004 MagicLogic Optimization Inc.
Copy unloaded packages from Stage 1 to Stage 2 - a setting for two stageloading, say, boxes on pallets and pallets onto a truck. If checked, not just the loadedpallets are made available for loading in Stage 2, but also all boxes that were notloaded in Stage 1.
Load each SKU together - if checked, each SKU will be loaded consecutively, that is,after loading the first one, all will be loaded (in the same container, if they fit).
3.4.5 Centre of Gravity
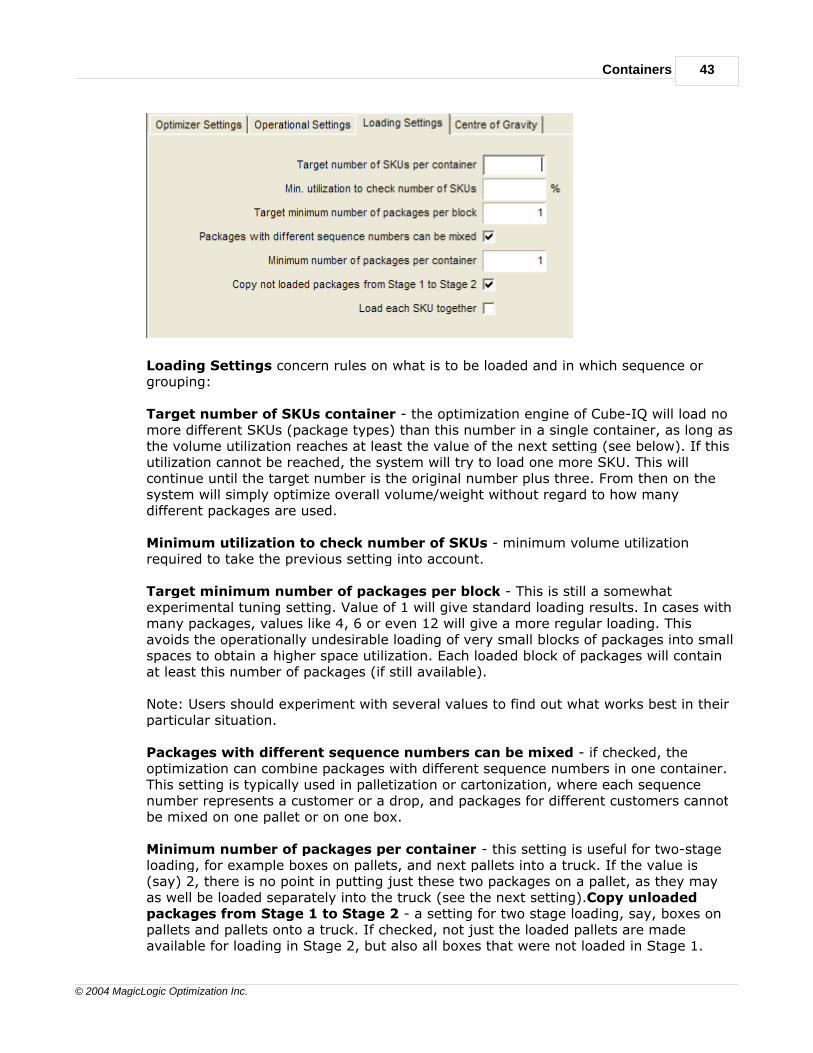
From the Program window, choose Tools / Settings (F7) and click on the Centre ofGravity tab.
The Centre of Gravity tab provides settings on how to position the centre of gravity(automatically). Under this tab, you can set limits for back, front, left and right. Theseare percentages of the full dimensions. For example, if you want the center of gravityin the length direction to be within 45% and 55% of the container length, enter a 45for the 'back' limit and a 55 for the 'front' limit.
The positioning of the center of gravity will only take place for directions (length orwidth) where two values have been entered.
3.5 Print Containers
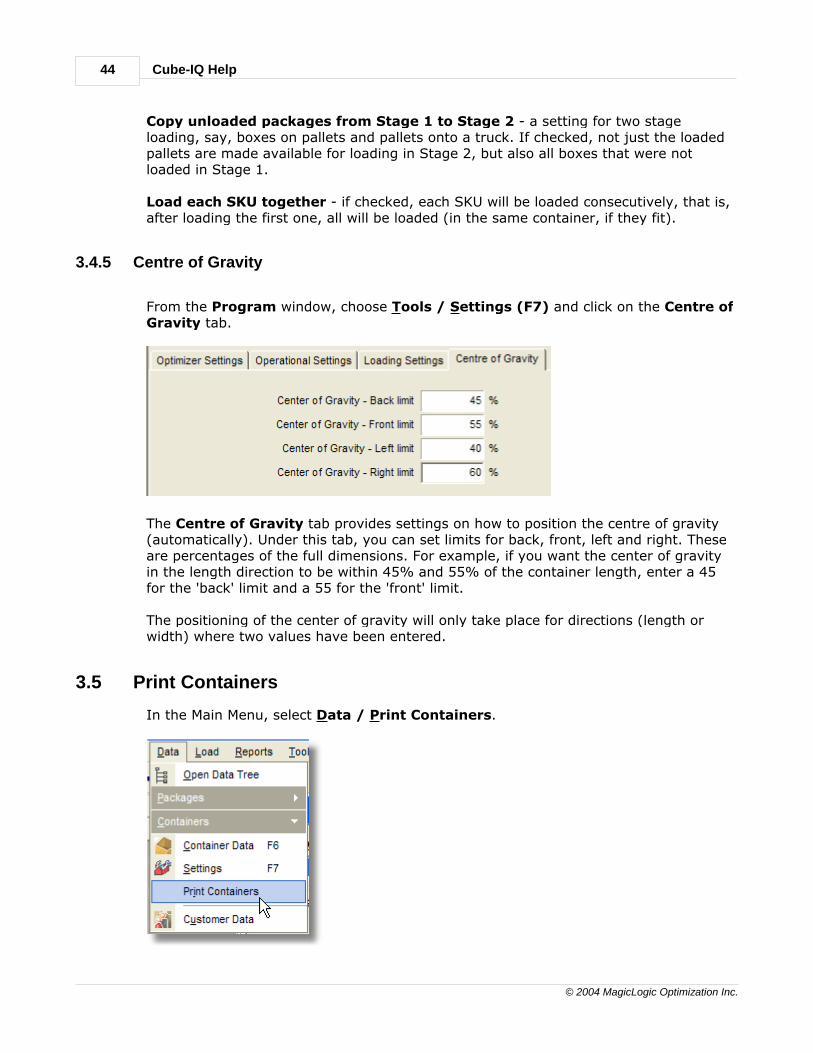
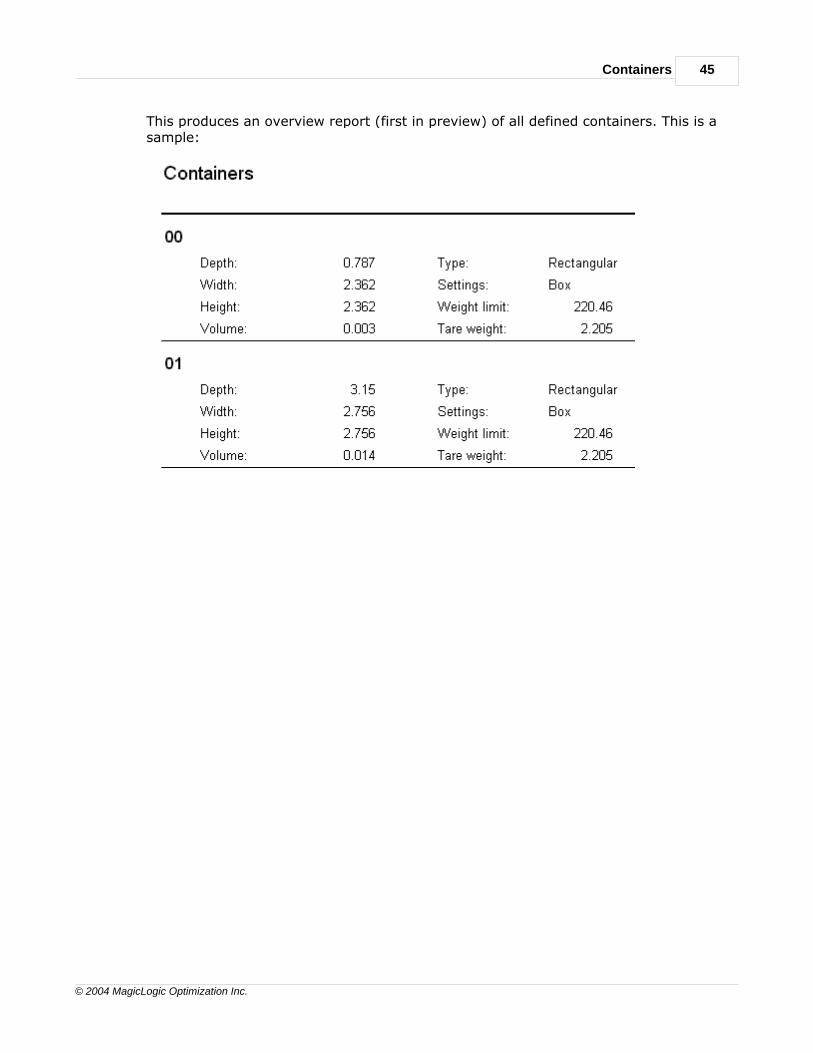
In the Main Menu, select Data / Print Containers.
Containers 45
© 2004 MagicLogic Optimization Inc.
This produces an overview report (first in preview) of all defined containers. This is asample:

Cube-IQ 3.0User Guide
Part
IV
Customers 47
© 2004 MagicLogic Optimization Inc.
4 Customers
4.1 Customer Data
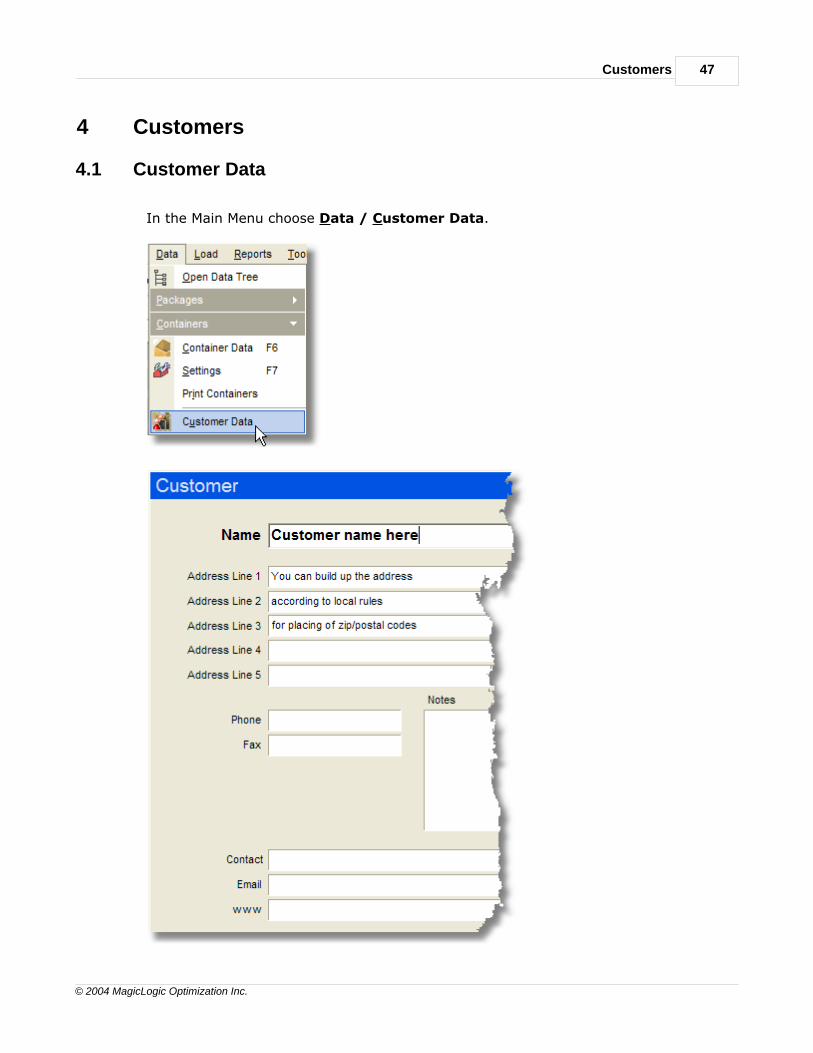
In the Main Menu choose Data / Customer Data.

Cube-IQ Help48
© 2004 MagicLogic Optimization Inc.
The user can set up a record for each customer. This data can then be used as part ofthe Loading Manifests.
Cube-IQ 3.0User Guide
Part
V
Cube-IQ Help50
© 2004 MagicLogic Optimization Inc.
5 Packages
5.1 Introduction
A package is defined as any object that can be loaded into one of Cube-IQ's containers.The object must be rectangular, cylindrical or 'sofa'-shaped (a 3-dimensional L-shape).Examples of rectangular objects are boxes, cartons, or even whole pallets. Cylindricalobjects are for example drums, rolls or tubes.
Cylindrical packages are in Cube-IQ loaded as if they are box-shaped, unless the loadcontains only cylinders, and they can all only be loaded straight-up.
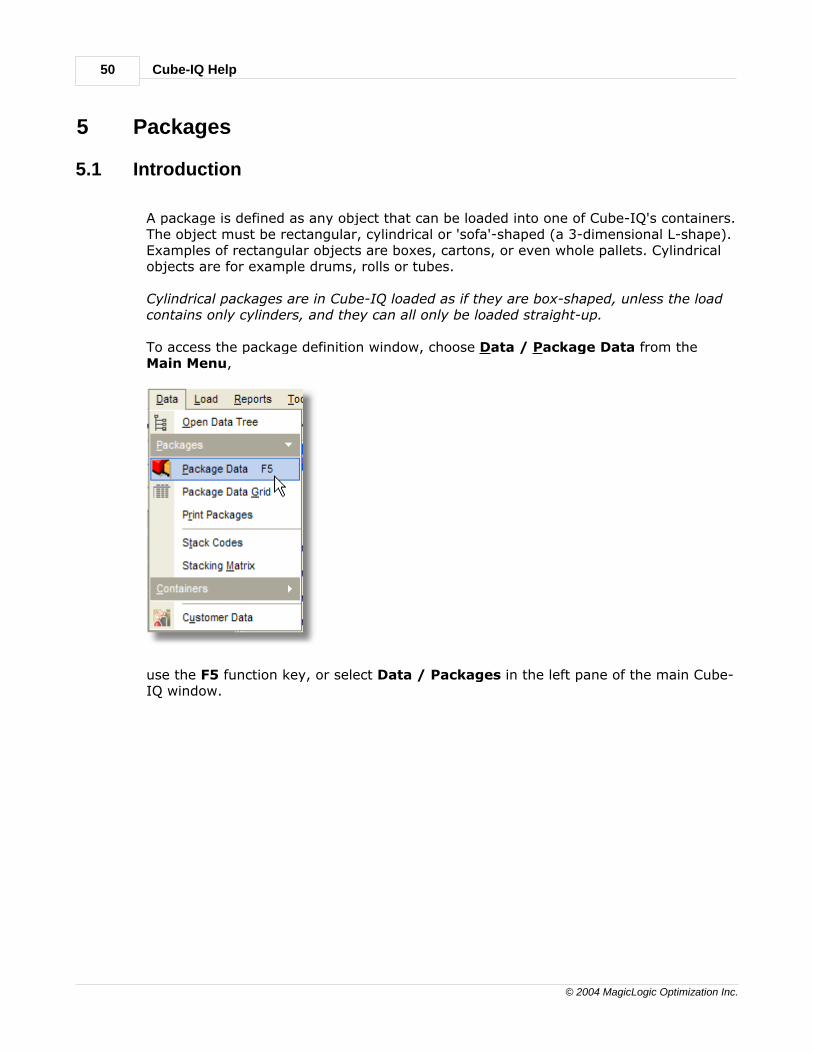
To access the package definition window, choose Data / Package Data from theMain Menu,
use the F5 function key, or select Data / Packages in the left pane of the main Cube-IQ window.
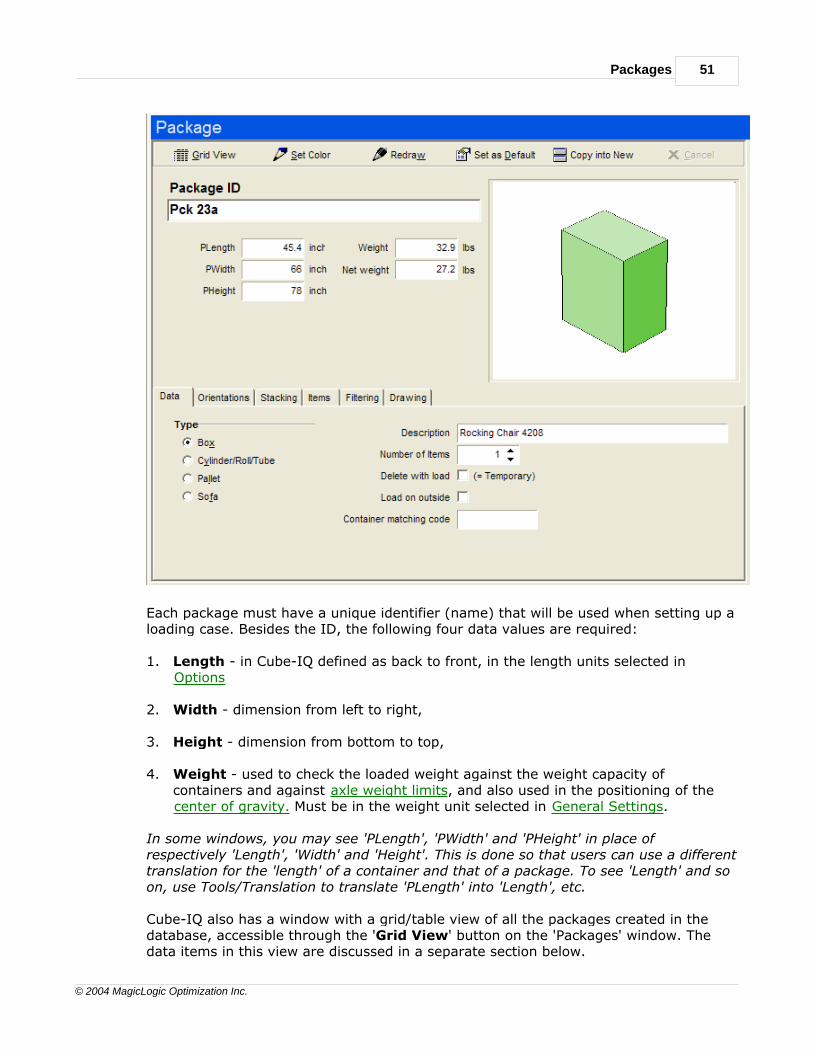
Packages 51
© 2004 MagicLogic Optimization Inc.
Each package must have a unique identifier (name) that will be used when setting up aloading case. Besides the ID, the following four data values are required:
1. Length - in Cube-IQ defined as back to front, in the length units selected inOptions
2. Width - dimension from left to right,
3. Height - dimension from bottom to top,
4. Weight - used to check the loaded weight against the weight capacity ofcontainers and against axle weight limits, and also used in the positioning of thecenter of gravity. Must be in the weight unit selected in General Settings.
In some windows, you may see 'PLength', 'PWidth' and 'PHeight' in place ofrespectively 'Length', 'Width' and 'Height'. This is done so that users can use a differenttranslation for the 'length' of a container and that of a package. To see 'Length' and soon, use Tools/Translation to translate 'PLength' into 'Length', etc.
Cube-IQ also has a window with a grid/table view of all the packages created in thedatabase, accessible through the 'Grid View' button on the 'Packages' window. Thedata items in this view are discussed in a separate section below.
Cube-IQ Help52
© 2004 MagicLogic Optimization Inc.
On the Package Data Window you can also select the following buttons:
· Grid View - takes you to a grid window that show many packages at the same time.The only drawback here is that many details cannot be shown.
· Set Color - allows you to change the colour of the package (Cube-IQ gives thepackage a random color when it is created.) The color of the package is used in thegraphics window and the Load Plan. This can be very useful to identify the differentpackages in a load.
· Redraw - to redraw the picture after changing its data.
· Set as Default - clicking this button will let Cube-IQ use the values of the currentpackage as initial data values for any new package.
· Copy into New - creates a new package with the same data as the current package,except for the ID.
· Cancel - only enabled when creating a new package from the Load Setup window, tocancel this operation.
Once your package has been defined, the single package view shows a small graphicalrepresentation on the right of the window. The view is from the right-front of thepackage, that is, 'length' is shown in the left-forward direction, and 'width' right-forward. The view angle depends on the orientation that is selected on the'Orientations' tab.
You can find an existing package by clicking on the Find button in the main menu. Thisopens an edit box into which you simply start typing.
Right click anywhere in the package window to see a pop-up selection list of allcurrently defined packages. You can also use the Select button or the F8 key to accessthis selection list.
All other data fields are logically combined into groups, each represented by a tab onthe package data screen. We will discuss each of these data tabs below in detail. Youcan use PgUp and PgDn to browse the tabs.
Tabs:
· Data
· Orientations
· Stacking
· Items
· Filtering
· Drawing
Packages 53
© 2004 MagicLogic Optimization Inc.
5.2 Package Data
5.2.1 Basic data
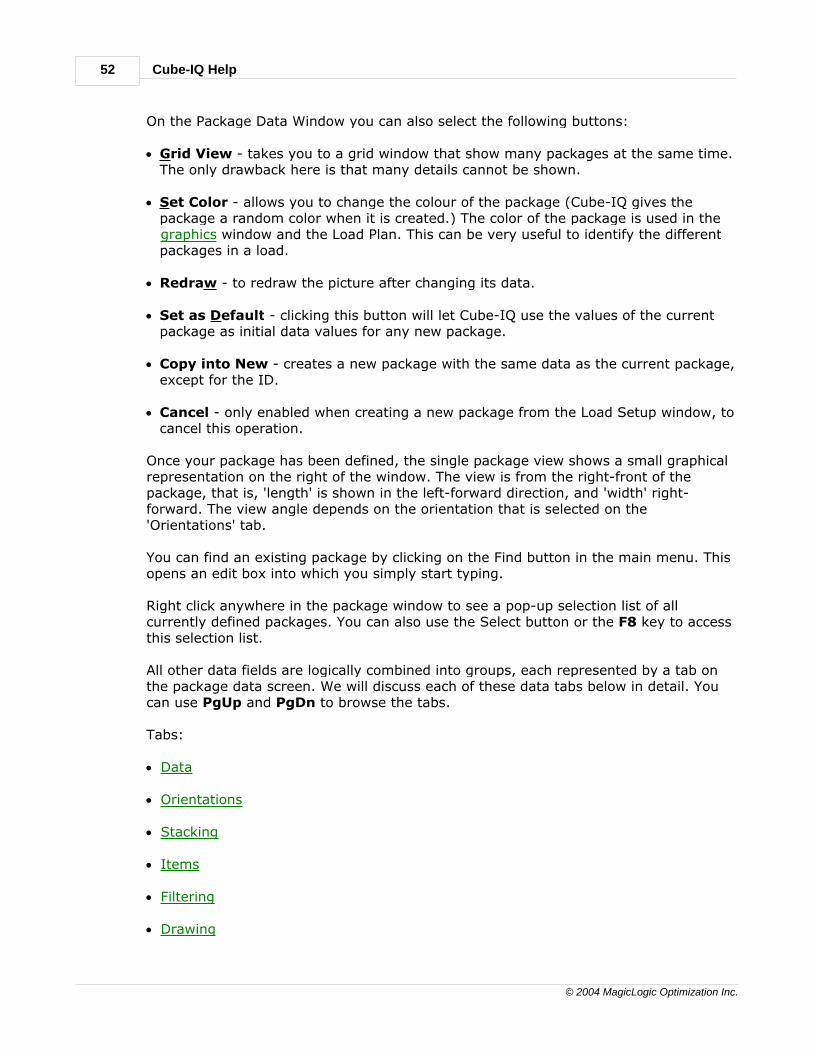
In the Main Menu, choose Data/ Package Data, use the F5 function key or in the leftpane, click Data / Packages. Click on the Data tab.
On the Data tab the following package data fields can be accessed:
Type - either 'Box', 'Cylinder/Roll/Tube', 'Pallet' or 'Sofa' (a 3-dimensional L-shape).
Description - this text is used only for user definable information. It is shown invarious windows and reports.
Number of Items - shown on the loading manifest.
Delete with load - if checked, the package will be deleted with the last load in whichit was used. This allows you to define temporary packages specifically for a given load,without leaving the package data in the system once the loading case gets deleted.
Load on outside - used for hazardous materials that on pallets may have to be loadedin such a way that they are at all times visible from the outside.
Container matching code - if this code has a (text) value, the package will be loadedonly in a container that has the same code as its 'Package matching code' (as set inContainer Data). This allows the user to indicate that certain packages can be loadedonly in certain containers.
5.2.2 Orientations
In the Main Menu, choose Data/ Package Data, use the F5 function key, or in theleft pane, click Data / Packages. Click on the Orientations tab.
Cube-IQ Help54
© 2004 MagicLogic Optimization Inc.
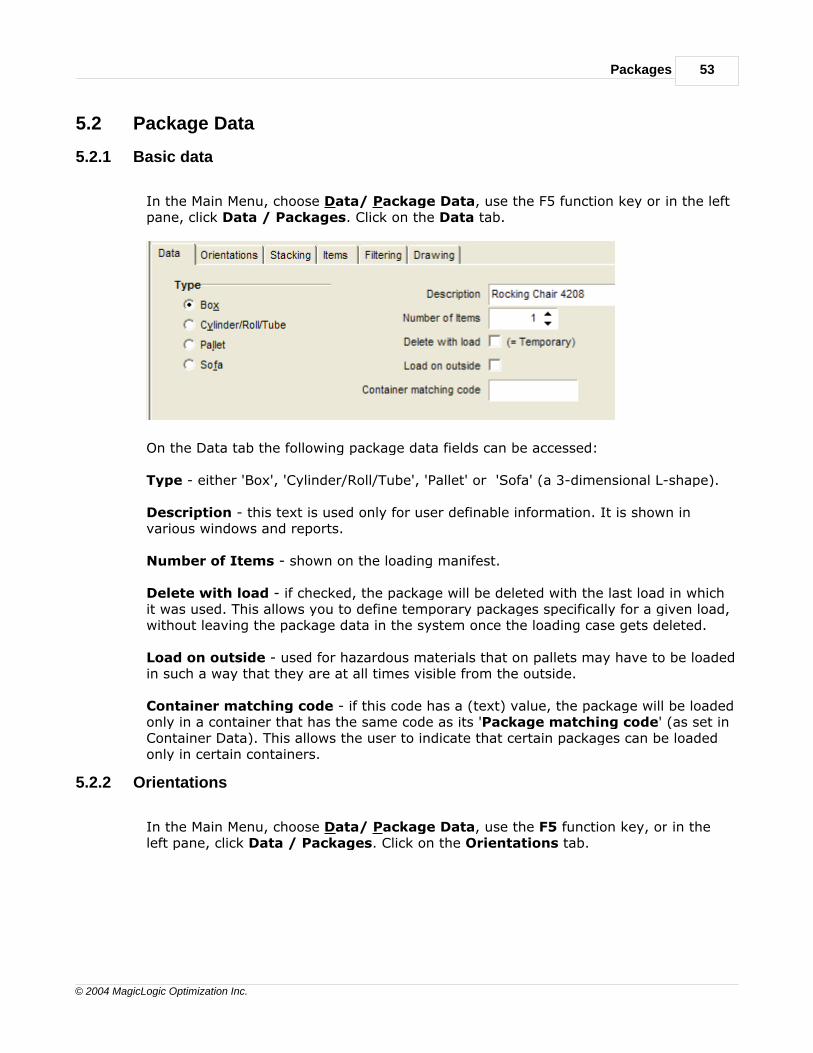
The orientations tab shows the six different ways in which a given package can beloaded. This can be seen by clicking on any of the six rows, and watching the packagepicture. You cannot delete or add orientations, only edit some of their data fields.
Cube-IQ allows the user to define various complex loading rules, by making standardrules available for each orientation of the package separately.
The following rules can be set 'per orientation':
Allowed - 'Yes/No' indicator whether the package can be loaded in this orientation.
Bottom Only - indicates that in this orientation, the package must be loaded on thefloor of the container, possibly in a stack (see Maximum in Stack).
Top Only - indicates that no other packages may be loaded on top of this package inthis orientation, unless they are packages of the same type, and the number in thestack is no greater than the Max. Stack value.
Max. Stack (= Maximum number in a stack) - if a package in a given orientation isbottom-only or top-only, the maximum number of this type of packages that can bestacked.
Supp.Weight (= Supported Weight) - the maximum weight that the package cansupport. If this feature is not to be checked, leave the value blank (not zero!).
Stack Index - if not blank, the package will support only packages that have the samestack index or a lower one (think 'lighter'). This feature will allow you to direct morefragile packages to be loaded higher up in the container. So, packages with a lowerstack index will be loaded higher in the container.
Some examples of loading rules that can be set up using this orientation-basedmechanism are:
Only flat if on top - indicates that the package must be loaded on its side or end if itsupports other packages. If flat (lowest dimension as height) it is to be treated in thesame way as Top Only.
Straight up if not on top - indicates that the package may only be loaded on its sideor end if it also loaded on top. If on its side or end, it is treated as Top Only. Thisloading rule is for packages that can only support other packages if their highest
Packages 55
© 2004 MagicLogic Optimization Inc.
dimension is upright.
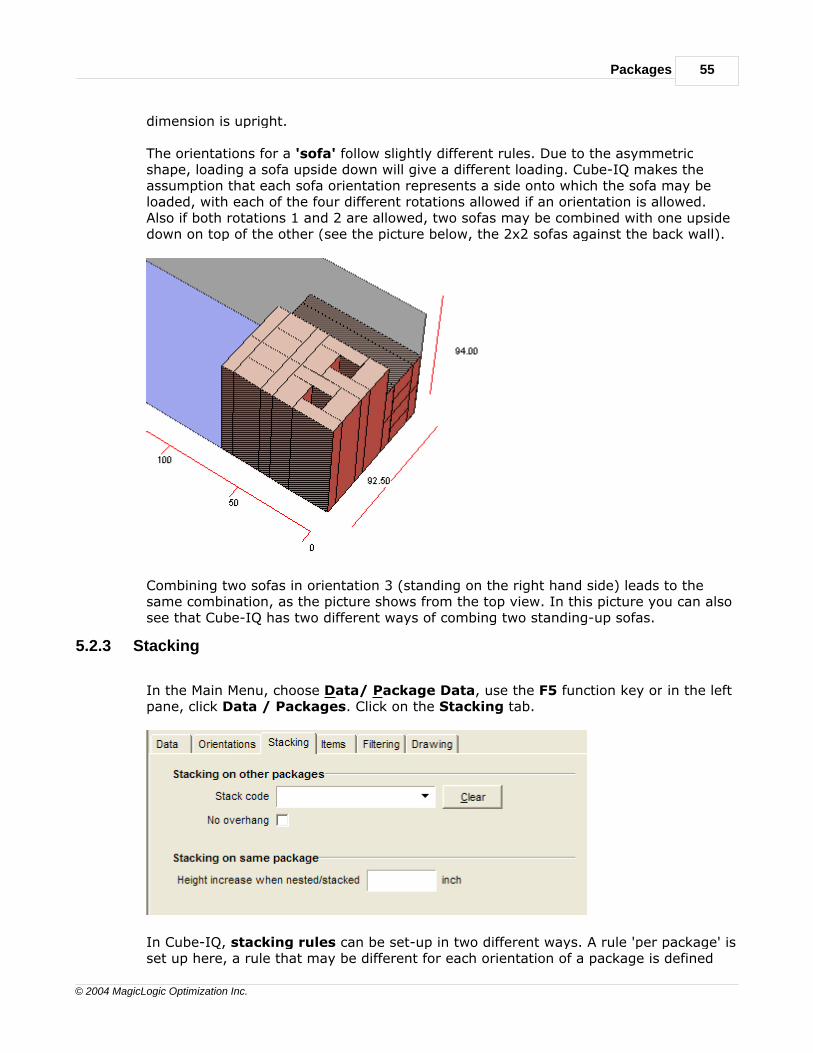
The orientations for a 'sofa' follow slightly different rules. Due to the asymmetricshape, loading a sofa upside down will give a different loading. Cube-IQ makes theassumption that each sofa orientation represents a side onto which the sofa may beloaded, with each of the four different rotations allowed if an orientation is allowed.Also if both rotations 1 and 2 are allowed, two sofas may be combined with one upsidedown on top of the other (see the picture below, the 2x2 sofas against the back wall).
Combining two sofas in orientation 3 (standing on the right hand side) leads to thesame combination, as the picture shows from the top view. In this picture you can alsosee that Cube-IQ has two different ways of combing two standing-up sofas.
5.2.3 Stacking
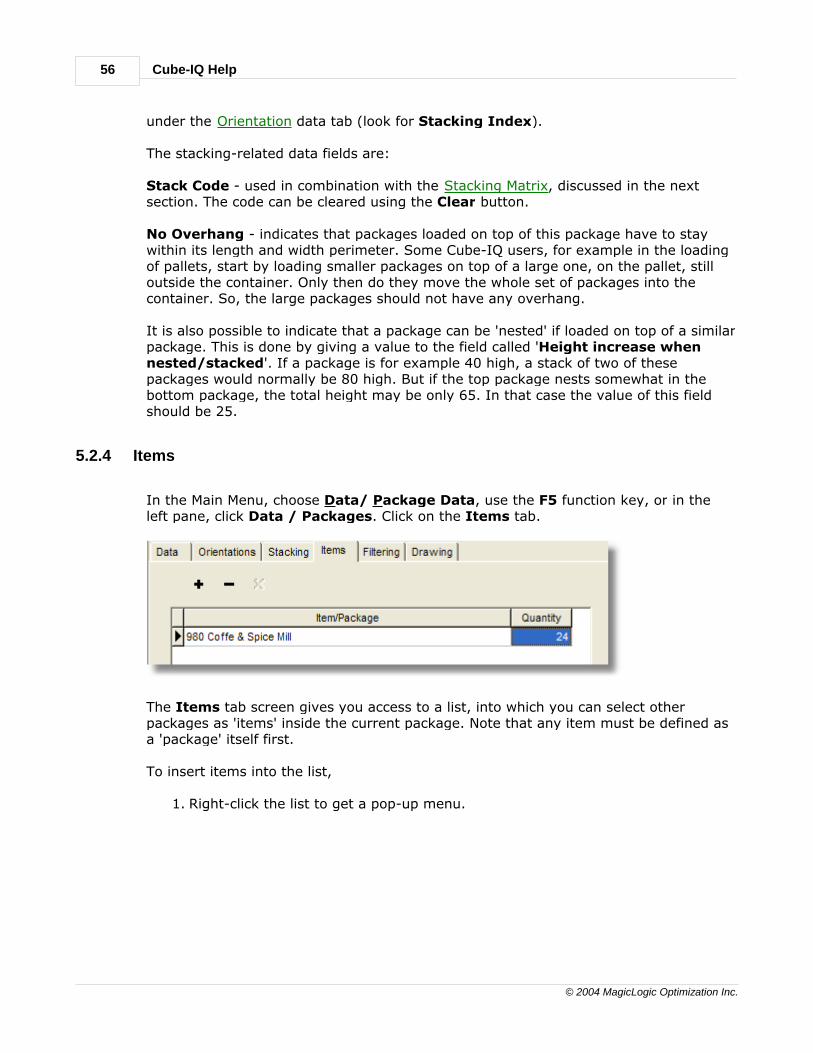
In the Main Menu, choose Data/ Package Data, use the F5 function key or in the leftpane, click Data / Packages. Click on the Stacking tab.
In Cube-IQ, stacking rules can be set-up in two different ways. A rule 'per package' isset up here, a rule that may be different for each orientation of a package is defined
Cube-IQ Help56
© 2004 MagicLogic Optimization Inc.
under the Orientation data tab (look for Stacking Index).
The stacking-related data fields are:
Stack Code - used in combination with the Stacking Matrix, discussed in the nextsection. The code can be cleared using the Clear button.
No Overhang - indicates that packages loaded on top of this package have to staywithin its length and width perimeter. Some Cube-IQ users, for example in the loadingof pallets, start by loading smaller packages on top of a large one, on the pallet, stilloutside the container. Only then do they move the whole set of packages into thecontainer. So, the large packages should not have any overhang.
It is also possible to indicate that a package can be 'nested' if loaded on top of a similarpackage. This is done by giving a value to the field called 'Height increase whennested/stacked'. If a package is for example 40 high, a stack of two of thesepackages would normally be 80 high. But if the top package nests somewhat in thebottom package, the total height may be only 65. In that case the value of this fieldshould be 25.
5.2.4 Items
In the Main Menu, choose Data/ Package Data, use the F5 function key, or in theleft pane, click Data / Packages. Click on the Items tab.
The Items tab screen gives you access to a list, into which you can select otherpackages as 'items' inside the current package. Note that any item must be defined asa 'package' itself first.
To insert items into the list,
1. Right-click the list to get a pop-up menu.
Packages 57
© 2004 MagicLogic Optimization Inc.
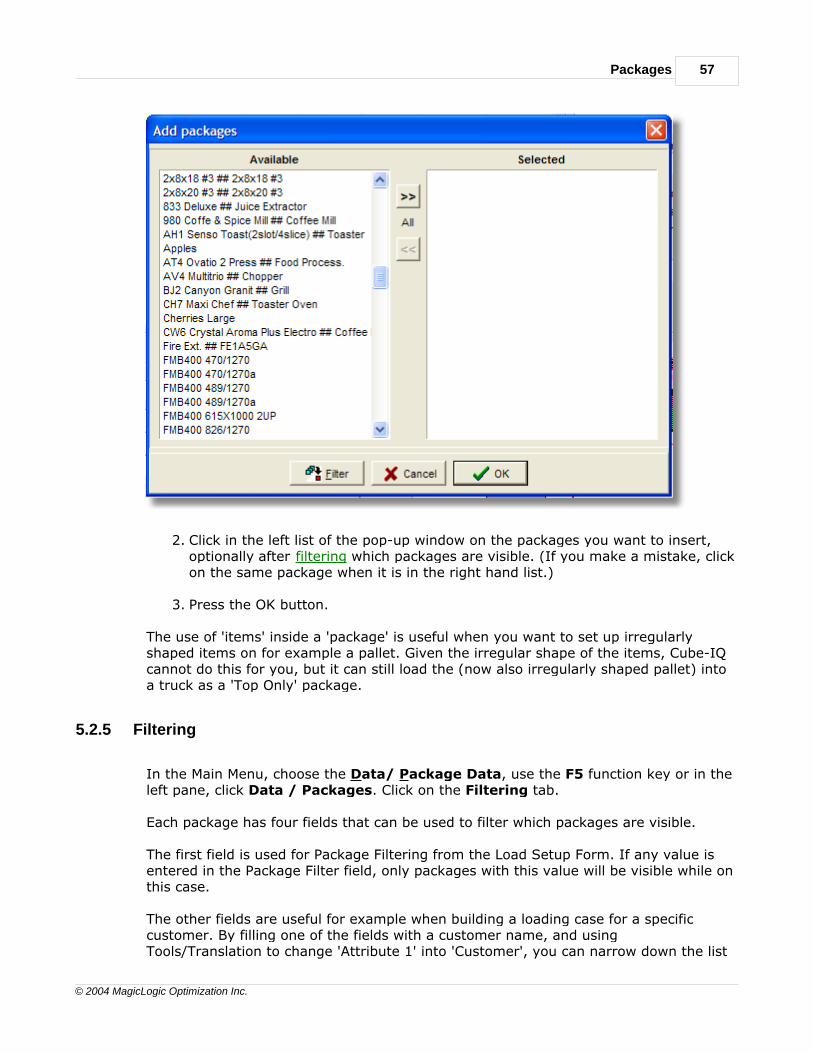
2. Click in the left list of the pop-up window on the packages you want to insert,optionally after filtering which packages are visible. (If you make a mistake, clickon the same package when it is in the right hand list.)
3. Press the OK button.
The use of 'items' inside a 'package' is useful when you want to set up irregularlyshaped items on for example a pallet. Given the irregular shape of the items, Cube-IQcannot do this for you, but it can still load the (now also irregularly shaped pallet) intoa truck as a 'Top Only' package.
5.2.5 Filtering
In the Main Menu, choose the Data/ Package Data, use the F5 function key or in theleft pane, click Data / Packages. Click on the Filtering tab.
Each package has four fields that can be used to filter which packages are visible.
The first field is used for Package Filtering from the Load Setup Form. If any value isentered in the Package Filter field, only packages with this value will be visible while onthis case.
The other fields are useful for example when building a loading case for a specificcustomer. By filling one of the fields with a customer name, and usingTools/Translation to change 'Attribute 1' into 'Customer', you can narrow down the list
Cube-IQ Help58
© 2004 MagicLogic Optimization Inc.
of packages.
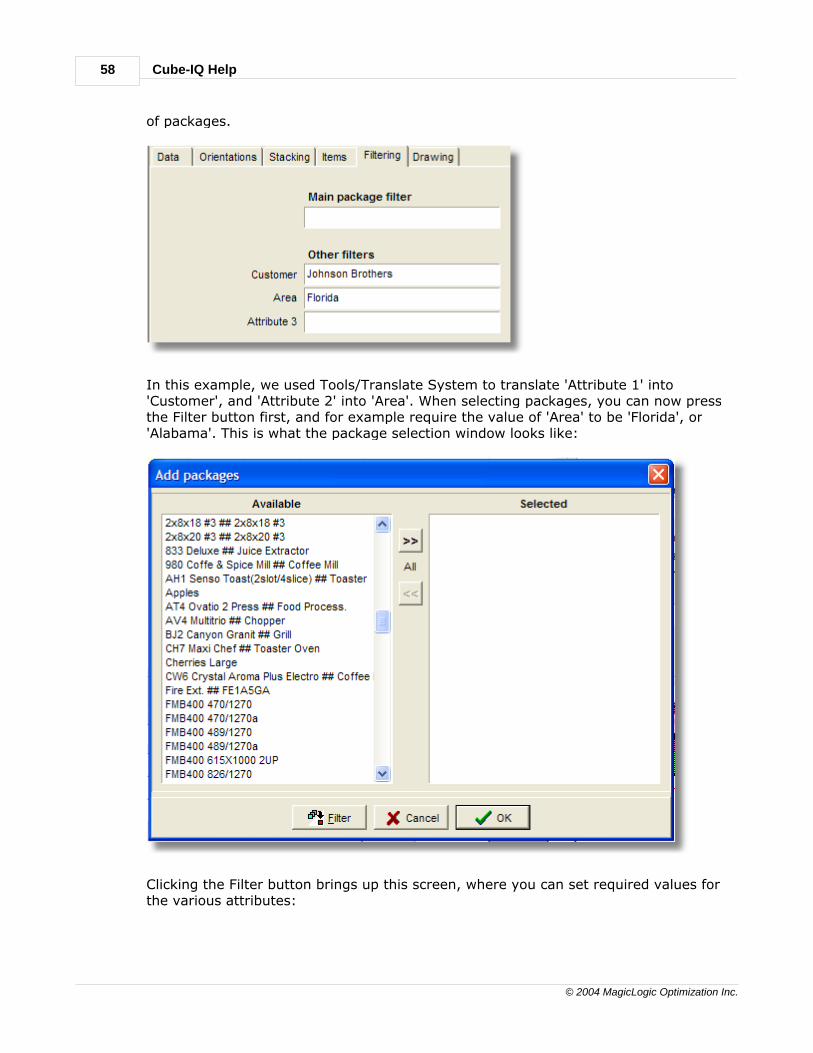
In this example, we used Tools/Translate System to translate 'Attribute 1' into'Customer', and 'Attribute 2' into 'Area'. When selecting packages, you can now pressthe Filter button first, and for example require the value of 'Area' to be 'Florida', or'Alabama'. This is what the package selection window looks like:
Clicking the Filter button brings up this screen, where you can set required values forthe various attributes:
Packages 59
© 2004 MagicLogic Optimization Inc.
You can specify for each of the three attribute fields which values should only beshown. If more than one attribute has a required value, only packages are shown thathave ALL those values.
5.2.6 Drawing
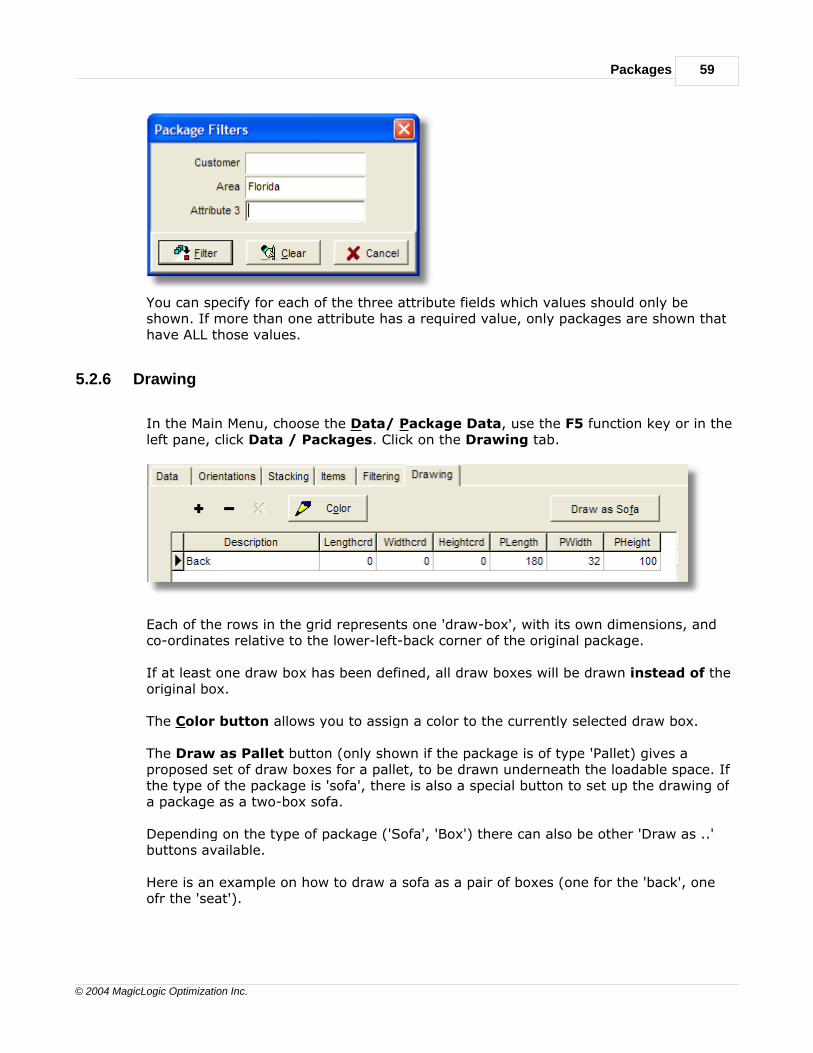
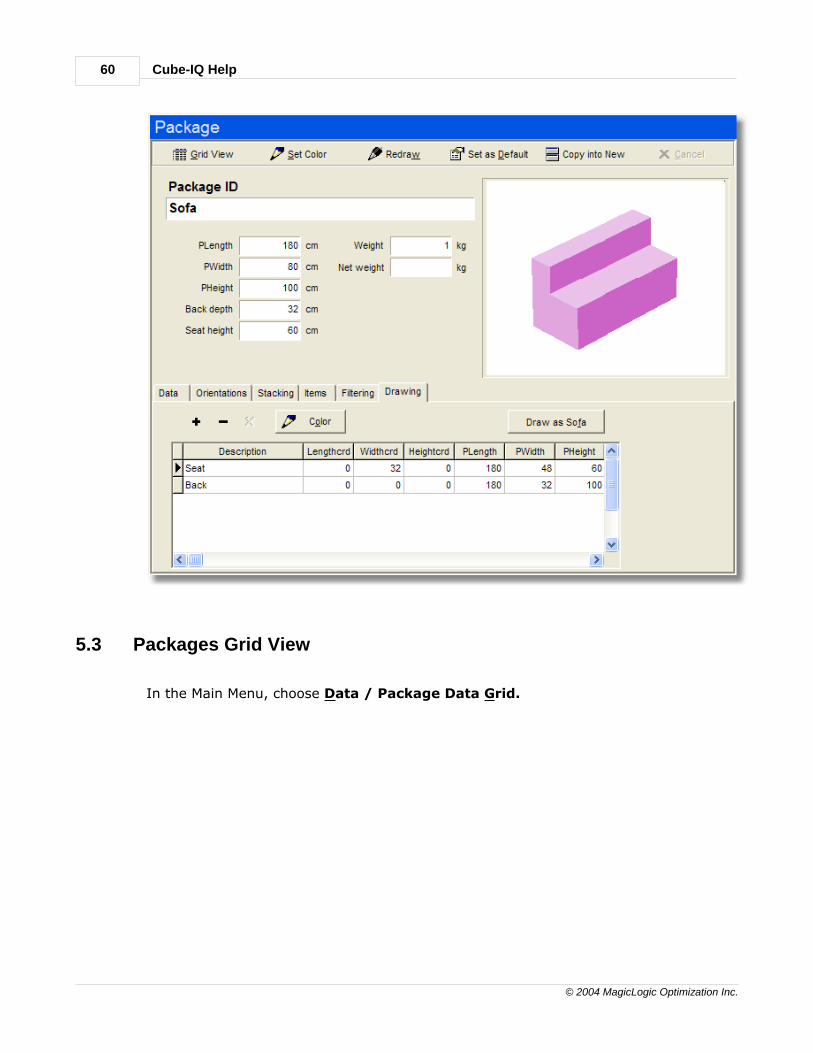
In the Main Menu, choose the Data/ Package Data, use the F5 function key or in theleft pane, click Data / Packages. Click on the Drawing tab.
Each of the rows in the grid represents one 'draw-box', with its own dimensions, andco-ordinates relative to the lower-left-back corner of the original package.
If at least one draw box has been defined, all draw boxes will be drawn instead of theoriginal box.
The Color button allows you to assign a color to the currently selected draw box.
The Draw as Pallet button (only shown if the package is of type 'Pallet) gives aproposed set of draw boxes for a pallet, to be drawn underneath the loadable space. Ifthe type of the package is 'sofa', there is also a special button to set up the drawing ofa package as a two-box sofa.
Depending on the type of package ('Sofa', 'Box') there can also be other 'Draw as ..'buttons available.
Here is an example on how to draw a sofa as a pair of boxes (one for the 'back', oneofr the 'seat').
Cube-IQ Help60
© 2004 MagicLogic Optimization Inc.
5.3 Packages Grid View
In the Main Menu, choose Data / Package Data Grid.

Packages 61
© 2004 MagicLogic Optimization Inc.
When you are in the Package Data Window, you can click the Grid View button in theToolbar.
You are presented with the Package Grid Window. This window show all packages ina data grid. On an 800x600 screen, you can click on the titles row of the grid to seemore fields. On larger screens you will see all available fields. Click on PackageWindow to go to the standard Package Data Window, which will show you a singlepackage at the timer.
As you can see, the Grid View of the package data allows comparing packagesquickly. It also facilitates changing a single field for many packages. On the otherhand, not all fields are shown here, and details like orientation and items are notvisible.
Cube-IQ Help62
© 2004 MagicLogic Optimization Inc.
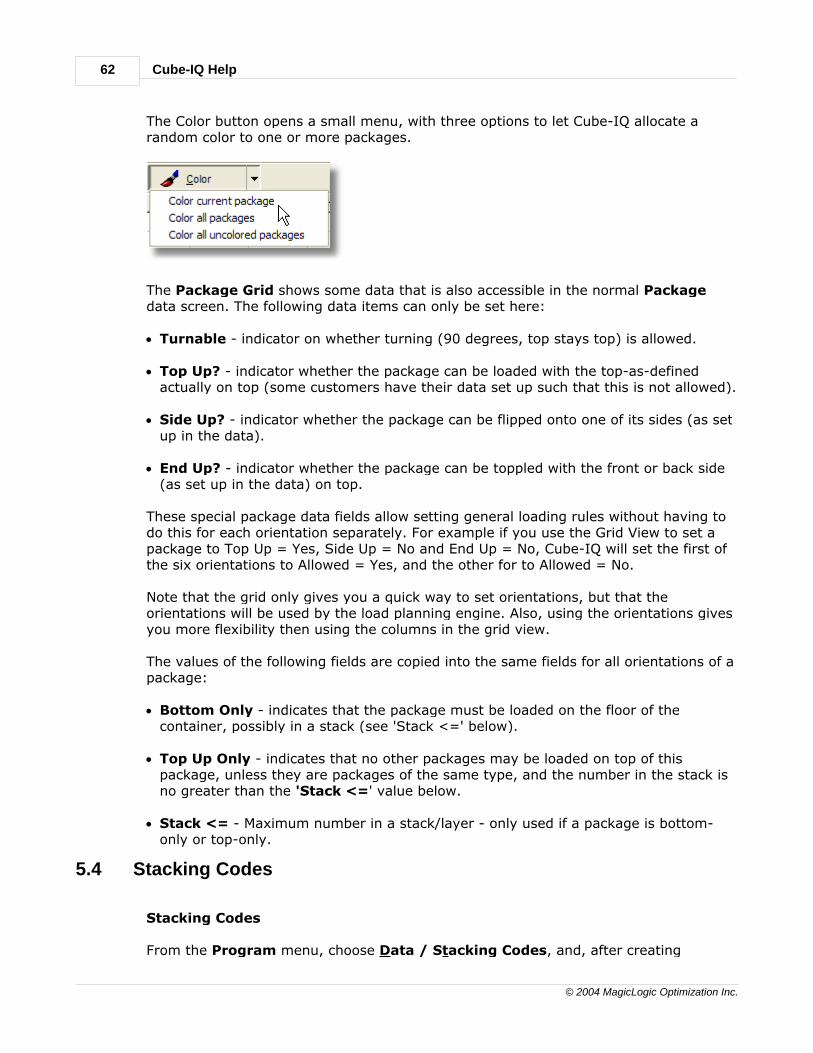
The Color button opens a small menu, with three options to let Cube-IQ allocate arandom color to one or more packages.
The Package Grid shows some data that is also accessible in the normal Packagedata screen. The following data items can only be set here:
· Turnable - indicator on whether turning (90 degrees, top stays top) is allowed.
· Top Up? - indicator whether the package can be loaded with the top-as-definedactually on top (some customers have their data set up such that this is not allowed).
· Side Up? - indicator whether the package can be flipped onto one of its sides (as setup in the data).
· End Up? - indicator whether the package can be toppled with the front or back side(as set up in the data) on top.
These special package data fields allow setting general loading rules without having todo this for each orientation separately. For example if you use the Grid View to set apackage to Top Up = Yes, Side Up = No and End Up = No, Cube-IQ will set the first ofthe six orientations to Allowed = Yes, and the other for to Allowed = No.
Note that the grid only gives you a quick way to set orientations, but that theorientations will be used by the load planning engine. Also, using the orientations givesyou more flexibility then using the columns in the grid view.
The values of the following fields are copied into the same fields for all orientations of apackage:
· Bottom Only - indicates that the package must be loaded on the floor of thecontainer, possibly in a stack (see 'Stack <=' below).
· Top Up Only - indicates that no other packages may be loaded on top of thispackage, unless they are packages of the same type, and the number in the stack isno greater than the 'Stack <=' value below.
· Stack <= - Maximum number in a stack/layer - only used if a package is bottom-only or top-only.
5.4 Stacking Codes
Stacking Codes
From the Program menu, choose Data / Stacking Codes, and, after creating
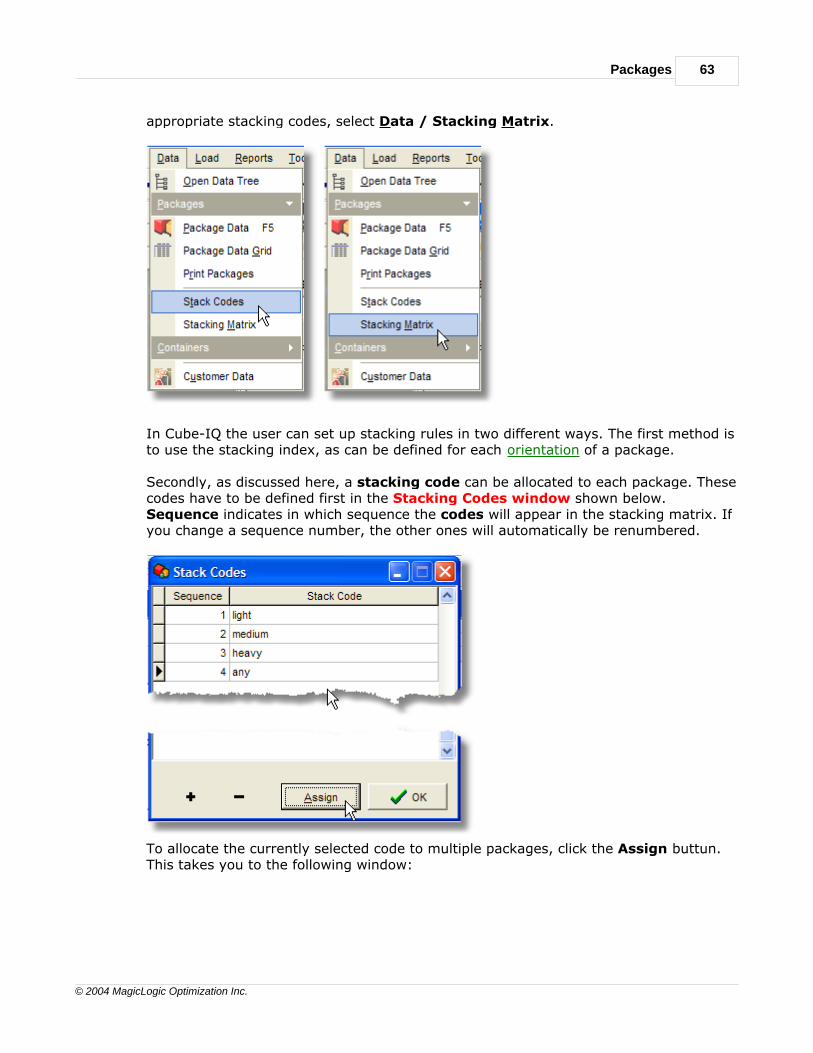
Packages 63
© 2004 MagicLogic Optimization Inc.
appropriate stacking codes, select Data / Stacking Matrix.
In Cube-IQ the user can set up stacking rules in two different ways. The first method isto use the stacking index, as can be defined for each orientation of a package.
Secondly, as discussed here, a stacking code can be allocated to each package. Thesecodes have to be defined first in the Stacking Codes window shown below.Sequence indicates in which sequence the codes will appear in the stacking matrix. Ifyou change a sequence number, the other ones will automatically be renumbered.
To allocate the currently selected code to multiple packages, click the Assign buttun.This takes you to the following window:
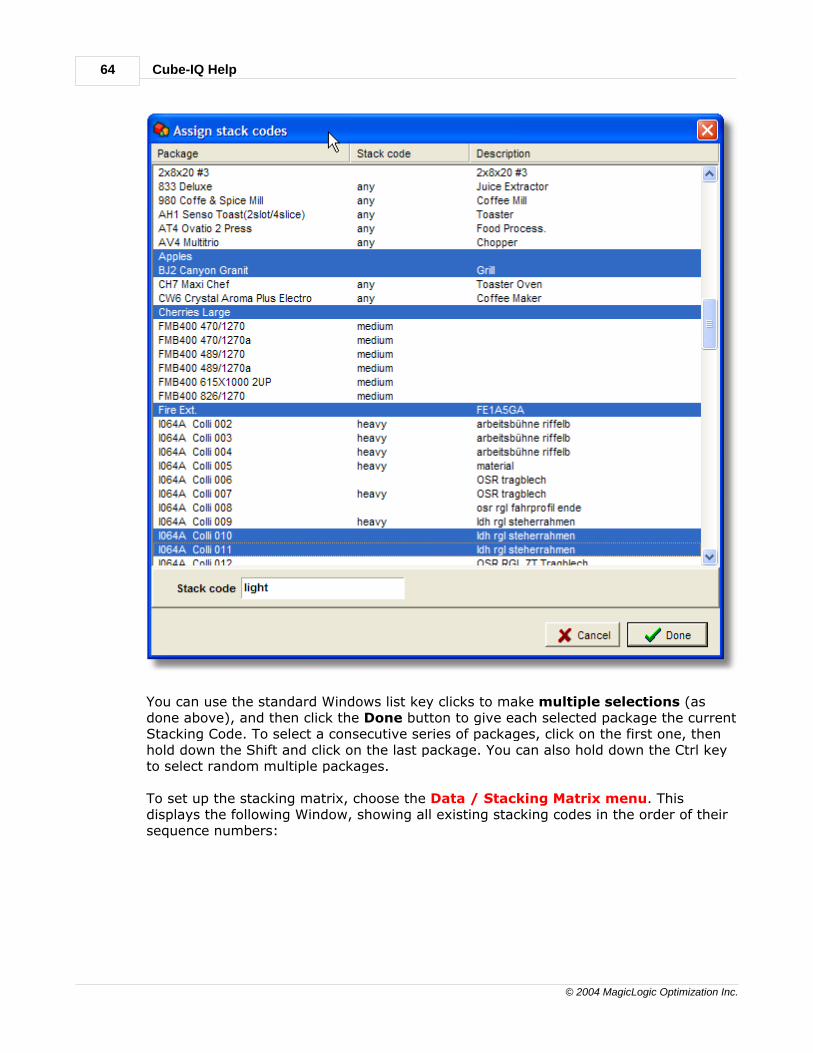
Cube-IQ Help64
© 2004 MagicLogic Optimization Inc.
You can use the standard Windows list key clicks to make multiple selections (asdone above), and then click the Done button to give each selected package the currentStacking Code. To select a consecutive series of packages, click on the first one, thenhold down the Shift and click on the last package. You can also hold down the Ctrl keyto select random multiple packages.
To set up the stacking matrix, choose the Data / Stacking Matrix menu. Thisdisplays the following Window, showing all existing stacking codes in the order of theirsequence numbers:
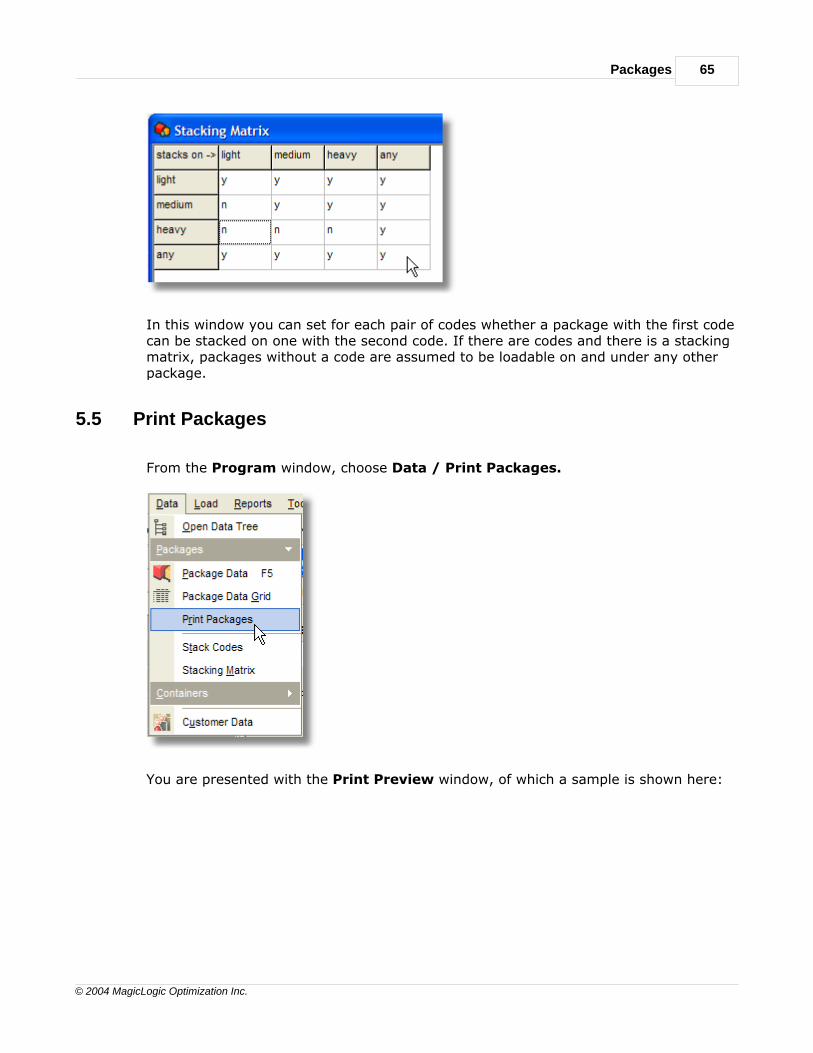
Packages 65
© 2004 MagicLogic Optimization Inc.
In this window you can set for each pair of codes whether a package with the first codecan be stacked on one with the second code. If there are codes and there is a stackingmatrix, packages without a code are assumed to be loadable on and under any otherpackage.
5.5 Print Packages
From the Program window, choose Data / Print Packages.
You are presented with the Print Preview window, of which a sample is shown here:
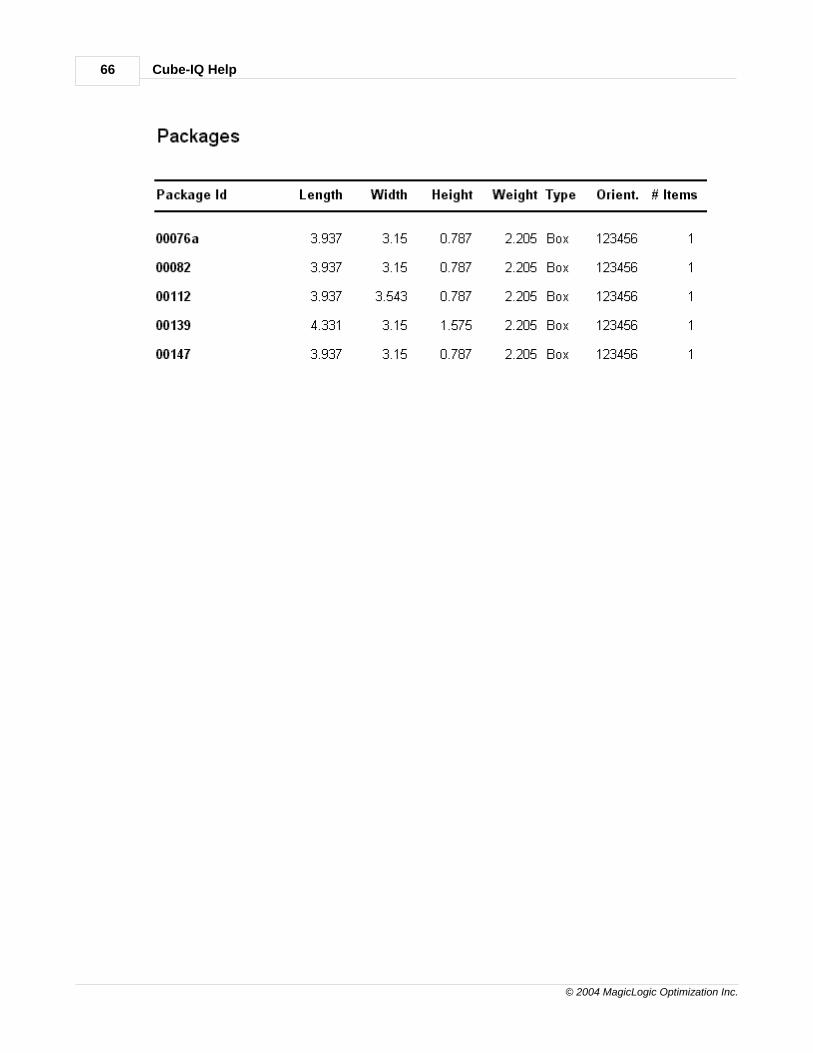
Cube-IQ Help66
© 2004 MagicLogic Optimization Inc.
Cube-IQ 3.0User Guide
Part
VI
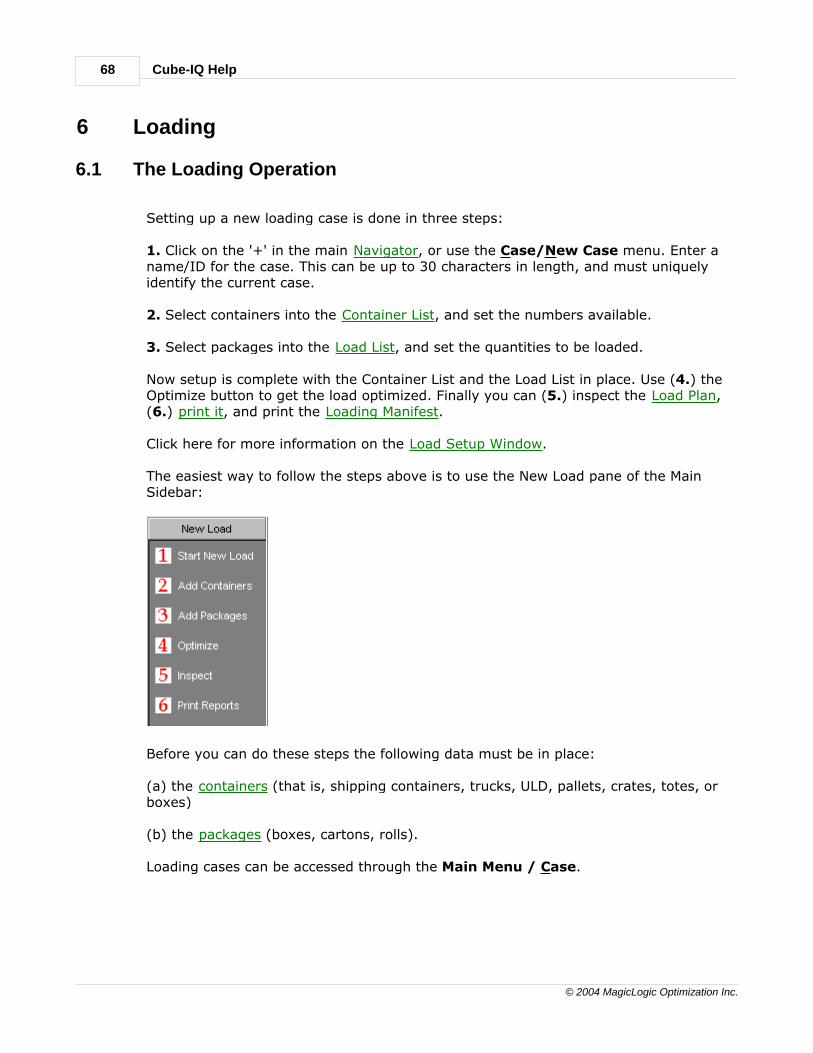
Cube-IQ Help68
© 2004 MagicLogic Optimization Inc.
6 Loading
6.1 The Loading Operation
Setting up a new loading case is done in three steps:
1. Click on the '+' in the main Navigator, or use the Case/New Case menu. Enter aname/ID for the case. This can be up to 30 characters in length, and must uniquelyidentify the current case.
2. Select containers into the Container List, and set the numbers available.
3. Select packages into the Load List, and set the quantities to be loaded.
Now setup is complete with the Container List and the Load List in place. Use (4.) theOptimize button to get the load optimized. Finally you can (5.) inspect the Load Plan,(6.) print it, and print the Loading Manifest.
Click here for more information on the Load Setup Window.
The easiest way to follow the steps above is to use the New Load pane of the MainSidebar:
Before you can do these steps the following data must be in place:
(a) the containers (that is, shipping containers, trucks, ULD, pallets, crates, totes, orboxes)
(b) the packages (boxes, cartons, rolls).
Loading cases can be accessed through the Main Menu / Case.
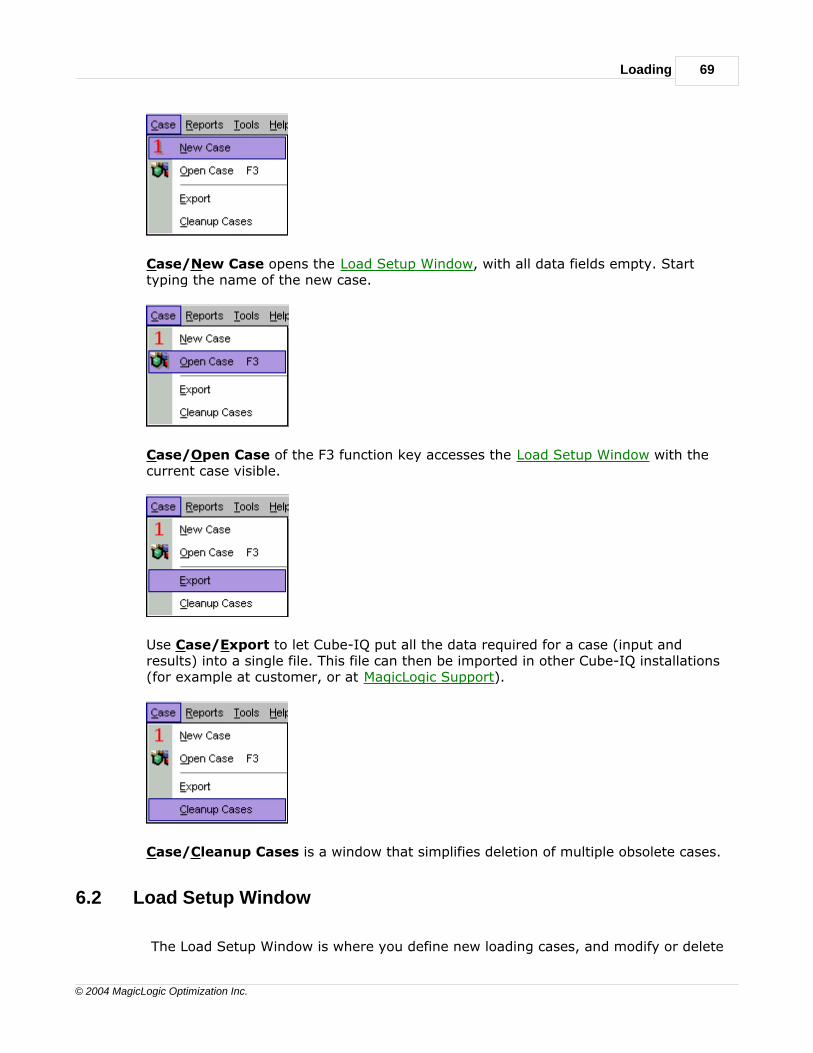
Loading 69
© 2004 MagicLogic Optimization Inc.
Case/New Case opens the Load Setup Window, with all data fields empty. Starttyping the name of the new case.
Case/Open Case of the F3 function key accesses the Load Setup Window with thecurrent case visible.
Use Case/Export to let Cube-IQ put all the data required for a case (input andresults) into a single file. This file can then be imported in other Cube-IQ installations(for example at customer, or at MagicLogic Support).
Case/Cleanup Cases is a window that simplifies deletion of multiple obsolete cases.
6.2 Load Setup Window
The Load Setup Window is where you define new loading cases, and modify or delete
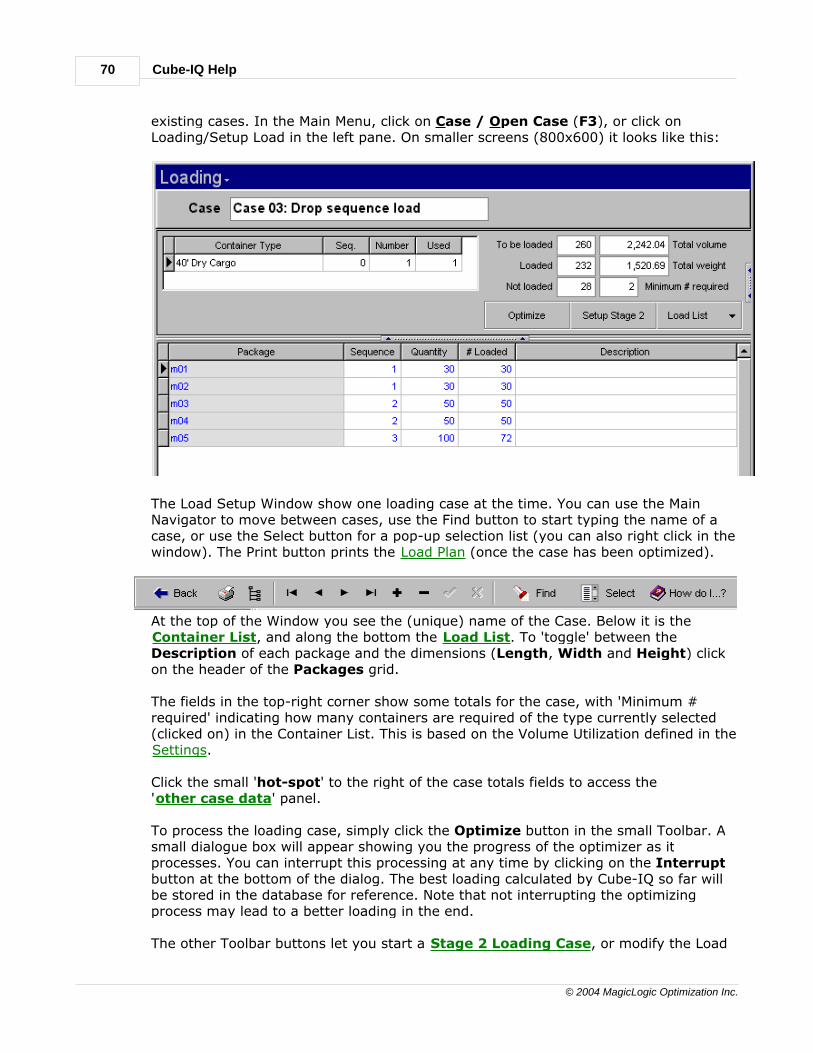
Cube-IQ Help70
© 2004 MagicLogic Optimization Inc.
existing cases. In the Main Menu, click on Case / Open Case (F3), or click onLoading/Setup Load in the left pane. On smaller screens (800x600) it looks like this:
The Load Setup Window show one loading case at the time. You can use the MainNavigator to move between cases, use the Find button to start typing the name of acase, or use the Select button for a pop-up selection list (you can also right click in thewindow). The Print button prints the Load Plan (once the case has been optimized).
At the top of the Window you see the (unique) name of the Case. Below it is theContainer List, and along the bottom the Load List. To 'toggle' between theDescription of each package and the dimensions (Length, Width and Height) clickon the header of the Packages grid.
The fields in the top-right corner show some totals for the case, with 'Minimum #required' indicating how many containers are required of the type currently selected(clicked on) in the Container List. This is based on the Volume Utilization defined in theSettings.
Click the small 'hot-spot' to the right of the case totals fields to access the'other case data' panel.
To process the loading case, simply click the Optimize button in the small Toolbar. Asmall dialogue box will appear showing you the progress of the optimizer as itprocesses. You can interrupt this processing at any time by clicking on the Interruptbutton at the bottom of the dialog. The best loading calculated by Cube-IQ so far willbe stored in the database for reference. Note that not interrupting the optimizingprocess may lead to a better loading in the end.
The other Toolbar buttons let you start a Stage 2 Loading Case, or modify the Load

Loading 71
© 2004 MagicLogic Optimization Inc.
List through a menu:
The various menu items are described in the section on the Load List.
On larger screens (1024x756 and up) you see two additional panels of information.Firstly, on the right you can see the full 'other case data' panel.
After a successful optimization, Cube-IQ shows information on each loaded containeralong the bottom of the window, including a small graphics Load Plan.
6.3 The Container List
The Container List is the grid shown on the Setup Load Window:
In the Container List, you can add a container type is two ways:
1. Use the cursor-down key when in the bottom existing row, or repeatedly press theTab key until a new row is created, and click in the left-most column. A drop-down list box of containers will appear.
Click on the required container. (In the list box you can start typing the ID of the
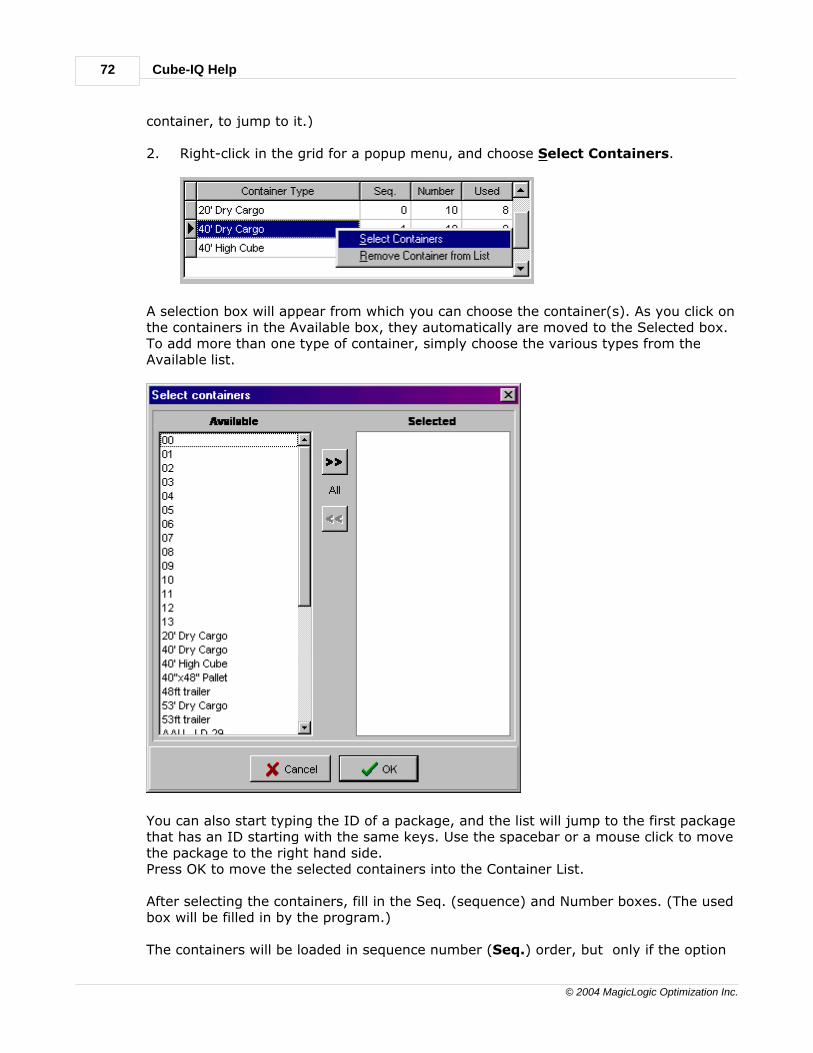
Cube-IQ Help72
© 2004 MagicLogic Optimization Inc.
container, to jump to it.)
2. Right-click in the grid for a popup menu, and choose Select Containers.
A selection box will appear from which you can choose the container(s). As you click onthe containers in the Available box, they automatically are moved to the Selected box.To add more than one type of container, simply choose the various types from theAvailable list.
You can also start typing the ID of a package, and the list will jump to the first packagethat has an ID starting with the same keys. Use the spacebar or a mouse click to movethe package to the right hand side.Press OK to move the selected containers into the Container List.
After selecting the containers, fill in the Seq. (sequence) and Number boxes. (The usedbox will be filled in by the program.)
The containers will be loaded in sequence number (Seq.) order, but only if the option
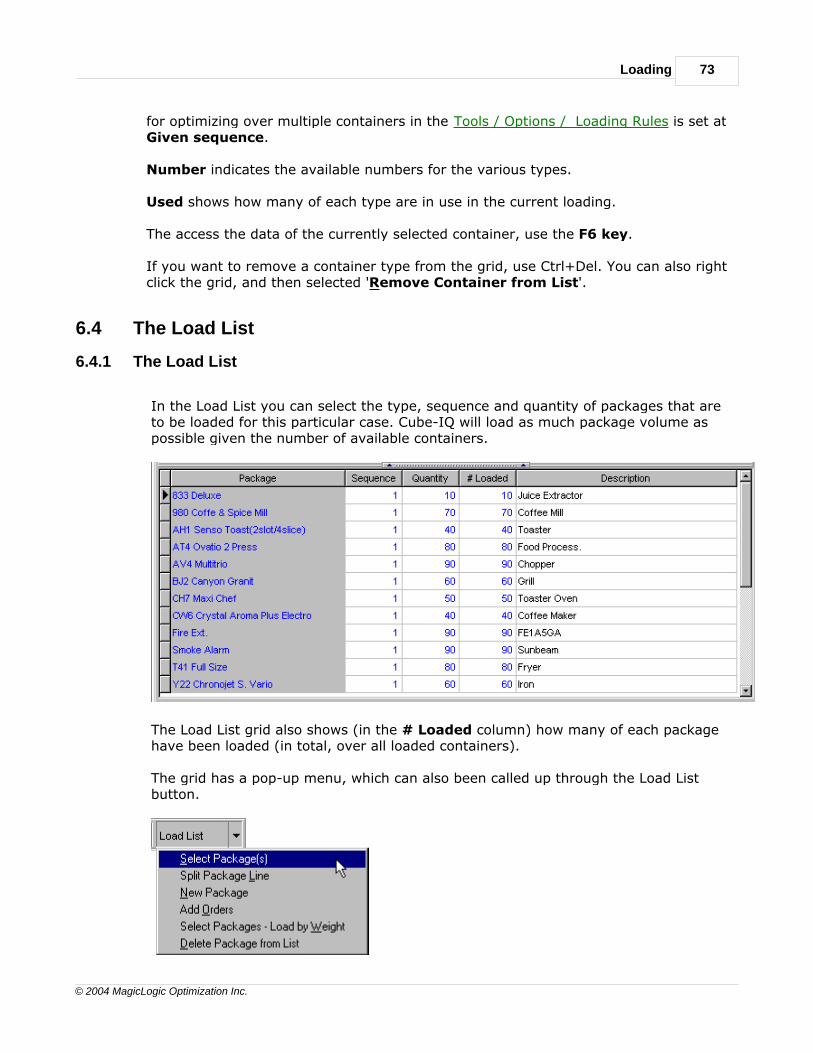
Loading 73
© 2004 MagicLogic Optimization Inc.
for optimizing over multiple containers in the Tools / Options / Loading Rules is set atGiven sequence.
Number indicates the available numbers for the various types.
Used shows how many of each type are in use in the current loading.
The access the data of the currently selected container, use the F6 key.
If you want to remove a container type from the grid, use Ctrl+Del. You can also rightclick the grid, and then selected 'Remove Container from List'.
6.4 The Load List
6.4.1 The Load List
In the Load List you can select the type, sequence and quantity of packages that areto be loaded for this particular case. Cube-IQ will load as much package volume aspossible given the number of available containers.
The Load List grid also shows (in the # Loaded column) how many of each packagehave been loaded (in total, over all loaded containers).
The grid has a pop-up menu, which can also been called up through the Load Listbutton.
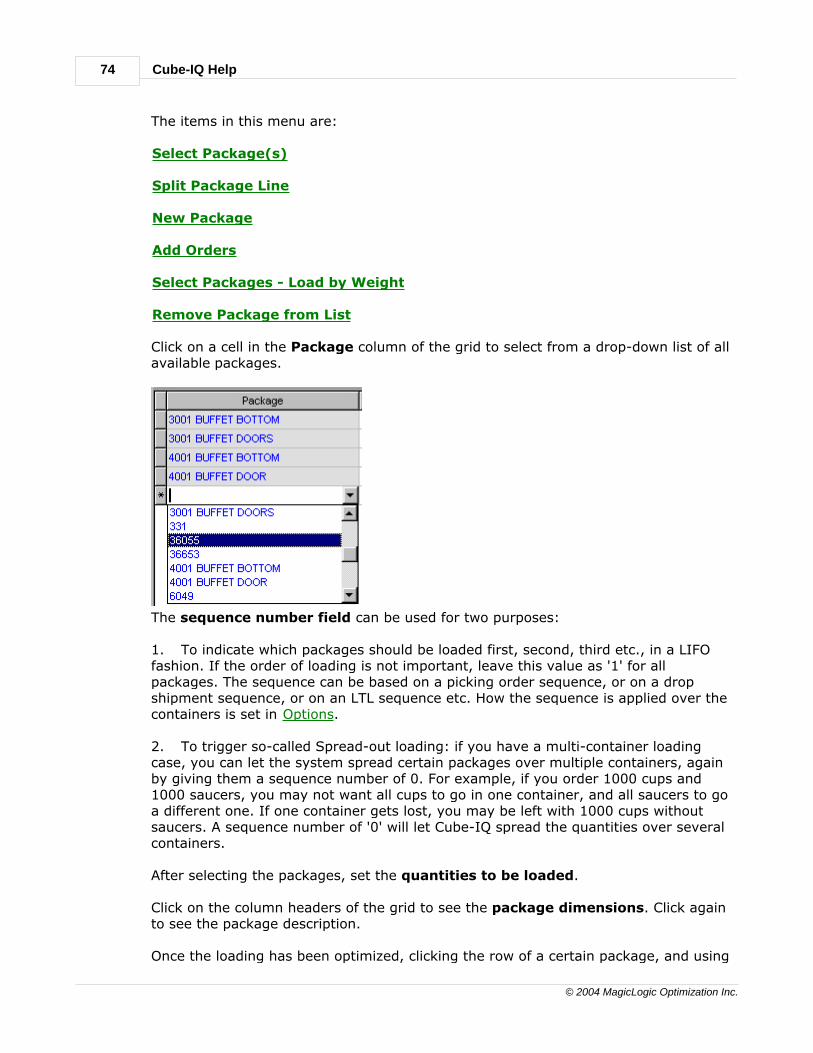
Cube-IQ Help74
© 2004 MagicLogic Optimization Inc.
The items in this menu are:
Select Package(s)
Split Package Line
New Package
Add Orders
Select Packages - Load by Weight
Remove Package from List
Click on a cell in the Package column of the grid to select from a drop-down list of allavailable packages.
The sequence number field can be used for two purposes:
1. To indicate which packages should be loaded first, second, third etc., in a LIFOfashion. If the order of loading is not important, leave this value as '1' for allpackages. The sequence can be based on a picking order sequence, or on a dropshipment sequence, or on an LTL sequence etc. How the sequence is applied over thecontainers is set in Options.
2. To trigger so-called Spread-out loading: if you have a multi-container loadingcase, you can let the system spread certain packages over multiple containers, againby giving them a sequence number of 0. For example, if you order 1000 cups and1000 saucers, you may not want all cups to go in one container, and all saucers to goa different one. If one container gets lost, you may be left with 1000 cups withoutsaucers. A sequence number of '0' will let Cube-IQ spread the quantities over severalcontainers.
After selecting the packages, set the quantities to be loaded.
Click on the column headers of the grid to see the package dimensions. Click againto see the package description.
Once the loading has been optimized, clicking the row of a certain package, and using
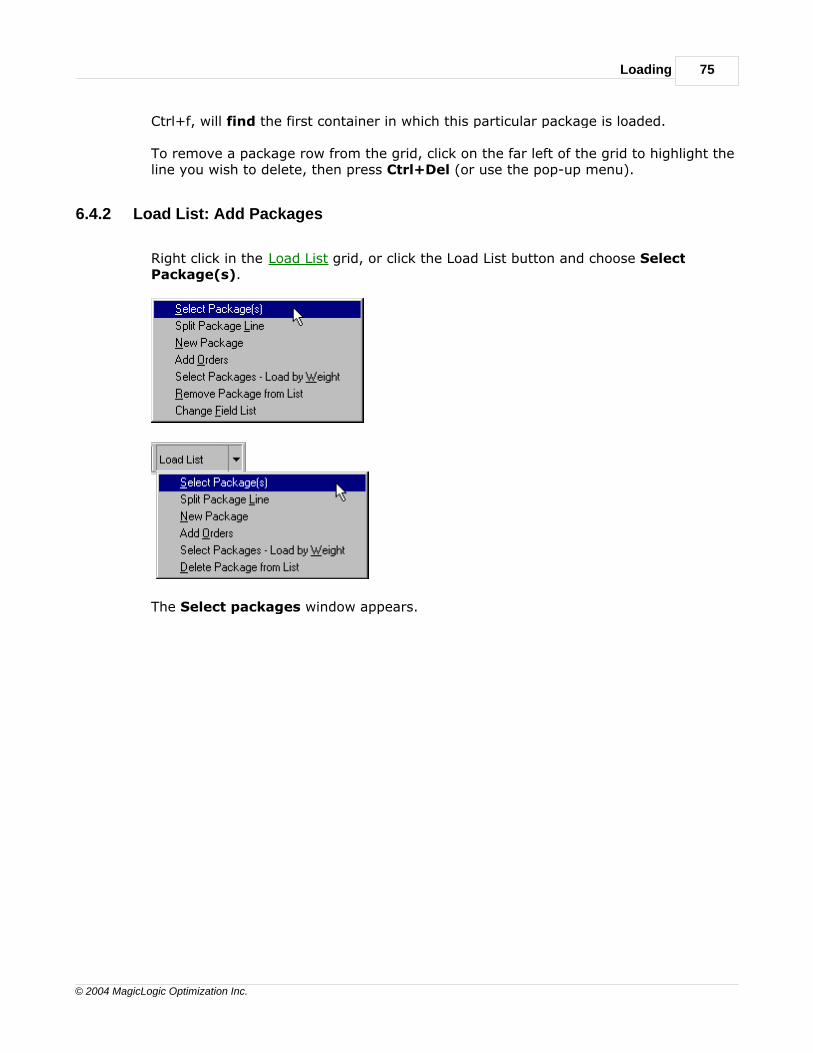
Loading 75
© 2004 MagicLogic Optimization Inc.
Ctrl+f, will find the first container in which this particular package is loaded.
To remove a package row from the grid, click on the far left of the grid to highlight theline you wish to delete, then press Ctrl+Del (or use the pop-up menu).
6.4.2 Load List: Add Packages
Right click in the Load List grid, or click the Load List button and choose SelectPackage(s).
The Select packages window appears.
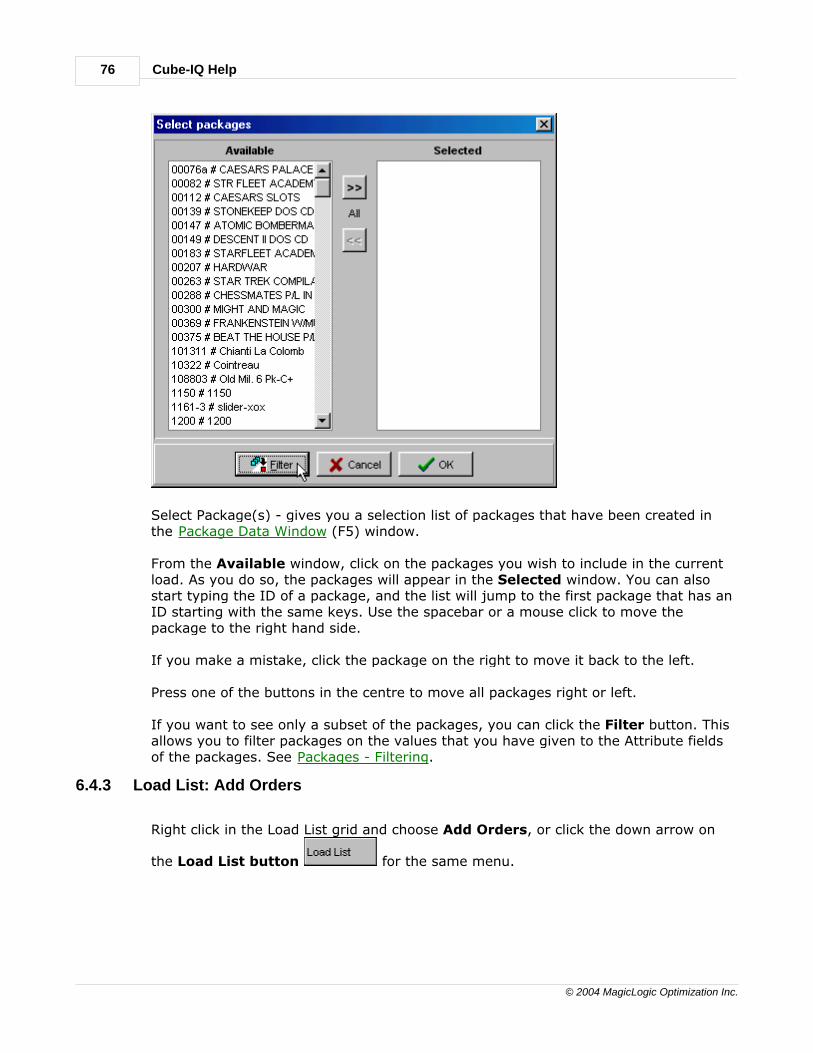
Cube-IQ Help76
© 2004 MagicLogic Optimization Inc.
Select Package(s) - gives you a selection list of packages that have been created inthe Package Data Window (F5) window.
From the Available window, click on the packages you wish to include in the currentload. As you do so, the packages will appear in the Selected window. You can alsostart typing the ID of a package, and the list will jump to the first package that has anID starting with the same keys. Use the spacebar or a mouse click to move thepackage to the right hand side.
If you make a mistake, click the package on the right to move it back to the left.
Press one of the buttons in the centre to move all packages right or left.
If you want to see only a subset of the packages, you can click the Filter button. Thisallows you to filter packages on the values that you have given to the Attribute fieldsof the packages. See Packages - Filtering.
6.4.3 Load List: Add Orders
Right click in the Load List grid and choose Add Orders, or click the down arrow on
the Load List button for the same menu.
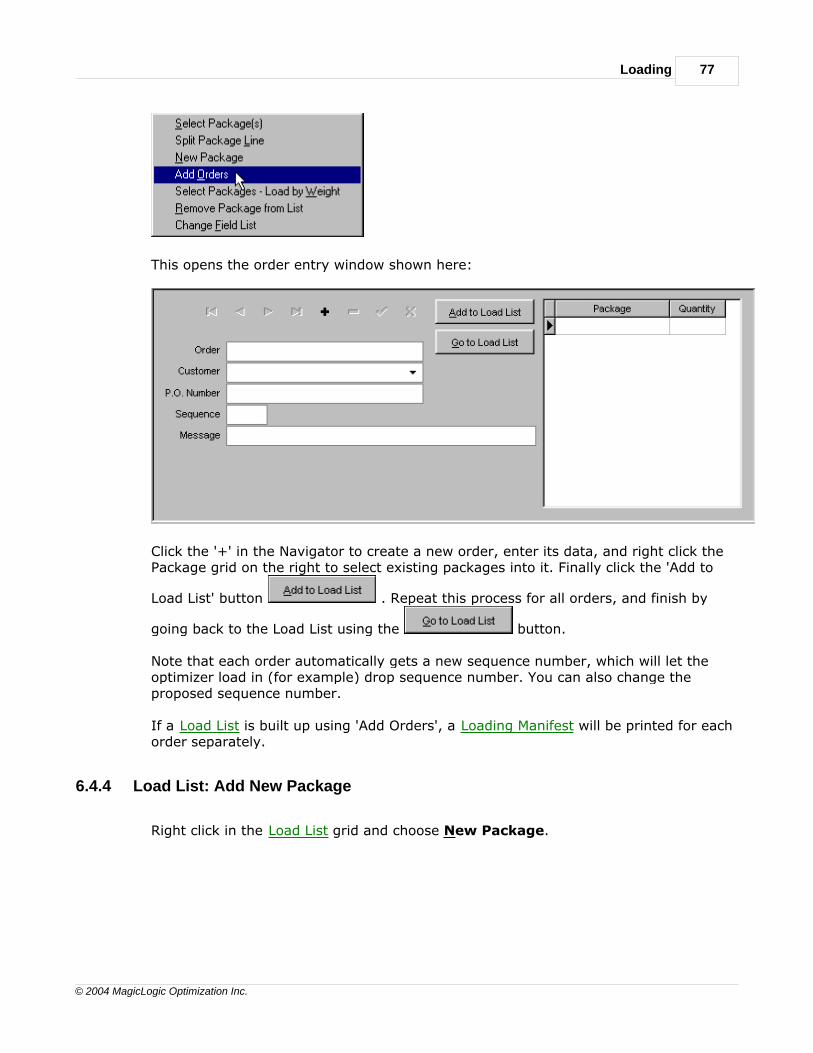
Loading 77
© 2004 MagicLogic Optimization Inc.
This opens the order entry window shown here:
Click the '+' in the Navigator to create a new order, enter its data, and right click thePackage grid on the right to select existing packages into it. Finally click the 'Add to
Load List' button . Repeat this process for all orders, and finish by
going back to the Load List using the button.
Note that each order automatically gets a new sequence number, which will let theoptimizer load in (for example) drop sequence number. You can also change theproposed sequence number.
If a Load List is built up using 'Add Orders', a Loading Manifest will be printed for eachorder separately.
6.4.4 Load List: Add New Package
Right click in the Load List grid and choose New Package.
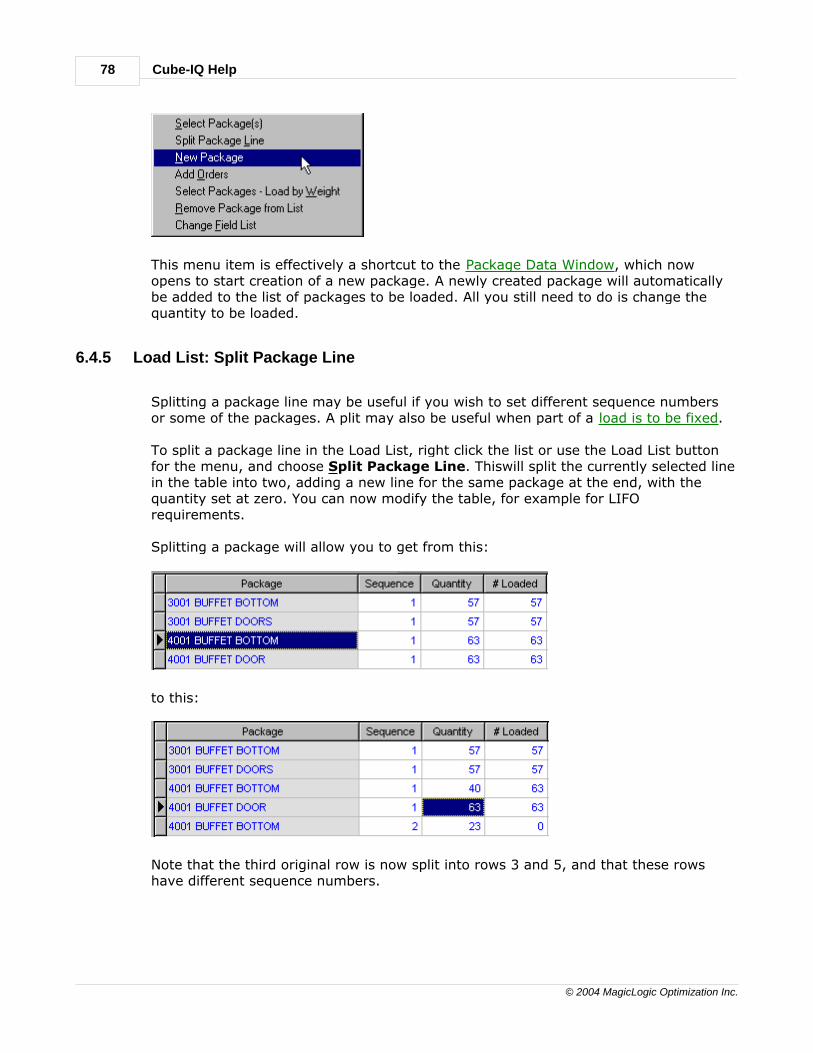
Cube-IQ Help78
© 2004 MagicLogic Optimization Inc.
This menu item is effectively a shortcut to the Package Data Window, which nowopens to start creation of a new package. A newly created package will automaticallybe added to the list of packages to be loaded. All you still need to do is change thequantity to be loaded.
6.4.5 Load List: Split Package Line
Splitting a package line may be useful if you wish to set different sequence numbersor some of the packages. A plit may also be useful when part of a load is to be fixed.
To split a package line in the Load List, right click the list or use the Load List buttonfor the menu, and choose Split Package Line. Thiswill split the currently selected linein the table into two, adding a new line for the same package at the end, with thequantity set at zero. You can now modify the table, for example for LIFOrequirements.
Splitting a package will allow you to get from this:
to this:
Note that the third original row is now split into rows 3 and 5, and that these rowshave different sequence numbers.
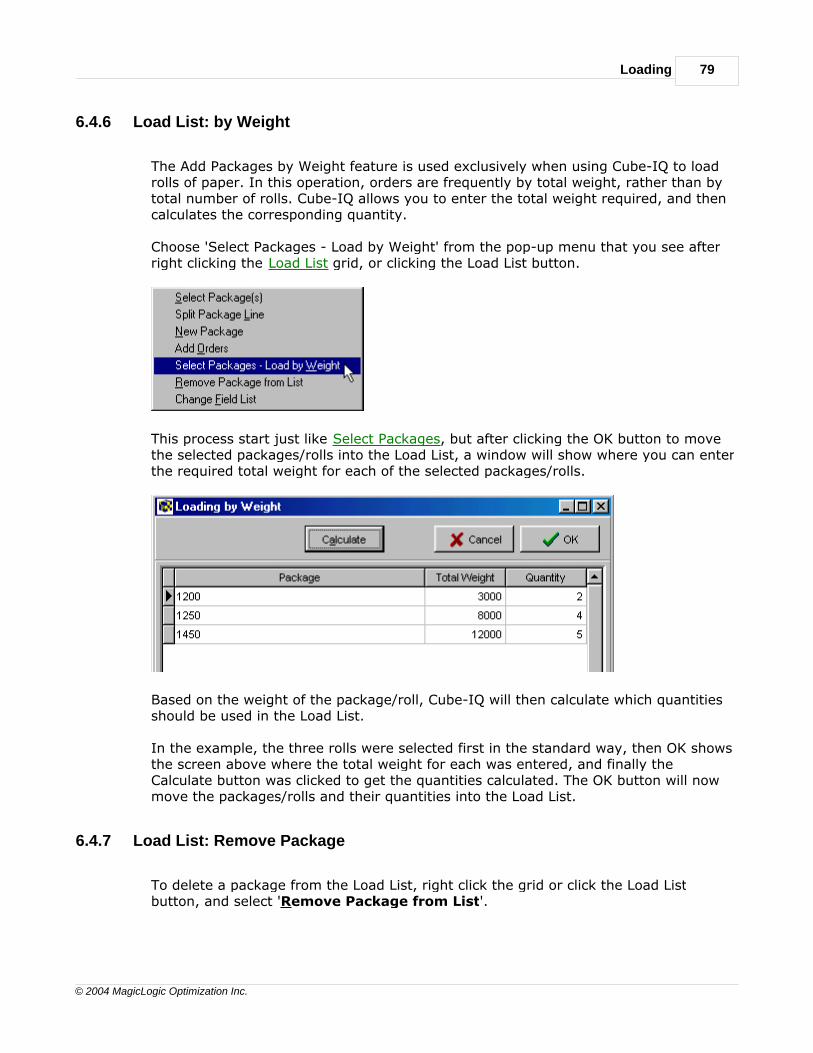
Loading 79
© 2004 MagicLogic Optimization Inc.
6.4.6 Load List: by Weight
The Add Packages by Weight feature is used exclusively when using Cube-IQ to loadrolls of paper. In this operation, orders are frequently by total weight, rather than bytotal number of rolls. Cube-IQ allows you to enter the total weight required, and thencalculates the corresponding quantity.
Choose 'Select Packages - Load by Weight' from the pop-up menu that you see afterright clicking the Load List grid, or clicking the Load List button.
This process start just like Select Packages, but after clicking the OK button to movethe selected packages/rolls into the Load List, a window will show where you can enterthe required total weight for each of the selected packages/rolls.
Based on the weight of the package/roll, Cube-IQ will then calculate which quantitiesshould be used in the Load List.
In the example, the three rolls were selected first in the standard way, then OK showsthe screen above where the total weight for each was entered, and finally theCalculate button was clicked to get the quantities calculated. The OK button will nowmove the packages/rolls and their quantities into the Load List.
6.4.7 Load List: Remove Package
To delete a package from the Load List, right click the grid or click the Load Listbutton, and select 'Remove Package from List'.
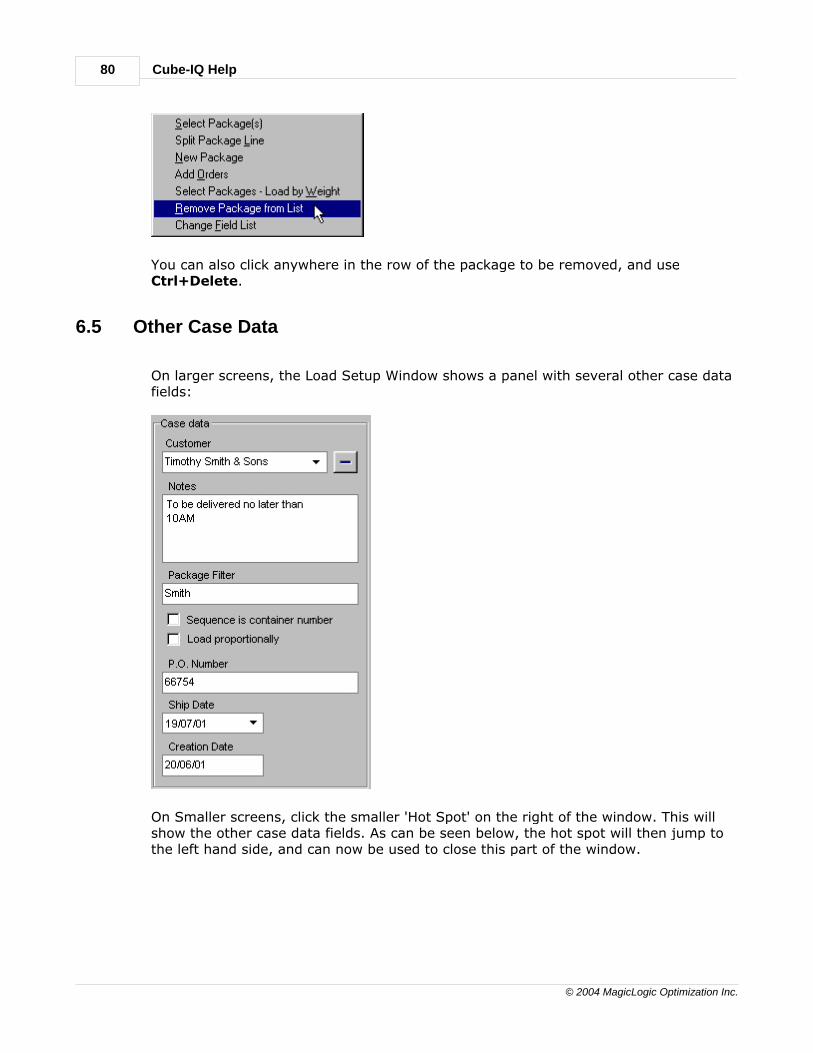
Cube-IQ Help80
© 2004 MagicLogic Optimization Inc.
You can also click anywhere in the row of the package to be removed, and useCtrl+Delete.
6.5 Other Case Data
On larger screens, the Load Setup Window shows a panel with several other case datafields:
On Smaller screens, click the smaller 'Hot Spot' on the right of the window. This willshow the other case data fields. As can be seen below, the hot spot will then jump tothe left hand side, and can now be used to close this part of the window.
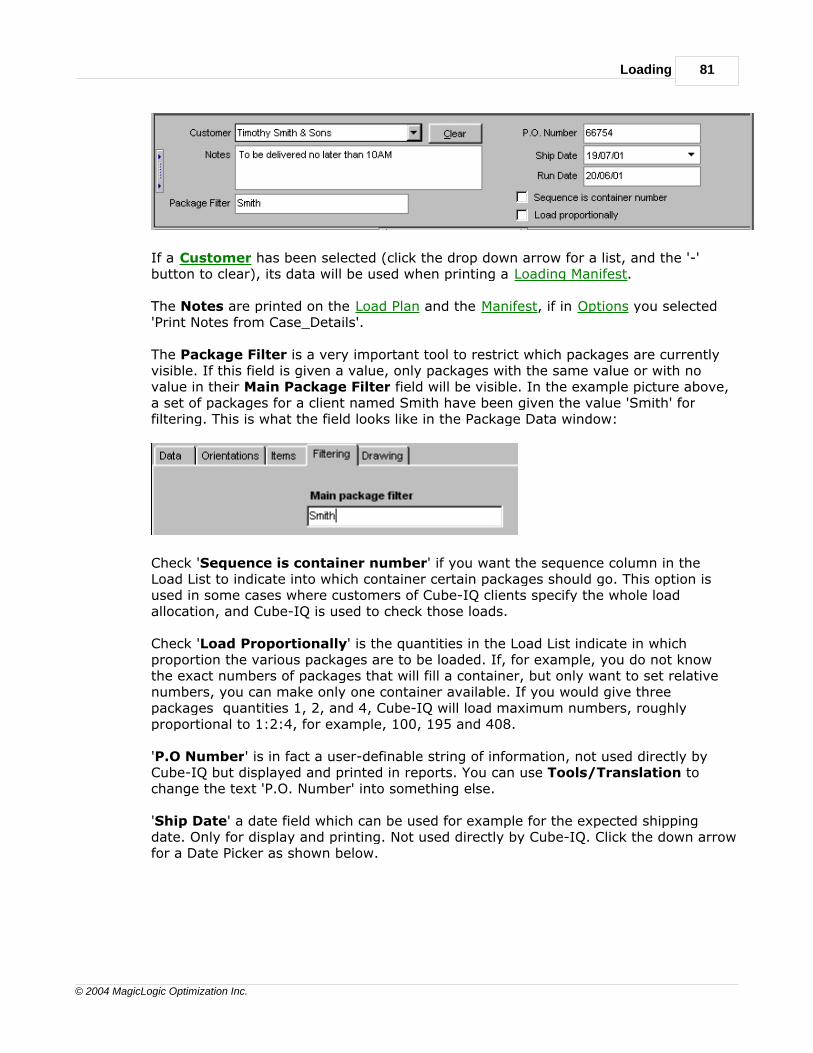
Loading 81
© 2004 MagicLogic Optimization Inc.
If a Customer has been selected (click the drop down arrow for a list, and the '-'button to clear), its data will be used when printing a Loading Manifest.
The Notes are printed on the Load Plan and the Manifest, if in Options you selected'Print Notes from Case_Details'.
The Package Filter is a very important tool to restrict which packages are currentlyvisible. If this field is given a value, only packages with the same value or with novalue in their Main Package Filter field will be visible. In the example picture above,a set of packages for a client named Smith have been given the value 'Smith' forfiltering. This is what the field looks like in the Package Data window:
Check 'Sequence is container number' if you want the sequence column in theLoad List to indicate into which container certain packages should go. This option isused in some cases where customers of Cube-IQ clients specify the whole loadallocation, and Cube-IQ is used to check those loads.
Check 'Load Proportionally' is the quantities in the Load List indicate in whichproportion the various packages are to be loaded. If, for example, you do not knowthe exact numbers of packages that will fill a container, but only want to set relativenumbers, you can make only one container available. If you would give threepackages quantities 1, 2, and 4, Cube-IQ will load maximum numbers, roughlyproportional to 1:2:4, for example, 100, 195 and 408.
'P.O Number' is in fact a user-definable string of information, not used directly byCube-IQ but displayed and printed in reports. You can use Tools/Translation tochange the text 'P.O. Number' into something else.
'Ship Date' a date field which can be used for example for the expected shippingdate. Only for display and printing. Not used directly by Cube-IQ. Click the down arrowfor a Date Picker as shown below.
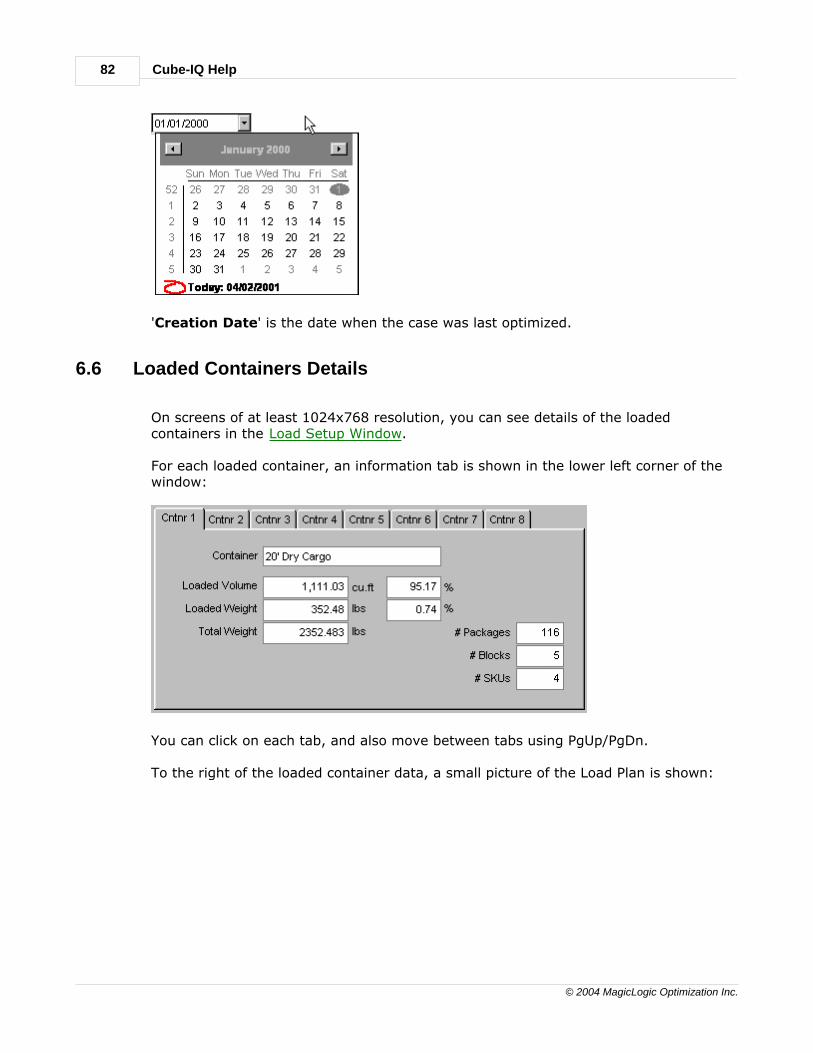
Cube-IQ Help82
© 2004 MagicLogic Optimization Inc.
'Creation Date' is the date when the case was last optimized.
6.6 Loaded Containers Details
On screens of at least 1024x768 resolution, you can see details of the loadedcontainers in the Load Setup Window.
For each loaded container, an information tab is shown in the lower left corner of thewindow:
You can click on each tab, and also move between tabs using PgUp/PgDn.
To the right of the loaded container data, a small picture of the Load Plan is shown:
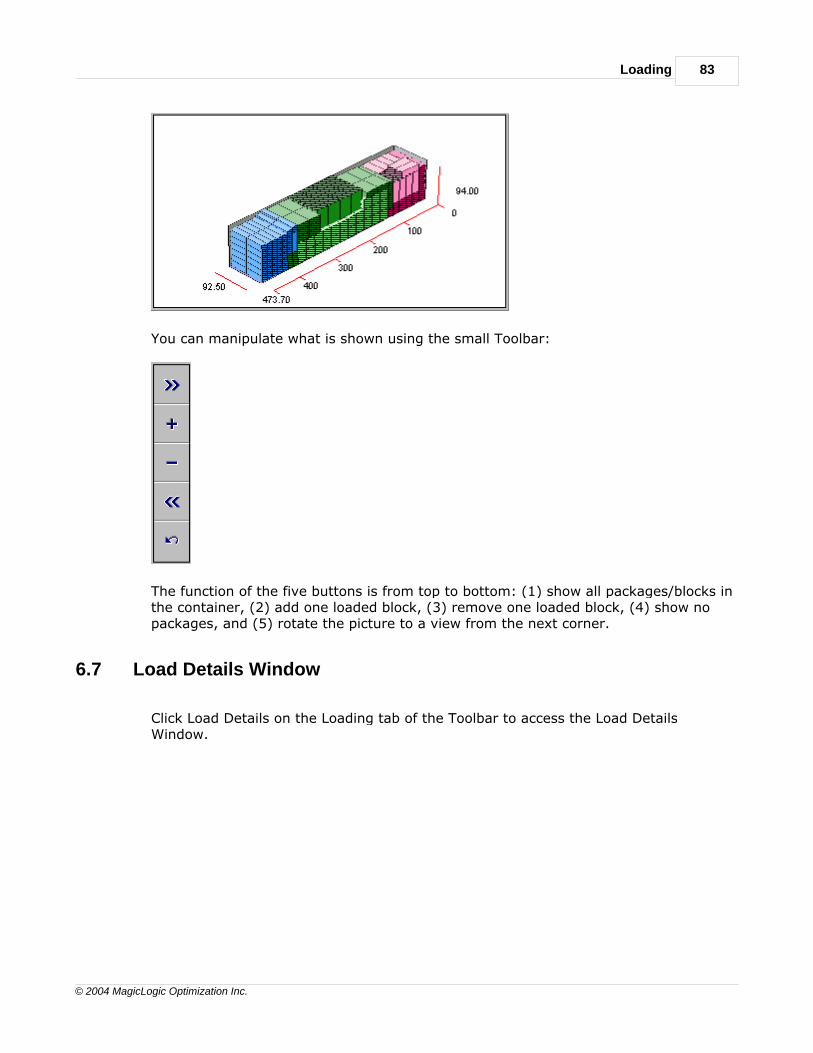
Loading 83
© 2004 MagicLogic Optimization Inc.
You can manipulate what is shown using the small Toolbar:
The function of the five buttons is from top to bottom: (1) show all packages/blocks inthe container, (2) add one loaded block, (3) remove one loaded block, (4) show nopackages, and (5) rotate the picture to a view from the next corner.
6.7 Load Details Window
Click Load Details on the Loading tab of the Toolbar to access the Load DetailsWindow.
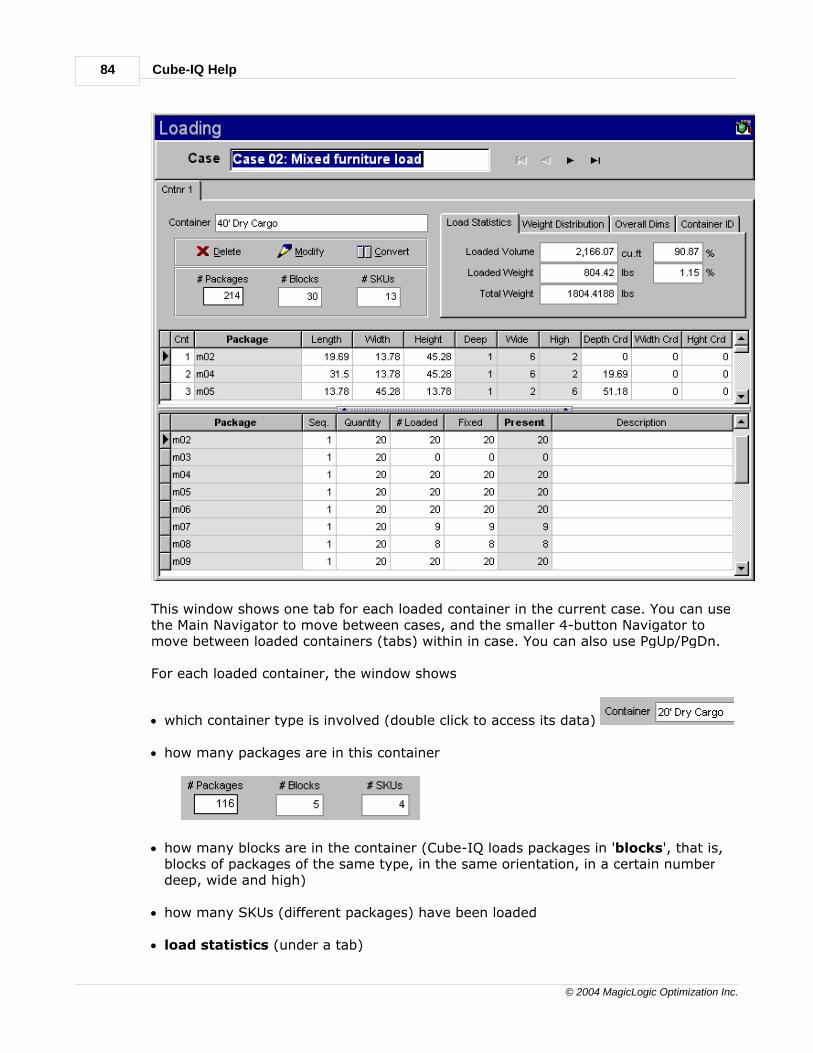
Cube-IQ Help84
© 2004 MagicLogic Optimization Inc.
This window shows one tab for each loaded container in the current case. You can usethe Main Navigator to move between cases, and the smaller 4-button Navigator tomove between loaded containers (tabs) within in case. You can also use PgUp/PgDn.
For each loaded container, the window shows
· which container type is involved (double click to access its data)
· how many packages are in this container
· how many blocks are in the container (Cube-IQ loads packages in 'blocks', that is,blocks of packages of the same type, in the same orientation, in a certain numberdeep, wide and high)
· how many SKUs (different packages) have been loaded
· load statistics (under a tab)
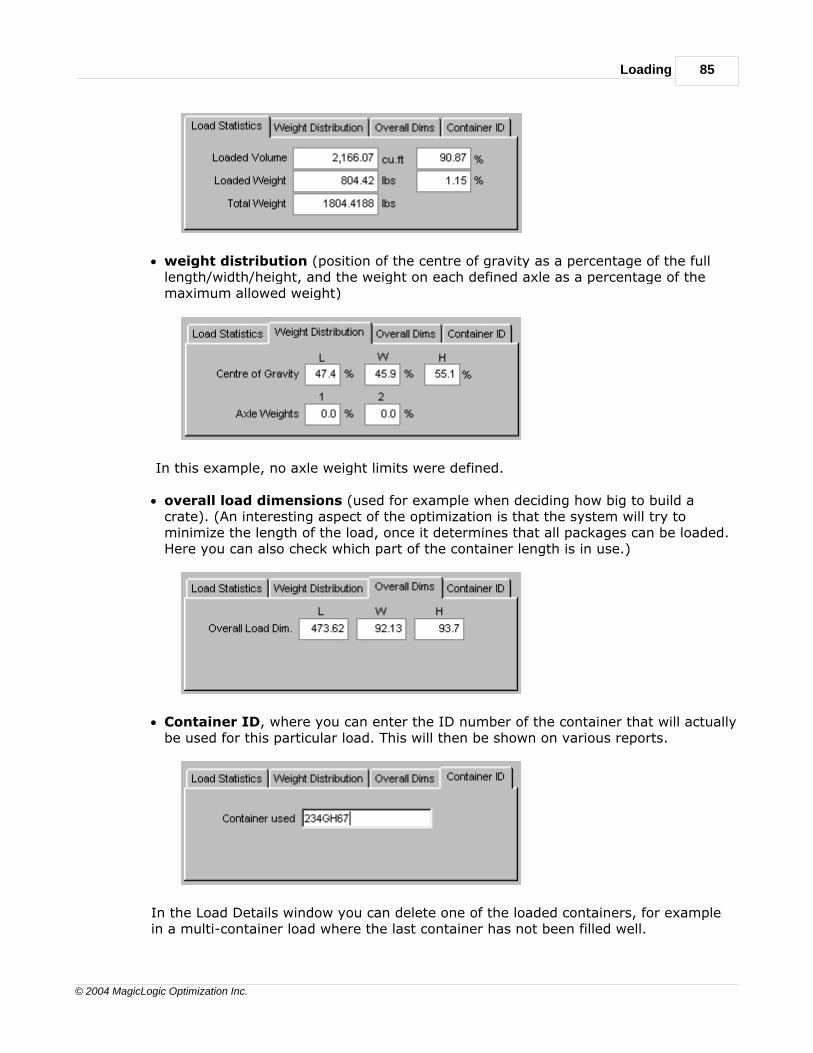
Loading 85
© 2004 MagicLogic Optimization Inc.
· weight distribution (position of the centre of gravity as a percentage of the fulllength/width/height, and the weight on each defined axle as a percentage of themaximum allowed weight)
In this example, no axle weight limits were defined.
· overall load dimensions (used for example when deciding how big to build acrate). (An interesting aspect of the optimization is that the system will try tominimize the length of the load, once it determines that all packages can be loaded.Here you can also check which part of the container length is in use.)
· Container ID, where you can enter the ID number of the container that will actuallybe used for this particular load. This will then be shown on various reports.
In the Load Details window you can delete one of the loaded containers, for examplein a multi-container load where the last container has not been filled well.
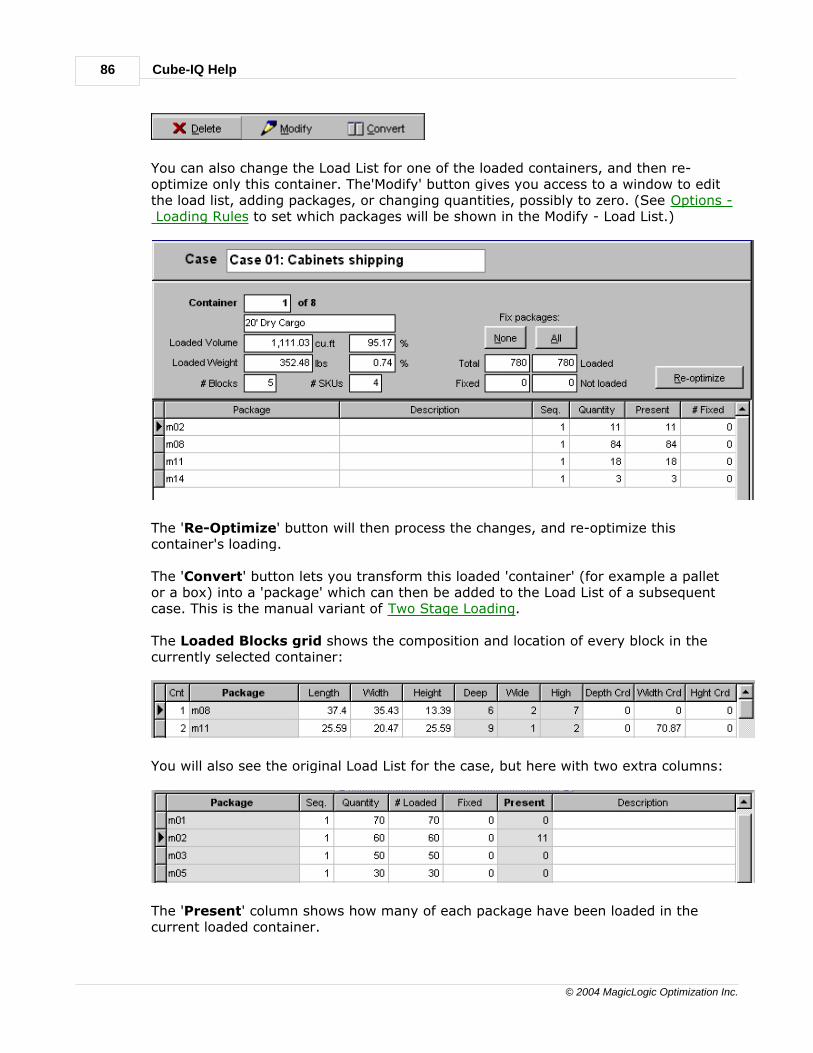
Cube-IQ Help86
© 2004 MagicLogic Optimization Inc.
You can also change the Load List for one of the loaded containers, and then re-optimize only this container. The'Modify' button gives you access to a window to editthe load list, adding packages, or changing quantities, possibly to zero. (See Options - Loading Rules to set which packages will be shown in the Modify - Load List.)
The 'Re-Optimize' button will then process the changes, and re-optimize thiscontainer's loading.
The 'Convert' button lets you transform this loaded 'container' (for example a palletor a box) into a 'package' which can then be added to the Load List of a subsequentcase. This is the manual variant of Two Stage Loading.
The Loaded Blocks grid shows the composition and location of every block in thecurrently selected container:
You will also see the original Load List for the case, but here with two extra columns:
The 'Present' column shows how many of each package have been loaded in thecurrent loaded container.
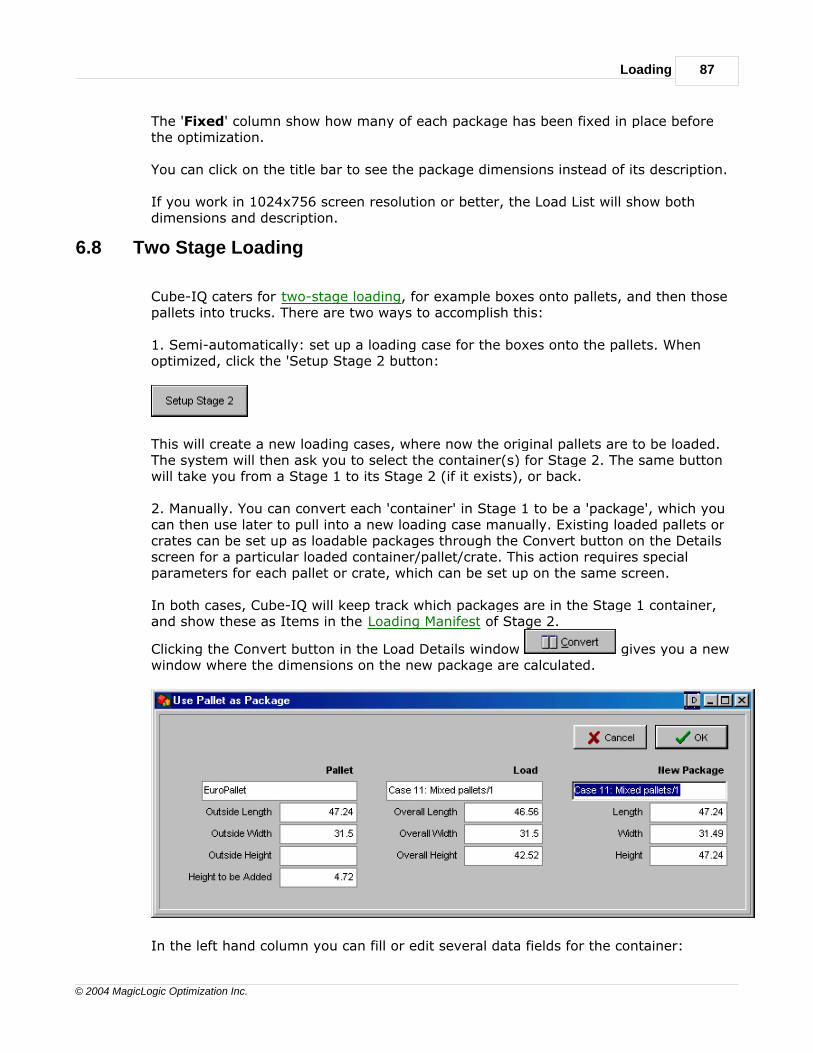
Loading 87
© 2004 MagicLogic Optimization Inc.
The 'Fixed' column show how many of each package has been fixed in place beforethe optimization.
You can click on the title bar to see the package dimensions instead of its description.
If you work in 1024x756 screen resolution or better, the Load List will show bothdimensions and description.
6.8 Two Stage Loading
Cube-IQ caters for two-stage loading, for example boxes onto pallets, and then thosepallets into trucks. There are two ways to accomplish this:
1. Semi-automatically: set up a loading case for the boxes onto the pallets. Whenoptimized, click the 'Setup Stage 2 button:
This will create a new loading cases, where now the original pallets are to be loaded.The system will then ask you to select the container(s) for Stage 2. The same buttonwill take you from a Stage 1 to its Stage 2 (if it exists), or back.
2. Manually. You can convert each 'container' in Stage 1 to be a 'package', which youcan then use later to pull into a new loading case manually. Existing loaded pallets orcrates can be set up as loadable packages through the Convert button on the Detailsscreen for a particular loaded container/pallet/crate. This action requires specialparameters for each pallet or crate, which can be set up on the same screen.
In both cases, Cube-IQ will keep track which packages are in the Stage 1 container,and show these as Items in the Loading Manifest of Stage 2.
Clicking the Convert button in the Load Details window gives you a newwindow where the dimensions on the new package are calculated.
In the left hand column you can fill or edit several data fields for the container:
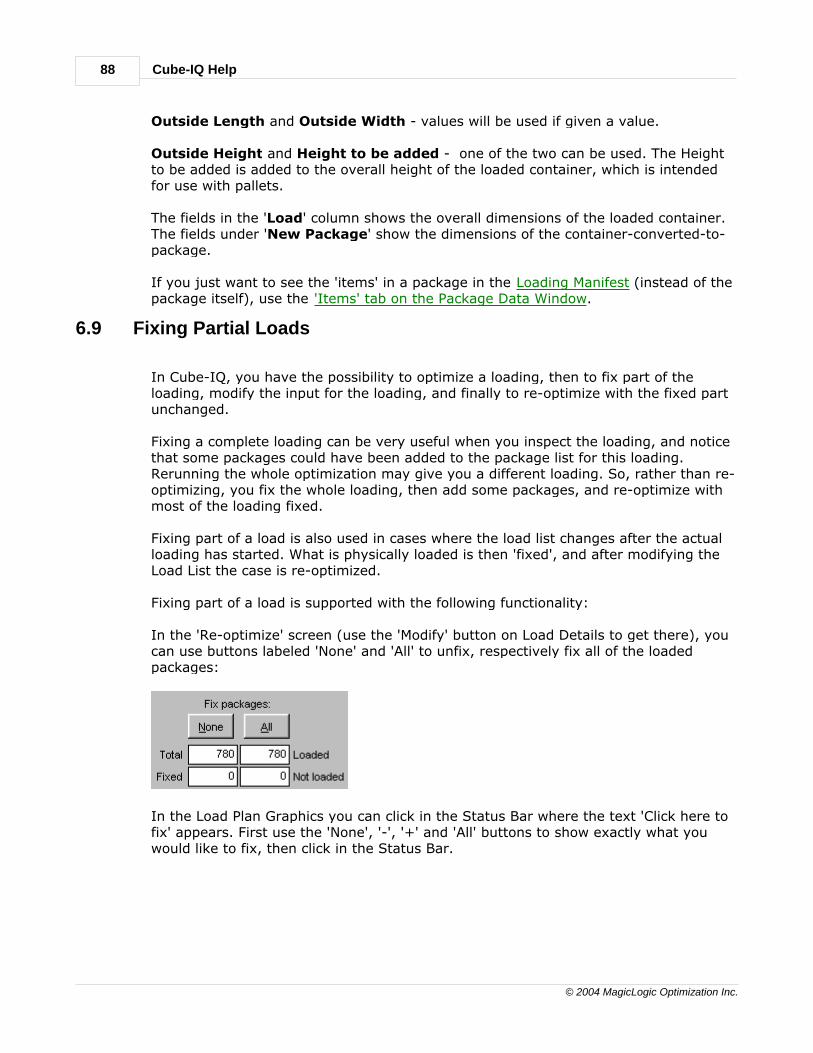
Cube-IQ Help88
© 2004 MagicLogic Optimization Inc.
Outside Length and Outside Width - values will be used if given a value.
Outside Height and Height to be added - one of the two can be used. The Heightto be added is added to the overall height of the loaded container, which is intendedfor use with pallets.
The fields in the 'Load' column shows the overall dimensions of the loaded container.The fields under 'New Package' show the dimensions of the container-converted-to-package.
If you just want to see the 'items' in a package in the Loading Manifest (instead of thepackage itself), use the 'Items' tab on the Package Data Window.
6.9 Fixing Partial Loads
In Cube-IQ, you have the possibility to optimize a loading, then to fix part of theloading, modify the input for the loading, and finally to re-optimize with the fixed partunchanged.
Fixing a complete loading can be very useful when you inspect the loading, and noticethat some packages could have been added to the package list for this loading.Rerunning the whole optimization may give you a different loading. So, rather than re-optimizing, you fix the whole loading, then add some packages, and re-optimize withmost of the loading fixed.
Fixing part of a load is also used in cases where the load list changes after the actualloading has started. What is physically loaded is then 'fixed', and after modifying theLoad List the case is re-optimized.
Fixing part of a load is supported with the following functionality:
In the 'Re-optimize' screen (use the 'Modify' button on Load Details to get there), youcan use buttons labeled 'None' and 'All' to unfix, respectively fix all of the loadedpackages:
In the Load Plan Graphics you can click in the Status Bar where the text 'Click here tofix' appears. First use the 'None', '-', '+' and 'All' buttons to show exactly what youwould like to fix, then click in the Status Bar.
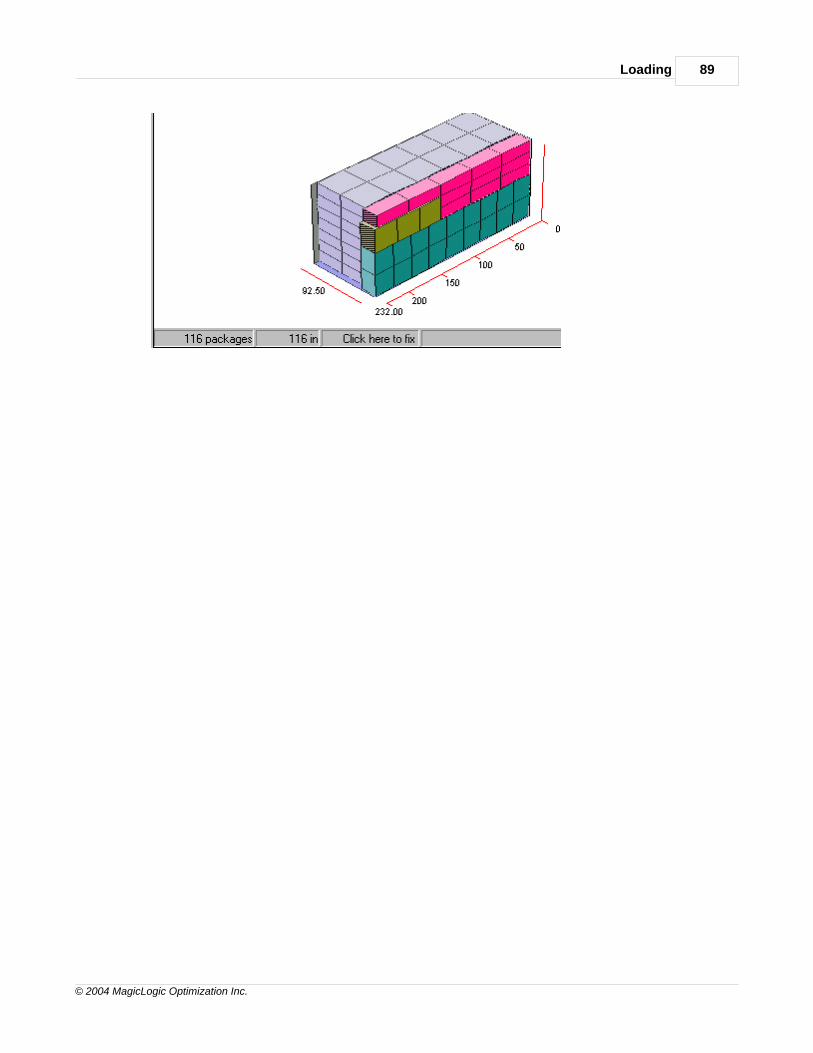
Loading 89
© 2004 MagicLogic Optimization Inc.

Cube-IQ 3.0User Guide
Part
VII
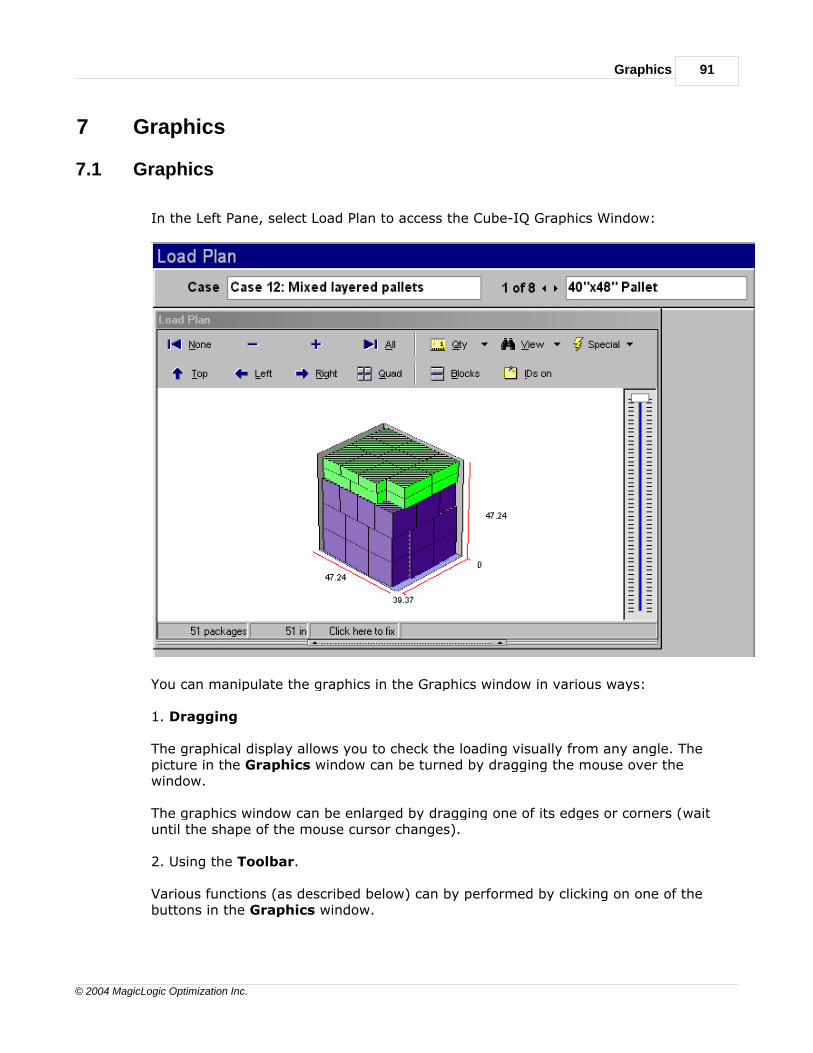
Graphics 91
© 2004 MagicLogic Optimization Inc.
7 Graphics
7.1 Graphics
In the Left Pane, select Load Plan to access the Cube-IQ Graphics Window:
You can manipulate the graphics in the Graphics window in various ways:
1. Dragging
The graphical display allows you to check the loading visually from any angle. Thepicture in the Graphics window can be turned by dragging the mouse over thewindow.
The graphics window can be enlarged by dragging one of its edges or corners (waituntil the shape of the mouse cursor changes).
2. Using the Toolbar.
Various functions (as described below) can by performed by clicking on one of thebuttons in the Graphics window.
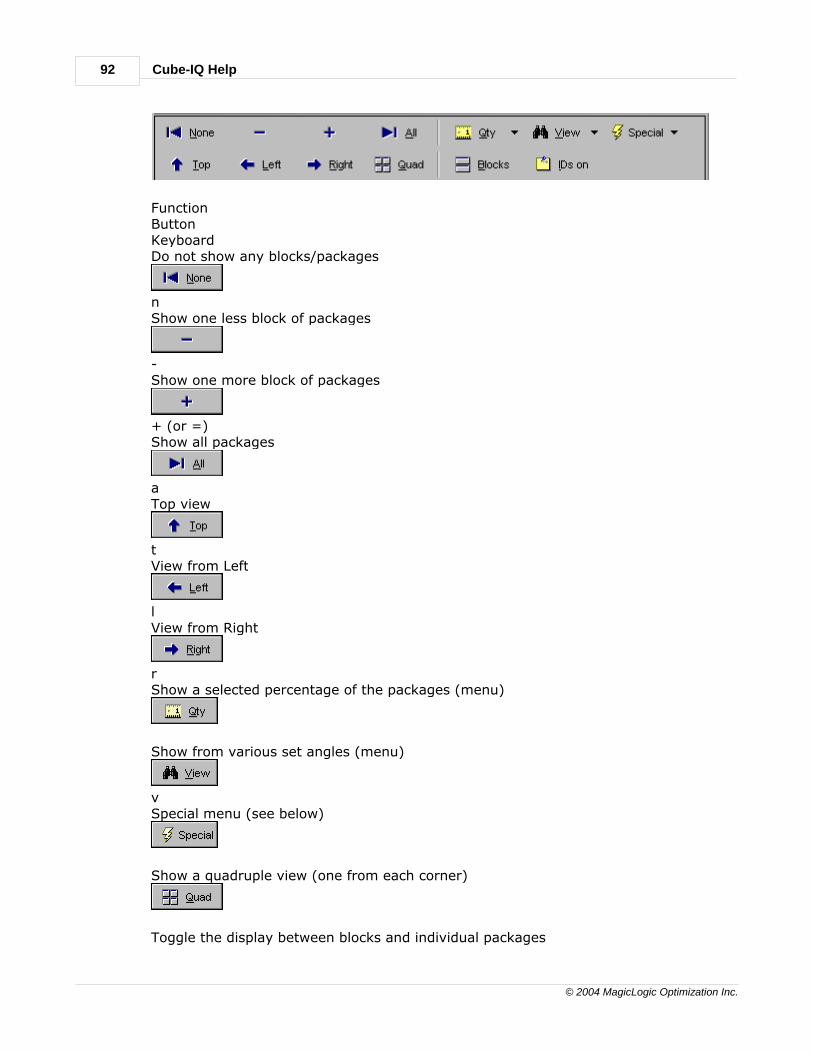
Cube-IQ Help92
© 2004 MagicLogic Optimization Inc.
FunctionButtonKeyboardDo not show any blocks/packages
nShow one less block of packages
-Show one more block of packages
+ (or =)Show all packages
aTop view
tView from Left
lView from Right
rShow a selected percentage of the packages (menu)
Show from various set angles (menu)
vSpecial menu (see below)
Show a quadruple view (one from each corner)
Toggle the display between blocks and individual packages
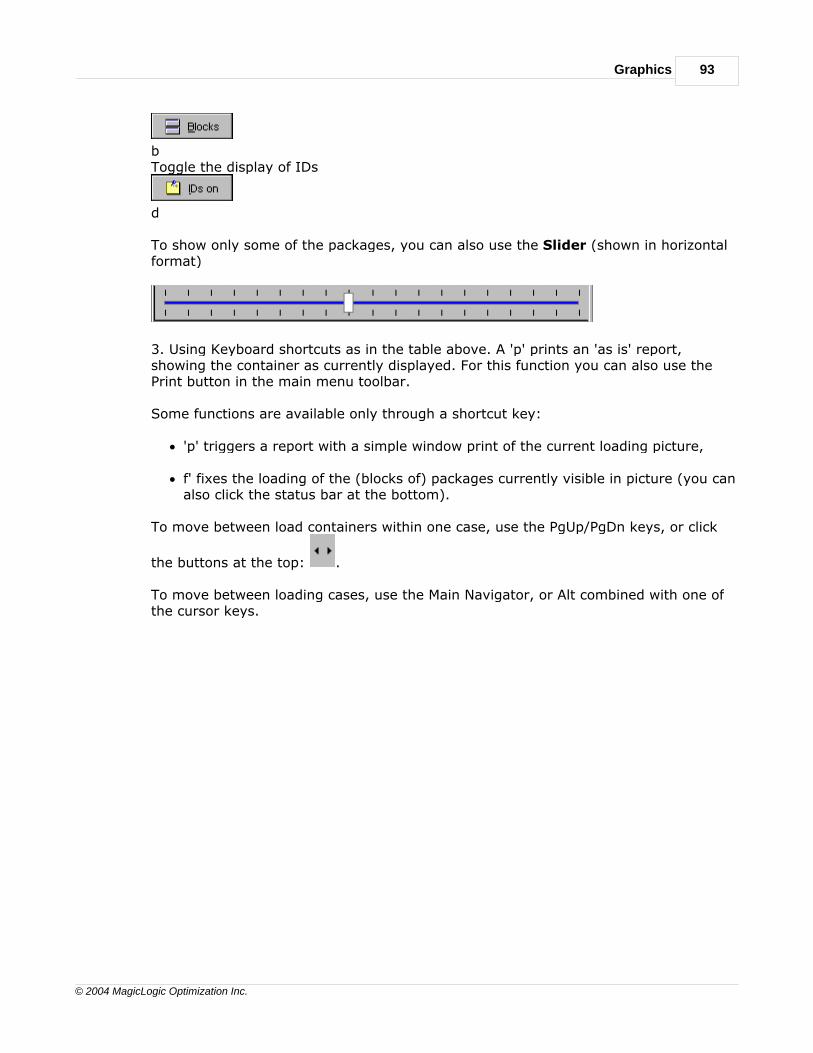
Graphics 93
© 2004 MagicLogic Optimization Inc.
bToggle the display of IDs
d
To show only some of the packages, you can also use the Slider (shown in horizontalformat)
3. Using Keyboard shortcuts as in the table above. A 'p' prints an 'as is' report,showing the container as currently displayed. For this function you can also use thePrint button in the main menu toolbar.
Some functions are available only through a shortcut key:
· 'p' triggers a report with a simple window print of the current loading picture,
· f' fixes the loading of the (blocks of) packages currently visible in picture (you canalso click the status bar at the bottom).
To move between load containers within one case, use the PgUp/PgDn keys, or click
the buttons at the top: .
To move between loading cases, use the Main Navigator, or Alt combined with one ofthe cursor keys.

Cube-IQ 3.0User Guide
Part
VIII
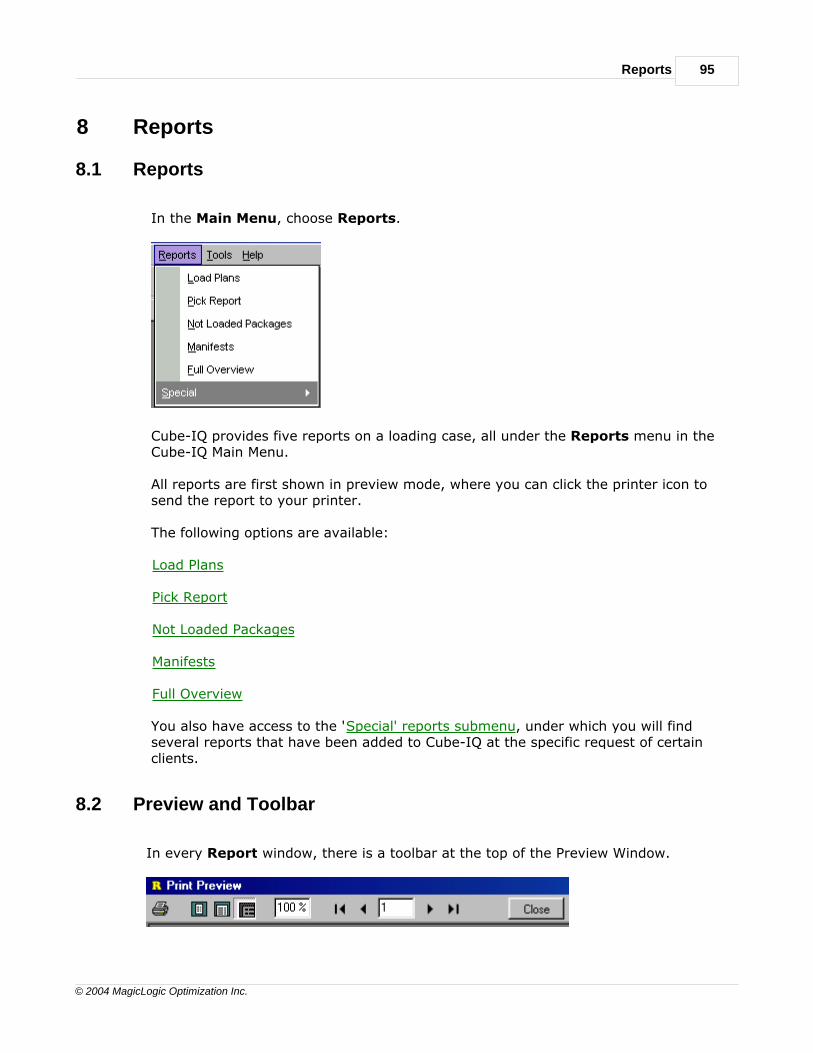
Reports 95
© 2004 MagicLogic Optimization Inc.
8 Reports
8.1 Reports
In the Main Menu, choose Reports.
Cube-IQ provides five reports on a loading case, all under the Reports menu in theCube-IQ Main Menu.
All reports are first shown in preview mode, where you can click the printer icon tosend the report to your printer.
The following options are available:
Load Plans
Pick Report
Not Loaded Packages
Manifests
Full Overview
You also have access to the 'Special' reports submenu, under which you will findseveral reports that have been added to Cube-IQ at the specific request of certainclients.
8.2 Preview and Toolbar
In every Report window, there is a toolbar at the top of the Preview Window.
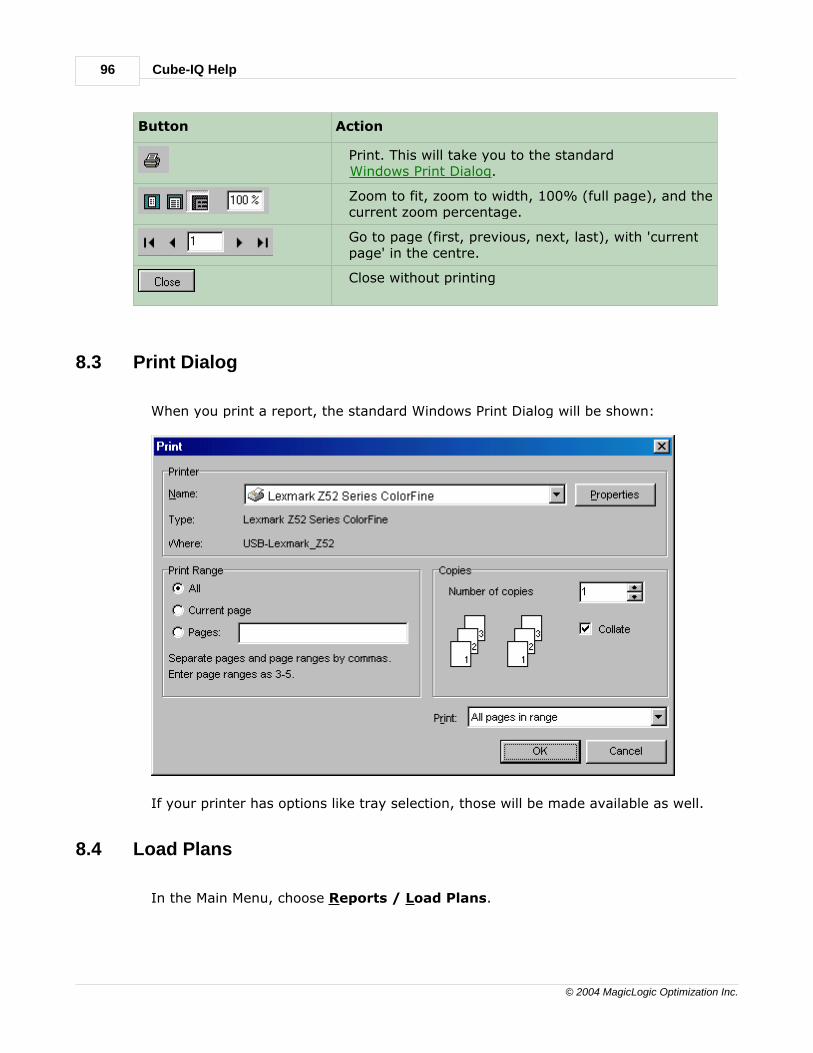
Cube-IQ Help96
© 2004 MagicLogic Optimization Inc.
Button Action
Print. This will take you to the standardWindows Print Dialog.
Zoom to fit, zoom to width, 100% (full page), and thecurrent zoom percentage.
Go to page (first, previous, next, last), with 'currentpage' in the centre.
Close without printing
8.3 Print Dialog
When you print a report, the standard Windows Print Dialog will be shown:
If your printer has options like tray selection, those will be made available as well.
8.4 Load Plans
In the Main Menu, choose Reports / Load Plans.
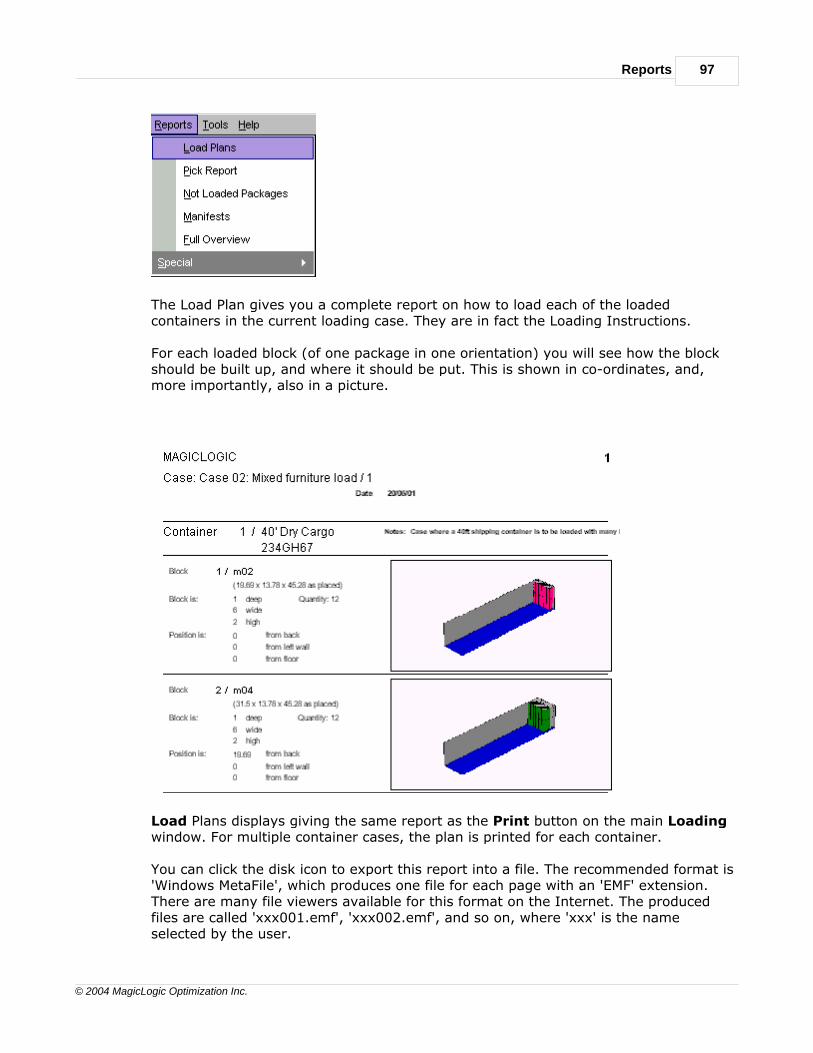
Reports 97
© 2004 MagicLogic Optimization Inc.
The Load Plan gives you a complete report on how to load each of the loadedcontainers in the current loading case. They are in fact the Loading Instructions.
For each loaded block (of one package in one orientation) you will see how the blockshould be built up, and where it should be put. This is shown in co-ordinates, and,more importantly, also in a picture.
Load Plans displays giving the same report as the Print button on the main Loadingwindow. For multiple container cases, the plan is printed for each container.
You can click the disk icon to export this report into a file. The recommended format is'Windows MetaFile', which produces one file for each page with an 'EMF' extension.There are many file viewers available for this format on the Internet. The producedfiles are called 'xxx001.emf', 'xxx002.emf', and so on, where 'xxx' is the nameselected by the user.
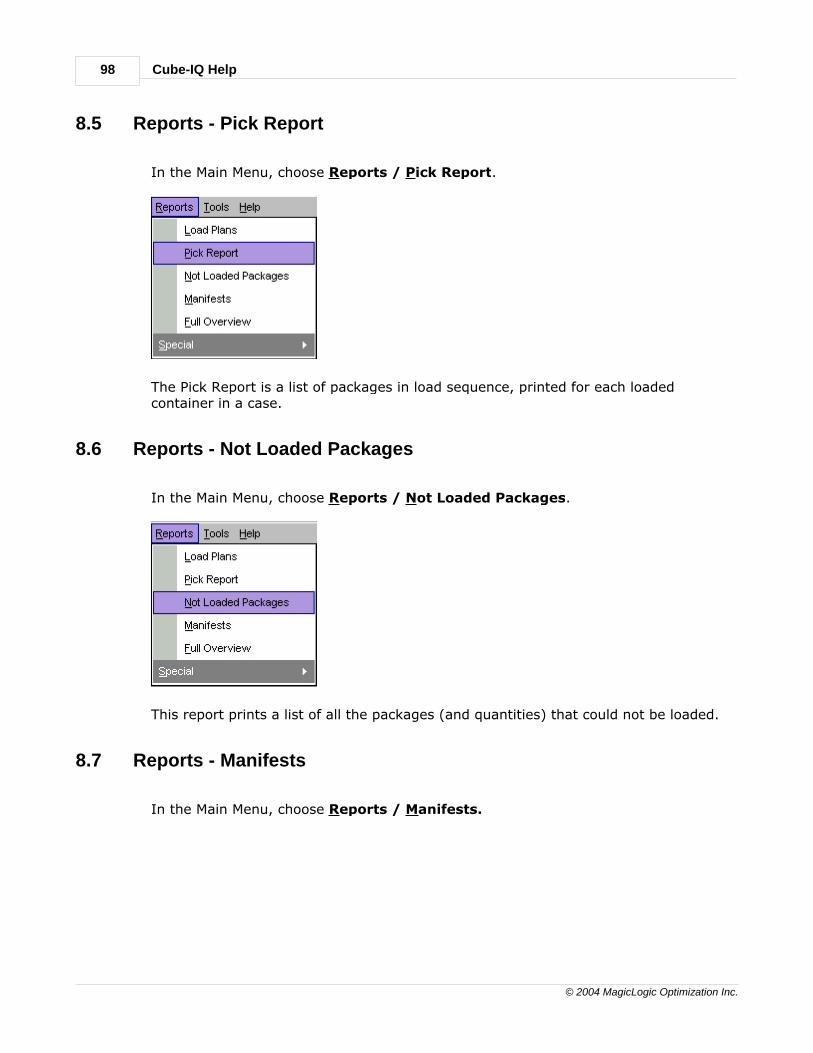
Cube-IQ Help98
© 2004 MagicLogic Optimization Inc.
8.5 Reports - Pick Report
In the Main Menu, choose Reports / Pick Report.
The Pick Report is a list of packages in load sequence, printed for each loadedcontainer in a case.
8.6 Reports - Not Loaded Packages
In the Main Menu, choose Reports / Not Loaded Packages.
This report prints a list of all the packages (and quantities) that could not be loaded.
8.7 Reports - Manifests
In the Main Menu, choose Reports / Manifests.
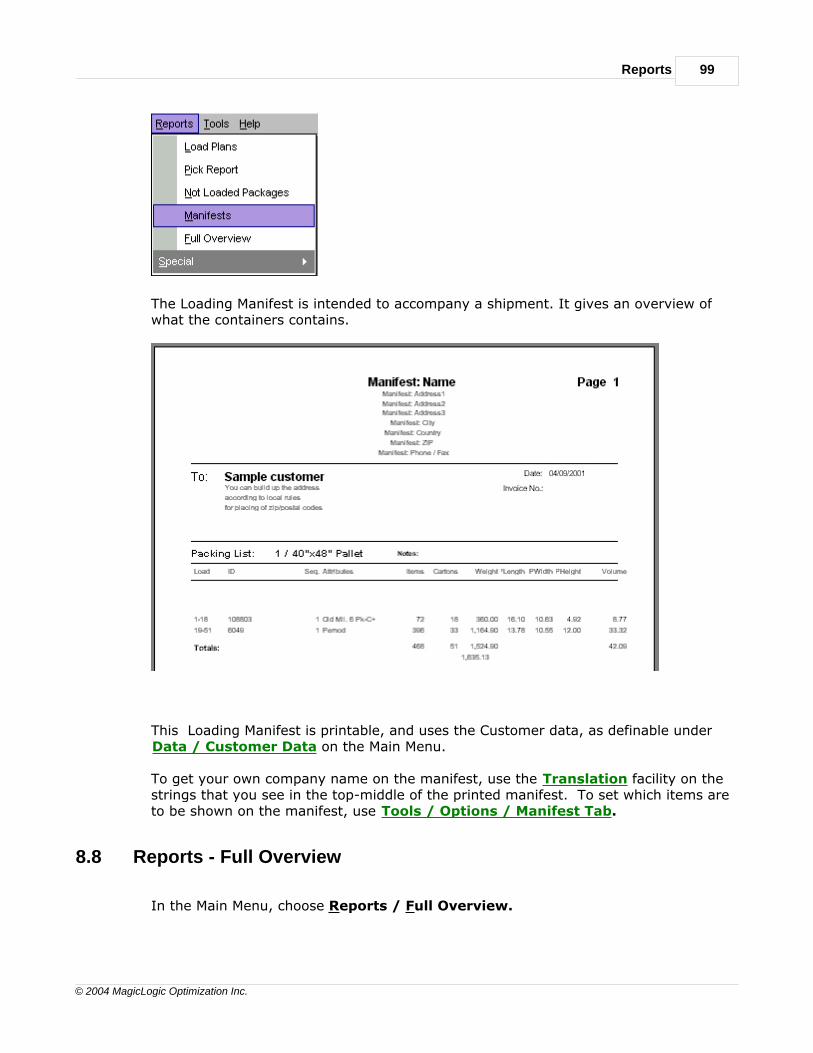
Reports 99
© 2004 MagicLogic Optimization Inc.
The Loading Manifest is intended to accompany a shipment. It gives an overview ofwhat the containers contains.
This Loading Manifest is printable, and uses the Customer data, as definable underData / Customer Data on the Main Menu.
To get your own company name on the manifest, use the Translation facility on thestrings that you see in the top-middle of the printed manifest. To set which items areto be shown on the manifest, use Tools / Options / Manifest Tab.
8.8 Reports - Full Overview
In the Main Menu, choose Reports / Full Overview.
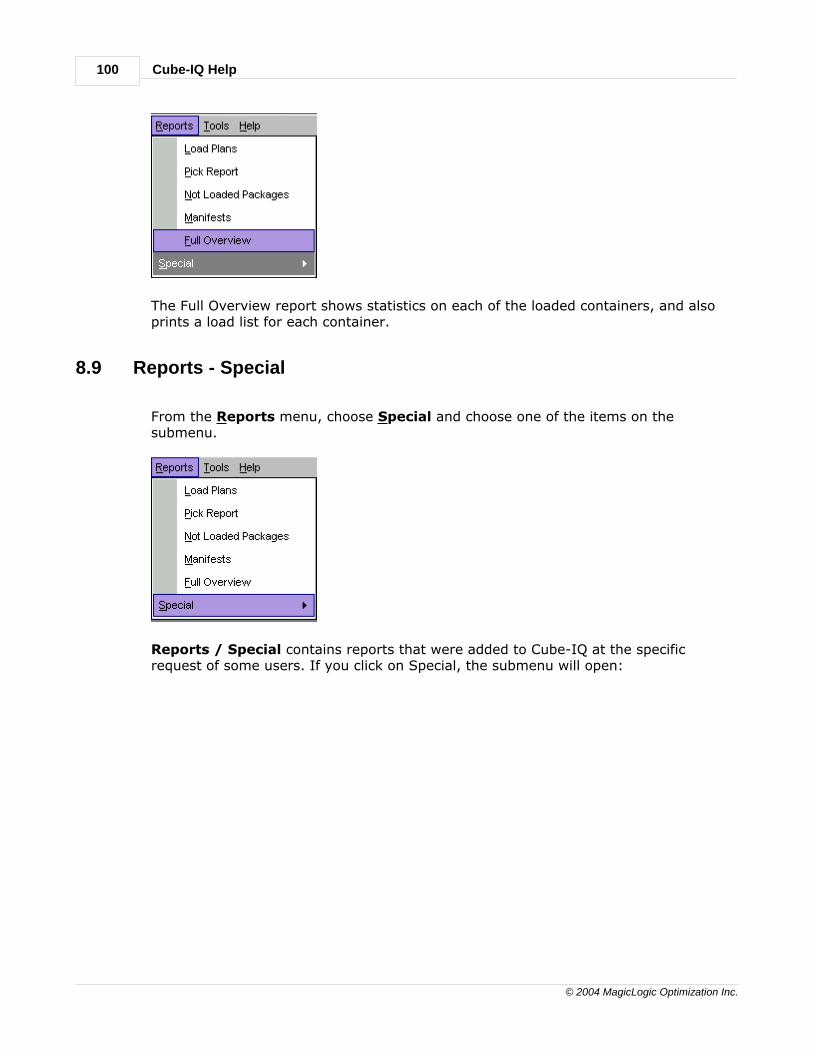
Cube-IQ Help100
© 2004 MagicLogic Optimization Inc.
The Full Overview report shows statistics on each of the loaded containers, and alsoprints a load list for each container.
8.9 Reports - Special
From the Reports menu, choose Special and choose one of the items on thesubmenu.
Reports / Special contains reports that were added to Cube-IQ at the specificrequest of some users. If you click on Special, the submenu will open:
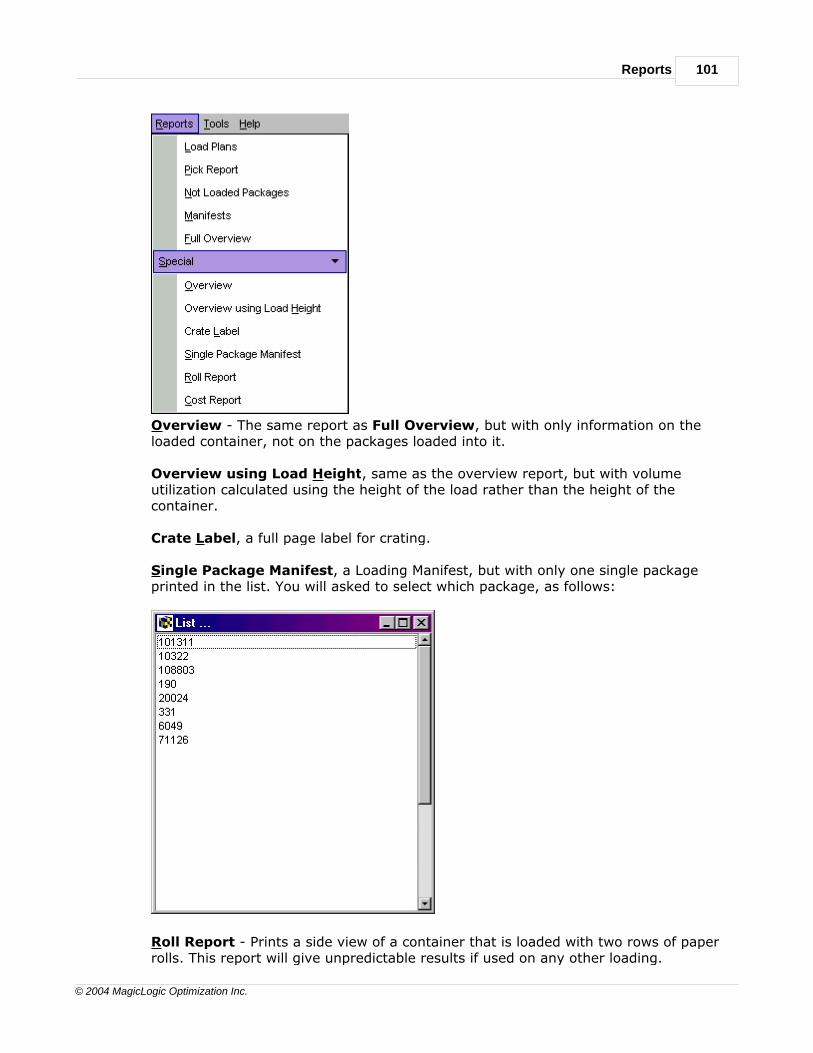
Reports 101
© 2004 MagicLogic Optimization Inc.
Overview - The same report as Full Overview, but with only information on theloaded container, not on the packages loaded into it.
Overview using Load Height, same as the overview report, but with volumeutilization calculated using the height of the load rather than the height of thecontainer.
Crate Label, a full page label for crating.
Single Package Manifest, a Loading Manifest, but with only one single packageprinted in the list. You will asked to select which package, as follows:
Roll Report - Prints a side view of a container that is loaded with two rows of paperrolls. This report will give unpredictable results if used on any other loading.

Cube-IQ Help102
© 2004 MagicLogic Optimization Inc.
Cost Report - Asks for the total cost of shipping the current container, and then givesa cost split over all loaded packages (proportional to their volumes)
Cube-IQ 3.0User Guide
Part
IX
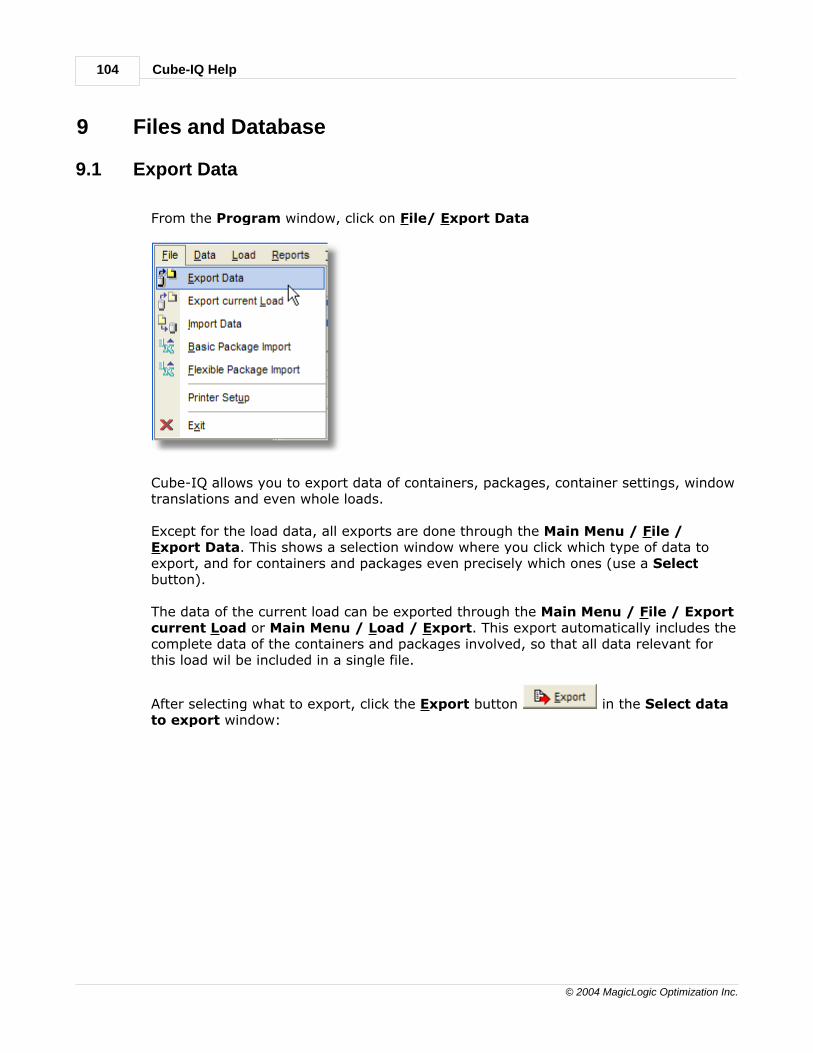
Cube-IQ Help104
© 2004 MagicLogic Optimization Inc.
9 Files and Database
9.1 Export Data
From the Program window, click on File/ Export Data
Cube-IQ allows you to export data of containers, packages, container settings, windowtranslations and even whole loads.
Except for the load data, all exports are done through the Main Menu / File /Export Data. This shows a selection window where you click which type of data toexport, and for containers and packages even precisely which ones (use a Selectbutton).
The data of the current load can be exported through the Main Menu / File / Exportcurrent Load or Main Menu / Load / Export. This export automatically includes thecomplete data of the containers and packages involved, so that all data relevant forthis load wil be included in a single file.
After selecting what to export, click the Export button in the Select datato export window:
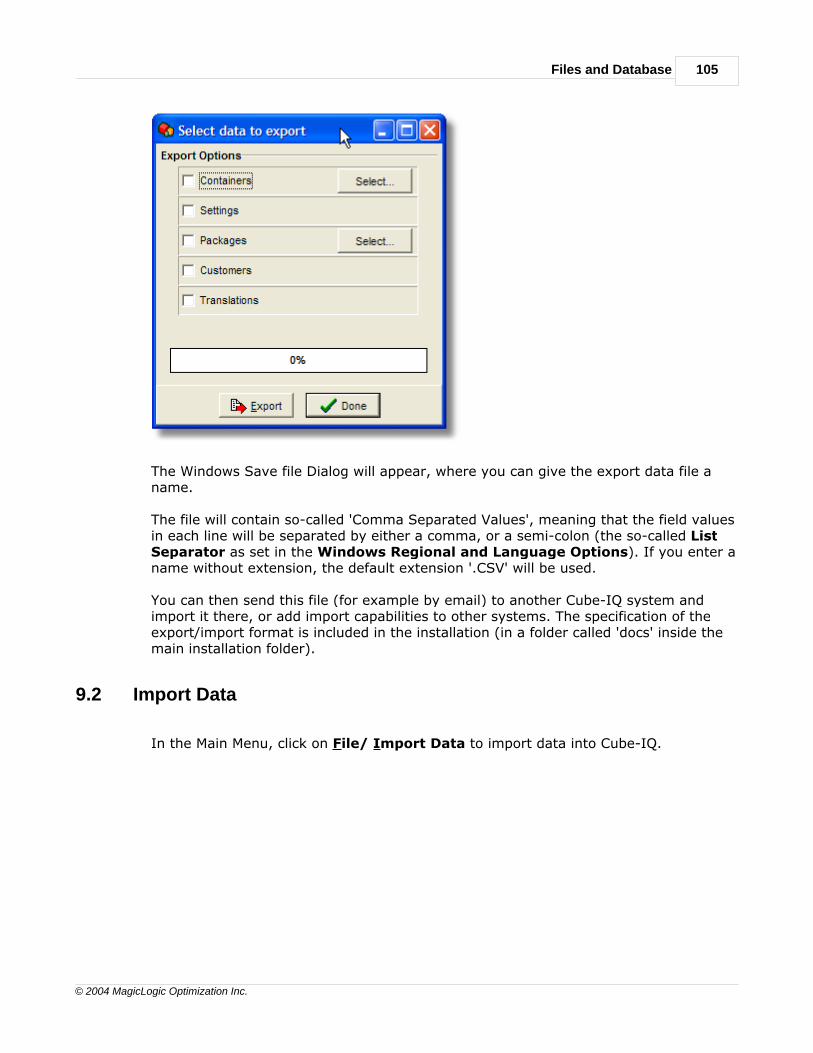
Files and Database 105
© 2004 MagicLogic Optimization Inc.
The Windows Save file Dialog will appear, where you can give the export data file aname.
The file will contain so-called 'Comma Separated Values', meaning that the field valuesin each line will be separated by either a comma, or a semi-colon (the so-called ListSeparator as set in the Windows Regional and Language Options). If you enter aname without extension, the default extension '.CSV' will be used.
You can then send this file (for example by email) to another Cube-IQ system andimport it there, or add import capabilities to other systems. The specification of theexport/import format is included in the installation (in a folder called 'docs' inside themain installation folder).
9.2 Import Data
In the Main Menu, click on File/ Import Data to import data into Cube-IQ.
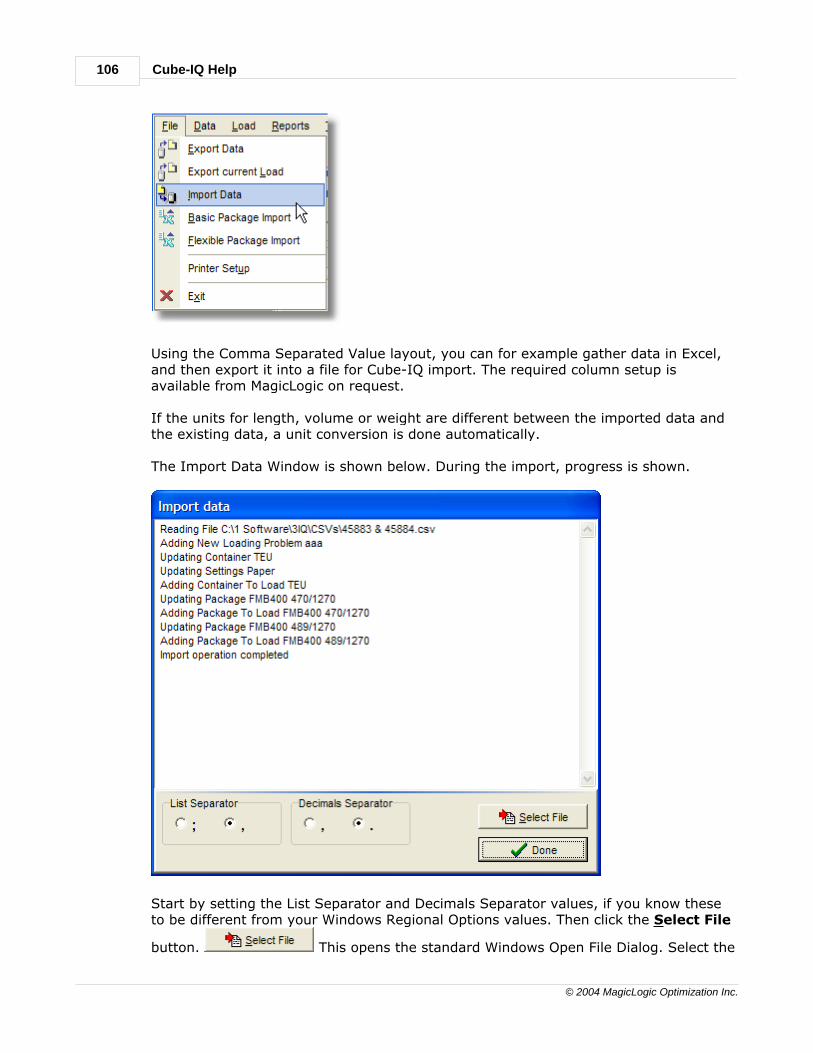
Cube-IQ Help106
© 2004 MagicLogic Optimization Inc.
Using the Comma Separated Value layout, you can for example gather data in Excel,and then export it into a file for Cube-IQ import. The required column setup isavailable from MagicLogic on request.
If the units for length, volume or weight are different between the imported data andthe existing data, a unit conversion is done automatically.
The Import Data Window is shown below. During the import, progress is shown.
Start by setting the List Separator and Decimals Separator values, if you know theseto be different from your Windows Regional Options values. Then click the Select File
button. This opens the standard Windows Open File Dialog. Select the

Files and Database 107
© 2004 MagicLogic Optimization Inc.
file you wish to import. Click Open to start the import.
If a data item is encountered with an id that already exists, you get the option to skip,overwrite, or rename.
To import a file that contains only basic package data, see Basic Package Import.
9.3 Basic Package Import
Cube-IQ gives you the option to import simple comma-delimited basic package data.In the Main Menu, select File / Basic Package Import.
The file to import should contain one line of text for each package, with on each
Cube-IQ Help108
© 2004 MagicLogic Optimization Inc.
line values for the following data fields (in this sequence):
· package id
· length
· width
· height
· weight
· description (optional)
The field values in each line should be separated by either a comma, or a semi-colon(the so-called List Separator from the Windows Regional and LanguageOptions). Such a text file can be created in for example Excel. Enter the data invarious columns (one row for each package), making sure that the List Separator(comma or semi-colon) does not occur in any text values ('package id' or'description'). Then save the file as type 'CSV (MS-DOS) (*.csv)', which is the so-called 'comma-delimited' format.
Basic Package Import only allows you to import the field values as given above. Ifyou would like to import more fields, you can use Flexible Package Import.
Data imported this way will be for the packages, which allows the user to select thesepackages eventually as part of a load. Adding the imported package to a load canalso be done directly in the import file, by adding one, two or three extra values:
1. quantity
2. sequence
3. group index
The first field (if present) must be the 'quantity', the second, if present, the 'loadingsequence number'. If any of these values is found, the package involved is not onlycreated in the Cube-IQ database, but also added to the currently visible load (withquantity, sequence, and group as imported).
9.4 Flexible Package Import
Cube-IQ gives you the option to import comma-delimited package data, while givingdefault values for missing data. In the Main Menu, select File / Flexible PackageImport.
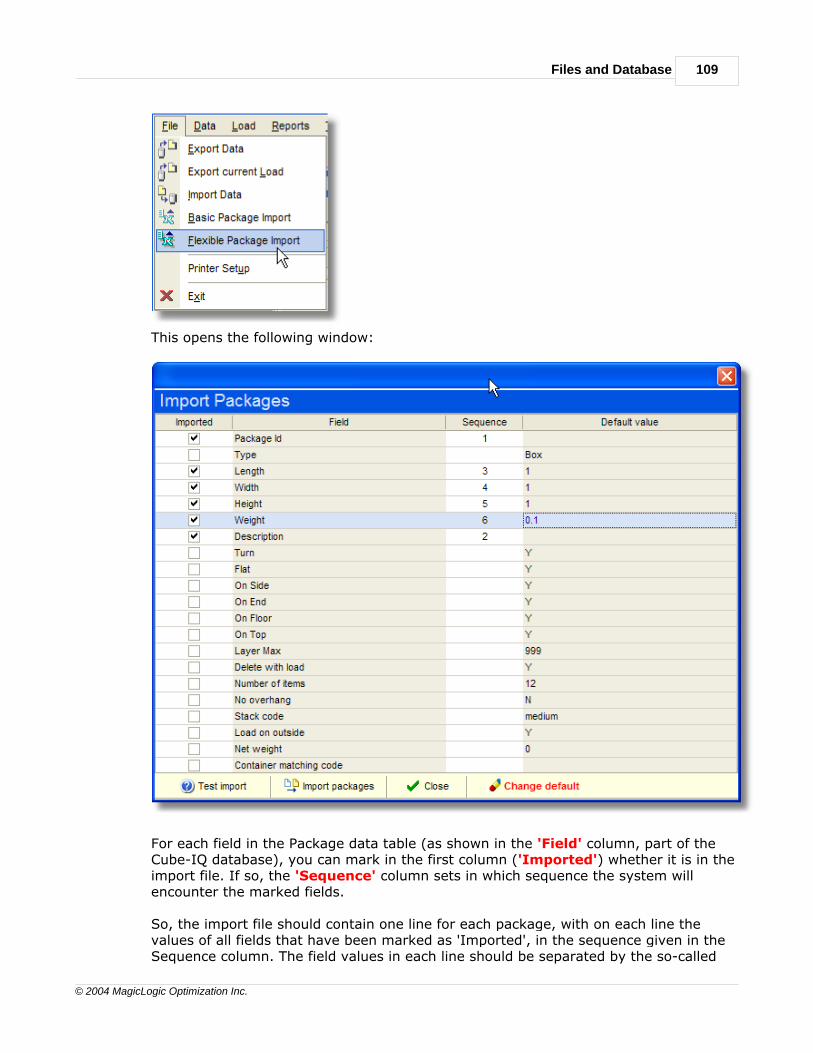
Files and Database 109
© 2004 MagicLogic Optimization Inc.
This opens the following window:
For each field in the Package data table (as shown in the 'Field' column, part of theCube-IQ database), you can mark in the first column ('Imported') whether it is in theimport file. If so, the 'Sequence' column sets in which sequence the system willencounter the marked fields.
So, the import file should contain one line for each package, with on each line thevalues of all fields that have been marked as 'Imported', in the sequence given in theSequence column. The field values in each line should be separated by the so-called
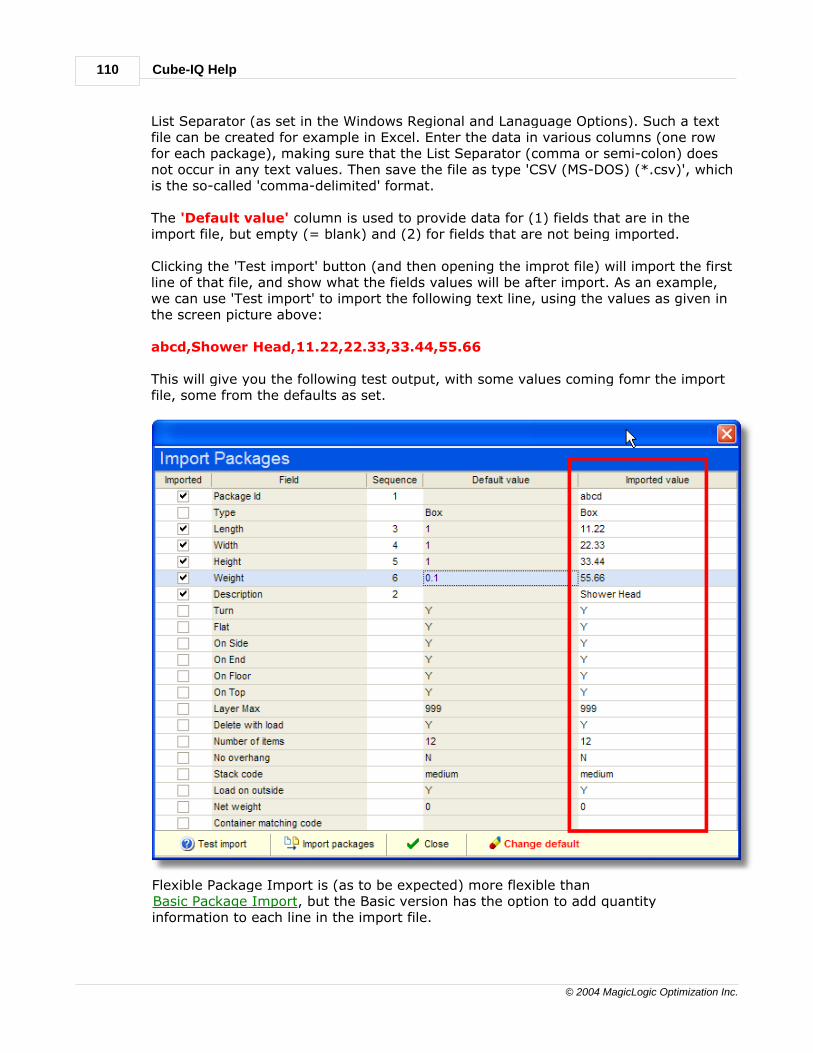
Cube-IQ Help110
© 2004 MagicLogic Optimization Inc.
List Separator (as set in the Windows Regional and Lanaguage Options). Such a textfile can be created for example in Excel. Enter the data in various columns (one rowfor each package), making sure that the List Separator (comma or semi-colon) doesnot occur in any text values. Then save the file as type 'CSV (MS-DOS) (*.csv)', whichis the so-called 'comma-delimited' format.
The 'Default value' column is used to provide data for (1) fields that are in theimport file, but empty (= blank) and (2) for fields that are not being imported.
Clicking the 'Test import' button (and then opening the improt file) will import the firstline of that file, and show what the fields values will be after import. As an example,we can use 'Test import' to import the following text line, using the values as given inthe screen picture above:
abcd,Shower Head,11.22,22.33,33.44,55.66
This will give you the following test output, with some values coming fomr the importfile, some from the defaults as set.
Flexible Package Import is (as to be expected) more flexible thanBasic Package Import, but the Basic version has the option to add quantityinformation to each line in the import file.
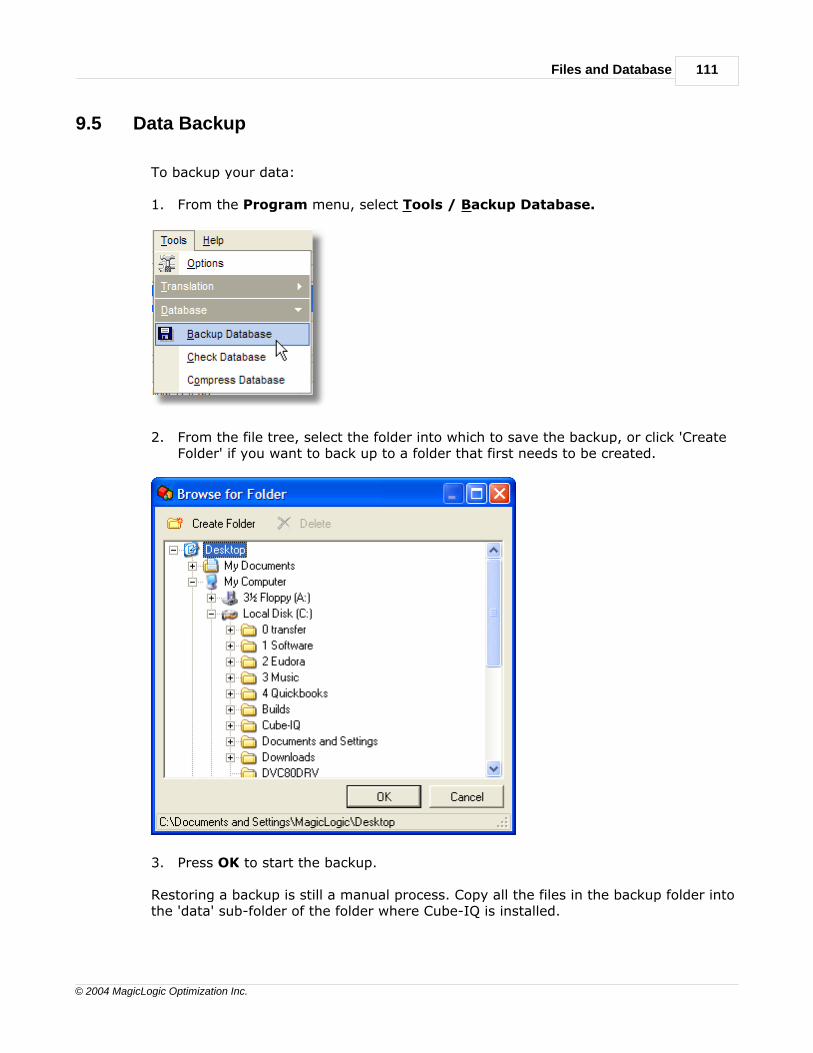
Files and Database 111
© 2004 MagicLogic Optimization Inc.
9.5 Data Backup
To backup your data:
1. From the Program menu, select Tools / Backup Database.
2. From the file tree, select the folder into which to save the backup, or click 'CreateFolder' if you want to back up to a folder that first needs to be created.
3. Press OK to start the backup.
Restoring a backup is still a manual process. Copy all the files in the backup folder intothe 'data' sub-folder of the folder where Cube-IQ is installed.
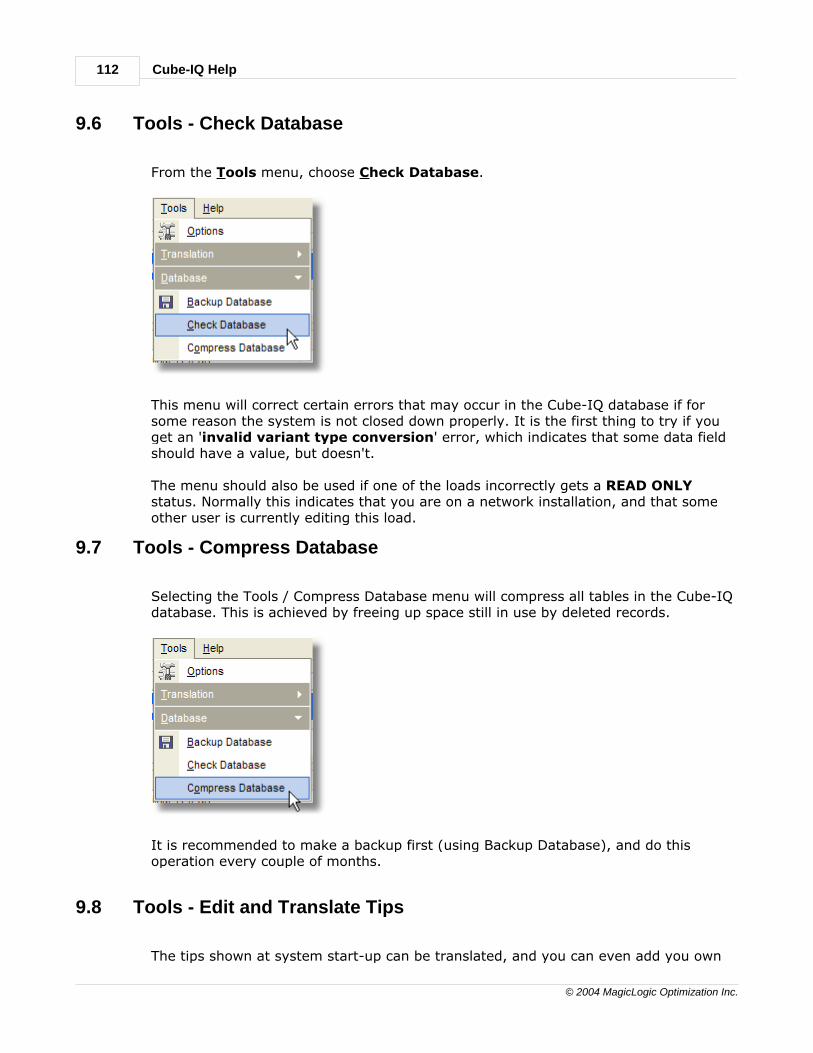
Cube-IQ Help112
© 2004 MagicLogic Optimization Inc.
9.6 Tools - Check Database
From the Tools menu, choose Check Database.
This menu will correct certain errors that may occur in the Cube-IQ database if forsome reason the system is not closed down properly. It is the first thing to try if youget an 'invalid variant type conversion' error, which indicates that some data fieldshould have a value, but doesn't.
The menu should also be used if one of the loads incorrectly gets a READ ONLYstatus. Normally this indicates that you are on a network installation, and that someother user is currently editing this load.
9.7 Tools - Compress Database
Selecting the Tools / Compress Database menu will compress all tables in the Cube-IQdatabase. This is achieved by freeing up space still in use by deleted records.
It is recommended to make a backup first (using Backup Database), and do thisoperation every couple of months.
9.8 Tools - Edit and Translate Tips
The tips shown at system start-up can be translated, and you can even add you own
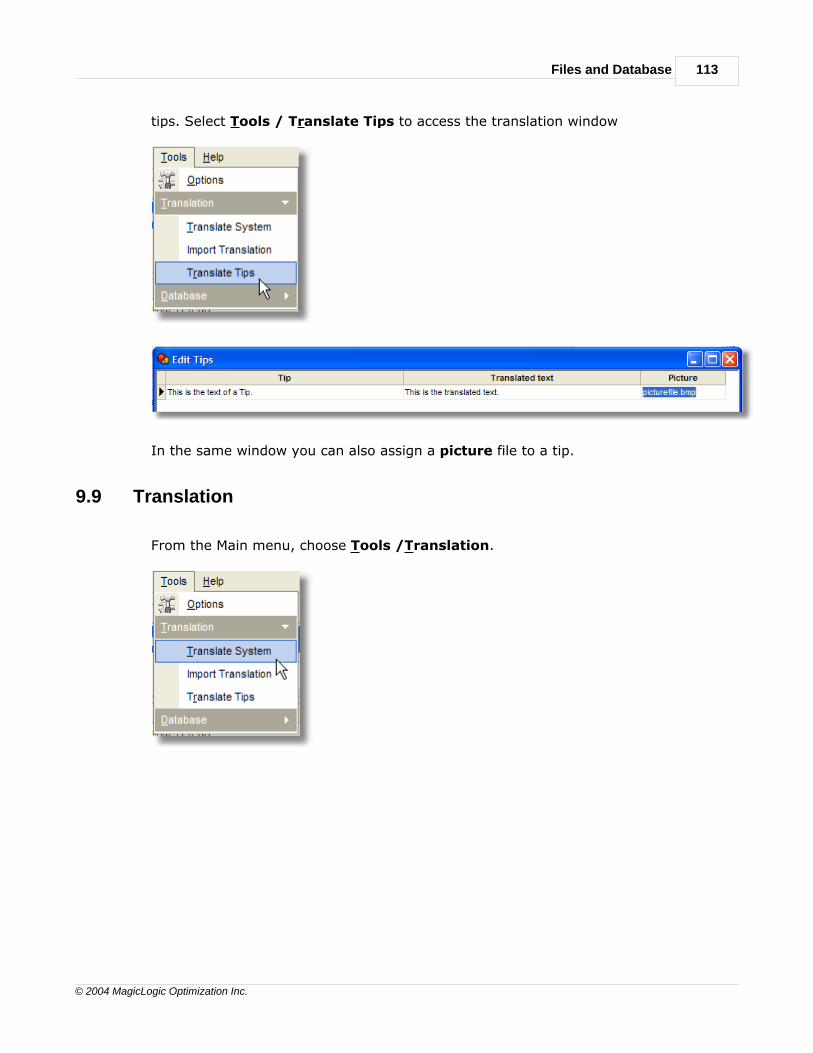
Files and Database 113
© 2004 MagicLogic Optimization Inc.
tips. Select Tools / Translate Tips to access the translation window
In the same window you can also assign a picture file to a tip.
9.9 Translation
From the Main menu, choose Tools /Translation.
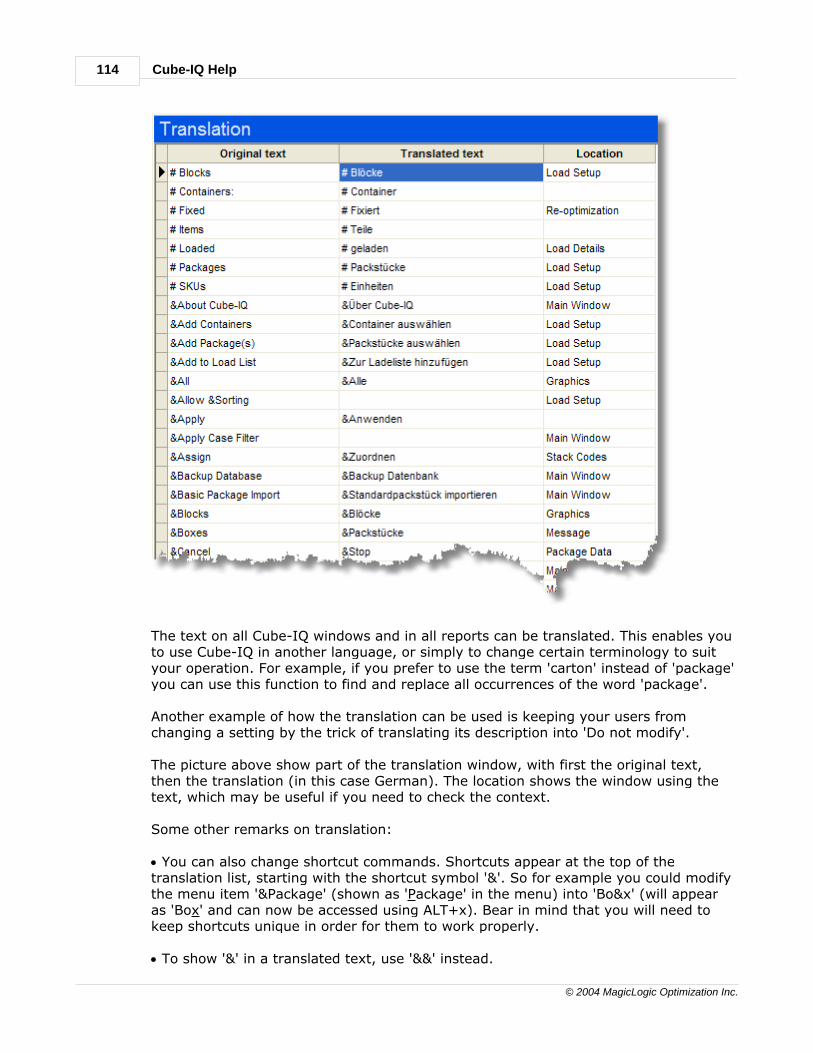
Cube-IQ Help114
© 2004 MagicLogic Optimization Inc.
The text on all Cube-IQ windows and in all reports can be translated. This enables youto use Cube-IQ in another language, or simply to change certain terminology to suityour operation. For example, if you prefer to use the term 'carton' instead of 'package'you can use this function to find and replace all occurrences of the word 'package'.
Another example of how the translation can be used is keeping your users fromchanging a setting by the trick of translating its description into 'Do not modify'.
The picture above show part of the translation window, with first the original text,then the translation (in this case German). The location shows the window using thetext, which may be useful if you need to check the context.
Some other remarks on translation:
· You can also change shortcut commands. Shortcuts appear at the top of thetranslation list, starting with the shortcut symbol '&'. So for example you could modifythe menu item '&Package' (shown as 'Package' in the menu) into 'Bo&x' (will appearas 'Box' and can now be accessed using ALT+x). Bear in mind that you will need tokeep shortcuts unique in order for them to work properly.
· To show '&' in a translated text, use '&&' instead.
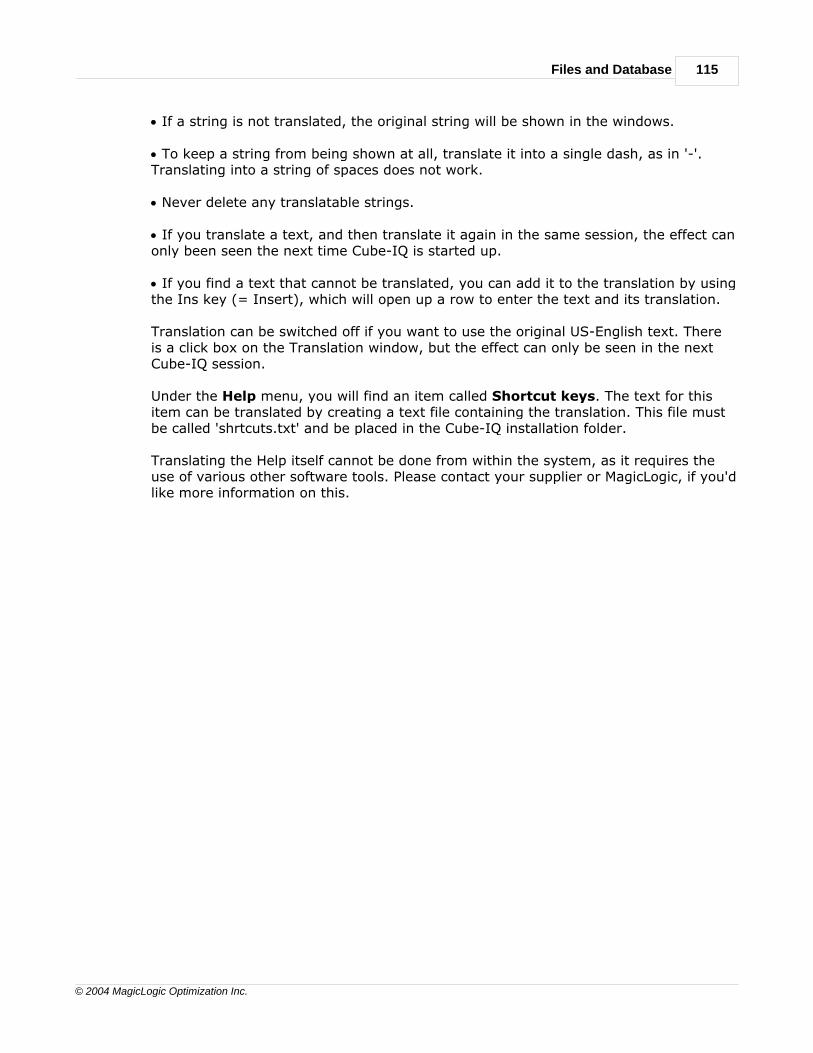
Files and Database 115
© 2004 MagicLogic Optimization Inc.
· If a string is not translated, the original string will be shown in the windows.
· To keep a string from being shown at all, translate it into a single dash, as in '-'.Translating into a string of spaces does not work.
· Never delete any translatable strings.
· If you translate a text, and then translate it again in the same session, the effect canonly been seen the next time Cube-IQ is started up.
· If you find a text that cannot be translated, you can add it to the translation by usingthe Ins key (= Insert), which will open up a row to enter the text and its translation.
Translation can be switched off if you want to use the original US-English text. Thereis a click box on the Translation window, but the effect can only be seen in the nextCube-IQ session.
Under the Help menu, you will find an item called Shortcut keys. The text for thisitem can be translated by creating a text file containing the translation. This file mustbe called 'shrtcuts.txt' and be placed in the Cube-IQ installation folder.
Translating the Help itself cannot be done from within the system, as it requires theuse of various other software tools. Please contact your supplier or MagicLogic, if you'dlike more information on this.

Cube-IQ 3.0User Guide
Part
X
Help 117
© 2004 MagicLogic Optimization Inc.
10 Help
10.1 Help - About Cube-IQ
If you need support and suspect some system problem, check the Help / AboutCube-IQ to find the current release and build number.
The About window also gives you a direct email link to MagicLogic. This works withmost but not all email programs.
10.2 Help - Register Cube-IQ
If you have an unregistered (trial) version of Cube-IQ, use Help / Register Cube-IQto enter the unlock code. This will be given to you by MagicLogic when you purchase alicense to the software.
10.3 Help - Register Options
When you first purchase a license for Cube-IQ, the unlock code will give you access tothe base version, and to all options included in your license. If you later decide to addoptions, use Help / Register Options to enter the code given to you by MagicLogicto open up the added options.
10.4 About MagicLogic
MagicLogic Optimization Inc. of Langley, British Columbia, Canada specializes insolving complex optimization problems. MagicLogic has been active in various types ofscheduling optimization. Besides Cube-IQ for Container Loading, the company marketsPlan-IQ for Panel Cutting Optimization, as used in the wood cutting, sheet metal, glassand PCB industry.
World Wide Web: www.magiclogic.comPhone: +1-604-532 8662 (Toll Free in North America: 866-535 5133)Email: [email protected] or [email protected]
Altura Limited is a UK-based company that developed the graphical engine for Cube-IQ. The company specializes in bespoke software applications such as Cube-IQ, andalso creates graphics and images for video and the Web.
World Wide Web: www.altura.co.ukPhone: +44-1273-502 544Email: [email protected]
Index- C -Container - Report 44
Container Data Window 29
Containers - Axle Weights 35
Containers - Outside Dimensions 37
Containers - Pallet Rules 32
Containers 30
Container - Report 44
Container Data Window 29
Containers - Data 31
Containers - Drawing 38
Containers - Outside Dimensions 37
Containers - Shape 33
Containers - Unusable Spaces 36
Load - Load Details 83
Load - Other Case Data 80
Containers - Axle Weights 35
Containers - Drawing 38
Containers - Outside Dimensions 37
Containers - Shape 33
Containers - Unusable Spaces 36
Customer - Data Window 47
- G -Graphics 91
- H -Help - About Cube-IQ 117
Help - Register Cube-IQ 117
Help - Register Options 117
- I -Intro - About Help 4
Intro - Main Menu 9
Intro - Database Navigation 4
File - Basic Package Import 107
File - Export Data 104
File - Import Data 105
Intro - Shortcut Keys 12
Intro - Getting Started 3
Intro - Introduction to Cube-IQ 3
Intro - Getting Started 3
Intro - Main Menu 9
Options 18
Tools - Backup Database 111
Tools - Check Database 112
Tools - Compress Database 112
Tools - Translate Tips 112
Tools - Translation 113
Intro - Main Window 5
Intro - Shortcut Keys 12
Intro - Support 16
Help - About Cube-IQ 117
Help - About MagicLogic 117
Intro - System Requirements 15
Intro - Units 14
- L -Load - Add New Package 77
Load - Add Orders 76
Load - Add Packages 75
Load - by Weight 79
Load - Fixing Packages 88
Load - Load Details 83
Load - Load List 73
Load - Operations 68
Customer - Data Window 47
Intro - Main Window 5
Load - Add Packages 75
Load - Container List 71
Load - Fixing Packages 88
Load - Load Details 83
Load - Load List 73
Load - Loaded Containers Details 82
Load - Other Case Data 80
Load - Setup Window 69
Load - Split Package Line 78
Load - Two Stage Loading 87
Reports - Load Plans 96
Reports - Manifests 98
Reports - Not Loaded Packages 98
Reports - Pick Report 98
Tools - Check Database 112
Load - Other Case Data 80
Cube-IQ Help118
© 2004 MagicLogic Optimization Inc.
- O -Options 18
Load - Load Details 83
Options - General 18
Options - Graphics 23
Options - Manifest 24, 25
Options - Miscellaneous 26
Options - General 18
Options - Graphics 23
Options - Loading Rules 22
Options - Manifest 24, 25
Options - Miscellaneous 26
Options - Printing 21
- P -Package Data Window 50
Containers - Drawing 38
Load - Load List 73
Load - Other Case Data 80
Options - Loading Rules 22
Options - Printing 21
Package - Report 65
Packages - Data 53
Packages - Drawing 59
Packages - Items 56
Packages - Stacking Codes 62
Packages Grid View 60
Settings - Operational 41
Packages - Data 53
Packages - Drawing 59
Packages - Items 56
Packages - Orientations 53
Print 44
Container - Report 44
- R -Reports - Introduction 95
Container - Report 44
Package - Report 65
Report - Preview Screen 95
Report - Print Dialog 96
Reports - Full Overview 99
Reports - Load Plans 96
Reports - Manifests 98
Reports - Not Loaded Packages 98
Reports - Pick Report 98
Reports - Special 100
Reports - Load Plans 96
Graphics 91
Reports - Manifests 98
Reports - Not Loaded Packages 98
Reports - Pick Report 98
Reports - Special 100
- S -Settings - Data Window 39
Containers - Pallet Rules 32
Settings - Centre of Gravity 44
Settings - Loading 42
Settings - Operational 41
Settings - Optimizer 40
Settings - Loading 42
Settings - Operational 41
Settings - Optimizer 40
Load - by Weight 79
- T -Tools - Backup Database 111
Tools - Check Database 112
Tools - Compress Database 112
Tools - Translate Tips 112
Tools - Translation 113
Intro - Startup Tips 15
Index 119
© 2004 MagicLogic Optimization Inc.

Cube-IQ Help120
© 2004 MagicLogic Optimization Inc.