advanced user guide
TRANSCRIPT

Advanced User Guide
E
CT2-D101-A © CANON INC. 2020

Contents
Introduction. . . . . . . . . . . . . . . . . . . . . . . . . . . . . . . . . . . . . . . . . . . . . . . . 9Package Contents. . . . . . . . . . . . . . . . . . . . . . . . . . . . . . . . . . . . . . . . . . . . . . 10
Instruction Manuals. . . . . . . . . . . . . . . . . . . . . . . . . . . . . . . . . . . . . . . . . . . . . 11
Quick Start Guide. . . . . . . . . . . . . . . . . . . . . . . . . . . . . . . . . . . . . . . . . . . . . . . 12
About This Guide. . . . . . . . . . . . . . . . . . . . . . . . . . . . . . . . . . . . . . . . . . . . . . . 16
Compatible Cards. . . . . . . . . . . . . . . . . . . . . . . . . . . . . . . . . . . . . . . . . . . . . . 18
Safety Instructions. . . . . . . . . . . . . . . . . . . . . . . . . . . . . . . . . . . . . . . . . . . . . . 19
Handling Precautions. . . . . . . . . . . . . . . . . . . . . . . . . . . . . . . . . . . . . . . . . . . . 22
Part Names. . . . . . . . . . . . . . . . . . . . . . . . . . . . . . . . . . . . . . . . . . . . . . . . . . . 24
Software. . . . . . . . . . . . . . . . . . . . . . . . . . . . . . . . . . . . . . . . . . . . . . . . . . . . . . 32
Preparation and Basic Operations. . . . . . . . . . . . . . . . . . . . . . . . . . . . . 36Charging the Battery. . . . . . . . . . . . . . . . . . . . . . . . . . . . . . . . . . . . . . . . . . . . 37
Inserting/Removing the Battery and Card. . . . . . . . . . . . . . . . . . . . . . . . . . . . 40
Using the Screen. . . . . . . . . . . . . . . . . . . . . . . . . . . . . . . . . . . . . . . . . . . . . . . 46
Turning on the Power. . . . . . . . . . . . . . . . . . . . . . . . . . . . . . . . . . . . . . . . . . . . 48
Attaching/Detaching Lenses. . . . . . . . . . . . . . . . . . . . . . . . . . . . . . . . . . . . . . 51
Attaching/Detaching EF/EF-S Lenses. . . . . . . . . . . . . . . . . . . . . . . . . . . . . . . 55
Basic Operations. . . . . . . . . . . . . . . . . . . . . . . . . . . . . . . . . . . . . . . . . . . . . . . 59
Setting the Screen Display Level. . . . . . . . . . . . . . . . . . . . . . . . . . . . . . . . . . . 66
Menu Operations and Settings. . . . . . . . . . . . . . . . . . . . . . . . . . . . . . . . . . . . . 73
Quick Control. . . . . . . . . . . . . . . . . . . . . . . . . . . . . . . . . . . . . . . . . . . . . . . . . . 80
Touch-Screen Operation. . . . . . . . . . . . . . . . . . . . . . . . . . . . . . . . . . . . . . . . . 83
Basic Zone. . . . . . . . . . . . . . . . . . . . . . . . . . . . . . . . . . . . . . . . . . . . . . . 85Scene Intelligent Auto. . . . . . . . . . . . . . . . . . . . . . . . . . . . . . . . . . . . . . . . . . . 86
Hybrid Auto. . . . . . . . . . . . . . . . . . . . . . . . . . . . . . . . . . . . . . . . . . . . . . . . . . . 95
Special Scene Mode. . . . . . . . . . . . . . . . . . . . . . . . . . . . . . . . . . . . . . . . . . . . 97
Self Portrait Mode. . . . . . . . . . . . . . . . . . . . . . . . . . . . . . . . . . . . . . . . . . . . . 100
Portrait Mode. . . . . . . . . . . . . . . . . . . . . . . . . . . . . . . . . . . . . . . . . . . . . . . . . 101
Smooth Skin Mode. . . . . . . . . . . . . . . . . . . . . . . . . . . . . . . . . . . . . . . . . . . . . 102
Landscape Mode. . . . . . . . . . . . . . . . . . . . . . . . . . . . . . . . . . . . . . . . . . . . . . 103

Sports Mode. . . . . . . . . . . . . . . . . . . . . . . . . . . . . . . . . . . . . . . . . . . . . . . . . . 104
Panning Mode. . . . . . . . . . . . . . . . . . . . . . . . . . . . . . . . . . . . . . . . . . . . . . . . 105
Close-up Mode. . . . . . . . . . . . . . . . . . . . . . . . . . . . . . . . . . . . . . . . . . . . . . . . 107
Food Mode. . . . . . . . . . . . . . . . . . . . . . . . . . . . . . . . . . . . . . . . . . . . . . . . . . . 108
Night Portrait Mode. . . . . . . . . . . . . . . . . . . . . . . . . . . . . . . . . . . . . . . . . . . . 109
Handheld Night Scene Mode. . . . . . . . . . . . . . . . . . . . . . . . . . . . . . . . . . . . . 111
HDR Backlight Control Mode. . . . . . . . . . . . . . . . . . . . . . . . . . . . . . . . . . . . . 113
Silent Mode. . . . . . . . . . . . . . . . . . . . . . . . . . . . . . . . . . . . . . . . . . . . . . . . . . 114
Creative Filters Mode. . . . . . . . . . . . . . . . . . . . . . . . . . . . . . . . . . . . . . . . . . . 115
Creative Zone. . . . . . . . . . . . . . . . . . . . . . . . . . . . . . . . . . . . . . . . . . . . 122Program AE Mode (P). . . . . . . . . . . . . . . . . . . . . . . . . . . . . . . . . . . . . . . . . . 123
Shutter-Priority AE Mode (Tv). . . . . . . . . . . . . . . . . . . . . . . . . . . . . . . . . . . . 125
Aperture-Priority AE Mode (Av). . . . . . . . . . . . . . . . . . . . . . . . . . . . . . . . . . . 128
Manual Exposure Mode (M). . . . . . . . . . . . . . . . . . . . . . . . . . . . . . . . . . . . . . 132
Long (Bulb) Exposures. . . . . . . . . . . . . . . . . . . . . . . . . . . . . . . . . . . . . . . . . . 135
AF, Drive, and Exposure Settings. . . . . . . . . . . . . . . . . . . . . . . . . . . . 137AF Operation. . . . . . . . . . . . . . . . . . . . . . . . . . . . . . . . . . . . . . . . . . . . . . . . . 138
AF Method. . . . . . . . . . . . . . . . . . . . . . . . . . . . . . . . . . . . . . . . . . . . . . . . . . . 143
Manual Focus. . . . . . . . . . . . . . . . . . . . . . . . . . . . . . . . . . . . . . . . . . . . . . . . . 155
Drive Mode. . . . . . . . . . . . . . . . . . . . . . . . . . . . . . . . . . . . . . . . . . . . . . . . . . . 159
Using the Self-Timer. . . . . . . . . . . . . . . . . . . . . . . . . . . . . . . . . . . . . . . . . . . 161
Remote Control Shooting. . . . . . . . . . . . . . . . . . . . . . . . . . . . . . . . . . . . . . . . 163
Metering Mode. . . . . . . . . . . . . . . . . . . . . . . . . . . . . . . . . . . . . . . . . . . . . . . . 164
Exposure Compensation. . . . . . . . . . . . . . . . . . . . . . . . . . . . . . . . . . . . . . . . 166
Exposure Lock (AE Lock). . . . . . . . . . . . . . . . . . . . . . . . . . . . . . . . . . . . . . . . 168
Flash Photography. . . . . . . . . . . . . . . . . . . . . . . . . . . . . . . . . . . . . . . . 170Shooting with the Built-in Flash. . . . . . . . . . . . . . . . . . . . . . . . . . . . . . . . . . . 171
Flash Function Settings. . . . . . . . . . . . . . . . . . . . . . . . . . . . . . . . . . . . . . . . . 177
Shooting with Speedlites. . . . . . . . . . . . . . . . . . . . . . . . . . . . . . . . . . . . . . . . 194
Shooting and Recording. . . . . . . . . . . . . . . . . . . . . . . . . . . . . . . . . . . . 196Still Photo Shooting. . . . . . . . . . . . . . . . . . . . . . . . . . . . . . . . . . . . . . . . . . 197
Tab Menus: Still Photo Shooting. . . . . . . . . . . . . . . . . . . . . . . . . . . . . . . . . . 199

Image Quality. . . . . . . . . . . . . . . . . . . . . . . . . . . . . . . . . . . . . . . . . . . . . . . . . 207
Still Image Aspect Ratio. . . . . . . . . . . . . . . . . . . . . . . . . . . . . . . . . . . . . . . . . 210
Exposure Compensation/AEB Settings. . . . . . . . . . . . . . . . . . . . . . . . . . . . . 212
ISO Speed Settings for Still Photos. . . . . . . . . . . . . . . . . . . . . . . . . . . . . . . . 214
Auto Lighting Optimizer. . . . . . . . . . . . . . . . . . . . . . . . . . . . . . . . . . . . . . . . . 218
Highlight Tone Priority. . . . . . . . . . . . . . . . . . . . . . . . . . . . . . . . . . . . . . . . . . 220
White Balance Settings. . . . . . . . . . . . . . . . . . . . . . . . . . . . . . . . . . . . . . . . . 221
White Balance Correction. . . . . . . . . . . . . . . . . . . . . . . . . . . . . . . . . . . . . . . 229
Color Space. . . . . . . . . . . . . . . . . . . . . . . . . . . . . . . . . . . . . . . . . . . . . . . . . . 232
Picture Style Selection. . . . . . . . . . . . . . . . . . . . . . . . . . . . . . . . . . . . . . . . . . 233
Picture Style Customization. . . . . . . . . . . . . . . . . . . . . . . . . . . . . . . . . . . . . . 237
Picture Style Registration. . . . . . . . . . . . . . . . . . . . . . . . . . . . . . . . . . . . . . . . 242
Lens Aberration Correction. . . . . . . . . . . . . . . . . . . . . . . . . . . . . . . . . . . . . . 245
Noise Reduction Features. . . . . . . . . . . . . . . . . . . . . . . . . . . . . . . . . . . . . . . 252
Appending Dust Delete Data. . . . . . . . . . . . . . . . . . . . . . . . . . . . . . . . . . . . . 256
Continuous AF. . . . . . . . . . . . . . . . . . . . . . . . . . . . . . . . . . . . . . . . . . . . . . . . 261
Touch & Drag AF Settings. . . . . . . . . . . . . . . . . . . . . . . . . . . . . . . . . . . . . . . 262
Focus Mode. . . . . . . . . . . . . . . . . . . . . . . . . . . . . . . . . . . . . . . . . . . . . . . . . . 266
AF-Assist Beam Firing. . . . . . . . . . . . . . . . . . . . . . . . . . . . . . . . . . . . . . . . . . 267
Lens Electronic MF. . . . . . . . . . . . . . . . . . . . . . . . . . . . . . . . . . . . . . . . . . . . 268
Image Stabilization. . . . . . . . . . . . . . . . . . . . . . . . . . . . . . . . . . . . . . . . . . . . . 269
Touch Shutter. . . . . . . . . . . . . . . . . . . . . . . . . . . . . . . . . . . . . . . . . . . . . . . . . 271
Review Duration. . . . . . . . . . . . . . . . . . . . . . . . . . . . . . . . . . . . . . . . . . . . . . . 273
Metering Timer. . . . . . . . . . . . . . . . . . . . . . . . . . . . . . . . . . . . . . . . . . . . . . . . 274
Exposure Simulation. . . . . . . . . . . . . . . . . . . . . . . . . . . . . . . . . . . . . . . . . . . 275
Shooting Information Display. . . . . . . . . . . . . . . . . . . . . . . . . . . . . . . . . . . . . 276
Reverse Display. . . . . . . . . . . . . . . . . . . . . . . . . . . . . . . . . . . . . . . . . . . . . . . 285
Viewfinder Display Format. . . . . . . . . . . . . . . . . . . . . . . . . . . . . . . . . . . . . . . 286
Display Performance. . . . . . . . . . . . . . . . . . . . . . . . . . . . . . . . . . . . . . . . . . . 287
Type of Digest Movie. . . . . . . . . . . . . . . . . . . . . . . . . . . . . . . . . . . . . . . . . . . 288
General Still Photo Shooting Precautions. . . . . . . . . . . . . . . . . . . . . . . . . . . 290
Movie Recording. . . . . . . . . . . . . . . . . . . . . . . . . . . . . . . . . . . . . . . . . . . . 293Tab Menus: Movie Recording. . . . . . . . . . . . . . . . . . . . . . . . . . . . . . . . . . . . 294

Movie Recording. . . . . . . . . . . . . . . . . . . . . . . . . . . . . . . . . . . . . . . . . . . . . . 298
Movie Recording Quality. . . . . . . . . . . . . . . . . . . . . . . . . . . . . . . . . . . . . . . . 306
Sound Recording. . . . . . . . . . . . . . . . . . . . . . . . . . . . . . . . . . . . . . . . . . . . . . 313
Video Snapshots. . . . . . . . . . . . . . . . . . . . . . . . . . . . . . . . . . . . . . . . . . . . . . 316
Time-Lapse Movies. . . . . . . . . . . . . . . . . . . . . . . . . . . . . . . . . . . . . . . . . . . . 324
Movie Servo AF. . . . . . . . . . . . . . . . . . . . . . . . . . . . . . . . . . . . . . . . . . . . . . . 335
Digital Zoom. . . . . . . . . . . . . . . . . . . . . . . . . . . . . . . . . . . . . . . . . . . . . . . . . . 338
Movie Auto Level. . . . . . . . . . . . . . . . . . . . . . . . . . . . . . . . . . . . . . . . . . . . . . 340
Shutter Button Function for Movies. . . . . . . . . . . . . . . . . . . . . . . . . . . . . . . . 341
Movie Self-Timer. . . . . . . . . . . . . . . . . . . . . . . . . . . . . . . . . . . . . . . . . . . . . . 343
Movie Digital IS. . . . . . . . . . . . . . . . . . . . . . . . . . . . . . . . . . . . . . . . . . . . . . . 344
Miniature Effect Movies. . . . . . . . . . . . . . . . . . . . . . . . . . . . . . . . . . . . . . . . . 347
Other Menu Functions. . . . . . . . . . . . . . . . . . . . . . . . . . . . . . . . . . . . . . . . . . 350
General Movie Recording Precautions. . . . . . . . . . . . . . . . . . . . . . . . . . . . . 356
Playback. . . . . . . . . . . . . . . . . . . . . . . . . . . . . . . . . . . . . . . . . . . . . . . . 359Tab Menus: Playback. . . . . . . . . . . . . . . . . . . . . . . . . . . . . . . . . . . . . . . . . . . 361
Image Playback. . . . . . . . . . . . . . . . . . . . . . . . . . . . . . . . . . . . . . . . . . . . . . . 364
Index Display (Multiple-Image Display). . . . . . . . . . . . . . . . . . . . . . . . . . . . . 367
Magnified Image Display. . . . . . . . . . . . . . . . . . . . . . . . . . . . . . . . . . . . . . . . 371
Movie Playback. . . . . . . . . . . . . . . . . . . . . . . . . . . . . . . . . . . . . . . . . . . . . . . 373
Editing a Movie's First and Last Scenes. . . . . . . . . . . . . . . . . . . . . . . . . . . . 377
Frame Extraction from 4K Movies or 4K Time-Lapse Movies. . . . . . . . . . . . 380
Digest Movie Editing. . . . . . . . . . . . . . . . . . . . . . . . . . . . . . . . . . . . . . . . . . . 383
Playback on a TV Set. . . . . . . . . . . . . . . . . . . . . . . . . . . . . . . . . . . . . . . . . . . 386
Protecting Images. . . . . . . . . . . . . . . . . . . . . . . . . . . . . . . . . . . . . . . . . . . . . 388
Erasing Images. . . . . . . . . . . . . . . . . . . . . . . . . . . . . . . . . . . . . . . . . . . . . . . 392
Rotating Still Photos. . . . . . . . . . . . . . . . . . . . . . . . . . . . . . . . . . . . . . . . . . . . 399
Changing Movie Orientation Information. . . . . . . . . . . . . . . . . . . . . . . . . . . . 401
Rating Images. . . . . . . . . . . . . . . . . . . . . . . . . . . . . . . . . . . . . . . . . . . . . . . . 403
Printing. . . . . . . . . . . . . . . . . . . . . . . . . . . . . . . . . . . . . . . . . . . . . . . . . . . . . . 409
Print Ordering (DPOF). . . . . . . . . . . . . . . . . . . . . . . . . . . . . . . . . . . . . . . . . . 412
Photobook Set-up. . . . . . . . . . . . . . . . . . . . . . . . . . . . . . . . . . . . . . . . . . . . . 418
Creative Assist. . . . . . . . . . . . . . . . . . . . . . . . . . . . . . . . . . . . . . . . . . . . . . . . 423

Creative Filters. . . . . . . . . . . . . . . . . . . . . . . . . . . . . . . . . . . . . . . . . . . . . . . . 426
Red-Eye Correction. . . . . . . . . . . . . . . . . . . . . . . . . . . . . . . . . . . . . . . . . . . . 429
Resizing. . . . . . . . . . . . . . . . . . . . . . . . . . . . . . . . . . . . . . . . . . . . . . . . . . . . . 431
Cropping. . . . . . . . . . . . . . . . . . . . . . . . . . . . . . . . . . . . . . . . . . . . . . . . . . . . . 433
Album Creation. . . . . . . . . . . . . . . . . . . . . . . . . . . . . . . . . . . . . . . . . . . . . . . 436
Slideshows. . . . . . . . . . . . . . . . . . . . . . . . . . . . . . . . . . . . . . . . . . . . . . . . . . . 440
Setting Image Search Conditions. . . . . . . . . . . . . . . . . . . . . . . . . . . . . . . . . . 444
Resuming from Previous Playback. . . . . . . . . . . . . . . . . . . . . . . . . . . . . . . . 447
Browsing Images with the Dial. . . . . . . . . . . . . . . . . . . . . . . . . . . . . . . . . . . . 448
Playback Information Display. . . . . . . . . . . . . . . . . . . . . . . . . . . . . . . . . . . . . 450
AF Point Display. . . . . . . . . . . . . . . . . . . . . . . . . . . . . . . . . . . . . . . . . . . . . . . 453
HDMI HDR Output. . . . . . . . . . . . . . . . . . . . . . . . . . . . . . . . . . . . . . . . . . . . . 454
Wireless Features. . . . . . . . . . . . . . . . . . . . . . . . . . . . . . . . . . . . . . . . 455Tab Menus: Wireless Settings. . . . . . . . . . . . . . . . . . . . . . . . . . . . . . . . . . . . 457
Wi-Fi/Bluetooth Connection. . . . . . . . . . . . . . . . . . . . . . . . . . . . . . . . . . . . . . 459
Connecting to a Smartphone. . . . . . . . . . . . . . . . . . . . . . . . . . . . . . . . . . . . . 461
Connecting to a Computer via Wi-Fi. . . . . . . . . . . . . . . . . . . . . . . . . . . . . . . 502
Connecting to a Printer via Wi-Fi. . . . . . . . . . . . . . . . . . . . . . . . . . . . . . . . . . 513
Sending Images to a Web Service. . . . . . . . . . . . . . . . . . . . . . . . . . . . . . . . . 527
Streaming Images. . . . . . . . . . . . . . . . . . . . . . . . . . . . . . . . . . . . . . . . . . . . . 543
Wi-Fi Connection via Access Points. . . . . . . . . . . . . . . . . . . . . . . . . . . . . . . 551
Connecting to a Wireless Remote Control. . . . . . . . . . . . . . . . . . . . . . . . . . . 559
Reconnecting via Wi-Fi. . . . . . . . . . . . . . . . . . . . . . . . . . . . . . . . . . . . . . . . . 563
Registering Multiple Connection Settings. . . . . . . . . . . . . . . . . . . . . . . . . . . 565
Airplane Mode. . . . . . . . . . . . . . . . . . . . . . . . . . . . . . . . . . . . . . . . . . . . . . . . 566
Wi-Fi Settings. . . . . . . . . . . . . . . . . . . . . . . . . . . . . . . . . . . . . . . . . . . . . . . . . 567
Bluetooth Settings. . . . . . . . . . . . . . . . . . . . . . . . . . . . . . . . . . . . . . . . . . . . . 569
Nickname. . . . . . . . . . . . . . . . . . . . . . . . . . . . . . . . . . . . . . . . . . . . . . . . . . . . 570
GPS Settings. . . . . . . . . . . . . . . . . . . . . . . . . . . . . . . . . . . . . . . . . . . . . . . . . 571
Changing or Deleting Connection Settings. . . . . . . . . . . . . . . . . . . . . . . . . . 575
Resetting Communication Settings. . . . . . . . . . . . . . . . . . . . . . . . . . . . . . . . 577
View Info Screen. . . . . . . . . . . . . . . . . . . . . . . . . . . . . . . . . . . . . . . . . . . . . . 578
Virtual Keyboard Operations. . . . . . . . . . . . . . . . . . . . . . . . . . . . . . . . . . . . . 579

Responding to Error Messages. . . . . . . . . . . . . . . . . . . . . . . . . . . . . . . . . . . 580
Wireless Communication Function Precautions. . . . . . . . . . . . . . . . . . . . . . . 590
Security. . . . . . . . . . . . . . . . . . . . . . . . . . . . . . . . . . . . . . . . . . . . . . . . . . . . . 592
Checking Network Settings. . . . . . . . . . . . . . . . . . . . . . . . . . . . . . . . . . . . . . 593
Wireless Communication Status. . . . . . . . . . . . . . . . . . . . . . . . . . . . . . . . . . 594
Set-up. . . . . . . . . . . . . . . . . . . . . . . . . . . . . . . . . . . . . . . . . . . . . . . . . . 596Tab Menus: Set-up. . . . . . . . . . . . . . . . . . . . . . . . . . . . . . . . . . . . . . . . . . . . . 597
Folder Settings. . . . . . . . . . . . . . . . . . . . . . . . . . . . . . . . . . . . . . . . . . . . . . . . 600
File Numbering. . . . . . . . . . . . . . . . . . . . . . . . . . . . . . . . . . . . . . . . . . . . . . . . 603
Formatting. . . . . . . . . . . . . . . . . . . . . . . . . . . . . . . . . . . . . . . . . . . . . . . . . . . 608
Auto Rotate. . . . . . . . . . . . . . . . . . . . . . . . . . . . . . . . . . . . . . . . . . . . . . . . . . 611
Adding Orientation Information to Movies. . . . . . . . . . . . . . . . . . . . . . . . . . . 613
Date/Time/Zone. . . . . . . . . . . . . . . . . . . . . . . . . . . . . . . . . . . . . . . . . . . . . . . 614
Language. . . . . . . . . . . . . . . . . . . . . . . . . . . . . . . . . . . . . . . . . . . . . . . . . . . . 619
Video System. . . . . . . . . . . . . . . . . . . . . . . . . . . . . . . . . . . . . . . . . . . . . . . . . 620
Beeps. . . . . . . . . . . . . . . . . . . . . . . . . . . . . . . . . . . . . . . . . . . . . . . . . . . . . . . 621
Power Saving. . . . . . . . . . . . . . . . . . . . . . . . . . . . . . . . . . . . . . . . . . . . . . . . . 622
Eco Mode. . . . . . . . . . . . . . . . . . . . . . . . . . . . . . . . . . . . . . . . . . . . . . . . . . . . 623
Display Settings. . . . . . . . . . . . . . . . . . . . . . . . . . . . . . . . . . . . . . . . . . . . . . . 624
Screen Brightness. . . . . . . . . . . . . . . . . . . . . . . . . . . . . . . . . . . . . . . . . . . . . 626
Viewfinder Brightness. . . . . . . . . . . . . . . . . . . . . . . . . . . . . . . . . . . . . . . . . . 627
UI Magnification. . . . . . . . . . . . . . . . . . . . . . . . . . . . . . . . . . . . . . . . . . . . . . . 628
HDMI Resolution. . . . . . . . . . . . . . . . . . . . . . . . . . . . . . . . . . . . . . . . . . . . . . 629
Touch Control. . . . . . . . . . . . . . . . . . . . . . . . . . . . . . . . . . . . . . . . . . . . . . . . . 630
Sensor Cleaning. . . . . . . . . . . . . . . . . . . . . . . . . . . . . . . . . . . . . . . . . . . . . . . 631
Resetting the Camera. . . . . . . . . . . . . . . . . . . . . . . . . . . . . . . . . . . . . . . . . . 633
Custom Functions (C.Fn). . . . . . . . . . . . . . . . . . . . . . . . . . . . . . . . . . . . . . . . 634
Copyright Information. . . . . . . . . . . . . . . . . . . . . . . . . . . . . . . . . . . . . . . . . . . 643
Other Information. . . . . . . . . . . . . . . . . . . . . . . . . . . . . . . . . . . . . . . . . . . . . . 646
My Menu. . . . . . . . . . . . . . . . . . . . . . . . . . . . . . . . . . . . . . . . . . . . . . . . 647Tab Menus: My Menu. . . . . . . . . . . . . . . . . . . . . . . . . . . . . . . . . . . . . . . . . . 648
My Menu Registration. . . . . . . . . . . . . . . . . . . . . . . . . . . . . . . . . . . . . . . . . . 649

Reference. . . . . . . . . . . . . . . . . . . . . . . . . . . . . . . . . . . . . . . . . . . . . . . 655Importing Images to a Computer. . . . . . . . . . . . . . . . . . . . . . . . . . . . . . . . . . 656
Household Power Outlet Accessories. . . . . . . . . . . . . . . . . . . . . . . . . . . . . . 658
Troubleshooting Guide. . . . . . . . . . . . . . . . . . . . . . . . . . . . . . . . . . . . . . . . . . 660
Error Codes. . . . . . . . . . . . . . . . . . . . . . . . . . . . . . . . . . . . . . . . . . . . . . . . . . 675
System Map. . . . . . . . . . . . . . . . . . . . . . . . . . . . . . . . . . . . . . . . . . . . . . . . . . 676
ISO Speed in Movie Recording. . . . . . . . . . . . . . . . . . . . . . . . . . . . . . . . . . . 678
Information Display. . . . . . . . . . . . . . . . . . . . . . . . . . . . . . . . . . . . . . . . . . . . 679
Specifications. . . . . . . . . . . . . . . . . . . . . . . . . . . . . . . . . . . . . . . . . . . . . . . . . 694
Trademarks and Licensing. . . . . . . . . . . . . . . . . . . . . . . . . . . . . . . . . . 707

Introduction
Before starting to shoot, be sure to read the following
To avoid shooting problems and accidents, first read the Safety Instructions and HandlingPrecautions. Also read this Advanced User Guide carefully to ensure that you use thecamera correctly.
Take some test shots, and understand about product liability
After shooting, play images back and check whether they have been properly recorded. Ifthe camera or memory card is faulty and the images cannot be recorded or downloaded to acomputer, Canon cannot be held liable for any loss or inconvenience caused.
Copyrights
Copyright laws in some countries prohibit the unauthorized use of images recorded with thecamera (or music/images with music transferred to the memory card) for purposes otherthan personal enjoyment. Also be aware that certain public performances, exhibitions, etc.may prohibit photography even for private enjoyment.
• Package Contents• Instruction Manuals• Quick Start Guide• About This Guide• Compatible Cards• Safety Instructions• Handling Precautions• Part Names• Software
9

Package Contents
Before use, make sure the following items are included in the package. If anything ismissing, contact your dealer.
Camera(with body cap (Camera Cover R-F-4))
Battery Pack LP-E12(with protective cover)
Battery Charger LC-E12/LC-E12E*
Strap
* Battery Charger LC-E12 or LC-E12E is provided. (The LC-E12E comes with a power cord.)
The camera does not come with a memory card ( ), interface cable, or HDMI cable.If you purchased a Lens Kit, check that the lenses are included.Be careful not to lose any of these items.
Caution
When you need Lens Instruction Manuals, download them from the Canon website( ).Lens Instruction Manuals (PDF files) are for lenses sold separately, and when alens kit is purchased, some accessories included with the lens may not matchthose listed in the Lens Instruction Manual.
10

Instruction Manuals
The Instruction Manual included with the camera provides basic instructions for thecamera and Wi-Fi functions.
Advanced User GuideComplete instructions are provided in this Advanced User Guide.For the latest Advanced User Guide, refer to the following website.https://cam.start.canon/C007/
Lens/Software Instruction ManualDownload from the following website.https://cam.start.canon/
Note
Select [ : Manual/software URL] to display the QR code on the camera screen.
11

Quick Start Guide
Insert the battery ( ).
Upon purchase, charge the battery to start using ( ).
Insert the card ( ).
Insert the card with the label facing the front of the camera until it clicksinto place.
12
1.
2.

Attach the lens ( ).
Align the lens mount indexes (white) on the lens and camera to attachthe lens.
Prepare to shoot ( ).
Press (1) as you turn (2) slightly, then release (1).Turn (2) a little more until it clicks.
Set the power switch to < >, then set the Mode dial to< > ( , ).
All the necessary camera settings will be set automatically.
13
3.
4.
5.

Flip out the screen ( ).
If the [Date/Time/Zone] setting screen is displayed, see Date/Time/Zone.
Focus on the subject ( ).
Center the subject on the screen.Press the shutter button halfway, and the camera will focus on thesubject.If < > blinks on the screen, manually raise the built-in flash.
Take the picture ( ).
Press the shutter button completely to take the picture.
14
6.
7.
8.

Review the picture.
The image just captured will be displayed for approx. 2 sec. on thescreen ( ).To display the image again, press the < > button ( ).
15
9.

About This Guide
Icons in This Guide
Basic Assumptions for Operational Instructions and Sample Photos
Icons in This Guide
< > Indicates the dial.
< >< >< >< >
Indicates the direction to press the cross keys.
< > Indicates the Quick Control/Set button.
*Indicates the duration (in * seconds) of the operation for the buttonyou pressed, as timed after you release the button.
In addition to the above, the icons and symbols used on the camera’s buttons anddisplayed on the screen are also used in this guide when discussing relevant operationsand functionality.
to the right of page titles indicates functions only available inCreative Zone modes (< >/< >/< >/< >) or formanual exposure movie recording.Links to pages with related topics.
Warning to prevent shooting problems.
Supplemental information.
Tips or advice for better shooting.
Troubleshooting advice.
16

Basic Assumptions for Operational Instructions andSample Photos
Before following any instructions, make sure the power switch is set to < > ( ).It is assumed that all the menu settings and Custom Functions are set to their defaults.Screen shots in this guide show the default menu settings for NTSC regions (NorthAmerica, Japan, South Korea, Mexico, etc.) as an example. Default menu settings forEurope, Russia, China, Australia, etc. will be for PAL.Illustrations in this guide show the camera with the EF-M15-45mm f/3.5-6.3 IS STM lensattached as an example.In references to using EF or EF-S lenses ( ), it is assumed that a mount adapter isused.The sample photos displayed on the camera and used in this guide are for instructionalpurposes only.
17
Compatible Cards
The following cards can be used with the camera regardless of capacity. If the card is newor was previously formatted (initialized) by another camera or computer, format thecard with this camera ( ).
SD/SDHC/SDXC memory cardsUHS-I cards supported.
Cards That Can Record Movies
When recording movies, use a high-capacity card with ample performance (fast enoughwriting and reading speeds) for the movie recording size. For details, see Cards That CanRecord Movies.
In this guide, “card” refers to SD memory cards, SDHC memory cards,and SDXC memory cards.* A card is not included. Please purchase it separately.
18

WARNING:
Safety Instructions
Be sure to read these instructions in order to operate the product safely.Follow these instructions to prevent injury or harm to the operator of the product or others.
Denotes the risk of serious injury or death.
Keep the product out of the reach of young children.Keep batteries out of the reach of children.
A strap wrapped around a person’s neck may result in strangulation.The parts or provided items of cameras or accessories are dangerous if swallowed. Ifswallowed, seek immediate medical assistance.
Use only power sources specified in this instruction manual for use with the product.Do not disassemble or modify the product.Do not expose the product to strong shocks or vibration.Do not touch any exposed internal parts.Stop using the product in any case of unusual circumstances such as the presence ofsmoke or a strange smell.Do not use organic solvents such as alcohol, benzine or paint thinner to clean theproduct.Do not get the product wet. Do not insert foreign objects or liquids into the product.Do not use the product where flammable gases may be present.
This may cause electric shock, explosion or fire.Do not leave a lens or a camera/camcorder with a lens attached, exposed without thelens cap attached.
The lens may concentrate the light and cause fire.Observe the following instructions when using commercially available batteries orprovided battery packs.
• Use batteries/battery packs only with their specified product.• Do not heat batteries/battery packs or expose them to fire.• Do not charge batteries/battery packs using non-authorized battery chargers.• Do not expose the terminals to dirt or let them come into contact with metallic pins
or other metal objects.• Do not use leaking batteries/battery packs.• When disposing of batteries/battery packs, insulate the terminals with tape or other
means.This may cause electric shock, explosion or fire.If a battery/battery pack leaks and the material contacts your skin or clothing, flush theexposed area thoroughly with running water. In case of eye contact, flush thoroughly withcopious amounts of clean running water and seek immediate medical assistance.
19

Observe the following instructions when using a battery charger.• Periodically remove any dust buildup from the power plug and power outlet using a
dry cloth.• Do not plug in or unplug the product with wet hands.• Do not use the product if the power plug is not fully inserted into the power outlet.• Do not expose the power plug and terminals to dirt or let them come into contact
with metallic pins or other metal objects.Do not touch the battery charger or AC adapter connected to a power outlet duringlightning storms.Do not place heavy objects on the power cord. Do not damage, break or modify thepower cord.Do not wrap the product in cloth or other materials when in use or shortly after use whenthe product is still warm in temperature.Do not leave the product connected to a power source for long periods of time.Do not charge batteries/battery packs at temperatures outside the range of 5 - 40 °C (41- 104 °F).
This may cause electric shock, explosion or fire.Do not allow the product to maintain contact with the same area of skin for extendedperiods of time during use.
This may result in low-temperature contact burns, including skin redness and blistering,even if the product does not feel hot. The use of a tripod or similar equipment isrecommended when using the product in hot places and for people with circulation problemsor less sensitive skin.
Follow any indications to turn off the product in places where its use is forbidden.Not doing so may cause other equipment to malfunction due to the effect of electromagneticwaves and even result in accidents.
20
CAUTIONS: Follow the cautions below. Otherwisephysical injury or property damage mayresult.
Do not fire the flash near the eyes.It may hurt the eyes.
Do not look at the screen or through the viewfinder for prolonged periods of time.This may induce symptoms similar to motion sickness. In such a case, stop using theproduct immediately and rest for a while before resuming use.
Flash emits high temperatures when fired. Keep fingers, any other part of your body,and objects away from the flash unit while taking pictures.
This may cause burns or malfunction of the flash.Do not leave the product in places exposed to extremely high or low temperatures.
The product may become extremely hot/cold and cause burns or injury when touched.Strap is intended for use on the body only. Hanging the strap with any product attachedon a hook or other object may damage the product. Also, do not shake the product orexpose the product to strong impacts.Do not apply strong pressure on the lens or allow an object to hit it.
This may cause injury or damage to the product.If any abnormal skin reaction or irritation occurs during or following the use of thisproduct, refrain from further use and get medical advice/attention.
21
Handling Precautions
Camera care
This camera is a precision instrument. Do not drop it or subject it to physical shock.The camera is not waterproof and cannot be used underwater. If the camera gets wet,contact a Canon Service Center immediately. Wipe off any water droplets with a dry andclean cloth. If the camera has been exposed to salty air, wipe it with a clean, well-wrungwet cloth.Never leave the camera near anything having a strong magnetic field such as a magnetor electric motor. Also, avoid using or leaving the camera near anything emitting strongradio waves, such as a large antenna. Strong magnetic fields can cause cameramalfunction or destroy image data.Do not leave the camera in excessive heat, such as in a car in direct sunlight. Hightemperatures can cause the camera to malfunction.The camera contains precision electronic circuitry. Never attempt to disassemble thecamera yourself.Only use a commercially available blower to blow away dust on the lens, viewfinder, orother parts. Do not use cleaners that contain organic solvents to clean the camera bodyor lens. For stubborn dirt, take the camera to the nearest Canon Service Center.Do not touch the camera’s electrical contacts with your fingers. This is to prevent thecontacts from corroding. Corroded contacts can cause camera malfunction.If the camera is suddenly brought in from the cold into a warm room, condensation mayform on the camera and internal parts. To prevent condensation, first put the camera ina sealed plastic bag and let it adjust to the warmer temperature before taking it out ofthe bag.If condensation forms on the camera, do not use the camera. This is to avoid damagingthe camera. If there is condensation, remove the lens, card and battery from thecamera, and wait until condensation has evaporated before using the camera.If the camera will not be used for an extended period, remove the battery and store thecamera in a cool, dry, well-ventilated location. Even while the camera is in storage,press the shutter button a few times once in a while to check that the camera is stillworking.Avoid storing the camera where there are chemicals that result in rust and corrosionsuch as in a chemical lab.If the camera has not been used for an extended period, test all its functions beforeusing it. If you have not used the camera for some time or if there is an important shootsuch as a foreign trip coming up, have the camera checked by your nearest CanonService Center or check the camera yourself and make sure it is working properly.The camera may become hot after repeated continuous shooting or still photo/movieshooting over an extended period. This is not a malfunction.If there is a bright light source inside or outside the image area, ghosting may occur.
22

Screen
Although the screen is manufactured with very high precision technology with over99.99% effective pixels, 0.01% or fewer of the pixels may be dead, and there may alsobe spots of black, red, or other colors. This is not a malfunction. They do not affect theimages recorded.If the screen is left on for a prolonged period, screen burn-in may occur where you seeremnants of what was displayed. However, this is only temporary and will disappearwhen the camera is left unused for a few days.The screen display may seem slightly slow in low temperatures or may look black inhigh temperatures. It will return to normal at room temperature.
Cards
To protect the card and its recorded data, note the following:
Do not drop, bend, or wet the card. Do not subject it to excessive force, physical shock,or vibration.Do not touch the card’s electronic contacts with your fingers or anything metallic.Do not affix any stickers, etc. on the card.Do not store or use the card near anything that has a strong magnetic field, such as atelevision, speakers, or magnets. Also avoid places prone to having static electricity.Do not leave the card in direct sunlight or near a heat source.Store the card in a case.Do not store the card in hot, dusty, or humid locations.
Smudges on the image sensor
Besides dust entering the camera from outside, in rare cases, lubricant from the camera’sinternal parts may adhere to the front of the sensor. If smudges are visible on images, havethe sensor cleaned by a nearest Canon Service Center.
Lens
After detaching the lens from the camera, put down the lens with the rear end up andattach the rear lens cap to avoid scratching the lens surface and electrical contacts(1).
23

Part Names
24

(1) Shutter button(2) < > Dial(3) EF-M lens mount index(4) Image sensor(5) Grip(6) Contacts(7) Lens mount(8) Movie shooting button(9) Power switch(10) Mode dial(11) < > Multi-function button(12) Built-in flash(13) Microphone(14) < > Focal plane mark(15) Strap mount(16) AF-assist beam/Red-eye reduction/Self-timer/Remote control lamp(17) Terminal cover(18) Lens release button(19) Lens lock pin(20) < > External microphone IN terminal(21) Dioptric adjustment knob(22) Speaker(23) Serial number(24) DC cord hole(25) Tripod socket(26) Card/battery compartment cover(27) Body cap
25

26

(1) Screen(2) Viewfinder(3) Hot shoe(4) Flash sync contacts(5) Access lamp(6) Strap mount(7) < > Wi-Fi button(8) < > Quick Control/Set button(9) < / > Left/Autofocus/Manual focus button(10) < > Playback button(11) < > AE lock/< > Magnify button(12) < > AF point selection/< > Index button(13) < > Info button(14) < / > Up/Exposure compensation button(15) < / > Right/Flash button(16) < / > Down/Erase button(17) < > Menu button(18) < > Digital terminal(19) < > HDMI micro OUT terminal
27
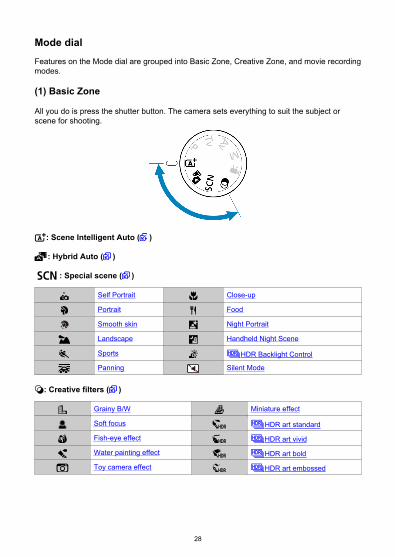
Mode dialFeatures on the Mode dial are grouped into Basic Zone, Creative Zone, and movie recordingmodes.
(1) Basic Zone
All you do is press the shutter button. The camera sets everything to suit the subject orscene for shooting.
: Scene Intelligent Auto ( )
: Hybrid Auto ( )
: Special scene ( )
Self Portrait Close-up
Portrait Food
Smooth skin Night Portrait
Landscape Handheld Night Scene
Sports HDR Backlight Control
Panning Silent Mode
: Creative filters ( )
Grainy B/W Miniature effect
Soft focus HDR art standard
Fish-eye effect HDR art vivid
Water painting effect HDR art bold
Toy camera effect HDR art embossed
28
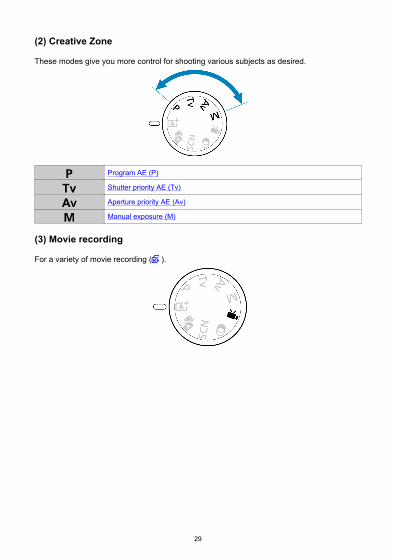
(2) Creative Zone
These modes give you more control for shooting various subjects as desired.
Program AE (P)
Shutter priority AE (Tv)
Aperture priority AE (Av)
Manual exposure (M)
(3) Movie recording
For a variety of movie recording ( ).
29

Battery Charger LC-E12Charger for Battery Pack LP-E12 ( ).
(1) Power plug(2) Charge lamp(3) Full-charge lamp(4) Battery pack slot
Battery Charger LC-E12ECharger for Battery Pack LP-E12 ( ).
(1) Power cord socket(2) Charge lamp(3) Full-charge lamp(4) Battery pack slot(5) Power cord
30

Attaching the Strap
Pass the end of the strap through the strap mount from the bottom, then pass it through thestrap buckle as shown. Pull the strap to take up any slack and make sure the strap will notloosen from the buckle.
31

Software
Software Overview
Downloading and Installing EOS Software or Other Dedicated Software
Downloading the Software Instruction Manual
Software Overview
This section summarizes software used with EOS cameras. Note that downloading andinstalling the software requires an internet connection. The software cannot be downloadedor installed in environments without an internet connection.
EOS Utility
Enables you to transfer your captured still photos and movies from the camera to aconnected computer, set various camera settings from the computer, and shoot remotelyfrom the computer. Also, you can copy background music tracks, such as EOS SampleMusic*, to the card.* You can use the background music as the soundtrack for a video snapshot album, movie, orslideshow played back with your camera.
Digital Photo Professional
Software recommended for users who shoot RAW images. Enables image viewing, editing,printing, and more.
Picture Style Editor
Enables you to edit existing Picture Styles or create and save original Picture Style files.This software is for users who are familiar with image processing.
32

Downloading and Installing EOS Software or OtherDedicated Software
Always install the latest version of the software.Update any previous versions that are installed by overwriting them with the latest version.
Caution
Do not connect the camera to a computer before you install the software. Thesoftware will not be installed correctly.The software cannot be installed unless the computer is connected to the internet.Previous versions cannot display images from this camera correctly. Also,processing RAW images from this camera is not possible.
33

1. Download the software.
Connect to the internet from a computer and access the followingCanon website.https://cam.start.canon/
Enter the serial number on the bottom of the camera, then downloadthe software.
Decompress it on the computer.
For WindowsClick the displayed installer file to start the installer.
For macOSA dmg file will be created and displayed. Follow the steps below tostartup the installer.
1.Double-click the dmg file.
• A drive icon and installer file will appear on the desktop.If the installer file does not appear, double-click the driveicon to display it.
2.Double-click the installer file.
• The installer starts.
2. Follow the on-screen instructions to install the software.
34

Downloading the Software Instruction Manual
Software Instruction Manuals (PDF files) can be downloaded from the Canon website toyour computer.
Software Instruction Manual download site
https://cam.start.canon/
35

Preparation and Basic Operations
This chapter describes preparatory steps before you start shooting and the basic cameraoperations.
• Charging the Battery• Inserting/Removing the Battery and Card• Using the Screen• Turning on the Power• Attaching/Detaching Lenses• Attaching/Detaching EF/EF-S Lenses• Basic Operations• Setting the Screen Display Level• Menu Operations and Settings• Quick Control• Touch-Screen Operation
36

Charging the Battery
1. Detach the protective cover provided with the battery.
2. Fully insert the battery into the charger.
Do the opposite to remove the battery.
37
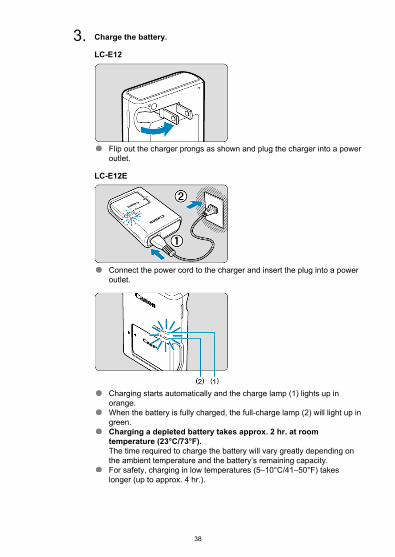
3. Charge the battery.
LC-E12
Flip out the charger prongs as shown and plug the charger into a poweroutlet.
LC-E12E
Connect the power cord to the charger and insert the plug into a poweroutlet.
Charging starts automatically and the charge lamp (1) lights up inorange.When the battery is fully charged, the full-charge lamp (2) will light up ingreen.Charging a depleted battery takes approx. 2 hr. at roomtemperature (23°C/73°F).The time required to charge the battery will vary greatly depending onthe ambient temperature and the battery’s remaining capacity.For safety, charging in low temperatures (5–10°C/41–50°F) takeslonger (up to approx. 4 hr.).
38
Upon purchase, the battery is not fully charged.Charge the battery before use.
Charge the battery on the day before or on the day it is to be used.Charged batteries gradually lose their charge, even when they are not used.
After charging the battery, remove it and disconnect the charger from the poweroutlet.
When not using the camera, remove the battery.If the battery is left in the camera for a prolonged period, a small amount of powercurrent will keep being released, resulting in excess discharge and shorter battery life.Store the battery with the protective cover attached. Storing the battery when it is fullycharged may lower the battery performance.
The battery charger can also be used in foreign countries.The battery charger is compatible with a 100 V AC to 240 V AC 50/60 Hz power source.If necessary, attach a commercially available plug adapter for the respective country orregion. To avoid damage, do not connect to portable voltage transformers.
If the battery becomes exhausted quickly even after having been fully charged,the battery has reached the end of its service life.Purchase a new battery.
Caution
After disconnecting the charger’s power plug, do not touch the prongs for approx. 5sec.The provided charger cannot charge any battery other than Battery Pack LP-E12.
39
Inserting/Removing the Battery and Card
Insertion
Formatting the Card
Removal
Insert a fully charged Battery Pack LP-E12 and card in the camera. The captured imagesare recorded onto the card.
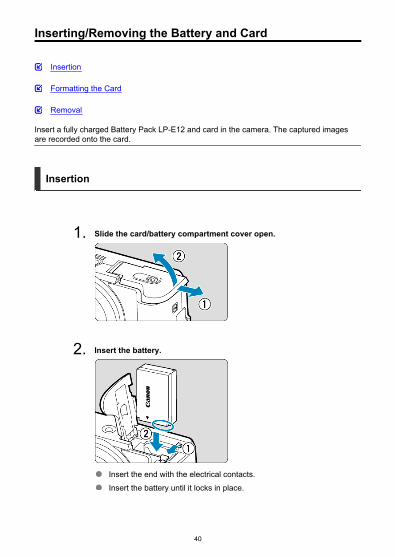
Insertion
1. Slide the card/battery compartment cover open.
2. Insert the battery.
Insert the end with the electrical contacts.Insert the battery until it locks in place.
40

3. Insert the card.
Insert the card with the label facing the front of the camera until it clicksinto place.
Caution
Make sure the card’s write-protect switch (1) is set upward toenable writing and erasing.
4. Close the cover.
Slide the cover until it clicks shut.
Caution
You cannot use batteries other than the Battery Pack LP-E12.
41

Formatting the Card
If the card is new or was previously formatted (initialized) by another camera or computer,format the card with this camera ( ).
42

Removal
1. Slide the card/battery compartment cover open.
Set the power switch to < >.
Make sure the access lamp (1) is off before opening the card/batterycompartment cover.
If [Saving...] is displayed on the screen, close the cover.
2. Removing the battery.
Press the battery lock lever as shown by the arrow and remove thebattery.To prevent short-circuits, always attach the included protective cover( ) to the battery.
43

3. Remove the card.
Gently push in the card, then let it go to eject.
Pull the card straight out, then close the cover.
Note
The number of available shots varies depending on the remaining capacity of thecard, the settings of image quality, ISO speed, etc.
44

Caution
When the access lamp is lit or blinking, it indicates that images are beingwritten to, read from, or erased from the card, or data is being transferred. Donot open the card/battery compartment cover. To avoid corrupting imagedata or damaging cards or the camera, never do any of the following whilethe access lamp is lit or blinking.
• Removing the card.• Removing the battery.• Shaking or striking the camera.• Unplugging or plugging in a power cord
(when using optional Household Power Outlet Accessories).If the card already contains recorded images, the image number may not start from0001 ( ).If a card-related error message is displayed on the screen, remove and reinsert thecard. If the error persists, use a different card.If you can transfer images on the card to a computer, transfer all the images andthen format the card with the camera ( ). The card may then return to normal.Do not touch the card’s contacts with your fingers or metal objects. Do not exposethe contacts to dust or water. If smudges adhere to the contacts, contact failuremay result.Multimedia cards (MMC) cannot be used. (Card error will be displayed.)
45

Using the Screen
You can change the direction and angle of the screen.
1. Flip out the screen.
2. Rotate the screen.
When the screen is out, you can tilt it up or down or rotate it to face thesubject.Indicated angles are only approximate.
3. Face it toward you.
Normally, use the camera with the screen facing you.
Caution
Avoid forcing the screen into position as you rotate it, which puts undue pressureon the hinge.When a cable is connected to a camera terminal, the rotation angle range of theflipped-out screen will be limited.
46

Note
Keep the screen closed and facing the camera body when the camera is not in use.You can protect the screen.
47

Turning on the Power
Setting the Date, Time, and Time Zone
Changing the Interface Language
Automatic Sensor Cleaning
Battery Level Indicator
< >The camera turns on. You can now shoot still photos and record movies.
< >The camera is turned off and does not function. Set the power switch to this positionwhen not using the camera.
48
Setting the Date, Time, and Time Zone
If the [Date/Time/Zone] setting screen is displayed after you turn on the camera, see Date/Time/Zone to set the date, time, and time zone.
Changing the Interface Language
To change the interface language, see Language.
Automatic Sensor Cleaning
Whenever the power switch is set to < > or < >, the sensor is cleanedautomatically (which may make a faint sound). During the sensor cleaning, the screenwill display [ ].If you repeatedly turn the power switch to < > or < > within a short timeperiod, the [ ] icon may not be displayed, but this does not indicate the camera ismalfunctioning.
Note
If you set the power switch to < > while an image is being recorded to thecard, [Saving...] will be displayed and the power will turn off after the recordingfinishes.
49

Battery Level Indicator
When the power switch is set to < >, the battery level will be indicated.
Battery level is sufficient.
Battery level is low, but the camera can still be used.
Battery will be exhausted soon (blinks).
Charge the battery.
Caution
Doing any of the following will exhaust the battery faster:• Pressing the shutter button halfway for a prolonged period.• Activating the AF frequently without taking a picture.• Using the lens’s Image Stabilizer.• Using the Wi-Fi function or Bluetooth function.
The number of available shots may decrease depending on the actual shootingconditions.Lens operations are powered by the camera’s battery. Certain lenses may exhaustthe battery faster than others.In low ambient temperatures, shooting may not be possible even with a sufficientbattery level.
50
Attaching/Detaching Lenses
Attaching a Lens
Detaching a Lens
All EF-M lenses can be used.
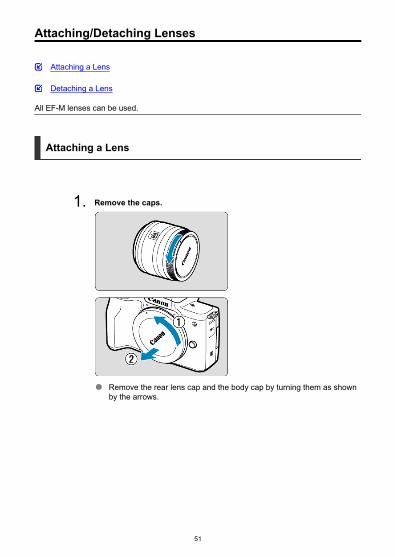
Attaching a Lens
1. Remove the caps.
Remove the rear lens cap and the body cap by turning them as shownby the arrows.
51
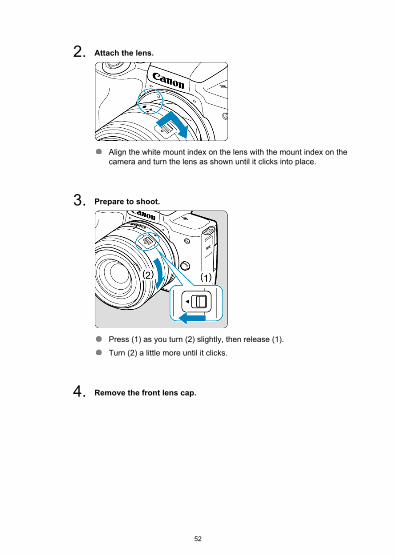
2. Attach the lens.
Align the white mount index on the lens with the mount index on thecamera and turn the lens as shown until it clicks into place.
3. Prepare to shoot.
Press (1) as you turn (2) slightly, then release (1).Turn (2) a little more until it clicks.
4. Remove the front lens cap.
52

Detaching a Lens
1. While pressing the lens release button, turn the lens as shown by thearrow.
Turn the lens until it stops, then detach it.Attach lens caps to the lens you removed.
Caution
Do not look at the sun directly through any lens. Doing so may cause loss of vision.When attaching or detaching a lens, set the camera’s power switch to < >.If the front part (focusing ring) of the lens rotates during autofocusing, do not touchthe rotating part.
Note
For instructions on how to use the lens, refer to the Lens Instruction Manual ( ).
Shooting angle of viewBecause the image area is smaller than 35 mm film format, the effective angle of viewcorresponds to approx. 1.6 times the lens’s indicated focal length.
(1) Image area (approx.) (22.3×14.9 mm)(2) 35 mm film format (36×24 mm)
53

Tips for avoiding smudges and dust
When changing lenses, do it quickly in a place with minimal dust.When storing the camera without a lens attached, be sure to attach the body cap tothe camera.Remove smudges and dust on the body cap before attaching it.
54

Attaching/Detaching EF/EF-S Lenses
Attaching a Lens
Detaching a Lens
EF and EF-S lenses can be attached by using an optional Mount Adapter EF-EOS M.
Attaching a Lens
1. Remove the caps.
Remove the caps on the lens, adapter, and body.
55

2. Attach the lens to the adapter.
(1) Red index
(2) White index
Align the red or white mount index on the lens with the correspondingmount index on the adapter and turn the lens as shown by the arrowuntil it clicks into place.
3. Attach the adapter to the camera.
Align the white mount indexes (3) on the adapter and camera and turnthe lens as shown until it clicks into place.
56

4. Set the lens’s focus mode switch to < >.
< > stands for autofocus.
< > stands for manual focus. Autofocus will not operate.
5. Remove the front lens cap.
57

Detaching a Lens
1. While pressing the lens release button, turn the adapter as shown bythe arrow.
Turn the lens until it stops, then detach it.
2. Detach the lens from the adapter.
Hold down the lens release lever on the adapter and turn the lenscounterclockwise.Turn the lens until it stops, then detach it.Attach lens caps to the lens you removed.
Caution
For lens precautions, see Detaching a Lens.With lenses heavier than the camera, hold the camera by the lens when you shootor carry it.With EF lenses that incorporate a tripod mount (such as super telephoto lenses),attach the tripod to the tripod mount on the lens. When using lenses without atripod mount, attach the tripod to the tripod mount on the mount adapter.
58

Basic Operations
Adjusting the Viewfinder (Dioptric Adjustment)
Holding the Camera
Shutter Button
Dial
< > Info Button
Multi-Function Button
Adjusting the Viewfinder (Dioptric Adjustment)
1. Switch the display mode.
To use the viewfinder, activate it by holding it near your eye.
2. Adjust the diopter.
Adjust it with the screen open.Slide the dioptric adjustment slider left or right to obtain the sharpestimage in the viewfinder.
59
Holding the Camera
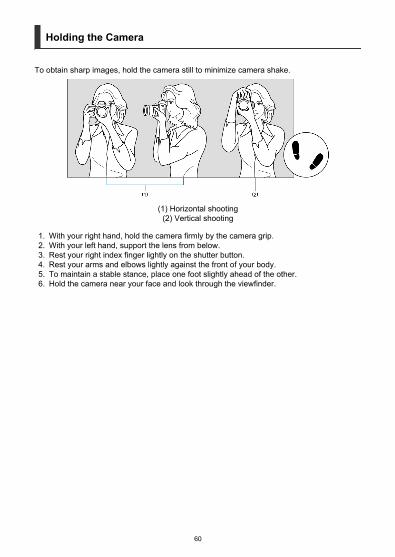
To obtain sharp images, hold the camera still to minimize camera shake.
(1) Horizontal shooting(2) Vertical shooting
1. With your right hand, hold the camera firmly by the camera grip.2. With your left hand, support the lens from below.3. Rest your right index finger lightly on the shutter button.4. Rest your arms and elbows lightly against the front of your body.5. To maintain a stable stance, place one foot slightly ahead of the other.6. Hold the camera near your face and look through the viewfinder.
60
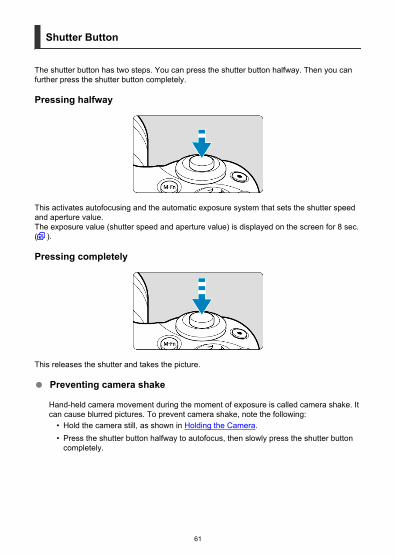
Shutter Button
The shutter button has two steps. You can press the shutter button halfway. Then you canfurther press the shutter button completely.
Pressing halfway
This activates autofocusing and the automatic exposure system that sets the shutter speedand aperture value.The exposure value (shutter speed and aperture value) is displayed on the screen for 8 sec.( ).
Pressing completely
This releases the shutter and takes the picture.
Preventing camera shake
Hand-held camera movement during the moment of exposure is called camera shake. Itcan cause blurred pictures. To prevent camera shake, note the following:
• Hold the camera still, as shown in Holding the Camera.• Press the shutter button halfway to autofocus, then slowly press the shutter button
completely.
61

Note
The camera will still pause before taking a picture if you press the shutter buttoncompletely without pressing it halfway first, or if you press the shutter buttonhalfway and immediately press it completely.Even during menu display or image playback, you can return to shooting standbyby pressing the shutter button halfway.
62

Dial
Watch the screen as you turn the < > dial.Use this dial to set the shutter speed, aperture value, etc.
63

< > Info Button
Each press of the < > button changes the information shown.The following examples are still photo shooting screens in < > mode. In (3), an electroniclevel or histogram is displayed, for example.
64

Multi-Function Button
By pressing the < > button and then turning the < > dial, you can set the ISOspeed ( ).
65

Setting the Screen Display Level
Menu Display
Shooting Mode Guide
Feature Guide
You can set how information is displayed on the screen according to your preference.Change the settings as necessary.
1. Display the main tabs.
Press the < > button to display the menu screen.
66

2. Select the [ ] tab.
Turn the < > dial or press the < >< > keys to select the [ ]tab, then press < >.
Menu Display
You can choose from [Standard] or [Guided] as the type of menu display. When set to[Guided], the camera displays main tab descriptions after you press the < > button.When set to [Standard], the camera only displays the menu screen after you press the< > button. The default setting is [Guided].
1. Select [ : Menu display].
67

2. Select the display type.
(1) Main tabs
Note
The [ ] tab (My Menu tab) is not displayed when [Guided] is set. For access toMy Menu ( ), change the menu display level to [Standard].
68

Shooting Mode Guide
A brief description of the shooting mode can be displayed when you switch shooting modes.The default setting is [Enable].
1. Select [ : Mode guide].
2. Select [Enable].
3. Turn the Mode dial.
A description of the selected shooting mode will appear.
69

4. Press the < > key.
The rest of the description will appear.
To clear the mode guide, press < >.
In < >/< > mode, you can display the shooting modeselection screen.
70

Feature Guide
A brief description of functions and items can be displayed when you use Quick Control ormenu settings. The default setting is [Enable].
1. Select [ : Feature guide].
2. Select [Enable].
71

Sample screens
Quick Control screen
Menu Screen
(1) Feature guide
Note
To clear a description, either tap it or continue performing operations.
72
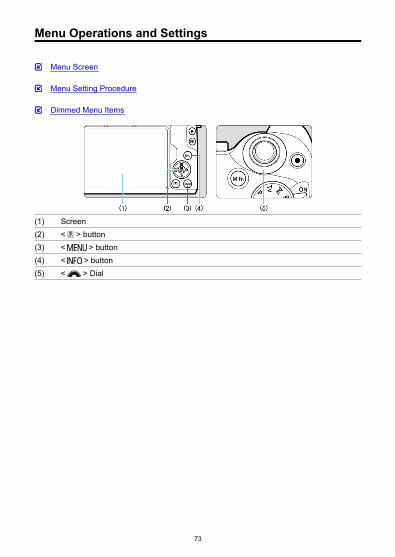
Menu Operations and Settings
Menu Screen
Menu Setting Procedure
Dimmed Menu Items
(1) Screen(2) < > button(3) < > button(4) < > button(5) < > Dial
73

Menu Screen
The menu tabs and items displayed vary depending on the shooting mode.
Basic Zone
Movie recording
Creative Zone
(1) Secondary tabs(2) Menu settings(3) Menu items
74

Menu Setting Procedure
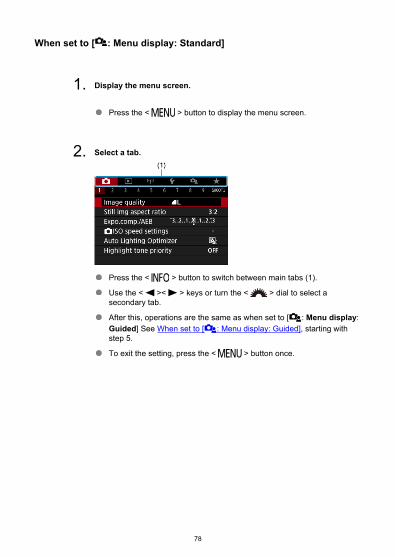
When set to [ : Menu display: Guided]
1. Display the main tabs.
When you press the < > button, the main tabs (1) and adescription of the selected tab will appear.
2. Select a main tab.
Turn the < > dial to switch between main tabs.
You can also switch main tabs by pressing the < > button.
3. Display the menu screen.
Press < > to display the menu screen.
To return to the main tab screen, press the < > button.
75

4. Select a secondary tab.
Use the < >< > keys or turn the < > dial to select asecondary tab.
5. Select an item.
Use the < >< > keys to select an item, then press < >.
6. Select an option.
Use the < >< > or < >< > keys to select an option. (Someoptions are selected with the < >< > keys and others with the< >< > keys.)The current setting is indicated in blue.
76

7. Set an option.
Press < > to set it.If you change the setting from the default, it will be indicated in blue(available only for the menu items under the [ ] tab).
8. Exit the setting.
Press the < > button twice to exit the menu and return toshooting standby.
Note
The description of menu functions hereafter assumes that the menu screen isdisplayed.In steps 2–8, you can also tap the screen to perform operations ( ).To cancel the operation, press the < > button.
77
When set to [ : Menu display: Standard]
1. Display the menu screen.
Press the < > button to display the menu screen.
2. Select a tab.
Press the < > button to switch between main tabs (1).
Use the < >< > keys or turn the < > dial to select asecondary tab.
After this, operations are the same as when set to [ : Menu display:Guided] See When set to [ : Menu display: Guided], starting withstep 5.
To exit the setting, press the < > button once.
78
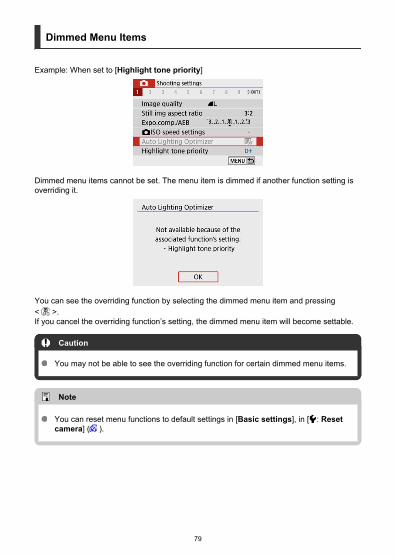
Dimmed Menu Items
Example: When set to [Highlight tone priority]
Dimmed menu items cannot be set. The menu item is dimmed if another function setting isoverriding it.
You can see the overriding function by selecting the dimmed menu item and pressing< >.If you cancel the overriding function’s setting, the dimmed menu item will become settable.
Caution
You may not be able to see the overriding function for certain dimmed menu items.
Note
You can reset menu functions to default settings in [Basic settings], in [ : Resetcamera] ( ).
79

Quick Control
During Shooting
During Playback
You can directly select and set the settings displayed on the screen.
During Shooting
1. Press < > ( ).
2. Select an item.
Press the < >< > keys for selection.
When the screen above is displayed, press the< >< >< >< > keys for selection.
80

3. Select an option.
Turn the < > dial or press the < >< > keys to adjust thesetting. Some items are set by pressing a button after this.
Press < > to return to the previous screen.
81

During Playback
1. Press < >.
2. Select an item.
Press the < >< > keys for selection.
3. Select an option.
Turn the < > dial or press the < >< > keys to adjust thesetting. Some items are set by pressing a button after this.
Configure items labeled with a [ ] icon on the bottom of the screenby pressing < >.
To cancel this operation, press the < > button.
Press < > to return to the previous screen.
Caution
For image rotation, set [ : Auto rotate] to [On ] ( ). When [ : Auto rotate]is set to [On ] or [Off], images will be tagged with your selected [ Rotate stills]option but not rotated on the camera.
Note
For images from other cameras, available options may be restricted.
82

Touch-Screen Operation
Tapping
Dragging
Tapping
Sample screen (shooting functions screen)
Use your finger to tap (touch briefly and then remove your finger from) the screen.
For example, when you tap [ ], the Quick Control screen appears. By tapping [ ],you can return to the preceding screen.
Note
If [ : Beep] is set to [Touch ], the beep will not sound for touch operations ( ).Responsiveness to touch operations can be adjusted in [ : Touch control] ( ).
83
Dragging
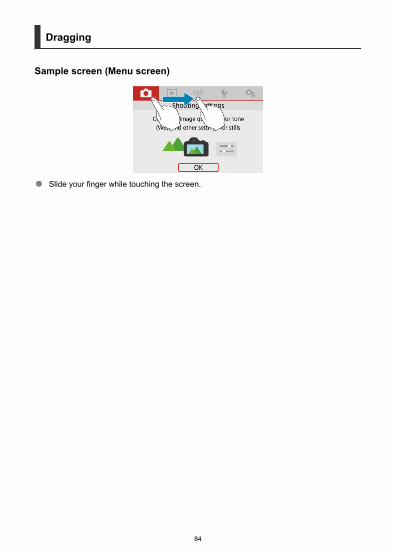
Sample screen (Menu screen)
Slide your finger while touching the screen.
84

Basic Zone
This chapter describes how to use the Basic Zone modes on the Mode dial for best results.With Basic Zone modes, all you do is point and shoot, and the camera sets everythingautomatically.
• Scene Intelligent Auto• Hybrid Auto• Special Scene Mode• Self Portrait Mode• Portrait Mode• Smooth Skin Mode• Landscape Mode• Sports Mode• Panning Mode• Close-up Mode• Food Mode• Night Portrait Mode• Handheld Night Scene Mode• HDR Backlight Control Mode• Silent Mode• Creative Filters Mode
85

Scene Intelligent Auto
Recomposing the Shot
Shooting Moving Subjects
Scene Icons
Adjusting Settings
Shooting with Effects Applied (Creative Assist)
< > is a fully automatic mode. The camera analyzes the scene and sets theoptimum settings automatically. It can also adjust focus automatically on either the still ormoving subject by detecting the motion of the subject ( ).
1. Set the Mode dial to < >.
2. Press < >.
Read the message and select [OK].
86

3. Aim the camera at what you will shoot (the subject).
Essentially, the camera focuses on the closest subject.AF points (1) are displayed over any faces or eyes detected.When a frame (AF point) appears on the screen, aim it over thesubject.
4. Focus on the subject.
Press the shutter button halfway to focus.If < > blinks, manually raise the built-in flash.You can also focus by tapping a person’s face or other subject on thescreen (Touch AF).Under low light, the AF-assist beam ( ) is automatically activated ifneeded.Once the subject is in focus, that AF point turns green and the camerabeeps (One-Shot AF).An AF point in focus on a moving subject turns blue and tracks subjectmovement (Servo AF).
87

5. Take the picture.
Press the shutter button completely to take the picture.The image just captured will be displayed for approx. 2 sec. on thescreen.To retract the built-in flash, push it down with your fingers.
Caution
Subject movement (whether subjects are still or moving) may not be detectedcorrectly for some subject or shooting conditions.
Note
AF operation (One-Shot AF or Servo AF) is set automatically when you press theshutter button halfway. Even when automatically set to One-Shot AF, the camerawill switch to Servo AF if subject motion is detected while you are pressing theshutter button halfway.The < > mode makes the colors look more impressive in nature, outdoor, andsunset scenes. If you do not obtain the desired color tones, change the mode to aCreative Zone mode ( ) and select a Picture Style other than [ ], then shootagain ( ).
Minimizing blurred photos
Be careful about camera shake in handheld shots. To avoid camera shake, considerusing a tripod. Use a sturdy tripod that can bear the weight of the shooting equipment.Attach the camera securely to the tripod.Using a wireless remote control (sold separately, ) is recommended.
88
FAQ
Focusing is not possible (indicated by an orange AF point).Aim the AF point over an area with good contrast, then press the shutter button halfway( ). If you are too close to the subject, move away and shoot again.
Multiple AF points are displayed simultaneously.Focus has been achieved at all those points.
The shutter speed display is blinking.Since it is too dark, taking the picture may result in a blurred subject due to camerashake. Using a tripod, the built-in flash, or an external flash ( ) is recommended.
Pictures are too dark.Raise the built-in flash in advance to enable automatic flash firing, in case subjects indaytime shots are backlit, or when shooting under low light.
Pictures taken with flash are too bright.Pictures may be bright (overexposed) if you shoot subjects at close range in flashphotography. Move away from the subject and shoot again.
The bottom part of pictures taken with flash is unnaturally dark.Shooting subjects that are too close may make the shadow of the lens visible in yourshots. Move away from the subject and shoot again. If you are using a lens hood, tryremoving it before shooting.
Note
Note the following if you are not using the built-in flash.Under low light, when camera shake tends to occur, hold the camera steady or usea tripod. When using a zoom lens, you can reduce the blur caused by camerashake by setting the lens to the wide-angle end.When shooting portraits under low light, tell subjects to stay still until you havefinished shooting. Any movement as you shoot will make the person look blurry inthe picture.
89

Recomposing the Shot
Depending on the scene, positioning the subject toward the left or right to include abalanced background will result in a picture with better perspective.Pressing the shutter button halfway to focus on a still subject will lock the focus on thatsubject. Recompose the shot while keeping the shutter button pressed halfway, and thenpress the shutter button completely to take the picture. This is called “focus lock.”
Note
The camera continues to focus on any faces initially detected and focused on, evenif you recompose the shot.
Shooting Moving Subjects
Pressing the shutter button halfway tracks moving subjects to keep them in focus.Keep the subject on the screen as you hold down the shutter button halfway, and at thedecisive moment, press the shutter button completely.
90

Scene Icons
The camera detects the scene type and sets everything automatically to suit the scene. Instill photo shooting, an icon representing the detected scene appears in the upper left of thescreen ( ).
Adjusting Settings
By touching icons on the screen, you can adjust settings for drive mode, image quality,Touch Shutter, and Creative Assist.
91
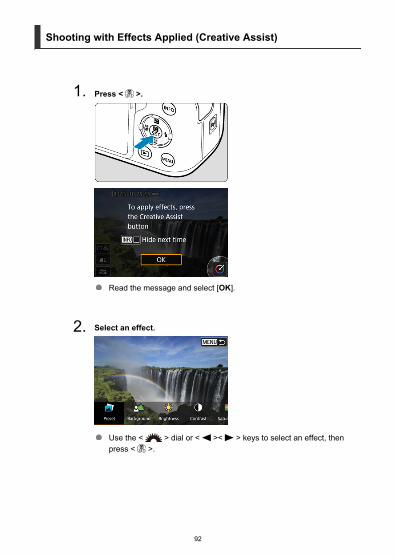
Shooting with Effects Applied (Creative Assist)
1. Press < >.
Read the message and select [OK].
2. Select an effect.
Use the < > dial or < >< > keys to select an effect, thenpress < >.
92

3. Select the effect level and other details.
Use the < > dial or < >< > keys to set it, then press < >.
To reset the setting, press the < > button, then select [OK].
93

Creative Assist effects
[ ] PresetSelect one of the preset effects.Note that [Saturation], [Color tone 1], and [Color tone 2] are not available with [B&W].
[ ] Background blurAdjust background blur. Choose higher values to make backgrounds sharper. To blurthe background, choose lower values. [Auto] adjusts background blurring to match thebrightness. Depending on lens brightness (f/number), some positions may not beavailable.
[ ] BrightnessAdjust image brightness.
[ ] ContrastAdjust contrast.
[ ] SaturationAdjust the vividness of colors.
[ ] Color tone 1Adjust amber/blue color tone.
[ ] Color tone 2Adjust green/magenta color tone.
[ ] MonochromeSet the toning effect for monochrome shooting.
Note
[Background blur] is not available in flash photography.These settings are reset when you switch shooting modes or set the power switchto < >. To save the settings, set [ : Retain Creative Assist data] to[Enable].
Saving effects
To save the current setting to the camera, press the < > button on the [CreativeAssist] setting screen, then select [OK]. Up to three presets can be saved as [USER*]. Afterthree have been saved, an existing [USER*] preset must be overwritten to save a new one.
94

Hybrid Auto
With < > mode, you can make a short movie of the day just by shooting still photos. Thecamera records 2–4-second clips of scenes before each shot, which are later combined in adigest movie ( , ).Still photo shooting functionality is the same as in < > mode. Note that Creative Assist isnot available.
1. Set the Mode dial to < >.
2. Press < >.
Read the message and select [OK].Compose your shots and shoot.
95

Note
For more impressive digest movies, keep the camera aimed at subjects for about 4sec. before shooting still photos.Battery life is shorter in this mode than in < > mode, because digest movies arerecorded for each shot.A digest movie may not be recorded if you shoot a still photo immediately afterturning the camera on, selecting < > mode, or operating the camera in otherways.Any sounds and vibrations from your camera or lens operations will be recorded indigest movies.Digest movie image quality is for NTSC or for PAL.This varies depending on the video system setting.The camera does not beep in response to operations such as pressing the shutterbutton halfway or using the self-timer.Digest movies are saved as separate movie files in the following cases even if theywere recorded on the same day in < > mode.
• Digest movie recording time reaches approx. 29 min. and 59 sec. (and mayalso be saved separately if size exceeds approx. 4 GB).
• Digest movie is protected.• Daylight saving time, video system, or time zone settings are changed.
Recorded shutter sounds cannot be modified or erased.
96

Special Scene Mode
The camera will automatically choose the appropriate settings when you select a shootingmode for your subject or scene.* < > stands for Special Scene.
1. Set the Mode dial to < >.
2. Press < >.
97

3. Select a shooting mode.
Use the < > dial or < >< > keys to select a shooting mode,then press < >.
Note
You can also set the shooting mode in [ : Shooting mode].When [ : Mode guide] is set to [Disable], after step 1, press < > to accessthe Quick Control screen, use the < > dial or < >< > keys to select ashooting mode, then press < >.
98
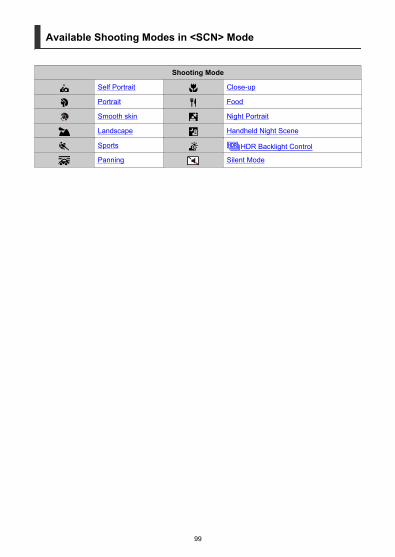
Available Shooting Modes in <SCN> Mode
Shooting Mode
Self Portrait Close-up
Portrait Food
Smooth skin Night Portrait
Landscape Handheld Night Scene
Sports HDR Backlight Control
Panning Silent Mode
99

Self Portrait Mode
To take shots that include yourself, use [ ] (Self Portrait) mode. Rotate the screen aroundtoward the lens. Customizable image processing includes skin smoothing as well asbrightness and background adjustment to make yourself stand out.
Shooting tips
Set the brightness and smooth skin effect.[Brightness] and [Smooth skin effect] can be set in a range of five levels. In[Background], you can adjust the level of background blurring.
Tap the screen to shoot.Besides pressing the shutter button completely to shoot, you can also shoot by tappingthe screen, once set to Touch Shutter: Enable by tapping [ ] to change it to [ ] ( ).
Caution
After the camera achieves focus, do not change the distance between you and thecamera until the picture is taken.Be careful not to drop the camera.
Note
The self-timer lamp ( ) does not blink when the screen is facing toward the frontof the camera in [Self Portrait] mode.You can also take shots of yourself in special scene modes other than [SelfPortrait] (except [Silent Mode]) by rotating the screen toward the front and tapping[ ] in the lower left.
100
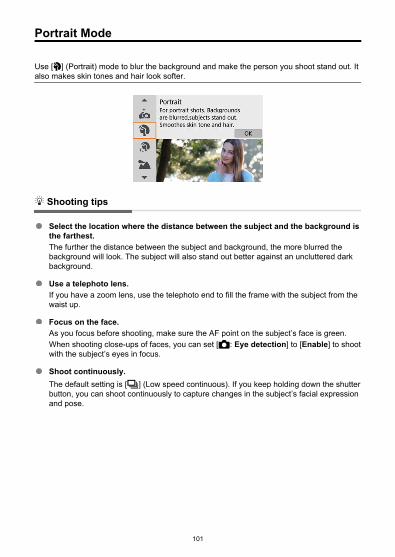
Portrait Mode
Use [ ] (Portrait) mode to blur the background and make the person you shoot stand out. Italso makes skin tones and hair look softer.
Shooting tips
Select the location where the distance between the subject and the background isthe farthest.The further the distance between the subject and background, the more blurred thebackground will look. The subject will also stand out better against an uncluttered darkbackground.
Use a telephoto lens.If you have a zoom lens, use the telephoto end to fill the frame with the subject from thewaist up.
Focus on the face.As you focus before shooting, make sure the AF point on the subject’s face is green.When shooting close-ups of faces, you can set [ : Eye detection] to [Enable] to shootwith the subject’s eyes in focus.
Shoot continuously.The default setting is [ ] (Low speed continuous). If you keep holding down the shutterbutton, you can shoot continuously to capture changes in the subject’s facial expressionand pose.
101

Smooth Skin Mode
Use [ ] (Smooth skin) mode to make skin look more attractive. Image processing makesskin look smoother.
Shooting tips
Enable the camera to detect faces.Frames are displayed around any main subjects detected for skin smoothing. For moreeffective skin smoothing, you can move closer to or farther from the subject so that theframe is displayed on the subject’s face.
Focus on the face.As you focus before shooting, make sure the AF point on the subject’s face is green.When shooting close-ups of faces, you can set [ : Eye detection] to [Enable] to shootwith the subject’s eyes in focus.
Caution
Areas other than people’s skin may be modified, depending on the shootingconditions.
102

Landscape Mode
Use [ ] (Landscape) mode for expansive scenery, to keep everything in focus from near tofar. For vivid blues and greens, and sharp and crisp images.
Shooting tips
With a zoom lens, use the wide-angle end.When using a zoom lens, set the lens to the wide-angle end to make the objects nearand far in focus. It also adds breadth to landscapes.
Keep the camera steady when shooting night scenes.Using a tripod is recommended.
Caution
Flash photography is not available.
103
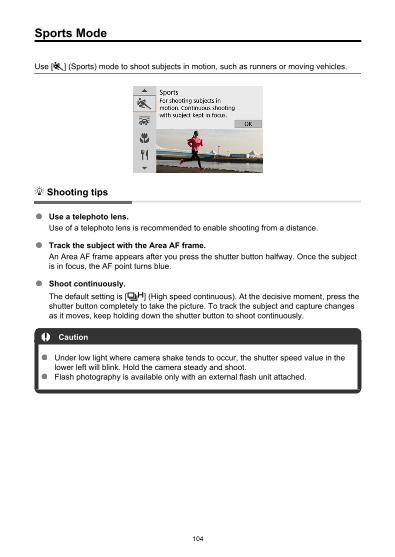
Sports Mode
Use [ ] (Sports) mode to shoot subjects in motion, such as runners or moving vehicles.
Shooting tips
Use a telephoto lens.Use of a telephoto lens is recommended to enable shooting from a distance.
Track the subject with the Area AF frame.An Area AF frame appears after you press the shutter button halfway. Once the subjectis in focus, the AF point turns blue.
Shoot continuously.The default setting is [ ] (High speed continuous). At the decisive moment, press theshutter button completely to take the picture. To track the subject and capture changesas it moves, keep holding down the shutter button to shoot continuously.
Caution
Under low light where camera shake tends to occur, the shutter speed value in thelower left will blink. Hold the camera steady and shoot.Flash photography is available only with an external flash unit attached.
104

Panning Mode
By panning, you can blur the background to convey a sense of speed.Attach a lens compatible with [ ] (Panning) mode to reduce subject blurring and keepsubjects clear and sharp.
Shooting tips
Turn the camera to follow the moving subject.As you shoot, turn the camera smoothly while tracking the moving subject. With the AFpoint over the part of the moving subject to focus on, press the shutter button halfway,start turning the camera to keep up with the subject, then press the shutter buttoncompletely to shoot. Continue tracking the subject with the camera after this.
Set the level of background motion blur.In [Effect], you can set the level of background motion blur. Set to [Effect: max] for aslower shutter speed and more background motion blur around subjects. If subject bluris excessive, reduce it by setting [Effect] to [Effect: med] or [Effect: min].
105

Caution
For details on lenses compatible with [ ] mode, visit the Canon website.Shutter speeds are slower. For this reason, Panning mode is not suitable unlessyou pan as you shoot.The default setting is [ ]. Note that [ ] is not available.Flash photography is not available.Although lens IS is applied to images captured with lenses supporting [ ] mode,the effect is not shown on the screen as you shoot. (IS and subject blur correctionare activated when you shoot, regardless of the lens IS setting.)With lenses that do not support [ ] mode, subject blur is not reduced, but shutterspeed is automatically adjusted to match the [Effect] setting.Your specified panning effect level may not be applied when shooting under brightlight (such as on sunny summer days), or when shooting slow subjects.The following subjects or shooting conditions may prevent suitable subject blurcorrection with lenses supporting [ ] mode.
• Subjects with very low contrast.• Subjects in low light.• Strongly backlit or reflective subjects.• Subjects with repetitive patterns.• Subjects with few patterns, or with monotone patterns.• Subjects with reflections (such as images reflected in glass).• Subjects smaller than the Zone AF frame.• Multiple subjects moving within a Zone AF frame.• Subjects moving in irregular directions or at irregular speeds.• Subjects who sometimes move erratically (such as runners who move up and
down as they run).• Subjects whose speed changes greatly (such as immediately after initial
movement, or when moving along a curve).• When the camera moves too quickly or slowly.• When camera movement does not match subject movement.• With long lens focal lengths.
106
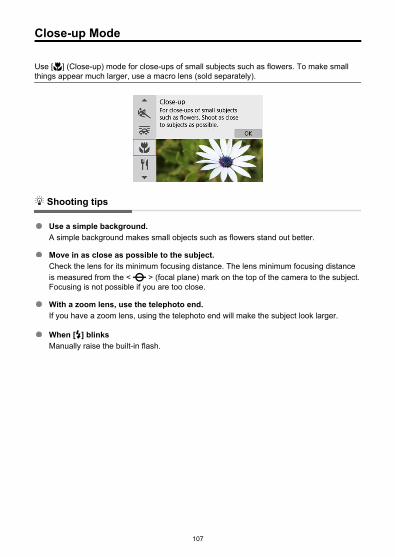
Close-up Mode
Use [ ] (Close-up) mode for close-ups of small subjects such as flowers. To make smallthings appear much larger, use a macro lens (sold separately).
Shooting tips
Use a simple background.A simple background makes small objects such as flowers stand out better.
Move in as close as possible to the subject.Check the lens for its minimum focusing distance. The lens minimum focusing distanceis measured from the < > (focal plane) mark on the top of the camera to the subject.Focusing is not possible if you are too close.
With a zoom lens, use the telephoto end.If you have a zoom lens, using the telephoto end will make the subject look larger.
When [ ] blinksManually raise the built-in flash.
107

Food Mode
Use [ ] (Food) mode for culinary photography. The photo will look bright and appetizing.Also, the reddish tinge due to the light source will be suppressed in the pictures taken undertungsten lights, etc.
Shooting tips
Change the color tone.[Color tone] can be adjusted. To increase the reddish tinge of food, set toward [Warmtone] (red), or set toward [Cool tone] (blue) if it looks too red.
Caution
The warm color cast of subjects may appear faded.When multiple light sources are included in the scene, the warm color cast of thepicture may not be reduced.In flash photography, [Color tone] switches to the standard setting.If there are people in the picture, the skin tone may not be reproduced properly.
108

Night Portrait Mode
Use [ ] (Night Portrait) mode for bright, beautiful shots of people with night scenes in thebackground. Note that shooting in this mode requires the built-in flash or a Speedlite.Using a tripod is recommended.
Shooting tips
Use a wide-angle lens and a tripod.When using a zoom lens, use the wide-angle end to obtain a wide night view. Becausecamera shake occurs in handheld shooting, using a tripod is also recommended.
Check the image brightness.It is recommended to play back the captured image on location to check the imagebrightness. If the subject looks dark, move nearer and shoot again.
Also shoot in other shooting modes.Consider also shooting in < > and [ ] mode, because shots are more likely to beblurry.
109

Caution
Tell subjects to remain still for a moment after the flash fires.Focusing may be difficult if subject faces look dark when you shoot. Focusmanually in this case, either by pressing the < > key to specify [MF] focus modeor by setting the lens focus mode switch to < > ( , ).Autofocusing at night or in dark scenes may be difficult when points of light liewithin the AF point. Focus manually in this case, either by pressing the < > keyto specify [MF] focus mode or by setting the lens focus mode switch to < >( , ).Shots will look slightly different from the preview image shown on the screen.When there is a risk of overexposure in flash photography, shutter speed or ISOspeed is automatically adjusted to reduce loss of detail in highlights and shoot atstandard exposure. In flash shots with certain lenses, the shutter speeds and ISOspeeds displayed when you press the shutter button halfway may not match theactual settings used. This may alter the brightness of backgrounds that are out offlash range.
Note
The self-timer lamp fires briefly after shots in this mode if the self-timer is used.
110

Handheld Night Scene Mode
[ ] (Handheld Night Scene) mode enables handheld shooting for night scenes. In thisshooting mode, four shots are taken consecutively for each picture, and the resulting imagewith reduced camera shake is recorded.
Shooting tips
Hold the camera steady.Keep your elbows close to your body to hold the camera steady ( ). In this mode, fourshots are aligned and merged into a single image, but if there is significant misalignmentin any of the four shots due to camera shake, they may not align properly in the finalimage.
For portraits, use an external flash unit.If your shots will include people, use an external flash unit. For nicer portraits, flash isused for the first shot. Tell the subject not to move until all four consecutive shots aretaken.
111

Caution
Compared to other shooting modes, the image area will be smaller.RAW image quality cannot be set.Autofocusing at night or in dark scenes may be difficult when points of light liewithin the AF point. Focus manually in this case, either by pressing the < > keyto specify [MF] focus mode or by setting the lens focus mode switch to < >( , ).Flash photography is available only with an external flash unit attached.Shooting subjects at close range with an external flash unit may causeoverexposure.Using an external flash unit in night scenes with limited lighting may result in blurrypictures from misaligned images.Using an external flash unit that illuminates both people and a nearby backgroundmay result in blurry pictures from misaligned images. Unnatural shadows andunsuitable colors may also appear.Flash coverage angle with a Speedlite:
• When using a Speedlite with automatic flash coverage setting, the zoomposition will be fixed to the wide (wide-angle) end regardless of the lens’s zoomposition.
• When using a Speedlite requiring manual flash coverage setting, set the flashhead to the normal position.
If you shoot a moving subject, the subject’s movement may leave afterimages orthe surrounding area of the subject may become dark.The image alignment may not function properly with repetitive patterns (lattice,stripes, etc.), flat or single-tone images, or images significantly misaligned due tocamera shake.It takes some time to record images to the card since they are merged aftershooting. “BUSY” appears on the screen as images are processed, and shooting isnot possible until processing is finished.Shots will look slightly different from the preview image shown on the screen.
112

HDR Backlight Control Mode
Use [ ] ( HDR Backlight Control) mode for backlit scenes with both bright and darkareas. Shooting once in this mode captures three consecutive images at differentexposures, which are combined to create a single HDR image that retains detail in shadowsthat might otherwise be lost from backlighting.* HDR stands for High Dynamic Range.
Shooting tips
Hold the camera steady.Keep your elbows close to your body to hold the camera steady ( ). In this mode, threeshots are aligned and merged into a single image. However, if there is significantmisalignment in any of the three shots due to camera shake, they may not align properlyin the final image.
Caution
Compared to other shooting modes, the image area will be smaller.RAW image quality cannot be set.Flash photography is not available.Note that the image may not be rendered with a smooth gradation and may lookirregular or have significant noise.HDR Backlight Control may not be effective for excessively backlit scenes orextremely high-contrast scenes.When shooting subjects that are sufficiently bright as they are, for example fornormally lit scenes, the image may look unnatural due to the HDR effect.Shooting moving subjects may result in afterimages from the movement, ordarkness around the subject.The image alignment may not function properly with repetitive patterns (lattice,stripes, etc.), flat or single-tone images, or images significantly misaligned due tocamera shake.It takes some time to record images to the card since they are merged aftershooting. “BUSY” appears on the screen as images are processed, and shooting isnot possible until processing is finished.
113

Silent Mode
Where silence is needed, you can shoot without beeps or shutter release sounds. As youshoot, a white frame is momentarily displayed around the screen.
Shooting tips
Take some test shots.Consider taking some test shots in advance, because lens aperture and focusingadjustment may be audible under some shooting conditions.
Caution
Be responsible when using silent shooting, and respect subject privacy and portraitrights.Images of fast-moving subjects may look distorted.Continuous shooting and flash photography are not available.
114

Creative Filters Mode
Creative Filter Characteristics
Adjusting the Miniature Effect
You can shoot with filter effects applied. Filter effects can be previewed before you shoot.
1. Set the Mode dial to < >.
2. Press < >.
115

3. Select a filter effect.
Use the < > dial or < >< > keys to select a filter effect ( ),then press < >.The image is shown with the filter effect applied.
4. Adjust the effect and shoot.
Press < > and select an icon below [Creative filters] (except // / / ).
Use the < > dial or < >< > keys to adjust the effect, thenpress < >.
Caution
RAW and RAW+JPEG are not available. When RAW image quality is set, imagesare captured with image quality. When RAW+JPEG image quality is set,images are captured with the specified JPEG image quality.Continuous shooting is not available when [ ], [ ], [ ], [ ], [ ], or [ ] is set.
116

Note
With [Grainy B/W], the grainy preview will differ somewhat from the appearance ofyour shots.With [Soft focus] or [Miniature effect] options, the blurred effect preview maydiffer somewhat from the appearance of your shots.No histogram is displayed.A magnified view is not available.In Creative Zone modes, some Creative filter settings are available from the QuickControl screen.
117

Creative Filter Characteristics
Grainy B/WMakes the image grainy and black and white. By adjusting the contrast, you can changethe black-and-white effect.
Soft focusGives the image a soft look. By adjusting the blur, you can change the degree ofsoftness.
Fish-eye effectGives the effect of a fish-eye lens. The image will have barrel distortion.Depending on the level of this filter effect, the area trimmed along the periphery of theimage changes. Also, because this filter effect magnifies the center of the image, theapparent resolution at the center may degrade depending on the number of recordedpixels, so set the filter effect while checking the resulting image. One AF point is used,fixed at the center.
Water painting effectMakes the photo look like a watercolor painting with soft colors. By adjusting the effect,you can change the color density. Note that night scenes or dark scenes may not berendered with a smooth gradation and may look irregular or have significant noise.
Toy camera effectShifts colors to those typical of toy cameras and darkens the four corners of the image.Color tone options can be used to change the color cast.
Miniature effectCreates a diorama effect.Shooting under the default setting will keep the center looking sharp.To move the area that looks sharp (the scene frame), see Adjusting the Miniature Effect.[1-point AF] is used as the AF method. Shooting with the AF point and scene framealigned is recommended.
HDR art standardPhotos retain more detail in highlights and shadows. With reduced contrast and flattergradation, the finish resembles a painting. The subject outlines will have bright (or dark)edges.
HDR art vividColors are more saturated than with [ HDR art standard], and the low contrast andflat gradation resemble graphic art.
HDR art boldThe colors are the most saturated, making the subject pop out, and the picture looks likean oil painting.
118

HDR art embossedThe color saturation, brightness, contrast and gradation are decreased to make thepicture look flat, so that the picture looks faded and old. The subject outlines will haveintensely bright (or dark) edges.
Caution
[ ], [ ], [ ], and [ ] precautionsCompared to other shooting modes, the image area will be smaller.Shots will look slightly different from the filter effect previews shown on the screen.Shooting moving subjects may result in afterimages from the movement, ordarkness around the subject.The image alignment may not function properly with repetitive patterns (lattice,stripes, etc.), flat or single-tone images, or images significantly misaligned due tocamera shake.Be careful about camera shake in handheld shots.Subjects such as the sky or white walls may not be rendered with smooth gradationand may have noise or irregular exposure or colors.Shooting under fluorescent or LED lighting may result in unnatural colorreproduction of the illuminated areas.It takes some time to record images to the card since they are merged aftershooting. “BUSY” appears on the screen as images are processed, and shooting isnot possible until processing is finished.Flash photography is not available.
Note
With [ ], [ ], [ ], and [ ], you can shoot high dynamic range photos thatretain detail in highlights and shadows of high-contrast scenes. Three consecutiveimages are captured at different brightnesses each time you shoot and used tocreate a single image. See the precautions for [ ], [ ], [ ], and [ ].
119

Adjusting the Miniature Effect
1. Move the scene frame.
Use the scene frame to set an area that will look sharp.To make the scene frame movable (displayed in orange), press the< > button or tap [ ] in the lower right of the screen. By tapping[ ], you can also switch between vertical and horizontal scene frameorientation. Scene frame orientation can also be switched fromhorizontal orientation by pressing the < >< > keys and fromvertical orientation with the < >< > keys.
To move the scene frame, use the < > dial or< >< >< >< > keys. To center the scene frame again, pressthe < > button.
To confirm the position of the scene frame, press < >. Next, set theAF point.
120

2. Move the AF point as needed and shoot.
The AF point turns orange and can be moved.
Press the < >< >< >< > keys to move the AF point to theposition to focus on.Aligning the AF point and scene frame is recommended.
To return the AF point to the center of the screen, tap [ ] in the lowerleft of the screen.
Press < > to confirm the position of the AF point.
121
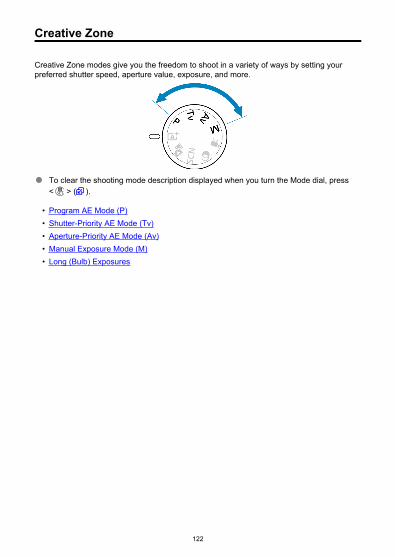
Creative Zone
Creative Zone modes give you the freedom to shoot in a variety of ways by setting yourpreferred shutter speed, aperture value, exposure, and more.
To clear the shooting mode description displayed when you turn the Mode dial, press< > ( ).
• Program AE Mode (P)• Shutter-Priority AE Mode (Tv)• Aperture-Priority AE Mode (Av)• Manual Exposure Mode (M)• Long (Bulb) Exposures
122

Program AE Mode (P)
The camera automatically sets the shutter speed and aperture value to suit the subject’sbrightness.* < > stands for Program.* AE stands for Auto Exposure.
1. Set the Mode dial to < >.
2. Focus on the subject.
Aim the AF point over the subject and press the shutter button halfway.
3. Check the display.
Standard exposure is available unless the shutter speed and aperturevalue are blinking.
123

4. Take the picture.
Compose the shot and press the shutter button completely.
Caution
If the “30"” shutter speed and the lowest aperture value blink, it indicatesunderexposure.Increase the ISO speed or use flash.If the “1/4000” shutter speed and the highest aperture value blink, it indicatesoverexposure.Lower the ISO speed or use an ND filter (sold separately) to reduce the amount oflight entering the lens.
Note
Differences between < > and < > modes
In < > mode, many functions, such as the AF method and metering mode, areset automatically to prevent spoiled shots. The functions you can set are limited.On the other hand, with < > mode, only the shutter speed and aperture value areset automatically. You can freely set the AF method, metering mode, and otherfunctions.
Program shiftWith Program AE, you can freely change the combination (program) of shutterspeed and aperture value set by the camera while maintaining the same exposure.This is called Program shift.With Program shift, you can press the shutter button halfway, then turn the< > dial until the desired shutter speed or aperture value is displayed.Program shift will be canceled automatically when the metering timer ends(exposure setting display turns off).Program shift cannot be used with flash.
124
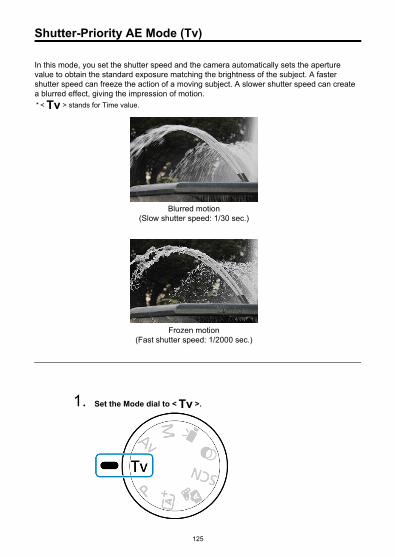
Shutter-Priority AE Mode (Tv)
In this mode, you set the shutter speed and the camera automatically sets the aperturevalue to obtain the standard exposure matching the brightness of the subject. A fastershutter speed can freeze the action of a moving subject. A slower shutter speed can createa blurred effect, giving the impression of motion.* < > stands for Time value.
Blurred motion(Slow shutter speed: 1/30 sec.)
Frozen motion(Fast shutter speed: 1/2000 sec.)
1. Set the Mode dial to < >.
125

2. Set the desired shutter speed.
Turn the < > dial to set it.
3. Focus on the subject.
Press the shutter button halfway.
4. Check the display and shoot.
As long as the aperture value is not blinking, the standard exposure willbe obtained.
Caution
If the lowest aperture value blinks, it indicates underexposure.Turn the < > dial to set a slower shutter speed until the aperture value stopsblinking or set a higher ISO speed.If the highest aperture value blinks, it indicates overexposure.Turn the < > dial to set a faster shutter speed until the aperture value stopsblinking, or set a lower ISO speed.
126

Note
Shutter speed displayFor shutter speeds slower than 1/4 sec., display changes from the denominatorformat to ". For example, 0"5 indicates 0.5 sec. and 15", 15 sec.
127

Aperture-Priority AE Mode (Av)
In this mode, you set the desired aperture value and the camera sets the shutter speedautomatically to obtain the standard exposure matching the subject brightness. A higher f/number (smaller aperture hole) will make more of the foreground and background fall withinacceptable focus. On the other hand, a lower f/number (larger aperture hole) will make lessof the foreground and background fall within acceptable focus.* < > stands for Aperture value (aperture opening).
Blurred background(With a low aperture value: f/5.6)
Sharp foreground and background(With a high aperture value: f/32)
128

1. Set the Mode dial to < >.
2. Set the desired aperture value.
Turn the < > dial to set it.
3. Focus on the subject.
Press the shutter button halfway.
4. Check the display and shoot.
As long as the shutter speed is not blinking, the standard exposure willbe obtained.
129

Caution
If the “30"” shutter speed blinks, it indicates underexposure.Turn the < > dial to decrease the aperture value (open the aperture) until theshutter speed blinking stops or set a higher ISO speed.If the “1/4000” shutter speed blinks, it indicates overexposure.Turn the < > dial to increase aperture value (close the aperture) until theshutter speed blinking stops or set a lower ISO speed.
Note
Aperture value displayThe higher the value, the smaller the aperture opening will be. The aperture valuedisplayed varies depending on the lens. If no lens is attached to the camera, “F00”will be displayed for the aperture.
130

Depth-of-Field Preview
The aperture changes only at the moment you shoot, and it remains open at other times. Forthis reason, the depth of field shown on the screen looks narrow, or shallow. To check thearea in focus, assign [ ] (depth-of-field preview) to a button and press it.
Note
The larger the aperture value, the wider the area in focus, from the foreground tothe background.The depth-of-field effect is readily apparent on the screen as you change theaperture value and press the button assigned to depth-of-field preview.Exposure is locked (AE lock) as you hold down the button assigned to depth-of-field preview.
131

Manual Exposure Mode (M)
In this mode, you set both the shutter speed and aperture value as desired. To determinethe exposure, refer to the exposure level indicator or use a commercially available exposuremeter.* < > stands for Manual.
1. Set the Mode dial to < >.
2. Set the ISO speed.
With ISO Auto, you can set exposure compensation ( ).
3. Set the desired shutter speed.
Turn the < > dial to set it.
132

4. Set the desired aperture value.
Press the < > key to select the aperture value, then turn the < >dial to set a value.
5. Focus on the subject.
(1) Standard exposure index(2) Exposure level mark
Press the shutter button halfway.
Check the exposure level mark [ ] to see how far the current exposurelevel is from the standard exposure level.
6. Set the exposure and take the picture.
Check the exposure level indicator and set the desired shutter speedand aperture value.
[ ] or [ ] appears at the ends of the exposure level indicator if thelevel exceeds ±3 stops from standard exposure.
133

Exposure Compensation with ISO Auto
If the ISO speed is set to [AUTO] for manual exposure shooting, you can set exposurecompensation ( ) as follows:
Tap the exposure level indicator[ : Expo.comp./AEB]
Caution
Exposure may not be as expected when ISO Auto is set, because the ISO speed isadjusted to ensure standard exposure for your specified shutter speed andaperture value. In this case, set the exposure compensation.Exposure compensation is not applied in flash photography with ISO Auto, even ifyou have set an exposure compensation amount.
Note
To enable Auto Lighting Optimizer to be specified in < > mode as well, clear the[ ] mark for [Disable during man expo] in [ : Auto Lighting Optimizer] ( ).When ISO Auto is set, you can press the < > button to lock the ISO speed.If you press the < > button and recompose the shot, you can see the exposurelevel difference on the exposure level indicator compared to when the < >button was pressed.
134

Long (Bulb) Exposures
In this mode, the shutter stays open as long as you hold down the shutter button completely,and closes when you let go of the shutter button. Use bulb exposures for night scenes,fireworks, astrophotography, and other subjects requiring long exposures.
1. Set the Mode dial to < >.
2. Set the shutter speed to [BULB].
Turn the < > dial to the left to set [BULB].
135

3. Set the desired aperture value.
Press the < > key to select the aperture value, then turn the < >dial to set a value.
4. Take the picture.
The exposure will continue for as long as you keep the shutter buttonpressed completely.
Elapsed exposure time is shown on the screen.
Caution
Do not point the camera toward an intense light source, such as the sun or anintense artificial light source. Doing so may damage the image sensor or thecamera’s internal components.Long bulb exposures produce more noise in the image than usual.If ISO Auto is set, ISO 400 will be set ( ).
Note
You can reduce the noise generated during long exposures by using [ : Longexp. noise reduction] ( ).Using a tripod is recommended for bulb exposures.You can also shoot bulb exposures by using Wireless Remote Control BR-E1 (soldseparately, ). When you press the remote controller’s release (transmit) button,the bulb exposure will start immediately or 2 sec. later. Press the button again tostop the bulb exposure.
136

AF, Drive, and Exposure Settings
This chapter describes how to configure AF, drive mode, metering mode, and relatedsettings.
Caution
< > stands for autofocus. < > stands for manual focus.
• AF Operation• AF Method• Manual Focus• Drive Mode• Using the Self-Timer• Remote Control Shooting
• Metering Mode
• Exposure Compensation
• Exposure Lock (AE Lock)
137

AF Operation
One-Shot AF for Still Subjects
Servo AF for Moving Subjects
AF-assist beam
You can select the AF operation characteristics to suit the shooting conditions or subject. InBasic Zone modes, the optimum AF operation is set automatically for the respectiveshooting mode.
1. Turn the Mode dial to a Creative Zone.
2. Select [ : AF operation].
3. Select an option.
Press the < >< > keys.: One-Shot AF: Servo AF
138

Note
Without using the menu, you can also switch focus modes by pressing the < >key.
139

One-Shot AF for Still Subjects
This AF operation is suited for still subjects. When you press the shutter button halfway, thecamera will focus only once.
Once a subject is in focus, the focusing AF point turns green and the camera beeps. Iffocus is not achieved, the AF point will turn orange.The focus remains locked while you hold down the shutter button halfway, allowing youto recompose the image before taking the picture.For details on the continuous shooting speed for continuous shooting, see Drive Mode.
Note
If [ : Beep] is set to [Disable], the beeper will not sound when focus is achieved.The focus remains locked while you hold down the shutter button halfway, allowingyou to recompose the image before taking the picture. This is called “focus lock.”See Lens Electronic MF when using a lens that supports electronic manualfocusing.
140

Servo AF for Moving Subjects
This AF operation is suited for moving subjects. While you hold down the shutter buttonhalfway, the camera will keep focusing on the subject continuously.
Once a subject is in focus, the focusing AF point turns blue.For details on the continuous shooting speed for continuous shooting, see Drive Mode.
Caution
Depending on the lens used, the distance to the subject and the subject’s speed,the camera may not be able to achieve correct focus.Zooming during continuous shooting may throw off the focus. Zoom first, thenrecompose and shoot.
Note
The beeper will not sound even when focus is achieved.The exposure is set at the moment the picture is taken.
141
AF-assist beam
The AF-assist beam ( , ) may fire when you press the shutter button halfway under lowlight or in similar conditions, to make autofocusing easier.
With a Speedlite, configure the setting on the Speedlite as needed.
Caution
The flash does not emit an AF-assist beam when AF operation is set to [Servo AF].
Note
To disable AF-assist beam firing, set [ : AF-assist beam firing] to [Disable].
142
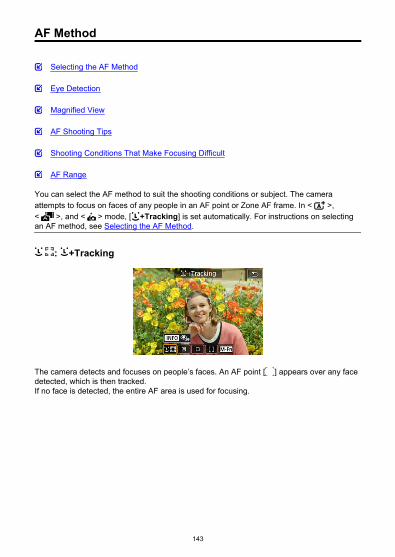
AF Method
Selecting the AF Method
Eye Detection
Magnified View
AF Shooting Tips
Shooting Conditions That Make Focusing Difficult
AF Range
You can select the AF method to suit the shooting conditions or subject. The cameraattempts to focus on faces of any people in an AF point or Zone AF frame. In < >,< >, and < > mode, [ +Tracking] is set automatically. For instructions on selectingan AF method, see Selecting the AF Method.
: +Tracking
The camera detects and focuses on people’s faces. An AF point [ ] appears over any facedetected, which is then tracked.If no face is detected, the entire AF area is used for focusing.
143

: Spot AF
The camera focuses in a narrower area than [1-point AF].
: 1-point AF
The camera focuses using a single AF point [ ].
: Zone AF
Focuses in a wide Zone AF frame, which makes it easier to acquire subjects than with [1-point AF].Prioritizes focusing on the nearest subject. Faces of any people in the Zone AF frame arealso given priority in focusing.AF points in focus are displayed with < >.
144

Selecting the AF Method
1. Select [ : AF method].
2. Select an option.
Note
Without using the menu, you can also set the AF method by pressing the < >button and then the < > button.
145

+Tracking:
The camera detects and focuses on people’s faces. If a face moves, the AF point [ ] alsomoves to track the face.With [Eye detection] set to [Enable], you can shoot with the subject’s eyes in focus ( ).* These instructions apply to the camera with AF operation set to [One-Shot AF] ( ). With [ServoAF] ( ) set, the AF point will turn blue when focus is achieved.
1. Check the AF point.
An AF point [ ] appears over any face detected.
When multiple faces are detected, pressing the < > button changesthe AF point to [ ]. Press the < >< > keys to select the face tofocus on.
146

2. Focus and take the picture.
Once you press the shutter button halfway and the subject is in focus,the AF point turns green and the camera beeps.An orange AF point indicates that the camera could not focus onsubjects.
Tapping a face for focus
Tapping a face or subject to focus on changes the AF point to [ ] and focuses where youtap.Even if the face or subject moves on the screen, the AF point [ ] moves to track it.
Caution
If the subject’s face is significantly out of focus, face detection will not be possible.Adjust the focus manually ( ) so that the face can be detected, then perform AF.An object other than a human face may be detected as a face.Face detection will not work if the face is very small or large in the picture, toobright or too dark, or partially hidden.AF cannot detect subjects or people’s faces at the edges of the screen.Recompose the shot to center the subject or bring the subject closer to the center.
Note
The active [ ] may cover only a part of the face, not the whole face.The size of the AF point changes depending on the subject.
147
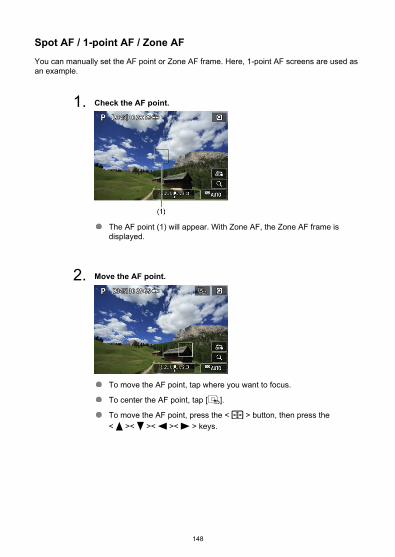
Spot AF / 1-point AF / Zone AFYou can manually set the AF point or Zone AF frame. Here, 1-point AF screens are used asan example.
1. Check the AF point.
The AF point (1) will appear. With Zone AF, the Zone AF frame isdisplayed.
2. Move the AF point.
To move the AF point, tap where you want to focus.
To center the AF point, tap [ ].
To move the AF point, press the < > button, then press the< >< >< >< > keys.
148

3. Focus and take the picture.
Aim the AF point over the subject and press the shutter button halfway.When focus is achieved, the AF point will turn green and the beeperwill sound. If focus is not achieved, the AF point will turn orange.
Caution
AF points may not track subjects under some shooting conditions when [Servo AF]is used with Zone AF.Focusing with an AF-assist beam may be difficult with AF points near the edge ofthe screen. In this case, move to an AF point in the center of the screen.
149

Eye Detection
With the AF method set to [ +Tracking], you can shoot with the subject’s eyes in focus.
1. Select [ : Eye detection].
2. Select [Enable].
150

3. Aim the camera at the subject.
An AF point is displayed around their eye.You can also tap the screen to choose an eye.If your selected eye is not detected, an eye to focus on is selectedautomatically.
You can choose an eye or face to focus on with the < >< > keyswhen [ ] is displayed after you press the < > button, dependingon the [Eye detection] setting.
4. Take the picture.
Caution
Subject eyes may not be detected correctly, depending on the subject and shootingconditions.To cancel eye detection, set [ : Eye detection] to [Disable].
Note
You can switch the [Eye detection] setting by pressing the < > button whenyou have set [AF method] to [ +Tracking] on the Quick Control screen afterpressing < >.
151

Magnified View
To check the focus when the AF method is other than [ +Tracking], magnify display byapprox. 5× or 10× by tapping [ ].
Magnification is centered on the AF point for [Spot AF] or [1-point AF] and on the ZoneAF frame for [Zone AF].Autofocusing is performed with magnified display if you press the shutter button halfwaywhen set to [Spot AF], and [1-point AF]. When set to [Zone AF], autofocusing isperformed after restoring normal display.With Servo AF, if you press the shutter button halfway in the magnified view, the camerawill return to the normal view for focusing.
Caution
If focusing is difficult in the magnified view, return to the normal view and performAF.If you perform AF in the normal view and then use the magnified view, accuratefocus may not be achieved.AF speed differs between the normal view and magnified view.Continuous AF and Movie Servo AF are not available when display is magnified.With the magnified view, achieving focus becomes more difficult due to camerashake. Using a tripod is recommended.
152

AF Shooting Tips
Even when focus is achieved, pressing the shutter button halfway will focus again.Image brightness may change before and after autofocusing.Depending on the subject and shooting conditions, it may take longer to focus, or thecontinuous shooting speed may decrease.If the light source changes as you shoot, the screen may flicker, and focusing may bedifficult. In this case, restart the camera and resume shooting with AF under the lightsource you will use.If focusing is not possible with AF, focus manually ( ).For subjects at the edge of the screen that are slightly out of focus, try centering thesubject (or AF point, or Zone AF frame) to bring them into focus, then recompose theshot before shooting.With certain lenses, it may take more time to achieve focus with autofocus, or accuratefocusing may not be achieved.
153

Shooting Conditions That Make Focusing Difficult
Subject with low-contrast such as the blue sky, solid-color flat surfaces or when highlightor shadow details are clipped.Subjects in low light.Stripes and other patterns where there is contrast only in the horizontal direction.Subjects with repetitive patterns (Example: Skyscraper windows, computer keyboards,etc.).Fine lines and subject outlines.Under light sources with constantly changing brightness, colors, or patterns.Night scenes or points of light.The image flickers under fluorescent or LED lighting.Extremely small subjects.Subjects at the edge of the screen.Strongly backlit or reflective subjects (Example: Car with a highly reflective surfaces,etc.).Near and distant subjects covered by an AF point (Example: Animal in a cage, etc.).Subjects that keep moving within the AF point and will not stay still due to camera shakeor subject blur.Performing AF when the subject is very far out of focus.Soft focus effect is applied with a soft focus lens.A special effect filter is used.Noise (dots of light, banding, etc.) appears on the screen during AF.
AF Range
The available autofocus range varies depending on the lens used and aspect ratio andwhether you are using features such as Movie digital IS.
154

Manual Focus
If focus cannot be achieved with autofocus, follow the procedure below to focus manually.
1. Set [ : Focus mode] to [ ].
Turn the lens focusing ring to set the approximate focus.
155
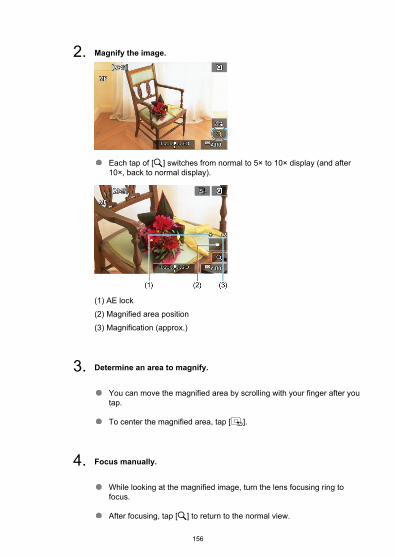
2. Magnify the image.
Each tap of [ ] switches from normal to 5× to 10× display (and after10×, back to normal display).
(1) AE lock(2) Magnified area position(3) Magnification (approx.)
3. Determine an area to magnify.
You can move the magnified area by scrolling with your finger after youtap.
To center the magnified area, tap [ ].
4. Focus manually.
While looking at the magnified image, turn the lens focusing ring tofocus.
After focusing, tap [ ] to return to the normal view.
156

5. Take the picture.
Note
When using non EF-M lenses, set the lens focus mode switch to < > in step 1.Even when focusing manually, you can use Touch Shutter to shoot.
MF Peaking Settings (Outline Emphasis)
As you shoot, edges of subjects in focus can be displayed in color to make focusing easier.You can set the outline color and adjust the sensitivity (level) of edge detection (except in< >/< > modes).
1. Select [ : MF peaking settings].
2. Select [Peaking].
Select [On].
157
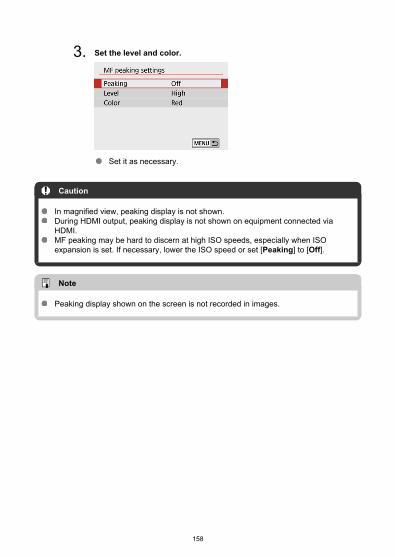
3. Set the level and color.
Set it as necessary.
Caution
In magnified view, peaking display is not shown.During HDMI output, peaking display is not shown on equipment connected viaHDMI.MF peaking may be hard to discern at high ISO speeds, especially when ISOexpansion is set. If necessary, lower the ISO speed or set [Peaking] to [Off].
Note
Peaking display shown on the screen is not recorded in images.
158
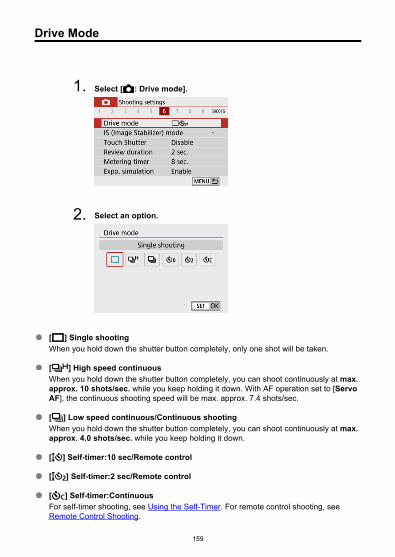
Drive Mode
1. Select [ : Drive mode].
2. Select an option.
[ ] Single shootingWhen you hold down the shutter button completely, only one shot will be taken.
[ ] High speed continuousWhen you hold down the shutter button completely, you can shoot continuously at max.approx. 10 shots/sec. while you keep holding it down. With AF operation set to [ServoAF], the continuous shooting speed will be max. approx. 7.4 shots/sec.
[ ] Low speed continuous/Continuous shootingWhen you hold down the shutter button completely, you can shoot continuously at max.approx. 4.0 shots/sec. while you keep holding it down.
[ ] Self-timer:10 sec/Remote control
[ ] Self-timer:2 sec/Remote control
[ ] Self-timer:ContinuousFor self-timer shooting, see Using the Self-Timer. For remote control shooting, seeRemote Control Shooting.
159

Caution
The maximum continuous shooting speed for [ ] ( ) is the value in continuousshooting under these conditions: shooting at room temperature (23°C/73°F) with afully charged Battery Pack LP-E12 at a 1/1000 sec. or faster shutter speed andmaximum aperture value (depending on the lens), with Image Stabilizer off(depending on the lens).Various factors may lower the continuous shooting speed for [ ], such astemperature, battery level, shutter speed, aperture value, subject conditions,brightness, AF operation, type of lens, use of built-in flash, and shooting settings.With Servo AF, the maximum continuous shooting speed may become slowerdepending on subject conditions or the lens used.If the battery temperature is low due to a low ambient temperature, the maximumcontinuous shooting speed may become slower.When internal memory becomes full during continuous shooting, the continuousshooting speed may drop off because shooting will be temporarily disabled ( ).
160

Using the Self-Timer
1. Select [ : Drive mode].
2. Select an option.
/ : Shoot in 10 sec.Remote control shooting is also possible ( ).
/ : Shoot in 2 sec.Remote control shooting is also possible ( ).
: Shoot continuously in 10 sec. for the specified number ofshotsPress the < >< > keys to set the number of shots to take (2–10).Remote control shooting is not possible.
[ ] and [ ] icons are displayed when the camera is paired with awireless remote control (sold separately, ).
161

3. Take the picture.
Focus on the subject, then press the shutter button completely.To check operation, look at the self-timer lamp, listen for beeps, orwatch the countdown in seconds on the screen.The self-timer lamp blinks faster approx. 2 sec. before the shot.
Caution
With [ ], the shooting interval may become longer under some shootingconditions, depending on image quality, use of flash, and other factors.
Note
[ ] can be used to start shooting without touching the camera and avoid camerashake when it is mounted on a tripod for still-life or long exposure shots.After taking self-timer shots, playing back the image ( ) to check focus andexposure is recommended.When using the self-timer to shoot yourself, use focus lock ( ) on an object at thesame distance as where you will stand.To cancel the self-timer, either tap the screen or press < >.Auto power off time may be extended when the camera is set for remote controlshooting.
162

Remote Control Shooting
You can shoot remotely by using an optional Wireless Remote Control BR-E1, which pairsvia Bluetooth.
Wireless Remote Control BR-E1
You can shoot remotely up to approx. 5 meters/16.4 feet from the camera. After pairing thecamera and BR-E1 ( ), set the drive mode to [ ] ( ).For operating instructions, refer to the BR-E1 instruction manual.
Note
Auto power off time may be extended when the camera is set for remote controlshooting.The remote control can also be used for movie recording ( ).
163
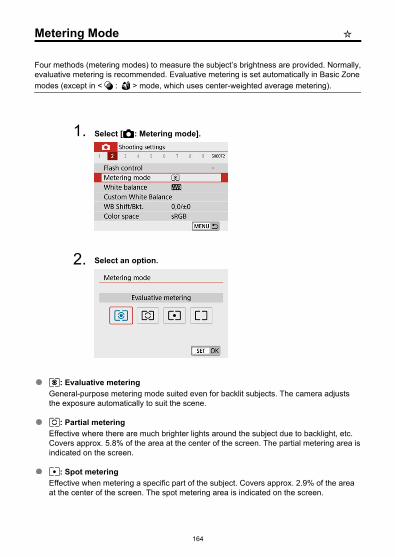
Metering Mode
Four methods (metering modes) to measure the subject’s brightness are provided. Normally,evaluative metering is recommended. Evaluative metering is set automatically in Basic Zonemodes (except in < : > mode, which uses center-weighted average metering).
1. Select [ : Metering mode].
2. Select an option.
: Evaluative meteringGeneral-purpose metering mode suited even for backlit subjects. The camera adjuststhe exposure automatically to suit the scene.
: Partial meteringEffective where there are much brighter lights around the subject due to backlight, etc.Covers approx. 5.8% of the area at the center of the screen. The partial metering area isindicated on the screen.
: Spot meteringEffective when metering a specific part of the subject. Covers approx. 2.9% of the areaat the center of the screen. The spot metering area is indicated on the screen.
164
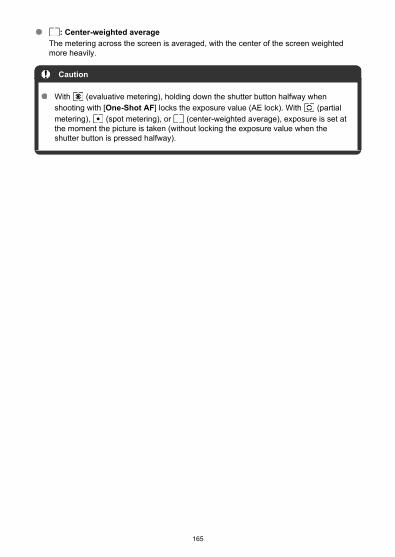
: Center-weighted averageThe metering across the screen is averaged, with the center of the screen weightedmore heavily.
Caution
With (evaluative metering), holding down the shutter button halfway whenshooting with [One-Shot AF] locks the exposure value (AE lock). With (partialmetering), (spot metering), or (center-weighted average), exposure is set atthe moment the picture is taken (without locking the exposure value when theshutter button is pressed halfway).
165

Exposure Compensation
Exposure compensation can brighten (increased exposure) or darken (decreased exposure)the standard exposure set by the camera.Exposure compensation is available in < >, < >, < >, and < > modes. Fordetails on exposure compensation when < > mode and ISO Auto are both set, seeExposure Compensation with ISO Auto.
1. Select the exposure level indicator.
Press the < > key to display the indicator.
2. Set the compensation amount.
Decreased exposure, to darken images
Increased exposure, to brighten images
Set it by looking at the screen as you turn the < > dial.
A [ ] icon is displayed to indicate exposure compensation.
3. Take the picture.
To cancel exposure compensation, return the exposure level indicator[ ] to [ ], the standard exposure index.
Caution
If [ : Auto Lighting Optimizer] ( ) is set to any setting other than [Disable], theimage may still look bright even if decreased exposure compensation is set todarken images.
166

Note
The exposure compensation amount will remain in effect even after you turn off thecamera.Can also be set on the shooting functions screen, in [ : Exposure comp./AEBsetting] ( ).
167

Exposure Lock (AE Lock)
You can lock the exposure when you want to set the focus and exposure separately or whenyou will take multiple shots at the same exposure setting. Press the < > button to lock theexposure, then recompose and take the picture. It is effective for shooting backlit subjects,etc.
1. Focus on the subject.
Press the shutter button halfway.
2. Press the < > button.
[ ] is displayed on the screen to indicate that exposure is locked (AElock). To cancel AE lock, press the < > button again.
3. Recompose and take the picture.
Press the shutter button.
Caution
If [ : Auto Lighting Optimizer] ( ) is set to any setting other than [Disable], theimage may still look bright even if decreased exposure compensation is set todarken images.
168

AE Lock Effects
Metering Mode ( )AF Point Selection ( )
Automatic Selection Manual SelectionExposure centered on the AF point in
focus is locked.Exposure centered on the selected AF
point is locked.
AE lock is applied at the center AF point.
* When set to [ ] with [ : Focus mode] set to [ ], AE is locked at an exposure value centeredon the center of the screen.
Note
AE lock is not possible with bulb exposures.
169
Flash Photography
This chapter describes how to shoot with the built-in flash or an external flash (EL/EX seriesSpeedlites).
to the right of page titles indicates functions only available in Creative Zone modes(< >/< >/< >/< >).
Caution
Flash cannot be used while you are recording movies.AEB is not available in flash photography.
• Shooting with the Built-in Flash• Flash Function Settings
• Shooting with Speedlites
170

Shooting with the Built-in Flash
Shutter Speed and Aperture Value in Flash Photography
Shooting With FE Lock
Using the built-in flash is recommended when the [ ] icon appears in the viewfinder or onthe screen, when subjects in daytime shots are backlit, or when shooting under low light.
1. Manually raise the flash.
In Creative Zone modes, shooting with flash is possible whenever theflash is raised.[BUSY] is displayed on the screen while the flash is charging.
2. Press the shutter button halfway.
Confirm that [ ] appears on the screen.
171

3. Take the picture.
When focus is achieved and you press the shutter button completely,the flash will fire at all times.To retract the built-in flash after shooting, push it down with your fingersuntil it clicks into place.
Shooting tips
In bright light, decrease the ISO speed.If the exposure setting in the viewfinder blinks, decrease the ISO speed.
Detach the lens hood. Do not get too close to the subject.If the lens has a hood attached or you are too close to the subject, the bottom of thepicture may look dark due to the obstructed flash light. For important shots, play backthe image and check to make sure the picture does not look unnaturally dark at thebottom part.
Shutter Speed and Aperture Value in Flash Photography
Shooting Mode Shutter Speed Aperture Value
Auto (1/200–30 sec.)* Automatically set
Manual (1/200–30 sec.) Automatically set
Auto (1/200–30 sec.)* Manually set
Manual (1/200–30 sec., Bulb) Manually set
* With [Slow synchro] in [ : Flash control] set to [1/200-30sec. auto]
Caution
Do not use the built-in flash unless it is fully raised.
172

Note
If the bottom of images is dark when you use super telephoto or large-diameterlenses, consider using an external Speedlite (sold separately, ).
173

Shooting With FE Lock
The background or other factors may make subjects brighter or darker in flash photographywith subjects near the edge of the screen. In this case, use FE lock. After setting the flashoutput for the appropriate subject brightness, you can recompose (put the subject toward theside) and shoot. This feature can also be used with a Canon EL/EX series Speedlite.* FE stands for Flash Exposure.
1. Manually raise the flash.
Press the shutter button halfway and confirm that [ ] appears on thescreen.
2. Focus on the subject.
174

3. Press the < > button ( ).
Center the subject in the viewfinder, then press the < > button.A preflash is fired by the flash, and the flash output required forshooting is retained.
[ ] lights up briefly on the screen.
Each time you press the < > button, a preflash is fired, and the flashoutput required for shooting is retained.
4. Take the picture.
Compose the shot and press the shutter button completely.
175

Caution
The [ ] icon blinks when subjects are too far away and your shots would be dark.Approach the subject and repeat steps 2–4.
176

Flash Function Settings
Flash Firing
E-TTL II Flash Metering
Red-Eye Reduction
Slow Synchro
Built-in Flash Function Settings
External Flash Function Settings
External Flash Custom Function Settings
Clearing Flash Function Settings/C.Fn Settings
Functions of the built-in flash or external EL/EX series Speedlites can be set from menuscreens on the camera.Before setting functions of external Speedlites, attach the Speedlite and turn it on.For details on external Speedlite functions, refer to the Speedlite’s instruction manual.
1. Select [ : Flash control].
177

2. Select an option.
178
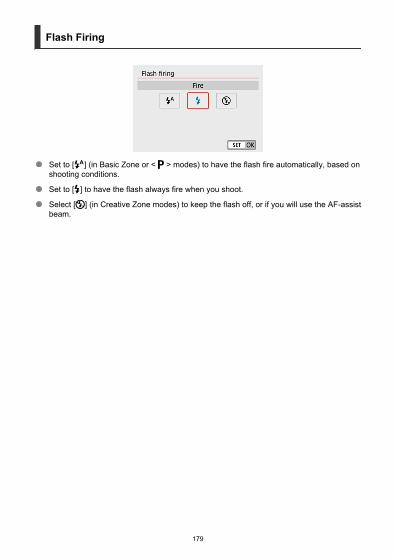
Flash Firing
Set to [ ] (in Basic Zone or < > modes) to have the flash fire automatically, based onshooting conditions.
Set to [ ] to have the flash always fire when you shoot.
Select [ ] (in Creative Zone modes) to keep the flash off, or if you will use the AF-assistbeam.
179

E-TTL II Flash Metering
Set to [Eval (FacePrty)] for flash metering suitable for shots of people. Continuousshooting speed for [ ] is slower than when [Evaluative] or [Average] is selected.Set to [Evaluative] for flash metering that emphasizes firing in continuous shooting.If [Average] is set, the flash exposure will be averaged for the entire metered scene.
Caution
Even when [Eval (FacePrty)] is set, some subjects and shooting conditions mayprevent you from obtaining the expected result.
180

Red-Eye Reduction
Set to [Enable] to reduce red-eye by firing the red-eye reduction lamp before firing the flash.
181

Slow Synchro
You can set the flash-sync speed for flash photography in < > mode or < > mode.
[ ] 1/200-30sec. autoThe flash sync speed is set automatically within a range of 1/200 sec. to 30 sec. to suitthe scene’s brightness. Slow-sync shooting is used in low-light locations (under someshooting conditions), and shutter speed is automatically lowered.
[ ] 1/200-1/60sec. autoPrevents a slow shutter speed from being set automatically in low-light conditions. It iseffective for preventing subject blur and camera shake. Light from the flash providesstandard exposure for subjects, but note that backgrounds may be dark.
[ ] 1/200 sec. (fixed)The shutter speed is fixed at 1/200 sec., which is more effective in preventing subjectblur and camera shake than with [1/200-1/60sec. auto]. However, in low light, thesubject’s background will come out darker than with [1/200-1/60sec. auto].
Caution
To use slow-sync shooting in < >/< > mode, set to [1/200-30sec. auto].
182

Built-in Flash Function Settings
Flash modeSet to [E-TTL II] to shoot in E-TTL II/E-TTL fully automatic flash mode.
Set to [Manual flash] to specify your preferred flash output in [ flash output].
• Only available in < >/< >/< > modes.
183

Shutter sync.Normally, set to [1st curtain] so that the flash fires immediately after shooting starts.Set to [2nd curtain] and use low shutter speeds for natural-looking shots of subject motiontrails, such as car headlights.
Caution
When shooting with [2nd curtain], set a shutter speed of 1/60 sec. or slower. Forshutter speeds exceeding 1/60 sec., first-curtain synchronization is usedautomatically even if [2nd curtain] is set.
184

exp. comp.Set the flash exposure compensation if the brightness of the subject does not come out asdesired (so you want to adjust the flash output) in flash photography. You can set the flashexposure compensation up to ±2 stops in 1/3-stop increments.
1. Select [ exp. comp.].
2. Set the compensation amount.
If the exposure is too dark, press the < > key (for increasedexposure).
If the exposure is too bright, press the < > key (for decreasedexposure).After taking the picture, cancel the flash exposure compensation bysetting it back to 0.
185

Caution
Setting [ : Auto Lighting Optimizer] ( ) to an option other than [Disable] maystill cause images to look bright even if you set negative flash exposurecompensation for darker exposure.If flash exposure compensation is set with a Speedlite (sold separately, ), youcannot set the flash exposure compensation with the camera (Quick Control orexternal flash function setting). Note that the Speedlite’s setting overrides thecamera’s if both are set at the same time.
Note
The exposure compensation amount will remain in effect even after you set thepower switch to < >.
186

External Flash Function Settings
The information displayed on the screen, position of display, and available options varydepending on the Speedlite model, its Custom Function settings, the flash mode, and otherfactors. Refer to the instruction manual of your flash unit for details on its functions.
Sample display
(1) Flash mode(2) Wireless functions/Firing ratio control(3) Flash zoom (flash coverage)(4) Shutter synchronization(5) Flash exposure compensation(6) Flash exposure bracketing
Caution
Functions are limited when using EX series Speedlites that are not compatible withflash function settings.
187

Flash modeYou can select the flash mode to suit your desired flash photography.
• [E-TTL II] is the standard mode of EL/EX-series Speedlites that support autoexposureflash photography.
• [Manual flash] is a mode for manually configuring the Speedlite’s [Flash output]setting.
• [CSP] (Continuous shooting priority mode) is available when using a compatibleSpeedlite. This mode automatically reduces flash output by one stop and increases ISOspeed by one stop. Useful in continuous shooting, and helps conserve flash batterypower.
• Regarding other flash modes, refer to the Instruction Manual of a Speedlite compatiblewith the respective flash mode.
Caution
Adjust Exposure Compensation as needed in case of overexposure from flashphotography with [CSP] in < >/< > mode.
Note
With [CSP], ISO speed is automatically set to [Auto].
188

Wireless functionsYou can use radio or optical wireless transmission to shoot with wireless multiple-flashlighting.For details on wireless flash, refer to the Instruction Manual of a Speedlite compatible withwireless flash photography.
Firing ratio controlWith a macro flash, you can set the firing ratio control.For details on firing ratio control, refer to the Instruction Manual of the macro flash.
Flash zoom (flash coverage)With Speedlites having a zooming flash head, you can set the flash coverage.
189

Shutter synchronizationNormally, set this to [First-curtain synchronization] so that the flash fires immediately afterthe shooting starts. Set to [Second-curtain synchronization] and use low shutter speedsfor natural-looking shots of subject motion trails, such as car headlights.Set to [High-speed synchronization] for flash photography at higher shutter speeds thanthe maximum flash sync shutter speed. This is effective when shooting with an openaperture in < > mode to blur the background behind subjects outdoors in daylight, forexample.
Caution
When shooting with [Second-curtain synchronization], set a shutter speed of1/60 sec. or slower. For shutter speeds exceeding 1/60 sec., first-curtainsynchronization is used automatically even if [Second-curtain synchronization] isset.
Flash exposure compensationJust as exposure compensation is adjustable, you can also adjust flash output of externalSpeedlites.
Caution
If flash exposure compensation is set with the Speedlite, you cannot set the flashexposure compensation with the camera. Note that the Speedlite’s settingoverrides the camera’s if both are set at the same time.
190

Flash exposure bracketingSpeedlites equipped with flash exposure bracketing (FEB) can change the external flashoutput automatically as three shots are taken at once.
191

External Flash Custom Function Settings
For details on the external Speedlite’s Custom Functions, refer to the Speedlite’s InstructionManual.
Caution
With an EL/EX series Speedlite, the Speedlite will always fire at full output if the[Flash metering mode] Custom Function is set to [1:TTL] (autoflash).Setting or clearing Speedlite Personal Functions (P.Fn) is not possible from thecamera’s [ : External flash func. setting] screen. Set them directly from theSpeedlite.
192

Clearing Flash Function Settings/C.Fn Settings
1. Select [Clear settings].
2. Select the settings to be cleared.
Select [Clear built-in flash set.], [Clear external flash set.], or [Clearext. flash C.Fn set.].Select [OK] on the confirmation screen to clear all flash settings orCustom Function settings.
193

Shooting with Speedlites
EL/EX Series Speedlites for EOS Cameras
Canon Speedlites Other Than the EL/EX Series
Non-Canon Flash Units
EL/EX Series Speedlites for EOS Cameras
The camera supports flash photography using all functions of EL/EX series Speedlites (soldseparately).For instructions, refer to the EL/EX series Speedlite’s Instruction Manual.
Canon Speedlites Other Than the EL/EX Series
With an EZ/E/EG/ML/TL series Speedlite set to A-TTL or TTL autoflash mode, the flashcan be fired at full output only.Set the camera’s shooting mode to < > or < > and adjust the aperture valuebefore shooting.When using a Speedlite that has manual flash mode, shoot in the manual flash mode.
194

Non-Canon Flash Units
Sync speedThe camera can synchronize with non-Canon compact flash units at up to 1/200 sec. Withlarge studio flash units, the flash duration is longer than that of a compact flash unit andvaries depending on the model. Before shooting, confirm that flash sync is performedcorrectly by taking some test shots at a sync speed of approx. 1/60 sec. to 1/30 sec.
Caution
Manually lower the built-in flash before attaching an external flash unit.Using the camera with a dedicated flash unit or flash accessory for cameras ofother manufacturers poses a risk of malfunction and even damage.Do not attach a high-voltage flash unit to the camera’s hot shoe. It may not fire.
195

Shooting and Recording
This chapter describes shooting and recording and introduces menu settings on theshooting ([ ]) tab.
• Still Photo Shooting• Movie Recording
196

Still Photo Shooting
to the right of page titles indicates functions only available in Creative Zone modes.
• Tab Menus: Still Photo Shooting• Image Quality• Still Image Aspect Ratio
• Exposure Compensation/AEB Settings
• ISO Speed Settings for Still Photos
• Auto Lighting Optimizer
• Highlight Tone Priority
• White Balance Settings
• White Balance Correction
• Color Space
• Picture Style Selection
• Picture Style Customization
• Picture Style Registration
• Lens Aberration Correction
• Noise Reduction Features
• Appending Dust Delete Data• Continuous AF• Touch & Drag AF Settings
• Focus Mode• AF-Assist Beam Firing
• Lens Electronic MF• Image Stabilization• Touch Shutter• Review Duration
• Metering Timer
• Exposure Simulation• Shooting Information Display
197

• Reverse Display• Viewfinder Display Format• Display Performance• Type of Digest Movie• General Still Photo Shooting Precautions
198

Tab Menus: Still Photo Shooting
Shooting 1
(1) Image quality(2) Still img aspect ratio
(3) Expo.comp./AEB
(4) ISO speed settings
(5) Auto Lighting Optimizer
(6) Highlight tone priority
Shooting 2
(1) Flash control
(2) Metering mode
(3) White balance
(4) Custom White Balance
(5) WB Shift/Bkt.
(6) Color space
199

Shooting 3
(1) Picture Style
Picture Style Selection
Picture Style Customization
Picture Style Registration
(2) Lens aberration correction
(3) Long exp. noise reduction
(4) High ISO speed NR
(5) Dust Delete Data
Shooting 4
(1) AF operation(2) AF method(3) Eye detection(4) Continuous AF(5) Touch & drag AF settings
(6) Focus mode
200

Shooting 5
(1) MF peaking settings(2) AF-assist beam firing
(3) Lens electronic MF
Shooting 6
(1) Drive mode(2) IS (Image Stabilizer) mode(3) Touch Shutter(4) Review duration
(5) Metering timer
(6) Expo. simulation
201

Shooting 7
(1) Shooting info. disp.(2) Reverse display(3) VF display format(4) Disp. performance
Shooting 8
(1) Movie rec quality(2) Sound recording
(3) ISO speed settings(4) Movie Servo AF
(5) Auto slow shutter
202
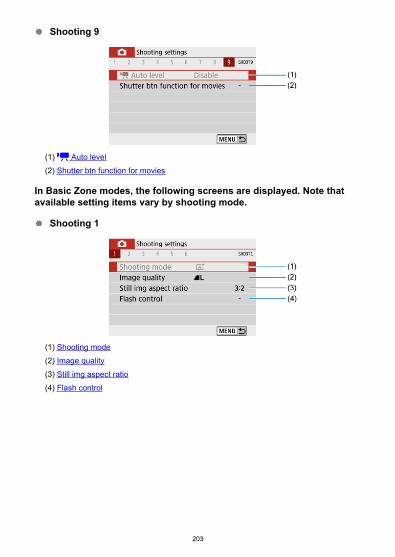
Shooting 9
(1) Auto level(2) Shutter btn function for movies
In Basic Zone modes, the following screens are displayed. Note thatavailable setting items vary by shooting mode.
Shooting 1
(1) Shooting mode(2) Image quality(3) Still img aspect ratio(4) Flash control
203
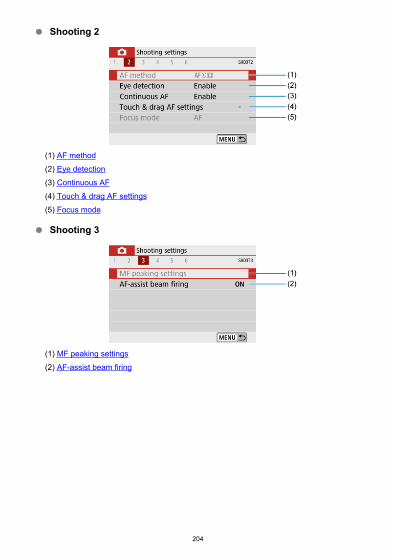
Shooting 2
(1) AF method(2) Eye detection(3) Continuous AF(4) Touch & drag AF settings(5) Focus mode
Shooting 3
(1) MF peaking settings(2) AF-assist beam firing
204

Shooting 4
(1) Drive mode(2) IS (Image Stabilizer) mode(3) Touch Shutter(4) Review duration(5) Shooting info. disp.(6) Reverse display
Shooting 5
(1) VF display format(2) Disp. performance(3) Digest type(4) Retain Creative Assist data
205

Shooting 6
(1) Movie rec quality(2) Sound recording(3) Movie Servo AF
(4) Auto level(5) Shutter btn function for movies
206

Image Quality
RAW Images
Guide to Image Quality Settings
Maximum Burst for Continuous Shooting
1. Select [ : Image quality].
2. Set the image quality.
For RAW images, turn the < > dial, and for JPEGs, press the< >< > keys.
Press < > to set it.
Caution
Number of shots available as indicated by [****] on the image quality setting screenalways applies to a setting of [3:2], regardless of the actual aspect ratio setting( ).
207

Note
If [–] is set for both the RAW image and JPEG image, will be set.If you select both RAW and JPEG, each time you shoot, the image will be recordedsimultaneously to the card as both a RAW and JPEG image at your specifiedimage qualities. The two images will be recorded with the same file numbers (fileextension: .JPG for JPEG and .CR3 for RAW).
is in (Fine) quality.Meaning of image quality icons: RAW, Compact RAW, JPEG, Fine,
Normal, Large, Medium, Small.
RAW Images
RAW images are raw data from the image sensor that are recorded to the card digitally as or (smaller than ) files, depending on your selection.
You can use Digital Photo Professional (EOS software) to process RAW images. You canmake various adjustments to images depending upon how they will be used and cangenerate JPEG or other types of images reflecting the effects of those adjustments.
Note
To display RAW images on a computer, using Digital Photo Professional (EOSsoftware, hereafter DPP) is recommended.Older versions of DPP Ver. 4.x do not support display, processing, editing, or otheroperations with RAW images captured by this camera. If a previous version of DPPVer. 4.x is installed on your computer, obtain and install the latest version of DPPfrom the Canon website to update it ( ), which will overwrite the previous version.Similarly, DPP Ver. 3.x or earlier does not support display, processing, editing, orother operations with RAW images captured by this camera.Commercially available software may not be able to display RAW images capturedby this camera. For compatibility information, contact the software manufacturer.
208

Guide to Image Quality Settings
See Specifications for details on file size, number of shots available, maximum burst, andother estimated values.
Maximum Burst for Continuous Shooting
The estimated maximum burst is shown on the top of the shooting screen.
Note
When the maximum burst in still photo shooting is indicated as “99,” you can shoot99 shots or more continuously. Fewer shots are available for a value of 98 or lower,and when [BUSY] is displayed on the shooting screen, internal memory is full andshooting will stop temporarily. If you stop continuous shooting, the maximum burstwill increase. After all captured images have been written to a card, you can onceagain shoot at the maximum burst listed in Specifications.
209

Still Image Aspect Ratio
You can change the image’s aspect ratio.
1. Select [ : Still img aspect ratio].
2. Set the aspect ratio.
Select an aspect ratio, then press < >.
JPEG imagesThe images will be recorded with the set aspect ratio.
RAW ImagesThe images will always be recorded in the [3:2] aspect ratio. The selected aspect ratioinformation is added to the RAW image file, which enables Digital Photo Professional(EOS software) to generate an image with the same aspect ratio as set at the time ofshooting when you process RAW images with this software.
210

Aspect ratio
4:3 16:9 1:1
Note
RAW images shot at an aspect ratio of [4:3], [16:9], or [1:1] are displayed duringplayback with lines indicating the respective aspect ratio, but these lines are notrecorded in the image.
211

Exposure Compensation/AEB Settings
You can capture three images at different shutter speeds, aperture values, and ISO speeds,as adjusted by the camera. This is called AEB.* AEB stands for Auto Exposure Bracketing.
1. Select [ : Expo.comp./AEB].
2. Set the AEB range.
Turn the < > dial to set the AEB range (1). By using the< >< > keys, you can set the amount of exposure compensation.
Press < > to set it.Once an AEB range is set, it is shown on the screen on the exposurelevel indicator.
212
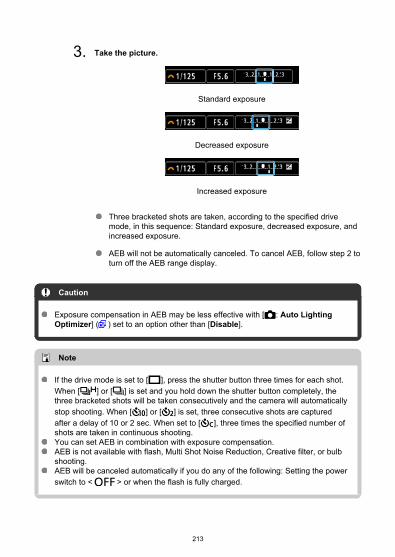
3. Take the picture.
Standard exposure
Decreased exposure
Increased exposure
Three bracketed shots are taken, according to the specified drivemode, in this sequence: Standard exposure, decreased exposure, andincreased exposure.
AEB will not be automatically canceled. To cancel AEB, follow step 2 toturn off the AEB range display.
Caution
Exposure compensation in AEB may be less effective with [ : Auto LightingOptimizer] ( ) set to an option other than [Disable].
Note
If the drive mode is set to [ ], press the shutter button three times for each shot.When [ ] or [ ] is set and you hold down the shutter button completely, thethree bracketed shots will be taken consecutively and the camera will automaticallystop shooting. When [ ] or [ ] is set, three consecutive shots are capturedafter a delay of 10 or 2 sec. When set to [ ], three times the specified number ofshots are taken in continuous shooting.You can set AEB in combination with exposure compensation.AEB is not available with flash, Multi Shot Noise Reduction, Creative filter, or bulbshooting.AEB will be canceled automatically if you do any of the following: Setting the powerswitch to < > or when the flash is fully charged.
213

ISO Speed Settings for Still Photos
Set the ISO speed (image sensor’s sensitivity to light) to suit the ambient light level.In Basic Zone modes, ISO speed is set automatically.For details on ISO speed in movie recording, see ISO Speed in Movie Recording.
1. Tap the ISO speed icon.
214

2. Set the ISO speed.
Set by pressing the < >< > keys.ISO speed can be set within ISO 100–25600 in 1/3-stop increments.With [AUTO] selected, ISO speed is set automatically.When [AUTO] is selected, pressing the shutter button halfway willdisplay the ISO speed actually set.
To specify [AUTO] when setting [ISO speed] in [ : ISO speedsettings] (shown above), press the < > button.
215
ISO speed guide
Low ISO speeds reduce image noise but may increase the risk of camera/subject shakeor reduce the area in focus (shallower depth of field), in some shooting conditions.High ISO speeds enable low-light shooting, a larger area in focus (deeper depth of field),and longer flash range but may increase image noise.
Note
Can also be set on the [ISO speed] screen in [ : ISO speed settings].To add [H] (equivalent to ISO 51200) as an available option, set [ISO expansion]to [1:Enable] in [ : Custom Functions(C.Fn)] ( ).
Caution
Setting [ : Highlight tone priority] to [Enable] or [Enhanced] will prevent youfrom selecting ISO 100/125/160 or [H] (equivalent to ISO 51200) ( ).Shooting in high temperatures may result in images that look grainier. Longexposures may also cause irregular colors in the image.When you shoot at high ISO speeds, noise (such as dots of light and banding) maybecome noticeable.If you use a high ISO speed and flash to shoot a close subject, overexposure mayresult.When shooting in conditions that produce an extreme amount of noise, such as acombination of high ISO speed, high temperature, and long exposure, images maynot be recorded properly.As “H” (equivalent to ISO 51200) is an expanded ISO speed setting, noise (dots oflight, banding, etc.) and irregular colors will be more noticeable, and the resolutionwill be lower compared to the standard setting.
216

Maximum [AUTO] ISO Speed
For ISO Auto, you can set the maximum ISO speed limit within ISO 400–25600.
1. Select [ : ISO speed settings].
2. Select [Max for Auto].
Select [Max for Auto], then press < >.
3. Select the ISO speed.
Select the ISO speed, then press < >.
217

Auto Lighting Optimizer
Brightness and contrast can be corrected automatically if shots look dark or contrast is toolow or high.
1. Select [ : Auto Lighting Optimizer].
2. Set a correction option.
Caution
Noise may increase and apparent resolution may change, under some shootingconditions.If the effect of Auto Lighting Optimizer is too strong and results are not at yourpreferred brightness, set to [Low] or [Disable].If a setting other than [Disable] is set and you use exposure compensation or flashexposure compensation to darken the exposure, the image may still come outbright. If you want a darker exposure, set this function to [Disable].Maximum burst is lower with [High]. Image recording to the card also takes longer.
218

Note
To enable [ : Auto Lighting Optimizer] to be set even in < > mode, pressthe < > button in step 2 to clear the checkmark [ ] for [Disable during manexpo].
219

Highlight Tone Priority
You can reduce overexposed, clipped highlights.
1. Select [ : Highlight tone priority].
2. Set an option.
[Enable]: Improves gradation in highlights. The gradation between thegrays and highlights becomes smoother.[Enhanced]: Reduces overexposed highlights even more than[Enable], under some shooting conditions.
Caution
Noise may increase slightly.The available ISO range starts at ISO 200. Expanded ISO speeds cannot be set.[Enhanced] is not available when recording movies.With [Enhanced], results in some scenes may not look as expected.
220

White Balance Settings
White Balance
[ ] Auto White Balance
[ ] Custom White Balance
[ ] Color Temperature
White balance (WB) is for making the white areas look white. Normally, the Auto [ ](Ambience priority) or [ ] (White priority) setting will obtain the correct white balance. Ifnatural-looking colors cannot be obtained with Auto, you can select the white balance tomatch the light source or set it manually by shooting a white object.
1. Select [ : White balance].
2. Select an option.
221
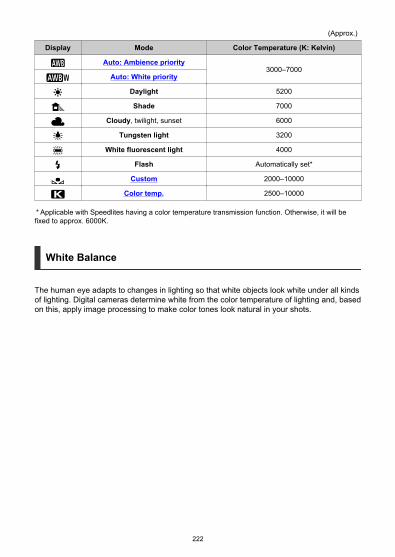
(Approx.)
Display Mode Color Temperature (K: Kelvin)
Auto: Ambience priority3000–7000
Auto: White priority
Daylight 5200
Shade 7000
Cloudy, twilight, sunset 6000
Tungsten light 3200
White fluorescent light 4000
Flash Automatically set*
Custom 2000–10000
Color temp. 2500–10000
* Applicable with Speedlites having a color temperature transmission function. Otherwise, it will befixed to approx. 6000K.
White Balance
The human eye adapts to changes in lighting so that white objects look white under all kindsof lighting. Digital cameras determine white from the color temperature of lighting and, basedon this, apply image processing to make color tones look natural in your shots.
222
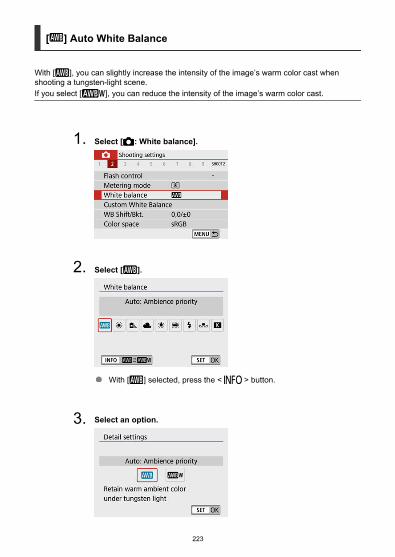
[ ] Auto White Balance
With [ ], you can slightly increase the intensity of the image’s warm color cast whenshooting a tungsten-light scene.If you select [ ], you can reduce the intensity of the image’s warm color cast.
1. Select [ : White balance].
2. Select [ ].
With [ ] selected, press the < > button.
3. Select an option.
223

Caution
Precautions when set to [ ]The warm color cast of subjects may appear faded.When multiple light sources are included in the scene, the warm color cast of thepicture may not be reduced.When using flash, the color tone will be the same as with [ ].
224

[ ] Custom White Balance
With custom white balance, you can manually set the white balance for the specific lightsource of the shooting location. Make sure to perform this procedure under the light sourceat the actual location of the shoot.
1. Shoot a white object.
Aim the camera at a plain white object, so that white fills the screen.Focus manually and shoot with the standard exposure set for the whiteobject.You can use any of the white balance settings.
2. Select [ : Custom White Balance].
225
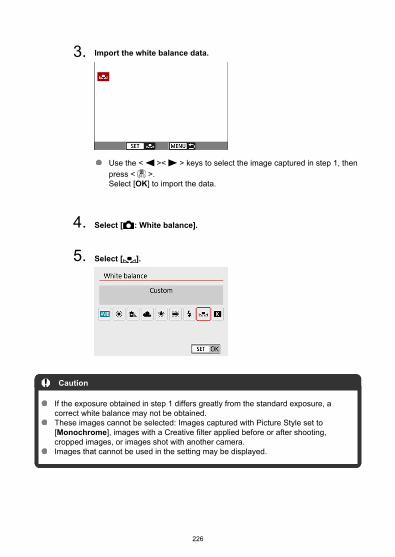
3. Import the white balance data.
Use the < >< > keys to select the image captured in step 1, thenpress < >.Select [OK] to import the data.
4. Select [ : White balance].
5. Select [ ].
Caution
If the exposure obtained in step 1 differs greatly from the standard exposure, acorrect white balance may not be obtained.These images cannot be selected: Images captured with Picture Style set to[Monochrome], images with a Creative filter applied before or after shooting,cropped images, or images shot with another camera.Images that cannot be used in the setting may be displayed.
226

Note
Instead of shooting a white object, you can also shoot a gray card or standard 18%gray reflector (commercially available).
227

[ ] Color Temperature
1. Select [ : White balance].
2. Set the color temperature.
Select [ ].
Turn the < > dial to set the desired color temperature, then press< >.The color temperature can be set from approx. 2500K to 10000K in100K increments.
Caution
When setting the color temperature for an artificial light source, set the whitebalance correction (magenta or green bias) as necessary.When setting [ ] to a value measured with a commercially available colortemperature meter, take some test shots in advance and adjust the setting asneeded to compensate for any difference between the color temperature meter andthe camera.
228

White Balance Correction
White Balance Correction
White Balance Auto Bracketing
White balance correction has the same effect as using a commercially available colortemperature conversion filter or color compensating filter.
White Balance Correction
1. Select [ : WB Shift/Bkt.].
229

2. Set the white balance correction.
Sample setting: A2, G1
Press the < >< > or < >< > keys to move the ■ mark to yourpreferred position.B is for blue, A for amber, M for magenta, and G for green. Whitebalance is corrected in the direction you move the mark.On the right of the screen, [Shift] indicates the direction and correctionamount, respectively.
Pressing the < > button will cancel all the [WB Shift/Bkt.]settings.
Press < > to exit the setting.
Note
One level of the blue/amber correction is equivalent to approx. 5 mireds of a colortemperature conversion filter. (Mired: Unit of measure for color temperature used toindicate values such as the density of a color temperature conversion filter.)
230

White Balance Auto Bracketing
White balance bracketing enables you to capture three images at once with different colortones.
Setting the white balance bracketing amount
B/A bias ±3 levels
In step 2 for White Balance Correction, when you turn the < > dial, the “■” mark onthe screen will change to “■ ■ ■” (3 points).Turning the dial clockwise sets the B/A bracketing, and turning it counterclockwise setsthe M/G bracketing.On the right of the screen, [Bracket] indicates the bracketing direction and correctionamount.
Pressing the < > button will cancel all the [WB Shift/Bkt.] settings.
Press < > to exit the setting.
Caution
During white balance bracketing, the maximum burst for continuous shooting willbe lower.Since three images are recorded for one shot, it takes longer to record the image tothe card.
Note
The images will be bracketed in the following sequence: 1. Standard white balance,2. Blue (B) bias, and 3. Amber (A) bias, or 1. Standard white balance, 2. Magenta(M) bias, and 3. Green (G) bias.You can also set white balance correction and AEB together with white balancebracketing. If you set AEB in combination with white balance bracketing, a total ofnine images will be recorded for a single shot.The white balance icon blinks when WB bracketing is set. (If the icon is not shown,press the < > button repeatedly to switch the display.)Bracket stands for bracketing.
231

Color Space
The range of reproducible colors is called the “color space.” For normal shooting, sRGB isrecommended.
1. Select [ : Color space].
2. Set a color space option.
Adobe RGB
This color space is mainly used for commercial printing and other professional applications.Recommended when using equipment such as Adobe RGB-compatible monitors or DCF 2.0(Exif 2.21 or later) compatible printers.
Note
File names of still photos shot in the Adobe RGB color space begin with “_”.The ICC profile is not appended. For the descriptions about the ICC profile, refer tothe Digital Photo Professional Instruction Manual (EOS software).In Basic Zone, [sRGB] is set automatically.
232

Picture Style Selection
Picture Style Characteristics
Symbols
Just by selecting a preset Picture Style, you can obtain image characteristics effectivelymatching your photographic expression or the subject.
1. Select [ : Picture Style].
2. Select a Picture Style.
233
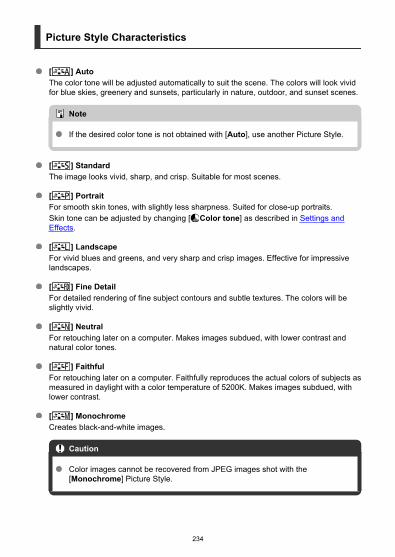
Picture Style Characteristics
[ ] AutoThe color tone will be adjusted automatically to suit the scene. The colors will look vividfor blue skies, greenery and sunsets, particularly in nature, outdoor, and sunset scenes.
Note
If the desired color tone is not obtained with [Auto], use another Picture Style.
[ ] StandardThe image looks vivid, sharp, and crisp. Suitable for most scenes.
[ ] PortraitFor smooth skin tones, with slightly less sharpness. Suited for close-up portraits.Skin tone can be adjusted by changing [ Color tone] as described in Settings andEffects.
[ ] LandscapeFor vivid blues and greens, and very sharp and crisp images. Effective for impressivelandscapes.
[ ] Fine DetailFor detailed rendering of fine subject contours and subtle textures. The colors will beslightly vivid.
[ ] NeutralFor retouching later on a computer. Makes images subdued, with lower contrast andnatural color tones.
[ ] FaithfulFor retouching later on a computer. Faithfully reproduces the actual colors of subjects asmeasured in daylight with a color temperature of 5200K. Makes images subdued, withlower contrast.
[ ] MonochromeCreates black-and-white images.
Caution
Color images cannot be recovered from JPEG images shot with the[Monochrome] Picture Style.
234

[ ] User Def. 1–3You can add a new style based on presets such as [Portrait] or [Landscape] or aPicture Style file, then adjust it as needed ( ). Shots taken with a style you have notcustomized yet will have the same characteristics as the default [Auto] setting.
235
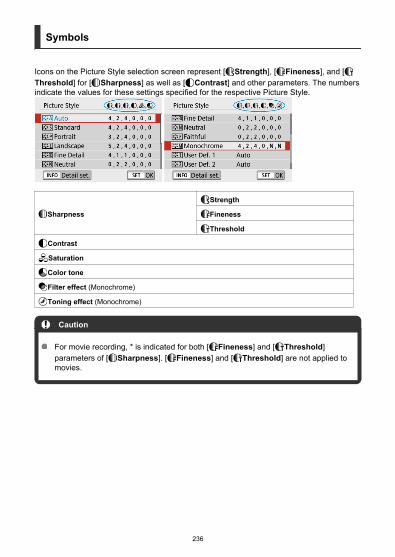
Symbols
Icons on the Picture Style selection screen represent [ Strength], [ Fineness], and [Threshold] for [ Sharpness] as well as [ Contrast] and other parameters. The numbersindicate the values for these settings specified for the respective Picture Style.
Sharpness
Strength
Fineness
Threshold
Contrast
Saturation
Color tone
Filter effect (Monochrome)
Toning effect (Monochrome)
Caution
For movie recording, * is indicated for both [ Fineness] and [ Threshold]parameters of [ Sharpness]. [ Fineness] and [ Threshold] are not applied tomovies.
236

Picture Style Customization
Settings and Effects
[ ] Monochrome Adjustment
You can customize any Picture Style by changing it from the default settings. For details oncustomizing [Monochrome], see [ ] Monochrome Adjustment.
1. Select [ : Picture Style].
2. Select a Picture Style.
Select the Picture Style to adjust, then press the < > button.
237

3. Select an option.
For details on settings and effects, see Settings and Effects.
4. Set the effect level.
Set the value, then press < >.
Press the < > button to save the adjusted setting and return tothe Picture Style selection screen.Any settings you change from default values are displayed in blue.
238

Settings and Effects
Sharpness
Strength 0: Weak outline emphasis 7: Strong outline emphasis
Fineness*1 1: Fine 5: Grainy
Threshold*2 1: Low 5: High
Contrast -4: Low contrast +4: High contrast
Saturation -4: Low saturation +4: High saturation
Color tone -4: Reddish skin tone +4: Yellowish skin tone
* 1: Indicates the edge thinness that enhancement applies to. The smaller the number, the finer theoutlines that can be emphasized.
* 2: Contrast threshold between edges and surrounding image areas, which determines edgeenhancement. The smaller the number, the more the outline will be emphasized when the contrastdifference is low. However, noise tends to be more noticeable when the number is smaller.
Note
For movie recording, [ Fineness] and [ Threshold] settings are not shown in[ Sharpness] and cannot be set.By selecting [Default set.] in step 3, you can restore the parameter settings of therespective Picture Style to the defaults.To shoot with the Picture Style you adjusted, first select the adjusted Picture Style,then shoot.
239

[ ] Monochrome Adjustment
[ Filter effect]
With a filter effect applied to a monochrome image, you can make white clouds or greentrees stand out more.
Filter Sample Effects
N:None Normal black-and-white image with no filter effects.
Ye:Yellow Blue sky will look more natural, and white clouds will look crisper.
Or:Orange The blue sky will look slightly darker. The sunset will look more brilliant.
R:Red The blue sky will look quite dark. Fall leaves will look crisper and brighter.
G:Green Skin tones and lips will appear muted. Green tree leaves will look crisper and brighter.
Note
Increasing [ Contrast] intensifies the filter effect.
240

[ Toning effect]
By applying a toning effect, you can create a monochrome image in the selected color.Effective when you want to create memorable images.
241
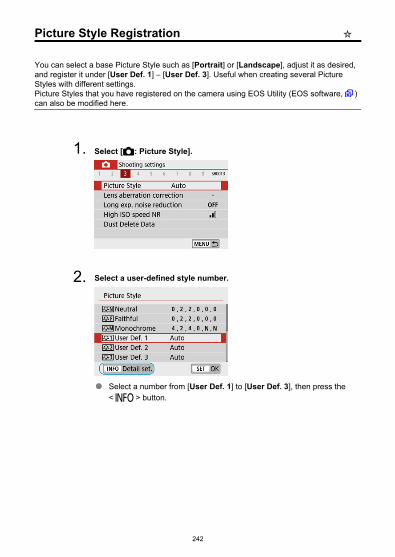
Picture Style Registration
You can select a base Picture Style such as [Portrait] or [Landscape], adjust it as desired,and register it under [User Def. 1] – [User Def. 3]. Useful when creating several PictureStyles with different settings.Picture Styles that you have registered on the camera using EOS Utility (EOS software, )can also be modified here.
1. Select [ : Picture Style].
2. Select a user-defined style number.
Select a number from [User Def. 1] to [User Def. 3], then press the< > button.
242

3. Press < >.
With [Picture Style] selected, press < >.
4. Select a base Picture Style.
Select the base Picture Style.Also select styles this way when adjusting styles registered to thecamera with EOS Utility (EOS software).
5. Select an option.
243

6. Set the effect level.
For details, see Picture Style Customization.
Press the < > button to save the adjusted setting and return tothe Picture Style selection screen.The base Picture Style will be indicated on the right of [User Def. *].Blue style names indicate that you have changed the settings fromdefault values.
Caution
If a Picture Style is already registered under [User Def. *], changing the basePicture Style will clear the parameter settings of the previously registered UserDefined Picture Style.[User Def. *] settings are reset when [Basic settings] in [ : Reset camera] ( ) isperformed.
Note
To shoot with a registered Picture Style, select the registered [User Def. *], thenshoot.Regarding the procedure to register a Picture Style file to the camera, refer to theEOS Utility Instruction Manual ( ).
244

Lens Aberration Correction
Peripheral Illumination Correction
Distortion Correction
Digital Lens Optimizer
Chromatic Aberration Correction
Diffraction Correction
Vignetting, image distortion, and other issues may be caused by lens optical characteristics.The camera can compensate for these phenomena by using [Lens aberration correction].
1. Select [ : Lens aberration correction].
2. Select an option.
245

3. Select [Enable].
Confirm that the name of the attached lens and [Correction dataavailable] are displayed (except when [Diffraction correction] is set).
If [Correction data not available] or a [ ] icon is displayed, seeDigital Lens Optimizer.
Peripheral Illumination Correction
Vignetting (dark image corners) can be corrected.
Caution
Depending on shooting conditions, noise may appear on the image periphery.The higher the ISO speed, the lower the amount of correction will be.
Note
The amount of correction applied will be lower than the maximum correctionamount applied with Digital Photo Professional (EOS software).Peripheral illumination is corrected automatically in Basic Zone modes whencorrection data is registered on the camera.
246
Distortion Correction
Distortion (image warping) can be corrected.
Caution
To correct distortion, the camera captures a narrower image area than the areaseen when shooting, which crops the image a little and slightly lowers the apparentresolution.Applying distortion correction may change the angle of view slightly.When you magnify images, distortion correction is not applied to the imagesdisplayed.Distortion correction is not applied in movie recording.Images with distortion correction applied will not have the Dust Delete Data ( )appended. Also, the AF point may be displayed out of position, relative to the timeof shooting.
247

Digital Lens Optimizer
Various aberrations from lens optical characteristics can be corrected, along with diffractionand low-pass filter-induced loss of resolution.If [Correction data not available] or [ ] is displayed by [Digital Lens Optimizer], you canuse EOS Utility to add the lens correction data to the camera. For details, refer to the EOSUtility Instruction Manual.
Caution
Depending on shooting conditions, noise may be intensified together with theeffects of correction. Image edges may also be emphasized. Adjust Picture Stylesharpness or set [Digital Lens Optimizer] to [Disable] as needed before shooting.The higher the ISO speed, the lower the amount of correction will be.For movie recording, [Digital Lens Optimizer] will not appear. (Correction is notpossible.)
Note
Enabling [Digital Lens Optimizer] will correct both chromatic aberration anddiffraction when you shoot, although these options are not displayed.Digital Lens Optimizer is applied automatically in Basic Zone modes with correctiondata registered on the camera.
248

Chromatic Aberration Correction
Chromatic aberration (color fringing around subjects) can be corrected.
Note
[Chromatic aberr corr] is not displayed when [Digital Lens Optimizer] is set to[Enable].
249

Diffraction Correction
Diffraction (loss of sharpness caused by the aperture) can be corrected.
Caution
Depending on shooting conditions, noise may be intensified together with theeffects of correction.The higher the ISO speed, the lower the amount of correction will be.For movie recording, [Diffraction correction] will not appear. (Correction is notpossible.)
Note
“Diffraction correction” corrects degraded resolution not only from diffraction butalso from the low-pass filter and other factors. Thus, correction is also effective forexposures with the aperture wide open.[Diffraction correction] is not displayed when [Digital Lens Optimizer] is set to[Enable].
Caution
General precautions for lens aberration correctionLens aberration correction cannot be applied to existing JPEG images.When using a non-Canon lens, setting the corrections to [Disable] isrecommended even if [Correction data available] is displayed.Magnifying the periphery of the image may display parts of the image that will notbe recorded.The amount of correction (except diffraction correction) is less for lenses that donot provide distance information.
250

Note
General notes for lens aberration correctionEffects of lens aberration correction vary by lens and shooting conditions. Also, theeffect may be difficult to discern depending on the lens used, shooting conditions,etc.If the correction is difficult to discern, magnifying and checking the image aftershooting is recommended.Corrections are applied even when an extender or life-size converter is attached.If the correction data for the attached lens is not registered to the camera, the resultwill be the same as when the correction is set to [Disable] (except for diffractioncorrection).If necessary, refer to the EOS Utility Instruction Manual as well.
251

Noise Reduction Features
Long Exposure Noise Reduction
High ISO Speed Noise Reduction
Long Exposure Noise Reduction
Noise that tends to occur in long exposures at shutter speeds of one sec. or slower can bereduced.
1. Select [ : Long exp. noise reduction].
252

2. Set a reduction option.
[ ] AutoFor images exposed for 1 sec. or longer, noise reduction is performedautomatically if noise typical of long exposures is detected. This settingis effective enough in most cases.
[ ] EnableNoise reduction is performed for all images exposed for 1 sec. orlonger. The [Enable] setting may reduce noise that cannot be detectedwith the [Auto] setting.
Caution
With [Auto] or [Enable] set, noise reduction after you shoot may take as long asexposure for the shot.Images may look grainier with the [Enable] setting than with the [Disable] or [Auto]setting.After you shoot a long exposure with [Enable] set, the shooting screen is notdisplayed during noise reduction processing (indicated by [BUSY] display), and youcannot shoot again until processing is finished.
253

High ISO Speed Noise Reduction
You can reduce the image noise generated. This function is especially effective whenshooting at high ISO speeds. When shooting at low ISO speeds, the noise in the darkerparts of the image (shadow areas) can further be reduced.
1. Select [ : High ISO speed NR].
2. Set the level.
[ ] Multi Shot Noise ReductionApplies noise reduction with higher image quality than [High]. For a single photo, fourshots are taken continuously and aligned and merged automatically into a single JPEGimage.Note that [Multi Shot Noise Reduction] is not available with image quality set to RAWor RAW+JPEG.
254
Caution
Precautions when set to [Multi Shot Noise Reduction]If there is significant misalignment in the image due to camera shake, the noisereduction effect may become smaller.Be careful about camera shake in handheld shots. Using a tripod is recommended.If you shoot a moving subject, the moving subject may leave afterimages.Auto image alignment may not function properly with repetitive patterns (lattice,stripes, etc.) or flat, single-tone images.If the subject’s brightness changes as the four consecutive shots are taken,irregular exposure in the image may result.After shooting, it may take some time to record an image to the card afterperforming noise reduction and merging the images. [BUSY] is displayed on theshooting screen during image processing. Shooting is not possible until processingis finished.[Multi Shot Noise Reduction] is not available when features such as these areset: bulb exposures, AEB or WB bracketing, RAW or RAW+JPEG shooting, longexposure noise reduction, or Creative filters.Flash photography is not available. Note that the AF-assist beam may be fired,depending on the [ : AF-assist beam firing] setting.[Multi Shot Noise Reduction] is not available (not displayed) when recordingmovies.Automatically switches to [Standard] if you set the power switch to < >,replace the battery or card, or switch to Basic Zone modes, bulb exposure, ormovie recording.
255

Appending Dust Delete Data
Preparation
Dust Delete Data Acquisition
Dust Delete Data Appending
Dust Delete Data used to erase dust spots can be appended to images in case sensorcleaning leaves dust on the sensor. The Dust Delete Data is used by Digital PhotoProfessional (EOS software) to erase the dust spots automatically.
Preparation
Prepare a solid white object such as a sheet of paper.Set the lens focal length to 50 mm or longer.Press < > to switch to [ ] focus mode, then set the focus to infinity (∞) by turningthe focusing ring clockwise, as viewed from the front of the camera.
256

Dust Delete Data Acquisition
1. Select [ : Dust Delete Data].
257
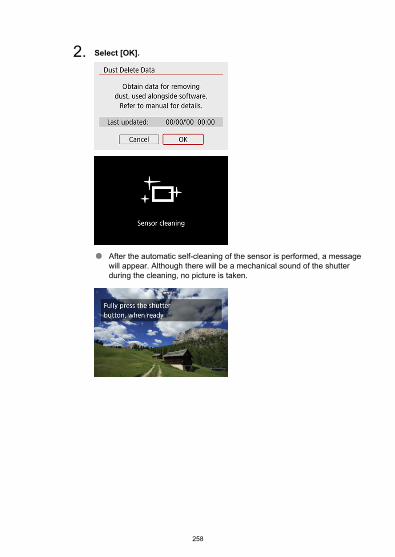
2. Select [OK].
After the automatic self-cleaning of the sensor is performed, a messagewill appear. Although there will be a mechanical sound of the shutterduring the cleaning, no picture is taken.
258
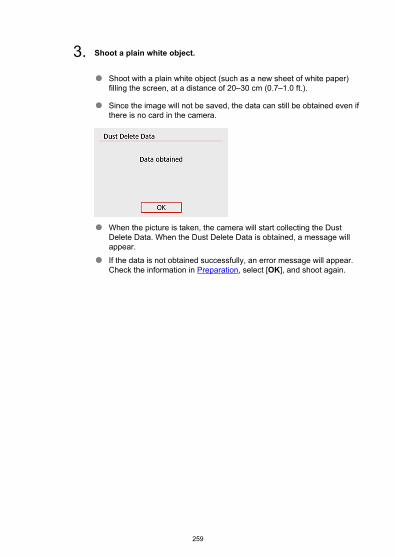
3. Shoot a plain white object.
Shoot with a plain white object (such as a new sheet of white paper)filling the screen, at a distance of 20–30 cm (0.7–1.0 ft.).
Since the image will not be saved, the data can still be obtained even ifthere is no card in the camera.
When the picture is taken, the camera will start collecting the DustDelete Data. When the Dust Delete Data is obtained, a message willappear.If the data is not obtained successfully, an error message will appear.Check the information in Preparation, select [OK], and shoot again.
259

Dust Delete Data Appending
Once acquired, Dust Delete Data is appended to still photos captured after that point.Acquiring Dust Delete Data before shooting is recommended.For details about using Digital Photo Professional (EOS software) to erase dust spotsautomatically, refer to the Digital Photo Professional Instruction Manual.File size is essentially unaffected by Dust Delete Data appended to images.
Caution
If the object has any pattern or design, it may be recognized as dust data and affectthe accuracy of the dust deletion with the Digital Photo Professional (EOSsoftware).Dust Delete Data is not added to shots taken under the following conditions.
• In [ ] or [ ] (< > mode) shooting
• In [ ] (< > mode) shooting• When multi-shot noise reduction is set
• When [Distortion correction] in [ : Lens aberration correction] is set to[Enable]
260
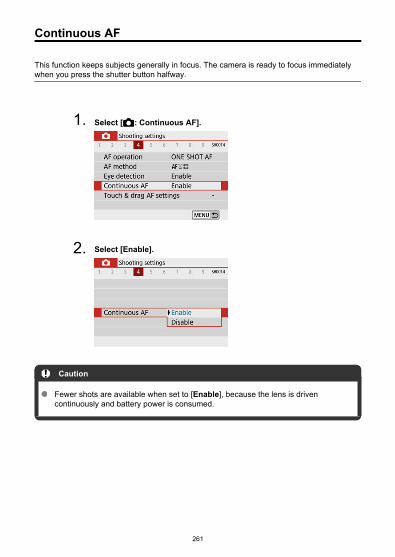
Continuous AF
This function keeps subjects generally in focus. The camera is ready to focus immediatelywhen you press the shutter button halfway.
1. Select [ : Continuous AF].
2. Select [Enable].
Caution
Fewer shots are available when set to [Enable], because the lens is drivencontinuously and battery power is consumed.
261
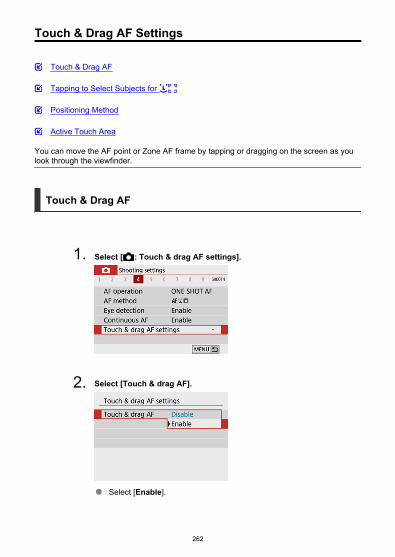
Touch & Drag AF Settings
Touch & Drag AF
Tapping to Select Subjects for
Positioning Method
Active Touch Area
You can move the AF point or Zone AF frame by tapping or dragging on the screen as youlook through the viewfinder.
Touch & Drag AF
1. Select [ : Touch & drag AF settings].
2. Select [Touch & drag AF].
Select [Enable].
262

Tapping to Select Subjects for
To switch the subject tracked to a different person when several faces are detected with theAF method set to , you can tap the area set in [Active touch area].Note that this setting is not available with [Touch & drag AF] set to [Enable].
1. Select [Tap to select subject for ].
2. Select [On].
Note
To switch to a person on the left, tap the left side of the area set in [Active toucharea], and to switch to a person on the right, tap the right side.With [Eye detection] set to [Enable], the camera switches to the eyes of a differentsubject.
263

Positioning Method
You can set how positions are specified by tapping or dragging.
1. Set [Positioning method].
AbsoluteThe AF point moves to the tapped or dragged position on the screen.RelativeThe AF point moves in the direction you drag, as much as you drag, nomatter where you touch the screen.
264

Active Touch Area
You can specify the area of the screen used for tap and drag operations.
1. Select [Active touch area].
2. Set the area that will respond to touch.
Note
Tapping the screen with [ +Tracking] set displays a round orange frame [ ].After you lift your finger at the position to move the AF point to, [ ] is displayedand that subject is tracked. To cancel subject selection, hold down the < >button.
265

Focus Mode
You can specify the method of focusing (focus mode) when using EF-M lenses.
1. Select [ : Focus mode].
2. Select an option.
[AF]: Autofocus[MF]: Manual focus
266
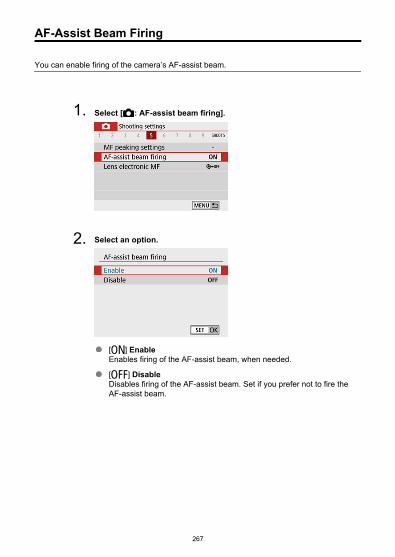
AF-Assist Beam Firing
You can enable firing of the camera’s AF-assist beam.
1. Select [ : AF-assist beam firing].
2. Select an option.
[ ] EnableEnables firing of the AF-assist beam, when needed.
[ ] DisableDisables firing of the AF-assist beam. Set if you prefer not to fire theAF-assist beam.
267

Lens Electronic MF
For EF-M, EF, or EF-S lenses equipped with electronic manual focusing, you can specifyhow manual focus adjustment is used with One-Shot AF.
1. Select [ : Lens electronic MF].
2. Select an item.
Disable after One-Shot AFAfter the AF operation, manual focusing adjustment is disabled.
Enable after One-Shot AFYou can manually adjust the focus after the AF operation if you keepholding down the shutter button halfway.
Caution
For details on your lens’s manual focus specifications, refer to the Lens InstructionManual.
268
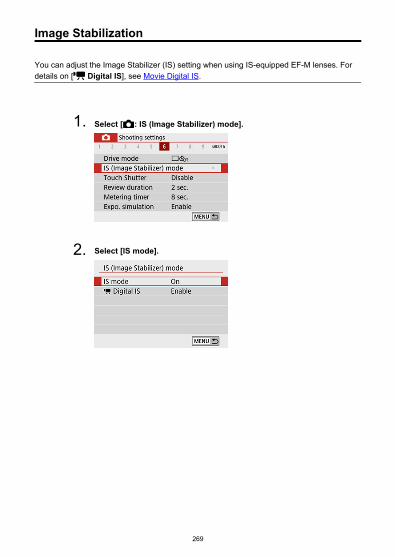
Image Stabilization
You can adjust the Image Stabilizer (IS) setting when using IS-equipped EF-M lenses. Fordetails on [ Digital IS], see Movie Digital IS.
1. Select [ : IS (Image Stabilizer) mode].
2. Select [IS mode].
269

3. Select an option.
[Off]Deactivates image stabilization.
[On]Camera shake will be corrected.
Caution
[IS mode] is not displayed for IS-equipped EF or EF-S lenses.If image stabilization cannot prevent camera shake, mount the camera on a tripodor take other measures to hold it still. In this case, set [IS mode] to [Off].
270

Touch Shutter
Just by tapping the screen, you can focus and take the picture automatically.
1. Enable the Touch Shutter.
Tap [ ] on the screen’s bottom right. Each time you tap the icon, itwill toggle between [ ] and [ ].
[ ] (Touch Shutter: Enable)The camera will focus on the spot you tap, then the picture will betaken.
[ ] (Touch Shutter: Disable)You can tap a spot to perform focusing on the spot. Press the shutterbutton completely to take the picture.
Can also be set from [ : Touch Shutter] (as shown above).
271
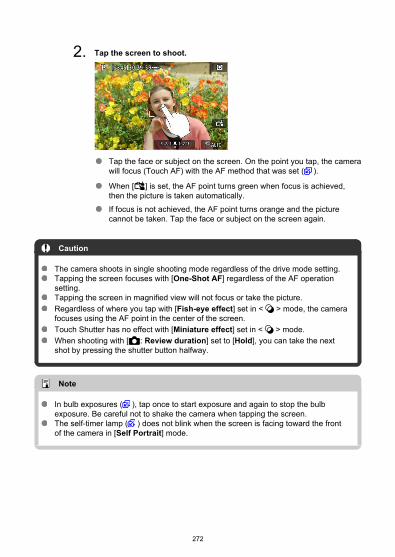
2. Tap the screen to shoot.
Tap the face or subject on the screen. On the point you tap, the camerawill focus (Touch AF) with the AF method that was set ( ).
When [ ] is set, the AF point turns green when focus is achieved,then the picture is taken automatically.If focus is not achieved, the AF point turns orange and the picturecannot be taken. Tap the face or subject on the screen again.
Caution
The camera shoots in single shooting mode regardless of the drive mode setting.Tapping the screen focuses with [One-Shot AF] regardless of the AF operationsetting.Tapping the screen in magnified view will not focus or take the picture.Regardless of where you tap with [Fish-eye effect] set in < > mode, the camerafocuses using the AF point in the center of the screen.Touch Shutter has no effect with [Miniature effect] set in < > mode.When shooting with [ : Review duration] set to [Hold], you can take the nextshot by pressing the shutter button halfway.
Note
In bulb exposures ( ), tap once to start exposure and again to stop the bulbexposure. Be careful not to shake the camera when tapping the screen.The self-timer lamp ( ) does not blink when the screen is facing toward the frontof the camera in [Self Portrait] mode.
272

Review Duration
Set to [Hold] to keep the captured image displayed after you shoot, or set to [Off] if youprefer not to have shots displayed.
1. Select [ : Review duration].
2. Set a time option.
Note
When [Hold] is set, images are displayed until the time set in [ : Power saving]elapses.
273

Metering Timer
You can set how long the metering timer runs (which determines the duration of exposurevalue display) after it is triggered automatically by an action such as pressing the shutterbutton halfway.
1. Select [ : Metering timer].
2. Set a time option.
274

Exposure Simulation
With exposure simulation, image brightness more closely matches the actual brightness(exposure) of your shots.
1. Select [ : Expo. simulation].
2. Select an option.
[Enable] ( )The displayed image brightness will be close to the actual brightness(exposure) of the resulting image. If you set exposure compensation,the image brightness will change accordingly.
[Disable] ( )The image is displayed at standard brightness, so it is easy to see.Even if you set exposure compensation, the image is displayed at thestandard brightness.
275

Shooting Information Display
Customizing Information on the Screen
Customizing Information in the Viewfinder
Viewfinder Vertical Display
Grid
Histogram
Clearing Settings
You can customize the details and screens of information shown on the screen or in theviewfinder when you shoot.
Customizing Information on the Screen
1. Select [ : Shooting info. disp.].
2. Select [Screen info. settings].
276

3. Select screens.
Press the < >< > keys to select screens of information to show onthe camera.
For information you prefer not to display, press < > to clear thecheckmark [ ].
To edit the screen, press the < > button.
4. Edit the screen.
Press the < >< > keys to select options to show on the informationscreen.
For items you prefer not to display, press < > to clear the checkmark[ ].Select [OK] to register the setting.
Note
Add a checkmark to [ ] to display an electronic level as a guideline for ensuringthat the camera is level from front to back and left to right. The red line turns greenwhen the image is essentially straight.
277

Customizing Information in the Viewfinder
1. Select [ : Shooting info. disp.].
2. Select [VF info/toggle settings].
3. Select screens.
Press the < >< > keys to select information screens to show in theviewfinder.
For information you prefer not to display, press < > to clear thecheckmark [ ].
To edit the screens when screen 2 or 3 is selected, press the < >button.
278

4. Edit the screen.
Press the < >< > keys to select options to show on the informationscreen in the viewfinder.
For items you prefer not to display, press < > to clear the checkmark[ ].Select [OK] to register the setting.
Note
Add a checkmark to [ ] to display an electronic level as a guideline for ensuringthat the camera is level from front to back and left to right. The red line turns greenwhen the image is essentially straight.
279

Viewfinder Vertical Display
You can select how viewfinder information is displayed when you are shooting still photosvertically.
1. Select [ : Shooting info. disp.].
2. Select [VF vertical display].
280

3. Select an option.
OnInformation is automatically rotated, making it easier to read.
OffInformation is not automatically rotated.
281

Grid
A grid can be displayed on the screen and viewfinder.
1. Select [ : Shooting info. disp.].
2. Select [Grid display].
3. Select an option.
282

Histogram
You can select the content and display size of the histogram.
1. Select [ : Shooting info. disp.].
2. Select [Histogram disp].
3. Select an option.
Select the content ([Brightness] or [RGB]) and display size ([Large] or[Small]).
283
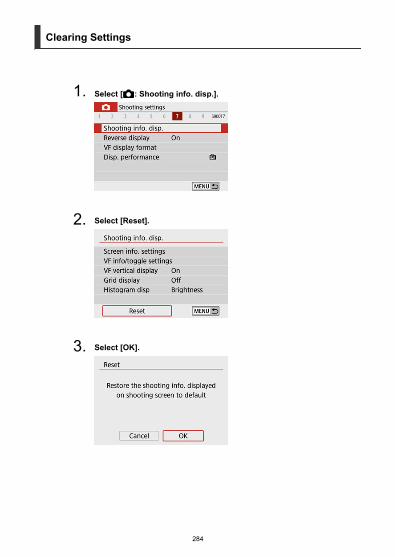
Clearing Settings
1. Select [ : Shooting info. disp.].
2. Select [Reset].
3. Select [OK].
284

Reverse Display
A mirror image can be displayed when you shoot with the screen rotated toward the subject(toward the front of the camera).
1. Select [ : Reverse display].
2. Select [On].
Select [Off] if you prefer not to reverse display when the screen isrotated toward the front.
285

Viewfinder Display Format
1. Select [ : VF display format].
2. Select an option.
286
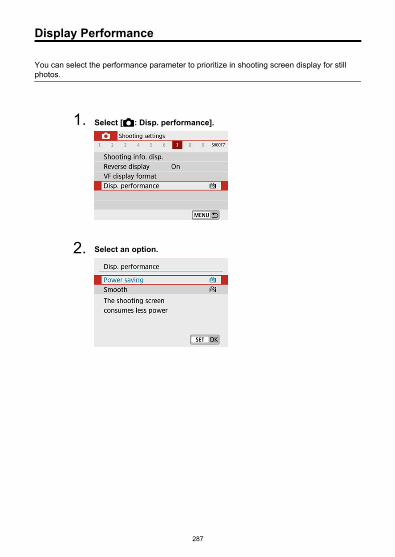
Display Performance
You can select the performance parameter to prioritize in shooting screen display for stillphotos.
1. Select [ : Disp. performance].
2. Select an option.
287

Type of Digest Movie
Both still photos and clips are captured when you shoot in < > mode, but you canspecify whether to include the still photos in the resulting digest movie.
1. Set the Mode dial to < >.
2. Select [ : Digest type].
288

3. Select an option.
[Include stills]Digest movies include still photos.
[No stills]Digest movies do not include still photos.
289

General Still Photo Shooting Precautions
During Shooting
Information Display
During Shooting
Caution
Do not point the camera toward an intense light source, such as the sun or anintense artificial light source. Doing so may damage the image sensor or thecamera’s internal components.
Image qualityWhen you shoot at high ISO speeds, noise (such as dots of light and banding) maybecome noticeable.Shooting in high temperatures may cause noise and irregular colors in the image.Frequent shooting over an extended period may cause high internal temperaturesand affect image quality. When you are not shooting, always turn off the camera.If you shoot a long exposure while the camera’s internal temperature is high, imagequality may decline. Stop shooting and wait a few minutes before shooting again.
White [ ] and red [ ] icons
White [ ] or red [ ] icons indicate high internal camera temperature, caused byfactors such as extended shooting or use in hot environments.The white [ ] icon indicates that the image quality of still photos will decline. Stopshooting for a while and allow the camera to cool down.Shooting at low ISO speeds instead of high speeds is recommended when thewhite [ ] icon is displayed.The red [ ] icon indicates that shooting will soon be terminated automatically.Shooting will not be possible again until the camera cools down internally, so stopshooting temporarily or turn off the camera and let it cool down a while.Shooting in hot environments over extended periods will cause the white [ ] orred [ ] icon to appear sooner. When you are not shooting, always turn off thecamera.If the camera’s internal temperature is high, the quality of images shot with a highISO speed or long exposure may decline even before the white [ ] icon isdisplayed.
290

Shooting resultsIn magnified view, the shutter speed and aperture value will be displayed in orange.If you take the picture in magnified view, the exposure may not come out asdesired. Return to the normal view before taking the picture.Even if you take the picture in magnified view, the image will be captured with theimage area of the normal view.
Images and displayUnder low- or bright-light conditions, the displayed image may not reflect thebrightness of the captured image.Although noise may be noticeable in images under low light (even at low ISOspeeds), there will be less noise in your shots, due to differences in image qualitybetween displayed and captured images.The screen or exposure value may flicker if the light source (lighting) changes. Inthis case, stop shooting temporarily and resume under the light source you will use.Pointing the camera at different direction may momentarily prevent correct displayof brightness. Wait until the brightness level stabilizes before shooting.If there is a very bright light source in the image, the bright area may appear blackon the screen. However, the actual captured image will correctly show the brightarea.Under low light, bright [ : Screen brightness] or [ : Viewfinder brightness]settings may cause noise or irregular colors in images. However, the noise orirregular colors will not be recorded in the captured image.When you magnify the image, the image sharpness may look more pronouncedthan in the actual image.
Custom FunctionsSome Custom Functions are not available (some settings have no effect).
LensImage Stabilizer is active all times, even without the shutter button pressedhalfway, when you use an EF-M lens with [IS mode] in [ : IS (Image Stabilizer)mode] set to [On], or an EF or EF-S lens with the lens Image Stabilizer switch setto < >.The Image Stabilizer consumes battery power and may decrease the number ofavailable shots depending on the shooting conditions. When the Image Stabilizer isnot necessary, such as when using a tripod, it is recommended that you set theImage Stabilizer switch to < >.With EF lenses, focus preset during shooting is only available when using (super)telephoto lenses equipped with this function released in and after the second half of2011.
Note
You can display images on a television by using a commercially available HDMIcable (not exceeding 2.5 m/8.2 ft., with a Type D terminal on the camera end, ).Note that no sound will be output.
291

Information Display
For details on the icons displayed for still photo shooting, see Still Photo Shooting Screen.
Note
White display of the [ ] icon indicates that your shots will be about as bright asthe image displayed.If the [ ] icon is blinking, it indicates that the image is displayed at a brightnessthat differs from the actual shooting result because of low- or bright-light conditions.However, the actual image recorded will reflect the exposure setting. Note that thenoise may be more noticeable than the actual image recorded.Exposure simulation may not be performed under some shooting settings. The[ ] icon and histogram will be displayed in gray. The image will be displayed onthe screen at the standard brightness. The histogram may not be properlydisplayed in low- or bright-light conditions.Histogram display is available when [ : Expo. simulation] is set to [Enable] ( ).
292

Movie Recording
For movie recording, set the Mode dial to < >.
Caution
When switching from still photo shooting to movie recording, check the camerasettings again before recording movies.
Note
You can record movies by pressing the movie shooting button during still photoshooting.
• Tab Menus: Movie Recording• Movie Recording• Movie Recording Quality• Sound Recording• Video Snapshots• Time-Lapse Movies• Movie Servo AF• Digital Zoom• Movie Auto Level• Shutter Button Function for Movies• Movie Self-Timer• Movie Digital IS• Miniature Effect Movies• Other Menu Functions• General Movie Recording Precautions
293

Tab Menus: Movie Recording
Shooting 1
(1) Shooting mode(2) Movie rec quality(3) Sound recording
Shooting 2
(1) Exposure comp.
(2) ISO speed settings(3) Auto Lighting Optimizer(4) Highlight tone priority
(5) Auto slow shutter
294

Shooting 3
(1) White balance(2) Custom White Balance(3) WB correction(4) Picture Style
Picture Style SelectionPicture Style CustomizationPicture Style Registration
(5) Lens aberration correction
Shooting 4
(1) Video snapshot(2) Time-lapse movie
295
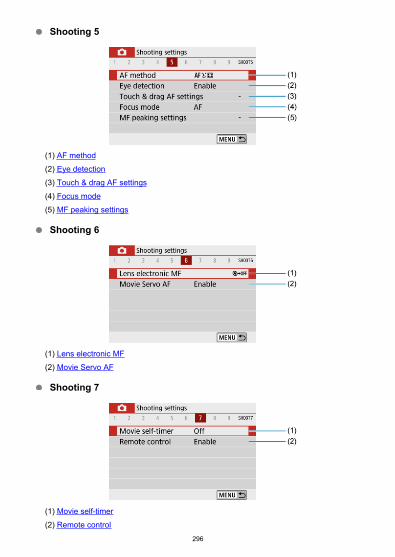
Shooting 5
(1) AF method(2) Eye detection(3) Touch & drag AF settings(4) Focus mode(5) MF peaking settings
Shooting 6
(1) Lens electronic MF(2) Movie Servo AF
Shooting 7
(1) Movie self-timer(2) Remote control
296
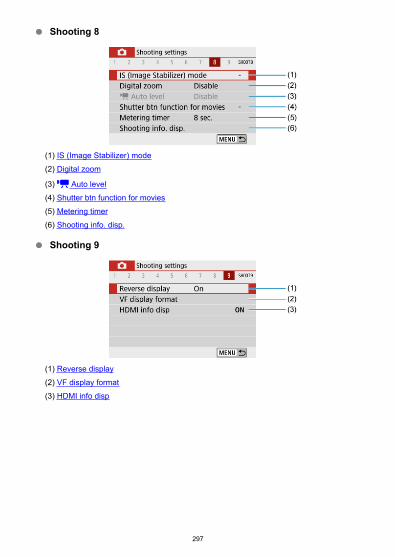
Shooting 8
(1) IS (Image Stabilizer) mode(2) Digital zoom
(3) Auto level(4) Shutter btn function for movies(5) Metering timer(6) Shooting info. disp.
Shooting 9
(1) Reverse display(2) VF display format(3) HDMI info disp
297

Movie Recording
Autoexposure Movie Recording
Manual Exposure Movie Recording
ISO Speed in Manual Exposure Recording
Still Photo Shooting
Information Display (Movie Recording)
Autoexposure Movie Recording
Exposure is controlled automatically to suit the brightness.
1. Set the Mode dial to < >.
Press < >.
When the screen above is displayed, tap the recording mode icon.
298

2. Select [ ].
You can also select [ ] (Movie auto exposure) from [ : Shootingmode].
3. Focus on the subject.
Before recording a movie, focus with AF ( ) or manually ( ).
By default, [ : Movie Servo AF] is set to [Enable] so that the cameraalways keeps focusing ( ).Pressing the shutter button halfway focuses using the current AFmethod.
299

4. Record the movie.
Press the movie shooting button to start recording a movie.
You can also start recording a movie by tapping [ ] on the screen.
Note
[ ] is not displayed under the following settings.
• With [Video snapshot] set to [Enable]
• With [Time-lapse movie] set to an option other than [Disable]
• With [Miniature effect movie] set to an option other than [Off]
While the movie is being recorded, the [ REC] icon will be displayedin the upper right of the screen.Sound is recorded by the built-in microphone ( ).To stop recording the movie, press the movie shooting button again.
You can also stop recording a movie by tapping [ ] on the screen.
300

ISO Speed in [ ] Mode
ISO speed is set automatically. For details on ISO speed, see ISO Speed in MovieRecording.
Note
You can lock the exposure (AE lock) by pressing the < > button ( ). To cancelAE lock, press the < > button again.Exposure compensation in manual exposure movie recording can be set in a rangeof up to ±3 stops.ISO speed, shutter speed, and aperture value are not recorded in movie Exifinformation.
301
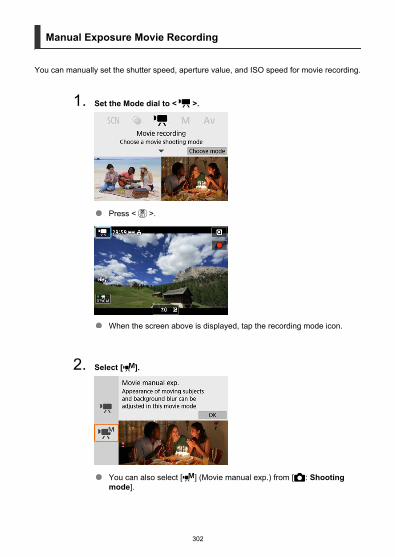
Manual Exposure Movie Recording
You can manually set the shutter speed, aperture value, and ISO speed for movie recording.
1. Set the Mode dial to < >.
Press < >.
When the screen above is displayed, tap the recording mode icon.
2. Select [ ].
You can also select [ ] (Movie manual exp.) from [ : Shootingmode].
302
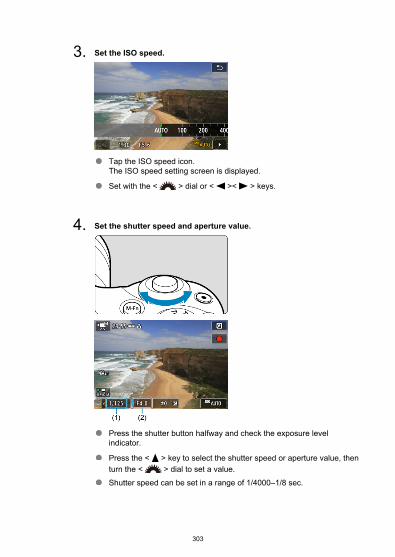
3. Set the ISO speed.
Tap the ISO speed icon.The ISO speed setting screen is displayed.
Set with the < > dial or < >< > keys.
4. Set the shutter speed and aperture value.
Press the shutter button halfway and check the exposure levelindicator.
Press the < > key to select the shutter speed or aperture value, thenturn the < > dial to set a value.Shutter speed can be set in a range of 1/4000–1/8 sec.
303

5. Focus and record the movie.
Same as step 4 in Autoexposure Movie Recording.
Caution
During movie recording, avoid changing the shutter speed, aperture value, or ISOspeed, which may record changes in the exposure or create more noise at highISO speeds.When recording a movie of a moving subject, a shutter speed of approx. 1/25 sec.to 1/125 sec. is recommended. The faster the shutter speed, the less smooth thesubject’s movement will look.Flickering shown on the screen when recording under fluorescent or LED lightingmay be recorded if you change the shutter speed.
Note
With ISO Auto, exposure compensation can be set in a range of ±3 stops ( ).To lock the ISO speed when ISO Auto is set, press the < > button. Press the< > button again to cancel ISO speed locking.If you press the < > button and recompose the shot, you can see the exposurelevel difference on the exposure level indicator compared to when the < >button was pressed.
304
ISO Speed in Manual Exposure Recording
You can set the ISO speed manually or select [ ]. For details on ISO speed, see ISOSpeed in Movie Recording.
Still Photo Shooting
Still photos cannot be taken during movie recording. To shoot still photos, turn theMode dial to switch to another shooting mode.
Information Display (Movie Recording)
For details on the icons on the movie recording screen, see Movie Recording Screen.
305
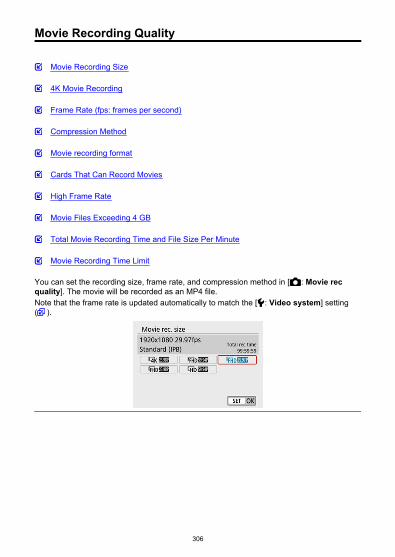
Movie Recording Quality
Movie Recording Size
4K Movie Recording
Frame Rate (fps: frames per second)
Compression Method
Movie recording format
Cards That Can Record Movies
High Frame Rate
Movie Files Exceeding 4 GB
Total Movie Recording Time and File Size Per Minute
Movie Recording Time Limit
You can set the recording size, frame rate, and compression method in [ : Movie recquality]. The movie will be recorded as an MP4 file.Note that the frame rate is updated automatically to match the [ : Video system] setting( ).
306

Movie Recording Size
[ ] 3840×2160The movie is recorded in 4K quality. The aspect ratio is 16:9.
[ ] 1920×1080The movie will be recorded in Full High-Definition (Full HD) quality. The aspect ratio is16:9.
[ ] 1280×720The movie is recorded in High-Definition (HD) quality. The aspect ratio is 16:9.
Caution
If you change the [ : Video system] setting, also set [Movie rec. size] again.Normal playback of 4K and / movies may not be possible on otherdevices, because playback is processing-intensive.Apparent resolution and noise vary depending on movie recording quality andsettings for the lens used.
Note
Movies cannot be recorded in VGA quality.
4K Movie Recording
Recording 4K movies requires a stable card with a fast writing speed. For details, seeCards That Can Record Movies.4K movie recording greatly increases the processing load, which may increase theinternal camera temperature faster or higher than for regular movies. If a red [ ] iconappears during movie recording, the card may be hot, so stop recording themovie and let the camera cool down before removing the card. (Do not remove thecard immediately.)From a 4K movie, you can select any frame to save to the card as a JPEG still image( ).
307

Frame Rate (fps: frames per second)
[ ] 59.94 fps/[ ] 29.97 fps/[ ] 23.98 fpsSet for areas using the NTSC TV system, such as North America, Japan, South Korea,and Mexico.
[ ] 50.00 fps/[ ] 25.00 fpsSet for areas using the PAL TV system, such as Europe, Russia, China, and Australia.
Compression Method
[ ] IPB (Standard)Compresses multiple frames at a time efficiently for recording.
[ ] ALL-I (For editing/I-only)Uses ALL-I compression for time-lapse movie recording ( ). Compresses each frame,one at a time, for recording. Although file sizes are larger than with IPB (Standard),movies are more suitable for editing.
Movie recording format
[ ] MP4All movies you record with the camera are recorded as movie files in MP4 format (fileextension “.MP4”).
308

Cards That Can Record Movies
See Card performance requirements (Movie recording) for details on cards that can recordat each level of movie recording quality.Test cards by recording a few movies to make sure they can record correctly at yourspecified size ( ).
Caution
Format cards before recording 4K movies ( ).If you use a slow-writing card when recording movies, the movie may not berecorded properly. Also, if you play back a movie on a card with a slow readingspeed, the movie may not be played back properly.When recording movies, use high-performance cards with a writing speedsufficiently higher than the bit rate.When movies cannot be recorded properly, format the card and try again. Ifformatting the card does not resolve the problem, refer to the card manufacturer’swebsite, etc.
Note
To obtain better performance with the card, formatting the card with the camerabefore recording movies is recommended ( ).To check the card’s writing/reading speed, refer to the card manufacturer’s website,etc.
309

High Frame Rate
You can record HD movies at a high frame rate of 119.88 fps or 100.00 fps by setting [HighFrame Rate] in [ : Movie rec quality] to [Enable]. This is ideal for recording movies thatwill be played back in slow motion.The maximum recording time per movie is 7 min. 29 sec.
Movies are recorded in or quality.Sound is not recorded in High Frame Rate movies.Because High Frame Rate movies are recorded as 29.97 fps/25.00 fps movie files, theyare played back in slow motion at 1/4 speed.
Caution
Check the [Movie rec. size] setting if you return this setting to [Disable].The screen may flicker if you record High Frame Rate movies under fluorescent orLED lighting.For a moment when you start or stop recording High Frame Rate movies, themovie is not updated, and the frame stops momentarily. Be aware of this whenrecording movies to external devices via HDMI.Movie frame rates shown on the screen as you record High Frame Rate movies donot correspond to the frame rate of the movie recorded.Sound is not recorded.
310

Movie Files Exceeding 4 GB
Even if you record a movie exceeding 4 GB, you can keep recording without interruption.
Using SD/SDHC cards formatted with the camera
FAT32 formatting is applied when the camera is used to format SD/SDHC cards.With a FAT32-formatted card, if you record a movie and the file size exceeds 4 GB, anew movie file will be created automatically.When you play back the movie, you will have to play back each movie file individually.Movie files cannot be played back automatically in consecutive order. After the movieplayback ends, select the next movie and play it back.
Using SDXC cards formatted with the camera
exFAT formatting is applied when the camera is used to format SDXC cards.When using an exFAT-formatted card, even if the file size exceeds 4 GB during movierecording, the movie will be saved as a single file (rather than being split into multiplefiles).
Caution
When importing movie files exceeding 4 GB to a computer, use either EOS Utilityor a card reader ( ). It may not be possible to save movie files exceeding 4 GB ifyou attempt this using standard features of the computer’s operating system.
311

Total Movie Recording Time and File Size Per Minute
For details on file sizes and the recording time available at each movie recording size, seeRecording Time, Bit Rate, and File Size Guidelines.
Movie Recording Time Limit
When recording 4K/Full HD/HD movies
The maximum recording time per movie is 29 min. 59 sec. Once 29 min. 59 sec. isreached, recording automatically stops. You can start recording a movie again bypressing the movie shooting button (which records the movie as a new file).
When recording High Frame Rate movies
The maximum recording time per movie is 7 min. 29 sec. Once 7 min. 29 sec. isreached, recording automatically stops. You can start recording a High Frame Ratemovie again by pressing the movie shooting button (which records the movie as a newfile).
312

Sound Recording
Sound Recording/Sound-Recording Level
Wind Filter
Attenuator
External Microphone
You can record movies while recording sound with the built-in stereo microphone or anexternal stereo microphone. You can also freely adjust the sound-recording level.Use [ : Sound rec.] to set sound recording functions.
Sound Recording/Sound-Recording Level
Auto
The sound-recording level is adjusted automatically. Auto level control will take effectautomatically in response to the sound level.
Manual
You can adjust the sound-recording level as needed.Select [Rec. level] and press the < >< > keys while looking at the level meter toadjust the sound-recording level. Look at the peak hold indicator, and adjust so that thelevel meter sometimes lights up on the right of the “12” (-12 dB) mark for the loudestsounds. If it exceeds “0,” the sound will be distorted.
Disable
Sound will not be recorded.
313

Wind Filter
Set to [Auto] for automatic reduction of audio distortion in windy outdoor scenes. Onlyactivated when the camera’s built-in microphone is used. When the wind filter function takeseffect, part of the low bass sounds will also be reduced.
Attenuator
This feature suppresses sound distortion caused by loud noises. Set to [Enable] if sound isdistorted with [Sound rec.] set to [Auto] or [Manual].
314

External Microphone
If an external microphone equipped with a miniature stereo plug (3.5 mm diameter) isconnected to the camera’s external microphone IN terminal, the external microphone will begiven the priority. Using a microphone such as Directional Stereo Microphone DM-E1 (soldseparately) is recommended.
Caution
Sounds from Wi-Fi operations may be captured with built-in or externalmicrophones. During sound recording, using the wireless communication functionis not recommended.When connecting an external microphone to the camera, make sure the plug isfully inserted.The camera’s built-in microphone will also record mechanical sounds of the lens orsounds of camera/lens operations if AF operations are performed or the camera isoperated during movie recording. In this case, using an external microphone mayreduce these sounds. If the sounds are still distracting with an external microphone,it may be more effective to remove the external microphone from the camera andposition it away from the camera and lens.Do not connect anything other than an external microphone to the camera’sexternal microphone IN terminal.
Note
In Basic Zone modes, the settings available for [Sound recording] are [On] and[Off]. Set to [On] for automatic adjustment of the recording level.Audio is also output when the camera is connected to televisions via HDMI, unless[Sound rec.] is set to [Disable].The sound volume balance between L (left) and R (right) cannot be adjusted.Sound is recorded at a 48 kHz/16-bit sampling rate.
315

Video Snapshots
Configuring Video Snapshot Settings
Creating Video Snapshot Albums
Adding to an Existing Album
Record a series of short video snapshots, each a few seconds long, and the camera willcombine them to create a video snapshot album that shows these highlights of your trip orevent.Video snapshots are available when the movie recording size is set to (NTSC) / (PAL).Video snapshot albums can also be played back with background music ( ).
Creating a Video Snapshot AlbumVideo snapshots 1, 2, and so on
Video snapshot album
Configuring Video Snapshot Settings
1. Configure [ : Video snapshot].
Select [Enable].
316

2. Configure [Album settings].
Select [Create a new album].Read the message and select [OK].
3. Configure [Playback time].
Specify playback time per video snapshot.
4. Configure [Playback effect].
This setting determines how fast albums are played back.
317

5. Configure [Show confirm msg].
Select [Enable].
6. Check the required recording time.
The time required to record each video snapshot is indicated (1), basedon the playback time and effect.
7. Close the menu.
Press the < > button to close the menu.A blue bar is displayed to indicate the recording time (2).
318

Creating Video Snapshot Albums
1. Record the first video snapshot.
Press the movie shooting button to start recording.The blue bar indicating recording time gradually decreases, and afterthe specified time elapses, recording stops automatically.A confirmation message is displayed ( ).
2. Save as a video snapshot album.
Select [ Save as album].The clip is saved as the first video snapshot in the album.
319

3. Record your next video snapshots.
Repeat step 1 to record the next video snapshot.
Select [ Add to album].
To create another album, select [ Save as a new album].Repeat step 3 as needed.
4. Stop recording video snapshots.
Set [Video snapshot] to [Disable]. To return to normal movierecording, be sure to specify [Disable].
Press the < > button to close the menu and return to normalmovie recording.
320

Options in steps 2 and 3Option Description
Save as album (step 2) Saves the clip as the first video snapshot in an album.
Add to album (step 3)Adds the current video snapshot to the album recorded mostrecently.
Save as a new album (step 3)Creates a new album and saves the clip as the first videosnapshot. This album file is different from the one recordedmost recently.
Playback video snapshot (steps 2, 3) Plays the video snapshot just recorded.
Do not save to album (step 2) Delete without saving to album (step 3)
Deletes the recently recorded video snapshot without savingit to an album. Select [OK] on the confirmation screen.
Note
If you prefer to record the next video snapshot immediately, set [Show confirmmsg] in [ : Video snapshot] to [Disable]. This setting enables you to record thenext video snapshot immediately, without a confirmation message.
321
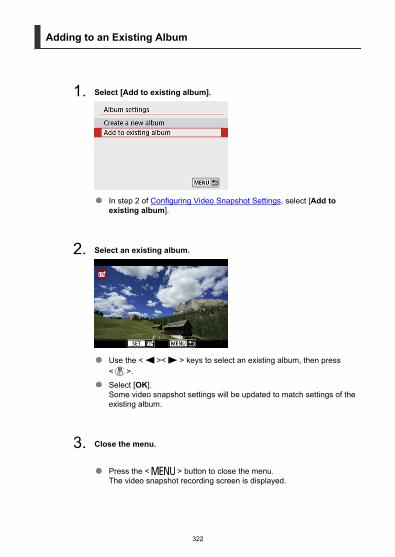
Adding to an Existing Album
1. Select [Add to existing album].
In step 2 of Configuring Video Snapshot Settings, select [Add toexisting album].
2. Select an existing album.
Use the < >< > keys to select an existing album, then press< >.Select [OK].Some video snapshot settings will be updated to match settings of theexisting album.
3. Close the menu.
Press the < > button to close the menu.The video snapshot recording screen is displayed.
322
4. Record a video snapshot.
Record the video snapshot, referring to Creating Video SnapshotAlbums.
Caution
You cannot select an album shot with another camera.
Caution
General video snapshot precautionsNo sound is recorded when [Playback effect] is set to [1/2x speed] or [2x speed].Recording time per video snapshot is only approximate. It may differ slightly fromthe actual recording time indicated during playback, due to the frame rate and otherfactors.
323

Time-Lapse Movies
Still photos shot at a set interval can be stitched together automatically to create a 4K or FullHD time-lapse movie. A time-lapse movie shows how a subject changes in a much shorterperiod of time than the actual time it took. It is effective for a fixed-point observation ofchanging scenery, growing plants, celestial motion, etc.Time-lapse movies are recorded in MP4 format at the following quality: (NTSC)/ (PAL) in 4K recording, and (NTSC)/(PAL) in Full HD recording.Note that the frame rate is updated automatically to match the [ : Video system] setting( ).
1. Select [ : Time-lapse movie].
2. Select [Time-lapse].
324

3. Select a scene.
Select a scene to suit the shooting situation.For greater freedom when setting the shooting interval and number ofshots manually, select [Custom].
4. Set the shooting interval.
Select [Interval/shots].
Select [Interval] (sec.). Use the < >< > keys to set a value, thenpress < >.
Refer to [ : Time required] (1) and [ : Playback time] (2) as youset it.
When [Custom] is set
Select [Interval] (min.:sec.).
Press < > to display < >.
Use the < >< > keys to set a value, then press < >. (Returns to< >.)
Select [OK] to register the setting.
325

5. Set the number of shots.
Select [No. of shots]. Use the < >< > keys to set a value, thenpress < >.
Refer to [ : Time required] and [ : Playback time] as you set thenumber.
When [Custom] is set
Select the digit.
Press < > to display < >.
Use the < >< > keys to set a value, then press < >. (Returns to< >.)
Make sure [ : Playback time] is not displayed in red.
Select [OK] to register the setting.
Caution
[Playback time] is displayed in red if the card does not haveenough free space for your specified number of shots. Althoughthe camera can continue recording, the recording will stop whenthe card becomes full.
[Playback time] is displayed in red if the [No. of shots] settingresults in a file size exceeding 4 GB for a card not formatted inexFAT ( ). If you keep recording in this condition and the moviefile size reaches 4 GB, the time-lapse movie recording will stop.
326

Note
With [Scene *], available intervals and numbers of shots arerestricted, to suit the type of scene.
For details on cards that can record time-lapse movies, see Cardperformance requirements (Movie recording).
If the number of shots is set to 3600, the time-lapse movie will beapprox. 2 min. in NTSC and approx. 2 min. 24 sec. in PAL.
6. Select the desired movie recording size.
(3840 × 2160)The movie is recorded in 4K quality. The aspect ratio is 16:9.The frame rate is 29.97 fps ( ) for NTSC and 25.00 fps ( ) forPAL, and movies are recorded in MP4 ( ) format with ALL-I ( )compression.
(1920 × 1080)The movie will be recorded in Full High-Definition (Full HD) quality. Theaspect ratio is 16:9.The frame rate is 29.97 fps ( ) for NTSC and 25.00 fps ( ) forPAL, and movies are recorded in MP4 ( ) format with ALL-I ( )compression.
327

7. Set [Auto exposure].
Fixed 1st frameWhen taking the first shot, metering is performed to set the exposureautomatically to match the brightness. The exposure setting for the firstshot will be applied to subsequent shots. Other shooting-relatedsettings for the first shot will also be applied for subsequent shots.
Each frameMetering is also performed for each subsequent shot to set theexposure automatically to match the brightness. Note that anyfunctions such as Picture Style and white balance that are set to [Auto]will be set automatically for each subsequent shot.
Caution
Significant changes in brightness between shots may prevent thecamera from shooting at the specified interval when [Interval] isset to 3 sec. or less and [Auto exposure] is set to [Each frame].
With [Auto exposure] set to [Each frame], the ISO speed, shutterspeed, and aperture value may not be recorded in the time-lapsemovie Exif information in some shooting modes.
328
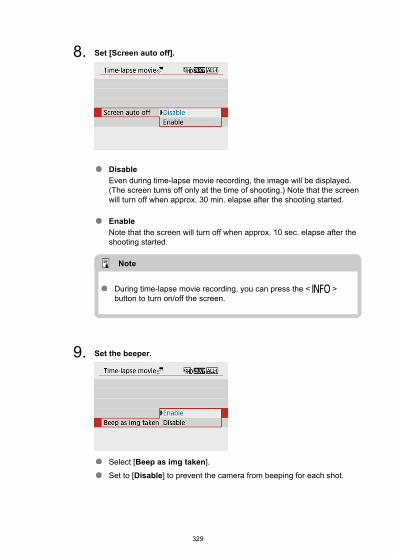
8. Set [Screen auto off].
DisableEven during time-lapse movie recording, the image will be displayed.(The screen turns off only at the time of shooting.) Note that the screenwill turn off when approx. 30 min. elapse after the shooting started.
EnableNote that the screen will turn off when approx. 10 sec. elapse after theshooting started.
Note
During time-lapse movie recording, you can press the < >button to turn on/off the screen.
9. Set the beeper.
Select [Beep as img taken].Set to [Disable] to prevent the camera from beeping for each shot.
329

10. Check the settings.
(1) Time requiredIndicates the time required to shoot the set number of shots with the setinterval. If it exceeds 24 hours, “*** days” will be displayed.
(2) Playback timeIndicates the movie recording time (time required to play back the movie)when creating the time-lapse movie in 4K movie or Full HD movie from thestill photos taken with the set intervals.
11. Close the menu.
Press the < > button to turn off the menu screen.
330

12. Record the time-lapse movie.
Press the < > button and check again the “Time required (1)” and“Interval (2)” displayed on the screen.
Press the movie shooting button to start time-lapse movie recording.
AF will not work during time-lapse movie recording.
“ REC” is displayed in the upper right of the screen as the time-lapsemovie is recorded.
When the set number of shots are taken, the time-lapse movierecording ends.
To cancel recording time-lapse movies, set [Time-lapse] to [Disable].
331

Caution
Do not point the camera toward an intense light source, such as the sun or anintense artificial light source. Doing so may damage the image sensor or thecamera’s internal components.[ : Time-lapse movie] cannot be set to an option other than [Disable] when thecamera is connected to a computer with the interface cable, or when an HDMIcable is connected.Movie Servo AF will not function.If the shutter speed is 1/30 sec. or slower, the exposure of the movie may not bedisplayed properly (may differ from that of the resulting movie).Do not zoom the lens during time-lapse movie recording. Zooming the lens maycause the image to be out of focus, the exposure to change, or the lens aberrationcorrection not to function properly.Recording time-lapse movies under flickering light may cause noticeable screenflickering, and images may be captured with horizontal stripes (noise) or irregularexposure.Images displayed as time-lapse movies are recorded may look different from theresulting movie (in details such as inconsistent brightness from flickering lightsources, or noise from a high ISO speed).When recording a time-lapse movie under low light, the image displayed duringshooting may look different from what is actually recorded in the movie. In suchcases, the [ ] icon will blink.If you move the camera from left to right (panning) or shoot a moving subject duringtime-lapse movie recording, the image may look extremely distorted.During time-lapse movie recording, auto power off will not take effect. Also, youcannot adjust the shooting function and menu function settings, play back images,etc.Sound is not recorded for time-lapse movies.If the shutter speed exceeds the shooting interval (such as for long exposures), or ifa slow shutter speed is set automatically, the camera may not be able to shoot atthe set interval. Shooting may also be prevented by shooting intervals nearly thesame as the shutter speed.If the next scheduled shot is not possible, it will be skipped. This may shorten therecording time of the created time-lapse movie.If the time it takes to record to the card exceeds the shooting interval due to theshooting functions set or card performance, some of the shots may not be takenwith the set intervals.The captured images are not recorded as still photos. Even if you cancel the time-lapse movie recording after only one shot is taken, it will be recorded as a moviefile.Set [ : Time-lapse movie] to [Disable] if you will connect the camera to acomputer with the interface cable and use EOS Utility (EOS software). Optionsother than [Disable] will prevent the camera from communicating with thecomputer.
332

During time-lapse movie recording, the lens’s Image Stabilizer will not operate.Time-lapse movie recording ends if the power switch is set to < >, and thesetting changes to [Disable].Even if a flash is used, it will not fire.The following operations cancel standby for time-lapse movie recording and switchthe setting to [Disable].
• Selecting either [Clean now ] in [ : Sensor cleaning] or [Basic settings]in [ : Reset camera]
• Using the Mode dialIf you start time-lapse movie recording while the white [ ] ( ) icon is displayed,the image quality of the time-lapse movie may deteriorate. It is recommended thatyou start time-lapse movie recording after the white [ ] icon disappears (camera’sinternal temperature decreases).
Note
Using a tripod is recommended.Taking test shots in advance is recommended.The movie’s field of view coverage for both the 4K and Full HD time-lapse movierecording is approx. 100%.To cancel time-lapse movie recording in progress, press the movie shooting button.The time-lapse movie shot so far will be recorded on the card.If the time required for recording is more than 24 hours but not more than 48 hours,“2 days” will be indicated. If three or more days are required, the number of dayswill be indicated in 24-hour increments.Even if the time-lapse movie’s playback time is less than 1 sec., a movie file will stillbe created. In this case, “00'00"” is indicated in [Playback time].If the recording time is long, using the household power outlet accessories (soldseparately) is recommended.YCbCr 4:2:0 (8-bit) color sampling and the BT.709 color space are used for 4K/FullHD time-lapse movies.
333

Note
You can use Wireless Remote Control BR-E1 (sold separately) to start and stop thetime-lapse movie recording. Prepare by setting [ : Remote control] to [Enable].
With Wireless Remote Control BR-E1• First, pair the BR-E1 with the camera ( ).
Camera Status/Remote Control
Setting< > (Immediate Release)
<2> (2-sec. Delay)< > (Movie
Recording)
Recording standby As set in the Shutter Button Function forMovies setting
Starts recordingDuring time-lapse
movie recording Ends recording
Approx. Time Available for Recording Time-Lapse Movies
For guidelines on how long you can record time-lapse movies (until the battery runs out),see Available Operating Time.
334

Movie Servo AF
With this function enabled, the camera focuses on the subject continuously during movierecording.
1. Select [ : Movie Servo AF].
335

2. Select [Enable].
With [Enable] set
• The camera focuses on the subject continuously even when youare not pressing the shutter button halfway.
• To keep the focus at a specific position, or if you prefer not torecord mechanical sounds from the lens, you can temporarily stopMovie Servo AF by tapping [ ] in the lower left of the screen.
• When Movie Servo AF is paused, if you return to movie recordingafter operations such as pressing the < > or < > buttonor changing the AF method, Movie Servo AF will resume.
With [Disable] set
• Press the shutter button halfway to focus.
336

Caution
Precautions when set to [Movie Servo AF: Enable]
Shooting conditions that make focusing difficult• A fast-moving subject approaching or moving away from the camera.• A subject moving at a close distance to the camera.• When recording with a higher aperture value.• Also see Shooting Conditions That Make Focusing Difficult.
Since the lens is driven continuously and the battery power is consumed, thepossible movie recording time ( ) will be shortened.The camera’s built-in microphone will also record mechanical sounds of the lens orsounds of camera/lens operations if AF operations are performed or the camera isoperated during movie recording. In this case, using an external microphone mayreduce these sounds. If the sounds are still distracting with an external microphone,it may be more effective to remove the external microphone from the camera andposition it away from the camera and lens.Movie Servo AF will pause during zooming or magnified view.During movie recording, if a subject approaches or moves away or if the camera ismoved vertically or horizontally (panning), the recorded movie image maymomentarily expand or contract (change in image magnification).
337

Digital Zoom
With the recording size set to [ ]/[ ] (NTSC) or [ ] (PAL), you canshoot with approx. 3–10× digital zoom.
1. Select [ : Digital zoom].
2. Select an option.
Select the amount to zoom, then press < >.
Press the < > button to close the menu.
338

3. Use digital zoom.
Press the < > button.The digital zoom bar will appear.
Press the < > key to zoom in or press the < > key to zoom out.Pressing the shutter button halfway focuses with [1-point AF] (fixed atcenter).To cancel digital zoom, select [Disable] in step 2.
Caution
Using a tripod to prevent camera shake is recommended.Time-lapse movies, Creative filters, Movie digital IS, and Auto level are notavailable.The maximum ISO speed will be ISO 6400.A magnified view is not available.Since Movie digital zoom processes the image digitally, the image will look grainierat higher magnifications. Noise, dots of light, etc. may also become noticeable.The scene icon will not be displayed.Also see Shooting Conditions That Make Focusing Difficult.
339

Movie Auto Level
Auto leveling helps keep movies straight during recording.
Caution
Set [ Digital IS] in [ : IS (Image Stabilizer) mode] to [Disable].
1. Select [ : Auto level].
2. Select an option.
340

Shutter Button Function for Movies
You can set the functions performed by pressing the shutter button halfway or completelyduring movie recording.
1. Select [ : Shutter btn function for movies].
341

2. Select an option.
Half-pressSpecify the function performed by pressing the shutter button halfway.
Fully-pressDisplayed with the Mode dial set to < >.Specify the function performed by pressing the shutter buttoncompletely.
With [Fully-press] set to [Start/stop mov rec], you can start/stop movierecording not only with the movie shooting button but also by pressing theshutter button completely.
Note
If [Half-press] is set to [Meter.+One-Shot AF], it is changed to [Meter.+ ServoAF] if you set [Movie rec. size] to [ ].
342

Movie Self-Timer
Movie recording can be started by the self-timer.
1. Select [ : Movie self-timer].
2. Select an option.
3. Record the movie.
After you press the movie shooting button or tap [ ], the camerabeeps and displays the number of seconds left before recording.
Note
To cancel the self-timer, either tap the screen or press < >.
343

Movie Digital IS
The camera’s Movie digital IS feature reduces camera shake as movies are recorded. Moviedigital IS can provide effective stabilization even when your lens is not equipped with ImageStabilizer. When using a lens equipped with Image Stabilizer, set the lens’s Image Stabilizerswitch to < >.
1. Select [ : IS (Image Stabilizer) mode].
2. Select [ Digital IS].
344
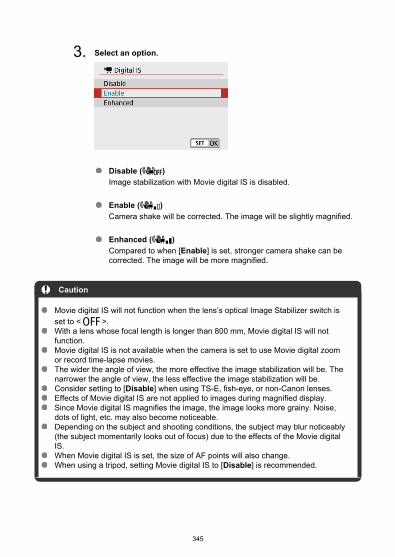
3. Select an option.
Disable ( )Image stabilization with Movie digital IS is disabled.
Enable ( )Camera shake will be corrected. The image will be slightly magnified.
Enhanced ( )Compared to when [Enable] is set, stronger camera shake can becorrected. The image will be more magnified.
Caution
Movie digital IS will not function when the lens’s optical Image Stabilizer switch isset to < >.With a lens whose focal length is longer than 800 mm, Movie digital IS will notfunction.Movie digital IS is not available when the camera is set to use Movie digital zoomor record time-lapse movies.The wider the angle of view, the more effective the image stabilization will be. Thenarrower the angle of view, the less effective the image stabilization will be.Consider setting to [Disable] when using TS-E, fish-eye, or non-Canon lenses.Effects of Movie digital IS are not applied to images during magnified display.Since Movie digital IS magnifies the image, the image looks more grainy. Noise,dots of light, etc. may also become noticeable.Depending on the subject and shooting conditions, the subject may blur noticeably(the subject momentarily looks out of focus) due to the effects of the Movie digitalIS.When Movie digital IS is set, the size of AF points will also change.When using a tripod, setting Movie digital IS to [Disable] is recommended.
345

Note
Combination ISEven more effective correction is possible by recording movies with Movie digital ISand a Combination IS-compatible lens, which will combine optical and digital imagestabilization by the lens and camera.
For details on lenses compatible with Combination IS, visit the Canon website.“+” is added to the Movie digital IS icon ( ) when a lens compatible withCombination IS is used.
346

Miniature Effect Movies
By blurring image areas outside a selected area, you can record movies with a miniaturemodel effect applied. You can also choose a playback speed before recording to createmovies that resemble miniature scenes with people and objects moving in fast motion. Notethat sound is not recorded.
1. Select [ ].
Press < >, and on the Quick Control screen, select [ ].
Select [ ], [ ], or [ ] as the playback speed.
347

2. Move the scene frame.
Use the scene frame to set an area that will look sharp.To make the scene frame movable (displayed in orange), press the< > button or tap [ ] in the lower right of the screen.To switch between vertical and horizontal scene frame orientation, tap[ ] in the lower left of the screen.
To move a horizontal scene frame, press the < >< > keys, and tomove a vertical scene frame, press the < >< > keys.
To return the scene frame to the center of the screen, tap [ ] in thelower left.
To confirm the position of the scene frame, press < >. Next, set theAF point.
3. Move the AF point.
The AF point turns orange and can be moved.
Press the < >< >< >< > keys to move the AF point to theposition to focus on.Aligning the AF point and scene frame is recommended.
To return the AF point to the center of the screen, tap [ ] in the lowerleft.
Press < > to confirm the position of the AF point.
348

4. Record the movie.
Press the movie shooting button.
Speed and playback time (for a 1-minute movie)Speed Playback Time
Approx. 12 sec.
Approx. 6 sec.
Approx. 3 sec.
Caution
To make people and objects in the scene move quickly during playback, select[ ], [ ], or [ ] before recording the movie. Movies will resemble scenes in aminiature model.Sound is not recorded.
Note
You can switch the scene frame orientation in step 2 with the < >< > keyswhen in horizontal orientation or the < >< > keys when in vertical orientation.
349

Other Menu Functions
[ 1]
[ 2]
[ 3]
[ 5]
[ 6]
[ 7]
[ 8]
[ 9]
350

[ 1]
Shooting modeAvailable options include autoexposure and manual exposure movie recording.
[ 2]
Exposure comp.Exposure compensation can be adjusted in a range of ±3 stops, in 1/3-stop increments.For details on exposure compensation, see Exposure Compensation.
ISO speed settings
• ISO speedIn [ ] mode, you can set the ISO speed manually. You can also select ISO Auto.
• Max for AutoYou can set the maximum limit for ISO Auto in movie recording in [ ] mode or in[ ] mode with ISO Auto.[H(25600)] is added as an option in [Max for Auto] when [1: ISO expansion] in [ :Custom Functions(C.Fn)] is set to [1:Enable].
Auto Lighting OptimizerBrightness and contrast can be corrected automatically. For details on Auto LightingOptimizer, see Auto Lighting Optimizer.
Highlight tone priorityYou can reduce overexposed, clipped highlights as you record movies. For details onHighlight tone priority, see Highlight Tone Priority.
Caution
[Enhanced] is not available (not displayed) when recording movies with [ :Highlight tone priority] set.
351

Auto slow shutter
You can choose whether to record movies that are brighter than when set to [Disable]by automatically slowing the shutter speed under low light.Available in [ ] recording mode. Applies when the frame rate of the movie recordingsize is or .
• DisableEnables you to record movies with smoother, more natural movement, less affectedby subject shake than when set to [Enable]. Note that under low light, movies maybe darker than when set to [Enable].
• EnableEnables you to record brighter movies than when set to [Disable] by automaticallyreducing the shutter speed to 1/30 sec. (NTSC) or 1/25 sec. (PAL) under low light.
Note
Setting to [Disable] is recommended when recording moving subjects underlow light, or when afterimages such as trails may occur.
352

[ 3]
White balanceFor details on white balance, see White Balance Settings.
Custom White BalanceFor details on custom white balance, see [ ] Custom White Balance.
WB correctionFor details on white balance correction, see White Balance Correction.
Picture StyleFor details on Picture Styles, see Picture Style Selection.
Lens aberration correctionFor details on lens aberration correction, see Lens Aberration Correction.
[ 5]
AF methodFor details on AF methods, see AF Method.
Eye detectionFor details on eye detection, see Eye Detection.
Touch & drag AF settingsFor details on touch & drag AF settings, see Touch & Drag AF Settings.
Focus modeFor details on focus modes, see Focus Mode.
MF peaking settingsFor details on MF peaking settings, see MF Peaking Settings (Outline Emphasis).
353

[ 6]
Lens electronic MFFor details on lens electronic MF, see Lens Electronic MF.
[ 7]
Remote controlBy setting to [Enable], you can start or stop movie recording using Wireless RemoteControl BR-E1 (sold separately). First, pair the BR-E1 with the camera ( ).
With Wireless Remote Control BR-E1For normal movie recording, set the release timing/movie shooting switch to < >,then press the release button.For time-lapse movie recording, see Time-Lapse Movies.
[ 8]
IS (Image Stabilizer) modeFor details on image stabilization settings, see Image Stabilization.
Metering timerFor details on the metering timer, see Metering Timer.
Shooting info. disp.For details on configuring shooting information display, see Shooting InformationDisplay.
354

[ 9]
Reverse displayFor details on reverse display, see Reverse Display.
VF display formatFor details on the viewfinder display format, see Viewfinder Display Format.
HDMI info disp
You can configure information display for image output via an HDMI cable.
• With infoThe image, shooting information, AF points, and other information is shown on theother device via HDMI. Note that the camera screen goes off. Recorded movies aresaved to the card.
• Clean / outputHDMI output consists solely of 4K movies. Shooting information and AF points arealso displayed on the camera, but no image is recorded to the card. Note that Wi-Ficommunication is not available.
• Clean / outputHDMI output consists solely of Full HD movies. Shooting information and AF pointsare also displayed on the camera, but no image is recorded to the card. Note thatWi-Fi communication is not available.
355

General Movie Recording Precautions
Caution
Precautions for movie recordingDo not point the camera toward an intense light source, such as the sun or anintense artificial light source. Doing so may damage the image sensor or thecamera’s internal components.If you record something that has fine detail, moire or false colors may result.White balance may change if the ISO speed or aperture value changes duringmovie recording when [ ] or [ ] is set.Recording movies under fluorescent or LED lighting may cause the screen toflicker.Autofocusing with a USM lens during movie recording under low light may causehorizontal banding to be recorded in movies. The same type of noise may occur ifyou focus manually ( ) with certain lenses equipped with an electronic focusingring.Recording a few test movies is recommended if you intend to perform zoomingduring movie recording. Zooming as you record movies may cause exposurechanges or lens sounds to be recorded, an uneven audio level, or loss of focus.Large aperture values may delay or prevent accurate focusing.Performing AF by pressing the shutter button halfway during movie recording maycause the following kinds of issues: significant temporary loss of focus, recording ofchanges in movie brightness, temporary stopping of movie recording, or recordingof mechanical lens sounds.Avoid covering the built-in microphones ( ) with your fingers or other objects.Also see General Still Photo Shooting Precautions, as needed.The camera may become hot in movie recording while connected via Wi-Fi. Use atripod or take other measures to avoid handheld recording.
Red [ ] internal temperature warning iconIf the camera’s internal temperature increases due to prolonged movie recording orunder a high ambient temperature, a red [ ] icon will appear.The red [ ] icon indicates that movie recording will soon end automatically. If thishappens, you will not be able to record again until the camera’s internaltemperature decreases, so turn off the power and let the camera cool down awhile. Note that the time until movie recording stops automatically when the red[ ] icon is displayed varies depending on shooting conditions.Recording a movie at a high temperature for a prolonged period will cause the red[ ] icon to appear earlier. When you are not recording, always turn off the camera.
356

Recording and image qualityIf the attached lens has an Image Stabilizer and you set the Image Stabilizer switchto < >, the Image Stabilizer will operate at all times even if you do not press theshutter button halfway. This will consume battery power, and it may reduce the totalmovie recording time under some shooting conditions. When the Image Stabilizeris not necessary, such as when using a tripod, it is recommended that you set theImage Stabilizer switch to < >.If the brightness changes as you record a movie with auto exposure, the moviemay appear to stop momentarily. In this case, record movies with manualexposure.If there is a very bright light source in the image, the bright area may appear blackon the screen. Movies are recorded almost exactly as they appear on the screen.Image quality may be lower when recording movies under a combination ofconditions such as high ISO speeds, high temperatures, low shutter speeds, andlow light.Recording movies over an extended period may cause the camera’s internaltemperature to rise and affect image quality. Turn off the camera when possible ifyou are not recording movies.Video and audio quality of recorded movies may be worse on other devices, andplayback may not be possible, even if the devices support MP4 formats.If you use a card with a slow writing speed, an indicator may appear on the rightof the screen during movie recording. The indicator shows how much data hasnot yet been written to the card (remaining capacity of the internal buffermemory), and with slower cards, it increases more quickly. If the indicator (1)becomes full, movie recording will stop automatically.
With cards that have fast writing speeds, the indicator will not appear, or the level(if displayed) will not increase much. First, record a few test movies to see if thecard can write fast enough.If the indicator shows that the card is full, and movie recording stops automatically,sound near the end of the movie may not be recorded properly.If the card’s writing speed is slow (due to fragmentation) and the indicator appears,formatting the card may make the writing speed faster.
Audio restrictionsNote that the following restrictions apply to audio in movie recording.
• Sound will not be recorded for approx. the last two frames.• When you play back movies in Windows, movie images and sound may
become slightly out of synchronization.
357

Note
Notes for movie recordingEach time you record a movie, a new movie file is created on the card.The movie’s field of view coverage for recording 4K, Full HD, and HD movies isapprox. 100%.To enable starting/stopping movie recording by pressing the shutter buttoncompletely, set [Fully-press] for [ : Shutter btn function for movies] to [Start/stop mov rec].Stereo sound is recorded by the camera’s built-in microphones ( ).Any external microphones such as Directional Stereo Microphone DM-E1 (soldseparately) connected to the camera’s external microphone IN terminal are usedinstead of the build-in microphones ( ).Most external microphones equipped with a 3.5 mm mini-jack can be used.With EF lenses, focus preset during recording is only available when using (super)telephoto lenses equipped with this function released in and after the second half of2011.YCbCr 4:2:0 (8-bit) color sampling and the BT.709 color space are used for 4K, FullHD, and HD movies.
358

Playback
This chapter covers topics related to playback—playing back captured still photos andmovies—and introduces menu settings on the playback ([ ]) tab.
Caution
Normal display or selection on this camera may not be possible for imagescaptured on other cameras, or images from this camera that have been edited orrenamed on a computer.Images that cannot be used with playback functions may be displayed.
• Tab Menus: Playback• Image Playback• Index Display (Multiple-Image Display)• Magnified Image Display• Movie Playback• Editing a Movie’s First and Last Scenes• Frame Extraction from 4K Movies or 4K Time-Lapse Movies• Digest Movie Editing• Playback on a TV Set• Protecting Images• Erasing Images• Rotating Still Photos• Changing Movie Orientation Information• Rating Images• Printing• Print Ordering (DPOF)• Photobook Set-up• Creative Assist• Creative Filters• Red-Eye Correction• Resizing• Cropping• Album Creation• Slideshows• Setting Image Search Conditions• Resuming from Previous Playback• Browsing Images with the Dial• Playback Information Display
359

• AF Point Display• HDMI HDR Output
360

Tab Menus: Playback
Playback 1
(1) Protect images(2) Erase images(3) Rotate stills(4) Change mov rotate info(5) Rating
Playback 2
(1) Print order(2) Photobook Set-up
361
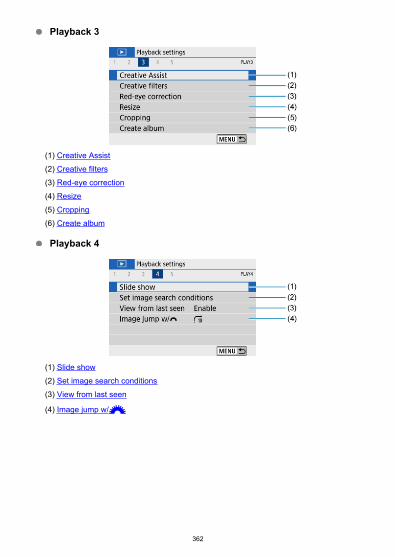
Playback 3
(1) Creative Assist(2) Creative filters(3) Red-eye correction(4) Resize(5) Cropping(6) Create album
Playback 4
(1) Slide show(2) Set image search conditions(3) View from last seen
(4) Image jump w/
362

Playback 5
(1) Playback information display(2) AF point disp.(3) HDMI HDR output
363

Image Playback
Single-Image Display
Shooting Information Display
Single-Image Display
1. Switch to playback.
Press the < > button.The last image captured or played back is displayed.
364

No information Basic information display
Shooting information display
2. Browse images.
To play back images starting with the most recent, press the < >key. To play back images starting with the first captured image, pressthe < > key.
Each time you press the < > button, the display will change.
3. Exit image playback.
Press the < > button to exit image playback and return to shootingstandby.
365

Note
Lines indicating the image area are shown on RAW images captured with [ : Stillimg aspect ratio] set to an option other than [3:2] ( ).If the search conditions are set with [ : Set image search conditions] ( ), onlythe filtered images will be displayed.
Shooting Information Display
With the shooting information screen displayed ( ), you can press the < > button tochange the information displayed at the bottom of the screen. You can also customize theinformation displayed, in [ : Playback information display] ( ).
366
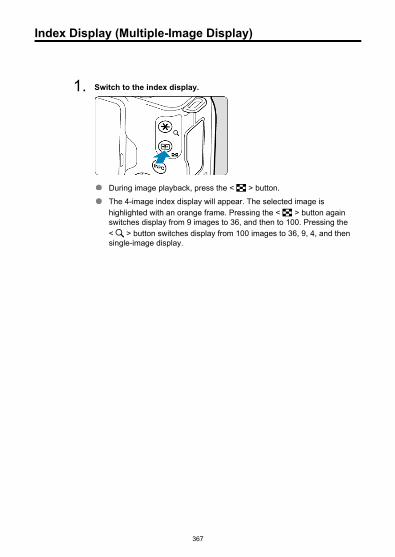
Index Display (Multiple-Image Display)
1. Switch to the index display.
During image playback, press the < > button.The 4-image index display will appear. The selected image ishighlighted with an orange frame. Pressing the < > button againswitches display from 9 images to 36, and then to 100. Pressing the< > button switches display from 100 images to 36, 9, 4, and thensingle-image display.
367

368
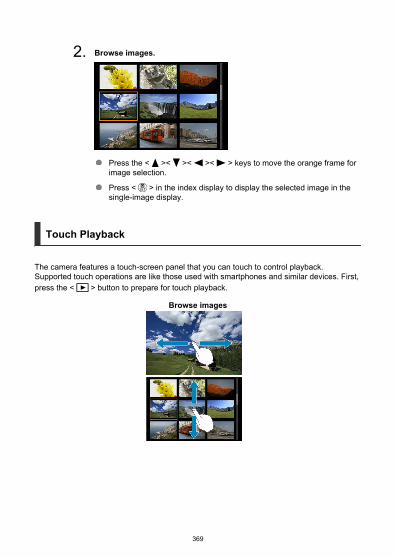
2. Browse images.
Press the < >< >< >< > keys to move the orange frame forimage selection.
Press < > in the index display to display the selected image in thesingle-image display.
Touch Playback
The camera features a touch-screen panel that you can touch to control playback.Supported touch operations are like those used with smartphones and similar devices. First,press the < > button to prepare for touch playback.
Browse images
369
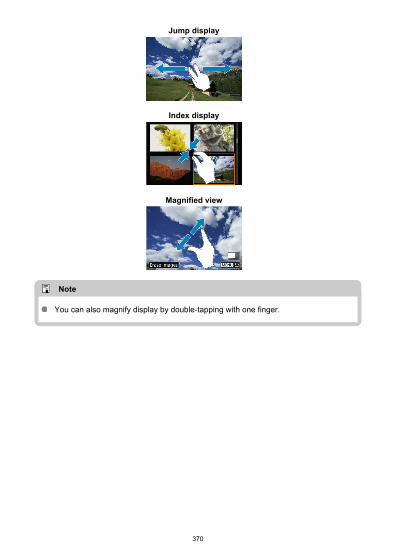
Jump display
Index display
Magnified view
Note
You can also magnify display by double-tapping with one finger.
370

Magnified Image Display
1. Magnify the image.
During image playback, press the < > button.
The magnified view will appear. The magnified area position (1) will bedisplayed in the lower right of the screen.
Each press of the < > button magnifies display.
Each press of the < > button reduces display. For index display( ), press the < > button again after the final reduction.To erase the current image, select [Erase images] ( ).
371

2. Scroll the image.
Press the < >< >< >< > keys to scroll around the image.
To cancel the magnified view, press the < > button or tap [].
372
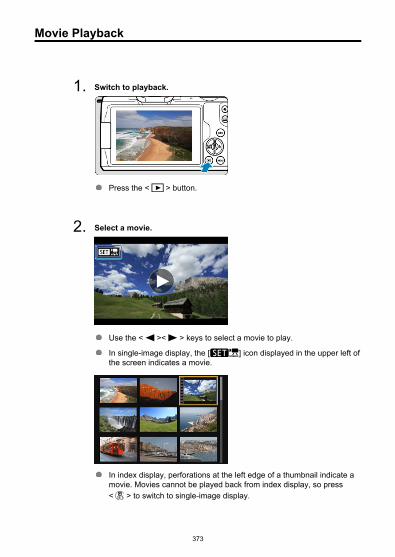
Movie Playback
1. Switch to playback.
Press the < > button.
2. Select a movie.
Use the < >< > keys to select a movie to play.
In single-image display, the [ ] icon displayed in the upper left ofthe screen indicates a movie.
In index display, perforations at the left edge of a thumbnail indicate amovie. Movies cannot be played back from index display, so press< > to switch to single-image display.
373

3. In single-image display, press < >.
4. Select [ ].
(1) SpeakerThe movie will start playing back.You can pause playback and display the movie playback panel bypressing < >. Press it again to resume the playback.
Pressing the < > key skips forward approx. 4 sec. during playback.Similarly, pressing the < > key skips back approx. 4 sec.
Use the < >< > keys to adjust the volume (even during playback).
374
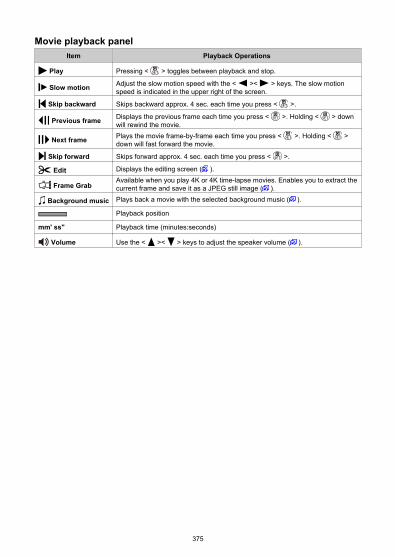
Movie playback panelItem Playback Operations
Play Pressing < > toggles between playback and stop.
Slow motion Adjust the slow motion speed with the < >< > keys. The slow motionspeed is indicated in the upper right of the screen.
Skip backward Skips backward approx. 4 sec. each time you press < >.
Previous frame Displays the previous frame each time you press < >. Holding < > downwill rewind the movie.
Next frame Plays the movie frame-by-frame each time you press < >. Holding < >down will fast forward the movie.
Skip forward Skips forward approx. 4 sec. each time you press < >.
Edit Displays the editing screen ( ).
Frame GrabAvailable when you play 4K or 4K time-lapse movies. Enables you to extract thecurrent frame and save it as a JPEG still image ( ).
Background music Plays back a movie with the selected background music ( ).
Playback position
mm' ss" Playback time (minutes:seconds)
Volume Use the < >< > keys to adjust the speaker volume ( ).
375

Movie playback panel (video snapshot albums and digest movies)Item Playback Operations
Play Pressing < > toggles between playback and stop.
Slow motion Adjust the slow motion speed with the < >< > keys. The slow motionspeed is indicated in the upper right of the screen.
Previous clip Displays the first frame of the previous video snapshot.
Previous frame Displays the previous frame each time you press < >. Holding < > downwill rewind the movie.
Next frame Plays the movie frame-by-frame each time you press < >. Holding < >down will fast forward the movie.
Next clip Displays the first frame of the next video snapshot.
Erase clip Erases the current video snapshot.
Edit Displays the editing screen ( ).
Background music Plays back an album with the selected background music ( ).
Playback position
mm' ss" Playback time (minutes:seconds)
Volume Use the < >< > keys to adjust the speaker volume ( ).
Caution
Adjust the volume using television controls when the camera is connected to atelevision for movie playback ( ), because volume cannot be adjusted with the< >< > keys.Movie playback may stop if the card’s read speed is too slow or movie files havecorrupted frames.
Note
To skip back or forward to the beginning of the previous or next video snapshot orclip during playback of video snapshot albums or digest movies, press the< >< > keys.For details on the movie recording time available, see Available Operating Time.
376

Editing a Movie’s First and Last Scenes
1. In single-image display, press < >.
2. Select [ ].
The movie will start playing back.
3. Press < > to pause the movie.
4. On the movie playback panel, select [ ].
377

5. Specify the part to be edited out.
Select either [ ] (Cut beginning) or [ ] (Cut end).
Press the < >< > keys to go back or forward one frame (or videosnapshot) at a time. Keep holding down the < > key to fast forward.
After deciding which part to edit out, press < >. The portion indicatedby a line at the bottom of the screen will remain.
6. Check the edited movie.
Select [ ] to play back the edited movie.To change the edited part, go back to step 5.
To cancel the editing, press the < > button.
378

7. Save.
Select [ ] (1).The save screen will appear.To save it as a new file, select [New file], or to save it and overwrite theoriginal movie file, select [Overwrite].
Select [ ] (2) to save a compressed version of the file. 4K moviesare converted to Full HD movies before compression.On the confirmation screen, select [OK] to save the edited movie andreturn to the movie playback screen.
Caution
Because editing is performed in approx. 1 sec. increments (at the position indicatedby [ ] at the bottom of the screen), the actual position where movies are trimmedmay differ from your specified position.Movies shot with another camera cannot be edited with this camera.You cannot edit a movie when the camera is connected to a computer.[ ] is not available for movies created with [Save compressed version],because further compression and saving is not possible.
Note
For instructions on editing video snapshot albums, see Album Creation.
379

Frame Extraction from 4K Movies or 4K Time-LapseMovies
From 4K movies or 4K time-lapse movies, you can select individual frames to save asapprox. 8.3 megapixel (3840 × 2160) JPEG still images. This function is called “Frame Grab(4K frame capture)”.
1. Switch to playback.
Press the < > button.
2. Select a 4K movie or 4K time-lapse movie.
Use the < >< > keys for selection.On the shooting information screen ( ), 4K movies and 4K time-lapsemovies are indicated by a [ ] icon.
In index display, press < > to switch to single-image display.
3. In single-image display, press < >.
4. Select [ ].
The movie will start playing back.
380

5. Press < > to pause the movie.
The movie playback panel will appear.
6. Select a frame to grab.
Use the movie playback panel to select the frame to grab as a stillimage.For movie playback panel instructions, see Movie Playback Panel.
7. Select [ ].
381

8. Save.
Select [OK] to save the current frame as a JPEG still image.
9. Select the image to display.
Check the destination folder and image file number.
Select [View original movie] or [View extracted still image].
Caution
Frame grabbing is not possible with Full HD movies, Full HD time-lapse movies,HD movies, or with 4K movies or 4K time-lapse movies from a different camera.
382

Digest Movie Editing
Individual chapters (clips) recorded in < > mode can be erased. Be careful when erasingclips, because they cannot be recovered.
1. Switch to playback.
Press the < > button.
2. Select a digest movie.
Use the < >< > keys to select a digest movie.
In single-image display, digest movies are labeled with [ ] inthe upper left.
In index display, press < > to switch to single-image display.
3. In single-image display, press < >.
4. Select [ ].
Digest movie playback begins.
383

5. Press < > to pause the digest movie.
The movie playback panel will appear.
6. Select a clip.
Use [ ] or [ ] to select a clip.
7. Select [ ].
8. Select [OK].
The clip is erased, and the digest movie is overwritten.
384

Note
Video snapshot albums can also be edited. However, albums created with [ :Create album] cannot be edited.For other instructions on using the movie playback panel for digest movies, seeMovie Playback Panel (Video Snapshot Albums and Digest Movies).
385
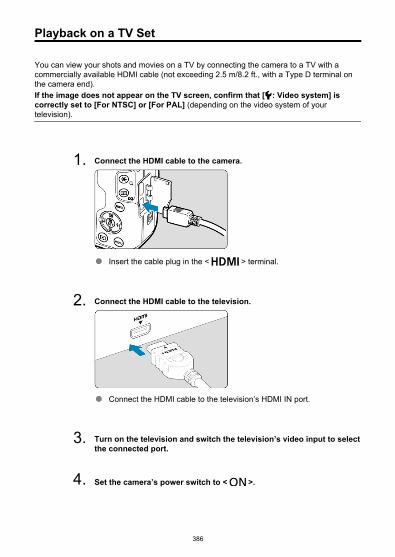
Playback on a TV Set
You can view your shots and movies on a TV by connecting the camera to a TV with acommercially available HDMI cable (not exceeding 2.5 m/8.2 ft., with a Type D terminal onthe camera end).If the image does not appear on the TV screen, confirm that [ : Video system] iscorrectly set to [For NTSC] or [For PAL] (depending on the video system of yourtelevision).
1. Connect the HDMI cable to the camera.
Insert the cable plug in the < > terminal.
2. Connect the HDMI cable to the television.
Connect the HDMI cable to the television’s HDMI IN port.
3. Turn on the television and switch the television’s video input to selectthe connected port.
4. Set the camera’s power switch to < >.
386

5. Press the < > button.
Images are now displayed on the television, with nothing displayed onthe camera screen.The images will automatically be displayed at the optimum resolutionmatching the connected television.
Caution
Adjust movie sound volume with the television. The sound volume cannot beadjusted with the camera.Before connecting or disconnecting the cable between the camera and television,turn off the camera and television.Depending on the television, part of the image displayed may be cut off.Do not connect any other device’s output to the camera’s < > terminal.Doing so may cause a malfunction.Certain televisions may not display the images due to incompatibility.It may take some time before images are displayed. To avoid delay, set [ : HDMIresolution] to [1080p] ( ).Touch-screen operations are not supported while the camera is connected to atelevision.
387

Protecting Images
Protecting a Single Image
Specifying the Range of Images to Protect
Protecting All Images in a Folder or on a Card
You can protect important images from being accidentally erased.
Protecting a Single Image
1. Select [ : Protect images].
2. Select [Select images].
3. Select an image.
Use the < >< > keys to select an image to protect.
388
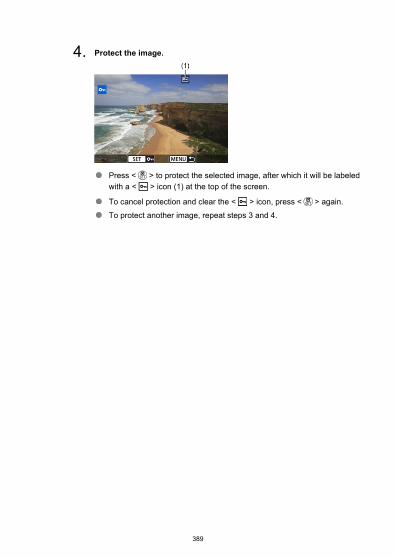
4. Protect the image.
Press < > to protect the selected image, after which it will be labeledwith a < > icon (1) at the top of the screen.
To cancel protection and clear the < > icon, press < > again.To protect another image, repeat steps 3 and 4.
389
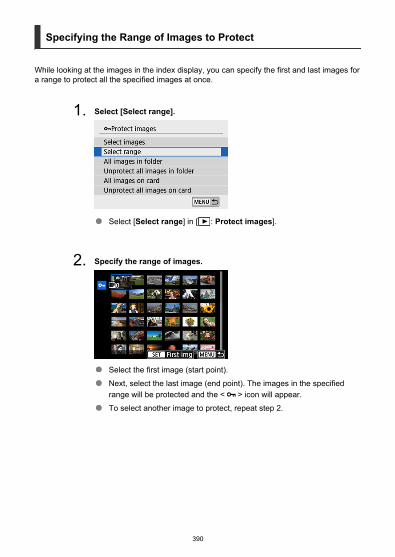
Specifying the Range of Images to Protect
While looking at the images in the index display, you can specify the first and last images fora range to protect all the specified images at once.
1. Select [Select range].
Select [Select range] in [ : Protect images].
2. Specify the range of images.
Select the first image (start point).Next, select the last image (end point). The images in the specifiedrange will be protected and the < > icon will appear.To select another image to protect, repeat step 2.
390

Protecting All Images in a Folder or on a Card
You can protect all the images in a folder or on a card at once.
When you select [All images in folder] or [All images on card] in [ : Protectimages], all the images in the folder or on the card will be protected.To cancel protection, select [Unprotect all images in folder] or [Unprotect all imageson card].
If the search conditions are set with [ : Set image search conditions] ( ), thedisplay will change to [All found images] and [Unprotect all found].
• If you select [All found images], all the images filtered by the search conditions willbe protected.
• If you select [Unprotect all found], the protection of all the filtered images will becanceled.
Caution
If you format the card ( ), the protected images will also be erased.
Note
Once an image is protected, it cannot be erased by the camera’s erase function. Toerase a protected image, you must first cancel the protection.If you erase all the images ( ), only the protected images will remain. This isconvenient when you want to erase all unneeded images at once.
391

Erasing Images
Erasing Images Individually
Selecting ([ ]) Multiple Images to Erase Together
Specifying the Range of Images to Erase
Erasing All Images in a Folder or on a Card
You can either select and erase unnecessary images individually or erase them in onebatch. Protected images ( ) will not be erased.
Caution
Once an image is erased, it cannot be recovered. Make sure you no longerneed the image before erasing it. To prevent important images from beingerased accidentally, protect them.
Erasing Images Individually
1. Select the image to be erased.
Press the < > button.
Use the < >< > keys for selection.
2. Press the < > key.
392

3. Erase the images.
JPEG or RAW images or movies
Select [Erase].
RAW+JPEG images
Select an option.
393
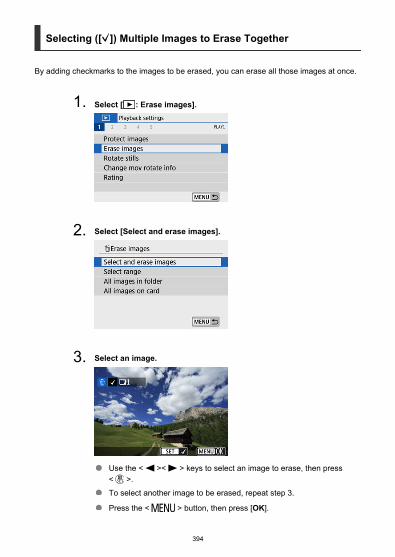
Selecting ([ ]) Multiple Images to Erase Together
By adding checkmarks to the images to be erased, you can erase all those images at once.
1. Select [ : Erase images].
2. Select [Select and erase images].
3. Select an image.
Use the < >< > keys to select an image to erase, then press< >.To select another image to be erased, repeat step 3.
Press the < > button, then press [OK].
394

4. Erase the images.
395

Specifying the Range of Images to Erase
While looking at the images in the index display, you can specify the first and last images fora range to erase all the specified images at once.
1. Select [Select range].
2. Specify the range of images.
Select the first image (start point).Next, select the last image (end point).
3. Press the < > button.
396

4. Erase the images.
Select [OK].
397

Erasing All Images in a Folder or on a Card
When you select [All images in folder] or [All images on card] in [ : Erase images],all the images in the folder or on the card will be erased.
If the search conditions are set with [ : Set image search conditions] ( ), thedisplay will change to [All found images].
• If you select [All found images], all the images filtered by the search conditions willbe erased.
Note
To erase all the images including protected images, format the card ( ).
398

Rotating Still Photos
You can use this feature to rotate the displayed image to the desired orientation.
1. Select [ : Rotate stills].
2. Select an image.
Use the < >< > keys to select an image to rotate.
3. Rotate the image.
Each time you press < >, the image will rotate clockwise as follows:90°→270°→0°.To rotate another image, repeat steps 2 and 3.
399

Note
If you set [ : Auto rotate] to [On ] ( ) before taking pictures, you need notrotate the image with this function.If the rotated image is not displayed rotated during playback, set [ : Auto rotate]to [On ].
400

Changing Movie Orientation Information
You can manually change movie orientation information (which determines which side isup).
1. Select [ : Change mov rotate info].
2. Select a movie.
Use the < >< > keys to select a movie with orientationinformation to change.
401

3. Press < >.
As you watch the image orientation icon in the upper left of the screen,press < > to specify which side is up.
Note
Orientation information of video snapshot albums cannot be changed.Movies are played horizontally on the camera, regardless of the [ : Add rotate info] setting ( ).
402
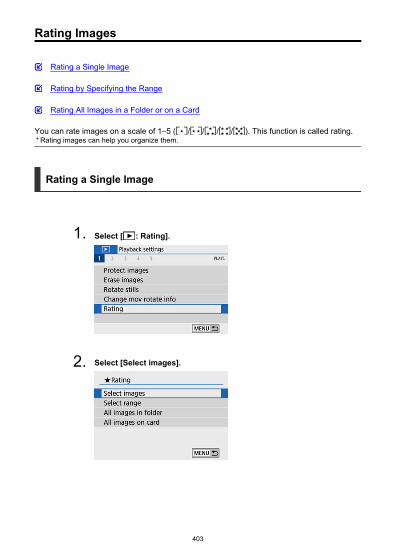
Rating Images
Rating a Single Image
Rating by Specifying the Range
Rating All Images in a Folder or on a Card
You can rate images on a scale of 1–5 ( / / / / ). This function is called rating.* Rating images can help you organize them.
Rating a Single Image
1. Select [ : Rating].
2. Select [Select images].
403

3. Select the image to be rated.
Use the < >< > keys to select an image to rate.
4. Rate the image.
Press < >, and a blue highlight frame will appear as shown in thescreen shown above.
Use the < >< > keys to select a rating mark, then press < >.When you append a rating mark to the image, the number beside theset rating will increase by one.To rate another image, repeat steps 3 and 4.
404

Rating by Specifying the Range
While looking at the images in the index display, you can specify the first and last images fora range to rate all the specified images at once.
1. Select [Select range].
2. Specify the range of images.
Select the first image (start point).Next, select the last image (end point).A checkmark [ ] will be appended to all the images within the rangebetween first and last images.
3. Press the < > button.
405

4. Rate the image.
Turn the < > dial to select a rating mark, then select [OK].All the images in the specified range will be rated (same rating) atonce.
406

Rating All Images in a Folder or on a Card
You can rate all the images in a folder or on a card at once.
Under [ : Rating], when you select [All images in folder] or [All images on card], allthe images in the folder or on the card will be rated.
Turn the < > dial to select a rating mark, then select [OK].
When you are not rating images or canceling the rating, select [ ].
If the search conditions are set with [ : Set image search conditions] ( ), thedisplay will change to [All found images].
If you select [All found images], all the images filtered by the search conditions will berated as specified.
407

Note
Values next to ratings are displayed as [###] if more than 1,000 images have thatrating.With [ : Set image search conditions] and [ : Image jump w/ ], you candisplay only the images given a specific rating.
408

Printing
All operations in direct printing are performed on the camera, as you view instructions on thecamera.
1. Prepare the printer.
For details, refer to the printer instruction manual.
2. Connect the camera to the printer with an interface cable (soldseparately).
As an interface cable, you can use an IFC-600PCU cable (soldseparately).Insert the cord’s plug into the camera’s digital terminal (USB Micro-B).Connect the other end to the printer’s USB terminal.
3. Turn the printer on.
409
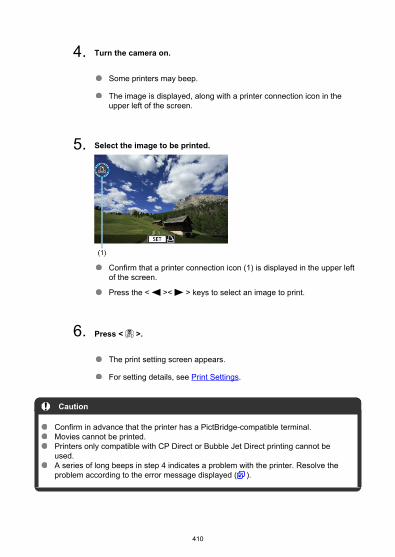
4. Turn the camera on.
Some printers may beep.
The image is displayed, along with a printer connection icon in theupper left of the screen.
5. Select the image to be printed.
Confirm that a printer connection icon (1) is displayed in the upper leftof the screen.
Press the < >< > keys to select an image to print.
6. Press < >.
The print setting screen appears.
For setting details, see Print Settings.
Caution
Confirm in advance that the printer has a PictBridge-compatible terminal.Movies cannot be printed.Printers only compatible with CP Direct or Bubble Jet Direct printing cannot beused.A series of long beeps in step 4 indicates a problem with the printer. Resolve theproblem according to the error message displayed ( ).
410

Note
The screen display and setting options vary depending on the printer. Also, certainsettings may not be available. For details, refer to the printer’s instruction manual.You can also print RAW images captured with this camera.When using a battery to power the camera, make sure it is fully charged.Turn off the camera and printer before disconnecting the cable, and hold the cableby the plug when disconnecting it.For direct printing, consider powering the camera with DC Coupler DR-E12 andCompact Power Adapter CA-PS700 (each sold separately).
411

Print Ordering (DPOF)
Setting Print Options
Selecting Images for Printing
DPOF (Digital Print Order Format) enables you to print images recorded on the cardaccording to your printing instructions such as the image selection, quantity to print, etc. Youcan print multiple images in one batch or create a print order for a photofinisher.You can set the print settings such as print type, date imprinting, file number imprinting, etc.The print settings will be applied to all the images specified for printing. (They cannot be setindividually for each image.)
Setting Print Options
1. Select [ : Print order].
2. Select [Set up].
412

3. Set the options as desired.
Set [Print type], [Date], and [File No.] options.
Print type
Standard Prints one image on one sheet.
Index Multiple thumbnail images are printed on onesheet.
Both Prints both the standard and index prints.
DateOn
[On] imprints the recorded date of the captured image.Off
File No.On
[On] imprints the file number.Off
4. Exit the setting.
Press the < > button.Next, select [Sel.Image] or [Multiple] to specify the images to beprinted.
413

Caution
If you print an image with a large image size using the [Index] or [Both] setting( ), the index print may not be printed with certain printers. In this case, resize theimage ( ), then print the index print.Even if [Date] and [File No.] are set to [On], the date or file number may not beprinted, depending on the print type setting and printer.With [Index] prints, the [Date] and [File No.] cannot both be set to [On] at the sametime.When printing with DPOF, use the card for which print order specifications are set.You cannot print in the specified print order if you extract just the images from thecard for printing.Certain DPOF-compliant printers and photofinishers may not be able to print theimages as you specified. When using a printer, refer to the printer’s instructionmanual. When requesting service from a photofinisher, ask in advance.Do not use this camera to configure print settings for images with DPOF settingsset up on another camera. All the print orders may be overwritten inadvertently.Also, the print order may not be possible, depending on the image type.
414
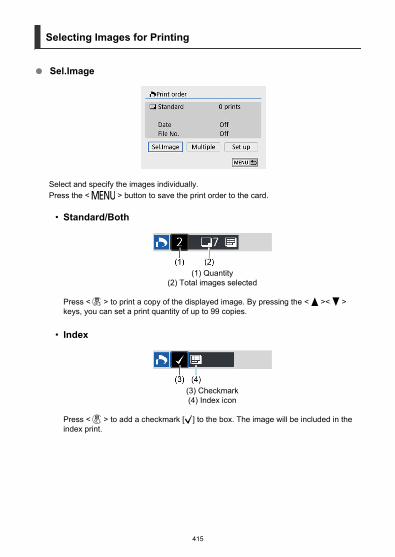
Selecting Images for Printing
Sel.Image
Select and specify the images individually.Press the < > button to save the print order to the card.
• Standard/Both
(1) Quantity(2) Total images selected
Press < > to print a copy of the displayed image. By pressing the < >< >keys, you can set a print quantity of up to 99 copies.
• Index
(3) Checkmark(4) Index icon
Press < > to add a checkmark [ ] to the box. The image will be included in theindex print.
415

Multiple
• Select range
Select [Select range] in [Multiple]. Selecting the first and last images of the rangemarks all the images in the range with a checkmark [ ], and one copy of eachimage will be specified for printing.
• All images in a folder
Select [Mark all in folder] and select the folder. A print order for one copy of all theimages in the folder will be specified.If you select [Clear all in folder] and select the folder, the print order for all theimages in the folder will be canceled.
• All images on a card
If you select [Mark all on card], one copy of all the images on the card will bespecified for printing.If you select [Clear all on card], the print order will be cleared for all the images onthe card.
If the search conditions are set with [ : Set image search conditions] ( ) and youselect [Multiple], the display will change to [Mark all found images] and [Clear allfound images].
All found images
If you select [Mark all found images], one copy of all the images filtered by thesearch conditions will be specified for printing.If you select [Clear all found images], all the print order of the filtered images willbe cleared.
416

Caution
RAW images or movies cannot be specified for printing. Note that RAW images ormovies will not be specified for printing even if you specify all images with[Multiple].When using a PictBridge-compatible printer, do not specify more than 400 imagesfor one print order. If you specify more than this, the images may not all be printed.
417

Photobook Set-up
Specifying Images Individually
Specifying the Image Range for a Photobook
Specifying All Images in a Folder or Card
You can specify up to 998 images for printing in a photobook. When you use EOS Utility(EOS software) to import images to a computer, the specified images for a photobook will becopied to a dedicated folder. This function is useful for ordering photobooks online.
Specifying Images Individually
1. Select [ : Photobook Set-up].
2. Select [Select images].
418

3. Select the image to be specified.
Use the < >< > keys to select an image for the photobook, thenpress < >.To select other images to be specified for a photobook, repeat step 3.
419

Specifying the Image Range for a Photobook
While looking at the images in the index display, you can specify the range (start point toend point) of images to be specified for a photobook at once.
1. Select [Multiple].
Select [Multiple] in [ : Photobook Set-up].
2. Select [Select range].
420

3. Specify the range of images.
Select the first image (start point).
Next, select the last image (end point). A checkmark [ ] will beappended to all the images within the range between first and lastimages.
421

Specifying All Images in a Folder or Card
You can specify all the images in a folder or on a card at once for a photobook.
All images in the folder or on the card are specified for the photobook when you select[All images in folder] or [All images on card] in the [Multiple] option for [ :Photobook Set-up].To cancel the selection, select [Clear all in folder] or [Clear all on card].
If the search conditions are set with [ : Set image search conditions] ( ) and youselect [Multiple], the display will change to [All found images] and [Clear all foundimages].
• [All found images]: All images filtered by the search conditions are specified for thephotobook.
• [Clear all found images]: Clears photobook designation of all filtered images.
Caution
RAW images or movies cannot be specified for the photobook. Note that RAWimages or movies will not be specified for the photobook even if you specify allimages with [Multiple].Do not use this camera to configure photobook settings for images with photobooksettings set up on another camera. All the photobook settings may be overwritteninadvertently.
422

Creative Assist
You can process RAW images by applying your preferred effects and saving as JPEGs.
1. Select [ : Creative Assist].
2. Select an image.
Use the < >< > keys to select images to process, then press< >.
423
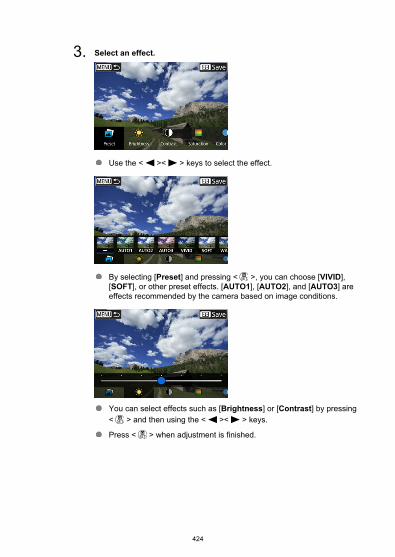
3. Select an effect.
Use the < >< > keys to select the effect.
By selecting [Preset] and pressing < >, you can choose [VIVID],[SOFT], or other preset effects. [AUTO1], [AUTO2], and [AUTO3] areeffects recommended by the camera based on image conditions.
You can select effects such as [Brightness] or [Contrast] by pressing< > and then using the < >< > keys.
Press < > when adjustment is finished.
424
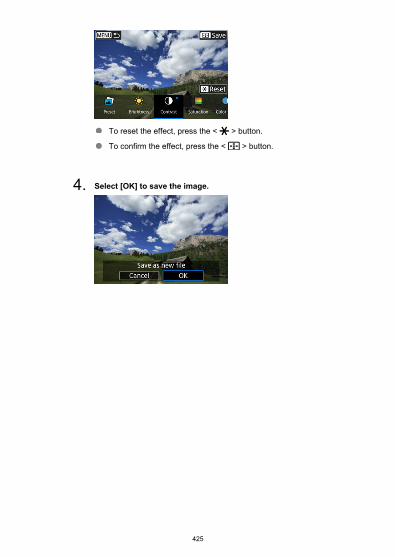
To reset the effect, press the < > button.
To confirm the effect, press the < > button.
4. Select [OK] to save the image.
425

Creative Filters
You can apply the following filter processing to an image and save it as a separate image:Grainy B/W, Soft focus, Fish-eye effect, Art bold effect, Water painting effect, Toy cameraeffect, and Miniature effect.
1. Select [ : Creative filters].
2. Select an image.
Use the < >< > keys to select an image, then press < >.
To select the image from index display, press the < > button.
3. Select a filter effect ( ).
426

4. Adjust the filter effect.
Adjust the filter effect, then press < >.
For [Miniature effect], turn the < > dial or use the < >< >keys to move the white frame enclosing the area to keep in sharperfocus, then press < >.
5. Save.
Select [OK].Check the destination folder and image file number, then select [OK].To apply filter processing to other images, repeat steps 2–5.
Note
For images captured in RAW+JPEG shooting, filter processing is applied to theRAW image, and the results are saved as a JPEG.For RAW images captured at a specific aspect ratio, the resulting image is saved atthat aspect ratio after filter processing.Images processed using the fish-eye effect filter will not have Dust Delete Data( ) appended.
427

Creative Filter Characteristics
Grainy B/W
Makes the image grainy and black and white. By adjusting the contrast, you can changethe black-and-white effect.
Soft focus
Gives the image a soft look. By adjusting the blur, you can change the degree ofsoftness.
Fish-eye effect
Gives the effect of a fish-eye lens. The image will have barrel distortion.Depending on the level of this filter effect, the area trimmed along the periphery of theimage changes. Also, because this filter effect magnifies the center of the image, theapparent resolution at the center may degrade depending on the number of recordedpixels, so set the filter effect in step 4 while checking the resulting image.
Art bold effect
Makes the photo look like an oil painting and the subject look more three-dimensional.By adjusting the effect, you can change the contrast and saturation. Note that subjectssuch as the sky or white walls may not be rendered with a smooth gradation and maylook irregular or have significant noise.
Water painting effect
Makes the photo look like a watercolor painting with soft colors. By adjusting the effect,you can change the color density. Note that night scenes or dark scenes may not berendered with a smooth gradation and may look irregular or have significant noise.
Toy camera effect
Shifts colors to those typical of toy cameras and darkens the four corners of the image.Color tone options can be used to change the color cast.
Miniature effect
Creates a diorama effect. You can change where the image looks sharp. To switchbetween vertical and horizontal orientation of the sharp area (white frame), press the< >< > keys in step 4 (or tap [ ] on the screen).
428

Red-Eye Correction
Automatically corrects relevant portions of images affected by red-eye. The image can besaved as a separate file.
1. Select [ : Red-eye correction].
2. Select an image with the < >< > keys.
After image selection, either tap [ ] or press < >.White frames are displayed around corrected image areas.
3. Select [OK].
The image is saved as a separate file.
429

Caution
Some images may not be corrected accurately.
430

Resizing
You can resize a JPEG image to make the pixel count lower and save it as a new image.Resizing an image is possible only with JPEG / / images. JPEG and RAW imagescannot be resized.
1. Select [ : Resize].
2. Select an image.
Use the < >< > keys to select an image to resize.
431

3. Select the desired image size.
Press < > to display the image sizes.Select the desired image size (1).
4. Save.
Select [OK] to save the resized image.Check the destination folder and image file number, then select [OK].To resize another image, repeat steps 2 to 4.
Note
For details on image sizes of resized images, see Still Photo Pixel Count.
432

Cropping
You can crop a captured JPEG image and save it as another image. Cropping an image ispossible only with JPEG images. Images shot in RAW cannot be cropped.
1. Select [ : Cropping].
2. Select an image.
Use the < >< > keys to select an image to crop.
433
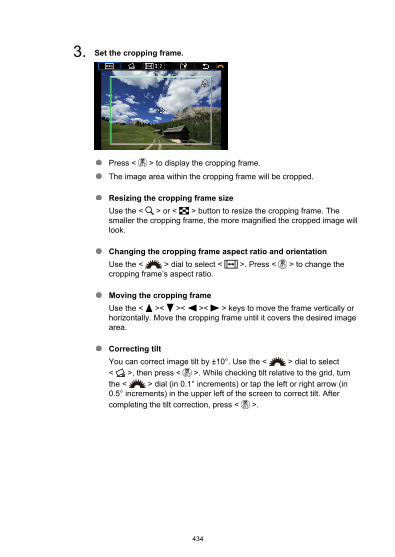
3. Set the cropping frame.
Press < > to display the cropping frame.The image area within the cropping frame will be cropped.
Resizing the cropping frame sizeUse the < > or < > button to resize the cropping frame. Thesmaller the cropping frame, the more magnified the cropped image willlook.
Changing the cropping frame aspect ratio and orientationUse the < > dial to select < >. Press < > to change thecropping frame’s aspect ratio.
Moving the cropping frameUse the < >< >< >< > keys to move the frame vertically orhorizontally. Move the cropping frame until it covers the desired imagearea.
Correcting tiltYou can correct image tilt by ±10°. Use the < > dial to select< >, then press < >. While checking tilt relative to the grid, turnthe < > dial (in 0.1° increments) or tap the left or right arrow (in0.5° increments) in the upper left of the screen to correct tilt. Aftercompleting the tilt correction, press < >.
434

4. Check the image area to be cropped.
Use the < > dial to select < >.The image area to crop is displayed.
5. Save.
Use the < > dial to select < >.Select [OK] to save the cropped image.Check the destination folder and image file number, then select [OK].To crop another image, repeat steps 2 to 5.
Caution
The position and size of the cropping frame may change depending on the angleset for tilt correction.Once a cropped image is saved, it cannot be cropped again or resized.AF point display information ( ) and Dust Delete Data ( ) will not be appendedto the cropped images.
435

Album Creation
You can rearrange, delete, or play back the video snapshots in an album.
1. Select [ : Create album].
2. Select an album to edit.
Press < > to add a checkmark [ ].
After selection, press the < > button.
436

3. Select an editing option.
Option Description
Rearrangevideo snapshots
Use the < >< > keys to select a video snapshot tomove, then press < >. Use the < >< > keys tomove it, then press < >.
Remove videosnapshot
Use the < >< > keys to select a video snapshot todelete, then press < >. Selected video snapshots arelabeled [ ]. To clear the selection and remove [ ], press< > again.
Play videosnapshot
Use the < >< > keys to select a video snapshot toplay, then press < >. Use the < >< > keys toadjust the volume.
4. Finish editing.
Press the < > button when you are finished editing.
Select [ ] (Finish editing).
437

5. Save.
To play an album with background music, use [Background music] toselect the music ( ).To check your editing, select [Preview].Selecting [Save] saves the edited album as a new album.
Caution
Video snapshot albums can only be edited once.
438
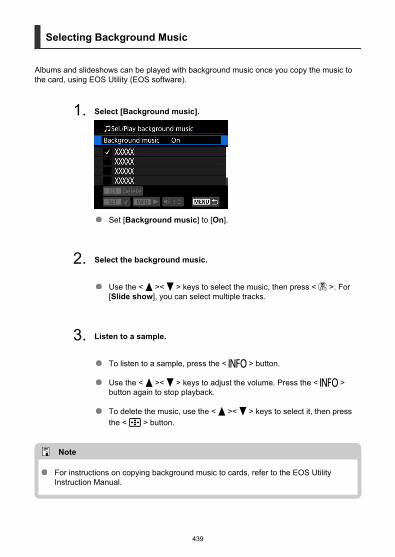
Selecting Background Music
Albums and slideshows can be played with background music once you copy the music tothe card, using EOS Utility (EOS software).
1. Select [Background music].
Set [Background music] to [On].
2. Select the background music.
Use the < >< > keys to select the music, then press < >. For[Slide show], you can select multiple tracks.
3. Listen to a sample.
To listen to a sample, press the < > button.
Use the < >< > keys to adjust the volume. Press the < >button again to stop playback.
To delete the music, use the < >< > keys to select it, then pressthe < > button.
Note
For instructions on copying background music to cards, refer to the EOS UtilityInstruction Manual.
439

Slideshows
You can play back the images on the card as an automatic slideshow.
1. Specify the images to be played back.
To play back all the images on the card, go to step 2.
If you want to specify the images to be played back in the slideshow,filter the images with [ : Set image search conditions] ( ).
2. Select [ : Slide show].
440

3. Set the playback as desired.
Select [Set up].Set the [Display time], [Repeat] (repeated playback), and [Transitioneffect] (effect when changing images) settings for the still photos.To play background music, use [Background music] to select themusic ( ).
After completing the settings, press the < > button.
Display time
Repeat
441

Transition effect
Background music
4. Start the slideshow.
Select [Start].After [Loading image...] is displayed, the slideshow will start.
5. Exit the slideshow.
To exit the slideshow and return to the setting screen, press the< > button.
442

Note
To pause the slideshow, press < >. During pause, [ ] will be displayed in theupper left of the screen. Press < > again to resume the slideshow.During the automatic playback of still photos, you can press the < > button toswitch the display format ( ).Volume during movie playback can be adjusted with the < >< > keys.During auto playback or when playback is paused, you can press the < >< >keys to view other images.During auto playback, auto power off will not take effect.The display time may differ depending on the image.
443

Setting Image Search Conditions
You can filter image display according to your search conditions. After setting the imagesearch conditions, you can play back and display only the found images.You can also protect, rate, play a slideshow, erase, and apply other operations to filteredimages.
1. Select [ : Set image search conditions].
444

2. Set the search conditions.
Use the < >< > keys to select an option.
Set with the < >< > keys or the < > button.
A checkmark [ ] (1) is appended to the left of the option. (Specified asthe search condition.)
If you select the option and press the < > button, the checkmark[ ] will be removed (which cancels the search condition).
Option Description
Rating Displays images with the selected (rating) condition.
Date Displays images taken on the selected shooting date.
Folder Displays images in the selected folder.
Protect Displays images with the selected (protect) condition.
Type of file (1) Displays images of the selected file type.
Type of file (2) Displays digest movies.
3. Apply the search conditions.
Press < > and read the message displayed.Select [OK].The search condition is applied.
445

4. Display the found images.
Press the < > button.Only the images that match the set conditions (filtered) will be playedback.When the images are filtered for display, the screen will have an outeryellow frame (2).
Clearing the Search Conditions
Access the screen in step 2, then press the < > button to clear all the search conditions.
Caution
If no images match the search conditions, < > cannot be pressed in step 3.
Note
Search conditions may be cleared if you perform power, card, or image editingoperations.Auto power off time may be extended while the [ : Set image searchconditions] screen is displayed.
446

Resuming from Previous Playback
1. Select [ : View from last seen].
2. Select an option.
[Enable]: Playback resumes from the last image displayed (unless youhave just finished shooting).[Disable]: Playback resumes from your most recent shot whenever thecamera is restarted.
447

Browsing Images with the Dial
In single-image display, you can turn the < > dial to jump through the images forwardor backward according to the jump method set.
1. Select [ : Image jump w/ ].
2. Select the jump method.
Note
With [Jump images by the specified number], you can turn the< > dial to select the number of images to jump by.
With [Display by image rating], turn the < > dial to selectthe rating ( ). If you browse images with [ ] selected, all therated images will be displayed.
448

3. Browse by jumping.
(1) Jump method(2) Playback position
Press the < > button.
In single-image display, turn the < > dial.You can browse by the jump method set.
Note
To search images by shooting date, select [ : Display by date].To search images by folder, select [ : Display by folder].If the card contains both movies and still photos, select [ : Display movies only]or [ : Display stills only] to display only one or the other.
449

Playback Information Display
You can specify screens and accompanying information displayed during image playback.
1. Select [ : Playback information display].
2. Add a checkmark [ ] next to the number of screens to display.
Use the < >< > keys to select numbers, then press < > to adda checkmark [ ].
Repeat these steps to add a checkmark [ ] to the number of eachscreen to display, then select [OK].
Your selected information can be accessed by pressing the < >button during playback.
450
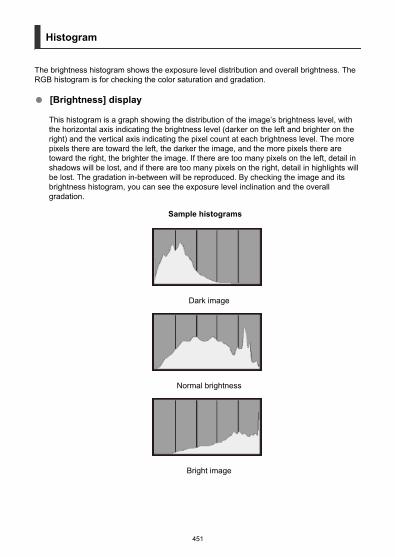
Histogram
The brightness histogram shows the exposure level distribution and overall brightness. TheRGB histogram is for checking the color saturation and gradation.
[Brightness] display
This histogram is a graph showing the distribution of the image’s brightness level, withthe horizontal axis indicating the brightness level (darker on the left and brighter on theright) and the vertical axis indicating the pixel count at each brightness level. The morepixels there are toward the left, the darker the image, and the more pixels there aretoward the right, the brighter the image. If there are too many pixels on the left, detail inshadows will be lost, and if there are too many pixels on the right, detail in highlights willbe lost. The gradation in-between will be reproduced. By checking the image and itsbrightness histogram, you can see the exposure level inclination and the overallgradation.
Sample histograms
Dark image
Normal brightness
Bright image
451

[RGB] display
This histogram is a graph showing the distribution of each primary color’s brightnesslevel in the image (RGB or red, green, and blue), with the horizontal axis indicating thecolor’s brightness level (darker on the left and brighter on the right) and the vertical axisindicating the pixel count at each color brightness level. The more pixels there aretoward the left, the darker and less prominent the color, and the more pixels there aretoward the right, the brighter and denser the color. If there are too many pixels on theleft, the corresponding color information will be lacking, and if there are too many pixelson the right, the color will be too saturated, without gradation. By checking the image’sRGB histogram, you can see the color’s saturation and gradation conditions, as well asthe white balance bias.
452

AF Point Display
You can display the AF points that were used to focus, which will be outlined in red on theplayback screen. If automatic AF point selection is set, multiple AF points may be displayed.
1. Select [ : AF point disp.].
2. Select [Enable].
453

HDMI HDR Output
You can view RAW images in HDR by connecting the camera to an HDR TV.
1. Select [ : HDMI HDR output].
2. Select [On].
Note
Make sure the HDR TV is set up for HDR input. For details on how to switch inputson the TV, refer to the TV manual.Depending on the TV used, images may not look as expected.Some image effects and information may not be displayed on an HDR TV.
454

Wireless Features
This chapter describes how to connect the camera to a smartphone wirelessly viaBluetooth® or Wi-Fi® and send images to devices or Web services, how to control thecamera from a computer or wireless remote control, and other operations.
Caution
ImportantNote that Canon cannot be held liable for any loss or damage caused by erroneouswireless communication settings when using the camera. In addition, Canon cannotbe held liable for any other loss or damage caused by use of the camera.When using wireless communication functions, establish appropriate security atyour own risk and discretion. Canon cannot be held liable for any loss or damagecaused by unauthorized access or other security breaches.
• Tab Menus: Wireless Settings• Wi-Fi/Bluetooth Connection• Connecting to a Smartphone• Connecting to a Computer via Wi-Fi• Connecting to a Printer via Wi-Fi• Sending Images to a Web Service• Streaming Images• Wi-Fi Connection via Access Points• Connecting to a Wireless Remote Control• Reconnecting via Wi-Fi• Registering Multiple Connection Settings• Airplane Mode• Wi-Fi Settings• Bluetooth Settings• Nickname• GPS Settings• Changing or Deleting Connection Settings• Resetting Communication Settings• View Info Screen• Virtual Keyboard Operations• Responding to Error Messages• Wireless Communication Function Precautions• Security• Checking Network Settings
455

• Wireless Communication Status
456
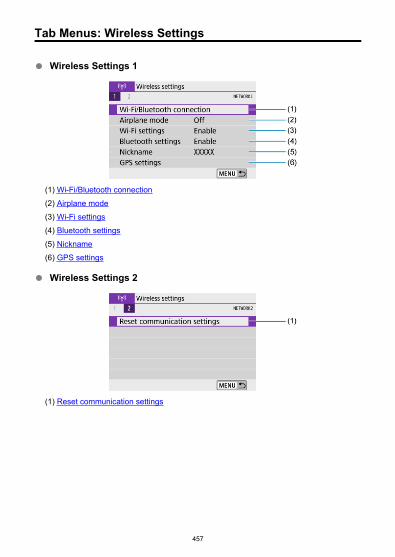
Tab Menus: Wireless Settings
Wireless Settings 1
(1) Wi-Fi/Bluetooth connection(2) Airplane mode(3) Wi-Fi settings(4) Bluetooth settings(5) Nickname(6) GPS settings
Wireless Settings 2
(1) Reset communication settings
457
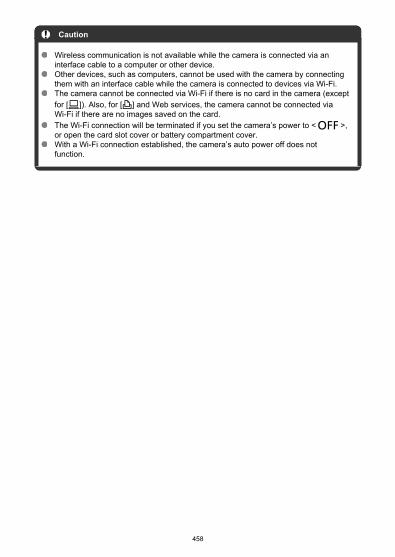
Caution
Wireless communication is not available while the camera is connected via aninterface cable to a computer or other device.Other devices, such as computers, cannot be used with the camera by connectingthem with an interface cable while the camera is connected to devices via Wi-Fi.The camera cannot be connected via Wi-Fi if there is no card in the camera (exceptfor [ ]). Also, for [ ] and Web services, the camera cannot be connected viaWi-Fi if there are no images saved on the card.The Wi-Fi connection will be terminated if you set the camera’s power to < >,or open the card slot cover or battery compartment cover.With a Wi-Fi connection established, the camera’s auto power off does notfunction.
458
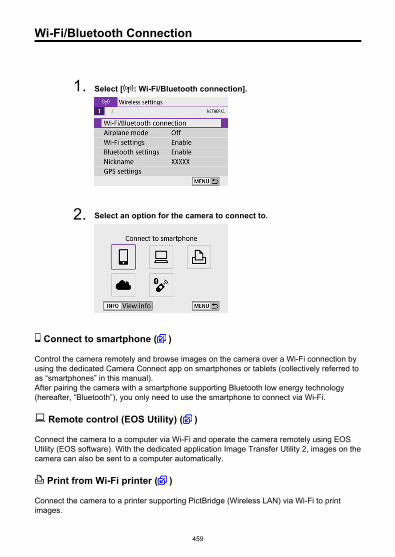
Wi-Fi/Bluetooth Connection
1. Select [ : Wi-Fi/Bluetooth connection].
2. Select an option for the camera to connect to.
Connect to smartphone ( )
Control the camera remotely and browse images on the camera over a Wi-Fi connection byusing the dedicated Camera Connect app on smartphones or tablets (collectively referred toas “smartphones” in this manual).After pairing the camera with a smartphone supporting Bluetooth low energy technology(hereafter, “Bluetooth”), you only need to use the smartphone to connect via Wi-Fi.
Remote control (EOS Utility) ( )
Connect the camera to a computer via Wi-Fi and operate the camera remotely using EOSUtility (EOS software). With the dedicated application Image Transfer Utility 2, images on thecamera can also be sent to a computer automatically.
Print from Wi-Fi printer ( )
Connect the camera to a printer supporting PictBridge (Wireless LAN) via Wi-Fi to printimages.
459

Upload to Web service ( )
Images can be sent directly from the camera to the image.canon cloud service for Canoncustomers after you complete member registration (free of charge). Original files of imagessent to image.canon are retained for 30 days, without storage limitations, and can bedownloaded to computers or transferred to other Web services.
Connect to Wireless Remote ( )
This camera can also be connected to Wireless Remote Control BR-E1 (sold separately) viaBluetooth for remote control shooting.
460

Connecting to a Smartphone
Turning on Bluetooth and Wi-Fi on a Smartphone
Installing Camera Connect on a Smartphone
Connecting to a Bluetooth-Compatible Smartphone via Wi-Fi
Camera Connect Functions
Maintaining a Wi-Fi Connection When the Camera Is Off
Canceling the Pairing
Wi-Fi Connection without Using Bluetooth
Automatic Image Transfer as You Shoot
Sending Images to a Smartphone from the Camera
Terminating Wi-Fi Connections
Settings to Make Images Viewable from Smartphones
You can do the following after pairing the camera with a Bluetooth-compatible smartphone.
Establish a Wi-Fi connection using only the smartphone ( ).Establish a Wi-Fi connection with the camera even when it is off ( ).Geotag images with GPS information acquired by the smartphone ( ).Control the camera remotely from a smartphone ( ).
You can also do the following after connecting the camera to a smartphone via Wi-Fi.
Browse and save images on the camera from a smartphone ( ).Control the camera remotely from a smartphone ( ).Send images to a smartphone from the camera ( ).
461

Turning on Bluetooth and Wi-Fi on a Smartphone
Turn on Bluetooth and Wi-Fi from the smartphone settings screen. Note that pairing with thecamera is not possible from the smartphone’s Bluetooth settings screen.
Note
To establish a Wi-Fi connection via an access point, see Wi-Fi Connection viaAccess Points.
462

Installing Camera Connect on a Smartphone
The dedicated app Camera Connect (free of charge) must be installed on the smartphoneon which Android or iOS is installed.
Use the latest version of the smartphone OS.Camera Connect can be installed from Google Play or App Store. Google Play or AppStore can also be accessed using the QR codes that appear when the camera is pairedor connected via Wi-Fi to a smartphone.
Note
For the operating system versions supported by Camera Connect, refer to thedownload site of Camera Connect.Sample screens and other details in this guide may not match the actual userinterface elements after camera firmware updates or updates to Camera Connect,Android, or iOS.
463

Connecting to a Bluetooth-Compatible Smartphone viaWi-Fi
Steps on the camera (1)
1. Select [ : Wi-Fi/Bluetooth connection].
2. Select [ Connect to smartphone].
3. Select [Add a device to connect to].
464

4. Select an option.
If Camera Connect is already installed, select [Do not display].If Camera Connect is not installed, select [Android] or [iOS], scan thedisplayed QR code with the smartphone to access Google Play or AppStore and install Camera Connect.
465

5. Select [Pair via Bluetooth].
Press < > to start pairing.
To pair with a different smartphone after pairing with one initially, select[OK] on the screen shown above.
466

Steps on the smartphone (1)
6. Start Camera Connect.
7. Tap the camera for pairing.
In Android, go to Steps on the camera (2).
8. Tap [Pair] (iOS only).
467

Steps on the camera (2)
9. Select [OK].
10. Press the < > button.
Pairing is now complete, and the camera is connected to thesmartphone via Bluetooth.
A Bluetooth icon appears on the main Camera Connect screen.
468

Caution
The camera cannot be connected to two or more devices at the same time viaBluetooth. To switch to a different smartphone for the Bluetooth connection, seeChanging or Deleting Connection Settings.Bluetooth connection consumes battery power even after the camera’s auto poweroff is activated. Therefore, the battery level may be low when you use the camera.
Troubleshooting pairingKeeping pairing records for previously paired cameras on your smartphone willprevent it from pairing with this camera. Before you try pairing again, removepairing records for previously paired cameras from your smartphone’s Bluetoothsettings screen.
Note
With a Bluetooth connection established, you can operate the camera to sendimages to the smartphone ( ).
469

Steps on the smartphone (2)
11. Tap a Camera Connect function.
In iOS, tap [Join] when a message is displayed to confirm cameraconnection.For the Camera Connect functions, see Camera Connect Functions.When a Wi-Fi connection is established, the screen for the selectedfunction will appear.
[ Wi-Fi on] is displayed on the camera screen.
The Bluetooth and Wi-Fi icons are lit on the main Camera Connectscreen.
The Wi-Fi connection to a Bluetooth-compatible smartphone is now complete.For how to terminate the Wi-Fi connection, see Terminating Wi-Fi Connections.Terminating the Wi-Fi connection will switch the camera to the Bluetooth connection.To reconnect via Wi-Fi, start Camera Connect and tap the function you will use.
470

[ Wi-Fi on] screen
Disconnect,exitTerminates the Wi-Fi connection.
Confirm set.You can check the settings.
Error detailsWhen a Wi-Fi connection error occurs, you can check the details of the error.
471

Camera Connect Functions
Images on camera
Images can be browsed, deleted, or rated.Images can be saved on a smartphone.Effects can be applied to RAW images from a smartphone (Creative Assist).
Remote live view shooting
Enables remote shooting as you view a live image on the smartphone.
Auto transfer
Enables camera and app setting adjustment for automatic transfer of your shots ( ).
Bluetooth remote controller
Enables remote control of the camera from a smartphone paired via Bluetooth. (Notavailable when connected via Wi-Fi.)Auto power off is disabled while you are using the Bluetooth remote controller feature.
Location information
Not supported on this camera.
Camera settings
Camera settings can be changed.
472
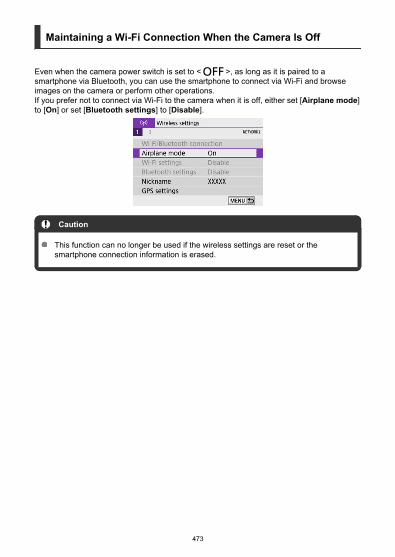
Maintaining a Wi-Fi Connection When the Camera Is Off
Even when the camera power switch is set to < >, as long as it is paired to asmartphone via Bluetooth, you can use the smartphone to connect via Wi-Fi and browseimages on the camera or perform other operations.If you prefer not to connect via Wi-Fi to the camera when it is off, either set [Airplane mode]to [On] or set [Bluetooth settings] to [Disable].
Caution
This function can no longer be used if the wireless settings are reset or thesmartphone connection information is erased.
473

Canceling the Pairing
Cancel pairing with a smartphone as follows.
1. Select [ : Wi-Fi/Bluetooth connection].
2. Select [ Connect to smartphone].
If the history ( ) is displayed, press the < >< > keys to switchthe screen.
3. Select [Edit/delete device].
474

4. Select the smartphone to cancel pairing with.
Smartphones currently paired with the camera are labeled [ ].
5. Select [Delete connection information].
6. Select [OK].
7. Clear the camera information on the smartphone.
In the smartphone’s Bluetooth setting menu, clear the camerainformation registered on the smartphone.
475

Wi-Fi Connection without Using Bluetooth
Steps on the camera (1)
1. Select [ : Wi-Fi/Bluetooth connection].
2. Select [ Connect to smartphone].
If the history ( ) is displayed, press the < >< > keys to switchthe screen.
3. Select [Add a device to connect to].
476
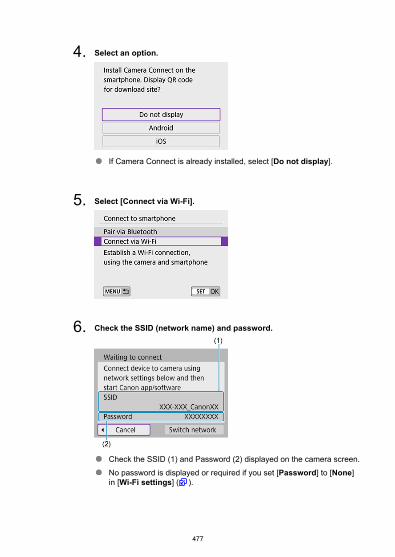
4. Select an option.
If Camera Connect is already installed, select [Do not display].
5. Select [Connect via Wi-Fi].
6. Check the SSID (network name) and password.
Check the SSID (1) and Password (2) displayed on the camera screen.No password is displayed or required if you set [Password] to [None]in [Wi-Fi settings] ( ).
477

Note
By selecting [Switch network] in step 6, you can establish a Wi-Fi connection viaan access point ( ).
478

Steps on the smartphone
7. Operate the smartphone to establish a Wi-Fi connection.
Smartphone’s screen (sample)
Activate the smartphone’s Wi-Fi function, then tap the SSID (networkname) checked in step 6 in Steps on the camera (1).For the password, enter the password checked in step 6 in Steps onthe camera (1).
8. Start Camera Connect and tap the camera to connect to via Wi-Fi.
479

Steps on the camera (2)
9. Select [OK].
To specify viewable images, press the < > button. Configure asdescribed in Settings to Make Images Viewable from Smartphones,starting in step 5.
The main window of Camera Connect will be displayed on thesmartphone.
The Wi-Fi connection to a smartphone is now complete.
Operate the camera using Camera Connect ( ).For how to terminate the Wi-Fi connection, see Terminating Wi-Fi Connections.To reconnect via Wi-Fi, see Reconnecting via Wi-Fi.
Note
When connected via Wi-Fi, you can send images to a smartphone from the QuickControl screen during playback ( ).
480
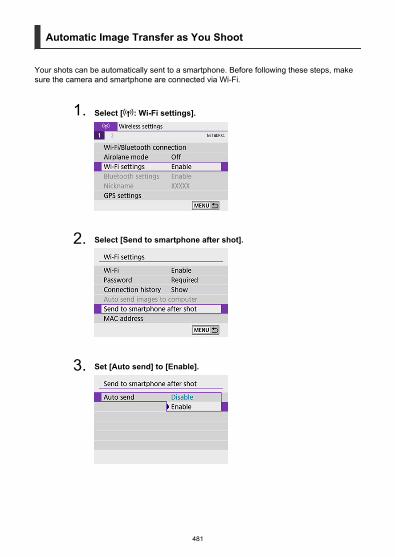
Automatic Image Transfer as You Shoot
Your shots can be automatically sent to a smartphone. Before following these steps, makesure the camera and smartphone are connected via Wi-Fi.
1. Select [ : Wi-Fi settings].
2. Select [Send to smartphone after shot].
3. Set [Auto send] to [Enable].
481

4. Set [Size to send].
5. Take the picture.
482
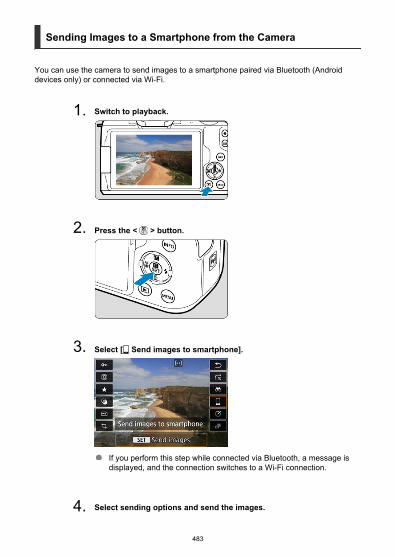
Sending Images to a Smartphone from the Camera
You can use the camera to send images to a smartphone paired via Bluetooth (Androiddevices only) or connected via Wi-Fi.
1. Switch to playback.
2. Press the < > button.
3. Select [ Send images to smartphone].
If you perform this step while connected via Bluetooth, a message isdisplayed, and the connection switches to a Wi-Fi connection.
4. Select sending options and send the images.
483
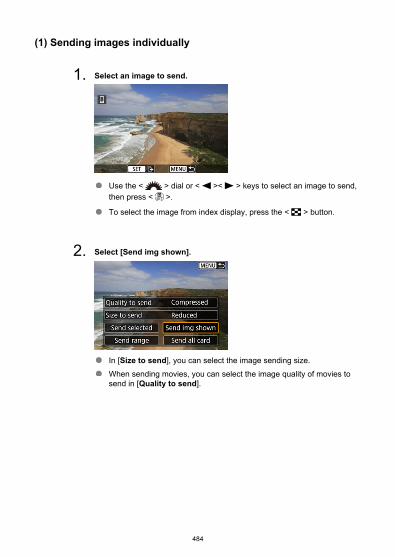
(1) Sending images individually
1. Select an image to send.
Use the < > dial or < >< > keys to select an image to send,then press < >.
To select the image from index display, press the < > button.
2. Select [Send img shown].
In [Size to send], you can select the image sending size.When sending movies, you can select the image quality of movies tosend in [Quality to send].
484

(2) Sending multiple selected images
1. Press < >.
2. Select [Send selected].
485

3. Select images to send.
Use the < > dial or < >< > keys to select an image to send,then press < >.
You can press the < > button to select the images from 3-imagedisplay. To return to the single-image display, press the < > button.
After selecting the images to send, press the < > button.
486

4. Select [Size to send].
On the displayed screen, select an image size.
When sending movies, select the image quality in [Quality to send].
5. Select [Send].
487

(3) Sending a specified range of images
1. Press < >.
2. Select [Send range].
3. Specify the range of images.
Select the first image (start point).Select the last image (end point).To cancel the selection, repeat this step.
You can press the < > button to change the number of imagesshown in the index display.
488
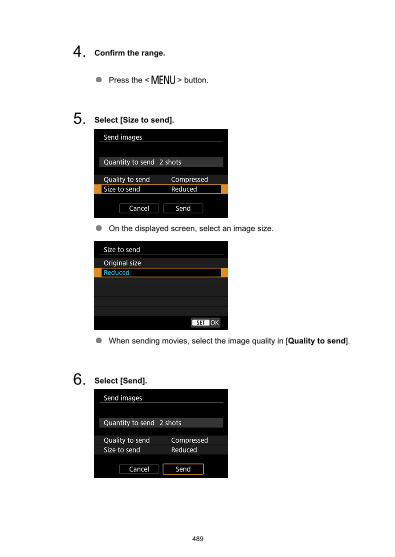
4. Confirm the range.
Press the < > button.
5. Select [Size to send].
On the displayed screen, select an image size.
When sending movies, select the image quality in [Quality to send].
6. Select [Send].
489
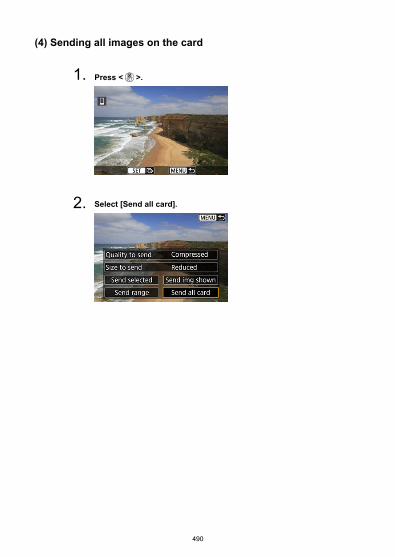
(4) Sending all images on the card
1. Press < >.
2. Select [Send all card].
490

3. Select [Size to send].
On the displayed screen, select an image size.
When sending movies, select the image quality in [Quality to send].
4. Select [Send].
491
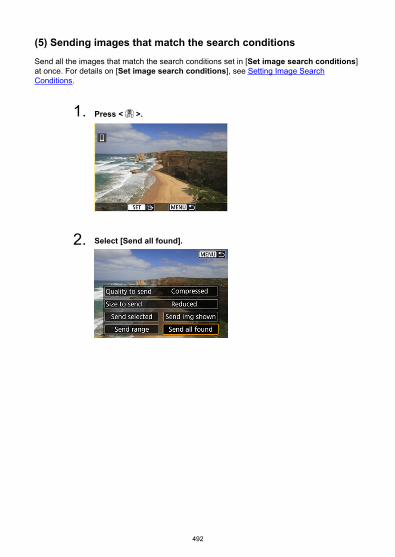
(5) Sending images that match the search conditionsSend all the images that match the search conditions set in [Set image search conditions]at once. For details on [Set image search conditions], see Setting Image SearchConditions.
1. Press < >.
2. Select [Send all found].
492

3. Select [Size to send].
On the displayed screen, select an image size.
When sending movies, select the image quality in [Quality to send].
4. Select [Send].
493

Ending image transferSending images from the camera when paired via Bluetooth (Android devices only)
Press the < > button on the image transfer screen.
Select [OK] to end image transfer and the Wi-Fi connection.
Sending images from the camera over a Wi-Fi connection
Press the < > button on the image transfer screen.To terminate the Wi-Fi connection, see Terminating Wi-Fi Connections.
Caution
During the image transfer operation, a picture cannot be taken even if the camera’sshutter button is pressed.
494

Note
You can cancel the image transfer by selecting [Cancel] during the transfer.You can select up to 999 files at a time.With a Wi-Fi connection established, disabling the smartphone’s power savingfunction is recommended.Selecting the reduced size for still photos applies to all still photos sent at that time.Note that size still photos are not reduced.Selecting compression for movies applies to all movies sent at that time. Note that
and movies are not reduced.When you use a battery to power the camera, make sure it is fully charged.
495

Terminating Wi-Fi Connections
Perform either of the following operations.
On the Camera Connect screen, tap [ ].
On the [ Wi-Fi on] screen, select [Disconnect,exit].
If the [ Wi-Fi on] screen is not displayed, select [ : Wi-Fi/Bluetooth connection].Select [Disconnect,exit], then select [OK] on the confirmation screen.
496

Settings to Make Images Viewable from Smartphones
Images can be specified after the Wi-Fi connection is terminated.
1. Select [ : Wi-Fi/Bluetooth connection].
2. Select [ Connect to smartphone].
If the history ( ) is displayed, press the < >< > keys to switchthe screen.
3. Select [Edit/delete device].
497

4. Select a smartphone.
Select the name of the smartphone on which you want to make theimages viewable.
5. Select [Viewable imgs].
498
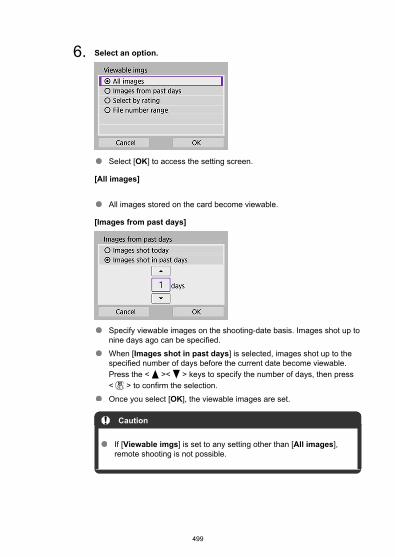
6. Select an option.
Select [OK] to access the setting screen.
[All images]
All images stored on the card become viewable.
[Images from past days]
Specify viewable images on the shooting-date basis. Images shot up tonine days ago can be specified.When [Images shot in past days] is selected, images shot up to thespecified number of days before the current date become viewable.Press the < >< > keys to specify the number of days, then press< > to confirm the selection.Once you select [OK], the viewable images are set.
Caution
If [Viewable imgs] is set to any setting other than [All images],remote shooting is not possible.
499
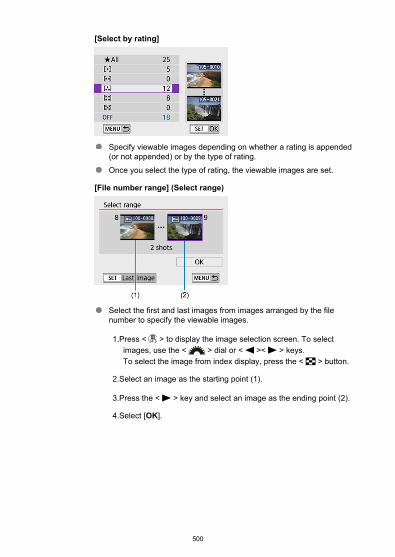
[Select by rating]
Specify viewable images depending on whether a rating is appended(or not appended) or by the type of rating.Once you select the type of rating, the viewable images are set.
[File number range] (Select range)
Select the first and last images from images arranged by the filenumber to specify the viewable images.
1.Press < > to display the image selection screen. To selectimages, use the < > dial or < >< > keys.To select the image from index display, press the < > button.
2.Select an image as the starting point (1).
3.Press the < > key and select an image as the ending point (2).
4.Select [OK].
500

Caution
If the Wi-Fi connection is terminated while recording a movie with remote shooting,the following will occur.
• Any movie recording in progress in movie recording mode will continue.• Any movie recording in progress in still photo shooting mode will end.
With a Wi-Fi connection to a smartphone established, certain functions areunavailable.In remote shooting, the AF speed may become slower.Depending on the communication status, image display or shutter release timingmay be delayed.When saving images to a smartphone, you cannot take a picture even if you pressthe camera’s shutter button. Also, the camera screen may turn off.
Note
With a Wi-Fi connection established, disabling the smartphone’s power savingfunction is recommended.
501

Connecting to a Computer via Wi-Fi
Operating the Camera Using EOS Utility
Sending Images on the Camera Automatically
This section describes how to connect the camera to a computer via Wi-Fi and performcamera operations using EOS software or other dedicated software. Install the latest versionof software on the computer before setting up a Wi-Fi connection.For computer operating instructions, refer to the computer user manual.
Operating the Camera Using EOS Utility
Using EOS Utility (EOS software), you can import images from the camera, control thecamera, and perform other operations.
Steps on the camera (1)
1. Select [ : Wi-Fi/Bluetooth connection].
502
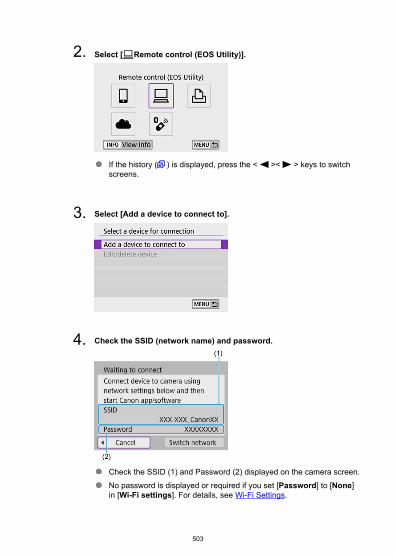
2. Select [ Remote control (EOS Utility)].
If the history ( ) is displayed, press the < >< > keys to switchscreens.
3. Select [Add a device to connect to].
4. Check the SSID (network name) and password.
Check the SSID (1) and Password (2) displayed on the camera screen.No password is displayed or required if you set [Password] to [None]in [Wi-Fi settings]. For details, see Wi-Fi Settings.
503

Steps on the computer (1)
5. Select the SSID, then enter the password.
Computer’s screen (sample)
On the computer’s network setting screen, select the SSID checked instep 4 in Steps on the camera (1).For the password, enter the password checked in step 4 in Steps onthe camera (1).
504
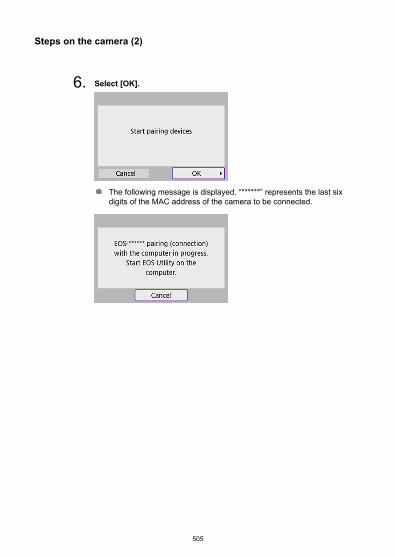
Steps on the camera (2)
6. Select [OK].
The following message is displayed. “******” represents the last sixdigits of the MAC address of the camera to be connected.
505
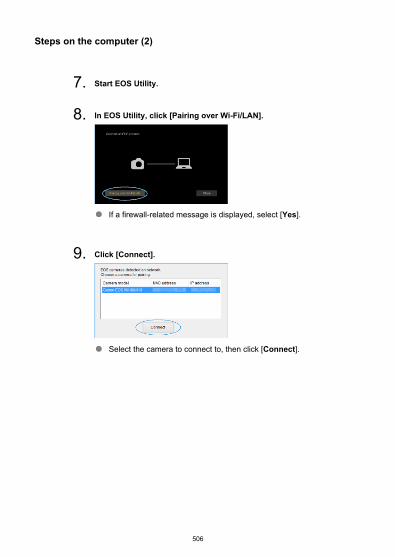
Steps on the computer (2)
7. Start EOS Utility.
8. In EOS Utility, click [Pairing over Wi-Fi/LAN].
If a firewall-related message is displayed, select [Yes].
9. Click [Connect].
Select the camera to connect to, then click [Connect].
506
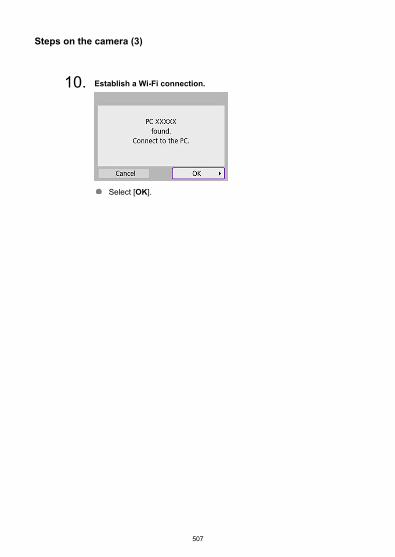
Steps on the camera (3)
10. Establish a Wi-Fi connection.
Select [OK].
507

[ Wi-Fi on] screen
Disconnect,exitTerminates the Wi-Fi connection.
Confirm set.You can check the settings.
Error detailsWhen a Wi-Fi connection error occurs, you can check the details of the error.
The Wi-Fi connection to a computer is now complete.
Operate the camera using EOS Utility on the computer.To reconnect via Wi-Fi, see Reconnecting via Wi-Fi.
Caution
If the Wi-Fi connection is terminated while recording a movie with remote shooting,the following will occur.
• Any movie recording in progress in movie recording mode will continue.• Any movie recording in progress in still photo shooting mode will end.
You cannot use the camera to shoot in still photo shooting mode when it is set tomovie recording mode in EOS Utility.With a Wi-Fi connection to EOS Utility established, certain functions areunavailable.In remote shooting, the AF speed may become slower.Depending on the communication status, image display or shutter release timingmay be delayed.In Remote Live View shooting, the rate of image transmission is slower comparedto a connection via an interface cable. Therefore, moving subjects cannot bedisplayed smoothly.
508

Sending Images on the Camera Automatically
With the dedicated software Image Transfer Utility 2, you can send images on the camera toa computer automatically.
Steps on the computer (1)
1. Connect the computer and access point and start Image TransferUtility 2.
The screen to set up pairing is shown when you follow the instructionsdisplayed the first time Image Transfer Utility 2 starts up.
Steps on the camera (1)
2. Select [Auto send images to computer].
Select [ : Wi-Fi settings].Select [Auto send images to computer].
3. Set [Auto send] to [Enable].
509

4. Select [OK].
5. Connect to an access point via Wi-Fi.
Establish a Wi-Fi connection between the camera and the access pointconnected to the computer. For connection instructions, see Wi-FiConnection via Access Points.
6. Select the computer to pair the camera with.
510

Steps on the computer (2)
7. Pair the camera and computer.
Select the camera, then click [Pairing].
Steps on the camera (2)
8. Select [OK].
9. Select [Image sending options].
511

10. Select what to send.
If you select [Selected imgs] in [Range to send], specify the images tosend on the [Select images to send] screen.After the settings are complete, turn the camera off.
Images on the camera are automatically sent to the active computer when you turn thecamera on within range of the access point.
Caution
If images are not sent automatically, try restarting the camera.
512

Connecting to a Printer via Wi-Fi
Image Printing
Print Settings
This section describes how to print images by directly connecting the camera to a printersupporting PictBridge (Wireless LAN) via Wi-Fi. For printer operating instructions, refer tothe printer user manual.
1. Select [ : Wi-Fi/Bluetooth connection].
2. Select [ Print from Wi-Fi printer].
If the history ( ) is displayed, press the < >< > keys to switchscreens.
513
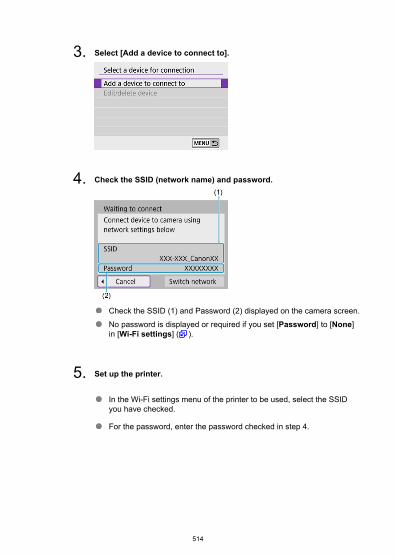
3. Select [Add a device to connect to].
4. Check the SSID (network name) and password.
Check the SSID (1) and Password (2) displayed on the camera screen.No password is displayed or required if you set [Password] to [None]in [Wi-Fi settings] ( ).
5. Set up the printer.
In the Wi-Fi settings menu of the printer to be used, select the SSIDyou have checked.
For the password, enter the password checked in step 4.
514
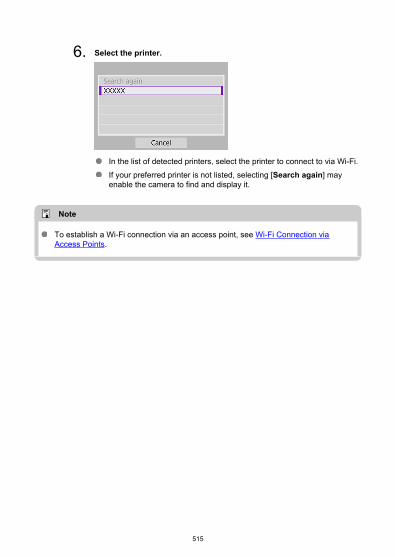
6. Select the printer.
In the list of detected printers, select the printer to connect to via Wi-Fi.If your preferred printer is not listed, selecting [Search again] mayenable the camera to find and display it.
Note
To establish a Wi-Fi connection via an access point, see Wi-Fi Connection viaAccess Points.
515

Image Printing
Printing images individually
1. Select the image to be printed.
Use the < > dial or < >< > keys to select an image to print,then press < >.
To select the image from index display, press the < > button.
2. Select [Print image].
516

3. Print the image.
For the print setting procedures, see Print Settings.Select [Print], then [OK] to start printing.
517

Printing according to specified image options
1. Press < >.
2. Select [Print order].
3. Set the printing options.
For the print setting procedures, see Print Ordering (DPOF).If the print order is complete before establishing a Wi-Fi connection, goto step 4.
518

4. Select [Print].
[Print] can be selected only when an image is selected and the printeris ready to print.
5. Configure [Paper settings] ( ).
6. Print the image.
When [OK] is selected, printing starts.
Caution
Shooting is not possible while connected to a printer via Wi-Fi.Movies cannot be printed.Before printing, be sure to set the paper size.File number printing may not be supported by certain printers.Dates may be printed on the border by certain printers when [Bordered] is set.Depending on the printer, the date may appear faint if it is printed on a brightbackground or on the border.RAW images cannot be printed by selecting [Print order]. Print by selecting [Printimage].
519

Note
When you use a battery to power the camera, make sure it is fully charged.It may take some time until printing starts after you select [Print], depending on filesize and image quality.To stop printing, press < > while [Cancel] is displayed, then select [OK].When printing with [Print order], you can select [Resume] to continue printing theremaining images if you have stopped printing in progress. Note that printing willnot resume if any of the following occurs.
• You change the print order or delete any of the specified images beforeresuming printing.
• When index is set and you change the paper setting before resuming printing.If a problem occurs during printing, see Notes.
520

Print Settings
The screen display and setting options vary depending on the printer. Also, certainsettings may not be available. For details, refer to the printer’s instruction manual.
Print settings screen
(1) Sets date or file number printing ( ).(2) Sets the printing effects ( ).(3) Sets the number of copies to print ( ).(4) Sets the print area ( ).(5) Sets the paper size, type, and layout ( , , ).(6) Returns to the image selection screen.(7) Starts the printing.(8) The paper size, type, and layout you have set are displayed.
* Depending on the printer, certain settings may not be selectable.
521

Paper settings
Select [Paper settings].
[ ] Setting the paper size
Select the size of the paper in the printer.
522

[ ] Setting the paper type
Select the type of the paper in the printer.
[ ] Setting the page layout
Select the page layout.
Caution
If the image’s aspect ratio is different from the printing paper’s aspect ratio, theimage may be cropped significantly when you print it as a borderless print. Imagesmay also be printed at lower resolution.
[ ] Setting printing of the date/file number
Select [ ].Select what to print.
523

[ ] Setting printing effects (image optimization)
Select [ ].Select printing effects.
Caution
ISO speeds may be misidentified in shooting information printed for images shot atan expanded ISO speed (H).[Default] in printing effects and other options refers to default settings determinedby the printer manufacturer. For [Default] details, refer to the printer instructionmanual.
[ ] Setting the number of copies
Select [ ].Select the number of copies to print.
524

Cropping the imageSet cropping immediately before printing. Changing other print settings after you cropimages may require you to crop the images again.
1. Select [Cropping] on the print setting screen.
2. Set the cropping frame size, position, and aspect ratio.
The image area within the cropping frame will be printed. The shape ofthe frame (aspect ratio) can be changed in [Paper settings].
Resizing the cropping frame sizePress the < > or < > button to resize the cropping frame.
Moving the cropping framePress the < >< >< >< > keys to move the frame vertically orhorizontally.
Switching the orientation of the cropping framePressing the < > button will toggle the cropping frame between thevertical and horizontal orientations.
3. Press < > to exit the cropping.
You can check the cropped image area in the upper left of the printsetting screen.
525

Caution
Depending on the printer, the cropped image area may not be printed as youspecified.The smaller the cropping frame, the lower the resolution at which images areprinted.
Note
Handling printer errorsIf printing does not resume after you resolve a printer error (such as no ink orpaper) and select [Continue], use buttons on the printer. For details on resumingprinting, refer to the printer’s instruction manual.
Error messagesIf a problem occurs during printing, an error message will appear on the camerascreen. After fixing the problem, resume printing. For details on how to fix a printingproblem, refer to the printer’s instruction manual.
Paper errorConfirm that paper is loaded correctly.
Ink errorCheck the printer’s ink level and the waste ink tank.
Hardware errorCheck for any printer problems other than paper and ink problems.
File errorThe selected image cannot be printed. Images taken with a different camera orimages edited with a computer may not be printable.
526

Sending Images to a Web Service
Registering Image.Canon
Sending Images
This section describes how to send images to image.canon.
Registering Image.Canon
Link the camera to image.canon to send images directly from the camera.
A computer or smartphone with a browser and internet connection is required.You will need to enter an email address used on your computer or smartphone.For instructions on how to use image.canon services and details on countries andregions where it is available, visit the image.canon site (https://image.canon/).Separate ISP connection and access point fees may apply.
Steps on the camera (1)
1. Select [ : Wi-Fi/Bluetooth connection].
2. Select [ Upload to Web service].
527

3. Select [I Agree].
4. Establish a Wi-Fi connection.
Connect to an access point via Wi-Fi. Go to step 6 in Wi-Fi Connectionvia Access Points.
5. Enter your email address.
Enter your email address, then select [OK].
528

6. Enter a four-digit number.
Enter a four-digit number of your choice, then select [OK].
7. Select [OK].
The [ ] icon changes to [ ].
529

Steps on the computer or smartphone
8. Set up camera web link.
Access the page in the notification message.
Follow the instructions to complete the settings on the camera web linksettings page.
530

Steps on the camera (2)
9. Add “image.canon” as a destination.
Select [ ].image.canon is now added.
531

Sending Images
Images can be sent to image.canon. Original files of images sent to image.canon areretained for 30 days, without storage limitations, and can be downloaded to computers ortransferred to other Web services.
Connecting to image.canon via Wi-Fi
1. Select [ : Wi-Fi/Bluetooth connection].
2. Select image.canon.
If the history ( ) is displayed, press the < >< > keys to switchscreens.
532

Sending images individually
1. Select an image to send.
Use the < > dial or < >< > keys to select an image to send,then press < >.
To select the image from index display, press the < > button.
2. Select [Send img shown].
In [Size to send], you can select the image sending size.On the screen after images are sent, select [OK] to end the Wi-Ficonnection.
533

Sending multiple selected images
1. Press < >.
2. Select [Send selected].
3. Select images to send.
Use the < > dial or < >< > keys to select an image to send,then press < >.
You can press the < > button to select the image from 3-imagedisplay. To return to the single-image display, press the < > button.
534

4. Select [Size to send].
On the displayed screen, select an image size.
5. Select [Send].
On the screen after images are sent, select [OK] to end the Wi-Ficonnection.
535

Sending a specified range of imagesSpecify the range of images to send all the images in the range at once.
1. Press < >.
2. Select [Send range].
3. Specify the range of images.
Select the first image (start point).Select the last image (end point).Images will be selected and [ ] will appear.To cancel the selection, repeat this step.
You can press the < > button to change the number of imagesshown in the index display.
536

4. Confirm the range.
Press the < > button.
5. Select [Size to send].
On the displayed screen, select an image size.
6. Select [Send].
On the screen after images are sent, select [OK] to end the Wi-Ficonnection.
537

Sending all images on the card
1. Press < >.
2. Select [Send all card].
538

3. Select [Size to send].
On the displayed screen, select an image size.
4. Select [Send].
On the screen after images are sent, select [OK] to end the Wi-Ficonnection.
539

Sending images that match the search conditionsSend all the images that match the search conditions set in [Set image search conditions]at once. For details on [Set image search conditions], see Setting Image SearchConditions.
1. Press < >.
2. Select [Send all found].
540

3. Select [Size to send].
On the displayed screen, select an image size.
4. Select [Send].
On the screen after images are sent, select [OK] to end the Wi-Ficonnection.
Caution
Shooting is not possible when connected via Wi-Fi to image.canon, even if youpress the camera’s shutter button.
541

Note
It may not be possible to send certain images with [Send range], [Send all card],or [Send all found].When you reduce the image size, all images to be sent at the same time areresized. Note that movies or size still photos are not reduced.[Reduced] only applies to still photos shot with cameras of the same model as thisone. Still photos shot with other models are sent without resizing.A record of sent images can be checked when you access image.canon.When you use a battery to power the camera, make sure it is fully charged.
542

Streaming Images
Preparing to Stream
Live Streaming
You can live-stream images from the camera.Only when streaming, you can use Wireless Remote Control BR-E1 (sold separately). Notethat before streaming, you will need to pair the camera with Wireless Remote Control BR-E1( ).
Caution
Check the YouTube streaming requirements in advance on the YouTube site.
Preparing to Stream
Set up [Live streaming] on the camera to enable streaming from the camera.
Register the camera for image.canon and complete camera link settings as described inRegistering Image.Canon.Complete the required streaming settings on the YouTube site.For instructions, visit the YouTube site.
Steps on the computer or smartphone
1. Enable YouTube streaming.
Display the settings screen for connected Web services used withimage.canon.
Next to [YouTube], click or tap [Connect].
Sign in to YouTube and allow image.canon access.
543

Steps on the camera
2. Select [ ].
A [Live streaming] icon is added.
544

Caution
StreamingYouTube is the only streaming service supported by this camera.Before you can use streaming services, you must complete image.canonregistration.YouTube streaming is subject to change, suspension, or termination without priornotice.Canon is in no way responsible for third-party services such as YouTubestreaming.No image is recorded to the card during streaming (but a card must be in thecamera).Images are streamed at approx. 6 Mbps for either (NTSC) or (PAL).Images are streamed horizontally, regardless of the [ : Add rotate info]setting.Audio may be noisy during streaming. Check for noisy audio in advance by using[PRVW] ( ), for example. If noise from the external microphone is distracting, tryplacing it on the left side of the camera (on the < > external microphone INterminal side) as far from the camera as possible.It is not possible to pair the camera with Wireless Remote Control BR-E1 (soldseparately, ) after you have set up streaming.Wireless Remote Control BR-E1 cannot be used while connected to the camera viaWi-Fi unless you are streaming.Remote control from a smartphone is not possible during streaming.
545

Live Streaming
You can also stream by using the camera to select an event that you have set up in advanceon the YouTube site (by entering the streaming time and title).
1. Complete event settings on the YouTube site.
For instructions, visit the YouTube site.
2. Set the Mode dial to < >.
You can select the movie recording mode ([Movie auto exposure] or[Movie manual exp.], which can be set in < > → [Shooting mode]).
3. Start streaming.
Press the < > button, then select [Live streaming].
Also available from the [ : Wi-Fi/Bluetooth connection] screen.
If the history ( ) is displayed, press the < >< > keys to switchscreens.
546
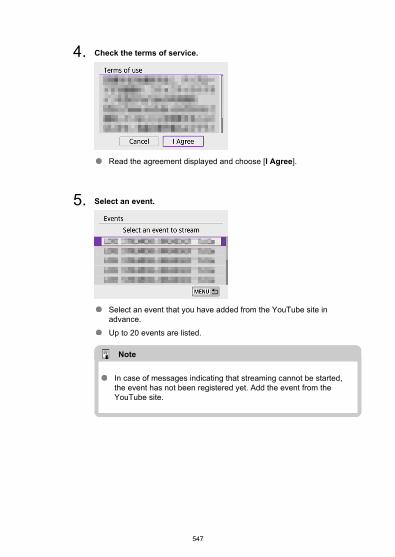
4. Check the terms of service.
Read the agreement displayed and choose [I Agree].
5. Select an event.
Select an event that you have added from the YouTube site inadvance.Up to 20 events are listed.
Note
In case of messages indicating that streaming cannot be started,the event has not been registered yet. Add the event from theYouTube site.
547

6. Check the streaming details.
Select [OK].
7. Select [OK].
8. Select [PRVW] or [LIVE].
Selecting [PRVW] (Preview) enables you to test streaming withoutreleasing images publicly. Useful for checking images beforestreaming.Selecting [LIVE] (Live) enables you to start streaming immediately.
548

9. Start previewing or streaming.
Configure recording features, just as in normal movie recording.When ready, press the movie shooting button.Previewing or streaming starts automatically after [Preparing preview]or [Preparing to stream] is displayed.
[ PRVW] or [ LIVE] is displayed in the upper right during previewingor streaming, respectively.The time that has elapsed since you pressed the movie shooting buttonis shown on the previewing/streaming screen (1). For streaming, thenumber of viewers is also indicated (2).Check the YouTube site to see how the streamed image looks.
10. Stop previewing or streaming.
Press the movie shooting button again to stop previewing or streaming.
After previewing the image, return to step 8 and select [LIVE] to startstreaming.
549

11. Exit streaming mode.
Press the < > button, then select [OK].
Caution
It will take a moment before streaming begins in step 9. Do not operate the camerawhile the message is displayed.In case of display problems (character corruption) on the camera for text youentered on the YouTube site, enter the text again from the YouTube site in ASCIIformat (single-byte letters or numbers).
550

Wi-Fi Connection via Access Points
Camera Access Point Mode
Manual IP Address Setup
This section describes how to join a Wi-Fi network via an access point compatible with WPS(PBC mode).First, check the position of the WPS button and how long to press it. It may take approx. 1min. to establish a Wi-Fi connection.
1. Select [ : Wi-Fi/Bluetooth connection].
2. Select an option.
If the history ( ) is displayed, press the < >< > keys to switchscreens.
551

3. Select [Add a device to connect to].
The following message is displayed if you have selected [ Connectto smartphone]. If Camera Connect is already installed, select [Do notdisplay].
On the [Connect to smartphone] screen displayed next, select[Connect via Wi-Fi].
4. Select [Switch network].
Displayed when [ ], [ ], or [ ] is selected.
552

5. Select [Connect with WPS].
Note
For [Camera access point mode] displayed in step 5, seeCamera Access Point Mode.
6. Select [WPS (PBC mode)].
Select [OK].
553

7. Connect to the access point via Wi-Fi.
Press the access point’s WPS button.Select [OK].
8. Select [Auto setting].
Select [OK] to access the setting screen for the Wi-Fi function.If an error occurs with [Auto setting], see Manual IP Address Setup.
554
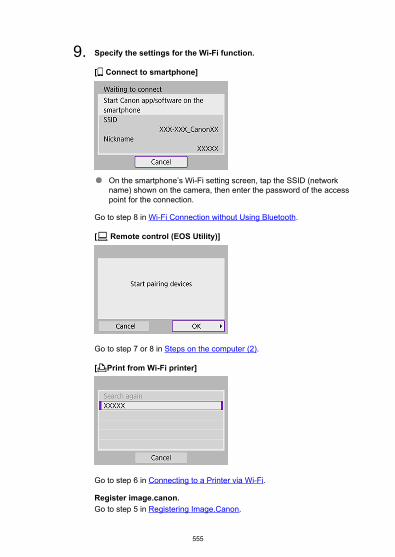
9. Specify the settings for the Wi-Fi function.
[ Connect to smartphone]
On the smartphone’s Wi-Fi setting screen, tap the SSID (networkname) shown on the camera, then enter the password of the accesspoint for the connection.
Go to step 8 in Wi-Fi Connection without Using Bluetooth.
[ Remote control (EOS Utility)]
Go to step 7 or 8 in Steps on the computer (2).
[ Print from Wi-Fi printer]
Go to step 6 in Connecting to a Printer via Wi-Fi.
Register image.canon.Go to step 5 in Registering Image.Canon.
555

Camera Access Point Mode
Camera access point mode is a connection mode for connecting the camera directly to eachdevice via Wi-Fi. Displayed when [ ], [ ], or [ ] is selected after [ : Wi-Fi/Bluetoothconnection].
556
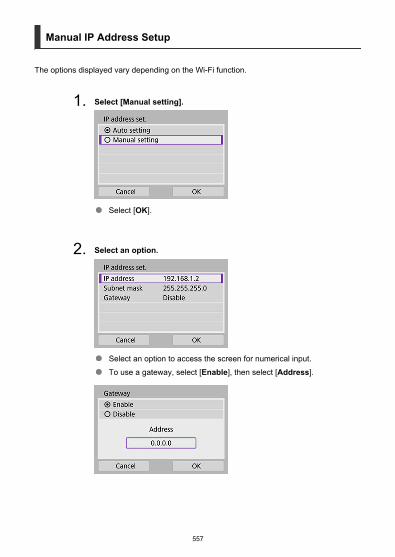
Manual IP Address Setup
The options displayed vary depending on the Wi-Fi function.
1. Select [Manual setting].
Select [OK].
2. Select an option.
Select an option to access the screen for numerical input.To use a gateway, select [Enable], then select [Address].
557

3. Enter the desired values.
Turn the < > dial to move the input position in the upper area, anduse the < >< > keys to select numbers to enter. Press < > toenter the selected number.
To delete the number just entered, press the < > button.Select [OK] after the numbers have been entered. Display returns tothe screen in step 2.
4. Select [OK].
When you have completed setting the necessary items, select [OK].If you are not sure what to enter, see Checking Network Settings, orask the network administrator or another person knowledgeable aboutthe network.
558

Connecting to a Wireless Remote Control
This camera can also be connected to Wireless Remote Control BR-E1 (sold separately, )via Bluetooth for remote control shooting.
1. Select [ : Wi-Fi/Bluetooth connection].
2. Select [ Connect to Wireless Remote].
3. Select [Add a device to connect to].
559

4. Pair the devices.
When the [Pairing] screen appears, press and hold the <W> and <T>buttons on the BR-E1 simultaneously for at least 3 sec.After a message confirms that the camera is paired with the BR-E1,press < >.
5. Set up the camera for remote shooting.
When shooting still photos, select [ ] or [ ] as the drive mode ( ).
For movie recording, set [ : Remote control] to [Enable].
For instructions after the pairing is complete, refer to the BR-E1’sInstruction Manual.
Caution
Bluetooth connections consume battery power even after the camera’s auto poweroff is activated.
Note
When you will not use Bluetooth, setting this function to [Disable] in step 1 isrecommended.
560

Canceling the Pairing
Before pairing with a different BR-E1, clear the information about the connected remotecontrol.
1. Select [ : Wi-Fi/Bluetooth connection].
2. Select [ Connect to Wireless Remote].
3. Select [Delete connection information].
561

4. Select [OK].
562

Reconnecting via Wi-Fi
Follow these steps to reconnect to devices or Web services with registered connectionsettings.
1. Select [ : Wi-Fi/Bluetooth connection].
2. Select an option.
Select an option to connect to via Wi-Fi from the displayed history. Ifthe option is not shown, press the < >< > keys to switch screens.The history is not displayed when [Connection history] is set to [Hide]( ).
563
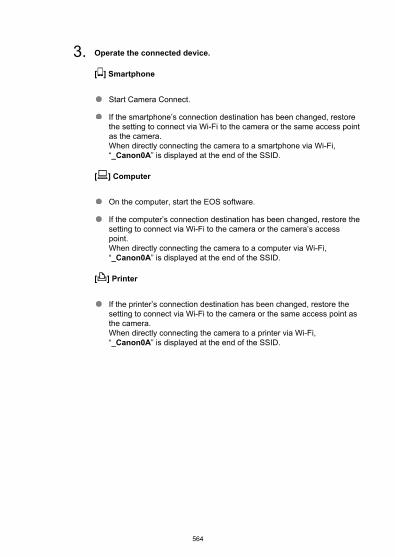
3. Operate the connected device.
[ ] Smartphone
Start Camera Connect.
If the smartphone’s connection destination has been changed, restorethe setting to connect via Wi-Fi to the camera or the same access pointas the camera.When directly connecting the camera to a smartphone via Wi-Fi,“_Canon0A” is displayed at the end of the SSID.
[ ] Computer
On the computer, start the EOS software.
If the computer’s connection destination has been changed, restore thesetting to connect via Wi-Fi to the camera or the camera’s accesspoint.When directly connecting the camera to a computer via Wi-Fi,“_Canon0A” is displayed at the end of the SSID.
[ ] Printer
If the printer’s connection destination has been changed, restore thesetting to connect via Wi-Fi to the camera or the same access point asthe camera.When directly connecting the camera to a printer via Wi-Fi,“_Canon0A” is displayed at the end of the SSID.
564

Registering Multiple Connection Settings
You can register up to 10 connection settings for the wireless communication functions.
1. Select [ : Wi-Fi/Bluetooth connection].
2. Select an option.
If the history ( ) is displayed, switch screens with the < >< >keys.
For details on [ Connect to smartphone], see Connecting to aSmartphone.
For details on [ Remote control (EOS Utility)], see Connecting to aComputer via Wi-Fi.
For details on [ Print from Wi-Fi printer], see Connecting to aPrinter via Wi-Fi.When sending images to a Web service, see Sending Images to a WebService.
Note
To delete connection settings, see Changing or Deleting Connection Settings.
565

Airplane Mode
You can temporarily disable Wi-Fi and Bluetooth functions.
1. Select [ : Airplane mode].
2. Set to [On].
[ ] is displayed on the screen.
Note
[ ] may not be displayed in still photo shooting, movie recording, or playback,depending on display settings. If it is not displayed, press the < > buttonrepeatedly to access detailed information display.
566

Wi-Fi Settings
1. Select [ : Wi-Fi settings].
567

2. Select an option.
Wi-FiWhen the use of electronic devices and wireless devices is prohibited,such as on board airplanes or in hospitals, set it to [Disable].
PasswordSet to [None] to allow Wi-Fi connections without a password (exceptwhen connecting to an access point via Wi-Fi).
Connection historyYou can set the connection history for devices connected via Wi-Fi to[Show] or [Hide].
Auto send images to computerWith the dedicated software Image Transfer Utility 2, you can sendimages on the camera to a computer automatically ( ).
Send to smartphone after shotImages can be transferred to a smartphone automatically ( ).
MAC addressYou can check the MAC address of the camera.
568

Bluetooth Settings
1. Select [ : Bluetooth settings].
2. Select an option.
BluetoothIf you will not use the Bluetooth function, select [Disable].
Check connection informationYou can check the name and communication status of the paireddevice.
Bluetooth addressYou can check the camera’s Bluetooth address.
569

Nickname
You can change the camera nickname (displayed on smartphones and other cameras) asneeded.
1. Select [ : Nickname].
2. Enter text using the Virtual Keyboard Operations.
When you finish entering characters, press the < > button.
570

GPS Settings
GPS via Mobile
GPS Connection Display
GPS via Mobile
You can geotag images with a Bluetooth enabled smartphone.Complete these settings after installing the dedicated Camera Connect app ( ) on thesmartphone.
1. On the smartphone, activate location services.
2. Establish a Bluetooth connection.
Start Camera Connect and pair the camera and smartphone viaBluetooth.
3. Select [ : GPS settings].
571
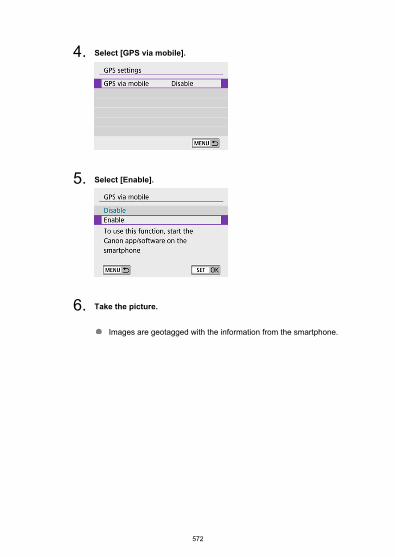
4. Select [GPS via mobile].
5. Select [Enable].
6. Take the picture.
Images are geotagged with the information from the smartphone.
572

GPS Connection Display
You can check the status of smartphone location information acquisition in the GPSconnection icon on the screens for still photo shooting or movie recording ( and ,respectively).
Gray: Location services are offBlinking: Location information cannot be acquiredOn: Location information acquired
Geotagging images as you shoot
Images you shoot while the GPS icon is on are geotagged.
Geotagging information
You can check the location information added to your shots on the shooting informationscreen ( ).
(1) Latitude(2) Longitude(3) Elevation(4) UTC (Coordinated Universal Time)
573

Caution
The smartphone can acquire location information only while it is paired with thecamera via Bluetooth.Direction information is not acquired.Acquired location information may not be accurate, depending on travelingconditions or smartphone status.It may take some time to acquire location information from the smartphone afteryou turn the camera on.Location information is no longer acquired after any of the following operations.
• Pairing with a wireless remote control via Bluetooth• Turning the camera off• Quitting Camera Connect• Deactivating location services on the smartphone
Location information is no longer acquired in any of the following situations.• The camera power turns off• The Bluetooth connection is ended• The smartphone’s remaining battery level is low
Note
Coordinated Universal Time, abbreviated as UTC, is essentially the same asGreenwich Mean Time.For movies, the GPS information initially acquired is added.
574

Changing or Deleting Connection Settings
To change or delete the connection settings, terminate the Wi-Fi connection first.
1. Select [ : Wi-Fi/Bluetooth connection].
2. Select an option.
If the history ( ) is displayed, press the < >< > keys to switchthe screen.
3. Select [Edit/delete device].
You can change the Bluetooth connection by selecting a smartphonelabeled with [ ] in gray. After the [Connect to smartphone] screen isdisplayed, select [Pair via Bluetooth], then press < > on the nextscreen.
575
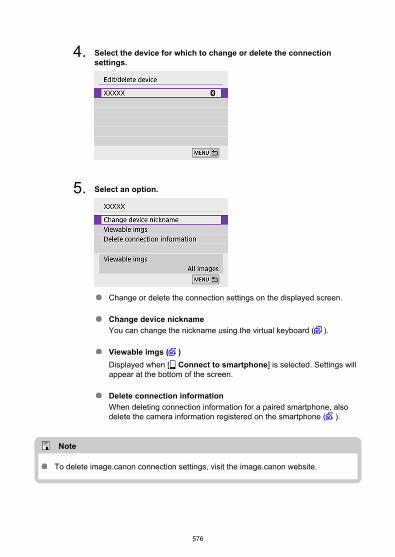
4. Select the device for which to change or delete the connectionsettings.
5. Select an option.
Change or delete the connection settings on the displayed screen.
Change device nicknameYou can change the nickname using the virtual keyboard ( ).
Viewable imgs ( )Displayed when [ Connect to smartphone] is selected. Settings willappear at the bottom of the screen.
Delete connection informationWhen deleting connection information for a paired smartphone, alsodelete the camera information registered on the smartphone ( ).
Note
To delete image.canon connection settings, visit the image.canon website.
576
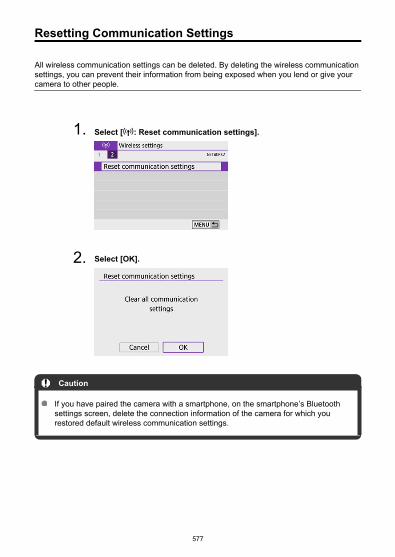
Resetting Communication Settings
All wireless communication settings can be deleted. By deleting the wireless communicationsettings, you can prevent their information from being exposed when you lend or give yourcamera to other people.
1. Select [ : Reset communication settings].
2. Select [OK].
Caution
If you have paired the camera with a smartphone, on the smartphone’s Bluetoothsettings screen, delete the connection information of the camera for which yourestored default wireless communication settings.
577

View Info Screen
You can check error details and the camera’s MAC address.
1. Select [ : Wi-Fi/Bluetooth connection].
2. Press the < > button.
The [View info] screen will appear.
When an error has occurred, press < > to display the error content.
578

Virtual Keyboard Operations
(1) Input area, for entering text(2) Cursor keys, for moving in the input area(3) Current no. of characters/no. available(4) Keyboard(5) Switch input modes(6) Space(7) Delete a character in the input area(8) Exit input
To move the cursor within (1), you can also turn the < > dial.To move between (2) and (4)–(7), use the < >< >< >< > keys.Press < > to confirm input or when switching input modes.
579

Responding to Error Messages
When an error occurs, display the details of the error by following one of the proceduresbelow. Then, eliminate the cause of the error by referring to the examples shown in thischapter.
On the [View info] screen, press < >.Select [Error details] on the [Wi-Fi on].
11 12
21 22 23
61 63 64 65 66 67 68 69
91
121 125 126 127
130 131 132 133 134 135
141 142
151 152
Note
When an error occurs, [Err**] is displayed in the upper right of the [Wi-Fi/Bluetooth connection] screen. It disappears when the camera’s power is set to< >.
580
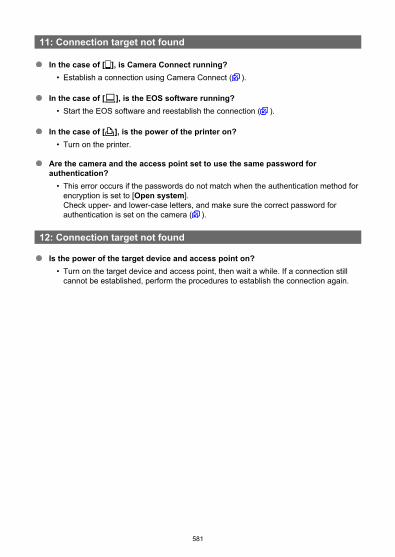
11: Connection target not found
In the case of [ ], is Camera Connect running?• Establish a connection using Camera Connect ( ).
In the case of [ ], is the EOS software running?• Start the EOS software and reestablish the connection ( ).
In the case of [ ], is the power of the printer on?• Turn on the printer.
Are the camera and the access point set to use the same password forauthentication?
• This error occurs if the passwords do not match when the authentication method forencryption is set to [Open system].Check upper- and lower-case letters, and make sure the correct password forauthentication is set on the camera ( ).
12: Connection target not found
Is the power of the target device and access point on?• Turn on the target device and access point, then wait a while. If a connection still
cannot be established, perform the procedures to establish the connection again.
581

21: No address assigned by DHCP server
What to check on the camera
On the camera, IP address is set to [Auto setting]. Is this the correct setting?• If no DHCP server is used, specify the settings after setting the IP address to
[Manual setting] on the camera ( ).
What to check on the DHCP server
Is the power of the DHCP server on?• Turn on the DHCP server.
Are there enough addresses for assignment by the DHCP server?• Increase the number of addresses assigned by the DHCP server.• Remove devices assigned addresses by the DHCP server from the network to
reduce the number of addresses in use.
Is the DHCP server working correctly?• Check the DHCP server settings to make sure it is working correctly as a DHCP
server.• If applicable, ask your network administrator to ensure the DHCP server is available.
582

22: No response from DNS server
What to check on the camera
On the camera, does the DNS server’s IP address setting match the server’sactual address?
• Set the IP address to [Manual setting], and on the camera, specify the same IPaddress as the DNS server used ( ).
What to check on the DNS server
Is the power of the DNS server on?• Turn on the DNS server.
Are the DNS server settings for IP addresses and the corresponding namescorrect?
• On the DNS server, make sure IP addresses and the corresponding names areentered correctly.
Is the DNS server working correctly?• Check the DNS server settings to make sure it is working correctly as a DNS server.• If applicable, ask your network administrator to ensure the DNS server is available.
What to check on the network as a whole
Does the network that you are trying to connect to via Wi-Fi include a router orsimilar device that serves as a gateway?
• If applicable, ask your network administrator for the network gateway address andset it on the camera ( , ).
• Make sure that the gateway address setting is correctly entered on all networkdevices including the camera.
583

23: Device with same IP address exists on selected network
What to check on the camera
Do the camera and another device connected via Wi-Fi to the same network havethe same IP address?
• Change the camera’s IP address to avoid using the same address as anotherdevice on the network. Otherwise, change the IP address of the device that has aduplicate address.
• If the camera’s IP address is set to [Manual setting] in network environments usinga DHCP server, change the setting to [Auto setting] ( ).
Note
Responding to error messages 21–23Also check the following points when responding to errors numbered 21–23.Are the camera and the access point set to use the same password forauthentication?
• This error occurs if the passwords do not match when the authenticationmethod for encryption is set to [Open system]. Check upper- and lower-caseletters, and make sure the correct password for authentication is set on thecamera ( ).
584

61: Selected SSID wireless LAN network not found
Are any obstacles blocking the line of sight between the camera and the antennaof the access point?
• Move the antenna of the access point to a position clearly visible from the point ofview of the camera ( ).
What to check on the camera
Does the SSID set on the camera match that of the access point?• Check the SSID at the access point, then set the same SSID on the camera.
What to check at the access point
Is the access point turned on?• Turn on the power of the access point.
If filtering by MAC address is active, is the MAC address of the camera in useregistered at the access point?
• Register the MAC address of the camera used to the access point. The MACaddress can be checked on the [View info] screen ( ).
63: Wireless LAN authentication failed
Are the camera and the access point set to use the same authentication method?• The camera supports the following authentication methods: [Open system],
[Shared key], and [WPA/WPA2-PSK].
Are the camera and the access point set to use the same password forauthentication?
• Check upper- and lower-case letters, and make sure the correct password forauthentication is set on the camera.
If filtering by MAC address is active, is the MAC address of the camera in useregistered at the access point?
• Register the MAC address of the camera used to the access point. The MACaddress can be checked on the [View info] screen ( ).
585

64: Cannot connect to wireless LAN terminal
Are the camera and the access point set to use the same encryption method?• The camera supports the following encryption methods: WEP, TKIP, and AES.
If filtering by MAC address is active, is the MAC address of the camera in useregistered at the access point?
• Register the MAC address of the camera used to the access point. The MACaddress can be checked on the [View info] screen ( ).
65: Wireless LAN connection lost
Are any obstacles blocking the line of sight between the camera and the antennaof the access point?
• Move the antenna of the access point to a position clearly visible from the point ofview of the camera.
The Wi-Fi connection was lost for some reason, and the connection cannot berestored.
• The following are possible reasons: excessive access to the access point fromanother device, a microwave oven or similar appliance in use nearby (interferingwith IEEE 802.11b/g/n (2.4 GHz band)), or influence of rain or high humidity ( ).
66: Incorrect wireless LAN password
Are the camera and the access point set to use the same password forauthentication?
• Check upper- and lower-case letters, and make sure the correct password forauthentication is set on the camera.
67: Incorrect wireless LAN encryption method
Are the camera and the access point set to use the same encryption method?• The camera supports the following encryption methods: WEP, TKIP, and AES.
If filtering by MAC address is active, is the MAC address of the camera in useregistered at the access point?
• Register the MAC address of the camera used to the access point. The MACaddress can be checked on the [View info] screen ( ).
586
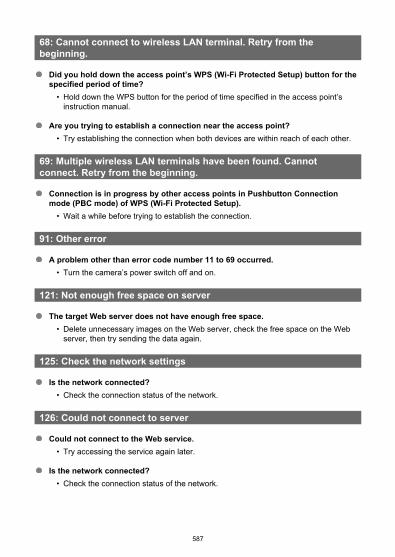
68: Cannot connect to wireless LAN terminal. Retry from thebeginning.
Did you hold down the access point’s WPS (Wi-Fi Protected Setup) button for thespecified period of time?
• Hold down the WPS button for the period of time specified in the access point’sinstruction manual.
Are you trying to establish a connection near the access point?• Try establishing the connection when both devices are within reach of each other.
69: Multiple wireless LAN terminals have been found. Cannotconnect. Retry from the beginning.
Connection is in progress by other access points in Pushbutton Connectionmode (PBC mode) of WPS (Wi-Fi Protected Setup).
• Wait a while before trying to establish the connection.
91: Other error
A problem other than error code number 11 to 69 occurred.• Turn the camera’s power switch off and on.
121: Not enough free space on server
The target Web server does not have enough free space.• Delete unnecessary images on the Web server, check the free space on the Web
server, then try sending the data again.
125: Check the network settings
Is the network connected?• Check the connection status of the network.
126: Could not connect to server
Could not connect to the Web service.• Try accessing the service again later.
Is the network connected?• Check the connection status of the network.
587

127: An error has occurred
A problem other than error code number 121 to 126 occurred while the camera isconnected to the Web service.
• Try again to establish the Wi-Fi connection to image.canon.
130: The server is currently busyPlease wait a moment and try again
The image.canon site is busy at the moment.• Try accessing image.canon over Wi-Fi again later.
131: Try again
An error occurred when connecting to image.canon over Wi-Fi.• Try again to establish the Wi-Fi connection to image.canon.
132: Error detected on serverTry again later
The image.canon site is currently offline for maintenance.• Try accessing image.canon over Wi-Fi again later.
133: Cannot log in to Web service
An error occurred when signing in to image.canon.• Check the image.canon settings.• Try accessing image.canon over Wi-Fi again later.
134: Set the correct date and time
The date, time, and time zone settings are incorrect.
• Check the [ : Date/Time/Zone] settings.
135: Web service settings have been changed
The settings for image.canon were changed.• Check the image.canon settings.
588

141: Printer is busy. Try connecting again.
Is the printer performing a printing process?• Try again to establish the Wi-Fi connection to the printer after the printing process is
finished.
Is another camera connected to the printer via Wi-Fi?• Try again to establish the Wi-Fi connection to the printer after the Wi-Fi connection
to the other camera has been terminated.
142: Could not acquire printer information. Reconnect to try again.
Is the power of the printer on?• Try again to establish the Wi-Fi connection after turning on the printer.
151: Transmission canceled
Automatic image transfer to the computer was somehow interrupted.
• To resume automatic image transfer, set the camera’s power switch to < >,and then set it to < >.
152: Card's write protect switch is set to lock
Is the card’s write-protect switch set to the locked position?• Slide the card’s write-protect switch to the writing position.
589

Wireless Communication Function Precautions
Distance Between the Camera and the Smartphone
Installation Location of Access Point Antenna
Nearby Electronic Devices
Precautions for Using Multiple Cameras
If the transmission rate drops, the connection is lost, or other problems occur when using thewireless communication functions, try the following corrective actions.
590

Distance Between the Camera and the Smartphone
If the camera is too far from the smartphone, a Wi-Fi connection may not be establishedeven when Bluetooth connection is possible. In this case, bring the camera and thesmartphone closer together, then establish a Wi-Fi connection.
Installation Location of Access Point Antenna
When using indoors, install the device in the room where you are using the camera.Install the device where people or objects do not come between the device and thecamera.
Nearby Electronic Devices
If the Wi-Fi transmission rate drops because of the influence of the following electronicdevices, stop using them or move further away from the devices to transmit communication.
The camera communicates over Wi-Fi via IEEE 802.11b/g/n using radio waves in the2.4 GHz band. For this reason, the Wi-Fi transmission rate will drop if there areBluetooth devices, microwave ovens, cordless telephones, microphones, smartphones,other cameras, or similar devices operating on the same frequency band nearby.
Precautions for Using Multiple Cameras
When connecting multiple cameras to one access point via Wi-Fi, make sure thecameras’ IP addresses are different.When multiple cameras are connected to one access point via Wi-Fi, the transmissionrate drops.When there are multiple IEEE 802.11b/g/n (2.4 GHz band) access points, leave a gap offive channels between each Wi-Fi channel to reduce radio wave interference. Forexample, use channels 1, 6, and 11, channels 2 and 7, or channels 3 and 8.
591

Security
If security settings have not been properly set, the following problems may occur.
Transmission monitoringThird parties with malicious intent may monitor wireless LAN transmissions and attemptto acquire the data you are sending.Unauthorized network accessThird parties with malicious intent may gain unauthorized access to the network you areusing to steal, modify, or destroy information. Additionally, you could fall victim to othertypes of unauthorized access such as impersonation (where someone assumes anidentity to gain access to unauthorized information) or springboard attacks (wheresomeone gains unauthorized access to your network as a springboard to cover theirtracks when infiltrating other systems).
It is recommended to make use of the systems and functions to thoroughly secure yournetwork, preventing these types of problems from occurring.
592
Checking Network Settings
WindowsOpen the Windows [Command Prompt], then enter ipconfig/all and press the <Enter> key.In addition to the IP address assigned to the computer, the subnet mask, gateway, and DNSserver information are also displayed.
macOSIn macOS, open the [Terminal] application, enter ifconfig -a, and press the <Return> key.The IP address assigned to the computer is indicated in the [en0] item next to [inet], in theformat “***.***.***.***”.For information about the [Terminal] application, refer to the macOS help.
To avoid using the same IP address for the computer and other devices on the network,change the rightmost number when configuring the IP address assigned to the camera inthe processes described in Manual IP Address Setup.Example: 192.168.1.10
593

Wireless Communication Status
Wireless communication status can be checked on the screen.
Shooting functions screen
Information display screen during playback
(1) Wi-Fi function(2) Wireless signal strength(3) Bluetooth function
Communication StatusScreen
Wi-Fi Function Wireless Signal Strength
Not connectedWi-Fi: Disable
OffWi-Fi: Enable
Connecting (Blinking)
Connected
Sending data ( )
Connection error (Blinking)
594

Bluetooth Function IndicatorBluetooth Function Connection Status Screen
Other than [Disable]Bluetooth connected
Bluetooth not connected
[Disable] Bluetooth not connected Not displayed
595

Set-up
This chapter describes menu settings on the set-up ([ ]) tab.
to the right of page titles indicates functions only available in Creative Zone modes(< >/< >/< >/< >).
• Tab Menus: Set-up• Folder Settings• File Numbering• Formatting• Auto Rotate• Adding Orientation Information to Movies• Date/Time/Zone• Language• Video System• Beeps• Power Saving• Eco Mode• Display Settings• Screen Brightness• Viewfinder Brightness• UI Magnification• HDMI Resolution• Touch Control• Sensor Cleaning
• Resetting the Camera
• Custom Functions (C.Fn)
• Copyright Information• Other Information
596
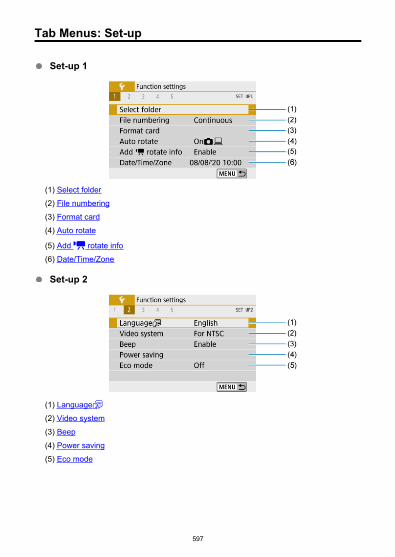
Tab Menus: Set-up
Set-up 1
(1) Select folder(2) File numbering(3) Format card(4) Auto rotate
(5) Add rotate info(6) Date/Time/Zone
Set-up 2
(1) Language(2) Video system(3) Beep(4) Power saving(5) Eco mode
597

Set-up 3
(1) Display settings(2) Screen brightness(3) Viewfinder brightness(4) UI magnification(5) HDMI resolution
Set-up 4
(1) Touch control(2) Sensor cleaning
598

Set-up 5
(1) Reset camera
(2) Custom Functions(C.Fn)
(3) Copyright information(4) Manual/software URL
(5) Certification Logo Display
(6) Firmware
In Basic Zone modes, the following screen is displayed for [ 4]. ([5] is not displayed.)
(1) Touch control(2) Sensor cleaning(3) Manual/software URL
599

Folder Settings
Creating a Folder
Selecting a Folder
You can freely create and select the folder where the captured images are to be saved.
Creating a Folder
1. Select [ : Select folder].
2. Select [Create folder].
600

3. Select [OK].
601

Selecting a Folder
(1) Folder name(2) Number of images in folder(3) Lowest file number(4) Highest file number
Select a folder on the folder selection screen.Captured images are stored in your selected folder.
Note
FoldersA folder can contain up to 9999 images (file number 0001–9999). When a folderbecomes full, a new folder with the folder number increased by one is createdautomatically. Also, if manual reset ( ) is executed, a new folder will be createdautomatically. Folders numbered from 100 to 999 can be created.
Creating folders with a computerWith the card open on the screen, create a new folder with “DCIM” as the name.Open the DCIM folder and create as many folders as necessary to save andorganize your images. “100ABC_D” is the required format for folder names, andthe first three digits must be a folder number in the range 100–999. The last fivecharacters can be any combination of upper- and lower-case letters from A to Z,numerals, and the underscore “_”. The space cannot be used. Also note that twofolder names cannot share the same three-digit folder number (for example,“100ABC_D” and “100W_XYZ”) even if the remaining five characters in each nameare different.
602

File Numbering
Continuous
Auto Reset
Manual Reset
The captured images saved in a folder are assigned a file number from 0001 to 9999. Youcan change how the image files are numbered.
(Example)
(1) File number
1. Select [ : File numbering].
603

2. Set the item.
Select [Numbering].Select [Continuous] or [Auto reset].
If you want to reset the file numbering, select [Manual reset] ( ).
Select [OK] to create a new folder, and the file number will start with0001.
Caution
If the file number in folder 999 reaches 9999, shooting will not be possible even ifthe card still has free space. After a message requesting you to replace the card isdisplayed, switch to a new card.
604
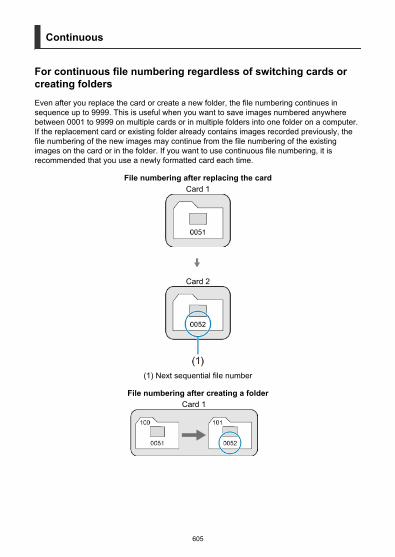
Continuous
For continuous file numbering regardless of switching cards orcreating foldersEven after you replace the card or create a new folder, the file numbering continues insequence up to 9999. This is useful when you want to save images numbered anywherebetween 0001 to 9999 on multiple cards or in multiple folders into one folder on a computer.If the replacement card or existing folder already contains images recorded previously, thefile numbering of the new images may continue from the file numbering of the existingimages on the card or in the folder. If you want to use continuous file numbering, it isrecommended that you use a newly formatted card each time.
File numbering after replacing the cardCard 1
Card 2
(1) Next sequential file number
File numbering after creating a folderCard 1
605
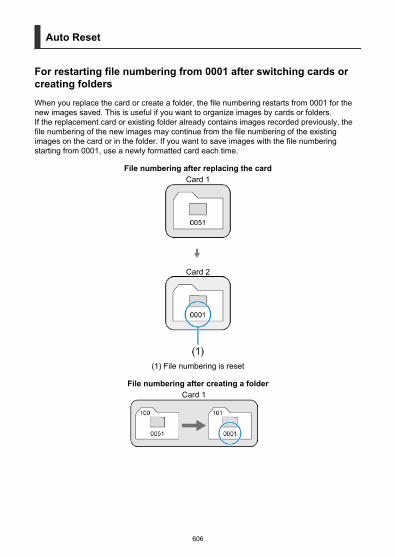
Auto Reset
For restarting file numbering from 0001 after switching cards orcreating foldersWhen you replace the card or create a folder, the file numbering restarts from 0001 for thenew images saved. This is useful if you want to organize images by cards or folders.If the replacement card or existing folder already contains images recorded previously, thefile numbering of the new images may continue from the file numbering of the existingimages on the card or in the folder. If you want to save images with the file numberingstarting from 0001, use a newly formatted card each time.
File numbering after replacing the cardCard 1
Card 2
(1) File numbering is reset
File numbering after creating a folderCard 1
606

Manual Reset
For resetting file numbering to 0001 or starting from 0001 in newfoldersWhen you reset the file numbering manually, a new folder is created automatically and thefile numbering of images saved to that folder starts from 0001.This is useful, for example, if you want to use different folders for the images takenyesterday and the ones taken today.
607

Formatting
If the card is new or was previously formatted (initialized) by another camera or computer,format the card with this camera.
Caution
When the card is formatted, all images and data on the card will be erased.Even protected images will be erased, so make sure there is nothing youneed to keep. If necessary, transfer the images and data to a computer, etc.before formatting the card.
1. Select [ : Format card].
2. Format the card.
Select [OK].
608

For low-level formatting, press the < > button to add a checkmark[ ] to [Low level format], then select [OK].
Note
The card capacity displayed on the card format screen may be smaller than thecapacity indicated on the card.This device incorporates exFAT technology licensed from Microsoft.
Conditions requiring card formatting
The card is new.The card was formatted by a different camera or a computer.The card is full of images or data.A card-related error is displayed.
Low-level formattingPerform low-level formatting if the card’s writing or reading speed seems slow or if youwant to totally erase the data on the card.Since low-level formatting will format all recordable sectors on the card, the formattingwill take longer than normal formatting.During low-level formatting, you can cancel formatting by selecting [Cancel]. Even inthis case, normal formatting will already be complete and you can use the card as usual.
609

Card file formatsSD/SDHC cards will be formatted in FAT32. SDXC cards will be formatted inexFAT.Individual movies recorded to exFAT cards are recorded as a single file (without splittingthem into multiple files) even if they exceed 4 GB, so the resulting movie file will exceed4 GB.
Caution
It may not be possible to use SDXC cards formatted with this camera in othercameras. Also note that exFAT-formatted cards may not be recognized bysome computer operating systems or card readers.Formatting or erasing data on a card does not completely erase the data. Beaware of this when selling or discarding the card. When disposing of cards,take steps to protect personal information if necessary, as by physicallydestroying cards.
610

Auto Rotate
You can change the auto rotation setting that straightens images shot in vertical orientationwhen they are displayed.
1. Select [ : Auto rotate].
2. Select an option.
OnAutomatically rotates images for display on both the camera andcomputers.
OnAutomatically rotates images only for display on computers.
Off
Caution
Images captured with auto rotation set to [Off] will not rotate during playback evenif you later set auto rotation to [On].
611

Note
If a picture is taken while the camera is aimed up or down, automatic rotation to theproper orientation for viewing may not be performed correctly.If images are not rotated automatically on a computer, try using EOS software.
612

Adding Orientation Information to Movies
For movies recorded with the camera held vertically, orientation information indicating whichside is up can be added automatically to enable playback in the same orientation onsmartphones or other devices.
1. Select [ : Add rotate info].
2. Select an option.
EnablePlay movies on smartphones or other devices in the orientation inwhich they were recorded.
DisablePlay movies horizontally on smartphones or other devices, regardlessof the recording orientation.
Note
Movies are played horizontally on the camera, regardless of the [ : Add rotate info] setting.
613

Date/Time/Zone
When you turn on the power for the first time or if the date/time/zone have been reset, followthese steps to set the time zone first.By setting the time zone first, you can simply adjust this setting as needed in the future andthe date/time will be updated to match it.Since the captured images will be appended with the shooting date and time information, besure to set your date/time.
1. Select [ : Date/Time/Zone].
614

2. Set the time zone.
Use the < >< > keys to select [Time zone].
Press < >.
Press < >.
Use the < >< > keys to select the time zone, then press < >.
If your time zone is not listed, press the < > button, then set thedifference from UTC in [Time difference].
615
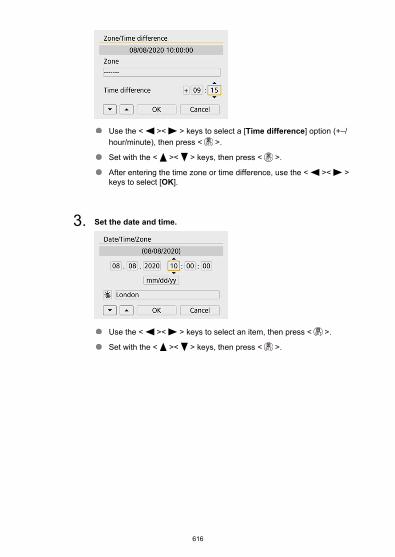
Use the < >< > keys to select a [Time difference] option (+–/hour/minute), then press < >.
Set with the < >< > keys, then press < >.
After entering the time zone or time difference, use the < >< >keys to select [OK].
3. Set the date and time.
Use the < >< > keys to select an item, then press < >.
Set with the < >< > keys, then press < >.
616

4. Set daylight saving time.
Set it as necessary.
Use the < >< > keys to select [ ], then press < >.
Use the < >< > keys to select [ ], then press < >.
When the daylight saving time is set to [ ], the time set in step 3 willadvance by 1 hour. If [ ] is set, the daylight saving time will becanceled and the time will go back by 1 hour.
5. Exit the setting.
Use the < >< > keys to select [OK].
Caution
The [Date/Time/Zone] setting may be reset when the camera is stored without thebattery, when the battery is depleted, or when it is exposed to freezingtemperatures for an extended period. If this happens, set them once again.After changing [Zone/Time difference], check that the correct date/time are set.
617

Note
Auto power off time may be extended while the [ : Date/Time/Zone] screen isdisplayed.
618

Language
1. Select [ : Language ].
2. Set the desired language.
619

Video System
Set the video system of any television used for display. This setting determines the framerates available when you record movies.
1. Select [ : Video system].
2. Select an option.
For NTSCFor areas where the TV system is NTSC (North America, Japan, SouthKorea, Mexico, etc.).
For PALFor areas where the TV system is PAL (Europe, Russia, China,Australia, etc.).
620
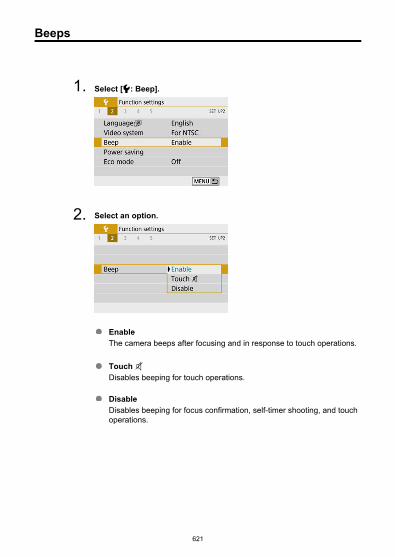
Beeps
1. Select [ : Beep].
2. Select an option.
EnableThe camera beeps after focusing and in response to touch operations.
Touch Disables beeping for touch operations.
DisableDisables beeping for focus confirmation, self-timer shooting, and touchoperations.
621
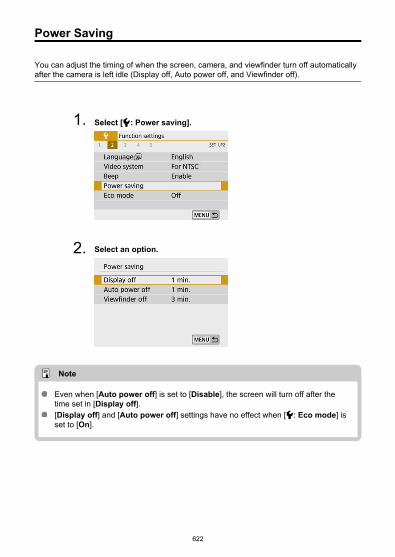
Power Saving
You can adjust the timing of when the screen, camera, and viewfinder turn off automaticallyafter the camera is left idle (Display off, Auto power off, and Viewfinder off).
1. Select [ : Power saving].
2. Select an option.
Note
Even when [Auto power off] is set to [Disable], the screen will turn off after thetime set in [Display off].[Display off] and [Auto power off] settings have no effect when [ : Eco mode] isset to [On].
622
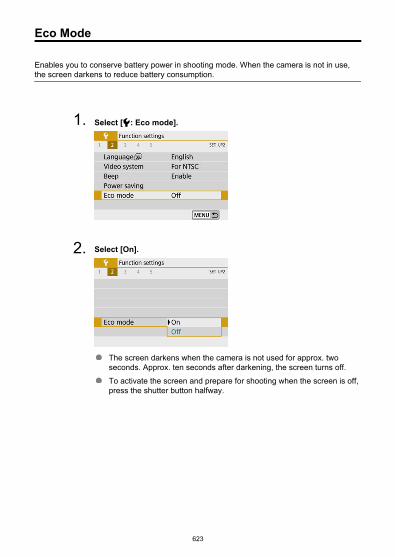
Eco Mode
Enables you to conserve battery power in shooting mode. When the camera is not in use,the screen darkens to reduce battery consumption.
1. Select [ : Eco mode].
2. Select [On].
The screen darkens when the camera is not used for approx. twoseconds. Approx. ten seconds after darkening, the screen turns off.To activate the screen and prepare for shooting when the screen is off,press the shutter button halfway.
623

Display Settings
You can specify to use the screen or viewfinder for display, to avoid accidentally activatingthe eye sensor when the screen is open.
1. Select [ : Display settings].
2. Set [Display control] to [Manual].
624

3. Select [Manual display].
ViewfinderAlways use the viewfinder for display.
ScreenAlways use the screen for display when it is open.
Note
The viewfinder is always used for display when the screen is closed.With [Display control] set to [Auto], the screen is always used for display when itis open, but display switches to the viewfinder when you look through it.
625
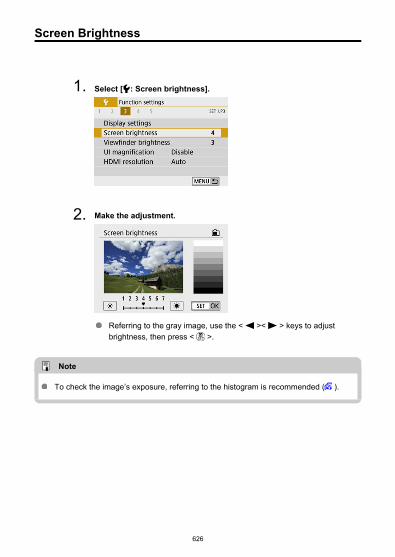
Screen Brightness
1. Select [ : Screen brightness].
2. Make the adjustment.
Referring to the gray image, use the < >< > keys to adjustbrightness, then press < >.
Note
To check the image’s exposure, referring to the histogram is recommended ( ).
626

Viewfinder Brightness
1. Select [ : Viewfinder brightness].
2. Make the adjustment.
As you look through the viewfinder, adjust the setting with the< >< > keys, then press < >.
627
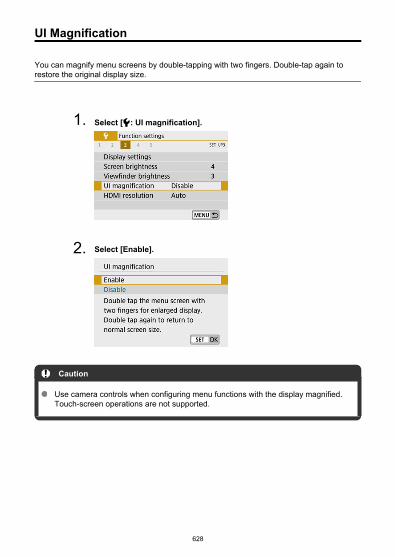
UI Magnification
You can magnify menu screens by double-tapping with two fingers. Double-tap again torestore the original display size.
1. Select [ : UI magnification].
2. Select [Enable].
Caution
Use camera controls when configuring menu functions with the display magnified.Touch-screen operations are not supported.
628
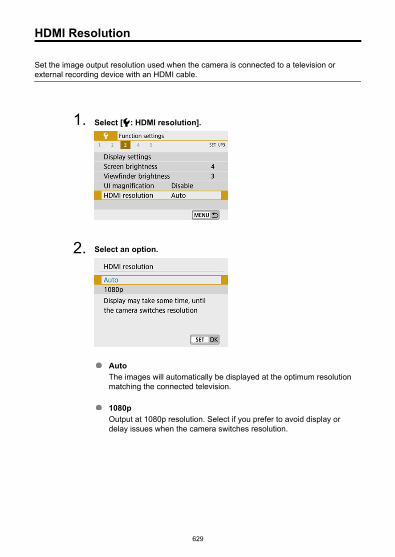
HDMI Resolution
Set the image output resolution used when the camera is connected to a television orexternal recording device with an HDMI cable.
1. Select [ : HDMI resolution].
2. Select an option.
AutoThe images will automatically be displayed at the optimum resolutionmatching the connected television.
1080pOutput at 1080p resolution. Select if you prefer to avoid display ordelay issues when the camera switches resolution.
629

Touch Control
1. Select [ : Touch control].
2. Select an option.
[Sensitive] makes the touch-screen panel more responsive than[Standard].To disable touch operations, select [Disable].
Caution
Precautions when using the screen (touch-screen panel)Do not use sharp objects such as fingernails or ballpoint pens for touch operations.Do not use wet fingers for touch operations. If the screen has any moisture or ifyour fingers are wet, the touch-screen panel may not respond or malfunction mayoccur. In this case, turn off the power and wipe off the moisture with a cloth.Attaching a commercially available protective sheet or a sticker on the screen mayimpair responsiveness to touch operations.The camera may not respond as well if you quickly perform touch operation when[Sensitive] is set.
630

Sensor Cleaning
Cleaning Now
Cleaning Automatically
Cleaning Now
1. Select [ : Sensor cleaning].
2. Select [Clean now ].
Select [OK] on the confirmation screen.
631

Cleaning Automatically
1. Select [Auto cleaning ].
2. Select an option.
Use the < >< > keys to select an option, then press < >.
Note
For best results, clean with the camera in a stable position on a desk or other flatsurface.Even if you repeat the sensor cleaning, the result will not improve much. Note that[Clean now ] may not be available immediately after cleaning.Dots of light may appear in captured images or on the shooting screen if the sensoris affected by cosmic rays or similar factors. By selecting [Clean now ], theirappearance may be suppressed ( ).
632
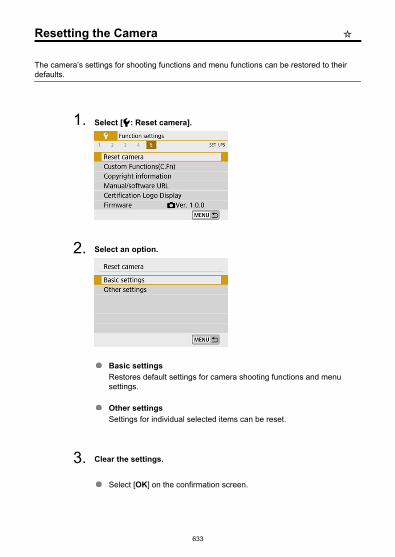
Resetting the Camera
The camera’s settings for shooting functions and menu functions can be restored to theirdefaults.
1. Select [ : Reset camera].
2. Select an option.
Basic settingsRestores default settings for camera shooting functions and menusettings.
Other settingsSettings for individual selected items can be reset.
3. Clear the settings.
Select [OK] on the confirmation screen.
633

Custom Functions (C.Fn)
Setting Custom Functions
Custom Functions
Custom Function Setting Items
Setting Custom Functions
1. Select [ : Custom Functions(C.Fn)].
2. Select a Custom Function number.
Use the < >< > keys to select the number of a Custom Functionto configure (1), then press < >.Current Custom Function settings are indicated below the respectivefunction number at the bottom of the screen (2).
634

3. Change the setting as desired.
Select a setting option.To set up another Custom Function, repeat steps 2–3.
Note
To clear all Custom Function settings you have configured (except [CustomControls]), access [ : Reset camera] and select [Custom Functions(C.Fn)] in[Other settings].
635

Custom Functions
Shading indicates that the Custom Function does not apply to this still photoshooting or movie recording. (The settings have no effect.)
C.Fn I: Exposure Still Photo Shooting Movie Recording
(1) ISO expansion ○ ○
(2) Safety shift ○
C.Fn II: Others Still Photo Shooting Movie Recording
(3) Custom Controls Varies by settings
(4) Release shutter w/o lens ○ ○
(5) Retract lens on power off ○ ○
636

Custom Function Setting Items
Custom Functions are divided into two groups by function: C.Fn I: Exposure and C.Fn II:Others.
C.Fn I: Exposure
C.Fn 1: ISO expansion
Makes “H” (equivalent to ISO 25600) available as an ISO speed you can set. Note thatexpanded ISO speeds (H) are not available when [ : Highlight tone priority] is set to[Enable] or [Enhanced].
0:Disable
1:Enable
C.Fn 2: Safety shift
You can shoot with the shutter speed and aperture value automatically adjusted to enablestandard exposure if standard exposure would not be available under your specified shutterspeed or aperture value in < > or < > mode.
0:Disable
1:Enable
637

C.Fn II: Others
C.Fn 3: Custom Controls
You can assign frequently used functions to camera buttons that are easy for you to use.
1. Select a part of the bar.
2. Select a function to assign.
Press < > to set it.
Note
With the screen in step 1 displayed, you can press the < > button to restorethe Custom Control settings to their defaults. [Custom Controls] are not clearedeven if you access [Reset camera] and select [Custom Functions(C.Fn)] in[Other settings].
638

Functions available for camera controls
AF
Function
Metering and AF start ○ ○
AF stop ○
Set AF point to center ○ ○ ○ ○ ○ ○
One-Shot AF Servo AF ○ ○ ○ ○ ○ ○
AF method ○ ○ ○ ○ ○ ○
Touch & drag AF ○ ○ ○ ○ ○ ○
Eye detection ○ ○ ○ ○ ○ ○
MF
Function
Manual focus ○ ○ ○ ○ ○ ○
Peaking ○ ○ ○ ○ ○ ○
Exposure
Function
Metering start ○
AE lock ○
AE lock (while button pressed) ○
AE lock/FE lock ○
Exposure compensation ○ ○ ○ ○ ○ ○
Set ISO speed ○ ○ ○ ○ ○ ○
Metering mode ○ ○ ○ ○ ○ ○
Flash function settings ○ ○ ○ ○ ○ ○
Flash firing ○ ○ ○ ○ ○ ○
FE lock ○
639

Movies
Function
Movie recording ○ ○ ○ ○ ○ ○
Pause Movie Servo AF ○ ○ ○ ○ ○ ○
Image
Function
Image quality ○ ○ ○ ○ ○ ○
One-touch image quality setting ○ ○ ○ ○ ○ ○
One-touch image quality (hold) ○ ○ ○ ○ ○ ○
Still img aspect ratio ○ ○ ○ ○ ○ ○
Auto Lighting Optimizer ○ ○ ○ ○ ○ ○
White balance ○ ○ ○ ○ ○ ○
Picture Style ○ ○ ○ ○ ○ ○
640
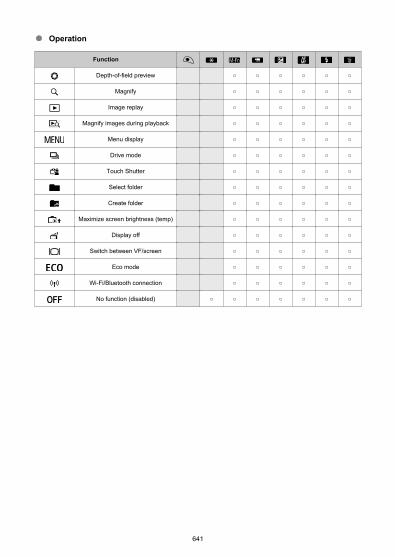
Operation
Function
Depth-of-field preview ○ ○ ○ ○ ○ ○
Magnify ○ ○ ○ ○ ○ ○
Image replay ○ ○ ○ ○ ○ ○
Magnify images during playback ○ ○ ○ ○ ○ ○
Menu display ○ ○ ○ ○ ○ ○
Drive mode ○ ○ ○ ○ ○ ○
Touch Shutter ○ ○ ○ ○ ○ ○
Select folder ○ ○ ○ ○ ○ ○
Create folder ○ ○ ○ ○ ○ ○
Maximize screen brightness (temp) ○ ○ ○ ○ ○ ○
Display off ○ ○ ○ ○ ○ ○
Switch between VF/screen ○ ○ ○ ○ ○ ○
Eco mode ○ ○ ○ ○ ○ ○
Wi-Fi/Bluetooth connection ○ ○ ○ ○ ○ ○
No function (disabled) ○ ○ ○ ○ ○ ○ ○
641

C.Fn 4: Release shutter w/o lens
You can specify whether shooting still photos or movies is possible without a lens attachedto the camera.
0:Disable
1:Enable
C.Fn 5: Retract lens on power off
You can set whether to retract gear-type STM lenses (such as EF40mm f/2.8 STM)automatically when the camera’s power switch is set to < >.
0:Enable
1:Disable
Caution
With auto power off, the lens will not retract regardless of the setting.Before detaching the lens, make sure that it is retracted.
Note
When [0:Enable] is set, this function takes effect regardless of the lens’s focusmode switch setting (AF or MF).
642

Copyright Information
Checking the Copyright Information
Deleting the Copyright Information
When you set the copyright information, it will be recorded to the image as Exif information.
1. Select [ : Copyright information].
2. Select an option.
643

3. Enter text.
Use the < >< >< >< > keys to select a character, then press< > to enter it.
By selecting [ ], you can change the input mode.
Select [ ] to delete a character.
4. Exit the setting.
Press the < > button, then press [OK].
Checking the Copyright Information
When you select [Display copyright info.] in step 2, you can check the [Author] and[Copyright] information that you entered.
644
Deleting the Copyright Information
When you select [Delete copyright information] in step 2, you can delete the [Author] and[Copyright] information.
Caution
If the entry for “Author” or “Copyright” is long, it may not be displayed entirely whenyou select [Display copyright info.].
Note
You can also set or check the copyright information with EOS Utility (EOSsoftware).
645

Other Information
Manual/software URL
To download instruction manuals, select [ : Manual/software URL] and scan thedisplayed QR code with a smartphone. You can also use a computer to access thewebsite at the URL displayed and download software.
Certification Logo Display
Select [ : Certification Logo Display] to display some of the logos of the camera’scertifications. Other certification logos can be found on the camera body and packaging.
Firmware
Select [ : Firmware] to update the firmware of the camera, lens, or other compatibleaccessories in use.
646

My Menu
On the My Menu tab, you can register menu items and Custom Functions you often adjust.
Caution
The [ ] tab is not displayed when [ : Menu display] is set to [Guided]. Change[ : Menu display] to [Standard] ( ).
• Tab Menus: My Menu• My Menu Registration
647
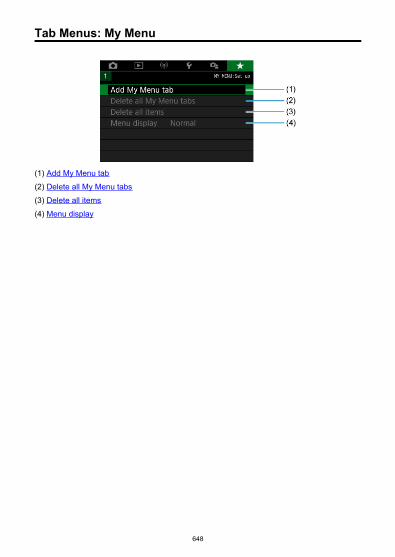
Tab Menus: My Menu
(1) Add My Menu tab(2) Delete all My Menu tabs(3) Delete all items(4) Menu display
648

My Menu Registration
Adding My Menu Tabs
Registering Menu Items on My Menu Tabs
My Menu Tab Settings
Deleting All My Menu Tabs/Deleting All Items
Menu Display
Adding My Menu Tabs
1. Select [Add My Menu tab].
2. Select [OK].
You can create up to five My Menu tabs by repeating steps 1 and 2.
649

Registering Menu Items on My Menu Tabs
1. Select [MY MENU*: Configure].
2. Select [Select items to register].
3. Register the desired items.
Select an item, then press < >.Select [OK] on the confirmation screen.You can register up to six items.
To return to the screen in step 2, press the < > button.
650

My Menu Tab Settings
You can sort and delete items on the menu tab, and rename or delete the menu tab itself.
Sort registered itemsYou can change the order of the registered items in My Menu. Select [Sort registereditems], select an item to rearrange, then press < >. With [ ] displayed, press the< >< > keys to rearrange the item, then press < >.
Delete selected items/Delete all items on tabYou can delete any of the registered items. [Delete selected items] deletes one item at atime, and [Delete all items on tab] deletes all the registered items on the tab.
Delete tabYou can delete the current My Menu tab. Select [Delete tab] to delete the [MY MENU*] tab.
Caution
Performing [Delete tab] also deletes tab names renamed with [Rename tab].
651

Rename tabYou can rename the My Menu tab from [MY MENU*].
1. Select [Rename tab].
2. Enter text.
To delete any unneeded characters, select [ ].
Use the < >< >< >< > keys to select a character, then press< >.
By selecting [ ], you can change the input mode.
3. Confirm input.
Press the < > button, then select [OK].
652
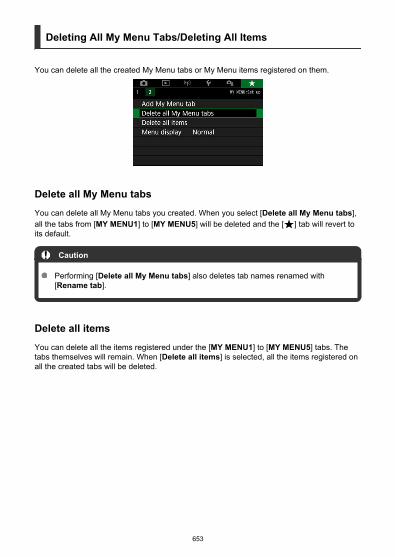
Deleting All My Menu Tabs/Deleting All Items
You can delete all the created My Menu tabs or My Menu items registered on them.
Delete all My Menu tabsYou can delete all My Menu tabs you created. When you select [Delete all My Menu tabs],all the tabs from [MY MENU1] to [MY MENU5] will be deleted and the [ ] tab will revert toits default.
Caution
Performing [Delete all My Menu tabs] also deletes tab names renamed with[Rename tab].
Delete all itemsYou can delete all the items registered under the [MY MENU1] to [MY MENU5] tabs. Thetabs themselves will remain. When [Delete all items] is selected, all the items registered onall the created tabs will be deleted.
653

Menu Display
You can select [Menu display] to set the menu screen that is to appear first when you pressthe < > button.
Normal displayDisplays the last displayed menu screen.
Display from My Menu tabDisplays with the [ ] tab selected.
Display only My Menu tabRestricts display to the [ ] tab ([ ]/[ ]/[ ]/[ ]/[ ] tabs are not displayed).
654

Reference
This chapter provides reference information on camera features.
• Importing Images to a Computer• Household Power Outlet Accessories• Troubleshooting Guide• Error Codes• System Map• ISO Speed in Movie Recording• Information Display• Specifications
655

Importing Images to a Computer
Connecting to a Computer via an Interface Cable (Sold Separately)
Card Reader
Connecting to a Computer via Wi-Fi
You can use EOS software to import images from the camera to a computer. There arethree ways to do this.
Connecting to a Computer via an Interface Cable (SoldSeparately)
1. Install the software ( ).
2. Connect the camera to the computer with an interface cable (soldseparately).
As an interface cable, you can use a IFC-600PCU cable (soldseparately).Insert the cord’s plug into the camera’s digital terminal (USB Micro-B).Connect the cord’s plug to the computer’s USB terminal (USB Type-A).
3. Use EOS Utility to import the images.
Refer to the EOS Utility Instruction Manual.
656

Caution
With a Wi-Fi connection established, the camera cannot communicate with thecomputer even if they are connected with an interface cable.
Card Reader
You can use a card reader to import images to a computer.
1. Install the software ( ).
2. Insert the card into the card reader.
3. Use Digital Photo Professional to import the images.
Refer to the Digital Photo Professional Instruction Manual.
Note
When downloading images from the camera to a computer with a card readerwithout using EOS software, copy the DCIM folder on the card to the computer.
Connecting to a Computer via Wi-Fi
You can connect the camera to the computer via Wi-Fi and import images to the computer( ).
657
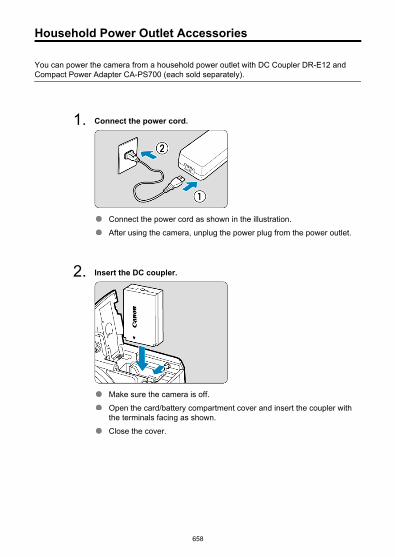
Household Power Outlet Accessories
You can power the camera from a household power outlet with DC Coupler DR-E12 andCompact Power Adapter CA-PS700 (each sold separately).
1. Connect the power cord.
Connect the power cord as shown in the illustration.After using the camera, unplug the power plug from the power outlet.
2. Insert the DC coupler.
Make sure the camera is off.Open the card/battery compartment cover and insert the coupler withthe terminals facing as shown.Close the cover.
658

3. Connect the adapter to the coupler.
Open the DC cord hole cover and insert the adapter plug fully into thecoupler terminal.
Caution
Do not connect or disconnect the power cord when the camera’s power switch isset to < >.
659

Troubleshooting Guide
Power-related problems
Shooting-related problems
Problems with wireless features
Operation problems
Display problems
Playback problems
Sensor cleaning problems
Computer connection problems
Troubleshoot camera issues as described in this section. If this Troubleshooting Guide doesnot resolve the problem, take the camera to the nearest Canon Service Center.
660
Power-related problems
The battery does not charge.
If the battery’s remaining capacity ( ) is 94% or higher, the battery will not be charged.Do not use any battery packs other than a genuine Canon Battery Pack LP-E12.
The charger’s lamp blinks at high speed.
If (1) the battery charger or battery has a problem or (2) communication with the batteryfailed (with a non-Canon battery pack), the protection circuit will stop charging, and thecharge lamp will blink in orange at a constant high speed. In the case of (1), unplug thecharger’s power plug from the power outlet. Detach and reattach the battery to thecharger. Wait a few minutes, then reconnect the power plug to the power outlet. If theproblem persists, take the camera to the nearest Canon Service Center.
The charger’s lamp does not blink.
If the internal temperature of the battery attached to the charger is high, the charger willnot charge the battery for safety reasons (lamp off). During charging, if the battery’stemperature becomes high for any reason, charging will stop automatically (lamp blinks).When the battery temperature goes down, charging will resume automatically.
The camera is not activated even when the power switch is set to< >.
Make sure the card/battery compartment cover is closed ( ).Make sure the battery is installed properly in the camera ( ).Charge the battery ( ).
The access lamp still lights or blinks even when the power switch is setto < >.
If the power is turned off while an image is being recorded to the card, the access lampwill remain on or continue to blink for a few seconds. When the image recording iscomplete, the power will turn off automatically.
[Battery communication error. Does this battery/do these batteriesdisplay the Canon logo?] is displayed.
Do not use any battery packs other than a genuine Canon Battery Pack LP-E12.Remove and install the battery again ( ).If the electrical contacts are dirty, use a soft cloth to clean them.
661

The battery becomes exhausted quickly.
Use a fully charged battery ( ).The battery performance may have degraded. If the battery performance is poor,replace the battery with a new one.The number of available shots will decrease with any of the following operations:
• Pressing the shutter button halfway for a prolonged period• Using AF often, but without shooting• Using the lens’s Image Stabilizer.• Using the wireless communication functions
The camera turns off by itself.
Auto power off is in effect. To deactivate auto power off, set [Auto power off] in [ :Power saving] to [Disable] ( ).Even with [Auto power off] set to [Disable], the screen will still turn off after the camerais left idle for the time set in [Display off] (although the camera itself remains on).Set [ : Eco mode] to [Off].
662

Shooting-related problems
The lens cannot be attached.
To attach EF/EF-S lenses, you will need a mount adapter. The camera cannot be usedwith RF lenses ( ).
No images can be shot or recorded.
Make sure the card is properly inserted ( ).Slide the card’s write-protect switch to the Write/Erase setting ( ).If the card is full, replace the card or delete unnecessary images to make space( , ).Shooting is not possible if the AF point turns orange when you attempt to shoot stillphotos or record movies. Press the shutter button halfway again to refocusautomatically, or focus manually ( , ).
The card cannot be used.
If a card error message is displayed, see Removal.
An error message is displayed when the card is inserted in anothercamera.
Since SDXC cards are formatted in exFAT, if you format a card with this camera andthen insert it into another camera, an error may be displayed and it may not be possibleto use the card.
The image is out of focus or blurred.
Set [ : Focus mode] to [AF] ( ).When using a lens with a focus mode switch, set the switch to < > ( ).Press the shutter button ( ) gently to prevent camera shake ( ).Set [IS mode] in [ : IS (Image Stabilizer) mode] to [On] ( ).With a lens equipped with an Image Stabilizer, set the Image Stabilizer switch to< >.In low light, the shutter speed may become slow. Use a faster shutter speed ( ), set ahigher ISO speed ( ), use flash ( ), or use a tripod.See Minimizing blurred photos.
I cannot lock the focus and recompose the shot.
Set the AF operation to One-Shot AF.Shooting with the focus locked is not possible with Servo AF ( ).
663
The continuous shooting speed is slow.
High-speed continuous shooting may be slower depending on conditions such as theambient temperature, battery level, flicker reduction, shutter speed, aperture value,subject conditions, brightness, AF operation, type of lens, use of flash, and shootingsettings. For details, see Drive Mode.
The maximum burst during continuous shooting is lower.
Shooting intricate subjects such as fields of grass may result in larger file sizes, and theactual maximum burst may be lower than the guidelines in Still photo file size / Numberof possible shots / Maximum burst for continuous shooting.
Even after I change the card, the maximum burst displayed forcontinuous shooting does not change.
The maximum burst displayed does not change when you switch cards, even if youswitch to a high-speed card. Maximum burst listed in Still photo file size / Number ofpossible shots / Maximum burst for continuous shooting is based on the standard Canontest card, and the actual maximum burst is higher for cards with faster writing speeds.For this reason, estimated maximum burst may differ from actual maximum burst.
Even if I set a decreased exposure compensation, the image comes outbright.
Set [ : Auto Lighting Optimizer] to [Disable] ( ). When [Low], [Standard], or[High] is set, even if you set a decreased exposure compensation or flash exposurecompensation, the image may come out bright.
I cannot set the exposure compensation when both manual exposureand ISO Auto are set.
See Exposure Compensation with ISO Auto to set the exposure compensation.
Not all the lens aberration correction options are displayed.
Although [Chromatic aberr corr] and [Diffraction correction] are not displayed when[Digital Lens Optimizer] is set to [Enable], both functions are applied in shooting, aswhen set to [Enable].During movie recording, [Digital Lens Optimizer], [Diffraction correction], and[Distortion correction] are not displayed.
The built-in flash does not fire.
Shooting with the flash may be temporarily disabled to protect the flash head if the built-in flash is used repeatedly over a short period.
664

The external Speedlite does not fire.
Make sure the external Speedlite is securely attached to the camera.
The Speedlite always fires at full output.
If you use a flash unit other than an EL/EX series Speedlite, the flash will always fire atfull output ( ).The flash always fires at full output when [Flash metering mode] in external flashCustom Function settings is set to [TTL flash metering] (autoflash) ( ).
Flash exposure compensation cannot be set for the external Speedlite.
If flash exposure compensation is set with the external Speedlite, compensation amountcannot be set with the camera. When the Speedlite’s flash exposure compensation iscanceled (set to 0), flash exposure compensation can be set with the camera.
Using flash in < >/< > mode lowers the shutter speed.
To provide standard exposure for subjects and backgrounds, the shutter speed isautomatically reduced (slow-sync shooting) for shots under low light in night scenes orwith similar backgrounds. To avoid slow shutter speeds, set [Slow synchro] in [ :Flash control] to [1/200-1/60sec. auto] or [1/200 sec. (fixed)] ( ).
The specified exposure changes when I shoot with ISO Auto usingflash.
When there is a risk of overexposure in flash photography, shutter speed or ISO speedis automatically adjusted to reduce loss of detail in highlights and shoot at standardexposure. In flash shots with certain lenses, the shutter speeds and ISO speedsdisplayed when you press the shutter button halfway may not match the actual settingsused. This may alter the brightness of backgrounds that are out of flash range.To avoid shooting at different shutter speeds or ISO speeds than displayed when youpress the shutter button halfway in Creative Zone modes, shoot with a manually set ISOspeed.
Remote control shooting is not possible.
When taking still photos, set the drive mode to < > or < > ( ). In movierecording, set [ : Remote control] to [Enable] ( ).Check the position of the remote control’s release timing switch.If you are using Wireless Remote Control BR-E1, see Wireless Remote Control BR-E1.To use a remote control for time-lapse movie recording, see Time-Lapse Movies.
665

A white [ ] or red [ ] icon is displayed in still photo shooting.
It indicates that the camera’s internal temperature is high. Image quality of still photosmay be worse when a white [ ] icon is displayed. Display of a red [ ] icon indicatesthat shooting will soon stop automatically ( ).
ISO 100 cannot be set or ISO speed expansion cannot be selected instill photo shooting.
The minimum speed in the ISO speed range is ISO 200 when [ : Highlight tonepriority] is set to [Enable] or [Enhanced].Expanded ISO speeds (H) are not available when [ : Highlight tone priority] is set to[Enable] or [Enhanced], even with [ISO expansion] set to [1:On] in [ : CustomFunctions(C.Fn)].
A red [ ] icon is displayed during movie recording.
It indicates that the camera’s internal temperature is high. If the red [ ] icon isdisplayed, it indicates that the movie recording will soon stop automatically ( ).
A red [ ] icon is displayed.
If the camera temporarily overheats during extended 4K recording, [ ] is displayed andrecording stops. At this time, movie recording will be unavailable, even if you press themovie shooting button.Following the instructions displayed, either set the movie recording size to an optionother than [ ] or [ ] or turn off the camera to let it cool down before youresume recording.
Movie recording stops by itself.
If the card’s writing speed is slow, movie recording may stop automatically. For detailson cards that can record movies, see Card performance requirements (Movierecording). To find out the card’s writing speed, refer to the card manufacturer’s website,etc.If you record a movie for 29 min. 59 sec., the movie recording will stop automatically.
The ISO speed cannot be set for movie recording.
ISO speed is set automatically in [ ] shooting mode. In [ ] mode, you can set theISO speed manually ( ).
666

The manually set ISO speed changes when switching to movierecording.
For still photo shooting, ISO speed is set according to [ISO speed] in [ : ISOspeed settings] ( ), and for movie recording, according to [ISO speed] in [ : ISOspeed settings] ( ).
ISO 100 cannot be set or ISO speed expansion cannot be selectedduring movie recording.
Check the [ISO speed] setting in [ : ISO speed settings].Expanded ISO speeds are not available when [ : Highlight tone priority] is set to[Enable].The minimum speed in the ISO speed range is ISO 200 when [ : Highlight tonepriority] is set to [Enable].H (expanded ISO speed) is not available (not displayed) in 4K movie recording.
The exposure changes during movie recording.
If you change the shutter speed or aperture value during movie recording, the changesin the exposure may be recorded.Recording a few test movies is recommended if you intend to perform zooming duringmovie recording. Zooming as you record movies may cause exposure changes or lenssounds to be recorded, an uneven audio level, or loss of focus.
The image flickers or horizontal stripes appear during movie recording.
Flickering, horizontal stripes (noise), or irregular exposures can be caused byfluorescent lighting, LED lighting, or other light sources during movie recording. Also,changes in the exposure (brightness) or color tone may be recorded. In [ ] shootingmode, using a slower shutter speed may reduce the problem. The problem may be morenoticeable in time-lapse movie recording.
The subject looks distorted during movie recording.
If you move the camera to the left or right (panning) or shoot a moving subject, theimage may look distorted.
I cannot take still photos during movie recording.
Still photos cannot be taken with the Mode dial set to < >. Before taking still photos,set the dial to a shooting mode other than < >.
667

Problems with wireless features
Cannot pair with a smartphone.
Use a smartphone compliant with Bluetooth Specification Version 4.1 or later.Turn on Bluetooth from the smartphone settings screen.Pairing with the camera is not possible from the smartphone’s Bluetooth settings screen.Install the dedicated app Camera Connect (free of charge) on the smartphone ( ).Pairing with a previously paired smartphone is not possible if pairing informationregistered for another camera remains on the smartphone. In this case, remove thecamera’s registration retained in the Bluetooth settings on the smartphone and trypairing again ( ).
Wi-Fi functions cannot be set.
If the camera is connected to a computer or another device with an interface cable,Wi-Fi functions cannot be set. Disconnect the interface cable before setting anyfunctions ( ).
A device connected with an interface cable cannot be used.
Other devices, such as computers, cannot be used with the camera by connecting themwith an interface cable while the camera is connected to devices via Wi-Fi. Terminatethe Wi-Fi connection before connecting the interface cable.
Operations such as shooting and playback are not possible.
With a Wi-Fi connection established, operations such as shooting and playback may notbe possible. Terminate the Wi-Fi connection, then perform the operation.
Cannot reconnect to a smartphone.
Even with a combination of the same camera and smartphone, if you have changed thesettings or selected a different setting, reconnection may not be established even afterselecting the same SSID. In this case, delete the camera connection settings from theWi-Fi settings on the smartphone and set up a connection again.A connection may not be established if Camera Connect is running when youreconfigure connection settings. In this case, quit Camera Connect for a moment andthen restart it.
668

Operation problems
Touch operation is not possible.
Make sure [ : Touch control] is set to [Standard] or [Sensitive] ( ).
A camera button or dial does not work as expected.
Check the [Custom Controls] setting in [ : Custom Functions(C.Fn)] ( ).In movie recording, check the [ : Shutter btn function for movies] setting ( ).
669

Display problems
The menu screen shows fewer tabs and items.
Certain tabs and items are not shown in Basic Zone modes or movie recording.
The display starts with [ ] My Menu, or the [ ] tab alone is displayed.
[Menu display] on the [ ] tab is set to [Display from My Menu tab] or [Display onlyMy Menu tab]. Set [Normal display] ( ).
The file name’s first character is an underscore (“_”).
Set [ : Color space] to [sRGB]. If [Adobe RGB] is set, the first character will be anunderscore ( ).
The file name starts with “MVI_”.
It is a movie file ( ).
The file numbering does not start from 0001.
If the card already contains recorded images, the image number may not start from0001 ( ).
The shooting date and time displayed are incorrect.
Make sure the correct date and time are set ( ).Check the time zone and daylight saving time ( ).
The date and time are not in the image.
The shooting date and time do not appear in the image. The date and time are recordedin the image data as shooting information. When you print photos, this information canbe used to include the date and time ( ).
[###] is displayed.
If the number of images recorded on the card exceeds the number the camera candisplay, [###] will be displayed.
670

The screen does not display a clear image.
If the screen is dirty, use a soft cloth to clean it.The screen display may seem slightly slow in low temperatures or may look black inhigh temperatures, but it will return to normal at room temperature.
671

Playback problems
A red box is displayed on the image.
[ : AF point disp.] is set to [Enable] ( ).
During image playback, the AF points are not displayed.
AF points are not displayed when the following types of images are played back:• Images taken in < : > mode.
• Images taken in < : > mode.• Images taken with Multi Shot Noise Reduction applied.• Cropped images.
The image cannot be erased.
If the image is protected, it cannot be erased ( ).
Still photos and movies cannot be played back.
The camera may not be able to play back images taken with another camera.Movies edited with a computer cannot be played back with the camera.
Only few images can be played back.
The images have been filtered for playback with [ : Set image search conditions]( ). Clear the image search conditions.
Mechanical sounds or sounds of camera operations can be heardduring movie playback.
The camera’s built-in microphone will also record mechanical sounds of the lens orsounds of camera/lens operations if AF operations are performed or the camera isoperated during movie recording. In this case, using an external microphone mayreduce these sounds. If the sounds are still distracting with an external microphone, itmay be more effective to remove the external microphone from the camera and positionit away from the camera and lens ( ).
The movie appears to freeze momentarily.
Significant change in the exposure level during autoexposure movie recording maycause recording to stop momentarily until the brightness stabilizes. In this case, recordin [ ] mode ( ).
672
No picture appears on the television.
Make sure [ : Video system] is set to [For NTSC] or [For PAL] correctly for the videosystem of your television.Make sure the HDMI cable’s plug is inserted all the way in ( ).
There are multiple movie files for a single movie recording.
If the movie file size reaches 4 GB, another movie file will be created automatically ( ).However, if you use an SDXC card formatted with the camera, you can record a moviein a single file even if it exceeds 4 GB.
My card reader does not recognize the card.
Depending on the card reader used and the computer’s operating system, SDXC cardsmay not be correctly recognized. In this case, either connect the camera to a computerwith an interface cable (sold separately) and use EOS Utility (EOS software, ) orconnect the camera to a computer via Wi-Fi ( ) to import the images on the camera.
The image cannot be resized.
With this camera, you cannot resize JPEG and RAW images ( ).
The image cannot be cropped.
With this camera, you cannot crop RAW images ( ).
Dots of light appear on the image.
White, red, or blue dots of light may appear in captured images if the sensor is affectedby cosmic rays or similar factors. Their appearance may be reduced by performing[Clean now ] under [ : Sensor cleaning] ( ).
673

Sensor cleaning problems
The shutter makes a sound during sensor cleaning.
Although there is a mechanical sound from the shutter during cleaning after [Clean now] in [ : Sensor cleaning] is selected, no image is recorded to the card ( ).
Automatic sensor cleaning does not work.
Repeated < >/< > power switch operations within a short period may preventdisplay of the [ ] icon ( ).
Computer connection problems
I cannot import images to a computer.
Install EOS Utility (EOS software) on the computer ( ).If the camera is already connected via Wi-Fi, it cannot communicate with any computerconnected with an interface cable (sold separately).
Communication between the connected camera and computer does notwork.
When using EOS Utility (EOS software), set [ : Time-lapse movie] to [Disable] ( ).
674
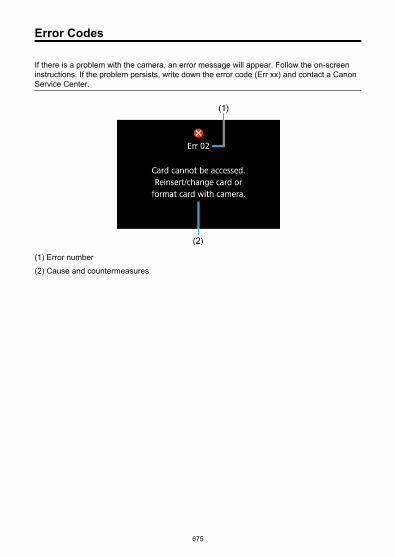
Error Codes
If there is a problem with the camera, an error message will appear. Follow the on-screeninstructions. If the problem persists, write down the error code (Err xx) and contact a CanonService Center.
(1) Error number(2) Cause and countermeasures
675

System Map
(11)(13) (14)
(30)(24) (25)
(26)(29)
(31)
(35)(34)
(28)(27)(23)(22)(21)
(20)
(18) (19)
(16)
(17)
(15)
(33)
(32)
(12)
(2)(1) (4)(3) (5) (6) (8)(7) (9) (10)
: Bundled accessories
676

(1) Speedlite Transmitter ST-E2*1
(2) Speedlite Transmitter ST-E3-RT(3) Speedlite 270EX II(4) Speedlite EL-100(5) Speedlite 430EX III-RT/430EX III(6) Speedlite 470EX-AI(7) Speedlite EL-1(8) Speedlite 600EX II-RT(9) Macro Ring Lite MR-14EX II(10) Macro Twin Lite MT-26EX-RT(11) Wireless Remote Control BR-E1(12) EF-M lenses(13) EF lenses(14) EF-S lenses(15) Neck Strap EM-200DB*2
(16) Neck Strap EM-E2(17) Protecting Cloth PC-E1/E2(18) Body Jacket EH32-CJ(19) Tripod Grip HG-100TBR(20) Battery Pack LP-E12*2
(21) Battery Charger LC-E12*2
(22) DC Coupler DR-E12(23) Compact Power Adapter CA-PS700(24) Directional Stereo Microphone DM-E1(25) Stereo Microphone DM-E100(26) USB cable*3
(27) SD/SDHC/SDXC memory cards(28) Card reader(29) HDMI cable*4
(30) Mount Adapter EF-EOS M(31) TV/monitor(32) PictBridge-compatible printer(33) USB port(34) Card slot(35) Computer
* 1: With some lenses, Off Camera Shoe Cord OC-E3 may be required.* 2: Also available for purchase separately.* 3: Camera end: USB Micro-B. A genuine Canon accessory is also available (Interface Cable IFC-600PCU).* 4: Use a commercially available cable no longer than 2.5 m (8.2 ft.). The camera end is Type D.
677

ISO Speed in Movie Recording
In [ ]/[ ] mode, when set to ISO Auto
ISO speed is automatically set in a range of ISO 100–12800 for Full HD/HD movies andISO 100–6400 for 4K movies.The maximum value in the automatic setting range is expanded to H (equivalent to ISO25600) in Full HD/HD movie recording when [ISO expansion] in [ : CustomFunctions(C.Fn)] is set to [1:Enable] ( ) and then [Max for Auto] in [ : ISOspeed settings] is set to [H(25600)] ( ). Note that in 4K movie recording, maximumISO speed expansion is not available ([Max for Auto] is not available), even with [ISOexpansion] set to [1:Enable]).With [ : Highlight tone priority] set to [Enable] ( ), the minimum value in theautomatic setting range is ISO 200. Maximum ISO speed is not expanded, even with[Max for Auto] set to [H (25600)].
In [ ] mode with ISO speed set manually
ISO speed can be set manually in a range of ISO 100–12800 for Full HD/HD moviesand ISO 100–6400 for 4K movies.The maximum value in the manual setting range is expanded to H (equivalent to ISO25600) in Full HD/HD movie recording when [ISO expansion] in [ : CustomFunctions(C.Fn)] is set to [1:Enable]. Note that in 4K movie recording, maximum ISOspeed expansion is not available ([H] is not displayed), even with [ISO expansion] set to[1:Enable]).With [ : Highlight tone priority] set to [Enable] ( ), the minimum value in themanual setting range is ISO 200. Maximum ISO speed is not expanded, even with [ISOexpansion] set to [1:Enable].
678

Information Display
Quick Control Screen
Still Photo Shooting Screen
Movie Recording Screen
Scene Icons
Playback Screen
679

Quick Control Screen
In Creative Zone modes (other than the shooting functionsscreen)
(1) AF method(2) AF operation(3) Drive mode(4) Metering mode(5) Image quality(6) Movie recording size(7) Return(8) White balance(9) Picture Style(10) Auto Lighting Optimizer(11) Creative filters(12) Still image aspect ratio
680

Shooting functions screen in Creative Zone modes
(1) Shutter speed(2) Shooting mode*(3) Exposure compensation/AEB setting(4) White balance(5) Picture Style(6) White balance correction(7) AF method(8) AF operation(9) Drive mode(10) Aperture value(11) ISO speed(12) Flash exposure compensation(13) Auto Lighting Optimizer(14) Metering mode(15) White balance bracketing(16) Image quality(17) Self-timer(18) Return* These functions cannot be set with Quick Control.
681
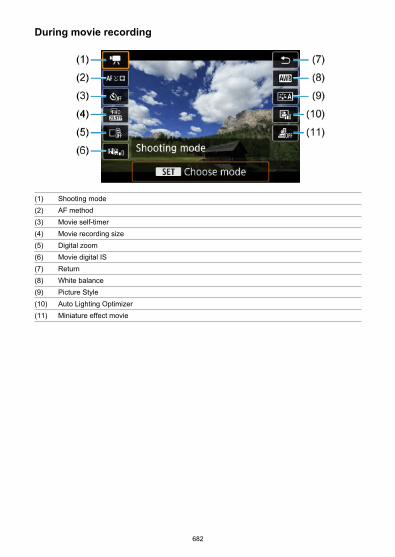
During movie recording
(1) Shooting mode(2) AF method(3) Movie self-timer(4) Movie recording size(5) Digital zoom(6) Movie digital IS(7) Return(8) White balance(9) Picture Style(10) Auto Lighting Optimizer(11) Miniature effect movie
682
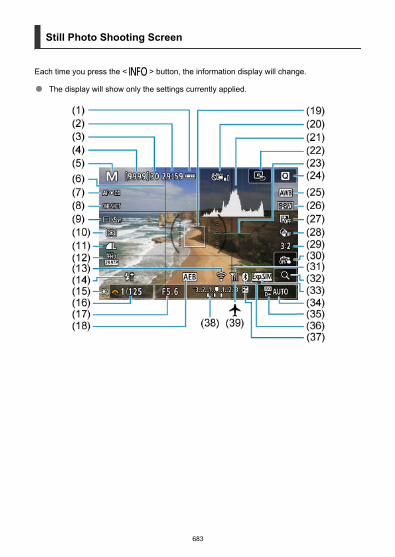
Still Photo Shooting Screen
Each time you press the < > button, the information display will change.
The display will show only the settings currently applied.
683

(1) Battery level(2) Movie recording time available(3) Maximum burst(4) Number of available shots/Sec. until self-timer shoots(5) Shooting mode/Scene icon(6) Grid(7) AF method(8) AF operation(9) Drive mode(10) Metering mode(11) Image quality(12) Movie recording size(13) Wi-Fi function(14) Warning to use flash (blinking)/Flash ready (on)/FE lock/High-speed sync(15) AE lock(16) Shutter speed(17) Aperture value(18) AEB(19) AF point (1-point AF)(20) Warning: Deactivating Movie digital IS recommended(21) Histogram (Brightness/RGB)(22) Set AF point to center(23) Electronic level(24) Quick Control button(25) White balance/White balance correction(26) Picture Style(27) Auto Lighting Optimizer(28) Creative filters(29) Still image aspect ratio(30) Touch Shutter(31) Wi-Fi signal strength(32) Magnify button(33) Exposure simulation(34) ISO speed(35) Highlight tone priority(36) Bluetooth function(37) Exposure compensation(38) Exposure level indicator(39) Airplane mode
684

Note
You can specify the information displayed in response to pressing the < >button ( ).The electronic level is not displayed when the camera is connected via HDMI to atelevision.Other icons may be displayed temporarily after setting adjustments.
685

Movie Recording Screen
Each time you press the < > button, the information display will change.
The display will show only the settings currently applied.
686

(1) Sound recording off indicator(2) Movie orientation information(3) Battery level(4) Movie recording time available/Elapsed recording time(5) Movie recording mode(6) Grid(7) AF method(8) Movie self-timer(9) Movie recording size(10) Digital zoom(11) Movie digital IS(12) Movie Servo AF(13) AE lock(14) Shutter speed(15) Audio recording level indicator (manual/line input)(16) Aperture value(17) Exposure compensation(18) Temperature warning(19) AF point (1-point AF)(20) Histogram (for manual exposure)(21) Set AF point to center(22) Electronic level(23) Quick Control button(24) Movie recording start button(25) White balance/White balance correction(26) Picture Style(27) Auto Lighting Optimizer(28) Miniature effect movie(29) Wi-Fi signal strength(30) Magnify button(31) Bluetooth function(32) ISO speed(33) Highlight tone priority(34) Wi-Fi function(35) Airplane mode
687

Caution
You can specify the information displayed in response to pressing the < >button ( ).The electronic level is not displayed when the camera is connected via HDMI to atelevision.The electronic level, grid lines, and histogram cannot be displayed during movierecording (and if they are currently displayed, recording a movie will clear thedisplay).When movie recording starts, the movie recording remaining time will change to theelapsed time.
Note
Other icons may be displayed temporarily after setting adjustments.
688

Subject
Background
Scene Icons
In < > shooting mode, the camera detects the type of scene and sets all settingsaccordingly. The detected scene type is indicated in the upper left of the screen.
People Subjects Other Than PeopleBackground
ColorIn MotionNature/OutdoorScene
In Motion At CloseRange
BrightGray
Backlit
Blue Sky IncludedLight blue
Backlit
Sunset *1 *1 Orange
Spotlight
Dark blueDark
With Tripod *1 *1
* 1: Icons of scenes selected from those that can be detected are displayed.
Caution
Icons displayed may not match the actual scene, depending on the scene, shootingconditions, lens used, and other factors.
689
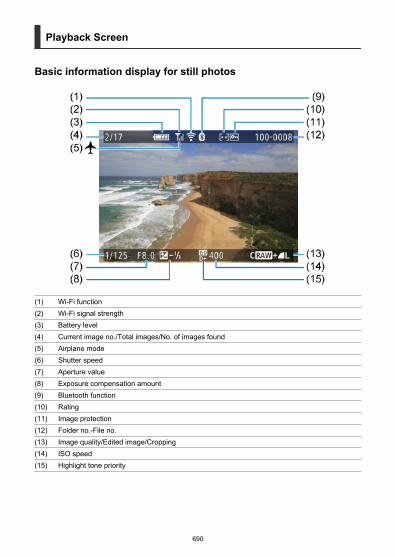
Playback Screen
Basic information display for still photos
(1) Wi-Fi function(2) Wi-Fi signal strength(3) Battery level(4) Current image no./Total images/No. of images found(5) Airplane mode(6) Shutter speed(7) Aperture value(8) Exposure compensation amount(9) Bluetooth function(10) Rating(11) Image protection(12) Folder no.-File no.(13) Image quality/Edited image/Cropping(14) ISO speed(15) Highlight tone priority
690

Caution
You can specify the information displayed in response to pressing the < >button ( ).If the image was taken by another camera, certain shooting information may not bedisplayed.It may not be possible to play back images taken with this camera on othercameras.
691

Detailed information display for still photos
(1) Shutter speed(2) Shooting mode(3) Aperture value(4) White balance(5) White balance correction amount(6) Exposure compensation amount(7) Shooting date and time(8) Histogram (Brightness/RGB)(9) ISO speed(10) Highlight tone priority(11) Metering mode(12) Flash photography/Flash exposure compensation amount(13) Auto Lighting Optimizer(14) Picture Style/Settings(15) Image quality/Edited image/Cropping(16) File size
* When you shoot in RAW+JPEG image quality, the RAW image file size will be displayed.* Lines indicating the image area will be displayed for images taken with the aspect ratio set ( ) and with RAW or RAW+JPEGset for image quality.* For images with added cropping information, lines are shown to indicate the image area.
* During flash photography without flash exposure compensation, [ ] will be displayed.
* [ ] indicates Creative filter shots, or images saved after resizing, cropping, or frame-grabbing.
692

Detailed information display for movies
(1) Movie playback(2) Movie recording mode/Time-lapse movie/Video snapshot(3) Movie orientation information(4) Image size(5) Frame rate(6) Movie digital IS(7) Recording time(8) Movie recording format(9) Movie compression method
* For simplicity, explanations are omitted for items that are also included in basic/detailed information display for still photos,which are not shown here.
Note
During movie playback, “*, *” is displayed for the [Fineness] and [Threshold]parameters of [Sharpness] in [Picture Style].
693

Specifications
Type
Type: Digital single-lens non-reflex AF/AE camera with built-in flashLens mount: Canon EF-M mountCompatible lenses: Canon EF-M lens group* Using mount adapter EF-EOS M: Canon EF or EF-S lenses* RF mount lenses cannot be usedLens focal length: Approx. 1.6 times the focal length indicated on the lens
Image sensor
Type: CMOS sensor (Supports Dual Pixel CMOS AF)
Screen size Approx. 22.3 × 14.9 mm
Effective pixels*1 Approx. 24.1 megapixels
* 1: Rounded to the nearest 100,000.
Recording system
Image recording format: Compliant with DCF 2.0 and Exif 2.31** Supports time difference information
Still photo image type and extension
Extension Bit depth
JPEG JPG 8 bit
RAWCR3 14 bit (14 bit A/D conversion*1), Canon Original
C-RAW
* 1: For continuous shooting and Silent Mode, 12-bit A/D conversion is used.
694
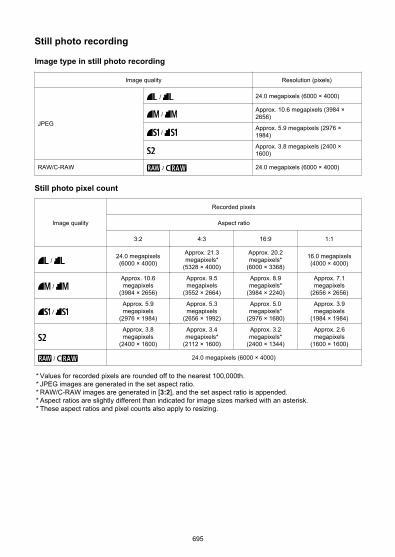
Still photo recording
Image type in still photo recording
Image quality Resolution (pixels)
JPEG
/ 24.0 megapixels (6000 × 4000)
/ Approx. 10.6 megapixels (3984 ×2656)
/ Approx. 5.9 megapixels (2976 ×1984)
Approx. 3.8 megapixels (2400 ×1600)
RAW/C-RAW / 24.0 megapixels (6000 × 4000)
Still photo pixel count
Image quality
Recorded pixels
Aspect ratio
3:2 4:3 16:9 1:1
/ 24.0 megapixels(6000 × 4000)
Approx. 21.3megapixels*
(5328 × 4000)
Approx. 20.2megapixels*
(6000 × 3368)
16.0 megapixels(4000 × 4000)
/ Approx. 10.6megapixels
(3984 × 2656)
Approx. 9.5megapixels
(3552 × 2664)
Approx. 8.9megapixels*
(3984 × 2240)
Approx. 7.1megapixels
(2656 × 2656)
/ Approx. 5.9megapixels
(2976 × 1984)
Approx. 5.3megapixels
(2656 × 1992)
Approx. 5.0megapixels*
(2976 × 1680)
Approx. 3.9megapixels
(1984 × 1984)
Approx. 3.8megapixels
(2400 × 1600)
Approx. 3.4megapixels*
(2112 × 1600)
Approx. 3.2megapixels*
(2400 × 1344)
Approx. 2.6megapixels
(1600 × 1600)
/ 24.0 megapixels (6000 × 4000)
* Values for recorded pixels are rounded off to the nearest 100,000th.* JPEG images are generated in the set aspect ratio.* RAW/C-RAW images are generated in [3:2], and the set aspect ratio is appended.* Aspect ratios are slightly different than indicated for image sizes marked with an asterisk.* These aspect ratios and pixel counts also apply to resizing.
695

Still photo file size / Number of possible shots / Maximum burst for continuousshooting
Image quality File size(Approx. MB)
Possible shots(Approx.)
Maximum burst(Approx.)
8.4 3600 36
4.5 6610 35
4.6 6480 34
2.6 11400 34
3.1 9690 34
1.8 16010 34
1.8 16340 34
27.2 1120 10
15.8 1930 16
+ 35.6 850 10
+ 24.2 1250 14
* The number of possible shots and maximum burst apply to a UHS-I compliant 32 GB card based onCanon testing standards.* File size, number of possible shots, and maximum burst vary depending on shooting conditions (includingsubject, ISO speed, Picture Style, and Custom Function).
696

Movie recording
Movie recording format: MP4
Estimated recording time, movie bit rate, and file size
Movie recording size
Total recording time on each card(approx.) Movie bit rate (approx.)
/ File size (approx.)32 GB 128 GB
4K (UHD)3840 × 2160
23.98 fps25.00 fps IPB (Standard) 35 min. 2 hr. 21 min. 120 Mbps
861 MB/min.
Full HD1920 × 1080
59.94 fps50.00 fps
IPB (Standard)
1 hr. 10 min. 4 hr. 43 min. 60 Mbps432 MB/min.
29.97 fps23.98 fps25.00 fps
2 hr. 20 min. 9 hr. 23 min. 30 Mbps217 MB/min.
HD1280 × 720
59.94 fps50.00 fps
IPB (Standard)2 hr. 42 min. 10 hr. 49 min. 26 Mbps
188 MB/min.
119.88 fps100.00 fps 1 hr. 22 min. 5 hr. 28 min. 52 Mbps
372 MB/min.
Movie recording notes* Bit rate indicates video output only, audio is not included.* File size and time including video output and audio.* With [ : Digital IS] set to [Disable].* Movie recording stops automatically when the recording time reaches 29:59 (or 7:29 for HD high framerate movies).
Card performance requirements (Movie recording)
Movie recording size Memory cards
4K (UHD)3840 × 2160 IPB (Standard) 23.98 fps
25.00 fpsUHS-I, UHS Speed Class 3or higher
Full HD1920 × 1080 IPB (Standard)
59.94 fps50.00 fps
SD Speed Class 10 orhigher
29.97 fps23.98 fps25.00 fps
SD Speed Class 6 or higher
HD1280 × 720 IPB (Standard)
59.94 fps50.00 fps SD Speed Class 4 or higher
119.88 fps100.00 fps
SD Speed Class 10 orhigher
Time-lapse movies (4K)3840 × 2160 ALL-I 29.97 fps
25.00 fpsCard with read speed of 40MB/s or higher
Time-lapse movies (FullHD)1920 × 1080
ALL-I 29.97 fps25.00 fps
Card with read speed of 20MB/s or higher
* With [ : Digital IS] set to [Disable].
697

Recording microphone
Built-in microphone: Stereo microphonesExternal microphone terminal: 3.5 mm diameter stereo mini jack
Recording media
Recording media: SD, SDHC, and SDXC memory cards
SD speed class Supported
UHS speed class Supported
UHS-I Supported
Viewfinder (electronic viewfinder)
Type: OLED color electronic viewfinderScreen size: 0.39 inchDot count: Approx. 2,360,000 dots
Specifications
Coverage Approx. 100%(at L image quality, an aspect ratio of 3:2, and approx. 22 mm eyepoint)
Eyepoint Approx. 22 mm (at -1 m-1 from eyepiece lens end)
Dioptric adjustment Approx. -3.0 to +1.0 m-1 (dpt)
Screen
Type: TFT color, liquid-crystal monitorScreen size: 3.0-inch (aspect ratio of 3:2)Dot count: Approx. 1,040,000 dotsAngle of view: Approx. 170° vertically and horizontally
Adjustment features
Screen brightness Possible (7 levels)
Color tone adjustmentNot supported
Fine-tuning color tone
Touch-screen panel specifications: Capacitive sensing
698

HDMI output
HDMI video / audio output: HDMI micro OUT terminal (Type D) / CEC not supportedHDMI resolution: Auto / 1080p
AutofocusItem Still photo shooting Movie recording
Focusingmethod Dual Pixel CMOS AF Dual Pixel CMOS AF
(Contrast detection method at 4K*1)
Focusingoperation
(1) Autofocus
• One-Shot AF• Servo AF
(2) Manual focus
(1) Autofocus
• Movie Servo AF• One-Shot AF
(2) Manual focus
AF zone
Horizontal: approx. 88% × Vertical: approx.100%, or Horizontal: approx. 80% × Vertical:approx. 80%* Automatic switching based on lens
Horizontal: approx. 88% × Vertical: approx.100%, or Horizontal: approx. 80% × Vertical:approx. 95%* Automatic switching based on lens
Number of AFzonesavailable forautomaticselection
Max. 143 zones* May vary depending on settings.
Max. 117 zones* May vary depending on settings.
Selectablepositions for AFpoint
Max. 3975 positions* Aspect ratio 3:2* At Horizontal: approx. 88% × Vertical: approx. 100%* When selecting with up, down, left and right buttons
Max. 3375 positions* Full HD* At Horizontal: approx. 88% × Vertical: approx. 100%* When selecting with up, down, left and right buttons
Eye detectionSupported* When set to [ +Tracking]* Except for Fish-eye effect and Miniature effect
Supported* When set to [ +Tracking]* Except for Miniature effect movie
Focusingbrightness range
EV -4 to 18* With an f/1.4 lens, center AF point, One-Shot AF, atroom temperature, ISO 100
EV -2 to 18* With an f/1.4 lens, center AF point, One-Shot AF, atroom temperature, ISO 100* Full HD at 29.97 fps / 23.98 fps / 25.00 fps
* 1: When recording 4K movies with Contrast AF, focusing may take longer compared to full HD and HDmovie recording, and it may be difficult to focus with certain lenses.
699

Exposure control
Metering functions under various shooting conditions
Item Still photo shooting Movie recording
Metering mode 384-zone (24 × 16) metering using the image sensor
Evaluativemetering Supported When faces are detected with [ +Tracking]
automatically set
Partial metering Supported: approx. 5.8% of the screen –
Spot metering Supported: approx. 2.9% of the screen –
Center-weightedaverage Supported
Automatically set for [1-point AF], [Zone AF],and when face recognition is not performed with[ +Tracking]
Meteringbrightness range* At roomtemperature, ISO100
EV -2 to 20 EV 0 to 20
ISO speed (Recommended exposure index) in still photo shooting
Normal ISO speed, expanded ISO speed (Still photo shooting)
Normal ISO speed ISO 100–25600
Expanded ISO speed H (51200) equivalent
* When manually set* May vary depending on shooting mode and settings
ISO speed range when set manually (Still photo shooting)
Highlight tone priority
Disable Enable
ISO expansionDisable ISO 100–25600 ISO 200–25600
Enable ISO 100–H (51200)equivalent ISO 200–25600
* The normal ISO speed range can be set in 1/3-stop increments
ISO Auto range setting (Still photo shooting)
Maximum setting*1 Maximum 400–25600 (in 1-stop increments)
* 1: The default setting is [Max for Auto: 6400]
700

ISO Auto details (Still photo shooting)
Shooting modeISO Auto range
No flash Flash on
Creative ZoneISO 100 to
ISO Auto maximum settingvalue
ISO 100–1600
*1
Basic Zone
Scene Intelligent Auto< >
ISO 100–6400
Using built-in flashISO 100–3200
Using external flashISO 100–1600
Special scene < > Depends on the shooting mode
Creative filters ISO 100–6400 ISO 100–1600
* 1: ISO 400 when BULB is set
Movie recording ISO speed (Recommended exposure index)
Normal ISO speed, expanded ISO speed (Movie recording)
Full HD / HD 4K
Normal ISO speed ISO 100–12800 ISO 100–6400
Expanded ISO speed H (25600) equivalent –
* When manually set* May vary depending on settings
ISO speed range when set manually (Movie recording)
Highlight tone priority
Disable Enable
ISO expansionDisable ISO 100–12800
ISO 200–12800(in 1/3-stop increments)
Enable ISO 100–H (25600)equivalent
* The normal ISO speed range can be set in 1/3-stop increments* Maximum ISO 6400 for 4K video (no expansion)* Maximum ISO 6400 with [ : Digital zoom] set to an option other than [Disable]
ISO Auto range setting (Movie recording)
Maximum setting*1 Maximum 6400 / 12800 / when expanded: H (25600) equivalent
* 1: The default setting is [Max for Auto: 12800]
701

Shutter
Still photo shooting
Type
Electronically controlled focal-plane shutter* Electronic 1st / mechanical 2nd curtain* Except when Silent Mode is setRolling shutter, using the image sensor* Electronic shutter* When Silent Mode is set
Shutter speedCreative Zone: 1/4000–30 sec., Bulb*1
Basic Zone: 1/4000–1 sec.*2
Maximum flash sync speed: 1/200 sec.
* 1: Shooting mode: In manual recording mode only* 2: Varies depending on shooting mode.
Movie recording
Type Rolling shutter, using the image sensor* Electronic shutter
Shutter speedMovie recording with auto exposure: 1/4000–1/25*1 sec.Movies with manual exposure recording: 1/4000–1/8 sec.In time-lapse movie recording: 1/4000–1/30 sec. (NTSC), or 1/25 sec. (PAL)
* 1: Varies by frame rate.
Built-in flash
Type: Retractable manual pop-up flashRetraction method: ManualGuide number: G. No.: Approx. 5 (ISO 100, m) / 16.4 (ISO 100, feet)Flash range (examples)
ISO speed
Lens: EF-M15-45mm f/3.5-6.3 IS STM
Wide-angle end: f/3.5 Telephoto end: f/6.3
Approx. meters Approx. feet Approx. meters Approx. feet
100 0.5–1.0 1.6–3.3 0.5–0.6 1.6–2.0
1600 1.3–4.0 4.3–13.1 0.7–2.5 2.3–8.2
25600 5.1–15.8 16.7–51.8 2.6–10.1 8.5–33.1
* Rounded to the second decimal place* Suitable exposure may not be obtained when shooting distant subjects at high ISO speeds, because pre-firing metering limits may be exceeded
External flash
Sync contacts: Hot shoe: X-sync contact* Maximum flash sync speed: 1/200 sec.* No PC terminal providedFlash mode: E-TTL II metering
702

Drive
Drive mode and continuous shooting speed
Single shooting ○
High-speed continuous shooting*3One-Shot AF Max. approx. 10 shots/sec.*1
Servo AF Max. approx. 7.4 shots/sec.*1
Low-speed continuous shooting*3One-Shot AF Max. approx. 4.0 shots/sec.*1
Servo AF Max. approx. 4.0 shots/sec.*1
Self-timer:10 sec. / remote control*2 ○
Self-timer:2 sec. / remote control*2 ○
Self-timer: Continuous ○ (2–10 shots)
* 1: With a fully charged Battery Pack LP-E12, 1/1000 sec. or faster shutter speed, open aperture, roomtemperature (23°C/73°F)
* 2: BR-E1: Supported / RC-6: Not supported* 3: RAW / C-RAW is processed with 12-bit A/D conversion
PlaybackItem Still photos Movies
Magnify zoomdisplay
1.5×–10×* Can be activated by double-tapping –
AF point display ○ –
Highlight alert ○* Detailed information display only
Ratings OFF / ★ to ★★★★★Select images / Select range / All images in folder / All images on card
Image search Search conditions: Rating / Date / Folder / Protect / Type of file
Protect Select images / Select range / All images in folder / Unprotect all images in folder / All images oncard / Unprotect all images on card
Resizing ○ –
Cropping ○ –
703

Print order (DPOF)
System: Compliant with DPOF Version 1.1
External interface
Digital terminal
Terminal type USB Micro-B
Transmission Hi-Speed USB (USB 2.0) equivalent
Applications For PC communicationFor printer connection
HDMI output terminal: Type D (Resolution switches automatically)* CEC not supported* [For NTSC] / [For PAL] settings are required to match the video format of the TV you are connectingtoExternal microphone input terminal: Compatible with the 3.5 mm diameter stereo miniplug
Power source
Battery: Battery Pack LP-E12 × 1* Can be AC-driven using AC Adapter CA-PS700 and DC Coupler DR-E12
Number of still photos that can be taken
Shooting method TemperatureShooting conditions
AE: 100%(Flash off) Flash: 50%
Viewfinder shooting23°C / 73°F Approx. 275 shots Approx. 250 shots*1
0°C / 32°F Approx. 245 shots Approx. 230 shots
On-screen shooting23°C / 73°F Approx. 320 shots Approx. 305 shots*1
0°C / 32°F Approx. 305 shots Approx. 280 shots
* With a fully charged LP-E12* With [ : Disp. performance] set to [Power saving] (default)* 1: CIPA testing standards compliant.
704

Available operating time
Shooting method Temperature Available operatingtime
Time available for bulb exposure 23°C / 73°F Approx. 3 hr. 15 min.
Time available formovie recording(continuousrecording)*1
4K 23.98 fps On-screen shooting 23°C / 73°F Approx. 1 hr. 35 min.
Full HD 29.97 fps On-screen shooting23°C / 73°F Approx. 2 hr. 10 min.
0°C / 32°F Approx. 2 hr. 10 min.
Time available fortime-lapse movierecording
Full HD recordinginterval 5 sec.
Screen on 23°C / 73°F Approx. 2 hr. 25 min.
Screen off 23°C / 73°F Approx. 3 hr. 35 min.
Time available forcontinuous playback Movies (Normal playback) 23°C / 73°F Approx. 3 hr. 45 min.
* With a fully charged LP-E12* 1: With [ : Movie Servo AF] set to [Disable], and automatically stopping/resuming after the time per
recording is reached
Battery check: Automatic battery check with 3-level display when the power switch is set toON
Battery information: You can check the remaining capacity (3 levels)
Wi-Fi
Wi-Fi standards
Wi-Fi standards Transmission method
IEEE802.11b DS-SS modulation
IEEE802.11gOFDM modulation
IEEE802.11n
Transmission frequency (central frequency)
Frequency 2412–2462 MHz
Channels 1–11 channels
705

Connection, authentication, and data encryption methods
Connection method Authentication Encryption
Camera access pointWPA2-PSK AES
Open Disable
Infrastructure
OpenWEP
Disable
Shared key WEP
WPA-PSKTKIPAES
WPA2-PSK
Bluetooth
Standards compliance: Bluetooth Specification Version 4.2 compliant (Bluetooth LowEnergy technology)Transmission method: GFSK modulation
Dimensions and weight
Dimensions: Approx. 116.3 (W) × 88.1 (H) × 58.7 (D) mmApprox. 4.58 (W) × 3.47 (H) × 2.31 (D) in.
Weight
Exterior color Weight
Body(including battery and memory card)*1
Black Approx. 387 gApprox. 13.65 oz.
White Approx. 388 gApprox. 13.69 oz.
Body onlyBlack Approx. 350 g
Approx. 12.35 oz.
White Approx. 351 gApprox. 12.38 oz.
* Without body cap
Operating environment
Operating temperature: 0–40°C / 32–104°FOperating humidity: 85% or less
All data above is based on Canon testing standards and CIPA (Camera & Imaging Products Association)testing standards and guidelines.Dimensions and weight listed above are based on CIPA Guidelines (except weight for camera body only).Product specifications and the exterior are subject to change without notice.If a problem occurs with a non-Canon lens attached to the camera, consult the respective lens manufacturer.
706

Trademarks and Licensing
Trademarks
About MPEG-4 Licensing
Accessories
Trademarks
Adobe is a trademark of Adobe Systems Incorporated.Microsoft and Windows are trademarks or registered trademarks of MicrosoftCorporation in the United States and/or other countries.App Store and macOS are trademarks of Apple Inc., registered in the U.S. and othercountries.Google Play and Android are trademarks of Google LLC.IOS is a trademark or registered trademark of Cisco in the U.S. and other countries andis used under license.QR Code is a trademark of Denso Wave Inc.SDXC logo is a trademark of SD-3C, LLC.HDMI, HDMI logo, and High-Definition Multimedia Interface are trademarks or registeredtrademarks of HDMI Licensing LLC.The Wi-Fi CERTIFIED logo and the Wi-Fi Protected Setup mark are trademarks of theWi-Fi Alliance.The Bluetooth® word mark and logos are registered trademarks owned by BluetoothSIG, Inc. and any use of such marks by Canon Inc. is under license. Other trademarksand trade names are those of their respective owners.All other trademarks are the property of their respective owners.
707

About MPEG-4 Licensing
“This product is licensed under AT&T patents for the MPEG-4 standard and may be used forencoding MPEG-4 compliant video and/or decoding MPEG-4 compliant video that wasencoded only (1) for a personal and non-commercial purpose or (2) by a video providerlicensed under the AT&T patents to provide MPEG-4 compliant video. No license is grantedor implied for any other use for MPEG-4 standard.”
THIS PRODUCT IS LICENSED UNDER THE AVC PATENT PORTFOLIO LICENSE FORTHE PERSONAL USE OF A CONSUMER OR OTHER USES IN WHICH IT DOES NOTRECEIVE REMUNERATION TO (i) ENCODE VIDEO IN COMPLIANCE WITH THE AVCSTANDARD (''AVC VIDEO'') AND/OR (ii) DECODE AVC VIDEO THAT WAS ENCODED BYA CONSUMER ENGAGED IN A PERSONAL ACTIVITY AND/OR WAS OBTAINED FROMA VIDEO PROVIDER LICENSED TO PROVIDE AVC VIDEO. NO LICENSE IS GRANTEDOR SHALL BE IMPLIED FOR ANY OTHER USE. ADDITIONAL INFORMATION MAY BEOBTAINED FROM MPEG LA, L.L.C. SEE HTTP://WWW.MPEGLA.COM
* Notice displayed in English as required.
708

Accessories
Use of genuine Canon accessories is recommendedThis product is designed to achieve optimum performance when used with genuine Canonaccessories. Therefore, using this product with genuine accessories is highly recommended.Canon shall not be liable for any damage to this product and/or accidents such asmalfunction, fire, etc. caused by the failure of non-genuine Canon accessories (e.g., aleakage and/or explosion of a battery). Please note that repairs arising out of the malfunctionof non-genuine accessories will not be covered by the warranty for repairs, although youmay request such repairs on a chargeable basis.
Caution
Battery Pack LP-E12 is dedicated to Canon products only. Using it with anincompatible battery charger or product may result in malfunction or accidents forwhich Canon cannot be held liable.
709