7.2 user guide - sage crm
TRANSCRIPT

7.2User Guide
Sage CRM

© Copyright 2013 Sage Technologies Limited, publisher of this work. All rights reserved.
No part of this documentation may be copied, photocopied, reproduced, translated, microfilmed, or otherwise duplicated onany medium without prior written consent of Sage Technologies Limited.
Use of the software programs described herein and this documentation is subject to the End User Licence Agreementenclosed in the software package, or accepted during system sign-up.
Sage, and the Sage logo are registered trademarks or trademarks of The Sage Group PLC. All other marks are trademarks orregistered trademarks of their respective owners.

Contents
Chapter 1: About This Guide 1-1
How this Guide is Organized 1-1
Chapter Format 1-1
Chapter Summary 1-1
Introduction to CRM 1-3
Chapter 2: Getting Started 2-1
Starting the Logon Page 2-1
Logging On 2-1
Changing Your Password 2-2
Resetting Your Password 2-2
Logging Off 2-2
Basic Screen Elements 2-2
Context Area 2-3
Tabs 2-3
Panel 2-3
Hyperlinks 2-4
Action Buttons 2-4
Menu Buttons 2-4
Menu Button Pop Out Lists 2-4
Recent List 2-4
Tabs 2-5
Company Tabs 2-5
My CRM Tabs 2-6
Navigating 2-7
Tab 2-7
Enter 2-7
Right Click 2-7
Hover 2-7
Today’s Date 2-8
Hot Keys 2-8
User Guide Contents – i
Contents
Drop-down Lists 2-8
Next and Previous Arrows 2-8
Check Boxes 2-9
Go Arrows 2-9
Advanced Search Select 2-9
Required Fields 2-10
On-screen Coaching 2-10
Getting Help 2-10
Chapter 3: Finding Information 3-1
Basic Search Techniques 3-1
Pop Out List or Menu Button with Context Area 3-1
Find Menu and Action Buttons 3-2
Repeating an Earlier Search 3-2
Resetting Search Criteria 3-3
Searching for a Person 3-3
Searching for a Company 3-3
Finding an Opportunity 3-4
Finding a Case 3-4
Combining Search Criteria 3-5
Wild Card Search 3-6
Date Field Search 3-6
Numeric Field Search 3-6
Using Advanced Find 3-7
Example: Searching for Companies using Advanced Find 3-7
Example: Searching for People using Advanced Find 3-8
Using Keyword Search 3-9
Searching Using Keyword Search 3-11
Using an Existing Saved Search 3-13
Creating a New Saved Search 3-13
Updating a Saved Search 3-14
Deleting a Saved Search 3-14
Creating Saved Searches for all Users 3-14
Contents – ii Sage CRM

Contents
Running Actions on Search Lists 3-14
Counting 3-15
Filtering 3-15
Sorting 3-15
Setting a Default Find Page 3-16
Setting the Size of the Search Results List 3-16
Chapter 4: Adding Customer Information 4-1
Pop Out List or Menu Button with Context Area 4-2
Adding a New Company 4-2
Company Fields 4-4
Address Fields 4-5
Phone and E-mail Fields 4-5
Person Fields 4-6
Person Phone Details Fields 4-7
Person E-mail Fields 4-7
Validation Errors 4-7
Territory Management 4-7
Changing Company Details 4-8
Changing Company Address Details 4-8
Changing Person Details 4-9
Adding a New Address to an Existing Company 4-9
Adding a New Person to an Existing Company 4-9
Maintaining Address Links 4-10
Assigning a Different Address to a Person 4-12
Adding a Private Address to a Person 4-12
Changing Phone/E-mail Details 4-12
Adding a Company that has Multiple Sites 4-12
Working with the Relationships tab 4-13
Adding a New Relationship 4-13
Relationship Fields 4-14
Deleting a Relationship 4-15
Adding a Note 4-15
User Guide Contents – iii

Contents
Editing a Company or Person Note 4-16
Building a Company Team 4-16
Adding a Person without a Company Link 4-16
Reassigning a Person to a Company 4-17
Preventing Duplicate Entries 4-17
Merging Duplicate Companies 4-18
Merging Duplicate People 4-19
Deleting Company or Person Records 4-20
Chapter 5: Appointments and Tasks 5-1
Creating a Task 5-1
Creating an Appointment 5-2
Scheduling a Callback 5-2
Communication Fields 5-3
Scheduling Unlinked Communications 5-9
Scheduling a Quick Appointment or Task 5-9
Notifications 5-10
Changing the Status of a Communication 5-10
Finding a Communication 5-11
Adding Attachments to Tasks 5-11
Reassign an Existing Task to a Colleague 5-12
Scheduling a Task for a Colleague 5-12
Checking a Colleague’s Calendar 5-12
Navigating your Calendar 5-13
Meeting Planner 5-15
Reviewing the Contact History 5-16
Inviting External Attendees to a Meeting 5-16
Recurring Appointments 5-17
Creating a Recurring Appointment 5-17
Changing a Recurring Appointment 5-18
Deleting a Recurring Appointment 5-19
Deleting a Communication 5-19
Chapter 6: E-mail 6-1
Contents – iv Sage CRM
Contents
Setting a Default E-mail Template 6-1
Sending an E-mail 6-1
E-mail Shortcut Keys 6-4
Handling Inbound E-mails 6-4
Replying to an E-mail 6-4
Using Microsoft Outlook to Send E-mails 6-4
Converting E-mails 6-5
Filing Inbound and Outbound E-mails 6-5
E-mail Out 6-5
E-mail In 6-6
Rules Applied to E-mail Handling 6-7
Chapter 7: Exchange Integration 7-1
What is Exchange Integration? 7-1
Getting Started with Exchange Integration 7-1
Do I need to install anything to get Exchange Integration working? 7-1
How do I know my mailbox is synchronizing with CRM? 7-2
Does everything in my mailbox synchronize to CRM? 7-2
Synchronizing Contacts 7-2
Contacts: CRM to Exchange 7-2
Updating and Deleting Contacts in CRM 7-3
Contacts: Exchange to CRM 7-4
Updating and Deleting Contacts in Exchange 7-4
Synchronizing Tasks 7-4
Tasks: CRM to Exchange 7-5
Tasks: Exchange to CRM 7-5
Synchronizing Appointments 7-6
Exchange to CRM 7-6
CRM to Exchange 7-7
Exchange to CRM and CRM to Exchange 7-7
Appointments: CRM to Exchange 7-7
Appointments: Exchange to CRM 7-8
Stub Appointments 7-9
User Guide Contents – v

Contents
Reviewing Exchange Integration Logs 7-10
Reviewing Skipped Items 7-10
Installing the Outlook Plug-in for Exchange Integration 7-10
Uninstalling the Outlook Plug-in 7-12
Working with the Outlook Plug-in for Exchange Integration 7-12
File E-mail 7-13
Add Contact 7-13
Chapter 8: Classic Outlook Integration 8-1
Downloading the Outlook Plug-in for Classic Outlook Integration 8-1
Using CRM from within Outlook (Classic Outlook Integration) 8-3
Synchronizing Contacts (Classic Outlook Integration) 8-6
Adding Contacts: CRM to Outlook (Classic Outlook Integration) 8-6
Adding Contacts: Outlook to CRM (Classic Outlook Integration) 8-7
Changing and Deleting Contacts (Classic Outlook Integration) 8-8
Viewing Detailed Contact Information from Outlook (Classic Outlook Integration) 8-8
Synchronizing Appointments and Tasks (Classic Outlook Integration) 8-9
Outlook Appointments and Tasks (Classic Outlook Integration) 8-9
CRM Appointments and Tasks (Classic Outlook Integration) 8-9
Working with Appointments, Meetings and Multiple Users (Classic OutlookIntegration) 8-10
Recurring Appointments and Tasks (Classic Outlook Integration) 8-11
All Day Events (Classic Outlook Integration) 8-12
Reviewing Synchronization Conflicts (Classic Outlook Integration) 8-12
Reviewing Skipped Items (Classic Outlook Integration) 8-13
Attaching Shared Documents to Outlook E-mails (Classic Outlook Integration) 8-14
Filing E-mails from Outlook to CRM (Classic Outlook Integration) 8-15
Reinstalling the Outlook Plug-in for Classic Outlook Integration 8-16
Uninstalling the Outlook Plug-in for Classic Outlook Integration 8-16
Chapter 9: Managing Documents 9-1
Downloading the CRM Plug-in 9-1
Mail Merge Templates 9-2
Carrying out a Mail Merge 9-2
Contents – vi Sage CRM

Contents
Carrying out a Mail Merge to Multiple Contacts 9-3
Uploading an Image File 9-4
Creating a New Template and Adding Merge Fields 9-4
Creating a Quote or Order Template 9-5
Creating a New Template in Microsoft Word 9-6
Uploading a Local Word Document 9-7
Tracking Documents in the Documents Tab 9-7
Retrieving a Merged Document from the Documents Tab 9-8
Add a Document to the Documents Tab 9-9
Document Drop 9-9
Drop Files Here... Area 9-10
Linking E-mail Correspondence to a Customer 9-10
Dropping a Document into the Documents Tab 9-11
Shared Documents 9-11
Accessing Documents in Shared Documents 9-11
Filtering Shared Documents 9-12
Adding Documents to the Shared Documents Tab 9-12
Editing Documents in the Shared Documents Tab 9-13
Chapter 10: Running Reports 10-1
Sample Reports 10-1
Running a Report 10-1
Example: Company List by Segment (List) 10-2
Example: Activities Logged Report by User (Cross Tab) 10-3
Example: Opportunity Closing History (Historical) 10-4
Example: Person Summary Report 10-5
Example: Exporting a Company List from a Search List 10-5
Saving Report Search Criteria 10-6
Adding Favorite Reports 10-6
Changing the Report Display Options 10-7
Adobe PDF 10-7
XLSX 10-9
Excel CSV 10-9
User Guide Contents – vii
Contents
CSV 10-9
Interacting with Report Charts 10-10
Chart Display Options with the Adobe Flash Player 10-10
Chapter 11: Working with Lists 11-1
Introduction to List Actions 11-1
Start Mail Merge 11-1
New Task 11-2
Send E-mail 11-3
Export To File 11-4
Chapter 12: Sales Opportunities 12-1
What is an Opportunity? 12-2
Closing a Sale: Scenario 12-2
Opportunity Fields 12-3
Creating a New Opportunity 12-4
Adding Information to an Existing Opportunity 12-5
Products 12-5
Progressing an Opportunity 12-9
Sending a Quotation 12-9
Turning a Quote into an Order 12-10
Printing an Order 12-13
Closing a Sale 12-14
Manually Progressing Opportunities 12-14
Viewing the Sales Pipeline 12-14
Drilling Down on the Pipeline 12-15
Running an Opportunity Report 12-15
Finding Out what Opportunities I am working on 12-16
Creating an Opportunity from other Contexts 12-16
Deleting an Opportunity 12-16
Creating Quotes and Orders Outside of the Opportunity Context 12-16
Finding a Quote 12-17
Finding an Order 12-17
Chapter 13: Sales Forecasting 13-1
Contents – viii Sage CRM

Contents
What is Sales Forecasting 13-1
Sales Forecasting Terminology 13-1
Creating a Forecast for Yourself 13-3
Submitting a Forecast 13-4
Viewing Past Submitted Forecasts 13-4
Working with your Team's Forecasts 13-5
Administrator Access to Forecasts 13-6
Chapter 14: Leads 14-1
What is a Lead? 14-1
Lead Qualification: Scenario 14-2
Creating a New Lead 14-2
Lead Fields 14-3
Searching for an Existing Lead 14-5
Matching a Lead to an Existing Company 14-5
Qualifying a Lead 14-6
Converting a Lead to an Opportunity 14-7
Manually Progressing Leads 14-8
Viewing the Lead Pipeline 14-9
Viewing Leads Assigned to You 14-9
Creating a Lead from My CRM 14-9
Deleting a Lead 14-10
Chapter 15: Outbound Call Handling 15-1
Introduction 15-1
Outbound Call Handling Buttons 15-1
Outbound Call Handling Tabs 15-2
Accessing Outbound Calls 15-2
Working with Outbound Calls 15-3
Chapter 16: Groups 16-1
Introduction to Groups 16-1
Technical Overview 16-2
Groups Tab 16-2
Creating a Group 16-2
User Guide Contents – ix

Contents
Creating a Group from the Groups Tab 16-2
Group Action Buttons 16-4
Creating a Group from the Wave Activities Tab 16-6
Creating a Group Based on a Primary Entity Search 16-6
Adding a Primary Entity Record to a Group 16-7
Adding Multiple Records to a Group 16-7
Adding Multiple Records to a Group using Find/Saved Search 16-8
Adding Multiple Records to a Group using Advanced Find 16-8
Adding the Records of One Group to Another Group 16-8
Refreshing a Group 16-9
Editing a Group 16-9
Performing a Mass Update on a Group 16-10
Updating Group Territories 16-11
How Group Information is Stored 16-11
Key Attribute Data Generated by Groups 16-13
Adding Group List Information to a Tab 16-14
Exporting Group Information 16-16
Viewing an Exported Group 16-16
Sending Mass E-mails 16-17
Opt out of E-marketing Communications Flag 16-17
Configuring CRM for Mass E-mails 16-17
Sending E-mails to Groups 16-18
Sending E-marketing E-mails to Groups 16-20
Chapter 17: Campaign Management 17-1
What is Campaign Management? 17-2
Campaign Scenario 17-2
Adhering to Anti-Spam Regulation 17-3
Setting up a New Campaign 17-3
Campaign, Wave and Wave Activity Fields 17-4
Campaign Wave Activity Action Types 17-7
Cloning a Campaign 17-8
Carrying out an Internal Mail Merge 17-9
Contents – x Sage CRM
Contents
Scheduling an Internal Telesales Activity 17-9
Setting up New Response Codes 17-10
Creating a New Group based on Responses 17-12
Exporting the Group 17-12
Setting up Outbound Call Handling 17-13
Creating an Outbound Call Wave Activity 17-13
Creating the Outbound Call List 17-16
Refreshing the Outbound Call List 17-16
Reallocating Calls 17-17
Setting up Key Attribute Profiling Data on the Call Handling Screen 17-17
Reporting on Opportunities Generated through Campaigns 17-20
Setting up an E-marketing Campaign 17-20
Creating an E-marketing E-mail 17-21
E-marketing E-mail Fields 17-22
Setting up a Drip Marketing Campaign 17-23
Creating a Drip Marketing E-mail 17-23
Drip Marketing E-mail Fields 17-24
Creating a Drip Marketing Call List 17-25
Editing E-marketing E-mail Templates 17-26
Analyzing E-marketing Campaigns 17-26
E-Marketing Results Summary Columns 17-27
E-marketing Results Analysis Reports 17-28
Working with the E-marketing User Profile Tab 17-29
Chapter 18: Cases 18-1
What is a Case? 18-1
Solving a Problem: Scenario 18-2
Creating a New Case 18-2
Case Fields 18-3
Assigning a Case to a Colleague 18-5
Progressing a Case 18-6
Solving a Case 18-6
Closing a Case 18-6
User Guide Contents – xi
Contents
Adding a Solution to the Solutions Knowledge Base 18-7
Manually Progressing Cases 18-7
Viewing the Case Pipeline 18-7
Running a Case Report 18-8
Determining which Cases you are Working on 18-8
Deleting a Case 18-8
Chapter 19: Knowledge Base 19-1
What is a Solution? 19-1
Solution Fields 19-1
Finding Solutions 19-2
Viewing Solutions from My CRM 19-2
Adding a New Solution 19-3
Adding a New Solution from a Case 19-3
Publishing a Solution 19-4
Deleting a Solution 19-5
Linking a Solution to a Case 19-5
E-mailing a Solution 19-5
Chapter 20: Interactive Dashboard 20-1
What is the Interactive Dashboard? 20-2
Accessing the Interactive Dashboard 20-3
Quick Start 20-3
Selecting a Dashboard 20-3
Setting a Default Dashboard 20-4
Creating a Dashboard from a Template 20-4
Copying a Dashboard 20-5
Creating a New Dashboard 20-5
Modifying Dashboard Details 20-6
Deleting a Dashboard 20-6
Adding a Gadget Template to a Dashboard 20-6
Adding a New Gadget to a Dashboard 20-7
Gadget Quick Reference 20-7
Calendar Gadget 20-8
Contents – xii Sage CRM

Contents
Chart Gadget 20-8
List Gadget 20-9
Main Menu Item Gadget 20-10
Notification Gadget 20-11
Record Summary Gadget 20-11
RSS Feed Gadget 20-11
SData List Gadget 20-11
Working with the SData Navigator 20-13
SData Record Summary Gadget 20-13
Summary Gadget 20-13
Task List Gadget 20-14
Web Site Gadget 20-14
Editing Gadget Content 20-15
Linking Gadgets 20-15
Notes on SData gadget linking 20-16
Example 1: Sending data from a Company List gadget to Case List,Opportunity List, and Company Record Summary gadgets 20-16
Example 2: Sending data from two different Opportunity List gadgets to oneOpportunity Summary gadget 20-17
Example 3: Linking SData List and SData Record Summary gadgets 20-18
Modifying Gadgets 20-19
Gadget Header Icons 20-19
Changing the Gadget Column Layout 20-20
Adding New Data Sources 20-20
Adding an SData Feed Template 20-21
Working with Dashboard Templates 20-21
Adding a Dashboard Template 20-22
Assigning Users to a Dashboard Template 20-22
Modifying a Dashboard Template 20-23
Deleting a Dashboard Template 20-23
Managing User Dashboards 20-24
Adding a Template Gadget 20-24
User Guide Contents – xiii

Contents
Modifying a Gadget Template 20-24
Deleting a Gadget Template 20-25
Setting up an Interactive Company Dashboard 20-25
Chapter 21: Classic Dashboard 21-1
What is the Classic Dashboard? 21-1
Setting up a New Classic Dashboard 21-1
Changing Content Directly from the Classic Dashboard Page 21-3
Editing Classic Dashboard Details 21-3
Modifying Classic Dashboard Content 21-4
Adding Saved Searches to a Classic Dashboard 21-4
Adding Favorite Reports to a Classic Dashboard 21-5
Adding Report Charts to a Classic Dashboard 21-5
Setting up a Classic Company Dashboard 21-6
Modifying the Content of the Company Dashboard 21-7
Chapter 22: Preferences 22-1
Accessing Preferences 22-1
Preference Fields 22-2
Changing Preferences 22-6
Chapter 23: Writing Reports 23-1
Introduction to Writing Reports 23-1
Creating a New Report Category 23-1
Moving a Report to a Different Category 23-2
Creating a List Report 23-2
Report Fields and Buttons 23-4
Chart Styles 23-10
Adding a Chart to a Report 23-12
Creating a Cross Tabular Report 23-14
Creating a Historical Report 23-14
Cloning a Report 23-16
Adding a new report style 23-16
Deleting a Report 23-17
Glossary of Terms i
Contents – xiv Sage CRM

Contents
Index i
User Guide Contents – xv


Chapter 1: About This Guide
This guide is for Sage CRM end users.
We assume that you are familiar with the use of aWeb browser.
How this Guide is Organized
Chapter Format
Each chapter follows the same format:
l A checklist sets the goals for each chapter.
l Step-by-step examples to give you hands-on practice of each section.
l Tables to explain the meaning of fields.
Chapter Summary
The tables below give a summary of each chapter.
Part I: Basics
This part is for all users. Basic navigation is covered in this section.
Chapter Description
Getting Started Logging on and basic navigation.
Part II: Contact Management
This part is for all users. Basic contact management is covered in this section.
Chapter Description
Finding Information Searching for different types of information, changeyour search criteria, and work more effectively withlarge amounts of data.
Adding Customer Information Building a customer profile, and how to update andkeep customer information current.
Appointments and Tasks How tomanage your calendar, schedulemeetings, andset reminders.
E-mail How to send and reply to e-mails from CRM, andmakeuse of e-mail templates.
Exchange Integration Working with Sage CRM Exchange Server Integration,and installing the Outlook plug-in.
User Guide 1-1
Chapter 1
Chapter Description
Classic Outlook Integration How to work with Classic Outlook Integration includingsynchronizing contacts, tasks, and appointments.
Managing Documents How tomerge customer data with documents forprinting, faxing, or e-mailing.
Running Reports How to run list, cross tabular, historical, and summaryreports.
Working with Lists How to carry out actions, such as mail merges, onsearch lists, saved searches, and the Contacts lists.
Part III: Sales
This part is for sales users.
Chapter Description
Sales Opportunities How to take a qualified lead through to a done deal.
Sales Forecasting How to create and submit a sales forecast.
Part IV: Marketing
This part is for marketing users.
Chapter Description
Leads Handling unqualified prospect information.
Outbound Call Handling How to work through an outbound call list.
Groups How to set up andmanage groups.
CampaignManagement How tomanage and track marketing campaign activity.
Part V: Customer Service
This part is for customer service users.
Chapter Description
Cases How to take a customer service issue from loggedthrough to resolution, and working with Service LevelAgreements.
Knowledge Base How to create and publish Solutions to build up yourknowledge base.
Part VI: Tools
This part looks at tools you can use to customize your work area. It also shows users with InfoManager Reporting rights how to create new reports.
1-2 Sage CRM

Chapter 1: About This Guide
Chapter Description
Interactive Dashboard How to set up interactive dashboards and add gadgets.
Classic Dashboard Setting up customized classic dashboard pages toreflect the way you work.
Preferences Customizing the way you see information in thesystem.
Writing Reports How to create and customize reports.
Introduction to CRM
CRM is a single source for all your customermanagement needs.
The system helps integratemarketing, sales, customer service, and customer information toolstogether in an entirely Web-based package. Why is that so valuable?
Consider a typical office environment:
l Someone takes a phone call for a representative in a different department and forgets to tell them.Result? A lost opportunity.
l Your desk is littered with sticky notes reminding you to do things, but what do you have to dotoday?
l Sales and customer service both work with the same customers, but use separate systems—ornone at all. No one has a clear idea what has been happening with that customer recently.
l Different sales teams are pursuing different agendas, so you can't see what is in the pipeline.
l A customer phones up, irate that his simple query hasn't been answered yet. But that should havebeen dealt with.
CRM can bring it all together.
User Guide 1-3
Chapter 1
Browse Customer Information
Contact Management:
l Find customer information fast.
l Focus on the information most relevant to the work you're doing right now.
l Create and update customer information.
l Create unlimited notes for special detail.
Manage your Time
CommunicationManagement:
l Schedule reminders and appointments.
l Assign, re-assign, and delegate activities.
l Plan your workload and view your history of actions.
l Manage your personal schedule.
l Manage team workloads.
Tools at your Fingertips
Document Management:
l Create letters, e-mails, and proposals using standard templates.
l Store all documents as part of shared customer history.
l Attach documents to communications.
l Send e-mails and attachments using standard mail protocols.
l Record your communication tasks.
Qualify Leads
Marketing:
l Record and qualify raw lead data.
l Use outbound call lists to work on multiple campaigns.
l Generate leads from a telephone-based follow-up campaign.
l Report on the success of a campaign.
1-4 Sage CRM

Chapter 1: About This Guide
Clinch a Deal
Sales Management:
l Track opportunities as they move through the sales cycle.
l Record and maintain a history of all progress updates.
l Assign opportunities and tasks to colleagues for team selling.
l Maintain a communication history for each sales opportunity.
l Report and analyze sales progress, forecasts, and lists.
Produce Professional Reports
Reporting:
l Produce account lists and pipeline overviews.
l List customer cases.
l Analyze performance and forecasts.
l Monitor campaign success.
l Run standard reports from your Web browser.
Provide Customer Service
Customer Service:
l Log customer service calls.
l Track customer service issues as they progress through to resolution.
l Monitor Service Level Agreement adherence.
l Publishing solutions and performing key word searches on a solutionsdatabase.
l Escalate overdue cases.
Personalize your System
Customization:
l Set up personalized dashboards.
l Change the look and feel of the user interface.
l Switch between your top five hot prospects.
l Maintain an overview of your high priority customer service issues.
l Set your own time zone and currency preferences.
User Guide 1-5

Chapter 2: Getting Started
In this chapter you will learn how to:
l Get to the logon page.
l Log on.
l Log off.
l Change my password.
l Reset my password if I have forgotten it.
l Find my way around the different screen areas.
l Know what information is stored where.
l Find my personal work area.
l Use mouse and keyboard navigation.
l Use on-screen coaching.
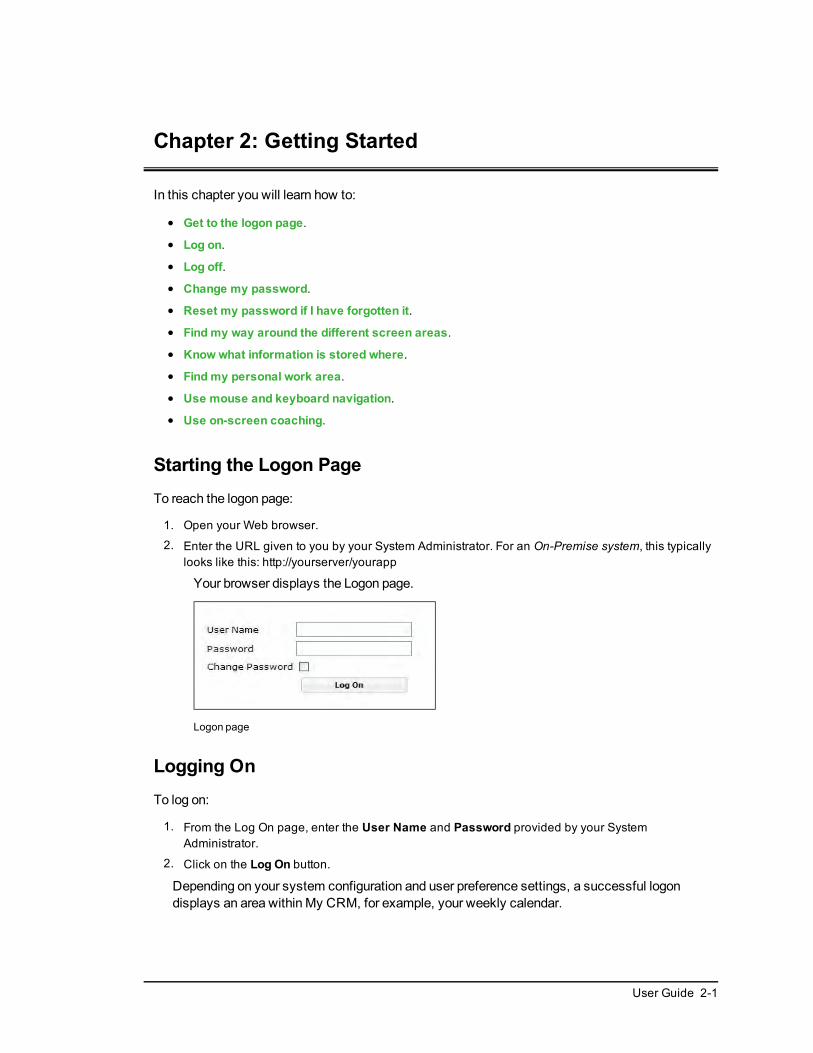
Starting the Logon PageTo reach the logon page:
1. Open your Web browser.
2. Enter the URL given to you by your System Administrator. For an On-Premise system, this typicallylooks like this: http://yourserver/yourapp
Your browser displays the Logon page.
Logon page
Logging OnTo log on:
1. From the Log On page, enter the User Name and Password provided by your SystemAdministrator.
2. Click on the Log On button.
Depending on your system configuration and user preference settings, a successful logondisplays an area within My CRM, for example, your weekly calendar.
User Guide 2-1
Chapter 2
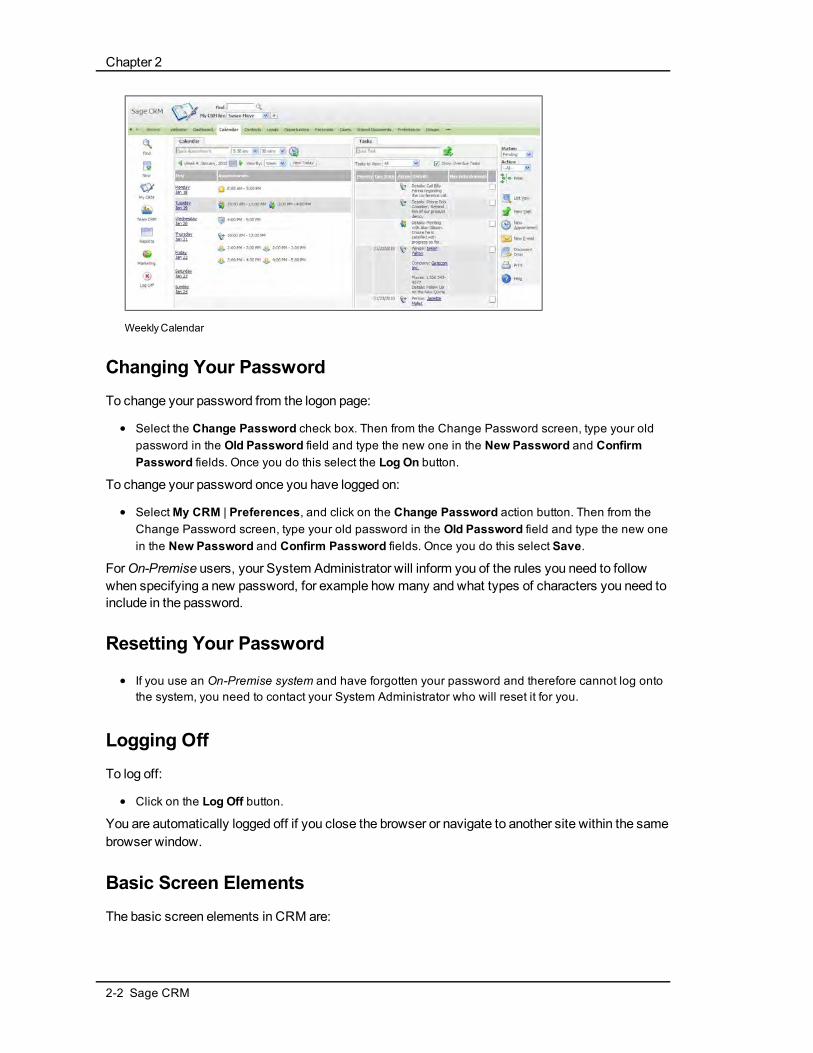
WeeklyCalendar
Changing Your PasswordTo change your password from the logon page:
l Select the Change Password check box. Then from the Change Password screen, type your oldpassword in the Old Password field and type the new one in the New Password and ConfirmPassword fields. Once you do this select the Log On button.
To change your password once you have logged on:
l SelectMy CRM | Preferences, and click on the Change Password action button. Then from theChange Password screen, type your old password in the Old Password field and type the new onein the New Password and Confirm Password fields. Once you do this select Save.
ForOn-Premise users, your System Administrator will inform you of the rules you need to followwhen specifying a new password, for example how many and what types of characters you need toinclude in the password.
Resetting Your Password
l If you use an On-Premise system and have forgotten your password and therefore cannot log ontothe system, you need to contact your System Administrator who will reset it for you.
Logging OffTo log off:
l Click on the Log Off button.
You are automatically logged off if you close the browser or navigate to another site within the samebrowser window.
Basic Screen ElementsThe basic screen elements in CRM are:
2-2 Sage CRM

Chapter 2: Getting Started
1. Context Area2. Tabs3. Panel4. Hyperlinks5. Action Buttons6. Menu Buttons7. Recent List8. Help9. On-screen Coaching
Context Area
The Context Area displays a summary of the information you are currently focused on. Forexample, when you are in the context of a person, all the information displayed in the Tabs andPanels below the context area relates to this person.
You can quickly move from the context area of a person to the company they work for, by clickingon the Company link within the context area.
Tabs
Tabs are like folder dividers. The information found in each folder section is determined by thecurrent context. For example, if the person "Anita Chapman" is zoomed in on in the context area,selecting the Communications Tab displays themost recent interactions your company has hadwith Ms. Chapman.
Panel
Panels display information on, for example, the person in the current context. One page ofinformation can be divided into a number of panels. Each panel groups related information for easierviewing.
User Guide 2-3
Chapter 2
Hyperlinks
Hyperlinks allow you to jump from one page to another. For example, when you click on a companyname, the Summary page associated with that company is displayed in the work area. All e-mailandWeb site addresses are hyperlinked. You can click on an e-mail address to send an e-mailstraight away, or on aWeb site address to navigate to theWeb site.
Action Buttons
As you work with the system you will certainly need to change the data, for example, add newaddresses, alter contact information, or progress sales opportunities. Action buttons on the right-hand of the screen let you work with data. The Action buttons available change depending on thecontext you are in.
Menu Buttons
You canmove directly from one work area to another with theMenu buttons on the left-hand side ofyour screen. TheMenu buttons available to you remain the same regardless of the company orperson or any other context you are working in.
l Click on Find to search for a company, person, case, opportunity, lead, quote, order,communication, solution, or to perform an advanced find or keyword search.
l Click on New to create a new company, person, solution, case, opportunity, lead, quote, order,appointment, task, e-mail, or document.
l Click on My CRM to display a series of tabs with information relating to your work in progress.
l Click on Team CRM to view your team's activities.
l Click on Marketing to set up new marketing campaigns.
l Click on Reports to run reports on customer information.
l Click on Log Off to exit the system.
The number of menu buttons you can see is set up by your System Administrator in your userprofile.
Menu Button Pop Out Lists
Right-clicking or hovering over themenu buttons gives you access to shortcut pop out listsaccessible from anywhere in the system.
Recent List
The Recent List can be viewed on the top left-hand corner of your screen. It allows you to quicklyselect and return to the company, person, opportunity, quote, order, lead, case, solution, campaignor group you weremost recently dealing with.
The Recent List can be activated by clicking on or hovering over theRecent button. You can definehow you want to activate the list from the Preferences tab inMy CRM.
The Recent List is set to a default maximum size of 40, but it can be resized. Please refer to yourSystem Administrator for more details.
2-4 Sage CRM
Chapter 2: Getting Started
As well as returning to a specific record, selecting one of the recent list heading icons returns you tothe corresponding find page. For example, selecting the Person heading icon, displays the personFind page. Selecting Clear, clears the list. Selecting the Groups heading takes you to theMy CRM |Groups tab.
TabsTabs are like folder dividers. The information found in each folder section is determined by thecurrent context. For example, if the person "Anita Chapman" is zoomed in on in the context area,selecting the Communications Tab displays themost recent interactions your company has hadwith Ms. Chapman.
Company TabsThis section discusses each tab within the context of a company. The purpose of this is to give youan overview of the different types of information held in the system, and how they fit together.
l The Summary tab shows the core company details, the phone and e-mail, principal address, andcontact.
l If you want to know your recent history with this company at a glance, click on the Quick Look tab. Itlists the most recent communications, sales opportunities, and cases linked to the company.
l The Dashboard tab within the Company context can be used to display a management overview ofthe status of a customer account. For example, a chart of overdue cases, a list of high priorityopportunities, or a snapshot of upcoming meetings
l If Key Attribute Profiling has been set up for Companies, you can use the Key Attributes tab torecord additional information about the company that is not provided for by the standard Companyfields.
l The Marketing tab can be fully customized to your needs to track information, such as detailedcompany segmentation information.
l You can add general free text information on the company under the Notes tab. For example, arecent press release indicates the company is due to merge with another company. Thisinformation can be added to the Company Notes.
l The Communications tab shows all the phone calls, meetings, and day-to-day correspondencewith this company.
l The Opportunities tab shows your sales pipeline, past and planned, for this company.
l If you want to see how good your customer support has been, click on the Cases tab.
l The People tab shows all of the people who you have contact with at the company.
l The Addresses tab shows a list of all company addresses.
l The Phone/E-mail tab shows the different phone and e-mail details for the company.
l The Company Team tab shows all the people from your organization who are involved in activitieswith this company.
l The Documents tab shows references to all documents related to this company.
l The Relationships tab shows links between the company and related companies, people,opportunities, and other information, grouped together by relationship type. For example, a list ofsub-contractors working with the company.
User Guide 2-5

Chapter 2
l The ... (Ellipses) icon at the end of a row of tabs enables you to change the default tabs you see indifferent areas of the system. For example, if you rarely work with Opportunities, you can removethis tab from the Company tabs. However, you can easily enable it again if you change your mind.
The tabs available within the context of a Person are similar to those described above, however theinformation relates specifically to the person.
My CRM TabsThis section discusses each tab within the context of theMy CRM area. TheMy CRM tabs showwork in progress specific to you. You can also set up your own system preferences from theMyCRM tabs.
l The Dashboard tab shows a customizable set of gadgets relating to you. For example, a list ofcompanies from a personal saved search and a local RSS news feed.
l The Calendar tab shows all of your planned phone calls, meetings, and day-to-daycorrespondence.
l The Contacts tab allows you to specify contacts in CRM that you want to synchronize with MSOutlook (in "Classic" Outlook Integration or Exchange Integration).
l The Leads tab displays a list of unqualified queries about your business.
l The Outbound Call Lists tab displays a list of all Outbound call lists that you are working on. Thistab is not displayed by default. It can be enabled from the Preferences tab.
l The Opportunities tab shows your current sales pipeline.
l The Forecasts tab displays a list of your quarterly sales forecasts. This tab is not displayed bydefault. The System Administrator gives you access to this tab.
l If you want to see a list of open customer service cases assigned to you, click on the Cases tab.
l The Solutions tab shows a listing of knowledge base items. This tab is not displayed by default. Itcan be enabled from the Preferences tab, if your System Administrator has given you the rights toaccess Solutions.
l The Shared Documents tab stores corporate documents that you may need quick access to on adaily basis.
l The Preferences tab allows you to define system settings specific to your requirements, forexample, your time zone, preferred theme, preferred currency, or first page displayed when you logon.
l The Groups tab allows you to create and manage groups. Groups functionality allows you tocreate, modify, and save lists of people, companies, leads, cases, and opportunities.
l Exchange Integration Logs. This tab must be enabled by your System Administrator. Allows usersenabled for Exchange Integration to view their own log files.
l E-marketing User Profile. This tab is only available for E-marketing users. It lets them change theirE-marketing contact details and e-mail address.
l The ... (Ellipses) icon at the end of a row of tabs enables you to change the default tabs you see indifferent areas of the system. For example, if you rarely work with Opportunities, you can removethis tab from your My CRM work area. However, you can easily enable it again if you change yourmind.
The tabs available within the context of your Team CRM are similar to those described above,however the information relates to your Team. There are no Forecasts, Outbound Calls,Preferences, Contacts, Dashboard, E-marketing, or Exchange tabs within Team CRM.
2-6 Sage CRM

Chapter 2: Getting Started
NavigatingWorldWideWeb navigation is dominated by simple, intuitive "point and click" hyperlinks, whichmove you from oneWeb page to the next. Note: Opening CRM items in a new window or tab usingthe right-handmouse button is not supported in the CRM application.
In addition to point-and-click, the following keystrokes and buttons can speed up your navigation.
Tab (page 2-7)Enter (page 2-7)Right Click (page 2-7)Hover (page 2-7)Today’s Date (page 2-8)Hot Keys (page 2-8)Drop-down Lists (page 2-8)Next and Previous Arrows (page 2-8)Check Boxes (page 2-9)Go Arrows (page 2-9)Advanced Search Select (page 2-9)Required Fields (page 2-10)Getting Help (page 2-10)
Tab
The Tab key moves you quickly from field to field when entering or changing data that requireskeyboard input. Shift + Tabmoves the cursor to the previous field.
Enter
The Enter key is useful when performing searches. If you enter a company name as the searchcriteria during a search and then press Enter, a list of all companies matching your search criteria isdisplayed. It is an alternative to selecting the Find action button. The Enter key can also be used toconfirm a highlighted selection.
Right Click
You can right-click themouse on the Find and New menu buttons to activate shortcut pop out lists.Youmust have the PopOut List Activation By field set to Click to activate the pop out lists in thisway. This field is set in the Preferences tab.
Hover
The Recent List and the Find and New PopOut Lists can all be activated by "hovering" over theRecent List, Find, or New buttons with themouse. Youmust have the Recent List Activation Byand PopOut List Activation By fields set to Hover to activate these lists by hovering. These fieldsare set in the Preferences tab.
User Guide 2-7

Chapter 2
Today’s Date
When using Internet Explorer 6, Ctrl + T inserts today’s date into a date field. ALT + N will performthe same function in Internet Explorer 7. Alternatively, you can select the Calendar Grid icon next tothe Date field. When the date in the Date field is within the current month, today’s date is highlightedon the calendar.
Hot Keys
If you like working with your keyboard, a number of hot keys are available tomake it quicker andeasier for you to perform certain tasks in the system. Different hot keys are available in differentCRM screens. You can identify the availability of a hot key when you see that a letter on the actionbutton name is underlined. Selecting Alt plus the letter that is underlined performs that action. Forexample if the letter T is underlined on the New Task action button on the current screen, selectingAlt and T creates a new task.
Hot keys available when working with CRM in Internet Explorer include:
Alt + A: Creates a new appointment within the Calendar or Communication tab.
Alt + T: Creates a new task within the Calendar or Communication tab.
Alt + E: Creates a new E-mail within the Calendar or Communication tab.
Alt + V: Switches between Calendar and List view within the Calendar or Communication tab.
Alt + C: Lets you exit from some screens.
Alt + S: Saves records.
Most of the short cut keys can be invoked in non-IE browsers as follows:
l Firefox - use Alt + Shift + Key, and then press Enter.
l Chrome - use Alt + Shift + Key
l Safari – use Alt + Ctrl + Key
Drop-down Lists
Drop-down lists provide predefined lists of selections. They help increase the accuracy of dataentry andmake filtering and reporting on datamuch easier.
Drop-down lists can be accessed by selecting the drop-down arrow with themouse, or ALT +[DownArrow Key] on the keyboard.
Next and Previous Arrows
Icon Description
The Next and Previous arrows appear when a list ofinformation extends tomore than one page. Clickingon the inner left- or right-pointing arrows displays theprevious or next page, respectively. The outer
2-8 Sage CRM

Chapter 2: Getting Started
Icon Description
arrows take you to the first or last page within a setof pages.For example, if you search for a company withoutspecifying any search criteria, a list of all companiesis displayed. This is likely to extend over severalpages. You can scroll between the pages usingthese arrows.
Check Boxes
Check boxes can be toggled on or off by clicking in the check box. An example of a check box is thePrivate field of a communication (task or appointment). You can also toggle the check box using theSpacebar on the keyboard.
Go Arrows
Icon Description
The triangular Go allows you to jump to the summaryscreen of the related record.
The right-pointing Go arrow allows you jump toanother user's My CRM area from the context areaof the screen.
Advanced Search Select
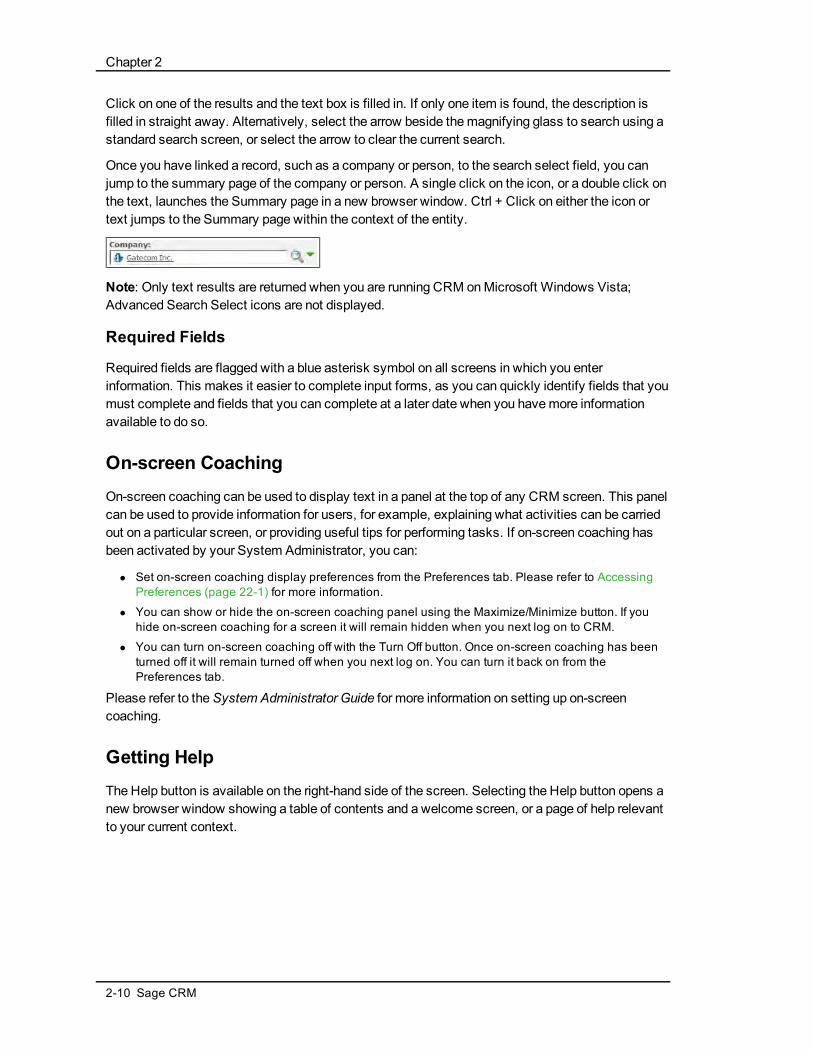
A small magnifying glass displayed next to a small down-pointing arrow indicates that the field is anAdvanced Search Select field. An example of where it is displayed is theWave Activity field on theNew Lead page.
Icon Name
Advanced Search Select field.
Where the Advanced Search Select icon is present, you can type a few letters, click themagnifyingglass icon, and searchmatches are displayed as hyperlinks underneath the field.
Advanced Search Select results
User Guide 2-9
Chapter 2
Click on one of the results and the text box is filled in. If only one item is found, the description isfilled in straight away. Alternatively, select the arrow beside themagnifying glass to search using astandard search screen, or select the arrow to clear the current search.
Once you have linked a record, such as a company or person, to the search select field, you canjump to the summary page of the company or person. A single click on the icon, or a double click onthe text, launches the Summary page in a new browser window. Ctrl + Click on either the icon ortext jumps to the Summary page within the context of the entity.
Note: Only text results are returned when you are running CRM onMicrosoft Windows Vista;Advanced Search Select icons are not displayed.
Required Fields
Required fields are flagged with a blue asterisk symbol on all screens in which you enterinformation. This makes it easier to complete input forms, as you can quickly identify fields that youmust complete and fields that you can complete at a later date when you havemore informationavailable to do so.
On-screen CoachingOn-screen coaching can be used to display text in a panel at the top of any CRM screen. This panelcan be used to provide information for users, for example, explaining what activities can be carriedout on a particular screen, or providing useful tips for performing tasks. If on-screen coaching hasbeen activated by your System Administrator, you can:
l Set on-screen coaching display preferences from the Preferences tab. Please refer to AccessingPreferences (page 22-1) for more information.
l You can show or hide the on-screen coaching panel using the Maximize/Minimize button. If youhide on-screen coaching for a screen it will remain hidden when you next log on to CRM.
l You can turn on-screen coaching off with the Turn Off button. Once on-screen coaching has beenturned off it will remain turned off when you next log on. You can turn it back on from thePreferences tab.
Please refer to theSystem Administrator Guide for more information on setting up on-screencoaching.
Getting HelpThe Help button is available on the right-hand side of the screen. Selecting the Help button opens anew browser window showing a table of contents and a welcome screen, or a page of help relevantto your current context.
2-10 Sage CRM
Chapter 3: Finding Information
In this chapter you will learn how to:
l Use the Find menu button.
l Find a company.
l Find a person.
l Find an opportunity.
l Find a case.
l Clear a previous search.
l Combine search criteria.
l Use wild cards.
l Use date field search.
l Use numeric field search.
l Use advanced find.
l Use keyword search.
l Use an existing saved search.
l Create a new saved search.
l Update a saved search.
l Delete a saved search.
l Create saved searches for all users.
l Run actions on search lists.
l Sort lists differently.
l Filter lists differently.
l Set a default find page.
l Change the size of search results list.
Basic Search TechniquesThe following basic techniques get you started on carrying out searches in CRM:
Pop Out List or Menu Button with Context Area (page 3-1)Find Menu and Action Buttons (page 3-2)Repeating an Earlier Search (page 3-2)Resetting Search Criteria (page 3-3)
Pop Out List or Menu Button with Context Area
You can initiate a search by:
User Guide 3-1

Chapter 3
l Activating the Find Pop Out List. To do this, either right-click or hover over the Findmenu button,and select the type of search you want to carry out. For example, Person, Case, Sales Opportunity,or Communication.
Find PopOut List
l Selecting the Find menu button. To do this, select the Findmenu button, then select the type ofsearch you want to carry out from the context area of the screen.
FindMenu Button and Context Area of Screen
Youmay find it faster to use theMenu Buttonmethod if the context of your search is the same asthe last search that you carried out. If the context of your search is different from your last one, youmay find the PopOut List method easier.
Find Menu and Action Buttons
Whichever method you use for initiating a search, the basic sequence is the same:
1. Call up a find screen using the Find button on the left-hand side of the screen. This is the FindMenu button.
2. Type in the search criteria.
3. Retrieve the information using the Find button on the right-hand side of the screen. This is calledthe Find Action button.
Repeating an Earlier Search
Don’t forget the Recent List. This lists themost recent information you have been working with. It’sa fast way to get back tomost frequently "opened folders" of customer information. You can alsouse the icons on the recent list headings to open the corresponding search page.
3-2 Sage CRM
Chapter 3: Finding Information
Resetting Search Criteria
When you perform a search in the normal way, that is, using the Find button and specifying searchcriteria, the Search Results page is displayed reflecting the criteria you specified. However, if youreturn to that same Search page any time during the same session, you will notice that the SearchResults page you generated earlier remains on-screen. To clear the page and perform a new search:
1. From the Search Results page, select the Clear action button.
2. Specify new search criteria, and click on the Find action button. A New Search Results page isdisplayed.
Searching for a Person"It's Janet Andrews on the line for you"…Umm, who?
You can search for a person by any criteria or combination of criteria on the Search screen. Thisexample shows you how to search by Last Name.
1. Select the Findmenu button.
2. If you are not in the Person context, select Person from the context area of the screen.
3. Type the last name, or part of the last name in the Last Name field.
4. Select the Find action button on the right-hand side of the screen. A list of people matching yoursearch criteria is displayed.
5. Click on the hyperlink of the person you want to drill down on. This opens the 'file' of the selectedperson and you now have access to all the person’s details.
6. For the fastest overview of recent activities your company has had with the person, select the QuickLook tab.
This shows you a recent lost sales opportunity and the last contacts your company had with her.You notice one of the last contacts shows she was implementing an internally developed softwareproduct. Now you know who she is and have a good idea why shemight be calling.
QuickLook tab
"Janet, how are you? How is your project going?"
Searching for a Company"My name is Bradshaw, calling from Design Right. We haven't spoken before, I work with ArthurBrowne."
User Guide 3-3

Chapter 3
It sounds like you probably don't have any information onMr. Bradshaw yet, but you do on DesignRight.
You can search for a company by any criteria or combination of criteria on the Search screen. Thisexample shows you how to search by Company Name.
1. Right-click on or hover over the Findmenu button.
2. Select Company from the pop out list.
3. Type the company name or part of the company name in the Company Name field and select theFind action button on the right-hand side of the screen. A list of all companies matching your searchcriteria is displayed.
4. Click on the hyperlink of the company you want to drill down on. This opens the 'file' of the selectedcompany and you now have access to all the company’s details.
TheQuick Look tab shows you themost recent activities your organization has had withDesign Right.
5. To find a full listing of all the people you work with at Design Right, select the People tab.
CompanyPeople tab
"That's right, we've also been working closely with Reg Barrow over the last few weeks."
Finding an Opportunity"Hi, this is Kieran O'Toole calling from Eurolandia. You quotedme yesterday for a 100 user licensedeal. Is there someone who can answer a couple of queries I have on it? I've got a reference numberhere—KOT/SM2"
The fastest way to locate the details associated with the sales opportunity is to find the opportunity.In this example, Kieran has provided a reference number, however you can also search for anopportunity by company name.
To search for an opportunity:
1. Right-click on or hover over the Findmenu button.
2. SelectOpportunity from the pop out list.
3. Type in the search criteria, for example, Customer Ref and/or the Company Name and select theFind action button.
4. Click on the hyperlink Status icon of the opportunity. This opens the 'file' of the selected opportunityand you now have access to all the opportunity details.
"I have the details in front of me now, Kieran. Do you want to go ahead with your questions?"
Finding a Case"This is Arthur from Design Right. I'm still waiting to find out why the Setup isn’t working on theTimEx Enterprise software. Can you tell me what the status is? The case reference ID is 0-20."
3-4 Sage CRM
Chapter 3: Finding Information
Even though youmay not be handling this case, you can still give the customer a status and follow-up if necessary.
To find a case:
1. Right-click on or hover over the Findmenu button.
2. Select Case from the pop out list.
3. Type in the search criteria, for example, the RefId and/or the Company Name and select the Findaction button.
4. Click on the hyperlink Status icon of the Case. The Case Summary page is displayed, which givesyou an overview of the case. A quick look in the Communications tab shows if the person handlingthis case has scheduled any follow-up action.
"Arthur, it looks like Graham is still looking into this for you. Let me try his line for you now to get anupdate."
Combining Search Criteria"I've got John from Global on the phone for you."
You probably have countless people called John andmaybe a number of different company entriesfor Global. However, combining the two criteria narrows your search to show only people calledJohn working at Global.
You can combine any number of criteria on the Search screen. This example shows you how tocombine Company Name and Person Name search criteria.
To combine search criteria:
1. Right-click on or hover over the Findmenu button.
2. Select Person from the pop out list.
3. Click on the Clear button to clear your last search from this page.
4. Type the person name or part of the name in the Last Name field, and the company name in theCompany Name field.
5. Click on the Find action button or press Enter.
Person search results page
6. Click on the hyperlink of the person you want to drill down on.
User Guide 3-5
Chapter 3
Wild Card SearchYou can use the wild card search on any field on the search screen. This example uses the wildcard with the Company Name field. The wild card in CRM is the "%" symbol. The% wild cardmeans 'contains the value'.
To search using a wild card:
l Select the Findmenu button.
l In the company or person context type, for example,%software in the Company Name field andselect the Find action button. All companies containing the word "software" are returned from thissearch.
Companysearch results using a wild card
Date Field SearchA System Administrator can add date search fields to any find screen in CRM.
SomeCRM find screens already have a date search capability by default. For example, on the Leadfind screen you can search for leads that were created either between two specified dates or withina certain period relative to a specified date.
To search using date fields:
1. Right-click on or hover over the Findmenu button. The Pop Out list is displayed.
2. Select Lead from the pop out list. The lead Find page is displayed.
3. Click on the Clear button to clear your last search from this page.
4. Select Between from the Created Date drop-down list.
5. Click on the first calendar button and select a date.
6. Click on the second calendar button and select a date.
7. Click on the Find action button or press Enter. A list of all opportunities matching your searchcriteria is displayed.
Numeric Field SearchA System Administrator can add numeric search fields to any find screen in CRM. Please refer to"Screen Customization" in theSystem Administrator Guide for details on adding fields to a screen.
3-6 Sage CRM

Chapter 3: Finding Information
For the following example, the Opportunity: Total Quoted Price field was added to the Opportunityfind screen. Say you would like to see how many opportunities you currently have with a totalquoted price over $10,000.
To search using numeric fields:
1. Right-click on or hover over the Findmenu button. The Pop Out list is displayed.
2. SelectOpportunity from the pop out list. The opportunity Find page is displayed.
3. Click on the Clear button to clear your last search from this page.
4. SelectGreater Than from the Opportunity - Total Quoted Price drop-down list. Select the dollar ($)sign from the currency symbol drop-down list and type 10000 in the value field.
5. Click on the Find action button or press Enter. A list of all opportunities matching your searchcriteria is displayed.
Using Advanced FindYou can use the Advanced Find feature to perform complex database searches. Advanced findsearches can be based on any of themain CRM entities - these are Case, Communication,Company, Lead, Opportunity, Order, Person, Quote, and Solution.
Advanced Find allows you to create enhanced searches based on aWHERE clause, and thecriteria for selection can be extended using the AND andOR clauses. For example, youmightcreate an Advanced Find search for all companies WHERE the city equals Chicago AND thenumber of employees is over 1000OR the annual revenue exceeds $10million.
While creating an Advanced Find search you can click on the Preview SQL button at any time toreview the SQL query behind your search.
If you are a System Administrator, two extra buttons are displayed with the results of an advancedfind - Mass Updates and Update Territory. Please refer to Performing aMass Update on aGroup(page 16-10) for more information onMass Updates, and Updating Group Territories (page 16-11) forinformation on Updating Territories.
For information on saving Advanced Find search criteria, please refer to Creating a New SavedSearch (page 3-13). For information on creating a new group based on the results of an advancedfind, please Creating aGroup Based on a Primary Entity Search (page 16-6).
Example: Searching for Companies using Advanced Find
Say you would like to see a list of all customer or prospect companies in the United States.
To search using advanced find:
1. Right-click on or hover over the Findmenu button. The Pop Out list is displayed.
2. Select Advanced Find from the pop out list. The Advanced Find page is displayed.
3. Click on the Clear button to clear your last search from this page.
4. Select Company from the Entity drop-down list.
5. Select Address: Country from the Field Name drop-down list and click on the Add button.
6. Select Company: Type from the Field Name drop-down list and click on the Add button. Thenrepeat this action to add a second Company: Type field. You have now added the fields on which
User Guide 3-7

Chapter 3
your search will be based. You must now set up the values for the selected fields and therelationships between those fields.
7. For the Country field, select the equals operator, and select United States from the Value drop-down list.
8. Select And from the And/Or drop-down list.
9. For the first Company: Type field, select the single opening bracket from the ( drop-down list.Brackets must always enclose an Or statement. In this example, you will be searching forcompanies that are either customers or prospects, so you will enclose these two search termswithin single brackets.
10. Select the equals operator and select Customer from the Value drop-down list.
11. SelectOr from the And/Or drop-down list.
12. For the second Type field, select the equals operator and select Prospect from the Value drop-down list.
13. Select the single closing bracket from the ) drop-down list.
14. Click on the Find action button or press Enter. A list of all companies matching your search criteriais displayed.
Advanced Find search results page
Example: Searching for People using Advanced Find
Youwould like to see a list of people where the Person Title Code is Chief Executive Officer and theCompany Sector is either Computer Software, Computer Hardware, or Computer Services. For theCEOs in the Computer Software Sector, you only want to see people where the Company Territoryis US East.
To search for people using Advanced Find:
1. Right-click on or hover over the Findmenu button. The Pop Out list is displayed.
2. Select Advanced Find from the pop out list. The Advanced Find page is displayed.
3. Click on the Clear button to clear your last search from this page.
4. Select Person from the Entity drop-down list.
5. Select Person: Title Code from the Field Name drop-down list and click on the Add button.
6. Select Company: Segment from the Field Name drop-down list and click on the Add button. Thenrepeat this action to add a second and a third Company: Segment field.
7. Select Company: Territory from the Field Name drop-down list and click on the Add button.
3-8 Sage CRM
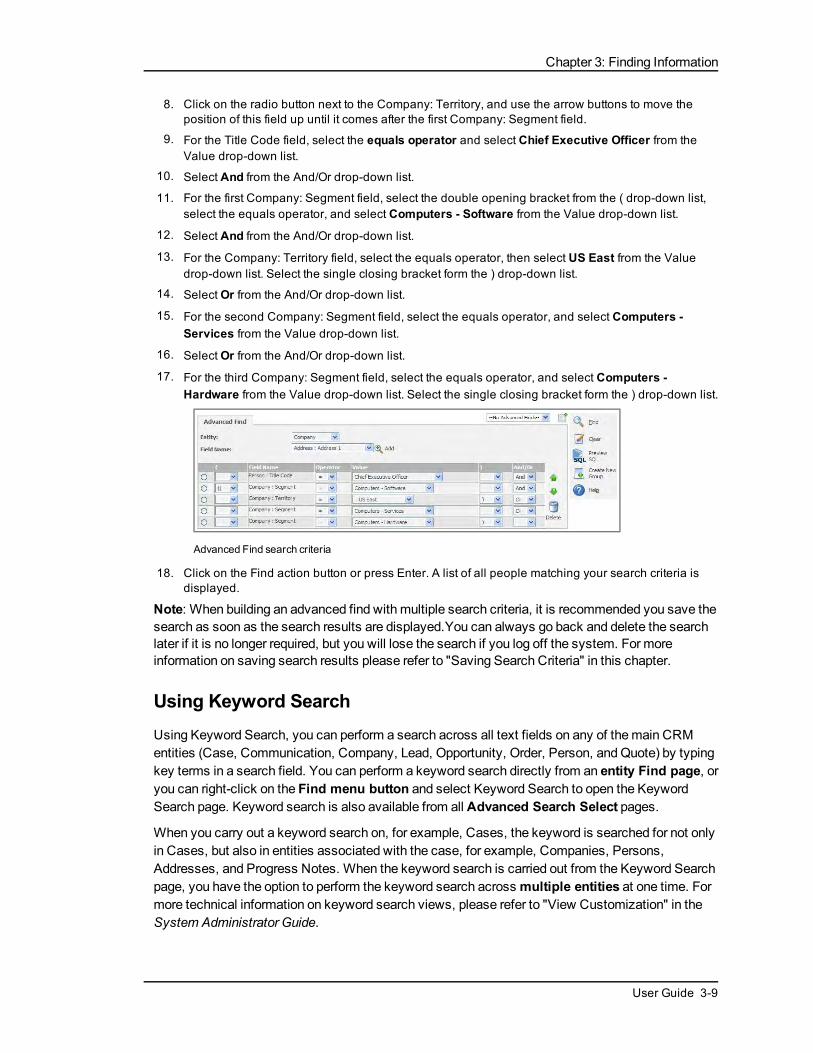
Chapter 3: Finding Information
8. Click on the radio button next to the Company: Territory, and use the arrow buttons to move theposition of this field up until it comes after the first Company: Segment field.
9. For the Title Code field, select the equals operator and select Chief Executive Officer from theValue drop-down list.
10. Select And from the And/Or drop-down list.
11. For the first Company: Segment field, select the double opening bracket from the ( drop-down list,select the equals operator, and select Computers - Software from the Value drop-down list.
12. Select And from the And/Or drop-down list.
13. For the Company: Territory field, select the equals operator, then select US East from the Valuedrop-down list. Select the single closing bracket form the ) drop-down list.
14. SelectOr from the And/Or drop-down list.
15. For the second Company: Segment field, select the equals operator, and select Computers -Services from the Value drop-down list.
16. SelectOr from the And/Or drop-down list.
17. For the third Company: Segment field, select the equals operator, and select Computers -Hardware from the Value drop-down list. Select the single closing bracket form the ) drop-down list.
Advanced Find search criteria
18. Click on the Find action button or press Enter. A list of all people matching your search criteria isdisplayed.
Note: When building an advanced find with multiple search criteria, it is recommended you save thesearch as soon as the search results are displayed.You can always go back and delete the searchlater if it is no longer required, but you will lose the search if you log off the system. For moreinformation on saving search results please refer to "Saving Search Criteria" in this chapter.
Using Keyword SearchUsing Keyword Search, you can perform a search across all text fields on any of themain CRMentities (Case, Communication, Company, Lead, Opportunity, Order, Person, andQuote) by typingkey terms in a search field. You can perform a keyword search directly from an entity Find page, oryou can right-click on the Find menu button and select Keyword Search to open the KeywordSearch page. Keyword search is also available from all Advanced Search Select pages.
When you carry out a keyword search on, for example, Cases, the keyword is searched for not onlyin Cases, but also in entities associated with the case, for example, Companies, Persons,Addresses, and Progress Notes. When the keyword search is carried out from the Keyword Searchpage, you have the option to perform the keyword search acrossmultiple entities at one time. Formore technical information on keyword search views, please refer to "View Customization" in theSystem Administrator Guide.
User Guide 3-9

Chapter 3
The CRM keyword search function uses an "any words" search technique. An any words searchreturns records containing all of the words listed in a search term once those words appear in therecord text fields or in the text fields of any associated entity record specified in the keyword searchview. For example, a search for european software services returns all records containing thewords european + software + services in any text field. These words can appear in any order withina record and across more than one text field. If the search term is not enclosed in quotationmarks,matching records are picked up even where there are words inserted between the search termwords within a record. If quotationmarks are used, only records containing the exact phrase arereturned.
You can further refine your keyword search by combining it with other criteria from the standardFind page. For example, you can perform a keyword search using the search termMurphy andrefine this search by selecting Ireland from the Territory drop-down field on the Find Person page.This means that a person keyword search is carried out on the term “Murphy” but only those recordsthat have amatching “Ireland” territory are returned in the search list.
Note: By further refining your keyword search using the standard entity find page you are refiningthe results brought back from CRM by the initial search based on the keyword(s) supplied. If youenter a value into the keyword search box and you enter or select a value from one of the standardsearch fields, then a keyword search is performed first of all based on the keyword search termsupplied. Then, based on the keyword search results retrieved from CRM, these results are furtherfiltered by the values entered or selected from the standard search fields such as the Territory drop-down list.
When performing a keyword search, it may sometimes be the case that you know part of the termyou wish to search on. For example, youmay have part of a company name, or you know that youare looking for someone called either Smith or Smyth, or youmight know only the first few digits of atelephone number. A variety of special characters can help you narrow your search results in suchcircumstances:
Character Usage
* % A * or% can be placed at any position in a word andmatches any number of characters. Both the * and%perform exactly the same action. For example,*ope*wouldmatch Europe, open, and so on. Note:You should take care to leave a space betweenwords when using these characters with multi-wordsearch terms.
Quotationmarks To search for a phrase, place it in quotationmarks.For example, a search for "software services"willreturn all records containing the phrase softwareservices.Punctuationmarks are treated as blank space. So,for example, a search for "(1451)4579937"wouldsearch for two text strings, 1451 and 4579937.
? A ? can be placed at any position in a word and
3-10 Sage CRM
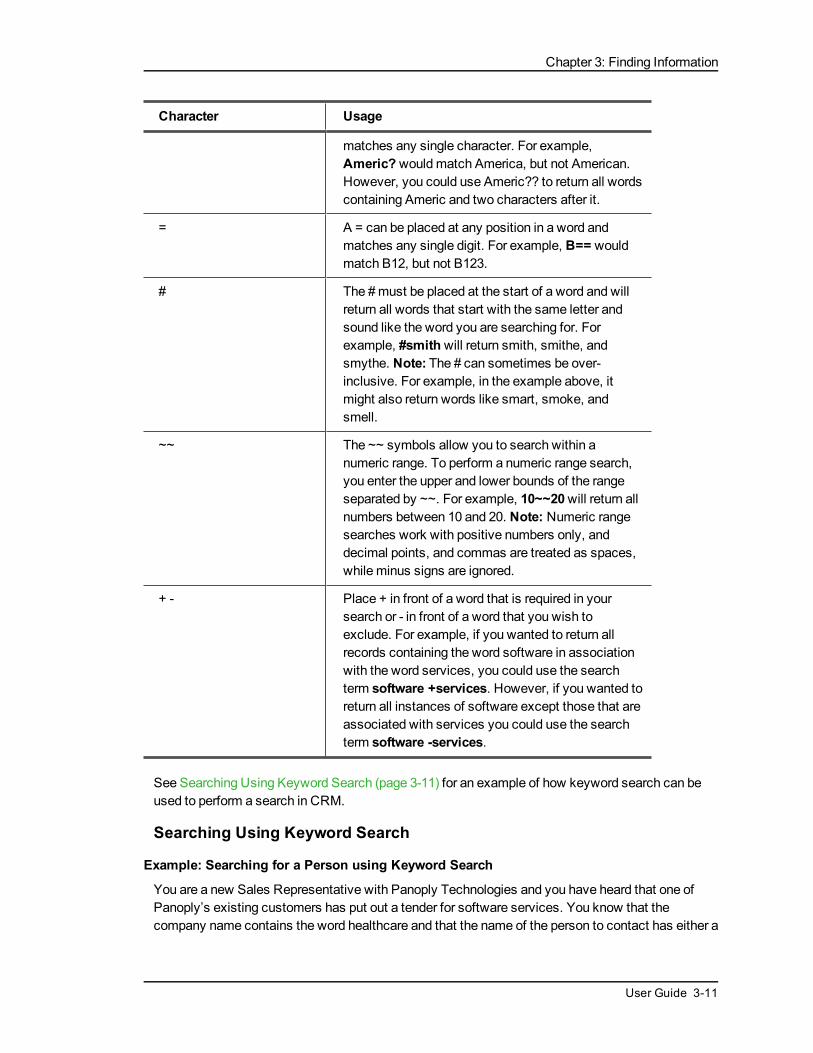
Chapter 3: Finding Information
Character Usage
matches any single character. For example,Americ?wouldmatch America, but not American.However, you could use Americ?? to return all wordscontaining Americ and two characters after it.
= A = can be placed at any position in a word andmatches any single digit. For example, B== wouldmatch B12, but not B123.
# The #must be placed at the start of a word and willreturn all words that start with the same letter andsound like the word you are searching for. Forexample, #smithwill return smith, smithe, andsmythe. Note: The # can sometimes be over-inclusive. For example, in the example above, itmight also return words like smart, smoke, andsmell.
~~ The ~~ symbols allow you to search within anumeric range. To perform a numeric range search,you enter the upper and lower bounds of the rangeseparated by ~~. For example, 10~~20will return allnumbers between 10 and 20. Note: Numeric rangesearches work with positive numbers only, anddecimal points, and commas are treated as spaces,while minus signs are ignored.
+ - Place + in front of a word that is required in yoursearch or - in front of a word that you wish toexclude. For example, if you wanted to return allrecords containing the word software in associationwith the word services, you could use the searchterm software +services. However, if you wanted toreturn all instances of software except those that areassociated with services you could use the searchterm software -services.
See Searching Using Keyword Search (page 3-11) for an example of how keyword search can beused to perform a search in CRM.
Searching Using Keyword Search
Example: Searching for a Person using Keyword Search
You are a new Sales Representative with Panoply Technologies and you have heard that one ofPanoply’s existing customers has put out a tender for software services. You know that thecompany name contains the word healthcare and that the name of the person to contact has either a
User Guide 3-11

Chapter 3
first or last name starting with dav. With this information, you should be able to narrow down yoursearch for the appropriate contact person using a keyword search.
To perform a keyword search:
1. Right-click on or hover over the Findmenu button. The Pop Out list is displayed.
2. Select Keyword Search from the pop out list. The Keyword Search page is displayed.
3. Type dav% and healthcare in the What Would You Like To Search For? text field.
4. Note: You can click on the question mark button next to the Keyword Search field to view someexamples of how to use keyword search.
5. You can select a specific entity check box to restrict your search to that entity. Alternatively, you canspecify that all primary entities should be searched by selecting the Select All check box. For thisexample, select the Person entity check box to limit your search to that entity. Note: If you do notselect any check box, no records are returned.
6. Click on the Find button. Your search results are displayed. Note: If the records found cannot all bepresented in the initial list of results, you can click on the hyperlink in the Results panel or on theView All link that will be displayed under the results list to view the full search results.
Example: Searching for a Keyword across all Main Entities
You are the new TrainingManager in a company. You want to review all customer contact history(Cases, Communications, Opportunities etc.) where Training has been discussed.
To carry out a keyword search for the keyword "training" across all main entities:
1. Right-click on or hover over the Findmenu button. The Pop Out list is displayed.
2. Select Keyword Search from the pop out list.The Keyword Search page is displayed.
3. Type training in the What would you like to search for? field.
4. You can select a specific entity check box to restrict your search to that entity. Alternatively, you canspecify that all primary entities should be searched by selecting the Select All check box. For thisexample, select the Select All check box to search across all main entities. Note: If you do notselect any check box, no records are returned.
5. Click on the Find button. The search results are displayed.
Keyword Search results page
3-12 Sage CRM

Chapter 3: Finding Information
Note: If the records found cannot all be presented in the initial list of results, you can click on thehyperlink in the Results panel or on the View All link that will be displayed under the results list toview the full search results.
Using an Existing Saved SearchThere are a number of predefined saved searches available within different Find screens that youmay find useful. For example, theMy Companies saved search—available from the Find Companyscreen—is set up to return a list of all of the companies assigned to you. TheMy Cases In Progresssaved search—available from the Find Case screen—returns all the active cases currentlyassigned to you.
To display a predefined saved search:
l Select the Findmenu button and select the entity that the saved search is contained within.
l Choose the saved search you want displayed from the Saved Search drop-down. The selectedsaved search list is displayed.
Creating a New Saved SearchWhen you perform a search to return Companies, People, Opportunities, Orders, Quotes, Cases,Solutions, Leads, or Communications that match specific search criteria, youmay want to save thelist and reuse it.
Note: You cannot create a saved search based on a keyword search.
You can save an advanced find search in the sameway as you would any other search. However,only a System Administrator or Info Manager canmake an advanced find search available to otherusers.
You can also create a group to save search criteria. Please refer to Creating aGroup (page 16-2) formore information.
To create a new saved search:
1. Select the Findmenu button and select an entity from the Find drop-down list, for exampleCompany.
2. Select your required search criteria and click on the Find button. Your search results are displayed.
3. Click on the New Search button next to the Saved Search drop-down. The Saved Search detailsbox is displayed.
4. Type in the name of the new saved list, for example, San Francisco Companies - 21 - 50Employees.
Saved Search details box
5. Select Save.
User Guide 3-13
Chapter 3
Updating a Saved SearchYou canmake changes to your saved searches using the action buttons located beside the SavedSearch drop-down list.
To update a saved search:
1. Select the Findmenu button and select the entity that the Saved Search is saved under from theFind drop-down list, for example Company.
2. Select the Saved Search you wish to update from the Saved Search drop-down list.
3. Select your new search criteria and click on the Find button. Your new search results are displayed.
4. Select the Update action button at the top of the screen.
5. When the Saved Search details box is displayed, you can change the name of the saved search ifyou wish.
6. Select Save.
Deleting a Saved SearchYou can delete saved searches that are no longer useful to you.
To delete a saved search:
1. Open the saved search you no longer use by selecting it from the Saved Search drop-down list atthe top of the Find screen it is saved in.
2. Select the Delete action button beside the Saved Search drop-down list.
Creating Saved Searches for all UsersIf you are an InfoManager, you can create saved searches that are available to all users in thesystem.
To create a saved search that is available to all users:
1. Select the Findmenu button and select an entity from the Find drop-down list, for exampleCompany.
2. Select your required search criteria and click on the Find button. Your search results are displayed.
3. Click on the New Search button next to the Saved Search drop-down. The Saved Search detailsbox is displayed.
4. Type in the name of the new saved list, for example, San Francisco Companies - 21 - 50Employees.
5. Select the Available To All Users check box and select Save.
Running Actions on Search ListsYou can perform a number of actions on all types of search lists — lists returned by a standardsearch, lists returned by Advanced Find, lists returned by Keyword Search, lists based on savedsearches, or theMy CRMContacts list. Actions available are:
3-14 Sage CRM
Chapter 3: Finding Information
l Start Mail Merge. You can create a merged document for all contacts contained in your list.
l New Task. You can create a new task with the same details for each of the contacts on your list.
If you have the appropriate rights, the following two actions are also available:
l New E-mail. You can create an e-mail with merge fields, which can be sent to all of the contacts onyour list.
l Export to File. You can export your list of contacts, and contact details, to a spreadsheet or to a textfile.
To run an action on a search list:
l Return a search list by either performing a standard search or selecting a saved search from theSaved Search drop-down list at the top of the screen.
l Select one of the Action buttons on the bottom, right-hand side of the screen. The action youselected is performed.
CountingYou can view the number of records in a list to give you an idea of the total length of long lists. Arecord counter is displayed in the top left-hand corner of most lists. It also shows the page numberout of the total number of pages containing records. Hovering over the right-pointing arrow indicatesthat the next page shows records 11-20 out of a total of 22.
FilteringYou can easily change the way lists of information are displayed. This example shows you how tochange the way you view the list of communications within the context of a company can produce along list of historical and current activities.
To narrow down this list to show only Pending communications:
1. Within the context of a company, click on the Communications tab.
2. To view only the pending communications, select Pending from the Status list on the right-handside of the page.
3. Click on the Filter button. The list of communications is restricted to show only those with a status ofPending. This filter applies to all Company Communications lists until changed or until the userlogs out.
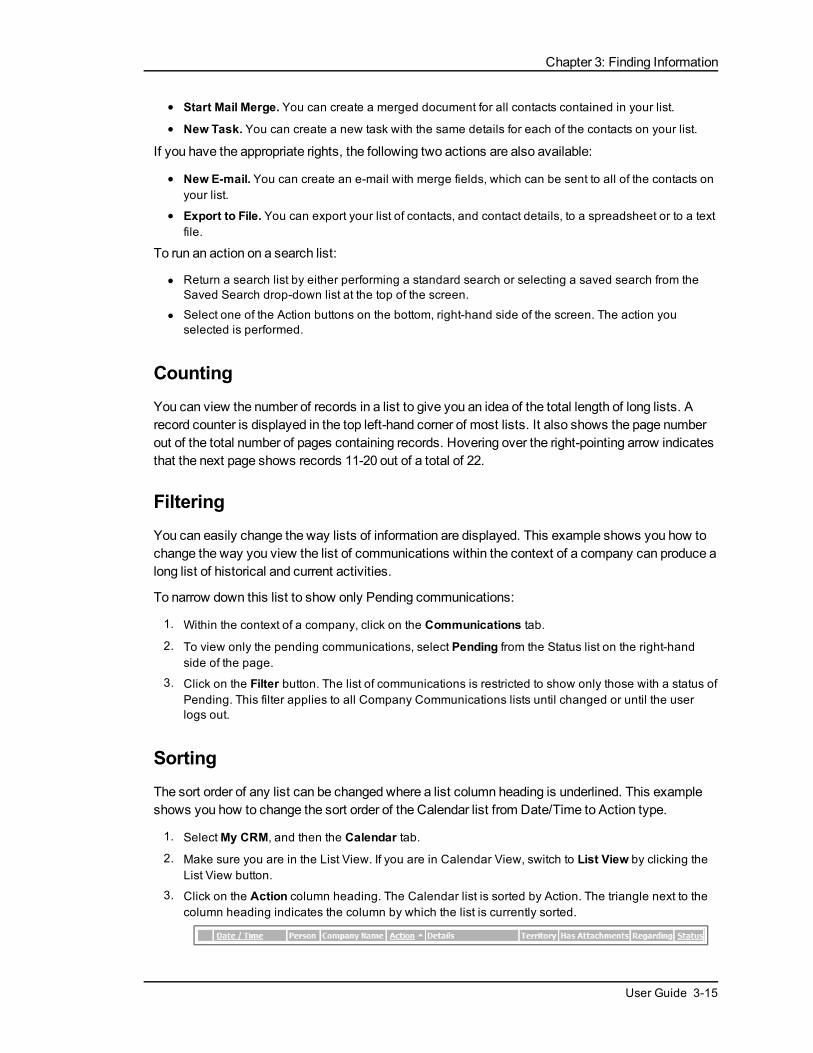
SortingThe sort order of any list can be changed where a list column heading is underlined. This exampleshows you how to change the sort order of the Calendar list from Date/Time to Action type.
1. SelectMy CRM, and then the Calendar tab.
2. Make sure you are in the List View. If you are in Calendar View, switch to List View by clicking theList View button.
3. Click on the Action column heading. The Calendar list is sorted by Action. The triangle next to thecolumn heading indicates the column by which the list is currently sorted.
User Guide 3-15

Chapter 3
Communication column heading
4. To change the sort order back to Date/Time, click on the Date/Time column.
This example changes the sort order of your Calendar list from ascending Date/Time to descendingDate/Time.
1. Select the My CRM button.
2. Click on the Date/Time column heading. The Calendar list is now sorted by Date/Time with themost recent pending communication first.
3. To change the sort order back to ascending, click on the Date/Time column. The Calendar listreverts back to the original sort order.
Setting a Default Find PageYou can specify the Find screen that you want to appear at the beginning of a session. However,note that the system "remembers" your last Find, until you change it. This means you can set yourdefault Find screen to be Company. However, as soon as you search by Person, the next time youpress Find, the person Find page is displayed.
To specify a default Find page:
1. From within My CRM | Preferences tab, select the Change action button.
2. Select the Find Screen you want to set as the default from the My Default Find Screen field, andselect Save.
Setting the Size of the Search Results ListTo specify the default maximum length of lists and grids on any page:
1. From within My CRM | Preferences tab, select the Change action button.
2. Select the default maximum length from the Grid Size field, and select Save.
3-16 Sage CRM

Chapter 4: Adding Customer Information
In this chapter you will learn how to:
l Use the Newmenu button.
l Understand the company fields.
l Understand the person fields.
l Understand the address fields.
l Understand the phone and e-mail fields.
l Understand the person phone details fields.
l Understand the person e-mail fields.
l Understand how territories work.
l Add a new company, person, and address.
l Add a person to an existing company.
l Add an address to an existing company.
l Maintain address links.
l Add a person unlinked to a company.
l Interpret validation errors.
l Change company details.
l Change person details.
l Change address details.
l Update a phone number.
l Assign a different address to a person than the company address.
l Add a private address to a person.
l Add a company that has multiple sites.
l View information in the Relationships tab.
l Add a new relationship.
l Understand the relationship fields.
l Delete a relationship.
l Assign an in-house project team to a company.
l Add notes to a company or a person.
l Editing Company Notes.
l Merge two companies.
l Merge two people.
l Assign an unlinked person to a company.
l Delete company or person records.
User Guide 4-1

Chapter 4
Pop Out List or Menu Button with Context AreaYou can add new information by:
l Activating the New Pop Out List. To do this, either right-click on or hover over the Newmenu button,and select the type of information you want to add. For example, Person, Case, or Opportunity.
New PopOut List
l Selecting the New menu button. To do this, select the Newmenu button, then select the type ofinformation you want to add from the context area of the screen.
NewMenu Button and Context Area of Screen
l The action buttons on the right-hand side of the screen can also be used to add information. Theseare available when you already have a folder of information open.
Whichever method you use, the system is smart enough to add in the context information if it isavailable. For example, if you already have the company Design Right Inc open and you add a newperson, they will automatically be "filed" with Design Right when you save the person details.
Adding a New CompanyTo add a new company:
1. Right-click on or hover over the Newmenu button.
2. Select Company from the pop out list. The Company duplicate find page is displayed.
4-2 Sage CRM
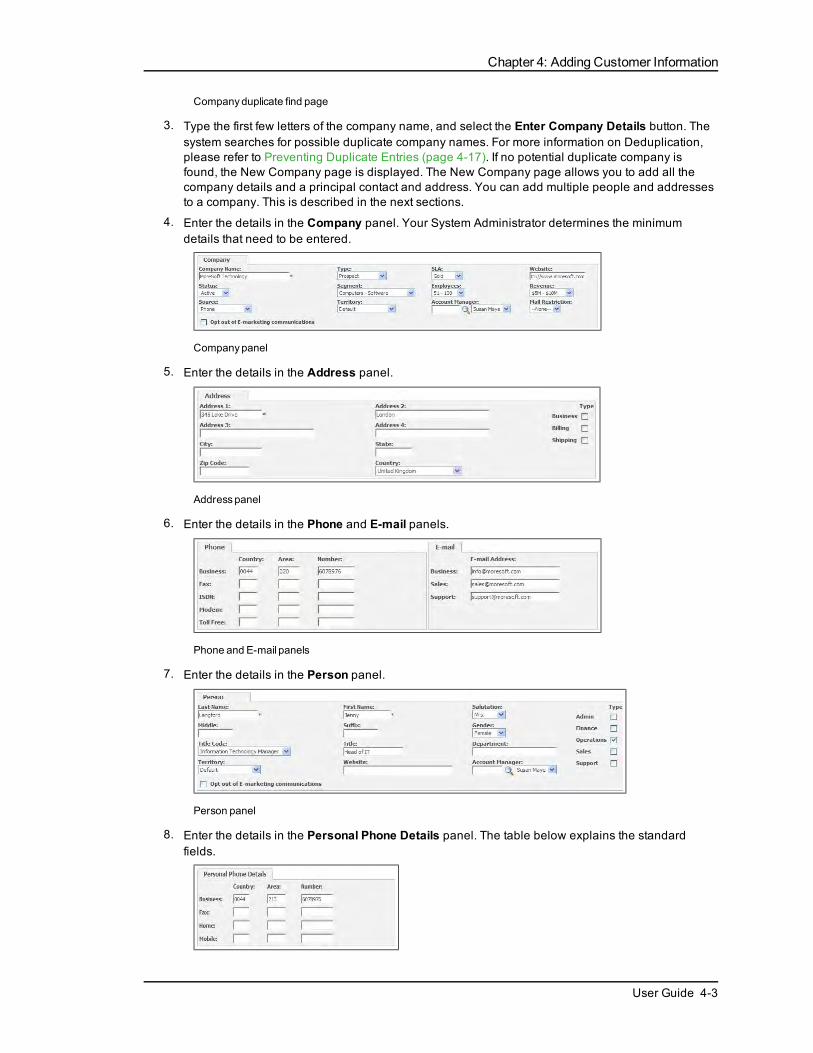
Chapter 4: Adding Customer Information
Companyduplicate find page
3. Type the first few letters of the company name, and select the Enter Company Details button. Thesystem searches for possible duplicate company names. For more information on Deduplication,please refer to Preventing Duplicate Entries (page 4-17). If no potential duplicate company isfound, the New Company page is displayed. The New Company page allows you to add all thecompany details and a principal contact and address. You can add multiple people and addressesto a company. This is described in the next sections.
4. Enter the details in the Company panel. Your System Administrator determines the minimumdetails that need to be entered.
Companypanel
5. Enter the details in the Address panel.
Addresspanel
6. Enter the details in the Phone and E-mail panels.
Phone and E-mail panels
7. Enter the details in the Person panel.
Person panel
8. Enter the details in the Personal Phone Details panel. The table below explains the standardfields.
User Guide 4-3

Chapter 4
Person Phone Details panel
9. Enter the details in the Personal E-mail Details panel. The table below explains the standardfields.
PersonalE-mailDetails panel
10. Click on the Save button. You may need to scroll back to the top of the page to access the buttons.
Company Fields
Field Description
Company Name Name of the company.
Type Type of relationship to your company. For example,Prospect, Supplier, or Customer.
SLA Service Level Agreement that the company hassigned up for—please refer to Cases (page 18-1).The SLA selected here will be the default SLA forany cases you create relating to the company.
Website The company URL.
Status Current status, for example, Active or Inactive.
Segment Industry sector, for example, Retail or FinancialServices.
Employees Number of people employed by the company.
Revenue Company revenue. The standard drop-down valuesfor this field are in USD ($).
Source How contact with the company was initiated. Forexample, Tradeshow or Customer Referral.
Territory Security territory of the company. Please refer toTerritory Management (page 4-7).
Account Manager Person from your organization responsible for therelationship with this company.
Mail Restriction A flag to allow or prevent the company being addedtomailing lists.
4-4 Sage CRM

Chapter 4: Adding Customer Information
Field Description
Opt out of E-marketingCommunications
This flag is automatically set if the e-mail addressassociated with the company has opted out of all E-marketing communications received via SageCRM's integrated E-marketing (Swiftpage). The usercanmanually check or uncheck the option, howeverthis has no impact on E-marketing e-mails sent fromSwiftpage (these will always retain the opt-out flagset from the E-marketing e-mail).
Address Fields
Field Description
Address 1 First line of the address.
Address 2 Second line of the address.
Address 3 Third line of the address.
Address 4 Fourth line of the address.
City City the company is based in.
State State or county.
Zip Code Zip or postal code of the address.
Country Country the company is based in.
Type Type of address—one ormore of these can bechecked.
Phone and E-mail FieldsThe conventions for entering country and area codes and voice and data numbers are determined byyour System Administrator. They may vary from those shown here.
Field Description
Business Main switchboard phone number.
Fax Main fax number.
ISDN Integrated Services Digital Network number.
Modem Modem number.
User Guide 4-5
Chapter 4
Field Description
Toll Free Toll free number.
Info General information e-mail address.
Sales Sales e-mail address.
Support Support e-mail address.
Person Fields
Field Description
Last Name Person's family name.
First First name.
Salutation Salutation, for example, Mr, Dr, or Miss.
Middle Middle name or initial.
Suffix Suffix. For example, BA (Hons), MSc, or Esq.
Gender Gender, Male or Female.
Title Code List of roles. For example, Managing Director orSales Executive.
Title Free text description of person's title as it appears ontheir business card.
Department Department the person works in.
Territory Security territory of the person. Please refer toTerritory Management (page 4-7).
Account Manager Person from your organization responsible for therelationship with this person.
Type Organizational area that this person works in. One ormore can be checked.
Opt out of E-marketingCommunications
This flag is automatically set if the e-mail addressassociated with the person has opted out of all E-marketing communications received via SageCRM's integrated E-marketing (Swiftpage). The usercanmanually check or uncheck the option, howeverthis has no impact on E-marketing e-mails sent fromSwiftpage (these will always retain the opt-out flagset from the E-marketing e-mail).
4-6 Sage CRM
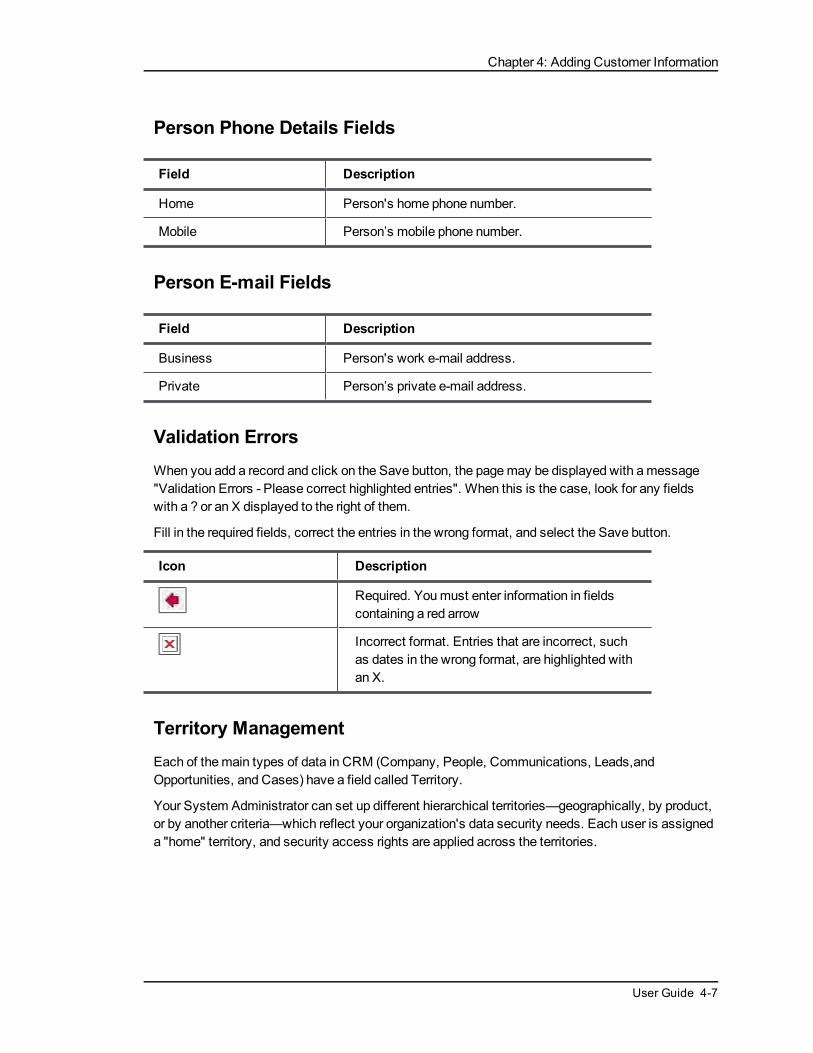
Chapter 4: Adding Customer Information
Person Phone Details Fields
Field Description
Home Person's home phone number.
Mobile Person’s mobile phone number.
Person E-mail Fields
Field Description
Business Person's work e-mail address.
Private Person’s private e-mail address.
Validation ErrorsWhen you add a record and click on the Save button, the pagemay be displayed with amessage"Validation Errors - Please correct highlighted entries". When this is the case, look for any fieldswith a ? or an X displayed to the right of them.
Fill in the required fields, correct the entries in the wrong format, and select the Save button.
Icon Description
Required. Youmust enter information in fieldscontaining a red arrow
Incorrect format. Entries that are incorrect, suchas dates in the wrong format, are highlighted withan X.
Territory ManagementEach of themain types of data in CRM (Company, People, Communications, Leads,andOpportunities, and Cases) have a field called Territory.
Your System Administrator can set up different hierarchical territories—geographically, by product,or by another criteria—which reflect your organization's data security needs. Each user is assigneda "home" territory, and security access rights are applied across the territories.
User Guide 4-7

Chapter 4
Territories
For example, your organization has sales teams based in Europe, Asia, and the USA. It is arequirement that the sales people can view all companies, but they can only insert and change thecompanies in their own "home" territory or hierarchically subordinated to their home territory.
When inserting new data, you can select a territory to assign the record to from the Territory list.The territories available to you in the list are defined by your System Administrator. If you do notselect a territory, the record is automatically assigned a territory according to the territory securitymanagement set up by your System Administrator and a set of system rules.
If no territories are defined by your System Administrator, you can ignore this field. All records arethen automatically assigned to the highest level territory calledWorldwide.
The Territory field appears in most lists and filter boxes within CRM. If your implementationmakesuse of territories, all areas of the system (including Reporting andGroups) are affected by it.
For example, if you do not have rights to view data in the USA sales territory, no USA sales territorydata is displayed on a company list report run by you.
Changing Company Details1. Open the company you want to make changes to, and click on the Summary tab.
2. Select the Change button.
3. Make the changes to the company information.
4. Select the Save button.
Changing Company Address DetailsOne of your customers has moved to a new location and you need to update the address and phonedetails.
1. Open the company you want to make changes to, and click on the Summary tab.
2. Select the Addresses tab. This displays a list of all company addresses. The Link Status iconshows if the company address you are about to change is linked to existing contacts.
3. Click on the hyperlink of the address you want to change.
4. Type the new address. Note that the Set As Default Address For Company check box shouldremain selected if this address is the new principal address for the company. Leaving this checkbox selected also means that this is the default address for any new people who are added to thecompany.
Set AsDefault AddressFor Companycheckbox
4-8 Sage CRM

Chapter 4: Adding Customer Information
5. Select the Save button. Note that any people linked to this address are also affected by the change.Click on the Link Status icon to view the linked contacts.
Changing Person DetailsWhat do you do if one of the people who works at the company you have been dealing with movesdepartment and receives a promotion?
Update the information as soon as you receive it. Someone else in your organizationmay besending out amail shot to your contact, so it is important to get the new title in the system.
To change the details of the person:
1. Open the person context of the person you want to make changes to, and click on the Summarytab.
2. Select the Change button.
3. Make the changes to the person's details and select the Save button. Note that the Set As Defaultcheck box should remain selected if this person is still the principal contact person for the company.
Adding a New Address to an Existing Company1. Open the company you want to make changes to, and click on the Addresses tab.
2. Select the New Address button.
Addresspanel
3. Enter the details of the new address, or click on the Select An Address To Update Or Copy icon tobase the new address on an existing address. The Set As Default check box can be selected tomake this address the principal company address.
4. Select the Save button.
Note: A new address added in the context of a company is linked to the company, but the LinkStatus shows as single-linked until the address is linked to one or more contact people. A newaddress added in the context of a person is linked to the person, but the Link Status shows assingle-linked until the address in linked tomore than one person or to the company.
Adding a New Person to an Existing Company1. Open the company you want to make changes to, and click on the People tab.
2. Select the New Person button. The Person duplicate find page is displayed.
User Guide 4-9
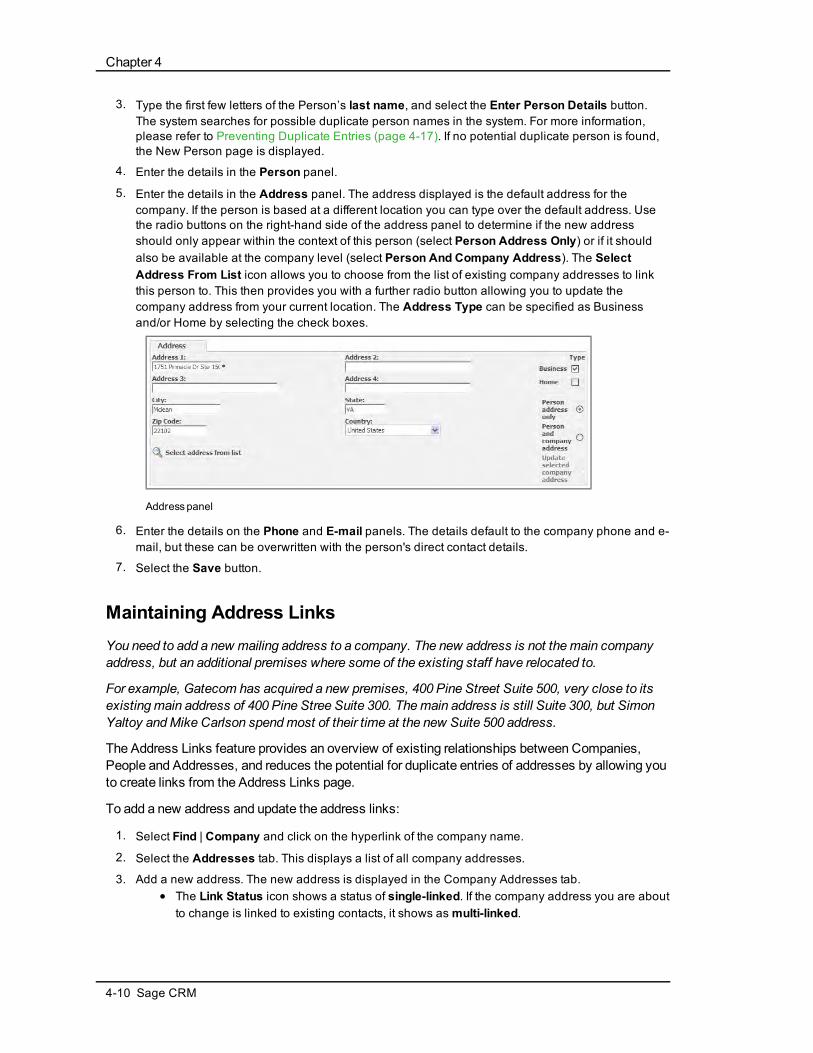
Chapter 4
3. Type the first few letters of the Person’s last name, and select the Enter Person Details button.The system searches for possible duplicate person names in the system. For more information,please refer to Preventing Duplicate Entries (page 4-17). If no potential duplicate person is found,the New Person page is displayed.
4. Enter the details in the Person panel.
5. Enter the details in the Address panel. The address displayed is the default address for thecompany. If the person is based at a different location you can type over the default address. Usethe radio buttons on the right-hand side of the address panel to determine if the new addressshould only appear within the context of this person (select Person Address Only) or if it shouldalso be available at the company level (select Person And Company Address). The SelectAddress From List icon allows you to choose from the list of existing company addresses to linkthis person to. This then provides you with a further radio button allowing you to update thecompany address from your current location. The Address Type can be specified as Businessand/or Home by selecting the check boxes.
Addresspanel
6. Enter the details on the Phone and E-mail panels. The details default to the company phone and e-mail, but these can be overwritten with the person's direct contact details.
7. Select the Save button.
Maintaining Address LinksYou need to add a new mailing address to a company. The new address is not themain companyaddress, but an additional premises where some of the existing staff have relocated to.
For example, Gatecom has acquired a new premises, 400 Pine Street Suite 500, very close to itsexistingmain address of 400 Pine Stree Suite 300. Themain address is still Suite 300, but SimonYaltoy andMike Carlson spendmost of their time at the new Suite 500 address.
The Address Links feature provides an overview of existing relationships between Companies,People and Addresses, and reduces the potential for duplicate entries of addresses by allowing youto create links from the Address Links page.
To add a new address and update the address links:
1. Select Find | Company and click on the hyperlink of the company name.
2. Select the Addresses tab. This displays a list of all company addresses.
3. Add a new address. The new address is displayed in the Company Addresses tab.l The Link Status icon shows a status of single-linked. If the company address you are about
to change is linked to existing contacts, it shows asmulti-linked.
4-10 Sage CRM
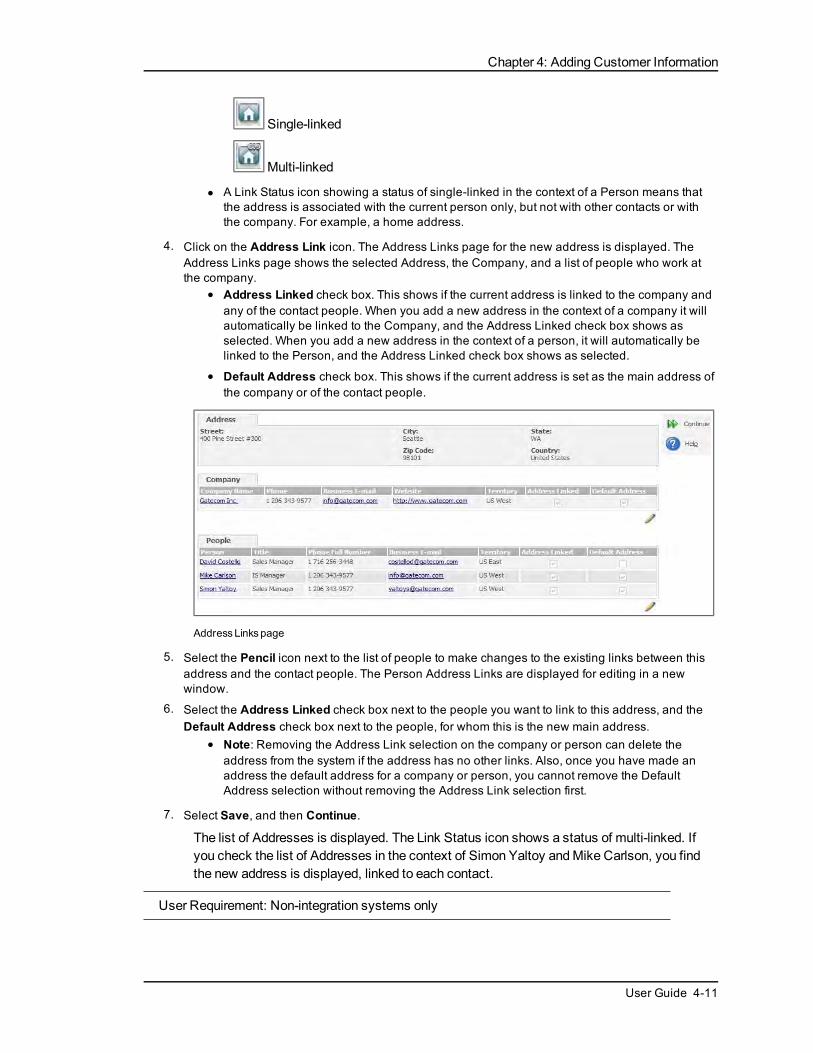
Chapter 4: Adding Customer Information
Single-linked
Multi-linked
l A Link Status icon showing a status of single-linked in the context of a Person means thatthe address is associated with the current person only, but not with other contacts or withthe company. For example, a home address.
4. Click on the Address Link icon. The Address Links page for the new address is displayed. TheAddress Links page shows the selected Address, the Company, and a list of people who work atthe company.
l Address Linked check box. This shows if the current address is linked to the company andany of the contact people. When you add a new address in the context of a company it willautomatically be linked to the Company, and the Address Linked check box shows asselected. When you add a new address in the context of a person, it will automatically belinked to the Person, and the Address Linked check box shows as selected.
l Default Address check box. This shows if the current address is set as the main address ofthe company or of the contact people.
AddressLinkspage
5. Select the Pencil icon next to the list of people to make changes to the existing links between thisaddress and the contact people. The Person Address Links are displayed for editing in a newwindow.
6. Select the Address Linked check box next to the people you want to link to this address, and theDefault Address check box next to the people, for whom this is the new main address.
l Note: Removing the Address Link selection on the company or person can delete theaddress from the system if the address has no other links. Also, once you have made anaddress the default address for a company or person, you cannot remove the DefaultAddress selection without removing the Address Link selection first.
7. Select Save, and then Continue.
The list of Addresses is displayed. The Link Status icon shows a status of multi-linked. Ifyou check the list of Addresses in the context of Simon Yaltoy andMike Carlson, you findthe new address is displayed, linked to each contact.
User Requirement: Non-integration systems only
User Guide 4-11

Chapter 4
Assigning a Different Address to a PersonYoumay want to assign an address to a person that is different from the Company’s usual address.To do this:
1. Find the person whose details you want to change, and open the Summary page for the person.
2. Click on the Addresses tab and select New Address.
3. Fill in the address details and ensure that you select the Person Address Only option underneaththe address details.
4. Click on the Save button.
Adding a Private Address to a PersonYoumay want to assign a private address to a person. To do this:
1. Find the person whose details you want to change, and open the Summary page for the person.
2. Click on the Addresses tab and select New Address.
3. Fill in the address details and ensure that you select the Home check box on the right-hand side ofthe screen.
4. Click on the Save button.
Changing Phone/E-mail DetailsTo update a person’s phone number:
1. Find the person whose details you want to change, and open the Summary page for the person.
2. Select the Phone/E-mail tab.
3. Enter the change on the Phone panel and click on Save.
To update a company phone number:
1. Find the company whose details you want to change, and open the Summary page for thecompany.
2. Select the Phone/E-mail tab.
3. Enter the change on the Phone panel and click on Save.
Adding a Company that has Multiple SitesIf you are creating a new company that has more than one geographical site, you should create thecompany in the normal way and then add the additional address with the New Address button on theAddresses tab.
Alternatively, youmay wish to talk to your System Administrator about customizing the Companyand Address fields to suit you needs.
4-12 Sage CRM

Chapter 4: Adding Customer Information
Working with the Relationships tabThe Relationships tab is available in the context of all main entities including Companies, People,Leads, Opportunities, Quotes, Orders, and Cases. Typical examples include relationships whichshow:
l A parent company and its subsidiaries.
l People who are on the board of directors of multiple companies.
l Companies and their suppliers.
l Critical cases affecting a company.
CompanyRelationships tab
All relationships are "reciprocal". This means they can be viewed and set up from the context ofeach party involved in the relationship.
Youmay find it helpful to "read" the Relationship information from the top of the screen downwards.
Your System Administrator is responsible for setting up relationship types available in the system.If you need new or different relationship types tomeet your business needs, please contact yourSystem Administrator.
Adding a New RelationshipArnold Ball has recently joined the board of directors of Magnetic Software. With a 45% stake in thecompany, he holds significant influence over Magnetic that you want to track.
To add a new company relationship:
1. Search for the Company. For example, Magnetic Software.
2. Select the Relationships tab in the context of the company.
3. Select the icon representing the type of relationship you want to add, for example, New Parent. TheCreate New Relationship page is displayed.
User Guide 4-13

Chapter 4
Create New Relationship page
4. Fill in the fields for the new relationship.
5. Select Save.
The new relationship is displayed on the Relationships tab. All related information is hyperlinked.
For example, clicking on Arnold Ball opens Arnold Ball as the current context. If you check theRelationships tab in the context of Arnold Ball, you can see all the companies he is a director of,includingMagnetic Software andGatecom.
You can run reports and create new reports on the information in the Relationships tab. Please referto Running Reports (page 10-1) and Introduction toWriting Reports (page 23-1) for more informationon running and writing reports. You can also display relationship information on your Dashboard.Please see Classic Dashboard (page 21-1) for more information.
Relationship Fields
Field Description
Relationship Type Select from Parent, Child or Sibling. Parent or Childrelationships normally represent hierarchicalrelationships or relationship where some kind of"ownership" is involved. Sibling relationshipsnormally represent "influencing" or "affecting"relationships. This is only a guide. There is flexibilityto allow your System Administrator to set uprelationship types to suit your specific businessneeds.
Relationship Name Select from a list of relationships defined by yourSystem Administrator. For example, Directors(Director of). The text in brackets shows thereciprocal relationship. For example, Arnold Ball islisted under "Directors" in the context of Gatecom; inthe context of Arnold Ball, Gatecom is listed underthe relationship heading "Director of".
[Entity] Search Select Search for the Person, or other entity, that you wantto link to from the current context. For example,search for Arnold Ball. Note: If the Search Select fora Person is set to First Name (this is the default),then type Arnold, and select themagnifying glassicon.
4-14 Sage CRM

Chapter 4: Adding Customer Information
Field Description
Notes A short note about the relationship. For example, 45% Stakeholder. This text is displayed when youhover over the Person, Case, etc. from theRelationships tab. You can add a new note or edit anexisting note by clicking on theMaintainRelationship pencil icon and clicking on the hyperlinkof the note you want to change.
Deleting a RelationshipArnold Ball is no longer a director of Magnetic Software.
You can delete a relationship that is no longer valid from theRelationships tab where it isdisplayed. Before you do this, youmay want to capture the relationship "history" some other way.For example, add a note to the Notes tab in the context of the person, and/or in the context of thecompany.
To delete a relationship:
1. Find the Company (or other entity) where the relationship is displayed.
2. Select the Relationships tab.
3. Click on the Maintain Relationship pencil icon next to the relationship heading. A list of all peoplewho are, for example, Directors of the current company, is displayed.
4. Select the Remove Relationship check box next to the relationships you want to delete.
5. Select the Delete Selected Relationships button. A confirmation dialog box is displayed.
6. Click OK to continue.
The Relationships tab is displayed. The deleted relationship is no longer displayed on theRelationships tab in the current context or in the context of the reciprocal Relationships tab.
Adding a NoteYou can add notes to Companies, People, Cases, Solutions, Sales Opportunities, and Leads. Toadd a free text note to a Company, for example:
1. Open the company you want to make changes to, and click on the Notes tab.
2. Select the New Note button.
3. Type the text of the note.
4. Select the Save button.
You can add an unlimited number of text notes to the system, and attach them directly to therecords where they aremost relevant. Notes can be attached to: Companies, People,Communications, Leads, Sales opportunities, Customer service cases.
User Guide 4-15

Chapter 4
Editing a Company or Person NoteTo edit a free text note to a company, for example:
1. Open the company you want to make changes to, and click on the Notes tab.
2. Click on the hyperlink of the note. The Notes input page is displayed.
3. Type the changes to the note.
4. Select the Save button.
Building a Company TeamThe Company Team tab within the context of a company gives you an overview of who is involvedfrom your organization in themanagement of large accounts. Your System Administrator must giveyou access to the Company Team tab. The System Administrator can also set up restrictions sothat only Company Teammembers can gain access to sensitive accounts.
To add a new Company Teammember to a company:
1. Open the company you want to make changes to, and click on the Company Team tab.
2. Select the Add Team Member button.
3. Select the User from your organization from the list and add a description of their role.
4. Select the Save button.
Adding a Person without a Company LinkYou can add a person to the system independent of any company affiliation. This means you can:
l Keep track of a valuable contact as they move in their career.
l Stay in contact with a source of advice or expertise who does not work for any one company.
To add a new person who is not affiliated to a company:
1. Make sure you are not in the context of an existing company. If you are, click on the My CRMbutton. This takes you out of an existing company "folder" with one click.
2. Right-click on or hover over the Newmenu button.
3. Select Person from the pop out list. The Person duplicate find page is displayed.
4. Type the first few letters of the person's name, and select the Enter Person Details button. Thesystem searches for possible duplicate person names. For more information, please refer toPreventing Duplicate Entries (page 4-17). If no potential duplicate person is found, the New Personpage is displayed.
5. Leave the For panel blank if you do not want to associate this person with a company. If you dowant to link the person to a company, search for the company from the For panel.
6. Enter the details in the Person panel.
7. Enter the details in the Address panel.
8. Enter the details in the Phone and E-mail panel.
9. Select the Save button. The Summary page for the new person is displayed.
4-16 Sage CRM

Chapter 4: Adding Customer Information
Person Summarypage
You can see that there is no link to a company in the context area of the screen. All the tabs relate tothe person. You can add notes, addresses, phone, and e-mail information for the person in the sameway as you do for a company or for a person within a company.
Reassigning a Person to a CompanyIf a person who you have been tracking as an individual (that is, the person is not related to acompany in any way) later moves to join a specific company, you can assign them to a companyandmove all the communications, opportunities, and cases linked to them across to the company.
Note: Your System Administrator needs to give you rights to do this.
To reassign a person to a company:
1. Find the person you want to reassign.
2. Click on the hyperlink of their name to display the Summary page.
3. Select the Change button. The Summary page is displayed in edit mode, with a new button, MergePerson.
4. Select the Merge Person button. This displays an additional panel, Assign Company.
5. Search for and select the company that you want to assign the person to.
6. Select the Save button.
Preventing Duplicate EntriesDeduplication is enabled by default in the system, with thematch rules outlined below. Thededuplication screens and thematch rules can be customized by your System Administrator.Checking for duplicates then automatically becomes part of the process for adding a new companyor person into the system.
To check for duplicate entries before adding a new company:
1. Right-click on or hover over the Newmenu button.
2. Select Company from the pop out list. The Company duplicate find page is displayed.
3. Type the company name and select the Enter Company Details button. If the information youtyped matches a current company record in the system (according to the match rules defined byyour System Administrator), a list of detected duplicates is displayed. The default match rule on acompany is where the Company Name "contains" the entry you have typed—that is, if you typeRight as the company name, "Design Right" is detected as a possible duplicate.From the list of detected duplicates you can:
User Guide 4-17

Chapter 4
l Click on the hyperlink of an existing company.
l Return to the Company duplicate find page by selecting the Back To Company Entry button.
l Proceed to add a new company by selecting the Ignore Warning And Enter Companybutton.
4. To proceed to add a new company anyway, select the Ignore Warning And Enter Companybutton.
5. The New Company page is displayed including the details entered on the Company duplicate findpage.
6. Enter the company details and select the Save button.
The new company is added into the system and the Company Summary page of the newcompany is displayed.
To check for duplicate people who are unrelated to a company or people linked to companies,follow the same steps as described above, but select the New | Person option from the pop outlist.
The default match rule on a person is where the Last Name "contains" the entry you typed—thatis, if you type the person name as "Smith", both "Smith" and "Blacksmith" are detected aspossible duplicates.
Note: The system also checks for duplicates if you change any of the fields that havematchrules set on them when you edit a record. For example, you change the company name of anexisting company "Design Right Inc." to "Design". The system checks for other companies,which contain the word "Design", and warns of possible duplicates, before updating thecompany record.
Merging Duplicate CompaniesTomerge two companies, first decide which company is the "Source" company and which is the"Destination" company. When the companies aremerged the source company is deleted, and theinformation associated with it—for example, people, communications, opportunities, and cases—iscopied over to the "Destination" company. Relationships set up via the Relationships tab are notmerged.
Note: Your System Administrator needs to give you Delete rights to use this feature. If you do nothave Delete rights andmerge two companies, the old company will remain but all of the data will bemerged.
Tomerge two companies:
1. Find the company that you want to keep and use as the "Destination" company. Usually, this is thecompany with more information stored against it.
2. Click on the hyperlink of the company name.
3. Select the Change button and then the Merge Company button. This displays an additional panel,Merge Company.
Merge Companypanel
4-18 Sage CRM
Chapter 4: Adding Customer Information
4. Use the Search Select buttons to select the source company.
5. Select the Save button. The destination Company Summary page is displayed. A review of the tabsshows that people, communications, opportunities, and cases of the source company have beencopied across to the merged company. In addition, the source company is deleted.
Note: The source company’s addresses get transferred to the destination company’s Addressestab. The source company’s contact people also retain their original address links. These can beupdated once themerge has been completed using theAddress Links feature. Please refer toMaintaining Address Links (page 4-10) for more information.
Merging Duplicate PeopleYour System Administrator needs to give you rights to use this feature. The following table explainsthe check boxes.
Check box Description
DELETESource Entity
Youmust have Person delete rights for this option to work. If thisbox is selected on its ownwithout any other check boxes, thenthe source person and all of the associated data(communications, opportunities etc) from the source person willbe deleted . Note: This is the case, even if the user does nothave delete rights for the associated data.
Select/Dese-lect All
Toggles the selection of all the check boxes. If all check boxesare selected, then the source person record is deleted and theassociated data is merged with the "Destination" person.
MergeOpportunities
Selecting this check box means that the opportunities associatedwith the source person aremerged over to the destinationperson. For example, opportunities associated with the duplicatesource person, "Clemence Sticky" will be associated with thedestination person "Clemence Stickings" after themerge.
Merge Leads Selecting this check box means that the leads associated withthe source person aremerged over to the destination person.
Merge Cases Selecting this check box means that the cases associated withthe source person aremerged over to the destination person.
MergeRelations
Selecting this check box means that the linked information set upby your System Administrator and associated with the sourceperson is merged over to the destination person.
Merge Library Selecting this check box means that the documents associatedwith the source person aremerged over to the destination person.
MergeCom-munications
Selecting this check box means that the communicationsassociated with the source person aremerged over to thedestination person.
User Guide 4-19

Chapter 4
Check box Description
Merge Notes Selecting this check box means that the notes associated withthe source person aremerged over to the destination person.
Tomerge duplicate person entries:
1. Find the person that you want to keep and use as the "Destination" person. Usually, this is theperson with the most information stored against them.
2. Click on the hyperlink of the person's name.
3. Select the Change button and then select the Merge Person button. This displays an additionalpanel, Merge Person.
Merge Person panel
4. Click on the magnifying glass, search for and select the source person.
5. Check the boxes according to the information that you wish to merge. Unlike the company merge,you also have the option to keep the source person.
6. Select the Save button. The destination Person Summary page is displayed. A review of the tabsshows that the information associated with the source person has been copied across to themerged person, according to the check boxes you selected. The source person is only deleted ifyou selected the Delete Source Entity check box.
Deleting Company or Person RecordsUnless you are a System Administrator or a power user, it is unlikely that you will have the ability todelete company or person records. Instead you should:
l Ask your System Administrator about giving you the rights to merge person and company records.
Or
l Set the status of the company to Inactive. To do this, open the Company Summary page, select theChange action button, select Inactive from the Status list and click on Save. A Status field can alsobe added to the Person Summary page by your System Administrator, if your organization decidesto use a similar method to indicate a person is no longer used.
If your profile allows you to delete company or person records, a Delete action button is available onthe Person or Company Summary page.
To delete a Company or Person:
1. Find and open the company or person you want to delete.
2. From the Summary page, click on the Delete button and then on the Confirm Delete button. Theperson or company record is deleted from the system.
4-20 Sage CRM
Chapter 5: Appointments and Tasks
In this chapter you will learn how to:
l Create a task.
l Create an appointment.
l Schedule a callback.
l Understand the Communication fields and icons.
l Check my own calendar.
l Check a colleague’s calendar.
l Review the contact history with a person or company.
l Review notifications.
l Change the status of a task or an appointment.
l Find a communication.
l Add attachments to tasks.
l Invite external attendees to a meeting.
l Create a recurring task or appointment.
l Synchronize my CRM and Outlook calendars.
l See my colleague’s availability for an appointment.
l Deleting a communication.
Creating a TaskTo create a task:
1. Right-click on or hover over the Findmenu button. The Pop Out list is displayed.
2. Select Person. The person Find page is displayed
3. Type the name of the person and select the Find action button. A list of people matching yoursearch criteria is displayed.
4. Click on the hyperlink of the person you want to schedule the task with. This displays the PersonSummary page.
5. Right-click on or hover over the Newmenu button. The Pop Out list is displayed.
6. Select Task. The New Task page is displayed. Note: You can also select the Task button directlyfrom the New Pop Out list or from My CRM | Calendar. The difference is that you then need to findthe person you are scheduling the task with, using the Regarding panel. You can also schedulecommunications that are not linked to a person or company.
7. Enter the details on the page. Note: The time and date fields under Due Date/Time areautomatically populated with the current date and a time 30 minutes into the future.
8. Select the Save button.
User Guide 5-1

Chapter 5
Creating an AppointmentTo create a new appointment:
1. From the My CRM | Calendar tab, select the New Appointment button. Alternatively, right-click orhover over the Newmenu button and select Appointment.
2. Fill in the details of the appointment. The Regarding panel allows you to link the appointment to anexisting company and person.
3. Ensure that your name is selected from the list of users, and select Save.
Scheduling a CallbackFollowing an internal meeting, you are asked tomake contact with a potential business partner. Youreceive information that themanaging director is away at a conference. The call would be besttimed after his return a week from today. You want to capture this information as quickly as possibleand thenmove on to other tasks at hand until the call is due.
To create a callback:
1. Right-click on or hover over the Findmenu button. The Pop Out list is displayed.
2. Select Person. The person Find page is displayed.
3. Type the name of the person and select the Find action button. A list of people matching yoursearch criteria is displayed.
4. Click on the hyperlink of the person you want to schedule the callback with. This displays thePerson Summary page.
5. Right-click on or hover over the Newmenu button. The Pop Out list is displayed.
6. Select Task. The New Task page is displayed. Note: You can also select the Task button directlyfrom the New Pop Out list or from My CRM | Calendar. The difference is that you then need to findthe person you are scheduling the communication with, using the Regarding panel.
New Taskpage
5-2 Sage CRM
Chapter 5: Appointments and Tasks
7. Enter the details on the page.
8. Select the Save button.
Communication FieldsThe table below explains the fields on the Regarding panel.
Field Description
Company The company you are communicating with. If linked,you can jump to the summary screen of the relatedcompany by clicking on the Company icon or doubleclicking on the text in this field.
Person The person you are communicating with. If linked,you can jump to the summary screen of the relatedperson by clicking on the Person icon or doubleclicking on the text in this field.
About The opportunity or case that the communicationrelates to. If linked, you can jump to the summaryscreen of the related opportunity or case by clickingon theOpportunity or Case icon or double clicking onthe text in this field.
The table below explains the fields on the Details panel.
Field Description
Action The type of task, for example, PhoneOut or E-mail In.
Subject Subject of the appointment or task.
Location Appointments only. Location of the appointment. Type in thelocation, or leave blank. If a Resource type user is added to theappointment, for example, LondonMeeting Room, then thisresource is automatically added to the Location field. If you havealready typed some text into this field, the resource user gets addedon to the end after a semi-colon.
Details A summary of the task.
Status Status of the communication. For example, Planned, Complete, orCancelled.
Priority Priority of the task. For example, High, Medium, or Low.
Territory Security territory of the communication. Please refer to TerritoryManagement (page 4-7) for more information.
User Guide 5-3
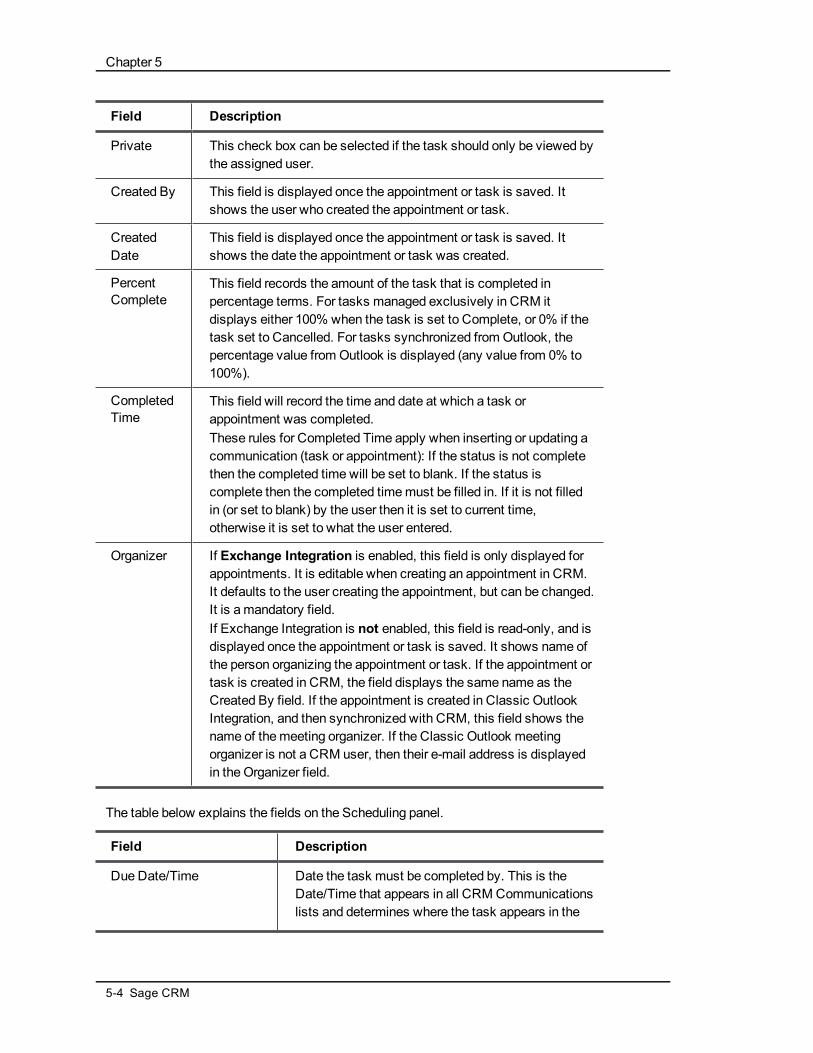
Chapter 5
Field Description
Private This check box can be selected if the task should only be viewed bythe assigned user.
Created By This field is displayed once the appointment or task is saved. Itshows the user who created the appointment or task.
CreatedDate
This field is displayed once the appointment or task is saved. Itshows the date the appointment or task was created.
PercentComplete
This field records the amount of the task that is completed inpercentage terms. For tasks managed exclusively in CRM itdisplays either 100% when the task is set to Complete, or 0% if thetask set to Cancelled. For tasks synchronized from Outlook, thepercentage value from Outlook is displayed (any value from 0% to100%).
CompletedTime
This field will record the time and date at which a task orappointment was completed.These rules for Completed Time apply when inserting or updating acommunication (task or appointment): If the status is not completethen the completed time will be set to blank. If the status iscomplete then the completed timemust be filled in. If it is not filledin (or set to blank) by the user then it is set to current time,otherwise it is set to what the user entered.
Organizer If Exchange Integration is enabled, this field is only displayed forappointments. It is editable when creating an appointment in CRM.It defaults to the user creating the appointment, but can be changed.It is amandatory field.If Exchange Integration is not enabled, this field is read-only, and isdisplayed once the appointment or task is saved. It shows name ofthe person organizing the appointment or task. If the appointment ortask is created in CRM, the field displays the same name as theCreated By field. If the appointment is created in Classic OutlookIntegration, and then synchronized with CRM, this field shows thename of themeeting organizer. If the Classic Outlook meetingorganizer is not a CRM user, then their e-mail address is displayedin the Organizer field.
The table below explains the fields on the Scheduling panel.
Field Description
DueDate/Time Date the task must be completed by. This is theDate/Time that appears in all CRM Communicationslists and determines where the task appears in the
5-4 Sage CRM

Chapter 5: Appointments and Tasks
Field Description
Tasks panel of your Calendar View. When you addthe Due Date/Time, the Onscreen Reminder field isenabled, and the Reminder Date/Time set to thesame time as the Due Date/Time.
User The person who is responsible for executing thetask.If your CRM system has less than ten users, thisfield is displayed as a single list. You can select, ormulti-select using themouse and holding the CTRLkey.With more than ten users, a search is built in to helpyou find the users. In the Search For field, type thefirst letter, or a few letters of the first or last name, forexample, w.The first user, whose first name begins with theletter "w", is highlighted in the list of matching users.This list also displays all users containing the letter"w".Highlight one user, or multiple users by holding downthe CTRL key, and click on the Add button to assignthem to the task or meeting.If there are 10 users or less in the system, all of theusers will be listed in the User section. Select therequired users from the list provided to assign themto the task or meeting.Note: When you addmore than one user to a task,you are creatingmultiple tasks.
Start Date/Time Date/Time the task is "active" from. Used inMSOutlook if you are filtering tasks by the active dateand time.
Onscreen Reminder This field is implementation dependent andmayhave been switched off by your SystemAdministrator. Check this box to get an on-screenreminder for the task.
Reminder Date/Time Date/Time of the reminder. Defaults to the DueDate/Time.
Send Reminder Message If the Onscreen Reminder field is enabled, you canselect this check box to receive the reminder indifferent formats depending on the priority of thecommunication. The different formats and prioritiesare set up within the Preferences tab. Please refer to
User Guide 5-5

Chapter 5
Field Description
Preferences (page 22-1) for more information.
Team The Team the task is assigned to.
If the new communication is an appointment, the scheduling panel includes the additional fieldsdescribed below.
Field Description
Date / Time Start date and time of the appointment. Defaults tothe current Date/Time.
End Time End date and time of the communication. Defaults tohalf an hour after the Date/Time.
All Day Event Select to show the appointment is an all day event.Once selected, the Date / Time is set to 00:00 and isread-only. The End Time date is set to the same day,and the End Time is set to 11:59 pm (23:59) - bothread-only. When viewed in the Calendar, an all dayevent appointment is prefixed with "All Day Event".
Reminder Select the length of time from the list. This is thelength of time prior to themeeting taking place thatyou receive a reminder.
RecurrenceSelect this button if you want to set the currentappointment up as part of a recurring pattern ofappointments. For example, every Monday at 10.00AM tomeet with the Professional Services team.
TheMeeting Planner panel is displayed on all Appointments (communications where the Actionfield is set to Meeting). TheMeeting Planner panel is not displayed for Recurring Appointments orTasks.
The table below explains the fields on the Follow-up panel.
Field Description
Create Follow-up Task The check box can be checked to generate a newtask based on the current information, immediatelyafter saving the current task.
Create Follow-upAppointment
The check box can be checked to generate a newmeeting based on the current information,immediately after saving the current task.The Create Follow-up Task and Appointment check
5-6 Sage CRM

Chapter 5: Appointments and Tasks
Field Description
boxes cannot be checked at the same time
Create Follow-upOpportunity
The check box can be checked to generate a newopportunity based on the current information.Note that it is only displayed when editing existingcommunications.
Send SMS MessageImmediately
If SMS messaging is enabled by your SystemAdministrator, selecting this option immediatelynotifies the user(s) assigned to the task or meeting.
Selecting the Show Campaigns button displays a new panel called Campaigns.
The table below explains the fields on the Campaigns panel.
Field Description
Wave Activity Click on themagnifying glass to search for aCampaignWave Activity to link the communicationto. Once you have selected theWave Activity afurther field, called Response Type, is displayed. Ifthe communication was scheduled within thecontext of aWave Activity, for example, to register amail shot going out, theWave Activity is read-only.
Response Type List of Response Types related to theWaveActivity.
Communications generated within the context of a campaign are automatically linked to a waveactivity. When edited, the Campaigns panel is immediately displayed.
For more information, please refer to CampaignManagement (page 17-1).
The table below shows the standard Action type icons.
Icon Action
Vacation
PhoneOut
Phone In
Letter Out
User Guide 5-7
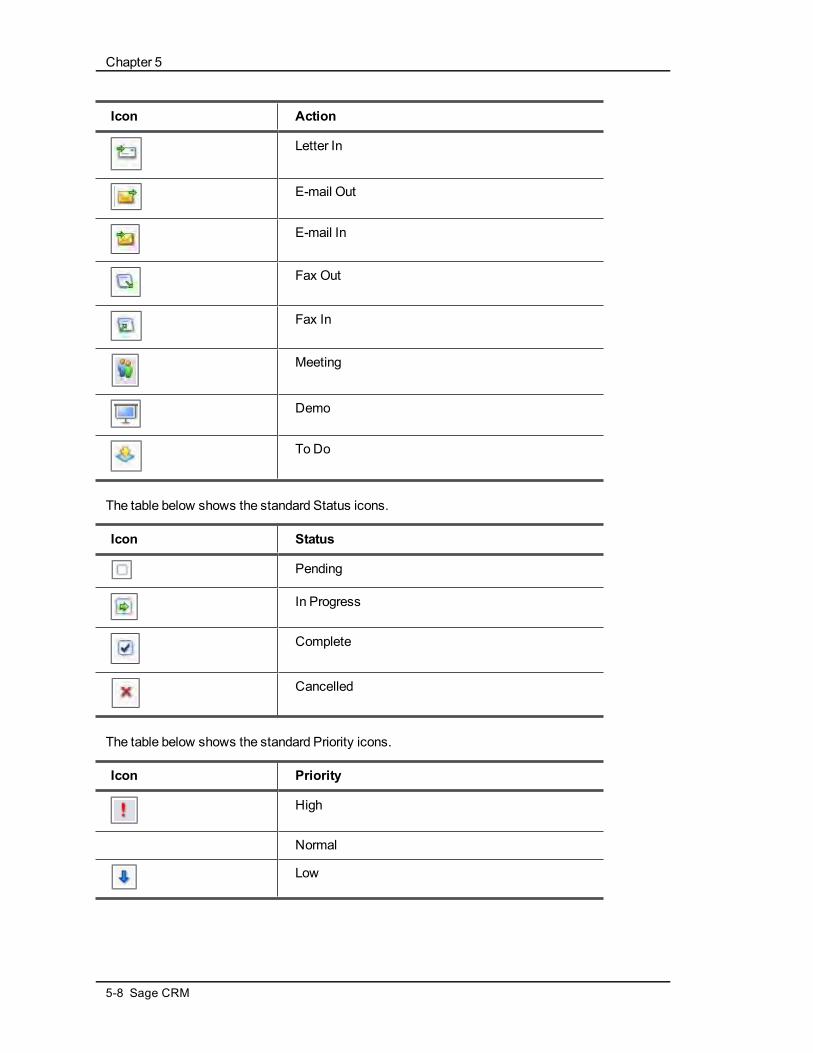
Chapter 5
Icon Action
Letter In
E-mail Out
E-mail In
Fax Out
Fax In
Meeting
Demo
ToDo
The table below shows the standard Status icons.
Icon Status
Pending
In Progress
Complete
Cancelled
The table below shows the standard Priority icons.
Icon Priority
High
Normal
Low
5-8 Sage CRM
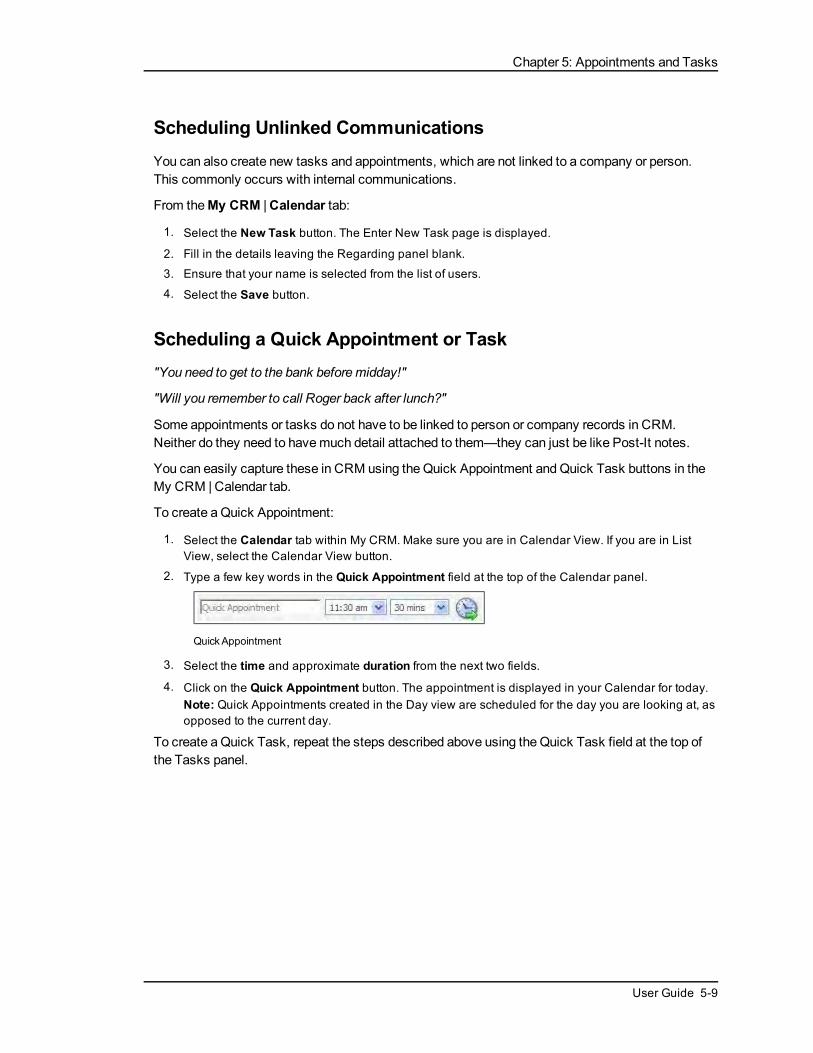
Chapter 5: Appointments and Tasks
Scheduling Unlinked CommunicationsYou can also create new tasks and appointments, which are not linked to a company or person.This commonly occurs with internal communications.
From theMy CRM |Calendar tab:
1. Select the New Task button. The Enter New Task page is displayed.
2. Fill in the details leaving the Regarding panel blank.
3. Ensure that your name is selected from the list of users.
4. Select the Save button.
Scheduling a Quick Appointment or Task"You need to get to the bank beforemidday!"
"Will you remember to call Roger back after lunch?"
Some appointments or tasks do not have to be linked to person or company records in CRM.Neither do they need to havemuch detail attached to them—they can just be like Post-It notes.
You can easily capture these in CRM using the Quick Appointment andQuick Task buttons in theMy CRM | Calendar tab.
To create aQuick Appointment:
1. Select the Calendar tab within My CRM. Make sure you are in Calendar View. If you are in ListView, select the Calendar View button.
2. Type a few key words in the Quick Appointment field at the top of the Calendar panel.
QuickAppointment
3. Select the time and approximate duration from the next two fields.
4. Click on the Quick Appointment button. The appointment is displayed in your Calendar for today.Note: Quick Appointments created in the Day view are scheduled for the day you are looking at, asopposed to the current day.
To create aQuick Task, repeat the steps described above using the Quick Task field at the top ofthe Tasks panel.
User Guide 5-9

Chapter 5
NotificationsNotificationmessages are displayed at the top of the screen. They are usually set and displayed asreminders for tasks or appointments.
Notificationsdisplayed on-screen
l When you log on to CRM and you have notifications, the number of notifications is displayed in aNotifications bar towards the top of the browser window. Select the Notifications title bar to extendand view all the outstanding notifications.
l You can clear or "snooze" all of your reminders at the same time, or you can clear or snooze themindividually.
l When one or more notification reminders are displayed on-screen, you can dismiss all of them byselecting the Clear All hyperlink. To clear a single notification reminder, select the close icon (x)next to the individual notification.
l When you extend an individual notification, you can choose the View Original link to go to theoriginal communication that the notification relates to.
l You can "snooze" all of the on-screen notifications for a selected time interval, such as 30 Minutes,6 Hours, or 1 Day by selecting the snooze interval from the Snooze All For drop-down list. Tosnooze a single notification reminder, select the snooze interval from the Snooze For drop-downlist next to the individual notification.
Changing the Status of a CommunicationFrom your Calendar:
1. Click on the Action icon of the task. The Task Details page is displayed.
2. As you are making the call, you can add notes to the Details field.
3. When the call is completed, select Complete from the Status list. You can also click on the PendingStatus icon from the Calendar View. This automatically changes the status to Complete anddisplays the Task page.
4. Check the follow-up boxes if required.
5. Select the Save button. The Calendar page is displayed.
5-10 Sage CRM
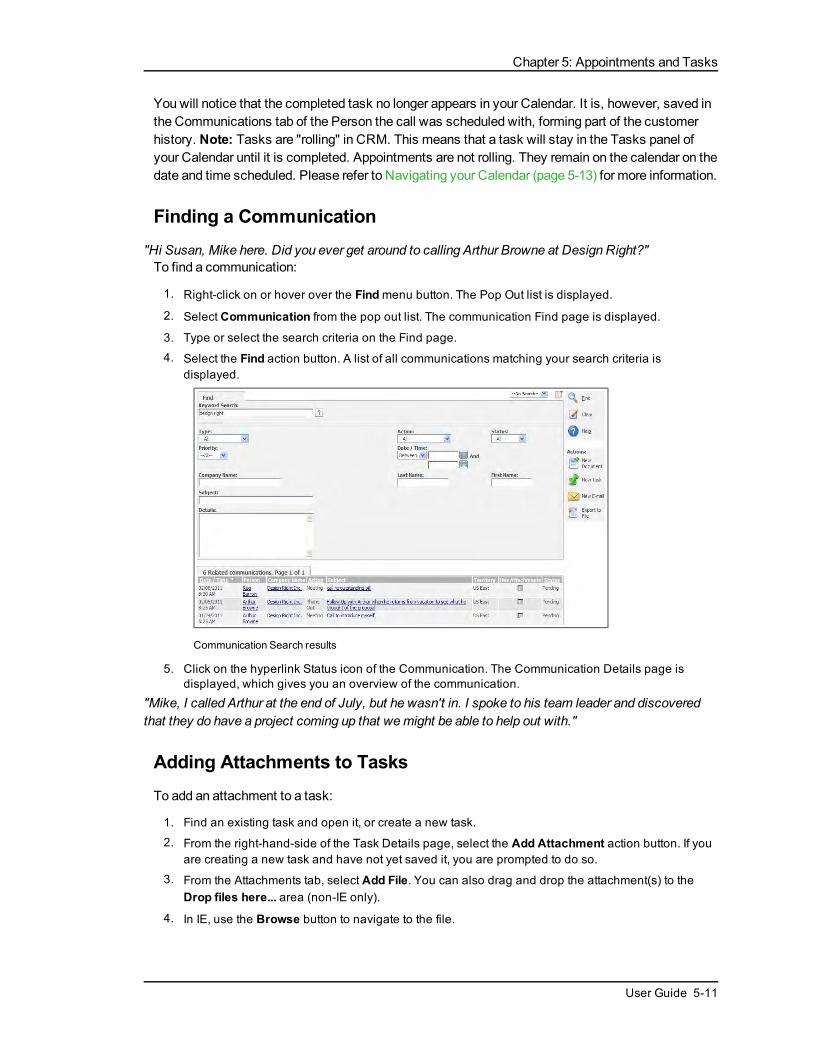
Chapter 5: Appointments and Tasks
You will notice that the completed task no longer appears in your Calendar. It is, however, saved inthe Communications tab of the Person the call was scheduled with, forming part of the customerhistory. Note: Tasks are "rolling" in CRM. This means that a task will stay in the Tasks panel ofyour Calendar until it is completed. Appointments are not rolling. They remain on the calendar on thedate and time scheduled. Please refer to Navigating your Calendar (page 5-13) for more information.
Finding a Communication"Hi Susan, Mike here. Did you ever get around to calling Arthur Browne at Design Right?"To find a communication:
1. Right-click on or hover over the Findmenu button. The Pop Out list is displayed.
2. Select Communication from the pop out list. The communication Find page is displayed.
3. Type or select the search criteria on the Find page.
4. Select the Find action button. A list of all communications matching your search criteria isdisplayed.
Communication Search results
5. Click on the hyperlink Status icon of the Communication. The Communication Details page isdisplayed, which gives you an overview of the communication.
"Mike, I called Arthur at the end of July, but he wasn't in. I spoke to his team leader and discoveredthat they do have a project coming up that wemight be able to help out with."
Adding Attachments to TasksTo add an attachment to a task:
1. Find an existing task and open it, or create a new task.
2. From the right-hand-side of the Task Details page, select the Add Attachment action button. If youare creating a new task and have not yet saved it, you are prompted to do so.
3. From the Attachments tab, select Add File. You can also drag and drop the attachment(s) to theDrop files here... area (non-IE only).
4. In IE, use the Browse button to navigate to the file.
User Guide 5-11

Chapter 5
5. For other browsers, select the file(s) you want to add from their current location. A list of the file(s)you have attempted to upload is displayed. The green check mark and red cross icons indicatewhether the files uploaded or not. To upload successfully, the files must comply with the system filesize, type, and number of files settings. These are defined by your System Administrator.
6. Select Save to complete the attachment of the file(s) to the task. You can use Add File to attachmore files to the task.
To view a file you have already attached, click on the paperclip icon next to the attachment, or drillinto the attachment and select theView Attachment icon. All files attached to the task in thecontext of an entity (Company, Person, Opportunity etc) are also saved as entries in theDocuments tab of that entity.
Reassign an Existing Task to a Colleague1. From your Calendar tab, click on the Action icon of the task. The Task page is displayed.
2. Select the name of your colleague from the User field.
3. Select the Save button. The task is now displayed in your colleague's Calendar/Tasks tab.
Scheduling a Task for a Colleague1. SelectMy CRM | Calendar tab.
2. Select the New Task button. The Enter New Task page is displayed.
3. Use the Search Select buttons to add the person you want to the Company and Person fields onthe Regarding panel.
Regarding panel
4. Add in the task details, selecting your colleague from the User field.
5. Select the Save button.
The new task is displayed in the list of the Communications tab of the company and personselected. It is also displayed in the Calendar tab of the user it has been scheduled for.
The Created By field indicates who scheduled the task.
Checking a Colleague’s CalendarThe ability to check a colleague’s calendar depends on your security profile. If you have theappropriate rights, you can check calendars via My CRM or you can check them while you arescheduling ameeting.
To check a colleague’s calendar via My CRM:
1. Open the My CRM | Calendar tab.
2. Type the first few letters of the user’s name in the Find field in the context area at the top of thepage.
5-12 Sage CRM

Chapter 5: Appointments and Tasks
3. If there is more than one match, select the name from the My CRM For list. Otherwise, the nameappears in the My CRM For field automatically.
4. Click on the right-pointing arrow beside the My CRM For field.
Your colleague’s calendar is displayed.
To check a colleague’s calendar while you are scheduling ameeting:
1. Begin creating the meeting in the normal way.
2. Review the Meeting Planner panel on the Enter New Appointment page.
3. Any conflicts with the current meeting are highlighted in red. Hovering over the overlap shows thedetails of the meeting.
4. After you have made adjustments, save the meeting in the normal way.
Navigating your Calendar
Graphic Description
Select the New Appointment button to create anew appointment.
Type in a few key words, select a time andapproximate duration, and select the QuickAppointment button to create a quick unlinkedcalendar entry.
Select the New Task button to create a new task.For example, a call back you need tomake.
Type in a few key words, and select the QuickTask button to create a quick item in your Tasklist for the day.
Select the New E-mail button to create and sendan e-mail.
You can reduce or expand the list of Tasks thatyou see by changing the Tasks To Viewselections. You can also toggle overdue tasks onor off. Overdue tasks are highlighted in red.
The Filter Box on the right-hand side of the screenis set by default to show all communications(appointments and tasks) with a status ofPending. You can change this to show Cancelled,Complete, or All types of Status. You can alsoset a filter to show, for example, only PhoneOut
User Guide 5-13

Chapter 5
Graphic Description
actions. When you change filter settings,remember to select the Apply Filter button to seethe effects.
The List View button allows you to toggle to thelist view of the Calendar/Tasks page. Once in theList View, you can toggle back to the CalendarView by selecting the Calendar View button.
The Print button is available if you are in daily orweekly Calendar View. You use it to print out allappointments and tasks for the selected timerange, as well as all overdue tasks.
Your System Administrator defines the accessrights to be able to view other peoples' calendarswithin your organization. If you do have access,you can select another user's namewithin theMyCRM context area to view their calendar. Toswitch back to your own calendar, select yourname from the context area of the screen. TheMyCRM For field is always available in this context.However, the Find field is available only whenthere aremore then 10 users in the system.
The View By list at the top of the calendar allowsyou to switch between daily, weekly, monthly,and yearly views of your calendar. The daily viewcan be customized from theMy CRM |Preferences tab. Please refer to AccessingPreferences (page 22-1) for more information.Note: Themonthly and yearly calendar viewsneedmore space to be displayed. With either ofthese options selected, the Tasks panel will notbe displayed. The tasks are displayed on theMonthly and Yearly calendars.
You can use the date display at the top of theCalendar panel to navigate forwards andbackwards from the current date. You can clickon the calendar icon to select a specific date.Note: changing the date display on the Calendarpanel affects the view of your appointments inyour calendar. The Tasks that you can view aredetermined by the settings at the top of the Taskspanel.
5-14 Sage CRM

Chapter 5: Appointments and Tasks
Graphic Description
Clicking onView Today displays the daily viewof your Calendar for today’s date.You can reschedule appointments in yourcalendar by drag-and-drop. Select thecommunication icon and, holding down themouse button, drag the appointment to a newtime or date.Gray shading indicates the current time, date orweek in the daily, weekly, andmonthly calendarviews respectively.
Meeting PlannerYou need to set up a workshop with a customer, which requires attendance by your whole projectteam. If you have access to their calendars, you can review their availability as outlined in thesection above. However, you would need to look at each person's calendar— one at a time.
To speed up the planning process, there is ameeting planner tool integrated into the Enter NewAppointment page.
To schedule themeeting and invite your colleagues:
1. Find the customer you are having the meeting with and open their "file" so that the person's nameappears in the context area of the screen. You can also schedule a new appointment from yourCalendar tab by selecting the New Appointment button. You then search for the person within theEnter New Communication page.
2. Right-click on or hover over the Newmenu button. The Pop Out list is displayed.
3. Select Appointment.
4. Select the date and start and finish times of the meeting from the calendar. The meeting planner isdisplayed in a panel with your user name already selected as an attendee.
5. To invite colleagues, search for the names from the User field and click on the Add button. Theinvited users are displayed in the Meeting Planner panel. Any conflicts with the current meeting arehighlighted in red. Hovering over the overlap shows the details of the meeting.
Meeting Planner showing overlappingmeetings
6. To change the start or finish time of the meeting, click on the time line of the Meeting Planner, oruse the Date/Time and End Time fields.
7. When you have completed the adjustments to the meeting times, click on the Save button.
Themeeting is displayed in the Calendar of each invited user. When the appointment is viewedin the Team CRM calendar, an appointment icon is displayed for each invited user. Note: If a
User Guide 5-15
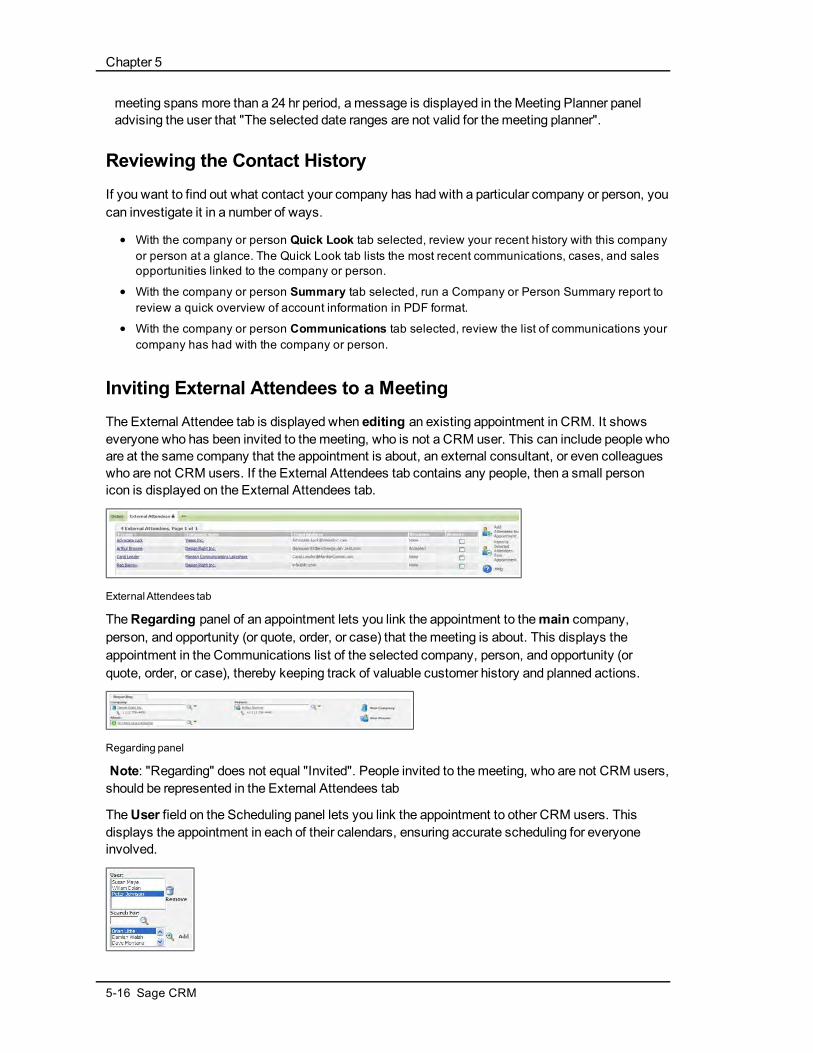
Chapter 5
meeting spans more than a 24 hr period, amessage is displayed in theMeeting Planner paneladvising the user that "The selected date ranges are not valid for themeeting planner".
Reviewing the Contact HistoryIf you want to find out what contact your company has had with a particular company or person, youcan investigate it in a number of ways.
l With the company or person Quick Look tab selected, review your recent history with this companyor person at a glance. The Quick Look tab lists the most recent communications, cases, and salesopportunities linked to the company or person.
l With the company or person Summary tab selected, run a Company or Person Summary report toreview a quick overview of account information in PDF format.
l With the company or person Communications tab selected, review the list of communications yourcompany has had with the company or person.
Inviting External Attendees to a MeetingThe External Attendee tab is displayed when editing an existing appointment in CRM. It showseveryone who has been invited to themeeting, who is not a CRM user. This can include people whoare at the same company that the appointment is about, an external consultant, or even colleagueswho are not CRM users. If the External Attendees tab contains any people, then a small personicon is displayed on the External Attendees tab.
ExternalAttendees tab
TheRegarding panel of an appointment lets you link the appointment to themain company,person, and opportunity (or quote, order, or case) that themeeting is about. This displays theappointment in the Communications list of the selected company, person, and opportunity (orquote, order, or case), thereby keeping track of valuable customer history and planned actions.
Regarding panel
Note: "Regarding" does not equal "Invited". People invited to themeeting, who are not CRM users,should be represented in the External Attendees tab
TheUser field on the Scheduling panel lets you link the appointment to other CRM users. Thisdisplays the appointment in each of their calendars, ensuring accurate scheduling for everyoneinvolved.
5-16 Sage CRM
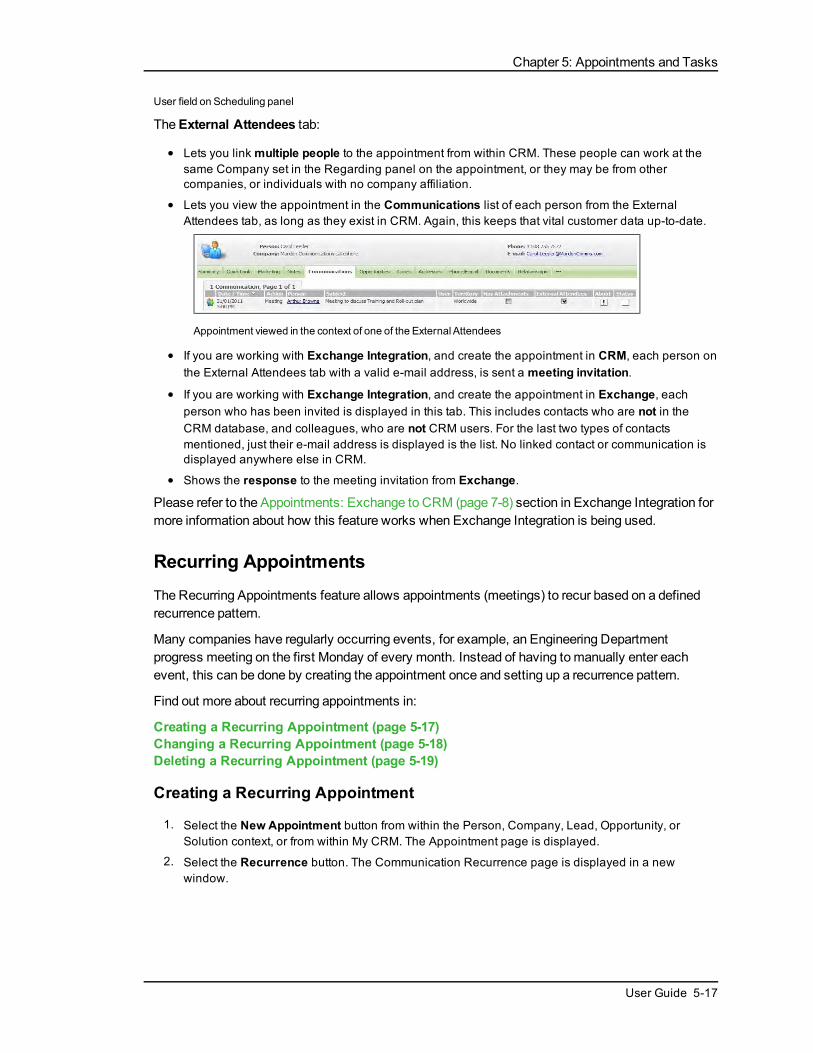
Chapter 5: Appointments and Tasks
User field on Scheduling panel
TheExternal Attendees tab:
l Lets you linkmultiple people to the appointment from within CRM. These people can work at thesame Company set in the Regarding panel on the appointment, or they may be from othercompanies, or individuals with no company affiliation.
l Lets you view the appointment in the Communications list of each person from the ExternalAttendees tab, as long as they exist in CRM. Again, this keeps that vital customer data up-to-date.
Appointment viewed in the context of one of the ExternalAttendees
l If you are working with Exchange Integration, and create the appointment in CRM, each person onthe External Attendees tab with a valid e-mail address, is sent a meeting invitation.
l If you are working with Exchange Integration, and create the appointment in Exchange, eachperson who has been invited is displayed in this tab. This includes contacts who are not in theCRM database, and colleagues, who are not CRM users. For the last two types of contactsmentioned, just their e-mail address is displayed is the list. No linked contact or communication isdisplayed anywhere else in CRM.
l Shows the response to the meeting invitation from Exchange.
Please refer to the Appointments: Exchange to CRM (page 7-8) section in Exchange Integration formore information about how this feature works when Exchange Integration is being used.
Recurring AppointmentsThe Recurring Appointments feature allows appointments (meetings) to recur based on a definedrecurrence pattern.
Many companies have regularly occurring events, for example, an Engineering Departmentprogress meeting on the first Monday of every month. Instead of having tomanually enter eachevent, this can be done by creating the appointment once and setting up a recurrence pattern.
Find out more about recurring appointments in:
Creating a Recurring Appointment (page 5-17)Changing a Recurring Appointment (page 5-18)Deleting a Recurring Appointment (page 5-19)
Creating a Recurring Appointment
1. Select the New Appointment button from within the Person, Company, Lead, Opportunity, orSolution context, or from within My CRM. The Appointment page is displayed.
2. Select the Recurrence button. The Communication Recurrence page is displayed in a newwindow.
User Guide 5-17

Chapter 5
Communication Recurrence page
3. Set the Recurrence Pattern to Daily, Weekly, or Monthly.
4. Select the Daily Pattern for each date in the series. This can be set to either Occurs Once At orOccurs Every. When the Occurs Once At option is selected, just one communication is created foreach date set up in the recurrence pattern. When Occurs Every option is selected, severalcommunications are created. The Starting At and Ending At times enable you to specify a range inwhich the communications will occur.
Note: The recurring appointment Daily Pattern option, Occurs Every, is disabled ifExchange Integration is being used.
5. Select the Start Date and End Date for the recurring pattern of appointments.
6. Select the Continue button.
7. Select the Save button. Appointments are created for the time, frequency, and duration selected inthe Communication Recurrence page.
Note: The default maximum number of occurrences is 200. This is set by the SystemAdministrator. If you exceed themaximum number of occurrences, an error message isdisplayed before you are allowed to save the recurring appointment.
Changing a Recurring Appointment
l Click on the hyperlink icon of the appointment. The Appointment page is displayed.
l To change the Date or Time or any of the recurrence details, you need to select the Recurrencebutton, make the changes in the Communication Recurrence page, and select Continue.
l The text on the lower part of the Scheduling panel indicates the current recurrence status of theappointment.
l To change any other details of the communication, for example, the users taking part in a meeting,make the changes, decide if they apply to just this or all the recurrences of this appointment, andselect Save.
l When you select Save after making changes to a Recurring Appointment, a dialog box opensgiving you the option to apply the changes to the current instance of the appointment, all therecurrences of the appointment, or the current instance and all other instances of the appointment
5-18 Sage CRM

Chapter 5: Appointments and Tasks
in the future. Select This Appointment Only, All Appointments In The Series, or This and FutureAppointments, and click OK.
Note: You can turn existing non-recurring appointments into recurring appointments and viceversa.
Deleting a Recurring Appointment
If you have the rights to delete communication records, you can also delete recurring appointments.You do this in the sameway as non-recurring appointments.
However, note that selecting theAll Appointments In The Series option results in all recurrencesof the appointment being deleted.
Deleting a CommunicationA Delete action button is available on the Task or Appointment Details page if your SystemAdministrator has given you the rights to delete communications.
Before deleting, consider whether changing the communication status to Complete or Cancelledmay be a better solution. All communications, even completed ones from the past, form animportant part of the customer history.
To delete a communication:
1. Find and open the communication you want to delete.
2. From the Details page, click on the Delete button. If the communication has one or moreattachments, for example an e-mail or a letter, then the attachments will also be deleted, and theywill no longer be available in the Documents tab of the associated entity (Person, Company,Opportunity, etc.) Note: This does not apply to mass mail communications deleted in the context ofa recipient.
3. Select the Confirm Delete button to go ahead and delete, or Cancel if you do not want to delete.
User Guide 5-19

Chapter 6: E-mail
In this chapter you will learn how to:
l Set up a default e-mail template.
l Send e-mails from CRM.
l Reply to an e-mail.
l Handle inbound e-mail.
l Keep e-mails with customer records.
l Use MS Outlook to send e-mails.
l Use e-mail shortcuts in CRM.
Setting a Default E-mail TemplateYou can set a default e-mail template, so that when you create a new e-mail the default e-mailtemplate will be selected automatically, and all of the values of the default template will be copied tothe new e-mail. The System Administrator defines the list of default e-mail templates that you canselect from.
To set a default e-mail template:
1. Click on the My CRM button.
2. Select the Preferences tab and then click on the Change button.
3. Select the e-mail template you want to set as default from the Default E-mail Template drop-downlist.
Preferences tab
4. Click on the Save button to save the new settings.
Sending an E-mailCRM takes advantage of having all of your customer and prospect data in the system, by providinga functionality for sending and receiving e-mails so that you:
User Guide 6-1

Chapter 6
l Don’t need to retype or remember contact e-mail addresses that are already in the system.
l Can store e-mails with the customer record for future reference.
l Can convert inbound e-mails directly to a Customer Service Case, a Sales Opportunity, or newLead.
To send an e-mail from CRM:
1. Search for the customer you want to send an e-mail to.
2. Click on the hyperlink of the person’s e-mail address. The E-mail input form is displayed.
E-mail input form
3. The E-mail input form can be opened by clicking on any hyperlinked e-mail address in the system,or by clicking on the New E-mail button from within the My CRM | Calendar tab, or from anyCommunications tab. The e-mail screen can be displayed in different modes:
l Normal. The e-mail screen takes up the whole CRM screen.
l Split. The e-mail screen is displayed in the lower half of the screen. This allows you to carryon working in the system, performing such tasks as searching for people or companies andviewing their details, while writing the e-mail in the lower half of the screen. This is thedefault way the screen appears.
l Popup. The e-mail screen is displayed in a new browser window. This also allows youcontinue working in the system and write the e-mail at the same time.
4. You can switch from Split to one of the other screen positions by changing the E-mail ScreenPosition setting from the My CRM | Preferences tab. For information on changing your Preferencesettings, please refer to Preferences (page 22-1).
5. Select a template from the Template list or leave the default selection to start a blank e-mail. CRMtemplates usually contain standard content and field codes. Further formatting layouts are availablefrom the Layouts toolbar button.If you have a large number of templates you can type a template name and select the Go button tosearch. The standard setting for the search to appear is when there are more than ten templates.
6. The From list contains your e-mail address by default. However, if you have been given permissionto send e-mails from other accounts, you can select the addresses from this list. You can alsochange your default e-mail address in My CRM | Preferences if you have been given permission tosend e-mails from other accounts.
6-2 Sage CRM

Chapter 6: E-mail
7. Select the Reply To address in the same way as you selected the From address. Whether theReply To e-mail addresses are available depends on whether you have been given permissions tosend e-mails from other accounts. If you have not been given permissions, the field is notdisplayed.
8. Check you have the intended recipient of the e-mail in the To field.l If you are already in the context of a person when you click on the New E-mail button, or you
have clicked on the person’s e-mail address hyperlink, then the e-mail address is alreadydisplayed in the To field.
l If you are working in split-screen or popup mode, then you can Find the Person or Companythat you want to send the e-mail to, and click on the hyperlink of their e-mail address.
9. Enter the e-mail address of the person you want to CC the e-mail to in the CC field. You can specifymore than one person here if you wish.
l If you want to BCC the e-mail to anybody, enter their e-mail address(es) in this field.
l If you want to include CRM users in the To, CC, or BCC fields you can add them byselecting their name from the list of users and clicking on the To, CC, or BCC button. Youcan include as many users as you wish in this way, but you must add them one-by-one.
10. Type your message in the body section. You can format the text you entered with the formattingbuttons at the top of the body field. There a number of new formatting options, including bullets andnumbering, tables, text highlighting and the ability to change text color.
11. You can also include HTML content and inline images in the body. For more information on addingHTML content and inline images to the e-mail body and formatting text, please refer to SendingMass E-mails (page 16-17).
12. You can check the spelling of your e-mails before you send them by clicking the Check Spellingbutton. The spell check is carried out in the language of the user set by the System Administrator inAdministration | Users. Language dictionaries available include German, Spanish, French, UKEnglish, and US English. If there is no spell checker dictionary available for the language of theuser, then US English is used.
13. To attach a shared document, use the Advanced Search Select icons to locate the file, select thefile and then select the Upload Attachment button. Please refer to Advanced Search Select (page2-9) for details on using the Advanced Search Select buttons.
14. To attach a local file, select the Browse button, navigate to the file, and select the UploadAttachment button.
15. You can remove the attachment by selecting the delete button, which is displayed once the file isuploaded.
l When you send the e-mail, a communication record is automatically created and storedagainst each person the e-mail was sent to.
l The Communication Options panel displayed at the end of the E-mail input form allows youto change the default entries for some of the Communication fields.
16. Make any changes required to the fields on the Communication Options panel.
17. Select the Send button to send the e-mail. Once the e-mail is sent, it is saved as a Communicationagainst the Person it was sent to and in your Calendar. To view the e-mail you sent, click on theCommunications icon.
Communication for Person
User Guide 6-3
Chapter 6
E-mail Shortcut KeysYou can use the following short cuts on any hyperlinked e-mail address for inserting contactinformation into the e-mail address fields:
Short cut What it does
Shift + Click Opens new e-mail and puts addresses in To field.
Ctrl + Click Opens new e-mail and puts addresses in CC field.
Alt + Click Opens new e-mail and puts addresses in BCC field.
Handling Inbound E-mailsIf you have theOutlook Plug-in for either Exchange Integration or Classic Outlook Integrationinstalled, then you can use the File E-mail button from Outlook to file an inbound e-mailcommunication with the customer record in CRM. Please refer to Filing E-mails from Outlook toCRM (Classic Outlook Integration) (page 8-15) or File E-mail (page 7-13) for more information.
If E-mail Management is set up on your system, inbound e-mails can automatically get filed againstthematching person or company record. Please refer to Filing Inbound andOutbound E-mails (page6-5) for more information. Please refer to Linking E-mail Correspondence to a Customer (page 9-10)for more information.
Replying to an E-mailTo reply to e-mail that is stored in CRMwith a communication record:
1. Find the person who you received the e-mail from.
2. Select the Communications tab within the context of that person.
3. Click on the Communications icon of the e-mail you sent. The E-mail In page is displayed.
4. Select the Reply or Reply All button. The E-mail input form is displayed.
5. Complete all of the fields and send the e-mail. Please refer to Sending an E-mail (page 6-1) for adescription of the fields.
Using Microsoft Outlook to Send E-mailsYou canmerge customer details with the e-mail functionality in CRM and then send the e-mail usingOutlook.
To send the e-mail using Outlook:
1. Find the person you want to send the e-mail to.
2. Click on the hyperlink of the person’s e-mail address. The E-mail input form is displayed.
3. Instead of selecting the Send button, click the Send Using Outlook button. An Outlook window isdisplayed, containing the To address of the selected person.
4. Type the body of the e-mail.
6-4 Sage CRM

Chapter 6: E-mail
5. Select the Send button in the Outlook window. The e-mail is sent by Outlook, and it is also savedwith the communication record against the person or company it was sent to.
Note:Any attachments to the CRM e-mail will be attached automatically to the Outlook e-mail.
Converting E-mailsYou can convert either an inbound or outbound e-mail communication to an opportunity, case, orlead.
For example, you receive an e-mail with a problem from a customer. If you have E-mailManagement installed, inbound e-mails can automatically get filed against thematching person orcompany record. You can then convert the e-mail directly to a customer service case using theworkflow buttons on the right-hand side of the Communication page.
Even if you do not have these additional modules installed, you can convert any existingcommunication, where the action type is E-mail In or E-mail Out to a case, opportunity, or lead.
To do this:
1. Open the E-mail In/Out communication that was created when you sent or received the e-mail.
2. Select New Case, New Opportunity, or New Lead from the Create list.
3. Enter the details of the case, opportunity, or lead and select the Save button. The case, opportunity,or lead is saved against the person or company you sent the e-mail to.
Filing Inbound and Outbound E-mailsYou can carry out basic filing of e-mails from Outlook to CRM using the Outlook Plug-in for eitherExchange Integration or Classic Outlook Integration. Please refer to Filing E-mails from Outlook toCRM (Classic Outlook Integration) (page 8-15) or File E-mail (page 7-13) for more information.
If your System Administrator has set up CRM to use the E-mail Management functionality,additional automated e-mail filing is available to you.
E-mail Out
l E-mails sent from CRM, or from CRM using the Send Using Outlook button, are automaticallyBCCed to a Mail Manager Server Filing address.
l Note: In CRM, this address is not visible in the BCC field, but you can tell if the E-mail Managementfunctionality is set up, as this Mail Manager Server filing address is visible in the BCC field if youclick the Send Using Outlook button.
User Guide 6-5
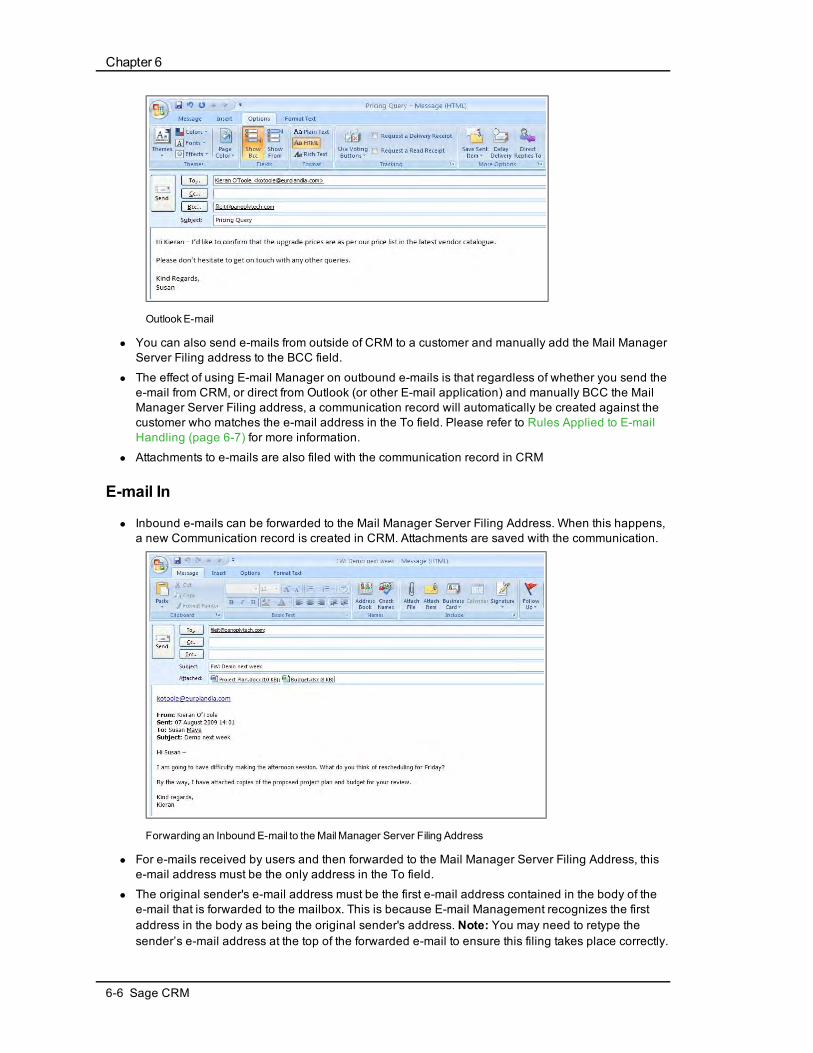
Chapter 6
OutlookE-mail
l You can also send e-mails from outside of CRM to a customer and manually add the Mail ManagerServer Filing address to the BCC field.
l The effect of using E-mail Manager on outbound e-mails is that regardless of whether you send thee-mail from CRM, or direct from Outlook (or other E-mail application) and manually BCC the MailManager Server Filing address, a communication record will automatically be created against thecustomer who matches the e-mail address in the To field. Please refer to Rules Applied to E-mailHandling (page 6-7) for more information.
l Attachments to e-mails are also filed with the communication record in CRM
E-mail In
l Inbound e-mails can be forwarded to the Mail Manager Server Filing Address. When this happens,a new Communication record is created in CRM. Attachments are saved with the communication.
Forwarding an Inbound E-mail to theMailManager Server Filing Address
l For e-mails received by users and then forwarded to the Mail Manager Server Filing Address, thise-mail address must be the only address in the To field.
l The original sender's e-mail address must be the first e-mail address contained in the body of thee-mail that is forwarded to the mailbox. This is because E-mail Management recognizes the firstaddress in the body as being the original sender's address. Note: You may need to retype thesender’s e-mail address at the top of the forwarded e-mail to ensure this filing takes place correctly.
6-6 Sage CRM
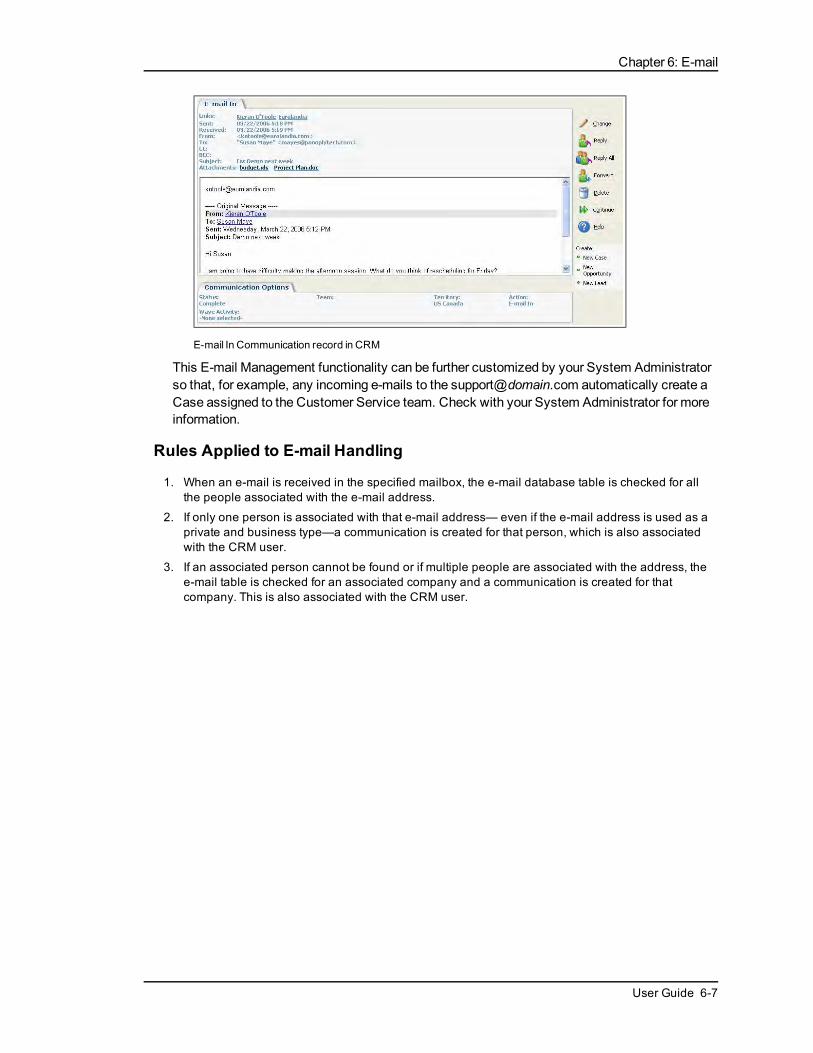
Chapter 6: E-mail
E-mail In Communication record in CRM
This E-mail Management functionality can be further customized by your System Administratorso that, for example, any incoming e-mails to the [email protected] automatically create aCase assigned to the Customer Service team. Check with your System Administrator for moreinformation.
Rules Applied to E-mail Handling
1. When an e-mail is received in the specified mailbox, the e-mail database table is checked for allthe people associated with the e-mail address.
2. If only one person is associated with that e-mail address— even if the e-mail address is used as aprivate and business type—a communication is created for that person, which is also associatedwith the CRM user.
3. If an associated person cannot be found or if multiple people are associated with the address, thee-mail table is checked for an associated company and a communication is created for thatcompany. This is also associated with the CRM user.
User Guide 6-7

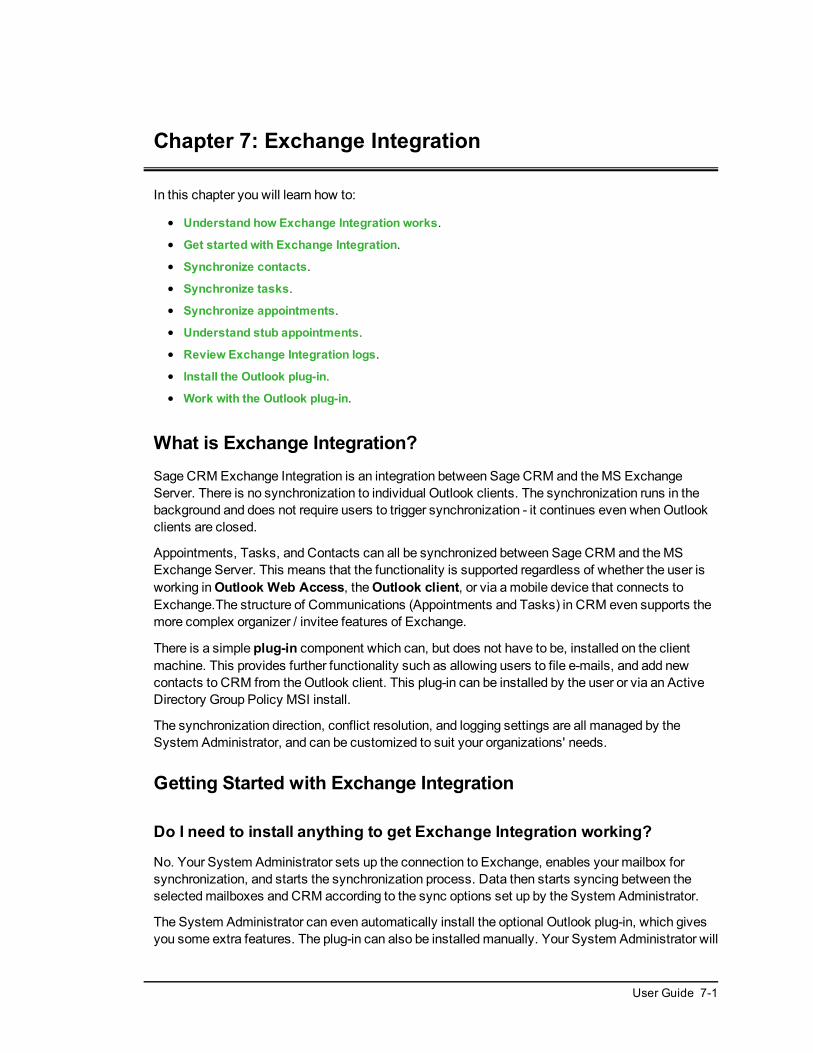
Chapter 7: Exchange Integration
In this chapter you will learn how to:
l Understand how Exchange Integration works.
l Get started with Exchange Integration.
l Synchronize contacts.
l Synchronize tasks.
l Synchronize appointments.
l Understand stub appointments.
l Review Exchange Integration logs.
l Install the Outlook plug-in.
l Work with the Outlook plug-in.
What is Exchange Integration?Sage CRM Exchange Integration is an integration between Sage CRM and theMS ExchangeServer. There is no synchronization to individual Outlook clients. The synchronization runs in thebackground and does not require users to trigger synchronization - it continues even whenOutlookclients are closed.
Appointments, Tasks, and Contacts can all be synchronized between Sage CRM and theMSExchange Server. This means that the functionality is supported regardless of whether the user isworking inOutlook Web Access, theOutlook client, or via amobile device that connects toExchange.The structure of Communications (Appointments and Tasks) in CRM even supports themore complex organizer / invitee features of Exchange.
There is a simple plug-in component which can, but does not have to be, installed on the clientmachine. This provides further functionality such as allowing users to file e-mails, and add newcontacts to CRM from theOutlook client. This plug-in can be installed by the user or via an ActiveDirectory Group Policy MSI install.
The synchronization direction, conflict resolution, and logging settings are all managed by theSystem Administrator, and can be customized to suit your organizations' needs.
Getting Started with Exchange Integration
Do I need to install anything to get Exchange Integration working?
No. Your System Administrator sets up the connection to Exchange, enables your mailbox forsynchronization, and starts the synchronization process. Data then starts syncing between theselectedmailboxes and CRM according to the sync options set up by the System Administrator.
The System Administrator can even automatically install the optional Outlook plug-in, which givesyou some extra features. The plug-in can also be installedmanually. Your System Administrator will
User Guide 7-1
Chapter 7
advise you if you need to do this - it is a few simple steps, described here: Installing the OutlookPlug-in for Exchange Integration (page 7-10).
How do I knowmy mailbox is synchronizing with CRM?
l Your System Administrator has told you.
l You get a notification next time you log on to CRM.
l You may have a tab in My CRM called Exchange Integration Logs.
Does everything in my mailbox synchronize to CRM?
No, that is unlikely. It depends on the sync options selected by the System Administrator. In atypical default set-up, the following data synchronizes:
l Tasks modified within the last 14 days.
l Appointments, where the end date is in the last 14 days, or sometime in the future.
l Recurring appointments, where the end date of the recurrence pattern is in the last 14 days, orsometime in the future.
l Contacts, which are in the My CRM | Contacts list, and contacts in Exchange, which are alreadylinked to CRM.
l Only default calendar, task list, and contact folders are synchronized. Sub- or secondary foldersare not included.
Synchronizing ContactsThis section assumes that:
l Synchronization has been enabled by the System Administrator.
l Your mailbox has been enabled for synchronization by the System Administrator.
l Contacts are synchronized in both directions.
l Where conflicts arise, the CRM update takes precedence ("wins").
Note: The default synchronization options described abovemay have been customized by theSystem Administrator, therefore some outcomes may vary slightly from those described.
Contacts: CRM to ExchangeNote: If you are working with Classic Outlook Integration, please refer to Adding Contacts: CRM toOutlook (Classic Outlook Integration) (page 8-6) for more information on working with theMyCRM | Contacts tab.
To flag CRM contacts for synchronization with Exchange:
1. SelectMy CRM | Contacts | Add Contacts.
2. Search for the contacts you want to synchronize. For example, search for all people who work atthe company Design Right Inc.
3. Use the Select/Deselect All check box to toggle all the contact selections on or off.
4. Select the Add Contacts button. The Contacts page is displayed, showing the contacts that youselected.
7-2 Sage CRM
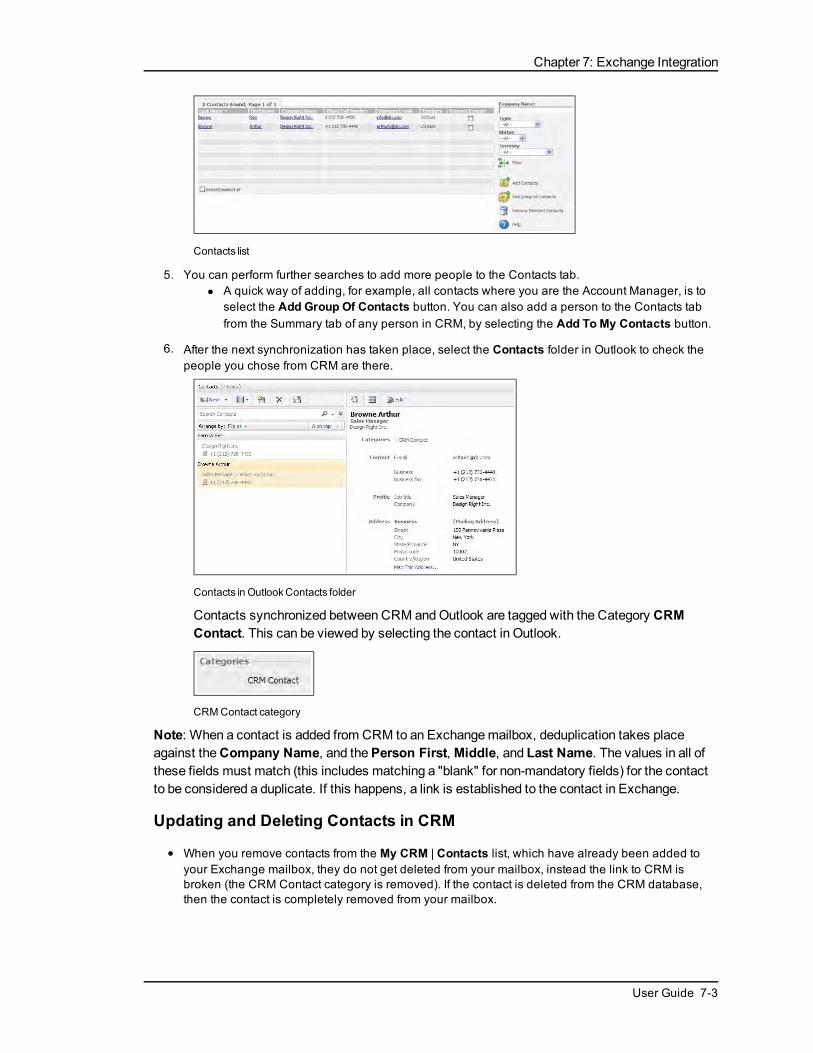
Chapter 7: Exchange Integration
Contacts list
5. You can perform further searches to add more people to the Contacts tab.l A quick way of adding, for example, all contacts where you are the Account Manager, is to
select the Add Group Of Contacts button. You can also add a person to the Contacts tabfrom the Summary tab of any person in CRM, by selecting the Add To My Contacts button.
6. After the next synchronization has taken place, select the Contacts folder in Outlook to check thepeople you chose from CRM are there.
Contacts in OutlookContacts folder
Contacts synchronized between CRM andOutlook are tagged with the Category CRMContact. This can be viewed by selecting the contact in Outlook.
CRM Contact category
Note: When a contact is added from CRM to an Exchangemailbox, deduplication takes placeagainst theCompany Name, and thePerson First,Middle, and Last Name. The values in all ofthese fields must match (this includes matching a "blank" for non-mandatory fields) for the contactto be considered a duplicate. If this happens, a link is established to the contact in Exchange.
Updating and Deleting Contacts in CRM
l When you remove contacts from the My CRM | Contacts list, which have already been added toyour Exchange mailbox, they do not get deleted from your mailbox, instead the link to CRM isbroken (the CRM Contact category is removed). If the contact is deleted from the CRM database,then the contact is completely removed from your mailbox.
User Guide 7-3

Chapter 7
Contacts: Exchange to CRMContacts, which are already linked to CRM, are synchronized from Exchange to CRM. Contactsbecome linked in two ways:
l Contacts, which originated from CRM (My CRM | Contacts) in the first place, are automaticallylinked to CRM. Any updates or deletes to these contacts in Exchange are synced back to CRM.
l Contacts, which have been added to CRM from Exchange using the Outlook plug-in Add Contactfeature, and have been synchronized. Please refer to Working with the Outlook Plug-in forExchange Integration (page 7-12) for more information.
Note: Contacts in Exchange will not synchronize to CRM unless they are explicitly linked in one ofthe above two ways.
Updating and Deleting Contacts in Exchange
l If two or more users update contacts in their Exchange mailboxes, who are linked to the samesingle contact record in CRM, then the most recent update "wins", and the change is synched backimmediately to the linked contact records in the other Exchange mailboxes.
l When a contact is deleted in a user's mailbox in Exchange, it is removed from the My CRM |Contacts list for that user, but not deleted out of CRM.
Synchronizing TasksThis section assumes that:
l Synchronization has been enabled by the System Administrator.
l Your mailbox has been enabled for synchronization by the System Administrator.
l Tasks are synchronized in both directions.
l Tasks modified in the last 14 days are synchronized.
l Where conflicts arise, the Exchange update takes precedence ("wins").
Note: The default synchronization options described abovemay have been customized by theSystem Administrator, therefore some outcomes may vary slightly from those described.
Important business rules to understand on task synchronization include:
l A task created by you in Exchange, but assigned to someone else, does not get synched from yourmailbox, as you are not the task owner.
l Copies of tasks, where the mailbox owner is not the same as the task owner are not synchronized.For example, a task which has been assigned to you in Exchange, but which you have not yetaccepted (and therefore do not yet "own"), is skipped in the synchronization.
l A task created in CRM formultiple users (whose mailboxes are all due to synchronize), will besynchronized - as CRM creates an "owned" copy of each task for each user automatically.
l Recurring tasks are not synchronized.
l Deduplication takes place on the Subject, CRM User/Exchange Owner, Start Date, and Due Datefields. The Time section of the Date/Time fields from CRM is ignored for deduplication. If the StartDate is blank in either CRM or Exchange - which is quite common, as it is not pre-filled in either
7-4 Sage CRM

Chapter 7: Exchange Integration
system - it is ignored for deduplication purposes.
l "Mass" tasks, tasks generated against groups or lists, are not synchronized.
Tasks: CRM to ExchangeTo create a task in CRM and view it in your mailbox:
1. Create the task in CRM. For example, a phone call to Arthur Browne of Design Right. Please referto Scheduling a Callback (page 5-2) for more information on how to do this.
Enter New Taskpage
2. Once the next synchronization has taken place, check your mailbox Tasks folder to see the task.The information from the Regarding panel in CRM is displayed in the body of the task in Outlook.The content of this text can be customized by the System Administrator.
Task in Outlook
Tasks: Exchange to CRMTo create a task in Exchange and view it in CRM:
1. From Outlook, add a new task (Tasks | New).
2. Select Save and Close.
User Guide 7-5

Chapter 7
Task in Outlook
3. Switch to CRM, and after the next synchronization has taken place, check My CRM | Calendar forthe new task.
CRMTasks in Calendar view
Note: Only tasks from the default Tasks folder are synchronized with CRM. If you have tasks thatyou do not want to synchronize to CRM, then it is recommended these are created in secondaryfolders.
Synchronizing AppointmentsThis section assumes that:
l Synchronization has been enabled by the System Administrator.
l Your mailbox has been enabled for synchronization by the System Administrator.
l Appointments are synchronized in both directions.
l Appointments, where the end date is in the last 14 days, or sometime in the future, aresynchronized.
l Where conflicts arise, the Exchange update takes precedence ("wins").
Note: The default synchronization options described abovemay have been customized by theSystem Administrator, therefore some outcomes may vary slightly from those described.
Important business rules to understand on appointment synchronization include:
Exchange to CRM
l In order to provide a robust and reliable synchronization, appointment synchronization is based onthe organizer copy of appointment. This is because the appointment in the organizer's Exchangemailbox is the most reliable version of the appointment available to CRM. Invitees see a copy of theorganizer appointment in their CRM calendars - not their own customized versions of the inviteeappointment from Exchange.
l The exception to this synchronization rule is when the Exchange organizer of the appointment isnot a CRM user enabled for synchronization, and the appointment includes invitees who areCRM users enabled for synchronization. In this case, the synchronization bases itself on the
7-6 Sage CRM

Chapter 7: Exchange Integration
invitee copies of the appointment, to ensure the calendars of all the CRM users stay up-to-date. Inthis case, a read-only stub appointment is created in CRM, based on the invitee copies.
CRM to Exchange
l Appointments created in CRM, where the organizer is not a sync user do not sync to Exchange.For example: Susan Maye is not set up to sync with Exchange. William Dolan and John Finch are.In CRM, Susan Maye creates an appointment and adds William Dolan and John Finch to theappointment. This appointment never appears in the Exchange mailboxes of any of the three users.An Exchange Info message is displayed on the appointment to tell you the appointment does notget synced.
Exchange to CRM and CRM to Exchange
l Recurring appointments, where the end date of the recurrence pattern is in the last 14 days, orsometime in the future, are synchronized.
l Deduplication takes place on the Subject,Organizer, Start Time, and End Time, and All DayEvent fields. The values in all these fields must match for the appointment to be considered aduplicate.For recurring appointments, the recurrence pattern and range must also match to beconsidered a duplicate.
Appointments: CRM to ExchangeTo create an appointment in CRM and view it in your mailbox:
1. Create the appointment in CRM. For example, a meeting with Arthur Browne of Design Right todiscuss pricing. Please refer to Creating an Appointment (page 5-2) for more information on how todo this.
Enter New Appointment page
2. Once the next synchronization has taken place, the appointment synchronizes to the Organizer'smailbox, and Exchange sends out the meeting requests. Check your mailbox Calendar folder tosee the appointment. The information from the Regarding panel in CRM is displayed in the body ofthe appointment in Outlook. The content of this text can be disabled or customized by the SystemAdministrator.
User Guide 7-7

Chapter 7
Appointment in Outlook
If the e-mail address of a Resource user in CRMmatches amailbox address in Exchange, then theresource displays in Exchange as a Required attendee.
Appointments: Exchange to CRMTo create an appointment in Exchange and view it in CRM:
1. From Outlook, add a new appointment or meeting request (Calendar | New). For example, ameeting with Arthur Browne of Design Right to enter final negotiations. You can add the customercontact (Arthur) to the Required attendee list if you want to send him an invitation to the meeting.
2. Select Save and Close or Send.
Appointment in Outlook
3. Switch to CRM, and after the next synchronization has taken place, check My CRM | Calendar forthe new appointment.
Appointment in CRM
7-8 Sage CRM

Chapter 7: Exchange Integration
Note: Only appointments from the default Calendar are synchronized with CRM. If you haveappointments that you do not want to synchronize to CRM, then it is recommended these arecreated in secondary folders.
There are a few things that you'll notice straight away about the way the appointment looks in CRM:
l There is a small Exchange Sync Info icon in the top left-hand side of the appointment - click onthis, and a blue banner informs you that this appointment is linked to Exchange.
l The External Attendees tab shows a person icon on the tab - this indicates that additional people,to those shown on the appointment Details page, have been invited to the meeting. Please refer toInviting External Attendees to a Meeting (page 5-16) for more information.
l If you have invited a customer in the Exchange appointment, for example Arthur Browne,who alsoexists in your CRM database, they are listed as an External Attendee, and an appointment record isdisplayed in the Communications tab of the customer record in CRM.
Appointment in context of invited customer
l Attendees from Exchange, whose mailboxes map to Resource user e-mail addresses in CRM, areadded to the User list in CRM. If they do not map to Resource user e-mail addresses in CRM, theyare added to the External Attendees tab in CRM.
Stub AppointmentsSage CRM Exchange Integration usually carries out appointment synchronization based on theOrganizer's copy of an appointment. Invitees, as long as they are CRM users enabled forsynchronization, can view a copy of the appointment in their calendars in CRM.
The exception to this synchronization rule is when the Exchange organizer of the appointment isnot aCRM user enabled for synchronization, and the appointment includes invitees who areCRM users enabled for synchronization. In this case, the synchronization bases itself on theinvitee copies of the appointment, to ensure the calendars of all the CRM users stay up-to-date.
These invitee copies of appointments are calledStub Appointments. They are read-only. Click ontheExchange Sync Info icon in the top left of the page, and a blue banner gives youmoreinformation on the status of the appointment.
Stub Appointment
User Guide 7-9
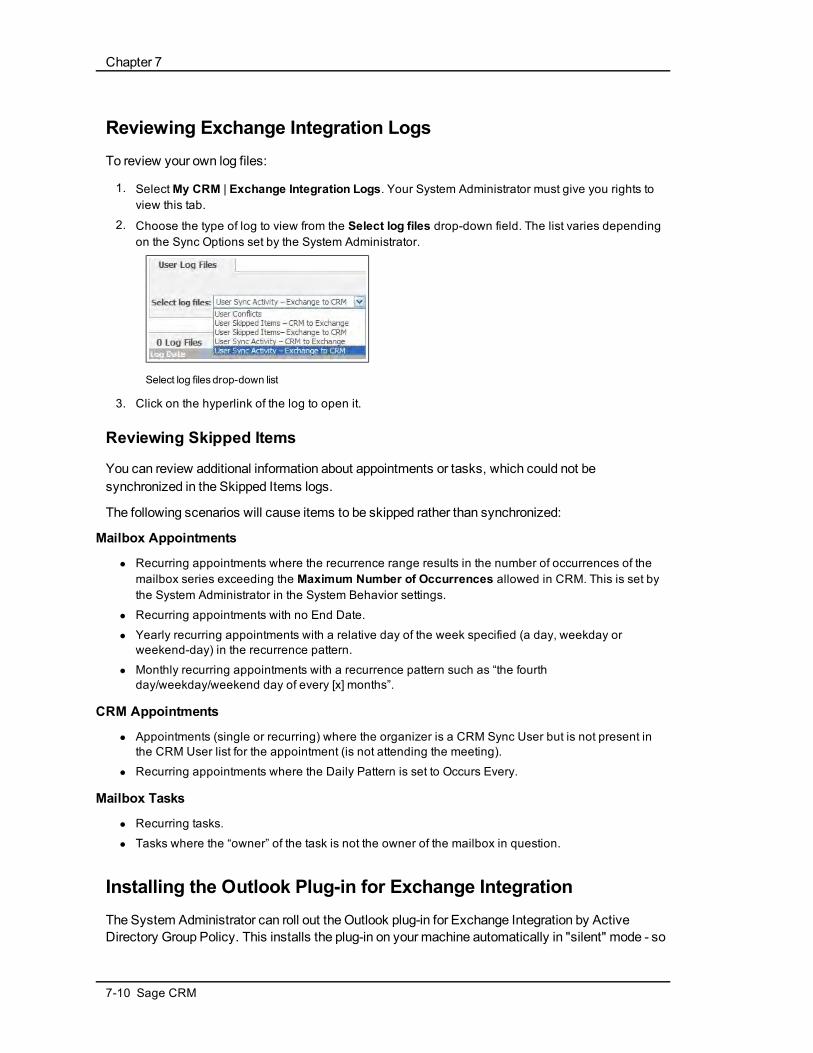
Chapter 7
Reviewing Exchange Integration LogsTo review your own log files:
1. SelectMy CRM | Exchange Integration Logs. Your System Administrator must give you rights toview this tab.
2. Choose the type of log to view from the Select log files drop-down field. The list varies dependingon the Sync Options set by the System Administrator.
Select log files drop-down list
3. Click on the hyperlink of the log to open it.
Reviewing Skipped Items
You can review additional information about appointments or tasks, which could not besynchronized in the Skipped Items logs.
The following scenarios will cause items to be skipped rather than synchronized:
Mailbox Appointments
l Recurring appointments where the recurrence range results in the number of occurrences of themailbox series exceeding the Maximum Number of Occurrences allowed in CRM. This is set bythe System Administrator in the System Behavior settings.
l Recurring appointments with no End Date.
l Yearly recurring appointments with a relative day of the week specified (a day, weekday orweekend-day) in the recurrence pattern.
l Monthly recurring appointments with a recurrence pattern such as “the fourthday/weekday/weekend day of every [x] months”.
CRM Appointments
l Appointments (single or recurring) where the organizer is a CRM Sync User but is not present inthe CRM User list for the appointment (is not attending the meeting).
l Recurring appointments where the Daily Pattern is set to Occurs Every.
Mailbox Tasks
l Recurring tasks.
l Tasks where the “owner” of the task is not the owner of the mailbox in question.
Installing the Outlook Plug-in for Exchange IntegrationThe System Administrator can roll out the Outlook plug-in for Exchange Integration by ActiveDirectory Group Policy. This installs the plug-in on your machine automatically in "silent" mode - so
7-10 Sage CRM

Chapter 7: Exchange Integration
youmay already have the plug-in.
If not, there is a "manual" install option, as long as the following prerequisites aremet:
l Users must be administrators of their own machines to carry out this installation.
l You are running Outlook 2007 or 2010.
l The System Administrator has given you rights to see the plug-in button.
Tomanually install the Outlook plug-in for Exchange Integration:
1. Select Install CRM Outlook Exchange Integration from My CRM | Preferences. A security promptis displayed.
2. Click Install to continue. The install checks for .NET Framework 4.0. If this is not on your machine,follow the install steps for this first.
.NET Framework install dialog
3. Click Continue once the .NET install is complete. File download and security warning dialogs aredisplayed.
4. Click Run. The CRM Client Install Shield Wizard is displayed.
5. Before continuing, make sure Internet Explorer and Outlook are both closed.
6. Select Install, and follow the steps on-screen. During the install, you are prompted to confirmconnection settings (see table below).
CRM Server connection dialog
7. Once the install is finished, click Finish.
8. Open Outlook. A number of new options are available - please see Working with the OutlookIntegration Plug-in.
The following table explains theConnection Settings:
Field Description
Server Name TheCRM server name. Should be auto-filled from theCRM server.
Install Name CRM Install name. Should be auto-filled from the CRMserver.
Port Number Defaults to 80. Can be changed if required. For
User Guide 7-11

Chapter 7
Field Description
example, if HTTPS is used, an alternative port may beneeded.
Use Secure ConnectionHTTPS
Select to use an HTTPS connection.
User Name Should be auto-filled from the CRM server.
Domain The Exchange Server domain name.
Uninstalling the Outlook Plug-in
Tomanually uninstall the Outlook plug-in for Exchange Integration:
1. Make sure Outlook and Internet Explorer are closed.
2. From Control Panel | Add or Remove Programs, select Sage CRM Client Applications, andfollow the steps on-screen.
3. You can reinstall manually from My CRM | Preferences | Re-install CRM Outlook ExchangeIntegration.
Working with the Outlook Plug-in for Exchange IntegrationWhen you log on to Outlook after installing the Outlook Plug-in for Exchange Integration, a numberof new options are available. The following are described as they appear inOutlook 2007. If you areworking withOutlook 2010, the same options are available, but from the Sage CRM group on theMail |Home ribbon.
Option Location / Description
File E-mail Toolbar button and Sage CRMmenu. Lets you fileone or more e-mails to CRM. An e-mail must behighlighted for this option to be active.
Add Contact Toolbar button and Sage CRMmenu. Lets you add acontact to CRM. A contact must be highlighted forthis option to be active. The Add Contact option isavailable if Exchange Integration has been set tosynchronize contacts.
Send and File Sage CRMmenuwithin a new e-mail. Launches theFile E-mail page once the e-mail has reached the SentItems folder. Note: Send Immediately whenconnected (Tools | Options | Mail Setup) must beenabled for this option to work.
Attach Shared Doc Sage CRMmenuwithin a new e-mail.Lets you attachdocuments fromMy CRM | Shared Documents.
Help Sage CRMmenu. Launches Sage CRM help for the
7-12 Sage CRM

Chapter 7: Exchange Integration
Option Location / Description
Outlook Plug-in for Exchange Integration.
About Sage CRM Plug-in Version information on the plug-in.
When you try to access any of these options for the first time since opening Outlook, you areprompted to log on to CRM.
File E-mailTo file one or more e-mails from Outlook/Exchange to CRM:
1. Highlight the e-mail(s) to file and select File E-mail from the toolbar. CRM searches for matches onthe From address for incomingmail, and on the recipients e-mail addresses for outgoingmails.The results are displayed in the E-mail Target List.
File E-mail
2. Use the Add and Remove buttons to find or remove target companies/people to file under. Ifmultiple people are selected, the e-mail(s) are filed against each target specified.
3. Set the Filing Options to determine what kind of communication the e-mail(s) are filed against.
4. Select File E-mail to carry out the filing in CRM and return to Outlook, or File and View to view thecommunication in CRM first. Attachments are saved with the communication record.
Filed e-mails aremarked with themessage Filed to Sage CRM.
Add ContactThe AddContact option is available if the Exchange Integration has been set to synchronizecontacts.
To add a contact from Outlook/Exchange to CRM:
1. Highlight the contact in Outlook, and select the Add Contact button. Deduplication is carried outbased on the match rules set by the System Administrator in CRM. For example, Company Name"contains", and Person Last Name "contains". Please refer to Preventing Duplicate Entries (page 4-17) for more information.
User Guide 7-13

Chapter 7
AddContact
2. Review and complete the contact details in CRM, then select Save.
3. The contact is added to the CRM database, and also displayed in the My CRM | Contacts list. TheAdd Contact button is disabled for the contact you have added.
If the CRM match rules detected that the contact was already in the CRM database, then it is justadded to theMy CRM | Contacts list. Note: The contact does not show as linked (CRM Contactcategory in Outlook) until the next synchronization. At that point, deduplication takes places usingExchange Synchronization deduplication. Please see Contacts: CRM to Exchange (page 7-2) formore information.
7-14 Sage CRM
Chapter 8: Classic Outlook Integration
In this chapter you will learn how to:
l Download the Outlook plug-in for Classic Outlook Integration.
l Use CRM from within Outlook.
l Synchronize Contacts from CRM to Outlook.
l Synchronize Contacts from Outlook to CRM.
l Change and Delete Contacts.
l View contact information from Outlook.
l Synchronize Outlook Appointments and Tasks.
l Synchronize CRM Appointments and Tasks.
l Review Synchronization Conflicts.
l Review Skipped Items.
l Attaching Shared Documents to Outlook E-mails.
l File E-mails from Outlook to CRM.
l Reinstalling the Outlook plug-in for Classic Outlook Integration.
l Uninstall the Outlook plug-in for Classic Outlook Integration.
Downloading the Outlook Plug-in for Classic Outlook IntegrationTo use the Classic Outlook Integration features of CRM, you need to download theOutlook Plug-infor Classic Outlook Integration from within CRM. Before you do this:
l Check that your e-mail account runs on Microsoft Exchange Server, or is a POP3 e-mail account,as CRM Outlook client integration is supported for e-mail accounts running on Microsoft ExchangeServer MAPI or POP3. Roaming Profiles are not supported for Outlook in a Terminal Services orCitrix environment.
l Check that you are running either Outlook 2007 or Outlook 2010.
l Check with your System Administrator that you are an administrator of your own machine and thatOutlook integration / synchronization has been enabled.
l Check that your timezone is set correctly in My CRM | Preferences.
l Check with your System Administrator how the Classic Outlook synchronization has beenconfigured. Options include:
l One Way Synchronization. The system can be configured to synchronize from CRM toOutlook only or from Outlook to CRM only. The default configuration is that thesynchronization takes place both ways - CRM to Outlook, and Outlook to CRM.
l Note: When this setting is changed by the System Administrator in CRM, users need torestart their CRM sessions from within Outlook, then synchronize, for this change to takeaffect.
l Synchronize Outlook Deletions. If the user deletes appointments, tasks, or contacts inOutlook, then the corresponding records are deleted in CRM, if the user has appropriaterights to delete them. If the user deletes appointments or tasks in CRM, then the
User Guide 8-1

Chapter 8
corresponding records are deleted in Outlook. If a contact is removed from the My CRM |Contacts list in CRM, it is deleted in Outlook. This is the default configuration.
l Managing CRM And Outlook Updates. This option can be used when One WaySynchronization is set to No, to help manage conflicts that may arise if two people changethe same information in either system since the last synchronization.Conflicts can beviewed via View Conflict Log in Outlook. The settings are:
l Outlook Updates Win. The changes made to Outlook will appear in both Outlook andCRM. This is the recommended option for organizations that use Outlook as theirprimary appointment scheduling tool. The default for new installations is OutlookUpdates Win.
l Organizer Updates Win. This only applies to Appointments. The Organizer refers tothe person who created the meeting in Outlook. If any users update the same recordin both systems and the Organizer synchronizes, then the system behaves as perthe Outlook Updates Win setting. If any users update the same record in bothsystems and an “Attendee” synchronizes, then the system behaves as per the CRMUpdates Win setting. This option is suitable for organizations that mainly rely onCRM for their customer interaction management, however they also have a numberof users who work with Outlook to organize and update meetings. This option willensure that the Outlook organizers’ changes will be accepted in CRM.
l CRM Updates Win. Changes made to CRM appear in both Outlook and CRM. Thisis the recommended option for organizations that use CRM as their primaryappointment scheduling tool.
l Synchronize Outlook Contacts. The default setting is for Contact synchronization to takeplace between Outlook and CRM.
l Synchronize Outlook Appointments. The default setting is for Appointmentsynchronization to take place between Outlook and CRM.
l Synchronize Outlook Tasks. The default setting is for Task synchronization to take placebetween Outlook and CRM.
To download theOutlook plug-in for Classic Outlook Integration:
1. Close Outlook if it is currently open.
2. From CRM, select the Preferences tab. The Preferences page is displayed.
3. Select the Install CRM Outlook Integration button. If the Microsoft .NET framework is not alreadyinstalled on your computer, you are prompted to install it at this point. The .NET framework must beinstalled for the Outlook plug-in to work.
4. Once the .NET installation has finished, select the Continue button. The Security Warning dialogbox is displayed.
5. Verify the information in the security prompt, and select the Run button. The CRM ClientInstallShield Wizard is displayed.
Note: If the plug-in has already been installed by another user on the current client, the FileDownload and Security Warning dialog boxes are skipped, and the CRMClient InstallShieldWizard will run automatically to take you through the procedure for installing the Outlookplug-in.
6. Make sure you are logged off CRM and Internet Explorer and Outlook are closed before continuingwith the install.
Note: If you are running Vista and want to connect to CRM using HTTPS, youmust selectthe Custom option during the CRMOutlook Integration install, and thenmark the Sage .NETTools check box.
8-2 Sage CRM

Chapter 8: Classic Outlook Integration
7. Complete the InstallShield Wizard steps.
8. Open Outlook. CRM Classic Outlook Integration features are displayed within Outlook. In CRM, theInstall icon changes to a Reinstall icon.
Using CRM from within Outlook (Classic Outlook Integration)The following are described as they appear inOutlook 2007. If you are working withOutlook 2010,most of the same options are available, but from the Sage CRM group on theMail |Home ribbon. InOutlook 2010, the following features are not available:
l CRM folder - the full CRM application cannot be used within Outlook 2010
l View Contact - this button is not available in Outlook 2010
InOutlook 2007, working with CRM from within Outlook is similar to working with CRM in its ownbrowser window, but there are some differences:
l The Menu buttons appear as sub-folders underneath the CRM folder, or as icons in the CRMgroup, instead of appearing down the left-hand side of CRM.
You can use either the shortcut group or the sub-folders to navigate CRM inOutlook.
These are the default settings tomaximize the space you have to view CRMwithin Outlook. Theusual menu and navigation buttons on the left-hand side of the CRM page can be reactivated via theFull Menu in Outlook setting in My CRM | Preferences. The Full Menu in Outlook setting can bealtered in either CRM or Outlook, and you will see the change the next time you log on to CRM viaOutlook.
After the plug-in is downloaded, the following CRMOutlook integration features are displayed inOutlook:
l A CRM toolbar. See table below for details.
l A CRM folder in the Folder List and a new CRM group in the Shortcuts. In Outlook 2007, this folderdisplays after the first successful logon to CRM.
CRM folder in Outlook
l A CRM menu option on the Tools menu. This can be accessed from Tools | CRM. See table belowfor details.
l CRM Options page. This can be accessed from Tools | CRM | Options, or by selecting the Optionsbutton on the CRM Logon page.
User Guide 8-3

Chapter 8
CRM Optionspage
The following table explains the CRM toolbar buttons.
Toolbar Button Description
CRM Select this button to log onto CRM from Outlook.
View Conflict Log View conflicts which arise during synchronization tofield-level detail.
File E-mail File single or multiple e-mail records with thecompany or person record in CRM
View Contact Highlight an Outlook contact, that has beensynchronized with CRM, and the CRM PersonSummary page for that contact is displayed inOutlook.
Add Contact Highlight an individual Outlook contact, then add toCRM using this button.
Sync Initiates a synchronization between CRM andOutlook.
The following table explains the Tools |CRM selections.
Menu Option Description
View Skipped Items View details about items that were skipped duringsynchronization. Please refer to Reviewing SkippedItems (Classic Outlook Integration) (page 8-13) formore information.
Sync Info Reset Resets mappings between synchronized contacts,appointments and tasks back to the state they werein after the first post-plug-in-install synchronization.
8-4 Sage CRM

Chapter 8: Classic Outlook Integration
Menu Option Description
Uninstall Uninstalls the CRMOutlook plug-in.
Options Opens the CRMOptions page.
View Conflict Log View conflicts which arise during synchronization tofield-level detail.
The following table explains the fields on theCRM Options page.
Menu Option Description
Server Name CRM install server name.To change the default port (80), add the alternativeport after the server name. For example,JUPITER:1234 [Server Name]:[HTTP port]
Install Name CRM install name.
Use HTTPS Uses an HTTPS connection.To change the default HTTPS port (443), add thealternative port after the server name. For example,JUPITER:10443 [Server Name]:[HTTPS port]Note: If you are running Vista and want to connect toCRM using HTTPS, youmust select the Customoption during the CRMOutlook Integration install,and thenmark the Sage .NET Tools check box.
Sync Every (mins) Sets the automatic synchronization interval.
Show Conflicts Displays Synchronization Conflicts window aftereach synchronization when in Auto Synchmode (theSystem Administrator sets the automaticsynchronization interval).
Warning if Sync to DeleteMore Than [] Items
A dialog box is displayed if more than the specifiednumber of records in CRM are going to be deleted asa result of a synchronization. You can then decide toproceed with the deletions or to stop them.
Toolbar to Display CRMButtons
When creating, forwarding, or replying to an e-mailfrom Outlook while logged on to CRM, two extrabuttons are displayed on the Standard Outlooktoolbar by default - Send And File and Attach SharedDoc. This option allows you tomove these toolbarbuttons to any Outlook toolbar.
New Mail Buttons Positions[] from the Left Side
This option allows you to position the toolbar buttonsdescribed above on the toolbar.
User Guide 8-5

Chapter 8
Synchronizing Contacts (Classic Outlook Integration)Once you have flagged the CRM contacts you want added to Outlook, or if you amend or deleteflagged contacts, the end result is reflected in Outlook once a synchronization takes place.
Outlook contacts, on the other hand, get added to CRMmanually with the Add Contact button. Ifyou amend or delete these contacts in Outlook, the end result is reflected on CRM once asynchronization takes place.
Once contacts have been synchronized, it doesn't matter if youmake changes to them in Outlookor in CRM—the details get synchronized both ways. Synchronization can be donemanually, or itcan be done automatically at specified intervals.
Adding Contacts: CRM to Outlook (Classic Outlook Integration)Before they can get synchronized, you first need to flag the CRM contacts you want to synchronizewith Outlook. Note: If a synchronized CRM contact has an address that is shared by anotherperson or company and the user changes that address in Outlook, CRMwill update the sharedaddress with the new information during Contact synchronization.
To flag CRM contacts and synchronize them with Outlook:
1. Select the Contacts tab from My CRM. The Contacts page is displayed.
Contacts page
2. Select the Add Contacts button. The Find And Add Contacts page is displayed.
3. Search for the contact or contacts you want to see in Outlook. For example, search for all peoplewho work at the company Design Right Inc. A list of people matching your search criteria isdisplayed. They are all unselected by default.
4. Select any contacts you want to see in Outlook. You can use the Select/Deselect All check box totoggle all the contacts selections on or off. Note: You can sort contacts by clicking on any subjectheading except Remove Contact.
5. Select the Add Contacts button. The Contacts page is displayed, showing the contacts that youselected.
8-6 Sage CRM

Chapter 8: Classic Outlook Integration
Contacts page
6. You can perform further searches to add more people to the Contacts tab.l A quick way of adding, for example, all contacts where you are the Account Manager, is to
select the Add Group Of Contacts button. You can also add a person to the Contacts tabfrom the Summary tab of any person in CRM, by selecting the Add To My Contacts button.
l You can perform actions (Start Mail Merge, New Task, Send E-mail, Export To File) on yourContacts list in the same way as you can for any search lists or saved searches.
l You can wait until the next automatic synchronization takes place, or you can synchronizemanually at this point if you wish.
7. Select the Sync button from the Outlook toolbar to synchronize manually. A dialog box shows thesynchronization status.
8. If the synchronization process has detected any conflicts, a dialog box is displayed allowing you toreview the conflicts.
9. Select the Contacts folder in MS Outlook to check the people you chose from CRM are there.Contacts synchronized between CRM and Outlook are tagged in Outlook with the Category CRMContact. This can be viewed by double clicking on the contact in Outlook.
CRM Contact Category
Adding Contacts: Outlook to CRM (Classic Outlook Integration)You addOutlook contacts to CRMmanually with the Add Contact button. You cannot add a contactfrom outlook to CRM if the contact in Outlook has company information and the user does not haveinsert rights to the company entity in CRM. To add the contact, youmust either be given rights toinsert company data or youmust remove the Company information from the outlook record.
Note: If you change company information for a contact in Outlook and then synchronize with CRM,the updated company information will not be carried through to CRM. Youmust manually update thecompany information for this contact in CRM.
CRM field level security is not applied to required fields in Outlook. So, for example, if you deletethe contents of a required field in anOutlook Contact and then synchronize with CRM, you will notbe warned that a required field has not been populated.
To addOutlook contacts to CRM:
1. Select Contacts from the Outlook Shortcuts group.
2. Highlight the contact you want to add to CRM.
User Guide 8-7

Chapter 8
3. Select the Add Contact button from the toolbar.l If the Outlook contact contains a company, a dedupe is performed on the Company name.
Please refer to Preventing Duplicate Entries (page 4-17) for more information on handlingduplicate contacts.
l If a company match is detected in CRM, the list of matches is displayed and you canselect a matching company by clicking on it. Alternatively, if no company on the listmatches the contact you are adding, you can click on the Ignore Warning and EnterCompany button.
l If you select a company from the list of matching companies, a dedupe is thenperformed on the Person. Please refer to Preventing Duplicate Entries (page 4-17)for more information on handling duplicate contacts. If any duplicates are detected,they are displayed. You can select a contact by clicking on it. If no duplicates aredetected, the new Person page is displayed in CRM within Outlook, with the existingcontact details from Outlook filled in.
l If a company match is not detected, or if one is detected and you select the IgnoreWarning and Enter Company button, a new company (that includes the persondetails on the Person panel) is automatically created using the Company name fromOutlook.
l If the Outlook contact does not have a company associated with it, a dedupe is performedon the Person name.
l If a person match is detected in CRM, the list of matches is displayed and you canselect a matching person by clicking on it. Alternatively, if nobody on the list matchesthe contact you are adding, you can click on the Ignore Warning and Enter Individualbutton.
l You can create a company for the contact in CRM by selecting the New Companybutton on the Person details page. Please refer to Adding a New Company (page 4-2) for more information on creating companies.
4. Select Save to save the contact in CRM. The contact is added to the Contacts tab in CRM so that itgets synchronized in the future. When a contact is added from Outlook to CRM, the Outlook plug-inwill automatically run synchronization with CRM on contacts only. This is to ensure that anyadditional information entered in CRM is also reflected in Outlook.
Changing and Deleting Contacts (Classic Outlook Integration)If youmake any changes to any of your My CRM contacts, the changes are reflected in Outlook thenext time you synchronize.
When you remove a contact from Contacts in CRM or if the contact is deleted from CRM andtherefore automatically removed from Contacts, it is deleted from Outlook the next time yousynchronize.
Viewing Detailed Contact Information from Outlook (ClassicOutlook Integration)Any contact in Outlook, who has been synchronized with CRMmaintains a link to all the detailedcustomer interaction history in CRM.
To access detailed contact information from Outlook:
1. Select the Contacts icon in Outlook.
2. Highlight the contact you want to view detailed information on.
8-8 Sage CRM

Chapter 8: Classic Outlook Integration
3. Select the View Contact button from the Outlook toolbar.
The Person Summary tab of the selected contact is displayed.
Synchronizing Appointments and Tasks (Classic OutlookIntegration)Note that before you start working with the Outlook Synchronization feature, you need to check thatyour correct Time Zone is specified in My CRM | Preferences.
l At the first synchronization all recurring appointments, and all appointments which have beenmodified in last fourteen days, or which have an end date between the previous 14 days and today,get synchronized.
l At subsequent synchronizations all appointments modified since the last synchronization getsynchronized.
l At the first synchronization all tasks which have been modified in last fourteen days, or which havea status of Pending or In Progress are synchronized.
l At subsequent synchronizations all tasks modified since the last synchronization aresynchronized.
Outlook Appointments and Tasks (Classic Outlook Integration)
To schedule a task from Outlook:
1. Select the Calendar folder in Outlook.
2. Select the New drop-down arrow on the Toolbar, and select Task. The Task window is displayed.
3. Complete the details of the task, and set a reminder if you wish. Although you can add a contact tothe task in Outlook, this will not be reflected in CRM—even if the contact is in CRM.
4. Select the Save And Close button. The task is displayed in your Task list in Outlook.
5. Select the Sync button, then switch to CRM. The task is displayed in My CRM. If you set a reminderin Outlook, this will pop up in Outlook as a Reminder, and in CRM as an on-screen notification.
Tasks created in Outlook are given the default completion time of 12 noon on their Due Date inCRM.
If you set a reminder in Outlook, this will pop up in Outlook as a Reminder, and in CRM as an on-screen notification.This applies for Tasks and Appointments.
CRM Appointments and Tasks (Classic Outlook Integration)
To schedule an appointment in CRM:
1. Set up the appointment with a contact, for example Arthur Browne, in CRM for next week, andselect Save.
User Guide 8-9
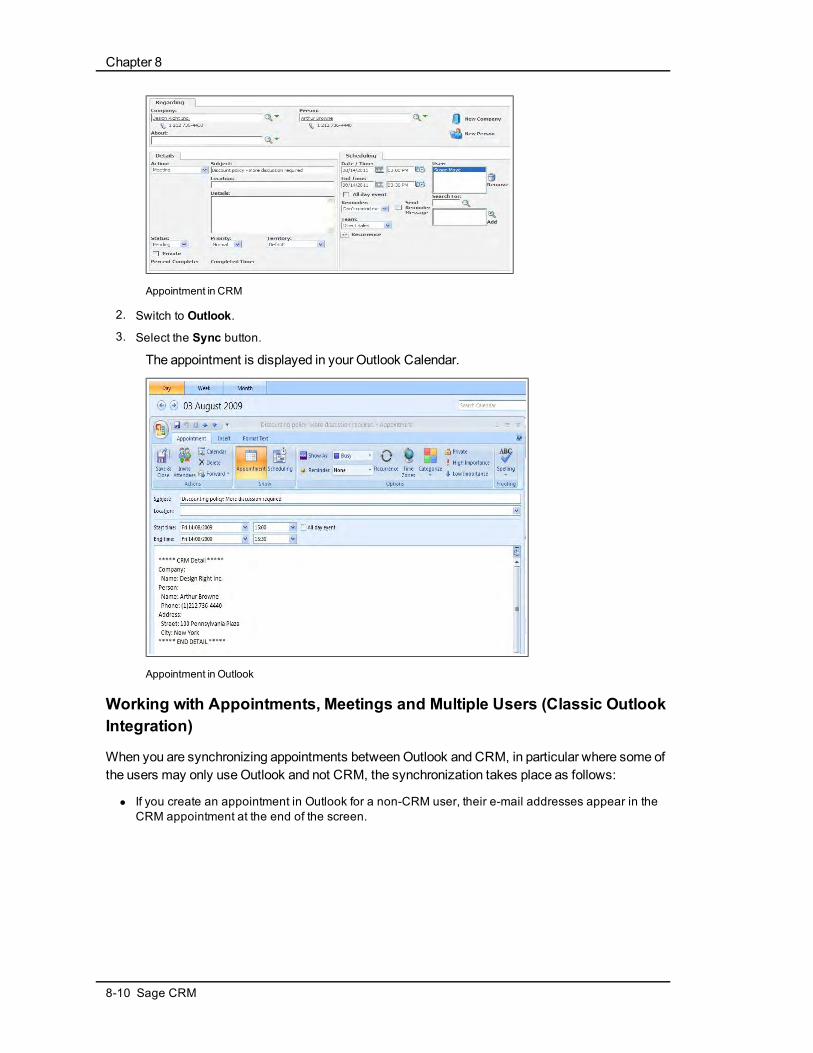
Chapter 8
Appointment in CRM
2. Switch to Outlook.
3. Select the Sync button.
The appointment is displayed in your Outlook Calendar.
Appointment in Outlook
Working with Appointments, Meetings and Multiple Users (Classic OutlookIntegration)
When you are synchronizing appointments betweenOutlook and CRM, in particular where some ofthe users may only useOutlook and not CRM, the synchronization takes place as follows:
l If you create an appointment in Outlook for a non-CRM user, their e-mail addresses appear in theCRM appointment at the end of the screen.
8-10 Sage CRM

Chapter 8: Classic Outlook Integration
OutlookResponse from non-CRM users displayed in CRM
l If you create an appointment in Outlook for multiple CRM users, multiple users are listed againstthe appointment in CRM—as long as e-mail addresses have been set up against the user. TheOutlook meeting organizer is displayed in the Organizer field in CRM.
CRMusers asAttendees in Outlookand CRM
l If you create an appointment with a person, for example, Arthur Browne in CRM, his e-mail addressappears on the list of attendees in Outlook. You do not see from CRM if he has accepted themeeting and can attend.
Person in CRM asattendee in Outlook
l When a user in CRM creates an appointment and links a person or company to it, the selectedcompany or person is displayed in the body of the appointment in Outlook.
l If you create an appointment in CRM with a user who does not have an associated e-mail address,for example, a Resource user such as London Meeting Room, the appointment is synchronizedwith Outlook, but the user is not displayed in the appointment in Outlook.
l Only one Outlook calendar folder (the default Calendar) is supported by CRM Outlook Integration.
l Private appointments (and tasks) do not get synchronized between CRM and Outlook.
Recurring Appointments and Tasks (Classic Outlook Integration)
When creating a recurring Appointment in Outlook, an End By datemust be selected on therecurrence dialog box if the appointment is to be synched to CRM. Recurring Tasks are not
User Guide 8-11
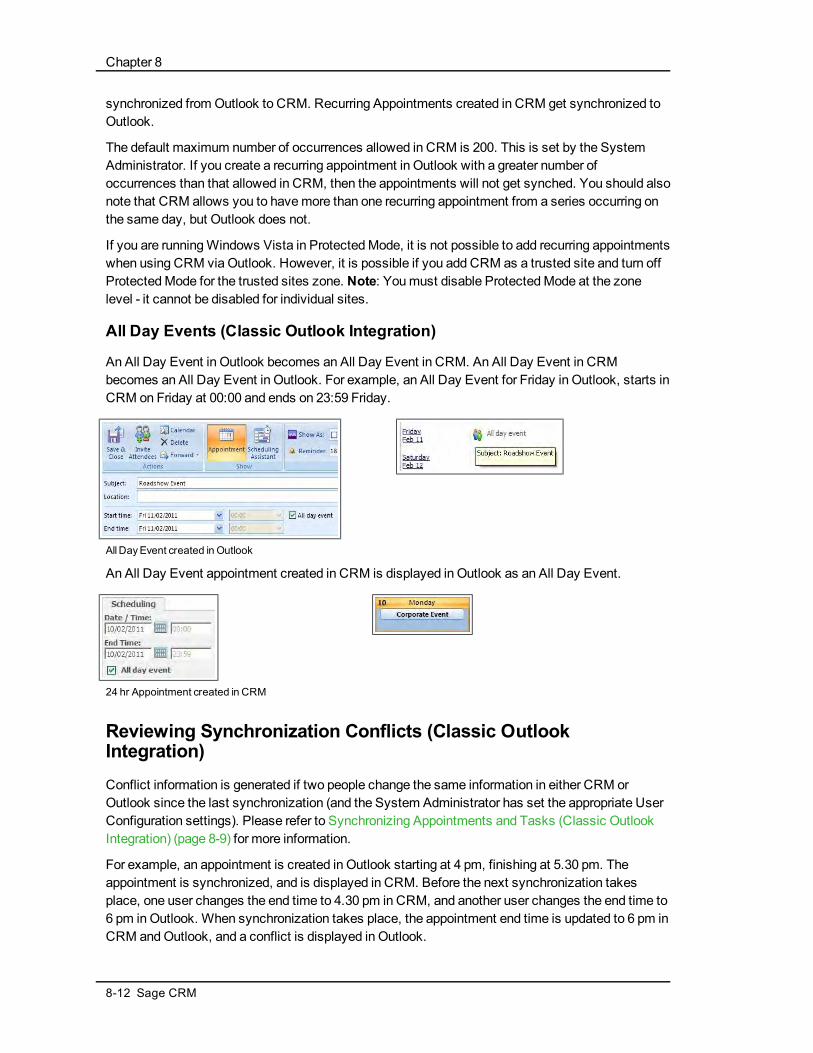
Chapter 8
synchronized from Outlook to CRM. Recurring Appointments created in CRM get synchronized toOutlook.
The default maximum number of occurrences allowed in CRM is 200. This is set by the SystemAdministrator. If you create a recurring appointment in Outlook with a greater number ofoccurrences than that allowed in CRM, then the appointments will not get synched. You should alsonote that CRM allows you to havemore than one recurring appointment from a series occurring onthe same day, but Outlook does not.
If you are runningWindows Vista in ProtectedMode, it is not possible to add recurring appointmentswhen using CRM via Outlook. However, it is possible if you add CRM as a trusted site and turn offProtectedMode for the trusted sites zone. Note: Youmust disable ProtectedMode at the zonelevel - it cannot be disabled for individual sites.
All Day Events (Classic Outlook Integration)
An All Day Event in Outlook becomes an All Day Event in CRM. An All Day Event in CRMbecomes an All Day Event in Outlook. For example, an All Day Event for Friday in Outlook, starts inCRM on Friday at 00:00 and ends on 23:59 Friday.
AllDayEvent created in Outlook
An All Day Event appointment created in CRM is displayed in Outlook as an All Day Event.
24 hr Appointment created in CRM
Reviewing Synchronization Conflicts (Classic OutlookIntegration)Conflict information is generated if two people change the same information in either CRM orOutlook since the last synchronization (and the System Administrator has set the appropriate UserConfiguration settings). Please refer to Synchronizing Appointments and Tasks (Classic OutlookIntegration) (page 8-9) for more information.
For example, an appointment is created in Outlook starting at 4 pm, finishing at 5.30 pm. Theappointment is synchronized, and is displayed in CRM. Before the next synchronization takesplace, one user changes the end time to 4.30 pm in CRM, and another user changes the end time to6 pm in Outlook. When synchronization takes place, the appointment end time is updated to 6 pm inCRM andOutlook, and a conflict is displayed in Outlook.
8-12 Sage CRM

Chapter 8: Classic Outlook Integration
To review the synchronization conflict:
1. Select the View Conflicts button from the Synchronization Process dialog box or from the ViewConflicts toolbar button. The Synchronization Conflicts window is displayed.
Synchronization Conflictswindow
2. Select the conflict you want to view in the List Of Logged Conflicts panel. The left-hand side of theConflict Details panel shows the field or fields where a conflict has arisen. The right-hand side ofthe Conflict Details panel shows the values before the synchronization took place.
l Hide Empty Fields and Hide Equal. Toggling these fields on or off hides or shows the fieldswhere the values are equal in both Outlook and CRM.
l Clear Log. Clears all the conflict from the List Of Logged Conflicts panel.
l Delete Selected. Clears the selected conflict from the List Of Logged Conflicts panel.
l Copy Details. Copies the Outlook value to the clipboard so that it can be reinstated ifrequired.
l Help. Displays the CRM help page on Synchronization Conflicts.
3. Scroll to highlighted field to review the conflict in data. Select the Close button to close theSynchronization Conflicts window.
Reviewing Skipped Items (Classic Outlook Integration)You can review additional information about appointments, tasks or contacts which could not besynchronized in the Skipped Items log.
The following scenarios will cause items to be skipped rather than synchronized:
l Incorrect recurring appointment pattern type, specifically where no end date has been set inOutlook.
l An appointment created in Outlook, which has no subject and no body text.
l A task created in Outlook, which has no subject and no body text.
l A user was added only to one of occurrence of recurring appointment.
l A contact in Outlook has an empty first and last name.
l When there has been no response from Outlook when reading or writing an appointment, task orcontact from or to Outlook.
l When a recurring appointment is created and the meeting organizer and invitees sync, but themeeting organizer later changes one of the occurrences in the series and sends the update to theinvitees.
User Guide 8-13
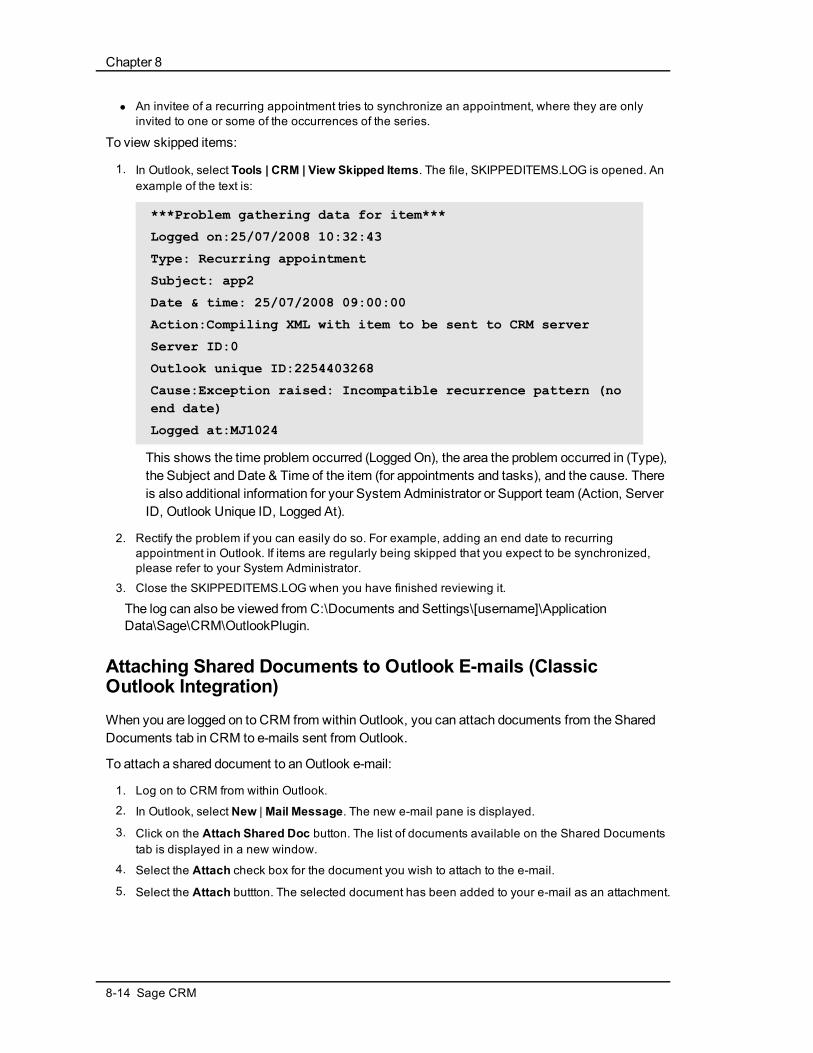
Chapter 8
l An invitee of a recurring appointment tries to synchronize an appointment, where they are onlyinvited to one or some of the occurrences of the series.
To view skipped items:
1. In Outlook, select Tools | CRM | View Skipped Items. The file, SKIPPEDITEMS.LOG is opened. Anexample of the text is:
***Problem gathering data for item***
Logged on:25/07/2008 10:32:43
Type: Recurring appointment
Subject: app2
Date & time: 25/07/2008 09:00:00
Action:Compiling XML with item to be sent to CRM server
Server ID:0
Outlook unique ID:2254403268
Cause:Exception raised: Incompatible recurrence pattern (noend date)
Logged at:MJ1024
This shows the time problem occurred (LoggedOn), the area the problem occurred in (Type),the Subject and Date & Time of the item (for appointments and tasks), and the cause. Thereis also additional information for your System Administrator or Support team (Action, ServerID, Outlook Unique ID, Logged At).
2. Rectify the problem if you can easily do so. For example, adding an end date to recurringappointment in Outlook. If items are regularly being skipped that you expect to be synchronized,please refer to your System Administrator.
3. Close the SKIPPEDITEMS.LOG when you have finished reviewing it.
The log can also be viewed from C:\Documents and Settings\[username]\ApplicationData\Sage\CRM\OutlookPlugin.
Attaching Shared Documents to Outlook E-mails (ClassicOutlook Integration)When you are logged on to CRM from within Outlook, you can attach documents from the SharedDocuments tab in CRM to e-mails sent from Outlook.
To attach a shared document to anOutlook e-mail:
1. Log on to CRM from within Outlook.
2. In Outlook, select New |Mail Message. The new e-mail pane is displayed.
3. Click on the Attach Shared Doc button. The list of documents available on the Shared Documentstab is displayed in a new window.
4. Select the Attach check box for the document you wish to attach to the e-mail.
5. Select the Attach buttton. The selected document has been added to your e-mail as an attachment.
8-14 Sage CRM

Chapter 8: Classic Outlook Integration
Filing E-mails from Outlook to CRM (Classic Outlook Integration)You can file e-mails from any folder in Outlook against records in CRM.
When filing e-mails from Outlook to CRM, the plugin tries tomatch the e-mail address on theOutlook e-mail with an e-mail address in CRM. You can also select a batch of e-mails from anyfolder in Outlook and file them to CRM in a single action. When you perform amass filing, CRMwilllook only for amatch with the first e-mail address in the batch you have selected. If nomatch isfound for the first e-mail address, youmust manually match the e-mail batch to a record in CRM.When filing batches of e-mails, it is recommended that all e-mails in the Outlook-based batch havethe same e-mail address.
Note: When filing an e-mail from outlook to CRM, if the user selects a company or person, the e-mail will inherit the territory of either the company or person (in that order), depending on the usersinsert rights for those territories.
To file an e-mail from your Inbox:
1. From your Inbox, highlight or select the e-mail you want to file in CRM.
2. Click on the File E-mail button when it becomes active. The File E-mail screen is displayed.
3. Use the search select advanced buttons on the screen to specify what records you want the e-mailfiled against.
File E-mail screen
4. Check the settings in the Filing Options panel, and change them if you need to.l Status The current status of the e-mail, i.e. Cancelled, Complete, Pending, or In Progress.
l File By Date And Time Select whether to file the e-mail by the original date and time the e-mail was received or by the current date and time.
l Action The action type under which to file the e-mail, for example, E-mail In, E-mail Out, orMeeting.
5. Click on theFile And View E-mail action button in CRM. The E-mail In page is displayed. This givesyou access to E-mail action buttons in CRM to reply to the e-mail straightaway from within CRM.This automatically logs the reply as a communication record against the customer.
6. The File E-mail button returns you to the e-mail list in Outlook.
User Guide 8-15

Chapter 8
7. If you select File And View E-mail for multiple e-mails, the Communications tab of the person you e-mailed is displayed.
8. Select the Continue button.
The list of e-mails in Outlook is displayed. The filed e-mail has a check mark next to it showing itwas successfully filed in CRM.
You also can right-click on your Inbox in Outlook, select Open In New Window, and drag anddrop e-mails directly onto the Document Drop icon in CRM (Internet Explorer only). This methodstores the whole e-mail as an attachment to the communication record. For more information ondragging and dropping, please refer to Document Drop (page 9-9).
To file an e-mail while sending it from Outlook:
1. Log on to CRM from within Outlook.
2. In Outlook, select New |Mail Message. The new e-mail pane is displayed.
3. Fill in the e-mail address fields.
4. Click on the Send And File button. The File E-mail screen is displayed.
5. Use the Advanced Search Select buttons on the screen to specify what records you want the e-mailfiled against.
6. Select the appropriate settings in the Filing Options panel.
7. Click on the File E-mail action button. The e-mail is filed in the CRM database against the recordyou specified.
Reinstalling the Outlook Plug-in for Classic Outlook IntegrationYour System Administrator may instruct you to reinstall the Outlook plug-in, for example, if CRM isupgraded with a new plug-in.
To reinstall the Outlook plug-in for Classic Outlook Integration:
1. Select the Preferences tab.
2. Click on the Reinstall CRM MS Outlook Integration button.
A dialog box is displayed, informing you that the new plugin will load next time you start MSOutlook.
You can check the Plug-in version from Internet Explorer. Select Tools | Internet Options |Settings | View Objects, then right-click on the CRMOutlook Plug-in file and select Properties |Version.
Uninstalling the Outlook Plug-in for Classic Outlook IntegrationYour System Administrator may instruct you to uninstall the Outlook plug-in for Classic OutlookIntegration.
To uninstall the Outlook plug-in:
l In Outlook, select Tools | CRM | Uninstall.
l A dialog is displayed communicating that the uninstall was successful. Click OK and Outlook will beclosed.
8-16 Sage CRM
Chapter 8: Classic Outlook Integration
Note: The plug-in cannot be uninstalled when User Account Control (UAC) is enabled inWindows Vista orWindows 7. To uninstall the plugin, a user with administrator privileges musttemporarily disable UAC. After uninstalling, the administrator can re-enable UAC.
User Guide 8-17


Chapter 9: Managing Documents
In this chapter you will learn how to:
l Download the CRM Plug-in.
l Carry out a mail merge.
l Carry out a mail merge to multiple contacts.
l Upload an image file.
l Create a newmail merge template.
l Create a quote or order template.
l Create a newmail merge template in Microsoft Word.
l Upload a local Word document template.
l Track documents on the Documents tab.
l Retrieve a merged document from the Documents tab.
l Add a document to the Documents tab.
l Use document drop.
l Use the drop files here... area.
l Link e-mail correspondence to a customer.
l Drop a document into the Documents tab.
l Shared Documents.
l Access documents in Shared Documents.
l Filter Shared Documents.
l Add documents to the Shared Documents tab.
l Edit documents in the Shared Documents tab.
Downloading the CRM Plug-inThe plug-in allows you to work with theDocument Drop feature. It also gives you access to anEdit Attachment button on the Document Details panel and in the final step of amail merge. Note:These features are only available when working with CRM in Internet Explorer. The SystemAdministrator can enable/disable access to the plug-in required for Document Drop and EditAttachment for all users from the Administration area in CRM.
The first time you encounter one of the features requiring the plug-in (for example, the DocumentDrop icon in your Calendar), you are prompted to download the plug-in.
Follow the instructions provided on-screen. You only need to do this once. If you receive anupgrade, or changemachines, you are prompted to download the plug-in again.
User Guide 9-1

Chapter 9
Mail Merge TemplatesSamplemail merge templates are available from the Shared Templates list. Shared templates arestored on the CRM server and are available to all users. You can create new mail merge templatesthat are available exclusively to you. Info Managers and System Administrators can create andupload templates available to all users. For details of how to create new mail merge templates,please refer to Creating a New Template and AddingMerge Fields (page 9-4). You can also createmail merge documents withWord document templates you have saved locally. For details of how todo this, please refer to Uploading a Local Word Document (page 9-7).
Carrying out a Mail MergeTomerge an existing template with company and person details:1. Find the prospect you want to send the letter to.
2. Click on the hyperlink of the person so that their name appears in the context area of the screen.
3. From the Documents tab, select Start Mail Merge. A list of shared templates is displayed.
4. Click the hyperlink of the file you want to merge.
5. From the Edit and Merge Document page you can:l Modify the document for this mail merge if you are working with an HTML template. Add
custom text, insert more Sage CRM merge fields, and apply custom formatting.
l Preview Merge. Opens a new browser window. Note: You may need to disable any activepop-up blockers to view.
l Save Template. Updates the template with any changes made. You can only save updatedtemplates if they belong to you. Shared templates can only be modified by a SystemAdministrator or Info Manager.
6. SelectMerge and Continue.7. From the Complete Merge Process page you can:
l Deselect or select the Create Communication check box. Leaving the check box selectedcreates a completed Communication record with a link to the merged document. It alsomakes the merged document available from the Documents tab.
l Viewmerged document. This opens a new browser window. You may need to disable anyactive pop-up blockers to view.
l Edit merged document. This opens a new browser window where you can edit the mergeddocument. This option is only available in IE and when the Active X plug-in is being used.Make your changes to the document, save and close. Then select the Save button on theComplete Merge Process page. Note: The ability to use the Active X plug-in is controlled bythe System Administrator from Administration | E-mail and Documents | Documents andReports Configuration.
8. Select Continue. If you left the Create Communication check box selected, the Save MergedDocument As A Communication page is displayed.
9. Add a Subject for the communication, and update any other fields you need to.
10. Select the Save button.
A communication record is created to record that a letter was sent out, forming part of thecustomer's interaction history. Themerged document can be viewed as an attachment on thecommunication record. It can also be viewed from the Documents tab.
9-2 Sage CRM

Chapter 9: Managing Documents
Communication record
Carrying out a Mail Merge to Multiple ContactsYou can create amerged document for all contacts contained in a search list, saved search, or agroup.
To perform amail merge tomultiple contacts:
1. Select the Findmenu button and choose Person from the drop-down list in the context area of thepage.
2. Enter the search criteria, and select the Find action button from the right-hand side of the page.
Search results page
3. Select the Start Mail Merge action button.
4. Click the hyperlink of the file you want to merge.
5. From the Edit and Merge Document page you can:l Modify the document for this mail merge if you are working with an HTML template. Add
custom text, insert more Sage CRM merge fields, and apply custom formatting.
l Preview Merge. Opens a new browser window. Only the first record will display if you arepreviewing a mail merge of multiple records.Note: You may need to disable any active pop-up blockers to view.
l Save Template. Updates the template with the changes made. You can only save updatedtemplates if they belong to you. Shared templates can only be modified by a SystemAdministrator or Info Manager.
6. SelectMerge and Continue.7. From the Complete Merge Process page you can:
l Deselect or select the Create Communication check box. Leaving the check box selectedcreates a completed Communication record against all of the contacts on your list with a linkto the merged document.
User Guide 9-3

Chapter 9
l View the merged form letters by selecting the paperclip icon. This opens a new browserwindow. You may need to disable any active pop-up blockers to view.
l Viewmerged document. This opens a new browser window. You may need to disable anyactive pop-up blockers to view.
l Edit merged document. This opens a new browser window where you can edit the mergeddocument. This option is only available in IE and when the Active X plug-in is being used.Make your changes to the document, save and close. Then select the Save button on theComplete Merge Process page. Note: The ability to use the Active X plug-in is controlled bythe System Administrator from Administration | E-mail and Documents | Documents andReports Configuration.
8. Select Continue. If you left the Create Communication check box selected, the Save MergedDocument As A Communication page is displayed.
9. Add a Subject for the communication, and update any other fields you need to.
10. Select the Save button.
A communication record is created against all of the contacts on your list. A link to themergeddocument is maintained in the communication record.
Uploading an Image FileIf you want to use images when creating your HTML mail merge templates, youmust upload thoseimages to the server first.
To insert any uploaded images into an HTML template, type the image namewithin anHTML IMG tag, for example <img src="logo.png">.
To upload an image when performing amail merge in the context of a company record:
1. Click the Findmenu button and select Company from the Find drop-down list.
2. Enter your search criteria and click the Find action button.
3. Click on the hyperlink of the company to whom you want to send the merged document.
4. Right-click the Newmenu button and select the Mail Merge option, or click Start Mail Merge buttonin the Documents tab. The Select Or Create a New Template page is displayed.
5. Select the Add Local Template / Image button.
6. In IE, use the Browse button to navigate to the file.
7. For other browsers, select the image file(s) you want to add from their current location. The Detailspanel is displayed, and the File(s) list shows the image file(s) you have attempted to upload. Thegreen check mark and red cross icons indicate whether the files uploaded or not. To uploadsuccessfully, the files must comply with the system file size, type, and number of files settings.These settings are defined by your System Administrator. Note: When using Safari, it is possible toadd only one file at a time.
8. Fill in the details of the image file.
9. Select the Save button. All valid (green check mark in non-IE) image files are saved. When youhave saved the image, you can use it when creating a new mail merge template in Sage CRM.
Creating a New Template and Adding Merge FieldsAll users can add new templates for their own use.
9-4 Sage CRM

Chapter 9: Managing Documents
To create a new template:
1. Make sure that you are in the context you want the template to be associated with. For example,drill into a case record if you want to create a template that uses case merge fields.
2. In the Documents tab, click the Start Mail Merge button.3. Click the Create Template button. The Create and Merge Document page is displayed.
4. Enter a name in the File field and, if required, a description in the Description field.
5. Create the main body of your template. You can paste content from Microsoft Word or HTML sourcecode into the rich text editor.
6. Insert any images you want to use in the template by inserting the image name within anHTML IMG tag, for example <img src="logo.png">. Any images you want to use must first beuploaded to the server. Please refer to Uploading an Image File (page 9-4) for more information.
7. Insert CRM merge fields from the Insert Sage CRM Field drop-down list.
If you need amerge field that is not available, make sure that you started themerge in thecorrect context. If you have checked the context of themail merge, and still do not have all themerge fields you want, you can ask your System Administrator to customize themail mergeview for themain entity of themail merge.
8. Click the Save Template button. The template is saved in HTML format and is available in theShared Templates list. When you click the Save Template button, a Delete button appears. It ispossible to delete only templates that you have created using the rich text editor.
You can now continue with amerge by selectingMerge and Continue, or click Cancel andcarry out amerge with your new template at a later stage. To share your template with otherusers, save it locally, e-mail it to your System Administrator and have them upload it to theShared Templates list.
Creating a Quote or Order TemplateSample Quote andOrder templates are shipped with a standard install. However, you can createyour own.
To create a new Quote template:
1. Ensure you are in the Quote context.
2. In the documents tab, click the Start Mail Merge button.3. Click the Create Template button. The Create and Merge Document page is displayed.
4. Enter a name for the template in the File field and, if you want, a description in the Description field.
5. Create the main body of your template. You can insert Sage CRM merge fields by selecting themfrom the Insert Sage CRM Field drop-down list.
If you want to include a table with merge fields, click the Insert Nested Region hyperlink. Thisinserts the start and end tags for both themain table (Quotes) and the child table (Quote Items).
Youmust include TableStart and TableEnd in the same template section, table row or table cell.For example, if you want a row of quote item data to display, the first column in that row mustinclude a TableStart:QuoteItems tag, and the final row must include a TableEnd:QuoteItemstag.
User Guide 9-5

Chapter 9
BasicQuoteMailMerge Template
6. You can preview how the merged document will look by clicking the Preview Merge button.
Note: If you aremergingmultiple records, the preview will show only the first record in the group.
7. When you are happy with the template, click the Save button. The template is saved inHTML format.
Note: All users can create and save templates andmerge documents using them. However, youcannot make changes to shared templates. Youmust be an InfoManager or Administrator tomake changes to shared templates.
Creating a New Template in Microsoft WordYou can createmail merge templates inWord that you can upload to Sage CRM.
To ensure the template works properly, all merge fields entered into the templatemust correspondto the exact field name in Sage CRM. You can check the field namewith your SystemAdministrator.
You should only enter merge fields from one primary entity when creating a new template inMicrosoft Word. For example, when creating a template for use with case records, you can entercase, person, company, address and user merge fields but not quotemerge fields.
9-6 Sage CRM
Chapter 9: Managing Documents
When you upload it the template, youmust associate it with the entity (e.g. Case), for which youhave enteredmerge fields.
To create a new Word template:
1. In the main document, type any content that you want to appear on every copy of the document.
2. To add a picture, such as a logo, click Picture in the Illustrations group on the Insert tab. Note: Toensure your logo and text remain formatted correctly during the merge process, we recommendusing a table to format your document.
3. Insert the Sage CRM merge fields you want to include in your template. To insert a merge field,click Quick Parts in the Text part of the Insert tab, then select the Field option. The Field dialogbox is displayed.
4. Select the MergeField option from the Field Names drop-down in the Please Choose A Field panel.
5. Type the Sage CRM merge field name in the Field Name field of the Field Properties panel.
6. When you have finished creating your template, select File | Save As, give your template a name,and save it. You can save your new template in the following formats: .DOCX file, .HTM, and.HTML.
You can now upload the template and use it to perform mail merges. To share it with other users, e-mail it to your System Administrator and have them upload it to the Shared Templates list.
Uploading a Local Word DocumentTo upload a local Word document template so you can use it to perform amail merge:
1. In the context of an entity, go to the Documents tab.2. Select the Start Mail Merge button. The Select or Create a New Template page is displayed.
3. Select the Add Local Template / Image button.4. In IE, use the Browse button to navigate to the file.5. For other browsers, select the file you want to add from its current location. The Details panel is
displayed, and the File(s) list shows the document you have attempted to upload. The green checkmark and red cross icons indicate whether the file uploaded or not. To upload successfully, the filemust comply with the system file size, type, and number of files settings. These are defined by yourSystem Administrator.
6. Fill in the details and add a brief description of the document.
7. Select the context you want the template to be associated with from the Entity drop-down. Selectthe person record, for example, if you want to add more person merge fields to the template.
8. Click on the Save button. The Word document is saved as a new template for you to use whenperforming a mail merge.
Tracking Documents in the Documents TabManaging documents relating to your customers, suppliers, partners, and prospects is an integralpart of managing your whole relationship with them.
The Documents tab enables you to:
l Link copies of merged documents generated through the system, such as letters and e-mails, to acustomer.
l Retrieve these documents at a later date from within the company or person context for viewingand editing.
User Guide 9-7

Chapter 9
l Link copies of any document generated outside of the system to a company, person, salesopportunity, case, or solution.
l Carry out a mail merge using the customer details from the context you are in.
The Documents tab is available within the context of a:
l Company
l Person
l Opportunity
l Case
l Solution
l Quote
l Order
l Custom entity
Documents in the Opportunity or Case documents tabs are visible in the Company and PersonLibrary tabs. Documents in the Person Documents tab are also visible in the Company Documentstab (unless the person is not linked to a company).
Retrieving a Merged Document from the Documents TabIf you sent out a letter to a customer using theMerge Document functionality, setting the CreateCommunication and Save Document letter options to Yes in the process, a copy of themergeddocument is automatically attached to the communication record and stored in the Documents tab.
You can view the document from:
l The Communication record, by selecting the View Attachment button
l The Documents tab, by selecting the View Attachment icon directly from the Documents tab
l The Document record, by opening the document entry and selecting the View Attachment button
To view the attachment from the Document record:
1. Find the customer you sent the letter to.
2. Click on the hyperlink link of the person so that their name appears in the context area of thescreen.
3. Select the Documents tab. A list of all document entries for the person is displayed.
4. Click on the hyperlink of the Documents entry you wish to review. The Document Details page isdisplayed. The View Attachment button works the same way as in the Communication Detailspage. Clicking on it opens up the document in a new browser window. Alternatively, you can selectthe View Attachment icon in the left-hand column of the list of documents. This opens thedocument without having to drill into the document entry details first.
9-8 Sage CRM
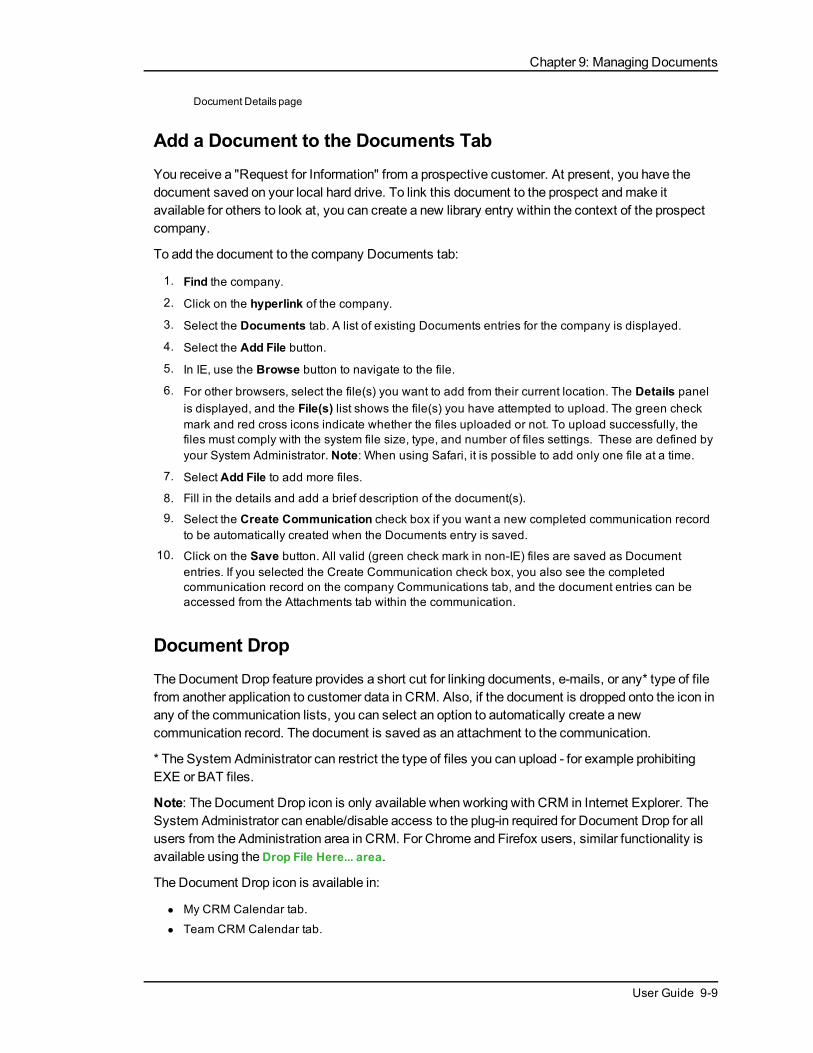
Chapter 9: Managing Documents
Document Details page
Add a Document to the Documents TabYou receive a "Request for Information" from a prospective customer. At present, you have thedocument saved on your local hard drive. To link this document to the prospect andmake itavailable for others to look at, you can create a new library entry within the context of the prospectcompany.
To add the document to the company Documents tab:
1. Find the company.
2. Click on the hyperlink of the company.
3. Select the Documents tab. A list of existing Documents entries for the company is displayed.
4. Select the Add File button.
5. In IE, use the Browse button to navigate to the file.
6. For other browsers, select the file(s) you want to add from their current location. The Details panelis displayed, and the File(s) list shows the file(s) you have attempted to upload. The green checkmark and red cross icons indicate whether the files uploaded or not. To upload successfully, thefiles must comply with the system file size, type, and number of files settings. These are defined byyour System Administrator. Note: When using Safari, it is possible to add only one file at a time.
7. Select Add File to add more files.
8. Fill in the details and add a brief description of the document(s).
9. Select the Create Communication check box if you want a new completed communication recordto be automatically created when the Documents entry is saved.
10. Click on the Save button. All valid (green check mark in non-IE) files are saved as Documententries. If you selected the Create Communication check box, you also see the completedcommunication record on the company Communications tab, and the document entries can beaccessed from the Attachments tab within the communication.
Document DropThe Document Drop feature provides a short cut for linking documents, e-mails, or any* type of filefrom another application to customer data in CRM. Also, if the document is dropped onto the icon inany of the communication lists, you can select an option to automatically create a newcommunication record. The document is saved as an attachment to the communication.
* The System Administrator can restrict the type of files you can upload - for example prohibitingEXE or BAT files.
Note: The Document Drop icon is only available when working with CRM in Internet Explorer. TheSystem Administrator can enable/disable access to the plug-in required for Document Drop for allusers from the Administration area in CRM. For Chrome and Firefox users, similar functionality isavailable using theDrop File Here... area.
The Document Drop icon is available in:
l My CRM Calendar tab.
l Team CRM Calendar tab.
User Guide 9-9

Chapter 9
l Company Communications tab.
l Person Communications tab.
l Lead Communications tab.
l Opportunity Communications tab.
l Case Communications tab.
l Solution Communications tab.
l Quote Communications tab.
l Order Communications tab.
l Any Documents tab.
Drop Files Here... AreaThe Drop Files Here... area provides a clear drag-and-drop zone for adding files to CRM.
Drop FilesHere... area
Note: The Drop Files Here... area is not available when working with CRM in Internet Explorer orSafari. TheDocument Drop feature provides similar functionality for users working in IE. Safariusers can drag-and-drop onto theAdd File button.
Drop Files Here... is available in:
l Any Documents tab. For example the Documents tab within the context of a company.
l The Attachments tab within the context of a task.
l The Select Or Create a New Template screen when performing a mail merge.
l My CRM | Shared Documents if you are a System Administrator or Info Manager with DocumentLibrary rights.
l Administration | E-mail and Documents | Document Templates.
To upload successfully, the files must comply with the system file size, type, and number of filessettings. These are defined by your System Administrator.
Linking E-mail Correspondence to a CustomerYou have just received an e-mail from a customer regarding a new project you are working on. Thisforms a vital part of the customer interaction history.
To link this correspondence to the customer using Document Drop (IE only):
1. Find the customer.
2. Click on the hyperlink of the person.
3. Select the Communications tab. A list of communications with this person is displayed. You willalso notice the Document Drop icon on the right-hand side of the page.
9-10 Sage CRM
Chapter 9: Managing Documents
4. You can drop the e-mail onto the icon by: tiling the windows on your desktop and, using the mouse,dragging the e-mail onto the Document Drop icon. The Enter New Task page is displayed.
5. The Action type is automatically set to E-mail In. Enter the rest of the details and select the Savebutton.
The new communication is displayed in the Communications list of the company. If you click onthe E-mail icon of the communication, the Communication Details page is displayed. Select theView Attachment button to review the e-mail.
Remember, other options for linking e-mail correspondence to customer records in CRMinclude:
l Outlook Integration. If you have Classic Outlook Integration installed on your system, you can usethe File E-mail button from Outlook to file an inbound e-mail communication with the customerrecord in CRM. Please refer to Classic Outlook Integration (page 8-1) for more information.
l E-mail Management. If E-mail Management is set up on your system, inbound e-mails canautomatically get filed against the matching person or company record. Please refer to FilingInbound and Outbound E-mails (page 6-5) for more information.
Dropping a Document into the Documents TabTo drag and drop a document into the Documents tab:
1. Find the company.
2. Click on the hyperlink of the company.
3. Select the Documents tab. A list of existing Documents entries for the company is displayed.
4. Reduce the size of your CRM window.
5. Click and drag the document from, for example, your desktop, onto the Document Drop icon (IEonly). In Chrome and Firebox browsers you can drag single or multiple files to the Add File buttonor the Drop files here... area. In Safari you can drag single files to the Add File button. TheDocuments Details panel is displayed.
6. Enter the document details and click on the Save button. The Documents list displays the newdocuments entry (or entries).
Shared DocumentsAll users have access to theShared Documents tab. This tab stores corporate documents thatyoumay need quick access to on a daily basis. However, youmay not have access to alldocuments within the Documents tab.
You need to be a System Administrator or an InfoManager with Document Library rights to add newdocuments to the Shared Documents tab.
Accessing Documents in Shared DocumentsTo access documents in Shared Documents:
1. From within My CRM, select the Shared Documents tab. A list of documents is displayed.
2. Click on the View Attachment icon next to the file you want to open, or select the documenthyperlink and then click the View Attachment button from the Document Details screen.
User Guide 9-11
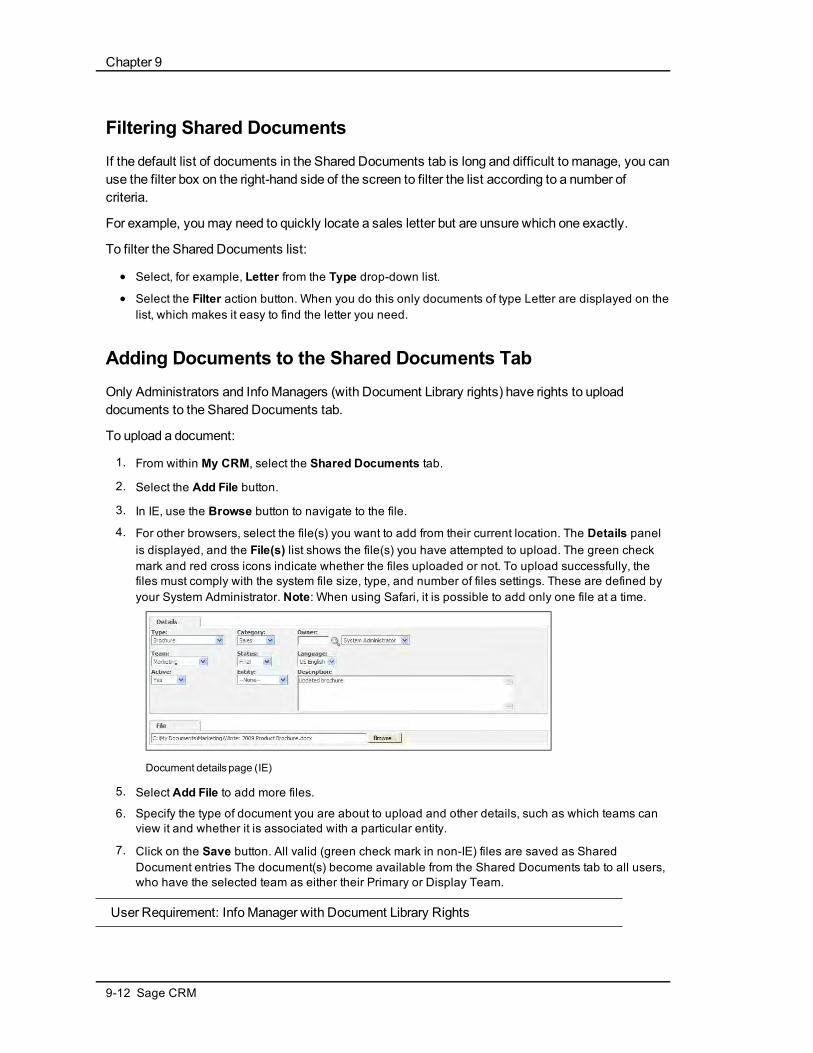
Chapter 9
Filtering Shared DocumentsIf the default list of documents in the Shared Documents tab is long and difficult to manage, you canuse the filter box on the right-hand side of the screen to filter the list according to a number ofcriteria.
For example, youmay need to quickly locate a sales letter but are unsure which one exactly.
To filter the Shared Documents list:
l Select, for example, Letter from the Type drop-down list.
l Select the Filter action button. When you do this only documents of type Letter are displayed on thelist, which makes it easy to find the letter you need.
Adding Documents to the Shared Documents TabOnly Administrators and InfoManagers (with Document Library rights) have rights to uploaddocuments to the Shared Documents tab.
To upload a document:
1. From within My CRM, select the Shared Documents tab.
2. Select the Add File button.
3. In IE, use the Browse button to navigate to the file.
4. For other browsers, select the file(s) you want to add from their current location. The Details panelis displayed, and the File(s) list shows the file(s) you have attempted to upload. The green checkmark and red cross icons indicate whether the files uploaded or not. To upload successfully, thefiles must comply with the system file size, type, and number of files settings. These are defined byyour System Administrator. Note: When using Safari, it is possible to add only one file at a time.
Document details page (IE)
5. Select Add File to add more files.
6. Specify the type of document you are about to upload and other details, such as which teams canview it and whether it is associated with a particular entity.
7. Click on the Save button. All valid (green check mark in non-IE) files are saved as SharedDocument entries The document(s) become available from the Shared Documents tab to all users,who have the selected team as either their Primary or Display Team.
User Requirement: Info Manager with Document Library Rights
9-12 Sage CRM

Chapter 9: Managing Documents
Editing Documents in the Shared Documents TabOnly Administrators and InfoManagers have rights to modify documents already uploaded.
To edit documents in the Shared Documents tab:
1. From within My CRM, select the Shared Documents tab.
2. Locate the document you wish to edit and click on the hyperlink to open it.
3. Click on the View Attachment button to open up the attached document, and Save it locally.
4. Make the document changes you require and Save them.
5. Ensuring that you make a note of the document details, return to CRM and delete the existingdocument using the Delete button. You are returned to the list of documents.
6. Select the Add File button to begin uploading the updated document.
7. Select Save. Users can now access the updated document from within My CRM | SharedDocuments.
User Requirement: Info Manager Administration Rights
User Guide 9-13

Chapter 10: Running Reports
In this chapter you will learn how to:
l Find the sample reports available in the system.
l Run list, cross tabular, historical, and summary reports.
l Save report search criteria.
l Add favorite reports.
l Change the report display options.
l Interact with report charts.
Sample ReportsA standard installation includes sample reports in the following categories:
l Activity
l Communications
l Customer Service
l General
l Lead
l Marketing
l Sales
l Administrator
l Campaigns
l Outbound Calls
Running a ReportThere are three types of standard report:
l List. Creates rows and columns of information based on the criteria selected.
l Cross Tabular. Creates a record count across an X and Y axis based on the criteria selected.
l Historical. Creates a report giving a static view of a record at previous points in time.
Summary reports, which show a quick overview of account information, are available from theSummary tabs of:
l Companies
l People
l Opportunities
l Cases
If you have appropriate permissions you can also generate report output from any search list, savedsearch, or group.
User Guide 10-1

Chapter 10
Example: Company List by Segment (List)
This report shows a simple list of companies in selected industry segments. For example, allcompanies in the Computer - Software segment. To run the report:
1. Select the Reports button. The Reports page is displayed.
2. Select the General report category.
3. Click on the hyperlink of the report called Company List by Segment or select the Run button. TheDisplay Options and Search Criteria page is displayed.
Report DisplayOptionsand Search Criteria page
4. The default display option is to display the report output on-screen. Leave the on-screen optionselected for this example.
5. Select the criteria for the report. If you leave the search criteria blank, the default is set to match allthe permitted values. To select multiple criteria on the right-hand side of the panel, hold the Ctrl keyand select the individual entries.
6. Click on the Go button. The Company List by Segment report is displayed in a new window. TheSearch Criteria are displayed at the top of the report output. The report output page may containhyperlinks from the data to the corresponding Summary page. If it does contain hyperlinks you can,for example, select a company name from the report output page and you are taken to theSummary page of that company.
Report output page
7. You can navigate between pages of a longer report using the navigation buttons at the top of thepage. The first page of the report is displayed as soon as it is generated, with arrows at the top togo to the next or last page. If you click on the next or last page buttons before those pages havebeen generated, a message is displayed to inform you that the page is not ready. Once the wholereport has been generated, a Go To Page icon is displayed at the top of the page, and a Print iconis also available. The navigation buttons are defined in the report builder by the SystemAdministrator or a user with report editing rights.
10-2 Sage CRM

Chapter 10: Running Reports
Report navigation buttons
8. To close the reports page, close the window displaying the report output.
Example: Activities Logged Report by User (Cross Tab)
This report shows the number of different types of communications logged by specified Users. Thesearch criteria includes the Date/Time field from the communication, so that you can review, forexample, all communications logged for your team over the last month. To run the report:
1. Select the Reports button. The Reports page is displayed.
2. Select the report category Activity Reports.
3. Click on the hyperlink of the report called Activities Logged Report by User, or select the Runbutton. The Display Options and Search Criteria page is displayed. The search criteria arecombined with logical "AND"s—that is, only activities meeting both the Date/Time and User criteriaare returned.
DisplayOptionsand Search Criteria page
4. Select the criteria for the report. For the Date/Time Search Criteria, you can choose several differentdate range criteria. For example:
l An exact date combined with an operator—for example, =, <>, or =>.
l A specific date range (Between).
l A relative date, for example, Current Quarter, Next Month, Previous Week—these are allrelative to today’s date.
l A given date, for example, any Monday between the 1st of November and the 30th ofNovember.
5. Select the users whose activities you want to report on.
6. Click on the Go button. The report output is displayed in a new window. This report includes a chartgraphic.
User Guide 10-3

Chapter 10
Report output page
Example: Opportunity Closing History (Historical)
This report shows opportunities that were opened during the specified time period, for example, 1stJuly to 31st July. A further search criteria of Opportunity Status can be added to show, for example,all opportunities opened between 1st July to 31st July, which were subsequently Won during thattime period or after. To run the report:
1. Select the Reports button. The Reports page is displayed.
2. Select the Sales report category.
3. Click on the hyperlink of the report called Opportunity Closing History or select the Run button. TheDisplay Options and Search Criteria page is displayed.
DisplayOptionsand Search Criteria page
4. Select the criteria for the report.
5. Click on the Go button. The report output is displayed in a new window. The total number ofopportunities opened from the 1st of July to the 31st of July, which were subsequently won, is thenumber shown on the last week of the selected time period (not the total of all the weeks). Theweekly totals give you a point-in-time snapshot for the whole "opened" period being measured.
Report output page
10-4 Sage CRM
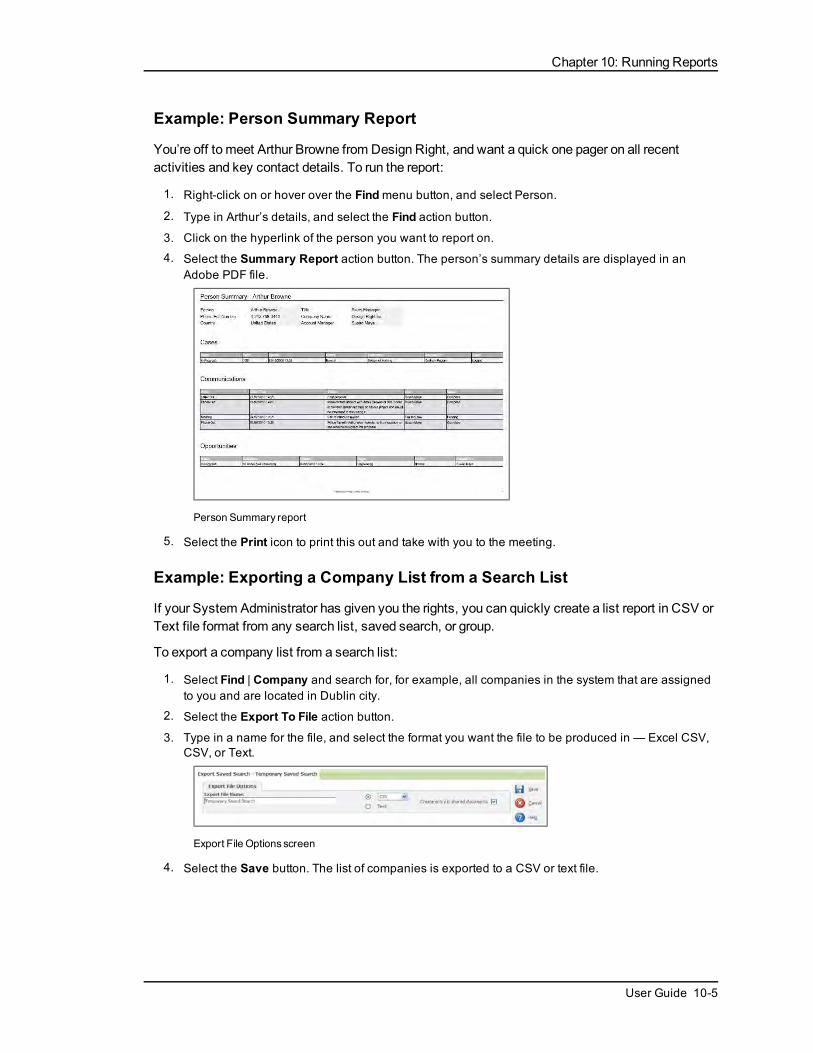
Chapter 10: Running Reports
Example: Person Summary Report
You’re off to meet Arthur Browne from Design Right, and want a quick one pager on all recentactivities and key contact details. To run the report:
1. Right-click on or hover over the Findmenu button, and select Person.
2. Type in Arthur’s details, and select the Find action button.
3. Click on the hyperlink of the person you want to report on.
4. Select the Summary Report action button. The person’s summary details are displayed in anAdobe PDF file.
Person Summary report
5. Select the Print icon to print this out and take with you to the meeting.
Example: Exporting a Company List from a Search List
If your System Administrator has given you the rights, you can quickly create a list report in CSV orText file format from any search list, saved search, or group.
To export a company list from a search list:
1. Select Find | Company and search for, for example, all companies in the system that are assignedto you and are located in Dublin city.
2. Select the Export To File action button.
3. Type in a name for the file, and select the format you want the file to be produced in — Excel CSV,CSV, or Text.
Export File Options screen
4. Select the Save button. The list of companies is exported to a CSV or text file.
User Guide 10-5

Chapter 10
Saving Report Search CriteriaIf you regularly run reports using the same search criteria—for example, monthly activity report forDamien, John, Kylie, and Susan—you can save and re-use the search criteria selected. To savereporting search criteria:
1. Select the Reports button.
2. Select a report category from the context area of the screen. For example, Activity Reports.
3. Click on the Run button next to the report you want to run. For Example, Activities Logged Reportby User. The Display Options and Search Criteria page is displayed.
4. Select the search criteria, and click on the Save button. You are prompted to enter a name for theSaved search. Selecting the Available to All Users check box will make the saved search availableto all users.
Saved Search dialog box
5. Enter a short description for the search, for example, Telco Team Monthly, and select the Savebutton. When you return to the list of reports, the saved search criteria is displayed in a list next tothe report.
Saved Search
To run the report using the saved search criteria, click the Run button next to the saved searchname. To edit a saved search, select it from the Saved Search column, click on the Run button,make the changes you require and click on the Save button. To delete a saved search, select itfrom the Saved Search column, click on the Run button and click on the Delete button.
Adding Favorite ReportsYou can group reports that you work with regularly in your own personal reports category. To add areport to theMy Favorite Reports category:
1. Select the Reports menu button. The page of existing report categories is displayed.
2. Select the category where your favorite report is.
3. Select the Favorite check box next to the report you want to add to the My Favorite Reportscategory.
10-6 Sage CRM

Chapter 10: Running Reports
SalesReports list
4. To view your favorite reports, select the My Favorite Reports category. A list of all reports you havemarked as Favorites is displayed.
Changing the Report Display OptionsYou can display a report in the following formats:
l On-screen in CRM.
l As an Adobe PDF file.
l XLSX. Exports the data to an .XLSX file. Compatible with Excel 2007 and 2010. Report charts arealso displayed.
l Excel CSV. Exports the data to a CSV file. This option provides backward compatibility for filesprepared from/for Sage CRM prior to 7.1. It also renders well in Excel if your local settings supporttab delimitation. The data in Excel CSV is always tab delimited and padded with =" ", regardless oflocal settings. For example:="JuneWebsite Offer Lead" [TAB] ="Accantia Ltd." [TAB] ="Thomas Beesley" [TAB]"Lead"
l CSV. Exports the data to a CSV file. The data is delimited according to the CSV File ExportDelimiter set at System and User level. If the file is opened in MS Excel, it may not be formattedcorrectly. You can either: open it in Notepad, use the CSV Excel option, or open in MS Excel andconvert the formatting (for example, using the Text To Columns option).
Find out more on the following report display options:
Adobe PDF (page 10-7)XLSX (page 10-9)Excel CSV (page 10-9)CSV (page 10-9)
Adobe PDF
To display report output in Adobe PDF format:
l Select the Print Preview option from the Display Options panel.
The output is displayed in Adobe PDF format.
User Guide 10-7
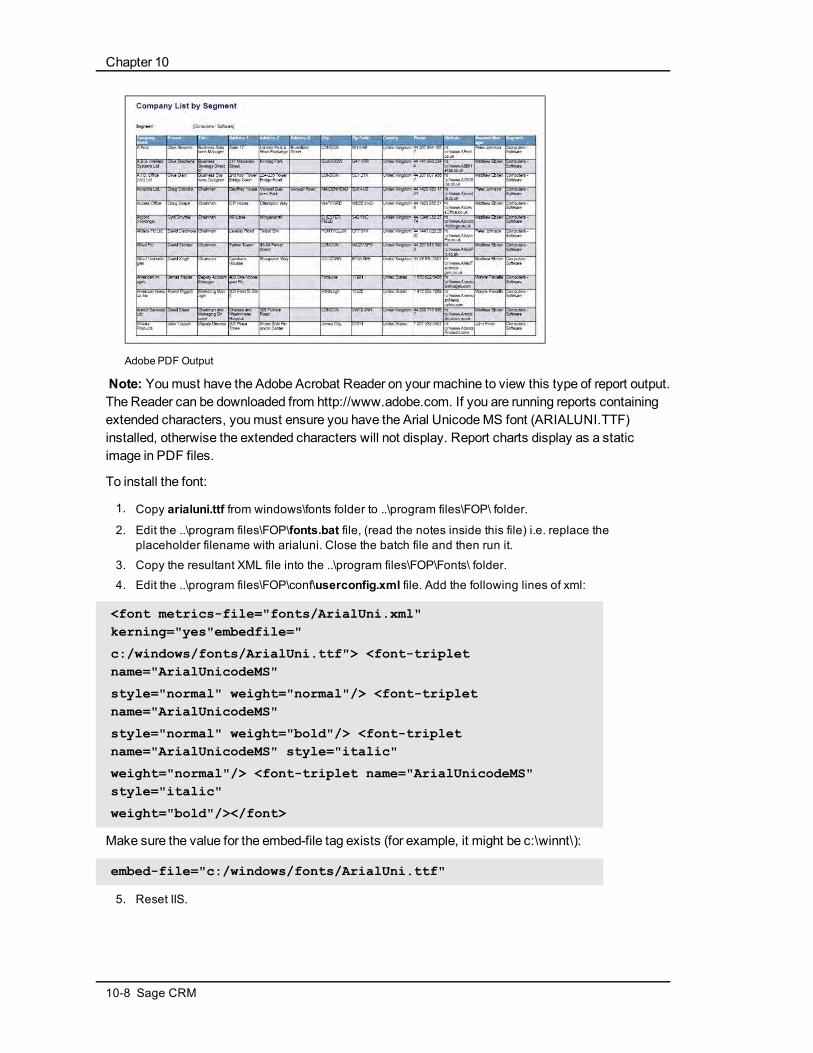
Chapter 10
Adobe PDF Output
Note: Youmust have the Adobe Acrobat Reader on your machine to view this type of report output.The Reader can be downloaded from http://www.adobe.com. If you are running reports containingextended characters, youmust ensure you have the Arial UnicodeMS font (ARIALUNI.TTF)installed, otherwise the extended characters will not display. Report charts display as a staticimage in PDF files.
To install the font:
1. Copy arialuni.ttf from windows\fonts folder to ..\program files\FOP\ folder.
2. Edit the ..\program files\FOP\fonts.bat file, (read the notes inside this file) i.e. replace theplaceholder filename with arialuni. Close the batch file and then run it.
3. Copy the resultant XML file into the ..\program files\FOP\Fonts\ folder.
4. Edit the ..\program files\FOP\conf\userconfig.xml file. Add the following lines of xml:
<font metrics-file="fonts/ArialUni.xml"kerning="yes"embedfile="
c:/windows/fonts/ArialUni.ttf"> <font-tripletname="ArialUnicodeMS"
style="normal" weight="normal"/> <font-tripletname="ArialUnicodeMS"
style="normal" weight="bold"/> <font-tripletname="ArialUnicodeMS" style="italic"
weight="normal"/> <font-triplet name="ArialUnicodeMS"style="italic"
weight="bold"/></font>
Make sure the value for the embed-file tag exists (for example, it might be c:\winnt\):
embed-file="c:/windows/fonts/ArialUni.ttf"
5. Reset IIS.
10-8 Sage CRM

Chapter 10: Running Reports
XLSX
To display report output in XLSX format:
l Select the XLSX option from the Display Options panel.
The output is displayed in a XLSX format.
Excel CSV
To display report output in Excel CSV format:
l Select the Excel CSV option from the Display Options panel.
The output is displayed in a Excel CSV format.
Note: If you want to view CSV in Excel then this is the correct option to select (not the CSVoption).
CSV
To display report output in CommaSeparated Value (CSV) format:
l Select the CSV option from the Display Options panel.
The output is displayed in a CSV format.
CSV Format
User Guide 10-9

Chapter 10
Interacting with Report ChartsReport charts, using FusionCharts, are available with built-in animation and interaction.
You can view the charts either by running the report from the Reports menu button, from a chartgadget on the Interactive Dashboard, or on the Classic Dashboard - just make sure that, for thereport you are running, the Show Chart option is selected on the Report Options, Step 2 of 2 page.Please refer toWriting Reports (page 23-1) for more information.
The built-in animationmeans you can watch, for example, the bars of a horizontal bar chart grow asthe chart is drawn. And you can interact with charts when they are drawn - for example, you canhighlight slices of pie charts, and rotate the pie chart to get a better view of the information yourequire.
To interact with a pie chart once it is drawn:
1. Edit an existing report and make sure it has the Chart Style set to Pie. Save the report, and then runit.
2. Click on a slice of the pie chart to highlight it.
3. To rotate the pie chart, right-click on the chart and select Enable Rotation, then click and drag thechart to its new position.
The standard drill-down feature of hyperlinked charts can also be used.
Chart Display Options with the Adobe Flash Player
The Adobe Flash Player is not required for either running or interacting with report charts. Someenhanced display options, such as greater depth of color, are available in charts when the AdobeFlash Player is installed on the client machine. If Flash is not available, the charts are displayedusing HTML 5.
If it is not desirable to use Flash on the client at a customer site, then a custom setting,ChartUseFlash, can be set toN in the Custom System Parameters table, to only ever allow thedisplay of static images. This should only be carried out by an experienced System Administrator.More information is available on the Sage CRM Community web site.
10-10 Sage CRM
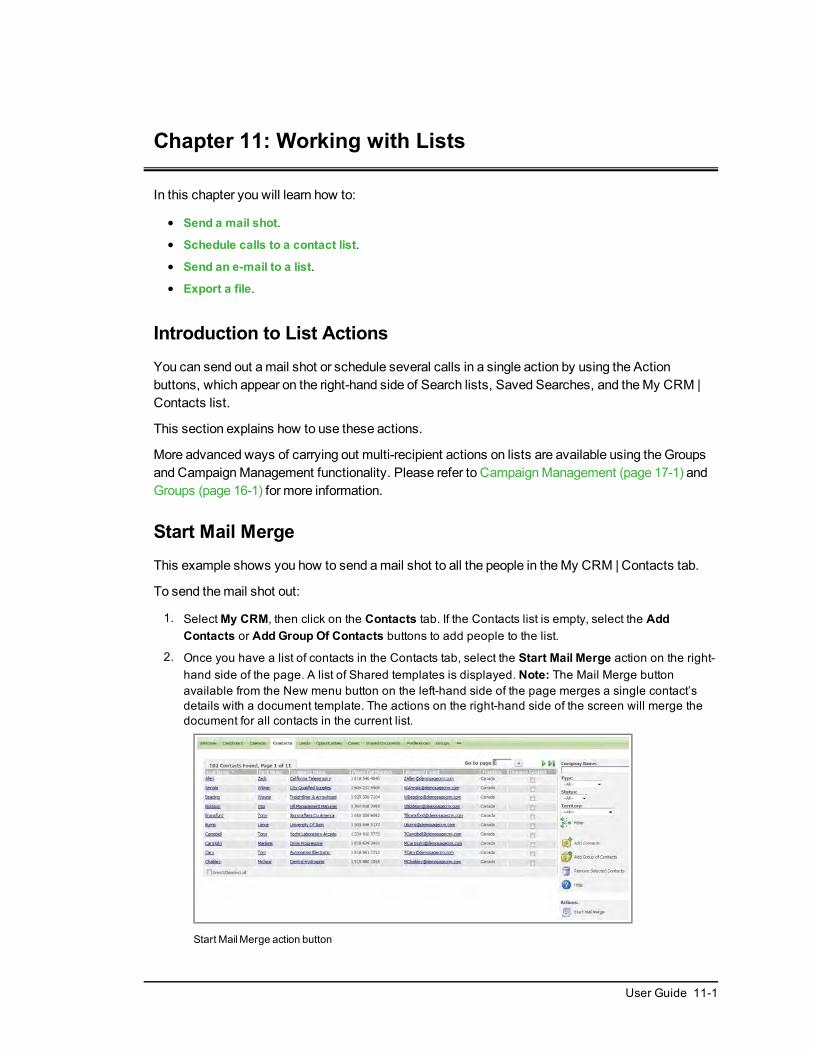
Chapter 11: Working with Lists
In this chapter you will learn how to:
l Send a mail shot.
l Schedule calls to a contact list.
l Send an e-mail to a list.
l Export a file.
Introduction to List ActionsYou can send out amail shot or schedule several calls in a single action by using the Actionbuttons, which appear on the right-hand side of Search lists, Saved Searches, and theMy CRM |Contacts list.
This section explains how to use these actions.
More advanced ways of carrying out multi-recipient actions on lists are available using the Groupsand CampaignManagement functionality. Please refer to CampaignManagement (page 17-1) andGroups (page 16-1) for more information.
Start Mail MergeThis example shows you how to send amail shot to all the people in theMy CRM | Contacts tab.
To send themail shot out:
1. SelectMy CRM, then click on the Contacts tab. If the Contacts list is empty, select the AddContacts or Add Group Of Contacts buttons to add people to the list.
2. Once you have a list of contacts in the Contacts tab, select the Start Mail Merge action on the right-hand side of the page. A list of Shared templates is displayed. Note: The Mail Merge buttonavailable from the New menu button on the left-hand side of the page merges a single contact’sdetails with a document template. The actions on the right-hand side of the screen will merge thedocument for all contacts in the current list.
Start MailMerge action button
User Guide 11-1
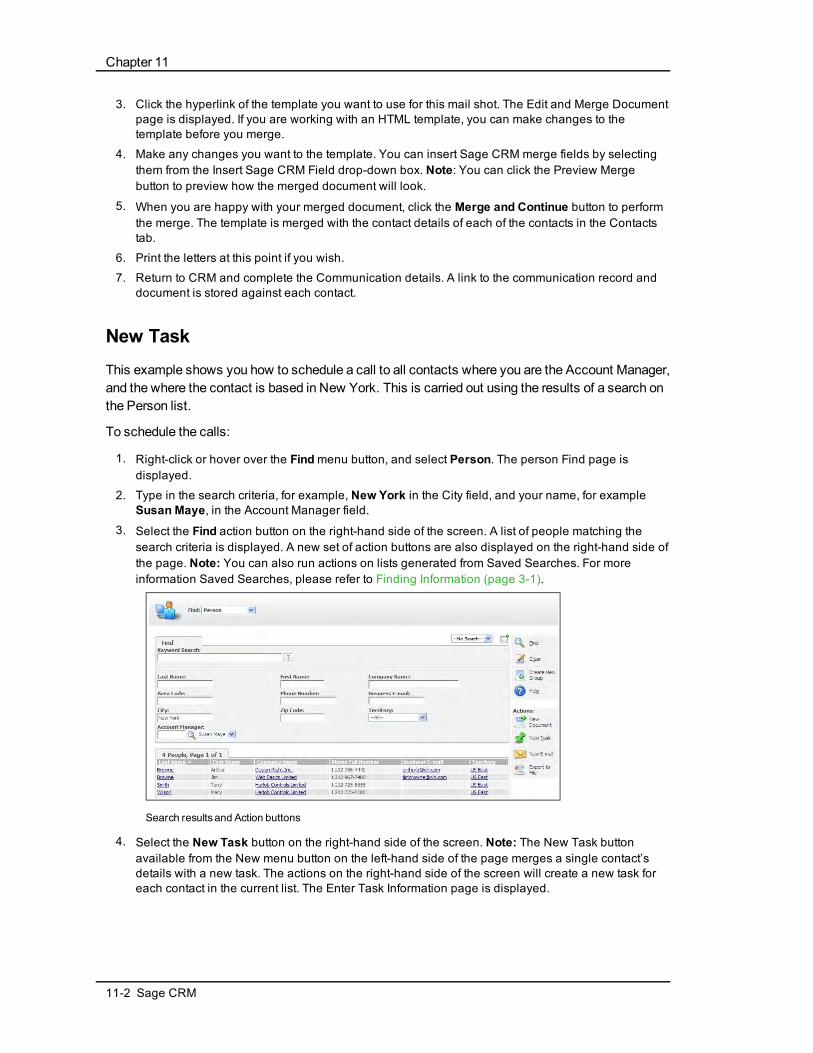
Chapter 11
3. Click the hyperlink of the template you want to use for this mail shot. The Edit and Merge Documentpage is displayed. If you are working with an HTML template, you can make changes to thetemplate before you merge.
4. Make any changes you want to the template. You can insert Sage CRM merge fields by selectingthem from the Insert Sage CRM Field drop-down box. Note: You can click the Preview Mergebutton to preview how the merged document will look.
5. When you are happy with your merged document, click the Merge and Continue button to performthe merge. The template is merged with the contact details of each of the contacts in the Contactstab.
6. Print the letters at this point if you wish.
7. Return to CRM and complete the Communication details. A link to the communication record anddocument is stored against each contact.
New TaskThis example shows you how to schedule a call to all contacts where you are the Account Manager,and the where the contact is based in New York. This is carried out using the results of a search onthe Person list.
To schedule the calls:
1. Right-click or hover over the Findmenu button, and select Person. The person Find page isdisplayed.
2. Type in the search criteria, for example, New York in the City field, and your name, for exampleSusan Maye, in the Account Manager field.
3. Select the Find action button on the right-hand side of the screen. A list of people matching thesearch criteria is displayed. A new set of action buttons are also displayed on the right-hand side ofthe page. Note: You can also run actions on lists generated from Saved Searches. For moreinformation Saved Searches, please refer to Finding Information (page 3-1).
Search results and Action buttons
4. Select the New Task button on the right-hand side of the screen. Note: The New Task buttonavailable from the New menu button on the left-hand side of the page merges a single contact’sdetails with a new task. The actions on the right-hand side of the screen will create a new task foreach contact in the current list. The Enter Task Information page is displayed.
11-2 Sage CRM
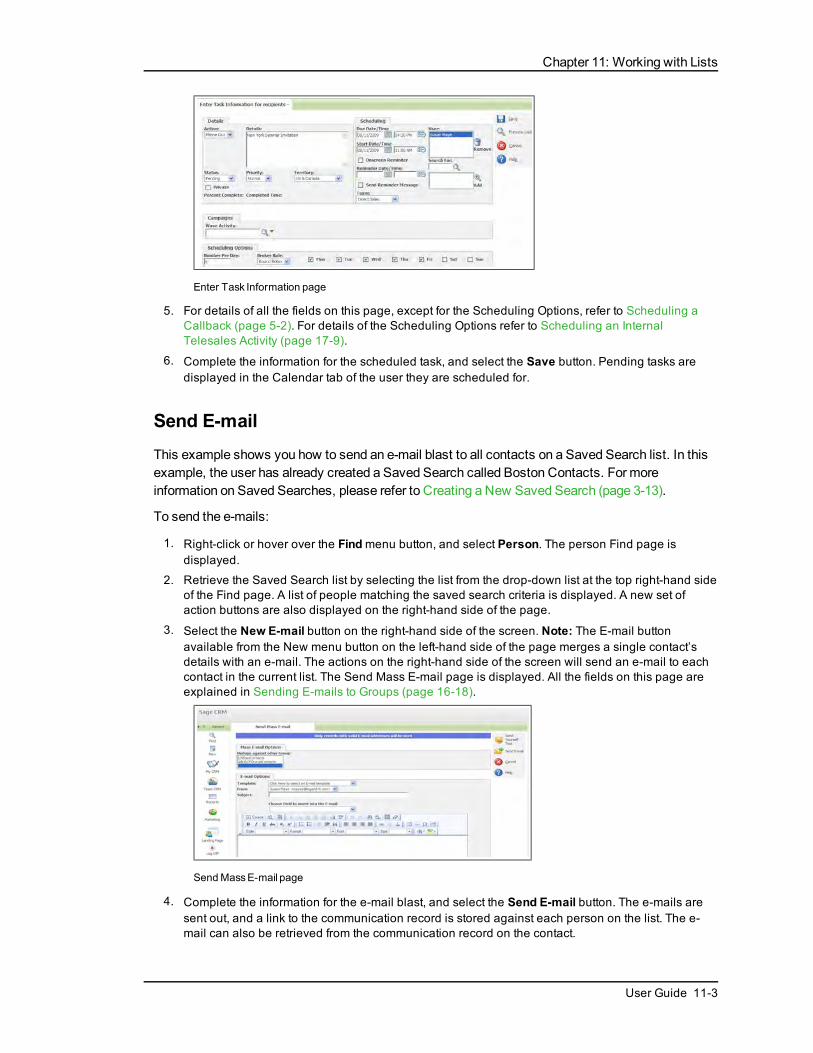
Chapter 11: Working with Lists
Enter Task Information page
5. For details of all the fields on this page, except for the Scheduling Options, refer to Scheduling aCallback (page 5-2). For details of the Scheduling Options refer to Scheduling an InternalTelesales Activity (page 17-9).
6. Complete the information for the scheduled task, and select the Save button. Pending tasks aredisplayed in the Calendar tab of the user they are scheduled for.
Send E-mailThis example shows you how to send an e-mail blast to all contacts on a Saved Search list. In thisexample, the user has already created a Saved Search called Boston Contacts. For moreinformation on Saved Searches, please refer to Creating a New Saved Search (page 3-13).
To send the e-mails:
1. Right-click or hover over the Findmenu button, and select Person. The person Find page isdisplayed.
2. Retrieve the Saved Search list by selecting the list from the drop-down list at the top right-hand sideof the Find page. A list of people matching the saved search criteria is displayed. A new set ofaction buttons are also displayed on the right-hand side of the page.
3. Select the New E-mail button on the right-hand side of the screen. Note: The E-mail buttonavailable from the New menu button on the left-hand side of the page merges a single contact’sdetails with an e-mail. The actions on the right-hand side of the screen will send an e-mail to eachcontact in the current list. The Send Mass E-mail page is displayed. All the fields on this page areexplained in Sending E-mails to Groups (page 16-18).
SendMassE-mail page
4. Complete the information for the e-mail blast, and select the Send E-mail button. The e-mails aresent out, and a link to the communication record is stored against each person on the list. The e-mail can also be retrieved from the communication record on the contact.
User Guide 11-3
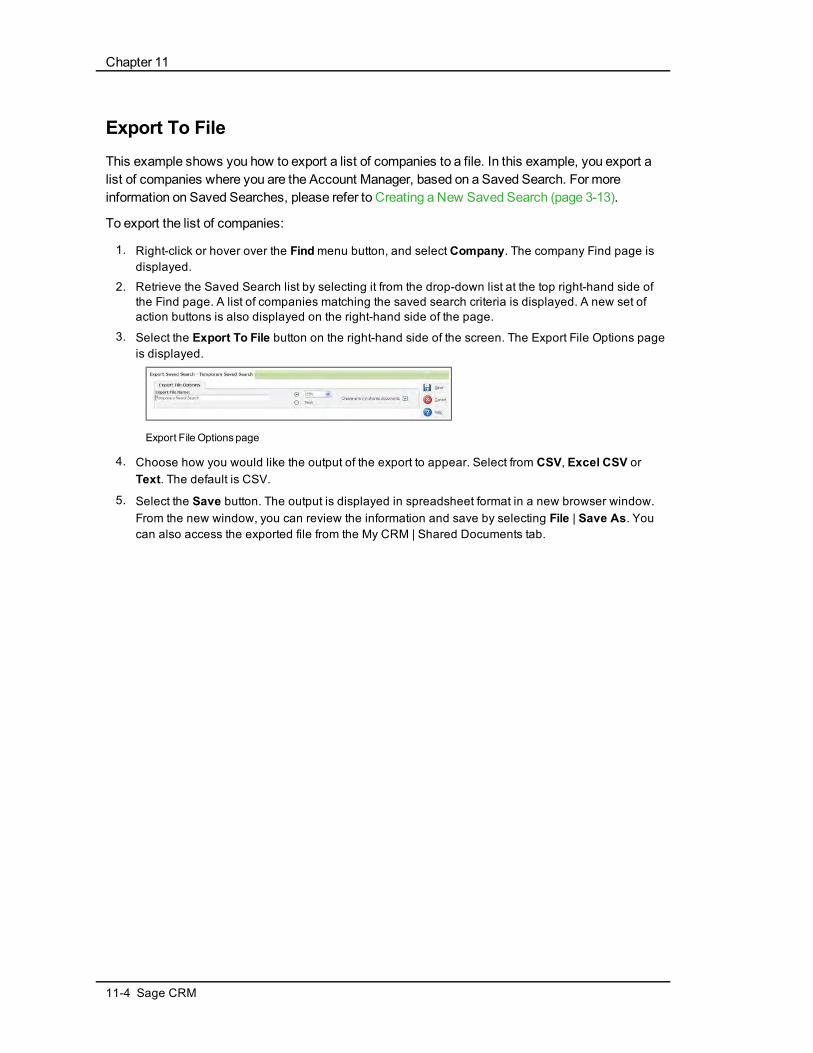
Chapter 11
Export To FileThis example shows you how to export a list of companies to a file. In this example, you export alist of companies where you are the Account Manager, based on a Saved Search. For moreinformation on Saved Searches, please refer to Creating a New Saved Search (page 3-13).
To export the list of companies:
1. Right-click or hover over the Findmenu button, and select Company. The company Find page isdisplayed.
2. Retrieve the Saved Search list by selecting it from the drop-down list at the top right-hand side ofthe Find page. A list of companies matching the saved search criteria is displayed. A new set ofaction buttons is also displayed on the right-hand side of the page.
3. Select the Export To File button on the right-hand side of the screen. The Export File Options pageis displayed.
Export File Optionspage
4. Choose how you would like the output of the export to appear. Select from CSV, Excel CSV orText. The default is CSV.
5. Select the Save button. The output is displayed in spreadsheet format in a new browser window.From the new window, you can review the information and save by selecting File | Save As. Youcan also access the exported file from the My CRM | Shared Documents tab.
11-4 Sage CRM

Chapter 12: Sales Opportunities
In this chapter you will learn how to:
l Define what an opportunity is.
l Create a new opportunity.
l Understand the fields on the opportunity screen.
l Understand the opportunity status icons.
l Add information to an existing opportunity.
l Record product interest.
l Progress an opportunity.
l Send a quotation from within the opportunity.
l Turn a quote into an order.
l Print an order.
l Progress opportunities through the sales cycle to closure.
l View the sales pipeline.
l Run an opportunity report.
l Find out what opportunities I am working on.
l Create an opportunity from other contexts.
l Delete and opportunity.
l Create quotes and orders outside the opportunity context.
l Find a quote.
l Find an order.
User Guide 12-1

Chapter 12
What is an Opportunity?AnOpportunity in CRM is a Sales Opportunity. An opportunity can be created either directly by aSales Representative or from the conversion of amarketing lead into an opportunity.
Closing a Sale: Scenario
12-2 Sage CRM
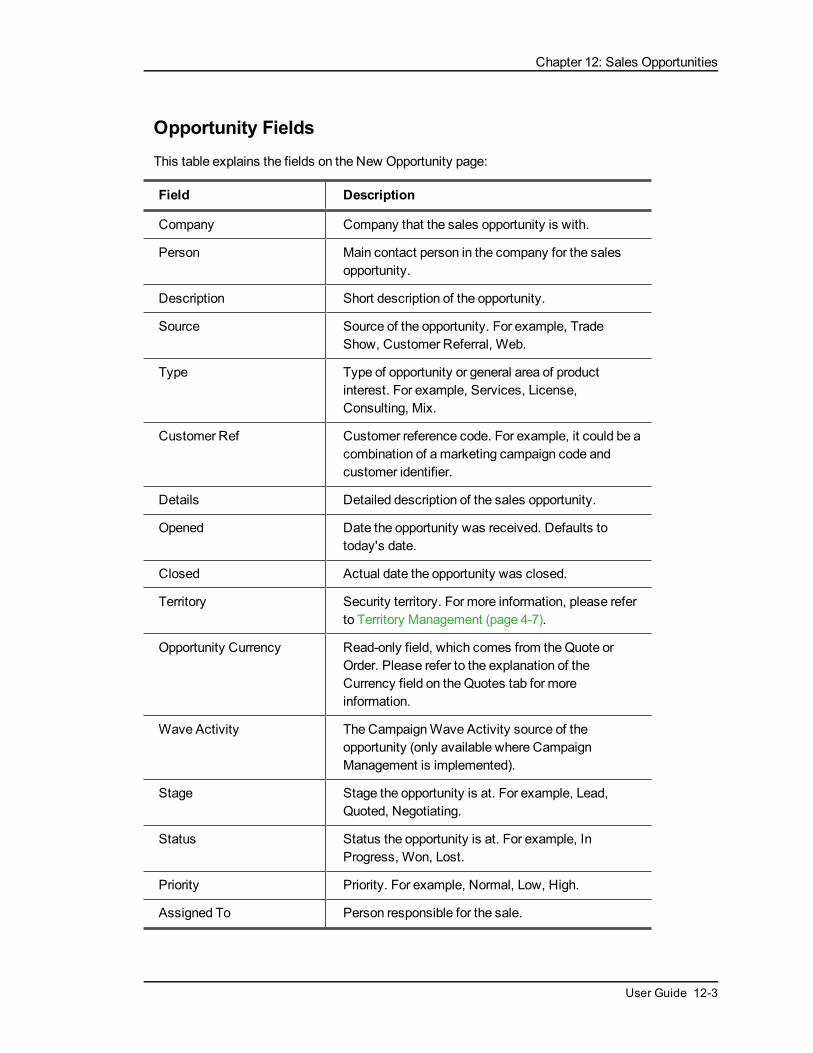
Chapter 12: Sales Opportunities
Opportunity FieldsThis table explains the fields on the New Opportunity page:
Field Description
Company Company that the sales opportunity is with.
Person Main contact person in the company for the salesopportunity.
Description Short description of the opportunity.
Source Source of the opportunity. For example, TradeShow, Customer Referral, Web.
Type Type of opportunity or general area of productinterest. For example, Services, License,Consulting, Mix.
Customer Ref Customer reference code. For example, it could be acombination of amarketing campaign code andcustomer identifier.
Details Detailed description of the sales opportunity.
Opened Date the opportunity was received. Defaults totoday's date.
Closed Actual date the opportunity was closed.
Territory Security territory. For more information, please referto Territory Management (page 4-7).
Opportunity Currency Read-only field, which comes from theQuote orOrder. Please refer to the explanation of theCurrency field on theQuotes tab for moreinformation.
Wave Activity The CampaignWave Activity source of theopportunity (only available where CampaignManagement is implemented).
Stage Stage the opportunity is at. For example, Lead,Quoted, Negotiating.
Status Status the opportunity is at. For example, InProgress, Won, Lost.
Priority Priority. For example, Normal, Low, High.
Assigned To Person responsible for the sale.
User Guide 12-3

Chapter 12
Field Description
Team Team responsible for the sale.
Close By Forecast close date.
Total Quote Value Read-only field. Gross Amount from the quotesassociated with this opportunity where the Include InQuotes Total check box has been selected.This value is not used for forecasting purposes.If the quote is set to a Status of Inactive, the GrossAmount from the quote is deducted from the TotalQuote Value.When a quote is converted to an order, the GrossAmount of the quote is deducted from the TotalQuote Value. If only one quote has the Include InQuotes Total check box selected, this value will beset to zero when the quote is converted.
Total Order Value Read-only field. Gross Amount from the ordersassociated with this opportunity where the Include InQuotes Total check box was selected on the quote.This value is populated when a quote is converted toan order. It is not used for forecasting purposes.If the order is set to a Status of Inactive, the GrossAmount from the order is deducted from the TotalOrder Value on the opportunity.
This table shows theOpportunity Status icons.
Status Icon Description
In Progress
Won
Lost
Creating a New OpportunityTo create a new opportunity:
1. Find the prospect. If they are new to your database, you first need to create a new company.
2. Click on the hyperlink of the company, and select the Opportunities tab.
3. Click on the New Opportunity button, and add all the information you are aware of at this stage tothe opportunity details.
12-4 Sage CRM
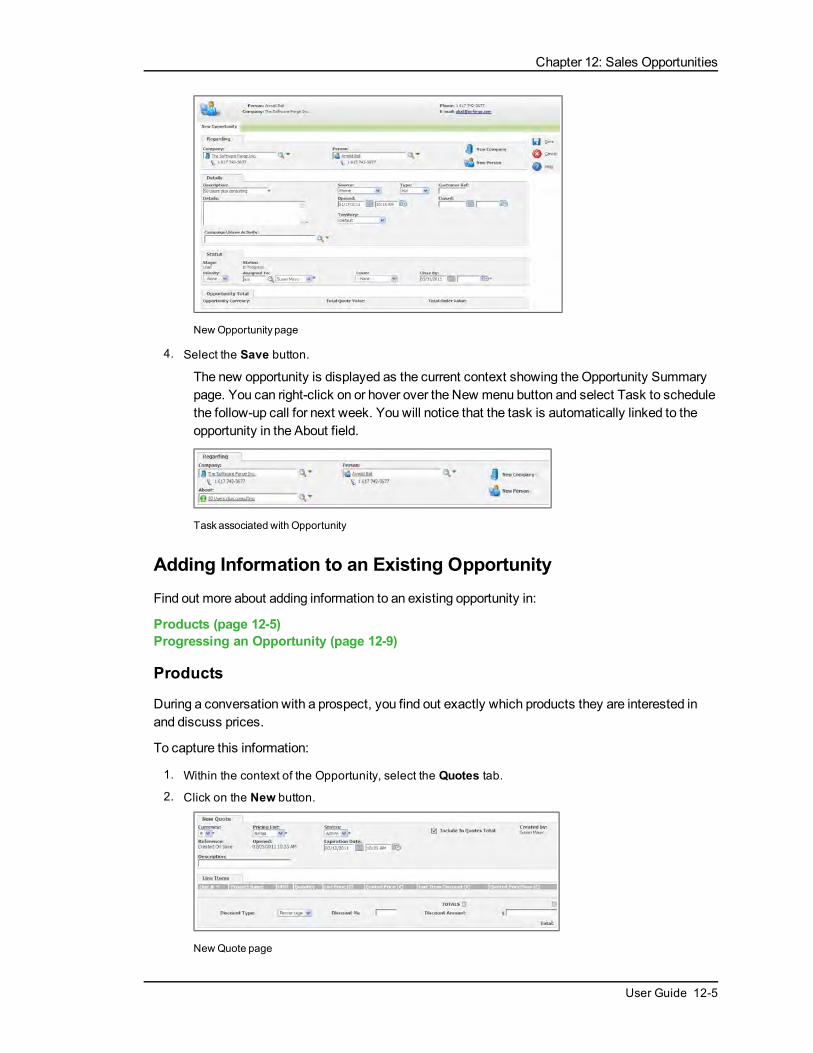
Chapter 12: Sales Opportunities
NewOpportunity page
4. Select the Save button.
The new opportunity is displayed as the current context showing theOpportunity Summarypage. You can right-click on or hover over the New menu button and select Task to schedulethe follow-up call for next week. You will notice that the task is automatically linked to theopportunity in the About field.
Taskassociated with Opportunity
Adding Information to an Existing OpportunityFind out more about adding information to an existing opportunity in:
Products (page 12-5)Progressing an Opportunity (page 12-9)
Products
During a conversation with a prospect, you find out exactly which products they are interested inand discuss prices.
To capture this information:
1. Within the context of the Opportunity, select the Quotes tab.
2. Click on the New button.
NewQuote page
User Guide 12-5

Chapter 12
3. Add the information on the New Quote page. The fields are described in the table below.
Field Description
Currency Currency of the quote. The quote currency isdisplayed in the preferred currency of the logged onuser. The currency can only be changed if there areno line items. The currency set here is displayed ontheOpportunity Summary page.You can createmultiple quotes with no line items,and set a different currency each time you create aquote. However, as you set the currency for the newquote, the currency on all the other empty quotes willbe changed to the same currency.
Pricing List Select the Pricing List that the quote is to be basedon. This is amandatory field, and the Default PricingList will be selected automatically if the user doesnot select an alternative.
Status A Quote can have a status of Active, Inactive, orConverted. You can select from Active or Inactive.The status of Converted is automatically set oncethe quote is converted to an order.Setting the status to Inactive deducts the GrossAmount of the quote from the Total Quote Value onthe opportunity (if the Include In Quotes Total checkbox was selected).
Include In Quotes Total Toggles the inclusion of the quote in the Total QuoteValue field on theOpportunity. You can set one ormore quotes to be included in the Total Quote Valueon theOpportunity.The Total Quote Value is not used for forecastingpurposes.
Reference Generated automatically when the quote is saved.The format of the Reference is determined by theSystem Administrator.
Opened Read-only field set by the system when the quote iscreated.
Expiration Date Defaults to seven days from the date the quote iscreated. You canmanually change this date. TheSystem Administrator can change the default lengthof validity.
Description Short description of the quote.
TheQuote level discount fields are:
12-6 Sage CRM

Chapter 12: Sales Opportunities
Field Description
Discount Type Select from Percentage or Amount.
Discount Percentage Percentage discount on the whole quote. Discountswill be rounded to the system setting for decimalplaces. If the Discount Type has been set toAmount, this field is read-only and is calculatedaccording to the amount entered in the DiscountAmount field.
Discount Amount Money amount discount on the whole quote. Can betyped in to two decimal places.If the Discount Type has been set to Percentage,then this field is read-only and will be calculatedaccording to the percentage entered in the DiscountPercentage field.
Note: It is possible to add a discount on a quote or order, which has no line items. Youmay wishto do this if:
l you want to raise a credit note, or
l for example, you have agreed to give a customer "$10 off every order". This means you can add the$10 as a discount before the customer has decided on the products.
4. Select the Next button. The New Line Item panel is displayed.
New Line Item panel
5. Enter the information in the New Line Item panel. The fields are explained in the table below.
Field Description
Product Family Group that the product belongs to. For example, acompany selling office products may have theproduct families: Office Furniture, ComputersPeripherals, Stationary, and Filing.The Product Family selected will narrow down theproducts to select from the Product field.Product Families are set up by the SystemAdministrator.
Product Select from a list of products set up by your SystemAdministrator.
UOM Unit of Measure available for the selected product.For example, a company selling office products may
User Guide 12-7

Chapter 12
Field Description
sell pens as singles and in packs of 24 or 36. TheSystem Administrator can set up a UOM family for"Pen Packs", and then UOMs as Single, 24-pack,and 36-pack.If the System Administrator has not enabled Units ofMeasure, then this field is not displayed.
Quantity Quantity of the product. If UOMs are being used,then this is the quantity of the UOM.
List Price Standard price of the product. If UOMs are beingused, then this is the standard price the UOM.This is a read-only field.
Quoted Price Defaults to the List Price for a quantity of one—of aproduct or of a UOM. This field can be edited todiscount line items.
Line Item Discount Read-only field. Calculated by subtracting theQuoted Price from the List Price, andmultiplying bythe Quantity.
6. Select Save and New to add the next line item, or Save to add the line item and quit the New LineItem panel.
When you have finished adding the line items, you can:
l Change Summary.Gives you access to the Quote Summary panel and to the Line Items discountarea.
l New Line Item. Enables you to add further line items to the quote.
l New Free Text Item. You can add a free text line item, for example, for a product which is notdisplayed in your standard price list. You can add a Description, Quantity, and Price for the lineitem. These line items will be included on the printed quote.
l New Comment Line Item. You can add a free text comment, for example, to add extra informationabout another line item in your quote. You can add a Line Number and a Description. For example,if you add the Line Number 2, then the comment will be positioned as the second line item. If youhave already selected other line items, their line item numbers will be resequenced. Comment lineitems will be included on the printed quote.
l Clone.Creates a new quote based on the existing quote information.
l Convert. Changes the quote into an order.
l Start Mail Merge.Mail merges the quote with a quote template document.
l Add This Record To A Group. Adds the quote to an existing group of quotes to use, for example,as part of a mailing action. Please refer to Groups (page 16-1) for more information.
Note:When editing a line item, you cannot change the Product or Product family.
12-8 Sage CRM
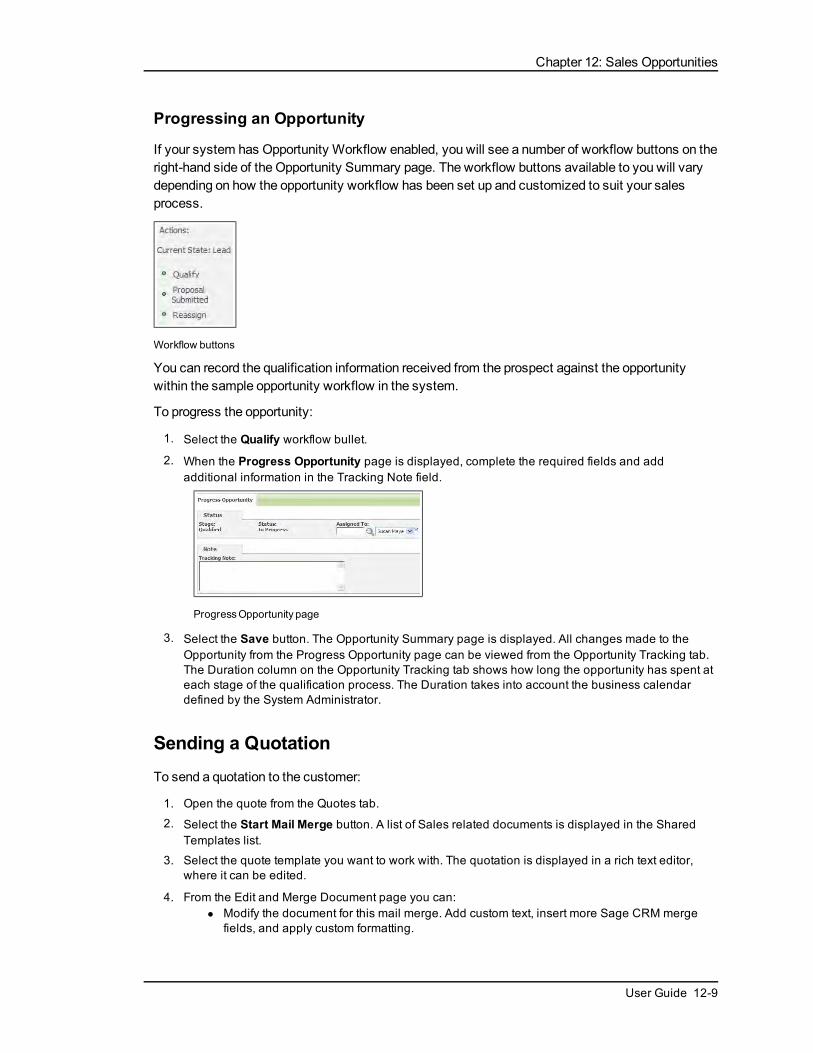
Chapter 12: Sales Opportunities
Progressing an Opportunity
If your system has Opportunity Workflow enabled, you will see a number of workflow buttons on theright-hand side of the Opportunity Summary page. The workflow buttons available to you will varydepending on how the opportunity workflow has been set up and customized to suit your salesprocess.
Workflow buttons
You can record the qualification information received from the prospect against the opportunitywithin the sample opportunity workflow in the system.
To progress the opportunity:
1. Select the Qualify workflow bullet.
2. When the Progress Opportunity page is displayed, complete the required fields and addadditional information in the Tracking Note field.
ProgressOpportunity page
3. Select the Save button. The Opportunity Summary page is displayed. All changes made to theOpportunity from the Progress Opportunity page can be viewed from the Opportunity Tracking tab.The Duration column on the Opportunity Tracking tab shows how long the opportunity has spent ateach stage of the qualification process. The Duration takes into account the business calendardefined by the System Administrator.
Sending a QuotationTo send a quotation to the customer:
1. Open the quote from the Quotes tab.
2. Select the Start Mail Merge button. A list of Sales related documents is displayed in the SharedTemplates list.
3. Select the quote template you want to work with. The quotation is displayed in a rich text editor,where it can be edited.
4. From the Edit and Merge Document page you can:l Modify the document for this mail merge. Add custom text, insert more Sage CRM merge
fields, and apply custom formatting.
User Guide 12-9
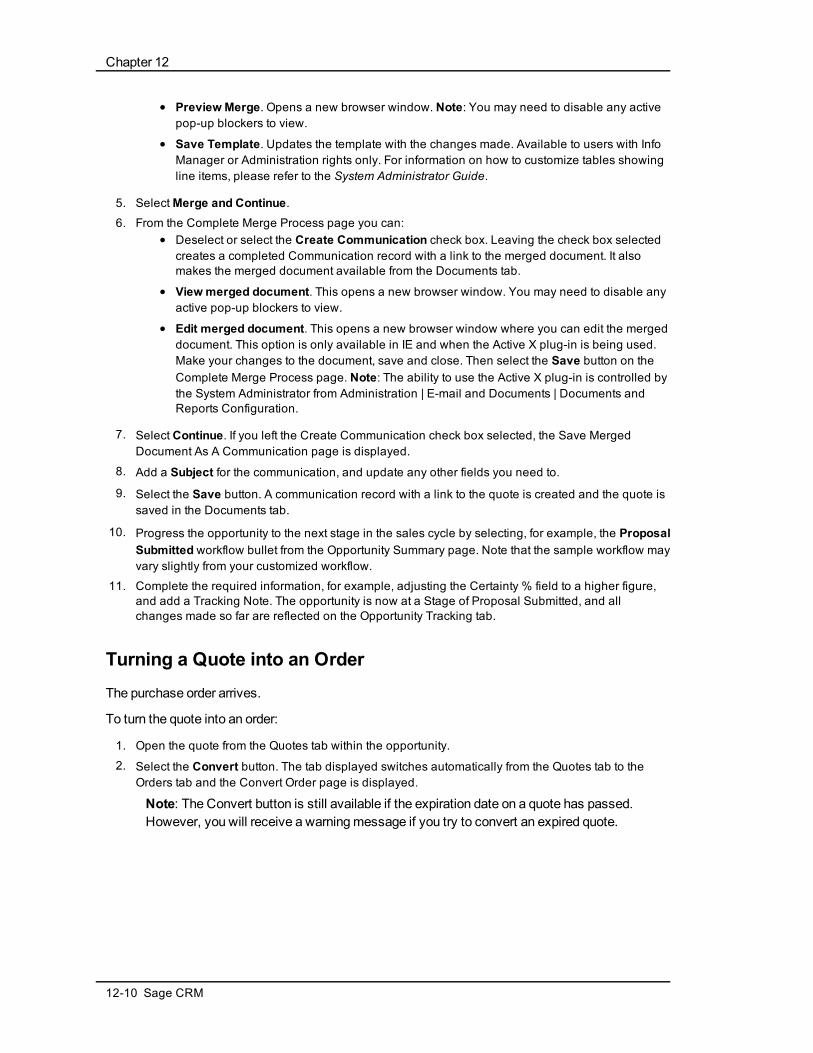
Chapter 12
l Preview Merge. Opens a new browser window. Note: You may need to disable any activepop-up blockers to view.
l Save Template. Updates the template with the changes made. Available to users with InfoManager or Administration rights only. For information on how to customize tables showingline items, please refer to the System Administrator Guide.
5. SelectMerge and Continue.6. From the Complete Merge Process page you can:
l Deselect or select the Create Communication check box. Leaving the check box selectedcreates a completed Communication record with a link to the merged document. It alsomakes the merged document available from the Documents tab.
l Viewmerged document. This opens a new browser window. You may need to disable anyactive pop-up blockers to view.
l Edit merged document. This opens a new browser window where you can edit the mergeddocument. This option is only available in IE and when the Active X plug-in is being used.Make your changes to the document, save and close. Then select the Save button on theComplete Merge Process page. Note: The ability to use the Active X plug-in is controlled bythe System Administrator from Administration | E-mail and Documents | Documents andReports Configuration.
7. Select Continue. If you left the Create Communication check box selected, the Save MergedDocument As A Communication page is displayed.
8. Add a Subject for the communication, and update any other fields you need to.
9. Select the Save button. A communication record with a link to the quote is created and the quote issaved in the Documents tab.
10. Progress the opportunity to the next stage in the sales cycle by selecting, for example, the ProposalSubmitted workflow bullet from the Opportunity Summary page. Note that the sample workflow mayvary slightly from your customized workflow.
11. Complete the required information, for example, adjusting the Certainty % field to a higher figure,and add a Tracking Note. The opportunity is now at a Stage of Proposal Submitted, and allchanges made so far are reflected on the Opportunity Tracking tab.
Turning a Quote into an OrderThe purchase order arrives.
To turn the quote into an order:
1. Open the quote from the Quotes tab within the opportunity.
2. Select the Convert button. The tab displayed switches automatically from the Quotes tab to theOrders tab and the Convert Order page is displayed.
Note: The Convert button is still available if the expiration date on a quote has passed.However, you will receive a warningmessage if you try to convert an expired quote.
12-10 Sage CRM

Chapter 12: Sales Opportunities
Convert Order page
3. Add the information in the Convert Order page. The fields are displayed in the tables below:
Field Description
Currency Currency of the order. This value is carried over fromthe Currency field on the quote. If there are no lineitems associated with the order, this field can beedited.
Pricing List Pricing List of the orders. Read-only. This value iscarried over from the Pricing List field on the quote.
Reference Generated automatically when the order is saved.The format of the Reference is determined bySystem Administrator.
Opened Date and time the quote was converted to an order.
Delivery Date Defaults to a set number of days from the date theorder is created. The default is defined by yourSystem Administrator. You canmanually changethis date.
Status Set to Archive, Inactive, or Completed. Defaults toActive.Setting the status to Inactive deducts the GrossAmount of the order from the Total Order Value onthe opportunity (if the Include In Quotes Total checkbox was selected in the original quote).
Description Short description of the order.
POReference Purchase order or order reference number from thecustomer.
Contact Contact person for the order.
Billing Address Populated by the first "Billing" type address of thecompany. If there is no billing address, it defaults tothemain address for the company. The address type
User Guide 12-11

Chapter 12
Field Description
is set via the Type check box field when a newaddress is created.The address can be changed by selecting analternative address already associated with thecompany. A list of existing addresses associatedwith this company can be selected from the drop-down field below the Billing Address field.Alternatively you can type over the existing addressinformation.
Shipping Address Populated by the first "Shipping" type address of thecompany. If there is no shipping address, it defaultsto themain address for the company. The addresstype is set via the Type check box field when a newaddress is created.The address can be changed by selecting analternative address from the drop-down field belowthe Shipping Address field. Alternatively you cantype over the existing address information.
ShippingMethod Select from a drop-down list. For example, Courier,Mail.
TheOrder level discount fields are:
Field Description
Discount Type Select from Percentage or Amount.
Discount Percentage Percentage discount on the whole order.
Discount Amount Money amount discount on the whole quote.
4. Select the Save button.
When you save the order, a link to the related quote can be accessed from the AssociatedQuote column in the Orders tab. A link to the related order can be accessed from theAssociated Order column of the Quotes tab.
Once the order is saved, you can:
l Change Summary.Gives you access to the Order Summary panel and to the Line Items discountarea.
l New Line Item. Allows you to add a new line item to the order.
l New Free Text Item. You can add a free text line item, for example, for a product which is notdisplayed in your standard price list. You can add a Description, Quantity, and Price for the lineitem. These line items will be included on the printed order.
12-12 Sage CRM
Chapter 12: Sales Opportunities
l New Comment Line Item. You can add a free text comment, for example, to add extra informationabout another line item in your quote. You can add a Line Number and a Description. For example,if you add the Line Number 2, then the comment will be positioned as the second line item. If youhave already selected other line items, their line item numbers will be resequenced. Comment lineitems will be included on the printed order.
l Clone. Creates a new order based on the existing order information.
l Start Mail Merge.Mail merges the order with an order template document.
l Add This Record To A Group. Adds the order to an existing group of orders to use, for example, aspart of a mailing action. Please refer to Groups (page 16-1) for more information.
Printing an OrderYou can create an order confirmation to send to both the customer and your order fulfillment team.
To print an order:
1. Select the Start Mail Merge button from the Orders tab. A list of shared templates is displayed.
2. Select the hyperlink of the order template you want to work with. The order is displayed on-screen,and it can be edited.
3. From the Edit and Merge Document page you can:l Modify the document for this mail merge. Add custom text, insert more Sage CRM merge
fields, and apply custom formatting.
l Preview Merge. Opens a new browser window. Note: You may need to disable any activepop-up blockers to view.
l Save Template. Updates the template with the changes made. Available to users with InfoManager or Administration rights only. For information on how to customize tables showingline items, please refer to the System Administrator Guide.
4. SelectMerge and Continue.5. From the Complete Merge Process page you can:
l Deselect or select the Create Communication check box. Leaving the check box selectedcreates a completed Communication record with a link to the merged document. It alsomakes the merged document available from the Documents tab.
l Viewmerged document. This opens a new browser window. You may need to disable anyactive pop-up blockers to view.
l Edit merged document. This opens a new browser window where you can edit the mergeddocument. This option is only available in IE and when the Active X plug-in is being used.Make your changes to the document, save and close. Then select the Save button on theComplete Merge Process page. Note: The ability to use the Active X plug-in is controlled bythe System Administrator from Administration | E-mail and Documents | Documents andReports Configuration.
6. Select Continue. If you left the Create Communication check box selected, the Save MergedDocument As A Communication page is displayed.
7. Add a Subject for the communication, and update any other fields you need to.
8. Select the Save button. A communication record with a link to the order is created, and the order issaved in the Documents tab.
User Guide 12-13

Chapter 12
Closing a SaleTo close an opportunity:
1. Within the context of the opportunity, select the Sold workflow bullet. The Progress Opportunitypage is displayed.
2. Complete the Status details and add a Tracking Note.
3. Select the Save button.
TheOpportunity is set to a Stage of Sale Agreed and a Status of Won. The final step in thissample workflow is to close the opportunity by selecting the Closed workflow bullet.
Manually Progressing OpportunitiesThe workflow functionality automates the progression of opportunities to follow predefined businessprocesses.
If your system does not haveOpportunity Workflow enabled, you will notice that the Opportunityworkflow bullets on the right-hand side of the Summary page are replaced by aProgress button.This button allows you tomanually change details of the opportunity via the Progress Opportunitypage. Changes are still recorded in the Tracking tab.
Progressbutton
Viewing the Sales PipelineTo view a graphical representation of your Opportunities:
l Select the My CRM button, and click on the Opportunities tab.
TheOpportunities page is displayed which is made up of the following areas:
l Graphical pipeline.
l Statistics panel.
l Opportunities list.
l Filter box.
Opportunities page
The information in the Statistics panel is summarized in the table below.
12-14 Sage CRM

Chapter 12: Sales Opportunities
Field Description
No. Oppos Total number of opportunities for the current stage.
Forecast Total Forecast value of opportunities for the currentstage.
Weighted Forecast Weighted Forecast value of opportunities for thecurrent stage, that is, Forecast valuemultiplied bythe% Certainty.
Average Value Average Forecast value of opportunities for thecurrent stage, that is Total Forecast value divided bythe number of opportunities.
Average Certainty Total % Certainty divided by the number ofopportunities.
Weighted Average Average Valuemultiplied by Average Certainty.
Drilling Down on the PipelineClicking on a section of the pipeline or on one of the stage hyperlinks underneath the pipeline drillsdown the Statistics panel to show statistics for the selected Stage in the pipeline.
Drilling down on theOpportunity pipeline
It also filters the list of Opportunities to show those in the selected Stage on the pipeline. The Stageselected on the pipeline is automatically set in the Filter Box.
You can also drill down on the pipeline by changing the Opportunity Stage from the Filter Box.
The pipeline graphic can also be viewed from theOpportunities tab of a company or person.
Running an Opportunity ReportOpportunity Summary reports provide a quick overview of a particular sales opportunity. Togenerate a summary report for an opportunity:
User Guide 12-15

Chapter 12
1. Find and open the opportunity you want to generate the report for.
2. From the Opportunity Summary page, select the Summary Report button. The report is displayedin PDF format.
Finding Out what Opportunities I am working onTo find out which opportunities you are currently working on, that is the ones currently assigned toyou:
l From within My CRM, select the Opportunities tab.
The list of opportunities currently assigned to you is displayed. If the list is long and difficult towork with, you can filter it using the filterbox on the right-hand side of the screen.
Creating an Opportunity from other ContextsAs well as using the New menu button to create a new opportunity, you can also create newopportunities from within My CRM. To create a new opportunity from within My CRM:
1. Select the Opportunities tab and click on the New Opportunity action button. The new opportunitygets assigned to you by default, but you can assign it to another user if you wish.
2. Fill in the opportunity details and select Save.
When you create quotes and orders outside the context of a company or opportunity, youmay find iteasier to track down the quote or order again by doing a search for the Quote or Order using the Findmenu button or accessing your Recent List.
Deleting an OpportunityThe ability to delete opportunities depends on your security profile. If your profile allows you todelete opportunities, a Delete action button is available on theOpportunity summary page when youare in edit mode. Please contact your System Administrator if you need to be able to deleteopportunities but the button is not available to you.
To delete an opportunity:
1. Find and open the opportunity you want to delete.
2. From the Opportunity Summary page, select the Edit button.
3. Click on the Delete button and then on the Confirm Delete button to delete the opportunity.
The opportunity record is deleted from the system.
Creating Quotes and Orders Outside of the Opportunity ContextYou can create Quotes andOrders outside of the Opportunity context, for example when you are intheMy CRMwork area or in the context of a company.
To create aQuote or Order from outside of the Opportunity context:
1. From My CRM, select the Newmenu button and select Quote or Order.
2. The New Quote or Order page is displayed.
12-16 Sage CRM

Chapter 12: Sales Opportunities
3. Add the information on the New Quote or Order page. Please refer to Products (page 12-5) formore information.
4. You can link the Quote or Order to a company or person at this point using the advanced searchbuttons.
5. Save the Quote or Order. A new opportunity is automatically created, and the Quote or Order islinked to the new opportunity.
Finding a QuoteTo find a quote:
1. Right-click on or hover over the Findmenu button. The Pop Out list is displayed.
2. SelectQuote from the pop out list. The quote Find page is displayed.
3. Type or select the search criteria on the Find page.
4. Select the Find action button. A list of all quotes matching your search criteria is displayed.
5. Click on the hyperlink of the Quote Reference or Description. The Quote Details page is displayed,which gives you an overview of the quote.
Finding an OrderTo find a order:
1. Right-click on or hover over the Findmenu button. The Pop Out list is displayed.
2. SelectOrder from the pop out list. The order Find page is displayed.
3. Type or select the search criteria on the Find page.
4. Select the Find action button. A list of all orders matching your search criteria is displayed.
5. Click on the hyperlink of the Order Reference, Description or Status. The Order Details page isdisplayed, which gives you an overview of the order.
User Guide 12-17


Chapter 13: Sales Forecasting
In this chapter you will learn how to:
l Define what sales forecasting is.
l Understand sales forecasting terminology.
l Create my own forecast.
l Submit a forecast to my manager.
l View forecasts I already submitted.
l Work with team forecasts.
l View other people’s forecasts as an administrator.
What is Sales ForecastingSales Forecasting functionality:
l Allows individual Sales Users to flag opportunities in their pipeline to indicate whether they shouldbe included in their sales forecast.
l Allows individual Sales Users to enter forecasts using their opportunity pipeline as a defaultstarting point.
l Allows Sales Managers to make their forecast based on their own personal pipeline (if they haveone), as well as on the forecasts of their team.
Sales Forecasting TerminologyThis table explains the sales forecasting terminology:
Term Description
Opportunity A sales opportunity that is being worked on by aspecific Sales Rep.
Pipeline The list of opportunities that are currently assignedto a Sales User (in My CRM |Opportunities).
Opportunity Forecast Value Each opportunity will have a forecast value given toit by the Sales User. This is the number the SalesUser expects to get, if the deal closes.
Opportunity Certainty A percentage certainty that this deal will close atsome point in the future.
Opportunity Target CloseDate
The date that the Sales User expects this deal toclose. This is mandatory, and it provides the basisfor deciding which Quarterly Forecast an opportunity
User Guide 13-1

Chapter 13
Term Description
is to be included in.
Opportunity ForecastScenario
Indicates which elements of a forecast thisopportunity should be included in: Exclude (leave outof the forecast); Commit (this will definitely close—figure is included in Commit, Likely and Best Case);Likely (this will probably close, figure is included inLikely and Best Case); Best Case (figure is includedin Best Case scenario only).
This table explains forecast-related terminology
Term Description
Quarter A threemonth period.
Sales Forecast A forecast for a given period of time (quarter) for agiven Sales User, which indicates how much aSales User feels they will close in business. Eachforecast contains three values for eachmonth in thequarter: Commit (worst case scenario); Likely; BestCase.
Sales Rep A Sales User who has no-one 'reporting/rolling up' tothem—they are responsible for their own pipelineonly.
Sales Manager / Boss A Sales User who has one or more other SalesUsers 'reporting/rolling up' to them— they areresponsible for including these sub-forecasts in theirtotal forecast.
Rolling Up To facilitate a sales team hierarchy, users can 'roll-up/report to' to other users. This is similar to areporting structure. For example Tim McGraw is theUK Sales Manager. Peter Johnson andMathewEbden are both UK Sales Reps whose forecastsshould 'roll-up' to Tim McGraw. When TimMcGrawsubmits his forecast to the EMEA Sales Manager,he includes any deals hemay be working on himselfin the forecast, and the forecasts of his team—PeterJohnson andMathew Ebden.
Quota The sales target that a Sales User has for amonth,quarter, or year. Entered by their manager andmaybe overridden (depending on system settings) by theuser themselves.
13-2 Sage CRM
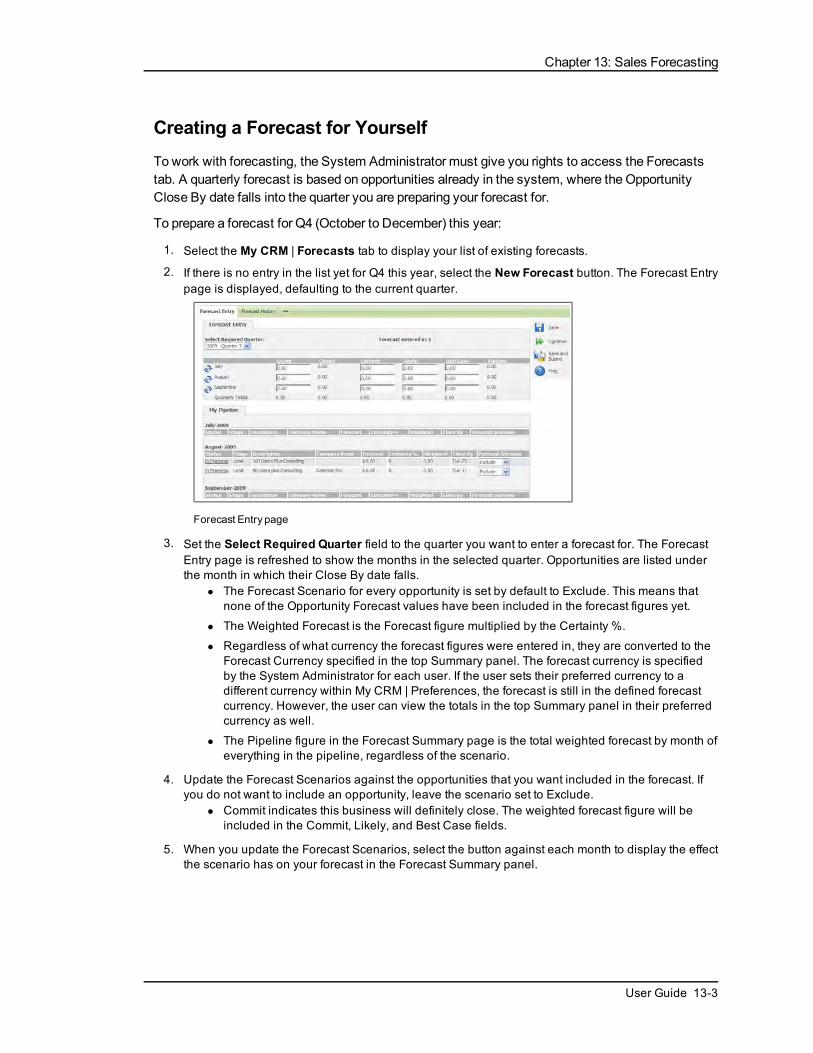
Chapter 13: Sales Forecasting
Creating a Forecast for YourselfTowork with forecasting, the System Administrator must give you rights to access the Forecaststab. A quarterly forecast is based on opportunities already in the system, where the OpportunityClose By date falls into the quarter you are preparing your forecast for.
To prepare a forecast for Q4 (October to December) this year:
1. Select the My CRM | Forecasts tab to display your list of existing forecasts.
2. If there is no entry in the list yet for Q4 this year, select the New Forecast button. The Forecast Entrypage is displayed, defaulting to the current quarter.
Forecast Entry page
3. Set the Select Required Quarter field to the quarter you want to enter a forecast for. The ForecastEntry page is refreshed to show the months in the selected quarter. Opportunities are listed underthe month in which their Close By date falls.
l The Forecast Scenario for every opportunity is set by default to Exclude. This means thatnone of the Opportunity Forecast values have been included in the forecast figures yet.
l The Weighted Forecast is the Forecast figure multiplied by the Certainty %.
l Regardless of what currency the forecast figures were entered in, they are converted to theForecast Currency specified in the top Summary panel. The forecast currency is specifiedby the System Administrator for each user. If the user sets their preferred currency to adifferent currency within My CRM | Preferences, the forecast is still in the defined forecastcurrency. However, the user can view the totals in the top Summary panel in their preferredcurrency as well.
l The Pipeline figure in the Forecast Summary page is the total weighted forecast by month ofeverything in the pipeline, regardless of the scenario.
4. Update the Forecast Scenarios against the opportunities that you want included in the forecast. Ifyou do not want to include an opportunity, leave the scenario set to Exclude.
l Commit indicates this business will definitely close. The weighted forecast figure will beincluded in the Commit, Likely, and Best Case fields.
5. When you update the Forecast Scenarios, select the button against each month to display the effectthe scenario has on your forecast in the Forecast Summary panel.
User Guide 13-3

Chapter 13
Forecast Summarypanel after recalculating figures
6. Update the Forecast Scenarios against the remaining opportunities that you want to include in theforecast.
l Likely indicates that the business will probably close. The weighted forecast figure will beincluded in the Likely and Best Case fields.
l Best Case indicates that the business may close. The weighted forecast figure will beincluded in the Best Case field only.
7. If you have the appropriate rights, you can manually override the forecast figures in the ForecastSummary panel. To do this, select the Save button to save the overrides you have made. You canalso add your monthly sales quota for comparison against the forecast figures.
8. Select the Continue button to return to the Forecast list.
9. Select the New Forecast button to add a forecast for another quarter and work through the stepsdescribed above. Otherwise, to go back and edit the forecast you have been working on, click onthe hyperlink of the forecast in the Forecast list.
Submitting a ForecastTo submit your forecast to your manager:
1. Select the My CRM | Forecasts tab, and click on the hyperlink of the quarterly forecast you want tosubmit. The Forecast Entry page is displayed.
2. Make any final changes you need to, and select the Save And Submit button. Clicking on the SaveAnd Submit button:
l Makes your forecast available to your "roll-up" manager. Prior to clicking on the Save AndSubmit button, the details of your forecast are not available to your manager.
l Adds your forecast to the Forecast History tab to give you a static snapshot in time of yoursubmitted forecast.
Viewing Past Submitted ForecastsTo view a past submitted forecast:
1. Select the My CRM | Forecasts tab, and click on the hyperlink for the quarterly forecast that youwant to review. The Forecast Entry page is displayed.
2. Click on the Forecast History tab. A list of all submitted forecasts for the selected quarter isdisplayed. There may be several if you are required to submit a forecast on, for example, a weeklybasis.
13-4 Sage CRM

Chapter 13: Sales Forecasting
Forecast History list
3. Click on the hyperlink of the Forecast History you want to review. The Forecast Entry page isdisplayed in read-only mode. You can click on the hyperlink of an individual opportunity to view thedetails of the opportunity as they stood at the time of submitting the forecast. This page is opened ina new browser window, and it can be customized by the System Administrator to show more ordifferent information on the selected opportunity.
4. Select the Continue button to return to the Forecast History list.
Working with your Team's ForecastsSales Managers have exactly the same forecast tab as other users, except that they see theirteams' (users who 'roll up' to them) submitted forecasts in addition to their own forecast.
To view a team’s forecasting information:
1. Select the My CRM | Forecasts tab.
2. Click on the New Forecast button to create a new forecast.
3. Select the Quarter and Year of the forecast, for example, this year Quarter 4. Your own forecast isdisplayed within the My Pipeline panel, and your team’s forecasts are displayed in the My DirectReports panel.
4. To review the detail of an individual’s forecast and enter the manager’s assessment of thesalesperson’s Commit, Likely, and Best Case, click on the hyperlink of the user. The ForecastDetail Screen for the selected user is displayed. Sales managers can enter their own assessmentin the top Forecast Entry panel.Note: When amanager clicks on the hyperlink of a subordinate's opportunities, the summaryscreen for that Opportunity is displayed.
User Guide 13-5

Chapter 13
MyDirect Reports panel
5. Select the Save button to update the manager’s assessment.
6. Select the Back button to return to your own Forecast Detail screen. Your own assessment of thesales person’s forecast is updated in the My Assessment panel.
7. Click on the magnifying glass icons next to the months to update the overall forecast.
8. Make any final manual changes required to the forecast figures on the top panel.
9. Select the Save And Submit button to submit the full team’s forecast. This includes anyopportunities the manager is personally working on.
Selecting the Save And Submit button creates a “snapshot in time” in the Forecast History tab,in the sameway as when an individual Sales User submits their own forecast.
Administrator Access to ForecastsA user with full System Administrator rights can access and submit a forecast for other Sales UsersfromMy CRM | Forecasts. To do this, the administrator should log on with their own ID andpassword, then change the user name in the context area of My CRM. The administrator can thenreview, change, and submit that user’s forecast as if it was their own.
If the administrator moves away from this screen and then uses, for example, the back button toreturn to the screen, it will be in read-only mode.
13-6 Sage CRM

Chapter 14: Leads
In this chapter you will learn how to:
l Define what a lead is.
l Understand the fields on the leads screen.
l Create a new lead.
l Search for an existing lead.
l Match a lead to an existing company.
l Qualify a lead.
l Convert a lead to an opportunity.
l Manually progress a lead.
l View the lead pipeline.
l Run a leads report.
l Find out what leads I am working on.
l Create a lead from other contexts.
l Delete a lead.
What is a Lead?A lead represents unqualified information received from, for example, your corporateWeb site, tradeshows, and purchasedmailing lists.
A lead exists outside of the context of a person or company. This is to prevent the system frombecoming overloaded with thousands of unclean, unqualified companies and people.
Only when the lead has been qualified and is ready to be converted to an opportunity is a newcompany and person record created. If the company and person already exist in your system, thelead details can bematched to the existing company and person record.
This section does not describe how to import leads from, for example, purchased lists of data. Thisrequires System Administrator rights to carry out a Data Upload. Please ask your SystemAdministrator for more information.
User Guide 14-1

Chapter 14
Lead Qualification: Scenario
Creating a New Lead"Hello, we work closely with First Mutual Finance. They referred us to you as the best supplier forour needs."
To capture a new lead:
1. Right-click on or hover over the Newmenu button, and select Lead from the pop out list.
14-2 Sage CRM

Chapter 14: Leads
New Lead page
2. Enter the details and select the Save button. When you do this the Lead Summary page isdisplayed.
You can add notes to leads from the Notes tab. You can also add and view communicationslinked to the lead from the Communications tab. You can recognize that a communication islinked to a lead by the Lead icon in the About column of the communication list. The Tracking tabshows all changes made to the Lead record using either the Progress button, or theWorkflowbuttons.
Lead FieldsThis table explains the standard fields on the New Lead page.
Field Description
Description Short description of the lead.
Source How the lead was initiated. For example, PhoneEnquiry, Conference.
Opened Date the lead was opened.
Main Product Interest Select from a list of main product lines.
Details Detailed description of the requirements.
Campaign\Wave Activity CampaignWave Activity the lead is linked to. Selectfrom a list of existingWave Activities. For example,CeBIT tradeshow.
Decision Timeframe Timeframewithin which a decision will bemade.
Opt out of E-marketingCommunications
This flag is automatically set if the e-mail addressassociated with the lead has opted out of all E-marketing communications received via Sage
User Guide 14-3
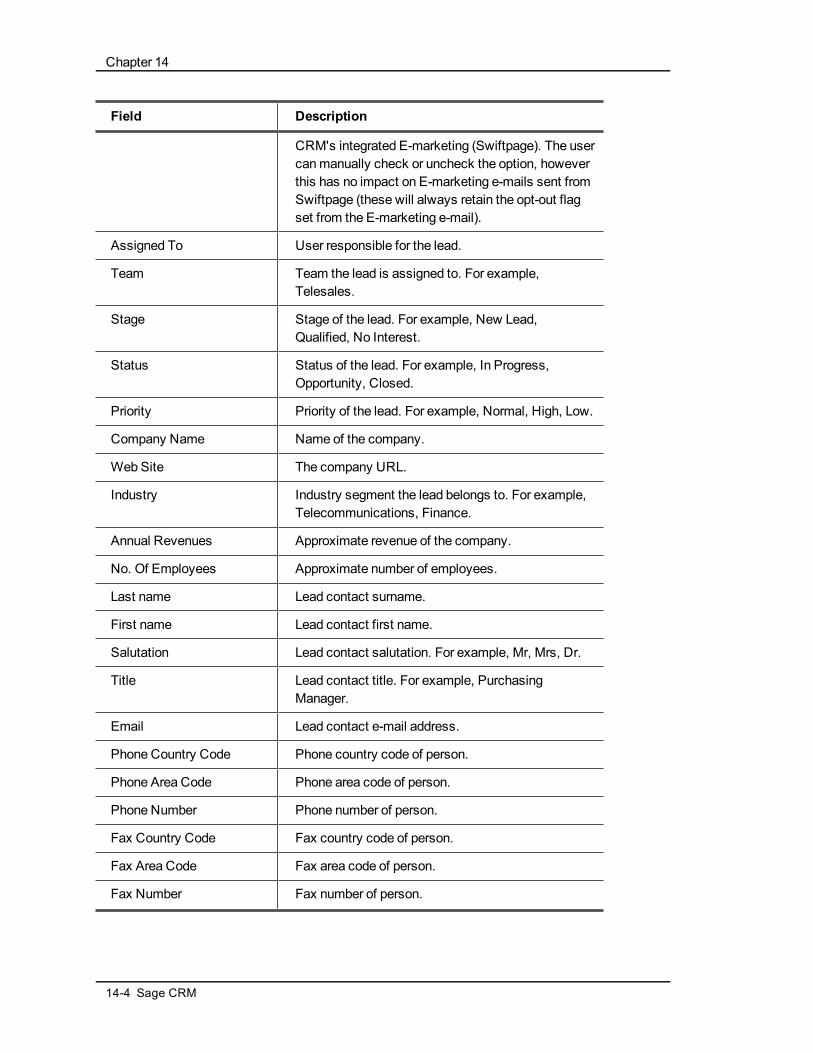
Chapter 14
Field Description
CRM's integrated E-marketing (Swiftpage). The usercanmanually check or uncheck the option, howeverthis has no impact on E-marketing e-mails sent fromSwiftpage (these will always retain the opt-out flagset from the E-marketing e-mail).
Assigned To User responsible for the lead.
Team Team the lead is assigned to. For example,Telesales.
Stage Stage of the lead. For example, New Lead,Qualified, No Interest.
Status Status of the lead. For example, In Progress,Opportunity, Closed.
Priority Priority of the lead. For example, Normal, High, Low.
Company Name Name of the company.
Web Site The company URL.
Industry Industry segment the lead belongs to. For example,Telecommunications, Finance.
Annual Revenues Approximate revenue of the company.
No. Of Employees Approximate number of employees.
Last name Lead contact surname.
First name Lead contact first name.
Salutation Lead contact salutation. For example, Mr, Mrs, Dr.
Title Lead contact title. For example, PurchasingManager.
Email Lead contact e-mail address.
Phone Country Code Phone country code of person.
Phone Area Code Phone area code of person.
Phone Number Phone number of person.
Fax Country Code Fax country code of person.
Fax Area Code Fax area code of person.
Fax Number Fax number of person.
14-4 Sage CRM

Chapter 14: Leads
Field Description
Address 1 First line of address.
Address 2 Second line of address.
Address 3 Third line of address.
Address 4 Fourth line of address.
City Address city.
Zip Code Address zip or postal code.
State Address state or county.
Country Address country.
The table below shows the Lead Status icons.
Status Icon Description
In Progress
Opportunity
Closed
Searching for an Existing Lead"Hello, this is Terry Gormley from NWTB. I spoke to someone yesterday about a new project wehave. I had a few more questions I wanted to ask."
To search for a lead:
1. Right-click on or hover over the Findmenu button, and select Lead from the pop out list.
2. Type in the name of the person, or combine any other search criteria available to you.
3. Select the Find action button.
4. Click on the hyperlink of the lead description to open the lead you want to view.
You can see the details of the lead and view related communications and notes from within thecontext of the lead.
Matching a Lead to an Existing CompanyIf you get a "Possible Company Match" message when you save a new Lead, the company mayalready exist in the system.
User Guide 14-5
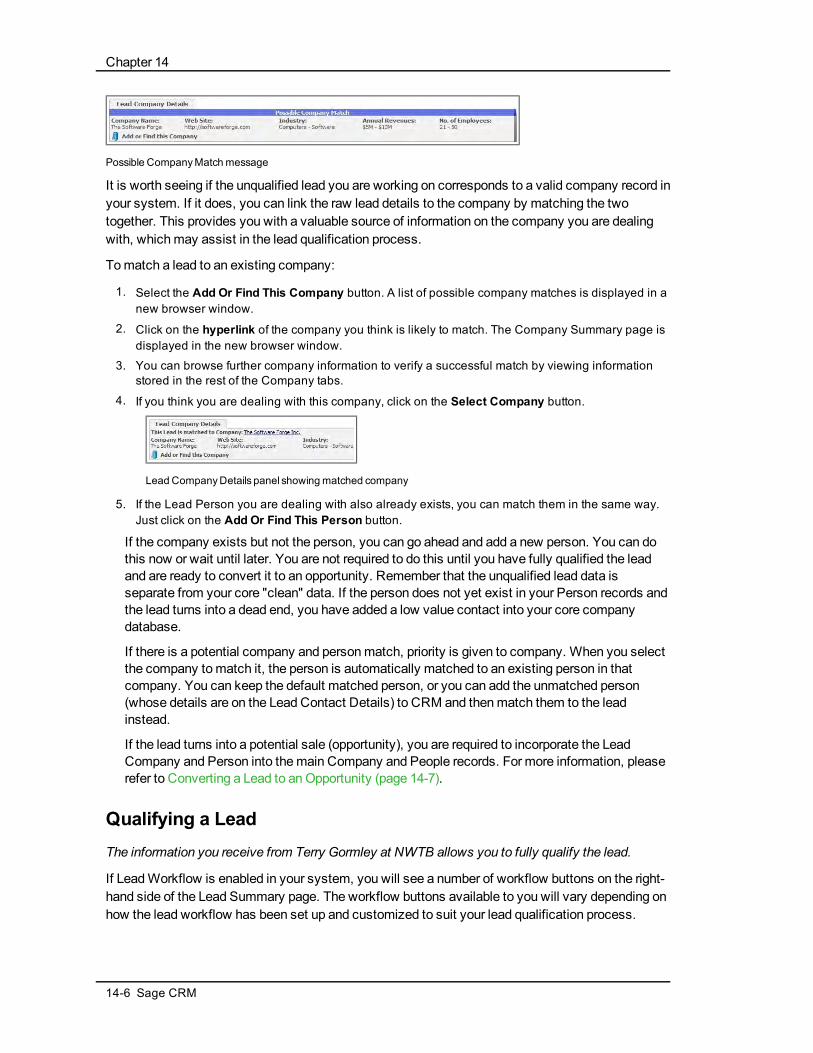
Chapter 14
Possible CompanyMatchmessage
It is worth seeing if the unqualified lead you are working on corresponds to a valid company record inyour system. If it does, you can link the raw lead details to the company by matching the twotogether. This provides you with a valuable source of information on the company you are dealingwith, whichmay assist in the lead qualification process.
Tomatch a lead to an existing company:
1. Select the Add Or Find This Company button. A list of possible company matches is displayed in anew browser window.
2. Click on the hyperlink of the company you think is likely to match. The Company Summary page isdisplayed in the new browser window.
3. You can browse further company information to verify a successful match by viewing informationstored in the rest of the Company tabs.
4. If you think you are dealing with this company, click on the Select Company button.
Lead CompanyDetails panel showingmatched company
5. If the Lead Person you are dealing with also already exists, you can match them in the same way.Just click on the Add Or Find This Person button.
If the company exists but not the person, you can go ahead and add a new person. You can dothis now or wait until later. You are not required to do this until you have fully qualified the leadand are ready to convert it to an opportunity. Remember that the unqualified lead data isseparate from your core "clean" data. If the person does not yet exist in your Person records andthe lead turns into a dead end, you have added a low value contact into your core companydatabase.
If there is a potential company and personmatch, priority is given to company. When you selectthe company tomatch it, the person is automatically matched to an existing person in thatcompany. You can keep the default matched person, or you can add the unmatched person(whose details are on the Lead Contact Details) to CRM and thenmatch them to the leadinstead.
If the lead turns into a potential sale (opportunity), you are required to incorporate the LeadCompany and Person into themain Company and People records. For more information, pleaserefer to Converting a Lead to anOpportunity (page 14-7).
Qualifying a LeadThe information you receive from Terry Gormley at NWTB allows you to fully qualify the lead.
If LeadWorkflow is enabled in your system, you will see a number of workflow buttons on the right-hand side of the Lead Summary page. The workflow buttons available to you will vary depending onhow the lead workflow has been set up and customized to suit your lead qualification process.
14-6 Sage CRM
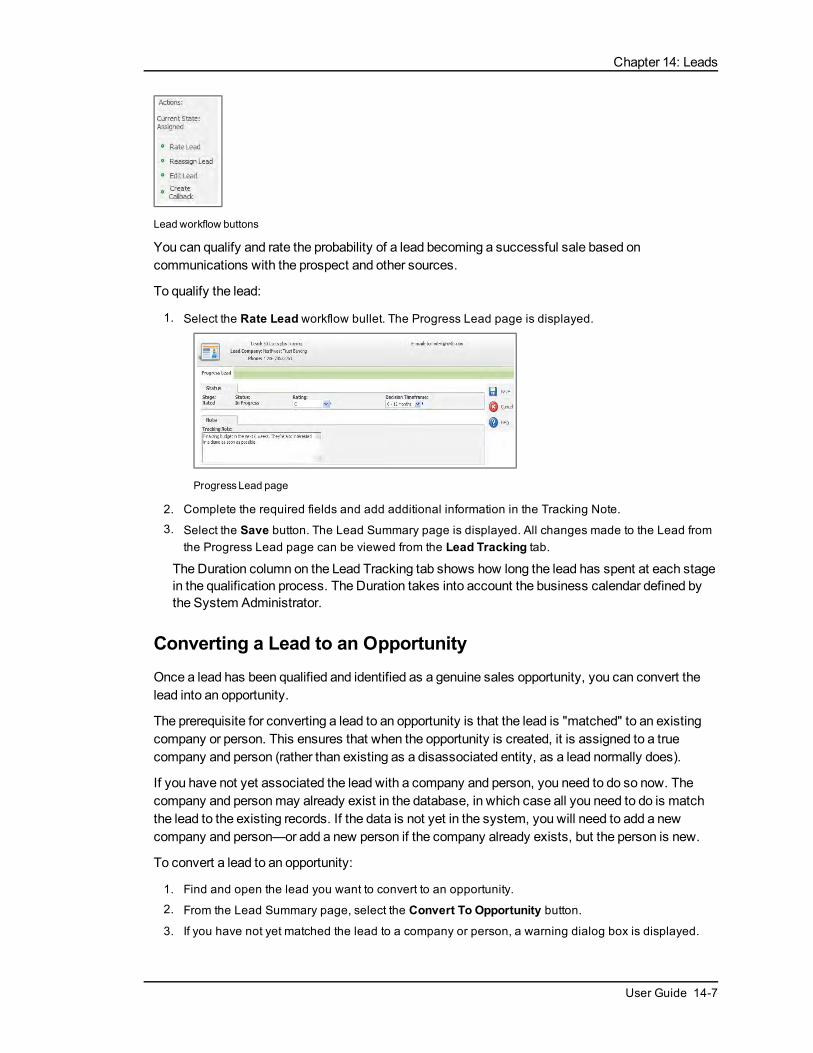
Chapter 14: Leads
Lead workflow buttons
You can qualify and rate the probability of a lead becoming a successful sale based oncommunications with the prospect and other sources.
To qualify the lead:
1. Select the Rate Lead workflow bullet. The Progress Lead page is displayed.
ProgressLead page
2. Complete the required fields and add additional information in the Tracking Note.
3. Select the Save button. The Lead Summary page is displayed. All changes made to the Lead fromthe Progress Lead page can be viewed from the Lead Tracking tab.
The Duration column on the Lead Tracking tab shows how long the lead has spent at each stagein the qualification process. The Duration takes into account the business calendar defined bythe System Administrator.
Converting a Lead to an OpportunityOnce a lead has been qualified and identified as a genuine sales opportunity, you can convert thelead into an opportunity.
The prerequisite for converting a lead to an opportunity is that the lead is "matched" to an existingcompany or person. This ensures that when the opportunity is created, it is assigned to a truecompany and person (rather than existing as a disassociated entity, as a lead normally does).
If you have not yet associated the lead with a company and person, you need to do so now. Thecompany and personmay already exist in the database, in which case all you need to do is matchthe lead to the existing records. If the data is not yet in the system, you will need to add a newcompany and person—or add a new person if the company already exists, but the person is new.
To convert a lead to an opportunity:
1. Find and open the lead you want to convert to an opportunity.
2. From the Lead Summary page, select the Convert To Opportunity button.
3. If you have not yet matched the lead to a company or person, a warning dialog box is displayed.
User Guide 14-7

Chapter 14
Warning dialog box
4. To match the lead to a company, select the Add Or Find This Company button on the LeadSummary page.
l The system automatically searches for an existing company in the database that matchesthe company name on the lead.
l If the system finds a name that begins with the company name you have already entered, itfirst gives you the option of selecting the existing company.
l If you already matched the company at an earlier stage, and just need to match up theperson, you can skip the next steps and click on the Add Or Find This Person button.
l If no matching company is found, or if you choose to ignore suggested matches, the NewCompany page is displayed in a new browser window. This page takes over details, suchas Company Name and Person Name, already entered against the lead so that you do nothave to retype them. Complete any further known details on the New Company page.
5. Select the Save button.
6. Click the Select Company button. The Lead Summary page is displayed, showing that the leadhas been matched to the new company and person that you have added to the system.
7. Select the Convert To Opportunity button. For more information on the Opportunity fields, pleaserefer to Creating a New Opportunity (page 12-4).
8. Complete any further known details on the Record New Opportunity page.
9. Select the Save button. The Opportunity Summary page for the new opportunity is displayed.
An opportunity that has been created via conversion from a lead has the following features:
l A View Lead button on the Summary page. This allows you to toggle between the details of theopportunity and the lead. You can view communications associated with the lead, but you can nolonger add communications to the lead once conversion has taken place.
l The Opportunity Tracking tab shows a record of the conversion from Lead to Opportunity.
l Communications, which were created in the context of the lead, are displayed in theCommunications tab of the Opportunity.
Manually Progressing LeadsThe workflow functionality automates the progression of Leads to follow predefined businessprocesses. Whether your system uses workflow or not is a an option which can be configured byyour System Administrator in Administration | Advanced Customization |Workflow & EscalationConfiguration.
If your system does not use LeadWorkflow, you will notice that the Lead workflow bullets on theright-hand-side of the Summary page are replaced by a Progress button. This button allows you tomanually change details of the lead via the Progress Lead page. Changes are still recorded on theTracking tab.
14-8 Sage CRM
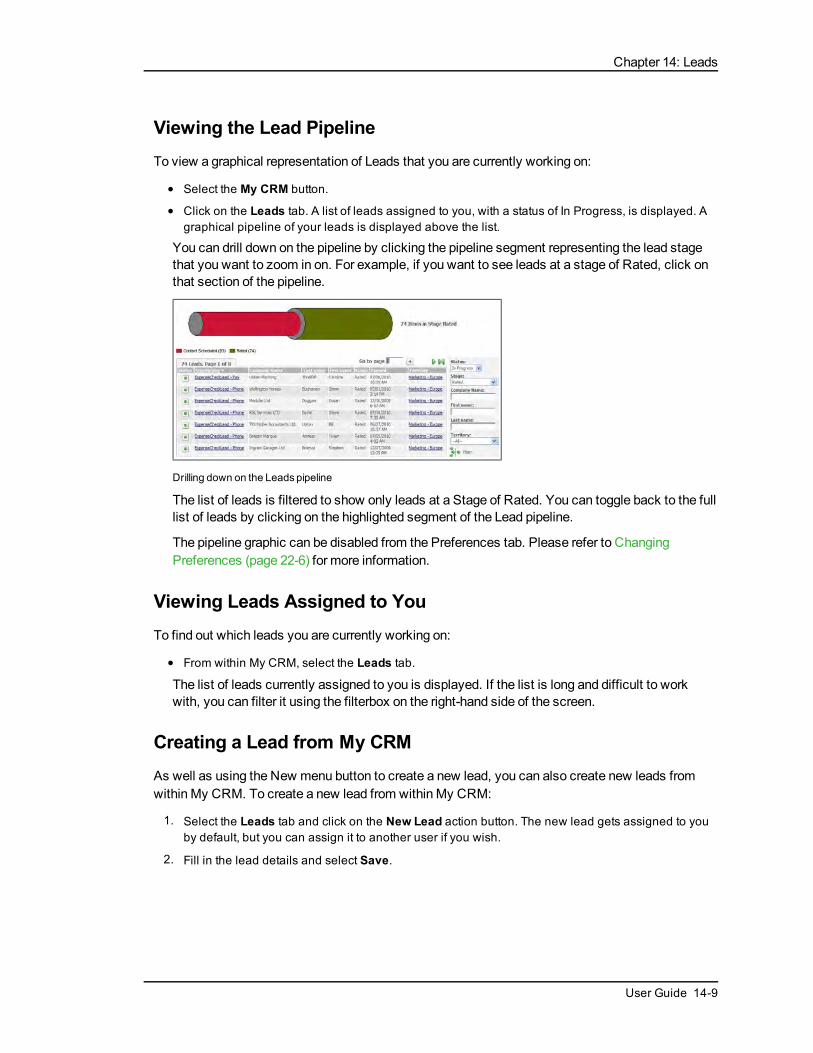
Chapter 14: Leads
Viewing the Lead PipelineTo view a graphical representation of Leads that you are currently working on:
l Select the My CRM button.
l Click on the Leads tab. A list of leads assigned to you, with a status of In Progress, is displayed. Agraphical pipeline of your leads is displayed above the list.
You can drill down on the pipeline by clicking the pipeline segment representing the lead stagethat you want to zoom in on. For example, if you want to see leads at a stage of Rated, click onthat section of the pipeline.
Drilling down on the Leadspipeline
The list of leads is filtered to show only leads at a Stage of Rated. You can toggle back to the fulllist of leads by clicking on the highlighted segment of the Lead pipeline.
The pipeline graphic can be disabled from the Preferences tab. Please refer to ChangingPreferences (page 22-6) for more information.
Viewing Leads Assigned to YouTo find out which leads you are currently working on:
l From within My CRM, select the Leads tab.
The list of leads currently assigned to you is displayed. If the list is long and difficult to workwith, you can filter it using the filterbox on the right-hand side of the screen.
Creating a Lead from My CRMAs well as using the New menu button to create a new lead, you can also create new leads fromwithin My CRM. To create a new lead from within My CRM:
1. Select the Leads tab and click on the New Lead action button. The new lead gets assigned to youby default, but you can assign it to another user if you wish.
2. Fill in the lead details and select Save.
User Guide 14-9
Chapter 14
Deleting a LeadThe ability to delete leads depends on your security profile. If your profile allows you to delete leads,a Delete action button is available on the Lead Summary page when you are in edit mode. Contactyour System Administrator if you need to be able to delete leads but the button is not available toyou.
To delete a lead:
1. Find and open the lead you want to delete.
2. From the Lead Summary page, select the Edit button.
3. Click on the Delete button and then on the Confirm Delete button to delete the lead.
The lead record is deleted from the system.
14-10 Sage CRM

Chapter 15: Outbound Call Handling
In this chapter you will learn how to:
l Define Outbound Call Handling.
l Use the Outbound Call Handling Buttons.
l Access related information to the person I’m calling.
l Access outbound calls.
l Working with outbound calls.
IntroductionOutbound Call Handlingmodule automates the process of performing outbound phone-basedtelemarketing campaigns.
Outbound Call Handling is tailored specifically to high volume telemarketing activities, where callsare not preallocated to individual users and a Communication record is only created when asuccessful contact is made.
The advantages include:
l Your personal Calendar list does not get cluttered with hundreds of campaign-based telephonecalls.
l Your quota of campaign calls will not get overlooked if you are out sick or allocated to work on adifferent project for the day.
l More efficient handling of repetitive calls via Got Through and Get Next Call buttons.
l In a CTI environment, Outbound Call Handling is automatically CTI-enabled.
The person whomanages marketing campaigns in your organization is typically responsible forsetting up outbound call lists. They require special security rights to do this. Contact your SystemAdministrator for more details.
Outbound Call Handling ButtonsThese buttons are available within Outbound Call Handling.
Button Description
Get Another Call Displays the details of the next person on the calllist.
Finish Calling Ends the call session, and displays the Summarypage for this call list.
Got Through Displays the Contact Introduction page and allowsthe user to gather data relating to the call as defined
User Guide 15-1
Chapter 15
Button Description
by theMarketingManager.
Exclude Removes the contact from the call list. The user isprompted for an exclusion reason.
Call Back After Blocks the contact from the call list until after thedate/time set.
Outbound Call Handling TabsThese tabs are accessible from the Introduction page.
Field Description
Company Summary Displays the company tabs in a new browserwindow.
Person Summary Displays the person tabs in a new browser window.
New Person Allows the user to add a new person from a newbrowser window.
Quick Look Displays the Quick Look tab in a new browserwindow.
New Lead Allows the user to add a new lead from a newbrowser window. The lead is linked by default to thecall list Wave Activity.
New Opportunity Allows the user to add a new opportunity from a newbrowser window.
New Communication Allows the user to add a new communication from anew browser window.
Accessing Outbound CallsYou have access to all call lists you have been assigned to work on from theMy CRM area.
To access the call lists:
1. Go to the Preferences tab in My CRM and make sure that the Show Outbound Calls In My CRMoption is set to Yes.
2. From within My CRM, click on the Outbound Call Lists tab. All outbound call lists that you havebeen assigned to work on are displayed.
15-2 Sage CRM

Chapter 15: Outbound Call Handling
Outbound Calls tab
3. Click on the hyperlink of the call list you want to work on. The Summary page is displayed. Theinformation displayed is divided into: Individual Statistics; Wave Activity Summary.
Summarypage
A user with InfoManager Administration rights also sees an additional panel called OverallStatistics. TheOverall Statistics panel gives a summary of calls made, time spent, and so on forall users working on this call list, including the current user.
Working with Outbound CallsYou use the buttons on the right-hand side of the page when working with call lists.
To contact the first person on the call list:
1. Select the Get A Call button. The Introduction page is displayed, showing the Call Data panel,Introduction panel, and Person Summary. If anyone else from the same company is also on the calllist, they are exclusively "offered" to the agent (user) who makes contact with the first person fromthe same company. This is explained in more detail in the next sections. The Introduction panelcontains the greeting text defined by the Marketing Manager when the campaign is set up. Pleaserefer to Outbound Call Fields (page 17-14) for more information. This is a "pre-pitch" prompt to helpthe user establish that they are talking to the right person. You can also add a comment from thispage by selecting the Add A Comment button. The comment is stored in the call list record for thisperson.
User Guide 15-3

Chapter 15
Introduction page
2. Select the Got Through button. The Contact Introduction page is displayed. This displays the CallData panel, Contact Introduction panel, and data to be collected as defined by the MarketingManager. The Contact Introduction panel contains greeting text defined by the Marketing Managerrelevant to the correct contact. This is the "pitch" once you have established you are speaking to thecorrect person.
Contact Introduction page
3. Add the data gathered during the conversation. This gets stored in the system—usually with theCommunication or Person—as defined by the Marketing Manager or System Administrator. Acompleted communication record is automatically created for each call where the user selects GotThrough.
4. When you are ready for the next call, select the Get Another Call button. The Introduction page isdisplayed with the details of the next person to call. If anyone else from the same company is alsoon the call list, they are exclusively "offered" to the agent (user) who makes contact with the firstperson from that company. This is to prevent agents who are working on the same call list fromcalling several people from the same company, and avoid the embarrassing—"my colleague justspoke to someone from your company". It also allows the user to easily switch between theavailable contacts. "You need to be talking to Arthur, he is handling the business side". Othercontacts from the same company who are not on the call list are also displayed.
Introduction page
5. If you can speak to more than one person from the same company on the same phone call, switchto the other person by clicking on the hyperlink of their name. If you are not able to speak to themon the same call or decide to call them later, they will remain assigned to you.
6. To exclude a contact from the list—"I’m sorry, Arthur doesn’t work in that department any more"—click on the Exclude button. The Exclude From Call List page is displayed.
15-4 Sage CRM

Chapter 15: Outbound Call Handling
Exclude fromCall List page
7. Select a Reason For Exclusion and click on the Save button. These are defined by the MarketingManager or your System Administrator.
8. You can toggle the person back onto the call list using the Include button.
9. You can block a contact from the call list until after a specific date/time by selecting the Call BackAfter button. This can be used if, for example, the contact is on holidays for the next two weeks.The Call Back After page is displayed.
10. Set the date and time when the contact is available again, and click on the Save button.
Call BackAfter page
11. To finish a session of calls using the current call list, select the Finish Calling button. The OutboundCalls Summary page is displayed, showing updated statistics for the current call list.
User Guide 15-5


Chapter 16: Groups
In this chapter you will learn how to:
l Understand the scope of Group functionality.
l How groups are compiled.
l Access the Groups tab.
l Create a group.
l Create a group from the Groups tab.
l Create a group from the Wave Activities tab.
l Create a group based on a primary entity search.
l Add a primary entity record to a group.
l Addmultiple records to a group.
l Addmultiple records to a group using Find/Saved Search.
l Addmultiple records to a group using advanced find.
l Add the records of one group to another group.
l Editing a Group.
l Perform a mass update on a group.
l Update group territories.
l Refresh a group.
l Understand how information generated through groups is stored.
l Process information generated using groups.
l Add a tab to hold information generated by groups.
l Export group information.
l View an exported group.
l Configure the system to send mass e-mails.
l Send a mass e-mail.
Introduction to GroupsGroups functionality allows you to create, modify, and save lists of people, companies, leads,cases, opportunities, quotes, and orders based on defined filter criteria. The filter criteria can besimple, for example, "All IT Managers in Dublin", or complex, for example, "All MarketingManagersin the Telecoms sector in London, Dublin, or Manchester, who attended our seminar last year, butwho have not yet replied to our invitationmail shot".
Groups alsomake use of the following features:
l Groups can be generated based on views of equivalent flexibility and power as CRM reports can.Please refer to "View Customization" in the System Administrator Guide for more information.
User Guide 16-1

Chapter 16
l Groups can be generated based on the Key Attributes functionality. Please refer to "Key AttributeProfiling" in the System Administrator Help for more information.
l You can define how a group’s contents are sorted when it is displayed.
l Overall navigation in and around groups makes use of forward and back buttons between pagesand Go To page.
Note: A company that does not have any people associated with it can appear in a group. However,such a group cannot appear in anOutbound Call List.
Technical OverviewGroup Building. Groups are based on SQL views generated by queries that retrieve recordsselected according to specified entity IDs. The user can select the view to base the group on.These views can be added to and/or changed by the System Administrator in Administration |Customization | Views. The user can use any of the fields available from the view to filter the groupresult. The user can use Key Attribute Data for filtering purposes as well.
Group Storage. Groups can be static or dynamic. When a static group is saved, both the querythat generated the group and the list of records it returned are saved. Whenever a user goes backinto a static group, it returns the list of records that were saved. In other words, if more recordsmatching the same criteria were added to CRM after the group was saved, they will not appear inthe group.
When a dynamic group is saved, only the query that generates the group is stored in CRM. Eachtime a dynamic group is opened, the query is run and the group contents are refreshed to return theCRM records that match the query criteria at that time.
Groups TabGroups can be viewed andmanaged from theMy CRM | Groups tab. TheGroups tab will onlyappear in My CRM if your System Administrator has given you rights to access to the Groups tabviaAdministration | Users.
Creating a GroupGroups can be created in the following ways:
l From the Groups tab.
l From the Wave Activity tab.
l Based on a primary entity search.
l When performing a Data Upload. Please refer to "Running the Data Upload" in the SystemAdministrator Help for more information.
l From any search list results.
Creating a Group from the Groups TabTo create a new group from theGroups tab:
16-2 Sage CRM

Chapter 16: Groups
1. Select the My CRM button.
2. Click on the Groups tab.
3. Click on the New Group button. The New Group Stage 1 of 4 page is displayed.
NewGroup Stage 1 of 4 page
4. Type a name and description for the group in the Name and Description fields.
5. Select which type of group you wish to create from the Type drop-down list. You can create a staticor dynamic group.
6. Select the main entity that the group is to be based on from the Entity drop-down list. All recordswithin a group must be based on the same primary entity. When you select an entity the screen isrefreshed to display the Source View drop-down list. Only views that return one row per ID field willbe displayed.
7. Select the Source View for the group and click on the Continue button. The New Group, Stage 2 of4 page is displayed.
NewGroup Stage 2 of 4 page
8. Select the columns that you wish to include in the group contents, search criteria, and sort order.
9. Select the Advanced Find check box if you wish to create an advanced find query to generate thegroup. Please refer to Using Advanced Find (page 3-7) for more information.
10. You can also add Key Attribute Data to the selection fields of your group definition.
11. Select the Continue button when you are ready to proceed. If you have added search criteria, theNew Group, Stage 3 of 4 page is displayed.
User Guide 16-3
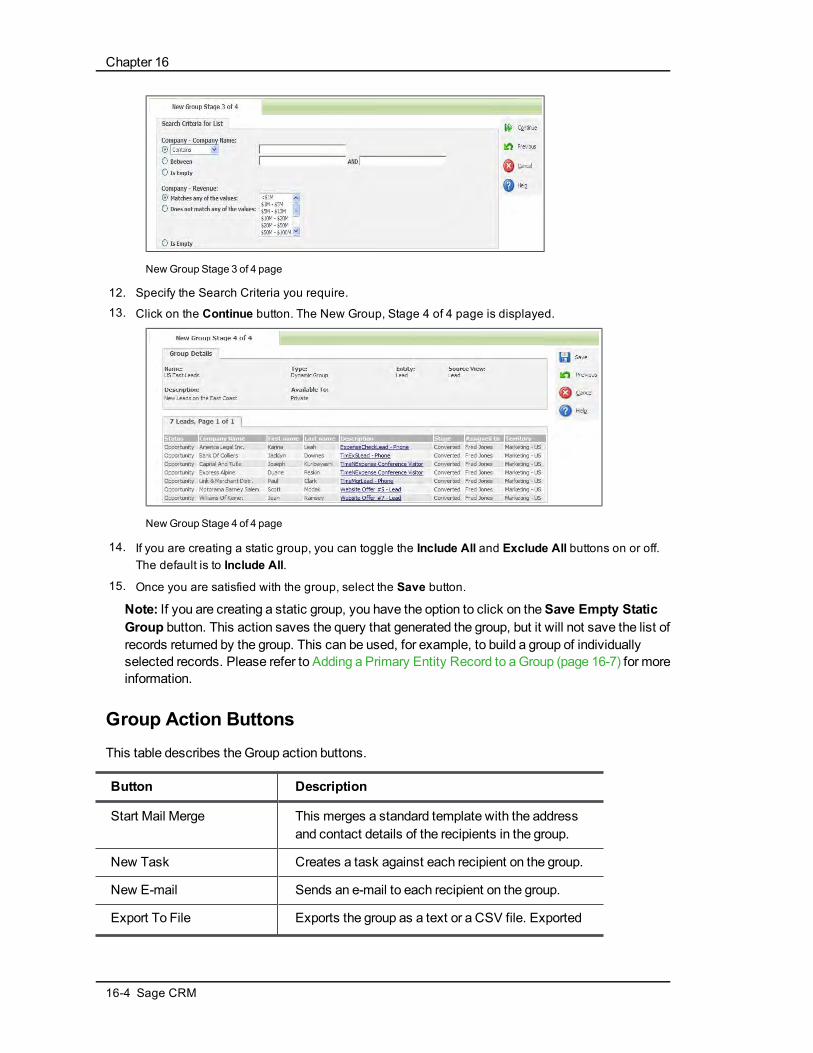
Chapter 16
NewGroup Stage 3 of 4 page
12. Specify the Search Criteria you require.
13. Click on the Continue button. The New Group, Stage 4 of 4 page is displayed.
NewGroup Stage 4 of 4 page
14. If you are creating a static group, you can toggle the Include All and Exclude All buttons on or off.The default is to Include All.
15. Once you are satisfied with the group, select the Save button.
Note: If you are creating a static group, you have the option to click on theSave Empty StaticGroup button. This action saves the query that generated the group, but it will not save the list ofrecords returned by the group. This can be used, for example, to build a group of individuallyselected records. Please refer to Adding a Primary Entity Record to a Group (page 16-7) for moreinformation.
Group Action ButtonsThis table describes the Group action buttons.
Button Description
Start Mail Merge This merges a standard template with the addressand contact details of the recipients in the group.
New Task Creates a task against each recipient on the group.
New E-mail Sends an e-mail to each recipient on the group.
Export To File Exports the group as a text or a CSV file. Exported
16-4 Sage CRM

Chapter 16: Groups
Button Description
groups can be viewed fromMy CRM | SharedDocuments.
New E-marketing E-mail Lets you set up an E-marketing E-mail WaveActivity to send an E-marketing E-mail to eachrecipient on the group. Youmust choose aCampaign andWave for E-marketing E-mail WaveActivity first. Youmust also have E-Marketingenabled. Please refer to Setting up an E-marketingCampaign (page 17-20) and Creating an E-marketingE-mail (page 17-21) for more information.
Mass Update Displayed to System Administrators only, and theAdministration | System Behavior setting AllowMass Update And Update Territory must be set toYes. Please refer to Performing aMass Update on aGroup (page 16-10) for more information. Allowssimultaneous updates to all records in the group.
Update Territory Displayed to System Administrators only, and theAdministration | System Behavior setting AllowMass Update And Update Territory must be set toYes. Please refer to Updating Group Territories(page 16-11) for more information. Allows anadministrator to update territories for a group.
Include All Available for static groups only. Toggles allmembers of the group to be included.
Exclude All Available for static groups only. Toggles allmembers of the group to be excluded.
Refresh Refreshes the group to include all people,companies, or leads who have been added since thecreation of the group and whomeet the searchcriteria.
Exclude PreviousRecipients
Available for static groups only. If the group hasalready been used for an action, this button excludesthe people, companies, or leads who were thetargets of that action.
SQL Displayed to System Administrators only. Displaysa new window containing the current SQL used togenerate the group. If you have SQL experience, thisstatement can be customized.
User Guide 16-5
Chapter 16
When you select one of these actions, for example, New E-mail, you will notice a new panel calledParent Category Selection. To begin with, this will just contain one entry, for example e-mails,which corresponds to the type of action you selected to perform on the group.
Parent CategorySelection panel
When you select the Parent Category, and execute the action you are performing, a new category isautomatically created in Key Attribute Data underneath—or as a "child" category of—eMails. This"child" record stores a link to every recipient for this particular action. This means that this piece ofkey attribute data can itself be used as a selection criteria for a follow-up action to this e-mail.Please see Key Attribute Data Generated by Groups (page 16-13).for more information.
Creating a Group from the Wave Activities TabTo create groups from theWave Activity tab in theMarketing area, youmust have SystemAdministrator or InformationManager rights. Groups created from here can be used to allow you tofilter andmanage responses to individual wave activities. For example, you could create a dynamicgroup that will filter and record all good responses to a wave activity. For more information oncreating groups from theWave Activity tab, please refer to Creating a New Group based onResponses (page 17-12).
Creating a Group Based on a Primary Entity SearchIf you have groups access, you can create a group containing the results of a search on any of theprimary entities - Company, Person, Case, Opportunity, Lead, Quote, or Order. For example, youmight want to create a group based on the results of a search for all companies based in Chicago.
A group can also be created based on the results of an Advanced Find search. Please refer to UsingAdvanced Find (page 3-7) for more information.
To create a group based on a primary entity search:
1. Select Find | Company. The Company Find screen is displayed.
2. Type Chicago in the City field.
3. Click on the Find button. A list of companies based in Chicago is returned.
4. Click on the Create New Group button. The Create New Group dialog box is displayed.
16-6 Sage CRM

Chapter 16: Groups
Create New Group
5. Enter a name and description for the new group in the Name and Description fields.
6. Select who you would like to make the group available to from the Available To drop-down list. Asan Info Manager with Groups access, you can make groups available to other InformationAdministrators, or you can choose to keep the group for your own private use. As a SystemAdministrator, you could also choose to make a group available to all users.
7. In the Type field, you can choose to make the group dynamic or static.
8. Select the Save button to save the new group.
Adding a Primary Entity Record to a GroupYou can add a primary entity record (person, company, case, opportunity, or lead) to an existinggroup based on that entity directly from the entity summary screen. In this example, we will add acompany record to a group.
Note:Primary entity records can only be added to static groups in this way.
To add a primary entity record to a group:
1. Select Find | Company and locate the company you wish to add to a group.
2. Open the company summary page.
3. Click on the Add This Record To A Group button. The Add To Group dialog box is displayed.
4. Select the group to which you wish to add the record from the Select Group drop-down list. For thisexample you can choose from static groups based on the Company entity, which are available toall users.
5. Click on the Save button.
Adding Multiple Records to a GroupUsers with group access rights can addmultiple records of the same entity type to any static group.You can add records by searching on a standard entity search screen, or you can search for recordsusing an advanced search. You can also add all of the records of one group to another group,provided both groups are based on the same entity. When addingmultiple records to a group, anotice will be displayed to alert you if you attempt to add a record that is already in the destinationgroup.
User Guide 16-7
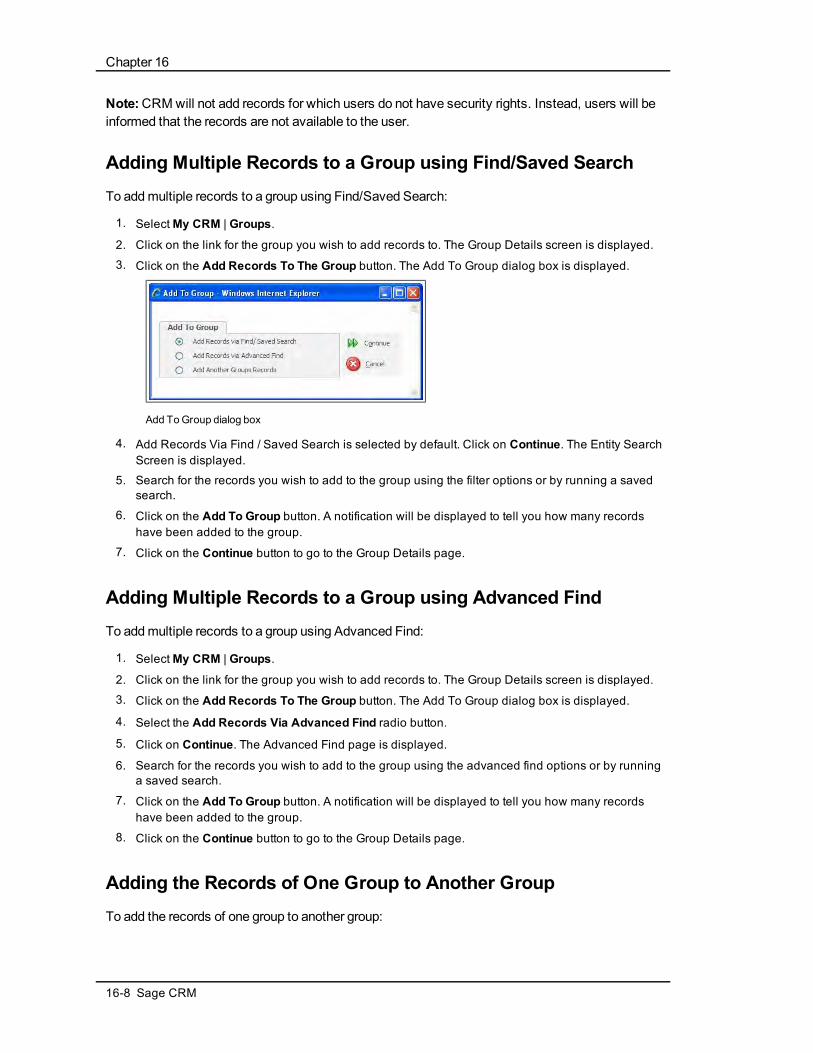
Chapter 16
Note:CRMwill not add records for which users do not have security rights. Instead, users will beinformed that the records are not available to the user.
Adding Multiple Records to a Group using Find/Saved SearchTo addmultiple records to a group using Find/Saved Search:
1. SelectMy CRM | Groups.
2. Click on the link for the group you wish to add records to. The Group Details screen is displayed.
3. Click on the Add Records To The Group button. The Add To Group dialog box is displayed.
Add ToGroup dialog box
4. Add Records Via Find / Saved Search is selected by default. Click on Continue. The Entity SearchScreen is displayed.
5. Search for the records you wish to add to the group using the filter options or by running a savedsearch.
6. Click on the Add To Group button. A notification will be displayed to tell you how many recordshave been added to the group.
7. Click on the Continue button to go to the Group Details page.
Adding Multiple Records to a Group using Advanced FindTo addmultiple records to a group using Advanced Find:
1. SelectMy CRM | Groups.
2. Click on the link for the group you wish to add records to. The Group Details screen is displayed.
3. Click on the Add Records To The Group button. The Add To Group dialog box is displayed.
4. Select the Add Records Via Advanced Find radio button.
5. Click on Continue. The Advanced Find page is displayed.
6. Search for the records you wish to add to the group using the advanced find options or by runninga saved search.
7. Click on the Add To Group button. A notification will be displayed to tell you how many recordshave been added to the group.
8. Click on the Continue button to go to the Group Details page.
Adding the Records of One Group to Another GroupTo add the records of one group to another group:
16-8 Sage CRM

Chapter 16: Groups
1. SelectMy CRM | Groups.
2. Click on the link for the group you wish to add records to. The Group Details screen is displayed.
3. Click on the Add Records To The Group button. The Add To Group dialog box is displayed.
4. Select the Add Another Groups Records radio button.
5. Click on Continue.
6. Select the group whose records you wish to add from the Groups drop-down list.
7. Click on the Save button. A notification will be displayed to tell you how many records have beenadded to the group. Note: Duplicate records will not be added.
8. Click on the Close button to close the Groups dialog box.
Refreshing a GroupLet’s say you set up a group of people based on the search criteria of City = Dublin. You carry out amail shot to that audience announcing an upcoming trade show. Meanwhile, your data entry peoplehave been busy collecting new contact details of people in the Dublin area. These have been addedto the system during the week after you sent themail shot out.
Dynamic groups will refresh automatically, with new records that match the group search criteriabeing automatically added to the group. With a static group, youmust use the Refresh button to addnew matching records to a group. With a static group, when performing amail merge, you can usethe Refresh button to send a similar mail shot to all the people who have since been added to thesystem.
To refresh a static group:
1. Create a new group of people based on a criteria, such as City = Dublin.
2. Open the group and perform a mail merge using the Start Mail Merge button.
3. Add three new people to the system, making sure they meet the search criteria you used for thegroup generation.
4. Open the group, and make a note of the number of people on it, for example 23.
5. Click on the Refresh button.
6. The number of people should be as before plus three, for example 26.
7. If the mail shot you are sending out is exactly the same as the one you have already sent, you donot need to resend it to all the previous recipients.
8. Select the Exclude Previous Recipients button.
9. The list should still show 26 people, with 23 excluded.
10. Now you can carry out the mail merge using the Start Mail Merge button, and it only goes to thethree new contacts.
Editing a GroupYou can edit certain fields in both static and dynamic groups.
To edit a group:
1. Select the Groups tab.
2. Open the group that you want to edit. The Group Details page is displayed.
User Guide 16-9
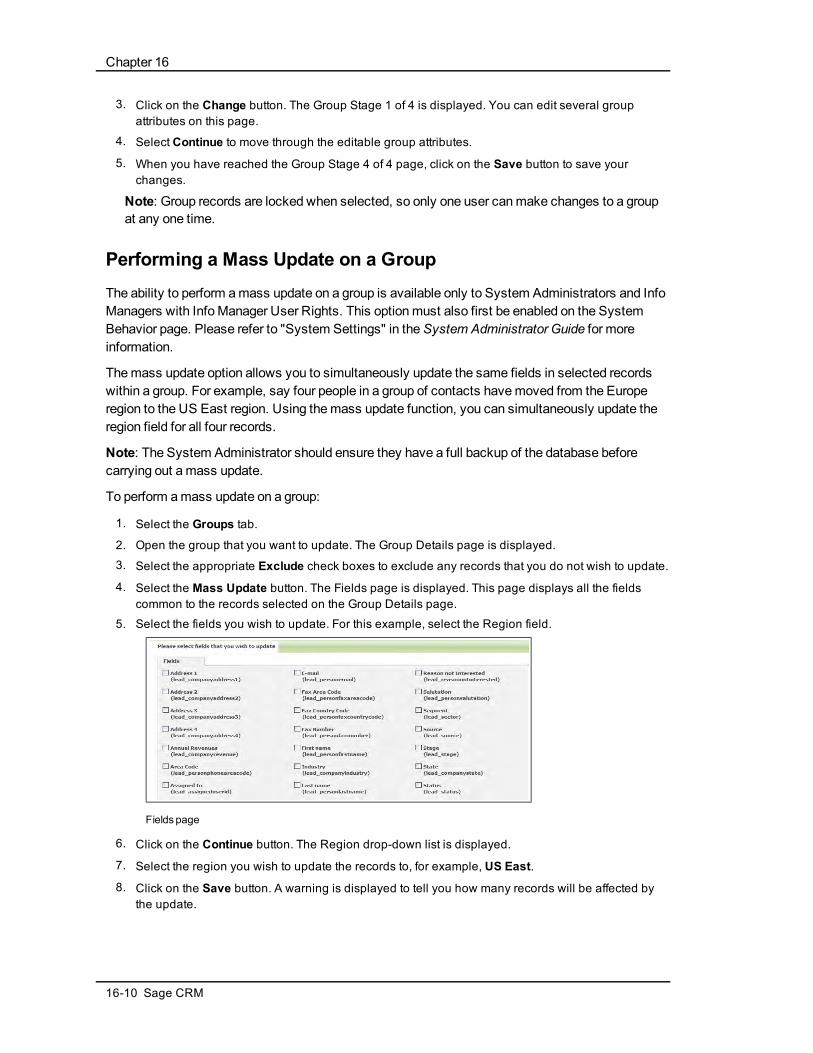
Chapter 16
3. Click on the Change button. The Group Stage 1 of 4 is displayed. You can edit several groupattributes on this page.
4. Select Continue to move through the editable group attributes.
5. When you have reached the Group Stage 4 of 4 page, click on the Save button to save yourchanges.
Note: Group records are locked when selected, so only one user canmake changes to a groupat any one time.
Performing a Mass Update on a GroupThe ability to perform amass update on a group is available only to System Administrators and InfoManagers with InfoManager User Rights. This optionmust also first be enabled on the SystemBehavior page. Please refer to "System Settings" in theSystem Administrator Guide for moreinformation.
Themass update option allows you to simultaneously update the same fields in selected recordswithin a group. For example, say four people in a group of contacts havemoved from the Europeregion to the US East region. Using themass update function, you can simultaneously update theregion field for all four records.
Note: The System Administrator should ensure they have a full backup of the database beforecarrying out amass update.
To perform amass update on a group:
1. Select the Groups tab.
2. Open the group that you want to update. The Group Details page is displayed.
3. Select the appropriate Exclude check boxes to exclude any records that you do not wish to update.
4. Select the Mass Update button. The Fields page is displayed. This page displays all the fieldscommon to the records selected on the Group Details page.
5. Select the fields you wish to update. For this example, select the Region field.
Fieldspage
6. Click on the Continue button. The Region drop-down list is displayed.
7. Select the region you wish to update the records to, for example, US East.
8. Click on the Save button. A warning is displayed to tell you how many records will be affected bythe update.
16-10 Sage CRM

Chapter 16: Groups
9. Click OK. The Summary Of Updated Records page is displayed.
10. Select the Continue button. The selected records have now been updated.
User Requirement: System Administrator Rights or Info Manager User Rights
Updating Group TerritoriesThe ability to perform an update on group territories is available only to System Administrators, andthis optionmust first be enabled on the System Behavior page. Please refer to "System Settings" intheSystem Administrator Guide for more information. The update territories option allows you toupdate simultaneously the territory field in selected records within a group. For example, say youhave a group of contacts that have been assigned to various territories in the US and you would liketo update the entire group to the US Canada territory.
Note: The System Administrator should ensure they have a full backup of the database beforecarrying out amass update. It is also recommended that all users are logged out of the systembefore carrying out a territory update. Please refer to theSystem Administrator Guide for moredetails.
To update group territories:
1. Select the Groups tab.
2. Open the group that you want to update. The Group Details page is displayed.
3. Exclude any records that you do not wish to update.
4. Select the Update Territory button. The Territory page is displayed.
5. Select the new group territory from the Territory Name drop-down list. For this example, select USCanada.
Territory page
6. Click on the Save button. The Summary Of Potential Update Records page is displayed.
7. Click on the Go button. The Summary of Updated Records page is displayed.
8. Select the Continue button. The selected records have now been updated.
User Requirement: System Administrator Rights
How Group Information is StoredInformation generated by static groups is stored in Key Attribute Data. This occurs in two ways:
l When you create a static group and save it, the group—and all its "records" (that is, Companies,People, Leads, Opportunities, Cases, Quotes, or Orders) are saved with a piece of key attributedata, which identifies the group and all its members. The saved group can be viewed from
User Guide 16-11

Chapter 16
Administration | Advanced Customization | Key Attributes | Categories under the Group Entriescategory. The key attribute field, which is stored against the group member is set to either Includeor Exclude.
KeyAttribute Categories list with Group Entries
l When you perform an action against records in either a static or dynamic group, the action—and allthe records in the group it was carried out on—are saved with a piece of key attribute data. Theactions can be viewed from Administration | Advanced Customization | Key Attributes |Categories under the Default Activities category. The key attribute data field, which is storedagainst the group member is set to the Date that the action was carried out.
User Requirement: Info Manager Administration Rights
16-12 Sage CRM

Chapter 16: Groups
Key Attribute Data Generated by GroupsThe following example illustrates how to work with key attribute data generated by static groups.Youmust have System Administrator rights, or Info Manager with Key Attributes rights to followthese steps.
1. Create a new static group of people where the Title Code = IT Manager.
2. Select the Continue button, and select the columns you want to display in the group.
3. Select the Continue button and set the search criteria to IT Manager. The New Group Stage 3 of 4page is displayed.
4. Select the Continue button. The New Group Stage 4 of 4 page is displayed.
5. Select the Save button. The page is displayed with a Group Saved bar at the top.
6. Select Administration | Advanced Customization | Key Attributes | Categories. The Key AttributeCategories list is displayed showing the saved group you created as a child category of the GroupEntries category.
Group Entries categories
7. Now return to Main Menu |My CRM and select the Groups tab.
8. Click on the hyperlink of the group you created.
9. Select the New Task button to schedule a phone call to each person in the group. The New Taskpage is displayed.
10. Complete the communication details, and select Internal Actions on the Parent Category panel atthe end of the page. The default Parent Category is set up from Administration | Key Attributes |Category Groups | Activity Category Groups.
New Taskpage
11. Select the Save button. A communication is scheduled for each person in the group, and you arereturned to the Build List, Step 3 of 3 page.
12. Select Administration | Advanced Customization | Key Attributes | Categories. The Key AttributeCategories list is displayed showing the action against the group as a child category of the DefaultActivities | Internal Actions category.
User Guide 16-13
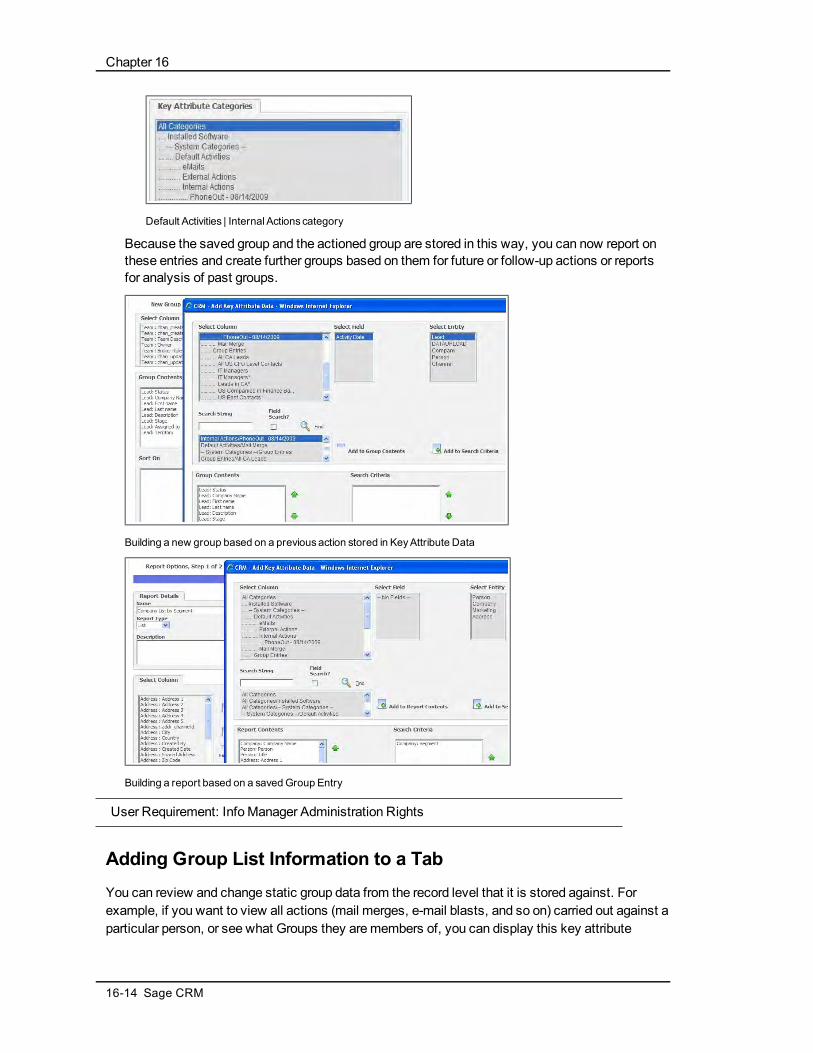
Chapter 16
Default Activities | InternalActions category
Because the saved group and the actioned group are stored in this way, you can now report onthese entries and create further groups based on them for future or follow-up actions or reportsfor analysis of past groups.
Building a new group based on a previousaction stored in KeyAttribute Data
Building a report based on a savedGroup Entry
User Requirement: Info Manager Administration Rights
Adding Group List Information to a TabYou can review and change static group data from the record level that it is stored against. Forexample, if you want to view all actions (mail merges, e-mail blasts, and so on) carried out against aparticular person, or see what Groups they aremembers of, you can display this key attribute
16-14 Sage CRM

Chapter 16: Groups
profiling data on a tab within the person context. The Key Attribute Profiling chapter in theSystemAdministrator Guide gives more information on exactly how to do this, but the summary steps arelisted below.
Youmust have System Administrator rights, or Info Manager with Key Attributes rights to followthese steps.
1. Select Administration | Advanced Customization | Key Attributes | Category Groups, and makesure thatGeneral Category Groups is selected in the list.
2. Click on the New button.
3. Enter a name and description for the Category Group, for example, Group Information.
4. Select the categories, for example, Default Activities and Group Entries, that you want to bedisplayed within this category group from the Key Attribute Categories list and move them over tothe Categories Within Group list. These are at the upper level of the Key Attribute Categories list.You could start much lower down the child categories to display more specific information relatingto a particular set of actions or groups.
CategoryGroupspage
5. Select the Save button to display the new category group.
6. To display the information on a tab within the context of a person, select Administration |Customization | Person | Tabs.
7. Click on the hyperlink of the Person tab group. The Customize Tabs page is displayed.
8. Add a new tab, with the Action set to Key Attributes, and the Key Attribute Category Group set to thecategory group you have just created.
Customize Tabspage
9. Select the Add button, then click on the Save button.
10. Search for a Person, who is already on one of the groups you have created, and where you havecarried out an action against that group.
User Guide 16-15
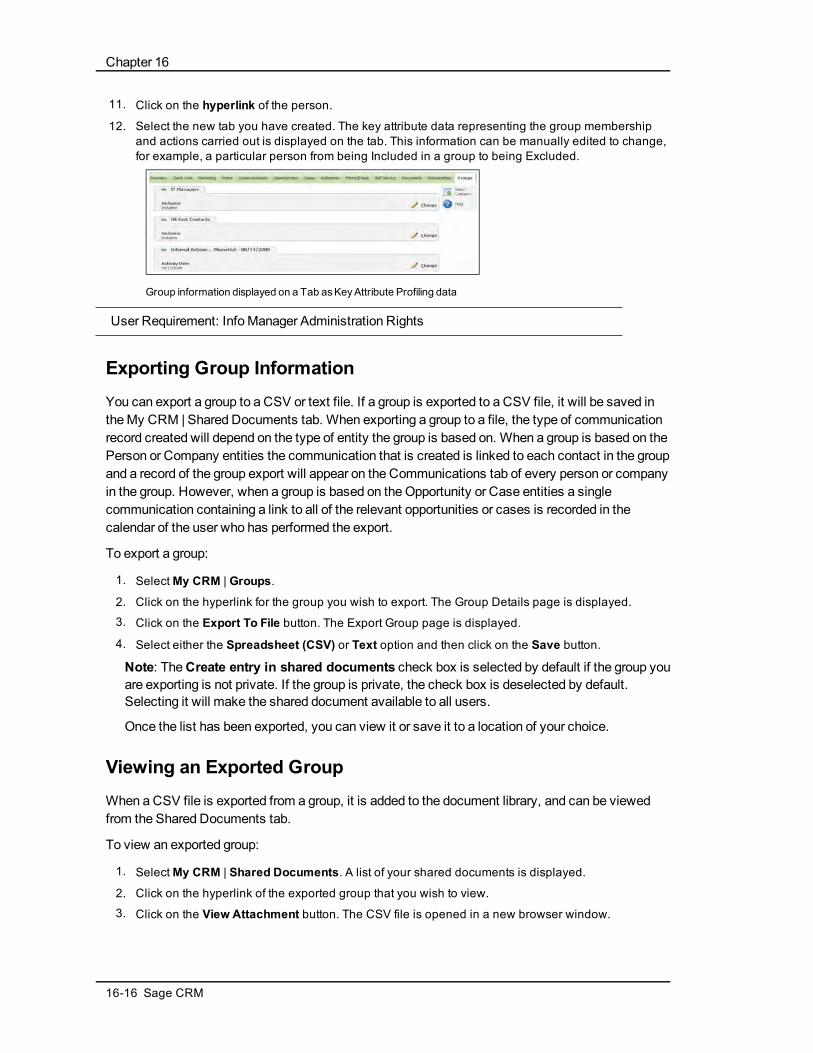
Chapter 16
11. Click on the hyperlink of the person.
12. Select the new tab you have created. The key attribute data representing the group membershipand actions carried out is displayed on the tab. This information can be manually edited to change,for example, a particular person from being Included in a group to being Excluded.
Group information displayed on a Tab asKeyAttribute Profiling data
User Requirement: Info Manager Administration Rights
Exporting Group InformationYou can export a group to a CSV or text file. If a group is exported to a CSV file, it will be saved intheMy CRM | Shared Documents tab. When exporting a group to a file, the type of communicationrecord created will depend on the type of entity the group is based on. When a group is based on thePerson or Company entities the communication that is created is linked to each contact in the groupand a record of the group export will appear on the Communications tab of every person or companyin the group. However, when a group is based on theOpportunity or Case entities a singlecommunication containing a link to all of the relevant opportunities or cases is recorded in thecalendar of the user who has performed the export.
To export a group:
1. SelectMy CRM | Groups.
2. Click on the hyperlink for the group you wish to export. The Group Details page is displayed.
3. Click on the Export To File button. The Export Group page is displayed.
4. Select either the Spreadsheet (CSV) or Text option and then click on the Save button.
Note: TheCreate entry in shared documents check box is selected by default if the group youare exporting is not private. If the group is private, the check box is deselected by default.Selecting it will make the shared document available to all users.
Once the list has been exported, you can view it or save it to a location of your choice.
Viewing an Exported GroupWhen aCSV file is exported from a group, it is added to the document library, and can be viewedfrom the Shared Documents tab.
To view an exported group:
1. SelectMy CRM | Shared Documents. A list of your shared documents is displayed.
2. Click on the hyperlink of the exported group that you wish to view.
3. Click on the View Attachment button. The CSV file is opened in a new browser window.
16-16 Sage CRM

Chapter 16: Groups
Sending Mass E-mailsMass e-mails can be in text or HTML format, and they can contain file attachments and inlineimages. Youmust have the Send E-mail As HTML field set to Yes (in Administration | Email AndDocuments | Email Configuration) to upload an inline image.
Note that if you are using a free 30-day trial, your mass e-mails are not sent. However, they aresaved as communications.
Opt out of E-marketing Communications Flag
There is a check box flag on the Company, Person, and Lead Summary pages, which isautomatically set by Swiftpage if E-marketing is being used. E-marketing e-mails will never go outto the associated Company, Person or Lead e-mail address where this flag is set - even if the userhas manually unchecked the option in CRM.
If you are using CRM's ownmass e-mail feature, it is recommended that the opt-out flag is added tothe group search criteria to ensure that people who have opted out of receiving e-mails via E-marketing, do not receive other marketing e-mails generated using the standardMass E-mailfeature.
Using the opt-out flag in group search criteria
Configuring CRM for Mass E-mails
Once the Embedded E-mail Editor is configured, you can use theMass E-mail functionality.However, if you want the ability to send e-mails in HTML format, you will need tomake sure thesystem is configured to do so. You will also need to ensure that the required From and Reply Toaddresses have been specified.
To ensure that HTML e-mails can be sent to groups:
1. Select Administration | E-mail And Documents | E-mail Configuration. The E-mail/SMS settingspage is displayed.
2. Check that the Send E-mail As HTML field is set to Yes. If you don’t have a requirement to sendHTML e-mails, the Internal SMTP option can be chosen.
To ensure that From and Reply To addresses have been specified:
1. Open Administration | E-mail And Documents | E-mail Aliases and select the New button. A listof e-mail addresses that e-mails can be sent from is displayed. If the entry for the e-mail addressyou want to send mass e-mails from is not listed, you will need to set up an entry for it.
2. Click on the hypelink of the mailbox you want to use to send mass e-mails from, and select theChange button. In this example, the Marketing mailbox is being used.
3. Ensure that the E-mail Address and Display Name fields are completed and that From and ReplyTo addresses are enabled and specified.
User Guide 16-17
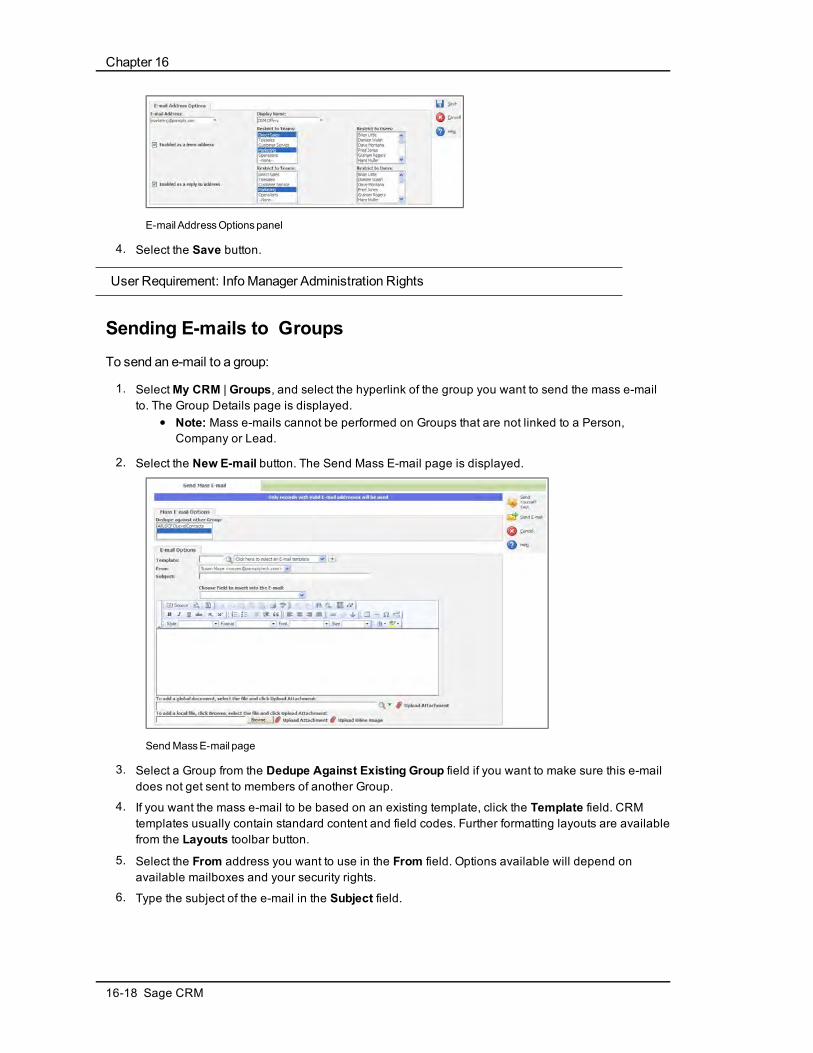
Chapter 16
E-mail AddressOptionspanel
4. Select the Save button.
User Requirement: Info Manager Administration Rights
Sending E-mails to GroupsTo send an e-mail to a group:
1. SelectMy CRM | Groups, and select the hyperlink of the group you want to send the mass e-mailto. The Group Details page is displayed.
l Note: Mass e-mails cannot be performed on Groups that are not linked to a Person,Company or Lead.
2. Select the New E-mail button. The Send Mass E-mail page is displayed.
SendMassE-mail page
3. Select a Group from the Dedupe Against Existing Group field if you want to make sure this e-maildoes not get sent to members of another Group.
4. If you want the mass e-mail to be based on an existing template, click the Template field. CRMtemplates usually contain standard content and field codes. Further formatting layouts are availablefrom the Layouts toolbar button.
5. Select the From address you want to use in the From field. Options available will depend onavailable mailboxes and your security rights.
6. Type the subject of the e-mail in the Subject field.
16-18 Sage CRM

Chapter 16: Groups
7. You can include information in different formats in the body section.l You can type a message in standard text, and use the formatting buttons to format the text.
You can also use bullets and numbering and insert tables in your e-mails.
l Select merge fields from the Choose Field To Insert Into The E-mail drop-down if you wantto include, for example, the recipient’s first name or title in the e-mail.
l You can copy HTML content and paste it into the body field.
l Select the Source button, and you can then copy HTML content and paste it into the bodyfield. HTML source code typically references image files, such as JPGs, GIFs and BMPs.Ensure that such images are referenced correctly so that the person receiving the e-mailcan view them. The source of the image files must be specified in the HTML source code aspaths on the Internet, for example, <img src = "http://www.domain.com/products/image.gif">.If you do not have experience in writing HTML source code, you should ask the personcreating the HTML source to ensure that the images are referenced in this way in the HTMLfile before you use it in your mass e-mails.
l You can add a .GIF, .JPEG, or .JPG file as an inline image. An inline image is an individualimage that is included in the e-mail body. Inline images are displayed in the e-mail body,and they are referenced from the e-mail server in the HTML source. To upload an inlineimage, navigate to the image file using the Browse button, select the image file, and clickthe Upload Inline Image button. The image then needs to be referenced within the HTML inorder to be displayed in the body of the e-mail. You can edit the HTML source by selectingthe Edit Source button and amending the script.
l You can attach global documents and local files. To attach a global document, use theSearch Select icons to locate the file, select the file and then select the Upload Attachmentbutton. Please refer to Advanced Search Select (page 2-9) for details on using the SearchSelect buttons. To attach a local file, select the Browse button, navigate to the file, andselect the Upload Attachment button.
8. Once you have added content in the e-mail body, you may want to specify additional rules forsaving the communication in the database. The option to specify additional rules is not available ifyou are using E-mail Management to handle outbound e-mails. From the Communication Optionspanel, select the team and territory in which you want the communication to be saved from theTeam and Territory fields, respectively. In addition, specify the status and the type ofcommunication you want the e-mail saved as from the Status and Action fields.
9. If you want to link the mass e-mail to a Wave Activity, select it using the Wave Activity field.
10. If you select E-mails from the Parent Category selection field, a new category is automaticallycreated in Key Attribute Profiling as a "child" category of eMails, when the e-mail is sent. The nameof the category corresponds to the text you typed in the subject field, for example, CRM Offers. This"child" record stores a link to every recipient of the e-mail. This means that this piece of key attributedata can itself be used as a selection criteria for a follow-up action to this e-mail.
11. Before you send the completed e-mail to the group you can carry out final proofing by:l Using the Preview and Check Spelling buttons on the E-mail Editor toolbar.
l Using the Send Yourself A Test button.
12. Select the Send E-mail button to send the e-mail to all people or companies included in the group.A dialog box is displayed to inform you of the number of e-mails you are about to send.
13. Click OK. Select the Marketing |Mass E-mail Status tab to review the status of the job.
MassE-mail Status screen
User Guide 16-19
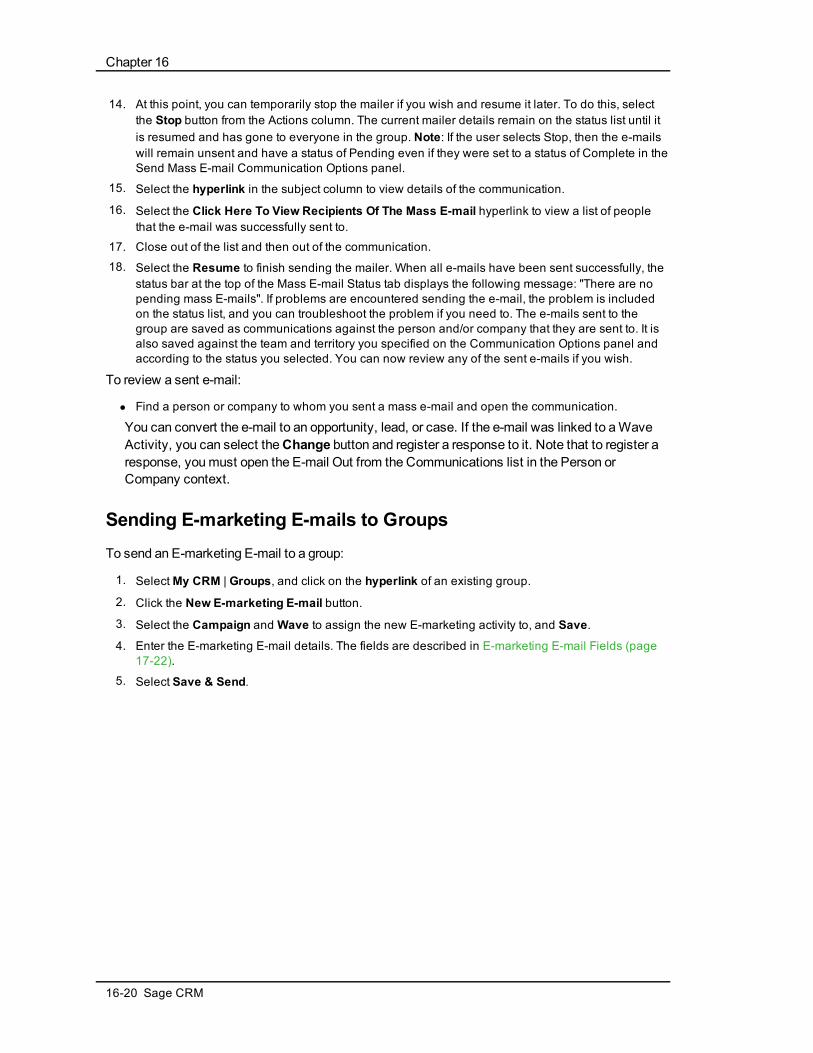
Chapter 16
14. At this point, you can temporarily stop the mailer if you wish and resume it later. To do this, selectthe Stop button from the Actions column. The current mailer details remain on the status list until itis resumed and has gone to everyone in the group. Note: If the user selects Stop, then the e-mailswill remain unsent and have a status of Pending even if they were set to a status of Complete in theSend Mass E-mail Communication Options panel.
15. Select the hyperlink in the subject column to view details of the communication.
16. Select the Click Here To View Recipients Of The Mass E-mail hyperlink to view a list of peoplethat the e-mail was successfully sent to.
17. Close out of the list and then out of the communication.
18. Select the Resume to finish sending the mailer. When all e-mails have been sent successfully, thestatus bar at the top of the Mass E-mail Status tab displays the following message: "There are nopending mass E-mails". If problems are encountered sending the e-mail, the problem is includedon the status list, and you can troubleshoot the problem if you need to. The e-mails sent to thegroup are saved as communications against the person and/or company that they are sent to. It isalso saved against the team and territory you specified on the Communication Options panel andaccording to the status you selected. You can now review any of the sent e-mails if you wish.
To review a sent e-mail:
l Find a person or company to whom you sent a mass e-mail and open the communication.
You can convert the e-mail to an opportunity, lead, or case. If the e-mail was linked to aWaveActivity, you can select theChange button and register a response to it. Note that to register aresponse, youmust open the E-mail Out from the Communications list in the Person orCompany context.
Sending E-marketing E-mails to GroupsTo send an E-marketing E-mail to a group:
1. SelectMy CRM | Groups, and click on the hyperlink of an existing group.
2. Click the New E-marketing E-mail button.
3. Select the Campaign andWave to assign the new E-marketing activity to, and Save.
4. Enter the E-marketing E-mail details. The fields are described in E-marketing E-mail Fields (page17-22).
5. Select Save & Send.
16-20 Sage CRM

Chapter 17: Campaign Management
In this chapter you will learn how to:
Campaign Set-up and Normal Wave Activities
l Understand how CRM enables you to run marketing campaigns.
l Understand what a wave is.
l Understand what a wave activity is.
l Create a new campaign.
l Create a wave.
l Create a wave activity.
l Understand the fields on the Campaign page.
l Understand the fields on the Wave page.
l Understand the fields on the Wave Activity page.
l Understand the different action types that can be applied to wave activities.
l Clone a campaign.
l Carry out a mail merge using a group.
l Set up response codes that can be used during calls.
l Schedule a follow up call.
l Create a new group based on responses to follow-up calls.
l Report on the success of my campaigns.
l Set up an outbound call handling wave activity.
l Understand the fields on the outbound call list.
E-marketing
l Set up an E-marketing campaign.
l Create an E-marketing e-mail.
l Understand E-marketing e-mail fields.
l Set up a Drip marketing campaign.
l Create a Drip marketing e-mail.
l Understand Drip marketing e-mail fields.
l Create a Drip marketing call list.
l Edit E-marketing e-mail templates.
l Analyze E-marketing campaigns.
l Work with the E-marketing User Profile tab.
User Guide 17-1

Chapter 17
What is Campaign Management?CampaignManagement enables you to record activities undertaken as part of marketingcampaigns. Campaigns consist of Waves, which in turn consist of Wave Activities.
Waves:Waves are a way of grouping activities within a campaign, normally in chronological order.
Wave activities:Wave Activities define exactly what action is done for the campaign, for example,Outbound Telesales Activity or Flyer Mailing Activity.
Sage E-marketing for Sage CRM is an integration with Swiftpage (http://www.swiftpage.com),which delivers E-marketing e-mail functionality driven from Sage CRM. E-marketing campaignsfollow the same basic structure as standard campaigns, but provide additional features such e-mailblast scheduling and "open and click" analysis. You can also use standard campaign wave activitytypes within E-marketing campaigns.
Campaign Scenario
CampaignManagement covers all the areas available from theMarketingmenu button - thisincludes E-marketing. The typical user operating in this area is the CampaignManager, who isresponsible for setting up andmonitoring progress on all campaigns. In practice, marketingactivities can be carried out frommany areas of Sage CRM - for example an e-mail blast fromMyCRM |Groups - and linked to campaigns set up from theMarketing area. More advancedcampaigns can reach beyond theMarketingmenu and include areas such as Data Upload and KeyAttributes.
The shaded area shows the steps which can be substituted with E-marketing campaign steps.
17-2 Sage CRM

Chapter 17: CampaignManagement
User Requirement: Info Manager Administration Rights
Adhering to Anti-Spam RegulationWorking with E-marketing, even on a trial account, requires strict adherence to anti-spam laws. Youmust ensure you comply with the US CAN-SPAM Act and your own regional anti-spam regulations.The essence of most regulation is that e-mail recipients must "opt in" to receiving e-mail from yourcompany, that you clearly identify yourself, and that youmake it easy for recipients to "opt out".Useful guidelines and links from Swiftpage can be found here:http://www.swiftpage.com/deliverability/antispampolicy.htm.
Swiftpage will not e-mail any address, which has opted out of receiving E-marketing e-mails fromyour company, using the opt-out link in the footer of the e-mail templates. The opt-out flag issynchronized and displayed in CRM on the Company, Person, or Lead summary page associatedwith the e-mail address that has "opted out". A CRM user canmanually check or uncheck theoption, however this has no impact on E-marketing e-mails sent from Swiftpage (these will alwaysretain the opt-out flag set from the E-marketing e-mail).
If you are using CRM's ownmass e-mail feature, it is recommended that the opt-out flag is added tothe group search criteria to ensure that people who have opted out of receiving e-mails via E-marketing, do not receive other marketing e-mails generated using the standardMass E-mailfeature. More information can be found on this in SendingMass E-mails (page 16-17).
Setting up a New CampaignTo set up a new campaign:
1. Select the Marketing button.
2. Select the Campaign List tab.
3. Select the New Campaign button.
Campaign page
4. Enter the campaign details, and select the Save button. The Campaign Summary page isdisplayed. Note: You must be in Hide Wave Activities mode to add a new wave from the CampaignSummary page. To toggle between the Expanded and Summary modes of the Campaign Summarypage, select the Show / Hide Wave Activities buttons.
User Guide 17-3

Chapter 17
Campaign Summarypage
5. Set up the waves, or phases of your campaign, by selecting the NewWave button. The New Waveinput form is displayed.
NewWave input form
6. Enter the Wave details and select the Save button.
7. Set up the Wave Activities by selecting the NewWave Activity button. The Wave Activity page isdisplayed.
Wave Activity page
8. Enter the Wave Activity details and select the Save button. You have now set up the framework ofthe campaign, and can begin on the first wave.
User Requirement: Info Manager Administration Rights
Campaign, Wave and Wave Activity FieldsNote: In most areas of E-marketing campaigns, the following special characters are notsupported: $ % ^ & ( ) { } [ ] ~ | / ? < > , :. The following special characters can be used in the e-mail subject and personal message: $ % & ( ) ? , :.
These tables explain the standard fields on the Campaign, Wave, andWave Activity pages. Pleaserefer to E-marketing E-mail Fields (page 17-22), Drip Marketing E-mail Fields (page 17-24), andOutbound Call Fields (page 17-14) for more information on fields relating specifically to theseWaveActivity types.
Campaign fields:
17-4 Sage CRM

Chapter 17: CampaignManagement
Field Description
Campaign Name Name of the campaign.
Type Drip marketing campaigns only. Set the dripmarketing campaign type: Anchor, Duration, orCalendar.Anchor - wave activities are carried out relative tothis date (before and after). For example a productlaunch.Duration - wave activities are carried out inresponse to other actions. For example, 1 day after arecipient opened and clicked an initial e-mail, theyreceive a "tips and tricks" newsletter.Calendar - wave activities are carried out onspecific dates. For example, scheduled quarterlynewsletters.
Anchor Date Drip marketing campaigns only, where the Type is setto Anchor. Enter the date around which the waveactivities should be based.
Ends On Drip marketing campaigns only, where the Type is setto Duration. Enter the date beyond which waveactivities should not be carried out (even if the othercriteria aremet).
Start Start date of the campaign.
End End date of the campaign. Must be on or after thecampaign start date. Not available for Drip marketingcampaigns, where the Type is set to Duration.
Status Status of the campaign. For example, Active,Cancelled, Finished, Pending. Read-only for Dripmarketing campaigns.
Group Drip marketing campaigns only. The group(recipients) is set at the Campaign level only (not perWave Activity), as subsequent wave activities or“stages” are based on filtered criteria from theoriginal group. Note: The groupmust include an e-mail address field and at least one recipient. Formore information on creating groups please refer toGroups (page 16-1).
Get E-mail From Drip marketing campaigns only. If the source viewthat the group is based on contains more than one e-mail field, you can select the one you want to usefrom theGet E-mail Address From field.
User Guide 17-5
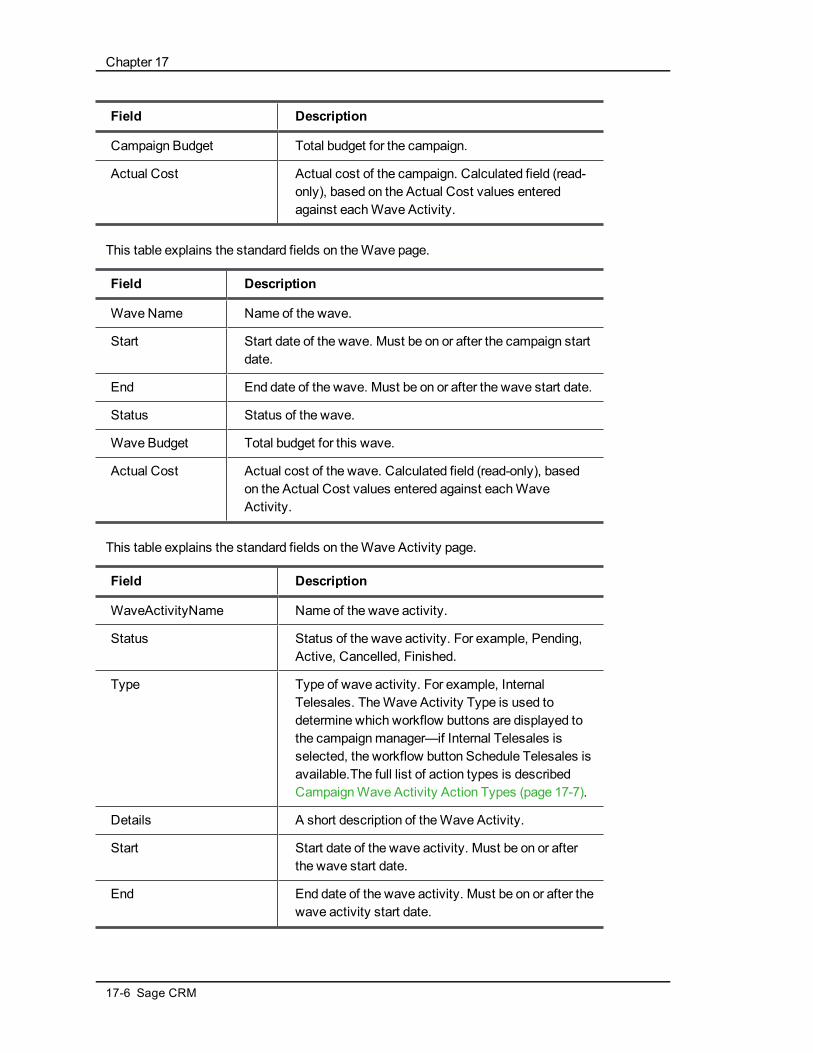
Chapter 17
Field Description
Campaign Budget Total budget for the campaign.
Actual Cost Actual cost of the campaign. Calculated field (read-only), based on the Actual Cost values enteredagainst eachWave Activity.
This table explains the standard fields on theWave page.
Field Description
WaveName Name of the wave.
Start Start date of the wave. Must be on or after the campaign startdate.
End End date of the wave. Must be on or after the wave start date.
Status Status of the wave.
Wave Budget Total budget for this wave.
Actual Cost Actual cost of the wave. Calculated field (read-only), basedon the Actual Cost values entered against eachWaveActivity.
This table explains the standard fields on theWave Activity page.
Field Description
WaveActivityName Name of the wave activity.
Status Status of the wave activity. For example, Pending,Active, Cancelled, Finished.
Type Type of wave activity. For example, InternalTelesales. TheWave Activity Type is used todetermine which workflow buttons are displayed tothe campaignmanager—if Internal Telesales isselected, the workflow button Schedule Telesales isavailable.The full list of action types is describedCampaignWave Activity Action Types (page 17-7).
Details A short description of theWave Activity.
Start Start date of the wave activity. Must be on or afterthe wave start date.
End End date of the wave activity. Must be on or after thewave activity start date.
17-6 Sage CRM
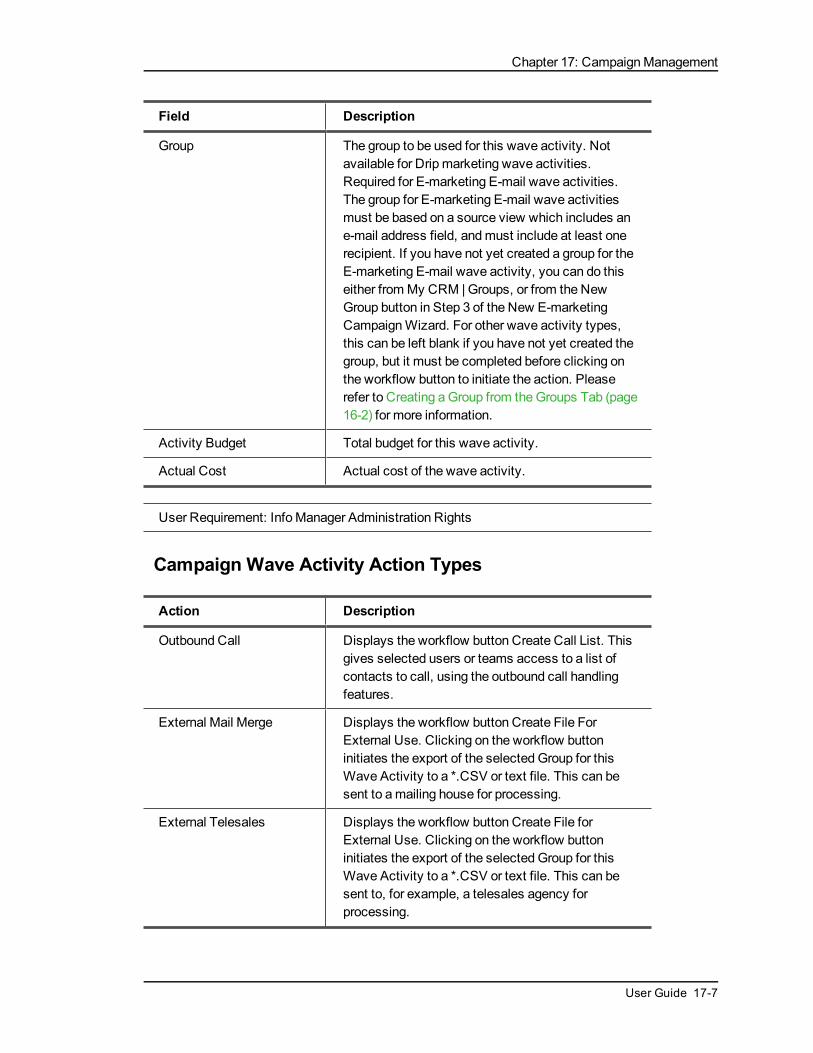
Chapter 17: CampaignManagement
Field Description
Group The group to be used for this wave activity. Notavailable for Drip marketing wave activities.Required for E-marketing E-mail wave activities.The group for E-marketing E-mail wave activitiesmust be based on a source view which includes ane-mail address field, andmust include at least onerecipient. If you have not yet created a group for theE-marketing E-mail wave activity, you can do thiseither fromMy CRM | Groups, or from the NewGroup button in Step 3 of the New E-marketingCampaignWizard. For other wave activity types,this can be left blank if you have not yet created thegroup, but it must be completed before clicking onthe workflow button to initiate the action. Pleaserefer to Creating aGroup from theGroups Tab (page16-2) for more information.
Activity Budget Total budget for this wave activity.
Actual Cost Actual cost of the wave activity.
User Requirement: Info Manager Administration Rights
Campaign Wave Activity Action Types
Action Description
Outbound Call Displays the workflow button Create Call List. Thisgives selected users or teams access to a list ofcontacts to call, using the outbound call handlingfeatures.
External Mail Merge Displays the workflow button Create File ForExternal Use. Clicking on the workflow buttoninitiates the export of the selected Group for thisWave Activity to a *.CSV or text file. This can besent to amailing house for processing.
External Telesales Displays the workflow button Create File forExternal Use. Clicking on the workflow buttoninitiates the export of the selected Group for thisWave Activity to a *.CSV or text file. This can besent to, for example, a telesales agency forprocessing.
User Guide 17-7

Chapter 17
Action Description
Internal Mail Merge Displays the workflow button DoMass Mail Merge.Clicking on the workflow button initiates themailmerge process.
Drip Marketing Call List Sets up an outbound call list once the criteria for thedrip campaign stage aremet. Drip Marketing CallLists can only be set up within a Drip Marketingcampaign. The first wave activity in a Drip Marketingcampaign cannot be a Drip Marketing Call List - itmust be a Drip Marketing E-mail.
Drip Marketing E-mail Sends out an e-mail once the criteria for the dripcampaign stage aremet. Drip marketing E-mails canonly be set up within a Drip Marketing campaign. Thefirst wave activity of a Drip Marketing campaignmustbe a Drip Marketing E-mail wave activity.
E-marketing E-mail Sends out an e-mail blast on the set date and time, orsends to the e-mail queue for immediate processing.If you are adding the E-marketing E-mail waveactivity to a standard campaign, the associatedcampaign can only be accessed from the E-marketingtab in the future.
Internal Telesales Displays the workflow button Schedule Telesales.Displays the New Task scheduling page, whichallows the scheduling of calls among a selectednumber of users.
Other Does not have an associated workflow button. Canbe used for, for example, a print advertising phase ofthe campaign.
User Requirement: Info Manager Administration Rights
Cloning a CampaignAll campaigns can be cloned (normal and E-marketing).
To clone campaign:
1. SelectMarketing | Campaigns or Marketing | E-marketing, and click on the hyperlink of acampaign.
2. Select Clone Campaign.
3. Give the campaign a new name, and select the new start date.
4. Select Save. The start dates for the Waves and Wave Activities are automatically adjusted to thesame offset as the original campaign - but based on the new campaign start date. Cloned DripMarketing campaigns are not launched until you select the Launch Drip Marketing Campaign
17-8 Sage CRM

Chapter 17: CampaignManagement
button from the Campaign Summary page. E-marketing E-mail activities must be edited aftercloning to become active.
Carrying out an Internal Mail MergeThis step assumes you have already set up the wave activity and the document template.
Tomerge the groupmembers with a document template:
1. Click on the Marketing button.
2. Select the Campaign List tab.
3. Select the CampaignWave Activity for the mail merge action.
4. Select the DoMass Mail Merge workflow button. The Progress Wave Activity page is displayed.
5. Select the group you wish to merge with.
6. Click on the Save button. A list of shared templates is displayed.
7. Select the template you want to use from the list.
8. Make any changes you want to the template. You can insert Sage CRM merge fields by selectingthem from the Insert Sage CRM Field drop-down box.
9. When you are happy with your merged document, click theMerge and Continue button to performthe merge.
10. When the merge is complete, click the paperclip icon to view the merged document, or clickContinue to go to the Save Merged Document as a Communication page. If you do not want tosave the merged document as a communication, you can deselect the Create Communicationcheck box.
11. Complete the relevant fields in the Details and Scheduling panels on the Save Merged Documentas a Communication page.
12. Select the Save button. The Wave Activity Summary page is displayed, with the Status field set toActions Completed.
User Requirement: Info Manager Administration Rights
Scheduling an Internal Telesales ActivityTo schedule follow-up calls for themarketing team:
1. Select theWave Activity. The Wave Activity Summary page is displayed.
2. Select the Schedule Telesales workflow button. The Wave Activity Progress page is displayed.
3. Select the group and click on Save. The New Task page is displayed with special schedulingoptions to distribute the calls among the Marketing Team.
User Guide 17-9

Chapter 17
New Taskpage
4. Select the members of the team to carry out the calls from the list of users.
5. Set the start date and time from the calendar and time fields.
6. Use the Scheduling Options to set the maximum number of calls per day.l If the Round Robin Broker Rule is selected, the number of calls per day will be the
maximum number of calls distributed evenly per user per day.
l If the Queue Broker Rule is selected, the number of calls per day will be the maximumnumber of calls distributed per day to the selected Team. The Queue Broker Rule can onlybe used if a Team has been selected.
l If the Distribute Among Team Users is checked, the calls will be distributed among all userswhose Primary Team is equal to the selected Team.
7. Select the Internal Actions option in the Parent Category field. The Parent Category field will storethe static list of recipients for this particular phone follow-up in Key Attribute Data.
8. Click on the Save button. The Wave Activity summary page is displayed. Clicking on theCommunications tab within this Wave Activity summary displays the full list of calls that have justbeen scheduled.
TheMarketing Team can now work through the follow-up calls from their respective Calendars,selecting the relevant response code as they complete each call.
User Requirement: Info Manager Administration Rights
Setting up New Response CodesA standard set of response codes is supplied with a standard installation. These can be capturedagainst any communication, which is linked to a campaign. The standard response codes are Good,Bad, Indifferent, or None. When you schedule, for example, follow-up calls for amail shot linked toa campaign, the response code can be completed at the end of the telephone call.
17-10 Sage CRM

Chapter 17: CampaignManagement
Communication with Campaign Response Codes
When all calls are completed, a new group can be created based on people who responded in acertain way. You can define new response codes for each campaign, or even for eachWaveActivity within a campaign. Response Codes defined at theWave Activity level apply to allcommunications linked to that Wave Activity. If no response codes have been defined at theWaveActivity level, then those defined at the Campaign level will apply to the associatedcommunications. If you do not define any new response codes, the standard CRM response codesare available.
This section shows you how to create new response codes customized to a particularWaveActivity. If the set of data to be collected during a campaign wave activity is more complex, it isrecommended Key Attribute Profiling andOutbound Call Handling are used to handle this.Response codes are suitable for a single expected outcome of a campaign wave activity. Forexample, for a Follow-up Call Wave Activity, the following response codes are required:
l A - Purchase within 3-6 months
l B - Purchase within 6-12 months
l C - Purchase decision >12 months
l D - No Interest
To set up a new Response Code:
1. Select the Marketing button.
2. Click on the hyperlink of the campaign in which you want to set up the Response Codes. Makesure you are viewing the "expanded" campaign page (click on the Show Wave Activities button if itis visible) and can see the Wave Activities in the Campaign.
3. Click on the hyperlink of the Wave Activity in which you want to set up the Response Codes. TheWave Activity Summary page is displayed.
4. Select the Response Setup button. The Maintain Lookup Selections page is displayed.
5. Add the code name (as it should appear to the user) in the Add Translation field, for example, 3-6Months.
6. Add a short code for the Response Code, for example A36.
User Guide 17-11
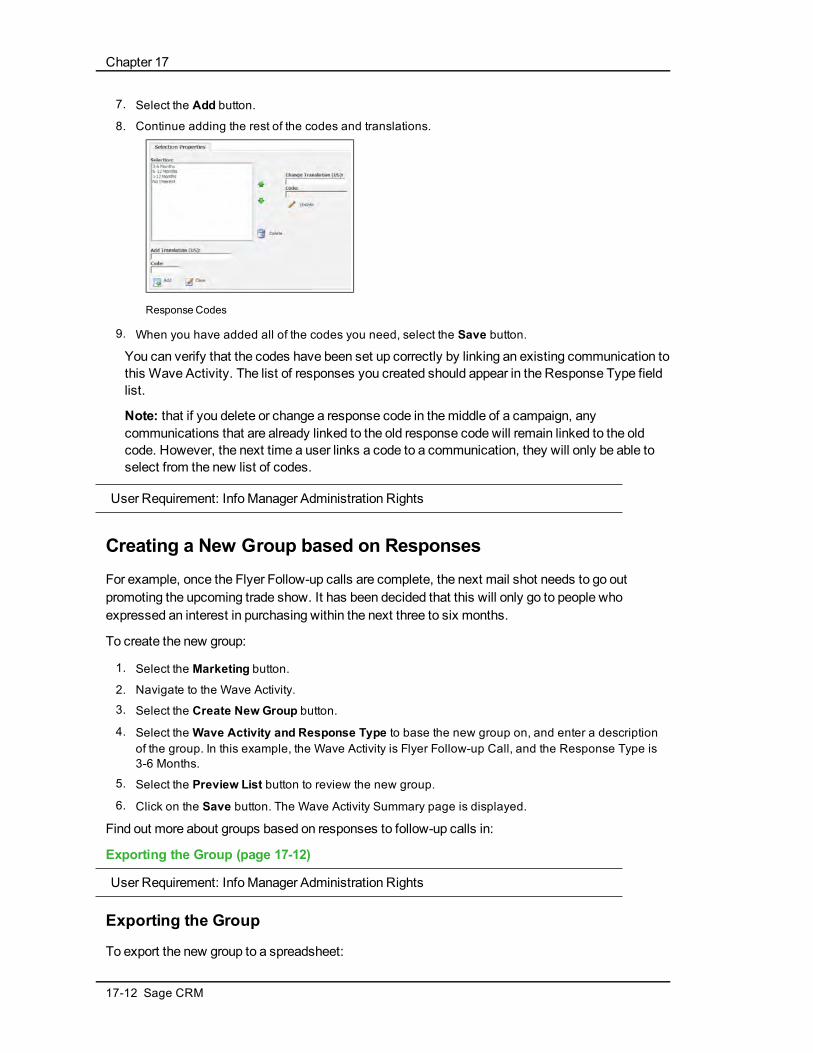
Chapter 17
7. Select the Add button.
8. Continue adding the rest of the codes and translations.
Response Codes
9. When you have added all of the codes you need, select the Save button.
You can verify that the codes have been set up correctly by linking an existing communication tothis Wave Activity. The list of responses you created should appear in the Response Type fieldlist.
Note: that if you delete or change a response code in themiddle of a campaign, anycommunications that are already linked to the old response code will remain linked to the oldcode. However, the next time a user links a code to a communication, they will only be able toselect from the new list of codes.
User Requirement: Info Manager Administration Rights
Creating a New Group based on ResponsesFor example, once the Flyer Follow-up calls are complete, the next mail shot needs to go outpromoting the upcoming trade show. It has been decided that this will only go to people whoexpressed an interest in purchasing within the next three to six months.
To create the new group:
1. Select the Marketing button.
2. Navigate to the Wave Activity.
3. Select the Create New Group button.
4. Select theWave Activity and Response Type to base the new group on, and enter a descriptionof the group. In this example, the Wave Activity is Flyer Follow-up Call, and the Response Type is3-6 Months.
5. Select the Preview List button to review the new group.
6. Click on the Save button. The Wave Activity Summary page is displayed.
Find out more about groups based on responses to follow-up calls in:
Exporting the Group (page 17-12)
User Requirement: Info Manager Administration Rights
Exporting the Group
To export the new group to a spreadsheet:
17-12 Sage CRM

Chapter 17: CampaignManagement
1. Select the Wave Activity, for example, TradeshowMail Shot.
2. Click the workflow button Create File For External Use. The Wave Activity Progress page isdisplayed.
3. Confirm the group to be exported from the Group field.
4. Click on the Save button. The Export File Options page is displayed. Note: if the output file alreadyexists, it will be overwritten with no warning.
5. Select the Spreadsheet (CSV) option. The list of contacts is displayed in spreadsheet format in anew window and can be sent to the external fulfillment house for processing. Complete thecommunication and export details and select Save. This allows a record to be kept against thisWave Activity and against each person in the group. The link to the exported group can also beviewed from the My CRM | Shared Documents tab. Once the wave activities have been completed,the workflow button, Completed, can be used to change the status of the wave activities. The ActualCost of the wave activities and the Wave Status can also be updated.
User Requirement: Info Manager Administration Rights
Setting up Outbound Call HandlingSetting upOutbound Call Handling for a campaign involves:
l Creating an Outbound Call Wave Activity
l Creating the Outbound Call List
Find out more about outbound call handling in:
Creating an Outbound Call Wave Activity (page 17-13)Creating the Outbound Call List (page 17-16)Refreshing the Outbound Call List (page 17-16)Reallocating Calls (page 17-17)Setting up Key Attribute Profiling Data on the Call Handling Screen (page 17-17)
User Requirement: Info Manager Administration Rights
Creating an Outbound Call Wave Activity
When you run the outbound call list, it displays the introductory message that the customer servicerepresentative will say when talking with the customer. Merge fields can be used in this introductorytext (for example, #pers_firstname#) so that the introductory text can be specific to the person youaremaking the call to.
Call lists are associated with CampaignWave Activities and are set up from theWave Activitypage by selecting theWave Activity TypeOutbound Call. When this Type is selected, two newpanels are displayed to add theOutbound Call details, and associated workflow buttons to schedulethe calls are displayed when the page is saved. These steps assume you have already set up acampaign and campaign waves.
To create anOutbound Call Wave Activity:
1. Select the Marketing button, and click on the Campaign List tab.
2. Click on the hyperlink of the Campaign. The Campaign Summary page is displayed.
3. Click on the hyperlink of the Wave.The Wave Summary page is displayed.
User Guide 17-13

Chapter 17
4. Select the NewWave Activity button. The Wave Activity page is displayed.
5. Type in theWave Activity Name and selectOutbound Call from the Type field. The Wave Activitypage is expanded to display the Outbound Call Details panel and Default Communication Detailspanel.
Outbound CallDetails panel
6. Enter the details on the Wave Activity page and select the Save button. The Outbound CallSummary page is displayed, showing workflow buttons relevant to the Wave Activity TypeOutbound Call on the lower right-hand side of the page.
User Requirement: Info Manager Administration Rights
Outbound Call Fields
TheWave Activity panel fields are described in Campaign, Wave andWave Activity Fields (page17-4). The table below explains the fields on the remaining panels of the Outbound Call WaveActivity.
Field Description
Team Gives access to the Outbound Call list to all users,whose primary team is the same as the teamselected in this field. This is not a required field, andif desired, only individual users can be given accessto the Outbound Call list by leaving this field blankand adding users in the Users field described below.
Introduction General greeting or introduction guideline. This canincludemerge fields, such as #pers_firstname#.
Contact Introduction Greeting or introduction once you get through to thecorrect contact person.This can includemergefields, such as #user_firstname#.
Daily Call Target Target level of daily calls for the Outbound Call list.This is also displayed to the user from the CallHandling page.
17-14 Sage CRM
Chapter 17: CampaignManagement
Field Description
Category Group Link to Key Attribute Category Group. Key AttributeData set up by the System Administrator can bemade available to the end user from the CallHandling page.
Users Users who have rights to access the Outbound Calllist fromMy CRM. Any user can be given access tothe call list even if they have a different primary teamfrom the one defined in the team field above.
Priority Priority of the communication that is automaticallycreated when a user reaches the contact.
Subject Subject of the communication. This can includemerge fields such as #pers_firstname#.
Communication Details Default Details of the communication.
Wave ItemsCommunications Team
Default Team of the communication.
Territory Default security territory of the communication.
Send on Drip Marketing Call Lists only.
When the call list should be scheduled.
Options vary depending on the Drip MarketingCampaign Type selected (Anchor, Calendar, orDuration).
Anchor - select the number of days/weeks/monthsbefore/after the anchor date at a specified time.
Calendar - send on a specified date/time.
Duration - specify the number of days after thecontact is added to the campaign, that the call listshould be started.This is the number of days after thecontact has become amember of the recipient list -for example, 1 day after they opened and clicked thefirst e-mail they were sent (if Sent To "Contacts fromprevious e-mail stages, matching Response ClickedA Link" was selected).
Send to Drip Marketing Call Lists only.
Who should be called.
Select from:
l All Contacts in Drip Marketing List
User Guide 17-15

Chapter 17
Field Description
l Contacts from previous E-mail stages, matchingresponse (one or more can be selected): Opened,No Clicks, Clicked a Link, or Unopened. Thisoption is disabled for the first Drip Marketing E-mailwave activity of the campaign.
l From Stage - select a specific previous stage.
Notification Drip Marketing Call Lists only.Choose if you want an e-mail notification, sent fromSwiftpage, a number of days before the stage isexecuted.
User Requirement: Info Manager Administration Rights
Creating the Outbound Call List
To create the call list:
1. Select the Create Call List workflow button. The Progress Wave Activity page is displayed.
2. Select the Group that the Outbound Call list will be created for.
3. Select the Save button. The Outbound Call Summary page is displayed. For each person in thegroup, a record is created in the List of Calls table. This list of customers is used by the systemwhen the agent requests the next call. All details related to the calling of that customer will besaved in the List of Calls table (for example, comments or call attempts). To check that the call listhas been created, log on as one of the users who has access to the Outbound Call list and checkthe My CRM | Outbound Calls tab.
User Requirement: Info Manager Administration Rights
Refreshing the Outbound Call List
New contacts, whomeet the selection criteria in the group but who were added to the databaseafter you created the initial call list, can be included in the call list at a later time by refreshing thecall list.
To refresh the call list:
1. From the Outbound Call Summary page, select the Refresh Call List button. The Progress WaveActivity page is displayed.
2. Select the Group that the call list should be refreshed against.
3. Select the Save button. The Outbound Call Summary page is displayed. This option runs the SQLin the group again and stores any new contacts who meet the group criteria in the call list.
User Requirement: Info Manager Administration Rights
17-16 Sage CRM

Chapter 17: CampaignManagement
Reallocating Calls
Calls on the call list are not usually allocated to individual agents (users). The exception to this is ifa user has successfully reached one of the people on the list, and there are other people working atthe same company still to call. In this case, these calls are preallocated to the user whomade thefirst contact.
If one of the agents is, for example, out sick for the rest of the week, and the campaign is due toend, the CampaignManager can reallocate these preallocated calls to another agent from theOutbound Call Summary page within theMarketing area of the system.
To reallocate any preallocated calls:
1. Select the Reallocate Calls button from the Outbound Call Summary page. The Reallocate Callspage is displayed in a new browser window.
2. Select the users to reallocate the calls from and to and click on the Save button. The ReallocateCalls From Users list displays all users who have preallocated calls. The Reallocate Calls To Userslist displays all users whose Primary Team is the same as the Reallocate Calls From user.Preallocated calls are reallocated according to the users specified.
User Requirement: Info Manager Administration Rights
Setting up Key Attribute Profiling Data on the Call Handling Screen
To collect information during the outbound call, theMarketingManager or System Administrator canset up Key Attribute Profiling data and link it to the call handling screen. This can be reported on andused for future group selections.
Example: Seminar Attendance Outbound Call Wave Activity
This example assumes the following data needs to be collected, and has already been set up in theKey Attributes Categories list.
Categories page
Question Answer (s)
Received Invitation Yes
No
Attending Seminar Yes
User Guide 17-17

Chapter 17
Question Answer (s)
No
Reason for not attending Time
Budget
Not Relevant
Other
Interested as Partner
Prospect
Journalist
Comments Text
To set up the Call Handling Category Group for Seminar Attendance data:
1. From Administration | Advanced Customization | Key Attributes, select the Category Groups tab. Alist of category groups is displayed.
2. Select Call Handling Category Groups from the list. A list of Call Handling category groups isdisplayed.
3. Select the New button. The Call Handling Category Groups page is displayed.
4. Add the information to the Call Handling Category Groups page. The fields are described in thetable below.
Field Description
Name Name of the category group, for example Seminar Response.
Description Longer description of the category group.
Key AttributeCategories
Highlight the categories you want to appear on the call handlingscreen from the Key Attribute Categories list andmove them tothe Categories Within Group list using the Add button.
Search String Allows you to search the Key Attribute Categories list.
Field Search? Extends the search to fields within categories.
Categories WithinGroup
Displays the categories you have selected from the KeyAttribute Categories list. You can change the order using thearrow buttons.
Related Entity The call handling datamust be stored against a CRM entity—for example, Person, Company, Communication. Select theentity from this list.
Question Prefixes the Key Attribute Data on the Call Handling Screenwith Question text. If this is left blank, then the category nameis displayed against the Key Attribute Data.
17-18 Sage CRM

Chapter 17: CampaignManagement
Field Description
Preview Preview displays the selected categories and all of their"children".
5. Select the Save button.
6. To link the category group to the Outbound Call Wave Activity, select the Marketing button andnavigate to the Campaign Wave Activity that you want the data collected for.
7. Click on the hyperlink of the Wave Activity. The Outbound Call Summary page is displayed.
Outbound Call Summarypage
8. Select the Change button.
9. Select the category group from the Category Group field.
10. Click on the Save button. The Outbound Call Summary page is displayed.
The key attribute profiling data can be viewed and collected fromMy CRM |Outbound CallLists by selecting the Outbound Call Wave Activity that you linked the Category Group to.When youGet a Call and click onGot Through, the key attribute data is displayed.
KeyAttribute Data on the CallHandling page
The data collected is stored against the entity selected during the Call Handling Category Groupsetup. For example, if you selected Communications, it is stored with the communication which iscreated upon completion of the call. This can be reported on, used for further group generation, andso on.
If you want the data collected during the call to be visible to the end user from, for example, anadditional tab within the Communication tab group, you need to set up aGeneral Category Group forthe key attribute data. Then, in the usual way, set up a new tab and link the tab to this CategoryGroup using the Key Attributes action.
You can also restrict this tab to only appear for the relevant Outbound Call Wave Activity by addingan SQL statement on the tab. For more information on adding key attribute profiling data to tabs,
User Guide 17-19

Chapter 17
please refer to "Key Attribute Profiling" in the System Administrator Help. For more information onTab Customization, please refer to "Tab Customization" in the System Administrator Help.
User Requirement: Info Manager Administration Rights
Reporting on Opportunities Generated through CampaignsWithin the context of a Campaign the Report tab displays a running status of the success of thecampaign:
Any opportunities generated as a result of this campaign should have been linked via theWaveActivity field on theOpportunity to the relevant Wave Activity.
Report tab within a Campaign
You can also use existing or create new reports accessed from the Reports button tomeasure otherinformation about the campaign.
User Requirement: Info Manager Administration Rights
Setting up an E-marketing CampaignBefore you start, make sure that:
l Your E-marketing Administrator has enabled you for E-marketing - check that you have access tothe E-marketing action button (New E-marketing Campaign) from Marketing | E-marketing.
l You have completed the e-mail address verification with Swiftpage - once the E-marketingAdministrator enables you for E-marketing, an automated verification e-mail is sent to you. Checkyour Junk or Spam E-mail folder if you have not received it yet.
l You have access to the Internet - communication between Sage CRM and Swiftpage is requiredfor the E-marketing features to work. This is carried out over the Internet.
To set up an E-marketing campaign:
1. SelectMarketing | E-marketing, and click on the New E-marketing Campaign action button. Allthe fields on the Campaign, Wave, and Wave Activity panels are described in Campaign, Waveand Wave Activity Fields (page 17-4).
2. Complete the Campaign fields in New E-marketing Campaign, Step 1 of 3.
3. Click Continue.
4. Complete the Wave fields in New E-marketing Campaign, Step 2 of 3.
5. Click Continue.
6. Complete the Wave Activity fields in New E-marketing Campaign, Step 3 of 3.
17-20 Sage CRM
Chapter 17: CampaignManagement
7. Complete the E-marketing E-mail fields. These are described in E-marketing E-mail Fields (page17-22). You can Preview Recipients to review the people who will receive the e-mail.
8. Select Save & Send to complete Step 3. The E-marketing E-mail Activity Summary page isdisplayed. If you have not put a date/time in the Schedule Mail field, the e-mail blast gets sent to thee-mail queue for immediate processing.An E-marketing E-mail communication is created for the user and can be viewed from My CRM |Calendar. Once results have been synchronized back to CRM from Swiftpage, the communicationstatus is updated to Complete, and the communication record is displayed in the Communicationstab of each recipient. An e-mail notification is also sent from Swiftpage including statistics on thenumber of e-mails sent, bounced, and failed.
Once any E-marketing wave activity has been completed, and this information has beensynchronized back to CRM from Swiftpage, a status banner is displayed at the top of thewave activity.
9. Click Continue to return to the E-marketing Wave Summary page. From here you can add morewave activities to the same campaign wave. For example, this could be another E-marketing e-mailor any other standard wave activity types.
User Requirement: Info Manager Administration Rights and E-marketing enabled.
Creating an E-marketing E-mailAn E-marketing E-mail can be created in a number of ways:
l In Step 3 of the E-marketing Campaign wizard. See Setting up an E-marketing Campaign (page17-20).
l By clicking the New E-marketing E-mail button from My CRM | Groups. See Sending E-marketingE-mails to Groups (page 16-20).
l By adding an E-marketing E-mail wave activity to an existing E-marketing or normal campaign. Seebelow.
To create an E-marketing e-mail:
1. From either Marketing | Campaign List or Marketing | E-marketing, click on the hyperlink of acampaign. Note: If you are adding the E-marketing E-mail wave activity to a standard campaign,the associated campaign can only be accessed from the E-marketing tab in the future. Click Cancelif you do not want to proceed.
2. Drill down to a campaign wave, and select NewWave Activity.
3. Complete the Wave Activity Fields, making sure that the Type is set to E-marketing E-mail.
4. Complete the E-marketing E-mail fields. These are described in E-marketing E-mail Fields (page17-22). You can select Preview Recipients to review the people who will receive the e-mail.
5. Select Save & Send. If you have not put a date/time in the Schedule Mail field, the e-mail blast getssent to the e-mail queue for immediate processing.An E-marketing E-mail communication is created for the user and can be viewed from My CRM |Calendar. Once results have been synchronized back to CRM from Swiftpage, the communicationstatus is updated to Complete, and the communication record is displayed in the Communicationstab of each recipient.
An e-mail notification is also sent from Swiftpage including statistics on the number of e-mails sent, bounced, and failed.
6. Click Continue to return to the E-marketing Wave Summary page. From here you can add morewave activities to the same campaign wave. For example, this could be another E-marketing e-mail
User Guide 17-21

Chapter 17
or any other standard wave activity types.
User Requirement: Info Manager Administration Rights and E-marketing enabled.
E-marketing E-mail Fields
Field Description
Subject The subject line for the e-mail. The following special charactersmust not be used in this field: ^ { } [ ] ~ | / < >
Send As Choose from a drop-down of enabled and verified E-marketingusers. You can select active or inactive E-marketing users to sendthe e-mail from. The e-mail is sent from the e-mail addressassociated with the selected user.
Group(Recipients)
Select from a list of all groups you have access to - for example amix of your own private groups, and thosemade available to allusers. If you have not yet created a group for the E-marketing E-mail wave activity, you can do this either fromMy CRM | Groups,or from the New Group button in Step 3 of the New E-marketingCampaignWizard.
Get E-mailAddressFrom
Select the source of the e-mail address. All e-mail addressesincluded in the view, used to create the group, are displayed forselection. For example, if you have a group based on the CompanyGroup view, you can choose between the Person's Business E-mail or the Company's Business E-mail address to send the e-mailto.
Template Select from a list of global and local templates available in theSwiftpage TemplateManager. If you want to upload a customtemplate to use in the E-marketing e-mail, go to E-marketing | EditE-mail Templates first. Once uploaded, the custom templatedisplays in the list. See Editing E-marketing E-mail Templates(page 17-26) for more information.
View/EditTemplate
Allows you to preview and edit the template in the SwiftpageTemplateManager.
PersonalMessage
A short block of text specific to this wave activity, which can beadded as amerge field to an e-mail template. This means that youcan reuse the same template for a number of wave activities. Forexample "Get the Early Bird Rate" in the first wave activity, and"Last chance for the Early Bird Rate" in the next wave activity. Thefollowing special characters must not be used in this text: ^ { } [ ]~ | / < >
ScheduleMail
Set the date and time to send the e-mail blast, or leave blank tosend to the e-mail queue for immediate processing.
17-22 Sage CRM

Chapter 17: CampaignManagement
User Requirement: Info Manager Administration Rights and E-marketing enabled.
Setting up a Drip Marketing CampaignBefore you start, make sure that:
l Your E-marketing Administrator has enabled you for Drip Marketing - check that you have access tothe New Drip Marketing Campaign action button from Marketing | E-marketing.
l You have completed the e-mail address verification with Swiftpage - once the E-marketingAdministrator enables you for E-marketing, an automated verification e-mail is sent to you. Checkyour Junk or Spam E-mail folder if you have not received it yet.
l You have access to the Internet - communication between Sage CRM and Swiftpage is requiredfor the E-marketing features to work. This is carried out over the Internet.
To set up a Drip Marketing campaign:
1. SelectMarketing | E-marketing, and click on the New Drip Marketing Campaign action button. Allthe fields on the Campaign, Wave, and Wave Activity panels are described in Campaign, Waveand Wave Activity Fields (page 17-4).Note: The Group is set at campaign level only for Drip Marketing campaigns. All Drip Marketingwave activities work from variations on the initial group set up for the campaign. For example, youcan set it up so that all recipients who opened and clicked into the first e-mail automatically getadded to the next stage, which may be a Drip Marketing Call List activity.
2. Complete the Campaign fields in New Drip Marketing Campaign, Step 1 of 3.
3. Click Continue.
4. Complete the Wave fields in New E-marketing Campaign, Step 2 of 3.
5. Click Continue.
6. Complete the Wave Activity fields in New E-marketing Campaign, Step 3 of 3. Note: The first waveactivity of a Drip Marketing campaign must be a Drip Marketing E-mail.
7. Complete the Drip Marketing E-mail fields. These are described in Drip Marketing E-mail Fields(page 17-24).
8. Select Preview Recipients to review the people who will receive the e-mail.
9. Select Save & Send to complete Step 3. The Drip Marketing E-mail Activity Summary page isdisplayed.
10. Click Continue to return to the Drip Marketing Wave Summary page. From here you can add morewave activities to the same campaign wave. For example, this could be another Drip Marketing E-mail, or any other standard wave activity types. Note: Standard wave activity types can use theirown Groups, even if they are set up within Drip Marketing campaigns. They are executedseparately by user-driven workflow, rather than Drip Marketing automation.
11. When you are ready to start the Drip Marketing campaign, click the Launch Drip MarketingCampaign action button from the E-marketing Campaign Summary page. No changes can bemade to the campaign once it has been launched. If you need to make changes, for example, toadd another wave activity, click the Suspend Drip Marketing Campaign button.
User Requirement: Info Manager Administration Rights and E-marketing enabled.
Creating a Drip Marketing E-mailA Drip Marketing E-mail can be created in a number of ways:
User Guide 17-23
Chapter 17
l In Step 3 of the Drip Marketing Campaign wizard. See Setting up a Drip Marketing Campaign(page 17-23).
l By adding a Drip Marketing E-mail wave activity to an existing Drip Marketing campaign. Seebelow.
To create a Drip Marketing E-mail wave activity:
1. SelectMarketing | E-marketing, click on the hyperlink of an existing drip campaign. Note: A dripmarketing wave activity can only be set up as part of a drip marketing campaign.
2. Drill down to a campaign wave, and select NewWave Activity.
3. Complete the Wave Activity Fields, making sure that the Type is set to Drip Marketing E-mail.
4. Complete the Drip Marketing E-mail fields. These are described in Drip Marketing E-mail Fields(page 17-24).
5. Select Save. A Drip Campaign communication is created for the user and can be viewed from MyCRM | Calendar. Once the e-mail has been sent by Swiftpage, the communication status isupdated to Complete, and the communication record is displayed in the Communications tab ofeach recipient.
6. Click Continue to return to the Drip Marketing Wave Summary page. From here you can add morewave activities to the same campaign wave. For example, this could be another Drip Marketing e-mail or any other standard wave activity type.
User Requirement: Info Manager Administration Rights and E-marketing enabled.
Drip Marketing E-mail Fields
Field Description
Subject The subject line for the e-mail. Special charactersmust not be used in the Subject line.
Template Select from a list of global and local templatesavailable in the Swiftpage TemplateManager. If youwant to upload a custom template to use in the DripMarketing e-mail, go to E-marketing | Edit E-mailTemplates first. Once uploaded, the customtemplate displays in the list. See Editing E-marketing E-mail Templates (page 17-26) for moreinformation.
View/Edit Template Allows you to preview and edit the template in theSwiftpage TemplateManager.
Personal Message Add a personalized introduction to the e-mail.
SendOn When the e-mail should be sent.
Options vary depending on the Drip MarketingCampaign Type selected (Anchor, Calendar, orDuration).
17-24 Sage CRM
Chapter 17: CampaignManagement
Field Description
Anchor - select the number of days/weeks/monthsbefore/after the anchor date at a specified time.
Calendar - send on a specified date/time.
Duration - specify the number of days after thecontact is added to the campaign, that the e-mailshould be sent out. If this is the first wave activity,this is the number of days after the drip launch. If it isa later stage in the campaign, then it is the number ofdays after the contact has become amember of therecipient list - for example, 1 day after they openedand clicked the first e-mail (if Sent To "Contacts fromprevious e-mail stages, matching Response ClickedA Link" was selected).
Send To Who the e-mail should be sent to.
Select from:
l All Contacts in Drip Marketing Listl Contacts from previous E-mail stages, matching
response (one or more can be selected): Opened,No Clicks, Clicked a Link, or Unopened. Thisoption is disabled for the first Drip Marketing E-mailwave activity of the campaign.
l From Stage - select a specific previous stage. Thisoption is disabled for the first Drip Marketing E-mailwave activity of the campaign.
Notification Choose if you want an e-mail notification, sent fromSwiftpage, a number of days before the stage isexecuted.
User Requirement: Info Manager Administration Rights and E-marketing enabled.
Creating a Drip Marketing Call ListTo create a Drip Marketing Call List wave activity:
1. SelectMarketing | E-marketing, click on the hyperlink of an existing drip campaign. Note: A dripmarketing wave activity can only be set up as part of a drip marketing campaign.
2. Drill down to a campaign wave, and select NewWave Activity.
3. Complete the Wave Activity Fields, making sure that the Type is set to Drip Marketing Call List.
4. Complete the Drip Marketing Call List fields. These are described in Outbound Call Fields (page17-14). You must assign either a team, or one or more users, to carry out the Drip Marketing CallList wave activity.
User Guide 17-25

Chapter 17
5. Select Save. A Drip Campaign communication is created for the user and can be viewed from MyCRM | Calendar. Once the e-mail has been sent by Swiftpage, the communication status isupdated to Complete, and the communication record is displayed in the Communications tab ofeach recipient.
6. Click Continue to return to the Drip Marketing Wave Summary page. From here you can add morewave activities to the same campaign wave. For example, this could be a Drip Marketing e-mail,another Drip Marketing call list, or any other standard wave activity type.
User Requirement: Info Manager Administration Rights and E-marketing enabled.
Editing E-marketing E-mail TemplatesYou can edit existing, and add new templates from either of the following areas:
l Marketing | E-Marketing | Edit E-mail Templates
l Selecting View/Edit Template within an E-marketing E-mail or Drip Marketing E-mail wave activity.
Both routes take you to the Swiftpage TemplateManager. From here you can:
l Upload custom templates
l Store referenced graphics
l Share templates with other E-marketing users
l Insert merge fields into standard templates. The standard merge fields available include:
Template Editor Merge Field CRM
Personal Message Personal message entered inWave Activity.
E-mail Address E-marketing user's e-mail address.
First Name Person (recipient) first name.
Last Name Person (recipient) last name.
Phone Person (recipient) full phone number.
Business Suffix Person (recipient) suffix. For example, PhD, MD.
Company Company name of the recipient.
You can also use any CRM field name, which has been included in the Group Contents, of thegroup that the e-marketing e-mail is going out to. The field namemust be enclosed in double squarebrackets, for example, [[pers_title]].
Click on the help button within Swiftpage for further assistance.
User Requirement: Info Manager Administration Rights and E-marketing enabled.
Analyzing E-marketing CampaignsThe E-marketing Analysis tab is displayed in the context of Campaigns andWave Activities, andshows results from E-marketing E-mails and Drip Marketing E-mails. In theWave Activity context
17-26 Sage CRM

Chapter 17: CampaignManagement
you can drill down on individual reports, for example, Open & Clicks, and export them to Excel, orcreate a new group of recipients from the report results.
Note: The results are updated nightly (03:00Mountain Time - GMT -6 hrs/-7 hrs) with informationpulled from Swiftpage.
To view E-marketing analysis data at theWave Activity level:
1. From the E-marketing Wave Activity Summary tab, switch to the E-marketingWave ActivityAnalysis tab. The top panel shows a summary of the results, the bottom panel provides hyperlinksto analysis reports. The tables below explain the columns and reports.
2. Click on the hyperlink of, for example, the Open & Clicks report. A list of recipients meeting thereport criteria is displayed.
3. From the report results you can Create New Group, Export To Excel, or Export To PDF. You canuse the filter box on the right-hand side of the screen to narrow the list. For example, recipientswhere the number of clicks is greater than 2 - and then base your new group of the filtered list.
4. Click Continue to return to the Analysis tab.
E-Marketing Results Summary Columns
Column Description
Subject Subject of the E-marketing or Drip E-mail. Click onthe hyperlink to open theWave Activity Summarypage.
Submitted The number of e-mails that were submitted forsending (the number of the recipients in the group).
Sent The number of e-mails actually sent (submittedminus duplicate, invalid, or opted out e-mailaddresses).
Unsent The number of e-mails that were not sent due toduplicate, invalid, or opted out e-mail addresses.
Bounced The number of e-mails that bounced back due toinvalid e-mail addresses or domain names. Note:When an e-mail bounces back three times from thesame e-mail address within a 60-day period, thefourth and further times that the same e-mail addressis blasted, the e-mail does not go out, and is countedas Unsent.
UniqueOpens The number of individuals, who opened the e-mail,regardless of how many times they opened it.
Unique Clicks The number of individuals, who clicked on any link inthe e-mail. An individual can only count once per linkwithin an e-mail.
User Guide 17-27
Chapter 17
Column Description
Total Clicks The total number of times any of the links wereclicked on within any of the e-mails sent out. Anindividual's clicks on a link counts more than once.
E-marketing Results Analysis Reports
Report Description
Open & Clicks For each recipient, shows the:
l Time they first opened the e-mail
l Number of times they opened the e-mail
l Number of times they clicked on a link
UniqueOpens By Time Shows the:
l Local time stamp of the first time that the recipientopened the e-mail
l Number of times they opened the e-mail
The report is sorted by the local time column.
UniqueOpens By E-mail Shows the number of times each recipient opened thee-mail, sorted by e-mail address.
Opens By E-mail Shows the local time that the e-mail was opened,sorted by e-mail address.
Opens By Time Shows the local time that the e-mail was opened,sorted by opened time.
Unique Clicks By Link Shows the address of each link in the e-mail, and thee-mail address of the recipient who clicked on it,sorted by link.
Unique Clicks By E-mail Shows the number of times each link was clicked on,sorted by e-mail address.
Clicks By Link Shows the first click and total number of clicks foreach link, sorted by e-mail address.
Unopened Shows a list of recipients where the e-mail remainedunopened.
Bounced Shows a list of recipients where the e-mail bounced.
Unsent Shows a list of recipients where the e-mail wasunsent and a reason (supplied by Swiftpage).
User Requirement: Info Manager Administration Rights and E-marketing enabled.
17-28 Sage CRM

Chapter 17: CampaignManagement
Working with the E-marketing User Profile TabThe E-marketing User Profile Tab is accessed fromMy CRM | E-marketing User Profile. You canview the user information associated with your E-marketing account from this area. You can alsoedit some of the details, for example, the e-mail address associated with your E-marketing userprofile (your "Send From" address).
To edit your E-marketing User Profile:
1. SelectMy CRM | E-marketing User Profile, and click on the Change button.
2. Update the details, for example, your e-mail address.
3. Click Save. If you change the e-mail address, the verification e-mail is automatically resent.
4. Go to your e-mail inbox and click on the verification link to complete the change. You can click theResend Verification E-mail button if you delete the first e-mail by mistake before completing theverification process.
Note: The Drip Marketing User check box on the E-marketing User Profile Tab is not currentlyavailable.
User Guide 17-29


Chapter 18: Cases
In this chapter you will learn how to:
l Define what a case is.
l Understand the fields on the case screen.
l Know if a case is within an SLA.
l Create a new case.
l Assign a case to a colleague.
l Progress the status of a case.
l Solve a case.
l Close a case.
l View the case pipeline.
l Run a case report.
l Find out what cases I am working on.
l Delete a case.
What is a Case?A Case in CRM is a Customer Service issue.
In CRM you can capture a customer query and track the progress of the problem through to asolution and closure.
User Guide 18-1

Chapter 18
Solving a Problem: Scenario
Creating a New CaseTo raise the customer service issue:
1. Find the customer.
2. Click on the hyperlink of the company.
3. Select the Cases tab, and click on the New button. Alternatively, you can right-click on or hoverover the New menu button and select Case to log a new case. The Log New Case page isdisplayed.
18-2 Sage CRM

Chapter 18: Cases
Case Details page
4. Add as much information as you know at this stage to the case details.
5. Select the Save button. The Case Summary page is displayed.
6. Select the Continue button. The Case is displayed in the list of cases on the Cases tab.
Case Fields
Field Description
Company Company that the case is with.
Person Main contact person for the case.
RefId Automatically generated reference Id for the case.Made up of [User Number] - [Automatic Counter].
Found In Which version of the product the problem was foundin.
SLA Service Level Agreement. If None is selected, theservice level agreement linked to the Company isused as the default to calculate target response andresolution times.
SLA Severity Service Level Agreement Severity. Also used tocalculate target response and resolution times. Forexample, Customers on theGold SLA, should havea response to all High SLA Severity Cases within 30minutes.
Description Short description of the problem.
Area Area of the product affected by the problem.
Source How the problem came to you. For example, Phone,E-mail, Fax.
Customer Ref Customer's own reference identifier.
Product Which product the customer has a problem with.
User Guide 18-3

Chapter 18
Field Description
Fix In Product version that a fix is due to be supplied in.
Territory Security territory. For more information, please referto Territory Management (page 4-7).
Created By Person the case is logged by.
Severity Severity of the case. For example, Normal, Low,High.
Assigned To Person currently responsible for the case.
Stage Stage of the case. For example, Logged, Queued,Investigating.
Status Status of the case. For example, In Progress,Closed.
Problem Type Type of problem. For example, Customerknowledge, Missing component.
Problem Details Detailed description of problem.
When you save the Case, the following additional fields are displayed in read-only format. They areavailable for editing on the Progress Case screen at the relevant point in the customer serviceworkflow process.
Field Description
Team Team responsible for the case.
Solution Type Type of solution. For example, Replacecomponent, On-Site Engineer.
Solution Details Detailed description of solution.
Closed Date the case is closed.
This table explains the Case Status icons.
Status Icon Description
In Progress
Closed
This table explains the SLA Status icons.
18-4 Sage CRM
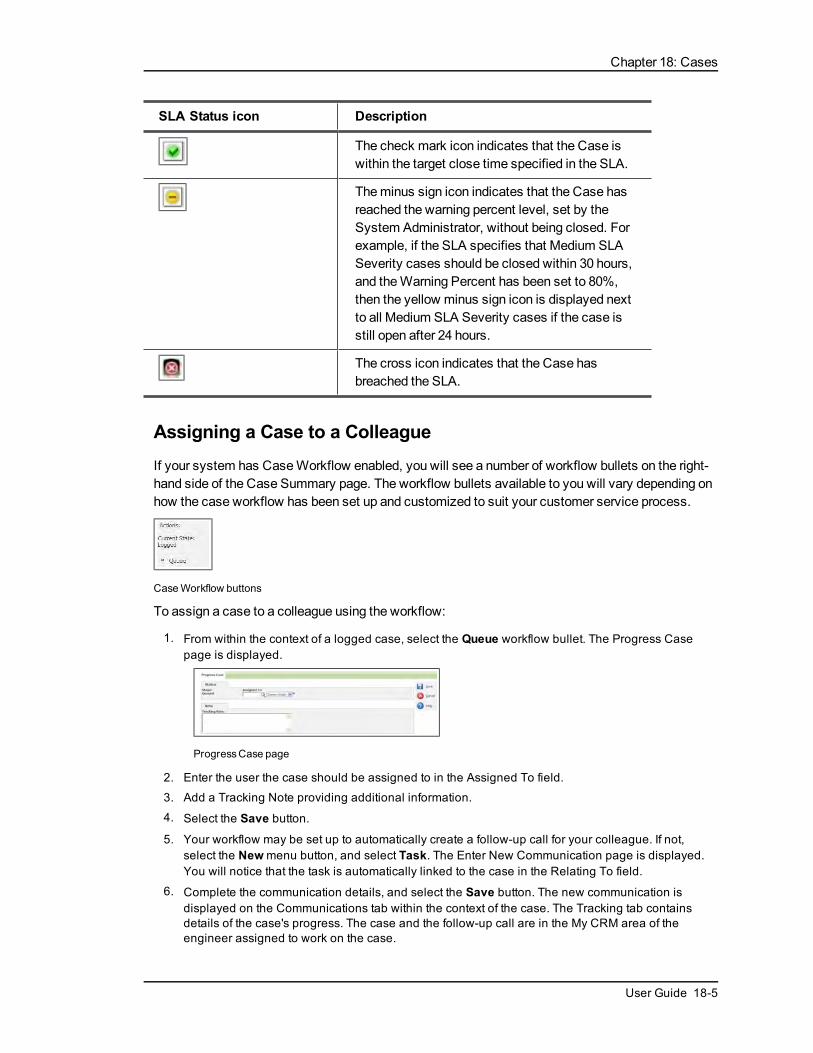
Chapter 18: Cases
SLA Status icon Description
The check mark icon indicates that the Case iswithin the target close time specified in the SLA.
Theminus sign icon indicates that the Case hasreached the warning percent level, set by theSystem Administrator, without being closed. Forexample, if the SLA specifies that Medium SLASeverity cases should be closed within 30 hours,and theWarning Percent has been set to 80%,then the yellow minus sign icon is displayed nextto all Medium SLA Severity cases if the case isstill open after 24 hours.
The cross icon indicates that the Case hasbreached the SLA.
Assigning a Case to a ColleagueIf your system has CaseWorkflow enabled, you will see a number of workflow bullets on the right-hand side of the Case Summary page. The workflow bullets available to you will vary depending onhow the case workflow has been set up and customized to suit your customer service process.
CaseWorkflow buttons
To assign a case to a colleague using the workflow:
1. From within the context of a logged case, select the Queue workflow bullet. The Progress Casepage is displayed.
ProgressCase page
2. Enter the user the case should be assigned to in the Assigned To field.
3. Add a Tracking Note providing additional information.
4. Select the Save button.
5. Your workflow may be set up to automatically create a follow-up call for your colleague. If not,select the Newmenu button, and select Task. The Enter New Communication page is displayed.You will notice that the task is automatically linked to the case in the Relating To field.
6. Complete the communication details, and select the Save button. The new communication isdisplayed on the Communications tab within the context of the case. The Tracking tab containsdetails of the case's progress. The case and the follow-up call are in the My CRM area of theengineer assigned to work on the case.
User Guide 18-5

Chapter 18
Progressing a CaseThe tech support specialist assigned to the case can access the case and the follow-up call fromtheir My CRM area. They may have even received an on-screen notification or e-mail regarding thecase.
Tomake the follow-up call and progress the case:
1. Select the My CRM button.
2. Click on the Cases tab. A list of all cases assigned to the current user is displayed.
3. Click on the case Status icon. The Summary page of the case is displayed.
4. Select the Investigating workflow bullet. The Progress Case page is displayed.
5. Add a Tracking Note, and select the Save button. The Case Summary page is displayed.
All changes made to the Case from the Progress Case page can be viewed from the CaseTracking tab. The tech support specialist can now complete the task set by his colleague to callthe customer back. He can confirm the current status and continue working on a resolution. TheDuration column in the Case Tracking tab shows how long the case has spent at each stage inthe resolution process. The Duration takes into account the business calendar linked to the SLA.These are defined by the System Administrator.
Solving a CaseOnce the tech support specialist is satisfied with a solution, the case can be progressed again tothe next stage of Solved.
l This time, when the case is progressed, the Solution Type and Solution Details should be filled in.
Case Progress page
Closing a CaseThe customer confirms that the solution fixes the problem and the case can be closed.
l The case is progressed through the workflow states of Pass and Regression Pass. The Case Stageis automatically set to Confirmed, and the Case Status to Closed.
l The Closed date should automatically be filled in.
l The case is now closed, and moves out of the tech support specialist's My CRM area, but it remainsas an integral part of the customer history for future reference.
18-6 Sage CRM
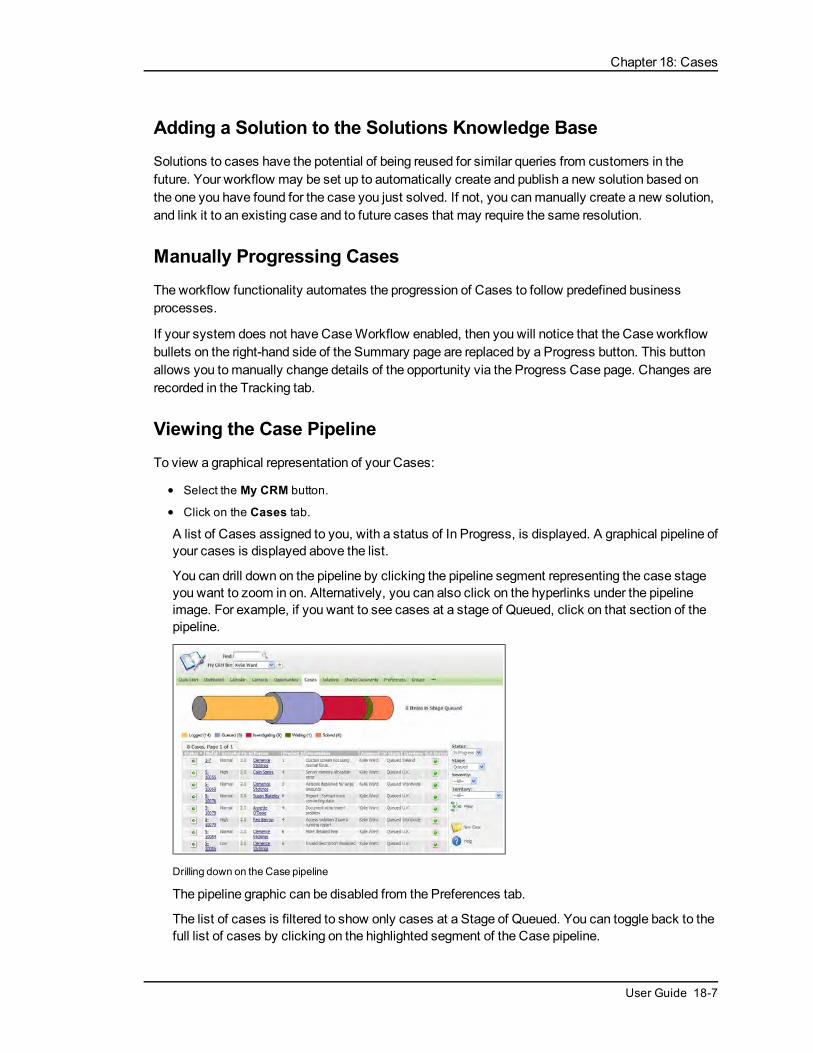
Chapter 18: Cases
Adding a Solution to the Solutions Knowledge BaseSolutions to cases have the potential of being reused for similar queries from customers in thefuture. Your workflow may be set up to automatically create and publish a new solution based onthe one you have found for the case you just solved. If not, you canmanually create a new solution,and link it to an existing case and to future cases that may require the same resolution.
Manually Progressing CasesThe workflow functionality automates the progression of Cases to follow predefined businessprocesses.
If your system does not have CaseWorkflow enabled, then you will notice that the Case workflowbullets on the right-hand side of the Summary page are replaced by a Progress button. This buttonallows you tomanually change details of the opportunity via the Progress Case page. Changes arerecorded in the Tracking tab.
Viewing the Case PipelineTo view a graphical representation of your Cases:
l Select the My CRM button.
l Click on the Cases tab.
A list of Cases assigned to you, with a status of In Progress, is displayed. A graphical pipeline ofyour cases is displayed above the list.
You can drill down on the pipeline by clicking the pipeline segment representing the case stageyou want to zoom in on. Alternatively, you can also click on the hyperlinks under the pipelineimage. For example, if you want to see cases at a stage of Queued, click on that section of thepipeline.
Drilling down on the Case pipeline
The pipeline graphic can be disabled from the Preferences tab.
The list of cases is filtered to show only cases at a Stage of Queued. You can toggle back to thefull list of cases by clicking on the highlighted segment of the Case pipeline.
User Guide 18-7
Chapter 18
Running a Case ReportCase Summary reports provide a quick overview of a particular customer service issue. Togenerate a summary report for a case:
1. Find and open the case you want to generate the report for.
2. From the Case Summary page, select the Summary Report button.
The report is displayed in PDF format.
Determining which Cases you are Working onTo find out which cases you are currently working on:
l From within My CRM, select the Cases tab.
The list of cases currently assigned to you is displayed. If the list is long and difficult to workwith, you can filter it using the filterbox on the right-hand side of the screen.
Deleting a CaseThe ability to delete cases depends on your security profile. If your profile allows you to deletecases, a Delete action button is available on the Case Summary page when you are in edit mode.Contact your System Administrator if you need to be able to delete cases but the button is notavailable to you.
To delete a case:
1. Find and open the case you want to delete.
2. From the Case Summary page, select the Edit button.
3. Click on the Delete button and then on the Confirm Delete button to delete the case.
The case record is deleted from the system.
18-8 Sage CRM
Chapter 19: Knowledge Base
In this chapter you will learn how to:
l Define what a solution is.
l Find solutions.
l View solutions from My CRM.
l Add a new solution.
l Understand the fields on the solution screen.
l Creating a new solution from a solved case.
l Link a solution to a case.
l Publish a solution.
l Delete a solution.
l E-mail a solution to a customer.
What is a Solution?Solutions are the "cleaned and approved" basis of a knowledge base. Solutions can be enteredmanually or published from a solved case using workflow. They can be searched for using keywords from aCase screen, or from a self serviceWeb page, so that customers or partners can findanswers to their questions without having to call a telephone support hotline.
Solutions are not linked to companies or people, however they can be linked tomultiple cases—anda case can be linked tomultiple solutions.
Note: Your System Administrator must give you rights to access Solutions for you to be able towork with them.
Solution FieldsThe fields are explained in the table below.
Field Description
Reference Id Automatically generated reference Id for thesolution. Made up of [User Number] - [AutomaticCounter].
Area Area of product or service affected.
Description Short description of the solution.
Details Longer description of the solution.
User Guide 19-1

Chapter 19
Field Description
Team Team responsible for the solution.
Stage Solution Stage. For example, Draft, Rejected,Reviewed.
Status Solution Status. For example, Not Published,Published.
Assigned To Person responsible for the solution.
Finding SolutionsThe following query arrives in your [email protected]: "How do I import fromMSExcel?".
To search for existing solutions:
1. Right-click on or hover over the Findmenu button, and select Solution from the pop out list.
Solution Find page
2. Type a keyword in the Description or Details field (for example, Excel), and select the Containsradio button. This will search for all solutions containing the keyword you have typed in. Add moresearch criteria if you need to narrow the results of the search even further. Note: You can also usethe % wildcard to turn the search into a "contains" search.
3. Select the Find action button. A list of all Solutions meeting your search criteria is displayed.
4. Click on the hyperlink of the Solution you want to review. The Solution Summary page isdisplayed. This should give you enough detail to respond to the initial query.
Viewing Solutions from My CRMOnce the System Administrator has given you rights, you can access Solutions from the Solutionstab within Cases or by selecting Solution from the Findmenu button. If you are a frequent user ofSolutions, youmay find it convenient to view the list of all Solutions currently assigned to you fromtheMy CRM area. To set this up:
1. Select the My CRM button.
2. Click on the Preferences tab, and select the Change button.
3. Set the Show Solutions In My CRM field to Yes.
4. Select the Save button. The Solutions tab appears in the My CRM tab group immediately.
19-2 Sage CRM
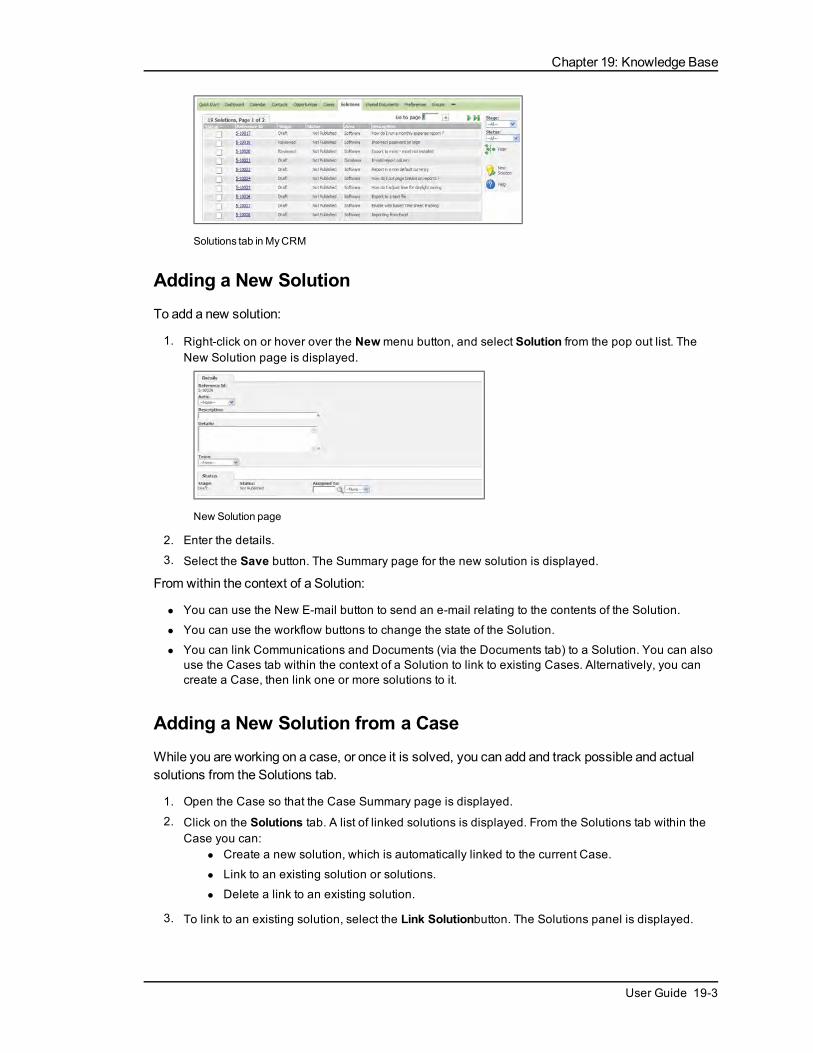
Chapter 19: Knowledge Base
Solutions tab inMyCRM
Adding a New SolutionTo add a new solution:
1. Right-click on or hover over the Newmenu button, and select Solution from the pop out list. TheNew Solution page is displayed.
New Solution page
2. Enter the details.
3. Select the Save button. The Summary page for the new solution is displayed.
From within the context of a Solution:
l You can use the New E-mail button to send an e-mail relating to the contents of the Solution.
l You can use the workflow buttons to change the state of the Solution.
l You can link Communications and Documents (via the Documents tab) to a Solution. You can alsouse the Cases tab within the context of a Solution to link to existing Cases. Alternatively, you cancreate a Case, then link one or more solutions to it.
Adding a New Solution from a CaseWhile you are working on a case, or once it is solved, you can add and track possible and actualsolutions from the Solutions tab.
1. Open the Case so that the Case Summary page is displayed.
2. Click on the Solutions tab. A list of linked solutions is displayed. From the Solutions tab within theCase you can:
l Create a new solution, which is automatically linked to the current Case.
l Link to an existing solution or solutions.
l Delete a link to an existing solution.
3. To link to an existing solution, select the Link Solutionbutton. The Solutions panel is displayed.
User Guide 19-3

Chapter 19
Solutionspanel
4. To find an existing solution, you can use the Advanced Search Select feature by typing a key worddirectly into the Link Solution field and clicking on the first magnifying glass icon. This displays alist of matches below the Link Solution field. You can also use the % wildcard to turn the search intoa "contains" search. Alternatively, click on the second magnifying glass icon and the standardSearch Select page is displayed in a new window.
Advanced Search Select results
5. Click on the hyperlink of the solution you want to link to this case.
6. Select the Save button. The linked solution is displayed in the list of Solutions.
Publishing a SolutionCustomers can be given rights to view and search through all published solutions from your externalWeb site.
Suppose Arthur Browne from Design Right is an existing customer contact with a valid supportcontract. Arthur should be able to view and search through all published solutions from your externalWeb site. You can work through this example if your System Administrator has installed the SelfService demonstrationWeb site. Remember to enable Arthur for self-service from the Person SelfService tab.
To publish a solution to an external Self ServiceWeb site:
1. Open the Solution so that the Solution Summary page is displayed.
2. Click on the Approve workflow button. The Progress Solution page is displayed.
3. You can add a tracking note to explain how the Solution was reviewed, and select the Save button.
4. Select the Publish workflow button.
5. You can add a tracking note, and select the Save button. The Solution Summary page is displayed,where the Stage is set to Reviewed and the Status is set to Published.
Once published, a customer or partner with a self-service logon ID can search for and view thesolution.
19-4 Sage CRM

Chapter 19: Knowledge Base
Finding a solution from a Self ServiceWeb site
Deleting a SolutionThe ability to delete solutions depends on your security profile. If the Delete action button is notavailable to you but you want to be able to delete solutions, contact your System Administrator.
To delete a solution:
l Open the solution so that the Solution Summary page is displayed.
l Click on Change.
l Select the Delete action button and then select Confirm Delete to delete the record.
Linking a Solution to a CaseTo link a solution to a case:
1. Open the solution so that the Solution Summary page is displayed.
2. Select the Cases tab and click on the Link Case button.
3. Find the Case you want to using the search select icons.
4. Once the case is displayed in the Link Case field, select Save.
E-mailing a SolutionTo e-mail a solution:
l Open the solution so that the Solution Summary page is displayed.
l Select the Send E-mail button. The solution details are included in the e-mail body.
l Complete the rest of the e-mail details, including the recipient and select Send to send the e-mail tothe customer.
User Guide 19-5

Chapter 20: Interactive Dashboard
In this chapter you will learn how to:
Dashboards
l Understand what to use a dashboard for.
l Access the interactive dashboard.
l Quick start with the interactive dashboard.
l Select a dashboard.
l Set a default dashboard.
l Creating a dashboard from a template.
l Copy a dashboard.
l Create a new dashboard.
l Modify dashboard details.
l Delete a dashboard.
l Set up a company dashboard.
Gadgets
l Add a gadget template to a dashboard.
l Add a new gadget to a dashboard.
l View the gadget quick reference.
l Edit gadget content.
l Link gadgets.
l Modify gadgets.
l Addmore data sources for gadgets.
Templates
l Work with dashboard templates.
l Add a dashboard template.
l Assign users to a dashboard template.
l Modify a dashboard template.
l Delete a dashboard template.
l Manage user dashboards.
l Add a gadget template.
l Modify a gadget template.
l Delete a gadget template.
l Add an SData feed template.
User Guide 20-1

Chapter 20
What is the Interactive Dashboard?The interactive dashboard is a highly-customizable workspace where you control what informationyou need to be effective in your job. Createmultiple dashboards and gadgets by choosing the feeds,workflow, and actions you want to drive from your workspace – or select predefined gadgets anddashboards from templates. Choose feeds from CRM, theWeb or ERP systems using SData.Watch one gadget change as you scroll through another, and drag and drop your gadgets to createthe layout you want.
Interactive Dashboard
1. Control Bar
Holds the buttons and sub-menus to select and build dashboards and gadgets. You can also TurnSnapOn/Off (snap-to-grid for flexible dashboard layout), access help, and return to the ClassicDashboard page from the control bar.
2. Status Bar
Displays the name and category of the dashboard, and shows if you are working with a dashboardtemplate. Youmust be an InfoManager or System Administrator to edit and save changes on atemplate.
3. Gadget
Gadgets feed information frommultiple data sources, internal and external to CRM, into yourworkspace. They are also platforms to carry out tasks and actions from, such as logging a newcase or progressing a sales opportunity through a workflow.
4. Workspace
Displays gadgets. Gadgets can be dragged and dropped, resized and overlapped, columns withingadgets can even be dragged and dropped - all to create the best workspace for your type of job andstyle of working.
20-2 Sage CRM
Chapter 20: Interactive Dashboard
Accessing the Interactive DashboardTo access the interactive dashboard:
l SelectMy CRM | Dashboard.A welcome dashboard is displayed.
Accessing the Interactive Dashboard after the first LogonThe next time you access the Dashboard tab within the same user session, the InteractiveDashboard is displayed, showing the last dashboard you were viewing.
The next time you access the Dashboard tab in a new user session, one of the following isdisplayed:
l Your default dashboard, if you have one.
l If no default has been set, the most recently modified dashboard.
l If you have no personal dashboards, a dashboard which has been assigned to you by an InfoManager or System Administrator. If you have multiple dashboards assigned to you, the mostrecently modified dashboard is displayed.
l If you have no personal or assigned dashboards, then the default welcome dashboard isdisplayed.
Quick StartThis example assumes your system includes either the standard CRM demo data, or at least onedashboard template and one gadget template set up by an InfoManager or System Administrator.
The quickest way to get up and running with the interactive dashboard is to:
1. Click New Dashboard | Choose Template.
2. Highlight one of the dashboards in the list of templates.
3. Click OK.
4. Give the dashboard a name, and click OK.
5. Select New Gadget | Choose Template to add more predefined gadgets.
6. Use the Edit button on the gadget headers to modify existing gadgets, or create your own customgadgets from New Gadget | Create Gadget.
7. To set your new dashboard as your default dashboard, select the Dashboard drop-down arrow,then click Dashboard Options. Highlight the dashboard you want to set as the default, click SetDefault, and then OK.
Selecting a DashboardTo select a dashboard:
1. Click My CRM | Dashboard, and click on the dashboard drop-down arrow. A list of dashboards isdisplayed.
2. Select the dashboard you want to display on your workspace.
User Guide 20-3
Chapter 20
The dashboard is displayed on your workspace. If the dashboard selected has been created bysomeone else, who has given you access to it, the Status bar displays themessage: "DashboardTemplate – youmust be an InfoManager or Administrator to edit and save". If you still want tomodify the dashboard, you can select theCreate a copy link on the status bar. The copieddashboard can bemodified by you.
Setting a Default DashboardTo set a default dashboard:
1. SelectMy CRM | Dashboard, click on the Dashboard drop-down arrow, and select DashboardOptions. If a default dashboard has already been set, a check mark icon is displayed next to thecurrent default dashboard.
Dashboard Options
2. Use the Filter by field to narrow the list of dashboards. The Filter by field works on a "Begins with"basis. For example, type "a" and you get a list of dashboards and categories beginning with theletter "a". You can also modify your category names from this dialog. Highlight the category andselectModify Category. A category containing dashboards cannot be deleted. The No Categorycategory can only be modified by the System Administrator via Administration | Translations.
3. Highlight the dashboard you want to set as your default, and click Set Default. A check mark icon isdisplayed next to the dashboard to show that the default dashboard is set. You can close the dialogwith the close (x) icon, or select and open the default dashboard by clicking OK.
4. Click OK. The default dashboard is displayed on your workspace. It is also displayed as the firstdashboard after your next logon, even if you have been working with other dashboards during yourlast user session.
To clear a default dashboard, highlight the default dashboard and select Clear Default.
Creating a Dashboard from a TemplateTo create a new dashboard from a template:
1. Click New Dashboard | Choose Template. The dashboards are grouped alphabetically bycategory, and then alphabetically by dashboard within each category.
2. Use the Filter by field to narrow the list of dashboards. The Filter by field works on a "Begins with"basis. For example, type "a" and you get a list of dashboards and categories beginning with theletter "a". You can also modify your category names from this dialog box. Highlight the category andselectModify Category.
20-4 Sage CRM

Chapter 20: Interactive Dashboard
3. Highlight the dashboard you want to display on your workspace, and click OK. The DashboardDetails dialog is displayed.
4. Give the dashboard a name. The category can also be updated from this dialog box.
5. Click OK. The new dashboard is displayed on your workspace with the updated name and can bemodified to suit your needs.
Copying a DashboardYou can copy a dashboard by either selecting theCreate A Copy hyperlink from aDashboardTemplate, or by using theCopy button within the Dashboard Options dialog.
To copy a dashboard from Dashboard Options:
1. Select Dashboard Options from the dashboard drop-down.
2. Highlight the dashboard you want to copy.
3. Select Copy.
4. Click Modify to change the Name, Description, and Category of the copy, and Save.
5. Click OK to select the copied dashboard and make changes to the gadgets on it.
To create a copy of a dashboard template:
1. Make sure the dashboard you want to copy is displayed on your workspace.
2. Select Create a copy. The Dashboard Details dialog box is displayed. The default namingconvention for the copied dashboard is Copy of [copied dashboard name].
3. Update the Name, Description and Category of the new dashboard. Note: The layout type (Fixedor Flexible) automatically copies the layout type from the source dashboard and cannot bechanged.
4. SelectOK. The copied dashboard is displayed on your workspace. It is also available from your listof personal dashboards via the dashboard drop-down list.
An InfoManager or System Administrator can clone dashboard templates and user dashboardsfrom Dashboard Templates. Please refer toWorking with Dashboard Templates (page 20-21) formore information.
Creating a New DashboardTo create a new dashboard:
1. SelectMy CRM | Dashboard | New Dashboard | Create Dashboard. The Dashboard Detailsdialog box is displayed.
2. Set the Type to Flexible or Fixed layout. Note: Once selected, and the dashboard is on yourworkspace, you cannot change the layout type.
l Fixed gives you a three-column layout. You can drag and drop and rearrange gadgetswithin a fixed format, extend the length of gadgets, and maximize them. If you regularlyswitch between different screen resolutions during your day, it is recommended you workwith a Fixed layout.
l Flexible lets you freestyle your dashboard layout. Gadgets can overlap, be arrangeddiagonally down your screen, and expanded width-ways.
User Guide 20-5

Chapter 20
3. Enter the Name, Description and Category for the dashboard. The dashboard name is a requiredfield. The category can be selected from the drop-down list, or a new one created by typing in theCategory field.
4. Click OK. The Gadget Template dialog box is displayed.
5. Select the check boxes next to the gadget templates you want to display on your dashboard. If youdon't want to display any of the gadget templates, close the dialog box. The next step is skipped.You can go back and add gadget templates later by clicking New Gadget | Choose Template or byadding new gadgets from New Gadget | Create Gadget.
6. Click OK. The new dashboard is displayed on your workspace with the gadgets you selected.
Modifying Dashboard DetailsTomodify dashboard details:
1. Select Dashboard Options from the Dashboard drop-down.
2. Highlight the dashboard you want to modify, and click Modify.
3. Update the Name, Description, and Category.
4. Click Save.
5. Click OK. The updated dashboard is displayed on your workspace. The details of Assigned andTemplate Dashboards can only be modified by Info Managers or System Administrators. This canbe done from Templates | Dashboard Templates — then follow the steps described above.
Deleting a DashboardTo delete a dashboard:
1. Make sure the dashboard you want to delete is not displayed on your workspace.
2. SelectMy CRM | Dashboard, and select Dashboard Options from the Dashboard drop-down.
3. Highlight the dashboard you want to delete, and click Delete.
Template and Assigned dashboards can only be deleted by a System Administrator or InfoManager. This can be done from Template | Dashboard Templates.
Adding a Gadget Template to a DashboardGadget templates are predefined by a System Administrator or Info Manager. A normal user canselect a gadget template and add it to their dashboard. Once the gadget is on your dashboard, youcan customize it to suit your needs.
To add a gadget template to a dashboard:
1. Make sure the dashboard you want to add the gadget template to is displayed on your workspace.
2. Select New Gadget | Choose Template. The Gadget Template dialog box is displayed showing alist of all gadget templates grouped by gadget type.
3. Click the check box next to the gadget template that you want to display on your dashboard.
4. Click OK. The gadgets are displayed on your dashboard.
20-6 Sage CRM

Chapter 20: Interactive Dashboard
Adding a New Gadget to a DashboardTo add a new gadget to a dashboard:
1. Make sure the dashboard you want to add the new gadget to is displayed on your workspace.
2. Select New Gadget | Create Gadget. The Gadget wizard is displayed.
3. Select the type of gadget you want to add. Please refer to the Gadget Quick Reference (page 20-7)for more information.
4. Complete the gadget wizard steps. The new gadget is displayed on your dashboard.
Gadget Quick Reference
Gadget Description
Calendar Gadget (page 20-8)
Drill into appointments, add quick appointments,scroll through your calendar, and filter byappointment status. Note: Quick appointmentscannot be added on the Company dashboard tab.
Chart Gadget (page 20-8) Display a report chart, drill into the associated reportsearch criteria, run the full report, and use built-inanimation.
List Gadget (page 20-9) View, filter, and carry out actions on lists. Can belinked to other list and record summary gadgets fordynamic filtering.
MainMenu Item Gadget(page 20-10)
Addmultiple CRM or web site icons to a singlegadget. CRM actions includemainmenu actionssuch as Find Quote and New Lead.
Notification Gadget (page20-11)
View and drill into notification alerts, dismiss orsnooze individual or all notifications.
Record Summary Gadget(page 20-11)
View aCRM record’s summary page. Must be linkedto a list gadget to display data.
RSS FeedGadget (page20-11)
Displays an RSS feed. User Name and Passworddetails can be preset for feeds requiringauthentication.
SData List Gadget (page 20-11)
Work with records from SData-compliant ERPsystems or from a Sage CRM SData Feed. Can belinked to SData List or SData Record Summarygadgets for dynamic filtering.
SData Record SummaryGadget (page 20-13)
View an SData record’s summary page. Must belinked to an SData list gadget to display data.
User Guide 20-7
Chapter 20
Gadget Description
Summary Gadget (page 20-13)
Link tomultiple lists from a single gadget. Lists canbe displayed as icons, summary lists, or a pipelinegraphic (for single lists).
Task List Gadget (page 20-14)
Drill into tasks, add a new quick task, filter by taskstatus, and switch between daily, weekly, andmonthly task lists. Note: Quick tasks cannot beadded on the Company dashboard tab.
Web Site Gadget (page 20-14)
Type or paste in a web site address, or select acontent block set up by the System Administrator.Note: Not all web sites are compatible with thisgadget, for example, web sites which do not allowthemselves to be embedded in other pages. An errormessage is displayed once the gadget is on thedashboard.TheWeb Site gadget can display a static URL. Todefine a static URL in theWeb Site gadget, the URLmust begin with the text #crm_server#. The actualHTML files must be placed in a folder off theWWWRoot folder. Please refer toWeb Site Gadget(page 20-14) for more details. This format can alsobe used to link to third-party gadgets. Please refer totheDeveloper Guide for more details.
Calendar Gadget
To add a new calendar gadget to a dashboard:
1. Click Calendar from the Gadget Wizard.
2. Add a Name and Description for the gadget.
3. Click Finish.
Once the Calendar gadget is on your dashboard you can:
l Drill into an appointment by clicking on the Action icon.
l Add a new quick appointment. Note: Quick appointments cannot be added on the Companydashboard tab.
l Scroll through your calendar.
l Filter by appointment status. You can have multiple calendar gadgets on your dashboard. Forexample, you might want one calendar which shows only pending appointments, and anotherwhich shows all appointments.
Chart Gadget
To add a new chart gadget:
20-8 Sage CRM
Chapter 20: Interactive Dashboard
1. Click Chart from the Gadget Wizard. A list of reports with charts is displayed.
2. Select the chart or report title from the list of report charts. Use the Filter by field to narrow the list ofcharts. The Filter by field works on a "Begins with" basis.
3. Click Next.
4. Select the Drill Down option from the drop-down field.Go To List Or Report displays an Actionicon in the gadget header once the gadget is on the dashboard. When you click on the Action icon,the report Display Options and Search Criteria page is displayed.
5. Select the Default Action option from the drop-down field. Run Report adds a hyperlink to thereport chart, which runs the full report. Default search criteria are applied to the report if they exist.Note: If you want to use the animation directly from the chart on the dashboard, make sure DefaultAction is set to None -otherwise the full report is displayed - but you can also access the animationfrom the full report.
6. Click Next.
7. Add a Name and Description for the gadget.
8. Click Finish.
Built-in animationmeans that you can watch charts grow as they are formed. You can also interactwith charts once they are drawn – for example, highlighting slices and rotating pie charts. For moreinformation on interacting with charts, please refer to Running a Report (page 10-1).
List Gadget
To add a new list gadget:
1. Click List from the Gadget Wizard. A list of entities is displayed.
2. Select the entity to base your gadget on from the list.
3. Click Next. A list of data sources, grouped by type (Group, Report, Saved Advanced Find, SavedSearch) is displayed.
4. Select the data source to base your gadget on from the list. Use the Filter by field to narrow the list.The Filter by field works on a "Begins with" basis.
5. Click Next. A list of columns available to display on the gadget is displayed.
6. Click the check box next to the columns you want to display on the gadget, or click Select All. Thenumber of records to display per page of the gadget defaults to 10. This can be changed in the No.Of Rows field.
7. Click Next.
8. Select the Drill Down option from the drop-down field.Go To List Or Report displays an Actionicon in the gadget header once the gadget is on the dashboard. Clicking on the Action icon drillsinto either the report search criteria page (for report data sources) or to the associated list of asaved search, advanced find, or group data sources.
Drill Down Action icon on gadget header
9. Select the Default Action option from the drop-down field. Setting a Default Action adds a columndisplaying an icon next to each record in the gadget. The selected action is launched when youclick on the icon:
User Guide 20-9
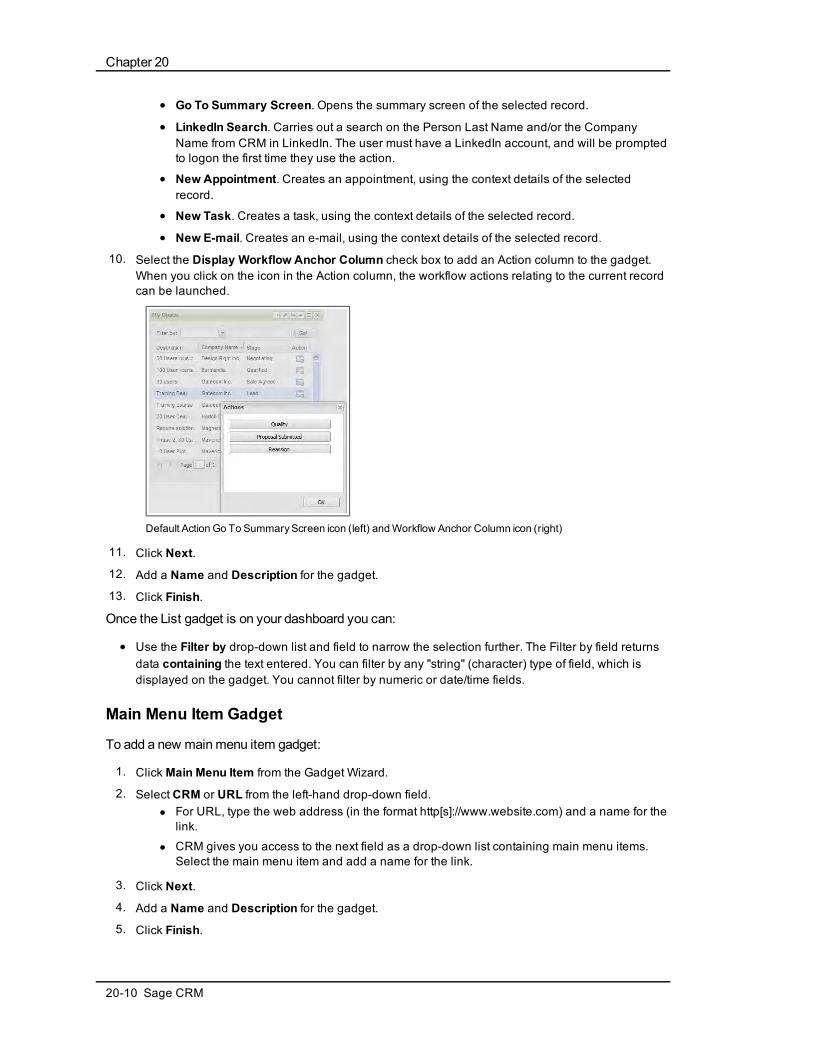
Chapter 20
l Go To Summary Screen. Opens the summary screen of the selected record.
l LinkedIn Search. Carries out a search on the Person Last Name and/or the CompanyName from CRM in LinkedIn. The user must have a LinkedIn account, and will be promptedto logon the first time they use the action.
l New Appointment. Creates an appointment, using the context details of the selectedrecord.
l New Task. Creates a task, using the context details of the selected record.
l New E-mail. Creates an e-mail, using the context details of the selected record.
10. Select the Display Workflow Anchor Column check box to add an Action column to the gadget.When you click on the icon in the Action column, the workflow actions relating to the current recordcan be launched.
Default Action Go To SummaryScreen icon (left) andWorkflow Anchor Column icon (right)
11. Click Next.
12. Add a Name and Description for the gadget.
13. Click Finish.
Once the List gadget is on your dashboard you can:
l Use the Filter by drop-down list and field to narrow the selection further. The Filter by field returnsdata containing the text entered. You can filter by any "string" (character) type of field, which isdisplayed on the gadget. You cannot filter by numeric or date/time fields.
Main Menu Item Gadget
To add a new mainmenu item gadget:
1. Click Main Menu Item from the Gadget Wizard.
2. Select CRM or URL from the left-hand drop-down field.l For URL, type the web address (in the format http[s]://www.website.com) and a name for the
link.
l CRM gives you access to the next field as a drop-down list containing main menu items.Select the main menu item and add a name for the link.
3. Click Next.
4. Add a Name and Description for the gadget.
5. Click Finish.
20-10 Sage CRM

Chapter 20: Interactive Dashboard
Notification Gadget
To add a new notification gadget to a dashboard:
1. Click Notification from the Gadget Wizard.
2. Add a Name and Description for the gadget.
3. Click Finish.
Once the Notification gadget is on your dashboard you can:
l Drill into an appointment by clicking on the appointment details.
l Dismiss or snooze individual or all notifications.
Record Summary Gadget
To add a new record summary gadget:
1. Click Record Summary from the Gadget Wizard. A list of entities is displayed.
2. Select the entity to base your gadget on from the list.
3. Click Next. A list of record summary blocks is displayed.
4. Select the block to base your gadget on.
5. Click Next.
6. Add a Name and Description for the gadget.
7. Click Finish.
The record summary gadget displays content when it is linked to a list gadget. Please refer toLinking Gadgets (page 20-15) for more information.
RSS Feed Gadget
To add a new RSS feed gadget:
1. Click RSS Feed from the Gadget Wizard.
2. Type or paste theWeb Address for the feed (in the format http[s]://www.website.com).
3. Select the Authentication check box to set up the User Name and Password for a feed requiringauthentication. Setting the authentication on the gadget prevents the user from being prompted forlogon details each time the secure feed is accessed.
4. Click Next.
5. Add a Name and Description for the gadget.
6. Click Finish.
SData List Gadget
To add a new SData list gadget:
1. Click SData List from the Gadget Wizard.
2. Select from:
User Guide 20-11
Chapter 20
l Sage CRM SData feed - to create a gadget based on data from CRM's internal SData feed.
l Pre-configured SData feed - to create a gadget based on an existing SData feed to surfacedata from an SData-compliant ERP system. The pre-configured SData feed is set up by anAdministrator or Info Manager in Template | SData Feed Templates.
l Custom SData feed - to create a gadget based on an SData schema URL, which you typein yourself. Type a valid SData schema URL to get information about the data sourcesavailable from the provider in the Web Address field.
l A valid SData schema URL takes the format:http[s]://server[:port]/sdata/application/contract/resource kind/$schemaPlease refer to theDeveloper Help for more information on constructingcustom SData feeds.
l Set up the User Name and Password for a feed requiring authentication. Settingthe authentication on the gadget prevents the user from being prompted for logondetails each time the secure feed is accessed.
l After the gadget has been saved, feeds added in the Custom section will beavailable as pre-configured feeds to the user who added the feed.
3. Click Next.
4. Select the entity to base your gadget on from the list. The list of entities displayed is defined in theSData Schema.
5. Click Next.
6. Click the check box next to the columns you want to display on the gadget, or click Select All. Thecolumns within each entity are defined in the SData Schema.
7. Click Next.
8. In Step 4 of the wizard, select Include/Exclude, the field to filter on, the operator, and the value tofilter by. For example, Include Invoices where Status Is Equal To Overdue.
l The operators available change depending on the field type selected. Enter the value as adrop-down selection or free text. The format of some fields, for example dates, depends onhow the data is supplied in the feed.
l If the full field name from the feed is too long to display in field drop-down, an ellipses (...) isdisplayed in the middle of the field. Hovering over the field name shows the full name.
l A maximum of five filter rules can be added to a gadget. All filters are logical Ands. Thismeans that an SData gadget with multiple filters returns data, which meets all the filtercriteria. For example, Include Invoices where Status Is Equal To Overdue AND IncludeInvoices where Payment Terms Is Equal To 30 days.
9. Click Next.
10. Add a Name and Description for the gadget.
11. Click Finish.
Once the SData List gadget is on your dashboard you can:
l Drill into and edit the data using the drill-down icon in the left-hand column. The record details aredisplayed in the SData Navigator.
l Use the Filter by drop-down list and field to narrow the selection further. The Filter by field returnsdata containing the text entered. You can filter by any "string" (character) type of field, which isdisplayed on the gadget. You cannot filter by numeric or date/time fields.
l Link it to another SData List gadget or to an SData Record Summary gadget.
20-12 Sage CRM
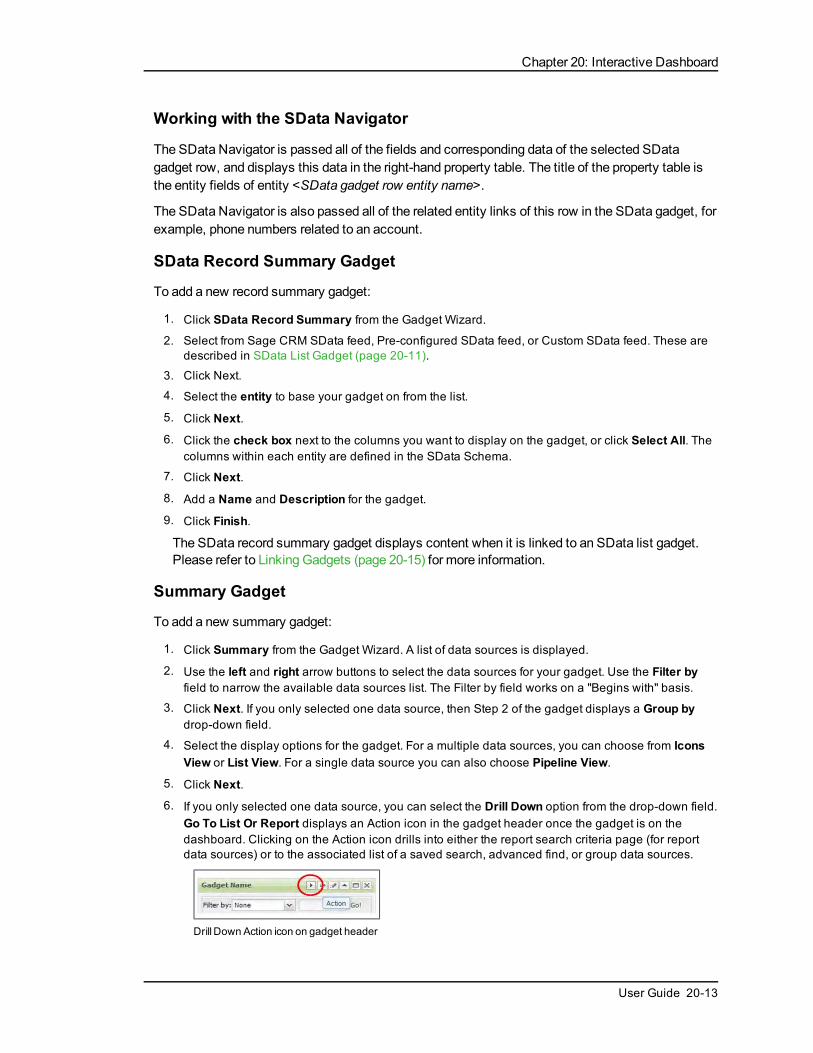
Chapter 20: Interactive Dashboard
Working with the SData Navigator
The SData Navigator is passed all of the fields and corresponding data of the selected SDatagadget row, and displays this data in the right-hand property table. The title of the property table isthe entity fields of entity <SData gadget row entity name>.
The SData Navigator is also passed all of the related entity links of this row in the SData gadget, forexample, phone numbers related to an account.
SData Record Summary Gadget
To add a new record summary gadget:
1. Click SData Record Summary from the Gadget Wizard.
2. Select from Sage CRM SData feed, Pre-configured SData feed, or Custom SData feed. These aredescribed in SData List Gadget (page 20-11).
3. Click Next.
4. Select the entity to base your gadget on from the list.
5. Click Next.
6. Click the check box next to the columns you want to display on the gadget, or click Select All. Thecolumns within each entity are defined in the SData Schema.
7. Click Next.
8. Add a Name and Description for the gadget.
9. Click Finish.
The SData record summary gadget displays content when it is linked to an SData list gadget.Please refer to Linking Gadgets (page 20-15) for more information.
Summary Gadget
To add a new summary gadget:
1. Click Summary from the Gadget Wizard. A list of data sources is displayed.
2. Use the left and right arrow buttons to select the data sources for your gadget. Use the Filter byfield to narrow the available data sources list. The Filter by field works on a "Begins with" basis.
3. Click Next. If you only selected one data source, then Step 2 of the gadget displays a Group bydrop-down field.
4. Select the display options for the gadget. For a multiple data sources, you can choose from IconsView or List View. For a single data source you can also choose Pipeline View.
5. Click Next.
6. If you only selected one data source, you can select the Drill Down option from the drop-down field.Go To List Or Report displays an Action icon in the gadget header once the gadget is on thedashboard. Clicking on the Action icon drills into either the report search criteria page (for reportdata sources) or to the associated list of a saved search, advanced find, or group data sources.
Drill Down Action icon on gadget header
User Guide 20-13
Chapter 20
If you selectedmultiple data sources you can drill down by clicking on the summary list oricon once the gadget is on the dashboard. The drill down from the summary list or icon iseither into the report search criteria page (for report data sources) or to the associated list of asaved search, advanced find, or group data sources.
7. Click Next.
8. Add a Name and Description for the gadget.
9. Click Finish.
Task List Gadget
To add a new task list gadget to the dashboard:
1. SelectModify Dashboard | Add New Gadget.
2. Select the Task List gadget.
3. Add a Name and Description for the gadget.
4. Click Finish.
Once the Task List gadget is on your dashboard you can:
l Drill into a task by clicking on the Communication Action icon.
l Add a new quick task. Note: Quick appointments cannot be added on the Company dashboard tab.
l Filter by today, this week, this month, and this year.
l Filter by task status.
l Customize the column layout by dragging and dropping or clicking on the drop-down arrow next tothe column heading.
l Link to other task list, list, or record summary gadgets. Please refer to Linking Gadgets (page 20-15) for more information.
Web Site Gadget
To add a new web site gadget:
1. ClickWeb Site from the Gadget Wizard.
2. Type or paste theWeb Address (in the format http[s]://www.website.com), or select a ContentBlock, which has been predefined by the System Administrator. Note: Not all web sites arecompatible with this gadget, for example, web sites which do not allow themselves to be embeddedin other pages. An error message is displayed once the gadget is on the dashboard.
3. Click Next.
4. Add a Name and Description for the gadget.
5. Click Finish.
Displaying a Static URL
TheWeb Site gadget can display a static URL. To define a static URL in theWeb Site gadget, theURLmust begin with the text #crm_server#. The actual HTML files must be placed in a folder offtheWWWRoot folder. A System Administrator with access to this folder can help you do this.
Example 1:
#crm_server#/StaticContent/abcd.html
20-14 Sage CRM

Chapter 20: Interactive Dashboard
Relates to a file called abcd.html in a folder created off theWWWRoot folder called StaticContent.
This format can also be used to link to third-party gadgets. Please refer to theDeveloper Guide formore details.
Example 2:
#crm_server#/StaticContent/#language#/ecosystem/CommunityLinks.htm
Relates to a folder created off theWWWRoot folder called StaticContent, which contains anoptional placeholder that picks up the language of the user (it would appear on the file system asWWWRoot\StaticContent\uk\ecosystem\CommunityLinks.htm).
Editing Gadget ContentTo edit a gadget which is already on a dashboard:
1. Select the pencil icon in the gadget header. The first step of the gadget wizard for the currentgadget is opened.
2. Make the changes to gadget.
3. Click Finish. The updated gadget is displayed on the dashboard.
Linking GadgetsAvailable on List, Task List, Record Summary, SData, and Third-party (added via theWeb Sitegadget) gadgets. List and Task List gadgets can be linked to each other or to Record Summarygadgets for dynamic filtering. SData gadgets can be linked to each other. Third-party gadgets canbe linked to each other, or to List and Record Summary gadgets.
To link gadgets:
1. Select the dashboard you want to link gadgets on.
2. Make sure you have at least two gadgets on your dashboard. For example, a list gadget based ona company data source, and a list gadget based on an opportunity data source.
3. Select the Links icon on any one of the gadgets that you want to link, for example, the company listgadget. The Gadget Linking dialog box is displayed.
4. Click New Link. The top half of the Link information dialog shows the gadgets you want to link. Thegadget where you selected the Links icon from is already selected. For example, the company list.
5. Set the drop-down to either Sends Data To or Receives Data From. Note: Record Summarygadgets can only "receive data from" other gadgets. For this example, choose Sends Data To.
6. Select the gadget to link to from the right-hand drop-down. For example, the opportunity list.
7. In the lower half of the dialog, the left-hand list shows all the fields from the first gadget that you canlink. Select, for example, Company (Company ID).
8. The right-hand list shows the fields from the gadget on the right-hand side of the dialog that youcan link, based on the selection already made. Select, for example, Company (Company).
User Guide 20-15

Chapter 20
Link information dialog
9. Click OK. Click Close to exit the Gadget Linking dialog. The opportunities list gadget is filtered asyou click through the company list gadget. The gadget header changes to show the current filter. Toedit the current links on a gadget,click on the Links icon in the gadget header.
Notes on SData gadget linking
l An advanced (System Administrator) level of understanding of the SData feed source (i.e. CRM orERP system) is required to set up some links between SData gadgets. For example, while theSData schema may make the fields available to set up a link between two columns such as"opportunity priority" and " case priority", it will not result in data filtering from one gadget to another.
l Likewise, care must be taken when linking gadgets via ID fields. For example, if you are trying tofilter a person list by company, then linking an SData company list gadget to an SData person listgadget using comp_companyid and pers_channelid will not work. This is because there is no realcorrelation between an identifier [ID] of a Company and the ID of the Channel [Team], which aPerson record is associated to. Such a link therefore does not make sense. Using comp_companyid and pers_companyid will work.
Please refer to the SData example in the section below for more information.
Multiple Gadget Linking ExamplesList, SData, and third-party gadgets can send or receive data from other gadgets. In other words,they can set the filter or be filtered by other gadgets.Record summary gadgets can only bereceivers. A gadget can havemany concurrent links with other dashboard gadgets.
The following examples show how this can be set up in practice.
Example 1: Sending data from a Company List gadget to Case List,Opportunity List, and Company Record Summary gadgets
Links can be set up from a company gadget to a case list gadget, an opportunity list gadget, and acompany record summary gadget.
Gadget linking dialog
20-16 Sage CRM

Chapter 20: Interactive Dashboard
When the user scrolls through the list of companies, the opportunity and case list gadgets, and thecompany summary gadget are all filtered by the selected company.
Gadget linking between one sender (MyCompanies list) andmultiple receivers (MyOpportunities list, MyCases list, andCompanySummarygadget)
In the example described above, the company list gadget is the sender, and the other gadgets arethe receivers. This relationship should not be confused with parent and child record relationships.An opportunity list could just as easily be the sender and a company list a receiver. Scrolling on theopportunity list would then filter the company list.
Example 2: Sending data from two different Opportunity List gadgets toone Opportunity Summary gadget
Links can be set up from an opportunity summary gadget (Opportunity Summary), to an opportunitylist gadget for an individual user (My Opportunities), and to an opportunity list gadget for a team(TeamOpportunities).
Gadget linking dialog
When the user scrolls through their own list of opportunities, the summary gadget shows the detailsof each of their own opportunities. Click over to the list of team opportunities and scroll through - thesummary gadget show the details of each of the team's opportunities.
User Guide 20-17

Chapter 20
Gadget linking between one receiver (OpportunitySummarygadget) andmultiple senders (MyOpportunities list, TeamOpportunities list gadget)
In the example described above, both opportunity list gadgets are senders, and the summarygadget is the receiver. This can save you space on your dashboard, as you can easily toggle theview on a single receiver gadget between the two sender gadgets.
Example 3: Linking SData List and SData Record Summary gadgets
Links can be set up from an SData List gadget (Quotes List - using quot_orderquotid), to anotherSData List gadget (Quote Items - using quit_orderquoteid) , and from each of those list gadgets totheir corresponding SData Summary gadgets (Quote Summary andQuote Items Summary - againusing quot_orderquotid and quit_orderquoteid respectively) .
Gadget linking dialog on SData QuotesList Link Information dialog on SDataQuotes List to SData Quote Items List
When the user scrolls through the list of quotes, the quote items gadget shows the line itemsrelating to the quote, and the quote summary gadget shows the details of the quote. Click over tothe list of quote items and scroll through - the quote items summary gadget show the details of theselected line item.
20-18 Sage CRM
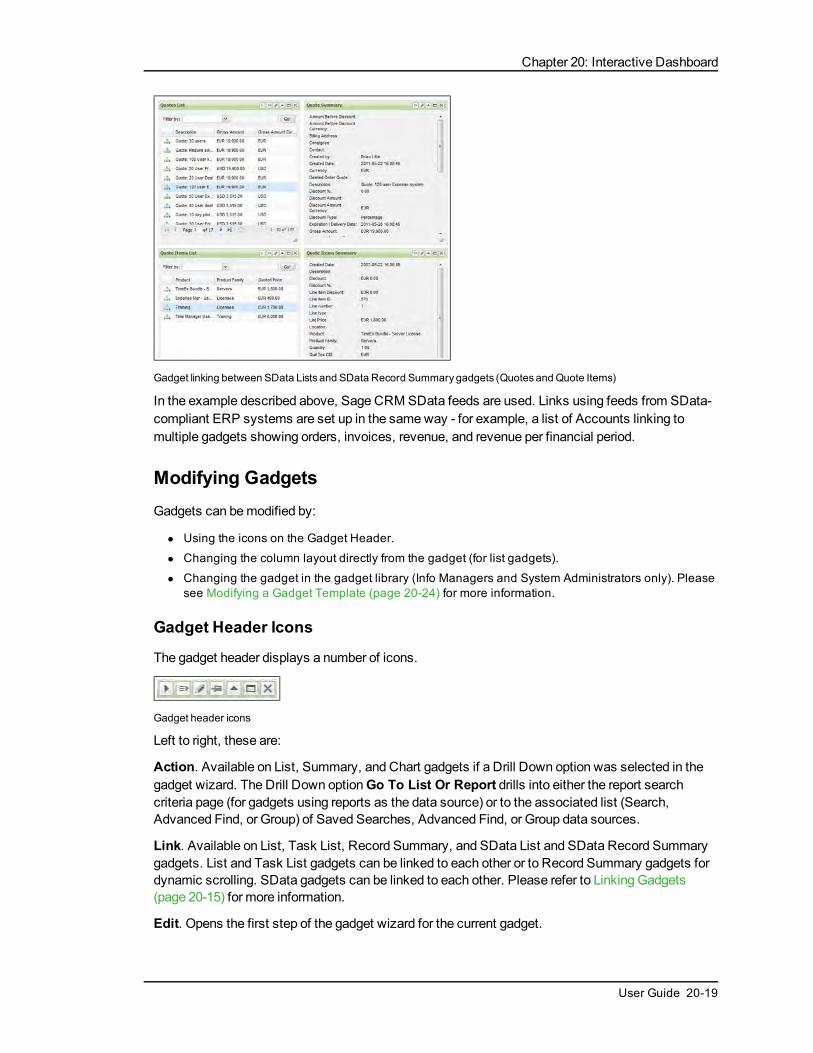
Chapter 20: Interactive Dashboard
Gadget linking between SData Lists and SData Record Summarygadgets (QuotesandQuote Items)
In the example described above, Sage CRM SData feeds are used. Links using feeds from SData-compliant ERP systems are set up in the sameway - for example, a list of Accounts linking tomultiple gadgets showing orders, invoices, revenue, and revenue per financial period.
Modifying GadgetsGadgets can bemodified by:
l Using the icons on the Gadget Header.
l Changing the column layout directly from the gadget (for list gadgets).
l Changing the gadget in the gadget library (Info Managers and System Administrators only). Pleasesee Modifying a Gadget Template (page 20-24) for more information.
Gadget Header Icons
The gadget header displays a number of icons.
Gadget header icons
Left to right, these are:
Action. Available on List, Summary, and Chart gadgets if a Drill Down option was selected in thegadget wizard. The Drill Down optionGo To List Or Report drills into either the report searchcriteria page (for gadgets using reports as the data source) or to the associated list (Search,Advanced Find, or Group) of Saved Searches, Advanced Find, or Group data sources.
Link. Available on List, Task List, Record Summary, and SData List and SData Record Summarygadgets. List and Task List gadgets can be linked to each other or to Record Summary gadgets fordynamic scrolling. SData gadgets can be linked to each other. Please refer to Linking Gadgets(page 20-15) for more information.
Edit. Opens the first step of the gadget wizard for the current gadget.
User Guide 20-19

Chapter 20
Enable/disable resizing and dragging. Fixes the position and size of the gadget. Available inflexible dashboard layout only. Toggles the resize icon in the lower right-hand corner of the gadgetwith a pin icon. When gadgets aremoved around in flexible layout you can also toggle a snap-to-gridlink (Turn Snap On/Off) from the control bar. When this is on, gadgets resize and align to a grid tothe nearest 20px.
Minimize. Displays the gadget header.
Maximize. Opens the gadget to size of the dashboard workspace.
Close. Deletes the gadget from the dashboard. Cannot be undone.
TheSData gadget header includes an additional header icon on the far left, Select columns.
SData gadget header icons
Changing the Gadget Column Layout
To change the column layout on a List, Task List, or SData List gadget you can use any of thefollowing options:
Customizing list gadget column layout
l Drag and drop the columns to the desired layout.
l Switch the sort order between ascending and descending, by clicking on the current sort ordercolumn heading.
l Click on the drop-down arrow next to any column heading and select Columns. A sub-menu of allcolumns available is displayed. Select the check box next to the columns you want to add orremove.
l Select the Action check box to display theWorkflow Anchor Column.
Adding New Data SourcesYou canmake new data sources available to you in the gadget wizard by creating new reports,groups, advanced finds, and saved searches in the normal way in CRM. You can also add new datasources from SData feeds, which have been pre-defined by users with InfoManager orAdministrator rights.
To find out more about adding these types of data sources, please refer to:
Groups (page 16-1)
20-20 Sage CRM
Chapter 20: Interactive Dashboard
Writing Reports (page 23-1)Creating a New Saved Search (page 3-13)Using Advanced Find (page 3-7)Adding an SData Feed Template (page 20-21)
Whenworking with data sources for the interactive dashboard please note:
l The report data sources are grouped in the Interactive Dashboard by the entity selected in thereport source view, not the report category. Data sources from cross-tabular or historical typereports are not included in List gadget report data sources.
l Users must be given access to Enterprise Reports (in Administration | Users) to be able to viewdata on gadgets based on Report data sources.
l For group data sources to be displayed in the dashboard the group type must be set to DynamicGroup.
l Care must be taken when deleting data sources. For example, a gadget using a group data sourcewill no longer show any data if that group is deleted.
l Private group data sources are not available when setting up template gadgets.
Adding an SData Feed TemplateTo add a new SData feed template:
1. Select Template | SData Feed Templates | New.
2. Enter a short description for the feed in the Feed Name field.
3. Type a valid SData schema URL in the Feed URL field.
l A valid SData schema URL takes the format:http[s]://server[:port]/sdata/application/contract/resource kind/$schema
Please refer to theDeveloper Help for more information on constructing customSData feeds.
4. Set up the User Name and Password for a feed requiring authentication. Setting theauthentication on the gadget prevents the user from being prompted for logon details each time thesecure feed is accessed.
5. To assign teams or users to the SData feed, select the Assigned Users tab.
6. Select the check boxes next to the users and/or teams that you want to assign the SData feedtemplate to.
7. Click Save. Each assigned user or member of the assigned team can access the SData feed fromStep 1 of the SData gadget wizard.
User Requirement: Info Manager Administration Rights
Working with Dashboard TemplatesDashboard Templates are accessed via Template |Dashboard Templates.
Once in Dashboard Templates with theProperties tab active, you canmanage all the template anduser dashboards using the following fields, buttons and tabs:
User Guide 20-21

Chapter 20
Field or Button Description
Filter by Searches template or user dashboards andcategories using a "Begins with" search.
Template Displays a list of all template dashboards.
User Displays a list of all user dashboards.
New Adds a new dashboard template.
Modify Details Changes the name, description and category of atemplate or user dashboard. The "No Category"category cannot bemodified from the Dashboardinterface, however a System Administrator canmodify the category name from Administration |Customization | Translations (Caption FamilyLandingPage, Caption CodeBlankCategory). Acategory containing dashboards cannot be deleted.
Clone Copies a template or user dashboard as a template.
Delete Deletes a template or user dashboard.
Modify Gadgets Adds, removes, modifies gadgets on a template oruser dashboard.
Assigned Users Assigns users and teams to a template. TheAssigned Users tab is active when you select adashboard template.
User Requirement: Info Manager Administration Rights
Adding a Dashboard TemplateTo add a new dashboard template:
1. Select Template | Dashboard Templates | New.
2. Set the Type to Flexible or Fixed Layout. Defaults to Flexible. The type cannot be switched oncethe dashboard has been added.
3. Add a Name, Description, and Category. The dashboard name is a required field.
4. Click Save. The template dashboard is displayed in the list of templates. You can open the newtemplate and add gadgets to it by selecting the Modify Gadgets button.
User Requirement: Info Manager Administration Rights
Assigning Users to a Dashboard TemplateTo assign users to a dashboard template:
20-22 Sage CRM
Chapter 20: Interactive Dashboard
1. Select Template | Dashboard Templates.
2. Make sure the Template radio button is selected.
3. Highlight the dashboard you want to assign users to.
4. Select the Assigned Users tab.
5. Click the Assign button to populate the list of users and primary teams.
6. Use the Filter by field to search for users or teams. This is a "Begins with" search.
7. Select the check boxes next to the users and/or teams that you want to assign the templatedashboard to.
8. Click Save. A check mark icon is displayed next to each assigned user or team. Each assigneduser or member of the assigned team can access the dashboard from the dashboard drop-down.
A user added to a team at a later date automatically gets access to all dashboards already assignedto their team.
User Requirement: Info Manager Administration Rights
Modifying a Dashboard TemplateTomodify a dashboard template:
1. Select Template | Dashboard Templates.
2. Make sure the Template radio button is selected.
3. Highlight the dashboard you want to modify.
4. Click Modify Details to change the Name, Description, or Category of the dashboard.
5. Click Modify Gadgets to change the gadgets on the dashboard. The template dashboard isdisplayed with a message that changes may affect other users. Note: Any users assigned to thetemplate will see the changes next time the assigned dashboard is accessed.
While you are working on new templates, youmay find it useful to create a new category ofdashboards called "Drafts" or similar. This makes it clear to other users that these dashboards are"work-in-progress".
User Requirement: Info Manager Administration Rights
Deleting a Dashboard TemplateTo delete a dashboard template:
1. Select Template | Dashboard Templates.
2. Make sure the Template radio button is selected.
3. Highlight the dashboard you want to delete.
4. Click Delete. A message is displayed asking you to check for assigned users, and informing youthat this action cannot be undone.
5. Click OK to delete the dashboard template. The dashboard template is removed from theDashboard Templates list and from the dashboard lists of all assigned users. If a user was in themiddle of working with an assigned dashboard, they can continue to do so until they navigate awayfrom that dashboard.
User Guide 20-23
Chapter 20
User Requirement: Info Manager Administration Rights
Managing User DashboardsTo view and administer user dashboards:
1. Select Template | Dashboard Templates.
2. Make sure the User radio button is selected. A list of all user dashboards is displayed, grouped byuser.
3. Highlight the dashboard you want to view, modify, or delete.
4. Select the action to carry out on the user dashboard. For example, selectModify Details to changethe category that the dashboard is stored under.
5. Click Save.
This feature can be useful if a user has added content to their dashboard which is preventing themfrom logging on to CRM.The System Administrator can delete the user dashboard (without openingit), so that the user can regain access to CRM.
User Requirement: Info Manager Administration Rights
Adding a Template GadgetTo add a new template:
1. Select Template | Gadget Templates | New.
2. Select the type of gadget you want to add. Please refer to the Gadget Quick Reference (page 20-7)for more information.
3. Complete the gadget wizard steps. The new gadget is displayed in the gadget templates list and isavailable for selection by users.
User Requirement: Info Manager Administration Rights
Modifying a Gadget TemplateTomodify a gadget template:
1. Select Template | Gadget Templates.
2. Highlight the gadget you want to modify.
3. Click Modify. The first step of the gadget wizard for the current gadget is opened.
4. Make the changes to gadget.
5. Click Finish. The updated gadget is displayed in the gadget templates list and is available forselection by users.
Changes to gadget templates only affect the gadget template itself, not any instances of the gadgeton template, assigned, or personal dashboards.
User Requirement: Info Manager Administration Rights
20-24 Sage CRM
Chapter 20: Interactive Dashboard
Deleting a Gadget TemplateTo delete a gadget template:
1. Select Template | Gadget Templates.
2. Highlight the gadget you want to delete.
3. Click Delete Gadget. A warning message is displayed informing you that this action cannot beundone.
4. Click OK to delete the gadget. The gadget is removed from the gadget templates and is no longeravailable for selection by users.
Deleting a gadget template only removes the instance of the gadget from the gadget templates list,and not any instances of the gadget on template, assigned, or personal dashboards.
User Requirement: Info Manager Administration Rights
Setting up an Interactive Company DashboardSage CRM is delivered with a standard Company Interactive Dashboard template, which isassigned to all users, and can bemodified by InfoManagers. It works in the sameway as theMyCRM | Dashboard, but filters gadget content to match the company context. Please refer toWhat isthe Interactive Dashboard? (page 20-2) for an overview of the Interactive Dashboard. CompanyDashboards are only available from the Dashboard tab within the Company context.
You can create one or more of your own personalized Company Dashboards, and then switchbetween them to access different levels of company detail.
Once a Company dashboard is selected, the same dashboard is displayed to you in the Dashboardtab of all companies, until you change it.
To set up a new company dashboard:
1. Make sure you are in the context of a company, and click on the Dashboard tab.
2. Make sure you are in the Interactive (and not Classic) Dashboard. Switch to the InteractiveDashboard by clicking the Interactive Dashboard hyperlink if you need to.
3. Select New Dashboard | Create Dashboard and add the gadgets you want. Please refer toGadget Quick Reference (page 20-7) for more information.
4. Set as your default dashboard by selecting Dashboard Options from the dashboard drop-down.
Changes to the Company Dashboard do not affect the Dashboards available fromMy CRM |Dashboard. Company Dashboard templates are only available from the Company Dashboard tab.
User Guide 20-25


Chapter 21: Classic Dashboard
In this chapter you will learn how to:
l Understand what to use the classic dashboard for.
l Set up a new classic dashboard.
l Change content directly on the dashboard page.
l Edit classic dashboard details.
l Modify classic dashboard content.
l Add saved searches to a classic dashboard.
l Add favorite reports to a classic dashboard.
l Add report charts to a classic dashboard.
l Set up a company dashboard.
l Modify the content of the company dashboard.
What is the Classic Dashboard?The Classic Dashboard is a customizable page that contains informationmost relevant to your dailywork. For example:
l A snapshot of companies you most often work with.
l A list of high priority cases assigned to you.
l Outstanding appointments.
l A list of recently viewed leads.
l A pie chart of opportunities by territory.
You can define:
l What information you want on your page based on a predefined list of content.
l A preference for displaying the Dashboard tab as the first page you see after logging on.
l More than one dashboard in CRM.
l Your default dashboard.
Setting up a New Classic DashboardYou can create a new dashboard with all the content you need for your day-to-day work.
To create a new dashboard:
1. SelectMy CRM | Dashboard.l If the System Administrator has not set up a standard dashboard, then the Dashboard
Details page is displayed.
User Guide 21-1

Chapter 21
l If a standard dashboard has been set up, then the Dashboard page displays the contentfrom the default dashboard. If this is the case, click on the New Dashboard button to createa new dashboard.
l If multiple dashboards already exist, but no default has been set, then the system displaysthe first dashboard in the drop-down list. If this is the case, click on the New Dashboardbutton to create a new dashboard.
l If you are viewing an Interactive Dashboard, select the Classic Dashboard link, then addthe new dashboard.
2. Enter a name for the new dashboard. If a dashboard with the same name already exists, a warningprompt is displayed, however you can still add a new dashboard with the same name as anexisting dashboard.
3. Select the Set As Defaultcheck box to make this the default dashboard. The Set As MobileDashboard check box makes the dashboard available on mobile devices.
Dashboard Details page
4. Click on the Continue button. The Dashboard Content page is displayed.The Dashboard Content page is divided into the Available Content panel and the SelectedContent panel.
l Use the Add button next to the item in the Available Content list to add it to the SelectedContent panel.
l Use the Filter By drop-down list to narrow down the list of all content to view content byarea, for example, all content related to Opportunities.
l Use the Blocks radio buttons to filter the list of all content to view content by narrow orwide widths. The System Administrator is responsible for defining the width of the content.
Dashboard Content page
5. Select and add the content to the Selected Content panel.l To remove a selected content item, highlight the item in the Narrow or Wide content list, and
click on the Remove button to the right-hand side of the Narrow or Wide content list.
l You can also remove a selected content item by clicking on the Remove button next to theitem in the Available Content panel.
l To change the order of a selected content item, highlight the item, and click on the up anddown arrows to the right-hand side of the Narrow or Wide content list.
21-2 Sage CRM
Chapter 21: Classic Dashboard
l Narrow columns are displayed by default on the left-hand side of the Dashboard page. Youcan switch this by selecting the Right radio button at the top of the Select Content panel. Ifonly wide content is selected, it is displayed spanning the whole width of the Dashboardpage.
l The double arrows moves a content item to the top or bottom of the list of Selected Content.
l Use the Clear button to clear all the selected content in the Narrow or Wide content list.
6. Click on the Save button. The new dashboard is displayed.l The Dashboard toolbar is displayed in the top left-hand side of the Dashboard page,
showing the dashboard you created in the drop-down list.
Dashboard toolbar
l You can use the Dashboard toolbar to set up another dashboard, modify the existingdashboard, and switch between existing dashboards. You can use the Print button to printyour dashboard.
l Note: You can set the Dashboard page to be the first page you see when you logon to CRMby selecting Dashboard from the Log Me Into field on the My CRM | Preferences tab.
Changing Content Directly from the Classic Dashboard Page
l You can minimize, restore, or remove dashboard content by clicking on the icons in the top right-hand corner of the content panel.
l You can change the columns that appear on content panels, and reduce the size of wide contentpanels, where you see the Customize Columns icon in the top right-hand corner of the contentpanel. Note: If you remove columns on a content panel, they will stay hidden, even if you removethe entire dashboard content panel, and replace the content panel later on. To unhide columnsclick on the Customize Columns icon and check the boxes next to the hidden columns.
l When a list of content is longer than 10 records, or longer than the Grid Size set in the Preferencestab, then a View All hyperlink is displayed in the bottom right-hand corner of the panel. Click on thishyperlink to view all the records of this content panel in a new browser window.
l When a Calendar or Tasks list is longer than 10 records, or longer than the Grid size set in thePreferences tab, then a View Calendar hyperlink is displayed. The hyperlink takes you to theCalendar tab.
Editing Classic Dashboard Details
l Click on the Edit Dashboard Details button to change the dashboard name, or to change thedefault setting.
Dashboard Details page
User Guide 21-3
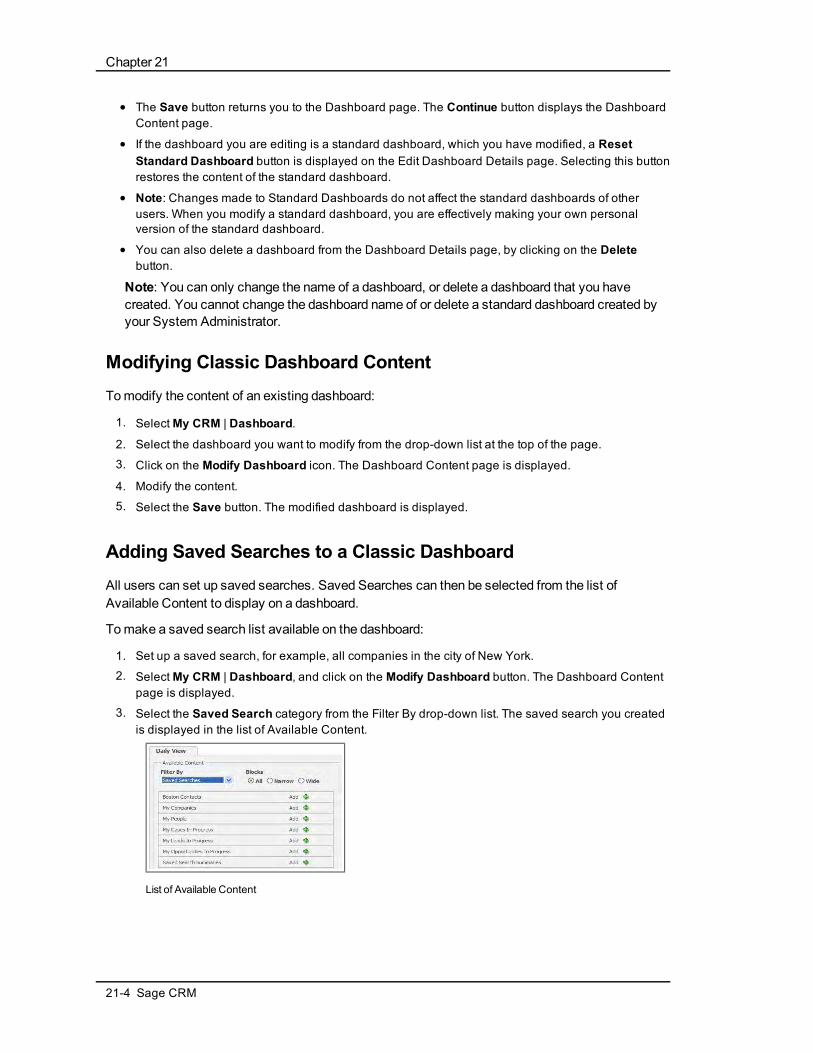
Chapter 21
l The Save button returns you to the Dashboard page. The Continue button displays the DashboardContent page.
l If the dashboard you are editing is a standard dashboard, which you have modified, a ResetStandard Dashboard button is displayed on the Edit Dashboard Details page. Selecting this buttonrestores the content of the standard dashboard.
l Note: Changes made to Standard Dashboards do not affect the standard dashboards of otherusers. When you modify a standard dashboard, you are effectively making your own personalversion of the standard dashboard.
l You can also delete a dashboard from the Dashboard Details page, by clicking on the Deletebutton.
Note: You can only change the name of a dashboard, or delete a dashboard that you havecreated. You cannot change the dashboard name of or delete a standard dashboard created byyour System Administrator.
Modifying Classic Dashboard ContentTomodify the content of an existing dashboard:
1. SelectMy CRM | Dashboard.
2. Select the dashboard you want to modify from the drop-down list at the top of the page.
3. Click on the Modify Dashboard icon. The Dashboard Content page is displayed.
4. Modify the content.
5. Select the Save button. The modified dashboard is displayed.
Adding Saved Searches to a Classic DashboardAll users can set up saved searches. Saved Searches can then be selected from the list ofAvailable Content to display on a dashboard.
Tomake a saved search list available on the dashboard:
1. Set up a saved search, for example, all companies in the city of New York.
2. SelectMy CRM | Dashboard, and click on the Modify Dashboard button. The Dashboard Contentpage is displayed.
3. Select the Saved Search category from the Filter By drop-down list. The saved search you createdis displayed in the list of Available Content.
List of Available Content
21-4 Sage CRM
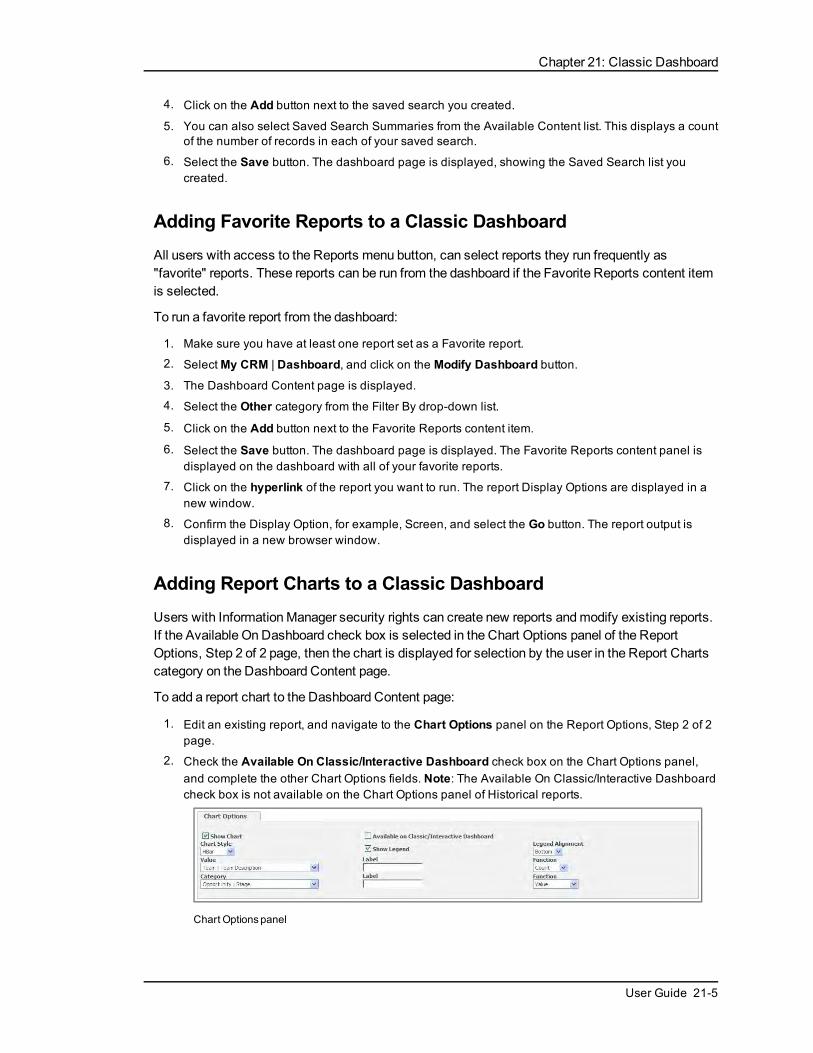
Chapter 21: Classic Dashboard
4. Click on the Add button next to the saved search you created.
5. You can also select Saved Search Summaries from the Available Content list. This displays a countof the number of records in each of your saved search.
6. Select the Save button. The dashboard page is displayed, showing the Saved Search list youcreated.
Adding Favorite Reports to a Classic DashboardAll users with access to the Reports menu button, can select reports they run frequently as"favorite" reports. These reports can be run from the dashboard if the Favorite Reports content itemis selected.
To run a favorite report from the dashboard:
1. Make sure you have at least one report set as a Favorite report.
2. SelectMy CRM | Dashboard, and click on the Modify Dashboard button.
3. The Dashboard Content page is displayed.
4. Select the Other category from the Filter By drop-down list.
5. Click on the Add button next to the Favorite Reports content item.
6. Select the Save button. The dashboard page is displayed. The Favorite Reports content panel isdisplayed on the dashboard with all of your favorite reports.
7. Click on the hyperlink of the report you want to run. The report Display Options are displayed in anew window.
8. Confirm the Display Option, for example, Screen, and select the Go button. The report output isdisplayed in a new browser window.
Adding Report Charts to a Classic DashboardUsers with InformationManager security rights can create new reports andmodify existing reports.If the Available OnDashboard check box is selected in the Chart Options panel of the ReportOptions, Step 2 of 2 page, then the chart is displayed for selection by the user in the Report Chartscategory on the Dashboard Content page.
To add a report chart to the Dashboard Content page:
1. Edit an existing report, and navigate to the Chart Options panel on the Report Options, Step 2 of 2page.
2. Check the Available On Classic/Interactive Dashboard check box on the Chart Options panel,and complete the other Chart Options fields. Note: The Available On Classic/Interactive Dashboardcheck box is not available on the Chart Options panel of Historical reports.
Chart Optionspanel
User Guide 21-5

Chapter 21
3. Select the Save button.
4. SelectMy CRM | Dashboard, and click on the Modify Dashboard button. The Dashboard Contentpage is displayed.
5. Select the Report Charts category from the Filter By drop-down list.
6. Click on the Add button next to the Report chart you added. Note: If the Report Chart comes from areport with multiple saved searches, then a Report chart panel is available for selection for eachsaved search and for the full report.
7. Select the Save button. The dashboard page is displayed. The report chart is displayed on thedashboard. You can click on the View Full Report In NewWindow icon to view more of the report.This icon is not available on "standalone" chart content panels. These can be identified in thecontent lists by the prefix "Chart".
Report Chart on Dashboard page
Built-in animationmeans that you can watch charts grow as they is formed. You can alsointeract with charts once they are drawn – for example, highlighting slices and rotating piecharts. For more information on interacting with charts, please refer to Running a Report (page10-1).
User Requirement: Info Manager Administration Rights
Setting up a Classic Company DashboardThe Dashboard tab within the Company context can be used to display amanagement overview ofcustomer information. Once a Company dashboard is set up, the same dashboard will be availablefrom the Company context page of all companies.
To set up a company dashboard:
1. Within the context of a company, select the Dashboard tab.l If the System Administrator has not set up a standard company dashboard, then the
Dashboard Content page is displayed.
l If a standard company dashboard has been set up, then the Dashboard page is displayed,showing the content from the standard company dashboard. If this is the case, click on theModify Dashboard button to review the existing content.
21-6 Sage CRM

Chapter 21: Classic Dashboard
2. In the Available Content panel, click on the Add button beside the content panels you want to addto the dashboard. The selected content is listed in the Selected Content list.
3. Click on the Save button. The Company Dashboard is displayed.
CompanyDashboard
Select theReset Standard Dashboard button to revert to the Standard Company Dashboard,set up by the System Administrator.
Modifying the Content of the Company DashboardTomodify the content of a company dashboard:
1. Within the context of a company, select the Dashboard tab. The Dashboard page is displayed
2. Click on the Modify Dashboard button. The Dashboard Content page is displayed.
3. Make the changes you require.
4. Click on the Save button. The Company Dashboard page is displayed with the changes you made.
User Guide 21-7


Chapter 22: Preferences
In this chapter you will learn how to:
l Open the Preferences work area.
l Know which preferences I can change.
l Change Preferences.
Accessing PreferencesUser Preferences give youmore control over the way information is displayed. You can tailor thedisplay of information to better suit the way you work. For example, if you work in the customerservice team, your main interest is probably the status of existing cases. Using the LogMe In Tooption, you can set Preferences to show the cases you are working on as the first page you seewhen you log on.
To access Preferences:
1. Select the My CRM button.
2. Click on the Preferences tab.
Preferencespage
3. Select the Change button.
4. Enter the details in the Preferences page.
5. Select the Save button. The Preferences page is displayed. Log off and back on again to see thechanges take affect.
Note: The Install CRMOutlook Integration / Install CRMOutlook Exchange Integration, andChange Password action buttons are available on the Preferences page. Please refer toDownloading the Outlook Plug-in for Classic Outlook Integration (page 8-1), Installing theOutlook Plug-in for Exchange Integration (page 7-10), and Changing Your Password (page 2-2)for more details.
User Guide 22-1

Chapter 22
Preference FieldsThe table below describes the standard fields.
Field Description
LogMe In To Determines the default first page when you log on.For example, Dashboard, Calendar, Case List, orOpportunity List.
Empty Recent List ForEach Session
The Recent List "remembers" themost recent pagesyou have visited in CRM. Selecting Yes empties theRecent List each time you log off and back on again.
Recent List Activation By Options available are Click and Hover, as theRecent List can be viewed by clicking on or hoveringover the Recent button. Please refer toAppointments and Tasks (page 5-1) for moreinformation.
PopOut List Activation By Select from Hover or Click. You can hover or right-click on themenu buttons to activate the PopOutlists.
My Default Find Screen Determines the Find screen that appears at thebeginning of a session. Note that the system"remembers" your last Find, until you change it. Thismeans you can set your default Find screen to beCompany. However, as soon as you search byPerson, the next time you press Find, the personFind page is displayed.
Show Solutions InMy CRM Makes the Solutions tab available in theMy CRMwork area. The System Administrator must give yourights to view Solutions for this option to appear.
Show Outbound Calls InMy CRM
Makes theOutbound Calls tab available in theMyCRMwork area.
Currency Currency in whichmonetary fields are displayed tothe user. Implementation dependent.
Show Leads Pipeline Displays the graphical pipeline of leads in the Leadstab within My CRM and Team CRM.
Show OpportunitiesPipeline
Displays the graphical pipeline of opportunities in theOpportunities tab within My CRM and Team CRM.
Show Cases Pipeline Displays the graphical pipeline of cases in theCases tab within My CRM and Team CRM.
22-2 Sage CRM

Chapter 22: Preferences
Field Description
Grid Size Determines the default maximum length of lists andgrids on a page.
E-mail Screen Position The way in which the New E-mail screen isdisplayed. Select from Normal, Popup, or Split.Note, the Normal and Split options are ignored if youare working with CRM inOutlook. In other words, anew e-mail will always be displayed in a popupwindow.
Line Item Screen Position The way in which the Line Item screen is displayed.Select from Popup or Split.
Report Print PreviewDefault Page size
The default page size used on the Report DisplayOptions page for producing a report in PDF format.
Report Print PreviewDefault Orientation
The default orientation (Portrait or Landscape) usedon the Report Display Options page for producing areport in PDF format.
On-screen Coaching Determines how on-screen coaching is displayed.On. Turns coaching on for all screens for whichcoaching is available.Off. Turns all coaching off.Minimized. Users must click on theMaximize On-screen Coaching button at the top of an individualscreen to view on-screen coaching for that screen.Customized. Allows users tominimize on-screencoaching on some screens while leaving itmaximized on others.
Single-ColumnCalendar Set to Yes, the calendar is in single column format,with vertical spacing adjusting to the content of thetime slot. Set to No, the daily view can be displayedin anOutlook-style view, where there is equalspacing between vertical time slots andmultipleappointments at the same time are placed next toeach other in columns.
Number of CalendarColumns
Themaximum number of columns when the Single-ColumnCalendar setting is set to No. When thisnumber is exceeded, the calendar style reverts to asingle column format.
Full Menu in Outlook Field applies to Classic Outlook Integration only, andis not available when Exchange Server Integration inenabled.
User Guide 22-3

Chapter 22
Field Description
Displays or hides themenu buttons in CRM inOutlook (2007 only). Defaults to No tomaximizeviewing space for CRM inOutlook. The Full Menu inOutlook setting can be altered in either CRM orOutlook, and you will see the change the next timeyou log on to CRM via Outlook. Please refer toUsing CRM from within Outlook (Classic OutlookIntegration) (page 8-3) for more information.
Preferred Theme Allows you to customize the look and feel of theCRM user interface. The alternative themesavailable to you are defined by your SystemAdministrator. You need to log off and back on againto see the effect of the new theme.Note: System Help and Self Service are not affectedby Themes.
CSV File Export Delimiter Set the delimiter as comma, semi-colon, or tab.When you use the Export To File button on, forexample, the results of a company search, the CSVexport will use the delimiter you have set.This setting also impacts data uploads from CSVfiles. Pleasemake sure the delimiter in the import filematches the delimiter set in Preferences.
Default Screen ForCompany
Sets the default tab which is displayed when you drillinto a Company. Set to Summary to display theSummary tab or Interactive Dashboard to display theDashboard tab.
Default E-mail Template The user can set a default e-mail template. Whencreating a new e-mail the default e-mail template isselected automatically and all its values are copiedto the new e-mail screen.
Default E-mail Address The default From e-mail address used in the New E-mail screen. You can change your default Fromaddress if you have been given permission to sende-mails from other accounts.
Default Tablet Version Set to Desktop Version if you want to use the desktopversion of Sage CRM from a tablet device. Set toTablet Version is you want to use the Tablet themefrom a tablet device.
Calendar View Determines the default calendar view. For example,Day, Month, Week, Year.
22-4 Sage CRM
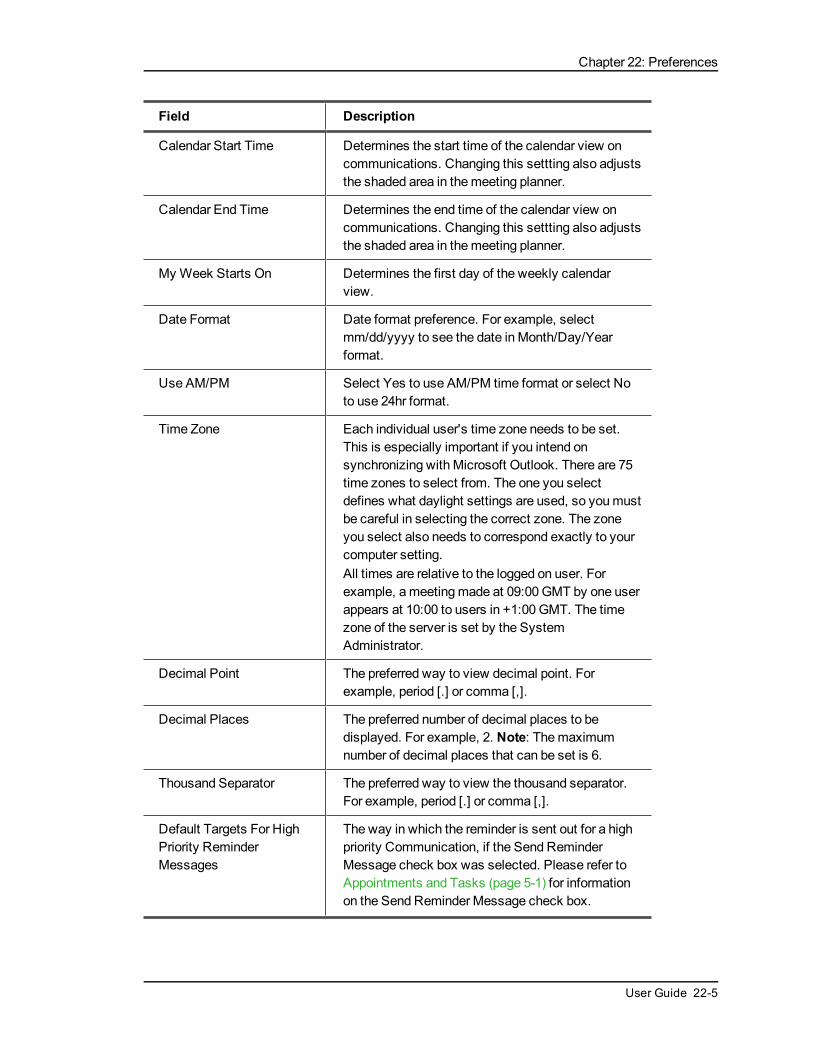
Chapter 22: Preferences
Field Description
Calendar Start Time Determines the start time of the calendar view oncommunications. Changing this settting also adjuststhe shaded area in themeeting planner.
Calendar End Time Determines the end time of the calendar view oncommunications. Changing this settting also adjuststhe shaded area in themeeting planner.
My Week Starts On Determines the first day of the weekly calendarview.
Date Format Date format preference. For example, selectmm/dd/yyyy to see the date in Month/Day/Yearformat.
Use AM/PM Select Yes to use AM/PM time format or select Noto use 24hr format.
Time Zone Each individual user's time zone needs to be set.This is especially important if you intend onsynchronizing with Microsoft Outlook. There are 75time zones to select from. The one you selectdefines what daylight settings are used, so youmustbe careful in selecting the correct zone. The zoneyou select also needs to correspond exactly to yourcomputer setting.All times are relative to the logged on user. Forexample, ameetingmade at 09:00 GMT by one userappears at 10:00 to users in +1:00 GMT. The timezone of the server is set by the SystemAdministrator.
Decimal Point The preferred way to view decimal point. Forexample, period [.] or comma [,].
Decimal Places The preferred number of decimal places to bedisplayed. For example, 2. Note: Themaximumnumber of decimal places that can be set is 6.
Thousand Separator The preferred way to view the thousand separator.For example, period [.] or comma [,].
Default Targets For HighPriority ReminderMessages
The way in which the reminder is sent out for a highpriority Communication, if the Send ReminderMessage check box was selected. Please refer toAppointments and Tasks (page 5-1) for informationon the Send Reminder Message check box.
User Guide 22-5

Chapter 22
Field Description
Default Targets For NormalPriority ReminderMessages
The way in which the reminder is sent out for anormal priority Communication, if the SendReminder Message check box has been checked.Please refer to Appointments and Tasks (page 5-1)for information on the Send Reminder Messagecheck box.
Default Targets For LowPriority ReminderMessages
The way in which the reminder is sent out for a lowpriority Communication, if the Send ReminderMessage check box was checked. Please refer toAppointments and Tasks (page 5-1) for informationon the Send Reminder Message check box.
Changing PreferencesTo change Preferences:
1. Select the Preferences tab. The Preferences page is displayed.
2. Select the Change button.
3. Enter the new details on the Preferences page.
4. Select the Save button. The Preferences page is displayed. You can use the Set To Defaultsbutton to return Preferences to the default settings.
22-6 Sage CRM

Chapter 23: Writing Reports
In this chapter you will learn how to:
l Understand the scope of the reporting functionality.
l Understand the fields and buttons when I’m creating a new report or changing an existing one.
l Add a new report category.
l Move a report to a different category.
l Create a list report.
l Add a chart to a report.
l Create a cross tabular report.
l Create a historical report.
l Cloning a report.
l Add a new report style.
l Delete a report.
Introduction to Writing ReportsWhen creating a new report, you canmake use of the following features in the report editor:
l An extensive list of Report Sources, which can be further expanded by using the ViewsCustomization functionality.
l Choice of List, Cross Tabular, or Historical report types.
l The ability to add a Chart to the report.
l Use of sums, averages, groups, and record counts.
l The ability to format data in the reports to make use of hyperlinks and number formats.
l Display header and footer information, such as the user who has run the report and the date/time itwas run.
l Rows Per Page setting on List reports to improve the layout of the report output.
l Private reports, available only to the user who created the report.
User Requirement: Info Manager Administration Rights
Creating a New Report CategoryA user who has rights to create new reports can create new report categories.
To create a new report category:
1. Click on the Reports menu button. The Reports page is displayed.
2. Click on the New Report Category button. The New Report Category page is displayed.
3. Enter a name and a description for the new report category and select Save. The new reportcategory is displayed.
User Guide 23-1

Chapter 23
The report name and description can be translated into other languages from Administration |Customization | Translations. Please refer to theSystem Administrator Help for moreinformation onmaintaining translations.
To delete a report category, change the order of the report categories, or change the graphicdisplayed next to the report category, you need to be a System Administrator. The changes canbemade in Administration | Advanced Customization | SystemMenus. Please refer to theSystem Administrator Help for more information.
User Requirement: Info Manager Administration Rights
Moving a Report to a Different CategoryReports can easily bemoved from one category to another.
Tomove a report to a different category:
1. Click on the Reports menu button. The Reports page is displayed.
2. Select the category that contains the report you wish to move.
3. Click on the Edit button for the relevant report. The Report Options, Step 1 of 2 page is displayed.
4. Select the new report category from the Report Category drop-down menu.
5. Click on the Continue button. The Search Criteria for Report page is displayed.
6. Select the Continue button. The Report Options, Step 2 of 2 page is displayed.
7. Select the Save button. The report is moved to the selected report category.
Creating a List ReportExample: Person List
This example creates a list report, which shows People and their associated contact details.
Report columns should include:
l Person : Last Name
l Person : First
l Person : Salutation
l Person : Title
l Address : City
l Person : Business E-mail
l Person : Area Code
l Person : Phone
l Company : Company Name
Further specifications include:
l Sort On—Person : Last Name, Company : Company Name
l Search Criteria—Person : Title Code, Company : Territory, Company : Account Manager
To create the report:
23-2 Sage CRM

Chapter 23: Writing Reports
1. Select the Reports button. A list of report categories is displayed.
2. Select the category in which you want to create and save your report, for example, General.
3. Select the New action button. The Report Options, Step 1 of 2 page is displayed.
Report Options, Step 1 of 2
4. Complete the Report Details panel. When you select the Source View, the page is expanded toshow the Select Column panel and a panel showing lists of columns for Content, Searching,Sorting, and Grouping.
5. Select the columns you want to make up the Report Contents.
6. If you want any of these columns to make up the Search or Sort criteria, or if the report should beGrouped by any of them, click on the corresponding button. Please refer to Report Fields andButtons (page 23-4) for details on the available buttons.
Report Options for Person List report
7. Select the Add Key Attribute Data button. A new browser window, Add Key Attribute Data, isdisplayed.
8. Select the column, field, and entity to report on, then add to either the Report Contents, SearchCriteria, or both.
9. Select the Continue button to return to the Report Options, Step 1 of 2 page.
10. Select the Continue button to proceed to the next stage. The Search Criteria for Report page isdisplayed.
11. If you want the report output to show, for example, only People where you are the AccountManager, you can specify this information on this page.
User Guide 23-3
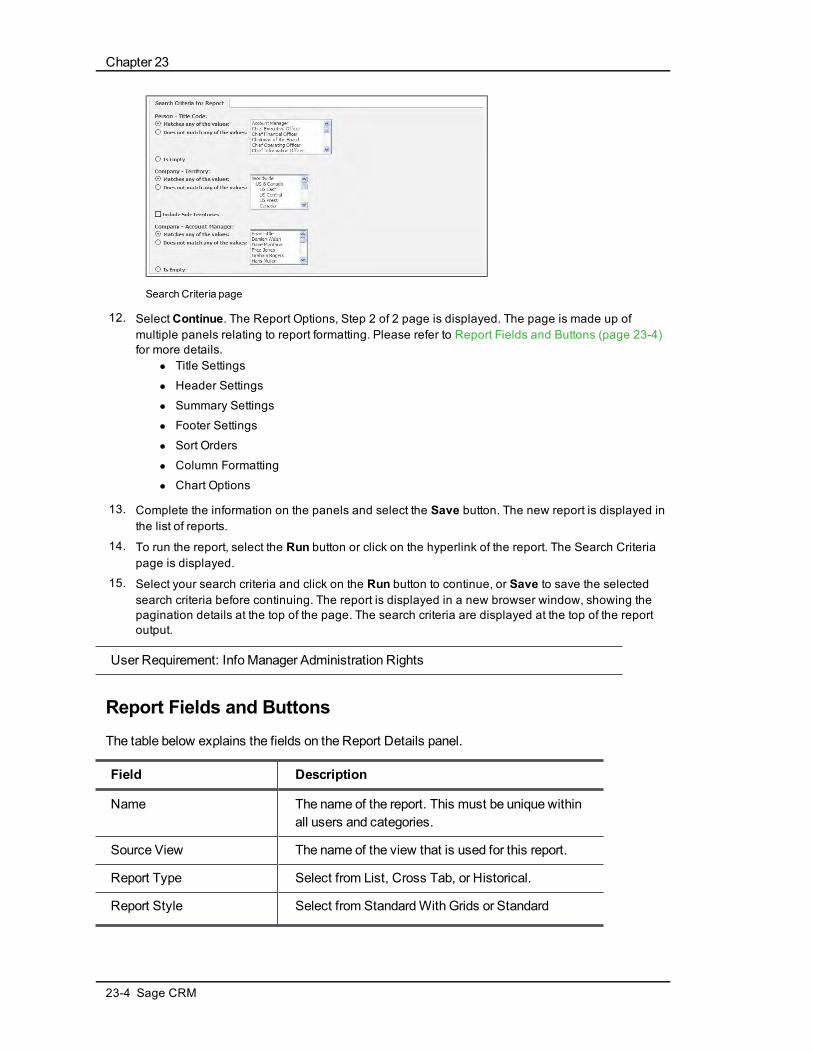
Chapter 23
Search Criteria page
12. Select Continue. The Report Options, Step 2 of 2 page is displayed. The page is made up ofmultiple panels relating to report formatting. Please refer to Report Fields and Buttons (page 23-4)for more details.
l Title Settings
l Header Settings
l Summary Settings
l Footer Settings
l Sort Orders
l Column Formatting
l Chart Options
13. Complete the information on the panels and select the Save button. The new report is displayed inthe list of reports.
14. To run the report, select the Run button or click on the hyperlink of the report. The Search Criteriapage is displayed.
15. Select your search criteria and click on the Run button to continue, or Save to save the selectedsearch criteria before continuing. The report is displayed in a new browser window, showing thepagination details at the top of the page. The search criteria are displayed at the top of the reportoutput.
User Requirement: Info Manager Administration Rights
Report Fields and ButtonsThe table below explains the fields on the Report Details panel.
Field Description
Name The name of the report. This must be unique withinall users and categories.
Source View The name of the view that is used for this report.
Report Type Select from List, Cross Tab, or Historical.
Report Style Select from StandardWith Grids or Standard
23-4 Sage CRM

Chapter 23: Writing Reports
Field Description
Without Grids. The gridlines appear on the chartsection of your report output. The SystemAdministrator can define further styles andmakethem available from this field.
Rows Per Page This option is displayed for List reports and appliesto on-screen output only. Enter the number of rowsyou want to see per page. When the rows per page isset, the first page is displayed as soon as it isgenerated, with arrows at the top to go to the next orlast page. If you click on the next or last pagebuttons before that page has been generated, amessage is displayed, advising that the page is notyet ready. Once the whole report has beengenerated, a Go To page icon is displayed at the topof the page. Note: The rows per page setting doesnot count the report header, title, and footer as rows.For example, 20 rows per pagemeans 20 rows ofdata per page, including total lines, blank lines, andcharts.A Print Preview icon is also available, which opens anew window containing the full report as a PDF.
Description A free text description of the report.
Private Report If checked, then only the user who created the reportcan see the report in the Report list.
Auto Hyperlinking Creates hyperlinks from the content in the reportcolumns to the record in CRM. For example, click onhyperlink of Company Name on the Report Outputpage, and the Summary page of the selectedCompany is displayed.
Show Original CurrencyValues
Displays the currency values entered in the system,rather than the user’s preferred currency.Note: Currency fields display in reports to thedecimal precision defined by the SystemAdministrator in the Base Currency. Numeric fieldsdisplay in reports to the decimal precision defined inMy CRM | Preferences.
Filter By Current User Allows the user creating the report to limit thereturned data to be applicable to the current loggedon user. For example, the report output of aCommunication List report, will automatically be
User Guide 23-5

Chapter 23
Field Description
restricted to show Communications scheduled forthe logged on user.
Filter By User’s PrimaryTeam
Allows the person creating the report to limit thereturned data to be applicable to the logged on user’sPrimary Team. For example, the report output of anOpportunity List report will automatically berestricted to show Opportunities assigned to thePrimary Team of the logged on user.
Filter By User’s HomeTerritory
Allows the person creating the report to limit thereturned data to be applicable to the logged on user’sHome Territory. For example, the report output of anOpportunity List report will automatically berestricted to show Opportunities in the HomeTerritory of the logged on user.
Select Distinct Values Removes duplicate rows in the report output. Forexample, if you have a report that lists all companiesthat have "High" priority Cases, and there are twohigh priority Cases with the company Design Right,Design Right appears twice in the report output.However, if you choose the option Select DistinctValues for this report, Design Right only appearsonce.
The buttons on the Select Column panel on the Report Source page are explained below.
Add To Report Contents. Adds the column to the Report Contents list. These will make up thereport columns (the first item in the list will make up the first report column on the left hand side ofyour report, the second item the next column along, and so on).
Add To Search Criteria. Adds the column to the Search Criteria list. These will be the criteria thatyou can filter your report output by. In the example above, selecting Assigned To as a searchcriteria means that when you run the report, you can decide to view opportunities for just one or aselection of Sales Reps.
In the report designer, you cannot delete fields from the Search Criteria list if the report has savedsearches. Please refer to the Saving Report Search Criteria (page 10-6) for more information.
Advanced Find. Allows you to use the Advanced Find feature to create the report. WhenAdvanced Find is selected the next screen displayed will be the Advanced Find page, where youcan create complex queries to return specific report results. For more details on using advancedfind, please refer to Using Advanced Find (page 3-7).
Add To Sort On. Adds the column to the Sort On list. The report will be sorted by this column. Ifthere aremultiple columns in this list, the report will sort first by the column at the top of the list, thenby the next column. Note that if you have addedGroup By columns, these will make up the"primary" sort order. The columns within the Sort On list determine the sort order within the group.
23-6 Sage CRM
Chapter 23: Writing Reports
Add to Group By. Adds the column to the Group By list. The report results will be grouped by thecolumns in this list. In the above example, the opportunity list is grouped by Sales Rep (OpportunityAssigned To). Note that you do not need to select the Group By column as one of the ReportContents columns. TheGroup By selection creates its own column as the very first left handcolumn of the list report.
Add Key Attribute Data. Key Attribute data can also be added to the report. For example, if youhave Key Attribute data set up to track subscribers to a Partner Newsletter, this can be included inthe report contents.
Fields on the report formatting panels (Title, Header, Summary, Footer, Sort Orders, and ColumnFormatting) are described below:
Field Description
Title The title to be displayed on the report. This title alsoforms the name of the Chart gadget on theInteractive Dashboard. If you clone a report with achart in it, it is recommended that you update thechart title in the cloned report.
Left Content (Header) The header appears at the very top of the reportbefore any other details.The header and footer are divided into threesections; left, center, and right. The same set ofoptions can be displayed on each section:Date. Current date, formatted according to the user'spreferences.Date Time. Current date and time formattedaccording to the user's preferences.Logo. Displays a logo. The logomust be a file calledLOGO.JPG located in the Reports directory. Thereis also a file called PDFLOGO.JPG in the samelocation. The system uses the PDFLOGO.JPG forAdobe PDF output (usually a higher resolutionimage), and LOGO.JPG for on-screen output. Thelogos are not used in CSV orMS Excel output.Page Number. Displays the page number on HTMLand Adobe reports.Report Title. Displays the title of the report.Time. Current time, formatted according to theuser's preferences.User Name. The name of the user who is running thereport.For more information on customizing FusionCharts,please refer toCustomizing Report Charts in theThemes section of theSystem Administrator Guide.
User Guide 23-7

Chapter 23
Field Description
Centre Content (Header) See above.
Right Content (Header) See above.
Show Summary Data If checked, the grand totals are displayed.
Left Content (Footer) The footer appears at the very end of the reportunderneath all other details. See above.
Centre Content (Footer) See above.
Right Content (Footer) See above.
GroupOrders This section is only displayed if columns have beenadded to the Group By list on the Report Options,Step 1 of 2 page. See "Sort Orders" below for anexplanation of the three columns.
Sort Orders This section is only displayed if columns have beenadded to the Sort On list on the Report Options, Step1 of 2 page. Each field is listed in a grid in threecolumns. The first column displays the name of thefield and the second column displays a check boxwith the column heading "Descending". If this checkbox is selected, the field is sorted in descendingorder. The default is in ascending order. The thirdcolumn gives you the option to sort by Caption Orderor by Translation Order. When you create drop-downlist captions, it is possible to specify the order thatthey appear in using the Caption Order field inTranslations. This is the order that will be used if youselect Caption Order. Translation Order is thealphabetical order of the actual translation of thecolumn in the language of the user running the report.If neither is selected, the default is alphabetically onthe Caption Code.
Column Formatting This section lists all of the columns (except GroupBy columns) that are displayed on the report. Foreach field listed there are three options. The firstoption is the name of the field, the second optionallows you to specify a total for the column. Thereare five types of totals, Average, Count, Maximum,Minimum, and Sum. All five types are available if thefield is a numeric field. For non-numeric fields onlyCount is available. The third option is for alignment,there is a radio-group with three options: left-justify,center-justify, and right-justify.
23-8 Sage CRM

Chapter 23: Writing Reports
The table below explains the fields in the Chart Options panel.
Field Description
Show Chart Check to show a chart.
Available OnClassic/InteractiveDashboard
When checked, the chart is available for selectionfrom the Report Charts category on the Classic orInteractive Dashboard. Refer to Adding ReportCharts to a Classic Dashboard (page 21-5) or ChartGadget (page 20-8) for more information.
Chart Style The type of chart you want to display. Availablestyles include Line, Bar, Horizontal Bar, Pie, Area,Point, Fast Line, Doughnut, Pyramid, and Funnel.Please refer to Chart Styles (page 23-10) forexamples.
Show Legend Toggles the legend display on or off.
Legend Alignment Aligns legend bottom, top, left, or right.
Value Indicates what column is to be used for the left axisof the chart.
Label Chart label for the left axis. If this is blank thetranslated field name is used.
Function Indicates what totalling function to use on the leftfield. The returned values of the left field must benumeric. Valid options for this field are Average,Count, Minimum, Maximum, and Sum. Only numericfields have all five options, non-numeric fields onlyhave the Count option. Because the returned valuemust be numeric, non-numeric fields always havethe Count option selected. Numeric fields can alsospecify no totalling since the underlying field value isnumeric.
Category The field to be used for the bottom axis of the chart.
Label The caption to be used for the bottom axis. If this isblank the translated field name is used.
Function Only applicable if the Category field is a date/timefield. Allows the value of the field to be split up intodate ranges likemonth names.
Group By If a Group By option was selected in the ReportOptions Step 1 of 2 page, this field is displayed onthe Chart Options panel. It displays a separate chartper grouping.
User Guide 23-9
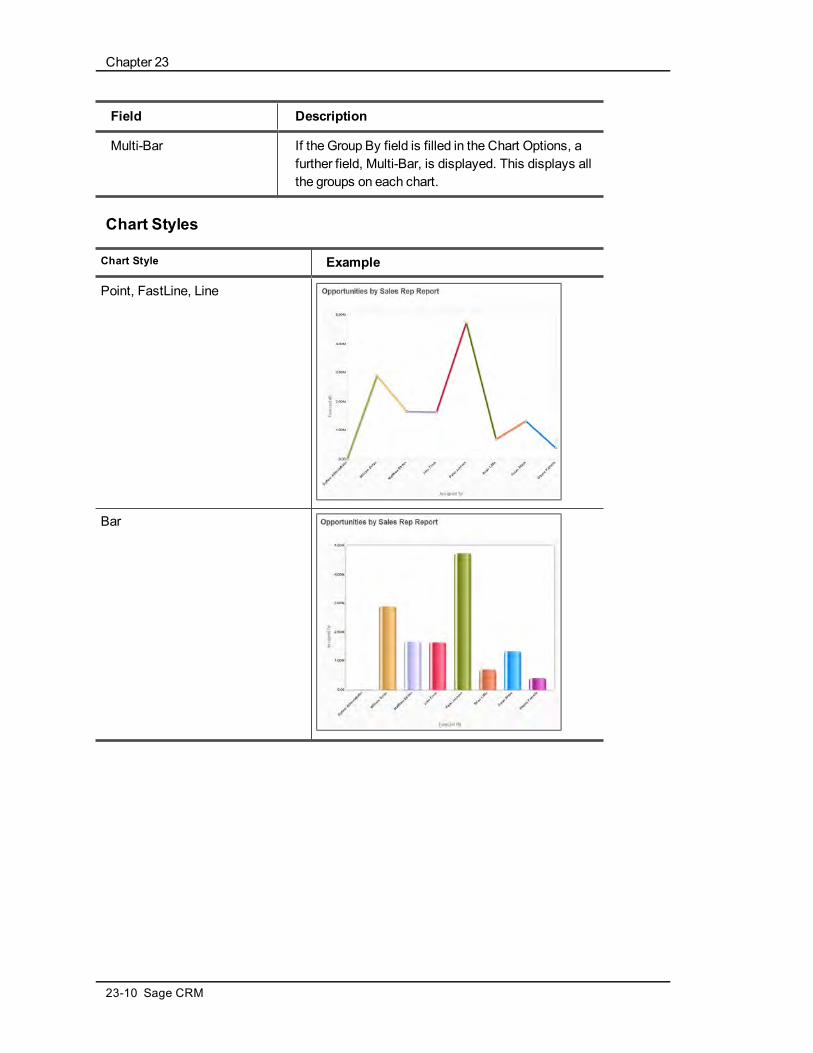
Chapter 23
Field Description
Multi-Bar If the Group By field is filled in the Chart Options, afurther field, Multi-Bar, is displayed. This displays allthe groups on each chart.
Chart Styles
Chart Style Example
Point, FastLine, Line
Bar
23-10 Sage CRM

Chapter 23: Writing Reports
Chart Style Example
Area
HBar
Pie
User Guide 23-11

Chapter 23
Chart Style Example
Doughnut
Pyramid
Funnel
User Requirement: Info Manager Administration Rights
Adding a Chart to a ReportThe Chart Options section of the Report Options, Step 2 of 2 page allows you to add and define achart for your report. The chart uses the same view as the rest of the report, but you can specifydifferent fields for the chart than you did for the report.
Example: Forecast Value by Sales Rep
This example demonstrates how to add a chart to an opportunity list report to show the TotalForecast Value by Sales Rep as a horizontal bar chart.
First, create the list report based on theOpportunity Summary Report Source according to thefollowing specifications.
Report columns should include:
23-12 Sage CRM

Chapter 23: Writing Reports
l Company : Company Name
l Person : Person
l Opportunity : Description
l Opportunity : Stage
l Opportunity : Status
l Opportunity : Close By (date)
l Opportunity : Certainty%
l Opportunity : Forecast (summed)
Further specifications include:
l Search criteria of Opportunity : Assigned To, Opportunity : Stage, Opportunity : Status, Opportunity :Close By, and Opportunity : Forecast.
l Grouping by the Sales Rep (Opportunity Assigned To) in order to get the Forecast totals by Rep.
l Sorting by Opportunity Assigned To and the Forecast amount.
l Right justify numerical columns.
To add the chart:
1. Select the Edit button next to the report you want to add the chart to. The Report Options, Step 1 of2 page is displayed.
2. Select the Continue button. The Search Criteria for Report page is displayed.
3. Click on the Continue button. The Report Options, Step 2 of 2 page is displayed.
4. Scroll to the Chart Options panel of the page.
Chart Optionspanel
5. Complete the details in the Chart Options panel and select the Save button. Refer to Report Fieldsand Buttons (page 23-4) for information on the Chart Options fields.
6. To view the chart, run the report.
HorizontalBar Chart report output
User Guide 23-13

Chapter 23
User Requirement: Info Manager Administration Rights
Creating a Cross Tabular ReportExample: Opportunity Stage by Sales Rep
This example demonstrates how to create a cross tabular report, which shows Opportunity Stageby Sales Rep (Opportunity Assigned To).
The report should show the sales reps from left to right across the top of the report, and the stagesdown the left-hand side of the report.
To create the report:
1. Select the Reports button.
2. Select Sales from the context area of the screen.
3. Click on the New action button. The Report Options, Step 1 of 2 page is displayed.
4. Select the Source View, and then Cross Tab from the Report Type field.
5. Complete the details on the rest of the page. The fields are described in the List Report example onthe previous page.
6. There is a field called Cross Tab, which is only displayed when building a cross tabular report. Thisdefines the columns displayed horizontally (from left to right) on the table. The Report Contentsdefines the information displayed vertically in the table.
Report Contents list
7. Select the Continue button and complete the information in the Report Options, Step 2 of 2 page.
8. Select the Save button. The new report is displayed in the list of reports.
9. To run the report, select the Run button. The output is displayed in a new browser window.
User Requirement: Info Manager Administration Rights
Creating a Historical ReportTo create a report which shows, for example, opportunities opened during July, which weresubsequently closed within the same quarter (July - September), you can create a Historical report.
23-14 Sage CRM

Chapter 23: Writing Reports
To set up and run this report:
1. Select the Reports button.
2. Select the category to which you want to add your new report. For example, Sales. A list of Salesreports is displayed.
3. Select the New action button. The Report Options, Step 1 of 2 is displayed.
4. Give the report a name, for example, Opportunity Opened and Closed.
5. Select the Report Source as Opportunity Summary.
6. Set the Report Type to Historical. The panels below the Report Details are changed to reflect thistype of report.
l The In Range field should reflect the type of start date you are measuring, in this case,Opportunity : Opened. You can also use the Opportunity : Created Date. The former is set bythe system but can be changed by the end user. The latter is set by the system and cannotbe changed by the user. The way in which you structured your sales process and workflowdetermines which date to report on.
l The Out Of Range field can be used to form a logical pair with the In Range field. Forexample, if you select the In Range field as Opportunity : Opened, and the Out Of Rangefield as Opportunity : Closed, when you report over a period of, for example, one quarter,the report will return the number of opportunities still open at the end of that quarter.
7. For this report, we are more interested in what has closed within the specified time frame, so youcan leave the Out Of Range field blank, but add the Opportunity : Closed to the Search Criteria ofthe report. You can also add the Opportunity : Status to Search Criteria.
Report Options, Step 1 of 2
8. The Date Partition field divides the report results into sections within the In Range date specified.Since our In Range date will cover a month time period, it would be useful to divide the results byweek. You can do this by setting the Date Partition field to Week.
9. Select the Continue button. The Search Criteria for Report page is displayed.
10. The In Range date is automatically displayed as the first search criteria. Specify the date range forOpportunity Opened, such as between 01 July and 31 July.
11. Specify the Opportunity Closed date range, such as between 01 July and 30 September.
12. Add the Opportunity Status search criteria, for example, Won.
13. Click on the Continue button. The Report Options, Step 2 of 2 page is displayed.
14. Complete the Header and Footer settings and Chart Options. A line chart will be displayed bydefault.
15. Select the Save button. The report is displayed in the list of reports.
User Guide 23-15

Chapter 23
16. Click on the hyperlink of the report or select the Run button to run the report. The report DisplayOptions page is displayed.
17. Select the appropriate display options. You can also re-set the report search criteria if you wish.
18. Select the Run button. The report output is displayed in a new browser window. The report outputshows the number of opportunities that were opened in July, which were closed and won within theQ3 (Jul - Sep) period.
The total number of opportunities opened from the 1st of July to the 31st of July, which weresubsequently won, is the number shown on the last week of the selected time period (not thetotal of all the weeks). The weekly totals give you a point-in-time snapshot for the whole"opened" period beingmeasured.
User Requirement: Info Manager Administration Rights
Cloning a ReportTo clone a report:
1. Select the Edit button next to the report you want to clone. The Report Options, Step 1 of 2 page isdisplayed.
2. Select the Clone button. The old report title is displayed with Copy of in the title.
3. Type in the new report name. This must be unique.
4. Select Save. The Report Options, Step 1 of 1 page is displayed so that you can complete themodifications to the cloned report.
User Requirement: Info Manager Administration Rights
Adding a new report styleThe System Administrator can expand the list of standard report styles by copying and editing anexisting style, andmaking it available in the Report Style drop-down list.
Report Style drop-down
To create a new report style:
1. Go to the Reports subdirectory of your CRM installation.
2. In this directory there are a number of *.XSL (Extensible Style-sheet Language) files, which definethe existing two styles for the desktop and WindowsCE browsers. The files should have the samename, ending with PC or CE for desktop and WindowsCE browsers respectively. There are alsoCSS files which are referenced by the PC *.XSL files.
3. Copy, for example, the STDGRIDSPC.XSL and the STDGRIDS.CSS files and rename them with anew style name.
4. Edit the *.XSL file and *.CSS file. The *.XSL file controls the structure of the report and the *.CSS filecontrols the look and feel of the report. Make sure you change the LINK tag in the new XSL file topoint to the new CSS file.
5. Save the changes you have made. To create a translation for the new styles so that they appear inthe Report Style field:
23-16 Sage CRM
Chapter 23: Writing Reports
6. In CRM, select the Administration button.
7. Select Translations from the context area of the screen. The Find page is displayed.
8. Select the New button. The Translation input page is displayed.
9. Enter the Caption Code, which must be the same as the file names (without the PC or CE).
10. Enter the Caption Family as ReportStyles.11. Enter the Caption Family Type as Choices.12. Add the translations for the languages used in your organization.
13. Select the Save button.
14. Test the new style by creating a new report. The new style appears in the Report Style field andyour report output should reflect the style changes.
User Requirement: Info Manager Administration Rights
Deleting a ReportTo delete a report:
1. Select the Edit button next to the report you want to change. The Report Options, Step 1 of 2 pageis displayed.
2. Select the Delete button. The Delete Report page is displayed.
3. Select the Confirm Delete button. The report is deleted and no longer appears in the report list.
User Requirement: Info Manager Administration Rights
User Guide 23-17


Glossary of Terms
Action buttonAction buttons are usually found on the right-hand side of the screen. They help you add andchange information and perform different tasks within the system. The action buttons availableto you change depending on where you are. Examples of Action buttons are: Change, Delete,Confirm Delete, New Task, New Appointment.
Advanced FindAllows users to create enhanced search queries based on complex SQL statements usingWHERE, AND, andOR clauses.
Apply Filter buttonThe apply filter button allows you to restrict lists of information by a predefined set of criteria. Forexample, theMy CRM | Calendar list defaults to filter out all pending communications for thecurrent user. The user can narrow the list further by filtering all pendingmeetings.
CampaignA campaign is a planned rollout of marketing activities in phases, orWaves. Each phase can inturn bemade up of several actions orWave Activities. Each action can in turn bemade up ofindividual communications between your company and its target audience.
For example, a campaign calledWest Coast LeadGeneration aims to generate leads in aspecific geography.
CaseA case is a customer service issue. These issues can range from a technical problem to acustomer complaint. A case keeps track of the issue from the initial logging through toresolution. Multiple communications (or tasks) can be linked to one case.
CommunicationCommunication refers to a task or meeting. The specific types of communication are determinedas action types. For example, Letter In, Letter Out, Phone In, PhoneOut, Demo.
Company TeamA Company Team is a group of users linked to a company for the purpose of tracking accountmanagement responsibilities.
Context AreaThe context area displays a summary of the information you are currently focused on. Example:If you are working in the context of a person, their name appears on the top of your screen.Within the same context area you can see their company, phone number, and e-mail address.You can quickly move from the context area of a person to the company they work for byclicking on the Company link within the context area.
User Guide Glossary – i
Glossary of Terms
CTIComputer Telephony Integration. CRMCTI provides CTI-enabled users with telephonyfunctionality from their desktops, via the Sage CRM interface.
DashboardThe Dashboard is a customizable page that contains informationmost relevant to your dailywork. For example, a list of the companies youmost often work with.
Documents TabThe Documents tab is available within the context of a person, company, opportunity, case, orsolution. It stores a link to a document.
Document DropThe Document Drop feature provides a short cut for linking documents, e-mails and other typesof files from another application to customer data in CRM. It is only available when usingCRM in Internet Explorer. The System Administrator can enable/disable access to the plug-inrequired for Document Drop for all users from the Administration area in CRM.
Find pageThe Find page is displayed when the user selects the Findmenu button. There is a Find page forcompanies, people, opportunities, leads, solutions, cases, and communications.
GroupsGroups allow users to create collections of records within CRM. Groups can be static ordynamic.
HyperlinkHyperlinks allow you to jump from one page to another. Examples of hyperlinks are: when youclick on a company name, the Summary page associated with that company is displayed in thework-area; or you can click on an e-mail address to send an e-mail straight away.
LeadA lead represents unqualified information received from your corporateWeb site, trade shows,and purchasedmailing lists.
Line ItemLine items are products that your customer is interested in buying. They are linked to theopportunity and selected through theQuotes or Orders tab.
Link StatusThe Link Status icon is displayed in the Addresses tab. A new address added in the context of acompany is linked to the company, but the Link Status shows as single-linked (plain house icon)until the address is linked to one or more contact people. Then the icon changes tomulti-linked(a house with a link above it). A new address added in the context of a person is linked to theperson, but the Link Status shows as single-linked until the address is linked tomore than oneperson or to the company.
Glossary -ii Sage CRM

Glossary of Terms
Menu buttonMenu buttons are found on the left-hand side of the screen. They help you navigate to commonlyused pages. Menu buttons remain the same regardless of the company or individual or any othercontext you are working in. However, one user may see a different set of menu buttons toanother, since access to these is set up in the user profile. Examples of Menu buttons are: New,Find, Team CRM.
My CRMTheMy CRM button shows a series of tabs all containing information related to the logged inuser. Depending on the user's rights, theMy CRM areas of others can also be viewed byselecting another person from the context area of the screen.
Next and Previous arrowsThe Next and Previous arrows appear when a list of information extends tomore than one page.Clicking on the left- or right-pointing arrows will display the previous or next page respectively.The outer arrows take you to the first or last page within a set of pages.
NotificationThe notification feature is implementation dependent. When the notification feature is switchedon, notifications act as reminders for upcoming or overdue tasks. They are set in theCommunications Details page and appear either on-screen, or as e-mail or SMS messages.They can also be integrated into the workflow functionality.
OpportunityAn opportunity refers to a sales opportunity. Opportunities track sales interest from the initialqualified lead through to closing the deal.
Outbound Call ListOutbound Call Lists are used for high volume telemarketing activities, where calls are not pre-allocated to individual users, and a Communication record is only created when a successfulcontact is made.
PanelA panel groups related information for easier viewing. One page of information can be dividedinto a number of panels.
Pop Out listYou can hover or right-click on themenu buttons to activate PopOut lists. These allow you toquickly navigate through CRM.
Progress buttonThe progress button is available in the context of leads, opportunities, solutions, and caseswhen the workflow functionality is not in use.
It can be accessed from the lead, opportunity, solution, or case summary page.
It allows users to change the Stage, Status and other data relating to the lead, opportunity,solution, or case. It also allows users to add a tracking note, which forms part of the history ofthe lead, opportunity, solution, or case "life cycle".
User Guide Glossary – iii
Glossary of Terms
Quick LookTheQuick Look tab lists themost recent communications and sales opportunities linked to thecompany or person. Cases are listed by Status.
Recent listThe Recent list is located in the top left-hand corner of your screen. Clicking the recent list orhovering over it, allows you to select and return to the companies, people, opportunities, leads,solutions, or cases you weremost recently dealing with.
RelationshipsThe Relationships tab is available within the context of all main entities. You can show linksbetween different types of information. For example, you can set up a relationship between acompany and its directors, or between an opportunity and the people influencing it. Your SystemAdministrator defines the different Relationship Types that can be set up from each tab.
Shared DocumentsTheMy CRM | Shared Documents tab lists all the Shared Documents and Templates you haveaccess to.
SLASLA stands for Service Level Agreement. A Service Level Agreement is made between yourorganization and a customer to set standards for customer service case resolution times.Service level agreements can be linked to companies and to individual customer service cases.
SMSSMS stands for Short Messaging Service. If this feature is activated for your system, SMS isused to notify users via their mobile phone or other wireless device of events taking place. Forexample, you can receive a reminder of an upcomingmeeting via SMS messaging. It can alsobe used in conjunction with workflow to notify users of new leads, overdue cases, or closedopportunities.
SolutionSolutions are the "cleaned and approved" basis of a knowledge base. Solutions can beaccessed by internal CRM users, as well as customers and partners via a self serviceWeb site.Solutions are a separate entity from Cases, but they can be linked tomultiple cases—and acase can be linked tomultiple solutions.
SortYou can change the sort order of any list by clicking on the underlined column heading.
TabTabs are like folder dividers. The information found in each folder section is determined by thecurrent context. For example, if the person "Anita Chapman" has been zoomed in on in thecontext area, selecting the Quick Look tab will display themost recent interactions yourcompany has had specifically with Ms Chapman.
Glossary -iv Sage CRM

Glossary of Terms
TeamA team is a group of users who perform similar roles. Tasks (communications), opportunities,leads, and cases can all be assigned to a team. A user can be amember of one team. This iscalled their Primary Team. A user can also have rights to view information in multiple teams.
ThemeThemes allow you to customize look and feel of the CRM user interface. For example, youmayprefer a green/gray based look to a blue/white based look. Your Administrator defines thethemes available to you and can add new ones to suit your corporate identity. Your preferredtheme can be set in My CRM | Preferences.
Tracking noteTracking notes are used in the context of leads, opportunities, cases, and solutions tomake freetext notes on the progress of the lead, opportunity, solution, or case.
Validation errorA validation error message appears on the screen when an incomplete or incorrect new entryhas beenmade in the system. The user must fill in required fields that are empty, or correct aninvalid entry, such as numbers in a text-only field. These fields are highlighted with a questionmark and cross mark, respectively.
WaveAWave is a phase of amarketing campaign. Each wave can bemade up of several actions orWave Activities. Each action can in turn bemade up of individual communications between yourcompany and its target audience.
For example, a campaign calledWest Coast LeadGeneration aims to generate leads in aspecific geography. The campaign consists of three different Waves: 1) Raise Awareness; 2)Product Launch at Tradeshow; 3) Qualify Interest.
Wave ActivityAWave Activity is a type of action within a wave of amarketing campaign. Each wave activitycan bemade up of individual communications between your company and its target audience.
For example, a campaign calledWest Coast LeadGeneration aims to generate leads in aspecific geography. The campaign consists of three different Waves: 1) Raise Awareness; 2)Product Launch at Tradeshow; 3) Qualify Interest. The first wave is made up of two differentwave activities: "Flyer Mailing" and "Newsletter Mailing". The second wave is made up of thefollowing two wave activities: "Invitation with Response Card" and "Response Card Follow-up",and so on.
Wild CardThe% wild card helps you complete unspecific searches. The% (percentage) symbol, means"contains". For example, typing "%software" in the Company Name field of the company Findpage returns a list of all companies, which contain the word "software" in their company name.
WorkflowWorkflow automates your company's business processes using a predefined set of rules andactions.
User Guide Glossary – v


Index
A
Accessing
Interactive dashboard 20-3
Outbound Calls 15-2
Preferences 22-1
Action buttons 2-4
Actions
Export To File 11-4
New Task 11-2
Send E-mail 11-3
Activities
scheduling 5-1
Activity
reports 10-1
Add Comment button 15-3
Add Contact
Exchange 7-13
Add Contacts
button (Classic Outlook) 8-6
Add This Record To A Group button 12-8,12-13
Adding
attachments to tasks 5-11
charts to a reports 23-12
Classic Outlook contacts to CRM 8-6
comment line item 12-8
dashboard template 20-22
data sources to dashboard 20-20
document to the Documents tab 9-9
free text line item 12-8
gadget template to dashboard 20-6
gadget to library 20-24
line item 12-8
multiple records to a group 16-7
new address 4-9
new gadget to dashboard 20-7
notes to a company 4-15
person to a company 4-9
primary entity records to a group 16-7
relationships 4-13
report style 23-16
SData feed template 20-21
Address
adding a new 4-9
changing 4-8
fields 4-5
type 4-10
Address Links
maintaining 4-10
Addresses
tab 2-5
Administrator reports 10-1
Adobe PDF 10-7
Advanced Find
searching 3-7
Advanced Search Select 2-9, 2-9
All day events (Classic Outlook) 8-12
Analyzing
e-marketing campaigns 17-26
Appointment
synchronizing (Classic Outlook) 8-9
Appointments
stub (Exchange) 7-9
User Guide Index – i

Index
synchronizing (Exchange) 7-6, 7-7, 7-8
Assigning
a case to a colleague 18-5
tasks to other people 5-12
users to dashboard template 20-22
Attachments
adding to tasks 5-11
B
Best Case forecast scenario 13-4
Button
Add Contacts (Classic Outlook) 8-6
Add This Record To A Group 12-8, 12-13
File And View E-mail 8-15
Reset Standard Dashboard 21-4
Send And File 8-16
Start Mail Merge 12-8, 12-13
C
Calendar 2-8
gadget 20-8
list sorting 3-15
tab 2-6
viewing 5-14
Calendar management 5-13
Call Back After button 15-5
Callback
creating a 5-1
Campaign
creating a new 17-3
fields 17-5
reporting 17-20
reports 10-1
Case
closing 18-6
creating a new 18-2, 18-5
fields 18-3
icons 18-4, 18-4
pipeline 18-7
progressing 18-6, 18-7
searching for 3-4
solving 18-6
Cases
tab 2-5, 2-6
Changing
address links 4-10
address, phone and e-mail 4-8
an opportunity 12-5
classic dashboard 21-4
company dashboard 21-7
company details 4-8
dashboard template 20-23
gadget layout 20-19
interactive dashboard details 20-6
library gadgets 20-24
password 2-2
person details 4-9
preferences 22-6
recurring appointments 5-18
report display options 10-7
Chart
gadget 20-8
Chart options 23-9
Check Boxes 2-9
Classic dashboard
changing 21-4
Index -ii Sage CRM
Index
content 21-2
default 21-2
deleting 21-4
details 21-3
favorite reports 21-5
narrow and wide blocks 21-2
reset 21-4
saved search 21-4
tab 21-1
toolbar 21-3
Classic Dashboard
creating a new 21-1
Classic Outlook
all day events 8-12
attaching shared documents 8-14
CRM Logon page 8-4, 8-4
CRMOptions panel 8-5
CRM toolbar 8-4
default system settings 8-1
installing integration 8-1, 8-2
plug-in 8-1
recurring appointments and tasks 8-11
skipped items 8-13
synchronization conflicts 8-12
using CRM in 8-3
viewing contact information 8-8
Classic Outlook Integration
reinstalling the plug-in 8-16
uninstalling the plug-in 8-16
Clear button 3-5
Cloning
line item 12-8, 12-13
reports 23-16
Closing a case 18-6
Coaching
on-screen 2-10
Combining search criteria 3-5
Comment line item 12-8
Commit forecast scenario 13-3
Communication
changing status 5-10
dragging and dropping 5-15
fields 5-3
icons 5-7, 5-7
recurring 5-17
reports 10-1
scheduling unlinked 5-9
searching 5-11
Communications
tab 2-5
Company
changing details 4-8
classic dashboard 21-6
creating a new 4-8
fields 4-4
merging 4-18
searching for 3-3
tabs 2-5
Company Team
tab 2-5
Configuring
mass e-mail 16-17
Conflicts in Classic Outlook 8-12
Contacts
synchronizing (Exchange) 7-2, 7-2, 7-4
tab 2-6
User Guide Index – iii

Index
Context Area 2-3
Convert to Opportunity button 14-8
Convert to Opportunity Button 14-7
Converting
an e-mail to a lead, opportunity orcase 6-5
Converting a lead to an opportunity 14-7
Copying
interactive dashboard 20-5
Counting 3-15
creating
a task 5-1
Creating
a classic company dashboard 21-6
a forecast 13-3
a new case 18-2
a new classic dashboard 21-1
a new company 4-2
a new interactive dashboard 20-5
a new lead 14-2
a new opportunity 12-4
a new report category 23-1
a new solution 18-7, 19-3
a recurring appointment 5-17
a solution from a case 19-3
E-marketing E-mail 17-21
group 17-12
groups 16-2
new campaign 17-3
new wave 17-4
new wave activities 17-4
outbound call list 17-13, 17-16
outbound call wave activity 17-13
report 23-2
response codes 17-10
team forecast 13-5
Cross Tabular
report 10-1, 10-3, 23-14
CSV format 10-9
Currency 12-6
quotation 12-6
Customer Service reports 10-1
D
Dashboard
charts 21-5
report charts 21-5
tab 2-5, 2-6
templates 20-21
Data sources
adding to dashboard 20-20
Default
interactive dashboard 20-4
Default classic dashboard 21-2
Deleting
classic dashboard 21-4
interactive dashboard 20-6
library gadget 20-25
recurring appointments 5-19
relationships 4-15
reports 23-17
saved search 3-14
template dashboard 20-23
Discount
order level 12-12
quote level 12-7
Index -iv Sage CRM
Index
Document
adding to documents tab 9-9
drop 9-9
Drop Files Here area 9-10
shared documents 9-11
Documents
retrieving 9-8
tab 2-5, 9-7
Documents Tab
adding a document to 9-12
drop a document into 9-11
Drag and Drop
communications 5-15
e-mail 9-10
Drop-down lists 2-8
Duplication 4-17
E
attachments 6-3, 16-19
converting to lead, opportunity orcase 6-5
drag-and-drop 9-10
filing 6-5
filing (Classic Outlook) 8-15
inbound 6-4
Microsoft Outlook 6-4
replying to 6-4
screen position 6-2
sending 6-1
setting a default template 6-1
short cut keys 6-4
template 6-2
E-marketing
e-mail 17-21
setting up campaign 17-20
E-marketing campaigns
analyzing 17-26
E-marketing E-mail
fields 17-22
templates 17-26
E-marketing User Profile 17-29
tab 2-6
Editing
gadget content 20-15
Enter key 2-7
Excel CSV 10-9
Exchange
Add Contact 7-13
File E-mail 7-13
logs 7-10
Exchange Integration 7-1, 7-1
Exchange Integration Logs
tab 2-6
Exclude button 15-4
Export To File
action 11-4
Exporting
group 17-12
F
Favorite Reports 10-6, 21-5
Fields
Address 4-5
Campaign 17-5
Case 18-3
Communication 5-3
User Guide Index – v

Index
Company 3-10, 4-4
E-marketing E-mail 17-22
Lead 14-3
Line Item 12-7
Opportunity 12-3
Order 12-11
Order Discount 12-12
Person 4-4, 4-6
person e-mail 4-7
person phone details 4-7
Phone/E-mail 4-5
Preferences 22-2
Quote 12-6
Quote Discount 12-7
Relationships 4-14
Solution 19-1
Wave 17-6
Wave Activity 17-6
File And View E-mail button 8-15
File E-mail 7-13
Filing
e-mail 6-5
e-mail (Classic Outlook) 8-15
Filter button 3-15
Filtering 3-15
Find action button 3-3
Find button 2-4
Findmenu button 3-3
Finish Calling button 15-5
Forecast
creating a new 13-3
submitting 13-4
Forecast History
tab 13-4
viewing 13-4
Forecast scenario 13-2, 13-3
best case 13-4
commit 13-3
likely 13-4
Forecasts
tab 2-6, 13-3
Free text line item 12-8
G
Gadget
add to library 20-24
adding to dashboard 20-7
calendar 20-8
chart 20-8
edit content 20-15
header icons 20-19
layout 20-19
linking 20-15
list 20-9
mainmenu 20-10
modify library 20-24
notification 20-11
quick reference 20-7
record summary 20-11
RSS feed 20-11
SData list 20-11
SData record summary 20-13
summary 20-13
task list 20-14
web site 20-14
Index -vi Sage CRM

Index
Gadget template
adding 20-6
General reports 10-1
Get A Call button 15-3
Get Another Call button 15-4
Go arrows 2-9
Got Through button 15-4
Group
adding information to tab 16-14
creating 16-2, 17-12
exporting 17-12
how information is stored 16-11
mass e-mail 16-18
mass update 16-10
refreshing 16-9
update territories 16-11
Groups
addingmultiple records 16-7
adding primary entity records 16-7
tab 2-6
H
Help button 2-10
Historical report 10-1, 10-4, 23-14
Hot Keys 2-8
Hyperlink 2-4
Hypertext Link 3-3
I
Icon
Link Status 4-10
Icons
case 18-4
communication 5-7
lead 14-5
opportunity 12-4
SLA 18-4
Inbound e-mail 6-4
Installing
Classic Outlook integration 8-1, 8-2
Outlook plug-in for Exchange 7-10
Interactive dashboard
accessing 20-3
add data sources 20-20
adding gadget template 20-6
adding new gadget 20-7
adding SData feed template 20-21
adding template 20-22
assigning users 20-22
copying 20-5
creating 20-5
default 20-4
deleting 20-6
details 20-6
personal 20-3
quick start 20-3
template 20-4
user 20-24
K
Key attribute data
groups 16-13
Key attribute profiles
call handling 17-17
Key Attributes
reports 23-7
tab 2-5
Keys
hot keys 2-8
User Guide Index – vii

Index
Keyword search 3-9
L
Lead
converting to opportunity 14-7
creating a new 14-5
fields 14-3
icons 14-5
pipeline 14-9
progressing 14-8
qualifying 14-6
searching for 14-5
Lead reports 10-1
Leads
tab 2-6
Library
adding gadget to 20-24
modifying gadgets 20-24
Library gadget
deleting 20-25
Likely forecast scenario 13-4
Line item 12-8
cloning 12-8, 12-13
fields 12-7
Link Solution button 19-3
Link Status
icon 4-10
Linking
gadgets 20-15
List
gadget 20-9
List actions 11-1
List report 10-1, 10-2, 23-2
LogOff button 2-4
Logging off 2-2
Logging on 2-1
Logon page 2-1
Logs
Exchange 7-10
M
Mail Merge
executing 9-2
tomultiple contacts 9-3
Mainmenu
gadget 20-10
Marketing
reports 10-1
tab 2-5
Marketing button 2-4
Mass e-mail 16-17
configuration 16-17
group 16-18
Mass Update
group 16-10
Meeting
inviting others 5-15
planning 5-15
Meeting Planner 5-6
Menu buttons 2-4
Merging
companies 4-18
people 4-19
Microsoft Outlook 6-4
My CRM
tabs 2-6
My CRM button 2-4
Index -viii Sage CRM

Index
N
Narrow blocks 21-2
Navigating 2-7
New Button 2-4
New Task
action 11-2
Next and Previous arrows 2-8
Note
adding to a company 4-15
Notes
tab 2-5
Notification
gadget 20-11
Notifications 5-10
Numeric Field
searching 3-6
O
On-screen coaching 2-10
Opportunities
tab 2-5, 2-6
Opportunity
changing 12-5
creating a new 12-4
fields 12-3
icons 12-4
pipeline 12-14
progress page 12-9
progressing 12-9, 12-14
searching for 3-4
Order
fields 12-11
printing 12-13
sending 12-13
turning a quote into an 12-10
Order Discount
fields 12-12
Outbound call
wave activity 17-13
Outbound call handling 17-13
key attribute data 17-17
Outbound call list
creating 17-13, 17-16
refreshing 17-16
Outbound Call Lists
tab 2-6, 15-2
Outbound Calls
accessing 15-2
reports 10-1
Outlook
File And View E-mail 8-15
Send And File 8-16
Outlook plug-in
installing for Exchange 7-10
working with (for Exchange) 7-12
P
Panel 2-3
statistics 12-14
Password 2-1
changing 2-2
People
tab 2-5
Person
adding to a company 4-9
changing the details 4-9
E-mail fields 4-7
fields 4-4, 4-6
User Guide Index – ix

Index
merging 4-19
reassigning to a company 4-17
searching for 3-3
Personal
dashboard 20-3
Phone/E-mail
fields 4-3, 4-5
tab 2-5
Pipeline
Case 18-7
Lead 14-9
Opportunity 12-14
Plug-in
Classic Outlook 8-1
downloading 9-1
Outlook for Exchange 7-12
PopOut
list 3-1
Preferences
accessing 22-1
changing 22-6
e-mail screen position 6-2
fields 22-2
solutions 19-2
tab 2-6
Printing
orders 12-13
Product
adding to an opportunity 12-5
Progressing
a case 18-6, 18-7
a lead 14-8
an opportunity 12-9, 12-14
Promoting
quote to order 12-10
Publishing
a solution 19-4
Q
Qualifying
a lead 14-6
Quick appointment 5-9
Quick Look
tab 2-5
Quick task 5-9
Quotation
promoting 12-10
sending a 12-9
Quote
fields 12-6
Quote Discount
fields 12-7
Quotes
tab 12-5
R
Reallocating calls 17-17
Reassigning
a person 4-17
communication to a colleague 5-12
Recent
button 2-4
list 2-4
menu 22-2
Record summary
gadget 20-11
Recurrence button 5-6
Index -x Sage CRM
Index
Recurring appointment 5-17
changing 5-18
Classic Outlook 8-11
deleting 5-19
Recurring communication
creating a new 5-17
Refreshing
group 16-9
Refreshing outbound call list 17-16
Reinstalling
Outlook plug-in for Classic OutlookIntegration 8-16
Relationships
adding 4-13
deleting 4-15
fields 4-14
tab 2-5, 4-13
Replying
to an e-mail 6-4
Report category
creating a new 23-1
moving a report 23-2
Reports
activity 10-1
adding a new style 23-16
adding charts 23-12
administrator 10-1
advanced find 23-6
campaign 10-1, 17-20
categories 23-1
changing categories 23-2
chart options 23-9
classic dashboard 21-5
cloning 23-16
communication 10-1
contents 23-6
creating a new 23-2
cross tabular 10-1, 10-3, 23-14
customer service 10-1
dashboard 21-5
deleting 23-17
favorite 10-6
general 10-1
group by 23-7
historical 10-1, 10-4, 23-14
key attribute data 23-7
leads 10-1
list 10-1, 10-2
marketing 10-1
outbound calls 10-1
running 10-1
sales 10-1
search criteria 10-6, 23-6
sorting 23-6
summary 10-1, 10-5
Reports button 2-4
Response Codes
creating new 17-11
Response Setup button 17-11
RSS Feed
gadget 20-11
Running
a report 10-1
S
Sales
reports 10-1
User Guide Index – xi

Index
Sales Forecasting
terminology 13-1
Save And Submit button 13-4
Saved Search
classic dashboard 21-4
creating a new 3-13
creating for all users 3-14
deleting 3-14
updating 3-14
using an existing 3-13
Saving
report search criteria 10-6
Schedule Telesales button 17-9
Scheduling
a task for a colleague 5-12
Screen Elements 2-2
SData
gadget 20-11
Navigator 20-13
SData Record summary
gadget 20-13
Search Criteria
saving 3-13
Searching
advanced find 3-7
combined searches 3-5
date field 3-6
for a case 3-4
for a communication 5-11
for a company 3-3
for a lead 14-5
for a person 3-3
for a solution 19-2
for opportunities 3-4
keyword search 3-9
numeric field 3-6
wild card 3-6
Selecting
personal dashboard 20-3
Send
mass e-mail 11-3
Send And File button 8-16
Send E-mail
action 11-3
Sending
a quotation 12-9
e-mail 6-1
mass e-mails 16-17
Setting
default interactive dashboard 20-4
Setting up
E-marketing campaign 17-20
Shared Documents
accessing documents 9-11
Classic Outlook 8-14
filtering 9-12
tab 2-6
Skipped items (Classic Outlook) 8-13
SLA 18-3
icons 18-4
severity 18-3
Solution
creating a new 18-7, 19-3
creating from within a case 19-3
fields 19-1
publishing 19-4
Index -xii Sage CRM

Index
searching for 19-2
Solutions
tab 2-6, 19-2
Solving
a case 18-6
Sorting
reports 23-6
Start Mail Merge
button 12-13
Start Mail Merge button 12-8
Statistics panel 12-14
Status
changing communication 5-10
Stub appointments 7-9
Submitting a forecast 13-4
Summary
gadget 20-13
tab 2-5
Summary report 10-1, 10-5
Synchronizing
appointment (Exchange) 7-6, 7-7, 7-8
Appts and Tasks (Classic Outlook) 8-9
contacts (Exchange) 7-2, 7-2, 7-4
tasks (Exchange) 7-4, 7-5, 7-5
T
Tab
Quotes 12-5
Tab key 2-7
Tabs 2-3, 2-5
adding group information 16-14
Addresses 2-5
Calendar 2-6
Cases 2-5, 2-6
Classic dashboard 21-1
Communications 2-5
Company 2-5
Company Dashboard 2-5
Company Team 2-5
Contacts 2-6
Dashboard 2-6
Documents 2-5, 9-7
E-marketing User Profile 2-6
Ellipses 2-6
Exchange Integration Logs 2-6
Forecast History 13-4
Forecasts 2-6, 13-3
groups 2-6
Key Attributes 2-5
Leads 2-6
Marketing 2-5
My CRM 2-6
Notes 2-5
Opportunities 2-5, 2-6
Outbound Call Lists 2-6, 15-2
People 2-5
Phone/E-mail 2-5
Preferences 2-6
Quick Look 2-5
Relationships 2-5, 4-13
shared documents 2-6
Solutions 2-6
Summary 2-5
Target Close Date 13-1
Target list
key attribute data 16-13
User Guide Index – xiii
Index
Task
synchronizing (Classic Outlook) 8-9
Task list
gadget 20-14
Tasks
synchronizing (Exchange) 7-4, 7-5, 7-5
Team
building a new 4-16
Team CRM button 2-4
Team forecast
creating a new 13-5
Template
dashboard 20-4, 20-22, 20-23
SData feed 20-21
Template dashboard
deleting 20-23
Templates
e-mail 6-1
E-marketing E-mail 17-26
interactive dashboard 20-21
Territories
update group territories 16-11
Territory Management 4-7
U
Uninstalling
Outlook plug-in for Classic OutlookIntegration 8-16
User
dashboards 20-24
V
Validation Errors 4-4
View Attachment button 9-8
View Lead button 14-8
Viewing
calendar 5-14
forecast history 13-4
W
Web site
gadget 20-14
Wide blocks 21-2
X
XLSX 10-9
Index -xiv Sage CRM

CRMDocument Version Code: USE-MAN-ENG-720-1.0