blackbaud crm treasury guide
TRANSCRIPT

Treasury Guide
03/21/2013 Blackbaud CRM 3.0 Treasury US
©2013 Blackbaud, Inc. This publication, or any part thereof, may not be reproduced or transmitted in any form or by anymeans, electronic, or mechanical, including photocopying, recording, storage in an information retrieval system, orotherwise, without the prior written permission of Blackbaud, Inc.
The information in this manual has been carefully checked and is believed to be accurate. Blackbaud, Inc., assumes noresponsibility for any inaccuracies, errors, or omissions in this manual. In no event will Blackbaud, Inc., be liable for direct,indirect, special, incidental, or consequential damages resulting from any defect or omission in this manual, even if advisedof the possibility of damages.
In the interest of continuing product development, Blackbaud, Inc., reserves the right to make improvements in this manualand the products it describes at any time, without notice or obligation.
All Blackbaud product names appearing herein are trademarks or registered trademarks of Blackbaud, Inc.
All other products and company names mentioned herein are trademarks of their respective holder.
Treasury-2013
ContentsTREASURY 1Manage Bank Accounts 2
Go to Bank Account 2Add a Bank 2
Bank Search 3Bank Search Screen 4
Bank Page 5Edit Bank Information 5Delete a Bank 5
Add a Bank Account 6Add Bank Account Screen 8
Bank Account Page 8Bank Account Register 9Add or Edit EFT File Information 9
Edit EFT File Information Screen 11Edit Bank Account Information 12Close Bank Account 12Delete Bank Account 12Delete Transactions 13Bank Account Search 13
Bank Account Search Screen 14Banking Systems 14Add Miscellaneous Payments 15
Add a Miscellaneous Payment Screen 17Miscellaneous Payment Search 18Miscellaneous Payment Search Screen 18
Miscellaneous Payment Page 19Edit Miscellaneous Payments 19Edit Miscellaneous Payment Screen 19Delete Miscellaneous Payments 21GL Distributions Tab for a Miscellaneous Payment 21
Add Deposits 21Add a Deposit Screen 22Deposit Search 23
Deposit Search Screen 23Deposit Page 24
Edit Deposit 25Edit Deposit Screen 25Edit Deposit Number 25
Edit Allowed Payment Methods 26Lock/Unlock Deposit 26Delete Deposit 27Payments Tab 27Deposit Corrections Tab 27
Add a Deposit Correction 27Payment Defaults Tab 28
Edit Payment Defaults 28GL Distributions Tab for a Deposit 29
Go to Payment 29Unlink Payments 29Link Payments 30Link Multiple Payments 30
Link Multiple Payments Screen 31Reconcile Credit Card Transactions with Blackbaud Merchant Services 32
Deposit Correction Page 33Edit a Deposit Correction 33Delete a Deposit Correction 33GL Distributions Tab for a Deposit Correction 33
Adjustment Categories 33Add an Adjustment Category Screen 35Edit Adjustment Category 35Delete Adjustment Category 35Copy Adjustment Category Information 36
Adjustment Category Search Screen 36Add Adjustments 37
Add an Adjustment Screen 38Adjustment Page 38
Edit Adjustments 39Edit Adjustment Screen 39Delete Adjustments 39GL Distributions Tab for an Adjustment 40
Edit GL Distribution 40Edit GL Distributions Screen 40
Documentation 41Notes 41
Add Notes 41Add a Note Screen 41Edit Notes 41Delete Notes 42
Notifications 42Add Notifications to Specific Records 43Edit Notifications for Specific Records 43
Delete Notifications from Specific Records 44Media Links 44
Add Media Links 44Add aMedia Link Screen 44Edit Media Links 44Delete Media Links 44
Attachments 45Add Attachments 45Add an Attachment Screen 45Edit Attachments 45Delete Attachments 45
Open Attachment Files 46
CREATE DEPOSITS PROCESS 47Create Deposits Process 47
Configure Deposit Templates 48Create Deposits Page 51
Add Deposit Process 51Add Deposit Process Screen 52
Delete Deposit Process 53Edit Deposit Processes 53Run Deposit Process 53View Deposit Process Information 55
Recent Status Tab 56History Tab 56
Delete a Status Record from the History Tab of a Process Status Page 56Schedule a Deposit Process Job 56Generate Windows Scripting File for a Deposit Process 58
RECONCILE OUTSTANDING CREDIT CARD TRANSACTIONS 59Credit Card Reconciliation Workflow 60Set the Default Settlement Date for Existing Transactions 61Settle Credit Card Transactions 62
Automatically Settle Transactions Through Blackbaud Merchant Services 63Upload a Settlement Report 63
Manage Column Mappings for Settlement Report Formats 65Add a Column Mapping Screen 66
Mark a Transaction as Settled or Unsettled 67Reconcile Settlement Report Transactions 68
Find a Transaction Match 68Blackbaud Merchant Services Alerts and Information 69
Suspect Transactions 69
Refund Suspect Transactions 69Chargeback Transactions 70
Pending Review 70Challenge Chargeback Requests 71
Under Dispute 72Resolved 72
Blackbaud Merchant Services Transaction Details 73
TREASURY REPORTS 75Deposit Report 75Miscellaneous Payments Report 77Receipt for Miscellaneous Payment 78Deposit Summary Report 78
INDEX 81
TreasuryManage Bank Accounts 2
Add a Bank 2
Bank Page 5
Add a Bank Account 6
Bank Account Page 8
Banking Systems 14
Add Miscellaneous Payments 15
Miscellaneous Payment Page 19
Add Deposits 21
Deposit Page 24
Deposit Correction Page 33
Adjustment Categories 33
Add Adjustments 37
Adjustment Page 38
In Treasury you maintain all your bank and account information. You can add banks and accounts, adjustmentcategories and adjustments, miscellaneous payments, and deposits. You can also link multiple payments andaccess each bank account register within Treasury. The bank account register displays information specific to theselected account, such as transaction date and type, system, number, payee, status, amount, balance, and datecleared. You can also work with outstanding credit card transactions, as well as chargeback and suspecttransactions.In addition, you can create and review deposits. All eligible payments made through Treasury (miscellaneouspayments) and the back office can be added to the deposit process. Examples of back office payments includepayments made as part of a batch or from a revenue record outside of Treasury.
Note: If your organization implements site security, the Review deposits link does not appear on the Treasurypage. Click Create deposits to access the Create Deposits page where you can you can add, edit, delete, and runa deposit process.
chapter 1
From themain Treasury page, you can access all areas of Treasury and perform searches for specific records.
Manage Bank AccountsTheManage Bank Accounts page displays bank and account information such as bank name, account name andtype, routing number or BIC, and current and ending balances. You can add, view, and delete bank accountsfrom this page, as well as access the bank account register.
Note: Depending on the banking systems enabled for your organization, additional columns that representbanking system and routing number information may display on this page. You can enable or disable bankingsystems for your organization from the Banking systems link on the Treasury page.
All bank accounts, regardless of bank, display in the grid. To access theManage Bank Accounts page, clickManage bank accounts from the Treasury page.
Go to Bank AccountTo access the bank account register and view information for a specific bank account, select a bank account inthe Bank accounts grid on theManage Bank Accounts page and click Go to account. You can also open a bankaccount from the Accounts tab of the bank record.
} View bank account information
1. From theManage Bank Accounts page, or from the Accounts tab of the bank record, select the bankaccount you want to view and click Go to account. The Bank Account page for the account you selectedopens.
2. From the bank account record, you can edit or delete the bank account, and add transactions.
Add a BankWhen you add a bank to the system, you assign a constituency to an organization. This organizationconstituency stores specific bank information, such as routing number or BIC. You can add a bank from theManage Bank Accounts page.
} Add a bank
1. From the Treasury page, clickManage bank accounts. TheManage Bank Accounts page appears.
2. From the Tasks pane, click Add a bank. The Add a bank screen appears.
3. From theOrganization field, click the search icon. The Non-Bank Search screen appears.
When you add a bank, you apply the Bank constituency to an organization that is not already a bank.
4. From the Non-Bank Search screen, search for and select the organization to add as a bank.
If the organization is not in your database, you can add it from this screen. To add an organization fromthe Non-Bank Search screen, on the Results grid, click Add.
5. Click Select. You return to the Add a bank screen.
Tip: Rather than click the search icon, you can enter the first few letters of the organization’s name andpress Tab. If your entry is unique to the organization, the program fills the rest of the field with the
2 CHAPTER 1
organization’s name. If there aremultiple entries that match, the Non-Bank Search screen appears withthe possible organizations.
6. In theDefault banking system field, select the banking system you want to associate with the bank.
Note: Banking systems can only be enabled or disabled through the Banking systems link on theTreasury page.
7. Enter the default routing number information. This number is provided by your bank.
Note: Default routing number and BIC fields can display differently depending on the banking systemyou select. For example, if Europe (SEPA) is an enabled banking system, and you select it in theDefaultbanking system field on this screen, theDefault BIC field appears.
8. Click Save to save the bank.
Note: You can view the bank record on the Constituency tab of the Organization record.
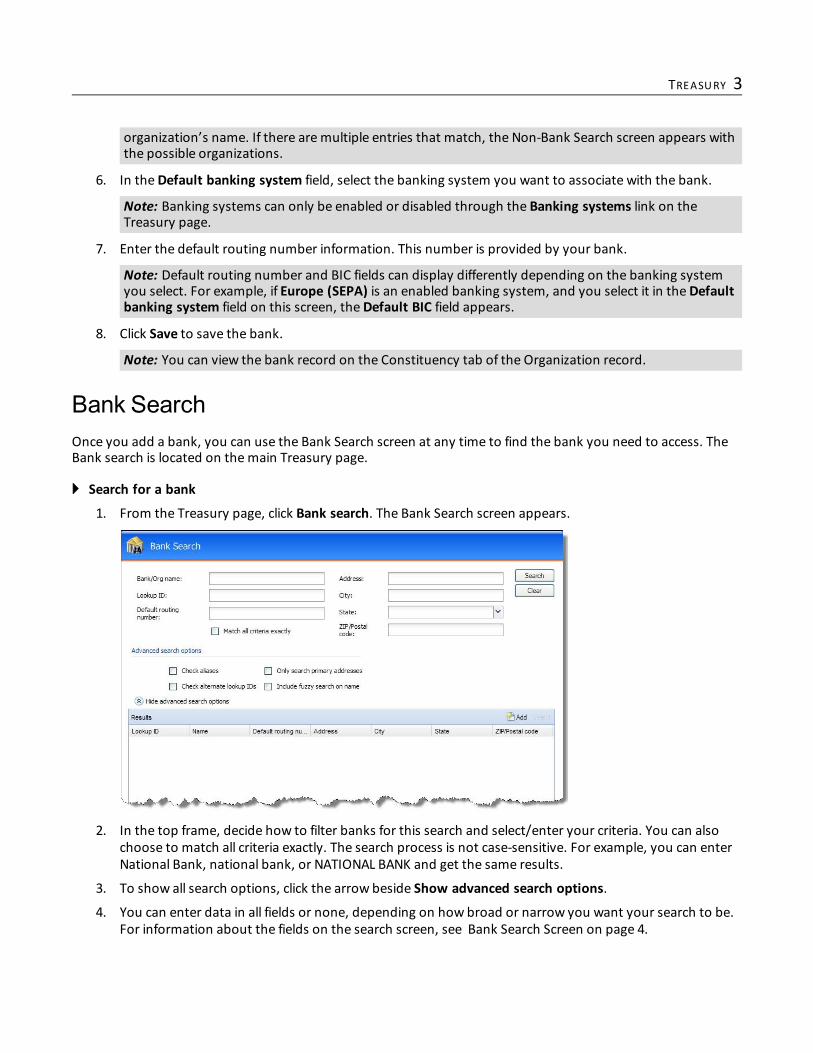
Bank SearchOnce you add a bank, you can use the Bank Search screen at any time to find the bank you need to access. TheBank search is located on themain Treasury page.
} Search for a bank
1. From the Treasury page, click Bank search. The Bank Search screen appears.
2. In the top frame, decide how to filter banks for this search and select/enter your criteria. You can alsochoose to match all criteria exactly. The search process is not case-sensitive. For example, you can enterNational Bank, national bank, or NATIONAL BANK and get the same results.
3. To show all search options, click the arrow beside Show advanced search options.
4. You can enter data in all fields or none, depending on how broad or narrow you want your search to be.For information about the fields on the search screen, see Bank Search Screen on page 4.
TREASURY 3
5. Click Search. The program searches the database and displays all the banks that meet your search criteriain the Results grid.
6. Select the bank to open and click Select on the action bar. The Bank page for that bank appears.
Note: To add a new bank from the Results grid, click Add on the action bar.
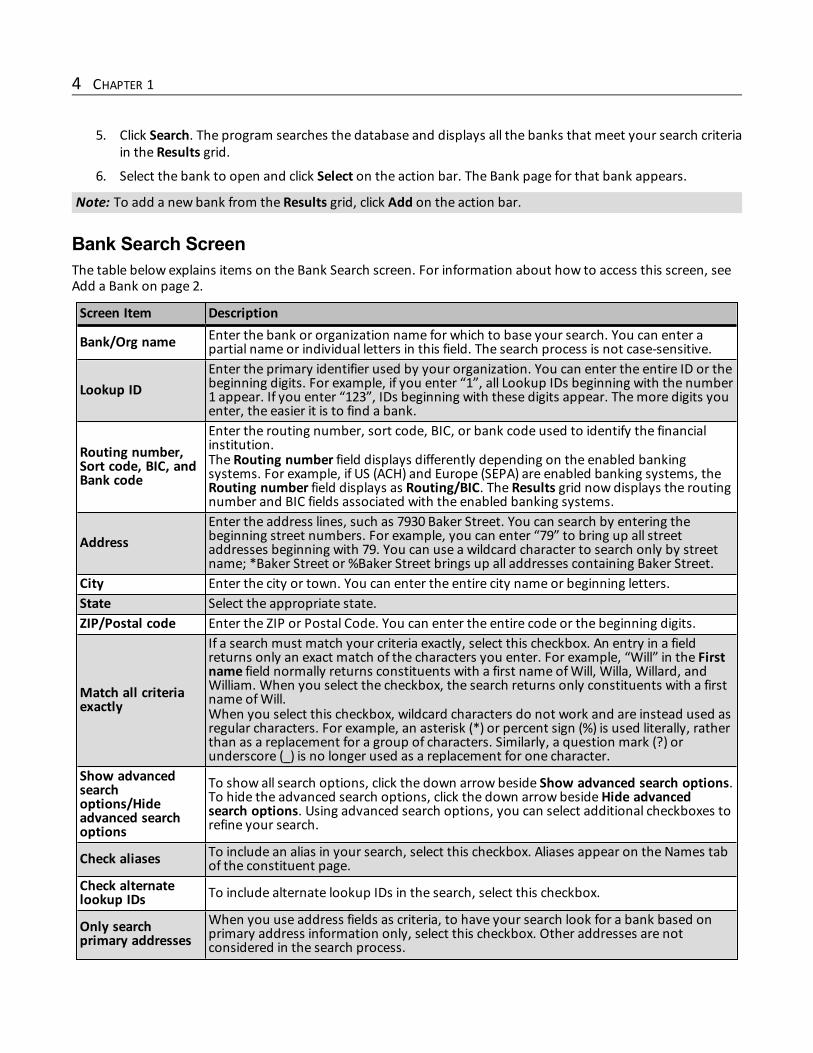
Bank Search ScreenThe table below explains items on the Bank Search screen. For information about how to access this screen, seeAdd a Bank on page 2.
Screen Item Description
Bank/Org name Enter the bank or organization name for which to base your search. You can enter apartial name or individual letters in this field. The search process is not case-sensitive.
Lookup IDEnter the primary identifier used by your organization. You can enter the entire ID or thebeginning digits. For example, if you enter “1”, all Lookup IDs beginning with the number1 appear. If you enter “123”, IDs beginning with these digits appear. Themore digits youenter, the easier it is to find a bank.
Routing number,Sort code, BIC, andBank code
Enter the routing number, sort code, BIC, or bank code used to identify the financialinstitution.The Routing number field displays differently depending on the enabled bankingsystems. For example, if US (ACH) and Europe (SEPA) are enabled banking systems, theRouting number field displays as Routing/BIC. The Results grid now displays the routingnumber and BIC fields associated with the enabled banking systems.
AddressEnter the address lines, such as 7930 Baker Street. You can search by entering thebeginning street numbers. For example, you can enter “79” to bring up all streetaddresses beginning with 79. You can use a wildcard character to search only by streetname; *Baker Street or %Baker Street brings up all addresses containing Baker Street.
City Enter the city or town. You can enter the entire city name or beginning letters.State Select the appropriate state.ZIP/Postal code Enter the ZIP or Postal Code. You can enter the entire code or the beginning digits.
Match all criteriaexactly
If a search must match your criteria exactly, select this checkbox. An entry in a fieldreturns only an exact match of the characters you enter. For example, “Will” in the Firstname field normally returns constituents with a first name ofWill, Willa, Willard, andWilliam. When you select the checkbox, the search returns only constituents with a firstname ofWill.When you select this checkbox, wildcard characters do not work and are instead used asregular characters. For example, an asterisk (*) or percent sign (%) is used literally, ratherthan as a replacement for a group of characters. Similarly, a question mark (?) orunderscore (_) is no longer used as a replacement for one character.
Show advancedsearchoptions/Hideadvanced searchoptions
To show all search options, click the down arrow beside Show advanced search options.To hide the advanced search options, click the down arrow besideHide advancedsearch options. Using advanced search options, you can select additional checkboxes torefine your search.
Check aliases To include an alias in your search, select this checkbox. Aliases appear on the Names tabof the constituent page.
Check alternatelookup IDs To include alternate lookup IDs in the search, select this checkbox.
Only searchprimary addresses
When you use address fields as criteria, to have your search look for a bank based onprimary address information only, select this checkbox. Other addresses are notconsidered in the search process.
4 CHAPTER 1
Screen Item DescriptionEach bank has one primary address, designated on the Contact tab of the constituentpage.
Include fuzzysearch on name
You can have the search include fuzzy namematching to include other names ofindividuals. The search logic looks for similar sounding names like Smith and Smyth andreturns them all in the results.
Bank PageThe Bank page displays information specific the to a bank, such as name and address, lookup ID, and status, aswell as information about each account within a bank. Use the General and Accounts tabs on the Bank page toview this information.
Note: On the Accounts tab, depending on the banking systems enabled for your organization, additionalcolumns that represent banking system and routing number information may display on this page. You canenable or disable banking systems for your organization from the Banking systems link on the Treasury page.
From the Bank page, you can edit the default banking information for the bank, as well as add, edit, and deletebank accounts associated with a bank.Use the Bank Search screen to locate and open bank records.
Edit Bank InformationYou can edit default banking information from the General tab of the Bank page.
} Edit bank information
1. From the General tab of an open bank record, click Edit. The Edit default banking information screenappears.
2. In theDefault banking system field, select the banking system you want to associate with the bank.
Note: Banking systems can only be enabled or disabled through the Banking systems link on theTreasury page.
3. Enter the default routing number information. This number is provided by your bank.
Note: Default routing number and BIC fields can display differently depending on the banking systemyou select. For example, if Europe (SEPA) is an enabled banking system, and you select it in theDefaultbanking system field on this screen, theDefault BIC field appears.
4. Click Save. You return to the bank record.
Delete a BankWhen you delete a bank, you remove the bank constituency from the organization. Banks with active accountscannot be deleted.To delete a bank constituency, access the Constituencies tab on the organization record and remove the bankconstituency.
TREASURY 5
Add a Bank AccountYou can store information about bank accounts in your database, such as bank names, account numbers,account types, and banking systems.You manage your organization’s banking information from theManage Bank Accounts page. To access theManage Bank Accounts page in Treasury, clickManage bank accounts from the Treasury page. To add a bankaccount from theManage Bank Accounts page, click Add a bank account. You can also add a bank account fromthe Accounts tab on the Bank page.
Note: When you create a file to send to your organization’s bank, you select a bank account to process allfinancial transactions included in the file. For example, when you generate a direct debit transmission file, youselect a bank account in the Bank account field on the Add a direct debit file process screen. The bank accountsyou establish in Treasury appear as choices for this field. For more information about processing files to send toyour organization’s bank, see the EFT and Credit Card Processes chapter of the Revenue Guide or the EFTsection of the help file.
} Add a bank account
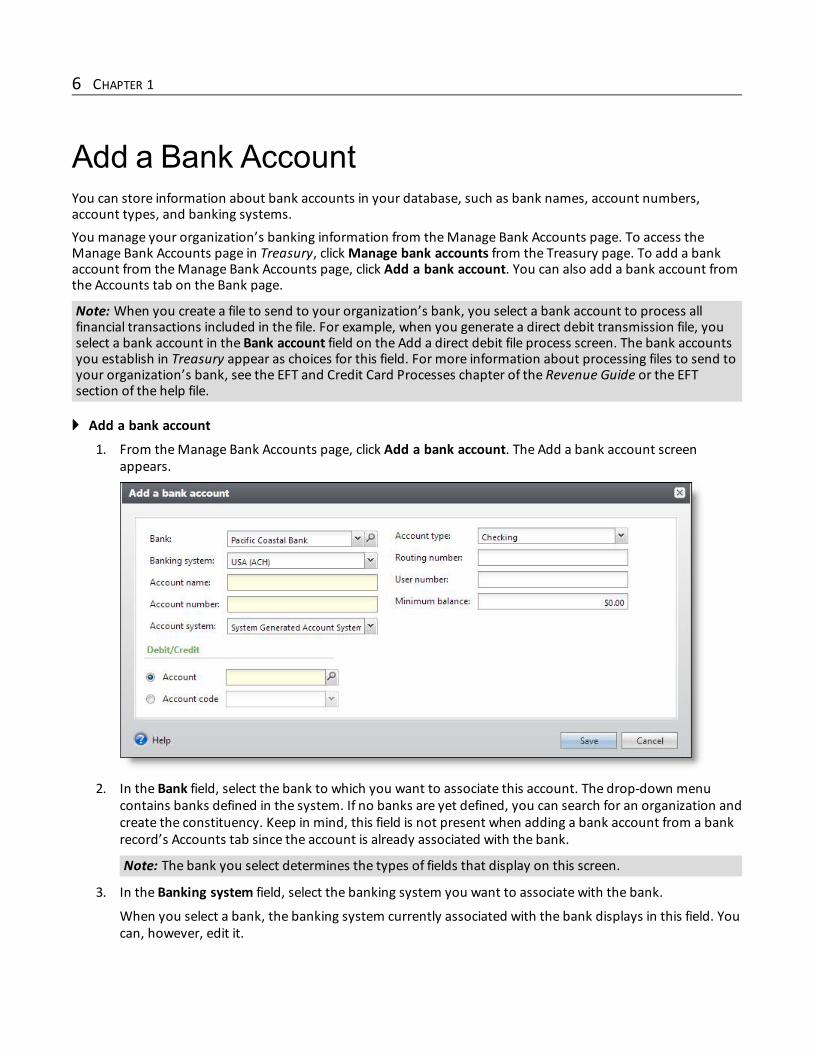
1. From theManage Bank Accounts page, click Add a bank account. The Add a bank account screenappears.
2. In the Bank field, select the bank to which you want to associate this account. The drop-down menucontains banks defined in the system. If no banks are yet defined, you can search for an organization andcreate the constituency. Keep in mind, this field is not present when adding a bank account from a bankrecord’s Accounts tab since the account is already associated with the bank.
Note: The bank you select determines the types of fields that display on this screen.
3. In the Banking system field, select the banking system you want to associate with the bank.
When you select a bank, the banking system currently associated with the bank displays in this field. Youcan, however, edit it.
6 CHAPTER 1
Note: Banking systems can only be enabled or disabled through the Banking systems link on theTreasury page.
4. In the Account name field, enter a name for the account. The account namemust be unique among allbank accounts.
5. In the Account number field, enter the account number for the bank account.
Note: Many of the fields on this screen display differently depending on the default banking systemyou select. For example, if Europe (SEPA) is an enabled banking system, and you select it in the Bankingsystem field on this screen, the Account number (IBAN) field appears.
Warning: Validation of the Account number (IBAN) field is performed when you save the bankaccount. An error may appear if you enter an incorrect value, do not include a sufficient amount ofcharacters, or do not begin the Account number (IBAN) field with a valid country code.
6. If your organization uses multiple general ledger account systems, you must select the system you wantto use with this bank account in the Account System field.
7. In the Account type field, select a type of account, such as Savings.
8. Enter the routing number information. This number is provided by your bank.
Note: Routing number and BIC fields can display differently depending on the banking system youselect. For example, if Europe (SEPA) is an enabled banking system, and you select it in the Bankingsystem field on this screen, the BIC field appears.
Warning: Bank accounts must contain a unique combination of routing number and account number.For example, two accounts at two different banks could have the same account number, but theycannot have the same routing number. Likewise, two accounts at the same bank could have the samerouting number, but must have different account numbers.
9. In theUser number field, enter the user number or originator identification number used to identifyyour organization.
10. In theMinimum balance field, enter theminimum amount the bank requires for you to avoid servicecharges.
11. Under Debit/Credit, select whether to associate the bank account with a cash account or an accountcode.
• To associate the account with a cash account, select Account and then search for the cash accountto associate with the bank account.
• To associate the account with an account code, select Code and then select the account code toassociate with the bank account.
To create an account, select an account system from the general Ledger Setup page in Administrationand click Define GL Accounts.
Note: Selections in the Code field usemasking to generate the debit (cash) account. For example, apayment with the credit account of 01-4000-00 deposited to a bank account with a “1000” default cashaccount code uses masking to generate the 01-1000-00 debit (cash) account. For more informationabout creating a default GL cash account, see the Administration Guide.
12. Click Save. You return to theManage Bank Accounts page.
TREASURY 7
Add Bank Account ScreenThe table below describes the items on the Add a bank account screen. For information about how to access thisscreen, see Add a Bank Account on page 6.
Screen Item Description
Bank
Select the bank to associate with the account. From themenu, you can select any bankdefined in the system. If no banks are yet defined, search for an organization to add as abank.When you add an account from the Accounts tab on a bank record, this field does notappear since the account is already associated with the bank.
Banking system
Select the banking system you want to associate with the bank. When you select abank, the banking system currently associated with the bank displays in this field. Youcan, however, edit it.You can enable or disable banking systems for your organization from the Bankingsystems link on the Treasury page.
Account name Enter a unique name to help identify the account. The account namemust be uniqueamong all bank accounts.
Account number
Enter the account number for the bank account.Many of the fields on this screen display differently depending on the default bankingsystem you select. For example, if Europe (SEPA) is an enabled banking system, and youselect it in the Banking system field on this screen, the Account number (IBAN) fieldappears.
Account system If your organization uses multiple general ledger account systems, select the accountsystem to use with the bank account.
Account type Select the type of account, such as Savings.
Routing number,Sort code, BIC, andBank code
Enter the routing number, sort code, BIC, or bank code used to identify the financialinstitution.Routing number, sort code, BIC, and bank code fields can display differently dependingon the banking system you select. For example, if Europe (SEPA) is an enabled bankingsystem, and you select it in the Banking system field on this screen, the BIC fieldappears.
User number Enter the user number or originator identification number used to identify yourorganization.
Minimum balance Enter theminimum amount the bank requires to avoid service charges.Client name Enter the name used to identify your organization at the bank.
Debit/Credit
Select whether to associate a bank account with a cash account or a cash code. If youselect Account, search for the cash account to associate with the bank account. If youselect Code, select the cash code to associate with the account.To create an account, select an account system from the general Ledger Setup page inAdministration. From the account system page that appears, click Define GL Accounts.
Bank Account PageThe Bank Account page displays information specific to the bank account, such as account name, type andnumber, minimum balance, status, and routing number or sort code, as well as transactions and adjustmentcategories and EFT information (if applicable).
Note: Depending on the banking systems enabled for your organization, additional columns that represent
8 CHAPTER 1
banking system and routing information may display on this page.
To view and edit bank account information from this page, click Edit bank account under Tasks in the explorerbar. For information about editing a bank account, see Edit Bank Account Information on page 12. To close ordelete a bank account, click Close bank account or Delete bank account under Tasks.To add EFT information to a new bank account, click Add EFT information (To edit EFT information at a laterdate, you can click Edit from the EFT Information tab).• Add or Edit EFT File Information on page 9• Adjustment Categories on page 33
Bank Account RegisterThe bank account register displays transaction information specific to the account, such as sequence, date, typeof transaction and amount, reference information, and account balance. From the Register tab, you can openand edit specific transactions in the register, as well as add and delete transactions.To locate transactions within the register, use the register filters located just above the bank account register onthe Register tab. For example, you can specify a particular date or date range and select the number of rows thatdisplay. Once you select your filters, click Apply to filter the grid.
Add or Edit EFT File InformationTo generate a direct debit transmission file, you must add EFT information to be included in the direct debitheader file. The direct debit header file contains information specific to a bank account such as the immediatedestination, immediate origin, company name, and company ID. The direct debit header file is required toprocess direct debit transactions. To add EFT information for a bank account, click Add EFT information underTasks in the explorer bar.When EFT information exists for a bank account, the EFT Information tab appears. To edit details on the EFTInformation tab, click Edit.
} Add EFT information
1. From the bank account for which you want to add EFT file information, click Add EFT information underTasks in the explorer bar. The Edit EFT file information screen appears. For more information about theitems on this screen, see Edit EFT File Information Screen on page 11.
TREASURY 9
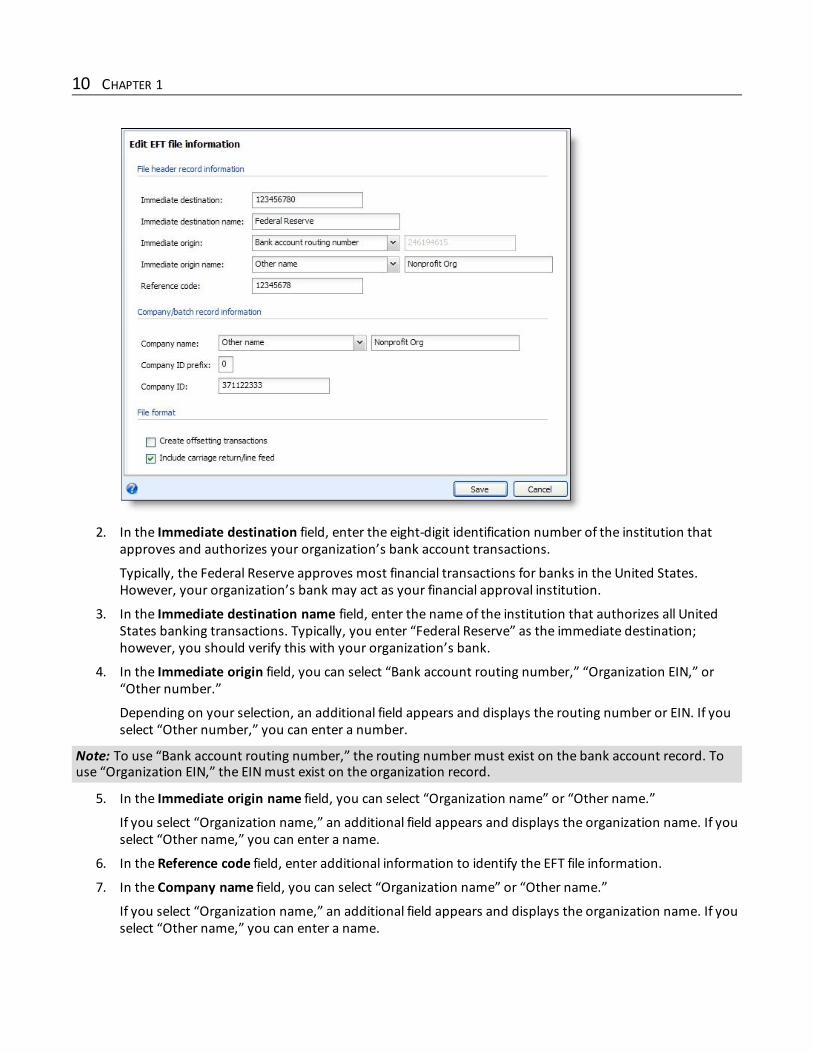
2. In the Immediate destination field, enter the eight-digit identification number of the institution thatapproves and authorizes your organization’s bank account transactions.
Typically, the Federal Reserve approves most financial transactions for banks in the United States.However, your organization’s bank may act as your financial approval institution.
3. In the Immediate destination name field, enter the name of the institution that authorizes all UnitedStates banking transactions. Typically, you enter “Federal Reserve” as the immediate destination;however, you should verify this with your organization’s bank.
4. In the Immediate origin field, you can select “Bank account routing number,” “Organization EIN,” or“Other number.”
Depending on your selection, an additional field appears and displays the routing number or EIN. If youselect “Other number,” you can enter a number.
Note: To use “Bank account routing number,” the routing number must exist on the bank account record. Touse “Organization EIN,” the EINmust exist on the organization record.
5. In the Immediate origin name field, you can select “Organization name” or “Other name.”
If you select “Organization name,” an additional field appears and displays the organization name. If youselect “Other name,” you can enter a name.
6. In the Reference code field, enter additional information to identify the EFT file information.
7. In the Company name field, you can select “Organization name” or “Other name.”
If you select “Organization name,” an additional field appears and displays the organization name. If youselect “Other name,” you can enter a name.
10 CHAPTER 1
8. In the Company ID prefix field, enter the digit, 0 through 9, to appear before your company ID in theheader file. Typically, your organization’s bank determines this prefix.
9. In the Company ID field, enter your organization’s federal tax identification number, employeridentification number, or the number that your bank specifies for you.
10. To include offsetting transactions in a direct debit transmission file, select Create offsetting transactions.
An offsetting transaction is the transaction that credits your organization’s account for themoneydebited from your donor’s accounts. Before you select this, check with your organization’s bank, assome banks prefer to generate the offset transaction themselves.
11. To display each record as its own row in the direct debit transmission file, select Include carriagereturn/line feed.
12. Click Save.
} Edit EFT file information
1. From the bank account for which you want to add EFT file information, select the EFT Information tab.
2. Click Edit. The Edit EFT file information screen appears. For more information about the items on thisscreen, see Edit EFT File Information Screen on page 11.
3. Click Save.
Edit EFT File Information ScreenThe table below describes the items on the Edit EFT file information screen. For information about how to accessthis screen, see Add or Edit EFT File Information on page 9.
Screen Item Description
Immediatedestination
In the Immediate destination field, Enter the eight-digit identification number of theinstitution that approves and authorizes your organization’s bank account transactions.Typically, the Federal Reserve approves most financial transactions for banks in the UnitedStates. However, your organization’s bank may act as your financial approval institution.
Immediatedestinationname
In the Immediate destination name field, enter the name of the institution that authorizesall United States banking transactions. Typically, you enter “Federal Reserve” as theimmediate destination; however, you should verify this with your organization’s bank.
Immediateorigin
In the Immediate origin field, you can select “Bank account routing number,”“Organization EIN,” or “Other number.”Depending on your selection, an additional field appears and displays the routing numberor EIN. If you select “Other number,” you can enter a number.To use “Bank account routing number,” the routing number must exist on the bankaccount record. To use “Organization EIN,” the EINmust exist on the organization record.
Immediateorigin name
In the Immediate origin name field, you can select “Organization name” or “Other name.”If you select “Organization name,” an additional field appears and displays theorganization name. If you select “Other name,” you can enter a name.
Company name In the Company name field, if you select “Organization name,” an additional field appearsand displays the organization name. If you select “Other name,” you can enter a name.
Company IDprefix
In the Company ID prefix field, enter the digit, 0 through 9, to appear before yourcompany ID in the header file. Typically, your organization’s bank determines this prefix.
Company ID In the Company ID field, enter your organization’s federal tax identification number,employer identification number, or the number that your bank specifies for you.
Include carriagereturn/line feed
To display each record as its own row in the direct debit transmission file, select Includecarriage return/line feed.
TREASURY 11
Edit Bank Account InformationYou can edit bank account information from the Bank Account page. For example, you might want to change theaccount status or minimum balance. Keep in mind, if you close a bank account, you cannot link payments to,unlink payments from, or delete deposits associated with the account. To access the Edit bank account screen,click Edit bank account from the bank account page.After you add a bank account, you cannot edit the account system for it.The items on the Edit bank account screen are the same as the Add a bank account screen. For informationabout the fields on the Edit bank account screen, see Add Bank Account Screen on page 8.
Close Bank AccountIf you have a bank account you no longer use, we recommend you close the account instead of deleting toindicate the bank account is no longer current or valid.To close a bank account, from a bank account page, click Close bank account under Tasks in the explorer bar.
} Close bank account
1. From an open bank account page, click Close bank account under Tasks in the explorer bar. Aconfirmation message appears asking you to reassign the GL cash code or account associated with thisbank account.
2. If you do not want to reassign the GL cash code or account associated with this bank account, click No.The bank account is closed and cannot be used.
3. To reassign the GL cash code or account to a new bank account, click Yes. The Add a bank account screenappears where you can specify new bank account information, such as bank account name and routingnumber.
The GL cash code or account from the closed bank account defaults into either the Account or Accountcode field.
For detailed information about the items on the Add a bank account screen, see Add Bank AccountScreen on page 8.
Note: If you choose to reopen a previously closed bank account for which you reassigned the GL cash code oraccount, you are prompted to select a newGL Cash code or account upon reopening the bank account.
4. Once you enter the appropriate bank information, click Save. The new bank account is now active.
Delete Bank AccountYou can delete a bank account as long as it does not have activity. If you have a bank account you no longer use,we recommend you close the account instead to indicate the bank account is no longer current or valid.You delete bank accounts from theManage Bank Accounts page, Bank Account page, or from the Accounts tabof the bank record.
} Delete bank account
1. From theManage Bank Accounts page or from the Accounts tab of a bank record, select the bankaccount you want to delete and click Delete. If you are on an open bank account, click Delete bank
12 CHAPTER 1

account under Tasks in the explorer bar. A confirmation message appears.
2. Click Yes to delete the bank account and return to theManage Bank Accounts page.
Delete TransactionsThe bank account register displays transaction information specific to the open account, such as sequence, date,type of transaction and amount, reference information, and account balance. From the Register tab, you candelete deposit and adjustment transactions.Keep in mind, you cannot delete a transaction if it has been posted. You can delete a deposit at any time,regardless of status. If the deposit has linked payments, those payments will become unlinked.To delete transactions from the bank account register, select a transaction in the grid and click Delete on theaction bar.
Bank Account SearchUse the Bank Account Search to locate existing bank accounts within the system. To access the Bank AccountSearch, click themagnifying glass in the Bank account field.
} Search for a bank account
1. From the Bank account field, click themagnifying glass. The Bank Account Search screen appears.
2. In the top frame, decide how to filter bank accounts for this search and select/enter your criteria.
3. You can enter data in all fields or none, depending on how broad or narrow you want your search to be.For information about the fields on the search screen, see Bank Account Search Screen on page 14.
4. Click Search. The program searches the database and displays all the bank accounts that meet yoursearch criteria in the Results grid.
5. Select the bank account to open and click Select on the action bar. The Bank Account page appears.
Note: To add a new bank from the Results grid, click Add on the action bar.
TREASURY 13
Bank Account Search ScreenThe table below explains items on the Bank Account Search screen. For information about how to access thisscreen, see Bank Account Search on page 13.
Screen Item Description
BankEnter the bank name to base your search on bank accounts within a particular bank.You can enter a partial name or individual letters in this field. The search process is notcase-sensitive.
Account name Use this field to base your search on the bank account name.Account number Use this field to base your search on the bank account number.
Status Enter the status of the bank account to base your search on the status of bankaccounts. Your choices include “Open” and “Closed.”
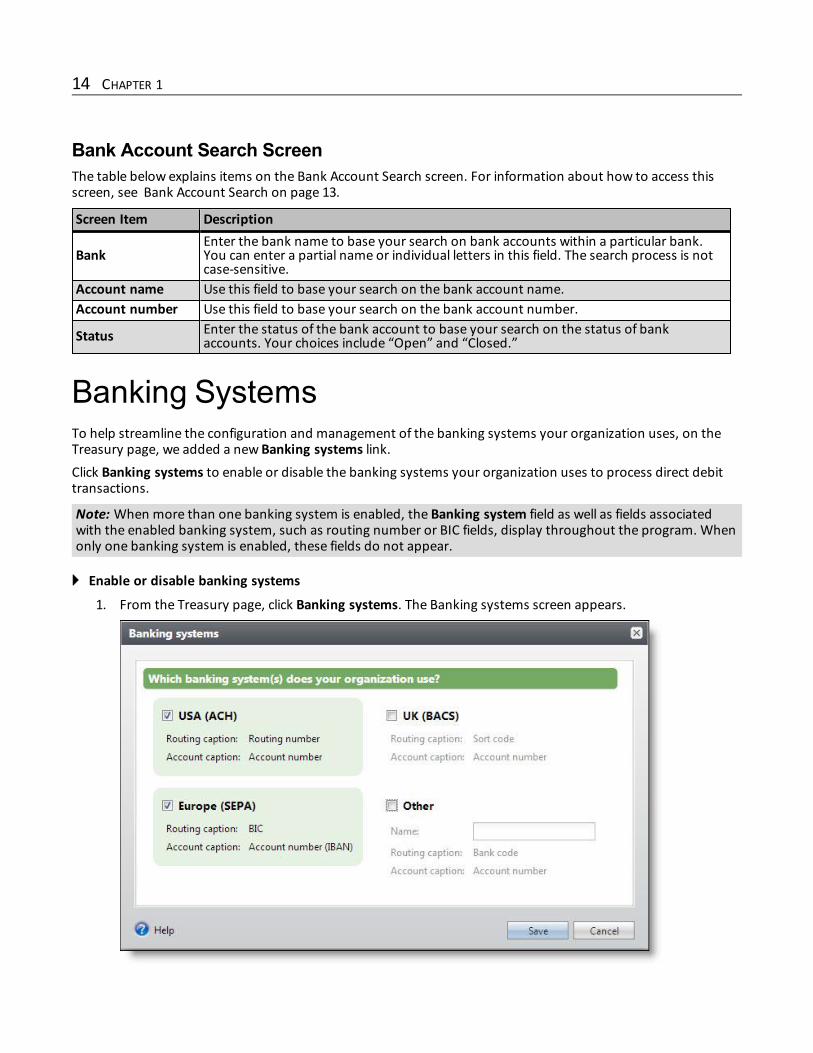
Banking SystemsTo help streamline the configuration and management of the banking systems your organization uses, on theTreasury page, we added a new Banking systems link.Click Banking systems to enable or disable the banking systems your organization uses to process direct debittransactions.
Note: When more than one banking system is enabled, the Banking system field as well as fields associatedwith the enabled banking system, such as routing number or BIC fields, display throughout the program. Whenonly one banking system is enabled, these fields do not appear.
} Enable or disable banking systems
1. From the Treasury page, click Banking systems. The Banking systems screen appears.
14 CHAPTER 1
2. Select or deselect the checkboxes next to the banking systems your organization uses.
• USA (ACH) is the Automated Clearing House banking system. "Routing number" and "Accountnumber" display in all related areas of the program whereUSA (ACH) is the selected bankingsystem.
• UK (BACS) is the Banks Automated Clearing System banking system. "Sort code" and "Accountnumber" display in all related areas of the program whereUK (BACS) is the selected bankingsystem.
• Europe (SEPA) is the Single Euro Payment Area banking system. "BIC" and "Account number (IBAN)"display in many related areas of the program where Europe (SEPA) is the selected banking system.
Note: BIC signifies the bank identifier code.
Note: In some areas of the program, such as the bank account page, when "Europe (SEPA)" is theselected banking system, the Account number column header does not change.
• Other is used to create a user-defined banking system. In the Banking system name field, enter thename of the banking system you want to create. "Bank code" and "Account number" display in allrelated areas of the program where the user-defined banking system is selected.
Warning: You cannot disable a banking system that is linked to a constituent financial institution, bankaccount, or bank.
Note: When more than one banking system is enabled, the Banking system field as well as fieldsassociated with the enabled banking system, such as routing number or BIC fields, display throughoutthe program. When only one banking system is enabled, these fields do not appear.
3. Click Save to enable or disable the selected banking systems and return to the Treasury page.
Add Miscellaneous PaymentsWithin Treasury, you can record miscellaneous payments and associate them with deposits. Miscellaneouspayment transactions may include postagemeter money, concession revenue, application fees, pay phonerevenue, and vending machine revenue.Themiscellaneous payment record explains the source and reason for the payment. In order to post amiscellaneous payment and view it in the bank register, you must link it to a deposit. The deposit records thetotal amount of cash, credit card, or other payments you receive and adds the funds to your bank account.To createmiscellaneous payments, from the Treasury page, click Add a miscellaneous payment.
} Add a miscellaneous payment
1. From the Treasury page, click Add a miscellaneous payment. The Add a miscellaneous payment screenappears.
TREASURY 15
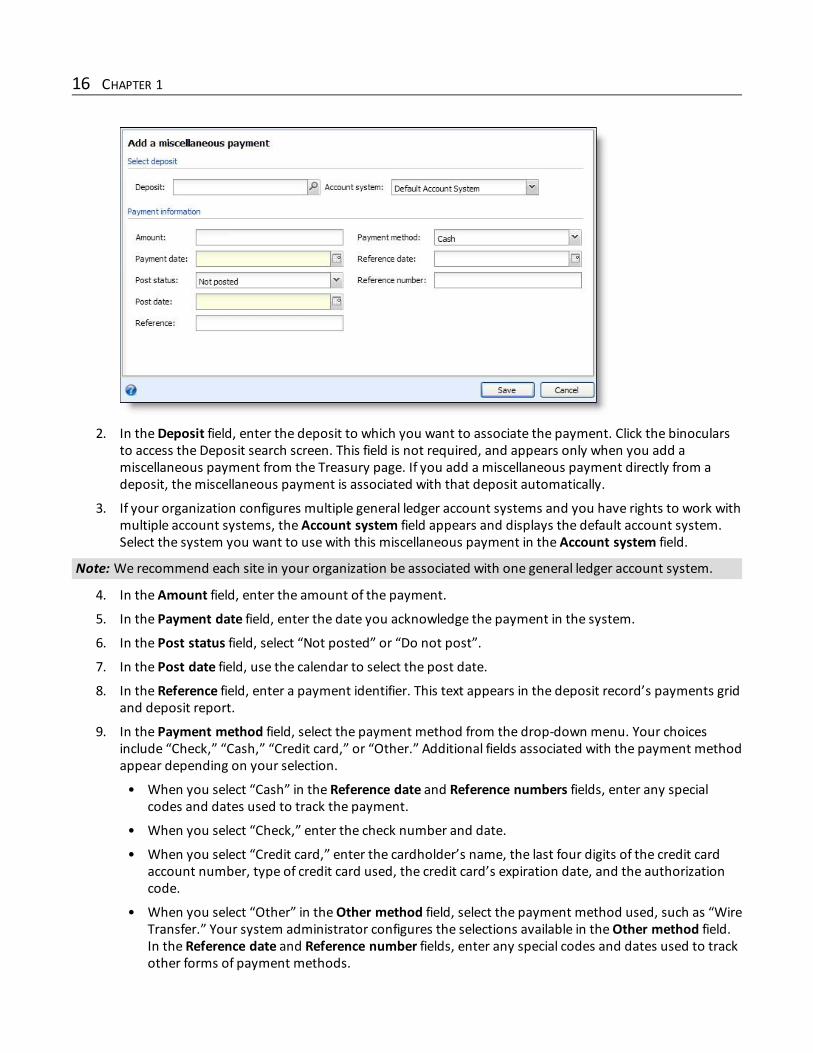
2. In theDeposit field, enter the deposit to which you want to associate the payment. Click the binocularsto access the Deposit search screen. This field is not required, and appears only when you add amiscellaneous payment from the Treasury page. If you add a miscellaneous payment directly from adeposit, themiscellaneous payment is associated with that deposit automatically.
3. If your organization configures multiple general ledger account systems and you have rights to work withmultiple account systems, the Account system field appears and displays the default account system.Select the system you want to use with this miscellaneous payment in the Account system field.
Note: We recommend each site in your organization be associated with one general ledger account system.
4. In the Amount field, enter the amount of the payment.
5. In the Payment date field, enter the date you acknowledge the payment in the system.
6. In the Post status field, select “Not posted” or “Do not post”.
7. In the Post date field, use the calendar to select the post date.
8. In the Reference field, enter a payment identifier. This text appears in the deposit record’s payments gridand deposit report.
9. In the Payment method field, select the payment method from the drop-down menu. Your choicesinclude “Check,” “Cash,” “Credit card,” or “Other.” Additional fields associated with the payment methodappear depending on your selection.
• When you select “Cash” in the Reference date and Reference numbers fields, enter any specialcodes and dates used to track the payment.
• When you select “Check,” enter the check number and date.
• When you select “Credit card,” enter the cardholder’s name, the last four digits of the credit cardaccount number, type of credit card used, the credit card’s expiration date, and the authorizationcode.
• When you select “Other” in theOther method field, select the payment method used, such as “WireTransfer.” Your system administrator configures the selections available in theOther method field.In the Reference date and Reference number fields, enter any special codes and dates used to trackother forms of payment methods.
16 CHAPTER 1
10. Click Save to save the newmiscellaneous payment.
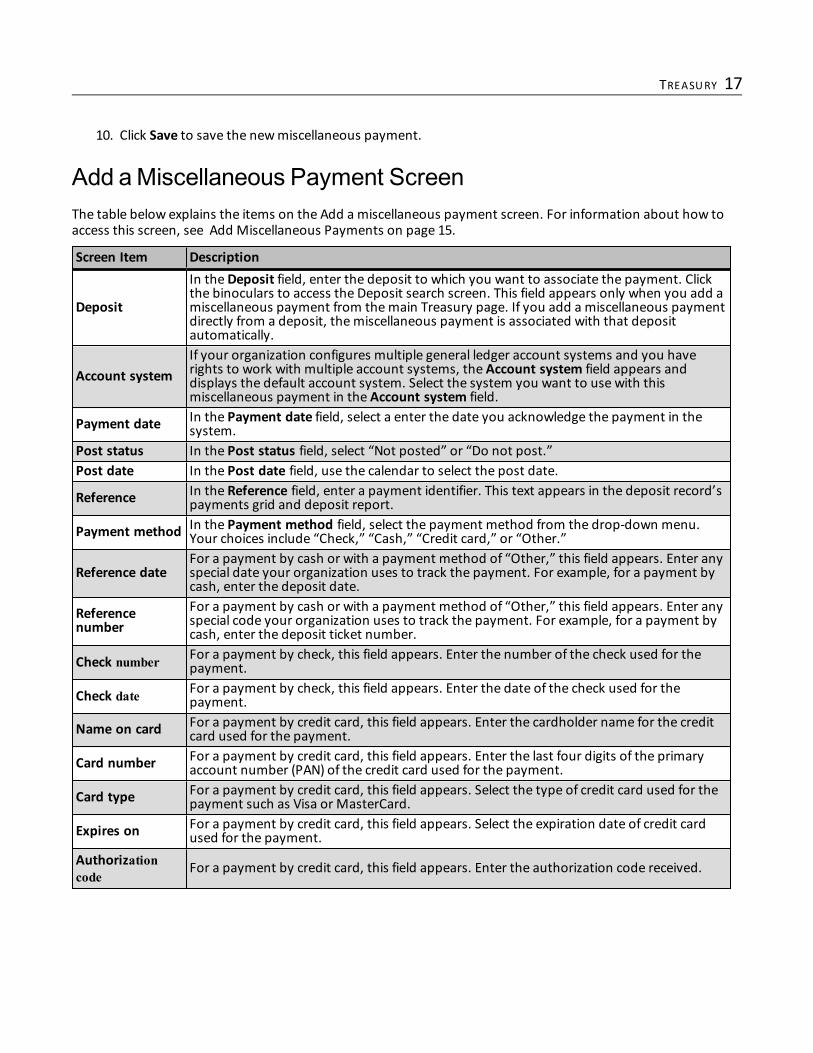
Add aMiscellaneous Payment ScreenThe table below explains the items on the Add a miscellaneous payment screen. For information about how toaccess this screen, see Add Miscellaneous Payments on page 15.
Screen Item Description
Deposit
In theDeposit field, enter the deposit to which you want to associate the payment. Clickthe binoculars to access the Deposit search screen. This field appears only when you add amiscellaneous payment from themain Treasury page. If you add a miscellaneous paymentdirectly from a deposit, themiscellaneous payment is associated with that depositautomatically.
Account systemIf your organization configures multiple general ledger account systems and you haverights to work with multiple account systems, the Account system field appears anddisplays the default account system. Select the system you want to use with thismiscellaneous payment in the Account system field.
Payment date In the Payment date field, select a enter the date you acknowledge the payment in thesystem.
Post status In the Post status field, select “Not posted” or “Do not post.”Post date In the Post date field, use the calendar to select the post date.
Reference In the Reference field, enter a payment identifier. This text appears in the deposit record’spayments grid and deposit report.
Payment method In the Payment method field, select the payment method from the drop-down menu.Your choices include “Check,” “Cash,” “Credit card,” or “Other.”
Reference dateFor a payment by cash or with a payment method of “Other,” this field appears. Enter anyspecial date your organization uses to track the payment. For example, for a payment bycash, enter the deposit date.
Referencenumber
For a payment by cash or with a payment method of “Other,” this field appears. Enter anyspecial code your organization uses to track the payment. For example, for a payment bycash, enter the deposit ticket number.
Check number For a payment by check, this field appears. Enter the number of the check used for thepayment.
Check date For a payment by check, this field appears. Enter the date of the check used for thepayment.
Name on card For a payment by credit card, this field appears. Enter the cardholder name for the creditcard used for the payment.
Card number For a payment by credit card, this field appears. Enter the last four digits of the primaryaccount number (PAN) of the credit card used for the payment.
Card type For a payment by credit card, this field appears. Select the type of credit card used for thepayment such as Visa or MasterCard.
Expires on For a payment by credit card, this field appears. Select the expiration date of credit cardused for the payment.
Authorizationcode
For a payment by credit card, this field appears. Enter the authorization code received.
TREASURY 17
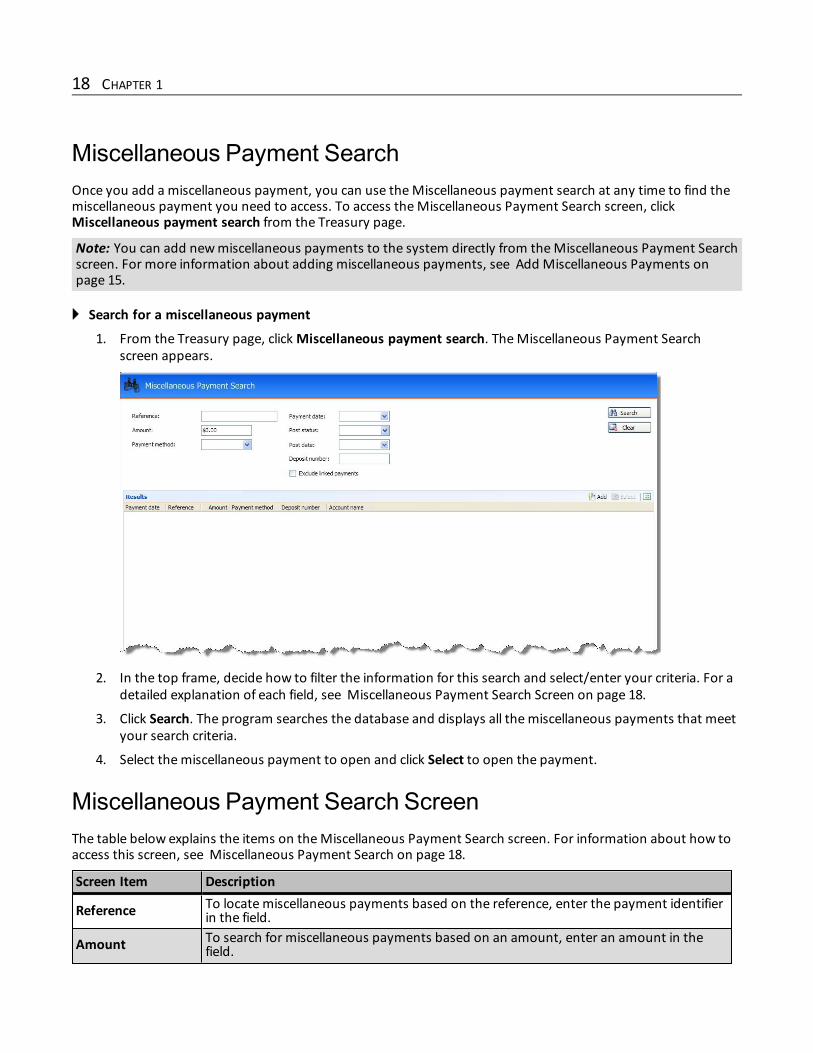
Miscellaneous Payment SearchOnce you add a miscellaneous payment, you can use theMiscellaneous payment search at any time to find themiscellaneous payment you need to access. To access theMiscellaneous Payment Search screen, clickMiscellaneous payment search from the Treasury page.
Note: You can add newmiscellaneous payments to the system directly from theMiscellaneous Payment Searchscreen. For more information about adding miscellaneous payments, see Add Miscellaneous Payments onpage 15.
} Search for a miscellaneous payment
1. From the Treasury page, clickMiscellaneous payment search. TheMiscellaneous Payment Searchscreen appears.
2. In the top frame, decide how to filter the information for this search and select/enter your criteria. For adetailed explanation of each field, see Miscellaneous Payment Search Screen on page 18.
3. Click Search. The program searches the database and displays all themiscellaneous payments that meetyour search criteria.
4. Select themiscellaneous payment to open and click Select to open the payment.
Miscellaneous Payment Search ScreenThe table below explains the items on theMiscellaneous Payment Search screen. For information about how toaccess this screen, see Miscellaneous Payment Search on page 18.
Screen Item Description
Reference To locatemiscellaneous payments based on the reference, enter the payment identifierin the field.
Amount To search for miscellaneous payments based on an amount, enter an amount in thefield.
18 CHAPTER 1
Screen Item Description
Payment method In the Payment method field, you can select a payment method upon which to baseyour search. Your choices include “Cash”, “Check”, “Credit Card” or “Other.”
Payment date Using the Payment date field, you can search on the date you acknowledged thepayment in the system.
Post status To filter on a post status, enter the Post status field. Your choices include “Not posted”and “Do not post.”
Post date To search for miscellaneous payments based on the date the payment posted to thegeneral ledger, enter a post date.
Deposit number To search for miscellaneous payments based on the associated deposit, you can enterthe number in theDeposit number field.
Exclude linkedpayments
To exclude all linked payments from your search, select the checkbox. This is helpful ifyou are trying to locatemiscellaneous payment that are not associated with a deposit.
Add Click Add to add a newmiscellaneous payment. For more information about addingmiscellaneous payments, see Add Miscellaneous Payments on page 15.
Miscellaneous Payment PageYou can view, edit, and delete a miscellaneous payment from theMiscellaneous Payment page. TheMiscellaneous Payment page displays all the information associated with the payment, such as paymentmethod, reference, and date. On the Documentation tab, you can view any documentation attached to themiscellaneous payment.For more information about adding documentation to a miscellaneous payment, see Documentation on page 1.Use the GL Distributions tab to viewGL distributions for a payment. You can view the transaction type, account,amount, and reference for each distribution. For more information, see GL Distributions Tab for a MiscellaneousPayment on page 21.You can also create a receipt for themiscellaneous payment from theMiscellaneous Payment page. For moreinformation, see Receipt for Miscellaneous Payment on page 78.To access theMiscellaneous Payment page, you use theMiscellaneous payment search located on the Treasurypage, or select a payment on the Payments tab of a deposit and click Go to payment.
Edit Miscellaneous PaymentsTo edit miscellaneous payments from theMiscellaneous Payment page, click Edit miscellaneous payment underTasks in the explorer bar. The Edit miscellaneous payment screen appears. For information about the items onthis screen, see Edit Miscellaneous Payment Screen on page 19.
Edit Miscellaneous Payment ScreenThe table below explains the items on the Edit miscellaneous payment screen. For information about how toaccess this screen, see Edit Miscellaneous Payments on page 19.
Screen Item Description
DepositIn theDeposit field, enter the deposit to which you want to associate the payment. Clickthe binoculars to access the Deposit search screen. This field appears only when you add amiscellaneous payment from themain Treasury page. If you add a miscellaneous payment
TREASURY 19
Screen Item Descriptiondirectly from a deposit, themiscellaneous payment is associated with that depositautomatically.
Account systemIf your organization configures multiple general ledger account systems and you haverights to work with multiple account systems, the Account system field appears anddisplays the default account system. Select the system you want to use with thismiscellaneous payment in the Account system field.
Payment date In the Payment date field, select a enter the date you acknowledge the payment in thesystem.
Post status In the Post status field, select “Not posted” or “Do not post.”Post date In the Post date field, use the calendar to select the post date.
Reference In the Reference field, enter a payment identifier. This text appears in the deposit record’spayments grid and deposit report.
Paymentmethod
In the Payment method field, select the payment method from the drop-down menu.Your choices include “Check,” “Cash,” “Credit card,” or “Other.”
Reference dateFor a payment by cash or with a payment method of “Other,” this field appears. Enter anyspecial date your organization uses to track the payment. For example, for a payment bycash, enter the deposit date.
Referencenumber
For a payment by cash or with a payment method of “Other,” this field appears. Enter anyspecial code your organization uses to track the payment. For example, for a payment bycash, enter the deposit ticket number.
Check number For a payment by check, this field appears. Enter the number of the check used for thepayment.
Check date For a payment by check, this field appears. Enter the date of the check used for thepayment.
Name on card For a payment by credit card, this field appears. Enter the cardholder name for the creditcard used for the payment.
Card number For a payment by credit card, this field appears. Enter the last four digits of the primaryaccount number (PAN) of the credit card used for the payment.
Card type For a payment by credit card, this field appears. Select the type of credit card used for thepayment such as Visa or MasterCard.
Expires on For a payment by credit card, this field appears. Select the expiration date of credit cardused for the payment.
Authorizationcode
For a payment by credit card, this field appears. Enter the authorization code received.
Adjusted postdate
When you edit a payment that has posted to the general ledger, this field appears. Bydefault, the program automatically enters the current date in this field. Enter the date toassociate with the posting of the adjustment in the general ledger.
Adjusted dateWhen you edit a payment that has posted to the general ledger, this field appears. Bydefault, the program automatically enters the current date in this field. Enter the date toassociate with the adjustment to the payment.
Adjustmentreason
When you edit a payment that has posted to the general ledger, this field appears.Select the reason code to explain the need for the adjustment. For information aboutreason codes for adjustments, see the Administration Guide.
Adjustmentdescription Enter any additional information about the adjustment.
20 CHAPTER 1
DeleteMiscellaneous PaymentsTo delete a miscellaneous payment from theMiscellaneous Payment page, click Delete miscellaneous paymentunder Tasks in the explorer bar. Keep in mind, you cannot delete a miscellaneous payment if the associateddeposit has been posted or locked, or if the bank account is closed.You can unlink miscellaneous payments from deposits without deleting the payments. For more information,see Unlink Payments on page 29.For more information about payments, see Add Miscellaneous Payments on page 15.
GLDistributions Tab for aMiscellaneous PaymentOn the GL Distributions tab for a miscellaneous payment, if your organization uses more than one accountsystem and you have rights to viewmultiple account systems, the account system associated with the paymentappears under GL information. Each site in your organization must be associated with one account system.Under GL distributions, you can view the transaction type, such as Debit or Credit and the GL account number foreach GL distribution. You can also view the amount and reference. The distributions you create determine theinformation that appears on this tab. You establish GL distributions from the General Ledger Setup page inAdministration.For information about editing a GL distribution, see the Revenue Records chapter of the Revenue Guide.
Add DepositsYou can create deposits to record the amount of cash, credit card, check, or other payments you receive anddeposit into your bank account. Once you create an unlocked deposit, you can add an unlimited number ofpayments to the deposit.When you create a deposit record, you enter information on the Add a deposit screen. For a detailed explanationof each field on this screen, see Add a Deposit Screen on page 22. You can enter defaults for a payment date,method, and amount associated with the deposit on the Payment Defaults tab of a deposit page. For moreinformation about payment defaults, see Payment Defaults Tab on page 28.You can add deposits from the Treasury page, or directly from an open bank account. When you add a depositfrom the Treasury page, you must select a bank account to associate with the deposit. If you add a depositdirectly from an open bank account, the deposit is associated with that bank account automatically.
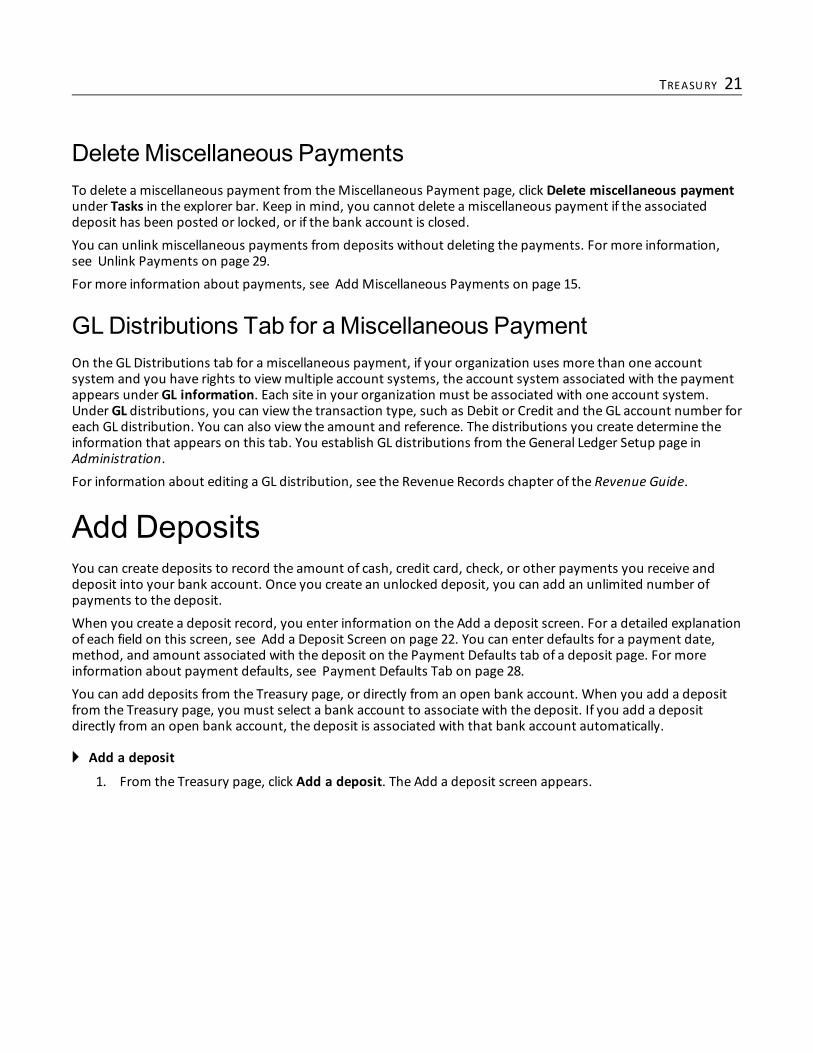
} Add a deposit
1. From the Treasury page, click Add a deposit. The Add a deposit screen appears.
TREASURY 21
2. In the Bank account field, select a bank account to associate with the deposit.
This field appears only when you add a deposit from the Treasury page. If you add a deposit directly froman open bank account, the deposit is associated with that bank account automatically.
3. In theDeposit date field, enter the date the deposit is made to the bank account.
4. In the Post status field, select “Not posted” or “Do not post” as the post status for the deposit.
5. In the Post date field, enter the date to post the deposit.
6. In the Reference field, you can enter additional text to identify this deposit. This text appears in theReference column of the bank account register, and can be used when searching for deposits.
7. In theNumber of payments field, enter the projected number of payments included with this deposit.
8. In the Amount field, enter the projected total deposit amount.
9. Click Save.
Add a Deposit ScreenWhen you create a deposit record, you enter information on the Add a deposit screen. This table explains theitems on this screen.
Screen Item Description
Bank accountIn the Bank account field, select a bank account to associate with the deposit. This fieldappears only when you add a deposit from the Treasury page. If you add a deposit directlyfrom an open bank account, the deposit is associated with that bank account automatically.
Deposit date In theDeposit date field, enter the date the deposit is made to the bank account.
Post status In the Post status field, select “Not posted” or “Do not post” as the post status for thedeposit.
22 CHAPTER 1
Screen Item DescriptionPost date In Post date field, enter the date to post the deposit.
ReferenceIn the Reference field, you can enter additional text to identify this deposit. This text appearsin the Reference column of the bank account register, and can be used when searching fordeposits.
Number ofpayments
In theNumber of payments field, enter the projected number of payments included withthis deposit.
Amount In the Amount field, enter the projected total deposit amount.
Deposit Search
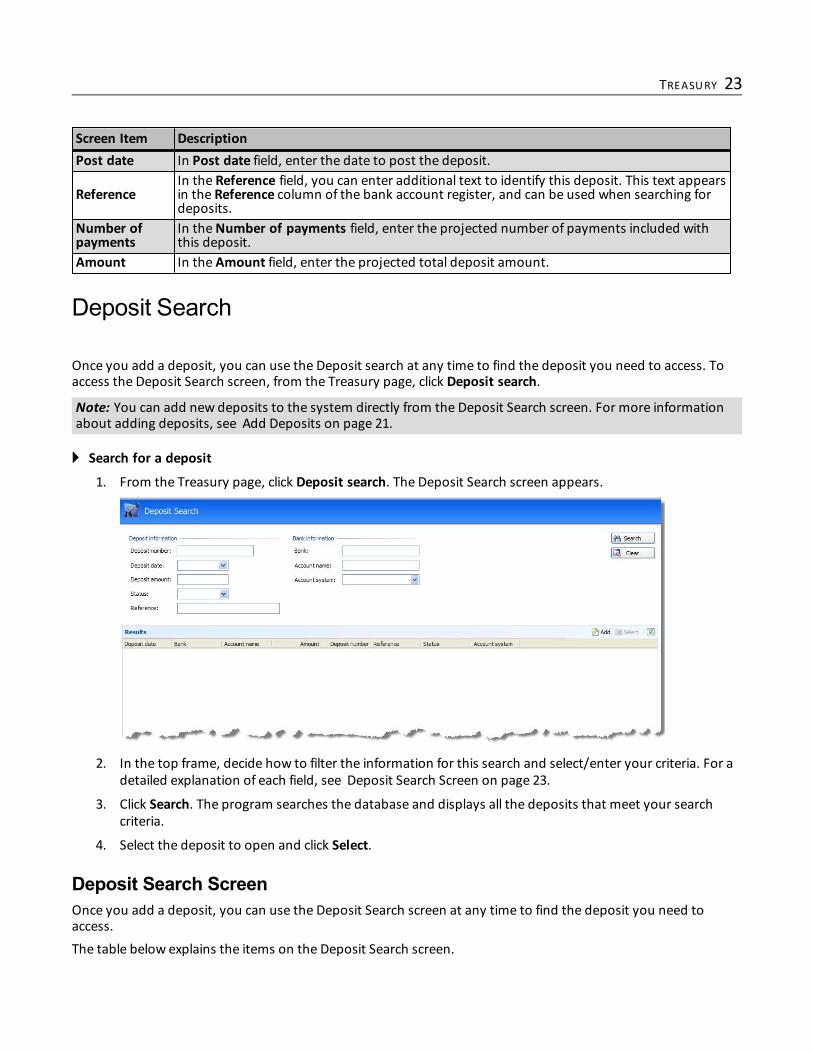
Once you add a deposit, you can use the Deposit search at any time to find the deposit you need to access. Toaccess the Deposit Search screen, from the Treasury page, click Deposit search.
Note: You can add new deposits to the system directly from the Deposit Search screen. For more informationabout adding deposits, see Add Deposits on page 21.
} Search for a deposit
1. From the Treasury page, click Deposit search. The Deposit Search screen appears.
2. In the top frame, decide how to filter the information for this search and select/enter your criteria. For adetailed explanation of each field, see Deposit Search Screen on page 23.
3. Click Search. The program searches the database and displays all the deposits that meet your searchcriteria.
4. Select the deposit to open and click Select.
Deposit Search ScreenOnce you add a deposit, you can use the Deposit Search screen at any time to find the deposit you need toaccess.The table below explains the items on the Deposit Search screen.
TREASURY 23
Screen Item Description
Deposit number To search for a deposit based on the deposit number, enter the number in theDepositnumber field.
Deposit date To search for a deposit based on the date it was deposited in the bank, use the calendarin the drop-down menu to select a date.
Deposit amount To search for a deposit based on the deposit amount, enter an amount in theDepositamount field.
Status In the Status field, you can select a deposit status upon which to base your search. Yourchoices include “Unlocked” or “Locked.”
ReferenceIn the Reference field, you can enter any additional text used to identify deposits whenthey were created. This text appears in the Reference column of the bank accountregister.
Bank To search for a deposit based on the associated bank, enter the bank in the Bank field.
Account name To search for a deposit based on the associated bank account name, enter the bankaccount name in the Account name field.
Account system
To search for a deposit based on the associated general ledger account system, selectthe account system in the Account system field.Each site in your organization should be associated with one general ledger accountsystem. If your organization uses only one account system, the Account system fielddoes not appear on the Deposit Search screen.
Deposit PageThe Deposit page displays all the information associated with the deposit, such as amount and projectedamount, total corrections, deposit date, number of payments and projected number of payments, and status.From the Deposit page, you can view, edit, and delete a deposit, edit the deposit number, edit allowed paymentmethods, lock/unlock the deposit, add a deposit correction, as well as add and link and unlink payments. Youcan also access the Deposit report to view deposit details. For more information, see Deposit Report on page 75.
Note: If differences exist between projected totals and actual totals, a warning icon appears next to thedifference in the summary section of the deposit.
The Deposit page also displays all linked payments, payment defaults, and any documentation associated withthe deposit. On the Payments tab, you can add, open, link, and unlink payments. You can also click Go topayment to go to a specific payment associated with the deposit. For more information about the Payments tab,see Payments Tab on page 27.On the Deposit Corrections tab, you can add a correction to an existing deposit. For example, the expectedamount of ticket sales may not equal the amount of cash in your drawer at the end of the day. You can add acorrection so that the deposit amount reflects the actual amount of cash taken in. You can select a depositcorrection and click Go to deposit correction on the action bar. The Deposit correction page appears where youcan view additional details and edit or delete the correction. For more information about the Deposit Correctionstab, see Deposit Corrections Tab on page 27.On the Payment Defaults tab, you can enter defaults for payments. Defaults are used only when a deposit isselected on a new payment record before you enter information, or if a payment is added from the Deposit page.For more information about the Payment Defaults tab, see Payment Defaults Tab on page 28.On the Documentation tab, you can add notes to track helpful or interesting pieces of additional informationabout the deposit.For more information about adding documentation to a deposit, see Documentation on page 1.
24 CHAPTER 1
On the GL Distributions tab for a deposit, you can view details for GL distributions. You establish GL distributionsfrom the GL Account Setup page in Administration. For more information about viewing GL distributions, see GLDistributions Tab for a Deposit on page 29.To access the Deposit page, select a deposit on the Register tab of an open bank account and click Go totransaction, or double-click the deposit. You can also search for deposits from themain Treasury page.
Edit DepositYou can edit deposits from the Deposit page. For example, you might want to change the post status or theprojected number of payments. To edit deposit information, click Edit deposit under Tasks in the explorer bar.For information about the fields on the Edit deposit screen, see Edit Deposit Screen on page 25.
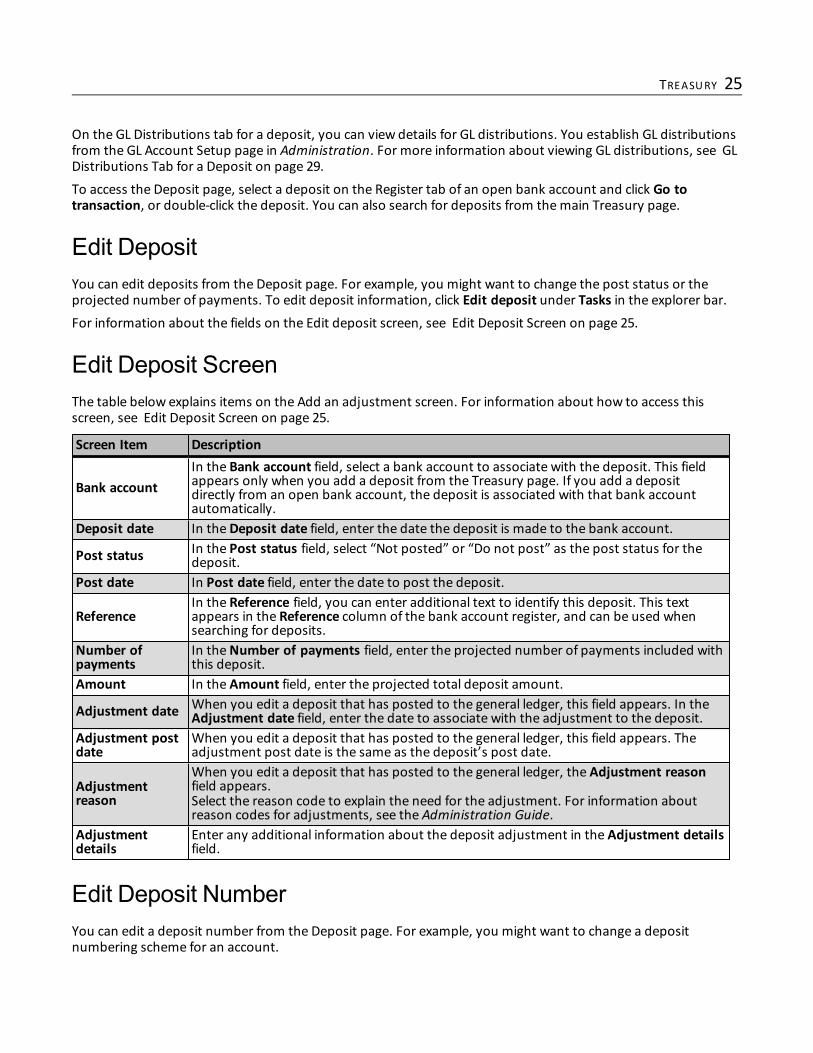
Edit Deposit ScreenThe table below explains items on the Add an adjustment screen. For information about how to access thisscreen, see Edit Deposit Screen on page 25.
Screen Item Description
Bank accountIn the Bank account field, select a bank account to associate with the deposit. This fieldappears only when you add a deposit from the Treasury page. If you add a depositdirectly from an open bank account, the deposit is associated with that bank accountautomatically.
Deposit date In theDeposit date field, enter the date the deposit is made to the bank account.
Post status In the Post status field, select “Not posted” or “Do not post” as the post status for thedeposit.
Post date In Post date field, enter the date to post the deposit.
ReferenceIn the Reference field, you can enter additional text to identify this deposit. This textappears in the Reference column of the bank account register, and can be used whensearching for deposits.
Number ofpayments
In theNumber of payments field, enter the projected number of payments included withthis deposit.
Amount In the Amount field, enter the projected total deposit amount.
Adjustment date When you edit a deposit that has posted to the general ledger, this field appears. In theAdjustment date field, enter the date to associate with the adjustment to the deposit.
Adjustment postdate
When you edit a deposit that has posted to the general ledger, this field appears. Theadjustment post date is the same as the deposit’s post date.
Adjustmentreason
When you edit a deposit that has posted to the general ledger, the Adjustment reasonfield appears.Select the reason code to explain the need for the adjustment. For information aboutreason codes for adjustments, see the Administration Guide.
Adjustmentdetails
Enter any additional information about the deposit adjustment in the Adjustment detailsfield.
Edit Deposit NumberYou can edit a deposit number from the Deposit page. For example, you might want to change a depositnumbering scheme for an account.
TREASURY 25
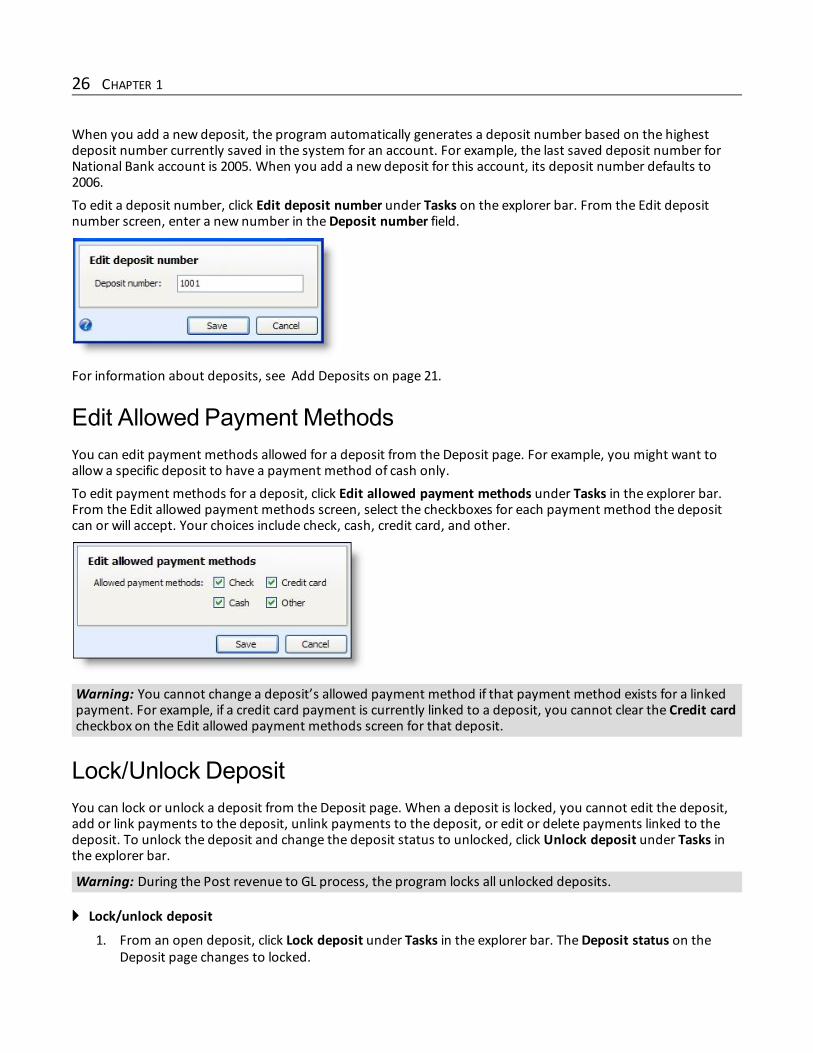
When you add a new deposit, the program automatically generates a deposit number based on the highestdeposit number currently saved in the system for an account. For example, the last saved deposit number forNational Bank account is 2005. When you add a new deposit for this account, its deposit number defaults to2006.To edit a deposit number, click Edit deposit number under Tasks on the explorer bar. From the Edit depositnumber screen, enter a new number in theDeposit number field.
For information about deposits, see Add Deposits on page 21.
Edit Allowed Payment MethodsYou can edit payment methods allowed for a deposit from the Deposit page. For example, you might want toallow a specific deposit to have a payment method of cash only.To edit payment methods for a deposit, click Edit allowed payment methods under Tasks in the explorer bar.From the Edit allowed payment methods screen, select the checkboxes for each payment method the depositcan or will accept. Your choices include check, cash, credit card, and other.
Warning: You cannot change a deposit’s allowed payment method if that payment method exists for a linkedpayment. For example, if a credit card payment is currently linked to a deposit, you cannot clear the Credit cardcheckbox on the Edit allowed payment methods screen for that deposit.
Lock/Unlock DepositYou can lock or unlock a deposit from the Deposit page. When a deposit is locked, you cannot edit the deposit,add or link payments to the deposit, unlink payments to the deposit, or edit or delete payments linked to thedeposit. To unlock the deposit and change the deposit status to unlocked, click Unlock deposit under Tasks inthe explorer bar.
Warning: During the Post revenue to GL process, the program locks all unlocked deposits.
} Lock/unlock deposit
1. From an open deposit, click Lock deposit under Tasks in the explorer bar. TheDeposit status on theDeposit page changes to locked.
26 CHAPTER 1
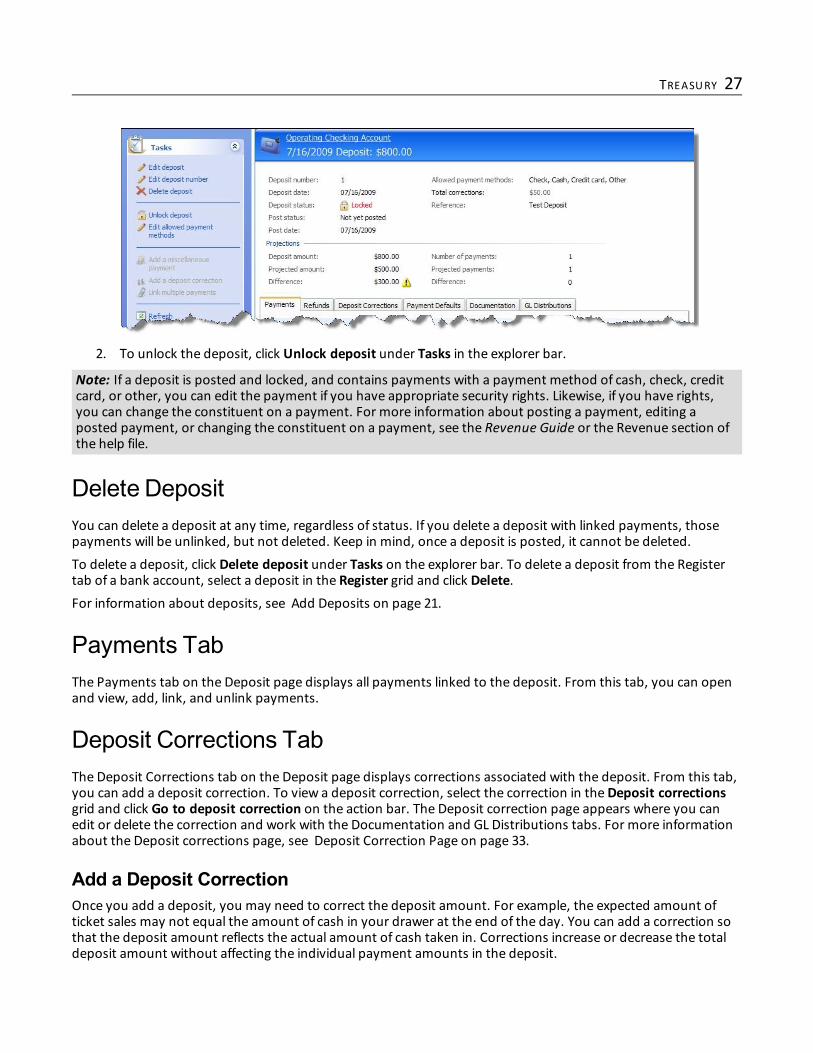
2. To unlock the deposit, click Unlock deposit under Tasks in the explorer bar.
Note: If a deposit is posted and locked, and contains payments with a payment method of cash, check, creditcard, or other, you can edit the payment if you have appropriate security rights. Likewise, if you have rights,you can change the constituent on a payment. For more information about posting a payment, editing aposted payment, or changing the constituent on a payment, see the Revenue Guide or the Revenue section ofthe help file.
Delete DepositYou can delete a deposit at any time, regardless of status. If you delete a deposit with linked payments, thosepayments will be unlinked, but not deleted. Keep in mind, once a deposit is posted, it cannot be deleted.To delete a deposit, click Delete deposit under Tasks on the explorer bar. To delete a deposit from the Registertab of a bank account, select a deposit in the Register grid and click Delete.For information about deposits, see Add Deposits on page 21.
Payments TabThe Payments tab on the Deposit page displays all payments linked to the deposit. From this tab, you can openand view, add, link, and unlink payments.
Deposit Corrections TabThe Deposit Corrections tab on the Deposit page displays corrections associated with the deposit. From this tab,you can add a deposit correction. To view a deposit correction, select the correction in theDeposit correctionsgrid and click Go to deposit correction on the action bar. The Deposit correction page appears where you canedit or delete the correction and work with the Documentation and GL Distributions tabs. For more informationabout the Deposit corrections page, see Deposit Correction Page on page 33.
Add a Deposit CorrectionOnce you add a deposit, you may need to correct the deposit amount. For example, the expected amount ofticket sales may not equal the amount of cash in your drawer at the end of the day. You can add a correction sothat the deposit amount reflects the actual amount of cash taken in. Corrections increase or decrease the totaldeposit amount without affecting the individual payment amounts in the deposit.
TREASURY 27
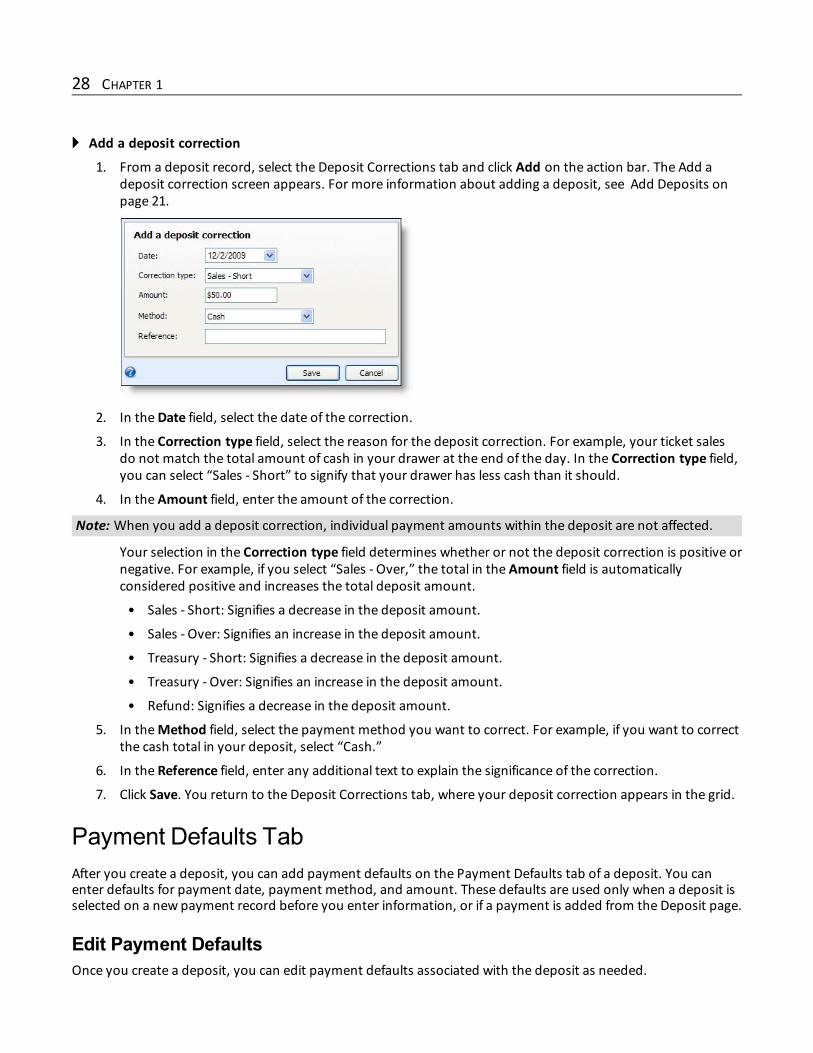
} Add a deposit correction
1. From a deposit record, select the Deposit Corrections tab and click Add on the action bar. The Add adeposit correction screen appears. For more information about adding a deposit, see Add Deposits onpage 21.
2. In theDate field, select the date of the correction.
3. In the Correction type field, select the reason for the deposit correction. For example, your ticket salesdo not match the total amount of cash in your drawer at the end of the day. In the Correction type field,you can select “Sales - Short” to signify that your drawer has less cash than it should.
4. In the Amount field, enter the amount of the correction.
Note: When you add a deposit correction, individual payment amounts within the deposit are not affected.
Your selection in the Correction type field determines whether or not the deposit correction is positive ornegative. For example, if you select “Sales - Over,” the total in the Amount field is automaticallyconsidered positive and increases the total deposit amount.
• Sales - Short: Signifies a decrease in the deposit amount.
• Sales - Over: Signifies an increase in the deposit amount.
• Treasury - Short: Signifies a decrease in the deposit amount.
• Treasury - Over: Signifies an increase in the deposit amount.
• Refund: Signifies a decrease in the deposit amount.
5. In theMethod field, select the payment method you want to correct. For example, if you want to correctthe cash total in your deposit, select “Cash.”
6. In the Reference field, enter any additional text to explain the significance of the correction.
7. Click Save. You return to the Deposit Corrections tab, where your deposit correction appears in the grid.
Payment Defaults TabAfter you create a deposit, you can add payment defaults on the Payment Defaults tab of a deposit. You canenter defaults for payment date, payment method, and amount. These defaults are used only when a deposit isselected on a new payment record before you enter information, or if a payment is added from the Deposit page.
Edit Payment DefaultsOnce you create a deposit, you can edit payment defaults associated with the deposit as needed.
28 CHAPTER 1

} Edit payment defaults for a deposit
1. From a deposit record, select the Payment Defaults tab and click Edit on the action bar. The Editpayment defaults screen appears. For more information about adding a deposit, see Add Deposits onpage 21.
2. In the Payment date field, enter the default effective date of payments that will be added to this deposit.When you click the arrow, you can use the calendar in the field to select a date.
3. In the Payment method field, select the default payment method for the payments in this deposit. Yourchoices include None, Check, Cash, Credit card, and Other.
If you select “Credit card,” the Card type field appears for you to select a credit card type.
If you select “Other,” theOther method field appears for you to select a payment method other thanthose currently listed in the Payment method field.
Note: Credit card types and other forms of payment methods are included in code tables you set up inAdministration. For more information, see the Administration Guide.
4. In the Payment amount field, enter the default amount for payments that will be added to this deposit.
5. Click Save.
GLDistributions Tab for a DepositOn the GL Distributions tab for a deposit, you can view the transaction type, such as Debit or Credit and the GLaccount number for each GL distribution. You can also view the amount and reference. The distributions youcreate determine the information that appears on this tab. You establish GL distributions from the GL AccountSetup page in Administration.
Go to PaymentFrom the GL Distributions tab, click the payment to access the payment record. Distributions are driven by thepayments on a deposit. You can view details of the payment and make changes to the distribution as necessary.For information about editing a GL distribution, see the Revenue Records chapter of the Revenue Guide.
Unlink PaymentsYou can unlink payments from deposits with an unlocked status that have not been posted. You cannot unlinkpayments from deposits with a locked status, or if the associated bank account is closed.
TREASURY 29
To unlink miscellaneous payments from the Payments tab of an unlocked deposit, select a payment in thePayments grid and click Unlink on the action bar.
Tip: To unlink multiple payments, select the payments you want to unlink and click Unlink on the action bar.
For information about miscellaneous payments, see Add Miscellaneous Payments on page 15.
Link PaymentsYou can link a payment to an unlocked deposit directly from a deposit record. Linking a payment to a depositassociates that payment with the deposit. Because payments are a part of the deposit record, all payments mustbe linked to a deposit before they can be posted.To link payments to an unlocked deposit, click Link on the action bar of the Payments tab.
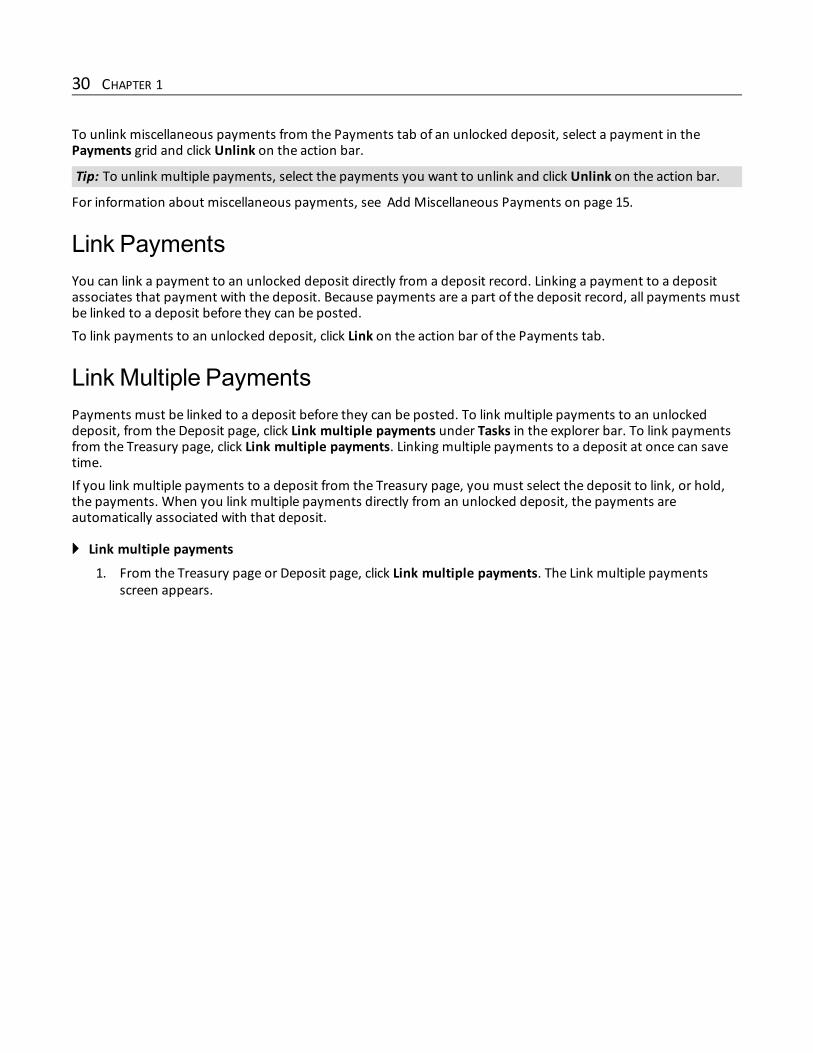
Link Multiple PaymentsPayments must be linked to a deposit before they can be posted. To link multiple payments to an unlockeddeposit, from the Deposit page, click Link multiple payments under Tasks in the explorer bar. To link paymentsfrom the Treasury page, click Link multiple payments. Linking multiple payments to a deposit at once can savetime.If you link multiple payments to a deposit from the Treasury page, you must select the deposit to link, or hold,the payments. When you link multiple payments directly from an unlocked deposit, the payments areautomatically associated with that deposit.
} Link multiple payments
1. From the Treasury page or Deposit page, click Link multiple payments. The Link multiple paymentsscreen appears.
30 CHAPTER 1
2. In theDeposit field, select a deposit to which you want to link the payments. To locate a deposit, use thebinoculars to access the Deposit search screen.
3. TheUnlinked payments grid lists all payments in the system that are not currently linked to a deposit.To narrow your search, you can set filters to display only the payments you want to view. For moreinformation about the filters, see Link Multiple Payments Screen on page 31. Once you have enteredyour filters, click Apply.
4. TheUnlinked payments grid lists all payments in the system that are not currently linked to a deposit.To narrow your search, you can set filters to display only the payments you want to view. For moreinformation about the filters, see Link Multiple Payments Screen on page 31. Once you have enteredyour filters, click Apply.
5. Select the payments you want to link to the deposit and click the Link Selected button to move thepayments to the Linked payments grid.
6. Click Save to link the payments in the Linked payments grid.
Link Multiple Payments ScreenThe table below explains the items on the Link Multiple Payments screen. For information about how to accessthis screen, see Link Multiple Payments on page 30.
Screen Item Description
DepositThis field appears when you link multiple payments from the Treasury page. Select adeposit to which you want to link the payments. Keep in mind, when you link multiplepayments directly from a deposit, the payments are associated with the open depositautomatically and this field does not appear.
TREASURY 31
Screen Item Description
Batch number Use the Batch number filter to display payments from a particular batch. To locate anexisting batch, click the binoculars to access the Batch Search screen.
Added by Use the Added by filter to display payments entered by a specific person.
Reference Use the Reference filter to display payments containing a specific reference or checknumber.
Post status To filter on a post status, enter the Post status field. Your choices include “Not posted”and “Do not post.”
Application type Use the Application type filter to display payments by application type, such asDonation or Matching gift.
Payment method Use the Payment method filter to display payments made using a specific method. Forexample, you can filter on payments made by check or cash.
Card type Use the Card type filter to display payments made using a particular credit card. Thisfield appears only if you select “Credit card” as the payment method.
Other method Use theOther method filter to display payment methods not listed in the Paymentmethod field. This field appears only if you select “Other” as the payment method.
Start date Use the Start date filter to display payments with a specific start date.End date Use the End date filter to display payments with a specific end date.
ApplyOnce you select a deposit, click Apply. TheUnlinked payments frame lists all paymentsin the system that are not currently linked to a deposit. To narrow your search, you canset filters to display only the payments you want to view. Once you enter filters, clickApply.
Clear Click this button to return to the default view, which displays all payments in the systemthat are not linked to a deposit.
Unlinked payments TheUnlinked payments frame lists all the payments in the system that are notcurrently linked to a deposit.
Linked payments The Linked payments frame lists the payments you intend to link to the deposit.
Link SelectedLink All
Use the Link Selected button to move payments from theUnlinked payments grid tothe Linked payments grid. You can use the Link All button to move all payments to theLinked payments grid.
Unlink SelectedUnlink All
Use theUnlink Selected button to remove payments from the Linked payments grid.You can use theUnlink All button to remove all payments.
Reconcile Credit Card Transactions with BlackbaudMerchantServicesIf your organization uses Blackbaud Merchant Services to process credit card transactions, you can run theDaily Transactions report from the Blackbaud Merchant Services web portal. With this report, you can viewinformation about the transactions processed on a selected day, including any processing fees assessed byBlackbaud Merchant Services. To reconcile daily credit card transaction activity from Treasury, you can add thetotal processing fees assessed by Blackbaud Merchant Services to the day’s deposit as a Deposit Correctionwith a type of Treasury Short. After you add the processing fees, the deposit total matches the net amount of thecredit card revenue deposited to your bank. After you complete the deposit, you can also run the Deposit Reportfrom its record.For information about the Daily Transactions report, see the help file accessible through the BlackbaudMerchant Services web portal.
32 CHAPTER 1
Deposit Correction PageThe Deposit correction page displays all the information associated with the correction, such as amount,correction date and type, method, and reference. From the Deposit correction page, you can view, edit, anddelete a correction.On the Documentation tab, you can add notes to track helpful or interesting pieces of additional informationabout the deposit correction.For more information about adding documentation to a deposit correction, see Documentation on page 1.On the GL Distributions tab for a deposit correction, you can view details for GL distributions. You establish GLdistributions from the GL Account Setup page in Administration. For more information about viewing GLdistributions, see GL Distributions Tab for a Deposit Correction on page 33.To access the Deposit correction page, select a deposit correction on the Deposit Corrections tab of a deposit andclick Go to deposit correction, or double-click the correction.
Edit a Deposit CorrectionYou can edit deposit corrections from the Deposit correction page. For example, you may want to change thecorrection date or the reference. To edit deposit correction information, click Edit deposit correction underTasks in the explorer bar.The fields on the Edit a deposit correction screen are the same as the Add a deposit correction screen.For more information, see Add a Deposit Correction on page 27.
Delete a Deposit CorrectionYou can delete deposit corrections from the Deposit correction page. To delete a deposit correction, click Deletedeposit correction under Tasks in the explorer bar. You cannot delete a deposit correction if the associateddeposit has been posted or locked, or if the bank account is closed.
GLDistributions Tab for a Deposit CorrectionOn the GL Distributions tab for a deposit correction, you can view the transaction type, such as Debit or Creditand the GL account number for each GL distribution. You can also view the amount and reference. Thedistributions you create determine the information that appears on this tab. You establish GL distributions fromthe GL Account Setup page in Administration.For information about editing a GL distribution, see Edit GL Distribution on page 40.
Adjustment CategoriesAdjustments are used to record bank account transactions such as interest earned, service charges, balanceadjustments, and transfers between bank accounts. On the Adjustment Categories tab, you can createadjustment categories for adjustment transactions you use regularly.Using adjustment categories reduces data entry time and maintains consistency. For example, if you have amonthly bank service fee for savings, you can create an adjustment category for this fee that includes all the
TREASURY 33
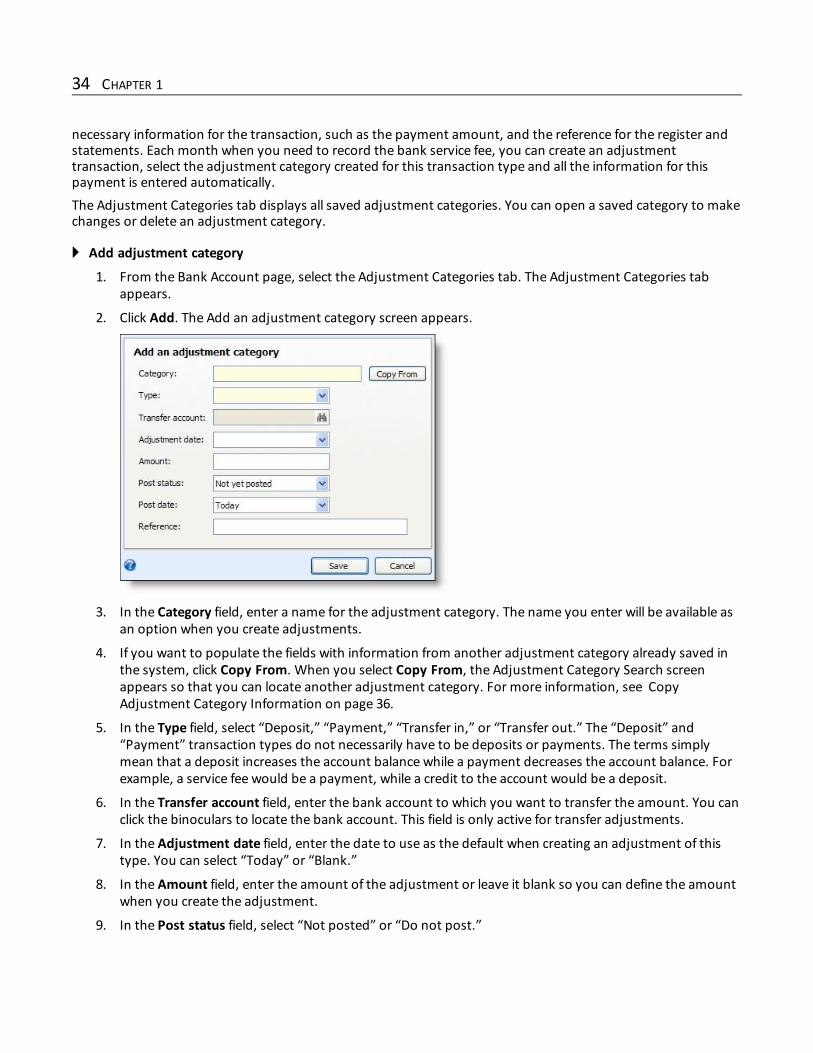
necessary information for the transaction, such as the payment amount, and the reference for the register andstatements. Each month when you need to record the bank service fee, you can create an adjustmenttransaction, select the adjustment category created for this transaction type and all the information for thispayment is entered automatically.The Adjustment Categories tab displays all saved adjustment categories. You can open a saved category to makechanges or delete an adjustment category.
} Add adjustment category
1. From the Bank Account page, select the Adjustment Categories tab. The Adjustment Categories tabappears.
2. Click Add. The Add an adjustment category screen appears.
3. In the Category field, enter a name for the adjustment category. The name you enter will be available asan option when you create adjustments.
4. If you want to populate the fields with information from another adjustment category already saved inthe system, click Copy From. When you select Copy From, the Adjustment Category Search screenappears so that you can locate another adjustment category. For more information, see CopyAdjustment Category Information on page 36.
5. In the Type field, select “Deposit,” “Payment,” “Transfer in,” or “Transfer out.” The “Deposit” and“Payment” transaction types do not necessarily have to be deposits or payments. The terms simplymean that a deposit increases the account balance while a payment decreases the account balance. Forexample, a service fee would be a payment, while a credit to the account would be a deposit.
6. In the Transfer account field, enter the bank account to which you want to transfer the amount. You canclick the binoculars to locate the bank account. This field is only active for transfer adjustments.
7. In the Adjustment date field, enter the date to use as the default when creating an adjustment of thistype. You can select “Today” or “Blank.”
8. In the Amount field, enter the amount of the adjustment or leave it blank so you can define the amountwhen you create the adjustment.
9. In the Post status field, select “Not posted” or “Do not post.”
34 CHAPTER 1
10. In the Post date field, select the default post date for adjustments of this type. Select “Adjustment date”for the post date to equal the adjustment start date, or select “Today” for the post date to equal thedate the adjustment is created.
11. In the Reference field, you can enter additional text to identify this adjustment category.
12. Click Save to save the new adjustment category.
Add an Adjustment Category ScreenThe table below explains the items on the Add an adjustment category screen. For information about how toaccess this screen, see Adjustment Categories on page 33.
Screen Item Description
Category In the Category field, enter a name for the adjustment category. The name you enter willbe available as an option when you create adjustments.
Copy FromClick Copy From to populate the fields with information from another adjustmentcategory already saved in the system. When you click Copy From, the AdjustmentCategory Search screen appears so that you can locate another adjustment category.For more information, see Copy Adjustment Category Information on page 36.
Type
In the Type field, select “Deposit,” “Payment,” “Transfer in,” or “Transfer out,” The“Deposit” and “Payment” transaction types do not necessarily have to be deposits orpayments. The terms simply mean that a deposit increases the account balance while apayment decreases the account balance. For example, a service fee would be a payment,while a credit to the account would be a deposit.
Transfer accountIn the Transfer account field, enter the bank account to which you want to transfer theamount. You can click the binoculars to locate the bank account. This field is only activefor transfer adjustments.
Adjustment date In the Adjustment date field, enter the date to use as the default when creating anadjustment of this type. You can select “Today” or “Blank.”
Amount In the Amount field, enter the amount of the adjustment or leave it blank so you candefine the amount when you create the adjustment.
Post status In the Post status field, select “Not posted” or “Do not post.”
Post dateIn the Post date field, select the default post date for adjustments of this type. Select“Adjustment date” for the post date to equal the period start date, or select “Today” forthe post date to equal the date the adjustment is created.
Reference In the Reference field, you can enter additional text to identify this adjustment category.
Edit Adjustment CategoryTo edit adjustment category information from the Adjustment Categories tab, select an adjustment category inthe grid and click Edit. For example, you might want to change the amount or transfer account.For information about the fields on the Edit adjustment category screen, see Add an Adjustment CategoryScreen on page 35.
Delete Adjustment CategoryYou can delete an adjustment category from the Adjustment Categories tab by selecting an adjustment categoryin the grid and clicking Delete.For information about adjustment categories, see Adjustment Categories on page 33.
TREASURY 35
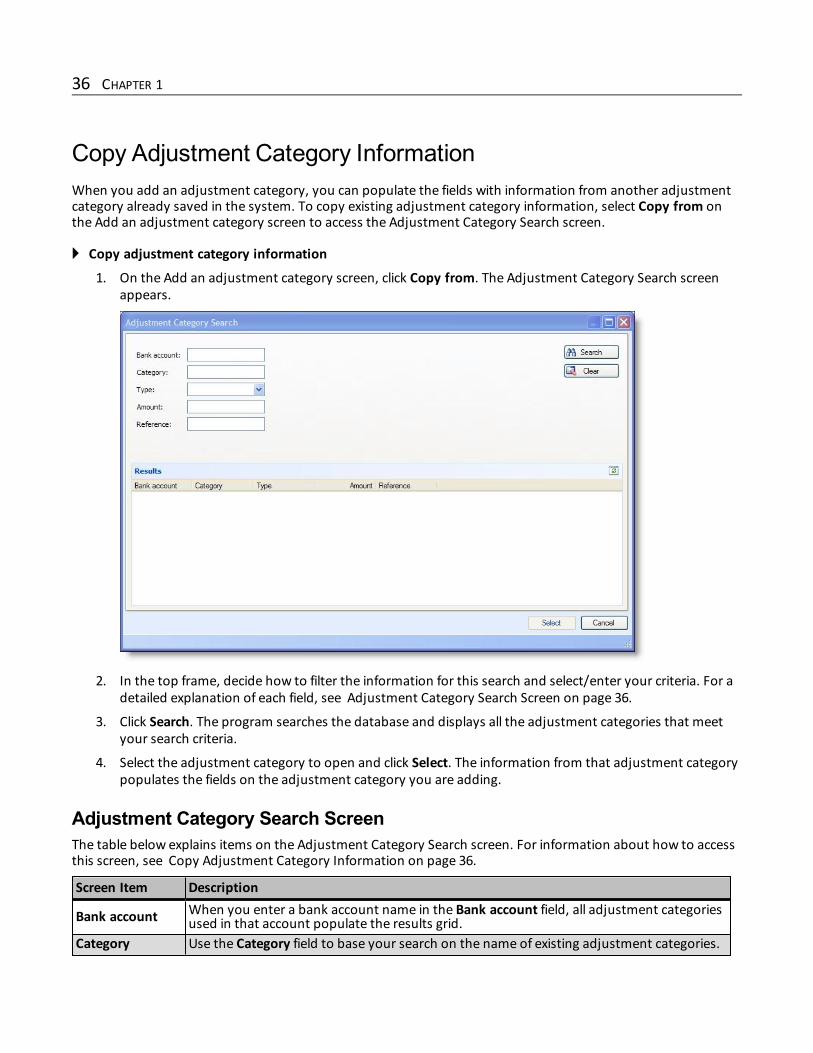
Copy Adjustment Category InformationWhen you add an adjustment category, you can populate the fields with information from another adjustmentcategory already saved in the system. To copy existing adjustment category information, select Copy from onthe Add an adjustment category screen to access the Adjustment Category Search screen.
} Copy adjustment category information
1. On the Add an adjustment category screen, click Copy from. The Adjustment Category Search screenappears.
2. In the top frame, decide how to filter the information for this search and select/enter your criteria. For adetailed explanation of each field, see Adjustment Category Search Screen on page 36.
3. Click Search. The program searches the database and displays all the adjustment categories that meetyour search criteria.
4. Select the adjustment category to open and click Select. The information from that adjustment categorypopulates the fields on the adjustment category you are adding.
Adjustment Category Search ScreenThe table below explains items on the Adjustment Category Search screen. For information about how to accessthis screen, see Copy Adjustment Category Information on page 36.
Screen Item Description
Bank account When you enter a bank account name in the Bank account field, all adjustment categoriesused in that account populate the results grid.
Category Use the Category field to base your search on the name of existing adjustment categories.
36 CHAPTER 1
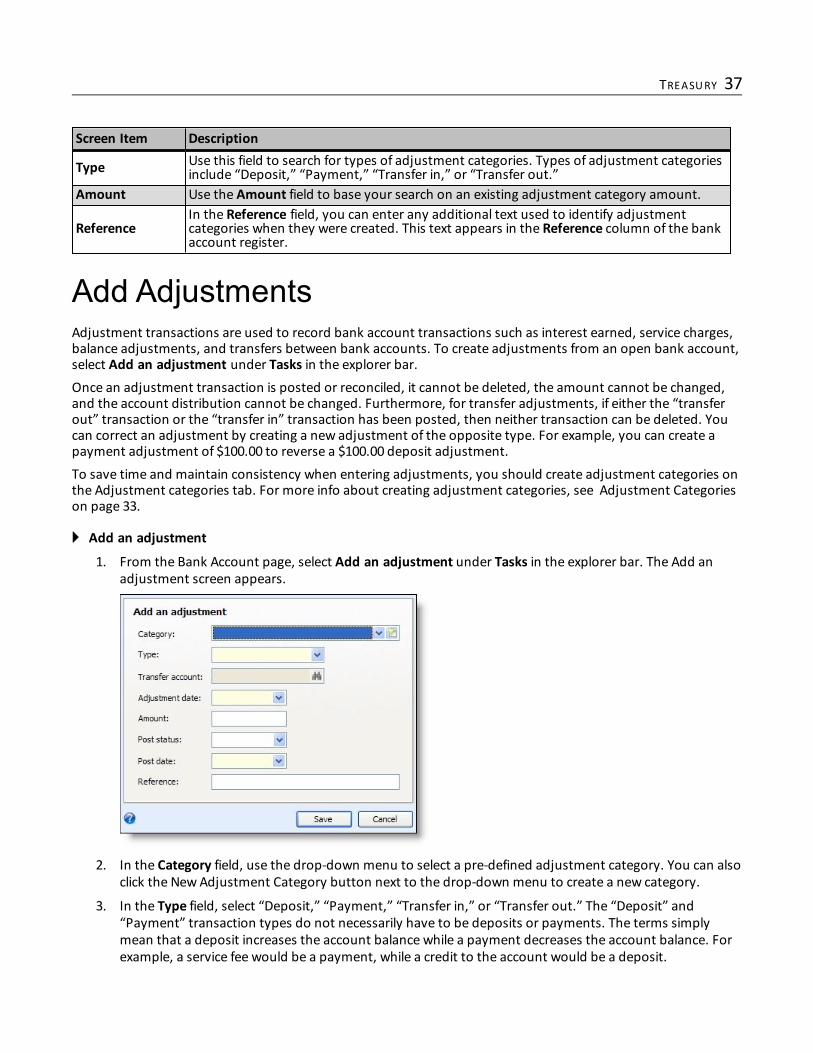
Screen Item Description
Type Use this field to search for types of adjustment categories. Types of adjustment categoriesinclude “Deposit,” “Payment,” “Transfer in,” or “Transfer out.”
Amount Use the Amount field to base your search on an existing adjustment category amount.
ReferenceIn the Reference field, you can enter any additional text used to identify adjustmentcategories when they were created. This text appears in the Reference column of the bankaccount register.
Add AdjustmentsAdjustment transactions are used to record bank account transactions such as interest earned, service charges,balance adjustments, and transfers between bank accounts. To create adjustments from an open bank account,select Add an adjustment under Tasks in the explorer bar.Once an adjustment transaction is posted or reconciled, it cannot be deleted, the amount cannot be changed,and the account distribution cannot be changed. Furthermore, for transfer adjustments, if either the “transferout” transaction or the “transfer in” transaction has been posted, then neither transaction can be deleted. Youcan correct an adjustment by creating a new adjustment of the opposite type. For example, you can create apayment adjustment of $100.00 to reverse a $100.00 deposit adjustment.To save time and maintain consistency when entering adjustments, you should create adjustment categories onthe Adjustment categories tab. For more info about creating adjustment categories, see Adjustment Categorieson page 33.
} Add an adjustment
1. From the Bank Account page, select Add an adjustment under Tasks in the explorer bar. The Add anadjustment screen appears.
2. In the Category field, use the drop-down menu to select a pre-defined adjustment category. You can alsoclick the NewAdjustment Category button next to the drop-down menu to create a new category.
3. In the Type field, select “Deposit,” “Payment,” “Transfer in,” or “Transfer out.” The “Deposit” and“Payment” transaction types do not necessarily have to be deposits or payments. The terms simplymean that a deposit increases the account balance while a payment decreases the account balance. Forexample, a service fee would be a payment, while a credit to the account would be a deposit.
TREASURY 37
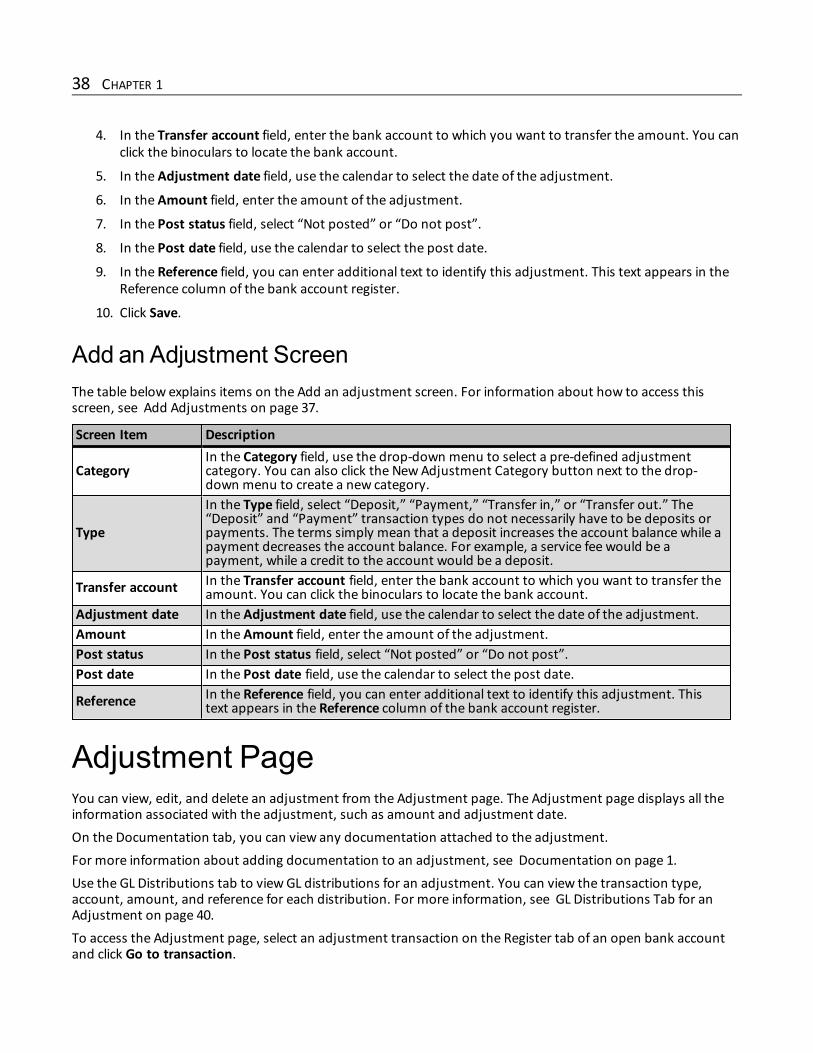
4. In the Transfer account field, enter the bank account to which you want to transfer the amount. You canclick the binoculars to locate the bank account.
5. In the Adjustment date field, use the calendar to select the date of the adjustment.
6. In the Amount field, enter the amount of the adjustment.
7. In the Post status field, select “Not posted” or “Do not post”.
8. In the Post date field, use the calendar to select the post date.
9. In the Reference field, you can enter additional text to identify this adjustment. This text appears in theReference column of the bank account register.
10. Click Save.
Add an Adjustment ScreenThe table below explains items on the Add an adjustment screen. For information about how to access thisscreen, see Add Adjustments on page 37.
Screen Item Description
CategoryIn the Category field, use the drop-down menu to select a pre-defined adjustmentcategory. You can also click the NewAdjustment Category button next to the drop-down menu to create a new category.
Type
In the Type field, select “Deposit,” “Payment,” “Transfer in,” or “Transfer out.” The“Deposit” and “Payment” transaction types do not necessarily have to be deposits orpayments. The terms simply mean that a deposit increases the account balance while apayment decreases the account balance. For example, a service fee would be apayment, while a credit to the account would be a deposit.
Transfer account In the Transfer account field, enter the bank account to which you want to transfer theamount. You can click the binoculars to locate the bank account.
Adjustment date In the Adjustment date field, use the calendar to select the date of the adjustment.Amount In the Amount field, enter the amount of the adjustment.Post status In the Post status field, select “Not posted” or “Do not post”.Post date In the Post date field, use the calendar to select the post date.
Reference In the Reference field, you can enter additional text to identify this adjustment. Thistext appears in the Reference column of the bank account register.
Adjustment PageYou can view, edit, and delete an adjustment from the Adjustment page. The Adjustment page displays all theinformation associated with the adjustment, such as amount and adjustment date.On the Documentation tab, you can view any documentation attached to the adjustment.For more information about adding documentation to an adjustment, see Documentation on page 1.Use the GL Distributions tab to viewGL distributions for an adjustment. You can view the transaction type,account, amount, and reference for each distribution. For more information, see GL Distributions Tab for anAdjustment on page 40.To access the Adjustment page, select an adjustment transaction on the Register tab of an open bank accountand click Go to transaction.
38 CHAPTER 1
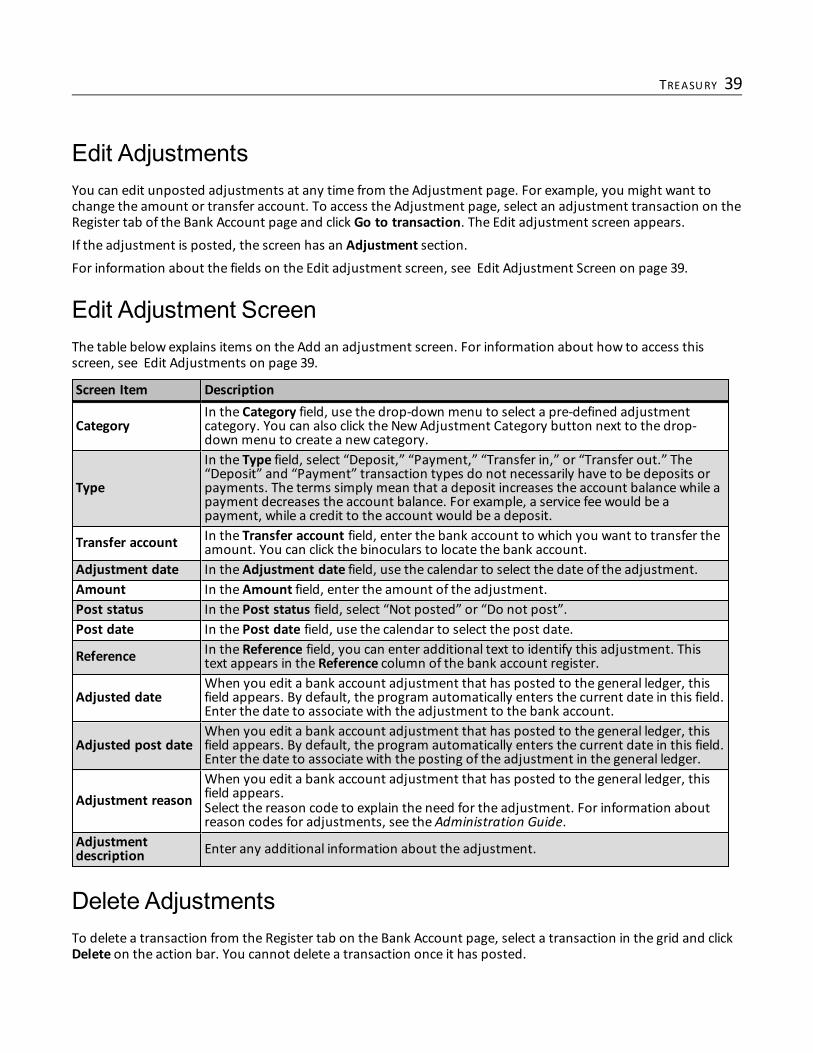
Edit AdjustmentsYou can edit unposted adjustments at any time from the Adjustment page. For example, you might want tochange the amount or transfer account. To access the Adjustment page, select an adjustment transaction on theRegister tab of the Bank Account page and click Go to transaction. The Edit adjustment screen appears.If the adjustment is posted, the screen has an Adjustment section.For information about the fields on the Edit adjustment screen, see Edit Adjustment Screen on page 39.
Edit Adjustment ScreenThe table below explains items on the Add an adjustment screen. For information about how to access thisscreen, see Edit Adjustments on page 39.
Screen Item Description
CategoryIn the Category field, use the drop-down menu to select a pre-defined adjustmentcategory. You can also click the NewAdjustment Category button next to the drop-down menu to create a new category.
Type
In the Type field, select “Deposit,” “Payment,” “Transfer in,” or “Transfer out.” The“Deposit” and “Payment” transaction types do not necessarily have to be deposits orpayments. The terms simply mean that a deposit increases the account balance while apayment decreases the account balance. For example, a service fee would be apayment, while a credit to the account would be a deposit.
Transfer account In the Transfer account field, enter the bank account to which you want to transfer theamount. You can click the binoculars to locate the bank account.
Adjustment date In the Adjustment date field, use the calendar to select the date of the adjustment.Amount In the Amount field, enter the amount of the adjustment.Post status In the Post status field, select “Not posted” or “Do not post”.Post date In the Post date field, use the calendar to select the post date.
Reference In the Reference field, you can enter additional text to identify this adjustment. Thistext appears in the Reference column of the bank account register.
Adjusted dateWhen you edit a bank account adjustment that has posted to the general ledger, thisfield appears. By default, the program automatically enters the current date in this field.Enter the date to associate with the adjustment to the bank account.
Adjusted post dateWhen you edit a bank account adjustment that has posted to the general ledger, thisfield appears. By default, the program automatically enters the current date in this field.Enter the date to associate with the posting of the adjustment in the general ledger.
Adjustment reasonWhen you edit a bank account adjustment that has posted to the general ledger, thisfield appears.Select the reason code to explain the need for the adjustment. For information aboutreason codes for adjustments, see the Administration Guide.
Adjustmentdescription Enter any additional information about the adjustment.
Delete AdjustmentsTo delete a transaction from the Register tab on the Bank Account page, select a transaction in the grid and clickDelete on the action bar. You cannot delete a transaction once it has posted.
TREASURY 39
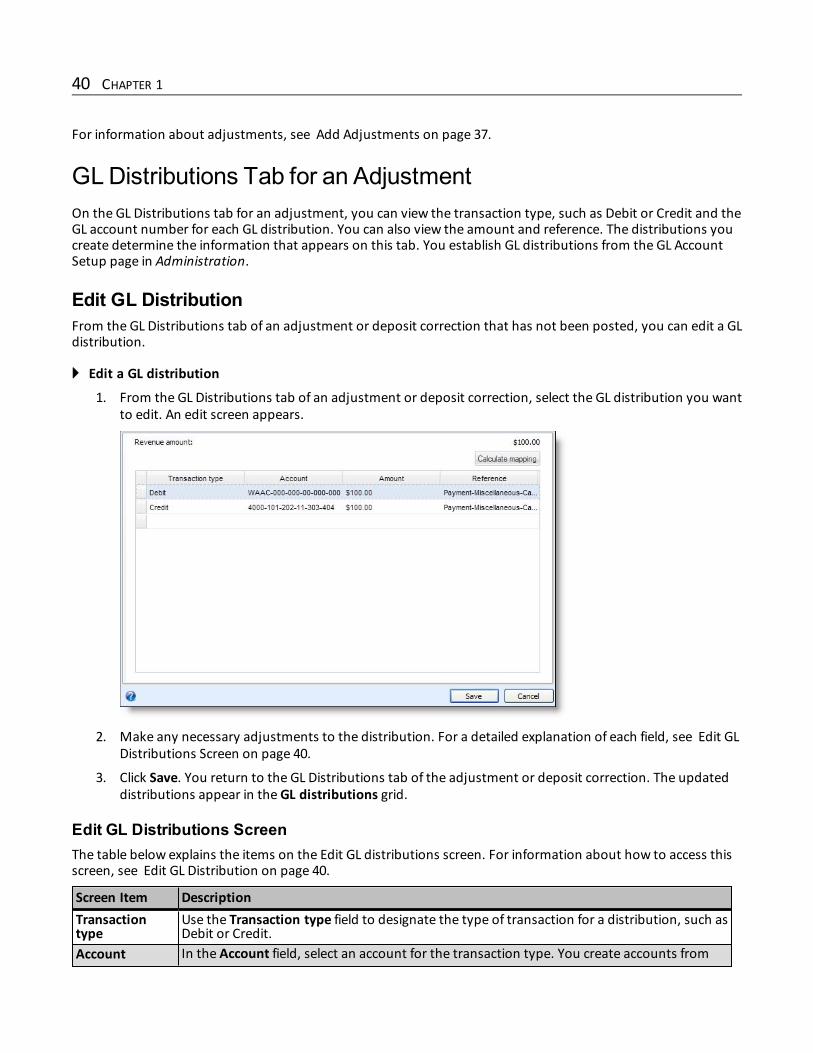
For information about adjustments, see Add Adjustments on page 37.
GLDistributions Tab for an AdjustmentOn the GL Distributions tab for an adjustment, you can view the transaction type, such as Debit or Credit and theGL account number for each GL distribution. You can also view the amount and reference. The distributions youcreate determine the information that appears on this tab. You establish GL distributions from the GL AccountSetup page in Administration.
Edit GL DistributionFrom the GL Distributions tab of an adjustment or deposit correction that has not been posted, you can edit a GLdistribution.
} Edit a GL distribution
1. From the GL Distributions tab of an adjustment or deposit correction, select the GL distribution you wantto edit. An edit screen appears.
2. Make any necessary adjustments to the distribution. For a detailed explanation of each field, see Edit GLDistributions Screen on page 40.
3. Click Save. You return to the GL Distributions tab of the adjustment or deposit correction. The updateddistributions appear in theGL distributions grid.
Edit GL Distributions ScreenThe table below explains the items on the Edit GL distributions screen. For information about how to access thisscreen, see Edit GL Distribution on page 40.
Screen Item DescriptionTransactiontype
Use the Transaction type field to designate the type of transaction for a distribution, such asDebit or Credit.
Account In the Account field, select an account for the transaction type. You create accounts from
40 CHAPTER 1
Screen Item Description
theDefine GL Accounts link on theManage GL Account Setup page in Administration.
Amount You can edit the Amount field for a distribution as necessary. However, the totaldistribution amounts must equal the total of the payment or adjustment transaction.
Reference The Reference field is automatically generated, can be edited if necessary, and appears onrelated reports.
Calculatemapping
For transactions that have not posted, the Calculate mapping button appears on the EditGL distributions screen. Click the Calculate mapping button to viewmapped segments.
DocumentationOn the Documentation tab, you can add notes to track helpful or interesting information about your records.You can save links to websites or related materials stored outside of the program. You can also attach itemsdirectly to records. When you attach a file, the program stores a copy in the database.
NotesOn the Documentation tab, you can add notes to track helpful or interesting information about your records.
Add NotesOn the Documentation tab, you can track notes about your records.
} Add a note
1. On the Documentation tab of a record, click Add, Note. The Add a note screen appears.
2. Select a note type. Enter the date, title, author, and the content of the note.
3. Click Save. You return to the Documentation tab.
Add a Note Screen
Screen Item Description
Type Select the type of note. The system administrator configures note types. If you havesecurity rights, click Type to add a note type.
Date Enter the date of the note.Title Enter the title, or purpose, of the note.Author To search for an author, click themagnifying glass. A search screen appears.Notes Enter the content of the note.
Edit NotesOn the Documentation tab, you can edit notes as necessary.
} Edit a note
1. On the Documentation tab of a record, select a note and click Edit. The Edit note screen appears.
2. Make changes as necessary to the note type, date, title, author, or note content.
3. Click Save. You return to the Documentation tab.
TREASURY 41
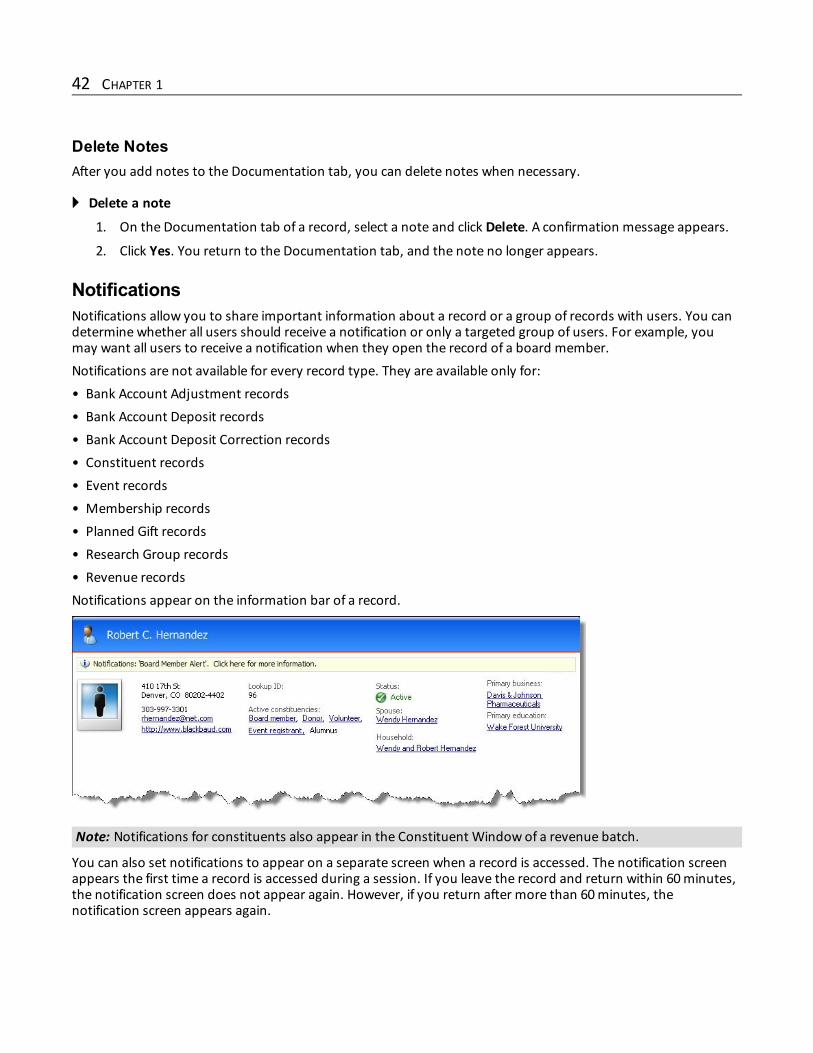
Delete NotesAfter you add notes to the Documentation tab, you can delete notes when necessary.
} Delete a note
1. On the Documentation tab of a record, select a note and click Delete. A confirmation message appears.
2. Click Yes. You return to the Documentation tab, and the note no longer appears.
NotificationsNotifications allow you to share important information about a record or a group of records with users. You candetermine whether all users should receive a notification or only a targeted group of users. For example, youmay want all users to receive a notification when they open the record of a board member.Notifications are not available for every record type. They are available only for:• Bank Account Adjustment records• Bank Account Deposit records• Bank Account Deposit Correction records• Constituent records• Event records• Membership records• Planned Gift records• Research Group records• Revenue recordsNotifications appear on the information bar of a record.
Note: Notifications for constituents also appear in the Constituent Window of a revenue batch.
You can also set notifications to appear on a separate screen when a record is accessed. The notification screenappears the first time a record is accessed during a session. If you leave the record and return within 60minutes,the notification screen does not appear again. However, if you return after more than 60minutes, thenotification screen appears again.
42 CHAPTER 1
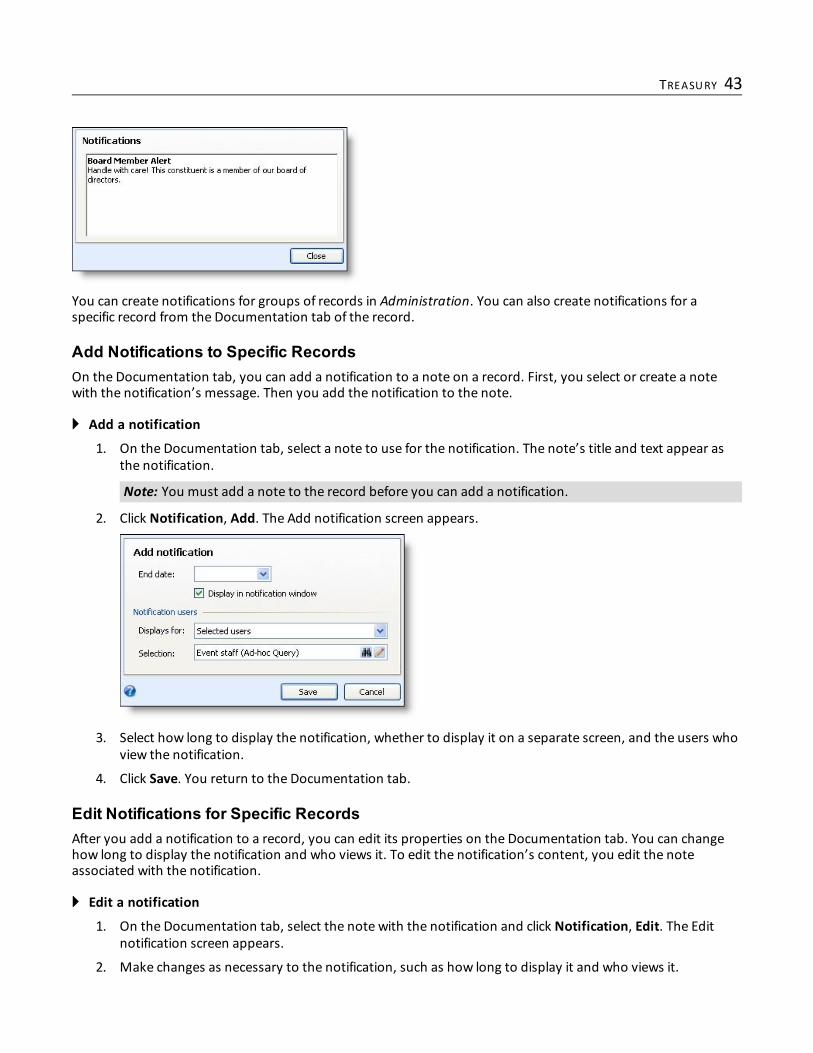
You can create notifications for groups of records in Administration. You can also create notifications for aspecific record from the Documentation tab of the record.
Add Notifications to Specific RecordsOn the Documentation tab, you can add a notification to a note on a record. First, you select or create a notewith the notification’s message. Then you add the notification to the note.
} Add a notification
1. On the Documentation tab, select a note to use for the notification. The note’s title and text appear asthe notification.
Note: You must add a note to the record before you can add a notification.
2. Click Notification, Add. The Add notification screen appears.
3. Select how long to display the notification, whether to display it on a separate screen, and the users whoview the notification.
4. Click Save. You return to the Documentation tab.
Edit Notifications for Specific RecordsAfter you add a notification to a record, you can edit its properties on the Documentation tab. You can changehow long to display the notification and who views it. To edit the notification’s content, you edit the noteassociated with the notification.
} Edit a notification
1. On the Documentation tab, select the note with the notification and click Notification, Edit. The Editnotification screen appears.
2. Make changes as necessary to the notification, such as how long to display it and who views it.
TREASURY 43

Note: To edit the notification title or content, edit the note itself.
3. Click Save. You return to the Documentation tab.
Delete Notifications from Specific RecordsOn the Documentation tab, you can delete a notification when you no longer need it. To remove a notificationfrom a record, select the note with the notification to remove and click Notification, Delete.
Media LinksOn the Documentation tab, you can save links to websites or related materials stored outside of the program.
Add Media LinksWhen you add a media link, you enter the website address.
} Add a media link
1. On the Documentation tab of a record, click Add,Media link. The Add a media link screen appears.
2. Select a media link type. Enter the date, title, and author. Enter the URL for a website.
3. Click Save. You return to the Documentation tab.
Add a Media Link Screen
Screen Item Description
Type Select the type ofmedia link. The system administrator configures media link types. Ifyou have security rights, click Type to add a media link type.
Date Enter the date of themedia link.Title Enter the title, or purpose, of the link.Author To search for an author, click the binoculars. A search screen appears.Media URL Enter the URL for a website.
Edit Media LinksYou can edit the URL for a website.
} Edit a media link
1. On the Documentation tab of a record, select a media link and click Edit. The Edit media link screenappears.
2. Make changes as necessary to themedia link type, date, title, or author. You can edit the URL for awebsite.
3. Click Save. You return to the Documentation tab.
Delete Media LinksAfter you add media links to the Documentation tab, you can delete them as necessary.
44 CHAPTER 1
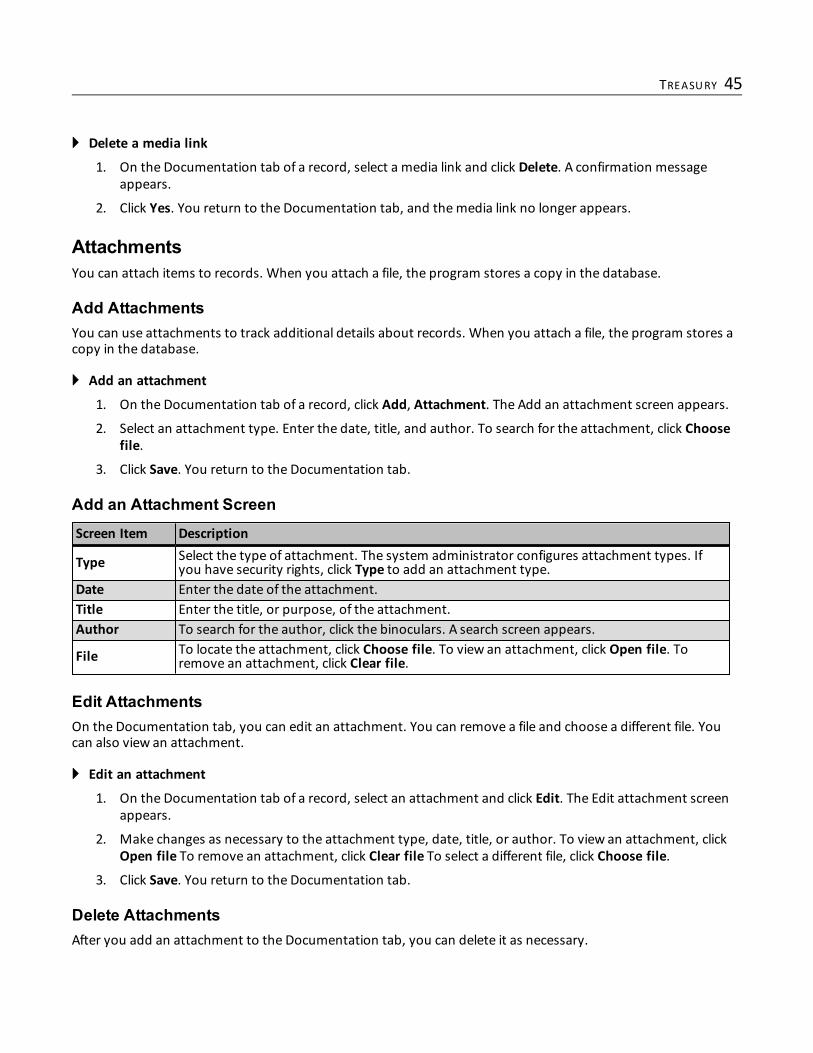
} Delete a media link
1. On the Documentation tab of a record, select a media link and click Delete. A confirmation messageappears.
2. Click Yes. You return to the Documentation tab, and themedia link no longer appears.
AttachmentsYou can attach items to records. When you attach a file, the program stores a copy in the database.
Add AttachmentsYou can use attachments to track additional details about records. When you attach a file, the program stores acopy in the database.
} Add an attachment
1. On the Documentation tab of a record, click Add, Attachment. The Add an attachment screen appears.
2. Select an attachment type. Enter the date, title, and author. To search for the attachment, click Choosefile.
3. Click Save. You return to the Documentation tab.
Add an Attachment Screen
Screen Item Description
Type Select the type of attachment. The system administrator configures attachment types. Ifyou have security rights, click Type to add an attachment type.
Date Enter the date of the attachment.Title Enter the title, or purpose, of the attachment.Author To search for the author, click the binoculars. A search screen appears.
File To locate the attachment, click Choose file. To view an attachment, click Open file. Toremove an attachment, click Clear file.
Edit AttachmentsOn the Documentation tab, you can edit an attachment. You can remove a file and choose a different file. Youcan also view an attachment.
} Edit an attachment
1. On the Documentation tab of a record, select an attachment and click Edit. The Edit attachment screenappears.
2. Make changes as necessary to the attachment type, date, title, or author. To view an attachment, clickOpen file To remove an attachment, click Clear file To select a different file, click Choose file.
3. Click Save. You return to the Documentation tab.
Delete AttachmentsAfter you add an attachment to the Documentation tab, you can delete it as necessary.
TREASURY 45
} Delete an attachment
1. On the Documentation tab of a record, select an attachment and click Delete. A confirmation messageappears.
2. Click Yes. You return to the Documentation tab, and the attachment no longer appears.
Open Attachment FilesAfter you add an attachment on the Documentation tab, you can open the attachment. Select the attachmentand click Open file.
46 CHAPTER 1
Create Deposits ProcessCreate Deposits Process 47
In Treasury, you can perform a number of tasks related to your financial activity. You can add and search fordeposits, view deposit and payment reports, and create and review deposit processes. When you create depositprocesses, you work with deposit templates to associate with specific bank accounts, revenue resources, andpayment methods. This chapter focuses on the tasks involved with creating and running deposit processes.
Create Deposits ProcessPayments can be linked to deposits in several ways. You can manually link a payment to a deposit, link multiplepayments to deposits using the Link multiple payments task in Treasury, or link payments to deposits using thecreate deposits process.With the create deposits process, you can create deposits for all eligible payments made through Treasury(miscellaneous payments) and the back office. Examples of back office revenue include payments made as part ofa batch or from a revenue record outside of Treasury. You can also create deposits for online sales, which includesponsorship recurring gift and sponsorship additional donation payments.With miscellaneous payments made from Treasury as well as back office and online sales payments, there is noclose drawer process. A supervisor includes these payments when they create deposits.The processes for creating deposits can be run manually or automatically. To run these processes automatically,you can generate a Windows Scripting File (*.wsf) for use with MicrosoftWindows Task Scheduler. You can alsocreate a job schedule for running the process. When you create a job schedule, you specify the frequency andscheduled time of the process occurrence. Using the job schedule and SQL Server, the program runs the processat the scheduled time and interval.Before you can create deposits, you must create deposit templates. When you create deposit templates, youmust select the revenue sources and payment methods (and currency, if your organization implementsMulticurrency) that the template will use. You can create different deposit templates based on the revenuesources you need, such as back office revenue. For more information about deposit templates, see ConfigureDeposit Templates on page 48.For posting, it is important to note that the default post status for payments is “Not posted.” If needed, you canaccess a payment record and edit the payment to change the status to “Do not post.” When the deposit processruns, "Not posted" deposits are created for all payments with a “Not posted” status while "Do not post" depositsare created for all payments with a “Do not post” status. Also note that when payments are linked to deposits,either manually or through the deposit process, the payment post date is updated to the deposit post date.Deposit details appear in the Deposit Summary Report.
Note: Only a supervisor or user with proper security rights can manage deposit templates or run the depositprocess.
WithMulticurrency, when a deposit process includes payments with multiple currencies, the deposit processautomatically creates separate deposits for each type of currency. The deposit summary report displays thepayments in a deposit and groups them according to the payment's currency. When multiple currencies areincluded in the report, the report total displays "N/A."
chapter 2
You can work with deposit processes from Treasury. Use the Review deposits and Create deposits links to createand work with deposit templates, and review and run deposit processes automatically.
Note: If your organization implements site security, the Review deposits link does not appear on the Treasurypage. Click Create deposits under Processing to access the Create Deposits page.
Configure Deposit TemplatesA deposit template defines which revenue sources and payment methods (and currency, if your organizationimplementsMulticurrency) you want to associate with a specific bank account. Deposit templates must bedefined for all accepted payment methods before you can run the deposit processes for miscellaneous paymentsadded from Treasury as well as back office revenue and online sales payments. Examples of back office revenueinclude payments made as part of a batch or from a revenue record outside of Treasury.When you create deposit templates, you must select a revenue source that the template will use. You can createdifferent deposit templates based on the revenue sources you need, such as miscellaneous payments fromTreasury.When the Deposit process runs for miscellaneous payments added from Treasury as well as back office andonline sales payments, it locates these payments and links them to the bank account defined for the appropriatedeposit template. Back office payments associated with uncommitted batches are excluded from this process.Before you create a deposit template, you must configure the bank accounts for your deposits.
} Add a deposit template
1. From Treasury, under Processing, click Review deposits. The Deposits page appears. For informationabout the Deposits page, see ViewDeposit Process Information on page 55.
Note: If your organization implements site security, the Review deposits link does not appear on theTreasury page. Click Create deposits under Processing to access the Create Deposits page. From thispage, click a deposit process to access the Deposits page. From the Deposit Templates tab, you can adddeposit templates for a deposit process.
2. Select the Deposit Templates tab and click Add on the action bar. The Add deposit template screenappears.
48 CHAPTER 2

3. Enter a name for the deposit template.
4. Enter the bank account associated with the deposit.
Note: You must configure a bank account to associate with the deposit before you can save a deposittemplate.
5. In the Reference field, select how to identify the deposit on the Register tab of the bank account record.
6. In the Revenue sources field, select all or specific revenue sources to include in the deposit template.
To select specific revenue sources, click themagnifying glass. The Revenue sources screen appears andlists the available revenue sources, such as back office revenue.
7. In the Payment methods field, select all or specific payment methods to include in the deposit template.
To select specific payment methods, click themagnifying glass. The Payment methods screen appearsand lists the available payment methods, such as cash.
Note: You can select "Credit card – card type not specified" to include credit card transactions that arenot associated with specific credit card types.
8. WithMulticurrency, the Currencies field appears. In the Currencies field, select all or specific currenciesto include in the deposit template.
To select specific currencies, click themagnifying glass. The Currencies screen appears and lists theavailable currencies, such as US Dollar. The program lists currencies associated with the account systemfor the bank account you specified on the Add deposit template screen.
Warning: The program considers a deposit template's currency when determining if template conflictsexist. For example, two deposit templates cannot share the same settings for revenue source, paymentmethod, and currency.
9. Click Save. You return to the Deposits page. Repeat this process until you have added each deposittemplate you need.
CREATE DEPOSITS PROCESS 49
} Edit a deposit template
1. From Treasury, under Processing, click Review deposits. The Deposits page appears. For informationabout the Deposits page, see ViewDeposit Process Information on page 55.
Note: If your organization implements site security, the Review deposits link does not appear on theTreasury page. Click Create deposits under Processing to access the Create Deposits page. From thispage, click a deposit process to access the Deposits page. From the Deposit Templates tab, you can editdeposit templates for a deposit process.
2. Click the Deposit Templates tab.
3. Select a deposit template and click Edit on the action bar. The Edit deposit template screen appears.
You can change the name for the deposit template as well as the bank account associated with thedeposit.
Note: Before you can save a deposit template, you must configure a bank account to associate with thedeposit.
4. In the Reference field, select how to identify the deposit on the Register tab of the bank account record.
5. In the Revenue sources field, select all or specific revenue sources to include in the deposit template.
To select specific revenue sources, click themagnifying glass. The Revenue sources screen appears andlists the available revenue sources, such as back office revenue.
6. In the Payment methods field, select all or specific payment methods to include in the deposit template.
To select specific payment methods, click themagnifying glass. The Payment methods screen appearsand lists the available payment methods, such as cash.
Note: You can select "Credit card – card type not specified" to include credit card transactions that arenot associated with specific credit card types.
7. WithMulticurrency, the Currencies field appears. In the Currencies field, select all or specific currenciesto include in the deposit template.
To select specific currencies, click themagnifying glass. The Currencies screen appears and lists theavailable currencies, such as US Dollar. The program lists currencies associated with the account systemfor the bank account you specified on the Add deposit template screen.
8. Click Save. Your return to the Deposits page.
} Delete Deposit Templates
1. From Treasury, under Processing, click Review deposits. The Deposits page appears. For informationabout the Deposits page, see ViewDeposit Process Information on page 55.
Note: If your organization implements site security, the Review deposits link does not appear on theTreasury page. Click Create deposits under Processing to access the Create Deposits page. From thispage, click a deposit process to access the Deposits page. From the Deposit Templates tab, you candelete deposit templates for a deposit process.
2. Click the Deposit Templates tab.
3. Select a deposit template and click Delete on the action bar. Click Yes on the confirmation message. Thedeposit template is deleted.
50 CHAPTER 2
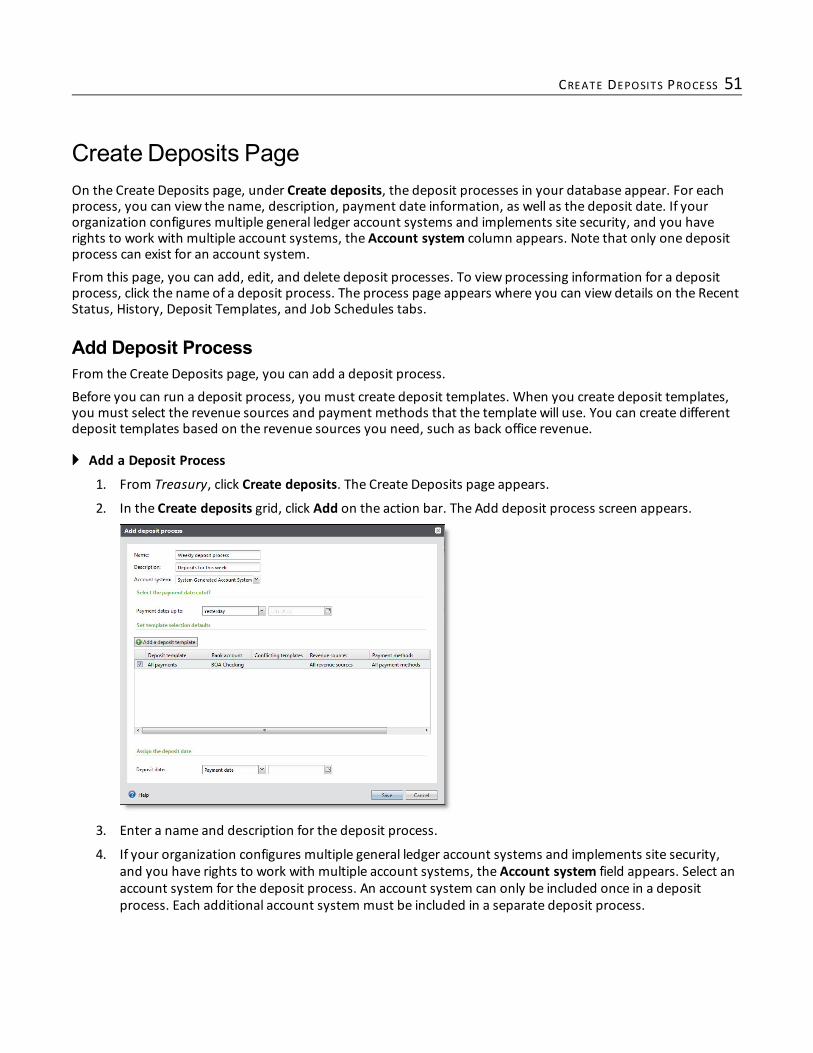
Create Deposits PageOn the Create Deposits page, under Create deposits, the deposit processes in your database appear. For eachprocess, you can view the name, description, payment date information, as well as the deposit date. If yourorganization configures multiple general ledger account systems and implements site security, and you haverights to work with multiple account systems, the Account system column appears. Note that only one depositprocess can exist for an account system.From this page, you can add, edit, and delete deposit processes. To view processing information for a depositprocess, click the name of a deposit process. The process page appears where you can view details on the RecentStatus, History, Deposit Templates, and Job Schedules tabs.
Add Deposit ProcessFrom the Create Deposits page, you can add a deposit process.Before you can run a deposit process, you must create deposit templates. When you create deposit templates,you must select the revenue sources and payment methods that the template will use. You can create differentdeposit templates based on the revenue sources you need, such as back office revenue.
} Add a Deposit Process
1. From Treasury, click Create deposits. The Create Deposits page appears.
2. In the Create deposits grid, click Add on the action bar. The Add deposit process screen appears.
3. Enter a name and description for the deposit process.
4. If your organization configures multiple general ledger account systems and implements site security,and you have rights to work with multiple account systems, the Account system field appears. Select anaccount system for the deposit process. An account system can only be included once in a depositprocess. Each additional account system must be included in a separate deposit process.
CREATE DEPOSITS PROCESS 51
Note: Once you select an account system and click Save, you cannot edit the account system. To selecta different account system, you must delete the deposit process and create a new onewith the correctaccount system.
5. In the Payment dates up to field, select to include transactions based on a specific time frame. Forexample, when you select "Yesterday," the process includes transactions made prior to and includingyesterday's date. When you select "Specific date,” theDate field is enabled.
6. Under Set template selection defaults, click Add a deposit template to add a deposit template for theprocess. For more information about the items on the Add deposit template screen, see Add DepositTemplate Screen on page 1.
In the deposit templates grid, for each deposit template, you can view the associated bank account,revenue sources, and payment methods.
7. As you select deposit templates, the Conflicting templates column displays any template that conflictswith a template you select. You can only select each payment method once for each revenue source for adeposit template process.
Note: WithMulticurrency, the Currencies column appears and displays the amount in transactioncurrency. Currencies are associated with the account system for the bank account specified for thedeposit template. The program considers a deposit template's currency when determining if templateconflicts exist during the create deposit process. For example, two deposit templates cannot share thesame settings for revenue source, payment method, and currency when running the create depositprocess.
8. In theDeposit date field, select a date to associate with the deposit process.
When you select "Specific day," the calendar field is enabled. Click this field to select a date.
9. Click Save to save the deposit process and return to the Create Deposits page.
Add Deposit Process ScreenThe table below explains the items on the Add deposit process screen. For information about how to access thisscreen, see Add a Deposit Process on page 51.
Screen Item Description
Name Enter a name for the deposit process.
Description Enter a description for the deposit process.
Accountsystem
If your organization configures multiple general ledger account systems and implements sitesecurity, and you have rights to work with multiple account systems, the Account systemfield appears. Select an account system for the deposit process. An account system can onlybe included once in a deposit process. Each additional account system must be included in aseparate deposit process.After you select an account system and click Save, you cannot edit the account system. Toselect a different account system, you must delete the deposit process and create a new onewith the correct account system.
Payment datesup to
In the Payment dates up to field, select to include transactions based on a specific timeframe. For example, when you select "Yesterday," the process includes transactions madeprior to and including yesterday's date. When you select "Specific date,” theDate field isenabled.
Add a deposittemplate
Under Set template selection defaults, click Add a deposit template to add a deposittemplate for the process. For more information about the items on the Add deposittemplate screen, see Add Deposit Template Screen on page 1.
52 CHAPTER 2
Screen Item DescriptionFor each deposit template, you can view the associated bank account, revenue sources, andpayment methods.As you select deposit templates, the Conflicting templates column displays any templatethat conflicts with a template you select. You can only select each payment method once foreach revenue source for a deposit template process.
Currencies
WithMulticurrency, the Currencies column appears in the deposit templates grid anddisplays the amount in transaction currency. Currencies are associated with the accountsystem for the bank account specified for the deposit template. The program considers adeposit template's currency when determining if template conflicts exist during the createdeposit process. For example, two deposit templates cannot share the same settings forrevenue source, payment method, and currency when running the create deposit process.
Deposit date In theDeposit date field, select a date to associate with the deposit process. When youselect "Specific day," the calendar field is enabled. Click this field to select a date.
Delete Deposit ProcessAt any time, you can delete a deposit process from the database.From the Create Deposits page in Treasury, in the Create deposits grid, select the deposit process you want todelete and click Delete on the action bar. When a message appears to ask whether to delete the deposit process,click Yes. You return to the Create Deposits page.
Edit Deposit ProcessesAfter you run a deposit process, you can edit the information for a process, such as the name and description.You can also select different templates to include.From the Deposits page, click Edit process, under Tasks. The Edit deposit process screen appears. Edit theinformation as necessary.
Note: If your organization implements site security, you can edit a deposit process from the Create Depositspage in Treasury. In the Create deposits grid, select the deposit process you want to edit and click Edit on theaction bar. The Edit deposit process screen appears. The items on this screen are the same as the items on theAdd deposit process screen. For more information about these items, see Add Deposit Process Screen on page52.
If your organization configures multiple general ledger account systems and implements site security, and youhave rights to work with multiple account systems, the Account system field appears. You cannot edit theaccount system from the Edit deposit process screen.
RunDeposit ProcessAfter the deposit templates are created, you can run deposit processes for miscellaneous payments fromTreasury as well as back office and online sales payments. Examples of back office revenue include paymentsmade as part of a batch or from a revenue record outside of Treasury.When you run the deposit process, deposits are created for payments processed from Treasury as well as backoffice and online sales payments. Payments with a “Not posted” status are linked to "Not posted" deposits andpayments with a status of “Do not post” are linked to "Do not post" deposits. Note that when payments arelinked to deposits, either manually or through the deposit process, the payment post date is updated to thedeposit post date. Deposit details appear in the Deposit Summary Report. Only payments that are notassociated with a deposit are eligible to be included in a deposit.
CREATE DEPOSITS PROCESS 53
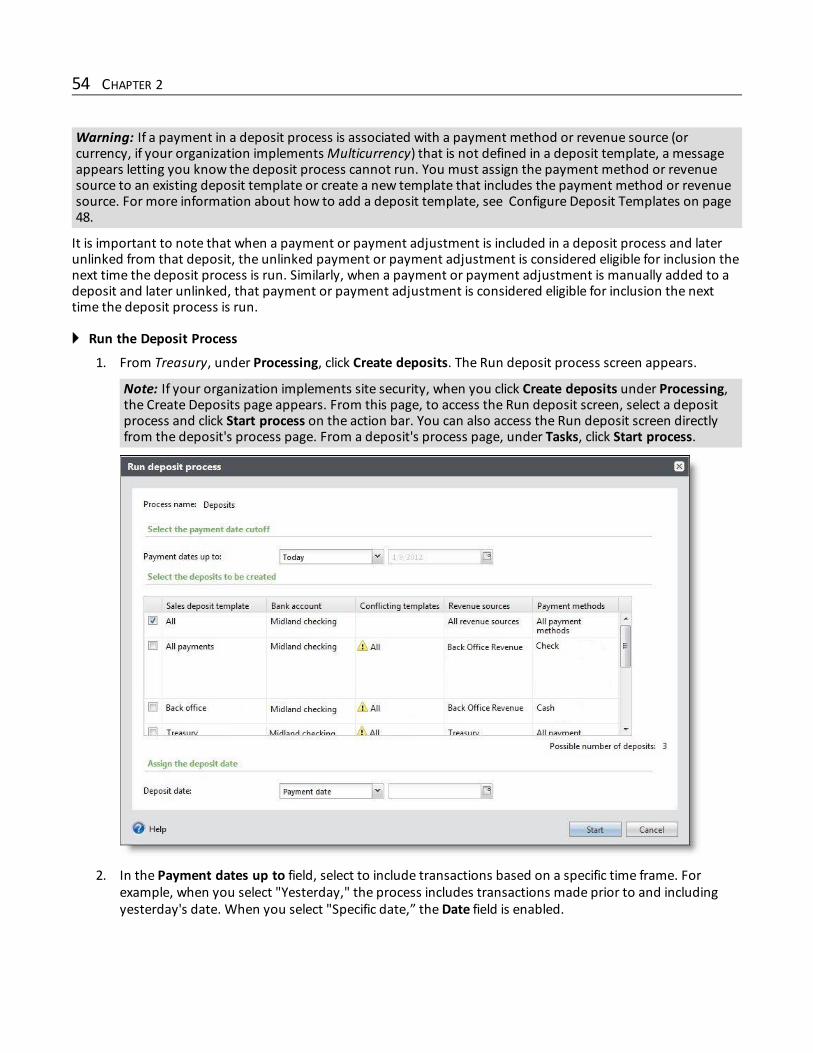
Warning: If a payment in a deposit process is associated with a payment method or revenue source (orcurrency, if your organization implementsMulticurrency) that is not defined in a deposit template, a messageappears letting you know the deposit process cannot run. You must assign the payment method or revenuesource to an existing deposit template or create a new template that includes the payment method or revenuesource. For more information about how to add a deposit template, see Configure Deposit Templates on page48.
It is important to note that when a payment or payment adjustment is included in a deposit process and laterunlinked from that deposit, the unlinked payment or payment adjustment is considered eligible for inclusion thenext time the deposit process is run. Similarly, when a payment or payment adjustment is manually added to adeposit and later unlinked, that payment or payment adjustment is considered eligible for inclusion the nexttime the deposit process is run.
} Run the Deposit Process
1. From Treasury, under Processing, click Create deposits. The Run deposit process screen appears.
Note: If your organization implements site security, when you click Create deposits under Processing,the Create Deposits page appears. From this page, to access the Run deposit screen, select a depositprocess and click Start process on the action bar. You can also access the Run deposit screen directlyfrom the deposit's process page. From a deposit's process page, under Tasks, click Start process.
2. In the Payment dates up to field, select to include transactions based on a specific time frame. Forexample, when you select "Yesterday," the process includes transactions made prior to and includingyesterday's date. When you select "Specific date,” theDate field is enabled.
54 CHAPTER 2
3. In the deposit templates grid, select deposit templates you want to include in the deposit process. Foreach deposit template, you can view the associated bank account, revenue sources, and paymentmethods.
As you select deposit templates, the Conflicting templates column displays any template that conflictswith a template you select. You can only select each payment method once for each revenue source for adeposit template process.
Note: WithMulticurrency, the Currencies column appears and displays the amount in transactioncurrency. Currencies are associated with the account system for the bank account specified for thedeposit template. The program considers a deposit template's currency when determining if templateconflicts exist during the create deposit process. For example, two deposit templates cannot share thesame settings for revenue source, payment method, and currency when running the create depositprocess.
4. In theDeposit date field, select a date to associate with the deposit.
When you select "Specific day," the calendar field is enabled. Click this field to select a date.
5. Possible number of deposits displays the number of deposits the program could create based on thenumber of deposit templates you select.
This number can change based on the option you select in theDeposit date field. For example, when youselect "Payment date" in theDeposit date field, the possible number of deposits displays the number ofdeposit templates multiplied by the number of payment dates.
6. To create the deposits, click Start. Once the process completes, the Deposit Process page appears. Forinformation about the Deposit Process page, see ViewDeposit Process Information on page 55.
Note: If you do not implement site security, the program uses the selections you make on the Rundeposit process screen as defaults for the next deposit process.
Warning: If a payment in a deposit process is associated with a payment method or revenue source(and currency, if your organization implementsMulticurrency) that is not defined in a deposit template,a message appears letting you know the deposit process cannot run. You must assign the paymentmethod or revenue source to an existing deposit template or create a new template that includes thepayment method or revenue source. For more information about how to add a deposit template, seeConfigure Deposit Templates on page 48.
ViewDeposit Process InformationAfter you run a deposit process, the Deposits page appears. The Recent Status tab displays information aboutthemost recently run process instance. Undeposited transactions display in theUndeposited transactions grid.The History tab displays information about all past instances. The information you can view includes the status,duration, total records processed, and any exceptions.When the deposit process runs, payments with a “Not posted” status are linked to "Not posted" deposits andpayments with a status of “Do not post” are linked to "Do not post" deposits. Also note that when payments arelinked to deposits, either manually or through the deposit process, the payment post date is updated to thedeposit post date. These deposits and the payments included in each are listed in the Deposit Summary report.You can view this report from both the Recent Status tab and History tab. To view the report from the RecentStatus tab, click View report. To view the report from the History tab, select the process to view and click Viewreport. To delete history, select the process and click Delete.
CREATE DEPOSITS PROCESS 55
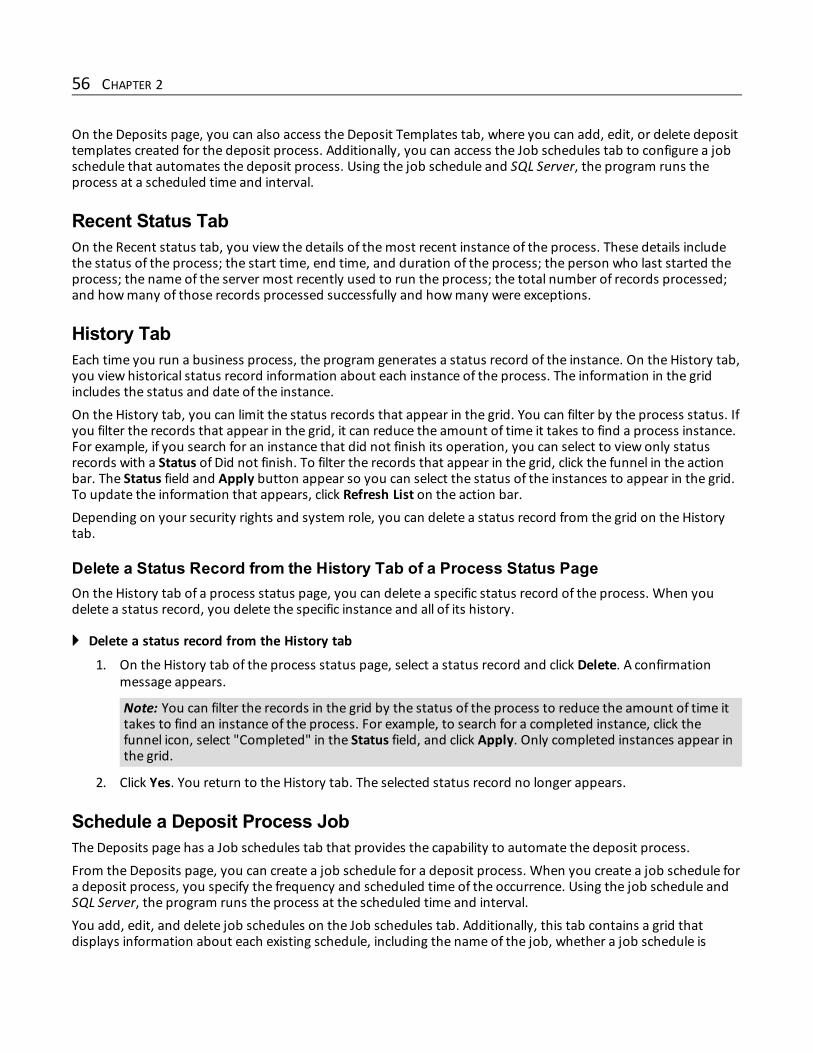
On the Deposits page, you can also access the Deposit Templates tab, where you can add, edit, or delete deposittemplates created for the deposit process. Additionally, you can access the Job schedules tab to configure a jobschedule that automates the deposit process. Using the job schedule and SQL Server, the program runs theprocess at a scheduled time and interval.
Recent Status TabOn the Recent status tab, you view the details of themost recent instance of the process. These details includethe status of the process; the start time, end time, and duration of the process; the person who last started theprocess; the name of the server most recently used to run the process; the total number of records processed;and howmany of those records processed successfully and howmany were exceptions.
History TabEach time you run a business process, the program generates a status record of the instance. On the History tab,you view historical status record information about each instance of the process. The information in the gridincludes the status and date of the instance.On the History tab, you can limit the status records that appear in the grid. You can filter by the process status. Ifyou filter the records that appear in the grid, it can reduce the amount of time it takes to find a process instance.For example, if you search for an instance that did not finish its operation, you can select to view only statusrecords with a Status of Did not finish. To filter the records that appear in the grid, click the funnel in the actionbar. The Status field and Apply button appear so you can select the status of the instances to appear in the grid.To update the information that appears, click Refresh List on the action bar.Depending on your security rights and system role, you can delete a status record from the grid on the Historytab.
Delete a Status Record from the History Tab of a Process Status PageOn the History tab of a process status page, you can delete a specific status record of the process. When youdelete a status record, you delete the specific instance and all of its history.
} Delete a status record from the History tab
1. On the History tab of the process status page, select a status record and click Delete. A confirmationmessage appears.
Note: You can filter the records in the grid by the status of the process to reduce the amount of time ittakes to find an instance of the process. For example, to search for a completed instance, click thefunnel icon, select "Completed" in the Status field, and click Apply. Only completed instances appear inthe grid.
2. Click Yes. You return to the History tab. The selected status record no longer appears.
Schedule a Deposit Process JobThe Deposits page has a Job schedules tab that provides the capability to automate the deposit process.From the Deposits page, you can create a job schedule for a deposit process. When you create a job schedule fora deposit process, you specify the frequency and scheduled time of the occurrence. Using the job schedule andSQL Server, the program runs the process at the scheduled time and interval.You add, edit, and delete job schedules on the Job schedules tab. Additionally, this tab contains a grid thatdisplays information about each existing schedule, including the name of the job, whether a job schedule is
56 CHAPTER 2
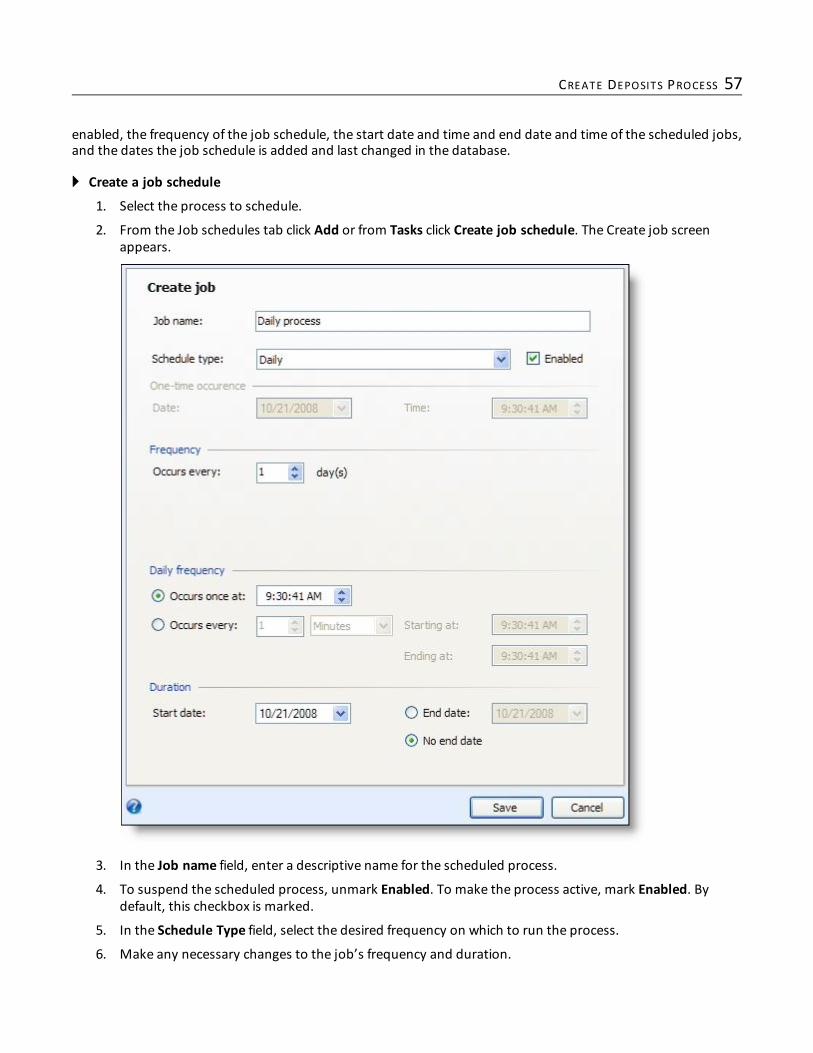
enabled, the frequency of the job schedule, the start date and time and end date and time of the scheduled jobs,and the dates the job schedule is added and last changed in the database.
} Create a job schedule
1. Select the process to schedule.
2. From the Job schedules tab click Add or from Tasks click Create job schedule. The Create job screenappears.
3. In the Job name field, enter a descriptive name for the scheduled process.
4. To suspend the scheduled process, unmark Enabled. To make the process active, mark Enabled. Bydefault, this checkbox is marked.
5. In the Schedule Type field, select the desired frequency on which to run the process.
6. Make any necessary changes to the job’s frequency and duration.
CREATE DEPOSITS PROCESS 57
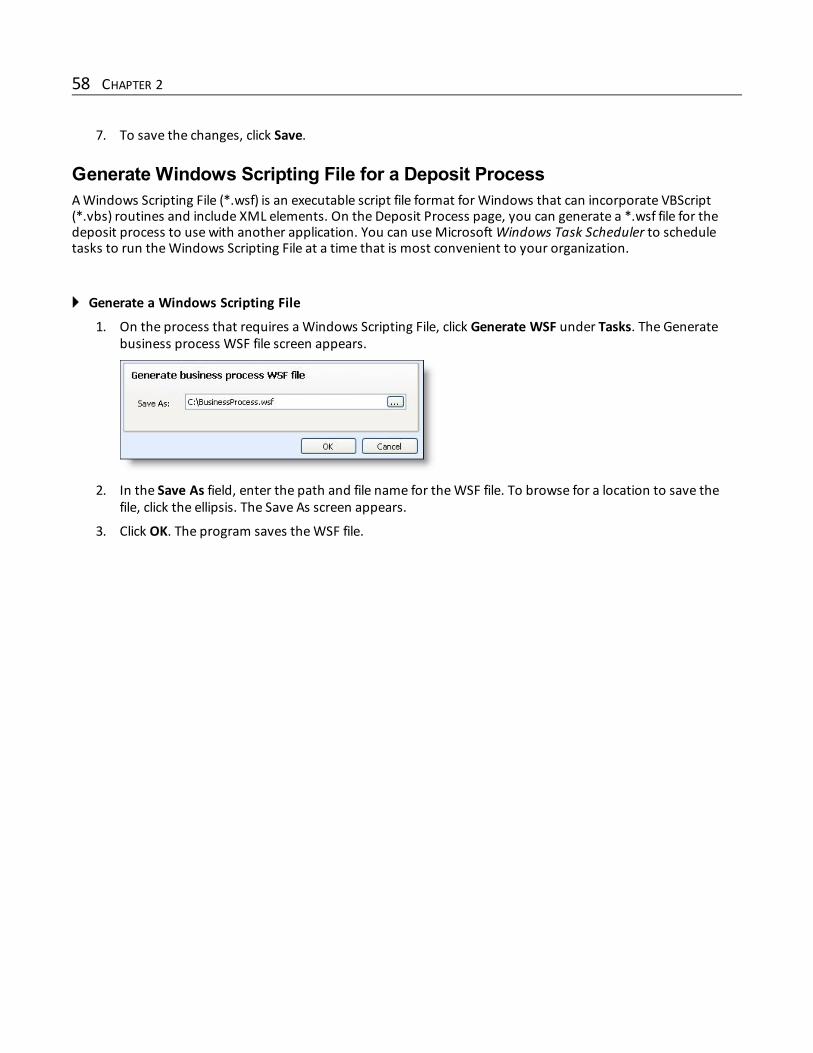
7. To save the changes, click Save.
Generate Windows Scripting File for a Deposit ProcessAWindows Scripting File (*.wsf) is an executable script file format for Windows that can incorporate VBScript(*.vbs) routines and include XML elements. On the Deposit Process page, you can generate a *.wsf file for thedeposit process to use with another application. You can useMicrosoftWindows Task Scheduler to scheduletasks to run theWindows Scripting File at a time that is most convenient to your organization.
} Generate a Windows Scripting File
1. On the process that requires a Windows Scripting File, click Generate WSF under Tasks. The Generatebusiness process WSF file screen appears.
2. In the Save As field, enter the path and file name for theWSF file. To browse for a location to save thefile, click the ellipsis. The Save As screen appears.
3. Click OK. The program saves theWSF file.
58 CHAPTER 2

Reconcile OutstandingCredit Card TransactionsCredit Card Reconciliation Workflow 60
Set the Default Settlement Date for Existing Transactions 61
Settle Credit Card Transactions 62
Reconcile Settlement Report Transactions 68
Blackbaud Merchant Services Alerts and Information 69
From Revenue, your organization can run a process to submit credit card transactions for authorization througha credit card payment processor such as Blackbaud Merchant Services. After your processor authorizes creditcard transactions, it disburses the revenue from these transactions into your bank account. In addition, yourprocessor may provide a settlement report that includes information about the disbursement amount and thetransactions the disbursement includes.To verify all transactions process successfully, on the Outstanding credit card transactions page, you canreconcile credit card transactions based on your settlement report or disbursement activity. To access this pagefrom Treasury, click Outstanding credit card transactions.
chapter 3
Note: When your organization first accesses the Outstanding credit card transactions page, the Credit cardreconciliation screen appears. On this screen, you select whether to assign a settlement date to existingtransactions, such as the date of your most recent reconciliation.
On the top of the page, select the criteria of the credit card transactions to view and click Go.• In the Transactions for field, select the date range of the transactions to view, such as This quarter, Thismonth, or Specific dates.
• By default, the Outstanding Credit Card Transactions page displays only unsettled credit card transactions. Toview settled transactions, select Include settled transactions. Under Credit card transactions, a greencheckmark appears in the Settled column to indicate a settled transaction.
Under Credit card transactions, you can view the credit card transactions entered into the database during theselected time period, grouped by transaction date. For each date, you can view the total amount of thetransactions processed. For each transaction, you can view information about its transaction type, credit cardand cardholder, amount, settlement status, and gateway ID. For a settled transaction, you can also view itssettlement date. From this grid, you can settle transactions based on disbursement or settlement activity. Forexample, you can automatically settle transactions processed through Blackbaud Merchant Services, or uploada settlement report received from your processor to reconcile its transactions.
Tip: To view the transactions for a specific date, expand its node. To quickly expand or collapse the nodes in thegrid, click Expand all or Collapse all on the action bar.
Under Settlement report transactions to reconcile, you can view any credit card transactions included in thesettlement report with no corresponding transaction in your database. For example, your organization may havesubmitted these transactions to the processor from outside of the program, or the automatic reconciliation maynot have successfully matched these transactions with their counterparts in the database. From this grid, youcan manage these transactions as necessary. For example, you can remove a transaction processed outside ofthe program from the list, or search the database for a transaction's match.
Credit Card Reconciliation WorkflowFrom Treasury, you can upload a disbursement or settlement report from a payment processor to automaticallyreconcile credit card transactions with the transactions in the report. You can also manually settle transactions asnecessary. To successfully reconcile your credit card transactions, we recommend you perform the following.
q From Revenue, create and run the credit card processing process to automatically submit credit cardtransactions to a payment processor such as Blackbaud Merchant Services for authorization. As theprocessor authorizes the transactions, it may mark some as suspect or hold some due to a chargebackrequest. After authorization, the processor deposits the funds from approved transactions as a disbursementin your bank account.
q From Treasury, access the Outstanding Credit Card Transactions page to view all credit card transactionsentered during a selected time period. For information about the items on this page, see ReconcileOutstanding Credit Card Transactions on page 59.
Note: When your organization first accesses the Outstanding credit card transactions page, the Credit cardreconciliation screen appears. On this screen, you select whether to assign a settlement date to existingtransactions, such as the date of your most recent reconciliation. For information, see Set the DefaultSettlement Date for Existing Transactions on page 61.
60 CHAPTER 3
q After the processor deposits the disbursement, access the settlement report that provides information aboutthe transactions included in the disbursement. For example,with Blackbaud Merchant Services, you candownload the disbursement report from the web portal. To automatically reconcile transactions, you mustreceive or download the report as a comma-separated values (*.csv) file.
q If your organization processes credit card transactions through Blackbaud Merchant Services, on theOutstanding Credit Card Transactions page, select whether to enable the automatic settlement oftransactions based on your disbursement activity. For information about how to automatically settletransactions processed through Blackbaud Merchant Services, see Automatically Settle TransactionsThrough Blackbaud Merchant Services on page 63.
q If your organization uses a processor other than Blackbaud Merchant Services or selects to notautomatically settle transactions based on your Blackbaud Merchant Services disbursement, upload thesettlement report. When you upload the report and select the report format, the program searches for andsettles the credit card transactions that appear in the report. For information about how to upload thereport, see Upload a Settlement Report on page 63.
q If you cannot receive the report as an *.csv file, or if unsettled transactions remain after you upload thereport, manually reconcile transactions and adjust the settlement status as necessary. For information abouthow to manage the settlement status, see Mark a Transaction as Settled or Unsettled on page 67.
Tip: If your organization processes transactions through Blackbaud Merchant Services, you can view andmanage any suspect transactions or chargeback requests received by your account from Treasury. Forinformation, see Blackbaud Merchant Services Alerts and Information on page 69.
q After you upload a settlement report, any transactions in the report that do not match transactions in yourdatabase appear on the Outstanding Credit Card Transactions page. For example, you might submit atransaction to the processor from outside the program, or information about a transaction in the settlementreport may not match its revenue transaction record exactly. For information about how to manage thesetransactions, see Reconcile Settlement Report Transactions on page 68.
Set the Default Settlement Date for ExistingTransactionsOn the Outstanding credit card transactions page, you can reconcile your credit card transactions with asettlement report from the payment processor and manage the settlement status of your transactions. Toaccess this page from Treasury, click Outstanding credit card transactions. When your organization firstaccesses this page, the Credit card reconciliation screen appears so you can select whether to automatically markexisting reconciled transactions as settled.
RECONCILE OUTSTANDING CREDIT CARD TRANSACTIONS 61

Warning: On the Outstanding credit card transactions page, all unsettled credit card transactions for theselected time period appear under Credit card revenue transactions by default. To help reduce the number ofexisting transactions that first appear in this grid, we recommend you select to automatically mark existingtransactions as Settled and enter themost recent reconciliation date.
• If you select to automatically mark existing reconciled transactions with a settlement date, select the date ofyour most recent reconciliation. The program automatically marks any transactions entered as of that datewith a status of Settled.
• If you select to manually reconcile existing credit card transactions, no credit card transactions appear markedas Unsettled. On the Outstanding credit card transactions page, you can manually adjust the settlementstatus as you reconcile transactions. For information about how themanage the settlement status of atransaction, see Mark a Transaction as Settled or Unsettled on page 67.
Settle Credit Card TransactionsOn the Outstanding Credit Card Transactions page, under Credit card transactions, you can view the credit cardtransactions entered into the database during the selected time period, grouped by transaction date. For eachdate, you can view the total amount of the transactions processed. For each transaction, you can viewinformation about its transaction type, credit card and cardholder, amount, settlement status, and gateway ID.From this grid, you can settle credit card transactions based on your disbursement or settlement activity. Forexample, if your organization processes credit cards through a Blackbaud Merchant Services account, you canenable the program to automatically settle transactions based on your disbursements. If you use anotherpayment processor, or if you select to not automatically settle Blackbaud Merchant Services transactions, youcan upload the settlement report received from the processor to reconcile transactions.
Note: On the Outstanding Credit Card Transactions page, when you click Expand all and a large number ofoutstanding credit card transactions exist, a messagemay prompt you to continue to wait or cancel theprocess. Themessage that displays depends on the Internet browser you use. To reduce the number oftransactions that display, use the filters at the top of the page.
Unsettled transactions that appear under Credit card transactions after you upload a settlement report mayindicate transactions that the payment processor marked as suspect, transactions held or refunded due to achargeback request from the cardholder, or transactions to be processed in a separate disbursement. You canmanually manage the settlement status of a credit card transaction as necessary.
62 CHAPTER 3
Note: WithMulticurrency, the Amount column in the Credit card transactions section displays in thetransaction currency of the original transaction.
Tip: If your organization sets up a merchant account for Blackbaud Merchant Services, you can viewinformation about any suspect transactions or chargeback requests received by your account from Treasury.For information, see Blackbaud Merchant Services Alerts and Information on page 69.
Automatically Settle Transactions Through BlackbaudMerchantServicesIf your organization processes credit cards through Blackbaud Merchant Services, you can select whether toautomatically settle transactions based on your disbursement activity. When you enable the program toautomatically settle transactions, it automatically receives information from Blackbaud Merchant Servicesabout the transactions included in your disbursement and marks those transactions as settled. To automaticallysettle transactions processed through Blackbaud Merchant Services, on the Outstanding Credit CardTransactions page, click Enable BBMS auto settle under Credit card transactions.To disable the automatic settlement of transactions processed through Blackbaud Merchant Services, such asto manually upload the disbursement report at a different schedule, click Disable BBMS auto settle. Forinformation about how to upload the disbursement report to settle transactions, see Upload a SettlementReport on page 63.
Upload a Settlement ReportTo verify your credit card transactions process successfully, you can reconcile your transaction activity with asettlement report from your payment processor. To reconcile your credit card activity with the transactionsincluded in a settlement report, you can import the report as a comma-separated values (*.csv) file.
Tip: If your organization processes credit card transactions through Blackbaud Merchant Services, you canenable the program to automatically settle transactions based on your disbursement activity without a *.csvfile of your disbursement report. For information about how to automatically settle Blackbaud MerchantServices transactions, see Automatically Settle Transactions Through Blackbaud Merchant Services on page 63.
} Upload a settlement report
1. From Treasury, click Outstanding credit card transactions. The Outstanding Credit Card Transactionspage appears.
2. Under Credit card transactions, click Upload settlement report. The Upload settlement report screenappears.
RECONCILE OUTSTANDING CREDIT CARD TRANSACTIONS 63
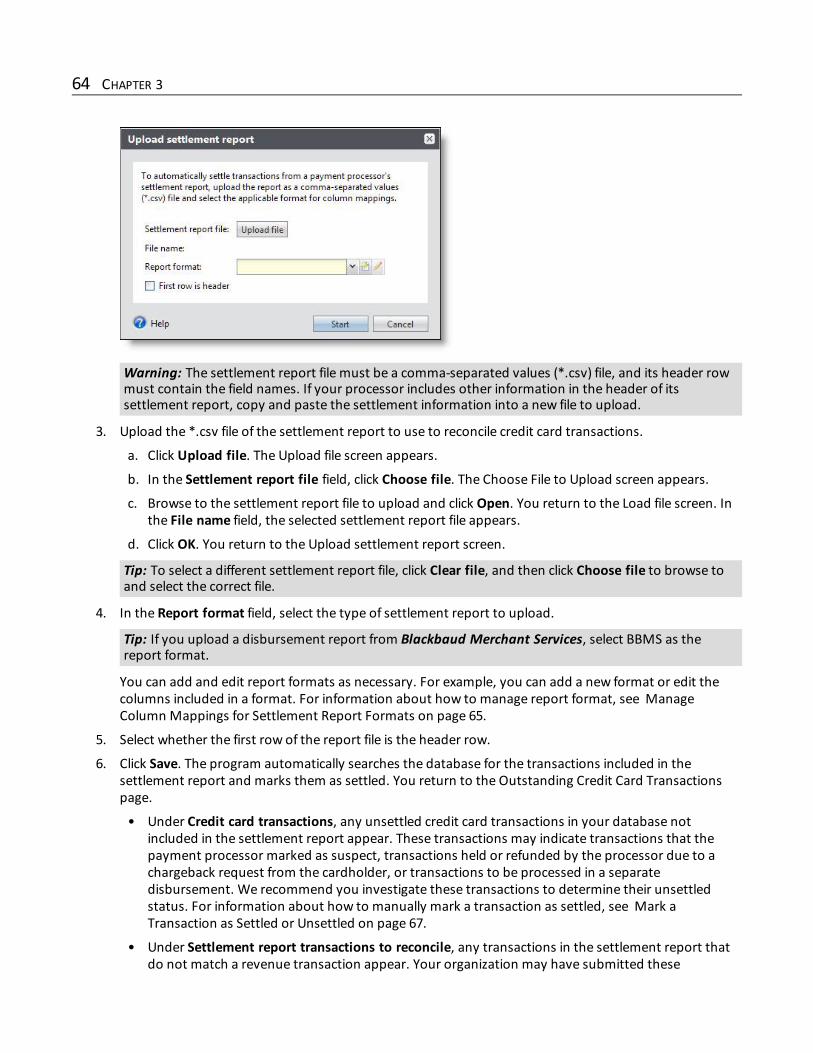
Warning: The settlement report file must be a comma-separated values (*.csv) file, and its header rowmust contain the field names. If your processor includes other information in the header of itssettlement report, copy and paste the settlement information into a new file to upload.
3. Upload the *.csv file of the settlement report to use to reconcile credit card transactions.
a. Click Upload file. The Upload file screen appears.
b. In the Settlement report file field, click Choose file. The Choose File to Upload screen appears.
c. Browse to the settlement report file to upload and click Open. You return to the Load file screen. Inthe File name field, the selected settlement report file appears.
d. Click OK. You return to the Upload settlement report screen.
Tip: To select a different settlement report file, click Clear file, and then click Choose file to browse toand select the correct file.
4. In the Report format field, select the type of settlement report to upload.
Tip: If you upload a disbursement report from Blackbaud Merchant Services, select BBMS as thereport format.
You can add and edit report formats as necessary. For example, you can add a new format or edit thecolumns included in a format. For information about how to manage report format, see ManageColumn Mappings for Settlement Report Formats on page 65.
5. Select whether the first row of the report file is the header row.
6. Click Save. The program automatically searches the database for the transactions included in thesettlement report and marks them as settled. You return to the Outstanding Credit Card Transactionspage.
• Under Credit card transactions, any unsettled credit card transactions in your database notincluded in the settlement report appear. These transactions may indicate transactions that thepayment processor marked as suspect, transactions held or refunded by the processor due to achargeback request from the cardholder, or transactions to be processed in a separatedisbursement. We recommend you investigate these transactions to determine their unsettledstatus. For information about how to manually mark a transaction as settled, see Mark aTransaction as Settled or Unsettled on page 67.
• Under Settlement report transactions to reconcile, any transactions in the settlement report thatdo not match a revenue transaction appear. Your organization may have submitted these
64 CHAPTER 3
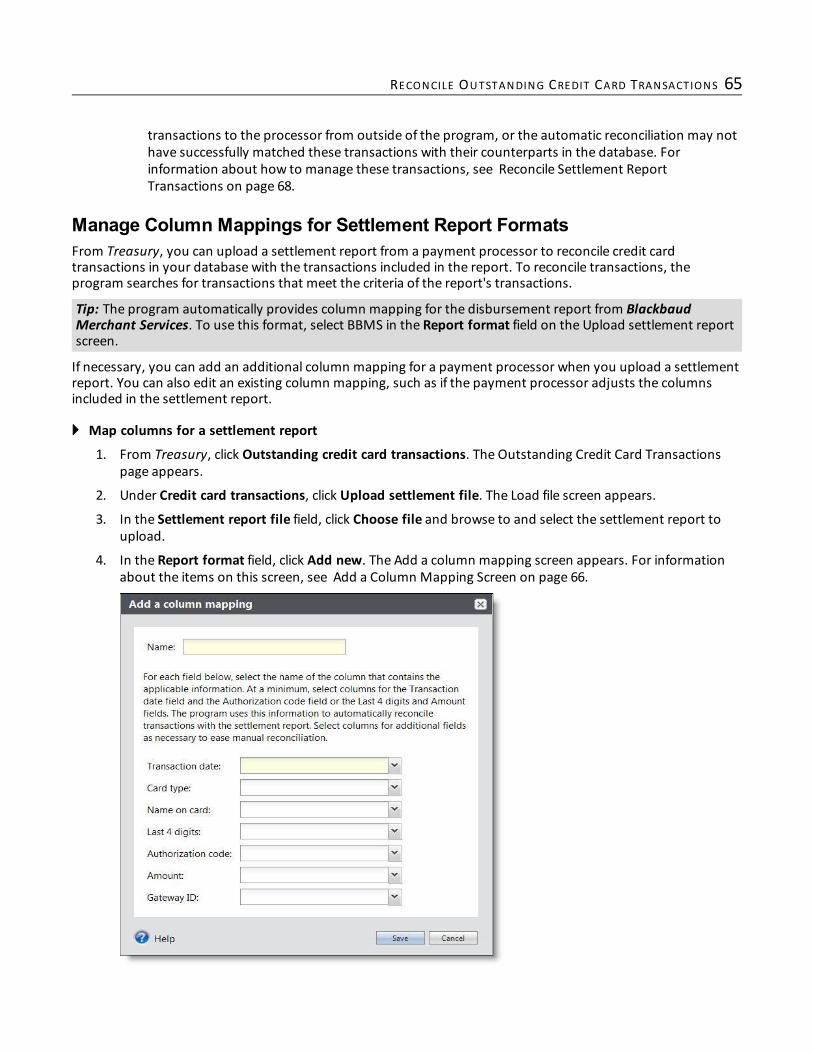
transactions to the processor from outside of the program, or the automatic reconciliation may nothave successfully matched these transactions with their counterparts in the database. Forinformation about how to manage these transactions, see Reconcile Settlement ReportTransactions on page 68.
Manage Column Mappings for Settlement Report FormatsFrom Treasury, you can upload a settlement report from a payment processor to reconcile credit cardtransactions in your database with the transactions included in the report. To reconcile transactions, theprogram searches for transactions that meet the criteria of the report's transactions.
Tip: The program automatically provides column mapping for the disbursement report from BlackbaudMerchant Services. To use this format, select BBMS in the Report format field on the Upload settlement reportscreen.
If necessary, you can add an additional column mapping for a payment processor when you upload a settlementreport. You can also edit an existing column mapping, such as if the payment processor adjusts the columnsincluded in the settlement report.
} Map columns for a settlement report
1. From Treasury, click Outstanding credit card transactions. The Outstanding Credit Card Transactionspage appears.
2. Under Credit card transactions, click Upload settlement file. The Load file screen appears.
3. In the Settlement report file field, click Choose file and browse to and select the settlement report toupload.
4. In the Report format field, click Add new. The Add a column mapping screen appears. For informationabout the items on this screen, see Add a Column Mapping Screen on page 66.
RECONCILE OUTSTANDING CREDIT CARD TRANSACTIONS 65
5. Enter a unique name to help identify the settlement report format, such as the name of its processor.
6. For each field, select the name of the column in the settlement report that contains the applicableinformation. For example, in the Transaction date field, select the column that contains the date thetransaction was processed.
Warning: At a minimum, select columns for the Transaction date field and the Authorization code fieldor the Amount and Last 4 digits fields. The program uses this criteria to automatically reconcile revenuetransactions that match this information. You can select columns for additional fields as necessary toeasemanual reconciliation.
7. Click Save. You return to the Load file screen. In the Report format field, the new format appears.
} Edit the column mapping for a settlement report format
You may need to edit the column mapping created for a settlement report format, such as if the paymentprocessor adjusts the information included in the report file. You can edit the column mapping as necessarywhen you upload the settlement report.
1. From Treasury, click Outstanding credit card transactions. The Outstanding Credit Card Transactionspage appears.
2. Under Credit card transactions, click Upload settlement file. The Load file screen appears.
3. In the Settlement report file field, click Choose file and browse to and select the settlement report toupload.
4. In the Report format field, select the type of report to upload and click Edit. The Edit a column mappingscreen appears. The items on this screen are the same as the Add a column mapping screen. Forinformation about the items on this screen, see Add a Column Mapping Screen on page 66.
5. Edit the name or column mapping as necessary.
6. Click Save. You return to the Load file screen.
Add a Column Mapping ScreenThe table below explains the items on the Add a column mapping screen. For information about how to accessthis screen, see Manage Column Mappings for Settlement Report Formats on page 65.
Screen Item Description
Name Enter a unique name to help identify the column mapping format. For example, enter thename of the payment processor that provides the settlement report.
Transactiondate
Select the name of the column in the settlement report file that provides the date thetransaction was processed. To ensure the program can automatically settle transactionswith the settlement report, you must select a column for this field.
Card type Select the name of the column in the settlement report file that provides the type of creditcard used with the transaction, such as Visa or MasterCard.
Name on card Select the name of the column in the settlement report file that provides the cardholdername of the credit card used with the transaction.
Last 4 digits
Select the name of the column in the settlement report file that provides the last four digitsof the credit card number used with the transaction. To ensure the program canautomatically settle transactions with the settlement report, you must select a column forthis field and the Amount field in addition to the Transaction date field, or you can select acolumn for the Auth. code field in addition to the Transaction date field.
66 CHAPTER 3
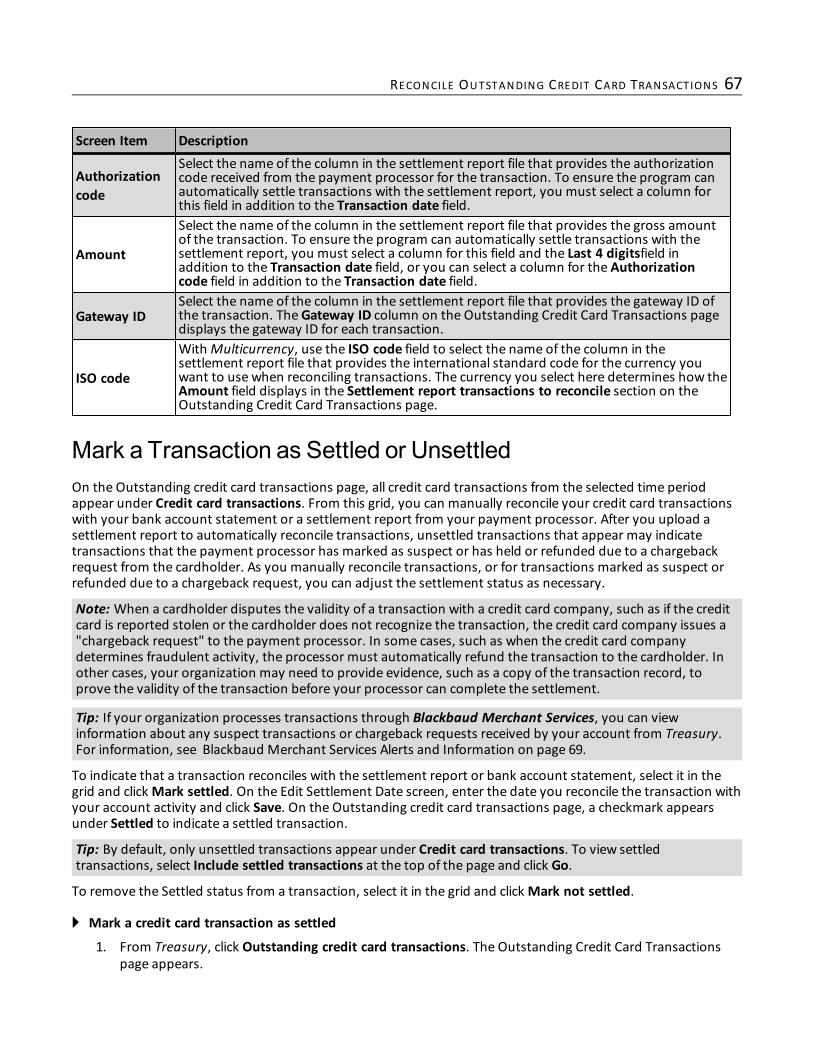
Screen Item Description
Authorizationcode
Select the name of the column in the settlement report file that provides the authorizationcode received from the payment processor for the transaction. To ensure the program canautomatically settle transactions with the settlement report, you must select a column forthis field in addition to the Transaction date field.
Amount
Select the name of the column in the settlement report file that provides the gross amountof the transaction. To ensure the program can automatically settle transactions with thesettlement report, you must select a column for this field and the Last 4 digitsfield inaddition to the Transaction date field, or you can select a column for the Authorizationcode field in addition to the Transaction date field.
Gateway IDSelect the name of the column in the settlement report file that provides the gateway ID ofthe transaction. TheGateway ID column on the Outstanding Credit Card Transactions pagedisplays the gateway ID for each transaction.
ISO code
WithMulticurrency, use the ISO code field to select the name of the column in thesettlement report file that provides the international standard code for the currency youwant to use when reconciling transactions. The currency you select here determines how theAmount field displays in the Settlement report transactions to reconcile section on theOutstanding Credit Card Transactions page.
Mark a Transaction as Settled or UnsettledOn the Outstanding credit card transactions page, all credit card transactions from the selected time periodappear under Credit card transactions. From this grid, you can manually reconcile your credit card transactionswith your bank account statement or a settlement report from your payment processor. After you upload asettlement report to automatically reconcile transactions, unsettled transactions that appear may indicatetransactions that the payment processor has marked as suspect or has held or refunded due to a chargebackrequest from the cardholder. As you manually reconcile transactions, or for transactions marked as suspect orrefunded due to a chargeback request, you can adjust the settlement status as necessary.
Note: When a cardholder disputes the validity of a transaction with a credit card company, such as if the creditcard is reported stolen or the cardholder does not recognize the transaction, the credit card company issues a"chargeback request" to the payment processor. In some cases, such as when the credit card companydetermines fraudulent activity, the processor must automatically refund the transaction to the cardholder. Inother cases, your organization may need to provide evidence, such as a copy of the transaction record, toprove the validity of the transaction before your processor can complete the settlement.
Tip: If your organization processes transactions through Blackbaud Merchant Services, you can viewinformation about any suspect transactions or chargeback requests received by your account from Treasury.For information, see Blackbaud Merchant Services Alerts and Information on page 69.
To indicate that a transaction reconciles with the settlement report or bank account statement, select it in thegrid and clickMark settled. On the Edit Settlement Date screen, enter the date you reconcile the transaction withyour account activity and click Save. On the Outstanding credit card transactions page, a checkmark appearsunder Settled to indicate a settled transaction.
Tip: By default, only unsettled transactions appear under Credit card transactions. To view settledtransactions, select Include settled transactions at the top of the page and click Go.
To remove the Settled status from a transaction, select it in the grid and clickMark not settled.
} Mark a credit card transaction as settled
1. From Treasury, click Outstanding credit card transactions. The Outstanding Credit Card Transactionspage appears.
RECONCILE OUTSTANDING CREDIT CARD TRANSACTIONS 67
2. Under Credit card transactions, select the transaction to mark as settled.
3. On the action bar, clickMark settled. The Edit settlement date screen appears.
4. Select the settlement date of the transaction.
5. Click Save. You return to the Outstanding Credit Card Transactions page.
Reconcile Settlement Report TransactionsOn the Outstanding Credit Card Transactions page, you can upload a settlement report to automaticallyreconcile credit card transactions with transactions included in the report. After you upload a report, theSettlement report transactions to reconcile grid displays any transactions in the report that do not matchtransactions in the database. Thesemay be transactions that do not have corresponding transactions in yourdatabase, such as a transaction submitted to the payment processor from outside the program. Or, thesemaybe transactions with corresponding transactions but were not automatically settled, such as if the transactiondates differ due to time zone differences.Under Settlement report transactions to reconcile, you can manage these transactions as necessary.• If a transaction does not have a corresponding transaction in your database, you can remove the transactionfrom the list. To remove a transaction, select it in the grid and click Remove from list on the action bar. Whena message appears to ask whether to remove the transaction, click Yes. You return to the Outstanding creditcard transactions page.
• If a transaction has a corresponding transaction in your database, you can reconcile the two transactions. Forinformation about how to reconcile the transactions, see Find a Transaction Match on page 68.
Find a TransactionMatchFrom Treasury, you can upload a settlement report or disbursement report from a payment processor toautomatically settle credit card transactions. After you upload a report, the Settlement report transactions toreconcile grid on the Outstanding Credit Card Transactions page displays any transactions in the report that donot match transactions in the database. Thesemay be transactions with corresponding transactions but werenot automatically settled, such as if the transaction dates differ due to time zone differences. If a transaction hasa corresponding transaction in your database, you can reconcile the two transactions.
} Match a settlement report transaction to an unsettled transaction
1. From Treasury, click Outstanding credit card transactions. The Outstanding Credit Card Transactionspage appears.
2. Under Settlement report transactions to reconcile, select and expand the transaction to match to anunsettled credit card transaction.
3. Under the expanded transaction, click Find transaction match. The Unsettled Credit Card TransactionSearch screen appears.
4. Enter the search criteria for the unsettled credit card transaction, such as cardholder name, credit cardtype, or the last four digits of the credit card number.
5. Click Search. Under Results, the transactions that match the search criteria appears.
6. Select the transaction that matches the settlement report transaction.
7. Click Select. You return to the Outstanding Credit Card Transactions page.
68 CHAPTER 3
Blackbaud Merchant Services Alerts andInformationIf your organization sets up a merchant account for Blackbaud Merchant Services, you can view informationabout any suspect transactions or chargeback requests received by your account from Treasury. From theTreasury page, click the Chargeback transactions and Suspect transactions links under Credit card settlement.
Note: If your organization has multiple accounts with Blackbaud Merchant Services, suspect and chargebacktransaction information displays from all the accounts.
Suspect TransactionsBlackbaud Merchant Services automatically flags transactions as suspect when they meet specific criteria, suchas a questionable IP address or multiple identical transactions from the same credit card within a short amountof time. Blackbaud Merchant Services does not disburse funds from a suspect transaction until you approve it.From Financials, on the Blackbaud Merchant Services Alerts widget, you can viewwhether suspect transactionsawait approval. To view information about any transactions flagged as suspect, click the alert on the widget toaccess the Suspect Transactions page. You can also view the Suspect Transactions page from Treasury.
On the Suspect Transactions page, the transactions that Blackbaud Merchant Services has flagged as suspectappear. For each transaction, you can view its date and amount, the card holder and last four digits of its creditcard, the reason for its suspect status, and the Gateway ID.From the grid, you can select whether to approve or refund each transaction. To help determine whether toapprove or refund a suspect transaction, you can access detail information about the transaction. In the grid,select the transaction and click Details on the action bar. The record of the Blackbaud Merchant Servicestransaction appears. For information about the items on this record, see Blackbaud Merchant ServicesTransaction Details on page 73.• If you determine that a suspect transaction is a valid transaction, you can approve the transaction. When youapprove a transaction, it returns to Blackbaud Merchant Services for disbursement during the nextdisbursement cycle. To approve a transaction, select it in the grid and click Approve on the action bar. When amessage appears to ask whether to approve the transaction, click Yes.
• If you determine that a suspect transaction is fraudulent, you can refund it to the card holder. For informationabout how to refund a transaction, see Refund Suspect Transactions on page 69.
Refund Suspect TransactionsBlackbaud Merchant Services automatically flags transactions as suspect when they meet specific criteria, suchas a questionable IP address or multiple identical transactions from the same credit card within a short amount
RECONCILE OUTSTANDING CREDIT CARD TRANSACTIONS 69
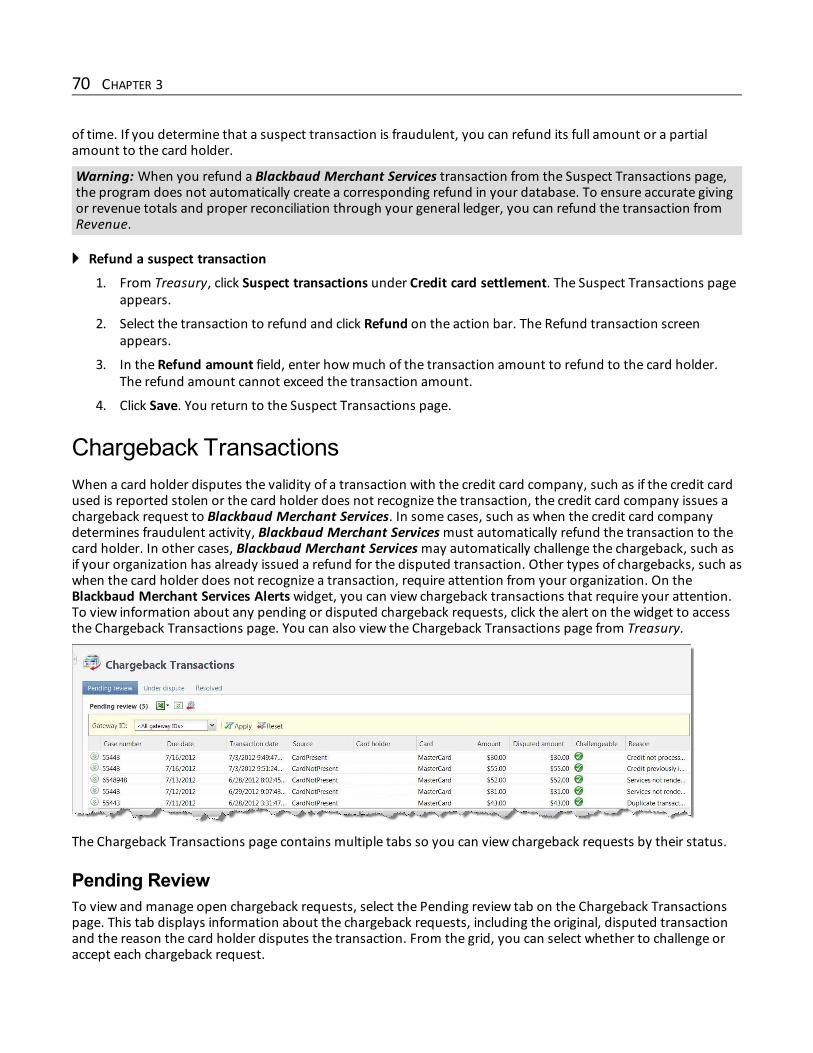
of time. If you determine that a suspect transaction is fraudulent, you can refund its full amount or a partialamount to the card holder.
Warning: When you refund a Blackbaud Merchant Services transaction from the Suspect Transactions page,the program does not automatically create a corresponding refund in your database. To ensure accurate givingor revenue totals and proper reconciliation through your general ledger, you can refund the transaction fromRevenue.
} Refund a suspect transaction
1. From Treasury, click Suspect transactions under Credit card settlement. The Suspect Transactions pageappears.
2. Select the transaction to refund and click Refund on the action bar. The Refund transaction screenappears.
3. In the Refund amount field, enter howmuch of the transaction amount to refund to the card holder.The refund amount cannot exceed the transaction amount.
4. Click Save. You return to the Suspect Transactions page.
Chargeback TransactionsWhen a card holder disputes the validity of a transaction with the credit card company, such as if the credit cardused is reported stolen or the card holder does not recognize the transaction, the credit card company issues achargeback request to Blackbaud Merchant Services. In some cases, such as when the credit card companydetermines fraudulent activity, Blackbaud Merchant Servicesmust automatically refund the transaction to thecard holder. In other cases, Blackbaud Merchant Servicesmay automatically challenge the chargeback, such asif your organization has already issued a refund for the disputed transaction. Other types of chargebacks, such aswhen the card holder does not recognize a transaction, require attention from your organization. On theBlackbaud Merchant Services Alerts widget, you can view chargeback transactions that require your attention.To view information about any pending or disputed chargeback requests, click the alert on the widget to accessthe Chargeback Transactions page. You can also view the Chargeback Transactions page from Treasury.
The Chargeback Transactions page contains multiple tabs so you can view chargeback requests by their status.
Pending ReviewTo view and manage open chargeback requests, select the Pending review tab on the Chargeback Transactionspage. This tab displays information about the chargeback requests, including the original, disputed transactionand the reason the card holder disputes the transaction. From the grid, you can select whether to challenge oraccept each chargeback request.
70 CHAPTER 3
• If you determine that a disputed transaction is a valid transaction, you can challenge the chargeback request.For information about how to challenge a chargeback, see Challenge Chargeback Requests on page 71.
• If you determine that a disputed transaction is not a valid transaction, you can accept the chargeback request.When you accept a chargeback, it returns to Blackbaud Merchant Services, which then refunds the disputedamount to the card holder. To accept a chargeback, select it in the grid and click Accept on the action bar.When a message appears to ask whether to accept the chargeback, click OK.
To help determine whether to challenge or accept a chargeback request, you can access detail information aboutthe chargeback. In the grid, select the chargeback and click Details on the action bar. The record of theBlackbaud Merchant Services transaction appears. For information about the items on the record, seeBlackbaud Merchant Services Transaction Details on page 73.
Challenge Chargeback RequestsWhen a card holder disputes the validity of a transaction with the credit card company, such as if the credit cardis reported stolen or the card holder does not recognize the transaction, the credit card company issues achargeback request to Blackbaud Merchant Services. If you determine that a transaction disputed by achargeback is valid, you can challenge the chargeback request. When you challenge the chargeback, you mustprovide collateral to support the validity of the transaction, such as a screen capture of the transaction record.When you create a chargeback challenge, you can attach this collateral as document and image files.
Tip: For assistance with a chargeback challenge, you can email Blackbaud Merchant Services [email protected] for consultation.
} Challenge a chargeback request
1. From Treasury, click Chargeback transactions under Credit card settlement. The ChargebackTransactions page appears.
2. On the Pending review tab, select the chargeback request to challenge.
3. On the action bar, click Challenge. The Chargeback Challenge screen appears and displays the casenumber assigned the chargeback request.
RECONCILE OUTSTANDING CREDIT CARD TRANSACTIONS 71
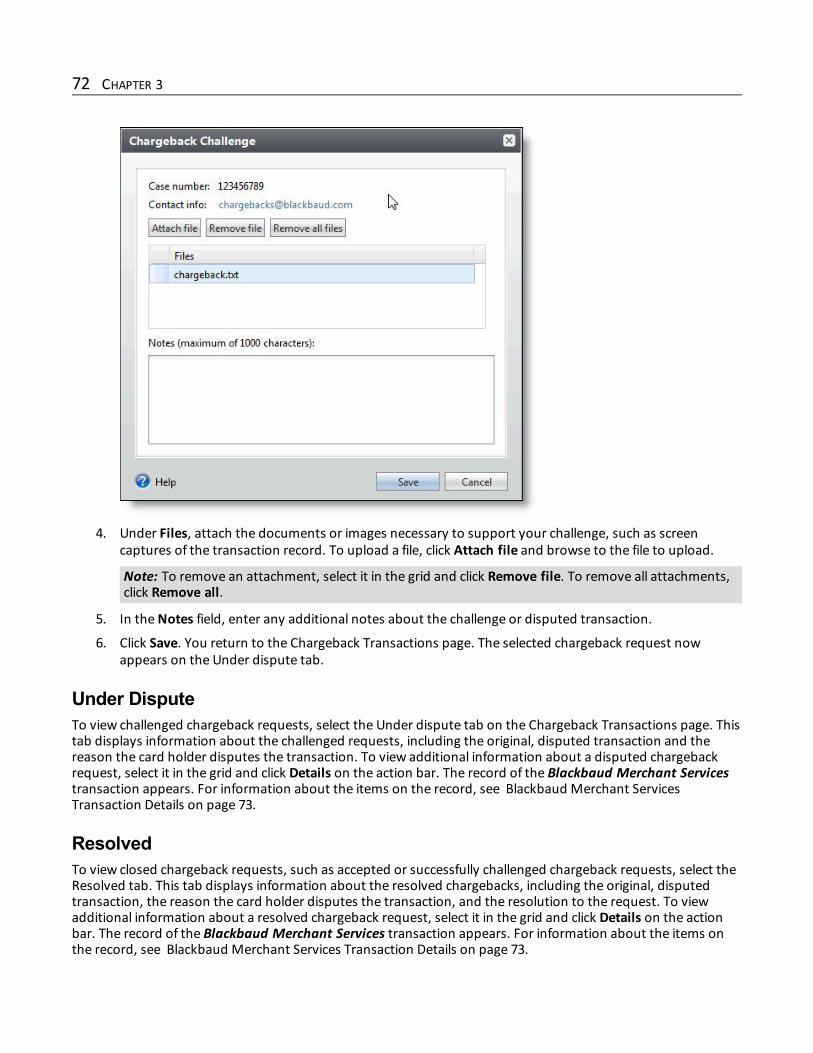
4. Under Files, attach the documents or images necessary to support your challenge, such as screencaptures of the transaction record. To upload a file, click Attach file and browse to the file to upload.
Note: To remove an attachment, select it in the grid and click Remove file. To remove all attachments,click Remove all.
5. In theNotes field, enter any additional notes about the challenge or disputed transaction.
6. Click Save. You return to the Chargeback Transactions page. The selected chargeback request nowappears on the Under dispute tab.
Under DisputeTo view challenged chargeback requests, select the Under dispute tab on the Chargeback Transactions page. Thistab displays information about the challenged requests, including the original, disputed transaction and thereason the card holder disputes the transaction. To view additional information about a disputed chargebackrequest, select it in the grid and click Details on the action bar. The record of the Blackbaud Merchant Servicestransaction appears. For information about the items on the record, see Blackbaud Merchant ServicesTransaction Details on page 73.
ResolvedTo view closed chargeback requests, such as accepted or successfully challenged chargeback requests, select theResolved tab. This tab displays information about the resolved chargebacks, including the original, disputedtransaction, the reason the card holder disputes the transaction, and the resolution to the request. To viewadditional information about a resolved chargeback request, select it in the grid and click Details on the actionbar. The record of the Blackbaud Merchant Services transaction appears. For information about the items onthe record, see Blackbaud Merchant Services Transaction Details on page 73.
72 CHAPTER 3
BlackbaudMerchant Services Transaction DetailsBlackbaud Merchant Servicesmaintains a record of each transaction it processes for your organization. Fromthe Suspect Transactions page and Chargeback Transactions page, you can access the record of a transactionand view its detail information to help determine the validity of the transaction. To access the record of atransaction, select it in its grid and click Details on the action bar. The record of the Blackbaud MerchantServices transaction appears.Under Transaction, you can view information about the credit card used for the transaction, including the cardholder, card type, the last four digits of the primary account number, and the expiration date. You can also viewdetail information about the transaction, such as the applicable rate and fee, its net amount, and whether it wasor can be disbursed. Under Result Details, you can view the processing result for the transaction, such aswhether it was approved. You can also view the code and reference number associated with the result.For a suspect transaction, you can view details about why Blackbaud Merchant Services flagged the transactionas suspect. For information about how to manage suspect transactions, see Suspect Transactions on page 69.For a chargeback transaction, you can view the reason given for the chargeback request. For a disputedchargeback, you can also view details about its challenge and download files provided as collateral to support thechallenge. For information about how to manage chargeback requests, see Chargeback Transactions on page 70.
RECONCILE OUTSTANDING CREDIT CARD TRANSACTIONS 73

74 CHAPTER 3
Treasury ReportsDeposit Report 75
Miscellaneous Payments Report 77
Receipt for Miscellaneous Payment 78
Deposit Summary Report 78
You can generate several reports within Treasury. You can run Deposit reports, as well as run Miscellaneouspayments reports and print receipts for miscellaneous payments.
Deposit ReportThe Deposit report includes information about a selection of deposits, including a summarized breakdown ofpayments methods and banking information such as the account number and routing number. Whencorrections exist for a deposit, you can view the correction date, method, type, and amount.
Note: Depending on the banking system associated with the deposit, routing number, sort code, and BICinformation may display differently on the report. You can enable or disable banking systems for yourorganization from the Banking systems link on the Treasury page.
To access the report from Treasury, click Deposit report under Reports on the explorer bar. The Deposit Reportpage appears.
Note: You can also access a Deposit report by clicking Analysis on the navigation bar and selecting Treasuryreports, Deposit report from themenu.
chapter 4
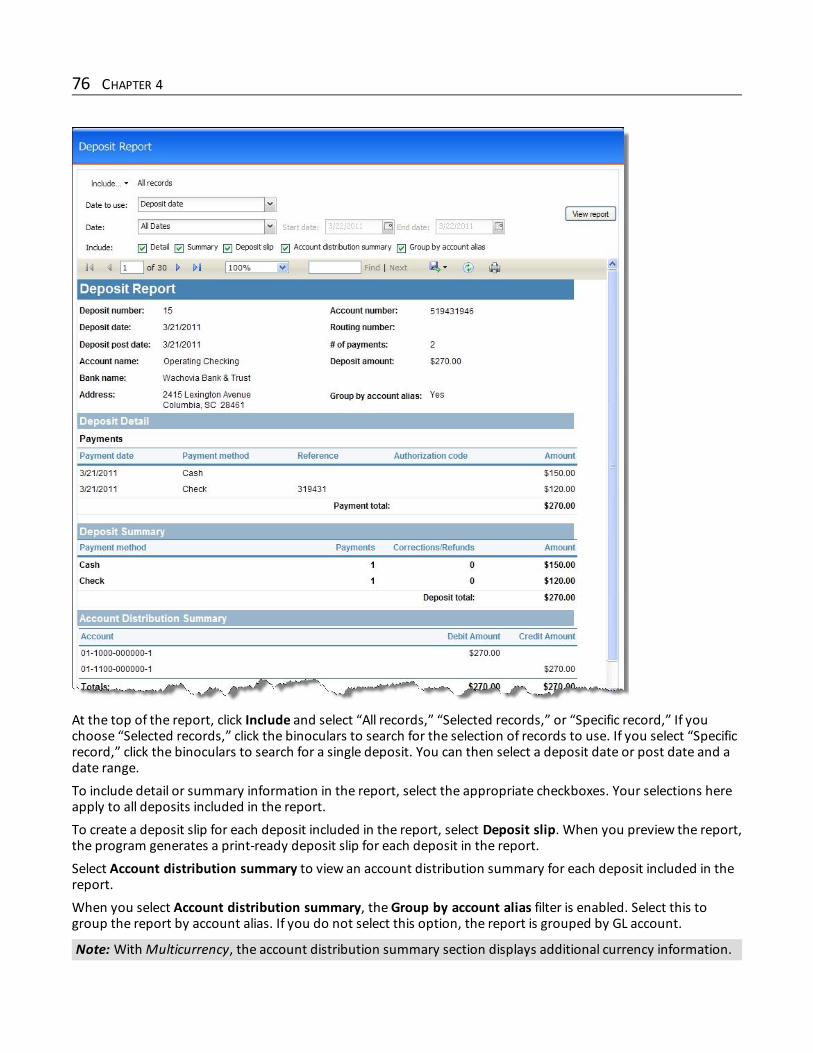
At the top of the report, click Include and select “All records,” “Selected records,” or “Specific record,” If youchoose “Selected records,” click the binoculars to search for the selection of records to use. If you select “Specificrecord,” click the binoculars to search for a single deposit. You can then select a deposit date or post date and adate range.To include detail or summary information in the report, select the appropriate checkboxes. Your selections hereapply to all deposits included in the report.To create a deposit slip for each deposit included in the report, select Deposit slip. When you preview the report,the program generates a print-ready deposit slip for each deposit in the report.Select Account distribution summary to view an account distribution summary for each deposit included in thereport.When you select Account distribution summary, theGroup by account alias filter is enabled. Select this togroup the report by account alias. If you do not select this option, the report is grouped by GL account.
Note: WithMulticurrency, the account distribution summary section displays additional currency information.
76 CHAPTER 4
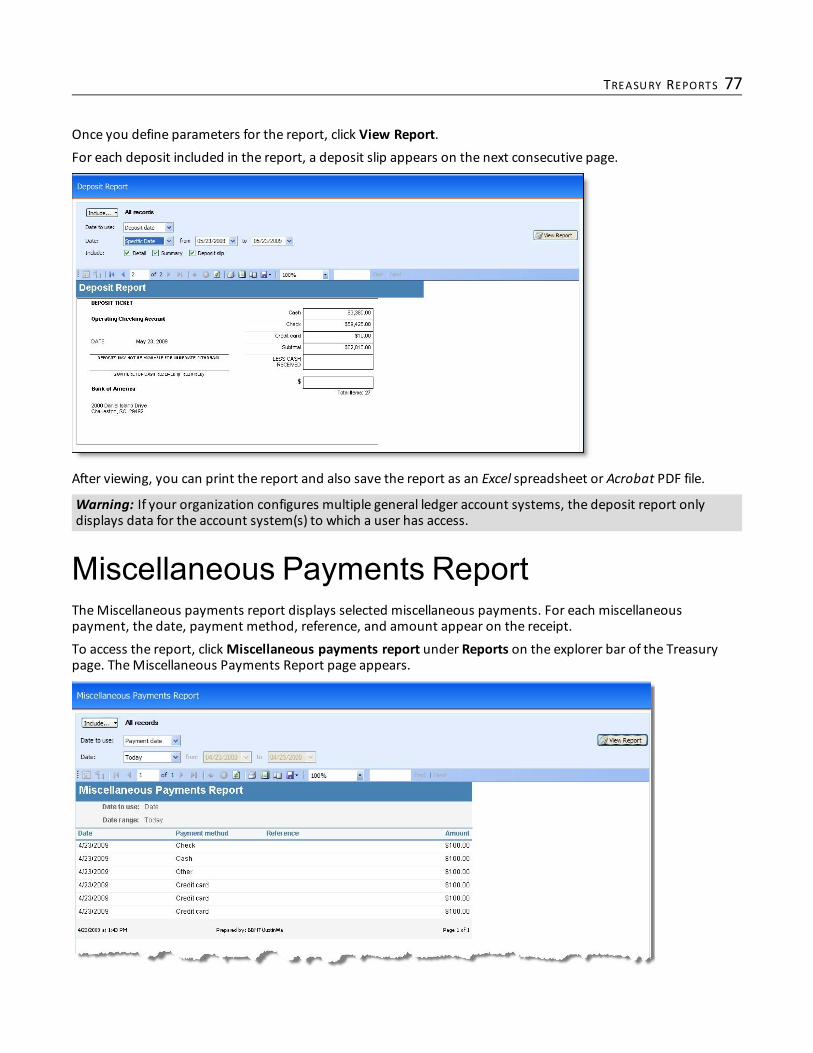
Once you define parameters for the report, click View Report.For each deposit included in the report, a deposit slip appears on the next consecutive page.
After viewing, you can print the report and also save the report as an Excel spreadsheet or Acrobat PDF file.
Warning: If your organization configures multiple general ledger account systems, the deposit report onlydisplays data for the account system(s) to which a user has access.
Miscellaneous Payments ReportTheMiscellaneous payments report displays selected miscellaneous payments. For each miscellaneouspayment, the date, payment method, reference, and amount appear on the receipt.To access the report, clickMiscellaneous payments report under Reports on the explorer bar of the Treasurypage. TheMiscellaneous Payments Report page appears.
TREASURY REPORTS 77
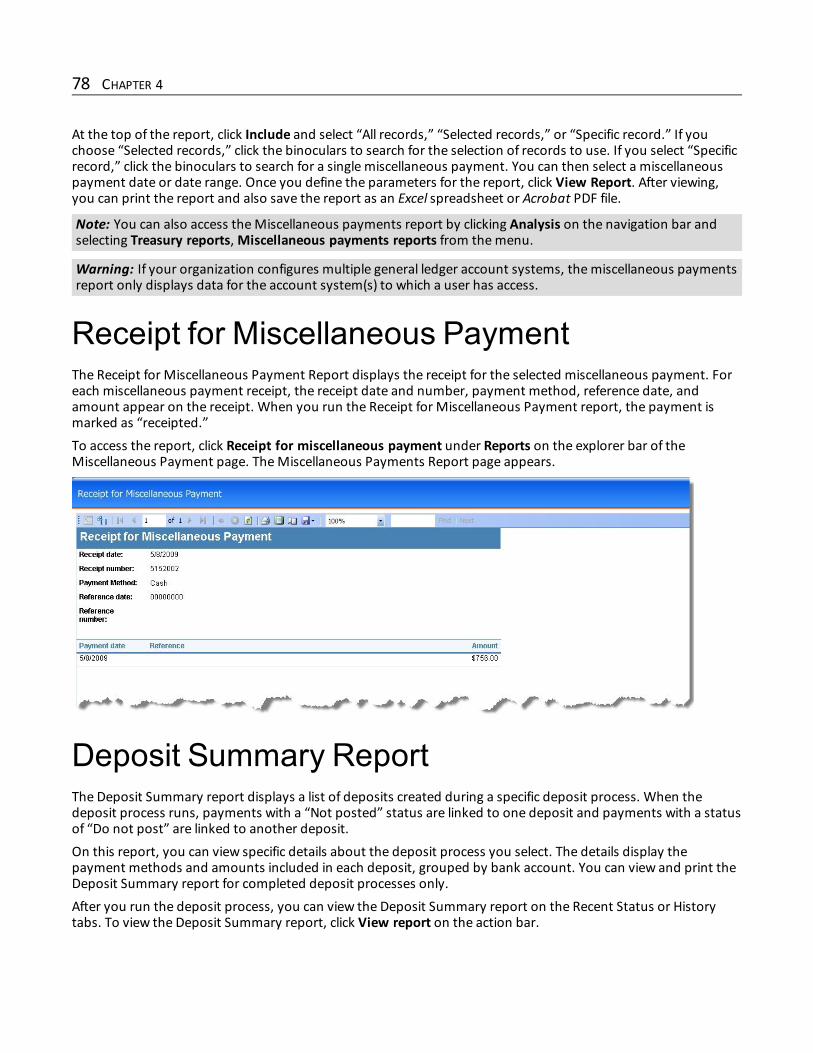
At the top of the report, click Include and select “All records,” “Selected records,” or “Specific record.” If youchoose “Selected records,” click the binoculars to search for the selection of records to use. If you select “Specificrecord,” click the binoculars to search for a single miscellaneous payment. You can then select a miscellaneouspayment date or date range. Once you define the parameters for the report, click View Report. After viewing,you can print the report and also save the report as an Excel spreadsheet or Acrobat PDF file.
Note: You can also access theMiscellaneous payments report by clicking Analysis on the navigation bar andselecting Treasury reports,Miscellaneous payments reports from themenu.
Warning: If your organization configures multiple general ledger account systems, themiscellaneous paymentsreport only displays data for the account system(s) to which a user has access.
Receipt for Miscellaneous PaymentThe Receipt for Miscellaneous Payment Report displays the receipt for the selected miscellaneous payment. Foreach miscellaneous payment receipt, the receipt date and number, payment method, reference date, andamount appear on the receipt. When you run the Receipt for Miscellaneous Payment report, the payment ismarked as “receipted.”To access the report, click Receipt for miscellaneous payment under Reports on the explorer bar of theMiscellaneous Payment page. TheMiscellaneous Payments Report page appears.
Deposit Summary ReportThe Deposit Summary report displays a list of deposits created during a specific deposit process. When thedeposit process runs, payments with a “Not posted” status are linked to one deposit and payments with a statusof “Do not post” are linked to another deposit.On this report, you can view specific details about the deposit process you select. The details display thepayment methods and amounts included in each deposit, grouped by bank account. You can view and print theDeposit Summary report for completed deposit processes only.After you run the deposit process, you can view the Deposit Summary report on the Recent Status or Historytabs. To view the Deposit Summary report, click View report on the action bar.
78 CHAPTER 4
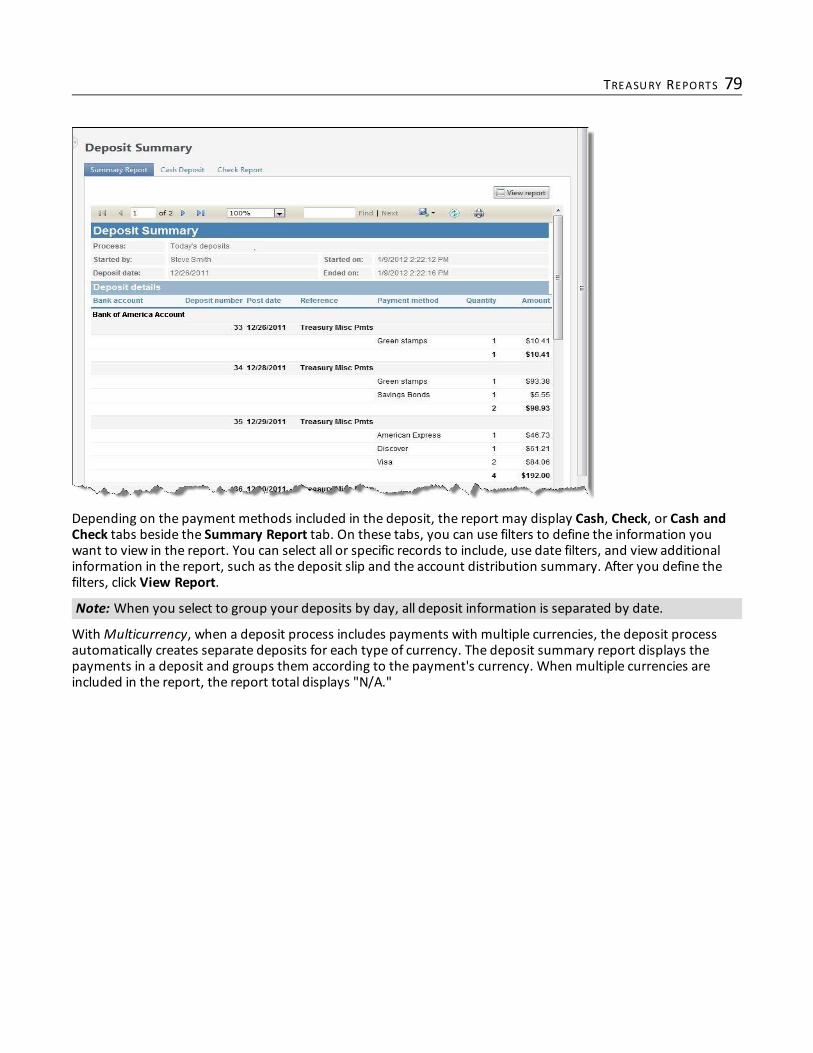
Depending on the payment methods included in the deposit, the report may display Cash, Check, or Cash andCheck tabs beside the Summary Report tab. On these tabs, you can use filters to define the information youwant to view in the report. You can select all or specific records to include, use date filters, and view additionalinformation in the report, such as the deposit slip and the account distribution summary. After you define thefilters, click View Report.
Note: When you select to group your deposits by day, all deposit information is separated by date.
WithMulticurrency, when a deposit process includes payments with multiple currencies, the deposit processautomatically creates separate deposits for each type of currency. The deposit summary report displays thepayments in a deposit and groups them according to the payment's currency. When multiple currencies areincluded in the report, the report total displays "N/A."
TREASURY REPORTS 79

80 CHAPTER 4
Index
Aadjustment categories
add 33copy 36delete 35edit 35
adjustmentsadd 37delete 39edit 39GL distributions tab 40NL distributions tab 40
allowed payment methods 26attachments
about 45add 45add screen 45delete 45edit 45open 46
Bbank
add 2delete 5edit 5search 3
bank accountadd 6close 12defined 2delete transactions 13edit 12EFT information 9register 9
Cclose bank account 12configure deposit templates
add deposit templates 48delete deposit templates 48edit templates 48
copy adjustment category information 36create 47
Ddelete status record from history tab 56deposit
add 21add deposit correction 27delete 27deposit corrections tab 27edit 25edit allowed payment methods 26edit deposit number 25edit payment defaults 28GL distributions tab 29link multiple payments 30link payments 30lock 26NL distributions tab 29payment defaults tab 28payment tab 27search 23unlink payments 29unlock 26
deposit correctionsadd 27defined 33delete 33edit 33GL distributions tab 33
NL distributions tab 33deposit corrections tab, defined 27deposit number, edit 25deposit report 75deposits
create sales depositssales deposits 47
deposit templates 48run sales deposit process 53view deposit information 55
EEFT information, bank account 9
GGL distributions
deposit 29miscellaneous payments 21
GL distributions tabadjustments 40deposit corrections 33
Hhistory tab 56
Jjob, sales deposit process 56
Llink multiple payments 30link payments 30lock deposit 26
Mmedia link
add 44add screen 44delete 44edit 44open 46
miscellaneous paymentsadd 15delete 21edit 19edit GL Distributions 40edit NL Distributions 40search 18
miscellaneous payments receipt 78miscellaneous payments report 77
NNL distributions
deposit 29miscellaneous payments 21
NL distributions tabadjustments 40deposit corrections 33
noteabout 41add 41add screen 41edit 41
notesdelete 42
notificationsabout 42add 43delete 44edit 43
Ppayment defaults tab, deposit 28payment defaults, edit 28payment tab, deposit 27
Rrecent status tab 56register, bank account 9report
deposit 75miscellaneous payments 77miscellaneous payments receipt 78
reportssales deposit summary 78
82 INDEX
Ssales deposit information 55sales deposit process 53sales deposit summary report 78schedule job
sales deposit process 56
Uunlink payments 29unlock deposits 26
Wwindows scripting file
generate 58
INDEX 83

84 INDEX