central - amazon web serviceswinshuttle-help.s3.amazonaws.com/documentation/winshuttle centr… ·...
TRANSCRIPT

CENTRAL
Version 10.3.1
Deployment Guide

Legal
The Winshuttle CENTRAL Deployment Guide is for informational purposes only. WINSHUTTLE
MAKES NO WARRANTIES, EXPRESS, IMPLIED OR STATUTORY, AS TO THE INFORMATION IN
THIS DOCUMENT.
The software contains proprietary information of Winshuttle, LLC; it is provided under a license
agreement containing restrictions on use and disclosure and is also protected by copyright law.
Reverse engineering of the software is prohibited.
Due to continued product development, this information may change without notice. The information
and intellectual property contained herein is confidential between Winshuttle, LLC. and the client and
remains the exclusive property of Winshuttle, LLC. Except as expressly provided in any written license
agreement from Winshuttle, the furnishing of this document does not give you any license to patents,
trademarks, copyrights, or other intellectual property rights covering subject matter contained in this
document.
No part of this publication may be reproduced, stored in a retrieval system, or transmitted in any form
or by any means, electronic, mechanical, photocopying, recording or otherwise without the prior written
permission of Winshuttle, LLC.
If you find any problems in the documentation, please report them to us in writing. Winshuttle, LLC.
does not warrant that this document is error-free.
© 2008-2012 Winshuttle, LLC. All rights reserved.
QUERY, TRANSACTION, SERVER, CENTRAL, Workflow, and Adaptive Query Throttling are
trademarks of Winshuttle, LLC in the United States and/or other countries.
Some portions of the software may include intellectual property owned and licensed by third parties.
Winshuttle, LLC makes no warranties with respect to such third party property, and makes no claim of
ownership thereto.
The names of actual companies and products mentioned herein are trademarks and/or registered
trademarks of their respective owners.
Contact Information
For more information, please contact: 1-800-711-9798, or visit our Web site at www.winshuttle.com

Contents Chapter 1: Getting Started ............................................................................................................................ 5
Winshuttle CENTRAL Deployment Guide ..................................................................................................... 6
Introduction .............................................................................................................................................. 6
Features ................................................................................................................................................... 6
Licensing .................................................................................................................................................. 7
New features of CENTRAL 10.3 .............................................................................................................. 7
Chapter 2: Before you install ......................................................................................................................... 9
Preparation .................................................................................................................................................. 10
System Requirements ............................................................................................................................ 10
Using a Development Server ................................................................................................................. 11
What accounts do I need? ..................................................................................................................... 11
Before you start the install, consider the following recommendations ................................................... 11
Options for installation locations ............................................................................................................ 12
Chapter 3: Installation ................................................................................................................................. 13
The four tasks in the installation process .................................................................................................... 14
Creating a web application..................................................................................................................... 14
Installing the CENTRAL binaries ........................................................................................................... 17
Creating a Site Collection ...................................................................................................................... 23
Configuring the CENTRAL Site for first time use ................................................................................... 25
Chapter 4: Upgrading CENTRAL ................................................................................................................ 31
Upgrading CENTRAL to Version 10.3 ........................................................................................................ 32
Before you upgrade ............................................................................................................................... 32
Upgrading CENTRAL 10.0 to 10.1 ........................................................................................................ 32
Upgrading CENTRAL 10.1 to 10.2 ........................................................................................................ 37
Upgrading CENTRAL 10.2 to 10.3 ........................................................................................................ 40
Upgrading CENTRAL 10.1 to 10.3 ........................................................................................................ 40
Chapter 5: Uninstalling CENTRAL .............................................................................................................. 41
Uninstalling CENTRAL ................................................................................................................................ 42
Preparing for uninstall ............................................................................................................................ 42

For Winshuttle Components .................................................................................................................. 42
For SharePoint Components ................................................................................................................. 42
Removing CENTRAL ............................................................................................................................. 42
Chapter 6: Support Information ................................................................................................................... 48
Support Information ..................................................................................................................................... 49
Chapter 7: Appendix ................................................................................................................................... 50
Known issues with special characters in non-English localizations of Microsoft SharePoint ..................... 51

Winshuttle CENTRAL - Deployment Guide
5
Chapter 1: Getting Started
The Winshuttle CENTRAL Deployment guide is
addressed to Systems Administrators who will
install CENTRAL on SharePoint. This guide
assumes SharePoint has already been installed per
Microsoft’s best practices. The Deployment Guide
covers installing, upgrading, basic configuring, and
uninstalling the CENTRAL site.

Winshuttle CENTRAL - Deployment Guide
6
Winshuttle CENTRAL Deployment Guide
This guide assumes that the reader has intermediate to advanced administrative skills and is familiar with
the terminology in Microsoft® SharePoint
® Server 2007, Microsoft SharePoint
® Server 2010, Microsoft
SQL Server ®
2005, and Windows Server® 2003.
Audience
This guide is intended for system administrators and architects who must understand the deployment
steps required for WinshuttleTM
CENTRALTM
10.3. In addition, the benchmark examples and analyses
should help users to understand the impact of CENTRAL on system and application performance.
NOTE: Unless otherwise specified, throughout this document Winshuttle CENTRAL or Winshuttle
CENTRAL Administration are referred to as the CENTRAL or CENTRAL Administration. In
some instances the document refers to a separate product called Microsoft SharePoint
Central Administration.
Introduction
Winshuttle CENTRAL provides centralized visibility and governance for enterprise deployments of
Winshuttle solutions. CENTRAL not only enables companies to share files and best practices across the
organization, but also addresses the organization's requirements for specific controls and audit trails to
meet SOX and corporate governance policies. CENTRAL delivers the controls, security, and traceability
that enable enterprises to deploy Winshuttle data solutions, such as Winshuttle TRANSACTIONTM
,
Winshuttle QUERYTM
, and Winshuttle RUNNERTM
, across the organization. CENTRAL provides this
functionality by using the Microsoft SharePoint framework, which provides native integration to Microsoft
technologies, including Microsoft Active Directory and Microsoft ExcelTM
.
Features
Winshuttle CENTRAL is a unified management interface within SharePoint for TRANSACTION, QUERY,
and RUNNER files. The key benefits of Winshuttle CENTRAL include the following:
Centralized administration of Winshuttle users and licenses
File sharing and collaboration
Activity dashboard and centralized reporting
Version control and workflow management
Native Microsoft Office and SharePoint integration
Autopost capability through Winshuttle SERVERTM
through reviewer and creator credentials or
with system account login
Post immediately or at a specific time through Winshuttle SERVER
Allows IT ease of control for Winshuttle user access to the SAP environment
Full traceability and ROI analysis through comprehensive logging of records uploaded and total
time saved by the user

Winshuttle CENTRAL - Deployment Guide
7
Winshuttle CENTRAL installation is non-disruptive to SQL and the SharePoint content database
instances. You should ensure that no connection to your target Site Collections is active during the
installation. An IIS reset occurs during deployment.
Below are key considerations for the Winshuttle CENTRAL deployment:
Winshuttle CENTRAL installs into the GAC. For SharePoint 2010 Winshuttle CENTRAL
installs custom layouts in the following location:
%systemroot%\Program Files\Common Files\Microsoft Shared\web server
extensions\14\TEMPLATE\LAYOUTS\Winshuttle.Winshuttle CENTRAL
Winshuttle loads Content Types in the Site Content Type Gallery as Sealed. You cannot
change sealed content types through the Windows SharePoint Services user interface, and
you must be a site collection administrator to unseal the content type using the object model.
CENTRAL installs a custom SQL database named eShuttleDB. The minimum role
memberships for eShuttleDB are ‘db_owner’ and ‘public’ using the BUILTIN\Users user
login. All CENTRAL configuration and transactional data is stored in eShuttleDB, in addition
to licensing information.
All CENTRAL features are scoped at the site level.
All CENTRAL database connection strings are done on the farm level.
CENTRAL workflows are designed in Microsoft Visual Studio®.
No MIME creation takes place on IIS.
Licensing
A Winshuttle CENTRAL activation code is needed to use the CENTRAL portal site. Although not required
to install other programs, CENTRAL is useful in combination with other Winshuttle programs. Thus,
proper licensing is highly recommended. Contact your Winshuttle sales representative for details.
New features of CENTRAL 10.3
The following new features have been introduced in this version:
Query caching is now available for query scripts stored in CENTRAL. Query caching reduces
workload on SAP systems.
In TRANSACTION, you can autopost password protected Excel files.
Winshuttle Workflow can be configured in CENTRAL. When configured, the Workflow Log Viewer
on the Workflow Administrator site is available under Audit & Reports.
Messages indicate which policy restricts a given user action.
It is now possible to revise linked and multiple .txr files that are in production.
For more information on the following new features, see the Winshuttle CENTRAL Online Help.

Winshuttle CENTRAL - Deployment Guide
8
For TRANSACTION scripts in the document library, the recording mode of the script is now
displayed.
You can retain the approval status of files stored in CENTRAL when you migrate from site to site.
Active User page now displays the client version of each product.
You can now search and sort product licenses for individual users and activations. This capability
is particularly useful when an organization has many users and licenses.
On the Manage License page, real names of users are available next to their Windows user
name. Displaying real names is useful when Windows names include only as letters and
numbers.
If you have many users for each product, you can now easily search for user names and sort on
the Display Name column. See "Using CENTRAL: Managing licenses."
You can customize email notifications through CENTRAL. Access the list of customizable email
messages through the Email Templates link under Site settings on the Winshuttle CENTRAL
Administration home page.

Winshuttle CENTRAL - Deployment Guide
9
Chapter 2: Before you install
In order to have a successful install it is best to be
prepared. A system that meets the minimum
requirements, the proper accounts, and a server
that can be used to test with will lend to a
successful implementation of CENTRAL.

Winshuttle CENTRAL - Deployment Guide
10
Preparation
The following sections include information about how to prepare for your Winshuttle CENTRAL
installation.
System Requirements
The list below outlines the minimum requirements for Winshuttle CENTRAL installation. Microsoft
SharePoint has its own best practices and minimum requirements that should be followed as well.
Component Minimum Requirement
Server Software
Operating System Windows Server 2003 R2 (32-bit or 64-bit)
Windows Server 2008 R2
Microsoft SharePoint SharePoint 2007 (all editions, including WSS)
SharePoint 2010 (all editions, including Foundation)
Database SQL Server 2005 (any edition, including Express)
SQL Server 2008 (any edition, including Express)
Other Software Microsoft® .NET Framework 3.5 SP1
IIS 6.0 for Server 2003
IIS 7.5 for Server 2008
Web Service Extensions must have ASP.NET v2.0.50727 allowed
1. Server Hardware
Processor Single, 2.5 GHz
Memory 8 GB
Storage 3 GB of free space

Winshuttle CENTRAL - Deployment Guide
11
Using a Development Server
To minimize the risk of disruption and data loss, we strongly recommend installing SharePoint and
Winshuttle CENTRAL on a development server first. The development sever simulates a server in a real
work environment, but it operates in isolation, so that it does not affect other users. You can create, test,
and refine your processes on the development server before moving them onto a production server in
your real work environment. When you are ready to move to the production server, specify the URL of
the production server within Winshuttle CENTRAL, and publish your scripts to that server.
What accounts do I need?
To deploy Winshuttle CENTRAL on a SharePoint site, you must provide credentials for two different accounts and an email address. The following table describes the accounts that are used to install and configure Winshuttle CENTRAL.
Account Purpose Requirements
Setup user account The Setup user account is used
to run the CENTRAL installer
This will deploy the CENTRAL
.wsp
Local administrator on each
server on which CENTRAL
will be installed.
SharePoint Farm
Administrator.
SQL Server service
account
The SQL Server service account
is used to install CENTRAL’s
database
dbcreator fixed server role
on SQL server instance
Email address The Email address will be used
as the “From” address for task
notifications for Transaction or
Query script approvals
Working email address
Before you start the install, consider the following recommendations
Review and understand the associated full system restore (disaster recovery) procedure for
your SharePoint environment, including any separate SQL servers.
Close all applications and disable any programs that run automatically, including anti-virus,
screen savers and operating system utilities.
Ensure there are no active connections to the target site you plan to deploy to.

Winshuttle CENTRAL - Deployment Guide
12
Options for installation locations
CENTRAL can be installed on either an existing web application or a new one. You can also make it a
subsite or the main site by choosing which template to create first, whether the Winshuttle template or
another template.

Winshuttle CENTRAL - Deployment Guide
13
Chapter 3: Installation

Winshuttle CENTRAL - Deployment Guide
14
The four tasks in the installation process
1. Choose the web application to install CENTRAL to.
You can choose to use an existing web application, create a new web application, or
extend an existing web application.
2. Install the CENTRAL software as a site definition or a non-site definition.
This deploys our central .wsp files to the SharePoint web application that was chosen.
3. Create a CENTRAL site collection.
4. Configure the Winshuttle CENTRAL site for first time use.
Creating a web application
If you have a Web Application setup already, skip to the section titled Installing CENTRAL.
1. Navigate to the SharePoint Central Administration page.
2. Under the heading Application Management select Manage web applications.
Figure 3.1: SharePoint Central Administration page
3. Select New at the top left of the page.

Winshuttle CENTRAL - Deployment Guide
15
Figure 3.2: The New icon located by the Site Actions link
4. The Create New Web Application form opens up.
Figure 3.3: Create New Web Application
5. Enter a designated port for the Web App to communicate with. Typically this is 80.
6. Enter the credentials of the user you want to use as the web application service account.

Winshuttle CENTRAL - Deployment Guide
16
7. Click OK at the bottom of the page.
8. The web application is created. This could take a few minutes to complete.
Figure 3.4: Operation in Progress screen
Figure 3.5: Application Created confirmation
9. When the web application is created, perform an IISReset.
10. Open the IIS manager and verify that the web app was created.

Winshuttle CENTRAL - Deployment Guide
17
Installing the CENTRAL binaries
To install CENTRAL it is best to log in to the SharePoint web front end server box as an account that is
both a SharePoint Farm Administrator and a local administrator.
NOTE: The install process is in English. You can change the locale after CENTRAL is installed.
1. Run Setup .
2. The Winshuttle CENTRAL Solution wizard appears.
Figure 4.1: Winshuttle CENTRAL setup wizard
3. Click Next. The prerequisites for CENTRAL installation are checked. If all the prerequisites are
satisfied, the Next button is enabled. Click Next.
During the prerequisites check, the Chart controls for .NET 3.51 may be marked as missing, even if
the .NET is already installed. To fix this error, a download link should appear during the prerequisite
check.

Winshuttle CENTRAL - Deployment Guide
18
Figure 4.2: System Check
4. On the End-user License Agreement page, if you accept the terms of the license agreement,
click I accept the terms in the License Agreement.
Figure 4.3: End User License Agreement
5. On the Winshuttle CENTRAL Site definition page, select Site Definition and click Next.
Site Definition - While creating the SharePoint Site, the SharePoint Administrator can
see the Winshuttle tab in Site Templates list. By selecting the template, the SharePoint
Administrator or the Site Collection Administrator can create the CENTRAL Site.
Winshuttle CENTRAL - Deployment Guide
19
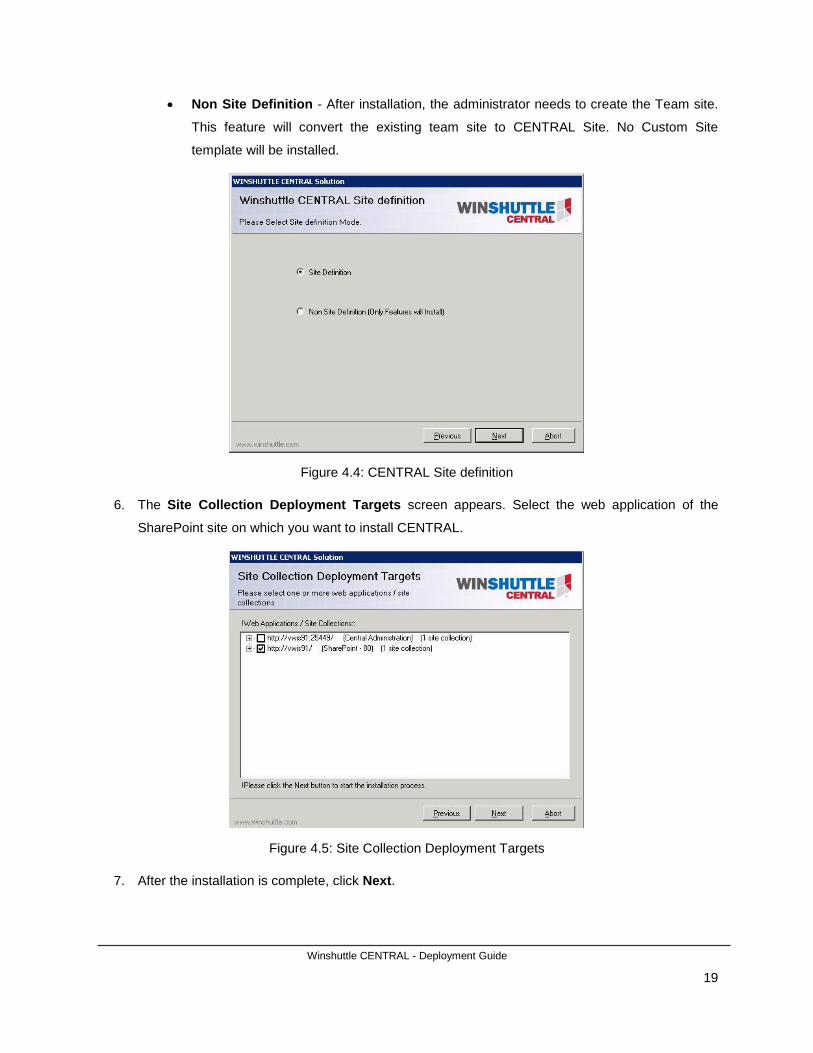
Non Site Definition - After installation, the administrator needs to create the Team site.
This feature will convert the existing team site to CENTRAL Site. No Custom Site
template will be installed.
Figure 4.4: CENTRAL Site definition
6. The Site Collection Deployment Targets screen appears. Select the web application of the
SharePoint site on which you want to install CENTRAL.
Figure 4.5: Site Collection Deployment Targets
7. After the installation is complete, click Next.

Winshuttle CENTRAL - Deployment Guide
20
Figure 4.6: Install progress
8. After the CENTRAL solution is installed, Winshuttle.eshuttle.database must be installed. The
installation of the database starts automatically.
NOTE: If the database installer does not start, go to the root of the CENTRAL setup folder, open the folder
eShuttleDBSetup, and then click Setup.exe to start the setup manually.
9. Click Next.
Figure 4.7: eShuttle.Database installation
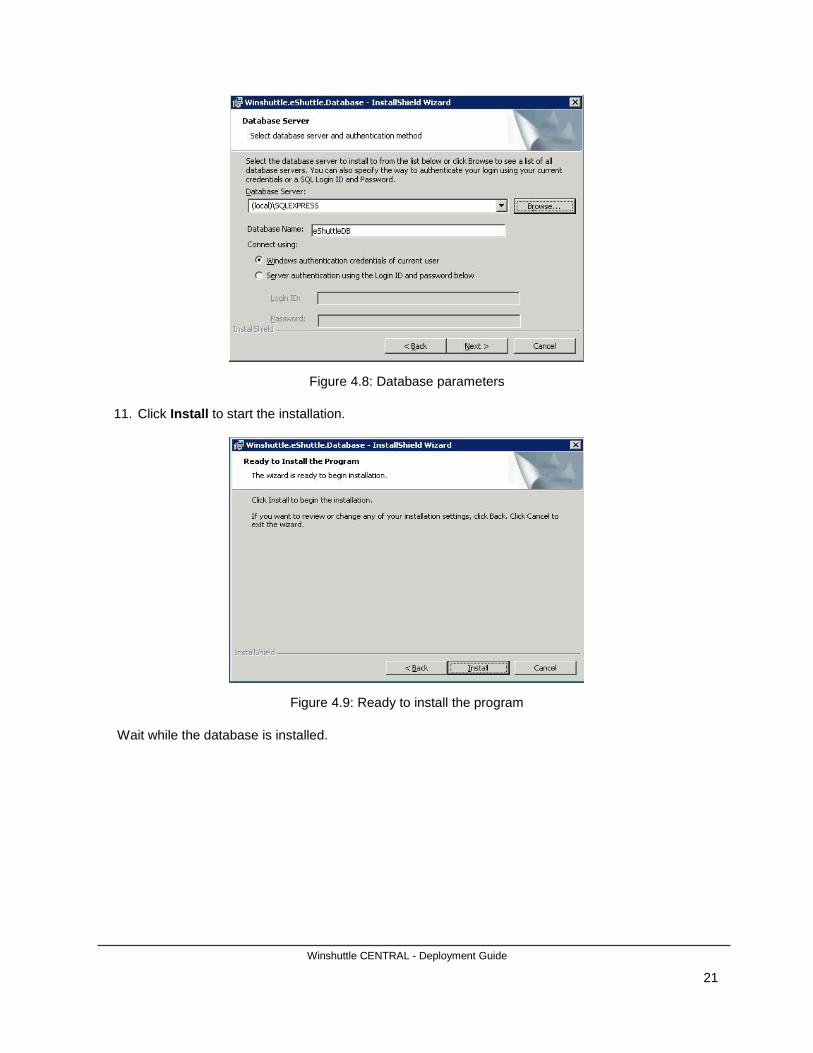
10. Type in your database server name or click Browse to view all the available servers. Select the
authentication type. Click Next.
Winshuttle CENTRAL - Deployment Guide
21
Figure 4.8: Database parameters
11. Click Install to start the installation.
Figure 4.9: Ready to install the program
Wait while the database is installed.

Winshuttle CENTRAL - Deployment Guide
22
Figure 4.10: Database installs progress
12. Click Finish to complete the installation.
Figure 4.11: Installation complete
13. Perform IISReset.
14. Verify the Database eSHUTTLEdb has been installed in the SQL Server instance.

Winshuttle CENTRAL - Deployment Guide
23
Creating a Site Collection
1. Navigate to the SharePoint Central Administration page, under the Application Management
header click Create site collections.
Figure 3.7: Create Site Collections under Application Management
2. Ensure the proper Web Application is selected.
Figure 3.8: Web Application Selection
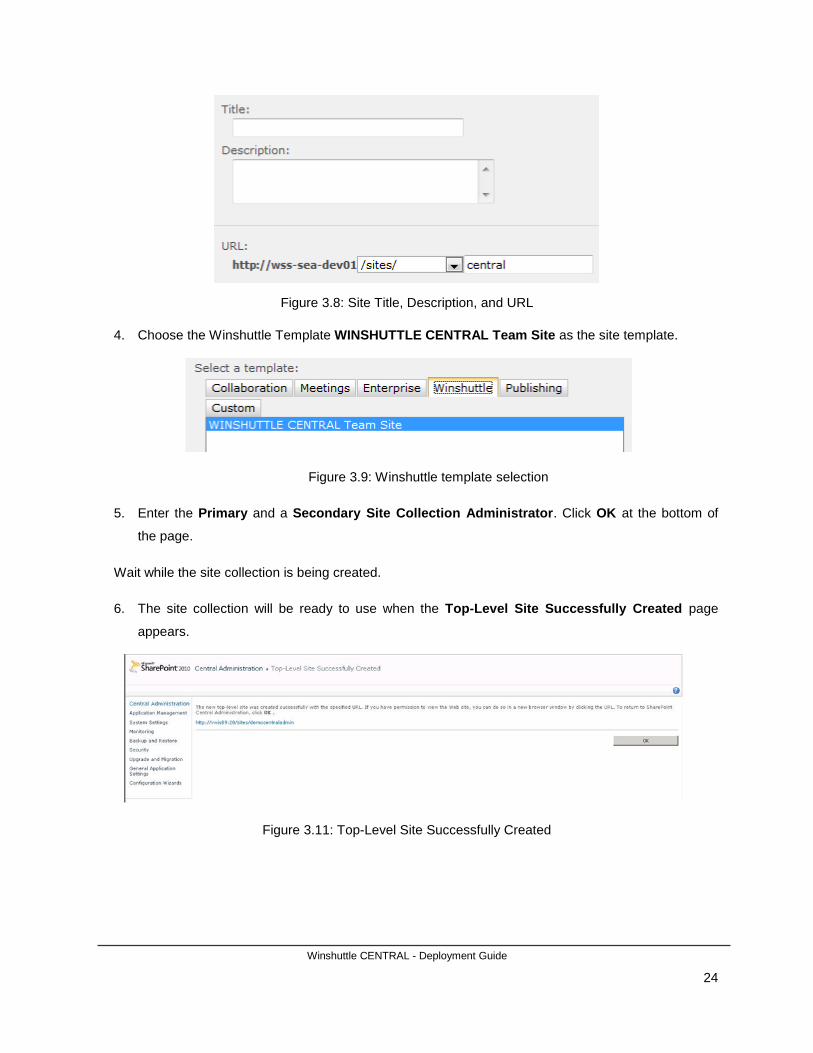
3. Enter the Title and Description and specify the URL.
Note: For the German language version of SharePoint, a sharp “s” ß in the URL of path or in a site
name causes errors. If the version of CENTRAL and the versions of other Winshuttle products are
earlier than 10.3, special characters in other locales when used in paths may also produce errors.
For more information, see “Known issues with special characters in non-English localizations of
Microsoft SharePoint”.
Winshuttle CENTRAL - Deployment Guide
24
Figure 3.8: Site Title, Description, and URL
4. Choose the Winshuttle Template WINSHUTTLE CENTRAL Team Site as the site template.
Figure 3.9: Winshuttle template selection
5. Enter the Primary and a Secondary Site Collection Administrator. Click OK at the bottom of
the page.
Wait while the site collection is being created.
6. The site collection will be ready to use when the Top-Level Site Successfully Created page
appears.
Figure 3.11: Top-Level Site Successfully Created

Winshuttle CENTRAL - Deployment Guide
25
Configuring the CENTRAL Site for first time use
Perform these seven steps to configure the Winshuttle CENTRAL site for use.
1. Activate the Winshuttle CENTRAL feature
2. Activate the Winshuttle CENTRAL site
3. Assign appropriate permissions
4. Enable LDAP settings
5. Install licenses
6. Manage licenses
7. Add SAP application servers
8. Assign policy settings
Activate the Winshuttle CENTRAL feature
1. Open the Home page of your target Site Collection site.
2. Click Site Actions and then click Site Settings.
3. Under Site Collection Administration, click Site collection features.
4. In the list of features, ensure that Winshuttle CENTRAL is active. If it is not active, click Activate.
Activate the Winshuttle CENTRAL site
1. Open the Home page of your target Site Collection site and navigate to Winshuttle CENTRAL
Administration.
2. Click the link Activate Winshuttle CENTRAL site.
3. When activated, the Winshuttle CENTRAL site page appears.

Winshuttle CENTRAL - Deployment Guide
26
Assign Appropriate Permissions
1. Open the home page of your target Winshuttle CENTRAL Site Collection and navigate to People
and Groups.
2. For the purposes of installation the Winshuttle CENTRAL Administrator must be added to the
following groups:
Site members – To have access to the site
CENTRAL License Administrator – To manage licenses
CENTRAL Reports Viewers – To view reports
CENTRAL Site Administrator – To administer CENTRAL site settings
NOTE: Winshuttle CENTRAL can recognize a domain or computer management group that has been
added to a SharePoint group if LDAP settings are configured. Winshuttle CENTRAL does not
support a domain group within a domain group or a domain group within a computer
management group.
3. Click a group page, click New, and then click Add Users. Repeat this step for all four of the
above groups.
4. In the Users/Groups box, type a domain name or user name. Click Check Names to verify,
or click Address Book to locate a name. Click OK when done.
Figure 5.3: Grant Permissions

Winshuttle CENTRAL - Deployment Guide
27
Enable LDAP settings
1. Open the home page of your target Winshuttle CENTRAL Site Collection and navigate to
WINSHUTTLE CENTRAL Administration
2. Under Site select Manage LDAP Connection
3. Enter the following LDAP configuration Settings
o LDAP Server Name – Enter the friendly name of the Domain Controller server.
o User Name – Enter a service account logon information to an account that has read
access
o Password – Enter the User Name’s password
o Domain Name – Enter the domain name where the server is located
i.e.: “winshuttle” for winshuttle.contoso.com
o Target OU – Enter the LDAP Connection String for the target domain
i.e. “dc=contoso,dc=com”
o Click “Test Connection” then “Save”
o Select the “Enable domain groups” button to enable this option
Install licenses
1. Open the home page of your target Winshuttle CENTRAL Site Collection and navigate to
WINSHUTTLE CENTRAL Administration.
2. Under the column heading Site, choose Activate Licenses
3. In the Activation Code box, add the activation code
4. In the User Information box, type the e-mail address of the license administrator for your
company, a copy of the license file will be sent to this email address
5. Click Download License File and save it.
6. Click Browse and navigate to the newly downloaded license file. This is an .xml file
7. Add a description of the activation. Click Activate License.
Manage licenses
When the licenses are installed they must be distributed. A license for each end user of a product is
necessary. For each Winshuttle product license, whether QUERY, TRANSACTION, or RUNNER, one
CENTRAL license is assigned in addition.
Note: If a single user has a TRANSACTION and QUERY license, only one CENTRAL license is assigned.
Assigning product licenses
1. Open the home page of your target Winshuttle CENTRAL Site Collection and navigate to
WINSHUTTLE CENTRAL Administration
2. Under the column heading Site, choose Manage Licenses

Winshuttle CENTRAL - Deployment Guide
28
3. Under Product Name, find the product you want to assign users to, and then click
Assign/Search Users
4. To search for a specific user, in the Select users box, type a domain name or user name. Click
Check Names to verify, or click Address Book to locate a name.
5. Under Select activation, select the product that you want to assign the user to.
6. Click Assign. Click Save.
Reclaiming product licenses
1. Open the home page of your target Winshuttle CENTRAL Site Collection and navigate to
Winshuttle CENTRAL Administration.
2. Under the column heading Site, choose Manage Licenses.
3. Under Product Name, find the product you want to unassign users from, and then click
Assign/Search Users.
4. Clear the check box next to that user’s name. Click Save. The user is removed from the list of
Assigned Users.

Winshuttle CENTRAL - Deployment Guide
29
Add SAP Servers
To control the various SAP servers in your deployment, you must configure the SAP Application Servers
in CENTRAL. The Application Servers setting facilitates communication of the desktop client and the SAP
server via CENTRAL. There are two server types: production and non-production. Production servers are
servers that run approved files; non-production servers are development servers, where files reside that
have not yet been approved or where development scripts are tested.
To add an application server to the CENTRAL site
1. Open the home page of your target Winshuttle CENTRAL Site Collection and navigate to
WINSHUTTLE CENTRAL Administration.
2. Under the column heading TRANSACTION or QUERY, select Application Servers.
3. Click Add, and then Add Server.
4. Enter the SAP system ID, the Client number, Server type, and a Description of the instance.
5. Check the Auto Logon Details box.
6. Enter the Application Server Host (either FQDN or IP)
7. Enter the System Number. Click Save.
Repeat as necessary for each server

Winshuttle CENTRAL - Deployment Guide
30
Assign Policy settings
Policies provide the CENTRAL administrator access control over the desktop clients. By specifying SAP
application servers and policies, you can set “who, what, and when” access points for the servers.
Winshuttle CENTRAL provides seven sample policies.
Sample Policies
Policy Name Description
Production Production Servers Only
Non Production Non Production Servers Only
No Month end Financial
Postings
Policy to disallow month end financial postings for F*
transactions for the first five days of any month
Limit Maximum Updates Limit the maximum no of records that can be created
or updated to maximum of 100 entries
Disallow use of Winshuttle for
SPRO
Disallow the use of Winshuttle for SPRO
Allow use of Winshuttle only for
Journal Entry
Allow users to only use Winshuttle for FB50
Table 6.1: Sample policies
Assigning users to a policy
1. In the Add new users or groups box, type a name.
2. Click Check Names to verify, or click Address Book to locate a name.
3. When you have located the name, click Add. The name appears in the Existing Users and
groups box.
Removing users from a policy
4. Under Policies, click the policy name. In the Existing users and groups box, select a name, and
then click Remove.

Winshuttle CENTRAL - Deployment Guide
31
Chapter 4: Upgrading CENTRAL
From time to time new releases are rolled out and
to take advantage of the new features, an
upgrade must be performed.

Winshuttle CENTRAL - Deployment Guide
32
Upgrading CENTRAL to Version 10.3
Before you upgrade
Because CENTRAL version 10.3 supports special characters, backup documents created in a version of
CENTRAL earlier than 10.3 can be restored only in an earlier version of CENTRAL.
Before you upgrade, backup your master pages and then restore them manually after the upgrade is
completed.
The following progression of CENTRAL upgrades is supported:
CENTRAL 10.0 to 10.1, and then 10.1 to 10.3
CENTRAL 10.0 to 10.2, and then CENTRAL10.2 to 10.3 (Recommended)
Upgrading CENTRAL 10.0 to 10.1
1. From the CENTRAL Administration site, ensure that the current version is 10.0 (Figure 8.1).
2. On the SharePoint server, run CENTRAL setup.exe.
3. When prompted, click Next on the CENTRAL Setup Wizard.
Figure 8.1: Version Verification
4. Ensure the System Check page displays Green check marks next to each step, and then click
Next.

Winshuttle CENTRAL - Deployment Guide
33
Figure 8.2: Click Next
5. Ensure that Upgrade is selected. Click Next.
Figure 8.3: Select Upgrade option
You are notified that running the upgrade will terminate existing workflows. The installation
process continues.

Winshuttle CENTRAL - Deployment Guide
34
Figure 8.4: Upgrade progress
6. When the upgrade completes, click Next.
Figure 8.5: Click Next
7. The screen confirms that the upgrade was successful. Click Close.

Winshuttle CENTRAL - Deployment Guide
35
Figure 8.6: Upgrade Successfully Completed
8. On the CENTRAL site, click CENTRAL Administration, and then click Upgrade V10.1 to V10.1.
Figure 8.7: Upgrade CENTRAL Site
9. Screen displays information being processed.

Winshuttle CENTRAL - Deployment Guide
36
Figure 8.8: Upgrade process
10. After the upgrade has completed click the CENTRAL Administration link. Version should now
appear as 10.1.

Winshuttle CENTRAL - Deployment Guide
37
Upgrading CENTRAL 10.1 to 10.2
1. On the SharePoint server, run CENTRAL setup.exe.
2. When prompted, click Next on the CENTRAL Setup Wizard.
3. Ensure that the System Check page displays Green check mark next to each step, and then click
Next.
Figure 8.9: Click Next
4. Ensure that Upgrade is selected. Click Next.
Figure 8.10: Select Upgrade option

Winshuttle CENTRAL - Deployment Guide
38
5. The installer displays a warning message that all the existing workflows will be terminated during
the upgrade process.
Figure 8.11: Warning
6. The wizard displays the progress of the installation.
Figure 8.12: Installation progress
7. When the upgrade completes, click Next.
Winshuttle CENTRAL - Deployment Guide
39
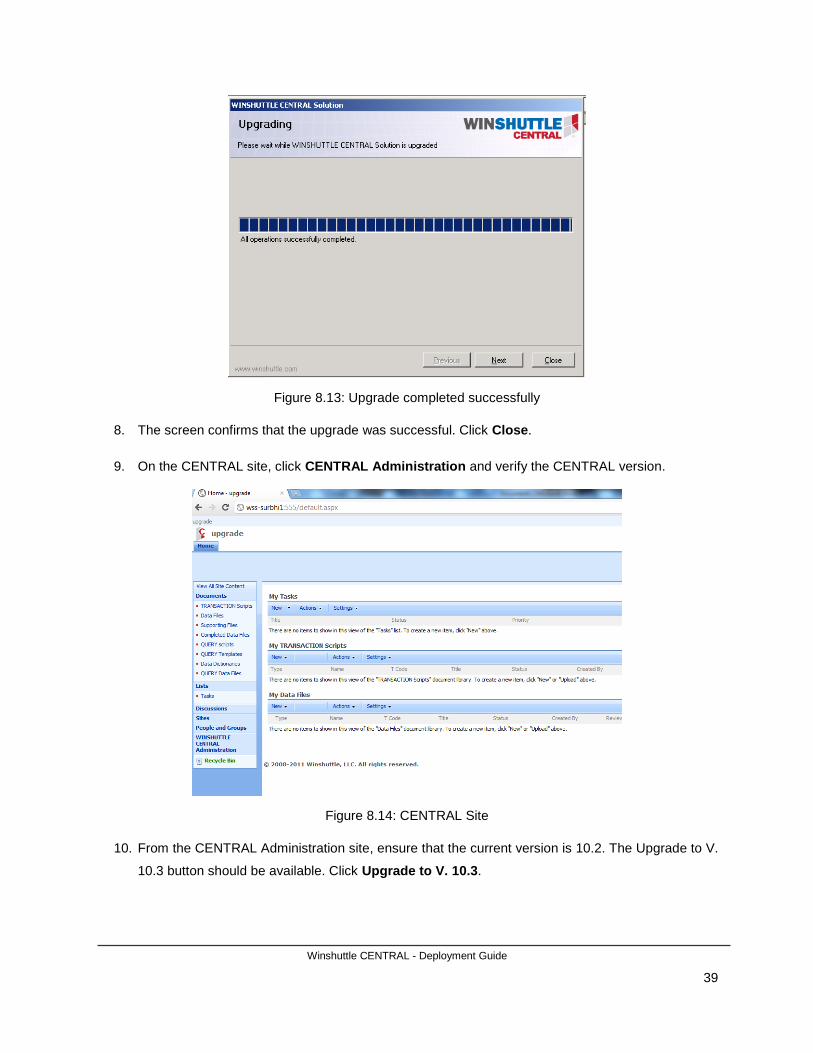
Figure 8.13: Upgrade completed successfully
8. The screen confirms that the upgrade was successful. Click Close.
9. On the CENTRAL site, click CENTRAL Administration and verify the CENTRAL version.
Figure 8.14: CENTRAL Site
10. From the CENTRAL Administration site, ensure that the current version is 10.2. The Upgrade to V.
10.3 button should be available. Click Upgrade to V. 10.3.

Winshuttle CENTRAL - Deployment Guide
40
Figure 8.15: Version Verification
Upgrading CENTRAL 10.2 to 10.3
Important: Before upgrading to 10.3, complete all existing workflows and pending jobs.
CENTRAL automatically upgrades the database and CENTRAL program from version 10.2 to version
10.3.
1. Download the Central 10.3 setup.zip and extract the files.
2. Click Setup. The Central Setup wizard appears. Click Next.
3. Ensure that the System Check page displays a green check mark next to each step, and then
click Next.
4. Ensure that Upgrade is selected. Click Next.
5. A warning message appears that all the existing workflows will be terminated during the upgrade.
If appropriate, click OK.
6. When the upgrade completes, click Next. Click Close.
7. Click Winshuttle CENTRAL Administration. Click the Upgrade to 10.3 button.
Upgrading CENTRAL 10.1 to 10.3
You can upgrade directly from 10.1 to 10.3.
Important: Before upgrading to 10.3, complete all existing workflows and pending jobs.
Follow the upgrade procedure in “Upgrading CENTRAL 10.2 to CENTRAL 10.3.”

Winshuttle CENTRAL - Deployment Guide
41
Chapter 5: Uninstalling CENTRAL
Winshuttle CENTRAL - Deployment Guide
42
Uninstalling CENTRAL
The following are considerations when preparing to uninstall CENTRAL:
Preparing for uninstall
Identify the computers you want to uninstall from and the components you want to uninstall from
each computer. Ensure that no active connections to the SharePoint Site Collection exist where
the instance of CENTRAL resides.
For Winshuttle Components
Log on to the client as local Administrator or as a member of the Administrators group.
Verify and ensure that you have a current backup of your computer, system, and SharePoint
databases.
For SharePoint Components
The process affects CENTRAL SharePoint components therefore it is important that no users be
logged into the affected CENTRAL sites.
Remove the Central database in the SQL instance of the SharePoint server.
Removing CENTRAL
1. Double-click the CENTRAL Setup.exe file to start the removal process.
2. When prompted at the Winshuttle CENTRAL Solution screen, click Next.

Winshuttle CENTRAL - Deployment Guide
43
Figure 9.1: Click Next
3. Allow the CENTRAL Solution System Check to complete the system checkpoints.
Figure 9.2: System Check
4. Click Remove and wait for the process to complete.
Winshuttle CENTRAL - Deployment Guide
44
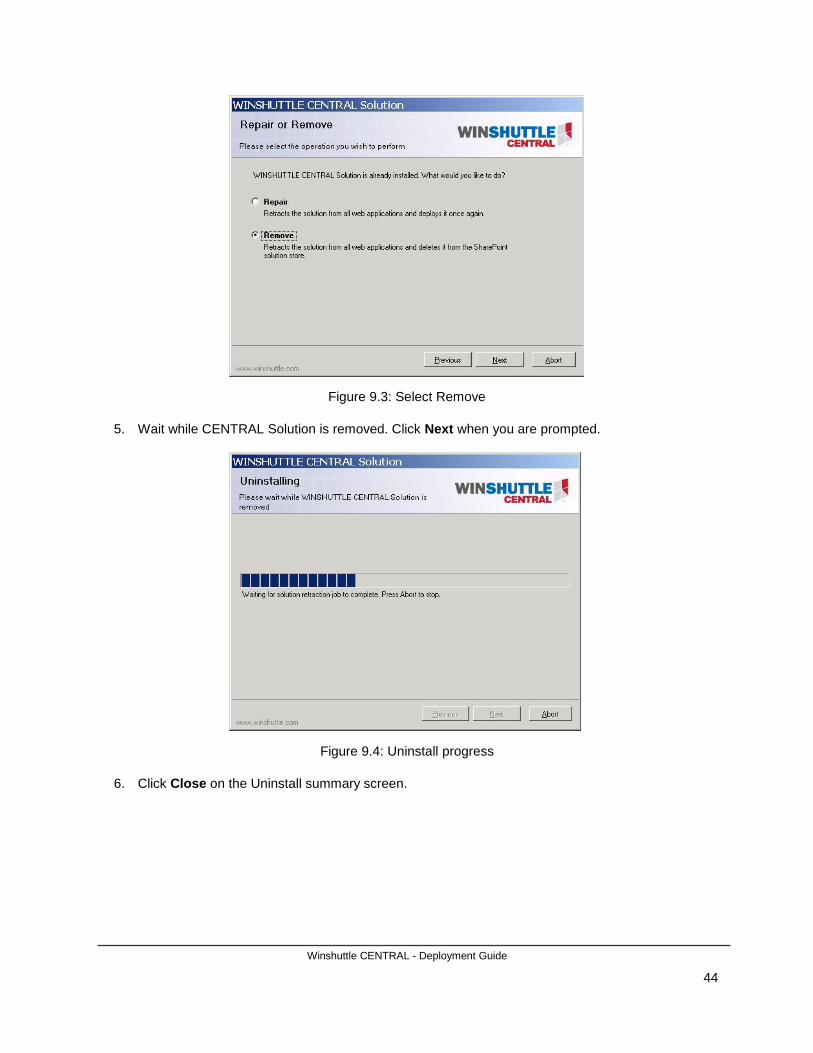
Figure 9.3: Select Remove
5. Wait while CENTRAL Solution is removed. Click Next when you are prompted.
Figure 9.4: Uninstall progress
6. Click Close on the Uninstall summary screen.

Winshuttle CENTRAL - Deployment Guide
45
Figure 9.5: Uninstall Successfully Completed
7. Now you must uninstall the Winshuttle.eSHUTTLE.Database from Add or Remove Programs. To
open Add or Remove Programs, click Start, and then click Control Panel.
Figure 9.6: Add or Remove Programs list

Winshuttle CENTRAL - Deployment Guide
46
Figure 9.7: Add or Remove Programs confirmation
8. Next, remove the eShuttleDB from SharePoint. Go to SQL Server Management Studio. Connect
the database, if necessary. Right-click eShuttleDB, and then click Delete.
Figure 9.8: SQL Server Management Studio
9. In the Delete Object dialog box, click OK. If an error appears that indicates that the database
cannot be deleted, select the Close existing connections box, and then click OK.

Winshuttle CENTRAL - Deployment Guide
47
Figure 9.9: Delete Object screen
10. The uninstall process is now complete.

Winshuttle CENTRAL - Deployment Guide
48
Chapter 6: Support Information
Winshuttle CENTRAL - Deployment Guide
49
Support Information
We hope that this guide has given you an understanding of the options and recommended practices for
CENTRAL in an Office SharePoint Server deployment.
For more information about backing up and restoring Office SharePoint Server, see the following articles:
Plan for backup and recovery (Office SharePoint Server)
(http://go.microsoft.com/fwlink/?LinkId=102799)
Administering backup and recovery for Office SharePoint Server 2007
(http://go.microsoft.com/fwlink/?LinkID=102627)
You can also visit our site at www.winshuttle.com.

Winshuttle CENTRAL - Deployment Guide
50
Chapter 7: Appendix

Winshuttle CENTRAL - Deployment Guide
51
Known issues with special characters in non-English localizations of
Microsoft SharePoint
Sharp “s” ß errors and SharePoint
In SharePoint, sharp “s”, ß, in site names, file names, and links, can present errors. To avoid errors, use
characters other than ß.
SharePoint 2007/SharePoint 2010
The following characters present problems when used in site or file names. Although they may
appear correctly when items are saved, they do not appear correctly in browse paths, and the
server cannot read the path or find the file. If a link contains a special character, the link might not
open when clicked from within Microsoft Outlook.
Note: All other characters are supported. However, supported characters work only when both
CENTRAL and the Winshuttle client program are version 10.3. If any Winshuttle program is
earlier than version 10.3, the following characters do not work.
SharePoint 2010
Spanish:
o If the file name or site name contains the following characters, the task cannot be opened
from the client.
—
’
“
”
–
Dutch:
o If the file name or site name contains the following characters, the task cannot be opened
from the client:
—
’
„
”
–

Winshuttle CENTRAL - Deployment Guide
52
German:
o If the file name or site name contains the following characters, the task cannot be opened
from the client:
—
’
„
“
–
French:
o If the file name or site name contains the following characters, the task cannot be opened
from the client:
Ÿ (Caps)
Œ
œ and its uppercase
æ and its uppercase
’
“
”
–
—
Special hyphen (hyphen of French character “–“)
SharePoint 2007
German:
If eszett ß is in the path of file, tasks cannot be opened from the client.
If the site name contains Ä, Ö, Ü, or ß (in caps), all the files produce the error “Der Wert darf nicht NULL sein” when opened.
If the site name contains Ä and file name is ß (in caps), the following error message is displayed: Das System kann die angegebene Datei nicht finden. (Ausnahme von HRESULT: 0x80070002)
If the site name contains Ö and file name contains Ö, no error results.
If the site name contains Ö and file name contains ß (in caps), the following error message is displayed: Das System kann die angegebene Datei nicht finden. (Ausnahme von HRESULT: 0x80070002)