oracle database oracle clusterware and oracle real...
TRANSCRIPT
Oracle® DatabaseOracle Clusterware and Oracle Real Application Clusters Administration and Deployment Guide
10g Release 2 (10.2)
B14197-03
January 2006

Oracle Clusterware and RAC Administration and Deployment Guide, 10g Release 2 (10.2)
B14197-03
Copyright © 2006, Oracle. All rights reserved.
Primary Authors: David Austin, Mark Bauer, Douglas Williams
Contributing Authors: Troy Anthony, Anand Beldalker, Carol Colrain, Jonathan Creighton, Rajesh Dasari, Yong Hu, Rajiv Jayaraman, Sameer Joshi, Raj Kumar, Ken Lee, Barb Lundhild, Venkat Maddali, Gaurav Manglik, John McHugh, Bharat Paliwal, Dipak Saggi, Sudheendra Sampath, Daniel Semler, Cathy Shea, Khethavath P. Singh, Bipul Sinha, Mike Zampiceni
The Programs (which include both the software and documentation) contain proprietary information; they are provided under a license agreement containing restrictions on use and disclosure and are also protected by copyright, patent, and other intellectual and industrial property laws. Reverse engineering, disassembly, or decompilation of the Programs, except to the extent required to obtain interoperability with other independently created software or as specified by law, is prohibited.
The information contained in this document is subject to change without notice. If you find any problems in the documentation, please report them to us in writing. This document is not warranted to be error-free. Except as may be expressly permitted in your license agreement for these Programs, no part of these Programs may be reproduced or transmitted in any form or by any means, electronic or mechanical, for any purpose.
If the Programs are delivered to the United States Government or anyone licensing or using the Programs on behalf of the United States Government, the following notice is applicable:
U.S. GOVERNMENT RIGHTS Programs, software, databases, and related documentation and technical data delivered to U.S. Government customers are "commercial computer software" or "commercial technical data" pursuant to the applicable Federal Acquisition Regulation and agency-specific supplemental regulations. As such, use, duplication, disclosure, modification, and adaptation of the Programs, including documentation and technical data, shall be subject to the licensing restrictions set forth in the applicable Oracle license agreement, and, to the extent applicable, the additional rights set forth in FAR 52.227-19, Commercial Computer Software—Restricted Rights (June 1987). Oracle Corporation, 500 Oracle Parkway, Redwood City, CA 94065
The Programs are not intended for use in any nuclear, aviation, mass transit, medical, or other inherently dangerous applications. It shall be the licensee's responsibility to take all appropriate fail-safe, backup, redundancy and other measures to ensure the safe use of such applications if the Programs are used for such purposes, and we disclaim liability for any damages caused by such use of the Programs.
Oracle, JD Edwards, PeopleSoft, and Retek are registered trademarks of Oracle Corporation and/or its affiliates. Other names may be trademarks of their respective owners.
The Programs may provide links to Web sites and access to content, products, and services from third parties. Oracle is not responsible for the availability of, or any content provided on, third-party Web sites. You bear all risks associated with the use of such content. If you choose to purchase any products or services from a third party, the relationship is directly between you and the third party. Oracle is not responsible for: (a) the quality of third-party products or services; or (b) fulfilling any of the terms of the agreement with the third party, including delivery of products or services and warranty obligations related to purchased products or services. Oracle is not responsible for any loss or damage of any sort that you may incur from dealing with any third party.
iii
Contents
Preface ............................................................................................................................................................... xiii
Audience..................................................................................................................................................... xiiiDocumentation Accessibility ................................................................................................................... xiiiRelated Documents ................................................................................................................................... xivConventions ............................................................................................................................................... xiv
What's New in Real Application Clusters Administration and Deployment? ........ xv
Oracle Database 10g Release 2 (10.2) New Features in RAC Administration and Deployment .. xvOracle Database 10g Release 1 (10.1) New Features for RAC Administration ............................... xxii
1 Introduction to Oracle Clusterware and Oracle Real Application Clusters
Oracle Clusterware and Oracle Real Application Clusters.............................................................. 1-1The Oracle Clusterware Architecture and Oracle Clusterware Processing .................................. 1-2
Oracle Clusterware Software Component Processing Details .................................................... 1-2The Oracle Clusterware Software Components ............................................................................ 1-4
The Real Application Clusters Architecture and Real Application Clusters Processing .......... 1-5The Real Application Clusters Software Components ................................................................. 1-6
Oracle Clusterware Components and High Availability ................................................................ 1-7The Oracle Clusterware Voting Disk and Oracle Cluster Registry ............................................ 1-7Oracle Clusterware High Availability and the Application Programming Interface.............. 1-8
Workload Management with Real Application Clusters ................................................................. 1-8Introduction to Installing Oracle Clusterware and Real Application Clusters ........................... 1-9
Oracle Clusterware Installation Process Description ................................................................... 1-9Real Application Clusters Installation and Database Creation Process Description ............ 1-10
Cloning Oracle Clusterware and RAC Software in Grid Environments ................................... 1-11Additional Considerations and Features for Real Application Clusters ................................... 1-11Managing Real Application Clusters Environments ..................................................................... 1-12
Designing Real Application Clusters Environments ................................................................. 1-12Administrative Tools for Real Application Clusters Environments........................................ 1-13Monitoring Real Application Clusters Environments ............................................................... 1-14Evaluating Performance in Real Application Clusters Environments.................................... 1-14
2 Introduction to Oracle Clusterware and RAC Administration and Deployment
Real Application Clusters Documentation Overview ...................................................................... 2-1Platform-Specific Oracle Real Application Clusters Installation and Configuration Guides. 2-2
iv
Introduction to Administering Real Application Clusters .............................................................. 2-2Administering Real Application Clusters ........................................................................................... 2-2Voting Disk and Oracle Cluster Registry Device Administration ................................................. 2-3Database Instance Management and Database Administration in RAC ...................................... 2-3Storage Management in Real Application Clusters .......................................................................... 2-3Oracle Clusterware for Real Application Clusters ............................................................................ 2-4Additional Real Application Clusters Administrative Topics ........................................................ 2-4Overview of Using Enterprise Manager with Real Application Clusters..................................... 2-4Overview of Deploying Applications on Real Application Clusters ........................................... 2-5
Code Changes are Not Required for Applications........................................................................ 2-6Implementing Oracle Features with Real Application Clusters..................................................... 2-6
Automatic Storage Management ..................................................................................................... 2-6Cluster File Systems in Real Application Clusters ........................................................................ 2-6Storage Management Features and Real Application Clusters................................................... 2-7Services in Oracle Database 10g ....................................................................................................... 2-7The Oracle Clusterware and High Availability in Real Application Clusters .......................... 2-8Additional Oracle High Availability Features and Solutions ..................................................... 2-9
3 Administering Oracle Clusterware Components
Administering Voting Disks in Real Application Clusters ............................................................. 3-1Backing up Voting Disks................................................................................................................... 3-1Recovering Voting Disks................................................................................................................... 3-2Changing the Voting Disk Configuration after Installing Real Application Clusters ............. 3-2
Administering the Oracle Cluster Registry in Real Application Clusters.................................... 3-2Adding, Replacing, Repairing, and Removing the OCR.............................................................. 3-3Managing Backups and Recovering the OCR Using OCR Backup Files ................................... 3-5Diagnosing OCR Problems with the OCRDUMP and OCRCHECK Utilities .......................... 3-7Overriding the Oracle Cluster Registry Data Loss Protection Mechanism............................... 3-7Administering the Oracle Cluster Registry with OCR Exports .................................................. 3-8Implementing the Oracle Hardware Assisted Resilient Data Initiative for the OCR ........... 3-10Upgrading and Downgrading the OCR Configuration in Real Application Clusters ......... 3-10
Administering Multiple Cluster Interconnects on UINIX-Based Platforms ............................. 3-10Failover and Failback and CLUSTER_INTERCONNECTS ...................................................... 3-11
4 Administering Storage
Overview of Storage in Oracle Real Application Clusters .............................................................. 4-1Datafile Access in Real Application Clusters................................................................................. 4-2Redo Log File Storage in Real Application Clusters ..................................................................... 4-2Automatic Undo Management in Real Application Clusters...................................................... 4-2
Automatic Storage Management in Real Application Clusters ...................................................... 4-2Automatic Storage Management Components in RAC ............................................................... 4-3Modifying Disk Group Configurations for ASM in RAC ............................................................ 4-3Standalone ASM Disk Group Management................................................................................... 4-3Administering ASM Instances and Disk Groups with Enterprise Manager in RAC............... 4-4Administering ASM Instances with SRVCTL in RAC ................................................................. 4-5
v
5 Administering Database Instances and Cluster Databases
Overview of Real Application Clusters Management Tools ........................................................... 5-1Overview of Administering Real Application Clusters with Enterprise Manager .................. 5-1Overview of Administering Real Application Clusters with SQL*Plus .................................... 5-2Overview of Administering Real Application Clusters with SRVCTL...................................... 5-3
Starting and Stopping Instances and Real Application Clusters Databases................................ 5-3Starting Up and Shutting Down with Enterprise Manager ......................................................... 5-4Starting Up and Shutting Down with SQL*Plus .......................................................................... 5-4Starting Up and Shutting Down with SRVCTL ............................................................................ 5-5
Customizing How Oracle Clusterware Manages RAC Databases ................................................. 5-6Switching Between the Automatic and Manual Policies.............................................................. 5-6
Overview of Initialization Parameter Files in Real Application Clusters .................................... 5-7Setting Server Parameter File Parameter Values for Real Application Clusters ...................... 5-7Parameter File Search Order in Real Application Clusters.......................................................... 5-8
Initialization Parameter Use in Real Application Clusters.............................................................. 5-8Parameters that Must Have Identical Settings on All Instances ................................................. 5-9Parameters That Must Have Unique Settings on All Instances .................................................. 5-9Parameters that Should Have Identical Settings on All Instances.............................................. 5-9
Summary of Parameter Use in Real Application Clusters Databases ........................................ 5-10Backing Up the Server Parameter File............................................................................................... 5-13
6 Introduction to Workload Management
Introduction to Workload Management and Application High Availability............................... 6-1Service Deployment Options................................................................................................................. 6-2
Using Oracle Services ........................................................................................................................ 6-2Default Service Connections............................................................................................................. 6-4Connection Load Balancing.............................................................................................................. 6-4
Fast Application Notification................................................................................................................. 6-5Overview of Fast Application Notification .................................................................................... 6-6Application High Availability with Services and FAN................................................................ 6-7Managing Unplanned Outages........................................................................................................ 6-7Managing Planned Outages ............................................................................................................. 6-7Fast Application Notification High Availability Events .............................................................. 6-7Using Fast Application Notification Callouts ................................................................................ 6-8
Load Balancing Advisory........................................................................................................................ 6-9Overview of the Load Balancing Advisory.................................................................................... 6-9Configuring Your Environment to Use the Load Balancing Advisory...................................... 6-9Load Balancing Advisory FAN Events ....................................................................................... 6-10
Oracle Clients that Are Integrated with Fast Application Notification ..................................... 6-11Enabling Java Database Connectivity Clients to Receive FAN Events ................................... 6-12Enabling Oracle Call Interface Clients to Receive FAN High Availability Events ............... 6-13Enabling ODP.NET Clients to Receive FAN High Availability Events.................................. 6-14Enabling ODP.NET Clients to Receive FAN Load Balancing Advisory Events.................... 6-15
Services and Distributed Transaction Processing in RAC ............................................................ 6-16Enabling Distributed Transaction Processing for Services ....................................................... 6-17
Administering Services ........................................................................................................................ 6-18
vi
Administering Services with Enterprise Manager, DBCA, PL/SQL, and SRVCTL ................. 6-20Administering Services with Enterprise Manager ..................................................................... 6-20Administering Services with the Database Configuration Assistant ...................................... 6-22Administering Services with the PL/SQL DBMS_SERVICE Package .................................... 6-23Administering Services with SRVCTL......................................................................................... 6-24
Measuring Performance by Service Using the Automatic Workload Repository .................... 6-26Service Thresholds and Alerts....................................................................................................... 6-27
Enabling Event Notification for Connection Failures in Real Application Clusters .............. 6-28
7 Configuring Recovery Manager and Archiving
Overview of Configuring RMAN for Real Application Clusters................................................... 7-1Configuring the RMAN Snapshot Control File Location ................................................................ 7-1Configuring the RMAN Control File and SPFILE Autobackup Feature....................................... 7-2Configuring Channels for RMAN in Real Application Clusters ................................................... 7-2
Configuring Channels to use Automatic Workload Balancing................................................... 7-3Configuring Channels to Use a Specific Channel.......................................................................... 7-3
Managing Archived Redo Logs Using RMAN in Real Application Clusters .............................. 7-3Archived Redo Log File Conventions in RAC.................................................................................... 7-4RMAN Archiving Configuration Scenarios........................................................................................ 7-5
Automatic Storage Management and Cluster File System Archiving Scheme......................... 7-5Non-Cluster File System Local Archiving Scheme ....................................................................... 7-6
Changing the Archiving Mode in Real Application Clusters ......................................................... 7-8Monitoring the Archiver Processes ................................................................................................. 7-8
8 Managing Backup and Recovery
RMAN Backup Scenario for Non-Cluster File System Backups .................................................... 8-1RMAN Restore Scenarios for Real Application Clusters ................................................................. 8-1
Cluster File System Restore Scheme................................................................................................ 8-2Non-Cluster File System Restore Scheme....................................................................................... 8-2Using RMAN or Enterprise Manager to Restore the Server Parameter File (SPFILE) ............ 8-2
RMAN Recovery Through Resetlogs in Real Application Clusters .............................................. 8-3RMAN and Oracle Net in Real Application Clusters ....................................................................... 8-3Instance Recovery in Real Application Clusters................................................................................ 8-3
Single Node Failure in Real Application Clusters......................................................................... 8-3Multiple-Node Failures in Real Application Clusters .................................................................. 8-4Using RMAN to Create Backups in Real Application Clusters .................................................. 8-4Channel Connections to Cluster Instances ..................................................................................... 8-4Node Affinity Awareness of Fast Connections ............................................................................ 8-5Deleting Archived Redo Logs after a Successful Backup............................................................. 8-5Autolocation for Backup and Restore Commands........................................................................ 8-5
Media Recovery in Real Application Clusters ................................................................................... 8-6Parallel Recovery in Real Application Clusters ................................................................................. 8-6
Parallel Recovery with RMAN......................................................................................................... 8-6Disabling Parallel Recovery.............................................................................................................. 8-7
Using a Flash Recovery Area in Real Application Clusters............................................................. 8-7
vii
9 Administrative Options
Enterprise Manager Tasks for Real Application Clusters ................................................................ 9-1Using Enterprise Manager Grid Control to Discover Nodes and Instances................................. 9-2Enterprise Manager Pages for Real Application Clusters ................................................................ 9-2
Databases Summary Page................................................................................................................. 9-2Cluster Database Home Page ........................................................................................................... 9-3Cluster Database Instances Pages.................................................................................................... 9-3The Databases Overview Page for Real Application Clusters .................................................... 9-4The Cluster Home Page for Real Application Clusters ................................................................ 9-4
Real Application Clusters Administration Procedures for Enterprise Manager ......................... 9-4Administering Enterprise Manager Jobs in Real Application Clusters ..................................... 9-4Administering Alerts in Real Application Clusters with Enterprise Manager......................... 9-5Performing Scheduled Maintenance Using Defined Blackouts in Enterprise Manager ......... 9-5
Additional Information About SQL*Plus in Real Application Clusters ..................................... 9-5How SQL*Plus Commands Affect Instances ................................................................................. 9-5Verifying that Instances are Running.............................................................................................. 9-6
Quiescing Real Application Clusters Databases ............................................................................... 9-6Quiesced State and Cold Backups ................................................................................................... 9-7
Administering System and Network Interfaces with OIFCFG....................................................... 9-7Defining Network Interfaces with OIFCFG ................................................................................... 9-7Syntax and Commands for the OIFCFG Command-Line Tool................................................... 9-8
Changing VIP Addresses ........................................................................................................................ 9-9
10 Adding and Deleting Nodes and Instances on UNIX-Based Systems
Cloning Oracle Clusterware and RAC Software in Grid Environments ................................... 10-1Quick-Start Node and Instance Addition and Deletion Procedures........................................... 10-2
Adding an Oracle Clusterware Home to a New Node ............................................................. 10-2Adding an Oracle Home with RAC to a New Node ................................................................. 10-4Deleting an Oracle Home with RAC from an Existing Node................................................... 10-4Deleting an Oracle Clusterware Home from an Existing Node............................................... 10-6
Detailed Node and Instance Addition and Deletion Procedures ................................................ 10-8Overview of Node Addition Procedures .......................................................................................... 10-8Step 1: Connecting New Nodes to the Cluster ................................................................................ 10-9
Making Physical Connections ....................................................................................................... 10-9Installing the Operating System.................................................................................................... 10-9Creating Oracle Users................................................................................................................... 10-10Verifying the Installation with the Cluster Verification Utility ............................................. 10-10Checking the Installation ............................................................................................................. 10-10
Step 2: Extending Clusterware and Oracle Software to New Nodes ........................................ 10-11Adding Nodes at the Vendor Clusterware Layer .................................................................... 10-11Adding Nodes at the Oracle Clusterware Layer ...................................................................... 10-11
Step 3: Preparing Storage on New Nodes....................................................................................... 10-14Raw Device Storage Preparation for New Nodes .................................................................... 10-15
Step 4: Adding Nodes at the Oracle RAC Database Layer.......................................................... 10-16Step 5: Adding Database Instances to New Nodes....................................................................... 10-17
Using Enterprise Manager to Add Database Instances to New Nodes ................................ 10-18
viii
Using DBCA in Interactive Mode to Add Database Instances to New Nodes .................... 10-18Using DBCA in Silent Mode to Add Database Instances to New Nodes ............................. 10-19
Adding Nodes that Already Have Clusterware and Oracle Software to a Cluster ................ 10-20Overview of Node Deletion Procedures ......................................................................................... 10-20Step 1: Deleting Instances from Real Application Clusters Databases .................................... 10-20
Using Enterprise Manager to Delete Database Instances from Existing Nodes .................. 10-21Using DBCA in Interactive Mode to Delete Database Instances from Existing Nodes ...... 10-21Using DBCA in Silent Mode to Delete Instance from Existing Nodes.................................. 10-22
Step 2: Deleting Nodes from Real Application Clusters Databases ......................................... 10-22Step 3: ASM Instance Clean-Up Procedures for Node Deletion................................................ 10-25
11 Adding and Deleting Nodes and Instances on Windows-Based Systems
Cloning Oracle Clusterware and RAC Software in Grid Environments ................................... 11-1Quick-Start Node and Database Instance Addition and Deletion Procedures......................... 11-2
Adding an Oracle Clusterware Home to a New Node ............................................................. 11-2Adding an Oracle Home with RAC to a New Node ................................................................. 11-3Deleting an Oracle Home with RAC from an Existing Node................................................... 11-4Deleting an Oracle Clusterware Home from an Existing Node............................................... 11-5
Detailed Node and Database Instance Addition and Deletion Procedures .............................. 11-7Overview of Node Addition Procedures .......................................................................................... 11-8Step 1: Connecting New Nodes to the Cluster ................................................................................ 11-8
Making Physical Connections ....................................................................................................... 11-8Installing the Operating System.................................................................................................... 11-9Verifying the Installation with the Cluster Verification Utility................................................ 11-9Checking the Installation ............................................................................................................... 11-9
Step 2: Extending Oracle Software to New Nodes at the Oracle Clusterware Layer ............. 11-10Step 3: Preparing Storage on New Nodes ....................................................................................... 11-12
Raw Device Storage Preparation for New Nodes .................................................................... 11-13Step 4: Adding Nodes at the Oracle RAC Database Layer.......................................................... 11-15Step 5: Adding Database Instances to New Nodes....................................................................... 11-16
Using Enterprise Manager to Add Database Instances to New Nodes ................................ 11-16Using DBCA in Interactive Mode to Add Database Instances to New Nodes .................... 11-17Using DBCA in Silent Mode to Add Database Instances to New Nodes ............................. 11-18Connecting to iSQL*Plus after Adding a Node ........................................................................ 11-18
Adding Nodes that Already Have Clusterware and Oracle Software to a Cluster ................ 11-19Overview of Node Deletion Procedures ......................................................................................... 11-19Step 1: Deleting Instances from Real Application Clusters Databases .................................... 11-19
Using Enterprise Manager to Delete Database Instances from Existing Nodes .................. 11-20Using DBCA in Interactive Mode to Delete Database Instances from Existing Nodes ...... 11-20Using DBCA in Silent Mode to Delete Instance from Existing Nodes.................................. 11-21
Step 2: Deleting Nodes from Real Application Clusters Databases ......................................... 11-21Step 3: ASM Instance Clean-Up Procedures for Node Deletion................................................ 11-24
12 Design and Deployment Techniques
Service Configuration Recommendations for High Availability ................................................ 12-1Service Topologies and Workload Management in Real Application Clusters..................... 12-1Recommended Real Application Clusters Service Configurations ......................................... 12-1
ix
Automatic Workload Repository.................................................................................................. 12-2Setting Service Levels and Thresholds......................................................................................... 12-2How Oracle Clusterware Manages Service Relocation ............................................................. 12-3
General Database Deployment Topics for Real Application Clusters ....................................... 12-3Tablespace Use in Real Application Clusters.............................................................................. 12-3Object Creation and Performance in Real Application Clusters ............................................. 12-3Node Addition and Deletion and the SYSAUX Tablespace in Real Application Clusters .. 12-3Distributed Transactions and Real Application Clusters.......................................................... 12-4
13 Monitoring Performance
Overview of Monitoring Real Application Clusters Databases .................................................. 13-1Verifying the Interconnect Settings for Real Application Clusters............................................. 13-1
Influencing Interconnect Processing ............................................................................................ 13-1Performance Views in Real Application Clusters........................................................................... 13-2Real Application Clusters Performance Statistics .......................................................................... 13-2
The Content of Real Application Clusters Statistics .................................................................. 13-2Automatic Workload Repository in Real Application Clusters Environments ........................ 13-3Monitoring Real Application Clusters Statistics and Events ....................................................... 13-3
RAC Statistics and Events in AWR and Statspack Reports ...................................................... 13-3Real Application Clusters Wait Events........................................................................................ 13-3Monitoring Performance by Analyzing GCS and GES Statistics ............................................. 13-4Analyzing Cache Fusion Transfer Impact Using GCS Statistics .............................................. 13-5Analyzing Response Times Based on Wait Events .................................................................... 13-6
Monitoring Performance with Oracle Enterprise Manager .......................................................... 13-7Overview of Enterprise Manager Monitoring ............................................................................ 13-7Collection-Based Monitoring......................................................................................................... 13-8Real-Time Performance Monitoring............................................................................................. 13-9Using the Cluster Database Performance Page .......................................................................... 13-9Using the Cluster Database Instance Performance Page......................................................... 13-16Using the Cluster Performance Page.......................................................................................... 13-17Using the Cluster Interconnects Page ........................................................................................ 13-17
14 Making Applications Highly Available Using Oracle Clusterware
Overview of Using the Oracle Clusterware Commands to Enable High Availability ............ 14-1Overview of Managing Custom Applications with Oracle Clusterware Commands ............ 14-3Creating Application Profiles ............................................................................................................. 14-3
Application Resource Profiles ....................................................................................................... 14-4Example of Using Oracle Clusterware Commands to Create Application Resources............. 14-7
Using crs_profile to Create An Application Resource Profile .................................................. 14-7The Oracle Clusterware Required Resources List ...................................................................... 14-8Application Placement Policies..................................................................................................... 14-9Optional Resources in Placement Decisions ............................................................................... 14-9
Oracle Clusterware Action Program Guidelines .......................................................................... 14-10How Oracle Clusterware Runs Action Programs ................................................................... 14-10User Defined Attributes ............................................................................................................... 14-11Windows crsuser Program .......................................................................................................... 14-11
x
Using Oracle Clusterware Commands ............................................................................................ 14-12Registering Application Resources............................................................................................. 14-12Starting Application Resources................................................................................................... 14-12Relocating Applications and Application Resources............................................................... 14-13Stopping Applications and Application Resources ................................................................. 14-13Managing Automatic Oracle Clusterware Resource Operations for Action Scripts........... 14-14Unregistering Applications and Application Resources......................................................... 14-15Displaying Clusterware Application and Application Resource Status Information ........ 14-16
15 Application-Specific Deployment Topics
General Deployment Strategies for Real Application Clusters-Based Applications .............. 15-1Deploying OLTP Applications in Real Application Clusters ...................................................... 15-1
Flexible Implementation with Cache Fusion .............................................................................. 15-1Deploying Data Warehouse Applications with Real Application Clusters .............................. 15-2
Speed-Up for Data Warehouse Applications on Real Application Clusters .......................... 15-2Parallel Execution in Data Warehouse Systems and RAC........................................................ 15-2Using Parallel Instance Groups..................................................................................................... 15-2
Data Security Considerations in Real Application Clusters ........................................................ 15-2Transparent Data Encryption and Wallets .................................................................................. 15-3Windows Firewall Considerations ............................................................................................... 15-3
A Troubleshooting
Overview of Troubleshooting Real Application Clusters............................................................... A-1Diagnosing Oracle Clusterware High Availability Components .................................................. A-1
Dynamic Debugging......................................................................................................................... A-2Component Level Debugging ......................................................................................................... A-2Oracle Clusterware Shutdown and Startup .................................................................................. A-2Enabling and Disabling Oracle Clusterware Daemons............................................................... A-3Diagnostics Collection Script........................................................................................................... A-3The Oracle Clusterware Alerts ........................................................................................................ A-3Resource Debugging......................................................................................................................... A-4Checking the Health of the Clusterware ....................................................................................... A-4Clusterware Log Files and the Unified Log Directory Structure ............................................... A-4Troubleshooting the Oracle Cluster Registry................................................................................ A-5Enabling Additional Tracing for Real Application Clusters High Availability....................... A-8
Diagnosing Oracle Real Application Clusters Components .......................................................... A-8Where to Find Files for Analyzing Errors ..................................................................................... A-8Using Instance-Specific Alert Files in Real Application Clusters .............................................. A-9Enabling Tracing for Java-Based Tools and Utilities in Real Application Clusters .............. A-10Resolving Pending Shutdown Issues ........................................................................................... A-10
Using the Cluster Verification Utility ............................................................................................... A-10Cluster Verification Utility Requirements................................................................................... A-11Understanding CVU Commands, Help, Output, and Nodelist Shortcuts ............................ A-12Performing Various CVU Tests..................................................................................................... A-14Known Issues for the Cluster Verification Utility ...................................................................... A-18
xi
B High Availability Oracle Clusterware Command-Line Reference and C API
Using Oracle Clusterware Commands ................................................................................................ B-1Application Profile Syntax............................................................................................................... B-1Security and Permissions ................................................................................................................. B-1
The Oracle Clusterware Commands.................................................................................................... B-2crs_getperm........................................................................................................................................ B-3crs_profile........................................................................................................................................... B-3crs_register ......................................................................................................................................... B-6crs_relocate......................................................................................................................................... B-8crs_setperm ...................................................................................................................................... B-10crs_stat .............................................................................................................................................. B-10crs_start............................................................................................................................................. B-13crs_stop ............................................................................................................................................. B-14crs_unregister .................................................................................................................................. B-15
C Application Programming Interface to Oracle Clusterware ..................................................... B-16clscrs_init_crs ................................................................................................................................... B-16clscrs_term_crs................................................................................................................................. B-16clscrs_getnodename........................................................................................................................ B-17clscrs_env_create ............................................................................................................................. B-17clscrs_env_set................................................................................................................................... B-17clscrs_env_delete............................................................................................................................. B-18clscrs_env_format............................................................................................................................ B-18clscrs_start_resource ....................................................................................................................... B-18clscrs_stop_resource ....................................................................................................................... B-19clscrs_check_resource..................................................................................................................... B-19clscrs_register_resource.................................................................................................................. B-20clscrs_unregister_resource............................................................................................................. B-21clscrs_stat.......................................................................................................................................... B-21
Functions for Managing Resource Structures.................................................................................. B-22Export Operations ........................................................................................................................... B-22
C Oracle Clusterware Messages
CRS—Oracle Clusterware Messages ................................................................................................... C-1
D Oracle Cluster Registry Configuration Tool Command Syntax
The OCR Configuration Tool Command Syntax and Options ...................................................... D-1
E Server Control Utility Reference
Overview of SRVCTL for Administering Real Application Clusters........................................... E-1Guidelines for Using SRVCTL in Real Application Clusters...................................................... E-1Obtaining Command-Line Help for SRVCTL .............................................................................. E-2
SRVCTL Command Syntax and Options ........................................................................................... E-2SRVCTL Cluster Database Configuration Tasks .............................................................................. E-2SRVCTL General Cluster Database Administration Tasks ............................................................ E-3SRVCTL Node-Level Tasks ................................................................................................................... E-3
xii
SRVCTL Command Reference ............................................................................................................. E-3SRVCTL Commands ............................................................................................................................... E-4
SRVCTL Commands Summary ...................................................................................................... E-4SRVCTL Objects Summary.............................................................................................................. E-4srvctl add ............................................................................................................................................ E-5srvctl config........................................................................................................................................ E-8srvctl enable ..................................................................................................................................... E-10srvctl disable .................................................................................................................................... E-12srvctl start ......................................................................................................................................... E-14srvctl stop ......................................................................................................................................... E-17srvctl modify .................................................................................................................................... E-20srvctl relocate ................................................................................................................................... E-24srvctl status ...................................................................................................................................... E-25srvctl getenv..................................................................................................................................... E-27srvctl setenv and unsetenv............................................................................................................. E-29srvctl remove.................................................................................................................................... E-33
F Oracle Real Application Clusters Tools Messages
Overview of Real Application Clusters-Specific Messages ........................................................... F-1Prefixes and Message Codes for RAC-Specific Messages........................................................... F-2Types of Real Application Clusters Messages and Related Files............................................... F-2
PRKA—Cluster Node Applications Messages .................................................................................. F-2PRKC—Cluster Command Messages.................................................................................................. F-4PRKD—Global Services Daemon Messages ................................................................................... F-14PRKE—Global Services Daemon Controller Utility Messages ................................................... F-14PRKH—Server Manager (SRVM) Messages.................................................................................... F-15PRKI—Cluster Pre-Install Messages ................................................................................................. F-16PRKN—Server Manager (SRVM) System Library Messages ....................................................... F-18PRKO—Server Control (SRVCTL) Utility Messages ..................................................................... F-18PRKP—Cluster Database Management Messages ......................................................................... F-22PRKR—Cluster Registry Messages ................................................................................................... F-29PRKS—Automatic Storage Management Messages....................................................................... F-35PRKU—Command-Line Parser Utility Messages........................................................................... F-39PRKV—Virtual IP Configuration Assistant Messages .................................................................. F-39
Index
xiii
Preface
The Oracle Database Oracle Clusterware and Oracle Real Application Clusters Administration and Deployment Guide describes the Oracle Clusterware and Real Application Clusters (RAC) architectures and provides an overview of these products. This book also describes administrative and deployment topics for Oracle Clusterware and RAC.
Information in this manual applies to RAC as it runs on all platforms unless otherwise noted. In addition, the content of this manual supplements administrative and deployment topics for Oracle single-instance databases that appear in other Oracle documentation. Where necessary, this manual refers to platform-specific documentation. This Preface contains these topics:
■ Audience
■ Documentation Accessibility
■ Related Documents
■ Conventions
AudienceThe Oracle Database Oracle Clusterware and Oracle Real Application Clusters Administration and Deployment Guide is intended for database administrators, network administrators, and system administrators who perform the following tasks:
■ Install and configure RAC databases
■ Administer and manage RAC databases
■ Manage and troubleshoot clusters and networks that use RAC
To use this document, you should be familiar with the administrative procedures described in Oracle Database 2 Day DBA and the Oracle Database Administrator's Guide. You should also read Oracle Database Concepts to become familiar with Oracle database concepts. You should also be familiar with installing and configuring RAC as described in the platform-specific RAC installation guides.
Documentation AccessibilityOur goal is to make Oracle products, services, and supporting documentation accessible, with good usability, to the disabled community. To that end, our documentation includes features that make information available to users of assistive technology. This documentation is available in HTML format, and contains markup to facilitate access by the disabled community. Accessibility standards will continue to
xiv
evolve over time, and Oracle is actively engaged with other market-leading technology vendors to address technical obstacles so that our documentation can be accessible to all of our customers. For more information, visit the Oracle Accessibility Program Web site at
http://www.oracle.com/accessibility/
Accessibility of Code Examples in DocumentationScreen readers may not always correctly read the code examples in this document. The conventions for writing code require that closing braces should appear on an otherwise empty line; however, some screen readers may not always read a line of text that consists solely of a bracket or brace.
Accessibility of Links to External Web Sites in DocumentationThis documentation may contain links to Web sites of other companies or organizations that Oracle does not own or control. Oracle neither evaluates nor makes any representations regarding the accessibility of these Web sites.
TTY Access to Oracle Support ServicesOracle provides dedicated Text Telephone (TTY) access to Oracle Support Services within the United States of America 24 hours a day, seven days a week. For TTY support, call 800.446.2398.
Related DocumentsFor more information, refer to the Oracle resources listed in this section.
■ Platform-specific Oracle Clusterware and RAC installation guides
■ Oracle Database 2 Day DBA
■ Oracle Database Administrator's Guide
■ Oracle Database Net Services Administrator's Guide
■ Oracle Database Platform Guide for Microsoft Windows (32-Bit)
■ Oracle Database 10g Administrator's Reference Release 1 (10.2) for UNIX Systems: AIX-Based Systems, HP-UX, Tru64 UNIX, Linux, and the Solaris Operating System (SPARC)
Database error messages descriptions are available online or by way of a Tahiti documentation search. Oracle Clusterware messages and RAC-specific java tool messages appear in Appendix C and Appendix F of this document respectively.
ConventionsThe following text conventions are used in this document:
Convention Meaning
boldface Boldface type indicates graphical user interface elements associated with an action, or terms defined in text or the glossary.
italic Italic type indicates book titles, emphasis, or placeholder variables for which you supply particular values.
monospace Monospace type indicates commands within a paragraph, URLs, code in examples, text that appears on the screen, or text that you enter.
xv
What's New in Real Application ClustersAdministration and Deployment?
This section describes the new administration and deployment features for Oracle Real Application Clusters (RAC) for the following releases:
■ Oracle Database 10g Release 2 (10.2) New Features in RAC Administration and Deployment
■ Oracle Database 10g Release 1 (10.1) New Features for RAC Administration
Oracle Database 10g Release 2 (10.2) New Features in RAC Administration and Deployment
This section describes the Oracle Database 10g release 2 (10.2) features for RAC administration.
■ Oracle Clusterware
Oracle Clusterware, formerly known as Cluster Ready Services (CRS) is an integrated cluster management solution that enables you to link multiple servers so that they function as a single system or cluster. The Oracle Clusterware simplifies the infrastructure required for RAC because it is integrated with the Oracle Database. In addition, Oracle Clusterware is also available for use with single-instance databases and applications that you deploy on clusters.
See Also: Oracle Database New Features for a complete description of the new features in Oracle Database 10g release 2 (10.2) and Oracle Database 2 Day DBA for an introduction to RAC administration
See Also:
■ Chapter 1, "Introduction to Oracle Clusterware and Oracle Real Application Clusters", Chapter 14, "Making Applications Highly Available Using Oracle Clusterware", and Appendix B, "High Availability Oracle Clusterware Command-Line Reference and C API" for more information about Oracle Clusterware, the Oracle Clusterware API, and the Oracle Clusterware API commands
■ Your platform-specific Oracle Clusterware and RAC installation guide for more information about installing Oracle Clusterware
xvi
■ The Real Application Clusters Deployment Book Merged into the Administration Book and Oracle Clusterware designated as a separate component
Information that was previously in the Oracle Real Application Clusters Deployment and Performance Guide and the Real Application Clusters Administrator’s Guide is combined into one book. The title of this book is Oracle Database Oracle Clusterware and Oracle Real Application Clusters Administration and Deployment Guide. In addition, because you can now use Oracle Clusterware for single-instance Oracle databases within clustered environments, Oracle Clusterware is presented as a separate, portable Oracle component.
■ Oracle Clusterware High Availability Application Programming Interface Support
You can now use the Oracle Clusterware high availability components to make your customized applications highly available. You can configure high availability features for applications that are inside or outside of the Oracle database environment. In addition, the functionality provided by some of the command-line interfaces is available through the application programming interfaces (API).
■ Cluster Verification Utility
The Cluster Verification Utility (CVU) verifies a wide range of cluster and RAC-specific components such as shared storage devices, networking configurations, system requirements, Oracle Clusterware, groups, and users. You can use CVU for pre- and post-installation checks of your cluster environment. You can also use CVU to verify your environment when performing administrative operations such as installation, storage management, node addition, and troubleshooting. The OUI runs CVU immediately after you successfully install Oracle Clusterware.
■ Extending RAC Databases by Cloning Oracle Clusterware and Oracle Real Application Clusters nodes and instances
The preferred method to extend RAC databases is to use Enterprise Manager Grid Control to clone nodes and instances as described in Oracle Universal Installer and OPatch User's Guide. Cloning enables you to copy base images of Oracle Clusterware and RAC software onto other nodes that have identical hardware and base software. You can also use cloning to create new clusters.
Note: You can install the Oracle Clusterware high availability Application Programming Interface (API) from the Oracle Database 10g release 10.2 client installation media.
See Also: Your platform-specific Oracle Clusterware and RAC installation guide for more information about installing Oracle Clusterware
See Also: Chapter 14, "Making Applications Highly Available Using Oracle Clusterware", and Appendix B, "High Availability Oracle Clusterware Command-Line Reference and C API" for more information about Oracle Clusterware, the Oracle Clusterware API, and Oracle Clusterware API commands
See Also: "Using the Cluster Verification Utility" on page A-10 for more information about CVU
xvii
■ Oracle Load Balancing Advisory
Applications using a RAC database need to balance the workload across the cluster. The Oracle Database 10g release 2 load balancing advisory assists in the balancing of application workloads across designated resources. The load balancing advisory monitors workload activity across the cluster for each instance on which a service is active. The advisory provides a percentage value to indicate how much of the workload should be sent to a particular instance. The advisory also provides a service quality flag to indicate how well an instance is responding to service requests. Oracle provides this feedback as an entry in the automatic workload repository and Oracle publishes a Fast Application Notification (FAN) event. To take advantage of the load balancing advisory, applications can use integrated clients or clients that use the Runtime Connection Load Balancing feature, or applications can directly subscribe to the FAN events.
■ Oracle RAC Runtime Connection Load Balancing using JDBC and Oracle Data Provider for .NET (ODP.NET)
Oracle supports Runtime Connection Load Balancing to balance work requests across all of the instances of a RAC database using service level information to select connections from a connection pool. The Oracle Database 10g client enables you to use Runtime Connection Load Balancing when using Java Database Connectivity (JDBC) or ODP.NET connection pools.
Runtime Connection Load Balancing balances work requests across instances based on a service’s real-time information. The connection cache manager uses RAC workload metrics and the load balancing policies to select the optimal instance to process a connection request. This results in efficient database resource usage with a balanced and dynamic distribution of the workload among RAC instances based on workload metrics and distribution policy.
■ Oracle Fast Connection Failover (FCF)
You can use FCF with JDBC, OCI, and ODP.NET to recover sessions when UP or DOWN events are published from clients. In the case of a DOWN event, Oracle cleans up any sessions in the connection pool that go to the instance that stops. For UP events, Oracle creates new connections to the recently-started instance. Clients can use any of the three connection protocols to accept event information that Runtime Connection Load Balancing publishes to re-create sessions and initiate failover. In addition, your chosen connection protocol, JDBC, OCI, or ODP.NET, reacts to throughput information that Runtime Connection Load Balancing publishes to choose the most appropriate connection.
■ Transparent Data Encryption and Real Application Clusters
See Also: Chapter 10, "Adding and Deleting Nodes and Instances on UNIX-Based Systems" and Chapter 11, "Adding and Deleting Nodes and Instances on Windows-Based Systems" for more information about adding or deleting nodes
Note: ODP.NET and OCI do not process UP events.
See Also: Chapter 6, "Introduction to Workload Management" for more information about services and the Oracle application development documentation set for more information about this feature
xviii
Transparent Data Encryption protects data that is stored in Oracle datafiles by preventing access to the data using means other than the normal database access mechanisms. This feature also provides secure storage and management of the encryption keys using a module that is external to the database. Thus, you can encrypt database column access and also more effectively manage encryption key access.
Using Transparent Data Encryption in a RAC environment requires that all of the database instances have access to the same encryption keys. For this release, the only key storage mechanism that is supported is the Oracle Wallet. All of the RAC nodes must be able to access the wallet either through a shared disk or by way of a local copy. All other Transparent Data Encryption administration and usage requirements are the same as those for single-instance Oracle database deployments.
■ RAC Configuration Assistant Enhancements
The Database Configuration Assistant (DBCA), the Database Upgrade Assistant (DBUA) have been enhanced for this release as follows:
– DBCA Enhancements for Standalone ASM Configuration
When you create a RAC database that uses ASM, DBCA creates the database in the same Oracle home that the ASM instance uses. If you create the database using a different home than the Oracle home that has ASM and if the ASM version is 10.2, then DBCA automatically extends ASM from whichever Oracle home ASM is running in. However, if the ASM version is 10.1 and if ASM instances do not yet exist on all of the selected nodes, then DBCA displays an error, prompting you to either run the add node script or to upgrade ASM using the Database Upgrade Assistant (DBUA).
– DBCA Enhancements for Standalone ASM Disk Group Management
You can use DBCA to create and manage an ASM instance and its diskgroups independent of the database creation process. You can use DBCA to create, add, and mount an ASM disk group on any node in the cluster database. If an ASM instance does not yet exist on a node, then DBCA automatically extends ASM.
– Database Configuration Assistant, General Enhancements
When you use DBCA to create a database in version 10.1, you configure the database control agent and OMS on all of the hosts. For version 10.2, DBCA by default configures an agent on all of the hosts where the RAC database has an instance, but only configures OMS on the node where you invoked DBCA. However, you can always run EMCA to change this configuration and set up
See Also: "Data Security Considerations in Real Application Clusters" on page 15-2 and Oracle Database Advanced Security Administrator's Guide for additional information about transparent data encryption
See Also: "Automatic Storage Management in Real Application Clusters" on page 4-2 for more information about ASM in RAC
See Also: Oracle Database Administrator's Guide for more information about ASM

xix
multiple database console OMS configurations on other hosts. If the central agent (also called the Grid Control agent) is configured on the cluster, you can optionally register the database to the central agent.
– Database Upgrade Assistant Enhancements
You can also upgrade ASM independently or upgrade both the database and ASM at the same time. During an upgrade, the Oracle Database Upgrade Assistant (DBUA) automatically locates the Oracle Database 10g release 1 (10.1) Listener, and migrates it to Oracle Database 10g release 2. The Listener migration process stops the Listener in the existing Oracle home and restarts the Listener from the new Oracle home. During migration, client applications may not be able to connect to any databases that are registered to the Listener that is being migrated.
If you are upgrading a database from Oracle Database 10g release 1.0 to Oracle Database 10g release 2.0, then the Database Control configuration in the 10gR1 Oracle home is upgraded to Oracle Database 10g release 2.0 as well. If you are upgrading a pre-Oracle Database 10g release 1.0 database to Oracle Database 10g release 2.0, then a new release 2.0 Database Control configuration will be performed. If the Listener was migrated as part of an upgrade operation, then the Enterprise Manager configurations will be updated with new information.
■ ASM Storage Consolidation
One ASM instance on a node can support both single-instance Oracle database instances and RAC instances running on that node.
■ Dynamic RMAN Channel Allocation for RAC Environments
In previous releases, to use RMAN's parallelism in RAC, you had to manually allocate an RMAN channel for each instance. You can now use the syntax CONFIGURE DEVICE TYPE device PARALLELISM n in RAC in the same way as in single-instance Oracle database environments. Dynamic channel allocation is only applicable where each node can access all of the datafiles, archived logs, and so on, in a RAC environment.
■ Archived Log Redo Thread Parameter Requirements
You must use all three archived log redo thread identifier parameters, %r or %R, %s or %S, and %t or %T, when identifying archived redo log threads. This enables Oracle to create unique names for the archive logs across the incarnation.
See Also: Your platform-specific Oracle Clusterware and RAC installation guide for more information about DBCA
See Also: Oracle Database Upgrade Guide for more information about database upgrades
See Also: "Automatic Storage Management in Real Application Clusters" on page 4-2 for more information about ASM in RAC
See Also: "Configuring Channels for RMAN in Real Application Clusters" on page 7-2 for more information about dynamic RMAN channel allocation in RAC

xx
■ Changing the Archiving Mode
You no longer need to modify the CLUSTER_DATABASE parameter setting to change the archiving mode in RAC. You can change archive log mode as long as the database is mounted in the local instance and not open in any instances.
■ Failover Improvements for Distributed Transaction Processing (DTP) in RAC
Oracle DTP transaction environments should now use services to simplify management in a RAC environment. This feature automates the implementation of workarounds for using distributed transactions in RAC. This feature leverages the Oracle services framework so that failure detection, failover, and fail back are transparent to DBAs.
In this release, DTP services automate the steps that are required to configure a RAC database to support distributed transactions in DTP environments. A DTP service will only be active on one instance in the cluster at a time. By creating multiple DTP services, with one or more DTP services enabled on each RAC instance, all tightly coupled branches of a global distributed transaction go to the same instance. In this way, you can leverage all of the instances of a RAC database to balance the distributed transaction load and thereby maximize application throughput.
For current and future client implementations, such as those for JDBC, you do not need the invocation to the SYS.DBMS_SYSTEM.DIST_TXN_SYNC procedure because the OPS_FAILOVER flag is deprecated. Instead, the server manages the synchronization of in-doubt transaction information across the RAC instances for transaction recovery.
■ Multiple Oracle Clusterware Files
When you install Oracle Clusterware, you can select the option of using multiple voting disks that reside on independent shared physical disks. This removes the requirement that the voting disk use redundant storage; now Oracle provides the redundancy and you do not need to use third party storage solutions to duplicate the voting disk. You can also select the option of mirroring your Oracle Cluster Registry (OCR). In addition, you can replace, repair, or remove an OCR if it fails, and you can perform these operation while the OCR is online. If you do not select the OCR mirroring option during the Oracle Clusterware installation, then you can mirror the OCR later.
See Also: "Archived Redo Log File Conventions in RAC" on page 7-4 for more information about changing the archived redo log thread
See Also: "Changing the Archiving Mode in Real Application Clusters" on page 7-8 for more information about changing the archiving mode in RAC
See Also: "Services and Distributed Transaction Processing in RAC" on page 6-16 for information about how to configure DTP services to support distributed transactions
See Also: Chapter 3, "Administering Oracle Clusterware Components" and your platform-specific RAC installation guide for more information about multiplexing the voting disk and the OCR
xxi
■ Fast-Start Failover and Data Guard Environments
Fast-start failover, which is provided with the Oracle Data Guard broker, enables failovers to occur automatically when a RAC primary database becomes unavailable. This occurs without DBA intervention and with no loss of data. When fast-start failover is enabled, the broker determines if a failover is necessary and automatically initiates the failover to a pre-specified target RAC standby database instance.
Fast-start failover will not occur in a RAC environment until all instances comprising a RAC primary database have failed. Moreover, after a failover completes, the broker can automatically reinstate the former primary database as a standby database in the new configuration.
■ Expanded Enterprise Manager Monitoring Features
You can use expanded Enterprise Manager monitoring features to:
– Monitor cluster interconnects to see all of the configured interfaces and interfaces that individual cluster database instances use. A single page provides information such as the transfer rates achieved on these interfaces, and whether the interface is private or public. You can see historical data for interconnects from drilldowns across the cluster or for a specific database.
– Improve scalability when monitoring clusters with a higher number of nodes. For example, the Performance page displays the maximum, minimum, and average loads across the cluster hosts, not just average load of each node. This enables you to quickly assess whether the load is evenly distributed. You only need to drill down to detailed information if a problem appears at the higher level Performance page.
– View backup reports for a group of databases.
– Global Cache Block Access Latency drilldowns. You can View the Global Cache Block Access Latency summary chart to see the end-to-end elapsed time or latency for a block request. You can drill down from there to the Cluster Cache Coherency page to see the cluster cache coherency metrics for the entire cluster database. This enables you to identify processing trends and optimize performance for your RAC environment.
■ Expanded Enterprise Manager Instance Addition
You can use Enterprise Manager to add instances to a RAC database.
■ Expanded Enterprise Manager Service Administration
You can use expanded Enterprise Manager service features for either Database Control or Grid Control to perform the following services tasks:
– Create
– Delete
– Update
– Test connections
■ Server Control Utility (SRVCTL) Enhancements
If you create additional Listeners with non-default names, in other words, with names other than the name listener_nodename where nodename is the name
See Also: Oracle Data Guard Broker for more information about Data Guard
xxii
of the node on which the Listener resides, then you must start and stop these Listeners with SRVCTL commands.
■ MAX_COMMIT_PROPAGATION_DELAY—The MAX_COMMIT_PROPAGATION_DELAY parameter is deprecated. By default, commits on one instance are immediately visible on all of the other instances.
■ Deprecated Views
Several views were deprecated in Oracle Database 10g release 1 (10.1). The information in these deprecated views is either obsolete or the information was incorporated into the GV$INSTANCE_CACHE_TRANSFER, V$INSTANCE_CACHE_TRANSFER, GV$SEGMENT_STATISTICS and V$SEGMENT_STATISTICS views. The deprecated views are:
■ GV$CLASS_CACHE_TRANSFER and V$CLASS_CACHE_TRANSFER
■ GV$CACHE_LOCK and V$CACHE_LOCK
■ GV$FALSE_PING and V$FALSE_PING
■ GV$FILE_CACHE_TRANSFER and V$FILE_CACHE_TRANSFER
■ GV$GC_ELEMENTS_WITH_COLLISIONS and V$GC_ELEMENTS_WITH_COLLISIONS
■ GV$TEMP_CACHE_TRANSFER and V$TEMP_CACHE_TRANSFER
■ GV$LOCK_ACTIVITY and V$LOCK_ACTIVITY
■ Windows Firewall Usage on Windows Server 2003
Depending on which Oracle products you install and how they are used, you may need to perform additional Windows post-installation configuration tasks so that the Firewall products are functional on Windows Server 2003.
Oracle Database 10g Release 1 (10.1) New Features for RAC Administration
This section describes the Oracle Database 10g release 1 (10.1) features for RAC administration.
■ High Availability, Workload Management, and Services
Oracle Real Application Clusters introduces integrated clusterware known as Cluster Ready Services (CRS). You install CRS on all platforms on which you can run Oracle Real Application Clusters software. CRS manages cluster database functions including node membership, group services, global resource management, and high availability.
See Also: Appendix E, "Server Control Utility Reference" for more information about SRVCTL
See Also: Oracle Database Reference for more information about parameters and deprecated parameters
See Also: Windows Firewall Considerations on page 15-3 for more information about Windows Firewall post-installation requirements
xxiii
In Oracle Real Application Clusters, you can use services to define application workloads by creating a service for each application, group of applications, or for major components within complex applications. You can then define where and when the service runs and thus use services to control your workload.
In both cluster and non-cluster environments, the Automatic Workload Repository (AWR) tracks performance metrics using services. You can also set thresholds on performance metrics to automatically generate alerts if these thresholds are exceeded.
■ Enhanced Cluster Management Implementation
In earlier releases of the Oracle Database, cluster manager implementations on some platforms were referred to as "Cluster Manager". In Oracle Database 10g release (10.1), Cluster Ready Services (CRS) serves as the clusterware software, and Cluster Synchronization Services (CSS) is the cluster manager software for all platforms. The Oracle Cluster Synchronization Service Daemon (OCSSD) performs some of the clusterware functions on UNIX-based systems. On Windows-based systems, OracleCSService, OracleCRService, and OracleEVMService replace the Oracle Database OracleCMService9i.
Oracle Enterprise Manager, the Database Configuration Assistant (DBCA), and the Server Control (SRVCTL) Utility provide tools to administer clusters, RAC databases, and services.
■ Enterprise Manager Enhancements for RAC
This release includes the new Web-based Enterprise Manager Database Control with which you can manage a RAC database, and Enterprise Manager Grid Control for administering multiple RAC databases. Administration of RAC databases is greatly simplified because of more simplified drill-down tasks and because Enterprise Manager displays cluster-wide performance information. This is available for both single-instance Oracle and RAC databases.
Enterprise Manager has several summary pages that show cluster database performance information at a glance; you no longer have to log in to each cluster database or display instance-specific pages to obtain a global view of cluster database performance.
■ Expanded Enterprise Manager Service Administration
You can use expanded Enterprise Manager service features for either Enterprise Manager Database Control or Grid Control to perform the following services tasks:
– Edit
– Enable
– Disable
– Start
See Also: Oracle Real Application Clusters Quick Installation Guide for Oracle Database Standard Edition for Microsoft Windows to install the Oracle Database 10g Standard Edition with RAC on Windows systems
See Also: Oracle Database PL/SQL Packages and Types Reference for more information about the DBMS_SERVICE PL/SQL and DBMS_MONITOR packages and for more information about setting thresholds.

xxiv
– Stop
■ Enhancements for Flash Recovery Area and Automatic Disk-Based Backup and Recovery
■ A flash recovery area is an Automatic Storage Management (ASM) disk group, a file system, or a directory that serves as a default storage area for recovery files. RAC supports the Automatic Disk-Based Backup and Recovery feature that simplifies managing disk space and backup and recovery files.
■ Database Configuration Assistant (DBCA) Enhancements
■ Use DBCA to perform instance addition and deletion as well as database deletion.
■ Database Upgrade Assistant (DBUA) Enhancements
Use DBUA to upgrade from an earlier RAC version to Oracle Database 10g with RAC. When you upgrade from a Primary/Secondary environment, DBUA creates one service and assigns it to one instance as a preferred instance, and to the other instance as its available instance.
■ Server Control (SRVCTL) Enhancements
Enhancements to SRVCTL support the management of services and Automatic Storage Management (ASM) instances within RAC.
■ Enhanced Recovery Parallelism on Multiple CPU Systems
The default for instance, crash, and media recovery is to operate in parallel mode on multiple-CPU systems.
■ Revised Error Messages for High Availability and Management Tools in Real Application Clusters
■ The high availability error messages have been enhanced for this release.
■ Oracle Cluster Registry (OCR) Enhancements
The OCR contains configuration details for the cluster database and for high availability resources such as services, Virtual Interconnect Protocol (VIP) addresses, and so on.
■ GCS_SERVER_PROCESSES Parameter
There is a new, static parameter to specify the number of server processes for an instance's Global Cache Service (GCS) for routing inter-instance traffic among RAC instances. The default number of GCS server processes is calculated based on system resources with a minimum of 2. You can set this parameter to different values on different instances.
Introduction to Oracle Clusterware and Oracle Real Application Clusters 1-1
1Introduction to Oracle Clusterware and
Oracle Real Application Clusters
This chapter introduces Oracle Clusterware and Oracle Real Application Clusters (RAC) by describing these products as well as how to install, administer, and deploy them. This chapter describes Oracle Clusterware and RAC architectures as well as the software and hardware components for both of these products. This chapter also briefly describes workload management, services, and high availability for both single-instance Oracle databases and RAC environments. This chapter includes the following topics:
■ Oracle Clusterware and Oracle Real Application Clusters
■ The Oracle Clusterware Architecture and Oracle Clusterware Processing
■ The Real Application Clusters Architecture and Real Application Clusters Processing
■ Oracle Clusterware Components and High Availability
■ Workload Management with Real Application Clusters
■ Introduction to Installing Oracle Clusterware and Real Application Clusters
■ Additional Considerations and Features for Real Application Clusters
■ Managing Real Application Clusters Environments
Oracle Clusterware and Oracle Real Application ClustersA cluster comprises multiple interconnected computers or servers that appear as if they are one server to end users and applications. Oracle Database 10g Real Application Clusters (RAC) enables the clustering of the Oracle Database. RAC uses Oracle Clusterware for the infrastructure to bind multiple servers so that they operate as a single system.
Oracle Clusterware is a portable cluster management solution that is integrated with the Oracle database. The Oracle Clusterware is also a required component for using RAC. In addition, Oracle Clusterware enables both single-instance Oracle databases and RAC databases to use the Oracle high availability infrastructure. The Oracle Clusterware enables you to create a clustered pool of storage to be used by any combination of single-instance and RAC databases.
Oracle Clusterware is the only clusterware that you need for most platforms on which RAC operates. You can also use clusterware from other vendors if the clusterware is certified for RAC.
The Oracle Clusterware Architecture and Oracle Clusterware Processing
1-2 Oracle Clusterware and RAC Administration and Deployment Guide
Single-instance Oracle databases have a one-to-one relationship between the Oracle database and the instance. RAC environments, however, have a one-to-many relationship between the database and instances. In RAC environments, the cluster database instances access one database. The combined processing power of the multiple servers can provide greater throughput and scalability than is available from a single server. RAC is the Oracle Database option that provides a single system image for multiple servers to access one Oracle database. In RAC, each Oracle instance usually runs on a separate server.
RAC is a unique technology that provides high availability and scalability for all application types. The RAC infrastructure is also a key component for implementing the Oracle enterprise grid computing architecture. Having multiple instances access a single database prevents the server from being a single point of failure. RAC enables you to combine smaller commodity servers into a cluster to create scalable environments that support mission critical business applications. Applications that you deploy on RAC databases can operate without code changes.
The Oracle Clusterware Architecture and Oracle Clusterware ProcessingThe Oracle Clusterware is software that when installed on servers running the same operating system, enables the servers to be bound together to operate as if they were one server. The Oracle Clusterware requires two clusterware components: a voting disk to record node membership information and the Oracle Cluster Registry (OCR) to record cluster configuration information. The voting disk and the OCR must reside on shared storage. The Oracle Clusterware requires that each node be connected to a private network by way of a private interconnect.
The private interconnect that Oracle Clusterware requires is a separate network that you configure between the cluster nodes. This interconnect, which is required by RAC, can be the same network that the clusterware uses, but the interconnect should not be accessible by nodes that are not part of the cluster.
Oracle recommends that you configure a redundant interconnect to prevent the interconnect from being a single point of failure. Oracle also recommends that you use User Datagram Protocol (UDP) on a Gigabit Ethernet for your cluster interconnect. Crossover cables are not supported for use with Oracle Clusterware or RAC databases.
The Oracle Clusterware manages node membership and prevents split brain syndrome in which two or more instances attempt to control the database. This can occur in cases where there is a break in communication between nodes through the interconnect.
The Oracle Clusterware architecture supports high availability by automatically restarting stopped components. The Oracle Clusterware can automatically re-start a node to prevent problems with that node from affecting the availability of the rest of the RAC environment. In a RAC environment, all Oracle processes are under the control of the Oracle clusterware. The Oracle Clusterware also provides an application programming interface (API) that enables you to control other Oracle processes with Oracle Clusterware.
Oracle Clusterware Software Component Processing DetailsThe Oracle Clusterware comprises several background processes that facilitate cluster operations. The Cluster Synchronization Service (CSS), Event Management (EVM), and Oracle Cluster components communicate with other cluster component layers in the other instances within the same cluster database environment. These components are also the main communication links between the Oracle Clusterware high
The Oracle Clusterware Architecture and Oracle Clusterware Processing
Introduction to Oracle Clusterware and Oracle Real Application Clusters 1-3
availability components and the Oracle Database. In addition, these components monitor and manage database operations.
The following list describes the functions of some of the major Oracle Clusterware components. This list includes these components which are processes on Unix and Linux operating systems or services on Windows.
■ Cluster Synchronization Services (CSS)—Manages the cluster configuration by controlling which nodes are members of the cluster and by notifying members when a node joins or leaves the cluster. If you are using third-party clusterware, then the css process interfaces with your clusterware to manage node membership information.
■ Cluster Ready Services (CRS)—The primary program for managing high availability operations within a cluster. Anything that the crs process manages is known as a cluster resource which could be a database, an instance, a service, a Listener, a virtual IP (VIP) address, an application process, and so on. The crs process manages cluster resources based on the resource’s configuration information that is stored in the OCR. This includes start, stop, monitor and failover operations. The crs process generates events when a resource status changes. When you have installed RAC, crs monitors the Oracle instance, Listener, and so on, and automatically restarts these components when a failure occurs. By default, the crs process makes five attempts to restart a resource and then does not make further restart attempts if the resource does not restart.
■ Event Management (EVM)—A background process that publishes events that crs creates.
■ Oracle Notification Service (ONS)—A publish and subscribe service for communicating Fast Application Notification (FAN) events.
■ RACG—Extends clusterware to support Oracle-specific requirements and complex resources. Runs server callout scripts when FAN events occur.
■ Process Monitor Daemon (OPROCD)—This process is locked in memory to monitor the cluster and provide I/O fencing. OPROCD performs its check, stops running, and if the wake up is beyond the expected time, then OPROCD resets the processor and reboots the node. An OPROCD failure results in Oracle Clusterware restarting the node. OPROCD uses the hangcheck timer on Linux platforms.
In the following table, if a process has a (r) beside it, then the process runs as the root user. Otherwise the process runs as the oracle user.
See Also: Chapter 14, "Making Applications Highly Available Using Oracle Clusterware" for more detailed information about the Oracle Clusterware API
Note: On Windows-based operating systems, many of the components are threads of the Oracle process instead of separate processes.
Table 1–1 List of Processes and Windows Services associated with Oracle Clusterware
Oracle Clusterware Component
Linux/Unix Process Windows Services
Windows Processes
Process Monitor Daemon
oprocd (r) OraFenceService
The Oracle Clusterware Architecture and Oracle Clusterware Processing
1-4 Oracle Clusterware and RAC Administration and Deployment Guide
The Oracle Clusterware Software ComponentsWhen Oracle Clusterware operates, several platform-specific processes or services will also be running on each node in the cluster to support Oracle Clusterware. The Oracle Clusterware platform-specific UNIX-based processes and Windows-based services are described under the following headings:
■ Oracle Clusterware Processes on UNIX-Based Systems
■ Oracle Clusterware Services on Windows-Based Systems
Oracle Clusterware Processes on UNIX-Based SystemsThe Oracle Clusterware processes on UNIX-based systems are:
■ crsd—Performs high availability recovery and management operations such as maintaining the OCR and managing application resources. This process runs as the root user, or by a user in the admin group on Mac OS X-based systems. This process restarts automatically upon failure.
■ evmd—Event manager daemon. This process also starts the racgevt process to manage FAN server callouts.
■ ocssd—Manages cluster node membership and runs as the oracle user; failure of this process results in cluster restart.
■ oprocd—Process monitor for the cluster. Note that this process only appears on platforms that do not use vendor clusterware with Oracle Clusterware.
Oracle Clusterware Services on Windows-Based Systems The Oracle Clusterware services on Windows-based systems are:
■ OracleCRService—Performs high availability recovery and management operations such as maintaining the OCR and managing application resources. This process runs as the root user, or by a user in the admin group on Mac OS X-based systems. This process restarts automatically upon failure.
■ OracleCSService—Manages cluster node membership and runs as oracle user; failure of this process results in cluster restart.
RACG racgmain, racgimon
racgmain.exe racgimon.exe
Oracle Notification Service (ONS)
ons ons.exe
Event Manager evmd (r), evmd.bin, evmlogger
OracleEVMService evmlogger.exe, evmd.exe
Cluster Ready crsd.bin (r) OracleCRSService crsd.exe
Cluster Synchronization Services
init.cssd (r), ocssd (r), ocssd.bin
OracleCSService ocssd.exe
Note: RAC on Linux platforms can have multiple threads that appear as separate processes with separate process identifiers.
Table 1–1 (Cont.) List of Processes and Windows Services associated with Oracle
Oracle Clusterware Component
Linux/Unix Process Windows Services
Windows Processes
The Real Application Clusters Architecture and Real Application Clusters Processing
Introduction to Oracle Clusterware and Oracle Real Application Clusters 1-5
■ OracleEVMService—Event manager daemon. This process also starts the racgevt process to manage FAN server callouts.
■ OraFenceService—Process monitor for the cluster. Note that this process only appears on platforms that do not use vendor clusterware with Oracle Clusterware.
The Real Application Clusters Architecture and Real Application Clusters Processing
A RAC database is a logically or physically shared everything database. All datafiles, control files, PFILEs, and redo log files in RAC environments must reside on cluster-aware shared disks so that all of the cluster database instances can access them. All of the instances must also share the same interconnect. In addition, RAC databases can share the same interconnect that Oracle Clusterware uses.
Because a RAC database uses a shared everything architecture, RAC requires cluster-aware storage for all database files. It is your choice as to how to configure your disk, but you must use a supported cluster-aware storage solution. Oracle Database 10g provides Automatic Storage Management (ASM), which is the recommended solution to manage your disk. However you may also use a cluster-aware volume manager or a cluster file system (not required). In RAC, the Oracle Database software manages disk access and the Oracle software is certified for use on a variety of storage architectures. A RAC database can have up to 100 instances. Depending on your platform, you can use the following file storage options for RAC:
■ ASM, which Oracle recommends
■ Oracle Cluster File System (OCFS), which is available for Linux and Windows platforms, or a third-party cluster file system that is certified for RAC
■ A network file system
■ Raw devices
RAC databases differ architecturally from single-instance Oracle databases in that each RAC database instance also has:
■ At least one additional thread of redo for each instance
■ An instance-specific undo tablespace
All nodes in a RAC environment must connect to a Local Area Network (LAN) to enable users and applications to access the database. Applications should use the Oracle Database services feature to connect to an Oracle database. Services enable you to define rules and characteristics to control how users and applications connect to database instances. These characteristics include a unique name, workload balancing and failover options, and high availability characteristics. Oracle Net Services enables the load balancing of application connections across all of the instances in a RAC database.
Users can access a RAC database using a client-server configuration or through one or more middle tiers, with or without connection pooling. Users can be DBAs, developers, application users, power users, such as data miners who create their own searches, and so on.
Most public networks typically use TCP/IP, but you can use any supported hardware and software combination. RAC database instances can be accessed through a database’s defined, default IP address and through VIP addresses.
The Real Application Clusters Architecture and Real Application Clusters Processing
1-6 Oracle Clusterware and RAC Administration and Deployment Guide
In addition to the node’s host name and IP address, you must also assign a virtual host name and an IP address to each node. The virtual host name or VIP should be used to connect to the database instance. For example, you might enter the virtual host name CRM in the address list of the tnsnames.ora file.
A virtual IP address is an alternate public address that client connections use instead of the standard public IP address. To configure VIP addresses, you need to reserve a spare IP address for each node that uses the same subnet as the public network.
If a node fails, then the node’s VIP fails over to another node on which the VIP cannot accept connections. Generally, VIPs fail over when the node on which a VIP runs fails or if all interfaces for the VIP fail or are disconnected from the network. Clients that attempt to connect to the VIP receive a rapid connection refused error instead of waiting for TCP connect timeout messages. You configure VIP addresses in the address list for your database connection definition to enable connectivity. The following section describes the RAC software components in more detail.
The Real Application Clusters Software ComponentsRAC databases have two or more database instances that each contain memory structures and background processes. A RAC database has the same processes and memory structures as a single-instance Oracle database as well as additional process and memory structures that are specific to RAC. Any one instance’s database view is nearly identical to any other instance’s view within the same RAC database; the view is a single system image of the environment.
Each instance has a buffer cache in its System Global Area (SGA). Using Cache Fusion, RAC environments logically combine each instance’s buffer cache to enable the instances to process data as if the data resided on a logically combined, single cache.
To ensure that each RAC database instance obtains the block that it needs to satisfy a query or transaction, RAC instances use two processes, the Global Cache Service (GCS) and the Global Enqueue Service (GES). The GCS and GES maintain records of the statuses of each data file and each cached block using a Global Resource Directory (GRD). The GRD contents are distributed across all of the active instances, which effectively increases the size of the System Global Area for a RAC instance.
After one instance caches data, any other instance within the same cluster database can acquire a block image from another instance in the same database faster than by reading the block from disk. Therefore, Cache Fusion moves current blocks between instances rather than re-reading the blocks from disk. When a consistent block is needed or a changed block is required on another instance, Cache Fusion transfers the block image directly between the affected instances. RAC uses the private interconnect for inter-instance communication and block transfers. The Global Enqueue Service Monitor and the Instance Enqueue Process manages access to Cache Fusion resources as well as enqueue recovery processing.
Note: Do not to use the interconnect or the private network for user communication because Cache Fusion uses the private interconnect for inter-instance communications.
Note: The SGA size requirements for RAC are greater than the SGA requirements for single-instance Oracle databases due to Cache Fusion.
Oracle Clusterware Components and High Availability
Introduction to Oracle Clusterware and Oracle Real Application Clusters 1-7
These RAC-specific processes and the GRD collaborate to enable Cache Fusion. The RAC-specific processes and their identifiers are as follows:
■ LMS—Global Cache Service Process
■ LMD—Global Enqueue Service Daemon
■ LMON—Global Enqueue Service Monitor
■ LCK0—Instance Enqueue Process
If you use Network Attached Storage (NAS), then you are required to configure a second private network. Access to this network is typically controlled by the vendor’s software. The private network uses static IP addresses.
Oracle Clusterware Components and High Availability When you combine Oracle Clusterware and RAC, you can achieve excellent scalability and high availability. The Oracle Clusterware achieves this using the components that this section describes under the following topics:
■ The Oracle Clusterware Voting Disk and Oracle Cluster Registry
■ Oracle Clusterware High Availability and the Application Programming Interface
■ The Oracle Clusterware Software Components
The Oracle Clusterware Voting Disk and Oracle Cluster RegistryThe Oracle Clusterware requires the following two critical files:
■ Voting Disk—Manages cluster membership by way of a health check and arbitrates cluster ownership among the instances in case of network failures. RAC uses the voting disk to determine which instances are members of a cluster. The voting disk must reside on shared disk. For high availability, Oracle recommends that you have multiple voting disks. The Oracle Clusterware enables multiple voting disks but you must have an odd number of voting disks, such as three, five, and so on. If you define a single voting disk, then you should use external mirroring to provide redundancy.
■ Oracle Cluster Registry (OCR)—Maintains cluster configuration information as well as configuration information about any cluster database within the cluster. The OCR also manages information about processes that Oracle Clusterware controls. The OCR stores configuration information in a series of key-value pairs within a directory tree structure. The OCR must reside on shared disk that is accessible by all of the nodes in your cluster. The Oracle Clusterware can multiplex the OCR and Oracle recommends that you use this feature to ensure cluster high availability. You can replace a failed OCR online, and you can update the OCR through supported APIs such as Enterprise Manager, the Server Control Utility (SRVCTL), or the Database Configuration Assistant (DBCA).
Note: Many of the Oracle components that this section describes are in addition to the components that are described for single-instance Oracle databases in Oracle Database Concepts.
Note: Both the voting disks and the OCRs must reside on either cluster file system files or on shared raw devices that you configure before you install Oracle Clusterware and RAC.

Workload Management with Real Application Clusters
1-8 Oracle Clusterware and RAC Administration and Deployment Guide
Oracle Clusterware High Availability and the Application Programming InterfaceOracle Clusterware provides a high availability application programming interface (API) that you can use to enable Oracle Clusterware to manage applications or processes that run a cluster. This enables you to provide high availability for all of your applications. The Oracle Clusterware with ASM enables you to create a consolidated pool of storage to support both the single-instance Oracle databases and the RAC databases that are running on your cluster.
To maintain high availability, Oracle Clusterware components can respond to status changes to restart applications and processes according to defined high availability rules. In addition, you can use the Oracle Clusterware high availability framework by registering your applications with Oracle Clusterware and configuring the clusterware to start, stop, or relocate your application processes. That is, you can make custom applications highly available by using Oracle Clusterware to create profiles that monitor, relocate, and restart your applications. The Oracle Clusterware responds to FAN events that are created by a RAC database. Oracle broadcasts FAN events when cluster servers may become unreachable and network interfaces are slow or non-functional.
Workload Management with Real Application ClustersWorkload Management enables you to manage the distribution of workloads to provide optimal performance for users and applications. This includes providing the highest availability for database connections, rapid failure recovery, and balancing workloads optimally across the active configuration. Oracle Database 10g with RAC includes many features that can enhance workload management such as connection load balancing, fast connection failover (FCF), the load balancing advisory, and Runtime Connection Load Balancing. Workload management provides the greatest benefits to RAC environments. You can, however, take advantage of workload management by using Oracle services in single-instance Oracle Databases, especially those that use Data Guard or Streams. Workload management comprises the following components:
■ High Availability Framework—The RAC high availability framework enables the Oracle Database to maintain components in a running state at all times. Oracle high availability implies that Oracle Clusterware monitors and restarts critical components if they stop, unless you override the restart processing. The Oracle Clusterware and RAC also provide alerts to clients when configurations change. This enables clients to immediately react to the changes, enabling application developers to hide outages and reconfigurations from end users. The scope of Oracle high availability spans from the restarting of stopped Oracle processes in an Oracle database instance to failing over the processing of an entire instance to other available instances.
■ Load Balancing Advisory—This is the ability of the database to provide information to applications about the current service levels being provided by the database and its instances. Applications can take advantage of this information to direct connection requests to the instance that will provide the application request with the best service quality to complete the application’s processing. Oracle has integrated its Java Database Connectivity (JDBC) and Oracle Data Provider for .NET (ODP.NET) connection pools to work with the load balancing information.
See Also: Chapter 14, "Making Applications Highly Available Using Oracle Clusterware" for more detailed information about the Oracle Clusterware API
Introduction to Installing Oracle Clusterware and Real Application Clusters
Introduction to Oracle Clusterware and Oracle Real Application Clusters 1-9
Applications can use the integrated connection pools without programmatic changes.
■ Services—Oracle Database 10g introduces a powerful automatic workload management facility, called services, to enable the enterprise grid vision. Services are entities that you can define in RAC databases. Services enable you to group database workloads and route the work to the optimal instances that are assigned to process the service. Furthermore, you can use services to define the resources that Oracle assigns to process workloads and to monitor workload resources. Applications that you assign to services transparently acquire the defined workload management characteristics, including high availability and load balancing rules. Many Oracle database features are integrated with services, such as Resource Manager, which enables you to restrict the resources that a service can use within an instance. Some database features are also integrated with Oracle Streams, Advanced Queuing, to achieve queue location transparency, and the Oracle Scheduler, to map services to specific job classes.
In RAC databases, the service performance rules that you configure control the amount of work that Oracle allocates to each available instance for that service. As you extend your database by adding nodes, applications, components of applications, and so on, you can add more services.
■ Connection Load Balancing— Oracle Net Services provides connection load balancing for database connections. Connection load balancing occurs when the connection is created. Connections for a given service are balanced across all of the running instances that offer the service. You should define how you want connections to be balanced in the service definition. However, you must still configure Oracle Net Services. When you enable the load balancing advisory, the Listener uses the load balancing advisory for connection load balancing.
Introduction to Installing Oracle Clusterware and Real Application Clusters
This section introduces the storage options for RAC and the installation processes for both Oracle Clusterware and RAC under the following topics:
■ Oracle Clusterware Installation Process Description
■ Real Application Clusters Installation and Database Creation Process Description
■ Cloning Oracle Clusterware and RAC Software in Grid Environments
Oracle Clusterware Installation Process DescriptionThe Oracle Clusterware is distributed on the Oracle Database 10g installation media. The Oracle Universal Installer (OUI) installs Oracle Clusterware into a directory structure, which can be referred to as CRS_home, that is separate from other Oracle software running on the machine. Because Oracle Clusterware works closely with the operating system, system administrator access is required for some of the installation tasks. In addition, some of the Oracle Clusterware processes must run as the system administrator, which is generally the root user on Unix and Linux systems and the System Administrator user on Windows systems.
Before you install Oracle Clusterware, Oracle recommends that you run the Cluster Verification Utility (CVU) to ensure that your environment meets the Oracle
See Also: Chapter 6, "Introduction to Workload Management" for more information about workload management and services
Introduction to Installing Oracle Clusterware and Real Application Clusters
1-10 Oracle Clusterware and RAC Administration and Deployment Guide
Clusterware installation requirements. The OUI also automatically runs CVU at the end of the clusterware installation to verify various clusterware components. The CVU simplifies the installation, configuration, and overall management of the Oracle Clusterware installation process by identifying problems in cluster environments.
During the Oracle Clusterware installation, you must identify three IP addresses for each node that is going to be part of your installation. One IP address is for the private interconnect and the other is for the public interconnect. The third IP address is the virtual IP address that clients will use to connect to each instance.
The Oracle Clusterware installation process creates the voting disk and OCR on cluster-aware storage. If you select the option for normal redundant copies during the installation process, then Oracle Clusterware automatically maintains redundant copies of these files to prevent the files from becoming single points of failure. The normal redundancy feature also eliminates the need for third party storage redundancy solutions. When you use normal redundancy, Oracle Clusterware automatically maintains two copies of the Oracle Cluster Registry (OCR) file and three copies of the Voting Disk file.
Real Application Clusters Installation and Database Creation Process DescriptionThe RAC software is distributed as part of the Oracle Database 10g installation media. By default, the standard Oracle Database 10g software installation process installs the RAC option when it recognizes that you are performing the installation on a cluster. The OUI installs RAC into a directory structure, which can be referred to as Oracle_home, that is separate from other Oracle software running on the machine. Because OUI is cluster-aware, it installs the RAC software on all of the nodes that you defined to be part of the cluster. If you are using a certified cluster file system for the Oracle home, then only select the node that you are connected to for the installation.
You must first install Oracle Clusterware before installing RAC. After Oracle Clusterware is operational, you can use OUI to install the Oracle database software with the RAC components. During the installation, OUI runs DBCA to create your RAC database according to the options that you select. The DBCA also runs the Net Configuration Assistant (NETCA) to configure the network for your RAC environment.
Oracle recommends that you select ASM during the installation to simplify storage management; ASM automatically manages the storage of all database files within disk groups. You can also configure services during installation, depending on your processing requirements. If you are using the Oracle Database 10g Standard Edition, then you must use ASM for storing all of the database files.
By default, DBCA creates one service for your environment and this service is for the database. The default service is available on all instances in a RAC environment, unless the database is in restricted mode.
Note: If you choose external redundancy for the OCR and voting disk, then to enable redundancy, your disk subsystem must be configurable for RAID mirroring. Otherwise, your system may be vulnerable because the OCR and voting disk are single points of failure.
See Also: Oracle Database Net Services Administrator's Guide for more information about NETCA
Additional Considerations and Features for Real Application Clusters
Introduction to Oracle Clusterware and Oracle Real Application Clusters 1-11
Cloning Oracle Clusterware and RAC Software in Grid EnvironmentsThis section briefly summarizes the procedures for deploying RAC in grid environments that have large numbers of nodes using cloned images for Oracle Clusterware and RAC. Oracle cloning is the preferred method of extending your RAC environment by adding nodes and instances. To perform the cloning procedures that are summarized in this section, refer to the Oracle Universal Installer and OPatch User's Guide.You can also use Enterprise Manager Grid Control to perform cloning.
The cloning process assumes that you successfully installed an Oracle Clusterware home and an Oracle home with RAC on at least one node. In addition, all root scripts must have run successfully on the node from which you are extending your cluster database. To use Oracle cloning, first clone the Oracle Clusterware home and then clone the Oracle home with the RAC software.
To clone the Oracle Clusterware home, on UNIX-based systems create a tar file of the Oracle Clusterware home and copy the file to the new node's Oracle Clusterware home. On Windows-based systems you must create zip files. Then on UNIX-based systems create the required users and groups on the new nodes. On Windows-based systems, you do not need to create users and groups, but the user that performs the cloning should be the same user that performed the installation.
Extract the tar file, or unzip the zip file, and run the Oracle Universal Installer (OUI) in clone mode as described in the Oracle Universal Installer and OPatch User's Guide. Then run the installation scripts and repeat these steps on each node that you are adding. The process for cloning the Oracle home onto new nodes is similar to the process for cloning the Oracle Clusterware home. In addition, you must run the Oracle Net Configuration Assistant (NETCA) on each new node to create a Listener.
If you have not already created a database, then you can run the Database Configuration Assistant (DBCA) to create one. Finally, follow the post-cloning procedures to complete the extension of your RAC environment onto the new nodes.
Additional Considerations and Features for Real Application ClustersIn addition to configuring services to manage your workloads, also consider using the following features when you deploy RAC:
■ Scaling Your RAC Database—As mentioned, you can add nodes and instances to your RAC environment using Oracle cloning. If you choose to not use cloning, then you can extend your database by using the manual procedures that are described in Chapter 10, "Adding and Deleting Nodes and Instances on UNIX-Based Systems" or Chapter 11, "Adding and Deleting Nodes and Instances on Windows-Based Systems".
■ Enterprise Manager—Use Enterprise Manager to administer your entire RAC environment, not just the RAC database. Use Enterprise Manager to create and modify services, and to start and stop the cluster database instances and the cluster database. Enterprise Manager has additional features as detailed in the section "Overview of Using Enterprise Manager with Real Application Clusters" on page 2-4.
See Also: Oracle Database Net Services Administrator's Guide for more information about NETCA
See Also: Oracle Universal Installer and OPatch User's Guide for details about the Oracle cloning procedures
Managing Real Application Clusters Environments
1-12 Oracle Clusterware and RAC Administration and Deployment Guide
■ Recovery Manager (RMAN)—RMAN backs up, restores, and recovers datafiles, control files, server parameter files (SPFILEs) and archived redo logs. You can use RMAN with a media manager to back up files to external storage. You can also configure parallelism when backing up or recovering RAC databases. In RAC, RMAN channels can be dynamically allocated across all of the RAC instances. Channel failover enables failed operations on one node to continue on another node. You can use RMAN in RAC from the Oracle Enterprise Manager Backup Manager or from a command line.
■ Automatic undo management—Automatically manages undo processing.
■ Automatic segment space management (ASSM)—Automatically manages segment freelists and freelist groups.
■ Locally managed tablespaces—Enhances space management performance.
■ Cluster Verification Utility (CVU)—Use CVU to verify the status of your clusterware if you experience problems or use it whenever you reconfigure your cluster.
■ Sequences—If you use sequence numbers, then always use CACHE with the NOORDER option for optimal sequence number generation performance. With the CACHE option, however, you may have gaps in the sequence numbers. If your environment cannot tolerate sequence number gaps, then use the NOCACHE option or consider pre-generating the sequence numbers. If your application requires sequence number ordering but can tolerate gaps, then use CACHE and ORDER to cache and order sequence numbers in RAC. If your application requires ordered sequence numbers without gaps, then use NOCACHE and ORDER. This combination has the most negative effect on performance compared to other caching and ordering combinations.
■ Indexes—If you use indexes, consider alternatives, such as reverse key indexes, to optimize index performance. Reverse key indexes are especially helpful if you have frequent inserts to one side of an index, such as indexes that are based on insert date.
Managing Real Application Clusters EnvironmentsThis section describes the following RAC environment management topics:
■ Designing Real Application Clusters Environments
■ Administrative Tools for Real Application Clusters Environments
■ Monitoring Real Application Clusters Environments
■ Evaluating Performance in Real Application Clusters Environments
Designing Real Application Clusters EnvironmentsConsider performing the following steps during the design and development of applications that you are deploying on a RAC database. Consider tuning:
1. The design and the application
2. The memory and I/O
3. Contention
See Also: Chapter 7, "Configuring Recovery Manager and Archiving" for more information about RMAN
Managing Real Application Clusters Environments
Introduction to Oracle Clusterware and Oracle Real Application Clusters 1-13
4. The operating system
Consider using hash partitioning for insert-intensive online transaction processing (OLTP) applications. Hash partitioning:
■ Reduces contention on concurrent inserts into a single database structure
■ Affects sequence-based indexes when indexes are locally partitioned with a table and tables are partitioned on sequence-based keys
■ Is transparent to the application
If you hash partitioned tables and indexes for OLTP environments, then you can greatly improve performance in your RAC database. Note that you cannot use index range scans on an index with hash partitioning.
If you are using sequence numbers, then always use the CACHE option. If you use sequence numbers with the CACHE option, then:
■ Your system may lose sequence numbers
■ There is no guarantee of the ordering of the sequence numbers
Administrative Tools for Real Application Clusters EnvironmentsOracle enables you to administer a cluster database as a single system image through Enterprise Manager, SQL*Plus, or through RAC command-line interfaces such as Server Control (SRVCTL). You can also use several tools and utilities to manage your RAC environment and its components as follows:
■ Enterprise Manager—Enterprise Manager has both the Database Control and Grid Control GUI interfaces for managing both single instance and RAC environments.
■ Cluster Verification Utility (CVU)—CVU is a command-line tool that you can use to verify a range of cluster and RAC-specific components such as shared storage devices, networking configurations, system requirements, and Oracle Clusterware, as well as operating system groups and users. You can use CVU for pre-installation checks as well as for post-installation checks of your cluster environment. CVU is especially useful during pre-installation and during installation of Oracle Clusterware and RAC components. The OUI runs CVU after Oracle Clusterware and the Oracle installation to verify your environment.
Note: If an application does not scale on an SMP machine, then moving the application to a RAC database cannot improve performance.
Note: If your environment cannot tolerate sequence number gaps, then consider pre-generating the sequence numbers or use the ORDER and CACHE options.
See Also: Chapter 9 and Chapter 13 for more information about Enterprise Manager
See Also: "Using the Cluster Verification Utility" on page A-10 for more information about CVU
Managing Real Application Clusters Environments
1-14 Oracle Clusterware and RAC Administration and Deployment Guide
■ Server Control (SRVCTL)—SRVCTL is a command-line interface that you can use to manage a RAC database from a single point. You can use SRVCTL to start and stop the database and instances and to delete or move instances and services. You can also use SRVCTL to manage configuration information.
■ Cluster Ready Services Control (CRSCTL)—CRSCTL is a command-line tool that you can use to manage Oracle Clusterware. You can use CRSCTL to start and stop Oracle Clusterware. CRSCTL has many options such as enabling online debugging,
■ Oracle Interface Configuration Tool (OIFCFG)—OIFCFG is a command-line tool for both single-instance Oracle databases and RAC environments that you can use to allocate and de-allocate network interfaces to components. You can also use OIFCFG to direct components to use specific network interfaces and to retrieve component configuration information.
■ OCR Configuration Tool (OCRCONFIG)—OCRCONFIG is a command-line tool for OCR administration. You can also use the OCRCHECK and OCRDUMP utilities to troubleshoot configuration problems that affect the OCR.
Monitoring Real Application Clusters Environments Web-based Enterprise Manager Database Control and Grid Control enable you to monitor a RAC database. The Enterprise Manager Console is a central point of control for the Oracle environment that you access by way of a graphical user interface (GUI). Use the Enterprise Manager Console to initiate cluster database management tasks. Use Enterprise Manager Grid Control to administer multiple RAC databases. Also note the following points about monitoring RAC environments:
■ The global views, or GV$ views, are based on V$ views. The catclustdb.sql script creates the GV$ views. Run this script if you do not create your database with DBCA. Otherwise, DBCA runs this script for you.
■ Statspack is RAC-aware.
Evaluating Performance in Real Application Clusters EnvironmentsYou do not need to perform special tuning for RAC; RAC scales without special configuration changes. If your application performed well on a single-instance Oracle database, then it will perform well in a RAC environment. Many of the tuning tasks
See Also: Appendix E for more information about SRVCTL
See Also: "Diagnosing Oracle Clusterware High Availability Components" on page A-1 for more information about CRSCTL
See Also: "Administering System and Network Interfaces with OIFCFG" on page 9-7 for more information about OIFCFG
See Also: Chapter 3 and Appendix D for more information about managing the OCR
Note: Instead of using Statspak, Oracle recommends that you use the more sophisticated management and monitoring features of the Oracle Database 10g Diagnostic and Tuning packs which include the Automatic Database Diagnostic Monitor (ADDM).

Managing Real Application Clusters Environments
Introduction to Oracle Clusterware and Oracle Real Application Clusters 1-15
that you would perform on a single-instance Oracle database can also improve RAC database performance. This is especially true if your environment required scalability across a greater number of CPUs.
Some of the RAC-specific performance features are:
■ Dynamic Resource Allocation
– Oracle dynamically allocates Cache Fusion resources as needed
– The dynamic mastering of resources improves performance by keeping resources local to data blocks
■ Cache Fusion Enables A Simplified Tuning Methodology
– You do not have to tune any parameters for Cache Fusion
– No application-level tuning is necessary
– You can use a bottom-up tuning approach with virtually no effect on your existing applications
■ More Detailed Performance Statistics
– More views for RAC performance monitoring
– Enterprise Manager Database Control and Grid Control are Integrated with RAC

Managing Real Application Clusters Environments
1-16 Oracle Clusterware and RAC Administration and Deployment Guide
Introduction to Oracle Clusterware and RAC Administration and Deployment 2-1
2Introduction to Oracle Clusterware and RAC
Administration and Deployment
This chapter provides an overview of administering Oracle Clusterware and Real Application Clusters (RAC) environments. This chapter includes the following topics:
■ Real Application Clusters Documentation Overview
■ Introduction to Administering Real Application Clusters
■ Administering Real Application Clusters
■ Database Instance Management and Database Administration in RAC
Real Application Clusters Documentation OverviewThis section describes the RAC documentation set. This book, the Oracle Database Oracle Clusterware and Oracle Real Application Clusters Administration and Deployment Guide, provides RAC-specific administration and application deployment information.
This book describes how to administer the Oracle Clusterware components such as the voting disks and the Oracle Cluster Registry (OCR). This book also explains how to administer storage and how to use RAC scalability features to add and delete instances and nodes. This book also discusses how to use Recovery Manager (RMAN), and how to perform backup and recovery in RAC.
The Oracle Database Oracle Clusterware and Oracle Real Application Clusters Administration and Deployment Guide describes RAC deployment topics by explaining how to deploy automatic workload management and take advantage of high availability by using services. This book describes how the Automatic Workload Repository (AWR) tracks and reports service levels and how you can use service level thresholds and alerts to improve high availability in your RAC environment. This book also explains how to make your applications highly available by using Oracle Clusterware.
The Oracle Database Oracle Clusterware and Oracle Real Application Clusters Administration and Deployment Guide explains how to monitor and tune performance in RAC environments by using Oracle Enterprise Manager and by using information in AWR and Oracle performance views. This book also highlights application-specific deployment techniques for online transaction processing and data warehousing environments.
The appendices in this book describe:
■ Troubleshooting tips such as debugging and log file use and general information about installing and using the Cluster Verification Utility (CVU)
Introduction to Administering Real Application Clusters
2-2 Oracle Clusterware and RAC Administration and Deployment Guide
■ The Oracle Clusterware command-line reference
■ The Oracle Cluster Registry command syntax
■ How to use the Server Control (SRVCTL) utility to start and stop the database and instances, to manage configuration information, and to delete or move instances and services
■ RAC tools error messages
In addition to this book, refer to the platform-specific Oracle Real Application Clusters installation and configuration guide on your product installation media as described under the following heading.
Platform-Specific Oracle Real Application Clusters Installation and Configuration Guides
Each platform-specific Oracle Database 10g installation media contains a copy of an Oracle Real Application Clusters platform-specific installation and configuration guide in HTML and PDF formats. These RAC installation books contain the pre-installation, installation, and post-installation information for the various UNIX- and Windows-based platforms on which RAC operates.
Introduction to Administering Real Application ClustersInstall Oracle Clusterware and your Oracle Database 10g software with the Oracle Universal Installer (OUI) and create your database with the Database Configuration Assistant (DBCA). This ensures that your RAC environment has the optimal network configuration, database structure, and parameter settings for the environment that you selected. As a DBA, after installation your tasks are to administer your RAC environment at three levels:
■ Instance Administration
■ Database Administration
■ Cluster Administration
Administering Real Application ClustersUse the following tools to perform administrative tasks in RAC:
■ Cluster Verification Utility (CVU)—Install and use CVU before you install RAC to ensure that your configuration meets the minimum RAC installation requirements. Also use the CVU for on-going administrative tasks, such as node addition and node deletion.
■ Enterprise Manager—Oracle recommends that you use Enterprise Manager to perform administrative tasks whenever feasible
Note: Additional information for this release may be available in the Oracle Database 10g README or Release Notes. If these documents are available for this release, then they are on your Oracle product installation media.
See Also: Your platform-specific Oracle Clusterware and RAC installation guide for information about how to manually install CVU
Storage Management in Real Application Clusters
Introduction to Oracle Clusterware and RAC Administration and Deployment 2-3
■ Task-specific GUIs such as the Database Configuration Assistant (DBCA) and the Virtual Internet Protocol Configuration Assistant (VIPCA)
■ Command-line tools such as SQL*Plus, Server Control (SRVCTL), the Oracle Clusterware command-line interface, and the Oracle Interface Configuration tool (OIFCFG)
Voting Disk and Oracle Cluster Registry Device AdministrationYou can use multiple disks for both the voting disk and the Oracle Cluster Registry (OCR) disk to prevent them from becoming single points of failure. Administer these components as described in Chapter 3, "Administering Oracle Clusterware Components".
Database Instance Management and Database Administration in RACUse Enterprise Manager, SQL*Plus, or SRVCTL to administer database instances and RAC databases as described in Chapter 5, "Administering Database Instances and Cluster Databases".
Storage Management in Real Application ClustersWhen you create your database, you can create Automatic Storage Management (ASM) disk groups and configure mirroring for ASM disk groups using DBCA. After your RAC database is operational, you can administer ASM disk groups with Enterprise Manager or the SRVCTL utility as described in Chapter 4, "Administering Storage".
You can configure ASM in a separate standalone ASM-only home. This enables instances for non-RAC and RAC databases to share a single ASM instance on a node. You also have the option to upgrade ASM independently of your database upgrades.
The Oracle tools that you use to manage ASM, including DBCA, Database Upgrade Assistant (DBUA), Enterprise Manager, and the silent mode install and upgrade commands, include options to manage ASM instances and disk groups. For example, you can run DBCA to create a new ASM instance or ASM diskgroup independently of creating a database.
When you perform ASM-related options during installs, upgrades, or other operations, the tool you are using may automatically extend ASM to other nodes in your cluster. This can include installing ASM software into the same home as on the current node and starting the ASM instance. For example, if you use DBCA to create a database using a new Oracle home, then DBCA will attempt to extend ASM to the new Oracle home on all of the nodes you select.
In some cases, your current configuration may not be compatible with an ASM activity that you are trying to perform, either explicitly or with an automatic ASM extension to other nodes. Should you be using DBCA, as described earlier, to build a database using a new Oracle home, and if the ASM version is from an earlier release of the Oracle software but does not exist on all of the nodes you selected for the database, then ASM cannot be extended. Instead, the DBCA session displays an error, prompting you either to run the add node script or to upgrade ASM using the Database Upgrade Assistant (DBUA).

Oracle Clusterware for Real Application Clusters
2-4 Oracle Clusterware and RAC Administration and Deployment Guide
Oracle Clusterware for Real Application ClustersWhen you create a RAC database, you can also use DBCA to create services and assign them to instances. After your RAC database is operational, you can use Enterprise Manager, DBCA, or SRVCTL to create and administer services and high availability components as described in Chapter 6, "Introduction to Workload Management".
Other high availability components include node resources such as the Virtual Internet Protocol (VIP) address, the Global Services Daemon, the Oracle Notification Service, and the Oracle Net Listeners. These resources are automatically started when Oracle Clusterware starts the node and then automatically restarts them if they stop. The application level resources are the instances and the Oracle Clusterware background processes that run on each instance.
You can use the VIPCA to administer VIP addresses and you can use SRVCTL to administer other node resources. The information that describes the configuration of these components is stored in the Oracle Cluster Registry (OCR) that you can administer as described in Chapter 3, "Administering Oracle Clusterware Components".
Additional Real Application Clusters Administrative TopicsThis book contains the following additional RAC administrative topics:
■ Scalability—Adding instances and nodes to a RAC database as described in Chapter 10, "Adding and Deleting Nodes and Instances on UNIX-Based Systems" and Chapter 11, "Adding and Deleting Nodes and Instances on Windows-Based Systems"
■ Backup and Recovery—Configuring Recovery Manager (RMAN) and performing backup and recovery processing as described in Chapter 7, "Configuring Recovery Manager and Archiving" and Chapter 8, "Managing Backup and Recovery"
■ Making Applications Highly Available—Wrapping your custom applications with the Oracle Clusterware commands to use the Oracle Clusterware infrastructure to keep your applications highly available as described in Chapter 14, "Making Applications Highly Available Using Oracle Clusterware" and Appendix B, "High Availability Oracle Clusterware Command-Line Reference and C API"
■ Log Files—Administering information that Oracle records in log files as described in Appendix A, "Troubleshooting"
■ Using SRVCTL—Using SRVCTL to administer RAC instances, databases, services, and so on, as described in Appendix E, "Server Control Utility Reference"
■ Error Messages—Interpreting error messages for RAC high availability and management tools as described in Appendix F, "Oracle Real Application Clusters Tools Messages"
Overview of Using Enterprise Manager with Real Application ClustersEnterprise Manager is a Web-based tool with RAC-specific administration and performance-related features. If you create your RAC database with the Database Configuration Assistant (DBCA), then the Enterprise Manager Database Control tool is automatically configured for your RAC environment. This means that all instances that were part of your installation have an Enterprise Manager Agent running on them. Enterprise Manager Database Control enables you to manage a single RAC database with its instance targets, Oracle Net Services Listener targets, host targets, and a cluster target.
Overview of Deploying Applications on Real Application Clusters
Introduction to Oracle Clusterware and RAC Administration and Deployment 2-5
You can configure Enterprise Manager Grid Control on additional hosts, which were not part of your initial RAC installation, either inside or outside your cluster environment. Enterprise Manager Grid Control enables you to manage multiple cluster databases, cluster database instances, and the hosts on which cluster database components operate.
Grid Control enables you to monitor and administer your entire computing environment from one network location. Use Grid Control to manage all of your enterprise services, including hosts, databases, Listeners, application servers, HTTP Servers, and Web applications, as one cohesive unit. Enterprise Manager Grid Control only requires one Agent on one host in your cluster environment to perform cluster database and instance discovery. Install Enterprise Manager Grid Control from a your Oracle Database 10g installation media.
You can also use both Enterprise Manager Database Control and the Enterprise Manager Grid Control to:
■ Administer database services—Create, configure, start, stop, relocate, obtain status, and so on
■ Create and assign resource plans—Assign resource plans to cluster database instances
■ Administer storage—Assign undo tablespaces and re-assign them from one instance to another, administer redo log assignments among cluster database instances, and switch archive log modes
■ Administer Automatic Storage Management—Administer ASM instances and ASM disk groups if the database uses ASM
■ Perform general database activities—Start up and shut down RAC databases and instances, perform backup and recovery operations, edit server parameter file (spfile) settings for instances or for entire cluster databases, and so on
■ Display host configurations—Memory, CPU, device I/O, network interfaces, the operating system and installed patches
The following sections introduce Oracle Real Application Clusters (RAC) application deployment and performance by explaining the main points that you need to remember when you deploy applications on RAC:
■ Overview of Deploying Applications on Real Application Clusters
■ Implementing Oracle Features with Real Application Clusters
Overview of Deploying Applications on Real Application Clusters To optimally deploy applications on RAC, remember the following points:
■ Storage for RAC datafiles must be shared storage—When you install RAC, use Automatic Storage Management (ASM) or a Cluster File System for datafile storage when available.
■ Create your database with the Database Configuration Assistant (DBCA).
■ Define services for your environment with DBCA or Enterprise Manager and administer them with Oracle Enterprise Manager or the Server Control (SRVCTL) Utility.
See Also: Oracle Enterprise Manager Concepts for more information about using Enterprise Manager
Implementing Oracle Features with Real Application Clusters
2-6 Oracle Clusterware and RAC Administration and Deployment Guide
■ Use the Server Parameter File (SPFILE)—The SPFILE should be located on either a cluster file system file or on a shared raw device.
■ Use Automatic Undo Management.
■ Use Automatic Segment-Space Management.
■ Use the Automatic Database Diagnostic Monitor (ADDM) to reduce the effort required to tune Oracle systems.
Code Changes are Not Required for ApplicationsApplications that perform well on single-instance Oracle databases do not require code changes to perform well on RAC databases. The same compatibility guidelines that apply to Oracle single-instance databases also apply to RAC. For example, if an application scales well in an SMP environment, then the application will scale well with RAC.
The primary feature of RAC that enables applications to scale across multiple instances is Cache Fusion. Cache Fusion enable each instance to locate the most useful version of a block of data for its needs, whether that block resides on disk or in the memory of another instance. The cluster interconnect provides a fast pathway for Cache Fusion to transfer required blocks of data between instances when necessary.
Implementing Oracle Features with Real Application ClustersThe Oracle features described in this section enhance the performance and simplify the administration of your RAC environment. The features discussed in this section are:
■ Automatic Storage Management
■ Cluster File Systems in Real Application Clusters
■ Storage Management Features and Real Application Clusters
■ Services in Oracle Database 10g
■ The Oracle Clusterware and High Availability in Real Application Clusters
■ Additional Oracle High Availability Features and Solutions
Automatic Storage ManagementAutomatic Storage Management (ASM) simplifies database administration by eliminating the need for you to manage Oracle database files. Instead, ASM enables you to create disk groups that comprise disks and the files that reside on them.
Cluster File Systems in Real Application ClustersDepending on your hardware platform, you can store Oracle homes and Oracle datafiles on a cluster file system. Cluster file systems are simpler to configure and manage than raw device storage. Cluster file systems also offer scalable, low latency, highly resilient storage that significantly reduces costs.
See Also: Your platform-specific Real Application Clusters installation guide for more information about configuring these features for Oracle Database 10g Real Application Clusters
Implementing Oracle Features with Real Application Clusters
Introduction to Oracle Clusterware and RAC Administration and Deployment 2-7
Storage Management Features and Real Application ClustersThe advanced storage features of Oracle Automatic Storage Management greatly enhance manageability for RAC just as with single instance Oracle. Other storage features include Oracle-managed files, automatic segment-space management, and automatic undo management. Refer to the Oracle database documentation for more information about using storage management features.
Services in Oracle Database 10gWith Oracle Database 10g, you can define application workloads as services so that you can individually manage and control them. You can create a service for each application or for major components within a complex application. Once created, you can define where and when a service runs. Your entire database workload can be separated into a few services, each of which can be managed independently, reducing the need to manage individual users or sessions for many tasks.
In a RAC database, you can use services to maximize the use of your cluster's processing resources. You can assign each service to one or more instances for normal startup (preferred), depending on its processing requirements. Additionally, you can define one or more alternate (available) instances that a service can use if one of the service’s assigned (preferred) instances becomes unavailable.
In both cluster and non-cluster environments, you can track performance metrics by service using the Automatic Workload Repository (AWR). You can set thresholds on performance metrics so that your system automatically generates alerts if the thresholds are exceeded. You can also map services to Resource Manager consumer groups to provide more fine-grained resource allocation controls such as placing limits on CPU consumption. Other Oracle tools and facilities such as Oracle Scheduler, Parallel Query, and Oracle Streams Advanced Queuing can also use services to manage their workloads.
The settings for Resource Manager are instance specific, that is, you can have different Resource Manager settings on different instances. Therefore, ensure that your Resource Manager settings are appropriate for the instances on which you are using it. The Automatic Workload Management features of Oracle Database 10g are integrated with the resource manager. The only difference in the way you use Resource Manager with RAC is that Resource Manager has instance specific settings.
Runtime Connection Load Balancing is used when selecting connections from a connection pool. For connection pools that support services at one instance only, the first available connection in the pool is used. When connection pools support services
See Also:
■ Oracle Database 2 Day DBA
■ Oracle Database Administrator's Guide
■ Oracle Database Application Developer's Guide - Object-Relational Features
Note: An example that shows how to manage a complex environment with database services is available on the Oracle Technology Network at the URL http://www.oracle.com/index.html. The example includes entries from the related files, such as listener, database, and Net Services parameter files, as well as the commands to create and use the services for application management.
Implementing Oracle Features with Real Application Clusters
2-8 Oracle Clusterware and RAC Administration and Deployment Guide
that span multiple instances using a policy such as service metrics, Runtime Connection Load Balancing distributes work requests across instances that are adequately serving a service. This avoids sending work to slow, hung, failed or restricted instances.
For connection load balancing, the method for balancing connections across a service uses four metrics: session count by instance, run queue length of the node, goodness by service, and weighted session count by service. The metrics used depend on what goals have been defined for the service and how Oracle Net Services has been configured.
Fast Connection Failover is used to prevent connections being directed to failed nodes or instances. Integrated connection pools will clean up connections when a failure occurs or add additional connections when new instances become available. This allows the application to be immediately aware of cluster configuration changes and react to them without any programming or configuration changes at the application tier.
The Oracle Clusterware and High Availability in Real Application ClustersThis section introduces the following high availability features:
■ High Availability with Oracle Clusterware
■ The Oracle Clusterware and High Availability
High Availability with Oracle ClusterwareOracle Real Application Clusters 10g introduces a complete, integrated clusterware management solution on all Oracle Database 10g platforms. This clusterware functionality provides all of the features required to manage your cluster database including node membership, group services, global resource management, and high availability functions.
You install Oracle Clusterware as a separate install that you can complete independently or as a pre-requisite to the RAC installation process. Oracle database features such as Oracle 10g services use the underlying Oracle Clusterware mechanisms to provide their capabilities. Oracle also continues to support select third-party clusterware products on specified platforms.
The Oracle Clusterware and High AvailabilityHigh availability configurations have redundant hardware and software that maintain operations by avoiding single points-of-failure. During outages, Oracle Clusterware relocates the processing performed by the inoperative component to a backup component. The Oracle recovery processes quickly re-master resources, recover partial or failed transactions, and rapidly restore the system.
You can combine many Oracle products and features to create highly reliable computing environments. Doing this requires capacity and redundancy planning. In addition, consider your overall system costs and your return on investment. There are also other practical considerations such as selecting the appropriate hardware and deciding whether to use idle machines that are part of your high availability configuration.
See Also: Chapter 6, "Introduction to Workload Management" for more detailed information about these features
See Also: Chapter 14, "Making Applications Highly Available Using Oracle Clusterware" for more information about Oracle Clusterware
Implementing Oracle Features with Real Application Clusters
Introduction to Oracle Clusterware and RAC Administration and Deployment 2-9
Additional Oracle High Availability Features and SolutionsThis section describes the following additional high availability solutions:
■ Connection Load Balancing with Real Application Clusters
■ Recovery Manager (RMAN) in Real Application Clusters
■ Data Guard
■ Primary/Secondary Instance Configurations in Earlier Releases
Connection Load Balancing with Real Application ClustersThe connection load balancing feature of Oracle Net Services automatically distributes connections among active instances. Connection load balancing does this based on the workload of each node and instance in a cluster.
Recovery Manager (RMAN) in Real Application ClustersRecovery Manager (RMAN) is an Oracle tool that you can use to backup, copy, restore, and recover datafiles, control files, SPFILEs, and archived redo logs. You can invoke RMAN as a command-line utility or use Oracle Enterprise Manager.
A best practice is to configure RMAN so that all instances can access all of the archive log threads throughout your cluster database. In the event of media recovery, the recovering instance requires access to all of the archived redo log threads. You can simplify media recovery administration by ensuring that a recovering instance can access a local copy of the archive log threads from all of the instances in your cluster database.
Data GuardOracle Data Guard works with standby databases to protect your data against errors, failures, and corruptions that might otherwise destroy your database. Data Guard protects critical data by automating the creation, management, and monitoring aspects of standby database environments. Oracle Data Guard automates the otherwise manual process of maintaining a transactional consistent copy of an Oracle database to recover from the loss of or damage to the production database.
Primary/Secondary Instance Configurations in Earlier ReleasesIf you are upgrading from a pre-Oracle 10g Primary/Secondary configuration, then the Database Upgrade Assistant (DBUA) creates a service on your database with one preferred instance and one available instance.
See Also: Chapter 7, "Configuring Recovery Manager and Archiving" for details about configuring RMAN for use with RAC and Oracle Database Backup and Recovery Advanced User's Guide for detailed information about RMAN

Implementing Oracle Features with Real Application Clusters
2-10 Oracle Clusterware and RAC Administration and Deployment Guide
Administering Oracle Clusterware Components 3-1
3Administering Oracle Clusterware
Components
The Oracle Clusterware includes two important components: the voting disk and the Oracle Cluster Registry (OCR). The voting disk is a file that manages information about node membership and the OCR is a file that manages cluster and RAC database configuration information. This chapter describes how to administer the voting disks and the Oracle Cluster Registry (OCR) under the following topics:
■ Administering Voting Disks in Real Application Clusters
■ Administering the Oracle Cluster Registry in Real Application Clusters
■ Administering Multiple Cluster Interconnects on UINIX-Based Platforms
Administering Voting Disks in Real Application ClustersOracle recommends that you select the option to configure multiple voting disks during Oracle Clusterware installation to improve availability. After installation, use the following procedures to regularly backup your voting disks and to recover them as needed:
■ Backing up Voting Disks
■ Recovering Voting Disks
Backing up Voting DisksRun the following command to back up a voting disk. Perform this operation on every voting disk as needed where voting_disk_name is the name of the active voting disk and backup_file_name is the name of the file to which you want to back up the voting disk contents:
dd if=voting_disk_name of=backup_file_name
Note: You can dynamically add voting disks after you complete the Oracle Clusterware and RAC installation processes.
See Also: "Administering the Oracle Cluster Registry in Real Application Clusters" on page 3-2 for more information about administering the OCR
Administering the Oracle Cluster Registry in Real Application Clusters
3-2 Oracle Clusterware and RAC Administration and Deployment Guide
Recovering Voting DisksRun the following command to recover a voting disk where backup_file_name is the name of the voting disk backup file and voting_disk_name is the name of the active voting disk:
dd if=backup_file_name of=voting_disk_name
Changing the Voting Disk Configuration after Installing Real Application ClustersYou can dynamically add and remove voting disks after installing Real Application Clusters. Do this using the following commands where path is the fully qualified path for the additional voting disk. Run the following command as the root user to add a voting disk:
crsctl add css votedisk path
Run the following command as the root user to remove a voting disk:
crsctl delete css votedisk path
Administering the Oracle Cluster Registry in Real Application ClustersThis section describes how to administer the OCR. The OCR contains information about the cluster node list, instance-to-node mapping information, and information about Oracle Clusterware resource profiles for applications that you have customized as described in Chapter 14, "Making Applications Highly Available Using Oracle Clusterware". The procedures discussed in this section are:
■ Adding, Replacing, Repairing, and Removing the OCR
■ Managing Backups and Recovering the OCR Using OCR Backup Files
■ Diagnosing OCR Problems with the OCRDUMP and OCRCHECK Utilities
■ Overriding the Oracle Cluster Registry Data Loss Protection Mechanism
■ Administering the Oracle Cluster Registry with OCR Exports
■ Implementing the Oracle Hardware Assisted Resilient Data Initiative for the OCR
■ Upgrading and Downgrading the OCR Configuration in Real Application Clusters
Note: You can use the ocopy command in Windows environments or use the crsctl commands described in the following note.
Note: If you have multiple voting disks, then you can remove the voting disks and add them back into your environment using the crsctl delete css votedisk path and crsctl add css votedisk path commands respectively, where path is the complete path of the location on which the voting disk resides.
Note: If your cluster is down, then you can use -force option to modify the voting disk configuration with either of these commands without interacting with active Oracle Clusterware daemons. However, using the -force option while any cluster node is active may corrupt your configuration.
Administering the Oracle Cluster Registry in Real Application Clusters
Administering Oracle Clusterware Components 3-3
Adding, Replacing, Repairing, and Removing the OCRThe Oracle installation process for RAC gives you the option of automatically mirroring the OCR. This creates a second OCR to duplicate the original OCR. You can put the mirrored OCR on an Oracle cluster file system disk, on a shared raw device, or on a shared raw logical volume.
You can also manually mirror the OCR if you:
■ Upgraded to release 10.2 but did not choose to mirror the OCR during the upgrade
■ Created only one OCR during the Oracle Clusterware installation
In addition to mirroring the OCR, you can also replace the OCR if Oracle displays an OCR failure alert in Enterprise Manager or in the Oracle Clusterware alert log file. You can also repair an OCR location if there is a mis-configuration or other type of OCR error. In addition, you can remove an OCR location if, for example, your system experiences a performance degradation due to OCR processing or if you transfer your OCR to RAID storage devices and chose to no longer use multiple OCRs. Use the following procedures to perform these tasks:
■ Adding an Oracle Cluster Registry
■ Replacing an Oracle Cluster Registry
■ Repairing an Oracle Cluster Registry Configuration on a Local Node
■ Removing an Oracle Cluster Registry
Adding an Oracle Cluster Registry You can add an OCR location after an upgrade or after completing the RAC installation. If you already mirror the OCR, then you do not need to add an OCR location; Oracle automatically manages two OCRs when it mirrors the OCR. RAC environments do not support more than two OCRs, a primary OCR and a second OCR.
See Also: Appendix A, "Troubleshooting" for information about the ocrdump utility
Note: Oracle strongly recommends that you use mirrored OCRs if the underlying storage is not RAID. This prevents the OCR from becoming a single point of failure.
Note: The operations in this section affect the OCR cluster-wide: they change the OCR configuration information in the ocr.loc file on UNIX-based systems and the Registry keys on Windows-based systems. However, the ocrconfig command cannot modify OCR configuration information for nodes that are shut down or for nodes on which Oracle Clusterware is not running.
Note: If your OCR resides on a cluster file system file or if the OCR is on an network file system, then create the target OCR file before performing the procedures in this section.
Administering the Oracle Cluster Registry in Real Application Clusters
3-4 Oracle Clusterware and RAC Administration and Deployment Guide
Run the following command to add an OCR location using either destination_file or disk to designate the target location of the additional OCR:
ocrconfig -replace ocr destination_file or disk
Run the following command to add an OCR mirror location using either destination_file or disk to designate the target location of the additional OCR:
ocrconfig -replace ocrmirror destination_file or disk
Replacing an Oracle Cluster Registry You can replace a mirrored OCR using the following procedure as long as one OCR-designated file remains online:
1. Verify that the OCR that you are not going to replace is online.
2. Verify that Oracle Clusterware is running on the node on which the you are going to perform the replace operation.
3. Run the following command to replace the OCR using either destination_file or disk to indicate the target OCR:
ocrconfig -replace ocr destination_file or disk
Run the following command to replace an OCR mirror location using either destination_file or disk to indicate the target OCR:
ocrconfig -replace ocrmirror destination_file or disk
4. If any node that is part of your current RAC environment is shut down, then run the command ocrconfig -repair on any node that is stopped to enable that node to rejoin the cluster after you restart the stopped node.
Repairing an Oracle Cluster Registry Configuration on a Local NodeYou may need to repair an OCR configuration on a particular node if your OCR configuration changes while that node is stopped. For example, you may need to repair the OCR on a node that was not up while you were adding, replacing, or removing an OCR. To repair an OCR configuration, run the following command on the node on which you have stopped the Oracle Clusterware daemon:
ocrconfig –repair ocrmirror device_name
This operation only changes the OCR configuration on the node from which you run this command. For example, if the OCR mirror device name is /dev/raw1, then use the command syntax ocrconfig -repair ocrmirror /dev/raw1 on this node to repair its OCR configuration.
Note: You must be root user to run ocrconfig commands.
Note: The OCR that you are replacing can be either online or offline. In addition, if your OCR resides on a cluster file system file or if the OCR is on an network file system, then create the target OCR file before continuing with this procedure.
Administering the Oracle Cluster Registry in Real Application Clusters
Administering Oracle Clusterware Components 3-5
Removing an Oracle Cluster RegistryTo remove an OCR location, at least one other OCR must be online. You can remove an OCR location to reduce OCR-related overhead or to stop mirroring your OCR because you moved your the OCR to redundant storage such as RAID. Perform the following procedure to remove an OCR location from your RAC environment:
1. Ensure that at least one OCR other than the OCR that you are removing is online.
2. Run the following command on any node in the cluster to remove the OCR:
ocrconfig -replace ocr
Run the following command on any node in the cluster to remove the mirrored OCR:
ocrconfig -replace ocrmirror
These commands update the OCR configuration on all of the nodes on which Oracle Clusterware is running.
Managing Backups and Recovering the OCR Using OCR Backup FilesThis section describes two methods for copying OCR content and using it for recovery. The first method uses automatically generated OCR file copies and the second method uses manually created OCR export files.
The Oracle Clusterware automatically creates OCR backups every four hours. At any one time, Oracle always retains the last three backup copies of the OCR. The CRSD process that creates the backups also creates and retains an OCR backup for each full day and at the end of each week.
You cannot customize the backup frequencies or the number of files that Oracle retains. You can use any backup software to copy the automatically generated backup files at least once daily to a different device from where the primary OCR resides.
The default location for generating backups on UNIX-based systems is CRS_home/cdata/cluster_name where cluster_name is the name of your cluster. The Windows-based default location for generating backups uses the same path structure.
Note: You cannot perform this operation on a node on which the Oracle Clusterware daemon is running.
Caution: Do not perform this OCR removal procedure unless there is at least one other active OCR online.
See Also: You can also use the -backuploc option to move the OCR to another location as described in Appendix D, "Oracle Cluster Registry Configuration Tool Command Syntax"
Note: When removing an OCR location, the remaining OCR must be online. If you remove a primary OCR, then the mirrored OCR becomes the primary OCR.
Administering the Oracle Cluster Registry in Real Application Clusters
3-6 Oracle Clusterware and RAC Administration and Deployment Guide
Restoring the Oracle Cluster Registry from Automatically Generated OCR BackupsIf an application fails, then before attempting to restore the OCR, restart the application. As a definitive verification that the OCR failed, run an ocrcheck and if the command returns a failure message, then both the primary OCR and the OCR mirror have failed. Attempt to correct the problem using one of the following platform-specific OCR restoration procedures.
■ Restoring the Oracle Cluster Registry on UNIX-Based Systems
■ Restoring the Oracle Cluster Registry on Windows-Based Systems
Restoring the Oracle Cluster Registry on UNIX-Based Systems Use the following procedure to restore the OCR on UNIX-based systems:
1. Identify the OCR backups using the ocrconfig -showbackup command. Review the contents of the backup using ocrdump -backupfile file_name where file_name is the name of the backup file.
2. Stop Oracle Clusterware on all of the nodes in your RAC database by executing the init.crs stop command on all of the nodes.
3. Perform the restore by applying an OCR backup file that you identified in Step 1 using the following command where file_name is the name of the OCR that you want to restore. Make sure that the OCR devices that you specify in the OCR configuration exist and that these OCR devices are valid before running this command.
ocrconfig -restore file_name
4. Restart Oracle Clusterware on all of the nodes in your cluster by restarting each node or by running the init.crs start command.
5. Run the following command to verify the OCR integrity where the -n all argument retrieves a listing of all of the cluster nodes that are configured as part of your cluster:
cluvfy comp ocr -n all [-verbose]
Restoring the Oracle Cluster Registry on Windows-Based Systems Use the following procedure to restore the OCR on Windows-based systems:
1. Identify the OCR backups using the ocrconfig -showbackup command. Review the contents of the backup using ocrdump -backupfile file_name where file_name is the name of the backup file.
Note: You must be root user to run ocrconfig commands.
Note: You cannot restore your configuration from an automatically created OCR backup file using the -import option, which is explained in "Administering the Oracle Cluster Registry with OCR Exports" on page 3-8. You must instead use the -restore option as described in the following sections.
See Also: Appendix A, "Troubleshooting" for more information about enabling and using CVU

Administering the Oracle Cluster Registry in Real Application Clusters
Administering Oracle Clusterware Components 3-7
2. On all of the remaining nodes, disable the following OCR clients and stop them using the Service Control Panel: OracleClusterVolumeService, OracleCSService, OracleCRService, and the OracleEVMService.
3. Execute the restore by applying an OCR backup file that you identified in Step 1 with the ocrconfig -restore file name command. Make sure that the OCR devices that you specify in the OCR configuration exist and that these OCR devices are valid.
4. Start all of the services that were stopped in step 2. Restart all of the nodes and resume operations in cluster mode.
5. Run the following command to verify the OCR integrity where the -n all argument retrieves a listing of all of the cluster nodes that are configured as part of your cluster:
cluvfy comp ocr -n all [-verbose]
Diagnosing OCR Problems with the OCRDUMP and OCRCHECK UtilitiesYou can use the OCRDUMP and OCRCHECK utilities to diagnose OCR problems as described under the following topics:
■ Using the OCRDUMP Utility
■ Using the OCRCHECK Utility
Using the OCRDUMP UtilityUse the OCRDUMP utility to write the OCR contents to a file so that you can examine the OCR content.
Using the OCRCHECK UtilityUse the OCRCHECK utility to verify the OCR integrity.
Overriding the Oracle Cluster Registry Data Loss Protection MechanismThe OCR has a mechanism that prevents data loss due to accidental overwrites. If you configure a mirrored OCR and if the OCR cannot access the two mirrored OCR locations and also cannot verify that the available OCR contains the most recent configuration, then the OCR prevents further modification to the available OCR. The OCR prevents overwriting by prohibiting Oracle Clusterware from starting on the node on which the OCR resides. In such cases, Oracle displays an alert message in either Enterprise Manager, the Oracle Clusterware alert log files, or both.
Sometimes this problem is local to only one node and you can use other nodes to start your cluster database. In such cases, Oracle displays an alert message in Enterprise Manager, the Oracle Clusterware alert log, or both.
See Also: "Cluster Verification Utility Oracle Clusterware Component Verifications" on page A-17 for more information about enabling and using CVU
See Also: "OCRDUMP Utility Syntax and Options" on page A-6 for more information about the OCRDUMP utility
See Also: Using the OCRCHECK Utility on page A-7 for more information about the OCRCHECK utility
Administering the Oracle Cluster Registry in Real Application Clusters
3-8 Oracle Clusterware and RAC Administration and Deployment Guide
However, if you are unable to start any cluster nodes in your environment and if you cannot repair the OCR, then you can override the protection mechanism. This procedure enables you to start the cluster using the available OCR, thus enabling you to use the updated OCR file to start your cluster. However, this can result in the loss of data that was not available at the time that the previous known good state was created.
Perform the following procedure to overwrite the OCR if a node cannot start up and if the alert log contains a a CLSD-1009 or CLSD-1011 message.
1. Attempt to resolve the cause of the a CLSD-1009 or CLSD-1011 message. Do this by comparing the node's OCR configuration (ocr.loc on Unix-based systems and the Registry on Windows-based systems) with other nodes on which Oracle Clusterware is running. If the configurations do not match, then run ocrconfig -repair. If the configurations match, then ensure that the node can access all of the configured OCRs by running an ls command on Unix-based systems or a dir command on Windows-based systems. Oracle issues a warning when one of the configured OCR locations is not available or if the configuration is incorrect.
2. Ensure that the most recent OCR contains the latest OCR updates. Do this by taking output from the ocrdump command and determine whether it has your latest updates.
3. If you cannot resolve the CLSD message, then run the command ocrconfig -overwrite to bring up the node.
Administering the Oracle Cluster Registry with OCR ExportsIn addition to using the automatically created OCR backup files, you should also export the OCR contents before and after making significant configuration changes, such as adding or deleting nodes from your environment, modifying Oracle Clusterware resources, or creating a database. Do this by using the ocrconfig -export command. This exports the OCR content to a file format.
Using the ocrconfig -export command enables you to restore the OCR using the -import option if your configuration changes cause errors. For example, if you have unresolvable configuration problems, or if you are unable to restart your clusterware after such changed, then restore your configuration using one of the following platform-specific procedures:
■ Importing Oracle Cluster Registry Content on UNIX-Based Systems
■ Importing Oracle Cluster Registry Content on Windows-Based Systems
Note: Overriding the OCR using this procedure can result in the loss of OCR updates that were made between the time of the last known good OCR update made to the currently-accessible OCR and the time at which you performed this procedure. In other words, running the ocrconfig -overwrite command can result in data loss if the OCR that you are using to perform the overwrite does not contain the latest configuration updates for your cluster environment.
Administering the Oracle Cluster Registry in Real Application Clusters
Administering Oracle Clusterware Components 3-9
Importing Oracle Cluster Registry Content on UNIX-Based Systems Use the following procedure to import the OCR on UNIX-based systems:
1. Identify the OCR export file that you want to import by identifying the OCR export file that you previously created using the ocrconfig -export file_name command.
2. Stop Oracle Clusterware on all of the nodes in your RAC database by executing the init.crs stop command on all of the nodes.
3. Perform the import by applying an OCR export file that you identified in Step 1 using the following command where file_name is the name of the OCR file from which you want to import OCR information:
ocrconfig -import file_name
4. Restart Oracle Clusterware on all of the nodes in your cluster by restarting each node.
5. Run the following Cluster Verification Utility (CVU) command to verify the OCR integrity where the -n all argument retrieves a listing of all of the cluster nodes that are configured as part of your cluster:
cluvfy comp ocr -n all [-verbose]
Importing Oracle Cluster Registry Content on Windows-Based Systems Use the following procedure to import the OCR on Windows-based systems:
1. Identify the OCR export file that you want to import by running the ocrconfig -showbackup command. .
2. Stop the following OCR clients on each node in your RAC environment using the Service Control Panel: OracleClusterVolumeService, OracleCMService, OracleEVMService, OracleCSService, and the OracleCRService.
3. Import an OCR export file using the ocrconfig -import command from one node.
4. Restart all of the affected services on all nodes.
Note: Most configuration changes that you make not only change the OCR contents, configuration changes also cause file and database object creation. Some of these changes are often not restored when you restore the OCR. Do not perform an OCR restore as a correction to revert to previous configurations if some of these configuration changes should fail. This may result in an OCR that has contents that do not match the state of the rest of your system.
Note: You cannot import an exported OCR backup file, which is described in "Managing Backups and Recovering the OCR Using OCR Backup Files" on page 3-5. You must instead use the -import option as described in the following sections.
See Also: Appendix A, "Troubleshooting" for more information about enabling and using CVU
Administering Multiple Cluster Interconnects on UINIX-Based Platforms
3-10 Oracle Clusterware and RAC Administration and Deployment Guide
5. Run the following Cluster Verification Utility (CVU) command to verify the OCR integrity where node_list is a list of all of the nodes in your cluster database:
cluvfy comp ocr -n all [-verbose]
Implementing the Oracle Hardware Assisted Resilient Data Initiative for the OCRThe Oracle Hardware Assisted Resilient Data (HARD) initiative prevents data corruptions from being written to permanent storage. If you enable HARD, then the OCR writes HARD-compatible blocks. To determine whether the device used by the OCR supports HARD and then enable it, review the Oracle HARD white paper at:
http://www.oracle.com/technology/deploy/availability/htdocs/HARD.html
Upgrading and Downgrading the OCR Configuration in Real Application ClustersWhen you install Oracle Clusterware, Oracle automatically runs the ocrconfig -upgrade command. To downgrade, follow the downgrade instructions for each component and also downgrade the OCR using the ocrconfig -downgrade command. If you are upgrading the OCR to Oracle Database 10g release 10.2, then you can use the cluvfy command to verify the integrity of the OCR. If you are downgrading, you cannot use the Cluster Verification Utility (CVU) commands to verify the OCR for pre-10.2 release formats.
HARD-Compatible OCR Blocks in Oracle9i In Oracle9i, the OCR did not write HARD-compatible blocks. If the device used by OCR is enabled for HARD, then use the method described in the HARD white paper to disable HARD for the OCR before downgrading your OCR. If you do not disable HARD, then the downgrade operation fails.
Administering Multiple Cluster Interconnects on UINIX-Based PlatformsIn RAC environments that run on UNIX-based platforms, you can use the CLUSTER_INTERCONNECTS initialization parameter to specify an alternative interconnect for the private network.
The CLUSTER_INTERCONNECTS initialization parameter requires the IP address of the interconnect instead of the device name. It enables you to specify multiple IP addresses, separated by colons. RAC network traffic is distributed between the specified IP addresses.
The CLUSTER_INTERCONNECTS initialization parameter is useful only in a UNIX-based environments where UDP IPC is enabled. The CLUSTER_INTERCONNECTS parameter enables you to specify an interconnect for all IPC traffic to include Oracle Global Cache Service (GCS), Global Enqueue Service (GES), and Interprocessor Parallel Query (IPQ).
Overall cluster stability and performance may improve when you force Oracle GCS, GES, and IPQ over a different interconnect by setting the CLUSTER_INTERCONNECTS initialization parameter. For example, to use the network interface whose IP address is 129.34.137.212 for all GCS, GES, and IPQ IPC traffic, set the CLUSTER_INTERCONNECTS parameter as follows:
CLUSTER_INTERCONNECTS=129.34.137.212
See Also: Appendix A, "Troubleshooting" for more information about enabling and using CVU
Administering Multiple Cluster Interconnects on UINIX-Based Platforms
Administering Oracle Clusterware Components 3-11
Use the ifconfig or netstat command to display the IP address of a device. This command provides a map between device names and IP addresses. For example, to determine the IP address of a device, run the following command as the root user:
# /usr/sbin/ifconfig -a fta0: flags=c63<UP,BROADCAST,NOTRAILERS,RUNNING,MULTICAST,SIMPLEX> inet 129.34.137.212 netmask fffffc00 broadcast 129.34.139.255 ipmtu 1500
lo0: flags=100c89<UP,LOOPBACK,NOARP,MULTICAST,SIMPLEX,NOCHECKSUM> inet 127.0.0.1 netmask ff000000 ipmtu 4096
ics0: flags=1100063<UP,BROADCAST,NOTRAILERS,RUNNING,NOCHECKSUM,CLUIF> inet 10.0.0.1 netmask ffffff00 broadcast 10.0.0.255 ipmtu 7000
sl0: flags=10<POINTOPOINT>
tun0: flags=80<NOARP>
In the preceding example, the interface fta0: has an IP address of 129.34.137.212 and the interface ics0: has an IP address of 10.0.0.1.
Bear in mind the following important points when using the CLUSTER_INTERCONNECTS initialization parameter:
■ The IP addresses specified for the different instances of the same database on different nodes must belong to network adapters that connect to the same network. If you do not follow this rule, then inter-node traffic may pass through bridges and routers or there may not be a path between the two nodes at all.
■ Specify the CLUSTER_INTERCONNECTS initialization parameter in the parameter file, setting a different value for each database instance.
■ If you specify multiple IP addresses for this parameter, then list them in the same order for all instances of the same database. For example, if the parameter for instance 1 on node 1 lists the IP addresses of the alt0:, fta0:, and ics0: devices in that order, then the parameter for instance 2 on node 2 must list the IP addresses of the equivalent network adapters in the same order.
■ If the interconnect IP address specified is incorrect or does not exist on the system, then Oracle Database uses the default cluster interconnect device. On Tru64 UNIX for example, the default device is ics0:.
Failover and Failback and CLUSTER_INTERCONNECTSSome operating systems support run-time failover and failback. However, if you use the CLUSTER_INTERCONNECTS initialization parameter, then failover and failback are disabled.
Note: Failover and failback and CLUSTER_INTERCONNECTS are not supported on AIX systems.

Administering Multiple Cluster Interconnects on UINIX-Based Platforms
3-12 Oracle Clusterware and RAC Administration and Deployment Guide
Administering Storage 4-1
4Administering Storage
This chapter describes storage topics such as Automatic Storage Management (ASM). The topics in this chapter are:
■ Overview of Storage in Oracle Real Application Clusters
■ Automatic Storage Management in Real Application Clusters
Overview of Storage in Oracle Real Application ClustersStorage for RAC databases must be shared. In other words, datafiles must reside in an Automatic Storage Management (ASM) disk group, on a cluster file system, or on shared raw devices. This must include space for an undo tablespace for each instance if you are using automatic undo management. Additionally, for each instance you must create at least two redo log files that reside on shared storage. In addition, as Oracle recommends, you can use one shared server parameter file (SPFILE) with instance-specific entries. Or you can use a local file system to store client-side parameter files (PFILEs).
Unless otherwise noted, Oracle storage features such as ASM, Oracle Managed Files (OMF), automatic segment-space management, and so on, function the same in RAC environments as they do in single-instance Oracle database environments. Refer to Oracle Database 2 Day DBA and the Oracle Database Administrator's Guide for additional information about these storage features.
If you do not use ASM, if your platform does not support a cluster file system, or if you do not want to use a cluster file system to store datafiles, then create additional raw devices as described in your platform-specific Oracle Real Application Clusters installation and configuration guide. However, Oracle recommends that you use ASM for datafile storage which is described later in this chapter in the section titled "Automatic Storage Management in Real Application Clusters" on page 4-2. The remainder of this section describes the following topics:
■ Datafile Access in Real Application Clusters
■ Redo Log File Storage in Real Application Clusters
■ Automatic Undo Management in Real Application Clusters
Note: To create a RAC database using the Oracle Database 10g Standard Edition, you must use ASM for your datafile storage.
Automatic Storage Management in Real Application Clusters
4-2 Oracle Clusterware and RAC Administration and Deployment Guide
Datafile Access in Real Application ClustersAll RAC instances must be able to access all datafiles. If a datafile needs to be recovered when the database is opened, then the first RAC instance to start is the instance that performs the recovery and verifies access to the file. As other instances start, they also verify their access to the datafiles. Similarly, when you add a tablespace or datafile or bring a tablespace or datafile online, all instances verify access to the file or files.
If you add a datafile to a disk that other instances cannot access, then verification fails. Verification also fails if instances access different copies of the same datafile. If verification fails for any instance, then diagnose and fix the problem. Then run the ALTER SYSTEM CHECK DATAFILES statement on each instance to verify datafile access.
Redo Log File Storage in Real Application ClustersEach instance has its own online redo log groups which are referred to as an instance's thread of online redo. Create these online redo log groups and establish group members as described in the Oracle Database Administrator's Guide.
Each instance must have at least two groups of online redo log files in its thread. When the current group fills, an instance begins writing to the next log file group. If your database is in ARCHIVELOG mode, then each instance must save filled log files into its own archive log thread and update the control file with the status of its thread.
Automatic Undo Management in Real Application ClustersOracle automatically manages undo segments within a specific undo tablespace that is assigned to an instance. Only the instance assigned to the undo tablespace can modify the contents of that tablespace. However, all instances can always read all undo blocks throughout the cluster environment for consistent read purposes. Also, any instance can update any undo tablespace during transaction recovery, as long as that undo tablespace is not currently used by another instance for undo generation or transaction recovery.
You assign undo tablespaces in your RAC database by specifying a different value for the UNDO_TABLESPACE parameter for each instance in your SPFILE or individual PFILEs. You cannot simultaneously use automatic undo management and manual undo management in a RAC database. In other words, all instances of a RAC database must operate in the same undo mode.
Automatic Storage Management in Real Application ClustersASM automatically optimizes storage to maximize performance by managing the storage configuration across the disks that ASM manages. ASM does this by evenly distributing the storage load across all of the available storage within your cluster database environment. ASM partitions your total disk space requirements into
Note: MAXLOGHISTORY is useful for sites with demanding availability requirements. This option can help you administer recovery, especially when there are many instances and many log files.
See Also: Oracle Database Administrator's Guide for detailed information about creating and managing undo tablespaces
Automatic Storage Management in Real Application Clusters
Administering Storage 4-3
uniformly sized units across all disks in a disk group. ASM can also automatically mirror data to prevent data loss. Because of these features, ASM also significantly reduces your administrative overhead.
To use ASM in RAC, select ASM as your storage option when you create your database with the Database Configuration Assistant (DBCA). As in single-instance Oracle databases, using ASM in RAC does not require I/O tuning. The following topics describe ASM and ASM administration as follows:
■ Automatic Storage Management Components in RAC
■ Modifying Disk Group Configurations for ASM in RAC
■ Standalone ASM Disk Group Management
■ Administering ASM Instances and Disk Groups with Enterprise Manager in RAC
■ Administering ASM Instances with SRVCTL in RAC
Automatic Storage Management Components in RACWhen you create your database, Oracle creates one ASM instance on each node in your RAC environment if one does not already exist. Each ASM instance has either an SPFILE or PFILE type parameter file. You may need to back up the parameter files and the TNS entries for nondefault Oracle Net Listeners.
Modifying Disk Group Configurations for ASM in RACWhen you create a disk group for a cluster or add new disks to an existing clustered disk group, you only need to prepare the underlying physical storage on shared disks. The shared disk requirement is the only substantial difference between using ASM in a RAC database compared to using it in a single-instance Oracle database. ASM automatically re-balances the storage load after you add or delete a disk or disk group.
In a cluster, each ASM instance manages its node's metadata updates to the disk groups. In addition, each ASM instance coordinates disk group metadata with other nodes in the cluster. As in single-instance Oracle databases, you can use Enterprise Manager, DBCA, SQL*Plus, and the Server Control Utility (SRVCTL) to administer disk groups for ASM in RAC. The Oracle Database Administrator's Guide explains how to use SQL*Plus to administer ASM instances. The following sections describe how to use the other tools.
Standalone ASM Disk Group ManagementWhen you create a database using DBCA and you select the ASM storage option, DBCA creates the ASM instances for you if they do not already exist. However, you can also use the standalone ASM disk group management feature to create and manage an ASM instance and its associated disk groups independently of creating a new database. You can use Enterprise Manager or DBCA to add disks to a disk group, to mount a disk group or to mount all of the disk groups, or to create ASM instances. Additionally, you can use Enterprise Manager to dismount and drop disk groups or to delete ASM instances.
To create an ASM instance without creating a database with DBCA, select the Configure Automatic Storage Management option on the DBCA Database Options page. You can also use this option to add or mount one or more ASM disk groups. The DBCA then displays the Node Selection page on which you can identify the nodes on which you want to create the ASM instance or on which you want to manage disk groups. If necessary, the next page you must complete is the DCBA Create Instance
Automatic Storage Management in Real Application Clusters
4-4 Oracle Clusterware and RAC Administration and Deployment Guide
Page on which you add the information about the ASM instance parameter file and SYS password and, for Windows-based systems, the owner of the ASM-related service.
The DBCA session provides the same ASM Disk Groups page for standalone ASM management as it does for database creation using ASM storage. Use this page to create new disk groups, to add disks to existing disk groups, or to mount disk groups that are not currently mounted. You can also use the standalone ASM feature, where you have the ability to manage ASM instances independent of the database, in DBCA silent mode to create an ASM instance or to manage ASM disk groups. The syntax for the DBCA silent mode command is:
dbca -silent -nodeList nodelist -configureASM -asmPassword asm_pwd [-diskList disk_list] [-redundancy redundancy_option] [-diskGroupName dgname] [-diskString disk_discovery_string] [-recoveryGroupName recovery_dgname] [-recoveryRedundancy redundancy_option]
Where:
■ nodelist is a comma-delimited list of nodes and these are the nodes on which you want to perform the ASM activities
■ asm_pwd is the password for the SYS account in the ASM instance
■ disk_list is a comma-delimited list of disks to be added to disk group
■ redundancy_option is NORMAL, HIGH, or EXTERNAL
■ dgname is either the name of an existing disk group, in which case the disk group is mounted on all of the selected nodes, or dgname is the name of a new disk group, in which case the disk group is created and started on all of the selected nodes
■ disk_recovery_string identifies the location or identifier for the ASM-ready disks
■ recovery_dgname is the name for a recovery disk group
Administering ASM Instances and Disk Groups with Enterprise Manager in RACYou can perform administrative operations on ASM disk groups with Enterprise Manager such as adding and deleting them. You can also monitor ASM disk group performance as well as control disk group availability at the instance level. For example, some of the RAC-specific ASM-related Enterprise Manager tasks that you can perform are:
■ When you add a disk group, the disk group definition includes a checkbox to indicate whether the disk group is automatically mounted to all of the cluster database instances.
■ The default Disk Group Performance page displays instance-level performance details when you click a performance characteristic such as Write Response Time or I/O Throughput.
■ When you mount and dismount ASM disk groups, you can use a checkbox to indicate which instances should mount or dismount a particular ASM Disk Group.
See Also: Oracle Database Administrator's Guide and Oracle Database 2 Day DBA for detailed information about using Enterprise Manager

Automatic Storage Management in Real Application Clusters
Administering Storage 4-5
Administering ASM Instances with SRVCTL in RAC You can use the Server Control Utility (SRVCTL) to add, remove, enable, and disable an ASM instance as described in the following procedures:
Use the following syntax to add configuration information about an existing ASM instance:
srvctl add asm -n node_name -i asm_instance_name -o oracle_home
Use the following syntax to remove an ASM instance:
srvctl remove asm -n node_name [-i asm_instance_name]
Use the following syntax to enable an ASM instance:
srvctl enable asm -n node_name [-i ] asm_instance_name
Use the following syntax to disable an ASM instance:
srvctl disable asm -n node_name [-i asm_instance_name]
You can also use SRVCTL to start, stop, and obtain the status of an ASM instance as in the following examples.
Use the following syntax to start an ASM instance:
srvctl start asm -n node_name [-i asm_instance_name] [-o start_options] [-c <connect_str> | -q]
Use the following syntax to stop an ASM instance:
srvctl stop asm -n node_name [-i asm_instance_name] [-o stop_options] [-c <connect_str> | -q]
Use the following syntax to show the configuration of an ASM instance:
srvctl config asm -n node_name
Use the following syntax to obtain the status of an ASM instance:
srvctl status asm -n node_name
Note: For all of the SRVCTL commands in this section for which the -i option is not required, if you do not specify an instance name, then the command applies to all of the ASM instances on the node.

Automatic Storage Management in Real Application Clusters
4-6 Oracle Clusterware and RAC Administration and Deployment Guide
Administering Database Instances and Cluster Databases 5-1
5Administering Database Instances and
Cluster Databases
This chapter describes how to administer Oracle Real Application Clusters (RAC) database instances and RAC databases. This chapter explains the startup and shutdown tasks for database components and well as how to administer parameters and parameter files in RAC. The topics in this chapter are:
■ Overview of Real Application Clusters Management Tools
■ Starting and Stopping Instances and Real Application Clusters Databases
■ Overview of Initialization Parameter Files in Real Application Clusters
■ Initialization Parameter Use in Real Application Clusters
■ Summary of Parameter Use in Real Application Clusters Databases
■ Backing Up the Server Parameter File
Overview of Real Application Clusters Management ToolsThe following section introduces the three tools that you will most likely use to manage RAC databases and RAC instances, namely, Oracle Enterprise Manager, SQL*Plus, and the SRVCTL utility. In many cases, you use these tools the same way to manage RAC environments as you would use them manage single-instance Oracle databases. The following sections identify the differences when managing a RAC database:
■ Overview of Administering Real Application Clusters with Enterprise Manager
■ Overview of Administering Real Application Clusters with SQL*Plus
■ Overview of Administering Real Application Clusters with SRVCTL
Overview of Administering Real Application Clusters with Enterprise ManagerUse the Web-based Enterprise Manager Database Control to manage a single RAC database. The Enterprise Manager Console provides a central point of control for the Oracle environment through a graphical user interface (GUI). You can use the Enterprise Manager Console to initiate a variety of cluster database management tasks. Use Enterprise Manager Grid Control to administer multiple RAC databases.
Enterprise Manager enables you to start, stop, and monitor databases, cluster database instances, and their Listeners, as well as to schedule jobs or set up alert thresholds for
See Also: Chapter 4, "Administering Storage" for information about managing Automatic Storage Management (ASM) instances
Overview of Real Application Clusters Management Tools
5-2 Oracle Clusterware and RAC Administration and Deployment Guide
metrics. You can perform these tasks simultaneously on multiple cluster databases. You can also use the Console to manage schemas, security, and cluster database storage features.
Overview of Administering Real Application Clusters with SQL*PlusSQL*Plus commands operate on the current instance. The current instance can be either the local default instance on which you initiated your SQL*Plus session, or it can be a remote instance to which you connect with Net Services.
Because, by default, the SQL*Plus prompt does not identify the current instance, you should direct your commands to the correct instance. Starting a SQL*Plus session and connecting to the database without specifying an instance directs all SQL*Plus commands to the local instance. In this case, the default instance is also the current instance.
To connect to a different instance in SQL*Plus, issue a new CONNECT command specify a remote instance net service name as in the following example:
CONNECT user name/password@net_service_name
Connecting as SYSOPER or SYSDBA enables you to perform privileged operations, such as instance startup and shutdown. Multiple SQL*Plus sessions can connect to the same instance at the same time. SQL*Plus automatically disconnects you from the first instance whenever you connect to another one.
See Also: Oracle Enterprise Manager Concepts for more information about administering RAC with Enterprise Manager
Note: You may wish to change the SQL*Plus prompt so that it includes the name of the current instance. To do this you can issue a SQL*Plus command such as the following:
SET SQLPROMPT '_CONNECT_IDENTIFIER> '
This command replaces the "SQL" string in front of the greater than symbol (>) with the user variable _CONNECT_IDENTIFIER that will display the current instance name for the duration of your current session.
To change the prompt for all sessions automatically, add an entry similar to the following entry in your glogin.sql file, found in the SQL*Plus administrative directory:
SET SQLPROMPT '_CONNECT_IDENTIFIER> '
You may include any other required text or SQL*Plus user variable between the single quotes in the command.
See Also:
■ Oracle Database Net Services Administrator's Guide for the proper specification of net_service_name
■ The Oracle Database Administrator's Guide for information about connecting to the database using SYSDBA or SYSOPER privileges
Starting and Stopping Instances and Real Application Clusters Databases
Administering Database Instances and Cluster Databases 5-3
Overview of Administering Real Application Clusters with SRVCTLThe SRVCTL tool manages configuration information that is used by several other Oracle tools. For example, Enterprise Manager uses the configuration information that SRVCTL generates to discover and monitor nodes in your cluster.
When you use SRVCTL to perform configuration operations on your cluster, SRVCTL stores configuration data in the Oracle Cluster Registry (OCR). SRVCTL performs other operations, such as starting and stopping instances, by calling SQL*Plus on each node.
Starting and Stopping Instances and Real Application Clusters DatabasesYou can start up and shut down instances with Enterprise Manager, SQL*Plus or SRVCTL as described in the following sections. Both Enterprise Manager and SRVCTL provide options to startup and shutdown all of the instances in a RAC database with a single step.
You can only perform certain operations when the database is in a NOMOUNT or MOUNT state. Performing other operations requires that the database be OPEN. In addition, some operations require that only one instance be in the required state, while other operations require that all of the instances be in an identical state.
The procedures in this section assume that you are using a server parameter file (SPFILE) and are described in the following topics:
■ Starting Up and Shutting Down with Enterprise Manager
■ Starting Up and Shutting Down with SQL*Plus
■ Starting Up and Shutting Down with SRVCTL
Before you can start a RAC instance, your clusterware and any required operating system-specific processes must be running. For more information about these processes, see your operating system documentation.
The procedure for shutting down RAC instances is identical to shutting down instances in single-instance Oracle, with the exceptions described here. Refer to the Oracle Database Administrator's Guide for more information about shutting down Oracle databases.
■ In RAC, shutting down one instance does not interfere with the operation of other running instances.
■ To shut down a RAC database completely, shut down every instance that has the database open or mounted.
■ After a NORMAL or IMMEDIATE shutdown, instance recovery is not required. Recovery is required, however, after you issue the SHUTDOWN ABORT command or after an instance terminates abnormally. The instance that is still running performs instance recovery for the instance that shut down. If no other instances are running, the next instance to open the database performs instance recovery for any instances needing it.
■ The SHUTDOWN TRANSACTIONAL command with the LOCAL option is useful to shutdown an instance after all active transactions on the instance have either committed or rolled back. This is in addition to what this command does for SHUTDOWN IMMEDIATE. Transactions on other instances do not block this operation. If you omit the LOCAL option, then this operation waits until transactions on all other instances that started before the shutdown was issued either commit or rollback.

Starting and Stopping Instances and Real Application Clusters Databases
5-4 Oracle Clusterware and RAC Administration and Deployment Guide
Starting Up and Shutting Down with Enterprise ManagerYou can shut down all instances or any identified instance from the Cluster Database Startup and Shutdown page. To start up or shut down a cluster database instance:
1. Go to the Cluster Database Home page.
2. Click the appropriate Startup or Shutdown button for your situation. If the system is down, a Startup button appears. If the system is up, a Shutdown button appears. A Specify Host and Target Database Credentials page appears.
3. Enter valid user names and passwords for host and database credentials to change the status of the database, then click OK. To change the status of the database, you must log in to the database as either SYSDBA or SYSOPER.
To start or shut down a cluster database, that is, all of the instances known to Enterprise Manager:
1. Go to the Cluster Database Home page.
2. Click Startup/Shutdown. The Specify Credentials page appears.
3. Enter a valid User Name and Password for the cluster that hosts the cluster database, then click Continue. You must be a member of the OSDBA group.
Starting Up and Shutting Down with SQL*Plus If you want to start or stop just one instance and you are connected to your local node, you should first ensure that your current environment includes the SID for the local instance. Note that any subsequent commands in your session, whether inside or outside a SQL*Plus session, will be associated with that same SID.
To start or shutdown your local instance, initiate a SQL*Plus session and connect with the SYSDBA or SYSOPER privilege and then issue the required command. For example to start and mount an instance on your local node, run the following commands within your SQL*Plus session:
CONNECT / AS SYSDBA STARTUP MOUNT
You can start more than one instance from a single SQL*Plus session on one node by way of Oracle Net Services. To achieve this, you must connect to each instance in turn by using a Net Services connection string, typically an instance-specific alias from your TNSNAMES.ORA file.
For example, you can use a SQL*Plus session on a local node to perform a transactional shutdown for two instances on remote nodes by connecting to each in turn using the instance's individual alias name. Assume the alias name for the first instance is db1 and that the alias for the second instance is db2. Connect to the first instance and shut it down as follows:
CONNECT /@db1 AS SYSDBA SHUTDOWN TRANSACTIONAL
Note: To ensure that you connect to the correct instance, you must use an alias in the connect string that is associated with just one instance. If you use an alias to a service or with multiple addresses, you may not be connected to your intended instance.

Starting and Stopping Instances and Real Application Clusters Databases
Administering Database Instances and Cluster Databases 5-5
Then connect to and shutdown the second instance by entering the following from you SQL*Plus session:
CONNECT /@db2 AS SYSDBA SHUTDOWN TRANSACTIONAL
Other startup and shut down keywords, such as NOMOUNT, MOUNT, IMMEDIATE, and so on, are described in the SQL*Plus User's Guide and Reference
It is not possible to start up or shut down more than one instance at a time in SQL*Plus, so you cannot start or stop all of the instances for a cluster database with a single SQL*Plus command. You may wish to create a script that will connect to each instance in turn and start it up and shut it down. However, you will need to maintain this script manually if you add or drop instances.
Intermittent Windows Shutdown Issue in RAC EnvironmentsIn an Oracle Real Application Clusters release 10.1.0.2 environment on Windows, a normal Windows shutdown may cause errors that prevent the Windows shutdown from completing. As a result, you may need to perform a power reset. The following steps are recommended to avoid this during Windows shutdowns. Before shutting down or restarting any Oracle cluster node, perform a graceful shutdown of all registered Oracle Clusterware resources on the affected cluster node. Do this by using SRVCTL commands to shutdown:
■ All services on the node.
■ All database instances on the node.
■ All ASM instances on the node.
■ All node applications on the node.
Lengthy Startup of OracleDBConsole and OracleCRService on WindowsAfter a cluster node restart, the node may not be fully responsive for some period of time. During this time, Oracle is attempting to restart the process OracleDBConsolesid and the OracleCRService resource. Eventually, all of the resource startup operations will complete and the computer will operate normally.
Starting Up and Shutting Down with SRVCTL Enter the following SRVCTL syntax from the command line, providing the required database name and instance name, or include more than one instance name to start more than one specific instance:
srvctl start instance -d db_name -i "inst_name_list" [-o start_options] [-c connect_str | -q]
Note that this command will also start all enabled and non-running services that have the listed instances either as preferred or available instances.
To stop one or more instances, enter the following SRVCTL syntax from the command line:
srvctl stop instance -d name -i "inst_name_list" [-o stop_options] [-c connect_str | -q]
This command will also stop the services related to the terminated instances on the nodes where the instances were running. As an example, the following command
Customizing How Oracle Clusterware Manages RAC Databases
5-6 Oracle Clusterware and RAC Administration and Deployment Guide
provides its own connection information to shut down the two instances, orcl3 and orcl4, using the IMMEDIATE option:
srvctl stop instance -d orcl -i "orcl3,orcl4" -o immediate -c "sysback/oracle as sysoper"
To start or stop your entire cluster database, that is, all of the instances and its enabled services, enter the following SRVCTL commands:
srvctl start database -d name [-o start_options] [-c connect_str | -q]
srvctl stop database -d name [-o stop_options] [-c connect_str | -q]
The following SRVCTL command, for example, mounts all of the non-running instances of a RAC database using the default connection information:
srvctl start database -d orcl -o mount
Customizing How Oracle Clusterware Manages RAC DatabasesBy default, Oracle Clusterware controls database restarts in RAC environments. In some cases, you may need to minimize the level of control that Oracle Clusterware has over your RAC database. You may need to do this, for example, during database migration or maintenance.
To prevent Oracle Clusterware from restarting your RAC database when you restart your system, or to avoid restarting failed instances more than once, configure a policy to define the degree of control. There are two policies, automatic, which is the default, and manual.
To use this feature, configure one of the pre-defined policies to define the degree of control. There are two policy types: automatic, which is the default, and manual. The manual policy, which minimizes the database instance protection level, is an override of the automatic policy.
This procedure enables you to configure your system so that either Oracle Clusterware automatically restarts your RAC database when you restart your system, or you manually restart your RAC database. You can also use this procedure to configure your system to prevent Oracle Clusterware from auto-restarting failed database instances more than once.
Switching Between the Automatic and Manual PoliciesUse SRVCTL commands to display and change these Oracle Clusterware policies. For example, use the following command syntax to display the current policy where database_name is the name of the database for which you want to change policies:
srvctl config database -d database_name -a
Use the following SRVCTL command syntax to change the current policy to another policy where policy_name is the name of the new policy for the database that is identified by database_name:
srvctl modify database d database_name -y policy_name
See Also: Appendix E, "Server Control Utility Reference" for information about SRVCTL options and information about other administrative tasks that you can perform with SRVCTL
Overview of Initialization Parameter Files in Real Application Clusters
Administering Database Instances and Cluster Databases 5-7
This command syntax changes the resource profile values for each applicable resource and sets the Current Policy OCR key to the new value. When you add a new database using the srvctl command, you can use the -y option to specify the policy as in the following example where database_name is the name of the database and policy_name is the name of the policy:
srvctl add database -d database_name -y policy_name
This command syntax places the new database under the control of Oracle Clusterware. If you do not provide a new option, then Oracle uses the default value of automatic. After you change the policy, the OCR records the new value for the affected database.
Overview of Initialization Parameter Files in Real Application ClustersWhen you create the database, Oracle creates an SPFILE in the file location that you specify. This location can be an ASM disk group, cluster file system file, or a shared raw device. If you manually create your database, then Oracle recommends that you create an SPFILE from an initialization parameter file (PFILE).
All instances in the cluster database use the same SPFILE at startup. Because the SPFILE is a binary file, do not directly edit the SPFILE with an editor. Instead, change SPFILE parameter settings using Enterprise Manager or ALTER SYSTEM SQL statements.
RAC uses a traditional PFILE only if an SPFILE does not exist or if you specify PFILE in your STARTUP command. Oracle recommends that you use SPFILE file to simplify administration, maintain parameter setting consistency, and to guarantee parameter setting persistence across database shutdown and startup events. In addition, you can configure RMAN to back up your SPFILE.
Setting Server Parameter File Parameter Values for Real Application ClustersYou can alter SPFILE settings with Enterprise Manager or by using the SET clause of the ALTER SYSTEM statement. The examples in this section appear in ASCII text although the SPFILE is a binary file. Assume that you start an instance with an SPFILE containing the following entries:
*.OPEN_CURSORS=500prod1.OPEN_CURSORS=1000
For the instance with the Oracle system identifier (sid) prod1, the OPEN_CURSORS parameter is set to 1000 even though it has a database-wide setting of 500. Parameter file entries that have the asterisk (*) wildcard character only affect the instances without an instance-specific entry. This gives you control over parameter settings for
See Also: Chapter 14, "Making Applications Highly Available Using Oracle Clusterware" for more information about using Oracle Clusterware and Appendix E, "Server Control Utility Reference" for more information about SRVCTL commands
Note: The value before the dot in an SPFILE entry identifies the instance to which the particular parameter value belongs. When an asterisk precedes the dot, the value is applied to all instances that do not have a subsequent, individual value listed in the SPFILE.
Initialization Parameter Use in Real Application Clusters
5-8 Oracle Clusterware and RAC Administration and Deployment Guide
instance prod1. These two types of settings can appear in any order in the parameter file.
If another DBA runs the following statement, then Oracle updates the setting on all instances except the instance with sid prod1:
ALTER SYSTEM SET OPEN_CURSORS=1500 sid='*' SCOPE=MEMORY;
Then if you run the following statement on another instance, the instance with sid prod1 also assumes the new setting of 2000:
ALTER SYSTEM SET OPEN_CURSORS=2000 sid='*' SCOPE=MEMORY;
In the following example, the server parameter file contains these entries:
prod1.OPEN_CURSORS=1000*.OPEN_CURSORS=500
Running the following statement makes Oracle disregard the first entry from the server parameter file:
ALTER SYSTEM RESET SCOPE=SPFILE;
To reset a parameter to its default value throughout your cluster database, enter the statement:
alter system reset open_cursors scope=spfile sid='prod1';
Parameter File Search Order in Real Application ClustersOracle searches for your parameter file in a particular order depending on your platform. On UNIX-based platforms, Oracle examines directories in the following order:
1. $ORACLE_HOME/dbs/spfilesid.ora
2. $ORACLE_HOME/dbs/spfile.ora
3. $ORACLE_HOME/dbs/initsid.ora
The search order on Windows-based platforms is:
1. %ORACLE_HOME%\database\spfilesid.ora
2. %ORACLE_HOME%\database\spfile.ora
3. %ORACLE_HOME%\database\initsid.ora
Initialization Parameter Use in Real Application ClustersBy default, Oracle sets most parameters to a default value and this value is the same across all instances. However, many initialization parameters can also have different values on different instances as described in the Oracle Database Reference. Other parameters must either be unique or identical as described in the following sections.
Note: Modifying SPFILEs with anything except Enterprise Manager or SQL*Plus can corrupt the file and prevent database startup. To repair the file, you might need to create the PFILE and regenerate the SPFILE.
Initialization Parameter Use in Real Application Clusters
Administering Database Instances and Cluster Databases 5-9
Parameters that Must Have Identical Settings on All InstancesCertain initialization parameters that are critical at database creation or that affect certain database operations must have the same value for every instance in a RAC database. Specify these parameter values in the SPFILE, or within the individual PFILEs for each instance. The following list contains the parameters must be identical on every instance:
■ ACTIVE_INSTANCE_COUNT
■ ARCHIVE_LAG_TARGET
■ CLUSTER_DATABASE
■ CLUSTER_DATABASE_INSTANCES
■ CONTROL_FILES
■ DB_BLOCK_SIZE
■ DB_DOMAIN
■ DB_FILES
■ DB_NAME
■ DB_RECOVERY_FILE_DEST
■ DB_RECOVERY_FILE_DEST_SIZE
■ DB_UNIQUE_NAME
■ UNDO_MANAGEMENT
The setting for DML_LOCKS must be identical on every instance only if set to zero.
Parameters That Must Have Unique Settings on All InstancesIf you use the THREAD or ROLLBACK_SEGMENTS parameters, then Oracle recommends setting unique values for them by using the sid identifier in the SPFILE. However, you must set a unique value for INSTANCE_NUMBER for each instance and you cannot use a default value.
Oracle uses the INSTANCE_NUMBER parameter to distinguish among instances at startup. Oracle uses the THREAD number to assign redo log groups to specific instances. To simplify administration, use the same number for both the THREAD and INSTANCE_NUMBER parameters.
Specify the ORACLE_SID environment variable, which comprises the database name and the number of the THREAD assigned to the instance. When you specify UNDO_TABLESPACE with automatic undo management enabled, then set this parameter to a unique undo tablespace name for each instance.
Parameters that Should Have Identical Settings on All InstancesOracle recommends that you set the values for the following parameters to the same value on all instances. Although you can have different settings for these parameters on different instances, setting each parameter to the same value on all instances simplifies administration:
■ ARCHIVE_LAG_TARGET
Different values for instances in your RAC database are likely to increase overhead because of additional automatic synchronization performed by the database processing.
Summary of Parameter Use in Real Application Clusters Databases
5-10 Oracle Clusterware and RAC Administration and Deployment Guide
When using Streams with your RAC database, the value should be greater than zero.
■ LICENSE_MAX_USERS
This parameter determines a database-wide limit on the number of users defined in the database and it is useful to have the same value on all instances of your database so you can see the current value no matter which instance you are using. Setting different values may cause additional warning messages to be generated during instance startup or cause commands related to database user management to fail on some instances.
■ LOG_ARCHIVE_FORMAT
If you do not use the same value for all your instances, then you unnecessarily complicate media recovery. The recovering instance expects the required archive log file names to have the format defined by its own value of LOG_ARCHIVE_FORMAT, regardless of which instance created the archive log files.
Databases that support Data Guard, either to send or receive archive log files, must use the same value of LOG_ARCHIVE_FORMAT for all instances.
■ SPFILE
If this parameter does not identify the same file to all instances, then each instance may behave differently and unpredictably in fail over, load-balancing, as well as normal operations. Additionally, a change you make to the SPFILE with an ALTER SYSTEM SET or ALTER SYSTEM RESET command is saved only in the SPFILE used by the instance where you run the command. Your change will not be reflected in instances using different SPFILEs.
If the SPFILE values are different in instances for which the values were set by the server, then you should restart the instances that are not using the default SPFILE.
■ TRACE_ENABLED
If you want diagnostic trace information to be always available for your RAC database, you must set TRACE_ENABLED to TRUE on all of your database instances. If you trace on only some of your instances, then diagnostic information might not be available when required should the only accessible instances be those with TRACE_ENABLED set to FALSE.
■ UNDO_RETENTION
By setting different values for UNDO_RETENTION in each instance, you are likely to reduce scalability and encounter unpredictable behavior following a fail over. Therefore, you should carefully consider whether you will accrue any benefits before you assign different values for this parameter to the instances in your RAC database.
Summary of Parameter Use in Real Application Clusters DatabasesThis section summarizes considerations for using parameters in RAC databases.
■ CLUSTER_DATABASE
Enables a database to be started in cluster mode. Set this parameter to TRUE.
■ CLUSTER_DATABASE_INSTANCES
Sets the number of instances in your RAC environment. A proper setting for this parameter can improve memory use. Set the CLUSTER_DATABASE_INSTANCES parameter to the same value on all instances. Otherwise, instance startup can fail.
Summary of Parameter Use in Real Application Clusters Databases
Administering Database Instances and Cluster Databases 5-11
Normally, set this parameter to be equal to the number of instances in your RAC database. Alternatively, you can set this parameter to a value that is greater than the current number of instances if you are planning to add instances.
■ CLUSTER_INTERCONNECTS
Specifies the cluster interconnect when there is more than one interconnect. Refer to your Oracle platform-specific documentation for the use, syntax, and behavior of this parameter.
You typically do not need to set the CLUSTER_INTERCONNECTS parameter. For example, do not set this parameter for the following common configurations:
■ If you have only one cluster interconnect.
■ If the default cluster interconnect meets the bandwidth requirements of your RAC database, which is typically the case.
■ If your database is running on a Sun Solaris cluster. If you do set the parameter, its value must be the same on all instances.
Oracle uses information from CLUSTER_INTERCONNECTS to distribute interconnect traffic among the various network interfaces if you specify more than one interconnect with this parameter. Note that the specified configuration inherits any limitations of the listed interconnects and the associated operating system IPC services, such as availability. Consider setting CLUSTER_INTERCONNECTS when a single cluster interconnect cannot meet your bandwidth requirements. You may need to set this parameter in data warehouse environments with high interconnect bandwidth demands from one or more databases as described here.
For example, if you have two databases with high interconnect bandwidth requirements, then you can override the default interconnect provided by your operating system and nominate a different interconnect for each database using the following syntax in each server parameter file where ipn is an IP address in standard dot-decimal format, for example: 144.25.16.214:
Database One: CLUSTER_INTERCONNECTS = ip1Database Two: CLUSTER_INTERCONNECTS = ip2
If you have one database with high bandwidth demands, then you can nominate multiple interconnects using the following syntax:
CLUSTER_INTERCONNECTS = ip1:ip2:...:ipn
If you set multiple values for CLUSTER_INTERCONNECTS as in the preceding example, then Oracle uses all of the interconnects that you specify. This provides load balancing as long as all of the listed interconnects remain operational. You must use identical values, including the order in which the interconnects are listed, on all instances of your database when defining multiple interconnects with this parameter.
Note: The value for this parameter determines the maximum number of instances that you can have in your RAC database environment. If you add instances, then you may need to reset the value for this parameter to accommodate the increased number of instances.
Summary of Parameter Use in Real Application Clusters Databases
5-12 Oracle Clusterware and RAC Administration and Deployment Guide
If an operating system error occurs while Oracle is writing to the interconnect that you specify with CLUSTER_INTERCONNECTS, then Oracle returns an error even if some other interfaces are available. This is because the communication protocols between Oracle and the interconnect can vary greatly depending on your platform. Refer to your Oracle platform-specific documentation for more information.
■ DB_NAME
If you set a value for DB_NAME in instance-specific parameter files, the setting must be identical for all instances.
■ DISPATCHERS
Set the DISPATCHERS parameter to enable a shared server configuration, that is a server that is configured to enable many user processes to share very few server processes. With shared server configurations, many user processes connect to a dispatcher. The DISPATCHERS parameter may contain many attributes.
Oracle recommends that you configure at least the PROTOCOL and LISTENER attributes. PROTOCOL specifies the network protocol for which the dispatcher process generates a listening end point. LISTENER specifies an alias name for the Oracle Net Services Listeners. Set the alias to a name that is resolved through a naming method such as a tnsnames.ora file. The tnsnames.ora file contains net service names. Clients, nodes, and the Oracle Performance Manager node need this file. Enterprise manager does not require tnsnames.ora entries on the client for Database Control or Grid Control. Refer to Oracle Database Net Services Administrator's Guide for complete information about configuring the DISPATCHERS parameter and its attributes and for configuring the shared server.
■ INSTANCE_NAME
This parameter is normally set to a different value for each instance to provide a simple method for clients to connect directly to a specific instance. However, you may use the same value for multiple instances. The value of the INSTANCE_NAME parameter is usually the same as the value of the SID for the instance, to which it defaults, and this association of the two names may help reduce confusion when managing complex systems.
■ SERVICE_NAMES
When you use an SPFILE, all RAC database instances must use the SPFILE and the file must be on shared storage. Entries in the SERVICE_NAMES parameter may be used by client connections rather than the INSTANCE_NAME parameter value. The SERVICE_NAMES parameter may include one or more names and different instances may share one or more names with other instances. This enables a client to connect to either a specific instance or to any one of a set of instances, depending on the service name chosen in the connection string.
Note: Setting this parameter does not provide interconnect failover. Because interconnect failover is operating-system dependent, refer to your operating system documentation for information about configuring interconnect failover.
Backing Up the Server Parameter File
Administering Database Instances and Cluster Databases 5-13
■ SESSIONS_PER_USER
Each instance maintains its own SESSIONS_PER_USER count. If SESSIONS_PER_USER is set to 1 for a user, the user can log on to the database more than once as long as each connection is from a different instance.
■ SPFILE
When you use an SPFILE, all RAC database instances must use the SPFILE and the file must be on shared storage.
■ THREAD
If specified, this parameter must have unique values on all instances. The THREAD parameter specifies the number of the redo thread to be used by an instance. You can specify any available redo thread number as long as that thread number is enabled and is not used.
Backing Up the Server Parameter FileOracle recommends that you regularly back up the server parameter file for recovery purposes. Do this using the CREATE PFILE statement. For example:
CREATE PFILE='?/dbs/initdbname.ora'FROM SPFILE='/dev/vx/rdsk/oracle_dg/dbspfile'
You can use RMAN (Recovery Manager) to create backups of the server parameter file. You can also recover an SPFILE by starting an instance using a client-side initialization parameter file. Then re-create the server parameter file using the CREATE SPFILE statement. Note that if the parameter file that you use for this operation was for a single instance, then the parameter file will not contain instance-specific values, even those that must be unique in RAC instances. Therefore, ensure that your parameter file contains the appropriate settings as described earlier in this chapter.
To ensure that your SPFILE (and control files) are automatically backed up by RMAN during typical backup operations, use Enterprise Manager or the RMAN CONTROLFILE AUTOBACKUP statement to enable the RMAN autobackup feature
Note: If you use services as described in Chapter 6, "Introduction to Workload Management", then do not set values for the SERVICE_NAMES parameter. The tools that create and manage services for workload management automatically set values this parameter.
See Also:
■ Oracle Database Backup and Recovery Basics for more information about RMAN
■ Oracle Database SQL Reference for more information about the CREATE SPFILE statement

Backing Up the Server Parameter File
5-14 Oracle Clusterware and RAC Administration and Deployment Guide
Introduction to Workload Management 6-1
6Introduction to Workload Management
This chapter describes how to manage workloads in Oracle Real Application Clusters (RAC) to provide high availability and scalability for your applications. This chapter contains the following topics:
■ Introduction to Workload Management and Application High Availability
■ Service Deployment Options
■ Fast Application Notification
■ Load Balancing Advisory
■ Oracle Clients that Are Integrated with Fast Application Notification
■ Services and Distributed Transaction Processing in RAC
■ Administering Services
■ Administering Services with Enterprise Manager, DBCA, PL/SQL, and SRVCTL
■ Measuring Performance by Service Using the Automatic Workload Repository
■ Enabling Event Notification for Connection Failures in Real Application Clusters
Introduction to Workload Management and Application High AvailabilityWorkload management enables you to manage workload distributions to provide optimal performance for users and applications. Workload management comprises the following:
■ Services—Oracle Database 10g introduces a powerful automatic workload management facility, called services, to enable the enterprise grid vision. Services are entities that you can define in RAC databases that enable you to group database workloads and route work to the optimal instances that are assigned to offer the service.
■ Connection Load Balancing—A feature of Oracle Net Services that balances incoming connections across all of the instances that provide the requested database service.
■ High Availability Framework—A RAC component that enables the Oracle Database to maintain components in a running state at all times.
■ Fast Application Notification (FAN)—The notification mechanism that RAC uses to quickly alert applications about configuration and workload service level changes.
■ Load Balancing Advisory—Provides information to applications about the current service levels that the database and its instances are providing. The load
Service Deployment Options
6-2 Oracle Clusterware and RAC Administration and Deployment Guide
balancing advisory makes recommendations to applications about where to direct application requests to obtain the best service based on the policy that you have defined for that service.
■ Fast Connection Failover—This is the ability of Oracle Clients to provide rapid failover of connections by subscribing to FAN events.
■ Runtime Connection Load Balancing—This is the ability of Oracle Clients to provide intelligent allocations of connections in the connection pool based on the current service level provided by the database instances when applications request a connection to complete some work.
When a user or application connects to a database, Oracle recommends that you specify a service in the connect data portion of the connect string. Oracle automatically creates one database service when the database is created. For many installations, this may be all you need. To enable more flexibility in the management of the workload using the database, Oracle Database 10g enables you to create multiple services and specify which instances offer the services. Continue reading this chapter to understand the added features that you can use with services if you are interested in greater workload management flexibility.
You can deploy RAC and single-instance Oracle database environments to use workload management features in many different ways. Depending on the number of nodes and your environment’s complexity and objectives, your choices for the optimal workload management and high availability configuration depend on several considerations that this chapter describes. The following section describes the various service deployment options.
Service Deployment OptionsThis section describes the following service deployment topics:
■ Using Oracle Services
■ Default Service Connections
■ Connection Load Balancing
Using Oracle ServicesTo manage workloads, you can define services that you assign to a particular application or to a subset of an application's operations. You can also group work by type under services. For example, online users can be a service while batch processing can be another and reporting can be yet another service type.
Oracle recommends that all users who share a service have the same service level requirements. You can define specific characteristics for services and each service can be a separate unit of work. There are many options that you can take advantage of when using services. Although you do not have to implement these options, using them helps optimize application performance.
When you define a service, you define which instances normally support that service. These are known as the PREFERRED instances. You can also define other instances to support a service if the service’s preferred instance fails. These are known as AVAILABLE instances.
When you specify PREFERRED instances, you are specifying the number of instances on which a service will normally run. The Oracle Clusterware attempts to ensure that the service always runs on the number of nodes for which you have configured the service. Afterwards, due to either instance failure or planned service relocations, a
Service Deployment Options
Introduction to Workload Management 6-3
service may be running on an AVAILABLE instance. When a service moves to an available instance, Oracle does not move the service back to the PREFERRED instance when the PREFERRED instance restarts because:
■ The service is already running on the desired number of instances
■ Maintaining the service on the current instance provides a higher level of service availability
■ Not moving the service back to the initial PREFERRED instance prevents a second outage
You can, however, easily automate fail back by using FAN callouts.
Resource profiles are automatically created when you define a service. A resource profile describes how Oracle Clusterware should manage the service and which instance the service should failover to if the preferred instance stops. Resource profiles also define service dependencies for the instance and the database. Due to these dependencies, if you stop a database, then the instances and services are automatically stopped in the correct order.
Services are integrated with Resource Manager which enables you to restrict the resources that are used by a service within an instance. The Resource Manager enables you to map a consumer group to a service so that users who connect with the service are members of the specified consumer group. Also, the Automatic Workload Repository (AWR) enables you to monitor performance by service.
Oracle Net Services provides connection load balancing to enable you to spread user connections across all of the instances that are supporting a service. For each service, you can define the method that you want the listener to use for load balancing by setting the connection load balancing goal, CLB_GOAL. You can also specify a single TAF policy for all users of a service by defining the FAILOVER_METHOD, FAILOVER_TYPE, and so on. RAC uses FAN to notify applications about configuration changes and the current service level that is provided by each instance where the service is enabled.
FAN has two methods for publishing events to clients, the Oracle Notification Service (ONS), which is used by Java Database Connectivity (JDBC) clients including the Oracle Application Server 10g, and Oracle Streams, Advanced Queueing which is used by Oracle Call Interface (OCI) and Oracle Data Provider for .NET (ODP.NET) clients. When using Advanced Queueing, you must enable the service to use the queue by setting AQ_HA_NOTIFICATIONS to true.
With Runtime Connection Load Balancing, applications can use load balancing advisory events to provide better service to users. The Oracle JDBC and ODP.NET clients are automatically integrated to take advantage of load balancing advisory events. The load balancing advisory informs the client about the current service level that an instance is providing for a service. The load balancing advisory also recommends how much of the workload should be sent to that instance. In addition, Oracle Net Services provides connection load balancing to enable you to spread user connections across all of the instances that support a service. To enable the load balancing advisory, set the GOAL parameter on the service.
Distributed transaction processing applications have unique requirements. To make it easier to use RAC with global transactions, set the distributed transaction processing parameter on the service so that all tightly coupled branches of a distributed transaction processing transaction are run on the same instance.

Service Deployment Options
6-4 Oracle Clusterware and RAC Administration and Deployment Guide
Default Service ConnectionsAs mentioned earlier, DBCA creates a default service for your RAC database and this service is a special Oracle database service. This default service is always available on all instances in a RAC environment, unless an instance is in restricted mode. You cannot alter this service or its properties. The database also supports the following two internal services:
■ SYS$BACKGROUND is used by the background processes only
■ SYS$USERS is the default service for user sessions that are not associated with any application service
Both of these internal services support all of the workload management features. You cannot stop or disable either of these internal services.
Connection Load BalancingOracle Net Services provides the ability to balance client connections across the instances in a RAC configuration. There are two types of load balancing that you can implement: client-side and server-side load balancing. Client-side load balancing balances the connection requests across the Listeners. With server-side load balancing, the Listener directs a connection request to the best instance currently providing the service by using the load balancing advisory. In a RAC database, client connections should use both types of connection load balancing.
FAN, FCF, and the load balancing advisory depend on an accurate connection load balancing configuration that includes setting the connection load balancing goal for the service. You can use a goal of either long or short for connection load balancing. These goals have the following characteristics:
■ Long—Use the LONG connection load balancing method for applications that have long-lived connections. This is typical for connection pools and SQL*Forms sessions. Long is the default connection load balancing goal. The following is an example of modifying a service, POSTMAN, with the PL/SQL DBMS_SERVICE package and the CLB_GOAL_LONG package constant to define the connection load balancing goal for long-lived sessions:
EXECUTE DBMS_SERVICE.MODIFY_SERVICE (service_name => 'POSTMAN' , clb_goal => DBMS_SERVICE.CLB_GOAL_LONG);
■ Short—Use the SHORT connection load balancing method for applications that have short-lived connections. The following example modifies the service known as ORDER, using the DBMS_SERVICE.CLB_GOAL_SHORT package constant to set the goal to short:
EXECUTE DBMS_SERVICE.MODIFY_SERVICE (service_name => 'ORDER' , CLB_GOAL => DBMS_SERVICE.CLB_GOAL_SHORT);
When you create a RAC database with the Database Configuration Assistant (DBCA), DBCA configures and enables server-side load balancing by default. The DBCA also creates a sample client-side load balancing connection definition in the tnsnames.ora file on the server. Any services created through DBCA have the default setting of CLB_GOAL=CLB_GOAL_LONG.
See Also: "Services and Distributed Transaction Processing in RAC" on page 6-16 for more information about distributed transaction processing in RAC

Fast Application Notification
Introduction to Workload Management 6-5
When Oracle Net Services establishes a connection to an instance, the connection remains open until the client closes the connection, the instance is shutdown, or a failure occurs. If you configure transparent application failover (TAF) for the connection, then Oracle moves the session to a surviving instance when an outage occurs.
TAF can restart a query after failover has completed but for other types of transactions, such as INSERT, UPDATE, or DELETE, the application must rollback the failed transaction and resubmit the transaction. You must re-execute any session customizations, in other words, ALTER SESSION statements, after failover has occurred. However, with TAF, a connection is not moved during normal processing, even if the workload changes over time.
Services simplify the deployment of TAF. You can define a TAF policy for a service and all connections using this service will automatically have TAF enabled. This does not require any client-side changes. The TAF setting on a service overrides any TAF setting in the client connection definition. To define a TAF policy for a service, use the DBMS_SERVICE PL/SQL procedure as in the following example:
EXECUTE DBMS_SERVICE.MODIFY_SERVICE (service_name => 'gl.us.oracle.com' , aq_ha_notifications => TRUE , failover_method => DBMS_SERVICE.FAILOVER_METHOD_BASIC , failover_type => DBMS_SERVICE.FAILOVER_TYPE_SELECT , failover_retries => 180 , failover_delay => 5 , clb_goal => DBMS_SERVICE.CLB_GOAL_LONG);
Client-side load balancing is defined in your client connection definition by setting the parameter LOAD_BALANCE=ON (the default is ON for description lists). When you set this parameter to ON, Oracle randomly selects an address in the address list, and connects to that node's Listener. This balances client connections across the available Listeners in the cluster. When the Listener receives the connection request, the Listener connects the user to an instance that the Listener knows provides the requested service. To see what services a Listener supports, run the lsnrctl services command.
Fast Application NotificationThis section provides a detailed description of FAN under the following topics:
■ Overview of Fast Application Notification
■ Application High Availability with Services and FAN
■ Managing Unplanned Outages
■ Managing Planned Outages
■ Fast Application Notification High Availability Events
■ Using Fast Application Notification Callouts
See Also: Oracle Database Net Services Administrator's Guide for detailed information about both types of load balancing
See Also: "Oracle Clients that Are Integrated with Fast Application Notification" on page 6-11 for more information about specific client environments that you can use with FAN
Fast Application Notification
6-6 Oracle Clusterware and RAC Administration and Deployment Guide
Overview of Fast Application NotificationFAN is a notification mechanism that RAC uses to notify other processes about configuration and service level information such as includes service status changes, such as UP or DOWN events. Applications can respond to FAN events and take immediate action. FAN UP and DOWN events can apply to instances, services, and nodes.
For cluster configuration changes, the RAC high availability framework publishes a FAN event immediately when a state change occurs in the cluster. Instead of waiting for the application to poll the database and detect a problem, applications can receive FAN events and react immediately.
FAN also publishes load balancing advisory events. Applications can take advantage of the load balancing advisory FAN events to direct work requests to the instance in the cluster that is currently providing the best service quality. You can take advantage of FAN events in the following three ways:
1. Your application can use FAN without programmatic changes if you use an integrated Oracle client. The integrated clients for FAN events include Oracle Database 10g JDBC (Oracle Database 10g Release 2 is required for load balancing), Oracle Database 10g Release 2 ODP.NET, and Oracle Database 10g Release 2 OCI. This includes applications that use TAF.
2. Applications can use FAN programmatically by using the ONS Application Programming Interface (API) to subscribe to FAN events and to execute event handling actions upon the receipt of an event.
3. You can implement FAN with server-side callouts on your database tier.
For DOWN events, the disruption to the application can be minimized because sessions to the failed instance or node can be terminated. Incomplete transactions can be terminated and the application user is immediately notified. Application users who request connections are directed to available instances only. For UP events, when services and instances are started, new connections can be created so that the application can immediately take advantage of the extra resources. Through server-side callouts, you can also use FAN to:
■ Log status information
■ Page DBAs or to open support tickets when resources fail to start
■ Automatically start dependent external applications that need to be co-located with a service
■ Change resource plans or to shut down services when the number of available instances decreases, for example, if nodes fail
■ Automate the fail back of a service to PREFERRED instances if needed
FAN events are published using ONS and an Oracle Streams Advanced Queuing. The publication mechanisms are automatically configured as part of your RAC installation.
The Connection Manager (CMAN) and Oracle Net Services Listeners are integrated with FAN events. This enables the Listener and CMAN to immediately de-register services provided by the failed instance and to avoid erroneously sending connection requests to failed instances.
If you use the service goal CLB_GOAL_SHORT, then the Listener uses the load balancing advisory when the Listener balances the connection loads. When load balancing advisory is enabled, the metrics used for the Listener are finer grained.
Fast Application Notification
Introduction to Workload Management 6-7
Application High Availability with Services and FANOracle focuses on maintaining service availability. In RAC, Oracle services are designed to be continuously available with loads shared across one or more instances. The RAC high availability framework maintains service availability by using Oracle Clusterware and resource profiles.
The RAC high availability framework monitors the database and its services and sends event notifications using FAN. The Oracle Clusterware recovers and balances services according to business rules.
Managing Unplanned OutagesYou can assign services in RAC to one or more instances. If RAC detects an outage, then Oracle Clusterware isolates the failed component and recovers the dependent components. For services, if the failed component is an instance, then Oracle Clusterware relocates the service to an available instance in the cluster. FAN events can occur at various levels within the Oracle Server architecture and the response can include notifying external entities by way of ONS, Advanced Queuing, or you can program notification using FAN callouts.
Notification occurs from a surviving node when the failed node is out of service. The location and number of instances in a RAC environment that provide a service are transparent to applications. Restart and recovery are automatic, including the restarting of the subsystems, such as the Listener and the Automatic Storage Management (ASM) processes, not just the database. You can use FAN callouts to report faults to your fault management system and to initiate repair jobs.
Managing Planned OutagesFor repairs, upgrades, and changes that require you to isolate one or more instances, RAC provides interfaces that relocate, disable, and enable services to minimize service disruption to application users. Once you complete the operation, you can return the service to normal operation.
Due to dependencies, if you manually shutdown your database, then all of your services automatically stop. If you then manually restart the database, then you must also restart the database’s services. Use FAN callouts to automate starting the services when the database starts.
Fast Application Notification High Availability EventsTable 6–1 describes the FAN event record parameters and the event types, followed by name-value pairs for the event properties. The event type is always the first entry and the timestamp is always the last entry as in the following example:
FAN event type: service_memberProperties: version=1.0 service=ERP database=FINPROD instance=FINPROD3 host=node3 status=up
Note: Oracle does not run RAC callouts with guaranteed ordering. Callouts are run asynchronously and they are subject to scheduling variabilities.

Fast Application Notification
6-8 Oracle Clusterware and RAC Administration and Deployment Guide
A FAN record matches the database signature of each session as shown in Table 6–2. The signature information is also available using OCI_ATTRIBUTES. These attributes are available in the OCI Connection Handle. Use this information to take actions on sessions that match the FAN event data.
Using Fast Application Notification CalloutsFAN callouts are server-side executables that RAC executes immediately when high availability events occur. You can use FAN callouts to automate the following activities when events occur in a cluster configuration, such as:
■ Opening fault tracking tickets
■ Sending messages to pagers
■ Sending e-mail
■ Starting and stopping server-side applications
■ Maintaining an uptime log by logging each event as it occurs
■ Relocating low-priority services when high priority services come online
To use FAN callouts, place an executable in the directory CRS_home/racg/usrco on every node that runs Oracle Clusterware. If you are using scripts, then set the shell as
Table 6–1 Event Record Parameters and Descriptions
Parameter Description
VERSION Version of the event record. Used to identify release changes.
EVENT TYPE SERVICE, SERVICE_MEMBER, DATABASE, INSTANCE, NODE, ASM, SRV_PRECONNECT. Note that Database and Instance types provide the database service, such as DB_UNIQUE_NAME.DB_DOMAIN.
DATABASE UNIQUE NAME The unique database supporting the service; matches the initialization parameter value for DB_UNIQUE_NAME, which defaults to the value of the initialization parameter DB_NAME.
INSTANCE The name of the instance that supports the service; matches the ORACLE_SID value.
NODE NAME The name of the node that supports the service or the node that has stopped; matches the node name known to Cluster Synchronization Services (CSS).
SERVICE The service name; matches the service in DBA_SERVICES.
STATUS Values are UP, DOWN, NOT_RESTARTING, PRECONN_UP, PRECONN_DOWN, and UNKNOWN.
REASON Failure, Dependency, User, Autostart, Restart.
CARDINALITY The number of service members that are currently active; included in all UP events.
INCARNATION For node DOWN events; the new cluster incarnation.
TIMESTAMP The local time zone to use when ordering notification events.
Table 6–2 FAN Parameters and Matching Database Signatures
FAN Parameter Matching Oracle Database Signature
SERVICE sys_context('userenv', 'service_name')
DATABASE UNIQUE NAME sys_context('userenv', 'db_unique_name')
INSTANCE sys_context('userenv', 'instance_name')
CLUSTER NODE NAME sys_context('userenv', 'server_host')
Load Balancing Advisory
Introduction to Workload Management 6-9
the first line of the executable. The following is an example file for the CRS_home/racg/usrco/callout.sh callout:
#! /bin/kshFAN_LOGFILE= [your path name]/admin/log/`hostname`_uptime.logecho $* "reported="`date` >> $FAN_LOGFILE &
The following output is from the previous example:
NODE VERSION=1.0 host=sun880-2 incarn=23 status=nodedown reason= timestamp=08-Oct-2004 04:02:14 reported=Fri Oct 8 04:02:14 PDT 2004
A FAN record matches the database signature of each session, as shown in Table 6–2. The signature information is also available using OCI_ATTRIBUTES. These attributes are available in the OCI Connection Handle. Use this information to take actions on sessions that match the FAN event data.
Load Balancing AdvisoryThis section describes the load balancing advisory under the following topics:
■ Overview of the Load Balancing Advisory
■ Configuring Your Environment to Use the Load Balancing Advisory
■ Load Balancing Advisory FAN Events
Overview of the Load Balancing AdvisoryLoad balancing distributes work across all of the available RAC database instances. Oracle recommends that applications use persistent connections that span the instances that offer a particular service. Connections are created infrequently and exist for a long duration. Work comes into the system with high frequency, borrows these connections, and exists for a relatively short duration. The load balancing advisory provides advice about how to direct incoming work to the instances that provide the optimal quality of service for that work. This minimizes the need to relocate the work later.
By using the THROUGHPUT or SERVICE_TIME goals, feedback is built in to the system. Work is routed to provide the best service times globally, and routing responds gracefully to changing system conditions. In a steady state, the system approaches equilibrium with improved throughput across all of the RAC instances.
Standard architectures that can use the load balancing advisory include connection load balancing, transaction processing monitors, application servers, connection concentrators, hardware and software load balancers, job schedulers, batch schedulers, and message queuing systems. All of these applications can allocate work.
The load balancing advisory is deployed with key Oracle clients, such as a Listener, the JDBC Implicit Connection Cache 10g, and the ODP.NET Connection Pool. The load balancing advisory is also open for third party subscription by way of ONS.
Configuring Your Environment to Use the Load Balancing AdvisoryYou can configure your environment to use the load balancing advisory by defining service-level goals for each service for which you want to enable load balancing. This
See Also: Table 6–1 for information about the callout and event details
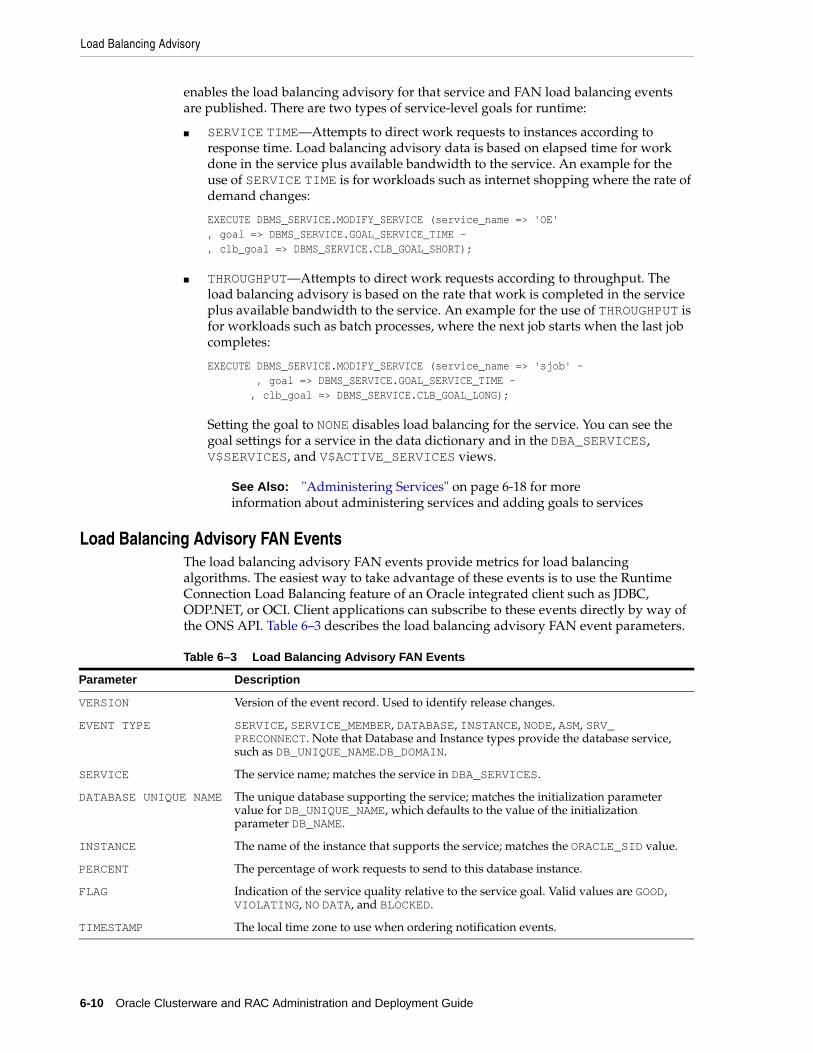
Load Balancing Advisory
6-10 Oracle Clusterware and RAC Administration and Deployment Guide
enables the load balancing advisory for that service and FAN load balancing events are published. There are two types of service-level goals for runtime:
■ SERVICE TIME—Attempts to direct work requests to instances according to response time. Load balancing advisory data is based on elapsed time for work done in the service plus available bandwidth to the service. An example for the use of SERVICE TIME is for workloads such as internet shopping where the rate of demand changes:
EXECUTE DBMS_SERVICE.MODIFY_SERVICE (service_name => 'OE' , goal => DBMS_SERVICE.GOAL_SERVICE_TIME -, clb_goal => DBMS_SERVICE.CLB_GOAL_SHORT);
■ THROUGHPUT—Attempts to direct work requests according to throughput. The load balancing advisory is based on the rate that work is completed in the service plus available bandwidth to the service. An example for the use of THROUGHPUT is for workloads such as batch processes, where the next job starts when the last job completes:
EXECUTE DBMS_SERVICE.MODIFY_SERVICE (service_name => 'sjob' - , goal => DBMS_SERVICE.GOAL_SERVICE_TIME - , clb_goal => DBMS_SERVICE.CLB_GOAL_LONG);
Setting the goal to NONE disables load balancing for the service. You can see the goal settings for a service in the data dictionary and in the DBA_SERVICES, V$SERVICES, and V$ACTIVE_SERVICES views.
Load Balancing Advisory FAN Events The load balancing advisory FAN events provide metrics for load balancing algorithms. The easiest way to take advantage of these events is to use the Runtime Connection Load Balancing feature of an Oracle integrated client such as JDBC, ODP.NET, or OCI. Client applications can subscribe to these events directly by way of the ONS API. Table 6–3 describes the load balancing advisory FAN event parameters.
See Also: "Administering Services" on page 6-18 for more information about administering services and adding goals to services
Table 6–3 Load Balancing Advisory FAN Events
Parameter Description
VERSION Version of the event record. Used to identify release changes.
EVENT TYPE SERVICE, SERVICE_MEMBER, DATABASE, INSTANCE, NODE, ASM, SRV_PRECONNECT. Note that Database and Instance types provide the database service, such as DB_UNIQUE_NAME.DB_DOMAIN.
SERVICE The service name; matches the service in DBA_SERVICES.
DATABASE UNIQUE NAME The unique database supporting the service; matches the initialization parameter value for DB_UNIQUE_NAME, which defaults to the value of the initialization parameter DB_NAME.
INSTANCE The name of the instance that supports the service; matches the ORACLE_SID value.
PERCENT The percentage of work requests to send to this database instance.
FLAG Indication of the service quality relative to the service goal. Valid values are GOOD, VIOLATING, NO DATA, and BLOCKED.
TIMESTAMP The local time zone to use when ordering notification events.
Oracle Clients that Are Integrated with Fast Application Notification
Introduction to Workload Management 6-11
Use the following example to monitor load balancing advisory events:
SET PAGES 60 COLSEP '|' LINES 132 NUM 8 VERIFY OFF FEEDBACK OFFCOLUMN user_data HEADING "AQ Service Metrics" FORMAT A60 WRAPBREAK ON service_name SKIP 1SELECT TO_CHAR(enq_time, 'HH:MI:SS') Enq_time , user_dataFROM sys.sys$service_metrics_tabORDER BY 1 ;
Oracle Clients that Are Integrated with Fast Application NotificationOracle has integrated FAN with many of the common client application environments that are used to connect to RAC databases. Therefore, the easiest way to use FAN is to use an integrated Oracle Client.
You can use the OCI Session Pools, CMAN session pools, and JDBC and ODP.NET connection pools. OCI applications with TAF enabled should use FAN high availability events for fast failover. The overall goal is to enable applications to consistently obtain connections to available instances that provide the best service. Due to the integration with FAN, Oracle integrated clients are more aware of the current status of a RAC cluster. This prevents client connections from waiting or trying to connect to an instance that is no longer available.
When instances start, RAC uses FAN to notify the connection pool so that the connection pool can create connections to the recently started instance and take advantage of the additional resources that this instance provides. The use of connection pools and FAN requires that you have properly configured database connection load balancing across all of the instances that provide the service(s) that the connection pool is using. Oracle recommends that you configure both client-side and server-side load balancing with Oracle Net Services, which is the default when you use DBCA to create your database. Oracle connection pools that are integrated with FAN can:
■ Balance connections across all of the RAC instances when a service starts; this is preferable to directing the sessions that are defined for the connection pool to the first RAC instance that supports the service
■ Remove terminated connections immediately when a service is declared DOWN at an instance, and immediately when nodes are declared DOWN
■ Report errors to clients immediately when Oracle detects the NOT RESTARTING state, instead of making the client wait while the service repeatedly attempts to restart
■ Balance work requests at run time using load balancing advisory events
The next sections describe how to enable FAN events for the several specific client development environments:
■ Enabling Java Database Connectivity Clients to Receive FAN Events
■ Enabling Oracle Call Interface Clients to Receive FAN High Availability Events
■ Enabling ODP.NET Clients to Receive FAN High Availability Events
■ Enabling ODP.NET Clients to Receive FAN Load Balancing Advisory Events
Oracle Clients that Are Integrated with Fast Application Notification
6-12 Oracle Clusterware and RAC Administration and Deployment Guide
Enabling Java Database Connectivity Clients to Receive FAN EventsEnabling FAN for the Oracle JDBC Implicit Connection Cache enables FAN high availability events in Oracle Database 10g release 1, and the load balancing advisory in Oracle Database 10g release 2. Your application can use the JDBC development environment for either thick or thin JDBC clients to use FAN. You must use the JDBC Implicit Connection Cache to enable the FAN features of Fast Connection Failover and Runtime Connection Load Balancing.
To configure the JDBC client, set the FastConnectionFailoverEnabled property before making the first getConnection() request to a data source. When you enable FCF, the failover applies to every connection in the connection cache. If your application explicitly creates a connection cache using the Connection Cache Manager, then you must first set FastConnectionFailoverEnabled.
Using FAN with Thick JDBC and Thin JDBC ClientsThis procedure explains how to enable FAN events for JDBC. For thick JDBC clients, if you enable FCF, do not enable TAF, either on the client or for the service. The FAN events that you enable can be both high availability events and load balancing advisory events. When using thin or thick JDBC clients, you can use FAN by configuring the JDBC implicit connection cache as described in the following procedure:
1. On a cache enabled DataSource, set the DataSource property FastConnectionFailoverEnabled to true as in the following example to enable FAN for Oracle implicit JDBC connect cache:
OracleDataSource ods = new OracleDataSource()ods.setUser("Scott");...ods.setPassword("tiger");ods.setConnectionCachingEnabled(True);ods.setFastConnectionFailoverEnabled(True);ods.setConnectionCacheName("MyCache");ods.setConnectionCacheProperties(cp);ods.setURL("jdbc:oracle:thin:@(DESCRIPTION= (LOAD_BALANCE=on) (ADDRESS=(PROTOCOL=TCP)(HOST=VIP1)(PORT=1521)) (ADDRESS=(PROTOCOL=TCP)(HOST=VIP2)(PORT=1521)) (CONNECT_DATA=(service_name=service_name)))");
2. Ensure that you have configured ONS on each node that is running Oracle Clusterware as in the following example using the CRS_home/opmn/conf/ons.config file.
See Also: The Oracle Database JDBC Developer's Guide and Reference for information about configuring the JDBC implicit connection cache and ONS
Note: Use the following system property to enable FAN without making data source changes: -D oracle.jdbc.FastConnectionFailover=true.
Note: This should have been automatically completed during the RAC installation.

Oracle Clients that Are Integrated with Fast Application Notification
Introduction to Workload Management 6-13
localport=6100 # This is the port ONS is writing to on this noderemoteport=6200 # This is the port ONS is listening on this nodeloglevel=3useocr=on
The information in the Oracle Cluster Registry (OCR) for ONS daemons is automatically configured by DBCA. If you are upgrading from a previous version of the database, then manually configure the OCR as follows. To add the middle tier nodes or to update the RAC nodes, use racgons from the Oracle Clusterware bin directory:
■ To add the ONS daemon configuration:
racgons add_config hostname:port [hostname:port] ...
■ To remove the ONS daemon configuration:
racgons remove_config hostname[:port] [hostname:port]..
3. Configure remote ONS subscription. Remote ONS subscription offers the following advantages:
■ Support for an All Java mid-tier software
■ An ONS daemon is not needed on the client machine; you do not need to manage this process
■ Simple configuration by way of a DataSource property
When using remote ONS subscription for FCF, an application uses setONSConfiguration, using the string remoteONSConfig, on an Oracle DataSource instance as in the following example:
ods.setONSConfiguration("nodes=racnode1:4200,racnode2:4200");
4. When you start the application, make sure that the ons.jar file is located on the application CLASSPATH. The ons.jar file is part of the Oracle client installation.
Enabling Oracle Call Interface Clients to Receive FAN High Availability EventsOracle Call Interface (OCI) clients can register to receive notifications about RAC high availability events and respond when events occur. This improves the session failover response time in OCI and also removes terminated connections from connection and session pools. This feature works on OCI applications that use TAF, connection pools, or session pools.
First, you must enable a service for high availability events. If your application is using TAF, then enable the TAF settings for the service. Then configure client applications to enable them to connect to a RAC instance to enable event notification. Clients can register callbacks that are used whenever an event occurs. This reduces the time that it takes to detect a connection failure. During DOWN event processing, OCI:
■ Terminates affected connections at the client
■ Removes connections from the OCI connection pool and the OCI session pool—the session pool maps each session to a physical connection in the connection pool, and there can be multiple sessions for each connection
■ Fails over the connection if you have configured TAF
See Also: Oracle Database JDBC Developer's Guide and Reference for more information about JDBC
Oracle Clients that Are Integrated with Fast Application Notification
6-14 Oracle Clusterware and RAC Administration and Deployment Guide
If TAF is not configured, then the client only receives an error.
Perform the following steps to configure Advanced Queueing notifications to an OCI client:
1. Ensure that the service that you are using has Advanced Queuing notifications enabled by setting the services’ values of AQ_HA_NOTIFICATIONS to TRUE. For example:
EXECUTE DBMS_SERVICE.MODIFY_SERVICE (service_name => 'gl.us.oracle.com' , aq_ha_notifications => TRUE , failover_method => DBMS_SERVICE.FAILOVER_METHOD_BASIC , failover_type => DBMS_SERVICE.FAILOVER_TYPE_SELECT , failover_retries => 180 , failover_delay => 5 , clb_goal => DBMS_SERVICE.CLB_GOAL_LONG);
2. Enable OCI_EVENTS at environment creation time on the client as follows:
( OCIEnvCreate(...) )
3. Client applications must link with the client thread or operating system library.
Clients on which you want to use this functionality that also require notifications, including TAF clients, must:
■ Register for notifications
■ Optionally register a client EVENT callback
An Advanced Queueing ALERT_QUE is populated automatically. To see the alert information, you can query the views DBA_OUTSTANDING_ALERTS and DBA_ALERT_HISTORY. OCI clients obtain a subscription to this queue if they meet the three criteria specified previously in this section.
Enabling ODP.NET Clients to Receive FAN High Availability EventsOracle Data Provider for .NET (ODP.NET) connection pools can subscribe to notifications that indicate when nodes, services, and service members are down. After a DOWN event, Oracle cleans up sessions in the connection pool that go to the instance that stops and ODP.NET proactively disposes connections that are no longer valid. ODP.NET establishes connections to existing RAC instances if the removal of severed connections brings the total number of connections below the value that is set for the MIN POOL SIZE parameter.
The procedures for enabling ODP.NET are similar to the procedures for enabling JDBC in that you must set parameters in the connection string to enable FCF. Perform the following steps to enable FAN:
1. Enable Advanced Queuing notifications by using the DBMS.SERVICE package as in the following example:
EXECUTE DBMS_SERVICE.MODIFY_SERVICE (service_name => 'gl.us.oracle.com' , aq_ha_notifications => TRUE , clb_goal => DBMS_SERVICE.CLB_GOAL_LONG);
Note: OCI does not manage UP events.
See Also: Oracle Call Interface Programmer's Guide for more information about OCI
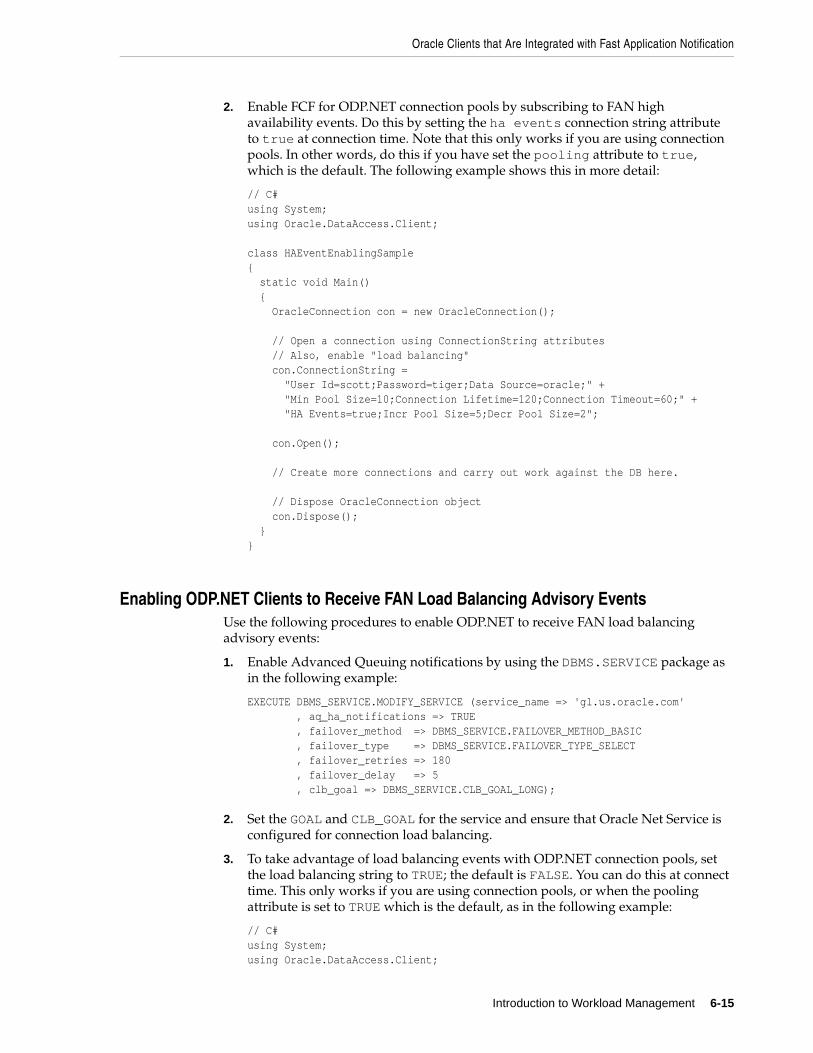
Oracle Clients that Are Integrated with Fast Application Notification
Introduction to Workload Management 6-15
2. Enable FCF for ODP.NET connection pools by subscribing to FAN high availability events. Do this by setting the ha events connection string attribute to true at connection time. Note that this only works if you are using connection pools. In other words, do this if you have set the pooling attribute to true, which is the default. The following example shows this in more detail:
// C#using System;using Oracle.DataAccess.Client; class HAEventEnablingSample{ static void Main() { OracleConnection con = new OracleConnection(); // Open a connection using ConnectionString attributes // Also, enable "load balancing" con.ConnectionString = "User Id=scott;Password=tiger;Data Source=oracle;" + "Min Pool Size=10;Connection Lifetime=120;Connection Timeout=60;" + "HA Events=true;Incr Pool Size=5;Decr Pool Size=2"; con.Open(); // Create more connections and carry out work against the DB here. // Dispose OracleConnection object con.Dispose(); }}
Enabling ODP.NET Clients to Receive FAN Load Balancing Advisory EventsUse the following procedures to enable ODP.NET to receive FAN load balancing advisory events:
1. Enable Advanced Queuing notifications by using the DBMS.SERVICE package as in the following example:
EXECUTE DBMS_SERVICE.MODIFY_SERVICE (service_name => 'gl.us.oracle.com' , aq_ha_notifications => TRUE , failover_method => DBMS_SERVICE.FAILOVER_METHOD_BASIC , failover_type => DBMS_SERVICE.FAILOVER_TYPE_SELECT , failover_retries => 180 , failover_delay => 5 , clb_goal => DBMS_SERVICE.CLB_GOAL_LONG);
2. Set the GOAL and CLB_GOAL for the service and ensure that Oracle Net Service is configured for connection load balancing.
3. To take advantage of load balancing events with ODP.NET connection pools, set the load balancing string to TRUE; the default is FALSE. You can do this at connect time. This only works if you are using connection pools, or when the pooling attribute is set to TRUE which is the default, as in the following example:
// C#using System;using Oracle.DataAccess.Client;
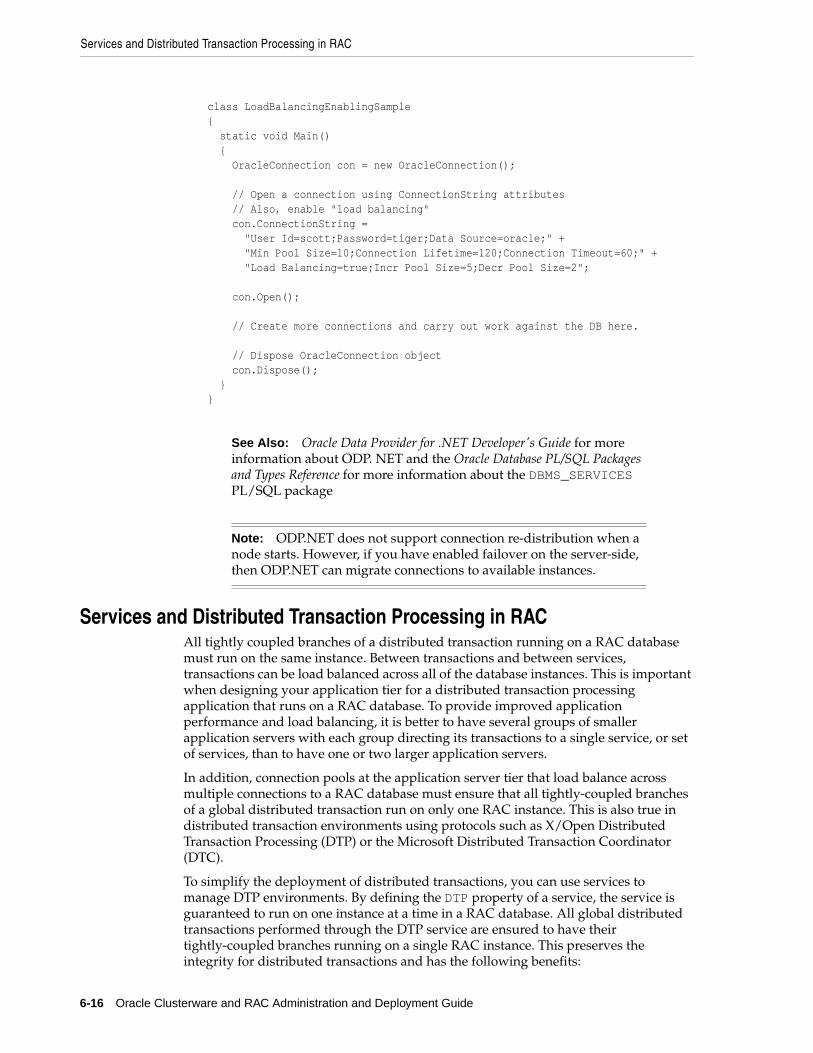
Services and Distributed Transaction Processing in RAC
6-16 Oracle Clusterware and RAC Administration and Deployment Guide
class LoadBalancingEnablingSample{ static void Main() { OracleConnection con = new OracleConnection(); // Open a connection using ConnectionString attributes // Also, enable "load balancing" con.ConnectionString = "User Id=scott;Password=tiger;Data Source=oracle;" + "Min Pool Size=10;Connection Lifetime=120;Connection Timeout=60;" + "Load Balancing=true;Incr Pool Size=5;Decr Pool Size=2"; con.Open(); // Create more connections and carry out work against the DB here. // Dispose OracleConnection object con.Dispose(); }}
Services and Distributed Transaction Processing in RACAll tightly coupled branches of a distributed transaction running on a RAC database must run on the same instance. Between transactions and between services, transactions can be load balanced across all of the database instances. This is important when designing your application tier for a distributed transaction processing application that runs on a RAC database. To provide improved application performance and load balancing, it is better to have several groups of smaller application servers with each group directing its transactions to a single service, or set of services, than to have one or two larger application servers.
In addition, connection pools at the application server tier that load balance across multiple connections to a RAC database must ensure that all tightly-coupled branches of a global distributed transaction run on only one RAC instance. This is also true in distributed transaction environments using protocols such as X/Open Distributed Transaction Processing (DTP) or the Microsoft Distributed Transaction Coordinator (DTC).
To simplify the deployment of distributed transactions, you can use services to manage DTP environments. By defining the DTP property of a service, the service is guaranteed to run on one instance at a time in a RAC database. All global distributed transactions performed through the DTP service are ensured to have their tightly-coupled branches running on a single RAC instance. This preserves the integrity for distributed transactions and has the following benefits:
See Also: Oracle Data Provider for .NET Developer's Guide for more information about ODP. NET and the Oracle Database PL/SQL Packages and Types Reference for more information about the DBMS_SERVICES PL/SQL package
Note: ODP.NET does not support connection re-distribution when a node starts. However, if you have enabled failover on the server-side, then ODP.NET can migrate connections to available instances.
Services and Distributed Transaction Processing in RAC
Introduction to Workload Management 6-17
■ The changes are available locally within one RAC instance when tightly coupled branches need information about changes made by each other
■ Relocation and failover of services are fully supported for DTP
■ By using more DTP services than there are RAC instances, Oracle can balance the load by services across all of the RAC database instances
To leverage all of the instances in a cluster, create one or more DTP services for each RAC instance that hosts distributed transactions. Choose one DTP service for one distributed transaction. Choose different DTP services for different distributed transactions to balance the workload among the RAC database instances. Because all of the branches of a distributed transaction are on one instance, you can leverage all of the instances to balance the load of many DTP transactions through multiple singleton services, thereby maximizing application throughput.
An external transaction manager, such as OraMTS, coordinates DTP/XA transactions. However, an internal Oracle transaction manager coordinates distributed SQL transactions. Both DTP/XA and distributed SQL transactions must use the DTP service in RAC.
For current and future client implementations, such as those for JDBC, you do not need the invocation to the SYS.DBMS_SYSTEM.DIST_TXN_SYNC procedure because the OPS_FAILOVER flag is deprecated. Instead, the server manages the synchronization of in-doubt transactions across the RAC instances for transaction recovery. However, for backward compatibility you should retain the invocation to the SYS.DBMS_SYSTEM.DIST_TXN_SYNC procedure. If you add or delete nodes from your cluster database, then you may need to identify and relocate services that you are using for DTP transactions to ensure that you maintain optimum performance levels.
Your transaction manager does not have to use the XA_RECOVER() call when the transaction manager has enough information about in-flight transactions. The transaction manager uses the XA_RECOVER() call only if the transaction manager needs to retrieve a list of prepared transactions from the database, in which case heuristically completed transaction information is also returned from the call.
Enabling Distributed Transaction Processing for ServicesFor services that you are going to use for distributed transaction processing, create the service using Enterprise Manager, DBCA, or SRVCTL and define only one instance as the preferred instance. You can have as many AVAILABLE instances as you want. For example, the following SRVCTL command creates a singleton service for database crm, xa_01.service.us.oracle.com, whose preferred instance is RAC01:
srvctl add service -d crm -s xa_01.service.us.oracle.com -r RAC01 -a RAC02, RAC03
Then mark the service for distributed transaction processing by setting the DTP parameter to TRUE; the default is FALSE. Enterprise Manager enables you to set this parameter on the Cluster Managed Database Services: Create Service or Modify Service page. You can also use the DBMS_SERVICE package to modify the DTP property of the singleton service as follows:
EXECUTE DBMS_SERVICE.MODIFY_SERVICE(service_name =>'xa_01.service.us.oracle.com', DTP=>TRUE);
See Also: Oracle Database Application Developer's Guide - Fundamentals for more information about transaction branch management in RAC
Administering Services
6-18 Oracle Clusterware and RAC Administration and Deployment Guide
If, for example, RAC01 which provides service XA_01 fails, then the singleton service that it provided fails over to one of the other instances, such as RAC02 or RAC03.
If services migrate to other instances after the cold-start of the RAC database, then you might need to force the relocation of the service to evenly re-balance the load on all of the available hardware. Use data from the GV$ACTIVE_SERVICES view to determine whether to do this.
Administering ServicesWhen you create and administer services, you are dividing the work that your database performs into manageable units. The goal of using services is to achieve optimal utilization of your database infrastructure. You can create and deploy services based on business requirements and Oracle can measure the performance for each service. You can define both the application modules within a service as well as the individual actions for a module and monitor thresholds for these actions. This enables you to manage workloads to deliver capacity on demand.
When you create new services for your database, you should define each service’s workload management characteristics. The characteristics of a service include:
■ A unique global name to identify the service.
■ A Net Service name that a client uses to connect to the service.
■ The preferred instances where you want the service to be enabled in a normal running environment.
■ The available instances where the service can be enabled if one of the preferred instances fails.
■ A service goal that determines whether connections are made to the service based on best service quality (how efficiently a single transaction completes) or best throughput (how efficiently a complete job or long-running query completes), as determined by the load balancing advisory.
■ An indicator that determines whether the service is used for distributed transactions.
■ An indicator that determines whether RAC high availability events are sent to OCI and ODP.NET clients that have registered to receive them through Advanced Queuing.
■ The characteristics of session failovers such as whether failovers occur, whether sessions can use pre-existing connections on the failover instance, and whether failed over sessions can continue to process interrupted queries. The service definition can also define the number of times that a failed session attempts to reconnect to the service and how long it should wait between reconnection attempts. The service definition can also include a connection load balancing goal that informs the Listener how to balance connection requests across the instances that provide the service.
See Also: Oracle Database Application Developer's Guide - Fundamentals for more information about distributed transactions in RAC
See Also: "Enabling Oracle Call Interface Clients to Receive FAN High Availability Events" on page 6-13 for more details
Administering Services
Introduction to Workload Management 6-19
■ The method for load balancing connections for each service. This method is used by the Listener when Oracle creates connections. Connections are classified as LONG (such as connection pools and SQL*FORMS) which tells the Listener to use session based, or SHORT which tells the Listener to use CPU based. If load balancing advisory is enabled, its information will be use to balance connections otherwise CPU utilization is used.
In addition to creating services, you may need to:
■ Delete a service. You can delete services that you created. However, you cannot delete or modify the properties of the default database service that Oracle created.
■ Check the status of a service. A service can be assigned different roles among the available instances. In a complex database with many services, you may not remember the details of every service. Therefore, you may need to check the status on an instance or service basis. For example, you may need to know the status of a service for a particular instance before you make modifications to that instance or to the Oracle home from which it runs.
■ Start or stop a service for a database or an instance. A service must be started before it can be used for client connections to that instance. If you shutdown your database, for example, by running the Server Control (SRVCTL) command srvctl stop database -d database_name where database_name is the name of the database that you want to stop, then Oracle stops all services to that database. You must manually re-start the services when you start the database.
■ Map a Service to a Consumer Group—Oracle can automatically map services to Resource Manager Consumer groups to limit the amount of resources that services can use in an instance. You must create the consumer group and then map the service to the consumer group.
■ Enable or disable a service for a database or an instance. By default, Oracle Clusterware attempts to restart a service automatically after failures. You can prevent this behavior by disabling a service. Disabling a service is useful when you need to perform database or instance maintenance, for example, if you are performing an upgrade and you want to prevent connection requests.
■ Relocate a service to a different instance. You can move a service from one instance to another instance to re-balance workloads, for example, after adding or deleting cluster nodes.
See Also: Oracle Database PL/SQL Packages and Types Reference for information about the DBMS_RESOURCE_MANAGER.SET_CONSUMER_GROUP_MAPPING_PRI procedure
Administering Services with Enterprise Manager, DBCA, PL/SQL, and SRVCTL
6-20 Oracle Clusterware and RAC Administration and Deployment Guide
Administering Services with Enterprise Manager, DBCA, PL/SQL, and SRVCTL
You can create and administer services with Enterprise Manager, DBCA, and the DBMS_SERVICE PL/SQL package, and you can perform most service administration tasks with the SRVCTL utility. The following sections describe how to perform service-related tasks using these tools:
■ Administering Services with Enterprise Manager
■ Administering Services with the Database Configuration Assistant
■ Administering Services with the PL/SQL DBMS_SERVICE Package
■ Administering Services with SRVCTL
Administering Services with Enterprise ManagerThe Cluster Managed Database Services page is the master page for beginning all tasks related to services. To access this page, go to the Cluster Database Maintenance page, then click Cluster Managed Database Services in the Services section. You can use this page and drilldowns from this page to:
■ View a list of services for the cluster
■ View the instances on which each service is currently running
■ View the status for each service
■ Create or edit a service
■ Start or stop a service
■ Enable or disable a service
■ Perform instance-level tasks for a service
■ Delete a service
Notes:
■ When you use services, do not set a value for the SERVICE_NAMES parameter; Oracle controls the setting for this parameter for the services that you create and for the default database service. The service features that this chapter describes are not directly related to the features that Oracle provides when you set SERVICE_NAMES. In addition, setting a value for this parameter may override some of the benefits of using services.
■ You must still use INSTANCE_GROUPS and PARALLEL_INSTANCE_GROUPS to restrict parallel execution processing to a subset of instances in a RAC database.
■ Using service names to access a queue provides location transparency for the queue within a RAC database.
See Also: Oracle Enterprise Manager Concepts for more information about administering services with Enterprise Manager
Administering Services with Enterprise Manager, DBCA, PL/SQL, and SRVCTL
Introduction to Workload Management 6-21
Service-Related Tasks that You Can Perform with Enterprise ManagerYou can perform service-related tasks as described for the following Enterprise Manager pages:
■ Cluster Managed Database Services Page
■ Cluster Managed Database Services Detail Page
■ Create Services Page
Cluster Managed Database Services Page The Cluster Managed Database Services page enables you to:
■ View a list of services for the cluster, the instances on which each service is currently running, and the status for each service
■ Start or stop a service, or enable or disable a service
■ Access the Create Service and Edit Service pages
■ Access the Services Detail page to perform instance-level tasks for a service
■ Test the connection for a service
Cluster Managed Database Services Detail Page The Cluster Managed Database Services Detail page enables you to:
■ View the status of a service on all of its preferred and available instances; the status can be Running, Stopped, or Disabled
■ Stop or start a service for an instance of a cluster database
■ Disable or enable a service for an instance of a cluster database
■ Relocate a service to manually re-balance the services load
Create Services Page The Create Services page enables you to:
■ Create the service with name, high availability and performance attributes
■ Select the desired service policy for each instance configured for the cluster database
■ Select the desired service properties, such as the TAF policy. (This configures client-side TAF. To set the service TAF policy, use the DBMS_SERVICE package). You can also set the notification properties, load balancing goals, alert levels, and resource management properties
Accessing the Enterprise Manager Services PagesTo access the Cluster Managed Database Services page and detail pages for service instances:
1. From the Cluster Database Home page, click the Maintenance tab.
2. From the Cluster Database Maintenance page, under the Services heading in the High Availability options list, click Cluster Managed Database Services. The Cluster and Database Login page appears.
3. Enter credentials for the database and for the cluster that hosts the cluster database and click Continue. The Cluster Managed Database Services page appears and displays services that are available on the cluster database instances. For
Administering Services with Enterprise Manager, DBCA, PL/SQL, and SRVCTL
6-22 Oracle Clusterware and RAC Administration and Deployment Guide
information about performing tasks on this page, refer to the online help for this page.
4. To manage a service at the instance level, either click a service name or select a service name, then select Manage from the Actions drop-down list and click Go. The Cluster Managed Database Services Detail page for the service appears. For information about performing tasks on this page, refer to the online help for this page.
To access the Relocate page:
1. Perform steps 1 - 3 from the previous procedure set.
2. From the Cluster Managed Database Services page, either click a Service name or select a service name, then select Manage from the Actions drop-down list and click Go. The Cluster Managed Database Services Detail page for the service appears.
3. Click Relocate. The Relocate Service from Instance page appears, where you can perform manual load balancing of services. For information about performing tasks on this page, refer to the online help for this page.
Administering Services with the Database Configuration AssistantYou can administer services in RAC with DBCA as described under the following topics:
■ Using the Database Configuration Assistant to Add and Modify Services
■ Using the Database Configuration Assistant to Administer Services
Using the Database Configuration Assistant to Add and Modify ServicesYou can use DBCA to create services and to perform administrative tasks on them. If you use the Database Upgrade Assistant (DBUA) to upgrade a Primary/Secondary configuration from an earlier release of the Oracle database, then the Database Upgrade Assistant (DBUA) creates one service and assigns it to one instance as a preferred instance and to the other instance as an available instance.
Using the Database Configuration Assistant to Administer ServicesThe DBCA Services Management feature enables you to manage service assignments and service preferences for instances and to configure TAF policies. You can perform these procedures while your RAC database is running. Even if your instances or the RAC database is not running, you can still use DBCA to configure services, but the services will not start automatically. To add, modify, or delete services using the DBCA Services Management feature:
1. On the DBCA Welcome page, select the Oracle Real Application Clusters option and click Next.
Note: You must have SYSDBA credentials to access a cluster database. Cluster Managed Database Services does not permit you to connect as anything other than SYSDBA.
See Also: Oracle Database PL/SQL Packages and Types Reference for more information about the DBMS_SERVICE PL/SQL and DBMS_MONITOR packages and for more information about setting thresholds
Administering Services with Enterprise Manager, DBCA, PL/SQL, and SRVCTL
Introduction to Workload Management 6-23
2. On the DBCA Operations page, select Services Management and click Next.
3. On the DBCA List of Databases page, select the cluster database for which you want to configure services and click Next. If the database that you selected already has services assigned to it, then DBCA displays these on this page.
4. Click Add, Modify, or Delete.
5. To add a service, enter the name of the service. Note that service names with the prefix SYS$ are reserved for use by Oracle internal processes. To modify a service, edit the service and configure the service's instance preferences and TAF policies. Assign the service to instances for preferred (normal) and available (recovery) processing. The DBCA records your changes when you select another service or proceed to another page. To delete a service, select the service and click Delete.
6. To remove a service, select the service and click Remove.
7. Click Finish and DBCA displays the Summary page. Click OK and DBCA displays a progress dialog while it configures your services.
When you click Finish, DBCA configures the Oracle Clusterware resources for the services that you added, modified, or removed. The DBCA also configures the net service entries for these services and starts them. When you use DBCA to remove services, DBCA stops the service, removes the Oracle Clusterware resource for the service, and removes the net service entries.
Administering Services with the PL/SQL DBMS_SERVICE PackageYou can manage services with the PL/SQL DBMS_SERVICE package procedures. These procedures are described in the following sections:
■ CREATE_SERVICE
■ MODIFY_SERVICE
■ DELETE_SERVICE
■ START_SERVICE
■ STOP_SERVICE
■ DISCONNECT_SESSION
CREATE_SERVICEThe CREATE_SERVICE procedure adds a new service to the RAC database. In the CREATE_SERVICE syntax service_name is the unique, global service name, network_name is the TNS name for connections to the service, goal sets the workload management goal directive to service quality or throughput, dtp is the distributed transaction flag, aq_ha_notification is the flag to send RAC high availability events to registered OCI clients, failover_method is the TAF failover method for the service, failover_type is the TAF failover method for the service, failover_retries is the TAF connection retry count, failover_delay is the wait time between TAF connection retries, and clb_goal sets the connection load balancing goal. When using services with RAC, add the high availability properties,
Note: Entries that you make in the Add a Service dialog are appended to the SERVICE_NAMES parameter entry which has a 4KB limit. Therefore, the total length of the names of all services assigned to an instance cannot exceed 4KB.
Administering Services with Enterprise Manager, DBCA, PL/SQL, and SRVCTL
6-24 Oracle Clusterware and RAC Administration and Deployment Guide
such as the PREFERRED and AVAILABLE placement, using Enterprise Manager, DBCA or SRVCTL.
MODIFY_SERVICEThe MODIFY_SERVICE procedure changes one or more service characteristics. In the MODIFY_SERVICE syntax the parameters are the same as those for the CREATE_SERVICE procedure.
DELETE_SERVICEThe DELETE_SERVICE procedure drops an existing service. In the DELETE_SERVICE syntax service_name is the name of the service to be dropped.
START_SERVICEThe START_SERVICE procedure starts a service on the connected instance, the named instance, or all instances. In the START_SERVICE syntax SERVICE_NAME is the name of the service to be started and INSTANCE_NAME can be NULL (to start the service on the connected instance), the name of an instance (to start the service on that instance), or the package constant DBMS_SERVICE.ALL_INSTANCES to start the service on all instances where it is defined.
STOP_SERVICEThe STOP_SERVICE procedure stops a service on the connected instance, the named instance, or all instances. In the STOP_SERVICE syntax the parameters are the same as those for the START_SERVICE procedure.
DISCONNECT_SESSIONThe DISCONNECT_SESSION procedure terminates all sessions on the connected instance, or the instance where the PL/SQL procedure is run. In the DISCONNECT_SESSION syntax service_name is the name of the service for which connections are to be dropped.
Administering Services with SRVCTLWhen you create a service with SRVCTL, you must start it with a separate SRVCTL command. However, you may later need to manually stop or restart the service. You may also need to disable the service to prevent automatic restarts, to manually relocate the service, or obtain status information about the service. The following sections explain how to use SRVCTL to perform the following administrative tasks:
■ Creating Services with SRVCTL
■ Starting and Stopping Services with SRVCTL
■ Enabling and Disabling Services with SRVCTL
■ Relocating Services with SRVCTL
Note: Oracle recommends that you use Enterprise Manager or DBCA to create services for RAC environments.
See Also: Oracle Database PL/SQL Packages and Types Reference for more information about the CREATE_SERVICE procedure syntax and for information about other procedures mentioned in this section
Administering Services with Enterprise Manager, DBCA, PL/SQL, and SRVCTL
Introduction to Workload Management 6-25
■ Obtaining the Statuses of Services with SRVCTL
■ Obtaining the Configuration of Services with SRVCTL
Creating Services with SRVCTLTo create a service with SRVCTL, enter a command from the command line using the following syntax:
srvctl add service -d database_unique_name -s service_name -r preferred_list[-a available_list] [-P TAF_policy]
Starting and Stopping Services with SRVCTLEnter the following SRVCTL syntax from the command line:
srvctl start service -d database_unique_name [-s service_name_list] [-i inst_name] [-o start_options] [-c connect_str | -q]
srvctl stop service -d database_unique_name -s service_name_list [-i inst_name] [-o start_options] [-c connect_str | -q]
Enabling and Disabling Services with SRVCTLUse the following SRVCTL syntax from the command line to enable and disable services:
srvctl enable service -d database_unique_name -s service_name_list [-i inst_name]srvctl disable service -d database_unique_name -s service_name_list [-i inst_name]
Relocating Services with SRVCTLRun the srvctl relocate service command from the command line to relocate a service. For example, the following command relocates the crm service from instance apps1 to instance apps3:
srvctl relocate service -d apps -s crm -i apps1 -t apps3
Obtaining the Statuses of Services with SRVCTLRun the srvctl relocate service command from the command line to obtain the status of a service. For example, the following command returns the status of the crm service that is running on the crm database:
srvctl status service -d apps -s crm
Obtaining the Configuration of Services with SRVCTLRun the srvctl relocate service command from the command line to obtain the high availability configuration of a service. For example, the following command returns the configuration of the crm service that is running on the crm database:
srvctl config service -d apps -s crm -a
See Also: Appendix E, "Server Control Utility Reference" for more information about SRVCTL and the other SRVCTL commands that you can use to manage services
Measuring Performance by Service Using the Automatic Workload Repository
6-26 Oracle Clusterware and RAC Administration and Deployment Guide
Measuring Performance by Service Using the Automatic Workload Repository
Services add a new dimension for performance tuning. With services, workloads are visible and measurable and resource consumption and wait times are attributable by application. Tuning by using ’service and SQL’ replaces tuning by ’session and SQL’ in the majority of systems where all sessions are anonymous and shared.
The AWR maintains performance statistics that include information about response time, throughput, resource consumption, and wait events for all services and work that a database performs. Oracle also maintains metrics, statistics, wait events, wait classes, and SQL-level traces for services. You can optionally augment these statistics by defining modules within your application to monitor certain statistics. You can also define the actions within those modules that business critical transactions should execute in response to particular statistical values. Enable module and action monitoring using the DBMS_MONTIOR PL/SQL package as follows:
EXECUTE DBMS_MONITOR.SERV_MOD_ACT_STAT_ENABLE(SERVICE_NAME => 'ERP', MODULE_NAME=>'PAYROLL', ACTION_NAME => 'EXCEPTIONS PAY');EXECUTE DBMS_MONITOR.SERV_MOD_ACT_STAT_ENABLE(SERVICE_NAME => 'ERP', MODULE_NAME=>'PAYROLL', ACTION_NAME => NULL);
Use the DBA_ENABLED_AGGREGATIONS view to verify that you have enabled monitoring.
Statistics aggregation and tracing by service are global in scope for RAC databases. In addition, they are persistent across instance restarts and service relocations for both RAC and single-instance Oracle databases.
The service, module, and action names are visible in V$SESSION, V$ACTIVE_SESSION_HISTORY, and V$SQL views. The call times and performance statistics are visible in V$SERVICE_STATS, V$SERVICE_EVENTS, V$SERVICE_WAIT_CLASSES, V$SERVICEMETRIC, and V$SERVICEMETRIC_HISTORY. When you enable statistics collection for an important transaction, you can see the call speed for each service, module, and action name at each database instance using the V$SERV_MOD_ACT_STATS view.
The following sample SQL*Plus script provides service quality statistics every five seconds. You can use these service quality statistics to monitor the quality of a service, to direct work, and to balance services across RAC instances:
SET PAGESIZE 60 COLSEP '|' NUMWIDTH 8 LINESIZE 132 VERIFY OFF FEEDBACK OFFCOLUMN service_name FORMAT A20 TRUNCATED HEADING 'Service'COLUMN begin_time HEADING 'Begin Time' FORMAT A10COLUMN end_time HEADING 'End Time' FORMAT A10COLUMN instance_name HEADING 'Instance' FORMAT A10COLUMN service_time HEADING 'Service Time|mSec/Call' FORMAT 999999999COLUMN throughput HEADING 'Calls/sec'FORMAT 99.99 BREAK ON service_name SKIP 1 SELECT service_name , TO_CHAR(begin_time, 'HH:MI:SS') begin_time , TO_CHAR(end_time, 'HH:MI:SS') end_time , instance_name , elapsedpercall service_time
See Also: Appendix E, "Server Control Utility Reference" for information about other administrative tasks that you can perform with SRVCTL
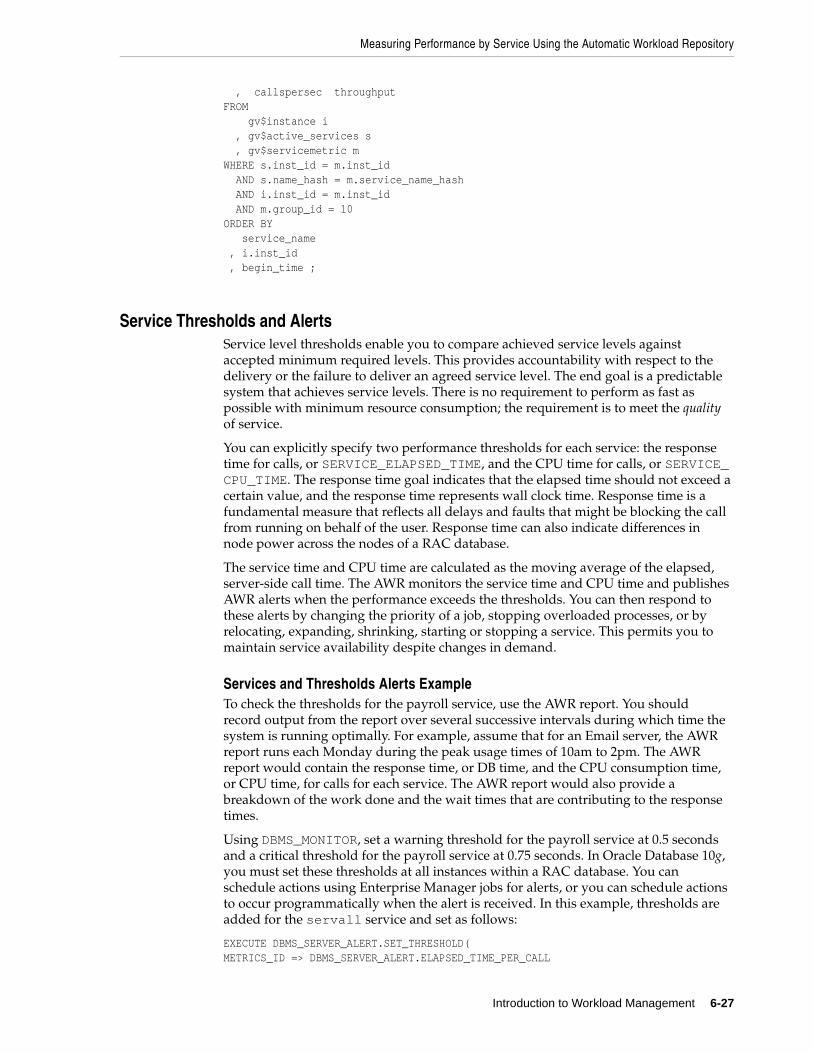
Measuring Performance by Service Using the Automatic Workload Repository
Introduction to Workload Management 6-27
, callspersec throughputFROM gv$instance i , gv$active_services s , gv$servicemetric m WHERE s.inst_id = m.inst_id AND s.name_hash = m.service_name_hash AND i.inst_id = m.inst_id AND m.group_id = 10ORDER BY service_name , i.inst_id , begin_time ;
Service Thresholds and AlertsService level thresholds enable you to compare achieved service levels against accepted minimum required levels. This provides accountability with respect to the delivery or the failure to deliver an agreed service level. The end goal is a predictable system that achieves service levels. There is no requirement to perform as fast as possible with minimum resource consumption; the requirement is to meet the quality of service.
You can explicitly specify two performance thresholds for each service: the response time for calls, or SERVICE_ELAPSED_TIME, and the CPU time for calls, or SERVICE_CPU_TIME. The response time goal indicates that the elapsed time should not exceed a certain value, and the response time represents wall clock time. Response time is a fundamental measure that reflects all delays and faults that might be blocking the call from running on behalf of the user. Response time can also indicate differences in node power across the nodes of a RAC database.
The service time and CPU time are calculated as the moving average of the elapsed, server-side call time. The AWR monitors the service time and CPU time and publishes AWR alerts when the performance exceeds the thresholds. You can then respond to these alerts by changing the priority of a job, stopping overloaded processes, or by relocating, expanding, shrinking, starting or stopping a service. This permits you to maintain service availability despite changes in demand.
Services and Thresholds Alerts ExampleTo check the thresholds for the payroll service, use the AWR report. You should record output from the report over several successive intervals during which time the system is running optimally. For example, assume that for an Email server, the AWR report runs each Monday during the peak usage times of 10am to 2pm. The AWR report would contain the response time, or DB time, and the CPU consumption time, or CPU time, for calls for each service. The AWR report would also provide a breakdown of the work done and the wait times that are contributing to the response times.
Using DBMS_MONITOR, set a warning threshold for the payroll service at 0.5 seconds and a critical threshold for the payroll service at 0.75 seconds. In Oracle Database 10g, you must set these thresholds at all instances within a RAC database. You can schedule actions using Enterprise Manager jobs for alerts, or you can schedule actions to occur programmatically when the alert is received. In this example, thresholds are added for the servall service and set as follows:
EXECUTE DBMS_SERVER_ALERT.SET_THRESHOLD( METRICS_ID => DBMS_SERVER_ALERT.ELAPSED_TIME_PER_CALL

Enabling Event Notification for Connection Failures in Real Application Clusters
6-28 Oracle Clusterware and RAC Administration and Deployment Guide
, warning_operator => DBMS_SERVER_ALERT.OPERATOR_GE , warning_value => '500000' , critical_operator => DBMS_SERVER_ALERT.OPERATOR_GE , critical_value => '750000' , observation_period => 30 , consecutive_occurrences => 5 , instance_name => NULL , object_type => DBMS_SERVER_ALERT.OBJECT_TYPE_SERVICE , object_name => 'servall');
Verify the threshold configuration using the following SELECT statement:
SELECT METRICS_NAME, INSTANCE_NAME, WARNING_VALUE, CRITICAL_VALUE, OBSERVATION_PERIOD FROM dba_thresholds ;
Enable Service, Module, and Action Monitoring You can enable performance data tracing for important modules and actions within each service. The performance statistics are available in the V$SERV_MOD_ACT_STATS view. As an example, set the following:
■ Under the ERP service, enable monitoring for the exceptions pay action in the module, payroll.
■ Under the ERP service, enable monitoring for the all actions in the module, payroll.
■ Under the HOT_BATCH service, enable monitoring for the all actions in the module, posting.
EXECUTE DBMS_MONITOR.SERV_MOD_ACT_STAT_ENABLE(service_name => 'erp', module_name=> 'payroll', action_name => 'exceptions pay');EXECUTE DBMS_MONITOR.SERV_MOD_ACT_STAT_ENABLE(service_name => 'erp', module_name => 'payroll', action_name => NULL);EXECUTE DBMS_MONITOR.SERV_MOD_ACT_STAT_ENABLE(service_name => 'hot_batch', module_name =>'posting', action_name => NULL);
Verify the enabled service, module, action configuration with the following SELECT statement:
COLUMN AGGREGATION_TYPE FORMAT A21 TRUNCATED HEADING 'AGGREGATION'COLUMN PRIMARY_ID FORMAT A20 TRUNCATED HEADING 'SERVICE'COLUMN QUALIFIER_ID1 FORMAT A20 TRUNCATED HEADING 'MODULE'COLUMN QUALIFIER_ID2 FORMAT A20 TRUNCATED HEADING 'ACTION'SELECT * FROM DBA_ENABLED_AGGREGATIONS ;
The output might appear as follows:
AGGREGATION SERVICE MODULE ACTION------------ -------------------- ---------- -------------SERVICE_MODULE_ACTION ERP PAYROLL EXCEPTIONS PAYSERVICE_MODULE_ACTION ERP PAYROLLSERVICE_MODULE_ACTION HOT_BATCH POSTING
Enabling Event Notification for Connection Failures in Real Application Clusters
Event notification is enabled if the SQL_ORCLATTR_FAILOVER_CALLBACK and SQL_ORCLATTR_FAILOVER_HANDLE attributes of the SQLSetConnectAttr function are set when a connection failure occurs in an Oracle Real Application Clusters (RAC) Database environment. Both attributes are set using the SQLSetConnectAttr function. The symbols for the new attributes are defined in the sqora.h file. The

Enabling Event Notification for Connection Failures in Real Application Clusters
Introduction to Workload Management 6-29
SQL_ORCLATTR_FAILOVER_CALLBACK attribute is used to specify the address of a routine to call when a failure event takes place.
The SQL_ORCLATTR_FAILOVER_HANDLE attribute is used to specify a context handle which will be passed as one of the parameters in the callback routine. This attribute is necessary in order for the ODBC application to determine which connection the failure event is taking place on.
The function prototype for the callback routine is as follows:
void failover_callback(void *handle, SQLINTEGER fo_code)
The handle parameter is the value that was set by the SQL_ORCLATTR_FAILOVER_HANDLE attribute. Null is returned if the attribute has not been set.
The fo_code parameter identifies the failure event that is taking place. The failure events map directly to the events defined in the OCI programming interface. The list of possible events is as follows:
■ ODBC_FO_BEGIN
■ ODBC_FO_ERROR
■ ODBC_FO_ABORT
■ ODBC_FO_REAUTH
■ ODBC_FO_END
The following is a sample program that demonstrates how to use this feature:
/*NAMEODBCCallbackTestDESCRIPTIONProgram to demonstrate the connection failover callback feature.PUBLIC FUNCTION(S) mainPRIVATE FUNCTION(S)NOTESCommand Line: ODBCCallbackTest filename [odbc-driver]*/#include <malloc.h>#include <stdio.h>#include <string.h>#include <sql.h>#include <sqlext.h>#include <sqora.h>#define TRUE 1#define FALSE 0/* * Funtion Prototypes */void display_errors(SQLSMALLINT HandleType, SQLHANDLE Handle);void failover_callback(void *Handle, SQLINTEGER fo_code);/* * Macros */#define ODBC_STS_CHECK(sts) \if (sts != SQL_SUCCESS) \{ \display_errors(SQL_HANDLE_ENV, hEnv); \display_errors(SQL_HANDLE_DBC, hDbc); \display_errors(SQL_HANDLE_STMT, hStmt); \
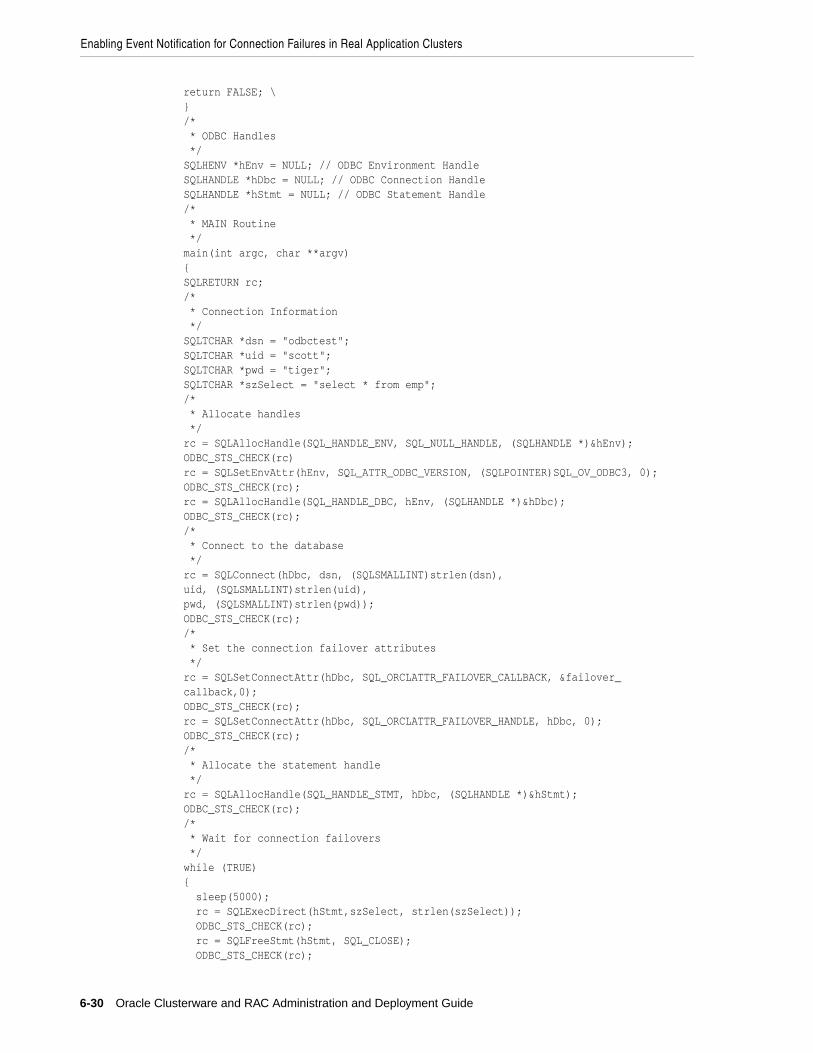
Enabling Event Notification for Connection Failures in Real Application Clusters
6-30 Oracle Clusterware and RAC Administration and Deployment Guide
return FALSE; \}/* * ODBC Handles */SQLHENV *hEnv = NULL; // ODBC Environment HandleSQLHANDLE *hDbc = NULL; // ODBC Connection HandleSQLHANDLE *hStmt = NULL; // ODBC Statement Handle/* * MAIN Routine */main(int argc, char **argv){SQLRETURN rc;/* * Connection Information */SQLTCHAR *dsn = "odbctest";SQLTCHAR *uid = "scott";SQLTCHAR *pwd = "tiger";SQLTCHAR *szSelect = "select * from emp";/* * Allocate handles */rc = SQLAllocHandle(SQL_HANDLE_ENV, SQL_NULL_HANDLE, (SQLHANDLE *)&hEnv);ODBC_STS_CHECK(rc)rc = SQLSetEnvAttr(hEnv, SQL_ATTR_ODBC_VERSION, (SQLPOINTER)SQL_OV_ODBC3, 0);ODBC_STS_CHECK(rc);rc = SQLAllocHandle(SQL_HANDLE_DBC, hEnv, (SQLHANDLE *)&hDbc);ODBC_STS_CHECK(rc);/* * Connect to the database */rc = SQLConnect(hDbc, dsn, (SQLSMALLINT)strlen(dsn),uid, (SQLSMALLINT)strlen(uid),pwd, (SQLSMALLINT)strlen(pwd));ODBC_STS_CHECK(rc);/* * Set the connection failover attributes */rc = SQLSetConnectAttr(hDbc, SQL_ORCLATTR_FAILOVER_CALLBACK, &failover_callback,0);ODBC_STS_CHECK(rc);rc = SQLSetConnectAttr(hDbc, SQL_ORCLATTR_FAILOVER_HANDLE, hDbc, 0);ODBC_STS_CHECK(rc);/* * Allocate the statement handle */rc = SQLAllocHandle(SQL_HANDLE_STMT, hDbc, (SQLHANDLE *)&hStmt);ODBC_STS_CHECK(rc);/* * Wait for connection failovers */while (TRUE){ sleep(5000); rc = SQLExecDirect(hStmt,szSelect, strlen(szSelect)); ODBC_STS_CHECK(rc); rc = SQLFreeStmt(hStmt, SQL_CLOSE); ODBC_STS_CHECK(rc);
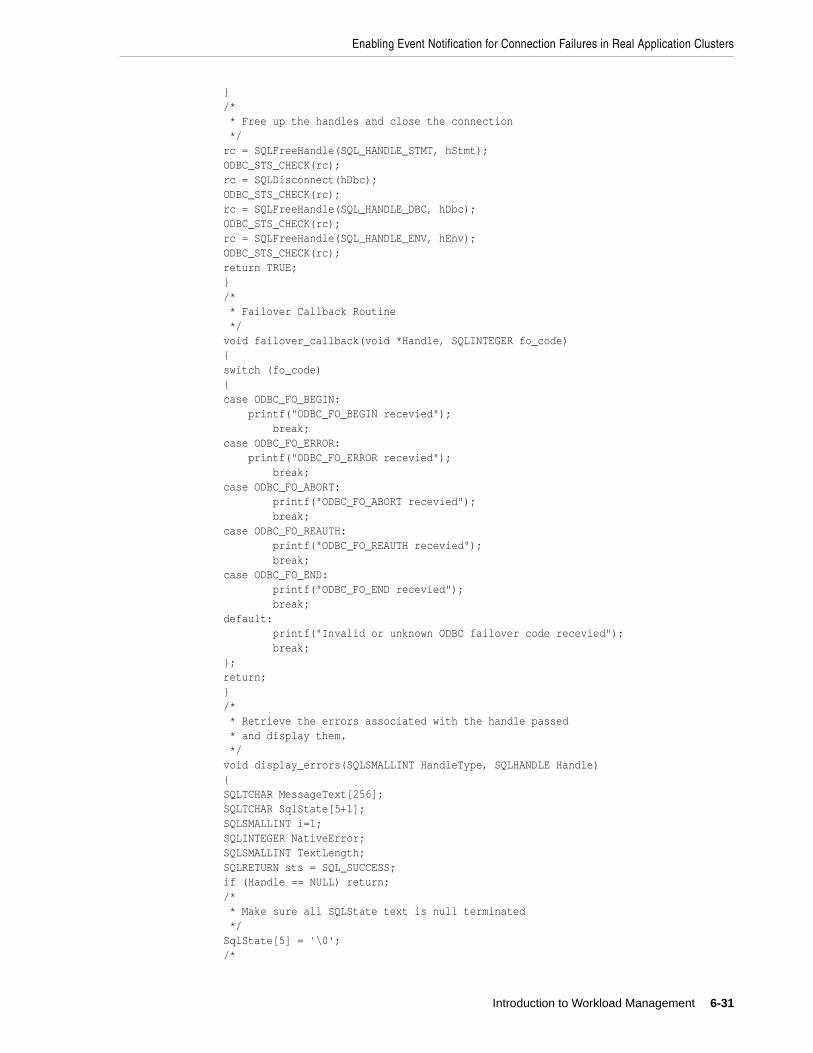
Enabling Event Notification for Connection Failures in Real Application Clusters
Introduction to Workload Management 6-31
}/* * Free up the handles and close the connection */rc = SQLFreeHandle(SQL_HANDLE_STMT, hStmt);ODBC_STS_CHECK(rc);rc = SQLDisconnect(hDbc);ODBC_STS_CHECK(rc);rc = SQLFreeHandle(SQL_HANDLE_DBC, hDbc);ODBC_STS_CHECK(rc);rc = SQLFreeHandle(SQL_HANDLE_ENV, hEnv);ODBC_STS_CHECK(rc);return TRUE;}/* * Failover Callback Routine */void failover_callback(void *Handle, SQLINTEGER fo_code){switch (fo_code){case ODBC_FO_BEGIN: printf("ODBC_FO_BEGIN recevied"); break;case ODBC_FO_ERROR: printf("ODBC_FO_ERROR recevied"); break;case ODBC_FO_ABORT: printf("ODBC_FO_ABORT recevied"); break;case ODBC_FO_REAUTH: printf("ODBC_FO_REAUTH recevied"); break;case ODBC_FO_END: printf("ODBC_FO_END recevied"); break;default: printf("Invalid or unknown ODBC failover code recevied"); break;};return;}/* * Retrieve the errors associated with the handle passed * and display them. */void display_errors(SQLSMALLINT HandleType, SQLHANDLE Handle){SQLTCHAR MessageText[256];SQLTCHAR SqlState[5+1];SQLSMALLINT i=1;SQLINTEGER NativeError;SQLSMALLINT TextLength;SQLRETURN sts = SQL_SUCCESS;if (Handle == NULL) return;/* * Make sure all SQLState text is null terminated */SqlState[5] = '\0';/*
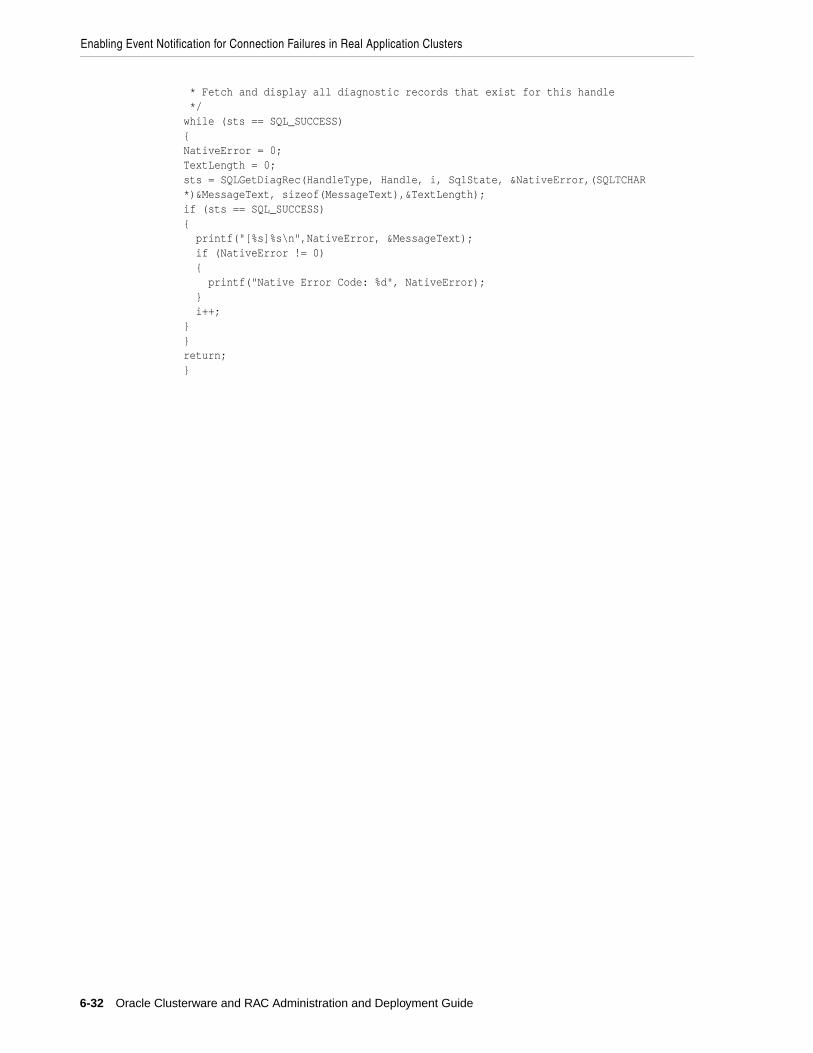
Enabling Event Notification for Connection Failures in Real Application Clusters
6-32 Oracle Clusterware and RAC Administration and Deployment Guide
* Fetch and display all diagnostic records that exist for this handle */while (sts == SQL_SUCCESS){NativeError = 0;TextLength = 0;sts = SQLGetDiagRec(HandleType, Handle, i, SqlState, &NativeError,(SQLTCHAR *)&MessageText, sizeof(MessageText),&TextLength);if (sts == SQL_SUCCESS){ printf("[%s]%s\n",NativeError, &MessageText); if (NativeError != 0) { printf("Native Error Code: %d", NativeError); } i++;}}return;}

Configuring Recovery Manager and Archiving 7-1
7Configuring Recovery Manager and
Archiving
This chapter explains how to configure Recovery Manager (RMAN) for use in Oracle Real Application Clusters (RAC) environments. This chapter also provides procedures for using RMAN for archiving in RAC environments and discusses redo logs and archived redo logs considerations. The topics in this chapter include:
■ Overview of Configuring RMAN for Real Application Clusters
■ Configuring the RMAN Snapshot Control File Location
■ Configuring the RMAN Control File and SPFILE Autobackup Feature
■ Managing Archived Redo Logs Using RMAN in Real Application Clusters
■ Archived Redo Log File Conventions in RAC
■ RMAN Archiving Configuration Scenarios
■ Changing the Archiving Mode in Real Application Clusters
Overview of Configuring RMAN for Real Application ClustersRecovery Manager (RMAN) enables you to back up, restore, and recover datafiles, control files, server parameter files (SPFILEs) and archived redo logs. It is included with the Oracle server and does not require separate installation. You can run RMAN from the command line or use RMAN in the Backup Manager in Oracle Enterprise Manager.
Configuring the RMAN Snapshot Control File LocationThe snapshot control file is a temporary snapshot control file that RMAN creates to re-synchronize from a read-consistent version of the control file. RMAN only needs a snapshot control file when re-synchronizing with the recovery catalog or when making a backup of the current control file. In RAC, the snapshot control file is only needed on the nodes on which RMAN performs backups; the snapshot control file does not need to be globally available to all instances in a RAC environment.
You can specify a cluster file system file or a raw device destination for the location of your snapshot control file. Run the following RMAN command to determine the configured location of the snapshot control file:
SHOW SNAPSHOT CONTROLFILE NAME;

Configuring the RMAN Control File and SPFILE Autobackup Feature
7-2 Oracle Clusterware and RAC Administration and Deployment Guide
You can change the configured location of the snapshot control file. For example, on UNIX-based systems you can specify the snapshot control file location as $ORACLE_HOME/dbs/scf/snap_prod.cf by entering the following at the RMAN prompt:
CONFIGURE SNAPSHOT CONTROLFILE NAME TO '$ORACLE_HOME/dbs/scf/snap_prod.cf';
This command globally sets the configuration for the location of the snapshot control file throughout your cluster database. Therefore, ensure that the directory $ORACLE_HOME/dbs/scf exists on all nodes that perform backups.
The CONFIGURE command creates persistent settings across RMAN sessions. Therefore, you do not need to run this command again unless you want to change the location of the snapshot control file. You can also specify a cluster file system file or a raw device destination for the location of your snapshot control file. This file is shared across all nodes in the cluster just like other datafiles in RAC. Refer to Oracle Database Backup and Recovery Reference for more information about configuring the snapshot control file.
Configuring the RMAN Control File and SPFILE Autobackup FeatureIf you set CONFIGURE CONTROLFILE AUTOBACKUP to ON, then RMAN automatically creates a control file and an SPFILE backup after you run the BACKUP or COPY commands. RMAN can also automatically restore an SPFILE if this is required to start an instance to perform recovery. This means that the default location for the SPFILE must be available to all nodes in your RAC database.
These features are important in disaster recovery because RMAN can restore the control file even without a recovery catalog. RMAN can restore an autobackup of the control file even after the loss of both the recovery catalog and the current control file. You can change the default name that RMAN gives to this file with the CONFIGURE CONTROLFILE AUTOBACKUP FORMAT command. Note that if you specify an absolute path name in this command, then this path must exist identically on all nodes that participate in backups.
RMAN performs the control file autobackup on the first allocated channel. Therefore, when you allocate multiple channels with different parameters, especially when you allocate a channel with the CONNECT command, determine which channel will perform the control file autobackup. Always allocate the channel for this node first. Refer to the Oracle Database Backup and Recovery Advanced User's Guide for more information about using the control file autobackup feature.
Besides using the RMAN control file, you can also use Enterprise Manager to use the RMAN features.
Configuring Channels for RMAN in Real Application ClustersThis section describes how to configure channels for RMAN. You can configure channels to use automatic workload balancing or you can specify specific channels for specific instances as described in the following topics:
■ Configuring Channels to use Automatic Workload Balancing
Note: The Enterprise Manager interface that you use to configure RMAN backup and recovery is documented in Oracle Database Backup and Recovery Basics. This chapter, Chapter 7, only describes topics for this subject if they are different from the single-instance description.
Managing Archived Redo Logs Using RMAN in Real Application Clusters
Configuring Recovery Manager and Archiving 7-3
■ Configuring Channels to Use a Specific Channel
Configuring Channels to use Automatic Workload BalancingTo configure channels to use automatic load balancing, use the following syntax:
CONFIGURE DEVICE TYPE [disk | sbt] PARALLELISM number of channels;...Where number of channels is the number of channels that you want to use for the operation. After you complete this one-time configuration, you can issue BACKUP or RESTORE commands.
Configuring Channels to Use a Specific ChannelTo configure channels to use a specific channel, use the following syntax:
CONFIGURE CHANNEL DEVICE TYPE sbt CONNECT'SYS/change_on_install@node1'CONFIGURE CHANNEL DEVICE TYPE sbt CONNECT'SYS/change_on_install@node2'...After this one-time configuration step, you can issue the BACKUP or RESTORE commands. In addition, you can use the PARMS command in this example to set vendor-specific parameters.
Managing Archived Redo Logs Using RMAN in Real Application ClustersWhen a node generates an archived redo log, Oracle always records the filename of the log in the control file of the target database. If you are using a recovery catalog, then RMAN also records the archived redo log filenames in the recovery catalog when a re-synchronization occurs.
The archived redo log naming scheme that you use is important because when a node writes to a log with a specific filename on its file system, the file must be readable by any node that needs to access this archived redo log. For example, if node 1 archives a log to /oracle/arc_dest/log_1_100_23452345.arc, then node 2 can only back up this archived redo log only if it can read/oracle/arc_dest/log_1_100_23452345.arc on its own file system.
The backup and recovery strategy that you choose depends on how you configure the archiving destinations for each node. Whether only one node or all nodes perform archived redo log backups, you need to ensure that all archived redo logs are backed up. If you use RMAN parallelism during recovery, then the node that performs recovery must have read access to all archived redo logs in your cluster.
Multiple nodes can restore archived logs in parallel. However, during recovery, one one node applies the archived logs. Therefore, the node that is performing the recovery must be able to access all of the archived logs that are needed for the recovery operation. By default, the database determines the optimum number of parallel threads to use during the recovery operation. You can use the PARALLEL clause in the RECOVER command to change this number.
Guidelines and Considerations for Archived Redo LogsThe primary consideration is to ensure that all archived redo logs can be read from every node during recovery, and if possible during backups. This section illustrates the archived redo log naming issues for configuring archiving in your cluster database. The scenario described here is for a non-cluster file system archiving scheme. Assume that the following conditions are met:
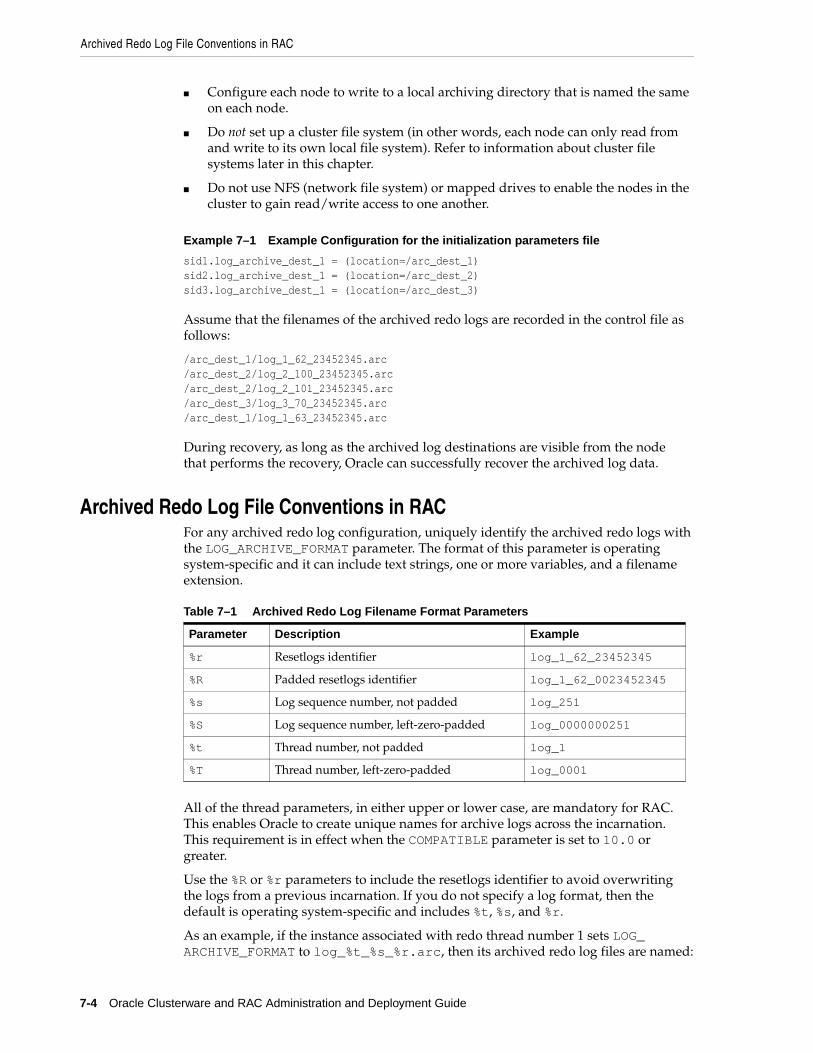
Archived Redo Log File Conventions in RAC
7-4 Oracle Clusterware and RAC Administration and Deployment Guide
■ Configure each node to write to a local archiving directory that is named the same on each node.
■ Do not set up a cluster file system (in other words, each node can only read from and write to its own local file system). Refer to information about cluster file systems later in this chapter.
■ Do not use NFS (network file system) or mapped drives to enable the nodes in the cluster to gain read/write access to one another.
Example 7–1 Example Configuration for the initialization parameters file
sid1.log_archive_dest_1 = (location=/arc_dest_1)sid2.log_archive_dest_1 = (location=/arc_dest_2)sid3.log_archive_dest_1 = (location=/arc_dest_3)
Assume that the filenames of the archived redo logs are recorded in the control file as follows:
/arc_dest_1/log_1_62_23452345.arc /arc_dest_2/log_2_100_23452345.arc/arc_dest_2/log_2_101_23452345.arc/arc_dest_3/log_3_70_23452345.arc/arc_dest_1/log_1_63_23452345.arc
During recovery, as long as the archived log destinations are visible from the node that performs the recovery, Oracle can successfully recover the archived log data.
Archived Redo Log File Conventions in RACFor any archived redo log configuration, uniquely identify the archived redo logs with the LOG_ARCHIVE_FORMAT parameter. The format of this parameter is operating system-specific and it can include text strings, one or more variables, and a filename extension.
All of the thread parameters, in either upper or lower case, are mandatory for RAC. This enables Oracle to create unique names for archive logs across the incarnation. This requirement is in effect when the COMPATIBLE parameter is set to 10.0 or greater.
Use the %R or %r parameters to include the resetlogs identifier to avoid overwriting the logs from a previous incarnation. If you do not specify a log format, then the default is operating system-specific and includes %t, %s, and %r.
As an example, if the instance associated with redo thread number 1 sets LOG_ARCHIVE_FORMAT to log_%t_%s_%r.arc, then its archived redo log files are named:
Table 7–1 Archived Redo Log Filename Format Parameters
Parameter Description Example
%r Resetlogs identifier log_1_62_23452345
%R Padded resetlogs identifier log_1_62_0023452345
%s Log sequence number, not padded log_251
%S Log sequence number, left-zero-padded log_0000000251
%t Thread number, not padded log_1
%T Thread number, left-zero-padded log_0001
RMAN Archiving Configuration Scenarios
Configuring Recovery Manager and Archiving 7-5
log_1_1000_23435343.arclog_1_1001_23452345.arclog_1_1002_23452345.arc...
RMAN Archiving Configuration ScenariosThis section describes the archiving scenarios for a RAC database. The two configuration scenarios in this chapter describe a three-node UNIX cluster for a RAC database. For both scenarios, the LOG_ARCHIVE_FORMAT that you specify for the instance performing recovery must be the same as the format that you specified for the instances that archived the files.
Automatic Storage Management and Cluster File System Archiving SchemeThe preferred configuration for RAC is to use Automatic Storage Management (ASM) for a recovery area with a different disk group for your recovery set than for your datafiles. Alternatively, you can use a cluster file system archiving scheme.
In this case, each node writes to a single cluster file system archived redo log destination and can read the archived redo log files of the other nodes. Read access is achieved for all nodes with a cluster file system. For example, if node 1 archives a log to /arc_dest/log_1_100_23452345.arc on the cluster file system, then any other node in the cluster can also read this file.
If you do not use a cluster file system, then the archived redo log files cannot be on raw devices. This is because raw devices do not enable sequential writing of consecutive archive log files.
See Also: Oracle Database Administrator's Guide about specifying the archived redo log filename format and destination, and Oracle platform-specific documentation about the default log archiving format and destination
Note: The archive log naming format in this example is only for a CFS example. ASM uses an Oracle Managed Files (OMF)-based naming format.
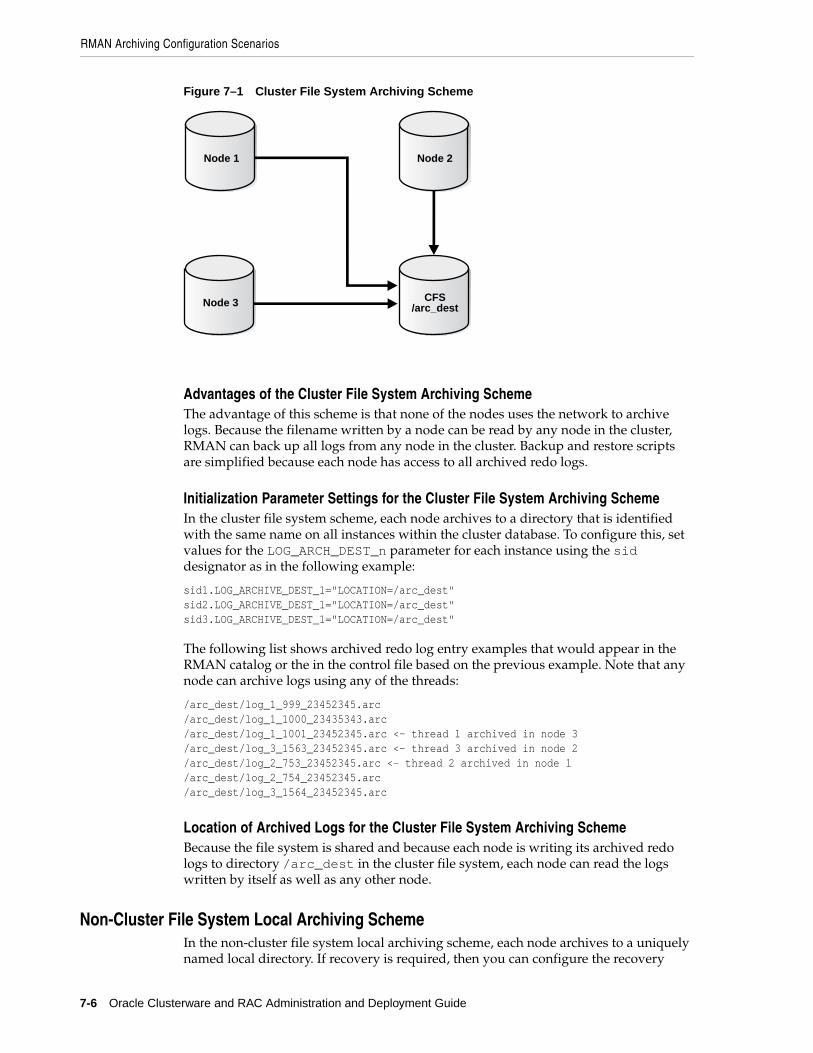
RMAN Archiving Configuration Scenarios
7-6 Oracle Clusterware and RAC Administration and Deployment Guide
Figure 7–1 Cluster File System Archiving Scheme
Advantages of the Cluster File System Archiving Scheme The advantage of this scheme is that none of the nodes uses the network to archive logs. Because the filename written by a node can be read by any node in the cluster, RMAN can back up all logs from any node in the cluster. Backup and restore scripts are simplified because each node has access to all archived redo logs.
Initialization Parameter Settings for the Cluster File System Archiving SchemeIn the cluster file system scheme, each node archives to a directory that is identified with the same name on all instances within the cluster database. To configure this, set values for the LOG_ARCH_DEST_n parameter for each instance using the sid designator as in the following example:
sid1.LOG_ARCHIVE_DEST_1="LOCATION=/arc_dest"sid2.LOG_ARCHIVE_DEST_1="LOCATION=/arc_dest"sid3.LOG_ARCHIVE_DEST_1="LOCATION=/arc_dest"
The following list shows archived redo log entry examples that would appear in the RMAN catalog or the in the control file based on the previous example. Note that any node can archive logs using any of the threads:
/arc_dest/log_1_999_23452345.arc/arc_dest/log_1_1000_23435343.arc/arc_dest/log_1_1001_23452345.arc <- thread 1 archived in node 3/arc_dest/log_3_1563_23452345.arc <- thread 3 archived in node 2/arc_dest/log_2_753_23452345.arc <- thread 2 archived in node 1/arc_dest/log_2_754_23452345.arc/arc_dest/log_3_1564_23452345.arc
Location of Archived Logs for the Cluster File System Archiving SchemeBecause the file system is shared and because each node is writing its archived redo logs to directory /arc_dest in the cluster file system, each node can read the logs written by itself as well as any other node.
Non-Cluster File System Local Archiving SchemeIn the non-cluster file system local archiving scheme, each node archives to a uniquely named local directory. If recovery is required, then you can configure the recovery
Node 3 CFS/arc_dest
Node 1 Node 2
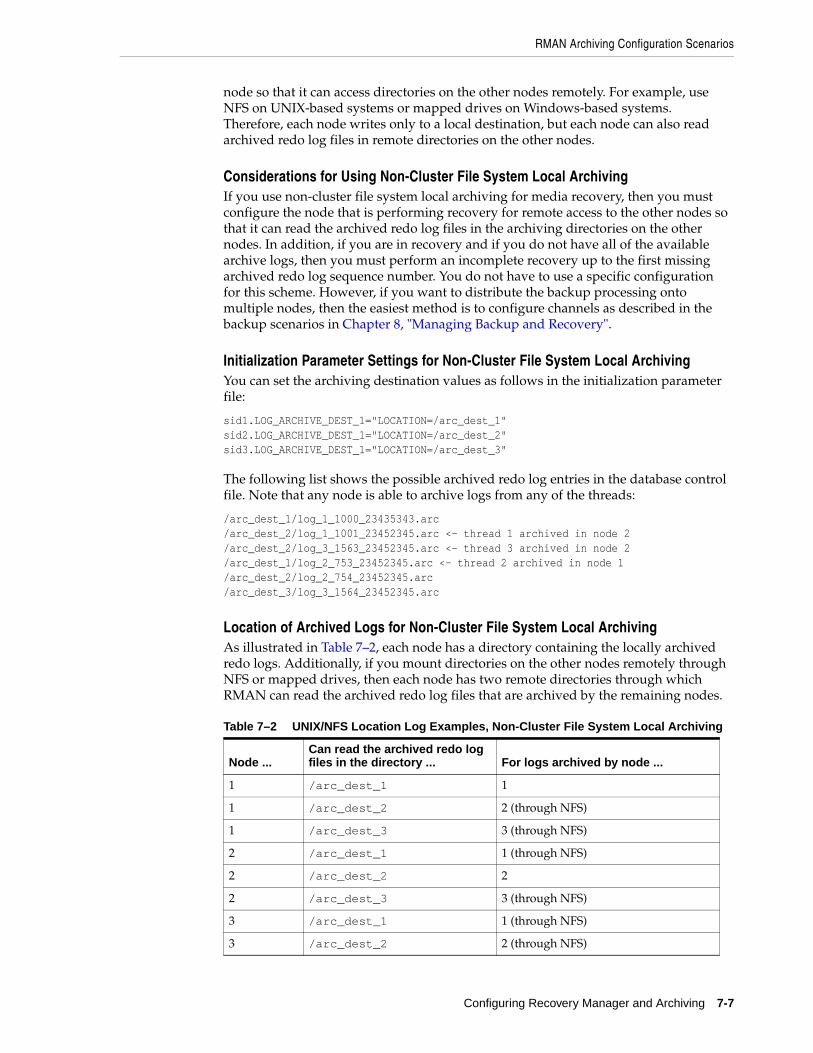
RMAN Archiving Configuration Scenarios
Configuring Recovery Manager and Archiving 7-7
node so that it can access directories on the other nodes remotely. For example, use NFS on UNIX-based systems or mapped drives on Windows-based systems. Therefore, each node writes only to a local destination, but each node can also read archived redo log files in remote directories on the other nodes.
Considerations for Using Non-Cluster File System Local ArchivingIf you use non-cluster file system local archiving for media recovery, then you must configure the node that is performing recovery for remote access to the other nodes so that it can read the archived redo log files in the archiving directories on the other nodes. In addition, if you are in recovery and if you do not have all of the available archive logs, then you must perform an incomplete recovery up to the first missing archived redo log sequence number. You do not have to use a specific configuration for this scheme. However, if you want to distribute the backup processing onto multiple nodes, then the easiest method is to configure channels as described in the backup scenarios in Chapter 8, "Managing Backup and Recovery".
Initialization Parameter Settings for Non-Cluster File System Local ArchivingYou can set the archiving destination values as follows in the initialization parameter file:
sid1.LOG_ARCHIVE_DEST_1="LOCATION=/arc_dest_1"sid2.LOG_ARCHIVE_DEST_1="LOCATION=/arc_dest_2"sid3.LOG_ARCHIVE_DEST_1="LOCATION=/arc_dest_3"
The following list shows the possible archived redo log entries in the database control file. Note that any node is able to archive logs from any of the threads:
/arc_dest_1/log_1_1000_23435343.arc/arc_dest_2/log_1_1001_23452345.arc <- thread 1 archived in node 2/arc_dest_2/log_3_1563_23452345.arc <- thread 3 archived in node 2/arc_dest_1/log_2_753_23452345.arc <- thread 2 archived in node 1/arc_dest_2/log_2_754_23452345.arc/arc_dest_3/log_3_1564_23452345.arc
Location of Archived Logs for Non-Cluster File System Local ArchivingAs illustrated in Table 7–2, each node has a directory containing the locally archived redo logs. Additionally, if you mount directories on the other nodes remotely through NFS or mapped drives, then each node has two remote directories through which RMAN can read the archived redo log files that are archived by the remaining nodes.
Table 7–2 UNIX/NFS Location Log Examples, Non-Cluster File System Local Archiving
Node ...Can read the archived redo log files in the directory ... For logs archived by node ...
1 /arc_dest_1 1
1 /arc_dest_2 2 (through NFS)
1 /arc_dest_3 3 (through NFS)
2 /arc_dest_1 1 (through NFS)
2 /arc_dest_2 2
2 /arc_dest_3 3 (through NFS)
3 /arc_dest_1 1 (through NFS)
3 /arc_dest_2 2 (through NFS)
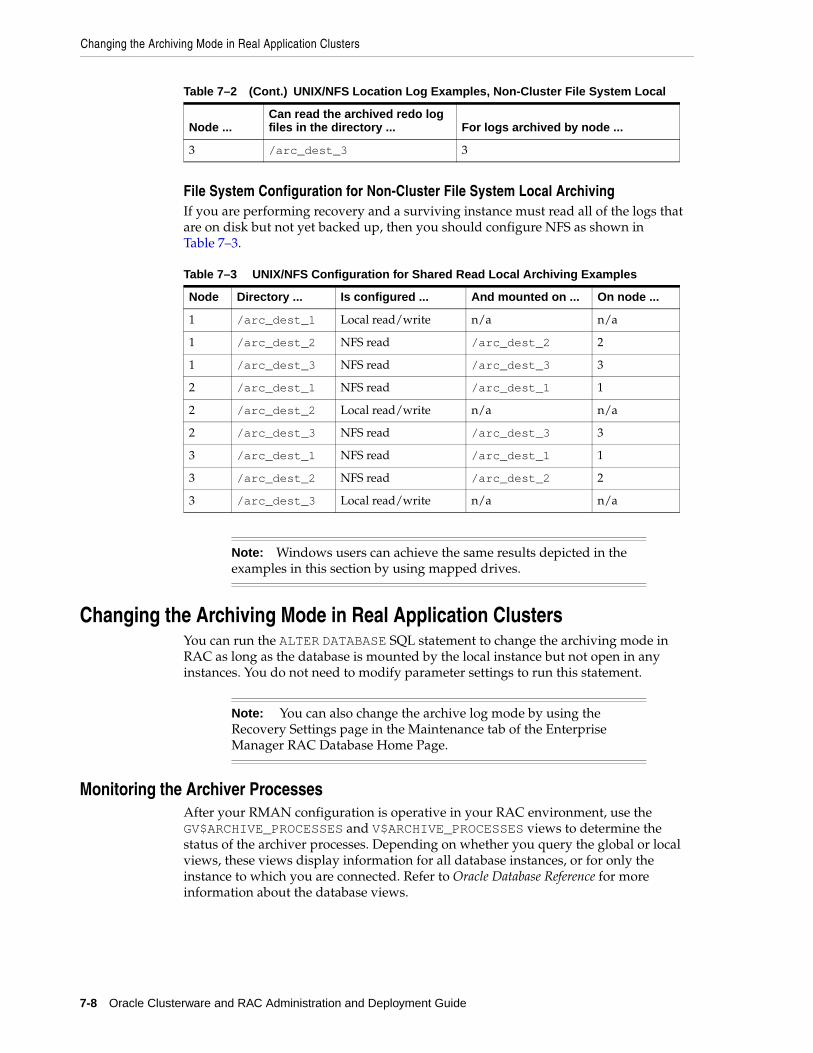
Changing the Archiving Mode in Real Application Clusters
7-8 Oracle Clusterware and RAC Administration and Deployment Guide
File System Configuration for Non-Cluster File System Local ArchivingIf you are performing recovery and a surviving instance must read all of the logs that are on disk but not yet backed up, then you should configure NFS as shown in Table 7–3.
Changing the Archiving Mode in Real Application ClustersYou can run the ALTER DATABASE SQL statement to change the archiving mode in RAC as long as the database is mounted by the local instance but not open in any instances. You do not need to modify parameter settings to run this statement.
Monitoring the Archiver ProcessesAfter your RMAN configuration is operative in your RAC environment, use the GV$ARCHIVE_PROCESSES and V$ARCHIVE_PROCESSES views to determine the status of the archiver processes. Depending on whether you query the global or local views, these views display information for all database instances, or for only the instance to which you are connected. Refer to Oracle Database Reference for more information about the database views.
3 /arc_dest_3 3
Table 7–3 UNIX/NFS Configuration for Shared Read Local Archiving Examples
Node Directory ... Is configured ... And mounted on ... On node ...
1 /arc_dest_1 Local read/write n/a n/a
1 /arc_dest_2 NFS read /arc_dest_2 2
1 /arc_dest_3 NFS read /arc_dest_3 3
2 /arc_dest_1 NFS read /arc_dest_1 1
2 /arc_dest_2 Local read/write n/a n/a
2 /arc_dest_3 NFS read /arc_dest_3 3
3 /arc_dest_1 NFS read /arc_dest_1 1
3 /arc_dest_2 NFS read /arc_dest_2 2
3 /arc_dest_3 Local read/write n/a n/a
Note: Windows users can achieve the same results depicted in the examples in this section by using mapped drives.
Note: You can also change the archive log mode by using the Recovery Settings page in the Maintenance tab of the Enterprise Manager RAC Database Home Page.
Table 7–2 (Cont.) UNIX/NFS Location Log Examples, Non-Cluster File System Local
Node ...Can read the archived redo log files in the directory ... For logs archived by node ...

Managing Backup and Recovery 8-1
8Managing Backup and Recovery
This chapter explains instance recovery and how to use Recovery Manager (RMAN) to back up and restore Oracle Real Application Clusters (RAC) databases. This chapter also describes RAC instance recovery, parallel backup, recovery with SQL*Plus, and using the Flash Recovery Area in RAC. The topics in this chapter include:
■ RMAN Backup Scenario for Non-Cluster File System Backups
■ RMAN Restore Scenarios for Real Application Clusters
■ RMAN Recovery Through Resetlogs in Real Application Clusters
■ RMAN and Oracle Net in Real Application Clusters
■ Instance Recovery in Real Application Clusters
■ Media Recovery in Real Application Clusters
■ Parallel Recovery in Real Application Clusters
■ Using a Flash Recovery Area in Real Application Clusters
RMAN Backup Scenario for Non-Cluster File System BackupsIn a non-cluster file system environment, each node can back up only its own local archived redo logs. For example, node 1 cannot access the archived redo logs on node 2 or node 3 unless you configure the network file system for remote access. If you configure a network file system file for backups, then each node will backup its archived logs to a local directory.
RMAN Restore Scenarios for Real Application ClustersThis section describes the following common RMAN restore scenarios:
Note: For restore and recovery in RAC environments, you do not have to configure the instance that performs the recovery to also be the sole instance that restores all of the datafiles. IN RAC, datafiles are accessible from every node in the cluster, so any node can restore archived log files.
See Also: Chapter 3, "Administering Oracle Clusterware Components" for information about backing and restoring the Oracle Clusterware components such as the Oracle Cluster Registry (OCR) and the voting disk
RMAN Restore Scenarios for Real Application Clusters
8-2 Oracle Clusterware and RAC Administration and Deployment Guide
■ Cluster File System Restore Scheme
■ Non-Cluster File System Restore Scheme
■ Using RMAN or Enterprise Manager to Restore the Server Parameter File (SPFILE)
Cluster File System Restore SchemeThe scheme that this section describes assumes that you are using the "Automatic Storage Management and Cluster File System Archiving Scheme" on page 7-5. In this scheme, assume that node 3 performed the backups to a CFS. If node 3 is available for the restore and recovery operation, and if all of the archived logs have been backed up or are on disk, then run the following commands to perform complete recovery:
RESTORE DATABASE;RECOVER DATABASE;
If node 3 performed the backups but is unavailable, then configure a media management device for one of the remaining nodes and make the backup media from node 3 available to this node.
Non-Cluster File System Restore SchemeThe scheme that this section describes assumes that you are using the "Non-Cluster File System Local Archiving Scheme" on page 7-6. In this scheme, each node archives locally to a different directory. For example, node 1 archives to /arc_dest_1, node 2 archives to /arc_dest_2, and node 3 archives to /arc_dest_3. You must configure a network file system file so that the recovery node can read the archiving directories on the remaining nodes.
If all nodes are available and if all archived redo logs have been backed up, then you can perform a complete restore and recovery by mounting the database and running the following commands from any node:
RESTORE DATABASE;RECOVER DATABASE;
Because the network file system configuration enables each node read access to the other nodes, then the recovery node can read and apply the archived redo logs located on the local and remote disks. No manual transfer of archived redo logs is required.
Using RMAN or Enterprise Manager to Restore the Server Parameter File (SPFILE)RMAN can restore the server parameter file either to the default location or to a location that you specify. This procedure is described in Oracle Database Backup and Recovery Basics.
You can also use Enterprise Manager to restore SPFILE. From the Backup/Recovery section of the Maintenance tab, click Perform Recovery. The Perform Recovery link is context-sensitive and navigates you to the SPFILE restore only when the database is closed.
Note: The restore and recovery procedures in a cluster file system scheme do not differ substantially from Oracle single-instance scenarios.
Instance Recovery in Real Application Clusters
Managing Backup and Recovery 8-3
RMAN Recovery Through Resetlogs in Real Application ClustersThe resetlogs operation automatically archives online logs. This ensures that your database has the necessary archived redo logs if recovery was done to a point in time in the online or in the standby logs. You do not need to perform a full backup after a resetlogs operation.
The default archivelog format includes a resetlogs identifier. You do not need to change the backup scripts after performing a reset logs operation. RMAN backs up earlier incarnation logs on running BACKUP ARCHIVELOG ALL or BACKUP ARCHIVELOG FROM TIME or BACKUP ARCHIVELOG FROM SCN command.
RMAN and Oracle Net in Real Application ClustersTo facilitate RMAN in Oracle Net, RMAN only needs a net service name that creates a dedicated server connection. You can configure this net service name on any active instance within your RAC environment.
For any RMAN connection made through a net service name, each net service name must specify only one instance. This applies to all RMAN connections, whether you configure these connections from the command line or through the CONNECT clause in ALLOCATE CHANNEL or CONFIGURE CHANNEL RMAN commands. Additionally, when you use RMAN from the command line, you can only connect to one instance in a RAC database at a time. For example, assume that node1, node2, and node3 are net service names for three instances in a RAC environment. In this case, connect to the target database with only one of these net service names, for example:
% rman TARGET SYS/oracle@node2 CATALOG rman/cat@catdb
Instance Recovery in Real Application ClustersInstance failure occurs when software or hardware problems disable an instance. After instance failure, Oracle automatically uses the online redo logs to perform recovery as described in this section.
Single Node Failure in Real Application ClustersInstance recovery in RAC does not include the recovery of applications that were running on the failed instance. Oracle clusterware restarts the instance automatically. You can also use callout programs as described in the example on OTN to trigger application recovery.
Applications that were running continue by using failure recognition and recovery. This provides consistent and uninterrupted service in the event of hardware or software failures. When one instance performs recovery for another instance, the surviving instance reads online redo logs generated by the failed instance and uses that information to ensure that committed transactions are recorded in the database. Thus, data from committed transactions is not lost. The instance performing recovery rolls back transactions that were active at the time of the failure and releases resources used by those transactions.
Note: All online redo logs must be accessible for instance recovery. Therefore, Oracle recommends that you mirror your online redo logs.
Instance Recovery in Real Application Clusters
8-4 Oracle Clusterware and RAC Administration and Deployment Guide
Multiple-Node Failures in Real Application ClustersWhen multiple node failures occur, as long as one instance survives, RAC performs instance recovery for any other instances that fail. If all instances of a RAC database fail, then Oracle automatically recovers the instances the next time one instance opens the database. The instance performing recovery can mount the database in either cluster database or exclusive mode from any node of a RAC database. This recovery procedure is the same for Oracle running in shared mode as it is for Oracle running in exclusive mode, except that one instance performs instance recovery for all of the failed instances.
Using RMAN to Create Backups in Real Application ClustersOracle provides RMAN for backing up and restoring the database. RMAN enables you to back up, restore, and recover datafiles, control files, SPFILEs, and archived redo logs. RMAN is included with the Oracle server and it is installed by default. You can run RMAN from the command line or you can use it from the Backup Manager in Oracle Enterprise Manager. In addition, RMAN is the recommended backup and recovery tool if you are using Automatic Storage Management (ASM).
The procedures for using RMAN in RAC environments do not differ substantially from those for Oracle single-instance environments. Refer to the Oracle Backup and Recovery documentation set for more information about single-instance RMAN backup procedures.
Channel Connections to Cluster InstancesChannel connections to the instances are determined using the connect string defined by channel configurations. For example, in the following configuration, three channels are allocated using user1/pwd1@service_name. If you configure the SQL Net service name with load balancing turned on, then he channels are allocated at a node as decided by the load balancing algorithm.
CONFIGURE DEVICE TYPE sbt PARALLELISM 3;CONFIGURE DEFAULT DEVICE TYPE TO sbt;CONFIGURE CHANNEL DEVICE TYPE SBT CONNECT 'user1/pwd1@<service_name>'
However, if the service name used in the connect string is not for load balancing, then you can control at which instance the channels are allocated using separate connect strings for each channel configuration as follows:
CONFIGURE DEVICE TYPE sbt PARALLELISM 3;CONFIGURE CHANNEL 1.. CONNECT 'user1/pwd1@node1';CONFIGURE CHANNEL 2.. CONNECT 'user2/pwd2@node2';CONFIGURE CHANNEL 3.. CONNECT 'user3/pwd3@node3';
In the previous example, it is assumed that node1, node2 and node3 are SQL Net service names that connect to pre-defined nodes in your RAC environment. Alternatively, you can also use manually allocated channels to backup your database files. For example, the following command backs up the spfile, controlfile, datafiles and archived logs:
RUN{ ALLOCATE CHANNEL CH1 CONNECT 'user1/pwd1@node1'; ALLOCATE CHANNEL CH2 CONNECT 'user2/pwd2@node2'; ALLOCATE CHANNEL CH3 CONNECT 'user3/pwd3@node3'; BACKUP DATABASE PLUS ARCHIVED LOG;}
Instance Recovery in Real Application Clusters
Managing Backup and Recovery 8-5
During a backup operation, as long as at least one of the channels allocated has access to the archived log, RMAN automatically schedules the backup of the specific log on that channel. Because the control file, spfile, and datafiles are accessible by any channel, the backup operation of these files is distributed across the allocated channels.
For a local archiving scheme, there must be at least one channel allocated to all of the nodes that write to their local archived logs. For a CFS archiving scheme, assuming that every node writes to the archived logs in the same CFS, the backup operation of the archived logs is distributed across the allocated channels.
During a backup, the instances to which the channels connect must be either all mounted or all open. For example, if the node1 instance has the database mounted while the node2 and node3 instances have the database open, then the backup fails.
Node Affinity Awareness of Fast Connections In some cluster database configurations, some nodes of the cluster have faster access to certain datafiles than to other datafiles. RMAN automatically detects this, which is known as node affinity awareness. When deciding which channel to use to back up a particular datafile, RMAN gives preference to the nodes with faster access to the datafiles that you want to back up. For example, if you have a three-node cluster, and if node 1 has faster read/write access to datafiles 7, 8, and 9 than the other nodes, then node 1 has greater node affinity to those files than nodes 2 and 3.
Deleting Archived Redo Logs after a Successful BackupAssuming that you have configured the automatic channels as defined in section "Channel Connections to Cluster Instances" on page 8-4, you can use the following example to delete the archived logs that you backed up n times. The device type can be DISK or SBT:
DELETE ARCHIVELOG ALL BACKED UP n TIMES TO DEVICE TYPE device_type;
During a delete operation, as long as at least one of the channels allocated has access to the archived log, RMAN will automatically schedule the deletion of the specific log on that channel. For a local archiving scheme, there must be at least one channel allocated that can delete an archived log. For a CFS archiving scheme, assuming that every node writes to the archived logs on the same CFS, the archived log can be deleted by any allocated channel.
If you have not configured automatic channels, then you can manually allocate the maintenance channels as follows and delete the archived logs.
ALLOCATE CHANNEL FOR MAINTENANCE DEVICE TYPE DISK CONNECT 'SYS/oracle@node1';ALLOCATE CHANNEL FOR MAINTENANCE DEVICE TYPE DISK CONNECT 'SYS/oracle@node2';ALLOCATE CHANNEL FOR MAINTENANCE DEVICE TYPE DISK CONNECT 'SYS/oracle@node3';DELETE ARCHIVELOG ALL BACKED UP n TIMES TO DEVICE TYPE device_type;
Autolocation for Backup and Restore CommandsRMAN automatically performs autolocation of all files that it needs to back up or restore. If you use the non-cluster file system local archiving scheme, then a node can
See Also: Oracle Database Backup and Recovery Reference for more information about the CONNECT clause of the CONFIGURE CHANNEL statement
Media Recovery in Real Application Clusters
8-6 Oracle Clusterware and RAC Administration and Deployment Guide
only read the archived redo logs that were generated by an instance on that node. RMAN never attempts to back up archived redo logs on a channel it cannot read.
During a restore operation, RMAN automatically performs the autolocation of backups. A channel connected to a specific node only attempts to restore files that were backed up to the node. For example, assume that log sequence 1001 is backed up to the drive attached to node 1, while log 1002 is backed up to the drive attached to node 2. If you then allocate channels that connect to each node, then the channel connected to node 1 can restore log 1001 (but not 1002), and the channel connected to node 2 can restore log 1002 (but not 1001).
Media Recovery in Real Application ClustersMedia recovery must be user-initiated through a client application, whereas instance recovery is automatically performed by the database. In these situations, use RMAN to restore backups of the datafiles and then recover the database. The procedures for RMAN media recovery in RAC environments do not differ substantially from the media recovery procedures for single-instance environments.
The node that performs the recovery must be able to restore all of the required datafiles. That node must also be able to either read all of the required archived redo logs on disk or be able to restore them from backups.
Parallel Recovery in Real Application ClustersOracle automatically selects the optimum degree of parallelism for instance, crash, and media recovery. Oracle applies archived redo logs using an optimal number of parallel processes based on the availability of CPUs. You can use parallel instance recovery and parallel media recovery in RAC databases as described under the following topics:
■ Parallel Recovery with RMAN
■ Disabling Parallel Recovery
Parallel Recovery with RMANWith RMAN's RESTORE and RECOVER commands, Oracle automatically makes parallel the following three stages of recovery:
Restoring Datafiles When restoring datafiles, the number of channels you allocate in the RMAN recover script effectively sets the parallelism that RMAN uses. For example, if you allocate five channels, you can have up to five parallel streams restoring datafiles.
Applying Incremental Backups Similarly, when you are applying incremental backups, the number of channels you allocate determines the potential parallelism.
Applying Archived Redo Logs With RMAN, the application of archived redo logs is performed in parallel. Oracle automatically selects the optimum degree of parallelism based on available CPU resources.
See Also: Oracle Database Backup and Recovery Advanced User's Guide for more information on these topics
Using a Flash Recovery Area in Real Application Clusters
Managing Backup and Recovery 8-7
Disabling Parallel RecoveryYou can override this using the procedures under the following topics:
■ Disabling Instance and Crash Recovery Parallelism
■ Disabling Media Recovery Parallelism
Disabling Instance and Crash Recovery ParallelismTo disable parallel instance and crash recovery on a multi-CPU system, set the RECOVERY_PARALLELISM parameter to 0.
Disabling Media Recovery ParallelismUse the NOPARALLEL clause of the RMAN RECOVER command or the ALTER DATABASE RECOVER statement to force Oracle to use non-parallel media recovery.
Using a Flash Recovery Area in Real Application ClustersTo use a flash recovery area in RAC, you must place it on an ASM disk group, a Cluster File System, or on a shared directory that is configured through a network file system file for each RAC instance. In other words, the flash recovery area must be shared among all of the instances of a RAC database. In addition, set the parameter DB_RECOVERY_FILE_DEST to the same value on all instances.
Enterprise Manager enables you to set up a flash recovery area. To use this feature:
1. From the Cluster Database home page, click the Maintenance tab.
2. Under the Backup/Recovery options list, click Configure Recovery Settings.
3. Specify your requirements in the Flash Recovery Area section of the page.
4. Click the Help for this page for more information.

Using a Flash Recovery Area in Real Application Clusters
8-8 Oracle Clusterware and RAC Administration and Deployment Guide
Administrative Options 9-1
9Administrative Options
This chapter describes administrative tasks or options within Oracle tools that are specific to Oracle Real Application Clusters (RAC) and not discussed elsewhere in this book. In some cases, you have a choice of tools to perform a task while other tasks must be performed through a specific tool, such as Enterprise Manager or SRVCTL. In addition, this chapter describes how to quiesce a RAC database and how to administer network interfaces with the Oracle Interface Configuration Tool (OIFCFG). The topics in this chapter are:
■ Enterprise Manager Tasks for Real Application Clusters
■ Real Application Clusters Administration Procedures for Enterprise Manager
■ Additional Information About SQL*Plus in Real Application Clusters
■ Quiescing Real Application Clusters Databases
■ Administering System and Network Interfaces with OIFCFG
■ Changing VIP Addresses
Enterprise Manager Tasks for Real Application ClustersWithin Enterprise Manager, RAC-specific administrative tasks generally focus on two levels: tasks that affect an entire cluster database and tasks that affect specific instances. For example, you can use Enterprise Manager to administer storage, the schema, and security at the cluster database level. Or you can perform instance-specific commands such as setting parameters or creating resource plans.
Because there is one Enterprise Manager Agent on each node of a RAC database, for Database Control you can use any URL for that database to administer it with Enterprise Manager. You can manage all of the following RAC components as targets in your Enterprise Manager framework:
■ Host cluster—Accessible from the Cluster Database Home Page.
■ Cluster database instances—Links to the instance pages appear on the Cluster Database Home Page.
■ Hosts and Listeners—Links to hosts and Listeners appear on the Cluster Database Instance Pages.
See Also: Oracle Enterprise Manager Concepts and the Enterprise Manager online help for more information about Enterprise Manager

Using Enterprise Manager Grid Control to Discover Nodes and Instances
9-2 Oracle Clusterware and RAC Administration and Deployment Guide
Using Enterprise Manager Grid Control to Discover Nodes and InstancesDiscovering RAC database and instance targets in Enterprise Manager enables monitoring and administration from the console. Database Control does not require discovery because DBCA performs any necessary configuration while creating the database. But for Grid Control, Enterprise Manager console interface can be used to discover RAC database and instance targets. If the Grid Control agents are installed on a cluster that already has RAC database, RAC database targets are discovered at install time. You can use the console interface to discover targets if a database is created after agents are installed or if a database is not automatically discovered at agent install time. To discover nodes and instances, use Enterprise Manager Grid Control as follows:
1. Log in to Enterprise Manager and click the Targets tab.
2. Click the Database tab to view all of the available targets. The column labeled Types shows the RAC databases using the entry "Cluster Database".
3. Add the database target by selecting the target name, then clicking Add. The Add Database Target: Specify Host page appears, which enables you to add databases, Listeners, and Automatic Storage Management (ASM) as monitored targets.
4. Click the flashlight icon to display the available host names, select a host, then click Continue. The Add Database: Specify Source page appears.
5. Either request Enterprise Manager to discover only single-instance databases and Listeners, or to discover all cluster databases, single-instance databases, and Listeners on the cluster, then click Continue.
Enterprise Manager performs discovery to locate and display the cluster database and its associated instances. The Targets Discovered on Cluster page appears. If this procedure did not discover your reconfigured cluster database and all of its instances, you can use this page to manually configure your cluster databases and single-instance databases.
Enterprise Manager Pages for Real Application ClustersThis section describes the following Enterprise Manager pages for RAC:
■ Databases Summary Page
■ Cluster Database Home Page
■ Cluster Database Instances Pages
■ The Databases Overview Page for Real Application Clusters
■ The Cluster Home Page for Real Application Clusters
Databases Summary PageThis is a top-level page in Enterprise Manager Grid Control. The page shows cluster and single-instance databases. If there are cluster databases in your environment, the Databases Summary page displays "Cluster Database" in the Type column. The page
See Also: Oracle Enterprise Manager Concepts for information about creating administrator accounts, using privileges, defining roles, and so on, and Oracle Enterprise Manager Advanced Configuration for information about configuring Enterprise Manager Grid Control for multiple RAC databases
Enterprise Manager Pages for Real Application Clusters
Administrative Options 9-3
also indicates cluster database availability as well as the ratio of active instances to inactive instances. Click a cluster database link and Enterprise Manager displays the Cluster Database Home Page for that database, which is described under the following heading.
Cluster Database Home PageFrom the Cluster Database Home Page you can manage the cluster nodes and hosts as well as cluster subcomponents such as instances, Listeners, and interconnects. The Cluster Database Home Page is also a summary page for cluster database management that provides an overview of cluster database activity. Enterprise Manager uses a unique database name to identify the cluster database it represents. You can use the Administration tab on this page to perform many activities such as:
■ Create undo tablespaces and redo threads and assign them to specific instances, SPFILE, create a backup
■ Start, stop, and relocate database services at the cluster database level
You can use the Maintenance tab on this page to perform operations such as:
■ Create backup and recovery scenarios
■ Toggle the archive mode on and off
■ Administer recovery settings
■ Manage resource plans for the database and its instances
You can define and modify the resource plans for the cluster database and also activate and deactivate resource plans for specific instances. You can also use the Resource Plan Schedule to schedule resource plan activation.
You can use the Interconnects tab on this page to perform tasks such as:
■ Monitoring the interconnect interfaces
■ Determining the load added by individual instances and databases on the interconnect
■ Determining configuration issues
■ Identifying transfer rate-related issues including excess traffic, and so on
Cluster Database Instances PagesInstances’ pages show instance-specific information similar to the information that you would see on a single-instance Oracle database. The RAC-specific contents of Instance Pages are:
■ Configuration—You can view instance states, view and edit initialization parameters at the instance level and at the cluster database level, and view resource plan performance statistics. You can also view and modify the undo tablespaces assigned to an instance and the undo tablespace retention period.
■ Sessions—You can list the statuses of connected users, view the latest SQL for specific sessions, and terminate sessions.
■ Locks—You can view details for currently held User type and System type locks.
Real Application Clusters Administration Procedures for Enterprise Manager
9-4 Oracle Clusterware and RAC Administration and Deployment Guide
The Databases Overview Page for Real Application ClustersThe Databases Overview Page links to Cluster Home Pages and to the node or instance Home Pages.
The Cluster Home Page for Real Application ClustersThe Cluster Home Page displays an overview of activities and detailed reports at both the cluster and instance levels. The Cluster Home Page has the following sections:
■ General Section—Provides a cluster status overview.
■ Configuration Section—Lists the hardware platform, operating system and version, and Oracle or vendor clusterware version.
■ Cluster Databases Table—Displays the cluster databases associated with a cluster, their availability, and any cluster database alerts. You can access the individual Cluster Database Home Pages from the Cluster Databases Table.
■ Alerts Table—Provides alert information such as severity rating.
■ Hosts Table—Displays information about the hosts or nodes in the cluster.
Real Application Clusters Administration Procedures for Enterprise Manager
The Cluster Database Home page shows all of the instances in the RAC database and provides an aggregate collection of several RAC-specific statistics that are collected by the Automatic Workload Repository (AWR) for server manageability.
You do not need to navigate to an instance-specific page to see these details. However, on the Cluster Database Home page, if an instance is down that should be operating, or if an instance has a high number of alerts, then you can drill down to the instance-specific page for each alert.
To perform specific administrative tasks as described in the remainder of this section, log in to the target RAC database, navigate to the Cluster Database Home page, and click the Administration tab.
Administering Enterprise Manager Jobs in Real Application ClustersYou can administer Enterprise Manager jobs at both the database and instance levels. For example, you can create a job at the cluster database level and the job will run on any active instance of the target RAC database. Or you can create a job at the instance level and the job will only run on the specific instance for which you created it. In the event of a failure, recurring jobs can run on a surviving instance.
Creating Enterprise Manager Jobs in Real Application Clusters Because you can create jobs at the instance level, cluster level, or cluster database level, jobs can run on any available host in the cluster database. This applies to scheduled jobs as well. Enterprise Manager also displays job activity in several categories, namely, Active, History, and Library.
Use the Jobs tab to submit operating system scripts and SQL scripts and to examine scheduled jobs. For example, to create a backup job for a specific RAC database:
1. Click Targets and click the database for which you want to create the job.
2. Log in to the target database.

Additional Information About SQL*Plus in Real Application Clusters
Administrative Options 9-5
3. When Enterprise Manager displays the Database Home page, click Maintenance.
4. Complete the Enterprise Manage Job Wizard panels to create the job.
Administering Alerts in Real Application Clusters with Enterprise ManagerYou can use Enterprise Manager to configure RAC environment alerts. You can also configure special RAC database tests, such as global cache converts, consistent read requests, and so on.
Enterprise Manager distinguishes between database- and instance-level alerts in RAC environments. Alert thresholds for instance level alerts, such as archive log alerts, can be set at the instance target level. This enables you to receive alerts for the specific instance if performance exceeds your threshold. You can also configure alerts at the database level, such as setting alerts for tablespaces. This enables you to avoid receiving duplicate alerts at each instance.
Performing Scheduled Maintenance Using Defined Blackouts in Enterprise ManagerYou can define blackouts for all managed targets of a RAC database to prevent alerts from occurring while performing maintenance. You can define blackouts for an entire cluster database or for specific cluster database instances.
Additional Information About SQL*Plus in Real Application Clusters The following sections describe the use of SQL*Plus in RAC environments:
■ How SQL*Plus Commands Affect Instances
■ Verifying that Instances are Running
How SQL*Plus Commands Affect InstancesMost SQL statements affect the current instance. You can use SQL*Plus to start and stop instances in the RAC database. You do not need to run SQL*Plus commands as root on UNIX-based systems or as Administrator on Windows-based systems. You need only the proper database account with the privileges that you normally use for a single-instance Oracle database. Some examples of how SQL*Plus commands affect instances are:
■ ALTER SYSTEM CHECKPOINT LOCAL affects only the instance to which you are currently connected, rather than the default instance or all instances.
■ ALTER SYSTEM CHECKPOINT or ALTER SYSTEM CHECKPOINT GLOBAL affects all instances in the cluster database.
■ ALTER SYSTEM SWITCH LOGFILE affects only the current instance.
■ To force a global log switch, use the ALTER SYSTEM ARCHIVE LOG CURRENT statement.
■ The INSTANCE option of ALTER SYSTEM ARCHIVE LOG enables you to archive each online redo log file for a specific instance.
Table 9–1 describes how SQL*Plus commands affect instances.
See Also: OTN for an example of configuring alerts in RAC and the Oracle Database PL/SQL Packages and Types Reference for information about using packages to configure thresholds
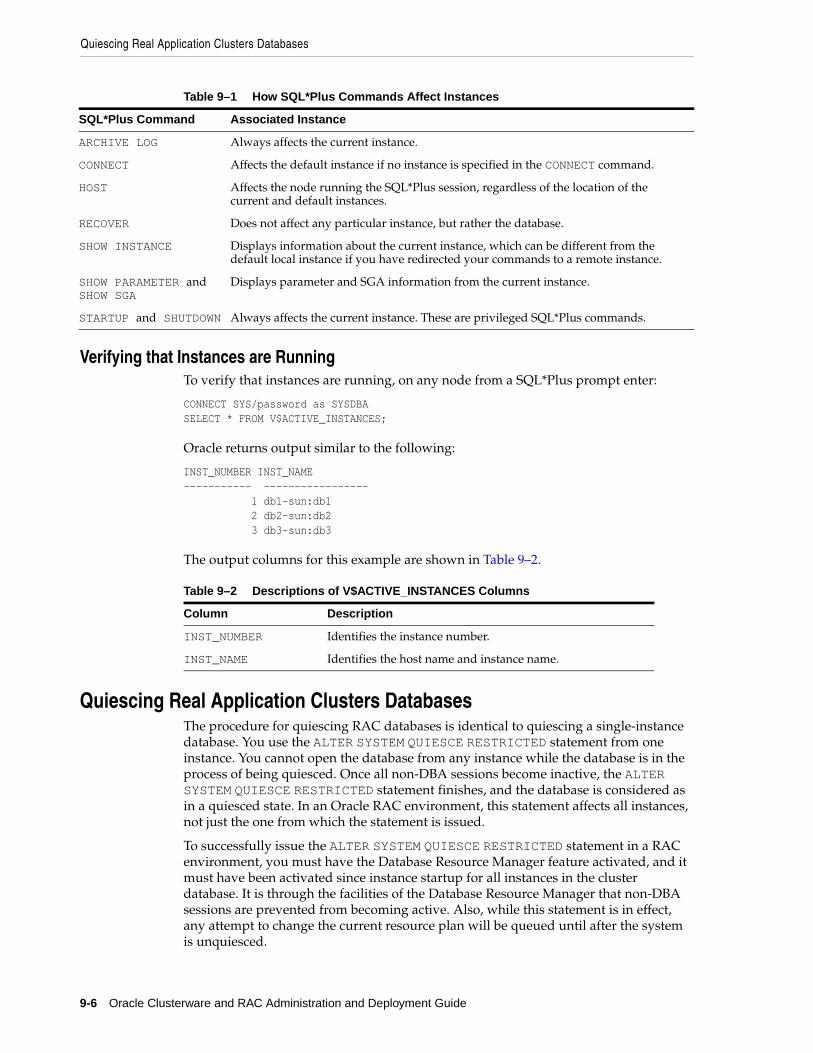
Quiescing Real Application Clusters Databases
9-6 Oracle Clusterware and RAC Administration and Deployment Guide
Verifying that Instances are RunningTo verify that instances are running, on any node from a SQL*Plus prompt enter:
CONNECT SYS/password as SYSDBASELECT * FROM V$ACTIVE_INSTANCES;
Oracle returns output similar to the following:
INST_NUMBER INST_NAME ----------- ----------------- 1 db1-sun:db1 2 db2-sun:db2 3 db3-sun:db3
The output columns for this example are shown in Table 9–2.
Quiescing Real Application Clusters DatabasesThe procedure for quiescing RAC databases is identical to quiescing a single-instance database. You use the ALTER SYSTEM QUIESCE RESTRICTED statement from one instance. You cannot open the database from any instance while the database is in the process of being quiesced. Once all non-DBA sessions become inactive, the ALTER SYSTEM QUIESCE RESTRICTED statement finishes, and the database is considered as in a quiesced state. In an Oracle RAC environment, this statement affects all instances, not just the one from which the statement is issued.
To successfully issue the ALTER SYSTEM QUIESCE RESTRICTED statement in a RAC environment, you must have the Database Resource Manager feature activated, and it must have been activated since instance startup for all instances in the cluster database. It is through the facilities of the Database Resource Manager that non-DBA sessions are prevented from becoming active. Also, while this statement is in effect, any attempt to change the current resource plan will be queued until after the system is unquiesced.
Table 9–1 How SQL*Plus Commands Affect Instances
SQL*Plus Command Associated Instance
ARCHIVE LOG Always affects the current instance.
CONNECT Affects the default instance if no instance is specified in the CONNECT command.
HOST Affects the node running the SQL*Plus session, regardless of the location of the current and default instances.
RECOVER Does not affect any particular instance, but rather the database.
SHOW INSTANCE Displays information about the current instance, which can be different from the default local instance if you have redirected your commands to a remote instance.
SHOW PARAMETER and SHOW SGA
Displays parameter and SGA information from the current instance.
STARTUP and SHUTDOWN Always affects the current instance. These are privileged SQL*Plus commands.
Table 9–2 Descriptions of V$ACTIVE_INSTANCES Columns
Column Description
INST_NUMBER Identifies the instance number.
INST_NAME Identifies the host name and instance name.
Administering System and Network Interfaces with OIFCFG
Administrative Options 9-7
These conditions apply to RAC:
■ If you issued the ALTER SYSTEM QUIESCE RESTRICTED statement but Oracle has not finished processing it, you cannot open the database.
■ You cannot open the database if it is already in a quiesced state.
■ The ALTER SYSTEM QUIESCE RESTRICTED and ALTER SYSTEM UNQUIESCE statements affect all instances in a RAC environment, not just the instance that issues the command.
Quiesced State and Cold BackupsYou cannot use the quiesced state to take a cold backup. This is because Oracle background processes may still perform updates for Oracle internal purposes even while the database is in quiesced state. In addition, the file headers of online datafiles continue to look like they are being accessed. They do not look the same as if a clean shutdown were done. You can still take online backups while the database is in a quiesced state. Refer to the Oracle Database Administrator's Guide for details on the quiesce database feature and the Oracle Database Reference for more information about the ALTER SYSTEM QUIESCE RESTRICTED syntax.
Administering System and Network Interfaces with OIFCFGThis section describes the following Oracle Interface Configuration (OIFCFG) topics:
■ Defining Network Interfaces with OIFCFG
■ Syntax and Commands for the OIFCFG Command-Line Tool
Use the OIFCFG command-line tool in single-instance Oracle databases and in RAC database environments to:
■ Allocate and de-allocate network interfaces to components
■ Direct components to use specific network interfaces
■ Retrieve component configuration information
The Oracle Universal Installer (OUI) also uses OIFCFG to identify and display the interfaces available on the system.
Defining Network Interfaces with OIFCFGThe specification for a network interface uniquely identifies it using the interface name, its associated subnet, and interface type. The interface type indicates the purpose for which the network is configured. The supported interface types are:
■ Public—An interface that can be used for communication with components external to RAC instances, such as Oracle Net and Virtual Internet Protocol (VIP) addresses
■ Cluster interconnect—A private interface used for the cluster interconnect to provide inter-instance or Cache Fusion communication
A network interface can be stored as a global interface or as a node-specific interface. An interface is stored as a global interface when all of the nodes of a RAC cluster have the same interface connected to the same subnet (recommended). It is stored as a node-specific interface only when there are some nodes in the cluster that have a different set of interfaces and subnets. If an interface is configured as both a global and

Administering System and Network Interfaces with OIFCFG
9-8 Oracle Clusterware and RAC Administration and Deployment Guide
a node-specific interface, the node-specific definition takes precedence over the global definition.
A network interface specification is in the form of:
interface_name/subnet:interface_type
For example, the following identifies qfe0 as a cluster interconnect located at the address 204.152.65.32:
qfe0/204.152.65.32:cluster_interconnect
Syntax and Commands for the OIFCFG Command-Line ToolUse the oifcfg -help command to display online help for OIFCFG. The elements of OIFCFG commands, some of which are optional depending on the command, are:
■ nodename—Name of the Oracle Clusterware node as listed in the output from the olsnodes command
■ if_name—Name by which the interface is configured in the system
■ subnet—Subnet address of the interface
■ if_type—Type of interface: public or cluster_interconnect
You can use OIFCFG to list the interface names and the subnets of all of the interfaces available on the local node by executing the iflist keyword as shown in this example:
oifcfg iflisthme0 139.185.141.0qfe0 204.152.65.16
You can also retrieve specific OIFCFG information with a getif command using the following syntax:
oifcfg getif [ [-global | -node nodename] [-if if_name[/subnet]] [-type if_type] ]
To store a new interface use the setif keyword. For example, to store the interface hme0, with the subnet 139.185.141.0, as a global interface (to be used as an interconnect for all of the RAC instances in your cluster), you would use the command:
oifcfg setif -global hme0/139.185.141.0:cluster_interconnect
For a cluster interconnect that exists between only two nodes, for example rac1 and rac2, you could create the cms0 interface with the following commands, assuming 139.185.142.0 is the subnet addresses for the interconnect on rac1 and rac2 respectively:
oifcfg setif -global cms0/139.185.142.0:cluster_interconnect
Use the OIFCFG delif command to delete the stored configuration for global or node-specific interfaces. A specific node-specific or global interface can be deleted by supplying the interface name, with an optional subnet, on the command line. Without the -node or -global options, the delif keyword deletes either the given interface or all of the global and node-specific interfaces on all of the nodes in the cluster. For example, the following command deletes the global interface named qfe0 for the subnet 204.152.65.0:
oifcfg delif -global qfe0/204.152.65.0
Changing VIP Addresses
Administrative Options 9-9
On the other hand, the next command deletes all of the global interfaces stored with OIFCFG:
oifcfg delif -global
Changing VIP AddressesUse the following procedure to change a VIP address:
1. Stop all database and ASM instances.
2. Stop the Listeners, and node applications using the srvctl stop nodeapps command.
3. Run the following command to verify node connectivity between all of the nodes for which your cluster is configured. This command discovers all of the network interfaces available on the cluster nodes and verifies the connectivity between all of the nodes by way of the discovered interfaces. This command also lists all of the interfaces available on the nodes which are suitable for use as VIPs.
cluvfy comp nodecon -n all [-verbose]
4. Run the srvctl modify nodeapps command with the -A option as described in Appendix E. Use the crs_stat command to identify all active node applications.
5. Restart all of the instances and node applications that you stopped in Step 1 and 2.
See Also: Appendix A, "Troubleshooting" for more information about enabling and using the Cluster Verification Utility (CVU)

Changing VIP Addresses
9-10 Oracle Clusterware and RAC Administration and Deployment Guide
Adding and Deleting Nodes and Instances on UNIX-Based Systems 10-1
10Adding and Deleting Nodes and Instances on
UNIX-Based Systems
This chapter describes how to add and delete nodes and instances in Oracle Real Application Clusters (RAC) databases on UNIX-based systems. The preferred method to add nodes and instances to RAC databases is to use the Oracle cloning procedures that are described in the Oracle Universal Installer and OPatch User's Guide. You can also use Enterprise Manager Grid Control to perform cloning operations. Cloning enables you to copy images of Oracle Clusterware and RAC software onto the other nodes that have identical hardware and software. If you do not want to use the cloning process, then you can use the manual procedures that are described in this chapter to add nodes and instances. The topics in this chapter are:
■ Cloning Oracle Clusterware and RAC Software in Grid Environments
■ Quick-Start Node and Instance Addition and Deletion Procedures
■ Detailed Node and Instance Addition and Deletion Procedures
■ Step 3: ASM Instance Clean-Up Procedures for Node Deletion
Cloning Oracle Clusterware and RAC Software in Grid EnvironmentsThe preferred method for extending your RAC environment is to use the Oracle cloning procedures in the Oracle Universal Installer and OPatch User's Guide. Only use the procedures in this chapter if you choose not to use Oracle cloning.
Note: For all of the add node and delete node procedures for UNIX-based systems, temporary directories such as /tmp, $TEMP, or $TMP, should not be shared directories. If your temporary directories are shared, then set your temporary environment variable, such as $TEMP, to a non-shared location on a local node. In addition, use a directory that exists on all of the nodes.
Note: The entries for CRS_home and Oracle_home as used in this chapter refer to substitutes for either environment variables or full path names for Oracle Clusterware and Oracle home with RAC respectively.
See Also: "Cloning Oracle Clusterware and RAC Software in Grid Environments" on page 1-11 for a summary about Oracle cloning
Quick-Start Node and Instance Addition and Deletion Procedures
10-2 Oracle Clusterware and RAC Administration and Deployment Guide
Quick-Start Node and Instance Addition and Deletion ProceduresThis section explains node and instance addition and deletion for UNIX-based systems using procedures that are presented in a quick-start format. For node addition, ensure that you install the required operating system patches and updates on the new nodes. Then configure the new nodes to be part of your cluster at the network level. Extend the Oracle Clusterware home from an existing Oracle Clusterware home to the new nodes and then extend the Oracle database software with RAC components to the new nodes. Finally, make the new nodes members of the existing RAC database. This section includes the following topics:
■ Adding an Oracle Clusterware Home to a New Node
■ Adding an Oracle Home with RAC to a New Node
■ Deleting an Oracle Home with RAC from an Existing Node
■ Deleting an Oracle Clusterware Home from an Existing Node
Adding an Oracle Clusterware Home to a New NodeUse one of the procedures described in this section to use OUI to add an Oracle Clusterware home to a node that is going to be part of your RAC cluster. These procedures assume that you are adding node2 and that you have already successfully installed Oracle Clusterware on node1 in a non-shared home, where CRS_home represents the successfully installed home. This section describes the following procedures:
■ Adding an Oracle Clusterware Home to a New Node Using OUI in Interactive Mode
■ Adding an Oracle Clusterware Home to a New Node Using OUI in Silent Mode
Note: If you are using Oracle Clusterware without vendor clusterware, then you can add and delete nodes without stopping the existing nodes. If you are using Oracle Clusterware with vendor clusterware, then you can add nodes on some UNIX-based systems without stopping the existing nodes if your clusterware supports this. Refer to your vendor-specific clusterware documentation for more information.
Note: For all of the procedures in this chapter, it is very important that you perform each step in the order shown.
See Also: Your Oracle Real Application Clusters platform-specific installation and configuration guide for procedures about using the Database Configuration Assistant (DBCA) to create and delete RAC databases
Note: When you extend a RAC database, you must first extend the Oracle Clusterware home to the new nodes and then extend the Oracle home. In other words, you extend the software onto the new nodes in the same order as you installed the clusterware and Oracle database software components on the existing nodes.
Quick-Start Node and Instance Addition and Deletion Procedures
Adding and Deleting Nodes and Instances on UNIX-Based Systems 10-3
The following sections are based on the addition of a node named node2 to an existing cluster that has a node named node1.
Adding an Oracle Clusterware Home to a New Node Using OUI in Interactive Mode1. Ensure that you have successfully installed Oracle Clusterware on at least one
node in your cluster environment. To use these procedures as shown, your $CRS_HOME environment variable must identify your successfully installed Oracle Clusterware home.
2. Go to CRS_home/oui/bin and run the addNode.sh script.
3. The Oracle Universal Installer (OUI) displays the Node Selection Page on which you should select the node or nodes that you want to add and click Next.
4. Verify the entries that OUI displays on the Summary Page and click Next.
5. Run the rootaddNode.sh script from the CRS_home/install/ directory on the node from which you are running OUI.
6. Run the orainstRoot.sh script on the new node if OUI prompts you to do so.
7. Run the root.sh script on the new node from CRS_home to start Oracle Clusterware on the new node.
8. Obtain the remote port identifier, which you need to know for the next step, by running the following command on the existing node from the CRS_home/opmn/conf directory:
cat ons.config
9. From the CRS_home/bin directory on an existing node, run the Oracle Notification Service (RACGONS) utility as in the following example where remote_port is the port number from the previous step and node2 is the name of the node that you are adding:
./racgons add_config node2:remote_port
Adding an Oracle Clusterware Home to a New Node Using OUI in Silent Mode1. Ensure that you have successfully installed Oracle Clusterware on at least one
node in your cluster environment. To use these procedures as shown, your $CRS_HOME environment variable must identify your successfully installed Oracle Clusterware home.
2. Go to CRS_home/oui/bin and run the addNode.sh script using the following syntax where node2 is the name of the new node that you are adding, node2-priv is the private node name for the new node, and node2-vip is the VIP name for the new node:
./addNode.sh –silent "CLUSTER_NEW_NODES={node2}" "CLUSTER_NEW_PRIVATE_NODE_NAMES={node2-priv}" "CLUSTER_NEW_VIRTUAL_HOSTNAMES={node2-vip}"
3. Perform OUI-related steps 5 through 9 from the previous section about using OUI interactively under the heading "Adding an Oracle Clusterware Home to a New Node Using OUI in Interactive Mode" on page 10-3.
Quick-Start Node and Instance Addition and Deletion Procedures
10-4 Oracle Clusterware and RAC Administration and Deployment Guide
Adding an Oracle Home with RAC to a New NodeUse one of the following procedures to add an Oracle home to a new node using OUI. These procedures assume that you want to extend an existing Oracle home with RAC on node1 to node2. Node2 should already be a member node of the cluster to which node1 belongs. The contents of these procedures assume that you have successfully installed RAC on node1 in a non-shared home and that Oracle_home represents the successfully installed Oracle home. This section describes the following procedures:
■ Adding an Oracle Home with RAC to a New Node Using OUI in Interactive Mode
■ Adding an Oracle Home with RAC to a New Node Using OUI in Silent Mode
Adding an Oracle Home with RAC to a New Node Using OUI in Interactive Mode1. Ensure that you have successfully installed Oracle with the RAC software on at
least one node in your cluster environment. To use these procedures as shown, your $ORACLE_HOME environment variable must identify your successfully installed Oracle home.
2. Go to Oracle_home/oui/bin and run the addNode.sh script.
3. When OUI displays the Node Selection Page, select the node or nodes to be added and click Next.
4. Verify the entries that OUI displays on the Summary Page and click Next.
5. Run the root.sh script on the new node from Oracle_home when OUI prompts you to do so.
6. On the new node, run the Oracle Net Configuration Assistant (NETCA) to add a Listener.
7. Use the Enterprise Manager or DBCA to add an instance as described under the heading "Step 5: Adding Database Instances to New Nodes" on page 10-17.
Adding an Oracle Home with RAC to a New Node Using OUI in Silent Mode1. Ensure that you have successfully installed Oracle with the RAC software on at
least one node in your cluster environment. To use these procedures, your $ORACLE_HOME environment variable must identify your successfully installed Oracle home and the node to be added is named node2.
2. Go to Oracle_home/oui/bin and run the addNode.sh script using the following syntax:
./addNode.sh -silent "CLUSTER_NEW_NODES={node2}"
3. Perform steps 5 through 7 from the previous section about using OUI interactively under the heading "Adding an Oracle Home with RAC to a New Node Using OUI in Interactive Mode" on page 10-4.
Deleting an Oracle Home with RAC from an Existing NodeUse the following procedures to delete nodes at the database Oracle home layer on Windows-based systems. These procedures assume that a RAC database home is installed on both node1 and node2 and that you want to delete the database home on node2. Also assume that Oracle_home represents the location of this home on the nodes. The procedures for deleting an Oracle home assume that you have successfully
See Also: Oracle Database Net Services Administrator's Guide for more information about NETCA
Quick-Start Node and Instance Addition and Deletion Procedures
Adding and Deleting Nodes and Instances on UNIX-Based Systems 10-5
installed RAC on the node from which you want to delete the Oracle home. You can use either of the following procedures to delete an Oracle home from a node:
■ Deleting an Oracle Home with RAC Using OUI in Interactive Mode
■ Deleting an Oracle Home with RAC Using OUI in Silent Mode
Deleting an Oracle Home with RAC Using OUI in Interactive Mode1. From a node that is to remain a part of your RAC database environment, use
Enterprise Manager or DBCA to remove any database instances from the node that you want to delete if instances exist on that node. To do this, refer to the procedure titled "Step 1: Deleting Instances from Real Application Clusters Databases" on page 10-20.
2. If you use ASM and this is the home from which the ASM instance runs, then perform the ASM clean up procedures as described under "Step 3: ASM Instance Clean-Up Procedures for Node Deletion" on page 10-25.
3. If this is the home from which the node-specific Listener runs, then use NETCA to remove the Listener and its Oracle Clusterware resources.
4. On the node to be deleted, ensure that the $ORACLE_HOME environment variable is set to the Oracle home then run the following command from Oracle_home/oui/bin where node_name is the name of the node to be deleted:
./runInstaller -updateNodeList ORACLE_HOME=Oracle_home "CLUSTER_NODES={node_name}" –local
5. Depending on whether you have a shared or non-shared Oracle home, complete one of the following two procedures:
■ For a shared home, run the following command on each of the nodes that are to be deleted, using the shared home location for the $ORACLE_HOME environment variable on each node:
./runInstaller -detachHome -local ORACLE_HOME=Oracle_home
■ For a non-shared home, on each node that you are deleting, run OUI from the home and deinstall this home. Make sure that you choose the home to be removed and not just the products under that home.
6. On any node other than the node that you are deleting, make sure that the $ORACLE_HOME environment variable is defined for the Oracle home that you are deleting. Run the following command from Oracle_home/oui/bin where
Note: When you remove Oracle Clusterware and RAC database software, you must first remove the Oracle database software and then remove Oracle Clusterware from the nodes that you are deleting. In other words, you remove the software components from the nodes that you are deleting in the reverse order that you originally installed the clusterware and Oracle database software components.
Note: For all of the procedures in this chapter, it is very important that you perform each step in the order shown.
See Also: Oracle Database Net Services Administrator's Guide for more information about NETCA
Quick-Start Node and Instance Addition and Deletion Procedures
10-6 Oracle Clusterware and RAC Administration and Deployment Guide
remaining_nodes_list is a comma-delimited list of the nodes that are going to remain as part of your RAC database:
./runInstaller -updateNodeList ORACLE_HOME=Oracle_home "CLUSTER_NODES={remaining_nodes_list}"
Deleting an Oracle Home with RAC Using OUI in Silent Mode 1. Perform steps 1 through 4 from the previous section about using OUI interactively
under the heading "Deleting an Oracle Home with RAC Using OUI in Interactive Mode" on page 10-5.
2. Depending on whether you have a shared or non-shared Oracle home, complete one of the following two procedures:
■ For a shared home, ensure that the $ORACLE_HOME environment variable is defined for the shared home location and run the following command on each of the nodes that are to be deleted:
./runInstaller -detachHome -local ORACLE_HOME=Oracle_home
■ For a non-shared home, on each node that you are deleting, ensure that the $ORACLE_HOME environment variable is defined for the home that you are deleting and perform the following step:
./runInstaller -deinstall -silent "REMOVE_HOMES={Oracle_home}"
3. Perform Step 6 from the procedure, "Deleting an Oracle Home with RAC Using OUI in Interactive Mode" on page 10-5.
Deleting an Oracle Clusterware Home from an Existing NodeThe procedures for deleting an Oracle Clusterware home assume that you have successfully installed the clusterware on the node from which you want to delete the Oracle Clusterware home. You can use either of the following procedures to delete an Oracle Clusterware home from a node:
■ Deleting an Oracle Clusterware Home Using OUI in Interactive Mode
■ Deleting an Oracle Clusterware Home Using OUI in Silent Mode
Deleting an Oracle Clusterware Home Using OUI in Interactive Mode1. Perform the delete node operation for database homes as described in the section
titled "Deleting an Oracle Home with RAC Using OUI in Interactive Mode" on page 10-5 or use the procedure, "Deleting an Oracle Home with RAC Using OUI in Silent Mode" on page 10-6, and ensure that the $CRS_HOME environment variable is defined to identify the appropriate Oracle Clusterware home on each node.
2. If you ran the Oracle Interface Configuration Tool (OIFCFG) with the -global flag during the installation, then skip this step. Otherwise, from a node that is going to remain in your cluster, from the CRS_home/bin directory, run the following command where node2 is the name of the node that you are deleting:
./oifcfg delif –node node2
3. Obtain the remote port number, which you will use in the next step, using the following command from the CRS_home/opmn/conf directory:
See Also: Oracle Database Net Services Administrator's Guide for more information about NETCA
Quick-Start Node and Instance Addition and Deletion Procedures
Adding and Deleting Nodes and Instances on UNIX-Based Systems 10-7
cat ons.config
4. From CRS_home/bin on a node that is going to remain in the cluster, run the Oracle Notification Service Utility (RACGONS) as in the following example where remote_port is the ONS remote port number that you obtained in the previous step and node2 is the name of the node that you are deleting:
./racgons remove_config node2:remote_port
5. On the node to be deleted, run rootdelete.sh as the root user from the CRS_home/install directory. If you are deleting more than one node, then perform this step on all of the other nodes that you are deleting.
6. From any node that you are not deleting, run the following command from the CRS_home/install directory as the root user where node2,node2-number represents the node and the node number that you want to delete:
./rootdeletenode.sh node2,node2-number
If necessary, identify the node number using the following command on the node that you are deleting:
CRS_home/bin/olsnodes -n
7. On the node or nodes to be deleted, run the following command from the CRS_home/oui/bin directory where node_to_be_deleted is the name of the node that you are deleting:
./runInstaller -updateNodeList ORACLE_HOME=CRS_home "CLUSTER_NODES={node_to_be_deleted}" CRS=TRUE -local
8. On the node that you are deleting, run OUI using the runInstaller command from the CRS_home/oui/bin directory. Depending on whether you have a shared or non-shared Oracle home, complete one of the following procedures:
■ If you have a shared home, then on any node other than the node to be deleted, run the following command from the CRS_home/oui/bin directory:
./runInstaller -detachHome -silent ORACLE_HOME=CRS_home
■ If you have a non-shared home, then de-install Oracle Clusterware using OUI by running the runInstaller command from the CRS_home/oui/bin directory.
9. On any node other than the node that you are deleting, run the following command from the CRS_home/oui/bin directory where remaining_nodes_list is a comma-delimited list of the nodes that are going to remain part of your RAC database:
./runInstaller -updateNodeList ORACLE_HOME=CRS_home "CLUSTER_NODES={remaining_nodes_list}" CRS=TRUE
Deleting an Oracle Clusterware Home Using OUI in Silent Mode 1. Perform steps 1 through 7 from the previous section about using OUI interactively
under the heading "Deleting an Oracle Clusterware Home Using OUI in Interactive Mode" on page 10-6. Also ensure that the $CRS_HOME environment variable is defined to identify the appropriate Oracle Clusterware home on each node.
Detailed Node and Instance Addition and Deletion Procedures
10-8 Oracle Clusterware and RAC Administration and Deployment Guide
2. Depending on whether you have a shared or non-shared Oracle Clusterware home, complete one of the following two procedures:
■ For shared homes, do not perform a de-install operation. Instead, perform a detach home operation on the node that you are deleting. To do this, run the following command from CRS_home/oui/bin:
./runInstaller -detachHome ORACLE_HOME=CRS_home
■ For a non-shared home, de-install the Oracle Clusterware home from the node that you are deleting using OUI as follows by running the following command from the Oracle_home/oui/bin directory, where CRS_home is the name defined for the Oracle Clusterware home:
./runInstaller -deinstall –silent "REMOVE_HOMES={CRS_home}"
3. Perform step 9 from the previous section about using OUI interactively under the heading "Deleting an Oracle Clusterware Home Using OUI in Interactive Mode" on page 10-6.
Detailed Node and Instance Addition and Deletion ProceduresThis section provides detailed procedures for adding and deleting nodes to clusters. The details of these steps appear in the following sections:
■ Overview of Node Addition Procedures
■ Step 1: Connecting New Nodes to the Cluster
■ Step 2: Extending Clusterware and Oracle Software to New Nodes
■ Step 3: Preparing Storage on New Nodes
■ Step 4: Adding Nodes at the Oracle RAC Database Layer
■ Step 5: Adding Database Instances to New Nodes
■ Adding Nodes that Already Have Clusterware and Oracle Software to a Cluster
■ Overview of Node Deletion Procedures
■ Step 1: Deleting Instances from Real Application Clusters Databases
■ Step 2: Deleting Nodes from Real Application Clusters Databases
■ Step 3: ASM Instance Clean-Up Procedures for Node Deletion
Overview of Node Addition ProceduresThis section explains how to add nodes to clusters using detailed manual procedures. Do this by setting up the new nodes to be part of your cluster at the network level. Then extend the Oracle Clusterware home from an existing Oracle Clusterware home to the new nodes and then extend the Oracle database software with RAC components to the new nodes. Finally, make the new nodes members of the existing RAC database.
Note: Oracle recommends that you back up your voting disk and OCR files after you complete the node deletion process.
Step 1: Connecting New Nodes to the Cluster
Adding and Deleting Nodes and Instances on UNIX-Based Systems 10-9
If the nodes that you are adding to your cluster do not have clusterware or Oracle software installed on them and if you are not using Oracle cloning, then you must complete the following five steps to add nodes. The procedures in these steps assume that you already have an operative UNIX-based RAC environment. The details of these steps appear in the following sections.
■ Step 1: Connecting New Nodes to the Cluster
■ Step 2: Extending Clusterware and Oracle Software to New Nodes
■ Step 3: Preparing Storage on New Nodes
■ Step 4: Adding Nodes at the Oracle RAC Database Layer
■ Step 5: Adding Database Instances to New Nodes
To add a node to your cluster when the node is already configured with clusterware and Oracle software, follow the procedure described in "Adding Nodes that Already Have Clusterware and Oracle Software to a Cluster" on page 10-20.
Step 1: Connecting New Nodes to the ClusterComplete the following procedures to connect the new nodes to the cluster and to prepare them to support your RAC database:
■ Making Physical Connections
■ Installing the Operating System
■ Creating Oracle Users
■ Verifying the Installation with the Cluster Verification Utility
■ Checking the Installation
Making Physical ConnectionsConnect the new nodes' hardware to the network infrastructure of your cluster. This includes establishing electrical connections, configuring network interconnects, configuring shared disk subsystem connections, and so on. Refer to your hardware vendor documentation for details about this step.
Installing the Operating SystemInstall a cloned image of the operating system that matches the operating system on the other nodes in your cluster. This includes installing required service patches and drivers. Refer to your hardware vendor documentation for details about this process.
Note: You can add nodes on some UNIX-based platforms without stopping existing nodes if your clusterware supports this. Refer to your vendor-specific clusterware documentation for more information.
See Also: Your platform-specific Real Application Clusters installation and configuration guide for procedures about using DBCA to create and delete RAC databases
Step 1: Connecting New Nodes to the Cluster
10-10 Oracle Clusterware and RAC Administration and Deployment Guide
Creating Oracle UsersAs root user, create the Oracle users and groups using the same user ID and group ID as on the existing nodes.
Verifying the Installation with the Cluster Verification UtilityVerify your installation using the Cluster Verification Utility (CVU) as in the following steps:
1. From the directory CRS_home/bin on the existing nodes, run the CVU command to verify your installation at the post hardware installation stage as shown in the following example, where node_list is a comma-delimited list of nodes you want in your cluster:
cluvfy stage -post hwos -n node_list|all [-verbose]
This command causes CVU to verify your hardware and operating system environment at the post-hardware setup stage. After you have configured the hardware and operating systems on the new nodes, you can use this command to verify node reachability, for example, to all of the nodes from the local node. You can also use this command to verify user equivalence to all given nodes the local node, node connectivity among all of the given nodes, accessibility to shared storage from all of the given nodes, and so on.
2. From the directory CRS_home/bin on the existing nodes, run the CVU command to obtain a detailed comparison of the properties of the reference node with all of the other nodes that are part of your current cluster environment where ref_node is a node in your existing cluster against which you want CVU to compare, for example, the newly added nodes that you specify with the comma-delimited list in node_list for the -n option, orainventory_group is the name of the Oracle inventory group, and osdba_group is the name of the OSDBA group:
cluvfy comp peer [ -refnode ref_node ] -n node_list [ -orainv orainventory_group ] [ -osdba osdba_group ] [-verbose]
Checking the InstallationTo verify that your installation is configured correctly, perform the following steps:
1. Ensure that the new nodes can access the private interconnect. This interconnect must be properly configured before you can complete the procedures in "Step 2: Extending Clusterware and Oracle Software to New Nodes" on page 10-11.
Note: You can only use the all option with the -n argument if you have set the CV_NODELIST variable to represent the list of nodes on which you want to perform the CVU operation.
See Also: "Using the Cluster Verification Utility" on page A-10 for more information about enabling and using the CVU
Note: For the reference node, select a node from your existing cluster nodes against which you want CVU to compare, for example, the newly added nodes that you specify with the -n option.
Step 2: Extending Clusterware and Oracle Software to New Nodes
Adding and Deleting Nodes and Instances on UNIX-Based Systems 10-11
2. If you are not using a cluster file system, then determine the location on which your cluster software was installed on the existing nodes. Make sure that you have at least 250MB of free space on the same location on each of the new nodes to install Oracle Clusterware. In addition, ensure you have enough free space on each new node to install the Oracle binaries.
3. Ensure that the Oracle Cluster Registry (OCR) and the voting disk are accessible by the new nodes using the same path as the other nodes use. In addition, the OCR and voting disk devices must have the same permissions as on the existing nodes.
4. Verify user equivalence to and from an existing node to the new nodes using rsh or ssh.
After completing the procedures in this section, your new nodes are connected to the cluster and configured with the required software to make them visible to the clusterware. Configure the new nodes as members of the cluster by extending the cluster software to the new nodes as described in "Step 2: Extending Clusterware and Oracle Software to New Nodes" on page 10-11.
Step 2: Extending Clusterware and Oracle Software to New NodesThe following topics describe how to add new nodes to the clusterware and to the Oracle database software layers using OUI:
■ Adding Nodes at the Vendor Clusterware Layer
■ Adding Nodes at the Oracle Clusterware Layer
Adding Nodes at the Vendor Clusterware LayerAdd the new nodes at the clusterware layer according to the vendor clusterware documentation. For systems using shared storage for the Oracle Clusterware home, ensure that the existing clusterware is accessible by the new nodes. Also ensure that the new nodes can be brought online as part of the existing cluster. Proceed to the next section to add the nodes at the clusterware layer.
Adding Nodes at the Oracle Clusterware LayerBefore beginning this procedure, ensure that your existing nodes have the $CRS_HOME environment variable set correctly. The OUI requires access to the private interconnect that you verified as part of the installation validation in Step 1. If OUI cannot make the required connections, then you will not be able to complete the following steps to add nodes.
1. On one of the existing nodes go to the CRS_home/oui/bin directory and run the addNode.sh script to start OUI.
Note: Do not change a hostname after the Oracle Clusterware installation. This includes adding or deleting a domain qualification.
Note: Instead of performing the first six steps of this procedure, you can alternatively run the addNode.sh script in silent mode as described at the end of this section.
Step 2: Extending Clusterware and Oracle Software to New Nodes
10-12 Oracle Clusterware and RAC Administration and Deployment Guide
2. The OUI runs in add node mode and the OUI Welcome page appears. Click Next and the Specify Cluster Nodes for Node Addition page appears.
3. The upper table on the Specify Cluster Nodes for Node Addition page shows the existing nodes, the private node names, and the virtual IP (VIP) addresses that are associated with Oracle Clusterware. Use the lower table to enter the public, private node names and the virtual hostnames of the new nodes.
4. If you are using vendor clusterware, then the public node names automatically appear in the lower table. Click Next and OUI verifies connectivity on the existing nodes and on the new nodes. The verifications that OUI performs include determining whether:
■ The nodes are up
■ The nodes and private node names are accessible by way of the network
■ The virtual hostnames are not already in use on the network.
5. If any verifications fail, then OUI re-displays the Specify Cluster Nodes for Node Addition page with a Status column in both tables indicating errors. Correct the errors or deselect the nodes that have errors and proceed. However, you cannot deselect existing nodes; you must correct problems on nodes that are already part of your cluster before you can proceed with node addition. If all the checks succeed, then OUI displays the Node Addition Summary page.
6. The Node Addition Summary page displays the following information showing the products that are installed in the Oracle Clusterware home that you are extending to the new nodes:
■ The source for the add node process, which in this case is the Oracle Clusterware home
■ The private node names that you entered for the new nodes
■ The new nodes that you entered
■ The required and available space on the new nodes
■ The installed products listing the products that are already installed on the existing Oracle Clusterware home
Click Next and OUI displays the Cluster Node Addition Progress page.
Note: If any of the existing nodes are down, you can proceed with the procedure. However, once the nodes are up, you must run the following command on each of those nodes:
runInstaller -updateNodeList -local "CLUSTER_NODES={available_node_list}" ORACLE_HOME=CRS_home
This operation should be run from the CRS_home/oui/bin directory and the available_node_list values is comma-delimited list of all of nodes currently in the cluster and CRS_home defines the Oracle Clusterware home directory.
Note: Oracle strongly recommends that you install Oracle Clusterware on every node in the cluster on which you have installed vendor clusterware.
Step 2: Extending Clusterware and Oracle Software to New Nodes
Adding and Deleting Nodes and Instances on UNIX-Based Systems 10-13
7. The Cluster Node Addition Progress page shows the status of the cluster node addition process. The table on this page has two columns showing the four phases of the node addition process and the phases' statuses as follows:
■ Instantiate Root Scripts—Instantiates rootaddNode.sh with the public nodes, private node names, and virtual hostnames that you entered on the Cluster Node Addition page.
■ Copy the Oracle Clusterware home to the New Nodes—Copies the Oracle Clusterware home to the new nodes unless the Oracle Clusterware home is on a cluster file system.
■ Save Cluster Inventory—Updates the node list associated with the Oracle Clusterware home and its inventory.
■ Run rootaddNode.sh and root.sh—Displays a dialog prompting you to run the rootaddNode.sh script from the local node (the node on which you are running OUI) and to run the root.sh script on the new nodes. If OUI detects that the new nodes do not have an inventory location, then OUI instructs you to run orainstRoot.sh on those nodes. The central inventory location is the same as that of the local node. The addNodeActionstimestamp.log file, where timestamp shows the session start date and time, contains information about which scripts you need to run and on which nodes you need to run them.
The Cluster Node Addition Progress page's Status column displays In Progress while the phase is in progress, Suspended when the phase is pending execution, and Succeeded after the phase completes. On completion, click Exit to end the OUI session. After OUI displays the End of Node Addition page, click Exit to end the OUI session.
8. Obtain the remote port number, which you will use in the next step, using the following command from the CRS_home/opmn/conf directory:
cat ons.config
9. Run the racgons utility from the bin subdirectory of the Oracle Clusterware home to configure the Oracle Notification Services (ONS) port number. Use the following command, supplying the name of the node that you are adding for new_node_name and the remote port number obtained in the previous step:
racgons add_config new_node_name:remote_port
10. Check that your cluster is integrated and that the cluster is not divided into partitions by completing the following operations:
■ Run the following CVU command to obtain detailed output for verifying cluster manager integrity on all of the nodes that are part of your RAC environment:
cluvfy comp clumgr -n all [-verbose]
■ Use the following CVU command to obtain detailed output for verifying cluster integrity on all of the nodes that are part of your RAC environment:
cluvfy comp clu [-verbose]
■ Use the following command to perform an integrated validation of the Oracle Clusterware setup on all of the configured nodes, both the pre-existing nodes and the nodes that you have added:
cluvfy comp stage -post crinst -n all [-verbose]
Step 3: Preparing Storage on New Nodes
10-14 Oracle Clusterware and RAC Administration and Deployment Guide
You can optionally run addNode.sh in silent mode, replacing steps 1 through 7, as follows where nodeI, nodeI+1, and so on are the new nodes that you are adding:
addNode.sh -silent "CLUSTER_NEW_NODES={nodeI, nodeI+1, … nodeI+n}" "CLUSTER_NEW_PRIVATE_NODE_NAMES={pnI, pnI+1, … pnI+n}" "CLUSTER_NEW_VIRTUAL_HOSTNAMES={vipI, vipI+1,…,vipI+n}"
You can alternatively specify the variable=value entries in a response file and run the addNode script as follows:
addNode.sh -silent -responseFile filename OR addNode.bat -silent -responseFile filename
Run rootaddNode.sh on the local node, or the node on which you are performing this procedure, and run root.sh on the new nodes. If OUI detects that the new nodes do not have an inventory location, then OUI instructs you to run orainstRoot.sh on those nodes. The central inventory location is the same as that of the local node. The addNodeActionstimestamp.log file, where timestamp shows the session start date and time, contains the information about which scripts you need to run and on which nodes you need to run them.
After you have completed the procedures in this section for adding nodes at the Oracle Clusterware layer, you have successfully extended the Oracle Clusterware home from your existing the Oracle Clusterware home to the new nodes. Proceed to "Step 3: Preparing Storage on New Nodes" on page 10-14 to prepare storage for RAC on the new nodes.
Step 3: Preparing Storage on New NodesTo extend an existing RAC database to your new nodes, configure the shared storage for the new instances to be added on new nodes so that the storage type is the same as the storage that is already used by the existing nodes’ instances. Prepare the same type of storage on the new nodes as you are using on the other nodes in the RAC environment that you want to extend as follows:
■ Automatic Storage Management (ASM)
If you are using ASM, then make sure that the new nodes can access the ASM disks with the same permissions as the existing nodes.
■ Oracle Cluster File System (OCFS)
If you are using Oracle Cluster File Systems, then make sure that the new nodes can access the cluster file systems in the same way that the other nodes access them.
■ Vendor Cluster File Systems
See Also: "Using the Cluster Verification Utility" on page A-10 for more information about enabling and using the CVU
See Also: Oracle Universal Installer and OPatch User's Guide for details about how to configure command-line response files
Note: command-line values always override response file values.
Step 3: Preparing Storage on New Nodes
Adding and Deleting Nodes and Instances on UNIX-Based Systems 10-15
If your cluster database uses vendor cluster file systems, then configure the new nodes to use the vendor cluster file systems. Refer to the vendor clusterware documentation for the pre-installation steps for your UNIX platform.
■ Raw Device Storage
If your cluster database uses raw devices, then prepare the new raw devices by following the procedures described in the next section.
Run the following command to verify your cluster file system and obtain detailed output where nodelist includes both the pre-existing nodes and the newly added nodes and file system is the name of the file system that you used for the Oracle Cluster File System:
cluvfy comp cfs -n nodelist -f file system [-verbose]
Raw Device Storage Preparation for New NodesTo prepare raw device storage on the new nodes, you need at least two new disk partitions to accommodate the redo logs for each new instance. Make these disk partitions the same size as the redo log partitions that you configured for the existing nodes' instances. Also create an additional logical partition for the undo tablespace for automatic undo management.
On applicable operating systems, you can create symbolic links to your raw devices. Optionally, you can create a raw device mapping file and set the DBCA_RAW_CONFIG environment variable so that it points to the raw device mapping file. Use your vendor-supplied tools to configure the required raw storage.
Run the following command to verify that the prepared raw device storage is accessible from all of the configured cluster nodes where node_list includes both the pre-existing nodes and the newly added nodes and storageID_list is a comma-delimited list of storage identifiers:
cluvfy comp ssa [ -n node_list ] [ -s storageID_list ] [-verbose]
After completing the procedures in this section, you have configured your shared storage for use by the instances to be added on the new nodes so that the new nodes can access the Oracle software. Additionally, the existing nodes can access the new nodes and instances. Use OUI as described in the procedures in "Step 4: Adding Nodes at the Oracle RAC Database Layer" on page 10-16 to configure the new nodes at the RAC database layer.
See Also: Oracle Database Oracle Clusterware and Oracle Real Application Clusters Installation Guide for Microsoft Windows for more information about the Oracle Cluster File System
See Also: "Using the Cluster Verification Utility" on page A-10 for more information about enabling and using the CVU
See Also: Your platform-specific Real Application Clusters installation and configuration guide for procedures about using DBCA to create and delete RAC databases
See Also: "Using the Cluster Verification Utility" on page A-10 for more information about enabling and using the CVU
Step 4: Adding Nodes at the Oracle RAC Database Layer
10-16 Oracle Clusterware and RAC Administration and Deployment Guide
Step 4: Adding Nodes at the Oracle RAC Database LayerTo add nodes at the Oracle RAC database later, run OUI in add node mode to configure your new nodes. Before beginning this procedure, ensure that your existing nodes have the $ORACLE_HOME environment variable set correctly. If you have multiple Oracle homes, then perform the following steps for each Oracle home that you want to include on the new nodes:
1. On an existing node from the Oracle_home/oui/bin directory, run the addNode.sh script. This starts OUI in add node mode and displays the OUI Welcome page. Click Next on the Welcome page and OUI displays the Specify Cluster Nodes for Node Addition page.
2. The Specify Cluster Nodes for Node Addition page has a table showing the existing nodes associated with the Oracle home from which you launched OUI. A node selection table appears on the bottom of this page showing the nodes that are available for addition. Select the nodes that you want to add and click Next.
3. The OUI verifies connectivity and performs availability checks on the existing nodes and on the nodes that you want to add. Some of checks performed determine whether:
■ The nodes are up
■ The nodes are accessible by way of the network
4. If any of the checks fail, then fix the problem and proceed or deselect the node that has the error and proceed. You cannot deselect existing nodes; you must correct problems on the existing nodes before proceeding with node addition. If all of the checks succeed, then OUI displays the Node Addition Summary page.
5. The Node Addition Summary page has the following information about the products that are installed in the Oracle home that you are going to extend to the new nodes:
■ The source for the add node process, which in this case is the Oracle home
■ The existing nodes and new nodes
■ The new nodes that you selected
■ The required and available space on the new nodes
■ The installed products listing all of the products that are already installed in the existing Oracle home
Note: Instead of performing the first six steps of this procedure, you can alternatively run addNode.sh in silent mode as described at the end of this section.
Note: If any of the existing nodes are down, then perform the updateNodeList procedure on each of the nodes to fix the node list after the nodes are up. Run the following command where node_list is a comma-delimited list of all of the nodes on which RAC is deployed:
oui/bin/runInstaller -updateNodeList "CLUSTER_NODES={node_list}" -local
Step 5: Adding Database Instances to New Nodes
Adding and Deleting Nodes and Instances on UNIX-Based Systems 10-17
Click Finish and OUI displays the Cluster Node Addition Progress page.
6. The Cluster Node Addition Progress page shows the status of the cluster node addition process. The table on this page has two columns showing the four phases of the node addition process and each phases’ status as follows:
■ Copy the Oracle Home to the New Nodes—Copies the entire Oracle home from the local node to the new nodes unless the Oracle home is on a cluster file system
■ Save Cluster Inventory—Updates the node list associated with the Oracle home and its inventory
■ Run root.sh—Displays the dialog prompting you to run root.sh on the new nodes
The Cluster Node Addition Progress page's Status column displays Succeeded if the phase completes, In Progress if the phase is in progress, and Suspended when the phase is pending execution. After OUI displays the End of Node Addition page, click Exit to end the OUI session.
7. Run the root.sh script on all of the new nodes.
The Oracle Clusterware issues the oifcfg command as in the following example:
oifcfg setif -global eth0/146.56.76.0:public eth1/192.0.0.0:cluster_interconnect
This sets both networks to global. Therefore, you do not need to run the oifcfg command manually after you add a node unless the network interfaces differ.
8. Add a Listener to the new node by running the Net Configuration Assistant (NetCA) from new node and selecting only the new node on the Node Selection page.
You can optionally run addNode.sh in silent mode, replacing steps 1 through 6, as follows where nodeI, nodeI+1, and so on are the new nodes that you are adding:
addNode.sh -silent "CLUSTER_NEW_NODES={nodeI, nodeI+1, … nodeI+n}"
You can also specify the variable=value entries in a response file, known as filename, and you can run the addNode script as follows:
addNode.sh -silent -responseFile filename
Command-line values always override response file values.
After completing the procedures in this section, you have defined the new nodes at the cluster database layer. You can now add database instances to the new nodes as described in "Step 5: Adding Database Instances to New Nodes" on page 10-17.
Step 5: Adding Database Instances to New NodesYou can use Enterprise Manager, or the Database Configuration Assistant (DBCA) in either interactive mode or in silent mode, to add database instances to new nodes. Before beginning this procedure, ensure that your existing nodes have the $ORACLE_
See Also: Oracle Universal Installer and OPatch User's Guide for more information about how to configure command-line response files and Oracle Database Net Services Administrator's Guide for more information about NETCA
Step 5: Adding Database Instances to New Nodes
10-18 Oracle Clusterware and RAC Administration and Deployment Guide
HOME environment variable set correctly. Use one of the following procedures to add the database instances to the new nodes:
■ Using Enterprise Manager to Add Database Instances to New Nodes
■ Using DBCA in Interactive Mode to Add Database Instances to New Nodes
■ Using DBCA in Silent Mode to Add Database Instances to New Nodes
Using Enterprise Manager to Add Database Instances to New NodesTo add a database instance to a new node with Enterprise Manager, perform the following procedure:
1. From the Cluster Database Home page, click the Maintenance tab.
2. Under the Deployments section, click Add Instance. This initiates a wizard to guide you through the instance addition process.
3. Perform the following tasks for each wizard step:
■ If the database uses ASM, then provide host and ASM credentials.
■ Specify the hosts for which you want to add instances.
■ Review and submit the job.
After you submit the job, the wizard provides a summary page that shows whether the job succeeded and the wizard also provides other detailed information about the job, such as the elapsed time and an output log.
After adding the instances to the new nodes using the steps described in this section, perform any needed service configuration procedures as described in Chapter 6, "Introduction to Workload Management".
Using DBCA in Interactive Mode to Add Database Instances to New NodesTo add a database instance to a new node with DBCA in interactive mode, perform the following procedure:
1. Start the Database Configuration Assistant (DBCA) by entering dbca at the system prompt from the bin directory in the Oracle_home directory.
The DBCA displays the Welcome page for RAC. Click Help on any DBCA page for additional information.
2. Select Real Application Clusters database, click Next, and DBCA displays the Operations page.
3. Select Instance Management, click Next, and DBCA displays the Instance Management page.
4. Select Add Instance and click Next. The DBCA displays the List of Cluster Databases page that shows the databases and their current status, such as ACTIVE, or INACTIVE.
5. From the List of Cluster Databases page, select the active RAC database to which you want to add an instance. Enter user name and password for the database user that has SYSDBA privileges. Click Next and DBCA displays the List of Cluster Database Instances page showing the names of the existing instances for the RAC database that you selected.
6. Click Next to add a new instance and DBCA displays the Adding an Instance page.
Step 5: Adding Database Instances to New Nodes
Adding and Deleting Nodes and Instances on UNIX-Based Systems 10-19
7. On the Adding an Instance page, enter the instance name in the field at the top of this page if the instance name that DBCA provides does not match your existing instance naming scheme. Then select the new node name from the list, click Next, and DBCA displays the Services Page.
8. Enter the services information for the new node's instance, click Next, and DBCA displays the Instance Storage page.
9. If you are using raw devices or raw partitions, then on the Instance Storage page select the Tablespaces folder and expand it. Select the undo tablespace storage object and a dialog appears on the right-hand side. Change the default datafile name to the raw device name for the tablespace.
10. If you are using raw devices or raw partitions or if you want to change the default redo log group file name, then on the Instance Storage page select and expand the Redo Log Groups folder. For each redo log group number that you select, DBCA displays another dialog box. Enter the raw device name that you created in the section "Raw Device Storage Preparation for New Nodes" on page 10-15 in the File Name field.
11. If you are using a cluster file system, then click Finish on the Instance Storage page. If you are using raw devices, then repeat step 10 for all of the other redo log groups, click Finish, and DBCA displays a Summary dialog.
12. Review the information on the Summary dialog and click OK or click Cancel to end the instance addition operation. The DBCA displays a progress dialog showing DBCA performing the instance addition operation. When DBCA completes the instance addition operation, DBCA displays a dialog asking whether you want to perform another operation.
13. After you terminate your DBCA session, run the following command to verify the administrative privileges on the new node and obtain detailed information about these privileges where nodelist consists of the newly added nodes:
cluvfy comp admprv -o db_config -d oracle_home -n nodelist [-verbose]
After adding the instances to the new nodes using the steps described in this section, perform any needed service configuration procedures as described in Chapter 6, "Introduction to Workload Management".
Using DBCA in Silent Mode to Add Database Instances to New NodesYou can use the Database Configuration Assistant (DBCA) in silent mode to add instances to nodes onto which you have extended an Oracle Clusterware home and an Oracle home. Use the following syntax to perform this operation where node is the node onto which you want to add the instance, gdbname is the global database name, instname is the name of the new instance, sysdba is the name of an Oracle user with SYSDBA privileges, and password is the password for the user name in sysdba:
dbca -silent -addInstance -nodeList node -gdbName gdbname [-instanceName instname] -sysDBAUserName sysdba -sysDBAPassword password
Note that you only need to provide an instance name if you want to override the Oracle naming convention for RAC instance names.
After you have completed either of the DBCA procedures in this section, DBCA has successfully added the new instance to the new node and completed the following steps:
■ Created and started an ASM instance on each new node if the existing instances were using ASM
Adding Nodes that Already Have Clusterware and Oracle Software to a Cluster
10-20 Oracle Clusterware and RAC Administration and Deployment Guide
■ Created a new database instance on each new node
■ Created and configured high availability components
■ Created the Oracle Net configuration
■ Started the new instance
■ Created and started services if you entered services information on the Services Configuration page
After adding the instances to the new nodes using the steps described in this section, perform any needed service configuration procedures as described in Chapter 6, "Introduction to Workload Management".
Adding Nodes that Already Have Clusterware and Oracle Software to a Cluster
Before beginning this procedure, ensure that your existing nodes have the $CRS_HOME and $ORACLE_HOME environment variables set correctly. To add nodes to a cluster that already have clusterware and Oracle software installed on them, you must configure the new nodes with the Oracle software that is on the existing nodes of the cluster. To do this, you must run two versions of an OUI process: one for the clusterware and one for the database layer as described in the following procedures:
1. Add new nodes at the Oracle Clusterware layer by running OUI from the Oracle Clusterware home on an existing node, using the following command:
CRS_home/oui/bin/addNode.sh -noCopy
2. Add new nodes at the Oracle software layer by running OUI from the Oracle home as follows:
Oracle_home/oui/bin/addNode.sh -noCopy
In the -noCopy mode, OUI performs all add node operations except for the copying of software to the new nodes.
Overview of Node Deletion ProceduresThis section explains how to delete nodes from clusters using detailed manual procedures. The details of these steps appear in the following sections:
■ Step 1: Deleting Instances from Real Application Clusters Databases
■ Step 2: Deleting Nodes from Real Application Clusters Databases
■ Step 3: ASM Instance Clean-Up Procedures for Node Deletion
Step 1: Deleting Instances from Real Application Clusters DatabasesThe procedures in this section explain how to use Enterprise Manager, or DBCA in interactive or silent mode, to delete an instance from a RAC database.
■ Using Enterprise Manager to Delete Database Instances from Existing Nodes
Note: Oracle recommends that you back up your voting disk and OCR files after you complete the node addition process.

Step 1: Deleting Instances from Real Application Clusters Databases
Adding and Deleting Nodes and Instances on UNIX-Based Systems 10-21
■ Using DBCA in Interactive Mode to Delete Database Instances from Existing Nodes
■ Using DBCA in Silent Mode to Delete Instance from Existing Nodes
Using Enterprise Manager to Delete Database Instances from Existing NodesTo delete an instance with Enterprise Manager from an existing node, perform the following steps:
1. From the Cluster Database Home page, click the Maintenance tab.
2. Under the Deployments section, click Delete Instance. This action initiates a wizard to guide you through the deletion process.
3. Perform the following tasks for each wizard step:
■ If the database uses ASM, then provide host and ASM credentials.
■ Specify hosts from which to delete instances.
■ Review and submit the job.
After you submit the job, the wizard displays a summary page that shows whether the job succeeded. The wizard also provides other detailed information about the job, such as an output log and information about the elapsed time.
Using DBCA in Interactive Mode to Delete Database Instances from Existing NodesTo delete an instance using DBCA in interactive mode, perform the following steps:
1. Start DBCA on a node other than the node that hosts the instance that you want to delete. On the DBCA Welcome page select Oracle Real Application Clusters Database, click Next, and DBCA displays the Operations page.
2. On the DBCA Operations page, select Instance Management, click Next, and DBCA displays the Instance Management page.
3. On the Instance Management page, Select Delete Instance, click Next, and DBCA displays the List of Cluster Databases page.
4. Select a RAC database from which to delete an instance. Enter a user name and password for the database user that has SYSDBA privileges. Click Next and DBCA displays the List of Cluster Database Instances page. The List of Cluster Database Instances page shows the instances that are associated with the RAC database that you selected and the status of each instance.
5. Select an instance to delete and click Finish.
6. If you have services assigned to this instance, then the DBCA Services Management page appears. Use this feature to reassign services from this instance to other instances in the cluster database.
7. Review the information about the instance deletion operation on the Summary page and click OK. Otherwise, click Cancel to cancel the instance deletion operation. If you click OK, then DBCA displays a Confirmation dialog.
8. Click OK on the Confirmation dialog to proceed with the instance deletion operation and DBCA displays a progress dialog showing that DBCA is performing the instance deletion operation. During this operation, DBCA removes the instance and the instance's Oracle Net configuration. When DBCA completes this operation, DBCA displays a dialog asking whether you want to perform another operation.
Step 2: Deleting Nodes from Real Application Clusters Databases
10-22 Oracle Clusterware and RAC Administration and Deployment Guide
9. Click No and exit DBCA or click Yes to perform another operation. If you click Yes, then DBCA displays the Operations page.
Using DBCA in Silent Mode to Delete Instance from Existing NodesUse DBCA to delete a database instance from a node as follows, where the variables are the same as those in the preceding add instance command:
dbca -silent -deleteInstance [-nodeList node] -gdbName gdbname -instanceName instname -sysDBAUserName sysdba -sysDBAPassword password
You only need to provide a node name if you are deleting an instance from a node other than the one on which you are running DBCA.
At this point, you have accomplished the following:
■ De-registered the selected instance from its associated Oracle Net Services listeners
■ Deleted the selected database instance from the instance's configured node
■ Removed the Oracle Net configuration
■ Deleted the Oracle Flexible Architecture directory structure from the instance's configured node.
Step 2: Deleting Nodes from Real Application Clusters DatabasesBefore beginning these procedures, ensure that your existing nodes have the $CRS_HOME and $ORACLE_HOME environment variables set correctly. Use the following procedures to delete nodes from Oracle clusters on UNIX-based systems:
1. If there are instances on the node that you want to delete, then perform the procedures in the section titled "Step 1: Deleting Instances from Real Application Clusters Databases" on page 10-20 before executing these procedures. If you are deleting more than one node, then delete the instances from all the nodes that you are going to delete.
2. If you use ASM, then perform the procedures in the following section, "Step 3: ASM Instance Clean-Up Procedures for Node Deletion" on page 10-25.
3. If this is the Oracle home from which the node-specific listener named LISTENER_nodename runs, then use NETCA to remove this listener. If necessary, re-create this listener in another home.
4. Depending on whether you have a shared or non-shared Oracle home, complete one of the following two procedures:
■ For a shared home, run the following command on each of the nodes that are to be deleted:
runInstaller -detachHome -local ORACLE_HOME=Oracle_home
Note: You can perform some of the steps in this procedure in silent mode as described at the end of this section.
See Also: Oracle Database Net Services Administrator's Guide for more information about NETCA
Step 2: Deleting Nodes from Real Application Clusters Databases
Adding and Deleting Nodes and Instances on UNIX-Based Systems 10-23
■ For a non-shared home, on each node that you are deleting, perform the following two steps:
– Run the following command:
runInstaller -updateNodeList ORACLE_HOME=Oracle_homeCLUSTER_NODES="" –local
The runInstaller command is located in the directory Oracle_home/oui/bin. Using this command does not launch an installer GUI.
– Run OUI from the home and deinstall this home. Make sure that you choose the home to be removed and not just the products under that home.
5. From an existing node, run the following command:
runInstaller -updateNodeList ORACLE_HOME=Oracle_home "CLUSTER_NODES={nodelist}"
where nodelist is a comma-delimited list of nodes that remain in the cluster.
6. Run the following commands to remove node-specific interface configurations where nodename is the name of the node and remote_port is port on the deleted node:
racgons remove_config nodename:remote_portoifcfg delif -node nodename
7. On the node that you are deleting, run the command CRS_home/install/rootdelete.sh to disable the Oracle Clusterware applications that are on the node. Only run this command once and use the nosharedhome argument if you are using a local file system. The default for this command is sharedhome which prevents you from updating the permissions of local files such that they can be removed by the oracle user.
If the ocr.loc file is on a shared file system, then run the command CRS_home/install/rootdelete.sh remote sharedvar. If the ocr.loc file is not on a shared file system, then run the CRS_home/install/rootdelete.sh remote nosharedvar command.
If you are deleting more than one node from your cluster, then repeat this step on each node that you are deleting.
8. Run CRS_home/install/rootdeletenode.sh on any remaining node in the cluster to delete the nodes from the Oracle cluster and to update the Oracle Cluster Registry (OCR). If you are deleting multiple nodes, then run the command CRS_home/install/rootdeletenode.sh node1,node1-number,node2,node2-number,... nodeN,nodeN-number where node1 through nodeN is a list of the nodes that you want to delete, and node1-number through nodeN-number represents the node number. To determine the node number of any node, run the command CRS_home/bin/olsnodes -n. To delete only one node, enter the node name and number of the node that you want to delete with the command CRS_home/install/rootdeletenode.sh node1,node1-number.
9. Depending on whether you have a shared or non-shared Oracle Clusterware home, complete one of the following two procedures:
■ For a shared home, run the following command on each of the nodes that are to be deleted, providing the shared home location for CRS_home:
runInstaller -detachHome -local ORACLE_HOME=CRS_home
Step 2: Deleting Nodes from Real Application Clusters Databases
10-24 Oracle Clusterware and RAC Administration and Deployment Guide
■ For a non-shared home, on each node that you are deleting, perform the following two steps:
– Run the following command:
runInstaller -updateNodeList ORACLE_HOME=CRS_homeCLUSTER_NODES="" –local CRS=true
The runInstaller command is located in the directory CRS_home/oui/bin. Executing this command does not launch an installer GUI.
– Run OUI from the home and deinstall this home. Make sure that you choose the home to be removed and not just the products under that home.
10. From an existing node, run the following command:
runInstaller -updateNodeList ORACLE_HOME=CRS_home "CLUSTER_NODES={nodelist}"
where nodelist is a comma-delimited list of nodes that remain in the cluster.
11. Run the following command to verify that the node is no longer a member of the cluster and to verify that the Oracle Clusterware components have been removed from this node:
cluvfy comp crs -n all [-verbose]
The response from this command should not contain any information about the node that you deleted; the deleted node should no longer have the Oracle Clusterware components on it. This verifies that you have deleted the node from the cluster.
As mentioned earlier in this procedure, you can optionally delete nodes from Real Application Clusters databases in silent mode by completing the following steps:
1. Complete steps 1 through 3 of the procedure described at the start of this section under the heading "Step 2: Deleting Nodes from Real Application Clusters Databases" on page 10-22.
2. Depending on whether you have a shared or non-shared Oracle home, complete one of the following two procedures:
■ For a shared home, run the following command on each of the nodes that are to be deleted:
./runInstaller -detachHome -local ORACLE_HOME=Oracle_home
■ For a non-shared home, on each node that you are deleting, perform the following two steps:
– Run the following command:
runInstaller -updateNodeList ORACLE_HOME=Oracle_homeCLUSTER_NODES="" –local
The runInstaller command is located in the directory Oracle_home/oui/bin. Using this command does not launch an installer GUI.
See Also: "Using the Cluster Verification Utility" on page A-10 for more information about enabling and using the CVU
Step 3: ASM Instance Clean-Up Procedures for Node Deletion
Adding and Deleting Nodes and Instances on UNIX-Based Systems 10-25
– De-install the Oracle home from the node that you are deleting by running the following command from the Oracle_home/oui/bin directory:
./runInstaller -deinstall -silent "REMOVE_HOMES={Oracle_home}"
3. Complete steps 5 through 8 from the procedure described at the start of this section that begins on page 10-22.
4. Depending on whether you have a shared or non-shared Oracle Clusterware home, complete one of the following two procedures:
■ For shared homes, do not perform a de-install operation. Instead, perform a detach home operation on the node that you are deleting. To do this, run the following command from CRS_home/oui/bin:
./runInstaller -detachHome ORACLE_HOME=CRS_home
■ For a non-shared home, on each node that you are deleting, perform the following two steps:
– Run the following command:
runInstaller -updateNodeList ORACLE_HOME=CRS_homeCLUSTER_NODES="" –local CRS=true
The runInstaller command is located in the directory CRS_home/oui/bin. Executing this command does not launch an installer GUI.
– On each node that you are deleting, perform the following step from the CRS_home/oui/bin directory:
./runInstaller -deinstall -silent "REMOVE_HOMES={CRS_home}"
where CRS_home is the name given to the Oracle Clusterware home you are deleting.
5. Complete steps 10 and 11 of the procedure described at the start of this section.
Step 3: ASM Instance Clean-Up Procedures for Node DeletionIf you are using ASM, then perform the following procedure to remove the ASM instances:
1. Stop all of the databases that use the ASM instance that is running from the Oracle home that is on the node that you are deleting.
2. On the node that you are deleting, if this is the Oracle home which from which the ASM instance runs, then remove the ASM configuration by completing the following steps. Run the command srvctl stop asm -n node_name for all of the nodes on which this Oracle home exists. Run the command srvctl remove asm -n node for all nodes on which this Oracle home exists. If there are databases on this node that use ASM, then use DBCA Disk Group Management to create an ASM instance on one of the existing Oracle homes on the node, restart the databases if you stopped them.
3. If you are using a cluster file system for your ASM Oracle home, then ensure that your local node has the $ORACLE_BASE and $ORACLE_HOME environment variables set correctly. Run the following commands from a node other than the node that you are deleting, where node_number is the node number of the node that you are deleting:

Step 3: ASM Instance Clean-Up Procedures for Node Deletion
10-26 Oracle Clusterware and RAC Administration and Deployment Guide
rm -r $ORACLE_BASE/admin/+ASMnode_numberrm -f $ORACLE_HOME/dbs/*ASMnode_number
4. If you are not using a cluster file system for your ASM Oracle home, then run the rm or delete commands mentioned in the previous step on each node on which the Oracle home exists.
Adding and Deleting Nodes and Instances on Windows-Based Systems 11-1
11Adding and Deleting Nodes and Instances on
Windows-Based Systems
This chapter describes how to add and delete nodes and instances in Oracle Real Application Clusters (RAC) databases on Windows-based systems. The preferred method to add nodes and instances to RAC databases is to use the Oracle cloning procedures that are described in the Oracle Universal Installer and OPatch User's Guide. You can also use Enterprise Manager Grid Control to perform cloning operations. Cloning enables you to copy images of Oracle Clusterware and RAC software onto the other nodes that have identical hardware and software. If you do not want to use the cloning process, then you can use the manual procedures that are described in this chapter to add nodes and instances. The topics in this chapter are:
■ Cloning Oracle Clusterware and RAC Software in Grid Environments
■ Quick-Start Node and Database Instance Addition and Deletion Procedures
■ Detailed Node and Database Instance Addition and Deletion Procedures
■ Step 3: ASM Instance Clean-Up Procedures for Node Deletion
Cloning Oracle Clusterware and RAC Software in Grid EnvironmentsThe preferred method for extending your RAC environment is to use the Oracle cloning procedures in the Oracle Universal Installer and OPatch User's Guide. Only use the procedures in this chapter if you choose not to use Oracle cloning.
Note: For all of the add node and delete node procedures, temporary directories such as %TEMP% or C:\Temp should not be shared directories. If your temporary directories are shared, then set your temporary environment variable, such as %TEMP%, to a non-shared location on a local node. In addition, use a directory that exists on all of the nodes.
Note: The entries for CRS_home and Oracle_home as used in this chapter refer to substitutes for either environment variables or full path names for the Oracle Clusterware and Oracle home with RAC respectively.
See Also: "Cloning Oracle Clusterware and RAC Software in Grid Environments" on page 1-11 for a summary about Oracle cloning
Quick-Start Node and Database Instance Addition and Deletion Procedures
11-2 Oracle Clusterware and RAC Administration and Deployment Guide
Quick-Start Node and Database Instance Addition and Deletion Procedures
This section explains node and instance addition and deletion using procedures that are presented in a quick-start format. For node addition, these procedures require that you install the required operating system patches and updates on the new nodes. Then configure the new nodes to be part of your cluster at the network level. Extend the Oracle Clusterware home from an existing Oracle Clusterware home to the new nodes and then extend the Oracle database software with RAC components to the new nodes. Finally, make the new nodes members of the existing RAC database. This section includes the following topics:
■ Adding an Oracle Clusterware Home to a New Node
■ Adding an Oracle Home with RAC to a New Node
■ Deleting an Oracle Home with RAC from an Existing Node
■ Deleting an Oracle Clusterware Home from an Existing Node
Adding an Oracle Clusterware Home to a New NodeUse one of the procedures described in this section to use OUI to add an Oracle Clusterware home to a node that is going to be part of your RAC cluster. These procedures assume that you are adding node2 and that you have already successfully installed Oracle Clusterware on node1 in a non-shared home, where CRS_home represents the successfully installed home.
■ Adding an Oracle Clusterware Home to a New Node Using OUI in Interactive Mode
■ Adding an Oracle Clusterware Home to a New Node Using OUI in Silent Mode
Adding an Oracle Clusterware Home to a New Node Using OUI in Interactive ModeUse the following procedure to add an Oracle Clusterware home to a new node, node2, to your cluster with an interactive OUI session.
1. Go to CRS_home\oui\bin on node1 and run the addnode.bat script.
2. The OUI displays the Node Selection page on which you must specify the node, private node name, and the VIP address for the new node that you are adding and click Next.
3. Verify the contents that OUI displays on the summary page and click Next. This installs the Oracle Clusterware home with RAC on the new node.
Note: For all of the procedures in this chapter, it is very important that you perform each step in the order shown.
See Also: Oracle Database Oracle Clusterware and Oracle Real Application Clusters Installation Guide for Microsoft Windows for procedures about using the Database Configuration Assistant (DBCA) to create and delete RAC databases
Note: Oracle recommends that you back up your voting disk and Oracle Cluster Registry files after you complete any node addition or deletion procedures.
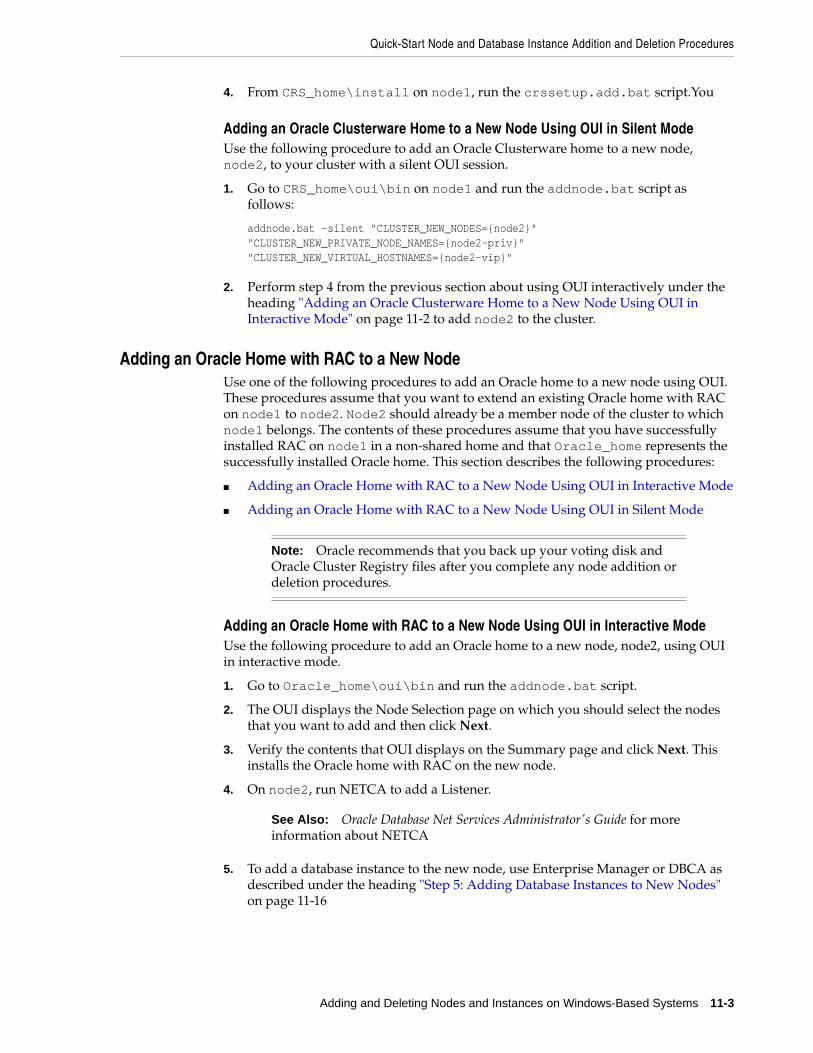
Quick-Start Node and Database Instance Addition and Deletion Procedures
Adding and Deleting Nodes and Instances on Windows-Based Systems 11-3
4. From CRS_home\install on node1, run the crssetup.add.bat script.You
Adding an Oracle Clusterware Home to a New Node Using OUI in Silent ModeUse the following procedure to add an Oracle Clusterware home to a new node, node2, to your cluster with a silent OUI session.
1. Go to CRS_home\oui\bin on node1 and run the addnode.bat script as follows:
addnode.bat –silent "CLUSTER_NEW_NODES={node2}" "CLUSTER_NEW_PRIVATE_NODE_NAMES={node2-priv}" "CLUSTER_NEW_VIRTUAL_HOSTNAMES={node2-vip}"
2. Perform step 4 from the previous section about using OUI interactively under the heading "Adding an Oracle Clusterware Home to a New Node Using OUI in Interactive Mode" on page 11-2 to add node2 to the cluster.
Adding an Oracle Home with RAC to a New NodeUse one of the following procedures to add an Oracle home to a new node using OUI. These procedures assume that you want to extend an existing Oracle home with RAC on node1 to node2. Node2 should already be a member node of the cluster to which node1 belongs. The contents of these procedures assume that you have successfully installed RAC on node1 in a non-shared home and that Oracle_home represents the successfully installed Oracle home. This section describes the following procedures:
■ Adding an Oracle Home with RAC to a New Node Using OUI in Interactive Mode
■ Adding an Oracle Home with RAC to a New Node Using OUI in Silent Mode
Adding an Oracle Home with RAC to a New Node Using OUI in Interactive ModeUse the following procedure to add an Oracle home to a new node, node2, using OUI in interactive mode.
1. Go to Oracle_home\oui\bin and run the addnode.bat script.
2. The OUI displays the Node Selection page on which you should select the nodes that you want to add and then click Next.
3. Verify the contents that OUI displays on the Summary page and click Next. This installs the Oracle home with RAC on the new node.
4. On node2, run NETCA to add a Listener.
5. To add a database instance to the new node, use Enterprise Manager or DBCA as described under the heading "Step 5: Adding Database Instances to New Nodes" on page 11-16
Note: Oracle recommends that you back up your voting disk and Oracle Cluster Registry files after you complete any node addition or deletion procedures.
See Also: Oracle Database Net Services Administrator's Guide for more information about NETCA

Quick-Start Node and Database Instance Addition and Deletion Procedures
11-4 Oracle Clusterware and RAC Administration and Deployment Guide
Adding an Oracle Home with RAC to a New Node Using OUI in Silent ModeUse the following procedure to add an Oracle home to a new node, node2, using OUI in interactive mode.
1. Go to Oracle_home\oui\bin and run the addnode.bat script as follows:
addnode.bat –silent "CLUSTER_NEW_NODES={node2}"
2. Perform steps 4 and 5 from the previous section for using OUI in interactive mode under the heading "Adding an Oracle Home with RAC to a New Node Using OUI in Interactive Mode" on page 11-3 to add the Listener and to create the database instance for the new node.
Deleting an Oracle Home with RAC from an Existing NodeUse the following procedures to delete nodes at the database Oracle home layer on Windows-based systems. These procedures assume that a RAC database home is installed on both node1 and node2 and that you want to delete the database home on node2. Also assume that Oracle_home represents the location of this home on the nodes. The procedures in this section are:
■ Deleting an Oracle Home with RAC Using OUI in Interactive Mode
■ Deleting an Oracle Home with RAC Using OUI in Silent Mode
Deleting an Oracle Home with RAC Using OUI in Interactive ModeUse the following procedures to use OUI to delete an Oracle home:
1. Remove any instances that are on node2 with Enterprise Manager or DBCA as described under the heading "Step 1: Deleting Instances from Real Application Clusters Databases" on page 11-19. Only delete the database instance on node2 that is associated with the Oracle home that you are deleting. Other instances may exist on node2 that you do not want to delete.
2. If you use ASM and this is the home from which the ASM instance runs, then perform the ASM instance clean-up procedures under the heading "Step 3: ASM Instance Clean-Up Procedures for Node Deletion" on page 11-24.
3. If this is the home from which the node-specific listener runs, then use NETCA to remove the listener and its CRS resources. If necessary, re-create this listener in other homes.
4. On the node to be deleted, which in this example is node2, run the following command from Oracle_home\oui\bin:
setup.exe –updateNodeList ORACLE_HOME=Oracle_home "CLUSTER_NODES={node2}" –local
Note: The same steps are applicable for node additions using a shared home.
Note: Oracle recommends that you back up your voting disk and Oracle Cluster Registry files after you complete any node addition or deletion procedures.
See Also: Oracle Database Net Services Administrator's Guide for more information about NETCA
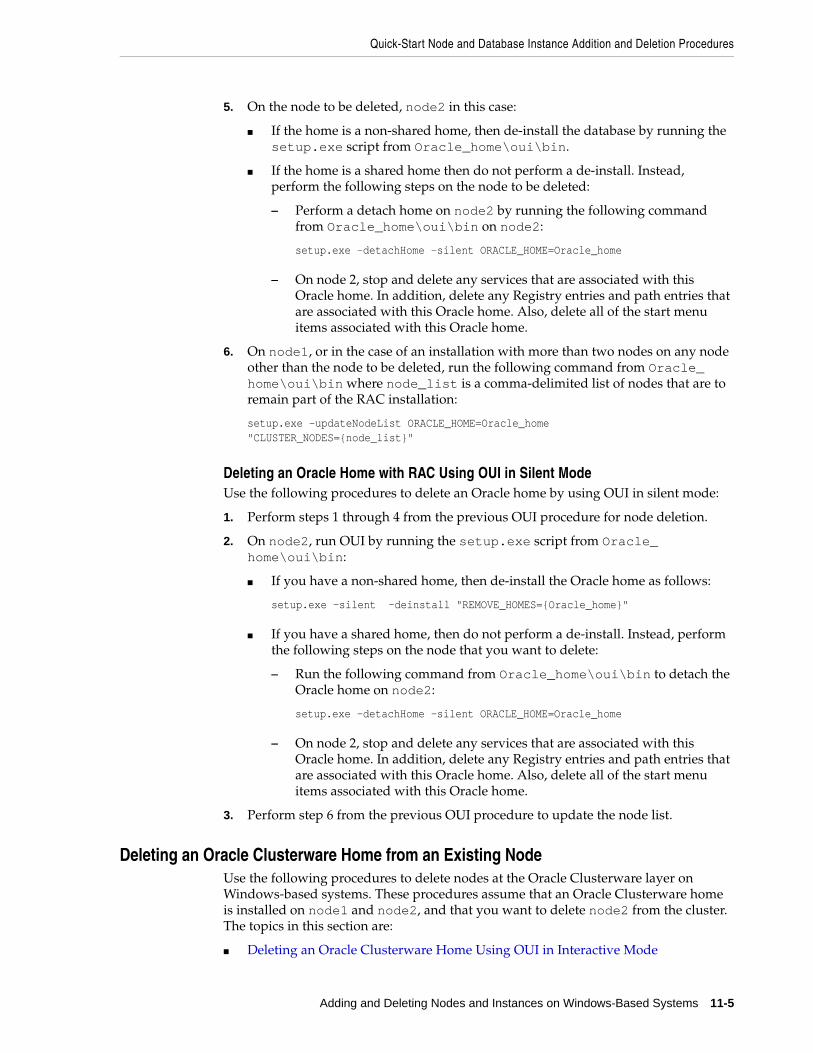
Quick-Start Node and Database Instance Addition and Deletion Procedures
Adding and Deleting Nodes and Instances on Windows-Based Systems 11-5
5. On the node to be deleted, node2 in this case:
■ If the home is a non-shared home, then de-install the database by running the setup.exe script from Oracle_home\oui\bin.
■ If the home is a shared home then do not perform a de-install. Instead, perform the following steps on the node to be deleted:
– Perform a detach home on node2 by running the following command from Oracle_home\oui\bin on node2:
setup.exe –detachHome –silent ORACLE_HOME=Oracle_home
– On node 2, stop and delete any services that are associated with this Oracle home. In addition, delete any Registry entries and path entries that are associated with this Oracle home. Also, delete all of the start menu items associated with this Oracle home.
6. On node1, or in the case of an installation with more than two nodes on any node other than the node to be deleted, run the following command from Oracle_home\oui\bin where node_list is a comma-delimited list of nodes that are to remain part of the RAC installation:
setup.exe –updateNodeList ORACLE_HOME=Oracle_home "CLUSTER_NODES={node_list}"
Deleting an Oracle Home with RAC Using OUI in Silent Mode Use the following procedures to delete an Oracle home by using OUI in silent mode:
1. Perform steps 1 through 4 from the previous OUI procedure for node deletion.
2. On node2, run OUI by running the setup.exe script from Oracle_home\oui\bin:
■ If you have a non-shared home, then de-install the Oracle home as follows:
setup.exe –silent -deinstall "REMOVE_HOMES={Oracle_home}"
■ If you have a shared home, then do not perform a de-install. Instead, perform the following steps on the node that you want to delete:
– Run the following command from Oracle_home\oui\bin to detach the Oracle home on node2:
setup.exe –detachHome –silent ORACLE_HOME=Oracle_home
– On node 2, stop and delete any services that are associated with this Oracle home. In addition, delete any Registry entries and path entries that are associated with this Oracle home. Also, delete all of the start menu items associated with this Oracle home.
3. Perform step 6 from the previous OUI procedure to update the node list.
Deleting an Oracle Clusterware Home from an Existing NodeUse the following procedures to delete nodes at the Oracle Clusterware layer on Windows-based systems. These procedures assume that an Oracle Clusterware home is installed on node1 and node2, and that you want to delete node2 from the cluster. The topics in this section are:
■ Deleting an Oracle Clusterware Home Using OUI in Interactive Mode
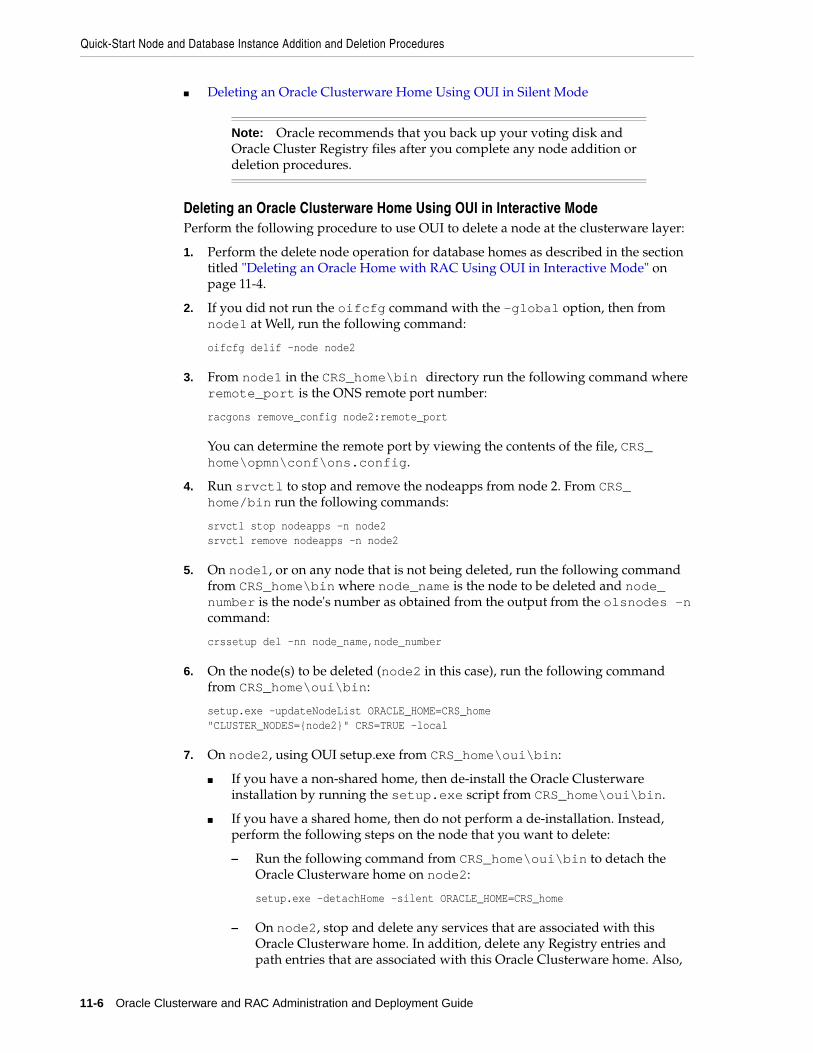
Quick-Start Node and Database Instance Addition and Deletion Procedures
11-6 Oracle Clusterware and RAC Administration and Deployment Guide
■ Deleting an Oracle Clusterware Home Using OUI in Silent Mode
Deleting an Oracle Clusterware Home Using OUI in Interactive ModePerform the following procedure to use OUI to delete a node at the clusterware layer:
1. Perform the delete node operation for database homes as described in the section titled "Deleting an Oracle Home with RAC Using OUI in Interactive Mode" on page 11-4.
2. If you did not run the oifcfg command with the -global option, then from node1 at Well, run the following command:
oifcfg delif –node node2
3. From node1 in the CRS_home\bin directory run the following command where remote_port is the ONS remote port number:
racgons remove_config node2:remote_port
You can determine the remote port by viewing the contents of the file, CRS_home\opmn\conf\ons.config.
4. Run srvctl to stop and remove the nodeapps from node 2. From CRS_home/bin run the following commands:
srvctl stop nodeapps –n node2srvctl remove nodeapps –n node2
5. On node1, or on any node that is not being deleted, run the following command from CRS_home\bin where node_name is the node to be deleted and node_number is the node's number as obtained from the output from the olsnodes -n command:
crssetup del –nn node_name,node_number
6. On the node(s) to be deleted (node2 in this case), run the following command from CRS_home\oui\bin:
setup.exe –updateNodeList ORACLE_HOME=CRS_home "CLUSTER_NODES={node2}" CRS=TRUE –local
7. On node2, using OUI setup.exe from CRS_home\oui\bin:
■ If you have a non-shared home, then de-install the Oracle Clusterware installation by running the setup.exe script from CRS_home\oui\bin.
■ If you have a shared home, then do not perform a de-installation. Instead, perform the following steps on the node that you want to delete:
– Run the following command from CRS_home\oui\bin to detach the Oracle Clusterware home on node2:
setup.exe –detachHome –silent ORACLE_HOME=CRS_home
– On node2, stop and delete any services that are associated with this Oracle Clusterware home. In addition, delete any Registry entries and path entries that are associated with this Oracle Clusterware home. Also,
Note: Oracle recommends that you back up your voting disk and Oracle Cluster Registry files after you complete any node addition or deletion procedures.
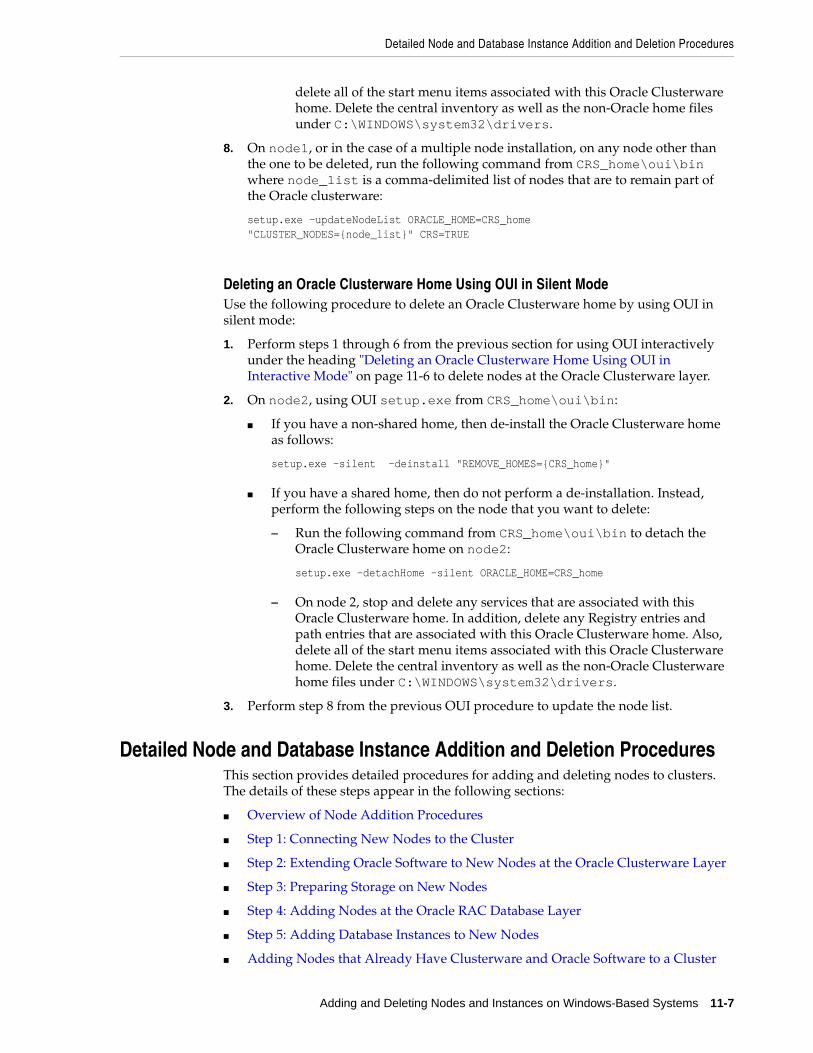
Detailed Node and Database Instance Addition and Deletion Procedures
Adding and Deleting Nodes and Instances on Windows-Based Systems 11-7
delete all of the start menu items associated with this Oracle Clusterware home. Delete the central inventory as well as the non-Oracle home files under C:\WINDOWS\system32\drivers.
8. On node1, or in the case of a multiple node installation, on any node other than the one to be deleted, run the following command from CRS_home\oui\bin where node_list is a comma-delimited list of nodes that are to remain part of the Oracle clusterware:
setup.exe –updateNodeList ORACLE_HOME=CRS_home"CLUSTER_NODES={node_list}" CRS=TRUE
Deleting an Oracle Clusterware Home Using OUI in Silent Mode Use the following procedure to delete an Oracle Clusterware home by using OUI in silent mode:
1. Perform steps 1 through 6 from the previous section for using OUI interactively under the heading "Deleting an Oracle Clusterware Home Using OUI in Interactive Mode" on page 11-6 to delete nodes at the Oracle Clusterware layer.
2. On node2, using OUI setup.exe from CRS_home\oui\bin:
■ If you have a non-shared home, then de-install the Oracle Clusterware home as follows:
setup.exe –silent -deinstall "REMOVE_HOMES={CRS_home}"
■ If you have a shared home, then do not perform a de-installation. Instead, perform the following steps on the node that you want to delete:
– Run the following command from CRS_home\oui\bin to detach the Oracle Clusterware home on node2:
setup.exe –detachHome –silent ORACLE_HOME=CRS_home
– On node 2, stop and delete any services that are associated with this Oracle Clusterware home. In addition, delete any Registry entries and path entries that are associated with this Oracle Clusterware home. Also, delete all of the start menu items associated with this Oracle Clusterware home. Delete the central inventory as well as the non-Oracle Clusterware home files under C:\WINDOWS\system32\drivers.
3. Perform step 8 from the previous OUI procedure to update the node list.
Detailed Node and Database Instance Addition and Deletion ProceduresThis section provides detailed procedures for adding and deleting nodes to clusters. The details of these steps appear in the following sections:
■ Overview of Node Addition Procedures
■ Step 1: Connecting New Nodes to the Cluster
■ Step 2: Extending Oracle Software to New Nodes at the Oracle Clusterware Layer
■ Step 3: Preparing Storage on New Nodes
■ Step 4: Adding Nodes at the Oracle RAC Database Layer
■ Step 5: Adding Database Instances to New Nodes
■ Adding Nodes that Already Have Clusterware and Oracle Software to a Cluster
Overview of Node Addition Procedures
11-8 Oracle Clusterware and RAC Administration and Deployment Guide
■ Overview of Node Deletion Procedures
■ Step 1: Deleting Instances from Real Application Clusters Databases
■ Step 2: Deleting Nodes from Real Application Clusters Databases
■ Step 3: ASM Instance Clean-Up Procedures for Node Deletion
Overview of Node Addition ProceduresThis section explains how to add nodes to clusters using detailed manual procedures. Do this by setting up the new nodes to be part of your cluster at the network level. Then extend the Oracle Clusterware home from an existing Oracle Clusterware home to the new nodes and then extend the Oracle database software with RAC components to the new nodes. Finally, make the new nodes members of the existing RAC database.
If the nodes that you are adding to your cluster do not have Oracle Clusterware or Oracle software installed on them, then complete the following five steps. The procedures in these steps assume that you already have an operative Windows-based RAC environment. The details of these steps appear in the following sections.
■ Step 1: Connecting New Nodes to the Cluster
■ Step 2: Extending Oracle Software to New Nodes at the Oracle Clusterware Layer
■ Step 3: Preparing Storage on New Nodes
■ Step 4: Adding Nodes at the Oracle RAC Database Layer
■ Step 5: Adding Database Instances to New Nodes
To add a node to your cluster when the node is already configured with Oracle Clusterware and Oracle software, follow the procedure described in "Adding Nodes that Already Have Clusterware and Oracle Software to a Cluster" on page 11-19.
Step 1: Connecting New Nodes to the ClusterComplete the following procedures to connect the new nodes to the cluster and to prepare them to support your RAC database:
■ Making Physical Connections
■ Installing the Operating System
■ Verifying the Installation with the Cluster Verification Utility
■ Checking the Installation
Making Physical ConnectionsConnect the new nodes' hardware to the network infrastructure of your cluster. This includes establishing electrical connections, configuring network interconnects,
See Also: Oracle Database Oracle Clusterware and Oracle Real Application Clusters Installation Guide for Microsoft Windows for procedures about using the Database Configuration Assistant (DBCA) to create and delete RAC databases
See Also: Oracle Database Oracle Clusterware and Oracle Real Application Clusters Installation Guide for Microsoft Windows for procedures about using DBCA to create and delete RAC databases
Step 1: Connecting New Nodes to the Cluster
Adding and Deleting Nodes and Instances on Windows-Based Systems 11-9
configuring shared disk subsystem connections, and so on. Refer to your hardware vendor documentation for details about this step.
Installing the Operating SystemAs the Windows Administrator, install a cloned image of the operating system that matches the operating system on the other nodes in your cluster. This includes installing any required service patches and drivers. Refer to your hardware vendor documentation for details about this process.
Verifying the Installation with the Cluster Verification UtilityVerify your installation using the Cluster Verification Utility (CVU) as in the following steps:
1. From the directory CRS_home\bin on the existing nodes, run the CVU command to verify your installation at the post hardware installation stage where node_list is a list of the nodes to include in the CVU operation as shown in the following example:
cluvfy stage -post hwos -n node_list|all [-verbose]
After you have configured the hardware and operating systems on the new nodes, you can use this command to verify node reachability, for example, to all of the nodes from the local node. You can also use this command to verify user equivalence to all given nodes from the local node, node connectivity among all of the given nodes, accessibility to shared storage from all of the given nodes, and so on.
2. From the directory CRS_home\bin on the existing nodes, run the CVU command to obtain a detailed comparison of the properties of the reference node with all of the other nodes that are part of your current cluster environment where node is the node, node_list is a list of the nodes to include, orainventory_group is the name of the Oracle inventory group, and osdba_group is the DBA group name:
cluvfy comp peer [ -refnode node ] -n node_list [-r { 10gR1 | 10gR2 } ] [ -orainv orainventory_group ] [ -osdba osdba_group ] [-verbose]
Checking the InstallationTo verify that your installation is configured correctly, perform the following steps:
Note: You can only use the all option with the -n argument if you have set the CV_NODE_ALL variable to represent the list of nodes on which you want to perform the CVU operation.
See Also: Appendix A, "Troubleshooting" for more information about enabling and using CVU
Note: For the reference node, select a node from your existing cluster nodes against which you want CVU to compare, for example, the newly added nodes that you specify with the -n option.
Step 2: Extending Oracle Software to New Nodes at the Oracle Clusterware Layer
11-10 Oracle Clusterware and RAC Administration and Deployment Guide
1. Ensure that the new nodes can access the private interconnect. This interconnect must be properly configured before you can complete the procedures in "Step 2: Extending Oracle Software to New Nodes at the Oracle Clusterware Layer" on page 11-10.
2. If you are not using a cluster file system, then determine the location on which your cluster software was installed on the existing nodes. Make sure that you have at least 250MB of free space on the same location on each of the new nodes to install Oracle Clusterware. In addition, ensure you have enough free space on each new node to install the Oracle binaries.
3. Ensure that the Oracle Cluster Registry (OCR) and the voting disk are accessible by the new nodes using the same path as the other nodes use. In addition, the OCR and voting disk devices must have the same permissions as on the existing nodes.
4. Ensure that user equivalence is established on the new nodes by performing the following:
■ Make sure that you can run the following command from all of the existing nodes of your cluster where the hostname is the public network name of the new node:
NET USE \\hostname\C$
You have the required administrative privileges on each node if the operating system responds with:
Command completed successfully.
After completing the procedures in this section, your new nodes are connected to the cluster and configured with the required software to make them visible to the clusterware. Configure the new nodes as members of the cluster by extending the cluster software to the new nodes as described in "Step 2: Extending Oracle Software to New Nodes at the Oracle Clusterware Layer" on page 11-10.
Step 2: Extending Oracle Software to New Nodes at the Oracle Clusterware Layer
The following section describes how to add new nodes to Oracle Clusterware and to the Oracle database software layers using OUI. The OUI requires access to the private interconnect that you checked as part of the installation validation in Step 1.
1. On one of the existing nodes go to the CRS home\oui\bin directory and run the addnode.bat script to start OUI.
2. The OUI runs in the add node mode and the OUI Welcome page appears. Click Next and the Specify Cluster Nodes for Node Addition page appears.
3. The upper table on the Specify Cluster Nodes for Node Addition page shows the existing nodes, the private node names and the virtual IP (VIP) addresses that are associated with Oracle Clusterware. Use the lower table to enter the public, private node names and the virtual hostnames of the new nodes.
4. Click Next and OUI verifies connectivity on the existing nodes and on the new nodes. The verifications that OUI performs include determining whether:
Note: Do not change a hostname after the Oracle Clusterware installation. This includes adding or deleting a domain qualification.
Step 2: Extending Oracle Software to New Nodes at the Oracle Clusterware Layer
Adding and Deleting Nodes and Instances on Windows-Based Systems 11-11
■ The nodes are up
■ The nodes are accessible by way of the network
■ The virtual hostnames are not already in use on the network
■ The user has write permission to create the Oracle Clusterware home on the new nodes
■ The user has write permission to the OUI inventory in the C:\Program Files\Oracle\Inventory directory
5. If OUI detects that the new nodes do not have an inventory location, then:
■ The OUI automatically updates the inventory location in the Registry key
If any verifications fail, then OUI re-displays the Specify Cluster Nodes for Node Addition page with a Status column in both tables indicating errors. Correct the errors or deselect the nodes that have errors and proceed. However, you cannot deselect existing nodes; you must correct problems on nodes that are already part of your cluster before you can proceed with node addition. If all of the checks succeed, then OUI displays the Node Addition Summary page.
6. The Node Addition Summary page displays the following information showing the products that are installed in the Oracle Clusterware home that you are extending to the new nodes:
■ The source for the add node process, which in this case is the Oracle Clusterware home
■ The private node names that you entered for the new nodes
■ The new nodes that you entered
■ The required and available space on the new nodes
■ The installed products listing the products that are already installed on the existing the Oracle Clusterware home
Click Next and OUI displays the Cluster Node Addition Progress page.
7. The Cluster Node Addition Progress page shows the status of the cluster node addition process. The table on this page has two columns showing the phase of the node addition process and the phase's status according to the following:
This page shows the following three OUI phases:
■ Copy the Oracle Clusterware Home to New Nodes—Copies the Oracle Clusterware home to the new nodes unless the Oracle Clusterware home is on the Oracle Cluster File System.
Note: If any of the existing nodes are down, then you can proceed with the procedure. However, once the nodes are up, you must run the following command on each of those nodes:
setup.exe -updateNodeList -local "CLUSTER_NODES={available_node_list}"ORACLE_HOME=CRS_home
This operation should be run from the CRS_home\oui\bin directory and the available_node_list value is a comma-delimited list of all of nodes currently in the cluster and CRS_home defines the Oracle Clusterware home directory.
Step 3: Preparing Storage on New Nodes
11-12 Oracle Clusterware and RAC Administration and Deployment Guide
■ Perform Oracle Home Setup—Updates the Registry entries for the new nodes, creates the services, and creates folder entries.
■ Save Cluster Inventory—Updates the node list associated with the Oracle Clusterware home and its inventory.
The Cluster Node Addition Progress page's Status column displays In Progress while the phase is in progress, Suspended when the phase is pending execution, and Succeeded after the phase completes. On completion, click Exit to end the OUI session. After OUI displays the End of Node Addition page, click Exit to end the OUI session.
8. From CRS_home\install on node1, run the crssetup.add.bat script.
9. Use the following command to perform an integrated validation of the Oracle Clusterware setup on all of the configured nodes, both the pre-existing nodes and the nodes that you have added
cluvfy comp stage -post crinst -n all [-verbose]
The CVU -post crinst stage check verifies the integrity of the Oracle Clusterware components. After you have completed the procedures in this section for adding nodes at the Oracle Clusterware layer, you have successfully extended the Oracle Clusterware home from your existing the Oracle Clusterware home to the new nodes. Proceed to Step 3 to prepare the storage for RAC on the new nodes.
You can optionally run addnode.bat in silent mode, replacing steps 1 through 6 as follows, where nodeI, nodeI+1, and so on are the new nodes that you are adding:
addnode.bat -silent "CLUSTER_NEW_NODES={nodeI,nodeI+1,…nodeI+n}""CLUSTER_NEW_PRIVATE_NODE_NAMES={node-privI,node-privI+1,…node-privI+n}" "CLUSTER_NEW_VIRTUAL_HOSTNAMES={node-vipI,node-vipI+1,…,node-vipI+n}"
You can alternatively specify the variable=value entries in a response file and run addnode as follows:
addnode.bat -silent -responseFile filename
Command-line values always override response file values.
Run crssetup.add.bat on the local node, or on the node on which you were performing this procedure.
After you have completed the procedures in this section for adding nodes at the Oracle Clusterware layer, you have successfully extended the Oracle Clusterware home from your existing the Oracle Clusterware home to the new nodes. Proceed to "Step 3: Preparing Storage on New Nodes" on page 11-12 to prepare storage for RAC on the new nodes.
Step 3: Preparing Storage on New NodesTo extend an existing RAC database to your new nodes, configure the shared storage for the new instances to be added on new nodes so that the storage type is the same as the storage that is already used by the existing nodes’ instances. Prepare the same type of storage on the new nodes as you are using on the other nodes in the RAC environment that you want to extend as follows:
■ Automatic Storage Management (ASM)
See Also: Oracle Universal Installer and OPatch User's Guide for details about how to configure command-line response files
Step 3: Preparing Storage on New Nodes
Adding and Deleting Nodes and Instances on Windows-Based Systems 11-13
If you are using ASM, then make sure that the new nodes can access the ASM disks with the same permissions as the existing nodes.
■ Oracle Cluster File System (OCFS)
If you are using Oracle Cluster File Systems, then make sure that the new nodes can access the cluster file systems in the same way that the other nodes access them.
■ Raw Device Storage
If your cluster database uses raw devices, then prepare the new raw devices by following the procedures described in"Raw Device Storage Preparation for New Nodes" on page 11-13.
If you are using Oracle Cluster File System, then run the following command to verify your cluster file system and obtain detailed output where node_list includes both the pre-existing nodes and the newly added nodes:
cluvfy comp ssa -n node_list -s storageID_list [-verbose]
Raw Device Storage Preparation for New NodesTo prepare raw device storage on the new nodes, you need at least two new disk partitions to accommodate the redo logs for each new instance. Make these disk partitions the same size as the redo log partitions that you configured for the existing nodes' instances. Also create an additional logical partition for the undo tablespace for automatic undo management. You can create a raw device mapping file and set the DBCA_RAW_CONFIG environment variable so that it points to the raw device mapping file.
Configure Raw PartitionsPerform the following steps from one of the existing nodes of the cluster:
1. Create or identify an extended partition.
2. Right click inside an unallocated part of the extended partition.
3. Choose Create from the Partition menu. A dialog box appears in which you should enter the size of the partition. Ensure you use the same sizes as those you used on your existing nodes.
4. Click the newly created partition and select Assign Drive Letter from the Tool menu.
5. Select Don't Assign Drive Letter, and click OK.
6. Repeat steps 2 through 5 for the second and any additional partitions.
See Also: Oracle Database Oracle Clusterware and Oracle Real Application Clusters Installation Guide for Microsoft Windows for more information about the Oracle Cluster File System
See Also: Appendix A, "Troubleshooting" for more information about enabling and using the Cluster Verification Utility (CVU)
See Also: Oracle Database Oracle Clusterware and Oracle Real Application Clusters Installation Guide for Microsoft Windows for more information about configuring raw partitions and using raw device mapping files
Step 3: Preparing Storage on New Nodes
11-14 Oracle Clusterware and RAC Administration and Deployment Guide
7. Select Commit Changes Now from the Partition menu to save the new partition information.
8. Enable the new and the existing nodes to recognize all of the partitions on the cluster. To do this, create logical names so that the existing nodes and the new nodes recognize the partitions by following these steps:
a. Start the Object Link Manager (OLM) by entering the following command from the CRS home\bin directory on one of the existing nodes:
GUIOracleOBJManager
b. The OLM starts and automatically detects the logical names of the partitions and displays them in OLM's graphical user interface.
c. Recall the disk and partition numbers for the partitions that you created in the previous section. Look for the disk and partition numbers in the OLM page and perform the following tasks:
– Right-click next to the box under the New Link column and enter the logical name for the first partition.
– Repeat the previous step for the second and any additional partitions.
For example, if your RAC database name is db and your database con-sists of two instances running on two nodes and you are adding a third instance on the third node, then your logical names for your redo logs should be db_redo3_1, db_redo3_2, and so on.
– To enable automatic undo management for a new node's instance, enter the logical name for the partition for the undo tablespace that you created in the previous section. For example, if your RAC database name is db and if it has two instances running on two nodes and you are adding a third instance on a third node, then your logical name for the undo tablespace should be db_undotbs3.
– Select Commit from the Options menu. This creates the new logical names on the current node.
– Select Sync Nodes from the Options menu. This makes the new logical names visible to all of the nodes in the cluster, including the new nodes.
– Select Exit from the Options menu to exit the Object Link Manager.
After completing the procedures in this section, you have configured your cluster storage so that the new nodes can access the Oracle software. Additionally, the existing nodes can access the new nodes and instances.
Run the following command to verify that the prepared raw device storage is accessible from all of the configured cluster nodes where nodelist includes both the pre-existing nodes and the newly added nodes:
cluvfy comp ssa -n node_list -s storageID_list -verbose
Proceed to the next section, "Step 4: Adding Nodes at the Oracle RAC Database Layer" on page 11-15.
See Also: Appendix A, "Troubleshooting" for more information about enabling and using the Cluster Verification Utility (CVU)
Step 4: Adding Nodes at the Oracle RAC Database Layer
Adding and Deleting Nodes and Instances on Windows-Based Systems 11-15
Step 4: Adding Nodes at the Oracle RAC Database LayerTo add nodes at the Oracle RAC database later, run OUI in add node mode to configure your new nodes. If you have multiple Oracle homes, then perform the following steps for each Oracle home that you want to include on the new nodes:
1. On an existing node from the Oracle_home\oui\bin run the addnode.bat script. This starts OUI in the add node mode and displays the OUI Welcome page. Click Next on the Welcome page and OUI displays the Specify Cluster Nodes for Node Addition page.
2. The Specify Cluster Nodes for Node Addition page has a table showing the existing nodes associated with the Oracle home from which you launched OUI. A node selection table appears on the bottom of this page showing the nodes that are available for addition. Select the nodes that you want to add and click Next.
3. The OUI verifies connectivity and performs availability checks on both the existing nodes and on the nodes that you want to add. Some of checks performed determine whether:
■ The nodes are up
■ The nodes are accessible by way of the network
■ The user has write permission to create the Oracle home on the new nodes
■ The user has write permission to the OUI inventory in the C:\Program Files\Oracle\Inventory directory on the existing nodes and on the new nodes
4. If the new nodes do not have an inventory set up, then OUI automatically updates the Registry entries for the inventory location. If any of the other checks fail, then fix the problem and proceed or deselect the node that has the error and proceed. You cannot deselect existing nodes; you must correct any problems on the existing nodes before proceeding with node addition. If all of the checks succeed, then OUI displays the Node Addition Summary page.
5. The Node Addition Summary page has the following information about the products that are installed in the Oracle home that you are going to extend to the new nodes:
■ The source for the add node process, which in this case is the Oracle home
■ The existing nodes and new nodes
■ The new nodes that you selected
■ The required and available space on the new nodes
■ The installed products listing all of the products that are already installed in the existing Oracle home
Click Finish and OUI displays the Cluster Node Addition Progress page.
6. The Cluster Node Addition Progress page shows the status of the cluster node addition process. The table on this page has two columns showing the phase of the node addition process and the phase's status. The Cluster Node Addition Progress shows the following three OUI phases:
■ Copy the Oracle Home To New Nodes—Copies the entire Oracle home to the new nodes unless the Oracle home is on a cluster file system
■ Performs Oracle Home Setup—Updates the Registry entries for the new nodes, creates the services, and creates folder entries
Step 5: Adding Database Instances to New Nodes
11-16 Oracle Clusterware and RAC Administration and Deployment Guide
■ Save Cluster Inventory—Updates the node list associated with the Oracle home and its inventory
The Cluster Node Addition Progress page's Status column displays Succeeded if the phase completes, In Progress if the phase is in progress, and Suspended when the phase is pending execution. After OUI displays the End of Node Addition page, click Exit to end the OUI session.
7. Add a Listener to the new node by running the Net Configuration Assistant (NetCA) from the new node and selecting only the new node on the Node Selection page.
After completing the procedures in this section, you have defined the new nodes at the cluster database layer. You can now add database instances to the new nodes as described in Step 5 on page 11-16.
You can optionally run addnode.bat in silent mode, replacing steps 1 through 6, as follows where nodeI, nodeI+1, and so on are the new nodes that you are adding:
addnode.bat -silent "CLUSTER_NEW_NODES={nodeI,nodeI+1,…nodeI+n}"
The variable=value entries can also be specified in a response file, filename, and addnode can be run as:
addnode.bat -silent -responseFile filename
Command-line values always override response file values. Proceed to the next section, "Step 5: Adding Database Instances to New Nodes" on page 11-16.
Step 5: Adding Database Instances to New NodesYou can use Enterprise Manager, or the Database Configuration Assistant (DBCA) in either interactive mode or in silent mode, to add database instances to new nodes as described under the following headings:
■ Using Enterprise Manager to Add Database Instances to New Nodes
■ Using DBCA in Interactive Mode to Add Database Instances to New Nodes
■ Using DBCA in Silent Mode to Add Database Instances to New Nodes
Using Enterprise Manager to Add Database Instances to New NodesTo add a database instance to a new node with Enterprise Manager, perform the following procedure:
1. From the Cluster Database Home page, click the Maintenance tab.
2. Under the Deployments section, click Add Instance. This initiates a wizard to guide you through the instance addition process.
3. Perform the following tasks for each wizard step:
■ If the database was using ASM, then provide host and ASM credentials.
■ Specify the hosts for which you want to add instances.
See Also: Oracle Universal Installer and OPatch User's Guide for details about how to configure command-line response files
See Also: Oracle Database Net Services Administrator's Guide for more information about NETCA
Step 5: Adding Database Instances to New Nodes
Adding and Deleting Nodes and Instances on Windows-Based Systems 11-17
■ Review and submit the job.
After you submit the job, the wizard provides a summary page that shows whether the job succeeded and the wizard also provides other detailed information about the job, such as the elapsed time and an output log.
After adding the instances to the new nodes using the steps described in this section, perform any needed service configuration procedures as described in Chapter 6, "Introduction to Workload Management".
Using DBCA in Interactive Mode to Add Database Instances to New NodesTo add a database instance to a new node with DBCA in interactive mode, perform the following procedure:
1. Start the Database Configuration Assistant (DBCA) by entering dbca at the system prompt from the bin directory in the Oracle_home directory.
The DBCA displays the Welcome page for RAC. Click Help on any DBCA page for additional information.
2. Select Real Application Clusters database, click Next, and DBCA displays the Operations page.
3. Select Instance Management, click Next, and DBCA displays the Instance Management page.
4. Select Add Instance and click Next. The DBCA displays the List of Cluster Databases page that shows the databases and their current status, such as ACTIVE, or INACTIVE.
5. From the List of Cluster Databases page, select the active RAC database to which you want to add an instance. Enter user name and password for the database user that has SYSDBA privileges. Click Next and DBCA displays the List of Cluster Database Instances page showing the names of the existing instances for the RAC database that you selected.
6. Click Next to add a new instance and DBCA displays the Adding an Instance page.
7. On the Adding an Instance page, enter the instance name in the field at the top of this page if the instance name that DBCA provides does not match your existing instance naming scheme. Then select the new node name from the list, click Next, and DBCA displays the Services Page.
8. Enter the services information for the new node's instance, click Next, and DBCA displays the Instance Storage page.
9. If you are using raw devices or raw partitions, then on the Instance Storage page select the Tablespaces folder and expand it. Select the undo tablespace storage object and a dialog appears on the right-hand side. Change the default datafile name to the raw device name for the tablespace.
10. If you are using raw devices or raw partitions or if you want to change the default redo log group file name, then on the Instance Storage page select and expand the Redo Log Groups folder. For each redo log group number that you select, DBCA displays another dialog box. Enter the raw device name that you created in the section "Raw Device Storage Preparation for New Nodes" on page 11-13 in the File Name field.

Step 5: Adding Database Instances to New Nodes
11-18 Oracle Clusterware and RAC Administration and Deployment Guide
11. If you are using a cluster file system, then click Finish on the Instance Storage page. If you are using raw devices, then repeat step 10 for all of the other redo log groups, click Finish, and DBCA displays a Summary dialog.
12. Review the information on the Summary dialog and click OK or click Cancel to end the instance addition operation. The DBCA displays a progress dialog showing DBCA performing the instance addition operation. When DBCA completes the instance addition operation, DBCA displays a dialog asking whether you want to perform another operation.
13. After you terminate your DBCA session, run the following command to verify the administrative privileges on the new node and obtain detailed information about these privileges where nodelist consists of the newly added nodes:
cluvfy comp admprv -o db_config -d oracle_home -n nodelist [-verbose]
After adding the instances to the new nodes using the steps described in this section, perform any needed service configuration procedures as described in Chapter 6, "Introduction to Workload Management".
Using DBCA in Silent Mode to Add Database Instances to New NodesYou can use the Database Configuration Assistant (DBCA) in silent mode to add instances to nodes onto which you have extended an Oracle Clusterware home and an Oracle home. Use the following syntax to perform this operation where node is the node onto which you want to add the instance, gdbname is the global database name, instname is the name of the new instance, sysdba is the name of an Oracle user with SYSDBA privileges, and password is the password for the user name in sysdba:
dbca -silent -addInstance -nodeList node -gdbName gdbname [-instanceName instname] -sysDBAUserName sysdba -sysDBAPassword password
Note that you only need to provide an instance name if you want to override the Oracle naming convention for RAC instance names.
After you have completed either of DBCA procedures in this section, DBCA has successfully added the new instance to the new node and completed the following steps:
■ Created and started an ASM instance on each new node if the existing instances were using ASM
■ Created a new database instance on each new node
■ Created and configured high availability components
■ Created the Oracle Net configuration
■ Started the new instance
■ Created and started services if you entered services information on the Services Configuration page
After adding the instances to the new nodes using the steps described in this section, perform any needed service configuration procedures as described in Chapter 6, "Introduction to Workload Management".
Connecting to iSQL*Plus after Adding a NodeAfter you add a node to a RAC database on Windows-based systems, you must manually create the following directories in the Oracle_base\Oracle_
Step 1: Deleting Instances from Real Application Clusters Databases
Adding and Deleting Nodes and Instances on Windows-Based Systems 11-19
home\oc4j\j2ee\isqlplus directory before you can run iSQL*Plus on the new node:
■ connectors
■ log
■ persistence
■ tldcache
After you create these directories, you can start iSQL*Plus either by running isqlplusctl start at the command prompt or by starting iSQL*Plus from the Windows Control Panel Services tool. If you try to connect to the iSQL*Plus URL without creating these directories, then you will not be able to connect.
Adding Nodes that Already Have Clusterware and Oracle Software to a Cluster
To add nodes to a cluster when the new nodes already have clusterware and Oracle software installed on them, you must configure the new nodes with the Oracle software that is on the existing nodes of the cluster. To do this, you must run two versions of an OUI process: one for the clusterware and one for the database layer as described in the following procedures:
1. Add new nodes at the Oracle Clusterware layer by running OUI using the following command:
CRS_home\oui\bin\addnode.bat -noCopy
2. Add new nodes at the Oracle software layer by running OUI from the Oracle home as follows:
Oracle_home\oui\bin\addnode.bat -noCopy
In the -noCopy mode, OUI performs all add node operations except for the copying of software to the new nodes.
Overview of Node Deletion ProceduresThis section explains how to delete nodes from clusters using detailed manual procedures. The details of these steps appear in the following sections:
■ Step 1: Deleting Instances from Real Application Clusters Databases
■ Step 2: Deleting Nodes from Real Application Clusters Databases
■ Step 3: ASM Instance Clean-Up Procedures for Node Deletion
Step 1: Deleting Instances from Real Application Clusters DatabasesThe procedures in this section explain how to use Enterprise Manager, or DBCA in interactive or silent mode, to delete an instance from a RAC database.
■ Using Enterprise Manager to Delete Database Instances from Existing Nodes
Note: Oracle recommends that you back up your voting disk and Oracle Cluster Registry files after you complete the node addition process.
Step 1: Deleting Instances from Real Application Clusters Databases
11-20 Oracle Clusterware and RAC Administration and Deployment Guide
■ Using DBCA in Interactive Mode to Delete Database Instances from Existing Nodes
■ Using DBCA in Silent Mode to Delete Instance from Existing Nodes
Using Enterprise Manager to Delete Database Instances from Existing NodesTo delete an instance with Enterprise Manager from an existing node, perform the following steps:
1. From the Cluster Database Home page, click the Maintenance tab.
2. Under the Deployments section, click Delete Instance. This action initiates a wizard to guide you through the deletion process.
3. Perform the following tasks for each wizard step:
■ If the database was using ASM, provide host and ASM credentials.
■ Specify hosts from which to delete instances.
■ Review and submit the job.
After you submit the job, the wizard displays a summary page that shows whether the job succeeded. The wizard also provides other detailed information about the job, such as an output log and information about the elapsed time.
Using DBCA in Interactive Mode to Delete Database Instances from Existing NodesTo delete an instance using DBCA in interactive mode, perform the following steps:
1. Start DBCA on a node other than the node that hosts the instance that you want to delete. On the DBCA Welcome page select Oracle Real Application Clusters Database, click Next, and DBCA displays the Operations page.
2. On the DBCA Operations page, select Instance Management, click Next, and DBCA displays the Instance Management page.
3. On the Instance Management page, Select Delete Instance, click Next, and DBCA displays the List of Cluster Databases page.
4. Select a RAC database from which to delete an instance. Enter a user name and password for the database user that has SYSDBA privileges. Click Next and DBCA displays the List of Cluster Database Instances page. The List of Cluster Database Instances page shows the instances that are associated with the RAC database that you selected and the status of each instance.
5. Select an instance to delete and click Finish.
6. If you have services assigned to this instance, then the DBCA Services Management page appears. Use this feature to reassign services from this instance to other instances in the cluster database.
7. Review the information about the instance deletion operation on the Summary page and click OK. Otherwise, click Cancel to cancel the instance deletion operation. If you click OK, then DBCA displays a Confirmation dialog.
8. Click OK on the Confirmation dialog to proceed with the instance deletion operation and DBCA displays a progress dialog showing that DBCA is performing the instance deletion operation. During this operation, DBCA removes the instance and the instance's Oracle Net configuration. When DBCA completes this operation, DBCA displays a dialog asking whether you want to perform another operation.
Step 2: Deleting Nodes from Real Application Clusters Databases
Adding and Deleting Nodes and Instances on Windows-Based Systems 11-21
9. Click No and exit DBCA or click Yes to perform another operation. If you click Yes, then DBCA displays the Operations page.
Using DBCA in Silent Mode to Delete Instance from Existing NodesUse DBCA to delete a database instance from a node as follows, where the variables are the same as those in the preceding add instance command:
dbca -silent -deleteInstance [-nodeList node] -gdbName gdbname -instanceName instname -sysDBAUserName sysdba -sysDBAPassword password
You only need to provide a node name if you are deleting an instance from a node other than the one on which you are running DBCA.
At this point, you have accomplished the following:
■ De-registered the selected instance from its associated Oracle Net Services listeners
■ Deleted the selected database instance from the instance's configured node
■ Removed the Oracle Net configuration
■ Deleted the Oracle Flexible Architecture directory structure from the instance's configured node.
Step 2: Deleting Nodes from Real Application Clusters DatabasesExecute the following procedures to delete nodes from Oracle clusters on Windows-based systems.
Perform the following steps on a node other than the node that you want to delete:
1. Use the Database Configuration Assistant (DBCA) to delete the instance.
2. Use the Net Configuration Assistant (NETCA) to delete the Listener.
Perform the following steps on the node that you want to delete:
1. If the node that you are deleting has an ASM instance, then delete the ASM instance using the procedures in the following section, "Step 3: ASM Instance Clean-Up Procedures for Node Deletion" on page 11-24.
2. On the that you are deleting, for example, node2, run the following command where location is the full path location of the Oracle home:
setup.exe -updateNodeList ORACLE_HOME=location"CLUSTER_ NODES={node2}"
3. Depending on whether you have a shared or non-shared Oracle home, complete one of the following two procedures:
See Also: Oracle Database Net Services Administrator's Guide for more information about NETCA
Note: You can perform some of the steps in the following procedure in silent mode as described at the end of this section.
Step 2: Deleting Nodes from Real Application Clusters Databases
11-22 Oracle Clusterware and RAC Administration and Deployment Guide
■ For a non-shared home, run OUI from the Oracle home and de-install this home. You can run the setup.exe command from Oracle_home\oui\bin to start OUI so that you can de-install the Oracle home.
■ For a shared home:
– Run the following command from the Oracle_home\oui\bin directory:
setup.exe –detachHome ORACLE_HOME=Oracle_home
– Delete the services associated with this Oracle home.
– Manually update the PATH environment variable by removing the entries associated with the Oracle home that you are removing.
– Manually delete any Start menu folder items associated with the deleted Oracle home.
4. On node1, or in the case of multiple node installations, on any node other than the node that you are deleting, run the following command from Oracle_home\oui\bin where node_list is a comma-delimited list of nodes that are to remain part of the RAC installation:
setup.exe –updateNodeList ORACLE_HOME=Oracle_home"CLUSTER_NODES={node_list}"
5. From CRS_home\bin on any existing node, run the following command where remote_port is the number of the remote port:
racgons remove_config node2:remote_port
You can determine the remote port by viewing the contents of the file, CRS_ home\opmn\conf\ons.config.
6. Run SRVCTL to stop and remove the node applications from node2. From CRS_ home\bin run the following commands:
srvctl stop nodeapps –n node2srvctl remove nodeapps –n node2
7. On node1, or on any node that you are not deleting, run the following command from CRS_home\bin where node_name is the node to be deleted and node_number is the node's number as obtained from the output of the olsnodes -n command:
crssetup del –nn node_name,node_number
8. On the node or nodes that you are deleting, node2 in this example, run the following command from CRS_home\oui\bin:
setup.exe –updateNodeList ORACLE_HOME=CRS_home "CLUSTER_NODES={node2}" CRS=TRUE –local
9. On node2, using OUI setup.exe from CRS_home\oui\bin:
■ If you have a non-shared home, then de-install the Oracle Clusterware installation by running the setup.exe script from CRS_home\oui\bin.
■ If you have a shared home, then do not perform a de-installation. Instead, perform the following steps on the node that you want to delete:
– Run the following command from CRS_home\oui\bin to detach the Oracle Clusterware home on node2:
setup.exe –detachHome ORACLE_HOME=CRS_home

Step 2: Deleting Nodes from Real Application Clusters Databases
Adding and Deleting Nodes and Instances on Windows-Based Systems 11-23
– On node2, stop any services that are associated with this Oracle Clusterware home. The associated service s are namely: OracleCRSService, OracleEVMService, OracleCSService, and OracleClusterVolumeService.
– Remove the Oracle services.
– Manually delete all of the Start menu items associated with this Oracle Clusterware home.
– Manually update the PATH environment variable to remove entries associated with this Clusterware home.
– Then remove the following files under %SystemRoot%\System32\drivers: ocfs.sys, orafencedrv.sys, and orafenceservice.sys.
10. On node1, or in the case of a multiple node installation, on any node other than the one to be deleted, run the following command from CRS_home\oui\bin where node_list is a comma-delimited list of nodes that are to remain part of the RAC database:
setup.exe –updateNodeList ORACLE_HOME=CRS_home"CLUSTER_NODES={node_list}" CRS=TRUE
As mentioned at the beginning of this procedure, you can optionally delete nodes from Real Application Clusters databases in silent mode by completing the following steps:
1. Perform steps 1 and 2 from the previous procedure.
2. On the node to be deleted, node2 in this case:
■ If you have a non-shared home, then de-install the Oracle home as follows:
setup.exe –silent -deinstall "REMOVE_HOMES={Oracle_home}"
■ If the home is a shared home, then do not perform a de-install. Instead, perform the following steps on the node to be deleted:
– Perform a detach home on node2 by running the following command from Oracle_home\oui\bin on node2:
setup.exe –detachHome –silent ORACLE_HOME=Oracle_home
– On node 2, stop and delete any services that are associated with this Oracle home. In addition, delete any Registry entries and path entries that are associated with this Oracle home. Also, delete all of the start menu items associated with this Oracle home.
3. Perform steps 4 through 8 from the previous procedure.
4. On node2, using OUI setup.exe from CRS_home\oui\bin:
■ If you have a non-shared home, then de-install the Oracle Clusterware home as follows:
setup.exe –silent -deinstall "REMOVE_HOMES={CRS_home}"
■ If you have a shared home, then do not perform a de-installation. Instead, perform the following steps on the node that you want to delete:
– Run the following command from CRS_home\oui\bin to detach the Oracle Clusterware home on node2:
Step 3: ASM Instance Clean-Up Procedures for Node Deletion
11-24 Oracle Clusterware and RAC Administration and Deployment Guide
setup.exe –detachHome –silent ORACLE_HOME=CRS_home
– On node2, stop any services that are associated with this Oracle Clusterware home. The associated service s are namely: OracleCRSService, OracleEVMService, OracleCSService, and OracleClusterVolumeService.
– Remove the Oracle services.
– Manually delete all of the Start menu items associated with this Oracle Clusterware home.
– Manually update the PATH environment variable to remove entries associated with this Clusterware home.
– Then remove the following files under %SystemRoot%\System32\drivers: ocfs.sys, orafencedrv.sys, and orafenceservice.sys.
5. Perform step 10 from the previous procedure.
Step 3: ASM Instance Clean-Up Procedures for Node DeletionIf you are using ASM, then the delete node procedure requires the following additional steps to remove the ASM instances:
1. If this is the Oracle home from which the node-specific Listener named LISTENER_nodename runs, then use NETCA to remove this Listener. If necessary, re-create this Listener in another home.
2. If this is the Oracle home from which the ASM instance runs, then remove the ASM configuration by running the following command for all nodes on which this Oracle home exists:
srvctl stop asm -n node
Then run the following command for the nodes that you are removing:
srvctl remove asm -n node
3. Run the following command on each node that you are going to delete that has an ASM instance:
oradim -delete -asmsid +ASMnode_number
4. If you are not using a cluster file system for your ASM Oracle home, then run the following commands on the deleted node:
rd /s /q ORACLE_BASE\admin\+ASMdel Oracle_home\database\*ASM*
Note: Oracle recommends that you back up your voting disk and Oracle Cluster Registry files after you complete the node deletion process.
See Also: Oracle Database Net Services Administrator's Guide for more information about NETCA

Design and Deployment Techniques 12-1
12Design and Deployment Techniques
This chapter briefly describes database design and deployment techniques for Oracle Real Application Clusters (RAC) environments. It also describes general high availability topics such as how Oracle Clusterware manages services within RAC. The topics in this chapter are:
■ Service Configuration Recommendations for High Availability
■ General Database Deployment Topics for Real Application Clusters
Service Configuration Recommendations for High AvailabilityThis section describes the following high availability service configuration recommendations:
■ Service Topologies and Workload Management in Real Application Clusters
■ Recommended Real Application Clusters Service Configurations
■ Automatic Workload Repository
■ Setting Service Levels and Thresholds
Service Topologies and Workload Management in Real Application ClustersServices are the basis for workload management in RAC. Clients and mid-tier applications make connection requests by specifying a global service name. Because RAC can reallocate services among instances in response to planned and unplanned outages, services greatly extend the availability and scalability of RAC environments.
Recommended Real Application Clusters Service ConfigurationsThe recommended service configuration is to uniformly distribute service assignments across all available nodes. This simplifies your configuration and provides optimal high availability. Another approach is to non-uniformly configure services. In other words, workload sharing configurations can resemble many different topologies.
For example, assume that you have a five-node cluster with two instances, A and B, serving as the preferred instances for Customer Relationship Management (CRM). This same cluster could have instances C, D, and E as the preferred instances for Accounts Payable (AP). Instances A and B are the available instances for AP if one or more of AP's preferred instances become unavailable. Instances C, D, and E are the
See Also: Oracle Enterprise Manager Concepts for more information about administering services with Enterprise Manager
Service Configuration Recommendations for High Availability
12-2 Oracle Clusterware and RAC Administration and Deployment Guide
available instances for CRM if one or more of the CRM preferred instances becomes unavailable.
This configuration enables each service to use a group of instances that acts as both the preferred instances and as the instances that are available in case of a failure. After an outage, a client recovers its connections on another instance in the same group.
In this configuration, during normal operations RAC routes application sessions by service to separate groups of instances. If a preferred instance becomes unavailable, then Oracle Clusterware relocates connections among the remaining RAC instances that offer that service.
Workload managed configurations achieve the highest availability and performance by transparently maintaining affinity based on service. Planned and unplanned outages on one domain can be isolated from other domains and the affected service is recovered or upgraded in isolation.
Automatic Workload RepositoryThe Automatic Workload Repository (AWR) tracks service level statistics as metrics. Server generated alerts can be placed on these metrics when they exceed or fail to meet certain thresholds. You can then respond, for example, by changing the priority of a job, stopping overloaded processes, or by modifying a service level requirement. This enables you to maintain continued service availability despite service level changes. You can configure the service level for one service to have priorities relative to other services, and you can also configure:
■ The measurement of service quality
■ Event notification and alert mechanisms to monitor service quality changes
■ Recovery scenarios for responses to service quality changes
The Automatic Workload Repository ensures that the Oracle Clusterware workload management framework and resource manager have persistent and global representations of performance data. This information helps Oracle schedule job classes by service and to assign priorities to consumer groups. If necessary, you can re-balance workloads manually with the DBMS_SERVICE.DISCONNECT_SESSION PL/SQL procedure. You can also use this procedure to disconnect a series of sessions and leave the service running.
Setting Service Levels and ThresholdsEnterprise Manager and local Listeners subscribe to events that indicate changes in service levels. You can set service level metric thresholds with either Enterprise Manager or with Oracle packages.
You can see historical values for metrics in the V$SERVICEMETRIC_HISTORY view. Information about a service from the application level is available in the V$SESSION and V$SQL views. Service levels, or thresholds, are the baseline operational levels, and events indicate violations of these baselines. You can also examine GV$SVCMETRIC for timings such as resource consumption. Use the V$ACTIVE_SERVICES and GV$ACTIVE_SERVICES views to identify which services are running on which instances.
See Also: Oracle Database Performance Tuning Guide for details about the Automatic Workload Repository andOracle Database PL/SQL Packages and Types Reference for details about Oracle packages
General Database Deployment Topics for Real Application Clusters
Design and Deployment Techniques 12-3
How Oracle Clusterware Manages Service RelocationWhen an instance goes offline due to a planned outage or failure, Oracle Clusterware relocates the service to another available instances and re-establishes the connection without service interruption. This occurs as long as the underlying service components on which the relocation relies are enabled for relocation and restart.
General Database Deployment Topics for Real Application ClustersThis section describes a few topics to consider when deploying RAC databases. Your RAC database performance is not compromised if you do not employ these techniques. If you have an effective single-instance design, then your application will run well on a RAC database. This section contains the following topics:
■ Tablespace Use in Real Application Clusters
■ Object Creation and Performance in Real Application Clusters
■ Node Addition and Deletion and the SYSAUX Tablespace in Real Application Clusters
■ Distributed Transactions and Real Application Clusters
Tablespace Use in Real Application ClustersIn addition to using locally managed tablespaces, you can further simplify space administration by using automatic segment-space management and automatic undo management.
Automatic segment-space management distributes instance workloads among each instance's subset of blocks for inserts. This improves RAC performance because it minimizes block transfers. To deploy automatic undo management in a RAC environment, each instance must have its own undo tablespace.
Object Creation and Performance in Real Application Clusters As a general rule, only use DDL statements for maintenance tasks and avoid executing DDL statements during peak system operation periods. In most systems, the amount of new object creation and other DDL statements should be limited. Just as in single-instance Oracle databases, excessive object creation and deletion can increase performance overhead.
Node Addition and Deletion and the SYSAUX Tablespace in Real Application ClustersIf you add nodes to your RAC database environment, then you may need to increase the size of the SYSAUX tablespace. Conversely, if you remove nodes from your cluster database, then you may be able to reduce the size of your SYSAUX tablespace.
See Also: Chapter 6, "Introduction to Workload Management" for more information about how to configure services in RAC environments
See Also: our Oracle Real Application Clusters installation and configuration guide for guidelines about sizing the SYSAUX tablespace for multiple instances.
General Database Deployment Topics for Real Application Clusters
12-4 Oracle Clusterware and RAC Administration and Deployment Guide
Distributed Transactions and Real Application ClustersWhen you use Oracle Distributed Transaction Processing (DTP) in RAC, which includes both XA and distributed SQL transactions, all tightly coupled branches of a distributed transaction must be hosted on the same instance. To ensure this, create multiple DTP services, with one or more on each RAC instance. Each DTP service is a singleton service that is available on one and only one RAC instance. All access to the database server for distributed transaction processing must be done by way of the DTP services. Ensure that all of the branches of a single global distributed transaction use the same DTP service. In other words, a network connection descriptor, such as a TNS name, a JDBC URL, and so on, must use a DTP service to support distributed transaction processing.
See Also: "Services and Distributed Transaction Processing in RAC" on page 6-16 for more details about enabling services and distributed transactions and Oracle Database Application Developer's Guide - Fundamentals for more information about distributed transactions in RAC

Monitoring Performance 13-1
13Monitoring Performance
This chapter describes how to monitor Oracle Real Application Clusters (RAC) performance. This chapter explains how to verify the interconnect settings, how to use the performance views for RAC, and descriptions of RAC-specific statistics and how to monitor them. This chapter describes Automatic Workload Repository (AWR), how to analyze RAC statistics, and how to analyze RAC wait events. This chapter also explains how to monitor performance in RAC databases with Enterprise Manager. This chapter contains these topics:
■ Overview of Monitoring Real Application Clusters Databases
■ Verifying the Interconnect Settings for Real Application Clusters
■ Performance Views in Real Application Clusters
■ Real Application Clusters Performance Statistics
■ Automatic Workload Repository in Real Application Clusters Environments
■ Monitoring Real Application Clusters Statistics and Events
■ Monitoring Performance with Oracle Enterprise Manager
Overview of Monitoring Real Application Clusters DatabasesAll single-instance tuning practices for Oracle Database apply to applications running on RAC databases. Therefore, implement the single-instance tuning methodologies described in Oracle Database Performance Tuning Guide.
Verifying the Interconnect Settings for Real Application ClustersThe interconnect and internode communication protocols can affect Cache Fusion performance. In addition, the interconnect bandwidth, its latency, and the efficiency of the IPC protocol determine the speed with which Cache Fusion processes block transfers.
Influencing Interconnect ProcessingOnce your interconnect is operative, you cannot significantly influence its performance. However, you can influence an interconnect protocol's efficiency by adjusting the IPC buffer sizes.
The Oracle Cluster Registry (OCR) stores your system’s interconnect information. Use the oifcfg command or OCRDUMP utility to identify the interconnect that you are using. You can then change the interconnect that you are using by running an oifcfg command.
Performance Views in Real Application Clusters
13-2 Oracle Clusterware and RAC Administration and Deployment Guide
Although you rarely need to set the CLUSTER_INTERCONNECTS parameter, you can use it to assign a private network IP address or NIC as in the following example:
CLUSTER_INTERCONNECTS=10.0.0.1
If you are using an operating system-specific vendor IPC protocol, then the trace information may not reveal the IP address.
Performance Views in Real Application ClustersEach instance has a set of instance-specific views. You can also query global dynamic performance views to retrieve performance information from all of the qualified instances. Global dynamic performance view names are prefixed with GV$. A global view contains all columns from its respective instance-specific view as well as the INST_ID column. The instance number is also appended to the names of the archived redo log threads to create a unique identifier for each instance's archived redo logs.
Creating Real Application Clusters Data Dictionary Views with CATCLUST.SQLIf you did not create your RAC database with the Database Configuration Assistant (DBCA), then you must run the CATCLUST.SQL script to create RAC-related views and tables. You must have SYSDBA privileges to run this script.
Real Application Clusters Performance StatisticsThis section provides an overview of the V$ and GV$ views that provide statistics that you can use evaluate block transfers in your cluster. Use these statistics to analyze interconnect block transfer rates as well as the overall performance of your RAC database.
The Content of Real Application Clusters StatisticsRAC-specific statistics appear as message request counters or as timed statistics. Message request counters include statistics showing the number of certain types of block mode conversions. Timed statistics reveal the total or average time waited for read and write I/O for particular types of operations.
See Also: Your vendor-specific interconnect documentation for more information about adjusting IPC buffer sizes
Note: You can also use the oifcfg command as described in "Administering System and Network Interfaces with OIFCFG" on page 9-7 to assign private network or private IP addresses.
See Also: Oracle Database Reference for restrictions on GV$ views and complete descriptions of related parameters and views
See Also: our Oracle Real Application Clusters installation and configuration guide for more information about creating your RAC database
Monitoring Real Application Clusters Statistics and Events
Monitoring Performance 13-3
Automatic Workload Repository in Real Application Clusters Environments
In RAC environments, each Automatic Workload Repository (AWR) snapshot captures data from all active instances within the cluster. The data for each snapshot set that is captured for all active instances is from the same point in time. In addition, the data for each instance is stored separately and is identified with an instance identifier. For example, the buffer_busy_wait statistic shows the number of buffer waits on each instance. AWR does not store data that is aggregated from across the entire cluster. In other words, the data is stored for each individual instance.
Monitoring Real Application Clusters Statistics and EventsThis section explains wait events and statistics specific to RAC and how to interpret them when assessing performance data generated by the Automatic Workload Repository, Statspack, or by ad-hoc queries of the dynamic performance views.
RAC Statistics and Events in AWR and Statspack ReportsThe statistics snapshots generated by AWR and Statspack can be evaluated by producing reports displaying summary data such as load and cluster profiles based on regular statistics and wait events gathered on each instance.
Most of the relevant data is summarized on the RAC Statistics Page. This information includes:
■ Global cache load profile
■ Global cache efficiency percentages—workload characteristics
■ Global cache and Enqueue Service (GES)—messaging statistics
Additional RAC-related sections appear later in the report:
■ Global enqueue statistics
■ Global CR statistics
■ Global CURRENT served statistics
■ Global cache transfer statistics.
Real Application Clusters Wait EventsAnalyzing and interpreting what sessions are waiting for is an important method to determine where time is spent. In RAC, the wait time is attributed to an event which reflects the exact outcome of a request. For example, when a session on an instance is looking for a block in the global cache, it does not know whether it will receive the data cached by another instance or whether it will receive a message to read from disk. The wait events for the global cache now convey precise information and waiting for global cache blocks or messages is:
■ Summarized in a broader category called Cluster Wait Class
■ Temporarily represented by a placeholder event which is active while waiting for a block, for example:
See Also: Oracle Database Performance Tuning Guide for more information about wait event analysis and the spdoc.txt file for details about the Statspack utility

Monitoring Real Application Clusters Statistics and Events
13-4 Oracle Clusterware and RAC Administration and Deployment Guide
■ gc current block request
■ gc cr block request
■ Attributed to precise events when the outcome of the request is known, for example:
■ gc current block 3-way
■ gc current block busy
■ gc cr block grant 2-way
In summary, the wait events for RAC convey information valuable for performance analysis. They are used in Automatic Database Diagnostic Monitor (ADDM) to enable precise diagnostics of the impact of cache fusion.
Monitoring Performance by Analyzing GCS and GES StatisticsIn order to determine the amount of work and cost related to inter-instance messaging and contention, examine block transfer rates, remote requests made by each transaction, the number and time waited for global cache events as described under the following headings:
■ Analyzing Cache Fusion Impact in Real Application Clusters
■ Analyzing Performance Using GCS and GES Statistics
Analyzing Cache Fusion Impact in Real Application ClustersThe effect of accessing blocks in the global cache and maintaining coherency is represented by
■ The Global Cache Service statistics for current and cr blocks, for example, gc current blocks received, gc cr blocks received, and so on)
■ The Global Cache Service wait events, for gc current block 3-way, gc cr grant 2-way, and so on.
The response time for cache fusion transfers is determined by the messaging and processing times imposed by the physical interconnect components, the IPC protocol and the GCS protocol. It is not affected by disk I/O factors other than occasional log writes. The cache fusion protocol does not require I/O to data files in order to guarantee cache coherency and RAC inherently does not cause any more I/O to disk than a non-clustered instance.
Analyzing Performance Using GCS and GES StatisticsThis section describes how to monitor Global Cache Service performance by identifying data blocks and objects which are frequently used ("hot") by all instances. High concurrency on certain blocks may be identified by Global Cache Service wait events and times.
The gc current block busy wait event indicates that the access to cached data blocks was delayed because they were busy either in the remote or the local cache. This means that the blocks were pinned or held up by sessions or delayed by a log write on a remote instance or that a session on the same instance is already accessing a block which is in transition between instances and the current session needs to wait behind it (for example, gc current block busy).
The V$SESSION_WAIT view to identify objects and data blocks with contention. The gc wait events contain the file and block number for a block request in p1 and p2, respectively.
Monitoring Real Application Clusters Statistics and Events
Monitoring Performance 13-5
An additional segment statistic, gc buffer busy, has been added to quickly determine the "busy" objects without recourse to the query on V$SESSION_WAIT mentioned earlier.
The AWR infrastructure provides a view of active session history which can also be used to trace recent wait events and their arguments. It is therefore useful for hot block analysis. Most of the reporting facilities used by AWR and Statspack contain the object statistics and cluster wait class category, so that sampling of the views mentioned earlier is largely unnecessary.
It is advisable to run ADDM on the snapshot data collected by the AWR infrastructure to obtain an overall evaluation of the impact of the global cache. The advisory will also identify the busy objects and SQL highest cluster wait time.
Analyzing Cache Fusion Transfer Impact Using GCS StatisticsThis section describes how to monitor Global Cache Service performance by identifying objects read and modified frequently and the service times imposed by the remote access. Waiting for blocks to arrive may constitute a significant portion of the response time, in the same way that reading from disk could increase the block access delays, only that cache fusion transfers in most cases are faster than disk access latencies.
The following wait events indicate that the remotely cached blocks were shipped to the local instance without having been busy, pinned or requiring a log flush:
■ gc current block 2-way
■ gc current block 3-way
■ gc cr block 2-way
■ gc cr block 3-way
The object statistics for gc current blocks received and gc cr blocks received enable quick identification of the indexes and tables which are shared by the active instances. As mentioned earlier, creating an ADDM analysis will, in most cases, point you to the SQL statements and database objects that could be impacted by inter-instance contention.
Any increases in the average wait times for the events mentioned earlier could be caused by the following occurrences:
■ High load: CPU shortages, long run queues, scheduling delays
■ Misconfiguration: using public instead of private interconnect for message and block traffic
If the average wait times are acceptable and no interconnect or load issues can be diagnosed, then the accumulated time waited can usually be attributed to a few SQL statements which need to be tuned to minimize the number of blocks accessed.
The column CLUSTER_WAIT_TIME in V$SQLAREA represents the wait time incurred by individual SQL statements for global cache events and will identify the SQL which may need to be tuned.
Note: You must run Statspack at level 7 to collect statistics related to block contention and segment block waits.

Monitoring Real Application Clusters Statistics and Events
13-6 Oracle Clusterware and RAC Administration and Deployment Guide
Analyzing Response Times Based on Wait EventsMost global cache wait events that show a high total time as reported in the AWR and Statspack reports or in the dynamic performance views are normal and may present themselves as the top database time consumers without actually indicating a problem. This section describes the most important and frequent wait events that you should be aware of when interpreting performance data.
If user response times increases and a high proportion of time waited is for global cache (gc), then the cause should be determined. Most reports include a breakdown of events sorted by percentage of the total time.
It is useful to start with an ADDM report, which would analyze the routinely collected performance statistics with respect to their impact and point to the objects and SQL contributing most to the time waited, and then move on to the more detailed reports produced by AWR and Statspack. The most important wait events for RAC include various categories, such as:
■ Block-oriented
■ gc current block 2-way
■ gc current block 3-way
■ gc cr block 2-way
■ gc cr block 3-way
■ Message-oriented
■ gc current grant 2-way
■ gc cr grant 2-way
■ Contention-oriented
■ gc current block busy
■ gc cr block busy
■ gc buffer busy
■ Load-oriented
■ gc current block congested
■ gc cr block congested
The block-oriented wait event statistics indicate that a block was received as either the result of a 2-way or a 3-way message, that is, the block was sent from either the resource master requiring 1 message and 1 transfer, or was forwarded to a third node from which it was sent, requiring 2 messages and 1 block transfer.
The gc current block busy and gc cr block busy wait events indicate that the remote instance received the block after a remote instance processing delay. In most cases, this is due to a log flush. The existence of these wait events does not necessarily characterize high concurrency for the blocks. High concurrency is instead evidenced by the existence of the gc buffer busy event. This event indicates that the block was pinned or held up by a session on a remote instance. It can also indicate that a session on the same instance has already requested the block, which in either case is in transition between instances and the current session needs to wait behind it.
These events are usually the most frequent in the absence of block contention and the length of the wait is determined by the time it takes on the physical network, the time to process the request in the serving instances and the time it takes for the requesting process to wake up after the block arrives.
Monitoring Performance with Oracle Enterprise Manager
Monitoring Performance 13-7
The average wait time and the total wait time should be considered when being alerted to performance issues where these particular waits have a high impact. Usually, either interconnect or load issues or SQL execution against a large shared working set can be found to be the root cause.
The message-oriented wait event statistics indicate that no block was received because it was not cached in any instance. Instead a global grant was given, enabling the requesting instance to read the block from disk or modify it.
If the time consumed by these events is high, then it may be assumed that the frequently used SQL causes a lot of disk I/O (in the event of the cr grant) or that the workload inserts a lot of data and needs to find and format new blocks frequently (in the event of the current grant).
The contention-oriented wait event statistics indicate that a block was received which was pinned by a session on another node, was deferred because a change had not yet been flushed to disk or because of high concurrency, and therefore could not be shipped immediately. A buffer may also be busy locally when a session has already initiated a cache fusion operation and is waiting for its completion when another session on the same node is trying to read or modify the same data. High service times for blocks exchanged in the global cache may exacerbate the contention, which can be caused by frequent concurrent read and write accesses to the same data.
The load-oriented wait events indicate that a delay in processing has occurred in the GCS, which is usually caused by high load, CPU saturation and would have to be solved by additional CPUs, load-balancing, off loading processing to different times or a new cluster node.For the events mentioned, the wait time encompasses the entire round trip from the time a session starts to wait after initiating a block request until the block arrives.
Monitoring Performance with Oracle Enterprise ManagerOracle Enterprise Manager is an Oracle Web-based integrated management solution for monitoring and administering your computing environment. From any location where you can access a Web browser, you can manage Oracle RAC databases, application servers, host computers, and Web applications, as well as related hardware and software. For example, you can monitor your RAC database performance from your office, home, or a remote site, as long as you have access to a Web browser.
Overview of Enterprise Manager MonitoringYou can install, configure, and monitor a RAC database from a single location using either Oracle Enterprise Manager Database Control or Oracle Enterprise Manager Grid Control as follows:
■ Oracle Enterprise Manager Database Control is designed to manage a single Oracle RAC10g Database with its instance, Listener, host, cluster, and Automatic Storage Management (ASM) targets. The Database Configuration Assistant (DBCA) automatically configures Database Control when you create a database.
■ Oracle Enterprise Manager Grid Control enables you to centrally manage your entire computing enterprise. You can install Grid Control separately onto servers either inside or outside of your cluster to manage multiple RAC databases and multiple cluster targets. Grid Control consists of the Grid Control console and one
See Also: Oracle Enterprise Manager Concepts and the Enterprise Manager Online Help for more information about Enterprise Manager
Monitoring Performance with Oracle Enterprise Manager
13-8 Oracle Clusterware and RAC Administration and Deployment Guide
or more Oracle Management Services, the Oracle Management Repository, and remote Oracle Management Agents installed on each monitored host.
Both Database Control and Grid Control are cluster-aware and provide a central console to manage your cluster database. From the Cluster Database pages, you can:
■ View the overall system status, such as the number of nodes in the cluster database and their current statuses. This high-level view capability means that you do not have to access each individual database instance for details if you just want to see inclusive, aggregated information.
■ View alerts aggregated across all of the instances with drilldowns to the source of each alert. An alert is an indicator that signifies that a particular metric condition has been encountered. A metric is a unit of measurement used to report the system’s conditions.
■ Set thresholds for alert generation on a cluster database-wide basis. Thresholds are values that indicate whether a warning or critical alert should be initiated.
■ Monitor performance metrics aggregated across all of the instances or displayed side by side so you can readily compare instances.
■ Monitor cluster cache coherency statistics to help you identify processing trends and optimize performance for your RAC environment.
■ Perform cluster database-wide operations, including initiating back up and recovery operations, starting and stopping instances, and so on.
Enterprise Manager accumulates data over specified periods of time, called collection-based data. Enterprise Manager also provides current data, known as real-time data. The following sections explain how to monitor both types of data.
Collection-Based MonitoringEnterprise Manager responds to metrics from a RAC database and publishes alerts when thresholds are exceeded. The following sections explain metrics, alerts, and thresholds.
MetricsMetrics are units of measurement used to determine the health of a target. It is through the use of metrics and associated thresholds that Enterprise Manager sends out alerts notifying you of problems with the target. A complete list of all the metrics for a target are available by clicking All Metrics on the target's home page. From the displayed All Metrics page, you can view all of the metrics for the target and then drill down to any particular metric for additional information. Examples of RAC database metric categories are Tablespaces Full, Data Guard Status, and Database Cardinality. Examples of RAC database instance metric categories are Global Cache Statistics, Instance Throughput, and Alert Log.
Enterprise Manager monitors metrics at the database and instance levels, and any available node can monitor database metrics. However, only one node at a time monitors the entire database while each node monitors metrics for its local instance.
AlertsAn alert indicates a potential problem. Either a warning or critical threshold for a monitored metric has been crossed, or the target is no longer available. You can receive critical alerts when a monitored metric has crossed its critical threshold, or warning alerts when a monitored metric has crossed its warning threshold. Also, you can receive alerts on various target availability states, such as when the:
Monitoring Performance with Oracle Enterprise Manager
Monitoring Performance 13-9
■ Target is down
■ Target is blacked out
■ Oracle Management Agent that is monitoring the target is unreachable
An alert can also signal that a warning or critical threshold has been crossed. You can define a response action to be executed if a metric reaches the level for warnings or critical severity alerts once a threshold is crossed.
When you receive an alert, you can use Enterprise Manager to obtain more information to help you decide how to address the issue. For example, using the Warning Alerts page, a message for a target host could state that the CPU Utilization is 93.925667%. From this description, you can decide how to best redistribute the CPU load.
ThresholdsThresholds are boundary values against which monitored metric values are compared. You can specify a warning threshold so that when a monitored metric value crosses that threshold, a warning alert is generated. This alert then notifies you about impending problems that you can address in a timely manner.
If a threshold is exceeded for a metric, then an alert appears on the Cluster Database Home page. You can also copy thresholds from one instance to other instances in Database Control and Grid Control, or you can copy thresholds between different RAC databases in Grid Control. Database Control does not manage multiple RAC databases.
Real-Time Performance MonitoringEnterprise Manager provides performance pages to monitor all levels of a cluster environment, including the cluster, the cluster database, and the cluster database instances. Enterprise Manager uses data from the Automatic Workload Repository (AWR) to display performance information and initiate database alerts. Statistics collected by AWR are aggregated for all instances in a RAC database and displayed on a summary Enterprise Manager Performance page.
Oracle Enterprise Manager provides several real-time performance charts and drilldowns for the targets that you manage. Enterprise Manager displays both aggregate and instance-specific performance statistics using color-coded charts for easier viewing. To help you identify the source of a problem and resolve it, you can click a legend link next to a chart to display a detail page that provides comprehensive information.
The Cluster Database Home page is your entry point for monitoring Enterprise Manager. From that page, you can access the following RAC-specific performance pages that show performance trends across one or more cluster databases:
■ Cluster Database Performance Page
■ Cluster Database Instance Performance Page
■ Cluster Performance Page
The following sections describe each of these pages as well as other related pages.
Using the Cluster Database Performance PageThe Cluster Database Performance page provides a quick glimpse of the performance statistics for a database. Statistics are rolled up across all of the instances in the cluster

Monitoring Performance with Oracle Enterprise Manager
13-10 Oracle Clusterware and RAC Administration and Deployment Guide
database. Using links that are next to the charts at the bottom of the page, you can drill down to:
■ Identify the causes of performance issues
■ Decide whether resources need to be added or redistributed
■ Tune your SQL plan and schema for better optimization
■ Resolve performance issues
Figure 13–1 shows the Cluster Database Performance page that you can access by clicking the Performance tab from the Cluster Database Home page.

Monitoring Performance with Oracle Enterprise Manager
Monitoring Performance 13-11
Figure 13–1 Cluster Database Performance Page
The following sections provide a description for several important charts, performance monitoring pages, and diagnostic pages.
Monitoring Performance with Oracle Enterprise Manager
13-12 Oracle Clusterware and RAC Administration and Deployment Guide
Cluster Host Load Average ChartThe Cluster Host Load Average chart in the Cluster Database Performance page shows potential problems that are outside of the database. The chart shows maximum, average, and minimum values for available hosts for the previous hour. These values appear at the same level for a cluster that has an evenly balanced load. For Windows-based systems, CPU usage is displayed.
If the load average is higher than the average of the total number of CPUs across all of the hosts in the cluster, then too many processes are waiting for CPU resources. SQL statements that are not tuned often cause high CPU usage. Compare the load average values with the values displayed for CPU Used in the Average Active Sessions chart. If the sessions value is low and the load average value is high, then this indicates that something else on the host, other than your database, is consuming the CPU.
Global Cache Block Access Latency ChartThe Global Cache Block Access Latency summary chart in the Cluster Database Performance page shows the end-to-end elapsed time or latency for a block request.
If accessing a database block of any class does not locate a buffered copy in the local cache, a global cache operation is initiated. Before reading a block from disk, an attempt is made to find the block in the buffer cache of another instance. If the block is in another instance, a version of the block may be shipped. Two different types of blocks are distinguished: current and consistent read blocks.
Long latencies can be caused by:
■ A high number of requests caused by SQL statements that are not tuned.
■ A large number of processes in the run queue waiting for CPU or scheduling delays.
■ Platform-specific operating system parameter settings that affect IPC buffering or process scheduling.
■ Slow, busy, or faulty interconnects. In these cases, look for dropped packets, retransmits, or cyclic redundancy check (CRC) errors. Ensure that the network is private and that inter-instance traffic is not routed through a public network. You can access the Cluster Interconnects page from the Cluster Cache Coherency page to monitor the transfer and related statistics for interconnects.
Concurrent read and write activity on shared data in a cluster is a frequently occurring activity. Depending on the service requirements, this activity does not normally cause performance problems. However, when global cache requests cause a performance problem, optimizing SQL plans and the schema to achieve effective local cache hit efficiency and minimize I/O is a successful strategy for performance tuning. If the value for CR and current block request time reaches 10 ms, then your first step in resolving the problem should be to drill down to the Cluster Cache Coherency page for more detailed information.
To access the Cluster Cache Coherency page, click Cluster Cache Coherency in the Additional Monitoring Links section of the Performance page. You can alternatively click either of the legends to the right of the Global Cache Block Access Latency chart. The Cluster Cache Coherency page appears, as shown in Figure 13–2, which contains summary charts for cache coherency metrics for the cluster.
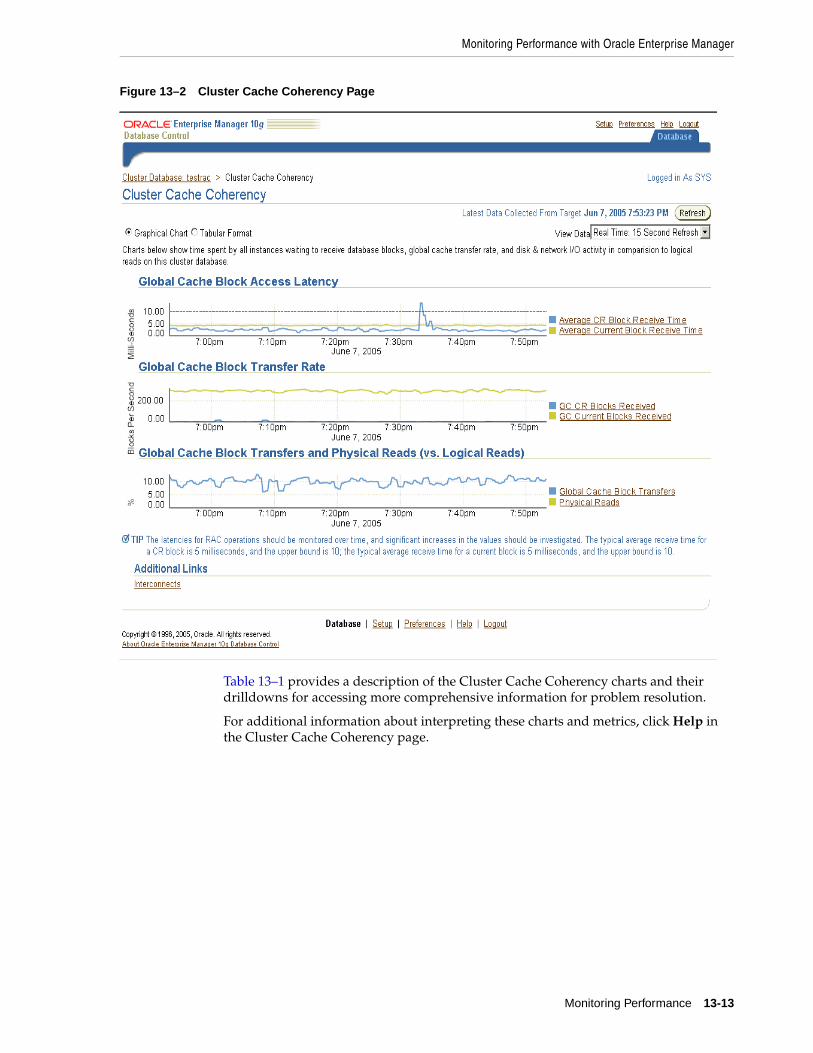
Monitoring Performance with Oracle Enterprise Manager
Monitoring Performance 13-13
Figure 13–2 Cluster Cache Coherency Page
Table 13–1 provides a description of the Cluster Cache Coherency charts and their drilldowns for accessing more comprehensive information for problem resolution.
For additional information about interpreting these charts and metrics, click Help in the Cluster Cache Coherency page.
Monitoring Performance with Oracle Enterprise Manager
13-14 Oracle Clusterware and RAC Administration and Deployment Guide
Average Active Sessions ChartThe Average Active Sessions chart in the Cluster Database Performance page shows potential problems inside the database. Categories, called wait classes, show how much of the database is waiting for a resource, such as CPU or disk I/O. Comparing CPU time to wait time helps to determine how much of the response time is consumed with useful work rather than waiting for resources that are potentially held by other processes.
The chart displays the load on the instance and identifies performance bottlenecks. At the cluster database level, this chart shows the aggregate wait class statistics across all of the instances.
The Session Count is computed by categorizing the time that all active sessions consumed in the last sampling interval into different wait classes, summing the amount in each wait class, and dividing it by the sampling interval. For example, If there are 3 active sessions in the last sampling interval (15 seconds), and each session spent half of the time on CPU (7.5 seconds each) and half of the time idling, then 3 x 7.5 / 15 = 1.5 active sessions on CPU appear for that sampling interval.
Compare the peaks on the Average Active Sessions chart with those on the Database Throughput charts. If the Average Active Sessions chart displays a large number of sessions waiting, indicating internal contention, but throughput is high, then the situation may be acceptable. The database is probably also performing efficiently if internal contention is low but throughput is high. However, if internal contention is high but throughput is low, then consider tuning the database.
The wait class legends beside the Average Active Sessions chart enable you to drill down to instance-level information stored in Active Sessions by Instance pages. These pages show the service times for up to four top instances. From these pages, you can select an instance of interest to see wait events, top SQL, top sessions, top services, top modules, and top actions if you need to diagnose and fix problems causing higher waits in a specific category.
Table 13–1 Cluster Cache Coherency Charts
Name Description
Global Cache Block Access Latency
Shows the end-to-end elapsed time or latency for a block request. Click one of the legends to the right of the chart to go to the Global Cache Block Receive Time by Instance page. From there, you can click an instance legend under the chart to go to the Block Transfer for Local Instance page, where you can identify block classes that are subject to intense global cache activity. You can also view the types of blocks that are being transferred, as well as which instances are transferring most of the blocks.
Cache transfer indicates how many current and CR blocks per block class were received from remote instances, including how many transfers incurred a delay (busy) or an unexpected longer delay (congested).
Global Cache Block Transfer Rate
Shows the total aggregated number of data blocks received by all instances in the cluster by way of an interconnect. Click one of the legends to the right of the chart to go to the Global Cache Blocks Received by Instance page. From there, you can click an instance legend under the chart to go to the Segment Statistics by Instance page, where you can see segments causing cache contention.
Global Cache Block Transfers and Physical Reads
Shows the percentage of logical reads that read data from the buffer cache of other instances by way of Direct Memory Access and from disk. It is essentially a profile of how much work is performed in the local buffer cache, rather than the portion of non-local references that incur some latency overhead. Click the legends to the right of the chart to go to the Global Cache Block Transfers vs. Logical Reads by Instance and Physical Reads vs. Logical Reads by Instance pages. From there, you can click an instance legend under the chart to go to the Segment Statistics by Instance page, where you can see segments causing cache contention.

Monitoring Performance with Oracle Enterprise Manager
Monitoring Performance 13-15
Database Throughput ChartsThe Database Throughput charts summarize any contentions that appear in the Average Active Sessions chart, and also show how much work the database is performing on behalf of the user. The Per Second view is for databases that handle SQL queries, shown as Physical Reads in the bottom chart. The Per Transaction view is for databases that handle transactions, shown as Transactions in the top chart and Redo Size in the bottom chart. Logons show how many users are logged onto the database per second.
You can also obtain information at the instance level by clicking one of the legends to the right of the charts to access the Database Throughput by Instance page. This page shows the breakdown for all active instances of the rolled-up Database Throughput chart on the Cluster Database Performance page. You can use this page to view the throughput for a particular instance, which may help you diagnose throughput problems.
You can drill down further to see the sessions of an instance consuming the greatest resources. Click an instance name legend just under the chart to go to the Top Sessions page. For more information on this page, see "Top Sessions Page" on page 13-15.
Top Consumers PageThe Top Consumers page provides access to several tabs that enable you to view real-time or collection-based data for the top database consumers (top services, top modules, top clients, and top actions) of system resources. You can access the Top Consumers page by clicking the Top Consumers link in the Additional Monitoring Links section of the Cluster Database Performance page.
By default, the Top Consumers page initially displays the Overview tab, which shows aggregated summary data for all top consumers. For instance-level information about a consumer, click the portion of a chart representing the consumer or click the link under the chart for that consumer. The page that appears shows the running instances that are serving the consumer. You can expand the names in the Module column to show data for individual instances.
Top Sessions PageThe Top Sessions page shows a real-time summary list of sessions based on aggregated data. You can see which sessions have consumed the greatest amount of system resources and then decide whether you want to stop the sessions. You can access the Top Sessions page by clicking the Top Sessions link in the Additional Monitoring Links section of the Cluster Database Performance page.
The summary list shows sessions for all instances. You can narrow the display to a particular instance by clicking the name in the Instance Name column. When you click the name, the Top Sessions page for the database instance appears and lists only sessions that are applicable to that instance.
You can see session details for a user by clicking a number assigned to the user name in the SID (Session ID) column. The Session Details page displays complete information about all aspects of a particular session.
Instance Activity PageThe Instance Activity page enables you to view instance activity for several metrics within general metric categories, such as cursors, transactions, sessions, logical I/O, physical I/O, and net I/O. You can access top sessions statistics for a particular metric by clicking a metric legend under the chart if in Graphic mode, or by clicking a name in the summary table if in Tabular mode. You can also use the Switch Database
Monitoring Performance with Oracle Enterprise Manager
13-16 Oracle Clusterware and RAC Administration and Deployment Guide
Instance drop-down menu to toggle from one database instance to another. You can view data on a per-second or per-transaction basis. You can access this page by clicking the Instance Activity link in the Additional Monitoring Links section at the bottom of the Cluster Database Performance page.
Top Segments PageCollecting and viewing segment-level statistics is an effective method for identifying hot tables or indexes in a database. The Top Segments page enables you to gather segment-level statistics to identify performance problems associated with individual segments. This page is particularly useful for RAC, because it also tracks the number of CR and current blocks received by an object. A high number of current blocks received plus a high number of buffer waits may indicate potential contention.
You can access the Top Segments page by clicking the Top Segments link in the Additional Monitoring Links section. You can view segments for all instances, or use a filter to see segments for a specific instance.
Database Locks PageUse the Database Locks page to determine whether multiple instances are holding locks for the same object. The page shows blocking locks, user locks, or all database locks. You can use this information to stop a session that is unnecessarily locking an object. You can access the Database Locks page by clicking the Database Locks link in the Additional Monitoring Links section.
Using the Cluster Database Instance Performance PageTo access the Cluster Database Instance Performance page, click the Performance tab in the Cluster Database Home page, and then click an instance name at the bottom of the page.
Page CharacteristicsStatistics are rolled up for the instance. You can drill down from links that appear alongside the charts, or at the bottom of the page, to perform the following tasks:
■ Identify the cause of performance issues.
■ Decide whether resources need to be added or redistributed to resolve performance issues.
■ Tune your SQL plan and schema for better optimization.
■ Resolve performance issues.
The Cluster Database Instance Performance page is essentially the same as the Cluster Database Performance page with the following exceptions:
■ This page shows performance data for a single instance, rather than enabling you to access data for all instances in a cluster database.
■ You can access the Top Activity page, which displays all wait classes and related statistics for Active Sessions, Top SQL, Top Sessions, Top Files, and Top Objects for an instance.
■ An Instance Disk I/O chart shows the total requests that represent the rate at which the database instance is issuing read/write requests.
■ You can run Automatic Database Diagnostic Monitor (ADDM) and Active Session History (ASH) reports for an instance.

Monitoring Performance with Oracle Enterprise Manager
Monitoring Performance 13-17
Creating ReportsThe Cluster Database Instance Performance page provides the means for running ADDM and ASH reports.
■ ADDM Report—enables you to create a new AWR snapshot and run ADDM on this and the previous snapshot. After you run ADDM, you can drill down for a detailed performance analysis and report page.
■ ASH Report—enables you to create a performance data report of the database based on session-sampling data over a specified period of time. This report is very useful for diagnosing small (five- to ten-minute) performance spikes that might be averaged out and consequently hidden or minimized by other issues in the 1-hour AWR report.
Using the Cluster Performance PageTo access the Cluster Performance page, click the Cluster link in the General section of the Cluster Database Performance page, and then click the Performance tab from the Cluster Home page.
The Cluster Performance Page displays utilization statistics, such as CPU, Memory, and Disk I/O, during the past hour for all hosts of a cluster, which is part of the greater Enterprise Manager environment. With this information, you can determine whether resources need to be added, suspended, or redistributed.
You can view the CPU, Memory, and Disk I/O charts for each host individually by clicking the host name in the legend to the right of the charts. The resulting Host page also shows statistics for CPU load, memory scan page rate, and longest service time.
Using the Cluster Interconnects PageThe Cluster Interconnects page enables you to monitor the interconnect interfaces, determine configuration issues, and identify transfer rate-related issues including excess traffic. This page helps determine the load added by individual instances and databases on the interconnect. Sometimes you can immediately identify interconnect delays that are due to applications that are outside Oracle Database.
To access this page, click the Cluster link in the General section of the Cluster Database Home page, then click the Interconnects tab. The Cluster Interconnects page appears, as shown in Figure 13–3.
See Also: Oracle Database Performance Tuning Guide for more information about managing and monitoring database instances
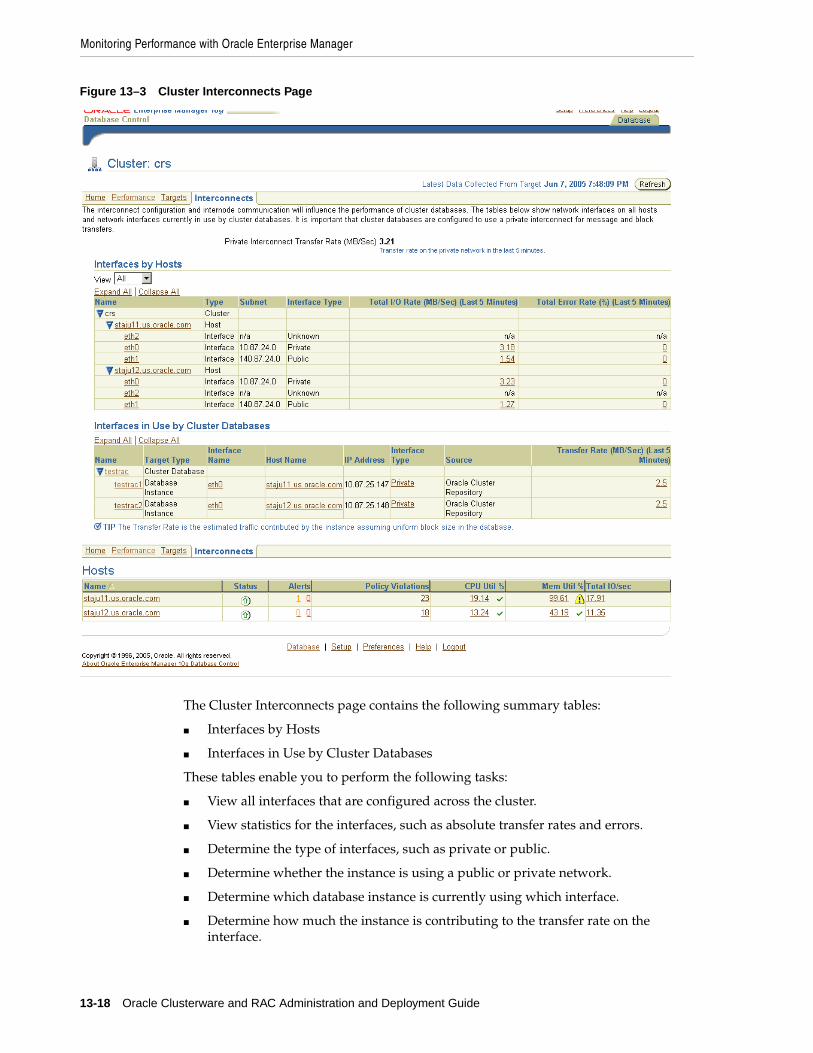
Monitoring Performance with Oracle Enterprise Manager
13-18 Oracle Clusterware and RAC Administration and Deployment Guide
Figure 13–3 Cluster Interconnects Page
The Cluster Interconnects page contains the following summary tables:
■ Interfaces by Hosts
■ Interfaces in Use by Cluster Databases
These tables enable you to perform the following tasks:
■ View all interfaces that are configured across the cluster.
■ View statistics for the interfaces, such as absolute transfer rates and errors.
■ Determine the type of interfaces, such as private or public.
■ Determine whether the instance is using a public or private network.
■ Determine which database instance is currently using which interface.
■ Determine how much the instance is contributing to the transfer rate on the interface.

Monitoring Performance with Oracle Enterprise Manager
Monitoring Performance 13-19
Note: Low transfer rates or an incorrect configuration, such as using the public network instead of the private network for the interconnect, generates metric alerts.

Monitoring Performance with Oracle Enterprise Manager
13-20 Oracle Clusterware and RAC Administration and Deployment Guide

Making Applications Highly Available Using Oracle Clusterware 14-1
14Making Applications Highly Available Using
Oracle Clusterware
This chapter explains how you can extend the high availability of the Oracle Clusterware framework to your applications. You do this by wrapping your applications with Oracle Clusterware commands. That is, you can use the same high availability mechanisms of the Oracle database and Real Application Clusters to make your custom applications highly available. You can use Oracle Clusterware to monitor, relocate, and restart your applications as described in this chapter under the following topics:
■ Overview of Managing Custom Applications with Oracle Clusterware Commands
■ Creating Application Profiles
■ Example of Using Oracle Clusterware Commands to Create Application Resources
■ Oracle Clusterware Action Program Guidelines
■ Using Oracle Clusterware Commands
Overview of Using the Oracle Clusterware Commands to Enable High Availability
The Oracle Clusterware includes a high availability framework that provides an infrastructure to manage any application. The Oracle Clusterware ensures that applications that it manages start when the system starts. The Oracle Clusterware also monitors the applications to make sure that they are always available. For example, if a process fails, then Oracle Clusterware attempts to restart the process based on scripts that you customize. If a node in the cluster fails, then you can program processes that normally run on the failed node to restart on another node. The monitoring frequency,
See Also: Appendix B, "High Availability Oracle Clusterware Command-Line Reference and C API" for detailed information about Oracle Clusterware commands and Appendix C, "Oracle Clusterware Messages" for information about Oracle Clusterware error messages
Note: You can install the Oracle Clusterware high availability Application Programming Interface (API) from the Oracle Database 10g release 10.2 client installation media. As described in this chapter, you can use the API to integrate non-oracle applications with Oracle Clusterware to make them highly available.
Overview of Using the Oracle Clusterware Commands to Enable High Availability
14-2 Oracle Clusterware and RAC Administration and Deployment Guide
starting, and stopping of the applications and the application dependencies are configurable.
To make applications highly available, first create an application profile that identifies your application. The application profile uses a second component, an action program, that describes how Oracle Clusterware should monitor your application and how Oracle Clusterware should respond to changes in your application’s status. Oracle stores application profile attributes in the OCR. The definitions of an application profile, action program, and the other primary Oracle Clusterware high availability components are as follows:
■ Action Program—A program that defines the location of your program, the monitoring frequency, and the start and stop actions that Oracle Clusterware should perform on the application. The start action starts the application, the stop action stops the application, and the monitoring or check action checks the application’s status.
■ Application Profile—An Oracle Clusterware resource file that describes the attributes of your application. An application profile influences your application’s behavior and it identifies other programs or scripts that Oracle Clusterware should run to perform various actions.
■ Privileges—Access and usage privileges that enable Oracle Clusterware to control all of the components of your application for high availability operations, including the right to start processes under other user identities. The Oracle Clusterware must run as a privileged user to control applications with the correct start and stop processes. On UNIX-based platforms, this usually implies that Oracle Clusterware must run as the root user and on Windows-based platforms Oracle Clusterware must run as Administrator.
■ Resource—An entity that Oracle Clusterware manages for high availability such as your application.
■ Resource Dependency—A relationship among resources or applications that implies an operational ordering. For example, during a start operation, parent resources are started before resources that have dependencies. During a stop, the most dependent resources are stopped first.
■ Oracle Cluster Registry (OCR)—A mechanism that stores configuration information that Oracle Clusterware and other RAC manageability systems use. The OCR uses a hierarchical name space for key value pairs. Keys and subkeys have enforced user, group, and other permissions. The OCR is stored either on a shared raw partition or on a non-cached, shared file system file.
■ Template—A user-created text file that contains the default values for application profile attributes. Template files contain default values for profile attributes.
Note: A resource in the Oracle Clusterware context is not the same as a resource in the Oracle database sense, such as "Resource Manager". A resource that Oracle Clusterware uses only refers to application programs.
See Also: Appendix B, "High Availability Oracle Clusterware Command-Line Reference and C API" for more information about using Oracle Clusterware commands to make your applications highly available
Creating Application Profiles
Making Applications Highly Available Using Oracle Clusterware 14-3
Overview of Managing Custom Applications with Oracle Clusterware Commands
You can use the Oracle Clusterware commands to start, stop, relocate, and check the status of your custom applications. Do this by defining your application with an application profile. The profile defines attributes that affect how Oracle Clusterware manages your application. Then register your application information in the OCR using the crs_register command. Use the following steps to create an application profile:
1. Create an application profile by editing an ASCII file or by running the crs_profile command. Refer to Table 14–1 for a listing of required and optional entries for the Oracle Clusterware profiles.
2. Register the application profile using the crs_register command.
3. Run the crs_start command to initiate the application profile and then Oracle Clusterware runs the action program command that you have included in the profile to start your application.
4. The Oracle Clusterware periodically runs the action program command to check an application’s status.
5. In the event of a check or node failure, Oracle Clusterware recovers the applications either by restarting it on the current node or by relocating the application to another node.
6. If you run the crs_stop command to stop the application, then Oracle Clusterware runs the action program command to stop it.
You can manage application availability as follows:
■ Specify starting resources during cluster or node start up
■ Restart applications that fail
■ Relocate applications to other nodes if they cannot run in their current location
Full administrative privileges are not required when using Oracle Clusterware. Any user can create resources or applications. However, the creator or owner must grant permission to other users or user groups in order for others to be able to use Oracle Clusterware on those applications. Additionally, profiles that have privileges defined can only be modified by privileged users. The following sections provide further details about application profiles.
Creating Application ProfilesApplication profiles have attributes that define how Oracle Clusterware starts, manages, and monitors applications. One attribute is the location of the action program that Oracle Clusterware uses to manipulate the application. The Oracle
Note: Do not use the Oracle Clusterware commands crs_register, crs_profile, crs_start or crs_stop on resources with names beginning with the prefix ora unless either Oracle Support asks you to, or unless Oracle has certified you as described in http://metalink.oracle.com. Server Control (SRVCTL) is the correct utility to use on Oracle resources. You can create resources that depend on resources that Oracle has defined. You can also use the Oracle Clusterware commands to inspect the configuration and status.
Creating Application Profiles
14-4 Oracle Clusterware and RAC Administration and Deployment Guide
Clusterware uses the action program to monitor or check the application status and to start and stop it. Oracle reads application profiles from files stored in specified locations and stores the information in the OCR. You use the Oracle Clusterware commands within profiles to designate resource dependencies and to determine what happens to an application or service when it loses access to a resource on which it depends.
The filenames of application profiles must be in the form resource_name.cap where resource_name is the name that you or the system assigns to an application and cap is the file suffix. The Oracle Clusterware commands in profiles refer to applications by name, such as resource_name, but not by the full filename. The following section describes this in more detail.
Application Resource ProfilesAttributes are defined by name=value entries in profile files and these entries can be in any order in the file. The following are some of the primary attributes of an application profile:
■ Resources that are required by an application which are defined by settings for the REQUIRED_RESOURCES parameter. The Oracle Clusterware relocates or stops an application if a required resource becomes unavailable. Required resources are defined for each node.
■ Rules for choosing the node on which to start or restart an application are defined by settings for the PLACEMENT parameter. The application must be accessible by the nodes that you nominate for placement.
■ A list of nodes to use in order of preference when Oracle Clusterware starts or fails over an application which is defined by settings for the HOSTING_MEMBERS parameter. This list is used if the placement policy defined by the PLACEMENT parameter is favored or restricted.
Required and Optional Profile AttributesApplication profiles have optional and required profile attributes. Optional profile attributes may be left unspecified in the profile. Optional profile attributes that have default values are merged at registration time with the values that are stored in the template for that resource type and for the generic template. Default values are derived from the template.
Each resource type has a template file named TYPE_resource_type.cap that is stored in the template subdirectory under the crs directory of the Oracle Clusterware home. A generic template file for values that are used in all types of resources is stored in the same location in the file named TYPE_generic.cap.
Application Profile AttributesTable 14–1 lists the Oracle Clusterware application profile attributes in alphabetical order. For each attribute, the table shows whether the attribute is required, its default value, and an attribute description.
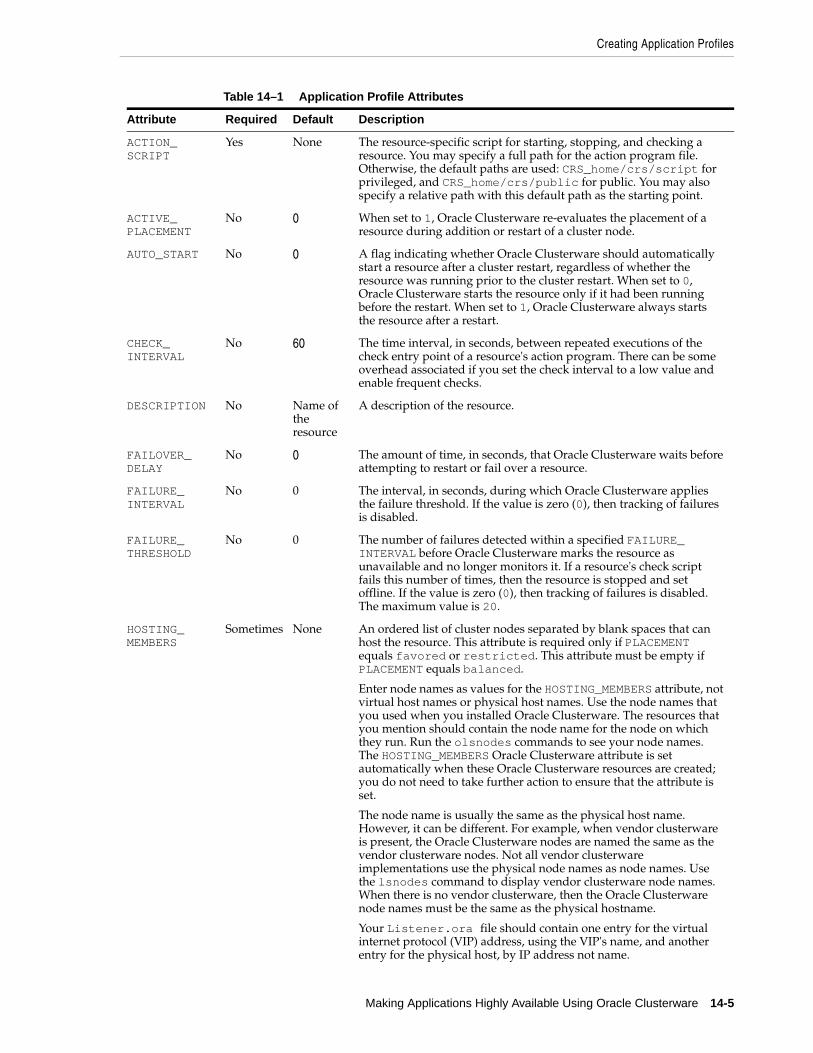
Creating Application Profiles
Making Applications Highly Available Using Oracle Clusterware 14-5
Table 14–1 Application Profile Attributes
Attribute Required Default Description
ACTION_SCRIPT
Yes None The resource-specific script for starting, stopping, and checking a resource. You may specify a full path for the action program file. Otherwise, the default paths are used: CRS_home/crs/script for privileged, and CRS_home/crs/public for public. You may also specify a relative path with this default path as the starting point.
ACTIVE_PLACEMENT
No 0 When set to 1, Oracle Clusterware re-evaluates the placement of a resource during addition or restart of a cluster node.
AUTO_START No 0 A flag indicating whether Oracle Clusterware should automatically start a resource after a cluster restart, regardless of whether the resource was running prior to the cluster restart. When set to 0, Oracle Clusterware starts the resource only if it had been running before the restart. When set to 1, Oracle Clusterware always starts the resource after a restart.
CHECK_INTERVAL
No 60 The time interval, in seconds, between repeated executions of the check entry point of a resource's action program. There can be some overhead associated if you set the check interval to a low value and enable frequent checks.
DESCRIPTION No Name of the resource
A description of the resource.
FAILOVER_DELAY
No 0 The amount of time, in seconds, that Oracle Clusterware waits before attempting to restart or fail over a resource.
FAILURE_INTERVAL
No 0 The interval, in seconds, during which Oracle Clusterware applies the failure threshold. If the value is zero (0), then tracking of failures is disabled.
FAILURE_THRESHOLD
No 0 The number of failures detected within a specified FAILURE_INTERVAL before Oracle Clusterware marks the resource as unavailable and no longer monitors it. If a resource's check script fails this number of times, then the resource is stopped and set offline. If the value is zero (0), then tracking of failures is disabled. The maximum value is 20.
HOSTING_MEMBERS
Sometimes None An ordered list of cluster nodes separated by blank spaces that can host the resource. This attribute is required only if PLACEMENT equals favored or restricted. This attribute must be empty if PLACEMENT equals balanced.
Enter node names as values for the HOSTING_MEMBERS attribute, not virtual host names or physical host names. Use the node names that you used when you installed Oracle Clusterware. The resources that you mention should contain the node name for the node on which they run. Run the olsnodes commands to see your node names. The HOSTING_MEMBERS Oracle Clusterware attribute is set automatically when these Oracle Clusterware resources are created; you do not need to take further action to ensure that the attribute is set.
The node name is usually the same as the physical host name. However, it can be different. For example, when vendor clusterware is present, the Oracle Clusterware nodes are named the same as the vendor clusterware nodes. Not all vendor clusterware implementations use the physical node names as node names. Use the lsnodes command to display vendor clusterware node names. When there is no vendor clusterware, then the Oracle Clusterware node names must be the same as the physical hostname.
Your Listener.ora file should contain one entry for the virtual internet protocol (VIP) address, using the VIP's name, and another entry for the physical host, by IP address not name.
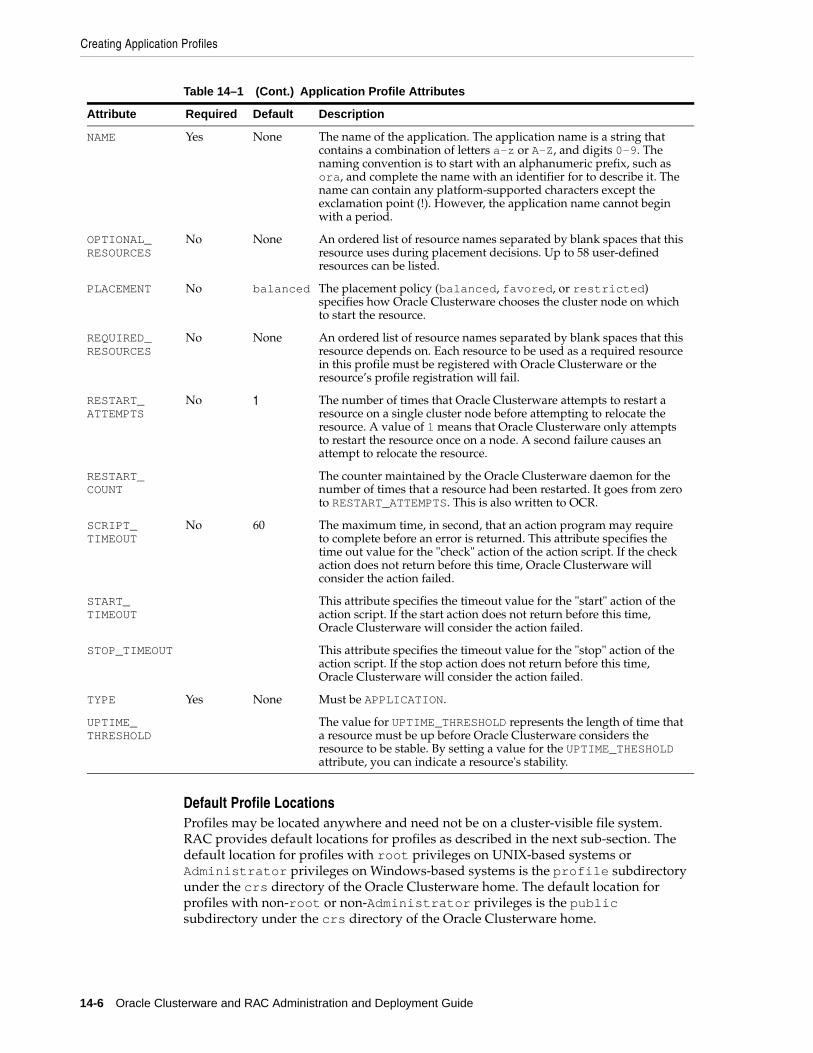
Creating Application Profiles
14-6 Oracle Clusterware and RAC Administration and Deployment Guide
Default Profile LocationsProfiles may be located anywhere and need not be on a cluster-visible file system. RAC provides default locations for profiles as described in the next sub-section. The default location for profiles with root privileges on UNIX-based systems or Administrator privileges on Windows-based systems is the profile subdirectory under the crs directory of the Oracle Clusterware home. The default location for profiles with non-root or non-Administrator privileges is the public subdirectory under the crs directory of the Oracle Clusterware home.
NAME Yes None The name of the application. The application name is a string that contains a combination of letters a-z or A-Z, and digits 0-9. The naming convention is to start with an alphanumeric prefix, such as ora, and complete the name with an identifier for to describe it. The name can contain any platform-supported characters except the exclamation point (!). However, the application name cannot begin with a period.
OPTIONAL_RESOURCES
No None An ordered list of resource names separated by blank spaces that this resource uses during placement decisions. Up to 58 user-defined resources can be listed.
PLACEMENT No balanced The placement policy (balanced, favored, or restricted) specifies how Oracle Clusterware chooses the cluster node on which to start the resource.
REQUIRED_RESOURCES
No None An ordered list of resource names separated by blank spaces that this resource depends on. Each resource to be used as a required resource in this profile must be registered with Oracle Clusterware or the resource’s profile registration will fail.
RESTART_ATTEMPTS
No 1 The number of times that Oracle Clusterware attempts to restart a resource on a single cluster node before attempting to relocate the resource. A value of 1 means that Oracle Clusterware only attempts to restart the resource once on a node. A second failure causes an attempt to relocate the resource.
RESTART_COUNT
The counter maintained by the Oracle Clusterware daemon for the number of times that a resource had been restarted. It goes from zero to RESTART_ATTEMPTS. This is also written to OCR.
SCRIPT_TIMEOUT
No 60 The maximum time, in second, that an action program may require to complete before an error is returned. This attribute specifies the time out value for the "check" action of the action script. If the check action does not return before this time, Oracle Clusterware will consider the action failed.
START_TIMEOUT
This attribute specifies the timeout value for the "start" action of the action script. If the start action does not return before this time, Oracle Clusterware will consider the action failed.
STOP_TIMEOUT This attribute specifies the timeout value for the "stop" action of the action script. If the stop action does not return before this time, Oracle Clusterware will consider the action failed.
TYPE Yes None Must be APPLICATION.
UPTIME_THRESHOLD
The value for UPTIME_THRESHOLD represents the length of time that a resource must be up before Oracle Clusterware considers the resource to be stable. By setting a value for the UPTIME_THESHOLD attribute, you can indicate a resource's stability.
Table 14–1 (Cont.) Application Profile Attributes
Attribute Required Default Description

Example of Using Oracle Clusterware Commands to Create Application Resources
Making Applications Highly Available Using Oracle Clusterware 14-7
Example of Using Oracle Clusterware Commands to Create Application Resources
The example in this section creates an application named postman. The Oracle Clusterware uses the script /opt/email/bin/crs_postman to start, stop, and monitor whether the application is running (action_script). The Oracle Clusterware checks postman every five seconds as specified by the setting for the check_interval parameter. The Oracle Clusterware restarts postman no more than once if it fails. When deciding on which node to place the postman application, Oracle Clusterware considers the value for the optional_resources parameter. If possible, Oracle Clusterware places postman on the same node. Finally, in order for postman to run, the resource network1 must be running on the same node as specified by the setting for the required_resources parameter. If network1 fails or if it is relocated to another node, then Oracle Clusterware stops or moves the postman application.
Using crs_profile to Create An Application Resource ProfileThe following example uses the crs_profile command to create an application profile for monitoring email.
# crs_profile -create postman -t application -B /opt/email/bin/crs_postman \-d "Email Application" -r network1 -l application2 \-a postman.scr -o ci=5,ft=2,fi=12,ra=2
The contents of the application profile file that the example creates are as follows:
NAME=postmanTYPE=applicationACTION_SCRIPT=/oracle/crs/script/postman.scrACTIVE_PLACEMENT=0AUTO_START=0CHECK_INTERVAL=5DESCRIPTION=email appFAILOVER_DELAY=0FAILURE_INTERVAL=12FAILURE_THRESHOLD=2HOSTING_MEMBERS=OPTIONAL_RESOURCES=application2PLACEMENT=balancedREQUIRED_RESOURCES=network1RESTART_ATTEMPTS=2SCRIPT_TIMEOUT=60
Note: Do not use the Oracle Clusterware commands crs_register, crs_profile, crs_start or crs_stop on resources with names beginning with the prefix ora unless either Oracle Support asks you to, or unless Oracle has certified you as described in http://metalink.oracle.com. Server Control (SRVCTL) is the correct utility to use on Oracle resources. You can create resources that depend on resources that Oracle has defined. You can also use the Oracle Clusterware commands to inspect the configuration and status.
See Also: Appendix B, "High Availability Oracle Clusterware Command-Line Reference and C API" for an explanation of the command options
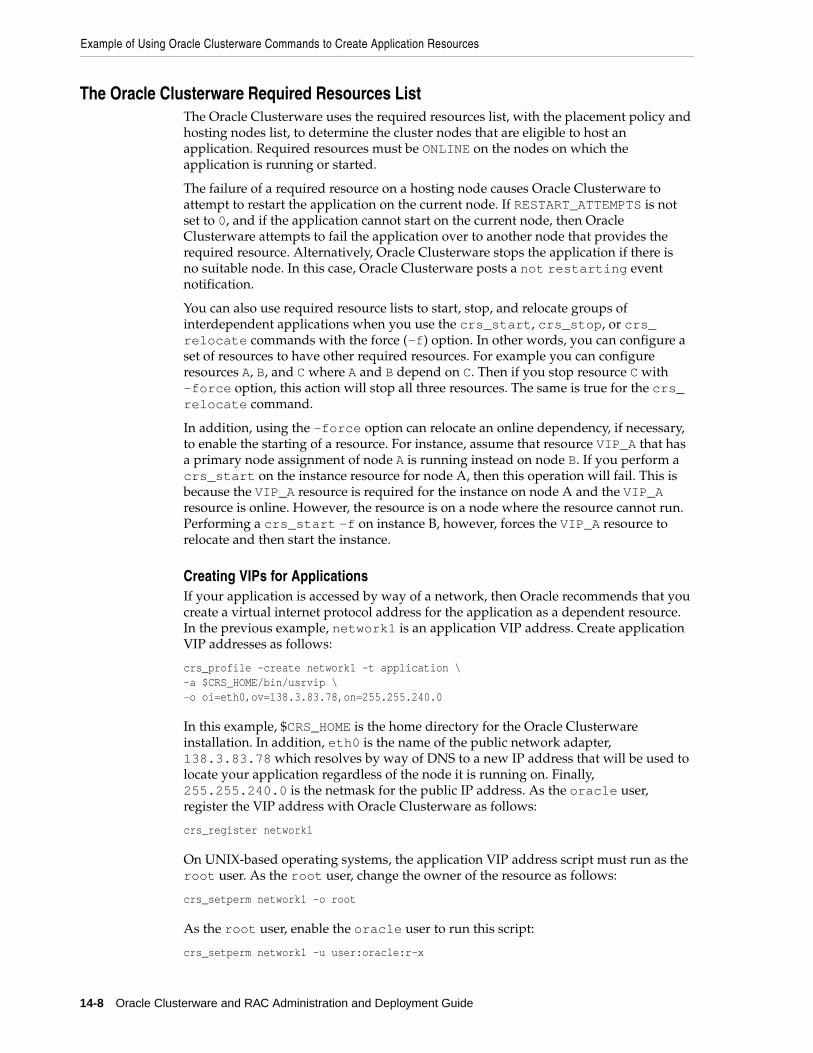
Example of Using Oracle Clusterware Commands to Create Application Resources
14-8 Oracle Clusterware and RAC Administration and Deployment Guide
The Oracle Clusterware Required Resources ListThe Oracle Clusterware uses the required resources list, with the placement policy and hosting nodes list, to determine the cluster nodes that are eligible to host an application. Required resources must be ONLINE on the nodes on which the application is running or started.
The failure of a required resource on a hosting node causes Oracle Clusterware to attempt to restart the application on the current node. If RESTART_ATTEMPTS is not set to 0, and if the application cannot start on the current node, then Oracle Clusterware attempts to fail the application over to another node that provides the required resource. Alternatively, Oracle Clusterware stops the application if there is no suitable node. In this case, Oracle Clusterware posts a not restarting event notification.
You can also use required resource lists to start, stop, and relocate groups of interdependent applications when you use the crs_start, crs_stop, or crs_relocate commands with the force (-f) option. In other words, you can configure a set of resources to have other required resources. For example you can configure resources A, B, and C where A and B depend on C. Then if you stop resource C with -force option, this action will stop all three resources. The same is true for the crs_relocate command.
In addition, using the -force option can relocate an online dependency, if necessary, to enable the starting of a resource. For instance, assume that resource VIP_A that has a primary node assignment of node A is running instead on node B. If you perform a crs_start on the instance resource for node A, then this operation will fail. This is because the VIP_A resource is required for the instance on node A and the VIP_A resource is online. However, the resource is on a node where the resource cannot run. Performing a crs_start -f on instance B, however, forces the VIP_A resource to relocate and then start the instance.
Creating VIPs for ApplicationsIf your application is accessed by way of a network, then Oracle recommends that you create a virtual internet protocol address for the application as a dependent resource. In the previous example, network1 is an application VIP address. Create application VIP addresses as follows:
crs_profile –create network1 -t application \-a $CRS_HOME/bin/usrvip \-o oi=eth0,ov=138.3.83.78,on=255.255.240.0
In this example, $CRS_HOME is the home directory for the Oracle Clusterware installation. In addition, eth0 is the name of the public network adapter, 138.3.83.78 which resolves by way of DNS to a new IP address that will be used to locate your application regardless of the node it is running on. Finally, 255.255.240.0 is the netmask for the public IP address. As the oracle user, register the VIP address with Oracle Clusterware as follows:
crs_register network1
On UNIX-based operating systems, the application VIP address script must run as the root user. As the root user, change the owner of the resource as follows:
crs_setperm network1 –o root
As the root user, enable the oracle user to run this script:
crs_setperm network1 –u user:oracle:r-x
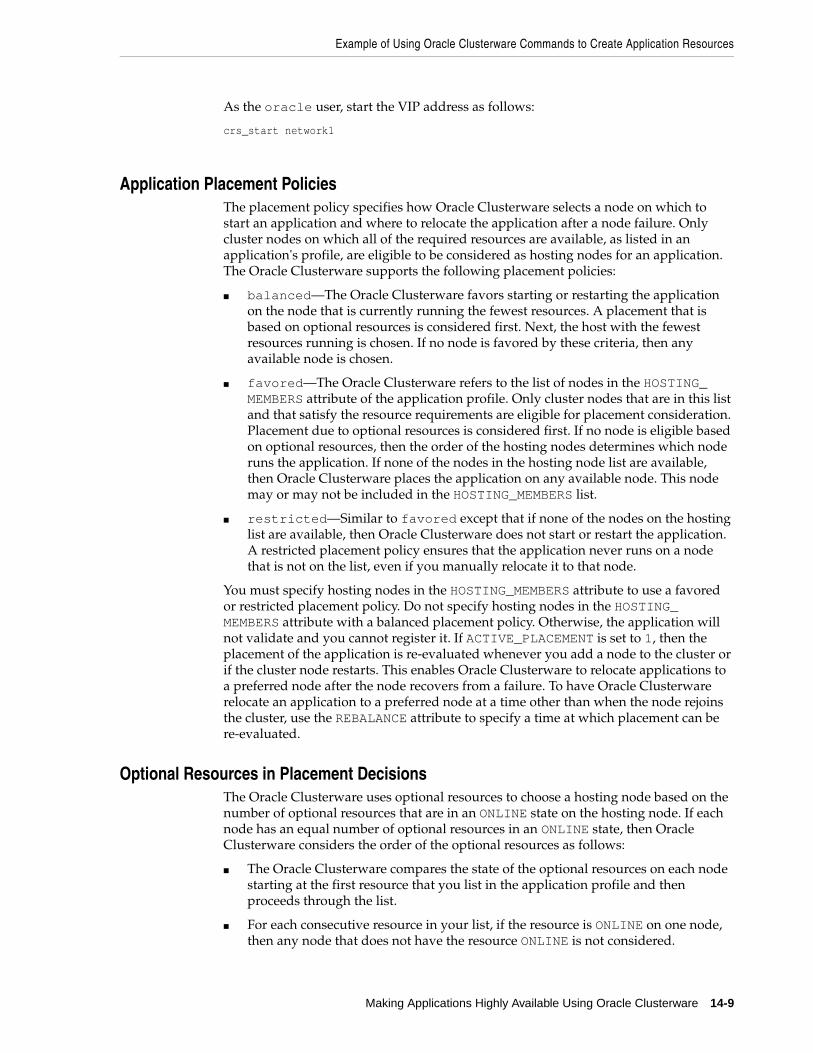
Example of Using Oracle Clusterware Commands to Create Application Resources
Making Applications Highly Available Using Oracle Clusterware 14-9
As the oracle user, start the VIP address as follows:
crs_start network1
Application Placement PoliciesThe placement policy specifies how Oracle Clusterware selects a node on which to start an application and where to relocate the application after a node failure. Only cluster nodes on which all of the required resources are available, as listed in an application's profile, are eligible to be considered as hosting nodes for an application. The Oracle Clusterware supports the following placement policies:
■ balanced—The Oracle Clusterware favors starting or restarting the application on the node that is currently running the fewest resources. A placement that is based on optional resources is considered first. Next, the host with the fewest resources running is chosen. If no node is favored by these criteria, then any available node is chosen.
■ favored—The Oracle Clusterware refers to the list of nodes in the HOSTING_MEMBERS attribute of the application profile. Only cluster nodes that are in this list and that satisfy the resource requirements are eligible for placement consideration. Placement due to optional resources is considered first. If no node is eligible based on optional resources, then the order of the hosting nodes determines which node runs the application. If none of the nodes in the hosting node list are available, then Oracle Clusterware places the application on any available node. This node may or may not be included in the HOSTING_MEMBERS list.
■ restricted—Similar to favored except that if none of the nodes on the hosting list are available, then Oracle Clusterware does not start or restart the application. A restricted placement policy ensures that the application never runs on a node that is not on the list, even if you manually relocate it to that node.
You must specify hosting nodes in the HOSTING_MEMBERS attribute to use a favored or restricted placement policy. Do not specify hosting nodes in the HOSTING_MEMBERS attribute with a balanced placement policy. Otherwise, the application will not validate and you cannot register it. If ACTIVE_PLACEMENT is set to 1, then the placement of the application is re-evaluated whenever you add a node to the cluster or if the cluster node restarts. This enables Oracle Clusterware to relocate applications to a preferred node after the node recovers from a failure. To have Oracle Clusterware relocate an application to a preferred node at a time other than when the node rejoins the cluster, use the REBALANCE attribute to specify a time at which placement can be re-evaluated.
Optional Resources in Placement DecisionsThe Oracle Clusterware uses optional resources to choose a hosting node based on the number of optional resources that are in an ONLINE state on the hosting node. If each node has an equal number of optional resources in an ONLINE state, then Oracle Clusterware considers the order of the optional resources as follows:
■ The Oracle Clusterware compares the state of the optional resources on each node starting at the first resource that you list in the application profile and then proceeds through the list.
■ For each consecutive resource in your list, if the resource is ONLINE on one node, then any node that does not have the resource ONLINE is not considered.
Oracle Clusterware Action Program Guidelines
14-10 Oracle Clusterware and RAC Administration and Deployment Guide
■ The Oracle Clusterware evaluates each resource in the list in this manner until only one node is available to host the resource.
■ The maximum number of optional resources is 58.
If this algorithm results in multiple preferred nodes, then the resource is placed on one of these nodes chosen according to its placement policy.
Oracle Clusterware Action Program GuidelinesThis section provides the following guidelines for writing Oracle Clusterware action programs that interpret Oracle Clusterware start, stop, and check commands:
■ The Oracle Clusterware relies on a status code upon exiting from an action program to set the resource state to ONLINE or OFFLINE. On Windows-based systems, the program should be non-blocking, which may imply a Windows service or a Windows resource that does not block during console interactions.
■ Action programs must return a status code to indicate success or failure. For example, on UNIX-based systems if the script is written in Bourne Shell, then the program should issue exit(1) to indicate failure, and exit(0) to indicate success. Similarly, on Windows-based systems, the action program should return a status of (0) to indicate success and (1) to indicate failure.
■ After application failure, Oracle Clusterware calls the action program with a check parameter. The action program replies to Oracle Clusterware with a status of (1) to indicate failure. After receiving this failure status, Oracle Clusterware calls the action program with a stop parameter. It is important that the action program returns a status of (0) to indicate a successful stop of the application, even though the application was not running when the stop request was called.
■ The Oracle Clusterware sets the resource state to UNKNOWN if an action program's stop entry point fails to exit within the number of seconds in the SCRIPT_TIMEOUT value, or if the action program returns with a code that indicates failure. This may occur during a start, relocation, or stop operation. Ensure that the action program’s stop entry point exits with a value that indicates success if the resource is successfully stopped or if the resource is not running.
■ When a daemon or service starts, it usually needs to start as a background process, depending on the platform. However, a resource started in this way always returns success during a start attempt. This means that the default scripts cannot detect failures caused by minor errors, such as misspelled command paths.
■ On UNIX-based systems, if a resource does not move to the background immediately upon startup, then you can start the application in the background by adding an ampersand (&) to the end of the line that starts the application.
■ On Windows-based systems, you can use net start to start a service that needs to start in the background.
■ When using commands to start daemons or services in the background, interactively make test runs of the commands used in the script to eliminate errors before using the script with Oracle Clusterware.
How Oracle Clusterware Runs Action Programs This section describes how Oracle Clusterware runs action programs. The first argument to an action program is the command start, stop, or check depending on which action Oracle Clusterware is running. The second argument is the Oracle
Oracle Clusterware Action Program Guidelines
Making Applications Highly Available Using Oracle Clusterware 14-11
Clusterware resource name of the application. This enables a script to determine which instance of the resource that Oracle Clusterware is starting, stopping, or checking.
An action program can retrieve any of its Oracle Clusterware resource attributes from the environment by using $_CAA_attribute_name. For example, $_CAA_NAME contains the application name, the second argument to the script, and $_CAA_HOSTING_MEMBERS contains its HOSTING_MEMBERS attribute.
User Defined AttributesThe Oracle Clusterware supports user-defined attributes in Oracle Clusterware applications, which are attributes having names that contain USR. User-defined attributes are stored as part of the Oracle Clusterware application profile for the application. You can reference them in an action program using $_USR_attributename.
To add a user-defined attribute, add it to the file CRS home/crs/template/application.tdf using the following syntax:
## an example user-defined attribute##!===========================attribute: USR_EXAMPLEtype: stringswitch: -o exampledefault:required: no
The attribute parameter contains the name of the new attribute. The type parameter defines the type of the user-defined attribute and can be one of the following:
■ string
■ boolean
■ integer—a numeric attribute
■ positive_integer—a numeric attribute that must be positive
■ name string
■ name_list—a comma-delimited list of names
The switch parameter describes how the attribute is specified for the crs_profile command. Set the required field to no for user-defined attributes.
Windows crsuser ProgramThis section describes the Windows-based crsuser program. If you create an Oracle Clusterware application, then run the following command:
crsuser add [domain\]username
Provide the user's Windows password. This creates the service OracleCRSToken_user that Oracle Clusterware needs for starting the Oracle Clusterware resources
Note: User-defined attribute names that begin with USR_ORA are reserved for use by Oracle.
Using Oracle Clusterware Commands
14-12 Oracle Clusterware and RAC Administration and Deployment Guide
under the given user ID. You can also use the crsuser command remove [domain\]username to remove a token service and crsuser list to list a registered users.
Using Oracle Clusterware CommandsThis section describes how to use the Oracle Clusterware commands under the following topics:
■ Registering Application Resources
■ Starting Application Resources
■ Relocating Applications and Application Resources
■ Stopping Applications and Application Resources
■ Unregistering Applications and Application Resources
■ Displaying Clusterware Application and Application Resource Status Information
Registering Application ResourcesEach application that you manage with Oracle Clusterware must have an application profile and the profile must be registered in the OCR. Use the crs_register command to register applications in the OCR. For example, enter the following command to register the mail monitoring application from the previous example:
# crs_register postman
If you modify a profile, then update the OCR by re-running the crs_register -u command.
Starting Application ResourcesTo start an application resource that is registered with Oracle Clusterware, use the crs_start command. For example:
# crs_start postman
The following text is an example of the command output:
Attempting to start `postman` on node `rac1`Start of `postman` on node `rac1` succeeded.
The application now runs on the node named rac1.
The command waits for the amount of time specified by the setting for the SCRIPT_TIMEOUT parameter to receive a notification of success or failure from the action program each time the action program is called. Application resources can be started if
Note: The name of the application resource may or may not be the same as the name of the application.
See Also : Appendix B, "High Availability Oracle Clusterware Command-Line Reference and C API" for examples of Oracle Clusterware command output
Using Oracle Clusterware Commands
Making Applications Highly Available Using Oracle Clusterware 14-13
they have stopped due to exceeding their failure threshold values. You must register a resource with crs_register before you can start it.
To start and resources, use the crs_start and crs_stop commands. Manual starts or stops outside of Oracle Clusterware can invalidate the resource status. In addition, Oracle Clusterware may attempt to restart a resource on which you perform a manual stop operation.
All required resources must be online on the node where you start the resource. If the resources that the REQUIRED_RESOURCES parameter identifies are offline, then the command crs_start resource_name will start the required resources before starting the resource.
Running the crs_start command on a resource sets the resource target value to ONLINE. The Oracle Clusterware attempts to change the state to match the target by running the action program with the start parameter. When a resource is running, both the target state and current state are ONLINE.
Starting an Application on an Unavailable NodeWhen starting an application on a cluster node that is unavailable, crs_start can give indeterminate results. In this scenario, the start section of the action program is run, but the cluster node fails before notification of the start is displayed on the command line. The crs_start command returns a failure with the error Remote start for resource_name failed on node node_name. The application is actually ONLINE but fails over to another node making the application appear as though it were started on the incorrect node.
If a cluster node fails while you are starting a resource on that node, then check the state of the resource on the cluster by using the crs_stat command to determine the state of that resource.
Relocating Applications and Application ResourcesUse the crs_relocate command to relocate applications and application resources. For example, to relocate the mail monitoring application to the node known as rac2, enter the following command:
# crs_relocate postman -c rac2
Each time that the action program is called, the crs_relocate command waits for the duration identified by the value for the SCRIPT_TIMEOUT parameter to receive notification of success or failure from the action program. A relocation attempt fails if:
■ The application has required resources that are ONLINE on the initial node
■ Applications that require the specified resource are ONLINE on the initial node
To relocate an application and its required resources, use the -f option with the crs_relocate command. The Oracle Clusterware relocates or starts all resources that are required by the application regardless of their state.
Stopping Applications and Application ResourcesTo stop applications and application resources, use the crs_stop command. Immediately after the crs_stop command completes, the application status converts to OFFLINE. Because Oracle Clusterware always attempts to match a resource's state to its target, the Oracle Clusterware subsystem stops the application. The following example stops the mail application from the example:
# crs_stop postman
Using Oracle Clusterware Commands
14-14 Oracle Clusterware and RAC Administration and Deployment Guide
The following text is an example of the command output:
Attempting to stop `postman` on node `rac1`Stop of `postman` on node `rac1` succeeded.
You cannot stop an application if the application is a required resource for another online application unless you use the force (-f) option. If you use the crs_stop -f resource_name command on an application that is required by other resources and if those resources are online, then Oracle Clusterware stops the application. In addition, all of the resources that require that application that are online are also stopped.
Managing Automatic Oracle Clusterware Resource Operations for Action ScriptsThe following section explains additional information for controlling how Oracle Clusterware manages restarts. You can prevent Oracle Clusterware from automatically restarting a resource by setting several action program attributes. You can also control how Oracle Clusterware manages the restart counters for your action programs. In addition, you can customize the timeout values for the start, stop, and check actions that Oracle Clusterware performs on action scripts. These topics are described under the following headings:
■ Preventing Automatic Database Instance Restarts
■ Automatically Manage Restart Attempts Counter for Resources
■ Implications of Restart and Timeout Features for Previous Releases
Preventing Automatic Database Instance RestartsWhen a node stops and restarts, Oracle Clusterware starts the instance as soon as the node starts. This may not be desirable because instance startup might fail if system components on which the instance depends, such as a volume manager or a file system, are not running. This is especially true if Oracle Clusterware does not manage the system component resources on which the instance depends. To manage automatic restarts, you can use the AUTO_START attribute to specify whether Oracle Clusterware should automatically start a resource when a node restarts. Valid AUTO_START values are:
■ always—Causes the resource to restart when the node restarts regardless of the resource’s state when the node stopped.
■ restore—Does not start the resource at restart time if it was in an offline state, such as STATE=OFFLINE, TARGET=OFFLINE, when the node stopped. The resource is restored to its state when the node went down. The resource is started only if it was online before and not otherwise.
■ never—The Oracle Clusterware never restarts the resource regardless of the resource’s state when the node stopped.
Note: The Oracle Clusterware can only stop applications and application resources. The Oracle Clusterware cannot stop network, tape, or media changer resources.
Note: Oracle only supports lower-case values for always, restore, and never.
Using Oracle Clusterware Commands
Making Applications Highly Available Using Oracle Clusterware 14-15
Automatically Manage Restart Attempts Counter for ResourcesWhen a resource fails, Oracle Clusterware restarts the resource for only the number of times specified in the profile attribute RESTART_ATTEMPTS regardless of how often the resource fails. The CRSD process maintains an internal counter to track how often a resource has been restarted. There is a mechanism by which Oracle Clusterware can automatically manage the restart attempts counter based on the stability of a resource. Use the UPTIME_THESHOLD attribute to indicate resource stability.
You can specify the time for the UPTIME_THRESHOLD attribute in different units of measure, such as seconds (s), minutes (m), hours (h), days (d) or weeks (w). Examples of valid values for this attribute are: 7d for seven days, 5h for five hours, 180m for 180 minutes, and so on. Specify the time period as a numeric value and the unit of measure as the last character, s, m, h, d, or w.
After the time period that you have indicated by the setting for UPTIME_THRESHOLD has elapsed, Oracle Clusterware resets the value for RESTART_COUNTS to 0. The Oracle Clusterware can alert you when the value for RESTART_COUNT reaches the value that you have set for RESTART_ATTEMPTS.
RESTART_ATTEMPTS and RESTART_COUNT Failure Scenarios Some of the failure scenarios for the RESTART_ATTEMPTS and RESTART_COUNT attributes are:
■ When a resource keeps restarting—The resource does not meet the uptime threshold criteria and it will be stopped after restarting for the number of attempts set by the value for RESTART_ATTEMPTS.
■ When a node fails or restarts—The Oracle Clusterware resets the value for RESTART_COUNTER to 0 either when the resource relocates or when it restarts on the same node.
■ If the crsd process fails—Because both RESTART_COUNT and RESTART_ATTEMPTS are stored in OCR, the behavior is not affected.
Implications of Restart and Timeout Features for Previous Releases If you have a pre-Oracle Database 10g release 2 (10.2) installation, add the release 2 (10.2) attributes to your profiles by doing one of the following:
■ Modify your resources with the release 2 (10.2) attributes and re-register the resources. This causes the separate timeouts to be effective.
■ Do not modify your resources. This retains the pre-release 2 (10.2) behavior of using the value in SCRIPT_TIMEOUT as the timeout for all start, stop, and check actions.
Unregistering Applications and Application ResourcesTo unregister an application or an application resource, use the crs_unregister command. You cannot unregister an application or resource that is ONLINE or required by another resource. The following example unregisters the mail application:
# crs_unregister postman
Note: Oracle Clusterware writes an alert to the CRSD log file when the value for RESTART_COUNT reaches the value that you have set for RESTART_ATTEMPTS. The Oracle Clusterware does not write this message to the alert file.
Using Oracle Clusterware Commands
14-16 Oracle Clusterware and RAC Administration and Deployment Guide
The unregistration process frees space on the OCR. Additionally, run the crs_unregister command as a clean-up step when a resource is no longer managed by Oracle Clusterware. Generally, you should unregister all permanently stopped applications.
Displaying Clusterware Application and Application Resource Status InformationTo display status information about applications and resources that are on cluster nodes, use the crs_stat command. The following example displays the status information for the postman application:
# crs_stat postmanNAME=postmanTYPE=applicationTARGET=ONLINESTATE=ONLINE on rac2
Enter the following command to view information about all applications and resources in tabular format:
# crs_stat -t
The following text is an example of the command output:
Name Type Target State Host----------------------------------------------------------------cluster_lockd application ONLINE ONLINE rac2dhcp application OFFLINE OFFLINE
Enter the following command to determine:
■ How many times an application resource has been restarted
■ How many times an application resource has failed within the failure interval
■ The maximum number of times that an application or resource can be restarted or fail
■ The target state of the application or resource and the normal status information
# crs_stat -v
To view verbose content in tabular format, enter the following command:
# crs_stat -v -t
The following text is an example of the command output:
Name Type R/RA F/FT Target State Host----------------------------------------------------------------------cluster_lockd application 0/30 0/0 ONLINE ONLINE rac2dhcp application 0/1 0/0 OFFLINE OFFLINEnamed application 0/1 0/0 OFFLINE OFFLINEnetwork1 application 0/1 0/0 ONLINE ONLINE rac1
Enter the following command to view the application profile information that is stored in the OCR:
# crs_stat -p
The following text is an example of the command output:
NAME=cluster_lockdTYPE=application

Using Oracle Clusterware Commands
Making Applications Highly Available Using Oracle Clusterware 14-17
ACTION_SCRIPT=cluster_lockd.scrACTIVE_PLACEMENT=0AUTO_START=1CHECK_INTERVAL=5DESCRIPTION=Cluster lockd/statdFAILOVER_DELAY=30FAILURE_INTERVAL=60FAILURE_THRESHOLD=1REBALANCE=HOSTING_MEMBERS=OPTIONAL_RESOURCES=PLACEMENT=balancedREQUIRED_RESOURCES=RESTART_ATTEMPTS=2SCRIPT_TIMEOUT=60 ...
Refer to the crs_stat command for more information.
See Also: Appendix B, "High Availability Oracle Clusterware Command-Line Reference and C API" for detailed information about the Oracle Clusterware commands

Using Oracle Clusterware Commands
14-18 Oracle Clusterware and RAC Administration and Deployment Guide
Application-Specific Deployment Topics 15-1
15Application-Specific Deployment Topics
This chapter discusses topics for deploying online (OLTP), data warehouse, and general purpose (hybrid) applications in Oracle Real Application Clusters (RAC) environments. The topics in this chapter are:
■ General Deployment Strategies for Real Application Clusters-Based Applications
■ Deploying OLTP Applications in Real Application Clusters
■ Deploying Data Warehouse Applications with Real Application Clusters
■ Data Security Considerations in Real Application Clusters
General Deployment Strategies for Real Application Clusters-Based Applications
All single-instance application development and deployment techniques apply to RAC. If your applications run well on a single-instance Oracle database, then they will run well on a RAC database.
Deploying OLTP Applications in Real Application ClustersCache Fusion makes RAC databases the optimal deployment servers for online transaction processing (OLTP) applications. This is because these types of applications require:
■ High availability in the event of failures
■ Scalability to accommodate increased system demands
■ Load balancing according to demand fluctuations
The high availability features of Oracle and RAC can re-distribute and load balance workloads to surviving instances without interrupting processing. RAC also provides excellent scalability so that if you add or replace a node, then Oracle re-masters resources and re-distributes processing loads.
Flexible Implementation with Cache FusionTo accommodate the frequently changing workloads of online transaction processing systems, RAC remains flexible and dynamic despite changes in system load and system availability. RAC addresses a wide range of service levels that, for example, fluctuate due to:
■ Varying user demands
■ Peak scalability issues like trading storms (bursts of high volumes of transactions)
Deploying Data Warehouse Applications with Real Application Clusters
15-2 Oracle Clusterware and RAC Administration and Deployment Guide
■ Varying availability of system resources
Deploying Data Warehouse Applications with Real Application ClustersThis section discusses how to deploy data warehouse systems in RAC environments by briefly describing the data warehouse features available in shared disk architectures. The topics in this section are:
■ Speed-Up for Data Warehouse Applications on Real Application Clusters
■ Parallel Execution in Data Warehouse Systems and RAC
■ Using Parallel Instance Groups
Speed-Up for Data Warehouse Applications on Real Application ClustersRAC is ideal for data warehouse applications because it augments the single instance benefits of Oracle. RAC does this by maximizing the processing available on all of the nodes that belong to a RAC database to provide speed-up for data warehouse systems.
The query optimizer considers parallel execution when determining the optimal execution plans. The default cost model for the query optimizer is CPU+I/O and the cost unit is time. In RAC, the query optimizer dynamically computes intelligent defaults for parallelism based on the number of processors in the nodes of the cluster. An evaluation of the costs of alternative access paths, table scans versus indexed access, for example, takes into account the degree of parallelism (DOP) available for the operation. This results in Oracle selecting the execution plans that are optimized for your RAC configuration.
Parallel Execution in Data Warehouse Systems and RACOracle's parallel execution feature uses multiple processes to run SQL statements on one or more CPUs. Parallel execution is available on both single-instance Oracle databases and RAC databases.
RAC takes full advantage of parallel execution by distributing parallel processing across all available instances. The number of processes that can participate in parallel operations depends on the DOP assigned to each table or index.
Using Parallel Instance GroupsYou can control the instances that allocate parallel execution server processes with instance groups. To do this, assign each active instance to at least one or more instance groups. Then dynamically control which instances spawn parallel processes by activating a particular group of instances.
Data Security Considerations in Real Application ClustersThis section describes the following two RAC security considerations:
See Also: Oracle Database Performance Tuning Guide for more information about the query optimizer
Note: An instance can belong to one or more groups. You can enter several instance group names with the INSTANCE_GROUPS parameter using a comma as a separator.
Data Security Considerations in Real Application Clusters
Application-Specific Deployment Topics 15-3
■ Transparent Data Encryption and Wallets
■ Windows Firewall Considerations
Transparent Data Encryption and WalletsWallets used by RAC instances for Transparent Database Encryption may be a local copy of a common wallet shared by multiple nodes or a shared copy residing on a network file system that all of the nodes can access. A deployment with a single wallet on a shared disk requires no additional configuration to use Transparent Data Encryption. Deployments where no shared storage exists require that each RAC node maintain its own local wallet. Details about creating and provisioning a wallet can be found in the Database Security Guide.
After you create and provision a wallet a single node, you must copy the wallet and make it available to all of the other nodes. For systems using Transparent Data Encryption with encrypted wallets, you can use any standard file transport protocol. For systems using Transparent Data Encryption with obfuscated wallets, file transport through a secured channel is recommended. The wallet must reside in the directory specified by the setting for the WALLET_LOCATION or ENCRYPTION_WALLET_LOCATION parameter in sqlnet.ora. The local copies of the wallet need not be synchronized for the duration of Transparent Data Encryption usage until the server key is re-keyed though the ALTER SYSTEM SET KEY SQL statement. Each time you run the ALTER SYSTEM SET KEY statement at a database instance, you must again copy the wallet residing on that node and make it available to all of the other nodes. To avoid unnecessary administrative overhead, reserve re-keying for exceptional cases where you are certain that the server master key is compromised and that not re-keying it would cause a serious security problem.
Windows Firewall ConsiderationsBy default, all installations of Windows Server 2003 Service Pack 1 and higher enable the Windows Firewall to block virtually all TCP network ports to incoming connections. As a result, any Oracle products that listen for incoming connections on a TCP port will not receive any of those connection requests, and the clients making those connections will report errors.
Depending upon which Oracle products you install and how they are used, you may need to perform additional Windows post-installation configuration tasks so that the Firewall products are functional on Windows Server 2003.
This section contains these topics:
■ Oracle Executables Requiring Firewall Exceptions
■ Configuring the Windows Firewall
■ Troubleshooting Windows Firewall Exceptions
Oracle Executables Requiring Firewall ExceptionsTable 15–1 lists the Oracle Database 10g Release 1 (10.1) or later executables that listen on TCP ports on Windows. If they are in use and accepting connections from a remote client computer, then Oracle recommends that you add them to the Windows Firewall exceptions list to ensure correct operation. Except as noted, they can be found in ORACLE_HOME\bin.
The RMI registry application and daemon executable listed in Table 15–1 are used by Oracle Ultra Search to launch a remote crawler. They must be added to the Windows
Data Security Considerations in Real Application Clusters
15-4 Oracle Clusterware and RAC Administration and Deployment Guide
Firewall exception list if you are using the Ultra Search remote crawler feature, and if the remote crawler is running on a computer with the Windows Firewall enabled.
Note: If multiple Oracle homes are in use, then several firewall exceptions may be needed for the same executable: one for each home from which that executable loads.
Table 15–1 Oracle Executables Requiring Windows Firewall Exceptions
File Name Executable Name
CRS_HOME\bin\crsd.exe OracleCRService
CRS_HOME\bin\evmd.exe OracleEVMService
CRS_HOME\bin\evmlogger.exe Event manager logging daemon
CRS_HOME\bin\GuiOracleObjManager.exe Oracle Object Link Manager (GUI version)
CRS_HOME\bin\ocssd.exe OracleCSService
CRS_HOME\bin\OracleObjManager.exe Oracle Object Link Manager (CLI version)
CRS_HOME\bin\racgvip.exe Virtual Internet Protocol Configuration Assistant
CRS_HOME\cfs\Ocfsfindvol.exe Oracle Cluster Volume Service
dgmgrl.exe Data Guard Manager
emagent.exe Oracle Database Control
extproc.exe External Procedures
hdodbc.exe Generic Connectivity
oidldapd.exe Oracle Internet Directory LDAP Server
omtsreco.exe Oracle Services for Microsoft Transaction Server
oracle.exe Oracle Database
ORACLE_HOME\apache\apache\apache.exe Apache Web Server
ORACLE_HOME\bin\emagent.exe Enterprise Manager Agent
ORACLE_HOME\bin\omtsreco.exe Oracle services for Microsoft Transaction Server
ORACLE_HOME\bin\ORACLE.EXE Oracle
ORACLE_HOME\bin\racgimon.exe RACG
ORACLE_HOME\bin\TNSLSNR.exe Oracle Listener
ORACLE_HOME\jdk\bin\java.exe Java Virtual Machine
ORACLE_HOME\jdk\bin\rmid.exe RMI daemon executable
ORACLE_HOME\jdk\bin\rmiregistry.exe RMI registry application
ORACLE_HOME\jdk\jre\bin\rmiregistry.exe RMI registry application
ORACLE_HOME\opmn\bin\ons.exe Oracle Notification Service
ORACLE_HOME\opmn\bin\opmn.exe Oracle Process Manager
pg4arv.exe Oracle Procedural Gateway for APPC
pg4mqc.exe Oracle Procedural Gateway for Websphere MQ
pg4mqs.exe Oracle Procedural Gateway for Websphere MQ
pg4t4ic.exe Oracle Procedural Gateway for APPC
Data Security Considerations in Real Application Clusters
Application-Specific Deployment Topics 15-5
Configuring the Windows FirewallPost-installation configuration for the Windows Firewall must be undertaken if all of the following conditions are met:
■ Oracle server-side components are installed.
These components include the Oracle Database, network listeners, and any Web servers or services.
■ The computer services connections from other computers over a network.
If no other computers connect to the computer with the Oracle software, then no post-installation configuration steps are required and the Oracle software will function as expected.
■ The Windows Firewall is enabled.
If the Windows Firewall is not enabled, then no post-installation configuration steps are required.
You can configure Windows Firewall by opening specific static TCP ports in the firewall or by creating exceptions for specific executables so that they are able to receive connection requests on any ports they choose. To configure the firewall, choose Control Panel > Windows Firewall > Exceptions or enter netsh firewall add... at the command line.
Alternatively, Windows will inform you if a foreground application is attempting to listen on a port, and it will ask you if you wish to create an exception for that executable. If you choose to do so, then the effect is the same as creating an exception for the executable either in the Control Panel or from the command line.
Troubleshooting Windows Firewall ExceptionsIf you cannot establish certain connections even after granting exceptions to the executables listed in Table 15–1, then follow these steps to troubleshoot the installation:
1. Examine Oracle configuration files (such as *.conf files), the Oracle key in the Windows registry, and network configuration files in ORACLE_HOME\network\admin.
2. Pay particular attention to any executable listed in ORACLE_HOME\network\admin\listener.ora in a PROGRAM= clause. Each of these must be granted an exception in the Windows Firewall, because a connection can be made through the TNS Listener to that executable.
3. Examine Oracle trace files, log files, and other sources of diagnostic information for details on failed connection attempts. Log and trace files on the database client
tg4drsrv.exe Oracle Transparent Gateway for DRDA
tg4msql.exe Oracle Transparent Gateway for MS-SQL Server
tg4sybs.exe Oracle Transparent Gateway for SYBASE
tg4tera.exe Oracle Transparent Gateway for Teradata
tnslsnr.exe Oracle TNS Listener
WINDOWS_HOME\system32\drivers\Ocfs.sys System file for Oracle Cluster File System
Table 15–1 (Cont.) Oracle Executables Requiring Windows Firewall Exceptions
File Name Executable Name
Data Security Considerations in Real Application Clusters
15-6 Oracle Clusterware and RAC Administration and Deployment Guide
computer may contain useful error codes or troubleshooting information for failed connection attempts. The Windows Firewall log file on the server may contain useful information as well.
4. If the preceding troubleshooting steps do not resolve a specific configuration issue on Windows XP Service Pack 2, then provide the output from command netsh firewall show state verbose=enable to Oracle Support for diagnosis and problem resolution.
See Also:
■ http://www.microsoft.com/downloads/details.aspx?FamilyID=a7628646-131d-4617-bf68-f0532d8db131&displaylang=en for information on Windows Firewall troubleshooting
■ http://support.microsoft.com/default.aspx?scid=kb;en-us;875357 for more information on Windows Firewall configuration
Troubleshooting A-1
ATroubleshooting
This appendix explains how diagnose problems for Oracle Clusterware and Oracle Real Application Clusters (RAC) components. The appendix explains how to do this by using dynamic debugging, enabling tracing, as well as by using trace and log file information. This appendix also includes information about the Cluster Verification Utility (CVU). The topics in this appendix are:
■ Overview of Troubleshooting Real Application Clusters
■ Diagnosing Oracle Clusterware High Availability Components
■ Diagnosing Oracle Real Application Clusters Components
■ Using the Cluster Verification Utility
Overview of Troubleshooting Real Application ClustersBoth Oracle Clusterware and Oracle RDBMS components have sub-components that you can troubleshoot as described in this chapter. You can enable dynamic debugging to troubleshoot Oracle Clusterware processing. You can also enable debugging and tracing for specific components and specific Oracle Clusterware resources to focus your troubleshooting efforts. A special clusterware health check command enables you to determine the status of several Oracle Clusterware components at one time.
The trace and log files that Oracle generates for RAC are available for both the Oracle Clusterware components and for the Oracle RDBMS with RAC components. For Oracle Clusterware, Oracle stores these under a unified directory log structure. In addition to debugging and tracing tools, you can use the Cluster Verification Utility (CVU) and instance-specific alert files for troubleshooting.
Diagnosing Oracle Clusterware High Availability ComponentsThis section describes the diagnosability features for Oracle Clusterware which include log files for the Oracle Clusterware daemon, as well as log files for the Event Manager daemon (EVM) and the Oracle Notification Service (RACGONS) under the following topics:
■ Dynamic Debugging
■ Component Level Debugging
■ Oracle Clusterware Shutdown and Startup
■ Diagnostics Collection Script
■ The Oracle Clusterware Alerts
Diagnosing Oracle Clusterware High Availability Components
A-2 Oracle Clusterware and RAC Administration and Deployment Guide
■ Resource Debugging
■ Checking the Health of the Clusterware
■ Clusterware Log Files and the Unified Log Directory Structure
■ Troubleshooting the Oracle Cluster Registry
■ Enabling Additional Tracing for Real Application Clusters High Availability
Dynamic DebuggingYou can use crsctl commands as the root user to enable dynamic debugging for Oracle Clusterware, the Event Manager (EVM), and the clusterware subcomponents. You can also dynamically change debugging levels using crsctl commands. Debugging information remains in the Oracle Cluster Registry (OCR) for use during the next startup. You can also enable debugging for resources. The crsctl syntax to enable debugging for Oracle Clusterware is:
crsctl debug log crs "CRSRTI:1,CRSCOMM:2"
The crsctl syntax to enable debugging for EVM is:
crsctl debug log evm "EVMCOMM:1"
The crsctl syntax to enable debugging for resources is:
crsctl debug log res "resname:1"
Component Level DebuggingYou can enable debugging for the CRS daemons, EVM, and their modules by setting environment variables or by running crsctl commands as follows where module_name is the name of the module, crs, evm, or css and debugging_level is a level from 1 to 5:
crsctl debug log module_name component:debugging_level
Run the following command to obtain component names where module_name is the name of the module, crs, evm, or css:
crsctl lsmodules module_name
Oracle Clusterware Shutdown and StartupYou can use a crsctl command as follows to stop Oracle Clusterware and its related resources on a specific node:
crsctl stop crs
You can use a crsctl command as follows to start Oracle Clusterware and its related resources on a specific node:
crsctl start crs
Note: You do not have to be the root user to run the crsctl command with the lsmodules option.
Diagnosing Oracle Clusterware High Availability Components
Troubleshooting A-3
Enabling and Disabling Oracle Clusterware DaemonsWhen the Oracle Clusterware daemons are enabled, they start automatically at the time the node is started. To prevent the daemons from starting during the boot process, you can disable them using crsctl commands. You can use crsctl commands as follows to enable and disable the startup of the Oracle Clusterware daemons. Run the following command to enable startup for all of the Oracle Clusterware daemons:
crsctl enable crs
Run the following command to disable the startup of all of the Oracle Clusterware daemons:
crsctl disable crs
Diagnostics Collection ScriptUse the diagcollection.pl script to collect diagnostic information from an Oracle Clusterware installation. The diagnostics provide additional information so that Oracle Support can resolve problems. Run this script from the following location:
CRS_HOME/bin/diagcollection.pl
The Oracle Clusterware AlertsThe Oracle Clusterware posts alert messages when important events occur. The following is an example of an alert from the CRSD process:
[NORMAL] CLSD-1201: CRSD started on host %s[ERROR] CLSD-1202: CRSD aborted on host %s. Error [%s]. Details is %s.ERROR] CLSD-1203: Failover failed for the CRS resource %s. Details in %s.[NORMAL] CLSD-1204: Recovering CRS resources for host %s[ERROR] CLSD-1205: Auto-start failed for the CRS resource %s. Details in %s.
The location of this alert log on UNIX-based systems is CRS Home/log/hostname/alerthostname.log where CRS_Home is the name of the location of Oracle Clusterware. Windows-based systems use the same path structure.
The following is an example of an EVMD alert:
[NORMAL] CLSD-1401: EVMD started on node %s [ERROR] CLSD-1402: EVMD aborted on node %s. Error [%s]. Details in %s.
Note: You must run these crsctl commands as the root user.
Note: You must run these crsctl commands as the root user.
Note: You must run this script as the root user.
Diagnosing Oracle Clusterware High Availability Components
A-4 Oracle Clusterware and RAC Administration and Deployment Guide
Resource DebuggingYou can use crsctl commands to enable resource debugging using the following syntax:
crsctl debug log res "ora.node1.vip:1"
This has the effect of setting the environment variable USER_ORA_DEBUG, to 1, before running the start, stop, or check action scripts for the ora.node1.vip resource.
Checking the Health of the ClusterwareUse the crsctl check command to determine the health of your clusterware as in the following example:
crsctl check crs
This command displays the status of the CSSD, EVMD, and CRSD processes. Run the following command to determine the health of individual daemons where daemon is crsd, cssd or evmd:
crsctl check daemon
Clusterware Log Files and the Unified Log Directory StructureOracle uses a unified log directory structure to consolidate the Oracle Clusterware component log files. This consolidated structure simplifies diagnostic information collection and assists during data retrieval and problem analysis.
Oracle retains five files that are 20MB in size for the cssd process and one file that is 10MB in size for the crsd and evmd processes. In addition, Oracle deletes the oldest log file for any log file group when the maximum storage limit for the group’s files exceeds 10MB. Alert files are stored in the following directory structures as described under the following headings:
■ The Cluster Ready Services Daemon (crsd) Log Files
■ Oracle Cluster Registry (OCR) Log Files
■ Cluster Synchronization Services (CSS) Log Files
■ Event Manager (EVM) Log Files
■ RACG Log Files
The Cluster Ready Services Daemon (crsd) Log FilesLog files for the CRSD process (crsd) can be found in the following directories:
CRS home/log/hostname/crsd
Note: You must run this crsctl command as the root user.
Note: You do not have to be the root user to perform health checks.
Note: This section uses UNIX-based directory structure examples. The directory structure in all cases is identical for Windows-based platforms.
Diagnosing Oracle Clusterware High Availability Components
Troubleshooting A-5
Oracle Cluster Registry (OCR) Log Files The Oracle Cluster Registry (OCR) records log information in the following location:
CRS Home/log/hostname/client
Cluster Synchronization Services (CSS) Log FilesYou can find CSS information that the OCSSD generates in log files in the following locations:
CRS Home/log/hostname/cssd
Event Manager (EVM) Log Files Event Manager (EVM) information generated by evmd is recorded in log files in the following locations:
CRS Home/log/hostname/evmd
RACG Log FilesThe Oracle RAC high availability trace files are located in the following two locations:
CRS home/log/hostname/racg$ORACLE_HOME/log/hostname/racg
Core files are in the sub-directories of the log directories. Each RACG executable has a sub-directory assigned exclusively for that executable. The name of the RACG executable sub-directory is the same as the name of the executable.
Troubleshooting the Oracle Cluster RegistryThis section explains how to troubleshoot the Oracle Cluster Registry (OCR) under the following topics:
■ Using the OCRDUMP Utility to View Oracle Cluster Registry Content
■ Using the OCRCHECK Utility
■ Oracle Cluster Registry Troubleshooting
Using the OCRDUMP Utility to View Oracle Cluster Registry ContentThis section explains how to use the OCRDUMP utility to view OCR content for troubleshooting. The OCRDUMP utility enables you to view the OCR contents by writing OCR content to a file or stdout in a readable format.
You can use a number of options for OCRDUMP. For example, you can limit the output to a key and its descendents. You can also write the contents to an XML-based file that you can view using a browser. OCRDUMP writes the OCR keys as ASCII strings and values in a datatype format. OCRDUMP retrieves header information based on a best effort basis. OCRDUMP also creates a log file in CRS_Home/log/hostname/client. To change the amount of logging, edit the file CRS_Home/srvm/admin/ocrlog.ini.
To change the logging component, edit the entry containing the comploglvl= entry. For example, to change the logging of the ORCAPI component to 3 and to change the
Diagnosing Oracle Clusterware High Availability Components
A-6 Oracle Clusterware and RAC Administration and Deployment Guide
logging of the OCRRAW component to 5, make the following entry in the ocrlog.ini file:
comploglvl="OCRAPI:3;OCRRAW:5"
OCRDUMP Utility Syntax and Options This section describes the OCRDUMP utility command syntax and usage. Run the ocrdump command with the following syntax where filename is the name of a target file to which you want Oracle to write the OCR output and where keyname is the name of a key from which you want Oracle to write OCR subtree content:
ocrdump [file_name|-stdout] [-backupfile backup_file_name] [-keyname keyname] [-xml] [-noheader]
Table A–1 describes the OCRDUMP utility options and option descriptions.
OCRDUMP Utility Examples The following ocrdump utility examples extract various types of OCR information and write it to various targets:
ocrdump
Writes the OCR content to a file called OCRDUMPFILE in the current directory.
ocrdump MYFILE
Writes the OCR content to a file called MYFILE in the current directory.
ocrdump -stdout -keyname SYSTEM
Writes the OCR content from the subtree of the key SYSTEM to stdout.
ocrdump -stdout -xml
Writes the OCR content to stdout in XML format.
Sample OCRDUMP Utility Output The following OCRDUMP examples show the KEYNAME, VALUE TYPE, VALUE, permission set (user, group, world) and access rights for two
Note: Make sure that you have file creation privileges in the CRS Home/log/hostname/client directory before using the OCRDUMP utility.
Table A–1 OCRDUMP Options and Option Descriptions
Options Description
file_name Name of a file to which you want OCRDUMP to write output.
-stdout The predefined output location that you can redirect with, for example, a filename.
-keyname The name of an OCR key whose subtree is to be dumped.
-xml Writes the output in XML format.
-noheader Does not print the time at which you ran the command and when the OCR configuration occurred.
-backupfile Option to identify a backup file.
backup_file_name
The name of the backup file the content of which you want to view. You can query the backups using the ocrconfig -showbackup command.
Diagnosing Oracle Clusterware High Availability Components
Troubleshooting A-7
sample runs of the ocrdump command. The following shows the output for the SYSTEM.language key that has a text value of AMERICAN_AMERICA.WE8ASCII37.
[SYSTEM.language]ORATEXT : AMERICAN_AMERICA.WE8ASCII37SECURITY : {USER_PERMISSION : PROCR_ALL_ACCESS, GROUP_PERMISSION : PROCR_READ, OTHER_PERMISSION : PROCR_READ, USER_NAME : user, GROUP_NAME : group} The following shows the output for the SYSTEM.version key that has integer value 3:
[SYSTEM.version]UB4 (10) : 3SECURITY : {USER_PERMISSION : PROCR_ALL_ACCESS, GROUP_PERMISSION : PROCR_READ, OTHER_PERMISSION : PROCR_READ, USER_NAME : user, GROUP_NAME : group}
Using the OCRCHECK UtilityThe OCRCHECK utility displays the version of the OCR’s block format, total space available and used space, OCRID, and the OCR locations that you have configured. OCRCHECK performs a block-by-block checksum operation for all of the blocks in all of the OCRs that you have configured. It also returns an individual status for each file as well as a result for the overall OCR integrity check. The following is a sample of the OCRCHECK output:
Status of Oracle Cluster Registry is as follows : Version : 2 Total space (kbytes) : 262144 Used space (kbytes) : 16256 Available space (kbytes) : 245888 ID : 1918913332 Device/File Name : /dev/raw/raw1 Device/File integrity check succeeded Device/File Name : /oradata/mirror.ocr Device/File integrity check succeeded Cluster registry integrity check succeeded
OCRCHECK creates a log file in the directory CRS_Home/log/hostname/client. To change amount of logging, edit the file CRS_Home/srvm/admin/ocrlog.ini.
Oracle Cluster Registry Troubleshooting Table A–2 describes common OCR problems with corresponding resolution suggestions.
Table A–2 Common OCR Problems and Solutions
Problem Solution
Not currently using OCR mirroring and would like to. Run the ocrconfig command with the -replace option as described on page 3-3.
An OCR failed and you need to replace it. Error messages in Enterprise Manager or OCR log file.
Run the ocrconfig command with the -replace option as described on page 3-4.
An OCR has a mis-configuration. Run the ocrconfig command with the -repair option as described on page 3-4.
You are experiencing a severe performance effect from OCR processing or you want to remove an OCR for other reasons.
Run the ocrconfig command with the -replace option as described on page 3-3.
Diagnosing Oracle Real Application Clusters Components
A-8 Oracle Clusterware and RAC Administration and Deployment Guide
Enabling Additional Tracing for Real Application Clusters High AvailabilityOracle Support may ask you to enable tracing to capture additional information. Because the procedures described in this section may affect performance, only perform these activities with the assistance of Oracle Support. This section includes the following topics:
■ Generating Additional Trace Information for a Running Resource
■ Verifying Event Manager Daemon Communications
Generating Additional Trace Information for a Running ResourceTo generate additional trace information for a running resource, Oracle recommends that you use CRSCTL commands. For example, run the following command to turn on debugging for resources:
crsctl debug log res "resname:level"
Alternatively, you can set the USR_ORA_DEBUG parameter in your resource profile to the value 1 using crsctl.
Verifying Event Manager Daemon CommunicationsThe event manager daemons (evmd) running on separate nodes communicate through specific ports. To determine whether the evmd for a node can send and receive messages, perform the test described in this section while running session 1 in the background.On node 1, session 1 enter:
$ evmwatch –A –t "@timestamp @@"
On node 2, session 2 enter:
$ evmpost -u "hello" [-h nodename]
Session 1 should show output similar to the following:
$ 21-Aug-2002 08:04:26 hello
Ensure that each node can both send and receive messages by executing this test in several permutations.
Diagnosing Oracle Real Application Clusters ComponentsThis section describes the diagnosability features for Oracle Real Application Clusters components. This section includes the following topics:
■ Where to Find Files for Analyzing Errors
■ Using Instance-Specific Alert Files in Real Application Clusters
■ Enabling Tracing for Java-Based Tools and Utilities in Real Application Clusters
■ Resolving Pending Shutdown Issues
Where to Find Files for Analyzing ErrorsOracle records information about important events that occur in your RAC environment in trace files. The trace files for RAC are the same as those in single-instance Oracle databases. As a best practice, monitor and back up trace files regularly for all instances to preserve their content for future troubleshooting.
Diagnosing Oracle Real Application Clusters Components
Troubleshooting A-9
Information about ORA-600 errors appear in the alert_SID.log file for each instance where SID is the instance identifier. For troubleshooting, you may need to also provide files from the following bdump locations:
■ $ORACLE_HOME/admin/db_name/bdump on UNIX-based systems
■ %ORACLE_HOME%\admin\db_name\bdump on Windows-based systems
Some files may also be in the udump directory.
In addition, the directory cdmp_timestamp contains in-memory traces of RAC instance failure information. This directory is located in ORACLE_HOME/admin/db_name/bdump/cdmp_timestamp, where timestamp is the time at which the error occurred.
Trace dump files are stored under the cdmp directory. Oracle creates these files for each process that is connected to the instance. The naming convention for the trace dump files is same as for trace files, but with .trw as the file extension.
Background Thread Trace Files in Real Application ClustersRAC background threads use trace files to record database operations and database errors. These trace logs help troubleshoot and also enable Oracle support to more efficiently debug cluster database configuration problems.
Background thread trace files are created regardless of whether the BACKGROUND_DUMP_DEST parameter is set in the server parameter file (SPFILE). If you set BACKGROUND_DUMP_DEST, then the trace files are stored in the directory specified. If you do not set the parameter, then the trace files are stored as follows:
■ $ORACLE_BASE/admin/db_name/bdump on UNIX-based systems
■ %ORACLE_BASE%\admin\db_name\bdump on Windows-based systems
■ SID_dbwr_1202.trc
■ SID_smon_4560.trc
Oracle creates a different trace file for each background thread. For both UNIX- and Windows-based systems, trace files for the background processes are named SID_process name_process identifier.trc, for example:
User Process Trace Files in Real Application ClustersTrace files are created for user processes if you set the USER_DUMP_DEST initialization parameter. User process trace file names have the format SID_ora_process_identifier/thread_identifier.trc, where process_identifier is a 5-digit number indicating the process identifier (PID) on UNIX-based systems and thread_identifier is the thread identifier on Windows-based systems.
Using Instance-Specific Alert Files in Real Application ClustersEach instance in a RAC database has one alert file. The alert file for each instance, alert.SID.log, contains important information about error messages and exceptions that occur during database operations. Information is appended to the alert file each time you start the instance. All process threads can write to the alert file for the instance.
The alert_SID.log file is in the directory specified by the BACKGROUND_DUMP_DEST parameter in the initdb_name.ora initialization parameter file. If you do not set the BACKGROUND_DUMP_DEST parameter, the alert_SID.log file is generated in the following locations:
■ $ORACLE_BASE/admin/db_name/bdump on UNIX-based systems.

Using the Cluster Verification Utility
A-10 Oracle Clusterware and RAC Administration and Deployment Guide
■ %ORACLE_BASE%\admin\db_name\bdump on Windows-based system
Enabling Tracing for Java-Based Tools and Utilities in Real Application ClustersAll Java-based tools and utilities that are available in RAC are invoked by executing scripts of the same name as the tool or utility. This includes the Cluster Verification Utility (CVU), Database Configuration Assistant (DBCA), the Net Configuration Assistant (NETCA), the Virtual Internet Protocol Configuration Assistant (VIPCA), Server Control (SRVCTL), and the Global Services Daemon (GSD). For example to run DBCA, enter the command dbca.
By default, Oracle enables traces for DBCA and the Database Upgrade Assistant (DBUA). For the CVU, GSDCTL, SRVCTL, and VIPCA, you can set the SRVM_TRACE environment variable to TRUE to make Oracle generate traces. Oracle writes traces to log files. For example, Oracle writes traces to log files in Oracle home/cfgtoollogs/dbca and Oracle home/cfgtoollogs/dbua for DBCA and the Database Upgrade Assistant (DBUA) respectively.
Resolving Pending Shutdown IssuesIn some situations a SHUTDOWN IMMEDIATE may be pending and Oracle will not quickly respond to repeated shutdown requests. This is because Oracle Clusterware may be processing a current shutdown request. In such cases, issue a SHUTDOWN ABORT using SQL*Plus for subsequent shutdown requests.
Using the Cluster Verification UtilityThis section describes the Cluster Verification Utility (CVU) under the following topics:
■ Cluster Verification Utility Requirements
■ Understanding CVU Commands, Help, Output, and Nodelist Shortcuts
■ Cluster Verification Utility Nodelist Shortcuts
The CVU can verify the primary cluster components during an operational phase or stage. A component can be basic, such as free disk space, or it can be complex, such as checking the Oracle Clusterware integrity. For example, CVU can verify multiple Oracle Clusterware subcomponents across the Oracle Clusterware layers. Additionally, CVU can check disk space, memory, processes, and other important cluster components. A stage could be, for example, database installation, for which CVU can perform a pre-check to verify whether your system meets the criteria for a RAC installation. Other stages include the initial hardware setup and the establishing of system requirements through the fully operational cluster setup.
When verifying stages, CVU uses entry and exit criteria. In other words, each stage has entry criteria that define a specific set of verification tasks to be performed before initiating that stage. This pre-check prevents you from beginning a stage, such as installing Oracle Clusterware, unless you meet the Oracle Clusterware stage's pre-requisites.
The exit criteria for a stage define another set of verification tasks that you need to perform after the completion of the stage. Post-checks ensure that the activities for that
See Also: Your platform-specific Oracle Clusterware and RAC installation guide for information about how to manually install CVU
Using the Cluster Verification Utility
Troubleshooting A-11
stage have been completed. Post-checks identify stage-specific problems before they propagate to subsequent stages.
The node list that you use with CVU commands should be a comma-delimited list of host names without a domain. The CVU ignores domains while processing node lists. If a CVU command entry has duplicate node entries after removing domain information, then CVU eliminates the duplicate node entries. Wherever supported, you can use the -n all option to verify all of your cluster nodes that are part of a specific RAC installation. You do not have to be the root user to use the CVU and the CVU assumes that the current user is the oracle user.
For network connectivity verification, the CVU discovers all of the available network interfaces if you do not specify an interface on the CVU command line. For storage accessibility verification, the CVU discovers shared storage for all of the supported storage types if you do not specify a particular storage identification on the command line. The CVU also discovers the Oracle Clusterware home if one is available.
Run the CVU command-line tool using the cluvfy command. Using cluvfy does not adversely affect your cluster environment or your installed software. You can run cluvfy commands at any time, even before the Oracle Clusterware installation. In fact, the CVU is designed to assist you as soon as your hardware and operating system are operational. If you run a command that requires Oracle Clusterware on a node, then the CVU reports an error if Oracle Clusterware is not yet installed on that node.
You can enable tracing by setting the environment variable SRVM_TRACE to true. For example, in tcsh an entry such as setenv SRVM_TRACE true enables tracing. The CVU trace files are created in the CV_HOME/cv/log directory. Oracle automatically rotates the log files and the most recently created log file has the name cvutrace.log.0. You should remove unwanted log files or archive them to reclaim disk place if needed. The CVU does not generate trace files unless you enable tracing.
Cluster Verification Utility RequirementsThe CVU requirements are:
■ At least 30MB free space for the CVU software on the node from which you run the CVU
■ A location for the current JDK, Java 1.4.1 or later
■ A work directory with at least 25MB free space on each node
Note: The CVU only supports an English-based syntax and English online help.
Note: When using the CVU, the CVU attempts to copy any needed information to the CVU work directory. Make sure that the CVU work directory exists on all of the nodes in your cluster database and that the directory on each node has write permissions established for the CVU user. Set this directory using the CV_DESTLOC environment variable. If you do not set this variable, then the CVU uses /tmp as the work directory on UNIX-based systems, and C:\temp on Windows-based systems.
Using the Cluster Verification Utility
A-12 Oracle Clusterware and RAC Administration and Deployment Guide
Understanding CVU Commands, Help, Output, and Nodelist Shortcuts This section describes the following Cluster Verification Utility topics:
■ Using CVU Help
■ Verbose Mode and UNKNOWN Output
■ Cluster Verification Utility Nodelist Shortcuts
Using CVU HelpThe cluvfy commands have context sensitive help that shows their usage based on the command-line arguments that you enter. For example, if you enter cluvfy, then the CVU displays high-level generic usage text describing the stage and component syntax. If you enter cluvfy comp -list, then the CVU shows the valid components with brief descriptions about each of them. If you enter cluvfy comp -help, then the CVU shows detailed syntax for each of the valid component checks. Similarly, cluvfy stage -list and cluvfy stage -help display valid stages and their syntax for their checks respectively.
If you enter an invalid CVU command, then the CVU shows the correct usage for that command. For example, if you type cluvfy stage -pre dbinst, then CVU shows the correct syntax for the pre-check commands for the dbinst stage. Enter the cluvfy -help command to see detailed CVU command information.
Verbose Mode and UNKNOWN OutputAlthough by default the CVU reports in non-verbose mode by only reporting the summary of a test, you can obtain detailed output by using the -verbose argument. The -verbose argument produces detailed output of individual checks and where applicable shows results for each node in a tabular layout.
If a cluvfy command responds with UNKNOWN for a particular node, then this is because the CVU cannot determine whether a check passed or failed. The cause of this could be a loss of reachability or the failure of user equivalence to that node. The cause could also be any system problem that was occurring on that node at the time that CVU was performing a check.
If you run the CVU using the -verbose argument and the CVU responds with UNKNOWN for a particular node, then this is because the CVU cannot determine whether a check passed or failed. The following is a list of possible causes for an UNKNOWN response:
■ The node is down
■ Executables that the CVU requires are missing in CRS_home/bin or the Oracle home directory
■ The user account that ran the CVU does not have privileges to run common operating system executables on the node
■ The node is missing an operating system patch or a required package
■ The node has exceeded the maximum number of processes or maximum number of open files, or there is a problem with IPC segments, such as shared memory or semaphores
Cluster Verification Utility Nodelist ShortcutsYou can use the following nodelist shortcuts:
Using the Cluster Verification Utility
Troubleshooting A-13
To provide the CVU a list of all of the nodes of a cluster, enter -n all. CVU attempts to obtain the node list in the following order:
1. If vendor clusterware is available, then the CVU selects all of the configured nodes from the vendor clusterware using the lsnodes utility.
2. If Oracle Clusterware is installed, then the CVU selects all of the configured nodes from Oracle Clusterware using the olsnodes utility.
3. If neither the vendor nor Oracle Clusterware is installed, then the CVU searches for a value for the CV_NODE_ALL key in the configuration file.
4. If vendor and Oracle Clusterware are not installed and no key named CV_NODE_ALL exists in the configuration file, then the CVU searches for a value for the CV_NODE_ALL environmental variable.
If you have not set this variable, then the CVU reports an error.
To provide a partial node list, you can set an environmental variable and use it in the CVU command. For example, on UNIX-based systems you can enter:
setenv MYNODES node1,node3,node5cluvfy comp nodecon -n $MYNODES [-verbose]
Cluster Verification Utility Configuration File You can use CVU’s configuration file to define specific inputs for the execution of the CVU. The path for the configuration file is CV_HOME/cv/admin/cvu_config. You can modify this using a text editor. The inputs to the tool are defined in the form of key entries. You must follow these rules when modifying the CVU configuration file:
■ Key entries have the syntax name=value
■ Each key entry and the value assigned to the key only defines one property
■ Lines beginning with the number sign (#) are comment lines and are ignored
■ Lines that do not follow the syntax name=value are ignored
The following is the list of keys supported by CVU:
■ CV_NODE_ALL—If set, it specifies the list of nodes that should be picked up when Oracle Clusterware is not installed and a -n all option has been used in the command line. By default, this entry is commented out.
■ CV_RAW_CHECK_ENABLED—If set to TRUE, it enables the check for accessibility of shared disks on RedHat release 3.0. This shared disk accessibility check requires that you install a cvuqdisk rpm on all of the nodes. By default, this key is set to TRUE and shared disk check is enabled.
■ CV_XCHK_FOR_SSH_ENABLED—If set to TRUE, it enables the X-Windows check for verifying user equivalence with ssh. By default, this entry is commented out and X-Windows check is disabled.
■ ORACLE_SRVM_REMOTESHELL—If set, it specifies the location for ssh/rsh command to override CVU’s default value. By default, this entry is commented out and the tool uses /usr/sbin/ssh and /usr/sbin/rsh.
■ ORACLE_SRVM_REMOTECOPY—If set, it specifies the location for the scp or rcp command to override the CVU default value. By default, this entry is commented out and CVU uses /usr/bin/scp and /usr/sbin/rcp.
If CVU does not find a key entry defined in the configuration file, then the CVU searches for the environment variable that matches the name of the key. If the
Using the Cluster Verification Utility
A-14 Oracle Clusterware and RAC Administration and Deployment Guide
environment variable is set, then the CVU uses its value, otherwise the CVU uses a default value for that entity.
Performing Various CVU TestsYou can perform the following tests using CVU as described under the following topics:
■ Cluster Verification Utility System Requirements Verifications
■ Cluster Verification Utility Storage Verifications
■ Cluster Verification Utility Connectivity Verifications
■ Cluster Verification Utility User and Permissions Verifications
■ Cluster Verification Utility Node Comparisons and Verifications
■ Cluster Verification Utility Installation Verifications
■ Cluster Verification Utility Oracle Clusterware Component Verifications
■ Cluster Verification Utility Cluster Integrity Verifications
■ Cluster Verification Utility Argument and Option Definitions
Cluster Verification Utility System Requirements VerificationsTo verify the minimal system requirements on the nodes prior to installing Oracle Clusterware or RAC, use the sys component verification command as follows:
cluvfy comp sys [ -n node_list ] -p { crs | database } } [-r { 10gR1 | 10gR2 } ] [ -osdba osdba_group ] [ -orainv orainventory_group ] [-verbose]
To check the system requirements for installing RAC, use the -p database argument, and to check the system requirements for installing Oracle Clusterware, use the -p crs argument. To check the system requirements for installing Oracle Clusterware or RAC from Oracle Database 10g release 1 (10.1), use the -r 10gR1 argument. For example, verify the system requirements for installing Oracle Clusterware on the cluster nodes known as node1,node2 and node3 by running the following command:
cluvfy comp sys -n node1,node2,node3 -p crs -verbose
Cluster Verification Utility Storage VerificationsTo verify whether storage is shared among the nodes in your cluster database or to identify all of the storage that is available on the system and can be shared across the cluster nodes, use the component verification command ssa as follows:
cluvfy comp ssa [ -n node_list ] [ -s storageID_list ] [-verbose]
For example, discover all of the shared storage systems available on your system by running the following command:
cluvfy comp ssa -n all -verbose
See Also: Table A–3 for details about the arguments and options used in the following CVU examples
See Also: Refer to "Known Issues for the Cluster Verification Utility" on page A-18 for the types of storage that CVU supports.
Using the Cluster Verification Utility
Troubleshooting A-15
You can verify the accessibility of a specific storage location, such as /dev/sda, across the cluster nodes by running the following command:
cluvfy comp ssa -n all -s /dev/sda
To verify whether a certain amount of free space is available on a specific location in the nodes of your cluster database, use the component verification command space.
cluvfy comp space [ -n node_list ] -l storage_location -z disk_space {B|K|M|G} [-verbose]
For example, you can verify the availability of at least 2GB of free space at the location /home/dbadmin/products on all of the cluster nodes by running the following command:
cluvfy comp space -n all -l / home/dbadmin/products –z 2G -verbose
To verify the integrity of your Oracle Cluster File System (OCFS) on platforms on which OCFS is available, use the component verification command cfs as follows:
cluvfy comp cfs [ -n node_list ] -f file_system [-verbose]
For example, you can verify the integrity of the cluster file system /oradbshare on all of the nodes by running the following command:
cluvfy comp cfs -f /oradbshare –n all -verbose
Cluster Verification Utility Connectivity VerificationsTo verify the reachability of the cluster nodes from the local node or from any other cluster node, use the component verification command nodereach as follows:
cluvfy comp nodereach -n node_list [ -srcnode node ] [-verbose]
To verify the connectivity between the cluster nodes through all of the available network interfaces or through specific network interfaces, use the component verification command nodecon as follows:
cluvfy comp nodecon -n node_list [ -i interface_list ] [-verbose]
Use the nodecon command without the -i option as follows to use CVU to:
■ Discover all of the network interfaces that are available on the cluster nodes
■ Review the interfaces’ corresponding IP addresses and subnets
■ Obtain the list of interfaces that are suitable for use as VIPs and the list of interfaces to private interconnects
■ Verify the connectivity between all of the nodes through those interfaces
cluvfy comp nodecon -n all [-verbose]
You can run this command in verbose mode to identify the mappings between the interfaces, IP addresses, and subnets. To verify the connectivity between all of the nodes through specific network interfaces, use the comp nodecon command with the -i option. For example, you can verify the connectivity between the nodes
Note: The sharedness check for the file system is supported for Oracle Cluster File System version 1.0.14 or higher.
Using the Cluster Verification Utility
A-16 Oracle Clusterware and RAC Administration and Deployment Guide
node1,node2, and node3, through interface eth0 by running the following command:
cluvfy comp nodecon -n node1,node2,node3 –i eth0 -verbose
Cluster Verification Utility User and Permissions VerificationsTo verify user accounts and administrative permissions-related issues, use the component verification command admprv as follows:
cluvfy comp admprv [ -n node_list ] [-verbose] | -o user_equiv [-sshonly] | -o crs_inst [-orainv orainventory_group ] | -o db_inst [-orainv orainventory_group ] [-osdba osdba_group ] | -o db_config -d oracle_home
To verify whether user equivalence exists on specific nodes, use the -o user_equiv argument. On UNIX-based platforms, this command verifies user equivalence first using ssh and then using rsh, if the ssh check fails. To verify the equivalence only through ssh, use the -sshonly option. By default, the equivalence check does not verify X-Windows configurations, such as whether you have disabled X-forwarding, whether you have the proper setting for the DISPLAY environment variable, and so on.
To verify X-Windows aspects during user equivalence checks, set the CV_XCHK_FOR_SSH_ENABLED key to TRUE in the configuration file that resides in the path CV_HOME/cv/admin/cvu_config before you run the admprv -o user_equiv command. Use the -o crs_inst argument to verify whether you have permissions to install Oracle Clusterware.
You can use the -o db_inst argument to verify the permissions that are required for installing RAC and the -o db_config argument to verify the permissions that are required for creating a RAC database or for modifying a RAC database's configuration. For example, you can verify user equivalence for all of the nodes by running the following command:
cluvfy comp admprv -n all -o user_equiv -verbose
On Linux and Unix platforms, this command verifies user equivalence by first using ssh and then using rsh if the ssh check fails. To verify the equivalence only through ssh, use the -sshonly option. By default, the equivalence check does not verify X-Windows configurations, such as when you have disabled X-forwarding with the setting of the DISPLAY environment variable. To verify X-Windows aspects during user equivalence checks, set the CV_XCHK_FOR_SSH_ENABLED key to TRUE in the configuration file CV_HOME/cv/admin/cvu_config before you run the admprv -o user_equiv command.
To verify the existence of node applications, namely VIP, ONS and GSD, on all of the nodes, use the component nodeapp command:
cluvfy comp nodeapp [ -n node_list ] [-verbose]
Cluster Verification Utility Node Comparisons and VerificationsUse the component verification peer command to compare the nodes as follows:
cluvfy comp peer [ -refnode node ] -n node_list [-r { 10gR1 | 10gR2 } ] [ -orainv orainventory_group ] [ -osdba osdba_group ] [-verbose]
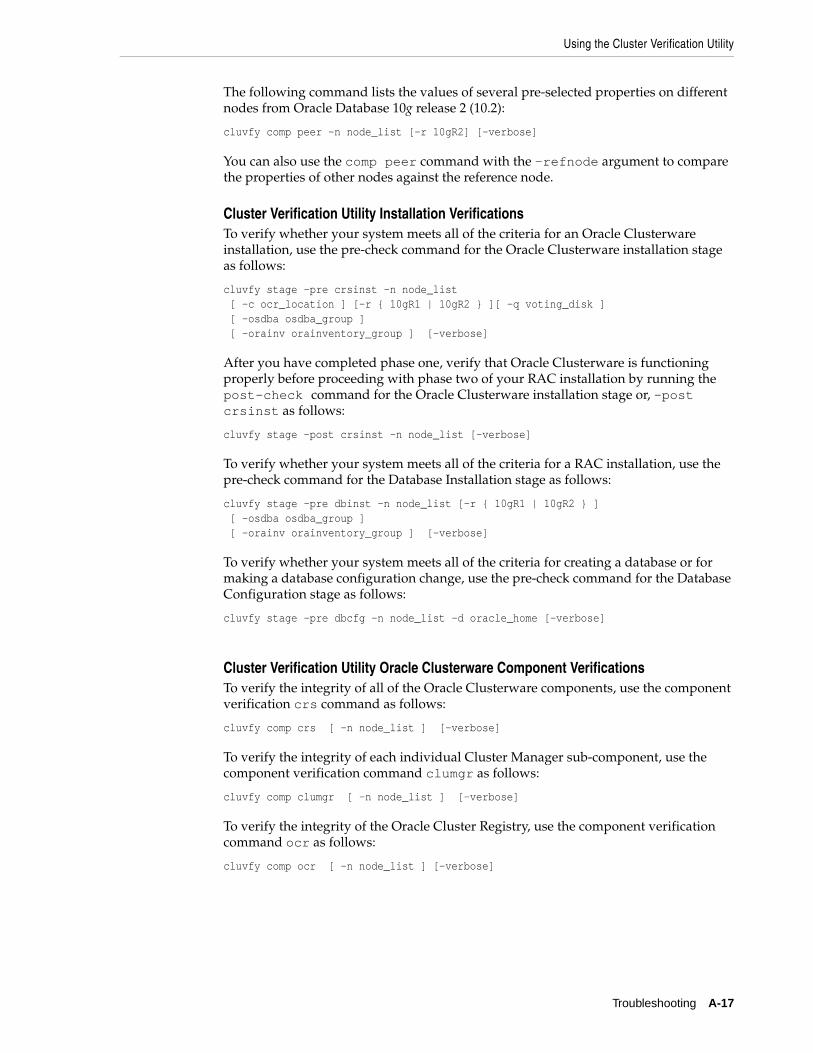
Using the Cluster Verification Utility
Troubleshooting A-17
The following command lists the values of several pre-selected properties on different nodes from Oracle Database 10g release 2 (10.2):
cluvfy comp peer -n node_list [-r 10gR2] [-verbose]
You can also use the comp peer command with the -refnode argument to compare the properties of other nodes against the reference node.
Cluster Verification Utility Installation VerificationsTo verify whether your system meets all of the criteria for an Oracle Clusterware installation, use the pre-check command for the Oracle Clusterware installation stage as follows:
cluvfy stage -pre crsinst -n node_list [ -c ocr_location ] [-r { 10gR1 | 10gR2 } ][ -q voting_disk ] [ -osdba osdba_group ] [ -orainv orainventory_group ] [-verbose]
After you have completed phase one, verify that Oracle Clusterware is functioning properly before proceeding with phase two of your RAC installation by running the post-check command for the Oracle Clusterware installation stage or, -post crsinst as follows:
cluvfy stage -post crsinst -n node_list [-verbose]
To verify whether your system meets all of the criteria for a RAC installation, use the pre-check command for the Database Installation stage as follows:
cluvfy stage -pre dbinst -n node_list [-r { 10gR1 | 10gR2 } ] [ -osdba osdba_group ] [ -orainv orainventory_group ] [-verbose]
To verify whether your system meets all of the criteria for creating a database or for making a database configuration change, use the pre-check command for the Database Configuration stage as follows:
cluvfy stage -pre dbcfg -n node_list -d oracle_home [-verbose]
Cluster Verification Utility Oracle Clusterware Component VerificationsTo verify the integrity of all of the Oracle Clusterware components, use the component verification crs command as follows:
cluvfy comp crs [ -n node_list ] [-verbose]
To verify the integrity of each individual Cluster Manager sub-component, use the component verification command clumgr as follows:
cluvfy comp clumgr [ -n node_list ] [-verbose]
To verify the integrity of the Oracle Cluster Registry, use the component verification command ocr as follows:
cluvfy comp ocr [ -n node_list ] [-verbose]

Using the Cluster Verification Utility
A-18 Oracle Clusterware and RAC Administration and Deployment Guide
Cluster Verification Utility Cluster Integrity VerificationsTo check the integrity of your entire cluster, which means to verify that all of the nodes in the cluster have the same view of the cluster configuration, use the component verification command clu as follows:
cluvfy comp clu
Cluster Verification Utility Argument and Option DefinitionsTable A–3 describes the CVU arguments and options used in the previous examples:
Known Issues for the Cluster Verification UtilityThis section describes the following known limitations for CVU:
■ Database Versions Supported by Cluster Verification Utility
■ Linux Shared Storage Accessibility (ssa) Check Reports Limitations
■ Shared Disk Discovery on Red Hat Linux
Table A–3 Cluster Verification Utility Arguments and Options
Argument or Option Definition
-n node_list The comma-delimited list of non-domain qualified node names on which the test should be conducted. If all is specified, then all of the nodes in the cluster will be used for verification.
-i interface_list The comma-delimited list of interface names.
-f file_system The name of the file system.
-s storageID_list The comma-delimited list of storage identifiers.
-l storage_location The storage path.
-z disk_space The required disk space, in units of bytes (B), kilobytes (K), megabytes (M), or gigabytes (G).
-osdba osdba_group The name of the OSDBA group. The default is dba.
-orainv orainventory_group The name of the Oracle inventory group. The default is oinstall.
-verbose Makes CVU print detailed output.
-o user_equiv Checks user equivalence between the nodes.
-sshonly Check user equivalence for ssh setup only.
-o crs_inst Checks administrative privileges for installing Oracle Clusterware.
-o db_inst Checks administrative privileges for installing RAC.
-o db_config Checks administrative privileges for creating or configuring a database.
-refnode The node that will be used as a reference for checking compatibility with other nodes.
-srcnode The node from which the reachability to other nodes should be checked.
-r { 10gR1 | 10gR2 } The release of Oracle Database 10g for which the requirements for installation of Oracle Clusterware or RAC are to be verified. If this options is not specified, then Oracle Database 10g release 2 (10.2) is assumed.

Using the Cluster Verification Utility
Troubleshooting A-19
Database Versions Supported by Cluster Verification UtilityThe current CVU release supports only Oracle Database 10g RAC and Oracle Clusterware and it is not backward compatible. In other words, CVU cannot check or verify pre-Oracle Database 10g products.
Linux Shared Storage Accessibility (ssa) Check Reports LimitationsThe current release of cluvfy has the following limitations on Linux regarding shared storage accessibility check.
■ Currently NAS storage (r/w, no attribute caching) and OCFS (version 1.0.14 or higher) are supported.
■ For sharedness checks on NAS, cluvfy commands require you to have write permission on the specified path. If the cluvfy user does not have write permission, cluvfy reports the path as not shared.
Shared Disk Discovery on Red Hat LinuxTo perform discovery and shared storage accessibility checks for SCSI disks on Red Hat Linux 3.0 and SUSE Linux Enterprise Server, CVU requires the CVUQDISK package. If you attempt to use CVU and the CVUQDISK package is not installed on all of the nodes in your RAC environment, then CVU responds with an error.
Perform the following procedure to install the CVUQDISK package:
1. Login as the root user.
2. Copy the rpm, cvuqdisk-1.0.1-1.rpm, to a local directory. You can find this rpm in the rpm sub-directory of the top-most directory in the Oracle Clusterware installation media. For example, you can find cvuqdisk-1.0.1-1.rpm in the directory /mountpoint/clusterware/rpm/ where mountpoint is the mounting point for the disk on which the directory is located.
3. Set the environment variable to a group that should own the CVUQDISK package binaries. If CVUQDISK_GRP is not set, then by default the oinstall group is the owner’s group.
4. Determine whether previous versions of the CVUQDISK package are installed by running the command rpm -q cvuqdisk. If you find previous versions of the CVUQDISK package, then remove them by running the command rpm -e cvuqdisk previous_version where previous_version is the identifier of the previous CVUQDISK version.
5. Install the latest CVUQDISK package by running the command rpm -iv cvuqdisk-1.0.1-1.rpm.

Using the Cluster Verification Utility
A-20 Oracle Clusterware and RAC Administration and Deployment Guide
High Availability Oracle Clusterware Command-Line Reference and C API B-1
BHigh Availability Oracle Clusterware
Command-Line Reference and C API
This appendix describes the Oracle Clusterware application program interface (API) command reference and includes the following topics:
■ Using Oracle Clusterware Commands
■ The Oracle Clusterware Commands
■ C Application Programming Interface to Oracle Clusterware
■ Functions for Managing Resource Structures
Using Oracle Clusterware CommandsThis section explains how to use the Oracle Clusterware commands to manage applications and application resources under the Oracle Clusterware framework.
Application Profile SyntaxThe examples in this appendix show the command syntaxes that you use in application profiles. Lines starting with a pound sign (#) are comment lines and are not processed as part of a profile. A backslash (\) at the end of a line indicates that the next line is a continuation of the previous line. Refer to the section titled "Using crs_profile to Create An Application Resource Profile" on page 14-7 to see a profile example.
Security and PermissionsThe Oracle Clusterware uses UNIX-like security where permissions may be specified for the owner, nodes of a group, or holders of specific privileges. There may also be default permissions for other users. These permissions are read, write, and run on Windows-based systems, and rwx on UNIX-based systems. Default ownership and permissions are set when you create an application profile. Table B–1 shows the Oracle Clusterware commands and their owners as well as which commands require write permission and which commands require run permission.
See Also: Chapter 14, "Making Applications Highly Available Using Oracle Clusterware" for detailed information about using Oracle Clusterware to make applications highly available and Appendix C, "Oracle Clusterware Messages" for information about Oracle Clusterware error messages
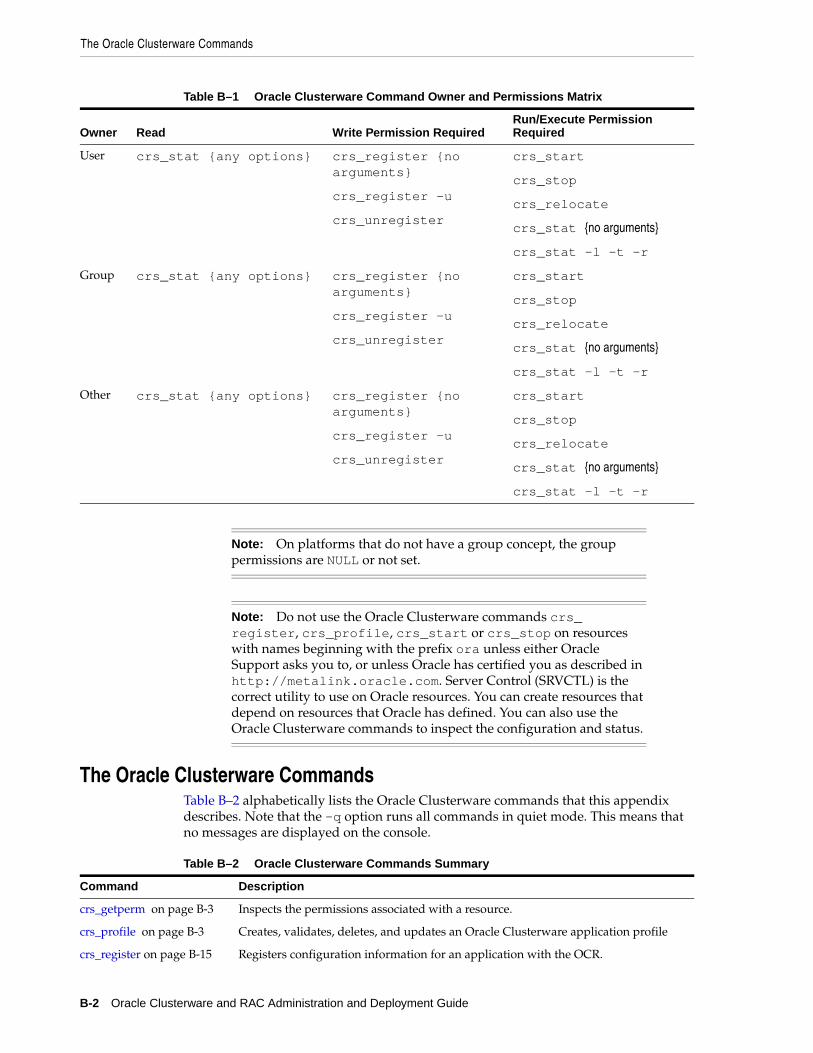
The Oracle Clusterware Commands
B-2 Oracle Clusterware and RAC Administration and Deployment Guide
The Oracle Clusterware CommandsTable B–2 alphabetically lists the Oracle Clusterware commands that this appendix describes. Note that the -q option runs all commands in quiet mode. This means that no messages are displayed on the console.
Table B–1 Oracle Clusterware Command Owner and Permissions Matrix
Owner Read Write Permission RequiredRun/Execute Permission Required
User crs_stat {any options} crs_register {no arguments}
crs_register -u
crs_unregister
crs_start
crs_stop
crs_relocate
crs_stat {no arguments}
crs_stat -l -t -r
Group crs_stat {any options} crs_register {no arguments}
crs_register -u
crs_unregister
crs_start
crs_stop
crs_relocate
crs_stat {no arguments}
crs_stat -l -t -r
Other crs_stat {any options} crs_register {no arguments}
crs_register -u
crs_unregister
crs_start
crs_stop
crs_relocate
crs_stat {no arguments}
crs_stat -l -t -r
Note: On platforms that do not have a group concept, the group permissions are NULL or not set.
Note: Do not use the Oracle Clusterware commands crs_register, crs_profile, crs_start or crs_stop on resources with names beginning with the prefix ora unless either Oracle Support asks you to, or unless Oracle has certified you as described in http://metalink.oracle.com. Server Control (SRVCTL) is the correct utility to use on Oracle resources. You can create resources that depend on resources that Oracle has defined. You can also use the Oracle Clusterware commands to inspect the configuration and status.
Table B–2 Oracle Clusterware Commands Summary
Command Description
crs_getperm on page B-3 Inspects the permissions associated with a resource.
crs_profile on page B-3 Creates, validates, deletes, and updates an Oracle Clusterware application profile
crs_register on page B-15 Registers configuration information for an application with the OCR.
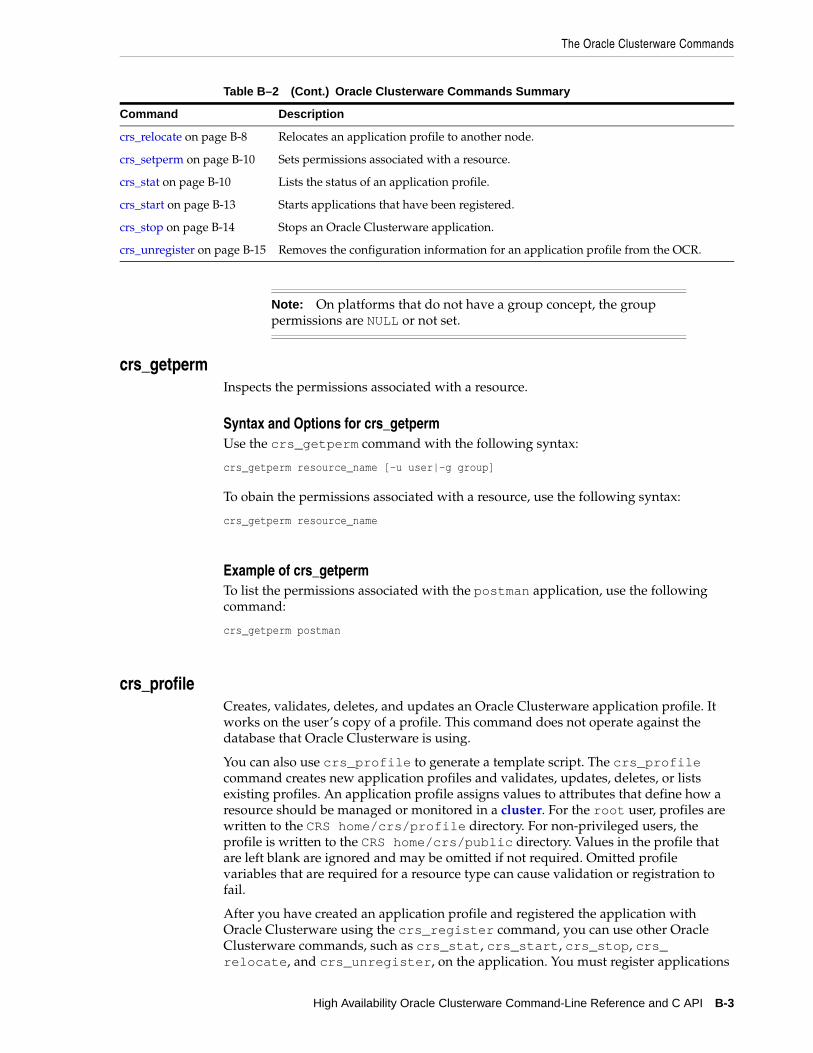
The Oracle Clusterware Commands
High Availability Oracle Clusterware Command-Line Reference and C API B-3
crs_getpermInspects the permissions associated with a resource.
Syntax and Options for crs_getpermUse the crs_getperm command with the following syntax:
crs_getperm resource_name [-u user|-g group]
To obain the permissions associated with a resource, use the following syntax:
crs_getperm resource_name
Example of crs_getpermTo list the permissions associated with the postman application, use the following command:
crs_getperm postman
crs_profileCreates, validates, deletes, and updates an Oracle Clusterware application profile. It works on the user’s copy of a profile. This command does not operate against the database that Oracle Clusterware is using.
You can also use crs_profile to generate a template script. The crs_profile command creates new application profiles and validates, updates, deletes, or lists existing profiles. An application profile assigns values to attributes that define how a resource should be managed or monitored in a cluster. For the root user, profiles are written to the CRS home/crs/profile directory. For non-privileged users, the profile is written to the CRS home/crs/public directory. Values in the profile that are left blank are ignored and may be omitted if not required. Omitted profile variables that are required for a resource type can cause validation or registration to fail.
After you have created an application profile and registered the application with Oracle Clusterware using the crs_register command, you can use other Oracle Clusterware commands, such as crs_stat, crs_start, crs_stop, crs_relocate, and crs_unregister, on the application. You must register applications
crs_relocate on page B-8 Relocates an application profile to another node.
crs_setperm on page B-10 Sets permissions associated with a resource.
crs_stat on page B-10 Lists the status of an application profile.
crs_start on page B-13 Starts applications that have been registered.
crs_stop on page B-14 Stops an Oracle Clusterware application.
crs_unregister on page B-15 Removes the configuration information for an application profile from the OCR.
Note: On platforms that do not have a group concept, the group permissions are NULL or not set.
Table B–2 (Cont.) Oracle Clusterware Commands Summary
Command Description

The Oracle Clusterware Commands
B-4 Oracle Clusterware and RAC Administration and Deployment Guide
using the crs_register command before the other Oracle Clusterware commands are available to manage the application. The crs_profile command may have other options for defining user-defined attributes in a profile.
Syntax and Options for crs_profileUse the crs_profile command with the following syntax to create an application profile template:
crs_profile -create resource_name -t application [-a action_script] [-B executable_pathname] [-dir directory] [-d description] [-p placement_policy] [-h hosting_nodes] [-r required_resources] [-l optional_resources] [-o option,[...]] [attribute_flag attribute_value] [...] [-f] [-q]
To create an application profile from an application profile template:
crs_profile -create resource_name -I template_file [-f] [-q]
To validate the application profile syntax of a profile, enter the following command:
crs_profile -validate resource_name [-q]
To list one or more application profiles:
crs_profile -print [resource_name [...]] [-q]
To create an application profile template from an existing application profile:
crs_profile -template resource_name [-O template_file] [-q]
To update an application profile:
crs_profile -update resource_name [option [...]] [-q]
To delete an application profile and its associated action program:
crs_profile -delete resource_name [-q]
Note: The crs_profile -delete command deletes the resource profile file but does not delete the action script file.
Table B–3 crs_profile Options
Option Description
-create resource_name
Creates a resource for the indicated application according to the specified options. A resource_name is a string containing a combination of characters [a-z, A-Z, 0-9, '.','_']. The resource name may not start with a period (.). The maximum length for a resource name is 128 characters. Resource profiles are created in the directory that you specify.
-t application Indicates an application or application resource type.
[-a action_script] Specifies the action program for the application. An action program has start, stop, and check entry points that are called by Oracle Clusterware. You can specify either a full path name for the script file or its filename.
[-B executable_pathname]
Specifies the location of the application executable and causes the crs_profile command to generate an action program file that contains the application executable path name.
[-dir directory] Specifies the file location.
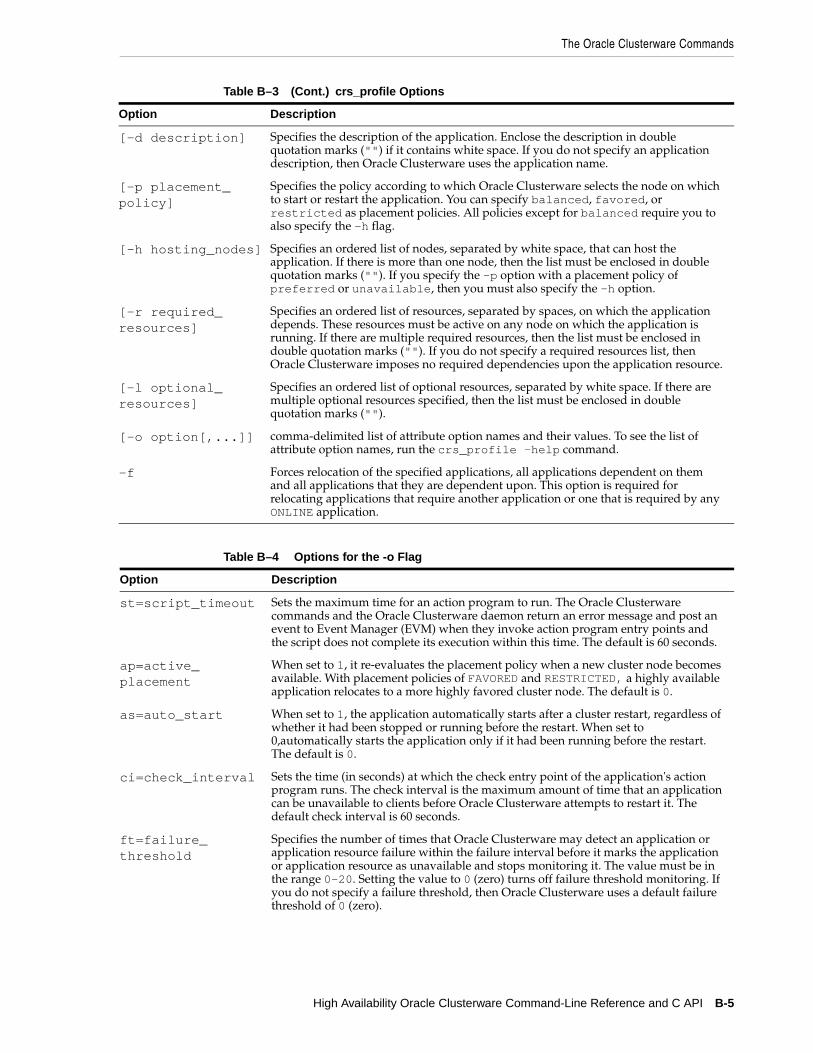
The Oracle Clusterware Commands
High Availability Oracle Clusterware Command-Line Reference and C API B-5
[-d description] Specifies the description of the application. Enclose the description in double quotation marks ("") if it contains white space. If you do not specify an application description, then Oracle Clusterware uses the application name.
[-p placement_policy]
Specifies the policy according to which Oracle Clusterware selects the node on which to start or restart the application. You can specify balanced, favored, or restricted as placement policies. All policies except for balanced require you to also specify the -h flag.
[-h hosting_nodes] Specifies an ordered list of nodes, separated by white space, that can host the application. If there is more than one node, then the list must be enclosed in double quotation marks (""). If you specify the -p option with a placement policy of preferred or unavailable, then you must also specify the -h option.
[-r required_resources]
Specifies an ordered list of resources, separated by spaces, on which the application depends. These resources must be active on any node on which the application is running. If there are multiple required resources, then the list must be enclosed in double quotation marks (""). If you do not specify a required resources list, then Oracle Clusterware imposes no required dependencies upon the application resource.
[-l optional_resources]
Specifies an ordered list of optional resources, separated by white space. If there are multiple optional resources specified, then the list must be enclosed in double quotation marks ("").
[-o option[,...]] comma-delimited list of attribute option names and their values. To see the list of attribute option names, run the crs_profile -help command.
-f Forces relocation of the specified applications, all applications dependent on them and all applications that they are dependent upon. This option is required for relocating applications that require another application or one that is required by any ONLINE application.
Table B–4 Options for the -o Flag
Option Description
st=script_timeout Sets the maximum time for an action program to run. The Oracle Clusterware commands and the Oracle Clusterware daemon return an error message and post an event to Event Manager (EVM) when they invoke action program entry points and the script does not complete its execution within this time. The default is 60 seconds.
ap=active_placement
When set to 1, it re-evaluates the placement policy when a new cluster node becomes available. With placement policies of FAVORED and RESTRICTED, a highly available application relocates to a more highly favored cluster node. The default is 0.
as=auto_start When set to 1, the application automatically starts after a cluster restart, regardless of whether it had been stopped or running before the restart. When set to 0,automatically starts the application only if it had been running before the restart. The default is 0.
ci=check_interval Sets the time (in seconds) at which the check entry point of the application's action program runs. The check interval is the maximum amount of time that an application can be unavailable to clients before Oracle Clusterware attempts to restart it. The default check interval is 60 seconds.
ft=failure_threshold
Specifies the number of times that Oracle Clusterware may detect an application or application resource failure within the failure interval before it marks the application or application resource as unavailable and stops monitoring it. The value must be in the range 0-20. Setting the value to 0 (zero) turns off failure threshold monitoring. If you do not specify a failure threshold, then Oracle Clusterware uses a default failure threshold of 0 (zero).
Table B–3 (Cont.) crs_profile Options
Option Description
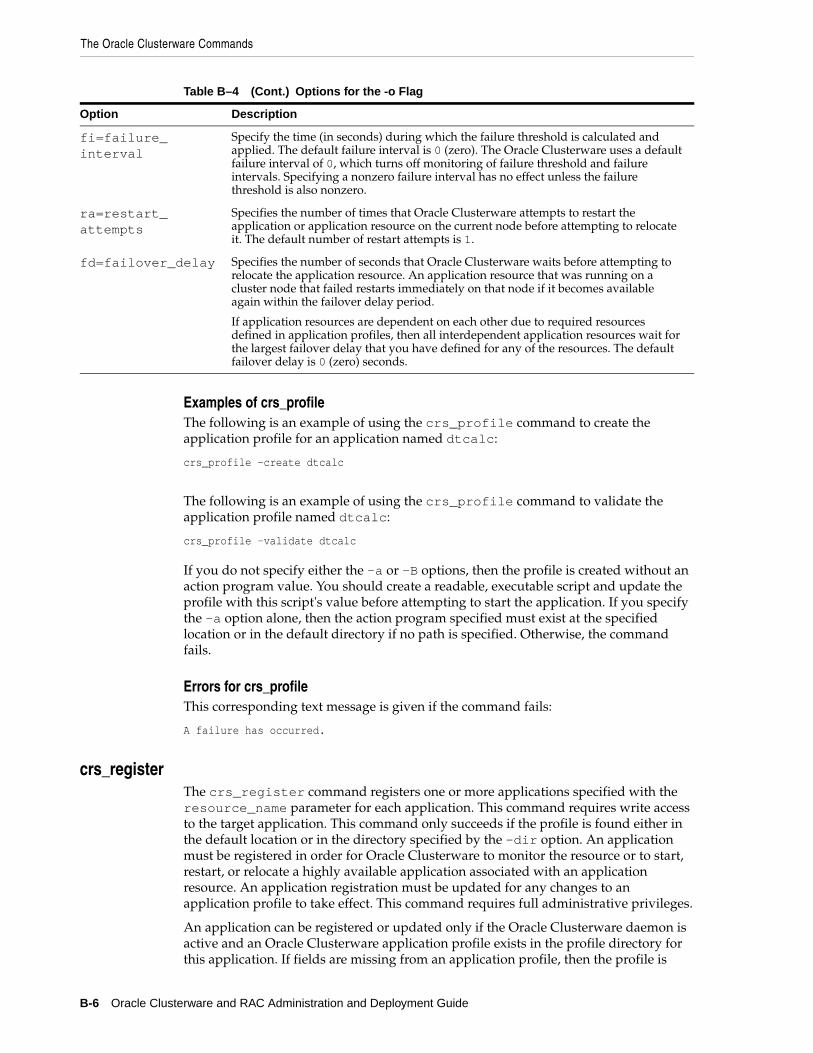
The Oracle Clusterware Commands
B-6 Oracle Clusterware and RAC Administration and Deployment Guide
Examples of crs_profileThe following is an example of using the crs_profile command to create the application profile for an application named dtcalc:
crs_profile -create dtcalc
The following is an example of using the crs_profile command to validate the application profile named dtcalc:
crs_profile -validate dtcalc
If you do not specify either the -a or -B options, then the profile is created without an action program value. You should create a readable, executable script and update the profile with this script's value before attempting to start the application. If you specify the -a option alone, then the action program specified must exist at the specified location or in the default directory if no path is specified. Otherwise, the command fails.
Errors for crs_profileThis corresponding text message is given if the command fails:
A failure has occurred.
crs_registerThe crs_register command registers one or more applications specified with the resource_name parameter for each application. This command requires write access to the target application. This command only succeeds if the profile is found either in the default location or in the directory specified by the -dir option. An application must be registered in order for Oracle Clusterware to monitor the resource or to start, restart, or relocate a highly available application associated with an application resource. An application registration must be updated for any changes to an application profile to take effect. This command requires full administrative privileges.
An application can be registered or updated only if the Oracle Clusterware daemon is active and an Oracle Clusterware application profile exists in the profile directory for this application. If fields are missing from an application profile, then the profile is
fi=failure_interval
Specify the time (in seconds) during which the failure threshold is calculated and applied. The default failure interval is 0 (zero). The Oracle Clusterware uses a default failure interval of 0, which turns off monitoring of failure threshold and failure intervals. Specifying a nonzero failure interval has no effect unless the failure threshold is also nonzero.
ra=restart_attempts
Specifies the number of times that Oracle Clusterware attempts to restart the application or application resource on the current node before attempting to relocate it. The default number of restart attempts is 1.
fd=failover_delay Specifies the number of seconds that Oracle Clusterware waits before attempting to relocate the application resource. An application resource that was running on a cluster node that failed restarts immediately on that node if it becomes available again within the failover delay period.
If application resources are dependent on each other due to required resources defined in application profiles, then all interdependent application resources wait for the largest failover delay that you have defined for any of the resources. The default failover delay is 0 (zero) seconds.
Table B–4 (Cont.) Options for the -o Flag
Option Description
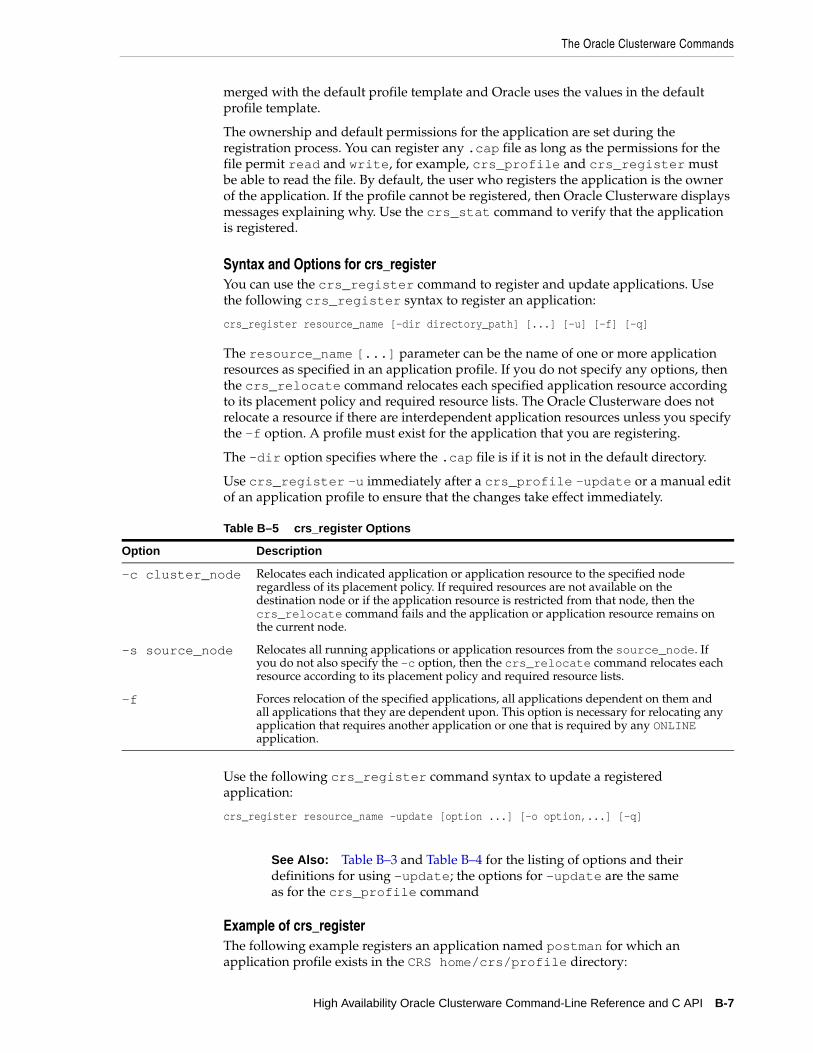
The Oracle Clusterware Commands
High Availability Oracle Clusterware Command-Line Reference and C API B-7
merged with the default profile template and Oracle uses the values in the default profile template.
The ownership and default permissions for the application are set during the registration process. You can register any .cap file as long as the permissions for the file permit read and write, for example, crs_profile and crs_register must be able to read the file. By default, the user who registers the application is the owner of the application. If the profile cannot be registered, then Oracle Clusterware displays messages explaining why. Use the crs_stat command to verify that the application is registered.
Syntax and Options for crs_registerYou can use the crs_register command to register and update applications. Use the following crs_register syntax to register an application:
crs_register resource_name [-dir directory_path] [...] [-u] [-f] [-q]
The resource_name [...] parameter can be the name of one or more application resources as specified in an application profile. If you do not specify any options, then the crs_relocate command relocates each specified application resource according to its placement policy and required resource lists. The Oracle Clusterware does not relocate a resource if there are interdependent application resources unless you specify the -f option. A profile must exist for the application that you are registering.
The -dir option specifies where the .cap file is if it is not in the default directory.
Use crs_register -u immediately after a crs_profile -update or a manual edit of an application profile to ensure that the changes take effect immediately.
Use the following crs_register command syntax to update a registered application:
crs_register resource_name -update [option ...] [-o option,...] [-q]
Example of crs_registerThe following example registers an application named postman for which an application profile exists in the CRS home/crs/profile directory:
Table B–5 crs_register Options
Option Description
-c cluster_node Relocates each indicated application or application resource to the specified node regardless of its placement policy. If required resources are not available on the destination node or if the application resource is restricted from that node, then the crs_relocate command fails and the application or application resource remains on the current node.
-s source_node Relocates all running applications or application resources from the source_node. If you do not also specify the -c option, then the crs_relocate command relocates each resource according to its placement policy and required resource lists.
-f Forces relocation of the specified applications, all applications dependent on them and all applications that they are dependent upon. This option is necessary for relocating any application that requires another application or one that is required by any ONLINE application.
See Also: Table B–3 and Table B–4 for the listing of options and their definitions for using -update; the options for -update are the same as for the crs_profile command
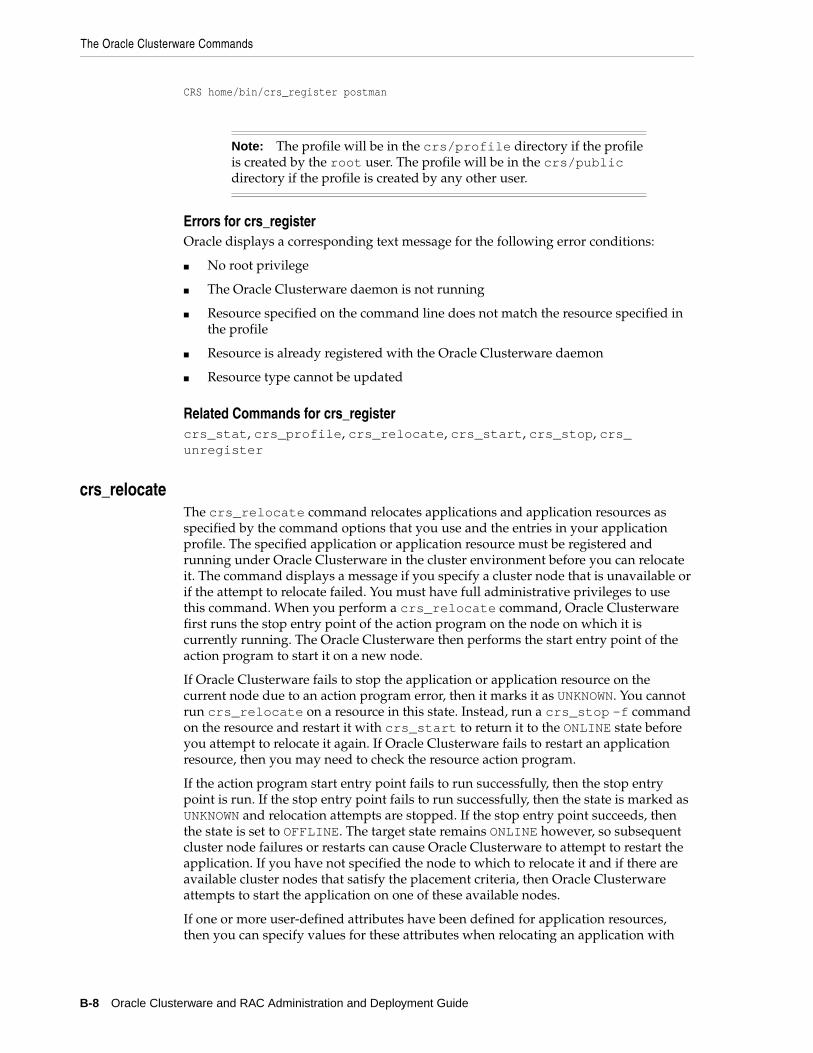
The Oracle Clusterware Commands
B-8 Oracle Clusterware and RAC Administration and Deployment Guide
CRS home/bin/crs_register postman
Errors for crs_registerOracle displays a corresponding text message for the following error conditions:
■ No root privilege
■ The Oracle Clusterware daemon is not running
■ Resource specified on the command line does not match the resource specified in the profile
■ Resource is already registered with the Oracle Clusterware daemon
■ Resource type cannot be updated
Related Commands for crs_registercrs_stat, crs_profile, crs_relocate, crs_start, crs_stop, crs_unregister
crs_relocateThe crs_relocate command relocates applications and application resources as specified by the command options that you use and the entries in your application profile. The specified application or application resource must be registered and running under Oracle Clusterware in the cluster environment before you can relocate it. The command displays a message if you specify a cluster node that is unavailable or if the attempt to relocate failed. You must have full administrative privileges to use this command. When you perform a crs_relocate command, Oracle Clusterware first runs the stop entry point of the action program on the node on which it is currently running. The Oracle Clusterware then performs the start entry point of the action program to start it on a new node.
If Oracle Clusterware fails to stop the application or application resource on the current node due to an action program error, then it marks it as UNKNOWN. You cannot run crs_relocate on a resource in this state. Instead, run a crs_stop -f command on the resource and restart it with crs_start to return it to the ONLINE state before you attempt to relocate it again. If Oracle Clusterware fails to restart an application resource, then you may need to check the resource action program.
If the action program start entry point fails to run successfully, then the stop entry point is run. If the stop entry point fails to run successfully, then the state is marked as UNKNOWN and relocation attempts are stopped. If the stop entry point succeeds, then the state is set to OFFLINE. The target state remains ONLINE however, so subsequent cluster node failures or restarts can cause Oracle Clusterware to attempt to restart the application. If you have not specified the node to which to relocate it and if there are available cluster nodes that satisfy the placement criteria, then Oracle Clusterware attempts to start the application on one of these available nodes.
If one or more user-defined attributes have been defined for application resources, then you can specify values for these attributes when relocating an application with
Note: The profile will be in the crs/profile directory if the profile is created by the root user. The profile will be in the crs/public directory if the profile is created by any other user.

The Oracle Clusterware Commands
High Availability Oracle Clusterware Command-Line Reference and C API B-9
the crs_relocate command. The specified value is passed to the action program as an environment variable with the attribute name.
The actions that Oracle Clusterware takes while relocating an application resource are echoed on the command line. You can also monitor them using the Event Manager (EVM). Standard error and standard output from a resource action program that is started by the crs_relocate command are redirected to the standard error and standard output for crs_relocate. Note that if the Oracle Clusterware daemon starts an application, then standard error and standard output of the action program is lost. Within an action program, you can check for user invocation of the action program using reason codes.
Syntax and Options for crs_relocateUse the crs_relocate command with the following syntax:
crs_relocate resource_name [...] [-c cluster_node] [-f] [-q]
crs_relocate resource_name [-c cluster_node] [-q]
crs_relocate [USR_attribute_name=value] [...] resource_name [-c cluster_node] [-q]
crs_relocate -s source_node [-c cluster_node] [-q]
Example of crs_relocateThe following example relocates an application resource to the node known as rac1:
crs_relocate postman -c rac1Attempting to stop `postman` on node `rac2`Stop of `postman` on node `rac1` succeededAttempting to start `postman` on node `rac1`Start of `postman` on node `rac1` succeeded
The following example attempts to relocate all application resources from node rac2 to node rac1:
crs_relocate -s rac2 -c rac1Attempting to stop `postman` on node `rac2`Stop of `postman` on node `rac2` succeeded.Attempting to start `postman` on node `rac1`Start of `postman` on node `rac1` succeeded.Attempting to stop `calc` on node `rac2`Stop of `calc` on node `rac2` succeeded.Attempting to start `calc` on node `rac1`Start of `calc` on node `rac1` succeeded.
Table B–6 crs_relocate Options
Option Description
-ls Lists resources, owners, and permissions for all resources.
-ls resource_name Lists resources, owners, and permissions for a specified resource.
-t Lists information for all resources in a tabular form.
-v Lists how many times a resource has been restarted or has failed within the resource failure interval; the maximum number of times that a resource can be restarted or can fail; and the target state of the application. Also lists normal status information.
The Oracle Clusterware Commands
B-10 Oracle Clusterware and RAC Administration and Deployment Guide
If a user-defined attribute USR_DEBUG has been defined, then the following example runs the stop and start entry point of the action program with the USR_DEBUG environment variable set to FALSE. This overrides any value set in the application profile. In the corresponding action program, if you add the following line to the appropriate section of the action program, then you can view the value:
echo $USR_DEBUG
Then run the following command:
# crs_relocate USR_DEBUG=false database
Errors for crs_relocateOracle displays a corresponding text message for the following error conditions:
■ No root privilege
■ Application is not running
■ Cluster node intended for relocation is not available
■ Relocation failed
crs_setpermModifies the permissions associated with a resource. This command is similar to the chmod command in UNIX-based systems or the Windows desktop options, in this order: File, Properties, Security, and Permissions.
Syntax and Options for crs_setpermUse the crs_setperm command with the following syntax:
crs_setperm resource_name -u aclstring [-q]crs_setperm resource_name -x aclstring [-q]crs_setperm resource_name -o user_name [-q]crs_setperm resource_name -g group_name [-q]
In the previous example syntax, -u updates the acl string, -x deletes the acl string, -o changes the owner of the resource, and -g changes the primary group of the resource, and aclstring is one of the following:
user:username:rwxgroup:groupname:r-xother::r--
Example of crs_setpermThe following example modifies the permissions on the admin1 user for the postman application:
crs_setperm postman -u user:admin1:r-x
crs_statThe crs_stat command provides status information for resources on the cluster nodes. To query resources with the crs_stat command, resource files must have
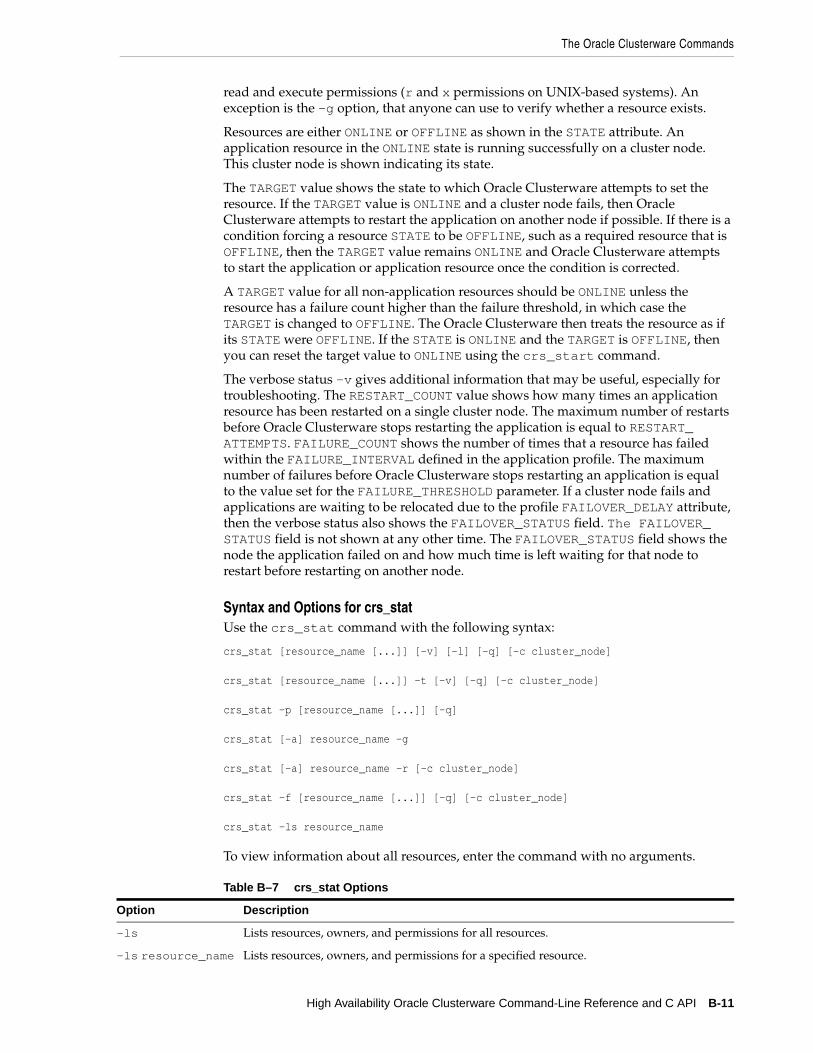
The Oracle Clusterware Commands
High Availability Oracle Clusterware Command-Line Reference and C API B-11
read and execute permissions (r and x permissions on UNIX-based systems). An exception is the -g option, that anyone can use to verify whether a resource exists.
Resources are either ONLINE or OFFLINE as shown in the STATE attribute. An application resource in the ONLINE state is running successfully on a cluster node. This cluster node is shown indicating its state.
The TARGET value shows the state to which Oracle Clusterware attempts to set the resource. If the TARGET value is ONLINE and a cluster node fails, then Oracle Clusterware attempts to restart the application on another node if possible. If there is a condition forcing a resource STATE to be OFFLINE, such as a required resource that is OFFLINE, then the TARGET value remains ONLINE and Oracle Clusterware attempts to start the application or application resource once the condition is corrected.
A TARGET value for all non-application resources should be ONLINE unless the resource has a failure count higher than the failure threshold, in which case the TARGET is changed to OFFLINE. The Oracle Clusterware then treats the resource as if its STATE were OFFLINE. If the STATE is ONLINE and the TARGET is OFFLINE, then you can reset the target value to ONLINE using the crs_start command.
The verbose status -v gives additional information that may be useful, especially for troubleshooting. The RESTART_COUNT value shows how many times an application resource has been restarted on a single cluster node. The maximum number of restarts before Oracle Clusterware stops restarting the application is equal to RESTART_ATTEMPTS. FAILURE_COUNT shows the number of times that a resource has failed within the FAILURE_INTERVAL defined in the application profile. The maximum number of failures before Oracle Clusterware stops restarting an application is equal to the value set for the FAILURE_THRESHOLD parameter. If a cluster node fails and applications are waiting to be relocated due to the profile FAILOVER_DELAY attribute, then the verbose status also shows the FAILOVER_STATUS field. The FAILOVER_STATUS field is not shown at any other time. The FAILOVER_STATUS field shows the node the application failed on and how much time is left waiting for that node to restart before restarting on another node.
Syntax and Options for crs_statUse the crs_stat command with the following syntax:
crs_stat [resource_name [...]] [-v] [-l] [-q] [-c cluster_node]
crs_stat [resource_name [...]] -t [-v] [-q] [-c cluster_node]
crs_stat -p [resource_name [...]] [-q]
crs_stat [-a] resource_name -g
crs_stat [-a] resource_name -r [-c cluster_node]
crs_stat -f [resource_name [...]] [-q] [-c cluster_node]
crs_stat -ls resource_name
To view information about all resources, enter the command with no arguments.
Table B–7 crs_stat Options
Option Description
-ls Lists resources, owners, and permissions for all resources.
-ls resource_name Lists resources, owners, and permissions for a specified resource.
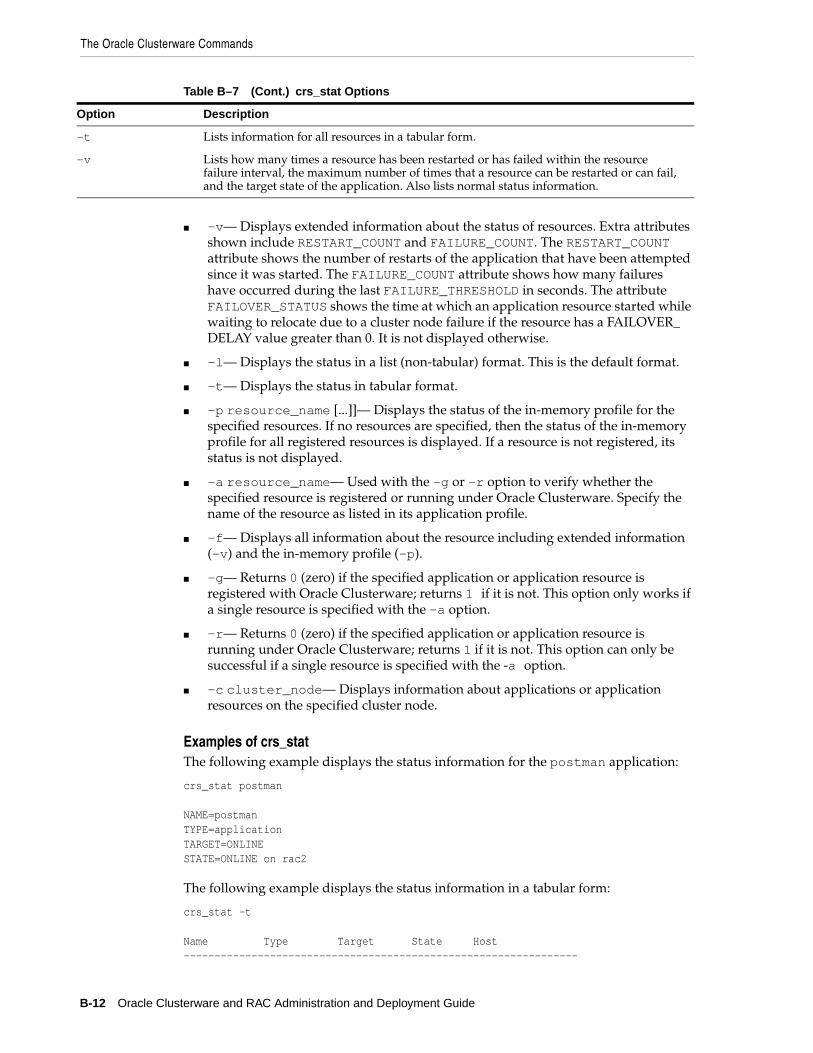
The Oracle Clusterware Commands
B-12 Oracle Clusterware and RAC Administration and Deployment Guide
■ -v— Displays extended information about the status of resources. Extra attributes shown include RESTART_COUNT and FAILURE_COUNT. The RESTART_COUNT attribute shows the number of restarts of the application that have been attempted since it was started. The FAILURE_COUNT attribute shows how many failures have occurred during the last FAILURE_THRESHOLD in seconds. The attribute FAILOVER_STATUS shows the time at which an application resource started while waiting to relocate due to a cluster node failure if the resource has a FAILOVER_DELAY value greater than 0. It is not displayed otherwise.
■ -l— Displays the status in a list (non-tabular) format. This is the default format.
■ -t— Displays the status in tabular format.
■ -p resource_name [...]]— Displays the status of the in-memory profile for the specified resources. If no resources are specified, then the status of the in-memory profile for all registered resources is displayed. If a resource is not registered, its status is not displayed.
■ -a resource_name— Used with the -g or -r option to verify whether the specified resource is registered or running under Oracle Clusterware. Specify the name of the resource as listed in its application profile.
■ -f— Displays all information about the resource including extended information (-v) and the in-memory profile (-p).
■ -g— Returns 0 (zero) if the specified application or application resource is registered with Oracle Clusterware; returns 1 if it is not. This option only works if a single resource is specified with the -a option.
■ -r— Returns 0 (zero) if the specified application or application resource is running under Oracle Clusterware; returns 1 if it is not. This option can only be successful if a single resource is specified with the -a option.
■ -c cluster_node— Displays information about applications or application resources on the specified cluster node.
Examples of crs_statThe following example displays the status information for the postman application:
crs_stat postman
NAME=postmanTYPE=applicationTARGET=ONLINESTATE=ONLINE on rac2
The following example displays the status information in a tabular form:
crs_stat -t
Name Type Target State Host----------------------------------------------------------------
-t Lists information for all resources in a tabular form.
-v Lists how many times a resource has been restarted or has failed within the resource failure interval, the maximum number of times that a resource can be restarted or can fail, and the target state of the application. Also lists normal status information.
Table B–7 (Cont.) crs_stat Options
Option Description
The Oracle Clusterware Commands
High Availability Oracle Clusterware Command-Line Reference and C API B-13
cluster_lockd application ONLINE ONLINE rac2dhcp application OFFLINE OFFLINE
The following example shows the output for the command crs_stat with the -v option for the node rac2:
crs_stat -v
NAME=cluster_lockdTYPE=applicationRESTART_ATTEMPTS=30RESTART_COUNT=0FAILURE_THRESHOLD=0FAILURE_COUNT=0TARGET=ONLINESTATE=ONLINE on rac2
crs_startThe crs_start command sets an application or application resource target state to ONLINE and attempts to start specified registered applications or application resources. The target state is the state that Oracle Clusterware attempts to achieve. You must have full administrative privileges to use this command.
There are several user-defined attributes available for starting an application with crs_start. The specified value is passed to the action program as an environment variable with the attribute name.
If you do not specify one node on which to start the application and there are available cluster nodes that satisfy the placement criteria, then Oracle Clusterware attempts to start the application on one of the available nodes. You must stop a resource that has failed before restarting it. You should also confirm why your action program is failing.
The crs_start command starts dependent resources as defined in the application profile REQUIRED_RESOURCE fields. After a registered resource is started, you must use the crs_stop command to end its execution.
The crs_start command displays status messages and if there are problems starting an application, then feedback is displayed. If network, tape, or media changer resources are defined as required resources for an application or as an application resource that is started, then messages stating that Oracle Clusterware is attempting to start these non-application resources appear. The Oracle Clusterware is not actually attempting to start these resources, but is testing the state of the devices. You can ignore these messages.
Standard error and standard output from a resource action program invoked by crs_start are redirected to the standard error and standard output for crs_start. Note that if the Oracle Clusterware daemon starts an application, then standard error and standard output of the action program is lost. Within an action program, you can check for user invocation of the action program using reason codes.
Syntax and Options for crs_startcrs_start resource_name [...] [-c cluster_node] [-q] [-f]
crs_start -all [-q]
crs_start [USR_attribute_name=value] [...] resource_name [-c node_name] [-q]
The Oracle Clusterware Commands
B-14 Oracle Clusterware and RAC Administration and Deployment Guide
For resource_name [...], the names are as specified in an application profile of one or more resources to be started. The resource must be registered with Oracle Clusterware. You can use the following options:
■ -c node_name—Starts each indicated resource on the specified node if the cluster node is enabled by the placement policy and resource dependencies. If the cluster node specified is not enabled by the placement policy and resource dependencies, then the crs_start command fails. If the specified node is not available, the command fails. If one of the specified resources fails to start, then the command still attempts to start other resources listed on the command line.
■ -all—Starts all registered Oracle Clusterware applications or application resources on active cluster nodes, according to their placement policies and required resource lists.
■ -q—Runs the crs_start command in quiet mode; no messages are displayed.
■ -f—Forces starting of a specified application or application resource if all of the required resources are available or can be started. Any applications or application resources in the specified application profile's required resource list are started if not currently running or are relocated if they are running on another cluster node. Use this option with only one specified application resource at a time.
Examples of crs_startThe following example starts an application named postman:
crs_start postmanAttempting to start `postman` on node `rac1`Start of `postman` on node `rac1` succeeded.
The following example starts the application on a specific cluster node rac2:
crs_start -c rac2 postmanAttempting to start `postman` on node `rac2`Start of `postman` on node `rac2` succeeded.
Errors for crs_startA failure has occurred. Oracle displays a corresponding text message for the following error conditions:
■ No root privilege
■ The Oracle Clusterware daemon is not running
■ The application is running
■ A start action program is not found
■ The cluster node was specified and it was not available
■ A timeout was reached before the startup was unsuccessful
crs_stopStops an application on the specified node. You can run the crs_stat command to verify that the application you specify is stopped.
Syntax and Options for crs_stopUse the crs_stop command with the following syntax:
crs_stop resource_name [...] [-f] [-q]

The Oracle Clusterware Commands
High Availability Oracle Clusterware Command-Line Reference and C API B-15
crs_stop -c cluster_node [...] [-q]
crs_stop -all [-q]
crs_stop [USR_attribute_name=value] [...] resource_name [-q]
-c cluster_node [...]
Specifies one or more active cluster nodes on which to stop all of the applications or application resources. You can use the following options:
■ -all—Stops all applications or application resources on all active cluster nodes.
■ -f—Forces termination of the indicated applications or application resources and all application resources dependent on the specified resources. This option is useful to stop all application resources when the crs_stop command fails because of application resources that are dependent on the specified resource or if the application is in the UNKNOWN state because of an unsuccessful stop. This option makes crs_stop ignore any errors that are reported by an action program.
Examples of crs_stopTo stop an application named dtcalc, enter the following command:
crs_stop dtcalc
The Oracle Clusterware displays status messages as follows:
Attempting to stop `dtcalc` on node `rac2`Stop of `dtcalc` on node `rac2` succeeded.
crs_unregisterThe crs_unregister command removes the registration information of Oracle Clusterware resources from the binary Oracle Clusterware registry database. The Oracle Clusterware will no longer acknowledge this resource. An application associated with a resource that is unregistered is no longer highly available. You must have full administrative privileges to use this command.
Upon successful completion of the crs_unregister command, the resource is removed from the online Oracle Clusterware environment. You cannot unregister a resource that is a required resource for another resource. You must stop the resource by using the crs_stop command before unregistering it.
Syntax and Options for crs_unregisterUse the crs_unregister command with the following syntax:
crs_unregister resource_name [...] [-q]
The only option available for this command is -q, that runs the crs_unregister command in quiet mode, which means no messages are displayed.
Example of crs_unregisterThe following example unregisters a highly available application called postman:
crs_unregister postman
C Application Programming Interface to Oracle Clusterware
B-16 Oracle Clusterware and RAC Administration and Deployment Guide
Errors for crs_unregisterOracle displays a corresponding text message for the following error conditions:
■ No root privilege
■ CAA daemon is not running
■ The application is running
■ The application is not registered
C Application Programming Interface to Oracle ClusterwareThe APIs described in this section provide access to operational control of resources that Oracle Clusterware manages. The API is used to register user applications to the Oracle Clusterware system so that they can be managed by Oracle Clusterware and made highly available. When an application is registered, the application can be started and its state queried. If the application is no longer to be run, it can be stopped and unregistered from Oracle Clusterware. The Oracle Clusterware services are provided by another process, such as the crsd process, running outside the database server. These APIs communicate with the crsd process using an IPC mechanism.
clscrs_init_crsInitializes a context for communications with Oracle Clusterware.
Parameters■ ctx—Context to initialize, caller allocated storage
■ errf—A Callback function for the error info, or NULL
■ errCtx—Context for the error callback func, or NULL
■ flags—CLSCRS_FLAG_TRACE, to enable tracing of lower layers
■ CLSCRS_FLAG_USETHREADS—Enables using the clscrs context in multiple threads
ReturnsStatus enum.
SyntaxCLSCRS_STAT clscrs_init_crs(clscrs_ctx **ctx, clscrs_msgf errf, void *errCtx, ub4 flags);
clscrs_term_crsReleases a context for communications with Oracle Clusterware.
Parameterctx—Context previously initialized with clscrs_init_crs.
See Also: Chapter 14, "Making Applications Highly Available Using Oracle Clusterware" for information about using the Oracle Clusterware commands
C Application Programming Interface to Oracle Clusterware
High Availability Oracle Clusterware Command-Line Reference and C API B-17
Returnsstatus enum
SyntaxCLSCRS_STAT clscrs_term_crs( clscrs_ctx **ctx);
clscrs_getnodenameReturns the correct node name. If you issue this command within a configured cluster, then this is the name as known to the clusterware. If not in a cluster, then the name is as known through other clusterware means. Getting a node name may require a lot of resources in the first call, especially if CLSCRS was not initialized with a pre-existing CSS context.
Parameters ■ ctx—Context previously initialized with clscrs_init
■ node_name—Filled in node name
SyntaxCLSCRS_STAT clscrs_getnodename(clscrs_ctx *ctx, oratext *node_name);
clscrs_env_createCreates a call environment describing the parameters to the Oracle Clusterware calls. The memory is owned by clscrs which is released by a call to clscrs_env_delete.
Parameters■ context—Input context
■ env—Output environment pointer
Returnsstatus enum
SyntaxCLSCRS_STAT clscrs_env_create( clscrs_ctx *ctx, clscrs_env *env );
clscrs_env_setSets an attribute or value argument in an environment for the Oracle Clusterware calls; the value may be NULL.
Parameters■ env—Previously created environment
■ attr—Attribute name
■ val—Attribute value, may be NULL pointer
C Application Programming Interface to Oracle Clusterware
B-18 Oracle Clusterware and RAC Administration and Deployment Guide
Returnsenvironment status enum
SyntaxCLSCRS_ENVCODE clscrs_env_set(clscrs_env env, const oratext *attr, const oratext *val);
clscrs_env_deleteDeletes an environment for the Oracle Clusterware calls. The environment must be created again before use. You cannot delete an environment and then set new parameters.
Parameters■ env—The environment whose contents are deleted
Returnsenvironment status enum.
SyntaxCLSCRS_ENVCODE clscrs_env_delete(clscrs_env env);
clscrs_env_formatCreates a callback with formatted environment lines.
Parameters■ env—Env to dump
■ msgf—Callback function
■ msgp—Argument to msgp, uninterpreted
ReturnsNone.
Syntaxvoid clscrs_env_format( clscrs_env env, clscrs_msgf msgf, void *msgp );
clscrs_start_resourceDirect Oracle Clusterware to start a named set of resources. If a host is specified, then start there, otherwise start according to the placement policy for the resources in question. If the flag is async, then msgf is never called and Oracle returns the OK status after initiating the call to Oracle Clusterware, and the actual starts are performed asynchronously, and msgf will never be called. If flag is not async and msgf is not NULL, then msgf will be driven one line at a time with collected output from the start programs.
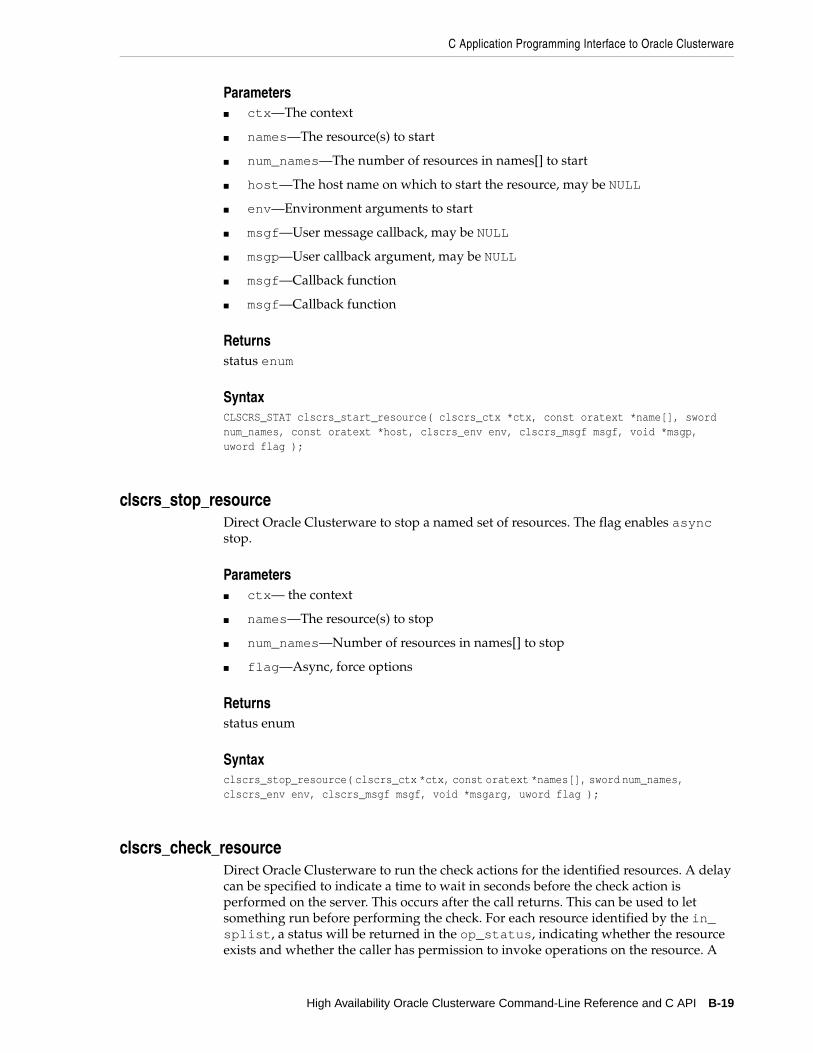
C Application Programming Interface to Oracle Clusterware
High Availability Oracle Clusterware Command-Line Reference and C API B-19
Parameters■ ctx—The context
■ names—The resource(s) to start
■ num_names—The number of resources in names[] to start
■ host—The host name on which to start the resource, may be NULL
■ env—Environment arguments to start
■ msgf—User message callback, may be NULL
■ msgp—User callback argument, may be NULL
■ msgf—Callback function
■ msgf—Callback function
Returnsstatus enum
SyntaxCLSCRS_STAT clscrs_start_resource( clscrs_ctx *ctx, const oratext *name[], sword num_names, const oratext *host, clscrs_env env, clscrs_msgf msgf, void *msgp, uword flag );
clscrs_stop_resourceDirect Oracle Clusterware to stop a named set of resources. The flag enables async stop.
Parameters■ ctx— the context
■ names—The resource(s) to stop
■ num_names—Number of resources in names[] to stop
■ flag—Async, force options
Returnsstatus enum
Syntaxclscrs_stop_resource( clscrs_ctx *ctx, const oratext *names[], sword num_names, clscrs_env env, clscrs_msgf msgf, void *msgarg, uword flag );
clscrs_check_resourceDirect Oracle Clusterware to run the check actions for the identified resources. A delay can be specified to indicate a time to wait in seconds before the check action is performed on the server. This occurs after the call returns. This can be used to let something run before performing the check. For each resource identified by the in_splist, a status will be returned in the op_status, indicating whether the resource exists and whether the caller has permission to invoke operations on the resource. A
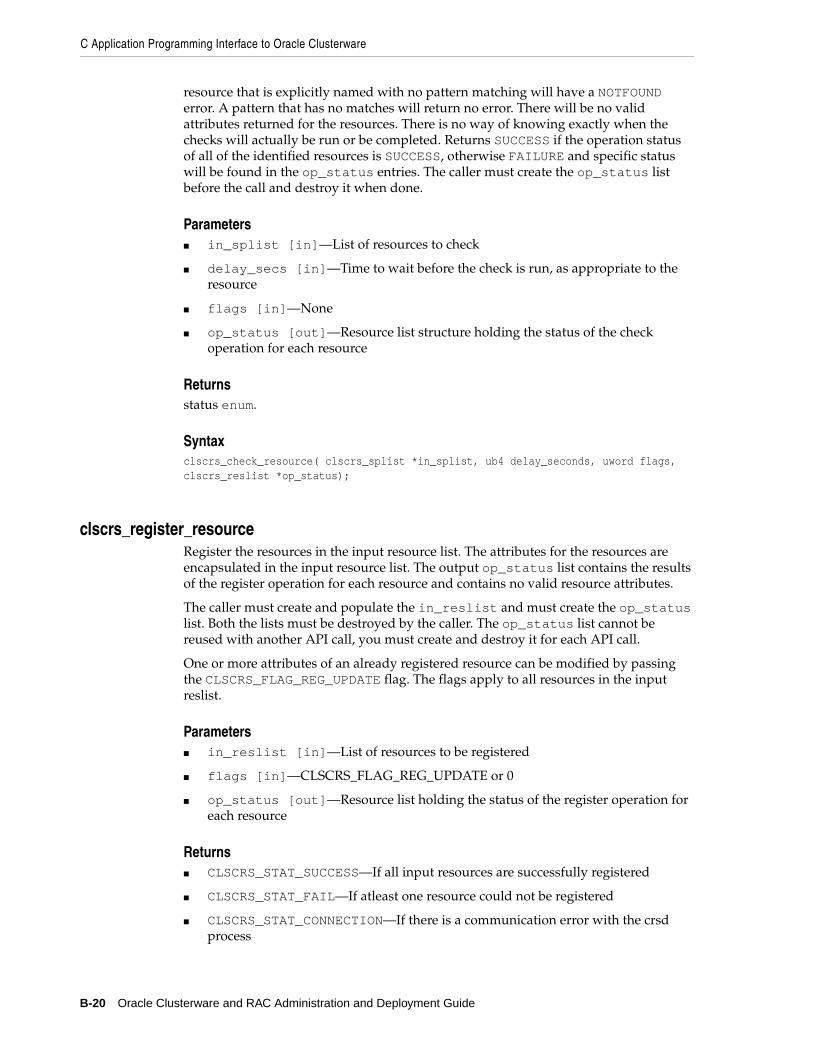
C Application Programming Interface to Oracle Clusterware
B-20 Oracle Clusterware and RAC Administration and Deployment Guide
resource that is explicitly named with no pattern matching will have a NOTFOUND error. A pattern that has no matches will return no error. There will be no valid attributes returned for the resources. There is no way of knowing exactly when the checks will actually be run or be completed. Returns SUCCESS if the operation status of all of the identified resources is SUCCESS, otherwise FAILURE and specific status will be found in the op_status entries. The caller must create the op_status list before the call and destroy it when done.
Parameters■ in_splist [in]—List of resources to check
■ delay_secs [in]—Time to wait before the check is run, as appropriate to the resource
■ flags [in]—None
■ op_status [out]—Resource list structure holding the status of the check operation for each resource
Returnsstatus enum.
Syntaxclscrs_check_resource( clscrs_splist *in_splist, ub4 delay_seconds, uword flags, clscrs_reslist *op_status);
clscrs_register_resourceRegister the resources in the input resource list. The attributes for the resources are encapsulated in the input resource list. The output op_status list contains the results of the register operation for each resource and contains no valid resource attributes.
The caller must create and populate the in_reslist and must create the op_status list. Both the lists must be destroyed by the caller. The op_status list cannot be reused with another API call, you must create and destroy it for each API call.
One or more attributes of an already registered resource can be modified by passing the CLSCRS_FLAG_REG_UPDATE flag. The flags apply to all resources in the input reslist.
Parameters ■ in_reslist [in]—List of resources to be registered
■ flags [in]—CLSCRS_FLAG_REG_UPDATE or 0
■ op_status [out]—Resource list holding the status of the register operation for each resource
Returns■ CLSCRS_STAT_SUCCESS—If all input resources are successfully registered
■ CLSCRS_STAT_FAIL—If atleast one resource could not be registered
■ CLSCRS_STAT_CONNECTION—If there is a communication error with the crsd process
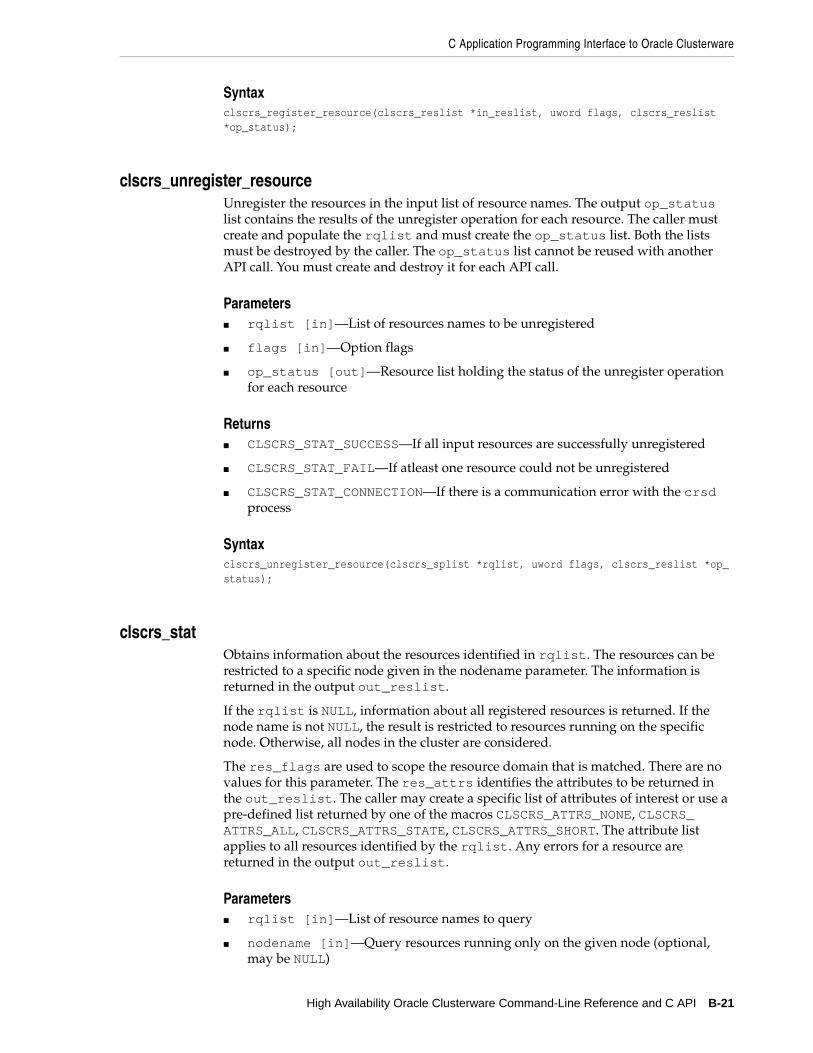
C Application Programming Interface to Oracle Clusterware
High Availability Oracle Clusterware Command-Line Reference and C API B-21
Syntaxclscrs_register_resource(clscrs_reslist *in_reslist, uword flags, clscrs_reslist *op_status);
clscrs_unregister_resourceUnregister the resources in the input list of resource names. The output op_status list contains the results of the unregister operation for each resource. The caller must create and populate the rqlist and must create the op_status list. Both the lists must be destroyed by the caller. The op_status list cannot be reused with another API call. You must create and destroy it for each API call.
Parameters■ rqlist [in]—List of resources names to be unregistered
■ flags [in]—Option flags
■ op_status [out]—Resource list holding the status of the unregister operation for each resource
Returns■ CLSCRS_STAT_SUCCESS—If all input resources are successfully unregistered
■ CLSCRS_STAT_FAIL—If atleast one resource could not be unregistered
■ CLSCRS_STAT_CONNECTION—If there is a communication error with the crsd process
Syntaxclscrs_unregister_resource(clscrs_splist *rqlist, uword flags, clscrs_reslist *op_status);
clscrs_statObtains information about the resources identified in rqlist. The resources can be restricted to a specific node given in the nodename parameter. The information is returned in the output out_reslist.
If the rqlist is NULL, information about all registered resources is returned. If the node name is not NULL, the result is restricted to resources running on the specific node. Otherwise, all nodes in the cluster are considered.
The res_flags are used to scope the resource domain that is matched. There are no values for this parameter. The res_attrs identifies the attributes to be returned in the out_reslist. The caller may create a specific list of attributes of interest or use a pre-defined list returned by one of the macros CLSCRS_ATTRS_NONE, CLSCRS_ATTRS_ALL, CLSCRS_ATTRS_STATE, CLSCRS_ATTRS_SHORT. The attribute list applies to all resources identified by the rqlist. Any errors for a resource are returned in the output out_reslist.
Parameters■ rqlist [in]—List of resource names to query
■ nodename [in]—Query resources running only on the given node (optional, may be NULL)
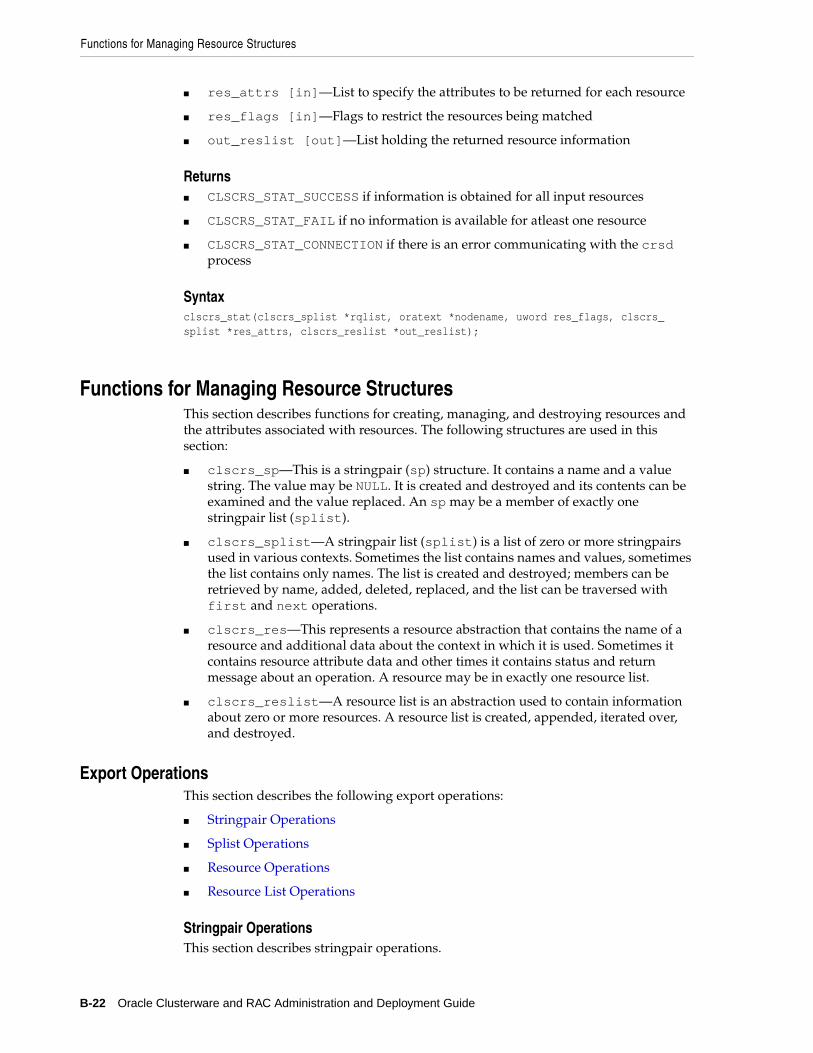
Functions for Managing Resource Structures
B-22 Oracle Clusterware and RAC Administration and Deployment Guide
■ res_attrs [in]—List to specify the attributes to be returned for each resource
■ res_flags [in]—Flags to restrict the resources being matched
■ out_reslist [out]—List holding the returned resource information
Returns■ CLSCRS_STAT_SUCCESS if information is obtained for all input resources
■ CLSCRS_STAT_FAIL if no information is available for atleast one resource
■ CLSCRS_STAT_CONNECTION if there is an error communicating with the crsd process
Syntaxclscrs_stat(clscrs_splist *rqlist, oratext *nodename, uword res_flags, clscrs_splist *res_attrs, clscrs_reslist *out_reslist);
Functions for Managing Resource StructuresThis section describes functions for creating, managing, and destroying resources and the attributes associated with resources. The following structures are used in this section:
■ clscrs_sp—This is a stringpair (sp) structure. It contains a name and a value string. The value may be NULL. It is created and destroyed and its contents can be examined and the value replaced. An sp may be a member of exactly one stringpair list (splist).
■ clscrs_splist—A stringpair list (splist) is a list of zero or more stringpairs used in various contexts. Sometimes the list contains names and values, sometimes the list contains only names. The list is created and destroyed; members can be retrieved by name, added, deleted, replaced, and the list can be traversed with first and next operations.
■ clscrs_res—This represents a resource abstraction that contains the name of a resource and additional data about the context in which it is used. Sometimes it contains resource attribute data and other times it contains status and return message about an operation. A resource may be in exactly one resource list.
■ clscrs_reslist—A resource list is an abstraction used to contain information about zero or more resources. A resource list is created, appended, iterated over, and destroyed.
Export OperationsThis section describes the following export operations:
■ Stringpair Operations
■ Splist Operations
■ Resource Operations
■ Resource List Operations
Stringpair OperationsThis section describes stringpair operations.

Functions for Managing Resource Structures
High Availability Oracle Clusterware Command-Line Reference and C API B-23
clscrs_sp_set Change the value part of a stringpair. The new value may be NULL. After the call returns, the memory of the value can be recycled.
Parameters
■ sp [in]—Stringpair to set the value for
■ value [in]—Value component of the stringpair (may be NULL)
Returns
■ clscrsretSUCC on success
■ clscrsretBADARG if the sp argument is NULL
Syntax
clscrsret clscrs_sp_set(clscrs_sp *sp, const oratext *value);
clscrs_sp_get Get the name and value components of a stringpair.
Parameters
■ sp [in]—Stringpair for which the name and value are being obtained
■ name [out]—Name component of the stringpair
■ value [out]—Value component of the stringpair (may be NULL)
Returns
■ clscrsretSUCC on success
■ clscrsretNOMEM if no memory can be allocated
■ clscrsretBADARG if the sp argument is NULL
Syntax
clscrsret clscrs_sp_get(clscrs_sp *sp, oratext **name, oratext **value);
clscrs_sp_get_value Get the value component of a stringpair.
Parameters
■ sp [in]—Stringpair for which the name and value are being obtained
■ value [out]—Value component of the stringpair (may be NULL)
Returns
■ clscrsretSUCC on success
■ clscrsretBADARG if the sp argument is NULL
Syntax
clscrsret clscrs_sp_get_value(clscrs_sp *sp, oratext **value);
Splist OperationsThis section describes the splist operations.
clscrs_splist_create Create a new stringpair list. The memory for the splist is allocated by the function.
Parameters

Functions for Managing Resource Structures
B-24 Oracle Clusterware and RAC Administration and Deployment Guide
■ ctx [in]—clscrs context
■ splist [out]—The new stringpair list created
Returns
■ clscrsretSUCC on success
■ clscrsretNOMEM if no memory can be allocated
■ clscrsretBADCTX if the context is NULL
Syntax
clscrsret clscrs_splist_create(clscrs_ctx *ctx, clscrs_splist **splist);
clscrs_splist_create_and_set Create a new stringpair list (splist) and set the name and value for the first stringpair in the list. The memory for the splist is allocated by the function.
Parameters
■ ctx [in]—clscrs context
■ name [in]—Name component of the stringpair
■ value [in]—Value component of the stringpair (may be NULL)
■ sp [out]—The new stringpair created
Returns
■ clscrsretSUCC on success
■ clscrsretNOMEM if no memory can be allocated
■ clscrsretBADCTX if the context is NULL
■ clscrsretBADARG if the name argument is NULL
Syntax
clscrsret clscrs_splist_create_and_set(clscrs_ctx *ctx, const oratext *name, const oratext *value, clscrs_splist **splist);
clscrs_splist_append Add a new stringpair (sp) to a stringpair list (splist).
Parameters
■ splist [in]—splist to add the new {name, value} stringpair.
■ name [in]—Name component of the stringpair
■ value [in]—Value component of the stringpair (may be NULL)
Returns
■ clscrsretSUCC on success
■ clscrsretNOMEM if no memory can be allocated
■ clscrsretBADARG if the name argument is NULL
Syntax
clscrsret clscrs_splist_append(clscrs_splist *splist, const oratext *name, const oratext *value);
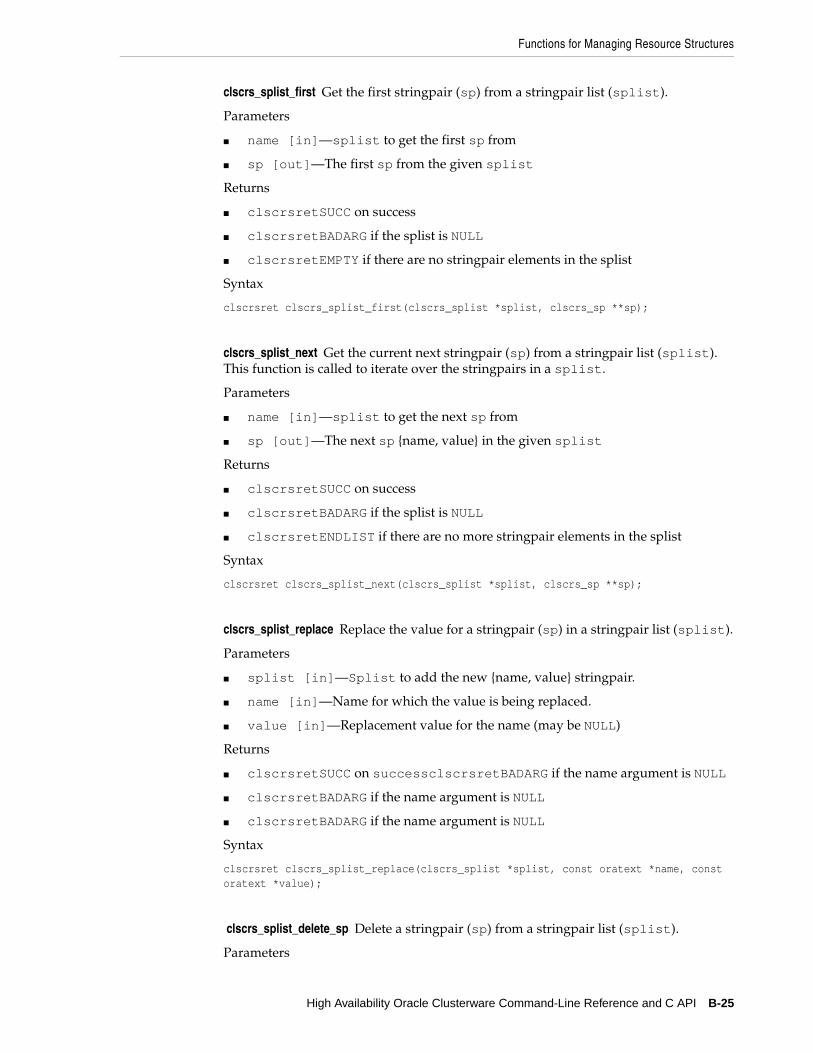
Functions for Managing Resource Structures
High Availability Oracle Clusterware Command-Line Reference and C API B-25
clscrs_splist_first Get the first stringpair (sp) from a stringpair list (splist).
Parameters
■ name [in]—splist to get the first sp from
■ sp [out]—The first sp from the given splist
Returns
■ clscrsretSUCC on success
■ clscrsretBADARG if the splist is NULL
■ clscrsretEMPTY if there are no stringpair elements in the splist
Syntax
clscrsret clscrs_splist_first(clscrs_splist *splist, clscrs_sp **sp);
clscrs_splist_next Get the current next stringpair (sp) from a stringpair list (splist). This function is called to iterate over the stringpairs in a splist.
Parameters
■ name [in]—splist to get the next sp from
■ sp [out]—The next sp {name, value} in the given splist
Returns
■ clscrsretSUCC on success
■ clscrsretBADARG if the splist is NULL
■ clscrsretENDLIST if there are no more stringpair elements in the splist
Syntax
clscrsret clscrs_splist_next(clscrs_splist *splist, clscrs_sp **sp);
clscrs_splist_replace Replace the value for a stringpair (sp) in a stringpair list (splist).
Parameters
■ splist [in]—Splist to add the new {name, value} stringpair.
■ name [in]—Name for which the value is being replaced.
■ value [in]—Replacement value for the name (may be NULL)
Returns
■ clscrsretSUCC on successclscrsretBADARG if the name argument is NULL
■ clscrsretBADARG if the name argument is NULL
■ clscrsretBADARG if the name argument is NULL
Syntax
clscrsret clscrs_splist_replace(clscrs_splist *splist, const oratext *name, const oratext *value);
clscrs_splist_delete_sp Delete a stringpair (sp) from a stringpair list (splist).
Parameters
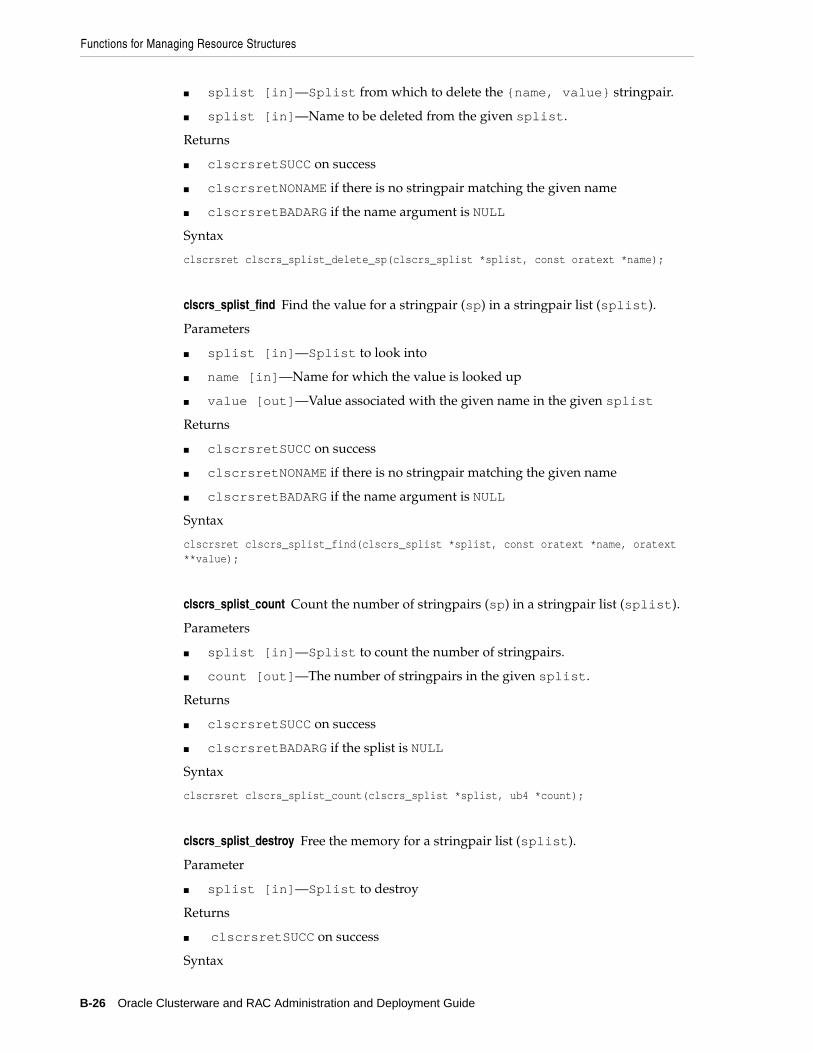
Functions for Managing Resource Structures
B-26 Oracle Clusterware and RAC Administration and Deployment Guide
■ splist [in]—Splist from which to delete the {name, value} stringpair.
■ splist [in]—Name to be deleted from the given splist.
Returns
■ clscrsretSUCC on success
■ clscrsretNONAME if there is no stringpair matching the given name
■ clscrsretBADARG if the name argument is NULL
Syntax
clscrsret clscrs_splist_delete_sp(clscrs_splist *splist, const oratext *name);
clscrs_splist_find Find the value for a stringpair (sp) in a stringpair list (splist).
Parameters
■ splist [in]—Splist to look into
■ name [in]—Name for which the value is looked up
■ value [out]—Value associated with the given name in the given splist
Returns
■ clscrsretSUCC on success
■ clscrsretNONAME if there is no stringpair matching the given name
■ clscrsretBADARG if the name argument is NULL
Syntax
clscrsret clscrs_splist_find(clscrs_splist *splist, const oratext *name, oratext **value);
clscrs_splist_count Count the number of stringpairs (sp) in a stringpair list (splist).
Parameters
■ splist [in]—Splist to count the number of stringpairs.
■ count [out]—The number of stringpairs in the given splist.
Returns
■ clscrsretSUCC on success
■ clscrsretBADARG if the splist is NULL
Syntax
clscrsret clscrs_splist_count(clscrs_splist *splist, ub4 *count);
clscrs_splist_destroy Free the memory for a stringpair list (splist).
Parameter
■ splist [in]—Splist to destroy
Returns
■ clscrsretSUCC on success
Syntax

Functions for Managing Resource Structures
High Availability Oracle Clusterware Command-Line Reference and C API B-27
clscrsret clscrs_splist_destroy(clscrs_splist **splist);
clscrs_res_create Create a new resource. The memory for the resource structure is allocated by the function. The memory is freed when a resource list (clscrs_reslist) is destroyed through clscrs_reslist_destroy().
Parameters
■ ctx [in]—clscrs context
■ resname [in]—Name of the resource
■ res [out]—The new resource created
Returns
■ clscrsretSUCC on success
■ clscrsretNOMEM if no memory can be allocated
■ clscrsretBADCTX if the context is NULL
■ clscrsretBADARG if the resource name is NULL
Syntax
clscrsret clscrs_res_create(clscrs_ctx *ctx, const oratext *resname, clscrs_res **res);
clscrs_res_get_name Get the name of a resource.
Parameters
■ res [in]—Resource for which the name is obtained
■ name [out]—Name of the resource
Returns
■ clscrsretSUCC on success
■ clscrsretBADARG if the resource argument is NULL
Syntax
clscrsret clscrs_res_get_name(clscrs_res *res, oratext **name);
clscrs_res_set_attr Set a resource attribute for a resource.
Paramters
■ res [in]—Resource for which the attribute is set
■ attrname [in]—Name of the resource attribute
■ value [in]—Value for the resource attribute (may be NULL)
Returns
■ clscrsretSUCC on success
■ clscrsretBADARG if the attribute name is NULL
■ clscrsretNOMEM if no memory can be allocated
Syntax
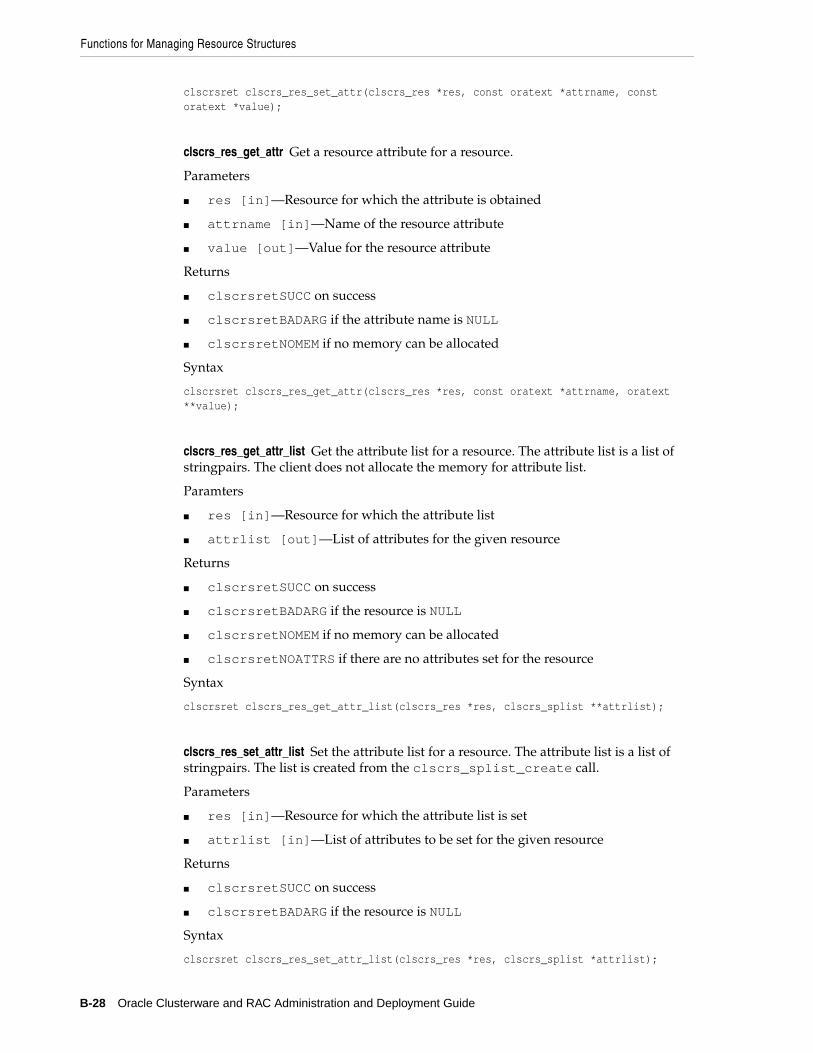
Functions for Managing Resource Structures
B-28 Oracle Clusterware and RAC Administration and Deployment Guide
clscrsret clscrs_res_set_attr(clscrs_res *res, const oratext *attrname, const oratext *value);
clscrs_res_get_attr Get a resource attribute for a resource.
Parameters
■ res [in]—Resource for which the attribute is obtained
■ attrname [in]—Name of the resource attribute
■ value [out]—Value for the resource attribute
Returns
■ clscrsretSUCC on success
■ clscrsretBADARG if the attribute name is NULL
■ clscrsretNOMEM if no memory can be allocated
Syntax
clscrsret clscrs_res_get_attr(clscrs_res *res, const oratext *attrname, oratext **value);
clscrs_res_get_attr_list Get the attribute list for a resource. The attribute list is a list of stringpairs. The client does not allocate the memory for attribute list.
Paramters
■ res [in]—Resource for which the attribute list
■ attrlist [out]—List of attributes for the given resource
Returns
■ clscrsretSUCC on success
■ clscrsretBADARG if the resource is NULL
■ clscrsretNOMEM if no memory can be allocated
■ clscrsretNOATTRS if there are no attributes set for the resource
Syntax
clscrsret clscrs_res_get_attr_list(clscrs_res *res, clscrs_splist **attrlist);
clscrs_res_set_attr_list Set the attribute list for a resource. The attribute list is a list of stringpairs. The list is created from the clscrs_splist_create call.
Parameters
■ res [in]—Resource for which the attribute list is set
■ attrlist [in]—List of attributes to be set for the given resource
Returns
■ clscrsretSUCC on success
■ clscrsretBADARG if the resource is NULL
Syntax
clscrsret clscrs_res_set_attr_list(clscrs_res *res, clscrs_splist *attrlist);

Functions for Managing Resource Structures
High Availability Oracle Clusterware Command-Line Reference and C API B-29
clscrs_res_attr_count Get the number of attributes for a resource.
Parameters
■ res [in]—Resource for which number of attributes is obtained
■ count [out]—Number of attributes for the given resource
Returns
■ clscrsretSUCC on success
■ clscrsretBADARG if the resource is NULL
Syntax
clscrsret clscrs_res_attr_count(clscrs_res *res, ub4 *count);
clscrs_res_get_op_status Get the status of an operation for a resource. The memory for the msg is allocated by the function.
Parameters
■ res [in]—Resource for which the operation status is obtained
■ status [out]—Status of an operation on the given resource
■ msg [out]—Text message for the result of an operation on the resource
Returns
■ clscrsretSUCC on success
■ clscrsretNOMEM if no memory can be allocated
■ clscrsretNOMSG if there is no msg available
■ clscrsretBADARG if the resource is NULL
Syntax
clscrsret clscrs_res_get_op_status(clscrs_res *res, CLSCRS_STAT *status, oratext **msg);
clscrs_res_get_registered Get the registration status of a resource.
Parameters
■ res [in]—Resource for which the operation status is set
■ registered [out]—Boolean indicating whether the resource is registered
Returns
■ clscrsretSUCC on success
■ clscrsretNOMEM if no memory can be allocated
■ clscrsretBADARG if the resource is NULL
Syntax
clscrsret clscrs_res_get_registered(clscrs_res *res, boolean *registered);
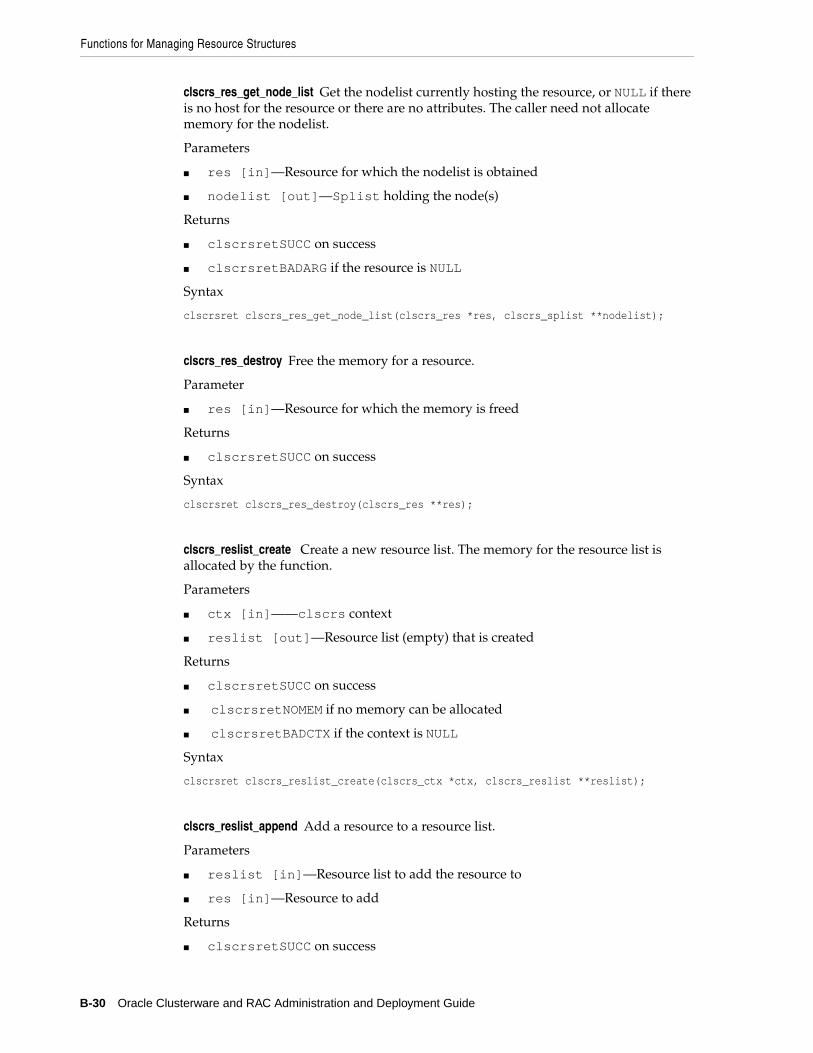
Functions for Managing Resource Structures
B-30 Oracle Clusterware and RAC Administration and Deployment Guide
clscrs_res_get_node_list Get the nodelist currently hosting the resource, or NULL if there is no host for the resource or there are no attributes. The caller need not allocate memory for the nodelist.
Parameters
■ res [in]—Resource for which the nodelist is obtained
■ nodelist [out]—Splist holding the node(s)
Returns
■ clscrsretSUCC on success
■ clscrsretBADARG if the resource is NULL
Syntax
clscrsret clscrs_res_get_node_list(clscrs_res *res, clscrs_splist **nodelist);
clscrs_res_destroy Free the memory for a resource.
Parameter
■ res [in]—Resource for which the memory is freed
Returns
■ clscrsretSUCC on success
Syntax
clscrsret clscrs_res_destroy(clscrs_res **res);
clscrs_reslist_create Create a new resource list. The memory for the resource list is allocated by the function.
Parameters
■ ctx [in]——clscrs context
■ reslist [out]—Resource list (empty) that is created
Returns
■ clscrsretSUCC on success
■ clscrsretNOMEM if no memory can be allocated
■ clscrsretBADCTX if the context is NULL
Syntax
clscrsret clscrs_reslist_create(clscrs_ctx *ctx, clscrs_reslist **reslist);
clscrs_reslist_append Add a resource to a resource list.
Parameters
■ reslist [in]—Resource list to add the resource to
■ res [in]—Resource to add
Returns
■ clscrsretSUCC on success

Functions for Managing Resource Structures
High Availability Oracle Clusterware Command-Line Reference and C API B-31
■ clscrsretBADARG if reslist is NULL
■ clscrsretRESEXISTS if the resource already exists in reslist
Syntax
clscrsret clscrs_reslist_append(clscrs_reslist *reslist, clscrs_res *res);
clscrs_reslist_first Get the first resource on a resource list.
Parameters
■ reslist [in]—Resource list for which the first resource is obtained
■ res [out]—The first resouce on the resource list
Returns
■ clscrsretSUCC on success.
■ clscrsretBADARG if reslist is NULL
■ clscrsretEMPTY if there are no resources in the list
Syntax
clscrsret clscrs_reslist_first(clscrs_reslist *reslist, clscrs_res **res);
clscrs_reslist_next Get the current next resource from the resource list. This function is called to iterate over the resources in a resource list.
Parameters
■ reslist [in]—Resource list for which the first resource is obtained
■ res [out]—The next resouce on the resource list
Returns
■ clscrsretSUCC on success
■ clscrsretBADARG if reslist is NULL
■ clscrsretENDLIST if there are no more resources in the list
Syntax
clscrsret clscrs_reslist_next(clscrs_reslist *reslist, clscrs_res **res);
clscrs_reslist_find Find a resource in a resource list.
Parameters
■ reslist [in]—Resource list (empty) that is created
■ name [in]—Name of the resource that is being obtained
■ res [out]—The resouce corresponding to the given name
Returns
■ clscrsretSUCC on success
■ clscrsretNORES if the resource is not found
■ clscrsretBADARG if reslist or name is NULL
Syntax
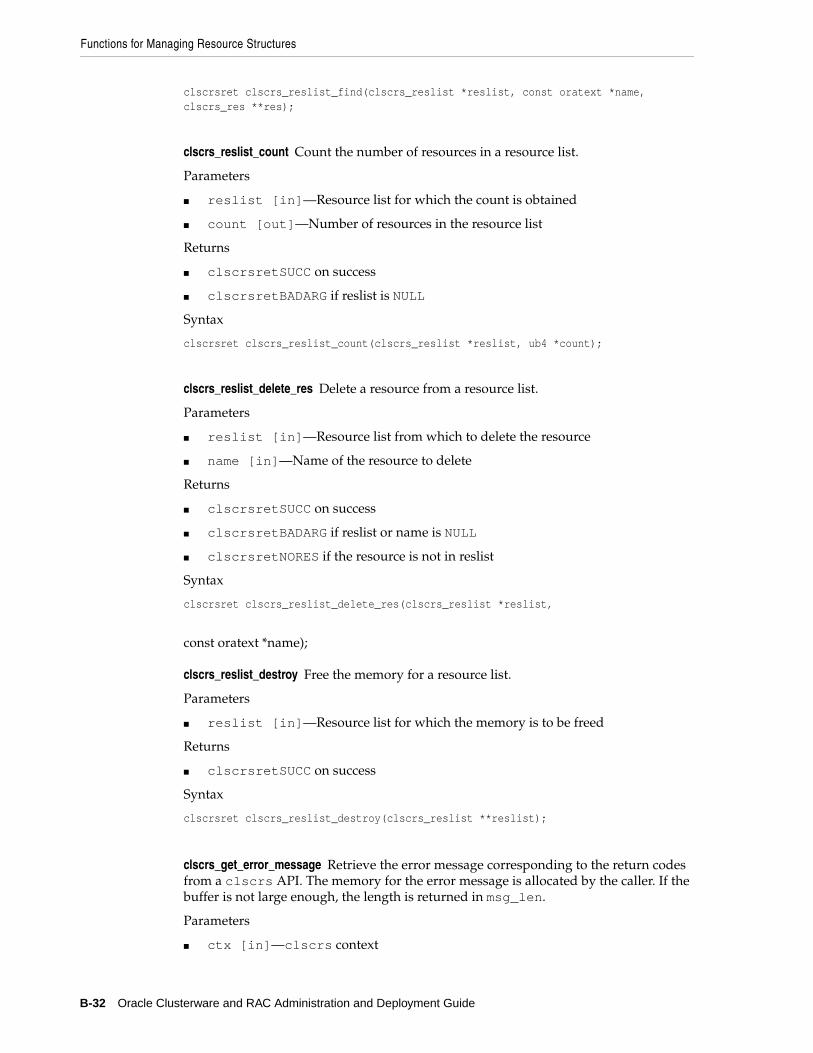
Functions for Managing Resource Structures
B-32 Oracle Clusterware and RAC Administration and Deployment Guide
clscrsret clscrs_reslist_find(clscrs_reslist *reslist, const oratext *name, clscrs_res **res);
clscrs_reslist_count Count the number of resources in a resource list.
Parameters
■ reslist [in]—Resource list for which the count is obtained
■ count [out]—Number of resources in the resource list
Returns
■ clscrsretSUCC on success
■ clscrsretBADARG if reslist is NULL
Syntax
clscrsret clscrs_reslist_count(clscrs_reslist *reslist, ub4 *count);
clscrs_reslist_delete_res Delete a resource from a resource list.
Parameters
■ reslist [in]—Resource list from which to delete the resource
■ name [in]—Name of the resource to delete
Returns
■ clscrsretSUCC on success
■ clscrsretBADARG if reslist or name is NULL
■ clscrsretNORES if the resource is not in reslist
Syntax
clscrsret clscrs_reslist_delete_res(clscrs_reslist *reslist,
const oratext *name);
clscrs_reslist_destroy Free the memory for a resource list.
Parameters
■ reslist [in]—Resource list for which the memory is to be freed
Returns
■ clscrsretSUCC on success
Syntax
clscrsret clscrs_reslist_destroy(clscrs_reslist **reslist);
clscrs_get_error_message Retrieve the error message corresponding to the return codes from a clscrs API. The memory for the error message is allocated by the caller. If the buffer is not large enough, the length is returned in msg_len.
Parameters
■ ctx [in]—clscrs context

Functions for Managing Resource Structures
High Availability Oracle Clusterware Command-Line Reference and C API B-33
■ err_code [in]—Error code returned from the clscrs API
■ msg [out]—Message corresponding to err_code
■ msg_len [inout]—Length of the message buffer.
Returns
■ clscrsretSUCC on success
Syntax
clscrsret clscrs_get_error_message(clscrs_ctx *ctx, clscrsret err_code, oratext *msg, sb4 msg_len);
clscrs_get_fixed_attrlist
Get the list of attributes corresponding to an attribute group identifier.
Parameters
■ ctx [in]—clscrs context
■ attrgrp [in]—Attribute group that identifies a group of attributes
■ attrlist [out]—List of attributes returned that corresponds to the attribute group
Returns
■ clscrsretSUCC on success
Syntax
clscrs_splist* clscrs_get_fixed_attrlist(clscrs_ctx *ctx, clscrs_attr_grp attrgrp);
Resource OperationsThis section describes resource functions. The clscrs_res resource abstraction contains the name of a resource and additional data appropriate to the context in which it is used. Sometimes it carries status and error return information about an operations. Other times it contains attribute data as input to an operation. A resource may be in exactly one resource list. If so, its successor may be found with the NEXT operation.
CLSCRSRET clscrs_res_create(clscrs_cts *ctx, const oratext *resname, clscrs_res **res) Creates a single resource and fills in a handle to it. The resname must be provided, and cannot be NULL.
CLSCRSRET clscrs_res_get_name (clscrs_res *res, oratext **name); Returns a pointer to the name of a resource. The returned name pointer is only valid as long as the resource exists.
CLSCRSRET clscrs_res_get_op_status (clscrs_res *res, CLSCRS_STAT *stat, oratext **msg) If there is a valid operation error value in the resource, fill in the stat and the pointer to an error message and return SUCCESS. May fill in a NULL to the msg. If there is no valid operation status, returns INVALID.
clscrs_splist *clscrs_res_get_node_list(clscrs_res *res); Returns an splist holding the nodes currently hosting the resource, or NULL if there is no host for the resource or there are no attributes. The count of the list may obtained and the list iterated. The list
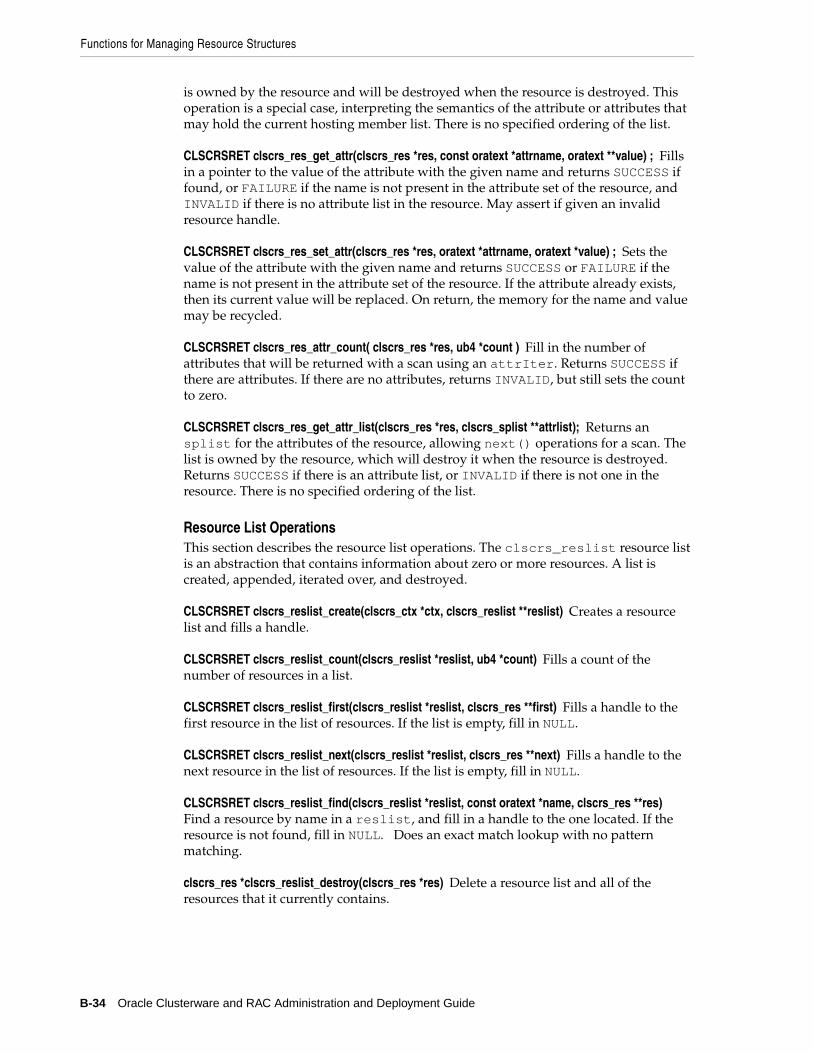
Functions for Managing Resource Structures
B-34 Oracle Clusterware and RAC Administration and Deployment Guide
is owned by the resource and will be destroyed when the resource is destroyed. This operation is a special case, interpreting the semantics of the attribute or attributes that may hold the current hosting member list. There is no specified ordering of the list.
CLSCRSRET clscrs_res_get_attr(clscrs_res *res, const oratext *attrname, oratext **value) ; Fills in a pointer to the value of the attribute with the given name and returns SUCCESS if found, or FAILURE if the name is not present in the attribute set of the resource, and INVALID if there is no attribute list in the resource. May assert if given an invalid resource handle.
CLSCRSRET clscrs_res_set_attr(clscrs_res *res, oratext *attrname, oratext *value) ; Sets the value of the attribute with the given name and returns SUCCESS or FAILURE if the name is not present in the attribute set of the resource. If the attribute already exists, then its current value will be replaced. On return, the memory for the name and value may be recycled.
CLSCRSRET clscrs_res_attr_count( clscrs_res *res, ub4 *count ) Fill in the number of attributes that will be returned with a scan using an attrIter. Returns SUCCESS if there are attributes. If there are no attributes, returns INVALID, but still sets the count to zero.
CLSCRSRET clscrs_res_get_attr_list(clscrs_res *res, clscrs_splist **attrlist); Returns an splist for the attributes of the resource, allowing next() operations for a scan. The list is owned by the resource, which will destroy it when the resource is destroyed. Returns SUCCESS if there is an attribute list, or INVALID if there is not one in the resource. There is no specified ordering of the list.
Resource List OperationsThis section describes the resource list operations. The clscrs_reslist resource list is an abstraction that contains information about zero or more resources. A list is created, appended, iterated over, and destroyed.
CLSCRSRET clscrs_reslist_create(clscrs_ctx *ctx, clscrs_reslist **reslist) Creates a resource list and fills a handle.
CLSCRSRET clscrs_reslist_count(clscrs_reslist *reslist, ub4 *count) Fills a count of the number of resources in a list.
CLSCRSRET clscrs_reslist_first(clscrs_reslist *reslist, clscrs_res **first) Fills a handle to the first resource in the list of resources. If the list is empty, fill in NULL.
CLSCRSRET clscrs_reslist_next(clscrs_reslist *reslist, clscrs_res **next) Fills a handle to the next resource in the list of resources. If the list is empty, fill in NULL.
CLSCRSRET clscrs_reslist_find(clscrs_reslist *reslist, const oratext *name, clscrs_res **res) Find a resource by name in a reslist, and fill in a handle to the one located. If the resource is not found, fill in NULL. Does an exact match lookup with no pattern matching.
clscrs_res *clscrs_reslist_destroy(clscrs_res *res) Delete a resource list and all of the resources that it currently contains.
Oracle Clusterware Messages C-1
COracle Clusterware Messages
This appendix describes the Oracle Clusterware messages. The Oracle Clusterware commands and the Oracle Clusterware APIs are the primary sources of these error messages. The topic in this appendix is:
■ CRS—Oracle Clusterware Messages
CRS—Oracle Clusterware MessagesCRS-184: Cannot communicate with the CRS daemon.
Cause: The CRS daemon on the local node is either not running or there was an internal communication error with the CRS daemon.
Action: Check if the CRS daemon process is running on the local node.
CRS-210: Could not find resource '%s'.Cause: An attempt was made to operate on a resource that is not registered.
Action: Check if the resource is registered using crs_stat.
CRS-211: Resource '%s' has already been registered.Cause: An attempt was made to register a resource that is already registered.
Action: Check if the resource is registered using crs_stat.
CRS-213: Could not register resource '%s'.Cause: There was an internal error while registering the resource.
Action: Check the CRS daemon log file.
CRS-214: Could not unregister resource '%s'.Cause: There was an internal error while unregistering the resource.
Action: Check the CRS daemon log file.
CRS-215: Could not start resource '%s'.Cause: There was an internal error while starting the resource.
Action: Check the CRS daemon log file.
CRS-216: Could not stop resource '%s'.
See Also: Oracle Database Platform Guide for Microsoft Windows (32-Bit) for Windows-based messages and for all other messages refer search online at
http://tahiti.oracle.com

CRS—Oracle Clusterware Messages
C-2 Oracle Clusterware and RAC Administration and Deployment Guide
Cause: There was an internal error while stopping the resource.
Action: Check the CRS daemon log file.
CRS-217: Could not relocate resource '%s'.Cause: There was an internal error while relocating the resource.
Action: Check the CRS daemon log file.
CRS-218: Could not restart the resource '%s' on the original node.Cause: There was an internal error while restarting the resource.
Action: Check the CRS daemon log file.
CRS-219: Could not update resource '%s'.Cause: There was an internal error while updating the resource.
Action: Check the CRS daemon log file.
CRS-220: Resource '%s' has invalid resource profile. Cause: Invalid attributes in the resource profile.
Action: Run crs_profile -validate to identify the invalid attributes.
CRS-221: Resource '%s''s action script cannot be found.Cause: The action script has been deleted from the file system.
Action: Run crs_stat -p to determine the action script location and to check for its existence.
CRS-223: Resource '%s' has placement error.Cause: There was no host available to on which failover/start the resource based on the Placement Policy for the resource.
Action: Check the target host for the resource and restart the resource using the crs_start command.
CRS-230: Member '%s' is not in the cluster.Cause: The hostname was not found in the cluster.
Action: Check the hostnames in the cluster.
CRS-232: Cluster member is down. Cannot perform operation.Cause: The node on which CRS is attempting to start the resource is down.
Action: Start the node and retry the operation.
CRS-233: Resource or relatives are currently involved with another operation.Cause: Another CRS daemon was operating on the same resource.
Action: Wait for a minute and try the command or operation again.
CRS-253: CRS configuration error, the CRS default directory is not set in OCR. Cause: The OCR key which contains the user default CRS key is not initialised.
Action: Check the CRS configuration. If necessary reinstall CRS.
CRS-254: Authorization failure.Cause: The user permissions were insufficient to operate on the resource.
Action: Check the permissions associated with the resource using crs_getperm.
CRS—Oracle Clusterware Messages
Oracle Clusterware Messages C-3
CRS-255: CRSD is not running in privileged mode. Insufficient permissions to run this command. Cause: The CRS daemon was not running as the privileged user.
Action: Check if the CRS daemon is running as root (Unix) or Administrator (Windows).
CRS-256: Username conflicts with the owner of the resource.Cause: An attempt was made to give separate user level permissions for the owner of the resource.
Action: Check the owner of the resource and the user being given permissions.
CRS-257: Groupname conflicts with the primary group of the resource.Cause: An attempt was made to give separate group level permissions for the primary group of the resource.
Action: Check the primary group of the resource and the group being given permissions.
CRS-258: Invalid ACL string format.Cause: CRS-258: Invalid ACL string format.
Action: Check the syntax of the permission string (ACL).
CRS-259: Owner of the resource does not belong to the group.Cause: The owner of the resource does not belong to the expected group.
Action: If this resource is owned by the root user, check if the root user belongs to the DBA group.
CRS-402: Could not make safe dir('%s').Cause: Unable to create safe directory('%s').
Action: Please check if you have proper permissions and sufficient space on the disk to create the directory.
CRS-403: Could not chdir to safe dir('%s').Cause: Unable to change directory to safe dir('%s').
Action: Please check if safe dir exists and if you have proper permissions.
CRS-413: Could not initialize the CSS context.Cause: Unable to communicate with the cluster services.
Action: Verify that the CSS Daemon is properly configured and is running.
CRS-414: Could not establish EVM connection.Cause: Unable to communicate with EVM daemon.
Action: Run the 'crsctl check evmd' command to determine whether EVM daemon is properly configured and is running.
CRS-451: CRS configuration error, unable to initialize OCR. Cause: The OCR that contains information about the CRS configuration is unavailable.
Action: Check the CRS configuration. If necessary reinstall CRS.
CRS-452: CRS configuration error, unable to find CRSD Connection Information in OCR.

CRS—Oracle Clusterware Messages
C-4 Oracle Clusterware and RAC Administration and Deployment Guide
Cause: The OCR key which contains the user default CRSD connection is not initialised.
Action: Check the CRS configuration. If necessary reinstall CRS.
CRS-453: CRS configuration error, unable to find Instance Information in OCR. Cause: The OCR key which contains the Instance's information is not initialised.
Action: Add the instance using srvctl.
CRS-471: Node number is not found.Cause: Cluster Services is unable to retrieve the node name.
Action: Verify your cluster installation, including any vendor cluster ware. If necessary reinstall the cluster.
CRS-472: Node name is not found.Cause: Cluster Services is unable to retrieve the node name.
Action: Verify your cluster installation, including any vendor cluster ware. If necessary reinstall the cluster.
CRS-1005: Failed to get required resources.Cause: There was an internal error while evaluating the required resources for the subject resource.
Action: Check if the status of any resource is UNKONOWN using crs_stat -t.
CRS-1006: No more members to consider.Cause: There was no host found on which to start the resource based on the placement policy.
Action: Check the placement policy and the required resources for the subject resource.
CRS-1007: Failed after successful dependency consideration.Cause: There was no host found on which to start the resource based on the placement policy.
Action: Check the placement policy and the required resources for the subject resource.
CRS-1009: Resource '%s' is already running on member '%s'.Cause: An attempt was made to start a resource on a host while it is already running on that host.
Action: This is an insignificant error. Check the operation being performed. 1011, 0, Trying to relocate to a dead member.
CRS-2001: User does not have permission to start CRSD.Cause: Unable to start CRSD due to insufficient permissions.
Action: Start CRSD as a privileged user.
CRS-2007: Could not communicate with EVM.Cause: Unable to communicate with EVM daemon.
Action: Run the 'crsctl check evmd' command to determine whether EVM daemon is properly configured and is running.
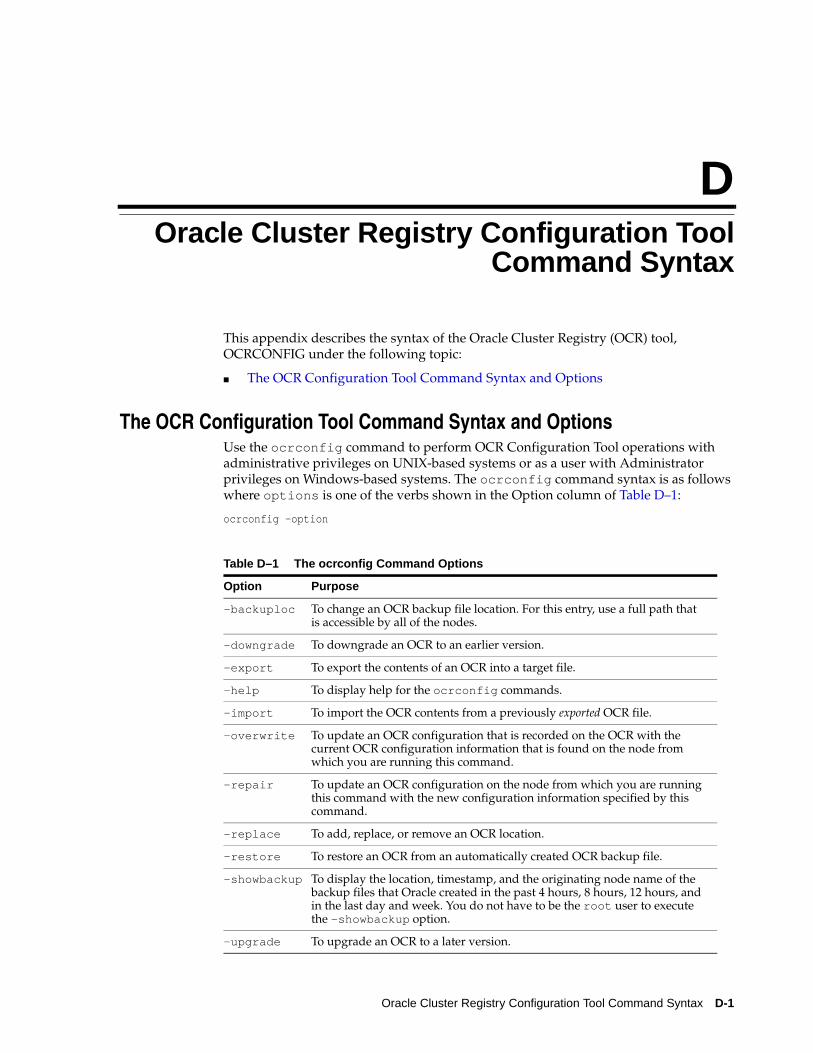
Oracle Cluster Registry Configuration Tool Command Syntax D-1
DOracle Cluster Registry Configuration Tool
Command Syntax
This appendix describes the syntax of the Oracle Cluster Registry (OCR) tool, OCRCONFIG under the following topic:
■ The OCR Configuration Tool Command Syntax and Options
The OCR Configuration Tool Command Syntax and OptionsUse the ocrconfig command to perform OCR Configuration Tool operations with administrative privileges on UNIX-based systems or as a user with Administrator privileges on Windows-based systems. The ocrconfig command syntax is as follows where options is one of the verbs shown in the Option column of Table D–1:
ocrconfig -option
Table D–1 The ocrconfig Command Options
Option Purpose
-backuploc To change an OCR backup file location. For this entry, use a full path that is accessible by all of the nodes.
-downgrade To downgrade an OCR to an earlier version.
-export To export the contents of an OCR into a target file.
-help To display help for the ocrconfig commands.
-import To import the OCR contents from a previously exported OCR file.
-overwrite To update an OCR configuration that is recorded on the OCR with the current OCR configuration information that is found on the node from which you are running this command.
-repair To update an OCR configuration on the node from which you are running this command with the new configuration information specified by this command.
-replace To add, replace, or remove an OCR location.
-restore To restore an OCR from an automatically created OCR backup file.
-showbackup To display the location, timestamp, and the originating node name of the backup files that Oracle created in the past 4 hours, 8 hours, 12 hours, and in the last day and week. You do not have to be the root user to execute the -showbackup option.
-upgrade To upgrade an OCR to a later version.

The OCR Configuration Tool Command Syntax and Options
D-2 Oracle Clusterware and RAC Administration and Deployment Guide
For example, to export the OCR contents to a binary file, use the ocrconfig command with the following syntax where file_name is the file to which you want to export the OCR contents as follows:
ocrconfig -export file_name
Server Control Utility Reference E-1
EServer Control Utility Reference
This chapter describes how to administer Oracle Real Application Clusters (RAC) databases and instances using the Server Control Utility (SRVCTL). The topics in this chapter include:
■ Overview of SRVCTL for Administering Real Application Clusters
■ SRVCTL Command Syntax and Options
■ SRVCTL General Cluster Database Administration Tasks
■ SRVCTL Cluster Database Configuration Tasks
■ SRVCTL Node-Level Tasks
■ SRVCTL Command Reference
■ SRVCTL Commands
Overview of SRVCTL for Administering Real Application ClustersThe Server Control (SRVCTL) utility is installed on each node by default. You can use SRVCTL to start and stop the database and instances, manage configuration information, and to move or remove instances and services. You can also use SRVCTL to add services. SRVCTL also manages configuration information.
Some SRVCTL operations store configuration information in the Oracle Cluster Registry (OCR). SRVCTL performs other operations, such as starting and stopping instances, by sending requests to the Oracle Clusterware process (CRSD), which then starts or stops the Oracle Clusterware resources.
To use SRVCTL, enter the srvctl command and its options in case sensitive syntax as described under the heading "SRVCTL Command Reference" on page E-3.
Guidelines for Using SRVCTL in Real Application ClustersGuidelines for using SRVCTL are:
■ To use SRVCTL to change your RAC database configuration, log in to the database as the oracle user. Members of the DBA group can start and stop the database.
■ Only use the version of SRVCTL that is provided with Oracle Database 10g on RAC databases that are created or upgraded for Oracle Database 10g.
See Also: Your platform-specific Oracle Real Application Clusters installation and configuration guide for information about using Database Configuration Assistant (DBCA)
SRVCTL Command Syntax and Options
E-2 Oracle Clusterware and RAC Administration and Deployment Guide
■ Always use SRVCTL from the Oracle_home of the database that you are administering.
■ SRVCTL does not support concurrent executions of commands on the same object. Therefore, only run one SRVCTL command at a time for each database, service, or other object.
Obtaining Command-Line Help for SRVCTLTo see help for all SRVCTL commands, from the command line enter:
srvctl -h
To see the command syntax and a list of options for each SRVCTL command, from the command line enter:
srvctl command (or verb) object (or noun) -h
To see the SRVCTL version number enter:
srvctl -V
SRVCTL Command Syntax and OptionsSRVCTL commands, objects, and options are case sensitive. Database, instance, and service names are case insensitive and case preserving. SRVCTL interprets the following command syntax:
srvctl command object [options]
In SRVCTL syntax:
■ srvctl is the command to start the SRVCTL utility.
■ command is a verb such as start, stop, or remove.
■ object is an object or target on which SRVCTL performs the command, such as database or instance. You can also use object abbreviations.
■ options extend the use of a preceding command combination to include additional parameters for the command. For example, the -i option indicates that a comma-delimited list of instance names follows; sometimes the -i option only permits one value and not a list of names. The -n option indicates that a node name or a comma-delimited list of node names follows. SRVCTL prompts for user credentials when you use the -q option with any SRVCTL command.
SRVCTL Cluster Database Configuration TasksThe database configuration tasks are:
■ Add, modify, and delete cluster database configuration information.
Caution: Although you may be able to cancel running SRVCTL commands by entering Control-C at the command line, you may corrupt your configuration data by doing this. You are strongly advised not to attempt to terminate SRVCTL in this manner.
Note: Enclose comma-delimited lists in double-quote ("...,..." ) symbols.
SRVCTL Command Reference
Server Control Utility Reference E-3
■ Add an instance or a service to, and delete an instance or service from the configuration of a cluster database.
■ Move instances and services in a cluster database configuration and modify service configurations.
■ Set and unset the environment for an instance or service in a cluster database configuration.
■ Set and unset the environment for an entire cluster database in a cluster database configuration.
SRVCTL General Cluster Database Administration TasksThe general database administration tasks are:
■ Start and stop cluster databases
■ Start and stop cluster database instances
■ Start, stop, and relocate cluster database services
■ Obtain statuses of cluster databases, cluster database instances, or cluster database services
SRVCTL Node-Level TasksThe node-level tasks are:
■ Adding and deleting node level applications.
■ Setting and unsetting the environment for node-level applications.
■ Administering node applications.
■ Administering ASM instances.
■ Starting and stopping a group of programs that includes virtual IP addresses, Listeners, Oracle Notification Services, and Oracle Enterprise Manager agents (for maintenance purposes).
SRVCTL Command ReferenceThis section presents the SRVCTL command reference:
■ srvctl add
■ srvctl config
■ srvctl enable
■ srvctl disable
■ srvctl start
■ srvctl stop
■ srvctl modify
■ srvctl relocate
■ srvctl status
■ srvctl getenv
■ srvctl setenv and unsetenv
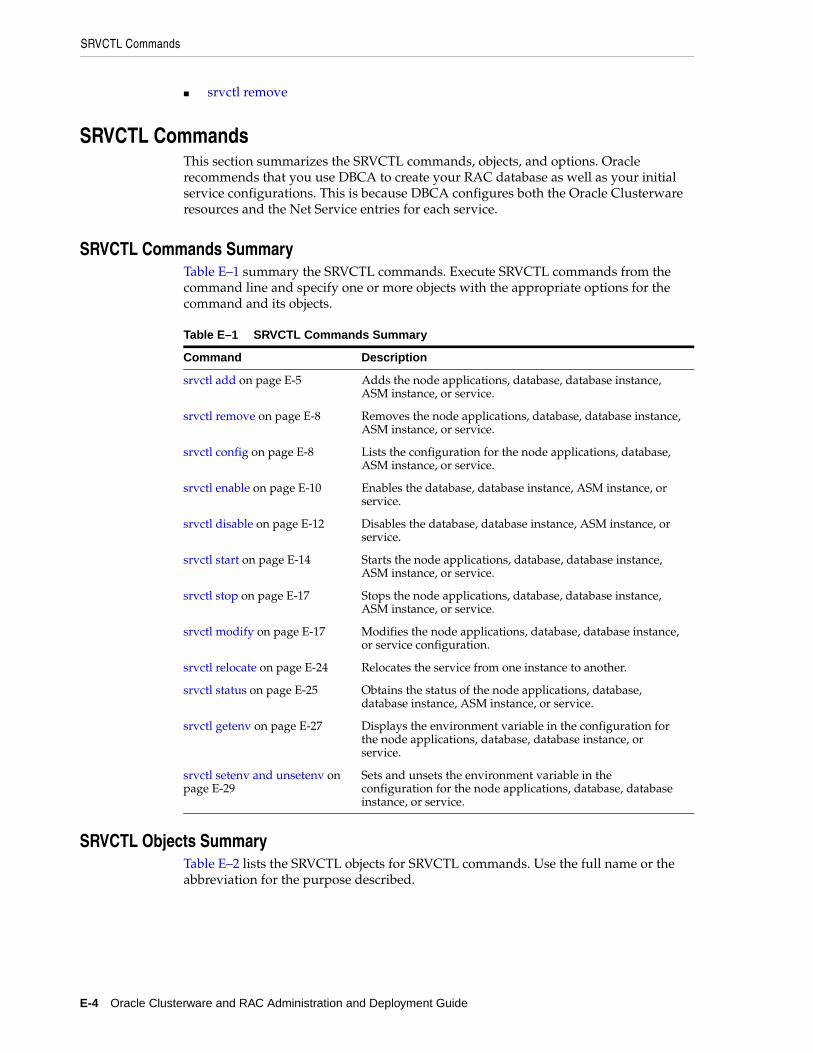
SRVCTL Commands
E-4 Oracle Clusterware and RAC Administration and Deployment Guide
■ srvctl remove
SRVCTL CommandsThis section summarizes the SRVCTL commands, objects, and options. Oracle recommends that you use DBCA to create your RAC database as well as your initial service configurations. This is because DBCA configures both the Oracle Clusterware resources and the Net Service entries for each service.
SRVCTL Commands SummaryTable E–1 summary the SRVCTL commands. Execute SRVCTL commands from the command line and specify one or more objects with the appropriate options for the command and its objects.
SRVCTL Objects SummaryTable E–2 lists the SRVCTL objects for SRVCTL commands. Use the full name or the abbreviation for the purpose described.
Table E–1 SRVCTL Commands Summary
Command Description
srvctl add on page E-5 Adds the node applications, database, database instance, ASM instance, or service.
srvctl remove on page E-8 Removes the node applications, database, database instance, ASM instance, or service.
srvctl config on page E-8 Lists the configuration for the node applications, database, ASM instance, or service.
srvctl enable on page E-10 Enables the database, database instance, ASM instance, or service.
srvctl disable on page E-12 Disables the database, database instance, ASM instance, or service.
srvctl start on page E-14 Starts the node applications, database, database instance, ASM instance, or service.
srvctl stop on page E-17 Stops the node applications, database, database instance, ASM instance, or service.
srvctl modify on page E-17 Modifies the node applications, database, database instance, or service configuration.
srvctl relocate on page E-24 Relocates the service from one instance to another.
srvctl status on page E-25 Obtains the status of the node applications, database, database instance, ASM instance, or service.
srvctl getenv on page E-27 Displays the environment variable in the configuration for the node applications, database, database instance, or service.
srvctl setenv and unsetenv on page E-29
Sets and unsets the environment variable in the configuration for the node applications, database, database instance, or service.
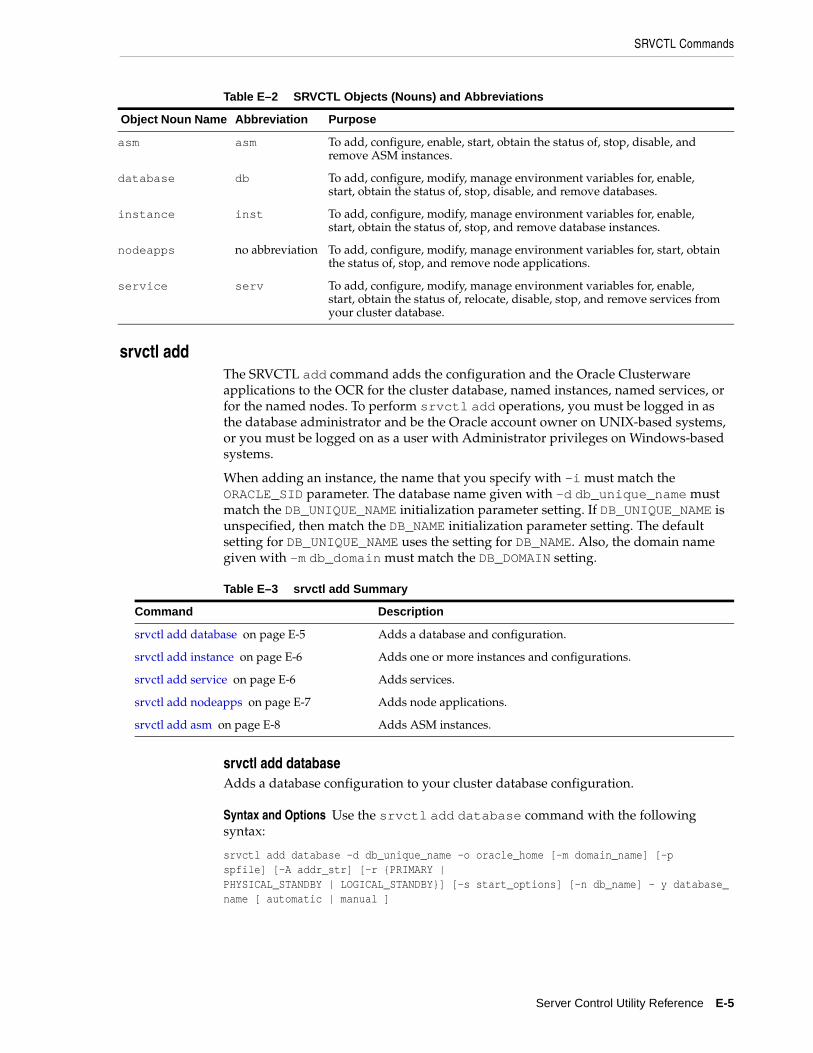
SRVCTL Commands
Server Control Utility Reference E-5
srvctl addThe SRVCTL add command adds the configuration and the Oracle Clusterware applications to the OCR for the cluster database, named instances, named services, or for the named nodes. To perform srvctl add operations, you must be logged in as the database administrator and be the Oracle account owner on UNIX-based systems, or you must be logged on as a user with Administrator privileges on Windows-based systems.
When adding an instance, the name that you specify with -i must match the ORACLE_SID parameter. The database name given with -d db_unique_name must match the DB_UNIQUE_NAME initialization parameter setting. If DB_UNIQUE_NAME is unspecified, then match the DB_NAME initialization parameter setting. The default setting for DB_UNIQUE_NAME uses the setting for DB_NAME. Also, the domain name given with -m db_domain must match the DB_DOMAIN setting.
srvctl add databaseAdds a database configuration to your cluster database configuration.
Syntax and Options Use the srvctl add database command with the following syntax:
srvctl add database -d db_unique_name -o oracle_home [-m domain_name] [-pspfile] [-A addr_str] [-r {PRIMARY |PHYSICAL_STANDBY | LOGICAL_STANDBY}] [-s start_options] [-n db_name] - y database_name [ automatic | manual ]
Table E–2 SRVCTL Objects (Nouns) and Abbreviations
Object Noun Name Abbreviation Purpose
asm asm To add, configure, enable, start, obtain the status of, stop, disable, and remove ASM instances.
database db To add, configure, modify, manage environment variables for, enable, start, obtain the status of, stop, disable, and remove databases.
instance inst To add, configure, modify, manage environment variables for, enable, start, obtain the status of, stop, and remove database instances.
nodeapps no abbreviation To add, configure, modify, manage environment variables for, start, obtain the status of, stop, and remove node applications.
service serv To add, configure, modify, manage environment variables for, enable, start, obtain the status of, relocate, disable, stop, and remove services from your cluster database.
Table E–3 srvctl add Summary
Command Description
srvctl add database on page E-5 Adds a database and configuration.
srvctl add instance on page E-6 Adds one or more instances and configurations.
srvctl add service on page E-6 Adds services.
srvctl add nodeapps on page E-7 Adds node applications.
srvctl add asm on page E-8 Adds ASM instances.
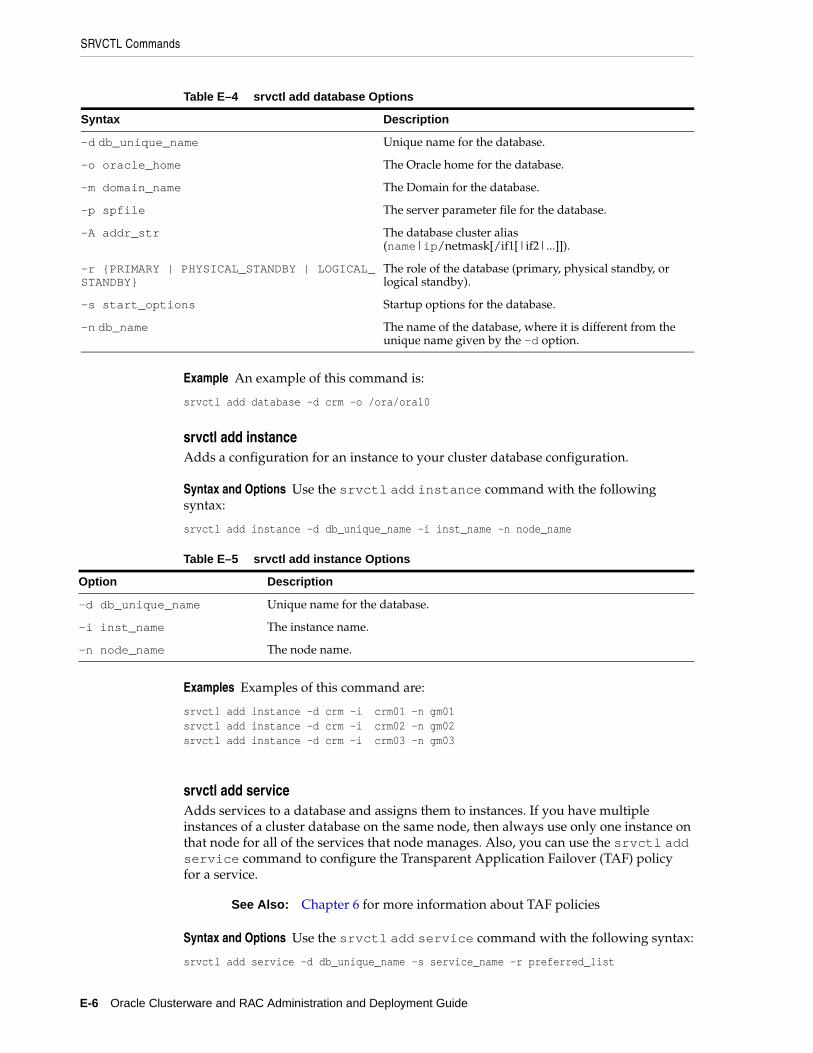
SRVCTL Commands
E-6 Oracle Clusterware and RAC Administration and Deployment Guide
Example An example of this command is:
srvctl add database -d crm -o /ora/ora10
srvctl add instanceAdds a configuration for an instance to your cluster database configuration.
Syntax and Options Use the srvctl add instance command with the following syntax:
srvctl add instance -d db_unique_name -i inst_name -n node_name
Examples Examples of this command are:
srvctl add instance -d crm -i crm01 -n gm01srvctl add instance -d crm -i crm02 -n gm02srvctl add instance -d crm -i crm03 -n gm03
srvctl add serviceAdds services to a database and assigns them to instances. If you have multiple instances of a cluster database on the same node, then always use only one instance on that node for all of the services that node manages. Also, you can use the srvctl add service command to configure the Transparent Application Failover (TAF) policy for a service.
Syntax and Options Use the srvctl add service command with the following syntax:
srvctl add service -d db_unique_name -s service_name -r preferred_list
Table E–4 srvctl add database Options
Syntax Description
-d db_unique_name Unique name for the database.
-o oracle_home The Oracle home for the database.
-m domain_name The Domain for the database.
-p spfile The server parameter file for the database.
-A addr_str The database cluster alias (name|ip/netmask[/if1[|if2|...]]).
-r {PRIMARY | PHYSICAL_STANDBY | LOGICAL_STANDBY}
The role of the database (primary, physical standby, or logical standby).
-s start_options Startup options for the database.
-n db_name The name of the database, where it is different from the unique name given by the -d option.
Table E–5 srvctl add instance Options
Option Description
-d db_unique_name Unique name for the database.
-i inst_name The instance name.
-n node_name The node name.
See Also: Chapter 6 for more information about TAF policies
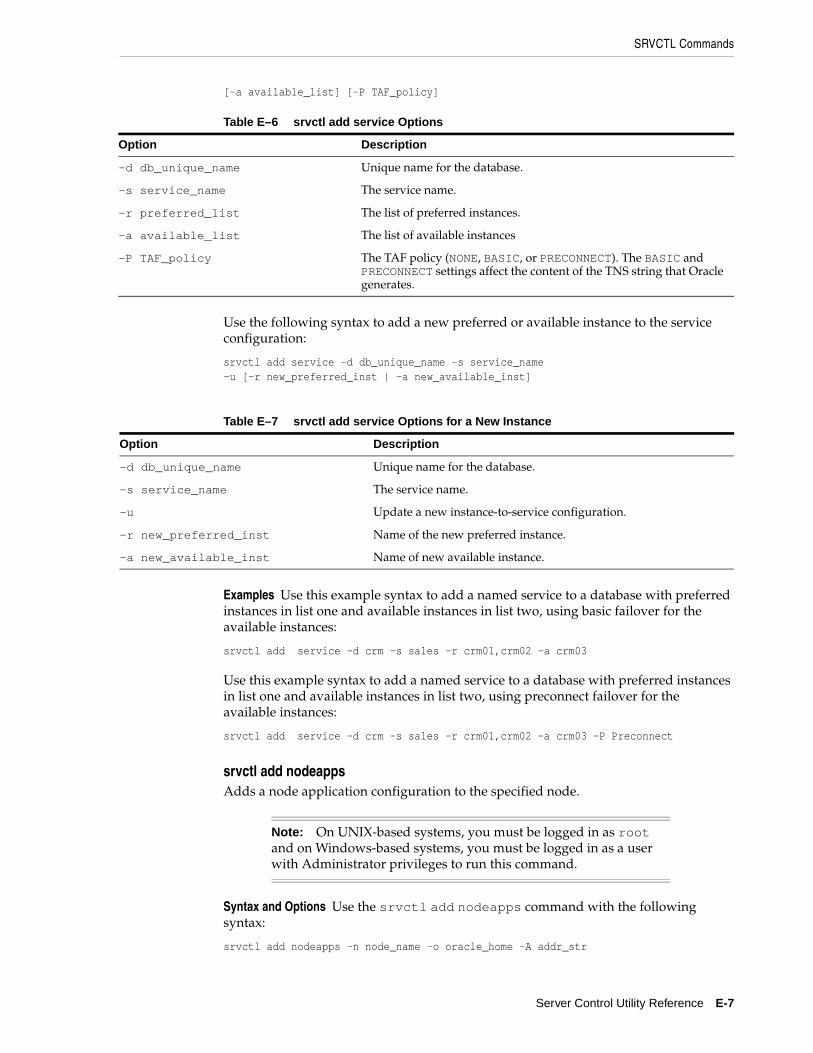
SRVCTL Commands
Server Control Utility Reference E-7
[-a available_list] [-P TAF_policy]
Use the following syntax to add a new preferred or available instance to the service configuration:
srvctl add service -d db_unique_name -s service_name -u [-r new_preferred_inst | -a new_available_inst]
Examples Use this example syntax to add a named service to a database with preferred instances in list one and available instances in list two, using basic failover for the available instances:
srvctl add service -d crm -s sales -r crm01,crm02 -a crm03
Use this example syntax to add a named service to a database with preferred instances in list one and available instances in list two, using preconnect failover for the available instances:
srvctl add service -d crm -s sales -r crm01,crm02 -a crm03 -P Preconnect
srvctl add nodeappsAdds a node application configuration to the specified node.
Syntax and Options Use the srvctl add nodeapps command with the following syntax:
srvctl add nodeapps -n node_name -o oracle_home -A addr_str
Table E–6 srvctl add service Options
Option Description
-d db_unique_name Unique name for the database.
-s service_name The service name.
-r preferred_list The list of preferred instances.
-a available_list The list of available instances
-P TAF_policy The TAF policy (NONE, BASIC, or PRECONNECT). The BASIC and PRECONNECT settings affect the content of the TNS string that Oracle generates.
Table E–7 srvctl add service Options for a New Instance
Option Description
-d db_unique_name Unique name for the database.
-s service_name The service name.
-u Update a new instance-to-service configuration.
-r new_preferred_inst Name of the new preferred instance.
-a new_available_inst Name of new available instance.
Note: On UNIX-based systems, you must be logged in as root and on Windows-based systems, you must be logged in as a user with Administrator privileges to run this command.
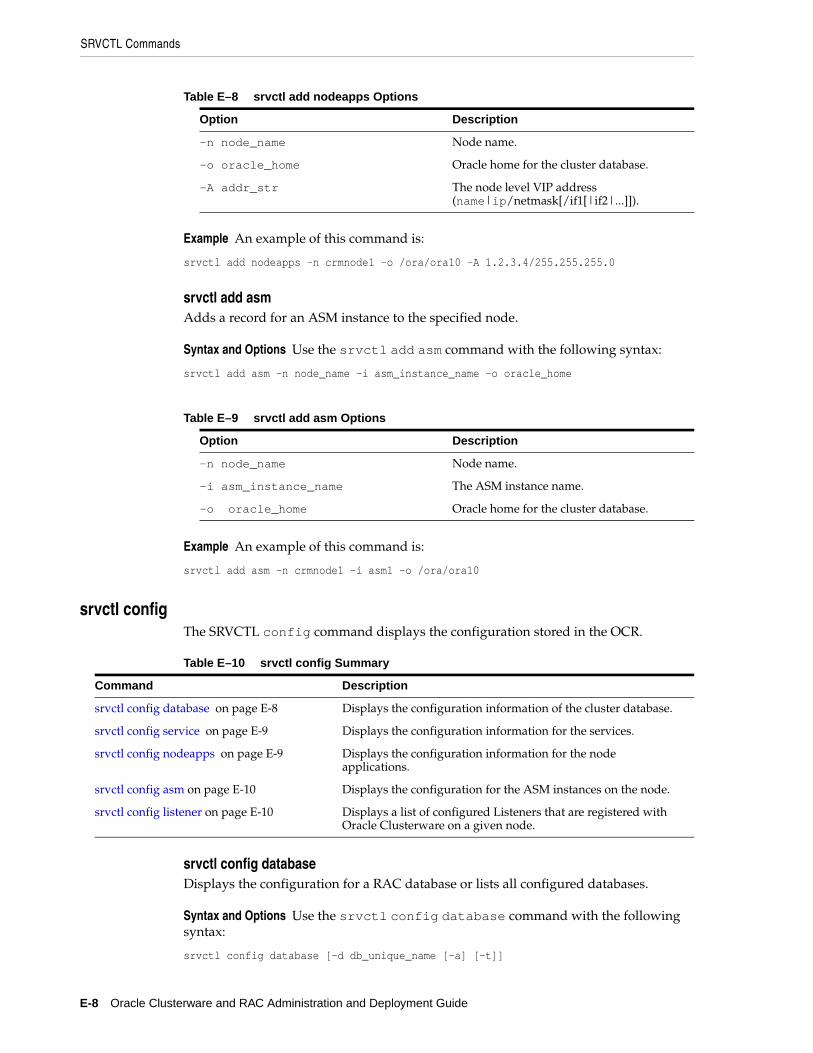
SRVCTL Commands
E-8 Oracle Clusterware and RAC Administration and Deployment Guide
Example An example of this command is:
srvctl add nodeapps -n crmnode1 -o /ora/ora10 -A 1.2.3.4/255.255.255.0
srvctl add asmAdds a record for an ASM instance to the specified node.
Syntax and Options Use the srvctl add asm command with the following syntax:
srvctl add asm -n node_name -i asm_instance_name -o oracle_home
Example An example of this command is:
srvctl add asm -n crmnode1 -i asm1 -o /ora/ora10
srvctl configThe SRVCTL config command displays the configuration stored in the OCR.
srvctl config databaseDisplays the configuration for a RAC database or lists all configured databases.
Syntax and Options Use the srvctl config database command with the following syntax:
srvctl config database [-d db_unique_name [-a] [-t]]
Table E–8 srvctl add nodeapps Options
Option Description
-n node_name Node name.
-o oracle_home Oracle home for the cluster database.
-A addr_str The node level VIP address (name|ip/netmask[/if1[|if2|...]]).
Table E–9 srvctl add asm Options
Option Description
-n node_name Node name.
-i asm_instance_name The ASM instance name.
-o oracle_home Oracle home for the cluster database.
Table E–10 srvctl config Summary
Command Description
srvctl config database on page E-8 Displays the configuration information of the cluster database.
srvctl config service on page E-9 Displays the configuration information for the services.
srvctl config nodeapps on page E-9 Displays the configuration information for the node applications.
srvctl config asm on page E-10 Displays the configuration for the ASM instances on the node.
srvctl config listener on page E-10 Displays a list of configured Listeners that are registered with Oracle Clusterware on a given node.
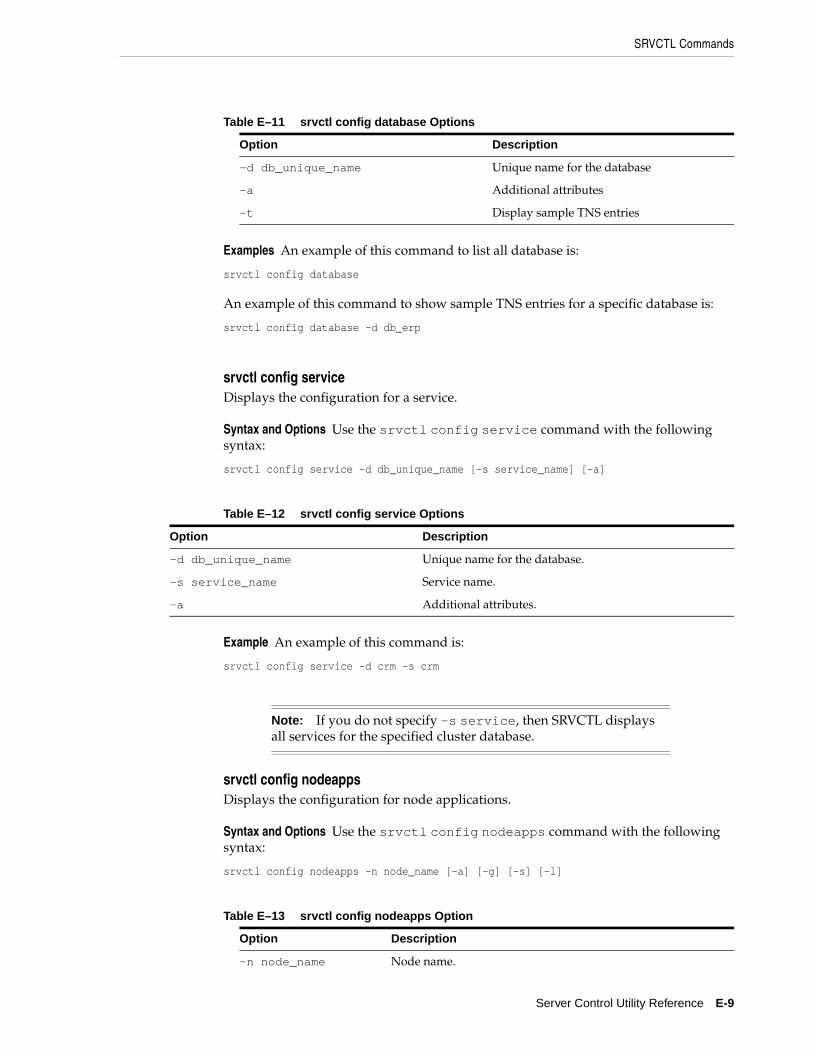
SRVCTL Commands
Server Control Utility Reference E-9
Examples An example of this command to list all database is:
srvctl config database
An example of this command to show sample TNS entries for a specific database is:
srvctl config database -d db_erp
srvctl config serviceDisplays the configuration for a service.
Syntax and Options Use the srvctl config service command with the following syntax:
srvctl config service -d db_unique_name [-s service_name] [-a]
Example An example of this command is:
srvctl config service -d crm -s crm
srvctl config nodeappsDisplays the configuration for node applications.
Syntax and Options Use the srvctl config nodeapps command with the following syntax:
srvctl config nodeapps -n node_name [-a] [-g] [-s] [-l]
Table E–11 srvctl config database Options
Option Description
-d db_unique_name Unique name for the database
-a Additional attributes
-t Display sample TNS entries
Table E–12 srvctl config service Options
Option Description
-d db_unique_name Unique name for the database.
-s service_name Service name.
-a Additional attributes.
Note: If you do not specify -s service, then SRVCTL displays all services for the specified cluster database.
Table E–13 srvctl config nodeapps Option
Option Description
-n node_name Node name.
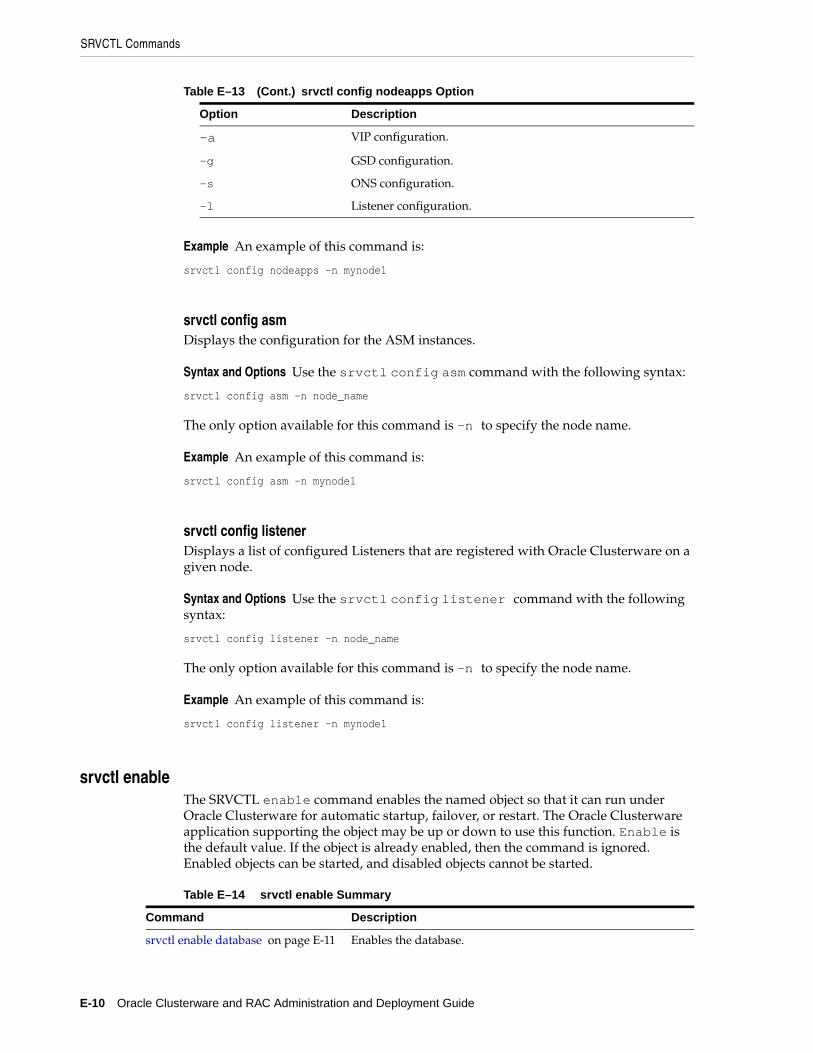
SRVCTL Commands
E-10 Oracle Clusterware and RAC Administration and Deployment Guide
Example An example of this command is:
srvctl config nodeapps -n mynode1
srvctl config asmDisplays the configuration for the ASM instances.
Syntax and Options Use the srvctl config asm command with the following syntax:
srvctl config asm -n node_name
The only option available for this command is -n to specify the node name.
Example An example of this command is:
srvctl config asm -n mynode1
srvctl config listenerDisplays a list of configured Listeners that are registered with Oracle Clusterware on a given node.
Syntax and Options Use the srvctl config listener command with the following syntax:
srvctl config listener -n node_name
The only option available for this command is -n to specify the node name.
Example An example of this command is:
srvctl config listener -n mynode1
srvctl enableThe SRVCTL enable command enables the named object so that it can run under Oracle Clusterware for automatic startup, failover, or restart. The Oracle Clusterware application supporting the object may be up or down to use this function. Enable is the default value. If the object is already enabled, then the command is ignored. Enabled objects can be started, and disabled objects cannot be started.
-a VIP configuration.
-g GSD configuration.
-s ONS configuration.
-l Listener configuration.
Table E–14 srvctl enable Summary
Command Description
srvctl enable database on page E-11 Enables the database.
Table E–13 (Cont.) srvctl config nodeapps Option
Option Description
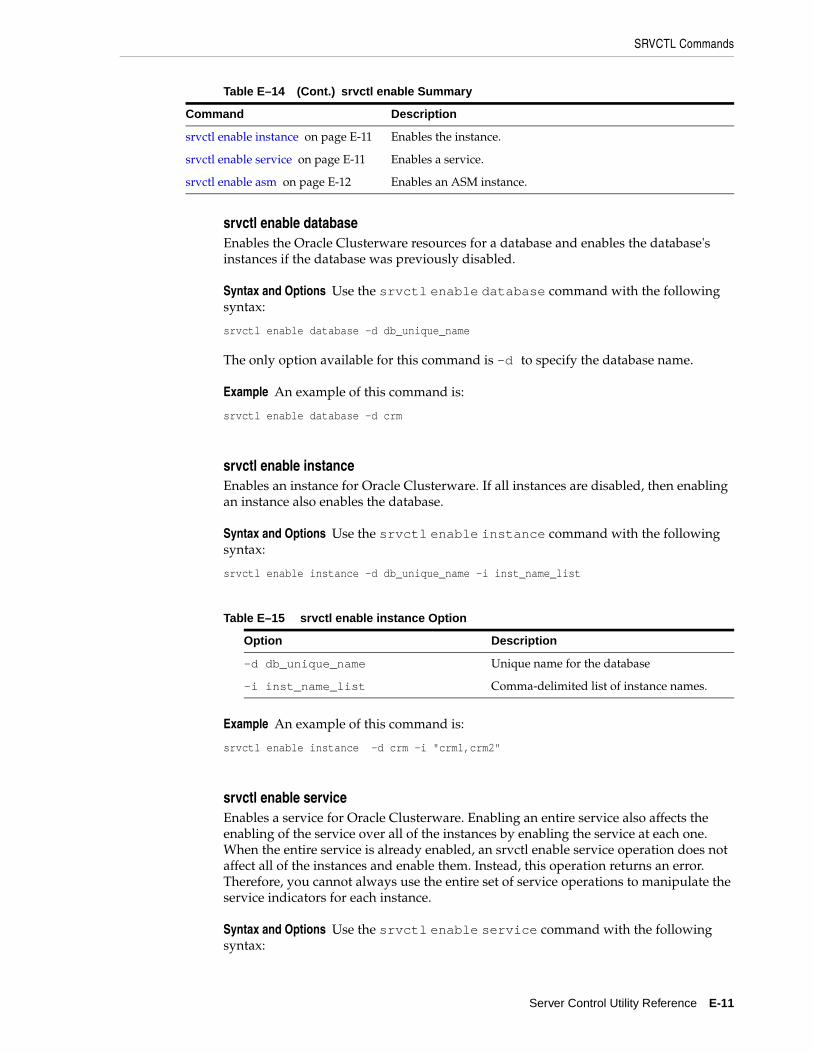
SRVCTL Commands
Server Control Utility Reference E-11
srvctl enable databaseEnables the Oracle Clusterware resources for a database and enables the database's instances if the database was previously disabled.
Syntax and Options Use the srvctl enable database command with the following syntax:
srvctl enable database -d db_unique_name
The only option available for this command is -d to specify the database name.
Example An example of this command is:
srvctl enable database -d crm
srvctl enable instanceEnables an instance for Oracle Clusterware. If all instances are disabled, then enabling an instance also enables the database.
Syntax and Options Use the srvctl enable instance command with the following syntax:
srvctl enable instance -d db_unique_name -i inst_name_list
Example An example of this command is:
srvctl enable instance -d crm -i "crm1,crm2"
srvctl enable serviceEnables a service for Oracle Clusterware. Enabling an entire service also affects the enabling of the service over all of the instances by enabling the service at each one. When the entire service is already enabled, an srvctl enable service operation does not affect all of the instances and enable them. Instead, this operation returns an error. Therefore, you cannot always use the entire set of service operations to manipulate the service indicators for each instance.
Syntax and Options Use the srvctl enable service command with the following syntax:
srvctl enable instance on page E-11 Enables the instance.
srvctl enable service on page E-11 Enables a service.
srvctl enable asm on page E-12 Enables an ASM instance.
Table E–15 srvctl enable instance Option
Option Description
-d db_unique_name Unique name for the database
-i inst_name_list Comma-delimited list of instance names.
Table E–14 (Cont.) srvctl enable Summary
Command Description
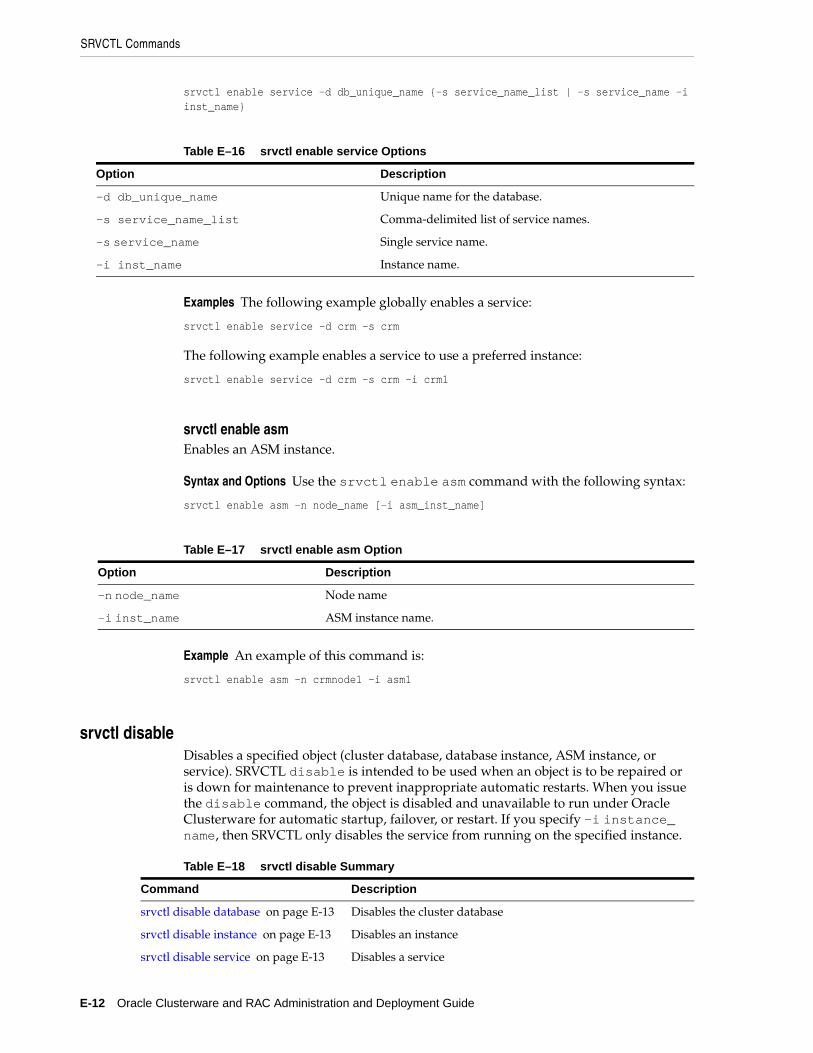
SRVCTL Commands
E-12 Oracle Clusterware and RAC Administration and Deployment Guide
srvctl enable service -d db_unique_name {-s service_name_list | -s service_name -i inst_name}
Examples The following example globally enables a service:
srvctl enable service -d crm -s crm
The following example enables a service to use a preferred instance:
srvctl enable service -d crm -s crm -i crm1
srvctl enable asmEnables an ASM instance.
Syntax and Options Use the srvctl enable asm command with the following syntax:
srvctl enable asm -n node_name [-i asm_inst_name]
Example An example of this command is:
srvctl enable asm -n crmnode1 -i asm1
srvctl disableDisables a specified object (cluster database, database instance, ASM instance, or service). SRVCTL disable is intended to be used when an object is to be repaired or is down for maintenance to prevent inappropriate automatic restarts. When you issue the disable command, the object is disabled and unavailable to run under Oracle Clusterware for automatic startup, failover, or restart. If you specify -i instance_name, then SRVCTL only disables the service from running on the specified instance.
Table E–16 srvctl enable service Options
Option Description
-d db_unique_name Unique name for the database.
-s service_name_list Comma-delimited list of service names.
-s service_name Single service name.
-i inst_name Instance name.
Table E–17 srvctl enable asm Option
Option Description
-n node_name Node name
-i inst_name ASM instance name.
Table E–18 srvctl disable Summary
Command Description
srvctl disable database on page E-13 Disables the cluster database
srvctl disable instance on page E-13 Disables an instance
srvctl disable service on page E-13 Disables a service
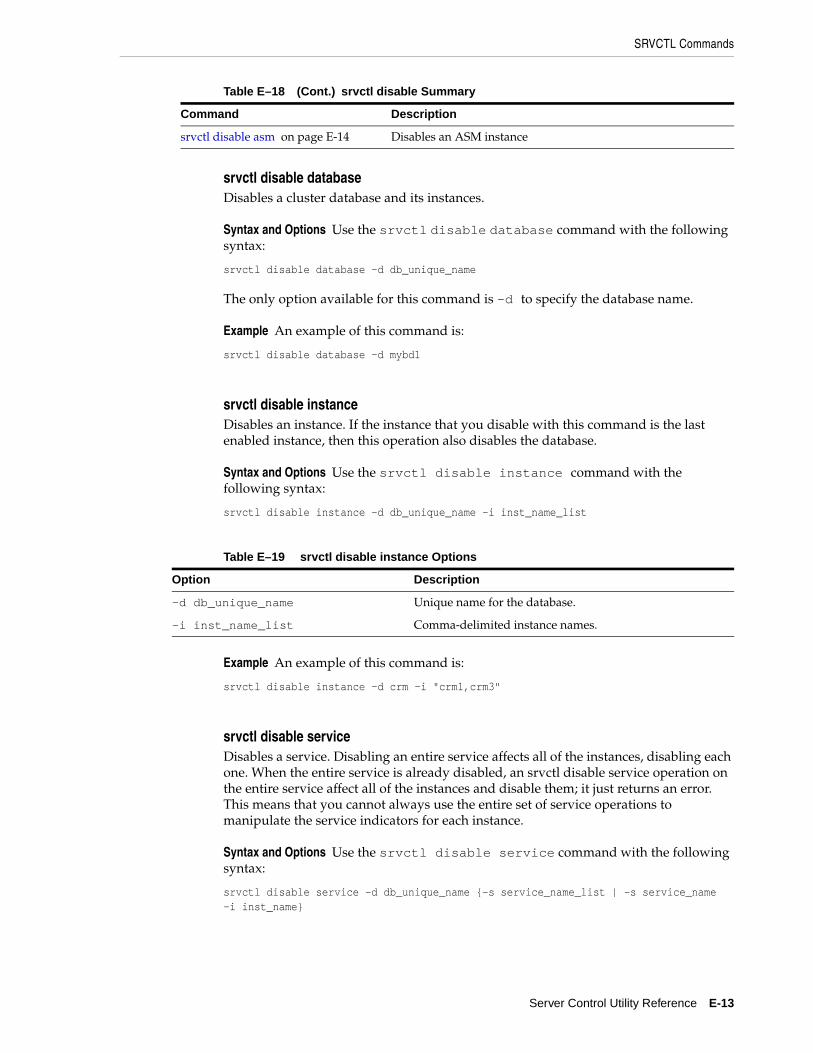
SRVCTL Commands
Server Control Utility Reference E-13
srvctl disable databaseDisables a cluster database and its instances.
Syntax and Options Use the srvctl disable database command with the following syntax:
srvctl disable database -d db_unique_name
The only option available for this command is -d to specify the database name.
Example An example of this command is:
srvctl disable database -d mybd1
srvctl disable instanceDisables an instance. If the instance that you disable with this command is the last enabled instance, then this operation also disables the database.
Syntax and Options Use the srvctl disable instance command with the following syntax:
srvctl disable instance -d db_unique_name -i inst_name_list
Example An example of this command is:
srvctl disable instance -d crm -i "crm1,crm3"
srvctl disable serviceDisables a service. Disabling an entire service affects all of the instances, disabling each one. When the entire service is already disabled, an srvctl disable service operation on the entire service affect all of the instances and disable them; it just returns an error. This means that you cannot always use the entire set of service operations to manipulate the service indicators for each instance.
Syntax and Options Use the srvctl disable service command with the following syntax:
srvctl disable service -d db_unique_name {-s service_name_list | -s service_name -i inst_name}
srvctl disable asm on page E-14 Disables an ASM instance
Table E–19 srvctl disable instance Options
Option Description
-d db_unique_name Unique name for the database.
-i inst_name_list Comma-delimited instance names.
Table E–18 (Cont.) srvctl disable Summary
Command Description
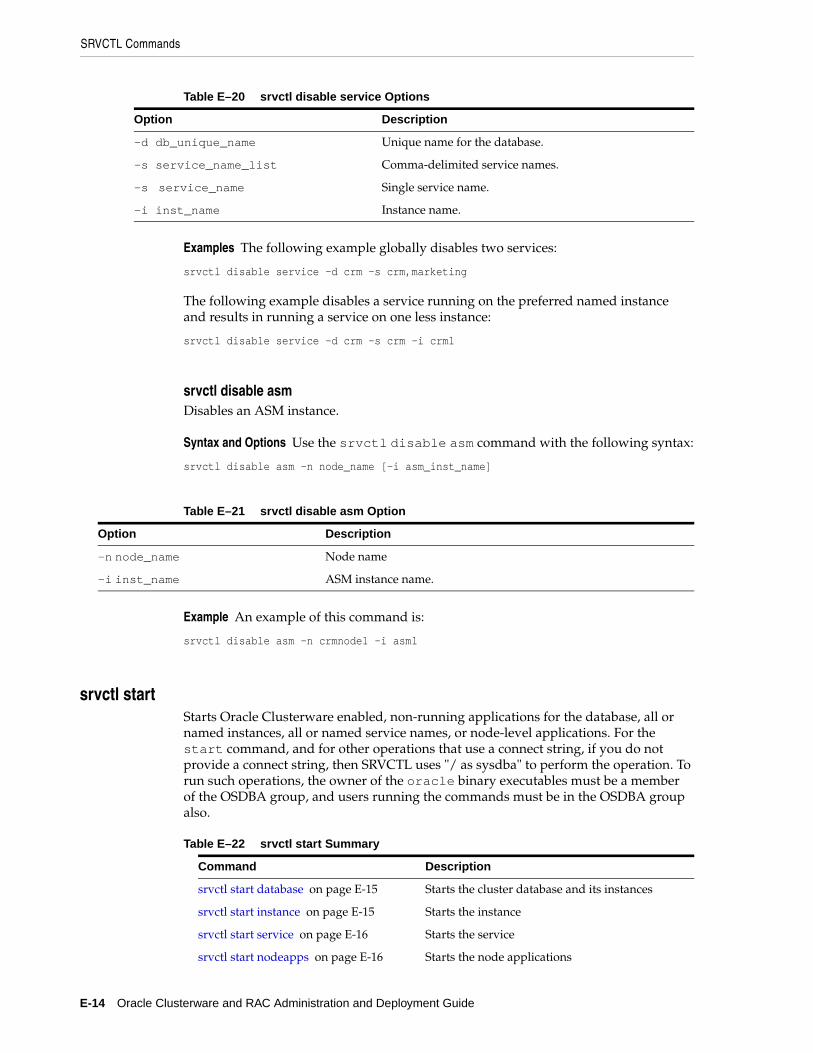
SRVCTL Commands
E-14 Oracle Clusterware and RAC Administration and Deployment Guide
Examples The following example globally disables two services:
srvctl disable service -d crm -s crm,marketing
The following example disables a service running on the preferred named instance and results in running a service on one less instance:
srvctl disable service -d crm -s crm -i crm1
srvctl disable asmDisables an ASM instance.
Syntax and Options Use the srvctl disable asm command with the following syntax:
srvctl disable asm -n node_name [-i asm_inst_name]
Example An example of this command is:
srvctl disable asm -n crmnode1 -i asm1
srvctl startStarts Oracle Clusterware enabled, non-running applications for the database, all or named instances, all or named service names, or node-level applications. For the start command, and for other operations that use a connect string, if you do not provide a connect string, then SRVCTL uses "/ as sysdba" to perform the operation. To run such operations, the owner of the oracle binary executables must be a member of the OSDBA group, and users running the commands must be in the OSDBA group also.
Table E–20 srvctl disable service Options
Option Description
-d db_unique_name Unique name for the database.
-s service_name_list Comma-delimited service names.
-s service_name Single service name.
-i inst_name Instance name.
Table E–21 srvctl disable asm Option
Option Description
-n node_name Node name
-i inst_name ASM instance name.
Table E–22 srvctl start Summary
Command Description
srvctl start database on page E-15 Starts the cluster database and its instances
srvctl start instance on page E-15 Starts the instance
srvctl start service on page E-16 Starts the service
srvctl start nodeapps on page E-16 Starts the node applications

SRVCTL Commands
Server Control Utility Reference E-15
srvctl start databaseStarts a cluster database and its enabled instances.
Syntax and Options Use the srvctl start database command with the following syntax:
srvctl start database -d db_unique_name [-o start_options] [-c connect_str | -q]
Example An example of this command is:
srvctl start database -d crm -o open
srvctl start instanceStarts instances in the cluster database.
Syntax and Options Use the srvctl start instance command with the following syntax:
srvctl start instance -d db_unique_name -i inst_name_list [-o start_options] [-c connect_str | -q]
Example An example of this command is:
srvctl start instance -d crm -i "crm1,crm4"
srvctl start asm on page E-16 Starts ASM instances
srvctl start listener on page E-17 Starts the specified Listener or Listeners.
Table E–23 srvctl start database Options
Option Description
-d db_unique_name Unique name for the database.
-o start_options Options for startup command (for example: open, mount, or nomount)
-c connect_str Connect string (default: / as sysdba)
-q Prompt for user credentials connect string from standard input.
Table E–24 srvctl start instance Options
Option Description
-d db_unique_name Unique name for the database.
-i inst_name_list Comma-delimited instance names.
-o start_options Options for startup command (for example: open, mount, or nomount).
-c connect_str Connect string (default: / as sysdba).
-q Prompt for user credentials connect string from standard input.
Table E–22 (Cont.) srvctl start Summary
Command Description
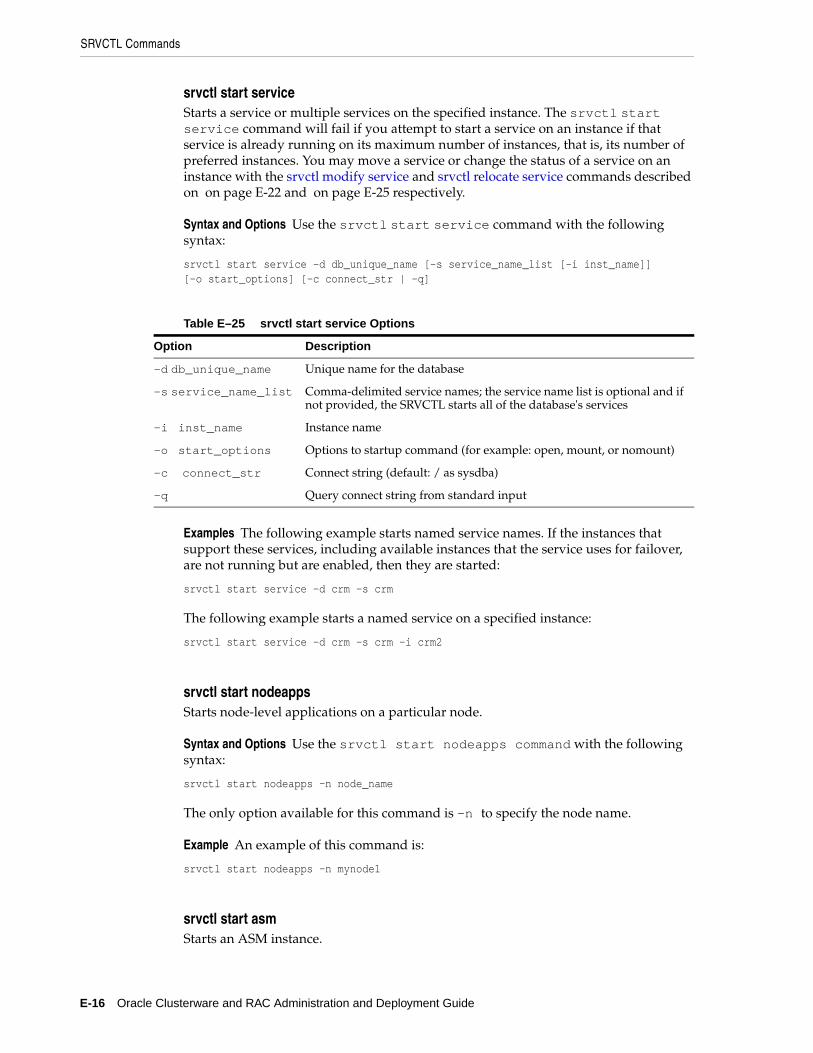
SRVCTL Commands
E-16 Oracle Clusterware and RAC Administration and Deployment Guide
srvctl start serviceStarts a service or multiple services on the specified instance. The srvctl start service command will fail if you attempt to start a service on an instance if that service is already running on its maximum number of instances, that is, its number of preferred instances. You may move a service or change the status of a service on an instance with the srvctl modify service and srvctl relocate service commands described on on page E-22 and on page E-25 respectively.
Syntax and Options Use the srvctl start service command with the following syntax:
srvctl start service -d db_unique_name [-s service_name_list [-i inst_name]] [-o start_options] [-c connect_str | -q]
Examples The following example starts named service names. If the instances that support these services, including available instances that the service uses for failover, are not running but are enabled, then they are started:
srvctl start service -d crm -s crm
The following example starts a named service on a specified instance:
srvctl start service -d crm -s crm -i crm2
srvctl start nodeappsStarts node-level applications on a particular node.
Syntax and Options Use the srvctl start nodeapps command with the following syntax:
srvctl start nodeapps -n node_name
The only option available for this command is -n to specify the node name.
Example An example of this command is:
srvctl start nodeapps -n mynode1
srvctl start asmStarts an ASM instance.
Table E–25 srvctl start service Options
Option Description
-d db_unique_name Unique name for the database
-s service_name_list Comma-delimited service names; the service name list is optional and if not provided, the SRVCTL starts all of the database's services
-i inst_name Instance name
-o start_options Options to startup command (for example: open, mount, or nomount)
-c connect_str Connect string (default: / as sysdba)
-q Query connect string from standard input
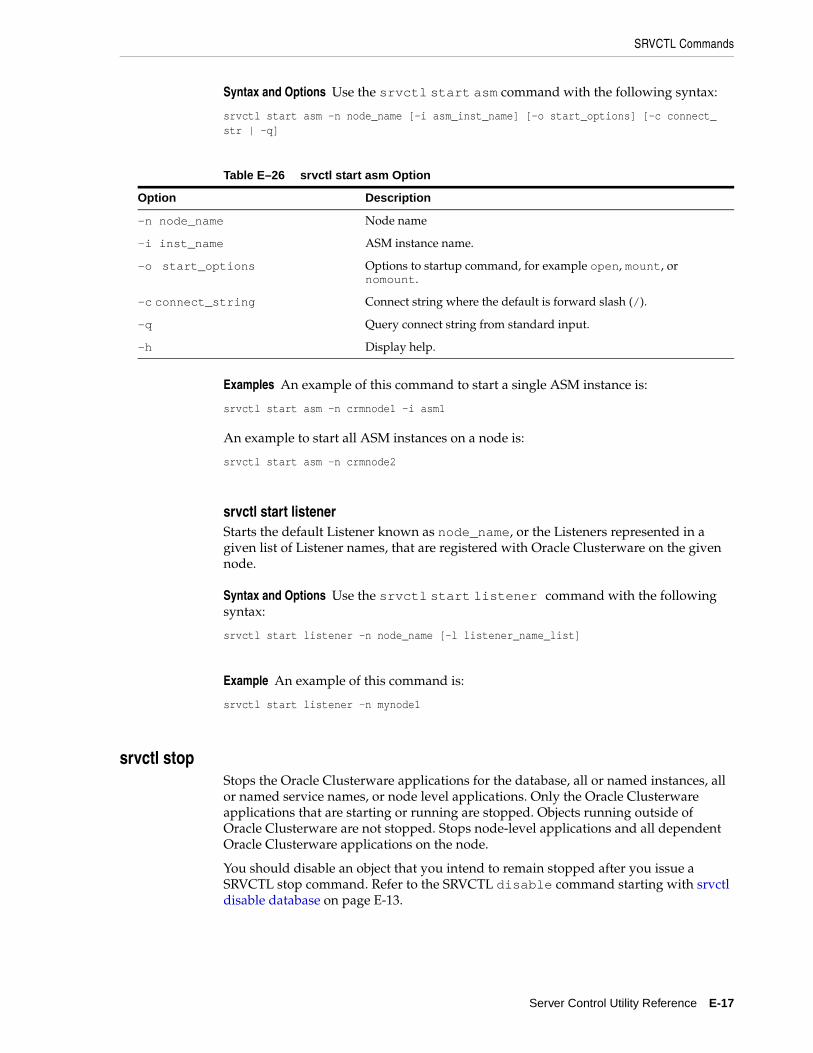
SRVCTL Commands
Server Control Utility Reference E-17
Syntax and Options Use the srvctl start asm command with the following syntax:
srvctl start asm -n node_name [-i asm_inst_name] [-o start_options] [-c connect_str | -q]
Examples An example of this command to start a single ASM instance is:
srvctl start asm -n crmnode1 -i asm1
An example to start all ASM instances on a node is:
srvctl start asm -n crmnode2
srvctl start listenerStarts the default Listener known as node_name, or the Listeners represented in a given list of Listener names, that are registered with Oracle Clusterware on the given node.
Syntax and Options Use the srvctl start listener command with the following syntax:
srvctl start listener -n node_name [-l listener_name_list]
Example An example of this command is:
srvctl start listener -n mynode1
srvctl stopStops the Oracle Clusterware applications for the database, all or named instances, all or named service names, or node level applications. Only the Oracle Clusterware applications that are starting or running are stopped. Objects running outside of Oracle Clusterware are not stopped. Stops node-level applications and all dependent Oracle Clusterware applications on the node.
You should disable an object that you intend to remain stopped after you issue a SRVCTL stop command. Refer to the SRVCTL disable command starting with srvctl disable database on page E-13.
Table E–26 srvctl start asm Option
Option Description
-n node_name Node name
-i inst_name ASM instance name.
-o start_options Options to startup command, for example open, mount, or nomount.
-c connect_string Connect string where the default is forward slash (/).
-q Query connect string from standard input.
-h Display help.
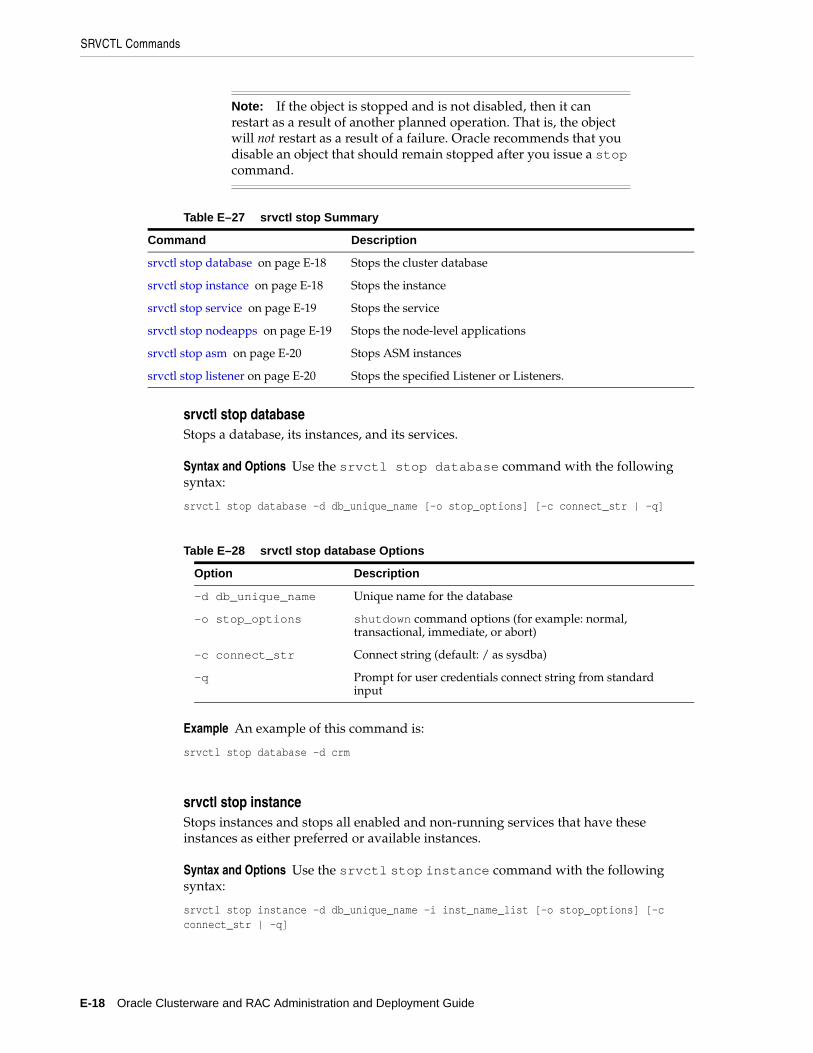
SRVCTL Commands
E-18 Oracle Clusterware and RAC Administration and Deployment Guide
srvctl stop databaseStops a database, its instances, and its services.
Syntax and Options Use the srvctl stop database command with the following syntax:
srvctl stop database -d db_unique_name [-o stop_options] [-c connect_str | -q]
Example An example of this command is:
srvctl stop database -d crm
srvctl stop instanceStops instances and stops all enabled and non-running services that have these instances as either preferred or available instances.
Syntax and Options Use the srvctl stop instance command with the following syntax:
srvctl stop instance -d db_unique_name -i inst_name_list [-o stop_options] [-c connect_str | -q]
Note: If the object is stopped and is not disabled, then it can restart as a result of another planned operation. That is, the object will not restart as a result of a failure. Oracle recommends that you disable an object that should remain stopped after you issue a stop command.
Table E–27 srvctl stop Summary
Command Description
srvctl stop database on page E-18 Stops the cluster database
srvctl stop instance on page E-18 Stops the instance
srvctl stop service on page E-19 Stops the service
srvctl stop nodeapps on page E-19 Stops the node-level applications
srvctl stop asm on page E-20 Stops ASM instances
srvctl stop listener on page E-20 Stops the specified Listener or Listeners.
Table E–28 srvctl stop database Options
Option Description
-d db_unique_name Unique name for the database
-o stop_options shutdown command options (for example: normal, transactional, immediate, or abort)
-c connect_str Connect string (default: / as sysdba)
-q Prompt for user credentials connect string from standard input

SRVCTL Commands
Server Control Utility Reference E-19
Example An example of this command is:
srvctl stop instance -d crm -i crm1
srvctl stop serviceStops one or more services globally across the cluster database, or on the specified instance.
Syntax and Options Use the srvctl stop service command with the following syntax:
srvctl stop service -d db_unique_name [-s service_name_list [-i inst_name]] [-c connect_str | -q] [-f]
Examples The following example stops a service globally across a cluster database:
srvctl stop service -d crm -s crm
The following example stops a service on a specified instance:
srvctl stop service -d crm -s crm -i crm2
srvctl stop nodeappsStops node-level applications on a particular node.
Syntax and Options Use the srvctl stop nodeapps command with the following syntax:
Table E–29 srvctl stop instance Options
Option Description
-d db_unique_name Unique name for the database
-i inst_name_list Comma-delimited instance names
-o stop_options Options for shutdown command (for example: normal, transactional, immediate, or abort)
-c connect_str Connect string (default: / as sysdba)
-q Query connect string from standard input
Table E–30 srvctl stop service Options
Option Description
-d db_unique_name Unique name for the database
-s service_name_list Comma-delimited service names; if you do not provide a service name list, then SRVCTL stops all services on the database
-i inst_name Instance name
-c connect_str Connect string (default: / as sysdba)
-q Query connect string from standard input
-f force Force SRVCTL to stop the service; this causes SRVCTL to disconnect all of the sessions transactionally, causing the sessions using the service to reconnect to another instance
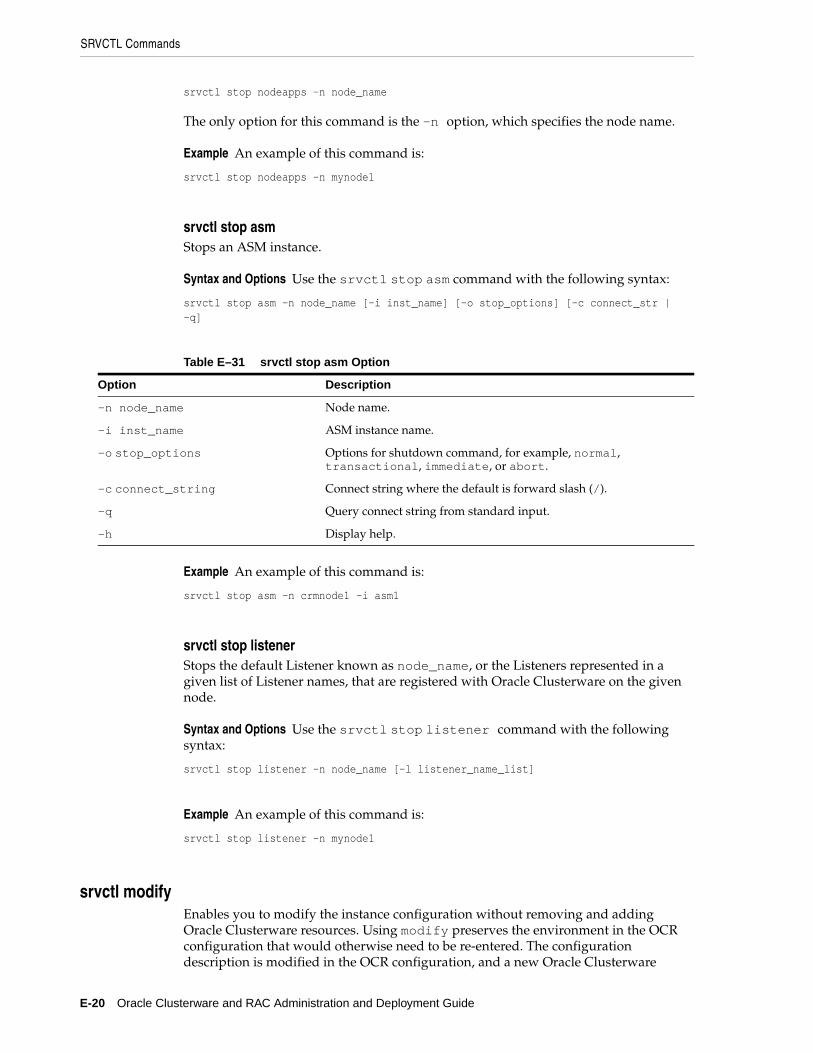
SRVCTL Commands
E-20 Oracle Clusterware and RAC Administration and Deployment Guide
srvctl stop nodeapps -n node_name
The only option for this command is the -n option, which specifies the node name.
Example An example of this command is:
srvctl stop nodeapps -n mynode1
srvctl stop asmStops an ASM instance.
Syntax and Options Use the srvctl stop asm command with the following syntax:
srvctl stop asm -n node_name [-i inst_name] [-o stop_options] [-c connect_str | -q]
Example An example of this command is:
srvctl stop asm -n crmnode1 -i asm1
srvctl stop listenerStops the default Listener known as node_name, or the Listeners represented in a given list of Listener names, that are registered with Oracle Clusterware on the given node.
Syntax and Options Use the srvctl stop listener command with the following syntax:
srvctl stop listener -n node_name [-l listener_name_list]
Example An example of this command is:
srvctl stop listener -n mynode1
srvctl modifyEnables you to modify the instance configuration without removing and adding Oracle Clusterware resources. Using modify preserves the environment in the OCR configuration that would otherwise need to be re-entered. The configuration description is modified in the OCR configuration, and a new Oracle Clusterware
Table E–31 srvctl stop asm Option
Option Description
-n node_name Node name.
-i inst_name ASM instance name.
-o stop_options Options for shutdown command, for example, normal, transactional, immediate, or abort.
-c connect_string Connect string where the default is forward slash (/).
-q Query connect string from standard input.
-h Display help.

SRVCTL Commands
Server Control Utility Reference E-21
profile is generated and registered. The change takes effect when the application is next restarted.
srvctl modify databaseModifies the configuration for a database.
Syntax and Options Use the srvctl modify database command with the following syntax:
srvctl modify database -d db_unique_name [-n db_name] [-o oracle_home] [-m domain_name] [-p spfile] [-r {PRIMARY | PHYSICAL_STANDBY | LOGICAL_STANDBY}] [-s start_options] [-y {AUTOMATIC | MANUAL}]
Example The following example changes the role of a database to a logical standby:
srvctl modify database -d crm -r logical_standby
srvctl modify instanceModifies the configuration for a database instance from its current node to another node or changes the dependency between and ASM instance and a database instance.
Syntax and Options Use the srvctl modify instance command with the following syntax:
srvctl modify instance -d db_unique_name -i inst_name {-n node_name | -s asm_instance_name | -r}
Table E–32 srvctl modify Summary
Command Description
srvctl modify database on page E-21 Modifies the configuration for a database.
srvctl modify instance on page E-21 Modifies the configuration for an instance.
srvctl modify service on page E-22 Modifies the configuration for a service.
srvctl modify nodeapps on page E-24 Modifies the configuration for a node application.
Table E–33 srvctl modify database Options
Option Description
-d db_unique_name Unique name for the database.
-n db_name Name of the database, where it is different from the unique name given by -d option.
-o oracle_home Oracle home for cluster database.
-m domain_name Domain for cluster database.
-p spfile Server parameter file for cluster database.
-r role [PRIMARY | PHYSICAL_STANDBY | LOGICAL_STANDBY]
Role of the database (primary, physical standby, or logical standby)
-s start_options Startup options for the database.
-y Management policy for the database, either automatic or manual.
-h Print usage.

SRVCTL Commands
E-22 Oracle Clusterware and RAC Administration and Deployment Guide
Examples An example of this command to relocate a database instance is:
srvctl modify instance -d crm -i crm1 -n my_new_node
The following example of this command establishes a dependency between an ASM instance and a database instance:
srvctl modify instance -d crm -i crm1 -s asm1
srvctl modify serviceMoves a service member from one instance to another. Additionally, this command changes which instances are to be the preferred and the available instances for a service. This command supports some online modifications to the service, for example:
■ When a service configuration is modified so that a new preferred or available instance is added, the running state of the existing service is not affected. However, the newly added instances will not automatically provide the service, until a srvctl start service command is issued as described on page E-16.
■ When there are available instances for the service, and the service configuration is modified so that a preferred or available instance is removed, the running state of the service may change unpredictably:
■ The service is stopped and then removed on some instances according to the new service configuration.
■ The service may be running on some instances that are being removed from the service configuration.
■ These services will be relocated to the next "free" instance in the new service configuration.
As a result of these considerations, when the online service is being modified, users may experience a brief service outage on some instances even if the instances are not being removed. Or users may experience a brief service outage on instances that are being removed from the service.
Syntax and Options Use the srvctl modify service command with the following syntax:
Table E–34 srvctl modify instance Options
Option Description
-d db_unique_name Unique name for the database.
-i inst_name Database instance name.
-n node_name Node name.
-s asm_instance_name ASM instance dependency to database instance.
-r Remove ASM instance dependency from database instance.
Important: Oracle recommends that you limit configuration changes to the minimum requirement and that you not perform other service operations while the online service modification is in progress.
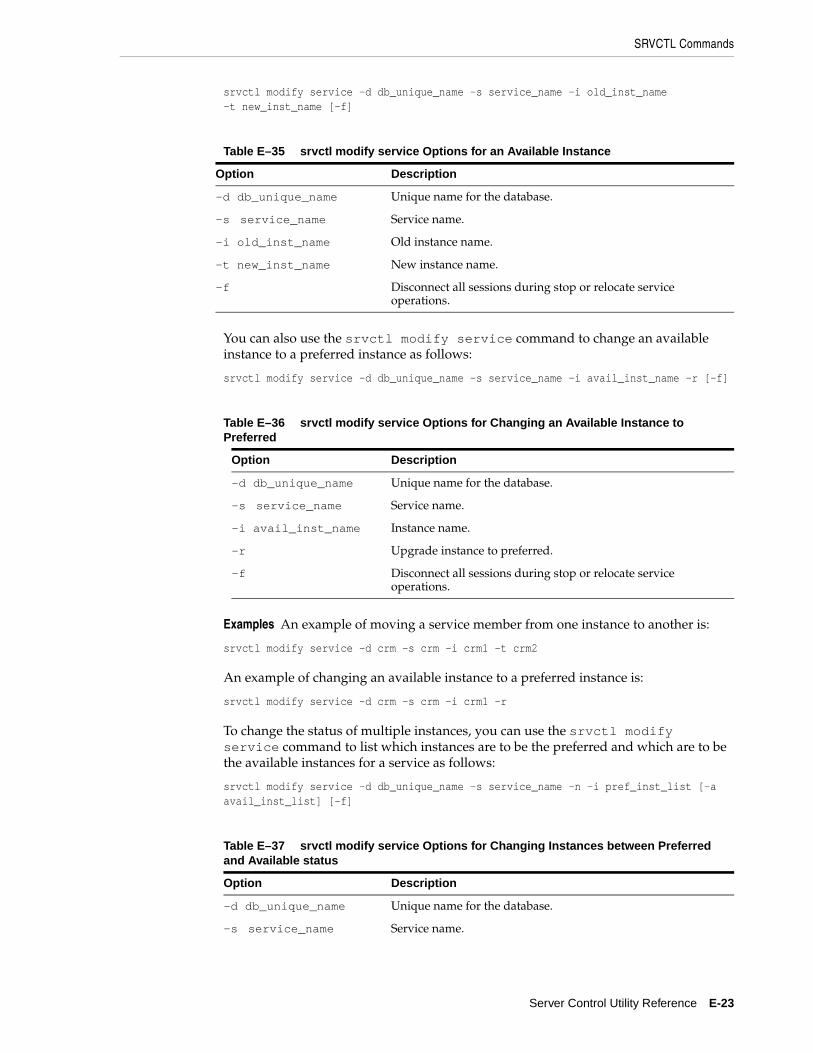
SRVCTL Commands
Server Control Utility Reference E-23
srvctl modify service -d db_unique_name -s service_name -i old_inst_name -t new_inst_name [-f]
You can also use the srvctl modify service command to change an available instance to a preferred instance as follows:
srvctl modify service -d db_unique_name -s service_name -i avail_inst_name -r [-f]
Examples An example of moving a service member from one instance to another is:
srvctl modify service -d crm -s crm -i crm1 -t crm2
An example of changing an available instance to a preferred instance is:
srvctl modify service -d crm -s crm -i crm1 -r
To change the status of multiple instances, you can use the srvctl modify service command to list which instances are to be the preferred and which are to be the available instances for a service as follows:
srvctl modify service -d db_unique_name -s service_name -n -i pref_inst_list [-a avail_inst_list] [-f]
Table E–35 srvctl modify service Options for an Available Instance
Option Description
-d db_unique_name Unique name for the database.
-s service_name Service name.
-i old_inst_name Old instance name.
-t new_inst_name New instance name.
-f Disconnect all sessions during stop or relocate service operations.
Table E–36 srvctl modify service Options for Changing an Available Instance to Preferred
Option Description
-d db_unique_name Unique name for the database.
-s service_name Service name.
-i avail_inst_name Instance name.
-r Upgrade instance to preferred.
-f Disconnect all sessions during stop or relocate service operations.
Table E–37 srvctl modify service Options for Changing Instances between Preferred and Available status
Option Description
-d db_unique_name Unique name for the database.
-s service_name Service name.
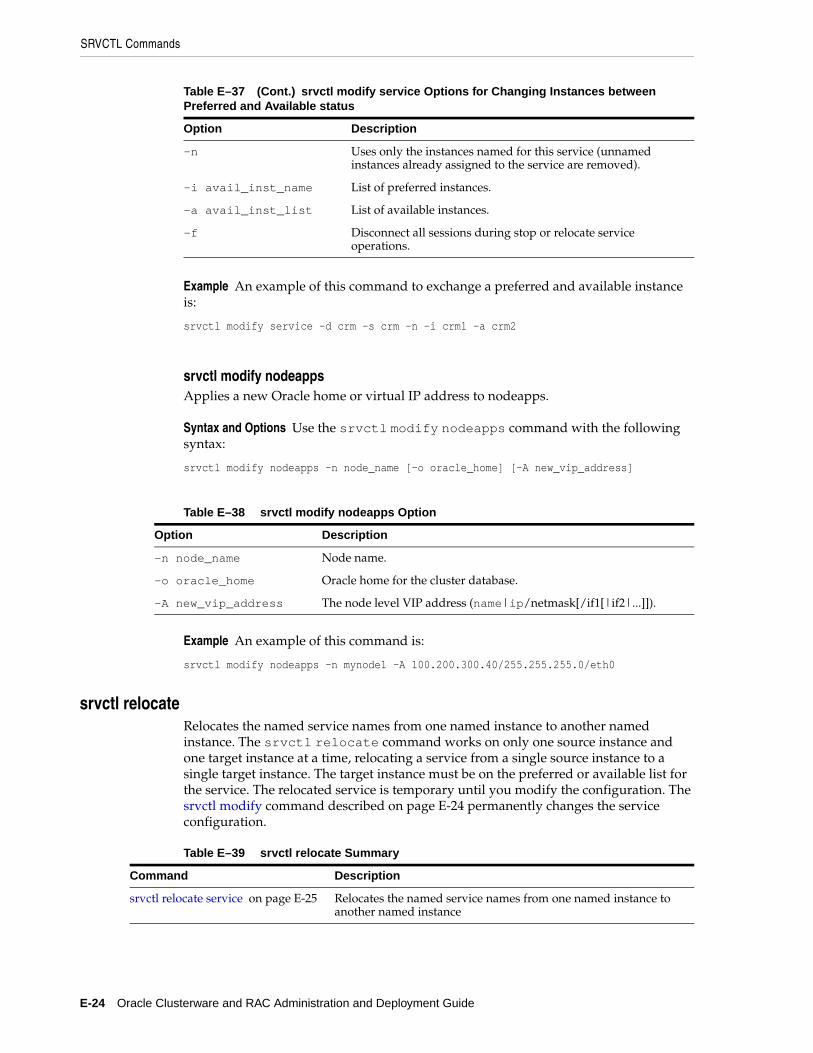
SRVCTL Commands
E-24 Oracle Clusterware and RAC Administration and Deployment Guide
Example An example of this command to exchange a preferred and available instance is:
srvctl modify service -d crm -s crm -n -i crm1 -a crm2
srvctl modify nodeappsApplies a new Oracle home or virtual IP address to nodeapps.
Syntax and Options Use the srvctl modify nodeapps command with the following syntax:
srvctl modify nodeapps -n node_name [-o oracle_home] [-A new_vip_address]
Example An example of this command is:
srvctl modify nodeapps -n mynode1 -A 100.200.300.40/255.255.255.0/eth0
srvctl relocateRelocates the named service names from one named instance to another named instance. The srvctl relocate command works on only one source instance and one target instance at a time, relocating a service from a single source instance to a single target instance. The target instance must be on the preferred or available list for the service. The relocated service is temporary until you modify the configuration. The srvctl modify command described on page E-24 permanently changes the service configuration.
-n Uses only the instances named for this service (unnamed instances already assigned to the service are removed).
-i avail_inst_name List of preferred instances.
-a avail_inst_list List of available instances.
-f Disconnect all sessions during stop or relocate service operations.
Table E–38 srvctl modify nodeapps Option
Option Description
-n node_name Node name.
-o oracle_home Oracle home for the cluster database.
-A new_vip_address The node level VIP address (name|ip/netmask[/if1[|if2|...]]).
Table E–39 srvctl relocate Summary
Command Description
srvctl relocate service on page E-25 Relocates the named service names from one named instance to another named instance
Table E–37 (Cont.) srvctl modify service Options for Changing Instances between Preferred and Available status
Option Description
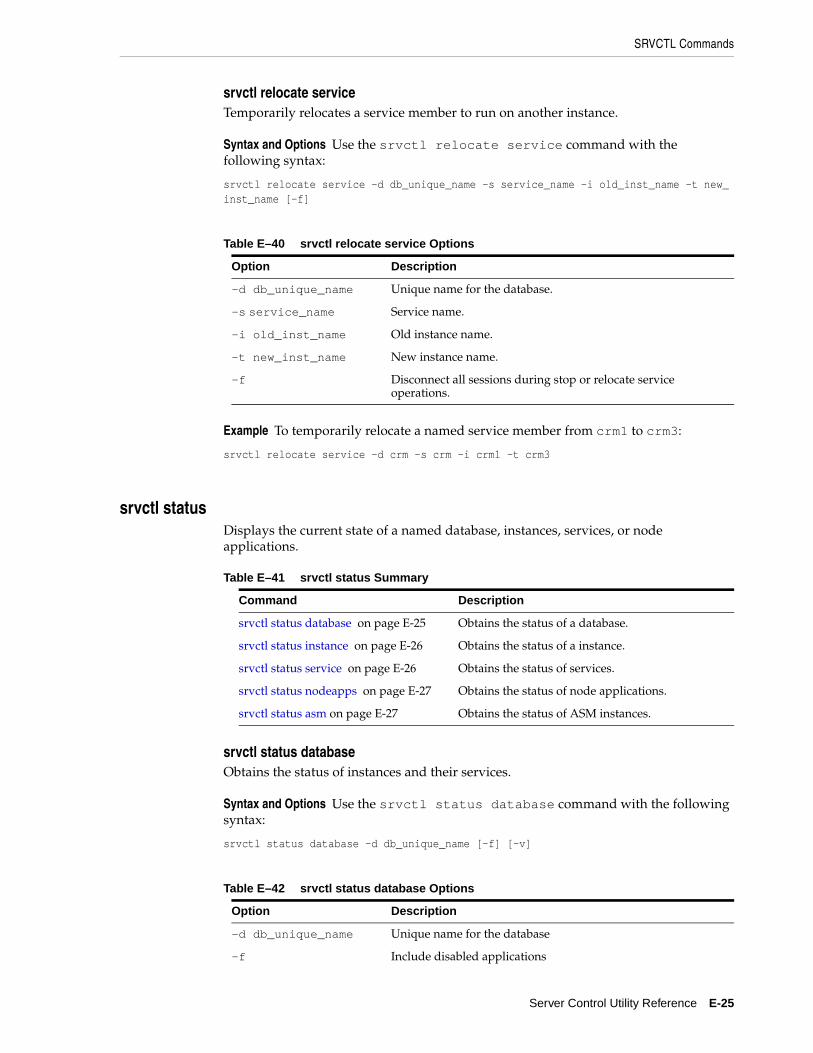
SRVCTL Commands
Server Control Utility Reference E-25
srvctl relocate serviceTemporarily relocates a service member to run on another instance.
Syntax and Options Use the srvctl relocate service command with the following syntax:
srvctl relocate service -d db_unique_name -s service_name -i old_inst_name -t new_inst_name [-f]
Example To temporarily relocate a named service member from crm1 to crm3:
srvctl relocate service -d crm -s crm -i crm1 -t crm3
srvctl statusDisplays the current state of a named database, instances, services, or node applications.
srvctl status databaseObtains the status of instances and their services.
Syntax and Options Use the srvctl status database command with the following syntax:
srvctl status database -d db_unique_name [-f] [-v]
Table E–40 srvctl relocate service Options
Option Description
-d db_unique_name Unique name for the database.
-s service_name Service name.
-i old_inst_name Old instance name.
-t new_inst_name New instance name.
-f Disconnect all sessions during stop or relocate service operations.
Table E–41 srvctl status Summary
Command Description
srvctl status database on page E-25 Obtains the status of a database.
srvctl status instance on page E-26 Obtains the status of a instance.
srvctl status service on page E-26 Obtains the status of services.
srvctl status nodeapps on page E-27 Obtains the status of node applications.
srvctl status asm on page E-27 Obtains the status of ASM instances.
Table E–42 srvctl status database Options
Option Description
-d db_unique_name Unique name for the database
-f Include disabled applications
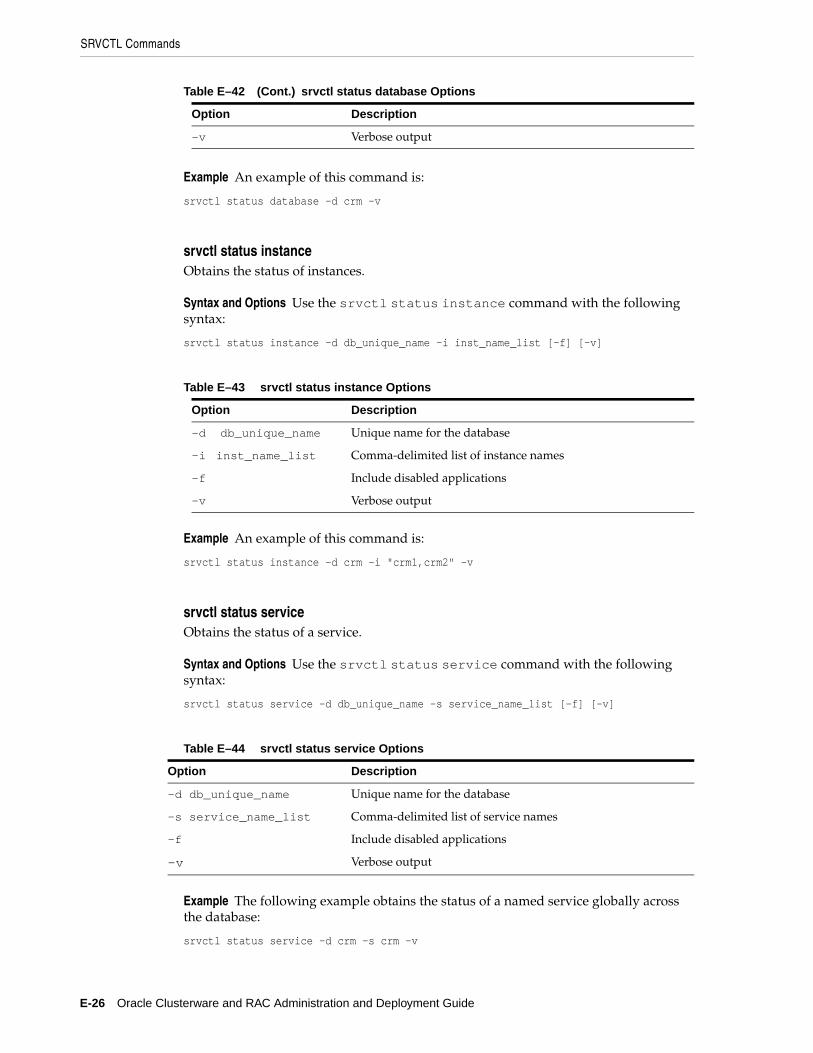
SRVCTL Commands
E-26 Oracle Clusterware and RAC Administration and Deployment Guide
Example An example of this command is:
srvctl status database -d crm -v
srvctl status instanceObtains the status of instances.
Syntax and Options Use the srvctl status instance command with the following syntax:
srvctl status instance -d db_unique_name -i inst_name_list [-f] [-v]
Example An example of this command is:
srvctl status instance -d crm -i "crm1,crm2" -v
srvctl status serviceObtains the status of a service.
Syntax and Options Use the srvctl status service command with the following syntax:
srvctl status service -d db_unique_name -s service_name_list [-f] [-v]
Example The following example obtains the status of a named service globally across the database:
srvctl status service -d crm -s crm -v
-v Verbose output
Table E–43 srvctl status instance Options
Option Description
-d db_unique_name Unique name for the database
-i inst_name_list Comma-delimited list of instance names
-f Include disabled applications
-v Verbose output
Table E–44 srvctl status service Options
Option Description
-d db_unique_name Unique name for the database
-s service_name_list Comma-delimited list of service names
-f Include disabled applications
-v Verbose output
Table E–42 (Cont.) srvctl status database Options
Option Description
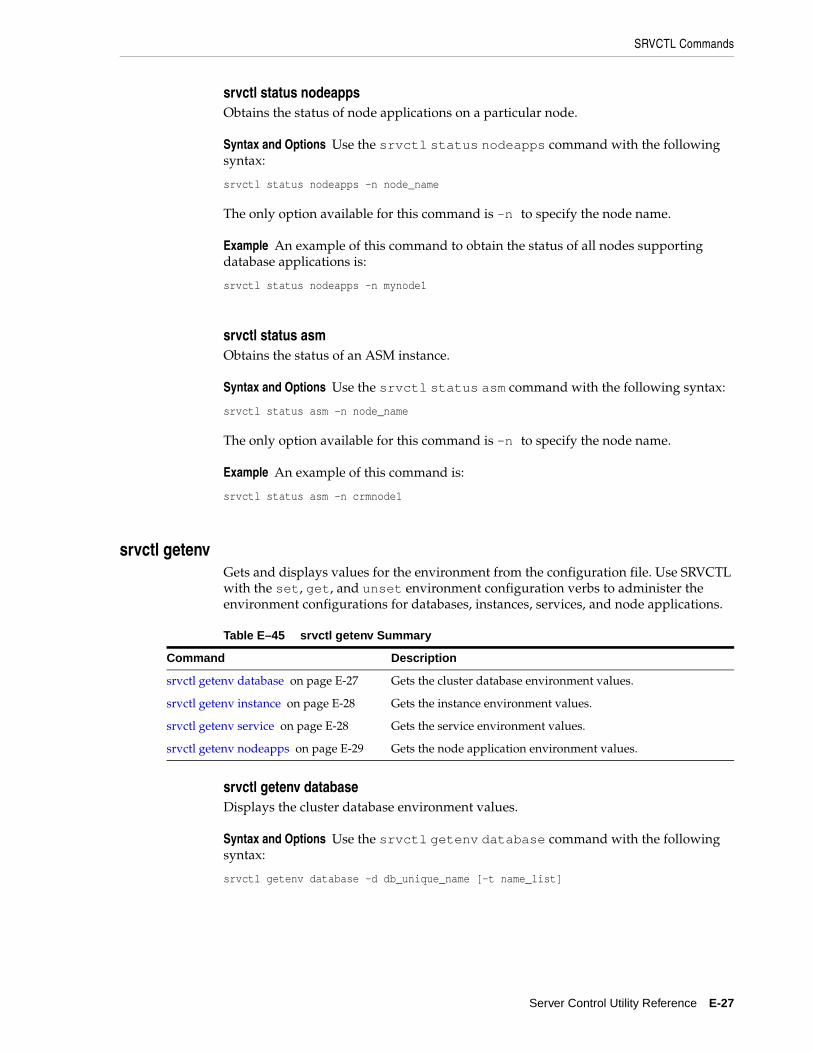
SRVCTL Commands
Server Control Utility Reference E-27
srvctl status nodeappsObtains the status of node applications on a particular node.
Syntax and Options Use the srvctl status nodeapps command with the following syntax:
srvctl status nodeapps -n node_name
The only option available for this command is -n to specify the node name.
Example An example of this command to obtain the status of all nodes supporting database applications is:
srvctl status nodeapps -n mynode1
srvctl status asmObtains the status of an ASM instance.
Syntax and Options Use the srvctl status asm command with the following syntax:
srvctl status asm -n node_name
The only option available for this command is -n to specify the node name.
Example An example of this command is:
srvctl status asm -n crmnode1
srvctl getenvGets and displays values for the environment from the configuration file. Use SRVCTL with the set, get, and unset environment configuration verbs to administer the environment configurations for databases, instances, services, and node applications.
srvctl getenv databaseDisplays the cluster database environment values.
Syntax and Options Use the srvctl getenv database command with the following syntax:
srvctl getenv database -d db_unique_name [-t name_list]
Table E–45 srvctl getenv Summary
Command Description
srvctl getenv database on page E-27 Gets the cluster database environment values.
srvctl getenv instance on page E-28 Gets the instance environment values.
srvctl getenv service on page E-28 Gets the service environment values.
srvctl getenv nodeapps on page E-29 Gets the node application environment values.
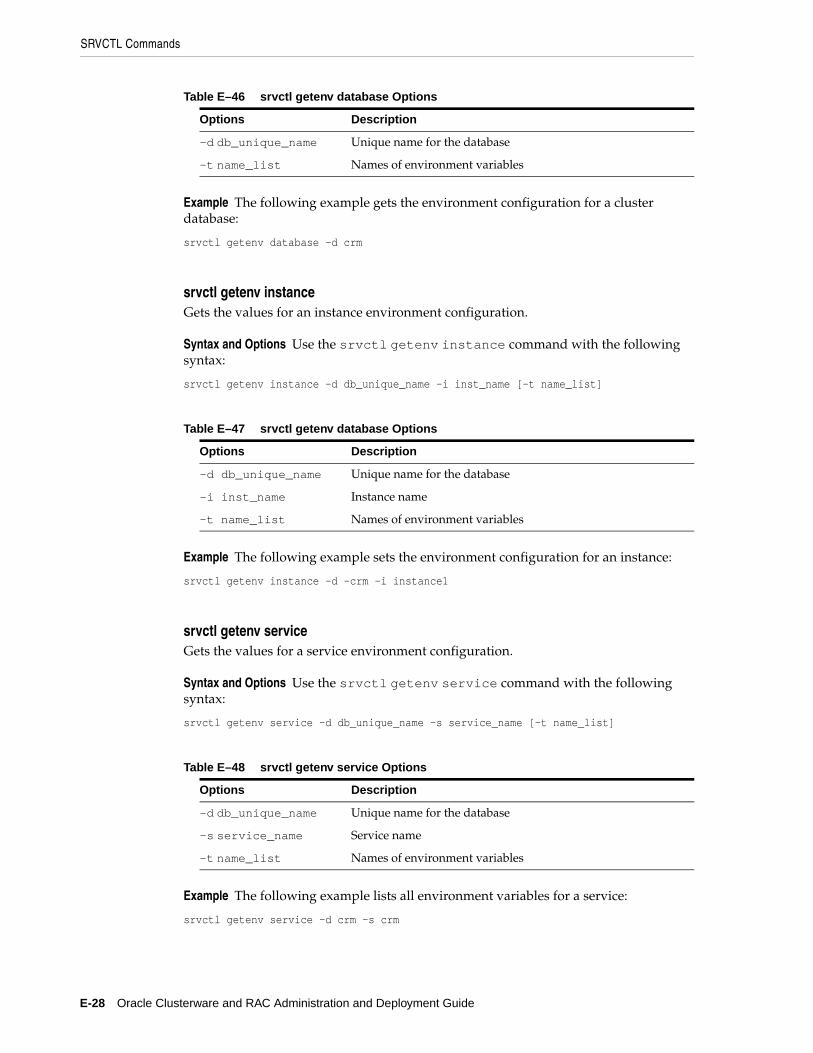
SRVCTL Commands
E-28 Oracle Clusterware and RAC Administration and Deployment Guide
Example The following example gets the environment configuration for a cluster database:
srvctl getenv database -d crm
srvctl getenv instanceGets the values for an instance environment configuration.
Syntax and Options Use the srvctl getenv instance command with the following syntax:
srvctl getenv instance -d db_unique_name -i inst_name [-t name_list]
Example The following example sets the environment configuration for an instance:
srvctl getenv instance -d -crm -i instance1
srvctl getenv serviceGets the values for a service environment configuration.
Syntax and Options Use the srvctl getenv service command with the following syntax:
srvctl getenv service -d db_unique_name -s service_name [-t name_list]
Example The following example lists all environment variables for a service:
srvctl getenv service -d crm -s crm
Table E–46 srvctl getenv database Options
Options Description
-d db_unique_name Unique name for the database
-t name_list Names of environment variables
Table E–47 srvctl getenv database Options
Options Description
-d db_unique_name Unique name for the database
-i inst_name Instance name
-t name_list Names of environment variables
Table E–48 srvctl getenv service Options
Options Description
-d db_unique_name Unique name for the database
-s service_name Service name
-t name_list Names of environment variables

SRVCTL Commands
Server Control Utility Reference E-29
srvctl getenv nodeappsGets the environment variables for the node application configurations.
Syntax and Options Use the srvctl getenv nodeapps command with the following syntax:
srvctl getenv nodeapps -n node_name [-t name_list]
Example The following example lists all environment variables for the node applications:
srvctl getenv nodeapps -n crmnode1
srvctl setenv and unsetenvThe setenv command sets values for the environment in the configuration file. The unsetenv command unsets values for the environment in the configuration file.
srvctl setenv databaseAdministers cluster database environment configurations.
Syntax and Options Use the srvctl setenv database command with the following syntax:
srvctl setenv database -d db_unique_name {-t name=val[,name=val,...] | -T name=val}
Table E–49 srvctl getenv nodeapps Options
Options Description
-n node_name Node name
-t name_list Names of environment variables
Table E–50 srvctl setenv and unsetenv Summary
Command Description
srvctl setenv database on page E-29 Administers cluster database environment configurations
srvctl setenv instance on page E-30 Administers instance environment configurations
srvctl setenv service on page E-30 Administers service environment configurations
srvctl setenv nodeapps on page E-31 Administers node application environment configurations
srvctl unsetenv database on page E-31 Unsets the cluster database environment configuration
srvctl unsetenv instance on page E-31 Unsets instance environment configurations
srvctl unsetenv service on page E-32 Unsets service environment configurations
srvctl unsetenv nodeapps on page E-32 Unsets node application environment configurations
Table E–51 srvctl setenv database Options
Options Description
-d db_unique_name Unique name for the database.
-t =,...nameval Names and values of environment variables.

SRVCTL Commands
E-30 Oracle Clusterware and RAC Administration and Deployment Guide
Example The following example sets the language environment configuration for a cluster database:
srvctl setenv database -d crm -t LANG=en
srvctl setenv instanceAdministers instance environment configurations.
Syntax and Options Use the srvctl setenv instance with the following syntax:
srvctl setenv instance -d db_unique_name [-i inst_name] {-t name=val[,name=val,...] | -T name=val}
Example The following example sets the environment configuration for an instance:
srvctl setenv instance -d -crm -i instance1 -t LANG=EN
srvctl setenv serviceAdministers service environment configurations.
Syntax and Options Use the srvctl setenv service command with the following syntax:
srvctl setenv service -d db_unique_name [-s service_name] {-t name=val[,name=val,...] | -T name=val}
-T name=val Enables single environment variable to be set to a value that contains commas or other special characters.
Table E–52 srvctl setenv instance Options
Options Description
-d db_unique_name Unique name for the database.
-i inst_name Instance name.
-t =,...nameval Names and values of environment variables.
-T name=val Enables single environment variable to be set to a value that contains commas or other special characters.
Table E–53 srvctl setenv service Options
Options Description
-d db_unique_name Unique name for the database.
-s service_name Service name.
-t =,...nameval Names and values of environment variables.
-T name=val Enables single environment variable to be set to a value that contains commas or other special characters.
Table E–51 (Cont.) srvctl setenv database Options
Options Description
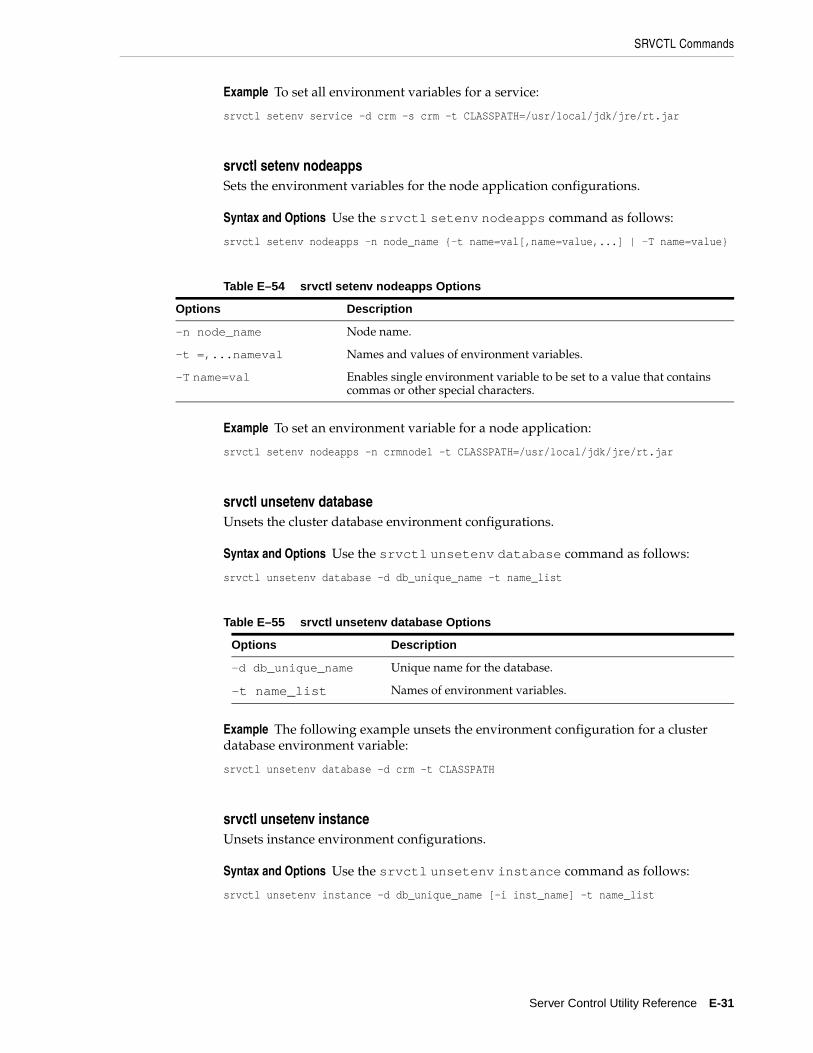
SRVCTL Commands
Server Control Utility Reference E-31
Example To set all environment variables for a service:
srvctl setenv service -d crm -s crm -t CLASSPATH=/usr/local/jdk/jre/rt.jar
srvctl setenv nodeappsSets the environment variables for the node application configurations.
Syntax and Options Use the srvctl setenv nodeapps command as follows:
srvctl setenv nodeapps -n node_name {-t name=val[,name=value,...] | -T name=value}
Example To set an environment variable for a node application:
srvctl setenv nodeapps -n crmnode1 -t CLASSPATH=/usr/local/jdk/jre/rt.jar
srvctl unsetenv databaseUnsets the cluster database environment configurations.
Syntax and Options Use the srvctl unsetenv database command as follows:
srvctl unsetenv database -d db_unique_name -t name_list
Example The following example unsets the environment configuration for a cluster database environment variable:
srvctl unsetenv database -d crm -t CLASSPATH
srvctl unsetenv instanceUnsets instance environment configurations.
Syntax and Options Use the srvctl unsetenv instance command as follows:
srvctl unsetenv instance -d db_unique_name [-i inst_name] -t name_list
Table E–54 srvctl setenv nodeapps Options
Options Description
-n node_name Node name.
-t =,...nameval Names and values of environment variables.
-T name=val Enables single environment variable to be set to a value that contains commas or other special characters.
Table E–55 srvctl unsetenv database Options
Options Description
-d db_unique_name Unique name for the database.
-t name_list Names of environment variables.
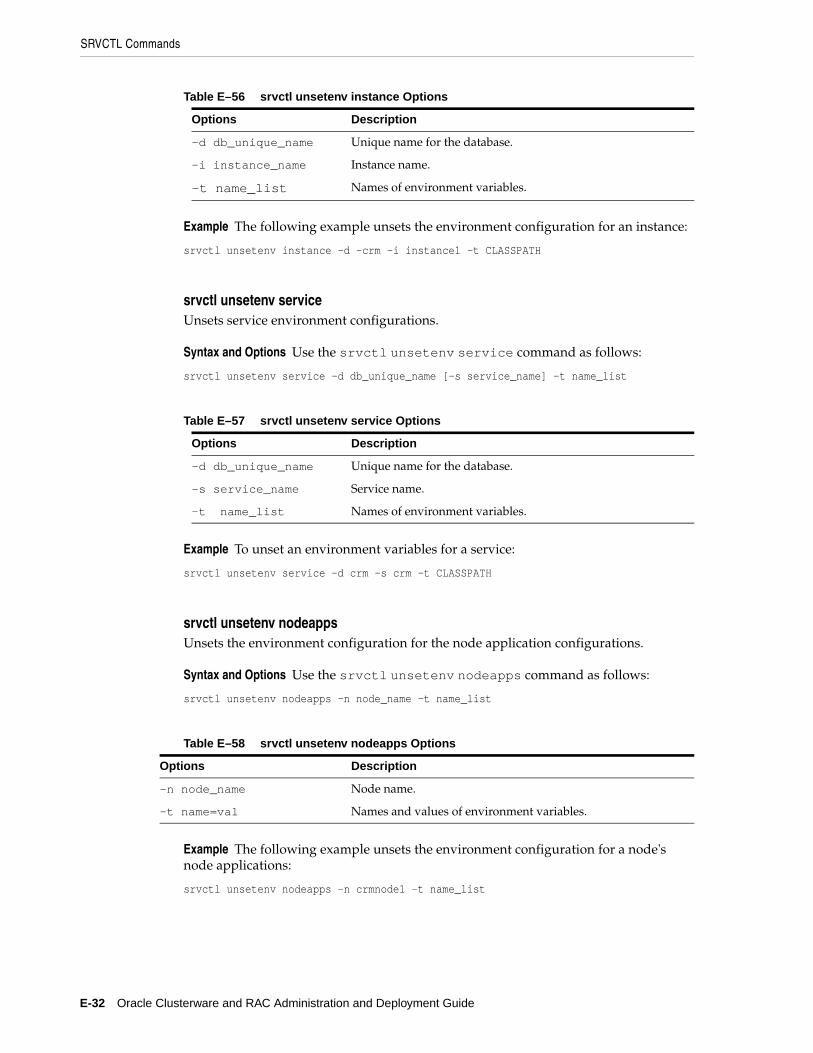
SRVCTL Commands
E-32 Oracle Clusterware and RAC Administration and Deployment Guide
Example The following example unsets the environment configuration for an instance:
srvctl unsetenv instance -d -crm -i instance1 -t CLASSPATH
srvctl unsetenv serviceUnsets service environment configurations.
Syntax and Options Use the srvctl unsetenv service command as follows:
srvctl unsetenv service -d db_unique_name [-s service_name] -t name_list
Example To unset an environment variables for a service:
srvctl unsetenv service -d crm -s crm -t CLASSPATH
srvctl unsetenv nodeappsUnsets the environment configuration for the node application configurations.
Syntax and Options Use the srvctl unsetenv nodeapps command as follows:
srvctl unsetenv nodeapps -n node_name -t name_list
Example The following example unsets the environment configuration for a node's node applications:
srvctl unsetenv nodeapps -n crmnode1 -t name_list
Table E–56 srvctl unsetenv instance Options
Options Description
-d db_unique_name Unique name for the database.
-i instance_name Instance name.
-t name_list Names of environment variables.
Table E–57 srvctl unsetenv service Options
Options Description
-d db_unique_name Unique name for the database.
-s service_name Service name.
-t name_list Names of environment variables.
Table E–58 srvctl unsetenv nodeapps Options
Options Description
-n node_name Node name.
-t name=val Names and values of environment variables.
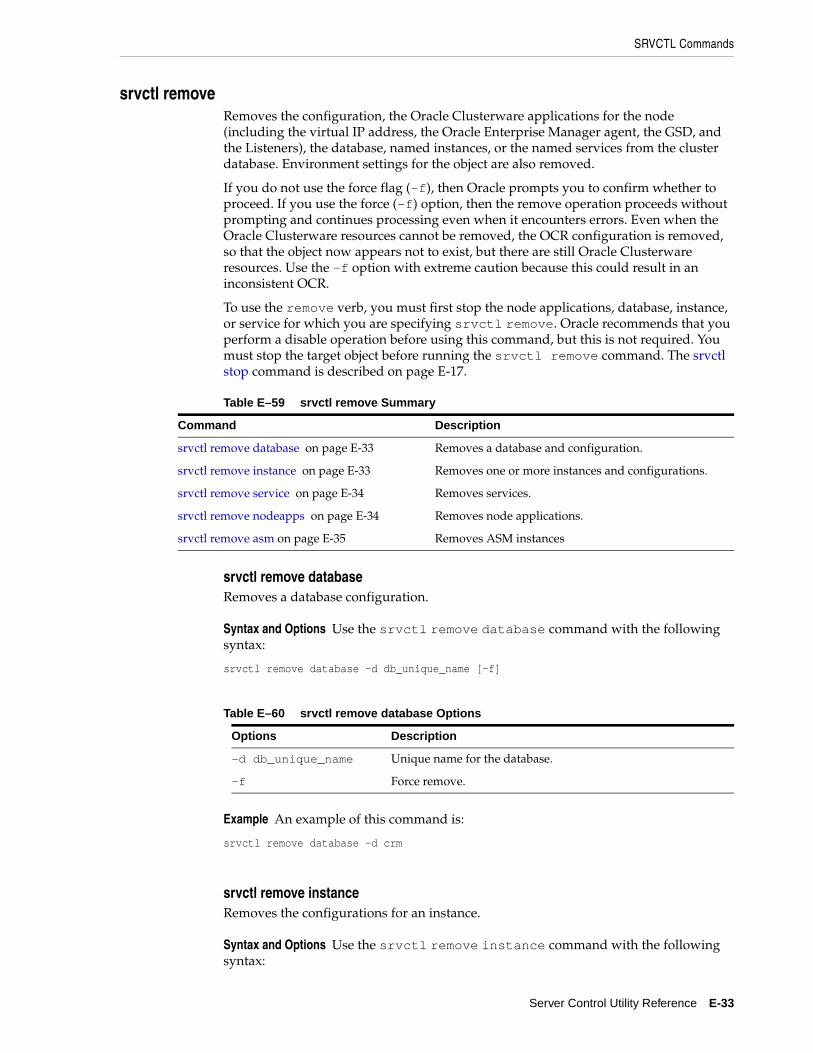
SRVCTL Commands
Server Control Utility Reference E-33
srvctl removeRemoves the configuration, the Oracle Clusterware applications for the node (including the virtual IP address, the Oracle Enterprise Manager agent, the GSD, and the Listeners), the database, named instances, or the named services from the cluster database. Environment settings for the object are also removed.
If you do not use the force flag (-f), then Oracle prompts you to confirm whether to proceed. If you use the force (-f) option, then the remove operation proceeds without prompting and continues processing even when it encounters errors. Even when the Oracle Clusterware resources cannot be removed, the OCR configuration is removed, so that the object now appears not to exist, but there are still Oracle Clusterware resources. Use the -f option with extreme caution because this could result in an inconsistent OCR.
To use the remove verb, you must first stop the node applications, database, instance, or service for which you are specifying srvctl remove. Oracle recommends that you perform a disable operation before using this command, but this is not required. You must stop the target object before running the srvctl remove command. The srvctl stop command is described on page E-17.
srvctl remove databaseRemoves a database configuration.
Syntax and Options Use the srvctl remove database command with the following syntax:
srvctl remove database -d db_unique_name [-f]
Example An example of this command is:
srvctl remove database -d crm
srvctl remove instanceRemoves the configurations for an instance.
Syntax and Options Use the srvctl remove instance command with the following syntax:
Table E–59 srvctl remove Summary
Command Description
srvctl remove database on page E-33 Removes a database and configuration.
srvctl remove instance on page E-33 Removes one or more instances and configurations.
srvctl remove service on page E-34 Removes services.
srvctl remove nodeapps on page E-34 Removes node applications.
srvctl remove asm on page E-35 Removes ASM instances
Table E–60 srvctl remove database Options
Options Description
-d db_unique_name Unique name for the database.
-f Force remove.
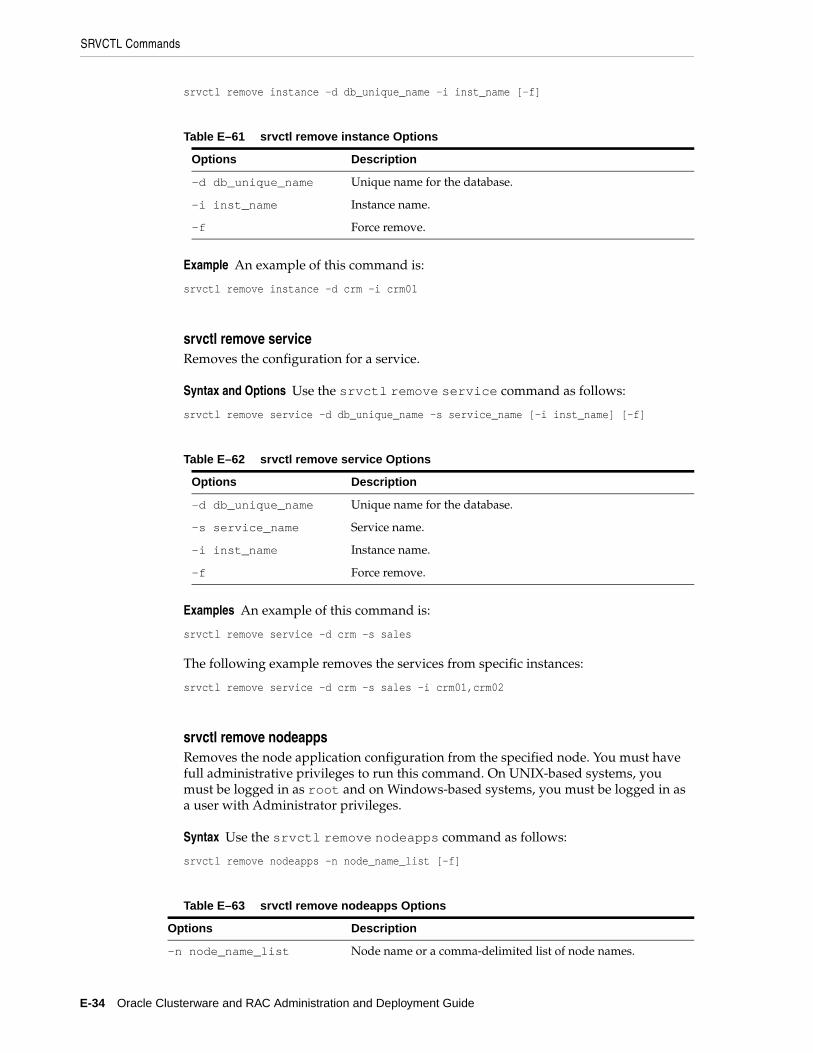
SRVCTL Commands
E-34 Oracle Clusterware and RAC Administration and Deployment Guide
srvctl remove instance -d db_unique_name -i inst_name [-f]
Example An example of this command is:
srvctl remove instance -d crm -i crm01
srvctl remove serviceRemoves the configuration for a service.
Syntax and Options Use the srvctl remove service command as follows:
srvctl remove service -d db_unique_name -s service_name [-i inst_name] [-f]
Examples An example of this command is:
srvctl remove service -d crm -s sales
The following example removes the services from specific instances:
srvctl remove service -d crm -s sales -i crm01,crm02
srvctl remove nodeappsRemoves the node application configuration from the specified node. You must have full administrative privileges to run this command. On UNIX-based systems, you must be logged in as root and on Windows-based systems, you must be logged in as a user with Administrator privileges.
Syntax Use the srvctl remove nodeapps command as follows:
srvctl remove nodeapps -n node_name_list [-f]
Table E–61 srvctl remove instance Options
Options Description
-d db_unique_name Unique name for the database.
-i inst_name Instance name.
-f Force remove.
Table E–62 srvctl remove service Options
Options Description
-d db_unique_name Unique name for the database.
-s service_name Service name.
-i inst_name Instance name.
-f Force remove.
Table E–63 srvctl remove nodeapps Options
Options Description
-n node_name_list Node name or a comma-delimited list of node names.
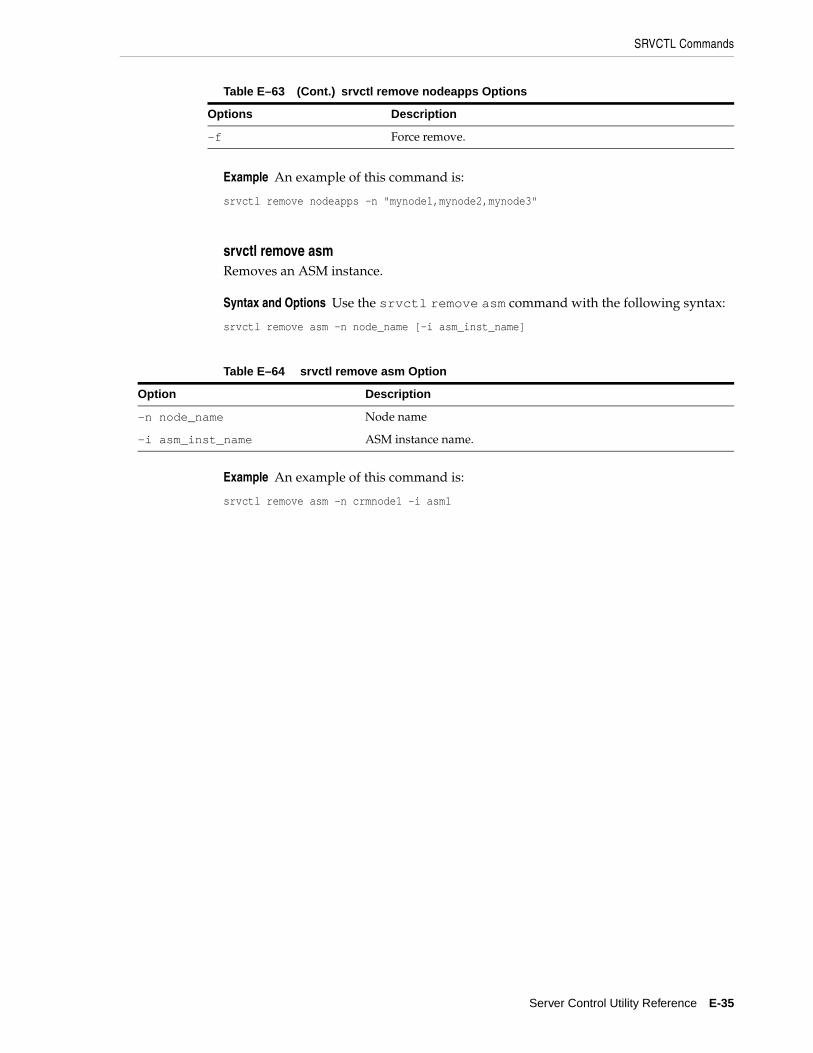
SRVCTL Commands
Server Control Utility Reference E-35
Example An example of this command is:
srvctl remove nodeapps -n "mynode1,mynode2,mynode3"
srvctl remove asmRemoves an ASM instance.
Syntax and Options Use the srvctl remove asm command with the following syntax:
srvctl remove asm -n node_name [-i asm_inst_name]
Example An example of this command is:
srvctl remove asm -n crmnode1 -i asm1
-f Force remove.
Table E–64 srvctl remove asm Option
Option Description
-n node_name Node name
-i asm_inst_name ASM instance name.
Table E–63 (Cont.) srvctl remove nodeapps Options
Options Description

SRVCTL Commands
E-36 Oracle Clusterware and RAC Administration and Deployment Guide
Oracle Real Application Clusters Tools Messages F-1
FOracle Real Application Clusters Tools
Messages
This appendix describes the Oracle Real Application Clusters (RAC) management tools messages. The messages in this appendix appear alphabetically by group. The topics in this appendix are:
■ Overview of Real Application Clusters-Specific Messages
■ PRKA—Cluster Node Applications Messages
■ PRKC—Cluster Command Messages
■ PRKD—Global Services Daemon Messages
■ PRKE—Global Services Daemon Controller Utility Messages
■ PRKH—Server Manager (SRVM) Messages
■ PRKI—Cluster Pre-Install Messages
■ PRKN—Server Manager (SRVM) System Library Messages
■ PRKO—Server Control (SRVCTL) Utility Messages
■ PRKP—Cluster Database Management Messages
■ PRKR—Cluster Registry Messages
■ PRKS—Automatic Storage Management Messages
■ PRKU—Command-Line Parser Utility Messages
■ PRKV—Virtual IP Configuration Assistant Messages
Overview of Real Application Clusters-Specific MessagesWithin Oracle Database 10g, RAC messages use the same ORA prefix and reside in the same e*.msg files as non-RAC or single-instance Oracle database messages. Additionally, some RAC messages are issued by the single-instance Oracle database. These messages appear online by way of a Tahiti error message search as described in the Oracle database documentation in the Preface of this book under the heading "Related Documents" on page -xiv.
See Also: Oracle Database Platform Guide for Microsoft Windows (32-Bit) for Windows-based messages and for all other messages refer search online at
http://tahiti.oracle.com
PRKA—Cluster Node Applications Messages
F-2 Oracle Clusterware and RAC Administration and Deployment Guide
Prefixes and Message Codes for RAC-Specific MessagesMessage prefixes indicate where to find information about the messages in this chapter. In addition, the prefixes indicate which RAC component issued the messages.
Types of Real Application Clusters Messages and Related FilesThe RAC high availability and cluster database management tools use the following syntax for internal messages:
PRKx-0000: Cause description "variable" text {variable} text {variable}
A message might appear as follows:
PRKC-1022 "Could not get "node name" for node {0} in {1}"
The variables in the previous example represent numbers, names, and character strings for objects in the physical or logical cluster and the cluster database. you can ignore empty variables.
PRKA—Cluster Node Applications MessagesPRKA-2001: GSD already exists
Cause: An attempt was made to create the Global Services Daemon (GSD) application while there is a running GSD application.
Action: Stop and remove the running GSD and create the GSD application again using the 'srvctl add nodeapps' command.
PRKA-2002: Listener already existsCause: An attempt was made to create a Listener application while there is a running Listener application.
Action: Stop and remove the running Listener and create the Listener application again using the 'srvctl add nodeapps' command.
PRKA-2003: EM Agent already existsCause: An attempt was made to create an Agent application while there is a running Agent application.
Action: Stop and remove the running Agent and create the Agent application again using the 'srvctl add nodeapps' command.
PRKA-2004: No database found for the cluster.Cause:
Action:
PRKA-2005: Netmasks are different for starting and ending IP addressesCause: Invalid range of VIP addresses specified for the cluster.
Action: Check if the starting and ending addresses in the VIP range belong to the same netmask.
PRKA-2006: Invalid VIP address rangeCause: Invalid range of VIP addresses specified for the cluster.
Action: Check if the starting address is less than ending address.
PRKA-2007: Empty VIP address rangeCause: Invalid range of VIP addresses specified for the cluster.

PRKA—Cluster Node Applications Messages
Oracle Real Application Clusters Tools Messages F-3
Action: Enter valid non-null VIP address range.
PRKA-2008: No VIP address is available in the VIP poolCause: No IP addresses are available for use in the range of IP addresses that you specified earlier.
Action: Check the VIP address pool to ensure that you are using valid VIP addresses.
PRKA-2009: VIP address is not foundCause: IP address is not found.
Action: Enter valid VIP address.
PRKA-2010: VIP address already existsCause: An attempt was made to create a Virtual IP while there is a running Virtual IP application.
Action: Stop and remove the running Virtual IP application and create the Virtual IP application using the 'srvctl add nodeapps' command.
PRKA-2011: Remote command failed - not used?Cause: The command failed to execute on remote node.
Action: Check the command for syntax and semantics and reissue the command.
PRKA-2012: Failed to get the VIP address range configuration from the OCRCause: There might not be any IP address ranges in the OCR or it is possible that an OCR error occurred while retrieving the VIP address range.
Action: Refer to the OCR logs for detailed error information.
PRKA-2013: Failed to add the VIP address range configuration to the OCRCause: An OCR error occurred while adding the VIP address range into the OCR.
Action: Refer to the OCR logs for detailed error information.
PRKA-2014: Failed to remove the VIP address range configuration from the OCRCause: An OCR error occurred while adding the VIP address range into the OCR.
Action: Refer to the OCR logs for detailed error information.
PRKA-2015: Invalid node nameCause: The node name that you entered does not belong to the cluster.
Action: Enter a node that belongs to the cluster.
PRKA-2016: Invalid listener nameCause: The listener name entered is invalid.
Action: Correct the listener name.
PRKA-2017: There are no IP addresses in the specified range. Make sure to specify the correct range for the IP addresses.Cause:
Action: Specify valid range for IP addresses.
PRKA-2018: Virtual IP can only be created or removed by the system privilege user.Cause: Only users with administrative privileges can configure Virtual IPs on the system.

PRKC—Cluster Command Messages
F-4 Oracle Clusterware and RAC Administration and Deployment Guide
Action: Verify the privileges of the user who is attempting to create or remove the VIP address.
PRKA-2019: Error executing command \"{0}\". File is missing.Cause:
Action:
PRKC—Cluster Command MessagesPRKC-1023: Invalid IP address format: {0}
Cause: The given IP address does not adhere to the IP address format standard.
Action: Use the correct IP address format.
PRKC-1024: Invalid netmask: {0}Cause: The given netmask format does not adhere to the format standard.
Action: Change the netmask format to a valid netmask format.
PRKC-1025: Failed to create a file in directory {0}Cause: Might be due to insufficient permission or due to insufficient disk space.
Action: Check the permission on the directory and available space.
PRKC-1026: Failed doing I/O to file {0}Cause: Might be due to insufficient permission or due to insufficient disk space or network issue.
Action: Check the permission on the directory and available space. Make sure the storage medium is accessible.
PRKC-1027: Error checking existence of file {0} on {1}Cause: Might be due to an improper user equivalence configuration or due to insufficient permissions on the parent directory.
Action: Verify that user equivalence is correctly configured and that the directory has read and execute permissions.
PRKC-1028: Error checking write permission for directory {0} on {1}Cause: Might be due to an improper user equivalence configuration or due to insufficient permissions on the parent directory.
Action: Verify that user equivalence is correctly configured and that the directory has read and execute permissions.
PRKC-1029: Failed to get modification time for file {0} on node {1}, [2]Cause: Might be due to an improper user equivalence configuration or due to insufficient permissions on the parent directory.
Action: Verify that user equivalence is correctly configured and that the directory has read and execute permissions.
PRKC-1030: Error checking accessibility for node {0}, {1}Cause: Might be due to a network issue or to an improper user equivalence setup.
Action: Check node reachability between the local and the remote nodes and make sure user equivalence is correctly configured.
PRKC-1031: Error checking free space for {0} on {1}

PRKC—Cluster Command Messages
Oracle Real Application Clusters Tools Messages F-5
Cause: Might be due to a network issue or to an improper user equivalence setup.
Action: Check node reachability between the local and the remote nodes and make sure that user equivalence is correctly configured.
PRKC-1032: Directory {0} does not existCause: The specified directory does not exist.
Action: Make sure that the specified directory exists. Use an absolute path for the directory.
PRKC-1033: Executable {0} does not existCause: The specified executable does not exist.
Action: Verify the existence of the executable before retrying.
PRKC-1034: No local node name found for host {0}Cause: The local node may not be part of the cluster or an error may have occurred while retrieving the local node name.
Action: Check CRS logs in ORA_CRS_HOME/log/<hostname> and OCR logs in ORA_CRS_HOME/srvm/log.
PRKC-1035: Node names for this cluster could not be retrievedCause: An error occurred while retrieving node names from the cluster.
Action: Check CRS logs in ORA_CRS_HOME/log/<hostname> and OCR logs in ORA_CRS_HOME/srvm/log.
PRKC-1036: CRS_HOME name passed to the method was nullCause: The CRS home name cannot be null.
Action: Pass non-null CRS_HOME to the method.
PRKC-1037: Error removing files listed in {0} from node {1}Cause: Might be due to an improper user equivalence configuration or due to insufficient permissions.
Action: Verify that user equivalence is correctly configured and that the mentioned files have the correct permissions.
PRKC-1038: Error copying files listed in {0} to node {1}Cause: Might be due to an improper user equivalence configuration or due to insufficient permissions.
Action: Verify that user equivalence is correctly configured and that the mentioned files have the correct permissions.
PRKC-1039: Error creating directories listed in {0} on node {1}Cause: Might be due to an improper user equivalence configuration or due to insufficient permissions.
Action: Verify that user equivalence is correctly configured and that the mentioned files have the correct permissions.
PRKC-1040: Remote Shell is not known yet.Cause: User equivalence is not yet configured.
Action: Configure user equivalence.
PRKC-1041: Remote Copy command is not known yet.Cause: User equivalence is not yet configured.
PRKC—Cluster Command Messages
F-6 Oracle Clusterware and RAC Administration and Deployment Guide
Action: Configure user equivalence.
PRKC-1042: The Remote Shell {0} requested by client is not recognized Cause: The system does not recognize the given remote shell command.
Action: Use ssh or rsh as the remote shell.
PRKC-1043: The Remote Copy command {0} requested by client is not recognizedCause: The system does not recognize the given remote copy command.
Action: Use scp or rcp for remote copy.
PRKC-1044: Failed to check remote command execution setup for node {0} using shells {1} and {2} Cause: Could not find the remote shell commands {1} and {2} on node {0}.
Action: Configure user equivalence. Use environment variables to pass remote shell commands.
PRKC-1045: Node name is nullCause: Node name received is null.
Action: Pass non-null node name to method/command.
PRKC-1046: The file list passed to the method was nullCause: The list of files obtained is null.
Action: Pass non-null file list to method.
PRKC-1047: The directory list passed to the method was nullCause: The list of directories obtained is null.
Action: Pass non-null directory list to method.
PRKC-1048: {0} is not supported on Windows platformCause: Unsupported operation.
Action: Do not attempt {0} on Windows.
PRKC-1049: CRS is not supported in version {0}. It is supported from version {1} onwardsCause: Unsupported operation.
Action: Upgrade to version {1} before attempting CRS commands.
PRKC-1050: EVM is not supported in version {0}. It is supported from version {1} onwardsCause: Unsupported operation.
Action: Upgrade to version {1} before attempting to use EVM.
PRKC-1051: Invalid data to set for registry key {0}.Cause: Data validation failed for registry operation.
Action: Check data passed as value for registry key {0}.
PRKC-1052: Invalid data type for registry key {0}.Cause: Data validation failed for registry key {0}.
Action: Check data type of value for registry key {0}.
PRKC-1053: Error returned from node {0} is \"{1}\"Cause:

PRKC—Cluster Command Messages
Oracle Real Application Clusters Tools Messages F-7
Action: Contact your customer support representative.
PRKC-1054: Node {0} is not accessibleCause: Might be due to a network issue or due to an improper user equivalence configuration.
Action: Contact your network or system administrator to verify connectivity and the health of node {0}.
PRKC-1055: Directory name passed was nullCause:
Action: Ensure non-null directory name is passed to command.
PRKC-1056: Failed to get the hostname for node {0}Cause: Unable to fetch the hostname.
Action: Check hostname of node {0}.
PRKC-1057: The computername and hostname do not match for node {0}. Make sure that they match.Cause:
Action: Contact your network or computer administrator to reconfigure the computer name and/or the hostname before re-attempting the operation.
PRKC-1058: The hostname registry key {0} has an empty value on node {1}Cause: Null value was passed for the registry key {0}.
Action: Contact your customer service representative.
PRKC-1059: The computername registry key {0} has an empty value on node {1}Cause: Null value was passed for the registry key {0}.
Action: Contact your customer service representative.
PRKC-1060: Cluster misconfigured on node \"{0}\", \"{1}\" property in {2} does not match with configured data in Oracle Cluster RegistryCause: Improper setup for the cluster.
Action: Contact your customer service representative.
PRKC-1061: Failed to list contents of the directory {0}Cause: Might be due to insufficient permission.
Action: Check the permission and the contents of directory {0}.
PRKC-1062: Node list is nullCause: The node list is null.
Action: Pass non-null node list to method/command.
PRKC-1063: Node list {0} contained {1} nodes, minimum number of nodes required is {2}Cause:
Action: Modify nodelist to contain appropriate number of nodes before retrying method/command.
PRKC-1064: Node list {0} contained {1} nodes whereas the cluster has {2} nodesCause: The node list that is configured for the cluster does not match the given node list.

PRKC—Cluster Command Messages
F-8 Oracle Clusterware and RAC Administration and Deployment Guide
Action: Modify the nodelist to contain {2} nodes.
PRKC-1065: Nodes {0} do not belong to this clusterCause: The provided nodes are not configured for the cluster.
Action: Remove the invalid nodes that do not belong to cluster.
PRKC-1066: Failed to retrieve node number for node \"{0}\Cause: Cluster was not properly setup.
Action: Check CRS logs for detailed error information.
PRKC-1067: File name is nullCause:
Action: Change file name to non-null value and retry method invocation.
PRKC-1068: Failed to get private interconnect node name for node {0}, {1}Cause: Cluster was not properly setup.
Action: Check logs for detailed error information.
PRKC-1069: Failed to get sub keys of \"{0}\" registry key, {1}Cause: Either the parent or the sub-key does not exist.
Action: Contact your customer service representative.
PRKC-1070: Failed to get sub keys of \"{0}\" registry key on node \"{1}\", {2}Cause: Either the parent or the sub-key does not exist.
Action: Contact your customer service representative.
PRKC-1071: Nodes \"{0}\" did not respond to ping in \"{1}\" seconds, {2}Cause: The node might be down or there could be a network outage.
Action: Contact your network administrator to verify connectivity between the specified nodes.
PRKC-1072: Invalid node \"{0}\" specified for checking the result of operationCause: Node name validation for the operation failed.
Action: Check the value of node {0}. Specify valid values for the nodes.
PRKC-1073: Failed to transfer directory \"{0}\" to any of the given nodes \"{1}\". {2}Cause: Could not copy the directory \"{0}\" to any of the given nodes \"{1}\".
Action: Verify that user equivalence is properly configured. Check the log files for details.
PRKC-1074: Error on node {0}:{1}Cause:
Action: Contact your customer support representative.
PRKC-1075: User equivalence does not exist with nodes \"{0}\", {1}Cause: User equivalence was not configured.
Action: Contact your system administrator to verify user equivalence between the specified nodes.
PRKC-1076: Oracle Home is nullCause:

PRKC—Cluster Command Messages
Oracle Real Application Clusters Tools Messages F-9
Action: Contact your customer support representative.
PRKC-1077: List file {0} has the following invalid files:{1}Cause: Filename validation failed for the given files.
Action: Remove invalid entries from list file.
PRKC-1078: Failed to transfer directories listed in \"{0}\" to any of the given nodes \"{1}\": {2}Cause: Could not copy the directory \"{0}\" to any of the given nodes \"{1}\".
Action: Verify that user equivalence is properly configured. Check the log files for details.
PRKC-1079: {0} is not contained within an Oracle HomeCause:
Action: Use {0} contained within an Oracle home.
PRKC-1080: Failed to transfer file \"{0}\" to any of the given nodes \"{1}\". {2}Cause: Could not copy the file \"{0}\" to any of the given nodes \"{1}\".
Action: Verify that user equivalence is properly configured. Check the log files for details.
PRKC-1081: Failed to transfer listed files in \"{0}\" to any of the given nodes \"{1}\". {2}Cause: Could not copy the files \"{0}\" to any of the given nodes \"{1}\".
Action: Verify that user equivalence is properly configured. Check the log files for details.
PRKC-1082: Failed to create listed directory in \"{0}\" to any of the given nodes \"{1}\". {2}Cause: Could not create the directory \"{0}\" to any of the given nodes \"{1}\".
Action: Verify that user equivalence is properly configured. Verify the permissions for the parent directory on the given nodes.
PRKC-1083: Failed to remove listed directory in \"{0}\" to any of the given nodes \"{1}\". {2}Cause: Could not remove the directory \"{0}\" to any of the given nodes \"{1}\".
Action: Verify that user equivalence is properly configured. Verify the permissions for the parent directory on the given nodes.
PRKC-1084: Failed to create path \"{0}\" in any of the given nodes \"{1}\". {2}Cause: Could not create the path \"{0}\" to any of the given nodes \"{1}\".
Action: Verify that user equivalence is properly configured. Verify the permissions for the parent directory on the given nodes.
PRKC-1085: Failed to retrieve Oracle private name for node \"{0}\"Cause: Cluster is not properly configured.
Action: Check whether node {0} is part of the cluster. If so, contact your customer support representative. If not, correct node name.
PRKC-1086: Unknown path type \"{0}\" specified for path \"{1}\" existence checkCause: Unknown path type.
Action: Specify a valid path type for the path existence check.

PRKC—Cluster Command Messages
F-10 Oracle Clusterware and RAC Administration and Deployment Guide
PRKC-1087: Failed to retrieve virtual IP for node \"{0}\"Cause: Cluster is not properly configured.
Action: Check whether node {0} is part of the cluster. If so, contact your customer support representative. If not, correct node name.
PRKC-1088: Failed to recursively list files from the directories specified in file: {0}Cause: File access issue.
Action: Verify that the files exist and make sure that the files permissions are correct.
PRKC-1089: List file {0} is emptyCause: An empty list file was passed to a transfer/copy command.
Action: Edit the contents of the list file before reattempting the command.
PRKC-1090: Failed to update environment on nodes \"{0}\", {1}Cause: Might be due to improper privilege.
Action: Check user privilege on nodes \"{0}\".
PRKC-1091: The include list file passed is nullCause:
Action: Pass non-null include file list to retry command/method.
PRKC-1092: Failed to retrieve the location of votedisks: {0}Cause: Node name passed to command is not part of cluster.
Action: Invalid node name passed to command. Use a name for a node that is part of the cluster.
PRKC-1093: Failed to retrieve the version of crs software on node \"{0}\" : {1}Cause: Cluster is not setup properly.
Action: Contact your customer support representative.
PRKC-1094: Failed to retrieve the active version of crs: {0}Cause: Cluster is not setup properly.
Action: Contact your customer support representative.
PRKC-1095: OLE initialization or OCX load error while registering OCX library on nodes \"{0}\", {1}Cause: Cluster is not setup properly.
Action: Contact your customer support representative.
PRKC-1096: Failed to do node reboot on nodes \"{0}\", {1}Cause: Cluster is not setup properly.
Action: Contact your customer support representative.
PRKC-1097: PRKC- The file, \"{0}\" is not an OCXCause: Cluster is not setup properly.
Action: Contact your customer support representative.
PRKC-1098: Failed to create new listfile with proper UNC path from the path specified in file: {0}Cause: Internal error.

PRKC—Cluster Command Messages
Oracle Real Application Clusters Tools Messages F-11
Action: Contact your customer support representative.
PRKC-1099: The host names or IP addresses passed as an argument are nullCause:
Action: Pass non-null arguments for hostnames or IP addresses.
PRKC-1100: The network port {0} is already in useCause: Preoccupied network port {0}.
Action: Free port {0} for use by CRS infrastructure.
PRKC-1101: The network port {0} is not available for use.Cause: The port {0} might be used by another application.
Action: Make port {0} available for use.
PRKC-1102: CSS is not configured with local-only OCR on node \"{0}\"Cause: CSS is not configured to run in a stand alone environment.
Action: Follow the documentation to setup CSS properly.
PRKC-1102: CSS is not configured with local-only OCR on node \"{0}\"Cause: CSS is not configured to run in a standalone environment.
Action: Follow the documentation to setup CSS properly.
PRKC-1103: Failed to check CSS status for any of the given nodes \"{0}\", {1}Cause: CSS might be down. User equivalence might not be set or there could be a network issue.
Action: Check the logs to see details.
PRKC-1104: Property, \"{0}\" is not found in file \"{1}\"Cause: File \"{1}\" does not contain the property \"{0}\".
Action: Check the file '{1}'.
PRKC-1105: Failed to retrieve the local CSS home for node \"{0}\"Cause: Cluster is not setup properly.
Action: Contact your customer support representative.
PRKC-1106: Failed to remove file \"{0}\" on node \"{1}\", {2}Cause: Could not remove the file \"{0}\" on node \"{1}\".
Action: Verify that user equivalence is properly configured. Verify the permissions for the parent directory as well as for the file on the given nodes.
PRKC-1107: Failed to create symbolic link from file \"{0}\" to \"{1}\" on node \"{2}\", {3}Cause: Could not create symbolic link.
Action: Verify that user equivalence is properly configured. Verify the permissions for the parent directory as well as for the file on the given nodes.
PRKC-1108: Failed to copy file \"{0}\" on node \"{1}\" to file \"{2}\" on node \"{3}\", {4}Cause: Could not copy the file \"{0}\" on node \"{1}\".
Action: Verify that user equivalence is properly configured. Verify the permissions for the parent directory as well as for the file on the given nodes.

PRKC—Cluster Command Messages
F-12 Oracle Clusterware and RAC Administration and Deployment Guide
PRKC-1109: Failed to move file \"{0}\" to file \"{1}\" on node \"{2}\", {3}Cause: Could not move the file \"{0}\" to file \"{1}\" on node \"{2}\".
Action: Verify that user equivalence is properly configured. Verify the permissions for the parent directory as well as for the file on the given nodes.
PRKC-1110: Failed to create directory \"{0}\" on node \"{1}\", {2}Cause: Could not create the directory \"{0}\" on node \"{1}\".
Action: Verify that user equivalence is properly configured. Check the log files for details.
PRKC-1111: Failed to remove directory \"{0}\" on node \"{1}\", {2}Cause: Could not remove the directory \"{0}\" on node \"{1}\".
Action: Verify that user equivalence is properly configured. Check the log files for details.
PRKC-1112: Failed to list contents of directory \"{0}\" on node \"{1}\", {2}Cause: Could not read the directory \"{0}\" on node \"{1}\".
Action: Verify that user equivalence is properly configured. Check the log files for details.
PRKC-1113: Directory \"{0}\" does not exist on node \"{1}\"Cause: The mentioned directory does not exist.
Action: Check for existence of directory {0}. Use absolute path for the directory.
PRKC-1114: Registry key name is nullCause:
Action: Correct registry key name passed to command.
PRKC-1115: Registry subkey name is nullCause:
Action: Correct registry subkey name passed to command.
PRKC-1116: Failed to create registry subkey \"{0}\" under key \"{1}\" on node \"{2}\", [3]Cause: Registry operation failed.
Action: See logs for detail.
PRKC-1117: Failed to delete registry subkey \"{0}\" under key \"{1}\" on node \"{2}\", [3]Cause: Registry operation failed.
Action: See logs for detail.
PRKC-1118: Failed to check existence of registry key \"{0}\" on node \"{1}\", [2]Cause: Registry operation failed.
Action: See logs for detail.
PRKC-1119: Failed to set data for value \"{0}\" of registry key \"{1}\" on node \"{2}\", [3]Cause: Registry operation failed.
Action: See logs for detail.

PRKC—Cluster Command Messages
Oracle Real Application Clusters Tools Messages F-13
PRKC-1120: Failed to retrieve data for value \"{0}\" of registry key \"{1}\" on node \"{2}\", [3]Cause: Registry operation failed.
Action: See logs for detail.
PRKC-1121: Failed to delete value \"{0}\" of registry key \"{1}\" on node \"{2}\", [3]Cause: Registry operation failed.
Action: See logs for detail.
PRKC-1122: Service name is nullCause: Empty service name provided.
Action: Reattempt the command with a non-null service name.
PRKC-1123: Failed to create service \"{0}\" on node \"{1}\", [2]Cause:
Action: Please refer to logs for detailed error information.
PRKC-1124: Failed to create service dependency between services \"{0}\" and \"{1}\" on node \"{2}\", [3]Cause:
Action: Please refer to logs for detailed error information.
PRKC-1125: Failed to start service \"{0}\" on node \"{1}\", [2]Cause:
Action: Please refer to logs for detailed error information.
PRKC-1126: Failed to stop service \"{0}\" on node \"{1}\", [2]Cause:
Action: Please refer to logs for detailed error information.
PRKC-1127:Failed to delete service \"{0}\" on node \"{1}\", [2]Cause:
Action: Please refer to logs for detailed error information.
PRKC-1128: Invalid Interface type {0} is specified as an argument.Cause:
Action: Correct interface type before retrying command.
PRKC-1129: Invalid IP address type {0} is specified as an argument.Cause:
Action: Change IP address type before reattempting command.
PRKC-1130: Version argument is null.Cause:
Action: Correct version argument and retry method invocation.
PRKC-1131: Failed to set user permissions on path {0} on nodes {1}, [{2}]Cause: Might be due to improper user equivalence setup.
Action: Verify that user equivalence is correctly configured.
PRKC-1132: Failed to set administrator permissions on path {0} on nodes {1}, [{2}]

PRKD—Global Services Daemon Messages
F-14 Oracle Clusterware and RAC Administration and Deployment Guide
Cause: Might be due to improper user equivalence setup.
Action: Verify that user equivalence is correctly configured.
PRKC-1133: Names of services on which this service \"{0}\" is dependent on is null.Cause:
Action: Invalid dependency list passed to method. Correct dependency list and retry command.
PRKC-1134: Failed to remove service dependency between services \"{0}\" and \"{1}\" on node \"{2}\", [3]Cause:
Action: Refer to logs for detailed error information.
PRKC-1135: Registry key name {0} is not valid, it must be fully defined registry key pathCause: Invalid registry key format.
Action: Provide valid registry key path.
PRKD—Global Services Daemon MessagesPRKD-3000: Failed to initialize and register with clusterware
Cause: This can occur if cluster synchronization services was not functioning properly.
Action: Check the state of your clusterware by running olsnodes from ORA_CRS_HOME/bin. It should list the nodes in the cluster.
PRKD-3001: Ready to receive client requestsCause: Global Services Daemon is ready.
Action: No action needed at this time.
PRKE—Global Services Daemon Controller Utility MessagesPRKE-1008: Failed to get list of active nodes from clusterware
Cause: Not operating in cluster mode, failure to load srvm libraries, failure to initialize clusterware context.
Action: Verify the health of the Oracle Clusterware by running the "lsnodes" command to obtain a list of the active nodes in the cluster. Also verify the presence of the SRVM libraries in the load library path. If the active node list is correct and the SRVM libraries are in the load path, then contact your customer support representative.
PRKE-1009: Failed to start GSD on local nodeCause: GSD is already running on the local node, or GSD could not be started because of some other reason.
Action: Run "srvctl status" to check if a daemon is already running on the local node. If a daemon is not running on local node, please contact your customer support representative to check for the other reasons for failure.
PRKE-1010: Failed to stop GSD on local nodeCause: GSD is not running on the local node, or GSD could not shutdown gracefully.

PRKH—Server Manager (SRVM) Messages
Oracle Real Application Clusters Tools Messages F-15
Action: Run "srvctl status" to check if a GSD is running on the local node. If a GSD is running, please contact your customer support representative to check for other reasons for failure.
PRKE-1011: Failed to get status of GSD on local nodeCause: Failure to get the list of active nodes from the cluster, or failure to query the list of live daemons from the clusterware.
Action: Run "lsnodes" to check the health of the clusterware. If the clusterware is working fine, check for the presence of srvm libraries in the load library path. If the libraries are present, please contact your customer support representative for further assistance.
PRKH—Server Manager (SRVM) MessagesPRKH-1000: Unable to load the SRVM HAS shared library
Cause: The system cannot find, or load the srvm has shared library.
Action: Check your system's library load path. Verify that the library exists, and that the libraries it depends on are readable and are in the load path.
PRKH-1001: HASContext Internal ErrorCause: An unexpected internal error has occurred while attempting to communicate with CRS.
Action: Contact Oracle support.
PRKH-1002: Internal HASContext Error: JNI Native Call FailureCause: An unexpected internal error has occurred while executing native code from java.
Action: Contact Oracle support.
PRKH-1003: Failed to allocate memory in native layer:Cause: The SRVM framework was unable to allocate memory.
Action: Your system is running low on memory. Check the memory and swap space, resolve the problem and retry.
PRKH-1004: Failed to execute remote join cluster alias {0} for nodes:Cause: Unable to execute a join cluster alias operation on another node.
Action: Check the failed nodes. Verify that the system can execute remote commands on those nodes. Check the cluster alias and its related functionality.
PRKH-1005: Failed to execute remote leave cluster alias {0} for nodes:Cause: Unable to execute a leave cluster alias operation on another node.
Action: Check the failed nodes. Verify that the system can execute remote commands on those nodes. Check the cluster alias and its related functionality.
PRKH-1006: The following nodes are either not active or not configured:Cause: The system was unable to find a node requested.
Action: Please check the node list supplied and verify that the node is available and configured.
PRKH-1007: Exception Caused by:Cause: The current exception was caused by another earlier exception.

PRKI—Cluster Pre-Install Messages
F-16 Oracle Clusterware and RAC Administration and Deployment Guide
Action: Examine all of the nested exceptions to determine the root cause of the error.
PRKH-1008: Internal HASContext Error: Argument {0} must be set.Cause: Internal software error.
Action: Contact Oracle support.
PRKH-1009: CRS HOME must be defined in the environment or in the Oracle Cluster RegistryCause: The system is unable to determine the ORA_CRS_HOME for this CRS installation.
Action: Check that the Oracle Cluster Registry is properly configured and available to this node.
PRKH-1010: Unable to communicate with CRS servicesCause: The system is unable to communicate with the Oracle Clusterware services.
Action: Check that all of the CRS daemons are running and are properly configured. Verify that the current program is attempting to communicate with the correct CRS daemons.
PRKH-1011: Process does not have sufficient privileges to perform the requested operation. {0}Cause: The user running the current operation is not permitted to execute a given operation.
Action: Check other messages in the error stack to determine which operation failed. Verify that you are running the operation as the correct user.
PRKH-1012: Unable to find or resolve user {0}Cause: The system was unable to find the username supplied.
Action: Check the username and try again.
PRKH-1013: The oracle home {0} does not existCause: The system was unable to find the oracle home supplied.
Action: Check the full path of the oracle home and try again.
PRKI—Cluster Pre-Install MessagesPRKI-2059 Unable to copy files to the nodes
Cause: Lack of permission to create destination file or copy file to the destination location.
Action: Verify permission to create the destination file. Also, please make sure that the destination file is not currently in use.
PRKI-2060 Unable to create service on the nodesCause: Lack of permission to create the service, or service already exists.
Action: Verify that you have the permission to create a service on the destination node or nodes. Also, verify that the service does not already exist.
PRKI-2061 Unable to start service on the nodesCause: Service is not created, service is already running, service marked for deletion, service could not be started properly.

PRKI—Cluster Pre-Install Messages
Oracle Real Application Clusters Tools Messages F-17
Action: Try to start the service manually from the service control panel and check the Windows Error message that it gives.
PRKI-2061 Unable to start service on the nodesCause: This could be because of several possible problems: the service is not created, the service is already running, the service is marked for deletion, or the service could not be started properly.
Action: Try to start the service manually from the service control panel and check the Windows error message that it gives.
PRKI-2064 Unable to update registry entries on the nodesCause: Lack of permission to modify registry entries on the nodes, error while updating the registries.
Action: Verify permission to modify registry entries.
PRKI-2066 Unable to find an Oracle disk partition. Please exit from the wizard, create Oracle partitions and try again.Cause: Absence of Oracle disk partition, failure to load OLM dll.
Action: Verify that OLM dll (oobjlib.dll) is present in the load path. Also, verify that the Oracle disk partitions are present by going to the Disk Administrator and looking for the partitions.
PRKI-2114 Cannot collect and verify hardware information for all the nodes. Press abort to exit the wizard or ignore to continue.Cause: Failure to connect to the remote nodes while adding a node to a cluster. Failure to collect VIA information if VIA was chosen.
Action: If you are trying to add a node to an existing cluster, then attempt to map a drive letter to a drive on each of the remote nodes (using commands such as "net use"). Also, verify that the you have permission to start a temporary service on the remote nodes to collect VIA information, in case your system uses VIA.
PRKI-2116 Cannot connect to remote drive on node {0}Cause: Failure to connect to remote node.
Action: Try to map a driver letter from the local node to the remote node using commands such as "net use".
PRKI-2119 Unable to delete files on {0}. Install may not succeed if files are not deletedCause: Files that you are trying to delete do not exist or are currently being used.
Action: If the files you are trying to delete do not exist, ignore this error. If the files you are trying to delete are currently being used, then stop the processes that are using the files and retry.
PRKI-2120 Unable to delete service {0} on {1}. Install may not succeed if services are not deletedCause: Service does not exist, or service could not be deleted.
Action: Check the service control panel to see if the service exists. If the service does not exist, ignore this error. If the service exists, try to delete it from the command line using utilities like "net" and "sc". If this fails, check the Windows error message returned by these commands.

PRKN—Server Manager (SRVM) System Library Messages
F-18 Oracle Clusterware and RAC Administration and Deployment Guide
PRKN—Server Manager (SRVM) System Library MessagesPRKN-1008: Unable to load the shared library "{0}" or a dependent library, from
{1}={2} [{3}]Cause: The SRVM framework was unable to load a shared library to perform native operations.
Action: Make sure that the library in question is installed and in a location where it can be loaded. Check the environment setting that determines shared library loading on your platform.
PRKN-1009: Native System Internal ErrorCause: An unexpected internal error occurred while attempting to execute a native operation from Java.
Action: Contact Oracle Support.
PRKN-1010: This system is not properly configured as a clusterCause: SRVM was unable to find the system libraries which are required in order to use the system as a cluster.
Action: Verify that the Oracle Clusterware installation succeeded and attempt to execute the 'srvctl status' command to obtain more diagnostic information.
PRKN-1011: Failed to retrieve value for "{0}" under registry key "{1}" on node "{2}", {3}Cause: There was a problem accessing the Windows registry key.
Action: Open the Windows Registry editor on the node and verify that the Registry key exists and that it contains the subkey.
PRKO—Server Control (SRVCTL) Utility MessagesPRKO-2001: "Invalid command line syntax"
Cause: An invalid SRVCTL command line was entered.
Action: Use -h SRVCTL command line option to find out the correct command line syntax and re-enter the command.
PRKO-2002: "Invalid command line option: "Cause: An invalid SRVCTL command line option was entered.
Action: Use -h SRVCTL command line option to find out the correct command line syntax and re-enter the command.
PRKO-2003: "Invalid command line option value: "Cause: An invalid SRVCTL command line option value was entered.
Action: Use -h SRVCTL command line option to find out the correct command line syntax and re-enter the command.
PRKO-2004: "Repetition of command line option: "Cause: Duplicate SRVCTL command line option was entered.
Action: Eliminate the duplicate and re-enter the command.
PRKO-2005: "Application error: Failure in getting Cluster Database Configuration for: "Cause: An error occurred when getting Cluster Database configuration for the named database.

PRKO—Server Control (SRVCTL) Utility Messages
Oracle Real Application Clusters Tools Messages F-19
Action: Make sure that the database has been configured in Cluster Database Configuration Repository; make sure that GSDs are running on each node in the cluster.
PRKO-2005: "Application error: Failure in getting Cluster Database Configuration for: "Cause: An error occurred when getting Cluster Database configuration for the named database.
Action: Verify that the database has been configured in the Oracle Cluster Registry; make sure that the GSDs are running on each node in the cluster.
PRKO-2006: "Invalid node name: "Cause: An invalid node name was entered.
Action: Use the correct node name. A valid node name should match the output from 'lsnodes' and must not contain domain name.
PRKO-2007: "Invalid instance name: "Cause: An invalid instance name was entered.
Action: Use the correct instance name for the database. Run the 'srvctl config database -d <db_name>' command to identify all instances of the database in the Oracle Cluster Registry.
PRKO-2008: "Invalid connect string: "Cause: An invalid connect string was entered.
Action: Use the correct connect string syntax: <user>/<password>[ as <role>].
PRKO-2009: "Invalid name/value string: "Cause: An invalid environment name/value pair was entered during SRVCTL setenv command.
Action: Make sure that the correct name/value string format is used: <name>=<value>.
PRKO-2010: "Error in adding instance to node: "Cause: An error occurred when adding instance to the Oracle Cluster Registry.
Action: Use the 'srvctl config database -d <db_name>' command to check if the database has been configured in the Oracle Cluster Registry; make sure that the GSDs are running on each node in the cluster.
PRKO-2011: "Error in removing instance: "Cause: An error occurred when removing an instance from the Oracle Cluster Registry.
Action: Use the 'srvctl config database -d <db_name>' command to check if the database and instance have been configured in the Oracle Cluster Registry; make sure that the GSDs are running on each node in the cluster.
PRKO-2012: "Error in moving instance to node: "Cause: An error occurred when changing the instance and node mapping in the Oracle Cluster Registry.
Action: Use the 'srvctl config database -d <db_name>' command to check if the database and instance have been configured in the Oracle Cluster Registry; make sure that the GSDs are running on each node in the cluster.
PRKO-2013: "Error in setting env: "

PRKO—Server Control (SRVCTL) Utility Messages
F-20 Oracle Clusterware and RAC Administration and Deployment Guide
Cause: An error occurred when setting environment variables for a database or an instance.
Action: Use 'srvctl config database -d <db_name>' command to check if the database and/or the instance have been configured in the Oracle Cluster Registry; make sure that the GSDs are running on each node in the cluster.
PRKO-2014: "Error in unsetting env: "Cause: An error occurred when unsetting environment variables for a database or an instance.
Action: Use the 'srvctl getenv' command to check if the environment variable exists for the database or instance; make sure that the database and/or the instance have been configured in the Oracle Cluster Registry; make sure that the GSDs are running on each node in the cluster.
PRKO-2015: "Error in checking condition of instance on node: "Cause: Could not get status information of an instance.
Action: Use the 'srvctl config database -d <db_name>' command to check if the instance has been configured in the Oracle Cluster Registry; make sure that the GSDs are running on each node in the cluster.
PRKO-2016: "Error in checking condition of listener on node: "Cause: Could not get status information of a listener.
Action: Check if the listener has been configured in the listener configuration file and if the database instance on the node is listed in SID_NAME in the listener configuration; make sure that GSDs are running on each node in the cluster.
PRKO-2017: "Service {0} is not supported on instance {1}."Cause: The named instance is not configured in the service configuration.
Action: In service related operations, make sure that you operate on the instances that are configured for the service.
PRKO-2018: "Mutual exclusive command line options -c and -q cannot be usedat the same time."
Cause: Both command line option -c and -q are specified on the command line.
Action: Use either one of the options, but not both.
PRKO-2019: Cannot change management policy when database is disabled. Either remove -y option or enable database before before running this commandCause: The database resource attributes cannot be changed when it is in online state.
Action: Stop the database using the 'srvctl stop database' command and then re-run the command to change the policy.
PRKO-2101: "Instance is disabled: "Cause: The instance is disabled and cannot be started.
Action: Enable the instance before starting.
PRKO-2102: "Service {0} is not supported on instance {1}."Cause: The named instance is not configured in the service configuration.
Action: In service related operations, make sure you operate on the instances that are configured for the service.

PRKO—Server Control (SRVCTL) Utility Messages
Oracle Real Application Clusters Tools Messages F-21
PRKO-2104: "Error in checking condition of service: "Cause: There is a problem with the CRS daemon, or the service resource is in an unknown state.
Action: Check whether the daemon is up and listening to the port that SRVCTL is communicating with. Check the service resource status.
PRKO-2105: "Error in checking condition of VIP on node: "Cause: There is a problem with the CRS daemon, or the VIP resource is in an unknown state.
Action: Check whether the daemon is up and listening to the port that SRVCTL is communicating with. Check the VIP resource status.
PRKO-2106: "Error in checking condition of GSD on node: "Cause: There is a problem with the CRS daemon, or the VIP resource is in an unknown state.
Action: Check whether the daemon is up and listening to the port that SRVCTL is communicating with. Check the VIP resource status.
PRKO-2108: "Node applications are still running on node: "Cause: Node applications are running on the node.
Action: Stop the node applications before removing them.
PRKO-2109: "Invalid address string: "Cause: Invalid address string.
Action: Use the correct format for address string.
PRKO-2112: "Some or all node applications are not removed successfully onnode: "
Cause: There was a problem when removing the node applications.
Action: Details of the problem are given in the text.
PRKO-2113: "Instance {0} is already a preferred instance for service {1}."Cause: The instance is configured as a preferred instance for the service.
Action: Pick another instance to configure.
PRKO-2114: "Instance {0} is already an available instance for service {1}."Cause: The instance is configured as an available instance for the service.
Action: Select another instance to configure.
PRKO-2115: "Cannot remove node-level applications on node {0}, because alistener application exists. Remove the listener application first, thenre-run this command."
Cause: A listener application exists.
Action: Remove the listener application first, then re-run this command.
PRKO-2116: "Error in checking condition of ONS daemon on node: "Cause: There is a problem with the CRS daemon, or the ONS resource is in an unknown state.
Action: Check if the daemon is up and listening to the port that SRVCTL is communicating with. Check the ONS resource status.
PRKP—Cluster Database Management Messages
F-22 Oracle Clusterware and RAC Administration and Deployment Guide
PRKO-2117: "This command should be executed as the system privilege user."Cause: User did not login as the system privilege user.
Action: Login as system privilege user and re-try.
PRKO-2118: "Error in checking condition of ASM instance {0} on node {1}."Cause: There is a problem with the CRS daemon, or the ASM resource is in an unknown state.
Action: Check if the daemon is up and listening to the port that SRVCTL is communicating with. Check the ASM resource status.
PRKO-2119: "Error in checking enable/disable status of ASM instance {0} onnode {1}."
Cause: There was some problem when checking the status of the ASM instance.
Action: Make sure that the Oracle Cluster Registry is functioning and that the CRS daemon is running.
PRKO-2120: "The internal database service {0} cannot be managed with srvctl."Cause: The internal database service is not supposed to be a highly available service.
Action: Do not operate on the internal database service.
PRKP—Cluster Database Management MessagesPRKP-1000 "Cannot retrive configuration for cluster database {0}"
Cause: The cluster database configuration cannot be retrieved from the repository. This can occur either because the database was never registered, or because the repository itself has not been created.
Action: Check if the database has been configured by printing a list of all cluster databases using 'srvctl config'. If the repository has not been created, use 'srvconfig -init' to create it.
PRKP-1001 "Error starting instance {0} on node {1}"Cause: The instance could not be started using the SQL*Plus startup command.
Action: Try starting the named instance manually using SQL*Plus to see why it failed.
PRKP-1002 "Error stopping instance {0} on node {1}"Cause: The SQL*Plus shutdown command returned an error while stopping the instance.
Action: Try stopping the named instance manually using SQL*Plus to see why it failed.
PRKP-1003 "Startup operation partially failed"Cause: Some components of the cluster database could not be started.
Action: See earlier error message for details.
PRKP-1004 "Shutdown operation partially failed"Cause: Some components of the cluster database reported errors while being stopped.
Action: See earlier error messages for details.
PRKP-1005 "Failed to start up cluster database {0}"

PRKP—Cluster Database Management Messages
Oracle Real Application Clusters Tools Messages F-23
Cause: The cluster database could not be started.
Action: See earlier error messages for details.
PRKP-1006 "Failed to shut down cluster database {0}"Cause: The cluster database reported errors while being shut down.
Action: See earlier error messages for details.
PRKP-1007 "Failed to start all the listeners associated with all the instances of cluster database {0}"Cause:
Action: Contact your customer support representative.
PRKP-1008 "Failed to start listeners associated with instance {0} on node {1}"Cause:
Action: Contact your customer support representative.
PRKP-1009 "Failed to stop all the listeners associated with all the instances of cluster database {0}"Cause: Either the listener name associated with an instance could not be determined, or "lsnrctl stop" failed for a listener.
Action: Verify that listener.ora contains a SID_LIST entry for each instance of the named database, and that the lsnrctl stop command succeeds for those listeners.
PRKP-1010 "Failed to stop all the listeners associated with instance {0} on node{1}"Cause: Either the listener name associated with an instance could not be determined, or "lsnrctl stop" failed for a listener.
Action: Verify that listener.ora contains a SID_LIST entry for each instance of the named database, and that the lsnrctl stop command succeeds for those listeners.
PRKP-1011 "Failed to get all the listeners associated with instance {0} on node{1}"Cause: The listener name associated with an instance could not be determined.
Action: Ensure that listener.ora contains a SID_LIST entry for the named instance.
PRKP-1012 "Invalid environment variable {0} setting for cluster database {1}"Cause: The argument to the -t option is not of the form <name>=<value> or it contains special characters.
Action: Ensure that the -t option has an argument of the form <name>=<value>. Enclose the argument to the -t flag in quotes.
PRKP-1013 "{0}: undefined environment variable for cluster database {1}"Cause: The named environment variable is not defined for the named cluster database.
Action: Set a value for the variable with "srvctl set env".
PRKP-1014 "{0}: undefined environment variable for instance {1} of cluster database {2}"Cause: The named environment variable is not defined for the given instance.
Action: Set a value for the variable with "srvctl set env".
PRKP-1015 "{0}: undefined environment variable"Cause: The named environment variable is not defined.

PRKP—Cluster Database Management Messages
F-24 Oracle Clusterware and RAC Administration and Deployment Guide
Action: Set a value for the named environment variable with "srvctl set env".
PRKP-1016 "Database {0} already enabled"Cause: An attempt was made to enable a database that is already enabled.
Action: No action required.
PRKP-1017 "Instance {0} already enabled."Cause: An attempt was made to enable an instance that is already enabled.
Action: No action required.
PRKP-1018 "Service {0} already enabled."Cause: An attempt was made to enable a service that is already enabled.
Action: No action required.
PRKP-1019 "Database {0} already disabled."Cause: An attempt was made to disable a database that is already disabled.
Action: No action required.
PRKP-1020 "Instance {0} already disabled."Cause: An attempt was made to disable an instance that is already disabled.
Action: No action required.
PRKP-1021 "Service {0} already disabled."Cause: An attempt was made to disable a service that is already disabled.
Action: No action required.
PRKP-1022 "The database {0} is still running."Cause: An attempt was made to delete a database that is still running.
Action: Stop the database using 'srvctl stop database' before deleting the database.
PRKP-1023 "The instance {0} is still running."Cause: An attempt was made to delete an instance that is still running.
Action: Stop the instance using 'srvctl stop instance' before deleting the instance.
PRKP-1024 "The service {0} is still running."Cause: An attempt was made to delete a service that is still running.
Action: Stop the service using 'srvctl stop service' before deleting the service.
PRKP-1025 "The service {0} does not exist."Cause: An attempt was made to operate on a non-configured service.
Action: Check if the service is configured through 'srvctl status service'.
PRKP-1026 "No instance found for database {0}."Cause: An attempt was made to operate on a non-configured instance.
Action:
PRKP-1027 "Instance {0} is not found for database {1}."Cause: An attempt was made to operate on a non-configured instance.
Action: Check if the instance is configured through 'srvctl config instance'.

PRKP—Cluster Database Management Messages
Oracle Real Application Clusters Tools Messages F-25
PRKP-1028 "No preferred instance(s) for service {0}."Cause: An attempt was made to create a service without preferred instances.
Action: Supply preferred instances for the service through 'srvctl create service'.
PRKP-1029 "Failed to register the service {0}."Cause: Internal error.
Action: Contact support.
PRKP-1030 "Failed to start the service {0}."Cause: Internal error.
Action: Contact support.
PRKP-1031 "Failed to stop the service {0}."Cause: Internal error.
Action: Contact support.
PRKP-1032 "Cannot start the disabled service {0}."Cause: Internal error.
Action: Contact support.
PRKP-1033 "Cannot relocate service {0} from instance {1} to instance {2}."Cause: Internal error.
Action: Contact support.
PRKP-1034 "{0}: undefined environment variable for node {1}." Cause: Internal error.
Action: Contact support.
PRKP-1035 "Invalid environment variable {0} setting for node {1}."Cause:
Action: Contact support.
PRKP-1036 "Failed to unregister HA resource {0}."Cause:
Action: Contact support.
PRKP-1037 "Failed to create cluster database {0}."Cause:
Action: Contact support.
PRKP-1038 "Invalid instance {0} specified for the Service {1}." Cause:
Action: Contact support.
PRKP-1039 "operation result is null"Cause:
Action: Contact support.
PRKP-1041: "Failed to reload all the listeners associated with cluster database {0}"Cause:
Action: Refer to CRS logs for detailed error information.

PRKP—Cluster Database Management Messages
F-26 Oracle Clusterware and RAC Administration and Deployment Guide
PRKP-1042: "Failed to reload all the listeners associated with instance {0} on node{1}"Cause:
Action: Refer to CRS logs for detailed error information.
PRKP-1043: "Failed to reload listeners on node {0}"Cause:
Action: Refer to CRS logs for detailed error information.
PRKP-1044 "Failed to enable the database {0}."Cause:
Action: Contact support.
PRKP-1045 "Failed to disable the database {0}."Cause:
Action: Contact support.
PRKP-1046 "Failed to enable the instance {0}."Cause:
Action: Contact support.
PRKP-1048 "Failed to change configuration for service {0}." Cause:
Action: Contact support.
PRKP-1049 "{0}: undefined environment variable for service {1} of cluster database {2}"Cause: The environment variable is not defined for the service.
Action: No action required.
PRKP-1050 "Failed to remove the service {0}."Cause: There was a problem while executing the crs_unregister command.
Action: Verify whether the crs_unregister command succeeds in unregistering a CRS resource.
PRKP-1051 "Failed to remove the service {0} on instance {1}." Cause: There was a problem while executing the crs_unregister command.
Action: Verify whether the crs_unregister command succeeds in unregistering a CRS resource.
PRKP-1052 "Failed to enable the service {0}."Cause: There was a problem while executing the crs_register command.
Action: Verify whether the crs_register command succeeds in registering a CRS resource.
PRKP-1053 "Failed to disable the service {0}."Cause: There was a problem while executing the crs_register command.
Action: Verify whether the crs_register command succeeds in registering a CRS resource.
PRKP-1054 "Failed to enable the service {0} on instance {1}."

PRKP—Cluster Database Management Messages
Oracle Real Application Clusters Tools Messages F-27
Cause: There was a problem while executing the crs_register command.
Action: Verify whether the crs_register command succeeds in registering a CRS resource.
PRKP-1055 "Failed to disable the service {0} on instance {1}." Cause: There was a problem while executing the crs_register command.
Action: Verify whether the crs_register command succeeds in registering a CRS resource.
PRKP-1056 "Failed to get the status of the resource {0}."Cause: There was a problem while executing the crs_stat command.
Action: Verify whether the crs_stat command gives the status of the CRS resources registered.
PRKP-1057 "Failed to set the environment for service {0}." Cause: There was a problem while accessing the OCR.
Action: Check whether the OCR is accessible by executing a srvctl config command.
PRKP-1058 "Failed to unset the environment for service {0}." Cause: There was a problem while accessing the OCR.
Action: Check whether the OCR is accessible by executing the srvctl config command.
PRKP-1059 "Failed to get the environment for service {0}." Cause: There was a problem while accessing the OCR.
Action: Check whether the OCR is accessible by executing the srvctl config command.
PRKP-1060 "Failed to get CRS home."Cause: Internal error.
Action: Contact support.
PRKP-1061 "Failed to modify the database {0}. "Cause: Internal error.
Action: Contact support.
PRKP-1062 "Service {0} is already running."Cause: Attempted to start a service that is already running.
Action: None required.
PRKP-1063 "Service {0} is already stopped."Cause: Attempted to stop a service that is already stopped.
Action: None required.
PRKP-1064 "Service {0} is already running on instance {1}." Cause: Attempted to start a service on an instance where it is already running.
Action: None required.
PRKP-1065 "Service {0} is already stopped on instance {1}." Cause: Attempted to stop a service on an instance where it is already stopped.
PRKP—Cluster Database Management Messages
F-28 Oracle Clusterware and RAC Administration and Deployment Guide
Action: None required.
PRKP-1066 "Instance {0} is not an available instance for service {1}." Cause:
Action: Contact support.
PRKP-1067 "Instance {0} is the last available instance for service {1}. Try modify service instead."Cause:
Action: Contact support.
PRKP-1068 "Cannot stop the critical instance {0} in critical standby database {1} because it would result in a shutdown of the primary database."Cause: Attempted to stop the critical instance in a critical standby database while the primary database is running.
Action: Do not stop the critical instance in a critical standby database while the primary database is running.
PRKP-1069 "Failed to change domain of the database {0} to {1}, because this domain name is already used by service {2} configured under the database."Cause: Attempted to change the database domain when there are services configured with this domain.
Action: Do not change the database domain when there are services configured with that domain.
PRKP-1070 "Service name {0} contains illegal characters."Cause: Invalid characters have been specified in the service name given.
Action: Supply a name for the service with the character set [a-zA-Z0-9_.].
PRKP-1071: "Database unique name or instance name {0} contains illegal characters {1}."},Cause:
Action: Correct db/instance name before retrying method/command.
PRKP-1072 "Failed to create service {0} for database {1}, because the specified service domain name is the same as the database domain {2}." Cause:
Action:
PRKP-1073 "Cannot create database {0} because a database named {1} already exists."Cause: Attempted to create a database that already exists.
Action: Choose a different name for the database being created.
PRKP-1074 "Failed to relocate a service resource to instance {0} during modifying service configuration for service {1}." Cause: Internal error.
Action: Contact support.
PRKP-1075 "Instance {0} is the last preferred instance for service {1}."Cause: Internal error.
Action: Contact support
PRKR—Cluster Registry Messages
Oracle Real Application Clusters Tools Messages F-29
PRKP-1076: Instance name passed to the method is nullCause: The Oracle instance SID that you are passing to this API cannot be null.
Action: Make sure that the Oracle instance is configure before this call. Check client specific error message for details.
PRKP-1077: Oracle home is null for the cluster database {0}Cause: Oracle home specified cannot be null.
Action: Make sure Oracle home is properly set. Check client specific error message for more details.
PRKP-1078: Failed to retrieve \"{0}\" attribute value from \"{1}\" file, {2}”Cause: An error occurred while retrieving CRS attribute value because of some CRS/OCR error.
Action: Refer to CRS or OCR logs in CRS home/log/<hostname> for detailed error information.
PRKP-1079: Cannot start service {0} on disabled database {1}Cause: Service cannot be started on a database which is already disabled.
Action: Enable the database using 'srvctl enable database' before re-attempting command.
PRKP-1080: "Cannot start service {0} on disabled instance {1}."Cause: Service cannot be started in an instance which is already disabled.
Action: Enable the instance using 'srvctl enable instance' before attempting to start the service.
PRKP-1081: Database name passed to the method is nullCause: The database name cannot be null to perform the operation.
Action: Verify the database name that you are using and retry the command
PRKP-1082: Instance \"{0}\" does not exist in database \"{1}\”Cause: The configuration information for this instance may not exist in the OCR, or the instance was never configured.
Action: Verify the instance name that you are using before retrying the command. Alternatively, verify the instances that are configured with a database by running the command 'srvctl config database -d <database>'.
PRKP-1083: The service {0} already exists.Cause: You cannot have multiple database services with same name.
Action: Make sure you use unique service names for each database.
PRKP-1084: Database \"{0}\" cannot have more than \"{1}\" servicesCause: The database supports only 115 user services. You cannot configure more than 115 services.
Action: If you must add this service, then remove some of the unused services using the command 'srvctl removes services' before adding any new services.
PRKR—Cluster Registry MessagesPRKR-1001 "cluster database {0} does not exist"
Cause: The cluster database was never configured in the OCR.

PRKR—Cluster Registry Messages
F-30 Oracle Clusterware and RAC Administration and Deployment Guide
Action: Check if the database has been configured by printing a list of all cluster databases using 'srvctl config'.
PRKR-1002 "cluster database {0} already exists"Cause: An attempt was made to configure a cluster database that already exists in the OCR.
Action: Check if the database has already been configured by printing a list of all cluster databases using 'srvctl config'.
PRKR-1003 "instance {0} does not exist"Cause: The named instance is not configured in the OCR.
Action: Use srvctl options to check if the instance was configured in the OCR.
PRKR-1004 "instance {0} already exists"Cause: The named instance is already configured in the OCR.
Action: Use srvctl options to check if the instance has already been configured in the OCR.
PRKR-1005 "adding of cluster database {0} configuration failed, {1}"Cause: An error occurred while attempting to add the cluster database configuration information to the OCR.
Action: Verify whether the OCR is accessible by using an 'ocrcheck' or 'srvctl config' command.
PRKR-1006 "deleting of cluster database {0} configuration failed, {1}"Cause: Same as PRKR-1005.
Action: See earlier error messages.
PRKR-1007 "getting of cluster database {0} configuration failed, {1}" Cause: Same as PRKR-1005.
Action: See earlier error messages.
PRKR-1008 "adding of instance {0} on node {1} to cluster database {2} failed, {3}"Cause: Same as PRKR-1005.
Action: See earlier error messages.
PRKR-1009 "deleting of instance {0} from cluster database {1} failed, {2}"Cause: Same as PRKR-1005.
Action: See earlier error messages.
PRKR-1010 "moving of instance {0} to node {1} of cluster database {2} failed, {3}"Cause: Same as PRKR-1005.
Action: See earlier error messages.
PRKR-1011 "renaming of instance {0} to instance {1} of cluster database {2} failed, {3}"Cause: Same as PRKR-1005.
Action: See earlier error messages.
PRKR-1016 "reading of cluster database {0} configuration failed, {1}, {2}"Cause: Same as PRKR-1005.
Action: See earlier error messages.

PRKR—Cluster Registry Messages
Oracle Real Application Clusters Tools Messages F-31
PRKR-1017 "writing of cluster database {0} configuration failed, {1}, {2}"Cause: Same as PRKR-1005.
Action: See earlier error messages.
PRKR-1018 "reading of directory failed, {0}, {1}"Cause: Internal error.
Action: Contact your customer support representative.
PRKR-1019 "writing of directory failed, {0}, {1}"Cause: Internal error.
Action: Contact your customer support representative.
PRKR-1020 "reading of version information failed, {0}, {1}" Cause: Same as PRKR-1005.
Action: See earlier error messages.
PRKR-1021 "writing of version information failed, {0}, {1}" Cause: Same as PRKR-1005.
Action: See earlier error messages.
PRKR-1022 "raw device {0} contains incompatible version, {1} != {2}"Cause: An attempt was made to use an incompatible version of the OCR.
Action: Contact your customer support representative.
PRKR-1023 "file {0} does not exist"Cause: The named file did not exist.
Action: Check if the file exists.
PRKR-1024 "file {0} does not have {1} permissions"Cause: The named file did not have the specified permission.
Action: Try changing the permission on the file to the specified permission.
PRKR-1025 "file {0} does not contain property {1}"Cause: The file did not contain the specified property.
Action: Contact your customer support representative.
PRKR-1026 "property {0} not set in file {1}"Cause: The file did not contain the specified property.
Action: Contact your customer support representative.
PRKR-1027 "failed to retrieve list of cluster databases"Cause: Same as PRKR-1005.
Action: See earlier error messages.
PRKR-1028 "raw device {0} is invalid\n[HINT: initialize raw device by using \"srvconfig\" tool]"Cause: The cluster registry was never initialized.
Action: Use srvconfig -init to initialize the cluster registry.
PRKR-1038 "invalid argument {0} specified to -init option"Cause:

PRKR—Cluster Registry Messages
F-32 Oracle Clusterware and RAC Administration and Deployment Guide
Action:
PRKR-1039 "invalid option {0} specified"Cause: The specified option was invalid.
Action: Check usage.
PRKR-1040 "missing <file> argument for {0} option"Cause: The specified option was invalid for srvconfig.
Action: Check usage for details.
PRKR-1045 "raw device version \"{0}\""Cause: Attempted to retrieve the version of the cluster registry.
Action: No action is required.
PRKR-1046 "srvconfig detected valid raw device \"{0}\"\n[HINT: please specify -init -f option to forcefully initialize it]" Cause: A valid cluster registry was detected.
Action: No action is required.
PRKR-1047 "raw device {0} is in use by daemon(s) on node(s) {1}" Cause: An attempt was made to initialize the OCR while the Global Services Daemons were up on one or more nodes in the cluster.
Action: Stop all of the Global Services Daemons on all of the nodes in the cluster by running the 'srvctl stop' command on every node. Try the 'srvconfig -init' operation again.
PRKR-1050 "file {0} creation in {1} directory failed, check permissions, etc."Cause: Attempted to create a file in a directory which did not exist or which d id not have the right permissions.
Action: Create the directory if it did not exist or change the permission of the directory.
PRKR-1051 "file {0} does not contain an entry for dbname {1}" Cause: Internal error.
Action: Contact your customer support representative.
PRKR-1052 "file name {0} is not of <cluster database name>.conf form" Cause: An attempt was made to register a cluster database in the OCR and the file argument passed was not of the <cluster database name>.conf form.
Action: Refer to the usage of the srvconfig command for more information.
PRKR-1053 "invalid range {0} specified in node_list = {1}" Cause:
Action: Contact your customer support representative.
PRKR-1054 "invalid parameter {0} specified in inst_oracle_sid = {1}" Cause: Extra number of arguments provided to srvconfig.
Action: See usage of srvconfig for details.
PRKR-1055 "invalid extra arguments {0} specified to {1} option" Cause: Provided invalid arguments to srvconfig.
Action: See usage of srvconfig for details.

PRKR—Cluster Registry Messages
Oracle Real Application Clusters Tools Messages F-33
PRKR-1056 "invalid registry entry {0} found, should be of form {1}" Cause: Detected an invalid registry entry while attempting to add a 8.1.7 or earlier version of Oracle Parallel Server in the OCR.
Action: Contact your customer support representative.
PRKR-1057 "environment variable does not exist"Cause: Attempted to retrieve non existing environment variable.
Action: Set the environment variable.
PRKR-1058 "Service {0} does not exist in cluster database {1}."Cause: The named service is not configured in the OCR.
Action: Use srvctl options to check whether the service was configured in the OCR.
PRKR-1059 "Node {0} does not exist."Cause: Node applications for the named node are not configured in the OCR.
Action: Use srvctl options to check whether the node applications were configured for the given node in the OCR.
PRKR-1060 "Failed to add configuration for node {0}"Cause:
Action: Contact your customer support representative.
PRKR-1061 "Failed to run remote command to get node configuration for node {0}"Cause: An internal error occurred while retrieving the configuration for the given node.
Action: Contact your customer support representative.
PRKR-1062 "Failed to find configuration for node {0}" Cause:
Action: Contact your customer support representative.
PRKR-1063 "VIP {0} is already existing"Cause:
Action: Contact your customer support representative.
PRKR-1064 "SRVM configuration operation failed due to Oracle Cluster Registry error :"Cause: Error occurred while accessing the Oracle Cluster Registry.
Action: Contact your customer support representative.
PRKR-1066 "cluster database domain does not match" Cause:
Action: Contact your customer support representative.
PRKR-1067 "Failed to get environment for cluster database {0}, {1}"Cause: Unable to retrieve the environment configuration for the given cluster database from the OCR.
Action: Use the ocrdump utility to check whether the environment was configured for the given cluster database in the OCR.
PRKR-1068 "Failed to get environment for instance {1} of cluster database {0}, {2}"

PRKR—Cluster Registry Messages
F-34 Oracle Clusterware and RAC Administration and Deployment Guide
Cause: Unable to retrieve the environment configuration for the given instance from the OCR.
Action: Use ocrdump to check if environment was configured for the given instance in the OCR.
PRKR-1069 "Failed to set environment for cluster database {0}, {1}" Cause: Unable to update the environment configuration for the given cluster database in the OCR.
Action: Contact your customer support representative.
PRKR-1070 "Failed to set environment for instance {1} of cluster database {0}, {2}"Cause: Unable to update the environment configuration for the given instance to the OCR.
Action: Contact your customer support representative.
PRKR-1071 "Failed to unset environment for cluster database {0}, {1}"Cause: Unable to update the environment configuration for the given cluster database in the OCR.
Action: Contact your customer support representative.
PRKR-1072 "Failed to unset environment for instance {1} of cluster database {0}, {2}"Cause: Unable to update the environment configuration for the given instance in the OCR.
Action: Contact your customer support representative.
PRKR-1073 "\n########## Configuration of nodeapps follows ##########\n"Cause:
Action: Contact your customer support representative.
PRKR-1074 "\n########## Configuration of vip_range follows ##########\n"Cause:
Action: Contact your customer support representative.
PRKR-1075 "Insufficient privileges for doing this operation" Cause: User did not have sufficient privileges when running this command.
Action: Execute this command as a privileged user.
PRKR-1076 "This command cannot run when the RAC daemons (crsd, evmd, ocssd) are running. Make sure the daemons are not running before invoking this command" Cause: The RAC daemons were running when this command was invoked.
Action: Make sure that the RAC daemons have been stopped before running this command.
PRKR-1077 "One or more arguments passed to the function are not valid"Cause: One or more invalid arguments were passed to the given method.
Action: Contact your customer support representative.
PRKR-1078 "Database {0} cannot be administered using current version of srvctl. Instead run srvctl from {1}" Cause: Using incorrect SRVCTL version.
Action: Contact your customer support representative.

PRKS—Automatic Storage Management Messages
Oracle Real Application Clusters Tools Messages F-35
PRKR-1079 "Failed to initialize the Oracle Cluster Registry" Cause: Failed to initialize the Oracle Cluster Registry.
Action: Contact your customer support representative.
PRKS—Automatic Storage Management MessagesPRKS-1000: "ASM instance "{0}" already exists on node "{1}"
Cause: An attempt was made to add configuration information for an ASM instance on the node where it already exists.
Action: Check whether the ASM instance was configured on the node using 'srvctl config asm -n <node>' before adding the configuration for it.
PRKS-1001: ASM instance "{0}" does not exist on node "{1}" Cause: The configuration for the ASM instance does not exist on the node.
Action: Check whether the ASM instance was configured on the node using 'srvctl config asm -n <node>' before performing the operation.
PRKS-1002: Failed to create CRS profile for ASM instance "{0}" on node "{1}", [{2}]Cause: 'crs_stat -p' command failed for the ASM instance resource on the node.
Action: Contact Oracle Support.
PRKS-1003: Failed to register CRS resource for ASM instance "{0}" on node "{1}", [{2}]Cause: crs_register command failed for ASM instance resource on the node.
Action: Contact Oracle Support.
PRKS-1004: Failed to unregister CRS resource for ASM instance "{0}" on node "{1}", [{2}]" }Cause: A crs_unregister command failed for the ASM instance resource on the node.
Action: Check if there is a database instance that is dependent upon the ASM instance on the node by running the command crs_stat -p ora.<db>.<inst>.inst and see if ASM instance resource name appears in the required resources for the database instance. Remove the database instance's required resource dependency on the ASM instance by running a 'srvctl modify asm' command before retrying this operation.
PRKS-1005: Failed to create CRS resource for ASM instance "{0}" on node "{1}", [{2}]Cause: crs_register command failed for the ASM instance resource on the node.
Action: Contact Oracle Support.
PRKS-1006: ASM instance "{0}" is already running on node "{1}". Cause: An attempt was made to start a running ASM instance on the node.
Action: None.
PRKS-1007: ASM instance "{0}" is still running on node "{1}". Cause: An attempt was made to remove the configuration for a running ASM instance on the node.
Action: Stop the ASM instance using 'srvctl stop asm -n <node> -i <inst>' command before performing the remove operation.
PRKS-1008: ASM instance "{0}" is not running on node "{1}".

PRKS—Automatic Storage Management Messages
F-36 Oracle Clusterware and RAC Administration and Deployment Guide
Cause: An attempt was made to stop a non-running ASM instance on the node.
Action: None.
PRKS-1009: Failed to start ASM instance "{0}" on node "{1}", [{2}] Cause: crs_start failed for the ASM instance resource on the node, may be due to invalid startup credentials or missing parameter file.
Action: Check if VIP resource is online on the node and then try to startup the ASM instance using SQL*Plus to get more diagnostic information.
PRKS-1010: Failed to start ASM instances "{0}" on node "{1}", [{2}]Cause: See above.
Action: See above.
PRKS-1011: Failed to check status of ASM instance "{0}" on node "{1}", [{2}]Cause: crs_stat failed for the ASM instance resource on the node.
Action: Contact Oracle Support.
PRKS-1012: Failed to stop ASM instance "{0}" on node "{1}", [{2}]" Cause: The crs_stop command failed for the ASM instances on the node. This may be due to a CRS resource dependency or because the user has invalid credentials for stopping ASM instances.
Action: Determine whether there are database instances that depend on the ASM instance on the node by running the crs_stat -p ora.<db>.<inst>.inst command. If ASM instance resource names appear in the required resources for the database instance, then stop the database instances first using the 'srvctl stop instance' command. Do this before retrying the ASM instance stop operation or try to stop the ASM instance using SQL*Plus to obtain more diagnostic information.
PRKS-1013: Failed to stop ASM instances "{0}" on node "{1}", [{2}]"Cause: See above.
Action: See above.
PRKS-1014: Failed to enable CRS resource for ASM instance "{0}" on node "{1}", [{2}]Cause: Failed to set the enable flag of the ASM instance configuration in the OCR.
Action: Verify that the OCR is accessible by running the 'srvctl config ' command.
PRKS-1015: Failed to enable CRS resources for ASM instances "{0}" on node "{1}", [{2}]"Cause: See above for each ASM instance.
Action: Check whether the OCR is accessible by running the 'srvctl config ' command.
PRKS-1016: Failed to disable CRS resource for ASM instance "{0}" on node "{1}", [{2}]"Cause: Failed to reset the enable flag of the ASM instance configuration in the OCR.
Action: Verify that the OCR is accessible by running the 'srvctl config ' command.
PRKS-1017: Failed to disable CRS resources for ASM instances "{0}" on node "{1}", [{2}]"Cause: See above for each ASM instance.
Action: Verify that the OCR is accessible by running the 'srvctl config ' command.

PRKS—Automatic Storage Management Messages
Oracle Real Application Clusters Tools Messages F-37
PRKS-1019: Cannot create CRS dependency between database instance "{0}" configured on node "{1}" and ASM instance "{2}" configured on node "{3}".Cause: An attempt was made to create a CRS dependency between a database instance and an ASM instance that is configured on a different node.
Action: Make sure that the database instance and the ASM instance are on the same node before creating a CRS dependency between them.
PRKS-1020: Failed to create CRS dependency between database instance "{0}" and ASM instance "{1}", [{2}]Cause: 'crs_register -u' failed to create CRS dependency between the database instance and the ASM instance on the node.
Action: Contact Oracle support.
PRKS-1021: Failed to remove CRS dependency between database instance "{0}" and ASM instance "{1}", [{2}]Cause: 'crs_register -u' command failed to remove CRS dependency between the database instance and the ASM instance on the node.
Action: Contact Oracle Support.
PRKS-1022: Failed to remove CRS dependency between database instance "{0}" and ASM instances "{1}", [{2}]Cause: See above.
Action: See above.
PRKS-1023: Failed to remove CRS resource for ASM instance "{0}" on node "{1}", [{2}]Cause: crs_unregister command failed to unregister CRS resource for the ASM instances on the node.
Action: Contact Oracle Support.
PRKS-1026: ASM Configuration for node "{0}" does not exist in cluster registry."Cause: An attempt was made to retrieve names of ASM instances configured on the node without configuring any ASM instance on it.
Action: First configure ASM instance using 'srvctl add asm' on the node command before executing the get configuration operation.
PRKS-1027: Configuration for ASM instance "{0}" does not exist in cluster registry." Cause: An attempt was made to retrieve node name for a given ASM instance name which is not configured on any cluster nodes.
Action: First configure ASM instance using 'srvctl add asm' command before executing the get configuration operation.
PRKS-1028: Configuration for ASM instance "{0}" on node "{1}" does not exist in cluster registry.Cause: An attempt was made to retrieve configuration for the ASM instance on the node name where it was not configured.
Action: Use "srvctl config asm -n <node>' command to determine the ASM instance names configured on it and then pass one of these names as "-i <inst>" argument to 'srvctl config asm' command.
PRKS-1029: Client version "{0}" is not compatible with ASM instance configuration version "{1}" in cluster registry.

PRKS—Automatic Storage Management Messages
F-38 Oracle Clusterware and RAC Administration and Deployment Guide
Cause: Version of the client that tried to retrieve ASM instance configuration is not compatible with ASM instance configuration version.
Action: Make sure client version is compatible with ASM instance configuration version before accessing it.
PRKS-1030: Failed to add configuration for ASM instance "{0}" on node "{1}" in cluster registry, [{2}]Cause: Failed to add the configuration information for the ASM instance in the OCR.
Action: Verify that the OCR is accessible by executing 'srvctl config ' command.
PRKS-1031: "Failed to retrieve configuration for ASM instance "{0}" on node "{1}" from cluster registry, [{2}]Cause: Failed to retrieve the configuration information for the ASM instance from the OCR.
Action: Verify that the OCR is accessible by executing 'srvctl config ' command.
PRKS-1032: Failed to modify configuration for ASM instance "{0}" on node "{1}" in cluster registry, [{2}]Cause: Failed to modify the configuration information for the ASM instance on the node in the OCR.
Action: Verify that the OCR is accessible by executing 'srvctl config ' command.
PRKS-1033: Failed to remove configuration for ASM instance "{0}" on node "{1}" from cluster registry, [{2}]Cause: Failed to remove the configuration information for the ASM instance from the OCR.
Action: Verify that the OCR is accessible by executing 'srvctl config ' command.
PRKS-1034: Failed to remove configuration for ASM instances "{0}" on node "{1}" from cluster registry, [{2}]"Cause: See above.
Action: See above.
PRKS-1035: Failed to retrieve ORACLE_HOME value for ASM instance "{0}" on node "{1}" from cluster registry, [{2}] Cause: Failed to retrieve the ORACLE_HOME from the ASM instance configuration in the OCR.
Action: Verify that the OCR is accessible by executing 'srvctl config ' command.
PRKS-1036: VIP resource for ASM instance node "{0}" does not exist." Cause: The VIP resource for the node does not exist; it is a required resource for the ASM instance configuration on the node.
Action: Configure the VIP resource for the node using the 'srvctl add nodeapps' command as a privileged user before adding configuration for the ASM instance.
PRKS-1037: Failed to check existence of VIP resource for ASM instance node "{0}", [{1}]Cause: 'crs_stat ora.<node>.vip' failed to check status of the VIP resource for the node.
Action: Contact Oracle Support.

PRKV—Virtual IP Configuration Assistant Messages
Oracle Real Application Clusters Tools Messages F-39
PRKU—Command-Line Parser Utility MessagesPRKU-1000: "Exception Caused by: "
Cause: The current exception was caused by another earlier exception.
Action: Examine all of the nested exceptions to determine the root cause of the error.
PRKU-1001: "The parameter {0} is required." Cause: The parameter specified is required by a command line utility.
Action: Supply the parameter specified.
PRKU-1002: "Unexpected argument {0}." Cause: The argument specified is not needed or not understood by this utility.
Action: Verify the arguments on the command you are executing.
PRKU-1003: "The parameter {0} requires an argument."Cause: The parameter specified must be accompanied by an argument.
Action: Verify the arguments on the command you are executing.
PRKV—Virtual IP Configuration Assistant MessagesPRKV-1013 "A network interface is required"
Cause: You did not provide a network interface for configuring the virtual IP address.
Action: When running VIPCA in GUI mode, select a suitable network interface from the list. When running VIPCA in silent mode, provide a suitable interface using the '-interfaces' option.
PRKV-1014 "Enter a valid IP address for the node \"{0}\"." Cause: You did not enter an IP address to be configured as a virtual IP for the node.
Action: Enter an unused IP address to be used for configuring the virtual IP address.
PRKV-1015 "Enter a valid subnet mask for the IP address \"{0}\"." Cause: You did not enter an IP netmask for the IP address.
Action: Enter a netmask for the IP address.
PRKV-1016 "IP address \"{0}\" is invalid. Enter a valid IP address."Cause: IP address entered is invalid.
Action: Enter a valid IP address in standard IEEE format.
PRKV-1017 "IP address \"{0}\" does not exist. Enter a valid IP address."Cause: IP address cannot be resolved in the network.
Action: Add an IP address in DNS or /etc/hosts so it can be resolved.
PRKV-1018 "IP address \"{0}\" has invalid format. Enter a valid IP address."Cause: IP address is not in standard IEEE format.
Action: Enter a valid IP address in IEEE format.
PRKV-1019 "Netmask entered \"{0}\" has invalid format. Enter a valid netmask."

PRKV—Virtual IP Configuration Assistant Messages
F-40 Oracle Clusterware and RAC Administration and Deployment Guide
Cause: Netmask entered in not in standard IEEE format.
Action: Enter a valid IP netmask in IEEE format.
PRKV-1039 "IP address \"{0}\" has already been used. Enter an unused IP address."Cause: The IP address entered is already used by another node as a virtual IP address.
Action: Enter an unused IP address.
PRKV-1059: "Invalid node name \"{0}\" entered in an input argument." Cause: The IP address entered is already used by another node as a virtual IP address.
Action: Enter an unused IP address.
PRKV-1060: "Virtual IP address is not entered for node \"{0}\". Enter a valid virtual IP address."Cause:
Action: Enter a valid virtual IP address for node {0} before re-attempting the command.
PRKV-1061 "Invalid IP address \"{0}\" entered in an input argument."Cause:
Action: Enter valid IP address in place of {0} before reattempting command.
PRKV-1062 "Invalid netmask \"{0}\" entered in an invalid argument."Cause:
Action: Enter valid netmask in place of {0} before reattempting command.
PRKV-1063 "Insufficient privileges."Cause:
Action: Contact your system administrator to grant the appropriate privileges to you so that you can perform the required operations.
PRKV-1064 "Failed to obtain handle to CRS.Cause:
Action: Refer to CRS logs for detailed error information.
PRKV-1065 "Host IP address \"{0}\" cannot be used as virtual IP for the node \"{1}\". Enter a different IP address.Cause:
Action: Change IP address {0} before reattempting command.
PRKV-1066 "Host IP address \"{0}\" of cluster node \"{1}\" cannot be used as virtual IP for the node \"{2}\". Enter a different IP address."Cause:
Action: Change IP address {0} before reattempting command.
PRKV-1070: Different interface names entered as an input for each node. Specify same set of interfaces for each node in the cluster.Cause: The nodes in a cluster should use the same set of public interfaces for configuring a Virtual IP.
Action: Make sure that you have public interfaces on each node of the cluster and that their names and subnets match.

PRKV—Virtual IP Configuration Assistant Messages
Oracle Real Application Clusters Tools Messages F-41
PRKV-1072: Invalid syntax used for option \"nodevips\". Check usage (vipca -help) for proper syntax.Cause: The syntax argument value specified for option “nodevips” is invalid.
Action: Run “vipca -help” to see the syntax in which nodevips option value should be specified.
PRKV-1073: "Node names \"{0}\" are duplicated in an input argument."Cause: The node names entered an input VIPCA command line should be unique.
Action: Remove duplicate node names from VIPCA command line and rerun the command.
PRKV-1073: "Node names \"{0}\" are duplicated in an input argument."Cause: The node names that you enter as input to the VIPCA command line should be unique.
Action: Remove duplicate node names from the VIPCA command line and rerun the command.
PRKV-1074: The given interface(s), \"{0}\" is not public. Public interfaces should be used to configure virtual Ips.Cause: The interface that you have specified as input is not a public interface. The Oracle Clusterware uses public interfaces for configuring VIPs.
Action: Find a public interface on your system with a name and subnet that matches all of the nodes of the cluster and specify this interface as an argument to VIPCA.

PRKV—Virtual IP Configuration Assistant Messages
F-42 Oracle Clusterware and RAC Administration and Deployment Guide
Glossary-1
Glossary
Automatic Workload Repository (AWR)
A built-in repository that exists in every Oracle Database. At regular intervals, the Oracle Database makes a snapshot of all of its vital statistics and workload information and stores them in the AWR.
cache coherency
The synchronization of data in multiple caches so that reading a memory location through any cache will return the most recent data written to that location through any other cache. Sometimes called cache consistency.
Cache Fusion
A diskless cache coherency mechanism in Real Application Clusters that provides copies of blocks directly from a holding instance's memory cache to a requesting instance's memory cache.
cluster
A set of interconnected instances that cooperates to perform the same task.
cluster file system
A distributed file system that is a cluster of servers that collaborate to provide high performance service to their clients. Cluster file system software deals with distributing requests to storage cluster components.
cluster database
The generic term for a Real Application Clusters database.
CRSD - Oracle Clusterware Daemon
The primary Oracle Clusterware process.
Cluster Synchronization Services (CSS)
An Oracle Clusterware component that discovers and tracks the membership state of each node by providing a common view of membership across the cluster. CSS also monitors process health, specifically the health of the database instance. The Global Enqueue Service Monitor (LMON), a background process that monitors the health of the cluster database environment and registers and de-registers from CSS. See also, OCSSD.
Glossary-2
Cluster Verification Utility (CVU)
A tool that verifies a wide range of RAC-specific components such as shared storage devices, networking configurations, system requirements, Oracle Clusterware, groups, and users.
CRSD
A UNIX-based process that performs high availability recovery and management operations such as maintaining the OCR. Also manages application resources and runs as root user (or by a user in the admin group on Mac OS X-based systems) and restarts automatically upon failure.
Distributed Transaction Processing (DTP)
The paradigm of distributed transactions, including both XA-type externally coordinated transactions, and distributed-SQL-type (database links in Oracle) internally coordinated transactions.
Enterprise Manager Configuration Assistant (EMCA)
A graphical user interface-based configuration assistant that you can use to configure Enterprise Manager features.
Event Manager (EVM)
The background process that publishes Oracle Clusterware events. EVM scans the designated callout directory and runs all scripts in that directory when an event occurs.
Event Manager Daemon (EVMD)
A UNIX-based event manager daemon that starts the racgevt process to manage callouts.
Fast Application Notification (FAN)
Applications can use FAN to enable rapid failure detection, balancing of connection pools after failures, and re-balancing of connection pools when failed components are repaired. The FAN notification process uses system events that Oracle publishes when cluster servers become unreachable or if network interfaces fail.
Fast Connection Failover
Fast Connection Failover provides high availability to FAN integrated clients, such as clients that use JDBC, OCI, or ODP.NET. If you configure the client to use fast connection failover, then the client automatically subscribes to FAN events and can react to database UP and DOWN events. In response, Oracle gives the client a connection to an active instance that provides the requested database service.
General Parallel File System (GPFS)
General Parallel File System (GPFS) is a shared-disk IBM file system product that provides data access from all of the nodes in a homogenous or heterogeneous cluster.
forced disk write
In Real Application Clusters, a particular data block can only be modified by one instance at a time. If one instance modifies a data block that another instance needs, then whether a forced disk write is required depends on the type of request submitted for the block.

Glossary-3
Global Cache Service (GCS)
Process that implement Cache Fusion. It maintains the block mode for blocks in the global role. It is responsible for block transfers between instances. The Global Cache Service employs various background processes such as the Global Cache Service Processes (LMSn) and Global Enqueue Service Daemon (LMD).
Global Cache Service Processes (LMSn)
Processes that manage remote messages. RAC provides for up to 10 Global Cache Service Processes. The number of LMSn varies depending on the amount of messaging traffic among nodes in the cluster.
Global Cache Service (GCS) resources
Global resources that coordinate access to data blocks in the buffer caches of multiple RAC instances to provide cache coherency.
global database name
The full name of the database that uniquely identifies it from any other database. The global database name is of the form database_name.database_domain—for example: OP.US.ORACLE.COM
global dynamic performance views (GV$)
Dynamic performance views storing information about all open instances in a Real Application Clusters cluster. (Not only the local instance.) In contrast, standard dynamic performance views (V$) only store information about the local instance.
Global Enqueue Service (GES)
A service that coordinates enqueues that are shared globally.
Global Enqueue Service Daemon (LMD)
The resource agent process that manages requests for resources to control access to blocks. The LMD process also handles deadlock detection and remote resource requests. Remote resource requests are requests originating from another instance.
Global Enqueue Service Monitor (LMON)
The background LMON process monitors the entire cluster to manage global resources. LMON manages instance deaths and the associated recovery for any failed instance. In particular, LMON handles the part of recovery associated with global resources. LMON-provided services are also known as Cluster Group Services.
Global Services Daemon (GSD)
A component that receives requests from SRVCTL to execute administrative job tasks, such as startup or shutdown. The command is executed locally on each node, and the results are returned to SRVCTL. by default.
High Availability Cluster Multi-Processing (HACMP)
High Availability Cluster Multi-Processing is an IBM AIX-based high availability cluster software product. HACMP has two major components: high availability (HA) and cluster multi-processing (CMP).
Oracle Hardware Assisted Resilient Data (HARD)
The Oracle Hardware Assisted Resilient Data (HARD) Initiative prevents data corruptions. The HARD initiative uses Oracle data validation algorithms inside storage devices to prevent writing corrupted data to permanent storage.
Glossary-4
high availability
Systems with redundant components that provide consistent and uninterrupted service, even in the event of hardware or software failures. This involves some degree of redundancy.
instance
For a RAC database, each node within a cluster usually has one instance of the running Oracle software that references the database. When a database is started, Oracle allocates a memory area called the System Global Area (SGA) and starts one or more Oracle processes. This combination of the SGA and the Oracle processes is called an instance. Each instance has unique Oracle System Identifier (sid), instance name, rollback segments, and thread ID.
instance membership recovery
The method used by RAC guaranteeing that all cluster members are functional or active. IMR polls and arbitrates the membership. Any members that do not show a heartbeat by way of the control file or who do not respond to periodic activity inquiry messages are presumed terminated.
instance name
Represents the name of the instance and is used to uniquely identify a specific instance when clusters share common services names. The instance name is identified by the INSTANCE_NAME parameter in the instance initialization file, initsid.ora. The instance name is the same as the Oracle System Identifier (sid).
instance number
A number that associates extents of data blocks with particular instances. The instance number enables you to start up an instance and ensure that it uses the extents allocated to it for inserts and updates. This will ensure that it does not use space allocated for other instances.
interconnect
The communication link between nodes.
Logical Volume Manager (LVM)
A generic term that describes UNIX-based subsystems for online disk storage management.
Inter-Process Communication (IPC)
A high-speed operating system-dependent transport component. The IPC transfers messages between instances on different nodes. Also referred to as the interconnect.
Master Boot Record (MBR)
A program that executes when a computer starts. Typically, the MBR resides on the first sector of a local hard disk. The program begins the startup process by examining the partition table to determine which partition to use for starting the machine. The MBR program then transfers control to the boot sector of the startup partition, which continues the startup process.
Network Attached Storage (NAS)
Storage that is attached to a server by way of a network.
Glossary-5
Network Time Protocol (NTP)
An Internet standard protocol, built on top of TCP/IP, that ensures the accurate synchronization to the millisecond of the computer clock times in a network of computers.
Network Interface Card (NIC)
A card that you insert into a computer to connect the computer to a network.
node
A node is a machine on which an instance resides.
Oracle Cluster File System (OCFS)
The Oracle proprietary cluster file system software that is available for Linux and Windows-based platforms.
Oracle Cluster Registry (OCR)
The RAC configuration information repository that manages information about the cluster node list and instance-to-node mapping information. The OCR also manages information about Oracle Clusterware resource profiles for customized applications.
Object Link Manager (OLM)
The Oracle interface that maps symbolic links to logical drives and displays them in the OLM graphical user interface.
OCSSD
A UNIX-based process that manages the Cluster Synchronization Services (CSS) daemon. Manages cluster node membership and runs as oracle user; failure of this process results in cluster restart.
Oracle Interface Configuration Tool (OIFCFG)
A command-line tool for both single-instance Oracle databases and RAC databases that enables you to allocate and de-allocate network interfaces to components, direct components to use specific network interfaces, and retrieve component configuration information. The Oracle Universal Installer (OUI) also uses OIFCFG to identify and display available interfaces.
Oracle Notification Services (ONS)
A publish and subscribe service for communicating information about all FAN events.
OPROCD
A UNIX-based process monitor for a cluster. Note that this process will only appear on platforms that do not use vendor clusterware with Oracle Clusterware.
Oracle Clusterware
Oracle-provided clusterware that manages cluster database processing including node membership, group services, global resource management, and high availability functions.
Oracle Universal Installer (OUI)
A tool to install Oracle Clusterware, the Oracle relational database software, and the Oracle Real Application Clusters software. You can also use the Oracle Universal Installer to launch the Database Configuration Assistant (DBCA).
Glossary-6
raw device
A disk drive that does not yet have a file system set up. Raw devices are used for Real Application Clusters since they enable the sharing of disks. See also raw partition.
raw partition
A portion of a physical disk that is accessed at the lowest possible level. A raw partition is created when an extended partition is created and logical partitions are assigned to it without any formatting. Once formatting is complete, it is called a cooked partition. See also raw device.
Recovery Manager (RMAN)
An Oracle tool that enables you to back up, copy, restore, and recover datafiles, control files, and archived redo logs. It is included with the Oracle server and does not require separate installation. You can invoke RMAN as a command line utility from the operating system (O/S) prompt or use the GUI-based Enterprise Manager Backup Manager.
Runtime Connection Load Balancing
Connection pool load balancing enables Oracle to make intelligent service connection decisions based on the connection pool that provides the optimal service for the requested application based on current workloads. The JDBC, ODP.NET, and OCI clients are integrated with the load balancing advisory; you can use any of these three client environments to provide connection pool load balancing.
scalability
The ability to add additional nodes to Real Application Clusters applications and achieve markedly improved scale-up and speed-up.
Secure Shell (SSH)
A program for logging into a remote computer over a network. You can use SSH to execute commands on a remote machine and to move files from one machine to another. SSH uses strong authentication and secure communications over insecure channels.
Server Control (SRVCTL) Utility
Server Management (SRVM) comprises the components required to operate Oracle Enterprise Manager in Real Application Clusters. The SRVM components, such as the Intelligent Agent, Global Services Daemon, and SRVCTL, enable you to manage cluster databases running in heterogeneous environments through an open client/server architecture using Oracle Enterprise Manager.
services
Entities that you can define in RAC databases that enable you to group database workloads and route work to the optimal instances that are assigned to offer the service.
shared everything
A database architecture in which all instances share access to all of the data.
singleton services
Services that run on only one instance at any one time. By defining the Distributed Transaction Property (DTP) property of a service, you can force the service to be a singleton service.
Glossary-7
split brain syndrome
Where two or more instances attempt to control a cluster database. In a two-node environment, for example, one instance attempts to manage updates simultaneously while the other instance attempts to manage updates.
system identifier (SID)
The Oracle system identifier (SID) identifies a specific instance of the running Oracle software. For a Real Application Clusters database, each node within the cluster has an instance referencing the database.
thread
Each Oracle instance has its own set of online redo log groups. These groups are called a thread of online redo. In non-Real Application Clusters environments, each database has only one thread that belongs to the instance accessing it. In Real Application Clusters environments, each instance has a separate thread, that is, each instance has its own online redo log. Each thread has its own current log member.
thread number
The number of the redo thread to be used by an instance as specified by the THREAD initialization parameter or the THREAD clause in the ALTER DATABASE ADD LOGFILE statement. You can use any available redo thread number but an instance cannot use the same thread number as another instance.
transparent application failover (TAF)
A runtime failover for high-availability environments, such as Real Application Clusters and Oracle Real Application Clusters Guard, TAF refers to the failover and re-establishment of application-to-service connections. It enables client applications to automatically reconnect to the database if the connection fails, and optionally resume a SELECT statement that was in progress. This reconnect happens automatically from within the Oracle Call Interface (OCI) library.
voting disk
A file that manages information about node membership.

Glossary-8
Index-1
Index
Aadding nodes
quick-start, 10-2, 11-2Additional Real Application Clusters
documentation, 2-1ADDM
see Automatic Database Diagnostic Monitoradministering
services, 6-18services with SRVCTL, 6-24
administering instanceswith Server Management, 9-1
administering servicesDBCA, 6-20Enterprise Manager, 6-20PL/SQL, 6-20SRVCTL, 6-20
administrationoverview, 2-2tools, 2-2
administrative toolsoverview and concepts, 1-13
Advanced Queuingand FAN, 6-6
affinityawareness, 8-5
alert administrationEnterprise Manager, 9-5
alert blackoutsEnterprise Manager, 9-5
alert logmanaging, A-8
alert logs, A-9alerts
performance monitoring, 13-8ALTER SYSTEM ARCHIVE LOG CURRENT
statement, 9-5ALTER SYSTEM ARCHIVE LOG statement, 9-5
INSTANCE option, 9-5ALTER SYSTEM CHECKPOINT LOCAL
statement, 9-5ALTER SYSTEM CHECKPOINT statement
global versus local, 9-5specifying an instance, 9-5
ALTER SYSTEM statement
CHECKPOINT clause, 9-5ALTER SYSTEM SWITCH LOGFILE statement, 9-5architecture
of RAC, 1-5ARCHIVE LOG command, 9-6archive logs
file format and destination, 7-4file naming, 7-3
archiver processmonitor, 7-8
archiving modechanging, 7-8
archiving redo log filesidentified in control file, 4-2log sequence number, 7-4
ASMarchiving scenario, 7-5installationReal Application Clusters, introduction to, 2-3see Automatic Storage Management
asmas SRVCTL noun, E-5
Automatic Database Diagnostic Monitor, 13-4, 13-5, 13-6
automatic segment-space management, 2-7, 12-3Automatic Storage Management, 2-7, 4-1
see ASMAutomatic Storage Management (ASM), 1-5Automatic Storage Management instance, 4-3automatic undo management, 2-7Automatic Workload Repository, 2-7, 6-26, 12-2,
13-3, 13-5snapshots, 13-3
AVAILABLE instancesfor services, 6-2
Average Active Sessions chartEnterprise Manager, 13-14
AWRsee Automatic Workload Repository
Bbackground process
crsd, 1-4evmd, 1-4ocssd, 1-4
Index-2
oprocd, 1-4background processes
SMON, 5-3, 8-3background thread trace files, A-9BACKGROUND_DUMP_DEST parameter, A-9backups
server parameter file, 5-13bandwidth
interconnect, 13-1block mode conversions
statistics for, 13-2blocks
associated with instance, 8-3buffer cache, 1-6
instance recovery, 8-3buffer sizes
IPC, adjusting for Real Application Clusters, 13-1
CCache Fusion, 1-6
and e-commerce applications, 15-1function, 2-6overview, 1-15
calloutshow they are run, 6-7
CATCLUST.SQL scriptusing to create views for Real Application
Clusters, 13-2CLB_GOAL_LONG, 6-4CLB_GOAL_SHORT, 6-4client
application environments and FAN, 6-11clients
integrated for FAN events, 6-6client-side
load balancing, 6-4client-side load balancing, 6-5cloning, 1-11CLSD-1009 message
resolving, 3-8CLSD-1011 message
resolving, 3-8cluster
definition of, 1-1Cluster Database Home Page
Enterprise Manager, 9-3Cluster Database Instance page
Enterprise Manager, 9-3Cluster Database Instance Performance page
Enterprise Manager, 13-16Cluster Database Performance page
Enterprise Manager, 13-17cluster file system
archiving parameter settings, 7-6archiving scenario, 7-5overview, 2-6restore, 8-2storage in Real Application Clusters, 4-1
Cluster Home page
Enterprise Manager, 9-4Cluster Host Load Average chart
Enterprise Manager, 13-12Cluster Interconnects page
Enterprise Manager, 13-17Cluster Managed Database Services Detail Page
Enterprise Manager, 6-21Cluster Managed Database Services Page
Enterprise Manager, 6-21Cluster Manager (CSS)
log files, A-5Cluster Ready Services, 2-8Cluster Ready Services Control
see CRSCTLCluster Synchronization Service (CSS), 1-2Cluster Synchronization Services (CSS)
purpose, 1-3Cluster Verification Utility
cluster integrity verifications, A-18connectivity verifications, A-15installation requirements, A-11installation verifications, A-17known issues, A-18node comparisons and verifications, A-16nodelist shortcuts, A-12Oracle Clusterware component
verifications, A-17performing various tests with, A-14see CVUstorage verifications, A-14system requirements verifications, A-14user and permissions verifications, A-16using, A-10using online help for, A-12verbose mode, A-12
CLUSTER_INTERCONNECTSparameter, 13-2
CMAN session poolsand FAN, 6-11
committed datainstance failure, 8-3
communication protocolsverifying settings for, 13-1
configuration problemsreinitializing the OCR, 3-8
CONNECT command, 5-2, 9-6CONNECT SYS
example of, 5-4connecting
to instances, 5-2connection load balancing
concepts, 1-9introduction to, 6-1long method, 6-4short method, 6-4
connection poolsand FAN, 6-11
consistent blocks, 1-6control files
MAXLOGHISTORY, 4-2
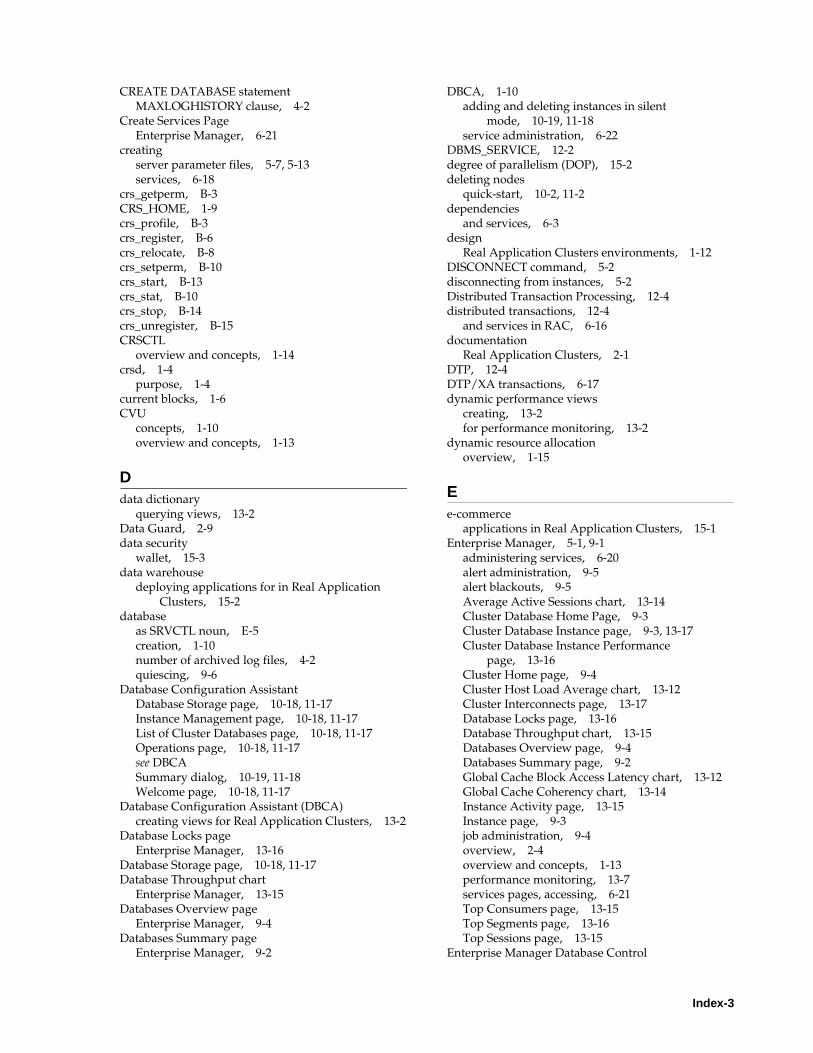
Index-3
CREATE DATABASE statementMAXLOGHISTORY clause, 4-2
Create Services PageEnterprise Manager, 6-21
creatingserver parameter files, 5-7, 5-13services, 6-18
crs_getperm, B-3CRS_HOME, 1-9crs_profile, B-3crs_register, B-6crs_relocate, B-8crs_setperm, B-10crs_start, B-13crs_stat, B-10crs_stop, B-14crs_unregister, B-15CRSCTL
overview and concepts, 1-14crsd, 1-4
purpose, 1-4current blocks, 1-6CVU
concepts, 1-10overview and concepts, 1-13
Ddata dictionary
querying views, 13-2Data Guard, 2-9data security
wallet, 15-3data warehouse
deploying applications for in Real Application Clusters, 15-2
databaseas SRVCTL noun, E-5creation, 1-10number of archived log files, 4-2quiescing, 9-6
Database Configuration AssistantDatabase Storage page, 10-18, 11-17Instance Management page, 10-18, 11-17List of Cluster Databases page, 10-18, 11-17Operations page, 10-18, 11-17see DBCASummary dialog, 10-19, 11-18Welcome page, 10-18, 11-17
Database Configuration Assistant (DBCA)creating views for Real Application Clusters, 13-2
Database Locks pageEnterprise Manager, 13-16
Database Storage page, 10-18, 11-17Database Throughput chart
Enterprise Manager, 13-15Databases Overview page
Enterprise Manager, 9-4Databases Summary page
Enterprise Manager, 9-2
DBCA, 1-10adding and deleting instances in silent
mode, 10-19, 11-18service administration, 6-22
DBMS_SERVICE, 12-2degree of parallelism (DOP), 15-2deleting nodes
quick-start, 10-2, 11-2dependencies
and services, 6-3design
Real Application Clusters environments, 1-12DISCONNECT command, 5-2disconnecting from instances, 5-2Distributed Transaction Processing, 12-4distributed transactions, 12-4
and services in RAC, 6-16documentation
Real Application Clusters, 2-1DTP, 12-4DTP/XA transactions, 6-17dynamic performance views
creating, 13-2for performance monitoring, 13-2
dynamic resource allocationoverview, 1-15
Ee-commerce
applications in Real Application Clusters, 15-1Enterprise Manager, 5-1, 9-1
administering services, 6-20alert administration, 9-5alert blackouts, 9-5Average Active Sessions chart, 13-14Cluster Database Home Page, 9-3Cluster Database Instance page, 9-3, 13-17Cluster Database Instance Performance
page, 13-16Cluster Home page, 9-4Cluster Host Load Average chart, 13-12Cluster Interconnects page, 13-17Database Locks page, 13-16Database Throughput chart, 13-15Databases Overview page, 9-4Databases Summary page, 9-2Global Cache Block Access Latency chart, 13-12Global Cache Coherency chart, 13-14Instance Activity page, 13-15Instance page, 9-3job administration, 9-4overview, 2-4overview and concepts, 1-13performance monitoring, 13-7services pages, accessing, 6-21Top Consumers page, 13-15Top Segments page, 13-16Top Sessions page, 13-15
Enterprise Manager Database Control
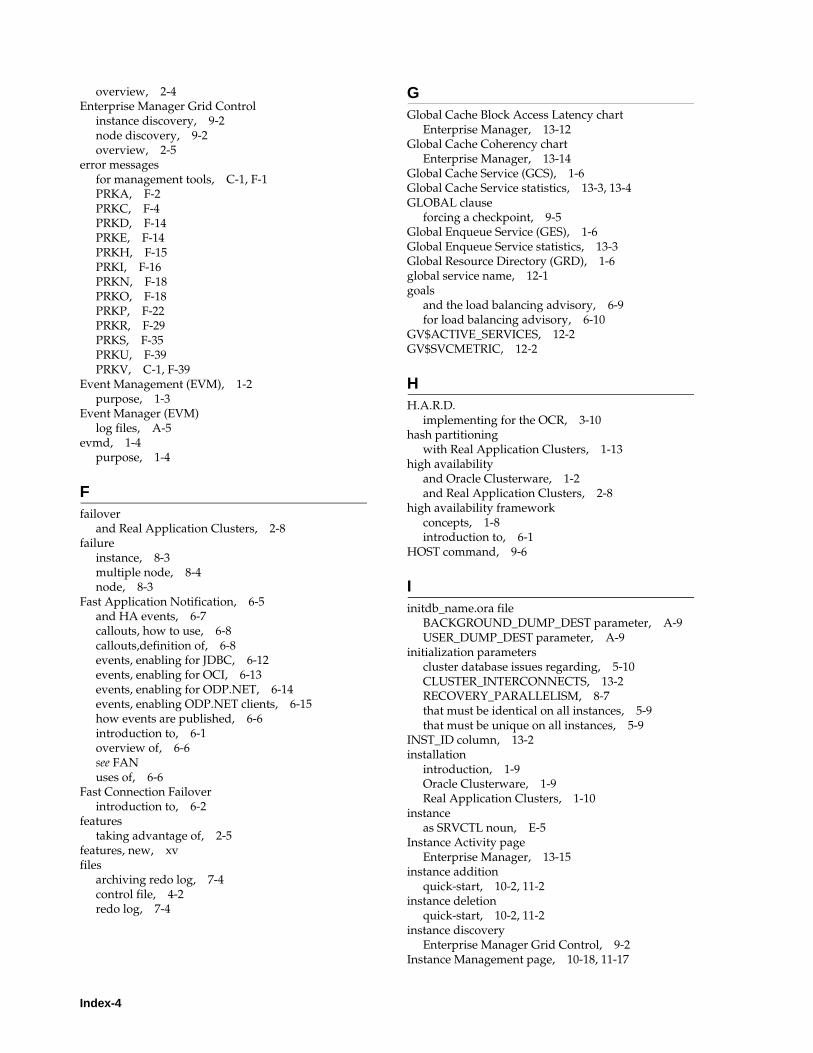
Index-4
overview, 2-4Enterprise Manager Grid Control
instance discovery, 9-2node discovery, 9-2overview, 2-5
error messagesfor management tools, C-1, F-1PRKA, F-2PRKC, F-4PRKD, F-14PRKE, F-14PRKH, F-15PRKI, F-16PRKN, F-18PRKO, F-18PRKP, F-22PRKR, F-29PRKS, F-35PRKU, F-39PRKV, C-1, F-39
Event Management (EVM), 1-2purpose, 1-3
Event Manager (EVM)log files, A-5
evmd, 1-4purpose, 1-4
Ffailover
and Real Application Clusters, 2-8failure
instance, 8-3multiple node, 8-4node, 8-3
Fast Application Notification, 6-5and HA events, 6-7callouts, how to use, 6-8callouts,definition of, 6-8events, enabling for JDBC, 6-12events, enabling for OCI, 6-13events, enabling for ODP.NET, 6-14events, enabling ODP.NET clients, 6-15how events are published, 6-6introduction to, 6-1overview of, 6-6see FANuses of, 6-6
Fast Connection Failoverintroduction to, 6-2
featurestaking advantage of, 2-5
features, new, xvfiles
archiving redo log, 7-4control file, 4-2redo log, 7-4
GGlobal Cache Block Access Latency chart
Enterprise Manager, 13-12Global Cache Coherency chart
Enterprise Manager, 13-14Global Cache Service (GCS), 1-6Global Cache Service statistics, 13-3, 13-4GLOBAL clause
forcing a checkpoint, 9-5Global Enqueue Service (GES), 1-6Global Enqueue Service statistics, 13-3Global Resource Directory (GRD), 1-6global service name, 12-1goals
and the load balancing advisory, 6-9for load balancing advisory, 6-10
GV$ACTIVE_SERVICES, 12-2GV$SVCMETRIC, 12-2
HH.A.R.D.
implementing for the OCR, 3-10hash partitioning
with Real Application Clusters, 1-13high availability
and Oracle Clusterware, 1-2and Real Application Clusters, 2-8
high availability frameworkconcepts, 1-8introduction to, 6-1
HOST command, 9-6
Iinitdb_name.ora file
BACKGROUND_DUMP_DEST parameter, A-9USER_DUMP_DEST parameter, A-9
initialization parameterscluster database issues regarding, 5-10CLUSTER_INTERCONNECTS, 13-2RECOVERY_PARALLELISM, 8-7that must be identical on all instances, 5-9that must be unique on all instances, 5-9
INST_ID column, 13-2installation
introduction, 1-9Oracle Clusterware, 1-9Real Application Clusters, 1-10
instanceas SRVCTL noun, E-5
Instance Activity pageEnterprise Manager, 13-15
instance additionquick-start, 10-2, 11-2
instance deletionquick-start, 10-2, 11-2
instance discoveryEnterprise Manager Grid Control, 9-2
Instance Management page, 10-18, 11-17
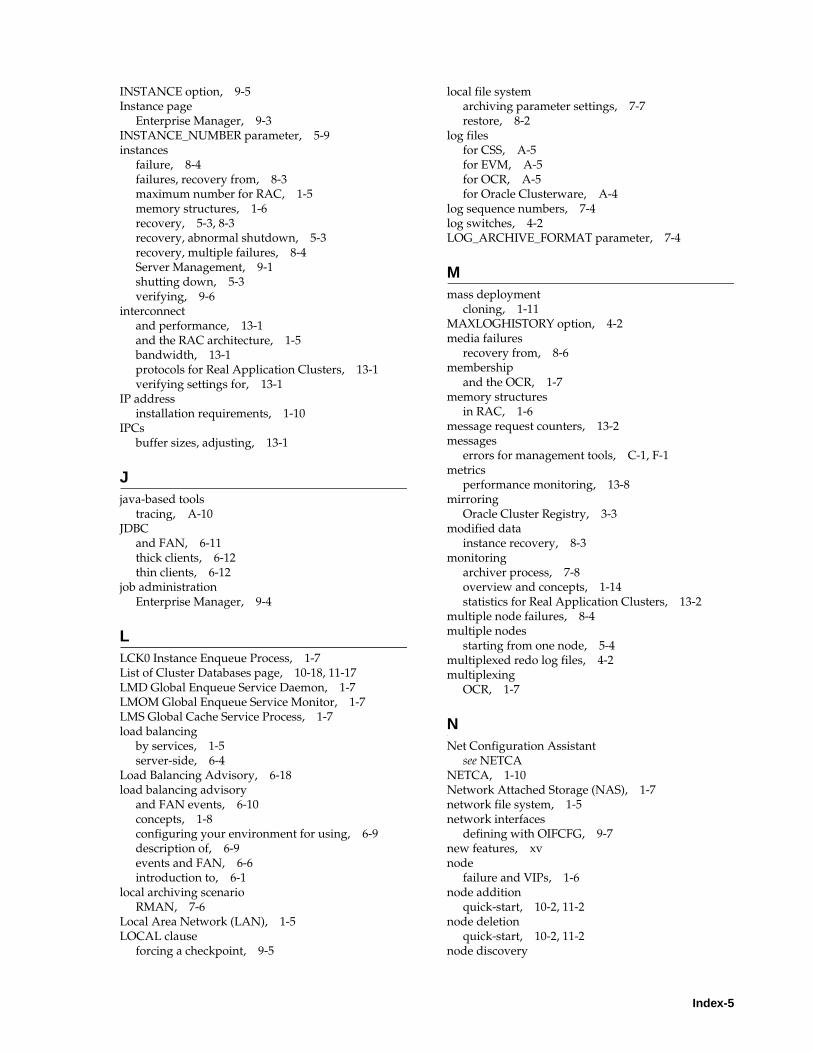
Index-5
INSTANCE option, 9-5Instance page
Enterprise Manager, 9-3INSTANCE_NUMBER parameter, 5-9instances
failure, 8-4failures, recovery from, 8-3maximum number for RAC, 1-5memory structures, 1-6recovery, 5-3, 8-3recovery, abnormal shutdown, 5-3recovery, multiple failures, 8-4Server Management, 9-1shutting down, 5-3verifying, 9-6
interconnectand performance, 13-1and the RAC architecture, 1-5bandwidth, 13-1protocols for Real Application Clusters, 13-1verifying settings for, 13-1
IP addressinstallation requirements, 1-10
IPCsbuffer sizes, adjusting, 13-1
Jjava-based tools
tracing, A-10JDBC
and FAN, 6-11thick clients, 6-12thin clients, 6-12
job administrationEnterprise Manager, 9-4
LLCK0 Instance Enqueue Process, 1-7List of Cluster Databases page, 10-18, 11-17LMD Global Enqueue Service Daemon, 1-7LMOM Global Enqueue Service Monitor, 1-7LMS Global Cache Service Process, 1-7load balancing
by services, 1-5server-side, 6-4
Load Balancing Advisory, 6-18load balancing advisory
and FAN events, 6-10concepts, 1-8configuring your environment for using, 6-9description of, 6-9events and FAN, 6-6introduction to, 6-1
local archiving scenarioRMAN, 7-6
Local Area Network (LAN), 1-5LOCAL clause
forcing a checkpoint, 9-5
local file systemarchiving parameter settings, 7-7restore, 8-2
log filesfor CSS, A-5for EVM, A-5for OCR, A-5for Oracle Clusterware, A-4
log sequence numbers, 7-4log switches, 4-2LOG_ARCHIVE_FORMAT parameter, 7-4
Mmass deployment
cloning, 1-11MAXLOGHISTORY option, 4-2media failures
recovery from, 8-6membership
and the OCR, 1-7memory structures
in RAC, 1-6message request counters, 13-2messages
errors for management tools, C-1, F-1metrics
performance monitoring, 13-8mirroring
Oracle Cluster Registry, 3-3modified data
instance recovery, 8-3monitoring
archiver process, 7-8overview and concepts, 1-14statistics for Real Application Clusters, 13-2
multiple node failures, 8-4multiple nodes
starting from one node, 5-4multiplexed redo log files, 4-2multiplexing
OCR, 1-7
NNet Configuration Assistant
see NETCANETCA, 1-10Network Attached Storage (NAS), 1-7network file system, 1-5network interfaces
defining with OIFCFG, 9-7new features, xvnode
failure and VIPs, 1-6node addition
quick-start, 10-2, 11-2node deletion
quick-start, 10-2, 11-2node discovery
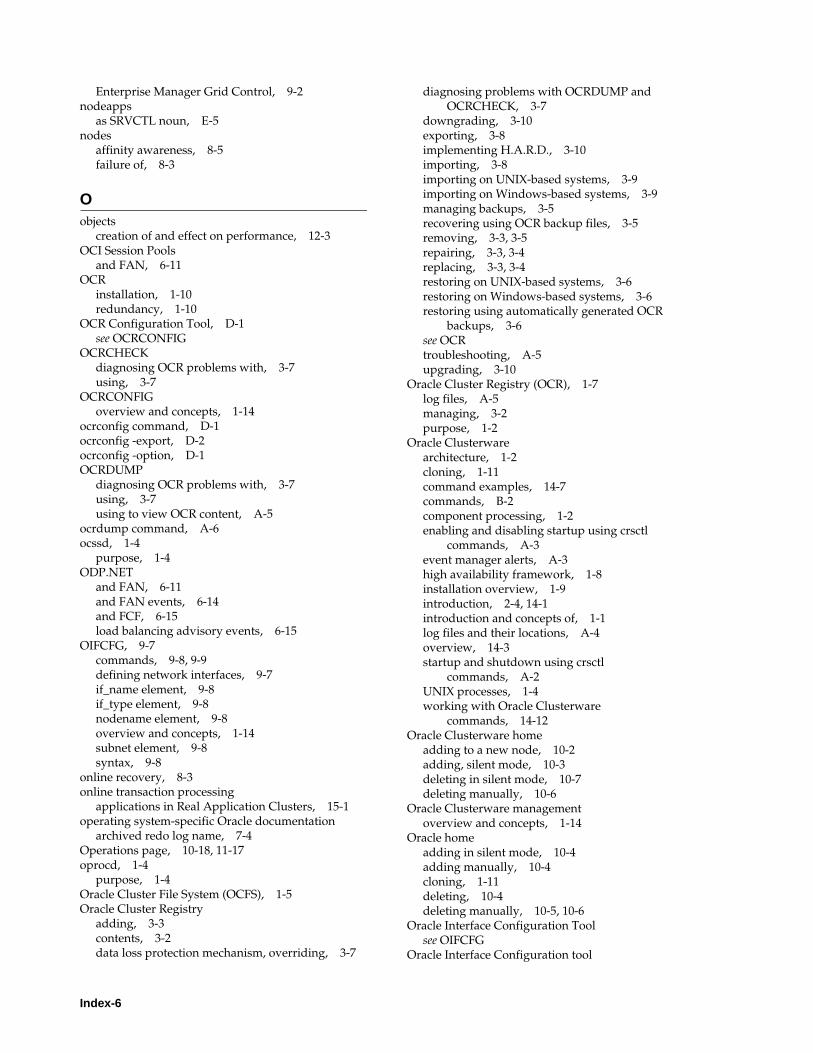
Index-6
Enterprise Manager Grid Control, 9-2nodeapps
as SRVCTL noun, E-5nodes
affinity awareness, 8-5failure of, 8-3
Oobjects
creation of and effect on performance, 12-3OCI Session Pools
and FAN, 6-11OCR
installation, 1-10redundancy, 1-10
OCR Configuration Tool, D-1see OCRCONFIG
OCRCHECKdiagnosing OCR problems with, 3-7using, 3-7
OCRCONFIGoverview and concepts, 1-14
ocrconfig command, D-1ocrconfig -export, D-2ocrconfig -option, D-1OCRDUMP
diagnosing OCR problems with, 3-7using, 3-7using to view OCR content, A-5
ocrdump command, A-6ocssd, 1-4
purpose, 1-4ODP.NET
and FAN, 6-11and FAN events, 6-14and FCF, 6-15load balancing advisory events, 6-15
OIFCFG, 9-7commands, 9-8, 9-9defining network interfaces, 9-7if_name element, 9-8if_type element, 9-8nodename element, 9-8overview and concepts, 1-14subnet element, 9-8syntax, 9-8
online recovery, 8-3online transaction processing
applications in Real Application Clusters, 15-1operating system-specific Oracle documentation
archived redo log name, 7-4Operations page, 10-18, 11-17oprocd, 1-4
purpose, 1-4Oracle Cluster File System (OCFS), 1-5Oracle Cluster Registry
adding, 3-3contents, 3-2data loss protection mechanism, overriding, 3-7
diagnosing problems with OCRDUMP and OCRCHECK, 3-7
downgrading, 3-10exporting, 3-8implementing H.A.R.D., 3-10importing, 3-8importing on UNIX-based systems, 3-9importing on Windows-based systems, 3-9managing backups, 3-5recovering using OCR backup files, 3-5removing, 3-3, 3-5repairing, 3-3, 3-4replacing, 3-3, 3-4restoring on UNIX-based systems, 3-6restoring on Windows-based systems, 3-6restoring using automatically generated OCR
backups, 3-6see OCRtroubleshooting, A-5upgrading, 3-10
Oracle Cluster Registry (OCR), 1-7log files, A-5managing, 3-2purpose, 1-2
Oracle Clusterwarearchitecture, 1-2cloning, 1-11command examples, 14-7commands, B-2component processing, 1-2enabling and disabling startup using crsctl
commands, A-3event manager alerts, A-3high availability framework, 1-8installation overview, 1-9introduction, 2-4, 14-1introduction and concepts of, 1-1log files and their locations, A-4overview, 14-3startup and shutdown using crsctl
commands, A-2UNIX processes, 1-4working with Oracle Clusterware
commands, 14-12Oracle Clusterware home
adding to a new node, 10-2adding, silent mode, 10-3deleting in silent mode, 10-7deleting manually, 10-6
Oracle Clusterware managementoverview and concepts, 1-14
Oracle homeadding in silent mode, 10-4adding manually, 10-4cloning, 1-11deleting, 10-4deleting manually, 10-5, 10-6
Oracle Interface Configuration Toolsee OIFCFG
Oracle Interface Configuration tool
Index-7
see OIFCFGOracle Net Services
and load balancing, 6-11and services, 6-3
Oracle Notification Service (ONS)purpose, 1-3
Oracle Notification ServicesAPI, 6-6
Oracle Real Application Clustersoverview of administration, 1-1, 2-1
Oracle Streams Advanced Queuingand FAN, 6-6
Oracle Universal Installersee OUI
ORACLE_HOME, 1-10ORACLE_SID parameter, 5-9OracleCRService
purpose, 1-4OracleCSService
purpose, 1-4OracleEVMService
purpose, 1-5OraFenceService
purpose, 1-5OUI
database installation, 1-10Oracle Clusterware installation, 1-9Real Application Clusters installation, 1-10
outagesplanned, 6-7unplanned, 6-7
Pparallel instance groups, 15-2parallel recovery, 8-7PARALLEL_MAX_SERVERS parameter, 8-7parallelism
in Real Application Clusters, 15-2parallel-aware query optimization, 15-2
parameter fileoverview, 5-7
parametersthat must be identical on all instances, 5-9that must be unique on all instances, 5-9
performanceprimary components affecting, 13-1
performance evaluationoverview and concepts, 1-14
performance monitoringalerts, 13-8Enterprise Manager, 13-7metrics, 13-8thresholds, 13-9
PL/SQLadministering services, 6-23
PREFERREDinstances for services, 6-2
private interconnectand Oracle Clusterware, 1-2
PRKA messages, F-2PRKC messages, F-4PRKD messages, F-14PRKE messages, F-14PRKH messages, F-15PRKI messages, F-16PRKN messages, F-18PRKO messages, F-18PRKP messages, F-22PRKR messages, F-29PRKS messages, F-35PRKU messages, F-39PRKV messages, C-1, F-39Process Monitor Daemon (OPROCD)
purpose, 1-3
Qquiesce database
in Real Application Clusters, 9-6
RRAC
cloning, 1-11software components, 1-6
RACGpurpose, 1-3
raw devices, 1-5Real Application Clusters
and e-commerce, 15-1installation overview, 1-10
RECOVER command, 9-6recovery
after SHUTDOWN ABORT, 5-3from multiple node failure, 8-4from single-node failure, 8-3instance, 5-3media failures, 8-6online, 8-3parallel, 8-7PARALLEL_MAX_SERVERS parameter, 8-7
Recovery Managersee RMAN
RECOVERY_PARALLELISM parameter, 8-7redo log files
identified in control file, 4-2instance recovery, 8-3log sequence number, 7-4using, 4-2
redo log groups, 4-2redo logs
format and destination specifications, 7-4Resource Manager
and services, 6-3resource manager, 12-2resource profiles
and service creation, 6-3attributes, 14-4
resources
Index-8
releasing, 8-3restore scenarios
RMAN, 8-1restore scheme
cluster file system, 8-2local file system, 8-2
RMANin Real Application Clusters, 2-9local archiving scenario, 7-6overviewrestore scenarios, 8-1
rolling backinstance recovery, 8-3
Runtime Connection Load Balancing, 6-3runtime connection load balancing
introduction to, 6-2
Sscalability
adding nodes and instances, 10-8, 11-7, 11-8adding nodes and instances, quick-start
format, 10-2, 11-2security
wallet, 15-3sequence numbers
with Real Application Clusters, 1-13sequences
log sequence number, 7-4Server Control
see SRVCTLServer Control Utility (SRVCTL), 1-7Server Management
administration of instances, 9-1server parameter file, 2-7
backing up, 5-13setting values in, 5-7
server parameter filescreating, 5-7, 5-13
serviceas SRVCTL noun, E-5dependencies, 6-3DTP property, 6-16levels, 6-27
SERVICE TIMEload balancing advisory goal, 6-10
SERVICE_NAMESparameter, 6-23
services, 2-7, 12-1administering, 6-18administering with DBCA, 6-20administering with Enterprise Manager, 6-20administering with PL/SQL, 6-20administering with SRVCTL, 6-20, 6-24and distributed transactions, 6-16basic concepts about, 6-2concepts, 1-9configurations for, 12-1configuring workload management
characteristics, 6-18
default, 6-4introduction to, 1-5, 6-1names, limitations for, 6-23using, 6-2
sessionsmultiple, 5-2
setting instances, 5-2shared everything, 1-5SHOW INSTANCE command, 9-6SHOW PARAMETER command, 9-6SHOW PARAMETERS command, 9-6SHOW SGA command, 9-6SHUTDOWN ABORT command, 5-3SHUTDOWN command, 9-6
ABORT option, 5-3SHUTDOWN TRANSACTIONAL, 5-3shutting down
instances, 5-3shutting down an instance
abnormal shutdown, 5-3shutting down instances, 5-3sidalrt.log file, A-9siddbwr.trc file, A-9sidsmon.trc file, A-9single system image, 1-6single-instance Oracle databases
how they differ from RAC, 1-5singleton services, 6-17SMON process
instance recovery, 8-3, 8-4recovery after SHUTDOWN ABORT, 5-3
snapshot control file, 7-1SPFILE
restore with Enterprise Manager, 8-2restore with RMAN, 8-2
split brain syndrome, 1-2SQL statements
instance-specific, 9-5SQL*Plus, 5-2, 9-5SRVCTL
add asm command, E-8add database command, E-5add instance command, E-6add nodeapps command, E-7add service command, E-7add, usage description, E-5administering services with, 6-24cluster database configuration tasks, E-2cluster database tasks, E-3concurrent commands, E-2config asm command, E-10config database command, E-8config nodeapps command, E-9config service command, E-9config, usage description, E-8disable asm command, E-14disable database command, E-13disable instance command, E-13disable service command, 6-25, E-13disable, usage description, E-12
Index-9
enable asm command, E-12enable database command, E-11enable instance command, E-11enable service command, 6-25, E-12enable, usage description, E-10getenv database command, E-28getenv instance command, E-28getenv nodeapps command, E-29getenv service command, E-28getenv, usage description, E-27modify database command, E-21modify instance command, E-21modify nodeapps command, E-24modify service command, E-23modify, usage description, E-20node-level tasks, E-3overview, 5-3overview and concepts, 1-14relocate service command, E-25relocate, usage description, E-24remove asm command, E-35remove database command, E-33remove instance command, E-34remove nodeapps command, E-34remove service command, E-34remove, usage description, E-33setenv database command, E-30setenv instance command, E-30setenv nodeapps command, E-31setenv service command, E-30setenv, usage description, E-29start asm command, E-17start database command, 5-6, E-15start instance command, 5-5, E-15start listener command, E-17start nodeapps command, E-16start service command, 6-25, E-16start, usage description, E-14status asm command, E-27status database command, E-25status instance command, E-26status nodeapps command, E-27status service command, 6-25, E-26status, usage description, E-25stop asm command, E-20stop database command, 5-6, E-18stop instance command, 5-5, E-18stop listener command, E-20stop nodeapps command, E-20stop service command, E-19stop, usage description, E-17unsetenv database command, E-31unsetenv instance command, E-31unsetenv nodeapps command, E-32unsetenv service command, E-32unsetenv, usage description, E-29
Standard EditionASM
standby databases, 2-9STARTUP command, 9-6
statisticscontents of, 13-2monitoring for Real Application Clusters, 13-2
Statspack, 13-3storage, 2-7
basic RAC requirements for, 1-5Real Application Clusters, introduction to, 2-3
storagecluster file system, 4-1
Summary dialog, 10-19, 11-18SYSAUX tablespace, 12-3SYSDBA
privilege for connecting, 5-2SYSOPER privilege
for connecting, 5-2system change, 7-4System Global Area (SGA), 1-6
size requirements, 1-6
TTCP/IP, 1-5THREAD parameter, 5-13thresholds
performance monitoring, 13-9services, 6-27
THROUGHPUTload balancing advisory goal, 6-10
timed statistics, 13-2timeout
messages, avoiding, 1-6Top Consumers page
Enterprise Manager, 13-15Top Segments page
Enterprise Manager, 13-16Top Sessions page
Enterprise Manager, 13-15trace files, A-9
background thread trace files, A-9managing, A-8sidalrt.log, A-9siddbwr.trc file, A-9sidsmon.trc file, A-9
tracingenabling for RAC high availability, A-8java-based tools, A-10
transactionsinstance failure, 8-3rolling back, 8-3waiting for recovery, 8-3
Transparent Application Failoverand services, 6-5
Transparent Database Encryption, 15-3troubleshooting, A-9tuning
overview, 1-15
Index-10
UUNDO_TABLESPACE parameter, 5-9unified log directory structure, A-4User Datagram Protocol (UDP)
and the private interconnect, 1-2user trace files, A-9USER_DUMP_DEST parameter, A-9
VV$ACTIVE_INSTANCES, 9-6V$ACTIVE_SERVICES, 12-2V$SERVICEMETRIC_HISTORY, 12-2V$SESSION, 12-2V$SQL, 12-2vendor clusterware, 1-1verification
datafiles, online files, 4-2views
creating for Real Application Clusters, 13-2for performance monitoring, 13-2
VIP addresses, 1-5configuring, 1-6
virtual host name, 1-6virtual IP address, 1-10volume manager
alternate storage method for RAC, 1-5Voting Disk, 1-7voting disk
administering, 3-1backing up, 3-1dynamically adding, 3-2installation, 1-10purpose, 1-2recovering, 3-2redundancy, 1-10
voting disksmultiple, 1-7redundancy, 1-7
Wwait events, 13-3wallet
data security, 15-3Welcome page, 10-18, 11-17Workload Management
concepts, 1-8workload management, 12-1
basic concepts about, 6-2introduction to, 6-1manual re-balancing, 12-2
workloadsand services, 6-2
XXA transactions, 12-4