oracle database oracle clusterware administration and ... · oracle® clusterware administration...
TRANSCRIPT

Oracle® ClusterwareAdministration and Deployment Guide
11g Release 2 (11.2)
E10717-05
October 2009

Oracle Clusterware Administration and Deployment Guide, 11g Release 2 (11.2)
E10717-05
Copyright © 2007, 2009, Oracle and/or its affiliates. All rights reserved.
Primary Author: Richard Strohm
Contributing Authors: Ahmed Abbas, Ram Avudaiappan, Mark Bauer, Eric Belden, Gajanan Bhat, Jonathan Creighton, Mark Fuller, John Grout, Andrey Gusev, Winston Huang, Sameer Joshi, Sana Karam, Roland Knapp, Erich Kreisler, Raj Kumar, Karen Li, Barb Lundhild, Bill Manry, Saar Maoz, Markus Michalewicz, Anil Nair, Philip Newlan, Kevin Reardon, Dipak Saggi, Viv Schupmann, K.P. Singh, Duane Smith, Janet Stern, Su Tang, Juan Tellez, Douglas Williams
This software and related documentation are provided under a license agreement containing restrictions on use and disclosure and are protected by intellectual property laws. Except as expressly permitted in your license agreement or allowed by law, you may not use, copy, reproduce, translate, broadcast, modify, license, transmit, distribute, exhibit, perform, publish, or display any part, in any form, or by any means. Reverse engineering, disassembly, or decompilation of this software, unless required by law for interoperability, is prohibited.
The information contained herein is subject to change without notice and is not warranted to be error-free. If you find any errors, please report them to us in writing.
If this software or related documentation is delivered to the U.S. Government or anyone licensing it on behalf of the U.S. Government, the following notice is applicable:
U.S. GOVERNMENT RIGHTS Programs, software, databases, and related documentation and technical data delivered to U.S. Government customers are "commercial computer software" or "commercial technical data" pursuant to the applicable Federal Acquisition Regulation and agency-specific supplemental regulations. As such, the use, duplication, disclosure, modification, and adaptation shall be subject to the restrictions and license terms set forth in the applicable Government contract, and, to the extent applicable by the terms of the Government contract, the additional rights set forth in FAR 52.227-19, Commercial Computer Software License (December 2007). Oracle USA, Inc., 500 Oracle Parkway, Redwood City, CA 94065.
This software is developed for general use in a variety of information management applications. It is not developed or intended for use in any inherently dangerous applications, including applications which may create a risk of personal injury. If you use this software in dangerous applications, then you shall be responsible to take all appropriate fail-safe, backup, redundancy, and other measures to ensure the safe use of this software. Oracle Corporation and its affiliates disclaim any liability for any damages caused by use of this software in dangerous applications.
Oracle is a registered trademark of Oracle Corporation and/or its affiliates. Other names may be trademarks of their respective owners.
This software and documentation may provide access to or information on content, products, and services from third parties. Oracle Corporation and its affiliates are not responsible for and expressly disclaim all warranties of any kind with respect to third-party content, products, and services. Oracle Corporation and its affiliates will not be responsible for any loss, costs, or damages incurred due to your access to or use of third-party content, products, or services.
iii
Contents
Preface ................................................................................................................................................................. xi
Audience....................................................................................................................................................... xiDocumentation Accessibility ..................................................................................................................... xiRelated Documents .................................................................................................................................... xiiConventions ............................................................................................................................................... xiii
What’s New in Oracle Clusterware Administration and Deployment?..................... xv
1 Introduction to Oracle Clusterware
What is Oracle Clusterware? .................................................................................................................. 1-1Oracle Clusterware Hardware Concepts and Requirements ...................................................... 1-3Oracle Clusterware Operating System Concepts and Requirements......................................... 1-4Oracle Clusterware Software Concepts and Requirements......................................................... 1-4Oracle Clusterware Network Configuration Concepts ................................................................ 1-5
Implementing GNS .................................................................................................................... 1-6Single Client Access Name (SCAN) ......................................................................................... 1-6Configuring Addresses Manually ........................................................................................... 1-6
Upgrading Oracle Clusterware........................................................................................................ 1-7Overview of Oracle Clusterware Platform-Specific Software Components ................................ 1-7
The Oracle Clusterware Stack .......................................................................................................... 1-7The Cluster Ready Services Stack............................................................................................. 1-8The Oracle High Availability Services Stack .......................................................................... 1-8
Overview of Installing Oracle Clusterware ..................................................................................... 1-10Oracle Clusterware Version Compatibility ................................................................................. 1-10
Overview of Managing Oracle Clusterware Environments ......................................................... 1-12Overview of Cloning and Extending Oracle Clusterware in Grid Environments .................. 1-13Overview of the Oracle Clusterware High Availability Framework and APIs ........................ 1-14
2 Administering Oracle Clusterware
Cluster Time Management ..................................................................................................................... 2-1Configuration and Installation for IPMI Node Fencing................................................................... 2-2
About Using IPMI for Node Fencing .............................................................................................. 2-2About Node-termination Escalation with IPMI ............................................................................ 2-2Configuring Server Hardware for IPMI ......................................................................................... 2-2
Network Requirements for IPMI.............................................................................................. 2-3

iv
IPMI Driver .................................................................................................................................. 2-3About BMC Configuration ........................................................................................................ 2-4BMC Configuration Example Using ipmitool on Linux ....................................................... 2-5BMC Configuration Example Using ipmiutil on Windows 2003 R2................................... 2-7
Postinstallation Configuration of IPMI-based Failure Isolation Using crsctl............................ 2-8IPMI Postinstallation Registration with Oracle Clusterware ............................................... 2-9Modifying Configurations with IPMI Postinstallation Configuration Utility ................... 2-9
Policy-Based Cluster and Capacity Management ........................................................................... 2-10Overview of Server Pools and Policy-based Management ....................................................... 2-10Server Attributes Assigned by Oracle Clusterware ................................................................... 2-11Understanding Server Pools.......................................................................................................... 2-13
How Server Pools Work.......................................................................................................... 2-13The Free Server Pool................................................................................................................ 2-14The Generic Server Pool.......................................................................................................... 2-14How Oracle Clusterware Assigns Servers to Server Pools................................................ 2-15Servers Moving from Server Pool to Server Pool................................................................ 2-15
How Oracle Clusterware Assigns New Servers ......................................................................... 2-17Role-separated Management............................................................................................................... 2-18
About Role-separated Management............................................................................................. 2-18Managing Cluster Administrators in the Cluster....................................................................... 2-19Configuring Horizontal Role Separation..................................................................................... 2-19
Voting Disk, Oracle Cluster Registry, and Oracle Local Registry ............................................... 2-21About Voting Disks, Oracle Cluster Registry, and Oracle Local Registry.............................. 2-21Managing Voting Disks.................................................................................................................. 2-21
Storing Voting Disks on Oracle ASM.................................................................................... 2-22Backing Up Voting Disks........................................................................................................ 2-23Restoring Voting Disks ........................................................................................................... 2-23Adding, Deleting, or Migrating Voting Disks ..................................................................... 2-24
Managing the Oracle Cluster Registry and Oracle Local Registries........................................ 2-25Migrating Oracle Cluster Registry to Oracle Automatic Storage Management ............. 2-26Adding, Replacing, Repairing, and Removing Oracle Cluster Registry Locations ....... 2-28Backing Up Oracle Cluster Registry...................................................................................... 2-33Restoring Oracle Cluster Registry ......................................................................................... 2-34Diagnosing Oracle Cluster Registry Problems .................................................................... 2-38Administering Oracle Cluster Registry with Oracle Cluster Registry Export and Import Commands 2-38Oracle Local Registry............................................................................................................... 2-41Upgrading and Downgrading the Oracle Cluster Registry Configuration .................... 2-42
Troubleshooting Oracle Cluster Registry and Diagnostic Output .......................................... 2-42Troubleshooting Oracle Cluster Registry............................................................................. 2-42Using the OCRCHECK Utility ............................................................................................... 2-43Using the OCRDUMP Utility to View Oracle Cluster Registry Content......................... 2-44Diagnostic Output for OCRCONFIG.................................................................................... 2-46
Changing Network Addresses on Manually Configured Networks .......................................... 2-46Understanding When You Must Configure Network Addresses ........................................... 2-46Understanding SCAN Addresses and Client Service Connections......................................... 2-46Changing the Virtual IP Addresses .............................................................................................. 2-47Changing Oracle Clusterware Private Network Configuration .............................................. 2-49
v
About Private Networks, Network Interfaces, and Network Adapters.......................... 2-49Consequences of Changing Interface Names Using OIFCFG........................................... 2-49Changing or Deleting a Network Interface From a Cluster Configuration File............. 2-50Changing the Network Adapter for the Interconnect ........................................................ 2-51
3 Cloning Oracle Clusterware to Create a Cluster
Introduction to Cloning Oracle Clusterware ...................................................................................... 3-1Preparing the Oracle Grid Infrastructure Home for Cloning.......................................................... 3-3
Step 1: Install Oracle Clusterware.................................................................................................... 3-3Step 2: Shut Down Running Software............................................................................................. 3-3Step 3: Create a Copy of the Oracle Grid Infrastructure Home .................................................. 3-3
Creating a Cluster by Cloning Oracle Clusterware ........................................................................... 3-5Step 1: Prepare the New Cluster Nodes.......................................................................................... 3-5Step 2: Deploy Oracle Clusterware on the Destination Nodes.................................................... 3-6Step 3: Run the clone.pl Script on Each Destination Node .......................................................... 3-7
Supplying input to the clone.pl script on the command line ............................................... 3-7Supplying Input to the clone.pl Script in a File ..................................................................... 3-8
Step 4: Prepare the crsconfig_params File on All Nodes ............................................................ 3-9Step 5: Run the orainstRoot.sh Script on Each Node ................................................................ 3-11Step 6: Run the GRID_HOME/root.sh and rootcrs.pl Scripts ................................................. 3-11Step 7: Run the Configuration Assistants and the Oracle Cluster Verification Utility ......... 3-12
Locating and Viewing Log Files Generated During Cloning ...................................................... 3-13
4 Adding and Deleting Cluster Nodes
Prerequisite Steps for Adding Cluster Nodes .................................................................................... 4-1Adding and Deleting Cluster Nodes on Linux and UNIX Systems ............................................... 4-3
Adding a Cluster Node on Linux and UNIX Systems.................................................................. 4-3Deleting a Cluster Node on Linux and UNIX Systems ................................................................ 4-4
5 Making Applications Highly Available Using Oracle Clusterware
Oracle Clusterware Resources and Agents ......................................................................................... 5-1Resources............................................................................................................................................. 5-2Resource Type..................................................................................................................................... 5-3Agents .................................................................................................................................................. 5-3Building an Agent .............................................................................................................................. 5-6Registering a Resource in Oracle Clusterware............................................................................... 5-6
Overview of Using Oracle Clusterware to Enable High Availability............................................ 5-7Resource Attributes............................................................................................................................ 5-8Resource State..................................................................................................................................... 5-8Resource Dependencies..................................................................................................................... 5-9
Start Dependencies .................................................................................................................. 5-10Stop Dependencies................................................................................................................... 5-13
Resource Placement ........................................................................................................................ 5-14Registering an Application as a Resource ........................................................................................ 5-15
Creating an Application VIP Managed by Oracle Clusterware............................................... 5-15Adding User-defined Resources ................................................................................................... 5-18
vi
Adding a Resource to a Top Level Server Pool ................................................................... 5-19Adding a Resource Using a Server-specific Deployment .................................................. 5-19
Adding Resources Using Oracle Enterprise Manager............................................................... 5-20Changing Resource Permissions................................................................................................... 5-21Application Placement Policies..................................................................................................... 5-21Unregistering Applications and Application Resources........................................................... 5-22
Using Oracle Clusterware Commands .............................................................................................. 5-22Registering Application Resources............................................................................................... 5-22Starting Application Resources..................................................................................................... 5-23Starting an Application on an Unavailable Server..................................................................... 5-23Relocating Applications and Application Resources................................................................. 5-23Stopping Applications and Application Resources ................................................................... 5-24Displaying Clusterware Application and Application Resource Status Information .......... 5-24
Managing Automatic Oracle Clusterware Resource Operations................................................. 5-24Preventing Automatic Restarts ..................................................................................................... 5-25Automatically Manage Restart Attempts Counter for Resources............................................ 5-25
A Cluster Verification Utility Reference
About Cluster Verification Utility ....................................................................................................... A-2Overview ............................................................................................................................................ A-3Operational Notes ............................................................................................................................. A-5Special Topics .................................................................................................................................... A-8
Cluster Verification Utility Command Reference........................................................................... A-11cluvfy comp acfs.............................................................................................................................. A-12cluvfy comp admprv ...................................................................................................................... A-13cluvfy comp asm ............................................................................................................................. A-15cluvfy comp cfs................................................................................................................................ A-16cluvfy comp clocksync ................................................................................................................... A-17cluvfy comp clu ............................................................................................................................... A-18cluvfy comp clumgr........................................................................................................................ A-19cluvfy comp crs................................................................................................................................ A-20cluvfy comp gns .............................................................................................................................. A-21cluvfy comp gpnp ........................................................................................................................... A-22cluvfy comp ha ................................................................................................................................ A-23cluvfy comp nodeapp..................................................................................................................... A-24cluvfy comp nodecon ..................................................................................................................... A-25cluvfy comp nodereach .................................................................................................................. A-27cluvfy comp ocr ............................................................................................................................... A-28cluvfy comp ohasd.......................................................................................................................... A-29cluvfy comp olr................................................................................................................................ A-30cluvfy comp peer............................................................................................................................. A-31cluvfy comp scan............................................................................................................................. A-32cluvfy comp software ..................................................................................................................... A-33cluvfy comp space........................................................................................................................... A-34cluvfy comp ssa ............................................................................................................................... A-35cluvfy comp sys ............................................................................................................................... A-37cluvfy comp vdisk........................................................................................................................... A-38

vii
cluvfy stage [-pre | -post] cfs ........................................................................................................ A-39cluvfy stage [-pre | -post] crsinst.................................................................................................. A-40cluvfy stage -pre dbcfg ................................................................................................................... A-41cluvfy stage -pre dbinst .................................................................................................................. A-42cluvfy stage [-pre | -post] hacfg ................................................................................................... A-43cluvfy stage -post hwos.................................................................................................................. A-44cluvfy stage [-pre | -post] nodeadd ............................................................................................. A-45cluvfy stage -post nodedel ............................................................................................................. A-46cluvfy stage [-pre | -post] acfscfg ................................................................................................. A-47
Troubleshooting and Diagnostic Output for CVU ......................................................................... A-48Enabling Tracing ............................................................................................................................. A-49Known Issues for the Cluster Verification Utility ...................................................................... A-50
Database Versions Supported by Cluster Verification Utility .......................................... A-50Linux Shared Storage Accessibility (ssa) Check Reports Limitations.............................. A-50Shared Disk Discovery on Red Hat Linux ........................................................................... A-50
B Oracle Clusterware Resource Reference
Resource Attributes................................................................................................................................. B-2Configurable Resource Attributes .................................................................................................. B-3
ACL .............................................................................................................................................. B-3ACTION_SCRIPT ...................................................................................................................... B-4ACTIVE_PLACEMENT ............................................................................................................ B-4AGENT_FILENAME................................................................................................................. B-4AUTO_START............................................................................................................................ B-5CARDINALITY .......................................................................................................................... B-5CHECK_INTERVAL ................................................................................................................. B-5DEGREE ...................................................................................................................................... B-5DESCRIPTION ........................................................................................................................... B-5ENABLED ................................................................................................................................... B-5FAILURE_INTERVAL .............................................................................................................. B-6FAILURE_THRESHOLD .......................................................................................................... B-6HOSTING_MEMBERS .............................................................................................................. B-6LOAD........................................................................................................................................... B-6NAME.......................................................................................................................................... B-7OFFLINE_CHECK_INTERVAL .............................................................................................. B-7PLACEMENT ............................................................................................................................. B-7RESTART_ATTEMPTS ............................................................................................................. B-7SCRIPT_TIMEOUT.................................................................................................................... B-8SERVER_POOLS ........................................................................................................................ B-8START_DEPENDENCIES ........................................................................................................ B-8START_TIMEOUT................................................................................................................... B-10STOP_DEPENDENCIES ......................................................................................................... B-11STOP_TIMEOUT...................................................................................................................... B-11TYPE .......................................................................................................................................... B-12UPTIME_THRESHOLD.......................................................................................................... B-12
Read-Only Resource Attributes .................................................................................................... B-13ACTION_FAILURE_EVENT_TEMPLATE.......................................................................... B-13
viii
LAST_SERVER ......................................................................................................................... B-13PROFILE_CHANGE_EVENT_TEMPLATE......................................................................... B-13RESTART_COUNT.................................................................................................................. B-13STATE_CHANGE_EVENT_TEMPLATE............................................................................. B-13STATE_DETAILS..................................................................................................................... B-13TARGET .................................................................................................................................... B-14
Third-Party Applications Using the Script Agent .......................................................................... B-15
C OLSNODES Command Reference
Using OLSNODES .................................................................................................................................. C-2Overview ............................................................................................................................................ C-3Operational Notes ............................................................................................................................. C-4
Summary of the OLSNODES Command ........................................................................................... C-5
D Oracle Interface Configuration Tool (OIFCFG) Command Reference
Starting the OIFCFG Command-Line Interface ................................................................................ D-2Summary of the OIFCFG Usage ........................................................................................................... D-3
E CRSCTL Utility Reference
CRSCTL Overview.................................................................................................................................. E-2Clusterized (Cluster Aware) Commands ...................................................................................... E-3Operational Notes ............................................................................................................................. E-4Deprecated Subprograms or Commands ...................................................................................... E-5
CRSCTL Command Reference ............................................................................................................. E-6Dual Environment CRSCTL Commands....................................................................................... E-7
crsctl add resource ..................................................................................................................... E-7crsctl add type .......................................................................................................................... E-10crsctl check css .......................................................................................................................... E-11crsctl delete resource ............................................................................................................... E-11crsctl delete type....................................................................................................................... E-12crsctl get hostname .................................................................................................................. E-12crsctl getperm resource ........................................................................................................... E-12crsctl getperm type .................................................................................................................. E-13crsctl modify resource ............................................................................................................. E-14crsctl modify type .................................................................................................................... E-16crsctl setperm resource............................................................................................................ E-17crsctl setperm type ................................................................................................................... E-18crsctl start resource .................................................................................................................. E-19crsctl status resource................................................................................................................ E-21crsctl status type....................................................................................................................... E-22crsctl stop resource................................................................................................................... E-23
Oracle RAC Environment CRSCTL Commands ........................................................................ E-25crsctl add crs administrator .................................................................................................... E-26crsctl add css votedisk ............................................................................................................. E-27crsctl add serverpool ............................................................................................................... E-27crsctl check cluster ................................................................................................................... E-29

ix
crsctl check crs .......................................................................................................................... E-30crsctl check resource ................................................................................................................ E-30crsctl check ctss......................................................................................................................... E-31crsctl config crs ......................................................................................................................... E-31crsctl delete crs administrator ................................................................................................ E-31crsctl delete css votedisk ......................................................................................................... E-32crsctl delete node...................................................................................................................... E-33crsctl delete serverpool............................................................................................................ E-33crsctl disable crs........................................................................................................................ E-34crsctl enable crs......................................................................................................................... E-34crsctl get css............................................................................................................................... E-34crsctl get css ipmiaddr............................................................................................................. E-35crsctl get nodename ................................................................................................................. E-35crsctl getperm serverpool ....................................................................................................... E-35crsctl lsmodules ........................................................................................................................ E-36crsctl modify serverpool ......................................................................................................... E-37crsctl pin css .............................................................................................................................. E-38crsctl query crs administrator ................................................................................................ E-38crsctl query crs activeversion ................................................................................................. E-38crsctl query crs releaseversion ............................................................................................... E-39crsctl query crs softwareversion ............................................................................................ E-39crsctl query css ipmidevice..................................................................................................... E-39crsctl query css votedisk ......................................................................................................... E-40crsctl relocate resource ............................................................................................................ E-40crsctl relocate server ................................................................................................................ E-42crsctl replace discoverystring................................................................................................. E-42crsctl replace votedisk ............................................................................................................. E-43crsctl set css ............................................................................................................................... E-44crsctl set css ipmiaddr ............................................................................................................. E-44crsctl set css ipmiadmin .......................................................................................................... E-45crsctl setperm serverpool ........................................................................................................ E-45crsctl start cluster ..................................................................................................................... E-46crsctl start crs ............................................................................................................................ E-47crsctl status server.................................................................................................................... E-47crsctl status serverpool............................................................................................................ E-48crsctl stop cluster...................................................................................................................... E-50crsctl stop crs............................................................................................................................. E-50crsctl unpin css ......................................................................................................................... E-50crsctl unset css .......................................................................................................................... E-51
Oracle Restart Environment CRSCTL Commands .................................................................... E-52crsctl check has ......................................................................................................................... E-52crsctl config has ........................................................................................................................ E-52crsctl disable has....................................................................................................................... E-53crsctl enable has........................................................................................................................ E-53crsctl query has releaseversion .............................................................................................. E-53crsctl query has softwareversion ........................................................................................... E-54crsctl start has ........................................................................................................................... E-54
x
crsctl stop has............................................................................................................................ E-54Troubleshooting and Diagnostic Output.......................................................................................... E-56
Dynamic Debugging....................................................................................................................... E-57crsctl set log............................................................................................................................... E-57crsctl set trace............................................................................................................................ E-57
Component Level Debugging ....................................................................................................... E-59Enabling Debugging for CRS, CSS, and EVM Modules..................................................... E-59Creating an Initialization File to Contain the Debugging Level ....................................... E-62
Enabling Additional Tracing for Oracle Clusterware High Availability................................ E-63Enabling Debugging for Oracle Clusterware Resources.................................................... E-63
F Oracle Clusterware C Application Program Interfaces
About the Programming Interface (C API) to Oracle Clusterware................................................ F-2Interactive CLSCRS APIs ...................................................................................................................... F-8Non-Interactive CLSCRS APIs ............................................................................................................. F-9
G Oracle Cluster Registry Configuration Utility Reference
About OCRCONFIG............................................................................................................................... G-2OCRCONFIG Command Reference.................................................................................................... G-3
H Troubleshooting Oracle Clusterware
Monitoring Oracle Clusterware............................................................................................................ H-1Clusterware Log Files and the Unified Log Directory Structure ................................................... H-3Diagnostics Collection Script................................................................................................................ H-4Oracle Clusterware Alerts...................................................................................................................... H-4
Alert Messages Using Diagnostic Record Unique IDs ............................................................... H-4
Glossary
Index
xi
Preface
The Oracle Clusterware Administration and Deployment Guide describes the Oracle Clusterware architecture and provides an overview of this product. This book also describes administrative and deployment topics for Oracle Clusterware.
Information in this manual applies to Oracle Clusterware as it runs on all platforms unless otherwise noted. In addition, the content of this manual supplements administrative and deployment topics for Oracle single-instance databases that appear in other Oracle documentation. Where necessary, this manual refers to platform-specific documentation. This Preface contains these topics:
■ Audience
■ Documentation Accessibility
■ Related Documents
■ Conventions
AudienceThe Oracle Clusterware Administration and Deployment Guide is intended for database administrators, network administrators, and system administrators who perform the following tasks:
■ Install and configure Oracle Real Application Clusters (Oracle RAC) databases
■ Administer and manage Oracle RAC databases
■ Manage and troubleshoot clusters and networks that use Oracle RAC
Documentation AccessibilityOur goal is to make Oracle products, services, and supporting documentation accessible to all users, including users that are disabled. To that end, our documentation includes features that make information available to users of assistive technology. This documentation is available in HTML format, and contains markup to facilitate access by the disabled community. Accessibility standards will continue to evolve over time, and Oracle is actively engaged with other market-leading technology vendors to address technical obstacles so that our documentation can be accessible to all of our customers. For more information, visit the Oracle Accessibility Program Web site at http://www.oracle.com/accessibility/.
xii
Accessibility of Code Examples in DocumentationScreen readers may not always correctly read the code examples in this document. The conventions for writing code require that closing braces should appear on an otherwise empty line; however, some screen readers may not always read a line of text that consists solely of a bracket or brace.
Accessibility of Links to External Web Sites in DocumentationThis documentation may contain links to Web sites of other companies or organizations that Oracle does not own or control. Oracle neither evaluates nor makes any representations regarding the accessibility of these Web sites.
Deaf/Hard of Hearing Access to Oracle Support ServicesTo reach Oracle Support Services, use a telecommunications relay service (TRS) to call Oracle Support at 1.800.223.1711. An Oracle Support Services engineer will handle technical issues and provide customer support according to the Oracle service request process. Information about TRS is available at http://www.fcc.gov/cgb/consumerfacts/trs.html, and a list of phone numbers is available at http://www.fcc.gov/cgb/dro/trsphonebk.html.
Related DocumentsFor more information, see the Oracle resources listed in this section.
■ Platform-specific Oracle Clusterware and Oracle RAC installation guides
Each platform-specific Oracle Database 11g installation media contains a copy of an Oracle Clusterware and Oracle RAC platform-specific installation and configuration guide in HTML and PDF formats. These installation books contain the preinstallation, installation, and postinstallation information for the various UNIX, Linux, and Windows platforms on which Oracle Clusterware and Oracle RAC operate.
■ Oracle Database 2 Day + Real Application Clusters Guide
This task-oriented guide helps you understand the basic steps required to install, configure, and administer Oracle Clusterware and Oracle Real Application Clusters on a two-node system using Red Hat Linux system.
■ Oracle Real Application Clusters Administration and Deployment Guide
This is an essential companion book that describes Oracle Clusterware components such as the voting disks and the Oracle Cluster Registry.
■ Oracle Database 2 Day DBA
■ Oracle Database Administrator's Guide
■ Oracle Database Net Services Administrator's Guide
■ Oracle Database Platform Guide for Microsoft Windows
■ Oracle Database Administrator's Reference 11g Release 1 (11.1) for UNIX Operating Systems: AIX Systems, HP-UX, Linux, and the Solaris Operating System (SPARC)
Database error messages descriptions are available online or by way of a Tahiti documentation search.

xiii
ConventionsThe following text conventions are used in this document:
Convention Meaning
boldface Boldface type indicates graphical user interface elements associated with an action, or terms defined in text or the glossary.
italic Italic type indicates book titles, emphasis, or placeholder variables for which you supply particular values.
monospace Monospace type indicates commands within a paragraph, URLs, code in examples, text that appears on the screen, or text that you enter.

xiv
xv
What’s New in Oracle ClusterwareAdministration and Deployment?
This section describes administration and deployment features for Oracle Clusterware in Oracle Database 11g release 2 (11.2).
■ Oracle Real Application Clusters One Node (Oracle RAC One Node)
Oracle Database 11g release 2 (11.2) introduces a new option, Oracle Real Application Clusters One Node (Oracle RAC One Node). Oracle RAC One Node is a single instance of Oracle Real Application Clusters (Oracle RAC) that runs on one node in a cluster. This option adds to the flexibility that Oracle offers for database consolidation. You can consolidate many databases into one cluster with minimal overhead while also providing the high availability benefits of failover protection, online rolling patch application, and rolling upgrades for the operating system and Oracle Clusterware.
You can limit the CPU utilization of individual database instances within the cluster through Resource Manager Instance Caging and dynamically change this limit if needed. With Oracle RAC One Node, there is no limit to server scalability and if applications grow to require more resources than a single node can supply, then you can easily upgrade your applications online to Oracle RAC. If the node that is running Oracle RAC One Node becomes overloaded, then you can migrate the instance to another node in the cluster using the Omotion online migration utility with no downtime for application users.
Oracle RAC One Node is supported on all platforms on which Oracle RAC is certified. With Oracle RAC and Oracle RAC One Node, you can standardize your deployments across a data center while achieving the required level of scalability and high availability for your applications.
Similar to Oracle RAC, Oracle RAC One Node will be certified on Oracle Virtual Machine (Oracle VM). Oracle VM is a no-cost, next-generation server virtualization and management solution that simplifies enterprise applications deployment, management, and support. Using Oracle RAC or Oracle RAC One Node with Oracle VM increases the benefits of Oracle VM with the high availability and scalability of Oracle RAC.
If your Oracle VM is sized too small, then you can migrate the Oracle RAC One Node instance to another Oracle VM node in your cluster using Omotion, and then resize your Oracle VM. When you move the Oracle RAC One Node instance
See Also: Oracle Database New Features Guide for a complete description of the features in Oracle Database 11g release 2 (11.2)
xvi
back to the newly resized Oracle VM node, you can dynamically increase any limits programmed with Resource Manger Instance Caging.
Alternatively, you can create a larger Oracle VM and use Omotion to migrate to the new Oracle VM and then dynamically resize the Oracle instance, depending on the resources available in the cluster. Since Oracle clients use the Single Client Access Name (SCAN) to connect to the database, they can locate the service independently of the node on which it is running.
■ Oracle Restart
Oracle Restart provides automatic restart of Oracle Database and listeners.
For standalone servers, Oracle Restart monitors and automatically restarts Oracle processes, such as Oracle Automatic Storage Management (Oracle ASM), Oracle Database, and listeners, on the server. Oracle Restart and Oracle ASM provide the grid infrastructure for a standalone server.
■ Improved Oracle Clusterware resource modeling
Oracle Clusterware can manage different types of applications and processes, including third-party applications. You can create dependencies among the applications and processes and manage them as one entity.
Oracle Clusterware uses different entities to manage your applications and processes, including resources, resource types, servers, and server pools. In addition to revised application programming interfaces (APIs), Oracle has created a new set of APIs to manage these entities.
■ Policy-based cluster and capacity management
Server capacity management is improved through logical separation of a cluster into server pools. You can determine where and how resources run in the cluster using a cardinality-based approach. Subsequently, nodes become anonymous, eliminating the need to identify the nodes when placing resources on them.
Server pools are assigned various levels of importance. When a failure occurs, Oracle Clusterware efficiently reallocates and reassigns capacity for applications to another, less important server pool within the cluster based on user-defined policies. This feature enables faster resource failover and dynamic capacity assignment.
See Also: Oracle Technology Network for more information at
http://otn.oracle.com/rac
See Also: Oracle Database Administrator's Guide for more information about Oracle Restart
See Also:
■ "Policy-Based Cluster and Capacity Management" on page 2-10 for more information about servers and server pools
■ "Oracle Clusterware Resources and Agents" on page 5-1 for more information about resources and resource types
■ Appendix F, "Oracle Clusterware C Application Program Interfaces" for more information about APIs

xvii
Clusters can host resources (defined as applications and databases) in server pools, which are isolated with respect to their resource consumption by the user-defined policies. For example, you can choose to run all human resources applications, accounting applications, and email applications in separate server pools.
■ Role-separated management
Role-separated management enables multiple applications and databases to share the same cluster and hardware resources, but ensures that different administration groups do not interfere with each other.
■ Cluster time synchronization service
Cluster time synchronization service synchronizes the system time on all nodes in a cluster when vendor time synchronization software (such as NTP on UNIX and Window Time Service) is not installed. Synchronized system time across the cluster is a prerequisite to successfully run an Oracle cluster, improving the reliability of the entire Oracle cluster environment.
■ Oracle Cluster Registry and voting disks can be stored using Oracle Automatic Storage Management
OCR and voting disks can be stored in Oracle Automatic Storage Management (Oracle ASM). The Oracle ASM partnership and status table (PST) is replicated on multiple disks and is extended to store OCR. Consequently, OCR can tolerate the loss of the same number of disks as are in the underlying disk group and be relocated in response to disk failures.
Oracle ASM reserves several blocks at a fixed location on every Oracle ASM disk for storing the voting disk. Should the disk holding the voting disk fail, Oracle ASM selects another disk on which to store this data.
Storing OCR and the voting disk on Oracle ASM eliminates the need for third-party cluster volume managers and eliminates the complexity of managing disk partitions for OCR and voting disks in Oracle Clusterware installations.
■ Oracle Automatic Storage Management Cluster File System
The Oracle Automatic Storage Management Cluster File System (Oracle ACFS) extends Oracle ASM by providing a robust, general purpose extent-based and journaling file system for files other than Oracle database files. Oracle ACFS
See Also: "Policy-Based Cluster and Capacity Management" on page 2-10 for more information
See Also: "Role-separated Management" on page 2-18 for more information
See Also: "Cluster Time Management" on page 2-1 for more information
Note: The dd commands used to back up and recover voting disks in previous versions of Oracle Clusterware are not supported in Oracle Clusterware 11g release 2 (11.2).
See Also: Chapter 2, "Administering Oracle Clusterware" for more information about OCR and voting disks
xviii
provides support for files such as Oracle binaries, report files, trace files, alert logs, and other application data files. With the addition of Oracle ACFS, Oracle ASM becomes a complete storage management solution for both Oracle database and non-database files.
Additionally, Oracle ACFS
– Supports large files with 64-bit file and file system data structure sizes leading to exabyte-capable file and file system capacities.
– Uses extent-based storage allocation for improved performance.
– Uses a log-based metadata transaction engine for file system integrity and fast recovery.
– Can be exported to remote clients through industry standard protocols such as Network File System and Common Internet File System.
Oracle ACFS eliminates the need for third-party cluster file system solutions, while streamlining, automating, and simplifying all file type management in both a single node and Oracle Real Application Clusters (Oracle RAC) and Grid computing environments.
Oracle ACFS supports dynamic file system expansion and contraction without downtime. It is also highly available, leveraging the Oracle ASM mirroring and striping features in addition to hardware RAID functionality.
■ Oracle Clusterware out-of-place upgrade
You can install a new version of Oracle Clusterware into a separate home. Installing Oracle Clusterware in a separate home before the upgrade reduces planned outage time required for cluster upgrades, which assists in meeting availability service level agreements. After the Oracle Clusterware software is installed, you can then upgrade the cluster by stopping the previous version of the Oracle Clusterware software and starting the new version node by node (known as a rolling upgrade).
■ Enhanced Cluster Verification Utility
Enhancements to the Cluster Verification Utility (CVU) include the following checks on the cluster:
– Before and after node addition
– Before and after node deletion
– Before and after storage addition
– Before and after storage deletion
– After network modification
– Oracle ASM integrity
In addition to command-line commands, these checks are done through the Oracle Universal Installer, Database Configuration Assistant, and Oracle Enterprise Manager. These enhancements facilitate implementation and configuration of
See Also: Oracle Database Storage Administrator's Guide for more information about Oracle ACFS
See Also: Oracle Grid Infrastructure Installation Guide for more information about out-of-place upgrades
xix
cluster environments and provide assistance in diagnosing problems in a cluster environment, improving configuration and installation.
■ Enhanced Integration of Cluster Verification Utility and Oracle Universal Installer
This feature fully integrates the CVU with Oracle Universal Installer so that multi-node checks are done automatically. This ensures that any problems with cluster setup are detected and corrected before installing Oracle software.
The CVU validates cluster components and verifies the cluster readiness at different stages of Oracle RAC deployment, such as installation of Oracle Clusterware and Oracle RAC databases, and configuration of Oracle RAC databases. It also helps validate the successful completion of a specific stage of Oracle RAC deployment.
■ Patch application with Oracle Enterprise Manager Database Control
Patches can be applied to single-instance databases, Oracle RAC databases, and Oracle Clusterware using Oracle Enterprise Manager Database Control.
■ Grid Plug and Play
Grid Plug and Play enables you to move your data center toward a dynamic grid infrastructure. This enables you to consolidate applications and lower the costs of managing applications, while providing a highly available environment that can easily scale when the workload requires. There are many modifications in Oracle RAC 11g release 2 (11.2) to support the easy addition of servers in a cluster and therefore a more dynamic grid.
In the past, adding or removing servers in a cluster required extensive manual preparation. With this release, Grid Plug and Play reduces the costs of installing, configuring, and managing server nodes by automating the following tasks:
– Adding an Oracle RAC database instance
– Negotiating appropriate network identities for itself
– Acquiring additional information it needs to operate from a configuration profile
– Configuring or reconfiguring itself using profile data, making host names and addresses resolvable on the network
Additionally, the number of steps necessary to add and remove nodes is reduced.
Oracle Enterprise Manager immediately reflects Grid Plug and Play-enabled changes.
See Also:
■ Appendix A, "Cluster Verification Utility Reference" for more information about CVU commands
■ Oracle Grid Infrastructure Installation Guide for more information about CVU checks done during installation
See Also: Oracle Grid Infrastructure Installation Guide for more information about CVU checks done during installation
See Also: Oracle Database 2 Day + Real Application Clusters Guide for more information

xx
■ Oracle Enterprise Manager support for Oracle ACFS
This feature provides a comprehensive management solution that extends Oracle ASM technology to support general purpose files not directly supported by ASM, and in both single-instance Oracle Database and Oracle Clusterware configurations. It also enhances existing Oracle Enterprise Manager support for Oracle ASM, and adds new features to support the Oracle ASM Dynamic Volume Manager (ADVM) and Oracle ASM Cluster File System technology (ACFS).
Oracle Automatic Storage Management Cluster File System (Oracle ACFS) is a scalable file system and storage management design that extends Oracle ASM technology. It supports all application data in both single host and cluster configurations and leverages existing Oracle ASM functionality to achieve the following:
– Dynamic file system resizing
– Maximized performance through Oracle ASM’s automatic distribution
– Balancing and striping of the file system across all available disks
– Storage reliability through Oracle ASM’s mirroring and parity protection
Oracle ACFS provides a multiplatform storage management solution to access clusterwide, non-database customer files.
■ Oracle Enterprise Manager-based Oracle Clusterware resource management
You can use Oracle Enterprise Manager to manage Oracle Clusterware resources. You can create and configure resources in Oracle Clusterware and also monitor and manage resources after they are deployed in the cluster.
■ Zero downtime for patching Oracle Clusterware
Patching Oracle Clusterware and Oracle RAC can be completed without taking the entire cluster down. This also allows for out-of-place upgrades to the cluster software and Oracle Database, reducing the planned maintenance downtime required in an Oracle RAC environment.
■ Improvements to provisioning of Oracle Clusterware and Oracle RAC
This feature offers a simplified solution for provisioning Oracle RAC systems. Oracle Enterprise Manager Database Control enables you to extend Oracle RAC clusters by automating the provisioning tasks on the new nodes.
See Also: Oracle Database Storage Administrator's Guide for more information about Oracle ACFS
See Also: "Adding Resources Using Oracle Enterprise Manager" on page 5-20
1
Introduction to Oracle Clusterware 1-1
1 Introduction to Oracle Clusterware
This chapter includes the following topics:
■ What is Oracle Clusterware?
■ Overview of Oracle Clusterware Platform-Specific Software Components
■ Overview of Installing Oracle Clusterware
■ Overview of Managing Oracle Clusterware Environments
■ Overview of Cloning and Extending Oracle Clusterware in Grid Environments
■ Overview of the Oracle Clusterware High Availability Framework and APIs
What is Oracle Clusterware?Oracle Clusterware enables servers to communicate with each other, so that they appear to function as a collective unit. This combination of servers is commonly known as a cluster. Although the servers are standalone servers, each server has additional processes that communicate with other servers. In this way the separate servers appear as if they are one system to applications and end users.
Oracle Clusterware provides the infrastructure necessary to run Oracle Real Application Clusters (Oracle RAC). Oracle Clusterware also manages resources, such as virtual IP (VIP) addresses, databases, listeners, services, and so on. These resources are generally named ora.host_name.resource_name. Oracle does not support editing these resources except under the explicit direction of Oracle support. Additionally, Oracle Clusterware can help you manage your applications.
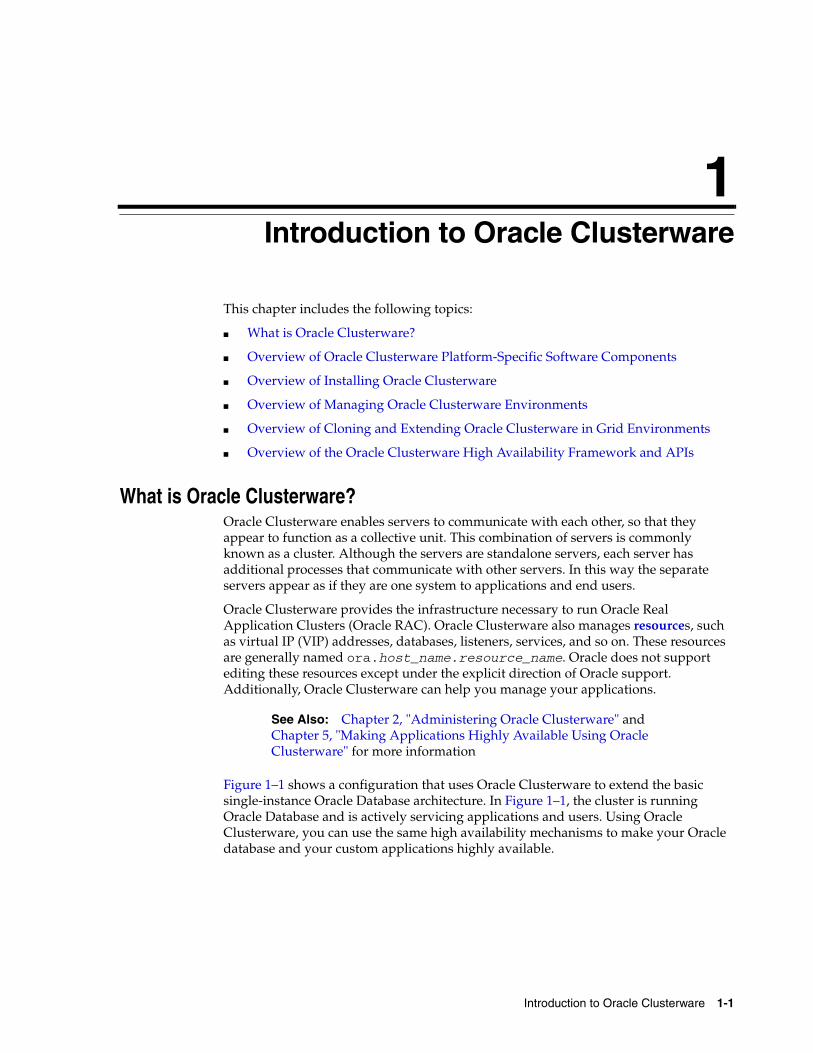
Figure 1–1 shows a configuration that uses Oracle Clusterware to extend the basic single-instance Oracle Database architecture. In Figure 1–1, the cluster is running Oracle Database and is actively servicing applications and users. Using Oracle Clusterware, you can use the same high availability mechanisms to make your Oracle database and your custom applications highly available.
See Also: Chapter 2, "Administering Oracle Clusterware" and Chapter 5, "Making Applications Highly Available Using Oracle Clusterware" for more information
What is Oracle Clusterware?
1-2 Oracle Clusterware Administration and Deployment Guide
Figure 1–1 Oracle Clusterware Configuration
The benefits of using a cluster include:
■ Scalability of applications
■ Use of less expensive commodity hardware
■ Ability to fail over
■ Ability to increase capacity over time by adding servers
■ Ability to program the startup of applications in a planned order that ensures dependent processes are started
■ Ability to monitor processes and restart them if they stop
You can program Oracle Clusterware to manage the availability of user applications and Oracle databases. In an Oracle RAC environment, Oracle Clusterware manages all of the resources automatically. All of the applications and processes that Oracle Clusterware manages are either cluster resources or local resources.
Creating a cluster with Oracle Clusterware provides the ability to:
■ Eliminate unplanned downtime due to hardware or software malfunctions
Application / Web Servers
Cluster
Heartbeat hb
Pool of Storage
Oracle Net Services Single Client Access Name
hb
Node 1 Node 3
hb
Node 2
What is Oracle Clusterware?
Introduction to Oracle Clusterware 1-3
■ Reduce or eliminate planned downtime for software maintenance
■ Increase throughput for cluster-aware applications by enabling the applications to run on all of the nodes in a cluster
■ Increase throughput on demand for cluster-aware applications, by adding servers to a cluster to increase cluster resources
■ Reduce the total cost of ownership for the infrastructure by providing a scalable system with low-cost commodity hardware
Oracle Clusterware is required for using Oracle RAC; it is the only clusterware that you need for platforms on which Oracle RAC operates. Although Oracle RAC continues to support many third-party clusterware products on specific platforms, you must also install and use Oracle Clusterware. Note that the servers on which you want to install and run Oracle Clusterware must use the same operating system.
Using Oracle Clusterware eliminates the need for proprietary vendor clusterware and provides the benefit of using only Oracle software. Oracle provides an entire software solution, including everything from disk management with Oracle Automatic Storage Management (Oracle ASM) to data management with Oracle Database and Oracle RAC. In addition, Oracle Database features, such as Oracle Services, provide advanced functionality when used with the underlying Oracle Clusterware high availability framework.
Oracle Clusterware has two stored components, besides the binaries: The voting disk files, which record node membership information, and the Oracle Cluster Registry (OCR), which records cluster configuration information. Voting disks and OCRs must reside on shared storage available to all cluster member nodes.
To use Oracle Clusterware, you must understand the hardware and software concepts and requirements as described in the following sections:
■ Oracle Clusterware Hardware Concepts and Requirements
■ Oracle Clusterware Operating System Concepts and Requirements
■ Oracle Clusterware Software Concepts and Requirements
■ Oracle Clusterware Network Configuration Concepts
■ Upgrading Oracle Clusterware
Oracle Clusterware Hardware Concepts and Requirements
A cluster comprises one or more servers. The hardware in a server in a cluster (or cluster member or node) is similar to a standalone server. However, a server that is part of a cluster, otherwise known as a node or a cluster member, requires a second network. This second network is referred to as the interconnect. For this reason, cluster member nodes require at least two network interface cards: one for a public network and one for a private network. The interconnect network is a private network using a switch (or multiple switches) that only the nodes in the cluster can access.1
Note: Many hardware providers have validated cluster configurations that provide a single part number for a cluster. If you are new to clustering, then use the information in this section to simplify your hardware procurement efforts when you purchase hardware to create a cluster.
What is Oracle Clusterware?
1-4 Oracle Clusterware Administration and Deployment Guide
Cluster size is determined by the requirements of the workload running on the cluster and the number of nodes that you have configured in the cluster. If you are implementing a cluster for high availability, then configure redundancy for all of the components of the infrastructure as follows:
■ At least two network interfaces for the public network, bonded to provide one address
■ At least two network interfaces for the private interconnect network, also bonded to provide one address
The cluster requires cluster-aware storage2 that is connected to each server in the cluster. This may also be referred to as a multihost device. Oracle Clusterware supports NFS, iSCSI, Direct Attached Storage (DAS), Storage Area Network (SAN) storage, and Network Attached Storage (NAS).
To provide redundancy for storage, generally provide at least two connections from each server to the cluster-aware storage. There may be more connections depending on your I/O requirements. It is important to consider the I/O requirements of the entire cluster when choosing your storage subsystem.
Most servers have at least one local disk that is internal to the server. Often, this disk is used for the operating system binaries; you can also use this disk for the Oracle software binaries. The benefit of each server having its own copy of the Oracle binaries is that it increases high availability, so that corruption to a one binary does not affect all of the nodes in the cluster simultaneously. It also allows rolling upgrades, which reduce downtime.
Oracle Clusterware Operating System Concepts and RequirementsEach server must have an operating system that is certified with the Oracle Clusterware version you are installing. Refer to the certification matrices available on My Oracle Support (formerly OracleMetaLink) for details, which are available from the following URL:
http://certify.oraclecorp.com/certifyv3/certify/cert_views.group_selection?p_html_source=0
When the operating system is installed and working, you can then install Oracle Clusterware to create the cluster. Oracle Clusterware is installed independently of Oracle Database. Once Oracle Clusterware is installed, you can then install Oracle Database or Oracle RAC on any of the nodes in the cluster.
Oracle Clusterware Software Concepts and RequirementsOracle Clusterware uses voting disk files to provide fencing and cluster node membership determination. The OCR provides cluster configuration information. You
1 Oracle Clusterware supports up to 100 nodes in a cluster on configurations running Oracle Database 10g release 2 (10.2) and later releases.
Note: Oracle does not support using crossover cables as Oracle Clusterware interconnects.
2 Cluster-aware storage may also be referred to as a multihost device.
See Also: Your platform-specific Oracle database installation documentation
What is Oracle Clusterware?
Introduction to Oracle Clusterware 1-5
can place the Oracle Clusterware files on either Oracle ASM or on shared common disk storage. If you configure Oracle Clusterware on storage that does not provide file redundancy, then Oracle recommends that you configure multiple locations for OCR and voting disks. The voting disks and OCR are described as follows:
■ Voting Disks
Oracle Clusterware uses voting disk files to determine which nodes are members of a cluster. You can configure voting disks on Oracle ASM, or you can configure voting disks on shared storage.
If you configure voting disks on Oracle ASM, then you do not need to manually configure the voting disks. Depending on the redundancy of your disk group, an appropriate number of voting disks are created.
If you do not configure voting disks on Oracle ASM, then for high availability, Oracle recommends that you have a minimum of three voting disks on physically separate storage. This avoids having a single point of failure. If you configure a single voting disk, then you must use external mirroring to provide redundancy.
You should have at least three voting disks, unless you have a storage device, such as a disk array that provides external redundancy. Oracle recommends that you do not use more than five voting disks. The maximum number of voting disks that is supported is 15.
■ Oracle Cluster Registry
Oracle Clusterware uses the Oracle Cluster Registry (OCR) to store and manage information about the components that Oracle Clusterware controls, such as Oracle RAC databases, listeners, virtual IP addresses (VIPs), and services and any applications. The OCR stores configuration information in a series of key-value pairs in a tree structure. To ensure cluster high availability, Oracle recommends that you define multiple OCR locations (multiplex). In addition:
– You can have up to five OCR locations
– Each OCR location must reside on shared storage that is accessible by all of the nodes in the cluster
– You can replace a failed OCR location online if it is not the only OCR location
– You must update the OCR through supported utilities such as Oracle Enterprise Manager, the Server Control Utility (SRVCTL), the OCR configuration utility (OCRCONFIG), or the Database Configuration Assistant (DBCA)
Oracle Clusterware Network Configuration ConceptsOracle Clusterware enables a dynamic grid infrastructure through the self-management of the network requirements for the cluster. Oracle Clusterware 11g release 2 (11.2) supports the use of DHCP for all private interconnect addresses, as well as for most of the VIP addresses. DHCP provides dynamic configuration of the host's IP address, but it does not provide an optimal method of producing names that are useful to external clients.
When you are using Oracle RAC, all of the clients must be able to reach the database. This means that the VIP addresses must be resolved by the clients. This problem is solved by the addition of the Grid Naming Service (GNS) to the cluster. GNS is linked to the corporate Domain Name Service (DNS) so that clients can easily connect to the
See Also: Chapter 2, "Administering Oracle Clusterware" for more information about voting disks and the OCR
What is Oracle Clusterware?
1-6 Oracle Clusterware Administration and Deployment Guide
cluster and the databases running there. Activating GNS in a cluster requires a DHCP service on the public network.
Implementing GNS To implement GNS, you must collaborate with your network administrator to obtain an IP address on the public network for the GNS VIP. DNS uses the GNS VIP to forward requests to the cluster to GNS. The network administrator must delegate a subdomain in the network to the cluster. The subdomain forwards all requests for addresses in the subdomain to the GNS VIP.
GNS and the GNS VIP run on one node in the cluster. The GNS daemon listens, using default port 53, on this address for incoming requests. Oracle Clusterware manages the GNS and the GNS VIP to ensure that they are always available. If the server on which GNS is running fails, then Oracle Clusterware fails GNS over, along with the GNS VIP, to another node in the cluster.
With DHCP on the network, Oracle Clusterware obtains an IP address from the server along with other network information, such as what gateway to use, what DNS servers to use, what domain to use, and what NTP server to use. Oracle Clusterware initially obtains the necessary IP addresses during cluster configuration and it updates the Oracle Clusterware resources with the correct information obtained from the DHCP server.
Single Client Access Name (SCAN)Oracle RAC 11g release 2 (11.2) introduces the Single Client Access Name (SCAN). The SCAN is a single name that resolves to three IP addresses in the public network. When using GNS and DHCP, Oracle Clusterware configures the VIP addresses for the SCAN name that is provided during cluster configuration.
The node VIP and the three SCAN VIPs are obtained from the DHCP server when using GNS. If a new server joins the cluster, then Oracle Clusterware dynamically obtains the required VIP address from the DHCP server, updates the cluster resource, and makes the server accessible through GNS.
Example 1–1 shows the DNS entries that delegate a domain to the cluster.
Example 1–1 DNS Entries
# Delegate to gns on myclustermycluster.example.com NS myclustergns.example.com#Let the world know to go to the GNS vipmyclustergns.example.com. 10.9.8.7
Configuring Addresses Manually Alternatively, you can choose manual address configuration, in which you configure the following:
■ One public host name for each node.
■ One VIP address for each node.
You must assign a VIP address to each node in the cluster. Each VIP address must be on the same subnet as the public IP address for the node and should be an address that is assigned a name in the DNS. Each VIP address must also be
See Also: Oracle Grid Infrastructure Installation Guide for details about establishing resolution through DNS
Overview of Oracle Clusterware Platform-Specific Software Components
Introduction to Oracle Clusterware 1-7
unused and unpingable from within the network before you install Oracle Clusterware.
■ Up to three SCAN addresses for the entire cluster.
Upgrading Oracle ClusterwareOracle supports in-place and out-of-place upgrades. Both strategies facilitate rolling upgrades. For Oracle Clusterware 11g release 2 (11.2), in-place upgrades are supported for patches only. Patch bundles and one-off patches are supported for in-place upgrades but patch sets and major point releases are supported for out-of-place upgrades only.
An in-place upgrade replaces the Oracle Clusterware software with the newer version in the same Grid home. Out-of-place upgrade has both versions of the same software present on the nodes at the same time, in different Grid homes, but only one version is active.
Rolling upgrades avoid downtime and ensure continuous availability of Oracle Clusterware while the software is upgraded to the new version. When you upgrade to 11g release 2 (11.2), Oracle Clusterware and Oracle ASM binaries are installed as a single binary called the grid infrastructure. You can upgrade Oracle Clusterware in a rolling manner from Oracle Clusterware 10g and Oracle Clusterware 11g, however you can only upgrade Oracle ASM in a rolling manner from Oracle Database 11g release 1 (11.1).
Overview of Oracle Clusterware Platform-Specific Software ComponentsWhen Oracle Clusterware is operational, several platform-specific processes or services run on each node in the cluster. This section describes these various processes and services.
The Oracle Clusterware StackOracle Clusterware consists of two separate stacks: an upper stack anchored by the Cluster Ready Services (CRS) daemon (crsd) and a lower stack anchored by the Oracle High Availability Services daemon (ohasd). These two stacks have several processes that facilitate cluster operations. The following sections describe these stacks in more detail:
■ The Cluster Ready Services Stack
■ The Oracle High Availability Services Stack
Note: The SCAN must resolve to at least one address on the public network. For high availability and scalability, Oracle recommends that you configure the SCAN to resolve to three addresses.
See Also: Your platform-specific Oracle Grid Infrastructure Installation Guide installation documentation for information about requirements and configuring network addresses
See Also: Oracle Grid Infrastructure Installation Guide for more information about upgrading Oracle Clusterware
Overview of Oracle Clusterware Platform-Specific Software Components
1-8 Oracle Clusterware Administration and Deployment Guide
The Cluster Ready Services StackThe list in this section describes the processes that comprise CRS. The list includes components that are processes on Linux and UNIX operating systems, or services on Windows.
■ Cluster Ready Services (CRS): The primary program for managing high availability operations in a cluster.
The CRS daemon (crsd) manages cluster resources based on the configuration information that is stored in OCR for each resource. This includes start, stop, monitor, and failover operations. The crsd process generates events when the status of a resource changes. When you have Oracle RAC installed, the crsd process monitors the Oracle database instance, listener, and so on, and automatically restarts these components when a failure occurs.
■ Cluster Synchronization Services (CSS): Manages the cluster configuration by controlling which nodes are members of the cluster and by notifying members when a node joins or leaves the cluster. If you are using certified third-party clusterware, then CSS processes interfaces with your clusterware to manage node membership information.
The cssdagent process monitors the cluster and provides I/O fencing. This service formerly was provided by Oracle Process Monitor Daemon (oprocd), also known as OraFenceService on Windows. A cssdagent failure results in Oracle Clusterware restarting the node.
■ Oracle ASM: Provides disk management for Oracle Clusterware.
■ Cluster Time Synchronization Service (CTSS): Provides time management in a cluster for Oracle Clusterware.
■ Event Management (EVM): A background process that publishes events that Oracle Clusterware creates.
■ Oracle Notification Service (ONS): A publish and subscribe service for communicating Fast Application Notification (FAN) events.
■ Oracle Agent (oraagent): Extends clusterware to support Oracle-specific requirements and complex resources. Runs server callout scripts when FAN events occur. This process was known as RACG in Oracle Clusterware 11g release 1 (11.1).
■ Oracle Root Agent (orarootagent): A specialized oraagent process that helps crsd manage resources owned by root, such as the network, and the Grid virtual IP address.
The Cluster Synchronization Service (CSS), Event Management (EVM), and Oracle Notification Services (ONS) components communicate with other cluster component layers in the other instances in the same cluster database environment. These components are also the main communication links between Oracle Database, applications, and the Oracle Clusterware high availability components. In addition, these background processes monitor and manage database operations.
The Oracle High Availability Services StackThe list in this section describes the processes that comprise the Oracle High Availability Services stack. The list includes components that are processes on Linux and UNIX operating systems, or services on Windows.
See Also: Chapter 5, "Making Applications Highly Available Using Oracle Clusterware" for more detailed information about the Oracle Clusterware API
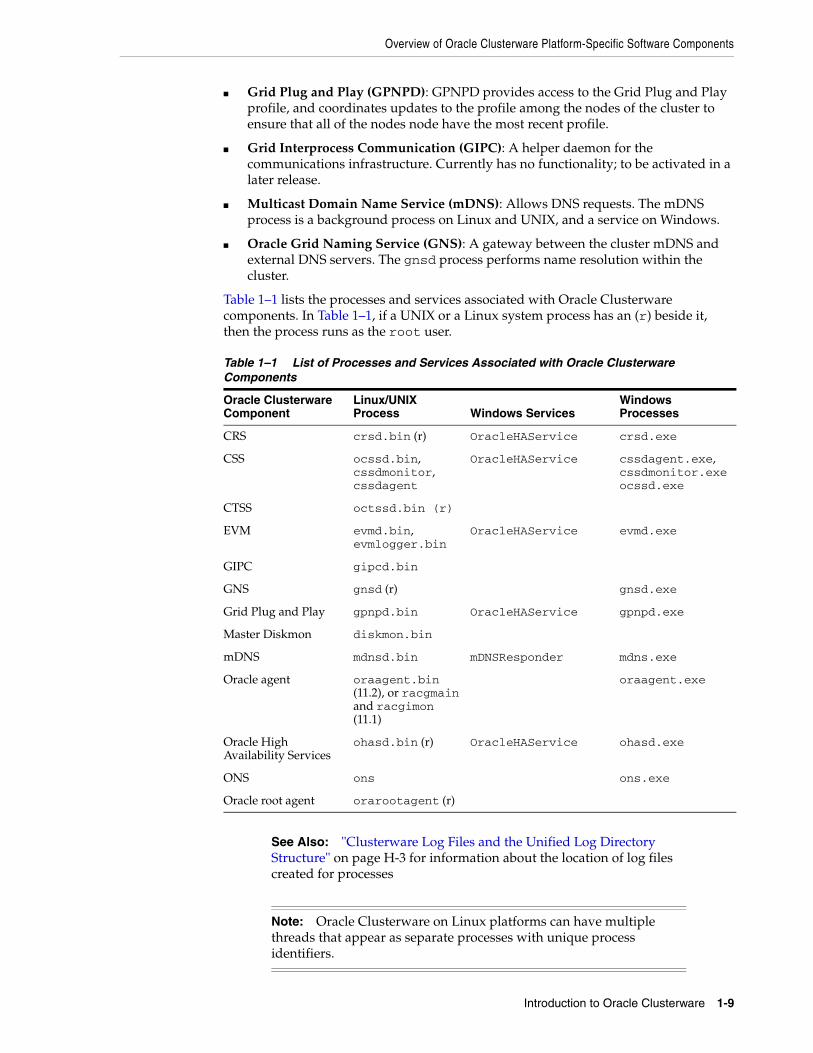
Overview of Oracle Clusterware Platform-Specific Software Components
Introduction to Oracle Clusterware 1-9
■ Grid Plug and Play (GPNPD): GPNPD provides access to the Grid Plug and Play profile, and coordinates updates to the profile among the nodes of the cluster to ensure that all of the nodes node have the most recent profile.
■ Grid Interprocess Communication (GIPC): A helper daemon for the communications infrastructure. Currently has no functionality; to be activated in a later release.
■ Multicast Domain Name Service (mDNS): Allows DNS requests. The mDNS process is a background process on Linux and UNIX, and a service on Windows.
■ Oracle Grid Naming Service (GNS): A gateway between the cluster mDNS and external DNS servers. The gnsd process performs name resolution within the cluster.
Table 1–1 lists the processes and services associated with Oracle Clusterware components. In Table 1–1, if a UNIX or a Linux system process has an (r) beside it, then the process runs as the root user.
Table 1–1 List of Processes and Services Associated with Oracle Clusterware Components
Oracle Clusterware Component
Linux/UNIX Process Windows Services
Windows Processes
CRS crsd.bin (r) OracleHAService crsd.exe
CSS ocssd.bin, cssdmonitor, cssdagent
OracleHAService cssdagent.exe, cssdmonitor.exeocssd.exe
CTSS octssd.bin (r)
EVM evmd.bin, evmlogger.bin
OracleHAService evmd.exe
GIPC gipcd.bin
GNS gnsd (r) gnsd.exe
Grid Plug and Play gpnpd.bin OracleHAService gpnpd.exe
Master Diskmon diskmon.bin
mDNS mdnsd.bin mDNSResponder mdns.exe
Oracle agent oraagent.bin (11.2), or racgmain and racgimon (11.1)
oraagent.exe
Oracle High Availability Services
ohasd.bin (r) OracleHAService ohasd.exe
ONS ons ons.exe
Oracle root agent orarootagent (r)
See Also: "Clusterware Log Files and the Unified Log Directory Structure" on page H-3 for information about the location of log files created for processes
Note: Oracle Clusterware on Linux platforms can have multiple threads that appear as separate processes with unique process identifiers.

Overview of Installing Oracle Clusterware
1-10 Oracle Clusterware Administration and Deployment Guide
Figure 1–2 Cluster Startup
Overview of Installing Oracle ClusterwareThe following section introduces the installation processes for Oracle Clusterware:
■ Oracle Clusterware Version Compatibility
Oracle Clusterware Version CompatibilityYou can install different releases of Oracle Clusterware, Oracle ASM, and Oracle Database on your cluster. Follow these guidelines when installing different releases of software on your cluster:
■ You can only have one installation of Oracle Clusterware running in a cluster, and it must be installed into its own home (Grid_home). The release of Oracle Clusterware that you use must be equal to or higher than the Oracle ASM and Oracle RAC versions that are running in the cluster. You cannot install a version of
Note: Install Oracle Clusterware with the Oracle Universal Installer.
Listenerora.LISTENER.lsnr
VIPora.NODENAME.vip
SCAN VIPora.SCANn.vip
eONS Daemonora.eons
ONS Daemonora.ons
Database Instanceora.DB.db
ora.gns.vip
SCAN Listenerora.LISTENER_
SCAN.lsnr
CTSSDora.ctssd
CRSDora.crsd
CSSDora.ocssd
EVMDora.evmd
MDNSDora.mdnsd
Oracle ASMora.asm
GPNPDora.gpnpdInit
cssdagent
oraagent
GNSDora.gnsd
OHASD
Oracle ASMInstanceora.asm
CSSD Monitorora.cssdmonitor
Communication
orarootagent
orarootagent
oraagent
Networkora.net1.network

Overview of Installing Oracle Clusterware
Introduction to Oracle Clusterware 1-11
Oracle RAC that was released after the version of Oracle Clusterware that you run on the cluster. In other words:
– Oracle Clusterware 11g release 2 (11.2) supports Oracle ASM release 11.2 only, because Oracle ASM is in the grid infrastructure home, which also includes Oracle Clusterware.
– Oracle Clusterware release 11.2 supports Oracle Database 11g release 2 (11.2), release 1 (11.1), Oracle Database 10g release 2 (10.2), and release 1 (10.1)
– Oracle ASM release 11.2 requires Oracle Clusterware release 11.2 and supports Oracle Database 11g release 2 (11.2), release 1 (11.1), Oracle Database 10g release 2 (10.2), and release 1 (10.1)
– Oracle Database 11g release 2 (11.2) requires Oracle Clusterware 11g release 2 (11.2)
For example:
* If you have Oracle Clusterware 11g release 2 (11.2) installed as your clusterware, then you can have an Oracle Database 10g release 1 (10.1) single-instance database running on one node, and separate Oracle Real Application Clusters 10g release 1 (10.1), release 2 (10.2), and Oracle Real Application Clusters 11g release 1 (11.1) databases also running on the cluster. However, you cannot have Oracle Clusterware 10g release 2 (10.2) installed on your cluster, and install Oracle Real Application Clusters 11g. You can install Oracle Database 11g single-instance on a node in an Oracle Clusterware 10g release 2 (10.2) cluster.
* When using different Oracle ASM and Oracle Database releases, the functionality of each is dependent on the functionality of the earlier software release. Thus, if you install Oracle Clusterware 11g and you later configure Oracle ASM, and you use Oracle Clusterware to support an existing Oracle Database 10g release 10.2.0.3 installation, then the Oracle ASM functionality is equivalent only to that available in the 10.2 release version. Set the compatible attributes of a disk group to the appropriate release of software in use.
■ There can be multiple Oracle homes for the Oracle database (both single instance and Oracle RAC) in the cluster. Note that the Oracle RAC databases must be running Oracle9i Database, or higher.
■ You can use different users for the Oracle Clusterware and Oracle database homes if they belong to the same primary group.
■ As of 11g release 2 (11.2), there can only be one installation of Oracle ASM running in a cluster. Oracle ASM is always the same version as Oracle Clusterware, which must be the same (or higher) release than that of the Oracle database.
■ For Oracle RAC running Oracle9i you must run an Oracle9i cluster. For UNIX systems, that is HACMP, Serviceguard, Sun Cluster, or Veritas SF. For Windows and Linux systems, that is the Oracle Cluster Manager. To install Oracle RAC 10g, you must also install Oracle Clusterware.
■ You cannot install Oracle9i RAC on an Oracle Database 10g cluster. If you have an Oracle9i RAC cluster, you can add Oracle RAC 10g to the cluster. However, when you install Oracle Clusterware 10g, you can no longer install any new Oracle9i RAC databases.
See Also: Oracle Database Storage Administrator's Guide for information about compatible attributes of disk groups

Overview of Managing Oracle Clusterware Environments
1-12 Oracle Clusterware Administration and Deployment Guide
■ Oracle recommends that you do not run different cluster software on the same servers unless they are certified to work together. However, if you are adding Oracle RAC to servers that are part of a cluster, either migrate to Oracle Clusterware or ensure that:
– The clusterware you run is supported to run with Oracle RAC 11g release 2 (11.2).
– You have installed the correct options for Oracle Clusterware and the other vendor clusterware to work together.
Overview of Managing Oracle Clusterware EnvironmentsThe following list describes the tools and utilities for managing your Oracle Clusterware environment:
■ Oracle Enterprise Manager: Oracle Enterprise Manager has both the Database Control and Grid Control GUI interfaces for managing both single instance and Oracle RAC database environments. It also has GUI interfaces to manage Oracle Clusterware and all components configured in the Oracle grid infrastructure installation. Oracle recommends that you use Oracle Enterprise Manager to perform administrative tasks, including applying patches.
■ Cluster Verification Utility (CVU): CVU is a command-line utility that you use to verify a range of cluster and Oracle RAC specific components. Use CVU to verify shared storage devices, networking configurations, system requirements, and Oracle Clusterware, and operating system groups and users.
Install and use CVU for both preinstallation and postinstallation checks of your cluster environment. CVU is especially useful during preinstallation and during installation of Oracle Clusterware and Oracle RAC components to ensure that your configuration meets the minimum installation requirements. Also use CVU to verify your configuration after completing administrative tasks, such as node additions and node deletions.
■ Server Control (SRVCTL): SRVCTL is a command-line interface that you can use to manage Oracle resources, such as databases, services, or listeners in the cluster.
See Also: Oracle Grid Infrastructure Installation Guide for more version compatibility information
See Also: Oracle Database 2 Day + Real Application Clusters Guide, Oracle Real Application Clusters Administration and Deployment Guide, and Oracle Enterprise Manager online documentation for more information about administering Oracle Clusterware with Oracle Enterprise Manager
See Also: Your platform-specific Oracle Clusterware and Oracle RAC installation guide for information about how to manually install CVU, and Appendix A, "Cluster Verification Utility Reference" for more information about using CVU
Note: You can only manage server pools that have names prefixed with ora.* by using SRVCTL.
Overview of Cloning and Extending Oracle Clusterware in Grid Environments
Introduction to Oracle Clusterware 1-13
■ Oracle Clusterware Control (CRSCTL): CRSCTL is a command-line tool that you can use to manage Oracle Clusterware. CRSCTL should be used for general Clusterware management and management of individual resources.
Oracle Clusterware 11g release 2 (11.2) introduces cluster-aware commands with which you can perform operations from any node in the cluster on another node in the cluster, or on all nodes in the cluster, depending on the operation.
You can use crsctl commands to monitor cluster resources (crsctl status resource) and to monitor and manage servers and server pools other than server pools that have names prefixed with ora.*, such as crsctl status server, crsctl status serverpool, crsctl modify serverpool, and crsctl relocate server. You can also manage Oracle High Availability Services on the entire cluster (crsctl start | stop | enable | disable | config crs), using the optional node-specific arguments -n or -all. You also can use CRSCTL to manage Oracle Clusterware on individual nodes (crsctl start | stop | enable | disable | config crs).
■ Oracle Interface Configuration Tool (OIFCFG): OIFCFG is a command-line tool for both single-instance Oracle databases and Oracle RAC environments. Use OIFCFG to allocate and deallocate network interfaces to components. You can also use OIFCFG to direct components to use specific network interfaces and to retrieve component configuration information.
■ Oracle Cluster Registry Configuration Tool (OCRCONFIG): OCRCONFIG is a command-line tool for OCR administration. You can also use the OCRCHECK and OCRDUMP utilities to troubleshoot configuration problems that affect OCR.
Overview of Cloning and Extending Oracle Clusterware in Grid Environments
Cloning nodes is the preferred method of creating new clusters. The cloning process copies Oracle Clusterware software images to other nodes that have similar hardware and software. Use cloning to quickly create several clusters of the same configuration. Before using cloning, you must install an Oracle Clusterware home successfully on at least one node using the instructions in your platform-specific Oracle Clusterware installation guide.
See Also: Server Control Utility reference appendix in the Oracle Real Application Clusters Administration and Deployment Guide
See Also:
■ Chapter 2, "Administering Oracle Clusterware" for more information about using crsctl commands to manage Oracle Clusterware
■ Appendix E, "CRSCTL Utility Reference" for a complete list of CRSCTL commands
See Also: Appendix D, "Oracle Interface Configuration Tool (OIFCFG) Command Reference"
See Also: Chapter 2, "Administering Oracle Clusterware" for more information about managing OCR
Overview of the Oracle Clusterware High Availability Framework and APIs
1-14 Oracle Clusterware Administration and Deployment Guide
For new installations, or if you must install on only one cluster, Oracle recommends that you use the automated and interactive installation methods, such as Oracle Universal Installer or the Provisioning Pack feature of Oracle Enterprise Manager. These methods perform installation checks to ensure a successful installation. To add or delete Oracle Clusterware from nodes in the cluster, use the addNode.sh and rootcrs.pl scripts.
Overview of the Oracle Clusterware High Availability Framework and APIsOracle Clusterware provides many high availability application programming interfaces called CLSCRS APIs that you use to enable Oracle Clusterware to manage applications or processes that run in a cluster. The CLSCRS APIs enable you to provide high availability for all of your applications. Oracle Clusterware with Oracle ASM enables you to create a consolidated pool of storage to support both single-instance Oracle databases and Oracle RAC databases.
You can define a VIP address for an application to enable users to access the application independently of the node in the cluster on which the application is running. This is referred to as the application VIP. You can define multiple application VIPs, with generally one application VIP defined for each application running. The application VIP is related to the application by making it dependent on the application resource defined by Oracle Clusterware.
To maintain high availability, Oracle Clusterware components can respond to status changes to restart applications and processes according to defined high availability rules. You can use the Oracle Clusterware high availability framework by registering your applications with Oracle Clusterware and configuring the clusterware to start, stop, or relocate your application processes. That is, you can make custom applications highly available by using Oracle Clusterware to create profiles that monitor, relocate, and restart your applications.
See Also:
■ Chapter 3, "Cloning Oracle Clusterware to Create a Cluster" for step-by-step cloning procedures
■ Oracle Enterprise Manager online Help system for more information about the Provisioning Pack
■ Chapter 4, "Adding and Deleting Cluster Nodes"
See Also: Appendix F, "Oracle Clusterware C Application Program Interfaces" for more detailed information about the CLSCRS APIs
2
Administering Oracle Clusterware 2-1
2 Administering Oracle Clusterware
This chapter describes how to administer Oracle Clusterware and includes the following topics:
■ Cluster Time Management
■ Configuration and Installation for IPMI Node Fencing
■ Policy-Based Cluster and Capacity Management
■ Role-separated Management
■ Voting Disk, Oracle Cluster Registry, and Oracle Local Registry
■ Changing Network Addresses on Manually Configured Networks
Cluster Time ManagementThe Cluster Time Synchronization Service (CTSS) is installed as part of Oracle Clusterware and runs in observer mode if it detects a time synchronization service or a time synchronization service configuration, valid or broken, on the system.
If CTSS detects that there is no time synchronization service or time synchronization service configuration on any node in the cluster, then CTSS goes into active mode and takes over time management for the cluster.
When nodes join the cluster, if CTSS is in active mode, then it compares the time on those nodes to a reference clock located on one node in the cluster. If there is a discrepancy between the two times and the discrepancy is within a certain stepping limit, then CTSS steps the time of the nodes joining the cluster to synchronize them with the reference.
When Oracle Clusterware starts, if CTSS is running in active mode and the time discrepancy is outside the stepping limit, then CTSS generates an alert in the alert log, exits, and Oracle Clusterware startup fails. You must manually adjust the time of the nodes joining the cluster to synchronize with the cluster, after which Oracle Clusterware can start and CTSS can manage the time for the nodes.
Clocks on the nodes in the cluster become desynchronized with the reference clock periodically for various reasons. When this happens, CTSS either speeds up or slows down the clocks on the nodes until they synchronize with the reference clock. CTSS never runs time backward to synchronize with the reference clock. CTSS periodically writes alerts to the alert log containing information about how often it adjusts time on nodes to keep them synchronized with the reference clock.
To activate CTSS in your cluster, then stop and deconfigure the vendor time synchronization service on all nodes in the cluster. CTSS detects when this happens and assumes time management for the cluster.

Configuration and Installation for IPMI Node Fencing
2-2 Oracle Clusterware Administration and Deployment Guide
Similarly, if you want to deactivate CTSS in your cluster, then configure and start the vendor time synchronization service on all nodes in the cluster. CTSS detects this change and reverts back to observer mode.
Configuration and Installation for IPMI Node FencingThis section contains the following topics:
■ About Using IPMI for Node Fencing
■ About Node-termination Escalation with IPMI
■ Configuring Server Hardware for IPMI
■ Postinstallation Configuration of IPMI-based Failure Isolation Using crsctl
About Using IPMI for Node FencingTo support the member-kill escalation to node-termination, you must configure and use an external mechanism capable of restarting a problem node without cooperation either from Oracle Clusterware or from the operating system running on that node. To provide this capability, Oracle Clusterware 11g release 2 (11.2) supports the Intelligent Management Platform Interface specification (IPMI), an industry-standard management protocol.
Normally, you configure node termination using IPMI during installation, when you are provided with the option of configuring IPMI from the Failure Isolation Support screen. If you do not configure IPMI during installation, then you can configure it after installation using crsctl as described in this section.
About Node-termination Escalation with IPMITo use IPMI for node termination, each cluster member node must be equipped with a Baseboard Management Controller (BMC) running firmware compatible with IPMI version 1.5, which supports IPMI over a local area network (LAN). During database operation, member-kill escalation is accomplished by communication from the evicting CSSD daemon to the victim node’s BMC over LAN. The IPMI over LAN protocol is carried over an authenticated session protected by a user name and password, which are obtained from the administrator during installation.
However, CSSD requires direct communication with the local BMC during CSS startup to obtain the IP address of the BMC. This is accomplished using a BMC probe command (OSD), which communicates with the BMC through an IPMI driver, which must be installed on each cluster system. The following sub-sections describe the required operations and interfaces.
Configuring Server Hardware for IPMIEnsure that each node in the cluster has
■ Network Requirements for IPMI
■ IPMI Driver
■ About BMC Configuration
See Also: Oracle Grid Infrastructure Installation Guide for your platform for information about configuring NTP for Oracle Clusterware, or disabling it to use CTSS
Configuration and Installation for IPMI Node Fencing
Administering Oracle Clusterware 2-3
■ BMC Configuration Example Using ipmitool on Linux
■ BMC Configuration Example Using ipmiutil on Windows 2003 R2
Network Requirements for IPMIIPMI requires a management network. The management network should be a secure, dedicated network, but it may also be a shared, multi-purpose network. In either case, the Ethernet port used by the BMC on each node must be connected to the network used for server management.
To enable fencing with IPMI, Oracle Clusterware must have access to the management network, so that it can communicate with the BMCs on cluster member nodes. You can provide that access in one of the following ways:
■ Use the same network connection both for the private network for interconnects and the management network
■ Use forwarding of network traffic for the management network to the BMC addresses from the private network or some other network accessible to Oracle Clusterware.
For flexibility in network management, you can configure the BMC for dynamic IP address assignment using DHCP. The design and implementation of fencing using IPMI supports this and assumes this to be the normal case. To support dynamic addressing of BMCs, the network used for IPMI-based management must have a DHCP server to assign the BMC's IP address.
IPMI DriverThe IPMI driver must be permanently installed on each node, so that it is available when the node is started, so that Oracle Clusterware can communicate with the BMCs.
Typically, the IMPI hardware on a server node obtains its IP address using DHCP when the node starts. While other fencing configuration information is stored in Oracle Registries, dynamic address information must be obtained from the BMC when Oracle Clusterware starts.
Linux Driver for IPMI On Linux platforms, use the OpenIPMI driver. This driver is available with the following Linux distributions:
■ Oracle Enterprise Linux 5
■ Red Hat Enterprise Linux 5
■ Red Hat Enterprise Linux 4 Update 2
■ SUSE SLES10
For testing or configuration purposes, you can install the driver dynamically by manually loading the required modules. To install the driver manually, log in as root and execute the following commands:
# /sbin/modprobe ipmi_msghandler
Note: Some server platforms put their network interfaces into a power saving mode when they are powered off, with the result that they may operate only at a lower link speed (for example, 100MB instead of 1 GB). For these platforms, the network switch port to which the BMC is connected must be able to auto-negotiate down to the lower speed, or IPMI cannot function properly.
Configuration and Installation for IPMI Node Fencing
2-4 Oracle Clusterware Administration and Deployment Guide
# /sbin/modprobe ipmi_si# /sbin/modprobe ipmi_devintf
To confirm the modules are loaded, enter /sbin/lsmod |grep ipmi. For example:
# /sbin/lsmod | grep ipmiipmi_devintf 12617 0ipmi_si 33377 0ipmi_msghandler 33701 2 ipmi_devintf,ipmi_si
You can install these modules automatically by running the modprobe commands from an initialization script (for example, rc.local) when the nodes are started.
Access the OpenIPMI driver using the device special file /dev/ipmi0. You can display the file using the command ls -l /dev/ipmi0. For example:
# ls -l /dev/ipmi0crw------- 1 root root 253, 0 Sep 23 06:29 /dev/ipmi0
Linux systems are typically configured to recognize devices dynamically (hotplug, udev). However if you do not see the device file using the ls command, then udevd is not set up to create device files automatically, and you must create the device special file manually. To create the device file manually, you must first determine the device major number for the IPMI device. For example:
# grep ipmi /proc/devices253 ipmidev
In the preceding example, the displayed "253" is the major number. Use this number with the mknod command to create the device file. For example:
# mknod /dev/ipmi0 c 253 0x0
Note in the example that the permissions on /dev/ipmi0 allow the device to be opened only by root, as otherwise the system would be vulnerable.
About BMC ConfigurationFor IPMI-based fencing to function, the BMC hardware must be properly configured for remote control using a LAN. Requirements are the same for all platforms, but the configuration process is platform-dependent. The BMC configuration may be effected from the firmware interface (BIOS), using a platform-specific management utility or one of many publicly available utilities, which can be downloaded from the Internet. Two of the available utilities are ipmitool (http://ipmitool.sourceforge.net/), which is available for Linux, and ipmiutil (http://ipmiutil.sourceforge.net/), which is available for both Linux and Windows.
The BMC configuration must provide the following:
■ Enable IPMI over LAN, which permits the BMC to be controlled over the network.
■ Establish a static IP address, or enable dynamic IP-addressing using DHCP.
■ Establish an administrator account with user name and password.
■ Configure the BMC for VLAN tags, if the BMC is on a tagged VLAN
The configuration mechanism does not influence functionality if the above requirements are met.

Configuration and Installation for IPMI Node Fencing
Administering Oracle Clusterware 2-5
BMC Configuration Example Using ipmitool on LinuxThe following is an example of BMC configuration on Linux using ipmitool (version 1.8.6). Because the protection settings on the BMC device (/dev/ipmi0) restrict access to root, the following commands must be run with root privilege.
1. When the IPMI driver is loaded and the device special file is created, verify that ipmitool can communicate with the BMC using the driver using the command ipmitool bmc info. For example:
# ipmitool bmc infoDevice ID : 32...
2. Enable IPMI over LAN:
a. Determine the IPMI channel number for LAN (typically 1) by printing channel attributes, starting from channel "1" until the output shows typical LAN attributes, such as the IP address. For example:
# ipmitool lan print 1 . . . IP Address Source : 0x01IP Address : 192.0.2.244. . .
b. Turn on LAN access for the channel found. For example, where the LAN channel is 1:
# ipmitool lan set 1 access on
3. Configure IP address settings for IPMI
a. Use dynamic IP addressing (DHCP). This is the default assumed by the Oracle Universal Installer. Use of DHCP requires a DHCP-server on the subnet, but has the advantage of making the other addressing settings for you automatically. For example:
# ipmitool lan set 1 ipsrc dhcp
b. Use static IP address assignment. If the BMC shares a network connection, with the OS, then the IP address must be on the same subnet. You must set not only the IP address, but the proper values for netmask and default gateway for your network configuration.
# ipmitool lan set 1 ipaddr 192.168.0.55# ipmitool lan set 1 netmask 255.255.255.0# ipmitool lan set 1 defgw ipaddr 192.168.0.1
4. Establish an administration account with username and password.
a. Set BMC to require password authentication for ADMIN access over LAN. For example:
Note: The address that you specify in this example, 192.168.0.55, is associated only with the BMC and does not respond to normal pings.

Configuration and Installation for IPMI Node Fencing
2-6 Oracle Clusterware Administration and Deployment Guide
# ipmitool lan set 1 auth ADMIN MD5,PASSWORD
b. List the account slots on the BMC and identify an unused slot (a User ID with an empty User Name field - in this example):
# ipmitool channel getaccess 1. . . User ID : 4User Name :Fixed Name : NoAccess Available : call-in / callbackLink Authentication : disabledIPMI Messaging : disabledPrivilege Level : NO ACCESS. . .
c. Assign the administrator user name and password and enable messaging for the identified slot. (Note that for IPMI v1.5 the user name and password can be at most 16 characters). Finally, set the privilege level for that slot when accessed over LAN (channel 1) to ADMIN (level 4). For example, using the administrator IPMIadm and password myIPMIpwd:
# ipmitool user set name 4 IPMIadm# ipmitool user set password 4 myIPMIpwd# ipmitool user enable 4# ipmitool channel setaccess 1 4 privilege=4
5. Verify the setup after you complete configuration using the command ipmitool lan print. For example (note configuration settings in italic)
# ipmitool lan print 1Set in Progress : Set CompleteAuth Type Support : NONE MD2 MD5 PASSWORDAuth Type Enable : Callback : MD2 MD5 : User : MD2 MD5 : Operator : MD2 MD5 : Admin : MD5 PASSWORD : OEM : MD2 MD5IP Address Source : Static Address (or DHCP Address)IP Address : 192.168.0.55Subnet Mask : 255.255.255.0MAC Address : 00:14:22:23:fa:f9SNMP Community String : publicIP Header : TTL=0x40 Flags=0x40 Precedence=… Default Gateway IP : 192.168.0.1Default Gateway MAC : 00:00:00:00:00:00...# ipmitool channel getaccess 1 4Maximum User IDs : 10Enabled User IDs : 2User ID : 4User Name : IPMIadmFixed Name : NoAccess Available : call-in / callbackLink Authentication : enabledIPMI Messaging : enabledPrivilege Level : ADMINISTRATOR

Configuration and Installation for IPMI Node Fencing
Administering Oracle Clusterware 2-7
6. Verify that the BMC is accessible and controllable from a remote node in your cluster. For example, on node1, with user IPMIadm, and password IPMIpwd, enter the following command:
# ipmitool -H node1 -U IPMIadm -P IPMIpwd bmc info
This command should return the BMC information from the node.
BMC Configuration Example Using ipmiutil on Windows 2003 R2The following is an example of BMC configuration on Windows Server 2003 R2 using ipmiutil.exe (version 2.24). These operations should be executed in a command window while logged in with Administrator privileges.
1. When the IPMI driver is loaded and the device special file is created, verify that ipmiutil.exe can communicate with the BMC using the driver using the command ipmiutil.exe lan. For example:
C:\bin> ipmiutil.exe lanipmiutil ver 2.42PEFilter parameters displayed . . . pefconfig, GetLanEntry for channel 1 . . .Lan Param(0) Set in progress: 00...
2. Establish remote LAN access with ADMIN privilege (-v 4) and the IPMI administrator user name and password (ipmiutil.exe locates the LAN channel on its own). For example:
C:\bin> ipmiutil.exe lan -l -v 4 -u root -p password
3. Configure dynamic or static IP address settings for the BMC:
a. Use dynamic IP-addressing (DHCP). This is the default assumed by the Oracle Universal Installer. Use of DHCP requires a DHCP-server on the subnet, but has the advantage of making the other addressing settings for you automatically.
C:\bin> ipmiutil.exe lan -l -D
b. Use static IP address assignment. If the BMC shares a network connection wit the operating system, then the IP address must be on the same subnet. You must set not only the IP address, but also the proper values default gateway and net mask for your network configuration. For example:
C:\bin> ipmiutil.exe lan –l –I 192.0.2.244(IP addr)C:\bin> ipmiutil.exe lan -l –G 192.0.2.1(gateway IP)C:\bin> ipmiutil.exe lan –l –S 255.255.248.0(netmask)
Caution: ipmiutil.exe sets certain LAN parameters only in the context of enabling IPMI over LAN; for example, by supplying the -l option. This can have the undesired effect of resetting to default values of some previously established parameters if they are not supplied on the command line. For that reason, it is important to complete the following steps in order.
Configuration and Installation for IPMI Node Fencing
2-8 Oracle Clusterware Administration and Deployment Guide
Also, enabling IPMI over LAN with the -l option resets the subnet mask to a value obtained from the operating system. Thus, when setting parameters one at a time as in the above example, the -S option should be specified last.
4. Verify the setup after you complete configuration using the ipmiutil.exe lan command, which displays the configuration. For example (note configuration settings in italic):
C:\bin> ipmiutil.exe lan ipmiutil.exe ver 2.24pefconfig ver 2.23-- BMC version 1.40, IPMI version 1.5pefconfig, GetPefEntry ...PEFilter(01): 04 h ? event ... (ignore PEF entries)... pefconfig, GetLanEntry for channel 1 ...Lan Param(0) Set in progress: 00Lan Param(1) Auth type support: 17 : None MD2 MD5 PswdLan Param(2) Auth type enables: 16 16 16 16 00Lan Param(3) IP address: 192.0.2.244Lan Param(4) IP addr src: 01 : StaticLan Param(5) MAC addr: 00 11 43 d7 4f bdLan Param(6) Subnet mask: 255 255 248 0Lan Param(7) IPv4 header: 40 40 10GetLanEntry: completion code=ccGetLanEntry(10), ret = -1GetLanEntry: completion code=ccGetLanEntry(11), ret = -1Lan Param(12) Def gateway IP: 192.0.2.1Lan Param(13) Def gateway MAC: 00 00 0c 07 ac dc...Get User Access(1): 0a 01 01 0f : No access ()Get User Access(2): 0a 01 01 14 : IPMI, Admin (root)Get User Access(3): 0a 01 01 0f : No access ()pefconfig, completed successfully
5. Use the ipmiutil.exe command to verify that the BMC is accessible and controllable from a remote node in your cluster. For example, where the IPMI administrator is root, and the node you are checking is node1:
C:\bin> ipmitutil.exe -N node1 -U root -P passwordipmiutil ver 2.42
This command should return the LAN configuration from the node.
Postinstallation Configuration of IPMI-based Failure Isolation Using crsctlThis section contains the following topics:
■ IPMI Postinstallation Registration with Oracle Clusterware
■ Modifying Configurations with IPMI Postinstallation Configuration Utility
Note: The address that you specify in this example, 192.0.244, is associated only with the BMC and does not respond to normal pings.
Configuration and Installation for IPMI Node Fencing
Administering Oracle Clusterware 2-9
IPMI Postinstallation Registration with Oracle ClusterwareWhen IPMI is installed during Oracle Clusterware installation, Failure Isolation is configured in two phases. Before you start installation, you install and enable the IPMI driver in the server operating system, and configure the IPMI hardware on each node (IP address mode, admin credentials, and so on). When you start Oracle Clusterware installation, the installer collects the IPMI administrator user ID and password, and stores them in an Oracle Wallet in node-local storage, in the Oracle Local Registry.
With postinstallation configuration, install and enable the IPMI driver, and configure the BMC as described in the preceding section, "Configuring Server Hardware for IPMI" on page 2-2.
After you have completed the server configuration, complete the following procedure on each cluster node to register IPMI administrators and passwords on the nodes.
1. Start Oracle Clusterware, which allows it to obtain the current IP address from the BMC. This confirms the ability of the clusterware to communicate with the BMC, which is necessary at startup.
If the clusterware was running before the BMC was configured, you can shut it down and restart it. Alternatively, you can use the BMC management utility to obtain the BMC’s IP address and then use the cluster control utility crsctl to store the BMC’s IP address in the Oracle Registry by issuing a command similar to the following:
crsctl set css ipmiaddr 192.168.10.45
2. Use the cluster control utility crsctl to store the previously established user ID and password for the resident BMC in the Oracle Registry by issuing the crsctl set css ipmiadmin command, and supplying the administrator and password at the prompt. For example:
crsctl set css ipmiadmin youradminIPMI BMC password: yourpassword
This command validates the supplied credentials and fails if another cluster node cannot access the local BMC using them.
After you complete hardware and operating system configuration, and register the IPMI administrator on Oracle Clusterware, IPMI-based Failure Isolation should be fully functional.
Modifying Configurations with IPMI Postinstallation Configuration UtilityTo modify an existing IPMI-based fencing configuration (for example to change BMC passwords, or to configure IPMI for fencing in an existing installation), use the cluster configuration utility crsctl with the BMC configuration tool appropriate to your platform. For example, to change the administrator password for the BMC, you must first modify the BMC configuration as described in "Configuring Server Hardware for IPMI" on page 2, and then use crsctl to inform the clusterware that the password has changed.
The configuration data needed by Oracle Clusterware for IPMI is kept in an Oracle Wallet in the Oracle Registry. Because the configuration information is kept in a secure
Note: If the BMC is configured to obtain its IP address using DHCP, it may be necessary to reset the BMC or restart the node to cause it to obtain an address.
Policy-Based Cluster and Capacity Management
2-10 Oracle Clusterware Administration and Deployment Guide
store, it must be written by the Oracle Clusterware installation owner account (the Grid user), so you must log in as that installation user.
Use the following procedure to modify an existing IPMI configuration:
1. Enter the command crsctl set css ipmiadmin admin_name. For example, with the user IPMIadm:
$ crsctl set css ipmiadmin IPMIadm
Provide the administrator password. Oracle Clusterware stores the administrator name and password for the local BMC in the Oracle Local Registry.
After storing the new credentials, Oracle Clusterware can retrieve the new credentials and distribute them as required.
2. Enter the command crsctl set css ipmiaddr bmc_ip_address. For example:
$ crsctl set css ipmiaddr 192.0.2.244
This command stores the new BMC IP address of the local BMC in the Oracle Registry, After storing the BMC IP address, Oracle Clusterware can retrieve the new configuration and distribute it as required.
3. Enter the command crsctl get css ipmiaddr. For example:
$ crsctl get css ipmiaddr
This command retrieves the IP address for the local BMC from the Oracle Registry and displays it on the console.
Policy-Based Cluster and Capacity ManagementThis section contains the following topics:
■ Overview of Server Pools and Policy-based Management
■ Server Attributes Assigned by Oracle Clusterware
■ Understanding Server Pools
■ How Oracle Clusterware Assigns New Servers
Overview of Server Pools and Policy-based ManagementWith Oracle Clusterware 11g release 2 (11.2) and later, resources managed by Oracle Clusterware are contained in logical groups of servers called server pools. Resources are hosted on a shared infrastructure and are contained within server pools. The resources are restricted with respect to their hardware resource (such as CPU and memory) consumption by policies, behaving as if they were deployed in a single-system environment.
You can choose to manage resources dynamically using server pools to provide policy-based management of resources in the cluster, or you can choose to manage resources using the traditional method of physically assigning resources to run on particular nodes.
Policy-based management:
■ Enables dynamic capacity assignment when needed to provide server capacity in accordance with the priorities you set with policies
Policy-Based Cluster and Capacity Management
Administering Oracle Clusterware 2-11
■ Enables allocation of resources by importance, so that applications obtain the required minimum resources, whenever possible, and so that lower priority applications do not take resources from more important applications
■ Ensures isolation where necessary, so that you can provide dedicated servers in a cluster for applications and databases
Applications and databases running in server pools do not share resources. Because of this, server pools isolate resources where necessary, but enable dynamic capacity assignments as required. Together with role-separated management, this capability addresses the needs of organizations that have a standardized cluster environments, but allow multiple administrator groups to share the common cluster infrastructure.
Oracle Clusterware efficiently allocates different resources in the cluster. You need only to provide the minimum and maximum number of nodes on which a resource can run, combined with a level of importance for each resource that is running on these nodes.
Server Attributes Assigned by Oracle ClusterwareOracle Clusterware assigns each server a set of attributes as soon as you add a server to a cluster. If you remove the server from the cluster, then Oracle Clusterware revokes those settings. Table 2–1 lists and describes server attributes.
See Also: Appendix B, "Oracle Clusterware Resource Reference" for more information about resource attributes
Table 2–1 Server Attributes
Attribute Description
NAME The node name of the server. A server name can contain any platform-supported characters except the exclamation point (!) and the tilde (~). A server name cannot begin with a period, or with ora. This attribute is required.
ACTIVE_POOLS A space-delimited list of the names of the server pools to which a server belongs. Oracle Clusterware manages this list, automatically.
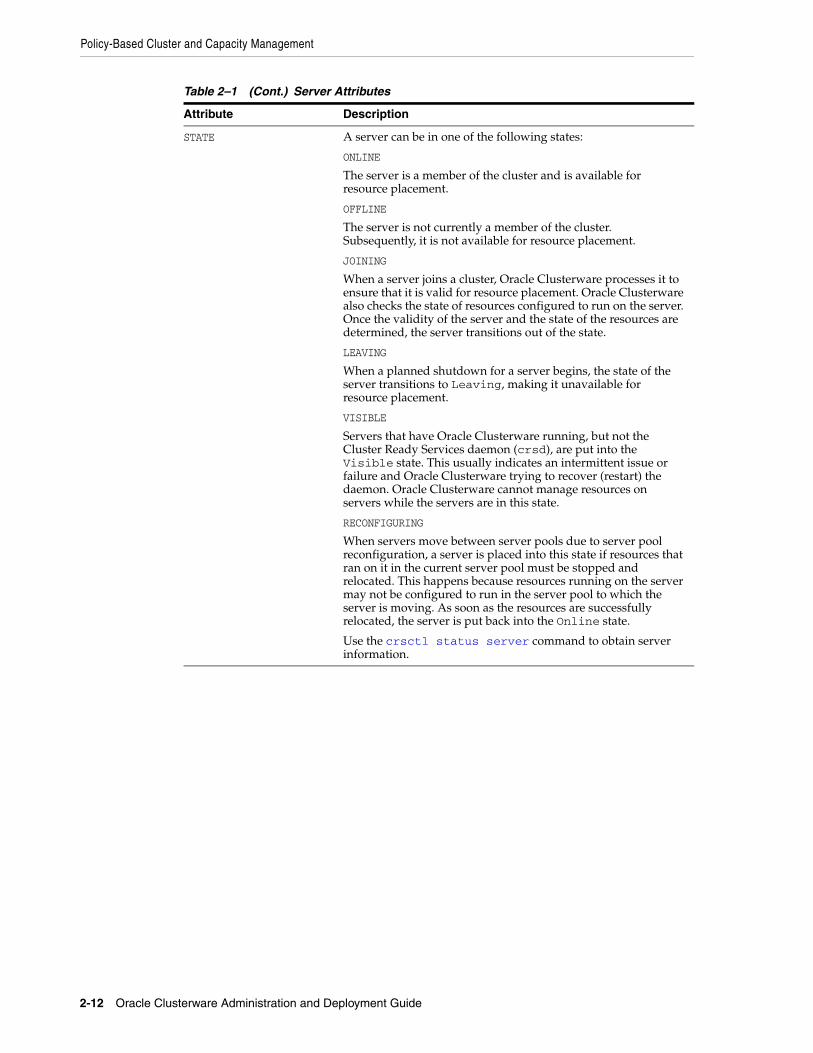
Policy-Based Cluster and Capacity Management
2-12 Oracle Clusterware Administration and Deployment Guide
STATE A server can be in one of the following states:
ONLINE
The server is a member of the cluster and is available for resource placement.
OFFLINE
The server is not currently a member of the cluster. Subsequently, it is not available for resource placement.
JOINING
When a server joins a cluster, Oracle Clusterware processes it to ensure that it is valid for resource placement. Oracle Clusterware also checks the state of resources configured to run on the server. Once the validity of the server and the state of the resources are determined, the server transitions out of the state.
LEAVING
When a planned shutdown for a server begins, the state of the server transitions to Leaving, making it unavailable for resource placement.
VISIBLE
Servers that have Oracle Clusterware running, but not the Cluster Ready Services daemon (crsd), are put into the Visible state. This usually indicates an intermittent issue or failure and Oracle Clusterware trying to recover (restart) the daemon. Oracle Clusterware cannot manage resources on servers while the servers are in this state.
RECONFIGURING
When servers move between server pools due to server pool reconfiguration, a server is placed into this state if resources that ran on it in the current server pool must be stopped and relocated. This happens because resources running on the server may not be configured to run in the server pool to which the server is moving. As soon as the resources are successfully relocated, the server is put back into the Online state.
Use the crsctl status server command to obtain server information.
Table 2–1 (Cont.) Server Attributes
Attribute Description

Policy-Based Cluster and Capacity Management
Administering Oracle Clusterware 2-13
Understanding Server PoolsThis section contains the following topics:
■ How Server Pools Work
■ The Free Server Pool
■ The Generic Server Pool
■ Servers Moving from Server Pool to Server Pool
How Server Pools WorkServer pools divide the cluster into groups of servers hosting the same or similar resources. They distribute a uniform workload (a set of Oracle Clusterware resources) over several servers in the cluster. For example, you can restrict Oracle databases to run only in a particular server pool. When you enable role-separated management, you can explicitly grant permission to operating system users to change attributes of certain server pools.
Top-level server pools:
STATE_DETAILS This is a read-only attribute that Oracle Clusterware manages. The attribute provides additional details about the state of a server. Possible additional details about a server state are:
Server state: ONLINE:
■ AUTOSTARTING RESOURCES
Indicates that the resource autostart procedure (performed when a server reboots or the Oracle Clusterware stack is restarted) is in progress for the server.
■ AUTOSTART QUEUED
The server is waiting for the resource autostart to commence. Once that happens, the attribute value changes to AUTOSTARTING RESOURCES.
Server state: RECONFIGURING:
■ STOPPING RESOURCES
Resources that are restricted from running in a new server pool are stopping.
■ STARTING RESOURCES
Resources that can run in a new sever pool are starting.
■ RECONFIG FAILED
One or more resources did not stop and thus the server cannot transition into the ONLINE state. At this point, manual intervention is required. You must stop or unregister resources that did not stop. After that, the server automatically transitions into the ONLINE state.
Server state: JOINING:
■ CHECKING RESOURCES
Whenever a server reboots, the Oracle Clusterware stack restarts, or crsd on a server restarts, the policy engine must determine the current state of the resources on the server. While that procedure is in progress, this value is returned.
Table 2–1 (Cont.) Server Attributes
Attribute Description

Policy-Based Cluster and Capacity Management
2-14 Oracle Clusterware Administration and Deployment Guide
■ Logically divide the cluster
■ Are always exclusive, meaning that one server can only reside in one particular server pool at a certain point in time
Server pools each have three attributes that they are assigned when they are created:
■ MIN_SIZE: The minimum number of servers the server pool should contain. If the number of servers in a server pool is below the value of this attribute, then Oracle Clusterware automatically moves servers from elsewhere into the server pool until the number of servers reaches the attribute value.
■ MAX_SIZE: The maximum number of servers the server pool should contain.
■ IMPORTANCE: A number from 0 to 1000 (0 being least important) that ranks a server pool among all other server pools in a cluster.
When Oracle Clusterware is installed, two server pools are created automatically: Generic and Free. All servers in a new installation are assigned to the Free server pool, initially. Servers move from Free to newly defined server pools automatically. When you upgrade Oracle Clusterware, all nodes are assigned to the Generic server pool, to ensure compatibility with database releases before Oracle Database 11g release 2 (11.2).
The Free Server PoolThe Free server pool contains servers that are not assigned to any other server pools. The attributes of the Free server pool are restricted, as follows:
■ SERVER_NAMES, MIN_SIZE, and MAX_SIZE cannot be edited by the user
■ IMPORTANCE and ACL can be edited by the user
The Generic Server PoolThe Generic server pool stores pre-11g release 2 (11.2) databases and administrator-managed databases that have fixed configurations. Additionally, the Generic server pool contains servers that match either of the following:
■ Servers that you specified in the HOSTING_MEMBERS attribute of all resources of the application resource type
■ Servers with names you specified in the SERVER_NAMES attribute of the server pools that list the Generic server pool as a parent server pool
The Generic server pool’s attributes are restricted, as follows:
■ No one can modify configuration attributes of the Generic server pool (all attributes are read-only)
■ When you specify a server name in the HOSTING_MEMBERS attribute, Oracle Clusterware only allows it if the server is:
– Online and exists in the Generic server pool
– Online and exists in the Free server pool, in which case Oracle Clusterware moves the server into the Generic server pool
– Online and exists in any other server pool and the client is either a cluster administrator or is allowed to use the server pool’s servers, in which case, the server is moved into the Generic server pool
See Also: "HOSTING_MEMBERS" on page B-6 for more information about this attribute

Policy-Based Cluster and Capacity Management
Administering Oracle Clusterware 2-15
– Offline and the client is a cluster administrator
■ When you register a child server pool with the Generic server pool, Oracle Clusterware only allows it if the server names pass the same requirements as previously specified for the resources.
Servers are initially considered for assignment into the Generic server pool at cluster startup time or when a server is added to the cluster, and only after that to other server pools.
How Oracle Clusterware Assigns Servers to Server PoolsWhen a server joins the cluster, Oracle Clusterware assigns the server to a server pool in the following order:
1. Until all server pools are filled in order of importance to their minimum (MIN_SIZE).
2. Until all server pools are filled in order of importance to their maximum (MAX_SIZE).
3. By default, any servers not placed in a server pool go into the Free server pool.
You can modify the IMPORTANCE attribute for the Free server pool.
Servers Moving from Server Pool to Server PoolIf the number of servers in a server pool falls below the value of the MIN_SIZE attribute for the server pool (such as when a server fails), based on values you set for the MIN_SIZE and IMPORTANCE attributes for all server pools, Oracle Clusterware can move servers from other server pools into the server pool whose number of servers has fallen below the value for MIN_SIZE. Oracle Clusterware selects servers from other server pools to move into the deficient server pool that meet the following criteria:
■ For server pools that have a lower IMPORTANCE value than the deficient server pool, Oracle Clusterware can take servers from those server pools even if it means that the number of servers falls below the value for the MIN_SIZE attribute.
■ For server pools with equal or greater IMPORTANCE, Oracle Clusterware only takes servers from those server pools if the number of servers in a server pool is greater than the value of its MIN_SIZE attribute.
Table 2–2 lists and describes all server pool attributes.
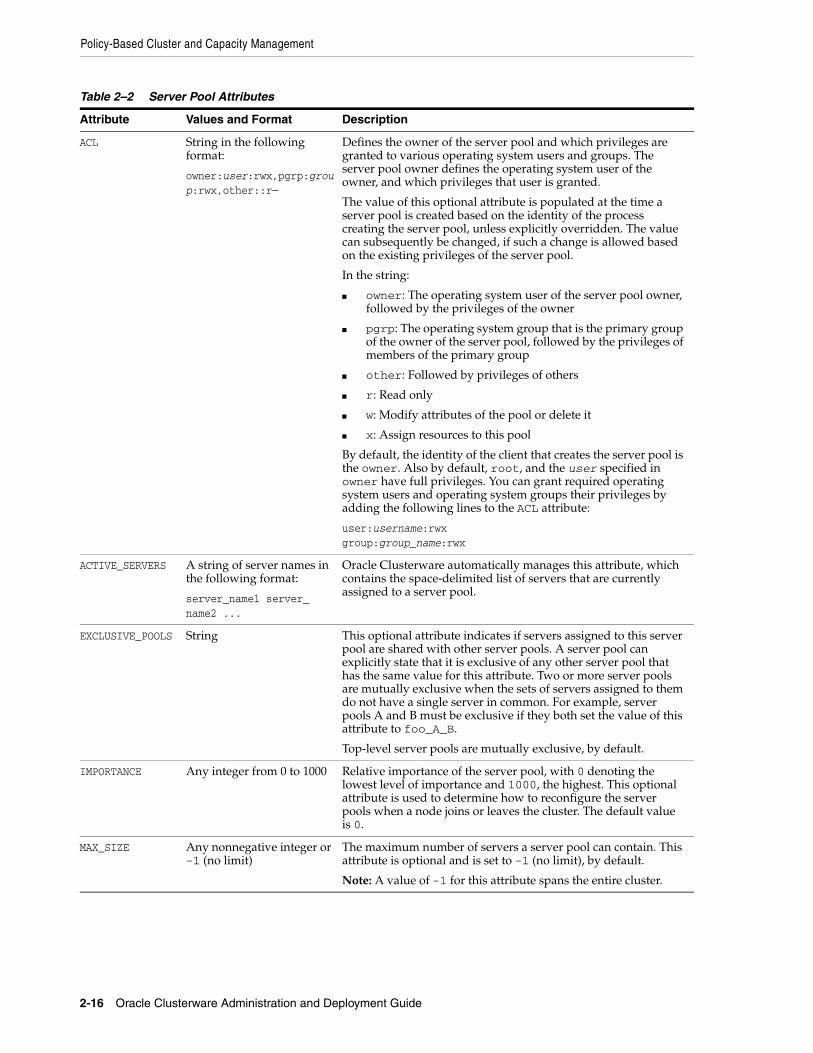
Policy-Based Cluster and Capacity Management
2-16 Oracle Clusterware Administration and Deployment Guide
Table 2–2 Server Pool Attributes
Attribute Values and Format Description
ACL String in the following format:
owner:user:rwx,pgrp:group:rwx,other::r—
Defines the owner of the server pool and which privileges are granted to various operating system users and groups. The server pool owner defines the operating system user of the owner, and which privileges that user is granted.
The value of this optional attribute is populated at the time a server pool is created based on the identity of the process creating the server pool, unless explicitly overridden. The value can subsequently be changed, if such a change is allowed based on the existing privileges of the server pool.
In the string:
■ owner: The operating system user of the server pool owner, followed by the privileges of the owner
■ pgrp: The operating system group that is the primary group of the owner of the server pool, followed by the privileges of members of the primary group
■ other: Followed by privileges of others
■ r: Read only
■ w: Modify attributes of the pool or delete it
■ x: Assign resources to this pool
By default, the identity of the client that creates the server pool is the owner. Also by default, root, and the user specified in owner have full privileges. You can grant required operating system users and operating system groups their privileges by adding the following lines to the ACL attribute:
user:username:rwxgroup:group_name:rwx
ACTIVE_SERVERS A string of server names in the following format:
server_name1 server_name2 ...
Oracle Clusterware automatically manages this attribute, which contains the space-delimited list of servers that are currently assigned to a server pool.
EXCLUSIVE_POOLS String This optional attribute indicates if servers assigned to this server pool are shared with other server pools. A server pool can explicitly state that it is exclusive of any other server pool that has the same value for this attribute. Two or more server pools are mutually exclusive when the sets of servers assigned to them do not have a single server in common. For example, server pools A and B must be exclusive if they both set the value of this attribute to foo_A_B.
Top-level server pools are mutually exclusive, by default.
IMPORTANCE Any integer from 0 to 1000 Relative importance of the server pool, with 0 denoting the lowest level of importance and 1000, the highest. This optional attribute is used to determine how to reconfigure the server pools when a node joins or leaves the cluster. The default value is 0.
MAX_SIZE Any nonnegative integer or -1 (no limit)
The maximum number of servers a server pool can contain. This attribute is optional and is set to -1 (no limit), by default.
Note: A value of -1 for this attribute spans the entire cluster.
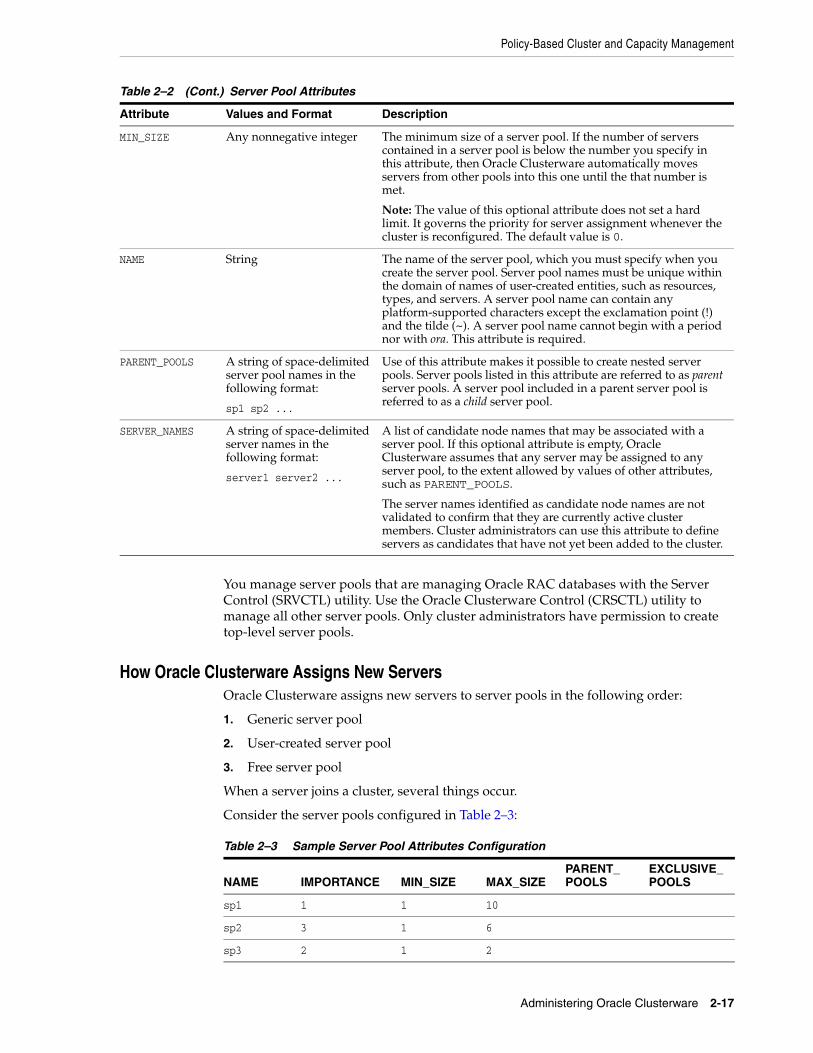
Policy-Based Cluster and Capacity Management
Administering Oracle Clusterware 2-17
You manage server pools that are managing Oracle RAC databases with the Server Control (SRVCTL) utility. Use the Oracle Clusterware Control (CRSCTL) utility to manage all other server pools. Only cluster administrators have permission to create top-level server pools.
How Oracle Clusterware Assigns New ServersOracle Clusterware assigns new servers to server pools in the following order:
1. Generic server pool
2. User-created server pool
3. Free server pool
When a server joins a cluster, several things occur.
Consider the server pools configured in Table 2–3:
MIN_SIZE Any nonnegative integer The minimum size of a server pool. If the number of servers contained in a server pool is below the number you specify in this attribute, then Oracle Clusterware automatically moves servers from other pools into this one until the that number is met.
Note: The value of this optional attribute does not set a hard limit. It governs the priority for server assignment whenever the cluster is reconfigured. The default value is 0.
NAME String The name of the server pool, which you must specify when you create the server pool. Server pool names must be unique within the domain of names of user-created entities, such as resources, types, and servers. A server pool name can contain any platform-supported characters except the exclamation point (!) and the tilde (~). A server pool name cannot begin with a period nor with ora. This attribute is required.
PARENT_POOLS A string of space-delimited server pool names in the following format:
sp1 sp2 ...
Use of this attribute makes it possible to create nested server pools. Server pools listed in this attribute are referred to as parent server pools. A server pool included in a parent server pool is referred to as a child server pool.
SERVER_NAMES A string of space-delimited server names in the following format:
server1 server2 ...
A list of candidate node names that may be associated with a server pool. If this optional attribute is empty, Oracle Clusterware assumes that any server may be assigned to any server pool, to the extent allowed by values of other attributes, such as PARENT_POOLS.
The server names identified as candidate node names are not validated to confirm that they are currently active cluster members. Cluster administrators can use this attribute to define servers as candidates that have not yet been added to the cluster.
Table 2–3 Sample Server Pool Attributes Configuration
NAME IMPORTANCE MIN_SIZE MAX_SIZEPARENT_POOLS
EXCLUSIVE_POOLS
sp1 1 1 10
sp2 3 1 6
sp3 2 1 2
Table 2–2 (Cont.) Server Pool Attributes
Attribute Values and Format Description
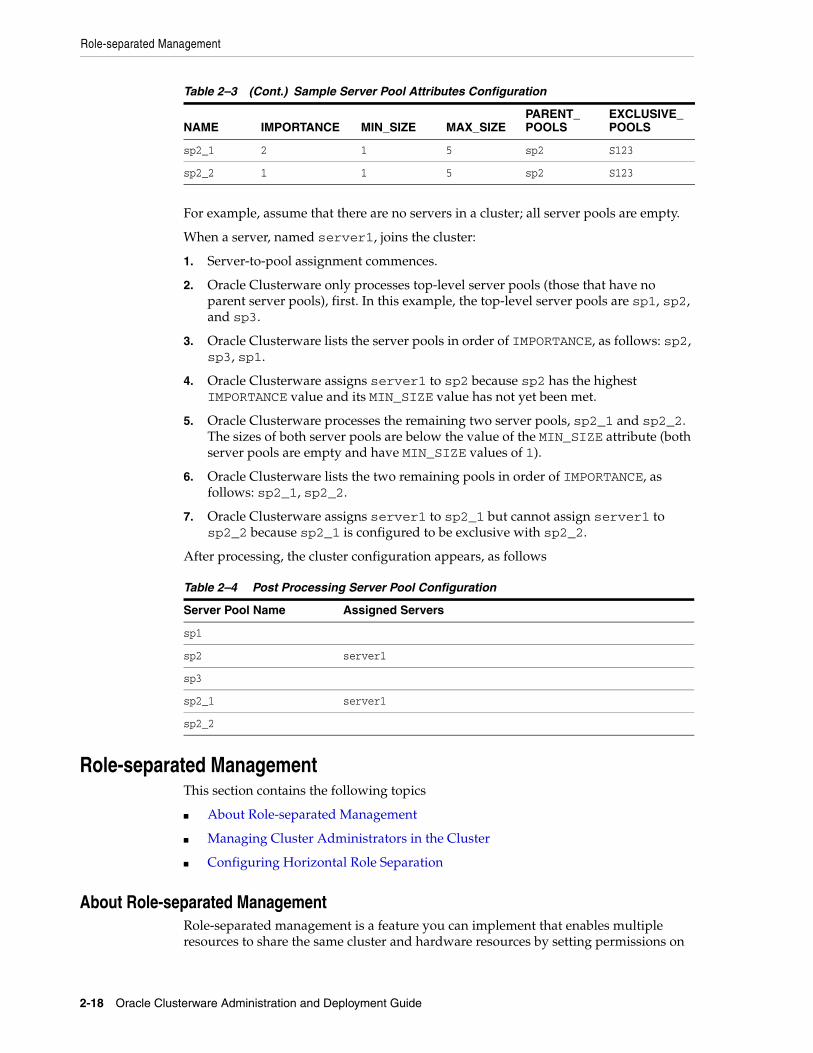
Role-separated Management
2-18 Oracle Clusterware Administration and Deployment Guide
For example, assume that there are no servers in a cluster; all server pools are empty.
When a server, named server1, joins the cluster:
1. Server-to-pool assignment commences.
2. Oracle Clusterware only processes top-level server pools (those that have no parent server pools), first. In this example, the top-level server pools are sp1, sp2, and sp3.
3. Oracle Clusterware lists the server pools in order of IMPORTANCE, as follows: sp2, sp3, sp1.
4. Oracle Clusterware assigns server1 to sp2 because sp2 has the highest IMPORTANCE value and its MIN_SIZE value has not yet been met.
5. Oracle Clusterware processes the remaining two server pools, sp2_1 and sp2_2. The sizes of both server pools are below the value of the MIN_SIZE attribute (both server pools are empty and have MIN_SIZE values of 1).
6. Oracle Clusterware lists the two remaining pools in order of IMPORTANCE, as follows: sp2_1, sp2_2.
7. Oracle Clusterware assigns server1 to sp2_1 but cannot assign server1 to sp2_2 because sp2_1 is configured to be exclusive with sp2_2.
After processing, the cluster configuration appears, as follows
Role-separated ManagementThis section contains the following topics
■ About Role-separated Management
■ Managing Cluster Administrators in the Cluster
■ Configuring Horizontal Role Separation
About Role-separated ManagementRole-separated management is a feature you can implement that enables multiple resources to share the same cluster and hardware resources by setting permissions on
sp2_1 2 1 5 sp2 S123
sp2_2 1 1 5 sp2 S123
Table 2–4 Post Processing Server Pool Configuration
Server Pool Name Assigned Servers
sp1
sp2 server1
sp3
sp2_1 server1
sp2_2
Table 2–3 (Cont.) Sample Server Pool Attributes Configuration
NAME IMPORTANCE MIN_SIZE MAX_SIZEPARENT_POOLS
EXCLUSIVE_POOLS
Role-separated Management
Administering Oracle Clusterware 2-19
server pools or resources, and then using access control lists (ACLs) to provide access. By default, this feature is not implemented during installation.
Role-separated management can be implemented in two ways:
■ Vertical implementation: Access permissions to server pools or resources are granted by assigning ownership of them to different users for each layer in the stack, and using ACLs assigned to those users. Oracle ASM provides an even more granular approach using groups. Careful planning is required to enable overlapping tasks.
■ Horizontal implementation: Access permissions for resources are granted using ACLS assigned to server pools and policy-managed databases or applications.
Role-separated management in Oracle Clusterware depends on a cluster administrator. The set of users that are cluster administrators is managed within Oracle Clusterware, as opposed to being an operating system group. By default, after an Oracle grid infrastructure for a cluster installation or after an upgrade, all users are cluster administrators (denoted by the asterisk (*) in the list of cluster administrators). However, the user that installed Oracle Clusterware in the Grid infrastructure home (Grid home) and root are permanent cluster administrators, and only these two users can add or remove users from the group. Additionally, only a permanent cluster administrator can remove the asterisk (*) value from the cluster administrator group, changing the group to enable role-separation management. When you enable this feature, you can limit the cluster administrator group to only those users added by the permanent cluster administrators.
If the cluster is shared by various users, then the cluster administrator can restrict access to certain server pools and, consequently, to certain hardware resources to specific users in the cluster. The permissions are stored for each server pool in the ACL attribute, described in Table 2–2.
Managing Cluster Administrators in the ClusterUse the following commands to manage cluster administrators in the cluster:
■ To query the list of users that are cluster administrators:
$ crsctl query crs administrator
■ To enable role-separated management, you must remove the * value from the list of cluster administrators, as either the user who installed Oracle Clusterware or root, as follows:
# crsctl delete crs administrator -u "*"
The asterisk (*) must be enclosed in double quotation marks ("").
■ To add specific users to the group of cluster administrators:
# crsctl add crs administrator -u user_name
To make all users cluster administrators, enter -u "*".
■ To remove specific users from the group of cluster administrators:
# crsctl delete crs administrator -u user_name
Configuring Horizontal Role SeparationUse the crsctl command crsctl setperm to configure horizontal role separation using ACLs that are assigned to server pools, resources, or both. The crsctl
Role-separated Management
2-20 Oracle Clusterware Administration and Deployment Guide
command is located in the path Grid_home/bin, where Grid_home is the Oracle grid infrastructure for a cluster home.
The command uses the following syntax, where the access control string (ACL) is indicated by italics:
crsctl setperm {resource|type|serverpool} name {-u aclstring|-x aclstring|-o user_name|-g group_name}
The flag options are:
■ -u
Update the entity ACL
■ -x
Delete the entity ACL
■ -o
Change the entity owner
■ -g
Change the entity primary group
The ACL strings are:
{ user:user_name[:readPermwritePermexecPerm] | group:group_name[:readPermwritePermexecPerm] | other[::readPermwritePermexecPerm] }where:
■ user
designates the user ACL (access permissions granted to the designated user)
■ group
designates the group ACL (permissions granted to the designated group members)
■ other
designates the other ACL (access granted to users or groups not granted particular access permissions)
■ readperm
Location of the read permission; r grants, and - forbids)
■ writeperm
Location of the write permission; w grants, and - forbids)
■ execperm
Location of the execute permission; x grants, and - forbids)
For example, to set permissions on a server pool called psft for the group personnel, where the administrative user has read/write/execute privileges, the psft group has read/write privileges, and users outside of the group are granted no access, enter the following command as the root user:
# crsctl setperm serverpool psft -o personadmin -g personnel:rwxr-w---
Voting Disk, Oracle Cluster Registry, and Oracle Local Registry
Administering Oracle Clusterware 2-21
Voting Disk, Oracle Cluster Registry, and Oracle Local RegistryThis section includes the following topics:
■ About Voting Disks, Oracle Cluster Registry, and Oracle Local Registry
■ Managing Voting Disks
■ Managing the Oracle Cluster Registry and Oracle Local Registries
■ Troubleshooting Oracle Cluster Registry and Diagnostic Output
About Voting Disks, Oracle Cluster Registry, and Oracle Local RegistryOracle Clusterware includes three components: voting disks, Oracle Cluster Registry (OCR), and Oracle Local Registry (OLR).
■ Voting disks manage information about node membership. Each voting disk must be accessible by all nodes in the cluster for nodes to be members of the cluster
■ OCR manages Oracle Clusterware and Oracle RAC database configuration information
■ OLR resides on every node in the cluster and manages Oracle Clusterware configuration information for each particular node
You can store voting disks and the OCR on Oracle Automatic Storage Management (Oracle ASM), or a certified cluster file system.
Oracle Universal Installer for Oracle Clusterware 11g release 2 (11.2), does not support the use of raw or block devices. However, if you upgrade from a previous Oracle Clusterware release, then you can continue to use raw or block devices. Oracle recommends that you use Oracle ASM to store voting disks and OCR.
Oracle recommends that you select the option to configure multiple voting disks during Oracle Clusterware installation to improve availability. If necessary, you can dynamically add or replace voting disks after you complete the Oracle Clusterware installation process without stopping the cluster.
Oracle recommends that you select the option to configure multiple OCRs during Oracle Clusterware installation to improve availability. If necessary, you can dynamically add or replace OCRs after you complete the Oracle Clusterware installation process without stopping the cluster.
Managing Voting DisksThis section includes the following topics for managing voting disks in your cluster:
■ Storing Voting Disks on Oracle ASM
■ Backing Up Voting Disks
■ Restoring Voting Disks
■ Adding, Deleting, or Migrating Voting Disks
Voting Disk, Oracle Cluster Registry, and Oracle Local Registry
2-22 Oracle Clusterware Administration and Deployment Guide
Storing Voting Disks on Oracle ASMOracle ASM manages voting disks differently from other files that it stores. When you place voting disks on disks in an Oracle ASM disk group, Oracle Clusterware records exactly where they are located. If Oracle ASM fails, then Cluster Synchronization Services (CSS) can still access the voting disks.
If you choose to store your voting disks in Oracle ASM, then Oracle ASM stores all the voting disks for the cluster.
The number of voting files you can store in a particular Oracle ASM disk group depends upon the redundancy of the disk group.
■ External redundancy: A disk group with external redundancy can store only one voting disk
■ Normal redundancy: A disk group with normal redundancy can store up to three voting disks
■ High redundancy: A disk group with high redundancy can store up to five voting disks
By default, Oracle ASM puts each voting disk in its own failure group within the disk group. A failure group is a subset of the disks in a disk group, which could fail at the same time because they share hardware. The failure of common hardware must be tolerated. For example, four drives that are in a single removable tray of a large JBOD (Just a Bunch of Disks) array are in the same failure group because the tray could be removed, making all four drives fail at the same time.
Conversely, drives in the same cabinet can be in multiple failure groups if the cabinet has redundant power and cooling so that it is not necessary to protect against failure of the entire cabinet. However, Oracle ASM mirroring is not intended to protect against a fire in the computer room that destroys the entire cabinet. If voting disks stored on Oracle ASM with Normal or High redundancy, and the storage hardware in one failure group suffers a failure, then if there is another disk available in a disk group in an unaffected failure group, Oracle ASM recovers the voting disk in the unaffected failure group.
Notes:
■ Voting disk backups are stored in OCR.
■ Voting disk management requires a valid and working OCR. Before you add, delete, replace, or restore voting disks, run the ocrcheck command as root. If OCR is not available or it is corrupt, then you must restore OCR as described in "Restoring Oracle Cluster Registry" on page 2-34.
■ If you upgrade from a previous version of Oracle Clusterware to 11g release 2 (11.2) and you want to store voting disks in an Oracle ASM disk group, then you must set the ASM Compatibility (COMPATIBLE.ASM) compatibility attribute to 11.2.0.0.
See Also:
■ Oracle Database Storage Administrator's Guide for information about setting Oracle ASM compatibility attributes
■ Oracle Database Administrator's Guide for information about creating server parameter files
Voting Disk, Oracle Cluster Registry, and Oracle Local Registry
Administering Oracle Clusterware 2-23
A normal redundancy disk group must contain at least two failure groups but if you are storing your voting disks on Oracle ASM, then a normal redundancy disk group must contain at least three failure groups. A high redundancy disk group must contain at least three failure groups. However, Oracle recommends using several failure groups. A small number of failure groups, or failure groups of uneven capacity, can create allocation problems that prevent full use of all of the available storage.
You must specify enough failure groups in each disk group to support the redundancy type for that disk group.
Backing Up Voting DisksIn Oracle Clusterware 11g release 2 (11.2), you no longer have to back up the voting disk. The voting disk data is automatically backed up in OCR as part of any configuration change and is automatically restored to any voting disk added. If all voting disks are corrupted, however, you can restore them as described in "Restoring Voting Disks" on page 2-23.
Restoring Voting DisksIf you have multiple voting disks, then you can remove the voting disks and add them back into your environment using the following commands, where GUID is the file universal identifier of the voting disk and path_to_voting_disk is the directory path to the voting disk:
$ crsctl delete css votedisk FUID$ crsctl add css votedisk path_to_voting_disk
Run the crsctl query css votedisk command to obtain the GUIDs of the voting disks in the cluster.
If all of the voting disks are corrupted, then you can restore them, as follows:
1. Restore OCR as described in "Restoring Oracle Cluster Registry" on page 2-34, if necessary.
This step is necessary only if OCR is also corrupted or otherwise unavailable, such as if OCR is on Oracle ASM and the disk group is no longer available.
2. Run the following command as root from only one node to start the Oracle Clusterware stack in exclusive mode, which does not require voting files to be present or usable:
# crsctl start crs -excl
3. Run the following command to retrieve the list of voting files currently defined:
$ crsctl query css votedisk
See Also:
■ Oracle Database Storage Administrator's Guide for more information about disk group redundancy and failure groups
■ "Adding, Deleting, or Migrating Voting Disks" on page 2-24 for information about migrating voting disks
See Also: Oracle Database Storage Administrator's Guide for more information about managing Oracle ASM disk groups

Voting Disk, Oracle Cluster Registry, and Oracle Local Registry
2-24 Oracle Clusterware Administration and Deployment Guide
This list may be empty if all voting disks are corrupted, or may have entries that are marked as status 3 or OFF.
4. Depending on where you store your voting files, do one of the following:
■ If the voting disks are stored in Oracle ASM, then run the following command to migrate the voting disks to the Oracle ASM disk group you specify:
crsctl replace votedisk +asm_disk_group
The Oracle ASM disk group to which you migrate the voting files must exist in Oracle ASM. You can use this command whether the voting disks were stored in Oracle ASM or some other storage device.
■ If voting disks are OFFLINE and are not stored in Oracle ASM (as indicated by the absence of a name in the last column of the string of information returned by the crsctl query css votedisk command), then run the following command using the File Universal Identifier (FUID) obtained in the previous step:
$ crsctl delete css votedisk FUID
Add a voting disk, as follows:
$ crsctl add css votedisk path_to_voting_disk
5. Stop the Oracle Clusterware stack as root:
# crsctl stop crs
6. Restart the Oracle Clusterware stack in normal mode as root:
# crsctl start crs
Adding, Deleting, or Migrating Voting DisksYou can add, remove, and migrate voting disks after you install Oracle Clusterware. Note that the commands you use to do this are different, depending on whether your voting disks are located on Oracle ASM, or are located on another storage option.
Use the following commands to modify voting disks, depending on your storage option:
■ To display the voting disk FUID and file path of each current voting disk, run the following command:
$ crsctl query css votedisk1. ONLINE 296641fd201f4f3fbf3452156d3b5881 (/ocfs2/staih09_vd3) []
This command returns a disk sequence number, the status of the disk, the FUID, and the path of the disk or the name of the Oracle ASM disk group on which the disk is stored.
■ To replace a voting disk with an Oracle ASM disk group, run the following command:
$ crsctl replace votedisk +asm_disk_group
■ To add one or more voting disks to a storage location other than Oracle ASM storage, run the following command, replacing the path_to_voting_disk variable with one or more space-delimited, complete paths to the voting disks you want to add:
$ crsctl add css votedisk path_to_voting_disk [...]
Voting Disk, Oracle Cluster Registry, and Oracle Local Registry
Administering Oracle Clusterware 2-25
■ To replace voting disk A with voting disk B, you must add voting disk B, and then delete voting disk A. To add a new disk and remove the existing disk, run the following command, replacing the path_to_voting_diskB variable with the fully qualified path name of voting disk B:
$ crsctl add css votedisk path_to_voting_diskB -purge
The -purge option deletes existing voting disks.
Use the crsctl replace votedisk command to replace a voting disk with an Oracle ASM disk group.
■ To remove a voting disk, run the following command, specifying one or more space-delimited, voting disk FUIDs or comma-delimited directory paths to the voting disks you want to remove:
$ crsctl delete css votedisk {FUID | path_to_voting_disk[...]}
■ To migrate voting disks from a storage device other than Oracle ASM to Oracle ASM, or to migrate from Oracle ASM to an alternative storage device, specify the Oracle ASM disk group name or path to the non-Oracle ASM storage device in the following command:
$ crsctl replace votedisk {+asm_disk_group | path_to_voting_disk}
You can run this command on any node in the cluster.
After modifying the voting disk, verify the voting disk location, as follows:
$ crsctl query css votedisk
Managing the Oracle Cluster Registry and Oracle Local RegistriesThis section describes how to manage the OCR and the Oracle Local Registry (OLR) with the following utilities: OCRCONFIG, OCRDUMP, and OCRCHECK.
The OCR contains information about all Oracle resources in the cluster.
The OLR is a registry similar to the OCR located on each node in a cluster, but contains information specific to each node. It contains manageability information about Oracle Clusterware, including dependencies between various services. The Oracle High Availability Services uses this information. The OLR is located on local storage on each node in a cluster. Its default location is in the path Grid_home/cdata/host_name.olr, where Grid_home is the Oracle grid infrastructure home, and host_name is the host name of the node.
This section describes how to administer the OCR in the following topics:
■ Migrating Oracle Cluster Registry to Oracle Automatic Storage Management
Note: If the cluster is down and cannot restart due to lost voting disks, then you must start CSS in exclusive mode to replace the voting disks by entering the following command:
$ crsctl start crs -excl
See Also: Appendix E, "CRSCTL Utility Reference" for more information about CRSCTL commands

Voting Disk, Oracle Cluster Registry, and Oracle Local Registry
2-26 Oracle Clusterware Administration and Deployment Guide
■ Adding, Replacing, Repairing, and Removing Oracle Cluster Registry Locations
■ Backing Up Oracle Cluster Registry
■ Restoring Oracle Cluster Registry
■ Diagnosing Oracle Cluster Registry Problems
■ Administering Oracle Cluster Registry with Oracle Cluster Registry Export and Import Commands
■ Oracle Local Registry
■ Upgrading and Downgrading the Oracle Cluster Registry Configuration
Migrating Oracle Cluster Registry to Oracle Automatic Storage ManagementTo improve Oracle Clusterware storage manageability, OCR is configured, by default, to use Oracle ASM in Oracle Database 11g release 2 (11.2). With the Oracle Clusterware storage residing in an Oracle ASM disk group, you can manage both database and clusterware storage using Oracle Enterprise Manager.
However, if you upgrade from a previous version of Oracle Clusterware, you can migrate OCR to reside on Oracle ASM, and take advantage of the improvements in managing Oracle Clusterware storage.
To migrate OCR to Oracle ASM using OCRCONFIG:1. Ensure that Oracle Clusterware upgrade to 11g release 2 (11.2) is complete. Run the
following command to verify the current running version:
$ crsctl query crs activeversion
2. Use the Oracle ASM Configuration Assistant (ASMCA) to configure and start Oracle ASM on all nodes in the cluster.
3. Use ASMCA to create an Oracle ASM disk group that is at least the same size of the existing OCR and has at least normal redundancy.
See Also: "About OCRCONFIG" on page G-2 for information about the OCRCONFIG utility, and "Troubleshooting Oracle Cluster Registry" on page 2-42 for information about the OCRDUMP and OCRCHECK utilities
Note: If you upgrade from a previous version of Oracle Clusterware to 11g release 2 (11.2) and you want to store OCR in an Oracle ASM disk group, then you must set the ASM Compatibility compatibility attribute to 11.2.0.0.
See Also: Oracle Database Storage Administrator's Guide for information about setting Oracle ASM compatibility attributes
See Also: Oracle Database Storage Administrator's Guide for more information about using ASMCA
Voting Disk, Oracle Cluster Registry, and Oracle Local Registry
Administering Oracle Clusterware 2-27
4. To add OCR to an Oracle ASM disk group, ensure that the Oracle Clusterware stack is running and run the following command as root:
# ocrconfig -add +new_disk_group
You can run this command more than once if you add multiple OCR locations. You can have up to five OCR locations. However, each successive run must point to a different disk group.
5. To remove storage configurations no longer in use, run the following command as root:
# ocrconfig -delete old_storage_location
Run this command for every configured OCR.
The following example shows how to migrate two OCRs to Oracle ASM using OCRCONFIG.
# ocrconfig -add +new_disk_group# ocrconfig -delete /dev/raw/raw2# ocrconfig -delete /dev/raw/raw1
Migrating Oracle Cluster Registry from Oracle ASM to Other Types of Storage To migrate OCR from Oracle ASM to another storage type:
1. Ensure that Oracle Clusterware upgrade to 11g release 2 (11.2) is complete. Run the following command to verify the current running version:
Notes:
■ If OCR is stored in an Oracle ASM disk group with external redundancy, then Oracle recommends that you add another OCR location to another disk group to avoid the loss of OCR, if a disk fails in the disk group.
Oracle does not support storing the OCR on different storage types simultaneously, such as storing OCR on both Oracle ASM and a shared file system, except during a migration.
■ If an Oracle ASM instance fails on any node, then OCR becomes unavailable on that particular node.
If the crsd process running on the node affected by the Oracle ASM instance failure is the OCR writer, the majority of the OCR locations are stored in Oracle ASM, and you attempt I/O on OCR during the time the Oracle ASM instance is down on this node, then crsd stops and becomes inoperable. Cluster management is now affected on this particular node.
Under no circumstances will the failure of one Oracle ASM instance on one node affect the whole cluster.
■ Ensure that Oracle ASM disk groups that you create are mounted on all of the nodes in the cluster.
See Also: Oracle Grid Infrastructure Installation Guide for more detailed sizing information
Note: OCR inherits the redundancy of the disk group. If you want high redundancy for OCR, you must configure the disk group with high redundancy when you create it.
Voting Disk, Oracle Cluster Registry, and Oracle Local Registry
2-28 Oracle Clusterware Administration and Deployment Guide
$ crsctl query crs activeversion
2. Create a file with the following permissions: root, oinstall, 640.
3. Ensure there is at least 280 MB of space on the mount partition.
4. Ensure that the file you created is visible from all nodes in the cluster.
5. To add the file as an OCR location, ensure that the Oracle Clusterware stack is running and run the following command as root:
# ocrconfig -add new_file_location
You can run this command more than once if you add more than one OCR location. Each successive run of this command must point to a different file location.
6. To remove storage configurations no longer in use, run the following command as root:
# ocrconfig -delete unused_storage_location
You can run this command more than once if there is more than one OCR location configured.
The following example shows how to migrate OCR from Oracle ASM to block devices using OCRCONFIG. For OCRs not stored on Oracle ASM, Oracle recommends that you mirror OCR on different devices.
# ocrconfig -add /dev/sdd1# ocrconfig -add /dev/sde1# ocrconfig -add /dev/sdf1# ocrconfig -delete +unused_disk_group
Adding, Replacing, Repairing, and Removing Oracle Cluster Registry LocationsThe Oracle installation process for Oracle Clusterware gives you the option of automatically mirroring OCR. You can manually put the mirrored OCRs on a shared network file system (NFS), or on any cluster file system that is certified by Oracle. Alternatively, you can place the OCR on Oracle ASM and allow it to create mirrors automatically, depending on the redundancy option you select.
This section includes the following topics:
■ Adding an Oracle Cluster Registry Location
■ Replacing an Oracle Cluster Registry Location
■ Repairing an Oracle Cluster Registry Configuration on a Local Node
■ Removing an Oracle Cluster Registry Location
■ Overriding the Oracle Cluster Registry Data Loss Protection Mechanism
You can manually mirror OCR, as described in the "Adding an Oracle Cluster Registry Location" on page 2-30 section, if you:
■ Upgraded to 11g release 2 (11.2) but did not choose to mirror OCR during the upgrade
Note: Create a mirror of the primary storage location to eliminate a single point of failure for OCR.
Voting Disk, Oracle Cluster Registry, and Oracle Local Registry
Administering Oracle Clusterware 2-29
■ Created only one OCR location during the Oracle Clusterware installation
In addition to mirroring OCR locations, you can also:
■ Replace an OCR location if there is a misconfiguration or other type of OCR error, as described in the "Replacing an Oracle Cluster Registry Location" on page 2-30 section.
■ Repair an OCR location if Oracle Database displays an OCR failure alert in Oracle Enterprise Manager or in the Oracle Clusterware alert log file, as described in the "Repairing an Oracle Cluster Registry Configuration on a Local Node" on page 2-31 section.
■ Remove an OCR location if, for example, your system experiences a performance degradation due to OCR processing or if you transfer your OCR to RAID storage devices and choose to no longer use multiple OCR locations, as described in the "Removing an Oracle Cluster Registry Location" on page 2-31 section.
Notes:
■ Oracle recommends that you configure:
At least three OCR locations, if the OCR is configured on non-mirrored or non-redundant storage. Oracle strongly recommends that you mirror the OCR if the underlying storage is not RAID. Mirroring can help prevent the OCR from becoming a single point of failure.
At least two OCR locations if the OCR is configured on an Oracle ASM disk group. You should configure the OCR in two independent disk groups. Typically this is the work area and the recovery area.
At least two OCR locations if the OCR is configured on mirrored hardware or third-party mirrored volumes.
■ If the original OCR location does not exist, then you must create an empty (0 byte) OCR location before you run the ocrconfig -add or ocrconfig -replace commands.
■ Ensure that the OCR devices that you specify in the OCR configuration exist and that these OCR devices are valid.
■ Ensure that the Oracle ASM disk group that you specify exists and is mounted.
■ The new OCR file, device, or disk group must be accessible from all of the active nodes in the cluster.
See Also:
■ Oracle Grid Infrastructure Installation Guide for information about creating OCRs
■ Oracle Database Storage Administrator's Guide for more information about Oracle ASM disk group management
Note: The operations in this section affect OCR clusterwide: they change the OCR configuration information in the ocr.loc file on Linux and UNIX systems and the Registry keys on Windows systems. However, the ocrconfig command cannot modify OCR configuration information for nodes that are shut down or for nodes on which Oracle Clusterware is not running.

Voting Disk, Oracle Cluster Registry, and Oracle Local Registry
2-30 Oracle Clusterware Administration and Deployment Guide
Adding an Oracle Cluster Registry Location Use the procedure in this section to add an OCR location. Oracle Clusterware can manage up to five redundant OCR locations.
As the root user, run the following command to add an OCR location to either Oracle ASM or other storage device:
# ocrconfig -add +asm_disk_group | file_name
Replacing an Oracle Cluster Registry Location If you must change an existing OCR location, or change a failed OCR location to a working location, then you can use the following procedure, if one OCR location remains online.
To change an Oracle Cluster Registry location:
Complete the following procedure:
1. Use the OCRCHECK utility to verify that a copy of OCR other than the one you are going to replace is online, using the following command:
$ ocrcheck
OCRCHECK displays all OCR locations that are registered and whether they are available (online). If an OCR location suddenly becomes unavailable, then it might take a short period for Oracle Clusterware to show the change in status.
2. Use the following command to verify that Oracle Clusterware is running on the node on which the you are going to perform the replace operation:
$ crsctl check crs
3. Run the following command as root to replace the current OCR location using either destination_file or +ASM_disk_group to indicate the current and target OCR locations:
# ocrconfig -replace current_OCR_location -replacement new_OCR_location
If you have only one OCR location, then use the following commands:
# ocrconfig -add +new_storage_disk_group# ocrconfig -delete +current_disk_group
Note: If OCR resides on a cluster file system file or a network file system, create an empty (0 byte) OCR location file before performing the procedures in this section.
Note: On Linux and UNIX systems, you must be root to run ocrconfig commands. On Windows systems, the user must be a member of the Administrator's group.
Note: The OCR location that you are replacing can be either online or offline.
See Also: Oracle Database Storage Administrator's Guide for more information about migrating storage
Voting Disk, Oracle Cluster Registry, and Oracle Local Registry
Administering Oracle Clusterware 2-31
4. If any node that is part of your current Oracle RAC cluster is shut down, then use the following command syntax on the stopped node to let that node rejoin the cluster after the node is restarted where you use either a destination_file or +ASM_disk_group to indicate the current and target OCR locations:
ocrconfig -repair -replace current_OCR_location -replacement new_OCR_location
Repairing an Oracle Cluster Registry Configuration on a Local Node It may be necessary to repair the OCR if your cluster configuration changes while that node is stopped. Repairing an OCR involves either adding, deleting, or replacing an OCR location. For example, you may have to repair an OCR location on a node that was stopped while you were adding, replacing, or removing the OCR. To repair an OCR, run the following command as root on the node on which you have stopped the Oracle Clusterware daemon:
# ocrconfig -repair -add file_name | -delete file_name | -replacecurrent_file_name -replacement new_file_name
This operation only changes the OCR on the node on which you run this command. For example, if the OCR location is /dev/sde1, then use the command syntax ocrconfig -repair -add /dev/sde1 on this node to repair the OCR on that node.
Removing an Oracle Cluster Registry Location To remove an OCR location, at least one other OCR must be online. You can remove an OCR location to reduce OCR-related overhead or to stop mirroring your OCR because you moved OCR to redundant storage such as RAID.
Perform the following procedure as the root user to remove an OCR location from your Oracle Clusterware environment:
1. Ensure that at least one OCR location other than the OCR location that you are removing is online.
Notes:
■ You cannot repair the OCR on a node on which Oracle Clusterware is running.
■ When you repair the OCR on a stopped node using ocrconfig -repair, you must provide the same OCR filename (which should be case-sensitive) as the OCR filenames on other nodes.
■ If you run the ocrconfig -add | -repair | -replace command, then the device, file, or Oracle ASM disk group that you are adding must be accessible. This means that a device must exist. You must create an empty (0 byte) OCR location, or the Oracle ASM disk group must exist and be mounted.
■ If you store OCR on Oracle ASM, then
See Also: Oracle Database Storage Administrator's Guide for more information about Oracle ASM disk group management
Caution: Do not perform this OCR removal procedure unless there is at least one other active OCR location online.
Voting Disk, Oracle Cluster Registry, and Oracle Local Registry
2-32 Oracle Clusterware Administration and Deployment Guide
2. Run the following command on any node in the cluster to remove an OCR location from either Oracle ASM or other location:
# ocrconfig -delete +ASM_disk_group | file_name
The file_name variable can be a device name or a file name. This command updates the OCR configuration on all of the nodes on which Oracle Clusterware is running.
Overriding the Oracle Cluster Registry Data Loss Protection Mechanism OCR has a mechanism that prevents data loss due to accidental overwrites. If you configure a mirrored OCR and if Oracle Clusterware cannot access the mirrored OCR locations and also cannot verify that the available OCR location contains the most recent configuration, then Oracle Clusterware prevents further modification to the available OCR location. In addition, the process prevents overwriting by prohibiting Oracle Clusterware from starting on the node on which only one OCR is available. In such cases, Oracle Database displays an alert message in either Oracle Enterprise Manager, the Oracle Clusterware alert log files, or both. If this problem is local to only one node, you can use other nodes to start your cluster database.
However, if you are unable to start any cluster node in your environment and if you can neither repair OCR nor restore access to all OCR locations, then you can override the protection mechanism. The procedure described in the following list enables you to start the cluster using the available OCR location. However, overriding the protection mechanism can result in the loss of data that was not available when the previous known good state was created.
Perform the following procedure to overwrite OCR if a node cannot start and if the alert log contains CLSD-1009 and CLSD-1011 messages.
1. Attempt to resolve the cause of the CLSD-1009 and CLSD-1011 messages.
Compare the node's OCR configuration (ocr.loc on Linux and UNIX systems and the Registry on Windows systems) with other nodes on which Oracle Clusterware is running.
■ If the configurations do not match, run ocrconfig -repair.
■ If the configurations match, ensure that the node can access all of the configured OCRs by running an ls command on Linux and UNIX systems. On Windows, use a dir command if the OCR location is a file and run GuiOracleObjectManager.exe to verify that the part of the cluster with the name exists.
2. Ensure that the most recent OCR contains the latest OCR updates.
Look at output from the ocrdump command and determine whether it has your latest updates.
Note: Overriding OCR using the following procedure can result in the loss of OCR updates that were made between the time of the last known good OCR update made to the currently accessible OCR and the time at which you performed the overwrite. In other words, running the ocrconfig -overwrite command can result in data loss if the OCR location that you are using to perform the overwrite does not contain the latest configuration updates for your cluster environment.
Voting Disk, Oracle Cluster Registry, and Oracle Local Registry
Administering Oracle Clusterware 2-33
3. If you cannot resolve the problem that caused the CLSD message, then run the command ocrconfig -overwrite to start the node.
Backing Up Oracle Cluster RegistryThis section describes how to back up OCR content and use it for recovery. The first method uses automatically generated OCR copies and the second method enables you to issue a backup command manually:
■ Automatic backups: Oracle Clusterware automatically creates OCR backups every four hours. At any one time, Oracle Database always retains the last three backup copies of OCR. The CRSD process that creates the backups also creates and retains an OCR backup for each full day and at the end of each week. You cannot customize the backup frequencies or the number of files that Oracle Database retains.
■ Manual backups: Run the ocrconfig -manualbackup command on a node where the Oracle Clusterware stack is up and running to force Oracle Clusterware to perform a backup of OCR at any time, rather than wait for the automatic backup. You must run the command as a user with administrative privileges. The -manualbackup option is especially useful when you want to obtain a binary backup on demand, such as before you make changes to the OCR. The OLR only supports manual backups.
When the clusterware stack is down on all nodes in the cluster, the backups that are listed by the command ocrconfig -showbackup may differ from node to node. After you install or upgrade Oracle Clusterware on a node, or add a node to the cluster, when the root.sh script finishes, it backs up the OLR.
Listing Backup FilesRun the following command to list the backup files:
# ocrconfig -showbackup
On Windows:
C:\>ocrconfig -showbackup
The ocrconfig -showbackup command to displays the backup location, timestamp, and the originating node name of the backup files that Oracle Clusterware creates. By default, the -showbackup option displays information for both automatic and manual backups but you can include the auto or manual flag to display only the automatic backup information or only the manual backup information, respectively.
Run the following command to inspect the contents and verify the integrity of the backup file:
# ocrdump -backupfile backup_file_name
On Windows:
C:\>ocrdump -backupfile backup_file_name
You can use any backup software to copy the automatically generated backup files at least once daily to a different device from where the primary OCR resides.
The default location for generating backups on Linux or UNIX systems is Grid_home/cdata/cluster_name, where cluster_name is the name of your cluster. The Windows default location for generating backups uses the same path structure. Because the default backup is on a local file system, Oracle recommends that you
Voting Disk, Oracle Cluster Registry, and Oracle Local Registry
2-34 Oracle Clusterware Administration and Deployment Guide
include the backup file created with the OCRCONFIG utility as part of your operating system backup using standard operating system or third-party tools.
Restoring Oracle Cluster RegistryIf a resource fails, then before attempting to restore OCR, restart the resource. As a definitive verification that OCR failed, run ocrcheck and if the command returns a failure message, then both the primary OCR and the OCR mirror have failed. Attempt to correct the problem using the OCR restoration procedure for your platform.
■ Restoring the Oracle Cluster Registry on Linux or UNIX Systems
■ Restoring the Oracle Cluster Registry on Windows Systems
Restoring the Oracle Cluster Registry on Linux or UNIX SystemsIf you are storing the OCR on an Oracle ASM disk group, and that disk group is corrupt, then you must restore the Oracle ASM disk group using Oracle ASM utilities, and then mount the disk group again before recovering the OCR. Recover the OCR by running the command ocrconfig -restore.
Use the following procedure to restore OCR on Linux or UNIX systems:
Tip: You can use the ocrconfig -backuploc option to change the location where OCR creates backups. Appendix G, "Oracle Cluster Registry Configuration Utility Reference" describes the OCRCONFIG utility options.
Note: On Linux and UNIX systems, you must be root user to run most but not all of the ocrconfig command options. On Windows systems, the user must be a member of the Administrator's group.
See Also: "Administering Oracle Cluster Registry with Oracle Cluster Registry Export and Import Commands" on page 2-38 to use manually created OCR export files to copy OCR content and use it for recovery
Notes:
■ You cannot restore your configuration from an OCR backup file using the -import option, which is explained in "Administering Oracle Cluster Registry with Oracle Cluster Registry Export and Import Commands" on page 2-38. You must instead use the -restore option, as described in the following sections.
■ If you store OCR on an Oracle ASM disk group and the disk group is not available, then you must recover and mount the Oracle ASM disk group.
See Also: Oracle Database Storage Administrator's Guide for more information about managing Oracle ASM disk groups
See Also: Oracle Database Storage Administrator's Guide for information about how to restore Oracle ASM disk groups
Voting Disk, Oracle Cluster Registry, and Oracle Local Registry
Administering Oracle Clusterware 2-35
1. List the nodes in your cluster by running the following command on one node:
$ olsnodes
2. Stop Oracle Clusterware by running the following command as root on all of the nodes:
# crsctl stop crs
If the preceding command returns any error due to OCR corruption, stop Oracle Clusterware by running the following command as root on all of the nodes:
# crsctl stop crs -f
3. If you are restoring OCR to a cluster file system or network file system, then run the following command as root to restore OCR with an OCR backup that you can identify in "Listing Backup Files" on page 2-33:
# ocrconfig -restore file_name
After you complete this step, skip to step 8.
4. Start the Oracle Clusterware stack on one node in exclusive mode by running the following command as root:
# crsctl start crs -excl
Ignore any errors that display.
Check whether crsd is running. If it is, stop it by running the following command as root:
# crsctl stop resource ora.crsd -init
5. Restore OCR with an OCR backup that you can identify in "Listing Backup Files" on page 2-33 by running the following command as root:
# ocrconfig -restore file_name
Caution: Do not use the -init flag with any other command.
Notes:
■ If the original OCR location does not exist, then you must create an empty (0 byte) OCR location before you run the ocrconfig -restore command.
■ Ensure that the OCR devices that you specify in the OCR configuration exist and that these OCR devices are valid.
■ If you configured OCR in an Oracle ASM disk group, then ensure that the Oracle ASM disk group exists and is mounted.
See Also:
■ Oracle Grid Infrastructure Installation Guide for information about creating OCRs
■ Oracle Database Storage Administrator's Guide for more information about Oracle ASM disk group management
Voting Disk, Oracle Cluster Registry, and Oracle Local Registry
2-36 Oracle Clusterware Administration and Deployment Guide
6. Verify the integrity of OCR:
# ocrcheck
7. Stop Oracle Clusterware on the node where it is running in exclusive mode:
# crsctl stop crs -f
8. Begin to start Oracle Clusterware by running the following command as root on all of the nodes:
# crsctl start crs
9. Verify the OCR integrity of all of the cluster nodes that are configured as part of your cluster by running the following CVU command:
$ cluvfy comp ocr -n all -verbose
Restoring the Oracle Cluster Registry on Windows SystemsIf you are storing the OCR on an Oracle ASM disk group, and that disk group is corrupt, then you must restore the Oracle ASM disk group using Oracle ASM utilities, and then mount the disk group again before recovering the OCR. Recover the OCR by running the command ocrconfig -restore.
Use the following procedure to restore OCR on Windows systems:
1. List the nodes in your cluster by running the following command on one node:
C:\>olsnodes
2. Stop Oracle Clusterware by running the following command as a Windows administrator on all of the nodes:
C:\>crsctl stop crs
If the preceding command returns any error due to OCR corruption, stop Oracle Clusterware by running the following command as a Windows administrator on all of the nodes:
C:\>crsctl stop crs -f
3. Start the Oracle Clusterware stack on one node in exclusive mode by running the following command as a Windows administrator:
C:\>crsctl start crs -excl
Ignore any errors that display.
Check whether crsd is running. If it is, stop it by running the following command as a Windows administrator:
C:\>crsctl stop resource ora.crsd -init
See Also: Appendix A, "Cluster Verification Utility Reference" for more information about enabling and using CVU
See Also: Oracle Database Storage Administrator's Guide for information about how to restore Oracle ASM disk groups
Caution: Do not use the -init flag in any other command.
Voting Disk, Oracle Cluster Registry, and Oracle Local Registry
Administering Oracle Clusterware 2-37
4. Restore OCR with the OCR backup file that you identified in "Listing Backup Files" on page 2-33 by running the following command as a Windows administrator:
C:\>ocrconfig -restore file_name
Make sure that the OCR devices that you specify in the OCR configuration exist and that these OCR devices are valid.
5. Verify the integrity of OCR:
C:\>ocrcheck
6. Stop Oracle Clusterware on the node where it is running in exclusive mode:
C:\>crsctl stop crs -f
7. Begin to start Oracle Clusterware by running the following command as a Windows administrator on all of the nodes:
C:\>crsctl start crs
8. Run the following Cluster Verification Utility (CVU) command to verify the OCR integrity of all of the nodes in your cluster database:
C:\>cluvfy comp ocr -n all -verbose
Diagnosing Oracle Cluster Registry ProblemsYou can use the OCRDUMP and OCRCHECK utilities to diagnose OCR problems as described under the following topics:
■ Using the OCRDUMP Utility
■ Using the OCRCHECK Utility
Using the OCRDUMP Utility Use the OCRDUMP utility to write the OCR contents to a file so that you can examine the OCR content.
Notes:
■ If the original OCR location does not exist, then you must create an empty (0 byte) OCR location before you run the ocrconfig -restore command.
■ Ensure that the OCR devices that you specify in the OCR configuration exist and that these OCR devices are valid.
■ Ensure that the Oracle ASM disk group you specify exists and is mounted.
See Also:
■ Oracle Grid Infrastructure Installation Guide for information about creating OCRs
■ Oracle Database Storage Administrator's Guide for more information about Oracle ASM disk group management
See Also: Appendix A, "Cluster Verification Utility Reference" for more information about enabling and using CVU

Voting Disk, Oracle Cluster Registry, and Oracle Local Registry
2-38 Oracle Clusterware Administration and Deployment Guide
Using the OCRCHECK Utility Use the OCRCHECK utility to verify the OCR integrity.
Administering Oracle Cluster Registry with Oracle Cluster Registry Export and Import CommandsIn addition to using the automatically created OCR backup files, you should also export the OCR contents before and after making significant configuration changes, such as adding or deleting nodes from your environment, modifying Oracle Clusterware resources, and upgrading, downgrading or creating a database. Do this by using the ocrconfig -export command, which exports the OCR content to a file format.
Using the ocrconfig -export command also enables you to restore OCR using the -import option if your configuration changes cause errors. For example, if you have unresolvable configuration problems, or if you are unable to restart Oracle Clusterware after such changes, then restore your configuration using the procedure for your platform.
See Also: "OCRDUMP Utility Syntax and Options" on page 2-44 for more information about the OCRDUMP utility
See Also: "Using the OCRCHECK Utility" on page 2-43 for more information about the OCRCHECK utility
Caution: Note the following restrictions for restoring the OCR:
■ The file format generated by ocrconfig -restore is incompatible with the file format generated by ocrconfig -export. The ocrconfig -export and ocrconfig -import commands are compatible. The ocrconfig -manualbackup and ocrconfig -restore commands are compatible. The two file formats are incompatible and must not be interchangeably used.
■ When exporting the OCR, Oracle recommends including "ocr", the cluster name, and the timestamp in the name string. For example:
ocr_mycluster1_20090521_2130_export
Notes: Oracle recommends that you use either automatic or manual backups and the ocrconfig -restore command instead of the ocrconfig -export and ocrconfig -import commands to restore OCR for the following reasons:
■ A backup is a consistent snapshot of OCR, whereas an export is not.
■ Backups are created when the system is online. You must shut down Oracle Clusterware on all nodes in the cluster to get a consistent snapshot using the ocrconfig -export command.
■ You can inspect a backup using the OCRDUMP utility. You cannot inspect the contents of an export.
■ You can list backups with the ocrconfig -showbackup command, whereas you must keep track of all generated exports.

Voting Disk, Oracle Cluster Registry, and Oracle Local Registry
Administering Oracle Clusterware 2-39
Importing Oracle Cluster Registry Content on Linux or UNIX Systems
Use the following procedure to import OCR on Linux or UNIX systems:
1. List the nodes in your cluster by running the following command on one node:
$ olsnodes
2. Stop Oracle Clusterware by running the following command as root on all of the nodes:
# crsctl stop crs
If the preceding command returns any error due to OCR corruption, stop Oracle Clusterware by running the following command as root on all of the nodes:
# crsctl stop crs -f
3. Start the Oracle Clusterware stack on one node in exclusive mode by running the following command as root:
# crsctl start crs -excl
Ignore any errors that display.
Check whether crsd is running. If it is, stop it by running the following command as root:
# crsctl stop resource ora.crsd -init
4. Import the OCR by running the following command as root:
# ocrconfig -import file_name
Note: Most configuration changes that you make not only change the OCR contents, the configuration changes also cause file and database object creation. Some of these changes are often not restored when you restore OCR. Do not restore OCR as a correction to revert to previous configurations, if some of these configuration changes should fail. This may result in an OCR location that has contents that do not match the state of the rest of your system.
Note: This procedure assumes default installation of Oracle Clusterware on all nodes in the cluster, where Oracle Clusterware autostart is enabled.
Caution: Do not use the -init flag with any other command.
Voting Disk, Oracle Cluster Registry, and Oracle Local Registry
2-40 Oracle Clusterware Administration and Deployment Guide
5. Verify the integrity of OCR:
# ocrcheck
6. Stop Oracle Clusterware on the node where it is running in exclusive mode:
# crsctl stop crs -f
7. Begin to start Oracle Clusterware by running the following command as root on all of the nodes:
# crsctl start crs
8. Verify the OCR integrity of all of the cluster nodes that are configured as part of your cluster by running the following CVU command:
$ cluvfy comp ocr -n all -verbose
Oracle Local RegistryIn Oracle Clusterware 11g release 2 (11.2), each node in a cluster has a local registry for node-specific resources, called an Oracle Local Registry (OLR), that is installed and configured when Oracle Clusterware installs OCR. Multiple processes on each node have simultaneous read and write access to the OLR particular to the node on which they reside, regardless of whether Oracle Clusterware is running or fully functional.
By default, OLR is located at Grid_home/cdata/host_name.olr on each node.
Manage OLR using the OCRCHECK, OCRDUMP, and OCRCONFIG utilities as root with the -local option.
Notes:
■ If the original OCR location does not exist, then you must create an empty (0 byte) OCR location before you run the ocrconfig -import command.
■ Ensure that the OCR devices that you specify in the OCR configuration exist and that these OCR devices are valid.
■ If you configured OCR in an Oracle ASM disk group, then ensure that the Oracle ASM disk group exists and is mounted.
See Also:
■ Oracle Grid Infrastructure Installation Guide for information about creating OCRs
■ Oracle Database Storage Administrator's Guide for more information about Oracle ASM disk group management
Note: You can only import an exported OCR. To restore OCR from a backup, you must instead use the -restore option, as described in "Backing Up Oracle Cluster Registry" on page 2-33.
See Also: Appendix A, "Cluster Verification Utility Reference" for more information about enabling and using CVU
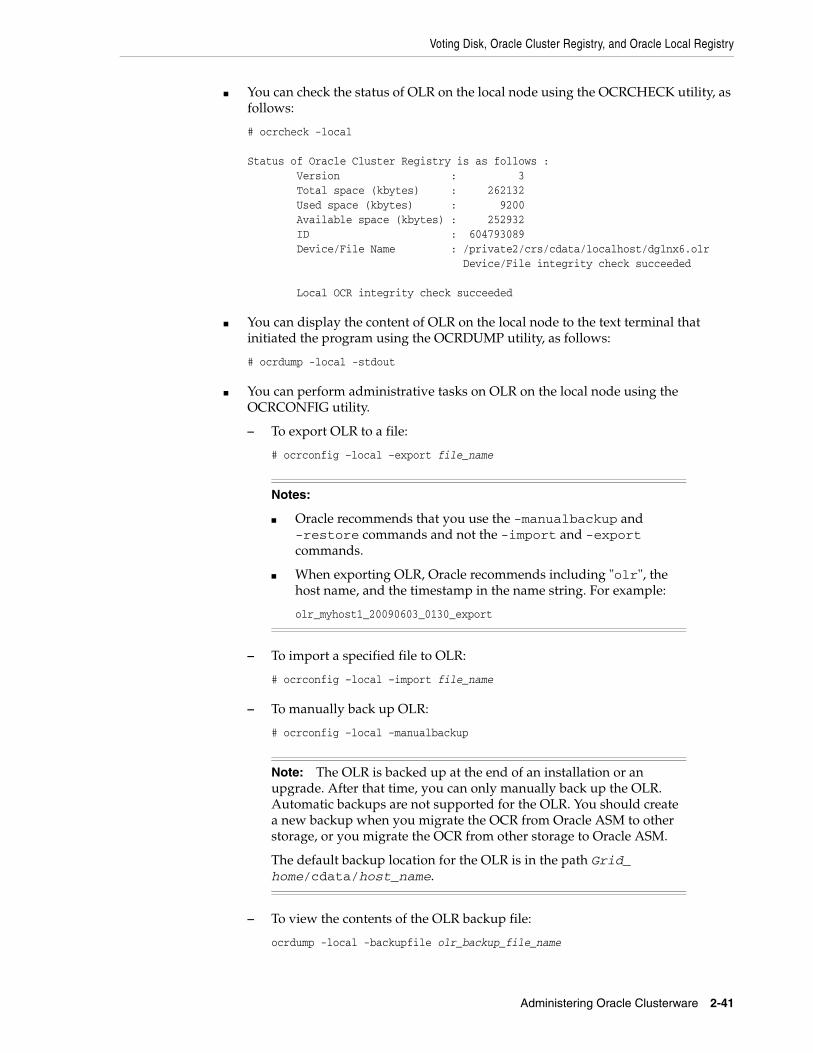
Voting Disk, Oracle Cluster Registry, and Oracle Local Registry
Administering Oracle Clusterware 2-41
■ You can check the status of OLR on the local node using the OCRCHECK utility, as follows:
# ocrcheck -local
Status of Oracle Cluster Registry is as follows : Version : 3 Total space (kbytes) : 262132 Used space (kbytes) : 9200 Available space (kbytes) : 252932 ID : 604793089 Device/File Name : /private2/crs/cdata/localhost/dglnx6.olr Device/File integrity check succeeded
Local OCR integrity check succeeded
■ You can display the content of OLR on the local node to the text terminal that initiated the program using the OCRDUMP utility, as follows:
# ocrdump -local -stdout
■ You can perform administrative tasks on OLR on the local node using the OCRCONFIG utility.
– To export OLR to a file:
# ocrconfig –local –export file_name
– To import a specified file to OLR:
# ocrconfig –local –import file_name
– To manually back up OLR:
# ocrconfig –local –manualbackup
– To view the contents of the OLR backup file:
ocrdump -local -backupfile olr_backup_file_name
Notes:
■ Oracle recommends that you use the -manualbackup and -restore commands and not the -import and -export commands.
■ When exporting OLR, Oracle recommends including "olr", the host name, and the timestamp in the name string. For example:
olr_myhost1_20090603_0130_export
Note: The OLR is backed up at the end of an installation or an upgrade. After that time, you can only manually back up the OLR. Automatic backups are not supported for the OLR. You should create a new backup when you migrate the OCR from Oracle ASM to other storage, or you migrate the OCR from other storage to Oracle ASM.
The default backup location for the OLR is in the path Grid_home/cdata/host_name.

Voting Disk, Oracle Cluster Registry, and Oracle Local Registry
2-42 Oracle Clusterware Administration and Deployment Guide
– To change the ORL backup location:
ocrconfig -local -backuploc new_olr_backup_path
– To restore OLR:
# crsctl stop crs# ocrconfig -local -restore file_name# ocrcheck -local# crsctl start crs$ cluvfy comp olr
Upgrading and Downgrading the Oracle Cluster Registry ConfigurationWhen you install Oracle Clusterware, it automatically runs the ocrconfig -upgrade command. To downgrade, follow the downgrade instructions for each component and also downgrade OCR using the ocrconfig -downgrade command. If you are upgrading OCR, then you can use the OCRCHECK utility to verify the integrity of OCR.
Troubleshooting Oracle Cluster Registry and Diagnostic OutputThis section describes various methods for troubleshooting problems with OCR, and obtaining diagnostic information from the utilities used to manage the OCR. You can use these utilities to troubleshoot OLR.
This section contains the following topics:
■ Troubleshooting Oracle Cluster Registry
■ Using the OCRCHECK Utility
■ Using the OCRDUMP Utility to View Oracle Cluster Registry Content
■ Diagnostic Output for OCRCONFIG
Troubleshooting Oracle Cluster RegistryTable 2–5 describes common OCR problems with corresponding resolution suggestions.
Table 2–5 Common Oracle Cluster Registry Problems and Solutions
Problem Solution
Not currently using OCR mirroring and would like to enable it.
Run the ocrconfig command with the -replace option.
OCR failed and you must replace it. Error messages in Oracle Enterprise Manager or OCR log file.
Run the ocrconfig command with the -replace option.
OCR has a misconfiguration. Run the ocrconfig command with the -repair option as described.
You are experiencing a severe performance effect from OCR processing or you want to remove OCR for other reasons.
Run the ocrconfig command with the -replace option as described.
OCR has failed and before you can fix it, the node must be rebooted with only one OCR.
Run the ocrconfig with the -repair option to remove the bad OCR location. Oracle Clusterware cannot start if it cannot find all OCRs defined.
Voting Disk, Oracle Cluster Registry, and Oracle Local Registry
Administering Oracle Clusterware 2-43
Using the OCRCHECK UtilityThe OCRCHECK utility displays the version of the OCR’s block format, total space available and used space, OCRID, and the OCR locations that you have configured. OCRCHECK performs a block-by-block checksum operation for all of the blocks in all of the OCRs that you have configured. It also returns an individual status for each file and a result for the overall OCR integrity check.
You can run the ocrcheck -help command to display usage information about this utility.
The following example shows a sample of the OCRCHECK utility output:
# ocrcheck
Status of Oracle Cluster Registry is as follows : Version : 3 Total space (kbytes) : 262120 Used space (kbytes) : 752 Available space (kbytes) : 261368 ID : 2098980155 Device/File Name : +dg1 Device/File integrity check succeeded Device/File Name : +dg2 Device/File integrity check succeeded Device/File not configured Device/File not configured Device/File not configured Cluster registry integrity check succeeded Logical corruption check succeeded
To display only configured OCRs:
$ ocrcheck -config
Oracle Cluster Registry configuration is : Device/File Name : Grid_home/oracle/has_work/data.ocr Device/File Name : Grid_home/oracle/has_work/mirror.ocr
Run the ocrcheck -local -config command to obtain OLR information.
$ ocrcheck -local -config
Oracle Local Registry configuration is : Device/File Name : Grid_home/oracle/has_work/data.olr.stact23
OCRCHECK creates a log file in the Grid_home/log/host_name/client directory. To change the log level, edit the Grid_home/srvm/admin/ocrlog.ini file.
Using the OCRDUMP Utility to View Oracle Cluster Registry ContentThis section explains how to use the OCRDUMP utility to view OCR and Oracle Local Registry (OLR) content for troubleshooting. The OCRDUMP utility enables you to view the OCR and OLR contents by writing the content to a file or stdout in a readable format.
Note: The logical corruption check is only performed if you run the ocrcheck command as root.

Voting Disk, Oracle Cluster Registry, and Oracle Local Registry
2-44 Oracle Clusterware Administration and Deployment Guide
You can use several options for OCRDUMP. For example, you can limit the output to a key and its descendents. You can also write the contents to an XML file that you can view using a browser. OCRDUMP writes the OCR keys as ASCII strings and values in a data type format. OCRDUMP retrieves header information based on a best effort basis.
OCRDUMP also creates a log file in Grid_home/log/host_name/client. To change the log level, edit the Grid_home/srvm/admin/ocrlog.ini file.
To change the logging component, edit the entry containing the comploglvl= entry. For example, to change the log level of the OCRAPI component to 3 and to change the log level of the OCRRAW component to 5, make the following entry in the ocrlog.ini file:
comploglvl="OCRAPI:3;OCRRAW:5"
This section includes the following topics:
■ OCRDUMP Utility Syntax and Options
■ OCRDUMP Utility Examples
■ Sample OCRDUMP Utility Output
OCRDUMP Utility Syntax and Options This section describes the OCRDUMP utility command syntax and usage. Run the ocrdump command with the following syntax where file_name is the name of a target file to which you want Oracle Database to write the Oracle Cluster Registry output and where key_name is the name of a key from which you want Oracle Database to write Oracle Cluster Registry subtree content:
$ ocrdump [file_name | -stdout] [-local] [-backupfile backup_file_name[-keyname key_name] [-xml] [-noheader]]Table 2–6 describes the OCRDUMP utility options and option descriptions.
Note: Make sure that you have file creation privileges in the Grid_home directory before using the OCRDUMP utility.
Table 2–6 OCRDUMP Options and Option Descriptions
Options Description
file_name The name of a file to which you want OCRDUMP to write output.
By default, OCRDUMP writes output to a predefined output file named OCRDUMPFILE. The file_name option redirects OCRDUMP output to a file that you specify.
-stdout Use this option to redirect the OCRDUMP output to the text terminal that initiated the program.
If you do not redirect the output, OCRDUMP writes output to a predefined output file named OCRDUMPFILE.
-local Use this option to dump the contents of OLR.
-backupfile Use this option to view the contents of an OCR backup file. Use the -local option with this option to view the contents of an OLR backup file.
backup_file_name
The name of the backup file with the content you want to view. You can query the backups using the ocrconfig -showbackup command.

Voting Disk, Oracle Cluster Registry, and Oracle Local Registry
Administering Oracle Clusterware 2-45
OCRDUMP Utility Examples The following ocrdump utility examples extract various types of OCR information and write it to various targets:
ocrdump
Writes the OCR content to a file called OCRDUMPFILE in the current directory.
ocrdump MYFILE
Writes the OCR content to a file called MYFILE in the current directory.
ocrdump -stdout -keyname SYSTEM
Displays the OCR content from the subtree of the key SYSTEM in the terminal window.
ocrdump -stdout -xml
Displays the OCR content in the terminal window in XML format.
ocrdump -stdout -backupfile $ORA_CRS_HOME/cdata/cluster_name/file_name
Writes the entire OCR and OLR content to a backup file located in the $ORA_CRS_HOME/cdata/cluster_name directory. You must run this command as root to be able to view all of the keys. Be sure to name the file appropriately so that it can be recognized by anyone as an OCR backup file, such as BACKUPOO.ocr.
Sample OCRDUMP Utility Output The following OCRDUMP examples show the KEYNAME, VALUE TYPE, VALUE, permission set (user, group, world) and access rights for two sample runs of the ocrdump command. The following shows the output for the SYSTEM.language key that has a text value of AMERICAN_AMERICA.WE8ASCII37.
[SYSTEM.language]ORATEXT : AMERICAN_AMERICA.WE8ASCII37SECURITY : {USER_PERMISSION : PROCR_ALL_ACCESS, GROUP_PERMISSION : PROCR_READ,OTHER_PERMISSION : PROCR_READ, USER_NAME : user, GROUP_NAME : group}
The following shows the output for the SYSTEM.version key that has integer value of 3:
[SYSTEM.version]UB4 (10) : 3SECURITY : {USER_PERMISSION : PROCR_ALL_ACCESS, GROUP_PERMISSION : PROCR_READ,OTHER_PERMISSION : PROCR_READ, USER_NAME : user, GROUP_NAME : group}
Diagnostic Output for OCRCONFIGThe OCRCONFIG utility creates a log file in Grid_home/log/host_name/client.
To change the amount of logging, edit the path in the Grid_home/srvm/admin/ocrlog.ini file.
-keyname key_name
The name of an Oracle Cluster Registry key whose subtree is to be dumped.
-xml Use this option to write the output in XML format.
-noheader Does not print the time at which you ran the command and when the Oracle Cluster Registry configuration occurred.
Table 2–6 (Cont.) OCRDUMP Options and Option Descriptions
Options Description
Changing Network Addresses on Manually Configured Networks
2-46 Oracle Clusterware Administration and Deployment Guide
Changing Network Addresses on Manually Configured NetworksThis section contains the following topics:
■ Understanding When You Must Configure Network Addresses
■ Understanding SCAN Addresses and Client Service Connections
■ Changing the Virtual IP Addresses
■ Changing Oracle Clusterware Private Network Configuration
Understanding When You Must Configure Network AddressesAn Oracle Clusterware configuration requires at least two interfaces:
■ A public network interface, on which users and application servers connect to access data on the database server
■ A private network interface for internode communication.
If you use Grid Naming Service and DHCP to manage your network connections, then you may not need to configure address information on the cluster. Using GNS allows public Virtual Internet Protocol (VIP) addresses to be dynamic, DHCP-provided addresses. Clients submit name resolution requests to your network’s Domain Name Service (DNS), which forwards the requests to the grid naming service (GNS), managed within the cluster. GNS then resolves these requests to nodes in the cluster.
If you do not use GNS, and instead configure networks manually, then public VIP addresses must be statically configured in the DNS, VIPs must be statically configured in the DNS and hosts file, and private IP addresses require static configuration.
Understanding SCAN Addresses and Client Service ConnectionsPublic network addresses are used to provide services to clients. If your clients are connecting to the Single Client Access Name addresses, then you may need to change public and virtual IP addresses as you add or remove nodes from the cluster, but you do not need to update clients with new cluster addresses.
SCANs function like a cluster alias. However, SCANs are resolved on any node in the cluster, so unlike a VIP address for a node, clients connecting to the SCAN no longer require updated VIP addresses as nodes are added to or removed from the cluster. Because the SCAN addresses resolve to the cluster, rather than to a node address in the cluster, nodes can be added to or removed from the cluster without affecting the SCAN address configuration.
The SCAN is a fully qualified name (host name+domain) that is configured to resolve to all the addresses allocated for the SCAN. The addresses resolve using Round Robin DNS either on the DNS server, or within the cluster in a GNS configuration. SCAN listeners can run on any node in the cluster. SCANs provide location independence for the databases, so that client configuration does not have to depend on which nodes run a particular database.
Oracle Database 11g release 2 (11.2) and later instances only register with SCAN listeners as remote listeners. Upgraded databases register with SCAN listeners as remote listeners, and also continue to register with all node listeners.
Changing the Virtual IP AddressesClients configured to use Public VIP addresses for Oracle Database releases before Oracle Database 11g release 2 (11.2) can continue to use their existing connection

Changing Network Addresses on Manually Configured Networks
Administering Oracle Clusterware 2-47
addresses. Oracle recommends that you configure clients to use SCANs, but it is not required that you use SCANs. When an earlier version of Oracle Database is upgraded, it is registered with the SCAN, and clients can start using the SCAN to connect to that database, or continue to use VIP addresses for connections.
If you continue to use VIP addresses for client connections, you can modify the VIP address while Oracle Database and Oracle ASM continue to run. However, you must stop services while you modify the address. When you restart the VIP address, services are also restarted on the node.
This procedure cannot be used to change a static public subnet to use DHCP. Only the command srvctl add nodeapps -S creates a DHCP network.
Perform the following steps to change a VIP address:
1. Stop all services running on the node whose VIP address you want to change using the following command syntax, where database_name is the name of the database, service_name_list is a list of the services you want to stop, and my_node is the name of the node whose VIP address you want to change:
srvctl stop service -d database_name -s service_name_list -n my_node
This example specifies the database name (grid) using the -d option and specifies the services (sales,oltp) on the appropriate node (mynode).
$ srvctl stop service -d grid -s sales,oltp -n mynode
2. Confirm the current IP address for the VIP address by running the srvctl config vip command. This command displays the current VIP address bound to one of the network interfaces. The following example displays the configured VIP address:
$ srvctl config vip -n stbdp03VIP exists.:stbdp03VIP exists.: /stbdp03-vip/192.168.2.20/255.255.255.0/eth0
3. Stop the VIP address using the srvctl stop vip command:
$ srvctl stop vip -n mynode
4. Verify that the VIP address is no longer running by running the ifconfig -a command on Linux and UNIX systems (or issue the ipconfig /all command on Windows systems), and confirm that the interface (in the example it was eth0:1) is no longer listed in the output.
5. Make any changes necessary to the /etc/hosts files on all nodes on Linux and UNIX systems, or the %windir%\system32\drivers\etc\hosts file on Windows systems, and make any necessary DNS changes to associate the new IP address with the old host name.
Note: The following instructions describe how to change only a VIP address, and assume that the host name associated with the VIP address does not change. Note that you do not need to update VIP addresses manually if you are using GNS, and VIPs are assigned using DHCP.
If you are changing only the VIP address, then update the DNS and the client hosts files. Also, update the server hosts files, if those are used for VIP addresses.
Changing Network Addresses on Manually Configured Networks
2-48 Oracle Clusterware Administration and Deployment Guide
6. Modify the node applications and provide the new VIP address using the following srvctl modify nodeapps syntax:
$ srvctl modify nodeapps -n node_name -A new_vip_address
The command includes the following flags and values:
■ -n node_name is the node name
■ -A new_vip_address is the node-level VIP address: name|ip/netmask[/if1[|if2|...]])
For example, issue the following command as the root user:
srvctl modify nodeapps -n mynode -A 192.168.2.125/255.255.255.0/eth0
Attempting to issue this command as the installation owner account may result in an error. For example, if the installation owner is oracle, then you may see the error PRCN-2018: Current user oracle is not a privileged user.
To avoid the error, run the command as the root or system administrator account.
7. Start the node VIP by running the srvctl start vip command:
$ srvctl start vip -n node_name
The following command example starts the VIP on the node named mynode:
$ srvctl start vip -n mynode
8. Repeat the steps for each node in the cluster.
Because the SRVCTL utility is a clusterwide management tool, you can accomplish these tasks for any specific node from any node in the cluster, without logging in to each of the cluster nodes.
9. Run the following command to verify node connectivity between all of the nodes for which your cluster is configured. This command discovers all of the network interfaces available on the cluster nodes and verifies the connectivity between all of the nodes by way of the discovered interfaces. This command also lists all of the interfaces available on the nodes which are suitable for use as VIP addresses.
$ cluvfy comp nodecon -n all -verbose
Changing Oracle Clusterware Private Network ConfigurationThis section contains the following topics:
■ About Private Networks, Network Interfaces, and Network Adapters
Note: To use a different subnet or NIC for the default network before any VIP resource is changed, you must use the command syntax srvctl modify nodeapps -S new_subnet/new_netmask/new_interface to change the network resource, where new_subnet is the new subnet address, new_netmask is the new netmask, and new_interface is the new interface. After you change the subnet, then you must change each node's VIP to an IP address on the new subnet, using the command syntax srvctl modify nodeapps -A new_ip.
Changing Network Addresses on Manually Configured Networks
Administering Oracle Clusterware 2-49
■ Consequences of Changing Interface Names Using OIFCFG
■ Changing or Deleting a Network Interface From a Cluster Configuration File
■ Changing the Network Adapter for the Interconnect
About Private Networks, Network Interfaces, and Network AdaptersOracle Clusterware requires that each node is connected through a private network (in addition to the public network). The private network connection is referred to as the cluster interconnect.
Oracle only supports clusters in which all of the nodes use the same network interface connected to the same subnet (defined as a global interface with the oifcfg command). You cannot use different network interfaces for each node (node-specific interfaces). Refer to Appendix D, "Oracle Interface Configuration Tool (OIFCFG) Command Reference" for more information about global and node-specific interfaces. Table 2–7 describes how the network interface card (NIC), or network adapter and the private IP address are stored.
Consequences of Changing Interface Names Using OIFCFGThe consequences of changing interface names depend on which name you are changing, and whether you are also changing the IP address. In cases where you are only changing the interface names, the consequences are minor. If you change the name for the Public Interface that is stored in the OCR, then you also must modify the node applications for each node. Therefore, you must stop the node applications for this change to take effect.
Changing or Deleting a Network Interface From a Cluster Configuration FileUse the following procedure to change or delete a network interface.
Table 2–7 Storage for the Network Adapter, Private IP Address, and Private Host Name
Entity Stored In... Comments
Network adapter name
Operating system
For example: eth1
Must be the same on all nodes. It can be changed globally.
Private network Interfaces
Oracle Clusterware, in the Grid Plug and Play (GPnP) Profile
Configure an interface for use as a private interface during installation by marking the interface as Private, or use the oifcfg cluster_interconnects command to designate an interface as a private interface.
Note: You cannot use the steps in this section to change the private node name after you have installed Oracle Clusterware.
See Also: My Oracle Support (formerly OracleMetaLink) note 276434.1 for more details about changing the nodeapps to use a new public interface name, available at the following URL:
https://metalink.oracle.com
Changing Network Addresses on Manually Configured Networks
2-50 Oracle Clusterware Administration and Deployment Guide
1. Ensure that Oracle Clusterware is running on all of the cluster nodes by running the following command:
olsnodes -s
The output from this command should show that Oracle Clusterware is running on all of the nodes in the cluster. For example:
./olsnodes -smyclustera Activemyclusterc Activemyclusterb Active
2. Ensure that the replacement interface is configured and operational in the operating system on all of the nodes. To do thus, use the form of the ifconfig command for your platform. For example, on Linux, use:
/sbin/ifconfig..
3. Add the new interface to the cluster as follows, providing the name of the new interface and the subnet address, using the following commands:
$ oifcfg setif -global/interface_name/subnet/:cluster_interconnect
4. Ensure that the previous step completes. Then you can remove the former subnet as follows by providing the name and subnet address of the former interface:
$ oifcfg delif -global /interface_name/subnet/
5. Verify the current configuration using the following command:
oifcfg getif
For example:
$ oifcfg getifeth2 10.220.52.0 global cluster_interconnecteth0 10.220.16.0 global public
6. On all of the nodes, stop Oracle Clusterware by running the following command as the root user:
# crsctl stop crs
7. When the cluster stops, you can deconfigure the deleted network interface in the operating system using the following command:
$ ifconfig down
Caution: The interface used by the Oracle RAC (RDBMS) interconnect must be the same interface that Oracle Clusterware is using with the hostname. Do not configure the private interconnect for Oracle RAC on a separate interface that is not monitored by Oracle Clusterware.
Note: You can use wildcards in the preceding command example.
Changing Network Addresses on Manually Configured Networks
Administering Oracle Clusterware 2-51
At this point, the IP address from network interfaces for the old subnet is deconfigured from Oracle Clusterware. This command does not affect the configuration of the IP address on the operating system.
8. Restart Oracle Clusterware by running the following command on each cluster member node as the root user:
# crsctl start crs
The changes take effect when Oracle Clusterware restarts.
If you use the CLUSTER_INTERCONNECTS initialization parameter, then you must update it to reflect the changes.
Changing the Network Adapter for the InterconnectTo change the network interface for the private interconnect (for example, eth1), you must perform the change on all nodes (globally). This is because Oracle currently does not support the use of different network interface cards in the same subnet for the cluster interconnect.
To change the network interface, perform the following steps:
1. Make sure that the Oracle Clusterware stack is up and running on all cluster nodes.
2. Use operating system commands (ifconfig, or the command for your system) to ensure that the new or replacement interface is configured and up on all cluster member nodes.
3. On a single node in the cluster add the new global interface specification:
$ oifcfg setif -global interface_name/subnet:cluster_interconnect
4. On a node in the cluster, use the ifconfig command to ensure that the new IP address exists.
5. Add the new subnet, with the following command, providing the name of the interface and the subnet address. The changes take effect when Oracle Clusterware restarts:
$ oifcfg setif -global interface_name/subnet:cluster_interconnect
Note: You can use wild cards with the interface name. For example, oifcfg setif -global "eth*/192.168.0.0:cluster_interconnect is valid syntax. However, be careful to avoid ambiguity with other addresses or masks used with other cluster interfaces. If you use wild cards, then you see warning similar to the following:
eth* 192.168.0.0 global cluster_interconnectPRIF-29: Warning: wildcard in network parameters can cause mismatchamong GPnP profile, OCR, and system
Legacy network configuration does not support wildcards; thus wildcards are resolved using current node configuration at the time of the update.
Changing Network Addresses on Manually Configured Networks
2-52 Oracle Clusterware Administration and Deployment Guide
6. Verify the configuration with the oifcfg getif command.
7. Stop Oracle Clusterware on all nodes by running the following command as root on each node:
# crsctl stop crs
8. Assign the current network address to the new network adapter using the ifconfig command.
As root user, issue the ifconfig operating system command to assign the currently used private network address to the network adapter intended to be used for the interconnect. This usually requires some downtime for the current interface and the new interface. See your platform-specific operating system documentation for more information about issuing the ifconfig command.
9. Update the network configuration settings on the operating system.
You must update the operating system configuration changes, because changes made using ifconfig are not persistent.
10. Remove the former subnet, as follows, providing the name and subnet address of the former interface:
oifcfg delif -global interface_name/subnet
For example:
$ oifcfg delif -global eth1/10.10.0.0
11. Restart Oracle Clusterware by issuing the following command as root user on all nodes:
# crsctl start crs
You must restart Oracle Clusterware after running the oifcfg delif command, because Oracle Clusterware, Oracle ASM, and Oracle RAC continue to use the former subnet until they are restarted.
See Also: Appendix D, "Oracle Interface Configuration Tool (OIFCFG) Command Reference" for more information about using the OIFCFG command
Note: With cluster network configuration changes, the cluster must be fully stopped; do not use rolling stops and restarts.
See Also: Your operating system documentation for more information about how to make ifconfig commands persistent
Caution: This step should be performed only after a replacement interface is committed into the Grid Plug and Play configuration. Simple deletion of cluster interfaces without providing a valid replacement can result in invalid cluster configuration.
3
Cloning Oracle Clusterware to Create a Cluster 3-1
3 Cloning Oracle Clusterware to Create aCluster
This chapter describes how to clone an Oracle grid infrastructure home and use the cloned home to create a cluster. You perform the cloning procedures in this chapter by running scripts in silent mode. The cloning procedures are applicable to Linux and UNIX systems. Although the examples in this chapter use Linux and UNIX commands, the cloning concepts and procedures apply generally to all platforms.
This chapter contains the following topics:
■ Introduction to Cloning Oracle Clusterware
■ Preparing the Oracle Grid Infrastructure Home for Cloning
■ Creating a Cluster by Cloning Oracle Clusterware
■ Locating and Viewing Log Files Generated During Cloning
Introduction to Cloning Oracle ClusterwareCloning is the process of copying an existing Oracle Clusterware installation to a different location and then updating the copied installation to work in the new environment. Changes made by one-off patches applied on the source Oracle grid infrastructure home are also present after cloning. During cloning, you run a script that replays the actions that installed the Oracle grid infrastructure home.
Cloning requires that you start with a successfully installed Oracle grid infrastructure home. You use this home as the basis for implementing a script that extends the Oracle grid infrastructure home to create a cluster based on the original Grid home.
Manually creating the cloning script can be error prone because you prepare the script without interactive checks to validate your input. Despite this, the initial effort is
Note: This chapter assumes that you are cloning an Oracle Clusterware 11g release 2 (11.2) installation configured as follows:
■ No Grid Naming Service (GNS)
■ No Intelligent Management Platform Interface specification (IPMI)
■ Voting disk and Oracle Cluster Registry (OCR) are stored in Oracle Automatic Storage Management (ASM)
■ Single Client Access Name (SCAN) resolves through DNS
Introduction to Cloning Oracle Clusterware
3-2 Oracle Clusterware Administration and Deployment Guide
worthwhile for scenarios where you run a single script to configure tens or even hundreds of clusters. If you have only one cluster to install, then you should use the traditional, automated and interactive installation methods, such as Oracle Universal Installer (OUI) or the Provisioning Pack feature of Oracle Enterprise Manager.
The Provisioning Pack feature of Oracle Enterprise Manager Grid Control provides a framework that automates the provisioning of nodes and clusters. For data centers with many clusters, the investment in creating a cloning procedure to provision new clusters and new nodes to existing clusters is worth the effort.
The following list describes some situations in which cloning is useful:
■ Cloning prepares an Oracle grid infrastructure home once and deploys it to many hosts simultaneously. You can complete the installation in silent mode, as a noninteractive process. You do not need to use a graphical user interface (GUI) console, and you can perform cloning from a Secure Shell (SSH) terminal session, if required.
■ Cloning enables you to create an installation (copy of a production, test, or development installation) with all patches applied to it in a single step. Once you have performed the base installation and applied all patch sets and patches on the source system, cloning performs all of these individual steps as a single procedure. This is in contrast to going through the installation process to perform the separate steps to install, configure, and patch the installation on each node in the cluster.
■ Installing Oracle Clusterware by cloning is a quick process. For example, cloning an Oracle grid infrastructure home to a cluster with more than two nodes requires a few minutes to install the Oracle software, plus a few minutes more for each node (approximately the amount of time it takes to run the root.sh script).
■ Cloning provides a guaranteed method of accurately repeating the same Oracle Clusterware installation on multiple clusters.
A cloned installation acts the same as its source installation. For example, you can remove the cloned Oracle grid infrastructure home using OUI or patch it using OPatch. You can also use the cloned Oracle grid infrastructure home as the source for another cloning operation. You can create a cloned copy of a test, development, or production installation by using the command-line cloning scripts.
The default cloning procedure is adequate for most cases. However, you can also customize some aspects of cloning, for example, to specify custom port assignments or to preserve custom settings.
The cloning process works by copying all of the files from the source Oracle grid infrastructure home to the destination Oracle grid infrastructure home. You can clone either a non-shared or shared Oracle grid infrastructure home. Thus, any files used by the source instance that are located outside the source Oracle grid infrastructure home's directory structure are not copied to the destination location.
Note: Cloning is not a replacement for Oracle Enterprise Manager cloning that is a part of the Provisioning Pack. During Oracle Enterprise Manager cloning, the provisioning process simplifies cloning by interactively asking for details about the Oracle home. The interview questions cover such topics as the location to which you want to deploy the cloned environment, the name of the Oracle database home, a list of the nodes in the cluster, and so on.

Preparing the Oracle Grid Infrastructure Home for Cloning
Cloning Oracle Clusterware to Create a Cluster 3-3
The size of the binary files at the source and the destination may differ because these files are relinked as part of the cloning operation, and the operating system patch levels may also differ between these two locations. Additionally, the number of files in the cloned home would increase because several files copied from the source, specifically those being instantiated, are backed up as part of the clone operation.
Preparing the Oracle Grid Infrastructure Home for CloningTo prepare the source Oracle grid infrastructure home to be cloned, create a copy of an installed Oracle grid infrastructure home and then use it to perform the cloning procedure on other nodes. Use the following step-by-step procedure to prepare the copy of the Oracle grid infrastructure home.
Step 1: Install Oracle ClusterwareUse the detailed instructions in the Oracle Grid Infrastructure Installation Guide to perform the following steps on the source node:
1. Install Oracle Clusterware 11g release 2 (11.2). This installation puts Oracle Cluster Registry (OCR) and the voting disk on Oracle Automatic Storage Management (Oracle ASM).
To install and configure the grid infrastructure for a cluster, stop Oracle Clusterware before performing the cloning procedures. If you install just Oracle Clusterware, then you do not have to stop Oracle Clusterware.
2. Install any patches that are required (for example, 11.2.0.n), if necessary.
3. Apply one-off patches, if necessary.
Step 2: Shut Down Running SoftwareBefore copying the source Oracle grid infrastructure home, shut down all of the services, databases, listeners, applications, Oracle Clusterware, and Oracle ASM instances that run on the node. Use the Server Control (SRVCTL) and Oracle Clusterware Control (CRSCTL) utilities to shut down these components.
Step 3: Create a Copy of the Oracle Grid Infrastructure HomeTo keep the installed Oracle grid infrastructure home as a working home, make a full copy of the source Oracle grid infrastructure home for cloning. Because the Oracle grid infrastructure home contains files that are relevant only to the source node, you can optionally remove the unnecessary files from the copy.
Note: Either install and configure the grid infrastructure for a cluster or install just the Oracle Clusterware software, as described in your platform-specific Oracle Grid Infrastructure Installation Guide.
See Also: Oracle Grid Infrastructure Installation Guide for Oracle Clusterware installation instructions
Note: When creating the copy, a best practice is to include the release number in the name of the file.

Preparing the Oracle Grid Infrastructure Home for Cloning
3-4 Oracle Clusterware Administration and Deployment Guide
Use one of the following methods to create a compressed copy of the Oracle grid infrastructure home.
Method 1: Create a copy of the Oracle grid infrastructure home and remove the unnecessary files from the copy:1. On the source node, create a copy of the Oracle grid infrastructure home. To keep
the installed Oracle grid infrastructure home as a working home, make a full copy of the source Oracle grid infrastructure home and remove the unnecessary files from the copy. For example, as root on Linux systems, run the cp command:
# cp -prf Grid_home location_of_the_copy_of_Grid_home
2. Delete unnecessary files from the copy.
The Oracle grid infrastructure home contains files that are relevant only to the source node, so you can remove the unnecessary files from the copy in the log, crs/init, and cdata directories. The following example for Linux and UNIX systems shows the commands to run to remove the unnecessary files from the copy of the Oracle grid infrastructure home:
[root@node1 root]# cd /opt/oracle/product/11g/crs[root@node1 crs]# rm -rf /opt/oracle/product/11g/crs/log/host_name[root@node1 crs]# rm -rf crs/init[root@node1 crs]# rm -rf cdata[root@node1 crs]# find gpnp -type f -exec rm -f {} \;[root@node1 crs]# rm -rf network/admin/*.ora[root@node1 crs]# find . -name '*.ouibak' -exec rm {} \;[root@node1 crs]# find . -name '*.ouibak.1' -exec rm {} \;[root@node1 crs]# rm -rf root.sh*[root@node1 crs]# rm -rf Grid_home/inventory/ContentsXML/oraclehomeproperties.xml[root@node1 crs]# cd cfgtoollogs[root@node1 cfgtoollogs]# find . -type f -exec rm -f {} \;
3. Create a compressed copy of the previously copied Oracle grid infrastructure home using tar or gzip on Linux and UNIX systems. Ensure that the tool you use preserves the permissions and file timestamps. For example:
On Linux and UNIX systems:
[root@node1 root]# cd /opt/oracle/product/11g/crs/[root@node1 crs]# tar -zcvf /path_name/gridHome.tgz .
In the example, the cd command changes the location to the Oracle grid infrastructure home, and the tar command creates the copy named crs11101.tgz. In the tar command, path_name represents the location of the file.
On AIX or HPUX systems:
tar cpf - . | compress -fv > temp_dir/gridHome.tar.Z
Method 2: Create a compressed copy of the Oracle grid infrastructure home using the -X option:1. Create a file that lists the unnecessary files in the Oracle grid infrastructure home.
For example, list the following file names, using the asterisk (*) wildcard, in a file called excludeFileList:
./opt/oracle/product/11g/crs/log/host_name
./opt/oracle/product/11g/crs/root.sh*
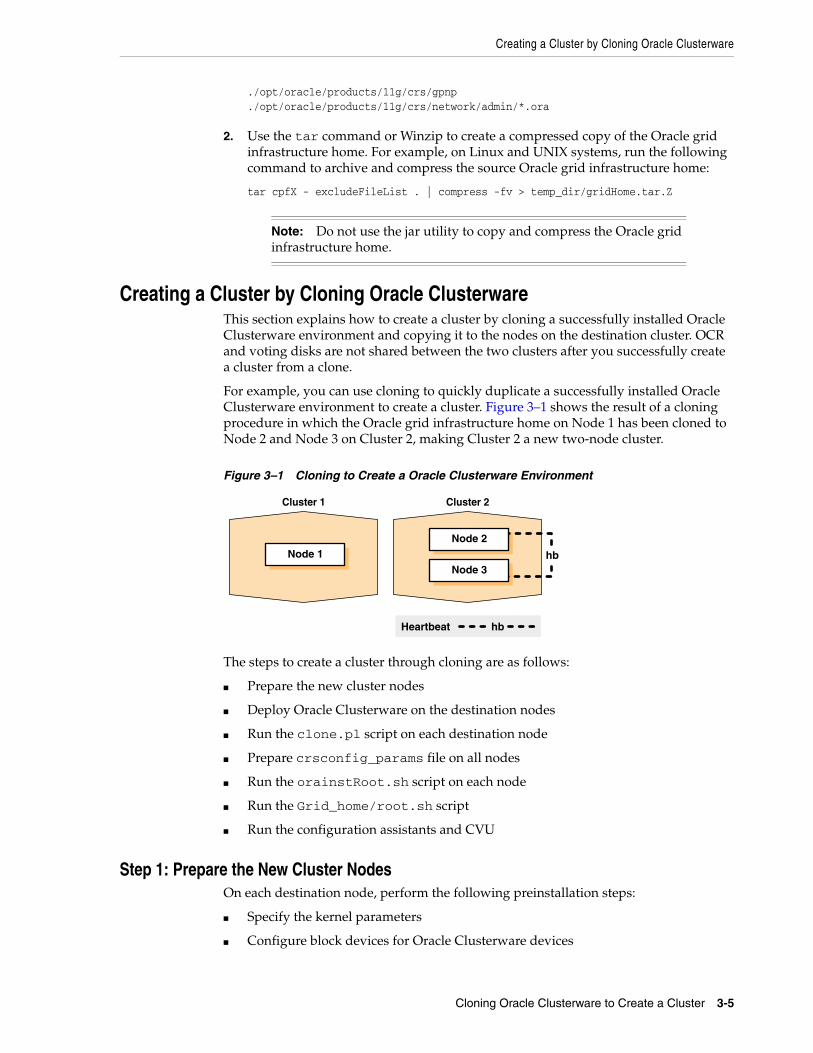
Creating a Cluster by Cloning Oracle Clusterware
Cloning Oracle Clusterware to Create a Cluster 3-5
./opt/oracle/products/11g/crs/gpnp
./opt/oracle/products/11g/crs/network/admin/*.ora
2. Use the tar command or Winzip to create a compressed copy of the Oracle grid infrastructure home. For example, on Linux and UNIX systems, run the following command to archive and compress the source Oracle grid infrastructure home:
tar cpfX - excludeFileList . | compress -fv > temp_dir/gridHome.tar.Z
Creating a Cluster by Cloning Oracle ClusterwareThis section explains how to create a cluster by cloning a successfully installed Oracle Clusterware environment and copying it to the nodes on the destination cluster. OCR and voting disks are not shared between the two clusters after you successfully create a cluster from a clone.
For example, you can use cloning to quickly duplicate a successfully installed Oracle Clusterware environment to create a cluster. Figure 3–1 shows the result of a cloning procedure in which the Oracle grid infrastructure home on Node 1 has been cloned to Node 2 and Node 3 on Cluster 2, making Cluster 2 a new two-node cluster.
Figure 3–1 Cloning to Create a Oracle Clusterware Environment
The steps to create a cluster through cloning are as follows:
■ Prepare the new cluster nodes
■ Deploy Oracle Clusterware on the destination nodes
■ Run the clone.pl script on each destination node
■ Prepare crsconfig_params file on all nodes
■ Run the orainstRoot.sh script on each node
■ Run the Grid_home/root.sh script
■ Run the configuration assistants and CVU
Step 1: Prepare the New Cluster NodesOn each destination node, perform the following preinstallation steps:
■ Specify the kernel parameters
■ Configure block devices for Oracle Clusterware devices
Note: Do not use the jar utility to copy and compress the Oracle grid infrastructure home.
Cluster 1
Heartbeat hb
Node 1
Cluster 2
hbNode 3
Node 2
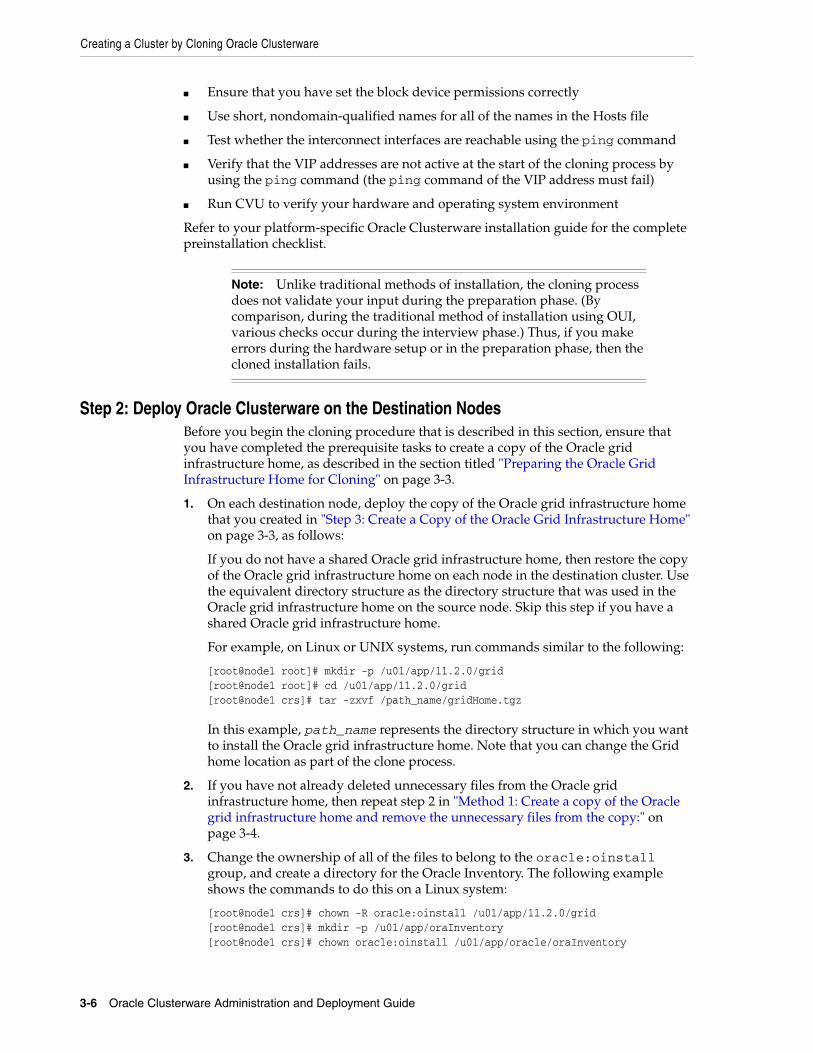
Creating a Cluster by Cloning Oracle Clusterware
3-6 Oracle Clusterware Administration and Deployment Guide
■ Ensure that you have set the block device permissions correctly
■ Use short, nondomain-qualified names for all of the names in the Hosts file
■ Test whether the interconnect interfaces are reachable using the ping command
■ Verify that the VIP addresses are not active at the start of the cloning process by using the ping command (the ping command of the VIP address must fail)
■ Run CVU to verify your hardware and operating system environment
Refer to your platform-specific Oracle Clusterware installation guide for the complete preinstallation checklist.
Step 2: Deploy Oracle Clusterware on the Destination NodesBefore you begin the cloning procedure that is described in this section, ensure that you have completed the prerequisite tasks to create a copy of the Oracle grid infrastructure home, as described in the section titled "Preparing the Oracle Grid Infrastructure Home for Cloning" on page 3-3.
1. On each destination node, deploy the copy of the Oracle grid infrastructure home that you created in "Step 3: Create a Copy of the Oracle Grid Infrastructure Home" on page 3-3, as follows:
If you do not have a shared Oracle grid infrastructure home, then restore the copy of the Oracle grid infrastructure home on each node in the destination cluster. Use the equivalent directory structure as the directory structure that was used in the Oracle grid infrastructure home on the source node. Skip this step if you have a shared Oracle grid infrastructure home.
For example, on Linux or UNIX systems, run commands similar to the following:
[root@node1 root]# mkdir -p /u01/app/11.2.0/grid[root@node1 root]# cd /u01/app/11.2.0/grid[root@node1 crs]# tar -zxvf /path_name/gridHome.tgz
In this example, path_name represents the directory structure in which you want to install the Oracle grid infrastructure home. Note that you can change the Grid home location as part of the clone process.
2. If you have not already deleted unnecessary files from the Oracle grid infrastructure home, then repeat step 2 in "Method 1: Create a copy of the Oracle grid infrastructure home and remove the unnecessary files from the copy:" on page 3-4.
3. Change the ownership of all of the files to belong to the oracle:oinstall group, and create a directory for the Oracle Inventory. The following example shows the commands to do this on a Linux system:
[root@node1 crs]# chown -R oracle:oinstall /u01/app/11.2.0/grid[root@node1 crs]# mkdir -p /u01/app/oraInventory[root@node1 crs]# chown oracle:oinstall /u01/app/oracle/oraInventory
Note: Unlike traditional methods of installation, the cloning process does not validate your input during the preparation phase. (By comparison, during the traditional method of installation using OUI, various checks occur during the interview phase.) Thus, if you make errors during the hardware setup or in the preparation phase, then the cloned installation fails.
Creating a Cluster by Cloning Oracle Clusterware
Cloning Oracle Clusterware to Create a Cluster 3-7
4. It is important to remove any Oracle network files from the /u01/app/11.2.0/grid/network/admin directory on both nodes before continuing. For example, remove any tnsnames.ora, listener.ora or sqlnet.ora files.
Step 3: Run the clone.pl Script on Each Destination Node
To set up the new Oracle Clusterware environment, the clone.pl script requires you to provide several setup values for the script. You can provide the variable values by either supplying input on the command line when you run the clone.pl script, or by creating a file in which you can assign values to the cloning variables. The following discussions describe these options.
Supplying input to the clone.pl script on the command lineIf you do not have a shared Oracle grid infrastructure home, navigate to the $ORACLE_HOME/clone/bin directory on each destination node and run the clone.pl script, which performs the main Oracle Clusterware cloning tasks. To run the script, you must supply input to several parameters. Table 3–1 describes the clone.pl script parameters.
For example, on Linux and UNIX systems:
See Also: "Locating and Viewing Log Files Generated During Cloning" on page 3-13
Note: Step 3 must be run to completion before you start Step 4. Similarly, Step 4 must be run to completion before you start Step 5.
You can perform Step 3, Step 4, and Step 5 simultaneously on different nodes. Step 5 must be complete on all nodes before you can run Step 6.
Table 3–1 Parameters for the clone.pl Script
Parameters Description
ORACLE_BASE=ORACLE_BASE
The complete path to the Oracle base to be cloned. If you specify an invalid path, then the script exits. This parameter is required.
ORACLE_HOME=GRID_HOME
The complete path to the grid infrastructure home for cloning. If you specify an invalid path, then the script exits. This parameter is required.
ORACLE_HOME_NAME=Oracle_home_name (or) -defaultHomeName
The Oracle home name of the home to be cloned. Optionally, you can specify the -defaultHomeName flag. This parameter is not required.
INVENTORY_LOCATION=location_of_inventory
The location for the Oracle Inventory.
-O'"CLUSTER_NODES={node1, node2}"'
The short node names for the nodes that are to be part of this new cluster.
-O'"LOCAL_NODE=node1"'
The short node name for the node on which clone.pl is running.
-debug Specify this option to run the clone.pl script in debug mode.
-help Specify this option to obtain help for the clone.pl script.
Creating a Cluster by Cloning Oracle Clusterware
3-8 Oracle Clusterware Administration and Deployment Guide
$ perl clone.pl -silent ORACLE_BASE=/u01/app/oracle ORACLE_HOME=/u01/app/1.2.0/grid ORACLE_HOME_NAME=OraHome1Grid \INVENTORY_LOCATION=/u01/app/oraInventory -O'"CLUSTER_NODES={node1, node2}"'-O'"LOCAL_NODE=node1"'
Refer to Table 3–2 and Table 3–3 for descriptions of the various variables in the preceding examples.
If you have a shared Oracle grid infrastructure home, then append the -cfs option to the command example in this step and provide a complete path location for the cluster file system.
Supplying Input to the clone.pl Script in a File Because the clone.pl script is sensitive to the parameter values that it receives, you must be accurate in your use of brackets, single quotation marks, and double quotation marks. To avoid errors, create a file that is similar to the start.sh script shown in Example 3–1 in which you can specify environment variables and cloning parameters for the clone.pl script.
Example 3–1 shows an excerpt from an example script called start.sh that calls the clone.pl script; the example is configured for a cluster named crscluster. Run the script as the operating system user that installed Oracle Clusterware.
Example 3–1 Excerpt From the start.sh Script to Clone Oracle Clusterware
#!/bin/shORACLE_BASE=/u01/app/oracleGRID_HOME=/u01/app/11.2.0/gridTHIS_NODE=`hostname -s` E01=ORACLE_BASE=${ORACLE_BASE}E02=ORACLE_HOME=${ORACLE_HOME}E03=ORACLE_HOME_NAME=OraGridHome1E04=INVENTORY_LOCATION=${ORACLE_BASE}/oraInventory #C00="-O'-debug'"C01="'-O\"CLUSTER_NODES={node1,node2}\"'"C02="'-O\"LOCAL_NODE=${THIS_NODE}\"'" perl ${GRID_HOME}/clone/bin/clone.pl -silent $E01 $E02 $E03 $E04 $C01 $C02
The start.sh script sets several environment variables and cloning parameters, as described in Table 3–2 and Table 3–3, respectively. Table 3–2 describes the environment variables E01, E02, E03, and E04 that are shown in bold typeface in Example 3–1.
Table 3–2 Environment Variables Passed to the clone.pl Script
Symbol Variable Description
E01 ORACLE_BASE The location of the Oracle base directory.
E02 ORACLE_HOME The location of the Oracle grid infrastructure home. This directory location must exist and must be owned by the Oracle operating system group: oinstall.
E03 ORACLE_HOME_NAME The name of the Oracle grid infrastructure home. This is stored in the Oracle Inventory.
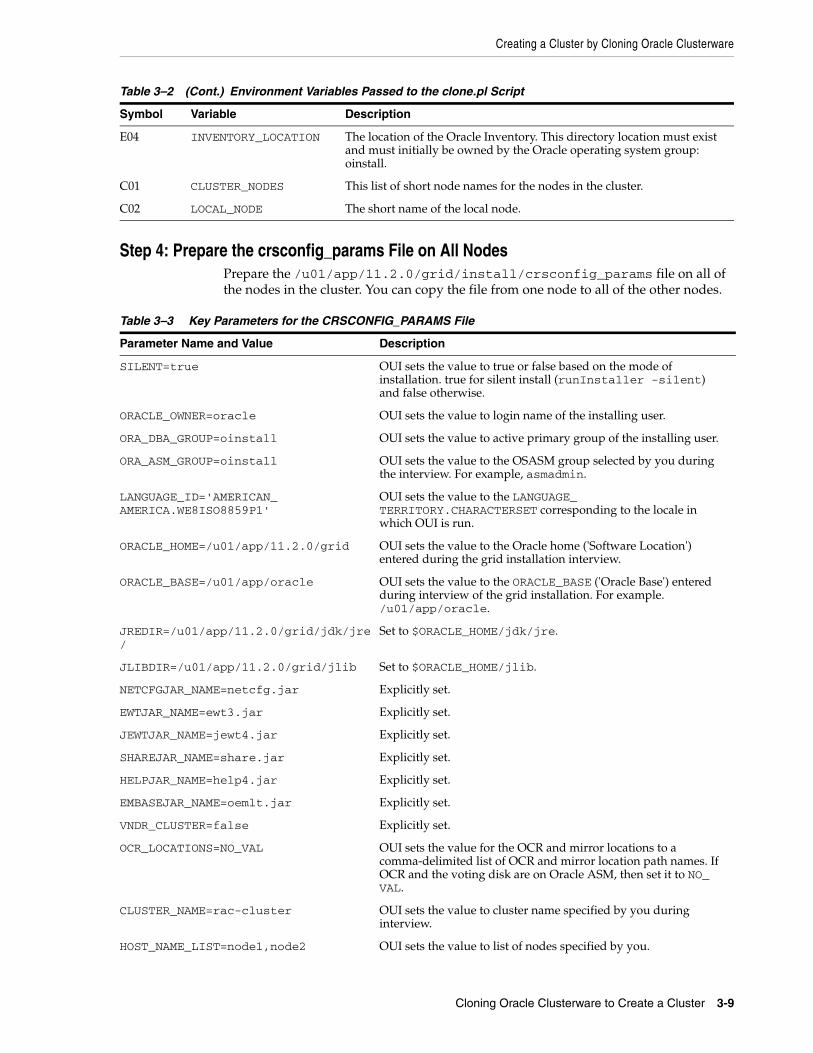
Creating a Cluster by Cloning Oracle Clusterware
Cloning Oracle Clusterware to Create a Cluster 3-9
Step 4: Prepare the crsconfig_params File on All Nodes Prepare the /u01/app/11.2.0/grid/install/crsconfig_params file on all of the nodes in the cluster. You can copy the file from one node to all of the other nodes.
E04 INVENTORY_LOCATION The location of the Oracle Inventory. This directory location must exist and must initially be owned by the Oracle operating system group: oinstall.
C01 CLUSTER_NODES This list of short node names for the nodes in the cluster.
C02 LOCAL_NODE The short name of the local node.
Table 3–3 Key Parameters for the CRSCONFIG_PARAMS File
Parameter Name and Value Description
SILENT=true OUI sets the value to true or false based on the mode of installation. true for silent install (runInstaller -silent) and false otherwise.
ORACLE_OWNER=oracle OUI sets the value to login name of the installing user.
ORA_DBA_GROUP=oinstall OUI sets the value to active primary group of the installing user.
ORA_ASM_GROUP=oinstall OUI sets the value to the OSASM group selected by you during the interview. For example, asmadmin.
LANGUAGE_ID='AMERICAN_AMERICA.WE8ISO8859P1'
OUI sets the value to the LANGUAGE_TERRITORY.CHARACTERSET corresponding to the locale in which OUI is run.
ORACLE_HOME=/u01/app/11.2.0/grid OUI sets the value to the Oracle home ('Software Location') entered during the grid installation interview.
ORACLE_BASE=/u01/app/oracle OUI sets the value to the ORACLE_BASE ('Oracle Base') entered during interview of the grid installation. For example. /u01/app/oracle.
JREDIR=/u01/app/11.2.0/grid/jdk/jre/
Set to $ORACLE_HOME/jdk/jre.
JLIBDIR=/u01/app/11.2.0/grid/jlib Set to $ORACLE_HOME/jlib.
NETCFGJAR_NAME=netcfg.jar Explicitly set.
EWTJAR_NAME=ewt3.jar Explicitly set.
JEWTJAR_NAME=jewt4.jar Explicitly set.
SHAREJAR_NAME=share.jar Explicitly set.
HELPJAR_NAME=help4.jar Explicitly set.
EMBASEJAR_NAME=oemlt.jar Explicitly set.
VNDR_CLUSTER=false Explicitly set.
OCR_LOCATIONS=NO_VAL OUI sets the value for the OCR and mirror locations to a comma-delimited list of OCR and mirror location path names. If OCR and the voting disk are on Oracle ASM, then set it to NO_VAL.
CLUSTER_NAME=rac-cluster OUI sets the value to cluster name specified by you during interview.
HOST_NAME_LIST=node1,node2 OUI sets the value to list of nodes specified by you.
Table 3–2 (Cont.) Environment Variables Passed to the clone.pl Script
Symbol Variable Description
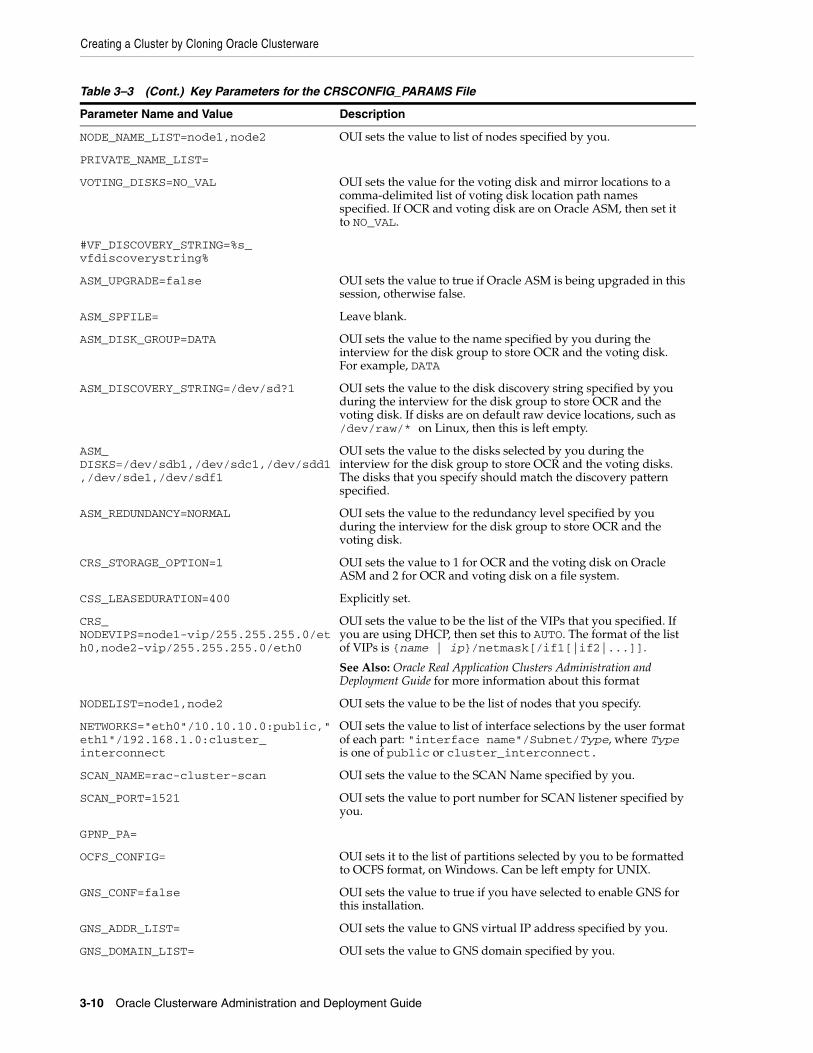
Creating a Cluster by Cloning Oracle Clusterware
3-10 Oracle Clusterware Administration and Deployment Guide
NODE_NAME_LIST=node1,node2 OUI sets the value to list of nodes specified by you.
PRIVATE_NAME_LIST=
VOTING_DISKS=NO_VAL OUI sets the value for the voting disk and mirror locations to a comma-delimited list of voting disk location path names specified. If OCR and voting disk are on Oracle ASM, then set it to NO_VAL.
#VF_DISCOVERY_STRING=%s_vfdiscoverystring%
ASM_UPGRADE=false OUI sets the value to true if Oracle ASM is being upgraded in this session, otherwise false.
ASM_SPFILE= Leave blank.
ASM_DISK_GROUP=DATA OUI sets the value to the name specified by you during the interview for the disk group to store OCR and the voting disk. For example, DATA
ASM_DISCOVERY_STRING=/dev/sd?1 OUI sets the value to the disk discovery string specified by you during the interview for the disk group to store OCR and the voting disk. If disks are on default raw device locations, such as /dev/raw/* on Linux, then this is left empty.
ASM_DISKS=/dev/sdb1,/dev/sdc1,/dev/sdd1,/dev/sde1,/dev/sdf1
OUI sets the value to the disks selected by you during the interview for the disk group to store OCR and the voting disks. The disks that you specify should match the discovery pattern specified.
ASM_REDUNDANCY=NORMAL OUI sets the value to the redundancy level specified by you during the interview for the disk group to store OCR and the voting disk.
CRS_STORAGE_OPTION=1 OUI sets the value to 1 for OCR and the voting disk on Oracle ASM and 2 for OCR and voting disk on a file system.
CSS_LEASEDURATION=400 Explicitly set.
CRS_NODEVIPS=node1-vip/255.255.255.0/eth0,node2-vip/255.255.255.0/eth0
OUI sets the value to be the list of the VIPs that you specified. If you are using DHCP, then set this to AUTO. The format of the list of VIPs is {name | ip}/netmask[/if1[|if2|...]].
See Also: Oracle Real Application Clusters Administration and Deployment Guide for more information about this format
NODELIST=node1,node2 OUI sets the value to be the list of nodes that you specify.
NETWORKS="eth0"/10.10.10.0:public,"eth1"/192.168.1.0:cluster_interconnect
OUI sets the value to list of interface selections by the user format of each part: "interface name"/Subnet/Type, where Type is one of public or cluster_interconnect.
SCAN_NAME=rac-cluster-scan OUI sets the value to the SCAN Name specified by you.
SCAN_PORT=1521 OUI sets the value to port number for SCAN listener specified by you.
GPNP_PA=
OCFS_CONFIG= OUI sets it to the list of partitions selected by you to be formatted to OCFS format, on Windows. Can be left empty for UNIX.
GNS_CONF=false OUI sets the value to true if you have selected to enable GNS for this installation.
GNS_ADDR_LIST= OUI sets the value to GNS virtual IP address specified by you.
GNS_DOMAIN_LIST= OUI sets the value to GNS domain specified by you.
Table 3–3 (Cont.) Key Parameters for the CRSCONFIG_PARAMS File
Parameter Name and Value Description
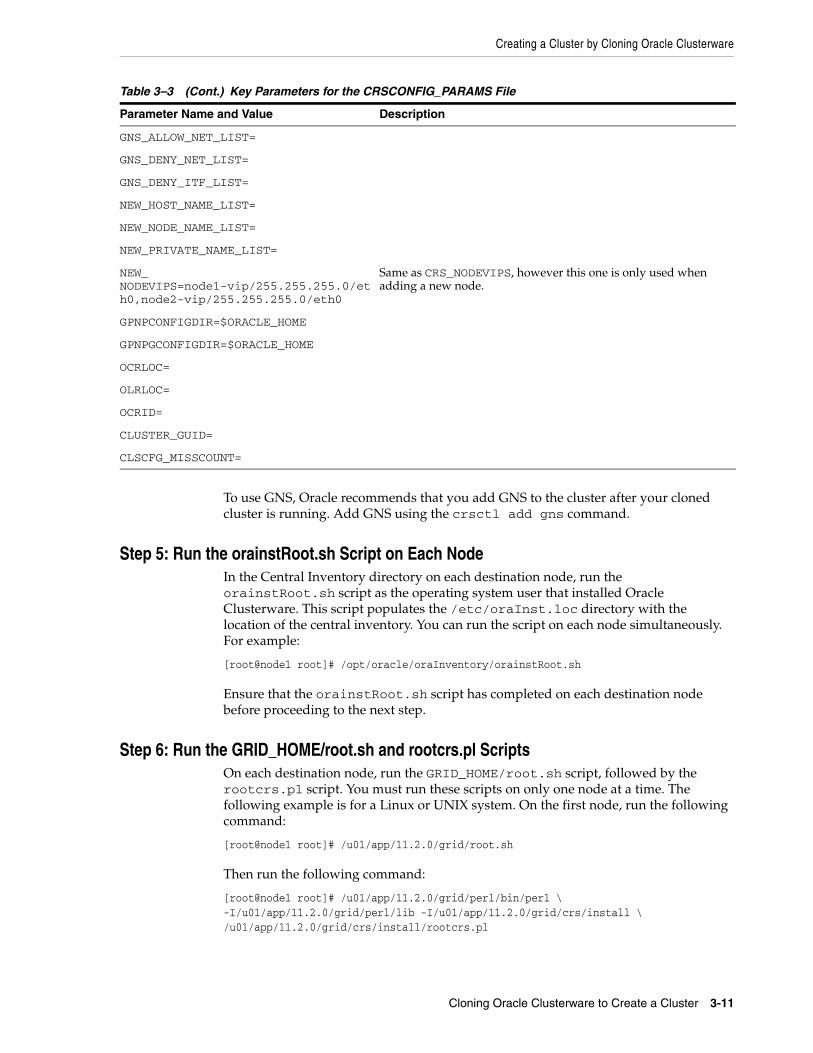
Creating a Cluster by Cloning Oracle Clusterware
Cloning Oracle Clusterware to Create a Cluster 3-11
To use GNS, Oracle recommends that you add GNS to the cluster after your cloned cluster is running. Add GNS using the crsctl add gns command.
Step 5: Run the orainstRoot.sh Script on Each Node In the Central Inventory directory on each destination node, run the orainstRoot.sh script as the operating system user that installed Oracle Clusterware. This script populates the /etc/oraInst.loc directory with the location of the central inventory. You can run the script on each node simultaneously. For example:
[root@node1 root]# /opt/oracle/oraInventory/orainstRoot.sh
Ensure that the orainstRoot.sh script has completed on each destination node before proceeding to the next step.
Step 6: Run the GRID_HOME/root.sh and rootcrs.pl Scripts On each destination node, run the GRID_HOME/root.sh script, followed by the rootcrs.pl script. You must run these scripts on only one node at a time. The following example is for a Linux or UNIX system. On the first node, run the following command:
[root@node1 root]# /u01/app/11.2.0/grid/root.sh
Then run the following command:
[root@node1 root]# /u01/app/11.2.0/grid/perl/bin/perl \-I/u01/app/11.2.0/grid/perl/lib -I/u01/app/11.2.0/grid/crs/install \/u01/app/11.2.0/grid/crs/install/rootcrs.pl
GNS_ALLOW_NET_LIST=
GNS_DENY_NET_LIST=
GNS_DENY_ITF_LIST=
NEW_HOST_NAME_LIST=
NEW_NODE_NAME_LIST=
NEW_PRIVATE_NAME_LIST=
NEW_NODEVIPS=node1-vip/255.255.255.0/eth0,node2-vip/255.255.255.0/eth0
Same as CRS_NODEVIPS, however this one is only used when adding a new node.
GPNPCONFIGDIR=$ORACLE_HOME
GPNPGCONFIGDIR=$ORACLE_HOME
OCRLOC=
OLRLOC=
OCRID=
CLUSTER_GUID=
CLSCFG_MISSCOUNT=
Table 3–3 (Cont.) Key Parameters for the CRSCONFIG_PARAMS File
Parameter Name and Value Description
Creating a Cluster by Cloning Oracle Clusterware
3-12 Oracle Clusterware Administration and Deployment Guide
Ensure that the root.sh and rootcrs.pl scripts have completed on the first node before running them on the second node and subsequent nodes. On each subsequent node, run the following command:
[root@node2 root]# /u01/app/11.2.0/grid/root.sh
Then run the following command:
[root@node1 root]# /u01/app/11.2.0/grid/perl/bin/perl \-I/u01/app/11.2.0/grid/perl/lib -I/u01/app/11.2.0/grid/crs/install \ /u01/app/11.2.0/grid/crs/install/rootcrs.pl
The root.sh script automatically configures the following node applications:
■ Global Services Daemon (GSD)
■ Oracle Notification Service (ONS)
■ Enhanced ONS (eONS)
■ Virtual IP (VIP) resources in the Oracle Cluster Registry (OCR)
■ Single Client Access Name (SCAN) VIPs and SCAN listeners
■ Oracle ASM
Step 7: Run the Configuration Assistants and the Oracle Cluster Verification Utility1. At the end of the Oracle Clusterware installation, on each new node, manually run
the configuration assistants and CVU. The following commands should be run from the first node only.
[oracle] $ /u01/app/11.2.0/grid/bin/netca \ /orahome /u01/app/11.2.0/grid \ /orahnam OraGridHome1 \ /instype typical \ /inscomp client,oraclenet,javavm,server\ /insprtcl tcp \ /cfg local \ /authadp NO_VALUE \ /responseFile /u01/app/11.2.0/grid/network/install/netca_ typ.rsp \ /silent
2. To complete ASM configuration, run the following command:
[oracle] $ /u01/app/11.2.0/grid/bin/asmca -silent -postConfigureASM-sysAsmPassword oracle -asmsnmpPassword oracle
3. If you a plan to run a pre-11g release 2 (11.2) database on this cluster, then you should run oifcfg as described in the Oracle Database 11g release 2 (11.2) documentation.
4. To use IPMI, use the crsctl command to configure IPMI on each node.
5. Run a final CVU check to confirm that your grid infrastructure home has been cloned correctly.
[oracle] $ /u01/app/11.2.0/grid/bin/cluvfy stage -post crsinst -n node1,node2
See Also: "Configuration and Installation for IPMI Node Fencing" on page 2-2 for information about configuring IPMI
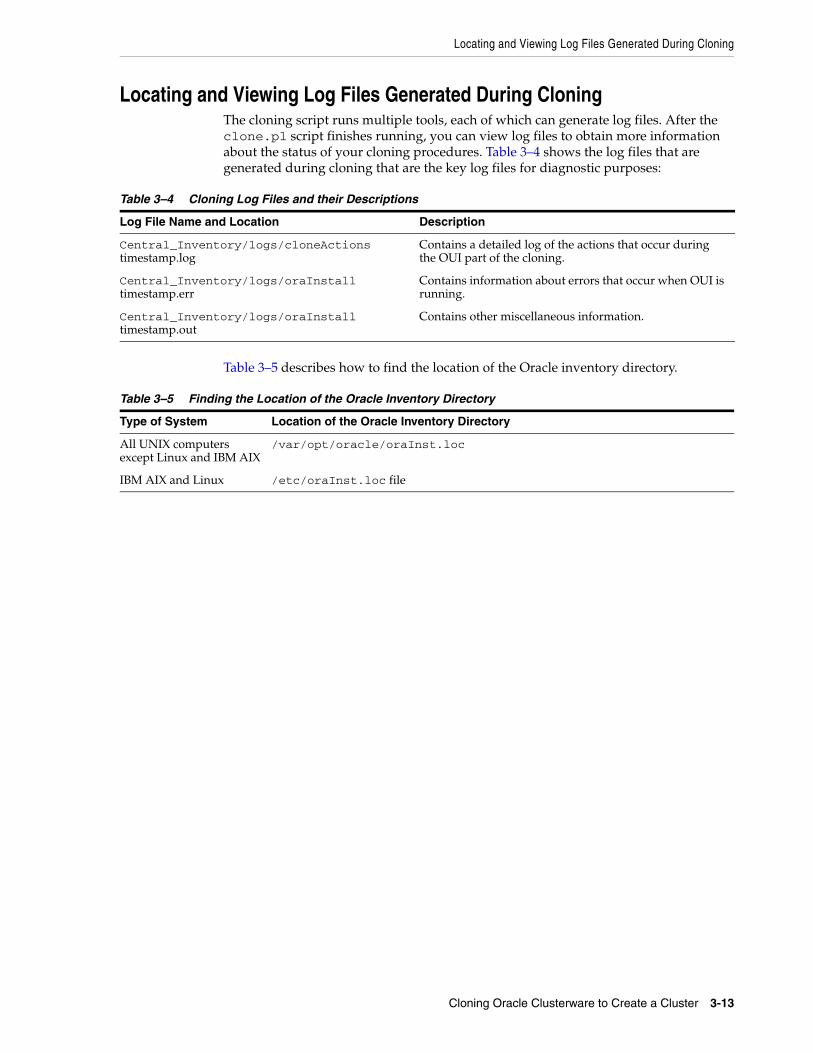
Locating and Viewing Log Files Generated During Cloning
Cloning Oracle Clusterware to Create a Cluster 3-13
Locating and Viewing Log Files Generated During Cloning The cloning script runs multiple tools, each of which can generate log files. After the clone.pl script finishes running, you can view log files to obtain more information about the status of your cloning procedures. Table 3–4 shows the log files that are generated during cloning that are the key log files for diagnostic purposes:
Table 3–5 describes how to find the location of the Oracle inventory directory.
Table 3–4 Cloning Log Files and their Descriptions
Log File Name and Location Description
Central_Inventory/logs/cloneActions timestamp.log
Contains a detailed log of the actions that occur during the OUI part of the cloning.
Central_Inventory/logs/oraInstall timestamp.err
Contains information about errors that occur when OUI is running.
Central_Inventory/logs/oraInstall timestamp.out
Contains other miscellaneous information.
Table 3–5 Finding the Location of the Oracle Inventory Directory
Type of System Location of the Oracle Inventory Directory
All UNIX computers except Linux and IBM AIX
/var/opt/oracle/oraInst.loc
IBM AIX and Linux /etc/oraInst.loc file

Locating and Viewing Log Files Generated During Cloning
3-14 Oracle Clusterware Administration and Deployment Guide
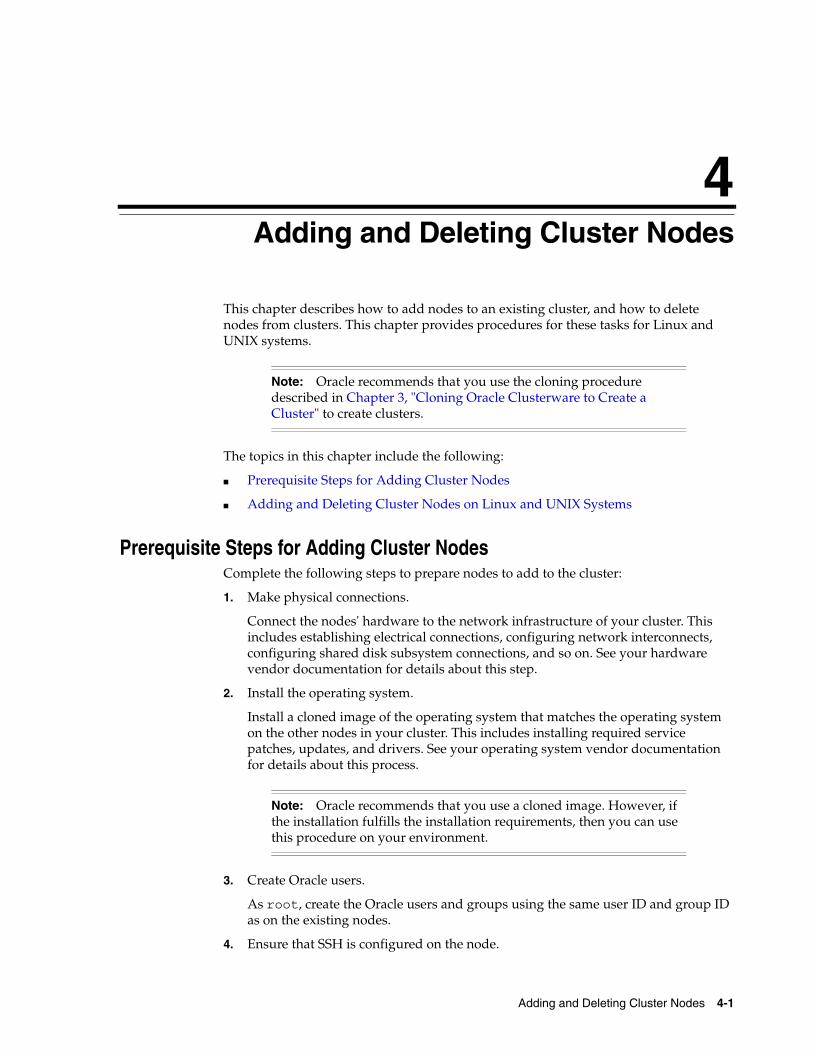
4
Adding and Deleting Cluster Nodes 4-1
4 Adding and Deleting Cluster Nodes
This chapter describes how to add nodes to an existing cluster, and how to delete nodes from clusters. This chapter provides procedures for these tasks for Linux and UNIX systems.
The topics in this chapter include the following:
■ Prerequisite Steps for Adding Cluster Nodes
■ Adding and Deleting Cluster Nodes on Linux and UNIX Systems
Prerequisite Steps for Adding Cluster NodesComplete the following steps to prepare nodes to add to the cluster:
1. Make physical connections.
Connect the nodes' hardware to the network infrastructure of your cluster. This includes establishing electrical connections, configuring network interconnects, configuring shared disk subsystem connections, and so on. See your hardware vendor documentation for details about this step.
2. Install the operating system.
Install a cloned image of the operating system that matches the operating system on the other nodes in your cluster. This includes installing required service patches, updates, and drivers. See your operating system vendor documentation for details about this process.
3. Create Oracle users.
As root, create the Oracle users and groups using the same user ID and group ID as on the existing nodes.
4. Ensure that SSH is configured on the node.
Note: Oracle recommends that you use the cloning procedure described in Chapter 3, "Cloning Oracle Clusterware to Create a Cluster" to create clusters.
Note: Oracle recommends that you use a cloned image. However, if the installation fulfills the installation requirements, then you can use this procedure on your environment.
Adding and Deleting Cluster Nodes on Linux and UNIX Systems
4-2 Oracle Clusterware Administration and Deployment Guide
5. Verify the hardware and operating system installations with the Cluster Verification Utility (CVU).
After you configure the hardware and operating systems on the nodes you want to add, you can run the following commands to verify that the nodes you want to add are reachable by other nodes in the cluster. You can also use this command to verify user equivalence to all given nodes the local node, node connectivity among all of the given nodes, accessibility to shared storage from all of the given nodes, and so on.
a. From the Grid_home/bin directory on an existing node, run the CVU command to verify your installation at the post-hardware installation stage as shown in the following example, where node_list is a comma-delimited list of nodes you want to add to your cluster:
$ cluvfy stage -post hwos -n node_list | all [-verbose]
b. From the Grid_home/bin directory on an existing node, run the CVU command to obtain a detailed comparison of the properties of the reference node with all of the other nodes that are part of your current cluster environment. Replace ref_node with the name of a node in your existing cluster against which you want CVU to compare the nodes to be added. Specify a comma-delimited list of nodes after the -n option. In the following example, orainventory_group is the name of the Oracle inventory group, and osdba_group is the name of the OSDBA group:
$ cluvfy comp peer [-refnode ref_node] -n node_list[-orainv orainventory_group] [-osdba osdba_group] [-verbose]
After completing the procedures in this section, you are ready to add the nodes to the cluster.
Adding and Deleting Cluster Nodes on Linux and UNIX SystemsThis section explains cluster node addition and deletion on Linux and UNIX systems. The procedures in this section assume that you have performed the steps in the "Prerequisite Steps for Adding Cluster Nodes" section.
Note: SSH configuration is done when you install Oracle Clusterware 11g release 2 (11.2). If, however, SSH is not configured, see Oracle Grid Infrastructure Installation Guide for information about configuring SSH.
See Also: Appendix A, "Cluster Verification Utility Reference" for more information about CVU command usage
Note: For the reference node, select a cluster node against which you want CVU to compare, for example, the nodes that you want to add that you specify with the -n option.
Note: Avoid changing host names after you complete the Oracle Clusterware installation, including adding or deleting domain qualifications. Nodes with changed host names must be deleted from the cluster and added back with the new name.
Adding and Deleting Cluster Nodes on Linux and UNIX Systems
Adding and Deleting Cluster Nodes 4-3
The last step of the node addition process includes extending the Oracle Clusterware home from an Oracle Clusterware home on an existing node to the nodes that you want to add.
This section includes the following topics:
■ Adding a Cluster Node on Linux and UNIX Systems
■ Deleting a Cluster Node on Linux and UNIX Systems
Adding a Cluster Node on Linux and UNIX SystemsThis procedure describes how to add a node to your cluster. This procedure assumes that:
■ There is an existing cluster with a node named node1
■ You are adding a node named node2
■ You have successfully installed Oracle Clusterware on node1 in a nonshared home, where Grid_home represents the successfully installed home
To add a node:
1. Ensure that you have successfully installed Oracle Clusterware on at least one node in your cluster environment. To perform the following procedure, Grid_home must identify your successfully installed Oracle Clusterware home.
2. Verify the integrity of the cluster and node2:
$ cluvfy stage -pre nodeadd -n node2 [-fixup [-fixupdir fixup_dir]] [-verbose]
You can specify the -fixup option and a directory into which CVU prints instructions to fix the cluster or node if the verification fails.
3. Navigate to the Grid_home/oui/bin directory on node1 and run the addNode.sh script using the following syntax, where node2 is the name of the node that you are adding and node2-vip is the VIP name for the node:
If you are using Grid Naming Service (GNS):
$ ./addNode.sh -silent "CLUSTER_NEW_NODES={node2}"
If you are not using GNS:
$ ./addNode.sh -silent "CLUSTER_NEW_NODES={node2}" "CLUSTER_NEW_VIRTUAL_HOSTNAMES={node2-vip}"
Alternatively, you can specify the entries shown in Example 4–1 in a response file, where file_name is the name of the file, and run the addNode.sh script, as follows:
$ addNode.sh -silent -responseFile file_name
When prompted, run root.sh before the addNode.sh script completes.
Example 4–1 Response File Entries for Adding Oracle Clusterware Home
RESPONSEFILE_VERSION=2.2.1.0.0
CLUSTER_NEW_NODES = {"newnode2"}
See Also: Oracle Grid Infrastructure Installation Guide for Oracle Clusterware installation instructions
Adding and Deleting Cluster Nodes on Linux and UNIX Systems
4-4 Oracle Clusterware Administration and Deployment Guide
CLUSTER_NEW_VIRTUAL_HOSTNAMES = {"newnode2-vip"}
4. Check that your cluster is integrated and that the cluster is not divided into separate parts by running the following CVU command. This command verifies that any number of specific nodes has been successfully added to the cluster at the network, shared storage, and clusterware levels:
$ cluvfy stage -post nodeadd -n node2 [-verbose]
you can optionally extend Oracle Database with Oracle Real Application Clusters (Oracle RAC) components to the new nodes, making them members of an existing Oracle RAC database.
Deleting a Cluster Node on Linux and UNIX SystemsThis section describes the procedure for deleting a node from a cluster.
To delete a node from a cluster:
1. Ensure that Grid_home correctly specifies the full directory path for the Oracle Clusterware home on each node, where Grid_home is the location of the installed Oracle Clusterware software.
2. If Cluster Synchronization Services (CSS) is not running on the node you are deleting, then the crsctl unpin css command in this step fails. Before you run the crsctl unpin css command, run the following command as either root or the user that installed Oracle Clusterware:
$ olsnodes -s -t
See Also: Oracle Universal Installer and OPatch User's Guide for details about how to configure command-line response files
Notes:
■ If you are not using Oracle Grid Naming Service (GNS), then you must add the name and address of node2 to DNS.
■ Command-line values always override response file values.
See Also: "cluvfy stage [-pre | -post] nodeadd" on page A-45 for more information about this CVU command
See Also: Oracle Real Application Clusters Administration and Deployment Guide for more information about extending Oracle Database with Oracle RAC to new nodes
Notes:
■ If you run a dynamic Grid Plug and Play cluster using DHCP and GNS, then you need only perform steps 3 (remove VIP resource), step 4 (delete node), and 7 (update inventory on remaining nodes).
■ Voting disks are automatically backed up in OCR after any changes you make to the cluster.
Adding and Deleting Cluster Nodes on Linux and UNIX Systems
Adding and Deleting Cluster Nodes 4-5
This command shows whether the node is active and whether it is pinned. If the node is unpinned, then you do not need to run the crsctl unpin css command.
From any node that you are not deleting, run the following command from the Grid_home/bin directory as root to expire the CSS lease on the node you are deleting:
# crsctl unpin css -n node_to_be_deleted
3. Disable the Oracle Clusterware applications and daemons running on the node. Run the rootcrs.pl script as root from the Grid_home/crs/install directory on the node to be deleted, as follows:
# ./rootcrs.pl -deconfig -force
If you are deleting multiple nodes, then run this script on each node that you are deleting.
If this is the last node in a cluster that you are deleting, then append the -lastnode option to the preceding command, as follows:
# ./rootcrs.pl -deconfig -force -lastnode
4. From any node that you are not deleting, run the following command from the Grid_home/bin directory as root to delete the node from the cluster:
Note:
■ You cannot unpin a node that has an instance of Oracle RAC that is older than 11g release 2 (11.2) if you installed Oracle Clusterware 11g release 2 (11.2) on that node.
■ If the node you are deleting is not accessible, then you can skip steps 3, 5, and 6.
Note: Before you run this command, you must stop the EMAGENT.
Notes:
■ If you do not use the -force option in the preceding command or the node you are deleting is not accessible for you to execute the preceding command, then the VIP resource remains running on the node. You must manually stop and remove the VIP resource using the following commands as root from any node that you are not deleting:
# srvctl stop vip -i vip_name -f# srvctl remove vip -i vip_name -f
Where vip_name is the VIP for the node to be deleted. If you specify multiple VIP names, then separate the names with commas and surround the list in double quotation marks ("").
■ If the node you are deleting is not accessible, then you can skip steps 5 and 6.
Adding and Deleting Cluster Nodes on Linux and UNIX Systems
4-6 Oracle Clusterware Administration and Deployment Guide
# crsctl delete node -n node_to_be_deleted
5. On the node you want to delete, run the following command as the user that installed Oracle Clusterware from the Grid_home/oui/bin directory where node_to_be_deleted is the name of the node that you are deleting:
$ ./runInstaller -updateNodeList ORACLE_HOME=Grid_home "CLUSTER_NODES={node_to_be_deleted}" CRS=TRUE -local
6. On the node that you are deleting, run the runInstaller command as the user that installed Oracle Clusterware. Depending on whether you have a shared or nonshared Oracle home, complete one of the following procedures:
■ If you have a shared home, then run the following command from the Grid_home/oui/bin directory on the node you want to delete:
$ ./runInstaller -detachHome ORACLE_HOME=Grid_home
■ For a nonshared home, deinstall the Oracle Clusterware home from the node that you want to delete, as follows, by running the following command from the Grid_home/deinstall directory, where Grid_home is the path defined for the Oracle Clusterware home:
$ ./deinstall –local
7. On any node other than the node you are deleting, run the following command from the Grid_home/oui/bin directory where remaining_nodes_list is a comma-delimited list of the nodes that are going to remain part of your cluster:
$ ./runInstaller -updateNodeList ORACLE_HOME=Grid_home"CLUSTER_NODES={remaining_nodes_list}" CRS=TRUE
8. Run the following CVU command to verify that the specified nodes have been successfully deleted from the cluster:
$ cluvfy stage -post nodedel -n node_list [-verbose]
Caution: If you do not specify the -local flag, then the command removes the grid infrastructure homes from every node in the cluster.
See Also: "cluvfy stage -post nodedel" on page A-46 for more information about this CVU command

5
Making Applications Highly Available Using Oracle Clusterware 5-1
5 Making Applications Highly Available UsingOracle Clusterware
When an application, process, or server fails in a cluster, you want the disruption to be as short as possible, if not completely unknown to users. For example, when an application fails on a server, that application can be restarted on another server in the cluster, minimizing or negating any disruption in the use of that application. Similarly, if a server in a cluster fails, then all of the applications and processes running on that server must be able to fail over to another server to continue providing service to the users. Using customizable action scripts and application agent programs, as well as resource attributes that you assign to applications and processes, Oracle Clusterware can manage all these entities to ensure high availability.
This chapter explains how to use Oracle Clusterware to start, stop, monitor, restart, and relocate applications. Oracle Clusterware is the underlying cluster solution for Oracle Real Application Clusters (Oracle RAC). The same functionality and principles you use to manage Oracle RAC databases are applied to the management of applications.
This chapter includes the following topics:
■ Oracle Clusterware Resources and Agents
■ Overview of Using Oracle Clusterware to Enable High Availability
■ Registering an Application as a Resource
■ Using Oracle Clusterware Commands
■ Managing Automatic Oracle Clusterware Resource Operations
Oracle Clusterware Resources and AgentsThis section discusses the framework that Oracle Clusterware uses to monitor and manage resources, in order to ensure high application availability.
This section includes the following topics:
■ Resources
■ Resource Type
■ Agents
■ Building an Agent
■ Registering a Resource in Oracle Clusterware
Oracle Clusterware Resources and Agents
5-2 Oracle Clusterware Administration and Deployment Guide
ResourcesOracle Clusterware manages applications and processes as resources that you register with Oracle Clusterware. The number of resources you register with Oracle Clusterware to manage an application depends on the application. Applications that consist of only one process are usually represented by only one resource. More complex applications, built on multiple processes or components, may require multiple resources.
When you register an application as a resource in Oracle Clusterware, you define how Oracle Clusterware manages the application using resource attributes you ascribe to the resource. The frequency with which the resource is checked and the number of attempts to restart a resource on the same server after a failure before attempting to start it on another server (failover) are examples of resource attributes. The registration information also includes a path to an action script or application-specific action program that Oracle Clusterware calls to start, stop, check, and clean up the application.
An action script is a shell script (a batch script in Windows) that a generic script agent provided by Oracle Clusterware calls. An application-specific agent is usually a C or C++ program that calls Oracle Clusterware-provided APIs directly.
Oracle Clusterware 11g release 2 (11.2) uses agent programs (agents) to manage resources and includes the following built-in agents so that you can use scripts to protect an application:
■ scriptagent: Use this agent (scriptagent.exe in Windows) to use shell or batch scripts to protect an application. Both the cluster_resource and local_resource resource types are configured to use this agent, and any resources of these types automatically take advantage of this agent.
■ appagent: This agent (appagent.exe in Windows) automatically protects any resources of the application resource type used in previous versions of Oracle Clusterware. You are not required to configure anything to take advantage of the agent. It invokes action scripts in the manner done with previous versions of Oracle Clusterware and should only be used for the application resource type.
By default, all resources not of the application resource type, use the script agent, unless you override this behavior by creating a new resource type and specifying a different agent as part of the resource type specification (using the AGENT_FILENAME attribute).
Additionally, you can create your own agents to manage your resources in any manner you want.
See Also: Appendix B, "Oracle Clusterware Resource Reference" for an example of an action script
Note: Oracle recommends that you use scriptagent for all resources of types other than application. Oracle provides the application agent for backward compatibility with the deprecated application type.
See Also: "Resource Type" on page 5-3 for more information about resource types
Oracle Clusterware Resources and Agents
Making Applications Highly Available Using Oracle Clusterware 5-3
Resource TypeGenerally, all resources are unique but some resources may have common attributes. Oracle Clusterware uses resource types to organize these similar resources. Benefits that resource types provide are:
■ Manage only necessary resource attributes
■ Manage all resources based on the resource type
Every resource that you register in Oracle Clusterware must have a certain resource type. In addition to the resource types included in Oracle Clusterware, you can define custom resource types using the Oracle Clusterware Control (CRSCTL) utility. The included resource types are:
■ Local resource: Instances of local resources—type name is local_resource—run on each server of the cluster. When a server joins the cluster, Oracle Clusterware automatically extends local resources to have instances tied to the new server. When a server leaves the cluster, Oracle Clusterware automatically sheds the instances of local resources that ran on the departing server. Instances of local resources are pinned to their servers; they do not fail over from one server to another.
■ Cluster resource: Cluster-aware resource types—type name is cluster_resource—are aware of the cluster environment and are subject to cardinality and cross-server switchover and failover.
AgentsOracle Clusterware manages applications when they are registered as a resources with Oracle Clusterware, and Oracle Clusterware has access to application-specific primitives that have the ability to start, stop, and monitor a specific resource. Oracle Clusterware runs all resource-specific commands through an entity called an agent.
An agent is a process that contains the agent framework and user code to manage resources. The agent framework is a library that enables you to plug in your application-specific code to manage customized applications. You program all of the
See Also: "Building an Agent" on page 5-6 for more information about building custom agents
See Also:
■ Appendix E, "CRSCTL Utility Reference" for more information about using CRSCTL to add resource types
■ "Resource State" on page 5-8 for more information about resource state
Note: Previous versions of Oracle Clusterware only supported the application resource type. This resource type still exists, but only for backward compatibility. Oracle recommends that you register application-type resources as cluster resource-type resources in Oracle Clusterware 11g release 2 (11.2). If you decide not to register your application-type resources as cluster resource-type resources, consult the documentation that corresponds to those applications for administration information.
Oracle Clusterware Resources and Agents
5-4 Oracle Clusterware Administration and Deployment Guide
actual application management functions, such as starting, stopping and checking the health of an application, into the agent. These functions are referred to as entry points.
The agent framework is responsible for invoking these entry point functions on behalf of Oracle Clusterware. Agent developers can use these entry points to plug in the required functionality for a specific resource, with respect to how to start, stop, and monitor a resource. Agents are capable of managing multiple resources.
Agent developers can set the following entry points as callbacks to their code:
■ START: The START entry point acts to bring a resource online. The agent framework calls this entry point whenever it receives the start command from Oracle Clusterware.
■ STOP: The STOP entry points acts to gracefully bring down a resource. The agent framework calls this entry point whenever it receives the stop command from Oracle Clusterware.
■ CHECK: The CHECK (monitor) entry point acts to monitor the health of a resource. The agent framework periodically calls this entry point. If it notices any state change during this action, then the agent framework notifies Oracle Clusterware about the change in the state of the specific resource.
■ CLEAN: The CLEAN entry point acts whenever there is a need to clean up a resource. It is a non-graceful operation that is invoked when users must forcefully terminate a resource. This command cleans up the resource-specific environment so that the resource can be restarted.
■ ABORT: If any of the other entry points hang, the agent framework calls the ABORT entry point to abort the ongoing action. If the agent developer does not supply an abort function, then the agent framework exits the agent program.
START, STOP, CHECK, and CLEAN are mandatory entry points and the agent developer must provide these entry points when building an agent. Agent developers have several options to implement these entry points, including using C, C++, or scripts. It is also possible to develop agents that use both C or C++ and script-type entry points. When initializing the agent framework, if any of the mandatory entry points are not provided, then the agent framework invokes a script pointed to by the ACTION_SCRIPT resource attribute.
At any given time, the agent framework invokes only one entry point per application. If that entry point hangs, then the agent framework calls the ABORT entry point to abort the current operation. The agent framework periodically invokes the CHECK entry point to determine the state of the resource. This entry point must return one of the following states as the resource state:
■ CLSAGFW_ONLINE: The CHECK entry point returns ONLINE if the resource was brought up successfully and is currently in a functioning state. The agent framework continues to monitor the resource when it is in this state.
■ CLSAGFW_UNPLANNED_OFFLINE/CLSAGFW_PLANNED_OFFLINE: The OFFLINE state indicates that the resource is not currently running. Two distinct categories exist to describe an resource's offline state: planned and unplanned.
When the state of the resource transitions to OFFLINE through Oracle Clusterware, then it is assumed that the intent for this resource is to be offline (TARGET=OFFLINE), regardless of which value is returned from the CHECK entry point. However, when an agent detects that the state of a resource has changed
See Also: "ACTION_SCRIPT" on page B-4 for information about this resource attribute
Oracle Clusterware Resources and Agents
Making Applications Highly Available Using Oracle Clusterware 5-5
independent of Oracle Clusterware (such as somebody stopping the resource through a non-Oracle interface), then the intent must be carried over from the agent to the Cluster Ready Services daemon (crsd). The intent then becomes the determining factor for the following:
– Whether to keep or to change the value of the resource's TARGET resource attribute. PLANNED_OFFLINE indicates that the TARGET resource attribute must be changed to OFFLINE only if the resource was running before. If the resource was not running (STATE=OFFLINE, TARGET=OFFLINE) and a request comes in to start it, then the value of the TARGET resource attribute changes to ONLINE. The start request then goes to the agent and the agent reports back to Oracle Clusterware a PLANNED_OFFLINE resource state, and the value of the TARGET resource attribute remains ONLINE. UNPLANNED_OFFLINE does not change the TARGET attribute.
– Whether to leave the resource's state as UNPLANNED_OFFLINE or attempt to recover the resource by restarting it locally or failing it over to a another server in the cluster. The PLANNED_OFFLINE state makes crsd leave the resource as is, whereas the UNPLANNED_OFFLINE state prompts resource recovery.
■ CLSAGFW_UNKNOWN: The CHECK entry point returns UNKNOWN if the current state of the resource cannot be determined. In response to this state, Oracle Clusterware does not attempt to failover or to restart the resource. The agent framework continues to monitor the resource if the previous state of the resource was either ONLINE or PARTIAL.
■ CLSAGFW_PARTIAL: The CHECK entry point returns PARTIAL when it knows that a resource is partially ONLINE and some of its services are available. Oracle Clusterware considers this state as partially ONLINE and does not attempt to failover or to restart the resource. The agent framework continues to monitor the resource in this state.
■ CLSAGFW_FAILED: The CHECK entry point returns FAILED whenever it detects that a resource is not in a functioning state and some of its components have failed and some clean up is required to restart the resource. In response to this state, Oracle Clusterware calls the CLEAN action to clean up the resource. After the CLEAN action finishes, the state of the resource is expected to be OFFLINE. Next, depending on the policy of the resource, Oracle Clusterware may attempt to failover or restart the resource. Under no circumstances does the agent framework monitor failed resources.
The agent framework implicitly monitors resources in the states listed in Table 5–1 at regular intervals, as specified by the CHECK_INTERVAL or OFFLINE_CHECK_INTERVAL resource attributes.
See Also: "CHECK_INTERVAL" on page B-5 and "OFFLINE_CHECK_INTERVAL" on page B-7 for more information about these resource attributes
Table 5–1 Agent Framework Monitoring Characteristics
State Condition Frequency
ONLINE Always CHECK_INTERVAL
PARTIAL Always CHECK_INTERVAL
Oracle Clusterware Resources and Agents
5-6 Oracle Clusterware Administration and Deployment Guide
Whenever an agent starts, the state of all the resources it monitors is set to UNKNOWN. After receiving an initial probe request from Oracle Clusterware, the agent framework executes the CHECK entry point for all of the resources to determine their current states.
Once the CHECK action successfully completes for a resource, the state of the resource transitions to one of the previously mentioned states. The agent framework then starts resources based on commands issued from Oracle Clusterware. After the completion of every action, the agent framework invokes the CHECK action to determine the current resource state. If the resource is in one of the monitored states listed in Table 5–1, then the agent framework periodically executes the CHECK entry point to check for changes in resource state.
By default, the agent framework does not monitor resources that are offline. However, if the value of the OFFLINE_CHECK_INTERVAL attribute is greater than 0, then the agent framework monitors offline resources.
Building an AgentBuilding an agent for a specific application involves the following steps:
1. Implement the agent framework entry points either in scripts, C, or C++.
2. Build the agent executable (for C and C++ agents).
3. Collect all the parameters needed by the entry points and define a new resource type. Set the AGENT_FILENAME attribute to the absolute path of the newly built executable.
Registering a Resource in Oracle ClusterwareRegister resources in Oracle Clusterware 11g release 2 (11.2) using the crsctl add resource command.
To register an application as a resource:
$ crsctl add resource resource_name -type resource_type [-file file_path] |[-attr "attribute_name=’attribute_value’, attribute_name=’attribute_value’, ..."]
OFFLINE Only if the value of the OFFLINE_CHECK_INTERVAL resource attribute is greater than 0.
OFFLINE_CHECK_INTERVAL
UNKNOWN Only monitored if the resource was previously being monitored as a result of any one of the previously mentioned conditions.
Whatever the value of either the CHECK_INTERVAL or OFFLINE_CHECK_INTERVAL attributes.
See Also: Example B–3 on page B-16 for an example of an action script for an agent
Note: The CRS_REGISTER and CRS_PROFILE commands are still available in the Oracle Clusterware home but are deprecated for this release.
Table 5–1 (Cont.) Agent Framework Monitoring Characteristics
State Condition Frequency
Overview of Using Oracle Clusterware to Enable High Availability
Making Applications Highly Available Using Oracle Clusterware 5-7
Choose a name for the resource based on the application for which it is being created. For example, if you create a resource for an Apache Web server, then you might name the resource myApache.
The name of the resource type follows the -type option. You can specify resource attributes in either a text file following the -file option or in a comma-delimited list of resource attribute-value pairs enclosed in double quotation marks ("") following the -attr option. You must enclose space or comma-delimited attribute values and values enclosed in parentheses in single quotation marks ('').
Following is an example of an attribute file:
PLACEMENT=favoredHOSTING_MEMBERS=node1 node2 node3RESTART_ATTEMPTS@CARDINALITYID(1)=0RESTART_ATTEMPTS@CARDINALITYID(2)=0FAILURE_THRESHOLD@CARDINALITYID(1)=2FAILURE_THRESHOLD@CARDINALITYID(2)=4FAILURE_INTERVAL@CARDINALITYID(1)=300FAILURE_INTERVAL@CARDINALITYID(2)=500CHECK_INTERVAL=2CARDINALITY=2
Overview of Using Oracle Clusterware to Enable High AvailabilityOracle Clusterware manages resources based on how you configure them to increase their availability. You can configure your resources so that Oracle Clusterware:
■ Starts resources during cluster or server start
■ Restarts resources when failures occur
■ Relocates resources to other servers, if the servers are available
To manage your applications with Oracle Clusterware:
1. Create an action script or use an existing agent.
2. Register your applications as resources with Oracle Clusterware.
If a single application requires that you register multiple resources, you may be required to define relevant dependencies between the resources.
3. Assign the appropriate privileges to the resource.
4. Start or stop your resources.
When a resource fails, Oracle Clusterware attempts to restart the resource based on attribute values that you provide when you register an application or process as a resource. If a server in a cluster fails, then you can configure your resources so that processes that were assigned to run on the failed server restart on another server. Based on various resource attributes, Oracle Clusterware supports a variety of configurable scenarios.
See Also:
■ "Adding User-defined Resources" on page 5-18 for examples of using the crsctl add resource command
■ "crsctl add resource" on page E-7 for more information about using the crsctl add resource command
Overview of Using Oracle Clusterware to Enable High Availability
5-8 Oracle Clusterware Administration and Deployment Guide
When you register a resource in Oracle Clusterware, the relevant information about the application and the resource-relevant information, is registered in the Oracle Cluster Registry (OCR). This information includes:
■ Path to the action script or application-specific agent: The absolute path to the script or application-specific agent that defines the start, stop, and check actions that Oracle Clusterware performs on the application. An additional action is included in Oracle Clusterware 11g release 2 (11.2): clean.
■ Privileges: Oracle Clusterware has the necessary privileges to control all of the components of your application for high availability operations, including the right to start processes that are owned by other user identities. Oracle Clusterware must run as a privileged user to control applications with the correct start and stop processes.
■ Resource Dependencies: Relationships among resources that imply an operational ordering or affect the placement of resources on servers in the cluster. For example, Oracle Clusterware can only start a resource that has a hard start dependency on another resource if the other resource is running. Oracle Clusterware prevents stopping a resource if other resources that depend on it are running. However, you can force a resource to stop using the crsctl stop resource -f command, which first stops all resources that depend on the resource being stopped.
This section includes the following topics:
■ Resource Attributes
■ Resource State
■ Resource Dependencies
■ Resource Placement
Resource AttributesResource attributes define how Oracle Clusterware manages resources of a specific resource type. Each resource type has a unique set of attributes. Some resource attributes are specified when you register resources, while others are internally managed by Oracle Clusterware.
Resource StateEvery resource in a cluster is in a particular state at any time. Certain actions or events can cause that state to change.
Table 5–2 lists and describes the possible resource states.
See Also: "Agents" on page 5-3 for more information about these actions
See Also: Appendix B, "Oracle Clusterware Resource Reference" for complete details of resource attributes
Table 5–2 Possible Resource States
State Description
ONLINE The resource is running.
OFFLINE The resource is not running.

Overview of Using Oracle Clusterware to Enable High Availability
Making Applications Highly Available Using Oracle Clusterware 5-9
Resource DependenciesYou can configure resources to be dependent on other resources, so that the dependent resources can only start or stop when certain conditions of the resources on which they depend are met. For example, when Oracle Clusterware attempts to start a resource, it is necessary for any resources on which the initial resource depends to be running and in the same location. If Oracle Clusterware cannot bring the resources online, then the initial (dependent) resource cannot be brought online, either. If Oracle Clusterware stops a resource or a resource fails, then any dependent resource is also stopped.
Some resources require more time to start than others. Some resources must start whenever a server starts, while other resources require a manual start action. These and many other examples of resource-specific behavior imply that each resource must be described in terms of how it is expected to behave and how it relates to other resources (resource dependencies).
UNKNOWN An attempt to stop the resource has failed. Oracle Clusterware does not actively monitor resources that are in this state. You must perform an application-specific action to ensure that the resource is offline, such as stop a process, and then run the crsctl stop resource command to reset the state of the resource to OFFLINE.
INTERMEDIATE A resource can be in the INTERMEDIATE state because of one of two events:
1. Oracle Clusterware cannot determine the state of the resource but the resource was either attempting to go online or was online the last time its state was precisely known. Usually, the resource transitions out of this state on its own over time, as the conditions that impeded the check action no longer apply.
2. A resource is partially online. For example, the Oracle Database VIP resource fails over to another server when its home server leaves the cluster. However, applications cannot use this VIP to access the database while it is on a non-home server. Similarly, when an Oracle Database instance is started and not open, the resource is partially online: it is running but is not available to provide services.
Oracle Clusterware actively monitors resources that are in the INTERMEDIATE state and, typically, you are not required to intervene. If the resource is in the INTERMEDIATE state due to the preceding reason 1, then as soon as the state of the resource is established, Oracle Clusterware transitions the resource out of the INTERMEDIATE state.
If the resource is in the INTERMEDIATE state due to the preceding reason 2, then it stays in this state if it remains partially online. For example, the home server of the VIP must rejoin the cluster so the VIP can switch over to it. A database administrator must issue a command to open the database instance.
In either case, however, Oracle Clusterware transitions the resource out of the INTERMEDIATE state automatically as soon as it is appropriate.Use the STATE_DETAILS resource attribute to explain the reason for a resource being in the INTERMEDIATE state and provide a solution to transition the resource out of this state.
Table 5–2 (Cont.) Possible Resource States
State Description
Overview of Using Oracle Clusterware to Enable High Availability
5-10 Oracle Clusterware Administration and Deployment Guide
Previous versions of Oracle Clusterware included only two dependency specifications: the REQUIRED_RESOURCES resource attribute and the OPTIONAL_RESOURCES resource attribute. The REQUIRED_RESOURCES resource attribute applied to both start and stop resource dependencies.
In Oracle Clusterware 11g release 2 (11.2), however, resource dependencies are separated into start and stop categories. This separation improves and expands the start and stop dependencies between resources and resource types.
This section includes the following topics:
■ Start Dependencies
■ Stop Dependencies
Start DependenciesOracle Clusterware considers start dependencies contained in the profile of a resource when the start effort evaluation for that resource begins. You specify start dependencies for resources using the START_DEPENDENCIES resource attribute. You can use modifiers on each dependency to further configure the dependency.
This section includes descriptions of the following START dependencies:
■ hard
■ weak
■ attraction
■ pullup
■ dispersion
hardDefine a hard start dependency for a resource if another resource must be running before the dependent resource can start. For example, if resource A has a hard start dependency on resource B, then resource B must be running before resource A can start. By default, resources A and B must be located on the same server (co-located).
You can configure the hard start dependency with the following constraints:
■ START_DEPENDENCIES=hard(global:resourceB)
Use the global modifier to specify that resources need not be co-located. For example, if resource A has a hard(global:resourceB) start dependency on
Note: The REQUIRED_RESOURCES and OPTIONAL_RESOURCES resource attributes are still available only for resources of application type. Their use to define resource dependencies in Oracle Clusterware 11g release 2 (11.2) is deprecated.
See Also: "START_DEPENDENCIES" on page B-8 for more information about the resource attribute, modifiers, and usage
Note: Oracle recommends that resources with hard start dependencies also have pullup start dependencies.

Overview of Using Oracle Clusterware to Enable High Availability
Making Applications Highly Available Using Oracle Clusterware 5-11
resource B, then, if resource B is running on any node in the cluster, resource A can start.
■ START_DEPENDENCIES=hard(intermediate:resourceB)
Use the intermediate modifier to specify that the dependent resource can start if a resource on which it depends is in either the ONLINE or INTERMEDIATE state.
■ START_DEPENDENCIES=hard(type:resourceB.type)
Use the type modifier to specify whether the hard start dependency acts on a particular resource or a resource type. For example, if you specify that resource A has a hard start dependency on the resourceB.type type, then if any resource of the resourceB.type type is running, resource A can start.
■ START_DEPENDENCIES=hard(resourceB, intermediate:resourceC, intermediate:global:type:resourceC.type)
You can combine modifiers and specify multiple resources in the START_DEPENDENCIES resource attribute.
weakIf resource A has a weak start dependency on resource B, then an attempt to start resource A attempts to start resource B, if resource B is not running. The result of the attempt to start resource B is, however, of no consequence to the result of starting resource A. By default, resources A and B must be co-located.
You can configure the weak start dependency with the following constraints:
■ START_DEPENDENCIES=weak(global:resourceB)
Use the global modifier to specify that resources need not be co-located. For example, if resource A has a weak(global:resourceB) start dependency on resource B, then, if resource B is running on any node in the cluster, resource A can start.
■ START_DEPENDENCIES=weak(concurrent:resourceB)
Use the concurrent modifier to specify that resource A and resource B can start concurrently, instead of waiting for resource B to start, first.
■ START_DEPENDENCIES=weak(type:resourceB.type)
Use the type modifier to specify that the dependency acts on a resource of a particular resource type, such as resourceB.type.
attractionIf resource A has an attraction dependency on resource B, then Oracle Clusterware prefers to place resource A on servers hosting resource B. Dependent resources, such as resource A in this case, are more likely to run on servers on which resources to which they have attraction dependencies are running. Oracle Clusterware places dependent resources on servers with resources to which they are attracted.
You can configure the attraction start dependency with the following constraints:
■ START_DEPENDENCIES=attraction(intermediate:resourceB)
Note: Separate modifier clauses with commas. The type modifier clause must always be the last modifier clause in the list and the type modifier must always directly precede the type.
Overview of Using Oracle Clusterware to Enable High Availability
5-12 Oracle Clusterware Administration and Deployment Guide
Use the intermediate modifier to specify whether the resource is attracted to resources that are in the INTERMEDIATE state.
■ START_DEPENDENCIES=attraction(type:resourceB.type)
Use the type modifier to specify whether the dependency acts on a particular resource type. The dependent resource is attracted to the server hosting the greatest number of resources of a particular type.
pullupUse the pullup start dependency if resource A must automatically start whenever resource B starts. This dependency only affects resource A if it is not running. As is the case for other dependencies, pullup may cause the dependent resource to start on any server. Use the pullup dependency whenever there is a hard stop dependency, so that if resource A depends on resource B and resource B fails and then recovers, then resource A is restarted.
You can configure the pullup start dependency with the following constraints:
■ START_DEPENDENCIES=pullup(intermediate:resourceB)
Use the intermediate modifier to specify whether resource B can be either in the ONLINE or INTERMEDIATE state to start resource A.
If resource A has a pullup dependency on multiple resources, then resource A starts only when all resources upon which it depends, start.
■ START_DEPENDENCIES=pullup:always(resourceB)
Use the always modifier to specify whether Oracle Clusterware starts resource A despite the value of the TARGET attribute of the resource on which resource A depends, whether the value of the TARGET attribute is ONLINE or OFFLINE. By default, pullup only starts resources if the value of the TARGET attribute of the resource on which they depend is ONLINE.
■ START_DEPENDENCIES=pullup(type:resourceB.type)
Use the type modifier to specify that the dependency acts on a particular resource type.
dispersionIf you specify the dispersion start dependency for a resource, then Oracle Clusterware starts this resource on a server that has the fewest number of resources to which this resource has dispersion. Resources with dispersion may still end up running on the same server if there are not enough servers to disperse them to.
You can configure the dispersion start dependency with the following modifiers:
■ START_DEPENDENCIES=dipersion(intermedite:resourceB)
Note: Previous versions of Oracle Clusterware used the now deprecated OPTIONAL_RESOURCES attribute to express attraction dependency.
Note: Oracle recommends that resources with hard start dependencies also have pullup start dependencies.
Overview of Using Oracle Clusterware to Enable High Availability
Making Applications Highly Available Using Oracle Clusterware 5-13
Use the intermediate modifier to specify that Oracle Clusterware disperses resource A whether resource B is either in the ONLINE or INTERMEDIATE state.
■ START_DEPENDENCIES=dipersion:active(resourceB)
Typically, dispersion is only applied when starting resources. If at the time of starting, resources that disperse each other start on the same server (because there are not enough servers at the time the resources start), then Oracle Clusterware leaves the resources alone once they are running, even when more servers join the cluster. However, Oracle Clusterware reapplies dispersion on resources later when new servers join the cluster, if you specify the active modifier.
Stop DependenciesOracle Clusterware considers stop dependencies between resources whenever a resource is stopped (the resource state changes from ONLINE to any other state).
hardIf resource A has a hard stop dependency on resource B, then resource A must be stopped when B stops running. The two resources may attempt to start or relocate to another server, depending upon how they are configured. Oracle recommends that resources with hard stop dependencies also have hard start dependencies.
The following constraints for a hard stop dependency:
You can configure the hard stop dependency with the following modifiers:
■ STOP_DEPENDENCIES=hard(intermedite:resourceB)
Use the intermediate modifier to specify whether resource B must either be in the ONLINE or INTERMEDIATE state for resource A to stay online.
■ STOP_DEPENDENCIES=hard(global:resourceB)
Use the global modifier to specify whether resource A requires that resource B be present on the same server or on any server in the cluster to remain online. If this constraint is not specified, then resources A and B must be running on the same server. Oracle Clusterware stops resource A when that condition is no longer met.
■ STOP_DEPENDENCIES=hard(shutdown:resourceB)
Use the shutdown modifier to stop the resource only when you shut down the Oracle Clusterware stack using either the crsctl stop crs or crsctl stop cluster commands.
Affect of Resource Dependencies on Resource State RecoveryWhen a resource goes from a running to a non-running state, while the intent to have it running remains unchanged, this transition is called a resource failure. At this point, Oracle Clusterware applies a resource state recovery procedure that may try to restart the resource locally, relocate it to another server, or just stop the dependent resources, depending on the high availability policy for resources and the state of entities at the time.
When two or more resources depend on each other, a failure of one of them may end up causing the other to fail, as well. In most cases, it is difficult to control or even predict the order in which these failures are detected. For example, even if resource A
See Also: "STOP_DEPENDENCIES" on page B-11 for more information about modifiers
Overview of Using Oracle Clusterware to Enable High Availability
5-14 Oracle Clusterware Administration and Deployment Guide
depends on resource B, Oracle Clusterware may detect the failure of resource B after the failure of resource A.
This lack of failure order predictability may lead to Oracle Clusterware attempting to restart dependent resources in parallel, which, ultimately, leads to the failure to restart some resources, because the resources upon which they depend are being restarted out of order.
In this case, Oracle Clusterware reattempts to restart the dependent resources locally if either or both the hard stop and pullup dependencies are used. For example, if resource A has either a hard stop dependency or pullup dependency, or both on resource B, and resource A fails because resource B failed, then Oracle Clusterware may end up trying to restart both resources at the same time. If the attempt to restart resource A fails, then as soon as resource B successfully restarts, Oracle Clusterware reattempts to restart resource A.
Resource PlacementAs part of the start effort evaluation, the first decision that Oracle Clusterware must make is where to start (or place) the resource. Making such a decision is easy when the caller specifies the target server by name. If a target server is not specified, however, then Oracle Clusterware attempts to locate the best possible server for placement given the resource’s configuration and the current state of the cluster.
Oracle Clusterware considers a resource's placement policy first and filters out servers that do not fit with that policy. Oracle Clusterware sorts the remaining servers in a particular order depending on the value of the PLACEMENT resource attribute of the resource.
The result of this consideration is a maximum of two lists of candidate servers on which Oracle Clusterware can start the resource. One list contains preferred servers and the other contains possible servers. The list of preferred servers will be empty if the value of the PLACEMENT resource attribute for the resource is set to balanced or restricted. The placement policy of the resource implies on which server the resource wants to run. Oracle Clusterware considers preferred servers over possible servers, if there are servers in the preferred list.
Oracle Clusterware then considers the resource’s dependencies to determine where to place the resource, if any exist. The attraction and dispersion start dependencies affect the resource placement decision, as do some of the dependency modifiers. Oracle Clusterware applies these placement hints to further order the servers in the two previously mentioned lists. Note that Oracle Clusterware processes each list of servers independently, so that the effect of the resource's placement policy is not confused by that of dependencies.
Finally, Oracle Clusterware chooses the first server from the list of preferred servers, if any servers are listed. If there are no servers on the list of preferred servers, then Oracle Clusterware chooses the first server from the list of possible servers, if any servers are listed. When no servers exist in either list, Oracle Clusterware generates a resource placement error.
See Also: "Application Placement Policies" on page 5-21 for more information about the PLACEMENT resource attribute
Note: Neither the placement policies nor the dependencies of the resources related to the resource Oracle Clusterware is attempting to start affect the placement decision.
Registering an Application as a Resource
Making Applications Highly Available Using Oracle Clusterware 5-15
Registering an Application as a ResourceThis section presents examples of the procedures for registering an application as a resource in Oracle Clusterware. The procedures instruct you how to add an Apache Web server as a resource to Oracle Clusterware.
Assume for the examples in this section that the Oracle Clusterware administrator has full administrative privileges over Oracle Clusterware and the user or group that owns the application that Oracle Clusterware is going to manage. Once the registration process is complete, Oracle Clusterware can start any application on behalf of any operating system user.
Oracle Clusterware distinguishes between an owner of a registered resource and a user. The owner of a resource is the operating system user under which the agent runs. The ACL resource attribute of the resource defines permissions for the users and the owner. Only root can modify any resource.
This section includes the following topics:
■ Creating an Application VIP Managed by Oracle Clusterware
■ Adding User-defined Resources
■ Adding Resources Using Oracle Enterprise Manager
■ Changing Resource Permissions
■ Application Placement Policies
■ Unregistering Applications and Application Resources
Creating an Application VIP Managed by Oracle ClusterwareIf clients of an application access the application through a network, then you must register a virtual internet protocol address (VIP) on which the application depends. An application VIP is a cluster resource that Oracle Clusterware manages (Oracle Clusterware provides a standard VIP agent for application VIPs). You should base any new application VIPs on this VIP type to ensure that your system experiences consistent behavior among all of the VIPs that you deploy in your cluster.
See Also: "Role-separated Management" on page 2-18
Notes:
■ Oracle Clusterware commands prefixed with crs_ are deprecated with this release. CRSCTL commands replace those commands. See Appendix E, "CRSCTL Utility Reference" for a list of CRSCTL commands and their corresponding crs_ commands.
■ Do not use CRSCTL commands on any resources that have names prefixed with ora (because these are Oracle resources), unless Oracle Support directs you to do so.
You can, however, create resources that depend on Oracle resources. When creating resources, do not use an ora prefix in the resource name. This prefix is reserved for Oracle use only.
To configure Oracle resources, use the server control utility, SRVCTL, which provides you with all configurable options.
Registering an Application as a Resource
5-16 Oracle Clusterware Administration and Deployment Guide
While you can add a VIP, as you can add any other resource that Oracle Clusterware manages, Oracle recommends using the script Grid_home/bin/appvipcfg to create or delete an application VIP.
The usage of this script is as follows:
appvipcfg create -network=network_number -ip=ip_address -vipname=vip_name-user=user_name [-group=group_name appvipcfg delete -vipname=vip_name]
Where network_number is the number of the network, ip_address is the IP address, vip_name is the name of the VIP, and user_name is the name of the user.
For example, as root, run the following command:
# Grid_home/bin/appvipcfg create -network=1 -ip=148.87.58.196 -vipname=appsVIP -user=root
The script only requires a network number (default is 1), the IP address, and a name for the VIP resource, as well as the user that owns the application VIP resource. A VIP resource is typically owned by root because VIP related operations require root privileges.
To delete an application VIP, use the same script with the -delete option. This option accepts the VIP name as a parameter.
After you have created the application VIP using this configuration script, you can view the VIP profile using the following command:
Grid_home/bin/crsctl status res VIPname -p
Verify and, if required, modify the following parameters using the Grid_home/bin/crsctl modify res command.
The appvipcfg script assumes that the default ora.vip network resource (ora.net1.network) is used as the default. In addition, it is also assumed that a default app.appvip.type is used for those purposes.
To create a type for the new application VIP, run following command as root or the Oracle Clusterware installation owner:
# crsctl add type app.appvip.type -basetype ora.cluster_vip_net1.type
Once you create an application VIP type, you can add the actual VIP resource to the cluster. To register a VIP as a resource with Oracle Clusterware, run the following command as root or the Oracle Clusterware installation owner:
# crsctl add resource appsvip -type app.appvip.type -attr "RESTART_ATTEMPTS=2,START_TIMEOUT=100,STOP_TIMEOUT=100,CHECK_INTERVAL=10,USR_ORA_VIP=192.168.10.10,START_DEPENDENCIES='hard(ora.net1.network) pullup(ora.net1.network)',STOP_DEPENDENCIES='hard(ora.net1.network)'"
In the preceding example, the VIP is defined as follows:
■ RESTART_ATTEMPTS=2: Oracle Clusterware tries to restart the resource twice before failing it over to another server.
See Also: Appendix B, "Oracle Clusterware Resource Reference" for detailed information about using CRSCTL commands
See Also: Appendix B, "Oracle Clusterware Resource Reference" for detailed information about using CRSCTL commands
Registering an Application as a Resource
Making Applications Highly Available Using Oracle Clusterware 5-17
■ START_TIMEOUT=100: CRSD waits 100 seconds for the VIP to start before CRSD stops and reports an error.
■ STOP_TIMEOUT=100: CRSD waits 100 seconds for the VIP to stop.
■ CHECK_INTERVAL=10: Oracle Clusterware checks the resource every 10 seconds to determine its status.
■ USR_ORA_VIP=192.168.10.10: The IP address that the resource uses. You can use an IP address that resolves through DNS.
■ START_DEPENDENCIES='hard(ora.net1.network) pullup(ora.net1.network)': The resource has hard and pull-up START dependencies on the network resource type.
■ STOP_DEPENDENCIES='hard(ora.net1.network)': The resource has a hard STOP dependency on the network resource type.
On Linux and UNIX operating systems, an application VIP must run as root. Unless you added the VIP resource as root, you must ensure that the VIP can run as root. To ensure that the VIP can run as root:
1. Log in as root and run the following command:
# crsctl setperm resource appsVIP –o root
2. Run the following command to give the Oracle Database installation owner permission to start the VIP:
# crsctl setperm resource appsVIP –u user:oracle:r-x
3. As the Oracle Database installation owner, start the VIP resource:
$ crsctl start resource appsVIP
Adding an Application VIP with Oracle Enterprise ManagerTo add an application VIP with Oracle Enterprise Manager:
1. Log into Oracle Enterprise Manager Database Control.
2. Click the Cluster tab.
3. Click Administration.
4. Click Manage Resources.
5. Enter a cluster administrator user name and password to display the Manage Resources page.
6. Click Add Application VIP.
7. Enter a name for the VIP in the Name field.
8. Enter a network number in the Network Number field.
9. Enter an IP address for the VIP in the Internet Protocol Address field.
10. Enter root in the Primary User field. Oracle Enterprise Manager defaults to whatever user name you are logged in as.
Note: Because the resource is based on the ora.cluster_vip.type resource type, no VIP-specific user script is necessary. Oracle Clusterware uses the same agent that ora.cluster_vip.type uses.
Registering an Application as a Resource
5-18 Oracle Clusterware Administration and Deployment Guide
11. Select Start the resource after creation if you want the VIP to start immediately.
12. Click Continue to display the Confirmation: Add VIP Resource page.
13. Enter root and the root password as the cluster credentials.
14. Click Continue to create the application VIP.
Adding User-defined ResourcesYou can add resources to Oracle Clusterware at any time. However, if you add a resource that is dependent on another resource, then you must first add the resource upon which it is dependent.
In the example in this section, assume that an action script, myApache.scr, resides in the /opt/cluster/scripts directory on each node to facilitate adding the resource to the cluster. You must decide whether to use administrator or policy management for the application.
Use administrator management for smaller, two-node configurations, where your cluster configuration is not likely to change. Use policy management for more dynamic configurations when your cluster consists of more than two nodes. For example, if a resource only runs on node 1 and node 2, for example, because only those nodes have the necessary files, then administrator management is probably more appropriate.
Oracle Clusterware supports the deployment of applications in access-controlled server pools made up of anonymous servers and strictly based on the desired pool size. Cluster administrator-defined policies can and must be used in this case to govern the server assignment with desired sizes and levels of importance. Alternatively, a strict or preferred server assignment can be used, in which resources run on specifically named servers. This represents the pre-existing model available in earlier releases of Oracle Clusterware.
Conceptually, a cluster hosting applications developed and deployed in both of the schemes can be viewed as two logically separated collections of servers. One server is used for server pools, enabling role separation and server capacity control. The other server assumes a fixed assignment based on named servers in the cluster.
A built-in server pool named "Generic" always owns the servers used by applications of the latter scheme. The Generic server pool is a logical division and can be used to separate the two parts of the cluster using different management schemes.
For third party developers to use the model to deploy applications, server pools must be used. To take advantage of the pre-existing application development and deployment model based on named servers, sub-pools of Generic (server pools that have Generic as their parent pool, defined by the server pool attribute PARENT_POOLS) must be used. By creating sub-pools that use Generic as their parent and enumerating servers by name in the sub-pool definitions, applications ensure that named servers are in Generic and are used exclusively for applications using the named servers model.
To manage an application using either deployment scheme, you must create a server pool before adding the resource to the cluster. In the following example, it is assumed
Note: Oracle recommends that you use shared storage, such as Oracle Automatic Storage Management Cluster File System, to store action scripts to decrease script maintenance.
Registering an Application as a Resource
Making Applications Highly Available Using Oracle Clusterware 5-19
that a server pool has been created to host an application. This server pool is not a sub-pool of Generic, but instead it is used to host the application in a top-level server pool.
This section includes the following topics:
■ Adding a Resource to a Top Level Server Pool
■ Adding a Resource Using a Server-specific Deployment
Adding a Resource to a Top Level Server PoolTo add the Apache Web server to a top- level server pool as a resource using the policy based deployment scheme, run the following command as the user that is supposed to run the Apache Server. For an Apache Server this is typically the root user:
$ crsctl add resource myApache -type cluster_resource-attr "ACTION_SCRIPT=/opt/cluster/scripts/myapache.scr, PLACEMENT=restricted,SERVER_POOLS=server_pool_list,CHECK_INTERVAL=30,RESTART_ATTEMPTS=2,START_DEPENDENCIES=hard(appsvip),STOP_DEPENDENCIES=hard(appsvip)"
In the preceding example, myApache is the name of the resource added to the cluster.
Notice that attribute values are enclosed in single quotation marks (' '). Configure the resource as follows:
■ The resource is a cluster_resource type.
■ ACTION_SCRIPT=/opt/cluster/scripts/myapache.scr: The path to the required action script.
■ PLACEMENT=restricted
■ SERVER_POOLS=sp1 sp3: This resource can only run in the server pools specified in this space-separated list.
■ CHECK_INTERVAL=30: Oracle Clusterware checks this resource every 30 seconds to determine its status.
■ RESTART_ATTEMPTS=2: Oracle Clusterware attempts to restart this resource twice before failing it over to another node.
■ START_DEPENDENCIES=hard(appsvip): This resource has a hard START dependency on the appsvip resource. The appsvip resource must be online in order for myApache to start.
■ STOP_DEPENDENCIES=hard(appsvip): This resource has a hard STOP dependency on the appsvip resource. The myApache resource stops if the appsvip resource goes offline.
Adding a Resource Using a Server-specific DeploymentTo add the Apache Web server as a resource that uses a named server deployment, it is assumed that the resource is added to a server pool that is by definition a sub-pool of the Generic server pool. Server pools that represent sub-pools of Generic are created
See Also: "Third-Party Applications Using the Script Agent" on page B-15
Note: A resource name cannot begin with a period or with the character string "ora."
Registering an Application as a Resource
5-20 Oracle Clusterware Administration and Deployment Guide
using the crsctl add serverpool command. These server pools define the Generic server pool as their parent in the server pool attribute PARENT_POOLS. In addition, they include a list of server names in the SERVER_NAMES parameter to specify the servers that should be assigned to the respective pool. For example:
$ crsctl add serverpool myApache_sp -attr "PARENT_POOLS=Generic, SERVER_NAMES=stado36 stado37"
Once this sub-pool has been created, you can add the resource, as in the previous example:
$ crsctl add resource myApache -type cluster_resource-attr "ACTION_SCRIPT=/opt/cluster/scripts/myapache.scr, PLACEMENT='restricted', SERVER_POOLS=myApache_sp, CHECK_INTERVAL='30', RESTART_ATTEMPTS='2', START_DEPENDENCIES='hard(appsvip)', STOP_DEPENDENCIES='hard(appsvip)'"
In addition, note that the server pools listed in the SERVER_POOLS resource parameter, must be sub-pools under Generic. These sub-pools are then typically assigned to run on certain, named servers.
Adding Resources Using Oracle Enterprise ManagerTo add resources to Oracle Clusterware using Oracle Enterprise Manager:
1. Log into Oracle Enterprise Manager Database Control.
2. Click the Cluster tab.
3. Click Administration.
4. Click Add Resource.
5. Enter a cluster administrator user name and password to display the Add Resource page.
6. Enter a name for the resource in the Name field.
7. Choose either cluster_resource or local_resource from the Resource Type drop down.
8. Optionally, enter a description of the resource in the Description field.
9. Select Start the resource after creation if you want the resource to start immediately.
10. The optional parameters in the Placement section define where in a cluster Oracle Clusterware places the resource.
Note: A resource name cannot begin with a period or with the character string "ora."
See Also: "Policy-Based Cluster and Capacity Management" on page 2-10
Note: A resource name cannot begin with a period nor with ora.
See Also: "Application Placement Policies" on page 5-21 for more information about placement
Registering an Application as a Resource
Making Applications Highly Available Using Oracle Clusterware 5-21
The attributes in this section correspond to the attributes described in Appendix B, "Oracle Clusterware Resource Reference"
11. In the Action Program section, choose from the Action Program drop down whether Oracle Clusterware calls an action script, an agent file, or both to manage the resource.
You must also specify a path to the script, file, or both, depending on what you select from the drop down.
If you choose Action Script, then you can click Create New Action Script to use the Oracle Enterprise Manager action script template to create an action script for your resource, if you have not yet done so.
12. To further configure the resource, click Attributes. On this page, you can configure start, stop, and status attributes, and offline monitoring and any attributes that you define.
13. Click Advanced Settings to enable more detailed resource attribute configurations.
14. Click Dependencies to configure start and stop dependencies between resources.
15. Click Submit when you finish configuring the resource.
Changing Resource PermissionsOracle Clusterware manages resources based on the permissions of the user who added the resource. The user who first added the resource owns the resource and the resource runs as the resource owner. Certain resources must be managed as root. If a user other than root adds a resource that must be run as root, then the permissions must be changed as root so that root manages the resource, as follows:
# crsctl setperm resource resource_name –o root
And as the user who installed Oracle Clusterware, enable the Oracle Database installation owner (oracle, in the following example) to run the script:
$ crsctl setperm resource resource_name –u user:oracle:r-x
Start the resource:
$ crsctl start resource resource_name
Application Placement PoliciesA resource can be started on any server, subject to the placement policies, the resource start dependencies, and the availability of the action script on that server.
The PLACEMENT resource attribute determines how Oracle Clusterware selects a server on which to start a resource and where to relocate the resource after a server failure. The HOSTING_MEMBERS and SERVER_POOLS attributes determine eligible servers to host a resource and the PLACEMENT attribute further refines the placement of resources.
See Also: "Resource Dependencies" on page 5-9 for more information about dependencies
See Also: Appendix B, "Oracle Clusterware Resource Reference" for more information about the HOSTING_MEMBERS and SERVER_POOLS resource attributes

Using Oracle Clusterware Commands
5-22 Oracle Clusterware Administration and Deployment Guide
The value of the PLACEMENT resource attribute determines how Oracle Clusterware places resources when they are added to the cluster or when a server fails. Together with either the HOSTING_MEMBERS or SERVER_POOLS attributes, you can configure how Oracle Clusterware places the resources in a cluster. When the value of the PLACEMENT attribute is:
■ balanced: Oracle Clusterware uses any online server for placement. Less loaded servers are preferred to servers with greater loads. To measure how loaded a server is, Oracle Clusterware uses the LOAD resource attribute of the resources that are in an ONLINE state on the server. Oracle Clusterware uses the sum total of the LOAD values to measure the current server load.
■ favored: If values are assigned to either the SERVER_POOLS or HOSTING_MEMBERS resource attribute, then Oracle Clusterware considers servers belonging to the member list in either attribute first. If no servers are available, then Oracle Clusterware places the resource on any other available server. If there are values for both the SERVER_POOLS and HOSTING_MEMBERS attributes, then SERVER_POOLS indicates preference and HOSTING_MEMBERS restricts the choices to the servers within that preference.
■ restricted: Oracle Clusterware only considers servers that belong to server pools listed in the SEVER_POOLS resource attribute or servers listed in the HOSTING_MEMBERS resource attribute for resource placement. Only one of these resource attributes can have a value, otherwise it results in an error.
Unregistering Applications and Application ResourcesTo unregister a resource, use the crsctl delete resource command. You cannot unregister an application or resource that is ONLINE or required by another resource, unless you use the -force option. The following example unregisters the Apache Web server application:
$ crsctl delete resource myApache
Run the crsctl delete resource command as a clean-up step when a resource is no longer managed by Oracle Clusterware. Oracle recommends that you unregister any unnecessary resources.
Using Oracle Clusterware CommandsThis section includes the following topics:
■ Registering Application Resources
■ Starting Application Resources
■ Starting an Application on an Unavailable Server
■ Relocating Applications and Application Resources
■ Stopping Applications and Application Resources
■ Displaying Clusterware Application and Application Resource Status Information
Registering Application ResourcesEach application that you manage with Oracle Clusterware is stored as a resource in OCR. Use the crsctl add resource command to register applications in OCR. For
See Also: "SERVER_POOLS" on page B-8 for more information
Using Oracle Clusterware Commands
Making Applications Highly Available Using Oracle Clusterware 5-23
example, enter the following command to register the Apache Web server application from the previous example:
$ crsctl add resource myApache -type cluster_resource-attr "ACTION_SCRIPT=/opt/cluster/scripts/myapache.scr, PLACEMENT=restricted,SERVER_POOLS=server_pool_list,CHECK_INTERVAL=30,RESTART_ATTEMPTS=2,START_DEPENDENCIES=hard(appsvip),STOP_DEPENDENCIES=hard(appsvip)"
If you modify a resource, then update OCR by running the crsctl modify resource command.
Starting Application ResourcesTo start an application resource that is registered with Oracle Clusterware, use the crsctl start resource command. For example:
$ crsctl start resource myApache
The command waits to receive a notification of success or failure from the action program each time the action program is called. Oracle Clusterware can start application resources if they have stopped due to exceeding their failure threshold values. You must register a resource using crsctl add resource before you can start it.
Start and stop resources with the crsctl start resource and crsctl stop resource commands. Manual starts or stops outside of Oracle Clusterware can invalidate the resource status. In addition, Oracle Clusterware may attempt to restart a resource on which you perform a manual stop operation.
Running the crsctl start resource command on a resource sets the resource TARGET value to ONLINE. Oracle Clusterware attempts to change the state to match the TARGET by running the action program with the start action.
Starting an Application on an Unavailable ServerIf a cluster server fails while you are starting a resource on that server, then check the state of the resource on the cluster by using the crsctl status resource command.
Relocating Applications and Application ResourcesUse the crsctl relocate resource command to relocate applications and application resources. For example, to relocate the Apache Web server application to a server named rac2, run the following command:
# crsctl relocate resource myApache -n rac2
Each time that the action program is called, the crsctl relocate resource command waits for the duration specified by the value of the SCRIPT_TIMEOUT resource attribute to receive notification of success or failure from the action program. A relocation attempt fails if:
■ The application has required resources that run on the initial server
■ Applications that require the specified resource run on the initial server
See Also: Appendix E, "CRSCTL Utility Reference" for usage information and examples of CRSCTL command output
Managing Automatic Oracle Clusterware Resource Operations
5-24 Oracle Clusterware Administration and Deployment Guide
To relocate an application and its required resources, use the -f option with the crsctl relocate resource command. Oracle Clusterware relocates or starts all resources that are required by the application regardless of their state.
Stopping Applications and Application ResourcesStop application resources with the crsctl stop resource command. The command sets the resource TARGET value to OFFLINE. Because Oracle Clusterware always attempts to match the state of a resource to its target, the Oracle Clusterware subsystem stops the application. The following example stops the Apache Web server:
# crsctl stop resource myApache
You cannot stop a resource if another resource has a hard stop dependency on it, unless you use the force (-f) option. If you use the crsctl stop resource resource_name -f command on a resource upon which other resources depend, and if those resources are running, then Oracle Clusterware stops the resource and all of the resources that depend on the resource you are stopping that are running.
Displaying Clusterware Application and Application Resource Status InformationTo display status information about applications and resources that are on cluster servers, use the crsctl status resource command. The following example displays the status information for the Apache Web server application:
# crsctl status resource myApache
NAME=myApacheTYPE=cluster_resourceTARGET=ONLINESTATE=ONLINE on server010Enter the following command to view information about all applications and resources in tabular format:
# crsctl status resource
Append a resource name to the preceding command to determine:
■ How many times the resource has been restarted
■ How many times the resource has failed within the failure interval
■ The maximum number of times that a resource can restart or fail
■ The target state of the resource and the normal status information
Use the -f option with the crsctl status resource resource_name command to view full information of a specific resource.
Managing Automatic Oracle Clusterware Resource OperationsYou can prevent Oracle Clusterware from automatically restarting a resource by setting several resource attributes. You can also control how Oracle Clusterware manages the restart counters for your resources. In addition, you can customize the timeout values for the start, stop, and check actions that Oracle Clusterware performs on resources.
This section includes the following topics:
See Also: Appendix E, "CRSCTL Utility Reference" for detailed information about CRSCTL commands

Managing Automatic Oracle Clusterware Resource Operations
Making Applications Highly Available Using Oracle Clusterware 5-25
■ Preventing Automatic Restarts
■ Automatically Manage Restart Attempts Counter for Resources
Preventing Automatic RestartsWhen a server restarts, Oracle Clusterware attempts to start the resources that run on the server as soon as the server starts. Resource startup might fail, however, if system components on which a resource depends, such as a volume manager or a file system, are not running. This is especially true if Oracle Clusterware does not manage the system components on which a resource depends. To manage automatic restarts, use the AUTO_START resource attribute to specify whether Oracle Clusterware should automatically start a resource when a server restarts.
Automatically Manage Restart Attempts Counter for ResourcesWhen a resource fails, Oracle Clusterware attempts to restart the resource the number of times specified in the RESTART_ATTEMPTS resource attribute, regardless of how often the resource fails. The crsd process maintains an internal counter to track how often Oracle Clusterware restarts a resource. The number of times Oracle Clusterware has attempted to restart a resource is reflected in the RESTART_COUNT resource attribute. Oracle Clusterware can automatically manage the restart attempts counter based on the stability of a resource. The UPTIME_THRESHOLD resource attribute determines the time period that a resource must remain online, after which the RESTART_COUNT attribute gets reset to 0. In addition, the RESTART_COUNT resource attribute gets reset to 0 if the resource is relocated or restarted by the user, or the resource fails over to another server.
Note: Regardless of the value of the AUTO_START resource attribute for a resource, the resource can start if another resource has a hard or weak start dependency on it or if the resource has a pullup start dependency on another resource.
See Also:
■ "Start Dependencies" on page 5-10 for more information
■ Appendix B, "Oracle Clusterware Resource Reference" for more information about the AUTO_START resource attribute

Managing Automatic Oracle Clusterware Resource Operations
5-26 Oracle Clusterware Administration and Deployment Guide

A
Cluster Verification Utility Reference A-1
A Cluster Verification Utility Reference
The Cluster Verification Utility (CVU) performs system checks in preparation for installation, patch updates, or other system changes. Using CVU ensures that you have completed the required system configuration and preinstallation steps so that your Oracle grid infrastructure or Oracle Real Application Clusters (Oracle RAC) installation, update, or patch operation completes successfully.
With Oracle Clusterware 11g release 2 (11.2), Oracle Universal Installer is fully integrated with CVU, automating many CVU prerequisite checks. Oracle Universal Installer runs all prerequisite checks and associated fixup scripts when you run the installer.
This appendix describes CVU under the following topics:
■ About Cluster Verification Utility
– Overview
– Operational Notes
– Special Topics
■ Cluster Verification Utility Command Reference
■ Troubleshooting and Diagnostic Output for CVU
See Also: Oracle Grid Infrastructure Installation Guide and Oracle Real Application Clusters Installation Guide for information about how to manually install CVU
Note: Check for and download updated versions of CVU on Oracle Technology Network at
http://www.oracle.com/technology/index.html
About Cluster Verification Utility
A-2 Oracle Clusterware Administration and Deployment Guide
About Cluster Verification Utility
This section includes topics which relate to using CVU.
■ Overview
■ Operational Notes
– Installation Requirements
– Usage Information
– CVU Configuration File
– Privileges and Security
– Using CVU Help
■ Special Topics
– Entry and Exit Criteria
– Verbose Mode and UNKNOWN Output
– CVU Node List Shortcuts
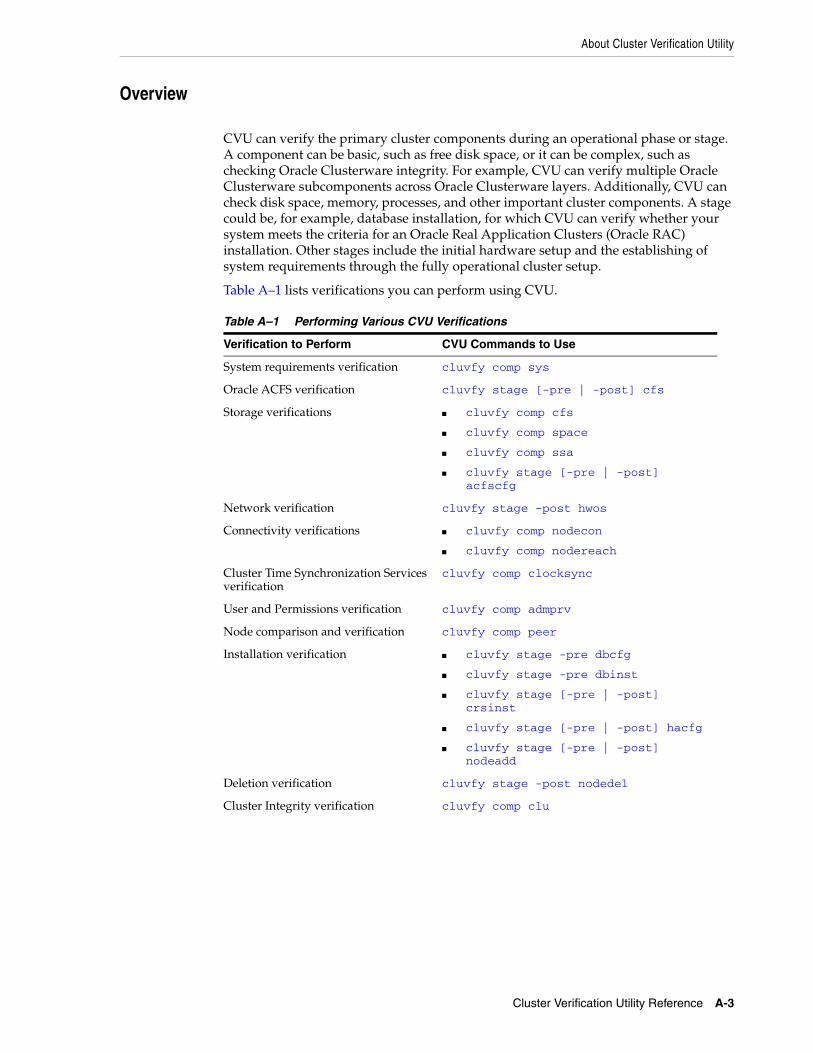
About Cluster Verification Utility
Cluster Verification Utility Reference A-3
Overview
CVU can verify the primary cluster components during an operational phase or stage. A component can be basic, such as free disk space, or it can be complex, such as checking Oracle Clusterware integrity. For example, CVU can verify multiple Oracle Clusterware subcomponents across Oracle Clusterware layers. Additionally, CVU can check disk space, memory, processes, and other important cluster components. A stage could be, for example, database installation, for which CVU can verify whether your system meets the criteria for an Oracle Real Application Clusters (Oracle RAC) installation. Other stages include the initial hardware setup and the establishing of system requirements through the fully operational cluster setup.
Table A–1 lists verifications you can perform using CVU.
Table A–1 Performing Various CVU Verifications
Verification to Perform CVU Commands to Use
System requirements verification cluvfy comp sys
Oracle ACFS verification cluvfy stage [-pre | -post] cfs
Storage verifications ■ cluvfy comp cfs
■ cluvfy comp space
■ cluvfy comp ssa
■ cluvfy stage [-pre | -post] acfscfg
Network verification cluvfy stage -post hwos
Connectivity verifications ■ cluvfy comp nodecon
■ cluvfy comp nodereach
Cluster Time Synchronization Services verification
cluvfy comp clocksync
User and Permissions verification cluvfy comp admprv
Node comparison and verification cluvfy comp peer
Installation verification ■ cluvfy stage -pre dbcfg
■ cluvfy stage -pre dbinst
■ cluvfy stage [-pre | -post] crsinst
■ cluvfy stage [-pre | -post] hacfg
■ cluvfy stage [-pre | -post] nodeadd
Deletion verification cluvfy stage -post nodedel
Cluster Integrity verification cluvfy comp clu

Overview
A-4 Oracle Clusterware Administration and Deployment Guide
Oracle Clusterware and Oracle ASM Component verifications
■ cluvfy comp asm
■ cluvfy comp clumgr
■ cluvfy comp crs
■ cluvfy comp gns
■ cluvfy comp gpnp
■ cluvfy comp ha
■ cluvfy comp nodeapp
■ cluvfy comp ocr
■ cluvfy comp ohasd
■ cluvfy comp olr
■ cluvfy comp scan
■ cluvfy comp software
■ cluvfy comp acfs
Table A–1 (Cont.) Performing Various CVU Verifications
Verification to Perform CVU Commands to Use
About Cluster Verification Utility
Cluster Verification Utility Reference A-5
Operational Notes
This section includes the following topics:
■ Installation Requirements
■ Usage Information
■ CVU Configuration File
■ Privileges and Security
■ Using CVU Help
Installation RequirementsCVU installation requirements are:
■ At least 30 MB free space for the CVU software on the node from which you run CVU
■ A work directory with at least 25 MB free space on each node
Usage InformationCVU includes two scripts: runcluvfy.sh, which you use before installing Oracle software, and cluvfy, located in the Grid_home/bin directory. The runcluvfy.sh script contains temporary variable definitions which enable it to be run before installing Oracle grid infrastructure or Oracle Database. After you install Oracle grid infrastructure, use the cluvfy command to check prerequisites and perform other system readiness checks.
Before installing Oracle software, run runcluvfy.sh from the mountpoint path of the software media, as follows:
cd /mountpoint./runcluvfy.sh options
In the preceding example, the options variable represents CVU command options that you select. For example:
$ cd /mnt/dvdrom$ ./runcluvfy.sh comp nodereach -n node1,node2 -verbose
Note: When using CVU, the utility attempts to copy any needed information to the CVU work directory. It checks for the existence of the work directory on each node. If it does not find one, then it attempts to create one. Make sure that the CVU work directory either exists on all nodes in your cluster or proper permissions are established on each node for the user running CVU to create that directory. Set this directory using the CV_DESTLOC environment variable. If you do not set this variable, then CVU uses /tmp as the work directory on Linux and UNIX systems, and C:\temp on Windows systems.
Note: Oracle Universal Installer runs cluvfy to check all prerequisites during Oracle software installation.

Operational Notes
A-6 Oracle Clusterware Administration and Deployment Guide
When you enter a CVU command, it provides a summary of the test. During preinstallation, Oracle recommends that you obtain detailed output by using the -verbose argument with the CVU command. The -verbose argument produces detailed output of individual checks. Where applicable, it shows results for each node in a tabular layout.
You can use the -fixup flag with certain CVU commands to generate fixup scripts before installation. Oracle Universal Installer can also generate fixup scripts during installation. The installer then prompts you to run the script as root in a separate terminal session. If you generate a fixup script from the command line, then you can run it as root after it is generated. When you run the script, it raises kernel values to required minimums, if necessary, and completes other operating system configuration.
Run the CVU command-line tool using the cluvfy command. Using cluvfy does not adversely affect your cluster environment or your installed software. You can run cluvfy commands at any time, even before the Oracle Clusterware installation. In fact, CVU is designed to assist you as soon as your hardware and operating system are operational. If you run a command that requires Oracle Clusterware on a node, then CVU reports an error if Oracle Clusterware is not yet installed on that node.
The node list that you use with CVU commands should be a comma-delimited list of host names without a domain. CVU ignores domains while processing node lists. If a CVU command entry has duplicate node entries after removing domain information, then CVU eliminates the duplicate node entries. Wherever supported, you can use the -n all option to verify all of your cluster nodes that are part of a specific Oracle RAC installation.
For network connectivity verification, CVU discovers all of the available network interfaces if you do not specify an interface on the CVU command line. For storage accessibility verification, CVU discovers shared storage for all of the supported storage types if you do not specify a particular storage identification on the command line. CVU also discovers the Oracle Clusterware home if one is available.
CVU Configuration FileYou can use the CVU configuration file to define specific inputs for the execution of CVU. The path for the configuration file is CV_HOME/cv/admin/cvu_config. You can modify this using a text editor. The inputs to the tool are defined in the form of key entries. You must follow these rules when modifying the CVU configuration file:
■ Key entries have the syntax name=value
■ Each key entry and the value assigned to the key only defines one property
■ Lines beginning with the number sign (#) are comment lines and are ignored
■ Lines that do not follow the syntax name=value are ignored
The following is the list of keys supported by CVU:
■ CV_NODE_ALL: If set, it specifies the list of nodes that should be picked up when Oracle Clusterware is not installed and a -n all option has been used in the command line. By default, this entry is commented out.
■ CV_ORACLE_RELEASE: If set, it specifies the specific Oracle release (10gR1, 10gR2, or 11gR1) for which the verifications have to be performed. If set, you do not have to use the -r release option wherever it is applicable.
■ CV_RAW_CHECK_ENABLED—If set to TRUE, it enables the check for accessibility of shared disks on RedHat release 3.0. This shared disk accessibility check requires that you install a cvuqdisk rpm on all of the nodes. By default, this key is set to TRUE and shared disk check is enabled.

About Cluster Verification Utility
Cluster Verification Utility Reference A-7
■ CV_XCHK_FOR_SSH_ENABLED—If set to TRUE, it enables the X-Windows check for verifying user equivalence with ssh. By default, this entry is commented out and X-Windows check is disabled.
■ ORACLE_SRVM_REMOTECOPY—If set, it specifies the location for the scp or rcp command to override the CVU default value. By default, this entry is commented out and CVU uses /usr/bin/scp and /usr/sbin/rcp.
■ ORACLE_SRVM_REMOTESHELL—If set, it specifies the location for ssh/rsh command to override the CVU default value. By default, this entry is commented out and the tool uses /usr/sbin/ssh and /usr/sbin/rsh.
If CVU does not find a key entry defined in the configuration file, then CVU searches for the environment variable that matches the name of the key. If the environment variable is set, then CVU uses its value, otherwise CVU uses a default value for that entity.
Privileges and SecurityCVU assumes that the current user is the user that owns the Oracle software installation, for example, oracle. You do not have to be the root user to use CVU.
Using CVU HelpThe cluvfy commands have context sensitive help that shows their usage based on the command-line arguments that you enter. For example, if you enter cluvfy, then CVU displays high-level generic usage text describing the stage and component syntax. The following is a list of context help commands:
■ cluvfy -help: CVU displays detailed CVU command information.
■ cluvfy comp -list: CVU displays a list of components that can be checked, and brief descriptions of how the utility checks each component.
■ cluvfy comp -help: CVU displays detailed syntax for each of the valid component checks.
■ cluvfy stage -list: CVU displays a list of valid stages.
■ cluvfy stage -help: CVU displays detailed syntax for each of the valid stage checks.
You can also use the -help option with any CVU command. For example, cluvfy stage -pre nodeadd -help returns detailed information for that particular command.
If you enter an invalid CVU command, then CVU shows the correct usage for that command. For example, if you type cluvfy stage -pre dbinst, then CVU shows the correct syntax for the precheck commands for the dbinst stage. Enter the cluvfy -help command to see detailed CVU command information.
Note: CVU only supports an English-based syntax and English online help.
Special Topics
A-8 Oracle Clusterware Administration and Deployment Guide
Special Topics
This section includes the following topics:
■ Using CVU to Determine if Installation Prerequisites are Complete
■ Using CVU with Oracle Database 10g Release 1 or 2
■ Entry and Exit Criteria
■ Verbose Mode and UNKNOWN Output
■ CVU Node List Shortcuts
Using CVU to Determine if Installation Prerequisites are CompleteYou can use CVU to determine which system prerequisites for installation are completed. Use this option if you are installing Oracle 11g release 2 (11.2) software on a system with a pre-existing Oracle software installation. In using this option, note the following:
■ You must run CVU as the user account you plan to use to run the installation. You cannot run CVU as root, and running CVU as another user other than the user that is performing the installation does not ensure the accuracy of user and group configuration for installation or other configuration checks.
■ Before you can complete a clusterwide status check, SSH must be configured for all cluster nodes. You can use the installer to complete SSH configuration, or you can complete SSH configuration yourself between all nodes in the cluster.
■ CVU can assist you by finding preinstallation steps that must be completed, but it cannot perform preinstallation tasks.
Use the following syntax to determine what preinstallation steps are completed, and what preinstallation steps you must perform; running the command with the -fixup flag generates a fixup script to complete kernel configuration tasks as needed:
$ ./runcluvfy.sh stage -pre crsinst -fixup -n node_list
In the preceding syntax example, replace the node_list variable with the names of the nodes in your cluster, separated by commas. On Windows, you must enclose the comma-delimited node list in double quotation marks ("").
For example, for a cluster with mountpoint /mnt/dvdrom/, and with nodes node1, node2, and node3, enter the following command:
$ cd /mnt/dvdrom/$ ./runcluvfy.sh stage -pre crsinst -fixup -n node1,node2,node3
Review the CVU report, and complete additional steps as needed.
Using CVU with Oracle Database 10g Release 1 or 2You can use CVU on the Oracle Database 11g release 2 (11.2) media to check system requirements for Oracle Database 10g Release 1 (10.1) and later installations. To use CVU to check 10. 2 installations, append the command -r 10gR2 flag to the standard CVU system check commands.
See Also: Your platform-specific installation guide for more information about installing your product
About Cluster Verification Utility
Cluster Verification Utility Reference A-9
For example, to perform a verification check for a Cluster Ready Services 10. 2 installation, on a system where the media mountpoint is /mnt/dvdrom, and the cluster nodes are node1, node2, and node3, enter the following command:
$ cd /mnt/dvdrom$ ./runcluvfy.sh stage -pre crsinst -n node1,node2,node3 -r 10gR2
Entry and Exit CriteriaWhen verifying stages, CVU uses entry and exit criteria. In other words, each stage has entry criteria that define a specific set of verification tasks to be performed before initiating that stage. This check prevents you from beginning a stage, such as installing Oracle Clusterware, unless you meet the Oracle Clusterware stage's prerequisites.
The exit criteria for a stage define another set of verification tasks that you must perform after the completion of the stage. Post-checks ensure that the activities for that stage have been completed. Post-checks identify stage-specific problems before they propagate to subsequent stages.
Verbose Mode and UNKNOWN OutputAlthough by default CVU reports in nonverbose mode by only reporting the summary of a test, you can obtain detailed output by using the -verbose argument. The -verbose argument produces detailed output of individual checks and where applicable shows results for each node in a tabular layout.
If a cluvfy command responds with UNKNOWN for a particular node, then this is because CVU cannot determine whether a check passed or failed. The cause of this could be a loss of reachability or the failure of user equivalence to that node. The cause could also be any system problem that was occurring on that node when CVU was performing a check.
If you run CVU using the -verbose argument and CVU responds with UNKNOWN for a particular node, then this is because CVU cannot determine whether a check passed or failed. The following is a list of possible causes for an UNKNOWN response:
■ The node is down
■ Executables that CVU requires are missing in Grid_home/bin or the Oracle home directory
■ The user account that ran CVU does not have privileges to run common operating system executables on the node
■ The node is missing an operating system patch or a required package
■ The node has exceeded the maximum number of processes or maximum number of open files, or there is a problem with IPC segments, such as shared memory or semaphores
CVU Node List ShortcutsYou can use the following node list shortcuts:
To provide CVU a list of all of the nodes of a cluster, enter -n all. CVU attempts to obtain the node list in the following order:
Note: If you do not specify a release version to check, then CVU checks for 11g release 2 (11.2) requirements.

Special Topics
A-10 Oracle Clusterware Administration and Deployment Guide
1. If vendor clusterware is available, then CVU selects all of the configured nodes from the vendor clusterware using the lsnodes utility.
2. If Oracle Clusterware is installed, then CVU selects all of the configured nodes from Oracle Clusterware using the olsnodes utility.
3. If neither the vendor clusterware nor Oracle Clusterware is installed, then CVU searches for a value for the CV_NODE_ALL key in the configuration file.
4. If vendor clusterware and Oracle Clusterware are not installed and no key named CV_NODE_ALL exists in the configuration file, then CVU searches for a value for the CV_NODE_ALL environmental variable.
If you have not set this variable, then CVU reports an error.
To provide a partial node list, you can set an environmental variable and use it in the CVU command. For example, on Linux or UNIX systems you can enter:
setenv MYNODES node1,node3,node5cluvfy comp nodecon -n $MYNODES [-verbose]
Cluster Verification Utility Command Reference
Cluster Verification Utility Reference A-11
Cluster Verification Utility Command Reference
This section lists and describes the following CVU commands:
■ cluvfy comp acfs
■ cluvfy comp admprv
■ cluvfy comp asm
■ cluvfy comp cfs
■ cluvfy comp clocksync
■ cluvfy comp clu
■ cluvfy comp clumgr
■ cluvfy comp crs
■ cluvfy comp gns
■ cluvfy comp gpnp
■ cluvfy comp ha
■ cluvfy comp nodeapp
■ cluvfy comp nodecon
■ cluvfy comp nodereach
■ cluvfy comp ocr
■ cluvfy comp ohasd
■ cluvfy comp olr
■ cluvfy comp peer
■ cluvfy comp scan
■ cluvfy comp software
■ cluvfy comp space
■ cluvfy comp ssa
■ cluvfy comp sys
■ cluvfy comp vdisk
■ cluvfy stage [-pre | -post] cfs
■ cluvfy stage [-pre | -post] crsinst
■ cluvfy stage -pre dbcfg
■ cluvfy stage -pre dbinst
■ cluvfy stage [-pre | -post] hacfg
■ cluvfy stage -post hwos
■ cluvfy stage [-pre | -post] nodeadd
■ cluvfy stage -post nodedel
■ cluvfy stage [-pre | -post] acfscfg
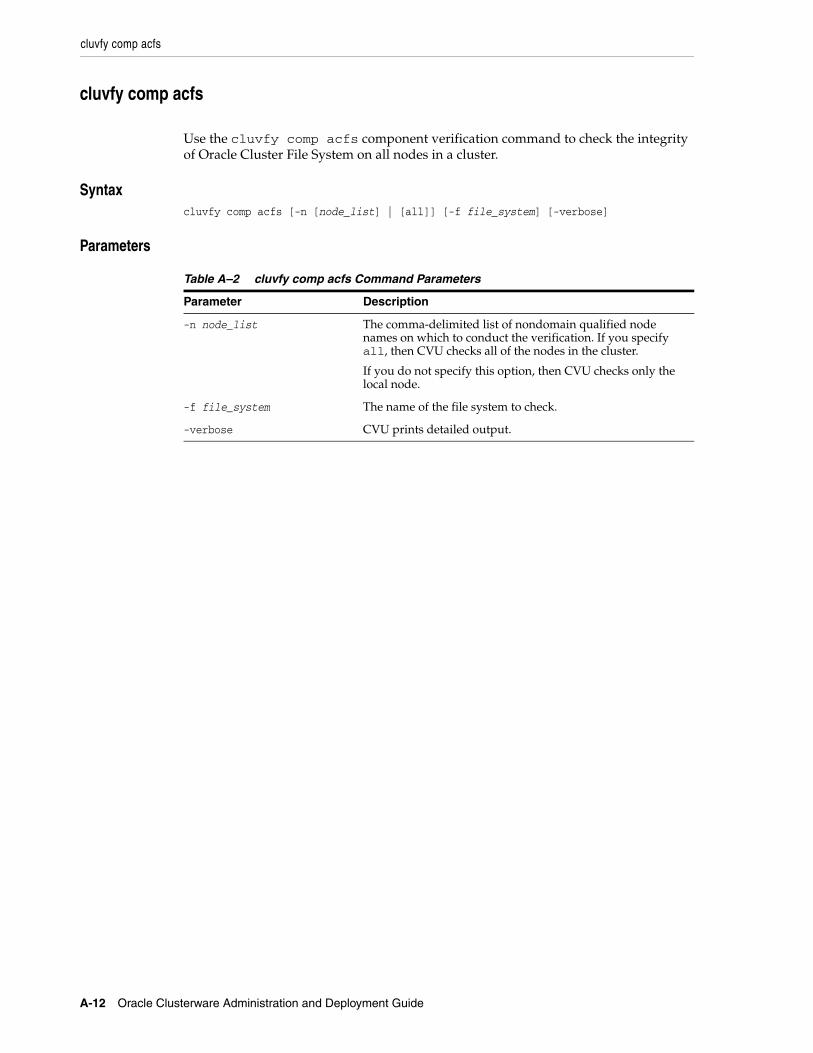
cluvfy comp acfs
A-12 Oracle Clusterware Administration and Deployment Guide
cluvfy comp acfs
Use the cluvfy comp acfs component verification command to check the integrity of Oracle Cluster File System on all nodes in a cluster.
Syntaxcluvfy comp acfs [-n [node_list] | [all]] [-f file_system] [-verbose]
Parameters
Table A–2 cluvfy comp acfs Command Parameters
Parameter Description
-n node_list The comma-delimited list of nondomain qualified node names on which to conduct the verification. If you specify all, then CVU checks all of the nodes in the cluster.
If you do not specify this option, then CVU checks only the local node.
-f file_system The name of the file system to check.
-verbose CVU prints detailed output.
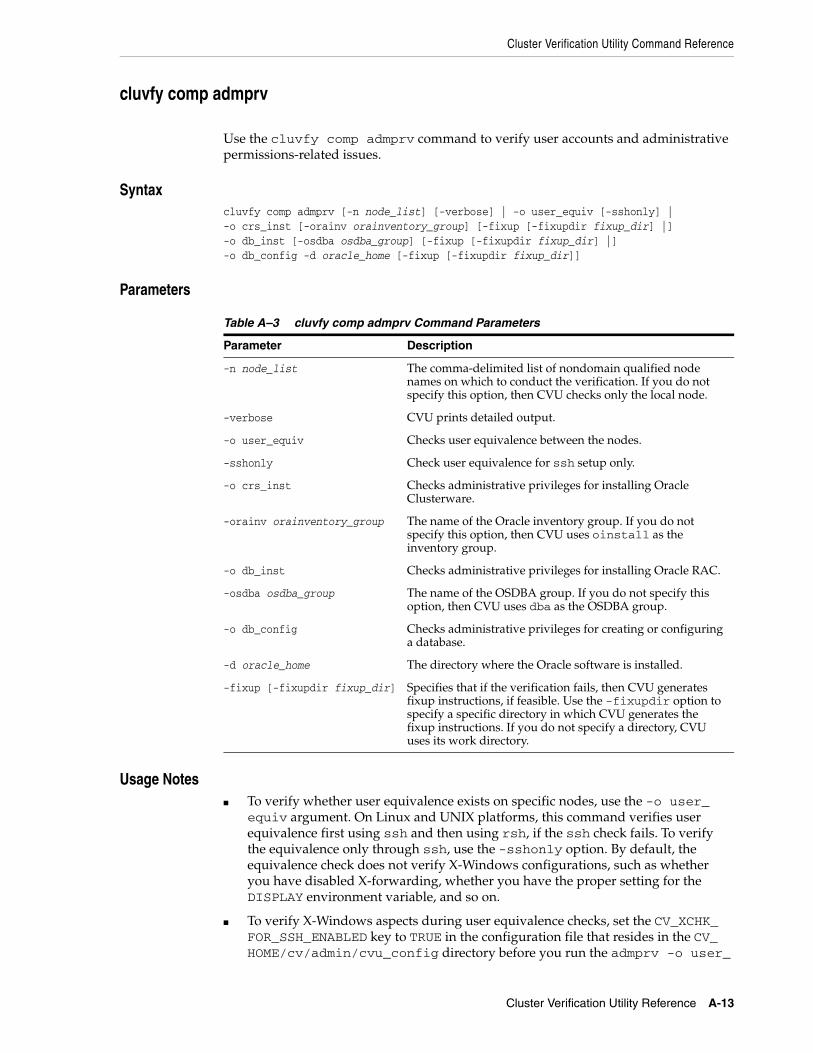
Cluster Verification Utility Command Reference
Cluster Verification Utility Reference A-13
cluvfy comp admprv
Use the cluvfy comp admprv command to verify user accounts and administrative permissions-related issues.
Syntaxcluvfy comp admprv [-n node_list] [-verbose] | -o user_equiv [-sshonly] |-o crs_inst [-orainv orainventory_group] [-fixup [-fixupdir fixup_dir] |]-o db_inst [-osdba osdba_group] [-fixup [-fixupdir fixup_dir] |]-o db_config -d oracle_home [-fixup [-fixupdir fixup_dir]]
Parameters
Usage Notes■ To verify whether user equivalence exists on specific nodes, use the -o user_
equiv argument. On Linux and UNIX platforms, this command verifies user equivalence first using ssh and then using rsh, if the ssh check fails. To verify the equivalence only through ssh, use the -sshonly option. By default, the equivalence check does not verify X-Windows configurations, such as whether you have disabled X-forwarding, whether you have the proper setting for the DISPLAY environment variable, and so on.
■ To verify X-Windows aspects during user equivalence checks, set the CV_XCHK_FOR_SSH_ENABLED key to TRUE in the configuration file that resides in the CV_HOME/cv/admin/cvu_config directory before you run the admprv -o user_
Table A–3 cluvfy comp admprv Command Parameters
Parameter Description
-n node_list The comma-delimited list of nondomain qualified node names on which to conduct the verification. If you do not specify this option, then CVU checks only the local node.
-verbose CVU prints detailed output.
-o user_equiv Checks user equivalence between the nodes.
-sshonly Check user equivalence for ssh setup only.
-o crs_inst Checks administrative privileges for installing Oracle Clusterware.
-orainv orainventory_group The name of the Oracle inventory group. If you do not specify this option, then CVU uses oinstall as the inventory group.
-o db_inst Checks administrative privileges for installing Oracle RAC.
-osdba osdba_group The name of the OSDBA group. If you do not specify this option, then CVU uses dba as the OSDBA group.
-o db_config Checks administrative privileges for creating or configuring a database.
-d oracle_home The directory where the Oracle software is installed.
-fixup [-fixupdir fixup_dir] Specifies that if the verification fails, then CVU generates fixup instructions, if feasible. Use the -fixupdir option to specify a specific directory in which CVU generates the fixup instructions. If you do not specify a directory, CVU uses its work directory.

cluvfy comp admprv
A-14 Oracle Clusterware Administration and Deployment Guide
equiv command. Use the -o crs_inst argument to verify whether you have permissions to install Oracle Clusterware.
■ Use the -o db_inst argument to verify the permissions that are required for installing Oracle RAC and the -o db_config argument to verify the permissions that are required for creating an Oracle RAC database or for modifying an Oracle RAC database configuration.
Examples
Example 1: Verifying User Equivalence for All NodesYou can verify user equivalence for all of the nodes by running the following command:
cluvfy comp admprv -n all -o user_equiv -verbose

Cluster Verification Utility Command Reference
Cluster Verification Utility Reference A-15
cluvfy comp asm
Use the cluvfy comp asm component verification command to check the integrity of Oracle Automatic Storage Management (Oracle ASM) on all nodes in the cluster.
Syntaxcluvfy comp asm [-n node_list | all ] [-verbose]
Parameters
Table A–4 cluvfy comp asm Command Parameters
Parameter Description
-n node_list | all The comma-delimited list of nondomain qualified node names on which to conduct the verification. If you specify all, then CVU checks all of the nodes in the cluster.
If you do not specify this option, then CVU checks only the local node.
-verbose CVU prints detailed output.
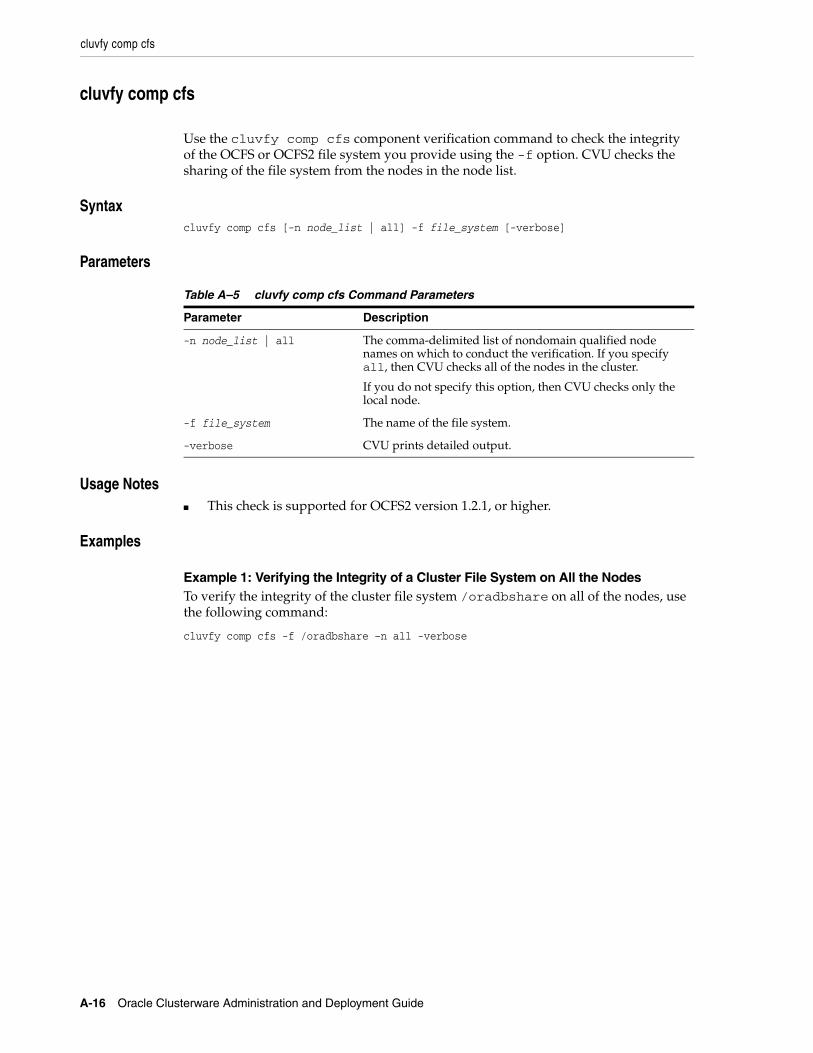
cluvfy comp cfs
A-16 Oracle Clusterware Administration and Deployment Guide
cluvfy comp cfs
Use the cluvfy comp cfs component verification command to check the integrity of the OCFS or OCFS2 file system you provide using the -f option. CVU checks the sharing of the file system from the nodes in the node list.
Syntaxcluvfy comp cfs [-n node_list | all] -f file_system [-verbose]
Parameters
Usage Notes■ This check is supported for OCFS2 version 1.2.1, or higher.
Examples
Example 1: Verifying the Integrity of a Cluster File System on All the NodesTo verify the integrity of the cluster file system /oradbshare on all of the nodes, use the following command:
cluvfy comp cfs -f /oradbshare –n all -verbose
Table A–5 cluvfy comp cfs Command Parameters
Parameter Description
-n node_list | all The comma-delimited list of nondomain qualified node names on which to conduct the verification. If you specify all, then CVU checks all of the nodes in the cluster.
If you do not specify this option, then CVU checks only the local node.
-f file_system The name of the file system.
-verbose CVU prints detailed output.
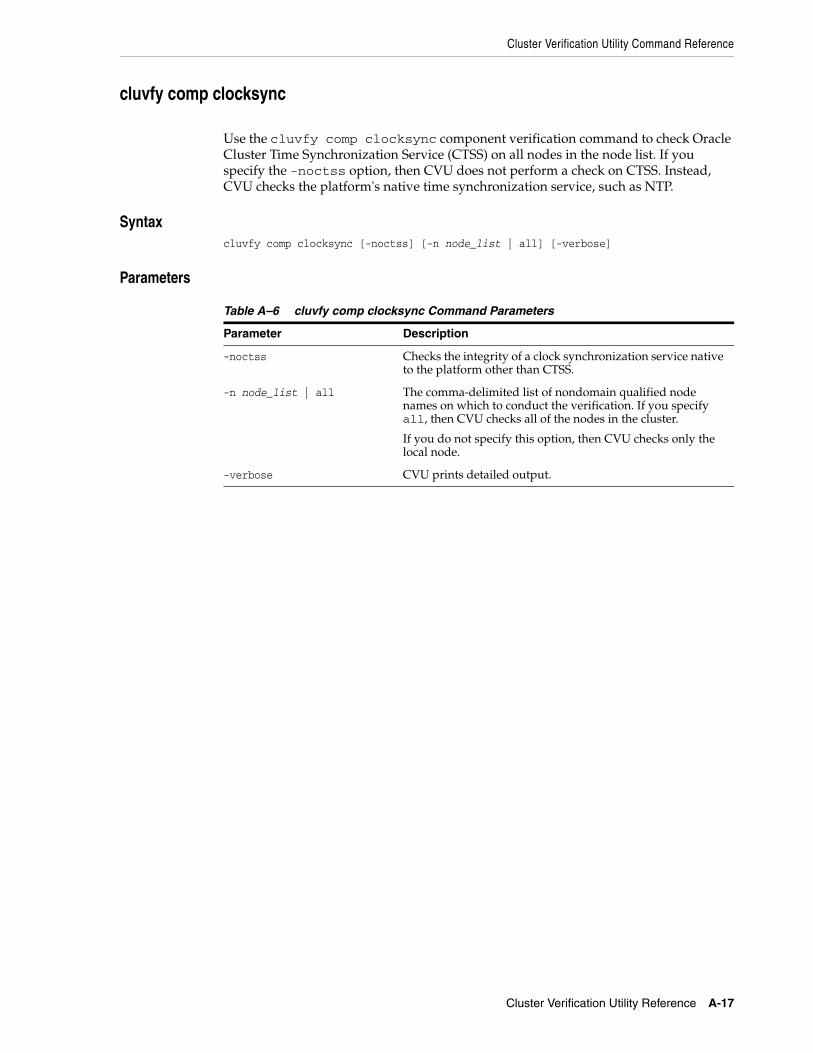
Cluster Verification Utility Command Reference
Cluster Verification Utility Reference A-17
cluvfy comp clocksync
Use the cluvfy comp clocksync component verification command to check Oracle Cluster Time Synchronization Service (CTSS) on all nodes in the node list. If you specify the -noctss option, then CVU does not perform a check on CTSS. Instead, CVU checks the platform's native time synchronization service, such as NTP.
Syntaxcluvfy comp clocksync [-noctss] [-n node_list | all] [-verbose]
Parameters
Table A–6 cluvfy comp clocksync Command Parameters
Parameter Description
-noctss Checks the integrity of a clock synchronization service native to the platform other than CTSS.
-n node_list | all The comma-delimited list of nondomain qualified node names on which to conduct the verification. If you specify all, then CVU checks all of the nodes in the cluster.
If you do not specify this option, then CVU checks only the local node.
-verbose CVU prints detailed output.
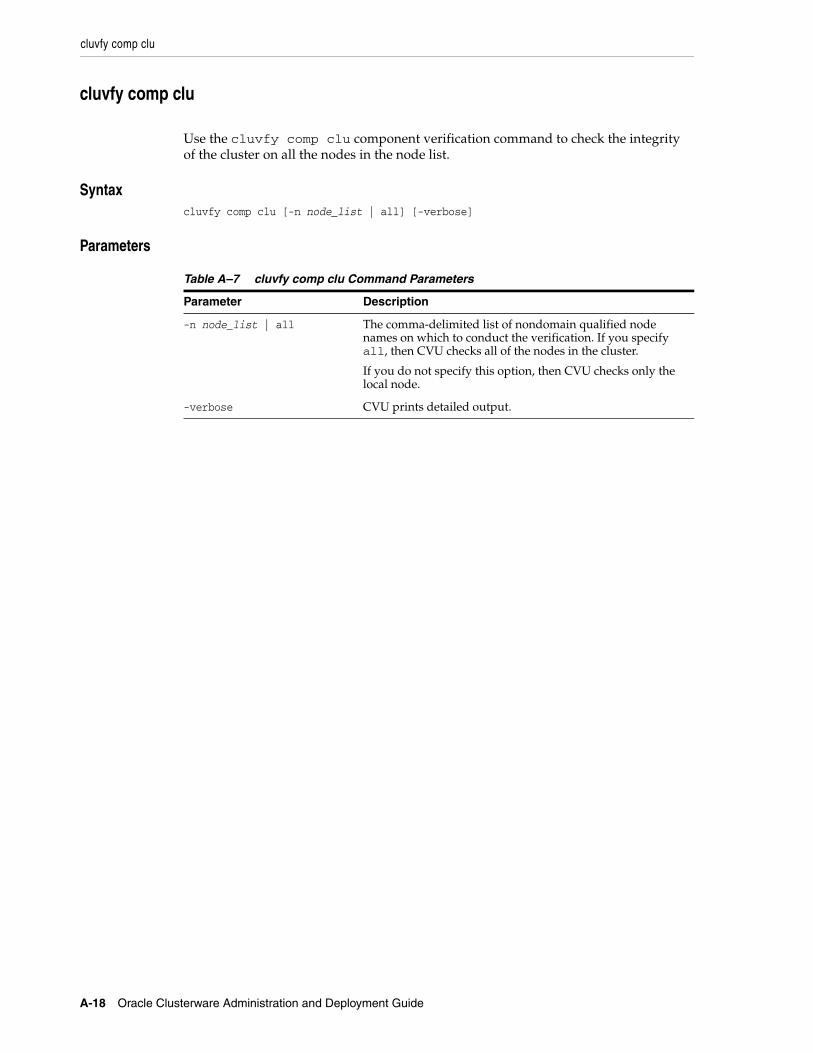
cluvfy comp clu
A-18 Oracle Clusterware Administration and Deployment Guide
cluvfy comp clu
Use the cluvfy comp clu component verification command to check the integrity of the cluster on all the nodes in the node list.
Syntaxcluvfy comp clu [-n node_list | all] [-verbose]
Parameters
Table A–7 cluvfy comp clu Command Parameters
Parameter Description
-n node_list | all The comma-delimited list of nondomain qualified node names on which to conduct the verification. If you specify all, then CVU checks all of the nodes in the cluster.
If you do not specify this option, then CVU checks only the local node.
-verbose CVU prints detailed output.

Cluster Verification Utility Command Reference
Cluster Verification Utility Reference A-19
cluvfy comp clumgr
Use the cluvfy comp clumgr component verification command to check the integrity of Oracle Cluster Synchronization Services (CSS) on all the nodes in the node list.
Syntaxcluvfy comp clumgr [-n node_list | all] [-verbose]
Parameters
Table A–8 cluvfy comp clumgr Command Parameters
Parameter Description
-n node_list | all The comma-delimited list of nondomain qualified node names on which to conduct the verification. If you specify all, then CVU checks all of the nodes in the cluster.
If you do not specify this option, then CVU checks only the local node.
-verbose CVU prints detailed output.
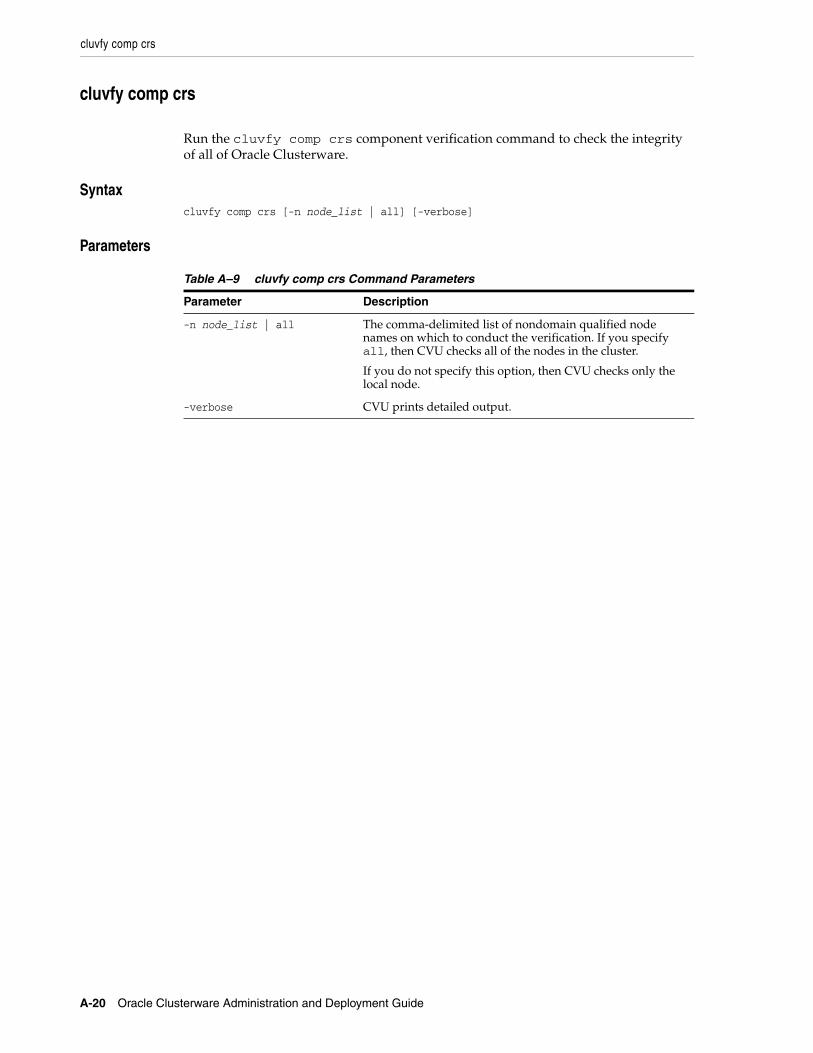
cluvfy comp crs
A-20 Oracle Clusterware Administration and Deployment Guide
cluvfy comp crs
Run the cluvfy comp crs component verification command to check the integrity of all of Oracle Clusterware.
Syntaxcluvfy comp crs [-n node_list | all] [-verbose]
Parameters
Table A–9 cluvfy comp crs Command Parameters
Parameter Description
-n node_list | all The comma-delimited list of nondomain qualified node names on which to conduct the verification. If you specify all, then CVU checks all of the nodes in the cluster.
If you do not specify this option, then CVU checks only the local node.
-verbose CVU prints detailed output.
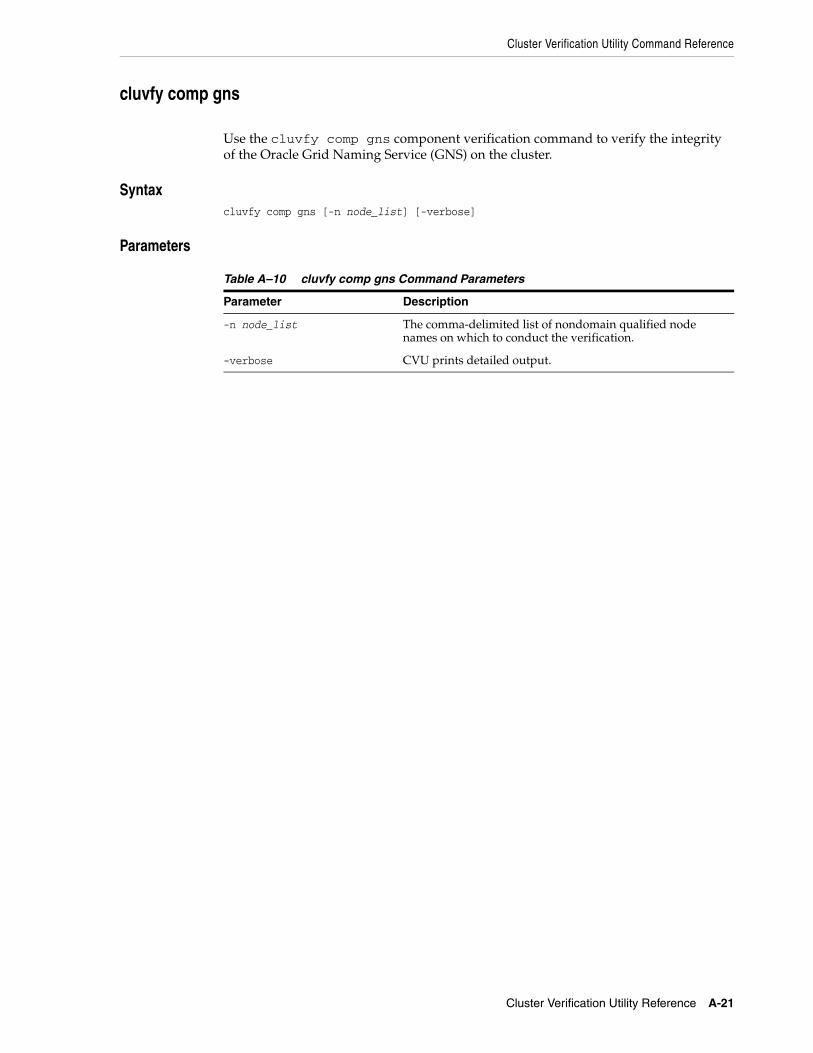
Cluster Verification Utility Command Reference
Cluster Verification Utility Reference A-21
cluvfy comp gns
Use the cluvfy comp gns component verification command to verify the integrity of the Oracle Grid Naming Service (GNS) on the cluster.
Syntaxcluvfy comp gns [-n node_list] [-verbose]
Parameters
Table A–10 cluvfy comp gns Command Parameters
Parameter Description
-n node_list The comma-delimited list of nondomain qualified node names on which to conduct the verification.
-verbose CVU prints detailed output.

cluvfy comp gpnp
A-22 Oracle Clusterware Administration and Deployment Guide
cluvfy comp gpnp
Use the cluvfy comp gpnp component verification command to check the integrity of Grid Plug and Play on all of the nodes in a cluster.
Syntaxcluvfy comp gpnp [-n node_list] [-verbose]
Parameters
Table A–11 cluvfy comp gpnp Command Parameters
Parameter Description
-n node_list The comma-delimited list of nondomain qualified node names on which to conduct the verification.
-verbose CVU prints detailed output.
Cluster Verification Utility Command Reference
Cluster Verification Utility Reference A-23
cluvfy comp ha
Use the cluvfy comp ha component verification command to check the integrity of high availability on a local node.
Syntaxcluvfy comp ha [-verbose]
Parameters
Table A–12 cluvfy comp ha Command Parameters
Parameter Description
-verbose CVU prints detailed output.
cluvfy comp nodeapp
A-24 Oracle Clusterware Administration and Deployment Guide
cluvfy comp nodeapp
Use the component cluvfy comp nodeapp command to check for the existence of node applications, namely VIP, ONS, and GSD, on all of the nodes.
Syntaxcluvfy comp nodeapp [-n node_list | all] [-verbose]
Parameters
Table A–13 cluvfy comp nodeapp Command Parameters
Parameter Description
-n node_list | all The comma-delimited list of nondomain qualified node names on which to conduct the verification. If you specify all, then CVU checks all of the nodes in the cluster.
If you do not specify this option, then CVU checks only the local node.
-verbose CVU prints detailed output.
Cluster Verification Utility Command Reference
Cluster Verification Utility Reference A-25
cluvfy comp nodecon
Use the cluvfy comp nodecon component verification command to check the connectivity among the nodes specified in the node list. If you provide an interface list, then CVU checks the connectivity using the given interfaces. If you do not provide an interface list, then CVU discovers available interfaces and checks connectivity using each of them.
Syntaxcluvfy comp nodecon -n [node_list | all] [-i interface_list] [-verbose]
Parameters
Usage Notes■ You can run this command in verbose mode to identify the mappings between the
interfaces, IP addresses, and subnets.
■ Use the nodecon command without the -i option and with -n set to all to use CVU to:
– Discover all of the network interfaces that are available on the cluster nodes
– Review the interfaces’ corresponding IP addresses and subnets
– Obtain the list of interfaces that are suitable for use as VIPs and the list of interfaces to private interconnects
– Verify the connectivity between all of the nodes through those interfaces
Examples
Example 1: Verifying the connectivity between nodes through specific network interfaces:You can verify the connectivity between the nodes node1,node2, and node3, through interface eth0 by running the following command:
cluvfy comp nodecon -n node1,node2,node3 –i eth0 -verbose
Example 2: Discovering all available network interfaces and verifying the connectivity between the nodes in the cluster through those network interfaces:Use the nodecon command without the -i option and with -n set to all to use CVU to discover all of the network interfaces that are available on the cluster nodes. CVU then reviews the interfaces’ corresponding IP addresses and subnets. Using this information, CVU obtains a list of interfaces that are suitable for use as VIPs and a list
Table A–14 cluvfy comp nodecon Command Parameters
Parameter Description
-n node_list | all The comma-delimited list of nondomain qualified node names on which to conduct the verification. If you specify all, then CVU checks all of the nodes in the cluster.
-i interface_list The comma-delimited list of interface names.
-verbose CVU prints detailed output.

cluvfy comp nodecon
A-26 Oracle Clusterware Administration and Deployment Guide
of interfaces to private interconnects. Finally, CVU verifies the connectivity between all of the nodes in the cluster through those interfaces.
cluvfy comp nodecon -n all -verbose
Cluster Verification Utility Command Reference
Cluster Verification Utility Reference A-27
cluvfy comp nodereach
Use the cluvfy comp nodereach component verification command to check the reachability of specified nodes from a source node. Specify the source node with the -srcnode option. If you do not specify a source node, then the node on which you run the command is used as the source node.
Syntaxcluvfy comp nodereach -n [node_list | all] [-srcnode node] [-verbose]
Parameters
Table A–15 cluvfy comp nodereach Command Parameters
Parameter Description
-n node_list | all The comma-delimited list of nondomain qualified node names on which to conduct the verification. If you specify all, then CVU checks all of the nodes in the cluster.
-srcnode The node from which CVU performs the reachability test.
-verbose CVU prints detailed output.

cluvfy comp ocr
A-28 Oracle Clusterware Administration and Deployment Guide
cluvfy comp ocr
Use the cluvfy comp ocr component verification command to check the integrity of Oracle Cluster Registry (OCR) on all the nodes in the node list.
Syntaxcluvfy comp ocr [-n node_list | all] [-verbose]
Parameters
Examples
Example 1: Verifying the integrity of the local OCR on the local nodeTo verify the integrity of the local OCR on a local node, run the following command:
cluvfy comp ocr
Table A–16 cluvfy comp ocr Command Parameters
Parameter Description
-n node_list | all The comma-delimited list of nondomain qualified node names on which to conduct the verification. If you specify all, then CVU checks all of the nodes in the cluster.
If you do not specify this option, then CVU checks only the local node.
-verbose CVU prints detailed output.
Cluster Verification Utility Command Reference
Cluster Verification Utility Reference A-29
cluvfy comp ohasd
Use the cluvfy comp ohasd component verification command to check the integrity of the Oracle high availability service daemon.
Syntaxcluvfy comp ohasd [-n node_list | all] [-verbose]
Parameters
Table A–17 cluvfy comp ohasd Command Parameters
Parameter Description
-n node_list | all The comma-delimited list of nondomain qualified node names on which to conduct the verification. If you specify all, then CVU checks all of the nodes in the cluster.
If you do not specify this option, then CVU checks only the local node.
-verbose CVU prints detailed output.

cluvfy comp olr
A-30 Oracle Clusterware Administration and Deployment Guide
cluvfy comp olr
Use the cluvfy comp olr component verification command to check the integrity of Oracle Local Registry (OLR) on a local node.
Syntaxcluvfy comp olr [-verbose]
Parameters
Table A–18 cluvfu comp olr Command Parameters
Parameter Description
-verbose CVU prints detailed output.

Cluster Verification Utility Command Reference
Cluster Verification Utility Reference A-31
cluvfy comp peer
Use the cluvfy comp peer component verification command to check the compatibility of the nodes in the node list against the reference node you specify in the -refnode option. If you do not provide a reference node, then CVU reports values for all the nodes in the node list. If you do not specify an OSDBA group, then CVU uses dba. If you do not specify an Oracle inventory group, then CVU uses oinstall.
Syntaxcluvfy comp peer [-refnode node] -n node_list | all[-r {10gR1 | 10gR2 | 11gR1 | 11gR2}] [-orainv orainventory_group][-osdba osdba_group [-verbose]
Parameters
Usage NotesYou can also run the comp peer command with the -refnode argument to compare the properties of other nodes against the reference node. If you do not specify a value for -refnode, then CVU only reports the values from all the nodes in the node list.
Examples
Example 1: List the values of cluster configuration properties on different nodes:The following command lists the values of several preselected properties on different nodes from Oracle Database 11g release 2 (11.2):
cluvfy comp peer -n node1,node2,node4,node7 -verbose
Table A–19 cluvfy comp peer Command Parameters
Parameter Description
-refnode The node that CVU uses as a reference for checking compatibility with other nodes.
-n node_list | all The comma-delimited list of nondomain qualified node names on which to conduct the verification. If you specify all, then CVU checks all of the nodes in the cluster.
-r {10gR1 | 10gR2 | 11gR1 | 11gR2}
Specifies the Oracle Database release that CVU checks as required for installation of Oracle Clusterware or Oracle RAC. If you do not specify this option, then CVU assumes Oracle Database 11g release 2 (11.2).
-orainv orainventory_group The name of the Oracle inventory group. If you do not specify this option, then the utility uses oinstall as the inventory group.
-osdba osdba_group The name of the OSDBA group. If you do not specify this option, then the utility uses dba as the OSDBA group.
-verbose CVU prints detailed output.

cluvfy comp scan
A-32 Oracle Clusterware Administration and Deployment Guide
cluvfy comp scan
Use the cluvfy comp scan component verification command to check the Single Client Access Name (SCAN) configuration.
Syntaxcluvfy comp scan [-verbose]
Parameters
Table A–20 cluvfy comp scan Command Parameters
Parameter Description
-verbose CVU prints detailed output.
Cluster Verification Utility Command Reference
Cluster Verification Utility Reference A-33
cluvfy comp software
Use the cluvfy comp software component verification command to check the files distributed as part of the overall software distribution across nodes.
Syntaxcluvfy comp software [-n node_list | all] [-verbose]
Parameters
Table A–21 cluvfy comp software Command Parameters
Parameter Description
-n node_list | all The comma-delimited list of nondomain qualified node names on which to conduct the verification. If you specify all, then CVU checks all of the nodes in the cluster.
If you do not specify this option, then CVU checks only the local node.
-verbose CVU prints detailed output.
cluvfy comp space
A-34 Oracle Clusterware Administration and Deployment Guide
cluvfy comp space
Use the cluvfy comp space component verification command to check for free disk space at the location you specify in the -l option on all the nodes in the node list.
Syntaxcluvfy comp space [-n node_list | all] -l storage_location -z disk_space{B | K | M | G} [-verbose]
Parameters
Usage Notes■ The space component does not support block or raw devices.
Examples
Example 1: Verifying the availability of free space on all nodesYou can verify the availability of at least 2 GB of free space at the location /home/dbadmin/products on all of the cluster nodes by running the following command:
cluvfy comp space -n all -l /home/dbadmin/products –z 2G -verbose
Table A–22 cluvfy comp space Command Parameters
Parameter Description
-n node_list | all The comma-delimited list of nondomain qualified node names on which to conduct the verification. If you specify all, then CVU checks all of the nodes in the cluster.
If you do not specify this option, then CVU checks only the local node.
-l storage_location The storage path.
-z disk_space The required disk space, in units of bytes (B), kilobytes (K), megabytes (M), or gigabytes (G).
-verbose CVU prints detailed output.
Cluster Verification Utility Command Reference
Cluster Verification Utility Reference A-35
cluvfy comp ssa
Use the cluvfy comp ssa component verification command to check the sharing of the locations you specify in the -s option. CVU checks sharing for nodes in the node list.
Syntaxcluvfy comp ssa [-n node_list | all] [-s storageID_list][-t {software | data | ocr_vdisk}] [-verbose]
Parameters
Usage Notes■ The current release of cluvfy has the following limitations on Linux regarding
shared storage accessibility check.
– Currently NAS storage (r/w, no attribute caching) and OCFS2 (version 1.2.1 or higher) are supported.
– For sharedness checks on NAS, cluvfy commands require you to have write permission on the specified path. If the cluvfy user does not have write permission, cluvfy reports the path as not shared.
■ To perform discovery and shared storage accessibility checks for SCSI disks on Red Hat Linux 3.0 (or higher) and SUSE Linux Enterprise Server, CVU requires the CVUQDISK package. If you attempt to use CVU and the CVUQDISK package is not installed on all of the nodes in your Oracle RAC environment, then CVU responds with an error. See "Shared Disk Discovery on Red Hat Linux" on page A-50 for information about how to install the CVUQDISK package.
Table A–23 cluvfy comp ssa Command Parameters
Parameter Description
-n node_list | all The comma-delimited list of nondomain qualified node names on which to conduct the verification. If you specify all, then CVU checks all of the nodes in the cluster.
If you do not specify this option, then CVU checks only the local node.
-s storageID_list Checks the sharing of the given storage locations for supported storage types.
If you do not provide the -s option, then CVU discovers supported storage types and checks sharing for each of them.
-t {software | data | ocr_vdisk}
Checks the type of Oracle files stored on the storage device.
If you do not provide the -t option, then CVU discovers or checks the data type.
-verbose CVU prints detailed output.

cluvfy comp ssa
A-36 Oracle Clusterware Administration and Deployment Guide
Examples
Example 1: Discovering All of the Available Shared Storage Systems on Your SystemTo discover all of the shared storage systems available on your system, run the following command:
cluvfy comp ssa -n all -verbose
Example 2: Verifying the Accessibility of a Specific Storage LocationYou can verify the accessibility of a specific storage location, such as /dev/sda, across the cluster nodes by running the following command:
cluvfy comp ssa -n all -s /dev/sda
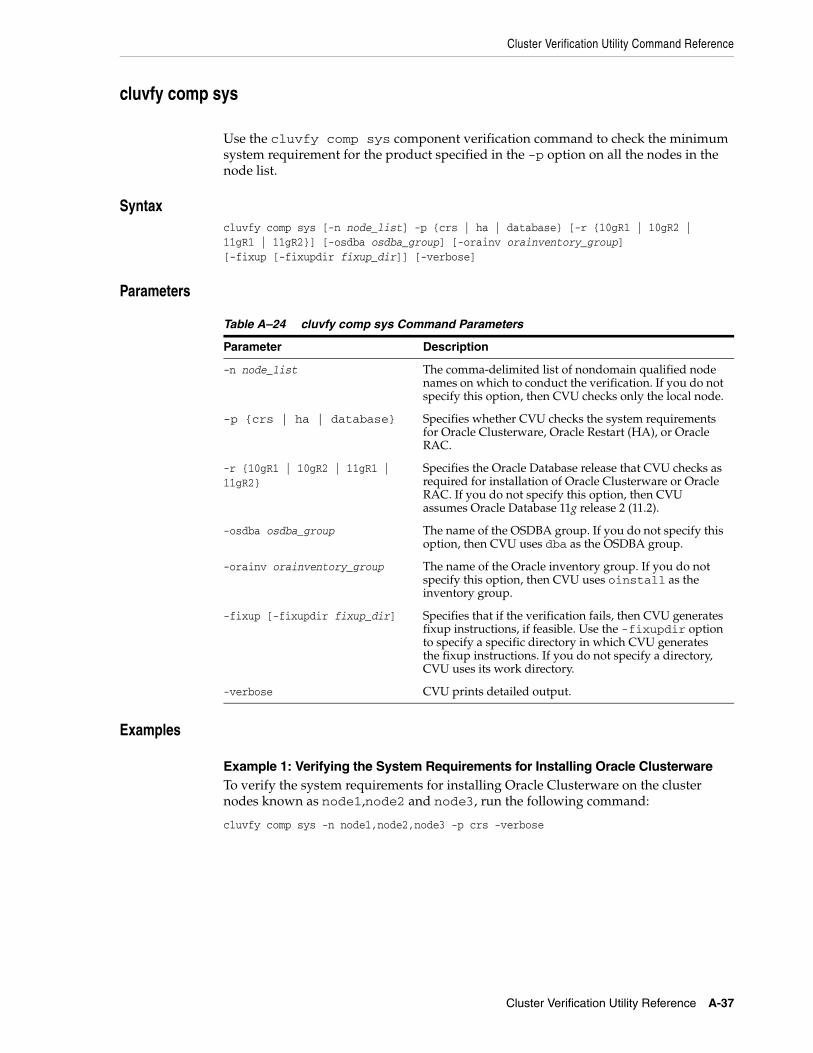
Cluster Verification Utility Command Reference
Cluster Verification Utility Reference A-37
cluvfy comp sys
Use the cluvfy comp sys component verification command to check the minimum system requirement for the product specified in the -p option on all the nodes in the node list.
Syntaxcluvfy comp sys [-n node_list] -p {crs | ha | database} [-r {10gR1 | 10gR2 |11gR1 | 11gR2}] [-osdba osdba_group] [-orainv orainventory_group][-fixup [-fixupdir fixup_dir]] [-verbose]
Parameters
Examples
Example 1: Verifying the System Requirements for Installing Oracle ClusterwareTo verify the system requirements for installing Oracle Clusterware on the cluster nodes known as node1,node2 and node3, run the following command:
cluvfy comp sys -n node1,node2,node3 -p crs -verbose
Table A–24 cluvfy comp sys Command Parameters
Parameter Description
-n node_list The comma-delimited list of nondomain qualified node names on which to conduct the verification. If you do not specify this option, then CVU checks only the local node.
-p {crs | ha | database} Specifies whether CVU checks the system requirements for Oracle Clusterware, Oracle Restart (HA), or Oracle RAC.
-r {10gR1 | 10gR2 | 11gR1 |11gR2}
Specifies the Oracle Database release that CVU checks as required for installation of Oracle Clusterware or Oracle RAC. If you do not specify this option, then CVU assumes Oracle Database 11g release 2 (11.2).
-osdba osdba_group The name of the OSDBA group. If you do not specify this option, then CVU uses dba as the OSDBA group.
-orainv orainventory_group The name of the Oracle inventory group. If you do not specify this option, then CVU uses oinstall as the inventory group.
-fixup [-fixupdir fixup_dir] Specifies that if the verification fails, then CVU generates fixup instructions, if feasible. Use the -fixupdir option to specify a specific directory in which CVU generates the fixup instructions. If you do not specify a directory, CVU uses its work directory.
-verbose CVU prints detailed output.
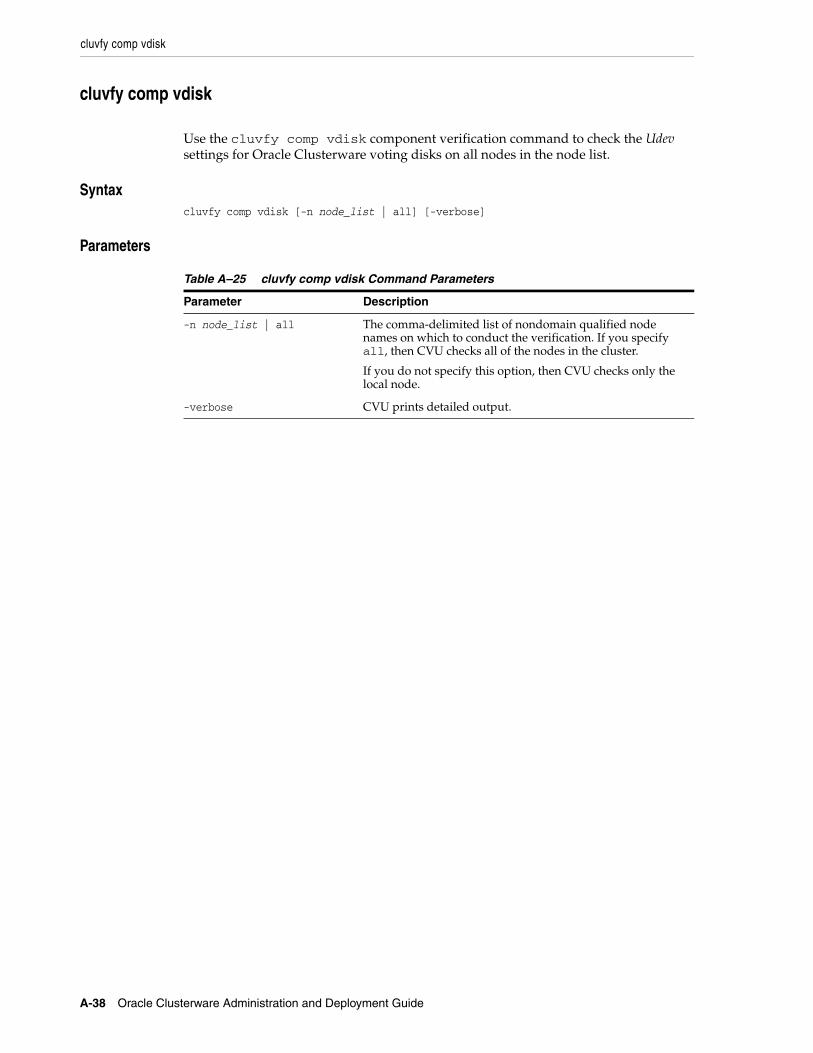
cluvfy comp vdisk
A-38 Oracle Clusterware Administration and Deployment Guide
cluvfy comp vdisk
Use the cluvfy comp vdisk component verification command to check the Udev settings for Oracle Clusterware voting disks on all nodes in the node list.
Syntaxcluvfy comp vdisk [-n node_list | all] [-verbose]
Parameters
Table A–25 cluvfy comp vdisk Command Parameters
Parameter Description
-n node_list | all The comma-delimited list of nondomain qualified node names on which to conduct the verification. If you specify all, then CVU checks all of the nodes in the cluster.
If you do not specify this option, then CVU checks only the local node.
-verbose CVU prints detailed output.
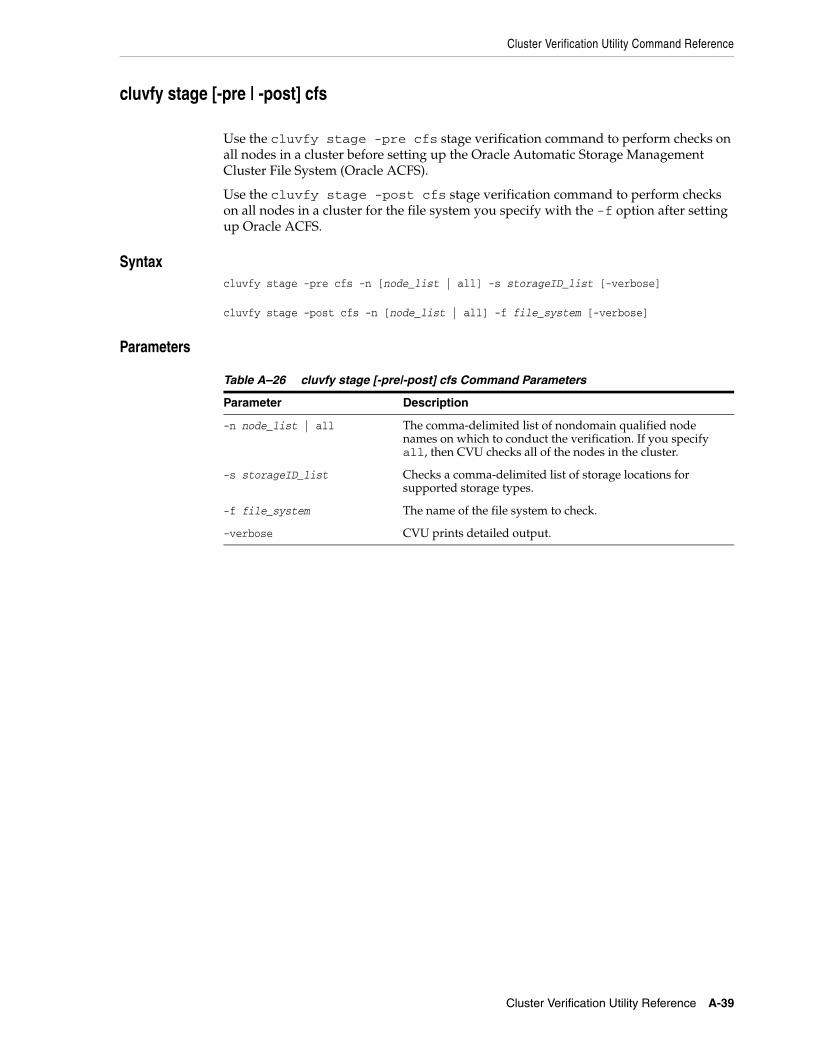
Cluster Verification Utility Command Reference
Cluster Verification Utility Reference A-39
cluvfy stage [-pre | -post] cfs
Use the cluvfy stage -pre cfs stage verification command to perform checks on all nodes in a cluster before setting up the Oracle Automatic Storage Management Cluster File System (Oracle ACFS).
Use the cluvfy stage -post cfs stage verification command to perform checks on all nodes in a cluster for the file system you specify with the -f option after setting up Oracle ACFS.
Syntaxcluvfy stage -pre cfs -n [node_list | all] -s storageID_list [-verbose]
cluvfy stage -post cfs -n [node_list | all] -f file_system [-verbose]
Parameters
Table A–26 cluvfy stage [-pre|-post] cfs Command Parameters
Parameter Description
-n node_list | all The comma-delimited list of nondomain qualified node names on which to conduct the verification. If you specify all, then CVU checks all of the nodes in the cluster.
-s storageID_list Checks a comma-delimited list of storage locations for supported storage types.
-f file_system The name of the file system to check.
-verbose CVU prints detailed output.
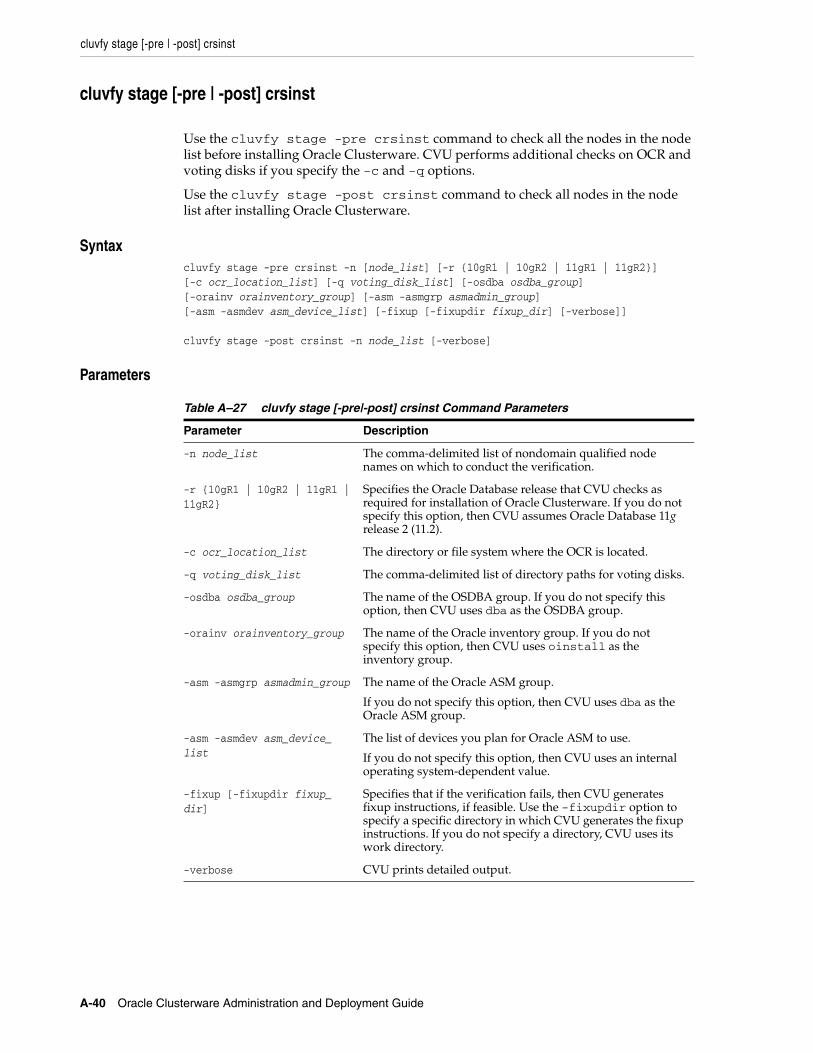
cluvfy stage [-pre | -post] crsinst
A-40 Oracle Clusterware Administration and Deployment Guide
cluvfy stage [-pre | -post] crsinst
Use the cluvfy stage -pre crsinst command to check all the nodes in the node list before installing Oracle Clusterware. CVU performs additional checks on OCR and voting disks if you specify the -c and -q options.
Use the cluvfy stage -post crsinst command to check all nodes in the node list after installing Oracle Clusterware.
Syntaxcluvfy stage -pre crsinst -n [node_list] [-r {10gR1 | 10gR2 | 11gR1 | 11gR2}][-c ocr_location_list] [-q voting_disk_list] [-osdba osdba_group][-orainv orainventory_group] [-asm -asmgrp asmadmin_group][-asm -asmdev asm_device_list] [-fixup [-fixupdir fixup_dir] [-verbose]]
cluvfy stage -post crsinst -n node_list [-verbose]
Parameters
Table A–27 cluvfy stage [-pre|-post] crsinst Command Parameters
Parameter Description
-n node_list The comma-delimited list of nondomain qualified node names on which to conduct the verification.
-r {10gR1 | 10gR2 | 11gR1 |11gR2}
Specifies the Oracle Database release that CVU checks as required for installation of Oracle Clusterware. If you do not specify this option, then CVU assumes Oracle Database 11g release 2 (11.2).
-c ocr_location_list The directory or file system where the OCR is located.
-q voting_disk_list The comma-delimited list of directory paths for voting disks.
-osdba osdba_group The name of the OSDBA group. If you do not specify this option, then CVU uses dba as the OSDBA group.
-orainv orainventory_group The name of the Oracle inventory group. If you do not specify this option, then CVU uses oinstall as the inventory group.
-asm -asmgrp asmadmin_group The name of the Oracle ASM group.
If you do not specify this option, then CVU uses dba as the Oracle ASM group.
-asm -asmdev asm_device_list
The list of devices you plan for Oracle ASM to use.
If you do not specify this option, then CVU uses an internal operating system-dependent value.
-fixup [-fixupdir fixup_dir]
Specifies that if the verification fails, then CVU generates fixup instructions, if feasible. Use the -fixupdir option to specify a specific directory in which CVU generates the fixup instructions. If you do not specify a directory, CVU uses its work directory.
-verbose CVU prints detailed output.
Cluster Verification Utility Command Reference
Cluster Verification Utility Reference A-41
cluvfy stage -pre dbcfg
Use the cluvfy stage -pre dbcfg command to check all the nodes in the node list before configuring an Oracle RAC database to verify whether your system meets all of the criteria for creating a database or for making a database configuration change.
Syntaxcluvfy stage -pre dbcfg -n [node_list] -d Oracle_home [-fixup [-fixupdir fixup_dir]][-verbose]
Parameters
Table A–28 cluvfy stage -pre dbcfg Command Parameters
Parameter Description
-n node_list The comma-delimited list of nondomain qualified node names on which to conduct the verification.
-d Oracle_home The Oracle home location for the database that is being checked.
-fixup [-fixupdir fixup_dir] Specifies that if the verification fails, then CVU generates fixup instructions, if feasible. Use the -fixupdir option to specify a specific directory in which CVU generates the fixup instructions. If you do not specify a directory, CVU uses its work directory.
-verbose CVU prints detailed output.
cluvfy stage -pre dbinst
A-42 Oracle Clusterware Administration and Deployment Guide
cluvfy stage -pre dbinst
Use the cluvfy stage -pre dbinst command to check the nodes in the node list before installing an Oracle RAC database to verify that your system meets all of the criteria for an Oracle RAC installation.
Syntaxcluvfy stage -pre dbinst -n [node_list] [-r {10gR1 | 10gR2 | 11gR1 | 11gR2}][-osdba osdba_group] [-fixup [-fixupdir fixup_dir] [-verbose]
Parameters
Table A–29 cluvfy stage -pre dbinst Command Parameters
Parameter Description
-n node_list The comma-delimited list of nondomain qualified node names on which to conduct the verification.
-r {10gR1 | 10gR2 | 11gR1 | 11gR2} Specifies the Oracle Database release that CVU checks as required for installation of Oracle RAC. If you do not specify this option, then CVU assumes Oracle Database 11g release 2 (11.2).
-osdba osdba_group The name of the OSDBA group. The name of the OSDBA group. If you do not specify this option, then CVU uses dba as the OSDBA group.
[-fixup [-fixupdir fixup_dir The name of the Oracle inventory group. If you do not specify this option, then CVU uses oinstall as the inventory group. If you do not specify a directory, CVU uses its work directory.
-verbose CVU prints detailed output.
Cluster Verification Utility Command Reference
Cluster Verification Utility Reference A-43
cluvfy stage [-pre | -post] hacfg
Use the cluvfy stage -pre hacfg command to check a local node before configuring a high availability installation.
Syntaxcluvfy stage -pre hacfg [-osdba osdba_group] [-orainv orainventory_group][-fixup [-fixupdir fixup_dir]] [-verbose]
cluvfy stage -post hacfg [-verbose]
Parameters
Table A–30 cluvfy stage [-pre|-post] hacfg Command Parameters
Parameter Description
-osdba osdba_group The name of the OSDBA group. If you do not specify this option, then CVU uses dba as the OSDBA group.
-orainv orainventory_group The name of the Oracle inventory group. If you do not specify this option, then CVU uses oinstall as the inventory group.
-fixup -fixupdir fixup_dir Specifies that if the verification fails, then CVU generates fixup instructions, if feasible. Use the -fixupdir option to specify a specific directory in which CVU generates the fixup instructions. If you do not specify a directory, CVU uses its work directory.
-verbose CVU prints detailed output.
cluvfy stage -post hwos
A-44 Oracle Clusterware Administration and Deployment Guide
cluvfy stage -post hwos
Use the cluvfy stage -post hwos stage verification command to perform network and storage verifications on all the nodes in the cluster.
Syntaxcluvfy stage -post hwos -n [node_list | all] [-s storageID_list] [-verbose]
Parameters
Table A–31 cluvfy stage -post hwos Command Parameters
Parameter Description
-n node_list | all The comma-delimited list of nondomain qualified node names on which to conduct the verification. If you specify all, then CVU checks all of the nodes in the cluster.
-s storageID_list Checks a comma-delimited list of storage locations for supported storage types.
If you do not provide the -s option, then CVU discovers supported storage types and checks sharing for each of them.
-verbose CVU prints detailed output.
Cluster Verification Utility Command Reference
Cluster Verification Utility Reference A-45
cluvfy stage [-pre | -post] nodeadd
Use the cluvfy stage -pre nodeadd command to check the nodes that you want to add to an existing cluster, and to verify the integrity of the cluster before you add the nodes.
This command verifies that the system configuration, such as the operating system version, software patches, packages, and kernel parameters, for the nodes that you want to add, is compatible with the existing cluster nodes, and that the clusterware is successfully operating on the existing nodes. Run this node on any node of the existing cluster.
Use the cluvfy stage -post nodeadd command to verify that any number of specific nodes has been successfully added to the cluster at the network, shared storage, and clusterware levels.
Syntaxcluvfy stage -pre nodeadd -n [node_list] [-fixup [-fixupdir fixup_dir]] [-verbose]
cluvfy stage -post nodeadd -n [node_list] [-verbose]
Parameters
Table A–32 cluvfy stage [-pre | -post] nodeadd Command Parameters
Parameter Description
-n node_list A comma-delimited list of nondomain qualified node names on which to conduct the verification. These are nodes you are adding to the cluster.
-fixup [-fixupdir fixup_dir] Specifies that if the verification fails, then CVU generates fixup instructions, if feasible. Use the -fixupdir option to specify a specific directory in which CVU generates the fixup instructions. If you do not specify a directory, CVU uses its work directory.
-verbose CVU prints detailed output.

cluvfy stage -post nodedel
A-46 Oracle Clusterware Administration and Deployment Guide
cluvfy stage -post nodedel
Use the cluvfy stage -post nodedel command to verify that specific nodes have been successfully deleted from a cluster. Typically, this command verifies that the node-specific interface configuration details have been removed, the nodes are no longer a part of cluster configuration, and proper Oracle ASM cleanup has been performed.
Syntaxcluvfy stage -post nodedel -n [node_list | all] [-verbose]
Parameters
Table A–33 cluvfy stage [-pre | -post] nodedel Command Parameters
Parameter Description
-n node_list | all The comma-delimited list of nondomain qualified node names on which to conduct the verification. If you specify all, then CVU checks all of the nodes in the cluster.
-verbose CVU prints detailed output.
Cluster Verification Utility Command Reference
Cluster Verification Utility Reference A-47
cluvfy stage [-pre | -post] acfscfg
Use the cluvfy stage -pre acfscfg command to check an existing cluster before you configure Oracle ACFS.
Use the cluvfy stage -post acfscfg to check an existing cluster after you configure Oracle ACFS.
Syntaxcluvfy stage -pre acfscfg [-n node_list] -asmdev asm_device_list [-verbose]
cluvfy stage -post acfscfg -n [node_list] [-verbose]
Parameters
Table A–34 cluvfy stage [-pre|-post] acfscfg Command Parameters
Parameter Description
-n node_list The comma-delimited list of nondomain qualified node names on which to conduct the verification. If you do not specify this option, then CVU checks only the local node.
-asmdev asm_device_list The list of devices you plan for Oracle ASM to use.
-asmgroup asmadmin_group(s) The comma-delimited list of Oracle ASM disk groups to be verified.
-verbose CVU prints detailed output.

Troubleshooting and Diagnostic Output for CVU
A-48 Oracle Clusterware Administration and Deployment Guide
Troubleshooting and Diagnostic Output for CVU
This section describes the following troubleshooting topics for CVU:
■ Enabling Tracing
■ Known Issues for the Cluster Verification Utility

Troubleshooting and Diagnostic Output for CVU
Cluster Verification Utility Reference A-49
Enabling Tracing
You can enable tracing by setting the environment variable SRVM_TRACE to true. For example, in tcsh an entry such as setenv SRVM_TRACE true enables tracing. The CVU trace files are created in the CV_HOME/cv/log directory. Oracle Database automatically rotates the log files and the most recently created log file has the name cvutrace.log.0. You should remove unwanted log files or archive them to reclaim disk place if needed. CVU does not generate trace files unless you enable tracing.
To choose the location in which CVU generates the trace files, set the CV_TRACELOC environment variable to the absolute path of the desired trace directory.
Known Issues for the Cluster Verification Utility
A-50 Oracle Clusterware Administration and Deployment Guide
Known Issues for the Cluster Verification Utility
This section describes the following known limitations for CVU:
■ Database Versions Supported by Cluster Verification Utility
■ Linux Shared Storage Accessibility (ssa) Check Reports Limitations
■ Shared Disk Discovery on Red Hat Linux
Database Versions Supported by Cluster Verification UtilityThe current CVU release supports only Oracle Database 10g or higher, Oracle RAC, and Oracle Clusterware and CVU is not backward compatible. In other words, CVU cannot check or verify Oracle Database products before Oracle Database 10g.
Linux Shared Storage Accessibility (ssa) Check Reports LimitationsThe current release of cluvfy has the following limitations on Linux regarding shared storage accessibility check.
■ OCFS2 (version 1.2.1 or higher) are supported.
■ For sharedness checks on NAS, cluvfy commands require you to have write permission on the specified path. If the cluvfy user does not have write permission, cluvfy reports the path as not shared.
Shared Disk Discovery on Red Hat LinuxTo perform discovery and shared storage accessibility checks for SCSI disks on Red Hat Linux 4.0 (or higher) and SUSE Linux Enterprise Server, CVU requires the CVUQDISK package. If you attempt to use CVU and the CVUQDISK package is not installed on all of the nodes in your Oracle RAC environment, then CVU responds with an error.
Perform the following procedure to install the CVUQDISK package:
1. Login as the root user.
2. Copy the rpm, cvuqdisk-1.0.6-1.rpm, to a local directory. You can find this rpm in the rpm subdirectory of the top-most directory in the Oracle Clusterware installation media. For example, you can find cvuqdisk-1.0.6-1.rpm in the directory /mountpoint/clusterware/rpm/ where mountpoint is the mounting point for the disk on which the directory is located.
3. Set the CVUQDISK_GRP environment variable to a group that should own the CVUQDISK package binaries. If CVUQDISK_GRP is not set, then, by default, the oinstall group is the owner’s group.
4. Determine whether previous versions of the CVUQDISK package are installed by running the command rpm -q cvuqdisk. If you find previous versions of the CVUQDISK package, then remove them by running the command rpm -e cvuqdisk previous_version where previous_version is the identifier of the previous CVUQDISK version.
5. Install the latest CVUQDISK package by running the command rpm -iv cvuqdisk-1.0.6-1.rpm.
B
Oracle Clusterware Resource Reference B-1
B Oracle Clusterware Resource Reference
This appendix is a reference for Oracle Clusterware resources. It includes descriptions and usage examples of all resource attributes and a detailed description and examples of action scripts.
This appendix includes the following topics:
■ Resource Attributes
■ Third-Party Applications Using the Script Agent
Resource Attributes
B-2 Oracle Clusterware Administration and Deployment Guide
Resource Attributes
This section lists and describes attributes used when you register applications as resources in Oracle Clusterware. Use these attributes with the crsctl add resource command, as follows:
$ crsctl add resource resource_name -type resource_type{[-attr "attribute_name=’attribute_value’, attribute_name=’attribute_value’, ..."] | [-file file_name]}
List attribute-value pairs in a comma-delimited list after the -attr flag and enclose the value of each attribute in single quotation marks (''). Some resource attributes you cannot configure and are read only.
Alternatively, you can create a text file that contains the attribute-value pairs. For example:
PLACEMENT=favoredHOSTING_MEMBERS=node1 node2 node3RESTART_ATTEMPTS@CARDINALITYID(1)=0RESTART_ATTEMPTS@CARDINALITYID(2)=0FAILURE_THRESHOLD@CARDINALITYID(1)=2FAILURE_THRESHOLD@CARDINALITYID(2)=4FAILURE_INTERVAL@CARDINALITYID(1)=300FAILURE_INTERVAL@CARDINALITYID(2)=500CHECK_INTERVAL=2CARDINALITY=2
This section includes the following topics:
■ Configurable Resource Attributes
■ Read-Only Resource Attributes
Resource Attributes
Oracle Clusterware Resource Reference B-3
Configurable Resource Attributes
This section describes the following resource attributes that you can configure when registering an application as a resource in Oracle Clusterware:
■ ACL
■ ACTION_SCRIPT
■ ACTIVE_PLACEMENT
■ AGENT_FILENAME
■ AUTO_START
■ CARDINALITY
■ CHECK_INTERVAL
■ DEGREE
■ DESCRIPTION
■ ENABLED
■ FAILURE_INTERVAL
■ FAILURE_THRESHOLD
■ HOSTING_MEMBERS
■ LOAD
■ NAME
■ OFFLINE_CHECK_INTERVAL
■ PLACEMENT
■ RESTART_ATTEMPTS
■ SCRIPT_TIMEOUT
■ SERVER_POOLS
■ START_DEPENDENCIES
■ START_TIMEOUT
■ STOP_DEPENDENCIES
■ STOP_TIMEOUT
■ TYPE
■ UPTIME_THRESHOLD
ACLDefines the owner of a resource and the access privileges granted to various operating system users and groups. The resource owner defines the operating system user of the owner and its privileges. You configure this optional attribute when you create a resource. If you do not configure this attribute, then the value is based on the identity
Note: Values for the all attributes must be in lowercase. Attribute names must be in uppercase.
Configurable Resource Attributes
B-4 Oracle Clusterware Administration and Deployment Guide
of the process creating a resource. You can change the value of the attribute if such a change is allowed based on the existing privileges of the resource.
In the string:
■ owner: The operating system user that owns a resource and the user under which the action script or application-specific agent run, followed by the privileges of the owner.
■ pgrp: The operating system group that is the primary group of the owner of a resource, followed by the privileges of members of the primary group.
■ other: Followed by privileges of others.
■ r: This access option is the read option and gives the ability to only see a resource, its state, and configuration
■ w: This access option gives the ability to modify a resource's attributes and to delete the resource
■ x: This access option gives the ability to start, stop, and relocate a resource
By default, the identity of the client that creates a resource is the owner. Also by default, root, and the user specified in owner have full privileges. You can grant required operating system users and operating system groups their privileges by adding the following lines to the ACL attribute:
user:user_name:rwxgroup:group_name:rwx
Usage ExampleACL=owner:user_1:rwx,pgrp:osdba:rwx,other::r-
ACTION_SCRIPTAn absolute file name that includes the path and file name of an action script. The agent specified in the AGENT_FILENAME attribute calls the script specified in the ACTION_SCRIPT attribute.
Usage ExampleACTION_SCRIPT=fully_qualified_path_to_action_script
ACTIVE_PLACEMENTWhen set to 1, Oracle Clusterware uses this attribute to reevaluate the placement of a resource during addition or restart of a cluster server. For resources where PLACEMENT=favored, Oracle Clusterware may relocate running resources if the resources run on a non-favored server when a favored one joins the cluster.
Usage ExampleACTIVE_PLACEMENT=1
AGENT_FILENAMEA fully qualified file name of an agent program that a resource type uses to manage its resources. Every resource type must have an agent program to manage its resources. Resource types use agent programs by either specifying a value for this attribute or inheriting it from their base resource type. There are two script agents included with Oracle Clusterware 11g release 2 (11.2): application and scriptagent. Oracle
Resource Attributes
Oracle Clusterware Resource Reference B-5
Clusterware uses the application script agent for resources of the deprecated application resource type. The default value for this attribute is scriptagent.
Usage ExampleAGENT_FILENAME=%Grid_home%/bin/application
AUTO_STARTIndicates whether Oracle Clusterware automatically starts a resource after a cluster server restart. Valid AUTO_START values are:
■ always: Restarts the resource when the server restarts regardless of the state of the resource when the server stopped.
■ restore: Restores the resource to the same state that it was in when the server stopped. Oracle Clusterware attempts to restart the resource if the value of TARGET was ONLINE before the server stopped.
■ never: Oracle Clusterware never restarts the resource regardless of the state of the resource when the server stopped.
CARDINALITYThe number of servers on which a resource can run, simultaneously. This is the upper limit for resource cardinality.
Usage ExampleCARDINALITY=1
CHECK_INTERVALThe time interval, in seconds, between repeated executions of the check action. Shorter intervals enable more frequent checks but also increase resource consumption if you use the script agent. Use an application-specific agent to reduce resource consumption.
Usage ExampleCHECK_INTERVAL=60
DEGREEThe number of instances of a cluster resource that can run on a single server.
Usage ExampleDEGREE=1
DESCRIPTIONEnter a description of the resource you are adding.
Usage ExampleDESCRIPTION=Apache Web server
ENABLEDOracle Clusterware uses this attribute to manage the state of the resource. Oracle Clusterware does not attempt to manage a disabled (ENABLED=0) resource either
Configurable Resource Attributes
B-6 Oracle Clusterware Administration and Deployment Guide
directly or because of a dependency to another resource. A disabled resource cannot be started but it can be stopped.
Oracle Clusterware does not actively monitor disabled resources, meaning that Oracle Clusterware does not check their state. However, when Oracle Clusterware starts, it does query the state of disabled resources.
Usage ExampleENABLED=1
FAILURE_INTERVALThe interval, in seconds, during which Oracle Clusterware applies the FAILURE_THRESHOLD attribute. If the value is zero (0), then tracking of failures is disabled.
Usage ExampleFAILURE_INTERVAL=30
FAILURE_THRESHOLDThe number of failures detected within a specified FAILURE_INTERVAL for a resource before Oracle Clusterware marks the resource as unavailable and no longer monitors it. If a resource fails the specified number of times, then Oracle Clusterware stops the resource. If the value is zero (0), then tracking of failures is disabled. The maximum value is 20.
Usage ExampleFAILURE_THRESHOLD=3
HOSTING_MEMBERSA space-separated, ordered list of cluster server names that can host a resource. This attribute is required only when using administrator management, and when the value of the PLACEMENT attribute is set to favored or restricted. When registering applications as Oracle Clusterware resources, use the SERVER_POOLS attribute, instead.
To obtain a list of candidate node names, run the olsnodes command to display a list of your server names.
Usage ExampleHOSTING_MEMBERS=server1 server2 server3
LOADOracle Clusterware interprets the value of this attribute along with that of the PLACEMENT attribute. When the value of PLACEMENT is balanced, the value of LOAD determines where best to place a resource. A nonnegative, numeric value that
Note: For resources of application type, Oracle Clusterware places servers listed in the HOSTING_MEMBERS attribute in the GENERIC server pool.
See Also: "Understanding Server Pools" on page 2-13 for more information about the GENERIC server pool
Resource Attributes
Oracle Clusterware Resource Reference B-7
quantitatively represents how much server capacity an instance of a resource consumes relative to other resources. Oracle Clusterware attempts to place resources on servers with the least total load of running resources.
Usage ExampleLOAD=1
NAMEA case-sensitive, alphanumeric string that names the resource. Oracle recommends a naming convention is to that starts with an alphanumeric prefix, such as sky1, and complete the name with an identifier to describe it. A resource name can contain any platform-supported characters except the exclamation point (!) and the tilde (~). A resource name cannot begin with a period (.) nor with the string ora.
Usage ExampleNAME=myApache
OFFLINE_CHECK_INTERVALControls offline monitoring of a resource. The value represents the interval (in seconds) that Oracle Clusterware monitors a resource when its state is OFFLINE. Monitoring is disabled if the value is 0.
Usage ExampleOFFLINE_CHECK_INTERVAL=30
PLACEMENTSpecifies how Oracle Clusterware selects a cluster server on which to start a resource. Valid values are balanced, favored, or restricted.
If you set the PLACEMENT attribute to favored or restricted, then you must also assign values to the SERVER_POOLS and HOSTING_MEMBERS attributes. If you set the value of the PLACEMENT attribute to balanced, then the HOSTING_MEMBERS attribute is not required.
Usage ExamplePLACEMENT=favored
RESTART_ATTEMPTSThe number of times that Oracle Clusterware attempts to restart a resource on the resource's current server before attempting to relocate it. A value of 1 indicates that Oracle Clusterware only attempts to restart the resource once on a server. A second failure causes Oracle Clusterware to attempt to relocate the resource. A value of 0 indicates that there is no attempt to restart but Oracle Clusterware always tries to fail the resource over to another server.
Usage ExampleRESTART_ATTEMPTS=2
See Also: "Application Placement Policies" on page 5-21 for more information about the PLACEMENT attribute
Configurable Resource Attributes
B-8 Oracle Clusterware Administration and Deployment Guide
SCRIPT_TIMEOUTThe maximum time (in seconds) for an action to run. Oracle Clusterware returns an error message if the action script does not complete within the time specified. The timeout applies to all actions (start, stop, check, and clean).
Usage ExampleSCRIPT_TIMEOUT=45
SERVER_POOLSThis attribute creates an affinity between a resource and one or more server pools regarding placement, and is dependent on the value of the PLACEMENT attribute.
If a resource can run on any server in a cluster, then use the default value, *. Only cluster administrators can specify * as the value for this attribute. Otherwise, you must specify in the SERVER_POOLS attribute a space-separated list of the server pools to which a particular resource can belong.
■ Use the PLACEMENT attribute with the SERVER_POOLS attribute, as follows: If you set the value of the PLACEMENT attribute to either restricted or favored, then you must also provide a value for the SERVER_POOLS attribute when using policy management for the resource.
■ If the value for PLACEMENT is set to balanced, then no value for the SERVER_POOLS attribute is required.
Usage ExampleSERVER_POOLS=pool1 pool2 pool3
START_DEPENDENCIESSpecifies a set of relationships that Oracle Clusterware considers when starting a resource. You can specify a space-separated list of dependencies on several resources and resource types on which a particular resource can depend.
SyntaxSTART_DEPENDENCIES=dependency(resource_set) [dependency(resource_set)] [...]
In the preceding syntax example the variables are defined, as follows:
■ dependency: Possible values are hard, weak, attraction, pullup, and dispersion. You can specify each dependency only once, except for pullup, which you can specify multiple times.
■ resource_set: A comma-delimited list of resource entities—either individual resources or resource types—enclosed in parentheses (), in the form of res1[, res2[, ...]], upon which the resource you are configuring depends.
Each resource entity is defined, as follows:
[modifier1:[modifier2:]] {resource_name | type:resource_type}
In the preceding syntax example, resource_name is the name of a specific resource and type:resource_type is the name of a specific resource type. The
See Also: "Understanding Server Pools" on page 2-13 for more information about server pools and "Role-separated Management" on page 2-18 for more information about cluster administrators

Resource Attributes
Oracle Clusterware Resource Reference B-9
resource type must be preceded by type and the type modifier must be the last resource entity in the list.
Optionally, you can specify modifiers to further configure resource entity dependencies. You can modify each dependency by prefixing the following modifiers to the resource entity:
– hard([intermediate:][global:]{resource_name | type:resource_type}): Specify a hard start dependency for a resource when you want the resource to start only when a particular resource or resource of a particular type starts.
Use intermediate to specify that Oracle Clusterware can start this resource if a resource on which it depends is in either the ONLINE or INTERMEDIATE state. If not specified, then resources must be in the ONLINE state for Oracle Clusterware to start this resource.
Use global to specify that resources are not required to reside on the same server as a condition to Oracle Clusterware starting this resource. If not specified, then resources must reside on the same server for Oracle Clusterware to start this resource.
If you specify the hard dependency on a resource type for a resource, then the resource can start if any resource of that particular type is running.
– weak([concurrent:][global:][uniform:]{resource_name | type:resource_type}): Specify a weak start dependency for a resource when you want that resource to start despite whether named resources are running, or not. An attempt to start this resource also attempts to start any resources on which this resource depends if they are not running.
Use concurrent to specify that Oracle Clusterware can start a dependent resource while a resource on which it depends is in the process of starting. If not specified, then resources must complete startup before Oracle Clusterware can start the dependent resource.
Use global to specify that resources are not required to reside on the same server as a condition to Oracle Clusterware starting the dependent resource.
Use uniform to start all instances of the resource everywhere the resource can run. If you do not specify a modifier (the default), then the resource starts on the same server as the resource on which it depends.
If you specify the weak start dependency on a resource type for a resource, then the resource can start if any resource of that particular type is running.
– attraction([intermediate:]{resource_name | type:resource_type}): Use the attraction start dependency when you want this resource to run on the same server with a particular named resource or any resource of a particular type.
Use intermediate to specify that this resource is attracted to resource entities on which it depends that are in the INTERMEDIATE state. If not specified, then resources must be in the ONLINE state to attract the dependent resource.
Note: Oracle recommends that resources with hard start dependencies also have pullup start dependencies.

Configurable Resource Attributes
B-10 Oracle Clusterware Administration and Deployment Guide
If you specify the attraction dependency on a resource type for a resource, then any resource of that particular type attracts the dependent resource.
– pullup[:always]([intermediate:][global:]{resource_name | type:resource_type}): When you specify the pullup start dependency for a resource, then this resource starts as a result of named resources starting.
Use the always modifier for pullup so that Oracle Clusterware starts this resource despite the value of its TARGET attribute, whether that value is ONLINE or OFFLINE. Otherwise, if you do not specify the always modifier, then Oracle Clusterware starts this resource only if the value of the TARGET attribute is ONLINE for the resources on which it depends.
Use intermediate to specify that Oracle Clusterware can start this resource if a resource on which it depends is in either the ONLINE or INTERMEDIATE state. If not specified, then resources must be in the ONLINE state for Oracle Clusterware to start this resource.
Use global to specify that resources on which this resource depends are not required to reside on the same server as a condition to Oracle Clusterware starting this resource. If not specified, then resources on which this resource depends must reside on the same server for Oracle Clusterware to start this resource.
If you specify the pullup dependency on a resource type for a resource, then, when any resource of that particular type starts, Oracle Clusterware can start this resource.
– dispersion[:active]([intermediate:]{resource_name | type:resource_type}): Specify the dispersion start dependency for a resource that you want to run on a server that is different from the named resources or resources of a particular type. Resources may still end up running on the same server, depending on availability of servers.
Use the active modifier to configure the dispersion dependency so that Oracle Clusterware attempts to relocate the dependent resource to another server if it is co-located with another resource and another server comes online. Oracle Clusterware does not relocate resources to newly available servers unless you specify the active modifier.
Use intermediate to specify that Oracle Clusterware can relocate the dependent resource if a resource is in either the ONLINE or INTERMEDIATE state. If not specified, then resources must be in the ONLINE state for dispersion of the dependent resource to occur.
START_TIMEOUTThe maximum time (in seconds) in which a start action can run. Oracle Clusterware returns an error message if the action does not complete within the time specified. If you do not specify a value for this attribute or you specify 0 seconds, then Oracle Clusterware uses the value of the SCRIPT_TIMEOUT attribute.
Note: Oracle recommends that resources with hard start dependencies also have pullup start dependencies.
See Also: "Start Dependencies" on page 5-10 for more details about start dependencies
Resource Attributes
Oracle Clusterware Resource Reference B-11
Usage ExampleSTART_TIMEOUT=30
STOP_DEPENDENCIESSpecifies a set of relationships that Oracle Clusterware considers when stopping a resource.
SyntaxSTOP_DEPENDENCIES=dependency(resource_set) [dependency(resource_set)] ...
In the preceding syntax example the variables are defined, as follows:
■ dependency: The only possible value is hard.
■ resource_set: A comma-delimited list, in the form of res1[, res2 [,...]], of resource entities—either individual resources or resource types—upon which the resource you are configuring depends.
Each resource entity is defined, as follows:
[modifier1:[modifier2:][modifier3:]] resource_name | type:resource_type
In the preceding syntax example, resource_name is the name of a specific resource and type:resource_type is the name of a specific resource type. The resource type must be preceded by type:.
Optionally, you can specify modifiers to further configure resource entity dependencies. You can modify each dependency by prefixing the following modifiers to the resource entity:
hard([intermediate:][global:][shutdown:]{resource_name | type:resource_type}): Specify a hard stop dependency for a resource that you want to stop when named resources or resources of a particular resource type stop.
Use intermediate to specify that the dependent resource can remain in an ONLINE state if a resource is in either the ONLINE or INTERMEDIATE state. If not specified, then Oracle Clusterware stops the dependent resource unless resources are in the ONLINE state.
Use global to specify that the dependent resource remains in an ONLINE state if a resource is in an ONLINE state on any node in the cluster. If not specified, then when resources residing on the same server go offline, Oracle Clusterware stops the dependent resource.
Use shutdown to apply this dependency when the Oracle Clusterware stack is shut down. This is a convenient way to affect the order of stopping resources when stopping the stack, without having any affect on planned or unplanned events on the individual resources. This dependency, when used with the shutdown modifier, does not go into effect if somebody stops the resource directly, but only when the stack is shut down.
STOP_TIMEOUTThe maximum time (in seconds) in which a stop or clean action can run. Oracle Clusterware returns an error message if the action does not complete within the time
See Also: "Stop Dependencies" on page 5-13 for more details about stop dependencies
Configurable Resource Attributes
B-12 Oracle Clusterware Administration and Deployment Guide
specified. If you do not specify this attribute or if you specify 0 seconds, then Oracle Clusterware uses the value of the SCRIPT_TIMEOUT attribute.
Usage ExampleSTOP_TIMEOUT=30
TYPEThe type of resource indicated when you create a resource. This attribute is required when creating a resource.
Usage Examplecrsctl add resource resource_name -type resource_type
UPTIME_THRESHOLDThe value for UPTIME_THRESHOLD represents the length of time that a resource must be up before Oracle Clusterware considers the resource to be stable. By setting a value for the UPTIME_THRESHOLD attribute, you can indicate the stability of a resource.
Enter values for this attribute as a number followed by a letter that represents seconds (s), minutes (m), hours (h), days (d), or weeks (w). For example, a value of 7h represents an uptime threshold of seven hours.
After the time period you specify for UPTIME_THRESHOLD elapses, Oracle Clusterware resets the value for RESTART_COUNT to 0. Oracle Clusterware can alert you when the value for RESTART_COUNT reaches the value that you set for RESTART_ATTEMPTS.
See Also: "Resource Type" on page 5-3 for details of resource types
Note: Oracle Clusterware writes an alert to the clusterware alert log file when the value for RESTART_COUNT reaches the value that you set for RESTART_ATTEMPTS.
Resource Attributes
Oracle Clusterware Resource Reference B-13
Read-Only Resource Attributes
You can view these attributes when you run the crsctl status resource command on a particular resource. Oracle Clusterware sets these attributes when you register resources.
■ ACTION_FAILURE_EVENT_TEMPLATE
■ LAST_SERVER
■ PROFILE_CHANGE_EVENT_TEMPLATE
■ RESTART_COUNT
■ STATE_CHANGE_EVENT_TEMPLATE
■ STATE_DETAILS
■ TARGET
ACTION_FAILURE_EVENT_TEMPLATEThis is an internally-managed attribute that you can view only when you run the crsctl status resource command on an ora resource. You cannot edit this attribute.
LAST_SERVERFor cluster_resource-type resources, this is an internally managed, read-only attribute that contains the name of the server on which the last start action for the resource succeeded.
For local_resource-type resources, this is the name of the server to which the resource instance is pinned.
PROFILE_CHANGE_EVENT_TEMPLATEThis is an internally-managed attribute that you can view only when you run the crsctl status resource command on an ora resource. You cannot edit this attribute.
RESTART_COUNTThe Oracle Clusterware daemon counts the number of attempts to restart a resource, starting from zero up to the value specified in the RESTART_ATTEMPTS attribute.
STATE_CHANGE_EVENT_TEMPLATEThis is an internally-managed attribute that you can view only when you run the crsctl status resource command on an ora resource. You cannot edit this attribute.
STATE_DETAILSAn internally managed, read-only attribute that contains details about the state of a resource.
The four resource states—ONLINE, OFFLINE, UNKNOWN, and INTERMEDIATE—may map to different resource-specific values, such as mounted, unmounted, and open. Resource agent developers can use the STATE_DETAILS attribute to provide a more detailed description of this mapping, resource to the resource state.

Read-Only Resource Attributes
B-14 Oracle Clusterware Administration and Deployment Guide
Providing details is optional. If details are not provided, then Oracle Clusterware uses only the four possible resource states. Additionally, if the agent cannot provide these details (as may also happen to the value of the resource state), then Oracle Clusterware sets the value of this attribute to provide minimal details about why the resource is in its current state.
TARGETAn internal, read-only attribute that describes the desired state of a resource. Using the crsctl start resource_name or crsctl stop resource_name commands, however, can affect the value of this attribute.
Third-Party Applications Using the Script Agent
Oracle Clusterware Resource Reference B-15
Third-Party Applications Using the Script Agent
This section includes examples of third-party applications using script agents.
Example B–1 shows an action script that fails over the Apache Web server.
Example B–1 Apache Action Script
#!/bin/sh
HTTPDCONFLOCATION=/etc/httpd/conf/httpd.confWEBPAGECHECK=http://<MyVIP>:80/icons/apache_pb.gif
case $1 in'start') /usr/sbin/apachectl -k start -f $HTTPDCONFLOCATION RET=$? ;;'stop') /usr/sbin/apachectl -k stop RET=$? ;;'clean') /usr/sbin/apachectl -k stop RET=$? ;;'check') /usr/bin/wget -q --delete-after $WEBPAGECHECK RET=$? ;;*) RET=0 ;;esac# 0: success; 1 : errorif [ $RET -eq 0 ]; thenexit 0elseexit 1fi
Example B–2 shows the xclock script, which is a simple action script using xclock available as a default binary on all Linux and UNIX platforms.
Example B–2 xclock Action Script
#!/bin/bash# start/stop/check script for xclock example# To test this change BIN_DIR to the directory where xclock is based# and set the DISPLAY variable to a server within your network.
BIN_DIR=/usr/X11R6/binLOG_DIR=/tmpBIN_NAME=xclockDISPLAY=yourhost.domain.com:0.0export DISPLAY
if [ ! -d $BIN_DIR ]then
Third-Party Applications Using the Script Agent
B-16 Oracle Clusterware Administration and Deployment Guide
echo "start failed" exit 2fi
PID1=`ps -ef | grep $BIN_NAME | grep -v grep | grep -v xclock_app | awk '{ print $2 }'`case $1 in'start') if [ "$PID1" != "" ] then status_p1="running" else if [ -x $BIN_DIR/$BIN_NAME ] then umask 002 ${BIN_DIR}/${BIN_NAME} & 2>${LOG_DIR}/${BIN_NAME}.log status_p1="started" else echo `basename $0`": $BIN_NAME: Executable not found" fi fi
echo "$BIN_NAME: $status_p1" ;;
'stop') if [ "${PID1}" != "" ] then kill -9 ${PID1} && echo "$BIN_NAME daemon killed" else echo "$BIN_NAME: no running Process!" fi ;;'check') if [ "$PID1" != "" ] then echo "running" exit 0 else echo "not running" exit 1 fi ;;*) echo "Usage: "`basename $0`" {start|stop|check}" ;;esac
Example B–3 shows an example of a shell script for an agent to monitor a file. When the agent is started, it creates the file (which is specified through an attribute) and when it is stopped, it deletes the file. The CHECK action consists of merely checking if the file exists or not. The variables with the _CRS_ prefix are attribute values that are provided to the script in its environment.
Example B–3 Action Script Example
#!/bin/shTOUCH=/bin/touchRM=/bin/rmPATH_NAME=/tmp/$_CRS_NAME

Third-Party Applications Using the Script Agent
Oracle Clusterware Resource Reference B-17
## These messages go into the CRSD agent log file.echo " ******* `date` ********** "echo "Action script '$_CRS_ACTION_SCRIPT' for resource[$_CRS_NAME] called for action $1"#
case "$1" in 'start') echo "START entry point has been called.." echo "Creating the file: $PATH_NAME" $TOUCH $PATH_NAME exit 0 ;;
'stop') echo "STOP entry point has been called.." echo "Deleting the file: $PATH_NAME" $RM $PATH_NAME exit 0 ;;
'check') echo "CHECK entry point has been called.." if [ -e $PATH_NAME ]; then echo "Check -- SUCCESS" exit 0 else echo "Check -- FAILED" exit 1 fi ;;
'clean') echo "CLEAN entry point has been called.." echo "Deleting the file: $PATH_NAME" $RM -f $PATH_NAME exit 0 ;;
esac

Third-Party Applications Using the Script Agent
B-18 Oracle Clusterware Administration and Deployment Guide
C
OLSNODES Command Reference C-1
COLSNODES Command Reference
This appendix describes the syntax and command options for the olsnodes command.
This appendix contains the following topics:
■ Using OLSNODES
– Overview
– Operational Notes
■ Summary of the OLSNODES Command

Using OLSNODES
C-2 Oracle Clusterware Administration and Deployment Guide
Using OLSNODES
This section contains topics which relate to using the OLSNODES command.
■ Overview
■ Operational Notes

Using OLSNODES
OLSNODES Command Reference C-3
Overview
The olsnodes command provides the list of nodes and other information for all nodes participating in the cluster.
You can use this command to quickly check that your cluster is operational, and all nodes are registered as members of the cluster. This command also provides an easy method for obtaining the node numbers.

Operational Notes
C-4 Oracle Clusterware Administration and Deployment Guide
Operational Notes
Usage InformationThis command is used by the Cluster Verification Utility (CLUVFY) to obtain a list of node names when the -n all option is used.
This command utility is located in the $ORA_CRS_HOME/bin directory. You can only use this command if the CRS daemon is started.
Privileges and SecurityYou must run this command as the root user.
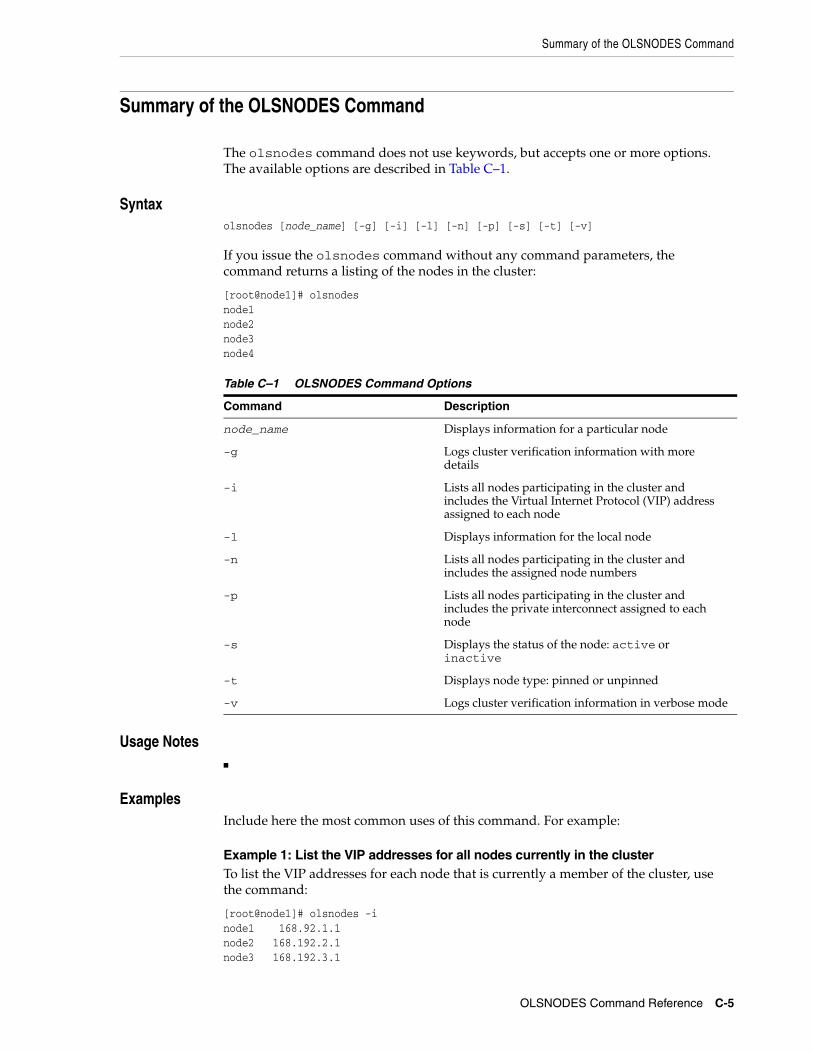
Summary of the OLSNODES Command
OLSNODES Command Reference C-5
Summary of the OLSNODES Command
The olsnodes command does not use keywords, but accepts one or more options. The available options are described in Table C–1.
Syntaxolsnodes [node_name] [-g] [-i] [-l] [-n] [-p] [-s] [-t] [-v]
If you issue the olsnodes command without any command parameters, the command returns a listing of the nodes in the cluster:
[root@node1]# olsnodesnode1node2node3node4
Usage Notes■
ExamplesInclude here the most common uses of this command. For example:
Example 1: List the VIP addresses for all nodes currently in the clusterTo list the VIP addresses for each node that is currently a member of the cluster, use the command:
[root@node1]# olsnodes -inode1 168.92.1.1node2 168.192.2.1node3 168.192.3.1
Table C–1 OLSNODES Command Options
Command Description
node_name Displays information for a particular node
-g Logs cluster verification information with more details
-i Lists all nodes participating in the cluster and includes the Virtual Internet Protocol (VIP) address assigned to each node
-l Displays information for the local node
-n Lists all nodes participating in the cluster and includes the assigned node numbers
-p Lists all nodes participating in the cluster and includes the private interconnect assigned to each node
-s Displays the status of the node: active or inactive
-t Displays node type: pinned or unpinned
-v Logs cluster verification information in verbose mode

Summary of the OLSNODES Command
C-6 Oracle Clusterware Administration and Deployment Guide
node4 168.192.4.1
Example 2: List the node names and node numbers for cluster membersTo list the node name and the node number for each node in the cluster, use the command:
[root@node1]# olsnodes -nnode1 1node2 2node3 3node4 4
D
Oracle Interface Configuration Tool (OIFCFG) Command Reference D-1
DOracle Interface Configuration Tool (OIFCFG)Command Reference
The Oracle Interface Configuration Tool (OIFCFG) command-line interface helps you to define and administer network interfaces. You can use OIFCFG commands Oracle Clusterware environments to:
■ Allocate and deallocate network interfaces to components
■ Direct components to use specific network interfaces
■ Retrieve component configuration information
This appendix includes the following topics:
■ Starting the OIFCFG Command-Line Interface
■ Summary of the OIFCFG Usage

Starting the OIFCFG Command-Line Interface
D-2 Oracle Clusterware Administration and Deployment Guide
Starting the OIFCFG Command-Line Interface
Before you invoke OIFCFG, ensure that you have started Oracle Clusterware on at least the local node and preferably on all nodes if you intend to include the -global option on the command.
Run OIFCFG from the Grid_home/bin/ directory as the user who installed the Oracle Clusterware software. For example:
$ ./oifcfg
Run the oifcfg -help command to display online help for OIFCFG.
$ ./oifcfg -help
Name: oifcfg - Oracle Interface Configuration Tool.
Usage: oifcfg iflist [-p [-n]] oifcfg setif {-node node_name | -global} {interface_name /subnet:interface_type}... oifcfg getif [-node node_name | -global] [ -if interface_name[/subnet] [-type interface_type]] oifcfg delif [{-node node_name | -global} [interface_name[/subnet]]] oifcfg [-help] node_name - name of the host, as known to a communications network interface_name - name by which the interface is configured in the system subnet - subnet address of the interface interface_type - type of the interface {cluster_interconnect | public}
Note: To change the global network interface, Oracle Clusterware must be running on all cluster nodes.
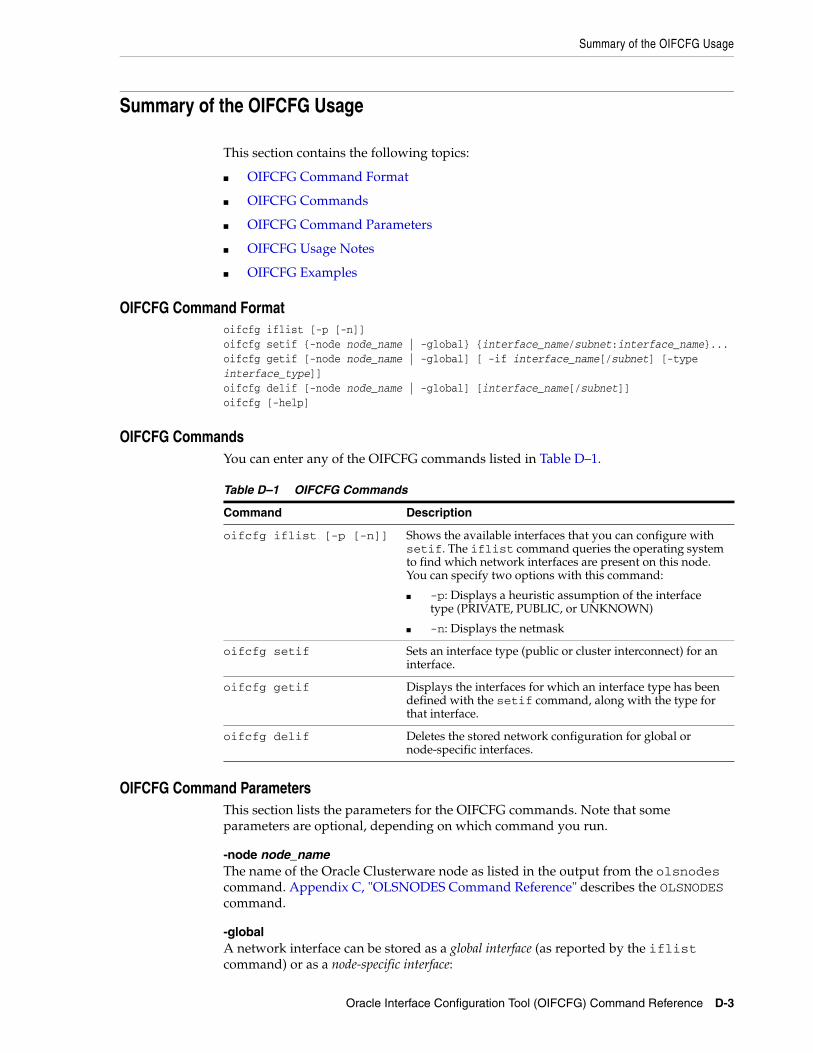
Summary of the OIFCFG Usage
Oracle Interface Configuration Tool (OIFCFG) Command Reference D-3
Summary of the OIFCFG Usage
This section contains the following topics:
■ OIFCFG Command Format
■ OIFCFG Commands
■ OIFCFG Command Parameters
■ OIFCFG Usage Notes
■ OIFCFG Examples
OIFCFG Command Formatoifcfg iflist [-p [-n]]oifcfg setif {-node node_name | -global} {interface_name/subnet:interface_name}...oifcfg getif [-node node_name | -global] [ -if interface_name[/subnet] [-type interface_type]]oifcfg delif [-node node_name | -global] [interface_name[/subnet]]oifcfg [-help]
OIFCFG CommandsYou can enter any of the OIFCFG commands listed in Table D–1.
OIFCFG Command ParametersThis section lists the parameters for the OIFCFG commands. Note that some parameters are optional, depending on which command you run.
-node node_nameThe name of the Oracle Clusterware node as listed in the output from the olsnodes command. Appendix C, "OLSNODES Command Reference" describes the OLSNODES command.
-globalA network interface can be stored as a global interface (as reported by the iflist command) or as a node-specific interface:
Table D–1 OIFCFG Commands
Command Description
oifcfg iflist [-p [-n]] Shows the available interfaces that you can configure with setif. The iflist command queries the operating system to find which network interfaces are present on this node. You can specify two options with this command:
■ -p: Displays a heuristic assumption of the interface type (PRIVATE, PUBLIC, or UNKNOWN)
■ -n: Displays the netmask
oifcfg setif Sets an interface type (public or cluster interconnect) for an interface.
oifcfg getif Displays the interfaces for which an interface type has been defined with the setif command, along with the type for that interface.
oifcfg delif Deletes the stored network configuration for global or node-specific interfaces.
Summary of the OIFCFG Usage
D-4 Oracle Clusterware Administration and Deployment Guide
■ An interface is stored as a global interface when all of the nodes of an Oracle Real Application Clusters (Oracle RAC) cluster have the same interface connected to the same subnet. The global interface (and configuring all nodes with the same network interface for each public subnet and the same network interface for each private subnet) is not only the recommended configuration, but it is also the default installation configuration.
■ An interface can be stored as a node-specific (local) interface.
-if interface_nameThe name by which the interface is configured in the system. Interface names can contain wildcard characters, for example, an asterisk (*) matches any string. However, interface names that contain wildcards should be surrounded with quotes.
subnetThe subnet number of the interface.
-type interface_typeThe type of interface: public or cluster_interconnect.
-helpDisplay online help for OIFCFG commands.
OIFCFG Usage Notes■ A network interface specification takes the following form:
interface_name/subnet:interface_type
The specification uniquely identifies the network interface using the:
– Interface name
– Associated subnet
– Interface type
The interface type indicates the purpose for which the network is configured. The supported interface types are:
* public—An interface that can be used for communication with components external to Oracle RAC instances, such as Oracle Net and Virtual Internet Protocol (VIP) addresses.
* cluster_interconnect—A private interface used for the cluster interconnect to provide interinstance or Cache Fusion1 communication.
Note: Oracle currently does not support having different network interfaces for each node in the cluster. The best practice is to configure all nodes with the same network interface for each public subnet and the same network interface for each private subnet.
Note: If you use wildcards on pre-11.2 databases, then Oracle resolves the interface name by expanding the wildcard on the local node. Therefore, using wildcards is not recommended on clusters with pre-11.2 databases. If you use wildcards on pre-11.2 databases, then those databases must use the CLUSTER_INTERCONNECTS parameter instead.
Summary of the OIFCFG Usage
Oracle Interface Configuration Tool (OIFCFG) Command Reference D-5
If you set the interface type to cluster_interconnect, then it affects instances as they start and changes do not take effect until you restart the instances.
For example, the following specification identifies qfe0 as a cluster interconnect located at the address 204.152.65.0:
qfe0/204.152.65.0:cluster_interconnect
■ The Oracle Universal Installer uses OIFCFG to identify and display available interfaces.
■ The effect of changing the interface names depends on which name you are changing, and whether you are also changing the IP address. In cases where you change only the interface names, the ramifications are minor. If you change the name for the public interface that is stored in the Oracle Cluster Registry (OCR), you must modify the nodeapps for each node. Therefore, you must stop the nodeapps for this change to take effect.
■ You must restart Oracle Clusterware on all members of the cluster when you make global changes. For local changes, you need only to perform a node restart. Interconnect changes for the database occur at instance startup. However, the interconnect for Oracle Clusterware might be different.
■ Because interconnects are chosen when instances start, just issuing OIFCFG commands does not have an immediate effect on the running system. Instead, changes take effect after restarting the component that might be affected by the command.
OIFCFG ExamplesThe following examples show some common uses for the OIFCFG commands.
Example 1 Listing the Names of Network InterfacesYou can use OIFCFG to list the interface names and the subnets of all of the interfaces available on the local node by executing the iflist keyword, as shown in this example:
oifcfg iflisthme0 139.185.141.0qfe0 204.152.65.0
Example 2 Retrieving Network InformationYou can also retrieve specific OIFCFG information with a getif command.
oifcfg getif [ [-global | -node node_name] [-if interface_name[/subnet]][-type interface_type]]
For example, after you install Oracle Clusterware, you can verify that the public and cluster interconnect have been set to the desired values by entering the following commands as root:
$ oifcfg getif
This command should return values for global public and global cluster_interconnect. For example:
1 Cache Fusion is a diskless cache coherency mechanism that provides copies of blocks directly from a holding instance's memory cache to a requesting instance's memory cache.

Summary of the OIFCFG Usage
D-6 Oracle Clusterware Administration and Deployment Guide
en0 144.25.68.0 global publichme0 139.185.141.0 global cluster_interconnect
Example 3 Storing a Global InterfaceTo store an interface, use the setif keyword. For example, to store the interface hme0, with the subnet 139.185.141.0, as a global interface (to be used as an interconnect for all of the Oracle RAC instances in your cluster and Oracle Clusterware), use the command:
oifcfg setif -global hme0/139.185.141.0:cluster_interconnect
Example 4 Deleting the Stored InterfaceUse the oifcfg delif command to delete the stored configuration for global or node-specific interfaces. A specific node-specific or global interface can be deleted by supplying the interface name, with an optional subnet, on the command line.
For example, the following command deletes the global interface named qfe0 for the subnet 204.152.65.0:
oifcfg delif -global qfe0/204.152.65.0
The following command deletes all of the global interfaces assigned with OIFCFG:
oifcfg delif -global
Note: Ensure that all nodes are running when you run the setif command because Oracle cannot update Grid Plug and Play profiles on nodes that are not running.
Note: If you only enter oifcfg delif, with no other arguments given on the command line, then OIFCFG deletes all interfaces on all nodes in the cluster.
E
CRSCTL Utility Reference E-1
E CRSCTL Utility Reference
This appendix describes how to administer Oracle Clusterware using the Oracle Clusterware Control (CRSCTL) utility.
This appendix includes the following topics:
■ CRSCTL Overview
– Operational Notes
– Deprecated Subprograms or Commands
■ CRSCTL Command Reference
– Dual Environment CRSCTL Commands
– Oracle RAC Environment CRSCTL Commands
– Oracle Restart Environment CRSCTL Commands
■ Troubleshooting and Diagnostic Output
Note: Do not use CRSCTL commands on Oracle entities (such as resources, resource types, and server pools) that have names beginning with ora unless you are directed to do so by Oracle Support. The Server Control utility (SRVCTL) is the correct utility to use on Oracle entities.

CRSCTL Overview
E-2 Oracle Clusterware Administration and Deployment Guide
CRSCTL Overview
CRSCTL is an interface between you and Oracle Clusterware, parsing and calling Oracle Clusterware APIs for Oracle Clusterware objects.
Oracle Clusterware 11g release 2 (11.2) introduces cluster-aware commands with which you can perform check, start, and stop operations on the cluster. You can run these commands from any node in the cluster on another node in the cluster, or on all nodes in the cluster, depending on the operation.
You can use CRSCTL commands to perform several operations on Oracle Clusterware, such as:
■ Starting and stopping Oracle Clusterware resources
■ Enabling and disabling Oracle Clusterware daemons
■ Checking the health of the cluster
■ Managing resources that represent third-party applications
■ Integrating Intelligent Platform Management Interface (IPMI) with Oracle Clusterware to provide failure isolation support and to ensure cluster integrity
■ Debugging Oracle Clusterware components

CRSCTL Overview
CRSCTL Utility Reference E-3
Clusterized (Cluster Aware) Commands
You can run clusterized commands on one node to perform operations on another node in the cluster. These are referred to as remote operations. This simplifies administration because, for example, you no longer have to log in to each node to check the status of the Oracle Clusterware on all of your nodes.
Clusterized commands are completely operating system independent; they rely on the OHASD (Oracle High Availability Service Daemon). If this daemon is running, then you can perform remote operations, such as the starting, stopping, and checking the status of remote nodes.
Clusterized commands include the following:
■ crsctl check cluster
■ crsctl start cluster
■ crsctl stop cluster
Operational Notes
E-4 Oracle Clusterware Administration and Deployment Guide
Operational Notes
Usage Information■ The CRSCTL utility is located in the Grid_home/bin directory. To run CRSCTL
commands, type in crsctl at the operating system prompt followed by the command and arguments, as shown in the following example:
crsctl stop crs
■ There are three categories of CRSCTL commands:
– Those that you use in either the Oracle Real Application Clusters (Oracle RAC) environment or in the Oracle Restart environment
– Those that you use in the Oracle RAC environment, only
– Those that you use in the Oracle Restart environment, only
■ Many CRSCTL commands use the -f option to force the command to run and ignore any checks.
For example, if you specify the force option for the crsctl stop resource command on a resource that is running and has dependent resources that are also running, then the force option omits the error message and instead stops or relocates all the dependent resources before stopping the resource you reference in the command.
■ Do not use versions of CRSCTL earlier than 11g release 2 (11.2) to manage Oracle Clusterware 11g release 2 (11.2).
Using CRSCTL HelpTo print the help information for CRSCTL, use the following command:
crsctl -help
If you want help for a specific command, such as start, then enter the command and append -help to the end, as shown in the following example:
crsctl start -help
You can also use the abbreviations -h or -? (this option functions in Linux, UNIX, and Windows environments) instead of -help.
CRSCTL Overview
CRSCTL Utility Reference E-5
Deprecated Subprograms or Commands
The following commands are deprecated in Oracle Clusterware 11g release 2 (11.2):
■ crs_stat
■ crs_register
■ crs_unregister
■ crs_start
■ crs_stop
■ crs_getperm
■ crs_profile
■ crs_relocate
■ crs_setperm
■ crsctl check crsd
■ crsctl check cssd
■ crsctl check evmd
■ crsctl debug log
■ crsctl set css votedisk
■ crsctl start resources
■ crsctl stop resources

CRSCTL Command Reference
E-6 Oracle Clusterware Administration and Deployment Guide
CRSCTL Command Reference
This section is separated into three categories of CRSCTL commands:
■ Dual Environment CRSCTL Commands
■ Oracle RAC Environment CRSCTL Commands
■ Oracle Restart Environment CRSCTL Commands
CRSCTL Command Reference
CRSCTL Utility Reference E-7
Dual Environment CRSCTL Commands
You can use the following commands in either the Oracle RAC or the Oracle Restart environments:
■ crsctl add resource
■ crsctl add type
■ crsctl check css
■ crsctl delete resource
■ crsctl delete type
■ crsctl get hostname
■ crsctl getperm resource
■ crsctl getperm type
■ crsctl modify resource
■ crsctl modify type
■ crsctl setperm resource
■ crsctl setperm type
■ crsctl start resource
■ crsctl status resource
■ crsctl status type
■ crsctl stop resource
crsctl add resourceUse the crsctl add resource command to register a resource to be managed by Oracle Clusterware. A resource could be an application process, a database, a service, a listener, and so on.
Syntaxcrsctl add resource resource_name -type resource_type [-file file_path |-attr "attribute_name=attribute_value,attribute_name=attribute_value,..."][-i] [-f]
Parameters
Table E–1 crsctl add resource Command Parameters
Parameter Description
resource_name A short, descriptive name for the resource.
-type resource_type The type of resource that you are adding preceded by the -type flag.
-file file_path Path name (either absolute or relative) for a text file containing line-separated attribute name-value pairs that define the resource.
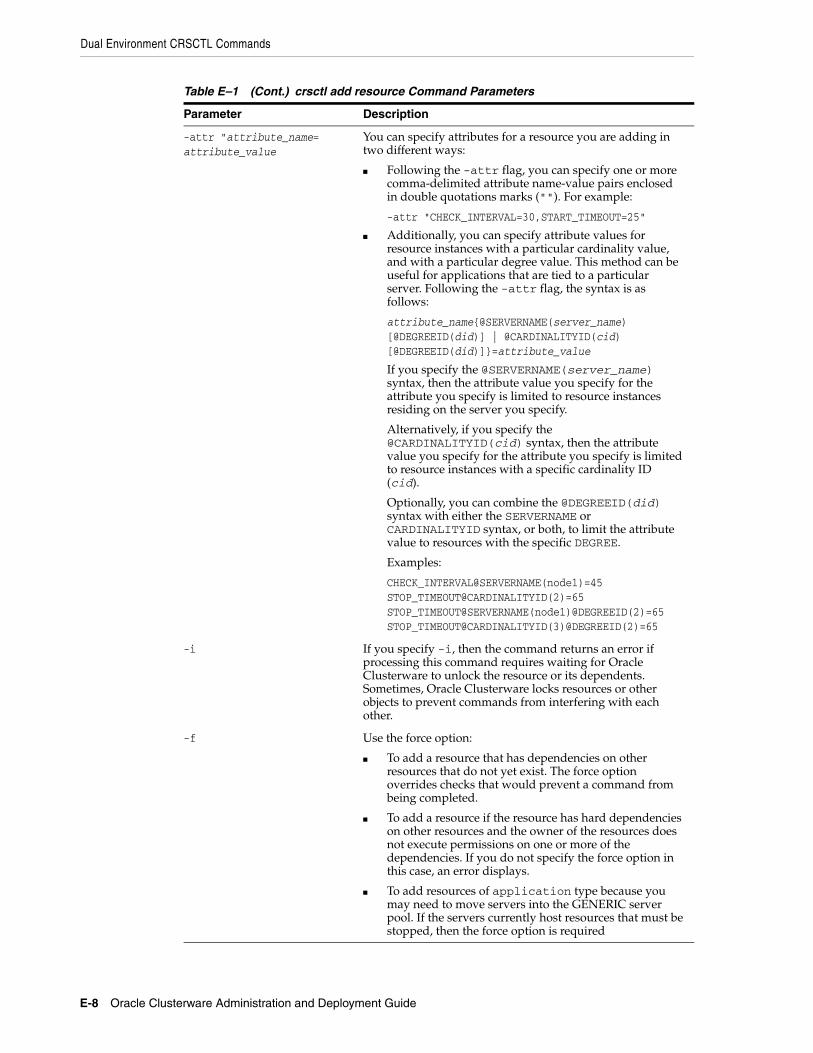
Dual Environment CRSCTL Commands
E-8 Oracle Clusterware Administration and Deployment Guide
-attr "attribute_name=attribute_value
You can specify attributes for a resource you are adding in two different ways:
■ Following the -attr flag, you can specify one or more comma-delimited attribute name-value pairs enclosed in double quotations marks (""). For example:
-attr "CHECK_INTERVAL=30,START_TIMEOUT=25"
■ Additionally, you can specify attribute values for resource instances with a particular cardinality value, and with a particular degree value. This method can be useful for applications that are tied to a particular server. Following the -attr flag, the syntax is as follows:
attribute_name{@SERVERNAME(server_name)[@DEGREEID(did)] | @CARDINALITYID(cid)[@DEGREEID(did)]}=attribute_value
If you specify the @SERVERNAME(server_name) syntax, then the attribute value you specify for the attribute you specify is limited to resource instances residing on the server you specify.
Alternatively, if you specify the @CARDINALITYID(cid) syntax, then the attribute value you specify for the attribute you specify is limited to resource instances with a specific cardinality ID (cid).
Optionally, you can combine the @DEGREEID(did) syntax with either the SERVERNAME or CARDINALITYID syntax, or both, to limit the attribute value to resources with the specific DEGREE.
Examples:
CHECK_INTERVAL@SERVERNAME(node1)=45STOP_TIMEOUT@CARDINALITYID(2)=65STOP_TIMEOUT@SERVERNAME(node1)@DEGREEID(2)=65STOP_TIMEOUT@CARDINALITYID(3)@DEGREEID(2)=65
-i If you specify -i, then the command returns an error if processing this command requires waiting for Oracle Clusterware to unlock the resource or its dependents. Sometimes, Oracle Clusterware locks resources or other objects to prevent commands from interfering with each other.
-f Use the force option:
■ To add a resource that has dependencies on other resources that do not yet exist. The force option overrides checks that would prevent a command from being completed.
■ To add a resource if the resource has hard dependencies on other resources and the owner of the resources does not execute permissions on one or more of the dependencies. If you do not specify the force option in this case, an error displays.
■ To add resources of application type because you may need to move servers into the GENERIC server pool. If the servers currently host resources that must be stopped, then the force option is required
Table E–1 (Cont.) crsctl add resource Command Parameters
Parameter Description
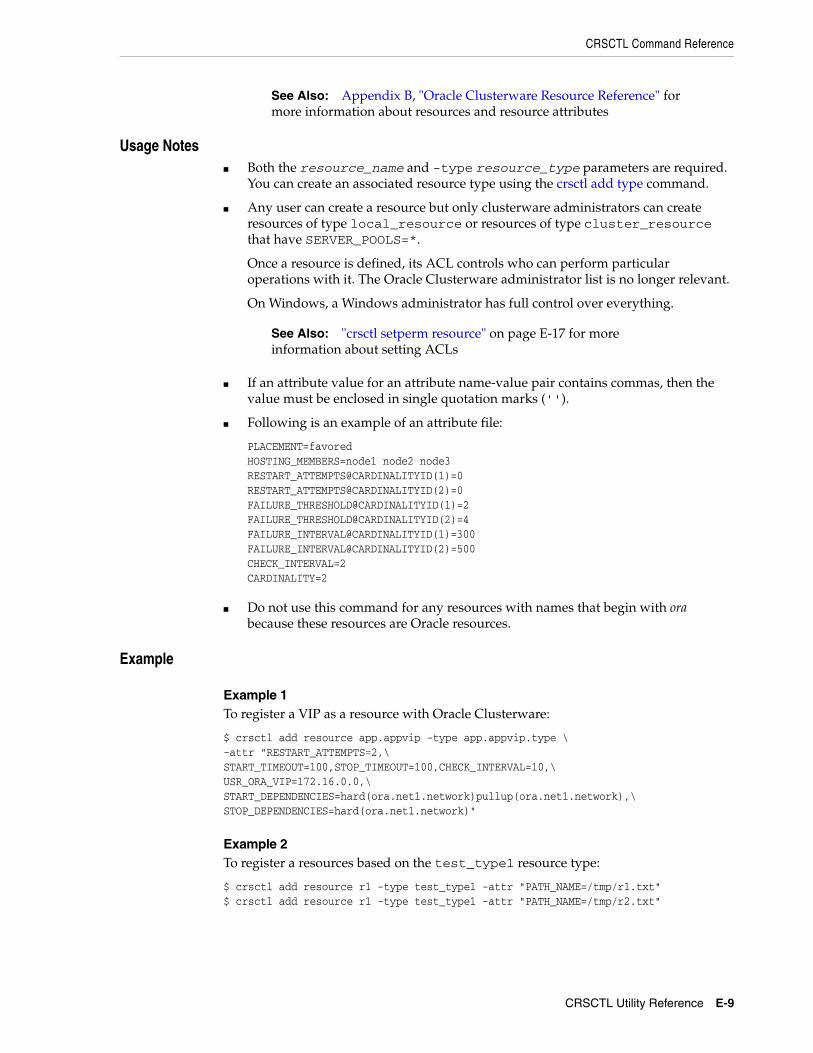
CRSCTL Command Reference
CRSCTL Utility Reference E-9
Usage Notes■ Both the resource_name and -type resource_type parameters are required.
You can create an associated resource type using the crsctl add type command.
■ Any user can create a resource but only clusterware administrators can create resources of type local_resource or resources of type cluster_resource that have SERVER_POOLS=*.
Once a resource is defined, its ACL controls who can perform particular operations with it. The Oracle Clusterware administrator list is no longer relevant.
On Windows, a Windows administrator has full control over everything.
■ If an attribute value for an attribute name-value pair contains commas, then the value must be enclosed in single quotation marks ('').
■ Following is an example of an attribute file:
PLACEMENT=favoredHOSTING_MEMBERS=node1 node2 node3RESTART_ATTEMPTS@CARDINALITYID(1)=0RESTART_ATTEMPTS@CARDINALITYID(2)=0FAILURE_THRESHOLD@CARDINALITYID(1)=2FAILURE_THRESHOLD@CARDINALITYID(2)=4FAILURE_INTERVAL@CARDINALITYID(1)=300FAILURE_INTERVAL@CARDINALITYID(2)=500CHECK_INTERVAL=2CARDINALITY=2
■ Do not use this command for any resources with names that begin with ora because these resources are Oracle resources.
Example
Example 1To register a VIP as a resource with Oracle Clusterware:
$ crsctl add resource app.appvip -type app.appvip.type \-attr "RESTART_ATTEMPTS=2,\START_TIMEOUT=100,STOP_TIMEOUT=100,CHECK_INTERVAL=10,\USR_ORA_VIP=172.16.0.0,\START_DEPENDENCIES=hard(ora.net1.network)pullup(ora.net1.network),\STOP_DEPENDENCIES=hard(ora.net1.network)"
Example 2To register a resources based on the test_type1 resource type:
$ crsctl add resource r1 -type test_type1 -attr "PATH_NAME=/tmp/r1.txt"$ crsctl add resource r1 -type test_type1 -attr "PATH_NAME=/tmp/r2.txt"
See Also: Appendix B, "Oracle Clusterware Resource Reference" for more information about resources and resource attributes
See Also: "crsctl setperm resource" on page E-17 for more information about setting ACLs
Dual Environment CRSCTL Commands
E-10 Oracle Clusterware Administration and Deployment Guide
crsctl add typeUse the crsctl add type command to create a resource type in Oracle Clusterware.
Syntaxcrsctl add type type_name -basetype base_type_name {-file file_path | -attr "ATTRIBUTE=attribute_name,TYPE={string | int} [,DEFAULT_VALUE=default_value][,FLAGS=[READONLY][|REQUIRED]]” [-attr ...]}
Parameters
Usage Notes■ Both the type_name and base_type_name parameters are required
Table E–2 crsctl add type Command Parameters
Parameter Description
type_name A name for the resource type in the form of xxx.yyy.type. Resource type names must be unique and cannot be changed after the resource type is registered.
-basetype base_type_name The name of an existing base type. Any resource type that you create must either have local_resource or cluster_resource as its base resource type.
-file file_path Path name (either absolute or relative) for a text file containing line-separated attribute name-value pairs that define the resource type.
-attr You can specify the resource type attributes using the -attr argument. Enter a comma-delimited description of a resource type attribute enclosed in double quotation marks (""). The descriptors for an attribute include:
■ ATTRIBUTE: Specify a name for the attribute. The name is case-sensitive and cannot contain spaces.
■ TYPE: Specify whether the attribute type is integer or string.
■ DEFAULT_VALUE: (Optional) If the attribute is required, then a default value is not required. For attributes that are not required, you must specify a default value that Oracle Clusterware uses when you create resources based on this resource type.
■ FLAGS: (Optional) Specify whether the attribute is READONLY or REQUIRED. READONLY means that after you register a resource with this resource type, you cannot modify this attribute.
REQUIRED means that you must specify the name and value of this attribute when you create a resource that is based on this resource type. If you specify that this attribute is not required, then Oracle Clusterware uses the default value of this attribute that you specify.
You can use multiple -attr arguments to define multiple arguments for the resource type.
See Also: "Resource Type" on page 5-3 for more information about resource types

CRSCTL Command Reference
CRSCTL Utility Reference E-11
■ You can either specify a file containing the type information or you can specify the type information on the command line
■ Do not use this command for any resource types with names that begin with ora because these resource types are Oracle resource types
■ You must have read permissions on the base type
ExampleTo create a resource type for demoActionScript:
# crsctl add type test_type1 -basetype cluster_resource \ -attr "ATTRIBUTE=PATH_NAME,TYPE=string,DEFAULT_VALUE=default.txt"\ -attr "ATTRIBUTE=ACTION_SCRIPT,TYPE=string,DEFAULT_VALUE=/u01/grid/crs/demo/demoActionScript"
crsctl check cssUse the crsctl check css command to check the status of Cluster Synchronization Services. This command is most often used when Oracle Automatic Storage Management (Oracle ASM) is installed on the local server.
Syntaxcrsctl check css
Usage Notes■
ExampleThe crsctl check css command returns output similar to the following:
CRS-4529: Cluster Synchronization Services is online
crsctl delete resourceUse the crsctl delete resource command to remove resources from the Oracle Clusterware configuration.
Syntaxcrsctl delete resource resource_name [-i] [-f]
Parameters
Table E–3 crsctl delete resource Command Parameters
Parameter Description
resource_name Specify the name of the resource you want to remove.
-i If you specify -i, then the command returns an error if processing this command requires waiting for Oracle Clusterware to unlock the resource or its dependents. Sometimes, Oracle Clusterware locks resources or other objects to prevent commands from interfering with each other.
-f Use the force option to remove either running resources, or remove this resource even though other resources have a hard dependency on it.

Dual Environment CRSCTL Commands
E-12 Oracle Clusterware Administration and Deployment Guide
Usage Notes■ The resource_name parameter is required
■ You must have read and write permissions to delete the specified resources
■ Do not use this command for any resources with names that begin with ora because these resources are Oracle resources
ExampleTo delete a resource from Oracle Clusterware:
# crsctl delete resource myResource
crsctl delete typeUse the crsctl delete type command to remove a resource type from the Oracle Clusterware configuration.
Syntaxcrsctl delete type type_name [-i]
Usage Notes■ The type_name parameter is required
■ If you specify -i, then the command fails if Oracle Clusterware cannot process the request immediately
■ Do not use this command for any resource types with names that begin with ora because these resource types are Oracle resource types
ExampleTo delete a resource type, run the following command as who has write permissions on the resource type:
$ crsctl delete type app.appvip.type
crsctl get hostnameUse the crsctl get hostname command to retrieve the host name of the local server.
Syntaxcrsctl get hostname
ExampleOracle Clusterware returns the host name of the local server:
$ crsctl get hostnamenode2
crsctl getperm resourceUse the crsctl getperm resource command to display the user and group permissions for the specified resource.
CRSCTL Command Reference
CRSCTL Utility Reference E-13
Syntaxcrsctl getperm resource resource_name [ {-u user_name | -g group_name} ]
Parameters
Usage Notes■ The resource_name parameter is required
■ You must have read permission on the specified resources to obtain their permissions
■ Do not use this command for any resources with names that begin with ora because these resources are Oracle resources
ExampleThe crsctl getperm resource command returns output similar to the following, depending on the command option you choose:
$ crsctl getperm resource app.appvip
Name: app.appvipowner:root:rwx,pgrp:oinstall:rwx,other::r--
$ crsctl getperm resource app.appvip -u oracle
Name: app.appviprwx
$ crsctl getperm resource app.appvip -g dba
Name: app.appvipr--
crsctl getperm typeUse the crsctl getperm type command to obtain permissions for a particular resource type.
Syntaxcrsctl getperm type resource_type [-u user_name] | [-g group_name]
See Also: Appendix B, "Oracle Clusterware Resource Reference" for more information about resources and resource attributes
Table E–4 crsctl getperm resource Command Parameters
Parameter Description
resource_name Specify the name of the resource for which you want to obtain permissions.
-u user_name If you specify -u, then Oracle Clusterware obtains permissions for a particular user.
-g group_name If you specify -g, then Oracle Clusterware obtains permissions for a particular group.
See Also: "Resource Type" on page 5-3 for more information about resource types

Dual Environment CRSCTL Commands
E-14 Oracle Clusterware Administration and Deployment Guide
Parameters
Usage Notes■ The resource_type parameter is required
■ Do not use this command for any resource types with names that begin with ora because these resource types are Oracle resource types
ExampleThe crsctl getperm type command returns output similar to the following:
$ crsctl getperm type app.appvip.type
Name: app.appvip.typeowner:root:rwx,pgrp:oinstall:rwx,other::r--
crsctl modify resourceUse the crsctl modify resource command to modify the attributes of a particular resource in Oracle Clusterware.
Syntaxcrsctl modify resource resource_name -attr "attribute_name=attribute_value"[-i] [-f] [-delete]
Parameters
Table E–5 crsctl getperm type Command Parameters
Parameter Description
resource_type Specify the resource type for which you want to obtain permissions.
-u user_name If you specify -u, then Oracle Clusterware obtains permissions for a particular user.
-g group_name If you specify -g, then Oracle Clusterware obtains permissions for a particular group.
Table E–6 crsctl modify resource Command Parameters
Parameter Description
resource_name The name of the resource you want to modify.
CRSCTL Command Reference
CRSCTL Utility Reference E-15
-attr "attribute_name=attribute_value"
You can specify attributes for a resource you want to modify in two different ways:
■ Following the -attr flag, you can specify one or more comma-delimited attribute name-value pairs to modify enclosed in double quotations marks (""). For example:
-attr "CHECK_INTERVAL=30, START_TIMEOUT=25"
■ Alternatively, you can specify attribute values for resources on a particular server, with a particular cardinality value, and with a particular degree value. This method can be useful for applications that are somehow tied to a particular server. Following the -attr flag, the syntax is as follows:
attribute_name{@SERVERNAME(server_name)[@DEGREEID(did)] | @CARDINALITYID(cid)[@DEGREEID(did)]}=attribute_value
If you specify the @SERVERNAME(server_name) syntax, then the attribute value you specify for the attribute you specify is limited to resources residing on the server you specify.
Alternatively, if you specify the @CARDINALITYID(cid) syntax, then the attribute value you specify for the attribute you specify is limited to resource instances with a specific cardinality ID (cid).
Optionally, you can combine the @DEGREEID(did) syntax with either the SERVERNAME or CARDINALITYID syntax, or both, to limit the attribute value to resources with the specific DEGREE.
Examples:
CHECK_INTERVAL@SERVERNAME(node1)=45STOP_TIMEOUT@CARDINALITYID(2)=65STOP_TIMEOUT@SERVERNAME(node1)@DEGREEID(2)=65STOP_TIMEOUT@CARDINALITYID(3)@DEGREEID(2)=65
-i If you specify -i, then the command returns an error if processing this command requires waiting for Oracle Clusterware to unlock the resource or its dependents. Sometimes, Oracle Clusterware locks resources or other objects to prevent commands from interfering with each other.
-f Use the -f option when:
■ The resource has a hard dependency on a non-existing resource
■ The owner of the resource does not have execute permissions on one or more hard dependencies
■ The modification results in servers being moved into the Generic pool and resources being stopped or relocated to accomplish the server move
-delete If you specify the -delete option, then Oracle Clusterware deletes the named attribute.
See Also: Appendix B, "Oracle Clusterware Resource Reference" for more information about resources and resource attributes
Table E–6 (Cont.) crsctl modify resource Command Parameters
Parameter Description
Dual Environment CRSCTL Commands
E-16 Oracle Clusterware Administration and Deployment Guide
Usage Notes■ The resource_name parameter is required
■ If an attribute value for an attribute name-value pair contains commas, then the value must be enclosed in single quotation marks (''). For example:
"START_DEPENDENCIES=’hard(res1,res2,res3)’"
■ You must have read and write permissions on the specified resources to modify them
■ Do not use this command for any resources with names that begin with ora because these resources are Oracle resources
ExampleTo modify the attributes of the appsvip resource:
$ crsctl modify resource appsvip -attr USR_ORA_VIP=10.1.220.17 -i
crsctl modify typeUse the crsctl modify type command to modify an existing resource type.
Syntaxcrsctl modify type type_name -attr "ATTRIBUTE=attribute_name,TYPE={string | int} [,DEFAULT_VALUE=default_value][,FLAGS=[READONLY][| REQUIRED]]" [-i] [-f]
Parameters
Usage Notes■ The type_name parameter is required
■ Do not use this command for any resource types with names that begin with ora because these resource types are Oracle resource types
Table E–7 crsctl modify type Command Parameters
Parameter Description
type_name Specify the name of the resource type you want to modify. You cannot modify resource type names.
-attr You can modify the following resource type attributes:
■ ATTRIBUTE
■ TYPE
■ DEFAULT_VALUE
■ FLAGS
See Also: Table E–2, " crsctl add type Command Parameters" for descriptions of these attributes
-i If you specify the -i option, then the command fails if Oracle Clusterware cannot process the request immediately.
See Also: "Resource Type" on page 5-3 for more information about resource types
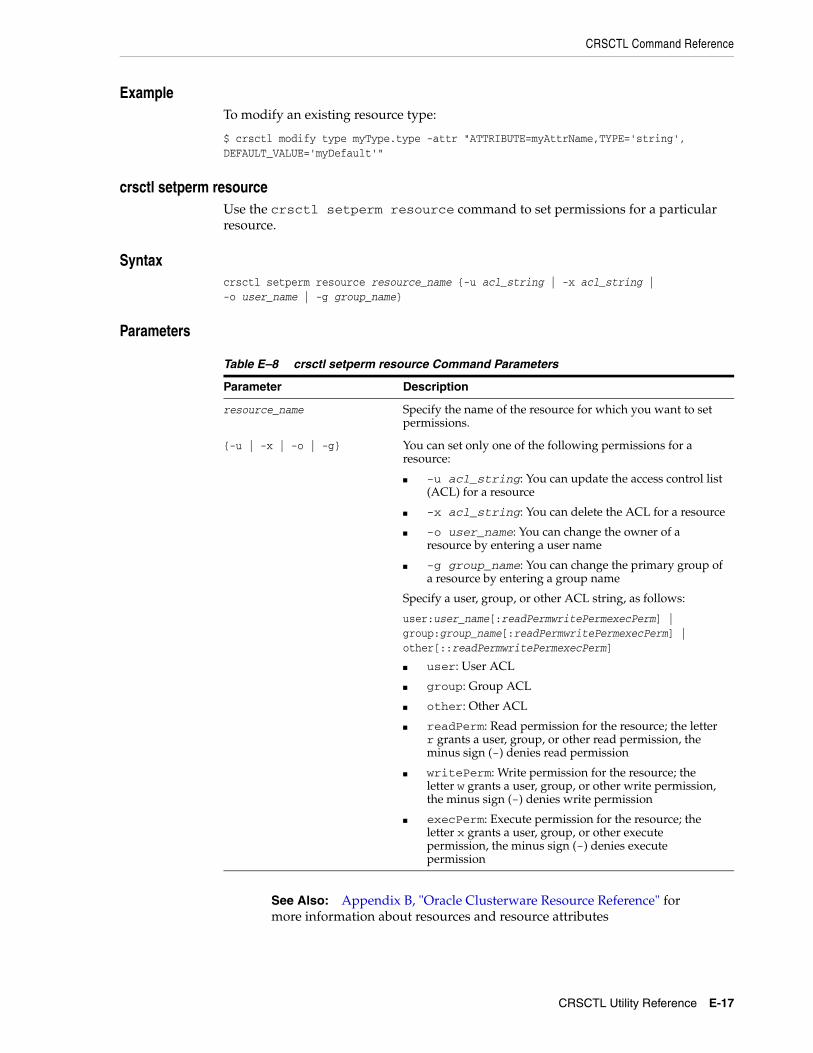
CRSCTL Command Reference
CRSCTL Utility Reference E-17
ExampleTo modify an existing resource type:
$ crsctl modify type myType.type -attr "ATTRIBUTE=myAttrName,TYPE='string',DEFAULT_VALUE='myDefault'"
crsctl setperm resourceUse the crsctl setperm resource command to set permissions for a particular resource.
Syntaxcrsctl setperm resource resource_name {-u acl_string | -x acl_string |-o user_name | -g group_name}
Parameters
Table E–8 crsctl setperm resource Command Parameters
Parameter Description
resource_name Specify the name of the resource for which you want to set permissions.
{-u | -x | -o | -g} You can set only one of the following permissions for a resource:
■ -u acl_string: You can update the access control list (ACL) for a resource
■ -x acl_string: You can delete the ACL for a resource
■ -o user_name: You can change the owner of a resource by entering a user name
■ -g group_name: You can change the primary group of a resource by entering a group name
Specify a user, group, or other ACL string, as follows:
user:user_name[:readPermwritePermexecPerm] |group:group_name[:readPermwritePermexecPerm] |other[::readPermwritePermexecPerm]
■ user: User ACL
■ group: Group ACL
■ other: Other ACL
■ readPerm: Read permission for the resource; the letter r grants a user, group, or other read permission, the minus sign (-) denies read permission
■ writePerm: Write permission for the resource; the letter w grants a user, group, or other write permission, the minus sign (-) denies write permission
■ execPerm: Execute permission for the resource; the letter x grants a user, group, or other execute permission, the minus sign (-) denies execute permission
See Also: Appendix B, "Oracle Clusterware Resource Reference" for more information about resources and resource attributes
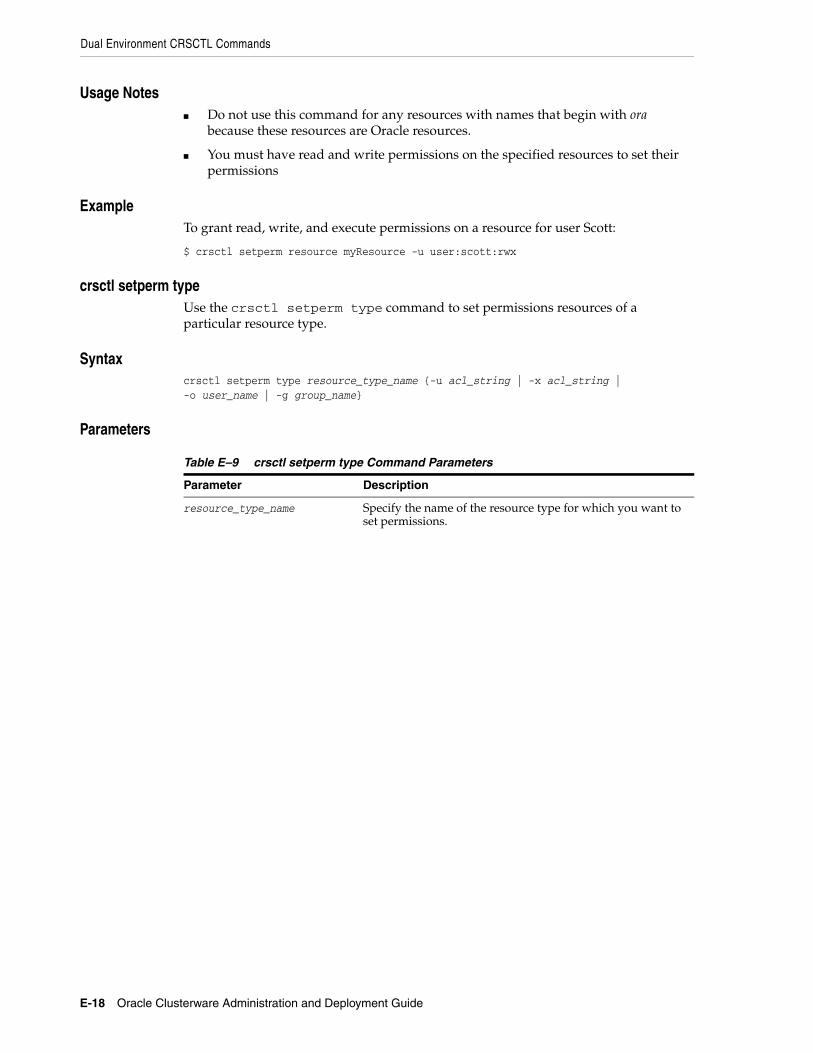
Dual Environment CRSCTL Commands
E-18 Oracle Clusterware Administration and Deployment Guide
Usage Notes■ Do not use this command for any resources with names that begin with ora
because these resources are Oracle resources.
■ You must have read and write permissions on the specified resources to set their permissions
ExampleTo grant read, write, and execute permissions on a resource for user Scott:
$ crsctl setperm resource myResource -u user:scott:rwx
crsctl setperm typeUse the crsctl setperm type command to set permissions resources of a particular resource type.
Syntaxcrsctl setperm type resource_type_name {-u acl_string | -x acl_string |-o user_name | -g group_name}
Parameters
Table E–9 crsctl setperm type Command Parameters
Parameter Description
resource_type_name Specify the name of the resource type for which you want to set permissions.

CRSCTL Command Reference
CRSCTL Utility Reference E-19
Usage Notes■ The resource_type_name parameter is required
■ You must have read and write permissions on the specified resources to set their permissions
■ Do not use this command for any resource types with names that begin with ora because these resource types are Oracle resource types
ExampleTo grant read, write, and execute permissions on a resource type for user Scott:
$ crsctl setperm type resType -u user:scott:rwx
crsctl start resourceUse the crsctl start resource command to start many idle resources on a particular server in the cluster.
Syntaxcrsctl start resource {resource_name [...] | -w filter | -all} [-n server_name][-k cid] [-d did] [-env "env1=val1,env2=val2,..."] [-i] [-f]
{-u | -x | -o | -g} You can specify only one of the following parameters for a resource type:
■ -u acl_string: You can update the access control list (ACL) for a resource type
■ -x acl_string: You can delete the ACL for a resource type
■ -o user_name: You can change the owner of a resource type by entering a user name
■ -g group_name: You can change the primary group of a resource type by entering a group name
Specify a user, group, or other ACL string, as follows:
user:user_name[:readPermwritePermexecPerm] |group:group_name[:readPermwritePermexecPerm] |other[::readPermwritePermexecPerm]
■ user: User ACL
■ group: Group ACL
■ other: Other ACL
■ readPerm: Read permission for the resource type; the letter r grants a user, group, or other read permission, the minus sign (-) denies read permission
■ writePerm: Write permission for the resource type; the letter w grants a user, group, or other write permission, the minus sign (-) denies write permission
■ execPerm: Execute permission for the resource type; the letter x grants a user, group, or other execute permission, the minus sign (-) denies execute permission
Table E–9 (Cont.) crsctl setperm type Command Parameters
Parameter Description
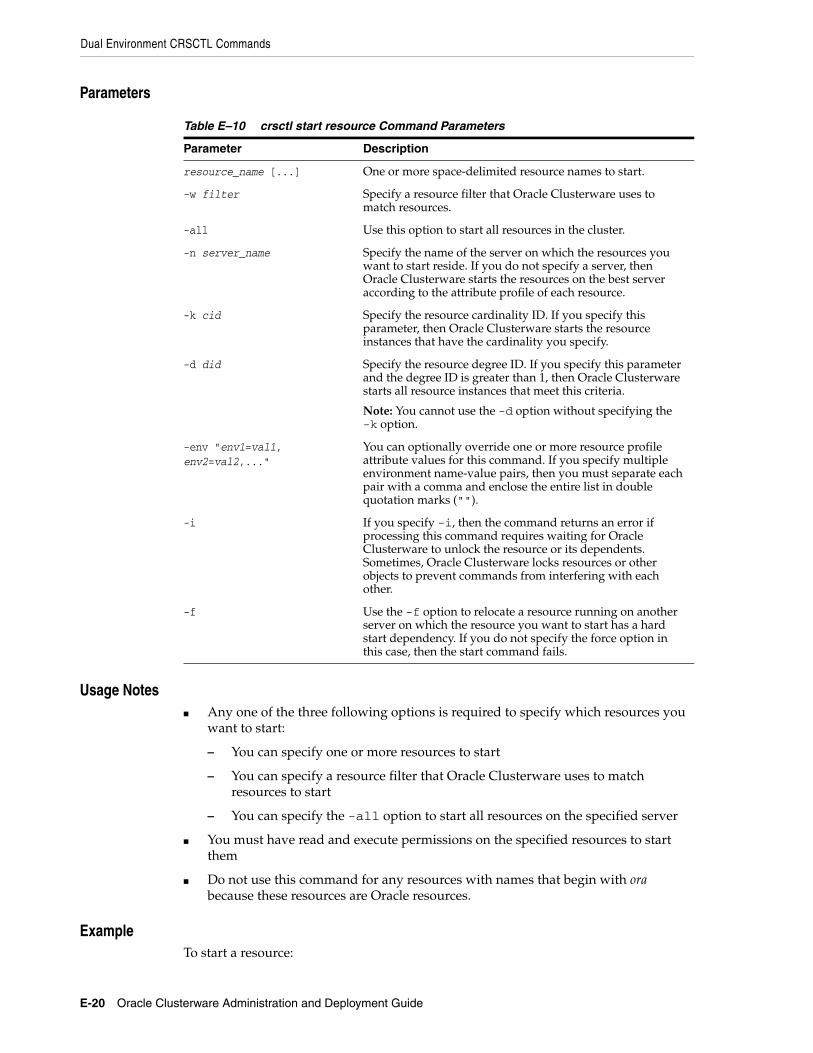
Dual Environment CRSCTL Commands
E-20 Oracle Clusterware Administration and Deployment Guide
Parameters
Usage Notes■ Any one of the three following options is required to specify which resources you
want to start:
– You can specify one or more resources to start
– You can specify a resource filter that Oracle Clusterware uses to match resources to start
– You can specify the -all option to start all resources on the specified server
■ You must have read and execute permissions on the specified resources to start them
■ Do not use this command for any resources with names that begin with ora because these resources are Oracle resources.
ExampleTo start a resource:
Table E–10 crsctl start resource Command Parameters
Parameter Description
resource_name [...] One or more space-delimited resource names to start.
-w filter Specify a resource filter that Oracle Clusterware uses to match resources.
-all Use this option to start all resources in the cluster.
-n server_name Specify the name of the server on which the resources you want to start reside. If you do not specify a server, then Oracle Clusterware starts the resources on the best server according to the attribute profile of each resource.
-k cid Specify the resource cardinality ID. If you specify this parameter, then Oracle Clusterware starts the resource instances that have the cardinality you specify.
-d did Specify the resource degree ID. If you specify this parameter and the degree ID is greater than 1, then Oracle Clusterware starts all resource instances that meet this criteria.
Note: You cannot use the -d option without specifying the -k option.
-env "env1=val1,env2=val2,..."
You can optionally override one or more resource profile attribute values for this command. If you specify multiple environment name-value pairs, then you must separate each pair with a comma and enclose the entire list in double quotation marks ("").
-i If you specify -i, then the command returns an error if processing this command requires waiting for Oracle Clusterware to unlock the resource or its dependents. Sometimes, Oracle Clusterware locks resources or other objects to prevent commands from interfering with each other.
-f Use the -f option to relocate a resource running on another server on which the resource you want to start has a hard start dependency. If you do not specify the force option in this case, then the start command fails.
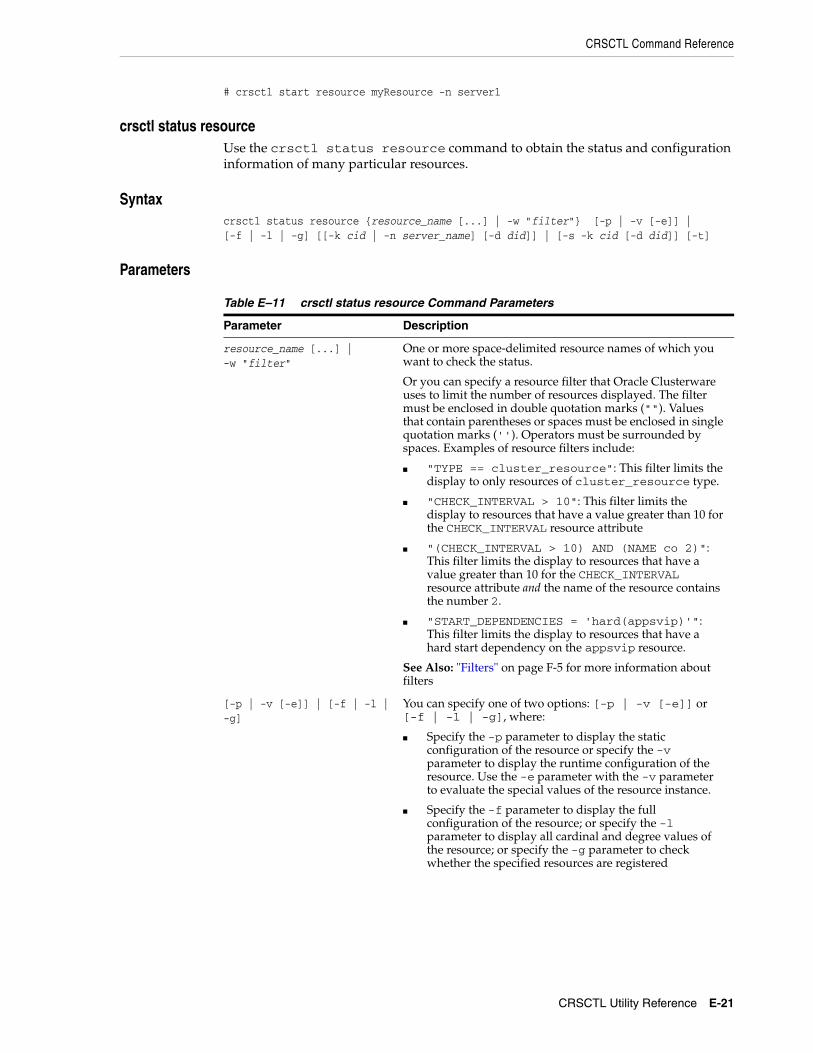
CRSCTL Command Reference
CRSCTL Utility Reference E-21
# crsctl start resource myResource -n server1
crsctl status resourceUse the crsctl status resource command to obtain the status and configuration information of many particular resources.
Syntaxcrsctl status resource {resource_name [...] | -w "filter"} [-p | -v [-e]] |[-f | -l | -g] [[-k cid | -n server_name] [-d did]] | [-s -k cid [-d did]] [-t]
Parameters
Table E–11 crsctl status resource Command Parameters
Parameter Description
resource_name [...] |-w "filter"
One or more space-delimited resource names of which you want to check the status.
Or you can specify a resource filter that Oracle Clusterware uses to limit the number of resources displayed. The filter must be enclosed in double quotation marks (""). Values that contain parentheses or spaces must be enclosed in single quotation marks (''). Operators must be surrounded by spaces. Examples of resource filters include:
■ "TYPE == cluster_resource": This filter limits the display to only resources of cluster_resource type.
■ "CHECK_INTERVAL > 10": This filter limits the display to resources that have a value greater than 10 for the CHECK_INTERVAL resource attribute
■ "(CHECK_INTERVAL > 10) AND (NAME co 2)": This filter limits the display to resources that have a value greater than 10 for the CHECK_INTERVAL resource attribute and the name of the resource contains the number 2.
■ "START_DEPENDENCIES = 'hard(appsvip)'": This filter limits the display to resources that have a hard start dependency on the appsvip resource.
See Also: "Filters" on page F-5 for more information about filters
[-p | -v [-e]] | [-f | -l | -g]
You can specify one of two options: [-p | -v [-e]] or [-f | -l | -g], where:
■ Specify the -p parameter to display the static configuration of the resource or specify the -v parameter to display the runtime configuration of the resource. Use the -e parameter with the -v parameter to evaluate the special values of the resource instance.
■ Specify the -f parameter to display the full configuration of the resource; or specify the -l parameter to display all cardinal and degree values of the resource; or specify the -g parameter to check whether the specified resources are registered
Dual Environment CRSCTL Commands
E-22 Oracle Clusterware Administration and Deployment Guide
Usage Notes■ Either a space-delimited list of resources or a resource filter is required
■ You must have read permissions on the specified resources to obtain their status
■ Do not use this command for any resources with names that begin with ora because these resources are Oracle resources
ExampleThe crsctl status resource command returns output similar to the following:
$ crsctl status resource ora.staii14.vip
NAME=ora.staii14.vipTYPE=ora.cluster_vip_net1.typeTARGET=ONLINESTATE=ONLINE on staii14
crsctl status typeUse the crsctl status type command to obtain the configuration information of one or more particular resource types.
Syntaxcrsctl status type resource_type_name [...]] [-g] [-p] [-f]
Parameters
[-k cid | -n server_name] [-d did |[-s -k cid [-d did]]]
You can specify one of two options: [-k cid | -n server_name] or [-s -k cid [-d did]], where:
■ Specify the -k cid parameter to specify a cardinality ID of the resources you want to query. Or you can specify the -n parameter to specify a particular server on which to check resources. Optionally, you can specify the -d parameter with the -n parameter to specify the degree ID of resources you want to check. If you specify a degree ID greater than 1, then Oracle Clusterware checks all resource instances on the server that meet this criteria.
■ Specify the -s parameter with the -k parameter to obtain a list of target servers for relocation. You can further limit the output by specifying a degree ID with the -d parameter.
-t Specify the -t parameter to display the output in tabular form.
Table E–12 crsctl status type Command Parameters
Parameter Description
[resource_type_name [...] Specify one or more space-delimited resource type names of which you want to check the status.
Table E–11 (Cont.) crsctl status resource Command Parameters
Parameter Description
CRSCTL Command Reference
CRSCTL Utility Reference E-23
Usage Notes■ The resource_type_name parameter or a filter is required
ExampleThe crsctl status type command returns output similar to the following:
$ crsctl status type ora.network.type
TYPE_NAME=ora.network.typeBASE_TYPE=ora.local_resource.type
crsctl stop resourceUse the crsctl stop resource command to stop running resources.
Syntaxcrsctl stop resource {resource_name [...] | -w "filter" | -all} [-n server_name][-k cid] [-d did] [-env "env1=val1,env2=val2,..."] [-i] [-f]
Parameters
-g] [-p] [-f You can specify the following parameters as options when Oracle Clusterware checks the status of specific server pools:
■ -g: Use this parameter to check if the specified resource types are registered
■ -p: Use this parameter to display static configuration of the specified resource types
■ -f: Use this parameter to display the full configuration of the resource types
Table E–13 crsctl stop resource Command Parameters
Parameter Description
resource_name [...] One or more space-delimited resource names to stop.
-w "filter" Specify a resource filter that Oracle Clusterware uses to limit the number of resources stopped. The filter must be enclosed in double quotation marks (""). Examples of resource filters include:
■ "TYPE == cluster_resource": This filter limits Oracle Clusterware to stop only resources of cluster_resource type
■ "CHECK_INTERVAL > 10": This filter limits Oracle Clusterware to stop resources that have a value greater than 10 for the CHECK_INTERVAL resource attribute
■ "(CHECK_INTERVAL > 10) AND (NAME co 2)": This filter limits Oracle Clusterware to stop resources that have a value greater than 10 for the CHECK_INTERVAL resource attribute and the name of the resource contains the number 2
-all Use this option to stop all resources in the cluster.
Table E–12 (Cont.) crsctl status type Command Parameters
Parameter Description

Dual Environment CRSCTL Commands
E-24 Oracle Clusterware Administration and Deployment Guide
Usage Notes■ Any one of the three following options is required to specify which resources you
want to stop:
– You can specify one or more resources to stop
– You can specify a resource filter that Oracle Clusterware uses to match resources to stop
– You can specify the -all option with the -n server_name option to stop all resources on a particular server
■ You must have read and execute permissions on the specified resources to stop them
■ Do not use this command for any resources with names that begin with ora because these resources are Oracle resources.
ExampleTo stop a resource:
$ crsctl stop resource -n node1 -k 2
-n server_name Specify the name of the server on which the resource instances you want to stop reside. If you do not specify a server, then Oracle Clusterware stops all instances of the resource.
-k cid Specify the resource cardinality ID. If you specify this parameter, then Oracle Clusterware stops the resource instances that have the cardinality you specify.
-d did Specify the resource degree ID. If you specify this parameter and the degree ID is greater than 1, then Oracle Clusterware stops all resource instances that meet this criteria.
-env "env1=val1,env2=val2,..."
You can optionally override one or more resource profile attribute values for this command. If you specify multiple environment name-value pairs, then you must separate each pair with a comma and enclose the entire list in double quotation marks ("").
-i If you specify -i, then the command returns an error if processing this command requires waiting for Oracle Clusterware to unlock the resource or its dependents. Sometimes, Oracle Clusterware locks resources or other objects to prevent commands from interfering with each other.
-f Specify the -f option to force the stopping of the resource when it has other resources running that depend on it. Dependent resources are relocated or stopped when you use this option.
Table E–13 (Cont.) crsctl stop resource Command Parameters
Parameter Description

CRSCTL Command Reference
CRSCTL Utility Reference E-25
Oracle RAC Environment CRSCTL Commands
The commands listed in this section manage the Oracle Clusterware stack in an Oracle RAC environment, which consists of the following:
■ Oracle Clusterware, the member nodes and server pools
■ Oracle ASM (if installed)
■ Cluster Synchronization Services
■ Cluster Time Synchronization Services
You can use the following commands only in an Oracle RAC environment:
■ crsctl add crs administrator
■ crsctl add css votedisk
■ crsctl add serverpool
■ crsctl check cluster
■ crsctl check crs
■ crsctl check resource
■ crsctl check ctss
■ crsctl config crs
■ crsctl delete crs administrator
■ crsctl delete css votedisk
■ crsctl delete node
■ crsctl delete serverpool
■ crsctl disable crs
■ crsctl enable crs
■ crsctl get css
■ crsctl get css ipmiaddr
■ crsctl get nodename
■ crsctl getperm serverpool
■ crsctl lsmodules
■ crsctl modify serverpool
■ crsctl pin css
■ crsctl query crs administrator
■ crsctl query crs activeversion
■ crsctl query crs releaseversion
■ crsctl query crs softwareversion
■ crsctl query css ipmidevice
■ crsctl query css votedisk
■ crsctl relocate resource
Oracle RAC Environment CRSCTL Commands
E-26 Oracle Clusterware Administration and Deployment Guide
■ crsctl relocate server
■ crsctl replace discoverystring
■ crsctl replace votedisk
■ crsctl set css
■ crsctl set css ipmiaddr
■ crsctl set css ipmiadmin
■ crsctl setperm serverpool
■ crsctl start cluster
■ crsctl start crs
■ crsctl status server
■ crsctl status serverpool
■ crsctl stop cluster
■ crsctl stop crs
■ crsctl unpin css
■ crsctl unset css
crsctl add crs administratorUse the crsctl add crs administrator command to add a user to the list of cluster administrators.
Syntaxcrsctl add crs administrator -u user_name [-f]
Parameters
Usage Notes■ You must run this command as root or a cluster administrator, or an
administrator on Windows systems
■ By default, root, the user that installed Oracle Clusterware, and the * wildcard are members of the list of users who have Oracle Clusterware administrative privileges. Run the crsctl delete crs administrator command to remove the wildcard and enable role-separated management of Oracle Clusterware.
ExampleTo add a user to the list of Oracle Clusterware administrators:
Table E–14 crsctl add crs administrator Command Parameters
Parameter Description
-u user_name The name of the user to whom you want to give Oracle Clusterware administrative privileges.
-f Use this option to override the user name validity check.
See Also: "Role-separated Management" on page 2-18 for more information
CRSCTL Command Reference
CRSCTL Utility Reference E-27
# crsctl add crs administrator -u scott
crsctl add css votediskUse the crsctl add css votedisk command to add one or more voting disks to the cluster on storage devices or to ASM diskgroup with redundancy normal or high.
Use the crsctl add css votedisk command to add one or more voting disks to the cluster on storage devices or to an Oracle ASM disk group with normal or high redundancy.
Syntaxcrsctl add css votedisk path_to_voting_disk [path_to_voting_disk ...] [-purge]
Parameters
Usage Notes■ You should have at least three voting disks, unless you have a storage device, such
as a disk array, that provides external redundancy. Oracle recommends that you do not use more than 5 voting disks. The maximum number of voting disks that is supported is 15.
ExampleTo add a voting disk to the cluster:
$ crsctl add css votedisk /stor/grid/ -purge
crsctl add serverpoolUse the crsctl add serverpool command to add a server pool to Oracle Clusterware.
Syntaxcrsctl add serverpool server_pool_name {-file file_path | -attr "attr_name=attr_value[,attr_name=attr_value[,...]]"} [-i] [-f]
Note: if disk group redundancy is set to external, then you can only create one voting disk in the ASM disk group. If you try to add multiple voting disks, then Oracle returns an error.
Table E–15 crsctl add css votedisk Command Parameters
Parameter Description
path_to_voting_disk A fully qualified path to the voting disk you want to add. To add multiple voting disks, separate each path with a space.
-purge Removes all existing voting disks at once. You can replace the existing set of voting files in one operation.
See Also: "Adding, Deleting, or Migrating Voting Disks" on page 2-24 for more information
Oracle RAC Environment CRSCTL Commands
E-28 Oracle Clusterware Administration and Deployment Guide
Parameters
Usage Notes■ The server_pool_name parameter is required
■ If an attribute value for an attribute name-value pair contains commas, then the value must be enclosed in single quotation marks ('')
■ Do not use this command for any server pools with names that begin with ora because these server pools are Oracle server pools
■ Running this command may result in Oracle Clusterware relocating other servers between server pools to comply with the new configuration
■ You must run this command as root or a cluster administrator
Table E–16 crsctl add serverpool Command Parameters
Parameter Description
server_pool_name A short, descriptive name for the server pool.
-file file_path Fully-qualified path to an attribute file to define the server pool.
attribute_name The name of a server pool attribute Oracle Clusterware uses to manage the server pool preceded by the -attr flag. The available attribute names include:
■ IMPORTANCE
■ MIN_SIZE
■ MAX_SIZE
■ SERVER_NAMES
■ PARENT_POOLS
■ EXCLUSIVE_POOLS
■ ACL
■ ACTIVE_SERVERS
attribute_value A value for the server pool attribute.
Note: The attribute_name and attribute_value parameters must be enclosed in double quotation marks ("") and separated by commas. For example:
-attr "MAX_SIZE=30, IMPORTANCE=3"
-i If you specify -i, then the command fails if Oracle Clusterware cannot process the request immediately.
-f If you specify the -f option, then Oracle Clusterware stops resources running on a server in another server pool and relocates that server into the server pool you are adding. If you do not specify the -f option, then Oracle Clusterware checks whether the creation of the server pool results in stopping any resources on a server in another server pool that is going to give up a server to the server pool you are adding. If so, then Oracle Clusterware rejects the crsctl add serverpool command.
See Also: "Understanding Server Pools" on page 2-13 for more information about server pools and server pool attributes
CRSCTL Command Reference
CRSCTL Utility Reference E-29
Example
Example 1To add a server pool named testsp with a maximum size of 5 servers, run the following command as root or the Oracle Clusterware installation owner:
# crsctl add serverpool testsp -attr "MAX_SIZE=5"
Example 2Create the sp1_attr file with the attribute values for the sp1 serverpool, each on its own line, as shown in the following example:
IMPORTANCE=1MIN_SIZE=1MAX_SIZE=2SERVER_NAMES=node3 node4 node5PARENT_POOLS=GenericEXCLUSIVE_POOLS=testspACL=owner:oracle:rwx,pgrp:oinstall:rwx,other::r--
Use the following command to create the sp1 server pool using the sp1_attr file as input:
$ crsctl add serverpool sp1 -file /tmp/sp1_attr
crsctl check clusterUse the crsctl check cluster command on any node in the cluster to check the status of the Oracle Clusterware stack.
Syntaxcrsctl check cluster [-all | [-n server_name [...]]
Usage Notes■ You can check the status of the Oracle Clusterware stack on all nodes in the cluster
with the -all option or you can specify one or more space-delimited nodes. If you do not specify either option, Oracle Clusterware checks the status of the Oracle Clusterware stack on the local server.
■ You can use this cluster-aware command on any node in the cluster.
ExampleThe crsctl check cluster command returns output similar to the following:
$ crsctl check cluster -all*****************************************************************node1:CRS-4537: Cluster Ready Services is onlineCRS-4529: Cluster Synchronization Services is onlineCRS-4533: Event Manager is online*****************************************************************node2:CRS-4537: Cluster Ready Services is onlineCRS-4529: Cluster Synchronization Services is onlineCRS-4533: Event Manager is online*****************************************************************
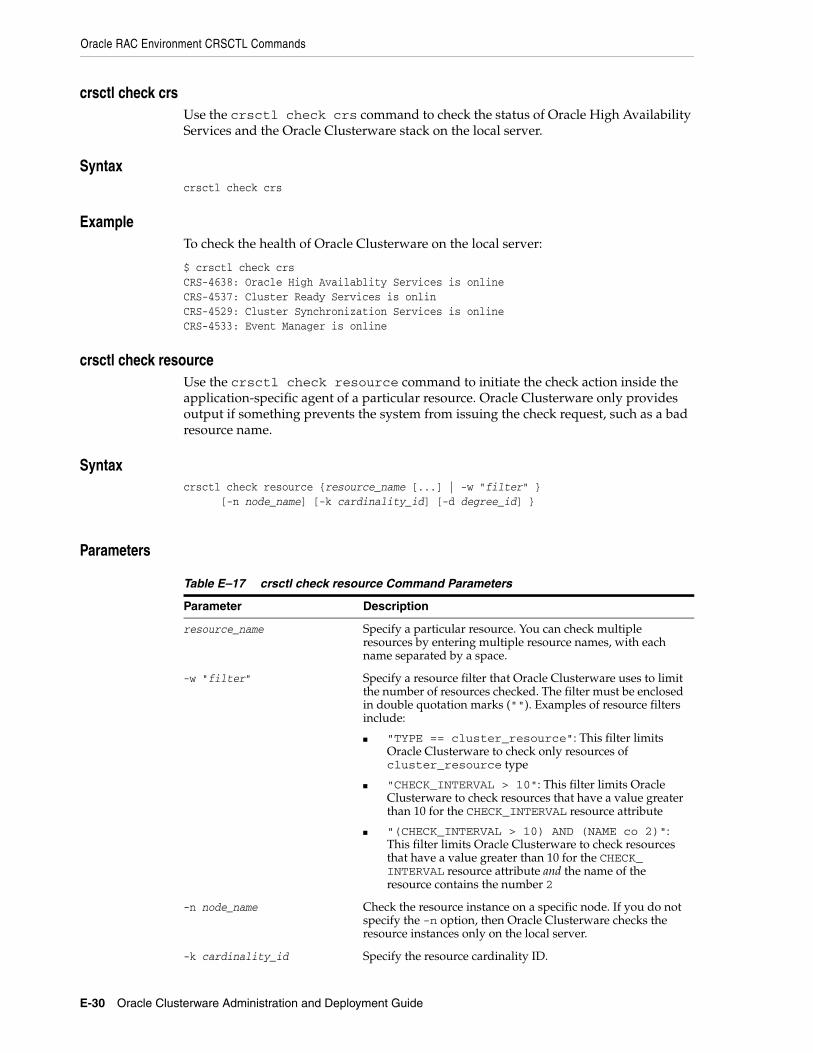
Oracle RAC Environment CRSCTL Commands
E-30 Oracle Clusterware Administration and Deployment Guide
crsctl check crsUse the crsctl check crs command to check the status of Oracle High Availability Services and the Oracle Clusterware stack on the local server.
Syntaxcrsctl check crs
ExampleTo check the health of Oracle Clusterware on the local server:
$ crsctl check crsCRS-4638: Oracle High Availablity Services is onlineCRS-4537: Cluster Ready Services is onlinCRS-4529: Cluster Synchronization Services is onlineCRS-4533: Event Manager is online
crsctl check resourceUse the crsctl check resource command to initiate the check action inside the application-specific agent of a particular resource. Oracle Clusterware only provides output if something prevents the system from issuing the check request, such as a bad resource name.
Syntaxcrsctl check resource {resource_name [...] | -w "filter" } [-n node_name] [-k cardinality_id] [-d degree_id] }
Parameters
Table E–17 crsctl check resource Command Parameters
Parameter Description
resource_name Specify a particular resource. You can check multiple resources by entering multiple resource names, with each name separated by a space.
-w "filter" Specify a resource filter that Oracle Clusterware uses to limit the number of resources checked. The filter must be enclosed in double quotation marks (""). Examples of resource filters include:
■ "TYPE == cluster_resource": This filter limits Oracle Clusterware to check only resources of cluster_resource type
■ "CHECK_INTERVAL > 10": This filter limits Oracle Clusterware to check resources that have a value greater than 10 for the CHECK_INTERVAL resource attribute
■ "(CHECK_INTERVAL > 10) AND (NAME co 2)": This filter limits Oracle Clusterware to check resources that have a value greater than 10 for the CHECK_INTERVAL resource attribute and the name of the resource contains the number 2
-n node_name Check the resource instance on a specific node. If you do not specify the -n option, then Oracle Clusterware checks the resource instances only on the local server.
-k cardinality_id Specify the resource cardinality ID.

CRSCTL Command Reference
CRSCTL Utility Reference E-31
Usage Notes■ You must have read and execute permissions on the specified resources to check
them
■ Do not use this command for any resources with names that begin with ora because these resources are Oracle resources
■ If this command is successful, it only means that a check was issued; it does not mean the CHECK action has been completed
ExampleTo initiate the check action inside the application-specific agent of a particular resource:
$ crsctl check resource appsvip
crsctl check ctssUse the crsctl check ctss command to check the status of the Cluster Time Synchronization services.
Syntaxcrsctl check ctss
ExampleThe crsctl check ctss command returns output similar to the following:
CRS-4700: The Cluster Time Synchronization Service is in Observer mode.
or
CRS-4701: The Cluster Time Synchronization Service is in Active mode.CRS-4702: Offset from the reference node (in msec): 100
crsctl config crsUse the crsctl config crs command to display Oracle High Availability Services automatic startup configuration.
Syntaxcrsctl config crs
ExampleThe crsctl config crs command returns output similar to the following:
CRS-4622: Oracle High Availability Services autostart is enabled.
crsctl delete crs administratorUse the crsctl delete crs administrator command to remove a user from the Oracle Clusterware administrator list.
-d degree_id Specify the resource degree ID.
Table E–17 (Cont.) crsctl check resource Command Parameters
Parameter Description
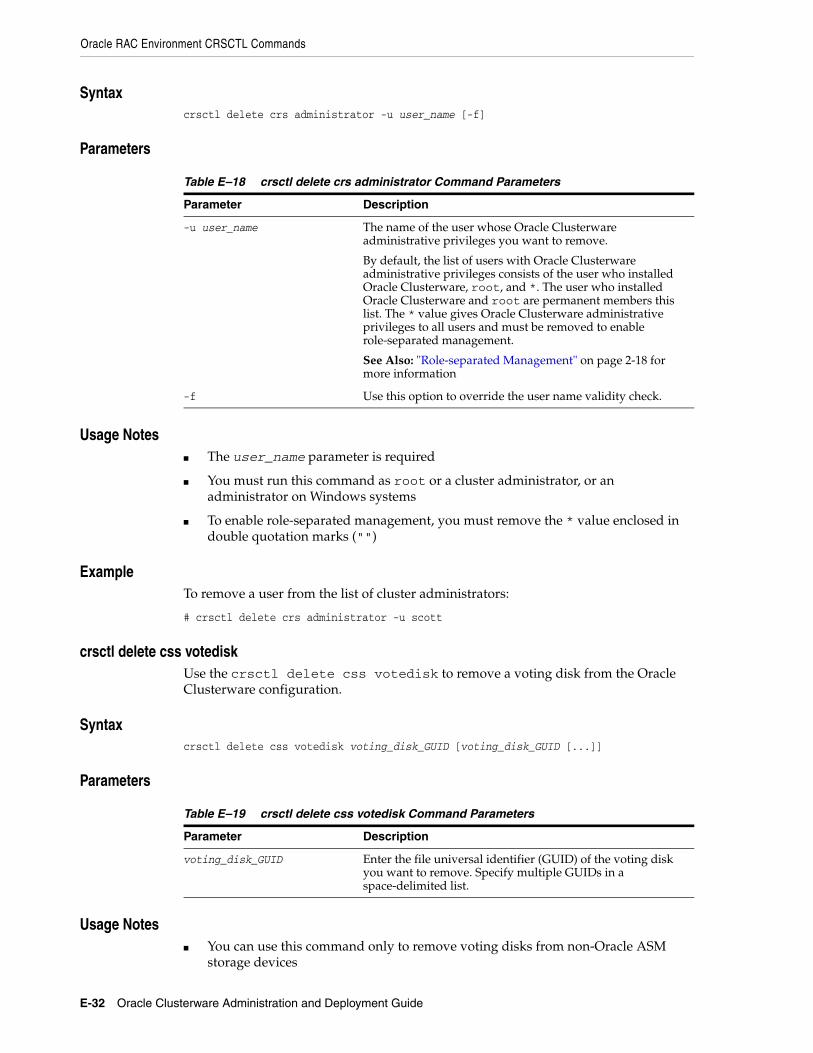
Oracle RAC Environment CRSCTL Commands
E-32 Oracle Clusterware Administration and Deployment Guide
Syntaxcrsctl delete crs administrator -u user_name [-f]
Parameters
Usage Notes■ The user_name parameter is required
■ You must run this command as root or a cluster administrator, or an administrator on Windows systems
■ To enable role-separated management, you must remove the * value enclosed in double quotation marks ("")
ExampleTo remove a user from the list of cluster administrators:
# crsctl delete crs administrator -u scott
crsctl delete css votediskUse the crsctl delete css votedisk to remove a voting disk from the Oracle Clusterware configuration.
Syntaxcrsctl delete css votedisk voting_disk_GUID [voting_disk_GUID [...]]
Parameters
Usage Notes■ You can use this command only to remove voting disks from non-Oracle ASM
storage devices
Table E–18 crsctl delete crs administrator Command Parameters
Parameter Description
-u user_name The name of the user whose Oracle Clusterware administrative privileges you want to remove.
By default, the list of users with Oracle Clusterware administrative privileges consists of the user who installed Oracle Clusterware, root, and *. The user who installed Oracle Clusterware and root are permanent members this list. The * value gives Oracle Clusterware administrative privileges to all users and must be removed to enable role-separated management.
See Also: "Role-separated Management" on page 2-18 for more information
-f Use this option to override the user name validity check.
Table E–19 crsctl delete css votedisk Command Parameters
Parameter Description
voting_disk_GUID Enter the file universal identifier (GUID) of the voting disk you want to remove. Specify multiple GUIDs in a space-delimited list.

CRSCTL Command Reference
CRSCTL Utility Reference E-33
■ You can obtain the file universal identifiers of each current voting disk by running the crsctl query css votedisk command
ExampleTo remove a voting disk:
$ crsctl delete css votedisk 26f7271ca8b34fd0bfcdc2031805581e
crsctl delete nodeUse the crsctl delete node to remove a node from the cluster.
Syntaxcrsctl delete node -n node_name
Usage Notes■ The node_name parameter is required
ExampleTo delete the node named node06 from the cluster, run the following command as root or the Oracle Clusterware installation owner:
# crsctl delete node -n node06
crsctl delete serverpoolUse the crsctl delete serverpool command to remove a server pool from the Oracle Clusterware configuration.
Syntaxcrsctl delete serverpool server_pool_name [server_pool_name [...]] [-i]
Usage Notes■ The server_pool_name parameter is required
■ If you specify -i, then the command fails if Oracle Clusterware cannot process the request immediately
■ Do not use this command for any server pools with names that begin with ora because these server pools are Oracle server pools
■ While you can use this command in either environment, it is only useful in the Oracle RAC environment
ExampleTo delete a server pool, run the following command as root or the Oracle Clusterware installation owner:
# crsctl delete serverpool sp1
See Also: "Understanding Server Pools" on page 2-13 for more information about server pools and server pool attributes

Oracle RAC Environment CRSCTL Commands
E-34 Oracle Clusterware Administration and Deployment Guide
crsctl disable crsUse the crsctl disable crs command to prevent the automatic startup of Oracle High Availability Services when the server boots.
Syntaxcrsctl disable crs
Usage Notes■ This command only affects the local server
■ If you disable Oracle High Availability Services automatic startup, you must use the crsctl start crs command to start Oracle High Availability Services
ExampleThe crsctl disable crs command returns output similar to the following:
CRS-4621: Oracle High Availability Services autostart is disabled.
crsctl enable crsUse the crsctl enable crs command to enable automatic startup of Oracle High Availability Services when the server boots.
Syntaxcrsctl enable crs
Usage Notes■ This command only affects the local server
ExampleThe crsctl enable crs command returns output similar to the following:
CRS-4622: Oracle High Availability Services autostart is enabled.
crsctl get cssUse the crsctl get css command to obtain the value of a specific Cluster Synchronization Services parameter.
Syntaxcrsctl get css parameter
Usage Notes■ Cluster Synchronization Services parameters include:
clusterguiddiagwaitdisktimeoutmisscountreboottimeprioritylogfilesize
■ This command only affects the local server

CRSCTL Command Reference
CRSCTL Utility Reference E-35
ExampleTo display the value of the disktimeout parameter for CSS, use the following command:
$ crsctl get css disktimeout200
crsctl get css ipmiaddrUse the crsctl get css ipmiaddr command to get the address of the local Intelligent Platform Management Interface (IPMI) device, or the Baseboard Management Controller (BMC), as specified in the Oracle Cluster Registry.
Syntaxcrsctl get css ipmiaddr
Usage Notes■ This command only obtains the BMC IP address for the local server
ExampleTo obtain the IPMI device IP address:
$ crsctl get css ipmiaddr
crsctl get nodenameUse the crsctl get nodename command to obtain the name of the local node.
Syntaxcrsctl get nodename
ExampleThe crsctl get nodename command returns output similar to the following:
node2
crsctl getperm serverpoolUse the crsctl getperm serverpool command to obtain permissions for a particular server pool.
Syntaxcrsctl getperm serverpool server_pool_name [-u user_name | -g group_name]
See Also: "Understanding Server Pools" on page 2-13 for more information about server pools and server pool attributes
Oracle RAC Environment CRSCTL Commands
E-36 Oracle Clusterware Administration and Deployment Guide
Parameters
Usage Notes■ The server_pool_name parameter is required
■ Do not use this command for any server pools with names that begin with ora because these server pools are Oracle server pools
■ While you can use this command in either environment, it is only useful in the Oracle RAC environment
ExampleThe crsctl getperm serverpool command returns output similar to the following:
$ crsctl getperm serverpool sp1NAME: sp1owner:root:rwx,pgrp:root:r-x,other::r--
crsctl lsmodulesUse the crsctl lsmodules command to list the components of the modules that you can debug.
Syntaxcrsctl lsmodules { crs | css | evm }
Usage Notes■ You can specify either crs (Oracle Clusterware), css (Cluster Synchronization
Services), or evm (Event Manager)
ExampleThe crsctl lsmodules command returns output similar to the following:
$ crsctl lsmodules evmList EVMD Debug Module: CLSVERList EVMD Debug Module: CLUCLSList EVMD Debug Module: COMMCRSList EVMD Debug Module: COMMNSList EVMD Debug Module: CRSOCRList EVMD Debug Module: CSSCLNTList EVMD Debug Module: EVMAGENT
Table E–20 crsctl getperm serverpool Command Parameters
Parameter Description
server_pool_name Specify the name of the server pool for which you want to obtain permissions.
-u user_name If you specify -u, then Oracle Clusterware obtains permissions for a particular user.
-g group_name If you specify -g, then Oracle Clusterware obtains permissions for a particular group.
See Also: "Dynamic Debugging" on page E-57 for more information about debugging
CRSCTL Command Reference
CRSCTL Utility Reference E-37
List EVMD Debug Module: EVMAPP...
crsctl modify serverpoolUse the crsctl modify serverpool command to modify an existing server pool.
Syntaxcrsctl modify serverpool server_pool_name -attr "attr_name=attr_value [,attr_name=attr_value[, ...]]" [-i] [-f]
Parameters
Usage Notes■ The server_pool_name parameter is required
■ If an attribute value for an attribute name-value pair contains commas, then the value must be enclosed in single quotation marks (''). For example:
"START_DEPENDENCIES=’hard(res1,res2,res3)’"
■ Running this command may result in Oracle Clusterware relocating other servers between server pools to comply with the new configuration
■ Do not use this command for any server pools with names that begin with ora because these server pools are Oracle server pools
■ While you can use this command in either environment, it is only useful in the Oracle RAC environment
Table E–21 crsctl modify serverpool Command Parameters
Parameter Description
server_pool_name The name of the server pool you want to modify.
attr_name The name of a server pool attribute you want to modify preceded by the -attr flag.
attr_value A value for the server pool attribute.
Note: The attr_name and attr_value parameters must be enclosed in double quotation marks ("") and separated by commas. For example:
-attr "CHECK_INTERVAL=30,START_TIMEOUT=25"
-i If you specify -i, then the command fails if Oracle Clusterware cannot process the request immediately.
-f If you specify the -f option, then Oracle Clusterware stops resources running on a server in another server pool and relocates that server into the server pool you are adding.
If you do not specify the -f option, then Oracle Clusterware checks whether the creation of the server pool results in stopping any resources on a server in another server pool that is going to give up a server to the server pool you are adding. If so, then Oracle Clusterware rejects the crsctl add serverpool command.
See Also: "Understanding Server Pools" on page 2-13 for more information about server pools and server pool attributes

Oracle RAC Environment CRSCTL Commands
E-38 Oracle Clusterware Administration and Deployment Guide
ExampleTo modify an existing server pool, run the following command as root or the Oracle Clusterware installation owner:
# crsctl modify serverpool sp1 -attr "MAX_SIZE=7"
crsctl pin cssUse the crsctl pin css command to pin many specific nodes. Pinning a node means that the association of a node name with a node number is fixed. If a node is not pinned, its node number may change if the lease expires while it is down. The lease of a pinned node never expires.
Syntaxcrsctl pin css -n node_name [ node_name [..]]
Usage Notes■ You can specify a space-delimited list of servers
■ Any pre-11g release 2 (11.2) Oracle software must reside on a pinned server.
■ A node may be unpinned with crsctl unpin css.
■ Deleting a node with the crsctl delete node command implicitly unpins the node.
ExampleTo pin the node named node2:
# crsctl pin css -n node2
crsctl query crs administratorUse the crsctl query crs administrator command to display the list of users with Oracle Clusterware administrative privileges.
Syntaxcrsctl query crs administrator
ExampleThe crsctl query crs administrator command returns output similar to the following:
CRS Administrator List: scott
crsctl query crs activeversionUse the crsctl query crs activeversion command to display the active version, or the binary version, of the Oracle Clusterware software on the local node.
Syntaxcrsctl query crs activeversion
ExampleThe crsctl query crs activeversion command returns output similar to the following:

CRSCTL Command Reference
CRSCTL Utility Reference E-39
Oracle Clusterware active version on the cluster is [11.2.0.1.0]"
crsctl query crs releaseversionUse the crsctl query crs releaseversion command to display the release version of the Oracle Clusterware software.
Syntaxcrsctl query crs releaseversion
ExampleThe crsctl query crs releaseversion command returns output similar to the following:
Oracle High Availablity Services release version on the local node is [11.2.0.1.0]
crsctl query crs softwareversionUse the crsctl query crs softwareversion command to display the software version, or the lowest Oracle Clusterware software version running on a particular server in the cluster.
Syntaxcrsctl query crs softwareversion node_name
Usage Notes■ If you do not provide a node name, then Oracle Clusterware displays the version
of Oracle Clusterware running on the local server.
ExampleThe crsctl query crs softwareversion command returns output similar to the following:
Oracle Clusterware version on node [node1] is [11.2.0.1.0]
crsctl query css ipmideviceUse the crsctl query css ipmidevice command to determine the presence of the Intelligent Platform Management Interface (IPMI) driver on the local system.
Syntaxcrsctl query css ipmidevice
Usage Notes■ This command was implemented to perform a pre-check during installation, and
is normally issued only by the installer.
■ There are no special privileges required to run this command.
■ This command performs a perfunctory check and a success return code from the command does not guarantee that the baseboard management controller (BMC) hardware is fully configured for use.

Oracle RAC Environment CRSCTL Commands
E-40 Oracle Clusterware Administration and Deployment Guide
ExampleThe crsctl query crs ipmidevice command returns output similar to the following:
CRS-4231: IPMI device successfully found and is configured
or
CRS-4128: IPMI device not found
crsctl query css votediskUse the crsctl query css votedisk command to display the voting disks used by Cluster Synchronization Services, the status of the voting disks, and the location of the disks, whether they are stored on Oracle ASM or elsewhere.
Syntaxcrsctl query css votedisk
Usage Notes■
ExampleThe crsctl query css votedisk command returns output similar to the following:
$ crsctl query css votedisk## STATE File Universal Id File Name Disk group-- ----- ----------------- --------- ---------1. ONLINE 296641fd201f4f3fbf3452156d3b5881 (/ocfs2/host09_vd3) []2. ONLINE 8c4a552bdd9a4fd9bf93e444223146f2 (/netapp/ocrvf/newvd) []3. ONLINE 8afeee6ae3ed4fe6bfbb556996ca4da5 (/ocfs2/host09_vd1) []Located 3 voting disk(s).
crsctl relocate resourceUse the crsctl relocate resource command to relocate resources to another server in the cluster.
Syntaxcrsctl relocate resource {resource_name | resource_name | -all -s source_server |-w "filter"} [-n destination_server] [-k cid] [-env "env1=val1,env2=val2,..."][-i] [-f]
Parameters
Table E–22 crsctl relocate resource Command Parameters
Parameter Description
resource_name The name of a resource you want to relocate.
resource_name | -all-s source_server
Specify one particular or all resources located on a particular server from which you want to relocate those resources.
CRSCTL Command Reference
CRSCTL Utility Reference E-41
Usage Notes■ Any one of the three following options is required to specify which resources you
want to relocate:
– You can specify one particular resource to relocate.
– Or you can specify one particular or all the resources to relocate from a particular source server.
– Thirdly, you can specify a resource filter that Oracle Clusterware uses to match resources to relocate.
■ If a resource has a degree ID greater than 1, then Oracle Clusterware relocates all instances of the resource.
-w "filter" Specify a resource filter that Oracle Clusterware uses to limit the number of resources relocated. The filter must be enclosed in double quotation marks (""). Examples of resource filters include:
■ "TYPE == cluster_resource": This filter limits Oracle Clusterware to relocate only resources of cluster_resource type
■ "CHECK_INTERVAL > 10": This filter limits Oracle Clusterware to relocate resources that have a value greater than 10 for the CHECK_INTERVAL resource attribute
■ "(CHECK_INTERVAL > 10) AND (NAME co 2)": This filter limits Oracle Clusterware to relocate resources that have a value greater than 10 for the CHECK_INTERVAL resource attribute and the name of the resource contains the number 2
-n destination_server Specify the name of the server to which you want relocate resources. If you do not specify a destination server, then Oracle Clusterware relocates the resources to the best server according to the attribute profile of each resource.
-k cid Specify the resource cardinality ID. If you specify this parameter, then Oracle Clusterware relocates the resource instance that have the cardinality you specify.
-env "env1=val1,env2=val2,..."
You can optionally override one or more resource profile attribute values for this command. If you specify multiple environment name-value pairs, then you must separate each pair with a comma and enclose the entire list in double quotation marks ("").
-i If you specify -i, then the command returns an error if processing this command requires waiting for Oracle Clusterware to unlock the resource or its dependents. Sometimes, Oracle Clusterware locks resources or other objects to prevent commands from interfering with each other.
-f Specify the -f option to force the relocating of the resource when it has other resources running that depend on it. Dependent resources are relocated or stopped when you use this option.
Note: When you are relocating resources that have cardinality greater than 1, you must use either -k or -s to narrow down which resource instances are to be relocated.
Table E–22 (Cont.) crsctl relocate resource Command Parameters
Parameter Description
Oracle RAC Environment CRSCTL Commands
E-42 Oracle Clusterware Administration and Deployment Guide
■ You must have read and execute permissions on the specified resources to relocate them
■ Do not use this command for any resources with names that begin with ora because these resources are Oracle resources.
ExampleTo relocate one particular resource from one server to another:
# crsctl relocate resource myResource1 -s node1 -n node3
crsctl relocate serverUse the crsctl relocate server command to relocate a server to a different server pool.
Syntaxcrsctl relocate server server_name [...] -c server_pool_name [-i] [-f]
Parameters
Usage Notes■ The server_name and -c server_pool_name parameters are required
ExampleTo move the node6 and node7 servers into the sp1 server pool without disrupting
any active resources on those nodes, use the following command:
$ crsctl relocate server node6 node7 -c sp1
crsctl replace discoverystringUse the crsctl replace discoverystring command to replace the existing discovery string used to locate voting disk files.
Syntaxcrsctl replace discoverystring 'absolute_path[,...]'
Table E–23 crsctl relocate server Command Parameters
Parameter Description
server_name The name of the server you want to relocate. You can provide a space-delimited list of servers if you want to relocate multiple servers.
-c server_pool_name Specify the name of the server pool to which you want relocate the servers.
-i If you specify -i, then the command fails if Oracle Clusterware cannot process the request immediately.
-f If you specify the -f option, then Oracle Clusterware stops resources running on the servers in another server pool and relocates that server into the server pool you specified.
If you do not specify the -f option, then Oracle Clusterware checks for resources that must be stopped on the servers that are being relocated. If it finds any, then Oracle Clusterware rejects the crsctl relocate server command.
CRSCTL Command Reference
CRSCTL Utility Reference E-43
Parameters
Usage Notes■ You must be root, the Oracle Clusterware installation owner, or a Windows
administrator to run this command.
■ You can run this command on any node in the cluster.
ExampleAssume the current discovery string is /oracle/css1/*. To also use voting disk files in the /oracle/css2/ directory, replace the current discovery string using the following command:
# crsctl replace discoverystring "/oracle/css1/*,/oracle/css2/*"
crsctl replace votediskUse the crsctl replace votedisk command to move or replace the existing voting disks. This command creates voting disks in the specified locations, either in Oracle ASM or some other storage option. Oracle Clusterware copies existing voting disk information into the new locations and removes the voting disks from the former locations.
Syntaxcrsctl replace votedisk [+asm_disk_group | path_to_voting_disk [...]]
Parameters
Usage Notes■ You must be root, the Oracle Clusterware installation owner, or a Windows
administrator to run this command.
■ Specify to replace a voting disk in either an Oracle ASM disk group or in some other storage device.
■ You can run this command on any node in the cluster.
Table E–24 crsctl replace discoverystring Command Parameters
Parameter Description
absolute_path Specify one or more comma-delimited absolute paths that match one or more voting disk file locations. Wildcards may be used.
The list of paths must be enclosed in quotes.
Table E–25 crsctl replace votedisk Command Parameters
Parameter Description
+asm_disk_group Specify the disk group in Oracle ASM where you want to locate the voting disk.
path_to_voting_disk [...] A space-delimited list of voting disk file paths for voting disk files that reside outside of Oracle ASM.
Oracle RAC Environment CRSCTL Commands
E-44 Oracle Clusterware Administration and Deployment Guide
Example
Example 1To replace a voting disk that is located within Oracle ASM:
$ crsctl replace votedisk +diskgroup1
Example 2To replace a voting disk that is located on a shared file system:
$ crsctl replace votedisk /mnt/nfs/disk1 /mnt/nfs/disk2
crsctl set cssUse the crsctl set css command to set the value of a Cluster Synchronization Services parameter.
Syntaxcrsctl set css parameter value
Usage Notes■ Cluster Synchronization Services parameters include:
diagwaitdisktimeoutmisscountreboottime
ExampleTo set the value of a Cluster Synchronization Services parameter:
$ crsctl set css diagwait 30
crsctl set css ipmiaddrUse the crsctl set css ipmiaddr command to store the address of the local Intelligent Platform Management Interface (IPMI) device, or the Baseboard Management Controller (BMC), in the Oracle Cluster Registry.
Syntaxcrsctl set css ipmiaddr ip_address
Usage Notes■ Run the command under the user account used to install Oracle Clusterware
■ Obtain the BMC IP address for the local server with the crsctl get css ipmiaddr command, or using the appropriate management utility for the local server (ipmiutil, ipmitool)
■ Oracle Clusterware stores IP address for the local BMC in the configuration store, and distributes the address as required
■ This command only stores the BMC IP address on the server from which you run it
CRSCTL Command Reference
CRSCTL Utility Reference E-45
ExampleTo store the BMC IP address on a local server and distribute it to other cluster nodes:
$ crsctl set css ipmiaddr 192.0.2.244
crsctl set css ipmiadminUse the crsctl set css ipmiadmin command to store in the Oracle Registry the login information of an Intelligent Platform Management Interface (IPMI) administrator configured on the resident baseboard management controller (BMC) of the local server.
Syntaxcrsctl set css ipmiadmin ipmi_administrator_name
Usage Notes■ This command must be run under the user account that installed Oracle
Clusterware.
■ When prompted, provide the new password to associate with the new administrator account name. Oracle Clusterware stores the name and password for the local baseboard management controller (BMC) in the configuration store, and distributes the new credentials as required.
■ This command only modifies the IPMI administrator on the server from which you run it.
■ This command fails if another server cannot access the local BMC at the supplied address.
ExampleTo modify the IPMI administrator scott:
$ crsctl set css ipmiadmin scott
crsctl setperm serverpoolUse the crsctl setperm serverpool command to set permissions for a particular server pool.
Syntaxcrsctl setperm serverpool server_pool_name {-u acl_string | -x acl_string |-o user_name | -g group_name}
Parameters
Table E–26 crsctl setperm serverpool Command Parameters
Parameter Description
server_pool_name Specify the name of the server pool for which you want to set permissions.

Oracle RAC Environment CRSCTL Commands
E-46 Oracle Clusterware Administration and Deployment Guide
Usage Notes■ The server_pool_name parameter is required
■ Do not use this command for any server pools with names that begin with ora because these server pools are Oracle server pools
■ While you can use this command in either environment, it is only useful in the Oracle RAC environment
ExampleTo grant read, write, and execute permissions on a server pool for user Scott Tiger:
crsctl setperm serverpool sp3 -u user:scott.tiger:rwx
crsctl start clusterUse the crsctl start cluster command on any node in the cluster to start the Oracle Clusterware stack.
Syntaxcrsctl start cluster [-all | -n server_name [...]]
{-u | -x | -o | -g} You can specify only one of the following parameters for a server pool:
■ -u acl_string: You can update the access control list (ACL) for a server pool
■ -x acl_string: You can delete the ACL for a server pool
■ -o user_name: You can change the owner of a server pool by entering a user name
■ -g group_name: You can change the primary group of a server pool by entering a group name
Specify a user, group, or other ACL string, as follows:
user:user_name[:readPermwritePermexecPerm] |group:group_name[:readPermwritePermexecPerm] |other[::readPermwritePermexecPerm]
■ user: User ACL
■ group: Group ACL
■ other: Other ACL
■ readPerm: Read permission for the server pool; the letter r grants a user, group, or other read permission, the minus sign (-) denies read permission
■ writePerm: Write permission for the server pool; the letter w grants a user, group, or other write permission, the minus sign (-) denies write permission
■ execPerm: Execute permission for the server pool; the letter x grants a user, group, or other execute permission, the minus sign (-) denies execute permission
Table E–26 (Cont.) crsctl setperm serverpool Command Parameters
Parameter Description

CRSCTL Command Reference
CRSCTL Utility Reference E-47
Usage Notes■ You can choose to start the Oracle Clusterware stack on all servers in the cluster,
on one or more named servers in the cluster (separate multiple server names by a space), or the local server, if you do not specify either -all or -n.
■ You can use this cluster-aware command on any node in the cluster.
ExampleTo start the Oracle Clusterware stack on two named servers run the following command as root or the owner of the Oracle Clusterware installation:
# crsctl start cluster -n node1 node2
crsctl start crsUse the crsctl start crs command to start Oracle High Availability Services on the local server.
Syntaxcrsctl start crs
Usage Notes■ This command starts Oracle High Availability Services only on the local server
ExampleTo start Oracle High Availability Services on the local server, run the following command as root or the owner of the Oracle Clusterware installation:
# crsctl start crs
crsctl status serverUse the crsctl status server command to obtain the status and configuration information of one or more particular servers.
Syntaxcrsctl status server [-p | -v | -f]
crsctl status server { server_name [...] | -w "filter"} [-g | -p | -v | -f]
Parameters
Table E–27 crsctl status server Command Parameters
Parameter Description
server_name [...] Specify one or more space-delimited server names
-w "filter" Specify a filter to determine which servers are displayed. The filter must be enclosed in double quotation marks (""). Values that contain parentheses or spaces must be enclosed in single quotation marks (''). For example, "STATE = ONLINE" limits the display to servers that are online.
See Also: "Filters" on page F-5 for more information about filters
Oracle RAC Environment CRSCTL Commands
E-48 Oracle Clusterware Administration and Deployment Guide
Example
Example 1The crsctl status server command returns output similar to the following:
NAME=node1STATE=ONLINE
NAME=node2STATE=ONLINE
Example 2To display the full configuration of a specific server, enter a command similar to the following:
$ crsctl status server node2 -fNAME=node2STATE=ONLINEACTIVE_POOLS=ora.orcl GenericSTATE_DETAILS=
crsctl status serverpoolUse the crsctl status serverpool command to obtain the status and configuration information of one or more particular server pools.
Syntaxcrsctl status serverpool [-p | -v | -f]
crsctl status serverpool [server_pool_name [...]] [-g | -p | -v | -f]
Parameters
-g | -p | -v | -f You can specify one of the following parameters when Oracle Clusterware checks the status of specific servers:
■ -g: Use this parameter to check if the specified servers are registered
■ -p: Use this parameter to display static configuration of the specified servers
■ -v: Use this parameter to display the runtime configuration of the specified servers
■ -f: Use this parameter to display the full configuration of the specified servers
Table E–28 crsctl status serverpool Command Parameters
Parameter Description
[server_pool_name [...] Specify one or more space-delimited server pool names.
Table E–27 (Cont.) crsctl status server Command Parameters
Parameter Description
CRSCTL Command Reference
CRSCTL Utility Reference E-49
Usage Notes■ The server_pool_name parameter or a filter is required
■ Do not use this command for any server pools with names that begin with ora because these server pools are Oracle server pools
■ While you can use this command in either environment, it is only useful in the Oracle RAC environment
Example
Example 1To display the full configuration of the server pool sp1:
$ crsctl status serverpool sp1 -f NAME=splIMPORTANCE=1MIN_SIZE=0MAX_SIZE=-1SERVER_NAMES=node3 node4 node5PARENT_POOLS=GenericEXCLUSIVE_POOLS=ACL=owner:oracle:rwx,pgrp:oinstall:rwx,other::r--ACTIVE_SERVERS=node3 node4
Example 2To display all the server pools and the servers associated with them, use the following command:
$ crsctl status serverpoolNAME=FreeACTIVE_SERVERS=
NAME=GenericACTIVE_SERVERS=node1 node2
NAME=ora.orclACTIVE_SERVERS=node1 node2
NAME=sp1ACTIVE_SERVERS=node3 node4
[-g | -p | -v | -f] You can optionally specify one of the following parameters:
■ -g: Use this parameter to check if the specified server pools are registered
■ -p: Use this parameter to display static configuration of the specified server pools
■ -v: Use this parameter to display the runtime configuration of the specified server pools
■ -f: Use this parameter to display the full configuration of the specified server pools
Table E–28 (Cont.) crsctl status serverpool Command Parameters
Parameter Description

Oracle RAC Environment CRSCTL Commands
E-50 Oracle Clusterware Administration and Deployment Guide
crsctl stop clusterUse the crsctl stop cluster command on any node in the cluster to stop the Oracle Clusterware stack on all servers in the cluster or specific servers.
Syntaxcrsctl stop cluster [-all | -n server_name [...]] [-f]
Usage Notes■ If you do not specify -all or one or more space-delimited server names, then
Oracle Clusterware stops the Oracle Clusterware stack on the local server.
■ You can use this cluster-aware command on any node in the cluster.
■ This command attempts to gracefully stop resources managed by Oracle Clusterware while attempting to stop the Oracle Clusterware stack.
If any resources that Oracle Clusterware manages are still running after you run the crsctl stop cluster command, then the command fails. Use the -f option to unconditionally stop all resources and stop the Oracle Clusterware stack.
ExampleTo stop the Oracle Clusterware stack on a particular server:
# crsctl stop cluster -n node1
crsctl stop crsUse the crsctl stop crs command to stop Oracle High Availability Services on the local server.
Syntaxcrsctl stop crs [-f]
Usage Notes■ This command attempts to gracefully stop resources managed by Oracle
Clusterware while attempting to stop Oracle High Availability Services on the local server.
If any resources that Oracle Clusterware manages are still running after you run the crsctl stop crs command, then the command fails. Use the -f option to unconditionally stop all resources and stop Oracle High Availability Services on the local server.
ExampleTo stop Oracle High Availability Services on the local server:
# crsctl stop crs
crsctl unpin cssUse the crsctl unpin css command to unpin many servers. If a node is not pinned, its node number may change if the lease expires while it is down.
Syntaxcrsctl unpin css -n node_name [node_name [...exit]]
CRSCTL Command Reference
CRSCTL Utility Reference E-51
Usage Notes■ You can specify a space-delimited list of nodes.
■ Unpinned servers that stop for longer than a week are no longer reported by olsnodes. These servers are dynamic when they leave the cluster, so you do not need to explicitly remove them from the cluster.
■ Deleting a node with the crsctl delete node command implicitly unpins the node.
■ During upgrade of Oracle Clusterware, all servers are pinned, whereas after a fresh installation of Oracle Clusterware 11g release 2 (11.2), all servers you add to the cluster are unpinned.
■ You cannot unpin a server that has an instance of Oracle RAC that is older than 11g release 2 (11.2) if you installed Oracle Clusterware 11g release 2 (11.2) on that server.
ExampleTo unpin two nodes:
$ crsctl unpin css node1 node4
crsctl unset cssUse the crsctl unset css command to restore the value of a Cluster Synchronization Services parameter to its default value.
Syntaxcrsctl unset css parameter
Usage Notes■ There are four Cluster Synchronization Services parameters you can specify:
– diagwait:
– disktimeout:
– misscount:
– reboottime:
ExampleTo restore the reboottime Cluster Synchronization Services parameter to its default value:
$ crsctl unset css reboottime
Oracle Restart Environment CRSCTL Commands
E-52 Oracle Clusterware Administration and Deployment Guide
Oracle Restart Environment CRSCTL Commands
The commands listed in this section control Oracle High Availability Services. These commands manage the Oracle High Availability Services stack in the Oracle Restart environment, which consists of the Oracle High Availability Services daemon (ohasd), Oracle ASM (if installed), and Cluster Synchronization Services (if Oracle ASM is installed). These commands only affect the local server on which you run them.
Each server in the cluster is in one of two possible states:
■ The whole stack is up, which means that Oracle High Availability Services is active
■ The whole stack is down, which means that Oracle High Availability Services is inactive
You can use the following commands in the Oracle Restart environment, only:
■ crsctl check has
■ crsctl config has
■ crsctl disable has
■ crsctl enable has
■ crsctl query has releaseversion
■ crsctl query has softwareversion
■ crsctl start has
■ crsctl stop has
crsctl check hasUse the crsctl check has command to check the status of ohasd.
Syntaxcrsctl check has
Usage Notes■
ExampleThe crsctl check has command returns output similar to the following:
CRS-4638: Oracle High Availability Services is online
crsctl config hasUse the crsctl check has command to display the automatic startup configuration of the Oracle High Availability Services stack on the server.
Syntaxcrsctl config has
Usage Notes■

CRSCTL Command Reference
CRSCTL Utility Reference E-53
ExampleThe crsctl config has command returns output similar to the following:
CRS-4622 Oracle High Availability Services autostart is enabled.
crsctl disable hasUse the crsctl disable has command to disable automatic startup of the Oracle High Availability Services stack when the server boots up.
Syntaxcrsctl disable has
Usage Notes■
ExampleThe crsctl disable has command returns output similar to the following:
CRS-4621 Oracle High Availability Services autostart is disabled.
crsctl enable hasUse the crsctl enable has command to enable automatic startup of the Oracle High Availability Services stack when the server boots up.
Syntaxcrsctl enable has
Usage Notes■
ExampleThe crsctl enable has command returns output similar to the following:
CRS-4622 Oracle High Availability Services autostart is enabled.
crsctl query has releaseversionUse the crsctl query crs releaseversion command to display the release version of the Oracle Clusterware software on the local node.
Syntaxcrsctl query has releaseversion
Usage Notes■
ExampleThe crsctl query has releaseversion command returns output similar to the following:
Oracle High Availability Services release version on the local node is

Oracle Restart Environment CRSCTL Commands
E-54 Oracle Clusterware Administration and Deployment Guide
[11.2.0.0.2]
crsctl query has softwareversionUse the crsctl query crs softwareversion command to display the software version on the local node.
Syntaxcrsctl query has softwareversion server_name
Usage Notes■ If you do not provide a server name, then Oracle Clusterware displays the version
of Oracle Clusterware running on the local server.
ExampleThe crsctl query has softwareversion command returns output similar to the following:
Oracle High Availability Services version on the local node is [11.2.0.0.2]
crsctl start hasUse the crsctl start has command to start Oracle High Availability Services on the local server.
Syntaxcrsctl start has
Usage Notes■
ExampleTo start Oracle High Availability Services on the local server:
# crsctl start has
crsctl stop hasUse the crsctl stop has command to stop Oracle High Availability Services on the local server.
Syntaxcrsctl stop has [-f]
Usage Notes■ This command attempts to gracefully stop resources managed by Oracle
Clusterware while attempting to stop Oracle High Availability Services.
If any resources that Oracle Clusterware manages are still running after you run the crsctl stop has command, then the command fails. Use the -f option to unconditionally stop all resources and stop Oracle High Availability Services.

CRSCTL Command Reference
CRSCTL Utility Reference E-55
ExampleTo stop Oracle High Availability Services on the local server:
# crsctl stop has"Troubleshooting and Diagnostic Output" on page E-56
Troubleshooting and Diagnostic Output
E-56 Oracle Clusterware Administration and Deployment Guide
Troubleshooting and Diagnostic Output
You can use crsctl set log commands as the root user to enable dynamic debugging for Cluster Ready Services (CRS), Cluster Synchronization Services (CSS), and the Event Manager (EVM), and the clusterware subcomponents. You can dynamically change debugging levels using crsctl debug commands. Debugging information remains in the Oracle Cluster Registry for use during the next startup. You can also enable debugging for resources.
This section covers the following topics:
■ Dynamic Debugging
■ Component Level Debugging
■ Enabling Debugging for Oracle Clusterware Resources
■ Enabling Additional Tracing for Oracle Clusterware High Availability
Troubleshooting and Diagnostic Output
CRSCTL Utility Reference E-57
Dynamic Debugging
This section includes the following CRSCTL commands that aid in debugging:
■ crsctl set log
■ crsctl set trace
crsctl set logUse the crsctl set log command to set log levels for Oracle Clusterware.
Syntaxcrsctl set log {[crs | css | evm "component_name=log_level, [...]"] | [all=log_level]}
You can also set log levels for the agents of specific resources, as follows:
crsctl set log res "resource_name=log_level, [...]"
Usage Notes■ You can set log levels for various components of the three modules, CRS, CSS, and
EVM. If you choose the all option, then you can set log levels for all components of one module with one command. Use the crsctl lsmodules command to obtain a list of components for each module.
■ Enter a comma-delimited list of component name-log level pairs enclosed in double quotation marks ("").
■ The log_level is a number from 1 to 5 that sets the log level for the component or resource, where 1 is the least amount of log output and 5 provides the most detailed log output.
■ To set log levels for resources, specify the name of a particular resource, or a comma-delimited list of resource name-log level pairs enclosed in double quotation marks ("").
ExamplesTo set log levels for the CRSRTI and CRSCOMM components of the CRS module:
$ crsctl set log crs "CRSRTI=1,CRSCOMM=2"
To set log levels for all components of the EVM module:
$ crsctl set log evm all=2
To set a log level for a resource:
$ crsctl set log res "myResource1=3"
crsctl set traceUse the crsctl set trace command to set tracing levels for Oracle Clusterware.
Note: Separate component name-log level pairs with an equals sign (=) in Oracle Clusterware 11g release 2 (11.2). Previous Oracle Clusterware versions used a colon (:).

Dynamic Debugging
E-58 Oracle Clusterware Administration and Deployment Guide
Syntaxcrsctl set trace {[crs | evm "component_name=tracing_level, [...]"] | ["all=tracing_level"]
Usage Notes■ You can set tracing levels for the components of two modules: CRS and EVM. Use
the crsctl lsmodules command to obtain a list of components for each module. If you choose the all option, then you can set tracing levels for all components of one module with one command.
■ Enter a comma-delimited list of component name-tracing level pairs enclosed in double quotation marks ("").
■ The tracing-level is a number from 1 to 5 that sets the tracing level for the component, where 1 is the least amount of tracing output and 5 provides the most detailed tracing output.
ExamplesTo set tracing levels for the CRSCCL and CRSEVT components of the CRS module:
$ crsctl set trace crs "CRSCCL=1,CRSEVT=2"
Note: Separate component name-tracing level pairs with an equals sign (=) in Oracle Clusterware 11g release 2 (11.2). Previous Oracle Clusterware versions used a colon (:).
Troubleshooting and Diagnostic Output
CRSCTL Utility Reference E-59
Component Level Debugging
You can use crsctl set log and crsctl set trace commands as the root user to enable dynamic debugging for the Oracle Clusterware Cluster Ready Services (CRS), Cluster Synchronization Services (CSS), and the Event Manager (EVM).
This section includes the following topics:
■ Enabling Debugging for CRS, CSS, and EVM Modules
■ Creating an Initialization File to Contain the Debugging Level
Enabling Debugging for CRS, CSS, and EVM ModulesYou can enable debugging for the CRS, CSS, and EVM modules and their components, and for resources, by setting environment variables or by issuing crsctl set log commands, using the following syntax:
crsctl set {log | trace} module_name “component:debugging_level[,component:debugging_level][...]”
Run the crsctl set command as the root user, and supply the following information:
■ module_name—The name of the module: CRS, CSS, or EVM.
■ component—The name of a component for the CRS, CSS, or EVM module. See Table E–29 for a list of all of the components.
■ debugging_level—A number from 1 to 5 to indicate the level of detail you want the debug command to return, where 1 is the least amount of debugging output and 5 provides the most detailed debugging output.
You can dynamically change the debugging level in the crsctl command or you can configure an initialization file for changing the debugging level, as described in "Creating an Initialization File to Contain the Debugging Level" on page 62.
The following commands show examples of how to enable debugging for the various modules:
■ To enable debugging for Oracle Clusterware:
crsctl set log crs "CRSRTI:1,CRSCOMM:2"
■ To enable debugging for OCR:
crsctl set log crs "CRSRTI:1,CRSCOMM:2,OCRSRV:4"
■ To enable debugging for EVM:
crsctl set log evm "EVMCOMM:1"
■ To enable debugging for resources
crsctl set log res "resname:1"
To obtain a list of components that can be used for debugging, run the crsctl lsmodules command, as follows:
crsctl lsmodules {crs | css | evm}
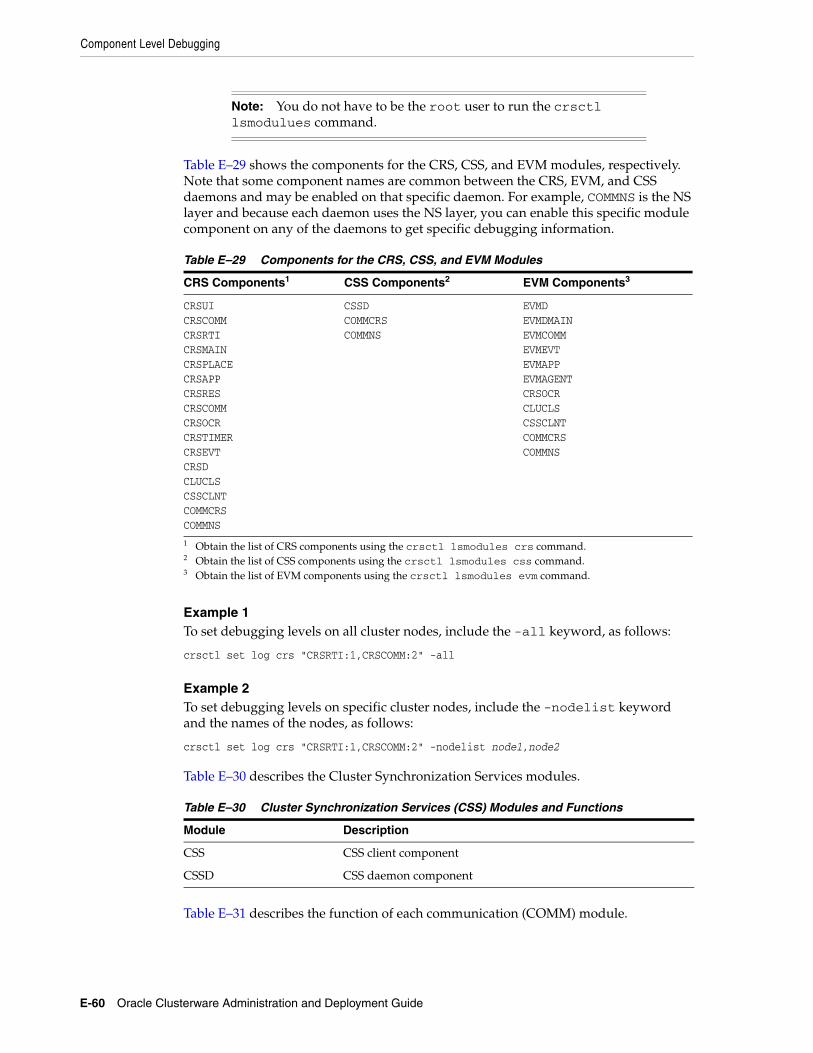
Component Level Debugging
E-60 Oracle Clusterware Administration and Deployment Guide
Table E–29 shows the components for the CRS, CSS, and EVM modules, respectively. Note that some component names are common between the CRS, EVM, and CSS daemons and may be enabled on that specific daemon. For example, COMMNS is the NS layer and because each daemon uses the NS layer, you can enable this specific module component on any of the daemons to get specific debugging information.
Example 1 To set debugging levels on all cluster nodes, include the -all keyword, as follows:
crsctl set log crs "CRSRTI:1,CRSCOMM:2" -all
Example 2 To set debugging levels on specific cluster nodes, include the -nodelist keyword and the names of the nodes, as follows:
crsctl set log crs "CRSRTI:1,CRSCOMM:2" -nodelist node1,node2
Table E–30 describes the Cluster Synchronization Services modules.
Table E–31 describes the function of each communication (COMM) module.
Note: You do not have to be the root user to run the crsctl lsmodulues command.
Table E–29 Components for the CRS, CSS, and EVM Modules
CRS Components1
1 Obtain the list of CRS components using the crsctl lsmodules crs command.
CSS Components2
2 Obtain the list of CSS components using the crsctl lsmodules css command.
EVM Components3
3 Obtain the list of EVM components using the crsctl lsmodules evm command.
CRSUICRSCOMMCRSRTICRSMAINCRSPLACECRSAPPCRSRESCRSCOMMCRSOCRCRSTIMERCRSEVTCRSDCLUCLSCSSCLNTCOMMCRSCOMMNS
CSSDCOMMCRSCOMMNS
EVMDEVMDMAINEVMCOMMEVMEVTEVMAPPEVMAGENTCRSOCRCLUCLSCSSCLNTCOMMCRSCOMMNS
Table E–30 Cluster Synchronization Services (CSS) Modules and Functions
Module Description
CSS CSS client component
CSSD CSS daemon component

Troubleshooting and Diagnostic Output
CRSCTL Utility Reference E-61
Table E–32 describes the functions performed by each CRS module.
Using the crsctl set log crs command, you can debug the OCR components listed in Table E–33. The components listed in Table E–33 can also be used for the Oracle Local Registry (OLR) except for OCRMAS and OCRASM. You can also use them for the OCR and OLR clients, except for OCRMAS and OCRSRV. Some of the OCR/OLR clients are OCRCONFIG, OCRDUMP, and so on.
Table E–34 describes the OCR tool modules.
Table E–31 Communication (COMM) Modules and Functions
Module Description
COMMCRS Clusterware communication layer
COMMNS NS communication layer
Table E–32 Oracle Clusterware (CRS) Modules and Functions
Module Descriptions
CRSUI User interface module
CRSCOMM Communication module
CRSRTI Resource management module
CRSMAIN Main module/driver
CRSPLACE CRS placement module
CRSAPP CRS application
CRSRES CRS resources
CRSOCR Oracle Cluster Registry interface
CRSTIMER Various timers related to CRS
CRSEVT CRS EVM/event interface module
CRSD CRS daemon
Table E–33 Oracle Cluster Registry (OCR) Component Names
Module Description
OCRAPI OCR abstraction component
OCRCLI OCR client component
OCRSRV OCR server component
OCRMAS OCR master thread component
OCRMSG OCR message component
OCRCAC OCR cache component
OCRRAW OCR raw device component
OCRUTL OCR util component
OCROSD OCR operating system dependent (OSD) layer
OCRASM OCR ASM component

Component Level Debugging
E-62 Oracle Clusterware Administration and Deployment Guide
Creating an Initialization File to Contain the Debugging LevelThis section describes how to specify the debugging level in an initialization file. This debugging information is stored for use during the next startup.
For each process to debug, you can create an initialization file that contains the debugging level.
The initialization file name includes the name of the process that you are debugging (process_name.ini). The file is located in the Grid_home/log/host_name/admin/ directory. For example, the name for the CLSCFG debugging initialization file on node1 would be:
Grid_home/log/node1/admin/clscfg.ini
You can also use an initialization file when using OCR utilities. The initialization file for ocrconfig, ocrdump, and ocrcheck is:
Grid_home/srvm/admin/ocrlog.ini
The format of the initialization file is as follows:
mesg_logging_level=2comploglvl=”OCRAPI:0;OCRSRV:0”comptrclvl=”OCRAPI:0;OCRSRV:0”
You can specify component names, logging, and tracing levels.
Table E–34 OCRCONFIG Modules and Functions
Module Description
OCRCONFIG OCRCONFIG component for configuring the OCR
OCRDUMP OCRDUMP component that lists the Oracle Cluster Registry contents
OCRCHECK OCRCHECK component that verifies all of the configured OCRs
See Also: "Enabling Debugging for CRS, CSS, and EVM Modules" on page 59 for information about dynamically changing debugging levels by specifying the level number (from 1 to 5) on the crsctl command
Troubleshooting and Diagnostic Output
CRSCTL Utility Reference E-63
Enabling Additional Tracing for Oracle Clusterware High Availability
Oracle Support may ask you to enable tracing to capture additional information. Because the procedures described in this section may affect performance, only perform these activities with the assistance of Oracle Support.
Enabling Debugging for Oracle Clusterware ResourcesYou can enable debugging for Oracle Clusterware resources by issuing crsctl set log and crsctl set trace commands, using the following syntax:
crsctl set {log | trace} resource “resource_name=debugging_level”
Run the crsctl set command as the root user, and supply the following information:
■ resource_name—The name of the resource to debug.
■ debugging_level—A number from 1 to 5 to indicate the level of detail you want the debug command to return, where 1 is the least amount of debugging output and 5 provides the most detailed debugging output.
You can dynamically change the debugging level in the crsctl command or you can configure an initialization file for changing the debugging level, as described in "Creating an Initialization File to Contain the Debugging Level" on page 62.
To obtain a list of resources that can be used for debugging, run the crsctl status resource command.
Example 1 To generate a debugging log for the VIP resource on node1, issue the following command:
crsctl set log resource "ora.node1.vip:1"
Example 2 To generate a trace file for a SCAN listener, use the following command:
crsctl set trace resource "ora.LISTENER_SCAN1.lsnr=3”
Note: You must run this crsctl set log or crsctl set trace command as the root user.

Enabling Additional Tracing for Oracle Clusterware High Availability
E-64 Oracle Clusterware Administration and Deployment Guide
F
Oracle Clusterware C Application Program Interfaces F-1
F Oracle Clusterware C Application ProgramInterfaces
This appendix describes the Oracle Clusterware C application program interfaces (APIs). This appendix contains the following topics:
■ About the Programming Interface (C API) to Oracle Clusterware
– Overview
– Operational Notes
– Deprecated CLSCRS APIs
■ Interactive CLSCRS APIs
■ Non-Interactive CLSCRS APIs
See Also: Chapter 5, "Making Applications Highly Available Using Oracle Clusterware" for detailed information about using Oracle Clusterware to make applications highly available
About the Programming Interface (C API) to Oracle Clusterware
F-2 Oracle Clusterware Administration and Deployment Guide
About the Programming Interface (C API) to Oracle Clusterware
This section contains information about using the programming interface (C API) to Oracle Clusterware (CLSCRS.
■ Overview
■ Operational Notes
■ Deprecated CLSCRS APIs
OverviewCLSCRS is a set of C-based APIs for Oracle Clusterware. The CLSCRS APIs enable you to manage the operation of entities that are managed by Oracle Clusterware. These entities include resources, resource types, servers, and server pools. You use the APIs to register user applications with Oracle Clusterware so that the clusterware can manage them and maintain high availability. Once an application is registered, you can manage it and query the application’s status. If you no longer need the application, then you can stop it and unregister it from Oracle Clusterware.
Oracle Clusterware services are provided by Cluster Ready Services that runs as part of Oracle Clusterware. The CLSCRS API uses a context that is explicitly named in all function calls. The API does not store anything at the process or thread level. You can use the callbacks for diagnostic logging.
Operational NotesThis section includes the following topics:
■ Context Initialization and Persistence
■ Threading Support
■ CLSCRS API Data Structures
■ Memory Management
■ Error Handling and Tracing
■ Callback Mechanism
■ Filters
■ Script Agent Usage
■ Help Interface
Context Initialization and PersistenceTo use the CLSCRS APIs, you must first initialize the clscrs context. The calls to create and terminate this context are:
■ clscrs_init_crs: Initializes the clscrs context
■ clscrs_term_crs: Terminates the clscrs context
The caller is responsible for terminating the context when it is no longer needed.
Note: You can install the Oracle Clusterware high availability API from the Oracle Database client installation media.
About the Programming Interface (C API) to Oracle Clusterware
Oracle Clusterware C Application Program Interfaces F-3
Threading SupportNone of the CLSCRS APIs spawn threads. Every CLSCRS API function executes in the context of the calling thread. APIs are not reentrant and no thread-affinity on the part of the client is required.
CLSCRS API Data StructuresThe following entities are passed into the API calls and contain return values from the API call:
■ clscrs_sp: A stringpair (sp) contains a name and a value string. The value can be NULL. It is created and destroyed, and its contents can be examined and the value replaced. A stringpair can be a member of exactly one stringpair list (splist).
■ clscrs_splist: A stringpair list (splist) is a list of zero or more stringpairs used in various contexts. An API can add stringpairs to or remove them from a stringpair list, or the API can iterate stringpairs.
■ clscrs_res: A resource instance (res) represents an Oracle Clusterware entity, which contains the name and additional data appropriate to the context in which the Oracle Clusterware entity is used. Sometimes a resource instance contains Oracle Clusterware entity attribute data and other times it carries status and return messages about an operation. A single resource instance can be a member of exactly one clscrs_reslist.
■ clscrs_reslist: A resource list (reslist) is a data structure that contains zero or more instances of clscrs_res. An API can add resources to or remove them from a resource list, or the API can iterate resources.
Memory ManagementThe CLSCRS APIs work on elements and lists. The elements are added to lists. The memory for both elements and lists is allocated and released through explicit API calls. It is the caller's responsibility to release the memory that they allocate. However, when elements are added to lists, only the list must be destroyed: the destruction of the list destroys its elements implicitly. The elements must be destroyed when they are not added to any list. For recursive lists, destroying the parent list also destroys any lists contained within it. The clscrs_sp and clscrs_res elements must be destroyed by the caller. If they are part of a clscrs_splist or clscrs_reslist, destroying the list destroys the respective clscrs_sp and clscrs_res entities.
For example, when a resource is created and added to a resource list, only the resource list must be destroyed, but not the individual resource. Destroying the resource list releases the memory for the individual resource, too.
Memory is allocated by the API through the following calls:
clscrs_sp_create()clscrs_res_create()clscrs_serverpool_create()clscrs_type_create()clscrs_splist_create()clscrs_reslist_create()clscrs_entity_id_create()
Each of the calls in the preceding list has a corresponding clscrs_*_destroy() call.
About the Programming Interface (C API) to Oracle Clusterware
F-4 Oracle Clusterware Administration and Deployment Guide
Error Handling and TracingInteractive and non-interactive CLSCRS APIs each use a different error-handling mechanism.
For non-interactive CLSCRS APIs, the error code is returned as the return value of the function call. For example:
clscrsret clscrs_sp_get_value(clscrs_sp *sp, oratext **value);
The error code is returned as a clscrsret value.
For interactive CLSCRS APIs, the output result is represented, as follows:
1. The return value of the function call provides a high-level output of the request. Did the request reach the server? Was it completely successful, or completely or only partially unsuccessful? A successful return value means the request was received, processed, and the outcome was successful for all entities requested.
2. For each entity on which the request operated, there is a programmatic completion code stored in the op_status list. If the value is not success, it indicates the high-level type of the problem specific to processing the request for the particular object.
3. Optionally, the API might indicate that it wants to receive localized, human-readable error, warning, or status messages by using the callback mechanism. Each invocation of the callback provides the message, message type (severity), and the ID of the object to which the callback invocation pertains.
For example:
CLSCRS_STAT clscrs_register_resource2(clscrs_reslist *in_reslist, uword flags, clscrs_msgf2 msgf, void *msgarg, clscrs_reslist *op_status);
1. The function returns an error code of value CLSCRS_STAT.
2. The crsd sends error messages, warning messages, and progress messages back to the client through the clscrs_msgf2 callback. The client must implement the callback to process these messages returned by the crsd.
3. In previous Oracle Clusterware releases, the API also contained results of each operation on the Oracle Clusterware entities as part of the op_status list. You can access that information using the following API:
clscrsret clscrs_res_get_op_status(clscrs_res *res, CLSCRS_STAT *status, oratext **msg);
The status argument contains a status code about the crsd operation on the Oracle Clusterware entity. Additionally, the msg argument contains a message from the crsd about the result of the operation. Though the op_status list continues to contain the results of the crsd operation for each Oracle Clusterware entity in the msg argument, usage of the msg argument to get the error codes and messages has now been deprecated and is not supported for any use of the API on a new entity. Only pre-existing use cases (for acting on resources, specifically) are supported. Use the callback function to process any messages returned by the crsd.
Callback MechanismInteractive CLSCRS APIs provide a callback mechanism that the clients can use to process error messages, warning messages, and progress messages sent by the crsd.
About the Programming Interface (C API) to Oracle Clusterware
Oracle Clusterware C Application Program Interfaces F-5
The signature of the callback mechanism is:
typedef void (*clscrs_msgf2)(void *usrp, const oratext *id, const oratext *msg, clscrs_msgtype msgtype);
In the preceding syntax:
■ usrp: Is a user-supplied pointer that probably contains the context of the call
■ id: Is the identifier of the entity to which the message corresponds
■ msg: Is the output text
■ msgtype: Is the type of the message; either error, warning, or progress
Example F–1 describes an example of the callback mechanism.
Example F–1 Callback Mechanism
void myCallback(void *arg, const oratext *pId, const oratext *pMsg, clscrs_msgtype msgType){ if (pMsg != NULL) { cout << pMsg << endl; }}
Example F–2 describes how to use the callback mechanism in an interactive API.
Example F–2 Using the Callback Mechanism In an Interactive API
clscrs_start_resource2(pResIdList, NULL, env, myCallback, NULL, 0, pOpStatus);
You can also print debug trace messages for the API, itself by passing the CLSCRS_FLAG_TRACE flag when creating the context. The signature for context creation is:
CLSCRS_STAT clscrs_init_crs(clscrs_ctx **ctx, clscrs_msgf2 errf, void *errCtx, ub4 flags);
For the trace messages to work, you must specify both the CLSCRS_FLAG_TRACE flag and a clscrs_msgf2 callback mechanism in the clscrs_init_crs API.
The clscrs_msgf2 callback mechanism has the following signature:
typedef void (*clscrs_msgf)(void *usrp, const oratext *msg, sword msglen);
FiltersYou can use filters to narrow down Oracle Clusterware entities upon which a CLSCRS API operates. Simple filters are attribute-value pairs with an operator. Operators must be surrounded by spaces, as shown in the examples. You can combine simple filters into expressions called expression filters using Boolean operators.
Supported filter operators are:
=><!=co: Containsst: Starts with
About the Programming Interface (C API) to Oracle Clusterware
F-6 Oracle Clusterware Administration and Deployment Guide
en: Ends with
Supported Boolean operators are AND and OR.
Examples of filters are:
■ TYPE = type1
■ ((TYPE = type1) AND (CHECK_INTERVAL > 50))
■ (TYPE = type1) AND ((CHECK_INTERVAL > 30) OR (AUTO_START co never))
■ NAME en network.res
■ TYPE st ora.db
There are two types of filters and CLSCRS has a set of APIs to create these filters:
■ Comparison filter: A simple filter that compares two values. For example:
TYPE = ora.db.type
Use the clscrs_compfilter_create API to create a comparison filter. For example, to create the (TYPE = ora.db.type) comparison filter:
clscrs_compfilter_create(ctx, clscrs_TYPE, clscrs_comparator_eq, (const oratext *)"ora.db.type", &myCompFilter);
■ Expression filter: A filter that is created from either a set of comparison filters or expression filters, or both. For example:
((TYPE = ora.db.type) AND (CHECK_INTERVAL > 50))
Use the clscrs_expfilter_create API to create a comparison filter. For example, to create an expression filter:
clscrs_exprfilter_create(myCompFilter1, clscrs_operator_or, myCompFilter2, &myExprFilter);
You can use filters in the following interactive CLSCRS APIs in place of an entity list:
clscrs_start_resource2clscrs_stat2clscrs_stop_resource2clscrs_check_resource2
See Also: Use the clscrs_comparator enum and the clscrs_operator enum located in the $ORA_CRS_HOME/crs/demo/clscrsx.h file to get the correct type for the above comparators and operators, respectively, in the API calls
See Also: The $ORA_CRS_HOME/crs/demo/clscrsx.h file for usage information for the clscrs_compfilter_create and clscrs_expfilter_create APIs
Note: Both the clscrs_compfilter_create and clscrs_expfilter_create APIs allocate memory that must be freed by calling clscrs_filter_destroy().
About the Programming Interface (C API) to Oracle Clusterware
Oracle Clusterware C Application Program Interfaces F-7
clscrs_relocate_resource2
Example F–3 describes using filters in an interactive CLSCRS API.
Example F–3 Filters In an Interactive CLSCRS API
clscrs_start_resource2(myCompFilter, NULL, env, msgf2, NULL, 0, pOpStatus);
Script Agent UsageWhen you use CLSCRS APIs inside script agent entry points, keep the following in mind:
1. Some actions, such as start, stop, and clean, are executed under a lock on the resource instance. Thus, issuing a request to the server to act on the resource directly or by extension of a relation results in a dead-lock.
2. Issuing read-only (clscrs_stat2) is generally safe unless it is an initial check, where the script agent must not call back on the server, because that results in a dead-lock, as well. Use the clsagfw APIs to query the check entry point.
Help InterfaceYou can find the entire list of CLSCRS APIs, including usage information for each, in the $ORA_CRS_HOME/crs/demo/clscrsx.h file, along with a demo called crsapp.c.
Deprecated CLSCRS APIsTable F–1 lists the deprecated CLSCRS APIs and the corresponding new APIs for Oracle Clusterware 11g release 2 (11.2).
See Also: Appendix B, "Oracle Clusterware Resource Reference" for examples of script agents
Table F–1 Deprecated CLSCRS APIs
Deprecated Command Replacement
clscrs_register_resource clscrs_register_resource2
clscrs_start_resource clscrs_start_resource2
clscrs_stat clscrs_stat2
clscrs_stop_resource clscrs_stop_resource2
clscrs_check_resource clscrs_check_resource2
clscrs_relocate_resource clscrs_relocate_resource2
clscrs_unregister_resource clscrs_unregister_resource2
clscrs_msgf clscrs_msgf2
clscrs_fail_resource No replacement.
Interactive CLSCRS APIs
F-8 Oracle Clusterware Administration and Deployment Guide
Interactive CLSCRS APIs
The APIs listed in Table F–2 make calls to the Cluster Ready Services daemon (crsd) to run commands. The crsd must be up and running for these APIs to function.
Table F–2 Summary of Interactive CLSCRS APIs for Oracle Clusterware
C API Description
clscrs_register_type Registers the resource types in the input resource list.
clscrs_register_serverpool Registers a server pool for the input list of servers.
clscrs_register_resource2 Registers the resources in the input resource list.
clscrs_start_resource2 Notifies Oracle Clusterware to start a named set of resources.
clscrs_stat2 Obtains information about the entities identified in rqlist.
clscrs_stop_resource2 Notifies Oracle Clusterware to stop a named set of resources.
clscrs_check_resource2 Notifies Oracle Clusterware to run the check entry points for the identified resources.
clscrs_relocate_resource2 Relocates the list of resource identifiers.
clscrs_unregister_resource2 Unregisters the resources in the input list of resource names.
clscrs_unregister_type Unregisters the resource types in the input list.
clscrs_unregister_serverpool Unregisters the given server pool.
clscrs_relocate_server Relocates a list of servers.
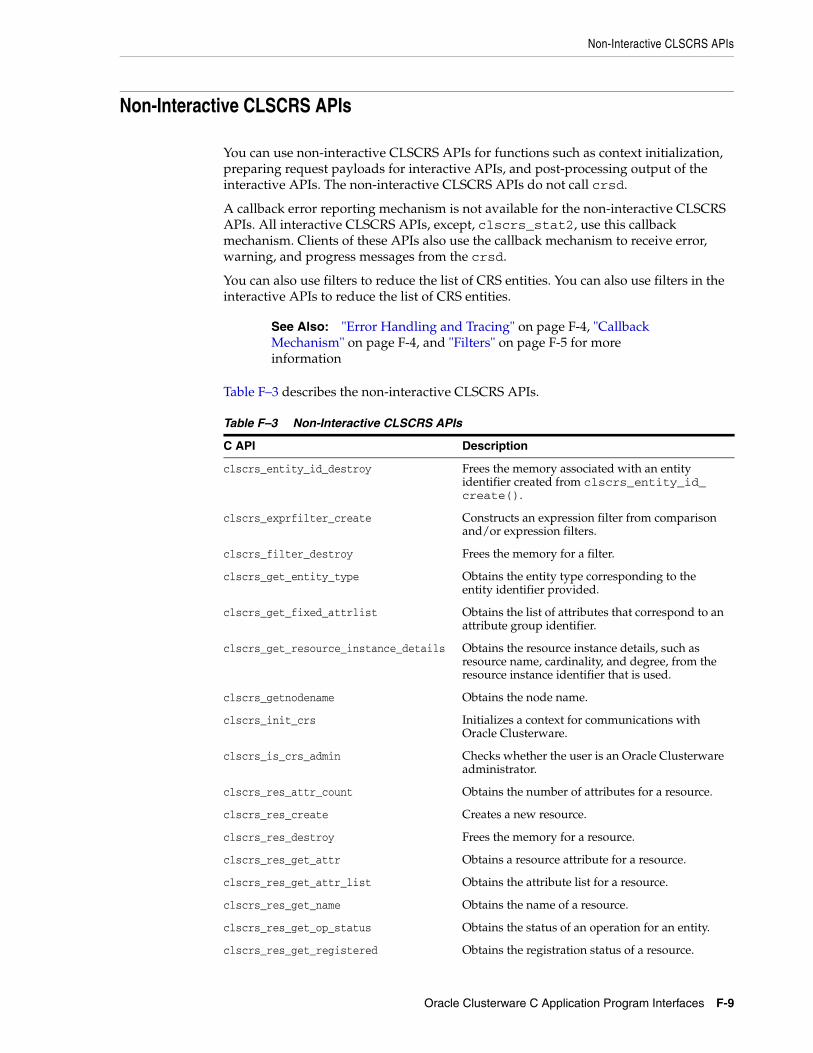
Non-Interactive CLSCRS APIs
Oracle Clusterware C Application Program Interfaces F-9
Non-Interactive CLSCRS APIs
You can use non-interactive CLSCRS APIs for functions such as context initialization, preparing request payloads for interactive APIs, and post-processing output of the interactive APIs. The non-interactive CLSCRS APIs do not call crsd.
A callback error reporting mechanism is not available for the non-interactive CLSCRS APIs. All interactive CLSCRS APIs, except, clscrs_stat2, use this callback mechanism. Clients of these APIs also use the callback mechanism to receive error, warning, and progress messages from the crsd.
You can also use filters to reduce the list of CRS entities. You can also use filters in the interactive APIs to reduce the list of CRS entities.
Table F–3 describes the non-interactive CLSCRS APIs.
See Also: "Error Handling and Tracing" on page F-4, "Callback Mechanism" on page F-4, and "Filters" on page F-5 for more information
Table F–3 Non-Interactive CLSCRS APIs
C API Description
clscrs_entity_id_destroy Frees the memory associated with an entity identifier created from clscrs_entity_id_create().
clscrs_exprfilter_create Constructs an expression filter from comparison and/or expression filters.
clscrs_filter_destroy Frees the memory for a filter.
clscrs_get_entity_type Obtains the entity type corresponding to the entity identifier provided.
clscrs_get_fixed_attrlist Obtains the list of attributes that correspond to an attribute group identifier.
clscrs_get_resource_instance_details Obtains the resource instance details, such as resource name, cardinality, and degree, from the resource instance identifier that is used.
clscrs_getnodename Obtains the node name.
clscrs_init_crs Initializes a context for communications with Oracle Clusterware.
clscrs_is_crs_admin Checks whether the user is an Oracle Clusterware administrator.
clscrs_res_attr_count Obtains the number of attributes for a resource.
clscrs_res_create Creates a new resource.
clscrs_res_destroy Frees the memory for a resource.
clscrs_res_get_attr Obtains a resource attribute for a resource.
clscrs_res_get_attr_list Obtains the attribute list for a resource.
clscrs_res_get_name Obtains the name of a resource.
clscrs_res_get_op_status Obtains the status of an operation for an entity.
clscrs_res_get_registered Obtains the registration status of a resource.
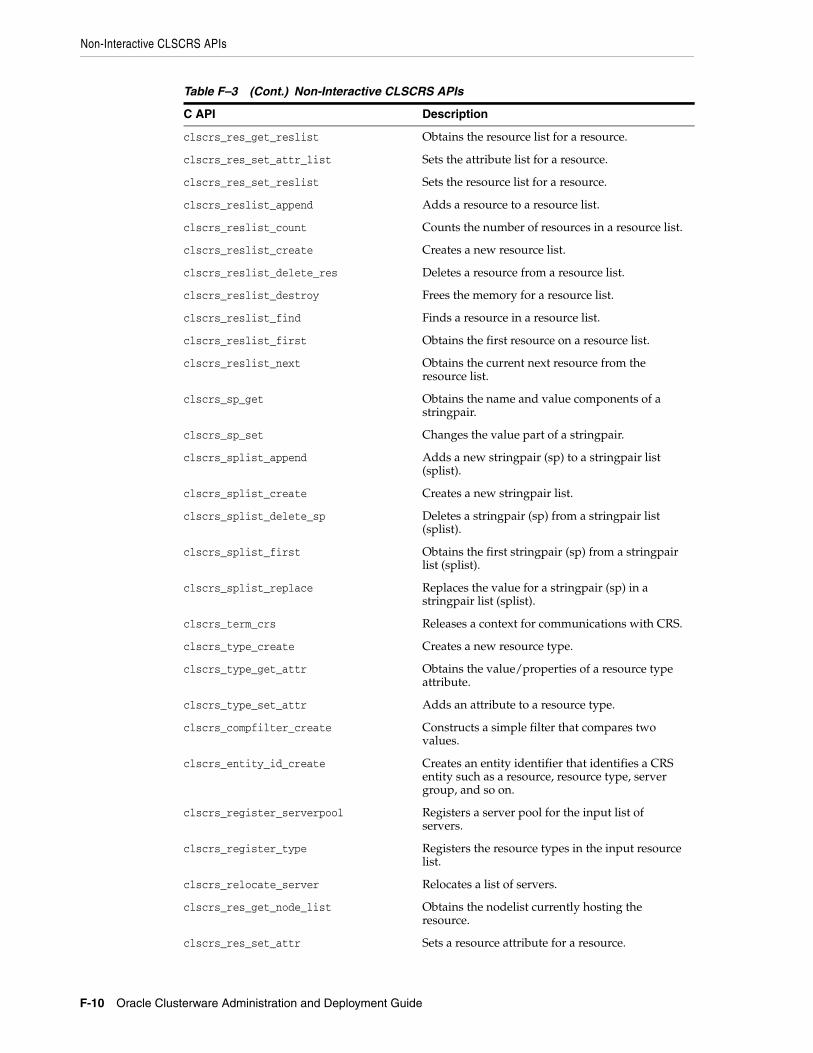
Non-Interactive CLSCRS APIs
F-10 Oracle Clusterware Administration and Deployment Guide
clscrs_res_get_reslist Obtains the resource list for a resource.
clscrs_res_set_attr_list Sets the attribute list for a resource.
clscrs_res_set_reslist Sets the resource list for a resource.
clscrs_reslist_append Adds a resource to a resource list.
clscrs_reslist_count Counts the number of resources in a resource list.
clscrs_reslist_create Creates a new resource list.
clscrs_reslist_delete_res Deletes a resource from a resource list.
clscrs_reslist_destroy Frees the memory for a resource list.
clscrs_reslist_find Finds a resource in a resource list.
clscrs_reslist_first Obtains the first resource on a resource list.
clscrs_reslist_next Obtains the current next resource from the resource list.
clscrs_sp_get Obtains the name and value components of a stringpair.
clscrs_sp_set Changes the value part of a stringpair.
clscrs_splist_append Adds a new stringpair (sp) to a stringpair list (splist).
clscrs_splist_create Creates a new stringpair list.
clscrs_splist_delete_sp Deletes a stringpair (sp) from a stringpair list (splist).
clscrs_splist_first Obtains the first stringpair (sp) from a stringpair list (splist).
clscrs_splist_replace Replaces the value for a stringpair (sp) in a stringpair list (splist).
clscrs_term_crs Releases a context for communications with CRS.
clscrs_type_create Creates a new resource type.
clscrs_type_get_attr Obtains the value/properties of a resource type attribute.
clscrs_type_set_attr Adds an attribute to a resource type.
clscrs_compfilter_create Constructs a simple filter that compares two values.
clscrs_entity_id_create Creates an entity identifier that identifies a CRS entity such as a resource, resource type, server group, and so on.
clscrs_register_serverpool Registers a server pool for the input list of servers.
clscrs_register_type Registers the resource types in the input resource list.
clscrs_relocate_server Relocates a list of servers.
clscrs_res_get_node_list Obtains the nodelist currently hosting the resource.
clscrs_res_set_attr Sets a resource attribute for a resource.
Table F–3 (Cont.) Non-Interactive CLSCRS APIs
C API Description
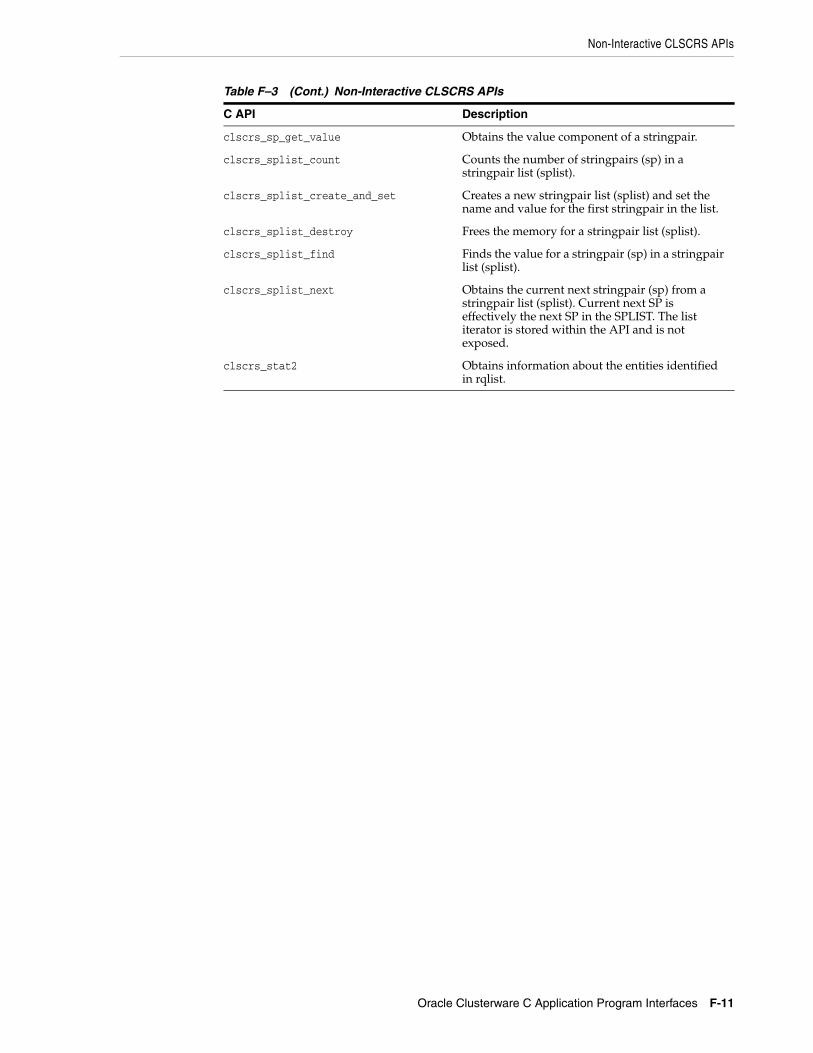
Non-Interactive CLSCRS APIs
Oracle Clusterware C Application Program Interfaces F-11
clscrs_sp_get_value Obtains the value component of a stringpair.
clscrs_splist_count Counts the number of stringpairs (sp) in a stringpair list (splist).
clscrs_splist_create_and_set Creates a new stringpair list (splist) and set the name and value for the first stringpair in the list.
clscrs_splist_destroy Frees the memory for a stringpair list (splist).
clscrs_splist_find Finds the value for a stringpair (sp) in a stringpair list (splist).
clscrs_splist_next Obtains the current next stringpair (sp) from a stringpair list (splist). Current next SP is effectively the next SP in the SPLIST. The list iterator is stored within the API and is not exposed.
clscrs_stat2 Obtains information about the entities identified in rqlist.
Table F–3 (Cont.) Non-Interactive CLSCRS APIs
C API Description

Non-Interactive CLSCRS APIs
F-12 Oracle Clusterware Administration and Deployment Guide
G
Oracle Cluster Registry Configuration Utility Reference G-1
G Oracle Cluster Registry Configuration UtilityReference
This appendix describes the syntax of the Oracle Cluster Registry (OCR) configuration utility, OCRCONFIG.
This appendix contains the following topics:
■ About OCRCONFIG
– Overview
– Operational Notes
■ OCRCONFIG Command Reference
About OCRCONFIG
G-2 Oracle Clusterware Administration and Deployment Guide
About OCRCONFIG
This section contains topics which relate to using the OCRCONFIG utility.
■ Overview
■ Operational Notes
OverviewUse the ocrconfig command to manage OCR. Using this utility you can import, export, add, delete, restore, overwrite, backup, repair, replace, move, upgrade, or downgrade OCR.
Operational Notes
Usage Information■ The OCRCONFIG executable is located in the Grid_home/bin directory
■ The ocrconfig command syntax is as follows:
ocrconfig -option
Using Utility HelpTo display the help output for the OCRCONFIG utility:
ocrconfig -help
Privileges and SecurityTo use the OCRCONFIG utility you must be logged into the operating system as a user with administrative privileges.
Log FilesWhen you use the OCRCONFIG utility, a log file called ocrconfig_pid.log is created in the $ORACLE_HOME/log/host_name/client directory. Ensure that you have write privileges in this directory before running the OCRCONFIG utility.
OCRCONFIG Command Reference
Oracle Cluster Registry Configuration Utility Reference G-3
OCRCONFIG Command Reference
This section lists the following OCRCONFIG commands:
■ ocrconfig -add
■ ocrconfig -backuploc
■ ocrconfig -delete
■ ocrconfig -downgrade
■ ocrconfig -export
■ ocrconfig -import
■ ocrconfig -manualbackup
■ ocrconfig -overwrite
■ ocrconfig -repair
■ ocrconfig -replace
■ ocrconfig -restore
■ ocrconfig -showbackup
■ ocrconfig -upgrade
ocrconfig -addUse the ocrconfig -add command to add an OCR location to a storage device or Oracle Automatic Storage Management (Oracle ASM) disk group. OCR locations that you add must exist, have sufficient permissions, and, in the case of Oracle ASM disk groups, must be mounted before you can add them.
Syntaxocrconfig -add location_name
Usage Notes■ You must run this command as root.
■ The location_name variable can be a device name, a file name, or the name of an Oracle ASM disk group. For example:
– /dev/raw/raw1: Ensure that the device exists
– /oradbocfs/crs/data.ocr: You must create an empty (0 byte) OCR location
– d:\oracle\mirror.ocr: You must create an empty (0 byte) OCR location
– +newdg: Ensure that the disk group exists and is mounted
If you specify an Oracle ASM disk group, the name of the disk group must be preceded by a plus sign (+).
OCRCONFIG Command Reference
G-4 Oracle Clusterware Administration and Deployment Guide
ExampleTo add an OCR location to the default location in Oracle ASM, data:
# ocrconfig -add +data
ocrconfig -backuplocUse the ocrconfig -backuploc command to specify an OCR backup directory location.
Syntaxocrconfig [-local] -backuploc file_name
Usage Notes■ You must run this command as root.
■ Use the -local option to back up OLR.
■ The file_name variable can be a full directory path name that is accessible by all nodes. For example:
– Grid_home/cdata/cluster3/
– d:\cdata\cluster3
■ The default location for generating OCR backups on Linux or UNIX systems is Grid_home/cdata/cluster_name, where cluster_name is the name of your cluster. The Windows default location for generating OCR backups uses the same path structure.
■ The default location for generating OLR backups on Linux or UNIX systems is Grid_home/cdata/host_name, where host_name is the name of the node on which the OLR resides that you want to back up. The Windows default location for generating OLR backups uses the same path structure.
ExampleTo specify an OCR backup location in a directory:
# ocrconfig -backuploc $Grid_home/cdata/cluster3
ocrconfig -deleteUse the ocrconfig -delete command to remove an OCR device or file.
Syntaxocrconfig -delete file_name
Usage Notes■ You must run this command as root.
■ The file_name variable can be a device name, a file name, or the name of an Oracle ASM disk group. For example:
See Also:
■ Oracle Grid Infrastructure Installation Guide for information about creating OCR locations and setting correct permissions
■ Oracle Database Storage Administrator's Guide for more information about Oracle ASM disk group management
OCRCONFIG Command Reference
Oracle Cluster Registry Configuration Utility Reference G-5
– /dev/raw/raw1
– /oradbocfs/crs/data.ocr
– d:\oracle\mirror.ocr
– +olddg
If you specify an Oracle ASM disk group, the name of the disk group must be preceded by a plus sign (+).
ExampleTo remove an OCR location:
# ocrconfig -delete +olddg
ocrconfig -downgradeUse the ocrconfig -downgrade command to downgrade OCR to an earlier specified version.
Syntaxocrconfig -downgrade [-version version_string]
Usage Notes■ You must run this command as root.
ExampleTo downgrade OCR to an earlier version:
# ocrconfig -downgrade -version
ocrconfig -exportUse the ocrconfig -export command to export the contents of OCR to a target file.
Syntaxocrconfig [-local] -export file_name
Usage Notes■ You must run this command as root.
■ Use the -local option to export the contents of OLR.
■ The file_name variable can be a full path name or the name of an Oracle ASM disk group that is accessible by all nodes. For example:
– /oradbocfs/crs/data.ocr
– d:\oracle\
ExampleTo export the contents of OCR to a file:
# ocrconfig -export d:\tmp\a
ocrconfig -importUse the ocrconfig -import command to import the contents of a target file into which you exported the contents of OCR back into OCR.
OCRCONFIG Command Reference
G-6 Oracle Clusterware Administration and Deployment Guide
Syntaxocrconfig [-local] -import file_name
Usage Notes■ You must run this command as root.
■ Use the -local option to import the contents of OLR from a file.
■ The file_name variable must be a full path name that is accessible by all nodes. For example:
– /oradbocfs/crs/data.ocr
– d:\oracle\
■ You must shut down Oracle Clusterware before running this command.
ExampleTo import the contents a file back into OCR:
# ocrconfig -import d:\tmp\a
ocrconfig -manualbackupUse the ocrconfig -manualbackup command to back up OCR on demand in the location you specify with the -backuploc option.
Syntaxocrconfig [-local] -manualbackup
Usage Notes■ You must run this command as root.
■ Use the -local option to perform a manual backup of OLR.
ExampleTo back up OCR:
# ocrconfig -manualbackup
ocrconfig -overwriteUse the ocrconfig -overwrite command to overwrite an OCR configuration in the OCR metadata with the current OCR configuration information that is found on the node from which you run this command.
Syntaxocrconfig -overwrite
Usage Notes■ You must run this command as root.
ExampleTo overwrite an OCR configuration:
# ocrconfig -overwrite
OCRCONFIG Command Reference
Oracle Cluster Registry Configuration Utility Reference G-7
ocrconfig -repairUse the ocrconfig -repair command to repair an OCR configuration on the node from which you run this command. Use this command to add, delete, or replace an OCR location on a node that may have been stopped while you made changes to the OCR configuration in the cluster. OCR locations that you add must exist, have sufficient permissions, and, in the case of Oracle ASM disk groups, must be mounted before you can add them.
Syntaxocrconfig -repair -add file_name | -delete file_name | -replace current_file_name -replacement new_file_name
Usage Notes■ You must run this command as root.
■ Oracle High Availability Services must be started to successfully complete the repair.
■ The Cluster Ready Services daemon must be stopped before running ocrconfig -repair.
■ The file_name variable can be a valid OCR and either a device name, an absolute path name of an existing file, or the name of an Oracle ASM disk group. For example:
– /dev/raw/raw1
– /oradbocfs/crs/data.ocr
– d:\oracle\mirror.ocr
– +newdg
If you specify an Oracle ASM disk group, the name of the disk group must be preceded by a plus sign (+).
■ You can only use one option with ocrconfig -repair at a time.
■ Running this command only modifies the local configuration and it and only affects the current node.
ExampleTo repair an OCR configuration:
# ocrconfig -repair -delete +olddg
ocrconfig -replaceUse the ocrconfig -replace command to replace an OCR device or file on the node from which you run this command. OCR locations that you add must exist, have sufficient permissions, and, in the case of Oracle ASM disk groups, must be mounted before you can add them.
See Also:
■ Oracle Grid Infrastructure Installation Guide for information about creating OCRs and setting correct permissions
■ Oracle Database Storage Administrator's Guide for more information about Oracle ASM disk group management
OCRCONFIG Command Reference
G-8 Oracle Clusterware Administration and Deployment Guide
Syntaxocrconfig -replace current_location_name -replacement new_location_name
Usage Notes■ You must run this command as root.
■ The new_location_name variable can be a device name, a file name, or the name of an Oracle ASM disk group. For example:
– /dev/raw/raw1: Ensure that the device exists
– /oradbocfs/crs/data.ocr: You must create an empty (0 byte) OCR location
– d:\oracle\mirror.ocr: You must create an empty (0 byte) OCR location
– +newdg: Ensure that the disk group exists and is mounted
If you specify an Oracle ASM disk group, the name of the disk group must be preceded by a plus sign (+).
■ You must have at least two OCR devices to use this command. If you do not have at least two OCR devices, then you must run the ocrconfig -add command to add a new OCR device followed by the ocrconfig -delete command to delete the OCR device you want to replace.
ExampleTo replace an OCR device or file:
# ocrconfig -replace /dev/raw/raw1 -replacement +newdg
ocrconfig -restoreUse the ocrconfig -restore command to restore OCR from an automatically created OCR backup file.
Syntaxocrconfig [-local] -restore file_name
Usage Notes■ You must run this command as root.
■ Before running this command, ensure that the original OCR or OLR files exist. If the original file does not exist, then you must create an empty file.
■ Use the -local option to restore a backup of OLR.
■ Example file names are:
– /oradbocfs/crs/BACKUP00.ocr
– d:\oracle\BACKUP01.ocr
See Also:
■ Oracle Grid Infrastructure Installation Guide for information about creating OCRs and setting correct permissions
■ Oracle Database Storage Administrator's Guide for more information about Oracle ASM disk group management

OCRCONFIG Command Reference
Oracle Cluster Registry Configuration Utility Reference G-9
■ Ensure that the storage devices that you specify exist and that those devices are valid.
■ If OCR is located on an Oracle ASM disk group, then ensure that the disk group exists and is mounted.
ExampleTo restore OCR from a file on Oracle ASM:
# ocrconfig -restore +backupdg:BACKUP02
ocrconfig -showbackupUse the ocrconfig -showbackup command to display the backup location, timestamp, and the originating node name of the backup files. By default, this command displays information for both automatic and manual backups unless you specify auto or manual.
Syntaxocrconfig [-local] -showbackup [auto | manual]
Usage Notes■ Use the -local option to show manual OLR backup information. The -local
flag functions only with the manual option.
■ You can optionally specify auto or manual to display information about only automatic backups or only manual backups, respectively:
– auto: Displays information about automatic backups that Oracle Clusterware created in the past 4 hours, 8 hours, 12 hours, and in the last day and week.
– manual: Displays information about manual backups that you invoke using the ocrconfig -manualbackup command.
ExampleTo display manual backup information for OLR:
$ ocrconfig -local -showbackup manual
ocrconfig -upgradeUse the ocrconfig -upgrade command to upgrade OCR from a previous version.
Syntaxocrconfig [-local] -upgrade [user [group]]
Usage Notes■ You must run this command as root.
■ Use the -local option to upgrade OLR.
ExampleTo display manual backup information for OLR:
# ocrconfig -local -showbackup manual

OCRCONFIG Command Reference
G-10 Oracle Clusterware Administration and Deployment Guide
H
Troubleshooting Oracle Clusterware H-1
H Troubleshooting Oracle Clusterware
This appendix introduces monitoring the Oracle Clusterware environment and explains how you can enable dynamic debugging to troubleshoot Oracle Clusterware processing, and enable debugging and tracing for specific components and specific Oracle Clusterware resources to focus your troubleshooting efforts.
This appendix contains the following topics:
■ Monitoring Oracle Clusterware
■ Clusterware Log Files and the Unified Log Directory Structure
■ Diagnostics Collection Script
■ Oracle Clusterware Alerts
Monitoring Oracle ClusterwareYou can use Oracle Enterprise Manager to monitor the Oracle Clusterware environment. When you log in to Oracle Enterprise Manager using a client browser, the Cluster Database Home page appears where you can monitor the status of both Oracle Clusterware environments. Monitoring can include such things as:
■ Notification if there are any VIP relocations
■ Status of the Oracle Clusterware on each node of the cluster using information obtained through the Cluster Verification Utility (cluvfy)
■ Notification if node applications (nodeapps) start or stop
■ Notification of issues in the Oracle Clusterware alert log for the Oracle Cluster Registry, voting disk issues (if any), and node evictions
The Cluster Database Home page is similar to a single-instance Database Home page. However, on the Cluster Database Home page, Oracle Enterprise Manager displays the system state and availability. This includes a summary about alert messages and job activity, and links to all the database and Automatic Storage Management (Oracle ASM) instances. For example, you can track problems with services on the cluster including when a service is not running on all of the preferred instances or when a service response time threshold is not being met.
You can use the Oracle Enterprise Manager Interconnects page to monitor the Oracle Clusterware environment. The Interconnects page shows the public and private interfaces on the cluster, the overall throughput on the private interconnect, individual throughput on each of the network interfaces, error rates (if any) and the load contributed by database instances on the interconnect, including:
■ Overall throughput across the private interconnect

Monitoring Oracle Clusterware
H-2 Oracle Clusterware Administration and Deployment Guide
■ Notification if a database instance is using public interface due to misconfiguration
■ Throughput and errors (if any) on the interconnect
■ Throughput contributed by individual instances on the interconnect
All of this information also is available as collections that have a historic view. This is useful with cluster cache coherency, such as when diagnosing problems related to cluster wait events. You can access the Interconnects page by clicking the Interconnect tab on the Cluster Database home page.
Also, the Oracle Enterprise Manager Cluster Database Performance page provides a quick glimpse of the performance statistics for a database. Statistics are rolled up across all the instances in the cluster database in charts. Using the links next to the charts, you can get more specific information and perform any of the following tasks:
■ Identify the causes of performance issues.
■ Decide whether resources must be added or redistributed.
■ Tune your SQL plan and schema for better optimization.
■ Resolve performance issues
The charts on the Cluster Database Performance page include the following:
■ Chart for Cluster Host Load Average: The Cluster Host Load Average chart in the Cluster Database Performance page shows potential problems that are outside the database. The chart shows maximum, average, and minimum load values for available nodes in the cluster for the previous hour.
■ Chart for Global Cache Block Access Latency: Each cluster database instance has its own buffer cache in its System Global Area (SGA). Using Cache Fusion, Oracle RAC environments logically combine each instance's buffer cache to enable the database instances to process data as if the data resided on a logically combined, single cache.
■ Chart for Average Active Sessions: The Average Active Sessions chart in the Cluster Database Performance page shows potential problems inside the database. Categories, called wait classes, show how much of the database is using a resource, such as CPU or disk I/O. Comparing CPU time to wait time helps to determine how much of the response time is consumed with useful work rather than waiting for resources that are potentially held by other processes.
■ Chart for Database Throughput: The Database Throughput charts summarize any resource contention that appears in the Average Active Sessions chart, and also show how much work the database is performing on behalf of the users or applications. The Per Second view shows the number of transactions compared to the number of logons, and the amount of physical reads compared to the redo size for each second. The Per Transaction view shows the amount of physical reads compared to the redo size for each transaction. Logons is the number of users that are logged on to the database.
In addition, the Top Activity drilldown menu on the Cluster Database Performance page enables you to see the activity by wait events, services, and instances. Plus, you can see the details about SQL/sessions by going to a prior point in time by moving the slider on the chart.
See Also: Oracle Database 2 Day + Real Application Clusters Guide
Clusterware Log Files and the Unified Log Directory Structure
Troubleshooting Oracle Clusterware H-3
Clusterware Log Files and the Unified Log Directory StructureOracle Database uses a unified log directory structure to consolidate the Oracle Clusterware component log files. This consolidated structure simplifies diagnostic information collection and assists during data retrieval and problem analysis.
Alert files are stored in the directory structures shown in Table H–1.
Table H–1 Locations of Oracle Clusterware Component Log Files
Component Log File Location1
1 The directory structure is the same for Linux, UNIX, and Windows systems.
Cluster Ready Services Daemon (CRSD) Log Files
Grid_home/log/host_name/crsd
Cluster Synchronization Services (CSS)
Grid_home/log/host_name/cssd
Cluster Time Synchronization Service (CTSS)
Grid_home/log/host_name/ctssd
Grid Plug and Play Grid_home/log/host_name/gpnpd
Multicast Domain Name Service Daemon (MDNSD)
Grid_home/log/host_name/mdnsd
Oracle Cluster Registry Oracle Cluster Registry tools (OCRDUMP, OCRCHECK, OCRCONFIG) record log information in the following location:2
Grid_home/log/host_name/client
Cluster Ready Services records Oracle Cluster Registry log information in the following location:
Grid_home/log/host_name/crsd
2 To change the amount of logging, edit the path in the Grid_home/srvm/admin/ocrlog.ini file.
Oracle Grid Naming Service (GNS)
Grid_home/log/host_name/gnsd
Oracle High Availability Services Daemon (OHASD)
Grid_home/log/host_name/ohasd
Event Manager (EVM) information generated by evmd
Grid_home/log/host_name/evmd
Oracle RAC RACG The Oracle RAC high availability trace files are located in the following two locations:
Grid_home/log/host_name/racg$ORACLE_HOME/log/host_name/racg
Core files are in subdirectories of the log directory. Each RACG executable has a subdirectory assigned exclusively for that executable. The name of the RACG executable subdirectory is the same as the name of the executable.
Additionally, you can find logging information for the VIP and database in these two locations, respectively.
Server Manager (SRVM) Grid_home/log/host_name/srvm
Disk Monitor Daemon (diskmon)
Grid_home/log/host_name/diskmon
Grid Interprocess Communication Daemon (GIPCD)
Grid_home/log/host_name/gipcd

Diagnostics Collection Script
H-4 Oracle Clusterware Administration and Deployment Guide
Diagnostics Collection ScriptEvery time an Oracle Clusterware error occurs, run the diagcollection.pl script to collect diagnostic information from Oracle Clusterware in trace files. The diagnostics provide additional information so Oracle Support can resolve problems. Run this script from the following location:
Grid_home/bin/diagcollection.pl
Oracle Clusterware AlertsOracle Clusterware posts alert messages when important events occur. The following is an example of an alert from the CRSD process:
2009-07-16 00:27:22.074[ctssd(12817)]CRS-2403:The Cluster Time Synchronization Service on host stnsp014 is in observer mode.2009-07-16 00:27:22.146[ctssd(12817)]CRS-2407:The new Cluster Time Synchronization Service reference node is host stnsp013.2009-07-16 00:27:22.753[ctssd(12817)]CRS-2401:The Cluster Time Synchronization Service started on host stnsp014.2009-07-16 00:27:43.754[crsd(12975)]CRS-1012:The OCR service started on node stnsp014.2009-07-16 00:27:46.339[crsd(12975)]CRS-1201:CRSD started on node stnsp014.
The location of this alert log on Linux, UNIX, and Windows systems is in the following directory path, where Grid_home is the name of the location where the Oracle grid infrastructure is installed: Grid_home/log/host_name.
The following example shows the start of the Oracle Cluster Time Synchronization Service (OCTSS) after a cluster reconfiguration:
[ctssd(12813)]CRS-2403:The Cluster Time Synchronization Service on host stnsp014 is in observer mode.2009-07-15 23:51:18.292[ctssd(12813)]CRS-2407:The new Cluster Time Synchronization Service reference node is host stnsp013.2009-07-15 23:51:18.961[ctssd(12813)]CRS-2401:The Cluster Time Synchronization Service started on host stnsp014.
Alert Messages Using Diagnostic Record Unique IDs Beginning with Oracle Database 11g release 2 (11.2), certain Oracle Clusterware messages contain a text identifier surrounded by "(:" and ":)". Usually, the identifier is part of the message text that begins with "Details in..." and includes an Oracle Clusterware diagnostic log file path and name similar to the following example. The identifier is called a DRUID, or Diagnostic Record Unique ID:
2009-07-16 00:18:44.472[/scratch/11.2/grid/bin/orarootagent.bin(13098)]CRS-5822:Agent '/scratch/11.2/grid/bin/orarootagent_root' disconnected from server. Details at (:CRSAGF00117:) in /scratch/11.2/grid/log/stnsp014/agent/crsd/orarootagent_
Note: You must run this script as the root user.

Oracle Clusterware Alerts
Troubleshooting Oracle Clusterware H-5
root/orarootagent_root.log.
DRUIDs are used to relate external product messages to entries in a diagnostic log file and to internal Oracle Clusterware program code locations. They are not directly meaningful to customers and are used primarily by Oracle Support when diagnosing problems.
Note: Oracle Clusterware uses a file rotation approach for log files. If you cannot find the reference given in the file specified in the "Details in" section of an alert file message, then this file might have been rolled over to a rollover version, typically ending in *.lnumber where number is a number that starts at 01 and increments to however many logs are being kept, the total for which can be different for different logs. While there is usually no need to follow the reference unless you are asked to do so by Oracle Support, you can check the path given for roll over versions of the file. The log retention policy, however, foresees that older logs are be purged as required by the amount of logs generated.

Oracle Clusterware Alerts
H-6 Oracle Clusterware Administration and Deployment Guide
Glossary-1
Glossary
action script
A script that defines the start, stop and check actions for a resource. The start action is invoked while starting the resource, the stop action for stopping the resource, and the check action while checking the running status of a resource.
administrator managed
Database administrators define on which servers a database resource should run, and place resources manually as needed. This is the management strategy used in previous releases.
availability directive
Instructions to Oracle Clusterware to reconfigure the system when a server leaves or joins a cluster.
cluster
Multiple interconnected computers or servers that appear as if they are one server to end users and applications.
cluster-aware
Any application designed to be deployed using clusterware.
cluster administrator
An administrator who can manage a certain part of a cluster based on set policies and privileges.
cluster resource
A resource that is aware of the cluster environment and subject to cross-node switchover and failover.
Cluster Time Synchronization Service
A time synchronization mechanism that ensures that all internal clocks of all nodes in a cluster are synchronized.
Cluster Verification Utility (CVU)
A tool that verifies a wide range of Oracle RAC components such as shared storage devices, networking configurations, system requirements, Oracle Clusterware, groups, and users.

dependency
Glossary-2
dependency
The relationship between two or more resources. and the interaction expressed between them.
disk group
An Oracle ASM disk group is a collection of disks that Oracle ASM manages as a unit. Within a disk group, Oracle ASM exposes a file system interface for Oracle Database files. The content of files that is stored in a disk group is evenly distributed, or striped, to eliminate hot spots and to provide uniform performance across the disks. Oracle ASM files may also be optionally mirrored within a disk group. The performance of disks in a disk group is comparable to the performance of raw devices.
grid infrastructure
The software that provides the infrastructure for an enterprise grid architecture. In a cluster this software includes Oracle Clusterware and Oracle ASM. For a standalone server, this software includes Oracle Restart and Oracle ASM. Oracle Database 11g release 2 (11.2) combines these infrastructure products into one software installation called the grid infrastructure home (Grid_home).
fixup script
Oracle Universal Installer detects when minimum requirements for installation are not completed, and creates shell script programs, called fixup scripts, to resolve many incomplete system configuration requirements. If Oracle Universal Installer detects an incomplete task, it prompts you to create a fixup script and then to run the fixup script in a separate terminal session. You can also generate fixup scripts with certain CVU commands by using the -fixup flag.
local resource
A resource that runs on the nodes of a cluster but is unaware of anything outside of the scope of the node.
OCR writer
Each crsd process also acts as an OCR server. One of the crsd processes in the cluster is the OCR server that performs I/O to the disk group or file, or block or raw device.
Oracle Automatic Storage Management (Oracle ASM)
Oracle ASM manages the storage disks used by Oracle Clusterware and Oracle RAC in disk groups. By default, Oracle Clusterware uses Oracle ASM to store OCR and voting disks.
Oracle Cluster Registry (OCR)
The Oracle RAC configuration information repository that manages information about the cluster node list and instance-to-node mapping information. The OCR also manages information about Oracle Clusterware resource profiles for customized applications.
Oracle Clusterware
Software that allows groups (clusters) of connected servers to operate or be controlled as a unit.
Oracle Clusterware stack
The Oracle Clusterware stack includes Oracle Clusterware, Event Manager, Cluster Synchronization Services, and Oracle ASM (if used).
state
Glossary-3
policy managed
Database administrators specify the server pool (excluding generic or free) in which the database resource runs. Oracle Clusterware places the database resource on a server.
resource
A database, application, or process managed by Oracle Clusterware.
resource state
The state of a particular resource at any given time that determines its availability to the cluster.
resource type
Defines whether a resource is either a cluster resource or a local resource.
server pool
A logical division of servers in a cluster into a group that hosts applications, databases, or both.
Single Client Access Name (SCAN)
A single name that resolves to three IP addresses in the public network.
start effort evaluation
The process that Oracle Clusterware goes through when it starts a resource. During this process, Oracle Clusterware considers resource dependencies contained in the profile of the resource.
state
A set of values that describes what the condition of a particular resource.

state
Glossary-4
Index-1
Index
Symbols(OCR) Oracle Cluster Registry
log files, H-3
AACL
resource attribute, B-3action entry points
defined, 5-8action scripts
actions, 5-8ACTION_FAILURE_EVENT_TEMPLATE
resource attribute, B-13ACTION_SCRIPT
resource attribute, B-4ACTIVE_PLACEMENT
resource attribute, B-4addresses, configuring manually, 1-6administrative tools
overview and concepts, 1-12agent
defined, 5-3agent framework
defined, 5-3AGENT_FILENAME
resource attribute, B-4agents
appagent, 5-2appagent.exe, 5-2scriptagent, 5-2scriptagent.exe, 5-2
alert messagesCRSD, H-4log file location, H-4
application agent, 5-2applications
defining a VIP address, 1-14highly available, 1-14managing with CLSCRS commands, F-2
attraction start dependency, 5-11modifiers, B-9
AUTO_STARTresource attribute, B-5
Bbackground processes, 1-7block-by-block checksum operation, 2-43BMC
obtaining IP address, E-35storing IP address, E-44
CCache Fusion
communication, D-4CARDINALITY
resource attribute, B-5changing interface names, consequences, 2-49changing VIP addresses, 2-47CHECK_INTERVAL
resource attribute, B-5checksum operation
block-by-block, 2-43client-side diagnosability infrastructure (CRSD)
alerts, H-4cloning
Oracle Clusterware, 3-1Oracle grid infrastructure, 3-1
cloning, overview for clusterware, 1-14CLSCRS APIs
callback mechanism, F-4data structures, F-3deprecated, F-7error handling and tracing, F-4filters, F-5
comparison filter, F-6expression filter, F-6
initialization and persistence, F-2memory management, F-3overview, F-2threading support, F-3
CLSCRS commandsoverview, F-2
CLSD-1009 messageresolving, 2-32
CLSD-1011 messageresolving, 2-32
cluster administrator management, 2-19cluster interconnect

Index-2
Cache Fusion communication, D-4changing private network addresses, 2-49
Cluster Manager (CSS)log files, H-3
Cluster Ready Services (CRS)debugging, E-59defined, 1-8
Cluster Ready Services Daemonlog files, H-3
cluster resource, 5-3cluster storage
recording with OCR, 1-5Cluster Synchronization Services (CSS), 1-8
debugging, E-59defined, 1-8
cluster time management, 2-1Cluster Time Synchronization Service (CTSS), 2-1Cluster Verification Utility (CVU)
See CVUCLUSTER_INTERCONNECT interface
specifying with OIFCFG, D-4cluster_resource, 5-3cluster-aware resource, 5-3clusterware, cloning overview, 1-14cluvfy
See CVUcompatibility
Oracle Clusterware, Oracle ASM, and database, 1-10
component parametersupplying to CRSCTL commands, E-59
componentsinitialization file for debugging purposes, E-62
configurationsreinitializing the OCR, 2-39
configuringvoting disks, 2-21
CRSSee Cluster Ready Services (CRS)
CRSCTLchecking the Oracle Clusterware status, 2-30command reference, E-6commands
add crs administrator, E-26add css votedisk, E-27add resource, E-7add serverpool, E-27add type, E-10check cluster, E-29check crs, E-30check css, E-11check ctss, E-31check has, E-52check resource, E-30config crs, E-31config has, E-52delete crs administrator, E-31delete css votedisk, E-32delete node, E-33delete resource, E-11
delete serverpool, E-33delete type, E-12disable crs, E-34disable has, E-53enable crs, E-34enable has, E-53get css, E-34get css ipmiaddr, E-35get hostname, E-12get nodename, E-35getperm resource, E-12getperm serverpool, E-35getperm type, E-13lsmodules, E-36modify resource, E-14modify serverpool, E-37modify type, E-16pin css, E-38query crs activeversion, E-38query crs administrator, E-38query crs releaseversion, E-39query crs softwareversion, E-39query css ipmidevice, E-39query css votedisk, E-40query has releaseversion, E-53query has softwareversion, E-54relocate resource, E-40relocate server, E-42replace discoverystring, E-42replace votedisk, E-43set css, E-44set css ipmiaddr, E-44set css ipmiadmin, E-45set log, E-57set trace, E-57setperm resource, E-17setperm serverpool, E-45setperm type, E-18start cluster, E-46start crs, E-47start has, E-54status resource, E-19, E-21status server, E-47status serverpool, E-48status type, E-22stop cluster, E-50stop crs, E-50stop has, E-54stop resource, E-23unpin css, E-50unset css, E-51
dual environment commands, E-7Oracle RAC environment commands, E-25Oracle Restart environment commands, E-52
CRSCTL commandscluster aware, 1-13component parameter, E-59debug log, E-59debugging_level parameter, E-59, E-63lsmodules, E-59

Index-3
module_name parameter, E-59overview, 1-13resource_name parameter, E-63set log, E-63
crsctl set log, E-59crsctl set trace, E-59crsd background process
alert messages, H-4log files, H-3
CSSSee Cluster Synchronization Services (CSS)
cssdlog files, H-3
CVUabout, A-1commands
cluvfy comp acfs, A-12cluvfy comp admprv, A-13cluvfy comp asm, A-15cluvfy comp cfs, A-16cluvfy comp clocksync, A-17cluvfy comp clu, A-18cluvfy comp clumgr, A-19cluvfy comp crs, A-20cluvfy comp gns, A-21cluvfy comp gpnp, A-22cluvfy comp ha, A-23cluvfy comp nodeapp, A-24cluvfy comp nodecon, 2-49, A-25cluvfy comp nodereach, A-27cluvfy comp ocr, A-28cluvfy comp ohasd, A-29cluvfy comp olr, A-30cluvfy comp peer, A-31cluvfy comp scan, A-32cluvfy comp software, A-33cluvfy comp space, A-34cluvfy comp ssa, A-35cluvfy comp sys, A-37cluvfy comp vdisk, A-38cluvfy stage -post acfscfg, A-47cluvfy stage -post cfs, A-39cluvfy stage -post crsinst, A-40cluvfy stage -post hacfg, A-43cluvfy stage -post hwos, A-44cluvfy stage -post nodeadd, A-45cluvfy stage -pre acfscfg, A-47cluvfy stage -pre cfs, A-39cluvfy stage -pre crsinst, A-40cluvfy stage -pre dbcfg, A-41cluvfy stage -pre dbinst, A-42cluvfy stage -pre hacfg, A-43cluvfy stage -pre nodeadd, A-45
component verificationscluster integrity, A-18Cluster Manager subcomponent, A-19connectivity between cluster nodes, A-25CTSS integrity, A-17free space, A-34Grid Plug and Play service and profile, A-22
integrity of high availability, A-23integrity of OCR, A-28integrity of ohasd, A-29integrity of OLR, A-30integrity of Oracle ACFS, A-12, A-16integrity of Oracle ASM, A-15integrity of voting disks, A-38node applications, A-24node comparison, A-31Oracle Clusterware component, A-20Oracle Grid Naming Service (GNS), A-21reachability of nodes, A-27SCAN configuration, A-32software distribution across nodes, A-33storage, A-35system requirements, A-37user and permissions, A-13
difference between runcluvfy.sh and cluvfy, A-5installation requirements, A-5known issues, A-50node list shortcuts, A-9online Help system, A-7overview and concepts, 1-12performing verifications, A-3runcluvfy.sh, A-5stage verifications
database configuration, A-41high availability installation, A-43network and storage on all nodes, A-44node installation, A-45Oracle ACFS, A-39Oracle ACFS configuration, A-47Oracle Clusterware installation, A-40Oracle RAC installation, A-42
UNKNOWN output, A-9verbose mode, A-9
Ddebugging
CRS, CSS, and EVM modules, E-59Oracle Clusterware resources, E-63
debugging_level parametersupplying to CRSCTL commands, E-59, E-63
defining network interfacesOIFCFG command-line interface, D-1
DEGREEresource attribute, B-5
delif commandOIFCFG command-line interface, D-6
DESCRIPTIONresource attribute, B-5
DHCP, 1-6diagcollection.pl script, H-4diagnostics collection script, H-4diagnostics data
collecting with the diagcollection.pl script, H-4dispersion start dependency, 5-12
modifiers, B-10DNS, entries example for GNS and SCAN, 1-6
Index-4
EENABLED
resource attribute, B-5enabling debugging for Oracle Clusterware
resources, E-63enabling debugging for the CRS, CSS, and EVM
modules, E-59entry points
ABORT, 5-4CHECK, 5-4
CLSAGFW_FAILED state, 5-5CLSAGFW_ONLINE state, 5-4CLSAGFW_PARTIAL state, 5-5CLSAGFW_PLANNED_OFFLINE state, 5-4CLSAGFW_UNKNOWN state, 5-5CLSAGFW_UNPLANNED_OFFLINE
state, 5-4CLEAN, 5-4defined, 5-4monitor, 5-4START, 5-4STOP, 5-4
Event Management (EVM)defined, 1-8
EVMdebugging, E-59log files, H-3overview, 1-8See Event Management (EVM)
FFAILURE_INTERVAL
resource attribute, B-6FAILURE_THRESHOLD
resource attribute, B-6Fast Application Notification
see FANfeatures, new, xvFree server pool, 2-14
described, 2-14
GGeneric server pool, 2-14generic server pool
described, 2-14getif command
OIFCFG command-line interface, D-5GIPC
See Grid Interprocess Communication (GIPC)global interface
network interface stored as, D-3GNS, 1-5
See Oracle Grid Naming Service (GNS)GNS, and SCAN, 1-6GNS, GNS VIP, 1-6grid infrastructure
cloning Oracle Clusterware in, 3-1Grid Interprocess Communication (GIPC)
defined, 1-9Grid Naming Service, 1-5Grid Naming Service (GNS)
described, 1-5Grid Plug and Play, xix
Hhard start dependency, 5-10
modifiers, B-9hard stop dependency, 5-13
modifiers, B-11hardware requirements, 1-3high availability
and Oracle Clusterware, 1-8application programming interface, 1-14framework, 1-14
HOSTING_MEMBERSresource attribute, B-6
Iiflist command
OIFCFG command-line interface, D-5importing
OCR, 2-39initialization files
creating for component-level debugging, E-62installation
introduction, 1-10installations
configuring voting disks, 2-21Interconnects page
monitoring clusterware with Oracle Enterprise Manager, H-1
interface names, consequences of changing, 2-49IPMI
BMCobtaining IP address, E-35storing IP address, E-44
modifying administrator, E-45
LLAST_SERVER
resource attribute, B-13listeners
in OCR, 1-5LOAD
resource attribute, B-6local resource, 5-3local_resource, 5-3log files
for CSS, H-3for EVM, H-3for Oracle Cluster Registry, H-3
log levelssetting for Oracle Clusterware, E-57
lsmodules parameteron the CRSCTL command, E-59
Index-5
Mmanaging applications
CLSCRS commands, F-2managing Oracle Clusterware
with CRSCTL, 1-13manual address configuration, 1-6mDNS
See Multicast Domain Name Service (mDNS)mirroring
OCR (Oracle Cluster Registry), 2-28module_name parameter
supplying to CRSCTL commands, E-59modules
CRSdebugging, E-59
CSSdebugging, E-59
EVMdebugging, E-59
Multicast Domain Name Service (mDNS)defined, 1-9
multiplexed OCR, 1-5
NNAME
resource attribute, B-7network adapter
storage for, 2-49network interface
global, D-3node-specific, D-3OIFCFG syntax, D-4
network interface card (NIC)See network adapter
network interfacesdefining with OIFCFG, D-1types, D-4updating subnet classification, D-2
new features, xvnodes
adding to a clusteron Linux or UNIX, 4-3
deleting from a clusteron Linux or UNIX, 4-4
VIP address, 1-5node-specific interface
network interface stored as, D-3
OOCR (Oracle Cluster Registry)
adding, 2-28, 2-30automatic backups, 2-33backing up, 2-33contents, 2-25diagnosing problems with OCRDUMP, 2-38downgrading, 2-42exporting, 2-38importing content
on Linux and UNIX systems, 2-39log file location, H-3managing, 2-25manual backups, 2-33migrating from Oracle ASM, 2-27migrating to Oracle ASM, 2-26OCRDUMP utility command examples, 2-45ocr.loc file, 2-30on Oracle ASM, xviioverriding data loss protection mechanism, 2-32recording cluster configuration information, 1-3recording cluster storage, 1-5removing, 2-28, 2-31repairing, 2-28, 2-31replacing, 2-28, 2-30restoring, 2-34
on Linux and UNIX systems, 2-35on Windows systems, 2-36using automatically generated OCR
backups, 2-34troubleshooting, 2-38, 2-43upgrading, 2-42viewing content with OCRDUMP, 2-44
OCR configuration toolSee OCRCONFIG utility
OCRCHECK utilitychanging the amount of logging, 2-44check status of OLR, 2-41diagnosing OCR problems with, 2-38log files, 2-44sample output, 2-43
OCRCONFIG utilityadministering OLR, 2-41commands
-add, G-3-backuploc, G-4-delete, G-4-downgrade, G-5-export, G-5-import, 2-39, G-5-manualbackup, G-6-overwrite, G-6-repair, G-7-replace, G-7-restore, G-8-showbackup, G-9-upgrade, G-9
log files, 2-46overview and concepts, 1-13syntax, G-2
OCRDUMP utilitychanging the amount of logging, 2-44command examples, 2-45commands, 2-45
backup, 2-45diagnosing OCR problems with, 2-38, 2-44dump content of OLR, 2-41log files, 2-44sample output, 2-45syntax and options, 2-44
Index-6
SYSTEM.language key output, 2-45SYSTEM.version key output, 2-46
ocr.loc file, 2-30ocrlog.ini file
editing, 2-44OFFLINE_CHECK_INTERVAL
resource attribute, B-7OIFCFG command-line interface
commands, D-3 to D-6interface types, D-4invoking, D-2overview and concepts, 1-13, D-1syntax, D-3
OLR (Oracle Local Registry)administering, 2-41backing up, 2-42check status of, 2-41defined, 2-41dump content of, 2-41exporting to a file, 2-41importing a file, 2-42restoring, 2-42viewing backup files, 2-42viewing content with OCRDUMP, 2-44
OLSNODES commandreference, C-1
ONSSee Oracle Notification Service (ONS)
operating systemsrequirements for Oracle Clusterware, 1-3
oraagentdefined, 1-8
Oracle ACFSdefined, xvii
Oracle agent, 1-8Oracle ASM
disk groupsredundancy, 2-22
migrating OCR locations to, 2-26OCR residing on, xvii
Oracle Automatic Storage ManagementSee Oracle ASM
Oracle Automatic Storage Management Cluster File System
See Oracle ACFSOracle Cluster Registry
See OCR (Oracle Cluster Registry)Oracle Clusterware
adding a home to a new node, 4-3debugging
component level, E-59creating an initialization file, E-62dynamic, E-57
defined, 1-1OCR
migrating from Oracle ASM, 2-27migrating to Oracle ASM, 2-26
processesCluster Ready Services (CRS), 1-8Cluster Synchronization Services (CSS), 1-8
Event Management (EVM), 1-8Grid Interprocess Communication (GIPC), 1-9Multicast Domain Name Service (mDNS), 1-9oraagent, 1-8Oracle Grid Naming Service (GNS), 1-9Oracle Notification Service (ONS), 1-8orarootagent, 1-8
upgradeout-of-place, 1-7
Oracle Clusterware Control (CRSCTL)See CRSCTL
Oracle Clusterware homeadding, 4-3deleting manually, 4-4
Oracle Enterprise Manageradding resources with, 5-20adding VIPs with, 5-17overview and concepts, 1-12using the Interconnects page to monitor Oracle
Clusterware, H-1Oracle grid infrastructure
cloning, 3-1Oracle Grid Naming Service (GNS)
defined, 1-9Oracle Interface Configuration tool
see OIFCFGOracle Local Registry
See OLR (Oracle Local Registry)Oracle Notification Service (ONS)
defined, 1-8Oracle RAC One Node, xvOracle Real Application Clusters
overview of administration, 1-1Oracle Real Application Clusters One Node, xvOracle root agent, 1-8Oracle Universal Installer
Oracle Clusterware installation, 1-10orarootagent
defined, 1-8out-of-place upgrade, 1-7
PPLACEMENT
resource attribute, B-7private network address
changing, 2-49private network addresses
changing the network interface for, 2-51PROFILE_CHANGE_EVENT_TEMPLATE
resource attribute, B-13public interface
specifying with OIFCFG, D-4pullup start dependency, 5-12
modifiers, B-10
Rrecording cluster configuration information, 1-3recording node membership information

Index-7
voting disk, 1-3redundancy
voting disk, 1-5registering resources, 5-6resource attributes
ACL, B-3ACTION_FAILURE_EVENT_TEMPLATE, B-13ACTION_SCRIPT, B-4ACTIVE_PLACEMENT, B-4AGENT_FILENAME, B-4AUTO_START, B-5CARDINALITY, B-5CHECK_INTERVAL, B-5DEGREE, B-5DESCRIPTION, B-5ENABLED, B-5FAILURE_INTERVAL, B-6FAILURE_THRESHOLD, B-6HOSTING_MEMBERS, B-6LAST_SERVER, B-13LOAD, B-6NAME, B-7OFFLINE_CHECK_INTERVAL, B-7PLACEMENT, B-7PROFILE_CHANGE_EVENT_TEMPLATE, B-13RESTART_ATTEMPTS, B-7RESTART_COUNT, B-13SCRIPT_TIMEOUT, B-8SERVER_POOLS, B-8START_DEPENDENCIES, B-8START_TIMEOUT, B-10STATE_CHANGE_EVENT_TEMPLATE, B-13STATE_DETAILS, B-13STOP_DEPENDENCIES, B-11STOP_TIMEOUT, B-11TARGET, B-14TYPE, B-12UPTIME_THRESHOLD, B-12
resource dependenciesdefined, 5-9start dependencies, 5-10
attraction, 5-11, B-9dispersion, 5-12, B-10hard, 5-10, B-9pullup, 5-12, B-10weak, 5-11, B-9
stop dependencies, 5-13hard, 5-13, B-11
resource permissionschanging, 5-21
resource typecluster_resource, 5-3defined, 5-3local_resource, 5-3
resource_name parametersupplying to CRSCTL commands, E-63
resourcesadding, 5-18
with Oracle Enterprise Manager, 5-20defined, 5-2
registering in Oracle Clusterware, 5-6RESTART_ATTEMPTS
resource attribute, B-7RESTART_COUNT
resource attribute, B-13restoring
OCR, 2-39runcluvfy.sh, A-5
Sscalability
adding nodes and instances, quick-start format, 4-3
SCAN, 1-6SCRIPT_TIMEOUT
resource attribute, B-8Server Control Utility (SRVCTL), 1-5
see SRVCTLserver pools
described, 2-13Free, 2-14Generic, 2-14
SERVER_POOLSresource attribute, B-8
server-centric resource, 5-3servers
described, 2-11how Oracle Clusterware assigns, 2-17Oracle Clusterware requirements, 1-3states, 2-11
setif commandOIFCFG command-line interface, D-6
Single Client Access Name (SCAN), 1-6software requirements, 1-4SRVCTL
overview and concepts, 1-12srvctl stop nodeapps command, 2-48start effort evaluation
described, 5-14START_DEPENDENCIES
resource attribute, B-8START_TIMEOUT
resource attribute, B-10starting the OIFCFG interface, D-2STATE_CHANGE_EVENT_TEMPLATE
resource attribute, B-13STATE_DETAILS
resource attribute, B-13STOP_DEPENDENCIES
resource attribute, B-11STOP_TIMEOUT
resource attribute, B-11subnet
configuring for VIP address, 1-5syntax
OCRDUMP utility, 2-44SYSTEM.language key
output, 2-45SYSTEM.version key
Index-8
output, 2-46
TTARGET
resource attribute, B-14tracing
enabling for Oracle Clusterware, E-59enabling for Oracle RAC high availability, E-63
tracing levelssetting for Oracle Clusterware, E-57
troubleshootingOCR, 2-43
TYPEresource attribute, B-12
Uupgrade
migrating storage after, 2-26, 2-27out-of-place, 1-7
upgradesand SCANs, 2-47
UPTIME_THRESHOLDresource attribute, B-12
Vversions
compatibility for Oracle Clusterware, Oracle ASM, and Oracle Database software, 1-10
VIP, 1-5adding
with Oracle Enterprise Manager, 5-17address
changing, 2-47defining for applications, 1-14requirements, 1-5
virtual IPSee VIP
voting disks, 1-5adding, 2-24adding to non-Oracle ASM storage, 2-24adding to Oracle ASM, 2-24administering, 2-21backing up, 2-23deleting, 2-24, 2-25file universal identifier (FUID)
obtaining, 2-24managing, 2-21migrating, 2-24migrating to Oracle ASM, 2-25on Oracle ASM, xviireplacing in non-ASM storage, 2-25replacing in Oracle ASM, 2-25restoring, 2-23storing on Oracle ASM, 2-22
Wweak start dependency, 5-11
modifiers, B-9