oracle universal installer and opatch user’s guide for …€¦ · running the oracle universal...
TRANSCRIPT
Oracle® Universal Installerand OPatch User’s Guide
10g Release 2 (10.2) for Windows and UNIX
B16227-05
January 2008

Oracle Universal Installer and OPatch User’s Guide, 10g Release 2 (10.2) for Windows and UNIX
B16227-05
Copyright © 1996, 2008, Oracle. All rights reserved.
Primary Author: Sivakumar Seshadri
Contributing Author: Phil Choi
Contributor: Sudip Datta, Debashis Saha, Pradeep Kumar Itharaju, Bharat Paliwal, Nitin Jerath, Shamik Ganguly, Jyotsna Gangwar
The Programs (which include both the software and documentation) contain proprietary information; they are provided under a license agreement containing restrictions on use and disclosure and are also protected by copyright, patent, and other intellectual and industrial property laws. Reverse engineering, disassembly, or decompilation of the Programs, except to the extent required to obtain interoperability with other independently created software or as specified by law, is prohibited.
The information contained in this document is subject to change without notice. If you find any problems in the documentation, please report them to us in writing. This document is not warranted to be error-free. Except as may be expressly permitted in your license agreement for these Programs, no part of these Programs may be reproduced or transmitted in any form or by any means, electronic or mechanical, for any purpose.
If the Programs are delivered to the United States Government or anyone licensing or using the Programs on behalf of the United States Government, the following notice is applicable:
U.S. GOVERNMENT RIGHTS Programs, software, databases, and related documentation and technical data delivered to U.S. Government customers are "commercial computer software" or "commercial technical data" pursuant to the applicable Federal Acquisition Regulation and agency-specific supplemental regulations. As such, use, duplication, disclosure, modification, and adaptation of the Programs, including documentation and technical data, shall be subject to the licensing restrictions set forth in the applicable Oracle license agreement, and, to the extent applicable, the additional rights set forth in FAR 52.227-19, Commercial Computer Software—Restricted Rights (June 1987). Oracle USA, Inc., 500 Oracle Parkway, Redwood City, CA 94065
The Programs are not intended for use in any nuclear, aviation, mass transit, medical, or other inherently dangerous applications. It shall be the licensee's responsibility to take all appropriate fail-safe, backup, redundancy and other measures to ensure the safe use of such applications if the Programs are used for such purposes, and we disclaim liability for any damages caused by such use of the Programs.
Oracle, JD Edwards, PeopleSoft, and Siebel are registered trademarks of Oracle Corporation and/or its affiliates. Other names may be trademarks of their respective owners.
The Programs may provide links to Web sites and access to content, products, and services from third parties. Oracle is not responsible for the availability of, or any content provided on, third-party Web sites. You bear all risks associated with the use of such content. If you choose to purchase any products or services from a third party, the relationship is directly between you and the third party. Oracle is not responsible for: (a) the quality of third-party products or services; or (b) fulfilling any of the terms of the agreement with the third party, including delivery of products or services and warranty obligations related to purchased products or services. Oracle is not responsible for any loss or damage of any sort that you may incur from dealing with any third party.
iii
Contents
Preface ............................................................................................................................................................... xiii
Audience..................................................................................................................................................... xiiiDocumentation Accessibility ................................................................................................................... xiiiStructure ..................................................................................................................................................... xivConventions ............................................................................................................................................... xv
1 Basic Concepts
Utilities ....................................................................................................................................................... 1-1Oracle Universal Installer ................................................................................................................. 1-1OPatch.................................................................................................................................................. 1-1
Actions Performed by the Utilities ....................................................................................................... 1-1Install.................................................................................................................................................... 1-2De-install.............................................................................................................................................. 1-2Cloning ................................................................................................................................................ 1-2Patching ............................................................................................................................................... 1-2Upgrades and Patchsets .................................................................................................................... 1-2Adding Nodes .................................................................................................................................... 1-2Inventory Operations ........................................................................................................................ 1-3
Attaching Oracle Homes............................................................................................................ 1-3Detaching Oracle Homes ........................................................................................................... 1-3Updating Node List .................................................................................................................... 1-3
Major Entities............................................................................................................................................ 1-3Inventory ............................................................................................................................................. 1-3Oracle Home ....................................................................................................................................... 1-3
Modes of Installation............................................................................................................................... 1-4Interactive Mode ................................................................................................................................ 1-4Suppressed-Interactive Mode........................................................................................................... 1-4Silent Mode ......................................................................................................................................... 1-4Cluster Install Mode .......................................................................................................................... 1-4
2 Introduction to Oracle Universal Installer
System Requirements.............................................................................................................................. 2-1Key Features .............................................................................................................................................. 2-1
iv
3 Managing Oracle Homes
Introduction to Oracle Homes ............................................................................................................... 3-1Installing the Oracle Product ................................................................................................................. 3-1Removing Oracle Homes ........................................................................................................................ 3-2Determining the Default Oracle Home ............................................................................................... 3-2Multiple Oracle Homes........................................................................................................................... 3-3
Target Home ....................................................................................................................................... 3-3About the Oracle Universal Installer Inventory ................................................................................ 3-3
Structure of the Oracle Universal Installer Inventory .................................................................. 3-4Central Inventory Pointer File................................................................................................... 3-4Central Inventory........................................................................................................................ 3-4
Inventory File ....................................................................................................................... 3-4Logs Directory...................................................................................................................... 3-5
Oracle Home Inventory ............................................................................................................. 3-5Components File .................................................................................................................. 3-6Home Properties File........................................................................................................... 3-6Other Folders........................................................................................................................ 3-7
Creating the Central Inventory ........................................................................................................ 3-7Detaching Oracle Homes from the Central Inventory.................................................................. 3-8
Removing the Central Inventory .............................................................................................. 3-8Removing the Central Inventory on UNIX Platforms.................................................... 3-8Removing the Central Inventory on Windows Platforms............................................. 3-9
Upgrading and Patching the Oracle Home.................................................................................... 3-9Cloning Oracle Homes ...................................................................................................................... 3-9Backing up the Inventory.................................................................................................................. 3-9Recovering from Inventory Corruption....................................................................................... 3-10
Diagnosing and Recovering from Central Inventory Corruption .................................... 3-10Diagnosing and Recovering from Oracle Home Inventory Corruption.......................... 3-11
Real Application Clusters .............................................................................................................. 3-11Updating the Nodes of a Cluster ........................................................................................... 3-11
Home Selector (Available on Win32 Platforms) .............................................................................. 3-12Home Selector Overview ............................................................................................................... 3-12How Home Selector Works ........................................................................................................... 3-12Oracle Home Directory Structure for Windows Platforms ...................................................... 3-13Optimal Flexible Architecture Directory Structure (on UNIX) ................................................ 3-13
ORACLE_BASE Directory...................................................................................................... 3-13ORACLE_HOME Directory ................................................................................................... 3-13
4 Customizing and Creating Response Files
About Response Files .............................................................................................................................. 4-1What Is a Silent Installation? ............................................................................................................ 4-1What Is a Response File? ................................................................................................................... 4-1Why Perform a Silent Installation?.................................................................................................. 4-2
Modifying a Response File..................................................................................................................... 4-2Creating a Response File With Record Mode ..................................................................................... 4-3
Using Record Mode ........................................................................................................................... 4-3Response File Format............................................................................................................................... 4-4

v
Variable Values................................................................................................................................... 4-4Variable Lookup Order .............................................................................................................. 4-4Setting the Recommendation Value......................................................................................... 4-4
Comments ........................................................................................................................................... 4-5Headers................................................................................................................................................ 4-5Response File Parameters ................................................................................................................. 4-5
Installing Using a Response File........................................................................................................ 4-11Specifying a Response File............................................................................................................. 4-11Optional Parameters When Specifying a Response File............................................................ 4-12Setting Response File Variables From the Command Line....................................................... 4-12
Specifying the Value of a Session Variable .......................................................................... 4-12Specifying the Value of a Component Variable .................................................................. 4-13
5 Installing Products Using Oracle Universal Installer
Checking Pre-Requisites Before Installation...................................................................................... 5-1Installing Oracle Products ...................................................................................................................... 5-2
Getting Help While Installing Oracle Products............................................................................. 5-2About the ORAPARAM.INI File ..................................................................................................... 5-3Modes of Installation ......................................................................................................................... 5-5Installation Media .............................................................................................................................. 5-6
Installing from a Single CD-ROM ............................................................................................ 5-6Installing from Multiple CD-ROMs ......................................................................................... 5-7
TEMP/TMP Directory ........................................................................................................ 5-7Unmounting a CD ............................................................................................................... 5-7
Installing from a staged HTTP location................................................................................... 5-8Special Instructions for UNIX Users ............................................................................................... 5-8
Failed to Connect to Server Error ............................................................................................. 5-9Providing a UNIX Installer Location with Root Privileges .................................................. 5-9Providing a UNIX Group Name............................................................................................ 5-10
De-installing Oracle Products............................................................................................................. 5-10Removing Oracle Products and Oracle Homes With Oracle Universal Installer .................. 5-10De-installing Top Level Products that Have Dependents ........................................................ 5-11Silent De-installation....................................................................................................................... 5-11
Immediately Displaying the Inventory Dialog Box............................................................ 5-11Hiding the Inventory Dialog Box .......................................................................................... 5-11Hiding the De-installation Confirmation and Progress Dialog Boxes ............................. 5-12
Running Oracle Universal Installer After Installation .................................................................. 5-12Starting Oracle Universal Installer ............................................................................................... 5-12Command Line Arguments........................................................................................................... 5-13Using Oracle Universal Installer Exit Codes............................................................................... 5-14Cloning Considerations.................................................................................................................. 5-15
About Oracle Universal Installer Log Files...................................................................................... 5-15
6 Cluster Environment Installations
Oracle Universal Installer and Real Application Clusters............................................................... 6-1Oracle Clusterware ............................................................................................................................ 6-2
vi
Installed Real Application Clusters Components ......................................................................... 6-2General System Installation Requirements for Real Application Clusters.................................. 6-2
Hardware Requirements for Real Application Clusters Setup ................................................... 6-3Software Requirements for Real Application Clusters Setup...................................................... 6-3
Cluster Setup and Pre-Installation Configuration Tasks for Real Application Clusters ........... 6-4Pre-Installation Tasks for Real Application Clusters on UNIX ...................................................... 6-4
Logging In to the System as root ..................................................................................................... 6-4Creating Required UNIX Groups and Users ................................................................................. 6-5
Creating Identical Users and Groups on Other Cluster Nodes ........................................... 6-5Identifying the User and Group IDs ................................................................................. 6-6Creating the User and Groups on the Other Cluster Nodes ......................................... 6-6
Configuring SSH on all Cluster Nodes.................................................................................... 6-6Configuring SSH on Cluster Member Nodes .................................................................. 6-6Enabling SSH User Equivalency on Cluster Member Nodes........................................ 6-7Preventing Oracle Clusterware Installation Errors Caused by stty Commands........ 6-8
Configuring the Oracle User Environment .................................................................................... 6-9Checking the Hardware Requirements .......................................................................................... 6-9Checking the Network Requirements............................................................................................. 6-9
Network Hardware Requirements........................................................................................... 6-9Network Parameter Requirements........................................................................................... 6-9IP Address Requirements ....................................................................................................... 6-10Node Time Requirements....................................................................................................... 6-10
Checking Software Requirements ................................................................................................ 6-10Configuring Kernel Parameters .................................................................................................... 6-10Identifying Required Software Directories ................................................................................. 6-10
Oracle Base Directory .............................................................................................................. 6-11Oracle Inventory Directory..................................................................................................... 6-11Oracle Clusterware Home Directory .................................................................................... 6-12Oracle Home Directory ........................................................................................................... 6-12
Identifying or Creating an Oracle Base Directory ...................................................................... 6-12Creating the Clusterware Home Directory ................................................................................. 6-12
Pre-Installation Tasks for Real Application Clusters on Windows............................................. 6-13Checking Hardware and Software Certification ........................................................................ 6-13Checking the Hardware Requirements ....................................................................................... 6-14
Hard Disk Space Requirements ............................................................................................. 6-14Checking the Software Requirements .......................................................................................... 6-14Checking the Network Requirements.......................................................................................... 6-14
Network Hardware Requirements........................................................................................ 6-14IP Address Requirements ....................................................................................................... 6-14
Checking Individual Component Requirements ....................................................................... 6-15Configuring Storage for Oracle Clusterware ................................................................................... 6-15Installing Oracle Clusterware on UNIX............................................................................................ 6-15
Running the Oracle Universal Installer to Install Oracle Clusterware.................................... 6-15Running the Oracle Universal Installer in Silent Mode to Install Oracle Clusterware......... 6-16Oracle Clusterware Background Processes................................................................................. 6-16
Installing Oracle Clusterware on Windows ..................................................................................... 6-16Running the Oracle Universal Installer to Install Oracle Clusterware.................................... 6-16
vii
Running the Oracle Universal Installer in Silent Mode to Install Oracle Clusterware......... 6-19Oracle Clusterware Background Processes................................................................................. 6-19
Adding Additional Nodes to the Cluster for Mass Deployment................................................. 6-19Installing Product Software on a Cluster ......................................................................................... 6-20
Cluster Detection............................................................................................................................. 6-20Availability Checking..................................................................................................................... 6-20Cluster Installation.......................................................................................................................... 6-21Cluster Installation in Silent Mode ............................................................................................... 6-21Cluster De-installation.................................................................................................................... 6-21
Command Line Options for Cluster Installs (UNIX Only) ........................................................... 6-22Patchsets and Upgrades........................................................................................................................ 6-22Post Installation Tasks .......................................................................................................................... 6-22
Verification....................................................................................................................................... 6-22Back Up Disk after Installation ..................................................................................................... 6-22Download and Install Patches....................................................................................................... 6-22Configure Oracle Products ............................................................................................................ 6-23
De-installing Real Application Clusters Software ......................................................................... 6-23De-installing Oracle Product Software on UNIX ....................................................................... 6-23De-installing Oracle Product Software on Windows................................................................. 6-24De-installing Oracle Clusterware ................................................................................................. 6-25
De-installing Oracle Clusterware from UNIX Environment............................................. 6-25De-installing Oracle Clusterware from Windows Environment ...................................... 6-26
De-installing Oracle Clusterware with No Previous Cluster Software Versions.... 6-26De-installing Oracle Clusterware with Clusterware Downgrade to 9.2................... 6-26
Converting Single Instance Nodes to Real Application Clusters................................................ 6-27Troubleshooting Real Application Clusters / Oracle Clusterware Installation ........................ 6-27
7 Oracle Software Cloning Using Oracle Universal Installer
About Cloning .......................................................................................................................................... 7-1Overview of the Cloning Process .......................................................................................................... 7-2
Source Preparation Phase ................................................................................................................. 7-2Cloning Phase ..................................................................................................................................... 7-3
Locating and Viewing Log Files ............................................................................................................ 7-3Cloning an Oracle Database 10.1 Oracle Home.................................................................................. 7-4
Preparing the Oracle Database 10.1 Source.................................................................................... 7-4Cloning an Oracle Database 10.1 ..................................................................................................... 7-5
Viewing Log and Error Files ..................................................................................................... 7-6Cloning an Oracle Database 10.2 Oracle Home.................................................................................. 7-6
Preparing the Oracle Database 10.2 Source.................................................................................... 7-6Cloning an Oracle Database 10.2 ..................................................................................................... 7-7
Viewing Log and Error Files ..................................................................................................... 7-8Creating Oracle Real Application Cluster Environment using Cloning....................................... 7-8
Creating Oracle RAC Environments on UNIX and Linux System-Based Environments ....... 7-9Cloning Oracle Clusterware on UNIX and Linux System-Based Environments .............. 7-9Cloning Oracle RAC Software on UNIX and Linux System-Based Environments ....... 7-10
Creating Oracle RAC Environments on Windows System-Based Environments................. 7-11Cloning Oracle Clusterware on Windows System-Based Environments........................ 7-11
viii
Cloning Oracle RAC Software on Windows System-Based Environments .................... 7-12Important Considerations when Cloning Oracle Real Application Clusters.................. 7-13
Adding Nodes Using Cloning in Oracle Real Application Clusters Environments................ 7-13Cloning Oracle RAC Environments on UNIX and Linux System-Based Environments ..... 7-13
Cloning Oracle Clusterware on UNIX and Linux System-Based Environments ........... 7-13Cloning Oracle RAC Software on UNIX and Linux System-Based Environments ....... 7-15
Cloning Oracle RAC Environments on Windows System-Based Environments.................. 7-15Cloning Oracle Clusterware on Windows System-Based Environments........................ 7-16Cloning Oracle RAC Software on Windows System-Based Environments .................... 7-17
Cloning Script Variables and their Definitions........................................................................... 7-18Variables for UNIX and Linux System-Based Environments ........................................... 7-18Variables for Windows System-Based Environments ........................................................ 7-19
8 Oracle Software Patching Using OPatch
About Interim Patches............................................................................................................................. 8-1Structure of Interim Patches................................................................................................................... 8-1Interim Patch Versions ............................................................................................................................ 8-2Getting Interim Patches .......................................................................................................................... 8-3About OPatch ............................................................................................................................................ 8-3Requirements for OPatch ....................................................................................................................... 8-3Features of OPatch ................................................................................................................................... 8-3Pre-requisite Checks in OPatch ............................................................................................................. 8-4
Check ORACLE_HOME and Environment Variable ................................................................... 8-4Check for JRE and JDK...................................................................................................................... 8-4Check for System Space..................................................................................................................... 8-4Check for Oracle Universal Installer and OPatch Version Compatibility ................................. 8-4Check for Patch Applicable on Operating System ........................................................................ 8-5Check for System Commands .......................................................................................................... 8-5Additional Pre-requisite Checks for Real Application Clusters.................................................. 8-5
Check for User Equivalence ...................................................................................................... 8-5Check for OPatch lsinventory ................................................................................................... 8-5
Backup and Recovery Considerations for Patching ....................................................................... 8-10Operations and Options in OPatch Utility....................................................................................... 8-10
apply Option .................................................................................................................................... 8-11lsinventory Option .......................................................................................................................... 8-12query Option.................................................................................................................................... 8-14rollback Option................................................................................................................................ 8-14version Option ................................................................................................................................. 8-16
Real Application Clusters Patching................................................................................................... 8-16Types of Real Application Clusters Patching.............................................................................. 8-16
All Node Patching.................................................................................................................... 8-17Rolling Patching ....................................................................................................................... 8-17Minimum Downtime Patching .............................................................................................. 8-18
About Patch Conflicts........................................................................................................................... 8-19Types of Conflicts............................................................................................................................ 8-19Patch Conflict Detection and Resolution ..................................................................................... 8-22Restoring Oracle Homes ................................................................................................................ 8-22
ix
Logging and Tracing ............................................................................................................................. 8-22Levels of Logging ............................................................................................................................ 8-23
Recovering from a Failed Patching Session Using OPatch ........................................................... 8-23Real Application Clusters Setup ................................................................................................... 8-26
Environment Variables Used by OPatch .......................................................................................... 8-29Troubleshooting OPatch ...................................................................................................................... 8-30
9 Oracle Internationalization and Translation
Installation Dialogs Language............................................................................................................... 9-1Product Language Selections ................................................................................................................. 9-1Language Add-on ..................................................................................................................................... 9-2
Changing the Language of an Installation Using Oracle Universal Installer ........................... 9-2
A Frequently Asked Questions
Oracle Universal Installer...................................................................................................................... A-1OPatch........................................................................................................................................................ A-2
B Troubleshooting and Debugging Oracle Universal Installer
Debugging Mechanisms in Oracle Universal Installer ................................................................... B-1Oracle Universal Installer Errors.......................................................................................................... B-3Other Tips ................................................................................................................................................. B-3
C Understanding Oracle Universal Installer Commands
Options Available in Oracle Universal Installer............................................................................... C-1Command Line Variables Available in Oracle Universal Installer ............................................... C-4
D Sample Files
Sample Response File............................................................................................................................. D-1Sample ORAPARAM.INI File .............................................................................................................. D-7Sample Components File ....................................................................................................................... D-7
Index

x
xi
List of Figures
6–1 Troubleshooting Real Application Clusters / Oracle Clusterware Installation ............. 6-288–1 Structure of Interim Patches ...................................................................................................... 8-28–2 All Node Patching.................................................................................................................... 8-178–3 Rolling Patching ....................................................................................................................... 8-188–4 Minimum Downtime Patching .............................................................................................. 8-188–5 Bug Superset ............................................................................................................................. 8-198–6 Bug Conflict .............................................................................................................................. 8-208–7 Combination Conflict .............................................................................................................. 8-21B–1 Setting Exceed's Window Manager to "Native" .................................................................... B-4
xii
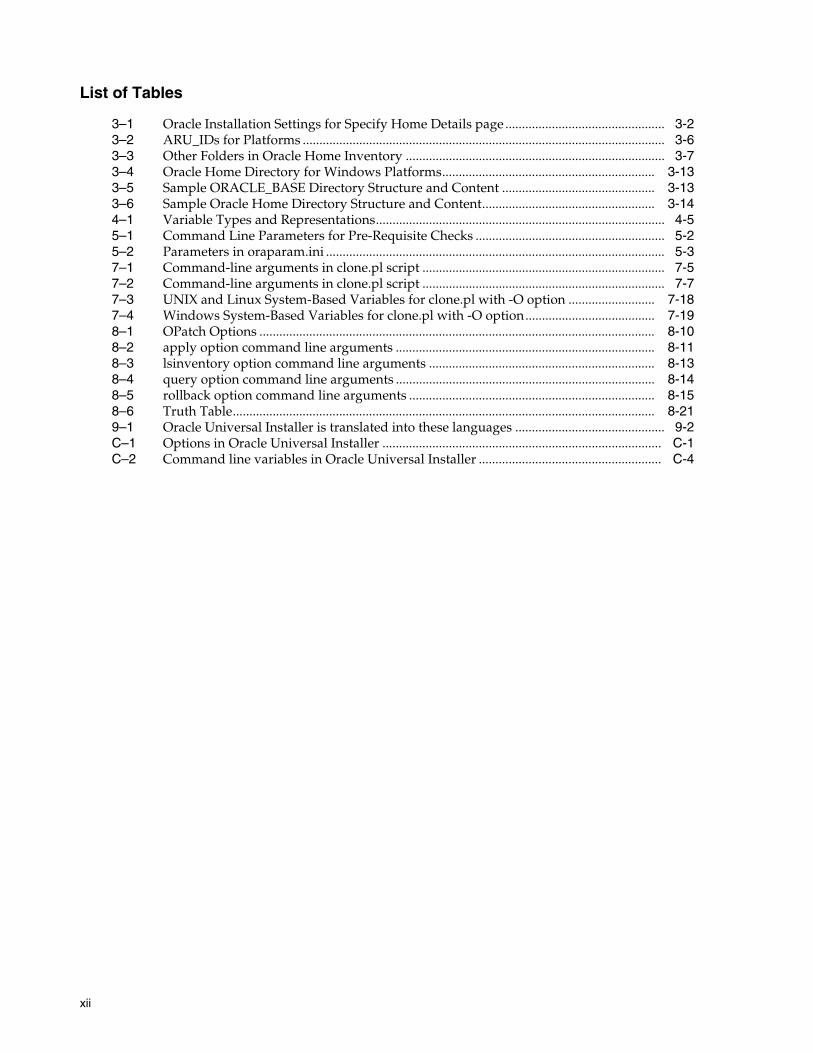
List of Tables
3–1 Oracle Installation Settings for Specify Home Details page ................................................ 3-23–2 ARU_IDs for Platforms ............................................................................................................. 3-63–3 Other Folders in Oracle Home Inventory .............................................................................. 3-73–4 Oracle Home Directory for Windows Platforms................................................................ 3-133–5 Sample ORACLE_BASE Directory Structure and Content .............................................. 3-133–6 Sample Oracle Home Directory Structure and Content.................................................... 3-144–1 Variable Types and Representations....................................................................................... 4-55–1 Command Line Parameters for Pre-Requisite Checks ......................................................... 5-25–2 Parameters in oraparam.ini ...................................................................................................... 5-37–1 Command-line arguments in clone.pl script ......................................................................... 7-57–2 Command-line arguments in clone.pl script ......................................................................... 7-77–3 UNIX and Linux System-Based Variables for clone.pl with -O option .......................... 7-187–4 Windows System-Based Variables for clone.pl with -O option....................................... 7-198–1 OPatch Options ....................................................................................................................... 8-108–2 apply option command line arguments .............................................................................. 8-118–3 lsinventory option command line arguments .................................................................... 8-138–4 query option command line arguments .............................................................................. 8-148–5 rollback option command line arguments .......................................................................... 8-158–6 Truth Table............................................................................................................................... 8-219–1 Oracle Universal Installer is translated into these languages ............................................. 9-2C–1 Options in Oracle Universal Installer .................................................................................... C-1C–2 Command line variables in Oracle Universal Installer ....................................................... C-4
xiii
Preface
This manual describes how to manage Oracle and third-party software using the Oracle Universal Installer and OPatch. This guide provides instructions for installing, setting up, and starting the Oracle Universal Installer software. It also provides instructions on cloning and patching Oracle software.
AudienceThis manual is intended for users installing Oracle software products using the Oracle Universal Installer and covers only the generic functionality and concepts. Use this manual in conjunction with any product-specific installation guides available with your Oracle product.
Documentation AccessibilityOur goal is to make Oracle products, services, and supporting documentation accessible, with good usability, to the disabled community. To that end, our documentation includes features that make information available to users of assistive technology. This documentation is available in HTML format, and contains markup to facilitate access by the disabled community. Accessibility standards will continue to evolve over time, and Oracle is actively engaged with other market-leading technology vendors to address technical obstacles so that our documentation can be accessible to all of our customers. For more information, visit the Oracle Accessibility Program Web site at
http://www.oracle.com/accessibility/
Accessibility of Code Examples in DocumentationScreen readers may not always correctly read the code examples in this document. The conventions for writing code require that closing braces should appear on an otherwise empty line; however, some screen readers may not always read a line of text that consists solely of a bracket or brace.
Accessibility of Links to External Web Sites in DocumentationThis documentation may contain links to Web sites of other companies or organizations that Oracle does not own or control. Oracle neither evaluates nor makes any representations regarding the accessibility of these Web sites.
xiv
TTY Access to Oracle Support ServicesOracle provides dedicated Text Telephone (TTY) access to Oracle Support Services within the United States of America 24 hours a day, seven days a week. For TTY support, call 800.446.2398.
StructureThis manual contains the following chapters and is organized as follows:
Chapter 1, "Basic Concepts"This chapter explains some of the basic concepts you need to understand in Oracle Universal Installer.
Chapter 2, "Introduction to Oracle Universal Installer"This chapter contains overview information on Oracle Universal Installer.
Chapter 3, "Managing Oracle Homes"This chapter contains information on how you can manage Oracle homes and Oracle inventory using Oracle Universal Installer.
Chapter 4, "Customizing and Creating Response Files"This chapter contains information on how you can perform a silent installation using response files in the Oracle Universal Installer.
Chapter 5, "Installing Products Using Oracle Universal Installer"This chapter contains information on the pre-requisites for installation and how you install and remove Oracle products.
Chapter 6, "Cluster Environment Installations"This chapter contains information on Oracle Clusterware and Real Application Clusters installation.
Chapter 7, "Oracle Software Cloning Using Oracle Universal Installer"This chapter contains information on Oracle software cloning using Oracle Universal Installer. It also contains the steps to perform a database cloning, Oracle Clusterware cloning, and Real Application Clusters cloning.
Chapter 8, "Oracle Software Patching Using OPatch"This chapter contains information on applying interim patches to Oracle products using the Oracle proprietary tool — OPatch.
Chapter 9, "Oracle Internationalization and Translation"This chapter contains information on the various languages in which Oracle produces software.
Appendix A, "Frequently Asked Questions"This appendix contains frequently asked questions on Oracle Universal Installer and OPatch.
xv
Appendix B, "Troubleshooting and Debugging Oracle Universal Installer"This appendix contains information on how you can troubleshoot Oracle Universal Installer.
Appendix C, "Understanding Oracle Universal Installer Commands"This appendix contains information on Oracle Universal Installer commands.
Appendix D, "Sample Files"This appendix contains a sample response file, a sample components file and ORAPARAM.INI file.
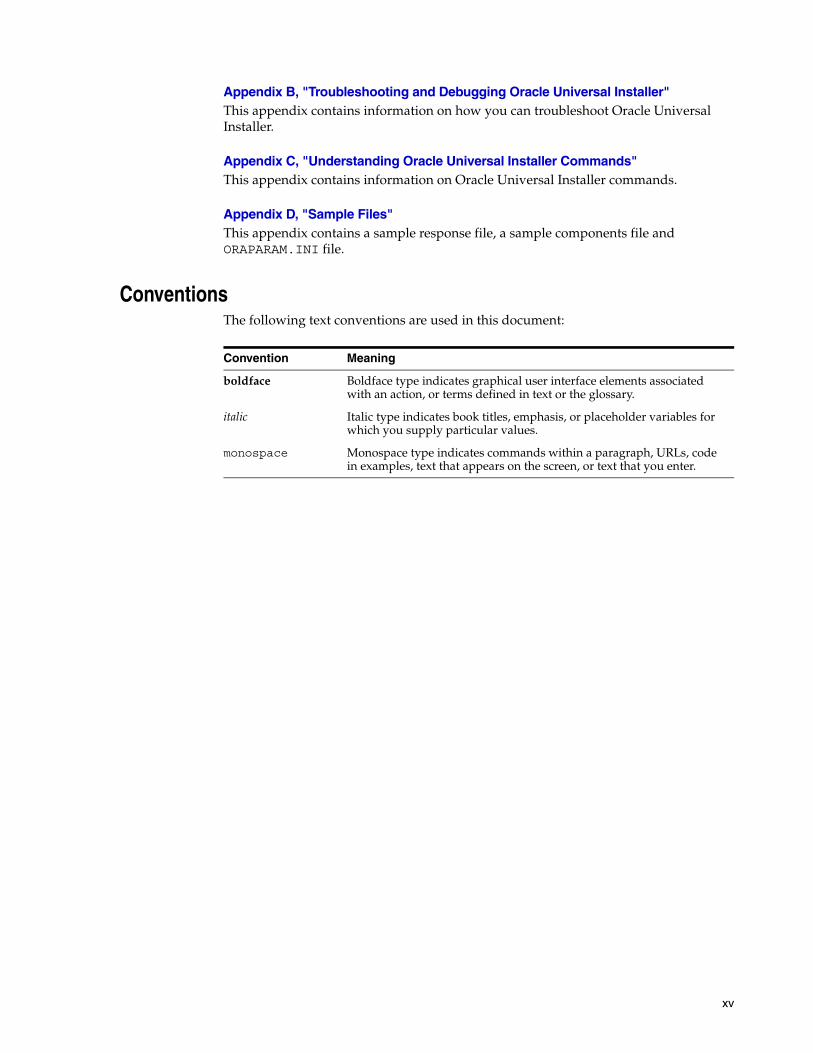
ConventionsThe following text conventions are used in this document:
Convention Meaning
boldface Boldface type indicates graphical user interface elements associated with an action, or terms defined in text or the glossary.
italic Italic type indicates book titles, emphasis, or placeholder variables for which you supply particular values.
monospace Monospace type indicates commands within a paragraph, URLs, code in examples, text that appears on the screen, or text that you enter.

xvi
Basic Concepts 1-1
1Basic Concepts
This chapter is designed to aid the developers, administrators, and all other users who install Oracle software, to understand the key concepts involved in Oracle Universal Installer.
This chapter includes the following sections:
■ Utilities
■ Actions Performed by the Utilities
■ Major Entities
■ Modes of Installation
UtilitiesOracle offers two utilities for software deployment:
■ Oracle Universal Installer to install Oracle products
■ OPatch to apply interim patches
Oracle Universal InstallerOracle Universal Installer 10g Release 2 (10.2) is a Java-based installer that enables you to install Oracle components from CDs or from a staged HTTP location. It performs component-based installs as well as complex installs, such as integrated bundle and suite installs, and installs over the Web.
OPatchOPatch is an Oracle supplied utility to assist you with the process of applying interim patches to Oracle's software. OPatch 10.2 is a Java-based utility that needs Oracle Universal Installer. It works on all operating systems for which Oracle releases software. For more information on OPatch, refer to Chapter 8, "Oracle Software Patching Using OPatch".
Actions Performed by the UtilitiesOracle Universal Installer and OPatch performs the following activities:
Actions Performed by the Utilities
1-2 Oracle® Universal Installer and OPatch User’s Guide
InstallInstallation is the process of choosing products from a release or stage area and deploying them in the target directory. There are four modes of installation, which are explained in the section "Modes of Installation" on page 1-4.
De-installDe-installation is the process of removing an installed product from the installation area. A de-installation can be cancelled, resumed or rolled back. It can be executed either interactively or silently.
CloningCloning is the process of copying an existing installation to a different location while preserving its configuration. You can install multiple copies of the Oracle product easily on different computers using cloning. During cloning, Oracle Universal Installer is invoked in clone mode to adapt the home to the target environment. Oracle Universal Installer in clone mode will replay all the actions that have been executed to originally install the Oracle home. The difference between installation and cloning is that, during cloning, Oracle Universal Installer will run the actions in the clone mode. Each action will decide how to behave during clone time. For more information on cloning refer to Chapter 7, "Oracle Software Cloning Using Oracle Universal Installer".
PatchingDuring Patching, a small collection of files are copied over an existing installation to fix certain bugs. OPatch is an Oracle supplied utility that facilitates Oracle software patching. For more information on OPatch, refer to Chapter 8, "Oracle Software Patching Using OPatch".
Upgrades and PatchsetsOracle Universal Installer enables you to upgrade a product from one version to another version. An upgrade is a major product enhancement that often requires installation of the upgraded software. For example, you may want to convert your Oracle9i Database to Oracle 10gR2 (10.2) Database, which is called an upgrade.
A group of patches form a patchset. For example, You may want to convert your Oracle 10gR1 (10.1) Database from version 10.1.1 to version 10.1.2, then it is called applying a patchset.
Adding NodesAn Oracle home may be installed on multiple nodes in a cluster. You can extend the cluster for a particular Oracle home using the -addNode flag of Oracle Universal Installer. More than one node may be added to the Oracle home. The Oracle Universal Installer with the -addNode flag is always run on the local node and not on the node(s) to be added. You can add nodes to an Oracle Clusterware node or a Real Application Clusters node depending upon whether the node addition is being performed at the Oracle Clusterware layer or the Real Application Clusters database layer. For more information on adding nodes, refer to section "Adding Additional Nodes to the Cluster for Mass Deployment" on page 6-19.
Major Entities
Basic Concepts 1-3
Inventory OperationsOracle Universal Installer supports the following inventory operations:
Attaching Oracle HomesOracle Universal Installer uses the -attachHome flag to attach an Oracle home to the inventory to set up the Central Inventory or to register an existing Oracle home with the Central Inventory.
For more information, refer to section "Creating the Central Inventory" on page 3-7.
Detaching Oracle HomesOracle Universal Installer uses the -detachHome flag to remove an Oracle home from the Central Inventory.
For more information, refer to section "Detaching Oracle Homes from the Central Inventory" on page 3-8.
Updating Node ListOracle Universal Installer uses the -updateNodeList flag to get the list of nodes and update the inventory.xml file. If the CRS flag is set to TRUE, then the oraclehomeproperties.xml file is updated with the Oracle Clusterware home information.
For more information, refer to section "Updating the Nodes of a Cluster" on page 3-11.
Major EntitiesThe following are the major entities created when you run Oracle Universal Installer.
InventoryThe Oracle Universal Installer inventory stores information about all Oracle software products installed in all the Oracle homes on a host, provided the product was installed using Oracle Universal Installer. The inventory is organized as follows:
■ Central Inventory
■ Oracle home inventory
For more information on the inventory and the structure of the inventory, refer to section "About the Oracle Universal Installer Inventory" on page 3-3.
Oracle HomeAn Oracle home is the system context in which the Oracle products run. This context consists of the following:
■ The directory location where the products are installed.
■ The corresponding system path setup.
■ The program groups associated with the products installed in that home (where applicable).
■ The services running from that home.
For more information on Oracle homes, refer to Chapter 3, "Managing Oracle Homes".
Modes of Installation
1-4 Oracle® Universal Installer and OPatch User’s Guide
Modes of InstallationYou can run the Oracle Universal Installer in the following modes:
Interactive ModeYou can use the graphical user interface (GUI) mode to walk through the installation by providing information in the dialogs when prompted. This method is useful when installing a small number of products in different setups on a small number of hosts.
Suppressed-Interactive ModeYou can use this mode to supply the necessary information by using a combination of a response file or command line entries with certain interactive dialogs. This is most useful when an installation has a common set of parameters that can be captured in a response file, in addition to the custom information that you must enter by hand.
Silent ModeYou can use this mode to bypass the GUI and supply the necessary information in a response file. This method is most useful when installing the same product multiple times on multiple hosts. By using the response files, you can also automate the installation of a product for which you know the installation parameters.
For more information on silent installation refer to Chapter 4, "Customizing and Creating Response Files".
Cluster Install ModeA cluster installation uses Oracle Universal Installer to install software on the nodes of a cluster that are network reachable and bound together by Oracle Clusterware. You can use Oracle Universal Installer to extend the Oracle home of a product installation to include additional nodes on the cluster. You need to install Oracle Clusterware for a Cluster Install.
For more information on cluster installs refer to Chapter 6, "Cluster Environment Installations".

Introduction to Oracle Universal Installer 2-1
2Introduction to Oracle Universal Installer
This chapter is designed to aid the developers, administrators, and all other users who install Oracle software, to understand the system requirements and features of Oracle Universal Installer.
This chapter includes the following sections:
■ System Requirements
■ Key Features
System RequirementsThe minimum system requirements for Oracle Universal Installer are as follows:
■ Java Runtime Environment (JRE). Automatically installed with Oracle Universal Installer on most platforms. Check the Release Notes or installation guide of the products that you are installing for the required version.
■ Memory Requirements. Memory requirements vary depending on the number of components installed. Check the Release Notes or installation guide for the products that you are installing for details. 32 MB minimum recommended on all platforms.
■ Disk Space Requirements. Oracle recommends atleast 60 MB for Oracle Universal Installer files on Windows platforms; 70 MB on UNIX. (UNIX requires more memory because of the difference in JRE sizes for the platforms.) You may need up to 1 MB for the related inventory files.
When you run Oracle Universal Installer from NFS mounted user home, especially for Linux, execute the quota command to check the space availability. Never perform an install on a user home for which space is allocated based on quota.
Key FeaturesOracle Universal Installer 10g Release 2 (10.2) offers the following features:
■ An XML-based centralized inventory.
The XML format allows third-party Java applications to query the inventory for information about installed software. For backward compatibility, the Central Inventory continues to maintain the binary versions as well.
■ Cloning of existing Oracle homes.
Allows you to copy an existing Oracle home to another location and "fix it up" by updating the installation configuration to be specific to the new environment.
Key Features
2-2 Oracle® Universal Installer and OPatch User’s Guide
Cloning makes it easy to propagate a standard setup without having to install and configure installation after installation.
■ Better support for cluster environments.
Oracle Universal Installer now replicates its inventory to all nodes that participate in a cluster-based installation. Users can invoke Oracle Universal Installer from any node on the cluster that is part of the installation. Users can then upgrade/remove/patch existing software from any node.
■ True silent capability.
When running Oracle Universal Installer in silent mode on a character mode console, you no longer need to specify an X-server or set the DISPLAY environment variable on UNIX. No GUI classes are instantiated, making the silent mode truly silent.
■ Ability to record your Oracle Universal Installer session to a response file.
This feature makes it easy to duplicate the results of a successful installation on multiple systems. All the options you selected during the installation are saved in the resulting response file. For information about recording your Oracle Universal Installer sessions refer to section "Creating a Response File With Record Mode" on page 4-3.
■ More accurate disk space calculations.
Oracle Universal Installer now uses a more accurate method of calculating the disk space required by your Oracle products. This feature reduces the risk of running out of disk space during an installation.
■ Automatically launched software after installation.
Some Oracle products now take advantage of a new feature that allows the software to launch automatically immediately after the installation.
■ Cleaner de-installation and upgrades.
De-installation completely removes all software, leaving no "bits" behind. Also completely removes files associated with configuration assistants and patchsets. Oracle homes can also be removed from the inventory and registry.
■ Integrated pre-requisite checking.
Provides a pre-requisite checking tool to diagnose the readiness of an environment for installation. The pre-requisite checks are run as part of the installation process, but can also be run as a separate application.
■ Support for single click installation.
Provides a facility where you can do single click installs for certain products for basic configurations. You also have an advanced mode for more options.
Managing Oracle Homes 3-1
3Managing Oracle Homes
This chapter contains the following sections:
■ Introduction to Oracle Homes
■ Installing the Oracle Product
■ Removing Oracle Homes
■ Determining the Default Oracle Home
■ Multiple Oracle Homes
■ About the Oracle Universal Installer Inventory
■ Home Selector (Available on Win32 Platforms)
Introduction to Oracle HomesThe Oracle Universal Installer supports the installation of several active Oracle homes on the same host. An Oracle home is a directory into which all Oracle software is installed. This is pointed by an environment variable. The home consists of the following:
■ The directory location where the products are installed.
■ The corresponding system path setup.
■ The program groups associated with the products installed in the home (where applicable).
■ The services running from the home.
Installing the Oracle ProductWhen you install an Oracle product, an Oracle home is created.
To install the product and create the Oracle home, perform the following steps:
1. Run Oracle Universal Installer.
2. In the Specify Home Details page enter the Oracle home settings for the installation session. See Table 3–1 for a description of the fields in this section of the screen.
3. Continue with your installation. Refer to Chapter 5, "Installing Products Using Oracle Universal Installer" for detailed information.

Removing Oracle Homes
3-2 Oracle® Universal Installer and OPatch User’s Guide
Removing Oracle HomesTo remove an existing Oracle home, invoke Oracle Universal Installer and click Deinstall Products. At the inventory dialog, select the homes you wish to delete and click Remove. You may also use the REMOVE_HOMES variable in the command line or in a response file. The syntax is as follows:
./runInstaller -deinstall ORACLE_HOME=<LOCATION_OF_ORACLE_HOME> "REMOVE_HOMES={<LOCATION_OF_ORACLE_HOME_TO_BE_REMOVED>}" -silent
Determining the Default Oracle HomeBy default, when you start Oracle Universal Installer, the software searches your system to determine the default Oracle home where Oracle software should be installed.
In all cases, the ORACLE_HOME name is taken first from the command line if it is specified, else from the response file, if specified. If not, then the following convention is used for the name:
Ora<short_marketing_name_in_oraparam.ini>_<home_identifier>
Where <short_marketing_name_in oraparam.ini> is the short product marketing name as specified in the oraparam.ini file, for example, "Db10g", and <home_identifier>
Table 3–1 Oracle Installation Settings for Specify Home Details page
Settings Functions
Name Enter a name for the Oracle home. This name identifies the program group associated with a particular home and the Oracle services installed on this home. The Oracle home name must be between 1 to 127 characters long and can include only alphanumeric characters and underscores.
Path Enter the full path to an Oracle home or select an Oracle home from the drop-down list of existing Oracle homes. The Oracle home location is the directory where products are installed.
Data files may or may not be installed within an Oracle home. You may use the Browse button to choose a directory to install your product.
For Windows platforms, you must give a valid path that is not in the Windows directory. Different homes cannot share the same location.
Note: Oracle recommends that you designate an Oracle home location that is an empty or non-existing directory. If you select a directory for the Oracle home location that is not empty or already exists, you will be warned and asked if you wish to proceed.
For silent installations, if a non-empty, existing directory is specified, an error is logged in the console and in the installActions<timestamp>.log file. Also, the Oracle Universal Installer aborts. To override this condition, use the -force flag on the command line. The effect of using the -force flag will be the same as selecting Yes while installing in GUI mode. You will receive a warning message, but the installation will continue.
About the Oracle Universal Installer Inventory
Managing Oracle Homes 3-3
is a counter derived from the Central Inventory. For example, the ORACLE_HOME name could be OraDb10g_2.
The ORACLE_HOME path is taken first from the command line if it is specified, else from the response file, if specified. If not, then the ORACLE_HOME environment variable is used. If neither is specified, the following conventions are used for the path:
■ If ORACLE_BASE has not been specified in the environment:
$HOME/product/<version>/<short_name>_<counter>
Where <short_name> is the short product name, for example, "Db", and <counter> is picked up based on the existence of the files. For example, the ORACLE_HOME path could be $HOME/product/10.2.0/Db_1
■ If ORACLE_BASE has been specified in the environment:
$ORACLE_BASE/product/<version>/<short_name>_<counter>
For example: $ORACLE_BASE/product/10.2.0/Db_1.
The instance-related directory location is accepted first from the response file, if specified. If not, the oradata, flash_recovery_area, admin, and doc directories are created under ORACLE_BASE. If ORACLE_BASE has not been specified, the default is the $ORACLE_HOME/oradata directory. If the parent directory of the Oracle home is writable, then these directories would be created in the parent directory of the Oracle home.
Multiple Oracle HomesOracle Universal Installer supports the installation of several active Oracle homes on the same host as long as the products support this at run-time. You can have multiple versions of the same product or different products running from different Oracle homes concurrently. Products installed in one home will not conflict or interact with products installed on another home. You can update software in any home at any time, assuming all Oracle applications, services, and processes installed on the target home are shut down. Processes from other homes may still be running.
Target HomeThe Oracle home currently accessed by Oracle Universal Installer for installation or de-installation is the target home. In order to upgrade or remove products from the target homes, those products must be shut down or stopped.
About the Oracle Universal Installer InventoryThe Oracle Universal Installer inventory stores information about all Oracle software products installed in all Oracle homes on a host, provided the product was installed using Oracle Universal Installer.
Inventory information is stored in Extensible Markup Language (XML) format. The XML format allows for easier diagnosis of problems and faster loading of data. Any secure information is not stored directly in the inventory. As a result, during removal of some products, you may be prompted to enter the required credentials for validation.
About the Oracle Universal Installer Inventory
3-4 Oracle® Universal Installer and OPatch User’s Guide
Structure of the Oracle Universal Installer InventoryThe Oracle Universal Installer inventory is hierarchical in structure consisting of the following:
■ Central Inventory Pointer File
■ Central Inventory
■ Oracle Home Inventory
Central Inventory Pointer FileEvery Oracle software installation has an associated Central Inventory where the details of all the Oracle products installed on a host are registered. The Central Inventory is located in the directory specified by the inventory pointer file. Each Oracle software installation will have its own Central Inventory pointer file which is unknown to another Oracle software installation.
In case of Oracle homes sharing the same Central Inventory, all read and write operations on the inventory is performed by the Oracle Universal Installer components. The operations on the Central Inventory are performed through a locking mechanism. This implies that when an operation like installation, upgrade, or patching happens on an Oracle home, these operations will get blocked on other Oracle homes that share the same Central Inventory.
You will find the inventory pointer file in the following location:
For Solaris: /var/opt/oracle/oraInst.locFor Linux: /etc/oraInst.locFor Windows this pointer is located in the registry key: \\HKEY_LOCAL_MACHINE\\Software\Oracle\inst_loc.
A sample of oraInst.loc file is listed:
inventory_loc=/home/oracle_db10g/product/10.2.0/db_1inst_group=oracle
In UNIX, if you do not want to use the Central Inventory located in the directory specified by the inventory pointer file, you can use the -invPtrLoc flag to specify another inventory pointer file. The syntax is as follows:
./runInstaller -silent -invPtrLoc <Location_of_oraInst.loc> ORACLE_HOME="<Location_of_Oracle_Home>" ORACLE_HOME_NAME="<Name_of_Oracle_Home>"
Central InventoryCentral Inventory contains the information relating to all Oracle products installed on a host. It contains the following files and folders:
■ Inventory File
■ Logs Directory
Inventory File This file lists all the Oracle homes installed on the node. For each Oracle home, it also lists the Oracle home name, the home index, and the nodes on which the home is installed. It also mentions if the home is an Oracle Clusterware home or a removed Oracle home. It can only detect removed Oracle homes created using Oracle
Note: If the contents of the oraInst.loc file is empty, Oracle Universal Installer prompts you to create a new inventory.
About the Oracle Universal Installer Inventory
Managing Oracle Homes 3-5
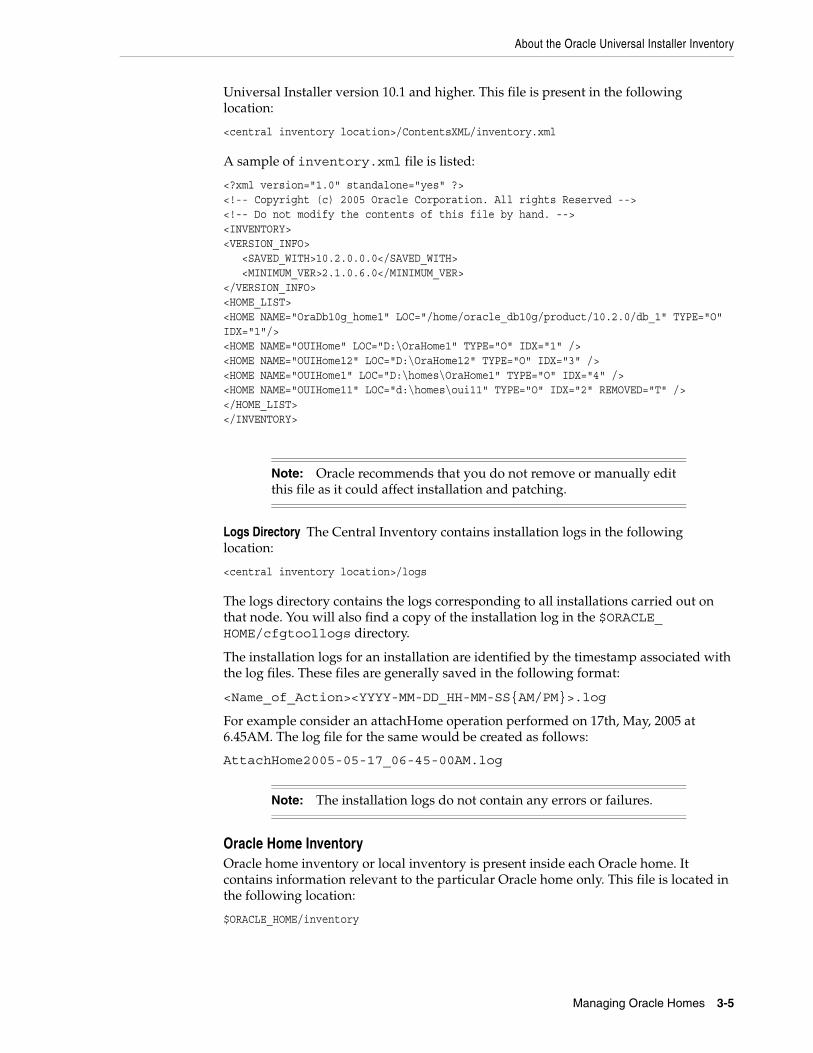
Universal Installer version 10.1 and higher. This file is present in the following location:
<central inventory location>/ContentsXML/inventory.xml
A sample of inventory.xml file is listed:
<?xml version="1.0" standalone="yes" ?><!-- Copyright (c) 2005 Oracle Corporation. All rights Reserved --><!-- Do not modify the contents of this file by hand. --><INVENTORY><VERSION_INFO> <SAVED_WITH>10.2.0.0.0</SAVED_WITH> <MINIMUM_VER>2.1.0.6.0</MINIMUM_VER></VERSION_INFO><HOME_LIST><HOME NAME="OraDb10g_home1" LOC="/home/oracle_db10g/product/10.2.0/db_1" TYPE="O" IDX="1"/><HOME NAME="OUIHome" LOC="D:\OraHome1" TYPE="O" IDX="1" /> <HOME NAME="OUIHome12" LOC="D:\OraHome12" TYPE="O" IDX="3" /> <HOME NAME="OUIHome1" LOC="D:\homes\OraHome1" TYPE="O" IDX="4" /> <HOME NAME="OUIHome11" LOC="d:\homes\oui11" TYPE="O" IDX="2" REMOVED="T" /> </HOME_LIST></INVENTORY>
Logs Directory The Central Inventory contains installation logs in the following location:
<central inventory location>/logs
The logs directory contains the logs corresponding to all installations carried out on that node. You will also find a copy of the installation log in the $ORACLE_HOME/cfgtoollogs directory.
The installation logs for an installation are identified by the timestamp associated with the log files. These files are generally saved in the following format:
<Name_of_Action><YYYY-MM-DD_HH-MM-SS{AM/PM}>.log
For example consider an attachHome operation performed on 17th, May, 2005 at 6.45AM. The log file for the same would be created as follows:
AttachHome2005-05-17_06-45-00AM.log
Oracle Home InventoryOracle home inventory or local inventory is present inside each Oracle home. It contains information relevant to the particular Oracle home only. This file is located in the following location:
$ORACLE_HOME/inventory
Note: Oracle recommends that you do not remove or manually edit this file as it could affect installation and patching.
Note: The installation logs do not contain any errors or failures.
About the Oracle Universal Installer Inventory
3-6 Oracle® Universal Installer and OPatch User’s Guide
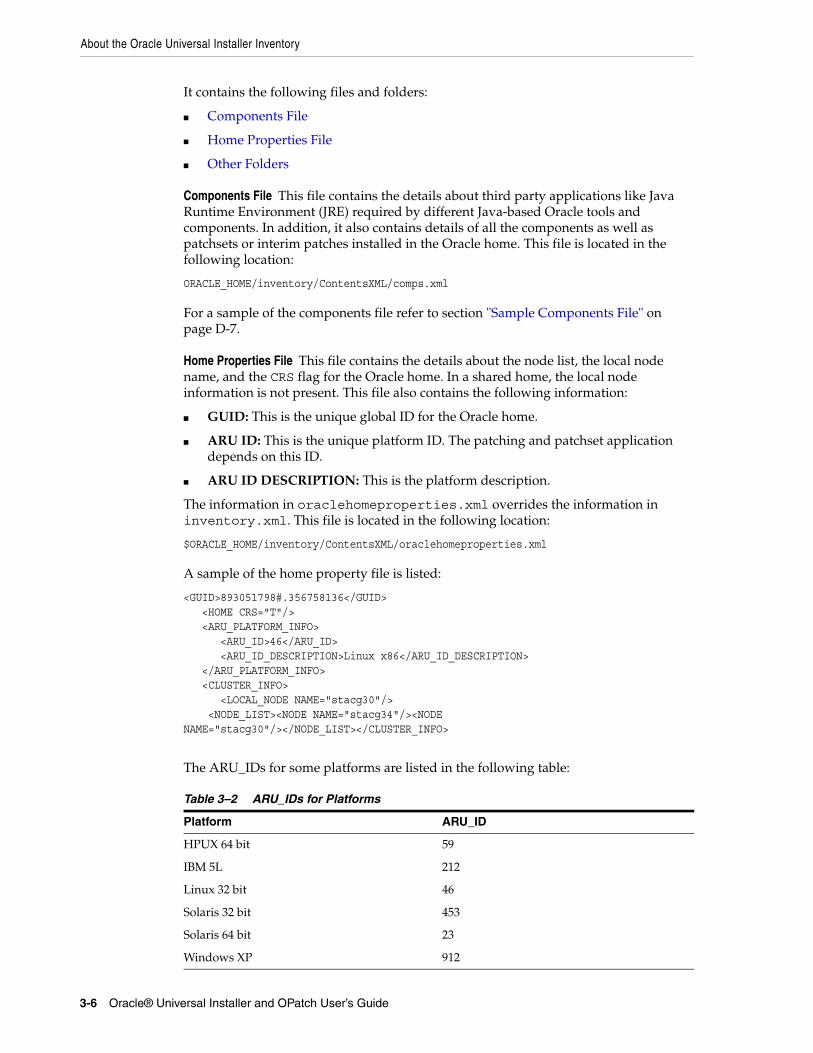
It contains the following files and folders:
■ Components File
■ Home Properties File
■ Other Folders
Components File This file contains the details about third party applications like Java Runtime Environment (JRE) required by different Java-based Oracle tools and components. In addition, it also contains details of all the components as well as patchsets or interim patches installed in the Oracle home. This file is located in the following location:
ORACLE_HOME/inventory/ContentsXML/comps.xml
For a sample of the components file refer to section "Sample Components File" on page D-7.
Home Properties File This file contains the details about the node list, the local node name, and the CRS flag for the Oracle home. In a shared home, the local node information is not present. This file also contains the following information:
■ GUID: This is the unique global ID for the Oracle home.
■ ARU ID: This is the unique platform ID. The patching and patchset application depends on this ID.
■ ARU ID DESCRIPTION: This is the platform description.
The information in oraclehomeproperties.xml overrides the information in inventory.xml. This file is located in the following location:
$ORACLE_HOME/inventory/ContentsXML/oraclehomeproperties.xml
A sample of the home property file is listed:
<GUID>893051798#.356758136</GUID> <HOME CRS="T"/> <ARU_PLATFORM_INFO> <ARU_ID>46</ARU_ID> <ARU_ID_DESCRIPTION>Linux x86</ARU_ID_DESCRIPTION> </ARU_PLATFORM_INFO> <CLUSTER_INFO> <LOCAL_NODE NAME="stacg30"/> <NODE_LIST><NODE NAME="stacg34"/><NODENAME="stacg30"/></NODE_LIST></CLUSTER_INFO>
The ARU_IDs for some platforms are listed in the following table:
Table 3–2 ARU_IDs for Platforms
Platform ARU_ID
HPUX 64 bit 59
IBM 5L 212
Linux 32 bit 46
Solaris 32 bit 453
Solaris 64 bit 23
Windows XP 912
About the Oracle Universal Installer Inventory
Managing Oracle Homes 3-7
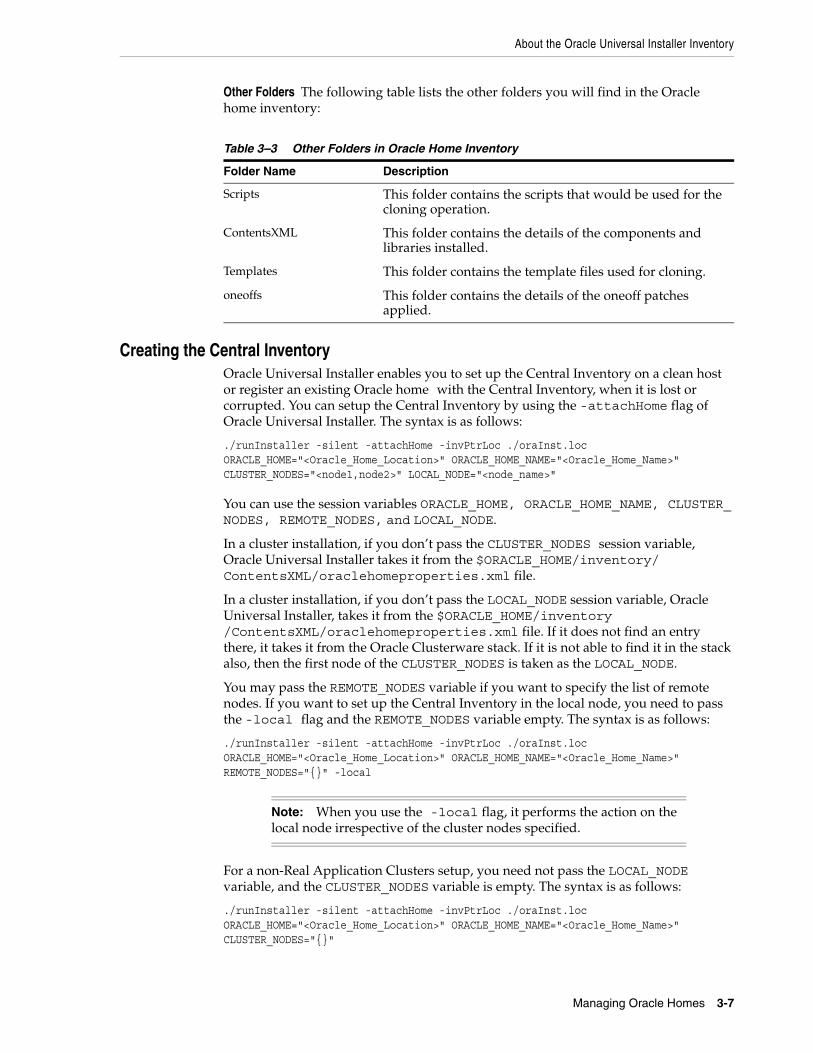
Other Folders The following table lists the other folders you will find in the Oracle home inventory:
Creating the Central InventoryOracle Universal Installer enables you to set up the Central Inventory on a clean host or register an existing Oracle home with the Central Inventory, when it is lost or corrupted. You can setup the Central Inventory by using the -attachHome flag of Oracle Universal Installer. The syntax is as follows:
./runInstaller -silent -attachHome -invPtrLoc ./oraInst.loc ORACLE_HOME="<Oracle_Home_Location>" ORACLE_HOME_NAME="<Oracle_Home_Name>"CLUSTER_NODES="<node1,node2>" LOCAL_NODE="<node_name>"
You can use the session variables ORACLE_HOME, ORACLE_HOME_NAME, CLUSTER_NODES, REMOTE_NODES, and LOCAL_NODE.
In a cluster installation, if you don’t pass the CLUSTER_NODES session variable, Oracle Universal Installer takes it from the $ORACLE_HOME/inventory/ContentsXML/oraclehomeproperties.xml file.
In a cluster installation, if you don’t pass the LOCAL_NODE session variable, Oracle Universal Installer, takes it from the $ORACLE_HOME/inventory/ContentsXML/oraclehomeproperties.xml file. If it does not find an entry there, it takes it from the Oracle Clusterware stack. If it is not able to find it in the stack also, then the first node of the CLUSTER_NODES is taken as the LOCAL_NODE.
You may pass the REMOTE_NODES variable if you want to specify the list of remote nodes. If you want to set up the Central Inventory in the local node, you need to pass the -local flag and the REMOTE_NODES variable empty. The syntax is as follows:
./runInstaller -silent -attachHome -invPtrLoc ./oraInst.loc ORACLE_HOME="<Oracle_Home_Location>" ORACLE_HOME_NAME="<Oracle_Home_Name>"REMOTE_NODES="{}" -local
For a non-Real Application Clusters setup, you need not pass the LOCAL_NODE variable, and the CLUSTER_NODES variable is empty. The syntax is as follows:
./runInstaller -silent -attachHome -invPtrLoc ./oraInst.loc ORACLE_HOME="<Oracle_Home_Location>" ORACLE_HOME_NAME="<Oracle_Home_Name>"CLUSTER_NODES="{}"
Table 3–3 Other Folders in Oracle Home Inventory
Folder Name Description
Scripts This folder contains the scripts that would be used for the cloning operation.
ContentsXML This folder contains the details of the components and libraries installed.
Templates This folder contains the template files used for cloning.
oneoffs This folder contains the details of the oneoff patches applied.
Note: When you use the -local flag, it performs the action on the local node irrespective of the cluster nodes specified.
About the Oracle Universal Installer Inventory
3-8 Oracle® Universal Installer and OPatch User’s Guide
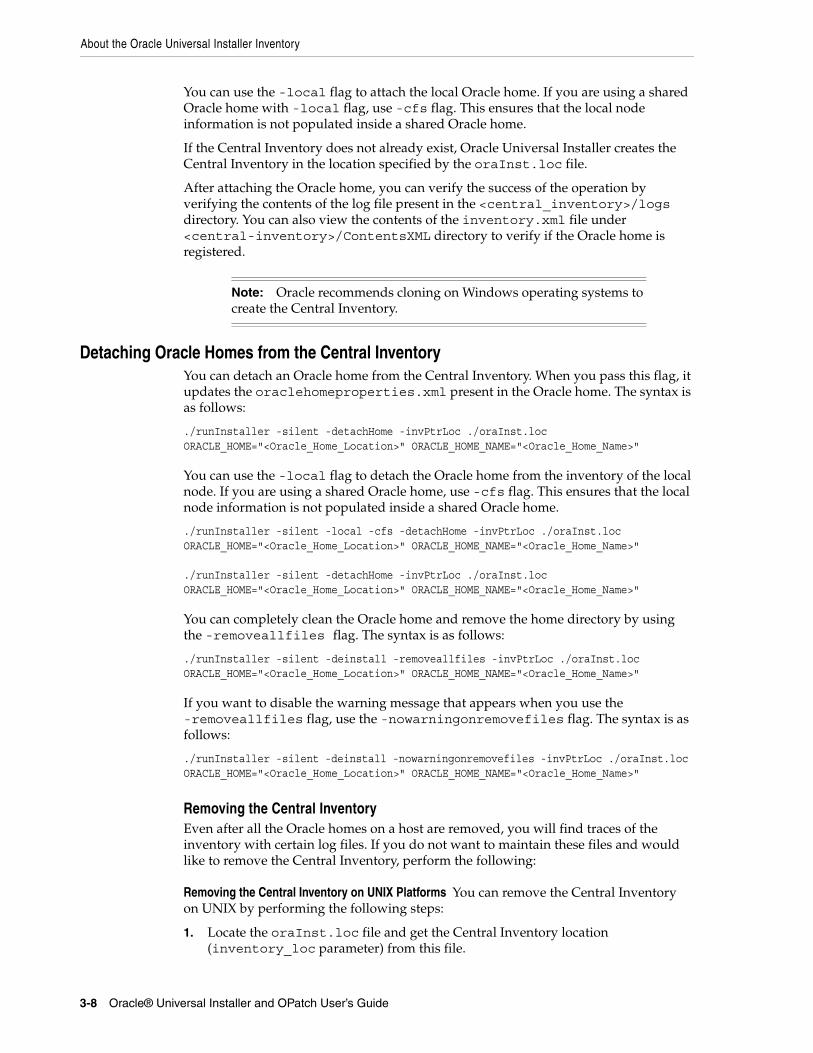
You can use the -local flag to attach the local Oracle home. If you are using a shared Oracle home with -local flag, use -cfs flag. This ensures that the local node information is not populated inside a shared Oracle home.
If the Central Inventory does not already exist, Oracle Universal Installer creates the Central Inventory in the location specified by the oraInst.loc file.
After attaching the Oracle home, you can verify the success of the operation by verifying the contents of the log file present in the <central_inventory>/logs directory. You can also view the contents of the inventory.xml file under <central-inventory>/ContentsXML directory to verify if the Oracle home is registered.
Detaching Oracle Homes from the Central InventoryYou can detach an Oracle home from the Central Inventory. When you pass this flag, it updates the oraclehomeproperties.xml present in the Oracle home. The syntax is as follows:
./runInstaller -silent -detachHome -invPtrLoc ./oraInst.loc ORACLE_HOME="<Oracle_Home_Location>" ORACLE_HOME_NAME="<Oracle_Home_Name>"
You can use the -local flag to detach the Oracle home from the inventory of the local node. If you are using a shared Oracle home, use -cfs flag. This ensures that the local node information is not populated inside a shared Oracle home.
./runInstaller -silent -local -cfs -detachHome -invPtrLoc ./oraInst.loc ORACLE_HOME="<Oracle_Home_Location>" ORACLE_HOME_NAME="<Oracle_Home_Name>"
./runInstaller -silent -detachHome -invPtrLoc ./oraInst.loc ORACLE_HOME="<Oracle_Home_Location>" ORACLE_HOME_NAME="<Oracle_Home_Name>"
You can completely clean the Oracle home and remove the home directory by using the -removeallfiles flag. The syntax is as follows:
./runInstaller -silent -deinstall -removeallfiles -invPtrLoc ./oraInst.loc ORACLE_HOME="<Oracle_Home_Location>" ORACLE_HOME_NAME="<Oracle_Home_Name>"
If you want to disable the warning message that appears when you use the -removeallfiles flag, use the -nowarningonremovefiles flag. The syntax is as follows:
./runInstaller -silent -deinstall -nowarningonremovefiles -invPtrLoc ./oraInst.loc ORACLE_HOME="<Oracle_Home_Location>" ORACLE_HOME_NAME="<Oracle_Home_Name>"
Removing the Central InventoryEven after all the Oracle homes on a host are removed, you will find traces of the inventory with certain log files. If you do not want to maintain these files and would like to remove the Central Inventory, perform the following:
Removing the Central Inventory on UNIX Platforms You can remove the Central Inventory on UNIX by performing the following steps:
1. Locate the oraInst.loc file and get the Central Inventory location (inventory_loc parameter) from this file.
Note: Oracle recommends cloning on Windows operating systems to create the Central Inventory.
About the Oracle Universal Installer Inventory
Managing Oracle Homes 3-9
For Solaris this file is located in /va/opt/oracle folder.
For Linux this file is located in /etc folder.
2. Remove the Central Inventory by executing the following command:
rm -rf <central_inventory_location>
3. Remove oraInst.loc file by executing the following command with root privileges:
For Solaris
rm /va/opt/oracle/oraInst.loc
For Linux
rm /etc/oraInst.loc
Removing the Central Inventory on Windows Platforms You can remove the Central Inventory on Windows by performing the following steps:
1. Locate the registry key \\HKEY_LOCAL_MACHINE\Software\Oracle\inst_loc and get the Central Inventory location from this key.
2. Delete the Central Inventory directory and all its contents.
3. Delete the registry key \\HKEY_LOCAL_MACHINE\Software\Oracle\inst_loc.
Upgrading and Patching the Oracle HomeYou can apply patchsets and upgrade an existing Oracle home. You can apply patchsets using Oracle Universal Installer. For more information on upgrading or applying patchsets for an Oracle product, refer to the respective Oracle product installation guide of the product that you wish to upgrade.
Cloning Oracle HomesYou can clone an Oracle home using Oracle Universal Installer. For more information on cloning, refer to Chapter 7, "Oracle Software Cloning Using Oracle Universal Installer".
Backing up the InventoryYou can backup the Oracle home using your preferred method. You can use any method such as zip, tar, and cpio to compress the Oracle home.
It is highly recommended to backup the Oracle home before any upgrade or patch operation. You should also backup the Central Inventory when Oracle home is installed or de-installed.
Example:
Consider the scenario where you have a Database Oracle Home called DBHome that is registered with the default Central Inventory in the /product directory. You want to patch this database but decide to back up the database before patching.
The command to backup the database is:
cd /product/DBHometar cf - * | gzip > /product/archive/DBHome.tar.gz
About the Oracle Universal Installer Inventory
3-10 Oracle® Universal Installer and OPatch User’s Guide
If you are using a Win32 system, you could use WinZip to zip up the Oracle Home. Do not use the jar command to zip the Oracle Home, as this causes the file persmissions to be lost.
Next, let’s say that you apply the patch and something goes terribly wrong. You decide to delete the Oracle Home from the Central Inventory and restore the original Oracle Home. To delete the Oracle Home from the Central Inventory, use the following command:
./runInstaller -silent -detachHome ORACLE_HOME="/product/DBHome"ORACLE_HOME_NAME="DBHome"
On Win32 systems, the command would be:
setup.exe -silent -detachHome ORACLE_HOME="C:\product\DBHome"ORACLE_HOME_NAME="DBHome"
Next, delete the Oracle Home:
cd /productrm -rf /product/DBHome
Next, you need to restore the original Oracle Home and update the Central Inventory. Restore the Oracle Home to its original location using the following commands:
mkdir -p /product/DBHomegunzip < /product/archive/DBHome.tar.gz | tar xf -
Finally, you need to attach this Oracle Home to the Central Inventory:
./runInstaller -silent -attachHome ORACLE_HOME="/product/DBHome"ORACLE_HOME_NAME="DBHome"
On Win32 systems, the command would be:
setup.exe -silent -attachHome ORACLE_HOME="C:\product\DBHome"ORACLE_HOME_NAME="DBHome"
Recovering from Inventory CorruptionThe inventory (Central and the Oracle home inventory) is a critical part in the Oracle software life cycle management. The following section explains about what you need to do in case of inventory corruption.
Diagnosing and Recovering from Central Inventory CorruptionWhen you execute an opatch lsinventory -detail or when you click Installed Products, the Oracle home does not appear.
Cause: The Oracle home may be missing from the Central Inventory or the Central Inventory could be missing or corrupted.
Action: Perform the following:
■ If the Oracle home is missing from the Central Inventory, perform an attach home operation on the missing Oracle home. The Central Inventory will be restored.
■ If the Central Inventory is missing or corrupted, restore the Central Inventory. If you have not backed up the Central Inventory, perform an attach home operation.
For more information on the attach home operation, refer to the section "Creating the Central Inventory" on page 3-7.
About the Oracle Universal Installer Inventory
Managing Oracle Homes 3-11
If there are multiple entries in the inventory.xml file for a given Oracle Home, then Inventory Collection from the Grid Control perspective would have issues. In this event, you should remove these duplicate entries manually.
Here are some examples of the kind of incorrect entries that could be there:
<HOME NAME="db10g" LOC="/product/db10g" TYPE="O" IDX="1"/><HOME NAME="oms10g" LOC="/product/em/oms10g" TYPE="O" IDX="2"/><HOME NAME="db10g" LOC="/product/db10g" TYPE="O" IDX="3"/>
In the above example the first and third entries are duplicates. The Oracle Home Name and Oracle Home Location are identical. In this example, remove the third line.
Note that all duplicate inventory issues have been caused by manual updates to the inventory.xml file. Use the OUI APIs to make changes to the inventory.
Diagnosing and Recovering from Oracle Home Inventory CorruptionWhen you execute an opatch lsinventory -detail or when you click Installed Products, the Oracle home appears, but the products and components within the Oracle home are not listed.
Cause: This may be due to missing or corrupted Oracle home inventory.
Action: If the Oracle home inventory is missing or corrupted, restore the Oracle home inventory. If you have not backed up the Oracle home inventory, you may have to install the software on a different node having the same platform and install the same patch levels including interim patches. After that, you can simply copy the inventory directory from the patched Oracle home to the location of the affected Oracle home.
Real Application ClustersIn a Real Application Clusters environment, the inventory also contains a list of nodes associated with an Oracle home. It is important that during upgrade and patching, the inventory is correctly populated with the list of nodes.
For more information, refer to Chapter 6, "Cluster Environment Installations".
Updating the Nodes of a ClusterWhen you use the -updateNodeList flag with the Oracle Universal Installer, it gets the list of nodes and updates the inventory.xml. If the CRS tag is set to TRUE, then the Oraclehomeproperties.xml file is updated with the Oracle Clusterware home information. For shared Oracle homes, you need to use this with -cfs flag. The syntax is as follows:
./runInstaller -updateNodeList CLUSTER_NODES={"Node1","Node2"} ORACLE_HOME="<Oracle_Home_Location>" ORACLE_HOME_NAME="<Oracle_Home_Name>" LOCAL_NODE="Node_Name"
Note: For Oracle Universal Installer version 10.2.0.2.0 and above, you will have the following scripts in Oracle home to recover from Oracle home inventory corruption:
■ detachHome.bat / detachHome.sh: Use this script if the Oracle home is corrupted or needs to be updated.
■ attachHome.bat / attachHome.sh: Use this script if the Oracle home needs to be added to the inventory.
Home Selector (Available on Win32 Platforms)
3-12 Oracle® Universal Installer and OPatch User’s Guide
Home Selector (Available on Win32 Platforms)The following sections describe the Home Selector, which is installed as part of Oracle Universal Installer on Windows computers.
To view the Home Selector, click the Environment tab of the Inventory dialog, which appears when you click the Installed Products button on several Oracle Universal Installer screens.
Home Selector OverviewThe Home Selector is a part of the installation software. The Home Selector enables you to easily change your primary Oracle home (the one that appears first in the PATH environment variable). If you need to switch the active home or need to perform batch work which requires a "default home" to be active, the Home Selector can be used to change the Windows NT system settings.
When using the Home Selector to make a specific Oracle home the active one, the software installation in question is moved to the front of the PATH variable, making it the first directory to be scanned for executable and library files.
Use the GUI in the Environment tab of the Inventory dialog to establish the order of Oracle homes in your PATH variable.
How Home Selector WorksWhen you perform an installation on a system, Oracle Universal Installer runs the selectHome.bat file to register the Oracle home you selected. In silent mode, you perform this outside Oracle Universal Installer. The first Oracle home will be named the "DEFAULT_HOME" and will register itself in the Windows NT registry under the key:
HKEY_LOCAL_MACHINE Software Oracle
This is the default Windows NT registry hive which contains all the "generic" Oracle settings. Also the PATH variable is adjusted and the BIN directory of the $ORACLE_HOME is added to the environment variable.
Some additional parameters will also be written to the key:
HKEY_LOCAL_MACHINE Software Oracle KEY_<ORACLE_Home_Name>
With Oracle Universal Installer, you can change the "DEFAULT_HOME" name to something else. Also, it registers all Oracle settings in the " KEY_<Home_NAME>" sub-key of the ORACLE key.
When an additional Oracle home is added to the system, the PATH variable is adjusted again to add the new BIN directory of the newly installed Oracle software. The registry variables are written to a key named "KEY_<HOME_NAME>".
Note: You update the nodes of a cluster only under exceptional circumstances. Oracle recommends that you perform this operation with the help of Oracle support.
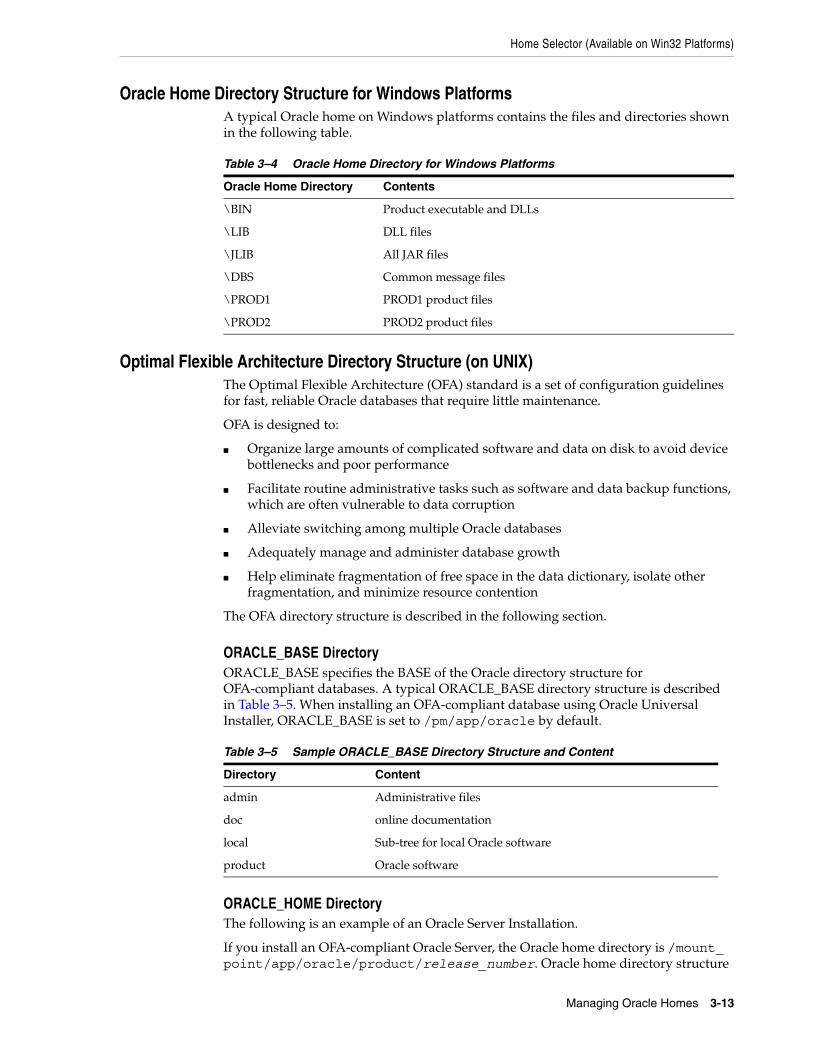
Home Selector (Available on Win32 Platforms)
Managing Oracle Homes 3-13
Oracle Home Directory Structure for Windows PlatformsA typical Oracle home on Windows platforms contains the files and directories shown in the following table.
Optimal Flexible Architecture Directory Structure (on UNIX)The Optimal Flexible Architecture (OFA) standard is a set of configuration guidelines for fast, reliable Oracle databases that require little maintenance.
OFA is designed to:
■ Organize large amounts of complicated software and data on disk to avoid device bottlenecks and poor performance
■ Facilitate routine administrative tasks such as software and data backup functions, which are often vulnerable to data corruption
■ Alleviate switching among multiple Oracle databases
■ Adequately manage and administer database growth
■ Help eliminate fragmentation of free space in the data dictionary, isolate other fragmentation, and minimize resource contention
The OFA directory structure is described in the following section.
ORACLE_BASE DirectoryORACLE_BASE specifies the BASE of the Oracle directory structure for OFA-compliant databases. A typical ORACLE_BASE directory structure is described in Table 3–5. When installing an OFA-compliant database using Oracle Universal Installer, ORACLE_BASE is set to /pm/app/oracle by default.
ORACLE_HOME DirectoryThe following is an example of an Oracle Server Installation.
If you install an OFA-compliant Oracle Server, the Oracle home directory is /mount_point/app/oracle/product/release_number. Oracle home directory structure
Table 3–4 Oracle Home Directory for Windows Platforms
Oracle Home Directory Contents
\BIN Product executable and DLLs
\LIB DLL files
\JLIB All JAR files
\DBS Common message files
\PROD1 PROD1 product files
\PROD2 PROD2 product files
Table 3–5 Sample ORACLE_BASE Directory Structure and Content
Directory Content
admin Administrative files
doc online documentation
local Sub-tree for local Oracle software
product Oracle software

Home Selector (Available on Win32 Platforms)
3-14 Oracle® Universal Installer and OPatch User’s Guide
and content are described in Table 3–6. Under UNIX, the Oracle home directory might contain the following subdirectories, as well as a subdirectory for each Oracle product selected.
Note: The examples in this table are only samples. The directories that appear in your own Oracle home will depend on whether the corresponding products are installed and the version of the Oracle Database you are running.
Table 3–6 Sample Oracle Home Directory Structure and Content
Directory Content
assistants configuration Assistants
bin binaries for all products
ctx interMedia Text cartridge
dbs initsid.ora, lksid
install install related files
lib Oracle product libraries
jlib Java classes
md Spatial cartridge
mlx Xerox Stemmer (for interMedia Text cartridge)
network Net8
nlsrtl NLS run-time loadable data
ocommon common files for all products
odg data gatherer
opsm Parallel Server Manager Components
oracore core libraries
ord data cartridges
otrace Oracle TRACE
plsql PL/SQL
precomp precompilers
rdbms server files and libraries required for the database
slax SLAX parser
sqlplus SQL*Plus
Customizing and Creating Response Files 4-1
4Customizing and Creating Response Files
This chapter introduces you to Oracle Universal Installer's use of response files for silent and suppressed installation. This chapter also describes how to modify or create a response file so you can customize and standardize the installation of Oracle products in your organization.
This chapter is organized into the following sections:
■ About Response Files
■ Modifying a Response File
■ Creating a Response File With Record Mode
■ Response File Format
■ Installing Using a Response File
About Response FilesThis section answers the following questions:
■ What Is a Silent Installation?
■ What Is a Response File?
■ Why Perform a Silent Installation?
What Is a Silent Installation?A silent installation runs in the console and does not use the GUI. The interactive dialogs normally seen by the user are not displayed in silent installation.
Instead of prompting the user to select a series of installation options, Oracle Universal Installer installs the software using a pre-defined set of options stored in a response file or passed on the command line. You can view the progress of a silent installation in the console.
What Is a Response File?A response file is a specification file containing information normally provided by the user through the Oracle Universal Installer user interface during an interactive installation session. Each answer is stored as a value for a variable identified in the response file.
For example, values for Oracle home or installation type can be set automatically within the response file.
Modifying a Response File
4-2 Oracle® Universal Installer and OPatch User’s Guide
The response file template for the installation of your product can be found on your stage (CD-ROM) under the <root of CD>/response directory, with pre-populated values. For example:
<Products.xml_Location>/Response/<product>.<installtype>.rsp
Why Perform a Silent Installation?Silent installations can be useful if you have to install an Oracle product multiple times on multiple computers. If the options you select while installing on each computer are always the same, you save the time of reviewing each installation screen and selecting the various installation options.
Silent installations can also ensure that multiple users in your organization use the same installation options when they install your Oracle products. This makes supporting those users easier because you already know what components and options have been installed on each computer.
Before you perform a silent installation, you should review the settings in the response file template provided with your Oracle product.
The rest of this chapter describes the various parameters and settings you can modify within an Oracle Universal Installer response file.
Modifying a Response FileIf your product installation includes a response file template, you can find it on your stage (CD-ROM) under the <root of CD>/response directory.
If your product installation does not include a response file template, you can create a response file based on the installation options you select. Refer to "Creating a Response File With Record Mode" on page 4-2 for more information.
To modify the response file:
1. Make a copy of the product's response file and open it in a text editor.
2. Review any information provided in the response file or in the product installation guide.
Many software products use settings in the response file to customize the installation of their particular product. Refer to the response file template for suggestions or guidelines on how to set up the file for your installation.
Note: Check the installation guide for the product that you are installing to get the correct list of required files.
Note: If you attempt to perform a silent installation on a UNIX computer where no Oracle products have been installed, Oracle Universal Installer uses the default inventory location, then prompts you to run the oraInstRoot.sh script with root privileges upon successful installation. The script is saved in the /oraInventory directory. This script sets up the Central Inventory on a clean host.
Refer to "About the Oracle Universal Installer Inventory" on page 3-3 for more information on the Central Inventory.
Creating a Response File With Record Mode
Customizing and Creating Response Files 4-3
3. Get familiar with the organization and content of the response file using the information in the section "Response File Format" on page 4-4.
4. Modify the response file to meet the needs of your organization and save the modified version.
5. See the section "Installing Using a Response File" on page 4-11 for information on starting Oracle Universal Installer using your modified response file.
Creating a Response File With Record ModeYou can create a new response file, based on the installation options you select, by using Oracle Universal Installer's record mode.
When you use record mode, Oracle Universal Installer records the installation session into a response file. You specify the name of the response file on the command line. The recorded response file is generated immediately after the Summary page, so you don't need to actually install your Oracle product to create the response file.
In other words, you can start the installation in Record mode and proceed through the installation options until you get to the Summary page. In the Summary Page, click Exit to stop the installation from proceeding with the installation. However, all the options you selected will be saved in the resulting response file.
You can use the newly created response file to run identical installation sessions on other computers in your organization.
Record mode can be also used during a silent installation. In those cases, the variable values specified in the original source response file will be recorded into the new response file.
The following sections describe how to use record mode on Windows and UNIX systems.
Using Record ModeTo record a new response file:
1. At the command prompt, use the cd command to change to the directory that contains the Oracle Universal Installer executable file (setup.exe or runInstaller.sh) for your installation.
2. Enter the following command:
setup -record -destinationFile <response_file_name> (on Windows)./runInstaller -record -destinationFile <response_file_name> (on UNIX)
Replace the <response_file_name> with the complete path for the new response file. For example:
setup -record -destinationFile C:\response_files\install_oracle10g.rsp (on Windows)./runInstaller -record -destinationFile /private/temp/install_oracle10g.rsp (on UNIX)
3. Use the Oracle Universal Installer user interface to select your installation options. These will be recorded.
When Oracle Universal Installer displays the Summary page, you can either continue with the installation or exit.
Response File Format
4-4 Oracle® Universal Installer and OPatch User’s Guide
Oracle Universal Installer saves your new response file using the path and file name you specified on the command line.
Response File FormatThe following sections describe the organization and content of an Oracle Universal Installer response file.
■ Variable Values
■ Comments
■ Headers
■ Response File Parameters
Variable ValuesThis section contains information on how variables are populated with values.
Variable Lookup OrderAll variable values within a response file are in the name-value format. If two components have a variable with the same name, then the expression should be written as follows to preserve each variable's uniqueness:
<component>:<variable>=<value>
If there are two components with the same internal name, but different versions, the ambiguity is resolved by specifying the expression as follows:
<component>:<version>:<variable>=<value>
Oracle Universal Installer looks for command line variables in the following order:
<component>:<version>:<variable>=<value><component>:<variable>=<value><variable>=<value>
If command line variables are not found, then Oracle Universal Installer looks for variables in the response file in the same order:
<component>:<version>:<variable>=<value><component>:<variable>=<value><variable>=<value>
Setting the Recommendation ValueValues for variables are specified as:
<variable> = <recommendation> : <value>
Note: Oracle recommends using absolute path for the file name. However, if the file name is a relative path, it should be relative to the directory where oraparam.ini file is present.
Note: Oracle Universal Installer treats incorrect context, format, or type values within a response file as if no value were specified.
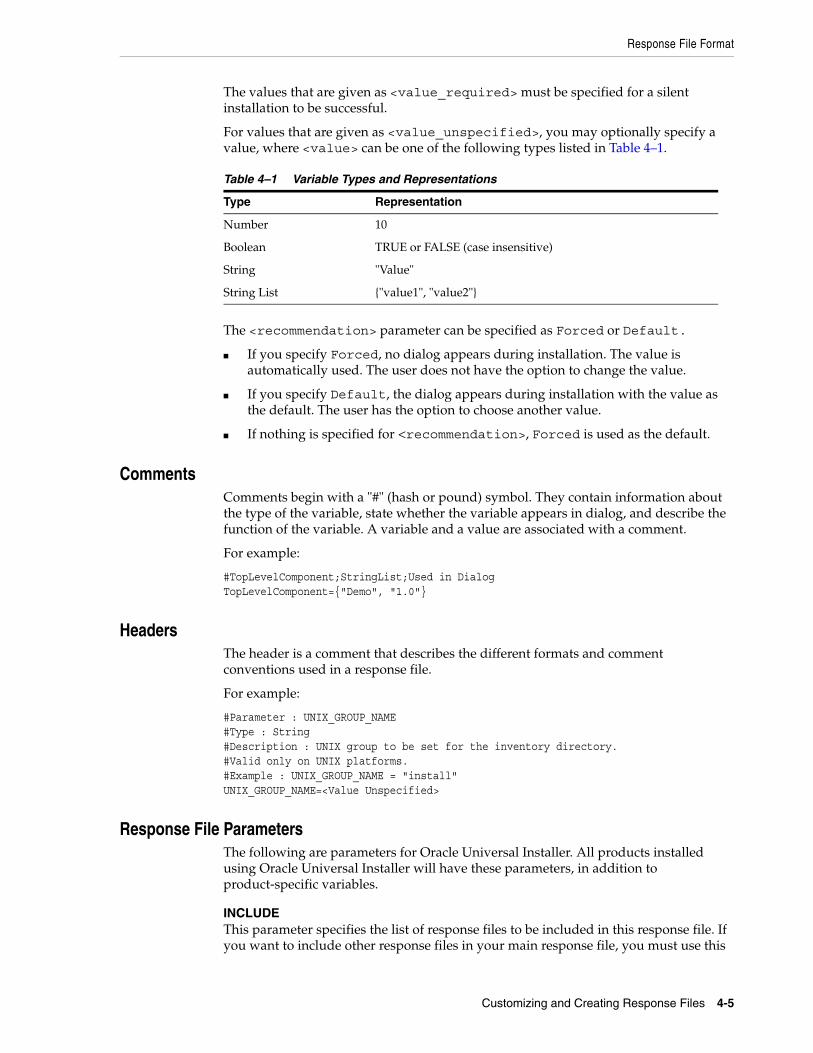
Response File Format
Customizing and Creating Response Files 4-5
The values that are given as <value_required> must be specified for a silent installation to be successful.
For values that are given as <value_unspecified>, you may optionally specify a value, where <value> can be one of the following types listed in Table 4–1.
The <recommendation> parameter can be specified as Forced or Default.
■ If you specify Forced, no dialog appears during installation. The value is automatically used. The user does not have the option to change the value.
■ If you specify Default, the dialog appears during installation with the value as the default. The user has the option to choose another value.
■ If nothing is specified for <recommendation>, Forced is used as the default.
CommentsComments begin with a "#" (hash or pound) symbol. They contain information about the type of the variable, state whether the variable appears in dialog, and describe the function of the variable. A variable and a value are associated with a comment.
For example:
#TopLevelComponent;StringList;Used in DialogTopLevelComponent={"Demo", "1.0"}
HeadersThe header is a comment that describes the different formats and comment conventions used in a response file.
For example:
#Parameter : UNIX_GROUP_NAME#Type : String#Description : UNIX group to be set for the inventory directory.#Valid only on UNIX platforms.#Example : UNIX_GROUP_NAME = "install"UNIX_GROUP_NAME=<Value Unspecified>
Response File ParametersThe following are parameters for Oracle Universal Installer. All products installed using Oracle Universal Installer will have these parameters, in addition to product-specific variables.
INCLUDEThis parameter specifies the list of response files to be included in this response file. If you want to include other response files in your main response file, you must use this
Table 4–1 Variable Types and Representations
Type Representation
Number 10
Boolean TRUE or FALSE (case insensitive)
String "Value"
String List {"value1", "value2"}
Response File Format
4-6 Oracle® Universal Installer and OPatch User’s Guide
parameter. Note that the values in the main response file take priority over the included response files.
INCLUDE={"file1.rsp","file2.rsp",............."filen.rsp"}
You should specify the absolute path in the INCLUDE statement for each response file to be included. If you wish to specify a relative path, note that the location is relative to the current working directory (the location of the oraparam.ini file).
RESPONSEFILE_VERSIONThis parameter specifies the version number of the response file.
RESPONSEFILE_VERSION = <version_number>
FROM_LOCATIONThe location of the source of the products to be installed. The default generated value for this parameter is a path relative to the location of the runInstaller file. Relative paths are necessary for shared response files used by multiple users over a network. Since people may be mapping to different drives, absolute paths will not work for shared response files.
FROM_LOCATION_CD_LABELThis parameter is used in multiple-CD installations. It includes the label of the compact disk where the file products.jar exists. The label can be found in the disk.label file in the same directory as products.jar.
LOCATION_FOR_DISK2Complete path to other disks.
LOCATION_FOR_DISK2="F:\teststage\cd\Disk2"
If there are more than two disks, more variables will be added as LOCATION_FOR_DISK3, and so on.
The CD location for a silent installation is located by two mechanisms:
1. Oracle Universal Installer looks for the Location_For_Disk{DiskNumber} variable in the response file and uses that location.
2. If the variable does not have a value or does not have the required files, it will look for the components under ../../Disk{DiskNumber}/stage (from products.jar).
Therefore, you can either specify the location to look for it in the response file or you can copy them into the disk. For example:
<Product_Shiphome_Location>/stage
Notes:
■ You must enter a value for FROM_LOCATION for a complete silent installation. You may want to use the command line to set this parameter. If the location is a relative path, remember that the path should be relative to the location of the oraparam.ini file.
■ Make sure that the /var/opt/oracle/oraInst.loc exists. The response file for UNIX has a public variable, setunixinstallgroup, that only takes effect when it is the first Oracle Universal Installer installation and the oraInst.loc file is not already present in /var/opt/oracle.
Response File Format
Customizing and Creating Response Files 4-7
RESTART_SYSTEMSet this boolean variable to TRUE if you want to restart the system without the user's confirmation. This is the force value for restarting the system.
NEXT_SESSIONSet this boolean variable to TRUE if the installer needs to go to the File Locations page for another installation or to another response file if you are performing a silent installation.
NEXT_SESSION = TRUE
NEXT_SESSION_ON_FAILSet this boolean variable to TRUE to allow users to invoke another installation session even if the current installation session fails. This variable is used only if the NEXT_SESSION variable is set to TRUE.
NEXT_SESSION_ON_FAIL = TRUE
NEXT_SESSION_RESPONSEUse this string variable to enter the complete path of the next session's response file if you want to automatically begin another silent installation when the current installation is complete. If you specify only a file name, the Installer looks for the response file in the <TEMP>/orainstall directory. This variable is only used if NEXT_SESSION is set to TRUE; otherwise, Oracle Universal Installer ignores the value of this variable.
NEXT_SESSION_RESPONSE="/private/usr2/nextinstall.rsp"
ORACLE_HOME The location where products are to be installed. You must enter a value for ORACLE_HOME for a complete silent installation.
ORACLE_HOME_NAME The name of the current Oracle home. You must enter a value for ORACLE_HOME_NAME for a complete silent installation.
SHOW_COMPONENT_LOCATIONS_PAGEThe location page, which appears in a custom installation type, can be suppressed by setting this value to FALSE. If you set the value to FALSE, the user is prevented from specifying alternate directories. If there are products with installed directories which can be changed, you may want to set the value to TRUE.
SHOW_CUSTOM_TREE_PAGESet SHOW_CUSTOM_TREE_PAGE to TRUE if the custom tree page in the installer must be shown. In the Custom Tree page, dependencies can be selected or de-selected. This page appears only in a custom installation type.
SHOW_END_SESSION_PAGE The installation success/failure page, which appears at the end of an installation, can be suppressed by setting this value to FALSE.
SHOW_EXIT_CONFIRMATIONSet to TRUE if the confirmation when exiting the installer needs to be shown.
SHOW_EXIT_CONFIRMATION = TRUE
SHOW_INSTALL_PROGRESS_PAGE The installation progress page, which appears during the installation phase, can be suppressed by setting the value to FALSE.
Response File Format
4-8 Oracle® Universal Installer and OPatch User’s Guide
SHOW_OPTIONAL_CONFIG_TOOL_PAGESet to TRUE if the Optional Configuration Tools page in the installer must be shown. The Optional Configuration Tools page shows the list of optional configuration tools that are part of this installation and the status of each tool, including detailed information on why the tool has failed.
SHOW_ROOTSH_CONFIRMATIONSet to TRUE if the Confirmation dialog asking to run the root.sh script in the installer needs to be shown. This variable is valid only on UNIX platforms.
SHOW_ROOTSH_CONFIRMATION = TRUE
SHOW_SPLASH_SCREENSet to TRUE if the initial splash screen in the installer needs to be shown.
SHOW_SPLASH_SCREEN = TRUE
SHOW_SUMMARY_PAGEThe Summary page can be suppressed by setting this value to FALSE.
SHOW_WELCOME_PAGESet to TRUE if the Welcome page in the installer needs to be shown.
SHOW_WELCOME_PAGE = FALSE
SHOW_RELEASE_NOTESSet this parameter to TRUE if you want the release notes for this installation to be shown at the end of the installation. A dialog box lists the available release notes. Note that the SHOW_END_SESSION parameter must be set to TRUE before you can use this parameter.
TOPLEVEL_COMPONENTThe name of the component (products) and the version as string list. You must enter a value for TOPLEVEL_COMPONENT.
Usually the components are represented with a pair of strings: the first one representing the internal name, the second representing the version.
For example, RDBMS 9.2. may be represented as {"oracle.rdbms","9.2.0.4.0"}.
UNIX_GROUP_NAME The UNIX group name to be set for the inventory on UNIX platforms.
Note: The UNIX group name is used for first-time installations only.
REMOVE_HOMESUse this parameter to identify the Oracle homes you wish to remove from the inventory during a de-installation session. For each home, specify the home name, using full path information.
REMOVE_HOMES={"/home/oracle/ora9i","/home/oracle/ora8i"}
DEINSTALL_LISTUse this parameter to enter a list of components to be removed during a silent de-install session. For each component, specify the internal component name and version.
DEINSTALL_LIST={"sample1","1.0.0.0.0"}
Response File Format
Customizing and Creating Response Files 4-9
SHOW_DEINSTALL_CONFIRMATIONSet this parameter to FALSE if you want to hide the de-install confirmation dialog box during a silent de-installation.
SHOW_DEINSTALL_PROGRESSSet this parameter to FALSE if you want to hide the de-installation progress dialog box during a silent de-installation.
DEPENDENCY_LISTThe DEPENDENCY_LIST is the list of dependents on which the component depends. These dependent components represent the list of components that appear as "selected" during installation. Following is a list of some of this parameter's characteristics:
■ The DEPENDENCY_LIST variable is only generated when dependencies are present and if the dependency is not a required one.
■ You cannot list components to appear as de-selected items in a dialog.
■ Specifying required dependents is redundant since they will be selected anyway. The dependents selection can have the other two types of dependents: optional and one-or-more.
■ The list of components is specified by an internal name and version number.
A typical example is listed:
DEPENDENCY_LIST={"oracle.netclt","9.2.0.4.0","oracle.netmgr","9.2.0.4.0"}
CLUSTER_NODESThis parameter lists the nodes on the cluster on which the Oracle home is installed or would be installed. For new installations, this would be the node list on which the installation needs to be done (including the local node). For patching or upgrades, this is the node list on which the Oracle home is already installed.
CLUSTER_NODES={"alpha-1", "alpha-2"}
REMOTE_NODESThis parameter lists the remote nodes (apart from the local node) on the cluster on which to install during a silent installation. Oracle Universal Installer will install on all named nodes.
REMOTE_NODES={"alpha-1", "alpha-2"}
LOCAL_NODEThis parameter specifies the current node on which the installation takes place.
LOCAL_NODE={}
OPTIONAL_CONFIG_TOOLS While all the required configuration tools are launched by the installer, you can control the configuration tools you would want to launch by specifying the tool's internal names in the OPTIONAL_CONFIG_TOOLS section.
You can call the Net Configuration Assistant or the Database Configuration Assistant at the end of a database installation in silent mode also. For example, to launch the Net
Note: The OPTIONAL_CONFIG_TOOLS variable is only generated when atleast one optional configuration tool is available.
Response File Format
4-10 Oracle® Universal Installer and OPatch User’s Guide
Configuration Assistant in silent mode, you can pass the parameter s_responseFileName="netca.rsp".
You can specify both the Auto-launch optional tools and User-launch optional tools in a string list.
#Example : OPTIONAL_CONFIG_TOOLS = {"configtool2 ", "configtool3"}OPTIONAL_CONFIG_TOOLS=<Value Unspecified>
If no value is specified for this variable, then all the tools are run by default.
If there is a value specified, then only those tools are run while the rest of the tools are ignored.
The way to suppress the configuration tool is to mention only the tools that you want to run as part of the OPTIONAL_CONFIG_TOOLS variable added for each component. You should use the internal names of the configuration tool. The response file generator generates these internal names also as part of the options given for the variable.
For example, if oracle.server has Tool1 and Tool2 and you want to run only Tool1 in the response file, you mention it as follows:
oracle.server:10.1.0.2.0:OPTIONAL_CONFIG_TOOLS={"Tool1"}
INSTALL_TYPEYou can set the installation type variable to determine the installation type of the currently selected top level component.
The installation type variable is only generated for the top level components and only when there are more than one installation type available.
SELECTED_LANGUAGESYou can set the languages in which the components will be installed. You must use the internal name while specifying the value:
en, : Englishfr, : Frenchde, : Germanja, : Japanese
For example, to specify Japanese:
SELECTED_LANGUAGES = {"ja"}
For more information on the languages Oracle Universal Installer supports, refer to "Product Language Selections" on page 9-1.
ACCEPT_LICENSE_AGREEMENTSet this Boolean variable to TRUE if you agree with the license agreement. This parameter requires you to set this variable to TRUE to indicate your acceptance of the license agreement normally accepted in the GUI. This variable is used only in silent installations. Installation cannot continue until this variable is set to TRUE.
Note: You must enter a value for INSTALL_TYPE.
Note: The SELECTED_LANGUAGES variable is only generated when more than one language is available.
Installing Using a Response File
Customizing and Creating Response Files 4-11
Installing Using a Response FileMany Oracle software products provide tools and procedures for running Oracle Universal Installer from the command line without displaying Oracle Universal Installer screens or responding to questions during the installation.
These are called silent installations. Instead of prompting you to select a series of installation options, Oracle Universal Installer installs the software using a predefined set of options. These options are stored in a response file (.rsp).
Consider the following information about response files:
■ If your product installation includes a response file, you can find it on your stage (CD-ROM) under the <root of CD>/response directory.
■ You can modify the response file for your Oracle product to customize an installation for your organization. Refer to section "Modifying a Response File" on page 4-2 for more information.
■ You can create your own response files using record mode. Refer to section "Creating a Response File With Record Mode" on page 4-3 for more information.
■ If you start Oracle Universal Installer from the command line, see "Using Oracle Universal Installer Exit Codes" on page 5-14.
The following sections describe how to specify a response file when you start Oracle Universal Installer.
Specifying a Response FileTo start Oracle Universal Installer and specify the response file, enter the following command at the command line in the directory where the executable file is installed:
setup.exe -responseFile <filename> <optional_parameters> (on Windows)./runInstaller -responseFile <filename> <optional_parameters> (on UNIX)
For help on command line usage, enter the following at the command line in the directory where the executable file is stored:
setup -help (on Windows)./runInstaller -help (on UNIX)
Note: If you attempt to perform a silent installation on a UNIX computer where no Oracle products have been installed, you will get an error message. Before you can perform a silent installation on such a computer, you must first run the script oraInstRoot.sh, which is saved in the /oraInventory directory. You must run this script with root privileges. This enables Oracle Universal Installer to set up the Central Inventory on a clean host.
Refer to "About the Oracle Universal Installer Inventory" on page 3-3 for more information on the Central Inventory.
Note: You must specify the complete responseFile path. If you do not, Oracle Universal Installer assumes the location to be relative to the oraparam.ini associated with the Oracle Universal Installer launched.
Installing Using a Response File
4-12 Oracle® Universal Installer and OPatch User’s Guide
In Windows, when you execute setup -help, a new command window appears, with the "Preparing to launch..." message. In a moment, the help information appears in that window.
Optional Parameters When Specifying a Response FileOptional parameters you may use with the -responseFile flag are:
-nowelcome-silent-formCluster
Use the -nowelcome flag along with the -responseFile flag to suppress the Welcome dialog that appears during installation.
Use the -silent flag along with the -responseFile flag to run Oracle Universal Installer in complete silent mode. Note that the Welcome dialog is suppressed automatically.
Use the -formCluster flag for Oracle Clusterware installations to specify the cluster.
Note that when the -silent flag is specified and there are no values specified to a particular variable in a dialog, then the installer will stop. The success or failure of the installation, when this flag is specified, is generated as follows:
■ In a file named silentInstall<timestamp>.log for hosts without an Oracle inventory. This file will be generated in the /tmp directory on UNIX and the directory specified by the variable TEMP on Windows platforms.
■ In the inventory logs directory for hosts that already had an inventory.
Setting Response File Variables From the Command LineWith Oracle Universal Installer 2.1 and higher, you can specify the value of certain variables when you start Oracle Universal Installer from the command line. Specifically, you can specify session and component variables. For specific information about the format and organization of response files, see "Modifying a Response File" on page 4-2.
When you specify the value of a variable on the command line, that value overrides the value of the variable if it is defined in the response file.
Specifying the Value of a Session VariableTo specify the value of a session variable, use the following command syntax:
./runInstaller session:<variable_name>=<value> (on UNIX)setup.exe session:<variable_name>=<value> (on Windows)
For example, to prevent the Universal Welcome page from displaying:
./runInstaller session:SHOW_WELCOME_PAGE=false (on UNIX)setup.exe session:SHOW_WELCOME_PAGE=false (on Windows)
Note that the "session:" tag is optional and is used mainly to remove any possible ambiguity.
Note: Using the -nowelcome option with the -silent option is unnecessary since the Welcome screen does not appear when you use the -silent option.
Installing Using a Response File
Customizing and Creating Response Files 4-13
Specifying the Value of a Component VariableTo specify the value of a component variable, use the following command syntax:
./runInstaller <component_name>:<component_version>:<variable_name>=<value> (on UNIX)setup.exe <component_name>:<component_version>:<variable_name>=<value> (on Windows)
For example, to modify the value of a variable VAR1 in version 1.1 of a component called COMP2:
./runInstaller COMP2_1.1_VAR1="test" (on UNIX)setup.exe COMP2_1.1_VAR1="test" (on Windows)
Note that the "<component_name>:" and "<component_version>:" tags are optional and are used mainly to remove any possible ambiguity. If there are two variables with the same name for different components/versions, then use these tags to distinguish between them.

Installing Using a Response File
4-14 Oracle® Universal Installer and OPatch User’s Guide
Installing Products Using Oracle Universal Installer 5-1
5Installing Products Using Oracle Universal
Installer
This chapter includes the following sections:
■ Checking Pre-Requisites Before Installation
■ Installing Oracle Products
■ De-installing Oracle Products
■ Running Oracle Universal Installer After Installation
■ About Oracle Universal Installer Log Files
Checking Pre-Requisites Before InstallationBefore installation, Oracle Universal Installer checks the environment to see whether it meets the requirements for successful installation. Early detection of problems with the system setup reduces the chances of encountering problems during installation; for instance, problems with insufficient disk space, missing patches, inappropriate hardware, and so on.
Oracle Universal Installer is required to perform all pre-requisite checks defined for the installation before installing any software, whether they are Oracle Universal Installer-specific tests, or tests defined for a specific product. Specific pre-requisite checks are defined for each operating system on which Oracle Universal Installer runs. All pre-requisite check parameters must be defined in the oraparam.ini file (or another *.ini file that you define). All the results are logged in the installActions<timestamp>.log file.
Pre-requisite checking can be performed in the following three ways:
■ Automatically: Checks are performed automatically when the user runs the Oracle Universal Installer executable during an installation. Simply run Oracle Universal Installer and all pre-defined pre-requisite checks will be performed.
■ Silent Mode: Checks can be run and managed from the command line for a silent installation. For silent installations, Oracle Universal Installer performs as many pre-requisite checks as possible, alerts the user on all errors (if any), and provides the location of the installActions<timestamp>.log file before exiting.
■ Standalone: Checks can be run without completing an installation. Refer to Table 5–1 for a description of the flags to use.
Installing Oracle Products
5-2 Oracle® Universal Installer and OPatch User’s Guide
Inputs to the checker are listed in the prerequisite.xml file. Once the checker is run, results, along with the pre-defined inputs, can be found in the prerequisite_results.xml file. These files are located in the oraInventory/logs directory. The prerequisite_results.xml file can be reused as an input file for subsequent executions of the checker.
Installing Oracle ProductsThe following sections describe how to start Oracle Universal Installer and install an Oracle product. Specifically, this section describes:
■ Getting Help While Installing Oracle Products
■ About the ORAPARAM.INI File
■ Modes of Installation
■ Installation Media
■ Special Instructions for UNIX Users
Getting Help While Installing Oracle ProductsAt any time while installing your product, click Help for information about the screens specific to your installation.
Oracle Universal Installer provides two kinds of online help
■ Generic online help provided with every copy of Oracle Universal Installer.
These topics describe the screens and dialog boxes that every Oracle Universal Installer user sees, regardless of the product they are installing.
■ Online help specific to a particular installation.
These topics are created by the product developer and describe the screens and dialog boxes specific to the product you are installing. For example, the help topic for the Installation Types page is often a custom help topic created by the installation developer that describes the specific installation types for the product you are installing.
Table 5–1 Command Line Parameters for Pre-Requisite Checks
Command Description
-paramFile <file name>
Use this flag to specify the location of the oraparam.ini file to be used. For example, you may create your own parameters file and use that to operate Oracle Universal Installer. Note that Oracle Universal Installer will use the file you specify for all operations, including the pre-requisite checks.
-executeSysPrereqs Use this flag on the command line to perform only the pre-requisite check, without continuing the installation. This can be used to verify that the basic pre-requisites have been met before deciding to perform an installation.
-ignoreSysPrereqs Use this flag on the command line to ignore all pre-requisite checks. This may be useful when you know that the checks themselves are faulty or the environment has already been verified.This is an optional flag though not recommended by Oracle.
Installing Oracle Products
Installing Products Using Oracle Universal Installer 5-3
After you view an online help topic, choose Navigator from the Tools menu to display the navigator pane. From the navigator pane, you can browse the table of contents, select other topics, or search for a particular word or phrase in the online help.
About the ORAPARAM.INI FileThe oraparam.ini file is the initialization file for Oracle Universal Installer. This file includes information that defines the behavior of certain Oracle Universal Installer features. Each product installation possesses a unique oraparam.ini file.
In general, you should not have to edit the contents of this file, but in certain situations, understanding the contents of this file can help you troubleshoot problems and understand certain aspects of the Oracle Universal Installer product.
For example, for most installations, Oracle Universal Installer provides a default value on the File Locations page that points to the location of the product's installation kit or stage. This default value is stored in the oraparam.ini file. The oraparam.ini file also identifies the location of the Java Runtime Environment (JRE) required for the installation.
In the staging area, it is located in the same directory as the executable file. For example:
For UNIX systems:
cd/<Product_Shiphome_Location>/install/solaris/runInstallercd/<Product_Shiphome_Location>/install/solaris/OraParam.ini
For Windows systems:
cd\<Product_Shiphome_Location>\install\win32\setup.execd\<Product_Shiphome_Location>\install\win32\OraParam.ini
In the staging area, the default OUI_LOCATION is relative to the location of the oraparam.ini file, as follows:
../../stage/
Once installed, the oraparam.ini file is located in the /oui directory.
The following table describes the parameters in the oraparam.ini file and how to use them.
Note: Only generic help topics are available in the navigator, or table of contents. Custom help topics can only be accessed by clicking the Help button on the dialogs or windows they describe.
Table 5–2 Parameters in oraparam.ini
Section/Parameter Description
[Oracle] This section contains various parameters related to your installation.
DISTRIBUTION Set to TRUE if the oraparam.ini file is on a distribution medium. A distribution medium can be a CD-ROM or a Web server. Once installed, this parameter is set to FALSE.
SOURCE Location of your staging area (the products.xml file). This location is relative to the directory where oraparam.ini exists.
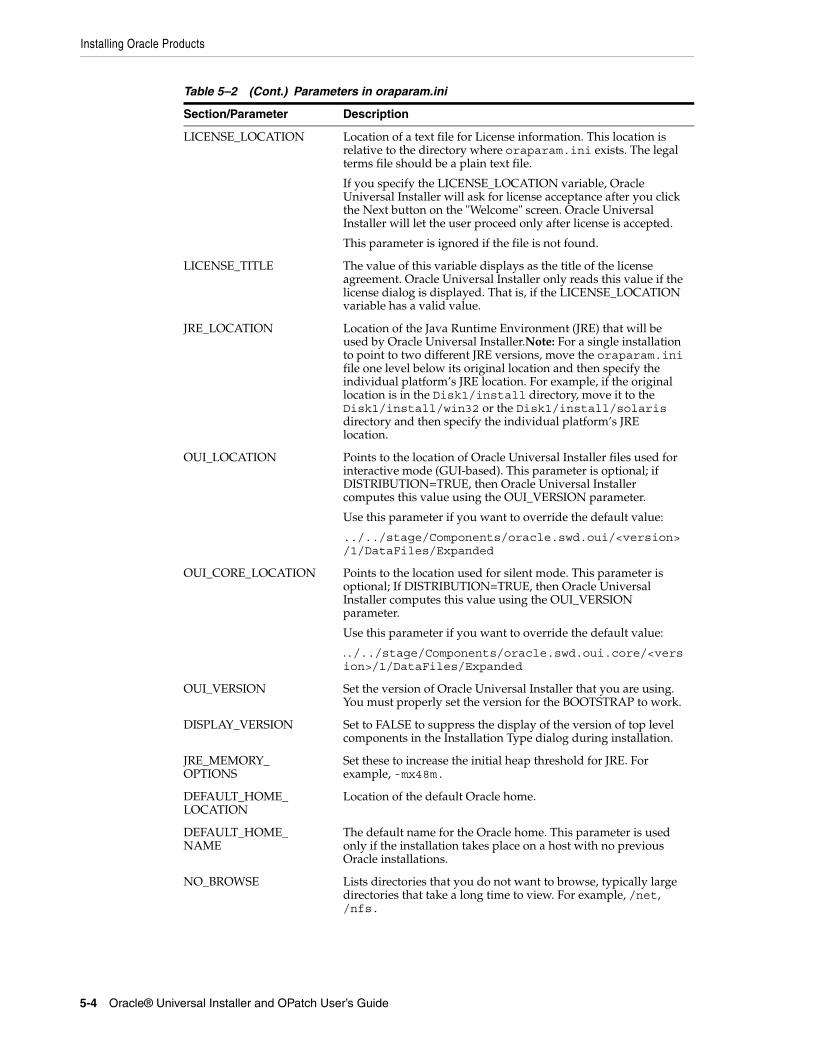
Installing Oracle Products
5-4 Oracle® Universal Installer and OPatch User’s Guide
LICENSE_LOCATION Location of a text file for License information. This location is relative to the directory where oraparam.ini exists. The legal terms file should be a plain text file.
If you specify the LICENSE_LOCATION variable, Oracle Universal Installer will ask for license acceptance after you click the Next button on the "Welcome" screen. Oracle Universal Installer will let the user proceed only after license is accepted.
This parameter is ignored if the file is not found.
LICENSE_TITLE The value of this variable displays as the title of the license agreement. Oracle Universal Installer only reads this value if the license dialog is displayed. That is, if the LICENSE_LOCATION variable has a valid value.
JRE_LOCATION Location of the Java Runtime Environment (JRE) that will be used by Oracle Universal Installer.Note: For a single installation to point to two different JRE versions, move the oraparam.ini file one level below its original location and then specify the individual platform’s JRE location. For example, if the original location is in the Disk1/install directory, move it to the Disk1/install/win32 or the Disk1/install/solaris directory and then specify the individual platform’s JRE location.
OUI_LOCATION Points to the location of Oracle Universal Installer files used for interactive mode (GUI-based). This parameter is optional; if DISTRIBUTION=TRUE, then Oracle Universal Installer computes this value using the OUI_VERSION parameter.
Use this parameter if you want to override the default value:
../../stage/Components/oracle.swd.oui/<version>/1/DataFiles/Expanded
OUI_CORE_LOCATION Points to the location used for silent mode. This parameter is optional; If DISTRIBUTION=TRUE, then Oracle Universal Installer computes this value using the OUI_VERSION parameter.
Use this parameter if you want to override the default value:
../../stage/Components/oracle.swd.oui.core/<version>/1/DataFiles/Expanded
OUI_VERSION Set the version of Oracle Universal Installer that you are using. You must properly set the version for the BOOTSTRAP to work.
DISPLAY_VERSION Set to FALSE to suppress the display of the version of top level components in the Installation Type dialog during installation.
JRE_MEMORY_OPTIONS
Set these to increase the initial heap threshold for JRE. For example, -mx48m.
DEFAULT_HOME_LOCATION
Location of the default Oracle home.
DEFAULT_HOME_NAME
The default name for the Oracle home. This parameter is used only if the installation takes place on a host with no previous Oracle installations.
NO_BROWSE Lists directories that you do not want to browse, typically large directories that take a long time to view. For example, /net, /nfs.
Table 5–2 (Cont.) Parameters in oraparam.ini
Section/Parameter Description
Installing Oracle Products
Installing Products Using Oracle Universal Installer 5-5
Modes of InstallationYou can use Oracle Universal Installer to install Oracle products in any of the three following modes:
■ Interactive: Use Oracle Universal Installer's interactive mode to use the graphical user interface to walk through the installation, providing information in the
NLS_ENABLED Set to TRUE for Oracle Universal Installer to enable NLS support. Set to FALSE to disable the installation session translations. Oracle Universal Installer displays in English even if you run on a non-English system.
BOOTSTRAP Set to TRUE or FALSE. This parameter instructs Oracle Universal Installer to attempt a bootstrap. Set to TRUE before cutting CDs, but set to FALSE once you have copied the staging area to the hard disk.
BOOTSTRAP_SIZE Use this parameter to set the size the temporary space requires when BOOTSTRAP is set to TRUE. For example, when you install Oracle Universal Installer, it sets the value of this parameter to the temporary space required by both Oracle Universal Installer and the JRE.
By default, if this entry is not set, Oracle Universal Installer will assume 45MB for Win32, 52MB for Win64, and 69MB for Solaris. However, these values could vary from one major release to the other, based on the space required by newer versions of JRE.
If the ship home contains advertisement images, installation developers should add the space taken by the images to this value. Oracle Universal Installer will check the temp space requirements before starting up and give an error if there is not enough space for Oracle Universal Installer to run in bootstrap mode.
USE_BUILD_NUMBER
Use this parameter to control whether or not Oracle Universal Installer considers the build number of the component when determining whether or not to overwrite a previous version or copy of a component. Note that this parameter is intended to be used in pre-production ship homes only.
APPLTOP_STAGE Use this parameter when you want your users to specify the location of an Oracle Applications top (APPL_TOP) directory. When this parameter is set to TRUE, the File Locations page will include fields for selecting an APPL_TOP directory. This is an optional parameter for use with Apps installs only. If not specified, the default is assumed to FALSE.
REGISTRATION_URL The URL where the user is directed from the Product Registration page in Oracle Universal Installer. The REGISTRATION_KEY parameter is validated at this site. Set this parameter along with the REGISTRATION_KEY parameter to invoke the Product Registration page. Both are required.
REGISTRATION_KEY This key is validated against an encrypted key at the REGISTRATION_URL location. Set this parameter along with the REGISTRATION_URL parameter to invoke the Product Registration page. Both are required.
[IMAGES] This section lists the images associated with an installation. To show advertisements during an installation, specify each image as a separate variable.
Table 5–2 (Cont.) Parameters in oraparam.ini
Section/Parameter Description
Installing Oracle Products
5-6 Oracle® Universal Installer and OPatch User’s Guide
installation dialogs when prompted. This method is most useful when installing a small number of products in different setups on a small number of hosts.
■ Suppressed: Use Oracle Universal Installer's suppressed mode to supply the necessary information by using a combination of a response file or command line entries with certain interactive dialogs. You can choose which dialogs to suppress by supplying the information at the command line when you invoke Oracle Universal Installer. This method is most useful when an installation has a common set of parameters that can be captured in a response file, in addition to custom information that must be input by hand.
■ Silent: Use Oracle Universal Installer's silent installation mode to bypass the graphical user interface and supply the necessary information in a response file. This method is most useful when installing the same product multiple times on multiple hosts. By using a response file, you can automate the installation of a product for which you know the installation parameters. For more information refer to Chapter 4, "Customizing and Creating Response Files", for detailed information on using response files and installing in silent mode.
Installation MediaFor each of these three installation modes, you can install from three different media:
■ Installing from a Single CD-ROM
■ Installing from Multiple CD-ROMs
■ Installing from a staged HTTP location
Refer to the following sections to learn more about these different installation approaches.
Installing from a Single CD-ROMWhile installing Oracle products contained on a single CD-ROM, start Oracle Universal Installer by running the executable file, setup.exe or runInstaller.sh, located in:
../install/<platform>
Where <platform> represents Win32, Win64, Solaris, Linux, and so on.
For UNIX systems, run the script by typing ./runInstaller at the command line.
Note: You can use the -noConsole flag on Windows platform to suppress the display of messages in the console.
Note: On Windows, when you start the installer from a shared drive, you need to map the shared drive and then invoke the installer from the shared drive.
Notes: When you invoke runInstaller (UNIX) or setup.exe (Windows), you should invoke it from the directory where this command is present, or you must specify the complete path to runInstaller (UNIX) or setup.exe (Windows).
Installing Oracle Products
Installing Products Using Oracle Universal Installer 5-7
Installing from Multiple CD-ROMsIf you are creating a multiple-CD installation on UNIX, you may need to launch runInstaller in the background using the following command:
./runInstaller &
By launching runInstaller in the background, you can change your current directory after you launch Oracle Universal Installer, allowing you to eject the CD. (It may also help to launch runInstaller as a foreground process from a different directory.)
You may want to create a shell script that launches Oracle Universal Installer in the background and then exits. If you choose to create a shell script, remember to also pass all parameters that you passed to the shell script to runInstaller in the event that you wish to install silently using a response file.
TEMP/TMP Directory On both UNIX and Windows installations, temporary copies of Oracle Universal Installer and JRE are placed in the TEMP or TMP directory in a subdirectory named /OraInstall<timestamp> so that these applications can be launched when you change CD-ROMs. Note that temporary files are created for single-CD installations as well. On both UNIX and Windows, Oracle Universal Installer looks for %TEMP% then %TMP%. If neither is set, Oracle Universal Installer will default to /tmp on UNIX and c:\temp on Windows
Unmounting a CD On UNIX, if you are having trouble installing a product from multiple CD-ROMs, try using the following procedure to unmount the first CD-ROM and mount the second CD-ROM. If you still have problems, refer to the documentation links at the end of this topic.
In most cases, the following procedure will help with any problems you experience while switching to a second CD-ROM while installing Oracle software. If you inadvertently run the installer while the current working directory is in the CD-ROM, follow these steps to mount the next CD-ROM:
1. Change to the root directory of your system and log in as the root user by using the following commands:
$ cd /$ su root
Note: Oracle Universal Installer for win64 works the same as Oracle Universal Installer for win32. However, the startup directory on the CD is "win64" instead of "win32." Launching Oracle Universal Installer from the win32 directory launches Oracle Universal Installer in 32-bit mode, used for installing 32-bit software. Use win64 for installing 64-bit software.
When you install both 32-bit and 64-bit Oracle Universal Installer on a 64-bit machine, two different inventories will be created and maintained. However, you cannot install 64-bit software in a 32-bit home, and vice versa.
Note: .The TEMP/TMP directory should not be a cluster file system or a shared location.
Installing Oracle Products
5-8 Oracle® Universal Installer and OPatch User’s Guide
2. Unmount and remove the CD-ROM from the drive with the following command:
# umount cdrom_mount_point_directory
3. Insert and mount the next CD-ROM into the drive by using the following command:
# mount options device_name cdrom_mount_point_directory
4. Enter the correct mount point in the Installation dialog box.
5. Click OK to continue.
If after attempting this procedure you are still having problems, refer to the section on installing from multiple CD-ROMs in the Oracle Database Installation Guide, which is available from the Oracle Technology Network:
http://otn.oracle.com/documentation
Installing from a staged HTTP locationWith Oracle Universal Installer, you can install products from the Web. You can publish your staging area from a Web server and then in the Oracle Universal Installer's Source location, specify the HTTP location for the products.xml file.
For example, you can enter:
http://www.oracle.com/product/ouiinstall/stage/products.xml
The Oracle Universal Installer recognizes a Web staging area just like a local, network, or CD-ROM stage.
System administrators of large customers who may want to deploy Oracle software to more than one target can use a combination of the Web installation and response file features:
1. Copy the staging area to a shared file system and make it accessible on the Intranet or a Web server.
2. Include predetermined response files on the same location. (Different groups of users might rely on different response files.)
3. Clients run Oracle Universal Installer locally and use the local response file that is mailed or downloaded so they can perform a silent installation.
The Web installation capability relies on some guidelines that must be followed at installation development time. Check your installation guide for your product to see if the installation of your product is certified for Web installation.
To test if your stage is Web-enabled, you may try the following:
1. Copy the stage to your Web server.
2. Start the Oracle Universal Installer locally and point to the location of the products.xml file. For example:
http://smpweb.us.oracle.com/product/ouiinstall/stage/products.xml
Special Instructions for UNIX UsersThe following sections describe special instructions that apply when you are installing certain products on a UNIX system.
Installing Oracle Products
Installing Products Using Oracle Universal Installer 5-9
Failed to Connect to Server ErrorIf you get an Xlib error or a "Failed to connect to Server" error when you are running Oracle Universal Installer on the Solaris operating system, you need to define the following environment variables on the host computer where you are running Oracle Universal Installer:
%setenv DISPLAY <machine name>:0.0
Replace <machine name> with the name of the computer that will display Oracle Universal Installer.
On the computer that will display Oracle Universal Installer, enter the following command. This command allows other computers to display information on the computer's monitor:
%xhost +
Re-run the runInstaller script after you have set the DISPLAY environment variable.
Providing a UNIX Installer Location with Root PrivilegesVarious installation operations on the UNIX platform must be performed with root privileges. For example, you must have root privileges to be able to create the Oracle Universal Installer inventory.
If you are installing Oracle Universal Installer for the first time, you will be prompted to run a shell script from another terminal window before proceeding with the installation. Oracle Universal Installer will prompt the user to run root.sh once installation completes only if the script is required to be run as root before configuration assistants are run. Otherwise, users are prompted to run root.sh as root later.
To successfully run the required shell script:
1. Leave the Oracle Universal Installer window open and open another terminal window.
2. In the new terminal window, use the substitute user command to log in with root privileges:
su -root
3. Change directory to the Oracle home into which you are currently installing your Oracle software product.
4. Run the shell script ./root.sh.
Note: You can run Oracle Universal Installer without specifying the DISPLAY by running in silent mode using a response file.
Note: When running Oracle Universal Installer in silent mode, if root.sh is required prior to configuration assistants, Oracle Universal Installer will skip configuration assistants during the installation. The user must run root.sh as root and then run the skipped configuration assistants after the silent installation is complete.
De-installing Oracle Products
5-10 Oracle® Universal Installer and OPatch User’s Guide
5. When the script is finished and you are returned to the command prompt, exit from the new terminal window and return to Oracle Universal Installer to continue the installation.
Providing a UNIX Group NameIf you are installing a product on a UNIX system, the Installer will also prompt you to provide the name of the group that owns the base directory.
You must choose a UNIX group name which will have permissions to update, install, and remove Oracle software. Members of this group must have write permissions to the base directory chosen.
Only users who belong to this group are able to install or remove software on this host.
De-installing Oracle ProductsThe following sections describe how to remove products installed using Oracle Universal Installer. Specifically, this section describes:
■ Removing Oracle Products and Oracle Homes With Oracle Universal Installer
■ De-installing Top Level Products that Have Dependents
■ Silent De-installation
Removing Oracle Products and Oracle Homes With Oracle Universal InstallerA de-installation can be performed before selecting products to install or after a successful installation.
To remove an Oracle product or Oracle home using interactive mode, perform the following steps:
1. Start Oracle Universal Installer from a CD-ROM or:
– For Windows platforms, launch Oracle Universal Installer from the Start menu by selecting Start, Installation Products, Oracle Universal Installer.
– For UNIX platforms, at the command line, run the script called runInstaller from the directory where it is stored, which is by default at the same level as the first Oracle home created on that host.
2. Click Deinstall Products on the "Welcome" screen.
The Inventory panel appears.
3. Select the product(s) you want to remove from the Contents tab of the Inventory panel and click Remove. Oracle homes may also be removed in the same manner. Once an Oracle home has been removed, you can reuse its name and location to install other products.
4. The Remove Confirmation Dialog appears, asking if you want to remove the products and their dependent components. Click Yes.
Note: Do not exit the installation in order to run the shell script. Exiting the installation removes this script.
You are prompted to run the script only the first time you install.
De-installing Oracle Products
Installing Products Using Oracle Universal Installer 5-11
Oracle Universal Installer warns you of any product dependencies that might cause problems if particular products are removed, and prompts you to confirm the de-installation.
Pay special attention to the full list of products being removed before proceeding. Oracle Universal Installer computes this list based on the dependencies of each component.
De-installing Top Level Products that Have DependentsA top level component is the most important component of an installation. It is the installable product you see at the first installation screen. You can only install one top level component for each installation session.
When you select a specific component for removal, Oracle Universal Installer analyzes the dependency information to determine if there are other components that should be removed along with it. In general, if a component is selected for removal, the following components will be removed with it:
■ All components that have a required dependency on the selected component.
■ Dependents of the selected component that have no other dependents. A dependent is a component on which the top level component (dependent) has a dependency.
Silent De-installationNot only can you perform command line installations, as described in section "Installing Using a Response File" on page 4-11, you can also perform command line de-installations. A command line de-installation enables you to remove Oracle products or Oracle homes from your system without using the Oracle Universal Installer graphical user interface.
You can choose to display no dialog boxes or prompts to the user, or you can selectively avoid displaying certain dialog boxes that are normally used during a de-installation.
Immediately Displaying the Inventory Dialog BoxUse the following commands to immediately display the Inventory dialog box, which allows the user to select items for removal without navigating the Oracle Universal Installer startup screen:
setup.exe -deinstall -silent (on Windows)./runInstaller -deinstall -silent (on UNIX)
Hiding the Inventory Dialog BoxIf you would like to hide the inventory dialog box from the user during a de-installation, you can specify the products to be removed in the DEINSTALL_LIST parameter of the response file; specify Oracle homes to be removed with the REMOVE_HOMES variable. For more information about response files, see "Installing Using a Response File" on page 4-10.
Note: You can also remove products by using the Installed Products button on Oracle Universal Installer as long as this action is performed before making your selection of products to install.
Running Oracle Universal Installer After Installation
5-12 Oracle® Universal Installer and OPatch User’s Guide
Refer to Chapter 4, "Customizing and Creating Response Files" for information about the DEINSTALL_LIST parameter.
As with other response file parameters, you can also specify the DEINSTALL_LIST parameter on the Oracle Universal Installer command line. For example, on a UNIX machine, enter:
./runInstaller -deinstall -silent DEINSTALL_LIST={"component1","1.0.1.2"}
To remove Oracle homes from the inventory, use the REMOVE_HOMES variable.
For more information about specifying response file parameters, see "Setting Response File Variables From the Command Line" on page 4-12.
Hiding the De-installation Confirmation and Progress Dialog BoxesUse the following commands to hide the de-installation confirmation and progress dialog boxes during a command line de-installation:
On a Windows system:
setup.exe -deinstall -silent session:SHOW_DEINSTALL_PROGRESS=false session:SHOW_DESINSTALL_CONFIRMATION=false
On a UNIX system:
./runInstaller -deinstall -silent session:SHOW_DEINSTALL_PROGRESS=false session:SHOW_DESINSTALL_CONFIRMATION=false
Running Oracle Universal Installer After InstallationThe following sections describe the different ways that Oracle Universal Installer can be used after installation. Specifically, this section describes:
■ Starting Oracle Universal Installer
■ Command Line Arguments
■ Using Oracle Universal Installer Exit Codes
■ Cloning Considerations
Starting Oracle Universal InstallerOracle Universal Installer is installed on your system during the installation of your Oracle products:
\Program Files\Oracle\oui (on Windows)At the same level as <oraInventory> (on UNIX)
For all platforms, the executable file (setup.exe or runInstaller.sh) is located in the following directory:
<oui_location>/bin
A new version of Oracle Universal Installer replaces its older version.
Oracle Universal Installer is placed under "Independent Products" in the Inventory panel as a "non-Oracle home" product.
To start Oracle Universal Installer:
■ On Windows platforms, select Start, Programs, Oracle Installation Products, Oracle Universal Installer.
Running Oracle Universal Installer After Installation
Installing Products Using Oracle Universal Installer 5-13
■ On UNIX, execute ./runInstaller from the directory where it is installed.
For example: if the <oraInventory> is /u01/oracle/oraInventory, then, Oracle Universal Installer will be at /u01/oracle/oui.
A runInstaller.sh script is also available, so that users can launch Oracle Universal Installer directly from a different directory.
When Oracle Universal Installer is first installed and run, it checks for the JRE path (the location from which it runs), using the location specified in the oraparam.ini file's JRE_LOCATION parameter. If Oracle Universal Installer cannot find the JRE specified, an error is returned.
Command Line ArgumentsFollowing is the output from the runInstaller -help command, which gives you the full list of command line options and their descriptions, as well as command line variables usage:
Usage:runInstaller [-options] [(<CommandLineVariable=Value>)*]Where options include:-clusterware oracle.crs,<crs version> Version of Cluster ready services installed.-crsLocation <Path> Used only for cluster installs, specifies the path to the crs homelocation. Specifying this overrides CRS information obtained from central inventory.-invPtrLoc <full path of oraInst.loc> Unix only. To point to a different inventory location.The orainst.loc file contains:
inventory_loc=<location of central inventory>inst_group=<>-jreLoc <location> Path where Java Runtime Environment is installed. OUI cannot be run without it.-logLevel <level> To filter log messages that have a lesser priority level than <level>. Valid options are: severe, warning, info, config, fine, finer, finest, basic, general, detailed, trace. The use of basic, general, detailed, trace is deprecated.-paramFile <location of file> Specify location of oraparam.ini file to be used by OUI.-responseFile <Path> Specifies the response file and path to use.-sourceLoc <location of products.xml> To specify the shiphome location.-addLangs To add new languages to an already installed product.-addNode For adding node(s) to the installation.-attachHome For attaching homes to the OUI inventory.-cfs Indicates that the Oracle home specified is on cluster file system(shared). This is mandatory when '-local' is specified so that OracleUniversal Installer can register the home appropriately into the inventory.-clone For making an Oracle Home copy match its current environment.-debug For getting the debug information from OUI.-deinstall For deinstall operations.-detachHome For detaching homes from the OUI inventory without deletinginventory directory inside Oracle home.-enableRollingUpgrade Used in cluster environment, to enable upgrade of a product on asubset of nodes (on which the product was installed).-executeSysPrereqs Execute system pre-requisite checks and exit.-force Allowing silent mode installation into a non-empty directory.-help Displays above usage.-ignorePatchConflicts Ignore all conflicts with existing interim patches during anupgrade. The conflicting interim patches are removed from the home.-ignoreSysPrereqs For ignoring the results of the system pre-requisite checks.-local Performs the operation on the local node irrespective of thecluster nodes specified.-printdiskusage Log debug information for disk usage.-printmemory Log debug information for memory usage.-printtime Log debug information for time usage.-record -destinationFile <Path> For record mode operation, information is recorded in thedestination file path.-removeallfiles For removing the home directory after deinstallation of all the components.

Running Oracle Universal Installer After Installation
5-14 Oracle® Universal Installer and OPatch User’s Guide
-removeAllPatches Remove all interim patches from the home-silent For silent mode operations, the inputs can be a response file or alist of command line variable value pairs.-updateNodeList For updating node list for this home in the OUI inventory.-waitforcompletion For windows. setup.exe will wait for completion instead ofspawning the java engine and exiting.-nobackground Do not show background image-noclusterEnabled No cluster nodes specified.-noconsole For suppressing display of messages to console. Console is notallocated.-nowarningonremovefiles To disable the warning message before removal of home directory.-nowait For windows. Do not wait for user to hit Enter on the consoleafter the task (install etc.) is complete.-formCluster To install the Oracle clusterware in order to form the cluster.-remotecp <Path> Unix specific option. Used only for cluster installs, specifiesthe path to the remote copy program on the local cluster node.-remoteshell <Path> Unix specific option. Used only for cluster installs, specifiesthe path to the remote shell program on the local cluster node.
Command Line Variables UsageCommand line variables are specified using <name=value>; for example:[ session: | compName: | compName:version: ]variableName="valueOfVariable"]
Session/Installer variables are specified using:[session:]varName=valueEx 1: session:ORACLE_HOME_NAME="OraHome"Ex 2: ORACLE_HOME_NAME="OraHome"The lookup order is session:varName then just varName).The session prefix is used to avoid ambiguity.
Component variables are specified using:[compInternalName:[Version:]]varNameEx 1: oracle.comp1:1.0.1:varName="VarValue"Ex 2: oracle.comp1:varName="VarValue"Ex 2: oracle.comp1:varName="VarValue"The lookup order is compInternalName:Version:varName, then compInternalName:varName, then just varName.
Using Oracle Universal Installer Exit CodesIf you are starting and stopping Oracle Universal Installer programmatically (for example, by invoking Oracle Universal Installer using a response file), you may need to consider the exit codes generated by Oracle Universal Installer and perform a particular action depending on the code Oracle Universal Installer returns.
Oracle Universal Installer returns one of the following exit codes:
Code Description
0 All installations were successful.
1 All installations were successful but some optional configuration tools failed.
2 Local installations were successful but some remote operations failed.
-1 Atleast one installation failed.
About Oracle Universal Installer Log Files
Installing Products Using Oracle Universal Installer 5-15
Note that:
■ This feature will not work if Oracle Universal Installer is running in "bootstrap" mode. In this case setup.exe/runInstaller will just launch the JRE process and return immediately without waiting for the exit code. Oracle Universal Installer will be running in "bootstrap" mode if the following line exists in the oraparam.ini file:
BOOTSTRAP=TRUE
■ If you exit without installing any products (for example if you exit from the "Welcome" screen), the exit code will be -1.
Cloning ConsiderationsYou can copy an existing Oracle home, then configure it for its new environment. This process is called "cloning."
Invoke Oracle Universal Installer in clone mode using the following command:
./runInstaller -clone ORACLE_HOME="<target location>" ORACLE_HOME_NAME="<unique name on node>" [-responseFile <full path>]
Use setup.exe instead of runInstaller for Windows machines. The -responseFile parameter is optional. Clone-time parameters may be supplied on the command line or through the response file named on the command line.
Clone-time activity is logged in the cloneActions<timestamp>.log file at installation time.
For more information on cloning refer to Chapter 7, "Oracle Software Cloning Using Oracle Universal Installer".
About Oracle Universal Installer Log FilesWhen you install or de-install products using Oracle Universal Installer, important information about each installation is saved not only in the inventory, but also in a series of log files, located in the following directory:
$ORACLE_HOME/cfgtoollogs
Note: Patching and de-installation on a cloned Oracle home act the same as a regularly installed Oracle home. You may directly patch a cloned installation.
Note: Because most cloning is done in silent mode, when cloning an Oracle home onto a "clean" host (one that has no oraInst.loc file), Oracle Universal Installer creates a Central Inventory in the location specified by the INVENTORY_LOCATION variable. If this variable is not specified, Oracle Universal Installer creates the Central Inventory in the <cloned_home>/oraInventory directory.
After cloning is finished, you must run oraInstRoot.sh as root to move oraInventory to the final, desired location.
About Oracle Universal Installer Log Files
5-16 Oracle® Universal Installer and OPatch User’s Guide
These log files can be used to troubleshoot installation problems. These files are also crucial for removing and configuring the various software components you install on your Windows or UNIX computer. Oracle Universal Installer displays the name and location of the current session's log file on the Install page. Each installation or configuration utility will provide a separate folder containing the logs inside the $ORACLE_HOME/cfgtoollogs folder.
Note that the logs used to remove products are different from the installActions<timestamp>.log generated during the install process. The installActions<timestamp>.log is easier to read and can be used to view the operations performed at installation time.
For more information about the log files generated by Oracle Universal Installer, refer to the online help. For more information about using the online help, see "Getting Help While Installing Oracle Products" on page 5-2.
Cluster Environment Installations 6-1
6Cluster Environment Installations
A cluster installation uses Oracle Universal Installer to install software on the nodes of a cluster that are network reachable and bound together by Oracle Clusterware. You can use Oracle Universal Installer to extend the Oracle home of a product installation to include additional nodes on the cluster.
This chapter includes the following sections:
■ Oracle Universal Installer and Real Application Clusters
■ General System Installation Requirements for Real Application Clusters
■ Cluster Setup and Pre-Installation Configuration Tasks for Real Application Clusters
■ Configuring Storage for Oracle Clusterware
■ Installing Oracle Clusterware on UNIX
■ Installing Oracle Clusterware on Windows
■ Adding Additional Nodes to the Cluster for Mass Deployment
■ Installing Product Software on a Cluster
■ Patchsets and Upgrades
■ Post Installation Tasks
■ De-installing Real Application Clusters Software
■ Troubleshooting Real Application Clusters / Oracle Clusterware Installation
Oracle Universal Installer and Real Application ClustersThe Oracle Universal Installer facilitates the installation of Oracle Clusterware. In most cases, you use the graphical user interface (GUI) provided by the Oracle Universal Installer to install the software. However, you can also use the Oracle Universal Installer to complete non-interactive (or "silent") installations, without using the GUI.
The Oracle inventory maintains records of Oracle software versions and patches. Each installation has a Central Inventory where the Oracle home is registered. Oracle software installations have a local home directory, whose path location is recorded in the Central Inventory. The local inventory directory for each Oracle software installation contains a list of components and applied interim patches associated with that software. Because your Oracle software installation can be corrupted by faulty inventory information, the Oracle Universal Installer must perform all read and write operations on Oracle inventories. Ensure that you do not modify files in the Central Inventory or the Oracle home inventory.
General System Installation Requirements for Real Application Clusters
6-2 Oracle® Universal Installer and OPatch User’s Guide
When you install Oracle Clusterware or Real Application Clusters, the Oracle Universal Installer copies the Oracle software onto the node from which you are running it. If your Oracle home is not on a shared file system, then the Oracle Universal Installer propagates the software onto the other nodes that you have selected to be part of your Oracle Universal Installer installation session. The Oracle inventory maintains a list of each node that is a member of the Real Application Clusters database, and lists the paths to each node’s Oracle home. This is used to maintain patches and updates for each member node of the Real Application Clusters database.
When the Oracle Universal Installer installs the Oracle software, Oracle recommends that you select a preconfigured database, or use the Database Configuration Assistant (DBCA) interactively to create your cluster database. You can also manually create your database as described in procedures posted on the Oracle Technical Network, which is at the following URL:
http://www.oracle.com/technology/index.htm
Oracle recommends that you use Automatic Storage Management (ASM). If you are not using ASM, or if you are not using a cluster file system, then configure shared raw devices before you create your database.
Oracle software provides additional components to operate Real Application Clusters. Some of the Real Application Clusters-specific components include:
■ Oracle Clusterware
■ Installed Real Application Clusters Components
Oracle ClusterwareThe Oracle Universal Installer installs Oracle Clusterware on each node on which the Oracle Universal Installer detects that third-party vendor clusterware is present. If third-party vendor clusterware is not present, then you must use the Oracle Universal Installer to enter the nodes on which you want the Oracle Clusterware to be installed. The Oracle Clusterware home can be either shared by all nodes, or private to each node, depending on your responses when you run the Oracle Universal Installer.
When third-party vendor clusterware is present, Oracle Clusterware may interact with the third-party vendor clusterware. In using third-party vendor clusterware, note that Oracle Clusterware can integrate with third-party vendor clusterware for all operating systems except Linux and Windows. You need to have Oracle Cluster Registry and Voting Disks shared across all nodes.
Installed Real Application Clusters ComponentsAll instances in Real Application Clusters environment share the control file, server parameter file, redo log files, and all data files. These files reside on a shared cluster file system or on shared disks. Either of these types of file configurations are accessed by all the cluster database instances. Each instance also has its own set of redo log files. During failures, shared access to redo log files enables surviving instances to perform recovery.
General System Installation Requirements for Real Application ClustersEach node that is going to be part of your Real Application Clusters installation must meet the following hardware and software requirements. You will perform
General System Installation Requirements for Real Application Clusters
Cluster Environment Installations 6-3
step-by-step tasks for hardware and software verification for the platform-specific pre-installation procedures.
Hardware Requirements for Real Application Clusters SetupEach node in a cluster requires the following hardware:
■ External shared disks for storing the Oracle Clusterware files.
Refer to the respective Real Application Clusters installation guide for information on the disk configuration options that are available. Review these options before you decide which storage option to use in your Real Application Clusters environment.
■ One private Internet protocol (IP) address for each node to serve as the private interconnect. The following must be true for each private IP address:
– It must be separate from the public network
– It must be accessible on the same network interface on each node
– It must have a unique address on each node
The private interconnect is used for inter-node communication by both Oracle Clusterware and Real Application Clusters. If the private address is available from a network name server (DNS), then you can use that name. Otherwise, the private IP address must be available in each node’s /etc/hosts file on UNIX and %SystemRoot%\system32\drivers\etc\hosts on Windows.
During Oracle Clusterware installation, the information you enter as the private IP address determines which private interconnects are used by Real Application Clusters database instances.
■ One public IP address for each node, to be used as the Virtual IP address for client connections and for connection failover.
This public Virtual IP address (VIP) must be associated with the same interface name on every node that is part of your cluster. In addition, the IP addresses that you use for all of the nodes that are part of a cluster must be from the same subnet. If you have a domain name server (DNS), then register the host names for the VIP with DNS. The Virtual IP address should not be in use at the time of the installation, because this is a Virtual IP address that Oracle manages.
■ One public fixed hostname address for each node, typically assigned by the system administrator during operating system installation. If you have a DNS, then register both the fixed IP and the VIP address with DNS. If you do not have DNS, then you must make sure that both public IP addresses are in the node hostfile.
Software Requirements for Real Application Clusters SetupEach node in a cluster requires a supported interconnect software protocol to support Cache Fusion, and to support Oracle Clusterware polling. Your interconnect must be certified by Oracle for your platform. You should also have a Web browser, both to enable Oracle Enterprise Manager, and to view online documentation. For Oracle Database 10g requirements, Oracle Clusterware provides the same functionality as third-party vendor clusterware. Using Oracle Clusterware also reduces installation and support complications. However, you may require third-party vendor clusterware if you use a non-ethernet interconnect, or if you have deployed clusterware-dependent applications on the same cluster where you deploy Real Application Clusters.
Cluster Setup and Pre-Installation Configuration Tasks for Real Application Clusters
6-4 Oracle® Universal Installer and OPatch User’s Guide
Cluster Setup and Pre-Installation Configuration Tasks for Real Application Clusters
Before installing Real Application Clusters, perform the following procedures:
1. Ensure that you have a certified combination of operating system and Oracle software version by referring to the OracleMetaLink certification information, which is located at the following Web site:
http://metalink.oracle.com
Click Certify & Availability, and select 1.View Certifications by Product.
2. Configure a high-speed interconnect that uses a private network. Some platforms support automatic failover to an additional interconnect.
3. Determine the storage option for your system and configure the shared disk.
4. Ensure that the directory structure is similar in all nodes.
5. Ensure that all nodes in the cluster have the same time zone settings.
6. Install the operating system patches for the Oracle software. For more information refer to the respective Oracle software Real Application Clusters installation guide.
Pre-Installation Tasks for Real Application Clusters on UNIXYou need to complete the following pre-installation tasks before you start the Oracle Universal Installer:
Logging In to the System as rootBefore you install the Oracle software, you must complete several tasks as the root user. To log in as the root user, complete one of the following procedures:
■ If you are installing the software from an X Window System workstation or X terminal, then:
1. Start a local terminal session, for example, an X terminal (xterm).
2. If you are not installing the software on the local system, then enter the following command to enable remote hosts to display X applications on the local X server:
$ xhost +
3. If you are not installing the software on the local system, then use the ssh, rlogin, or telnet command to connect to the system where you want to install the software:
$ telnet remote_host
4. If you are not logged in as the root user, then enter the following command to switch user to root:
$ su - root
Note: The layout of the OracleMetaLink site and the site's certification policies are subject to change.

Pre-Installation Tasks for Real Application Clusters on UNIX
Cluster Environment Installations 6-5
password:#
■ If you are installing the software from a PC or other system with X server software installed, then:
1. Start the X server software.
2. Configure the security settings of the X server software to permit remote hosts to display X applications on the local system.
3. Connect to the remote system where you want to install the software and start a terminal session on that system, for example, an X terminal (xterm).
4. If you are not logged in as the root user on the remote system, then enter the following command to switch user to root:
$ su - rootpassword:#
Creating Required UNIX Groups and UsersDepending on whether it is the first time an Oracle software is being installed on a system and on the products that you are installing, you may need to create several UNIX groups and a UNIX user account. The following UNIX group and users are required for all installations:
■ The Oracle Inventory group (oinstall)
You must create this group the first time you install Oracle software on the system. The usual name chosen for this group is oinstall. This group owns the Oracle inventory, which is a catalog of all Oracle software installed on the system.
■ The Oracle software owner user (oracle)
You must create this user the first time you install Oracle software on the system. This user owns all of the software installed during the installation. The usual name chosen for this user is oracle. This user must have the Oracle Inventory group as its primary group.
You need to create other groups and users in addition to the ones created above. For more information on creating the required groups and users refer to the respective Oracle software Real Application Clusters installation guide.
Creating Identical Users and Groups on Other Cluster NodesThe Oracle software users and groups must exist and be identical on all cluster nodes. To create these identical users and groups, you must identify the user ID and group IDs assigned to them on the node where you created them, then create the user and groups with the same name and ID on the other cluster nodes. You must create identical users and groups on other cluster nodes only if you are using local users and groups. If you are using users and groups defined in a directory service such as NIS, then they are already identical on each cluster node.
Note: If Oracle software is already installed on the system, the existing Oracle Inventory group must be the primary group of the UNIX user that you use to install new Oracle software. The following sections describe how to identify an existing Oracle Inventory group.
Pre-Installation Tasks for Real Application Clusters on UNIX
6-6 Oracle® Universal Installer and OPatch User’s Guide
Identifying the User and Group IDs To determine the user ID (UID) and the group IDs (GID) for the groups, follow these steps:
1. Enter following command:
# id oracle
The output from this command is similar to the following:
uid=440(oracle) gid=200(oinstall) groups=201(dba),202(oper)
2. From the output, identify the user identity (UID) for the oracle user and the group identities (GIDs) for the groups to which it belongs.
Creating the User and Groups on the Other Cluster Nodes To create the user and groups on the other cluster nodes, repeat the following procedure on each node:
1. Log in to the cluster node in which you want to create the user and groups as root.
2. Enter commands as per the syntax to create the respective groups. Use the -g option to specify the correct GID for each group:
# /usr/sbin/groupadd -g <group_id> <group_name>
Configuring SSH on all Cluster NodesBefore you install and use Oracle Real Application Clusters, you must configure secure shell (SSH) for the oracle user on all cluster nodes. Oracle Universal Installer uses the ssh and scp commands during installation to run remote commands on and copy files to the other cluster nodes. You must configure SSH so that these commands do not prompt for a password.
Configuring SSH on Cluster Member Nodes To configure SSH, complete the following steps on each cluster node:
1. Log in as the oracle user.
2. If necessary, create the .ssh directory in the oracle user’s home directory and set the correct permissions on it:
$ mkdir ~/.ssh$ chmod 700 ~/.ssh
3. Enter the following commands to generate an RSA key for version 2 of the SSH protocol:
$ /usr/bin/ssh-keygen -t rsa
At the prompts:
■ Accept the default location for the key file.
■ Enter and confirm a pass phrase that is different from the oracle user’s password.
Note: This section describes how to configure OpenSSH version 3. If SSH is not available, then Oracle Universal Installer attempts to use rsh and rcp instead. However, these services are disabled by default on most Linux systems.
Pre-Installation Tasks for Real Application Clusters on UNIX
Cluster Environment Installations 6-7
This command writes the public key to the ~/.ssh/id_rsa.pub file and the private key to the ~/.ssh/id_rsa file. Never distribute the private key to anyone.
4. Enter the following command to generate a DSA key for version 2 of the SSH protocol:
$ /usr/bin/ssh-keygen -t dsa
At the prompts:
■ Accept the default location for the key file.
■ Enter and confirm a pass phrase that is different from the oracle user’s password.
This command writes the public key to the ~/.ssh/id_dsa.pub file and the private key to the ~/.ssh/id_dsa file. Never distribute the private key to anyone.
5. Copy the contents of the ~/.ssh/id_rsa.pub and ~/.ssh/id_dsa.pub files to the ~/.ssh/authorized_keys file on this node and to the same file on all other cluster nodes.
6. Change the permissions on the ~/.ssh/authorized_keys file on all cluster nodes:
$ chmod 600 ~/.ssh/authorized_keys
At this point, if you use ssh to log in to or run a command on another node, you are prompted for the pass phrase that you specified when you created the DSA key.
Enabling SSH User Equivalency on Cluster Member Nodes To enable Oracle Universal Installer to use the ssh and scp commands without being prompted for a pass phrase, follow these steps:
1. On the system where you want to run Oracle Universal Installer, log in as the oracle user.
2. Enter the following commands:
$ exec /usr/bin/ssh-agent $SHELL$ /usr/bin/ssh-add
3. At the prompts, enter the pass phrase for each key that you generated.
If you have configured SSH correctly, then you can use the ssh or scp commands without being prompted for a password or a pass phrase.
4. To test the SSH configuration, enter the following commands from the same terminal session, testing the configuration of each cluster node:
$ ssh nodename1 date$ ssh nodename2 date..
Note: The ~/.ssh/authorized_keys file on every node must contain the contents from all of the ~/.ssh/id_rsa.pub and ~/.ssh/id_dsa.pub files that you generated on all cluster nodes.
Pre-Installation Tasks for Real Application Clusters on UNIX
6-8 Oracle® Universal Installer and OPatch User’s Guide
These commands should display the date set on each node. If any node prompts for a password or pass phrase, then verify that the ~/.ssh/authorized_keys file on that node contains the correct public keys.
5. To ensure that X11 forwarding will not cause the installation to fail, create a user-level SSH client configuration file for the Oracle software owner user, as follows:
a. Using any text editor, edit or create the ~oracle/.ssh/config file.
b. Make sure that the ForwardX11 attribute is set to no, for example:
Host *ForwardX11 no
6. You must run Oracle Universal Installer from this session or remember to repeat steps 2 and 3 before you start Oracle Universal Installer from a different terminal session.
Preventing Oracle Clusterware Installation Errors Caused by stty Commands During an Oracle Clusterware installation, the Oracle Universal Installer uses SSH (if available) to run commands and copy files to the other nodes. During the installation, hidden files on the system (for example, .bashrc or .cshrc) can cause installation errors if they contain stty commands.
To avoid this problem, Oracle recommends that you modify these files to suppress all output on STDERR, as in the following examples:
■ Bourne, Bash, or Korn shell:
if [ -t 0 ]; thenstty intr ^Cfi
■ C shell:
test -t 0if ($status == 0) thenstty intr ^Cendif
Note: The first time you use SSH to connect to a node from a particular system, you might see a message stating that the authenticity of the host could not be established. Enter yes at the prompt to continue. You should not see this message again when you connect from this system to that node.
If you see any other messages or text, apart from the date, then the installation can fail. Make any changes required to ensure that only the date is displayed when you enter these commands.
You should ensure that any parts of login scripts that generate any output, or ask any questions, are modified so that they only act when the shell is an interactive shell.
Pre-Installation Tasks for Real Application Clusters on UNIX
Cluster Environment Installations 6-9
Configuring the Oracle User EnvironmentYou run Oracle Universal Installer from the oracle account. However, before you start Oracle Universal Installer you must configure the environment of the oracle user. For more information on configuring the environment, refer to the respective Oracle product Real Application Clusters installation guide.
Checking the Hardware RequirementsEach system must meet certain minimum hardware requirements. For more information on hardware requirements, refer to the respective Oracle product Real Application Clusters installation guide.
Checking the Network RequirementsThere are some minimum networking hardware and Internet protocol (IP) address requirements. Check that you have the networking hardware and Internet protocol (IP) address required for an Oracle Real Application Clusters installation.
Network Hardware RequirementsEach node in the cluster must meet the following requirements:
■ Each node must have atleast two network adapters; one for the public network interface and one for the private network interface (the interconnect).
■ The interface names associated with the network adapters for each network must be the same on all nodes.
■ For increased reliability, you can configure redundant public and private network adapters for each node.
■ For the public network, each network adapter must support TCP/IP.
■ For the private network, the interconnect must support the user datagram protocol (UDP) using high-speed network adapters and switches that support TCP/IP (Gigabit Ethernet or better recommended).
■ For the private network, the end points of all designated interconnect interfaces must be completely reachable on the network.
Network Parameter RequirementsIf you are using NFS, then you must set the values for the NFS buffer size parameters rsize and wsize to atleast 16384. Oracle recommends that you use the value 32768.
Note: When SSH is not available, the Installer uses the rsh and rcp commands instead of ssh and scp. If there are hidden files that contain stty commands that are loaded by the remote shell, then this error can also occur.
Note: UDP is the default interconnect protocol for Real Application Clusters and TCP is the interconnect protocol for Oracle Clusterware. Token-Ring is not supported for the interconnect.
Pre-Installation Tasks for Real Application Clusters on UNIX
6-10 Oracle® Universal Installer and OPatch User’s Guide
IP Address RequirementsBefore starting the installation, you must identify or obtain the following IP addresses for each node:
■ An IP address and an associated host name registered in the domain name service (DNS) for each public network interface.
■ One unused virtual IP address and an associated virtual host name registered in DNS, or resolved in the hostfile, or both, that you will configure for the primary public network interface.
The virtual IP address must be in the same subnet as the associated public interface. After installation, you can configure clients to use the virtual host name or IP address. If a node fails, then its virtual IP address fails over to another node.
■ A private IP address and optional host name for each private interface.
Oracle recommends that you use non-routable IP addresses for the private interfaces; for example: 10.*.*.* or 192.168.*.*. You can use the /etc/hosts file on each node to associate private host names with private IP addresses.
Node Time RequirementsBefore starting the installation, ensure that each member node of the cluster is set as closely as possible to the same date and time. Oracle strongly recommends using the Network Time Protocol feature of most operating systems for this purpose, with all nodes using the same reference Network Time Protocol server.
Checking Software RequirementsThe Oracle Universal Installer performs checks on your system to verify that it meets the requirements listed for your platform. To ensure that these checks pass, verify the requirements before you start the Installer.
Depending on the Oracle products that you intend to install, verify that the required software is installed on the system. For more information on software requirements, refer to the respective Oracle product Real Application Clusters installation guide.
Configuring Kernel ParametersEach cluster node must meet the recommended kernel values. For information on verifying and setting the kernel parameters, refer to the respective Oracle product Real Application Clusters installation guide.
Identifying Required Software DirectoriesYou must identify or create the following directories for the Oracle software, as follows:
■ Oracle Base Directory
■ Oracle Inventory Directory
■ Oracle Clusterware Home Directory
■ Oracle Home Directory
The following subsections describe the requirements for these directories.
Pre-Installation Tasks for Real Application Clusters on UNIX
Cluster Environment Installations 6-11
Oracle Base DirectoryThe Oracle base directory acts as a top-level directory for Oracle software installations. It is analogous to the C:\Oracle directory used for Oracle software installations on Windows systems. On UNIX systems, the Optimal Flexible Architecture (OFA) guidelines recommend that you use a path similar to the following for the Oracle base directory:
/mount_point/app/oracle_sw_owner
In this example:
■ mount_point is the mount point directory for the file system that will contain the Oracle software.
The examples in this guide use /u01 for the mount point directory. However, you could choose another mount point directory, /oracle or /opt/oracle for example.
■ oracle_sw_owner is the operating system user name of the Oracle software owner, for example oracle.
You can use the same Oracle base directory for more than one installation or you can create separate Oracle base directories for different installations. If different operating system users install Oracle software on the same system, then each user must create a separate Oracle base directory. The following example Oracle base directories could all exist on the same system:
/u01/app/oracle
/u01/app/orauser
/opt/oracle/app/oracle
Regardless of whether you create an Oracle base directory or decide to use an existing one, you must set the ORACLE_BASE environment variable to specify the full path to this directory.
Oracle Inventory DirectoryThe Oracle Inventory directory (oraInventory) stores an inventory of all software installed on the system. It is required by, and shared by, all Oracle software installations on a single system. The first time you install Oracle software on a system, Oracle Universal Installer prompts you to specify the path to this directory. If you are installing the software on a local file system, then Oracle recommends that you choose the following path:
oracle_base/oraInventory
If the Oracle base directory is on a cluster file system, or on an NFS file system on a NAS device, then you must specify a path for the Oracle Inventory directory on a local file system. The Oracle base directory must be on a local file system to enable all of the nodes to have separate inventories.
Oracle Universal Installer creates the directory that you specify, and sets the correct owner, group, and permissions for it. You do not need to create it.
Note: The Oracle base directory can be on a local file system or on an NFS file system on a certified NAS device. Do not create the Oracle base directory on an OCFS version 1 file system.
Pre-Installation Tasks for Real Application Clusters on UNIX
6-12 Oracle® Universal Installer and OPatch User’s Guide
Oracle Clusterware Home DirectoryThe Oracle Clusterware home directory is the directory where you choose to install the software for Oracle Clusterware. You must install Oracle Clusterware in a separate home directory. When you run Oracle Universal Installer, it prompts you to specify the path to this directory, as well as a name that identifies it. Oracle recommends that you specify a path similar to the following for the Oracle Clusterware home directory:
/u01/crs/oracle/product/10.2.0/app
Oracle Home DirectoryThe Oracle home directory is the directory where you choose to install the software for a particular Oracle product. You must install different Oracle products, or different releases of the same Oracle product, in separate Oracle home directories. When you run Oracle Universal Installer, it prompts you to specify the path to this directory, as well as a name that identifies it. The directory that you specify must be a subdirectory of the Oracle base directory. Oracle recommends that you specify a path similar to the following for the Oracle home directory:
oracle_base/product/10.2.0/db_1
Oracle Universal Installer creates the directory path that you specify under the Oracle base directory. It also sets the correct owner, group, and permissions on it. You do not need to create this directory.
Identifying or Creating an Oracle Base DirectoryBefore starting the installation, you must either identify an existing Oracle base directory or if required create one. For more information on identifying or creating an Oracle Base Directory, refer to the respective Oracle product Real Application Clusters installation guide.
Creating the Clusterware Home DirectoryOracle Universal Installer creates the Oracle Clusterware home directory for you. Ensure before you start the installation that you provide sufficient disk space on a file system for the Oracle Clusterware directory, and the parent directory of the Oracle Clusterware directory space is writable by the Oracle user.
To create the Oracle Clusterware home directory and specify the correct owner, group, and permissions for it, follow these steps:
Note: All Oracle software installations rely on the Oracle base directory. Make sure that you back it up regularly.
Do not delete the Oracle base directory unless you have completely removed all Oracle software from the system.
Note: Because you must change the permissions of all of the parent directories of the Oracle Clusterware home directory after installing the software to grant write access only to the root user, the Oracle Clusterware home directory must not be a subdirectory of the Oracle base directory.
Pre-Installation Tasks for Real Application Clusters on Windows
Cluster Environment Installations 6-13
1. Enter commands similar to the following to create the recommended subdirectories in the mount point directory that you identified and set the appropriate owner, group, and permissions on them:
# mkdir -p /mount_point/crs/oracle_sw_owner/product/10.2.0/crs# chown -R root:oinstall /mount_point/crs# chmod -R 775 /mount_point/crs/oracle_sw_owner
If the mount point you identified is /u01, then the recommended Oracle Clusterware home directory path is as follows:
/u01/crs/oracle/product/10.2.0/crs
2. If necessary, repeat the commands listed in the previous step to create the same directory on the other nodes in the cluster.
3. Enter commands similar to the following to set the ORACLE_BASE and ORACLE_HOME environment variables in preparation for the Oracle Clusterware installation:
■ Bourne, Bash, or Korn shell:
$ ORACLE_BASE=/u01/app/oracle$ ORACLE_HOME=/u01/crs/oracle/product/10.2.0/crs$ export ORACLE_BASE$ export ORACLE_HOME
■ C shell:
% setenv ORACLE_BASE /u01/app/oracle% setenv ORACLE_HOME /u01/crs/oracle/product/10.2.0/crs
4. Enter the following commands to ensure that the TNS_ADMIN environment variable is not set:
■ Bourne, Bash, or Korn shell:
$ unset TNS_ADMIN
■ C shell:
% unsetenv TNS_ADMIN
5. To verify that the environment has been set correctly, enter the following commands:
$ umask$ env | more
Verify that the umask command displays a value of 22, 022, or 0022 and the environment variables that you set in this section have the correct values.
Pre-Installation Tasks for Real Application Clusters on WindowsYou need to complete the following pre-installation tasks before you start the Oracle Universal Installer to install Oracle Clusterware and Oracle Real Application Clusters on Microsoft Windows systems.
Checking Hardware and Software CertificationOracle recommends you to review the certification matrix on the OracleMetaLink Web site for the most up-to-date list of certified hardware platforms and operating system
Pre-Installation Tasks for Real Application Clusters on Windows
6-14 Oracle® Universal Installer and OPatch User’s Guide
versions for the Oracle software. This Web site also provides patches and workaround information for bugs. For more information on accessing the OracleMetaLink site, refer to "Download and Install Patches" on page 6-22.
Checking the Hardware RequirementsEach system must meet minimum hardware requirements. For more information on hardware requirements and the steps involved to check them, refer to the respective Oracle product Real Application Clusters installation guide.
Hard Disk Space RequirementsEach system must meet certain hard disk space requirements. For more information on hard disk space requirements, refer to the respective Oracle product Real Application Clusters installation guide.
Checking the Software RequirementsEach system must meet minimum software requirements. For more information on software requirements and the steps involved to check them, refer to the respective Oracle product Real Application Clusters installation guide.
Checking the Network RequirementsThere are some minimum networking hardware and Internet protocol (IP) address requirements. Check that you have the networking hardware and Internet protocol (IP) address required for an Oracle Real Application Clusters installation. For more information on the steps involved in checking these requirements, refer to the respective Oracle product Real Application Clusters installation guide.
Network Hardware RequirementsEach node in the cluster must meet the following requirements:
■ Each node must have atleast two network adapters; one for the public network interface and one for the private network interface (the interconnect).
■ The private and public network interface names must be different from each other and cannot contain any multibyte language characters. The names are case-sensitive.
■ The private network interface name must be the same on all nodes.
■ The public network interface name must be the same on all nodes.
■ The public interface must be listed first in the ipconfig list.
■ Oracle supports the TCP/IP protocol for the public and private networks.
IP Address RequirementsBefore starting the installation, you must identify or obtain the following IP addresses for each node:
■ An IP address and an associated host name registered in the domain name service (DNS) for each public network interface.
■ One unused virtual IP address and an associated virtual host name registered in DNS, that you will configure for the primary public network interface.
Installing Oracle Clusterware on UNIX
Cluster Environment Installations 6-15
The virtual IP address must be in the same subnet as the associated public interface. After installation, you can configure clients to use the virtual host name or IP address. If a node fails, then its virtual IP address fails over to another node.
■ A private IP address and optional host name for each private interface.
Oracle recommends that you use private network IP addresses for the private interfaces; for example: 10.*.*.* or 192.168.*.*. You can use the %SystemRoot%\system32\drivers\etc\hosts file on each node to associate private host names with private IP addresses.
Checking Individual Component RequirementsDepending on the Oracle products that you intend to install, verify the required components for the Oracle software you are installing and ensure that it is installed on the system. You will find more information on the components in the respective Oracle product Real Application Clusters installation guide.
Configuring Storage for Oracle ClusterwareYou need to perform certain storage configuration tasks before you start Oracle Universal Installer. For detailed information on the storage configuration tasks, refer to the respective Oracle product Real Application Clusters installation guide.
Installing Oracle Clusterware on UNIXThis section provides you with information about how to use the Oracle Universal Installer to install Oracle Clusterware on UNIX.
Running the Oracle Universal Installer to Install Oracle ClusterwareComplete the following steps to install Oracle Clusterware on your cluster. At any time during installation, if you have a question about what you are being asked to do, click Help in the Oracle Universal Installer page.
1. Start the runInstaller command with the -formCluster option from the main directory on the Oracle Clusterware 10g Release 2 (10.2) CD-ROM. This is a separate CD that contains the Oracle Clusterware software. When the Oracle Universal Installer displays the Welcome page, click Next.
2. Oracle Universal Installer displays the Installation Prerequisite Checks page. This screen shows the name, type, and status for all pre-requisite checks designed for the installation. Click Next.
3. Oracle Universal Installer displays the Specify Cluster Nodes for Node Addition page. Specify public, private, virtual IPs in this page and click Next.
4. Oracle Universal Installer displays the Specify Local Host Name page. Specify atleast one public and one private interface in this page and click Next.
5. Specify Oracle Cluster Registry location option to give a redundant OCR location and click Next.
6. Specify VD (Voting Disk Location) location option to give redundant VD locations and click Next.
7. Oracle Universal Installer displays the Summary page. Click Install and proceed.
8. After the installation is done, Oracle Universal Installer prompts you to run orainstRoot.sh and root.sh. You need to run these scripts and click OK.
Installing Oracle Clusterware on Windows
6-16 Oracle® Universal Installer and OPatch User’s Guide
9. After you run root.sh on all of the nodes, the Oracle Universal Installer runs the Oracle Notification Server Configuration Assistant and Oracle Private Interconnect Configuration Assistant. These assistants run without user intervention.
10. Oracle Universal Installer displays the End of Installation page. Click Exit.
Running the Oracle Universal Installer in Silent Mode to Install Oracle ClusterwareYou can run the Oracle Universal Installer in silent mode to install Oracle Clusterware by entering the following command:
./runInstaller -silent -responseFile <response file path>
For Oracle Clusterware, you need to use the -formCluster flag. You can pass session variables like nodelist, ocr, voting disk location etc from the command line for silent installation.
Oracle Clusterware Background ProcessesThe following processes must be running in your environment after the Oracle Clusterware installation for Oracle Clusterware to function:
■ oprocd — Process monitor for the cluster.
■ evmd — Event manager daemon that starts the racgevt process to manage call-outs.
■ ocssd — Manages cluster node membership and runs as oracle user; failure of this process results in node restart.
■ crsd — Performs high availability recovery and management operations such as maintaining the OCR. Also manages application resources and runs as root user and restarts automatically upon failure.
Installing Oracle Clusterware on WindowsThis section provides you with information about how to use the Oracle Universal Installer to install Oracle Clusterware on Windows.
Running the Oracle Universal Installer to Install Oracle ClusterwareComplete the following steps to install Oracle Clusterware on your cluster. At any time during installation, if you have a question about what you are being asked to do, click Help in the Oracle Universal Installer page.
1. Log in to Windows with Administrative privileges and run the setup.exe command on the Oracle Clusterware media. This will open the Oracle Universal Installer Welcome page.
2. After you click Next in the Welcome page, the Specify File Locations page will allow you to accept the displayed path name for the Oracle Clusterware products or select a different one. You may also accept default directory and path name for the location of your Clusterware home or browse for an alternate directory and destination. You must select a destination that exists on each cluster node that is part of this installation. Click Next to confirm your choices and proceed to the Language Selection page.
3. Select the language or languages for your Oracle Clusterware installation in the Language Selection page, then click Next for the Cluster Configuration page.
Installing Oracle Clusterware on Windows
Cluster Environment Installations 6-17
4. The Cluster Configuration page contains predefined node information if the Oracle Universal Installer detects that your system has the Oracle9i Release 2 Clusterware. Otherwise, the Oracle Universal Installer displays the Cluster Configuration page without predefined node information.
Provide your own cluster name if you do not wish to use the name provided by the Oracle Universal Installer. Note that the selected cluster name must be globally unique throughout the enterprise and its allowable character set is the same as that for hostnames, that is, underscores (_), hyphens (-), and single-byte alphanumeric characters (a to z, A to Z, and 0 to 9).
Enter a public and a private host name for each node. Neither the public nor the private name should have a domain qualifier. When you enter the public host name, use the primary host name of each node, that is, the name displayed by the hostname command. The private node refers to an address that is only accessible by the other nodes in this cluster, and which Oracle uses for Cache Fusion processing. You may enter either a private host name or a private IP address for each node.
Click Next after you have entered the cluster configuration information. This saves your entries and opens the Specify Network Interface Usage page.
5. In the Specify Network Interface Usage page the Oracle Universal Installer displays a list of cluster-wide interfaces. Use the drop-down menus on this page to classify each interface as Public, Private, or Do Not Use. The default setting for each interface is Do Not Use. You must classify atleast one interconnect as Public and one as Private. Click Next when you have made your selections to open the Select Disk Formatting Options page.
6. In the Select Disk Formatting Options page, you indicate what OCFS you want the Oracle Universal Installer to format for you.
The formatting options are as follows:
■ Format two logical drives for data and software storage. In this case, the Oracle Universal Installer creates two cluster file systems, one for the database files and one for the Oracle home. The OCR and voting disk are created in the datafile directory.
■ Format one logical drive for software storage. In this case, the Oracle Universal Installer creates one cluster file system for the Oracle home and requires two additional partitions, one for the OCR and one for the voting disk. If you select this option, then you must have configured the partitions before proceeding with the installation. These partitions will be stamped with "ocrcfg" for the OCR and "votedsk" for the voting disk.
■ Format one logical drive for data file storage. In this case, the Oracle Universal Installer creates one cluster file system for the database files which is also used to store the OCR and voting disk.
■ Do not format any logical drives. In this case, the Oracle Universal Installer requires two partitions, one for the OCR and one for the voting disk. If you select this option, then you must have configured the partitions before proceeding with the installation. These partitions will be stamped with "ocrcfg" for the OCR and "votedsk" for the voting disk.
Click Next after making your selection in the Select Disk Formatting Options page. The next page that the Oracle Universal Installer displays depends on your selection on the Select Disk Formatting Options page, as described in the following step.
Installing Oracle Clusterware on Windows
6-18 Oracle® Universal Installer and OPatch User’s Guide
7. If you selected the "Format two logical drives for data and software storage" option on the Select Disk Formatting Options page, then you must complete the Select Software Storage Drive page and the Select Data Storage Drive page as described in Steps a and b respectively.
If you selected the "Format one logical drive for software storage" option on the Select Disk Formatting Options page, then you must complete the Select Software Storage Drive page, the Disk Configuration - Oracle Cluster Registry (OCR) page, and the Disk Configuration - Voting Disk page as described in Steps a, c, and d respectively.
If you selected the "Format one logical drive for data file storage" option on the Select Disk Formatting Options page, then you must complete the Select Data Storage Drive page as described in Step b.
If you selected the "Do not format any logical drives" option on the Select Disk Formatting Options page, then you must complete the Disk Configuration - Oracle Cluster Registry (OCR) page and the Disk Configuration - Voting Disk page as described in Steps c and d respectively.
a. On the Select Software Storage Drive page, choose a shared drive to see a list of available partitions on that drive. Choose a partition with sufficient space to hold your Oracle home and select the partition’s disk number and partition number from the list. Click Next to proceed.
b. On the Select Data Storage Drive page, choose a shared drive to see a list of available partitions on that drive. Choose a partition with sufficient space to hold your database files and select the partition’s disk number and partition number from the list. Click Next to proceed.
c. On the Disk Configuration - Oracle Cluster Registry (OCR) page, choose a partition with sufficient space to hold your OCR and select the partition’s disk number and partition number from the list. Click Next to proceed.
d. On the Disk Configuration - Voting Disk page, choose a partition with sufficient space to hold your voting disk and select the partition’s disk number and partition number from the list. Click Next to proceed.
8. After you click Next, the Oracle Universal Installer checks whether the remote inventories are set. If they are not set, then the Oracle Universal Installer sets up the remote inventories by setting registry keys. The Oracle Universal Installer also verifies the permissions to enable writing to the inventory directories on the remote nodes. After completing these actions, the Oracle Universal Installer displays a Summary page that shows the cluster node information along with the space requirements and availability. Verify the installation that the Oracle Universal Installer is about to perform and click Finish.
9. When you click Finish, the Oracle Universal Installer installs the OCFS and Oracle Clusterware software on the local node and validates the installation again. The Oracle Universal Installer will also create any required OCFS file systems. After validating the installation, the Oracle Universal Installer completes the Oracle Clusterware software installation and configuration on the remote nodes.
Note: The Oracle Universal Installer pages described in this step display logical drives from which you must make your selections. To be valid for selection, a logical drive must be located on a disk without a primary partition.
Adding Additional Nodes to the Cluster for Mass Deployment
Cluster Environment Installations 6-19
Running the Oracle Universal Installer in Silent Mode to Install Oracle ClusterwareYou can run the Oracle Universal Installer in silent mode to install Oracle Clusterware by entering the following command:
./setup.exe -silent -responseFile <response file path>
For Oracle Clusterware, you need to use the -formCluster flag. You can pass session variables like nodelist, ocr, voting disk location etc from the command line for silent installation.
Oracle Clusterware Background ProcessesThe following processes must be running in your environment after the Oracle Clusterware installation for Oracle Clusterware to function:
■ oprocd — Process monitor for the cluster.
■ evmd — Event manager daemon that starts the racgevt process to manage call-outs.
■ ocssd — Manages cluster node membership and runs as oracle user; failure of this process results in node restart.
■ crsd — Performs high availability recovery and management operations such as maintaining the OCR. Also manages application resources and runs as root user and restarts automatically upon failure.
Adding Additional Nodes to the Cluster for Mass DeploymentIf you want to add additional nodes to the cluster by copying the Oracle Clusterware home to another node in the cluster, then complete the following procedure:
1. Perform a single-node cluster Oracle Clusterware installation on node1. In the following steps, the variable $CRS_HOME represents the Oracle Clusterware home directory of the successfully installed Oracle Clusterware software.
2. Go to the directory $CRS_HOME/oui/bin, and run the script addNode.sh.
3. The node selection page comes up. Select the nodes to be added and click Next.
4. The Summary page opens. Verify if the Summary page contains the correct node information, and click Next.
5. When prompted, run the script rootaddnode.sh on your local node.
6. If prompted to do so, run the script orainstroot.sh on the node on which you are creating another Oracle Clusterware home directory.
7. Run the root.sh script on the node on which you are creating another Oracle Clusterware home directory.
8. From the Oracle Clusterware home directory you created on the additional node, in the path $CRS_HOME/bin, run the following command:
./racgons add_config node2:4948
In the preceding syntax example, the variable node2 is the name of the node on which you are configuring the additional Oracle Clusterware home directory.
Installing Product Software on a Cluster
6-20 Oracle® Universal Installer and OPatch User’s Guide
Installing Product Software on a ClusterOnce clusterware has been installed and pre-installation tasks have been completed, you are ready to install the cluster-ready product on the cluster. To do this, you may use Oracle Universal Installer in interactive mode, command line mode, or silent mode using a response file.
Cluster DetectionWhen Oracle Universal Installer detects that the destination you entered on the File Locations page is part of a cluster, one of two dialogs will appear:
■ If the Oracle home name entered is new, the Specify Hardware Installation Mode page appears. Use this page to select between cluster and non-cluster installation:
– Cluster installation: Select the nodes for your installation from the list of nodes on which clusterware has been installed.
– Non-cluster installation: Install on a single-node only, even though that node is part of a cluster.
■ If the Oracle home name entered is a pre-existing home, the Selected Nodes page appears. This is an information-only page that displays the nodes associated with the Oracle home. The installation will be performed on all nodes selected. If any of the selected nodes are down, then the installation will not be allowed to proceed.
Availability CheckingWhen the user clicks Next on the Specify Hardware Installation Mode page or Selected Nodes page, Oracle Universal Installer performs the following availability checks on the nodes:
■ Network reachability: Tests whether the remote cluster nodes are up and running.
■ Network configuration: Tests whether the remote cluster nodes are properly network configured.
■ Inventory setup: Tests whether the inventory is set up on the remote nodes. If not set up, on UNIX, Oracle Universal Installer prompts the user to run root scripts on the remote nodes to set up inventory. On Windows, Oracle Universal Installer sets up the inventory location in the Windows registry.
■ Inventory permission: Tests whether the Central Inventory location is writable by the user.
■ Oracle home permission: Tests whether the Oracle home is writable by the user.
If all selected nodes are available, the installation process continues to the next step. If a node (or nodes) is not available, the page is re-displayed with a Status column
See Also: Refer to "Modes of Installation" on page 5-5 for more information on the different modes.
Note: In Oracle Universal Installer, click Installed Products to display the Inventory panel, which lists all installed Oracle homes. Clustered Oracle homes, homes installed on multiple cluster nodes, have an attribute called Cluster Nodes, which lists all the nodes associated with that home.
Installing Product Software on a Cluster
Cluster Environment Installations 6-21
indicating the results of the check. The user must fix the problem or choose another set of nodes in order to proceed.
If any of the remote nodes is unreachable, check if those nodes are up and running and if they are properly network configured. If either the inventory or the Oracle home is not writable, check for the appropriate permissions on the remote nodes for these directories.
Cluster InstallationIn a typical cluster installation, when clusterware is present, Universal Installer installs the Oracle software onto the node on which Oracle Universal Installer is running, then propagates the Oracle home from the local node installation to the other nodes that are part of the installation. Then Universal Installer runs -attachHome on the remote nodes to update the inventory. After this, you need to run orainstRoot.sh (if required) and root.sh on the local and remote nodes. After the scripts are run, the config steps are executed.
If the cluster is Cluster File System (CFS) or Network File System (NFS) mounted, then Oracle Universal Installer does not propagate the Oracle home to other nodes, as files are shared across nodes and the installation will exist on the shared disk.
Cluster Installation in Silent ModeFor Real Application Clusters installation, you can specify -local flag, CLUSTER_NODES, REMOTE_NODES, and LOCAL_NODE session variables to indicate the nodes on which the installation needs to be done.
When you use the -local flag in a cluster installation, it means that the installation or inventory operation needs to be performed only on the local node. The CLUSTER_NODES session variable indicates that the specified nodes are the part of the cluster.
./runInstaller -local "CLUSTER_NODES={a,b,c,d}"
In the above example, the installation would be performed in the local node and nodes a, b, c, and d would be taken as the part of the cluster.
When you use the REMOTE_NODES session variable in a cluster installation, it means that the installation or the inventory operation needs to be performed on the local node and the other nodes apart from the local node.
./runInstaller "REMOTE_NODES={c,d}" "CLUSTER_NODES={a,b,c,d}"
In the above example, the installation would be performed on the local node a and nodes c and d. The nodes a, b, c, and d would be taken as the part of the cluster.
Cluster De-installationWhen removing a clustered Oracle home, Oracle Universal Installer first removes software from the node from which you are de-installing, then removes software from the other cluster nodes associated with the Oracle home.
Note: For cluster installations, you must run oraInstRoot.sh on each node of the cluster to set up the inventory.
Command Line Options for Cluster Installs (UNIX Only)
6-22 Oracle® Universal Installer and OPatch User’s Guide
Command Line Options for Cluster Installs (UNIX Only)When using Oracle Universal Installer in suppressed or silent mode, specify the path to the remote copy or shell program on the local node to use for cluster installs using the following optional flags:
-remoteShell <path to program>-remoteCopy <path to program>
The default for remoteShell is /usr/local/bin/ssh. The default for remoteCopy is /usr/local/bin/scp. If these are not present, Oracle Universal Installer defaults to rsh and rcp respectively.
Patchsets and UpgradesOracle Universal Installer enables you to upgrade a product from one version to another version. An upgrade is a major product enhancement that often requires installation of the upgraded software. For example, if you convert your Oracle9i Database to Oracle 10gR2 Database, then it is called an upgrade.
A group of patches form a patchset. For example, if you convert your Oracle 10gR1 from version 10.1.1 to version 10.1.2, then it is called applying a patchset.
Post Installation TasksAfter completing a Real Application Clusters installation, it is advisable that you perform the following tasks:
VerificationAfter your Oracle product with Real Application Clusters installation is complete, go to $ORACLE_HOME/Opatch on each node and execute the following command:
$ORACLE_HOME/OPatch/opatch lsinventory -detail
This command lists the components installed inside the Oracle home and also lists the local and remote nodes for the home. Verify this information. You may also want to look at installation logs, inventory.xml, and oraclehomeproperties.xml.
Refer to "Troubleshooting Real Application Clusters / Oracle Clusterware Installation" on page 6-27 in case the check fails.
Back Up Disk after InstallationAfter your Oracle product with Real Application Clusters installation is complete and after you are sure that your system is functioning properly, make a backup of the contents of the disk.
Also make a backup of the disk contents after you complete any node additions or node deletions and after running any de-installation procedures.
Download and Install PatchesRefer to the OracleMetaLink Web site for required patches for your installation. To download the required patches:
1. Use a Web browser to view the OracleMetaLink Web site:
http://metalink.oracle.com
De-installing Real Application Clusters Software
Cluster Environment Installations 6-23
2. Log in to OracleMetaLink.
3. On the main OracleMetaLink page click Patches.
4. On the Select a Patch Search Area page click New MetaLink Patch Search.
5. On the Simple Search page click Advanced.
6. On the Advanced Search page click the search icon next to the Product or Product Family field.
7. In the Search and Select: Product Family field, enter the Oracle product name in the For field and click Go.
8. Select the Oracle product under the Results heading and click Select. The product name appears in the Product or Product Family field and the current release appears in the Release field.
9. Select your platform from the list in the Platform field and click Go.
10. Any available patches appear under the Results heading.
11. Click the number of the patch that you want to download.
12. On the Patch Set page, click View README and read the page that appears. The README page contains information about the patch set and how to apply the patches to your installation.
13. Return to the Patch Set page, click Download, and save the file on your system.
14. Use the unzip utility provided with Oracle software to uncompress the Oracle patches that you downloaded from OracleMetaLink. The unzip utility is located in the $ORACLE_HOME/bin directory.
Configure Oracle ProductsMany Oracle products and options must be configured before you use them for the first time. Before using individual Oracle products or options, refer to the manual in the product documentation library which is available on the documentation CD-ROM or on the OTN Web site.
De-installing Real Application Clusters SoftwareIf you need to de-install Real Application Clusters software, then you must run the Oracle Universal Installer to de-install the software on the same node from which you performed the installation. You must first de-install the Oracle product before de-installing the Oracle Clusterware software.
Perform the following procedures to de-install Oracle product and Oracle Clusterware software, as described in the following sections.
De-installing Oracle Product Software on UNIXThe following steps describe how to use Oracle Universal Installer to remove Oracle software from an Oracle home on UNIX systems:
Note: By default the patches would only be applied on the nodes on which the Oracle software installation was done. The node list can be changed using -enableRollingUpgrade option.
De-installing Real Application Clusters Software
6-24 Oracle® Universal Installer and OPatch User’s Guide
1. If necessary, log in as the oracle user:
$ su - oracle
2. Set the ORACLE_HOME environment variable to specify the path of the Oracle home directory that you want to remove:
■ Bourne, Bash, or Korn shell:
$ ORACLE_HOME=/u01/app/oracle/product/10.2.0/db_1$ export ORACLE_HOME
■ C shell:
$ setenv ORACLE_HOME /u01/app/oracle/product/10.2.0/db_1
3. Stop all processes running in this Oracle home.
4. Start Oracle Universal Installer with the -deinstall flag. When you use this flag only, the de-installation happens on the specified components. The Oracle home does not get removed from the Central Inventory. This is equivalent to selecting only the components and clicking Deinstall in the GUI. The syntax is as follows:
./runInstaller -deinstall ORACLE_HOME=<LOCATION_OF_ORACLE_HOME>
You can use REMOVE_HOMES variable to specify the location of the Oracle home to be removed. When you use this variable, the de-installation happens for the specified components and the Oracle home gets removed from the Central Inventory. This is equivalent to selecting an Oracle home and clicking Deinstall in the GUI. The syntax is as follows:
./runInstaller -deinstall ORACLE_HOME=<LOCATION_OF_ORACLE_HOME> "REMOVE_HOMES={<LOCATION_OF_ORACLE_HOME_TO_BE_REMOVED>}"
You can also use -removeallfiles flag with the REMOVE_HOMES variable to completely de-install the components, remove the Oracle home from the Central Inventory and delete the Oracle home directory. The syntax is as follows:
./runInstaller -deinstall ORACLE_HOME=<LOCATION_OF_ORACLE_HOME> "REMOVE_HOMES={<LOCATION_OF_ORACLE_HOME_TO_BE_REMOVED>}" -removeallfiles
For detailed instructions on de-installing an Oracle product, refer to the respective Oracle product installation guide.
De-installing Oracle Product Software on WindowsThe following steps describe how to use Oracle Universal Installer to remove Oracle software from an Oracle home on Windows systems:
1. Stop all the Oracle services running in this Oracle home.
Note: Always use Oracle Universal Installer to remove Oracle software. Do not delete any Oracle home directories without first using Oracle Universal Installer to remove the software.
Note: Always use Oracle Universal Installer to remove Oracle software. Do not delete any Oracle home directories without first using Oracle Universal Installer to remove the software.
De-installing Real Application Clusters Software
Cluster Environment Installations 6-25
2. Start Oracle Universal Installer: from the Start menu, select Programs, then ORACLE_ HOME_NAME, then Oracle Installation Products, then Oracle Universal Installer.
The Welcome screen for Oracle Universal Installer appears.
3. Click Deinstall Products.
The Inventory screen appears.
4. Expand the tree of installed components until you find the components to remove. For example, if you installed a database with the Enterprise Edition option and later installed additional components with the Custom option, expand the Oracle home component to display all the components installed in the Oracle home.
5. Select the components to remove.
6. Click Remove.
The Confirmation screen appears.
7. Click Yes to remove the selected components to initiate the removal process.
8. After the components are removed from your computer, the Inventory screen appears without the removed components.
9. Click Close to close the Inventory screen.
10. Click Cancel to exit Oracle Universal Installer.
11. Click Yes to confirm that you want to exit.
For detailed instructions on de-installing an Oracle product, refer to the respective Oracle product installation guide.
De-installing Oracle ClusterwareBefore de-installing Oracle Cluster software ensure that you have removed the respective Oracle product's home in each node by following the steps in the preceding section. The following section explains de-installation on Windows and UNIX.
De-installing Oracle Clusterware from UNIX EnvironmentDe-install each Oracle product Real Application Clusters home by running the procedure in the previous section. Then complete the de-installation by removing the Oracle Clusterware software using the following procedures:
1. Run the command $CRS_HOME/install/rootdelete.sh to disable the Oracle Clusterware applications that are running on the cluster node. The rootdelete.sh script requires three arguments. If you are running this command on a remote node of the cluster, then use remote as the first argument, otherwise use local as the first argument. If the ocr.loc file is on a shared file system, then use sharedvar. Otherwise use nosharedvar as the second argument. If the Oracle Clusterware home is on a shared file system, then use sharedhome, otherwise use nosharedhome as the third argument. Repeat this step on each node of the cluster from which you want to de-install Oracle Clusterware.
2. Run the script $CRS_HOME/install/rootdeinstall.sh on a local node to remove the OCR. You only need to run this script once.
3. Start Oracle Universal Installer. In the Welcome page, click Deinstall Products to display the list of installed products. Select the Oracle Clusterware home to de-install.
De-installing Real Application Clusters Software
6-26 Oracle® Universal Installer and OPatch User’s Guide
De-installing Oracle Clusterware from Windows EnvironmentDe-install each Oracle product Real Application Clusters home by running the procedure in the previous section. Then complete the de-installation by removing the Oracle Clusterware software using one of the following procedures:
■ De-installing Oracle Clusterware with No Previous Cluster Software Versions.
■ De-installing Oracle Clusterware with Clusterware Downgrade to 9.2.
De-installing Oracle Clusterware with No Previous Cluster Software Versions Perform the following steps to de-install Oracle 10g Clusterware software from a Windows environment:
1. Click Start and navigate to Settings, then to Control Panel, then to Administrative Tools, and then to Services. Stop the service oracleremexec.
2. Start the Oracle Universal Installer. On the Welcome page, click Deinstall Products to display the list of installed products. Select the Oracle Clusterware home you want to de-install.
3. If you have services with names such as OracleCRSTokenname, then remove them by running the following command:
crsuser remove user_namewhere user_name is a user name.
4. Shut down and restart each node that is a member of your cluster.
5. If you are not using a cluster file system, then on each node, use Windows Explorer to delete the Oracle directory, its subdirectories, and their contents.
De-installing Oracle Clusterware with Clusterware Downgrade to 9.2 Perform the following steps to de-install Oracle 10g Clusterware software from a Windows environment that also has 9.2 Real Application Clusters:
1. Run $CRS_HOME\bin\GuiOracleOBJManager.exe to make sure that the symbolic link named srvcfg exists and points to a disk partition, if you are not using OCFS to store the OCR.
2. If Oracle9i release 9.2 Clusterware uses Oracle CFS (Cluster File System), then ensure the following is true for all nodes:
■ The registry key HKLM\SOFTWARE\Oracle\osd9i\ocr exists
■ The registry key HKLM\SOFTWARE\Oracle\osd9i\ocr has a string value CfsOcrRoot that points to a release 9.2 OCR (CFS) location
3. Run $CRS_HOME\bin\ocrconfig -downgrade to downgrade the Cluster Registry to a release 9.2 OCR.
4. On each node, copy $CRS_HOME\cfs\OcfsFindVol.exe to %SYSTEMROOT%\system32\osd9i\cfs.
5. Run $CRS_HOME\oui\bin\setup.exe to start Oracle Universal Installer. On the Welcome page click Deinstall Products to list all the installed products. Select the Oracle Clusterware home name from the displayed products, and click Remove to deconfigure and de-install the product.
6. On each node, run %SYSTEMROOT%\system32\osd9i\olm\OracleOBJService.exe /install to re-install the Oracle 9.2 object service. Then start Oracle Object Service.
Troubleshooting Real Application Clusters / Oracle Clusterware Installation
Cluster Environment Installations 6-27
7. On each node, run %SYSTEMROOT%\system32\osd9i\cfs\OcfsFindVol.exe /i:%SYSTEMROOT%\system32\osd9i\cfs\OcfsFindVol.exe to re-install the Oracle Cluster Volume service. Then start the Oracle Cluster Volume service.
8. From a 9.2 Real Application Clusters Oracle home on each node run the command ORACLE_HOME\bin\gsdservice.exe -install. Then start the OracleGSDService.
9. On each node, copy %SYSTEMROOT%\system32\osd9i\orafencedrv.sys %SYSTEMROOT%\system32\drivers\orafenceservice.sys.
Converting Single Instance Nodes to Real Application ClustersYou can convert single instance nodes to Real Application Clusters using Oracle Universal Installer. For details on converting single instance nodes to Real Application Clusters, refer to the Oracle Clusterware and Oracle product Real Application Clusters installation guide for your platform.
Troubleshooting Real Application Clusters / Oracle Clusterware Installation
The following flowchart explains how you can solve problems associated with the Real Application Clusters or Oracle Clusterware installation.
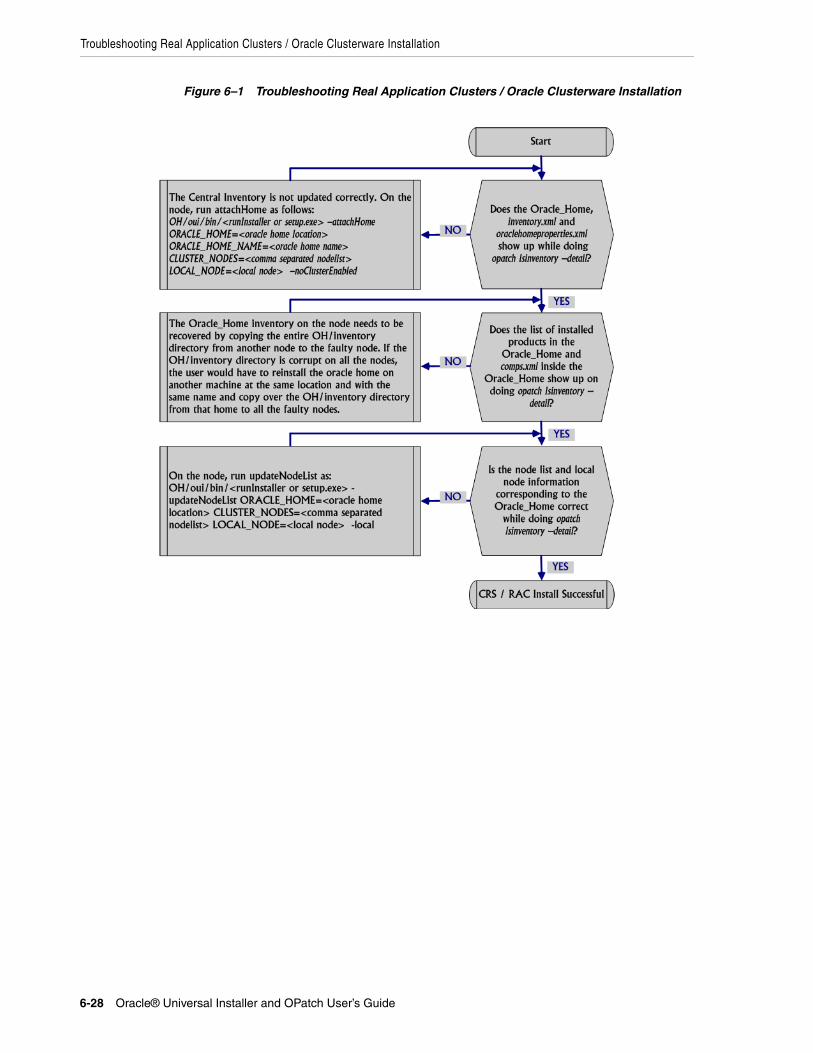
Troubleshooting Real Application Clusters / Oracle Clusterware Installation
6-28 Oracle® Universal Installer and OPatch User’s Guide
Figure 6–1 Troubleshooting Real Application Clusters / Oracle Clusterware Installation
Oracle Software Cloning Using Oracle Universal Installer 7-1
7Oracle Software Cloning Using Oracle
Universal Installer
This chapter provides information about Oracle cloning using Oracle Universal Installer (OUI). This chapter contains the following topics:
■ About Cloning
■ Overview of the Cloning Process
■ Locating and Viewing Log Files
■ Cloning an Oracle Database 10.1 Oracle Home
■ Cloning an Oracle Database 10.2 Oracle Home
■ Creating Oracle Real Application Cluster Environment using Cloning
■ Adding Nodes Using Cloning in Oracle Real Application Clusters Environments
About CloningCloning is the process of copying an existing Oracle installation to a different location and updating the copied bits to work in the new environment. The changes made by one-off patches applied on the source Oracle home, would also be present after the clone operation. The source and the destination path (host to be cloned) need not be the same. During cloning, OUI replays the actions that were run to install the home. Cloning is similar to installation except that OUI runs the actions in a special mode that is referred to as clone mode. Some situations in which cloning is useful are:
■ Creating an installation that is a copy of a production, test, or development installation. Cloning enables you to create a new installation with all patches applied to it in a single step. This is in contrast with going through the installation process by performing separate steps to install, configure, and patch the installation.
■ Rapidly deploying an instance and the applications that it hosts.
■ Preparing an Oracle home and deploying it to many hosts.
The cloned installation behaves the same as the source installation. For example, the cloned Oracle home can be removed using OUI or patched using OPatch. You can also use the cloned Oracle home as the source for another cloning operation. You can create a cloned copy of a test, development, or production installation by using the command-line cloning scripts. The default cloning procedure is adequate for most usage cases. However, you can also customize various aspects of cloning, for example, to specify custom port assignments, or to preserve custom settings.

Overview of the Cloning Process
7-2 Oracle® Universal Installer and OPatch User’s Guide
The cloning process works by copying all of the files from the source Oracle home to the destination Oracle home. Thus, any files used by the source instance that are located outside the source Oracle home's directory structure are not copied to the destination location.
The size of the binaries at the source and the destination may differ because these are relinked as part of the clone operation and the operating system patch levels may also differ between these two locations. Additionally, the number of files in the cloned home would increase because several files copied from the source, specifically those being instantiated, are backed up as part of the clone operation.
OUI Cloning is more beneficial than using the tarball approach because cloning configures the Central Inventory and the Oracle home inventory in the cloned home. Cloning also makes the home manageable and allows the paths in the cloned home and the target home to be different.
Overview of the Cloning ProcessThe cloning process uses the OUI cloning functionality. This operation is driven by a set of scripts and add-ons that are included in the respective Oracle software. The cloning process has two phases:
■ Source Preparation Phase
■ Cloning Phase
Source Preparation PhaseTo prepare the source Oracle home to be cloned, perform the following steps:
■ At the source, you run a script called prepare_clone.pl. This is a Perl script that prepares the source for cloning by recording the information that is required for cloning. This is generally located in the following location:
$ORACLE_HOME/clone/bin/prepare_clone.pl
During this phase, prepare_clone.pl parses files in the source Oracle home to extract and store the required values. For more information about the parameters to be passed, refer to the section Cloning Script Variables and their Definitions.
■ Archive and compress the source Oracle home using your preferred archiving tool. For example, you can use WinZip on Microsoft Windows system computers and tar or gzip on UNIX. Make sure that the tool that you use preserves the permissions and file timestamps. When archiving the home, also ensure that you skip the *.log, *.dbf, listerner.ora, sqlnet.ora, and tnsnames.ora from archiving. Also ensure that you do not archive the following folders:
$ORACLE_HOME/<Hostname>_<SID>$ORACLE_HOME/oc4j/j2ee/OC4J_DBConsole_<Hostname>_<SID>
The following is a sample exclude file list:
$ cat excludedFileList.txt
Note: The need to perform the preparation phase depends on the Oracle product that you are installing. This script needs to be executed only for the Application Server Cloning. Database and CRS Oracle home Cloning does not need this.
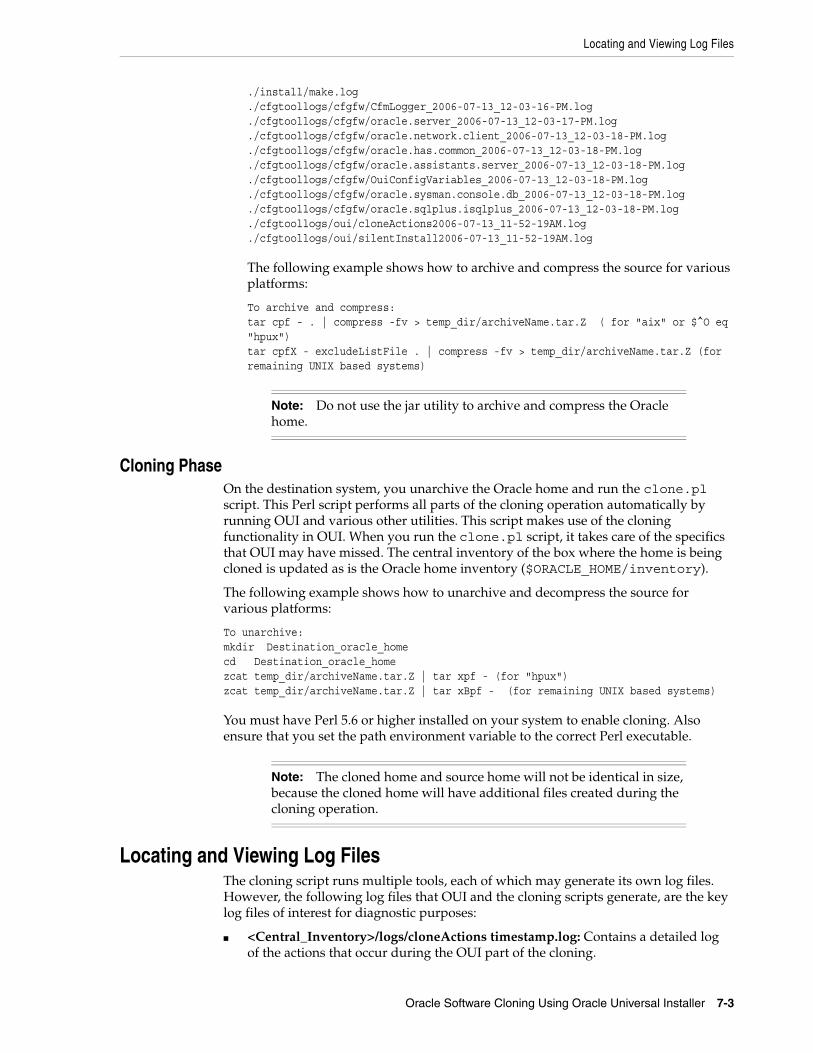
Locating and Viewing Log Files
Oracle Software Cloning Using Oracle Universal Installer 7-3
./install/make.log
./cfgtoollogs/cfgfw/CfmLogger_2006-07-13_12-03-16-PM.log
./cfgtoollogs/cfgfw/oracle.server_2006-07-13_12-03-17-PM.log
./cfgtoollogs/cfgfw/oracle.network.client_2006-07-13_12-03-18-PM.log
./cfgtoollogs/cfgfw/oracle.has.common_2006-07-13_12-03-18-PM.log
./cfgtoollogs/cfgfw/oracle.assistants.server_2006-07-13_12-03-18-PM.log
./cfgtoollogs/cfgfw/OuiConfigVariables_2006-07-13_12-03-18-PM.log
./cfgtoollogs/cfgfw/oracle.sysman.console.db_2006-07-13_12-03-18-PM.log
./cfgtoollogs/cfgfw/oracle.sqlplus.isqlplus_2006-07-13_12-03-18-PM.log
./cfgtoollogs/oui/cloneActions2006-07-13_11-52-19AM.log
./cfgtoollogs/oui/silentInstall2006-07-13_11-52-19AM.log
The following example shows how to archive and compress the source for various platforms:
To archive and compress:tar cpf - . | compress -fv > temp_dir/archiveName.tar.Z ( for "aix" or $^O eq "hpux")tar cpfX - excludeListFile . | compress -fv > temp_dir/archiveName.tar.Z (for remaining UNIX based systems)
Cloning PhaseOn the destination system, you unarchive the Oracle home and run the clone.pl script. This Perl script performs all parts of the cloning operation automatically by running OUI and various other utilities. This script makes use of the cloning functionality in OUI. When you run the clone.pl script, it takes care of the specifics that OUI may have missed. The central inventory of the box where the home is being cloned is updated as is the Oracle home inventory ($ORACLE_HOME/inventory).
The following example shows how to unarchive and decompress the source for various platforms:
To unarchive:mkdir Destination_oracle_homecd Destination_oracle_homezcat temp_dir/archiveName.tar.Z | tar xpf - (for "hpux")zcat temp_dir/archiveName.tar.Z | tar xBpf - (for remaining UNIX based systems)
You must have Perl 5.6 or higher installed on your system to enable cloning. Also ensure that you set the path environment variable to the correct Perl executable.
Locating and Viewing Log FilesThe cloning script runs multiple tools, each of which may generate its own log files. However, the following log files that OUI and the cloning scripts generate, are the key log files of interest for diagnostic purposes:
■ <Central_Inventory>/logs/cloneActions timestamp.log: Contains a detailed log of the actions that occur during the OUI part of the cloning.
Note: Do not use the jar utility to archive and compress the Oracle home.
Note: The cloned home and source home will not be identical in size, because the cloned home will have additional files created during the cloning operation.
Cloning an Oracle Database 10.1 Oracle Home
7-4 Oracle® Universal Installer and OPatch User’s Guide
■ <Central_Inventory>/logs/oraInstall timestamp.err: Contains information about errors that occur when OUI is running.
■ <Central_Inventory>/logs/oraInstall timestamp.out: Contains other miscellaneous messages generated by OUI.
■ $ORACLE_HOME/clone/logs/clone timestamp.log: Contains a detailed log of the actions that occur during the pre-cloning and cloning operations.
■ $ORACLE_HOME/clone/logs/error timestamp.log: Contains information about errors that occur during the pre-cloning and cloning operations.
To find the location of the Oracle inventory directory:
On all UNIX system computers except Linux and IBM AIX, look in /var/opt/oracle/oraInst.loc. On IBM AIX and Linux-based systems look in /etc/oraInst.loc file.
On Windows system computers, the location can be obtained from the Windows Registry key: HKEY_LOCAL_MACHINE\SOFTWARE\ORACLE\INST_LOC.
After the clone.pl script finishes running, refer to these log files to obtain more information about the cloning process.
Cloning an Oracle Database 10.1 Oracle HomeThere are two steps involved in cloning an Oracle Database 10.1 Oracle home:
■ Preparing the Oracle Database 10.1 Source
■ Cloning an Oracle Database 10.1
Preparing the Oracle Database 10.1 SourceTo prepare the source Oracle home to be cloned, perform the following steps:
■ Ensure that the Oracle Database installation whose home you want to clone has been successful.
For Windows system computers, you can check the status of the installation by reviewing the installActionsdate_time.log file for the installation session, where date_time represents the date and time when the file was created for example, installActions2006-05-30_10-28-04PM.log. This log file is normally located in the c:\Program Files\Oracle\Inventory\logs directory.
For Linux-based systems, the logs are kept in <inventory location>/logs directory. To determine the location of the central inventory, refer to section"Locating and Viewing Log Files".
If you have installed patches, then you can check their status by running the following commands:
For Windows system computers:
c:\ORACLE_BASE\ORACLE_HOME\OPatch> set ORACLE_HOME = ORACLE_HOME_using_patchc:\ORACLE_BASE\ORACLE_HOME\OPatch> opatch lsinventory
For Linux-based and UNIX-based systems:
Set the ORACLE_HOME environment variable. The syntax for this may change depending on the shell used.
/ORACLE_BASE/ORACLE_HOME/OPatch> setenv ORACLE_HOME ORACLE_HOME_using_patch
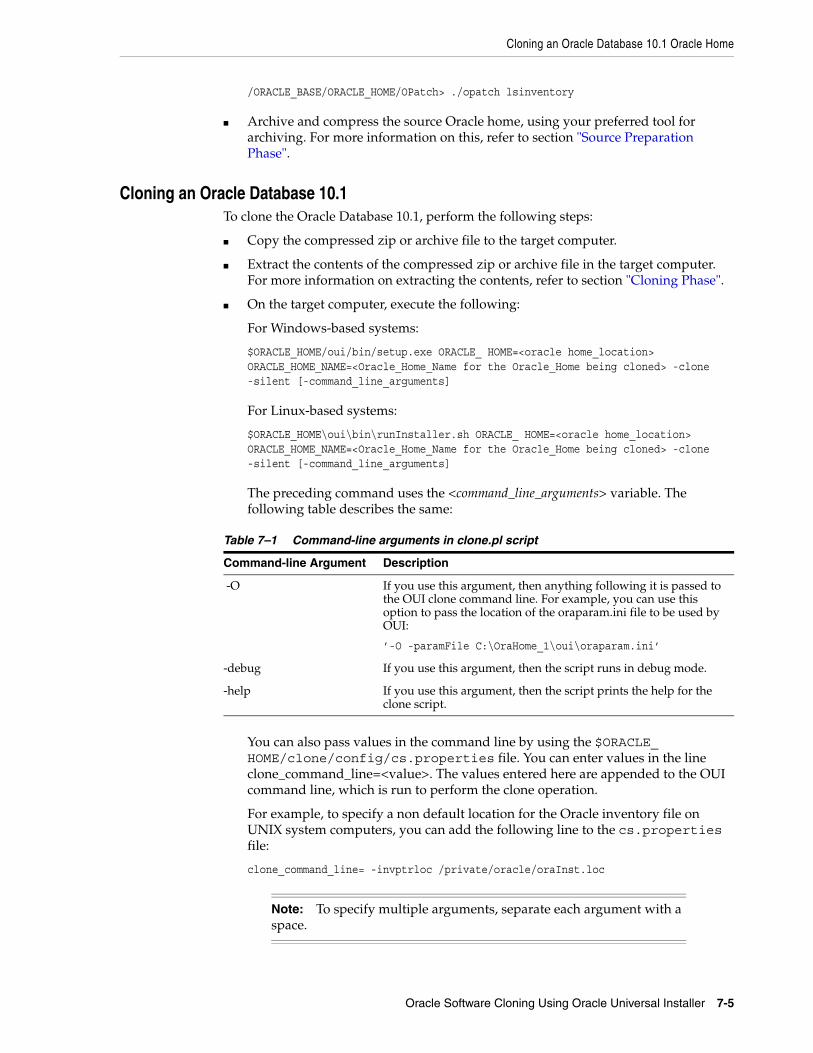
Cloning an Oracle Database 10.1 Oracle Home
Oracle Software Cloning Using Oracle Universal Installer 7-5
/ORACLE_BASE/ORACLE_HOME/OPatch> ./opatch lsinventory
■ Archive and compress the source Oracle home, using your preferred tool for archiving. For more information on this, refer to section "Source Preparation Phase".
Cloning an Oracle Database 10.1To clone the Oracle Database 10.1, perform the following steps:
■ Copy the compressed zip or archive file to the target computer.
■ Extract the contents of the compressed zip or archive file in the target computer. For more information on extracting the contents, refer to section "Cloning Phase".
■ On the target computer, execute the following:
For Windows-based systems:
$ORACLE_HOME/oui/bin/setup.exe ORACLE_ HOME=<oracle home_location> ORACLE_HOME_NAME=<Oracle_Home_Name for the Oracle_Home being cloned> -clone -silent [-command_line_arguments]
For Linux-based systems:
$ORACLE_HOME\oui\bin\runInstaller.sh ORACLE_ HOME=<oracle home_location> ORACLE_HOME_NAME=<Oracle_Home_Name for the Oracle_Home being cloned> -clone -silent [-command_line_arguments]
The preceding command uses the <command_line_arguments> variable. The following table describes the same:
You can also pass values in the command line by using the $ORACLE_HOME/clone/config/cs.properties file. You can enter values in the line clone_command_line=<value>. The values entered here are appended to the OUI command line, which is run to perform the clone operation.
For example, to specify a non default location for the Oracle inventory file on UNIX system computers, you can add the following line to the cs.properties file:
clone_command_line= -invptrloc /private/oracle/oraInst.loc
Table 7–1 Command-line arguments in clone.pl script
Command-line Argument Description
-O If you use this argument, then anything following it is passed to the OUI clone command line. For example, you can use this option to pass the location of the oraparam.ini file to be used by OUI:
’-O -paramFile C:\OraHome_1\oui\oraparam.ini’
-debug If you use this argument, then the script runs in debug mode.
-help If you use this argument, then the script prints the help for the clone script.
Note: To specify multiple arguments, separate each argument with a space.
Cloning an Oracle Database 10.2 Oracle Home
7-6 Oracle® Universal Installer and OPatch User’s Guide
■ OUI starts and records the cloning actions in the cloneActionstimestamp.log file. This log file is normally located in c:\Program Files\Oracle\Inventory\logs file in Windows.
For Linux-based systems, you can find this file in the <inventory location>/logs directory. To determine the location of the central inventory, refer to section "Locating and Viewing Log Files".
■ To configure the connection information for the new database, run Net Configuration Assistant.
On Windows system computers, select Start > Programs > Oracle - HOME_NAME > Configuration and Migration Tools > Net Configuration Assistant.
On Linux-based systems, set the ORACLE_HOME variable and run $ORACLE_HOME/bin/netca
■ To create a new database for the newly cloned Oracle home, run Oracle Database Configuration Assistant.
On Windows system computers, select Start > Programs > Oracle - HOME_NAME > Configuration and Migration Tools > Database Configuration Assistant.
For Linux-based systems, run $ORACLE_HOME/bin/dbca.
Viewing Log and Error FilesAfter cloning, you can view the status of the clone operation by navigating to the $ORACLE_HOME/clone/log directory and by reviewing the *.log and *.err files. For more information, refer to the section "Locating and Viewing Log Files" on page 7-3.
Cloning an Oracle Database 10.2 Oracle HomeThere are two steps involved in cloning an Oracle Database 10.2 Oracle home:
■ Preparing the Oracle Database 10.1 Source
■ Cloning an Oracle Database 10.1
Preparing the Oracle Database 10.2 SourceTo prepare the source Oracle home to be cloned, perform the following steps:
■ Ensure that the Oracle Database installation whose home you want to clone has been successful.
For Windows system computers, you can check the status of the installation by reviewing the installActionsdate_time.log file for the installation session, where date_time represents the date and time when the file was created for example, installActions2006-05-30_10-28-04PM.log. This log file is normally located in the c:\Program Files\Oracle\Inventory\logs directory.
For Linux-based systems, the logs are kept in <inventory location>/logs directory. To determine the location of the central inventory, refer to section"Locating and Viewing Log Files".
If you have installed patches, then you can check their status by running the following commands:
For Windows system computers:
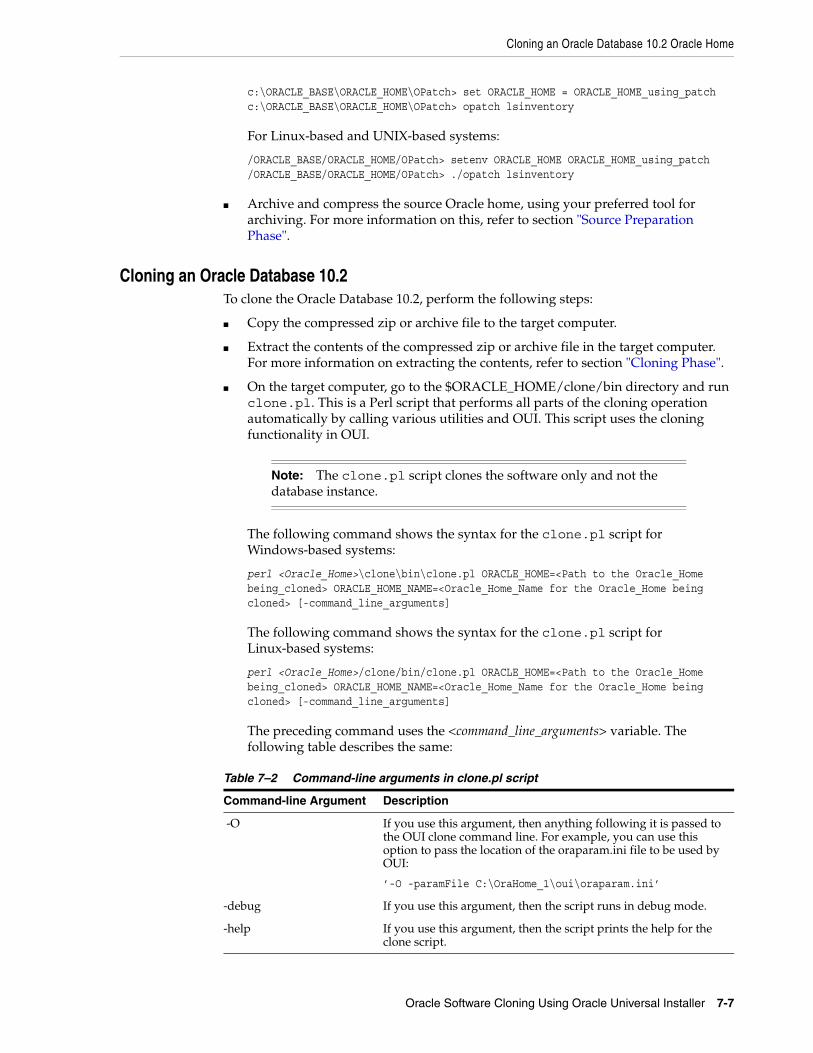
Cloning an Oracle Database 10.2 Oracle Home
Oracle Software Cloning Using Oracle Universal Installer 7-7
c:\ORACLE_BASE\ORACLE_HOME\OPatch> set ORACLE_HOME = ORACLE_HOME_using_patchc:\ORACLE_BASE\ORACLE_HOME\OPatch> opatch lsinventory
For Linux-based and UNIX-based systems:
/ORACLE_BASE/ORACLE_HOME/OPatch> setenv ORACLE_HOME ORACLE_HOME_using_patch/ORACLE_BASE/ORACLE_HOME/OPatch> ./opatch lsinventory
■ Archive and compress the source Oracle home, using your preferred tool for archiving. For more information on this, refer to section "Source Preparation Phase".
Cloning an Oracle Database 10.2To clone the Oracle Database 10.2, perform the following steps:
■ Copy the compressed zip or archive file to the target computer.
■ Extract the contents of the compressed zip or archive file in the target computer. For more information on extracting the contents, refer to section "Cloning Phase".
■ On the target computer, go to the $ORACLE_HOME/clone/bin directory and run clone.pl. This is a Perl script that performs all parts of the cloning operation automatically by calling various utilities and OUI. This script uses the cloning functionality in OUI.
The following command shows the syntax for the clone.pl script for Windows-based systems:
perl <Oracle_Home>\clone\bin\clone.pl ORACLE_HOME=<Path to the Oracle_Home being_cloned> ORACLE_HOME_NAME=<Oracle_Home_Name for the Oracle_Home being cloned> [-command_line_arguments]
The following command shows the syntax for the clone.pl script for Linux-based systems:
perl <Oracle_Home>/clone/bin/clone.pl ORACLE_HOME=<Path to the Oracle_Home being_cloned> ORACLE_HOME_NAME=<Oracle_Home_Name for the Oracle_Home being cloned> [-command_line_arguments]
The preceding command uses the <command_line_arguments> variable. The following table describes the same:
Note: The clone.pl script clones the software only and not the database instance.
Table 7–2 Command-line arguments in clone.pl script
Command-line Argument Description
-O If you use this argument, then anything following it is passed to the OUI clone command line. For example, you can use this option to pass the location of the oraparam.ini file to be used by OUI:
’-O -paramFile C:\OraHome_1\oui\oraparam.ini’
-debug If you use this argument, then the script runs in debug mode.
-help If you use this argument, then the script prints the help for the clone script.
Creating Oracle Real Application Cluster Environment using Cloning
7-8 Oracle® Universal Installer and OPatch User’s Guide
You can also pass values in the command line by using the $ORACLE_HOME/clone/config/cs.properties file. You can enter values in the line clone_command_line=<value>. The values entered here are appended to the OUI command line, which is run to perform the clone operation.
For example, to specify a non default location for the Oracle inventory file on UNIX system computers, you can add the following line to the cs.properties file:
clone_command_line= -invptrloc /private/oracle/oraInst.loc
■ OUI starts and records the cloning actions in the cloneActionstimestamp.log file. This log file is normally located in c:\Program Files\Oracle\Inventory\logs file in Windows.
For Linux-based systems, you can find this file in the <inventory location>/logs directory. To determine the location of the central inventory, refer to section "Locating and Viewing Log Files".
■ To configure the connection information for the new database, run Net Configuration Assistant.
On Windows system computers, select Start > Programs > Oracle - HOME_NAME > Configuration and Migration Tools > Net Configuration Assistant.
On Linux-based systems, set the ORACLE_HOME variable and run $ORACLE_HOME/bin/netca
■ To create a new database for the newly cloned Oracle home, run Oracle Database Configuration Assistant.
On Windows system computers, select Start > Programs > Oracle - HOME_NAME > Configuration and Migration Tools > Database Configuration Assistant.
For Linux-based systems, run $ORACLE_HOME/bin/dbca.
Viewing Log and Error FilesAfter cloning, you can view the status of the clone operation by navigating to the $ORACLE_HOME/clone/log directory and by reviewing the *.log and *.err files. For more information, refer to the section "Locating and Viewing Log Files" on page 7-3.
Creating Oracle Real Application Cluster Environment using CloningThis section explains how to create an Oracle RAC environment by using Oracle cloning. These procedures describe how to use cloning for both UNIX and Linux system environments and Windows system environments under the following topics:
■ Creating Oracle RAC Environments on UNIX and Linux System-Based Environments
■ Creating Oracle RAC Environments on Windows System-Based Environments
Note: To specify multiple arguments, separate each argument with a space.
Creating Oracle Real Application Cluster Environment using Cloning
Oracle Software Cloning Using Oracle Universal Installer 7-9
Creating Oracle RAC Environments on UNIX and Linux System-Based EnvironmentsThis section explains how to clone an Oracle RAC environment by using Oracle cloning as described in the following procedures:
■ Cloning Oracle Clusterware on UNIX and Linux System-Based Environments
■ Cloning Oracle RAC Software on UNIX and Linux System-Based Environments
Cloning Oracle Clusterware on UNIX and Linux System-Based EnvironmentsComplete the following steps to clone Oracle Clusterware on UNIX and Linux systems:
1. If you do not have a shared Oracle Clusterware home, then tar the Oracle Clusterware home from an existing node and copy it to the new node. Use $CRS_HOME as the destination Oracle Clusterware home on the new node. If you have a shared Oracle Clusterware home, then skip this step.
2. Unarchive the home on the new nodes. In the case of shared homes, unarchive the home only once on the nodes.
3. If you do not have a shared Oracle Clusterware home, then on the new node, navigate to the $ORACLE_HOME/clone/bin directory and run the following command where Oracle_home_name is the name of the Oracle home, new_node is the name of the new node, new_node-priv is the private interconnect protocol address of the new node, new_node-vip is the virtual interconnect protocol address of the new node, and central_inventory_location is the location of the Oracle central inventory:
perl clone.pl ORACLE_HOME=<$CRS_HOME> ORACLE_HOME_NAME=Oracle_home_name ’-On_storageTypeVDSK=2’ ’-On_storageTypeOCR=2’ '-O"sl_tableList={new_node:new_node-priv:new_node-vip}"' '-O-noConfig''-O"INVENTORY_LOCATION=central_inventory_location"'
If you have a shared Oracle Clusterware home, then append the -cfs option to the command example in this step and provide a complete path location for the cluster file system. Ensure that n_storageTypeOCR and n_storageTypeVDSK has been set to 2 for redundant storage. Ensure that this value is set to 1 for non-redundant storage. In this case, the mirror locations will also have to be specified.
4. On the new node, go to the directory that contains the central Oracle inventory. Run the orainstRoot.sh script to populate the file /etc/oraInst.loc with information about the central inventory location. On the new node, go to the $CRS_HOME directory and run ./root.sh. This starts the Oracle Clusterware on the new node.
5. Determine the remote port to use in the next step by running the following command from the $CRS_HOME/opmn/conf directory:
Note: For more information on archiving, refer to section "Source Preparation Phase".
Note: For more information on archiving, refer to section "Cloning Phase".
Creating Oracle Real Application Cluster Environment using Cloning
7-10 Oracle® Universal Installer and OPatch User’s Guide
cat ons.config | grep remoteport
6. On the new node, run the following from $CRS_HOME/bin directory where racgons is the Oracle RAC Notification Service Utility, new_node is the name of the new node, and remote_port is the value from the output of the previous step:
./racgons add_config new_node:<Remote_Port>
7. Execute the following command to get the interconnect information. You can use this information in the next step.
$CRS_HOME/bin/oifcfg iflist –p
8. Execute oifcfg command as follows:
oifcfg setif -global <interface_name>/<subnet>:public <inteface_name>/<subnet>:cluster_interconnect [<interface_name>/<subnet>:public <inteface_name>/<subnet>:cluster_interconnect .......]
Cloning Oracle RAC Software on UNIX and Linux System-Based EnvironmentsComplete the following steps to clone Oracle Database with RAC software on UNIX and Linux systems:
1. If you do not have a shared Oracle Database home, then tar the Oracle RAC home from the existing node and copy it to the new node. Assume that the location of the destination Oracle RAC home on the new node is $ORACLE_HOME. Otherwise, skip this step.
2. Unarchive the home on the new nodes. In the case of shared homes, unarchive the home only once on the nodes.
3. on the new nodes, go to the $ORACLE_HOME/clone/bin directory and run the following command where new_node2 and new_node3 are the names of the new nodes, and Oracle_home_name is the name of the Oracle home:
perl clone.pl ORACLE_HOME=<Path to the Oracle_Home being cloned> ORACLE_HOME_NAME=<Oracle_Home_Name for the Oracle_Home being cloned> ’-O"CLUSTER_NODES={new_node_2,new_node_3}"’ ’-O"LOCAL_NODE=new_node_2"’
If you have a shared Oracle Database home, then append the -cfs option to the command example in this step and provide a complete path location for the cluster file system
Note: Oracle Clusterware cloning can only be performed in silent mode.
Note: For more information on archiving, refer to section "Source Preparation Phase".
Note: For more information on unarchiving, refer to section "Cloning Phase".
Creating Oracle Real Application Cluster Environment using Cloning
Oracle Software Cloning Using Oracle Universal Installer 7-11
4. On the new node, go to the $ORACLE_HOME directory and run the following command:
./root.sh
5. On the new node, run Net Configuration Assistant (NETCA) to add a listener.
6. From the node that you cloned, run Database Configuration Assistant (DBCA) to add the new instance.
Creating Oracle RAC Environments on Windows System-Based EnvironmentsThis section explains how to clone an Oracle RAC environment by using Oracle cloning as described in the following procedures:
■ Cloning Oracle Clusterware on Windows System-Based Environments
■ Cloning Oracle RAC Software on Windows System-Based Environments
Cloning Oracle Clusterware on Windows System-Based EnvironmentsComplete the following steps to clone Oracle Clusterware on Windows system computers:
1. If you do not have a shared Oracle Clusterware home, then zip the Oracle Clusterware home from the existing node and copy it to the new node. Unzip the home on the new node in the equivalent directory structure as the directory structure in which the Oracle Clusterware home resided on the existing node. For example, assume that the location of the destination Oracle Clusterware home on the new node is %CRS_HOME%. Skip this step if you have a shared Oracle Clusterware home.
2. If you do not have a shared Oracle Clusterware home, then on the new node, navigate to the $ORACLE_HOME/clone/bin directory and run the following command where Oracle_home_name is the name of the Oracle home, new_node is the name of the new node, new_node-priv is the private interconnect protocol address of the new node, new_node-vip is the virtual interconnect protocol address of the new node, and central_inventory_location is the location of the Oracle central inventory:
perl clone.pl ORACLE_HOME=<CRS_HOME> ORACLE_HOME_NAME=<CRS_HOME_NAME> '-On_storageTypeVDSK=2' '-On_storageTypeOCR=2' '-O"sl_tableList={node2:node2-priv:node2-vip, node3:node3-priv:node3-vip}"' '-O"ret_PrivIntrList=<private interconnect list>"' '-O"sl_OHPartitionsAndSpace_valueFromDlg={partition and space information}"' '-O-noConfig'
If you have a shared Oracle Clusterware home, then append the -cfs option to the command example in this step and provide a complete path location for the cluster file system. Ensure that n_storageTypeOCR and n_storageTypeVDSK has been set to 2 for redundant storage. Ensure that this value is set to 1 for
Note: Set the LOCAL_NODE to the node on which you run the clone command.
Note: For more information on zipping and unzipping, refer to sections "Source Preparation Phase" and "Cloning Phase".
Creating Oracle Real Application Cluster Environment using Cloning
7-12 Oracle® Universal Installer and OPatch User’s Guide
non-redundant storage. In this case, the mirror locations will also have to be specified. On the other nodes, execute the same command, by passing an additional argument PERFORM_PARTITION_TASKS=FALSE.
perl clone.pl ORACLE_HOME=<CRS_HOME> ORACLE_HOME_NAME=<CRS_HOME_NAME> '-On_storageTypeVDSK=2' '-On_storageTypeOCR=2' '-O"sl_tableList={node2:node2-priv:node2-vip, node3:node3-priv:node3-vip}"' '-O"ret_PrivIntrList=<private interconnect list>"' '-O"sl_OHPartitionsAndSpace_valueFromDlg={partition and space information}"' '-O-noConfig' '-OPERFORM_PARTITION_TASKS=FALSE'
3. From the %CRS_HOME%\cfgtoollogs directory on the existing node, run the following command:
<CRS_HOME>\cfgtoollogs\cfgToolAllCommands
This instantiates the Virtual Protocol Configuration Assistant (VIPCA), the Oracle RAC Notification Service Utility (racgons), Oracle Clusterware Setup (crssetup), and oifcfg.
Cloning Oracle RAC Software on Windows System-Based EnvironmentsComplete the following steps to clone Oracle Database with RAC software on Windows system computers:
1. If you do not have a shared Oracle Database home, then zip the Oracle Database home with Oracle RAC on the existing node and copy it to the new node. Unzip the Oracle Database with Oracle RAC home on the new node in the same directory in which the Oracle Database home with Oracle RAC resided on the existing node. For example, assume that the location of the destination Oracle RAC home on the new node is %ORACLE_HOME%. Skip this step if you have a shared Oracle Database home.
2. On the new node, go to the %ORACLE_HOME%\clone\bin directory and run the following command where Oracle_Home is the Oracle Database home, Oracle_Home_Name is the name of the Oracle Database home, existing_node is the name of the existing node, and new_node is the name of the new node:
perl clone.pl ORACLE_HOME=Oracle_Home ORACLE_HOME_NAME=Oracle_Home_Name '-O"CLUSTER_NODES={existing_node,new_node}"' '-OLOCAL_NODE=new_node' '-O-noConfig'
If you have a shared Oracle Database home with Oracle RAC, then append the -O-cfs option to the command example in this step and provide a complete path location for the cluster file system. Repeat this step for all nodes.
3. On the new node, run NETCA to add a listener.
4. From the node that you cloned, run DBCA to add the database instance to the new node.
Note: Oracle Clusterware cloning can only be performed in silent mode.
Note: For more information on zipping and unzipping, refer to sections "Source Preparation Phase" and "Cloning Phase".
Adding Nodes Using Cloning in Oracle Real Application Clusters Environments
Oracle Software Cloning Using Oracle Universal Installer 7-13
Important Considerations when Cloning Oracle Real Application ClustersNote the following when cloning the Oracle Database with Oracle RAC:
■ The order of the nodes specified should always be the same on all hosts.
■ Oracle Clusterware should be installed on the cluster nodes prior to starting an Oracle RAC installation.
■ For a shared home, you need to also provide a value for the -cfs parameter on the command line.
Adding Nodes Using Cloning in Oracle Real Application Clusters Environments
This section explains how to add nodes to existing Oracle RAC environments by using Oracle cloning. These procedures describe how to use cloning for both UNIX and Linux system environments and Windows system environments under the following topics:
■ Cloning Oracle RAC Environments on UNIX and Linux System-Based Environments
■ Cloning Oracle RAC Environments on Windows System-Based Environments
Cloning Oracle RAC Environments on UNIX and Linux System-Based EnvironmentsThese procedures assume that you have successfully installed and configured an Oracle RAC environment to which you want to add nodes and instances. To add nodes to a UNIX or Linux system Oracle RAC environment using cloning, extend the Oracle Clusterware configuration, extend the Oracle Database software with RAC, and then add the listeners and instances by running the Oracle assistants as described in the following procedures:
■ Cloning Oracle Clusterware on UNIX and Linux System-Based Environments
■ Cloning Oracle RAC Software on UNIX and Linux System-Based Environments
Cloning Oracle Clusterware on UNIX and Linux System-Based EnvironmentsComplete the following steps to clone Oracle Clusterware on UNIX and Linux systems:
1. If you do not have a shared Oracle Clusterware home, then tar the Oracle Clusterware home from an existing node and copy it to the new node. Use $CRS_HOME as the destination Oracle Clusterware home on the new node. If you have a shared Oracle Clusterware home, then skip this step.
2. If you do not have a shared Oracle Clusterware home, then on the new node, navigate to the $ORACLE_HOME/clone/bin directory and run the following command where Oracle_home_name is the name of the Oracle home, new_node is the name of the new node, new_node-priv is the private interconnect protocol address of the new node, new_node-vip is the virtual interconnect protocol address of the new node, and central_inventory_location is the location of the Oracle central inventory:
Note: For more information on archiving and unarchiving, refer to sections "Source Preparation Phase" and "Cloning Phase".
Adding Nodes Using Cloning in Oracle Real Application Clusters Environments
7-14 Oracle® Universal Installer and OPatch User’s Guide
perl clone.pl ORACLE_HOME=$ORACLE_HOME ORACLE_HOME_NAME=Oracle_home_name '-O"sl_tableList={new_node:new_node-priv:new_node-vip}"' '-O-noConfig''-O"INVENTORY_LOCATION=central_inventory_location"'
If you have a shared Oracle Clusterware home, then append the -cfs option to the command example in this step and provide a complete path location for the cluster file system.
3. On the new node, go to the directory that contains the central Oracle inventory. Run the orainstRoot.sh script to populate the file /etc/oraInst.loc with information about the central inventory location.
4. Run the following command on the existing node where new_node is the name of the new node, new_node-priv is the private interconnect protocol address for the new node, and new_node-vip is the virtual interconnect protocol address for the new node:
$ORACLE_HOME/oui/bin/addNode.sh –silent "CLUSTER_NEW_NODES={new_node}" "CLUSTER_NEW_PRIVATE_NODE_NAMES={new_node-priv}" "CLUSTER_NEW_VIRTUAL_HOSTNAMES={new_node-vip}" –noCopy
5. On the existing node, run the rootaddnode.sh script from the $ORACLE_HOME/install directory.
6. On the new node, go to the $ORACLE_HOME directory and run the ./root.sh script to start the Oracle Clusterware on the new node.
7. Determine the remote port to use in the next step by running the following command from the $CRS_HOME/opmn/conf directory:
cat ons.config
8. From the $CRS_HOME/bin directory on an existing node, run the following command where racgons is the Oracle RAC Notification Service Utility, new_node is the name of the new node, and remote_port is the value from the output of the previous step:
Note: Only provide a value for the sl_tableList variable. The Perl clone.pl script takes all other variable settings from the zipped Oracle Clusterware home. This is only true, however, if the source of the zipped home was from an existing node of the cluster that you are extending.
If you use any other Oracle RAC environment as your cloning source, that is, if you clone from a node in a cluster other than the one that you are extending, then you must provide values for all of the arguments. This includes values for the Oracle Cluster Registry and voting disk location arguments. You must do this because the value for sl_tableList is used as shown in the command example in this step. Also note that you should only specify values for the new node for the sl_tableList options.
Note: (Because the clone.pl script has already been run on the new node, this step only updates the inventories on the nodes and instantiates scripts on the local node.
Adding Nodes Using Cloning in Oracle Real Application Clusters Environments
Oracle Software Cloning Using Oracle Universal Installer 7-15
./racgons add_config new_node:remote_port
Cloning Oracle RAC Software on UNIX and Linux System-Based EnvironmentsComplete the following steps to clone Oracle Database with RAC software on UNIX and Linux systems:
1. If you do not have a shared Oracle Database home, then tar the Oracle RAC home from the existing node and copy it to the new node. Assume that the location of the destination Oracle RAC home on the new node is $ORACLE_HOME. Otherwise, skip this step.
2. If you do not have a shared Oracle Database home, then on the new node go to the $ORACLE_HOME/clone/bin directory and run the following command where existing_node is the name of the node that you are cloning, new_node2 and new_node3 are the names of the new nodes, and Oracle_home_name is the name of the Oracle home:
perl clone.pl '-O“CLUSTER_NODES={existing_node,new_node2,new_node3}"' '-O"LOCAL_NODE=new_node2"' ORACLE_HOME=$ORACLE_HOME ORACLE_HOME_NAME=Oracle_home_name '-O-noConfig'
If you have a shared Oracle Database home, then append the -cfs option to the command example in this step and provide a complete path location for the cluster file system.
3. Run the following command on the existing node from the $ORACLE_HOME/oui/bin directory where existing_node is the name of the original node that you are cloning and new_node2 and new_node3 are the names of the new node:
./runInstaller –updateNodeList ORACLE_HOME=$ORACLE_HOME “CLUSTER_NODES={existing_node,new_node2,new_node3}”
4. On the new node, go to the $ORACLE_HOME directory and run the following command:
./root.sh
5. On the new node, run Net Configuration Assistant (NETCA) to add a listener.
6. From the node that you cloned, run Database Configuration Assistant (DBCA) to add the new instance.
Cloning Oracle RAC Environments on Windows System-Based EnvironmentsThese procedures assume that you have successfully installed and configured an Oracle RAC environment to which you want to add nodes and instances. To add nodes to a Windows system Oracle RAC environment using cloning, extend the Oracle Clusterware configuration, extend the Oracle Database software with RAC, and then add the listeners and instances by running the Oracle assistants as described in the following procedures:
■ Cloning Oracle Clusterware on Windows System-Based Environments
Note: For more information on archiving and unarchiving, refer to sections "Source Preparation Phase" and "Cloning Phase".
Adding Nodes Using Cloning in Oracle Real Application Clusters Environments
7-16 Oracle® Universal Installer and OPatch User’s Guide
■ Cloning Oracle RAC Software on Windows System-Based Environments
Cloning Oracle Clusterware on Windows System-Based EnvironmentsComplete the following steps to clone Oracle Clusterware on Windows system computers:
1. If you do not have a shared Oracle Clusterware home, then zip the Oracle Clusterware home from the existing node and copy it to the new node. Unzip the home on the new node in the equivalent directory structure as the directory structure in which the Oracle Clusterware home resided on the existing node. For example, assume that the location of the destination Oracle Clusterware home on the new node is %CRS_HOME%. Skip this step if you have a shared Oracle Clusterware home.
2. On the new node, go to the %CRS_HOME%\clone\bin directory and run the following command where CRS_HOME is the location of the Oracle Clusterware home, CRS_HOME_NAME is the name of the Oracle Clusterware home, and where new_node, new_node-priv, and new_node-vip are the name of the new node, the private interconnect protocol address of the new node, and the virtual interconnect protocol address of the new node respectively:
perl clone.pl ORACLE_HOME=CRS_HOME ORACLE_HOME_NAME=CRS_HOME_NAME '-O"sl_tableList={new_node:new_node-priv:new_node-vip}"' '-O-noConfig' '-OPERFORM_PARTITION_TASKS=FALSE'
If you have a shared Oracle Clusterware home, then append the -O-cfs option to the command example in this step and provide a complete path location for the cluster file system.
3. Run the following command on the existing node where new_node, new_node-priv, and new_node-vip are the name of the new node, the private
Note: For more information on zipping and unzipping, refer to sections "Source Preparation Phase" and "Cloning Phase".
Note: Only provide a value for the sl_tableList variable. The Perl clone.pl script takes all other variable settings from the zipped Oracle Clusterware home. This is only true, however, if the source of the zipped home was from an existing node of the cluster that you are extending.
If you use any other Oracle RAC environment as your cloning source, that is, if you clone from a node in a cluster other than the one that you are extending, then you must provide values for all of the arguments. This includes values for the Oracle Cluster Registry (OCR) and voting disk location arguments. You must do this because the value for sl_tableList is used as shown in the command example in this step. You must also specify the OCR and voting disk locations using the sl_OHPartitionsAndSpace_valueFromDlg variable as well as provide values for the PERFORM_PARTITION_TASKS argument. Only specify values for the new node for the sl_tableList options.
Adding Nodes Using Cloning in Oracle Real Application Clusters Environments
Oracle Software Cloning Using Oracle Universal Installer 7-17
interconnect protocol address of the new node, and the virtual interconnect protocol address of the new node respectively:
%ORACLE_HOME%\oui\bin\addNode.bat -silent "CLUSTER_NEW_NODES={new_node}" "CLUSTER_NEW_PRIVATE_NODE_NAMES={new_node-priv}" "CLUSTER_NEW_VIRTUAL_HOSTNAMES={new_node-vip}" -noCopy -noRemoteActions
4. From the %CRS_HOME%\install directory on the existing node, run the crssetup.add.bat script to instantiate the Virtual Protocol Configuration Assistant (VIPCA) and the Oracle RAC Notification Service Utility (racgons).
Cloning Oracle RAC Software on Windows System-Based EnvironmentsComplete the following steps to clone Oracle Database with RAC software on Windows system computers:
1. If you do not have a shared Oracle Database home, then zip the Oracle Database home with Oracle RAC on the existing node and copy it to the new node. Unzip the Oracle Database with Oracle RAC home on the new node in the same directory in which the Oracle Database home with Oracle RAC resided on the existing node. For example, assume that the location of the destination Oracle RAC home on the new node is %ORACLE_HOME%. Skip this step if you have a shared Oracle Database home.
2. On the new node, go to the %ORACLE_HOME%\clone\bin directory and run the following command where Oracle_Home is the Oracle Database home, Oracle_Home_Name is the name of the Oracle Database home, existing_node is the name of the existing node, and new_node is the name of the new node:
perl clone.pl ORACLE_HOME=Oracle_Home ORACLE_HOME_NAME=Oracle_Home_Name '-O"CLUSTER_NODES={existing_node,new_node}"' '-OLOCAL_NODE=new_node' '-O-noConfig'
If you have a shared Oracle Database home with Oracle RAC, then append the -O-cfs option to the command example in this step and provide a complete path location for the cluster file system.
3. On the existing node, from the RAC_HOME\oui\bin directory run the following command where Oracle_Home is the Oracle Database home with Oracle RAC, existing_node is the name of the existing node, and new_node is the name of the new node:
setup.exe -updateNodeList ORACLE_HOME=Oracle_Home "CLUSTER_NODES={existing_node,new_node" LOCAL_NODE=existing_node
4. On the new node, run NETCA to add a listener.
Note: (Because you have already run the clone.pl script on the new node, this step only updates the inventories on the nodes and instantiates scripts on the local node.
Note: For more information on zipping and unzipping, refer to sections "Source Preparation Phase" and "Cloning Phase".
Adding Nodes Using Cloning in Oracle Real Application Clusters Environments
7-18 Oracle® Universal Installer and OPatch User’s Guide
5. From the node that you cloned, run DBCA to add the database instance to the new node.
Cloning Script Variables and their DefinitionsThis section describes the clone.pl script variables and their definitions for UNIX and Linux systems and Windows systems under the following topics:
■ Variables for UNIX and Linux System-Based Environments
■ Variables for Windows System-Based Environments
Variables for UNIX and Linux System-Based EnvironmentsTable 7–3 describes the variables that can be passed to clone.pl with -O option for UNIX and Linux systems.
Table 7–3 UNIX and Linux System-Based Variables for clone.pl with -O option
Variable Datatype Description
storageTypeVDSK Integer This variable is set to 1 (Not Redundant) or 2 (Redundant) after the dialog returns.
n_storageTypeOCR Integer This variable is set to 1 (Not Redundant) or 2 (Redundant) after the dialog returns.
s_clustername String This variable contains user-entered cluster name information; allow a maximum of 15 characters.
VdskMirrorNotReqd String This variable is not required in the Oracle Cluster Registry (OCR) dialog.
CLUSTER_CONFIGURATION_FILE
String This variable is used to pass the cluster configuration file information which is the same file as that specified during installation. You may use this file instead of sl_tablelist. This file contains the public node name, private node name, and virtual host name which is white space-delimited information for the nodes of the cluster. For example,
node1 node1-priv node1-vipnode2 node2-priv node2-vip
Note that if you are cloning from an existing installation, then you should use sl_tableList. Do not specify this variable for a clone installation.
ret_PrivIntrList String List This is the return value from the Private Interconnect Enforcement table. This variable has values in the format {Interface Name, Subnet, Interface Type}. The value for Interface Type can be one of the following:
■ 1 to denote public,
■ 2 to denote private
■ 3 to denote Do Not Use
For example:
{"eth0:10.87.24.0:2","eth1:140.87.24.0:1","eth3:140.74.30.0:3"}
You can run the ipconfig command to identify the initial values from which you can determine the entries for ret_PrivIntrList.
Adding Nodes Using Cloning in Oracle Real Application Clusters Environments
Oracle Software Cloning Using Oracle Universal Installer 7-19
Variables for Windows System-Based EnvironmentsTable 7–4 describes the variables that can be passed to clone.pl with -O option for Windows system environments.
sl_tableList String List Set the value of this variable to be equal to the information in the cluster configuration information table. This file contains a comma-separated list of values. The first field designates the public node name, the second field designates the private node name, and the third field designates the virtual host name. The fourth and fifth fields are used only by OUI and should default to N:Y. OUI parses these values and assign s_publicname and s_privatename variables accordingly. For example:
{"node1:node1-priv:node1-vip:N:Y","node2:node2-priv:node2-vip:N:Y"}.
s_votingdisklocation String Set the value of this variable to be the location of the voting disk. For example:
/oradbshare/oradata/vdisk
s_OcrVdskMirror1RetVal String Set the value of this variable to be the location of the first additional voting disk. You must set this variable if you choose a value of 1 for the n_storageTypeVDSK variable or Not Redundant. For example:
/oradbshare/oradata/vdiskmirror1
s_ocrpartitionlocation String Set the value of this variable to the OCR location. Oracle places this value in the ocr.loc file when you run the root.sh script. For example:
/oradbshare/oradata/ocr
s_ocrMirrorLocation String Set the value of this variable to the value for the OCR mirror location. Oracle places this value in the ocr.loc file when you run the root.sh script. You must set this variable if you choose a value of 1 for the n_storageTypeOCR variable or Not Redundant. For example:
/oradbshare/oradata/ocrmirror
s_VdskMirror2RetVal String Set the value of this variable to be the location of the second additional voting disk. You must set this variable if you choose a value of 1 for the n_storageTypeVDSK variable or Not Redundant.
/oradbshare/oradata/vdiskmirror2
Table 7–4 Windows System-Based Variables for clone.pl with -O option
Variable Datatype Description
CLUSTER_NODES String List
The value of this variable represents the cluster node names that you selected for installation. For example, if you selected node1:
CLUSTER_NODES = {"node1"}
Table 7–3 (Cont.) UNIX and Linux System-Based Variables for clone.pl with -O option
Variable Datatype Description
Adding Nodes Using Cloning in Oracle Real Application Clusters Environments
7-20 Oracle® Universal Installer and OPatch User’s Guide
b_Response Boolean Only set this variable when performing a silent installation with a response file. The valid values are true or false.
s_clustername String Set the value for this variable to be the name of the cluster that you are creating from a cloning operation using a maximum of 15 characters. Valid characters for the cluster name can be any combination of lower and uppercase alphabetic characters A - Z, numerics 0 - 9 , hyphens (-), pound signs (#) and underscores (_).
sl_tableList String List
Set the value of this variable to be equal to the information in the cluster configuration information table. This file contains a comma-separated list of values. The first field designates the public node name, the second field designates the private node name, and the third field designates the virtual host name. The fourth and fifth fields are used only by the OUI and should default to N:Y. The OUI parses these values and assign s_publicname and s_privatename variables accordingly. For example:
{"node1:node1-priv:node1-vip:N:Y","node2:node2-priv:node2-vip:N:Y}
sl_OHPartitionsAndSpace_valueFromDlg
String List
Set the value for this variable using the following format:
■ 1 = disk number
■ 2 = partition number
■ 3 = partition size
■ 4 = format type, 0 for raw and 1 for cluster file system
■ 5 = Drive Letter (this value is not applicable if you use raw devices, use the available drive letter if you are using a cluster file system.
■ 6 Usage type as follows:
– 0 = Data or software use only
– 1 = Primary OCR only
– 2 = Voting disk only
– 3 = Primary OCR and voting disk on the same cluster file system partition
– 4 = OCR mirror only
– 5 = OCR mirror and voting disk on the same cluster file system partition
For example, to configure the OCR and voting disk on raw devices and to not use a cluster file system for either data or software, set sl_OHPartitionsAndSpace_valueFromDlg to list only the partitions that you intend to use for an Oracle Clusterware installation using the following format:
sl_OhPartitionsAndSpace_valueFromDlg = {Disk,Partition,partition size, 0,N/A,1,Disk,Partition, partition size,0,N/A,2,.....)
Table 7–4 (Cont.) Windows System-Based Variables for clone.pl with -O option
Variable Datatype Description
Oracle Software Patching Using OPatch 8-1
8Oracle Software Patching Using OPatch
The OPatch utility is a tool that allows the application and rollback of interim patches to Oracle products. This chapter provides information on using OPatch to apply patches.
This chapter includes the following topics:
■ About Interim Patches
■ Structure of Interim Patches
■ About OPatch
■ Requirements for OPatch
■ Features of OPatch
■ Backup and Recovery Considerations for Patching
■ Operations and Options in OPatch Utility
■ Real Application Clusters Patching
■ Recovering from a Failed Patching Session Using OPatch
■ Troubleshooting OPatch
About Interim PatchesPatches are a small collection of files that are copied over an existing installation. They are associated to particular versions of Oracle Products. Patches, when applied to the correct version of an installed product, results in an upgraded version of the product.
Interim patches are bug fixes that are made available to customers in response to specific bugs. They require a particular base release or patchset to be installed before they can be applied. They generally address specific bugs for a particular customer. These patches are not versioned and are generally made available in a future patchset as well as the next product release.
Structure of Interim PatchesInterim patches generally come in a zipped format. You need to unzip them before you apply a patch. The following figure illustrates the structure of the interim patch.
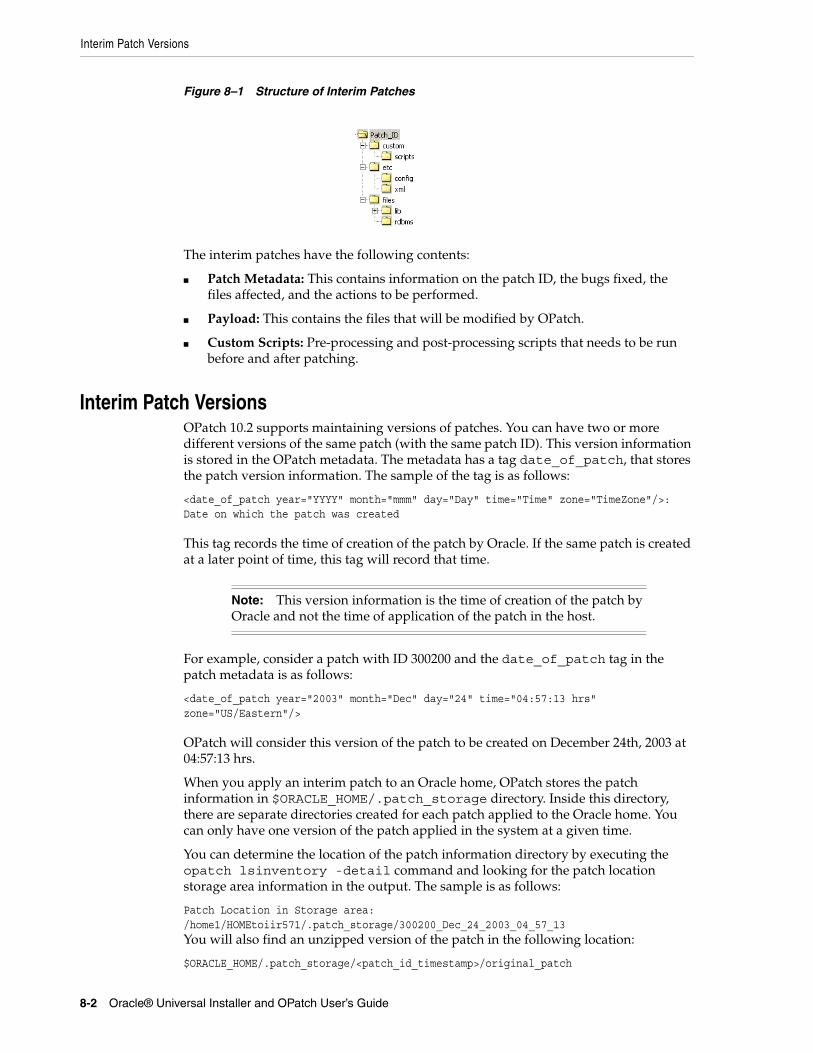
Interim Patch Versions
8-2 Oracle® Universal Installer and OPatch User’s Guide
Figure 8–1 Structure of Interim Patches
The interim patches have the following contents:
■ Patch Metadata: This contains information on the patch ID, the bugs fixed, the files affected, and the actions to be performed.
■ Payload: This contains the files that will be modified by OPatch.
■ Custom Scripts: Pre-processing and post-processing scripts that needs to be run before and after patching.
Interim Patch VersionsOPatch 10.2 supports maintaining versions of patches. You can have two or more different versions of the same patch (with the same patch ID). This version information is stored in the OPatch metadata. The metadata has a tag date_of_patch, that stores the patch version information. The sample of the tag is as follows:
<date_of_patch year="YYYY" month="mmm" day="Day" time="Time" zone="TimeZone"/>: Date on which the patch was created
This tag records the time of creation of the patch by Oracle. If the same patch is created at a later point of time, this tag will record that time.
For example, consider a patch with ID 300200 and the date_of_patch tag in the patch metadata is as follows:
<date_of_patch year="2003" month="Dec" day="24" time="04:57:13 hrs" zone="US/Eastern"/>
OPatch will consider this version of the patch to be created on December 24th, 2003 at 04:57:13 hrs.
When you apply an interim patch to an Oracle home, OPatch stores the patch information in $ORACLE_HOME/.patch_storage directory. Inside this directory, there are separate directories created for each patch applied to the Oracle home. You can only have one version of the patch applied in the system at a given time.
You can determine the location of the patch information directory by executing the opatch lsinventory -detail command and looking for the patch location storage area information in the output. The sample is as follows:
Patch Location in Storage area:/home1/HOMEtoiir571/.patch_storage/300200_Dec_24_2003_04_57_13You will also find an unzipped version of the patch in the following location:
$ORACLE_HOME/.patch_storage/<patch_id_timestamp>/original_patch
Note: This version information is the time of creation of the patch by Oracle and not the time of application of the patch in the host.
Features of OPatch
Oracle Software Patching Using OPatch 8-3
Getting Interim PatchesOracle releases interim patches frequently to fix a bug or a set of bugs. You can get the interim patches by specifying the patch ID in OracleMetalink from the following location:
http://www.oracle.com/support/metalink/index.html
About OPatchOPatch is an Oracle supplied utility to assist you with the process of applying interim patches to Oracle's software. OPatch is a Java-based utility which requires the Oracle Universal Installer to be installed. It is platform independent and runs on all supported operating systems.
OPatch supports the following:
■ Applying an interim patch.
■ Rolling back the application of an interim patch.
■ Detecting conflict when applying an interim patch after previous interim patches have been applied. It also suggests the best options to resolve a conflict.
■ Reporting on installed products and interim patch.
Requirements for OPatchThe OPatch utility requires the following:
■ The Oracle home environment variable (ORACLE_HOME) must point to a valid Oracle home directory and match the value used during installation of the Oracle home directory.
■ Java SDK 1.4 or higher, Java commands for Windows and ar, cp, fuser, and, make commands for UNIX must be made available.
■ The library path must be set correctly for Oracle Real Application Clusters environments. OPatch uses some APIs to detect if the system is Real Application Clusters. Ensure that the library path is set correctly as follows:
For SolarisLD_LIBRARY_PATH = $ORACLE_HOME/lib32:$ORACLE_HOME/libFor HP-UX - SHLIB_PATH=$ORACLE_HOME/lib32:/usr/lib
Features of OPatchThe OPatch 10.2 utility has the following features:
■ Scalability: OPatch is scalable to support large number of patches.
■ Reliability: OPatch is reliable and protects the Oracle home and inventory. It can bring the Oracle home back to a stable state from patch application failures. It can also easily detect patch conflicts.
See Also: For the latest information about the OPatch utility, and to check for updates, and to get latest versions refer to OracleMetaLink at
http://www.oracle.com/support/metalink/index.html
Pre-requisite Checks in OPatch
8-4 Oracle® Universal Installer and OPatch User’s Guide
■ Portability: OPatch is compatible with all operating systems for which Oracle releases software.
■ Robust: OPatch is very robust. It is very easy to apply a patch as well as remove it.
■ Easy to maintain: OPatch is easy to maintain and is also extensible.
■ Support for Silent Operation: OPatch supports silent operation. This mode allows you to run the software without any user interaction.
■ Support for Real Application Clusters: OPatch supports Real Application Clusters and works well in that setup. It is easy to extend it to the Grid Control.
■ Easy to debug: OPatch has various levels of logging and tracing mechanisms. It also has a debug option that helps to diagnose problems with the software easily.
Pre-requisite Checks in OPatchBefore you invoke OPatch, perform the following pre-requisite checks:
Check ORACLE_HOME and Environment VariableOPatch verifies if the Oracle home is present. You must ensure that the ORACLE_HOME environment variable is set to the Oracle home of the product you are trying to patch. Check the respective vendor documentation for the details to set the environment variable.
Check for JRE and JDKOPatch requires JDK 1.4 or higher to work properly. JRE comes as a part of JDK.
OPatch 10.2 uses the jar utility that comes with JDK for its jar, war, and ear operations. Opatch will look for JDK inside the Oracle home specified. In case the Oracle home does not have JDK, the user has to use the -jdk option in OPatch to provide an alternate location. OPatch will display an error, if there is a jar/war/ear operation and is unable to locate Java SDK location.
In order to find the version of JDK installed, execute the following command:
JDK/bin/java -version
Check for System SpaceWhen OPatch processes the script for the installation of a patch, it simultaneously generates a rollback script and saves a copy of every file edited or deleted during the patching. OPatch also backs up the inventory information. So, Oracle recommends that you have sufficient system space to accommodate the patch and the backup information.
Check for Oracle Universal Installer and OPatch Version CompatibilityOPatch 10.2 requires Oracle Universal Installer 10.2 or higher to work properly. If the Oracle Universal Installer version is less than what OPatch requires, then OPatch errors out.
Note: If the patch you are applying does not have a jar action, you might not need JDK and OPatch will work fine with JRE alone.
Pre-requisite Checks in OPatch
Oracle Software Patching Using OPatch 8-5
Check for Patch Applicable on Operating SystemOPatch detects if a particular patch is applicable for an operating system. If it is not applicable, it gives out a suitable error message.
Check for System CommandsOPatch supports a set of properties that are used for various operations of the software. You can use these properties to control the internal operations of OPatch. By default, OPatch uses standard Java property format to specify the properties. An exhaustive list of the default properties and their values are as follows:
fuser=/sbin:/usr/sbin
ar=/usr/ccs/bin/
make=/usr/bin
You can specify OPatch properties in the following ways:
■ By using the default OPatch properties.
■ By specifying the location of the user-defined properties file.
■ By using the command line. The syntax is as follows:
PROPERTY_NAME=VALUE
Example: fuser=/sbin:/usr/sbin
Additional Pre-requisite Checks for Real Application ClustersFor a Real Application Clusters, ensure that you perform the following pre-requisite checks in addition to the other checks listed in the preceding section:
Check for User EquivalenceYou must ensure that the cluster machines should have user equivalence set for the user installing Oracle Clusterware/ Real Application Clusters. On UNIX, this means rsh or ssh or both should be setup on the cluster machines. On Windows, this means the same <domain>\<user> should have administrative privileges on all the cluster machines and the machines should be a member of the <domain>.
If the user equivalence is set properly, the following command will work properly:
$ rsh <nodename> date
For more information on setting user equivalence, refer to section "Configuring SSH on all Cluster Nodes" on page 6-6.
Check for OPatch lsinventoryEnsure that you are able to invoke opatch lsinventory -detail command and are able to see the node information being printed out. A sample listing of the output of the command is as follows:
Oracle interim Patch Installer version 10.2.0.1.0Copyright (c) 2005, Oracle Corporation. All rights reserved..Oracle Home : /home/racqa/102_twork/toii/toiir/toiir571/HOMEtoiir571Central Inventory : /home/racqa/102_twork/toii/toiir/toiir571/inventory from : /home/racqa/102_twork/toii/toiir/toiir571/HOMEtoiir571/oraInst.loc
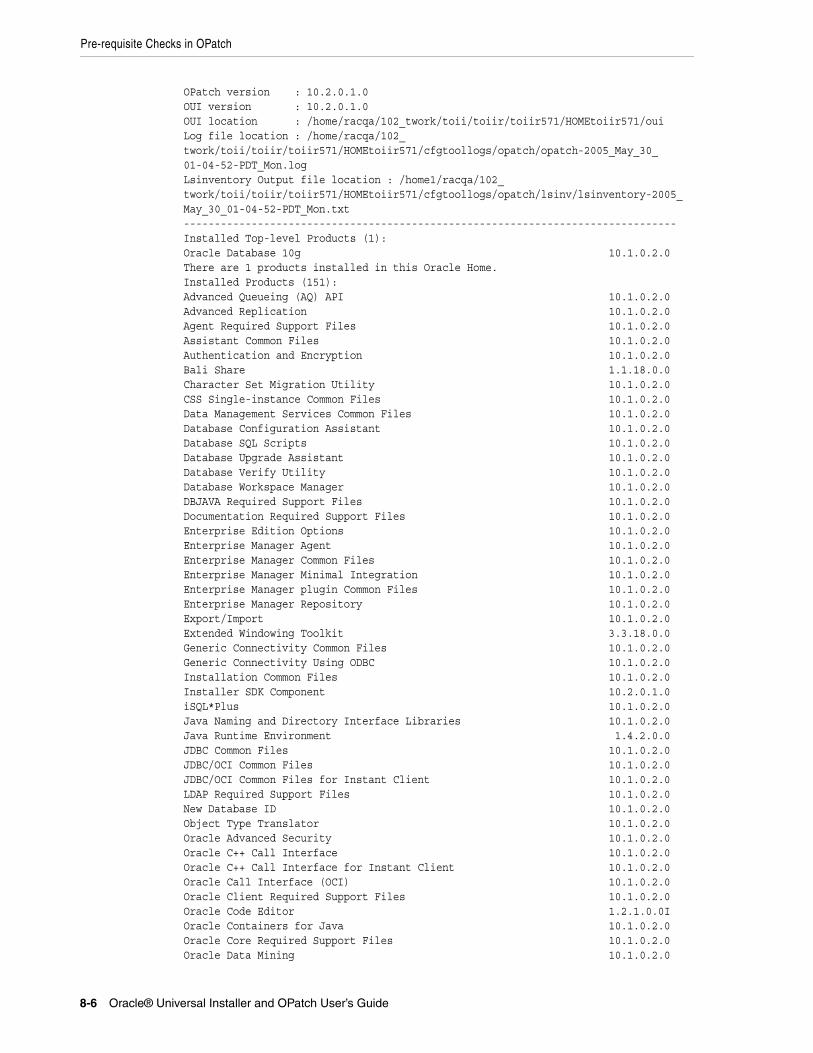
Pre-requisite Checks in OPatch
8-6 Oracle® Universal Installer and OPatch User’s Guide
OPatch version : 10.2.0.1.0OUI version : 10.2.0.1.0OUI location : /home/racqa/102_twork/toii/toiir/toiir571/HOMEtoiir571/ouiLog file location : /home/racqa/102_twork/toii/toiir/toiir571/HOMEtoiir571/cfgtoollogs/opatch/opatch-2005_May_30_01-04-52-PDT_Mon.logLsinventory Output file location : /home1/racqa/102_twork/toii/toiir/toiir571/HOMEtoiir571/cfgtoollogs/opatch/lsinv/lsinventory-2005_May_30_01-04-52-PDT_Mon.txt--------------------------------------------------------------------------------Installed Top-level Products (1): Oracle Database 10g 10.1.0.2.0There are 1 products installed in this Oracle Home.Installed Products (151): Advanced Queueing (AQ) API 10.1.0.2.0Advanced Replication 10.1.0.2.0Agent Required Support Files 10.1.0.2.0Assistant Common Files 10.1.0.2.0Authentication and Encryption 10.1.0.2.0Bali Share 1.1.18.0.0Character Set Migration Utility 10.1.0.2.0CSS Single-instance Common Files 10.1.0.2.0Data Management Services Common Files 10.1.0.2.0Database Configuration Assistant 10.1.0.2.0Database SQL Scripts 10.1.0.2.0Database Upgrade Assistant 10.1.0.2.0Database Verify Utility 10.1.0.2.0Database Workspace Manager 10.1.0.2.0DBJAVA Required Support Files 10.1.0.2.0Documentation Required Support Files 10.1.0.2.0Enterprise Edition Options 10.1.0.2.0Enterprise Manager Agent 10.1.0.2.0Enterprise Manager Common Files 10.1.0.2.0Enterprise Manager Minimal Integration 10.1.0.2.0Enterprise Manager plugin Common Files 10.1.0.2.0Enterprise Manager Repository 10.1.0.2.0Export/Import 10.1.0.2.0Extended Windowing Toolkit 3.3.18.0.0Generic Connectivity Common Files 10.1.0.2.0Generic Connectivity Using ODBC 10.1.0.2.0Installation Common Files 10.1.0.2.0Installer SDK Component 10.2.0.1.0iSQL*Plus 10.1.0.2.0Java Naming and Directory Interface Libraries 10.1.0.2.0Java Runtime Environment 1.4.2.0.0JDBC Common Files 10.1.0.2.0JDBC/OCI Common Files 10.1.0.2.0JDBC/OCI Common Files for Instant Client 10.1.0.2.0LDAP Required Support Files 10.1.0.2.0New Database ID 10.1.0.2.0Object Type Translator 10.1.0.2.0Oracle Advanced Security 10.1.0.2.0Oracle C++ Call Interface 10.1.0.2.0Oracle C++ Call Interface for Instant Client 10.1.0.2.0Oracle Call Interface (OCI) 10.1.0.2.0Oracle Client Required Support Files 10.1.0.2.0Oracle Code Editor 1.2.1.0.0IOracle Containers for Java 10.1.0.2.0Oracle Core Required Support Files 10.1.0.2.0Oracle Data Mining 10.1.0.2.0

Pre-requisite Checks in OPatch
Oracle Software Patching Using OPatch 8-7
Oracle Database 10g 10.1.0.2.0Oracle Database 10g 10.1.0.2.0Oracle Database User Interface 2.2.13.0.0Oracle Database Utilities 10.1.0.2.0Oracle Development Kit 10.1.0.2.0Oracle Display Fonts 9.0.2.0.0Oracle Enterprise Manager 10g Database Control 10.1.0.2.0Oracle Enterprise Manager Console DB 10.1.0.2.0Oracle Extended Windowing Toolkit 3.4.28.0.0Oracle Globalization Support 10.1.0.2.0Oracle Help For Java 4.2.5.0.0aOracle Help for the Web 1.1.7.0.0aOracle Ice Browser 5.2.3.3.0Oracle interMedia 10.1.0.2.0Oracle interMedia Annotator 10.1.0.2.0Oracle interMedia Audio 10.1.0.2.0Oracle interMedia Client Compatibility Files 10.1.0.2.0Oracle interMedia Client Demos 10.1.0.2.0Oracle interMedia Client Option 10.1.0.2.0Oracle interMedia Common Files 10.1.0.2.0Oracle interMedia Image 10.1.0.2.0Oracle interMedia Java Advanced Imaging 10.1.0.2.0Oracle interMedia Java Client 10.1.0.2.0Oracle interMedia Locator 10.1.0.2.0Oracle interMedia Video 10.1.0.2.0Oracle interMedia Web Client 10.1.0.2.0Oracle Internet Directory Client 10.1.0.2.0Oracle Internet Directory Client Common Files 10.1.0.2.0Oracle Internet Directory Tools 10.1.0.2.0Oracle Java Tools 10.1.0.2.0Oracle JDBC Thin Driver for JDK 1.2 10.1.0.2.0Oracle JDBC Thin Driver for JDK 1.4 10.1.0.2.0Oracle JDBC Thin Driver for JDK 1.4 for Instant Client 10.1.0.2.0Oracle JDBC/OCI Driver for JDK 1.4 10.1.0.2.0Oracle JFC Extended Windowing Toolkit 4.2.18.0.0Oracle JVM 10.1.0.2.0Oracle Locale Builder 10.1.0.2.0Oracle Message Gateway Common Files 10.1.0.2.0Oracle Net 10.1.0.2.0Oracle Net Configuration Assistant 10.1.0.2.0Oracle Net Listener 10.1.0.2.0Oracle Net Manager 10.1.0.2.0Oracle Net Required Support Files 10.1.0.2.0Oracle Net Services 10.1.0.2.0Oracle Notification Service 9.0.4.0.0Oracle OLAP 10.1.0.2.0Oracle OLAP API 10.1.0.2.0Oracle OLAP Catalog 10.1.0.2.0Oracle One-Off Patch Installer 10.2.0.1.0Oracle Partitioning 10.1.0.2.0Oracle Programmer 10.1.0.2.0Oracle RAC Required Support Files 10.1.0.2.0Oracle RAC Required Support Files-HAS 10.1.0.2.0Oracle Real Application Clusters 10.1.0.2.0Oracle Spatial 10.1.0.2.0Oracle Starter Database 10.1.0.2.0Oracle Text 10.1.0.2.0Oracle UIX 2.1.21.0.0aOracle Ultra Search Common Files 10.1.0.2.0Oracle Ultra Search Middle-Tier 10.1.0.2.0
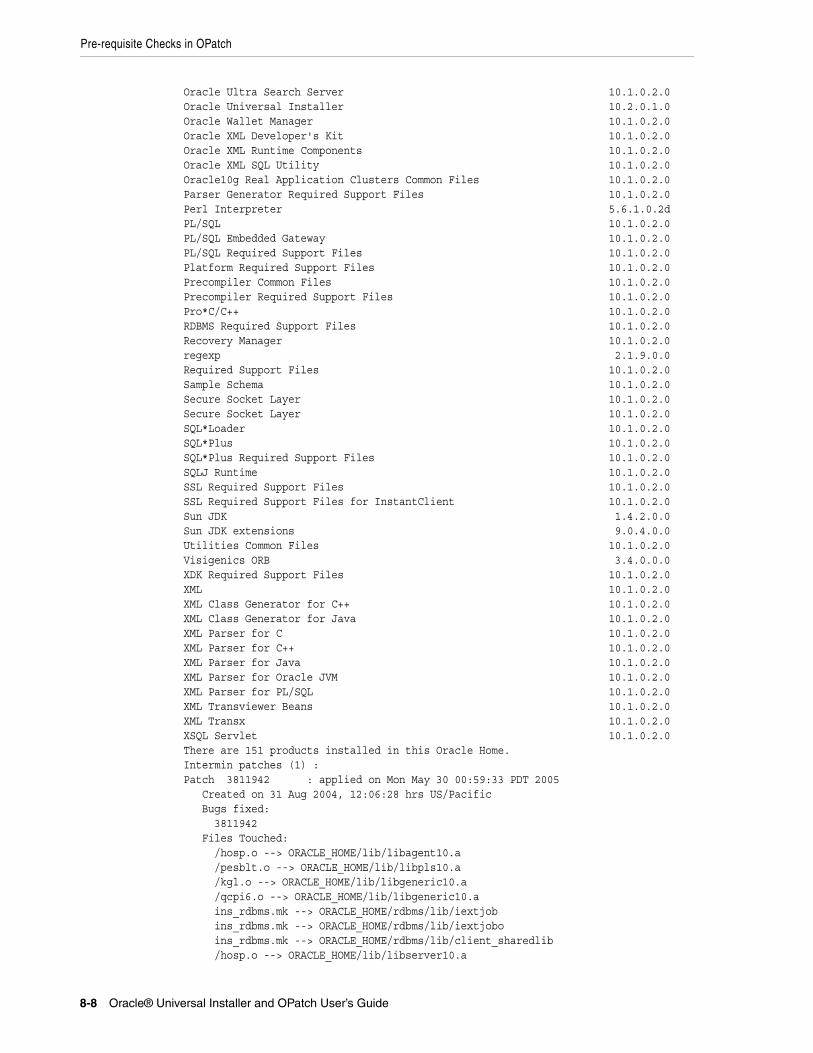
Pre-requisite Checks in OPatch
8-8 Oracle® Universal Installer and OPatch User’s Guide
Oracle Ultra Search Server 10.1.0.2.0Oracle Universal Installer 10.2.0.1.0Oracle Wallet Manager 10.1.0.2.0Oracle XML Developer's Kit 10.1.0.2.0Oracle XML Runtime Components 10.1.0.2.0Oracle XML SQL Utility 10.1.0.2.0Oracle10g Real Application Clusters Common Files 10.1.0.2.0Parser Generator Required Support Files 10.1.0.2.0Perl Interpreter 5.6.1.0.2dPL/SQL 10.1.0.2.0PL/SQL Embedded Gateway 10.1.0.2.0PL/SQL Required Support Files 10.1.0.2.0Platform Required Support Files 10.1.0.2.0Precompiler Common Files 10.1.0.2.0Precompiler Required Support Files 10.1.0.2.0Pro*C/C++ 10.1.0.2.0RDBMS Required Support Files 10.1.0.2.0Recovery Manager 10.1.0.2.0regexp 2.1.9.0.0Required Support Files 10.1.0.2.0Sample Schema 10.1.0.2.0Secure Socket Layer 10.1.0.2.0Secure Socket Layer 10.1.0.2.0SQL*Loader 10.1.0.2.0SQL*Plus 10.1.0.2.0SQL*Plus Required Support Files 10.1.0.2.0SQLJ Runtime 10.1.0.2.0SSL Required Support Files 10.1.0.2.0SSL Required Support Files for InstantClient 10.1.0.2.0Sun JDK 1.4.2.0.0Sun JDK extensions 9.0.4.0.0Utilities Common Files 10.1.0.2.0Visigenics ORB 3.4.0.0.0XDK Required Support Files 10.1.0.2.0XML 10.1.0.2.0XML Class Generator for C++ 10.1.0.2.0XML Class Generator for Java 10.1.0.2.0XML Parser for C 10.1.0.2.0XML Parser for C++ 10.1.0.2.0XML Parser for Java 10.1.0.2.0XML Parser for Oracle JVM 10.1.0.2.0XML Parser for PL/SQL 10.1.0.2.0XML Transviewer Beans 10.1.0.2.0XML Transx 10.1.0.2.0XSQL Servlet 10.1.0.2.0There are 151 products installed in this Oracle Home.Intermin patches (1) :Patch 3811942 : applied on Mon May 30 00:59:33 PDT 2005 Created on 31 Aug 2004, 12:06:28 hrs US/Pacific Bugs fixed: 3811942 Files Touched: /hosp.o --> ORACLE_HOME/lib/libagent10.a /pesblt.o --> ORACLE_HOME/lib/libpls10.a /kgl.o --> ORACLE_HOME/lib/libgeneric10.a /qcpi6.o --> ORACLE_HOME/lib/libgeneric10.a ins_rdbms.mk --> ORACLE_HOME/rdbms/lib/iextjob ins_rdbms.mk --> ORACLE_HOME/rdbms/lib/iextjobo ins_rdbms.mk --> ORACLE_HOME/rdbms/lib/client_sharedlib /hosp.o --> ORACLE_HOME/lib/libserver10.a
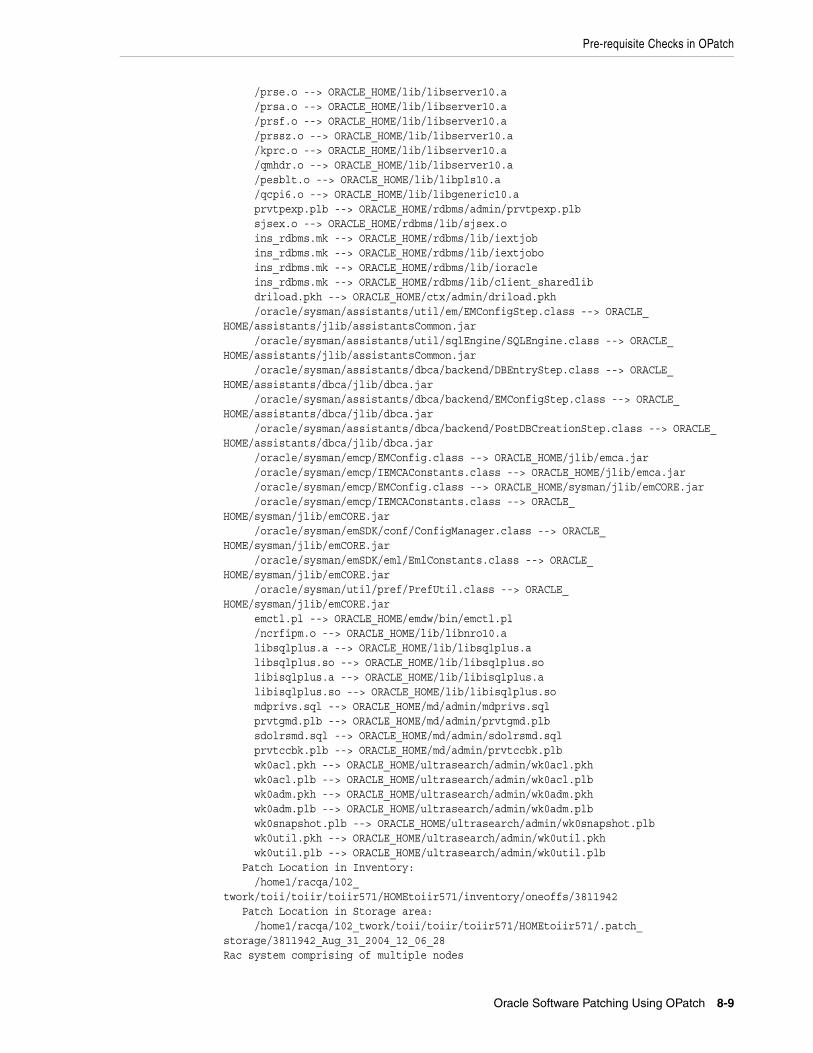
Pre-requisite Checks in OPatch
Oracle Software Patching Using OPatch 8-9
/prse.o --> ORACLE_HOME/lib/libserver10.a /prsa.o --> ORACLE_HOME/lib/libserver10.a /prsf.o --> ORACLE_HOME/lib/libserver10.a /prssz.o --> ORACLE_HOME/lib/libserver10.a /kprc.o --> ORACLE_HOME/lib/libserver10.a /qmhdr.o --> ORACLE_HOME/lib/libserver10.a /pesblt.o --> ORACLE_HOME/lib/libpls10.a /qcpi6.o --> ORACLE_HOME/lib/libgeneric10.a prvtpexp.plb --> ORACLE_HOME/rdbms/admin/prvtpexp.plb sjsex.o --> ORACLE_HOME/rdbms/lib/sjsex.o ins_rdbms.mk --> ORACLE_HOME/rdbms/lib/iextjob ins_rdbms.mk --> ORACLE_HOME/rdbms/lib/iextjobo ins_rdbms.mk --> ORACLE_HOME/rdbms/lib/ioracle ins_rdbms.mk --> ORACLE_HOME/rdbms/lib/client_sharedlib driload.pkh --> ORACLE_HOME/ctx/admin/driload.pkh /oracle/sysman/assistants/util/em/EMConfigStep.class --> ORACLE_HOME/assistants/jlib/assistantsCommon.jar /oracle/sysman/assistants/util/sqlEngine/SQLEngine.class --> ORACLE_HOME/assistants/jlib/assistantsCommon.jar /oracle/sysman/assistants/dbca/backend/DBEntryStep.class --> ORACLE_HOME/assistants/dbca/jlib/dbca.jar /oracle/sysman/assistants/dbca/backend/EMConfigStep.class --> ORACLE_HOME/assistants/dbca/jlib/dbca.jar /oracle/sysman/assistants/dbca/backend/PostDBCreationStep.class --> ORACLE_HOME/assistants/dbca/jlib/dbca.jar /oracle/sysman/emcp/EMConfig.class --> ORACLE_HOME/jlib/emca.jar /oracle/sysman/emcp/IEMCAConstants.class --> ORACLE_HOME/jlib/emca.jar /oracle/sysman/emcp/EMConfig.class --> ORACLE_HOME/sysman/jlib/emCORE.jar /oracle/sysman/emcp/IEMCAConstants.class --> ORACLE_HOME/sysman/jlib/emCORE.jar /oracle/sysman/emSDK/conf/ConfigManager.class --> ORACLE_HOME/sysman/jlib/emCORE.jar /oracle/sysman/emSDK/eml/EmlConstants.class --> ORACLE_HOME/sysman/jlib/emCORE.jar /oracle/sysman/util/pref/PrefUtil.class --> ORACLE_HOME/sysman/jlib/emCORE.jar emctl.pl --> ORACLE_HOME/emdw/bin/emctl.pl /ncrfipm.o --> ORACLE_HOME/lib/libnro10.a libsqlplus.a --> ORACLE_HOME/lib/libsqlplus.a libsqlplus.so --> ORACLE_HOME/lib/libsqlplus.so libisqlplus.a --> ORACLE_HOME/lib/libisqlplus.a libisqlplus.so --> ORACLE_HOME/lib/libisqlplus.so mdprivs.sql --> ORACLE_HOME/md/admin/mdprivs.sql prvtgmd.plb --> ORACLE_HOME/md/admin/prvtgmd.plb sdolrsmd.sql --> ORACLE_HOME/md/admin/sdolrsmd.sql prvtccbk.plb --> ORACLE_HOME/md/admin/prvtccbk.plb wk0acl.pkh --> ORACLE_HOME/ultrasearch/admin/wk0acl.pkh wk0acl.plb --> ORACLE_HOME/ultrasearch/admin/wk0acl.plb wk0adm.pkh --> ORACLE_HOME/ultrasearch/admin/wk0adm.pkh wk0adm.plb --> ORACLE_HOME/ultrasearch/admin/wk0adm.plb wk0snapshot.plb --> ORACLE_HOME/ultrasearch/admin/wk0snapshot.plb wk0util.pkh --> ORACLE_HOME/ultrasearch/admin/wk0util.pkh wk0util.plb --> ORACLE_HOME/ultrasearch/admin/wk0util.plb Patch Location in Inventory: /home1/racqa/102_twork/toii/toiir/toiir571/HOMEtoiir571/inventory/oneoffs/3811942 Patch Location in Storage area: /home1/racqa/102_twork/toii/toiir/toiir571/HOMEtoiir571/.patch_storage/3811942_Aug_31_2004_12_06_28Rac system comprising of multiple nodes
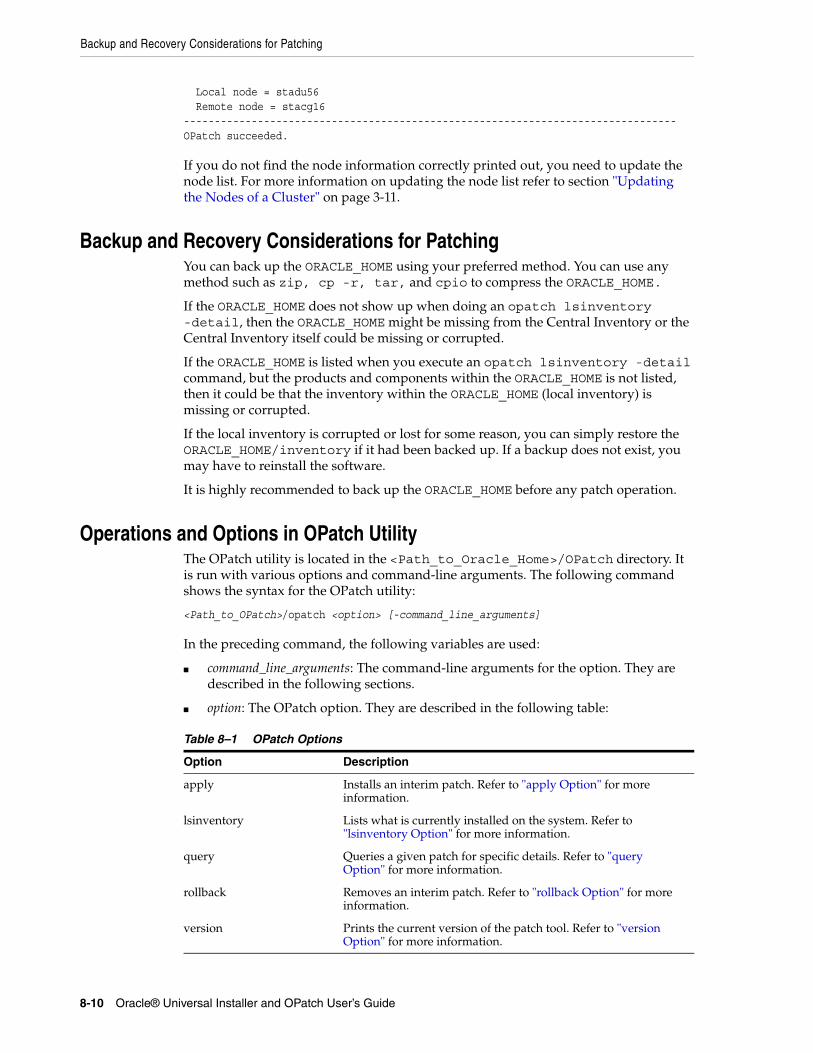
Backup and Recovery Considerations for Patching
8-10 Oracle® Universal Installer and OPatch User’s Guide
Local node = stadu56 Remote node = stacg16--------------------------------------------------------------------------------OPatch succeeded.
If you do not find the node information correctly printed out, you need to update the node list. For more information on updating the node list refer to section "Updating the Nodes of a Cluster" on page 3-11.
Backup and Recovery Considerations for PatchingYou can back up the ORACLE_HOME using your preferred method. You can use any method such as zip, cp -r, tar, and cpio to compress the ORACLE_HOME.
If the ORACLE_HOME does not show up when doing an opatch lsinventory -detail, then the ORACLE_HOME might be missing from the Central Inventory or the Central Inventory itself could be missing or corrupted.
If the ORACLE_HOME is listed when you execute an opatch lsinventory -detail command, but the products and components within the ORACLE_HOME is not listed, then it could be that the inventory within the ORACLE_HOME (local inventory) is missing or corrupted.
If the local inventory is corrupted or lost for some reason, you can simply restore the ORACLE_HOME/inventory if it had been backed up. If a backup does not exist, you may have to reinstall the software.
It is highly recommended to back up the ORACLE_HOME before any patch operation.
Operations and Options in OPatch UtilityThe OPatch utility is located in the <Path_to_Oracle_Home>/OPatch directory. It is run with various options and command-line arguments. The following command shows the syntax for the OPatch utility:
<Path_to_OPatch>/opatch <option> [-command_line_arguments]
In the preceding command, the following variables are used:
■ command_line_arguments: The command-line arguments for the option. They are described in the following sections.
■ option: The OPatch option. They are described in the following table:
Table 8–1 OPatch Options
Option Description
apply Installs an interim patch. Refer to "apply Option" for more information.
lsinventory Lists what is currently installed on the system. Refer to "lsinventory Option" for more information.
query Queries a given patch for specific details. Refer to "query Option" for more information.
rollback Removes an interim patch. Refer to "rollback Option" for more information.
version Prints the current version of the patch tool. Refer to "version Option" for more information.
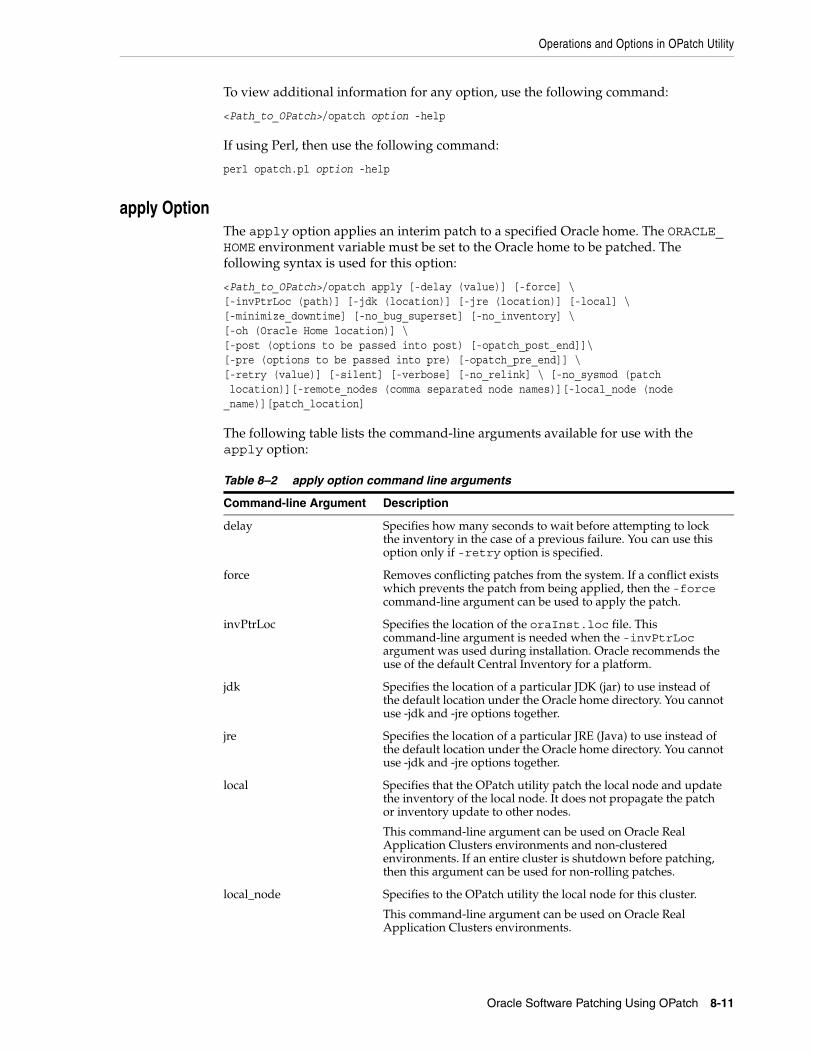
Operations and Options in OPatch Utility
Oracle Software Patching Using OPatch 8-11
To view additional information for any option, use the following command:
<Path_to_OPatch>/opatch option -help
If using Perl, then use the following command:
perl opatch.pl option -help
apply OptionThe apply option applies an interim patch to a specified Oracle home. The ORACLE_HOME environment variable must be set to the Oracle home to be patched. The following syntax is used for this option:
<Path_to_OPatch>/opatch apply [-delay (value)] [-force] \[-invPtrLoc (path)] [-jdk (location)] [-jre (location)] [-local] \[-minimize_downtime] [-no_bug_superset] [-no_inventory] \[-oh (Oracle Home location)] \[-post (options to be passed into post) [-opatch_post_end]]\[-pre (options to be passed into pre) [-opatch_pre_end]] \[-retry (value)] [-silent] [-verbose] [-no_relink] \ [-no_sysmod (patch location)][-remote_nodes (comma separated node names)][-local_node (node_name)][patch_location]
The following table lists the command-line arguments available for use with the apply option:
Table 8–2 apply option command line arguments
Command-line Argument Description
delay Specifies how many seconds to wait before attempting to lock the inventory in the case of a previous failure. You can use this option only if -retry option is specified.
force Removes conflicting patches from the system. If a conflict exists which prevents the patch from being applied, then the -force command-line argument can be used to apply the patch.
invPtrLoc Specifies the location of the oraInst.loc file. This command-line argument is needed when the -invPtrLoc argument was used during installation. Oracle recommends the use of the default Central Inventory for a platform.
jdk Specifies the location of a particular JDK (jar) to use instead of the default location under the Oracle home directory. You cannot use -jdk and -jre options together.
jre Specifies the location of a particular JRE (Java) to use instead of the default location under the Oracle home directory. You cannot use -jdk and -jre options together.
local Specifies that the OPatch utility patch the local node and update the inventory of the local node. It does not propagate the patch or inventory update to other nodes.
This command-line argument can be used on Oracle Real Application Clusters environments and non-clustered environments. If an entire cluster is shutdown before patching, then this argument can be used for non-rolling patches.
local_node Specifies to the OPatch utility the local node for this cluster.
This command-line argument can be used on Oracle Real Application Clusters environments.
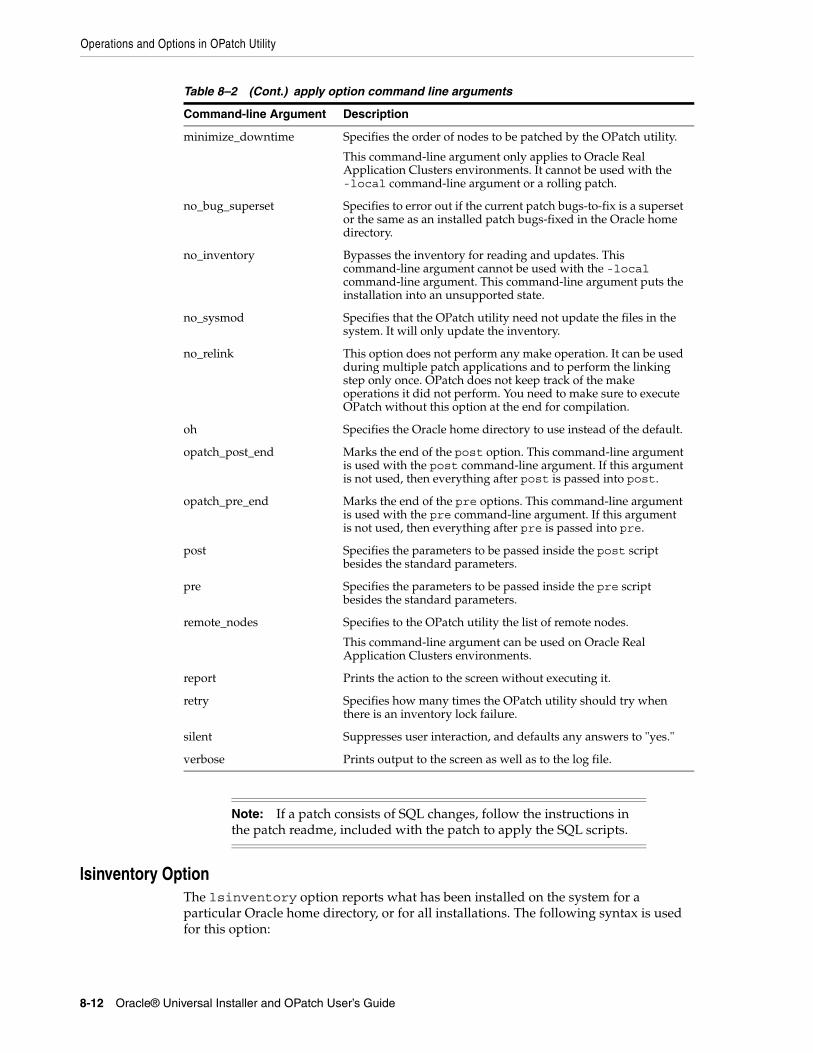
Operations and Options in OPatch Utility
8-12 Oracle® Universal Installer and OPatch User’s Guide
lsinventory OptionThe lsinventory option reports what has been installed on the system for a particular Oracle home directory, or for all installations. The following syntax is used for this option:
minimize_downtime Specifies the order of nodes to be patched by the OPatch utility.
This command-line argument only applies to Oracle Real Application Clusters environments. It cannot be used with the -local command-line argument or a rolling patch.
no_bug_superset Specifies to error out if the current patch bugs-to-fix is a superset or the same as an installed patch bugs-fixed in the Oracle home directory.
no_inventory Bypasses the inventory for reading and updates. This command-line argument cannot be used with the -local command-line argument. This command-line argument puts the installation into an unsupported state.
no_sysmod Specifies that the OPatch utility need not update the files in the system. It will only update the inventory.
no_relink This option does not perform any make operation. It can be used during multiple patch applications and to perform the linking step only once. OPatch does not keep track of the make operations it did not perform. You need to make sure to execute OPatch without this option at the end for compilation.
oh Specifies the Oracle home directory to use instead of the default.
opatch_post_end Marks the end of the post option. This command-line argument is used with the post command-line argument. If this argument is not used, then everything after post is passed into post.
opatch_pre_end Marks the end of the pre options. This command-line argument is used with the pre command-line argument. If this argument is not used, then everything after pre is passed into pre.
post Specifies the parameters to be passed inside the post script besides the standard parameters.
pre Specifies the parameters to be passed inside the pre script besides the standard parameters.
remote_nodes Specifies to the OPatch utility the list of remote nodes.
This command-line argument can be used on Oracle Real Application Clusters environments.
report Prints the action to the screen without executing it.
retry Specifies how many times the OPatch utility should try when there is an inventory lock failure.
silent Suppresses user interaction, and defaults any answers to "yes."
verbose Prints output to the screen as well as to the log file.
Note: If a patch consists of SQL changes, follow the instructions in the patch readme, included with the patch to apply the SQL scripts.
Table 8–2 (Cont.) apply option command line arguments
Command-line Argument Description
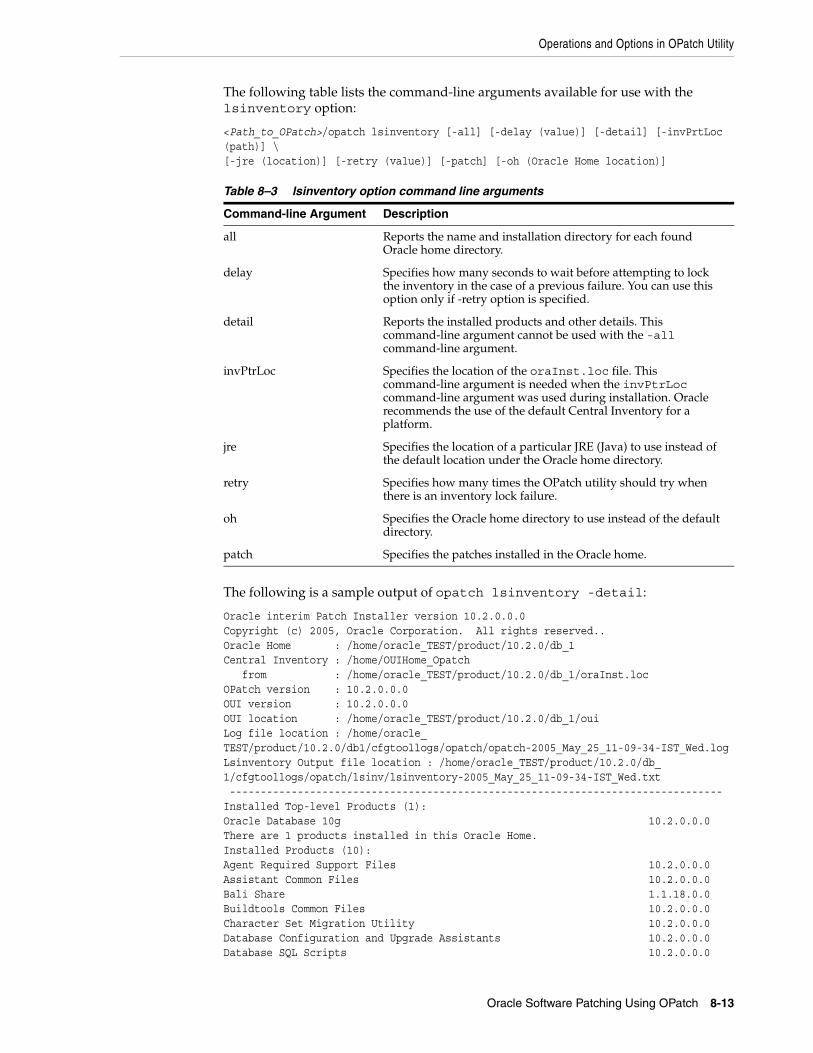
Operations and Options in OPatch Utility
Oracle Software Patching Using OPatch 8-13
The following table lists the command-line arguments available for use with the lsinventory option:
<Path_to_OPatch>/opatch lsinventory [-all] [-delay (value)] [-detail] [-invPrtLoc (path)] \ [-jre (location)] [-retry (value)] [-patch] [-oh (Oracle Home location)]
The following is a sample output of opatch lsinventory -detail:
Oracle interim Patch Installer version 10.2.0.0.0Copyright (c) 2005, Oracle Corporation. All rights reserved..Oracle Home : /home/oracle_TEST/product/10.2.0/db_1Central Inventory : /home/OUIHome_Opatch from : /home/oracle_TEST/product/10.2.0/db_1/oraInst.locOPatch version : 10.2.0.0.0OUI version : 10.2.0.0.0OUI location : /home/oracle_TEST/product/10.2.0/db_1/ouiLog file location : /home/oracle_TEST/product/10.2.0/db1/cfgtoollogs/opatch/opatch-2005_May_25_11-09-34-IST_Wed.logLsinventory Output file location : /home/oracle_TEST/product/10.2.0/db_1/cfgtoollogs/opatch/lsinv/lsinventory-2005_May_25_11-09-34-IST_Wed.txt --------------------------------------------------------------------------------Installed Top-level Products (1):Oracle Database 10g 10.2.0.0.0There are 1 products installed in this Oracle Home.Installed Products (10):Agent Required Support Files 10.2.0.0.0Assistant Common Files 10.2.0.0.0Bali Share 1.1.18.0.0Buildtools Common Files 10.2.0.0.0Character Set Migration Utility 10.2.0.0.0Database Configuration and Upgrade Assistants 10.2.0.0.0Database SQL Scripts 10.2.0.0.0
Table 8–3 lsinventory option command line arguments
Command-line Argument Description
all Reports the name and installation directory for each found Oracle home directory.
delay Specifies how many seconds to wait before attempting to lock the inventory in the case of a previous failure. You can use this option only if -retry option is specified.
detail Reports the installed products and other details. This command-line argument cannot be used with the -all command-line argument.
invPtrLoc Specifies the location of the oraInst.loc file. This command-line argument is needed when the invPtrLoc command-line argument was used during installation. Oracle recommends the use of the default Central Inventory for a platform.
jre Specifies the location of a particular JRE (Java) to use instead of the default location under the Oracle home directory.
retry Specifies how many times the OPatch utility should try when there is an inventory lock failure.
oh Specifies the Oracle home directory to use instead of the default directory.
patch Specifies the patches installed in the Oracle home.

Operations and Options in OPatch Utility
8-14 Oracle® Universal Installer and OPatch User’s Guide
Database Workspace Manager 10.2.0.0.0DBJAVA Required Support Files 10.2.0.0.0Enterprise Edition Options 10.2.0.0.0There are 10 products installed in this Oracle Home.Intermin patches (1) :Patch 102000 : applied on Mon May 23 19:44:08 IST 2005Created on 27 Jul 2004, 05:43:46 hrs PST8PDTBugs fixed: 102000Files Touched:/qmtest.o --> ORACLE_HOME/lib/libserver10.alibmapsym.so --> ORACLE_HOME/lib/libmapsym.soins_rdbms.mk --> ORACLE_HOME/rdbms/lib/ioracle/oracle/xml/jaxb/orajaxb.class --> ORACLE_HOME/lib/xml.jarPatch Location in Inventory:/home/oracle_TEST/product/10.2.0/db_1/inventory/oneoffs/102000Patch Location in Storage area:/home/oracle_TEST/product/10.2.0/db_1/.patch_storage/102000_Jul_27_2004_05_43_46 -------------------------------------------------------------------------------- OPatch succeeded.
query OptionThe query option queries a specific patch for specific details. It provides information about the patch and the system being patched. The following syntax is used for this option:
<Path_to_OPatch>/opatch query [-all] [-jre (Location)] [-jdk (Location)]\ [-oh (Location)] [patch_location]
The following table lists the command-line arguments available for use with the query option:
rollback OptionThe rollback option removes a specific interim patch from the appropriate Oracle home directory. The following syntax is used for this option:
<Path_to_OPatch>/opatch rollback -id (patch_id) [-ph (patch directory)] \[-delay] (value) [-invPtrLoc (path)] [-jdk (location)] [-jre (location)]\[-local] [-oh (Oracle Home location)] \[-post (options to be passed into post) [-opatch_post_end]] \[-pre (options to be passed into pre) [-opatch_pre_end]] [-retry (value)] \[-silent] [-verbose] [-no_relink] [-no_sysmod][-remote_nodes (node1,node2)][-local_node (node_name)]
Table 8–4 query option command line arguments
Command-line Argument Description
all Retrieves all information about a patch. This is equivalent to setting all command-line arguments.
jdk Specifies the location of a particular JDK (jar) to use instead of the default location under the Oracle home directory. You cannot use -jdk and -jre options together.
jre Specifies the location of a particular JRE (Java) to use instead of the default location under the Oracle home directory. You cannot use -jdk and -jre options together.
oh Specifies the Oracle home directory to use instead of the default directory.
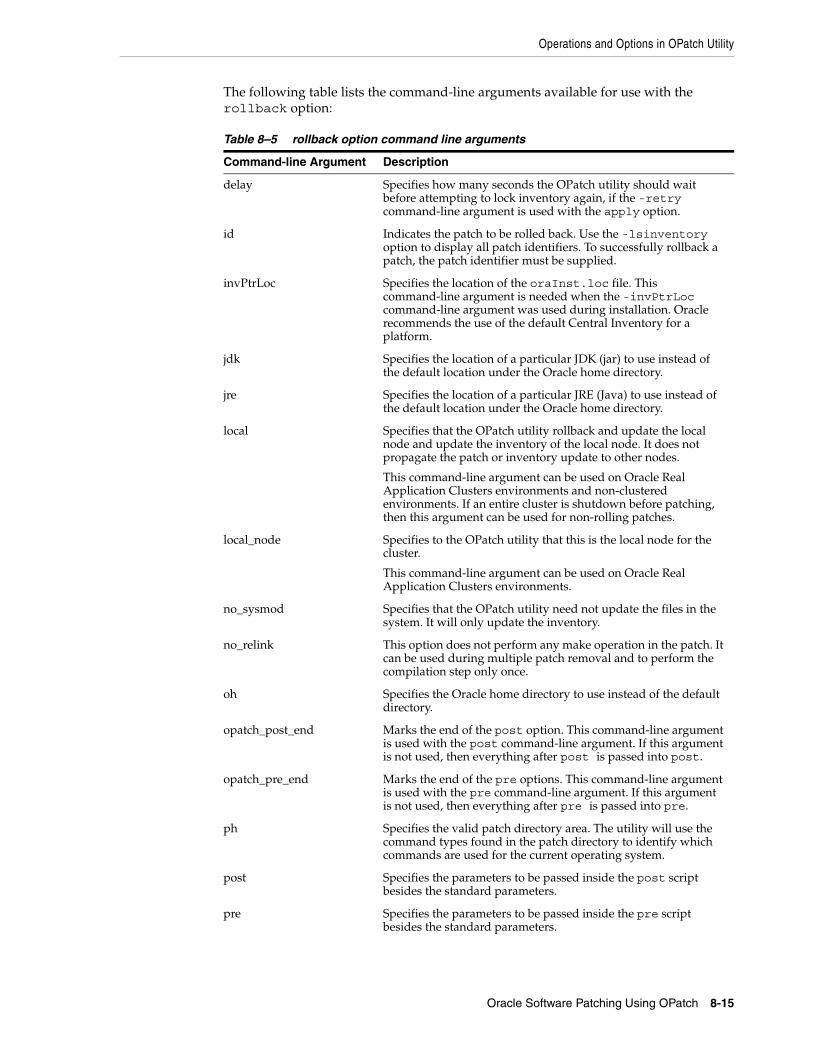
Operations and Options in OPatch Utility
Oracle Software Patching Using OPatch 8-15
The following table lists the command-line arguments available for use with the rollback option:
Table 8–5 rollback option command line arguments
Command-line Argument Description
delay Specifies how many seconds the OPatch utility should wait before attempting to lock inventory again, if the -retry command-line argument is used with the apply option.
id Indicates the patch to be rolled back. Use the -lsinventory option to display all patch identifiers. To successfully rollback a patch, the patch identifier must be supplied.
invPtrLoc Specifies the location of the oraInst.loc file. This command-line argument is needed when the -invPtrLoc command-line argument was used during installation. Oracle recommends the use of the default Central Inventory for a platform.
jdk Specifies the location of a particular JDK (jar) to use instead of the default location under the Oracle home directory.
jre Specifies the location of a particular JRE (Java) to use instead of the default location under the Oracle home directory.
local Specifies that the OPatch utility rollback and update the local node and update the inventory of the local node. It does not propagate the patch or inventory update to other nodes.
This command-line argument can be used on Oracle Real Application Clusters environments and non-clustered environments. If an entire cluster is shutdown before patching, then this argument can be used for non-rolling patches.
local_node Specifies to the OPatch utility that this is the local node for the cluster.
This command-line argument can be used on Oracle Real Application Clusters environments.
no_sysmod Specifies that the OPatch utility need not update the files in the system. It will only update the inventory.
no_relink This option does not perform any make operation in the patch. It can be used during multiple patch removal and to perform the compilation step only once.
oh Specifies the Oracle home directory to use instead of the default directory.
opatch_post_end Marks the end of the post option. This command-line argument is used with the post command-line argument. If this argument is not used, then everything after post is passed into post.
opatch_pre_end Marks the end of the pre options. This command-line argument is used with the pre command-line argument. If this argument is not used, then everything after pre is passed into pre.
ph Specifies the valid patch directory area. The utility will use the command types found in the patch directory to identify which commands are used for the current operating system.
post Specifies the parameters to be passed inside the post script besides the standard parameters.
pre Specifies the parameters to be passed inside the pre script besides the standard parameters.
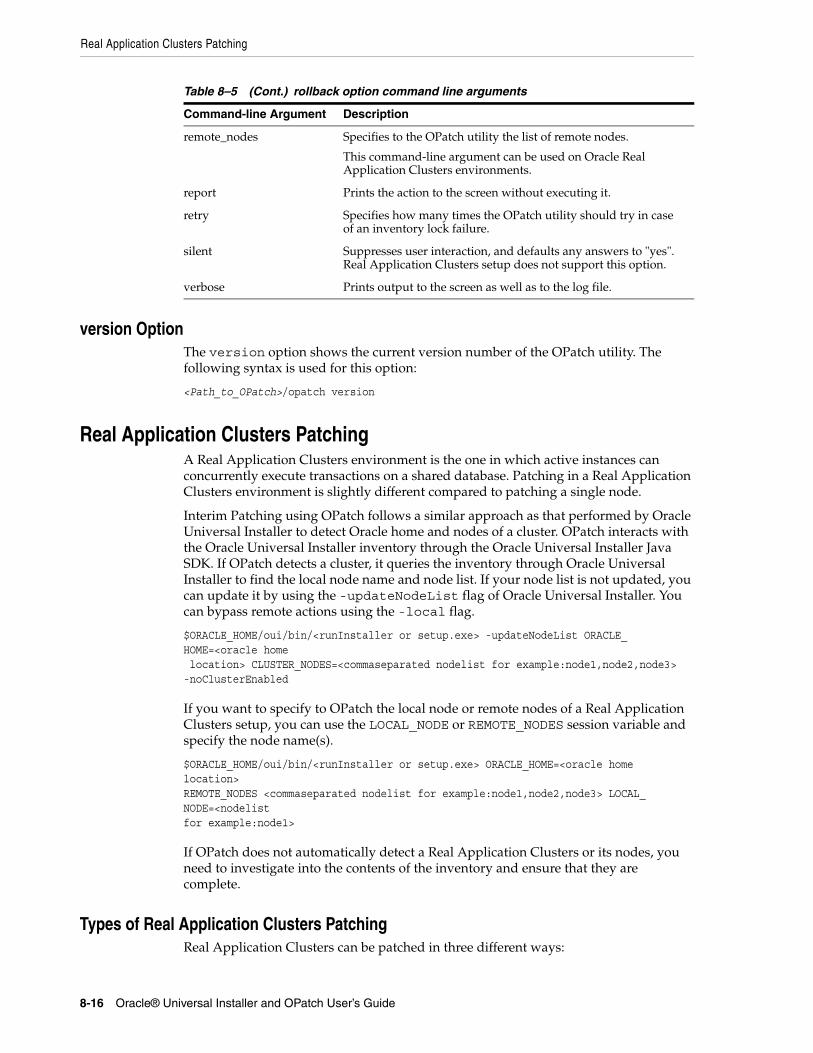
Real Application Clusters Patching
8-16 Oracle® Universal Installer and OPatch User’s Guide
version OptionThe version option shows the current version number of the OPatch utility. The following syntax is used for this option:
<Path_to_OPatch>/opatch version
Real Application Clusters PatchingA Real Application Clusters environment is the one in which active instances can concurrently execute transactions on a shared database. Patching in a Real Application Clusters environment is slightly different compared to patching a single node.
Interim Patching using OPatch follows a similar approach as that performed by Oracle Universal Installer to detect Oracle home and nodes of a cluster. OPatch interacts with the Oracle Universal Installer inventory through the Oracle Universal Installer Java SDK. If OPatch detects a cluster, it queries the inventory through Oracle Universal Installer to find the local node name and node list. If your node list is not updated, you can update it by using the -updateNodeList flag of Oracle Universal Installer. You can bypass remote actions using the -local flag.
$ORACLE_HOME/oui/bin/<runInstaller or setup.exe> -updateNodeList ORACLE_ HOME=<oracle home location> CLUSTER_NODES=<commaseparated nodelist for example:node1,node2,node3>-noClusterEnabled
If you want to specify to OPatch the local node or remote nodes of a Real Application Clusters setup, you can use the LOCAL_NODE or REMOTE_NODES session variable and specify the node name(s).
$ORACLE_HOME/oui/bin/<runInstaller or setup.exe> ORACLE_HOME=<oracle home location>REMOTE_NODES <commaseparated nodelist for example:node1,node2,node3> LOCAL_NODE=<nodelistfor example:node1>
If OPatch does not automatically detect a Real Application Clusters or its nodes, you need to investigate into the contents of the inventory and ensure that they are complete.
Types of Real Application Clusters PatchingReal Application Clusters can be patched in three different ways:
remote_nodes Specifies to the OPatch utility the list of remote nodes.
This command-line argument can be used on Oracle Real Application Clusters environments.
report Prints the action to the screen without executing it.
retry Specifies how many times the OPatch utility should try in case of an inventory lock failure.
silent Suppresses user interaction, and defaults any answers to "yes". Real Application Clusters setup does not support this option.
verbose Prints output to the screen as well as to the log file.
Table 8–5 (Cont.) rollback option command line arguments
Command-line Argument Description
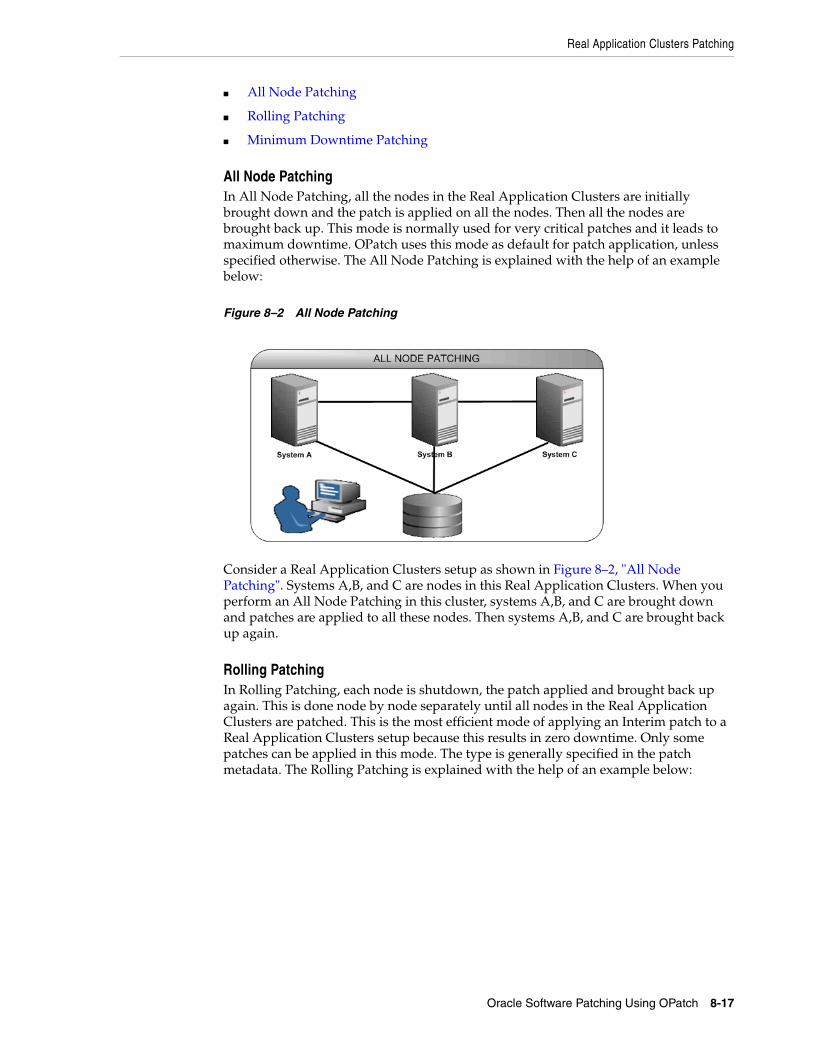
Real Application Clusters Patching
Oracle Software Patching Using OPatch 8-17
■ All Node Patching
■ Rolling Patching
■ Minimum Downtime Patching
All Node PatchingIn All Node Patching, all the nodes in the Real Application Clusters are initially brought down and the patch is applied on all the nodes. Then all the nodes are brought back up. This mode is normally used for very critical patches and it leads to maximum downtime. OPatch uses this mode as default for patch application, unless specified otherwise. The All Node Patching is explained with the help of an example below:
Figure 8–2 All Node Patching
Consider a Real Application Clusters setup as shown in Figure 8–2, "All Node Patching". Systems A,B, and C are nodes in this Real Application Clusters. When you perform an All Node Patching in this cluster, systems A,B, and C are brought down and patches are applied to all these nodes. Then systems A,B, and C are brought back up again.
Rolling PatchingIn Rolling Patching, each node is shutdown, the patch applied and brought back up again. This is done node by node separately until all nodes in the Real Application Clusters are patched. This is the most efficient mode of applying an Interim patch to a Real Application Clusters setup because this results in zero downtime. Only some patches can be applied in this mode. The type is generally specified in the patch metadata. The Rolling Patching is explained with the help of an example below:
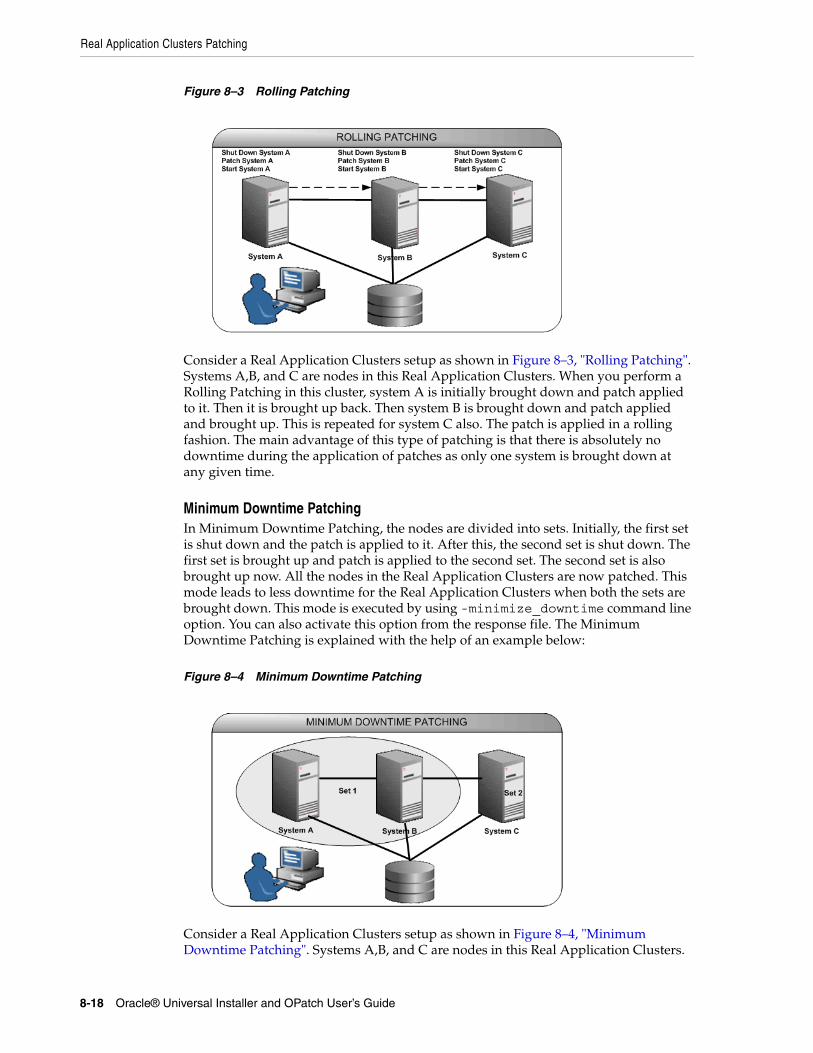
Real Application Clusters Patching
8-18 Oracle® Universal Installer and OPatch User’s Guide
Figure 8–3 Rolling Patching
Consider a Real Application Clusters setup as shown in Figure 8–3, "Rolling Patching". Systems A,B, and C are nodes in this Real Application Clusters. When you perform a Rolling Patching in this cluster, system A is initially brought down and patch applied to it. Then it is brought up back. Then system B is brought down and patch applied and brought up. This is repeated for system C also. The patch is applied in a rolling fashion. The main advantage of this type of patching is that there is absolutely no downtime during the application of patches as only one system is brought down at any given time.
Minimum Downtime PatchingIn Minimum Downtime Patching, the nodes are divided into sets. Initially, the first set is shut down and the patch is applied to it. After this, the second set is shut down. The first set is brought up and patch is applied to the second set. The second set is also brought up now. All the nodes in the Real Application Clusters are now patched. This mode leads to less downtime for the Real Application Clusters when both the sets are brought down. This mode is executed by using -minimize_downtime command line option. You can also activate this option from the response file. The Minimum Downtime Patching is explained with the help of an example below:
Figure 8–4 Minimum Downtime Patching
Consider a Real Application Clusters setup as shown in Figure 8–4, "Minimum Downtime Patching". Systems A,B, and C are nodes in this Real Application Clusters.
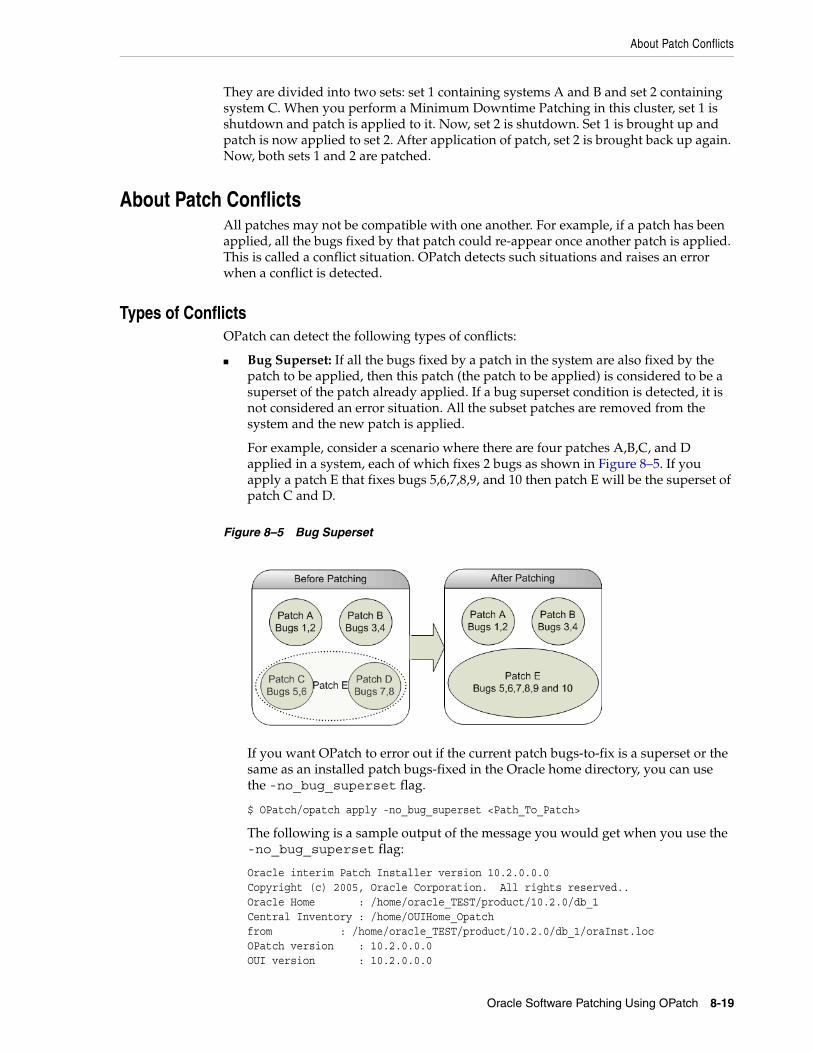
About Patch Conflicts
Oracle Software Patching Using OPatch 8-19
They are divided into two sets: set 1 containing systems A and B and set 2 containing system C. When you perform a Minimum Downtime Patching in this cluster, set 1 is shutdown and patch is applied to it. Now, set 2 is shutdown. Set 1 is brought up and patch is now applied to set 2. After application of patch, set 2 is brought back up again. Now, both sets 1 and 2 are patched.
About Patch ConflictsAll patches may not be compatible with one another. For example, if a patch has been applied, all the bugs fixed by that patch could re-appear once another patch is applied. This is called a conflict situation. OPatch detects such situations and raises an error when a conflict is detected.
Types of ConflictsOPatch can detect the following types of conflicts:
■ Bug Superset: If all the bugs fixed by a patch in the system are also fixed by the patch to be applied, then this patch (the patch to be applied) is considered to be a superset of the patch already applied. If a bug superset condition is detected, it is not considered an error situation. All the subset patches are removed from the system and the new patch is applied.
For example, consider a scenario where there are four patches A,B,C, and D applied in a system, each of which fixes 2 bugs as shown in Figure 8–5. If you apply a patch E that fixes bugs 5,6,7,8,9, and 10 then patch E will be the superset of patch C and D.
Figure 8–5 Bug Superset
If you want OPatch to error out if the current patch bugs-to-fix is a superset or the same as an installed patch bugs-fixed in the Oracle home directory, you can use the -no_bug_superset flag.
$ OPatch/opatch apply -no_bug_superset <Path_To_Patch>
The following is a sample output of the message you would get when you use the -no_bug_superset flag:
Oracle interim Patch Installer version 10.2.0.0.0Copyright (c) 2005, Oracle Corporation. All rights reserved..Oracle Home : /home/oracle_TEST/product/10.2.0/db_1Central Inventory : /home/OUIHome_Opatchfrom : /home/oracle_TEST/product/10.2.0/db_1/oraInst.locOPatch version : 10.2.0.0.0OUI version : 10.2.0.0.0
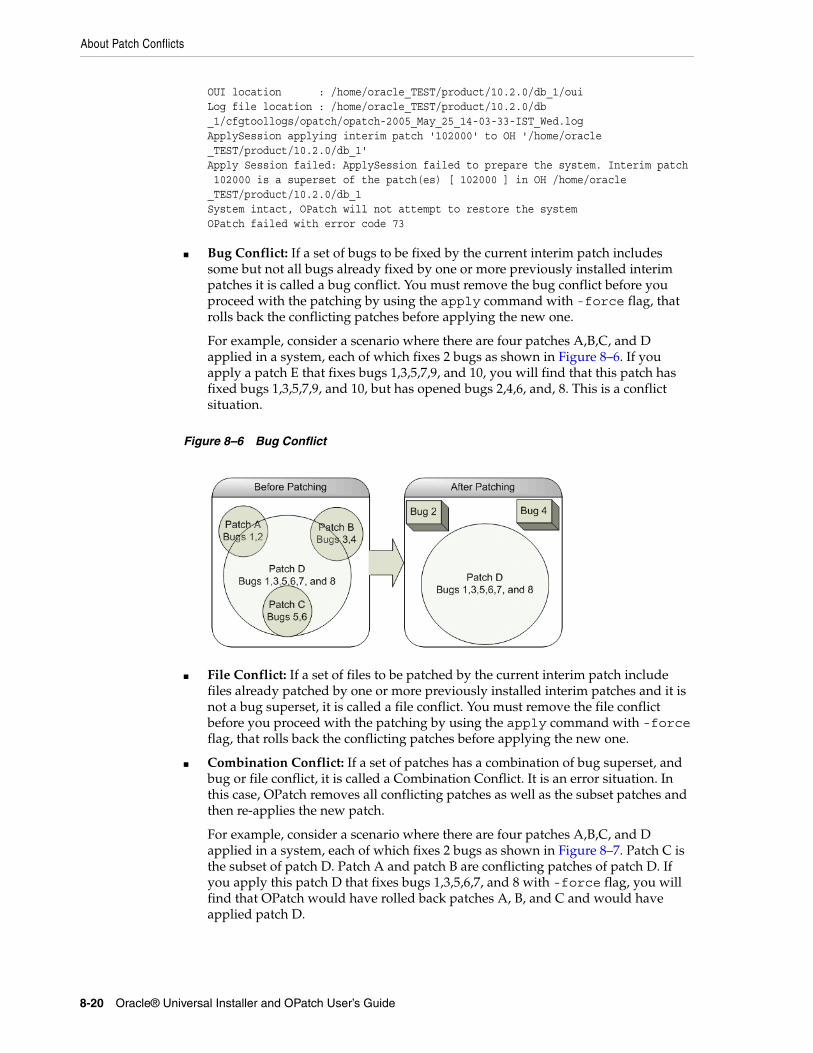
About Patch Conflicts
8-20 Oracle® Universal Installer and OPatch User’s Guide
OUI location : /home/oracle_TEST/product/10.2.0/db_1/ouiLog file location : /home/oracle_TEST/product/10.2.0/db_1/cfgtoollogs/opatch/opatch-2005_May_25_14-03-33-IST_Wed.logApplySession applying interim patch '102000' to OH '/home/oracle_TEST/product/10.2.0/db_1'Apply Session failed: ApplySession failed to prepare the system. Interim patch 102000 is a superset of the patch(es) [ 102000 ] in OH /home/oracle_TEST/product/10.2.0/db_1System intact, OPatch will not attempt to restore the systemOPatch failed with error code 73
■ Bug Conflict: If a set of bugs to be fixed by the current interim patch includes some but not all bugs already fixed by one or more previously installed interim patches it is called a bug conflict. You must remove the bug conflict before you proceed with the patching by using the apply command with -force flag, that rolls back the conflicting patches before applying the new one.
For example, consider a scenario where there are four patches A,B,C, and D applied in a system, each of which fixes 2 bugs as shown in Figure 8–6. If you apply a patch E that fixes bugs 1,3,5,7,9, and 10, you will find that this patch has fixed bugs 1,3,5,7,9, and 10, but has opened bugs 2,4,6, and, 8. This is a conflict situation.
Figure 8–6 Bug Conflict
■ File Conflict: If a set of files to be patched by the current interim patch include files already patched by one or more previously installed interim patches and it is not a bug superset, it is called a file conflict. You must remove the file conflict before you proceed with the patching by using the apply command with -force flag, that rolls back the conflicting patches before applying the new one.
■ Combination Conflict: If a set of patches has a combination of bug superset, and bug or file conflict, it is called a Combination Conflict. It is an error situation. In this case, OPatch removes all conflicting patches as well as the subset patches and then re-applies the new patch.
For example, consider a scenario where there are four patches A,B,C, and D applied in a system, each of which fixes 2 bugs as shown in Figure 8–7. Patch C is the subset of patch D. Patch A and patch B are conflicting patches of patch D. If you apply this patch D that fixes bugs 1,3,5,6,7, and 8 with -force flag, you will find that OPatch would have rolled back patches A, B, and C and would have applied patch D.
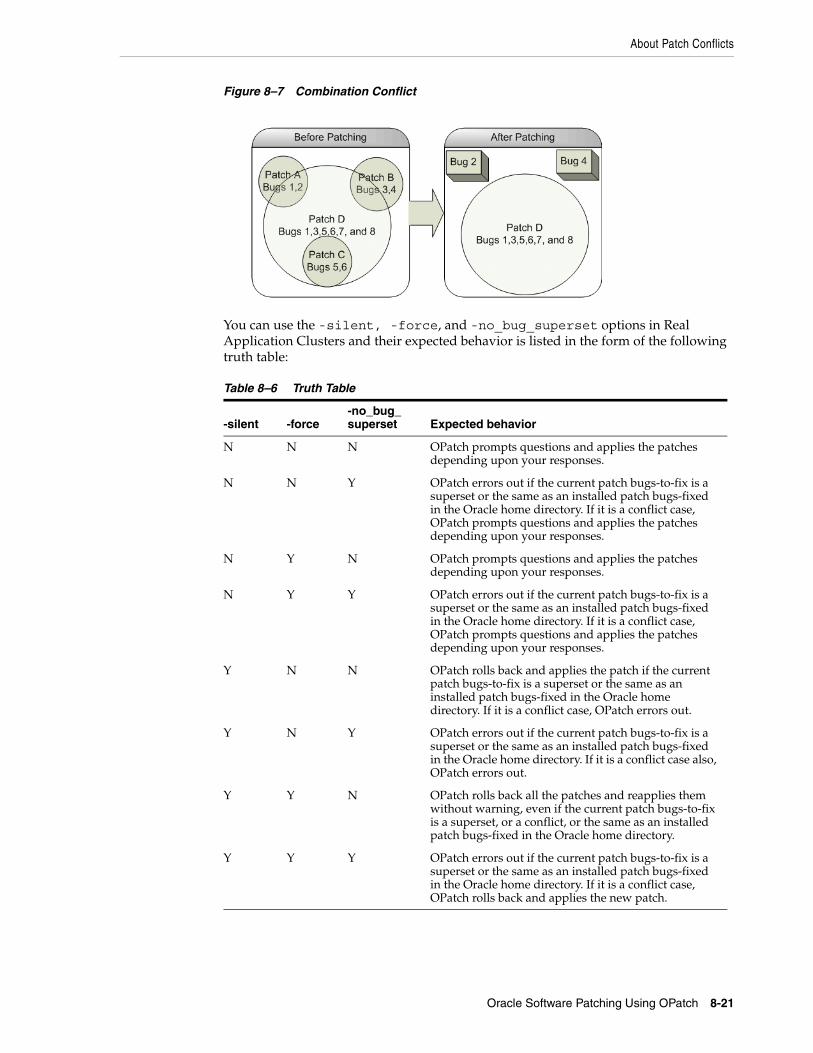
About Patch Conflicts
Oracle Software Patching Using OPatch 8-21
Figure 8–7 Combination Conflict
You can use the -silent, -force, and -no_bug_superset options in Real Application Clusters and their expected behavior is listed in the form of the following truth table:
Table 8–6 Truth Table
-silent -force-no_bug_superset Expected behavior
N N N OPatch prompts questions and applies the patches depending upon your responses.
N N Y OPatch errors out if the current patch bugs-to-fix is a superset or the same as an installed patch bugs-fixed in the Oracle home directory. If it is a conflict case, OPatch prompts questions and applies the patches depending upon your responses.
N Y N OPatch prompts questions and applies the patches depending upon your responses.
N Y Y OPatch errors out if the current patch bugs-to-fix is a superset or the same as an installed patch bugs-fixed in the Oracle home directory. If it is a conflict case, OPatch prompts questions and applies the patches depending upon your responses.
Y N N OPatch rolls back and applies the patch if the current patch bugs-to-fix is a superset or the same as an installed patch bugs-fixed in the Oracle home directory. If it is a conflict case, OPatch errors out.
Y N Y OPatch errors out if the current patch bugs-to-fix is a superset or the same as an installed patch bugs-fixed in the Oracle home directory. If it is a conflict case also, OPatch errors out.
Y Y N OPatch rolls back all the patches and reapplies them without warning, even if the current patch bugs-to-fix is a superset, or a conflict, or the same as an installed patch bugs-fixed in the Oracle home directory.
Y Y Y OPatch errors out if the current patch bugs-to-fix is a superset or the same as an installed patch bugs-fixed in the Oracle home directory. If it is a conflict case, OPatch rolls back and applies the new patch.
Logging and Tracing
8-22 Oracle® Universal Installer and OPatch User’s Guide
Patch Conflict Detection and ResolutionOPatch detects and reports any conflicts encountered when applying an Interim patch with a previously applied patch. The patch application fails in case of conflicts. The -force option of OPatch can be used to override this failure. If -force is specified, the installer will first rollback any conflicting patches and then proceed with the installation of the desired interim patch.
You may come across a bug conflict and might want to remove the conflicting patch. This process is known as patch rollback. During patch installation, OPatch saves copies of all the files that were replaced by the new patch before the new versions of these files are loaded and stores it in $ORACLE_HOME/.patch_storage. These saved files are called rollback files and are the key to making patch rollback possible. When you rollback a patch, these rollback files are restored to the system. You should only override the default behavior by using the -force flag, if you have gained a complete understanding of the patch rollback process. To rollback a patch, execute the following command:
$ OPatch/opatch rollback -id <Patch_ID>
Restoring Oracle HomesEvery time you apply a patch, you make changes to your inventory. Sometimes that change may corrupt the inventory. You can use the restore.sh or restore.bat script that comes with OPatch to remove any changes that were made to the inventory after the application of the patch.
When you apply a patch, OPatch creates a snapshot of your inventory and stores it in $ORACLE_HOME/.patch_storage/<patch-id_timestamp> directory. For more information refer to "Interim Patch Versions" on page 8-2.
When your inventory is corrupted, you need to perform the following steps to bring the application back to it's last known good state:
1. Ensure that the environment variable ORACLE_HOME is set properly.
2. Navigate to the $ORACLE_HOME/.patch_storage/<patch-id_timestamp> directory and execute the restore command:
For UNIX:$ORACLE_HOME/.patch_storage/<patch-id_timestamp>/restore.sh
For Windows:$ORACLE_HOME/.patch_storage/<patch-id_timestamp>/restore.bat
3. On UNIX, source $ORACLE_HOME/.patch_storage/<patch-id_timestamp>/make.txt file (if available) as follows:
/bin/sh make.txt
Logging and TracingLogging and Tracing is a common aid for debugging. OPatch maintains logs for all apply, rollback, and lsInventory operations. The log files are located in <ORACLE_HOME>/cfgtoollogs/opatch directory. Each log file will be tagged with the timestamp of the operation. Log files are named as opatch_<date mm-dd-yyyy>_<time hh-mm-ss>.log. Each time OPatch is executed a new log file is created.
For example, if a log file is created on May 17th, 2005 at 11.55 PM, then it will be named as follows:
Recovering from a Failed Patching Session Using OPatch
Oracle Software Patching Using OPatch 8-23
opatch_05-17-2005_23-55-00.log
OPatch also maintains an index of the commands executed with OPatch and the log files associated with it in the history.txt file located in <ORACLE_HOME>/cfgtoollogs/opatch directory. A sample of the history.txt file is as follows:
Date & Time : Tue Apr 26 23:00:55 PDT 2005Oracle Home : /private/oracle/product/10.1.0/db_1/OPatch Ver. : 10.2.0.0.0Current Dir : /scratch/oui/OPatchCommand : lsinventoryLog File : /private/oracle/product/10.1.0/db_1/cfgtoollogs/opatch/opatch-2005_Apr_26_23-00-55-PDT_Tue.log
Levels of LoggingOPatch follows the Oracle Diagnostic Logging (ODL) Guidelines. You can set the log level by using the -logLevel <level> option available. This option is used to control the amount of logging OPatch performs, according to the ODL guidelines.
OPatch supports the following log levels:
■ SEVERE
■ WARNING
■ INFO
■ CONFIG
■ FINE
■ FINER
■ FINEST
Recovering from a Failed Patching Session Using OPatchDuring patching, updates can occur in two phases:
1. System Update: In this phase, the files get replaced in the Oracle home.
2. Inventory Update: In this phase, the details of the patch applied is recorded in the inventory.
The following lists the various scenarios and how you recover from a failed patching session:
When you apply or rollback a patch, you get an interim inventory update exception.Cause: This occurs when the files on the system are patched, but the inventory update has failed. This may be due to a corrupted inventory.
Action: Perform the following steps:
1. Ensure that the environment variable ORACLE_HOME is set properly.
Note: You can set OPatch to debug mode by setting the environment variable OPATCH_DEBUG to TRUE.
Recovering from a Failed Patching Session Using OPatch
8-24 Oracle® Universal Installer and OPatch User’s Guide
2. Navigate to the $ORACLE_HOME/.patch_storage/<patch-id_timestamp> directory and execute the restore command.
For UNIX:$ORACLE_HOME/.patch_storage/<patch-id_timestamp>/restore.sh
For Windows:$ORACLE_HOME/.patch_storage/<patch-id_timestamp>/restore.bat
3. On UNIX, source $ORACLE_HOME/.patch_storage/<patch-id_timestamp>/make.txt file (if available) as follows:
/bin/sh make.txt
When you apply or rollback a patch, you get an OiiOneoffException exception.Cause: This occurs when the files on the system are patched, but the inventory update has failed. This may be because the base component of the interim patch may not be present in the inventory.
Action: OPatch tries to restore the Oracle home automatically and gives a message for the same. If OPatch does not give a message stating that it has restored the Oracle home, perform the following steps:
1. Ensure that the environment variable ORACLE_HOME is set properly.
2. Navigate to the $ORACLE_HOME/.patch_storage/<patch-id_timestamp> directory and execute the restore command.
For UNIX:$ORACLE_HOME/.patch_storage/<patch-id_timestamp>/restore.sh
For Windows:$ORACLE_HOME/.patch_storage/<patch-id_timestamp>/restore.bat
3. On UNIX, source $ORACLE_HOME/.patch_storage/<patch-id_timestamp>/make.txt file (if available) as follows:
/bin/sh make.txt
When you apply a patch and execute opatch lsinventory, it returns nothing.Cause: This may be due to losing all the patches applied before the application of the current patch or the patches might not have been updated in the inventory.
Action: Perform the following steps:
1. Navigate to the $ORACLE_HOME/.patch_storage/<patch-id_timestamp> directory and execute the restore command:
For UNIX:$ORACLE_HOME/.patch_storage/<patch-id_timestamp>/restore.sh
For Windows:$ORACLE_HOME/.patch_storage/<patch-id_timestamp>/restore.bat
2. On UNIX, source $ORACLE_HOME/.patch_storage/<patch-id_timestamp>/make.txt file (if available) as follows:
/bin/sh make.txt
3. If the files are properly patched, but the information is not updated in the inventory, then execute the following command:

Recovering from a Failed Patching Session Using OPatch
Oracle Software Patching Using OPatch 8-25
$ORACLE_HOME/OPatch/opatch apply -no_sysmod <Path_To_Patch>
Ensure that the patch has been applied and have been recorded properly in the inventory by executing the following command:
$ORACLE_HOME/OPatch/opatch lsinventory -detail
4. If the files are still not patched properly, but you are able to see the patch in the lsinventory flag, you need to re-apply the patch using the no_inventory flag:
$ORACLE_HOME/OPatch/opatch apply -no_inventory <Path_To_Patch>
When you apply a patch and execute opatch lsinventory, it does not return the details of the patch applied.Cause: This may be because OPatch may not have recorded the details of this patch in the inventory.
Action: Perform the following steps:
1. Navigate to the $ORACLE_HOME/.patch_storage/<patch-id_timestamp> directory and execute the restore command:
For UNIX:$ORACLE_HOME/.patch_storage/<patch-id_timestamp>/restore.sh
For Windows:$ORACLE_HOME/.patch_storage/<patch-id_timestamp>/restore.bat
2. On UNIX, source $ORACLE_HOME/.patch_storage/<patch-id_timestamp>/make.txt file (if available) as follows:
/bin/sh make.txt
3. If the files are properly patched, but the information is not updated in the inventory, then execute the following command:
$ORACLE_HOME/OPatch/opatch apply -no_sysmod <Path_To_Patch>
Ensure that the patch has been applied and have been recorded properly in the inventory by executing the following command:
$ORACLE_HOME/OPatch/opatch lsinventory -detail
When you press Ctrl + C during the application or rollback of a patch and execute opatch lsinventory, it does not return the details of the patch applied or rolled back.Cause: This may be because OPatch might have stopped the application or rollback of the patch on pressing Ctrl + C.
Action: Perform the following steps:
1. Ensure that the environment variable ORACLE_HOME is set properly.
2. Navigate to the $ORACLE_HOME/.patch_storage/<patch-id_timestamp> directory and execute the restore command, if it is available.
For UNIX:$ORACLE_HOME/.patch_storage/<patch-id_timestamp>/restore.sh
For Windows:$ORACLE_HOME/.patch_storage/<patch-id_timestamp>/restore.bat
Recovering from a Failed Patching Session Using OPatch
8-26 Oracle® Universal Installer and OPatch User’s Guide
3. On UNIX, source $ORACLE_HOME/.patch_storage/<patch-id_timestamp>/make.txt file (if available) as follows:
/bin/sh make.txt
When you apply a patch, you quit when OPatch failed to relink and prompted to continue.Cause: This may be due to relink failure.
Action: Perform the following steps:
1. Ensure that the environment variable ORACLE_HOME is set properly.
2. Navigate to the $ORACLE_HOME/.patch_storage/<patch-id_timestamp> directory and execute the restore command.
For UNIX:$ORACLE_HOME/.patch_storage/<patch-id_timestamp>/restore.sh
For Windows:$ORACLE_HOME/.patch_storage/<patch-id_timestamp>/restore.bat
3. Resolve the re-link failure issue by ensuring that you are able to invoke make manually on a UNIX shell. After this, apply the patch again.
Real Application Clusters SetupWhen I apply a patch on a Real Application Clusters setup, and execute ‘opatch
lsinventory’ on the local node, the patch is not listed.Cause: This may occur if OPatch failed to update inventory.
Action: Perform the following steps:
1. Ensure that the environment variable ORACLE_HOME is set properly in all the nodes of the cluster.
2. Navigate to the $ORACLE_HOME/.patch_storage/<patch-id_timestamp> directory of each node in the cluster and execute the restore command as follows:
For UNIX:$ORACLE_HOME/.patch_storage/<patch-id_timestamp>/restore.sh
For Windows:$ORACLE_HOME/.patch_storage/<patch-id_timestamp>/restore.bat
3. On UNIX, source $ORACLE_HOME/.patch_storage/<patch-id_timestamp>/make.txt file (if available) in each node of the cluster as follows:
/bin/sh make.txt
4. Apply the patch in each node in the cluster using the local flag:
$ORACLE_HOME/OPatch/opatch apply -local <Path_To_Patch>
Note: Ensure that all the nodes use the same OPatch version.
Recovering from a Failed Patching Session Using OPatch
Oracle Software Patching Using OPatch 8-27
When I apply a patch on a Real Application Clusters setup, and execute ‘opatch lsinventory’ on the local node, it returns nothing.Cause: This may be because you might have lost all the patches applied earlier.
Action: Perform the following steps:
1. Ensure that the environment variable ORACLE_HOME is set properly in each node in the cluster.
2. Navigate to the $ORACLE_HOME/.patch_storage/<patch-id_timestamp> directory and execute the restore command in each node in the cluster.
For UNIX:$ORACLE_HOME/.patch_storage/<patch-id_timestamp>/restore.sh
For Windows:$ORACLE_HOME/.patch_storage/<patch-id_timestamp>/restore.bat
3. On UNIX, source $ORACLE_HOME/.patch_storage/<patch-id_timestamp>/make.txt file (if available) in each node as follows:
/bin/sh make.txt
4. Apply the patch in each node using the local flag:
$ORACLE_HOME/OPatch/opatch apply -local <Path_To_Patch>
When I rollback a patch on a Real Application Clusters setup, and execute ‘opatch lsinventory’ on the local node, it shows that the patch was not removed.Cause: This may occur if OPatch failed to update inventory.
Action: Perform the following steps:
1. Ensure that the environment variable ORACLE_HOME is set properly in each node in the cluster.
2. Navigate to the $ORACLE_HOME/.patch_storage/<patch-id_timestamp> directory in each node in the cluster and execute the restore command as follows:
For UNIX:$ORACLE_HOME/.patch_storage/<patch-id_timestamp>/restore.sh
For Windows:$ORACLE_HOME/.patch_storage/<patch-id_timestamp>/restore.bat
3. On UNIX, source $ORACLE_HOME/.patch_storage/<patch-id_timestamp>/make.txt file (if available) in each node in the cluster as follows:
/bin/sh make.txt
4. Rollback the patch in all the nodes in the cluster using the local flag:
$ORACLE_HOME/OPatch/opatch rollback -local -id <Patch_ID>
Note: Ensure that all the nodes use the same OPatch version.
Recovering from a Failed Patching Session Using OPatch
8-28 Oracle® Universal Installer and OPatch User’s Guide
When I rollback a patch on a Real Application Clusters setup, and execute ‘opatch lsinventory’ on the local node, it returns nothing.Cause: This may be because you might have lost all the patches applied earlier.
Action: Perform the following steps:
1. Ensure that the environment variable ORACLE_HOME is set properly in each node in the cluster.
2. Navigate to the $ORACLE_HOME/.patch_storage/<patch-id_timestamp> directory and execute the restore command in each node in the cluster:
For UNIX:$ORACLE_HOME/.patch_storage/<patch-id_timestamp>/restore.sh
For Windows:$ORACLE_HOME/.patch_storage/<patch-id_timestamp>/restore.bat
3. On UNIX, source $ORACLE_HOME/.patch_storage/<patch-id_timestamp>/make.txt file (if available) as follows:
/bin/sh make.txt
4. Rollback the patch in the local node using the local flag:
$ORACLE_HOME/OPatch/opatch rollback -local -id <Patch_ID>
5. Rollback the patch on the other nodes also using local flag.
When I apply a patch on a Real Application Clusters setup, the patching in one node is fine (both the files and the inventory are fine), but I am not sure about the other nodes.Cause: This may be due to a failed system or inventory update.
Action: Perform the following steps:
1. Copy the Oracle home from the node that is fine to the other nodes.
2. After copying the Oracle home, make sure that the ORACLE_HOME/inventory/ContentsXML/comps.xml file has the latest timestamp.
3. Update the nodes of the cluster. For more information on updating the nodes of the cluster refer to section "Updating the Nodes of a Cluster" on page 3-11.
4. Ensure that all the prerequisite checks listed in the section "Pre-requisite Checks in OPatch" on page 8-4 pass.
Note: Ensure that all the nodes use the same OPatch version.
Note: Ensure that all the nodes use the same OPatch version.
Note: On Unix, use touch to change the timestamp.
Environment Variables Used by OPatch
Oracle Software Patching Using OPatch 8-29
When I apply a patch on a Real Application Clusters setup, the patching in one node is fine, but when I execute ‘opatch lsinventory’ on the other nodes, the patch is not listed.Cause: This may be due to a failed system or inventory update.
Action: Perform the following steps:
1. Copy the ORACLE_HOME /inventory directory from the node that is fine to the other nodes.
2. After copying the ORACLE_HOME /inventory directory, make sure that the ORACLE_HOME/inventory/ContentsXML/comps.xml file has the latest timestamp.
3. Update the nodes of the cluster. For more information on updating the nodes of the cluster refer to section "Updating the Nodes of a Cluster" on page 3-11.
4. Ensure that all the prerequisite checks listed in the section "Pre-requisite Checks in OPatch" on page 8-4 pass.
When I apply or rollback a patch on a Real Application Clusters setup, I am not able to apply or rollback the patch on all nodes.Cause: This may occur if the nodes are not properly updated.
Action: Perform any one or more of the following:
■ Ensure that all the nodes in the cluster are up-to-date. If they are not, update the nodes of the cluster. For more information on updating the nodes of the cluster refer to section "Updating the Nodes of a Cluster" on page 3-11.
■ Execute the appropriate command on all nodes of the cluster as follows:
opatch apply -local [patch_location]
opatch rollback -local [patch_location]
■ Execute the appropriate command on the local node of the cluster as follows:
opatch apply [-local_node (node_name)] [-remote_nodes (comma separated node_names)]
opatch rollback [-local_node (node_name)] [-remote_nodes (comma separated node_names)]
Environment Variables Used by OPatchOPatch uses some environment variables as follows:
ORACLE_HOME - This is the Oracle home location.
OPATCH_DEBUG - This is the log level that specifies the amount of logging OPatch should perform.
OPATCH_PLATFORM_ID - This is the unique platform ID.
PATH - This is the path information.
Note: On Unix, use touch to change the timestamp.
Troubleshooting OPatch
8-30 Oracle® Universal Installer and OPatch User’s Guide
Troubleshooting OPatchThis section provides solutions to errors that may occur during patch application.
■ Not a valid patch area
■ OPatch cannot find system commands like fuser, make
■ Unable to remove a partially-installed interim patch
Not a valid patch areaCause: The directory that the OPatch utility is using to do the patch does not match the template for what it is checking. This can also occur when the utility is run from an invalid ship home directory.
Action: When starting the OPatch utility, the directory needs the following:
■ A /etc directory that has the metadata files.
■ A /files directory that has the payload files.
■ The /etc/config/inventory file and the actions file under the same directory.
If you did not start the OPatch utility from the patch_id directory, then you can use the following command:
opatch apply /<Patch_Shiphome>
OPatch cannot find system commands like fuser, make Cause: The OPatch utility uses fuser on UNIX systems to check for active Oracle instances. On certain hp-ux systems, only a super-user can run fuser.
Action: Do the following steps to resolve this problem:
1. Set /tmp in your PATH.
For more information refer to section "Check for System Commands" on page 8-5.
2. Create an empty file named fuser.
3. Shut down the Oracle instances.
4. Run the OPatch utility.
Unable to remove a partially-installed interim patchCause: Interruption in the patching process is the potential cause for this problem. This may occur if you press CTRL+C during the patching process. If the error is the one that OPatch detects, it automatically takes care of it.
Action: Perform the following steps:
1. Ensure that the environment variable ORACLE_HOME is set properly.
2. Navigate to the $ORACLE_HOME/.patch_storage/<patch-id_timestamp> directory and execute the restore command as follows:
For UNIX:
Caution: Another way to resolve this problem is to give executable permission to other users for fuser. However, this exposes a potential security hole in the system, and is not recommended.

Troubleshooting OPatch
Oracle Software Patching Using OPatch 8-31
$ORACLE_HOME/.patch_storage/<patch-id_timestamp>/restore.sh
For Windows:$ORACLE_HOME/.patch_storage/<patch-id_timestamp>/restore.bat
3. On UNIX, source $ORACLE_HOME/.patch_storage/<patch-id_timestamp>/make.txt file (if available) as follows:
/bin/sh make.txt
Troubleshooting OPatch
8-32 Oracle® Universal Installer and OPatch User’s Guide
Oracle Internationalization and Translation 9-1
9Oracle Internationalization and Translation
The following sections describe how Oracle Universal Installer supports multiple languages and internationalization:
■ Installation Dialogs Language.
■ Product Language Selections.
■ Language Add-on
Installation Dialogs LanguageOracle Universal Installer runs in the language of the operating system. Oracle Universal Installer uses the language that Java detects, the system locale value, and sets that to the default language. The Oracle Universal Installer dialogs will be displayed in this language if available. If specific Oracle Universal Installer dialogs are not translated in the language of the operating system, those dialogs will be shown in English.
Oracle Universal Installer displays the translated GUI only if the variable NLS_ENABLED has been set to TRUE in the oraparam.ini file. If the NLS_ENABLED variable is set to FALSE, all text is shown in English.
Product Language SelectionsIf multiple languages are defined for the products installed, Oracle Universal Installer allows language selection for all installation types via the Languages button (shown on the Available Products page when there is more than one top level component).
The language selections are for the top level component being installed. A top level component is the product selected on the Products Selection dialog, one per installation session. If any sub-components (not top level) do not have files defined for
Note: If there is only one top level component, the Languages button is shown on the Install Types page.
If the staging area has only one top level component with only one installation type, then the button is not shown and a Language Selection dialog is displayed later in the installation. You can also control the selected languages by setting the SELECTED_LANGUAGES variable in a response file or through the command line:
setup.exe SELECTED_LANGUAGES={"fr","de"}

Language Add-on
9-2 Oracle® Universal Installer and OPatch User’s Guide
the language the user selects, English only will be installed. The English files are always installed for all components, regardless of user selection or operating system language.
During installation, Oracle Universal Installer looks at the language list of each file and file group to determine which files need to be copied.
The Oracle Universal Installer product is translated into 9 languages and includes translations for all generic Oracle Universal Installer dialogs. Note that any custom dialogs and product-specific information that are part of your installations must be translated and staged independently.
Language Add-onOracle Universal Installer 10.2 supports post-installation language translation addition. In prior versions, the only way to change the language of an installation was to reinstall the product with the new set of languages. Now to get a version of Oracle product with a particular language up and running, you need to invoke Oracle Universal Installer in -addLangs mode.
Changing the Language of an Installation Using Oracle Universal InstallerTo change the language of an installation using Oracle Universal Installer, perform the following steps:
1. Execute the following command:
./runInstaller -addLangs
2. Welcome page with language add-on specific message appears. Click Next.
3. Specify Home Details page appears. Select the name and full path of the home containing the product to which you want to add languages to and click Next.
4. Language Selection page appears. Select the languages in which you want your Oracle products to be upgraded and click Next.
5. Summary page displaying a snapshot of your preferences appears. Review them and click Install.
6. After the languages are successfully updated, End of Language Upgradation page appears. Click Exit.
Table 9–1 Oracle Universal Installer is translated into these languages
Language Abbreviation
French fr
Brazilian Portuguese pt_BR
German de
Italian it
Japanese ja
Korean ko
Simplified Chinese zh_CN
Spanish es
Traditional Chinese zh_TW
Frequently Asked Questions A-1
AFrequently Asked Questions
This appendix is organized into the following sections:
■ Oracle Universal Installer
■ OPatch
Oracle Universal InstallerThe following section answers the frequently asked questions in Oracle Universal Installer:
On Windows, when I run Oracle Universal Installer setup.exe, it is not invoked.
This may be due to some system resources being held by some services. If we stop these services, then Oracle Universal Installer would be invoked.
To run Oracle Universal Installer again, execute the following:
setup -J-Dsun.java2d.noddraw=true -Dsun.awt.nopixfmt=true
When I start Oracle Universal Installer from any location, after setting the PATH environment variable, I get an error that reads "Could not read any NLS message catalogue!". What do I do?
Oracle Universal Installer needs some files in the directory where the runInstaller (UNIX) or setup.exe (Windows) is running. So, when you invoke runInstaller (UNIX) or setup.exe (Windows), you should invoke it from the directory where this command is present, or you must specify the complete path.
I have lost my Central Inventory but have a valid Oracle home(s). What do I do?
Oracle Universal Installer allows you to set up the Central Inventory or register an existing ORACLE_HOME with the Central Inventory in case of inventory corruption or loss. You need to execute the command with the -attachHome flag. For more information refer to the section "Creating the Central Inventory" on page 3-7.
I want to deploy multiple Oracle home(s) from an existing Oracle home. How do I do this?
Oracle Universal Installer creates Oracle homes during Oracle software installation. To deploy multiple Oracle homes using an existing one, you need to clone the Oracle home. For more information on cloning and mass deployment, refer to Chapter 7, "Oracle Software Cloning Using Oracle Universal Installer".
I have lost my Oracle home inventory (comps.xml). What can I do?
Oracle recommends backing up the inventory when an Oracle home is installed or removed. Ensure that you back up the comps.xml having the latest timestamp. For
OPatch
A-2 Oracle® Universal Installer and OPatch User’s Guide
more information on backing up the inventory, refer to section "Backing up the Inventory" on page 3-9.
When your Oracle home inventory is corrupted or lost, you can restore from the backup or you can install the Oracle home from an identical installation.
When I run the config assistants, they fail. What do I do?
To recover from this problem, rename the configToolAllCommands and configToolFailedCommands files as follows:
In UNIX, rename the configToolAllCommands and configToolFailedCommands files located in the OracleHome/cfgtoollogs/ directory to configToolAllCommands.sh and configToolFailedCommands.sh respectively and execute them.
In Windows, rename the configToolAllCommands and configToolFailedCommands files located in the OracleHome/cfgtoollogs/ directory to configToolAllCommands.bat and configToolFailedCommands.bat respectively and execute them.
ConfigToolAllCommands(.sh/.bat) will be used when the install was done with a -noConfig option and you want to run all the configuration assistants in standalone mode, outside the OUI context.
ConfigToolFailedCommands(.sh/.bat) will be used when the install was done with failed configuration assistants and you want to run only the failed configuration assistants later in standalone mode, outside the OUI context.
When I apply a patchset or an interim patch, the installer tries to propagate to a node that I disconnected long back. What do I do?
This may be due to the presence of the Oracle home in the Central Inventory.
Oracle Universal Installer allows you to remove the Oracle home from the Central Inventory in cases where the Oracle home is uninstalled. To remove the Oracle home, you need to execute runInstaller with the -detachHome flag. You can also completely remove the Central Inventory to remove traces of log files. For more information refer to the section "Detaching Oracle Homes from the Central Inventory" on page 3-8.
When I apply a patchset or an interim patch, the patch is not propagated to some of my Real Application Clusters nodes. What do I do?
In a Real Application Clusters environment, the inventory contains a list of nodes associated with an Oracle home. It is important that during the application of a patchset or an interim patch, the inventory is correctly populated with the list of nodes. If the inventory is not correctly populated with values, the patch is propagated only to some of the nodes in the cluster.
Oracle Universal Installer allows you to update the inventory.xml with the nodes available in the cluster using the -updateNodeList flag in Oracle Universal Installer. For more information refer to the section "Updating the Nodes of a Cluster" on page 3-11.
OPatchThe following section answers the frequently asked questions in OPatch
When I apply a patch I get an error that reads "Failed to load the patch object. Possible causes are: The specified path is not an interim patchshiphome. Meta-data files are missing from the patch area ". What do I do?
OPatch
Frequently Asked Questions A-3
This simply means the directory OPatch is using to find the patch doesn't match the template it is checking for. For more information on this error, refer to section "Not a valid patch area" on page 8-30.
When I apply a patch I get an error that reads "Syntax error.....Patch location not valid". What do I do?
This simply means that the patch location that you specify is an invalid one. Give the correct patch location and apply the patch again.
When I apply a patch I get an error that reads "Exception in thread "main" java.lang.NoClassDefFoundError: <Class Name>". What do I do?
This may be due to OPatch not able to find the particular class listed in the error, which is supposed to be located inside $ORACLE_HOME/OPatch/jlib/opatch.jar file. Check if you have the particular class file there. To check this, execute the following command; the missing class file will be printed out:
cd $ORACLE_HOME/OPatch/jlibjar tf opatch.jar <Class File Name>.class
It is recommended that you contact Oracle support when you encounter this error.
Another reason might be having done a file transfer of OPatch in a non-binary mode.
When I apply a patch, I get an error that reads "OPatch cannot find the required command ’ar’ from Property file and your PATH". What do I do?
’ar’ is a command used by OPatch. This message may appear if OPatch is not able to locate this command.
For more details and workaround for this problem, refer to section "OPatch cannot find system commands like fuser, make" on page 8-30.
When I apply a patch, I get an error that reads "OPatch cannot find the required command ’fuser’ from Property file and your PATH". What do I do?
’fuser’ is a command used by OPatch. This message may appear if OPatch is not able to locate this command.
For more details and workaround for this problem, refer to section "OPatch cannot find system commands like fuser, make" on page 8-30.
How do I get the information about a patch that I applied long back?
You can look at the folder $ORACLE_HOME/.patch_storage/<patch-id_timestamp>. It has detailed information about the patch. You can also use opatch lsinventory -detail to see the files that have been modified by the patch.
Where do I get the OPatch 10.2 log files?
You can look at the folder $ORACLE_HOME/cfgtoollogs/opatch for OPatch 10.2 log files.
How do I find out a list of Oracle home(s) for a host?
To find out the list of Oracle home(s) in a host, use the command lsinventory -all.
How can I minimize the downtime when applying a patch to a Real Application Clusters setup?
You can minimize the downtime when applying a patch to a Real Application Clusters setup by doing a Minimum Downtime Patching. For more information refer to section "Minimum Downtime Patching" on page 8-18.
OPatch
A-4 Oracle® Universal Installer and OPatch User’s Guide
Can I stop applying a patch after applying it to a few nodes? What are the possible issues?
Yes, it is possible to stop applying a patch after applying it to a few nodes. But, Oracle recommends that you do not do this.
There is a prompt that allows you to stop applying the patch. This means you cannot apply another patch until the process is restarted and all the nodes are patched or the partially applied patch is rolled back.
Can I run patching in scripted mode?
Yes, it is possible by using the command opatch <option> -silent. For more information, refer to section "Operations and Options in OPatch Utility" on page 8-10.
Before applying a patch I want to know what is the impact of the patch?
You can use the command opatch <option> -report. For more information, refer to section "Operations and Options in OPatch Utility" on page 8-10.
What versions of OPatch can I use with Oracle Universal Installer 10.2?
Oracle recommends using OPatch version 10.2 from the Oracle home with Oracle Universal Installer 10.2. Also note that OPatch is compatible only with the version of Oracle Universal Installer that is installed in the Oracle home.
Is Opatch 10.2 backward compatible? Can I use OPatch 10.2 to apply 9.2 and 10.1 patches?
No, OPatch 10.2 is not backward compatible. You can use Opatch 10.2 only to apply 10.2 patches.
When I apply a patch, I get an error that reads as follows:
"OPatchSession cannot load inventory for the given Oracle Home <Home_Location>. Possible causes are:
No read or write permission to ORACLE_HOME/.patch_storage
Central Inventory is locked by another OUI instance
No read permission to Central Inventory
The lock file exists in ORACLE_HOME/.patch_storage
The Oracle Home does not exist in Central Inventory"
What do I do?
This error may occur because of any one or more of the following reasons:
1. The ORACLE_HOME/.patch_storage may not have read/write permissions. Ensure that you give read/write permissions to this folder and apply the patch again.
2. There may be another Oracle Universal Installer instance running. Stop it and try applying the patch again.
3. The Central Inventory may not have read permission. Ensure that you give read permission to the Central Inventory and apply the patch again.
4. The ORACLE_HOME/.patch_storage directory might be locked. If this directory is locked, you will find a file named patch_locked inside this directory. This may be due to a previously failed installation of a patch. To remove the lock, restore the Oracle home and remove the patch_locked file from the ORACLE_HOME/.patch_storage directory. For more information on restoring the Oracle home, refer to section "Restoring Oracle Homes" on page 8-22.
OPatch
Frequently Asked Questions A-5
5. The Oracle home may not be present in the Central Inventory. This may be due to a corrupted or lost inventory or the inventory may not be registered in the Central Inventory. For more information, refer to section "Diagnosing and Recovering from Central Inventory Corruption" on page 3-10.

OPatch
A-6 Oracle® Universal Installer and OPatch User’s Guide
Troubleshooting and Debugging Oracle Universal Installer B-1
BTroubleshooting and Debugging Oracle
Universal Installer
This appendix is organized into the following troubleshooting sections:
■ Debugging Mechanisms in Oracle Universal Installer
■ Oracle Universal Installer Errors
■ Other Tips
Debugging Mechanisms in Oracle Universal InstallerDuring the installation, Oracle Universal Installer writes a text file that contains information on:
■ Variable settings
■ Action calls
■ Queries
■ Exception information
The log of installation actions is written to a file named installActions<date>.log, located in the <oraInventory>\logs directory. The oraInstall<timestamp>.err and oraInstall<timestamp>.out files are also created and stored in the same logs directory. The .log, .err, and .out file for a particular session will be named with the same timestamp.
The installation log is used for debugging purposes only. All actions, queries, everything that happens during the installation, and all modifications to the target host are logged in the file.
A sample file is shown below:
installActions2002-08-16_09-52-16-AM.logEnvironment variables:ORACLE_HOME = PATH = E:\OEM\bin;E:\ORACLE815\bin;C:\Program Files\Oracle\jre\1.1.7\bin;C:\ORATST\BINCLASSPATH = C:\Program Files\Exceed.nt\hcljrcsv.zip;Username is: jdoe
The installer version is 2.2.1.0.0
*** Welcome Page***Setting value of FROM_LOCATION to E:\bootstrap\cd\Disk1\stage\products.jarSetting value of INVENTORY_LOCATION to C:\Program Files\Oracle\Inventory
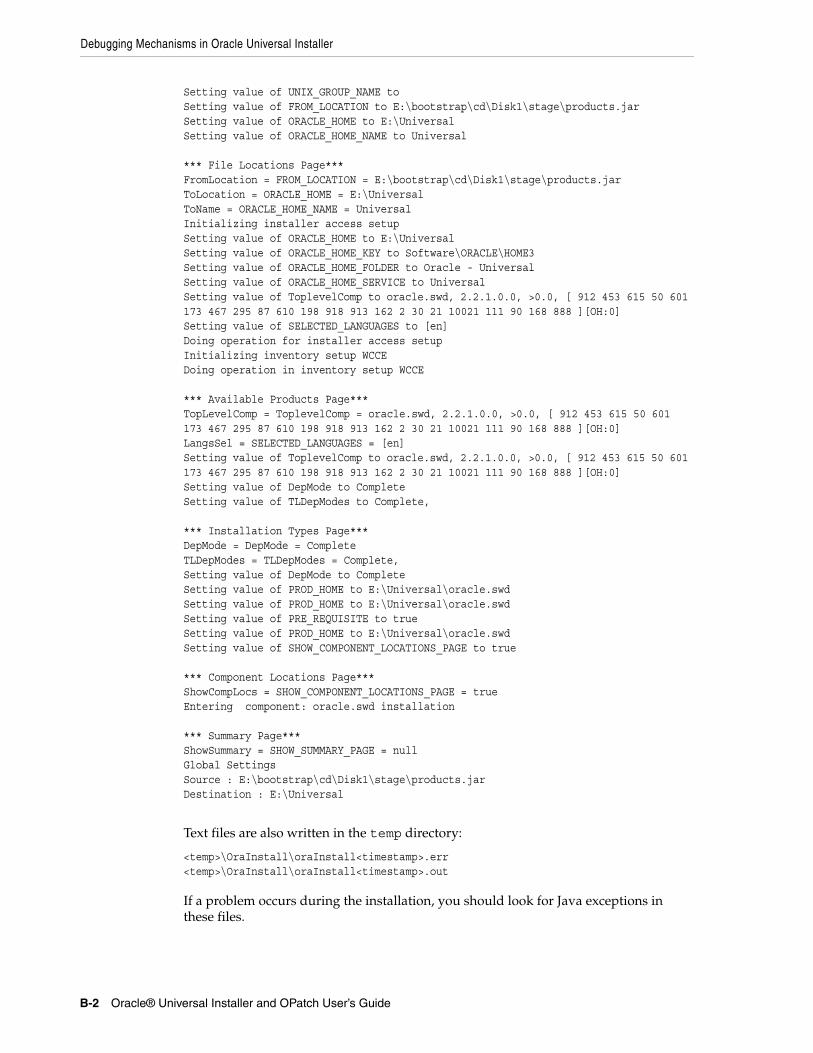
Debugging Mechanisms in Oracle Universal Installer
B-2 Oracle® Universal Installer and OPatch User’s Guide
Setting value of UNIX_GROUP_NAME to Setting value of FROM_LOCATION to E:\bootstrap\cd\Disk1\stage\products.jarSetting value of ORACLE_HOME to E:\UniversalSetting value of ORACLE_HOME_NAME to Universal
*** File Locations Page***FromLocation = FROM_LOCATION = E:\bootstrap\cd\Disk1\stage\products.jarToLocation = ORACLE_HOME = E:\UniversalToName = ORACLE_HOME_NAME = UniversalInitializing installer access setupSetting value of ORACLE_HOME to E:\UniversalSetting value of ORACLE_HOME_KEY to Software\ORACLE\HOME3Setting value of ORACLE_HOME_FOLDER to Oracle - UniversalSetting value of ORACLE_HOME_SERVICE to UniversalSetting value of ToplevelComp to oracle.swd, 2.2.1.0.0, >0.0, [ 912 453 615 50 601 173 467 295 87 610 198 918 913 162 2 30 21 10021 111 90 168 888 ][OH:0]Setting value of SELECTED_LANGUAGES to [en]Doing operation for installer access setupInitializing inventory setup WCCEDoing operation in inventory setup WCCE
*** Available Products Page***TopLevelComp = ToplevelComp = oracle.swd, 2.2.1.0.0, >0.0, [ 912 453 615 50 601 173 467 295 87 610 198 918 913 162 2 30 21 10021 111 90 168 888 ][OH:0]LangsSel = SELECTED_LANGUAGES = [en]Setting value of ToplevelComp to oracle.swd, 2.2.1.0.0, >0.0, [ 912 453 615 50 601 173 467 295 87 610 198 918 913 162 2 30 21 10021 111 90 168 888 ][OH:0]Setting value of DepMode to CompleteSetting value of TLDepModes to Complete,
*** Installation Types Page***DepMode = DepMode = CompleteTLDepModes = TLDepModes = Complete,Setting value of DepMode to CompleteSetting value of PROD_HOME to E:\Universal\oracle.swdSetting value of PROD_HOME to E:\Universal\oracle.swdSetting value of PRE_REQUISITE to trueSetting value of PROD_HOME to E:\Universal\oracle.swdSetting value of SHOW_COMPONENT_LOCATIONS_PAGE to true
*** Component Locations Page***ShowCompLocs = SHOW_COMPONENT_LOCATIONS_PAGE = trueEntering component: oracle.swd installation
*** Summary Page***ShowSummary = SHOW_SUMMARY_PAGE = nullGlobal SettingsSource : E:\bootstrap\cd\Disk1\stage\products.jarDestination : E:\Universal
Text files are also written in the temp directory:
<temp>\OraInstall\oraInstall<timestamp>.err<temp>\OraInstall\oraInstall<timestamp>.out
If a problem occurs during the installation, you should look for Java exceptions in these files.
Other Tips
Troubleshooting and Debugging Oracle Universal Installer B-3
Oracle Universal Installer ErrorsRefer to the release notes for information on any Oracle Universal Installer limitations for a particular version.
The most common Oracle Universal Installer errors are listed below:
■ Out of "temp" space
Make sure you have enough space in the default TEMP or TMP directory otherwise the installation will not succeed. The amount of space required depends on the product being installed.
■ Incomplete stage and missing files in file groups
Make sure you have a good staging area. You may have incorrectly copied the staging area from the CD to the hard disk.
■ Exceptions from action libraries:
– NT Services, if a service is already started
– File permissions
■ UNCAUGHT_RUNTIME exception when user tries to install the product on his machine
This is a blanket error catch that catches any run-time errors like NullPointers from libraries. Check if the temp\OraInstall\orainsrall.err has any stack trace. The user will have to call support to debug the staging area.
Other TipsThe following tips may help you to troubleshoot:
■ Make sure the correct version of the JRE is specified in the PATH.
■ If Java cannot run applications from a Sun machine on an NCD X terminal (Oracle Universal Installer does not start), remove the following file:
$JAVA_HOME/lib/font.properties
■ If you are deleting an Oracle home manually without using Oracle Universal Installer, the products remain registered with Oracle Universal Installer. You must then simulate a de-install so that all Oracle Universal Installer references are removed.
■ If the installation is canceled:
– Products will not be registered with Oracle Universal Installer
– Some files may have been copied, depending on when you issued the cancellation.
X terminal emulators that were tested with Oracle Universal Installer are listed in the following sections.
Note: On UNIX and Windows, Oracle Universal Installer looks for %TEMP% then %TMP%. If neither is set, Oracle Universal Installer will default to /tmp on UNIX and c:\temp on Windows.
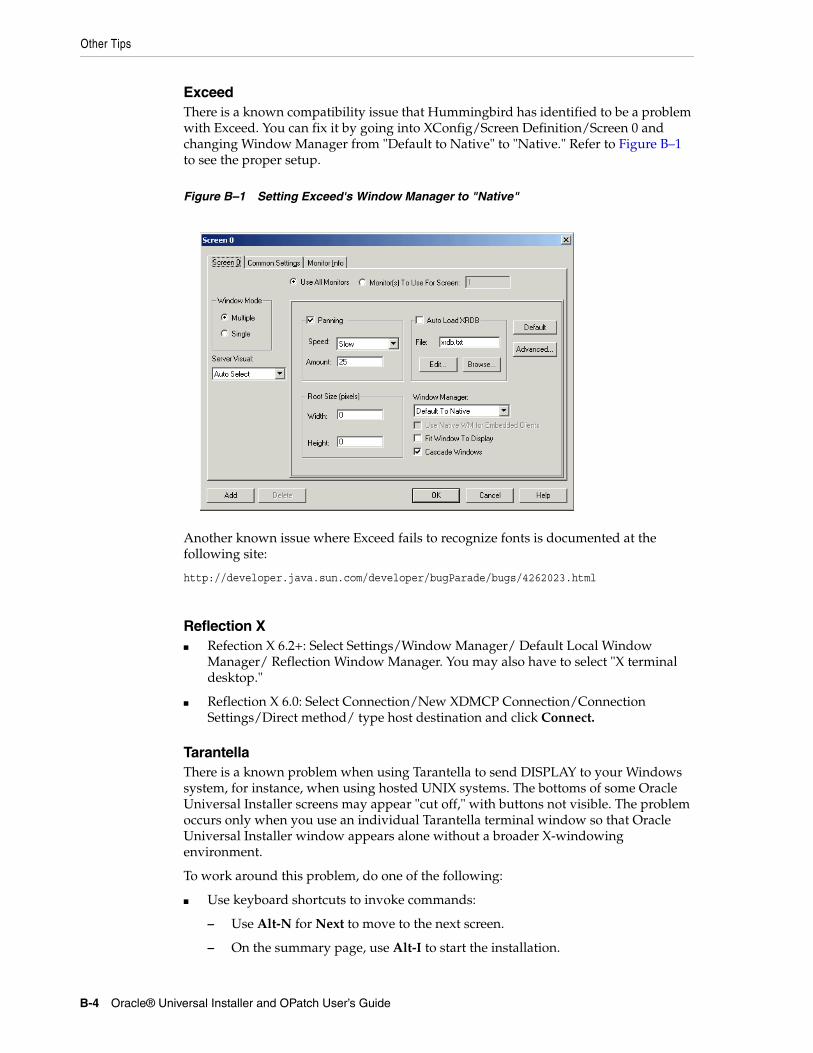
Other Tips
B-4 Oracle® Universal Installer and OPatch User’s Guide
ExceedThere is a known compatibility issue that Hummingbird has identified to be a problem with Exceed. You can fix it by going into XConfig/Screen Definition/Screen 0 and changing Window Manager from "Default to Native" to "Native." Refer to Figure B–1 to see the proper setup.
Figure B–1 Setting Exceed's Window Manager to "Native"
Another known issue where Exceed fails to recognize fonts is documented at the following site:
http://developer.java.sun.com/developer/bugParade/bugs/4262023.html
Reflection X■ Refection X 6.2+: Select Settings/Window Manager/ Default Local Window
Manager/ Reflection Window Manager. You may also have to select "X terminal desktop."
■ Reflection X 6.0: Select Connection/New XDMCP Connection/Connection Settings/Direct method/ type host destination and click Connect.
TarantellaThere is a known problem when using Tarantella to send DISPLAY to your Windows system, for instance, when using hosted UNIX systems. The bottoms of some Oracle Universal Installer screens may appear "cut off," with buttons not visible. The problem occurs only when you use an individual Tarantella terminal window so that Oracle Universal Installer window appears alone without a broader X-windowing environment.
To work around this problem, do one of the following:
■ Use keyboard shortcuts to invoke commands:
– Use Alt-N for Next to move to the next screen.
– On the summary page, use Alt-I to start the installation.
Other Tips
Troubleshooting and Debugging Oracle Universal Installer B-5
■ Use the Window Manager window in Tarantella, which displays the entire screen as if it were a UNIX monitor. Installer dialogs will appear properly in Window Manager.

Other Tips
B-6 Oracle® Universal Installer and OPatch User’s Guide
Understanding Oracle Universal Installer Commands C-1
CUnderstanding Oracle Universal Installer
Commands
The Oracle Universal Installer is run with various options and command-line arguments. This appendix lists the syntax of Oracle Universal Installer, the various command line options available in Oracle Universal Installer. The following command shows the syntax for running the Oracle Universal Installer:
./runInstaller or setup.exe <option> [-command_line_variable=value]
In the preceding command, the following variables are used:
■ option: The options available in Oracle Universal Installer. They are described in Table C–1, " Options in Oracle Universal Installer".
■ command_line_variable: The command-line variable for the option. They are described in Table C–2, " Command line variables in Oracle Universal Installer".
Options Available in Oracle Universal InstallerThe following table lists the various options available in Oracle Universal Installer:
Note: You can pass the command line variable in either of the following three ways:
1. <command_line_variable>={"value1","value2"}
2. "<command_line_variable>={value1,value2}"
3. <command_line_variable>="{value1,value2}"
Table C–1 Options in Oracle Universal Installer
Option Description
-clusterware oracle.crs,<crs version>
This is the version of the Oracle Clusterware installed.
-crsLocation <Path> This specifies the path to the Oracle Clusterware home location. This flag is used only for cluster installs. Specifying this flag overrides the CRS information obtained from the Central Inventory.
-invPtrLoc <full path of oraInst.loc>
This is used to point to a different inventory location. The orainst.loc file contains the following entries:
inventory_loc=<location of central inventory>
inst_group=<>
This flag can only be passed on UNIX platforms.
Options Available in Oracle Universal Installer
C-2 Oracle® Universal Installer and OPatch User’s Guide
-jreLoc <location> This is the path where the Java Runtime Environment is installed. You need to mention this path to override the default path.
-logLevel <level> This is used to filter log messages that have a lesser priority level than the level specified. Valid options are: severe, warning, info, config, fine, finer, and finest.
-paramFile <location of file> This is used to specify the location of oraparam.ini file to be used by Oracle Universal Installer.
-responseFile <Path> This is used to specify the location of the response file to use. This option is used with the -silent flag.
-sourceLoc <location of products.xml>
This is used to specify the ship home location.
-addLangs This is used to add new languages to an already installed product.
-addNode This is used for adding node(s) to the installation. You cannot use this flag in silent mode with response files. You can pass the required session variable through the command line. You must pass the CLUSTER_NEW_NODES, CLUSTER_NEW_PRIVATE_NODE_NAMES, and CLUSTER_NEW_VIRTUAL_HOSTNAMES session variables when using this flag.
-attachHome This is used for attaching homes to the Oracle Universal Installer inventory. You must pass the ORACLE_HOME and ORACLE_HOME_NAME session variables when using this flag.
-cfs This is used to indicate that the Oracle home specified is on cluster file system (shared). This is mandatory when '-local' flag is specified so that Oracle Universal Installer can register the home appropriately into the inventory.
-clone This is used for cloning an Oracle home from a source location to a target location. You must pass the ORACLE_HOME and ORACLE_HOME_NAME session variables when using this flag.
-debug This is used for getting the debug information from Oracle Universal Installer.
-deinstall This flag is used for de-install operations. You can pass the DEINSTALL_LIST and/or REMOVE_HOMES along with ORACLE_HOME and/or ORACLE_HOME_NAME session variables when using this flag
-detachHome This flag is used for detaching homes from the Oracle Universal Installer inventory without deleting the inventory directory inside the Oracle home. You must pass the ORACLE_HOME session variable when using this flag.
-enableRollingUpgrade This is used in cluster environments, to enable an upgrade of a product on a subset of nodes (on which the product was installed).
-executeSysPrereqs This is used to execute system pre-requisite checks and exit.
-force This allows silent mode installation on a non-empty directory without warning.
-help This is used to list the syntax and help information.
Table C–1 (Cont.) Options in Oracle Universal Installer
Option Description
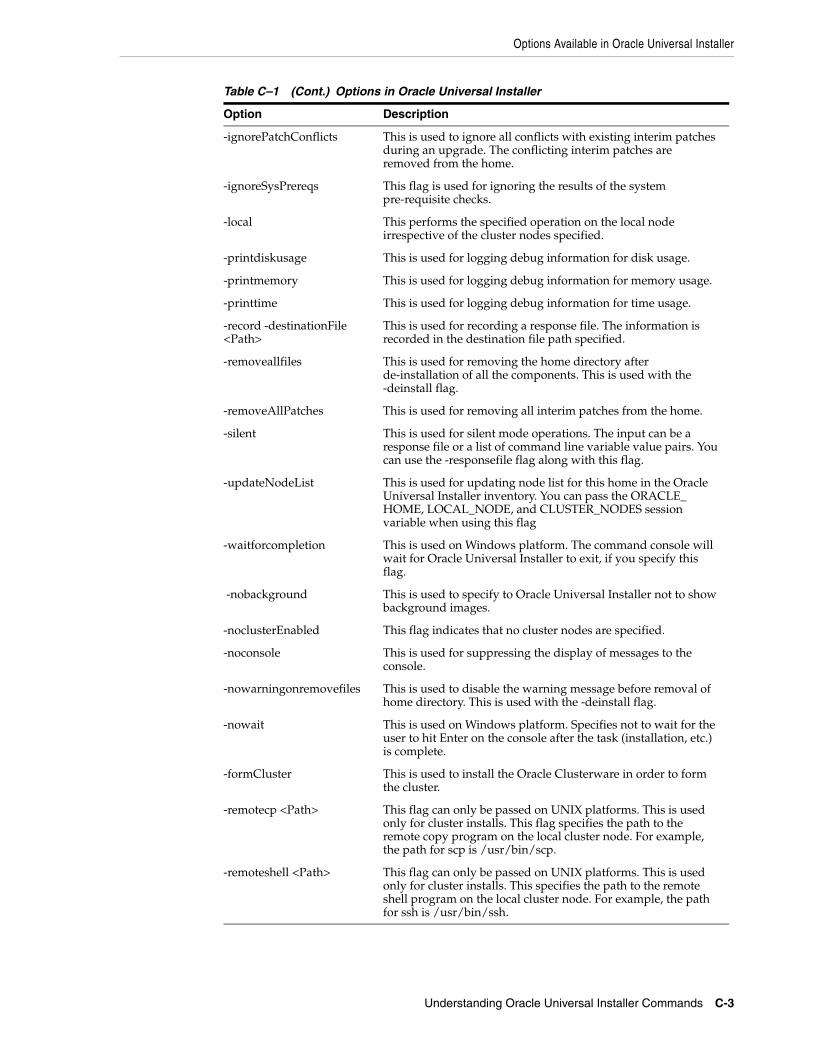
Options Available in Oracle Universal Installer
Understanding Oracle Universal Installer Commands C-3
-ignorePatchConflicts This is used to ignore all conflicts with existing interim patches during an upgrade. The conflicting interim patches are removed from the home.
-ignoreSysPrereqs This flag is used for ignoring the results of the system pre-requisite checks.
-local This performs the specified operation on the local node irrespective of the cluster nodes specified.
-printdiskusage This is used for logging debug information for disk usage.
-printmemory This is used for logging debug information for memory usage.
-printtime This is used for logging debug information for time usage.
-record -destinationFile <Path>
This is used for recording a response file. The information is recorded in the destination file path specified.
-removeallfiles This is used for removing the home directory after de-installation of all the components. This is used with the -deinstall flag.
-removeAllPatches This is used for removing all interim patches from the home.
-silent This is used for silent mode operations. The input can be a response file or a list of command line variable value pairs. You can use the -responsefile flag along with this flag.
-updateNodeList This is used for updating node list for this home in the Oracle Universal Installer inventory. You can pass the ORACLE_HOME, LOCAL_NODE, and CLUSTER_NODES session variable when using this flag
-waitforcompletion This is used on Windows platform. The command console will wait for Oracle Universal Installer to exit, if you specify this flag.
-nobackground This is used to specify to Oracle Universal Installer not to show background images.
-noclusterEnabled This flag indicates that no cluster nodes are specified.
-noconsole This is used for suppressing the display of messages to the console.
-nowarningonremovefiles This is used to disable the warning message before removal of home directory. This is used with the -deinstall flag.
-nowait This is used on Windows platform. Specifies not to wait for the user to hit Enter on the console after the task (installation, etc.) is complete.
-formCluster This is used to install the Oracle Clusterware in order to form the cluster.
-remotecp <Path> This flag can only be passed on UNIX platforms. This is used only for cluster installs. This flag specifies the path to the remote copy program on the local cluster node. For example, the path for scp is /usr/bin/scp.
-remoteshell <Path> This flag can only be passed on UNIX platforms. This is used only for cluster installs. This specifies the path to the remote shell program on the local cluster node. For example, the path for ssh is /usr/bin/ssh.
Table C–1 (Cont.) Options in Oracle Universal Installer
Option Description
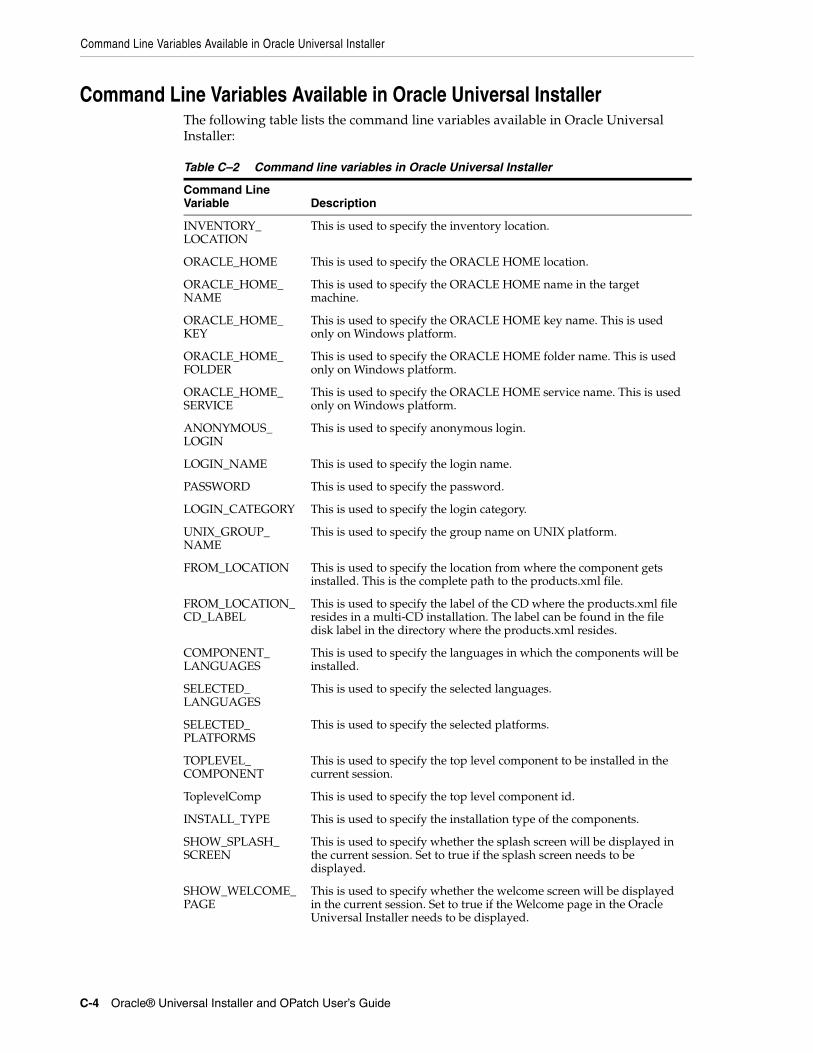
Command Line Variables Available in Oracle Universal Installer
C-4 Oracle® Universal Installer and OPatch User’s Guide
Command Line Variables Available in Oracle Universal InstallerThe following table lists the command line variables available in Oracle Universal Installer:
Table C–2 Command line variables in Oracle Universal Installer
Command Line Variable Description
INVENTORY_LOCATION
This is used to specify the inventory location.
ORACLE_HOME This is used to specify the ORACLE HOME location.
ORACLE_HOME_NAME
This is used to specify the ORACLE HOME name in the target machine.
ORACLE_HOME_KEY
This is used to specify the ORACLE HOME key name. This is used only on Windows platform.
ORACLE_HOME_FOLDER
This is used to specify the ORACLE HOME folder name. This is used only on Windows platform.
ORACLE_HOME_SERVICE
This is used to specify the ORACLE HOME service name. This is used only on Windows platform.
ANONYMOUS_LOGIN
This is used to specify anonymous login.
LOGIN_NAME This is used to specify the login name.
PASSWORD This is used to specify the password.
LOGIN_CATEGORY This is used to specify the login category.
UNIX_GROUP_NAME
This is used to specify the group name on UNIX platform.
FROM_LOCATION This is used to specify the location from where the component gets installed. This is the complete path to the products.xml file.
FROM_LOCATION_CD_LABEL
This is used to specify the label of the CD where the products.xml file resides in a multi-CD installation. The label can be found in the file disk label in the directory where the products.xml resides.
COMPONENT_LANGUAGES
This is used to specify the languages in which the components will be installed.
SELECTED_LANGUAGES
This is used to specify the selected languages.
SELECTED_PLATFORMS
This is used to specify the selected platforms.
TOPLEVEL_COMPONENT
This is used to specify the top level component to be installed in the current session.
ToplevelComp This is used to specify the top level component id.
INSTALL_TYPE This is used to specify the installation type of the components.
SHOW_SPLASH_SCREEN
This is used to specify whether the splash screen will be displayed in the current session. Set to true if the splash screen needs to be displayed.
SHOW_WELCOME_PAGE
This is used to specify whether the welcome screen will be displayed in the current session. Set to true if the Welcome page in the Oracle Universal Installer needs to be displayed.
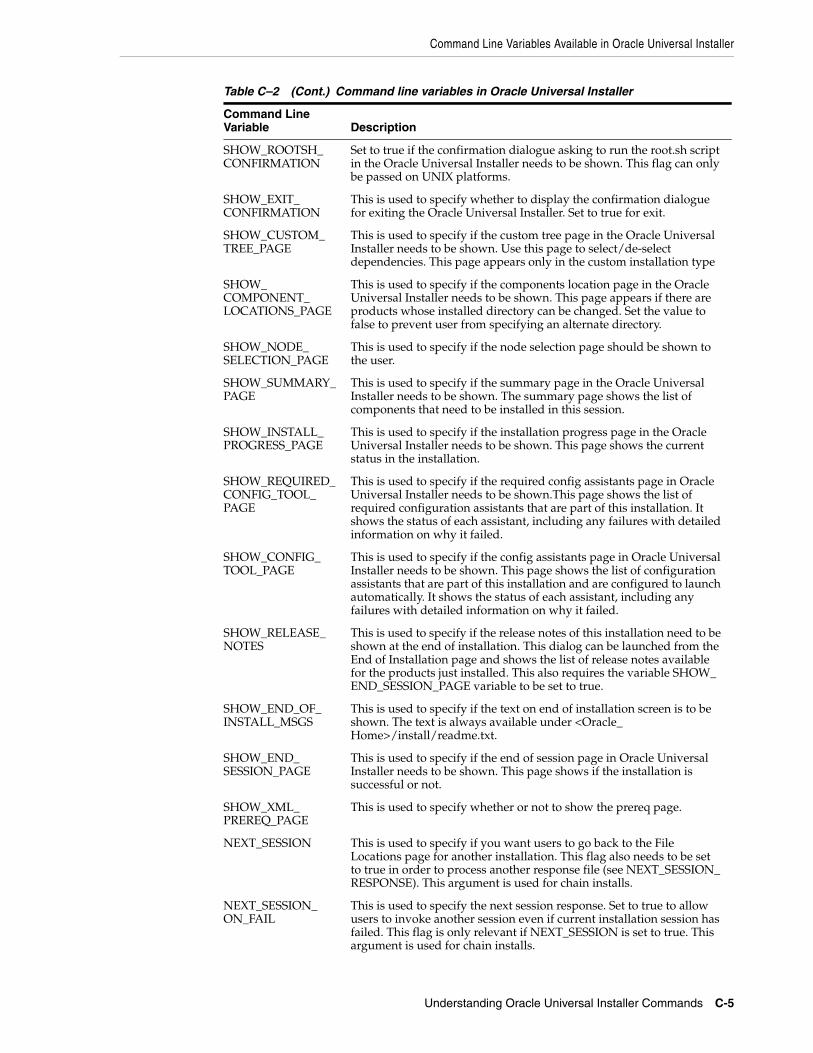
Command Line Variables Available in Oracle Universal Installer
Understanding Oracle Universal Installer Commands C-5
SHOW_ROOTSH_CONFIRMATION
Set to true if the confirmation dialogue asking to run the root.sh script in the Oracle Universal Installer needs to be shown. This flag can only be passed on UNIX platforms.
SHOW_EXIT_CONFIRMATION
This is used to specify whether to display the confirmation dialogue for exiting the Oracle Universal Installer. Set to true for exit.
SHOW_CUSTOM_TREE_PAGE
This is used to specify if the custom tree page in the Oracle Universal Installer needs to be shown. Use this page to select/de-select dependencies. This page appears only in the custom installation type
SHOW_COMPONENT_LOCATIONS_PAGE
This is used to specify if the components location page in the Oracle Universal Installer needs to be shown. This page appears if there are products whose installed directory can be changed. Set the value to false to prevent user from specifying an alternate directory.
SHOW_NODE_SELECTION_PAGE
This is used to specify if the node selection page should be shown to the user.
SHOW_SUMMARY_PAGE
This is used to specify if the summary page in the Oracle Universal Installer needs to be shown. The summary page shows the list of components that need to be installed in this session.
SHOW_INSTALL_PROGRESS_PAGE
This is used to specify if the installation progress page in the Oracle Universal Installer needs to be shown. This page shows the current status in the installation.
SHOW_REQUIRED_CONFIG_TOOL_PAGE
This is used to specify if the required config assistants page in Oracle Universal Installer needs to be shown.This page shows the list of required configuration assistants that are part of this installation. It shows the status of each assistant, including any failures with detailed information on why it failed.
SHOW_CONFIG_TOOL_PAGE
This is used to specify if the config assistants page in Oracle Universal Installer needs to be shown. This page shows the list of configuration assistants that are part of this installation and are configured to launch automatically. It shows the status of each assistant, including any failures with detailed information on why it failed.
SHOW_RELEASE_NOTES
This is used to specify if the release notes of this installation need to be shown at the end of installation. This dialog can be launched from the End of Installation page and shows the list of release notes available for the products just installed. This also requires the variable SHOW_END_SESSION_PAGE variable to be set to true.
SHOW_END_OF_INSTALL_MSGS
This is used to specify if the text on end of installation screen is to be shown. The text is always available under <Oracle_Home>/install/readme.txt.
SHOW_END_SESSION_PAGE
This is used to specify if the end of session page in Oracle Universal Installer needs to be shown. This page shows if the installation is successful or not.
SHOW_XML_PREREQ_PAGE
This is used to specify whether or not to show the prereq page.
NEXT_SESSION This is used to specify if you want users to go back to the File Locations page for another installation. This flag also needs to be set to true in order to process another response file (see NEXT_SESSION_RESPONSE). This argument is used for chain installs.
NEXT_SESSION_ON_FAIL
This is used to specify the next session response. Set to true to allow users to invoke another session even if current installation session has failed. This flag is only relevant if NEXT_SESSION is set to true. This argument is used for chain installs.
Table C–2 (Cont.) Command line variables in Oracle Universal Installer
Command Line Variable Description
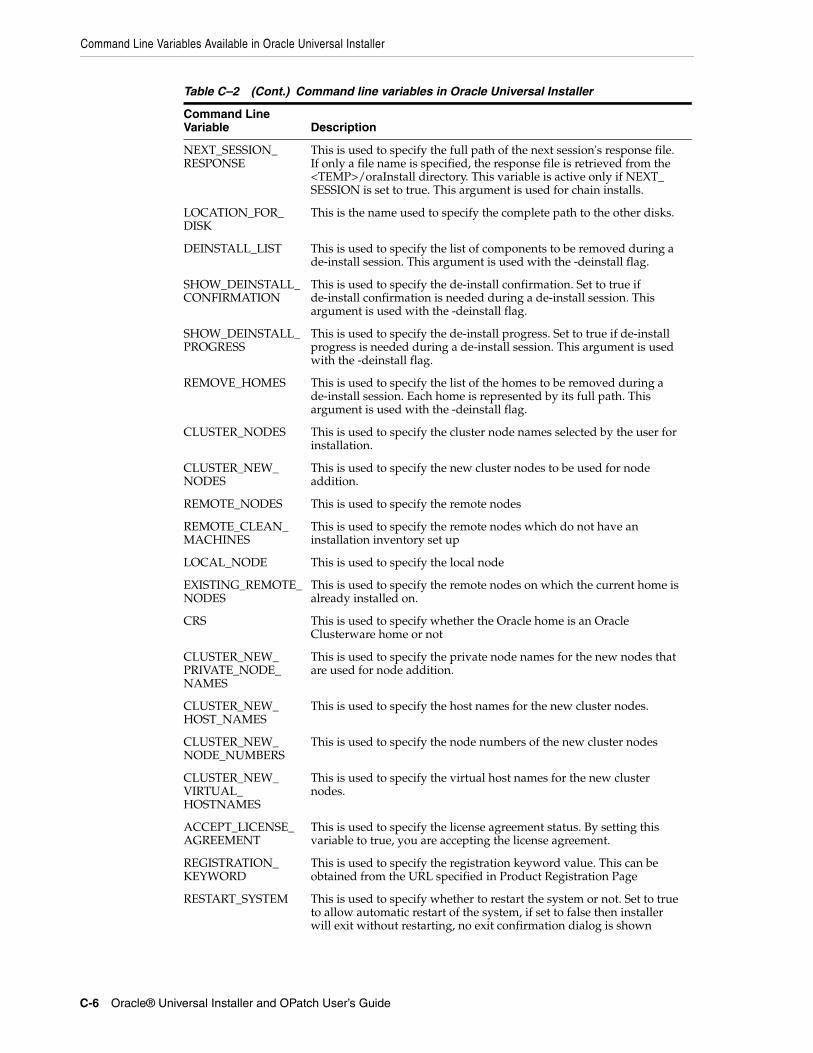
Command Line Variables Available in Oracle Universal Installer
C-6 Oracle® Universal Installer and OPatch User’s Guide
NEXT_SESSION_RESPONSE
This is used to specify the full path of the next session's response file. If only a file name is specified, the response file is retrieved from the <TEMP>/oraInstall directory. This variable is active only if NEXT_SESSION is set to true. This argument is used for chain installs.
LOCATION_FOR_DISK
This is the name used to specify the complete path to the other disks.
DEINSTALL_LIST This is used to specify the list of components to be removed during a de-install session. This argument is used with the -deinstall flag.
SHOW_DEINSTALL_CONFIRMATION
This is used to specify the de-install confirmation. Set to true if de-install confirmation is needed during a de-install session. This argument is used with the -deinstall flag.
SHOW_DEINSTALL_PROGRESS
This is used to specify the de-install progress. Set to true if de-install progress is needed during a de-install session. This argument is used with the -deinstall flag.
REMOVE_HOMES This is used to specify the list of the homes to be removed during a de-install session. Each home is represented by its full path. This argument is used with the -deinstall flag.
CLUSTER_NODES This is used to specify the cluster node names selected by the user for installation.
CLUSTER_NEW_NODES
This is used to specify the new cluster nodes to be used for node addition.
REMOTE_NODES This is used to specify the remote nodes
REMOTE_CLEAN_MACHINES
This is used to specify the remote nodes which do not have an installation inventory set up
LOCAL_NODE This is used to specify the local node
EXISTING_REMOTE_NODES
This is used to specify the remote nodes on which the current home is already installed on.
CRS This is used to specify whether the Oracle home is an Oracle Clusterware home or not
CLUSTER_NEW_PRIVATE_NODE_NAMES
This is used to specify the private node names for the new nodes that are used for node addition.
CLUSTER_NEW_HOST_NAMES
This is used to specify the host names for the new cluster nodes.
CLUSTER_NEW_NODE_NUMBERS
This is used to specify the node numbers of the new cluster nodes
CLUSTER_NEW_VIRTUAL_HOSTNAMES
This is used to specify the virtual host names for the new cluster nodes.
ACCEPT_LICENSE_AGREEMENT
This is used to specify the license agreement status. By setting this variable to true, you are accepting the license agreement.
REGISTRATION_KEYWORD
This is used to specify the registration keyword value. This can be obtained from the URL specified in Product Registration Page
RESTART_SYSTEM This is used to specify whether to restart the system or not. Set to true to allow automatic restart of the system, if set to false then installer will exit without restarting, no exit confirmation dialog is shown
Table C–2 (Cont.) Command line variables in Oracle Universal Installer
Command Line Variable Description
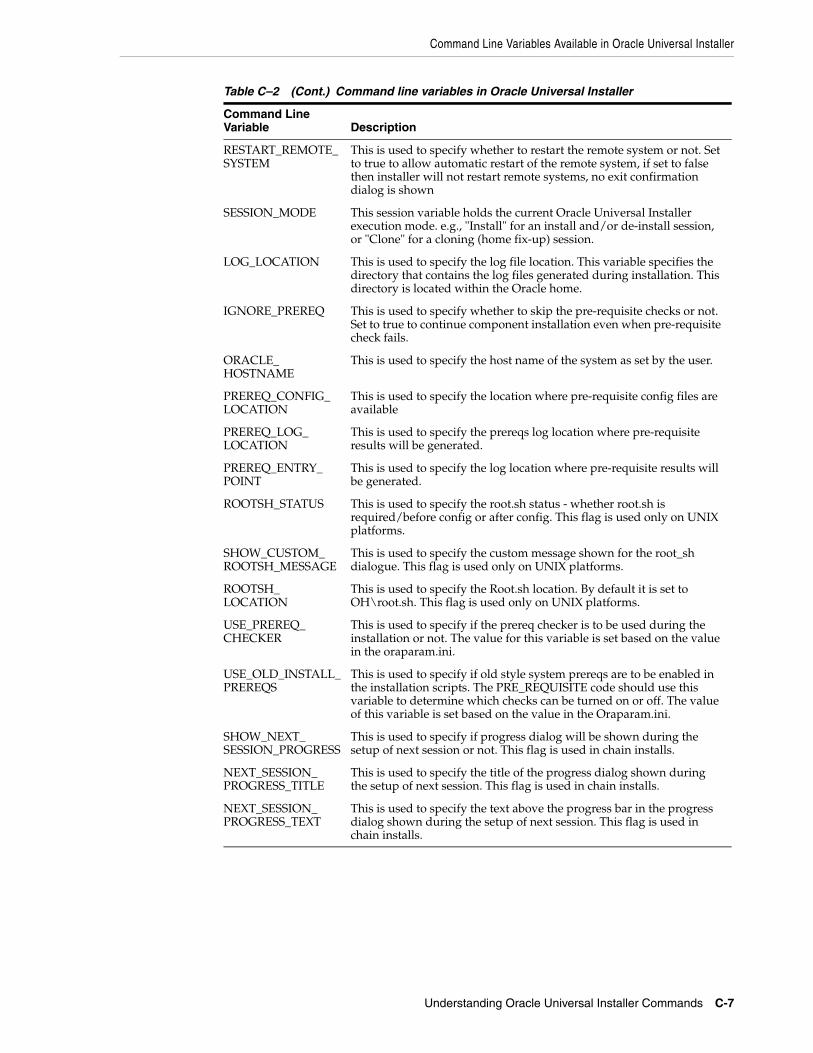
Command Line Variables Available in Oracle Universal Installer
Understanding Oracle Universal Installer Commands C-7
RESTART_REMOTE_SYSTEM
This is used to specify whether to restart the remote system or not. Set to true to allow automatic restart of the remote system, if set to false then installer will not restart remote systems, no exit confirmation dialog is shown
SESSION_MODE This session variable holds the current Oracle Universal Installer execution mode. e.g., "Install" for an install and/or de-install session, or "Clone" for a cloning (home fix-up) session.
LOG_LOCATION This is used to specify the log file location. This variable specifies the directory that contains the log files generated during installation. This directory is located within the Oracle home.
IGNORE_PREREQ This is used to specify whether to skip the pre-requisite checks or not. Set to true to continue component installation even when pre-requisite check fails.
ORACLE_HOSTNAME
This is used to specify the host name of the system as set by the user.
PREREQ_CONFIG_LOCATION
This is used to specify the location where pre-requisite config files are available
PREREQ_LOG_LOCATION
This is used to specify the prereqs log location where pre-requisite results will be generated.
PREREQ_ENTRY_POINT
This is used to specify the log location where pre-requisite results will be generated.
ROOTSH_STATUS This is used to specify the root.sh status - whether root.sh is required/before config or after config. This flag is used only on UNIX platforms.
SHOW_CUSTOM_ROOTSH_MESSAGE
This is used to specify the custom message shown for the root_sh dialogue. This flag is used only on UNIX platforms.
ROOTSH_LOCATION
This is used to specify the Root.sh location. By default it is set to OH\root.sh. This flag is used only on UNIX platforms.
USE_PREREQ_CHECKER
This is used to specify if the prereq checker is to be used during the installation or not. The value for this variable is set based on the value in the oraparam.ini.
USE_OLD_INSTALL_PREREQS
This is used to specify if old style system prereqs are to be enabled in the installation scripts. The PRE_REQUISITE code should use this variable to determine which checks can be turned on or off. The value of this variable is set based on the value in the Oraparam.ini.
SHOW_NEXT_SESSION_PROGRESS
This is used to specify if progress dialog will be shown during the setup of next session or not. This flag is used in chain installs.
NEXT_SESSION_PROGRESS_TITLE
This is used to specify the title of the progress dialog shown during the setup of next session. This flag is used in chain installs.
NEXT_SESSION_PROGRESS_TEXT
This is used to specify the text above the progress bar in the progress dialog shown during the setup of next session. This flag is used in chain installs.
Table C–2 (Cont.) Command line variables in Oracle Universal Installer
Command Line Variable Description

Command Line Variables Available in Oracle Universal Installer
C-8 Oracle® Universal Installer and OPatch User’s Guide
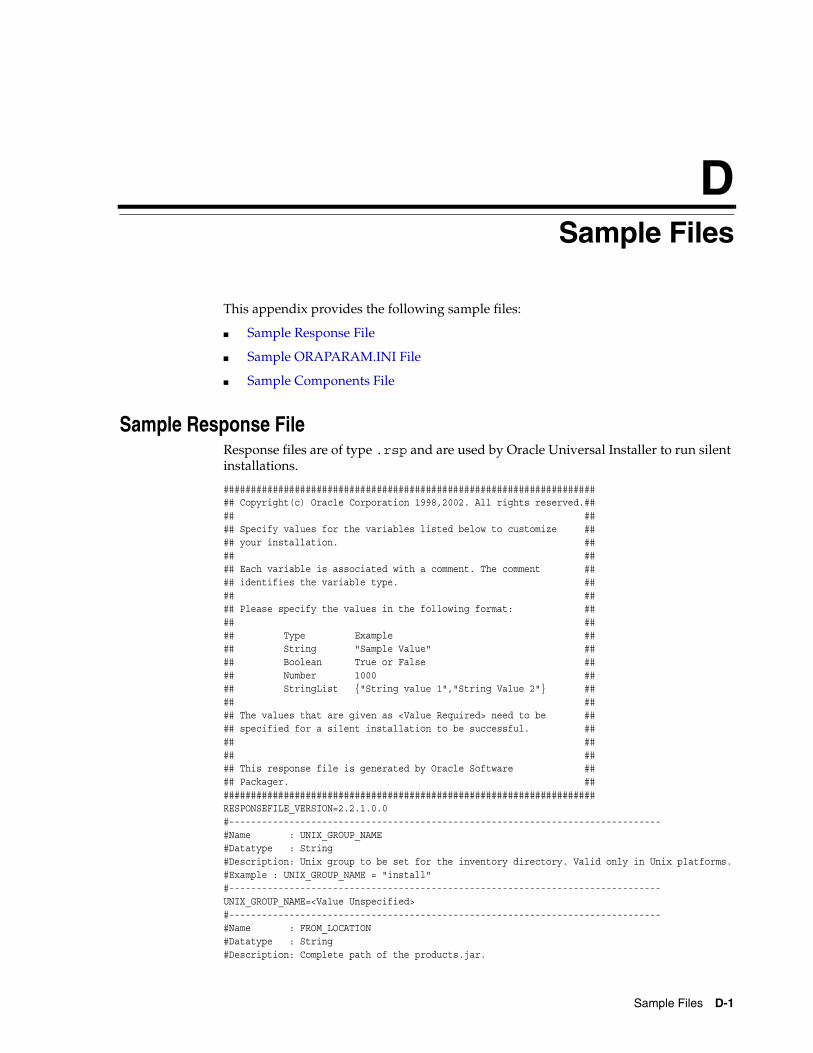
Sample Files D-1
DSample Files
This appendix provides the following sample files:
■ Sample Response File
■ Sample ORAPARAM.INI File
■ Sample Components File
Sample Response FileResponse files are of type .rsp and are used by Oracle Universal Installer to run silent installations.
###################################################################### Copyright(c) Oracle Corporation 1998,2002. All rights reserved.#### #### Specify values for the variables listed below to customize #### your installation. #### #### Each variable is associated with a comment. The comment #### identifies the variable type. #### #### Please specify the values in the following format: #### #### Type Example #### String "Sample Value" #### Boolean True or False #### Number 1000 #### StringList {"String value 1","String Value 2"} #### #### The values that are given as <Value Required> need to be #### specified for a silent installation to be successful. #### #### #### This response file is generated by Oracle Software #### Packager. ######################################################################RESPONSEFILE_VERSION=2.2.1.0.0#-------------------------------------------------------------------------------#Name : UNIX_GROUP_NAME#Datatype : String#Description: Unix group to be set for the inventory directory. Valid only in Unix platforms.#Example : UNIX_GROUP_NAME = "install"#-------------------------------------------------------------------------------UNIX_GROUP_NAME=<Value Unspecified>#-------------------------------------------------------------------------------#Name : FROM_LOCATION#Datatype : String#Description: Complete path of the products.jar.
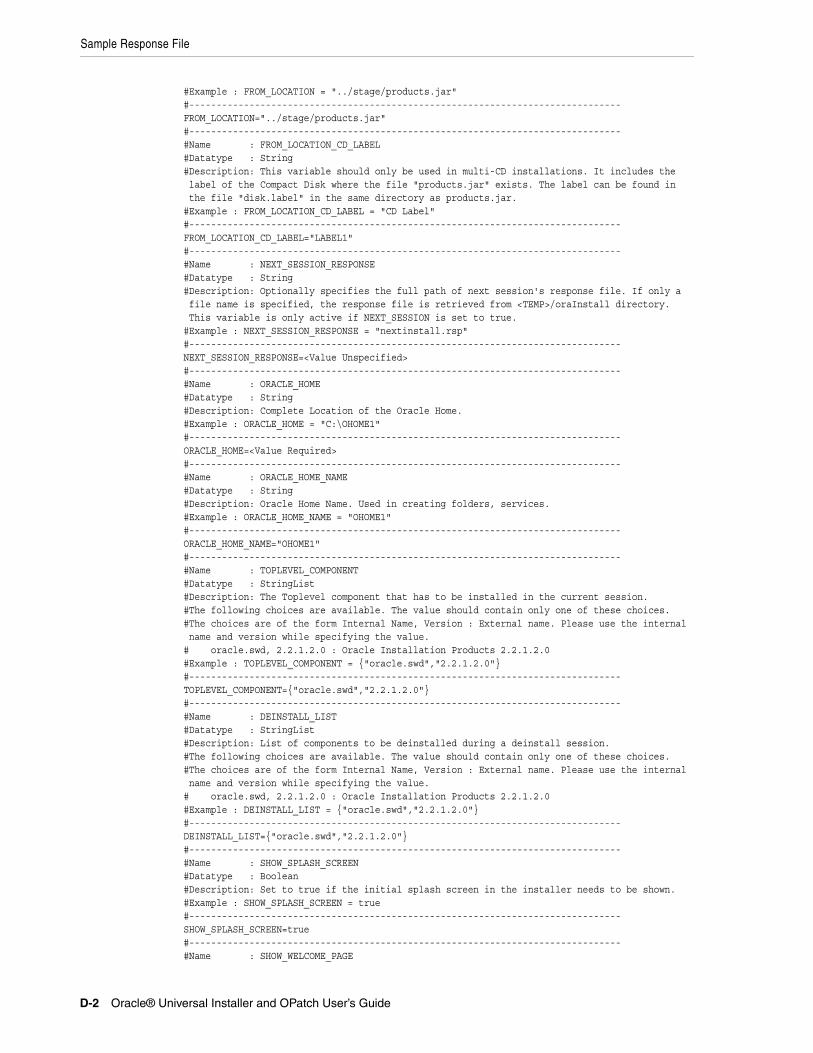
Sample Response File
D-2 Oracle® Universal Installer and OPatch User’s Guide
#Example : FROM_LOCATION = "../stage/products.jar"#-------------------------------------------------------------------------------FROM_LOCATION="../stage/products.jar"#-------------------------------------------------------------------------------#Name : FROM_LOCATION_CD_LABEL#Datatype : String#Description: This variable should only be used in multi-CD installations. It includes the label of the Compact Disk where the file "products.jar" exists. The label can be found in the file "disk.label" in the same directory as products.jar.#Example : FROM_LOCATION_CD_LABEL = "CD Label"#-------------------------------------------------------------------------------FROM_LOCATION_CD_LABEL="LABEL1"#-------------------------------------------------------------------------------#Name : NEXT_SESSION_RESPONSE#Datatype : String#Description: Optionally specifies the full path of next session's response file. If only a file name is specified, the response file is retrieved from <TEMP>/oraInstall directory. This variable is only active if NEXT_SESSION is set to true.#Example : NEXT_SESSION_RESPONSE = "nextinstall.rsp"#-------------------------------------------------------------------------------NEXT_SESSION_RESPONSE=<Value Unspecified>#-------------------------------------------------------------------------------#Name : ORACLE_HOME#Datatype : String#Description: Complete Location of the Oracle Home.#Example : ORACLE_HOME = "C:\OHOME1"#-------------------------------------------------------------------------------ORACLE_HOME=<Value Required>#-------------------------------------------------------------------------------#Name : ORACLE_HOME_NAME#Datatype : String#Description: Oracle Home Name. Used in creating folders, services.#Example : ORACLE_HOME_NAME = "OHOME1"#-------------------------------------------------------------------------------ORACLE_HOME_NAME="OHOME1"#-------------------------------------------------------------------------------#Name : TOPLEVEL_COMPONENT#Datatype : StringList#Description: The Toplevel component that has to be installed in the current session.#The following choices are available. The value should contain only one of these choices.#The choices are of the form Internal Name, Version : External name. Please use the internal name and version while specifying the value.# oracle.swd, 2.2.1.2.0 : Oracle Installation Products 2.2.1.2.0 #Example : TOPLEVEL_COMPONENT = {"oracle.swd","2.2.1.2.0"}#-------------------------------------------------------------------------------TOPLEVEL_COMPONENT={"oracle.swd","2.2.1.2.0"}#-------------------------------------------------------------------------------#Name : DEINSTALL_LIST#Datatype : StringList#Description: List of components to be deinstalled during a deinstall session.#The following choices are available. The value should contain only one of these choices.#The choices are of the form Internal Name, Version : External name. Please use the internal name and version while specifying the value.# oracle.swd, 2.2.1.2.0 : Oracle Installation Products 2.2.1.2.0 #Example : DEINSTALL_LIST = {"oracle.swd","2.2.1.2.0"}#-------------------------------------------------------------------------------DEINSTALL_LIST={"oracle.swd","2.2.1.2.0"}#-------------------------------------------------------------------------------#Name : SHOW_SPLASH_SCREEN#Datatype : Boolean#Description: Set to true if the initial splash screen in the installer needs to be shown.#Example : SHOW_SPLASH_SCREEN = true#-------------------------------------------------------------------------------SHOW_SPLASH_SCREEN=true#-------------------------------------------------------------------------------#Name : SHOW_WELCOME_PAGE
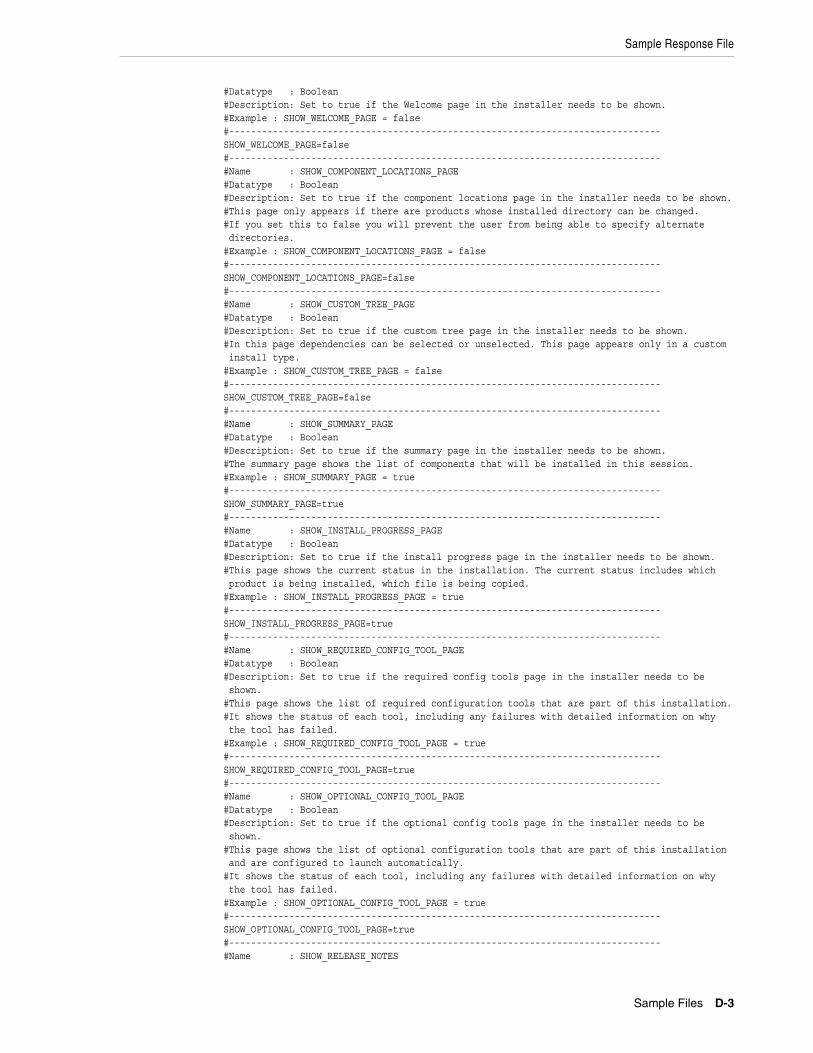
Sample Response File
Sample Files D-3
#Datatype : Boolean#Description: Set to true if the Welcome page in the installer needs to be shown.#Example : SHOW_WELCOME_PAGE = false#-------------------------------------------------------------------------------SHOW_WELCOME_PAGE=false#-------------------------------------------------------------------------------#Name : SHOW_COMPONENT_LOCATIONS_PAGE#Datatype : Boolean#Description: Set to true if the component locations page in the installer needs to be shown.#This page only appears if there are products whose installed directory can be changed.#If you set this to false you will prevent the user from being able to specify alternate directories.#Example : SHOW_COMPONENT_LOCATIONS_PAGE = false#-------------------------------------------------------------------------------SHOW_COMPONENT_LOCATIONS_PAGE=false#-------------------------------------------------------------------------------#Name : SHOW_CUSTOM_TREE_PAGE#Datatype : Boolean#Description: Set to true if the custom tree page in the installer needs to be shown.#In this page dependencies can be selected or unselected. This page appears only in a custom install type.#Example : SHOW_CUSTOM_TREE_PAGE = false#-------------------------------------------------------------------------------SHOW_CUSTOM_TREE_PAGE=false#-------------------------------------------------------------------------------#Name : SHOW_SUMMARY_PAGE#Datatype : Boolean#Description: Set to true if the summary page in the installer needs to be shown.#The summary page shows the list of components that will be installed in this session. #Example : SHOW_SUMMARY_PAGE = true#-------------------------------------------------------------------------------SHOW_SUMMARY_PAGE=true#-------------------------------------------------------------------------------#Name : SHOW_INSTALL_PROGRESS_PAGE#Datatype : Boolean#Description: Set to true if the install progress page in the installer needs to be shown.#This page shows the current status in the installation. The current status includes which product is being installed, which file is being copied.#Example : SHOW_INSTALL_PROGRESS_PAGE = true#-------------------------------------------------------------------------------SHOW_INSTALL_PROGRESS_PAGE=true#-------------------------------------------------------------------------------#Name : SHOW_REQUIRED_CONFIG_TOOL_PAGE#Datatype : Boolean#Description: Set to true if the required config tools page in the installer needs to be shown.#This page shows the list of required configuration tools that are part of this installation.#It shows the status of each tool, including any failures with detailed information on why the tool has failed.#Example : SHOW_REQUIRED_CONFIG_TOOL_PAGE = true#-------------------------------------------------------------------------------SHOW_REQUIRED_CONFIG_TOOL_PAGE=true#-------------------------------------------------------------------------------#Name : SHOW_OPTIONAL_CONFIG_TOOL_PAGE#Datatype : Boolean#Description: Set to true if the optional config tools page in the installer needs to be shown.#This page shows the list of optional configuration tools that are part of this installation and are configured to launch automatically.#It shows the status of each tool, including any failures with detailed information on why the tool has failed.#Example : SHOW_OPTIONAL_CONFIG_TOOL_PAGE = true#-------------------------------------------------------------------------------SHOW_OPTIONAL_CONFIG_TOOL_PAGE=true#-------------------------------------------------------------------------------#Name : SHOW_RELEASE_NOTES

Sample Response File
D-4 Oracle® Universal Installer and OPatch User’s Guide
#Datatype : Boolean#Description: Set to true if the release notes of this installation need to be shown at the end of installation.#This dialog is launchable from the End of Installation page and shows the list of release notes available for the products just installed.# This also requires the variable SHOW_END_SESSION_PAGE variable to be set to true.#Example : SHOW_RELEASE_NOTES = true#-------------------------------------------------------------------------------SHOW_RELEASE_NOTES=true#-------------------------------------------------------------------------------#Name : SHOW_ROOTSH_CONFIRMATION#Datatype : Boolean#Description: Set to true if the Confirmation dialog asking to run the root.sh script in the installer needs to be shown.#Valid only in Unix platforms.#Example : SHOW_ROOTSH_CONFIRMATION = true#-------------------------------------------------------------------------------SHOW_ROOTSH_CONFIRMATION=true#-------------------------------------------------------------------------------#Name : SHOW_END_SESSION_PAGE#Datatype : Boolean#Description: Set to true if the end of session page in the installer needs to be shown.#This page shows if the installation is successful or not.#Example : SHOW_END_SESSION_PAGE = true#-------------------------------------------------------------------------------SHOW_END_SESSION_PAGE=true#-------------------------------------------------------------------------------#Name : SHOW_EXIT_CONFIRMATION#Datatype : Boolean#Description: Set to true if the confirmation when exiting the installer needs to be shown.#Example : SHOW_EXIT_CONFIRMATION = true#-------------------------------------------------------------------------------SHOW_EXIT_CONFIRMATION=true#-------------------------------------------------------------------------------#Name : NEXT_SESSION#Datatype : Boolean#Description: Set to true to allow users to go back to the File Locations page for another installation. This flag also needs to be set to true in order to process another response file (see NEXT_SESSION_RESPONSE).#Example : NEXT_SESSION = true#-------------------------------------------------------------------------------NEXT_SESSION=true#-------------------------------------------------------------------------------#Name : NEXT_SESSION_ON_FAIL#Datatype : Boolean#Description: Set to true to allow users to invoke another session even if current install session has failed. This flag is only relevant if NEXT_SESSION is set to true.#Example : NEXT_SESSION_ON_FAIL = true#-------------------------------------------------------------------------------NEXT_SESSION_ON_FAIL=true#-------------------------------------------------------------------------------#Name : SHOW_DEINSTALL_CONFIRMATION#Datatype : Boolean#Description: Set to true if deinstall confimation is needed during a deinstall session.#Example : SHOW_DEINSTALL_CONFIRMATION = true#-------------------------------------------------------------------------------SHOW_DEINSTALL_CONFIRMATION=true#-------------------------------------------------------------------------------#Name : SHOW_DEINSTALL_PROGRESS#Datatype : Boolean#Description: Set to true if deinstall progress is needed during a deinstall session.#Example : SHOW_DEINSTALL_PROGRESS = true#-------------------------------------------------------------------------------SHOW_DEINSTALL_PROGRESS=true#-------------------------------------------------------------------------------#Name : component_languages
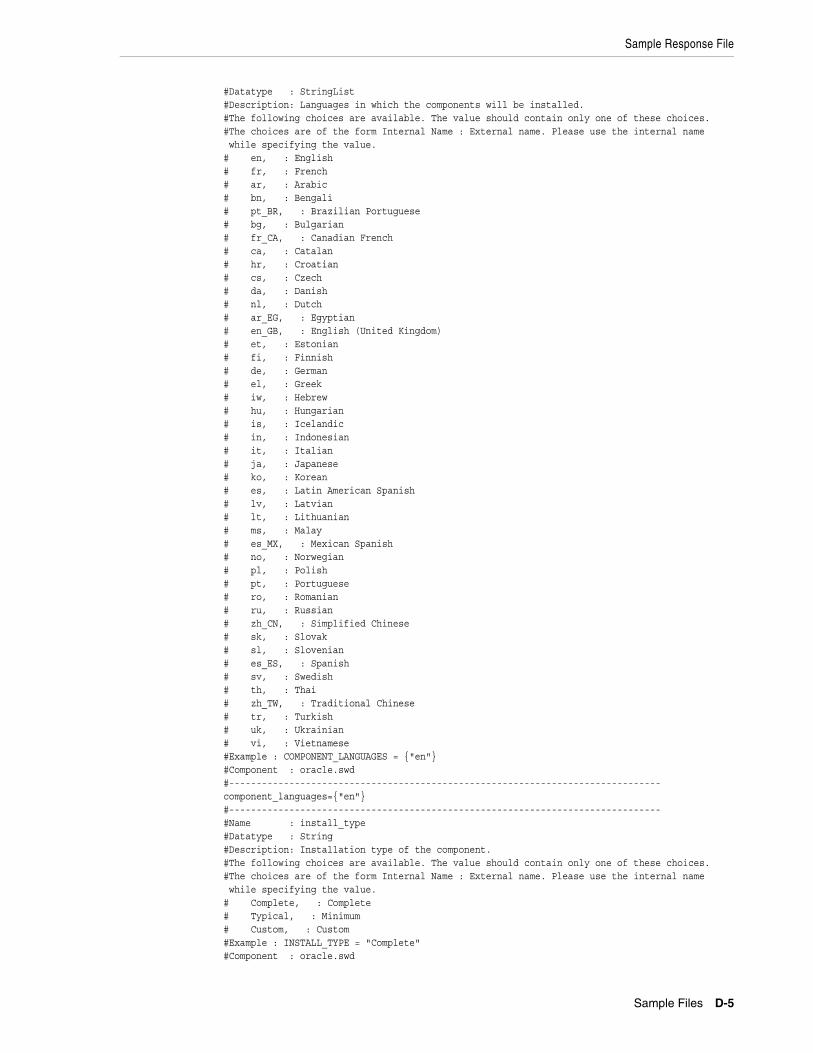
Sample Response File
Sample Files D-5
#Datatype : StringList#Description: Languages in which the components will be installed.#The following choices are available. The value should contain only one of these choices.#The choices are of the form Internal Name : External name. Please use the internal name while specifying the value.# en, : English# fr, : French# ar, : Arabic# bn, : Bengali# pt_BR, : Brazilian Portuguese# bg, : Bulgarian# fr_CA, : Canadian French# ca, : Catalan# hr, : Croatian# cs, : Czech# da, : Danish# nl, : Dutch# ar_EG, : Egyptian# en_GB, : English (United Kingdom)# et, : Estonian# fi, : Finnish# de, : German# el, : Greek# iw, : Hebrew# hu, : Hungarian# is, : Icelandic# in, : Indonesian# it, : Italian# ja, : Japanese# ko, : Korean# es, : Latin American Spanish# lv, : Latvian# lt, : Lithuanian# ms, : Malay# es_MX, : Mexican Spanish# no, : Norwegian# pl, : Polish# pt, : Portuguese# ro, : Romanian# ru, : Russian# zh_CN, : Simplified Chinese# sk, : Slovak# sl, : Slovenian# es_ES, : Spanish# sv, : Swedish# th, : Thai# zh_TW, : Traditional Chinese# tr, : Turkish# uk, : Ukrainian# vi, : Vietnamese#Example : COMPONENT_LANGUAGES = {"en"}#Component : oracle.swd#-------------------------------------------------------------------------------component_languages={"en"}#-------------------------------------------------------------------------------#Name : install_type#Datatype : String#Description: Installation type of the component.#The following choices are available. The value should contain only one of these choices.#The choices are of the form Internal Name : External name. Please use the internal name while specifying the value.# Complete, : Complete# Typical, : Minimum# Custom, : Custom#Example : INSTALL_TYPE = "Complete"#Component : oracle.swd
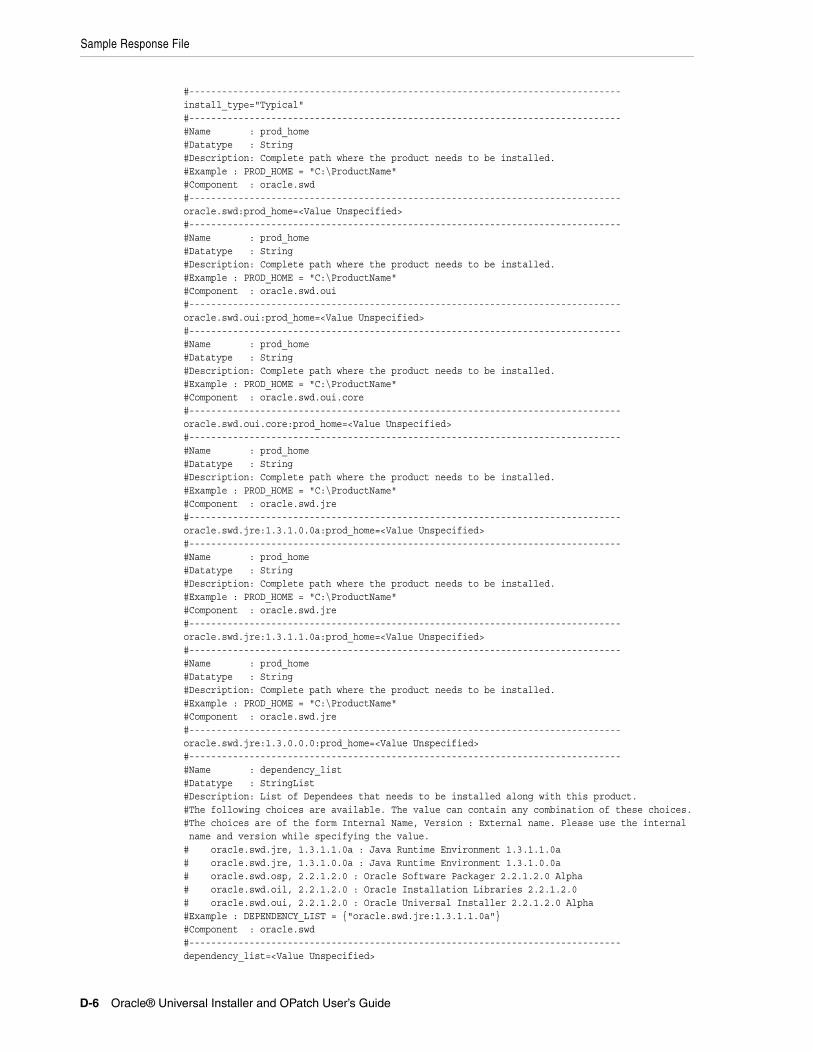
Sample Response File
D-6 Oracle® Universal Installer and OPatch User’s Guide
#-------------------------------------------------------------------------------install_type="Typical"#-------------------------------------------------------------------------------#Name : prod_home#Datatype : String#Description: Complete path where the product needs to be installed.#Example : PROD_HOME = "C:\ProductName"#Component : oracle.swd#-------------------------------------------------------------------------------oracle.swd:prod_home=<Value Unspecified>#-------------------------------------------------------------------------------#Name : prod_home#Datatype : String#Description: Complete path where the product needs to be installed.#Example : PROD_HOME = "C:\ProductName"#Component : oracle.swd.oui#-------------------------------------------------------------------------------oracle.swd.oui:prod_home=<Value Unspecified>#-------------------------------------------------------------------------------#Name : prod_home#Datatype : String#Description: Complete path where the product needs to be installed.#Example : PROD_HOME = "C:\ProductName"#Component : oracle.swd.oui.core#-------------------------------------------------------------------------------oracle.swd.oui.core:prod_home=<Value Unspecified>#-------------------------------------------------------------------------------#Name : prod_home#Datatype : String#Description: Complete path where the product needs to be installed.#Example : PROD_HOME = "C:\ProductName"#Component : oracle.swd.jre#-------------------------------------------------------------------------------oracle.swd.jre:1.3.1.0.0a:prod_home=<Value Unspecified>#-------------------------------------------------------------------------------#Name : prod_home#Datatype : String#Description: Complete path where the product needs to be installed.#Example : PROD_HOME = "C:\ProductName"#Component : oracle.swd.jre#-------------------------------------------------------------------------------oracle.swd.jre:1.3.1.1.0a:prod_home=<Value Unspecified>#-------------------------------------------------------------------------------#Name : prod_home#Datatype : String#Description: Complete path where the product needs to be installed.#Example : PROD_HOME = "C:\ProductName"#Component : oracle.swd.jre#-------------------------------------------------------------------------------oracle.swd.jre:1.3.0.0.0:prod_home=<Value Unspecified>#-------------------------------------------------------------------------------#Name : dependency_list#Datatype : StringList#Description: List of Dependees that needs to be installed along with this product.#The following choices are available. The value can contain any combination of these choices.#The choices are of the form Internal Name, Version : External name. Please use the internal name and version while specifying the value.# oracle.swd.jre, 1.3.1.1.0a : Java Runtime Environment 1.3.1.1.0a # oracle.swd.jre, 1.3.1.0.0a : Java Runtime Environment 1.3.1.0.0a # oracle.swd.osp, 2.2.1.2.0 : Oracle Software Packager 2.2.1.2.0 Alpha# oracle.swd.oil, 2.2.1.2.0 : Oracle Installation Libraries 2.2.1.2.0 # oracle.swd.oui, 2.2.1.2.0 : Oracle Universal Installer 2.2.1.2.0 Alpha#Example : DEPENDENCY_LIST = {"oracle.swd.jre:1.3.1.1.0a"}#Component : oracle.swd#-------------------------------------------------------------------------------dependency_list=<Value Unspecified>
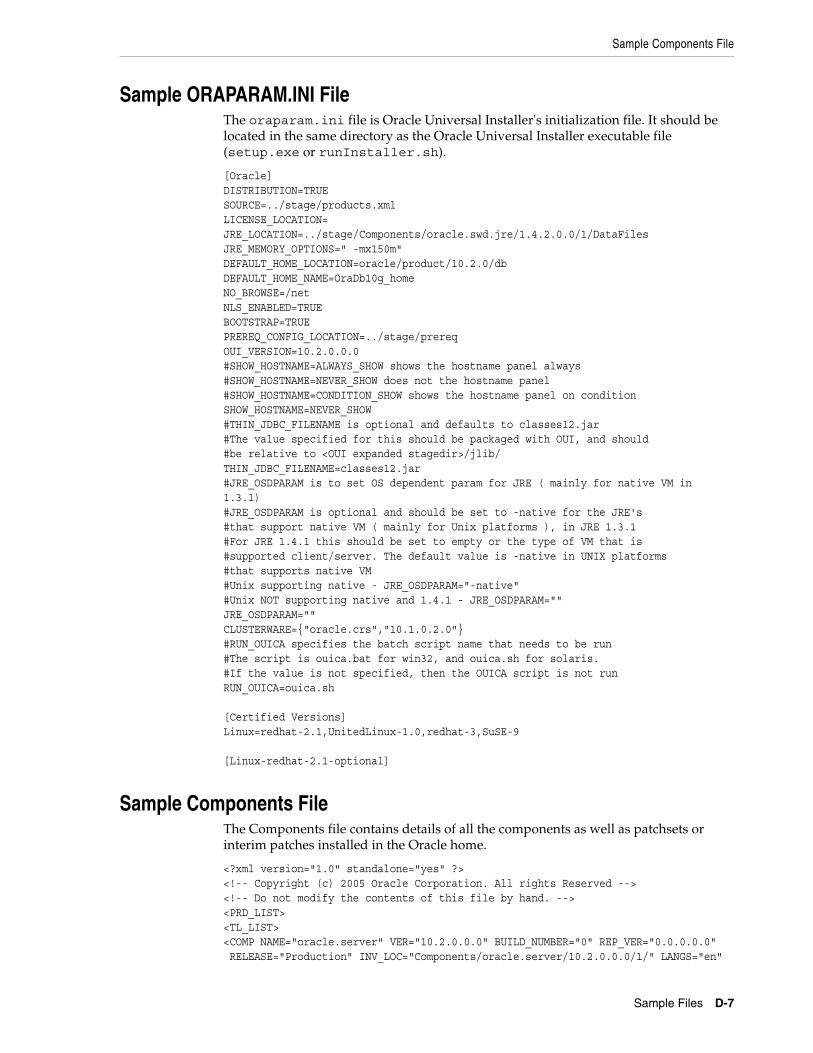
Sample Components File
Sample Files D-7
Sample ORAPARAM.INI FileThe oraparam.ini file is Oracle Universal Installer's initialization file. It should be located in the same directory as the Oracle Universal Installer executable file (setup.exe or runInstaller.sh).
[Oracle]DISTRIBUTION=TRUESOURCE=../stage/products.xmlLICENSE_LOCATION=JRE_LOCATION=../stage/Components/oracle.swd.jre/1.4.2.0.0/1/DataFilesJRE_MEMORY_OPTIONS=" -mx150m"DEFAULT_HOME_LOCATION=oracle/product/10.2.0/dbDEFAULT_HOME_NAME=OraDb10g_homeNO_BROWSE=/netNLS_ENABLED=TRUEBOOTSTRAP=TRUEPREREQ_CONFIG_LOCATION=../stage/prereqOUI_VERSION=10.2.0.0.0#SHOW_HOSTNAME=ALWAYS_SHOW shows the hostname panel always#SHOW_HOSTNAME=NEVER_SHOW does not the hostname panel#SHOW_HOSTNAME=CONDITION_SHOW shows the hostname panel on conditionSHOW_HOSTNAME=NEVER_SHOW#THIN_JDBC_FILENAME is optional and defaults to classes12.jar#The value specified for this should be packaged with OUI, and should #be relative to <OUI expanded stagedir>/jlib/THIN_JDBC_FILENAME=classes12.jar#JRE_OSDPARAM is to set OS dependent param for JRE ( mainly for native VM in 1.3.1)#JRE_OSDPARAM is optional and should be set to -native for the JRE's#that support native VM ( mainly for Unix platforms ), in JRE 1.3.1#For JRE 1.4.1 this should be set to empty or the type of VM that is #supported client/server. The default value is -native in UNIX platforms#that supports native VM#Unix supporting native - JRE_OSDPARAM="-native" #Unix NOT supporting native and 1.4.1 - JRE_OSDPARAM="" JRE_OSDPARAM=""CLUSTERWARE={"oracle.crs","10.1.0.2.0"}#RUN_OUICA specifies the batch script name that needs to be run#The script is ouica.bat for win32, and ouica.sh for solaris. #If the value is not specified, then the OUICA script is not runRUN_OUICA=ouica.sh
[Certified Versions]Linux=redhat-2.1,UnitedLinux-1.0,redhat-3,SuSE-9 [Linux-redhat-2.1-optional]
Sample Components FileThe Components file contains details of all the components as well as patchsets or interim patches installed in the Oracle home.
<?xml version="1.0" standalone="yes" ?><!-- Copyright (c) 2005 Oracle Corporation. All rights Reserved --><!-- Do not modify the contents of this file by hand. --><PRD_LIST><TL_LIST><COMP NAME="oracle.server" VER="10.2.0.0.0" BUILD_NUMBER="0" REP_VER="0.0.0.0.0" RELEASE="Production" INV_LOC="Components/oracle.server/10.2.0.0.0/1/" LANGS="en"

Sample Components File
D-8 Oracle® Universal Installer and OPatch User’s Guide
XML_INV_LOC="Components21/oracle.server/10.2.0.0.0/" ACT_INST_VER="10.2.0.0.0" DEINST_VER="10.1.0.2.0" INSTALL_TIME="2005.Jun.03 11:39:07 IST" INST_LOC="/home/shiva/oracle/product/10.2.0/db_2/oracle.server"> <EXT_NAME>Oracle Database 10g</EXT_NAME> <DESC>Installs an optional pre-configured starter database, product options, management tools, networking services, utilities and basic client software for an Oracle database server.</DESC> <DESCID>COMPONENT_DESC</DESCID> <STG_INFO OSP_VER="10.2.0.0.0"/> <CMP_JAR_INFO> <INFO NAME="filemapObj" VAL="Components/oracle/server/v10_2_0_0_0/filemap.xml"/> <INFO NAME="helpDir" VAL="Components/oracle/server/v10_2_0_0_0/help/"/> <INFO NAME="actionsClass" VAL="Components.oracle.server.v10_2_0_0_0.CompActions"/> <INFO NAME="resourceClass" VAL="Components.oracle.server.v10_2_0_0_0.resources.CompRes"/> <INFO NAME="identifiersXML" VAL="Components/oracle/server/v10_2_0_0_0/identifiers.xml"/> <INFO NAME="contextClass" VAL="Components.oracle.server.v10_2_0_0_0.CompContext"/> <INFO NAME="fastCopyLogXML" VAL="Components/oracle/server/v10_2_0_0_0/fastCopyLog.xml"/> </CMP_JAR_INFO> <LOC_INFO INST_DFN_LOC="../Scripts" JAR_NAME="install2.jar"/> <BOOK NAME="oracle.server.hs"/> <PRE_REQ DEF="F"/> <PROD_HOME DEF="F"/> <LANG_IDX_MAP> <LANG LIST="en fr ar bn pt_BR bg fr_CA ca hr cs da nl ar_EG en_GB et fi de el iw hu is in it ja ko es lv lt ms es_MX no pl pt ro ru zh_CN sk sl es_ES sv th zh_TW tr uk vi"/> <LANGSET IDX="1" BITSET="{0, 1, 2, 3, 4, 5, 6, 7, 8, 9, 10, 11, 12, 13, 14, 15, 16, 17, 18, 19, 20, 21, 22, 23, 24, 25, 26, 27, 28, 29, 30, 31, 32, 33, 34, 35, 36, 37, 38, 39, 40, 41, 42, 43, 44}"/> <LANGSET IDX="2" BITSET="{0}"/> <LANGSET IDX="3" BITSET="{2}"/> <LANGSET IDX="4" BITSET="{7}"/> <LANGSET IDX="5" BITSET="{9}"/> <LANGSET IDX="6" BITSET="{16}"/> <LANGSET IDX="7" BITSET="{10}"/> <LANGSET IDX="8" BITSET="{25, 29, 38}"/> <LANGSET IDX="9" BITSET="{17}"/> <LANGSET IDX="10" BITSET="{1}"/> <LANGSET IDX="11" BITSET="{19}"/> <LANGSET IDX="12" BITSET="{22}"/> <LANGSET IDX="13" BITSET="{18}"/> <LANGSET IDX="14" BITSET="{23}"/> <LANGSET IDX="15" BITSET="{24}"/> <LANGSET IDX="16" BITSET="{30}"/> <LANGSET IDX="17" BITSET="{11}"/> <LANGSET IDX="18" BITSET="{31}"/> <LANGSET IDX="19" BITSET="{4, 32}"/> <LANGSET IDX="20" BITSET="{4}"/> <LANGSET IDX="21" BITSET="{33}"/> <LANGSET IDX="22" BITSET="{34}"/> <LANGSET IDX="23" BITSET="{39}"/> <LANGSET IDX="24" BITSET="{15}"/> <LANGSET IDX="25" BITSET="{36}"/> <LANGSET IDX="26" BITSET="{40}"/>
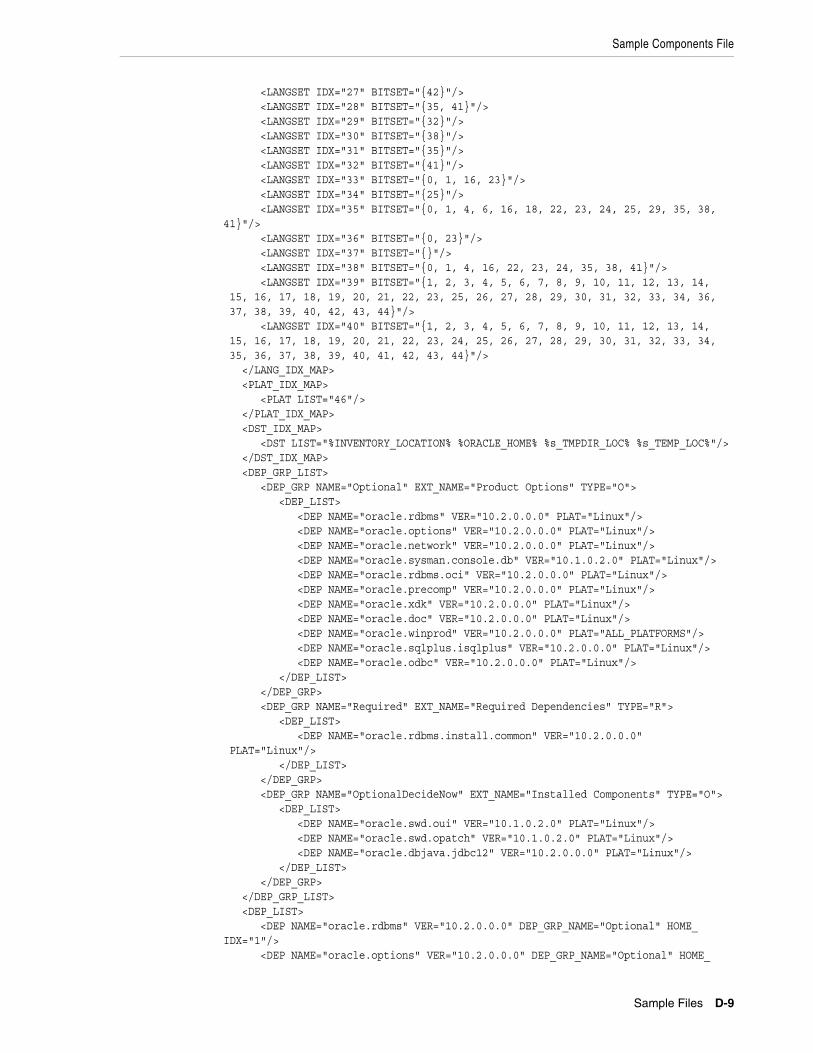
Sample Components File
Sample Files D-9
<LANGSET IDX="27" BITSET="{42}"/> <LANGSET IDX="28" BITSET="{35, 41}"/> <LANGSET IDX="29" BITSET="{32}"/> <LANGSET IDX="30" BITSET="{38}"/> <LANGSET IDX="31" BITSET="{35}"/> <LANGSET IDX="32" BITSET="{41}"/> <LANGSET IDX="33" BITSET="{0, 1, 16, 23}"/> <LANGSET IDX="34" BITSET="{25}"/> <LANGSET IDX="35" BITSET="{0, 1, 4, 6, 16, 18, 22, 23, 24, 25, 29, 35, 38, 41}"/> <LANGSET IDX="36" BITSET="{0, 23}"/> <LANGSET IDX="37" BITSET="{}"/> <LANGSET IDX="38" BITSET="{0, 1, 4, 16, 22, 23, 24, 35, 38, 41}"/> <LANGSET IDX="39" BITSET="{1, 2, 3, 4, 5, 6, 7, 8, 9, 10, 11, 12, 13, 14, 15, 16, 17, 18, 19, 20, 21, 22, 23, 25, 26, 27, 28, 29, 30, 31, 32, 33, 34, 36, 37, 38, 39, 40, 42, 43, 44}"/> <LANGSET IDX="40" BITSET="{1, 2, 3, 4, 5, 6, 7, 8, 9, 10, 11, 12, 13, 14, 15, 16, 17, 18, 19, 20, 21, 22, 23, 24, 25, 26, 27, 28, 29, 30, 31, 32, 33, 34, 35, 36, 37, 38, 39, 40, 41, 42, 43, 44}"/> </LANG_IDX_MAP> <PLAT_IDX_MAP> <PLAT LIST="46"/> </PLAT_IDX_MAP> <DST_IDX_MAP> <DST LIST="%INVENTORY_LOCATION% %ORACLE_HOME% %s_TMPDIR_LOC% %s_TEMP_LOC%"/> </DST_IDX_MAP> <DEP_GRP_LIST> <DEP_GRP NAME="Optional" EXT_NAME="Product Options" TYPE="O"> <DEP_LIST> <DEP NAME="oracle.rdbms" VER="10.2.0.0.0" PLAT="Linux"/> <DEP NAME="oracle.options" VER="10.2.0.0.0" PLAT="Linux"/> <DEP NAME="oracle.network" VER="10.2.0.0.0" PLAT="Linux"/> <DEP NAME="oracle.sysman.console.db" VER="10.1.0.2.0" PLAT="Linux"/> <DEP NAME="oracle.rdbms.oci" VER="10.2.0.0.0" PLAT="Linux"/> <DEP NAME="oracle.precomp" VER="10.2.0.0.0" PLAT="Linux"/> <DEP NAME="oracle.xdk" VER="10.2.0.0.0" PLAT="Linux"/> <DEP NAME="oracle.doc" VER="10.2.0.0.0" PLAT="Linux"/> <DEP NAME="oracle.winprod" VER="10.2.0.0.0" PLAT="ALL_PLATFORMS"/> <DEP NAME="oracle.sqlplus.isqlplus" VER="10.2.0.0.0" PLAT="Linux"/> <DEP NAME="oracle.odbc" VER="10.2.0.0.0" PLAT="Linux"/> </DEP_LIST> </DEP_GRP> <DEP_GRP NAME="Required" EXT_NAME="Required Dependencies" TYPE="R"> <DEP_LIST> <DEP NAME="oracle.rdbms.install.common" VER="10.2.0.0.0" PLAT="Linux"/> </DEP_LIST> </DEP_GRP> <DEP_GRP NAME="OptionalDecideNow" EXT_NAME="Installed Components" TYPE="O"> <DEP_LIST> <DEP NAME="oracle.swd.oui" VER="10.1.0.2.0" PLAT="Linux"/> <DEP NAME="oracle.swd.opatch" VER="10.1.0.2.0" PLAT="Linux"/> <DEP NAME="oracle.dbjava.jdbc12" VER="10.2.0.0.0" PLAT="Linux"/> </DEP_LIST> </DEP_GRP> </DEP_GRP_LIST> <DEP_LIST> <DEP NAME="oracle.rdbms" VER="10.2.0.0.0" DEP_GRP_NAME="Optional" HOME_IDX="1"/> <DEP NAME="oracle.options" VER="10.2.0.0.0" DEP_GRP_NAME="Optional" HOME_
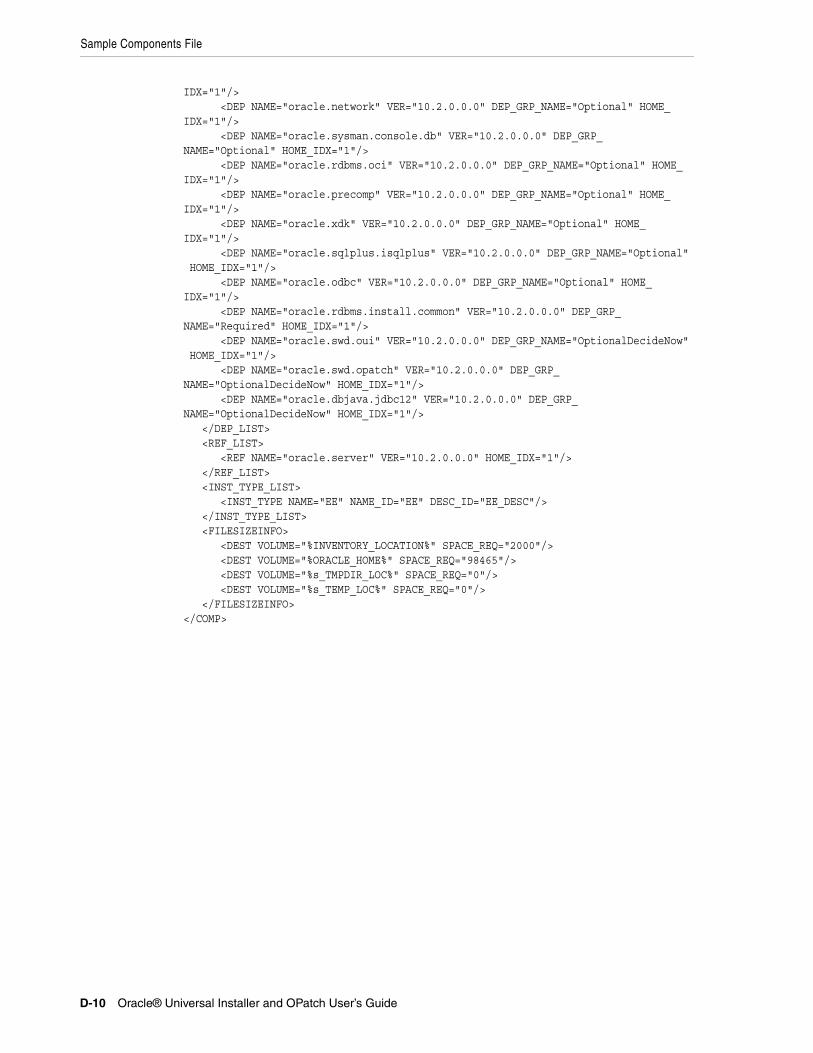
Sample Components File
D-10 Oracle® Universal Installer and OPatch User’s Guide
IDX="1"/> <DEP NAME="oracle.network" VER="10.2.0.0.0" DEP_GRP_NAME="Optional" HOME_IDX="1"/> <DEP NAME="oracle.sysman.console.db" VER="10.2.0.0.0" DEP_GRP_NAME="Optional" HOME_IDX="1"/> <DEP NAME="oracle.rdbms.oci" VER="10.2.0.0.0" DEP_GRP_NAME="Optional" HOME_IDX="1"/> <DEP NAME="oracle.precomp" VER="10.2.0.0.0" DEP_GRP_NAME="Optional" HOME_IDX="1"/> <DEP NAME="oracle.xdk" VER="10.2.0.0.0" DEP_GRP_NAME="Optional" HOME_IDX="1"/> <DEP NAME="oracle.sqlplus.isqlplus" VER="10.2.0.0.0" DEP_GRP_NAME="Optional" HOME_IDX="1"/> <DEP NAME="oracle.odbc" VER="10.2.0.0.0" DEP_GRP_NAME="Optional" HOME_IDX="1"/> <DEP NAME="oracle.rdbms.install.common" VER="10.2.0.0.0" DEP_GRP_NAME="Required" HOME_IDX="1"/> <DEP NAME="oracle.swd.oui" VER="10.2.0.0.0" DEP_GRP_NAME="OptionalDecideNow" HOME_IDX="1"/> <DEP NAME="oracle.swd.opatch" VER="10.2.0.0.0" DEP_GRP_NAME="OptionalDecideNow" HOME_IDX="1"/> <DEP NAME="oracle.dbjava.jdbc12" VER="10.2.0.0.0" DEP_GRP_NAME="OptionalDecideNow" HOME_IDX="1"/> </DEP_LIST> <REF_LIST> <REF NAME="oracle.server" VER="10.2.0.0.0" HOME_IDX="1"/> </REF_LIST> <INST_TYPE_LIST> <INST_TYPE NAME="EE" NAME_ID="EE" DESC_ID="EE_DESC"/> </INST_TYPE_LIST> <FILESIZEINFO> <DEST VOLUME="%INVENTORY_LOCATION%" SPACE_REQ="2000"/> <DEST VOLUME="%ORACLE_HOME%" SPACE_REQ="98465"/> <DEST VOLUME="%s_TMPDIR_LOC%" SPACE_REQ="0"/> <DEST VOLUME="%s_TEMP_LOC%" SPACE_REQ="0"/> </FILESIZEINFO></COMP>
Index-1
Index
AACCEPT_LICENSE_AGREEMENT, 4-10Adding, 1-2all node patching, 8-17APPLTOP_STAGE parameter in
ORAPARAM.INI, 5-5
BBOOTSTRAP parameter in ORAPARAM.INI, 5-5BOOTSTRAP_SIZE parameter in
ORAPARAM.INI, 5-5
CCentral Inventory
corruption, 3-10creating, 3-7detaching homes, 3-8inventory file, 3-4logs directory, 3-5removing, 3-8
cloningabout, 7-1clusterware, 7-8considerations, 5-15log files, 7-3Oracle Database 10.2, 7-4, 7-6overview, 7-2
cluisterde-installation, 6-23
cluster, 3-11availability checking, 6-20creating clusterware home, 6-12deinstallation, 6-21detection, 6-20hardware requirements, 6-3installation, 6-20OPatch
pre-requisites, 8-5patching, 8-16
all node patching, 8-17minimum downtime patching, 8-18rolling patching, 8-17types, 8-16
setup and pre-install config tasks (UNIX), 6-4setup and pre-install config tasks
(Windows), 6-13software requirements, 6-3system installation requirements, 6-2troubleshooting, 6-27updating nodes, 3-11
cluster installationcommand line options, 6-22
CLUSTER_NODES, 4-9clusters
cloningimportant considerations, 7-13
clusterware, 6-2cloning, 7-8creating home, 6-12de-install, 6-25installation, 6-15troubleshooting, 6-27
command line arguments, 5-13
Ddebugging mechanisms, B-1DEFAULT_HOME_LOCATION parameter in
ORAPARAM.INI, 5-4DEFAULT_HOME_NAME parameter in
ORAPARAM.INI, 5-4DEINSTALL_LIST, 4-8deinstallation
dependees, 5-11silent, 5-11top level products, 5-11
deinstalling from a cluster, 6-21Deinstalling Oracle Products, 5-10DEPENDENCY_LIST, 4-9disk space requirements, 2-1DISTRIBUTION parameter in ORAPARAM.INI, 5-3
Eerrors, B-3
exceptions from action libraries, B-3incomplete stage and missing files in file
groups, B-3out of "temp" space, B-3
Index-2
summary of, B-3UNCAUGHT_RUNTIME exception, B-3
Exceed, B-4exit codes, 5-14
FFROM_LOCATION, 4-6FROM_LOCATION_CD_LABEL, 4-6
Hhelp, online, 5-2Home Selector, 3-12
overview, 3-12working, 3-12
IIMAGES section of ORAPARAM.INI, 5-5INCLUDE, 4-5INSTALL_TYPE, 4-10installation
from the Web, 5-8on a cluster, 6-20using a response file, 4-11
installation media, 5-6installation modes, 1-4, 5-5
clusters, 1-4interactive, 1-4, 5-5silent, 1-4, 5-6suppressed, 1-4, 5-6
Installing Oracle Products, 5-2interim patches, 8-1
getting, 8-3structure, 8-1versions, 8-2
inventory, 1-3about, 3-3backup, 3-9Central Inventory, 3-4
corruption, 3-10creating, 3-7detaching homes, 3-8inventory file, 3-4logs directory, 3-5removing, 3-8
Local Inventorycorruption, 3-11
local inventory, 3-5operations, 1-3
attaching homes, 1-3detaching homes, 1-3updating nodelist, 1-3
Oracle home inventory, 3-5components file(comps.xml), 3-6ContentsXML folder, 3-7home properties file, 3-6oneoffs folder, 3-7scripts folder, 3-7templates folder, 3-7
pointer file, 3-4structure, 3-4
JJava Runtime Environment, 2-1JRE, 2-1JRE_LOCATION parameter in
ORAPARAM.INI, 5-4JRE_MEMORY_OPTIONS parameter in
ORAPARAM.INI, 5-4
Kkey features, 2-1
Llanguage
selections, 9-1LICENSE_LOCATION parameter in
ORAPARAM.INI, 5-4LICENSE_TITLE parameter in
ORAPARAM.INI, 5-4LOCATION_FOR_DISK2, 4-6log files, 5-15
Mmemory requirements, 2-1minimum downtime patching, 8-18modes of installation, 1-4, 5-5
clusters, 1-4interactive, 1-4, 5-5silent, 1-4, 5-6suppressed, 1-4, 5-6
multi-CD support, 4-6, 5-7multiple Oracle homes, 3-3
NNEXT_SESSION, 4-7NEXT_SESSION_ON_FAIL, 4-7NEXT_SESSION_RESPONSE, 4-7NLS_ENABLED parameter in ORAPARAM.INI, 5-5NLS_ENABLED variable, 9-1NO_BROWSE parameter in ORAPARAM.INI, 5-4
Oonline help, 5-2OPatch
about, 8-3apply Option, 8-11backup and recovery, 8-10bug conflict, 8-20bug superset, 8-19combination conflict, 8-20conflict detection, 8-22conflicts, 8-19
bug conflict, 8-20
Index-3
bug superset, 8-19combination conflict, 8-20detection, 8-22file conflict, 8-20resolution, 8-22types, 8-19
environment variables, 8-29features, 8-3file conflict, 8-20logging and tracing, 8-22logging levels, 8-23lsinventory Option, 8-12pre-requisites, 8-4query Option, 8-14recovering from failure, 8-23requirements, 8-3rollback Option, 8-14syntax, 8-10troubleshooting, 8-30types of conflicts, 8-19version Option, 8-16
Optimal Flexible Architecturecharacteristics of OFA, 3-13directory structure, 3-13
OPTIONAL_CONFIG_TOOLS, 4-9Oracle homes, 1-3
creating, 3-1default homes, 3-2detaching homes, 3-8directory structure (UNIX), 3-13directory structure (Windows), 3-13introduction, 3-1multiple homes, 3-3removing, 3-2, 5-10restoring, 8-22
ORACLE section of ORAPARAM.INI, 5-3ORACLE_BASE, 3-3ORACLE_BASE directory, 3-13ORACLE_HOME, 4-7ORACLE_HOME directory, 3-13ORACLE_HOME_NAME, 4-7ORAPARAM.INI file
APPLTOP_STAGE parameter, 5-5BOOTSTRAP parameter, 5-5BOOTSTRAP_SIZE parameter, 5-5DEFAULT_HOME_LOCATION, 5-4DEFAULT_HOME_NAME parameter, 5-4DISTRIBUTION parameter, 5-3IMAGES section, 5-5JRE_LOCATION parameter, 5-4JRE_MEMORY_OPTIONS parameter, 5-4LICENSE_LOCATION parameter, 5-4LICENSE_TITLE parameter, 5-4NLS_ENABLED parameter, 5-5NO_BROWSE parameter, 5-4ORACLE section, 5-3OUI_LOCATION parameter, 5-4OUI_VERSION parameter, 5-4REGISTRATION_KEY, 5-5REGISTRATION_URL, 5-5
SOURCE parameter, 5-3USE_BUILD_NUMBER parameter, 5-5
oraparam.ini file, 5-3sample, D-7
OUIcloning, 5-15command line arguments, 5-13errors, B-3exit codes, 5-14inventory, 3-3log files, 5-15running, 5-12starting, 5-12
OUI_LOCATION parameter in ORAPARAM.INI, 5-4
OUI_VERSION parameter in ORAPARAM.INI, 5-4out of "temp" space error, B-3
Ppatchsets, 1-2pre-requisite checks, 5-1
command line parameters, 5-2product language selections, 9-1
Rrecord mode, 4-3Reflection X, B-4REGISTRATION_KEY parameter in
ORAPARAM.INI, 5-5REGISTRATION_URL parameter in
ORAPARAM.INI, 5-5REMOVE_HOMES, 4-8removing Oracle homes, 3-2, 5-10requirements
disk space, 2-1memory, 2-1
response fileACCEPT_LICENSE_AGREEMENT, 4-10CLUSTER_NODES, 4-9creating with record mode, 4-3definition, 4-1DEINSTALL_LIST, 4-8DEPENDENCY_LIST, 4-9format, 4-4FROM_LOCATION, 4-6FROM_LOCATION_CD_LABEL, 4-6general format
comments, 4-5headers, 4-5values, 4-4
INCLUDE, 4-5INSTALL_TYPE, 4-10location, 4-2LOCATION_FOR_DISK2, 4-6modifying, 4-2NEXT_SESSION, 4-7NEXT_SESSION_ON_FAIL, 4-7NEXT_SESSION_RESPONSE, 4-7
Index-4
OPTIONAL_CONFIG_TOOLS, 4-9ORACLE_HOME, 4-7ORACLE_HOME_NAME, 4-7parameters, 4-5REMOVE_HOMES, 4-8RESPONSEFILE_VERSION, 4-6RESTART_SYSTEM, 4-7sample, D-1SELECTED_LANGUAGES, 4-10SHOW_COMPONENT_LOCATIONS_PAGE, 4-7SHOW_CUSTOM_TREE, 4-7SHOW_DEINSTALL_CONFIRMATION, 4-9SHOW_DEINSTALL_PROGRESS, 4-9SHOW_END_SESSION_PAGE, 4-7SHOW_EXIT_CONFIRMATION, 4-7SHOW_INSTALL_PROGRESS_PAGE, 4-7SHOW_OPTIONAL_CONFIG_TOOL_PAGE, 4-8SHOW_RELEASE_NOTES, 4-8SHOW_ROOTSH_CONFIRMATION, 4-8SHOW_SPLASH_SCREEN, 4-8SHOW_SUMMARY_PAGE, 4-8SHOW_WELCOME_PAGE, 4-8specifying, 4-11TOPLEVEL_COMPONENT, 4-8UNIX_GROUP_NAME, 4-8variable lookup order, 4-4
RESPONSEFILE_VERSION, 4-6RESTART_SYSTEM, 4-7rolling patching, 8-17running OUI after installation, 5-12
SSELECTED_LANGUAGES, 4-10SHOW_COMPONENT_LOCATIONS_PAGE, 4-7SHOW_CUSTOM_TREE_PAGE, 4-7SHOW_DEINSTALL_CONFIRMATION, 4-9SHOW_DEINSTALL_PROGRESS, 4-9SHOW_END_SESSION_PAGE, 4-7SHOW_EXIT_CONFIRMATION, 4-7SHOW_INSTALL_PROGRESS_PAGE, 4-7SHOW_OPTIONAL_CONFIG_TOOL_PAGE, 4-8SHOW_RELEASE_NOTES, 4-8SHOW_ROOTSH_CONFIRMATION, 4-8SHOW_SPLASH_SCREEN, 4-8SHOW_SUMMARY_PAGE, 4-8SHOW_WELCOME_PAGE, 4-8silent installation
definition, 4-1reasons for performing, 4-2
SOURCE parameter in ORAPARAM.INI, 5-3SSH configuration, 6-6starting OUI, 5-12stty commands, 6-8
TTarantella, B-4target home, 3-3TEMP/TMP directory, 5-7
TOPLEVEL_COMPONENT, 4-8troubleshooting
Exceed, B-4Reflection X, B-4Tarantella, B-4tips, B-3
UUNIX, special instructions, 5-8UNIX_GROUP_NAME, 4-8upgrades, 1-2USE_BUILD_NUMBER parameter in
ORAPARAM.INI, 5-5user equivalency, 6-7utilities, 1-1
actions performed, 1-1
Vvariable values, 4-4
WWeb installation, 5-8