oracle database oracle clusterware and oracle real ... · oracle database oracle clusterware and...
TRANSCRIPT

Oracle® DatabaseOracle Clusterware and Oracle Real Application Clusters Installation Guide
10g Release 2 (10.2) for Microsoft Windows
B14207-07
July 2008

Oracle Database Oracle Clusterware and Oracle Real Application Clusters Installation Guide, 10g Release 2 (10.2) for Microsoft Windows
B14207-07
Copyright © 2005, 2008, Oracle. All rights reserved.
Primary Authors: David Austin, Mark Bauer, Kevin Flood, Emily Murphy, Lyju Vadassery, Douglas Williams
Contributing Authors: Jonathan Creighton, Pat Huey, Raj Kumar
Contributors: Chris Allison, Karin Brandauer, Robert Chang, Sudip Datta, Luann Ho, Rajiv Jayaraman, Alex Keh, Roland Knapp, Diana Lorentz, Barb Lundhild, Vijay Lunawat, John Patrick McHugh, Randy Neville, Philip Newlan, Michael Polaski, Naga Prakash, Dipak Saggi, Sudheendra Sampath, Vishal Saxena, Janelle Simmons, Clive Simpkins, Khethavath P. Singh, Samarjeet Tomar, Nitin Vengurlekar, Gary Young
The Programs (which include both the software and documentation) contain proprietary information; they are provided under a license agreement containing restrictions on use and disclosure and are also protected by copyright, patent, and other intellectual and industrial property laws. Reverse engineering, disassembly, or decompilation of the Programs, except to the extent required to obtain interoperability with other independently created software or as specified by law, is prohibited.
The information contained in this document is subject to change without notice. If you find any problems in the documentation, please report them to us in writing. This document is not warranted to be error-free. Except as may be expressly permitted in your license agreement for these Programs, no part of these Programs may be reproduced or transmitted in any form or by any means, electronic or mechanical, for any purpose.
If the Programs are delivered to the United States Government or anyone licensing or using the Programs on behalf of the United States Government, the following notice is applicable:
U.S. GOVERNMENT RIGHTS Programs, software, databases, and related documentation and technical data delivered to U.S. Government customers are "commercial computer software" or "commercial technical data" pursuant to the applicable Federal Acquisition Regulation and agency-specific supplemental regulations. As such, use, duplication, disclosure, modification, and adaptation of the Programs, including documentation and technical data, shall be subject to the licensing restrictions set forth in the applicable Oracle license agreement, and, to the extent applicable, the additional rights set forth in FAR 52.227-19, Commercial Computer Software—Restricted Rights (June 1987). Oracle USA, Inc., 500 Oracle Parkway, Redwood City, CA 94065.
The Programs are not intended for use in any nuclear, aviation, mass transit, medical, or other inherently dangerous applications. It shall be the licensee's responsibility to take all appropriate fail-safe, backup, redundancy and other measures to ensure the safe use of such applications if the Programs are used for such purposes, and we disclaim liability for any damages caused by such use of the Programs.
Oracle, JD Edwards, PeopleSoft, and Siebel are registered trademarks of Oracle Corporation and/or its affiliates. Other names may be trademarks of their respective owners.
The Programs may provide links to Web sites and access to content, products, and services from third parties. Oracle is not responsible for the availability of, or any content provided on, third-party Web sites. You bear all risks associated with the use of such content. If you choose to purchase any products or services from a third party, the relationship is directly between you and the third party. Oracle is not responsible for: (a) the quality of third-party products or services; or (b) fulfilling any of the terms of the agreement with the third party, including delivery of products or services and warranty obligations related to purchased products or services. Oracle is not responsible for any loss or damage of any sort that you may incur from dealing with any third party.

iii
Contents
Preface ................................................................................................................................................................. ix
Intended Audience...................................................................................................................................... ixDocumentation Accessibility ..................................................................................................................... ixRelated Documents ..................................................................................................................................... xConventions ................................................................................................................................................. xi
What's New in Oracle Database 10g Oracle Clusterware and Oracle RAC Installation and Configuration?.......................................................................................................... xiii
Oracle Database 10g Release 2 (10.2) New Features............................................................................. xiiiOracle Database 10g Release 1 (10.1) New Features ............................................................................ xvi
Part I Oracle Clusterware and Oracle Real Application Clusters Installation Planning and Requirements
1 Introduction to Installing Oracle Clusterware and Oracle Real Application Clusters
Oracle Clusterware and Oracle Real Application Clusters Documentation Overview ............. 1-1General System Installation Requirements for Oracle Real Application Clusters..................... 1-2
Cluster Verification Utility................................................................................................................ 1-2Hardware Requirements for Oracle Database 10g Real Application Clusters.......................... 1-3Software Requirements for Oracle Database 10g Real Application Clusters ............................ 1-4
Cluster Setup and Pre-Installation Configuration Tasks for Real Application Clusters ........... 1-4Pre-Installation, Installation, and Post-Installation Overview ....................................................... 1-5
Pre-Installation Overview for Oracle Clusterware and Oracle Real Application Clusters .... 1-5Installation Overview for Oracle Clusterware and Oracle Real Application Clusters ............ 1-5Post-Installation Overview for Oracle Database 10g Real Application Clusters ..................... 1-6
Oracle Universal Installer and Real Application Clusters............................................................... 1-6Storage Considerations for Installing Oracle Database 10g Real Application Clusters ............ 1-7
Overview of Automatic Storage Management .............................................................................. 1-7Shared Storage for Database Recovery Area............................................................................... 1-10
Additional Considerations for Using Oracle Database 10g Features in Oracle RAC .............. 1-10Oracle Database 10g and Real Application Clusters Components.............................................. 1-10
Oracle Clusterware ......................................................................................................................... 1-11The Installed Real Application Clusters Components............................................................... 1-11
Oracle Database 10g Real Application Clusters Version Compatibility .................................... 1-11

iv
Cloning Oracle Clusterware and Oracle RAC in Grid Environments ........................................ 1-12Cloning Oracle Clusterware Homes ............................................................................................ 1-12Cloning Real Application Clusters Homes ................................................................................. 1-12
Part II Pre-Installation Procedures for Oracle Clusterware and Oracle Real Application Clusters
2 Server and Network Pre-Installation Tasks
Understanding and Using Cluster Verification Utility..................................................................... 2-1Entering Cluster Verification Utility Commands.......................................................................... 2-2Using Cluster Verification Utility Help .......................................................................................... 2-2Verbose Mode and "Unknown" Output ......................................................................................... 2-3
Installation Differences Between Windows and UNIX.................................................................... 2-3Checking Hardware and Software Certification................................................................................ 2-4
Web Browser Support ....................................................................................................................... 2-4Telnet and Terminal Services Support ............................................................................................ 2-4
Windows Telnet Services Support ........................................................................................... 2-5Windows Terminal Services and Remote Desktop Support ................................................ 2-5
Checking Hardware Requirements ...................................................................................................... 2-5Hard Disk Space Requirements ....................................................................................................... 2-6
Verifying Hardware Requirements....................................................................................................... 2-6Checking Software Requirements ....................................................................................................... 2-7Checking the Hardware and Operating System Setup with CVU ................................................. 2-9Checking Network Requirements ........................................................................................................ 2-9
Network Hardware Requirements .................................................................................................. 2-9IP Address Requirements .............................................................................................................. 2-10Checking Network Requirements ................................................................................................ 2-11
Checking the Network Setup.............................................................................................................. 2-12Checking Individual Component Requirements ........................................................................... 2-12
Oracle Advanced Security Requirements.................................................................................... 2-12Oracle Enterprise Manager Requirements .................................................................................. 2-12
Stopping Existing Oracle Processes................................................................................................... 2-13Verifying Cluster Privileges ................................................................................................................ 2-14
3 Storage Pre-Installation Tasks
Preliminary Shared Disk Preparation .................................................................................................. 3-1Disabling Write Caching ................................................................................................................... 3-1Enabling Automounting for Windows 2003 .................................................................................. 3-1
Reviewing Storage Options for Oracle Clusterware, Database, and Recovery Files.................. 3-2Overview of Storage Options ........................................................................................................... 3-2
Overview of Oracle Clusterware Storage Options................................................................. 3-2Overview of Oracle Database and Recovery File Options.................................................... 3-3General Storage Considerations ............................................................................................... 3-3Guidelines for Placing Oracle Datafiles on a File System ..................................................... 3-4Guidelines for Placing Oracle Recovery Files on a File System ........................................... 3-5After You Have Selected Disk Storage Options ..................................................................... 3-6

v
Checking for Available Shared Storage with CVU ....................................................................... 3-6Storage Configuration Steps for Real Application Clusters............................................................ 3-7
Configuring Storage for Oracle Clusterware Files on a Shared File System............................. 3-7Configuring Storage for Oracle Clusterware Files on Raw Devices........................................... 3-8
Configuring Disks for Automatic Storage Management ................................................................. 3-8General Steps for Configuring Automatic Storage Management ............................................... 3-8Step 1: Identifying Storage Requirements for Automatic Storage Management...................... 3-9Step 2 (Optional): Using an Existing Automatic Storage Management Disk Group ............ 3-11Step 3: Creating DAS or SAN Disk Partitions for Automatic Storage Management ............ 3-12Step 4: Manually Configuring Disks for Automatic Storage Management............................ 3-13
Overview of asmtoolg and asmtool ...................................................................................... 3-13Using asmtoolg (Graphical User Interface).......................................................................... 3-13Using asmtool (Command Line)............................................................................................ 3-14
Configuring Raw Logical Volumes or Raw Partitions ................................................................... 3-15Creating Partitions for Logical Volumes ..................................................................................... 3-15Assigning Logical Names .............................................................................................................. 3-16Creating the DBCA Raw Device Mapping File .......................................................................... 3-17
Requirements for Files Managed by Oracle .................................................................................... 3-18
Part III Installing Oracle Clusterware and Oracle Real Application Clusters
4 Installing Oracle Clusterware on Windows-Based Systems
Verifying Oracle Clusterware Requirements with CVU .................................................................. 4-1Troubleshooting Clusterware Setup for Windows ....................................................................... 4-2
Preparing to Install Oracle Clusterware with OUI ............................................................................ 4-3Installing Oracle Clusterware with OUI ............................................................................................. 4-5
Starting OUI in Console Mode......................................................................................................... 4-5Running OUI to Install Oracle Clusterware................................................................................... 4-5Installing Oracle Clusterware Using a Cluster Configuration File............................................. 4-7
Formatting Drives to Use Oracle Cluster File System after Installation ....................................... 4-8
5 Installing Oracle Database 10g with Oracle Real Application Clusters
Verifying System Readiness for Installing the Oracle Database with CVU ................................ 5-1Troubleshooting Installation Setup for Windows ......................................................................... 5-2
Selecting a Database Configuration Type ........................................................................................... 5-3Configuration Type Descriptions .................................................................................................... 5-3
General Purpose, Transaction Processing, and Data Warehouse Configuration Types .. 5-3Using the Advanced Configuration Type ............................................................................... 5-4
Behavior of OUI, DBCA, and Other Assistants During Installation .......................................... 5-4Installation of Oracle Database 10g with Oracle RAC Using Oracle Universal Installer ......... 5-5Installation on Windows-Based Systems with the Minimum Memory Requirements ............. 5-6De-Installing Real Application Clusters Software ............................................................................ 5-7
De-Installing Oracle Database 10g RAC Software ........................................................................ 5-8De-Installing Oracle Clusterware from Windows Environments .............................................. 5-9
De-Installing Oracle Clusterware with No Previous Cluster Software Versions.............. 5-9De-Installing Oracle Clusterware, with Clusterware Downgrade to 9.2 ........................ 5-10

vi
De-Installing Automatic Storage Management .......................................................................... 5-11
6 Creating Oracle RAC Databases with the Database Configuration Assistant
Using Database Configuration Assistant with Oracle Real Application Clusters...................... 6-1Benefits of Using Database Configuration Assistant ....................................................................... 6-2Oracle Real Application Clusters High Availability Services......................................................... 6-2
Service Configuration and Instance Preferences ........................................................................... 6-2Transparent Application Failover Policies ..................................................................................... 6-2
Verifying Requirements for DBCA ...................................................................................................... 6-2Creating the Database after Installation Using Database Configuration Assistant ................... 6-3Creating an Oracle Real Application Clusters Database with DBCA ........................................... 6-3Deleting a Real Application Clusters Database with DBCA ....................................................... 6-10
7 Oracle Real Application Clusters Post-Installation Procedures
Required Post-Installation Tasks .......................................................................................................... 7-1Back Up the Voting Disk after Installation..................................................................................... 7-1Download and Install Patches.......................................................................................................... 7-1Configure Oracle Products ............................................................................................................... 7-2
Recommended Post-Installation Tasks ................................................................................................ 7-2Verifying Enterprise Manager Operations ..................................................................................... 7-3Using Oracle9i Language and Definition Files with Oracle Database 10g ................................ 7-3Logging in to Oracle Enterprise Manager Database Control ...................................................... 7-3
Part IV Real Application Clusters Environment Configuration
8 Parameter Management for Real Application Clusters Databases
Parameter Files and Real Application Clusters.................................................................................. 8-1Using Server Parameter Files in Real Application Clusters ............................................................ 8-1
Location of the Server Parameter File ............................................................................................. 8-2Parameter File Search Order in Oracle Real Application Clusters................................................. 8-3Server Parameter File Errors in Real Application Clusters.............................................................. 8-3
9 Understanding the Oracle Real Application Clusters Installed Configuration
Understanding the Configured Environment in Real Application Clusters................................ 9-1The Oracle Cluster Registry in Real Application Clusters .............................................................. 9-1Database Components Created Using Database Configuration Assistant................................... 9-1
Tablespaces and Datafiles ................................................................................................................. 9-2Control Files ........................................................................................................................................ 9-3Redo Log Files .................................................................................................................................... 9-3
Managing Undo Tablespaces in Real Application Clusters ........................................................... 9-3Initialization Parameter Files................................................................................................................. 9-4Configuring Service Registration-Related Parameters in Real Application Clusters ................ 9-4Configuring the Listener File (listener.ora)......................................................................................... 9-5
Local Listeners .................................................................................................................................... 9-5Multiple Listeners .............................................................................................................................. 9-5How Oracle Uses the Listener (listener.ora File) ........................................................................... 9-5

vii
Listener Registration and PMON Discovery .......................................................................... 9-6Directory Server Access (ldap.ora File) ................................................................................................ 9-6Net Service Names (tnsnames.ora File)................................................................................................ 9-7Net Services Profile (sqlnet.ora File) ................................................................................................. 9-11
Part V Oracle Clusterware and Oracle Real Application Clusters Installation Reference Information
A Troubleshooting the Installation Process
Troubleshooting the Oracle Clusterware and Oracle RAC Installation....................................... A-1General Installation Issues ............................................................................................................... A-1Oracle Clusterware Install Actions Log Errors and Causes........................................................ A-2
The OCFS format is not recognized on one or more of the remote cluster nodes ........... A-2Timing issue with start of the OracleCSService: ................................................................... A-3You are on a Windows 2003 system, and Automount of new drives is not enabled: ..... A-3You have entered a period in one of the node names during CRS install......................... A-3Node1 failed to startup service OracleEVMService, err(1053) ............................................ A-3Ignoring upgrade failure of ocr(-1073740972) ....................................................................... A-3
Real Application Clusters Installation Error Messages ............................................................... A-3Performing Cluster Diagnostics During Real Application Clusters Installations ................... A-3
B Using Scripts to Create Oracle Real Application Clusters Databases
Creating a Database Using Scripts....................................................................................................... B-1
C Configuring Raw Devices for Oracle Real Application Clusters
Support for Raw Devices on Windows Systems ............................................................................... C-1Raw Devices Required by Database Configuration Assistant....................................................... C-1
Planning Your Raw Device Creation Strategy.............................................................................. C-2
D Converting to Real Application Clusters from Single-Instance Oracle Databases
Prerequisites for Conversion ................................................................................................................ D-1Single-Instance to Cluster-Enabled Conversion Administrative Issues ...................................... D-1Converting from Single-Instance to Real Application Clusters .................................................... D-2
Single Instance on a Non-Cluster computer to Oracle Database 10g with Oracle RAC......... D-2Back up the Original Single-Instance Database .................................................................... D-2Perform the Pre-Installation Steps........................................................................................... D-3Set up the Cluster ...................................................................................................................... D-3Validate the Cluster ................................................................................................................... D-3Copy the Preconfigured Database Image............................................................................... D-3Install Oracle Database 10g Software with Real Application Clusters .............................. D-3
Single Instance on a Cluster to Oracle Database 10g RAC.......................................................... D-4Single Instance on a Cluster Running from a Cluster Enabled Oracle Home .................. D-4
Post-Conversion Steps............................................................................................................................ D-6

viii
E Directory Structure for Oracle RAC Environments
Understanding the Real Application Clusters Directory Structure .............................................. E-1Directory Structures for Real Application Clusters ......................................................................... E-1
F Stopping Processes in Oracle RAC Databases and Performing Oracle Clusterware Rolling Upgrades
Back Up the Oracle Software ................................................................................................................ F-1Verify System Readiness for Patches and Upgrades ........................................................................ F-1How to Stop Processes in an Existing Oracle Database................................................................... F-2
Shut Down Oracle Real Application Clusters Databases............................................................ F-2Stop All Oracle Processes................................................................................................................. F-2
Stop Oracle Clusterware or Cluster Ready Services Processes ........................................... F-2Stop Oracle Database 10g Processes Before Adding Products or Upgrading .................. F-3
How to Perform Oracle Clusterware Rolling Upgrades .................................................................. F-4Copy Patch Software to the Primary Upgrade Node .................................................................. F-4Shut Down Oracle Real Application Clusters Instances on Upgrade Nodes........................... F-4Stop All Oracle Processes on Upgrade Nodes .............................................................................. F-5Start OUI and Complete Upgrade Processes on Upgrade Nodes ............................................. F-6
G Managing Oracle Database Port Numbers
About Managing Ports ........................................................................................................................... G-1Viewing Port Numbers and Access URLS.......................................................................................... G-1Port Numbers and Protocols of Oracle Components ....................................................................... G-2Changing the Oracle Enterprise Management Agent Port.............................................................. G-4Changing the Oracle Enterprise Manager Database Console Ports .............................................. G-4Changing the iSQL*Plus Ports ............................................................................................................. G-5Changing the Oracle XML DB Ports.................................................................................................... G-5
Index

ix
Preface
This guide explains how to install and configure Oracle Clusterware and Oracle Database with Oracle Real Application Clusters (Oracle RAC) on the following operating systems:
■ Microsoft Windows clusters running Windows 2000 (32-bit) with Service Pack 1 or higher
■ Microsoft Windows Server 2003 (32-bit)
■ Microsoft Windows Server 2003 x64
■ Microsoft Windows Server 2003 for 64-bit Itanium 2 Systems
■ Microsoft Windows Server 2008 (32-bit)
■ Microsoft Windows Server 2008 x64
This preface contains these topics:
■ Intended Audience
■ Documentation Accessibility
■ Related Documents
■ Conventions
Intended AudienceOracle Database Oracle Clusterware and Oracle Real Application Clusters Installation Guide for Microsoft Windows provides information for a database administrator who is installing Oracle Clusterware or Oracle RAC on a Windows cluster. The guide provides the network, cluster, and individual computer requirements for installing and configuring the software as well as the steps to complete an installation. In some cases, this book may help a network administrator or system administrator who is responsible for providing the required network and hardware configuration.
Documentation AccessibilityOur goal is to make Oracle products, services, and supporting documentation accessible, with good usability, to the disabled community. To that end, our
Note: For Windows Server 2008, Oracle supports all Windows Server 2008 editions.

x
documentation includes features that make information available to users of assistive technology. This documentation is available in HTML format, and contains markup to facilitate access by the disabled community. Accessibility standards will continue to evolve over time, and Oracle is actively engaged with other market-leading technology vendors to address technical obstacles so that our documentation can be accessible to all of our customers. For more information, visit the Oracle Accessibility Program Web site at
http://www.oracle.com/accessibility/
Accessibility of Code Examples in DocumentationScreen readers may not always correctly read the code examples in this document. The conventions for writing code require that closing braces should appear on an otherwise empty line; however, some screen readers may not always read a line of text that consists solely of a bracket or brace.
Accessibility of Links to External Web Sites in DocumentationThis documentation may contain links to Web sites of other companies or organizations that Oracle does not own or control. Oracle neither evaluates nor makes any representations regarding the accessibility of these Web sites.
TTY Access to Oracle Support ServicesOracle provides dedicated Text Telephone (TTY) access to Oracle Support Services within the United States of America 24 hours a day, 7 days a week. For TTY support, call 800.446.2398. Outside the United States, call +1.407.458.2479.
Related DocumentsFor more information, refer to the following Oracle resources:
Oracle Real Application Clusters Documentation■ Oracle Database Oracle Clusterware and Oracle Real Application Clusters Administration
and Deployment Guide
Installation Guides■ Oracle Database Installation Guide for Microsoft Windows (32-Bit)
■ Oracle Database Quick Installation Guide for Microsoft Windows (32-Bit)
■ Oracle Database Installation Guide for Microsoft Windows (x64)
■ Oracle Database Quick Installation Guide for Microsoft Windows (x64)
■ Oracle Database Installation Guide for Microsoft Windows (64-Bit) on Intel Itanium
■ Oracle Database Quick Installation Guide for Microsoft Windows (64-Bit) on Intel Itanium
■ Oracle Diagnostics Pack Installation
■ Oracle Universal Installer and OPatch User's Guide
Operating System-Specific Administrative Guides■ Oracle Database Platform Guide for Microsoft Windows (32-Bit)
■ Oracle Database Platform Guide for Microsoft Windows (x64)
■ Oracle Database Platform Guide for Microsoft Windows (64-Bit) on Intel Itanium

xi
Oracle Database 10g Real Application Clusters Management■ Oracle Database Oracle Clusterware and Oracle Real Application Clusters Administration
and Deployment Guide
■ Oracle Database 2 Day DBA
■ Getting Started with the Oracle Diagnostics Pack
Generic Documentation■ Oracle Database New Features
■ Oracle Database Net Services Administrator's Guide
■ Oracle Database Concepts
■ Oracle Database Reference
Most Oracle error message documentation is only available in HTML. If you only have access to the Oracle Documentation media, then browse the error messages by range. Once you find a range, use your browser's "find in page" feature to locate a specific message. When connected to the Internet, you can search for a specific error message using the error message search feature of the Oracle online documentation. However, error messages for Oracle Clusterware and Oracle RAC tools are included in Oracle Database Oracle Clusterware and Oracle Real Application Clusters Administration and Deployment Guide.
ConventionsThe following text conventions are used in this document:
Convention Meaning
boldface Boldface type indicates graphical user interface elements associated with an action, or terms defined in text or the glossary.
italic Italic type indicates book titles, emphasis, or placeholder variables for which you supply particular values.
monospace Monospace type indicates commands within a paragraph, URLs, code in examples, text that appears on the screen, or text that you enter.

xii

xiii
What's New in Oracle Database 10g OracleClusterware and Oracle RAC Installation and
Configuration?
This section describes the new features in Oracle Database 10g as they pertain to the installation and configuration of Oracle Clusterware and Oracle Real Application Clusters (Oracle RAC). The topic in this section is:
■ Oracle Database 10g Release 2 (10.2) New Features
■ Oracle Database 10g Release 1 (10.1) New Features
Oracle Database 10g Release 2 (10.2) New FeaturesThis section describes features introduced in Oracle Database 10g Release 2 (10.2) that affect the installation and configuration of Oracle Clusterware and Oracle RAC.
■ With this release, the component previously known as Cluster Ready Services, or CRS, is now called Oracle Clusterware.
■ Oracle Clusterware and Oracle RAC now run on Microsoft Windows Server 2008 (32-bit) and Windows Server 2008 x64.
■ This release of Oracle Database 10g is provided with Cluster Verification Utility (CVU). CVU is a validation tool that you can use to check whether your cluster is properly configured, to avoid installation failures and database creation failures. It provides the following cluster setup checks:
– The cluster configuration meets the requirements for installing Oracle Clusterware
– The cluster configuration meets the requirements for Real Application Clusters installation
– The cluster configuration meets the requirements for creating a database with Oracle Real Application Clusters, or meets the requirements for a change in database configuration
You can use the CVU command-line interface:
– To validate cluster components individually, including node connectivity, administrative privileges, and the proper configuration of Oracle Cluster Registry (OCR), Oracle Clusterware, and other required components for Real Application Clusters.

xiv
– To validate a pre-defined set of requirements, including the proper setup for node connectivity, user equivalence, shared storage accessibility, integrity of the Oracle Clusterware stack, and other requirements that a system must have for a specific stage of Oracle RAC deployment like Oracle Clusterware or database installation and database configuration.
CVU is available on the Oracle Clusterware media and is installed by OUI as part of the Oracle Clusterware installation. You can run CVU directly from the media, before installing Oracle software, to perform configuration checks. CVU commands to perform installation checks are provided in this installation guide.
■ With Oracle Database 10g Release 2 (10.2), you can create duplicates of a cluster node (or "clone" a node) using an image file. Cloning is now the preferred method for adding nodes to a cluster. You can manage node cloning using a GUI provided by Enterprise Manager Grid Control. The command line process for cloning, as well as details about using non-interactive (silent) installation scripts, is described in the manual Oracle Universal Installer and OPatch User's Guide.
Both Oracle Clusterware and Oracle Real Application Clusters can be cloned.
■ Oracle Database 10g Release 2 (10.2) enables rolling upgrades from Oracle Database 10g Release 1 (10.1) Cluster Ready Services to Oracle Database 10g Release 2 (10.2) Oracle Clusterware.
During Oracle Clusterware installation, if Oracle Universal Installer (OUI) detects an Oracle Database 10g Release 1 (10.1) Cluster Ready Services installation, then OUI provides the option to install Oracle Clusterware across all nodes in the cluster, or across a subset of nodes in the cluster. During Oracle Clusterware installation, Oracle Database 10g Release 1 (10.1) Cluster Ready Services remains available on nodes that are not being upgraded.
■ Starting with Oracle Database 10g Release 2 (10.2), Oracle Clusterware should be installed in a separate Oracle Clusterware home directory. This is a change to the Optimal Flexible Architecture (OFA) rules. You should not install Oracle Clusterware in an Oracle Clusterware directory in the release-specific mount point, as succeeding versions of Oracle Clusterware will overwrite the Oracle Clusterware installation in the same path. Installation of any version of Oracle Clusterware will also overwrite an existing Oracle Database 10g Release 1 (10.1) Cluster Ready Services installation in the same path.
■ Oracle Database 10g Release 2 (10.2) Oracle Clusterware installation provides the option to use a Cluster Configuration File. The Cluster Configuration File simplifies Oracle Clusterware installation in situations such as installing in test environments, or installing Oracle Clusterware on a large number of nodes.
■ Database Configuration Assistant (DBCA) provides a simplified procedure for creating an Automatic Storage Management (ASM) instance and for configuring disk groups.
■ ASM should be installed in a separate ASM home directory. This is a change to the OFA rules.
■ With Oracle Database 10g Release 2 (10.2), a single ASM instance is able to serve disk groups to all the database instances on the node, whether they are for single-instance or Oracle RAC databases. This change simplifies managing the
See Also: Oracle Database Oracle Clusterware and Oracle Real Application Clusters Administration and Deployment Guide for detailed information about CVU.

xv
cluster, as you do not need to distribute disks across multiple ASM instances statically. Instead, you can manage all disks with one ASM instance on each node.
■ With Oracle Database 10g Release 2 (10.2), an ASM disk group defined with normal redundancy can have its individual files defined with three-way redundancy (high redundancy) and, by default, the control file is created with three-way mirroring. You still have the option to create files in a normal redundancy group with the default two-way mirroring or with no mirroring.
■ Oracle cluster software, which was known as Cluster Ready Services in Oracle Database 10g Release 1 (10.1), has been renamed to Oracle Clusterware in Oracle Database 10g Release 2 (10.2). Oracle Clusterware contains the cluster management software required to support Oracle Database 10g RAC databases. Oracle Clusterware also provides high availability components that provide many system management features, including determining node availability, cluster group membership, and locking services for Oracle processes. The components of Oracle Clusterware interact with third-party vendor clusterware, if present, to coordinate cluster membership information.
In addition, while continuing to be required for Oracle RAC databases, Oracle Clusterware is also available for use with single-instance databases and applications that you deploy on clusters. The API libraries required for use with single-instance databases are provided with the Oracle Client installation media.
With this release, the following updates have been made to Oracle Clusterware:
– Versions of cluster manager previous to Oracle Database 10g were sometimes referred to as "Cluster Manager". In Oracle Database 10g, this function is performed by an Oracle Clusterware component known as Cluster Synchronization Services (CSS). The OracleCSService, OracleCRService, and OracleEVMService replace the service known previous to Oracle Database 10g as OracleCMService9i.
– With this release of Oracle Database 10g Release 2 (10.2) with Oracle RAC, CSS has been modified to allow you to configure CSS with multiple voting disks. In the 10g Release 1 (10.1) version, you could configure only one voting disk. By enabling multiple voting disk configuration, the redundant voting disk enables you to configure an Oracle RAC cluster with a voting disk that is mirrored on multiple independent shared physical disks. This option facilitates the use of the iSCSI network protocol, and other Network Attached Storage (NAS) storage solutions.
– Oracle Clusterware is available for use with single-instance databases and applications that you deploy on clusters.
See Also: Oracle Database Administrator's Guide for more information about the use of ASM disk groups and their options
Note: To obtain the benefits of multiple voting disks, you must configure three voting disks.
See Also: Oracle Database Oracle Clusterware and Oracle Real Application Clusters Administration and Deployment Guide for more information about Oracle Clusterware, Oracle Clusterware API, and the Oracle Clusterware API commands

xvi
■ Oracle Database 10g installation requires you to perform a two-phase process in which you run OUI twice. The first phase installs Oracle Clusterware 10g Release 2 (10.2) and the second phase installs the Oracle Database 10g software with Oracle RAC. The installation also enables you to create and configure services for your Oracle RAC environment.
If you have a previous Oracle cluster database version, then OUI activates Database Upgrade Assistant (DBUA) to automatically upgrade your pre-Oracle Database 10g cluster database. DBUA can upgrade 9.x and 10.1 Oracle RAC databases, and can upgrade 10.1 Oracle RAC databases using ASM to 10.2. It can also upgrade ASM 10.1 to ASM 10.2 The Oracle Database 10g installation process provides single system image, ease of use, and accuracy for Oracle RAC installations and patches.
Oracle Database 10g Release 1 (10.1) New FeaturesThis section describes features introduced in Oracle Database 10g Release 1 (10.1) that affect the installation and configuration of Oracle RAC.
■ Oracle Database 10g with Oracle RAC is available on both Standard Edition and Enterprise Edition.
■ There are new and changed pages and dialogs for Oracle Universal Installer (OUI), Database Configuration Assistant (DBCA), and Database Upgrade Assistant. Virtual Internet Protocol Configuration Assistant (VIPCA) is a new tool for this release. These enhancements are described in the following:
– OUI Cluster Installation Mode Page—This page enables you to select whether to perform a cluster or a single-instance Oracle Database 10g installation.
– SYS and SYSTEM Passwords Page—This page has fields for entering and confirming the SYS and SYSTEM user passwords. This includes SYSMAN and DBSNMP if you use Oracle Enterprise Manager Database Control.
– Storage Options Page—This page has storage options for selecting the storage type for the database files such as control files, datafiles, and redo logs.
– DBCA Services Page—This page enables you to create and configure services for your Oracle RAC environment.
– DBCA Initialization Parameters Page—This page has two dialogs to display both Basic and Advanced parameter settings.
– VIPCA—The pages for this assistant enable you to configure virtual internet protocol addresses for your Oracle RAC database.
■ A new auxiliary, system-managed tablespace called SYSAUX contains performance data and combines content that was stored in different tablespaces (some of which are no longer required) in earlier releases. This is a required tablespace for which you must plan disk space.
■ The gsdctl commands should only be used with Oracle9i databases. The Oracle cluster software installation process stops any existing GSD processes. To start or stop GSD processes manually, use srvctl start nodeapps or srvctl stop nodeapps respectively.
■ Versions of cluster manager previous to Oracle Database 10g were sometimes referred to as "Cluster Manager". In Oracle Database 10g, this function is performed by an Oracle cluster software component known as Cluster Synchronization Services (CSS). The OracleCSService, OracleCRService, and

xvii
OracleEVMService replace the service known previous to Oracle Database 10g as OracleCMService9i.
■ Oracle Database 10g provides cluster file system support for Windows-based platforms.
■ Oracle RAC and Database Configuration Assistant (DBCA) support Automatic Storage Management (ASM) and Oracle Managed Files (OMF).
■ The Oracle Database 10g version of the srvConfig.loc file is the ocr.loc file. The Oracle9i version of srvConfig.loc still exists for backward compatibility.
■ If you use raw partitions in your Windows environment, then you can use a newly-introduced DBCA raw device mapping file to associate database objects with their partition symbolic link names. This removes the DBCA requirement in previous versions to always prefix raw partition symbolic links with a database name. This enables you to reuse the same raw partition symbolic links for any database name if that partition is not a part of any existing database.
See Also:
■ Oracle Database Administrator's Guide for information about Automatic Storage Management, a new database file management feature
■ Oracle Database Oracle Clusterware and Oracle Real Application Clusters Administration and Deployment Guide for more information about administering services and storage in Oracle RAC
■ Oracle Database Upgrade Guide for information about using DBUA

xviii

Part IOracle Clusterware and Oracle Real
Application Clusters Installation Planningand Requirements
Part I describes how to plan your Oracle Clusterware and Oracle Real Application Clusters (Oracle RAC) installation, and describes Oracle RAC installation requirements. The chapter in Part I is:
Chapter 1, "Introduction to Installing Oracle Clusterware and Oracle Real Application Clusters"


Introduction to Installing Oracle Clusterware and Oracle Real Application Clusters 1-1
1Introduction to Installing Oracle Clusterware
and Oracle Real Application Clusters
This chapter provides an overview of Oracle Clusterware and Oracle Real Application Clusters (Oracle RAC) installation and configuration procedures and includes the following topics:
■ Oracle Clusterware and Oracle Real Application Clusters Documentation Overview
■ General System Installation Requirements for Oracle Real Application Clusters
■ Cluster Setup and Pre-Installation Configuration Tasks for Real Application Clusters
■ Pre-Installation, Installation, and Post-Installation Overview
■ Oracle Universal Installer and Real Application Clusters
■ Storage Considerations for Installing Oracle Database 10g Real Application Clusters
■ Additional Considerations for Using Oracle Database 10g Features in Oracle RAC
■ Oracle Database 10g and Real Application Clusters Components
■ Oracle Database 10g Real Application Clusters Version Compatibility
■ Cloning Oracle Clusterware and Oracle RAC in Grid Environments
Oracle Clusterware and Oracle Real Application Clusters Documentation Overview
This section describes the Oracle Clusterware and Oracle RAC documentation set.
Oracle Database Oracle Clusterware and Oracle Real Application Clusters Installation Guide for Microsoft WindowsOracle Database Oracle Clusterware and Oracle Real Application Clusters Installation Guide for Microsoft Windows, this document, contains the pre-installation, installation, and post-installation information for Microsoft Windows. Additional information for this release may be available in the Oracle Database 10g README or Release Notes. The platform-specific Oracle Database 10g media contains a copy of this book in both HTML and PDF formats.
The Server Documentation media contains Oracle Database Oracle Clusterware and Oracle Real Application Clusters Administration and Deployment Guide

General System Installation Requirements for Oracle Real Application Clusters
1-2 Oracle Database Oracle Clusterware and Oracle Real Application Clusters Installation Guide
Oracle Database Oracle Clusterware and Oracle Real Application Clusters Administration and Deployment GuideOracle Database Oracle Clusterware and Oracle Real Application Clusters Administration and Deployment Guide describes how to administer Oracle Clusterware components such as the voting disks and the Oracle Cluster Registry (OCR). This book also explains how to administer storage and how to use Oracle RAC scalability features to add and delete instances and nodes. This book also discusses how to use Recovery Manager (RMAN), and how to perform backup and recovery in Oracle RAC.
Oracle Database Oracle Clusterware and Oracle Real Application Clusters Administration and Deployment Guide describes Oracle RAC deployment topics such as services, high availability, and workload management. The book describes how Automatic Workload Repository (AWR) tracks and reports service levels and how you can use service level thresholds and alerts to balance complex workloads in your Oracle RAC environment. The book also describes how to make your applications highly available using Oracle Clusterware.
Oracle Database Oracle Clusterware and Oracle Real Application Clusters Administration and Deployment Guide also provides information about how to monitor and tune performance in Oracle RAC environments by using Oracle Enterprise Manager and by using information in AWR and Oracle performance views. This book also highlights some application-specific deployment techniques for online transaction processing and data warehousing environments.
General System Installation Requirements for Oracle Real Application Clusters
Each node that is going to be part of your Oracle Clusterware and Oracle RAC installation must meet the hardware and software requirements described in this section. You can verify these requirements with Cluster Verification Utility. This book provides step-by-step tasks that you can follow to prepare your hardware and software to meet these requirements for your system in Part II of this book. You can verify that you have met these requirements with Cluster Verification Utility.
Before using this manual, however, you should read the Oracle Database Oracle Clusterware and Oracle Real Application Clusters Administration and Deployment Guide to inform yourself about concepts such as services, setting up storage, and other information relevant to configuring your cluster.
Cluster Verification UtilityCluster Verification Utility (CVU) is provided with Oracle Database 10g Release 2 (10.2) with Real Application Clusters. The purpose of CVU is to enable you or your hardware vendors to verify during setup and configuration that all components required for a successful installation of an Oracle RAC database are installed and configured correctly, and to provide you with ongoing assistance any time you need to make changes to your Oracle RAC cluster. You are provided with commands to use CVU to verify completion of tasks in this guide.
There are two types of CVU commands:
■ Stage Commands are CVU commands used to test system setup and readiness for successful software installation, database creation, or configuration change steps. These commands are also used to validate successful completion of specific cluster configuration steps.

General System Installation Requirements for Oracle Real Application Clusters
Introduction to Installing Oracle Clusterware and Oracle Real Application Clusters 1-3
■ Component Commands are CVU commands used to check individual cluster components, and determine their state.
This guide provides stage and component CVU commands where appropriate to assist you with cluster verification.
Hardware Requirements for Oracle Database 10g Real Application ClustersEach node in a cluster requires the following hardware:
■ External shared disks for storing Oracle Clusterware and database files.
The disk configuration options available to you are described in Chapter 3, "Storage Pre-Installation Tasks". Review these options before you decide which storage option to use in your Oracle RAC environment. However, note that when Database Configuration Assistant (DBCA) configures automatic disk backup, it uses a database recovery area which must be shared. The database files and recovery files do not necessarily have to be located on the same type of storage.
■ One private internet protocol (IP) address for each node to serve as the private interconnect. The following must be true for each private IP address:
– It must be separate from the public network
– It must be accessible on the same network interface on each node
– It must have a unique address on each node
The private interconnect is used for inter-node communication by both Oracle Clusterware and Oracle RAC. If the private address is available from a network name server (DNS), then you can use that name. Otherwise, the private IP address must be available in each node’s C:\WINNT\system32\drivers\etc\hosts file.
During Oracle Clusterware installation, the information you enter as the private IP address determines which private interconnects are used by Oracle RAC database instances. If you define more than one interconnect, then they must all be in an up state, just as if their IP addresses were specified in the initialization parameter, CLUSTER_INTERCONNECTS. Oracle RAC does not fail over between cluster interconnects; if one is down then the instances using them will not start.
Oracle recommends that you use a logical Internet Protocol (IP) address that is available across all private networks, and that you take advantage of any available third party network interface cards that provide bonding to enable network failover by configuring them according to the vendor's instructions.
■ One public IP address for each node, to be used as the Virtual IP (VIP) address for client connections and for connection failover The name associated with the VIP must be different from the default host name.
This VIP must be associated with the same interface name on every node that is part of your cluster. In addition, the IP addresses that you use for all of the nodes that are part of a cluster must be from the same subnet. If you have a domain name server (DNS), then register the host names for the VIP with DNS. The Virtual IP address should not be in use at the time of the installation, because this is a Virtual IP address that Oracle manages.
■ One public fixed hostname address for each node, typically assigned by the system administrator during operating system installation. If you have a DNS,
See Also: Oracle Database Oracle Clusterware and Oracle Real Application Clusters Administration and Deployment Guide for detailed information about Cluster Verification Utility.
Cluster Setup and Pre-Installation Configuration Tasks for Real Application Clusters
1-4 Oracle Database Oracle Clusterware and Oracle Real Application Clusters Installation Guide
then register both the fixed IP and the VIP address with DNS. If you do not have DNS, then you must make sure that the public IP and VIP addresses for all nodes are in each node’s host file.
Software Requirements for Oracle Database 10g Real Application ClustersEach node in a cluster requires a supported interconnect software protocol to support Cache Fusion, and to support Oracle Clusterware polling. Your interconnect must be certified by Oracle for your platform. You should also have a Web browser, both to enable Oracle Enterprise Manager, and to view online documentation.
Oracle RAC databases on the same cluster must all be 64-bit or all 32-bit. Oracle does not support combining 64-bit Oracle RAC databases and 32-bit Oracle RAC databases on the same cluster.
Cluster Setup and Pre-Installation Configuration Tasks for Real Application Clusters
Before installing Oracle RAC, perform the following procedures:
1. Ensure that you have a certified combination of operating system and Oracle software version by referring to the OracleMetaLink certification information, which is located at the following Web site:
https://metalink.oracle.com
Click Certify & Availability, and select 1.View Certifications by Product.
2. Configure a high-speed interconnect that uses a private network. Some platforms support automatic failover to an additional interconnect.
3. Determine the storage option for your system and configure the shared disk. Oracle recommends that you use Automatic Storage Management (ASM) and Oracle Managed Files (OMF), or a cluster file system. If you use ASM or a cluster file system, then you can also take advantage of OMF and other Oracle Database 10g storage features. If you use Oracle RAC on Oracle Database 10g Standard Edition, then you must use ASM.
Note: In addition to these requirements, Oracle recommends the following:
■ While installing and using Real Application Clusters software, you should attempt to keep the system clocks on all of your cluster nodes as close as possible to the same time.
■ Use redundant switches as a standard configuration for all cluster sizes.
See Also: Oracle Database Platform Guide for Microsoft Windows for additional information about the OSDBA and OSOPER groups, and the SYSDBA and SYSOPER privileges.
Note: The layout of the OracleMetaLink site and the site's certification policies are subject to change.

Pre-Installation, Installation, and Post-Installation Overview
Introduction to Installing Oracle Clusterware and Oracle Real Application Clusters 1-5
If you intend to use multiple voting disks, then you need at least three voting disks to provide sufficient voting disk redundancy, and you should ensure that each voting disk is located on physically independent storage. When you start the Oracle Universal Installer (OUI) to install Oracle Clusterware, you are asked to provide the paths for each voting disk you want to configure: one disk, if you have existing redundancy support for the voting disk, or three disks to provide redundant voting disks managed by Oracle.
In addition, if you select multiple voting disks managed by Oracle, then you should ensure that all voting disks are located on a secure network protected from external security threats, and you should ensure that all voting disks are on regularly maintained systems. If a voting disk fails, then you need to fix the physical hardware and bring it back online. The Cluster Synchronization Services (CSS) component of Oracle Clusterware continues to use the other voting disks, and automatically makes use of the restored drive when it is brought online again.
4. Install the operating system patches that are listed in the pre-installation chapter in this book in Part II.
5. Use Cluster Verification Utility (CVU) to help you to verify that your system meets requirements for installing Oracle Database with Oracle RAC.
Pre-Installation, Installation, and Post-Installation OverviewThe following describes the installation procedures that are covered in Part II and Part III of this book.
Pre-Installation Overview for Oracle Clusterware and Oracle Real Application Clusters The pre-installation procedures in Part II explain how to verify user equivalence, perform network connectivity tests, as well as how to set directory and file permissions. Complete all of the pre-installation procedures and verify that your system meets all of the pre-installation requirements before proceeding to the install phase.
Installation Overview for Oracle Clusterware and Oracle Real Application ClustersOracle Database 10g Real Application Clusters installation is a two-phase installation. In phase one, use Oracle Universal Installer (OUI) to install Oracle Clusterware as described in Chapter 4, "Installing Oracle Clusterware on Windows-Based Systems". In phase two, install the database software using OUI. Oracle Clusterware installation starts Oracle Clusterware processes in preparation for installing Oracle Database 10g. In phase two, you install Oracle database software for use with single-instance or with Oracle RAC databases. To install the database software for use with single-instance databases in phase two, refer to the Microsoft Windows installation guides. To install the database software with Oracle RAC in phase two, use OUI to install Oracle RAC software as described in Chapter 5, "Installing Oracle Database 10g with Oracle Real Application Clusters". Note that the Oracle home that you use in phase one is a home
Note: If you use ASM, then Oracle recommends that you install ASM in a separate home from the Oracle Clusterware home and the Oracle home. You should particularly follow this recommendation if the ASM instance is to manage storage for more than one Oracle RAC database. Following this recommendation reduces downtime when upgrading or de-installing different versions of the software.

Oracle Universal Installer and Real Application Clusters
1-6 Oracle Database Oracle Clusterware and Oracle Real Application Clusters Installation Guide
for Oracle Clusterware software which must be different from the Oracle home that you use in phase two.
If OUI detects a previous version of Oracle Database, then OUI starts Database Upgrade Assistant (DBUA) to upgrade your database to Oracle Database 10g Release 2 (10.2). In addition, DBUA displays a Service Configuration page for configuring services in your Oracle RAC database.
After the database software installation completes, OUI starts the Oracle assistants, such as Database Configuration Assistant (DBCA), to configure your environment and create your database. For an Oracle RAC database, you can later use DBCA Instance Management feature to add or modify services and instances as described in Chapter 6, "Creating Oracle RAC Databases with the Database Configuration Assistant".
Post-Installation Overview for Oracle Database 10g Real Application Clusters After you create your database, download and install the most recent patch sets for your Oracle Database 10g version as described in the single-instance installation manual or in Chapter 7, "Oracle Real Application Clusters Post-Installation Procedures". If you are using other Oracle products with your Oracle RAC database, then you must also configure them.
You must also perform several post-installation configuration tasks to use certain Oracle Database 10g products such as Sample Schema, Oracle Net Services, or Oracle Messaging Gateway. You must also configure Oracle pre-compilers for your operating system and if desired, configure Oracle Advanced Security.
Use the Companion media to install additional Oracle Database 10g software that may improve performance or extend database capabilities, for example, Oracle JVM, Oracle interMedia or Oracle Text.
Oracle Universal Installer and Real Application ClustersOracle Universal Installer (OUI) facilitates the installation of Oracle Clusterware and Oracle Database 10g software. In most cases, you use the graphical user interface (GUI) provided by OUI to install the software. However, you can also use OUI to complete non-interactive (or "silent") installations, without using the GUI. See Appendix B for information about non-interactive installations.
The Oracle Inventory maintains records of Oracle software versions and patches. Each installation has central inventory where the Oracle home is registered. Oracle software installations have a local inventory directory, whose path location is recorded in the central inventory Oracle home. The local inventory directory for each Oracle software installation contains a list of components and applied interim patches associated with that software. Because your Oracle software installation can be corrupted by faulty inventory information, OUI must perform all read and write operations on Oracle inventories. The Oracle Inventory is installed in the path systemdrive:\program files\oracle.
See Also: Oracle Database Upgrade Guide for additional information about preparing for upgrades
See Also: Oracle Database Oracle Clusterware and Oracle Real Application Clusters Administration and Deployment Guide for more information about using Oracle RAC scalability features of adding and deleting nodes and instances from Oracle RAC databases

Storage Considerations for Installing Oracle Database 10g Real Application Clusters
Introduction to Installing Oracle Clusterware and Oracle Real Application Clusters 1-7
When you install Oracle Clusterware or Oracle RAC, OUI copies the Oracle software onto the node from which you are running it. If your Oracle home is not on a cluster file system, then OUI propagates the software onto the other nodes that you have selected to be part of your OUI installation session. The Oracle Inventory maintains a list of each node that is a member of the Oracle RAC database, and lists the paths to each node’s Oracle home. This is used to maintain patches and updates for each member node of the Oracle RAC database.
If you create your Oracle RAC database using OUI, or if you create it later using DBCA, then Oracle Enterprise Manager Database Control is configured for your cluster database. Database control can manage your cluster database and, for an Oracle RAC database, all of its instances.
You can also configure Enterprise Manager Grid Control to manage multiple databases and application servers from a single console. To manage Oracle RAC databases in Grid Control, you must a install Grid Control agent on each of the nodes of your cluster. The Agent installation is designed to recognize a cluster environment and install across all cluster nodes; you need to perform the install on only one of the cluster nodes to install Grid Control agent on all cluster nodes.
When OUI installs Oracle software, Oracle recommends that you select a preconfigured database, or use Database Configuration Assistant (DBCA) interactively to create your cluster database. You can also manually create your database as described in procedures posted on the Oracle Technology Network, which is at the following URL:
http://www.oracle.com/technology/index.html
Storage Considerations for Installing Oracle Database 10g Real Application Clusters
This section discusses storage configuration options that you should consider before installing Oracle Database 10g Release 2 (10.2) with Real Application Clusters. You must prepare storage specific for each phase of the installation and database creation processes.
Overview of Automatic Storage ManagementOracle recommends using Automatic Storage Management (ASM) or a cluster file system with Oracle Managed Files (OMF) for database storage. This section provides an overview of ASM.
Note that Oracle RAC installations using Oracle Database Standard Edition must use ASM for database file storage.
See Also:
■ Oracle Universal Installer and OPatch User's Guide for more details about OUI
■ Oracle Database Oracle Clusterware and Oracle Real Application Clusters Administration and Deployment Guide for information about using Enterprise Manager to administer Oracle RAC environments
■ The Grid Technology Center on the Oracle Technology Network (OTN), which is available at the following URL:
http://www.oracle.com/technology/tech/index.html

Storage Considerations for Installing Oracle Database 10g Real Application Clusters
1-8 Oracle Database Oracle Clusterware and Oracle Real Application Clusters Installation Guide
You can use ASM to simplify the administration of Oracle database files. Instead of having to manage potentially thousands of database files, using ASM, you need to manage only a small number of disk groups. A disk group is a set of disk devices that ASM manages as a single logical unit. You can define a particular disk group as the default disk group for a database, and Oracle will automatically allocate storage for, create, or delete, the files associated with the appropriate database object. When administering the database, you need only refer to database objects by name, rather than by file name.
When using ASM with a single Oracle home for database instances on a node, the ASM instance can run from that same home. If you are using ASM with Oracle database instances from multiple database homes on the same node, then Oracle recommends that you run the ASM instance from an Oracle home that is distinct from the database homes. In addition, the ASM home should be installed on every cluster node. Following this recommendation prevents the accidental removal of ASM instances that are in use by databases from other homes during the de-installation of a database's Oracle home.
Benefits of Automatic Storage Management ASM provides many of the same benefits as storage technologies such as a redundant array of independent disks (RAID) or logical volume managers (LVMs). Like these technologies, ASM enables you to create a single disk group from a collection of individual disk devices. It balances input and output (I/O) loads to the disk group across all of the devices in the disk group. It also implements striping and mirroring to improve I/O performance and data reliability.
However, unlike RAID or LVMs, ASM implements striping and mirroring at the file level. This implementation enables you to specify different storage attributes for individual files in the same disk group.
Disk Groups and Failure GroupsA disk group can include up to 10,000 disk devices. Each disk device can be an individual physical disk, a multiple disk device such as a RAID storage array or logical volume, or even a partition on a physical disk. However, in most cases, disk groups consist of one or more individual physical disks. To enable ASM to balance I/O and storage appropriately within the disk group, all devices in the disk group should have similar, if not identical, storage capacity and performance.
When you add a device to a disk group, you can specify a failure group for that device. Failure groups define ASM disks that share a common potential failure mechanism. An example of a failure group is a set of SCSI disks sharing the same SCSI controller. Failure groups are used to determine which ASM disks to use for storing redundant copies of data. For example, if two-way mirroring is specified for a file, ASM automatically stores redundant copies of file extents in separate failure groups.
Note: Do not assign more than one partition on a single physical disk to the same disk group. ASM expects each disk group device to be on a separate physical disk.
Although you can specify a logical volume as a device in an ASM disk group, Oracle does not recommend their use. Because logical volume managers can hide the physical disk architecture, ASM may not operate effectively when logical volumes are specified as disk group devices.

Storage Considerations for Installing Oracle Database 10g Real Application Clusters
Introduction to Installing Oracle Clusterware and Oracle Real Application Clusters 1-9
Redundancy LevelsASM provides three levels of mirroring, called redundancy levels, that you can specify when creating a disk group. The redundancy levels are:
■ External redundancy
In disk groups created with external redundancy, the contents of the disk group are not mirrored by ASM. You might choose this redundancy level when:
– The disk group contains devices, such as RAID devices, that provide their own data protection
– Your use of the database does not require uninterrupted access to data, for example, in a development environment where you have a suitable back-up strategy
■ Normal redundancy
In disk groups created with normal redundancy, the contents of the disk group are two-way mirrored by default, except the control file, which is three-way mirrored. However, you can choose to create certain files that are not mirrored or that are three-way mirrored in a disk group with normal redundancy. To create a disk group with normal redundancy, you must specify at least two failure groups (a minimum of two devices).
The effective disk space of a disk group that uses normal redundancy is half the total disk space of all of its devices.
■ High redundancy
In disk groups created with high redundancy, the contents of the disk group all three-way mirrored. To create a disk group with high redundancy, you must specify at least three failure groups (a minimum of three devices).
The effective disk space of a disk group that uses high redundancy is one-third of the total disk space of all of its devices.
ASM and Installation TypesThe type and number of disk groups that you can create when installing Oracle software depends on the type of database you choose to create during the installation, as follows:
■ Preconfigured database
If you choose to create the default preconfigured database that uses ASM, then OUI prompts you for the disk device names it will use to create a disk group with the default name of DATA.
■ Advanced database
If you choose to create an advanced database that uses ASM, then you can create one or more disk groups. These disk groups can use one or more devices. For each disk group, you can specify the redundancy level that suits your requirements.
The following table lists the total disk space required in all disk group devices for a typical preconfigured database, depending on the redundancy level you choose to use for the disk group:
Redundancy Level Total DIsk Space Required
External 1 GB
Normal 2 GB (on a minimum of two devices)

Additional Considerations for Using Oracle Database 10g Features in Oracle RAC
1-10 Oracle Database Oracle Clusterware and Oracle Real Application Clusters Installation Guide
You can also run OUI and to install ASM only without the database and Oracle RAC software.
Shared Storage for Database Recovery AreaWhen you configure a database recovery area in an Oracle RAC environment, the database recovery area must be on shared storage. When Database Configuration Assistant (DBCA) configures automatic disk backup, it uses a database recovery area that must be shared.
If the database files are stored on a cluster file system, then the recovery area can also be shared through the cluster file system.
If the database files are stored on an Automatic Storage Management (ASM) disk group, then the recovery area can also be shared through ASM.
If the database files are stored on raw devices, then you must use either a cluster file system or ASM for the recovery area.
Additional Considerations for Using Oracle Database 10g Features in Oracle RAC
Oracle recommends that you use the following Oracle Database 10g features to simplify Oracle RAC database management:
■ Enterprise Manager—Use Enterprise Manager to administer your entire processing environment, not just the Oracle RAC database. Enterprise Manager enables you to manage an Oracle RAC database with its instance targets, listener targets, host targets, and a cluster target, as well as ASM targets if you are using ASM storage for your database.
■ Automatic undo management—Automatically manages undo processing.
■ Automatic segment-space management—Automatically manages segment freelists and freelist groups.
■ Locally managed tablespaces—Enhances space management performance.
Oracle Database 10g and Real Application Clusters Components Oracle Database 10g provides single-instance database software and the additional components to operate Oracle RAC databases. Some Oracle RAC components include:
■ Oracle Clusterware
High 3 GB (on a minimum of three devices)
Note: ASM disk groups are always valid recovery areas, as are cluster file systems. Recovery area files do not have to be in the same location where datafiles are stored. For instance, you can store datafiles on raw devices, but use ASM for the recovery area.
See Also: Oracle Database Oracle Clusterware and Oracle Real Application Clusters Administration and Deployment Guide for more information about these features in Oracle RAC environments
Redundancy Level Total DIsk Space Required
Oracle Database 10g Real Application Clusters Version Compatibility
Introduction to Installing Oracle Clusterware and Oracle Real Application Clusters 1-11
■ A Oracle RAC enabled Oracle home
Oracle ClusterwareYou must provide OUI with the names of the nodes on which you want to install Oracle Clusterware. The Oracle Clusterware home can be either shared by all nodes, or private to each node, depending on your responses when you run OUI. The home that you select for Oracle Clusterware must be different from the Oracle RAC enabled Oracle home.
When third-party vendor clusterware is present, Oracle Clusterware may interact with the third-party vendor clusterware. For Oracle Database 10g on Windows, Oracle Clusterware coexists with but does not interact with previous Oracle clusterware versions.
The Installed Real Application Clusters ComponentsAll instances in Oracle RAC environments share the control file, server parameter file, redo log files, and all datafiles. These files reside on a shared cluster file system or on shared disks. Either of these types of file configurations are accessed by all the cluster database instances. Each instance also has its own set of redo log files. During failures, shared access to redo log files enables surviving instances to perform recovery.
Oracle Database 10g Real Application Clusters Version CompatibilityYou can install and operate different versions of Oracle cluster database software on the same computer as described in the following points:
■ With Oracle Database 10g Release 2 (10.2) if you have a pre-existing Oracle home, then you must install the database into the existing Oracle home. You should install Oracle Clusterware in a separate Oracle Clusterware home. Each node can have only one Oracle Clusterware home.
During installation, Oracle Universal Installer (OUI) prompts you to install additional Oracle Database 10g products if you have not already installed all of them.
■ OUI also enables you to de-install and re-install Oracle Database 10g Real Application Clusters if needed.
■ If OUI detects an earlier version of a database, then OUI asks you about your upgrade preferences. You have the option to upgrade one of the previous-version databases with DBUA or to create a new database using DBCA. The information collected during this dialog is passed to DBUA or DBCA after the software is installed.
Note: Versions of cluster manager previous to Oracle Database 10g were sometimes referred to as "Cluster Manager". In Oracle Database 10g, this function is performed by an Oracle Clusterware component known as Cluster Synchronization Services (CSS). The OracleCSService, OracleCRService, and OracleEVMService replace the service known previous to Oracle Database 10g as OracleCMService9i.
Note: Do not move Oracle binaries from the Oracle home to another location. Doing so can cause dynamic link failures.

Cloning Oracle Clusterware and Oracle RAC in Grid Environments
1-12 Oracle Database Oracle Clusterware and Oracle Real Application Clusters Installation Guide
Cloning Oracle Clusterware and Oracle RAC in Grid EnvironmentsThe preferred method to clone Oracle Clusterware and Oracle RAC software is to use Enterprise Manager Grid Control. The following sections provide a summary of the command line procedures for deployments of Oracle RAC in grid environments with large numbers of nodes using cloned Clusterware and Oracle RAC images:
■ Cloning Oracle Clusterware Homes
■ Cloning Real Application Clusters Homes
Cloning Oracle Clusterware HomesThis section outlines the procedure required to clone an existing Oracle Clusterware home from one node (the source node) to one or more other nodes (the target nodes). The procedure consists of the following tasks:
1. Ensure that Oracle Clusterware software is installed successfully on the source node. You can use CVU for this task.
2. As a Windows administrative user, create a zip file of the Oracle Clusterware home directory, selecting the "Save full path info" option.
3. On a selected target node, create an Oracle Clusterware home directory, and copy the Oracle Clusterware zip file from the source node to the target node Oracle Clusterware home.
4. As a Windows administrative user, extract the zip file contents, selecting the "Use folder names" option.
5. Repeat steps 3 and 4 on each of the other target nodes, unless the Oracle Clusterware home is on a shared storage device.
6. On each of the target nodes, run OUI in clone mode as described in Oracle Universal Installer and OPatch User's Guide.
7. Complete the post-cloning installation instructions as described in Oracle Universal Installer and OPatch User's Guide.
Cloning Real Application Clusters HomesComplete the following tasks to Clone an Oracle RAC database image on multiple nodes:
1. Ensure that Oracle Database with Oracle RAC software is installed successfully on the source node.
2. Create a zip file of the Oracle home directory, selecting the "Save full path info" option.
See Also: For detailed information about cloning Oracle RAC and Oracle Clusterware images, refer to the following documents:
Cloning, and adding and deleting nodes:
Oracle Universal Installer and OPatch User's Guide
Additional information about adding and deleting nodes:
Oracle Database Oracle Clusterware and Oracle Real Application Clusters Administration and Deployment Guide

Cloning Oracle Clusterware and Oracle RAC in Grid Environments
Introduction to Installing Oracle Clusterware and Oracle Real Application Clusters 1-13
3. On a selected target node, create an Oracle home directory, and copy the Oracle Clusterware zip file from the source node to the target node Oracle Clusterware home.
4. Extract the zip file contents, selecting the "Use folder names" option.
5. Repeat steps 3 and 4 on each of the other target nodes, unless the Oracle home is on a shared storage device.
6. On each of the target nodes, run OUI in clone mode as described in Oracle Universal Installer and OPatch User's Guide.
7. Complete the post-cloning installation instructions as described in Oracle Universal Installer and OPatch User's Guide.
8. Run the configuration assistant NetCA on a local node of the cluster, and provide a list when prompted of all nodes that are part of the cluster.
9. Run the configuration assistant DBCA to create the database.

Cloning Oracle Clusterware and Oracle RAC in Grid Environments
1-14 Oracle Database Oracle Clusterware and Oracle Real Application Clusters Installation Guide

Part IIPre-Installation Procedures for Oracle
Clusterware and Oracle Real ApplicationClusters
Part II describes the pre-installation procedures for Microsoft Windows that you must complete before installing Oracle Clusterware and Oracle Real Application Clusters (Oracle RAC). The chapters in Part II are:
■ Chapter 2, "Server and Network Pre-Installation Tasks"
■ Chapter 3, "Storage Pre-Installation Tasks"


Server and Network Pre-Installation Tasks 2-1
2Server and Network Pre-Installation Tasks
This chapter describes the tasks that you must complete before you start Oracle Universal Installer (OUI) to install Oracle Clusterware and Oracle Real Application Clusters (Oracle RAC) on Microsoft Windows x86 (32-bit and 64-bit) and Itanium systems. This chapter includes the following topics:
■ Understanding and Using Cluster Verification Utility
■ Installation Differences Between Windows and UNIX
■ Checking Hardware and Software Certification
■ Checking Hardware Requirements
■ Verifying Hardware Requirements
■ Checking Software Requirements
■ Checking the Hardware and Operating System Setup with CVU
■ Checking Network Requirements
■ Checking the Network Setup
■ Checking Individual Component Requirements
■ Stopping Existing Oracle Processes
■ Verifying Cluster Privileges
Understanding and Using Cluster Verification UtilityCluster Verification Utility (CVU) is a tool that performs system checks related to Oracle Clusterware and Oracle RAC requirements. CVU can assist you with confirming that your system is properly configured for Oracle Clusterware and Oracle Real Application Clusters installation. You will find CVU commands, along with information on how to respond to CVU output, in this chapter and the following chapters. Look for these commands at the start or the end of each major step in the pre-installation and installation processes.
This section tells you how to run CVU from your installation media and provides an overview of CVU commands. The section is divided into the following topics:
■ Entering Cluster Verification Utility Commands
■ Using Cluster Verification Utility Help
■ Verbose Mode and "Unknown" Output

Understanding and Using Cluster Verification Utility
2-2 Oracle Database Oracle Clusterware and Oracle Real Application Clusters Installation Guide
Entering Cluster Verification Utility Commands
Once you have installed Oracle Clusterware, you can use CVU by entering cluvfy commands on the command line. To use CVU before you install Oracle Clusterware, you must run the commands using a command file available on the Oracle Clusterware installation media. Use the following syntax to run a CVU command run from the installation media, where media is the location of the Oracle Clusterware installation media and options is a list of one or more CVU command options:
media\clusterware\cluvfy\runcluvfy.bat options
The value of media depends on where your installation media is located, such as on physical media inserted in a local ROM drive or downloaded onto a local disk drive from the Oracle Technology Network (OTN) Web site. The available CVU options are listed in the CVU help system, described in the next section.
The following code example is of a CVU help command, run from a staged copy of the Oracle Clusterware directory downloaded from OTN into a directory called stage on your C: drive:
C:\> stage\clusterware\cluvfy\runcluvfy.bat comp nodereach -n node1,node2 -verbose
By default, when you enter a CVU command, CVU provides a summary of the test and its results. During pre-installation, Oracle recommends that you obtain detailed output by using the -verbose argument with the CVU command as shown in example. When you use the -verbose argument, the command’s output includes detailed information about each individual check. Where applicable, the output shows results for each node in a tabular layout.
For a quick test, you can run the following CVU command that you would normally use after you have completed the basic hardware and software configuration:
prompt> media\clusterware\cluvfy\runcluvfy.bat stage –post hwos –n node_list
Use the location of your Oracle Clusterware installation media for the media value and a list of the nodes, separated by commas, in your cluster for node_list. Expect to see many errors if you run this command before you or your system administrator complete the cluster pre-installation steps.
Using Cluster Verification Utility HelpCVU commands have context-sensitive help that shows correct syntax usage based on the command line arguments that you enter.
If you enter an invalid CVU command, then CVU shows the correct usage for that command. For example, if you enter runcluvfy.bat stage -pre dbinst with the appropriate directory prefix, then CVU shows the correct syntax for the database pre-installation checks that CVU performs with the dbinst stage option. The following is a list of context help commands, shown with the normal, post-installation command line syntax:
Note: You must have the utility unzip installed and configured with a path command for runcluvfy.bat to run.
See Also: Oracle Database Installation Guide for Microsoft Windows (32-Bit) for further information about options for locating your installation media.

Installation Differences Between Windows and UNIX
Server and Network Pre-Installation Tasks 2-3
■ cluvfy: CVU displays high-level generic usage text describing the stage and component syntax.
■ cluvfy -help: CVU displays detailed CVU command information.
■ cluvfy comp -list: CVU displays a list of components that can be checked, and brief descriptions of how each component is checked.
■ cluvfy comp -help: CVU displays detailed syntax for each of the valid component checks.
■ cluvfy stage -list: CVU displays a list of valid stages.
■ cluvfy stage -help: CVU displays detailed syntax for each of the valid stage checks.
Verbose Mode and "Unknown" OutputIf you run CVU using the -verbose argument and a CVU command responds with UNKNOWN for a particular node, then this is because CVU cannot determine whether a check passed or failed. The following is a list of possible causes for an "Unknown" response:
■ The node is down
■ CVU executables are missing in the Oracle Clusterware home or Oracle home directory
■ The user account starting CVU does not have privileges to run common operating system executables on the node
■ The node is missing an operating system patch, or a required package
■ The node has exceeded the maximum number of processes or maximum number of open files, or there is a problem with problem with IPC segments, such as shared memory or semaphores
Installation Differences Between Windows and UNIXIf you are experienced with installing Oracle components in UNIX environments, note that many manual setup tasks required on UNIX are not required on Windows. The key differences between UNIX and Windows installations are:
■ Startup and shutdown services
In Windows, Oracle Universal Installer creates and sets startup and shutdown services at installation time. In UNIX systems, administrators are responsible for creating these services.
■ Environment variables
In Windows, Oracle Universal Installer sets environment variables such as PATH, ORACLE_BASE, ORACLE_HOME, and ORACLE_SID in the registry. In UNIX systems, you must manually set these environment variables.
■ DBA account for database administrators
Note: For Windows Server 2008, you must have administrator privileges and run commands from an Administrative command prompt to run executables that reside in the Oracle Clusterware home.

Checking Hardware and Software Certification
2-4 Oracle Database Oracle Clusterware and Oracle Real Application Clusters Installation Guide
In Windows, Oracle Universal Installer creates the ORA_DBA group. In UNIX systems, you must create the DBA account manually.
■ Account for running Oracle Universal Installer
In Windows, you log in with Administrator privileges. You do not need a separate account. In UNIX systems, you must create this account manually.
On Oracle Real Application Clusters systems, each member node of the cluster must have user equivalency for the Administrative privileges account that installs the database. This means that the administrative privileges user account and password must be the same on all nodes.
Checking Hardware and Software CertificationThe hardware and software requirements included in this installation guide were current at the time this guide was published. However, because new platforms and operating system software versions might be certified after this guide is published, review the certification matrix on the OracleMetaLink Web site for the most up-to-date list of certified hardware platforms and operating system versions. This Web site also provides compatible client and database versions, patches, and workaround information for bugs. The OracleMetaLink Web site is available at the following URL:
https://metalink.oracle.com/
You must register online before using OracleMetaLink. After logging in, select Certify & Availability from the left-hand column. From the Product Lifecycle page, select the Certifications button. Other Product Lifecycle options include Product Availability, Desupport Notices, and Alerts.
The following sections list the following certification information:
■ Web Browser Support
■ Telnet and Terminal Services Support
Web Browser SupportOn 32-bit Windows systems, the following Web browsers are supported for iSQL*Plus and Oracle Enterprise Manager Database Control:
■ Netscape Navigator 7.0 and higher
■ Microsoft Internet Explorer 5.5, 6.0, and higher with service pack 1
■ Mozilla version 1.3.1 and higher
On 64-bit Windows systems, Microsoft Internet Explorer 6.0 and higher is supported for for iSQL*Plus and Oracle Enterprise Manager Database Control.
Telnet and Terminal Services SupportThis section contains these topics:
■ Windows Telnet Services Support
■ Windows Terminal Services and Remote Desktop Support
See Also: "Oracle Database Windows/UNIX Differences," in Oracle Database Platform Guide for Microsoft Windows (32-Bit)

Checking Hardware Requirements
Server and Network Pre-Installation Tasks 2-5
Windows Telnet Services SupportWindows 2000 and Windows Server 2003 includes a Telnet Service that allows remote users to log on to the operating system and run console programs using the command line. Oracle supports the use of database command line utilities such as sqlplus, export, import and sqlldr using this feature, but does not support the database GUI tools such as Oracle Universal Installer, Database Configuration Assistant, and Oracle Net Configuration Assistant.
Windows Terminal Services and Remote Desktop SupportOracle supports installing, configuring, and running Oracle Database through Terminal Services, on Windows 2000 and Windows 2003 Server. If you encounter problems with the installation through Terminal Server, Oracle recommends that you try connecting to the Terminal Services console session of the server (using mstsc /console).
Platform-specific support information is as follows:
■ Windows 2000: Oracle supports installing, configuring, and running Oracle Database from a remote Terminal Services Client.
■ Windows Server 2003: You can configure Windows Server 2003 to use Terminal Services in Remote Desktop for Administration Mode or Terminal Server Mode.
The following products and features are not supported with Windows Terminal Services:
■ Oracle Connection Manager
■ Oracle Object Link Manager
■ Oracle Services for Microsoft Transaction Server
■ Server Management (SRVM) (You need to use a Windows Terminal Services console in order to use SRVM.)
Checking Hardware RequirementsYou must have at least the following hardware component values for installing Oracle Database:
■ RAM: 1 GB for all operating systems
■ Virtual memory: double the amount of RAM
■ Hard disk space: See Table 2–1
■ Temp disk space: 125 MB
Note: Ensure that the Telnet service is started on the Services control panel.
See Also:
■ The Microsoft Web site for more information about terminal servers
http://www.microsoft.com/
■ The OracleMetaLink Web site for the latest Terminal Server certification information
https://metalink.oracle.com
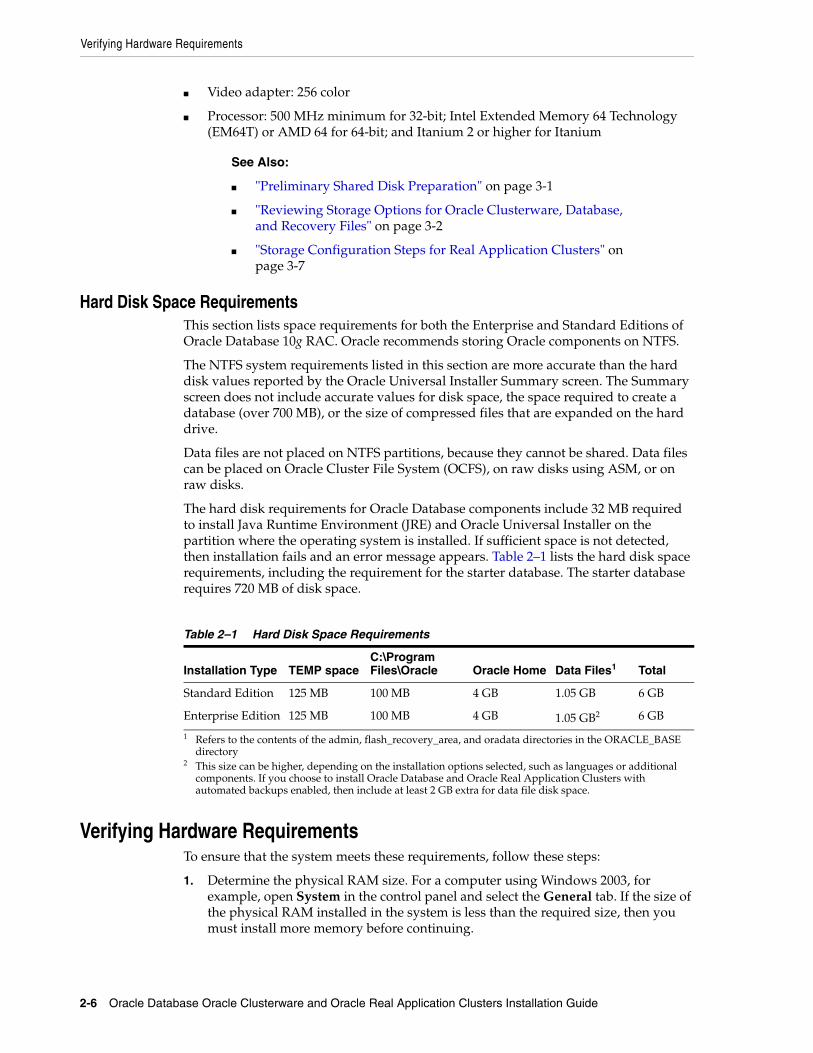
Verifying Hardware Requirements
2-6 Oracle Database Oracle Clusterware and Oracle Real Application Clusters Installation Guide
■ Video adapter: 256 color
■ Processor: 500 MHz minimum for 32-bit; Intel Extended Memory 64 Technology (EM64T) or AMD 64 for 64-bit; and Itanium 2 or higher for Itanium
Hard Disk Space RequirementsThis section lists space requirements for both the Enterprise and Standard Editions of Oracle Database 10g RAC. Oracle recommends storing Oracle components on NTFS.
The NTFS system requirements listed in this section are more accurate than the hard disk values reported by the Oracle Universal Installer Summary screen. The Summary screen does not include accurate values for disk space, the space required to create a database (over 700 MB), or the size of compressed files that are expanded on the hard drive.
Data files are not placed on NTFS partitions, because they cannot be shared. Data files can be placed on Oracle Cluster File System (OCFS), on raw disks using ASM, or on raw disks.
The hard disk requirements for Oracle Database components include 32 MB required to install Java Runtime Environment (JRE) and Oracle Universal Installer on the partition where the operating system is installed. If sufficient space is not detected, then installation fails and an error message appears. Table 2–1 lists the hard disk space requirements, including the requirement for the starter database. The starter database requires 720 MB of disk space.
Verifying Hardware RequirementsTo ensure that the system meets these requirements, follow these steps:
1. Determine the physical RAM size. For a computer using Windows 2003, for example, open System in the control panel and select the General tab. If the size of the physical RAM installed in the system is less than the required size, then you must install more memory before continuing.
See Also:
■ "Preliminary Shared Disk Preparation" on page 3-1
■ "Reviewing Storage Options for Oracle Clusterware, Database, and Recovery Files" on page 3-2
■ "Storage Configuration Steps for Real Application Clusters" on page 3-7
Table 2–1 Hard Disk Space Requirements
Installation Type TEMP spaceC:\Program Files\Oracle Oracle Home Data Files1
1 Refers to the contents of the admin, flash_recovery_area, and oradata directories in the ORACLE_BASE directory
Total
Standard Edition 125 MB 100 MB 4 GB 1.05 GB 6 GB
Enterprise Edition 125 MB 100 MB 4 GB 1.05 GB2
2 This size can be higher, depending on the installation options selected, such as languages or additional components. If you choose to install Oracle Database and Oracle Real Application Clusters with automated backups enabled, then include at least 2 GB extra for data file disk space.
6 GB

Checking Software Requirements
Server and Network Pre-Installation Tasks 2-7
2. Determine the size of the configured swap space (also known as paging file size). For a computer using Windows 2003, for example, open System in the control panel, select the Advanced tab, and click Settings in the Performance section.
If necessary, refer to your operating system documentation for information about how to configure additional swap space.
3. Determine the amount of free disk space on the system. For a computer using Windows 2003, for example, open My Computer, right-click the drive where the Oracle software is to be installed, and choose Properties.
4. Determine the amount of disk space available in the temp directory. This is equivalent to the total amount of free disk space, minus what will be needed for the Oracle software to be installed.
You require 125 MB of disk space available in the temp directory. If you do not have sufficient space, then first delete all unnecessary files. If the temp disk space is still less than the required amount, then set the TEMP or TMP environment variable to point to a different hard drive. For a computer using Windows 2003, for example, open the System control panel, select the Advanced tab, and click Environment Variables.
Checking Software Requirements Table 2–2 lists the software requirements for Oracle Database 10g Real Application Clusters.
Note: The temporary directory must reside in the same directory path on each node in the cluster.
Table 2–2 Software Requirements
Requirement Value
System Architecture Processor: Intel (x86), Intel Itanium, AMD64, or Intel Extended memory (EM64T)
Note: Oracle provides 32-bit (x86), 64-bit (Itanium), and 64-bit (x86-64) versions of Oracle Database with Oracle Real Application Clusters (Oracle RAC) for Windows.
The 32-bit Oracle RAC version runs on the 32-bit version of Windows. The 64-bit (x86-64) Oracle RAC version runs on the 64-bit version of Windows on AMD64 and EM64T hardware. 64-bit (Itanium) Oracle RAC runs on the 64-bit version of Windows on Itanium hardware. Oracle provides limited certification for 32-bit Oracle Database on 64-bit Windows (x86-64). For additional information, visit OracleMetaLink at the following URL:
https://metalink.oracle.com
Operating system for 32-bit Windows
Oracle Real Application Clusters for 32-bit Windows:
■ Windows 2000 with service pack 4 or higher. All editions, including Terminal Services and Windows 2000 MultiLanguage Edition (MLE), are supported.
■ Windows Server 2003 with service pack 1 or higher. Windows Multilingual User Interface Pack is supported on Windows Server 2003.
■ Windows Server 2008 (32-bit), all editions. Oracle does not support the following two operating system features: Windows Server 2008 Hyper-V and Server Core.
Operating system for x64 Windows
Oracle Real Application Clusters for x64 Windows:
■ Windows Server 2003 with Service Pack 1 or higher. Windows Multilingual User Interface Pack is supported on Windows Server 2003.

Checking Software Requirements
2-8 Oracle Database Oracle Clusterware and Oracle Real Application Clusters Installation Guide
If you are currently running an operating system version that is not supported by Oracle Database 10g, release 10.2, such as Windows NT Server 4.0, then you must first
Operating system for Windows on Itanium
Oracle Real Application Clusters for Itanium systems:
Windows Server 2003.
Windows Multilingual User Interface Pack is supported on Windows Server 2003.
Compiler for 32-bit Windows
Pro*Cobol has been tested and certified with the following two compilers:
■ ACUCOBOL-GT version 6.2
■ Micro Focus Net Express 4.0
Object Oriented COBOL (OOCOBOL) specifications are not supported.
The following components are supported with the Microsoft Visual C++ .NET 2002 7.0 and Microsoft Visual C++ .NET 2003 7.1 compilers:
■ Oracle C++ Call Interface
■ Oracle Call Interface
■ GNU Compiler Collection (GCC)
■ External callouts
■ PL/SQL native compilation
■ XDK
If you plan to use GNU Compiler Collection as your primary compiler, see Oracle Database Installation Guide for Microsoft Windows (32-Bit) for configuration instructions.
Compiler for Windows on Itanium
The following components are supported with the windows 2003 Microsoft Platform SDK compiler or later and with the Intel Compiler Version 7.1 and Version 8.1:
■ Oracle C++ Call Interface
■ Oracle Call Interface
■ External callouts
■ PL/SQL native compilation
■ XDK
Pro*Cobol, Object Oriented COBOL (OOCOBOL) specifications, and GNU Compiler Collection (GCC) are not supported.
Compiler for x64 Windows
The following components are supported with the Windows 2003 Service Pack 1 Microsoft Platform SDK compiler and with the Intel Compiler, Version 8.1:
■ Oracle C++ Call Interface
■ Oracle Call Interface
■ External callouts
■ PL/SQL native compilation
■ XDK
Pro*Cobol, Object Oriented COBOL (OOCOBOL) specifications, and GNU Compiler Collection (GCC) are not supported.
Network Protocol Oracle Net foundation layer uses Oracle protocol support to communicate with the following industry-standard network protocols:
■ TCP/IP
■ TCP/IP with SSL
■ Named Pipes
Table 2–2 (Cont.) Software Requirements
Requirement Value
Checking Network Requirements
Server and Network Pre-Installation Tasks 2-9
upgrade your operating system before upgrading to Oracle Database 10g Real Application Clusters.
If you are currently running a cluster with Oracle9i clusterware and wish to continue to use it, then you must upgrade to Oracle9i, version 9.2.0.4 to ensure compatibility between Cluster Manager Services in Oracle9i and Oracle Database 10g.
Checking the Hardware and Operating System Setup with CVUYou can use two different CVU commands to check your hardware and operating system configuration. The first is a general check of the configuration and the second specifically checks for the components required to install Oracle Clusterware.
The syntax of the more general CVU command is:
cluvfy stage –post hwos –n node_list [-verbose]
where node_list is the names of the nodes in your cluster, separated by commas. However, because you have not yet installed Oracle Clusterware, you must execute the CVU command from the installation media using a command like the one following. In this example, the command checks the hardware and operating system of a two-node cluster with nodes named node1 and node2, using a staged copy of the installation media in a directory called stage on the C: drive:
C:\> stage\clusterware\cluvfy\runcluvfy.bat stage –post hwos –n node1,node2 -verbose
You can omit the -verbose keyword if you do not wish to see detailed results listed as CVU performs each individual test.
The following example is a command, without the -verbose keyword, to check for the readiness of the cluster for installing Oracle Clusterware:
C:\> stage\clusterware\cluvfy\runcluvfy.bat comp sys -n node1,node2 -p crs
Checking Network RequirementsCheck that you have the networking hardware and internet protocol (IP) addresses required for an Oracle Real Application Clusters installation.
Network Hardware RequirementsEach node in the cluster must meet the following requirements:
■ Each node must have at least two network adapters; one for the public network interface and one for the private network interface (the interconnect).
See Also:
■ "Telnet and Terminal Services Support" on page 2-4
Note: For the most up-to-date information about supported network protocols and hardware for Oracle RAC installations, refer to the Certify pages on the OracleMetaLink Web site:
https://metalink.oracle.com

Checking Network Requirements
2-10 Oracle Database Oracle Clusterware and Oracle Real Application Clusters Installation Guide
■ The private and public network interface names must be different from each other and cannot contain any multibyte language characters. The names are case-sensitive.
■ The private network interface name must be the same on all nodes.
■ The public network interface name must be the same on all nodes.
■ The public interface on each node must be listed first in the bind order (the order in which network services access the node).
■ Oracle supports the TCP/IP protocol for the public and private networks and requires that Windows Media Sensing is disabled by setting the value of the DisableDHCPMediaSense parameter to 1.
IP Address RequirementsBefore starting the installation, you must have the following IP addresses available for each node:
■ An IP address with an associated network name registered in the domain name service (DNS) for the public interface. If you do not have an available DNS, then record the network name and IP address in the system hosts file, %SystemRoot%\system32\drivers\etc\hosts.
■ One virtual IP (VIP) address with an associated network name registered in DNS. If you do not have an available DNS, then record the network name and VIP address in the system hosts file, %SystemRoot%\system32\drivers\etc\hosts. Select an address for your VIP that meets the following requirements:
– The IP address and network name are currently unused
– The VIP is on the same subnet as your public interface
Before installation, ensure that the default gateway can be accessed by a ping command. To find the default gateway, use the route command, as described in your operating system's help utility. After installation, configure clients to use either the VIP address or the network name associated with the VIP. If a node fails, then the node's virtual IP address fails over to another node.
■ A private IP address with a host name for each private interface.
Oracle recommends that you use private network IP addresses for these interfaces (for example: 10.*.*.* or 192.168.*.*). Use the %SystemRoot%\system32\drivers\etc\hosts file on each node to associate private network names with private IP addresses.
For example, with a two node cluster where each node has one public and one private interface, you might have the configuration shown in the following table for your network interfaces, where the hosts file is %SystemRoot%\system32\drivers\etc\hosts:
Node Interface Name Type IP Address Registered In
rac1 rac1 Public 143.46.43.100 DNS (if available, else the hosts file)
rac1 rac1-vip Virtual 143.46.43.104 DNS (if available, else the hosts file)
rac1 rac1-priv Private 10.0.0.1 Hosts file
rac2 rac2 Public 143.46.43.101 DNS (if available, else the hosts file)
rac2 rac2-vip Virtual 143.46.43.105 DNS (if available, else the hosts file)

Checking Network Requirements
Server and Network Pre-Installation Tasks 2-11
To enable VIP failover, the configuration shown in the preceding table defines the public and VIP addresses of both nodes on the same subnet, 143.46.43. When a node or interconnect fails, then the associated VIP is relocated to the surviving instance, enabling fast notification of the failure to the clients connecting through that VIP. If the application and client are configured with transparent application failover options, then the client is reconnected to the surviving instance.
Checking Network RequirementsTo verify that each node meets the requirements, follow these steps:
1. If necessary, install the network adapters for the public and private networks and configure them with either public or private IP addresses.
2. Register the host names and IP addresses for the public network interfaces in DNS.
3. For each node, register one virtual host name and IP address in DNS.
4. For each private interface on every node, add a line similar to the following to the %SystemRoot%\system32\drivers\etc\hosts file on all nodes, specifying the private IP address and associated private host name:
10.0.0.1 rac1-priv
If you need to change a network interface name, follow these steps:
1. Click Start, then Settings, then Control Panel, and then Network and Dial-up Connections
2. Right click the icon of the network interface for which you need to change the name
3. Select Rename
4. Enter and save the new name
To ensure that your public interface is first in the bind order, follow these steps:
1. Right-click My Network Places and choose Properties.
2. In the Advanced menu, click Advanced Settings...
3. If the public interface name is not the first name listed under the Adapters and Bindings tab, then select it and click the arrow to move it to the top of list
4. Click OK to save the setting and then exit network setup dialog
To disable Windows Media Sensing for TCP/IP, you must set the value of the DisableDHCPMediaSense parameter to 1 on each node. Because you need to modify the Windows registry to disable Media Sensing, you should first backup the registry and confirm that you can restore it, using the methods described in your Windows documentation. Disable Media Sensing by completing the following steps on each node of your cluster:
1. Backup the Windows registry.
2. Use Registry Editor (Regedt32.exe) to view the following key in the registry:
HKEY_LOCAL_MACHINE\System\CurrentControlSet\Services\Tcpip\Parameters
rac2 rac2-priv Private 10.0.0.2 Hosts file
Node Interface Name Type IP Address Registered In

Checking the Network Setup
2-12 Oracle Database Oracle Clusterware and Oracle Real Application Clusters Installation Guide
3. Add the following registry value:
Value Name: DisableDHCPMediaSenseData Type: REG_DWORD -BooleanValue: 1
4. Restart the computer.
Checking the Network SetupEnter a command using the following syntax to verify node connectivity between all of the nodes for which your cluster is configured:
cluvfy comp nodecon -n node_list [-verbose]
In the preceding command, the variable node_list is a list of nodes, separated by commas, in your cluster. This command detects all the network interfaces available on the cluster nodes, and verifies the connectivity between all the nodes through the network interfaces it finds. This command also lists all the interfaces available on the nodes that are suitable for use as virtual IPs. If you have defined the IP addresses for your private interconnects as suggested earlier in this section, the command will also show the interfaces to the private interconnects that are successfully connected.
Include the option -verbose to receive progress updates as CVU performs its system checks, and detailed reporting of the test results. You will need to provide the full path name to the CVU executable on the installation, just as before.
In the following example, the media is in the staging area on the C: drive and the two-node cluster consists of nodes named node1 and node2:
C:\> stage\clusterware\cluvfy\runcluvfy.bat comp nodecon -n node1,node2 -verbose
Checking Individual Component RequirementsThis section contains these topics:
■ Oracle Advanced Security Requirements
■ Oracle Enterprise Manager Requirements
Oracle Advanced Security RequirementsSatisfy hardware and software requirements to use authentication support with Oracle components. Some Oracle Advanced Security components can use a Lightweight Directory Access Protocol (LDAP) directory such as Oracle Internet Directory.
Oracle Enterprise Manager RequirementsAll Oracle Enterprise Manager products must be of the same release. Older versions of Enterprise Manager are not supported with the current release.
See Also: Oracle Database Advanced Security Administrator's Guide

Stopping Existing Oracle Processes
Server and Network Pre-Installation Tasks 2-13
Stopping Existing Oracle Processes
If you are installing Oracle Clusterware on a node that already has a single-instance Oracle Database 10g installation, then stop the existing ASM instances. After Oracle Clusterware is installed, start up the ASM instances again. After Oracle Clusterware is installed, when you restart the ASM instances, they use the cluster CSS daemon instead of the daemon for the single-instance Oracle database.
If a GSD from Oracle9i, Release 9.2 or earlier, is running, then stop it before installing Oracle Database 10g Oracle Clusterware by stopping OracleGSDService. The procedure to stop Oracle services in the Services window appears at the end of this section.
If you choose to create a database during the installation, then most installation types configure and start a default Oracle Net listener using TCP/IP port 1521 and the IPC key value EXTPROC. However, if an existing Oracle Net listener process is using the same port or key value, then Oracle Universal Installer can only configure the new listener; it cannot start it. To ensure that the new listener process starts during the installation, you must shut down any existing listeners and stop their related services before starting Oracle Universal Installer.
To stop an Oracle service, perform one of the following procedures
■ Using the GUI:
1. Click Start, then click Settings, Control Panel, Administrative Tools, and then Services.
2. Right click the service you want to stop
3. Click Stop
■ Using command line, enter the command:
C:\>net stop service
where service is the name of the service you want to stop
Note: All Oracle Enterprise Manager products, except Oracle Enterprise Manager Database Control and Enterprise Manager Java Console, are released on the Enterprise Manager Grid Control installation media. Enterprise Manager Database Control is available on the Oracle Database installation media and Enterprise Manager Java Console is available on the Oracle Client installation media.
See Also: Oracle Enterprise Manager Grid Control Installation and Basic Configuration available on the Enterprise Manager Grid Control installation media
Caution: If you are installing additional Oracle Database 10g products in an existing Oracle home, stop all processes running in the Oracle home. You must complete this task to enable Oracle Universal Installer to relink certain executables and libraries.
Verifying Cluster Privileges
2-14 Oracle Database Oracle Clusterware and Oracle Real Application Clusters Installation Guide
Verifying Cluster PrivilegesBefore running Oracle Universal Installer, from the node where you intend to run the Installer, verify that you have administrative privileges on the other nodes. To do this, enter the following command for each node that is a part of the cluster:
net use \\node_name\C$
where node_name is the node name. If your installation will access drives in addition to the C: drive, repeat this command for every node in the cluster, substituting the drive letter for each drive you plan to use.
For the installation to be successful, you must use the same user name and password on each node in a cluster or use a domain user name. If you use a domain user name, then log on under a domain with a user name and password to which you have explicitly granted local administrative privileges on all nodes.
Note: If you receive a warning to stop all Oracle services after starting OUI, then run the command
Oracle_home\bin\localconfig delete
where Oracle_home is the home that is running CSS.

Storage Pre-Installation Tasks 3-1
3Storage Pre-Installation Tasks
This chapter describes the storage configuration tasks that you must complete before you start Oracle Universal Installer. It includes information about the following tasks:
■ Preliminary Shared Disk Preparation
■ Reviewing Storage Options for Oracle Clusterware, Database, and Recovery Files
■ Storage Configuration Steps for Real Application Clusters
■ Configuring Disks for Automatic Storage Management
■ Configuring Raw Logical Volumes or Raw Partitions
■ Requirements for Files Managed by Oracle
Preliminary Shared Disk PreparationComplete the following steps to prepare shared disks for storage:
■ Disabling Write Caching
■ Enabling Automounting for Windows 2003
Disabling Write CachingYou must disable write caching on all disks that will be used to share data between nodes in your cluster. To disable write caching, perform these steps:
1. Click Start, then click Settings, then Control Panel, then Administrative Tools, then Computer Management, then Device Manager, and then Disk drives
2. Expand the Disk drives and double-click the first drive listed
3. Under the Disk Properties tab for the selected drive, uncheck the option that enables the write cache
4. Double-click each of the other drives listed in the Disk drives hive and disable the write cache as described in the previous step
Enabling Automounting for Windows 2003If you are using Windows 2003, then you must enable disk automounting, depending on the Oracle products you are installing and on other conditions.
Caution: Any disks that you use to store files, including database files, that will be shared between nodes, must have write caching disabled.

Reviewing Storage Options for Oracle Clusterware, Database, and Recovery Files
3-2 Oracle Database Oracle Clusterware and Oracle Real Application Clusters Installation Guide
You must enable automounting when using:
■ Raw partitions for Oracle Real Application Clusters (Oracle RAC)
■ Cluster file system for Oracle RAC
■ Oracle Clusterware
■ Raw partitions for a single-node database installation
■ Logical drives for Automatic Storage Management (ASM)
To enable automounting:
1. Enter the following commands at a command prompt:
c:\> diskpartDISKPART> automount enableAutomatic mounting of new volumes enabled.
2. Type exit to end the diskpart session
3. Repeat steps 1 and 2 for each node in the cluster.
4. When you have prepared all the cluster nodes in your Windows 2003 system as described in the previous steps, restart all of the nodes.
Reviewing Storage Options for Oracle Clusterware, Database, and Recovery Files
This section describes supported options for storing Oracle Clusterware files, Oracle Database software, and database files. It includes the following sections:
■ Overview of Storage Options
■ Checking for Available Shared Storage with CVU
Overview of Storage OptionsUse the following overview to help you select your storage option:
Overview of Oracle Clusterware Storage OptionsThere are two ways to store Oracle Clusterware files:
■ Oracle Cluster File System (OCFS): The cluster file system Oracle provides for the Windows and Linux communities. If you intend to store Oracle Clusterware files on OCFS, then you must ensure that OCFS volume sizes are at least 500 MB each.
■ Raw storage: Raw logical volumes or raw partitions are created and managed by Microsoft Windows disk management tools or by tools provided by third party vendors.
Note: All nodes in the cluster must have automatic mounting enabled in order to correctly install Oracle RAC and Oracle Clusterware. Oracle recommends that you enable automatic mounting before creating any logical partitions for use by the database, ASM, or the Cluster File System.
You must restart each node after enabling disk automounting. After it is enabled and the node is restarted, automatic mounting remains active until it is disabled.

Reviewing Storage Options for Oracle Clusterware, Database, and Recovery Files
Storage Pre-Installation Tasks 3-3
Note that you must provide disk space for one mirrored Oracle Cluster Registry (OCR) file, and two mirrored voting disk files.
Overview of Oracle Database and Recovery File OptionsThere are three ways to store Oracle Database and recovery files on shared disks:
■ Automatic Storage Management (database files only): Automatic Storage Management (ASM) is an integrated, high-performance database file system and disk manager for Oracle files. Because ASM requires an Oracle Database instance, it cannot contain Oracle software, but you can use ASM to manage database and recovery files.
■ Oracle Cluster File System (OCFS): Note that if you intend to use OCFS for your database files, then you should create partitions large enough for the database files when you create partitions for Oracle Clusterware
■ Raw storage: Note that you cannot use raw storage to store Oracle database recovery files.
The storage option that you choose for recovery files can be the same as or different to the option you choose for the database files.
General Storage ConsiderationsFor all installations, you must choose the storage option that you want to use for Oracle Clusterware files and Oracle Database files. If you want to enable automated backups during the installation, then you must also choose the storage option that you want to use for recovery files (the flash recovery area). You do not have to use the same storage option for each file type.
For voting disk file placement, ensure that each voting disk is configured so that it does not share any hardware device or disk, or other single point of failure. An absolute majority of voting disks configured (more than half) must be available and responsive at all times for Oracle Clusterware to operate.
For single-instance Oracle Database installations using Oracle Clusterware for failover, you must use OCFS, ASM, or shared raw disks if you do not want the failover processing to include dismounting and remounting the disks containing your database files.
The following table shows the storage options supported for storing Oracle Clusterware files, Oracle Database files, and Oracle Database recovery files. Oracle Clusterware files include the Oracle Cluster Registry (OCR) and the Oracle Clusterware voting disk. Oracle Database files include data files, control files, redo log files, the server parameter file, and the password file.
Note: If you want to have a shared Oracle home directory for all nodes, then you must use OCFS.
Note: For the most up-to-date information about supported storage options for Oracle RAC installations, refer to the Certify pages on the OracleMetaLink Web site:
https://metalink.oracle.com

Reviewing Storage Options for Oracle Clusterware, Database, and Recovery Files
3-4 Oracle Database Oracle Clusterware and Oracle Real Application Clusters Installation Guide
Use the following guidelines when choosing the storage options that you want to use for each file type:
■ If you satisfy all of the requirements listed for the chosen storage options, then you can choose any combination of the supported storage options for each file type.
■ Oracle recommends that you choose Automatic Storage Management (ASM) as the storage option for database and recovery files.
■ For Standard Edition cluster installations, ASM is the only supported storage option for database or recovery files.
■ You cannot use ASM to store Oracle Clusterware files, because these files must be accessible before any Oracle instance starts, which includes the ASM instances required to manage ASM access.
■ If you intend to use ASM with Oracle RAC, and you are configuring a new ASM instance, then you must ensure that your system meets the following conditions:
– All nodes on the cluster have the release 2 (10.2) version of Oracle Clusterware installed
– Any existing ASM instance on any node in the cluster is shut down
■ If you intend to upgrade an existing Oracle RAC database, or an Oracle RAC database with ASM instances, then you must ensure that your system meets the following conditions:
– The Oracle RAC database or Oracle RAC database with ASM instance is running on the node from which the Oracle Universal Installer (OUI) and Database Configuration Assistant (DBCA) is run
– The Oracle RAC database or Oracle RAC database with ASM instance is running on the same nodes that you intend to make members of the new cluster installation. For example, if you have an existing Oracle RAC database running on a three node cluster, then you must install the upgrade on all three nodes. You cannot attempt to upgrade only 2 nodes of the cluster.
■ To obtain the benefits of voting disk redundancy, you must provide storage for three copies of the voting disk no matter which storage option you choose.
Guidelines for Placing Oracle Datafiles on a File SystemIf you decide to place the Oracle datafiles on OCFS, then use the following guidelines when deciding where to place them:
■ You can choose either a single cluster file system or more than one cluster file system to store the datafiles:
– If you want to use a single cluster file system, then choose a cluster file system on a physical device that is dedicated to the database.
Storage Option
File Types Supported
Oracle Clusterware Database Recovery
Automatic Storage Management No Yes Yes
Cluster file system (OCFS) Yes Yes Yes
Shared raw storage Yes Yes No

Reviewing Storage Options for Oracle Clusterware, Database, and Recovery Files
Storage Pre-Installation Tasks 3-5
For best performance and reliability, choose a RAID device or a logical volume on more than one physical device and implement the stripe-and-mirror-everything methodology, also known as SAME.
– If you want to use more than one cluster file system, then choose cluster file systems on separate physical devices or partitions that are dedicated to the database.
This method enables you to distribute physical I/O and create separate control files on different devices for increased reliability. It also enables you to fully implement Oracle Optimal Flexible Architecture (OFA) guidelines. To implement this method, you must choose either the Advanced database creation option or choose the Custom installation type during installation.
■ If you intend to create a preconfigured database during the installation, then the cluster file system (or systems) that you choose must have at least 4 GB of free disk space.
For production databases, you must estimate the disk space requirement depending on the use you want to make of the database.
■ For optimum performance, the cluster file systems that you choose should be on physical devices that are used only by the database.
■ The default location suggested by Oracle Universal Installer for the database file directory is a subdirectory of the Oracle base directory. However, this default location is not appropriate for Oracle RAC production databases.
Guidelines for Placing Oracle Recovery Files on a File System
If you choose to place the Oracle recovery files on a cluster file system, then use the following guidelines when deciding where to place them:
■ To prevent disk failure from making the database files as well as the recovery files unavailable, place the recovery files on a cluster file system that is on a different physical disk from the database files.
■ The cluster file system that you choose should have at least 3 GB of free disk space.
The disk space requirement is the default disk quota configured for the flash recovery area (specified by the DB_RECOVERY_FILE_DEST_SIZE initialization parameter).
If you choose the Custom installation type or the Advanced database configuration option, then you can specify a different disk quota value. After you
Note: You must not create an NTFS partition on a disk that you are using for OCFS.
Note: You must choose a location for recovery files only if you intend to enable automated backups during the installation.
Note: Alternatively use an ASM disk group with a normal or high redundancy level for either or both file types.

Reviewing Storage Options for Oracle Clusterware, Database, and Recovery Files
3-6 Oracle Database Oracle Clusterware and Oracle Real Application Clusters Installation Guide
create the database, you can also use Oracle Enterprise Manager to specify a different value.
■ The default location suggested by Oracle Universal Installer for the recovery area directory is a subdirectory of the Oracle base directory. However, this default location is not appropriate for Oracle RAC production databases.
After You Have Selected Disk Storage OptionsWhen you have determined your disk storage options, you must perform the following tasks in the following order:
1: Check for available storage with CVU Refer to "Checking for Available Shared Storage with CVU" on page 3-6
2: Configure storage for Oracle Clusterware files■ To use OCFS for Oracle Clusterware files, refer to Configuring Storage for Oracle
Clusterware Files on a Shared File System on page 3-7
■ To use raw devices (partitions) for Oracle Clusterware files, refer to "Configuring Storage for Oracle Clusterware Files on Raw Devices" on page 3-8
3: Configure storage for Oracle Database files and recovery files■ To use a file system for database or recovery file storage, refer to Configuring
Storage for Oracle Clusterware Files on a Shared File System on page 3-7, and ensure that in addition to the volumes you create for Oracle Clusterware files, you also create additional volumes with sizes sufficient to store database files.
■ To use Automatic Storage Management for database or recovery file storage, refer to "Configuring Disks for Automatic Storage Management" on page 3-8.
■ To use raw devices (partitions) for database file storage, refer to "Configuring Raw Logical Volumes or Raw Partitions" on page 3-15.
Checking for Available Shared Storage with CVUTo check for all shared file systems available across all nodes on the cluster, use the following CVU command:
cluvfy comp ssa -n node_list
Remember to use the full path name and the runcluvfy.bat command on the installation media and include the list of nodes in your cluster, separated by commas, for the node_list. The following example is for a system with two nodes, node1 and node2, and the installation media on drive F:
F:\> clusterware\cluvfy\runcluvfy.bat comp ssa -n node1,node2
If you want to check the shared accessibility of a specific shared storage type to specific nodes in your cluster, then use the following command syntax:
cluvfy comp ssa -n node_list -s storageID_list
In the preceding syntax, the variable node_list is the list of nodes you want to check, separated by commas, and the variable storageID_list is the list of storage
See Also: Oracle Backup and Recovery Basics for more information about sizing the flash recovery area.

Storage Configuration Steps for Real Application Clusters
Storage Pre-Installation Tasks 3-7
device IDs for the storage devices managed by the file system type that you want to check.
Storage Configuration Steps for Real Application ClustersLog in to Windows with Administrative privileges and perform the following steps depending on whether you use the Oracle Cluster File System (OCFS) or raw devices:
■ Configuring Storage for Oracle Clusterware Files on a Shared File System
■ Configuring Storage for Oracle Clusterware Files on Raw Devices
If you plan to use Automatic Storage Management (ASM) for your database files, then you only need to perform the actions related to the Oracle home and the Oracle Cluster Registry (OCR) and voting disk storage.
Configuring Storage for Oracle Clusterware Files on a Shared File SystemIf you plan to use OCFS for your Oracle home and datafiles, then the following partitions must exist before you run OUI to install Oracle Clusterware:
■ 3 GB, or larger, for the Oracle home
■ 3 GB, or larger, for the datafiles
The OCR and voting disk, required by Oracle Clusterware, are also stored in the OCFS datafile directory (datafile_disk\cdata\clustername) where datafile_disk is the OCFS partition and clustername is the name of your cluster.
Oracle Universal Installer (OUI) does not suggest a default location for the Oracle Cluster Registry (OCR) or the Oracle Clusterware voting disk. If you choose to create these files on a file system, then perform the steps described in this section to set up the shared disk raw partitions for OCFS. Windows refers to raw partitions as logical drives. If you need more information about creating partitions, then refer to the Windows online help from within the disk administration tools.
1. Run Windows Disk Management from one node to create an extended partition. Use a basic disk: dynamic disks are not supported.
2. Create at least two partitions: one for the Oracle home and one for the Oracle database files.
You do not need to create a partition for the voting disk if you plan to use OCFS. OCFS stores the voting device in a file.
The number of partitions used for OCFS affects performance. Therefore, you should create the minimum number of partitions needed for the OCFS option you choose.
To create the required partitions, perform the following steps:
1. From one of the existing nodes of the cluster, run the Windows disk administration tool as follows:
■ Click Start, then select Settings, Control Panel, Administrative Tools, and then Computer Management
■ Expand the Storage folder to Disk Management. Use a basic disk with a Master Boot Record (MBR) partition style as an extended partition for creating partitions.

Configuring Disks for Automatic Storage Management
3-8 Oracle Database Oracle Clusterware and Oracle Real Application Clusters Installation Guide
2. Right click inside an unallocated part of an extended partition and choose Create Logical Drive. A wizard presents pages for configuring the logical drive. Select the select logical drive radio button and click Next.
3. Enter the size that you want for the partition and click Next.
4. Choose the option "Do not assign a drive letter or path", click Next, and then choose the option "Do not format this partition". Click Finish on the last page of the wizard.
5. Repeat steps 2 through 4 for the second and any additional partitions. An optimal configuration is one partition for the Oracle home and one partition for Oracle database files.
6. If you are preparing drives on a Windows 2003 system, then you should restart all nodes in the cluster after you have created the logical drives.
7. Check all nodes in the cluster to ensure that the partitions are visible on all the nodes and to ensure that none of the Oracle partitions have drive letters assigned. If any partitions have drive letters assigned, then remove them by performing these steps:
■ Right-click the partition in the Windows disk administration tool
■ Select "Change Drive Letters and Paths..." from the menu
■ Click Remove in the "Change Drive Letter and Paths" window
Configuring Storage for Oracle Clusterware Files on Raw DevicesTo use raw devices, create two partitions: One 256MB partition for the voting disk and one 256 MB partition for the OCR. If you are not using OCFS for your datafiles, then you must also create raw partitions for your database files as described in "Configuring Raw Logical Volumes or Raw Partitions" on page 3-15.
Configuring Disks for Automatic Storage ManagementThis section describes how to configure disks for use with ASM. Before you configure the disks, you must determine the number of disks and the amount of free disk space that you require.
The following sections describe how to identify the requirements and configure the disks:
■ General Steps for Configuring Automatic Storage Management
■ Step 1: Identifying Storage Requirements for Automatic Storage Management
■ Step 2 (Optional): Using an Existing Automatic Storage Management Disk Group
■ Step 3: Creating DAS or SAN Disk Partitions for Automatic Storage Management
■ Step 4: Manually Configuring Disks for Automatic Storage Management
General Steps for Configuring Automatic Storage ManagementYou will follow these general steps to configure Automatic Storage Management:
1. Identify your site’s storage requirements.
2. Optionally, use an existing Automatic Storage Management disk group.

Configuring Disks for Automatic Storage Management
Storage Pre-Installation Tasks 3-9
3. If you are creating a new Automatic Storage Management disk group, then create partitions for DAS or SAN disks.
4. Use one of the following methods to complete the Automatic Storage Management configuration:
■ If you plan to install Oracle Database using interactive mode, then Oracle Universal Installer prompts you for the Automatic Storage Management disk configuration information during the installation.
■ If you plan to install Oracle Database using noninteractive mode, then you must configure the disks manually before performing the installation.
Step 1: Identifying Storage Requirements for Automatic Storage ManagementTo identify the storage requirements for using Automatic Storage Management, you must determine how many devices and the amount of free disk space that you require. To complete this task, follow these steps:
1. Determine whether you want to use Automatic Storage Management for Oracle datafiles, recovery files, or both.
If you plan to enable automated backups during the installation, then you can choose Automatic Storage Management as the storage mechanism for recovery files by specifying an ASM disk group for the flash recovery area. Depending how you choose to create a database during the installation, you have the following options:
■ If you select an installation method that runs Database Configuration Assistant in interactive mode (for example, by choosing the Advanced database configuration option), then you can decide whether you want to use the same ASM disk group for datafiles and recovery files. You can also choose to use different disk groups for each file type. Ideally, you should create separate ASM disk groups for datafiles and recovery files.
The same choice is available to you if you use Database Configuration Assistant after the installation to create a database.
■ If you select an installation type that runs Database Configuration Assistant in non-interactive mode, then you must use the same Automatic Storage Management disk group for datafiles and recovery files.
2. Choose the Automatic Storage Management redundancy level that you want to use for the Automatic Storage Management disk group.
The redundancy level that you choose for the Automatic Storage Management disk group determines how ASM mirrors files in the disk group, and determines the number of disks and amount of disk space that you require. The redundancy levels are as follows:
■ External redundancy
Note: You do not have to use the same storage mechanism for datafiles and recovery files. One can use the file system, while the other uses Automatic Storage Management. If you plan to use Automatic Storage Management for both datafiles and recovery files, then you should create separate ASM disk groups for the datafiles and the recovery files.

Configuring Disks for Automatic Storage Management
3-10 Oracle Database Oracle Clusterware and Oracle Real Application Clusters Installation Guide
An external redundancy disk group requires a minimum of one disk device. The effective disk space in an external redundancy disk group is the sum of the disk space in all of its devices.
Because Automatic Storage Management does not mirror data in an external redundancy disk group, Oracle recommends that you use only RAID or similar devices that provide their own data protection mechanisms as disk devices in this type of disk group.
■ Normal redundancy
In a normal redundancy disk group, Automatic Storage Management uses two-way mirroring by default (except for the control file, which is mirrored three ways), to increase performance and reliability. A normal redundancy disk group requires a minimum of two disk devices, or two failure groups. The effective disk space in a normal redundancy disk group is half the sum of the disk space in all of its devices.
For most installations, Oracle recommends that you use normal redundancy disk groups.
■ High redundancy
In a high redundancy disk group, Automatic Storage Management uses three-way mirroring to increase performance and provide the highest level of reliability. A high redundancy disk group requires a minimum of three disk devices (or three failure groups). The effective disk space in a high redundancy disk group is one-third the sum of the disk space in all of its devices.
While high redundancy disk groups do provide a high level of data protection, you must consider the higher cost of additional storage devices before deciding to use this redundancy level.
3. Determine the total amount of disk space that you require for the datafiles and recovery files.
Use the following table to determine the minimum number of disks and the minimum disk space requirements for the installation:
If an ASM instance already exists on the system, then you can use an existing disk group to meet these storage requirements. If necessary, you can add disks to an existing disk group during the installation.
The following section describes how to identify existing disk groups and determine the free disk space that they contain.
4. Optionally identify failure groups for the ASM disk group devices.
Redundancy Level
Minimum Number of Disks Datafiles
Recovery FIles
Both File Types
External 1 1.15 GB 2.3 GB 3.45 GB
Normal 2 2.3 GB 4.6 GB 6.9 GB
High 3 3.45 GB 6.9 GB 10.35 GB

Configuring Disks for Automatic Storage Management
Storage Pre-Installation Tasks 3-11
If you intend to use a normal or high redundancy disk group, then you can further protect your database against hardware failure by associating a set of disk devices in a custom failure group. Failure groups define ASM disks that share a common potential failure mechanism. For more information about ASM failure groups, refer to Oracle Database Administrator's Guide.
5. If you are sure that a suitable disk group does not exist on the system, then install or identify appropriate disk devices to add to a new disk group. Use the following guidelines when identifying appropriate disk devices:
■ All of the devices in an Automatic Storage Management disk group should be the same size and have the same performance characteristics.
■ Do not specify two or more partitions on a single physical disk as ASM disks in the same disk group. Automatic Storage Management expects each device for a disk group to be on a separate physical disk.
■ Although you can specify a logical volume as a device in an Automatic Storage Management disk group, Oracle does not recommend their use. Logical volume managers can hide the physical disk architecture, preventing Automatic Storage Management from optimizing I/O across the physical devices.
Step 2 (Optional): Using an Existing Automatic Storage Management Disk GroupIf you want to use Automatic Storage Management as the storage option for either database or recovery files, and an existing Automatic Storage Management disk group already exists, then you have the following choices, depending on the installation method that you select:
■ If you select an installation method that runs Database Configuration Assistant in interactive mode (for example, by choosing the Advanced database configuration option for example), then you can decide whether you want to create a new disk group, or use an existing disk group.
The same choice is available to you if you use Database Configuration Assistant after the installation to create a database.
■ If you select an installation type that runs Database Configuration Assistant in non-interactive mode, then you must choose an existing disk group for the new database; you cannot create a new disk group. However, you can add disk devices
Note: You need to complete this step only if you intend to use an installation method that runs Database Configuration Assistant in interactive mode–for example, if you intend to choose the Custom installation type, or the Advanced database configuration option. Other installation types do not enable you to specify failure groups.
Note: If you define custom failure groups, you must specify a minimum of two failure groups for normal redundancy disk groups and three failure groups for high redundancy disk groups.
Tip: As you progress through the following steps, make a list of the raw device names you intend to use and have it available during your database or ASM installation.

Configuring Disks for Automatic Storage Management
3-12 Oracle Database Oracle Clusterware and Oracle Real Application Clusters Installation Guide
to an existing disk group if the existing disk group has insufficient free space for your requirements.
To determine whether an existing ASM disk group exists, or to determine whether there is sufficient disk space in a disk group, you can use Oracle Enterprise Manager, either Grid Control or Database Control. Alternatively, you can use the following procedure:
1. In the Services Control Panel, make sure that the OracleASMService+ASMn service, where n is the node number, has started.
2. Open a Windows command prompt and temporarily set the ORACLE_SID environment variable to specify the appropriate value for the ASM instance that you want to use.
For example, if the ASM SID is named +ASM1, then enter a setting similar to the following:
C:\> set ORACLE_SID = +ASM1
3. Connect to the Automatic Storage Management instance as the SYS user with AS SYSDBA privilege and start the instance if necessary with a command similar to the following:
C:\> sqlplus "SYS/SYS_password as SYSDBA"SQL> STARTUP
4. Enter the following command to view the existing disk groups, their redundancy level, and the amount of free disk space in each disk group:
SQL> SELECT NAME,TYPE,TOTAL_MB,FREE_MB FROM V$ASM_DISKGROUP;
5. From the output, identify a disk group with the appropriate redundancy level and note the free space that it contains.
6. If necessary, install, or identify the additional disk devices required to meet the storage requirements listed in the previous section.
Step 3: Creating DAS or SAN Disk Partitions for Automatic Storage ManagementTo use a DAS or SAN disk in Automatic Storage Management, the disk must have a partition table. Oracle recommends creating exactly one partition for each disk containing the entire disk.
Note: The Automatic Storage Management instance that manages the existing disk group can be running in a different Oracle home directory.
Note: If you are adding devices to an existing disk group, then Oracle recommends that you use devices that have the same size and performance characteristics as the existing devices in that disk group.
Note: You can use any physical disk for Automatic Storage Management, as long as it is partitioned. However, you cannot use NAS or Microsoft dynamic disks.

Configuring Disks for Automatic Storage Management
Storage Pre-Installation Tasks 3-13
Use Microsoft Computer Management or the command line tool diskpart to create the partitions. Ensure that you create the partitions without drive letters. After you have created the partitions, the disks can be configured.
Step 4: Manually Configuring Disks for Automatic Storage ManagementTo use Automatic Storage Management with direct attached storage (DAS) or storage area network (SAN) storage, the disks must be stamped with a header. If you install Oracle Database in interactive mode, then Oracle Universal Installer configures the disks’ headers during the installation process.
However, if you plan to install Oracle Database in noninteractive mode, then you need to configure the disks manually before installation either by using asmtoolg (GUI version) or using asmtool (command line version). You can also use these tools to reconfigure the disks after installation. The asmtoolg and asmtool utilities only work on partitioned disks; you cannot use Automatic Storage Management on unpartitioned disks.
The following section describes the asmtoolg and asmtool functions and commands.
Overview of asmtoolg and asmtoolThe asmtoolg and asmtool tools associate meaningful, persistent names with disks to facilitate using those disks with Automatic Storage Management. Automatic Storage Management uses disk strings to operate more easily on groups of disks at once. The names that asmtoolg or asmtool create make this easier than using Windows drive letters.
All disk names created by asmtoolg or asmtool begin with the prefix ORCLDISK followed by a user-defined prefix (the default is DATA), and by a disk number for identification purposes. You can use them as raw devices in the Automatic Storage Management instance by specifying a name \\.\ORCLDISKprefixn, where prefix either can be DATA, or can be a value you supply, and where n represents the disk number.
To configure your disks with asmtoolg, refer to the section "Using asmtoolg (Graphical User Interface)" on page 3-13. To configure the disks with asmtool, refer to the section "Using asmtool (Command Line)" on page 3-14.
Using asmtoolg (Graphical User Interface)asmtoolg is a graphical interface for creating device names. Use asmtoolg to add, change, delete, and examine the devices available for use in Automatic Storage Management.
To add or change disk stamps:
1. In the installation media labeled Oracle Database 10g Release 2 (10.2), navigate to db\asmtool, and double-click asmtoolg.
If Oracle Database is already installed, then go to ORACLE_BASE\ORACLE_HOME\bin, and double-click asmtoolg.
2. Select the Add or change label option, and then click Next.
asmtoolg shows the devices available on the system. Unrecognized disks are labeled as a "Candidate device." Raw device files are labeled as "Oracle raw device
See Also: "Assigning Logical Names" on page 3-16 for more information about using diskpart to create a partition

Configuring Disks for Automatic Storage Management
3-14 Oracle Database Oracle Clusterware and Oracle Real Application Clusters Installation Guide
file." Stamped Automatic Storage Management disks are labeled as "Stamped ASM disk," and unstamped Automatic Storage Management disks are labeled as "Unstamped ASM disks." The tool also shows disks that are recognized by Windows as a file system (such as NTFS). These disks are not available for use as ASM disks, and cannot be selected. In addition, Microsoft Dynamic disks are not available for use as ASM disks.
If necessary, follow the steps under "Creating Partitions for Logical Volumes" on page 3-15 to create a disk partition for the ASM instance.
3. On the Stamp Disks screen, select the disks to stamp.
For ease of use, Automatic Storage Management can generate unique stamps for all of the devices selected for a given prefix. The stamps are generated by concatenating a number with the prefix specified. For example, if the prefix is DATA, then the first Automatic Storage Management link name is ORCLDISKDATA0.
You can also specify the stamps of individual devices.
4. Optionally, select a disk to edit the individual stamp (Automatic Storage Management link name).
5. Click Next.
6. Click Finish.
To delete disk stamps:
1. Select the Delete labels option, then click Next.
The delete option is only available if disks exist with stamps. The delete screen shows all stamped Automatic Storage Management disks.
2. On the Delete Stamps screen, select the disks to unstamp.
3. Click Next.
4. Click Finish.
Using asmtool (Command Line)asmtool is a command-line interface for stamping disks. It has the following options:
Option Description Example
-add Adds or changes stamps. You must specify the hard disk, partition, and new stamp name. If the disk is a raw device or has an existing Automatic Storage Management stamp, then you must specify the -force option.
If necessary, follow the steps under "Creating Partitions for Logical Volumes" on page 3-15 to create a disk partition for the ASM instance.
asmtool -add [-force]\Device\Harddisk1\Partition1 ORCLDISKASM0\Device\Harddisk2\Partition1 ORCLDISKASM2...
-addprefix Adds or changes stamps using a common prefix to generate stamps automatically. The stamps are generated by concatenating a number with the prefix specified. If the disk is a raw device or has an existing Automatic Storage Management stamp, then you must specify the -force option.
asmtool -addprefix ORCLDISKASM [-force]\Device\Harddisk1\Partition1\Device\Harddisk2\Partition1...

Configuring Raw Logical Volumes or Raw Partitions
Storage Pre-Installation Tasks 3-15
Configuring Raw Logical Volumes or Raw PartitionsThis section contains the following topics:
■ Creating Partitions for Logical Volumes
■ Assigning Logical Names
■ Creating the DBCA Raw Device Mapping File
Creating Partitions for Logical VolumesCreate the logical volumes listed in the following table. You must create these volumes to install an Oracle database.
-list List available disks. The stamp, windows device name, and disk size in megabytes are shown. Some disks may be file systems, and cannot be stamped. If the disk is a raw device or has an existing ASM stamp, then you must specify the -force option.
asmtool -list [-force]
-delete Removes existing stamps from disks. asmtool -delete ORCLDISKASM0 ORCLDISKASM1...
Note: For -add, -addprefix, and -delete, asmtool will notify any Automatic Storage Management instances on the local machine and other nodes in the cluster if available, to rescan the available disks.
Number
Partition Size (MB) Purpose and Sample Logical Volume Name
1 500 SYSTEM tablespace: dbname_system_raw_500m
1 800 SYSAUX tablespace: dbname_sysaux_raw_800m
1 for each instance
500 UNDOTBS1 tablespace: dbname_undotbs1_raw_500m
1 180 EXAMPLE tablespace: dbname_example_raw_180m
1 120 USERS tablespace: dbname_users_raw_120m
2 for each instance
120 Two online redo log files (where m is the thread number and n is the log number, 1 or 2): dbname_redom_n_raw_120m
2 110 First and second control files:
dbname_control[1|2]_raw_110m
1 250 TEMP tablespace: dbname_temp_raw_250m
1 5 Server parameter file (SPFILE): dbname_spfile_raw_5m
1 5 Password file: dbname_pwdfile_raw_5m
Option Description Example

Configuring Raw Logical Volumes or Raw Partitions
3-16 Oracle Database Oracle Clusterware and Oracle Real Application Clusters Installation Guide
To create and configure raw volumes or partitions, use the disk administration tools provided by the operating system or third party vendors. The following administration tools are provided by the operating system:
■ Windows 2000 and Windows Server 2003 provide Disk Management snap-in to manage disks.
To access this tool, type diskmgmt.msc at the command prompt. Alternatively, from the Start menu, select Programs, then Administrative Tools, then Computer Management. Then select the Disk Management node in the Storage tree.
■ Windows Server 2003 provides a command line tool to manage disks.
To access this tool, type diskpart.exe at the command prompt.
You can use the diskpart tool command create partition to create primary or extended partitions, or create logical drives.
The following example uses the diskpart tool to create a 32 MB extended partition on disk 100. In this syntax, diskpart.exe is the command line tool for managing disks.
c:\> diskpart.exeDISKPART> select disk 100DISKPART> create partition extended size=32
Assigning Logical NamesAfter creating volumes, assign logical names for the Oracle Database. You can assign names to partitions by using importSYMLinks from the command line, or by using Oracle Object Link Manager. To use Oracle Object Link Manager to create persistent
Note: If you need to download the diskmgmt.msc tool, consult Microsoft documentation on the Microsoft Web site
http://www.microsoft.com/
See Also: The online help or documentation for the administration tool you are using
Note: Be aware of the following restrictions for partitions:
■ You cannot use partitions defined on disks with primary partitions for storage defined while running the OUI to install Oracle Clusterware as described in Chapter 4, "Installing Oracle Clusterware on Windows-Based Systems".
■ With 32-bit Windows, you cannot create more than four primary disk partitions for each disk. With 64-bit and x64 Windows, you can create up to 128 primary partitions. However, Oracle recommends that you limit the number of partitions that you create to prevent disk contention.
Because of these restrictions, you may prefer to use extended partitions rather than primary partitions.

Configuring Raw Logical Volumes or Raw Partitions
Storage Pre-Installation Tasks 3-17
symbolic links to the corresponding raw partitions, run the command CRS_home\bin\GUIOracleObjManager.exe
Creating the DBCA Raw Device Mapping File
To enable Database Configuration Assistant (DBCA) to identify the appropriate raw partition symbolic links for each database file, you must create a raw device mapping file, as follows:
1. Set the ORACLE_BASE environment variable to specify the Oracle base directory that you identified or created previously, as in this example:
C:\>set ORACLE_BASE = E:\oracle
2. Create a database subdirectory under the Oracle base directory as in this example:
C:\>mkdir E:\oracle\dbname
where dbname is the name of the database that you chose previously.
3. Change directory to the %ORACLE_BASE%\dbname directory.
4. Using any text editor, create a file called conf.txt. The file should have the following characteristics:
■ Each line in the file must have the following format:
database_object_identifier = symbolic link name
■ For your Oracle RAC database, the file must specify one automatic undo tablespace datafile (undotbsn) and two redo log files (redon_1, redon_2) for each instance where n is the instance number.
■ Specify at least two control files (control1, control2).
The following syntax example is for a mapping file for a two-instance Oracle RAC cluster:
system=\\\\.\\dbname_SYSTEM sysaux=\\\\.\\dbname_SYSAUX spfile=\\\\.\\dbname_SPFILE
Note: For Windows Server 2008, you must have administrator privileges and run commands from an Administrative command prompt to run executables that reside in the Oracle Clusterware home.
Note: You must complete this procedure only if you are using raw devices for database files. You do not specify the raw devices for the Oracle Clusterware files in the DBCA raw device mapping file.
Note: In Windows, by default, \ represents the escape key. To enter a backslash as part of a script, you must enter it in as a string literal. This means that when configuring the mapping file, for Windows to read the mapping file with the path \\.\, you must enter the path as \\\\.\\. Windows reads this as "escape backslash escape backslash. escape backslash."
Requirements for Files Managed by Oracle
3-18 Oracle Database Oracle Clusterware and Oracle Real Application Clusters Installation Guide
users=\\\\.\\dbname_USERS temp=\\\\.\\dbname_TEMP undotbs1=\\\\.\\dbname_UNDOTBS1 undotbs2=\\\\.\\dbname_UNDOTBS2 control1=\\\\.\\dbname_CONTROL1 control2=\\\\.\\dbname_CONTROL2 redo1_1=\\\\.\\dbname_REDO1_1 redo1_2=\\\\.\\dbname_REDO1_2 redo2_1=\\\\.\\dbname_REDO2_1 redo2_2=\\\\.\\dbname_REDO2_2 example=\\\\.\\dbname_EXAMPLE pwdfile=\\\\.\\dbname_pwdfile
5. Save the file and note the file name that you specified.
6. You may optionally set an environment variable, DBCA_RAW_CONFIG, to specify the full path to this file. For the Oracle base defined in Step 1, you would use the following command:
C:\>set DBCA_RAW_CONFIG=E:\oracle\dbname\conf.txt
Requirements for Files Managed by OracleIf you use OCFS or ASM for your database files, then your database will be created by default with files managed by Oracle Database. You may also elect to use files managed by Oracle if you choose the Custom installation type or the Advanced database creation option. If you use this feature, you need only specify the database object name instead of file names when creating or deleting database files.
Configuration procedures are required in order to enable Oracle Managed Files.
See Also: "Using Oracle-Managed Files" in Oracle Database Administrator's Guide

Part IIIInstalling Oracle Clusterware and Oracle
Real Application Clusters
Part III describes the two-phase installation process of how to install Oracle Clusterware and Oracle Database 10g with Real Application Clusters (Oracle RAC). It also explains how to create Oracle RAC databases, and it describes the post-installation tasks. The chapters in Part III are:
■ Chapter 4, "Installing Oracle Clusterware on Windows-Based Systems"
■ Chapter 5, "Installing Oracle Database 10g with Oracle Real Application Clusters"
■ Chapter 6, "Creating Oracle RAC Databases with the Database Configuration Assistant"
■ Chapter 7, "Oracle Real Application Clusters Post-Installation Procedures"


Installing Oracle Clusterware on Windows-Based Systems 4-1
4Installing Oracle Clusterware on
Windows-Based Systems
This chapter describes the procedures for installing Oracle Clusterware on Windows, phase one of the Oracle Database 10g Real Application Clusters (Oracle RAC) installation on Windows-based systems. The topics in this chapter are:
■ Verifying Oracle Clusterware Requirements with CVU
■ Preparing to Install Oracle Clusterware with OUI
■ Installing Oracle Clusterware with OUI
■ Formatting Drives to Use Oracle Cluster File System after Installation
Verifying Oracle Clusterware Requirements with CVUUsing the following command syntax, start Cluster Verification Utility (CVU) to check system requirements for installing Oracle Clusterware:
cluvfy stage -pre crsinst -n node_list
In the preceding syntax, replace the cluvfy command with the path and name for the command on the installation media and the variable node_list with the names of the nodes in your cluster, separated by commas.
For example, with the installation files in a stage directory on the C: drive, enter the following command for a cluster with nodes node1, node2, and node3:
C:\> stage\clusterware\cluvfy\runcluvfy.bat stage -pre crsinst -n node1,node2,node3
The Cluster Verification Utility Oracle Clusterware stage check verifies the following:
■ User Equivalence: User equivalence exists on all the specified nodes
■ Node Reachability: All the specified nodes are reachable from the local node
Note: To install Oracle Clusterware on Windows Server 2008, use Oracle Database 10g Release 2 (10.2.0.3) for Microsoft Windows Vista and Microsoft Windows Server 2008 media. This media is available in the media pack and on Oracle Technology Network. In addition, for Windows Server 2008, you must have administrator privileges and run commands from an Administrative command prompt to run executables that reside in the Oracle Clusterware home.

Verifying Oracle Clusterware Requirements with CVU
4-2 Oracle Database Oracle Clusterware and Oracle Real Application Clusters Installation Guide
■ Node Connectivity: Connectivity exists between all the specified nodes through the public and private network interconnections
■ Administrative Privileges: The oracle user has proper administrative privileges to install Oracle Clusterware on the specified nodes
■ Shared Storage Accessibility: If specified, the Oracle Cluster Registry (OCR) device and voting disk are shared across all the specified nodes
■ System Requirements: All system requirements are met for installing Oracle Clusterware software, including kernel version, kernel parameters, software packages, memory, swap directory space, temp directory space, and required users and groups
■ Node Applications: VIP, ONS, and GSD node applications are created for all the nodes
Troubleshooting Clusterware Setup for WindowsIf the CVU report indicates that your system fails to meet the requirements for Oracle Clusterware installation, then use the topics in this section to correct the problem or problems indicated in the report, and run the CVU command again.
User Equivalence Check FailedCause: Failure to establish user equivalency across all nodes. This can be due to not providing the administrative user on each node with the same password.
Action: When you install Oracle Clusterware, each member node of the cluster must have user equivalency for the Administrative privileges account that installs the database. This means that the administrative privileges user account and password must be the same on all nodes. CVU provides a list of nodes on which user equivalence failed. For each node listed as a failure node, review the Oracle user configuration to ensure that the user configuration is properly completed.
Node Reachability Check Cause: One or more nodes in the cluster cannot be reached using TCP/IP protocol, through either the public or private interconnects.
Action: Use the command ping address to check each node address. When you find an address that cannot be reached, check your list of public and private addresses to make sure that you have them correctly configured. Ensure that the public and private network interfaces have the same interface names on each node of your cluster.
Administrative Privileges Check FailedCause: The administrative privileges required for installation are missing or incorrect.
Action: From the node where you intend to run OUI, verify that you have administrative privileges on the other nodes. To do this, enter the following command for each node that is a part of the cluster:
net use \\node_name\C$
where node_name is the node name.
If you find a node where you are not able to log on, then you must correct the user information on that node. Oracle recommends that you use the same user name and password on each node in a cluster, or use a domain user name. If you use a

Preparing to Install Oracle Clusterware with OUI
Installing Oracle Clusterware on Windows-Based Systems 4-3
domain user name, then log on under a domain with a username and password that has local administrative privileges on each node.
When you have corrected the path configuration information on the node, run the CVU check again.
Preparing to Install Oracle Clusterware with OUIBefore you install Oracle Clusterware, use the following checklist to ensure that you have all the information you will need during installation, and you have completed all tasks that must be done before starting to install Oracle Clusterware. Mark the check box for each task as you complete it, and write down the information needed, so that you can provide it during installation.
❏ Verify Cluster Privileges
Before running Oracle Universal Installer, from the node where you intend to run the Installer, verify that you have administrative privileges on the other nodes. To do this, enter the following command for each node that is a part of the cluster:
net use \\node_name\C$
where node_name is the node name.
❏ Shut Down Running Oracle Processes
If you are installing Oracle Clusterware on a node that already has a single-instance Oracle Database 10g installation, then stop the existing ASM instances. After Oracle Clusterware is installed, start up the ASM instances again. After Oracle Clusterware is installed, when you restart the ASM instances, they use the cluster CSS daemon instead of the daemon for the single-instance Oracle database.
If a GSD from Oracle9i, Release 9.2 or earlier is running, then stop it before installing Oracle Database 10g Oracle Clusterware by stopping the OracleGSDService in the Services window.
❏ Decide if you want to install other languages
During installation, you are asked if you want to install additional languages other than the default.
❏ Determine your cluster name, public node names, private node names, and virtual node names for each node in the cluster
If you install the clusterware during installation, then you are asked to provide a public node name and a private node name for each node. When you enter the
Note: If you receive a warning to stop all Oracle services after starting OUI, then run the command
Oracle_home\bin\localconfig delete
where Oracle_home is the home that is running CSS.
Note: If the language set for the operating system is not supported by Oracle Universal Installer, then Oracle Universal Installer, by default, runs in the English language.

Preparing to Install Oracle Clusterware with OUI
4-4 Oracle Database Oracle Clusterware and Oracle Real Application Clusters Installation Guide
public node name, use the primary host name of each node. In other words, use the name displayed by the hostname command but without any portion of the domain name that may be returned by the command.
In addition, ensure that the following are true:
– Determine a cluster name with the following characteristics:
* It must be globally unique throughout your host domain
* It must be at least one character long and less than 15 characters long
* It must consist of the same character set used for host names: underscores (_), hyphens (-), and single-byte alphanumeric characters (a to z, A to Z, and 0 to 9). If you use third-party vendor clusterware, then Oracle recommends that you use the vendor cluster name
– Determine a private node name or private IP address for each node. The private IP address is an address that is only accessible by the other nodes in this cluster. Oracle uses private IP addresses for inter-node, or instance-to-instance Cache Fusion traffic. Oracle recommends that you provide a name in the format public_hostname-priv. Example: myclstr2-priv.
– Determine a virtual host name for each node. A virtual host name is a public node name that is used to reroute client requests sent to the node if the node is down. Oracle uses virtual IP addresses (VIPs) for client to database connections, so the VIP address must be publicly accessible. Oracle recommends that you provide a name in the format public_hostname-vip. Example: myclstr2-vip
❏ Determine the complete path for the raw devices or shared file systems, and set up the voting disk and Oracle Cluster Registry partitions
During installation, at the Cluster Configuration Storage page, you are asked to provide paths for two files that must be shared across all nodes of the cluster, either on a shared raw device, or a shared file system file:
– The Cluster Synchronization Services (CSS) voting disk is a partition that Oracle Clusterware uses to verify cluster node membership and status.
– Provide at least 256 MB disk space for the voting disk.
– The Oracle Cluster Registry (OCR) contains cluster and database configuration information for the Oracle RAC database and for Oracle Clusterware,
Note: The following is a list of additional information about node IP addresses:
The IP addresses that you use for all of the nodes in the current installation process must be from the same subnet.
If you create private and virtual host names in the format nodename-priv and nodename-vip, then OUI looks up these addresses and fills them in by default during the installation. If the OUI does not find these addresses, then you must fill in addresses during installation.
Host names, private names, and virtual host names are not domain-qualified. If you provide a domain in the address field during installation, then the OUI removes the domain from the address.
Private IP addresses should not be accessible as public interfaces. Using public interfaces for Cache Fusion can cause performance problems.

Installing Oracle Clusterware with OUI
Installing Oracle Clusterware on Windows-Based Systems 4-5
including the node list, and other information about cluster configuration and profiles. Provide at least 256 MB disk space for the OCR.
In addition, if you intend to use Oracle Cluster File System (OCFS) then you are prompted to indicate which of the available disks you want to format with OCFS, what format type you want to use, and to what drive letter the formatted OCFS disk is mounted.
Ensure that you create at least the minimum required drives for installation.
Installing Oracle Clusterware with OUIThis section provides you with information about how to use Oracle Universal Installer (OUI) to install Oracle Clusterware. It contains the following sections:
■ Starting OUI in Console Mode
■ Running OUI to Install Oracle Clusterware
■ Installing Oracle Clusterware Using a Cluster Configuration File
Starting OUI in Console ModeIf you are performing an installation using VNC or terminal services, then you should perform that installation in console mode. If you do not do this, then the Oracle Clusterware software installs, but cluster configuration assistants fail.
Use the following command to start terminal services in console mode:
mstsc -v:servername /F –console
Running OUI to Install Oracle ClusterwarePerform the following procedures to complete phase one, install Oracle Clusterware with Oracle Universal Installer, of the installation of Oracle Database 10g with Oracle RAC:
1. Log in to Windows with Administrative privileges and run the setup.exe command on the Oracle Clusterware media. This will open the Oracle Universal Installer (OUI) Welcome page.
2. After you click Next on the Welcome page, the Specify File Locations page will allow you to accept the displayed path name for the Oracle Clusterware products or select a different one. You may also accept default directory and path name for the location of your Oracle Clusterware home or browse for an alternate directory and destination. You must select a destination that exists on each cluster node that is part of this installation. Click Next to confirm your choices.
3. The installer verifies that your environment meets all of the minimum requirements for installing and configuring the products that you have chosen to install. The results are displayed on the Product-Specific Prerequisite Checks page. Verify and confirm the items that are flagged with warnings and items that require manual checks. After you confirm your configuration, OUI proceeds to the Cluster Configuration page.
See Also: The pre-installation chapters in Part II for information about the minimum raw device sizes

Installing Oracle Clusterware with OUI
4-6 Oracle Database Oracle Clusterware and Oracle Real Application Clusters Installation Guide
4. The Cluster Configuration page contains predefined node information if OUI detects that your system has Oracle9i Release 2 clusterware. Otherwise, OUI displays the Cluster Configuration page without predefined node information.
Provide your own cluster name if you do not wish to use the name provided by OUI. Note that the selected cluster name must be globally unique throughout the enterprise and its allowable character set is the same as that for hostnames, that is, underscores (_), hyphens (-), and single-byte alphanumeric characters (a to z, A to Z, and 0 to 9).
Enter a public, a virtual, and a private host name for each node. Do not include a domain qualifier with the host names. When you enter the public host name, use the primary host name of each node, that is, the name displayed by the hostname command. The virtual node name is the name to be associated with the VIP for the node. The private node refers to an address that is only accessible by the other nodes in this cluster, and which Oracle uses for Cache Fusion processing. You should enter the private host name for each node.
Click Next after you have entered the cluster configuration information. This saves your entries and opens the Specify Network Interface Usage page.
5. In the Specify Network Interface Usage page OUI displays a list of cluster-wide interfaces. Use the drop-down menus on this page to classify each interface as Public, Private, or Do Not Use. The default setting for each interface is Do Not Use. You must classify at least one interface as Public and one as Private. Click Next when you have made your selections to open the Select Disk Formatting Options page.
6. On the Cluster Configuration Storage page, identify the disks that you want to use for the Oracle Clusterware files and, optionally, Oracle Cluster File System (OCFS) storage. Highlight each of these disks one at a time and click Edit to open the Specify Disk Configuration page where you define the details for the selected disk.
Note: If the check identifies an existing, local CSS, you must shutdown the Oracle database and ASM instance from the Oracle home where CSS is running. To accomplish this, run the following command, using the existing Oracle home, in a separate window before you continue with the installation:
Oracle home\bin\localconfig delete
Note: If your cluster has Oracle9i Release 2 clusterware installed, then you must enter the same cluster name that you used for the Oracle9i Release 2 installation or else the installation will fail.
Note: You may provide the cluster configuration information in a text file and provide that file name instead of completing the individual fields on the Cluster Configuration page. See the following section, "Installing Oracle Clusterware Using a Cluster Configuration File" on page 4-7, for details about cluster configuration files.

Installing Oracle Clusterware with OUI
Installing Oracle Clusterware on Windows-Based Systems 4-7
7. On the Specify Disk Configuration page, designate whether you want to place a copy of the OCR, a copy of the voting disk, or a copy of both files on the partition. If you plan to use OCFS, then indicate whether you plan to store software, database files, or both software and database files on selected disk. For OCFS, disks, select an available drive letter to be used to mount the partition once formatted.
8. After you click Next, OUI checks whether the remote inventories are set. If they are not set, then OUI sets up the remote inventories by setting registry keys. OUI also verifies the permissions to enable writing to the inventory directories on the remote nodes. After completing these actions, OUI displays a Summary page that shows the cluster node information along with the space requirements and availability. Verify the installation that OUI is about to perform and click Finish.
9. When you click Finish, OUI installs OCFS and Oracle Clusterware software on the local node and validates the installation again. OUI will also create any required OCFS file systems. After validating the installation, OUI completes the Oracle Clusterware software installation and configuration on the remote nodes.
10. For installations of Oracle Clusterware on a system that also contains Oracle9i Real Application Clusters, note these additional considerations and complete the steps as necessary:
■ Restart all of the newly installed Oracle Database 10g cluster member nodes. You can restart one node at a time so that availability of Oracle9i databases is not disrupted.
■ If there will be a significant delay before you perform phase two of the Oracle RAC installation to install Oracle Database 10g with Oracle RAC software, then execute the command CRS_home\bin\gsdctl start to start the GSD manually to service the 9.2 SRVCTL tool and assistants. Then, before configuring Oracle Database 10g with Oracle RAC software, run the command CRS_home\bin\gsdctl stop to stop the GSD.
At this point, you have completed phase one, Oracle Clusterware installation, and are ready to install Oracle Database 10g with Oracle RAC as described in Chapter 5, "Installing Oracle Database 10g with Oracle Real Application Clusters". If you intend to use Oracle Clusterware without an Oracle RAC database, then refer to the single-instance Oracle Database installation guide.
Installing Oracle Clusterware Using a Cluster Configuration FileDuring installation of Oracle Clusterware, on the Specify Cluster Configuration page, you are given the option either of providing cluster configuration information manually, or of using a cluster configuration file. A cluster configuration file is a text file that you can create before starting OUI, which provides OUI with information about the cluster name and node names that it needs to configure the cluster.
Notes:
The OUI page described in this step displays logical drives from which you must make your selections.
If you are installing on a cluster with an existing cluster file system from an earlier release of Oracle, then the OCR and voting disk will be stored in that file system. In this case, you do not require new partitions for the OCR and voting disk, even if you do not format a logical drive for data file storage.

Formatting Drives to Use Oracle Cluster File System after Installation
4-8 Oracle Database Oracle Clusterware and Oracle Real Application Clusters Installation Guide
Oracle suggests that you consider using a cluster configuration file if you intend to perform repeated installations on a test cluster, or if you intend to perform an installation on many nodes.
To create a cluster configuration file:
1. On the installation media, navigate to the directory Disk1\response.
2. Using a text editor, open the response file crs.rsp, and find the section CLUSTER_CONFIGURATION_FILE.
3. Follow the directions in that section for creating a cluster configuration file.
Formatting Drives to Use Oracle Cluster File System after InstallationIf you install Oracle Database 10g with Oracle RAC, and later you want to install OCFS, then run the ocfsformat.exe command from the crs_home\cfs directory using the following syntax. Use /f to apply the force option and reformat the partition if you previously formatted the partition with OCFS. Additional variable definitions for the following example are:
■ drive_letter is the drive on which you want to format OCFS
■ clustersize is the size of a file system block (the minimum amount of space that OCFS allocates for a file).
■ volume_label is an optional volume label
crs_home\cfs\ocfsformat.exe /l drive_letter /c clustersize [/v volume_label] [/f]

Installing Oracle Database 10g with Oracle Real Application Clusters 5-1
5Installing Oracle Database 10g with Oracle
Real Application Clusters
This chapter describes phase two of the installation procedures for installing Oracle Database 10g with Real Application Clusters (Oracle RAC). This chapter also describes some of the Oracle Universal Installer (OUI) features. This chapter contains the following topics:
■ Verifying System Readiness for Installing the Oracle Database with CVU
■ Selecting a Database Configuration Type
■ Installation of Oracle Database 10g with Oracle RAC Using Oracle Universal Installer
■ Installation on Windows-Based Systems with the Minimum Memory Requirements
■ De-Installing Real Application Clusters Software
Verifying System Readiness for Installing the Oracle Database with CVUTo help to verify that your system is prepared to install Oracle Database with Oracle RAC successfully, enter a Cluster Verification Utility (CVU) command using the following command syntax:
cluvfy stage -pre dbinst -n node_list [-r { 10gR1 | 10gR2 } ] [-verbose]
In the preceding syntax example:
■ The variable node_list is the list of nodes in your cluster, separated by commas
For example, to perform a pre-installation check for an Oracle Database with Oracle RAC installation on a two-node cluster with nodes node1 and node2, enter the following command:
cluvfy stage -pre dbinst -n node1,node2 -verbose
Oracle recommends that you select the option -verbose to receive progress updates as CVU performs its system checks. The -verbose option provides detailed test reporting, which you can use to identify the cause of any checks that fail.
Note: To install Oracle RAC on Windows Server 2008, use Oracle Database 10g Release 2 (10.2.0.3) for Microsoft Windows Vista and Microsoft Windows Server 2008 media. This media is available in the media pack and on Oracle Technology Network.

Verifying System Readiness for Installing the Oracle Database with CVU
5-2 Oracle Database Oracle Clusterware and Oracle Real Application Clusters Installation Guide
If the cluster verification check fails, then review and correct the relevant system configuration steps, and run the test again. Use the system configuration checks described in "Troubleshooting Installation Setup for Windows" to assist you.
Troubleshooting Installation Setup for WindowsIf you run CVU and your system fails system configuration checks, then review the CVU report, and use the output to resolve failed configuration checks.
User Equivalence Check FailedCause: Failure to establish user equivalency across all nodes.
Action: From the node where you intend to run OUI, verify that you have administrative privileges on the other nodes. To do this, enter the following command for each node that is a part of the cluster:
net use \\node_name\C$
where node_name is the node name.
If you find a node where you are not able to log on, then you must correct the user information on that node. Oracle recommends that you use the same user name and password on each node in a cluster, or use a domain user name. If you use a domain user name, then log on under a domain with a username and password that has administrative privileges on each node.
When you have corrected the path configuration information on the node, run the CVU check again.
Node Reachability Check FailedCause: Failure of one or more nodes to be properly connected for communication.
Action: Possible causes of this message include the following:
■ Improper network configuration
■ The node running CVU is unable to connect to one or more nodes in the cluster
Use the following command to check your current configuration on each node:
ipconfig /all
Node Connectivity Check FailedCause: One or more of the cluster nodes is not able to be connected from all nodes in the cluster
Action: Check for firewalls preventing the nodes from communicating on their private network interfaces.
System Requirements Check FailedCause: insufficient system resources, missing software packages, or other operating system or hardware problem.
Action: If you did not run the CVU command with the -verbose flag, then run the command again using -verbose, and review the report to determine which system requirement failed. Correct the problem.
See Also: "Checking Network Requirements" in Chapter 2

Selecting a Database Configuration Type
Installing Oracle Database 10g with Oracle Real Application Clusters 5-3
Selecting a Database Configuration TypeThis section describes OUI features that you should understand before beginning phase two of the Oracle RAC installation process. When you run OUI and select Oracle Database 10g, you can select the General Purpose, Transaction Processing, Data Warehouse, or Advanced database configuration type.
For the first three configuration types, you can complete additional procedures that are described later in this chapter. If you select Advanced configuration, then you can use Database Configuration Assistant (DBCA) to create the database as described in Chapter 6. Oracle recommends that you use DBCA to create your database.
You can also select the Advanced configuration, select a preconfigured template, customize the template, and then use DBCA to create a database using the template. These preconfigured templates correspond to the General Purpose, Transaction Processing, and Data Warehouse configuration types. You can also use DBCA with the Advanced template to create a database.
Oracle recommends that you use one of the preconfigured database options, or use the Advanced option with DBCA to create your database. However, if you want to configure your environment and create your database manually, then select the Do not create a database configuration option, and refer to the manual database creation procedures posted at the following Web site:
http://otn.oracle.com.
Configuration Type DescriptionsThe configuration type that you select, as described in Table 5–1, determines how you proceed.
General Purpose, Transaction Processing, and Data Warehouse Configuration TypesThe General Purpose, Transaction Processing, and Data Warehouse configuration types use preconfigured database templates. During installation, if you select one of these preconfigured database types, then OUI starts Oracle Network Configuration
See Also: Chapter 2, "Server and Network Pre-Installation Tasks" contains instructions for completing any system requirement configuration that CVU lists as incomplete.
Table 5–1 Oracle Universal Installer Database Configuration Types
Configuration Type Description Advantages
General Purpose, Transaction Processing, and Data Warehouse
Installs a preconfigured starter database, Oracle options (including Oracle Database 10g with Oracle RAC), networking services, Oracle Database 10g utilities, and online documentation. At the end of the installation, DBCA creates and configures your Oracle RAC database.
Minimal input required. You can create your database more quickly than with the Advanced type.
Advanced Enables you to customize your database options and storage components.
Enables you to create arbitrary tablespaces and datafiles and customize all aspects of your database.
Do not create a starter database
Installs only the software. Does not configure the listeners or network infrastructure and does not create a database.

Selecting a Database Configuration Type
5-4 Oracle Database Oracle Clusterware and Oracle Real Application Clusters Installation Guide
Assistant (NETCA) and DBCA, and installs the preconfigured database without further input. During database installation, OUI displays a progress indicator.
DBCA processing for these three configuration types creates a starter database, and configures Oracle network services. If you choose raw devices on the Specify Database File Storage Option page, then DBCA verifies that you configured the raw devices for each tablespace.
If you select Advanced configuration, then you must enter specific information as described in the next section.
Using the Advanced Configuration TypeIf you select the Advanced configuration type, then OUI runs DBCA, which displays four preconfigured database template choices:
■ General Purpose
■ Transaction Processing
■ Data Warehouse
■ Advanced
The first three templates create a database that is optimized for that environment. You also can customize these templates. The Advanced type, however, creates a database without using preconfigured options.
The following section provides more detail about OUI and DBCA processing when creating an Oracle RAC database.
Behavior of OUI, DBCA, and Other Assistants During InstallationAfter installation, OUI starts NETCA. After NETCA completes its processing, OUI runs DBCA to create your database using Optimal Flexible Architecture (OFA). This means that DBCA creates your database files, including the default server parameter file (SPFILE), using standard file naming and file placement practices. The primary phases of DBCA processing are:
■ Verify that you correctly configured the shared disks for each tablespace if you are using raw storage
■ Create the database
■ Configure Oracle network services
■ Start the listeners and database instances
You can also use DBCA in standalone mode to create a database.
You can use your Oracle9i database language and territory definition files with Oracle Database 10g Release 2 (10.2) that you are about to install. To enable this functionality, you must run OUI from a command line, as described in the following section, "Installation of Oracle Database 10g with Oracle RAC Using Oracle Universal Installer", but start the setup command using the following arguments to set the b_cr9idata variable to true:
setup oracle.rsf.nlsrtl_rsf:b_cr9idata=true
See Also: The Oracle Database Net Services Administrator's Guide if you experience problems, for example, with the listener configuration, and for further information about LDAP support

Installation of Oracle Database 10g with Oracle RAC Using Oracle Universal Installer
Installing Oracle Database 10g with Oracle Real Application Clusters 5-5
Installation of Oracle Database 10g with Oracle RAC Using Oracle Universal Installer
Perform the following procedures to install Oracle Database 10g software with Oracle RAC.
1. Start the setup.exe command from the base directory of the Oracle Database 10g Release 2 (10.2) media. When OUI displays the Welcome page, click Next.
2. Provide information when prompted by OUI. If you need assistance during installation, click Help. If you encounter problems during installation, examine the OUI actions recorded in the installation log file. The log file is located in the Oracle Inventory directory with a name that includes the timestamp (date_time) of the install process, as shown in this example:
C:\Program Files\Oracle\Inventory\logs\installActionsdate_time.log
In the preceding syntax example, the variables date and time represents the date and the time of the log file.
The following is a list of additional information to note about installation:
■ If you select Automatic Storage Management (ASM) during installation, then the default partitions for ASM disk partition locations from which you must select ASM disks are marked as follows:
\\.\orcldisk*
If you are installing Oracle RAC from the Standard Edition, then you must use ASM for your database storage. Even if you can click other database storage options, they are only supported by the Enterprise Edition and you should not select them.
3. Ensure that the path name for your new Oracle home is defined across the cluster by completing the following procedure on each remote node that is part of your current cluster installation:
a. On each remote node, navigate to Start, and select Control Panel, then System, then Advanced, and then Environment Variables
b. In the "System variables" dialog, select the Path variable and ensure that the value for the Path variable contains oracle_home\bin, where oracle_home is your new Oracle home. If the variable does not contain this
Note: The Oracle home name and path that you provide during database installation must be different from the home that you used during Oracle Clusterware installation in phase one. You must not install Oracle Database 10g with Oracle RAC software into the same home in which you installed Oracle Clusterware software.
Note: Oracle only supports one ASM instance for each node.
Note: The only partitions that OUI displays for Windows systems are logical drives that are on drives that do not contain a primary partition, and have been stamped with asmtool.

Installation on Windows-Based Systems with the Minimum Memory Requirements
5-6 Oracle Database Oracle Clusterware and Oracle Real Application Clusters Installation Guide
value, then click Edit and add this value to the start of the path variable definition in the Edit System Variable dialog. When you have added the value, click OK.
c. Click OK in the Environment Variables page, click OK in the System Properties page, and then close the Control Panel
When have completed all steps for the second and final phase of the installation, proceed to Chapter 7, "Oracle Real Application Clusters Post-Installation Procedures" to perform the post-installation tasks.
Installation on Windows-Based Systems with the Minimum Memory Requirements
Installations of Oracle RAC on nodes in Windows-based systems with 512 MB of RAM and 500 MB of virtual memory have the following limitations:
■ Computers with 512 MB of memory are not able to run Oracle Database Upgrade Assistant (DBUA), DBCA, or NETCA during an Oracle Universal Installer installation session.
■ Depending on how many applications are running on the computer, you may need to further increase the paging file size or reduce the size of the System Global Area (SGA) if you run out of virtual memory. Note that if temporary files and the paging file are both stored on the same physical drive, then a situation can occur where the space requirements for one can limit the size of another. If your system has limited free space, then first install the Oracle Database software. After the installation is finished, run NETCA to configure listeners and then DBCA to create a database.
On computer systems that barely meet the minimum memory and virtual memory requirements, 512 MB and 500 MB respectively, do not install the database. Instead, follow these guidelines:
■ Select Enterprise Edition Installation and deselect "Do not create a starter database"
■ Select Custom Installation, select "Do not create a starter database" from the Select Database Configuration page.
■ Select Advanced Installation, select the Custom installation type from the Select Installation Type page, and select No on the Create Database page when prompted to create the database.
■ Cancel DBCA from the Configuration Assistants page.
After installation, run the appropriate configuration assistant for your needs:
Note: If you need to change the VIP on an Oracle RAC node, then you should change it using a SRVCTL command, using the following syntax:
srvctl modify nodeapps -A new_address
Refer to Oracle Database Oracle Clusterware and Oracle Real Application Clusters Administration and Deployment Guide for additional information.

De-Installing Real Application Clusters Software
Installing Oracle Database 10g with Oracle Real Application Clusters 5-7
■ To create a new database, run DBCA from the Start Menu. Choose Start, then Programs, then Oracle - HOME_NAME, then Configuration and Migration Tools, and then Database Configuration Assistant.
■ To upgrade an existing database, run DBUA from the Start Menu. Choose Start, then Programs, then Oracle - HOME_NAME, then Configuration and Migration Tools, and then Database Upgrade Configuration Assistant.
To ensure that all nodes in your cluster use the new Oracle home, ensure that the path name for the new Oracle home is defined on each node in the cluster by completing the following procedure:
1. On each node, navigate to Start, then to Control Panel, then to System, then to Advanced and then to Environment Variables
2. In the "System variables" dialog, select the Path variable and ensure that the value for the Path variable contains oracle_home\bin, where oracle_home is your new Oracle home. If the variable does not contain this value, then click Edit and add this value to the start of the path variable definition in the Edit System Variable dialog and click OK.
3. Click OK in the Environment Variables page, then click OK in the System Properties page, and then close the Control Panel.
De-Installing Real Application Clusters SoftwareIf you need to de-install Real Application Cluster software, then you must run OUI to de-install the software on the same node from which you performed the installation, and you must de-install Oracle database software first before de-installing Oracle Clusterware software.
Perform the following procedures to de-install Oracle Database 10g RAC and Oracle Clusterware software, as described in the following sections:
■ De-Installing Oracle Database 10g RAC Software
■ De-Installing Oracle Clusterware from Windows Environments
■ De-Installing Automatic Storage Management
Note: For Windows Server 2008, you must have administrator privileges and run commands from an Administrative command prompt to run executables that reside in the Oracle Clusterware home.
Note: These sections describe a complete de-installation of the Oracle RAC, ASM, and Oracle Clusterware software where Oracle RAC and ASM share the Oracle home and no other Oracle home exists.
If you have multiple Oracle homes on the cluster, then check for any dependencies that might affect your other databases. Such dependencies can include listeners, ASM instances, and so on that run in the Oracle home to be deleted. To identify dependencies, review the oratab file to identify common Oracle homes.

De-Installing Real Application Clusters Software
5-8 Oracle Database Oracle Clusterware and Oracle Real Application Clusters Installation Guide
De-Installing Oracle Database 10g RAC SoftwareThis section describes the procedure to de-install Oracle Database 10g RAC software. Before you perform these steps, Oracle recommends that you make a backup of any databases that run from the Oracle home you are about to delete. You should then stop any instances and processes on all nodes, including services, that depend on the software that you are de-installing.
1. Drop all of the databases that are dependent on the Oracle home that you are deleting by using DBCA "Delete a database" option and selecting the correct database or databases to be dropped.
2. Drop any existing Oracle Database 10g with RAC software by using DBCA "Delete a database" option, and selecting the correct database or databases to be dropped.
3. If the database is in the Oracle home from which the ASM database runs, then ensure that there are no other database dependencies on these group of ASM instances, and then remove the ASM configuration by logging on as the oracle user and completing the following steps:
a. Connect to the ASM instance and run the following command to determine database instances using this ASM instance.:
SQL> select INSTANCE_NAME from GV$ASM_CLIENT;
b. For each instance listed in the output of the statement you run in Step a, stop the respective databases.
c. Oracle recommends that you back up the database files for all of the databases that are currently using this ASM instance.
d. Using your connection to the ASM instance, run the following command:
SQL> select * from V$ASM_DISKGROUP;
e. For each diskgroup listed in the output of the statement you run in Step d, run the following command:
SQL> drop diskgroup diskgroup_name including contents;
where diskgroup_name is the name of the diskgroup.
f. Shut down ASM on all Oracle RAC nodes, and verify that all ASM instances are stopped.
See Also: Oracle Database Oracle Clusterware and Oracle Real Application Clusters Administration and Deployment Guide for more information about using Oracle RAC scalability features of adding and deleting nodes and instances from Oracle RAC databases, and for information about viewing OCR content
Note: This command only lists database instances that are running. It is possible that other instances are associated with the ASM instance, but they are not currently running. If you removed a database from this Oracle home but the output from the command shows that this ASM instance is supporting a database instance in another Oracle home, then do not remove the ASM instance or the Oracle home.

De-Installing Real Application Clusters Software
Installing Oracle Database 10g with Oracle Real Application Clusters 5-9
g. Run OUI. On the Welcome page, click Deinstall Products to de-install the Oracle home from which ASM was running.
h. To remove the ASM entry from the OCR, run the following command for all nodes on which this Oracle home exists:
srvctl remove asm -n nodename
where nodename is the name of a node from which you want to remove the ASM instance.
i. If you are using a shared cluster file system for your Oracle home, then run the following commands on the local node:
delete %ORACLE_HOME%\database\*ASM*delete %ORACLE_BASE%\admin\+ASM
You may need to remove subordinate files or directories before these commands complete successfully.
j. If you are not using a shared cluster file system for your Oracle home, then run the commands from the previous step, Step i, on each node on which the Oracle home exists.
k. Run the following command on each node that has an ASM instance:
oradim -delete -asmsid +ASMnode_number
where node_number is the node identifier.
4. If the listener runs from this Oracle home, then use NETCA to remove the listener and its configuration.
5. If the Oracle RAC software you are deleting uses a different Oracle home from the Oracle home that your ASM environment uses, then start OUI. On the Welcome page, click Deinstall Products to display the list of installed products on which you can select the Oracle home to de-install.
De-Installing Oracle Clusterware from Windows EnvironmentsDe-install each Oracle Database 10g RAC home by running the procedure in the previous section, "De-Installing Oracle Database 10g RAC Software". Then complete the de-installation by removing Oracle Clusterware software using one of the following procedures:
■ De-Installing Oracle Clusterware with No Previous Cluster Software Versions
■ De-Installing Oracle Clusterware, with Clusterware Downgrade to 9.2
De-Installing Oracle Clusterware with No Previous Cluster Software VersionsPerform the following steps to de-install Oracle 10g Oracle Clusterware software from a Windows environment:
Note: You cannot perform an Oracle RAC installation from the same OUI session in which you perform an Oracle RAC de-installation. In other words, if you de-install Oracle RAC with OUI and want to perform another Oracle RAC installation. then you must start a new OUI session.

De-Installing Real Application Clusters Software
5-10 Oracle Database Oracle Clusterware and Oracle Real Application Clusters Installation Guide
1. Stop and remove the Oracle Clusterware node applications on each node that is associated with the Oracle home that you are deleting. Do this by running the following command for all of the nodes that are affected by the deletion of the Oracle home:
srvctl stop nodeapps -n node_name
where node_name is the node name. Repeat this command for each node in the cluster.
Then remove Oracle Clusterware node applications by running the following commands:
svrctl remove nodeapps -n node_name
where node_name is the node name. Repeat this command for each node in the cluster, responding to any operating-system prompts to confirm your operations for each node.
2. Click Start and navigate to Settings, then to Control Panel, then to Administrative Tools, and then to Services. Stop the service OracleRemExecService.
3. Start OUI. On the Welcome page, click Deinstall Products to display the list of installed products. Select the Oracle Clusterware home you want to de-install.
4. If you have services with names such as OracleCRSTokenname, then remove them by running the following command:
crsuser remove user_name
where user_name is a user name.
5. Shut down and restart each node that is a member of your cluster.
6. If you are not using a cluster file system, then on each node, use Windows Explorer to delete the Oracle directory, its subdirectories, and their contents.
De-Installing Oracle Clusterware, with Clusterware Downgrade to 9.2 Perform the following procedures to de-install Oracle 10g Oracle Clusterware software from a Windows environment that also has 9.2 Oracle RAC:
1. Run CRS_Home\bin\GuiOracleOBJManager.exe to make sure that the symbolic link named srvcfg exists and points to a disk partition, if you are not using OCFS to store the OCR.
2. If Oracle9i release 9.2 clusterware uses OCFS, then ensure the following is true for all nodes:
■ The registry key HKLM\SOFTWARE\Oracle\osd9i\ocr exists
■ The registry key HKLM\SOFTWARE\Oracle\osd9i\ocr has a string value CfsOcrRoot that points to a release 9.2 OCR (OCFS) location
3. On each node, use the following command to stop all node processes (virtual IPs, gsds, and ons):
srvctl stop nodeapps -n nodename
In the preceding syntax example, replace the variable nodename with the name of the node on which you want to stop node processes. Shut down all clusterware processes.

De-Installing Real Application Clusters Software
Installing Oracle Database 10g with Oracle Real Application Clusters 5-11
4. Run CRS_Home\bin\ocrconfig -downgrade -version 9.2 to downgrade the Cluster Registry to a release 9.2 OCR.
5. On each node, copy CRS_Home\cfs\OcfsFindVol.exe to %SYSTEMROOT%\system32\osd9i\cfs.
6. Run CRS_Home\oui\bin\setup.exe to start OUI. On the Welcome page click Deinstall products to list all the installed products. Select the Oracle Clusterware home name from the displayed products, and click Remove to deconfigure and de-install the product.
7. On each node, run %SYSTEMROOT%\system32\osd9i\olm\OracleOBJService.exe /install to re-install the Oracle 9.2 object service. Then start Oracle Object Service.
8. On each node, run %SYSTEMROOT%\system32\osd9i\cfs\OcfsFindVol.exe /i:%SYSTEMROOT%\system32\osd9i\cfs\OcfsFindVol.exe to re-install the Oracle Cluster Volume service. Then start the OracleClusterVolumeService.
9. From an Oracle9i Release 9.2 RAC Oracle home on each node run the command ORACLE_HOME\bin\gsdservice.exe -install. Then start the OracleGSDService.
10. On each node, copy %SYSTEMROOT%\system32\osd9i\orafencedrv.sys %SYSTEMROOT%\system32\drivers\orafenceservice.sys
De-Installing Automatic Storage ManagementTo remove the Automatic Storage Management (ASM) instances, complete the following tasks:
1. There is one listener for each node that Oracle Clusterware manages, and that is started and stopped with nodeapps. It is named nodename_LISTENER, and it is located in the Oracle home. Use NetCA to remove this listener and its Oracle Clusterware resources. If necessary, re-create this listener in another Oracle home.
2. If this is the Oracle home from which the ASM instance runs, then enter the following commands to remove the ASM configuration:
srvctl stop asm -n nodesrvctl remove asm -n node
3. If you are not using a cluster file system for your ASM Oracle home, then run the Server Control stop and remove commands listed in the previous step on each node on which the Oracle home exists.
4. If you are using a shared cluster file system for your ASM Oracle home, then run the following commands on the local node:
delete %ORACLE_HOME%\database\*ASM*delete %ORACLE_BASE%\admin\+ASM
You may need to remove subordinate files or directories before these commands complete successfully.
5. If you are not using a shared cluster file system for your ASM Oracle home, then run the commands from the previous step, step 4, on each node on which the Oracle home exists.
6. Run the following command on each node:

De-Installing Real Application Clusters Software
5-12 Oracle Database Oracle Clusterware and Oracle Real Application Clusters Installation Guide
%ORACLE_HOME%\bin\oradim.exe -delete -asmsid +ASMnode_number
where node_number is the node identifier.

Creating Oracle RAC Databases with the Database Configuration Assistant 6-1
6Creating Oracle RAC Databases with the
Database Configuration Assistant
This chapter describes how to use the Database Configuration Assistant (DBCA) in standalone mode to create and delete Oracle Real Application Clusters (Oracle RAC) databases. The topics in this chapter include:
■ Using Database Configuration Assistant with Oracle Real Application Clusters
■ Benefits of Using Database Configuration Assistant
■ Oracle Real Application Clusters High Availability Services
■ Verifying Requirements for DBCA
■ Creating the Database after Installation Using Database Configuration Assistant
■ Creating an Oracle Real Application Clusters Database with DBCA
■ Deleting a Real Application Clusters Database with DBCA
Using Database Configuration Assistant with Oracle Real Application Clusters
DBCA has the following primary functions:
■ Create the database and its instances
■ Set up network configuration for database, instances and database services
■ Configure Enterprise Manager Grid Control
■ Start up the database, its instances, services, and any other node applications
See Also: Oracle Database Oracle Clusterware and Oracle Real Application Clusters Administration and Deployment Guide for procedures on using Database Configuration Assistant (DBCA) to add and delete instances
See Also:
■ "Creating the Database after Installation Using Database Configuration Assistant" on page 6-3 for more information about using DBCA in standalone mode
■ Oracle Database Net Services Administrator's Guide if you experience problems, for example, with the listener configuration, and for further information about Lightweight Directory Access Protocol (LDAP)-compliant directory support

Benefits of Using Database Configuration Assistant
6-2 Oracle Database Oracle Clusterware and Oracle Real Application Clusters Installation Guide
Benefits of Using Database Configuration AssistantOracle recommends that you use Database Configuration Assistant (DBCA) to create your Oracle RAC database, because DBCA's preconfigured databases optimize your environment for features such as ASM, the server parameter file, and automatic undo management. DBCA also provides pages to create new ASM disk groups if they are needed; if you use ASM or cluster file system storage, then DBCA also configures recovery and backup disk space.
With DBCA, you can create site-specific tablespaces as part of database creation. If you have datafile requirements that differ from those offered by DBCA templates, then create your database with DBCA and modify the datafiles later. You can also run user-specified scripts as part of your database creation process.
DBCA also configures your Oracle RAC environment for various Oracle high availability features, such as services and cluster administration tools. It also starts any database instances required to support your defined configuration.
Oracle Real Application Clusters High Availability ServicesWhen you configure high availability services with the DBCA Database Services page, you can also configure service instance preferences and Transparent Application Failover (TAF) policies.
Service Configuration and Instance PreferencesUse the Database Services page button in the column labeled Not Used, Preferred, or Available to configure service instance preferences as described in the following list:
■ Preferred—The service runs primarily on the selected instance
■ Available—The service may run on the instance if a preferred instance fails
■ Not Used—The service never runs on the instance
Transparent Application Failover PoliciesUse the DBCA Database Services page to configure TAF failover policies. The DBCA Database Services page also has a TAF policy selector row under the instance preference display. Select one of the following options in this row for your failover and reconnection policy preference:
■ None—Do not use TAF
■ Basic—Establish connections at failover time
Verifying Requirements for DBCATo help to verify that your system is prepared to create the Oracle Database with Oracle RAC successfully, enter a Cluster Verification Utility command using the following command syntax:
cluvfy stage -pre dbcfg -n node_list -d oracle_home [-verbose]
In the preceding syntax example, the variable node_list is the list of nodes in your cluster, separated by commas, and the variable oracle_home is the path for the Oracle home under which the database is to be created or its configuration is to modified.

Creating an Oracle Real Application Clusters Database with DBCA
Creating Oracle RAC Databases with the Database Configuration Assistant 6-3
For example, to perform a check to determine if your system is prepared for an Oracle Database with Oracle RAC on a two-node cluster with nodes node1 and node2, and with the Oracle home path c:\oracle\product\10.2.0, enter the following command:
cluvfy stage -pre dbcfg -n node1,node2 -d c:\oracle\product\10.2.0
You can select the option -verbose to receive progress updates as the CVU performs its system checks, and detailed reporting of the test results.
If the Cluster Verification Utility summary indicates that the cluster verification check fails, then review and correct the relevant system configuration steps, and run the test again.
The command cluvfy stage -pre dbcfg verifies the following:
■ Node Reachability: All the specified nodes are reachable from the local node
■ User Equivalence: User equivalence exists on all the specified nodes
■ Node Connectivity: The connectivity exists between all the specified nodes through the available public and private network interfaces
■ Administrative Privileges: The oracle user has proper administrative privileges on the specified nodes for creating an Oracle RAC database
■ Oracle Clusterware Integrity: All the components of the Oracle Clusterware stack are operational
Creating the Database after Installation Using Database Configuration Assistant
To create a database with DBCA in standalone mode without ASM or a cluster file system, you must already have configured each raw device as described in Appendix C. In addition, you must already have run Oracle Net Configuration Assistant to configure your Oracle Net listener.ora file.
If you plan to use ASM storage, then you must already have created logical partitions without primary partitions on the same drive, and deleted the drive letters for these partitions on all nodes, or used DBCA to mark partitions.
If you select DBCA templates that use preconfigured datafiles and if you do not use ASM or a cluster file system, then during database creation, DBCA first verifies that you created the raw devices for each tablespace. If you have not configured the raw devices, then you must configure the raw devices and replace the default datafile names that DBCA provides with raw device names on the DBCA Storage page to continue database creation.
To start DBCA, click Start, and select Programs, Oracle - Oracle_home name, Configuration and Migration Tools, then Database Configuration Assistant
Creating an Oracle Real Application Clusters Database with DBCAWhen you start DBCA, the first page it displays is the Welcome page for Oracle RAC, which includes the option to select an Oracle Real Application Clusters (Oracle RAC) database. Note that you will not see this page if the Oracle home from which you are running DBCA was not installed in a cluster environment.
See Also: DBCA online help for more information

Creating an Oracle Real Application Clusters Database with DBCA
6-4 Oracle Database Oracle Clusterware and Oracle Real Application Clusters Installation Guide
If DBCA does not display the Welcome page for Oracle RAC, then DBCA was unable to detect whether the Oracle home is cluster-installed. In this case, check that the OUI inventory is correctly located in c:\Program Files\oracle\Inventory, and that the files in the Oracle inventory directory are not corrupted. Also, perform clusterware diagnostics by running the CVU command cluvfy stage -post crsinst -n nodename.
If the Oracle RAC welcome page opens, then complete the following steps to create an Oracle RAC database:
1. On the Welcome page, select Real Application Clusters database and click Next.
2. DBCA displays the Operations page.
Note that DBCA enables the options Configure Database Options, Delete a Database, Instance Management, Configure Automatic Storage Management, and Services Management options only if there is at least one Oracle RAC database configured on your cluster that runs from the Oracle home.
Select Create a Database, and click Next.
3. DBCA displays the Node Selection page. DBCA highlights the local node by default. Select the other nodes that you want to configure as members of your cluster database, and click Next.
4. DBCA displays the Database Templates page. The predefined template choices on the Database Templates page are Custom Database, Data Warehouse, General Purpose, and Transaction Processing.
Use one of the predefined templates, which include datafiles, if you want to create database with specifically configured options. The Custom Database template does not include datafiles or options specially configured for a particular type of application.
Select the template from which you wish to create your cluster database, and click Next.
5. DBCA displays the Database Identification page. Provide a unique global database domain name for your database (typically in the form of "database.acme.com.") The Oracle system identifier (SID) prefix is generated automatically from the name you provide. You can either use the automatically generated SID, or create your own. When you are finished, click Next.
Note: If nodes that are part of your cluster installation do not appear on the Node Selection page, then run the CVU to perform inventory diagnostics and clusterware diagnostics.
Note: The global database name can be up to 30 characters in length, and must begin with an alphabetical character. The SID prefix must begin with an alphabetical character.
The maximum number of characters you can use for the SID prefix depends on the number of nodes in the Oracle RAC database. If the Oracle RAC database contains from one to nine nodes, then the SID prefix can be no more than 61 characters on Windows-based systems. If the Oracle RAC database contains from 10 to 99 nodes, then the SID prefix can be no more than 60 characters. DBCA uses the SID prefix to generate a unique value for the variable ORACLE_SID for each instance.

Creating an Oracle Real Application Clusters Database with DBCA
Creating Oracle RAC Databases with the Database Configuration Assistant 6-5
6. The Management Options page appears. Select whether you will enable management through Oracle Enterprise Manager.
If you select Enterprise Manager with the Grid Control option and DBCA discovers agents running on the local node, then you can select the preferred agent from a list.
After you select the Database Control option, you can set up E-mail notification and enable daily backups. For E-mail notifications, you provide the outgoing mail server and E-mail address. For daily backups, you enter the backup time and operating system credentials for the user that performs backup.
When you have finished, click Next.
7. The Database Credentials page appears. Enter the passwords for your database on the Database Credentials page. You can enter the same or different passwords for the administrative users SYS and SYSTEM, and also, if you selected Enterprise Manager on the Management Options page, the monitoring accounts DBSNMP and SYSMAN. Select the option Use the Same Password for All Accounts to assign the same password to all of the listed users, or provide a different password for each of these users by selecting the option Use Different Passwords.
When you have entered the password information, click Next. DBCA displays the Storage Options page.
8. The Storage Options page appears. Use the Storage Options page to select a storage type for database creation. The Cluster File System option is the default. Select a storage option and click Next to proceed to the next page.
If you selected Cluster File System, then the next page that appears is the Database File Locations page, described in Step 9.
If you select Raw Devices, then the next page that appears is the Recovery Configuration page, described in Step 10.
If you select Automatic Storage Management (ASM), then provide additional information as follows:
a. If there is not an ASM instance on any of the cluster nodes, then DBCA displays the Create ASM Instance page for you, described in Step c. Otherwise DBCA displays the ASM Disk Groups page, described in Step d.
b. If an ASM instance exists on the local node, then DBCA displays a dialog asking you to enter the password for the SYS user for ASM.
c. To initiate the creation of the required ASM instance, supply the password for the SYS user of the ASM instance. If your Oracle home is installed on cluster file system, then the ASM instance uses an SPFILE; otherwise, you can select either an IFILE or an SPFILE on shared storage for the instances. After you enter the required information, click Next to create the ASM instance. When the instance is created, DBCA proceeds to the ASM Disk Groups page described in Step d.
d. From the ASM Disk Groups page, you can create a new disk group, add disks to an existing disk group, or select a disk group for your database storage.
If you have just created a new ASM instance, then there will be no disk groups from which to select, so you must create a new one by clicking Create New to open the Create Disk Group page, described in Step e.
Similarly, if one or more disk groups are displayed but you want to add a new one, then click Create New and follow the procedure described in Step e to complete the Create Disk Group page.

Creating an Oracle Real Application Clusters Database with DBCA
6-6 Oracle Database Oracle Clusterware and Oracle Real Application Clusters Installation Guide
If you want to use an existing disk group but wish to add more disks to it, click Add Disks and follow the instructions in Step f.
Once you are satisfied with the ASM disk groups available to you, select the one you wish to use for your database files and click Next to proceed to the Database File Locations page, described in step 9.
e. Enter the disk group name and then click the redundancy level for the group if you do not wish to use the default value (Normal). Create your disk group by selecting from the list of candidate disks. Continue by following the process described in Step g.
f. If there is a disk group that you want to use but you want to add more disks to it, then select the group and click Add Disks. Add to the disk group by selecting from the list of candidate disks. Continue by following the process described in Step g.
g. If you do not see the disks you wish to add, click Change Disk Discovery Path to alter the search path used by DBCA to find available disks. You can select disks with a status of Candidate or Former (never used in an ASM disk group or no longer in a group) by checking the select box. If you select a disk that has an ASM disk header, but the disk group is no longer in use (because of an aborted install, a de-install, and so on), then you must also check the Force column to override the header. When you have selected the desired disks, click OK to add them to your disk group and return to the ASM Disk Groups Page. To proceed, see the instructions described earlier in Step d.
h. If DBCA displays the following message:
The file oracle_home\bin\oracle does not exist on nodes node_list. Make sure that file exists on these nodes before proceeding.
then the Oracle home from which the first ASM instance in the cluster runs is not installed on these cluster nodes. You must extend the ASM Oracle home to these nodes by performing the procedure documented in "Step 4: Adding Nodes at the Oracle RAC Database Layer" in the Oracle Database Oracle Clusterware and Oracle Real Application Clusters Administration and Deployment Guide. However, do not perform Step 5 in that section. The OUI extends the ASM Oracle home to the selected nodes and performs any configuration required for running an ASM instance on these nodes.
i. If DBCA displays the message Please run the DBCA from one of the nodes that has an existing ASM instance node_list., then you are attempting to create an Oracle RAC database using ASM storage and the ASM instance does not exist on the node from which you ran DBCA. However, ASM instances do exist on the remote nodes that appear in the message node list. In this case, DBCA cannot clone the existing ASM instance from the remote node to the local node. To correct this, start DBCA from one of the nodes shown in the node list to create your Oracle RAC database using ASM storage. This copies the local node's ASM instance and modifies its
Note: To use a flash recovery area, Oracle recommends that you create two separate ASM disk groups: one for the database area and one for the recovery area.
See Also: Oracle Database Concepts for more information about using a flash recovery area

Creating an Oracle Real Application Clusters Database with DBCA
Creating Oracle RAC Databases with the Database Configuration Assistant 6-7
parameters and attributes to create ASM instances on the nodes in your cluster that do not have ASM instances.
j. If DBCA displays the message ORACLE_BASE for ASM home asm_home does not match the value for database home db_home. Please set ORACLE_BASE to asm_home and restart DBCA., then this means that you selected a node to be part of your Oracle RAC database that does not have an ASM instance. In addition, the ASM instance on the local node is running from an Oracle home that is different from the Oracle home for the database to be created. Both the ASM home and the database home must be under a common ORACLE_BASE. If you created the original ASM instance without setting ORACLE_BASE, then set the ORACLE_BASE to the asm_home and restart DBCA to proceed.
9. The Database File Locations page appears. The Database File Locations page enables you to specify a location where the database datafiles are created. Select one of the following options:
■ Use Database File Locations from Template: Select this option to allow the database file location to be determined by the Oracle database template type that you selected in step 4.
■ Use Common Location for All Database Files: Select this option if you want to use a file system. The files will not be managed by Oracle. You can enter a path on which you want database datafiles to be placed, or click Browse to locate a path.
■ Use Oracle-Managed Files: Select this option if you want your files to be managed using ASM. If you do not select the Database File Locations from Template option, then you can enter an existing ASM disk group name or directory path name in the Database Area field, or click Browse to open a selection list.
If you want to multiplex the database redo log files and control files, then click Multiplex Redo Logs and Control Files, and provide the location for each copy you want. Click OK when you have defined the multiplex locations to return to the Database File Locations page.
You may also define your own variables for the file locations if you plan to use the Database Storage page, explained in Step 14, to define individual file locations.
10. The Recovery Configuration page appears. You can select redo log archiving by clicking the Enable Archiving check box on the Recovery Configuration page.
If you are using ASM, then you can also select the flash recovery area and size.
You may also define your own variables for the file locations if you plan to use the Database Storage page, explained in Step 14, to define individual file locations.
When you have completed your entries, click Next. The Database Content page is displayed.
11. The Database Content page appears. On the Database Content page, if you chose the Custom Database option, you can select or deselect the database components and their corresponding tablespace assignment. For a seed database, you can select whether to include the sample schemas in your database and to run custom scripts as part of the database creation processing. After completing your selections, click Next.
12. The Database Services page appears. To create services on the Database Services page, expand the Services tree. Oracle displays the global database name in the top left-hand corner of the page. Select the global database name and click Add to

Creating an Oracle Real Application Clusters Database with DBCA
6-8 Oracle Database Oracle Clusterware and Oracle Real Application Clusters Installation Guide
add services to the database. Enter a service name in the Add a Service dialog and click OK to add the service and return to the Database Services page.
The service name appears under the global database name. Select the service name and DBCA displays the service preferences for the service on the right-hand side of the DBCA Database Services page. Change the instance preference (Not Used, Preferred, or Available) and TAF policies for the service as needed.
Repeat this procedure for each service and when you are done configuring services for your database, click Next. DBCA displays the Initialization Parameters page.
13. The Initialization Parameters page appears. By default, the Initialization Parameters page shows only the basic parameters, and only enables you to change the parameter file definition if you are using raw storage. Each tab on the Initialization Parameters page provides different sets of information that you can add or modify as follows:
a. Memory Tab: Click Typical for default values based on the database type you selected or Custom to set your own values for the memory parameters. You can also see values for the advanced parameters by clicking All Initialization Parameters. This causes the All Initialization Parameters table to appear
Carefully review the parameter settings displayed in the table, as DBCA configures these settings in your server parameter file. Instance-specific parameter settings for your Oracle RAC database appear at the bottom of the table. The SID prefixes for these entries appear in the Instance column, on the left side of the table.
To review the instance-specific parameter settings, scroll downward using the scroll bar on the right side of the table. Use the check box in the Override Default column to indicate whether DBCA should place the parameter setting in your server parameter file. DBCA only places a parameter entry into the server parameter file if the entry displays a check mark in the Override Default column of the All Initialization Parameters table.
b. Sizing Tab: Use this page to select the database standard block size and process count.
Notes:
■ You cannot modify the SID in the Instance column.
■ You can alter self-tuning parameters with this dialog. However, setting these parameters to inappropriate values may disable the Oracle self-tuning features.
■ You cannot specify instance-specific values for global parameters with DBCA.
■ You should set the value of the CLUSTER_DATABASE_INSTANCES parameter to the number of instances you intend to use in the cluster if you are not including all the related nodes during the current execution of DBCA.
■ If your global database name is longer than eight characters, then the database name value (in the db_name parameter) is truncated to the first eight characters and the DB_UNIQUE_NAME parameter value is set to the global name.

Creating an Oracle Real Application Clusters Database with DBCA
Creating Oracle RAC Databases with the Database Configuration Assistant 6-9
c. Character Sets Tab: Use this page to set the database character set value.
d. Connection Mode Tab: You can use this tab to select either dedicated or shared database connections to your database.
e. Parameter File Tab: This tab will only appear if you are using raw storage. Use this tab to enter a raw device name for the location of the server parameter file.
When you have completed all your work on the Initialization Parameters page, click Next.
14. The Database Storage page appears.
If you selected a preconfigured database template, such as the General Purpose template, then DBCA displays the control files, datafiles, and redo logs on the Database Storage page. Select the folder and the file name underneath the folder to edit the file name.
If you selected the Custom Database template (the template without datafiles), then DBCA displays the control files, tablespaces, datafiles, and redo logs. To change the tablespace properties, such as the datafile or the tablespace size, click the tablespaces icon to expand the object tree on the left-hand side of the page and click the tablespace. The tablespace property dialog appears on the right-hand side. Make your changes and click OK.
When entering file names in the Database Storage page for raw storage, note the following
■ If you have not set the DBCA_RAW_CONFIG environment variable, then DBCA displays default datafile names. You must override these names to provide raw device names on this page for each control file, datafile, and redo log group file.
■ For Windows-based platforms, if the default symbolic links exist and you have not set the DBCA_RAW_CONFIG environment variable, then DBCA replaces the default datafiles with these symbolic link names and displays them in the Database Storage page. If the symbolic links do not exist, then DBCA displays the default file system datafile file names on the Database Storage page. In this case, replace the default datafile file names with the symbolic link names.
After you complete your entries on the Database Storage page, click Next.
15. The Creation Options page appears. Select one of the following database options, and click Finish.
■ Create Database—Creates the database
■ Save as a Database Template—Creates a template that records the database structure, including user-supplied inputs, initialization parameters, and so on. You can later use this template to create a database. DBCA only displays this option if you selected the Custom Database template.
■ Generate Database Creation Scripts—Generates database creation scripts.
After you click Finish, DBCA displays a Summary dialog.
16. Review the Summary dialog information and click OK to create the database.
After you complete Step 16 DBCA:
■ Creates an operative Oracle RAC database and its instances
■ Creates the Oracle RAC data dictionary views

Deleting a Real Application Clusters Database with DBCA
6-10 Oracle Database Oracle Clusterware and Oracle Real Application Clusters Installation Guide
■ Configures the network for the cluster database
■ Starts the Oracle services if you are on a Windows-based platform
■ Starts the listeners and database instances and then starts the high availability services
Deleting a Real Application Clusters Database with DBCAThis section explains how to delete an Oracle RAC database with DBCA. This process deletes a database and removes a database's initialization parameter files, instances, OFA structure, and Oracle network configuration. However, this process does not remove datafiles if you placed the files on raw devices or on raw partitions.
To delete a database with DBCA:
1. Start DBCA on one of the nodes:
On Windows-based platforms, click Start, and select Programs, Oracle - Oracle_home name, Configuration and Migration Tools, then Database Configuration Assistant
The DBCA Welcome page appears.
2. Select Oracle Real Application Clusters and click Next.
After you click Next, DBCA displays the Operations page.
3. Select Delete a database, click Next. DBCA displays the List of Cluster Databases page.
4. If your user ID and password are not operating-system authenticated, then the List of Cluster Databases page displays the user name and password fields. If these fields appear, then enter a user ID and password that has SYSDBA privileges.
5. Select the database to delete and click Finish.
After you click Finish, DBCA displays a dialog to confirm the database and instances that DBCA is going to delete.
6. Click OK to begin the deletion of the database and its associated files, services, and environment settings, or click Cancel to stop the operation.
When you click OK, DBCA continues the operation and deletes all of the associated instances for this database. DBCA also removes the parameter files, password files, and oratab entries.
At this point, you have accomplished the following:
■ Deleted the selected database from the cluster
■ Deleted the selected database’s Oracle services for Windows-based platforms
■ Deleted high availability services that were assigned to the database
■ Deleted the Oracle Net configuration for the database
■ Deleted the OFA directory structure from the cluster
■ Deleted the datafiles if the datafiles were not on raw devices
See Also: "Database Password and Role Management in Real Application Clusters" on page B-19

Oracle Real Application Clusters Post-Installation Procedures 7-1
7Oracle Real Application Clusters
Post-Installation Procedures
This chapter describes how to complete the post-installation tasks after you have installed Oracle Database 10g with Real Application Clusters (Oracle RAC) software. It contains the following sections:
■ Required Post-Installation Tasks
■ Recommended Post-Installation Tasks
Required Post-Installation TasksYou must perform the following tasks after completing your installation:
■ Back Up the Voting Disk after Installation
■ Download and Install Patches
■ Configure Oracle Products
Back Up the Voting Disk after InstallationAfter your Oracle Database 10g with Oracle RAC installation is complete, and after you are sure that your system is functioning properly, make a backup of the contents of the voting disk using ocopy.exe.
Also make a backup of the voting disk contents after you complete any node additions or node deletions, and after running any deinstallation procedures.
Download and Install PatchesRefer to the OracleMetaLink Web site for required patches for your installation. To download required patches:
1. Use a Web browser to view the OracleMetaLink Web site:
https://metalink.oracle.com
2. Log in to OracleMetaLink.
Note: This chapter only describes basic configurations. Refer to Oracle Database 10g Administrator’s Guide for UNIX Systems, Oracle Database Platform Guide for Microsoft Windows (32-Bit), and the product administration and tuning guides for more detailed configuration and tuning information.

Recommended Post-Installation Tasks
7-2 Oracle Database Oracle Clusterware and Oracle Real Application Clusters Installation Guide
3. On the main OracleMetaLink page click Patches.
4. On the Select a Patch Search Area page click New MetaLink Patch Search.
5. On the Simple Search page click Advanced.
6. On the Advanced Search page click the search icon next to the Product or Product Family field.
7. In the Search and Select: Product Family field, enter RDBMS Server in the For field and click Go.
8. Select RDBMS Server under the Results heading and click Select.
RDBMS Server appears in the Product or Product Family field and the current release appears in the Release field.
9. Select your platform from the list in the Platform field and click Go.
10. Any available patches appear under the Results heading.
11. Click the number of the patch that you want to download.
12. On the Patch Set page, click View README and read the page that appears. The README page contains information about the patch set and how to apply the patches to your installation.
13. Return to the Patch Set page, click Download, and save the file on your system.
14. Use the unzip utility provided with Oracle Database 10g to uncompress the Oracle patches that you downloaded from OracleMetaLink. the unzip utility is located in the ORACLE_HOME/bin directory.
Configure Oracle ProductsMany Oracle products and options must be configured before you use them for the first time. Before using individual Oracle Database 10g database products or options, refer to the manual in the product documentation library which is available on the documentation media or on the OTN Web site.
Recommended Post-Installation TasksThis section explains the tasks that Oracle recommends you perform after completing an installation.
■ Verifying Enterprise Manager Operations
■ Using Oracle9i Language and Definition Files with Oracle Database 10g
■ Logging in to Oracle Enterprise Manager Database Control
Note: If you are not an OracleMetaLink registered user, then click Register for MetaLink and register.
Note: If you find patches for your Oracle Clusterware and for your Oracle Database, you must apply the patches for your CRS home before you apply the patches for your Oracle home.

Recommended Post-Installation Tasks
Oracle Real Application Clusters Post-Installation Procedures 7-3
Verifying Enterprise Manager OperationsRun the following command to verify the Enterprise Manager configuration in your newly installed Real Application Clusters environment:
srvctl config database -d db_name
SRVCTL displays the name of the node and the instance for the node. The following example for a database named orcl shows a node named iwinrac01 running an instance named orcl1. Run the following command:
C:\> srvctl config database -d orcl
The output should be similar to:
iwinrac01 orcl1 C:\oracle\product\10.2.0\db_1iwinrac02 orcl2 C:\oracle\product\10.2.0\db_1
Continue with the following section, "Using Oracle9i Language and Definition Files with Oracle Database 10g". When you have completed these tasks, you should proceed with the initial configuration tasks described in Part IV.
Using Oracle9i Language and Definition Files with Oracle Database 10gYou can use Oracle9i database language and territory definition files with Oracle Database 10g Release 2 (10.2).
To enable this functionality:
1. Run the cr9idata.pl script. By default, the script is located in ORACLE_BASE\ORACLE_HOME\nls\data\old.
Alternatively, before you install Oracle Database, you can run the Oracle Universal Installer setup command with the b_cr9idata variable set to true, as in the following example:
setup.exe oracle.rsf.nlsrtl_rsf:b_cr9idata=true
2. Set the ORA_NLS10 environment variable to point to the directory where you installed the new language and territory definition files. By default, language and territory definition files are in ORACLE_BASE\ORACLE_HOME\nls\data.
3. Restart the Oracle database.
Logging in to Oracle Enterprise Manager Database ControlIf you configure Oracle Enterprise Manager Database Control during installation, then you can use it to manage your database. Alternatively, you can use Oracle Enterprise Manager Grid Control to manage your database.
To use Database Control, you must access it on the node where you installed the database. If you want to log into Database Control from another cluster node, then you need to reconfigure Enterprise Manager to start the Database Control interface on that other node.
Use the following instructions to log in to Database Control:
See Also: the emca command line help for instructions to perform reconfiguration

Recommended Post-Installation Tasks
7-4 Oracle Database Oracle Clusterware and Oracle Real Application Clusters Installation Guide
1. On the node from which you installed the database, open a Web browser to access the Database Control URL, and use the following URL syntax:
http://host:port/em
In the preceding example:
■ host is the name of the computer on which you installed Oracle Database
■ port is the port number reserved for the Database Control or Grid Control during installation
If you do not know the correct port number to use, then look for the following line in the file $ORACLE_HOME/install/portlist.ini, which lists the assigned port:
Enterprise Manager Console HTTP Port (db_name) = 1158
The installation reserves the first available port from the range 5500 to 5519.
For example, if you install Oracle Database on host mgmt42, and the Database Control uses port 1158, then use the following URL:
http://mgmt42:1158/em
Oracle Enterprise Manager displays the Database Control login page.
2. Log in to the database using the user name SYS and connect as SYSDBA.
Use the password that you specified for the SYS account during the installation.
Note: You can also log in to the Database Control using the SYSTEM or SYSMAN accounts, or you can grant login privileges to other database users.

Part IVReal Application Clusters Environment
Configuration
Part IV describes how to use the server parameter file (SPFILE) in Oracle Database 10g Real Application Clusters (Oracle RAC) and it describes the installed configuration. The chapters in Part IV are:
■ Chapter 8, "Parameter Management for Real Application Clusters Databases"
■ Chapter 9, "Understanding the Oracle Real Application Clusters Installed Configuration"


Parameter Management for Real Application Clusters Databases 8-1
8Parameter Management for Real Application
Clusters Databases
This chapter describes server parameter file (SPFILE) placement and configuration in Real Application Clusters (Oracle RAC) environments. The topics in this chapter are:
■ Parameter Files and Real Application Clusters
■ Using Server Parameter Files in Real Application Clusters
■ Parameter File Search Order in Oracle Real Application Clusters
■ Server Parameter File Errors in Real Application Clusters
Parameter Files and Real Application ClustersOracle uses parameter settings in parameter files to determine how to control various database resources. You can use two types of files for parameter administration: the server parameter file (SPFILE) or one or more traditional client-side parameter files.
Oracle recommends that you manage parameters using an SPFILE. If you use client-side parameter files, then Oracle does not preserve parameter changes made for self-tuning after shutdown.
Using Server Parameter Files in Real Application ClustersBy default, Oracle creates the server parameter file based on one SPFILE. You can change parameter settings in the server parameter file only by using Oracle Enterprise Manager or ALTER SYSTEM SET SQL statements; the server parameter file is a binary file that you should not edit.
See Also: Oracle Database Oracle Clusterware and Oracle Real Application Clusters Administration and Deployment Guide for more information about parameters and Oracle Real Application Clusters Deployment and Performance Guide for a discussion of parallel execution-related parameters in Oracle RAC data warehouse environments
See Also: Oracle Database 10g Real Application Clusters documentation for more information about using client-side parameter files

Using Server Parameter Files in Real Application Clusters
8-2 Oracle Database Oracle Clusterware and Oracle Real Application Clusters Installation Guide
If you are upgrading from a previous Oracle release, then create and configure the server parameter file for Oracle RAC using the procedures described in the following section.
Location of the Server Parameter FileThe default location of the server parameter file (SPFILE) when the database creates it from a PFILE is:
%ORACLE_HOME%\database\SPFILE%ORACLE_SID%.ORA
The default location of the server parameter file is inappropriate for Oracle RAC databases if you use ASM or raw devices because all instances must use the same server parameter file.
For Windows-based platforms Oracle recommends that you use a PFILE in this directory:
%ORACLE_HOME%\database\init%ORACLE_SID%.ora
This path is valid for each instance and it refers to a single, shared initialization parameter file. If you use raw storage, then the file must contain the following entry on a Windows-based platform:
SPFILE='\\.\dbname_SPFILE'
However, if you use a cluster file system, then use the following file location, where O is the OCFS drive:
SPFILE=O:\oradata\database_name\spfile.ora
If you use ASM, then the SPFILE value will be:
SPFILE='+disk_group_name/dbunique_name/spfiledbname.ora'
where dbunique_name is the unique database name and dbname is the database name.
You must use the same value of SPFILE so that all instances use the same server parameter file at startup.
To use DBCA to create your database and to use the server parameter file, on the Initialization Parameters page select Create server parameter file (SPFILE) under the File Locations tab which is visible only if you are using raw storage. Then enter either a shared file system filename or the raw device path name in the Server Parameters Filename field.
Note: Oracle recommends that you avoid modifying the values for self-tuning parameters; overriding these settings can adversely affect performance.
Note: The SPFILE for an ASM instance cannot be stored in ASM disks groups.

Server Parameter File Errors in Real Application Clusters
Parameter Management for Real Application Clusters Databases 8-3
Parameter File Search Order in Oracle Real Application ClustersOracle searches for your parameter file in the following order:
1. %ORACLE_HOME%\database\spfilesid.ora
2. %ORACLE_HOME%\database\spfile.ora
3. %ORACLE_HOME%\database\initsid.ora
See the previous section, "Location of the Server Parameter File", for information on how to configure you system to prevent your Oracle RAC instances using inappropriate parameter files.
Server Parameter File Errors in Real Application ClustersOracle reports errors that occur during server parameter file creation or while reading the file during startup. If an error occurs during a parameter update, then Oracle records the error in your ALERT.LOG file and ignores subsequent parameter updates to the file. If this happens, then do either of the following:
■ Shut down the instance, recover the server parameter file, and restart the instance.
■ Restart the instance using a PFILE instead of the SPFILE.
Oracle displays errors for parameter changes that you attempt when you incorrectly use the ALTER SYSTEM SET statement. Oracle does this when an error occurs while reading from or writing to the server parameter file.
Note: When you use DBCA to create the server parameter file, the default PFILE file name is:
%ORACLE_HOME%\database\init%ORACLE_SID%.ora
This is the default PFILE name.
See Also: Oracle Database Oracle Clusterware and Oracle Real Application Clusters Administration and Deployment Guide for more information about backing up the SPFILE

Server Parameter File Errors in Real Application Clusters
8-4 Oracle Database Oracle Clusterware and Oracle Real Application Clusters Installation Guide

Understanding the Oracle Real Application Clusters Installed Configuration 9-1
9Understanding the Oracle Real Application
Clusters Installed Configuration
This chapter describes the Oracle Real Application Clusters (Oracle RAC) installed configuration. The topics in this chapter include:
■ Understanding the Configured Environment in Real Application Clusters
■ The Oracle Cluster Registry in Real Application Clusters
■ Database Components Created Using Database Configuration Assistant
■ Managing Undo Tablespaces in Real Application Clusters
■ Initialization Parameter Files
■ Configuring Service Registration-Related Parameters in Real Application Clusters
■ Configuring the Listener File (listener.ora)
■ Directory Server Access (ldap.ora File)
■ Net Service Names (tnsnames.ora File)
■ Net Services Profile (sqlnet.ora File)
Understanding the Configured Environment in Real Application ClustersOracle Net Configuration Assistant (NetCA) and Database Configuration Assistant (DBCA) configure your environment to meet the requirements for database creation and Enterprise Manager discovery of Real Application Cluster databases.
The Oracle Cluster Registry in Real Application ClustersDatabase Configuration Assistant uses the Oracle Cluster Registry (OCR) for storing the configurations for the cluster databases that it creates. The OCR is a shared file in a cluster file system environment. If you do not use a cluster file system, then you must make this file a shared raw device. Oracle Universal Installer (OUI) automatically initializes the OCR during the Oracle Clusterware installation.
Database Components Created Using Database Configuration AssistantThis section describes the database components that DBCA creates, which include:
Note: Configuration files are created on each node in your cluster database.

Database Components Created Using Database Configuration Assistant
9-2 Oracle Database Oracle Clusterware and Oracle Real Application Clusters Installation Guide
■ Tablespaces and Datafiles
■ Control Files
■ Redo Log Files
Tablespaces and DatafilesAn Oracle database for both single-instance and cluster database environments is divided into smaller logical areas of space known as tablespaces. Each tablespace corresponds to one or more datafiles stored on a disk. Table 9–1 shows the tablespace names used by an Oracle RAC database and the types of data they contain:
You cannot alter these tablespace names when using the preconfigured database configuration options from Oracle Universal Installer. However, you can change the names of the tablespaces if you use the advanced database creation method.
As mentioned, each tablespace has one or more datafiles. The datafile names created by the preconfigured database configuration options vary by storage type such as ASM, OFS, raw devices, and so on.
You can specify different symbolic names with the Advanced database configuration option.
Windows-based platforms use the symbolic link names for the datafile and other database files shown in Table 9–2:
Table 9–1 Tablespace Names that Real Application Clusters Databases Use
Tablespace Name Contents
SYSTEM Consists of the data dictionary, including definitions of tables, views, and stored procedures needed by the database. Oracle automatically maintains information in this tablespace.
SYSAUX An auxiliary system tablespace that contains the DRSYS (contains data for OracleText), CWMLITE (contains the OLAP schemas), XDB (for XML features), ODM (for Oracle Data Mining), TOOLS (contains Enterprise Manager tables), INDEX, EXAMPLE, and OEM-REPO tablespaces.
USERS Consists of application data. As you create and enter data into tables, Oracle fills this space with your data.
TEMP Contains temporary tables and indexes created during SQL statement processing. You may need to expand this tablespace if you are running a SQL statement that involves significant sorting, such as ANALYZE COMPUTE STATISTICS on a very large table, or the constructs GROUP BY, ORDER BY, or DISTINCT.
UNDOTBSn These are the undo tablespaces for each instance that DBCA creates for automatic undo management.
RBS If you do not use automatic undo management, then Oracle uses the RBS tablespace for the rollback segments.
Table 9–2 Windows-Based Platforms Symbolic Link Names and Files
Windows-Based Platforms Symbolic Link Names Tablespace or Other Database Files
db_name_system SYSTEM
db_name_SYSAUX SYSAUX
db_name_users USERS
db_name_temp TEMP
Managing Undo Tablespaces in Real Application Clusters
Understanding the Oracle Real Application Clusters Installed Configuration 9-3
Control FilesThe database is configured with two control files that are stored on shared storage.
Redo Log FilesEach instance is configured with at least two redo log files that are stored in the shared storage. If you chose cluster file system, then these files are shared file system files. If you do not have a cluster file system, then these files are raw devices. If you use ASM, then these files are stored on the ASM disk group.
The file names of the redo log files that are created with the preconfigured database configuration options vary by storage type. You must enter the raw device names unless you are using a cluster file system.
When using raw devices, to use the advanced database creation method, locate the redo log files in the Database Storage page and replace their default filenames with the correct raw device names or symbolic link names.
Managing Undo Tablespaces in Real Application Clusters Oracle stores rollback or undo information in undo tablespaces. To manage undo tablespaces, Oracle recommends that you use automatic undo management. Automatic undo management is an automated undo tablespace management mode that is easier to administer than manual undo management.
db_name_undotbs1 UNDOTBS1
db_name_undotbs2 UNDOTBS2
db_name_rbs RBS (optional)
db_name_example EXAMPLE
db_name_indx INDX
db_name_spfile SPFILE
db_name_control1 Control File 1
db_name_control2 Control File 2
db_name_redo_instance_number log_number
Where instance_number is the number of the instance and log_number is the log number (1 or 2) for the instance.
Redo Log Files
Each instance must have at least two redo log files. If the database name is db, then the link names for the first instance are:
db_redo1_1
db_redo1_2
The link names for the second instance’s redo log files are:
db_redo2_1
db_redo2_2
See Also: Oracle Database Oracle Clusterware and Oracle Real Application Clusters Administration and Deployment Guide for more information about managing undo tablespaces
Table 9–2 (Cont.) Windows-Based Platforms Symbolic Link Names and Files
Windows-Based Platforms Symbolic Link Names Tablespace or Other Database Files

Initialization Parameter Files
9-4 Oracle Database Oracle Clusterware and Oracle Real Application Clusters Installation Guide
Initialization Parameter FilesOracle recommends using the server parameter file (SPFILE). This file resides on the server on the shared disk; all instances in a cluster database can access this parameter file.
Configuring Service Registration-Related Parameters in Real Application Clusters
Two key benefits of Oracle RAC are connection load balancing and failover. Oracle RAC extends the ability of single-instance Oracle database load balancing, where connections are distributed among local dispatchers, to the balancing of connections among all instances in a cluster database. In addition, Oracle RAC provides failover by configuring multiple listeners on multiple nodes to manage client connection requests for the same database service. Connection load balancing and failover increase availability by taking advantage of the redundant resources within a cluster database. These features, however, require cross instance registration.
Cross instance registration in Oracle RAC occurs when an instance's PMON process registers with the local listener and with all other listeners. Thus, all instances in the cluster database register with all listeners that run on nodes that run instances of the cluster database. This enables all listeners to manage connections across all instances for both load balancing and failover.
Cross instance registration requires configuring the LOCAL_LISTENER and REMOTE_LISTENER initialization parameters. The LOCAL_LISTENER parameter identifies the local listener and the REMOTE_LISTENER parameter identifies the global list of listeners. The REMOTE_LISTENER parameter is dynamic. Oracle changes the setting for REMOTE_LISTENER dynamically when you reconfigure your cluster database, for example, when you add or delete instances.
By default, DBCA configures your environment with dedicated servers. However, if you select the Shared server option on DBCA, then Oracle configures the shared server. In this case, Oracle uses both dedicated and shared server processing. When shared servers are configured, the DISPATCHERS parameter is specified as in the following example:
DISPATCHERS="(protocol=tcp)"
If the DISPATCHERS initialization parameter does not specify the LISTENER attribute as in the previous example, then the PMON process registers information for all dispatchers with the listeners specified by the LOCAL_LISTENER and REMOTE_LISTENER parameters.
However, when the LISTENER attribute is specified, the PMON process registers dispatcher information with the listeners specified by the LISTENER attribute. In this case, setting the LISTENER attribute overrides REMOTE_LISTENER settings for the specified dispatchers as in the following example:
DISPATCHERS="(protocol=tcp)(listener=listeners_db_name)"
See Also: Chapter 8, "Parameter Management for Real Application Clusters Databases" for more information about the creation and use of parameter files

Configuring the Listener File (listener.ora)
Understanding the Oracle Real Application Clusters Installed Configuration 9-5
Configuring the Listener File (listener.ora)You can configure two types of listeners in the listener.ora file as described under the following headings:
■ Local Listeners
■ Multiple Listeners
■ How Oracle Uses the Listener (listener.ora File)
Local ListenersIf you configured dedicated server mode using the DBCA Connection Mode tab on the Initialization Parameters page, then DBCA automatically configures the LOCAL_LISTENER parameter when the listener uses a nondefault address port.
If you configured the dedicated server mode by setting the REMOTE_LISTENER initialization parameter, then you must also configure the instance-specific LOCAL_LISTENER initialization parameter.
For example, to configure the LOCAL_LISTENER parameter, add the following entry to the initialization parameter file, where listener_sid is resolved to a listener address through either a tnsnames.ora file or through Oracle Names Server:
sid.local_listener=listener_sid
The following entry should be in your tnsnames.ora file:
listener_sid=(address=(protocol=tcp)(host=node1-vip)(port=1522))
Multiple ListenersIf DBCA detects more than one listener on the node, it displays a list of the listeners. You can select one or all of these listeners with which to register your database.
How Oracle Uses the Listener (listener.ora File)Services coordinate their sessions using listener file entries by running a process on the server that receives connection requests on behalf of a client application. Listeners are configured to respond to connection requests sent to protocol addresses for a database service or non-database service.
Protocol addresses are configured in the listener configuration file, listener.ora, for a database service or a non-database service. Clients configured with the same addresses can connect to a service through the listener.
During a preconfigured database configuration installation, Oracle Net Configuration Assistant creates and starts a default listener called LISTENER_NODENAME. The listener is configured with a default protocol listening addresses for the database and external procedures. The advanced installation process prompts you to create at least one listener with Oracle Net Configuration Assistant. The listener is configured to respond to connection requests that are directed at one protocol address you specify, as well as an address for external procedures.
See Also: Oracle Database Net Services Administrator's Guide for further information about cross instance registration, shared and dedicated server configurations, and connection load balancing

Directory Server Access (ldap.ora File)
9-6 Oracle Database Oracle Clusterware and Oracle Real Application Clusters Installation Guide
Both installation modes configure service information about the Oracle RAC database and external procedures. An Oracle Database 10g Release 2 (10.2) database service automatically registers its information with the listener, such as its service name, instance names, and load information.
This feature, called service registration, does not require configuration in the listener.ora file. After listener creation, Oracle Net Configuration Assistant starts the listener. A sample listener.ora file with an entry for an instance named node1 is:
listener_node1= (description= (address=(protocol=ipc)(key=extproc)) (address=(protocol=tcp)(host=node1-vip)(port=1521)(IP=FIRST)) (address=(protocol=tcp)(host=node1-ip)(port=1521)(IP=FIRST)))sid_list_listener_node1= (sid_list= (sid_desc= (sid_name=plsextproc) (oracle_home=/private/system/db) (program=extproc)))
Listener Registration and PMON DiscoveryWhen a listener starts after the Oracle instance starts, and the listener is listed for service registration, registration does not occur until the next time the PMON discovery routine starts. By default, PMON discovery occurs every 60 seconds.
To override the 60-second delay, use the SQL ALTER SYSTEM REGISTER statement. This statement forces PMON to register the service immediately.
Oracle recommends that you create a script to run this statement immediately after starting the listener. If you run this statement while the listener is up and the instance is already registered, or while the listener is down, then the statement has no effect.
Directory Server Access (ldap.ora File)If you configure access to a Lightweight Directory Access Protocol (LDAP)-compliant directory server with Oracle Net Configuration Assistant during a Custom Install or Advanced database configuration, an ldap.ora file is created. The ldap.ora file contains the following types of information:
■ Type of directory
■ Location of the directory
■ Administrative context from which this server can look up, create, and modify a net service name, and the database service entries
See Also: Oracle Database Net Services Administrator's Guide for further information about the listener and the listener.ora file
See Also: Oracle Database Net Services Administrator's Guide for further information about directory naming configuration and directory server access configuration
Net Service Names (tnsnames.ora File)
Understanding the Oracle Real Application Clusters Installed Configuration 9-7
Net Service Names (tnsnames.ora File)A tnsnames.ora file is created on each node with net service names. A connect identifier is an identifier that maps to a connect descriptor. A connect descriptor contains the following information:
■ The network route to the service, including the location of the listener through a protocol address
■ The SERVICE_NAME for an Oracle release 8.1 or later, or SID for pre-8.1 Oracle releases
DBCA creates net service names for connections as shown in Table 9–3:
Note: The SERVICE_NAME parameter you use in tnsnames.ora is singular because you can only specify one service name.
Table 9–3 Connections for Net Service Names
Net Service Name Type Description
Database connections
Clients that connect to any instance of the database use the net service name entry for the database. This entry also enables Oracle Enterprise Manager to discover an Oracle RAC database.
A listener address is configured for each node that runs an instance of the database. The LOAD_BALANCE option causes Oracle to choose the address randomly. If the chosen address fails, then the FAILOVER option causes the connection request to fail over to the next address. Thus, if an instance fails, then clients can still connect using another instance.
In the following example, db.us.oracle.com is used by the client to connect to the target database, db.us.oracle.com.
db.us.acme.com= (description= (load_balance=on) (address=(protocol=tcp)(host=node1-vip)(port=1521) (address=(protocol=tcp)(host=node2-vip)(port=1521) (connect_data= (service_name=db.us.acme.com)))
Note: FAILOVER=ON is set by default for a list of addresses. Thus, you do not need to explicitly specify the FAILOVER=ON parameter.
When you set DB_UNIQUE_NAME by entering a global database name that is longer than eight characters, excluding DB_DOMAIN, then a net service entry similar to the following is created:
mydatabase.us.acme.com= (description = (address = (protocol = tcp)(host = node1-vip)(port = 1521)) (address = (protocol = tcp)(host = node2-vip)(port = 1521)) (load_balance = yes) (connect_data = (server = dedicated) (service_name = mydatabase.us.acme.com) ) )

Net Service Names (tnsnames.ora File)
9-8 Oracle Database Oracle Clusterware and Oracle Real Application Clusters Installation Guide
Instance connections
Clients that connect to a particular instance of the database use the net service name entry for the instance. This entry, for example, enables Oracle Enterprise Manager to discover the instances in the cluster. These entries are also used to start and stop instances.
In the following example, db1.us.acme.com, is used by Oracle Enterprise Manager to connect to an instance named db1 on db1-server:
db1.us.acme.com= (description= (address=(protocol=tcp)(host=node1-vip)(port=1521)) (connect_data= (service_name=db.us.acme.com) (instance_name=db1)))
Remote listeners
As discussed in "Configuring Service Registration-Related Parameters in Real Application Clusters" on page 9-4, the REMOTE_LISTENER parameter identifies the global list of listeners and it is dynamic. Oracle changes the setting for REMOTE_LISTENER when you reconfigure your cluster database.
Whether using shared servers or dedicated servers, the list of remote listeners is supplied using the REMOTE_LISTENER parameter, for example:
REMOTE_LISTENER=listeners_db_unique_name
This enables the instance to register with remote listeners on the other nodes; listeners_db_unique_name is resolved through a naming method such as a tnsnames.ora file.
In the following example, listeners_db.us.acme.com is resolved to a list of listeners available on the nodes on which the cluster database has instances:
listeners_db.us.acme.com= (address_list= (address=(protocol=tcp)(host=node1-vip)(port=1521)) (address=(protocol=tcp)(host=node2-vip)(port=1521)))
The instance uses this list to determine the addresses of the remote listeners with which to register its information.
Nondefault listeners
As discussed in "Local Listeners" on page 9-5 and "Multiple Listeners" on page 9-5, the LOCAL_LISTENER parameter is set in the initsid.ora file if a nondefault listener is configured, for example:
sid.local_listener=listener_sid
Where listener_sid is resolved to a listener address through a naming method such as a tnsnames.ora file.
In the following sample, listener_db1.us.acme.com is resolved to the nondefault listener address:
listener_db1.us.acme.com= (address=(protocol=tcp)(host=node1-vip)(port=1522))
Table 9–3 (Cont.) Connections for Net Service Names
Net Service Name Type Description

Net Service Names (tnsnames.ora File)
Understanding the Oracle Real Application Clusters Installed Configuration 9-9
Services Entries
When you configure high availability services using the DBCA Services page, then DBCA creates net service entries similar to the following. The three services in the following examples, db_svc1, db_svc2, and db_svc3, have TAF policies of NONE, BASIC and PRECONNECT respectively.
db_svc1.us.acme.com= (description = (address=(protocol=tcp)(host=node1-vip)(port=1521)) (address=(protocol=tcp)(host=node2-vip)(port=1521)) (load_balance=yes) (connect_data= (server = dedicated) (service_name = db_svc1.us.acme.com) ) )
db_svc2.us.acme.com= (description= (address=(protocol=tcp)(host=node1-vip)(port=1521)) (address=(protocol=tcp)(host=node2-vip)(port=1521)) (load_balance=yes) (connect_data = (server = dedicated) (service_name=db_svc2.us.acme.com) (failover_mode = (type=select) (method=basic) (retries=180) (delay=5) ) ) )
db_svc3.us.acme.com= (description= (address=(protocol=tcp)(host=node1-vip)(port=1521)) (address=(protocol=tcp)(host=node2-vip)(port=1521)) (load_balance=yes) (connect_data= (server=dedicated) (service_name=db_svc3.us.acme.com) (failover_mode= (backup=db_svc3_preconnect.us.acme.com) (type=select) (method=preconnect) (retries=180) (delay=5) ) ) )
Table 9–3 (Cont.) Connections for Net Service Names
Net Service Name Type Description

Net Service Names (tnsnames.ora File)
9-10 Oracle Database Oracle Clusterware and Oracle Real Application Clusters Installation Guide
Example 9–1 Example tnsnames.ora File
The following is a sample tnsnames.ora file that is created during a preconfigured database configuration installation:
db.us.acme.com= (description= (load_balance=on) (address=(protocol=tcp)(host=node1-vip)(port=1521)) (address=(protocol=tcp)(host=node2-vip)(port=1521)) (connect_data= (service_name=db.us.acme.com)))
db1.us.acme.com= (description= (address=(protocol=tcp)(host=node1-vip)(port=1521)) (connect_data= (service_name=db.us.acme.com) (instance_name=db1)))
db2.us.acme.com= (description= (address=(protocol=tcp)(host=node2-vip)(port=1521)) (connect_data= (service_name=db.us.acme.com) (instance_name=db2)))
listeners_db.us.acme.com= (address_list=
Services Entries (continued)
When a service has a TAF policy of PRECONNECT, then a service_name_preconnect net service entry is also created, as in the following example:
db_svc3_preconnect.us.acme.com = (description = (address = (protocol = tcp)(host = node1-vip)(port = 1521)) (address = (protocol = tcp)(host = node2-vip)(port = 1521)) (load_balance = yes) (connect_data = (server = dedicated) (service_name = db_svc3_preconnect.us.amce.com) (failover_mode = (backup = db_svc3.us.acme.com) (type = select) (method = basic) (retries = 180) (delay = 5) ) ) )
External procedures
An entry for connections to external procedures. This enables an Oracle Database 10g database to connect to external procedures.
extproc_connection_data.us.acme.com= (description= (address_list= (address=(protocol=ipc)(key=extproc0)) (connect_data= (sid=plsextproc)))
Table 9–3 (Cont.) Connections for Net Service Names
Net Service Name Type Description

Net Services Profile (sqlnet.ora File)
Understanding the Oracle Real Application Clusters Installed Configuration 9-11
(address=(protocol=tcp)(host=node1-vip)(port=1521)) (address=(protocol=tcp)(host=node2-vip)(port=1521)))
extproc_connection_data.us.acme.com= (description= (address_list= (address=(protocol=ipc)(key=extproc))) (connect_data= (sid=plsextproc) (presentation=RO)))
Net Services Profile (sqlnet.ora File)The sqlnet.ora file is automatically configured with:
■ The computer's domain
This domain is automatically appended to any unqualified net service name. For example, if the default domain is set to us.acme.com, then Oracle resolves db in the connect string CONNECT scott/tiger@db as: db.us.acme.com.
■ A naming method the server uses to resolve a name to a connect descriptor
The order of naming methods is as follows: directory naming (for Custom Install or Advanced database configuration options only), tnsnames.ora file, Oracle Names server, and host naming.
The following is a sample sqlnet.ora file created during a preconfigured database configuration install:
SQLNET.AUTHENTICATION_SERVICES= (NTS)NAMES.DIRECTORY_PATH= (TNSNAMES, EZCONNECT)
See Also: Oracle Database Net Services Administrator's Guide for further information about the tnsnames.ora file
See Also: Oracle Database Net Services Administrator's Guide for further information about the sqlnet.ora file

Net Services Profile (sqlnet.ora File)
9-12 Oracle Database Oracle Clusterware and Oracle Real Application Clusters Installation Guide

Part VOracle Clusterware and Oracle Real
Application Clusters Installation ReferenceInformation
Part V provides Real Application Clusters (Oracle RAC) installation and configuration reference information. The contents of Part V are:
■ Appendix A, "Troubleshooting the Installation Process"
■ Appendix B, "Using Scripts to Create Oracle Real Application Clusters Databases"
■ Appendix C, "Configuring Raw Devices for Oracle Real Application Clusters"
■ Appendix D, "Converting to Real Application Clusters from Single-Instance Oracle Databases"
■ Appendix E, "Directory Structure for Oracle RAC Environments"
■ Appendix F, "Stopping Processes in Oracle RAC Databases and Performing Oracle Clusterware Rolling Upgrades"
■ Appendix G, "Managing Oracle Database Port Numbers"


Troubleshooting the Installation Process A-1
ATroubleshooting the Installation Process
This appendix provides troubleshooting information for installing Oracle Clusterware and Oracle Real Application Clusters (Oracle RAC). The topic in this appendix is:
■ Troubleshooting the Oracle Clusterware and Oracle RAC Installation
Troubleshooting the Oracle Clusterware and Oracle RAC InstallationThis section contains these topics:
■ General Installation Issues
■ Oracle Clusterware Install Actions Log Errors and Causes
■ Real Application Clusters Installation Error Messages
■ Performing Cluster Diagnostics During Real Application Clusters Installations
General Installation IssuesThe following is a list of examples of types of errors that can occur during installation:
Nodes unavailable for selection from the OUI Node Selection screenCause: Oracle Clusterware is either not installed, or the Oracle Clusterware services are not up and running.
Action: Install Oracle Clusterware, or review the status of your Oracle Clusterware. Consider restarting the nodes, as doing so may resolve the problem.
Node nodename is unreachableCause: Unavailable IP host
Action: Attempt the following:
1. Run the command ipconfig /all. Compare the output of this command with the contents of the C:\WINNT\system32\drivers\etc\hosts file to ensure that the node IP is listed.
2. Run the command nslookup to see if the host is reachable.
Time stamp is in the futureCause: One or more nodes has a different clock time than the local node. If this is the case, then you may see output similar to the following:
See Also: Oracle Database Oracle Clusterware and Oracle Real Application Clusters Administration and Deployment Guide for additional information about Oracle Clusterware and Oracle RAC configuration and deployment.

Troubleshooting the Oracle Clusterware and Oracle RAC Installation
A-2 Oracle Database Oracle Clusterware and Oracle Real Application Clusters Installation Guide
time stamp 2005-04-04 14:49:49 is 106 s in the future
Action: Ensure that all member nodes of the cluster have the same clock time.
Administrative user unable to log in to SQL*Plus using the SYSDBA roleCause: When you install Oracle Database on Microsoft Windows, Oracle Universal Installer creates a Windows local group called ORA_DBA, and then adds your Windows username to it. Members of ORA_DBA automatically receive the SYSDBA privilege. However, for cluster installations, Oracle Universal Installer does not add the user to ORA_DBA if they have performed the installation remotely. As a result, this user cannot log in to SQL*Plus using the SYSDBA role
Action: Manually add remote users to ORA_DBA.
Oracle Clusterware Install Actions Log Errors and CausesThe following is a list of potential errors in the installActions.log:
■ PRIF-10: failed to initialize the cluster registry
Configuration assistant "Oracle Private Interconnect Configuration Assistant" failed
■ Step 4: Starting up CRS stack on all nodes
node1 service OracleCSService in improper STOPPED state, err(997)
node2 service OracleCSService in improper STOPPED state, err(997)
■ Step 4: Starting up CRS stack on all nodes
node1 service OracleCSService in improper STOPPED state, err(0)
node2 service OracleCSService in improper STOPPED state, err(997)
■ Step 4: Starting up CRS stack on all nodes
oracletest1 failed to startup service OracleEVMService, err(1053)
■ Step 1: checking status of CRS cluster
Step 2: configuring OCR repository
ignoring upgrade failure of ocr(-1073740972)
failed to configure Oracle Cluster Registry with CLSCFG, ret -1073740972
after installing the patch 3555863 the configuration fails with the same
problem
Each of these error messages can be caused by one of the following issues:
The OCFS format is not recognized on one or more of the remote cluster nodesIf you are using OCFS for your OCR and Voting disk partitions, then:
1. Leave the OUI window in place.
2. Restart the second node, and any additional nodes.
3. Retry the assistants
Troubleshooting the Oracle Clusterware and Oracle RAC Installation
Troubleshooting the Installation Process A-3
Timing issue with start of the OracleCSService:If you think the cause may be a timing issue, then:
1. Leave the OUI window in place.
2. Start the OracleCSService manually on all nodes. You may also need to start the OracleObjectService manually.
3. Retry the assistants
You are on a Windows 2003 system, and Automount of new drives is not enabled:If this is true, then:
For Oracle RAC on Windows 2003, you must issue the following commands on all nodes:
diskpartautomount enable
If you are already failing at the configuration assistants and this has not yet been run on all nodes in the cluster, you will need to clean up your CRS install, issue this command on all nodes, reboot all nodes, and start the CRS install again.
You have entered a period in one of the node names during CRS installPeriods (".") are not permitted in node names. Instead, use an underscore character ("_") or a hyphen. ("-").
To resolve a failed installation, remove traces of the Oracle installation, and reinstall with a permitted node name.
Node1 failed to startup service OracleEVMService, err(1053)The installation requires dll: MSVCP60.DLL. Copying MSVCP60.DLL to c:\winnt\system32 should allow EVM to start.
Ignoring upgrade failure of ocr(-1073740972)This error indicates that the user that is performing installation does not have Administrator privileges.
Real Application Clusters Installation Error MessagesReal Application Clusters Management Tools Error Messages are in Oracle Database Oracle Clusterware and Oracle Real Application Clusters Administration and Deployment Guide.
Performing Cluster Diagnostics During Real Application Clusters InstallationsIf Oracle Universal Installer (OUI) does not display the Node Selection page, then perform clusterware diagnostics by running the olsnodes -v command from the binary directory in your Oracle Clusterware home, CRS_home\BIN, and analyzing its output. Refer to your clusterware documentation if the detailed output indicates that your clusterware is not running.
In addition, use the following command syntax to check the integrity of the Cluster Manager:
cluvfy comp clumgr -n node_list -verbose

Troubleshooting the Oracle Clusterware and Oracle RAC Installation
A-4 Oracle Database Oracle Clusterware and Oracle Real Application Clusters Installation Guide
In the preceding syntax example, the variable node_list is the list of nodes in your cluster, separated by commas.

Using Scripts to Create Oracle Real Application Clusters Databases B-1
BUsing Scripts to Create Oracle Real
Application Clusters Databases
This chapter describes the steps required to create an Oracle Real Application Clusters (Oracle RAC) database from scripts. The topic in this appendix is:
■ Creating a Database Using Scripts
Creating a Database Using ScriptsTo generate scripts to create a Real Application Clusters database, create a database using the scripts, and prepare the database for use, complete the following steps:
1. Start Database Configuration Assistant (DBCA) and select your preferred options to build the Oracle RAC database. Note: you must select the Custom Database template on the Database Templates page for DBCA to provide the script generation option.
On the Creation Options page of your DBCA session, deselect Create Database and select Generate Database Creation Scripts before you click Finish. You can accept the default destination directory for the scripts, or browse for a different location. In either case, you should note the path name for use in the next step.
2. Navigate to the directory, which you noted in Step 1, where DBCA created the scripts, and review the SQL scripts to ensure that they contain the statements to build a database with the characteristics you require. If they do not, then Oracle recommends that you rerun DBCA to create scripts with the desired configuration rather than editing the scripts yourself.
3. On each cluster node you identified during your DBCA session, run the script or sid.bat on Windows, where sid is the sid prefix that you entered on the DBCA Database Name page.
4. Set the initialization parameter, cluster_database, to the value TRUE in your SPFILE by issuing an ALTER SYSTEM command, or by uncommenting it in your PFILE for each instance.
Note: The scripts generated by DBCA are for reference purposes only. Oracle strongly recommends that you use DBCA to create a database.
See Also: "Creating Oracle RAC Databases with the Database Configuration Assistant" for additional information about running a DBCA session.

Creating a Database Using Scripts
B-2 Oracle Database Oracle Clusterware and Oracle Real Application Clusters Installation Guide
5. Configure Net Services to support your new database and instances as described in Chapter 9, "Understanding the Oracle Real Application Clusters Installed Configuration".
6. Set the local_listener and remote_listener parameters in your SPFILE by issuing an ALTER SYSTEM command, or by uncommenting it in your PFILE for each instance.
7. Run SRVCTL to configure and start database and instance applications as described in Oracle Database Oracle Clusterware and Oracle Real Application Clusters Administration and Deployment Guide.
See Also: Oracle Universal Installer and OPatch User's Guide for additional information about creating and using scripts to install Oracle software

Configuring Raw Devices for Oracle Real Application Clusters C-1
CConfiguring Raw Devices for Oracle Real
Application Clusters
This appendix provides additional information about configuring raw devices to deploy Real Application Clusters (Oracle RAC). You must configure raw devices if you do not use automatic storage management or an Oracle Cluster File System. The topic in this appendix is:
■ Support for Raw Devices on Windows Systems
■ Raw Devices Required by Database Configuration Assistant
Support for Raw Devices on Windows SystemsOracle Database with Oracle Real Application Clusters supports the use of raw devices for Oracle files on Windows 2000 and Windows 2003.
You can partition a raw device to store data and control files. You can also use the entire raw device to store data.
You can create partitions on Windows 2000 and Windows 2003 by using the Disk Management utility, Diskmgmt.msc. To access this utility:
1. Click Start.
2. Select Run... from the program list.
3. In the Run dialog box, type diskmgmt.msc.
Raw Devices Required by Database Configuration AssistantIf you want to use Database Configuration Assistant to create a database on raw storage, that is, without using automatic storage management or an Oracle Cluster File System, then you must configure raw devices as described in this section. These devices are in addition to the OCR and voting disk required to install Oracle Clusterware. Create these devices before running Oracle Universal Installer to install Oracle Database 10g software. DBCA cannot create an Oracle RAC database unless you have properly configured the following devices:
■ Four raw devices for four tablespace datafiles
■ At least two raw devices for control files
■ One raw device for each instance for its own tablespace for automatic undo management
■ At least two raw devices for redo log files for each instance

Raw Devices Required by Database Configuration Assistant
C-2 Oracle Database Oracle Clusterware and Oracle Real Application Clusters Installation Guide
■ One raw device for the server parameter file
Planning Your Raw Device Creation StrategyBefore installing Oracle Database 10g software with Oracle RAC, create enough partitions of specific sizes to support your database, and also leave a few spare partitions of the same size for future expansion. For example, if you have space on your shared disk array, then select a limited set of standard partition sizes for your entire database. Partition sizes of 50MB, 100MB, 500MB, and 1GB are suitable for most databases. Also create a few very small and a few very large spare partitions that are, for example, 1MB and perhaps 5GB or greater in size. Based on your plans for using each partition, determine the placement of these spare partitions by combining different sizes on one disk, or by segmenting each disk into same-sized partitions.
Note: Each instance has its own redo log files, but all instances in a cluster share the control files and datafiles. In addition, each instance's online redo log files must be readable by all other instances to enable recovery.
Note: Ensuring that there are spare partitions enables you to perform emergency file relocations or additions if a tablespace datafile becomes full.

Converting to Real Application Clusters from Single-Instance Oracle Databases D-1
DConverting to Real Application Clusters from
Single-Instance Oracle Databases
This chapter describes the procedures for converting from Oracle Database 10g single-instance databases to Real Application Clusters (Oracle RAC) databases. The topics in this appendix are:
■ Prerequisites for Conversion
■ Single-Instance to Cluster-Enabled Conversion Administrative Issues
■ Converting from Single-Instance to Real Application Clusters
■ Post-Conversion Steps
If you are upgrading from Oracle Parallel Server to Oracle RAC or from an earlier version of Oracle RAC, then use the Database Upgrade Assistant (DBUA). In other words, the procedures in this chapter assume that your original single-instance database and the target Oracle RAC database are the same version of Oracle 10g, and running on the same platform.
Prerequisites for ConversionYour system must meet the following hardware and software requirements to convert to Oracle RAC:
■ A supported hardware and operating system software configuration
■ Use OCFS or shared disks
■ Before converting your database, refer to the Oracle Database Licensing Information manual to understand the scope of your license.
Single-Instance to Cluster-Enabled Conversion Administrative IssuesNote the following administrative considerations before conversion:
■ Backup procedures should be available before converting from a single-instance Oracle database to Oracle RAC.
■ Additional archiving considerations apply in Oracle RAC environments. In particular, the archive file format requires a thread number. In addition, the archived logs from all instances of an Oracle RAC database are required for media
See Also: Database Licensing Information to understand the restrictions of your license. You must comply with the restrictions of the license you have purchased.

Converting from Single-Instance to Real Application Clusters
D-2 Oracle Database Oracle Clusterware and Oracle Real Application Clusters Installation Guide
recovery. If you archive to a file and you do not use a cluster file system, then a method of accessing the archive logs from all nodes on which the cluster database has instances is required where file systems are not shared.
Converting from Single-Instance to Real Application ClustersTo convert from single-instance Oracle databases to Oracle RAC, Oracle strongly recommends that you use the Database Configuration Assistant (DBCA). This is because DBCA automates the configuration of the control file attributes, creates the undo tablespaces and the redo logs, and makes the initialization parameter file entries for cluster-enabled environments. It also configures the Oracle Net Services, Oracle Clusterware resources, and the configuration for Oracle RAC database management for use by Oracle Enterprise Manager or the SRVCTL utility. This section describes the following scenarios:
■ Single Instance on a Non-Cluster computer to Oracle Database 10g with Oracle RAC
■ Single Instance on a Cluster to Oracle Database 10g RAC
Single Instance on a Non-Cluster computer to Oracle Database 10g with Oracle RACTo convert from a single-instance Oracle database that is on a non-cluster computer to Oracle RAC, perform the procedures described under the following headings in the order shown:
■ Back up the Original Single-Instance Database
■ Perform the Pre-Installation Steps
■ Set up the Cluster
■ Copy the Preconfigured Database Image
■ Install Oracle Database 10g Software with Real Application Clusters
Back up the Original Single-Instance Database Use DBCA to create a preconfigured image of your single-instance database by using the following procedure:
1. Navigate to the bin directory in ORACLE_HOME, and start DBCA.
2. At the Welcome page, click Next.
3. On the Operations page, select Manage Templates, and click Next.
4. On the Template Management page, select Create a database template and From an existing database (structure as well as data), and click Next.
5. On the Source Database page, enter the SID prefix in the Database instance field, and click Next.
6. On the Template Properties page, enter a name for your template in the Name field. Oracle recommends that you use the database name.
By default, the template files are generated in the directory %ORACLE_HOME%\assistants\dbca\templates directory on Windows-based systems. If you choose to do so, you can enter a description of the file in the Description field, and change the template file location in the Template datafile field.
When you have completed entries, click Next.

Converting from Single-Instance to Real Application Clusters
Converting to Real Application Clusters from Single-Instance Oracle Databases D-3
7. On the Location of Database Related Files page, select Maintain the file locations, so that you can restore the database to the current directory structure, and click Finish.
DBCA generates two files: a database structure file (template_name.dbc), and a database preconfigured image file (template_name.dfb).
Perform the Pre-Installation StepsPerform the pre-installation steps as documented in chapters Chapter 2, "Server and Network Pre-Installation Tasks"and Chapter 3, "Storage Pre-Installation Tasks"in Part II of this book.
Set up the Cluster Form a cluster with the required number of nodes according to your hardware vendor's documentation. When you have configured all of the nodes in your cluster, either with or without vendor clusterware, then install Oracle Clusterware and validate cluster components by referring to the procedures in Chapter 4, "Installing Oracle Clusterware on Windows-Based Systems".
Validate the ClusterValidate the cluster configuration using the Cluster Verification Utility, as described in Chapter 5, "Installing Oracle Database 10g with Oracle Real Application Clusters".
Copy the Preconfigured Database ImageCopy the preconfigured database image. This includes copying the database structure *.dbc file and the database preconfigured image *.dfb file that DBCA created in the previous procedure "Back up the Original Single-Instance Database" on page D-2 to a temporary location on the node in the cluster from which you plan to run DBCA.
Install Oracle Database 10g Software with Real Application Clusters1. Run the Oracle Universal Installer (OUI) to perform an Oracle installation with the
Oracle 10g Database with Oracle RAC.
2. Select Cluster Installation Mode on the Specify Hardware Cluster Installation page of the Oracle Universal Installer (OUI) and select the nodes to include in your Oracle RAC database.
3. On the OUI Database Configuration Types page, select the Advanced install type.
After installing the Oracle software, the OUI runs post-installation configuration tools, such as the Network Configuration Assistant (NetCA), DBCA, and so on.
4. On the DBCA Template Selection page, use the template that you copied to a temporary location in the "Copy the Preconfigured Database Image" procedure. Use the browse option to select the template location.
5. If you selected raw storage on the OUI Storage Options page, then on the DBCA File Locations Tab on the Initialization Parameters page, replace the data files, control files, and log files, and so on, with the corresponding raw device files if you have not setup the DBCA_RAW_CONFIG environment variable. You must also replace default database files with raw devices on the Storage page.
See Also: Storage vendor-specific documentation for setting up the shared disk subsystem and for information about how to mirror and stripe disks

Converting from Single-Instance to Real Application Clusters
D-4 Oracle Database Oracle Clusterware and Oracle Real Application Clusters Installation Guide
6. After creating the Oracle RAC database, DBCA displays the Password Management page on which you must change the passwords for database privileged users who have SYSDBA and SYSOPER roles. When DBCA exits, the conversion process is complete.
Single Instance on a Cluster to Oracle Database 10g RACUse the following procedures to convert your single-instance database on a cluster computer to Oracle RAC for all of these scenarios.
Single Instance on a Cluster Running from a Cluster Enabled Oracle HomePerform the following procedures to convert a single-instance database on a cluster running from a cluster-installed (Oracle Database 10g with Oracle RAC) Oracle home.
1. Use DBCA to create a preconfigured image of your single-instance database as described under the heading "Back up the Original Single-Instance Database" on page D-2. To perform the conversion manually, shut down the single-instance database.
2. To add nodes to your cluster, add and connect these nodes to the cluster as described under the heading "Perform the Pre-Installation Steps" on page D-3. Ensure that all of these nodes can access the shared storage. Also extend the Oracle Clusterware home to the new nodes using the procedures for "Extending Clusterware and Oracle Software to New Nodes" as described in Oracle Database Oracle Clusterware and Oracle Real Application Clusters Administration and Deployment Guide.
3. From the existing Oracle home, extend this home to the new nodes using the procedure "Adding Nodes at the Oracle RAC Database Layer" as described in Oracle Database Oracle Clusterware and Oracle Real Application Clusters Administration and Deployment Guide.
4. From one of the newly added nodes, configure the listeners on the additional nodes using the NetCA. Choose the same port number and protocol that you used on the existing node. If the NetCA displays the existing node in the node list page, then do not select this node, because the listener is already configured on it.
5. Convert the database using one of the following procedures:
■ Automated Conversion Procedure
■ Manual Conversion Procedure
Automated Conversion Procedure If you created the preconfigured image of the single instance database as described under the heading "Back up the Original Single-Instance Database" on page D-2, then use DBCA to complete the conversion to an Oracle RAC database by completing the following steps:
1. Start DBCA from the initial node. Select the names of the nodes that you want to include as part of your cluster database. On the Template Selection page, select the preconfigured template that you created in Step 1 on page D-4. Enter the database name and respond to the remaining DBCA prompts.
2. To use raw devices for the cluster database files: When the Initialization Parameters page appears, enter the raw device name for the SPFILE on the File Locations tab. On the Storage page, replace the default database file names with
See Also: Chapter 6, "Creating Oracle RAC Databases with the Database Configuration Assistant" for more details about DBCA

Converting from Single-Instance to Real Application Clusters
Converting to Real Application Clusters from Single-Instance Oracle Databases D-5
the raw devices for the control files, redo logs, and datafiles to create the cluster database. Click Finish, and create the database.
After creating the Oracle RAC database, DBCA displays the Password Management page on which you must change the passwords for the database privileged users who have SYSDBA and SYSOPER roles. When DBCA exits, the conversion process is complete.
Manual Conversion Procedure If you did not use DBCA to create a preconfigured image of your single-instance database in Step 1 on page D-4, then perform the following steps to complete the conversion:
1. Create the OFA directory structure on each of the nodes that you have added.
2. If you are converting single-instance database files on a file system to raw devices, then copy the database datafiles, control files, redo logs, and server parameter file to their corresponding raw devices using the OCOPY command on Windows-based systems. Otherwise, continue to the next step.
3. Re-create the control files by running the CREATE CONTROLFILE SQL statement with the REUSE keyword and specify MAXINSTANCES and MAXLOGFILES, and so on, as needed for your Oracle RAC configuration. The MAXINSTANCES recommended default is 32.
4. Shut down the database instance.
5. If your single-instance database was using an SPFILE parameter file, then create a temporary PFILE from the SPFILE using the following SQL statement:
CREATE PFILE='pfile_name' from spfile='spfile_name'
6. Set the CLUSTER_DATABASE parameter to TRUE, set the INSTANCE_NUMBER parameter to a unique value for each instance, using a sid.parameter=value syntax.
If you optimized memory usage on your single-instance database, then adjust the size of the SGA to avoid swapping and paging when you convert to Oracle RAC. you should make this adjustment because Oracle RAC requires about 350 bytes for each buffer to accommodate the Global Cache Service (GCS). For example, if you have 10,000 buffers, then Oracle RAC requires about 350*10,000 bytes more memory. Therefore, adjust the size of the SGA by changing the DB_CACHE_SIZE and DB_nK_CACHE_SIZE parameters accordingly.
7. Start up the database instance using the PFILE created in step 5.
8. If your single-instance database was using automatic undo management, then create an undo tablespace for each additional instance using the CREATE UNDO TABLESPACE SQL statement. If you are using raw devices, then ensure that the datafile for the undo tablespace is on the raw device.
9. Create redo threads that have at least two redo logs for each additional instance. If you are using raw devices, then ensure that the redo log files are on raw devices. Enable the new redo threads by using an ALTER DATABASE SQL statement. Then shutdown the database instance.
10. Copy the Oracle password file from the initial node, or from the node from which you are working, to the corresponding location on the additional nodes on which the cluster database will have an instance. Make sure that you replace the
See Also: "Directory Structures for Real Application Clusters" on page E-1 for more information about OFA.

Post-Conversion Steps
D-6 Oracle Database Oracle Clusterware and Oracle Real Application Clusters Installation Guide
ORACLE_SID name in each password file appropriately for each additional instance.
11. Add REMOTE_LISTENER=LISTENERS_DB_NAME and sid.LOCAL_LISTENER=LISTENER_SID parameters to the PFILE.
12. Configure the net service entries for the database and instances and address entries for the LOCAL_LISTENER for each instance and REMOTE_LISTENER in the tnsnames.ora file and copy it to all nodes.
13. Create the SPFILE from the PFILE. If you are not using a cluster file system, then ensure that the SPFILE is on a raw device.
14. Create the %ORACLE_HOME%\database\initSID.ora file on Windows-based systems that contains the following entry:
spfile='spfile_path_name'
where spfile_path_name is the complete path name of the SPFILE.
15. Add the configuration for the Oracle RAC database and its instance-to-node mapping using SRVCTL.
16. Start the Oracle RAC database using SRVCTL.
After starting the database with SRVCTL, your conversion process is complete and, for example, you can run the following SQL statement to see the statuses of all the instances in your Oracle RAC database:
select * from gv$active_instances
Post-Conversion StepsAfter completing the conversion, note the following recommendations for Oracle RAC environments, as described in the Oracle RAC documentation:
■ Follow the recommendations for using load balancing and Transparent Application Failover as described in the Oracle Database Oracle Clusterware and Oracle Real Application Clusters Administration and Deployment Guide
■ Use locally managed tablespaces instead of dictionary managed tablespaces to reduce contention and manage sequences in Oracle RAC as described in the Oracle Real Application Clusters Deployment and Performance Guide
■ Follow the guidelines for configuring an interconnect, for using automatic segment space management, and for using SRVCTL to administer multiple instances, as described in the Oracle Database Oracle Clusterware and Oracle Real Application Clusters Administration and Deployment Guide
The buffer cache and shared pool capacity requirements in Oracle RAC are slightly greater than the requirements for single-instance Oracle databases. Therefore, you should increase the size of the buffer cache by about 10% and the size of the shared pool by about 15%.
Directory Structure for Oracle RAC Environments E-1
EDirectory Structure for Oracle RAC
Environments
This appendix describes the directory structures for Real Application Clusters (Oracle RAC) software environments. The topics in this appendix are:
■ Understanding the Real Application Clusters Directory Structure
■ Directory Structures for Real Application Clusters
Understanding the Real Application Clusters Directory StructureWhen you install Oracle Database 10g with Oracle RAC, all subdirectories are under a top-level Oracle base directory, named ORACLE_BASE by default. The ORACLE_HOME and ADMIN directories are also located under the Oracle base directory.
Directory Structures for Real Application ClustersTable E–1 shows the hierarchical directory tree of a sample OFA-compliant database for Oracle RAC on Windows-based systems:
See Also: Oracle Database Oracle Clusterware and Oracle Real Application Clusters Administration and Deployment Guide for further information about the ORACLE_HOME and ADMIN directories
Table E–1 Directory Structure for A Sample OFA-Compliant Windows Environment
Root Second-Level Third-LevelFourth-Level Description
x:\oracle_base
c:\oracle
The default ORACLE_BASE directory.
\%ORACLE_HOME%
\ora10.1
The name of the Oracle home by default.
\%ORA_CRS_HOME%
\crs10.1
The name of the Oracle Clusterware home by default.
\bin Subtree for Oracle binaries.
\network Subtree for Oracle Net configuration files, including tnsnames.ora, listener.ora and sqlnet.ora.
\srvm \admin subdirectory.

Directory Structures for Real Application Clusters
E-2 Oracle Database Oracle Clusterware and Oracle Real Application Clusters Installation Guide
\admin The Oracle RAC script clustdb.sql and initialization parameter files for database creation
\database A directory from previous releases containing initialization files pointing to the new directory location for parameter files: ORACLE_BASE\admin\db_name\pfile.
\admin Subtree for Oracle RAC database administration files
\db_name db_name database administration files for the instance identified by sid.
\adhoc Ad hoc SQL scripts.
\adump Audit files.
\arch Archived redo log files.
\bdump Background process trace files.
\cdump Core dump files.
\create Programs used to create the database.
\exp Database export files
\pfile Initialization parameter files
\udump User SQL trace files
See Also: Oracle Database Platform Guide 10g Release 2 (10.2) for Microsoft Windows for further information about the ORACLE_HOME and ADMIN directories
Table E–1 (Cont.) Directory Structure for A Sample OFA-Compliant Windows
Root Second-Level Third-LevelFourth-Level Description

Stopping Processes in Oracle RAC Databases and Performing Oracle Clusterware Rolling Upgrades F-1
FStopping Processes in Oracle RACDatabases and Performing Oracle
Clusterware Rolling Upgrades
This appendix describes how to stop processes in an Oracle Real Application Clusters (Oracle RAC) database, for one of the following two scenarios:
Scenario One: Stopping processes in an entire database, in preparation for adding additional products to an existing database, or in preparation for patch updates.
Scenario Two: Stopping processes on selected nodes in a database, in preparation for performing a rolling upgrade of Oracle Clusterware from any 10.2 installation to the latest patch update; for example, you can perform a rolling upgrade from 10.2.0.1 to 10.2.0.3.
This appendix contains the following topics:
■ Back Up the Oracle Software
■ Verify System Readiness for Patches and Upgrades
■ How to Stop Processes in an Existing Oracle Database
■ How to Perform Oracle Clusterware Rolling Upgrades
Back Up the Oracle SoftwareBefore you make any changes to the Oracle software, whether you intend to upgrade or patch part of the database or clusterware, or all of your cluster installation, Oracle recommends that you create a backup of the Oracle software.
Verify System Readiness for Patches and UpgradesIf you are completing a patch update of your database or clusterware, then after you download the patch software, and before you start to patch or upgrade your database, review the Patch Set Release Notes that accompany the patch to determine if your system meets the system requirements for the operating system and the hardware platform.
Note: For all command lines, Oracle_home represents the Oracle home path on your system, CRS_home represents the Oracle Clusterware home path on your system, and SID represents the Oracle system identifier (or name) of the database instance.
How to Stop Processes in an Existing Oracle Database
F-2 Oracle Database Oracle Clusterware and Oracle Real Application Clusters Installation Guide
Use the Cluster Verification Utility to assist you with system checks in preparation for starting a database patch or upgrade.
How to Stop Processes in an Existing Oracle DatabaseTo stop process in an existing Oracle Real Application Clusters Database, where you want to shut down the entire database, complete the following steps.
Shut Down Oracle Real Application Clusters DatabasesShut down any existing Oracle Database instances on each node, with normal or immediate priority.
If Automatic Storage Management (ASM) is running, then shut down all databases that use ASM, and then shut down the ASM instance on each node of the cluster.
Stop All Oracle ProcessesStop all listener and other processes running in the Oracle home directories where you want to modify the database software.
Stop Oracle Clusterware or Cluster Ready Services ProcessesIf you are modifying an Oracle Clusterware or Oracle Cluster Ready Services (CRS) installation, then shut down the following Oracle Database 10g services.
1. Shut down any processes in the Oracle home on each node that might be accessing a database; for example, shut down Oracle Enterprise Manager Database Control.
2. Shut down all Oracle RAC instances on all nodes. To shut down all Oracle RAC instances for a database, enter the following command, where db_name is the name of the database:
See Also: Oracle Database Upgrade Guide
Note: To upgrade using Oracle Clusterware or Cluster Ready Services, you must shut down all Oracle Database instances on all cluster nodes before modifying the Oracle software. If you are performing a patch update, review the instructions in the Patch Set Notes for detailed instructions.
Note: If you shut down ASM instances, then you must first shut down all database instances that use ASM, even if these databases run from different Oracle homes.
Note: You must perform these steps in the order listed.
Note: Before you shut down any processes that are monitored by Enterprise Manager Grid Control, set a blackout in Grid Control for the processes that you intend to shut down. This is necessary so that the availability records for these processes indicate that the shutdown was planned downtime, rather than an unplanned system outage.

How to Stop Processes in an Existing Oracle Database
Stopping Processes in Oracle RAC Databases and Performing Oracle Clusterware Rolling Upgrades F-3
Oracle_home\BIN\srvctl stop database -d db_name
3. Shut down all ASM instances on all nodes. To shut down an ASM instance, enter the following command, where node is the name of the node where the ASM instance is running:
Oracle_home\bin\srvctl stop asm -n node
4. Stop all node applications on all nodes. To stop node applications running on a node, enter the following command, where node is the name of the node where the applications are running
Oracle_home\bin\srvctl stop nodeapps -n node
5. Shut down the Oracle Clusterware or CRS process by entering the following command on all nodes:
CRS_home\bin\crsctl stop crs
6. Shut down the Oracle Clusterware or CRS Oracle Object Service and Oracle Cluster Volume Service processes from the Services window. Access the Services window by clicking Start, selecting Control Panel, selecting Administrative Tools, then selecting Services. From the Services window, shut down the following services:
Oracle Object ServiceOracleClusterVolumeServiceOracleServiceSID
Stop Oracle Database 10g Processes Before Adding Products or UpgradingThis section provides an overview of what needs to be done before adding additional products to Oracle Database 10g Release 2 (10.2). If you are performing a patch upgrade, then refer to the Database Patch Set Notes for the patch for additional instructions.
1. Shut down any processes in the Oracle home on each node that can access a database; for example, shut down Oracle Enterprise Manager Database Control.
2. Shut down all Oracle RAC instances on all nodes. To shut down all Oracle RAC instances for a database, enter the following command, where db_name is the name of the database:
Note: Depending on your configuration, your nodes may not be running all of the services listed. If the OracleASMService is still listed as running, then shut it down as well.
Note: You must perform these steps in the order listed.
Note: Before you shut down any processes that are monitored by Enterprise Manager Grid Control, set a blackout in Grid Control for the processes that you intend to shut down. This is necessary so that the availability records for these processes indicate that the shutdown was planned downtime, rather than an unplanned system outage.

How to Perform Oracle Clusterware Rolling Upgrades
F-4 Oracle Database Oracle Clusterware and Oracle Real Application Clusters Installation Guide
Oracle_home\bin\srvctl stop database -d db_name
3. Shut down all ASM instances on all nodes. To shut down an ASM instance, enter the following command, where node is the name of the node where the ASM instance is running:
Oracle_home\bin\srvctl stop asm -n node
How to Perform Oracle Clusterware Rolling UpgradesTo perform a rolling upgrade, complete all of the following steps in sequence.
■ Copy Patch Software to the Primary Upgrade Node
■ Shut Down Oracle Real Application Clusters Instances on Upgrade Nodes
■ Stop All Oracle Processes on Upgrade Nodes
■ Start OUI and Complete Upgrade Processes on Upgrade Nodes
Copy Patch Software to the Primary Upgrade NodeDownload the patch software to the primary node on the cluster (the node where you performed initial Oracle Clusterware and Oracle Database installation). Review the patch set Readme to confirm that your system meets the system requirements for the patch updates, and complete any special instructions for particular environments or configurations.
To download patches, or download the patch note Readme:
1. Log in to OracleMetaLink (https://metalink.oracle.com)
2. Click the Patches & Updates tab.
3. Search for the patch that you want to install.
4. Click the patch number to open the patch page
From this location, you can download the patch binary, download the patch Readme, and obtain other information regarding the patch update.
5. Download the patch set installation archive to a directory inside the Oracle base directory that meets the following requirements:
■ It is not the exiting Oracle home directory, or CRS home directory
■ It is not under an existing Oracle home directory, or CRS home directory
6. Extract the patch set installation archive
Shut Down Oracle Real Application Clusters Instances on Upgrade NodesOn each node on which you want to perform a rolling upgrade, shut down the Oracle Database instance, with normal or immediate priority.
Note: To perform rolling upgrades, the existing Oracle Clusterware home directory, commonly referred to in Oracle documentation as CRS home, must be located on local directories on the node. You cannot perform rolling upgrades on a shared CRS home directory.

How to Perform Oracle Clusterware Rolling Upgrades
Stopping Processes in Oracle RAC Databases and Performing Oracle Clusterware Rolling Upgrades F-5
If Automatic Storage Management (ASM) is running, then for each node that you intend to perform a rolling upgrade, shut down the database that uses ASM, and then shut down the ASM instance on the node.
Stop All Oracle Processes on Upgrade NodesOn each node on which you want to perform a rolling upgrade, before you upgrade Oracle Clusterware or Oracle Cluster Ready Services installations, you must shut down Oracle Database services that use clusterware processes.
Complete the following steps:
1. Shut down any processes on each node you intend to upgrade that might be accessing a database, such as Oracle Enterprise Manager Database Control.
2. Shut down all Oracle RAC instances on each node you intend to upgrade. To shut down Oracle RAC instances on individual nodes in the database, enter the following command, where db_name is the name of the database, and instance_name is the name of the instance:
Oracle_home\bin\srvctl stop instance -d db_name -i instance_name
Repeat this process on each node of the cluster on which you intend to perform the rolling upgrade.
3. Shut down ASM instances on each node on which you intend to perform the rolling upgrade.
To shut down an ASM instance, enter the following command, where node is the name of the node where the ASM instance is running:
Oracle_home\bin\srvctl stop asm -n node
Note: To upgrade Oracle Clusterware or Cluster Ready Services, you must shut down all Oracle Database instances on all cluster nodes that you intend to upgrade before modifying the Oracle software. If you are performing a patch update, review the instructions in the Patch Set Notes for detailed instructions.
Note: You must perform these steps in the order listed.
Note: Before you shut down any processes that are monitored by Enterprise Manager Grid Control, set a blackout in Grid Control for the processes that you intend to shut down. This is necessary so that the availability records for these processes indicate that the shutdown was planned downtime, rather than an unplanned system outage.
Note: If you shut down ASM instances, then you must first shut down all database instances on the nodes you intend to upgrade that use ASM, even if these databases run from different Oracle homes.

How to Perform Oracle Clusterware Rolling Upgrades
F-6 Oracle Database Oracle Clusterware and Oracle Real Application Clusters Installation Guide
4. Stop all node applications on each node on which you intend to perform the rolling upgrade. To stop node applications running on a node, enter the following command, where node is the name of the node where the applications are running
Oracle_home\bin\srvctl stop nodeapps -n node
5. On each node where you intend to perform the rolling upgrade, shut down the Oracle Clusterware or CRS process by entering the following command:
CRS_home\bin\crsctl stop crs
6. Shut down the Oracle Clusterware or CRS Oracle Object Service and Oracle Cluster Volume Service processes from the Services window. Access the Services window by clicking Start, selecting Control Panel, selecting Administrative Tools, then selecting Services. From the Services window, shut down the following services:
Oracle Object ServiceOracleClusterVolumeServiceOracleServiceSID
Start OUI and Complete Upgrade Processes on Upgrade NodesTo complete the patch upgrade, use the Oracle Universal Installer (OUI) downloaded with the patch update.
Complete the following steps:
1. Start the patch set OUI. At the Welcome window, click Next.
2. On the Specify Home Details window, select the CRS home directory, and click Next.
3. On the Specify Hardware Cluster Installation Nodes window, select the nodes where you want to perform the upgrade, and click Next.
4. Follow further instructions as directed from the OUI windows.
5. At the end of the install, OUI instructs you to run the command to stop Oracle Clusterware.
Enter a command similar to the following on the first node to stop the CRS daemons in the existing Oracle home:
CRS_home\bin\crsctl stop crs
Shut down the Oracle Clusterware or CRS Oracle Object Service and Oracle Cluster Volume Service processes from the Services window. Access the Services window by clicking Start, selecting Control Panel, selecting Administrative Tools, then selecting Services. From the Services window, shut down the following services:
Oracle Object ServiceOracleClusterVolumeServiceOracleServiceSID
6. When you are prompted by OUI, enter a command similar to the following:
Note: Depending on your configuration, your nodes may not be running all of the services listed. If the OracleASMService is still listed as running, then shut it down as well.

How to Perform Oracle Clusterware Rolling Upgrades
Stopping Processes in Oracle RAC Databases and Performing Oracle Clusterware Rolling Upgrades F-7
CRS_home\install\patch102.bat
7. When the install script completes, it displays text similar to the following, where patch_version displays the patch version you are installing:
clscfg -upgrade completed successfullySuccessful upgrade of this node to patch_version
This indicates that the upgrade process is complete. The upgraded Oracle Clusterware stack and AUTOSTART resources are started on the node.
Repeat steps 5, 6 and 7 for each node on which you are performing a rolling upgrade.

How to Perform Oracle Clusterware Rolling Upgrades
F-8 Oracle Database Oracle Clusterware and Oracle Real Application Clusters Installation Guide

Managing Oracle Database Port Numbers G-1
GManaging Oracle Database Port Numbers
This appendix lists the default port numbers and describes how to change the assigned port after installation:
■ About Managing Ports
■ Viewing Port Numbers and Access URLS
■ Port Numbers and Protocols of Oracle Components
■ Changing the Oracle Enterprise Management Agent Port
■ Changing the Oracle Enterprise Manager Database Console Ports
■ Changing the iSQL*Plus Ports
■ Changing the Oracle XML DB Ports
About Managing PortsDuring installation, Oracle Universal Installer assigns port numbers to components from a set of default port numbers. Many Oracle Database components and services use ports. As an administrator, it is important to know the port numbers used by these services, and to make sure that the same port number is not used by two services on your host.
Most port numbers are assigned during installation. Every component and service has an allotted port range, which is the set of port numbers Oracle Database attempts to use when assigning a port. Oracle Database starts with the lowest number in the range and performs the following checks:
■ Is the port used by another Oracle Database installation on the host?
The installation may be up or down at the time; Oracle Database can still detect if the port is used.
■ Is the port used by a process that is currently running?
This could be any process on the host, even a non-Oracle Database process.
If the answer to any of the preceding questions is yes, Oracle Database moves to the next highest port in the allotted port range and continues checking until it finds a free port.
Viewing Port Numbers and Access URLSIn most cases, the Oracle Database component’s port number is listed in the tool used to configure the port. In addition, ports for some Oracle Database applications are

Port Numbers and Protocols of Oracle Components
G-2 Oracle Database Oracle Clusterware and Oracle Real Application Clusters Installation Guide
listed in the portlist.ini file. This file is located in ORACLE_BASE\ORACLE_HOME\install.
If you change a port number, it is not updated in the portlist.ini file, so you can only rely on this file immediately after installation. To find or change a port number, use the methods described in this appendix.
Port Numbers and Protocols of Oracle ComponentsTable G–1 lists the port numbers and protocols used by components that are configured during the installation. By default, the first port in the range is assigned to the component, if it is available.
Table G–1 Ports Used in Oracle Components
Component and Description Default Port Number Port Range Protocol
Oracle SQL*Net Listener
Allows Oracle client connections to the database over Oracle's SQL*Net protocol. You can configure it during installation. To reconfigure this port, use Net Configuration Assistant.
1521 1521 TCP
Data Guard
Shares the SQL*Net port and is configured during installation. To reconfigure this port, use Net Configuration Assistant to reconfigure the Oracle SQL*Net listener.
1521 (same value as the listener)
1521 TCP
Connection Manager
Listening port for Oracle client connections to Oracle Connection Manager. It is not configured during installation, but can be configured using Net Configuration Assistant.
1630 1630 TCP
Oracle Management Agent
HTTP port for Oracle Management Agent, which is part of Oracle Enterprise Manager. It is configured during installation.
"Changing the Oracle Enterprise Management Agent Port" on page G-4 explains how to modify its port number
3938 1830–1849 HTTP
Oracle Enterprise Manager Database Console
HTTP port for Enterprise Manager Database Control. It is configured during installation. "Changing the Oracle Enterprise Manager Database Console Ports" on page G-4 explains how to modify its port number.
1158 5500–5519 TCP/HTTP
Oracle Enterprise Manager Database Console
RMI port for Enterprise Manager Database Control. It is configured during installation."Changing the Oracle Enterprise Manager Database Console Ports" on page G-4 explains how to modify its port number.
5520 5520–5539 TCP
Enterprise Manager Database Console
JMS port for Enterprise Manager Database Control. It is configured during installation. "Changing the Oracle Enterprise Manager Database Console Ports" on page G-4 explains how to modify its port number.
5540 5540–5559 TCP

Port Numbers and Protocols of Oracle Components
Managing Oracle Database Port Numbers G-3
iSQL*Plus
HTTP port for iSQL*Plus. The port number is automatically assigned during installation. "Changing the iSQL*Plus Ports" on page G-5 explains how to change its port number.
5560 5560–5579 TCP/HTTP
iSQL*Plus
RMI port for iSQL*Plus. The port number is automatically assigned during installation."Changing the iSQL*Plus Ports" on page G-5 explains how to change its port number.
5580 5580–5599 TCP
iSQL*Plus
JMS port for iSQL*Plus. The port number is automatically assigned during installation. "Changing the iSQL*Plus Ports" on page G-5 explains how to change its port number.
5600 5600–5619 TCP
Oracle XML DB
The Oracle XML DB HTTP port is used if Web-based applications need to access an Oracle database from an HTTP listener. It is configured during installation, but you cannot view it afterward. "Changing the Oracle XML DB Ports" on page G-5 explains how to change its port number.
Dynamic Dynamic HTTP
Oracle XML DB
The Oracle XML DB FTP is used when applications need to access an Oracle database from an FTP listener. It is configured during installation, but you cannot view it afterward. "Changing the Oracle XML DB Ports" on page G-5 explains how to change its port number.
Dynamic Dynamic FTP
Oracle Services for Microsoft Transaction Server
The port number for Microsoft Transaction Server is configured when you enter its value in Oracle Universal Installer during a Custom installation the first time you install it on a particular computer. If you install it in multiple Oracle homes on the same computer, Oracle Universal Installer uses the same port number that you specified during the first installation.
In most cases, you do not need to reconfigure the port number. If you do need to, you can edit its value in the HKEY_LOCAL_MACHINE\SOFTWARE\ORACLE\OracleMTSRecoveryService\Protid_0 Registry Editor key.
2030 2030 TCP
Oracle Real Application Clusters (Local Host: Windows only)
The port number is assigned automatically during installation. You cannot view or modify it afterward.
61000 61000–61300 TCP
Oracle Real Application Clusters (Cluster Interconnect: Windows only)
The port number is assigned automatically during installation. You cannot view or modify it afterward.
11000 11000–26000 TCP
Oracle Real Application Clusters (UNIX)
The port number is assigned automatically during installation. You cannot view or modify it afterward.
Dynamic Dynamic UDP
Table G–1 (Cont.) Ports Used in Oracle Components
Component and Description Default Port Number Port Range Protocol

Changing the Oracle Enterprise Management Agent Port
G-4 Oracle Database Oracle Clusterware and Oracle Real Application Clusters Installation Guide
Changing the Oracle Enterprise Management Agent PortTo find the current setting for the Oracle Management agent port, search for EMD_URL in the ORACLE_BASE\ORACLE_HOME\host_sid\sysman\config\emd.properties file.
To change the Oracle Management Agent HTTP port, use the emca -reconfig ports command:
emca -reconfig ports -AGENT_PORT 1831
Changing the Oracle Enterprise Manager Database Console PortsTo find the current HTTP, RMI, and JMS port settings, search in the following files:
■ HTTP port: Search for REPOSITORY_URL in the ORACLE_BASE\ORACLE_HOME\host_sid\sysman\config\emd.properties file.
■ RMI port: Search for the port attribute in the rmi-server tag in the ORACLE_BASE\ORACLE_HOME\oc4j\j2ee\OC4J_DBConsole_host_sid\config\rmi.xml file.
■ JMS port: Search for the port attribute in the jms-server tag in the ORACLE_BASE\ORACLE_HOME\oc4j\j2ee\OC4J_DBConsole_host_sid\config\jms.xml file.
To change the Oracle Enterprise Manager Database Console ports, use the emca -reconfig ports command:
ORACLE_BASE\ORACLE_HOME\bin> emca -reconfig ports option setting
where option can be:
■ DBCONTROL_HTTP_PORT: Sets the HTTP port, for example:
emca -reconfig ports -DBCONTROL_HTTP_PORT 1820
Oracle Clusterware
CRS daemon internode connection. The port number is assigned automatically during installation. You cannot view or modify it afterward.
49896 49896 TCP
Cluster Synchronization Service (CSS)
CSS daemon internode connection for the GM layer. The port number is assigned automatically during installation. You cannot view or modify it afterward.
49895 49895 TCP
Oracle Cluster Registry
The port number is assigned automatically during installation. You cannot view or modify it afterward.
Dynamic Dynamic TCP
Oracle Event Manager
The port number is assigned automatically during installation. You cannot view or modify it afterward.
49897 49897–49898 TCP
Cluster Manager
The port number is assigned automatically during installation. You cannot view or modify it afterward.
Dynamic Dynamic TCP
Table G–1 (Cont.) Ports Used in Oracle Components
Component and Description Default Port Number Port Range Protocol

Changing the Oracle XML DB Ports
Managing Oracle Database Port Numbers G-5
■ RMI_PORT: Sets the RMI port, for example:
emca -reconfig ports -RMI_PORT 5520
■ JMS_PORT: Sets the JMS port, for example:
emca -reconfig ports -JMS_PORT 5521
You can enter multiple -reconfig port settings in one line, for example:
emca -reconfig ports -DBCONTROL_HTTP_PORT 1820 -AGENT_PORT 1821 -RMI_PORT 5520
Changing the iSQL*Plus PortsThe following sections describe how to change the iSQL*Plus ports.
Changing the HTTP PortTo change the HTTP port, edit the following files:
■ ORACLE_BASE\ORACLE_HOME\host_sid\sysman\config\emoms.properties
Modify the following port parameters (for example, 5560) in the file:
oracle.sysman.db.isqlplusUrl=http\://host.domain\:5560/isqlplus/dynamicoracle.sysman.db.isqlplusWebDBAUrl=http\://host.domain\:5560/isqlplus/dynamic
■ ORACLE_BASE\ORACLE_HOME\oc4j\j2ee\isqlplus\config\http-web-site.xml
Modify the port attribute of the web-site element:
<web-site port="5560" ...>
Changing the RMI PortTo change the RMI port, modify the port attribute of the rmi-server element in the ORACLE_BASE\ORACLE_HOME\oc4j\j2ee\isqlplus\config\rmi.xml file:
<rmi-server port="5580"...>
Changing the JMS PortTo change the JMS port, modify the port attribute of the jms-server element in the ORACLE_BASE\ORACLE_HOME\oc4j\j2ee\isqlplus\config\jms.xml file:
<jms-server port="5600"...>
Changing the Oracle XML DB PortsTo change the Oracle XML DB FTP and HTTP ports, you need to run the catxdbdbca.sql script, which in a default installation is located in ORACLE_BASE\ORACLE_HOME\rdbms\admin.
To change the Oracle XML DB ports:
1. Check that the Oracle listener is running. To do so, in the Windows Services utility, make sure that the Oracle TNS Listener service (for example, OracleOraDb10g_home1TNSListener) is set to Started.
If you cannot start the listener, refer to Oracle Database Net Services Administrator's Guide.

Changing the Oracle XML DB Ports
G-6 Oracle Database Oracle Clusterware and Oracle Real Application Clusters Installation Guide
2. Log in to SQL*Plus or iSQL*Plus as SYS or XDB using the SYSDBA role.
For example, to log in to SQL*Plus as SYS using the password welcome:
C:\> sqlplus sys/welcome as sysdba
3. Run the catxdbdbca.sql script.
For example, to use 2200 for the FTP port and 8200 for the HTTP port, and assuming your Oracle home is in the following location, enter the following command:
SQL> @c:\oracle\product\10.20.0\db_1\rdbms\admin\catxdbdbca.sql 2200 8200
4. Exit SQL*Plus or iSQL*Plus.

Index-i
Index
Numerics32-bit
Windows-based installation, 2-132-bit, Windows-based installation, 2-164-bit
Windows-based installation, 2-1
AAdditional Real Application Clusters
documentation, 1-1Advanced
configuration type, 5-3, 5-4architecture
Optimal Flexible Architecture (OFA), 5-4archive logs
destinations, converting to cluster database, D-1ASM
ASM home, 1-5benefits of, 1-8characteristics of failure groups, 1-8compared to logical volume managers, 1-8compared to RAID, 1-8database recovery area for, 1-10de-installing, 1-5disk groups, 1-8failure groups, 1-8overview, 1-8recommendations for disk groups, 1-8redundancy levels, 1-9space required for preconfigured database, 1-9
asmtool utility, 3-14asmtoolg utility, 3-13authentication support
pre-installation requirements, 2-12Automatic Storage Management
storage option for data files, 3-3Automatic Storage Management (ASM)
asmtool utility, 3-14asmtoolg utility, 3-13configuring disks, 3-8 to 3-12DAS disks, 3-12disk groups
recommendations for, 3-9redundancy levels, 3-9
disks, supported, 3-12
failure groups, 3-9characteristics, 3-10examples, 3-11identifying, 3-11
mirroring, 3-9partition creation, 3-12redundancy levels, 3-9SAN disks, 3-12space required for preconfigured database, 3-10
automatic undo management, 9-3automount
enable, 3-1Available
service configuration policy, 6-2
Bbackups
and converting to cluster database, D-1Basic
TAF failover policy, 6-2bind order
Windows network, 2-11
Ccertification, hardware and software, 2-4cluster configuration file, 4-7Cluster Configuration page
Oracle Universal Installer, 4-6Cluster Configuration Storage page
Oracle Universal Installer, 4-6cluster database
installed configuration, 9-2cluster file system
database recovery area and, 1-10storage option for data files, 3-3
Cluster Managerports, ranges and protocol, G-4
cluster name, 4-6requirements for, 4-4
cluster nodesprivate node names, 4-4public node names, 4-4virtual node names, 4-4
cluster privilegesverifying for OUI cluster installation, 2-14

Index-ii
Cluster Synchronization Services, 1-5, 4-3Cluster Synchronization Services (CSS)
ports, ranges and protocol, G-4Cluster Verification Utility
about, 1-2DBCA database creation stage readiness
check, 6-2hardware and operating system setup stage
verification, 2-9help, 2-2Oracle Clusterware configuration check, 4-1overview, 2-1shared storage area check, 3-6syntax, 2-2user equivalency troubleshooting, 4-2verifying readiness for database installation, 5-1
CLUSTER_INTERCONNECTS parameter, 1-3clusterware diagnostics, A-3commands
emca, 7-3components
created when using DBCA, 9-1configuration types
Advanced, 5-3Data Warehouse, 5-3Do not create a starter database, 5-3General Purpose, 5-3New Database, 5-3Transaction Processing, 5-3
configuringglobal database name, 6-4
configuring disks for ASM, 3-8 to 3-12configuring raw devices, 3-15connection load balancing, 9-4Connection Manager
ports, ranges and protocol, G-2control file
installed configuration, 9-3control files, 1-11
described, 9-3raw devices, 3-15
convert to cluster databaseadministrative considerations, D-1from non-cluster system, D-2from single-instance, D-4from single-instance to Real Application
Clusters, D-1post-conversion, D-6to Real Application Clusters from single-instance
Oracle databases, D-1converting
from single-instance to Real Application Clusters, B-1
to Real Application Clusters from single-instance Oracle databases, B-1
Create Databaseoption on Creation Options page, 6-9
create databaseusing scripts, B-1
creating
Real Application Clusters databasewith the Database Configuration
Assistant, 5-4, 6-1, 6-3cross-node registration, 9-4CRS home
Windows-based system, 4-5CSS, 1-5, 4-3
OCCSD, 4-3custom database
failure groups for ASM, 3-11requirements when using ASM, 1-9requirements when using Automatic Storage
Management, 3-10CVU
See Cluster Verification Utility
DDAS (direct attached storage) disks, 3-12data files
storage options, 3-3Data Guard
ports, ranges and protocol, G-2data loss
minimizing with ASM, 1-8minimizing with Automatic Storage
Management, 3-10Data Warehouse
configuration type, 5-3database
ASM requirements, 1-9components, created when using DBCA, 9-1configurations, types, 5-3SID, 6-4
Database Configuration AssistantASM Disk Groups page, 6-5components created by, 9-1control files, 9-3Create ASM Instance page, 6-5Create Disk Group page, 6-5creating Real Application Clusters database
after installation, 6-3during installation, 5-4, 6-1
Creation Options page, 6-9Database Content page, 6-7Database Credentials page, 6-5Database File Locations page, 6-7Database Identification page, 6-4Database Services page, 6-7Database Storage page, 6-9Database Templates page, 6-4datafiles, 9-2deleting databases with, 6-10deleting Real Application Clusters
databases, 6-10initialization parameter files, 9-4Initialization Parameters page, 6-8List of Cluster Databases page, 6-10Management Options page, 6-5Node Selection page, 6-4Operations page, 6-4, 6-10

Index-iii
raw storage requirements, C-1Recovery Configuration page, 6-7redo log files, 9-3rollback segments, 9-3Storage Options page, 6-5Summary dialog, 6-9, 6-10tablespaces, 9-2using, 6-1Welcome page, 6-3
database configuration typeselecting, 5-3
database creation using scripts, B-1database directory, E-2database domain name, 6-4database recovery area
shared storage requirement for, 1-10databases
Automatic Storage Management requirements, 3-10
datafiles, 1-11and DBCA, 9-2described, 9-2managing with ASM, 1-8minimum disk space for, 3-5recommendations for file system, 3-4
DBCAdelete database, 6-10
dedicated servers, 9-4de-install CRS software, 5-9
Windows-based systems, 5-9de-install Oracle Database software, 5-8delete database with DBCA, 6-10device names
creating with asmtool, 3-14creating with asmtoolg, 3-13
diagnostics, A-3directory
database file directory, 3-4directory structure, E-1
Windows, E-1DisableDHCPMediaSense parameter, 2-10, 2-11disk automount
enable, 3-1disk devices
managing with ASM, 1-8disk group
ASM, 1-8Automatic Storage Management, with ASM
redundancy levels, 3-9recommendations for ASM disk groups, 1-8recommendations for Automatic Storage
Management disk groups, 3-9disk space
checking, 2-7requirements for preconfigured database in
ASM, 1-9, 3-10disk space requirements
Windows, 2-6disks
configuring for Automatic Storage
Management, 3-8 to 3-12configuring raw devices, 3-15supported for Automatic Storage
Management, 3-12Do not create a database
configuration type, 5-3documentation
Real Application Clusters, 1-1
Eenable automount, 3-1enable disk automount, 3-1environment variables
TEMP and TMPDIR, 2-7Environment Variables page
Windows, 5-7error messages
Real Application Clusters management tools, A-3EXAMPLE tablespace
raw device for, 3-15examples
Automatic Storage Management failure groups, 3-11
external redundancyASM redundancy level, 1-9Automatic Storage Management redundancy
level, 3-9
Ffailover
and service registration, 9-4failure group
ASM, 1-8characteristics of ASM failure group, 1-8
failure groupsAutomatic Storage Management, 3-9characteristics in Automatic Storage
Management, 3-10examples in Automatic Storage
Management, 3-11file system
storage option for data files, 3-3using for datafiles, 3-4
file systemssystem requirements, 2-6Windows system requirements, 2-6
filescontrol files
raw devices, 3-15raw device mapping file
on Windows, 3-17redo log files
raw devices, 3-15server parameter file
raw devices, 3-15SPFILE
raw devices, 3-15

Index-iv
GGeneral Purpose
configuration type, 5-3description of configuration type, 5-3
Generate Database Creation Scriptson Creation Options page, 6-9
global database name, 6-4
Hhardware certification, 2-4high redundancy
ASM redundancy level, 1-9Automatic Storage Management redundancy
level, 3-9
Iinitialization parameter files, 9-4
for instances, 8-1listener parameters, 9-5
initialization parametersDISPATCHERS, 9-4LOCAL_LISTENER, 9-4REMOTE_LISTENER, 9-4, 9-8
installationAutomatic Storage Management
requirements, 3-10directory structure, E-1ldap.ora file, 9-6listener.ora file, 9-5non-interactive, 1-6, B-1overview, 1-6requirements, hardware, 1-2requirements, software, 1-2tnsnames.ora file, 9-7using cluster configuration file, 4-7verifying raw devices, 6-3
installation typesand ASM requirements, 1-9
instancepreferences, 6-2
instancesinitialization parameter files, 8-1
iSQL*Plusports
changing, G-5ranges and protocol, G-3
ItaniumWindows-based installation, 2-1
JJava Runtime Environment
requirements, 2-6Windows requirements, 2-6
Lldap.ora file, 9-6
creating, 9-6default configuration, 9-6
Lightweight Directory Access Protocol (LDAP), 9-6
List of Cluster Databases page, 6-10listener
local, 9-4registration, 9-6stopping, 2-13stopping existing listener process, 2-13
listener.ora file, 9-5configuring, 9-5default configuration, 9-5
listenerslistener.ora file, 9-5
load balancingand service registration, 9-4
local deviceusing for datafiles, 3-5
local listener, 9-4logical volume manager
See LVMLogical Volume Manager (LVM)
recommendations for Automatic Storage Management, 3-9
LVMcompared to ASM, 1-8recommendations for ASM, 1-8
Mmapping file
for raw deviceson Windows, 3-17
Media Sensing, 2-10, 2-11disabling, 2-11
MetaLinkOracle patches, 7-1
Microsoft Internet Explorer, 2-4mirroring ASM disk groups, 3-9Mozilla, 2-4multiple voting disks, 1-5
Nnet service names, 9-7Netscape Navigator, 2-4network configuration files
ldap.ora.ora, 9-6listener.ora, 9-5sqlnet.ora, 9-11tnsnames.ora, 9-7
network directory, E-1network interface bind order, 2-11New Database
configuration type, 5-3node applications, 6-1None
TAF failover policy, 6-2non-interactive installation, 1-6normal redundancy
ASM redundancy level, 1-9normal redundancy, Automatic Storage Management
redundancy level, 3-9Not used
service configuration policy, 6-2

Index-v
NTFSsystem requirements, 2-6
OOCCSD, 4-3OCFS
formatting drives for, 4-8installation, 4-8
OCRinstalled configuration, 9-1Windows, 3-8
OCR contents, 9-1OCR. See Oracle Cluster Registryolsnodes command, A-3operating systems, supported, 2-7Optimal Flexible Architecture (OFA), 5-4Oracle Advanced Security
pre-installation requirements, 2-12Oracle Cluster Registry
configuration of, 4-4see OCR
Oracle Cluster Registry port, G-4Oracle Clusterware
install with Oracle Universal Installer on Windows, 4-5
installation setup procedures for Windows, 4-5installing, 4-1installing with Oracle Universal Installer, 4-5ports, ranges and protocol, G-4
Oracle Connection a Manager, 2-5Oracle Database
data file storage options, 3-3minimum disk space requirements, 3-5requirements with ASM, 1-9requirements with Automatic Storage
Management, 3-10Windows Terminal Services support, 2-5
Oracle Database Oracle Clusterware and Oracle Real Application Clusters Administration and Deployment Guide, 1-2
Oracle Enterprise Management Agentports
changing, G-4ranges and protocol, G-2
Oracle Enterprise ManagerDatabase Control, 7-3post-installation configuration, 7-3pre-installation requirements, 2-12
Oracle Enterprise Manager Database Consoleports
changing, G-4ranges and protocol, G-2
Oracle Event Managerports, ranges and protocol, G-4
Oracle Netstopping existing listener, 2-13stopping listener, 2-13
Oracle Object Link Manager, 2-5Oracle RAC high availability extensions
configuring services for, 6-2
TAF policies for, 6-2Oracle Real Application Clusters (Oracle RAC)
ports, ranges and protocol, G-3Oracle Services for Microsoft Transaction Server, 2-5
portsranges and protocol, G-3
Oracle SQL*Net Listenerports
ranges and protocol, G-2Oracle Universal Installer
and Oracle Clusterware, 4-5Cluster Configuration page, 4-6Cluster Configuration Storage page, 4-6overview, 1-6overview of processing, 1-6Specify File Locations page, 4-5Specify Network Interface Usage page, 4-6Summary page, 4-7Welcome page, 4-5, 5-5
Oracle XML DBports
changing, G-5ranges and protocol, G-3
OracleMetaLink, 7-1OracleMetaLink site
about, 2-4accessing, 2-4
OUIsee Oracle Universal Installer
Pparameter file search order, 8-3parameters
initialization, 8-1partition
using with ASM, 1-8partition creation for Automatic Storage Management
disks, 3-12partitions
using with Automatic Storage Management, 3-9patch upgrades, F-3
rolling upgrades, F-4patches
download, 7-1install, 7-1OracleMetaLink, 7-1
portlist.ini file, G-1ports
access URLs, G-1Cluster Manager, ranges and protocol, G-4Cluster Synchronization Services, ranges and
protocol, G-4configured for applications, G-1Connection Manager, ranges and protocol, G-2Data Guard, ranges and protocol, G-2default ranges, G-1iSQL*Plus
changing, G-5ranges and protocol, G-3
Oracle Cluster Registry, G-4
Index-vi
Oracle Clusterware, ranges and protocol, G-4Oracle Enterprise Management Agent
changing, G-4ranges and protocol, G-2
Oracle Enterprise Manager Database Consolechanging, G-4ranges and protocol, G-2
Oracle Event Manager, ranges and protocol, G-4Oracle Real Application Clusters (Oracle RAC),
ranges and protocol, G-3Oracle Services for Microsoft Transaction Server,
ranges and protocol, G-3Oracle SQL*Net Listener
ranges and protocol, G-2Oracle XML DB
changing, G-5ranges and protocol, G-3
post-installationOracle Enterprise Manager configuration, 7-3patch download and install, 7-1product configuration, 7-2
preconfigured databaseASM disk space requirements, 1-9Automatic Storage Management disk space
requirements, 3-10requirements when using ASM, 1-9requirements when using Automatic Storage
Management, 3-10preconfigured database installation types, 5-3Preferred
service configuration policy, 6-2pre-installation
raw device creation, 9-3, C-2requirements for Oracle Advanced Security, 2-12requirements for Oracle Enterprise Manager, 2-12
privilegesverifying for OUI cluster installation, 2-14
processstopping existing, 2-13stopping existing listener process, 2-13stopping listener process, 2-13
RRAID
compared to ASM, 1-8recommended ASM redundancy level, 1-9using for Oracle datafiles, 3-4
RAID (Redundant Array of Independent Disks)recommended ASM redundancy level, 3-10
raw devicefor server parameter file, 3-15for SPFILE, 3-15
raw devicesconfiguring, 3-15creating a raw device mapping file
on Windows, 3-17Database Configuration Assistant, C-1database recovery area and, 1-10for control files, 3-15for EXAMPLE tablespace, 3-15
for redo log files, 3-15for SYSAUX tablespace, 3-15for SYSTEM tablespace, 3-15for TEMP tablespace, 3-15for UNDOTBS tablespace, 3-15for USERS tablespace, 3-15identifying on Windows
db_name_indx1 symbolic link, 9-3db_name_rbs1 symbolic link, 9-3db_name_redo thread_number symbolic
link, 9-3db_name_spfile1 symbolic link, 9-3db_name_system1 symbolic link, 9-2db_name_temp1 symbolic link, 9-2db_name_users1 symbolic link, 9-2
identifying on Windows, undotbs1 and undotbs2 symbolic links, 9-3
setting up, 9-3, C-2storage option for data files, 3-3verification, 6-3
raw partitionsSee raw devices
raw storageDatabase Configuration Assistant
requirements, C-1RBS tablespace
description, 9-2readme.txt file, G-1Real Application Clusters
components, 1-10databases, deleting, 6-10installation requirements, 1-2installed components of, 1-11management tools error messages, A-3overview, 1-1, 6-1, 9-1raw device setup, 9-3, C-2
recovery filesshared storage requirement for, 1-10
redo log fileinstalled configuration, 9-3
redo log files, 1-11described, 9-3raw devices for, 3-15
redundancy leveland space requirements for preconfigured
database, 1-9, 3-10for ASM, 1-9for Automatic Storage Management, 3-9
redundant array of independent disksSee RAID
registrationcross-node, 9-4
required service packs, 2-7requirements
for Java Runtime Environment, 2-6for Java Runtime Environment on Windows, 2-6for Oracle Enterprise Manager, 2-12hardware certification, 2-4software certification, 2-4Web browser support, 2-4

Index-vii
Windows Remote Desktop Connection support, 2-5
Windows service packs, 2-7rollback segments
described, 9-3rolling upgrade
of Oracle Database with patch, F-4
SSAN (storage area network) disks, 3-12Save as a Database Template
option on Creation options page, 6-9scripts to create a Real Application Clusters
database, B-1Server Management (SRVM), 2-5server parameter file
raw device, 3-15server parameter files, 1-11, 8-1, 9-4
errors, 8-3Service Management
using, 6-2service pack requirements
Windows, 2-7service packs, 2-7service registration
configuring, 9-4services, 6-2shared configuration file, 9-1shared server, 9-4shared storage
requirement for recovery area, 1-10SID
creating, 6-4silent installation. See installation
non-interactivesoftware certification, 2-4Software Only
configuration type, 5-3Specify File Locations page
Oracle Universal Installer, 4-5Specify Network Interface Usage page
Oracle Universal Installer, 4-6SPFILE
default creation, 8-1default location, 8-2managing on ASM, 8-2managing on raw device, 8-2raw devices, 3-15
sqlnet.ora file, 9-11default configuration, 9-11
srvm\admin directory, E-1storage area network disks, 3-12Summary dialog, 6-9, 6-10Summary page
Oracle Universal Installer, 4-7supported operating systems, 2-7SYSAUX tablespace
for raw devices, 3-15system requirements
for NTFS file systems, 2-6
for Windows file systems, 2-6SYSTEM tablespace
description, 9-2for raw devices, 3-15
system variables dialogWindows, 5-7
Ttablespaces
and DBCA, 9-2expanding for large sorts, 9-2RBS, 9-2SYSTEM, 9-2TEMP, 9-2undo tablespaces for automatic undo
management, 9-2USERS, 9-2
TAF failover policiesBasic, 6-2None, 6-2
TEMP environment variable, 2-7TEMP tablespace
described, 9-2for raw devices, 3-15
temporary directory on Windows, 2-7temporary disk space
checking on Windows, 2-7freeing on Windows, 2-7
tmp directorychecking space for Windows installation, 2-7freeing space for Windows installation, 2-7
TMPDIR environment variable, 2-7tnsnames.ora file, 9-7
default configuration, 9-7Transaction Processing
configuration type, 5-3description of configuration type, 5-3
Transparent Application Failover (TAF) policies, 6-2troubleshooting
user equivalency, 4-2
Uundo management, 9-3UNDOTBS tablespace
raw device, 3-15upgrade
of Oracle Database with patch, F-3user equivalence
testing, 4-2USERS tablespace
described, 9-2raw device, 3-15
VVIP, 1-3virtual IP.See VIPvoting disk
configuration of, 4-4Windows, 3-8

Index-viii
voting disks, 3-3configuring multiple, 1-5requirement of absolute majority of, 3-3
WWeb browser support, 2-4Web browsers
Microsoft Internet Explorer, 2-4Mozilla, 2-4Netscape Navigator, 2-4
Web browsers, Microsoft Internet Explorer, 2-4Welcome page
Oracle Universal Installer, 4-5, 5-5Windows
32-bit installation, 2-164-bit installation, 2-1creating a raw device mapping file, 3-17Itanium-based installation, 2-1minimum memory installation, 5-6system variables dialog, 5-7
Windows Environment Variables page, 5-7Windows Media Sensing, 2-10
disabling, 2-11Windows network bind order, 2-11Windows Server 2008, 4-1Windows Terminal Services
support, 2-5