one$time$instructional$system(otis)webapps.ou.edu/otis/docs/otis_guide.pdfmicrosoft word - otis...
TRANSCRIPT

One Time Instructional System (OTIS) Web Address: http://otis.ou.edu
General Description: OTIS is an online application developed for the purpose of improving efficiencies in managing the University’s one-‐time instructional support. The system provides both an automated OTIS request process and the reports needed for management. The data available is from the following systems: OU student system, financial system, budget system and Human Resource system
Roles: Provost, Budget Office, College, Department
Questions about OTIS: Contact Budget Office at 325-‐5511
Role Descriptions
Provost: The Provost is a high-‐level, view-‐only role that allows the user to review OTIS Requests by college, department, subject, and course. Provost users can also view and download reports.
Budget Office: The Budget Office role has the same ability to view OTIS Requests and reports as the Provost Role. Users at this level can also change semester windows, add/manage departments, subjects, and fringe benefits, and add/manage users at the college level.
College: College level users have the same ability to view OTIS Requests and reports as Provost and Budget Office users, but can also approve or deny OTIS Requests.
Department: Departmental users can submit OTIS Requests and view reports regarding Requests already submitted.
Detailed instructions for each role are included below
Contents Role Descriptions ......................................................................................................................................... 1
Provost Role ................................................................................................................................................. 2
Request List ............................................................................................................................................. 3
Reports .................................................................................................................................................... 6
Budget Office Role ....................................................................................................................................... 7
Request List ............................................................................................................................................. 8
Reports .................................................................................................................................................. 10
Semester Windows ................................................................................................................................ 12
Tables ..................................................................................................................................................... 13
Department ....................................................................................................................................... 13
Subject ............................................................................................................................................... 14
Fringe Benefits ................................................................................................................................... 15
Users ...................................................................................................................................................... 15
College Level .............................................................................................................................................. 16
Request List ........................................................................................................................................... 17
Reports .................................................................................................................................................. 19
Users ...................................................................................................................................................... 20
Departmental User ........................................................................................ Error! Bookmark not defined.
Request List ............................................................................................... Error! Bookmark not defined.
Submitting an OTIS Request .............................................................................................................. 22
Filling out an OTIS Request ................................................................................................................ 23
Reports .................................................................................................................................................. 25

Provost Role
Request List On the “Request List” page, the user may view OTIS requested and approved funds by campus and semester, using the dropdown lists at the top of the screen to make their choice.
Results may be filtered by funding type using the dropdown list at the bottom of the screen. Users must press “Filter Results by Funding Type” each time they want to view new information. Users can also “Filter Results by Status”.
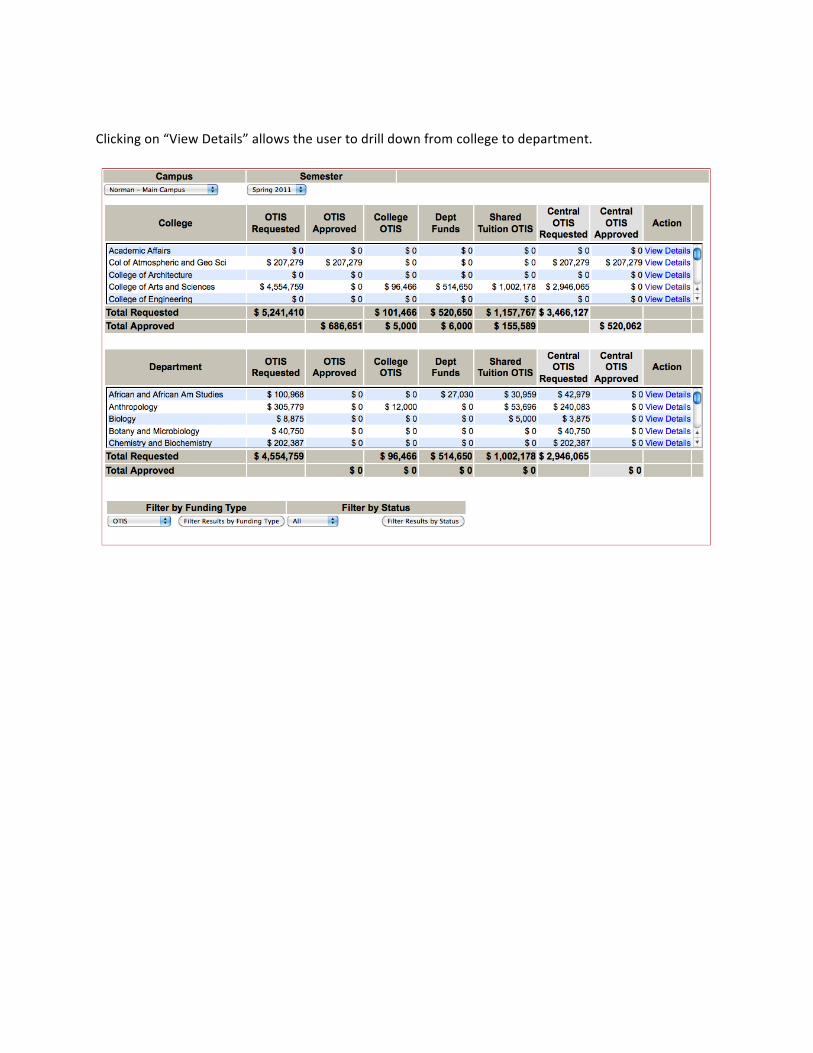
Clicking on “View Details” allows the user to drill down from college to department.
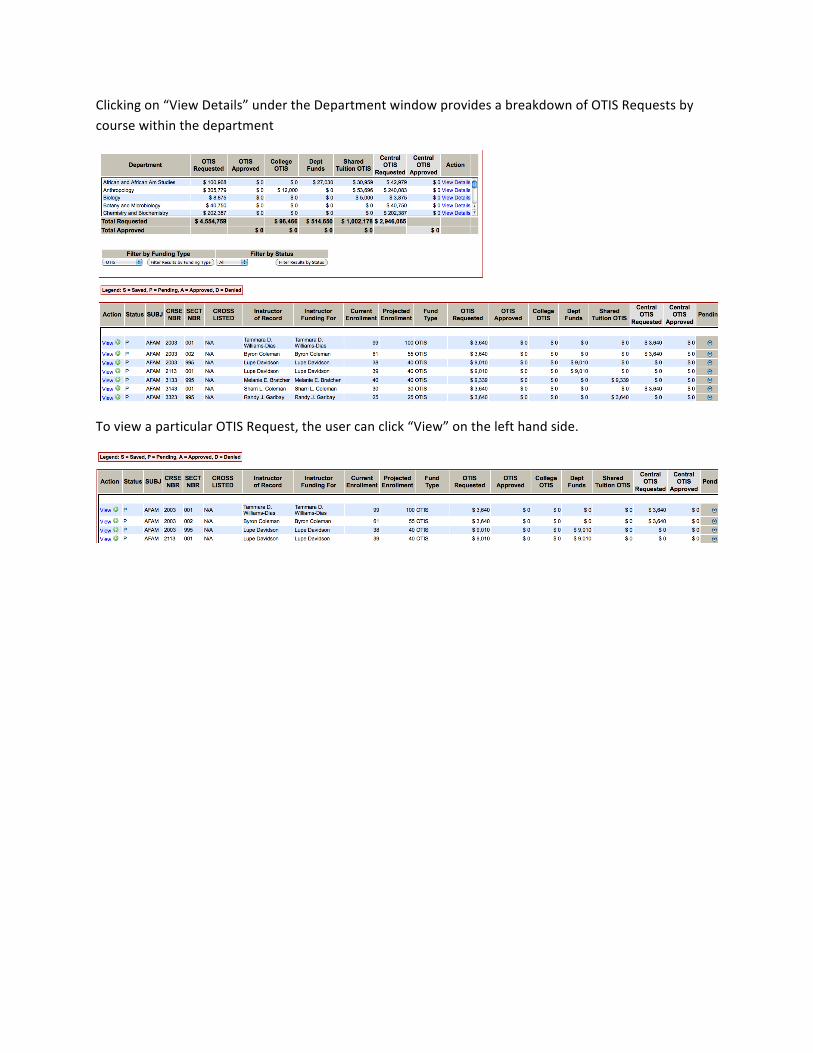
Clicking on “View Details” under the Department window provides a breakdown of OTIS Requests by course within the department
To view a particular OTIS Request, the user can click “View” on the left hand side.

A read-‐only version of the desired OTIS Request will open on a new page
Reports Provost users may also view reports by clicking on the “Reports” button from the menu at the top of the screen.
From here, users may choose which data they want to view by selecting the appropriate semester, college, subject, and funding and clicking “View Report.”
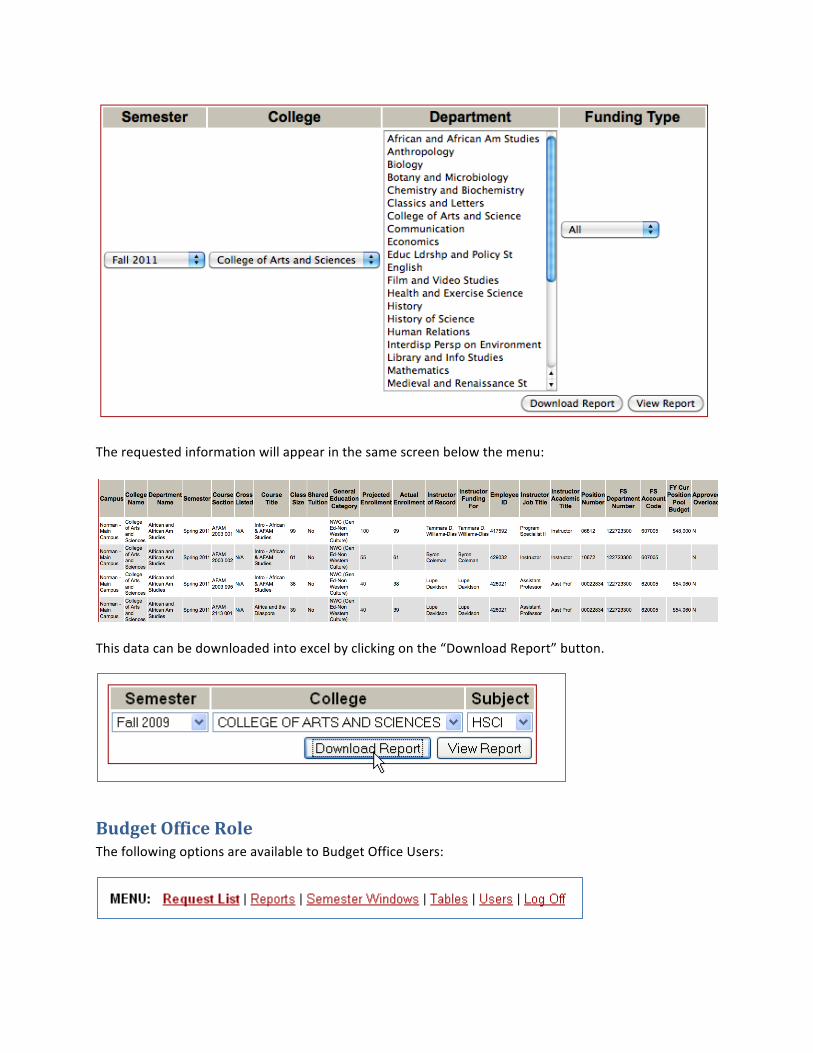
The requested information will appear in the same screen below the menu:
This data can be downloaded into excel by clicking on the “Download Report” button.
Budget Office Role The following options are available to Budget Office Users:

Request List On the “Request List” page, the user may view OTIS requested and approved funds by campus and semester, using the dropdown lists at the top of the screen to make their choice.
Results may be filtered by funding type using the dropdown list at the bottom of the screen. Users must press “Filter Results by Funding Type” or “Filter Results by Status” each time they want to view new information.
Clicking on “View Details” allows the user to drill down from college to department.
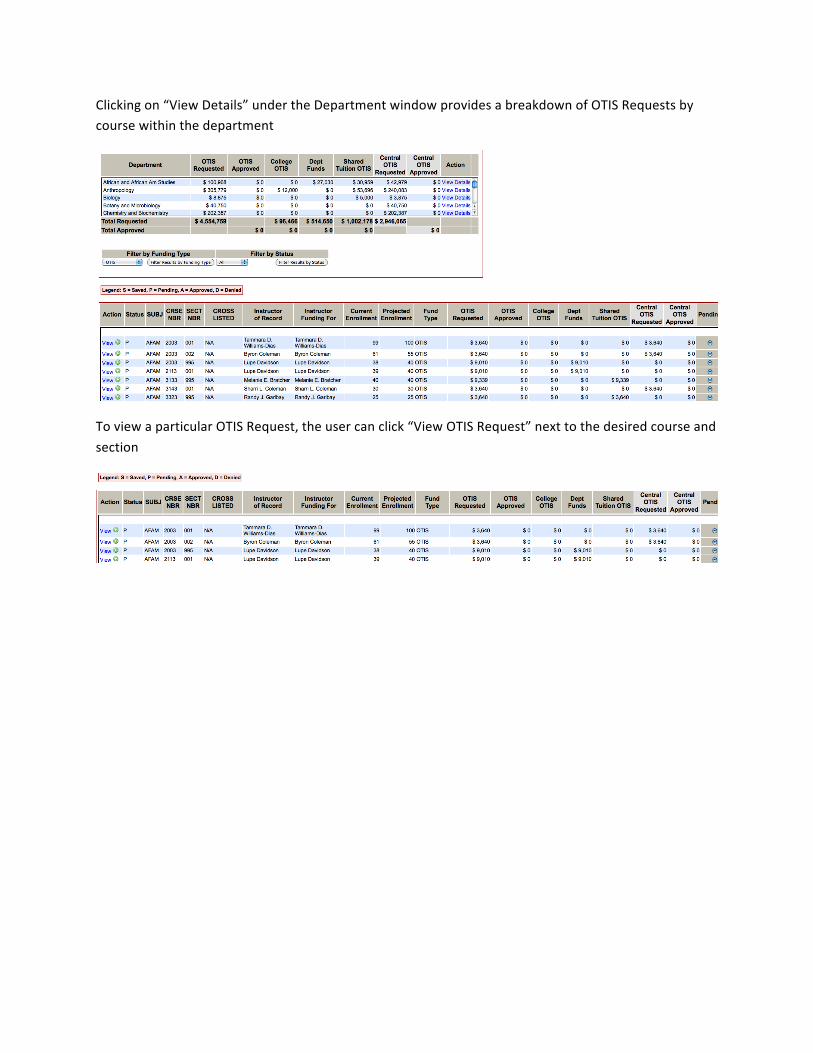
Clicking on “View Details” under the Department window provides a breakdown of OTIS Requests by course within the department
To view a particular OTIS Request, the user can click “View OTIS Request” next to the desired course and section

A read-‐only version of the desired OTIS Request will open on a new page
Reports Budget Office users may also view reports by clicking on the “Reports” button from the menu at the top of the screen.
From here, users may choose which data they want to view by selecting the appropriate semester, college, and subject and clicking “View Report.”
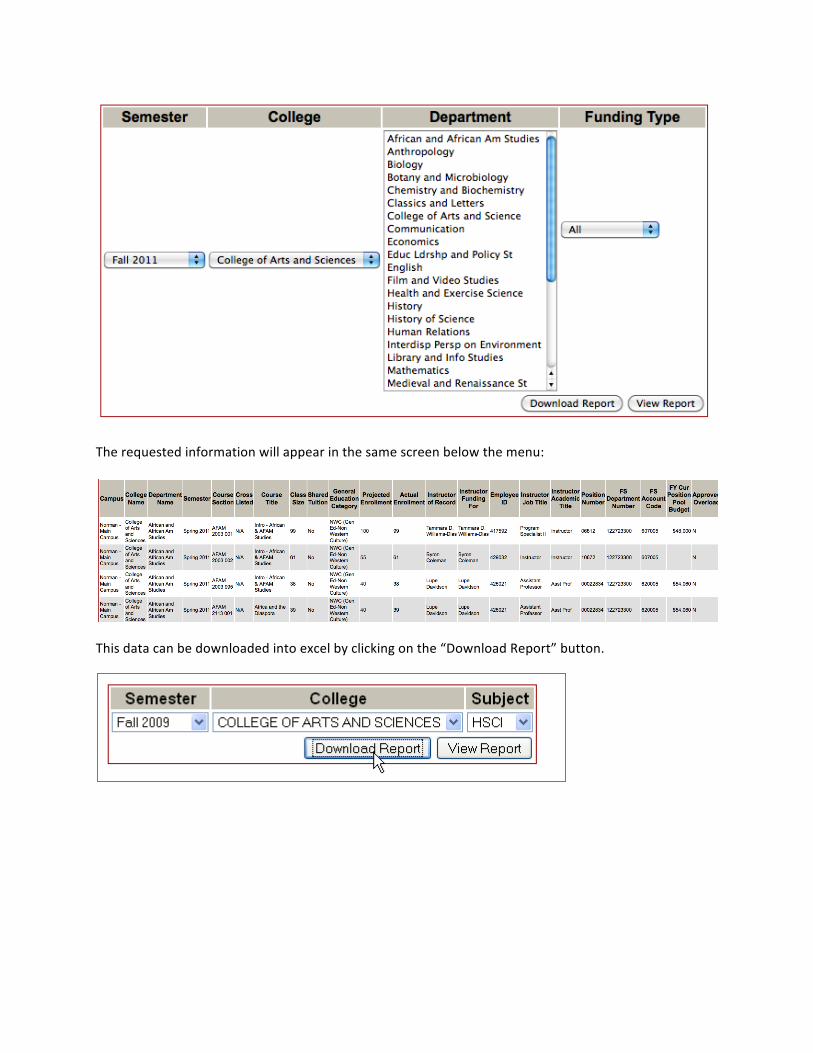
The requested information will appear in the same screen below the menu:
This data can be downloaded into excel by clicking on the “Download Report” button.
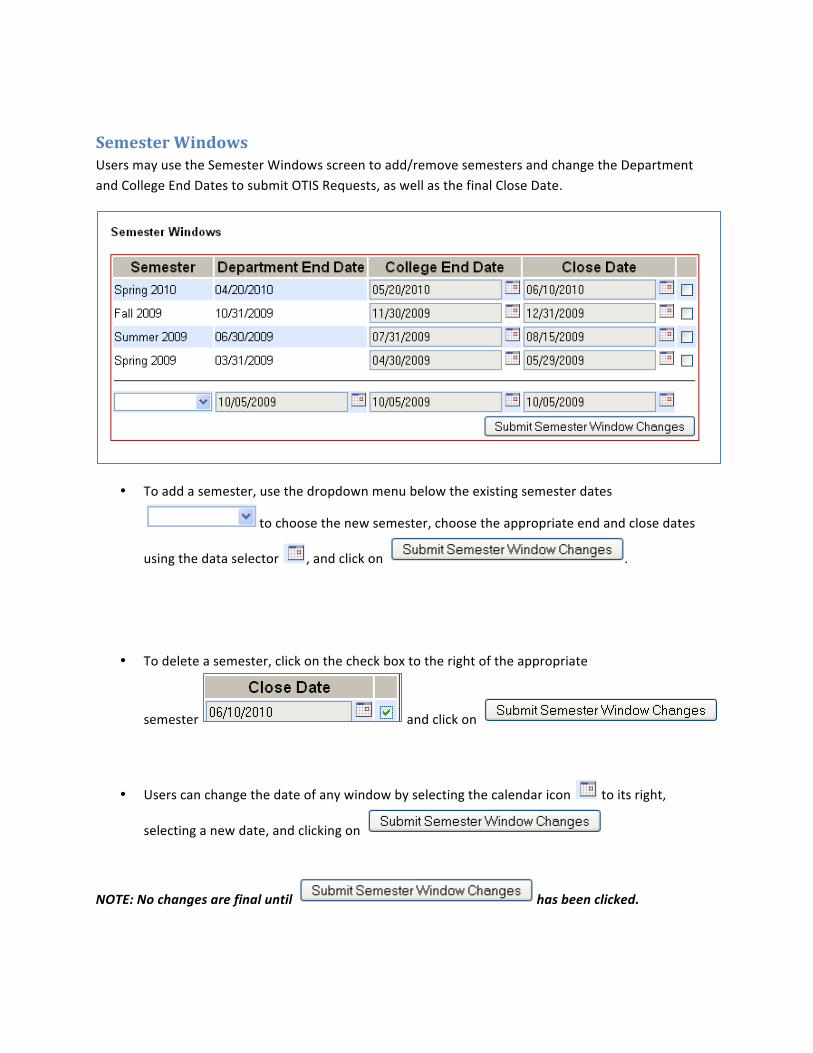
Semester Windows Users may use the Semester Windows screen to add/remove semesters and change the Department and College End Dates to submit OTIS Requests, as well as the final Close Date.
• To add a semester, use the dropdown menu below the existing semester dates
to choose the new semester, choose the appropriate end and close dates
using the data selector , and click on .
• To delete a semester, click on the check box to the right of the appropriate
semester and click on
• Users can change the date of any window by selecting the calendar icon to its right,
selecting a new date, and clicking on
NOTE: No changes are final until has been clicked.

Tables When the user clicks on “Tables,” three new options will appear below the menu—Department, Subject, and Fringe Benefits. Users can use these screens to add/change items in these areas.
Department
When a user clicks on “Department” the following screen will appear. To add a new Department, users can enter the appropriate Department Name, FSS Number, and College Name from the dropdown menu
and click on .
Users can change Department information through the “Update Departments” area by updating the
necessary information and clicking on at the bottom of the screen.

Subject When a user clicks on “Subjects” from the top menu, the user can add/manage subjects with the resulting screens.
A user can add a subject by entering the appropriate Subject Code, choosing the appropriate
Department Name, and clicking on .
A user can update existing subjects by changing the appropriate Subject Code and Department Name
and clicking on at the bottom of the screen.

Fringe Benefits A user can add/manage Fringe Benefits by clicking on “Fringe Benefits” from the top menu screen.
• To add a Benefit, select the appropriate Fiscal Year, Account Code, type in the FB Rate, and click
on . Once created, a Fringe Benefit cannot be deleted.
• To update a Benefit, change the FB Rate and click on .
Users
The Budget Office User can add/manage College users by clicking on “Users” from the top menu bar. The screen will display a list of current users, including their employee IDs and respective Colleges.

• To add a user, click on the button and type the name of the person you wish to add in the box that appears. Click on the name of the person and their employee ID will appear in the box.
Select the appropriate College and click .
• To delete a user, click on the checkbox to the right of their name and then click on
.
College Level
College level users have three menu options to choose from—Request List, Reports, and Users.
Request List
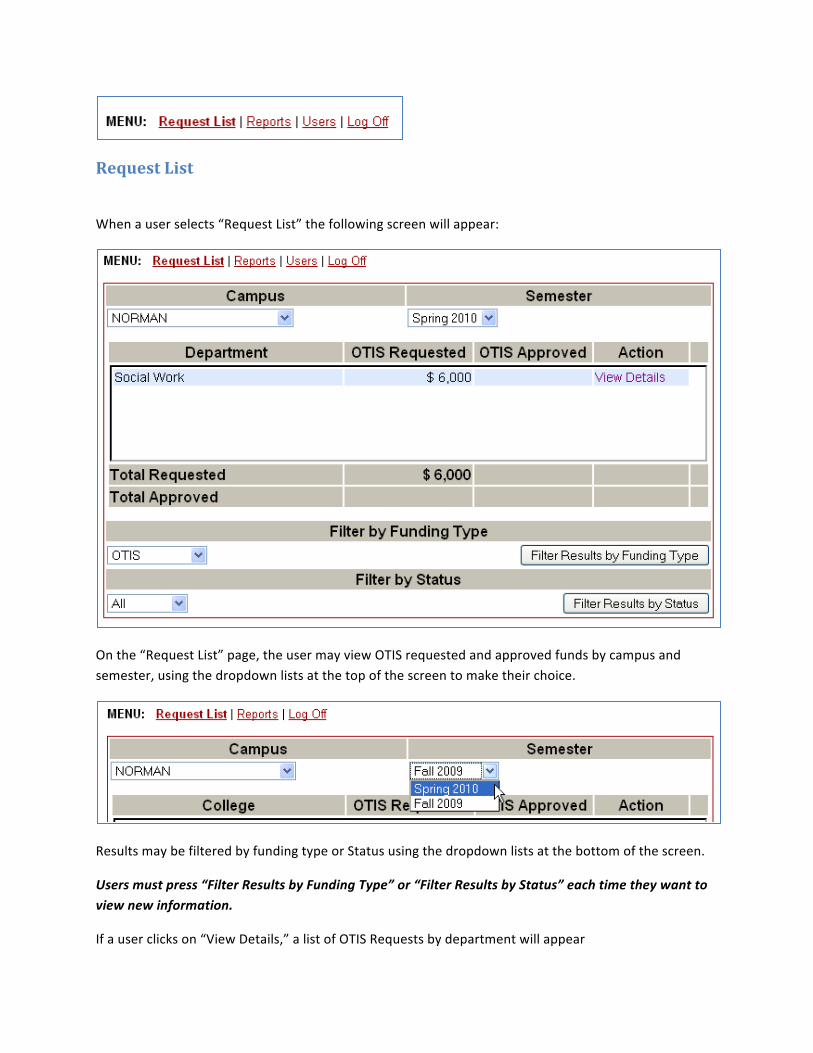
When a user selects “Request List” the following screen will appear:
On the “Request List” page, the user may view OTIS requested and approved funds by campus and semester, using the dropdown lists at the top of the screen to make their choice.
Results may be filtered by funding type or Status using the dropdown lists at the bottom of the screen.
Users must press “Filter Results by Funding Type” or “Filter Results by Status” each time they want to view new information.
If a user clicks on “View Details,” a list of OTIS Requests by department will appear

From this screen a College level user can approve, deny, and view specific OTIS Requests.
• To change the status of a request to “Pending,” a user should click the bubble next the
appropriate request and click . The user may also click the button to change the status of all requests in the current list to “Pending.”
• To change the status of a request to “Approved,” a user should click the bubble next the
appropriate request and click . The user may also click the button to change the status of all requests in the current list to “Approved.”
• To deny a request, a user should click the bubble next the appropriate request and click
. Requests cannot be denied in mass and require the user to submit a reason for each denial.

• To view a particular OTIS Request in detail, the user should click on and the entire report will appear on a new page in read-‐only form.
Reports College users may also view reports by clicking on the “Reports” button from the menu at the top of the screen.
From here, users may choose which data they want to view by selecting the appropriate semester, college, and subject and clicking “View Report.”
The requested information will appear in the same screen below the menu:
This data can be downloaded into excel by clicking on the “Download Report” button.

Users
A College User can add/manage Department users by clicking on “Users” from the top menu bar. The screen will display a list of current users, including their employee IDs and respective Departments.
• To add a user, click on the button and type the name of the person you wish to add in the box that appears. Click on the name of the person and their employee ID will appear in the box.
Select the appropriate College and click .

• To delete a user, click on the checkbox to the right of their name and then click on
.
Departmental User
Departmental Users have the following menu items to choose from:
Request List
Users may use this screen to filter by campus, semester, and funding type:
Results can be viewed in the table below

Total Requested and Total Approved Funding will appear at the bottom of the screen
Submitting an OTIS Request To submit an OTIS Request, click on blue text that reads “Make OTIS Request” under the heading “Action”

The blank request form will open on a new page
Filling out an OTIS Request
The following fields are required:
• FS Account Code • Reason For One Time Request • Position Number • Projected Enrollment • Approved Overload

To input an instructor, type the instructor’s 6-‐digit employee ID into the field and click “Get Instructor”
The instructor’s information will be inputted automatically by the system
“Total Stipend for Course” must equal the sum of all other funds fields. You can check this by clicking the “Check Total Funds” button. If the inputs are correct, the total will appear next to the “Total Funds” field.
If the funds are not correct, the following error will appear:
Users may save the report at any time, or submit the report using the buttons below:
Submitted requests will appear in the request list with the status of “P” (Pending)
Draft request will appear in the request list with the status of “S”

The user may click on “View” to view a submitted request in view-‐only mode and “Edit OTIS Request” to continue working on a saved request.
Once a request has been submitted, the user will receive an e-‐mail when the request is denied or approved.
Reports
Departmental users may also view reports by clicking on the “Reports” button from the menu at the top of the screen.
From here, users may choose which data they want to view by selecting the appropriate semester, college, and subject and clicking “View Report.”
The requested information will appear in the same screen below the menu:

This data can be downloaded into excel by clicking on the “Download Report” button.