ssis operational and tuning guide.docx
DESCRIPTION
SSIS Operational and Tuning Guide.docxTRANSCRIPT

SSIS Operational and Tuning Guide
SQL Server Technical Article
Writers: Alexei Khalyako, Carla Sabotta, Silvano Coriani, Sreedhar Pelluru, Steve Howard
Technical Reviewers: Cindy Gross, David Pless, Mark Simms, Daniel Sol
Published: December, 2012
Applies to: SQL Server 2012; Windows Azure SQL Database
Summary: SQL Server Integration Services (SSIS) can be used effectively as a tool for moving data to and from Windows Azure (WA) SQL Database, as part of the total extract, transform, and load (ETL) solution and as part of the data movement solution. SSIS can be used effectively to move data between sources and destinations in the cloud, and in a hybrid scenario between the cloud and on-premise. This paper outlines SSIS best practices for cloud sources and destinations, discusses project planning for SSIS projects whether the project is all in the cloud or involves hybrid data moves, and walks through an example of maximizing performance on a hybrid move by scaling out the data movement.

Copyright
This document is provided “as-is”. Information and views expressed in this document, including URL and other Internet Web site references, may change without notice. You bear the risk of using it.
Some examples depicted herein are provided for illustration only and are fictitious. No real association or connection is intended or should be inferred.
This document does not provide you with any legal rights to any intellectual property in any Microsoft product. You may copy and use this document for your internal, reference purposes.
© 2011 Microsoft. All rights reserved.
2

ContentsIntroduction.................................................................................................................................................5
Project Design..............................................................................................................................................5
Problem Scoping and Description............................................................................................................5
Why Data Movement is so critical in Azure.............................................................................................6
Key Data Movement Scenarios................................................................................................................7
Initial Data Loading and Migration from On-Premises to Cloud..........................................................7
Moving Cloud Generated Data to On-Premises Systems.....................................................................8
Moving Data between Cloud Services.................................................................................................8
Existing Tools, Services, and Solutions.....................................................................................................9
SQL Server Integration Services (SSIS).................................................................................................9
SqlBulkCopy class in ADO.NET...........................................................................................................10
Bulk Copy Program (BCP.EXE)............................................................................................................11
Azure Storage Blobs and Queues.......................................................................................................11
Design and Implementation Choices.....................................................................................................12
Design and Implement a Balanced Architecture................................................................................13
Data Types Considerations................................................................................................................14
Solution Packaging and Deployment.....................................................................................................14
Create Portable Solutions..................................................................................................................14
Packages and Code Components distribution...................................................................................15
Azure SQL Database as a Data Movement Destination.....................................................................15
Architectural Considerations.....................................................................................................................16
Designing for Restart without Losing Pipeline Progress........................................................................17
The Basic Principle.................................................................................................................................17
Example with a Single Destination.....................................................................................................17
Example with Multiple Destinations......................................................................................................23
Other Tips for Restarting.......................................................................................................................25
Designing for Retry without Manual Intervention.................................................................................27
Incorporating Retry...............................................................................................................................27
SSIS Performance Tuning Options.............................................................................................................32
3

Tuning network settings........................................................................................................................32
Network settings................................................................................................................................32
Note: When changing the settings of your network interface card to use Jumbo frames, make sure that the network infrastructure can support this type of frame.Packet Size.....................................33
SSIS Package settings.............................................................................................................................34
Special Considerations for BLOB data................................................................................................36
Using New Features in SSIS 2012 to Monitor Performance Across a Distributed System......................38
Log Performance Statistics................................................................................................................38
View Execution Statistics...................................................................................................................40
Monitor Data Flow.............................................................................................................................45
Conclusion.................................................................................................................................................50
4

IntroductionSQL Server Integration Services (SSIS) is an effective tool for moving data to and from Windows Azure (WA) SQL Database as part of the total extract, transform, and load (ETL) solution or as part of the data movement solution where no transformations are required. SSIS is effective for a variety of sources and destinations whether they are all in the cloud, all on-premises, or mixed in a hybrid solution. This paper outlines SSIS best practices for cloud sources and destinations, discusses project planning for SSIS projects whether the project is all in the cloud or involves hybrid data moves, and walks through an example of maximizing performance on a hybrid move by scaling out the data movement.
Project DesignProjects that move data between cloud and on-premises data stores can involve diverse processes inside various solutions. There are often many pieces starting from the initial population of the destination, which may take data from another system or platform, through maintenance such as rebalancing datasets among changing numbers of partitions or shards, and possibly continuing with periodic bulk data operations or refreshes. The project design and underlying assumptions will often differ for a solution involving data in the cloud as compared to a traditional, fully on-premises data movement environment. Many learnings, experiences, and practices will still apply but changes are necessary to accommodate differences such as the fact that your environment is no longer self-contained and fully under your control as you move to a shared pool of commodity resources. These differences require a more balanced and scalable approach to be successful.
Problem Scoping and DescriptionFor both native solutions built from the beginning for the cloud and for migrated solutions, data needs to be moved back and forth. This likely happens in multiple phases of the application lifecycle. The phases include pre-production testing, initial data loading, subsequent data synchronization between cloud generated data and original on-premises databases, and recurring data snapshots taken from the cloud down to other on-premises systems (e.g. data warehouses).
5

Figure 1 Data Movement scenarios
The main focus of this section is the initial data loading phase: considering the end to end experience of extracting data from the source database, moving from on premises to cloud, and loading the data into a final destination. It’s important to emphasize that most, if not all, of the best practices and optimizations described in this paper will equally apply to most of the described scenarios with minimal changes. We’ll talk about these scenarios and their main issues in the next sections.
Why Data Movement is so critical in AzureCompared to a traditional data center experience, where the challenges of moving data between applications and systems are typically related to issues like application compatibility, process orchestration and synchronization, plus the physical hardware resources and networking capabilities, in cloud environments such as WA there are several extra layers of complexity. The complexity may reside in areas such as connectivity between on premises and cloud (or between different cloud services) and be related to connection reliability, bandwidth, and latency. Accounting for this complexity is crucial in developing an optimal data movement solution. When you have a high number of moving parts involved in the solution, it’s even more important to focus your efforts on finding a balanced design between all the components and technologies involved. You try to avoid “flooding” the weakest link of the chain as this will negatively impact all the others.
Based on our tests, one of the critical areas is the ability for the data destination to ingest, at the appropriate rate, the amount of data pushed into it from the outside. The most common approach is scaling the destination database out to multiple back end nodes using custom
6

sharding(http://social.technet.microsoft.com/wiki/contents/articles/1926.how-to-shard-with-windows-azure-sql-database.aspx). This technique will be mandatory if the amount of data to load is significant (over 20 GB/hour is considered significant as of the time of this writing), and can be applied to both Azure SQL Database instances and SQL Server running in WA Virtual Machines (VMs). Because this will not automatically introduce linear scalability in the data loading solution, there is an increased need for balancing the other moving parts of the solution. In the next sections we’ll describe the most critical areas and the design options that can be adopted to maximize the final results.
Key Data Movement ScenariosThe following are the three main scenarios that we’ll consider as part of the overall end to end data movement experience. They will contain most of the recurring themes and challenges we’ve found along the way.
Initial Data Loading and Migration from On-Premises to Cloud
Moving Cloud Generated Data to On-Premises Systems Moving Data between Cloud Services
Initial Data Loading and Migration from On-Premises to Cloud
7
SQL Database or SQL Server in a VM
Every application that needs to be moved from an on-premises deployment to a cloud environment will require a certain volume of data to be moved as well. When the volume of data becomes significant, this operation may present some critical challenges that will require a slightly different approach compared to what we’re used to on premises. This is mainly due to the a couple of areas: public network bandwidth and latency, and the amount of (shared) resources to execute the data loading phase, that are available in the physical hardware node(s) hosting a database (either Azure SQL Database or WA VMs) in the cloud environment. There are specific approaches (see Figure 2) such as partitioning the original data into multiple bucket files and compressing these files before transferring across the network that can help minimize the impact of the least performing component in the overall solution. Partitioning data will also help on the cloud side to facilitate inserting this data into a data destination that will be very likely sharded across multiple Azure SQL Database instances or hosted by multiple WA VMs.
SSIS will play a major role on both the on premises and on the cloud side to physically execute import and export operations. The overall solution will require additional technologies like Azure Blob Storage and Queues to store intermediate file formats and to orchestrate the copy and retrieve operation across multiple instances of SSIS import processes.
For more information specifically related to the migration of a database schema and objects to Azure SQL Database please see Migrate Data-Centric Applications to Windows Azure (http://msdn.microsoft.com/en-us/library/windowsazure/jj156154.aspx ) guidance.
Moving Cloud Generated Data to On-Premises SystemsThis scenario is a close variation of the previous one, since from a technical perspective it is about reversing the loading process and data flow although there may be some differences in terms of overall goals. This scenario is typically associated with cold-generated data that needs to be recurrently retrieved and loaded into on-premises systems such as data warehouses, or with data that will feed local transactional solutions. This means that most of the techniques and technologies mentioned in the previous section will be relevant for this scenario as well. SSIS will extract data on the cloud side, and will then compress and send the data back to an on-premises system where again all the traditional guidance will apply. See Data Loading Performance Guide (http://msdn.microsoft.com/en-us/library/dd425070(v=SQL.100).aspx) for more information.
8

Moving Data between Cloud ServicesThere are several scenarios where moving data between different cloud services and databases is required. This includes data exchange between different solutions that need to interact with each other, and re-distributing partitioned data between tables hosted in different shards as illustrated in Figure 3 below.
These shards can be equally hosted by Azure SQL Database instances or SQL Server in a WA VM without changing the underlying approach and architecture. As a difference from previous scenarios, the entire data movement process will typically happen inside the boundaries of a single WA region, dramatically reducing the impact of network latency and eliminating the need to export and import data through an intermediate storage location (local disks or Azure Storage). While some scenarios may require moving data across regions, that discussion is outside the scope of this paper. At the same time, as the data source and destination will be both hosted in a shared cloud environment, the need to carefully tune the loading phase in particular will grow dramatically.
Existing Tools, Services, and SolutionsTo implement solutions that cover the previously described scenarios, you may use a combination of existing and new tools, and components and approaches that can help both on premises and in the cloud. In a hybrid environment, some of these components will need to be located with existing systems and data sources on premises while some other components will benefit from being located with data destinations in the cloud.
SQL Server Integration Services (SSIS)As a primary data movement and integration solution, SSIS offers a wide variety of facilities that cover most of the areas required in this range of scenarios. While not specifically designed for the hybrid environment, with the advent of WA VMs, SSIS packages can be executed both on premises and in the
9
Figure 3 Moving data between database shards
SQL Database or SQL Server in a VM

cloud and can potentially, directly connect the two worlds. This is opening the door for a large amount of knowledge and skill reuse in the DBA/ETL developer community, as many existing professionals have been trained and exposed to this technology; however it is important to understand that not all of the existing ETL processes implemented using SSIS can be directly reused when moving data from on premises to the cloud.
Depending on process complexity, data volume and velocity, and the intrinsic differences between cloud-based data destinations like SQL Server running in a WA VM and Azure SQL Database, a certain degree of re-architecture will be required.
Some of these challenges may be related to the current lack of capabilities in dealing with cloud connection realities when connecting to Windows Azure SQL Database or the amount of work needed to design SSIS packages that have to deal with failures and retries during data loading processes.
Another challenge can be to design packages that have to connect to partitioned (sharded) data destinations, where database entities can be spread across a sometimes changing number of physical nodes. Partitioning logic and metadata has to be managed and retrieved from application configuration files or data structures.
The SSIS platform already has most of the capabilities to deal with these challenges. For example, you can use Data Flow components such as the Conditional Split and Multicast transformations to implement partitioning logic.
In addressing any of the architecture challenges, some effort will be required to practically implement the new design, either using the traditional visual tool approach or through a more automated and programmatic way to architect a more complex solution. For the programmatic approach, SSIS offers a fully scriptable environment that spans from creating custom tasks inside the transformation pipeline to engine instrumentation that helps in troubleshooting and debugging package execution.
As part of the SQL Server 2012 release of Integration Services, a complete monitoring and management solution, based on a common catalog, can help you to design a distributed data movement solution and collect information around package execution statistics and results.
SqlBulkCopy class in ADO.NETIf developing a custom data movement solution is the preferred approach to solving a particular data movement issue, than the SqlBulkCopy (http://msdn.microsoft.com/en-us/library/system.data.sqlclient.sqlbulkcopy.aspx ) class inside ADO.NET data access library is probably one of the most common tools to get the job done. Built as a thin wrapper around ODBC Bulk Copy APIs, this class will accept a data table as input and an existing database connection and will offer a fast and fully configurable way to load data into a SQL Server or Azure SQL Database.
An important aspect of using the SqlBulkCopy class to interact with a cloud-based data destination is the ability to easily replace the traditional SqlConnection
10

(http://msdn.microsoft.com/en-us/library/system.data.sqlclient.sqlconnection.aspx) class used to interact with the server with the more appropriate ReliableSqlConnection (http://msdn.microsoft.com/en-us/library/microsoft.practices.enterpriselibrary.windowsazure.transientfaulthandling.sqlazure.reliablesqlconnection(v=pandp.50).aspx ) class that is part of the Transient Fault Handling Application Block (http://msdn.microsoft.com/en-us/library/hh680934(v=PandP.50).aspx ) library. This greatly simplifies the task of implementing a retry logic mechanism in a new or existing data loading process. Another interesting facet of the library is the ability to provide both standard and custom created retry policies to easily adapt to different connectivity conditions.
The SqlBulkCopy class exposes all the necessary attributes and properties to be able to adapt the loading process to pretty much every condition. This article will explain how to tune and optimize batch sizes depending on where the data loading process will run, how much data the process will have to import and what kind of connectivity will be available between the process and the data destination.
One situation where the SqlBulkCopy class wouldn’t be the most efficient choice to load data into a destination is when the amount of data inside a single batch is very low, for example between 10 and 1000 rows per batch. In this case, the overhead required by the SqlBulkCopy class to establish the initial metadata check before data loading starts can impact the overall performance. A good alternative approach for small batches would be to define a Table Valued Parameter (TVP) that implements the desired schema, and use “INSERT INTO Destination SELECT * FROM @TVP” to load the data.
For a full example of the use of the Bulk Copy API, see SqlBulkCopy Class (http://msdn.microsoft.com/en-us/library/system.data.sqlclient.sqlbulkcopy.aspx).
Bulk Copy Program (BCP.EXE)The Bulk Copy program (a command line utility created on the same Bulk Copy APIs described for the SqlBulkCopy class) has been used for some time to bulk load data to and from a SQL Server instance. The program is a simple yet powerful tool to efficiently automate simple data movement solutions. One of the tool’s main advantages is that it is simple to automate the tool installation in Azure Compute Nodes or VMs and to easily use existing scripts that may be adapted to run in a cloud environment.
On the other hand, BCP.EXE doesn’t provide any advanced, connection management capabilities. And, BCP.EXE requires the same effort as SSIS does in implementing reliable data movement tasks based on retry operations that can cause connection instability and loss. Also, unlike the other tools that we mentioned, BCP.EXE has to import or export data from physical files hosted in a local, mapped or attached drive. This makes it impossible to stream data from source to destination directly, or programmatically read data from different sources like SSIS or a SqlBulkCopy-based application can do.
Azure Storage Blobs and QueuesWhile not strictly tools related to data movement, Azure Storage capabilities are definitely integral to implementing complex solutions that require intermediate storage between on premises and cloud processes, and are integral to the ability to orchestrate phases and operations between the two environments. Azure Storage Blobs represent a powerful storage mechanism to load intermediate files, and to exchange these files between Azure Compute nodes or VMs and applications running on
11

premises. Azure Storage Queues represent a simple messaging tool that can be used to signal and coordinate access to files and content stored as Azure Blobs, from data loading processes.
Azure Storage Blobs and Azure Storage Queues are easy to integrate in existing applications, thanks to the .NET Azure Storage Client library that offers a simple set of classes to interact with Storage Accounts, Container, Blobs and related operations. This library hides the details of the underlying REST-based interface, and offers a bridge between on premises and cloud data. For more information on using Azure Storage Queues, and Blobs, see How to use the Queue Storage Service (http://www.windowsazure.com/en-us/develop/net/how-to-guides/queue-service/ ) and How to use the Windows Azure Blob Storage Service in .NET (http://www.windowsazure.com/en-us/develop/net/how-to-guides/blob-storage/).
Design and Implementation ChoicesSeveral factors can impact design and implementation choices regarding hybrid data movement solutions. The need for reusing existing artifacts and processes versus starting from a blank sheet is probably the most impactful to architectural decisions, followed by the skillset and profiles of team members (do you have more developers vs. more DBAs available for example). Does the team have the skillset to build a totally custom solution programmatically, or does the team have the skillset to adapt existing ETL processes? In either case, there are considerations to take into account when you introduce the cloud into the design because some of the obvious assumptions that you may have made about traditional, on premises environments may not be valid in a cloud environment.
Another important design aspect is where to place and run specific data movement tasks and services, such as the conditional split logic that performs sharding or data compressing activities. Depending on how these tasks are implemented at the component level (SSIS pipeline or custom tasks), these components can be very CPU intensive. To balance resource consumption, it may makes sense to move the tasks to Azure VMs, and leverage the natural elasticity of that cloud environment. At the same time, proximity to the data sources that they will operate on may provide even more benefits due to the reduced network latency that can be really critical in this kind of solution. Planning and testing will help you determine your particular resource bottlenecks and help guide your decisions on how to implement various tasks.
The efforts required to implement or adapt an existing solution to a hybrid scenario has to be justified by the benefits that the hybrid scenario can provide. You need to clarify the technical advantages that will be gained by moving some parts of your solution to the cloud versus the set of things that might be partially lost, to achieve the right mindset and be successful in a hybrid implementation. Those tradeoffs are related to very tangible aspects of a solution design. How can I leverage massive scale out capabilities provided by cloud platforms without losing too much control on my solution components? How can I run my data loading processes against a platform that is designed to scale out rather than scale up and still provide acceptably predictable performance? To address these questions requires abandoning some assumptions around network connectivity performance and reliability, application components and services that are always up and running, and planning instead for resources that can be added to solve performance issues. It requires entering into a world where design for failure is required,
12

latency is typically higher than in your past experience, and partitioning a workload across many small virtual machines or services is highly desired.
Design and Implement a Balanced ArchitectureAll these considerations should guide us in the right direction when designing a complex data movement solution with multiple moving parts, where none of them is necessarily representing a “best in class” equivalent of traditional on premises components.
This should be the guiding principle: Break down the data movement process into multiple smaller parts, from data source extraction to data destination loading, which have to be asynchronous and orchestrated in order to fit into the higher latency environment that the hybrid solution introduces. Finding the right balance between all the components in an environment will be much more important than reaching the grade of the steel (the limits) for a single component. Even individual steps of this process, like data loading for example, may need to be partitioned into smaller loading streams hitting different shards or physical databases, to overcome the limitations of a single back end node in our Azure SQL Database architecture.
Because of the highly available, shared and multi-tenant nature of some components in our system (Azure SQL Database nodes and the Azure Storage Blob repository for a WA VM hosting SQL Server) pushing too much data into a single node may create additional performance issues. An example of a performance issues is flooding the replication mechanism, which results in slowing down the entire data loading process.
Figure 4 Schematic representation of a balanced data loading architecture
13

Data Types ConsiderationsDatabase schema, entity design and data types used can impact the data movement process in many ways. As a general rule, data types that can achieve a greater amount of compression can provide several benefits when the data is bulk loaded from their sources into Azure Blobs or local storage for temporary operations. Compressing the data before transferring it over the wire of course improves performance.
Solution Packaging and DeploymentImplementing and deploying a solution that spans between on premises data centers and cloud-based environments typically means that you need to deal with several components and services. Providing a high degree of automation in both deploying and configuring all these parts is even more important if you plan to deploy multiple instances of the data movement solution. Virtualization technologies can help in creating a master image. The master image can potentially be used both on premises and in the Azure VM infrastructure to simplify the deployment of common services that need to be present in both environments.
At the same time, working with WA VMs introduces some limitations compared to what other Azure Compute nodes like Web Roles and Worker Roles can provide, in terms of both application and correlated packages and services (think about Startup tasks, for example).
If you are already leveraging software distribution capabilities, such as the ones available through the Windows Server and System Center families of products, another possibility would be to distribute solution components and packages with some components running in the cloud and others running in the on premises environments.
Another possibility is manually installing and configuring the various solution components such as SSIS and Azure SDK (to access Azure Storage capabilities), plus all the application installation packages (.msi) required in every VM that will run as part of the distributed environment.
Create Portable SolutionsOne aspect that will become even more important when you are running a solution in a scale out architecture, is the ability to quickly reconfigure options such as connection strings, credentials, and all the other configuration options that the solution will include. This typically requires some form of centralized configuration mechanism, where information will be accessed and propagated to all the various components and services involved in the data movement process to ensure that every change requires the minimum effort. Both standard tools such as SSIS, and custom developed components and applications, can easily be implemented with this approach in mind. Azure storage can be a good option for saving and maintaining the configuration information, given that it is easily accessible and available to both on premises and cloud components.
It’s worth noting that the SSIS platform already includes several features that simplify porting and scaling a solution, such as configuration files and parameters. Additional processes and services that compose the end-to-end data movement solution can implement the same types of configurable approaches, making it easier to move the solution between different environments.
14

Packages and Code Components distributionOnce all the solution elements have been implemented, the process you choose to physically distribute the various SSIS Packages and code components across multiple machines becomes critical. Another, even more critical aspect, will be how these packages and code elements will be hosted and executed inside the various servers and VMs. While the SSIS native environment in SQL Server 2012 offers different package storage types and deployment models, developing an end-to-end data movement solution may require difference choices. If you need to run some orchestration services/applications to supervise and control the data movement process, how can these services/applications be implemented? And how much of the underlying SSIS infrastructure can you use? A specific example of distributing and coordinating components is given in the “SQL Server 2012 SSIS for Azure and Hybrid Data Movement” white paper. The white paper is located in the MSDN library under the Microsoft White Papers node for SQL Server 2012.
WA VMs and physical Windows Server-based servers do not implement some of the features that the Azure platform provides for Web roles and Worker roles. Therefore, the best choice is to implement those components as Windows services, to ensure that the processes will start when the various hosts boot, and will continue to run independently from an interactive user session on that particular machine. The .NET platform makes it very easy to create and package this kind of software package that can then be distributed and deployed on the various hosts using the options that have been previously described.
The orchestration services/applications interact with the various external components (Windows Azure Blob Storage, Queues, etc.), invoke the SSIS execution engine (DtExec.exe), and orchestrate the data loading and transformation tasks on multiple hosts or VMs.
Custom components that the package execution requires will also need to be distributed across multiple nodes.
With this distributed approach, a robust, portable and flexible deployment and execution environment can be created to host our end –to-end data movement solution in a fully hybrid infrastructure.
Azure SQL Database as a Data Movement DestinationWhile SQL Server and Windows Azure SQL Databases have similarities, it is a mistake to consider them to be identical. There are several differences that may impact the way that applications perform on Windows Azure SQL database compared to SQL Server database.
Windows Azure SQL database is a hosted service implementing a fully, multi-tenant architecture. Unlike traditional SQL Server implementations, Windows Azure SQL Database contains features such as built-in high-availability (HA) and automated backups, and it runs on commodity hardware instead of large servers. The database runs a subset of the features commonly used in on-premises environments, including database compression, parallel queries, ColumnStore indexes, table partitioning and so on. For more information about feature limitations for Windows Azure SQL database, see SQL Server Feature Limitations (Windows Azure SQL Database) (http://msdn.microsoft.com/en-us/library/windowsazure/ff394115.aspx).
15

One of the biggest differences between Windows Azure SQL Database and SQL Server is that Windows Azure SQL Database exposes a scale-out, multi-tenant service, where different subscriptions are each sharing the resources of one or more machines in a Microsoft data center. The goal is to balance the overall load within the data center by occasionally moving customers around to different machines. These machines are standard, rack-based servers, maximizing price/performance instead of overall performance. Not every Windows Azure SQL Database node will use extremely high-end hardware in its hosted offering.
When a customer application needs to exceed the limits of a single machine, the application must be modified to spread the customer workload across multiple databases (likely meaning multiple machines) instead of a single server. One of the trade-offs of the elasticity and manageability of this environment is that sometimes your application may move to another machine unexpectedly. Since the sessions are stateless, the design of the application should use techniques that avoid single-points of failure. This includes caching in other tiers when appropriate and using retry logic on connection and commands to be resilient to failure.
Additionally, the various tiers in a WA infrastructure are not going to be on the same network subnet, so there will be some latency differences between client applications and Windows Azure SQL Database. This is true even when the applications and database are hosted in the same, physical datacenter. Traditional SQL Server data loading solutions that are very ‘chatty’ may run more slowly in Windows Azure due to these physical network differences. For those familiar with early client-server computing, the same solutions apply here – think carefully about round-trips between tiers in a solution to handle any visible latency differences.
Architectural ConsiderationsSome of the most common challenges with SSIS packages are in how to handle unexpected failures during execution, and how to minimize the amount of time required to finish the execution of an ETL process when you must resume processing after a failure. For control flow tasks such as file system tasks, checkpoints can be used to resume execution without reprocessing work that has already been completed. For complete instructions on using checkpoints, see Restart Packages by Using Checkpoints (http://msdn.microsoft.com/en-us/library/ms140226.aspx).
Often, the data flow is the largest portion of the SSIS package. In this section, you will see strategies for designing packages to allow for an automatic retry upon failure, and designing the data flow pipeline to allow you to pick up from the point of failure rather than retrying the entire dataflow.
Additional considerations for transient fault handling in the WA platform are covered in the “SQL Server 2012 SSIS for Azure and Hybrid Data Movement” white paper. The white paper is located in the MSDN library under the Microsoft White Papers node for SQL Server 2012.
16
Designing for Restart without Losing Pipeline ProgressWhen designing packages, one of the largest concerns is designing so that in the event of failure, you do not lose all of the progress the package has made up to this point. For items in the control flow of a package, this is accomplished by the use of checkpoints. However; being able to restart a data flow without losing progress is something that can only be accomplished by the design of the package. In this section, you will see a strategy for package design that allows the data flow to restart from the point of failure, and allows the package to automatically retry so that it will not fail in the case of a connection drop. Planning for such connection drops or short interruptions becomes especially important when moving data to or from WA SQL Database.
The Basic PrincipleAlthough performance is important in any data move, you should balance the performance requirements against how much progress you can afford to lose if something happens during your data move.
In each data move, you must have some way of knowing what data has already landed at the destination, and what has not. In the case of data that is only inserted, this can most often be determined by the primary key alone. For some other data, it may be the last modified date. Whatever the nature of the data, the first part of designing for restart is to understand how you identify data that already exists at the destination, what data must be updated at the destination, and what data still needs to be delivered to the destination. Once you have established this, you can segment and order the data in a way that allows you to only process the data that has not arrived at the destination, or to minimize the amount of rework that must be done at any stage.
Chunking and ordering allows you to easily track which chunks have been processed, and then with ordering, you can track which records within any chunk have already been processed. Following this approach, you do not need to compare every source row with the destination in order to know if that record has been processed.
More complex ETL processes may have several staging environments. Each staging environment is a destination for one stage of the ETL. In these types of environments, consider each of your staging environments to be a separate destination, and design each segment of your ETL for restart.
Example with a Single DestinationThe simplest restartable dataflow is a small one with a single integer as a primary key. When SQL Server is the source, you can query against this source using the best practice of limiting the data you pull from your source. Consider the classic example table from AdventureWorks: “Production.TransactionHistory” The table has the following structure:
CREATE TABLE [Production].[TransactionHistory](
[TransactionID] INT NOT NULL PRIMARY KEY,[ProductID] INT NOT NULL,[ReferenceOrderID] INT NOT NULL,[ReferenceOrderLineID] INT NOT NULL,
17

[TransactionDate] INT NOT NULL,[TransactionType] NCHAR(1) NOT NULL,[Quantity] INT NOT NULL,[ActualCost] MONEY NOT NULL,[ModifiedDate] DATETIME NOT NULL,
)
In this example, the table has a single integer as its primary key. If the data will be static at the time of the movement, or if data is only inserted into this table (no updates), then all you need in order to know whether or not a row has arrived at the destination is the primary key. Comparing each primary key value with the destination will be relatively expensive. Instead, use a strategy of ordering the data in the source file by the TransactionID column.
With such a strategy, the only thing you need to know is that data is processed in order, and what the highest TransactionID to have been committed at the destination is.
In an SSIS package, you can accomplish this by doing the following.
1. Check the highest key at your destination.2. Build your query from your source to pull only records with a TransactionID greater than the
highest TransactionID at the destination.3. Use an ORDER BY TransactionID in your source query to ensure that the comparison of highest
TransactionID remains valid the next time you start your package.
In SSIS, using a relational data source as your source, you can use an Execute SQL Task to pull the highest value into a variable in your package. However; consider the possibility that no rows at all exist at the destination.
SELECT MAX(TransactionID) FROM Production.TransactionHistory
To retrieve the maximum TransactionID, consider that the result from an empty table will be null. This may cause some problems in the logic you use in your package. A better approach is to first use an Execute SQL Task at your source and find the minimum unprocessed TransactionID at your source. Next, query for either the maximum TransactionID from your destination, or if none exists, then use a value lower than the minimum TransactionID from your source. Build your source query to pull only records greater than this value, and do not forget to use an ORDER BY TransactionID in your query.
NOTE: Although logically, you get the same results by just retrieving one value from your destination, and using an ISNULL function, or CASE statement in the WHERE clause of your source query, doing so can cause you performance issues, especially when your source queries gain complexity. Resist the urge to take this shortcut. Instead, find a value you can safely use as your lower boundary, and build your source query using the value.
NOTE: When your source is SQL Server, then using an ORDER BY clause on a clustered index does not cause SQL Server to do extra work to sort. The data is already ordered in such a way that it can be retrieved without performing a SORT. If the data at the destination also has a clustered index on the
18

same column, then ordering at the source optimizes your source query also optimizes the inserts into your destination. The other effect it has is guaranteeing the order within the SSIS pipeline, thus allowing you to be able to restart the dataflow at the point of failure.
To build this example package, do the following.
1. Create a new package either in a new or existing project. Rename the package “SimpleRestart.”2. Create connection managers to connect to your source and destination. For this example, an
OLE DB connection manager is created both for the source and for the destination servers.3. Drag a new Execute SQL Task onto the control flow surface and rename it “Pull Min
TransactionID From Source.” 4. Create an SSIS variable at the package level and name it minTransactionIDAtSource. We will use
this variable to store the value you pull from the Execute SQL Task you just added. Make sure the data type is Int32 to match the value of the TransactionID in the table, and set an appropriate initial value.
5. Configure the Pull Min TransactionID From Source as follows.a. Edit it and set the Connection to be the connection manager for your source server.b. Although you can store your SQLStatement in a variable, for this example leave the
SQLSourceType as Direct input. Open the input window for the SQLStatement, and enter the following query: SELECT ISNULL(MIN(TransactionID), 0) FROM
Production.TransactionHistory
NOTE: Test your SQL Queries before entering them into the editors in SSIS. This simplifies debugging as there is no real debugging help in the SSIS query editor windows.
19

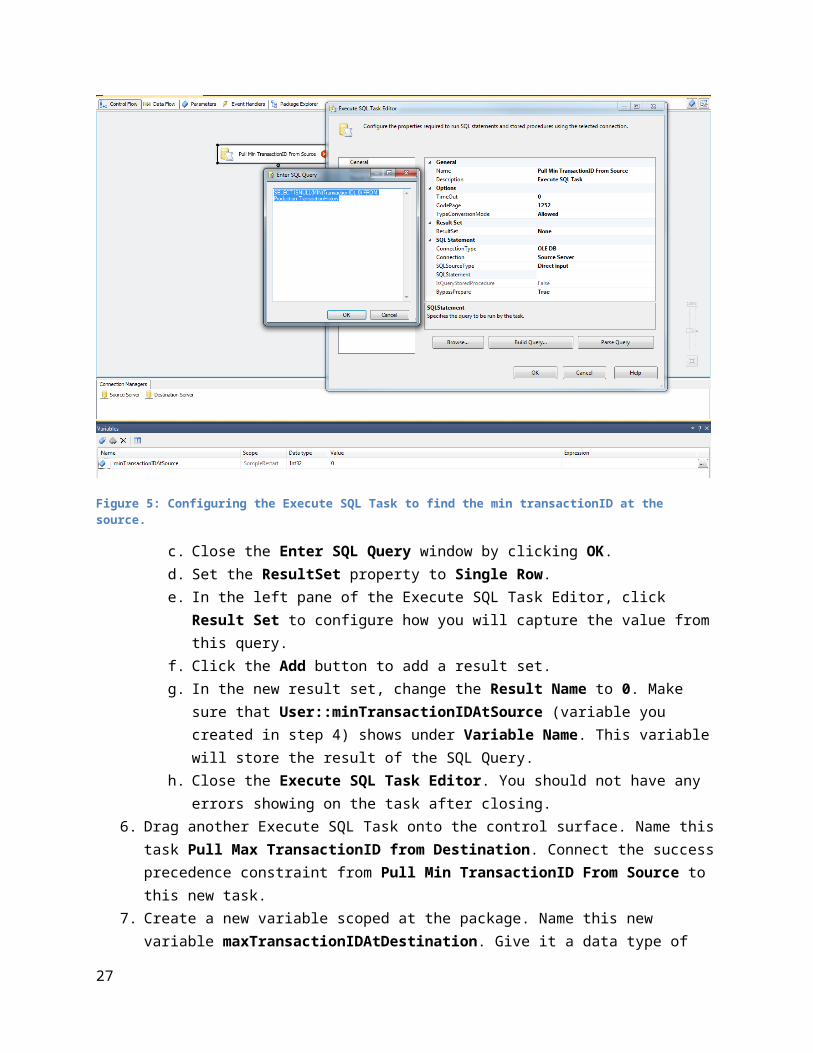
Figure 5: Configuring the Execute SQL Task to find the min transactionID at the source.
c. Close the Enter SQL Query window by clicking OK. d. Set the ResultSet property to Single Row.e. In the left pane of the Execute SQL Task Editor, click Result Set to configure how you will
capture the value from this query.f. Click the Add button to add a result set. g. In the new result set, change the Result Name to 0. Make sure that
User::minTransactionIDAtSource (variable you created in step 4) shows under Variable Name. This variable will store the result of the SQL Query.
h. Close the Execute SQL Task Editor. You should not have any errors showing on the task after closing.
6. Drag another Execute SQL Task onto the control surface. Name this task Pull Max TransactionID from Destination. Connect the success precedence constraint from Pull Min TransactionID From Source to this new task.
7. Create a new variable scoped at the package. Name this new variable maxTransactionIDAtDestination. Give it a data type of Int32 to match the datatype of the TransactionID, and give it an appropriate initial value.
8. Open the Execute SQL Task Editor for the new task and do the following:a. Set ResultSet to Single Row.b. Set to your Destination Server connection managerc. SQLSourceType: Direct input
20

d. For SQLStatement, use SELECT ISNULL(MAX(TransactionID), ?) FROM Production.TransactionHistoryNOTE: The ? is a query parameter. We will set the value of this momentarily.
e. Close the Query Editor by clicking OK, and click Parameter Mapping in the left panel of the Execute SQL Task Editor.
f. Click Add to add a single parameter. i. For Variable Name, choose User::minTransactionIDAtSource.
ii. For Direction, you should choose Input. iii. The Data Type should be LONG, which is a 32 bit Integer in this context. iv. Change Parameter Name to 0. Note that this must be changed to 0. The
character name will result in an error.g. Click on the Result Set in the left pane. Click the Add button to add a new result set.
i. Change the Result Name to 0.ii. Under Variable Name, choose User::maxTransactionIDAtDestination which is
the variable you created in step 7. This variable will contain the result of the query you input after this task executes.
NOTE: The next step will vary depending on the type of source you will use in your data flow. An OLE DB source can use an SSIS variable containing a SQL Statement as its query. An ADO.NET connection cannot do this, but it can be parameterized to use a package or project parameter as its source query. In this first example, you will use an OLE DB source with a variable containing the source query.
9. Drag a Data Flow task onto your control surface. Rename it to Main data move, and connect the success precedence constraint from Pull Max TransactionID From Destination to this Data Flow task.When the package executes at this point, you have stored the values you need to know to establish the start point for your current execution. Next, you need to set up a variable to hold the SQL Source query.
10. Create a new variable scoped at the package level. Name this variable sourceQuery and set the data type to string. You will use an expression to dynamically derive the value of this at runtime based on the value that you determined is the starting point for your query, by doing the following.
a. Click on the ellipsis button at the right of the Expression column to bring up the Expression Builder.
b. Expand the Variables and Parameters node in the upper left window in the Expression Builder. You will use the User::MaxTransactionIDAtDestination variable you created in step 7. You should see this variable in the listed variables. This variable is an Int32; however, and you will use it as part of a String variable. To do this, you will need to cast it as a DT_WSTR data type. In the upper right panel, expand the Type Casts node to find the (DT_WSTR, <<length>>) type cast.
c. In the Expression, type your query. In the places where you need your variable name, or your type cast, you can drag them from the appropriate window into the Expression box
21

to add them. This helps reduce the number of typos in this editor. Build the expression like this:
"SELECT TransactionID, ProductID, ReferenceOrderID, ReferenceOrderLineID, TransactionDate, TransactionType, Quantity, ActualCost, ModifiedDate FROM Production.TransactionHistory WHERE TransactionID > " + (DT_WSTR, 12 ) @[User::maxTransactionIDAtDestination] + " ORDER BY TransactionID"
Note the use of the typecast to change your integer value to a string with a maximum of 12 characters in width.
A 12 character width was used because it is large enough to contain the full range of SQL INT values including the negative when applicable. For BIGINT, you will need a 22 character width. Size your character variable according to the data type retrieved.
When you have typed your expression, click Evaluate Expression button to be sure SSIS can parse your expression correctly. You will see that it has properly placed the initial value of maxTransactionIDAtDestination into the evaluated expression. This value will be set appropriately at runtime.
Be sure you include the ORDER BY clause in your SQL Statement. Only with an ORDER BY do you get a guaranteed order from a relational database. The restart method you are building depends on the order of the key values.
d. Close the Expression Builder by clicking the OK button. Your dynamically constructed SQL Statement is now stored in your SourceQuery variable.
11. Double click the Main data move Data Flow task to open the Data Flow design surface.12. Drag an OLE DB Source onto your Data Flow control surface. Rename it to Retrieve from
TransactionHistory.
NOTE: You cannot include a period in the name of a data flow component, so the full name of Pull From Production.TransactionHistory is not allowed. If you do not use underscores for table names, you can substitute the underscore for the period in your SSIS naming convention.
13. Double click the Retrieve From TransactionHistory source to open the OLE DB Source Editor.a. For the OLE DB Connection Manager, choose your Source Server connection manager.b. In the Data Access Mode drop-down list, choose SQL Command from Variable.c. In the Variable name drop down list, choose the User::sourceQuery variable that you
created in step 10. d. Click Preview to ensure your query can run on your source server.
22

e. On the Columns page of the editor, ensure all the columns are selected.f. Click OK to exit the OLE DB Source Editor.
14. Drag an OLE DB Destination onto the control surface. Rename it to TransactionHistory Destination. Connect the Retrieve From TransactionHistory source to the new destination. Open the destination by double clicking, and configure by doing the following.
a. Choose the Destination Server connection manager in the OLE DB connection manager drop-down list.
b. For Data access mode, choose Table or view – fast load if it is not already selected.c. Under Name of the table or the view, either choose from the dropdown, or type in the
name of your destination server. In this case, it is Production.TransactionHistory.d. If you are using the definition of the TransactionHistory given above, for demo, you can
keep the default settings on Connection Manager page. If you are using the AdventureWorks database, you will need to select Keep Identity Values.
e. On the Mappings page of the editor, map your columns.
NOTE: In almost all cases, it is a good practice to send error rows to a destination file and redirect the output. This is not necessary for demonstrating restart on the pipeline. For steps on creating an error flow and redirecting rows, see Configure an Error Output in a Data Flow Component (http://msdn.microsoft.com/en-us/library/ms140083.aspx).
f. Click OK to exit the OLE DB Destination Editor. 15. Test this approach by starting an import and stopping, and then restarting. Each time, the data
flow should pick up with the next row that needs to be moved. Prior rows are ignored.
You have just built a simple package that can restart its data flow after a failure. This package will be used as a starting point for the example on designing a package that can retry. Note that you do not want any of the tasks in the Control Flow to save checkpoints. If the package fails and must be restarted, you need the Pull Min TransactionID From Source and the Pull Max TransactionID From Destination components to execute in order to find exactly where the data flow was interrupted in the previous execution. Designing a package to be able to find its progress and restart its flow like this is a good practice any time the characteristics exist within the data to be able to find the point at which the data flow was interrupted. However, this practice becomes especially important in an environment such as cloud that is more susceptible to network uncertainties.
Example with Multiple DestinationsThis principle can be extended to data flows with multiple destinations. One such scenario where this is useful is when moving data into a sharded data model as is often done with WA SQL Database. In these cases, a conditional split is used to send each row to its proper destination, or for reference data, a multicast may be used to send all data to all destinations. The following are the key principles to remember to design for restart.
23

Different destinations may have progressed to different points at the time of failure. Therefore, you must find the highest key value inserted in each destination. Create a variable to hold the highest value at each destination.
Your starting point at your source will be the next record after the lowest key value that was successfully inserted into your destinations. For example, if the highest key value inserted into a shard set were as follows, at your source you must resume your data flow with the next record after 1000.
o Shard00 key value 1000o Shard01 key value 1100o Shard02 key value 1050
Because this leaves open the possibility that some data may be extracted more than once, you must filter for each destination in order to prevent a Primary Key violation. Use a Conditional Split Transform to filter out the key values that have already been processed.
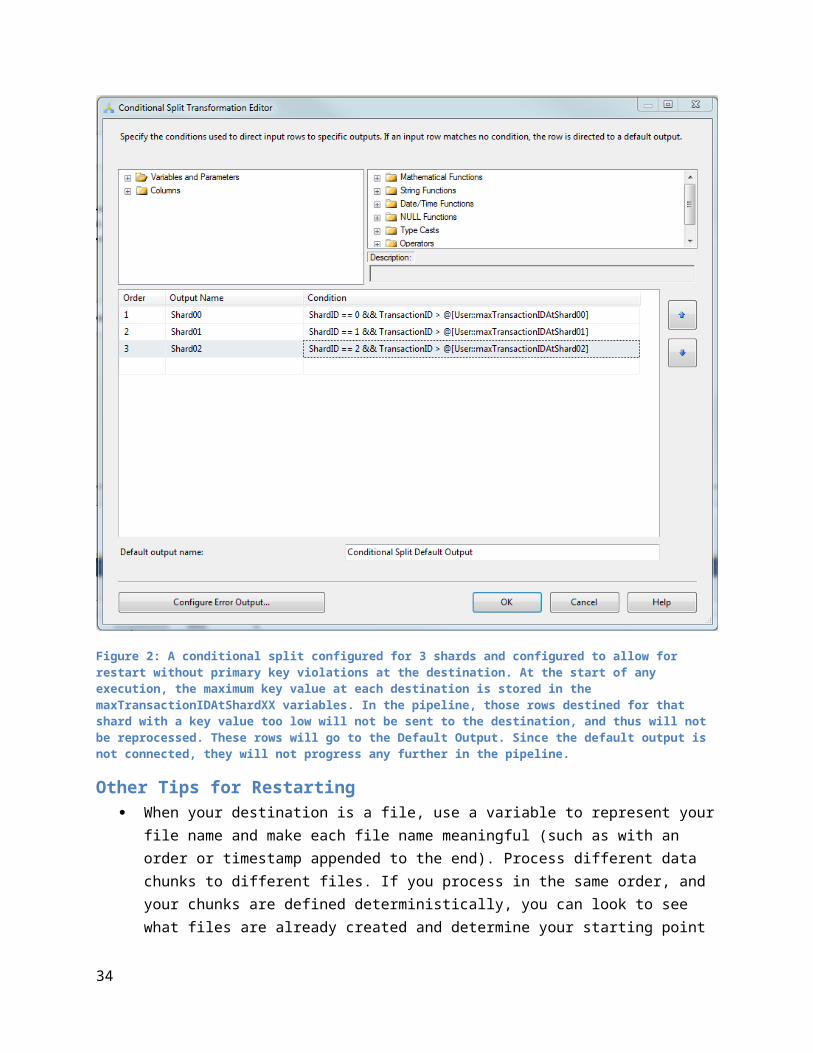
For the sharding example above, you would create variables named maxTransactionIDAtShard00, maxTransactionIDAtShard01 and maxTransactionIDAtShard02. In the Execute SQL Tasks, you would find the values to store in each. In the Conditional Split, you might define outputs named Shard00, Shard01, and Shard02. The expressionson the outputs would look like the following.
ShardID == 0 && TransactionID > @[User::maxTransactionIDAtShard00]ShardID == 1 && TransactionID > @[User::maxTransactionIDAtShard01]ShardID == 2 && TransactionID > @[User::maxTransactionIDAtShard02]
If any rows enter the pipeline that are less than the TransactionID at a particular shard, but the record goes to that shard, the record will not be sent and no primary key violations will be encountered. Let these records go to the Default output, or any disconnect output so that they are not processed any further.
24

Figure 2: A conditional split configured for 3 shards and configured to allow for restart without primary key violations at the destination. At the start of any execution, the maximum key value at each destination is stored in the maxTransactionIDAtShardXX variables. In the pipeline, those rows destined for that shard with a key value too low will not be sent to the destination, and thus will not be reprocessed. These rows will go to the Default Output. Since the default output is not connected, they will not progress any further in the pipeline.
Other Tips for Restarting When your destination is a file, use a variable to represent your file name and make each file
name meaningful (such as with an order or timestamp appended to the end). Process different data chunks to different files. If you process in the same order, and your chunks are defined deterministically, you can look to see what files are already created and determine your starting point from there. Depending on your needs and logic, you may need to move, rename, or delete files that have already been processed.
If your source is multiple files, process each file separately and track what your current file is. On restart, you can resume after the last file that was successfully processed. Use an ordering-by
25
file name or date to ensure you process files in the same order each time and can thus easily determine the last file that successfully processed.
When SQL Server is your source, you can use an SSIS string data type to query for integer values. So long as the string can be cast as a SQL Integer, SQL will cast the data type during optimization. Using this principle, you can change the MaxTransactionIDAtDestination and MinTransactionIDAtSource variables in the example package to a String, change the input parameter types in Pull Max TransactionID From Destination, and use this package as a template that will work with character primary keys as well. Do not use a SQL_VARIANT data type against any other data type in SQL as this will result in full scans when retrieving min and max key values.
If your source is a file, or any source where you cannot query with a WHERE or any other type of filter clause, then in your data flow do the following.
1. Put a conditional split transform between your source and destination components.2. In the conditional split, configure one output. Name this output Trash or some other
name that lets you know you do not want these rows.3. For the condition that gets rows sent to the destination, use an expression to filter out
the rows that are already in your destination. For example, the expression for the previous example would be the following.
[TransactionID] <= @[User::maxTransactionIDAtDestination]
4. Do not connect the Trash output to any component unless you really need to evaluate these rows. Its only purpose is to filter out rows you processed in your last run.
This does not prevent you from reading the rows you have already processed from this file, but it prevents you from sending them to your destination again thus saving network bandwidth. Since these rows are not sent to your destination, you do not need to delete any data from your destination.
When dealing with composite keys, use correlated subqueries to find the exact stopping point. Be sure to order your data by the same keys. The following is an example.
SELECT MAX(EmployeeID) AS EmployeeID, (SELECT MAX(EffectiveDate)
FROM HumanResources.EmployeeHistory i_forDate WHERE h.EmployeeID = i_forDate.EmployeeID) as EffectiveDate,
(SELECT MAX(EffectiveSequence) from HumanResources.EmployeeHistory i_forSeq where h.EmployeeID = i_forSeq.EmployeeID
and h.EffectiveDate = i.ForSeq.EffectiveDate) as EffectiveDateFROM HumanResources.EmployeeHistory hORDER BY EmployeeID, EffectiveDate, EffectiveSequence
26
Note what the order does in that example. If you were moving all records from all employees, and this was the order of your keys, this would be a good ordering. However, if all (or some) employees already existed at the destination, and you wanted to import only the changes that had taken effect since the last import, then ordering by EffectiveDate, EffectiveSequence and EmployeeID would be the ordering you would need to use to be able to resume from where you left off. Analyze what you are importing to define the order that allows you to determine the point at which you should resume.
Designing for Retry without Manual InterventionSSIS source and destination components do not directly incorporate retry logic. However, the SSIS package developer is not helpless do deal with this situation. Designing your packages so that you can restart your SSIS packages without losing the progress in your data flow also enables you to retry automatically after a failure with some additional consideration. In cases such as moving data to or from WA SQL Databases, you may need to retry automatically to handle transient fault conditions such as resources or connections being throttled. This section builds on the concepts demonstrated in the last section and shows an example of simple retry logic in your package. It then demonstrates using a chunked approach to allow for the retry of each chunk in order to add robustness to your package during times when transient faults may be more likely.
For more information on SQL Throttling, see Windows Azure SQL Database Performance and Elasticity Guide (http://social.technet.microsoft.com/wiki/contents/articles/3507.windows-azure-sql-database-performance-and-elasticity-guide.aspx).
Incorporating RetryFor cases of a single package, incorporating retry involves the following steps.
1. Determine the maximum number of times the package should retry before failing. For the sake of this example, we will determine that a component will be allowed a maximum of 5 retries before failing the package. Create a variable in your package named maxNumOfRetries. Make this variable of type int and give it the value of 5. This will be used in expressions in the package.
2. Set up a variable to store your success status. Create a new variable in your SSIS package. Name this new variable attemptNumber.
3. Use a FOR loop to retry up to the maximum number of retries if the data flow is not successful.
27

4. Put your data flow task inside the FOR loop.5. Set the MaximumErrorCount property on the FOR loop to the maximum number of times the
data flow should be retried so that a success after a retry will not fail your package. You should do this with an expression that uses the maxNumOfRetries variable you set up in step 1.
28

6. Use Execute SQL tasks as shown in the last section to find the minimum key values at the source and the maximum key values at the destination. For a simple retry, this can be done inside the FOR loop. For the more advanced examples, this may appear elsewhere in the control flow prior to the FOR loop.
7. Place your Execute SQL tasks in the FOR loop. 8. Connect the success constraint from the Execute SQL Task to the Data Flow task.9. Connect the success precedence constraint from the Data Flow task to a Script task that sets the
success status variable to true to break out of the FOR loop. The following is an example of the configuration of the Script task.
29

10. Connect a failure precedence constraint from the Data Flow task to another Script task for a time you expect to be longer than your most frequent or most troublesome expected problem. For this example we will use 10 seconds to cover the possibility of throttling. Set the value of the success variable to false.
30

11. For each task in the FOR loop, set the FailPackageOnFailure property to false. In this configuration, only when the FOR loop fails after using all of the configured retry attempts will it report failure and thus fail the package.
12. Configure Execute SQL tasks after the failure to again check for the minimum key values at the source, and maximum key values at the destination so that progress can be resumed without re-doing any work. Set these up as described in the Designing for Restart subsection in the Designing for Restart Without Losing Pipeline Progress section earlier in this document.
Each time an error in the data flow occurs, if the maximum number of retries has not been reached, then the process goes back to the point of finding the maximum key value at the destination. The
31

process continues by processing from the point that is currently committed at the destination. If there are multiple destinations in the dataflow, begin after the lowest key value to have safely arrived in the destination, and use a conditional split or error flow to handle any rows that would cause a primary key violation.
SSIS Performance Tuning OptionsBefore beginning a discussion about tips and tricks around the ETL performance tuning, you need to step back and look at which components and moving parts you have. Usually the ETL process consists of one or more of each of the following components:
Data Source – delivers data Package running on the SSIS server – extracts data from the data source, processes
transformations if this is required and loads data into the destination
32

Destination – receives data. A destination is typically a database with the table(s) that receive the data.
All these key parts work together over the network interface and pass data between each other. One of the first steps in ETL performance tuning is to ensure that the network can deliver the best possible performance.
For more information about the SSIS server, see Integration Services (SSIS) Server (http://msdn.microsoft.com/en-us/library/gg471508.aspx).
Tuning network settings.There are two layers that can impact the way data is transmitted between the parts we defined above: physical network configuration and the connection settings.
Network settings.The Ethernet frame defines how much data can be transmitted over the network at once. Each frame must be processed, which requires some hardware and software resources utilization. By increasing the frame size where supported by the network adapter, we can send more bytes with less overhead on the CPU and increase throughput by reducing the number of frames that need to be processed.
An Ethernet frame can carry up to 9000 bytes. This is known as a Jumbo Frame. In order to switch to using Jumbo Frames you need to change the settings of your network interface cards (NICs). As shown in the following example, the MaxJumboBuffers property is being set to 8192 to enable the use of Jumbo frames.
33
Note: When changing the settings of your network interface card to use Jumbo frames, make sure that the network infrastructure can support this type of frame.Packet SizeSQL Server can accept up to 32676 bytes in one SSIS network packet. Usually if an application has a different default packet size, this default value will override the SQL Server setting. Therefore, it is recommended that you set the Packet Size property for the destination connection manager in the SSIS package to the application default packet size.
To edit this property, right-click the connection manager in the SSIS Designer and click Edit. In the Connection Manager dialog box, click All.
SSIS Package settingsIn addition to the connection string settings, there are a few other settings that you may want to tweak in order to increase the processing capabilities of SQL Server.
The SSIS data flow reserves memory buffers for processing data. When you have dedicated servers with multiple cores and increased memory, often the default memory settings for SSIS can be adjusted to better leverage the capacities of the SSIS server.
The following are the SSIS memory settings you should consider adjusting.
34

DefaultBufferSize DefaultBufferMaxRows EngineThreads
DefaultBufferSize and DefaultBufferMaxRows are related to each other. The data flow engine tries to estimate the size of the single data row. This size is multiplied by the value stored in the DefaultBufferMaxRows, and the data flow engine attempts to reserve the appropriate chunk of memory for the buffer.
[Buffer Size Value] = [Size of single data row]x [DefaultBufferMaxRows]
If the buffer size value is bigger than DefaultBufferSize setting, the data flow engine reduces the number of data rows.
If the internally calculated minimum buffer size value is bigger than the buffer size value, the data flow engine increases the number of data rows. However, the engine does not exceed the DefaultBufferMaxRows value.
When you are adjusting the DefaultBufferSize and DefaultBufferMaxRows settings, it is recommended to pay attention to which values will result in the data flow engine writing data to disks. Memory paged out to the SSIS Server disk negatively impacts the performance of the SSIS package execution. You can watch the Buffers spooled counter to determine whether data buffers are being written to disk temporarily when a package is running.
For more information about performance counters for SSIS packages and obtaining counter statistics, see Performance Counters (http://msdn.microsoft.com/en-us/library/ms137622.aspx).
The EngineThreads setting suggests to the data flow engine how many threads can be used for executing a task. When the multicore server is used, it is recommended that you increase the default value of 10. However, the engine will not use more threads than it needs, regardless of the value of this
35

property. The engine may also use more threads than specified in this property, if necessary to avoid concurrency issues. A good starting point for complex packages is to use a minimum of 1 Engine Thread per execution tree while not going below the default value of 10.
For more information on the settings, see Data Flow Performance Features (http://msdn.microsoft.com/en-us/library/ms141031.aspx).
Special Considerations for BLOB dataWhen more data is in an SSIS pipeline set than will fit in the pre-sized pipeline buffer, the data will be spooled. This is a performance concern especially when you are dealing with BLOB data such as XML, text or image data. When BLOB data is in the pipeline, SSIS sets half of a buffer aside for in-row data, and half aside for BLOB data. The BLOB data that will not fit in half of the buffer, so the data will be spooled. You should therefore take the following actions to tune SSIS packages when BLOB data is to be in the pipeline:
1. Change the value of the BLOBTempStoragePath and BufferTempStoragePath to point to a high performance drive. By default, spooled objects will be written to temporary files in the directory defined by the TEMP or TMP environment variables. By default, this directory is located on the operating system drive. Typically, the operating system drive is not a high performance drive. You can ensure the temporary data spool files are written to a high performance drive by changing the value of the BLOBTempStoragePath in your SSIS Dataflow task properties to point to a directory on high performance storage. As with all properties in SSIS, you can use expressions to set this value.
2. Size your DefaultBufferSize and DefaultBufferMaxRows to minimize the occurrence of spooling. Since disks are usually the slowest component on your server, and their speed is typically several orders of magnitude slower than processor or memory speeds, you may find inefficient use of buffer space to be more efficient than allowing spooling. To minimize spooling due to BLOB data, use a method like the following to determine the DefaultBufferSize and DefaultBufferMaxRows when you have BLOB data in your data flow.
a. Determine your MaxBufferSize. Since you will have BLOB data in your dataflow, a good starting point may be the maximum value allowed which is 100 MB or 104857600 bytes.
b. Divide this number by 2. In the example, this gives 52428800 bytes. This is the half of the buffer that can contain BLOB data.
c. Select a size you will use for the estimated size of the BLOB data you will process in this data flow. A good starting place for this size is the average length + 2 standard deviations on the average length of all of your blob data that will be in a buffer. This value will contain approximately 98% of all of your blob data. Since it is likely that more than one row will be contained in a single SSIS buffer, this will ensure that almost no spooling will take place.
If your source is SQL Server, you can use a query such as the following to acquire the length
36

SELECT CAST(
AVG(DATALENGTH(ColName)) + (2 * STDEV(DATALENGTH(Demographics))) AS INT
) AS Length FROM SchemaName.TableName
If your table is too large to allow for querying the full data set for average and standard deviation, use a method such as the one described in Random Sampling in T-SQL (http://msdn.microsoft.com/en-us/library/aa175776(v=SQL.80).aspx) to find a sample from which to find the length to use.
d. Divide the number you got in step b by the number you got in step c. Use this number or a number slightly smaller as your DefaultBufferMaxRows value for your data flow task.
TIP: The DefaultBufferMaxRows and MaxBufferSize are both configurable by use of expressions. You can take advantage of this for data sets where the statistical nature of the blob data length may change often, or for the creation of template packages to set these values at runtime. To make these dynamic, do the following.
1. Create a new variable at the package level. Name the new variable DefaultMaxRowsInBuffer. Keep the data type as Int32. You can create a similar variable if you wish to set the MaxBufferSize property dynamically.
2. Use an Execute SQL task or Script task to find the value you will use for DefaultBufferMaxRows. Store the value you calculate in the DefaultMaxRowsInBuffer variable you created in step 1.
NOTE: For more information on how to use an Execute SQL Task to retrieve a single value into an SSIS variable, see Result Sets in the Execute SQL Task (http://technet.microsoft.com/en-us/library/cc280492.aspx).
3. In the properties box of the Data Flow task where you want to set the DefaultBufferMaxRows, select Expressions to open the Property Expressions Editor dialog box.
4. In the Property Expressions Editor, choose the DefaultBufferMaxRows in the Property drop-down menu, and click the ellipsis button to open the Expression Builder.
5. Drag the variable you created in step 1 from the Variables and Parameters list in the upper left hand corner into the Expression box, and click Evaluate Expression to see the default value of the variable in the Evaluated value box.
37

6. Click OK on the Expression Builder and Property Expressions Editor dialog boxes to save the configuration. In this configuration, the value for the properties will be set at runtime to minimize the chances of spooling BLOB data to disks.
Using New Features in SSIS 2012 to Monitor Performance Across a Distributed SystemThere are new features available in SQL Server 2012 for monitoring performance of Integration Services (SSIS) projects that you deploy to the SSIS server. You can log run-time performance information for a package execution, view package execution statistics, and monitor package data flow.
Log Performance StatisticsYou specify the scope of information that is logged during a package execution by selecting one of the following logging levels. To log performance statistics, select the performance or the verbose logging levels.
Logging Level Value DescriptionNone 0 Logging is turned off. Only the package execution status is logged.Basic 1 All events are logged, except custom and diagnostic events. This is the
default value.
Performance 2 Only performance statistics, and OnError and OnWarning events, are logged.
Verbose 3 All events are logged, including custom and diagnostic events.
Integration Services provides a rich set of custom events for writing log
38

entries for packages and many tasks. You can use these entries to save detailed information about execution progress, results, and problems by recording predefined events or user-defined messages for later analysis.
For more information, see Custom Messages for Logging (http://msdn.microsoft.com/en-us/library/ms345174.aspx )
You can specify the logging level by doing one or more of the following for an instance of a package execution.
Set parameters for an instance of a package execution by using the catalog.set_execution_parameter_value (http://msdn.microsoft.com/en-us/library/ff877990.aspx) stored procedure
Configure an instance of a package execution by using the Execute Package dialog box Configure a SQL Server Agent job for a package execution by using the New Job Step dialog box
To set the logging level by using the Execute Package dialog box
1. In SQL Server Management Studio, navigate to the package in Object Explorer.2. Right-click the package and select Execute.3. Select the Advanced tab.4. Under Logging level, select the logging level.
To set the logging level by using the New Job Step dialog box
1. Create a new job by expanding the SQL Server Agent node in Object Explorer, right-clicking Jobs, and then clicking New Job.
-or-
Modify an existing job by expanding the SQL Server Agent node, right-clicking an existing job, and then clicking Properties.
2. Click Steps in the left-hand pane, and then click New to open the New Job Step dialog box.3. Select SQL Server Integration Services Package in the Type list box.4. In the Package tab, select SSIS Catalog in the Package source list box, specify the server, and
then enter the package path in the Package box.5. On the Configuration tab, click Advanced, and then select a logging level in the Logging Level list
box.6. Finish configuring the job step and save your changes.
To set the logging level by using the catalog.set_execution_parameter_value stored procedure, set parameter_name to LOGGING_LEVEL and set parameter_value to the value for performance or verbose. The following example creates an instance of an execution for the Package.dtsx package and sets the
39

logging level to 2. The package is contained in the SSISPackages project, and the project is in the Packages folder.
Declare @execution_id bigint
exec catalog.create_execution 'Packages', 'SSISPackages', 'Package.dtsx', NULL, 1, @execution_id output
exec catalog.set_execution_parameter_value @execution_id, 50, 'LOGGING_LEVEL', 2
View Execution StatisticsThe SSISDB database views and stored procedures, and the standard reports that are available in SQL Server Management Studio, provide a wealth of information about package executions and information that is relevant to executions. An execution is an instance of a package execution.
Of the standard reports, the Integration Services Dashboard, All Executions, and All Connections reports are particularly useful for viewing package execution information.
The Integration Service Dashboard report provides the following information for packages that are running or have completed executions in the past 24 hours.
Integration Services Dashboard Report
Report Section DescriptionExecution Information
Shows the number of executions that are in different states (failed, running, succeeded, others)
Package Information Shows the total number of packages that have been executedConnection Information
Shows the connections that have been used in failed executions
Package Detailed Information
For each package, shows the details of the completed executions. For example, you’ll see the number of failed executions versus the total number of executions, the duration of an executions (in seconds), and the average duration of executions for over the past three months.
You can view additional execution information for a package by clicking Execution Performance , Overview, and All Messages.
The Execution Performance report charts the duration of the past 10 successful executions, and the Active Time and Total Time for the package data flow components. The active time refers to the total amount of time that component has spent executing in all phases, and the total time refers to the total time elapsed for a component. The report displays this information for data flow components only when the logging level of the last package execution was set to Performance or Verbose.
The Overview report shows the state of package tasks. The Messages
40

report shows the event messages and error messages for the package and tasks, such as reporting the start and end times, and the number of rows written.
The All Executions report provides the following information for executions that has been performed on the connected SQL Server instance. There can be multiple executions of the same package. Unlike the Integration Services Dashboard report, you can configure the All Executions report to show executions that have started during a range of dates. The dates can span multiple days, months, or years.
All Executions Report
Report Section DescriptionFilter Shows the current filter applied to the report, such
as the Start time range.Execution Information Shows the start time, end time, and duration for
each package execution.
You can view a list of the parameter values that were used with a package execution, such as values that were passed to a child package using the Execute Package task. To view the parameter list, click Overview.
41

The All Connections report provides the following information for connections that have failed, for executions that have occurred on the SQL Server instance.
Report Section DescriptionFilter Shows the current filter applied to the report, such
as connections with a specified string and the Last failed time range.
You set the Last failed time range to display only connection failures that occurred during a range of dates. The range can span multiple days, months, or years.
Details Shows the connection string, number of executions during which a connection failed, and the date when the connection last failed.
42

In addition to viewing the standard reports that are available in SQL Server Management Studio, you can also query the SSISDB database views for similar information about package executions. The following table describes the key views.
SSISDB Database View Descriptioncatalog.executable_statistics(http://msdn.microsoft.com/en-us/library/hh479592.aspx)
Displays a row for each executable that is run, including each iteration of an executable. An executable is a task or container that you add to the control flow of a package.
For example, the view displays the length of time the executable spent in execution, the times when the executable enters the pre-execute and post-execute phases, and the execution result for the executable such as success or failure.
An example of an execution result is the return code from stored procedure that is run by an Execute SQL Task. For more information, see Parameters and Return Codes in the Execute SQL Task.
catalog.executions(http://msdn.microsoft.com/en-us/library/ff878089.aspx)
Displays information about package executions. Packages that are executed with the Execute Package task, run in the same execution as the parent package.
For example, the view displays the status of an execution (running, failed, succeeded, and others), the total physical memory and available physical memory on the server when the execution is started, and the total page memory and available page memory when the execution is started.
catalog.execution_component_phases (http://msdn.microsoft.com/en-us/library/hh230981.aspx)
Displays the start and end times for the data flow components, for each phase of an execution. This information is displayed for multiple package executions.
The view displays this information for data flow components only when the logging level of the execution is set to Performance or Verbose.
catalog.event_messages(http://msdn.microsoft.com/en-us/library/hh479594.aspx)
Displays information about messages that were logged during operations such as creating and starting a package execution. The value for this type of operation is 200.
For example, the view displays the message text, the package component and the data flow component that are the source of the message, and the event associated with the message,The messages that the view displays for a package execution depends on the logging level setting of the execution.
catalog.event_message_context(http://msdn.microsoft.com/en-us/library/hh479590.aspx)
Displays information about the conditions that are associated with the execution event messages.
For example, the view displays the object that is associated
43

with the event message such as a variable value or a task, and the property name and value that are associated with the event message.
The view also displays the ID of each event message. You can find additional information about a specific event message by querying the catalog.event_messages view.
You can use the catalog.execution_component_phases view to calculate the time spent executing in all phases (active time) and the total time elapsed (total time) for package components. This can help identify components that may be running slower than expected.
This view is populated when the logging level of the package execution is set to Performance or Verbose. For more information, see Log Performance Statistics in this article.
In the following example, the active time and the total time are calculated for the components in the execution with an ID of 33. The sum and DATEDIFF functions are used in the calculation.
Declare @execution_id bigint
Set @execution_id = 33
select package_name, task_name, subcomponent_name, execution_path,
sum (DATEDIFF(ms, start_time, end_time)) as active_time,
DATEDIFF(ms,min(start_time), max(end_time)) as total_time
from catalog.execution_component_phases
where execution_id = @execution_id
group by package_name, task_name, subcomponent_name, execution_path
order by active_time desc
Finally, you can use the dm_execution_performance_counters function to obtain performance counter statistics, such as the number of buffers used and the number of rows read and written for a running execution.
In the following example, the function returns statistics for a running execution with an ID of 34.
select * from [catalog].[dm_execution_performance_counters] (34)
44

In the following example, the function returns statistics for all the running executions.
select * from [catalog].[dm_execution_performance_counters] (NULL)
Monitor Data FlowIntegration Services includes features and tools that you can use to troubleshoot the data flow in a package during execution.
Tapping the data flow during executionSQL Server Integration Services (SSIS) in SQL Server 2012 introduces a new feature that allows you to add a data tap on a data flow path of a package at runtime and direct the output from the data tap to an external file. To use this feature, you must deploy your SSIS project using the project deployment model to an SSIS Server. After you deploy the package to the server, you need to execute T-SQL scripts against the SSISDB database to add data taps before executing the package. Here is a sample scenario:
1. Create an execution instance of a package by using the catalog.create_execution (http://msdn.microsoft.com/en-us/library/ff878034) stored procedure.
2. Add a data tap by using either catalog.add_data_tap (http://msdn.microsoft.com/en-us/library/hh230989) or catalog.add_data_tap_by_guid (http://msdn.microsoft.com/en-us/library/hh230991) stored procedure.
3. Start the execution instance of the package by using the catalog.start_execution (http://msdn.microsoft.com/en-us/library/ff878160).
Here is a sample SQL script that performs the steps described in the above scenario:
Declare @execid bigint
45

EXEC [SSISDB].[catalog].[create_execution] @folder_name=N'ETL Folder', @project_name=N'ETL Project', @package_name=N'Package.dtsx', @execution_id=@execid OUTPUT
EXEC [SSISDB].[catalog].add_data_tap @execution_id = @execid, @task_package_path = '\Package\Data Flow Task', @dataflow_path_id_string = 'Paths[Flat File Source.Flat File Source Output]', @data_filename = 'output.txt'
EXEC [SSISDB].[catalog].[start_execution] @execid
The folder name, project name, and package name parameters of the create_execution stored procedure correspond to the folder, project, and package names in the Integration Services catalog. You can get the folder, project, and package names to use in the create_execution call from the SQL Server Management Studio as shown in the following image. If you do not see your SSIS project here, you may not have deployed the project to SSIS server yet. Right-click on SSIS project in Visual Studio and click Deploy to deploy the project to the expected SSIS server.
Instead of typing the SQL statements, you can generate the execute package script by performing the following steps:
1. Right-click Package.dtsx and click Execute. 2. Click Script toolbar button to generate the script.3. Now, add the add_data_tap statement before the start_execution call.
The task_package_path parameter of add_data_tap stored procedure corresponds to the PackagePath property of the data flow task in Visual Studio. In Visual Studio, right-click the Data Flow Task, and click Properties to launch the Properties window. Note the value of the PackagePath property to use it as a value for the task_package_path parameter for add_data_tap stored procedure call.
46
The dataflow_path_id_string parameter of add_data_tap stored procedure corresponds to the IdentificationString property of the data flow path to which you want to add a data tap. To get the dataflow_path_id_string, click the data flow path, and note the value of the IdentificationString property in the Properties window.
47

When you execute the script, the output file is stored in <Program Files>\Microsoft SQL Server\110\DTS\DataDumps. If a file with the name already exists, a new file with a suffix (for example: output[1].txt) is created.
As mentioned earlier, you can also catalog.add_data_tap_by_guid (http://msdn.microsoft.com/en-us/library/hh230991) stored procedure instead of using add_data_tap stored procedure. This stored procedure takes the ID of data flow task as a parameter instead of task_package_path. You can get the ID of data flow task from the properties window in Visual Studio.
Removing a data tapYou can remove a data tap before starting the execution by using the catalog.remove_add_data_tap stored procedure. This stored procedure takes the ID of data tap as a parameter, which you can get as an output of the add_data_tap stored procedure.
DECLARE @tap_id bigint
EXEC [SSISDB].[catalog].add_data_tap @execution_id = @execid, @task_package_path = '\Package\Data Flow Task', @dataflow_path_id_string = 'Paths[Flat File Source.Flat File Source Output]', @data_filename = 'output.txt' @data_tap_id=@tap_id OUTPUT
EXEC [SSISDB].[catalog].remove_data_tap @tap_id
Listing all data tapsYou can also list all the data taps by using the catalog.execution_data_taps view. The following example extracts data taps for a specification execution instance (ID: 54).
select * from [SSISDB].[catalog].execution_data_taps where execution_id=@execid
Performance considerationEnabling verbose logging level and adding data taps increase the I/O operations performed by your data integration solution. Hence, we recommend that you add data taps only for troubleshooting purposes.
Monitoring the data flow during executionYou can use the catalog.execution_data_statistics (http://msdn.microsoft.com/en-us/library/hh230986.aspx) SSISDB database view to analyze the data flow of packages. This view displays a row each time a data flow component sends data to a downstream component. The information can be used to gain a deeper understanding of the rows that are sent to each component.
Note: The logging level must be set to Verbose in order to capture information with the catalog.execution_data_statistics view.
48
The following example displays the number of rows sent between components of a package. The execution_id is the ID for an instance of execution that you can get as a return value from the create_execution stored procedure or from the catalog.executions view.
use SSISDB
select package_name, task_name, source_component_name, destination_component_name, rows_sent
from catalog.execution_data_statistics
where execution_id = 132
order by source_component_name, destination_component_name
The following example calculates the number of rows per millisecond sent by each component for a specific execution. The calculated values are:
total_rows - the sum of all the rows sent by the component wall_clock_time_ms – the total elapsed execution time, in milliseconds, for each component num_rows_per_millisecond – the number of rows per millisecond sent by each component
The HAVING clause is used to prevent a divide-by-zero error in the calculations.
use SSISDB
select source_component_name, destination_component_name,
sum(rows_sent) as total_rows,
DATEDIFF(ms,min(created_time),max(created_time)) as wall_clock_time_ms,
((0.0+sum(rows_sent)) / (datediff(ms,min(created_time),max(created_time)))) as [num_rows_per_millisecond]
from [catalog].[execution_data_statistics]
where execution_id = 132
group by source_component_name, destination_component_name
having (datediff(ms,min(created_time),max(created_time))) > 0
order by source_component_name desc
49

ConclusionSQL Server Integration Services (SSIS) can be used effectively as a tool for moving data to and from Windows Azure (WA) SQL Database, as part of the total extract, transform, and load (ETL) solution and as part of the data movement solution. SSIS can be used effectively to move data between sources and destinations in the cloud, and in a hybrid scenario between the cloud and on-premise. This paper outlined SSIS best practices for cloud sources and destinations, discussed project planning for SSIS projects whether the project is all in the cloud or involves hybrid data moves, and walked through an example of maximizing performance on a hybrid move by scaling out the data movement.
For more information:
http://www.microsoft.com/sqlserver/: SQL Server Web site
http://technet.microsoft.com/en-us/sqlserver/: SQL Server TechCenter
http://msdn.microsoft.com/en-us/sqlserver/: SQL Server DevCenter
Did this paper help you? Please give us your feedback. Tell us on a scale of 1 (poor) to 5 (excellent), how would you rate this paper and why have you given it this rating? For example:
Are you rating it high due to having good examples, excellent screen shots, clear writing, or another reason?
Are you rating it low due to poor examples, fuzzy screen shots, or unclear writing?
This feedback will help us improve the quality of white papers we release.
Send feedback.
50