mpt-8 music playback transport · mpt-8 user manual 4 warranty playback designs warrants the mpt-8...
TRANSCRIPT
Version 1.0
MPT-8Music Playback Transport
USER MANUAL

MPT-8 User Manual
3
IMPORTANT SAFETY INSTRUCTIONS Read and follow these instructions and keep this manual in a safe place. Do not use this apparatus near water. Do not block any ventilation openings. Do not install near any heat sources such as radiators, heaters, or other apparatus (including pre-
amplifiers and amplifiers) that produce heat. Do not install this apparatus in a confined space such as book cases or closed cabinets. Unplug this apparatus from the mains during lightning storms or when unused for long periods of
time.
CAUTIONThis product is a Class 1 laser product.
There is no hazardous invisible laser radiation during normal operation, because invisible laserradiation emitted inside this product is completely confined in the protective housings.Use of controls or adjustments or performance of procedures other than those specified herein mayresult in hazardous radiation exposure. The use of optical instruments with this product will increaseeye hazard.
!CAUTION: TO REDUCE THE RISK OF ELECTRICSHOCK, DO NOT REMOVE COVER. NO USERSERVICEABLE PARTS INSIDE. REFER SERVICINGTO QUALIFIED SERVICE PERSONNEL.
The lightning flash with arrowhead symbol within an equilateral triangle is intended to alertthe user to the presence of uninsulated “dangerous voltage” within the product’s enclosurethat may be of sufficient magnitude to constitute a risk of electric shock to persons.
!The exclamation point within an equilateral triangle is intended to alert the user to thepresence of important operating and maintenance (servicing)instructions in the literatureaccompanying the appliance.
INFORMATION TO THE USERAlteration or modification carried out without appropriate approval may invalidate the user’s right to operatethe equipment.

MPT-8 User Manual
4
WARRANTYPlayback Designs warrants the MPT-8 product against defects in material and workmanship under normaluse and service for a period of time specified by the product’s serial number from the date of first delivery tothe owner. The warranty time period is for 30 days. If within the first 30 days of ownership you register yourPlayback Designs product, by sending us a copy of your sales receipt, your name, address, city, state, zipcode, phone number, email address and your dealer’s store name, we will extend the warranty to 1 year forthe drive unit and 3 years for all other parts. This warranty is limited to the original owner.
Playback Designs will pay for return shipping charges (domestically) back to the owner when the product issent to Playback Designs within the first 30 days after purchase and the fault can be confirmed by PlaybackDesigns. Otherwise, owner will be responsible for all shipping charges to and from Playback Designs.International customers must deal with their local dealer or distributor.
For all warranty claims, a copy of the original invoice must accompany the product.Opening the product or modifying it in any way by the owner, including but not limited to cryogenic treatment,will void any warranty.If this product is equipped with the internal server option it is important that the operator follows the powerdown procedure described in this manual. Playback Designs does not warrant any damages resulting fromimproper power shut down with the server option.
Please contact Playback Designs for a RA (Return Authorization) number and shipping instructions beforeshipping any product to Playback Designs.
Playback Designs products are sold worldwide through authorized dealers with restricted territories. If anyPlayback Designs product is purchased from non-authorized dealers or from a dealer selling outside his / herauthorized territory all warranties will be void.
If you purchased this product from a dealer please take a moment and send us an email [email protected] so we can register you for the warranty. If this product has been shipped to youdirectly from Playback Designs you are automatically registered.
MPT-8 User Manual
5
BEFORE USING THE PRODUCT What is in the box: MPT-8 playback system
Optical cable for connection to MPD-8USB cablePower cord (110V versions only)User manual
Registration If you purchased this product from a dealer please take a moment andsend us an email to [email protected] so we can register you forthe warranty.
Installation: The AC voltage supplied to the unit should match the voltage ratingindicated on the rear panel.Do not place the player over an amplifier or any other equipment thatgenerates heat.
As this product may become warm during operation, always leavesufficient space around the player for ventilation. Always allow adequate aircirculation around the product.
During operation, the disc rotates at high speed. Do not lift or move thetransport while the disc is spinning. Doing so may damage the disc or thetransport.
When moving the transport, make sure to remove the disc and close thedisc tray. Then turn off the power and disconnect the power cord.
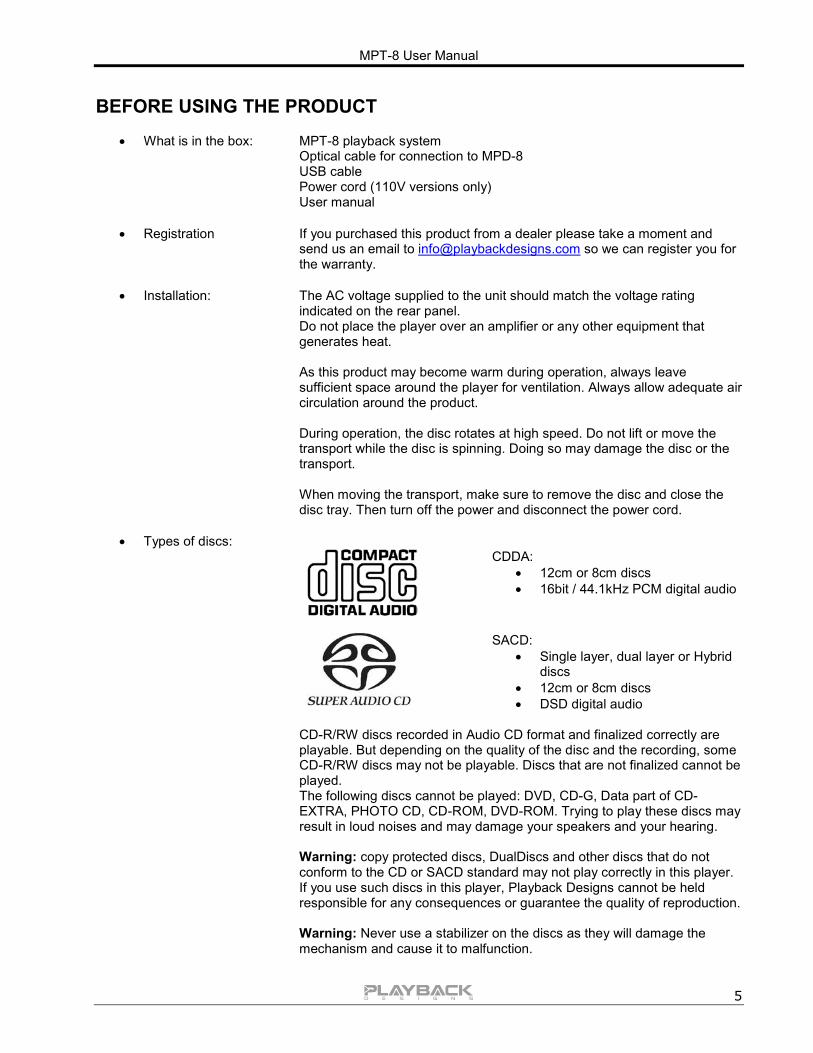
Types of discs:CDDA: 12cm or 8cm discs 16bit / 44.1kHz PCM digital audio
SACD: Single layer, dual layer or Hybrid
discs 12cm or 8cm discs DSD digital audio
CD-R/RW discs recorded in Audio CD format and finalized correctly areplayable. But depending on the quality of the disc and the recording, someCD-R/RW discs may not be playable. Discs that are not finalized cannot beplayed.The following discs cannot be played: DVD, CD-G, Data part of CD-EXTRA, PHOTO CD, CD-ROM, DVD-ROM. Trying to play these discs mayresult in loud noises and may damage your speakers and your hearing.
Warning: copy protected discs, DualDiscs and other discs that do notconform to the CD or SACD standard may not play correctly in this player.If you use such discs in this player, Playback Designs cannot be heldresponsible for any consequences or guarantee the quality of reproduction.
Warning: Never use a stabilizer on the discs as they will damage themechanism and cause it to malfunction.

MPT-8 User Manual
6
CONNECTIONS
IN
50/60 Hz100W max.
REMOTENETWORK TOSLINK
PLAYLINKOUT COAX
AES INAES OUT
USBAUDIO
RESET
STREAMERNETWORK
SERVER USBSERVICE
SERVERNETWORK
STREAMERUSB
MODEL: MPT-8MADE IN U.S.A.
Digital outputs: AES OUT: AES/EBU formatted for stereo linear PCM data. If playing from disc thedata on this output will be 16bits / 44.1kHz. If playing from a digital inputthe data on this output will be up to 24bits and up to 192kHz. Whenplaying single rate DSD sources this output will be DoP encoded.
PLINK OUT: Proprietary and high quality optical link to other Playback Designsequipment such as the MPD-8 DAC. This connection supports multipleaudio formats natively for PCM and DSD.
Digital inputs: AES: XLR connector for AES/EBU formatted stereo linear PCM data, up to24bits / 192kHz, and single rate DSD encoded in DoP.
COAX: same as AES, but S/PDIF formatted on RCA connector.
TOSLINK: same as COAX, but on optical connector, limited to 96kHz max.
PLINK IN: Proprietary and high quality optical link to other Playback Designsequipment such as the MPD-8 DAC. This connection supports multipleaudio formats natively for PCM and DSD.
USB AUDIO: Direct USB connection to computers and servers for PCM at samplerates up to 384kHz and DSD up to 11.2MHz.
STREAMER NETWORK: Only available when Stream-X option is installed. Input from networksources. See Stream-X manual for more details.
STREAMER USB: Only available when Stream-X option is installed. Input for USB devicessuch as USB drives and flash sticks. See Stream-X manual for moredetails.
SERVER NETWORK: Only available when Syrah or Roon server option is installed. Input fromnetwork sources. See Syrah manual for more details.
SERVER USB: Only available when Syrah or Roon server option is installed. Input fromUSB sources or output to external DAC. See Syrah manual for moredetails.
System Control: RESET: Used in connection with software update procedure. When pressedduring normal operation it resets the player.
REMOTE NETWORK: Remote control via tablet app (future expansion).
MPT-8 User Manual
7
Power: Before connecting the transport to the AC mains, please make sure that the rated voltagefor the MPT-8 is set correctly as indicated on the rear panel. Operating the transport at thewrong voltage will damage the unit. The voltage rating of the power supply cannot bechanged by the user.
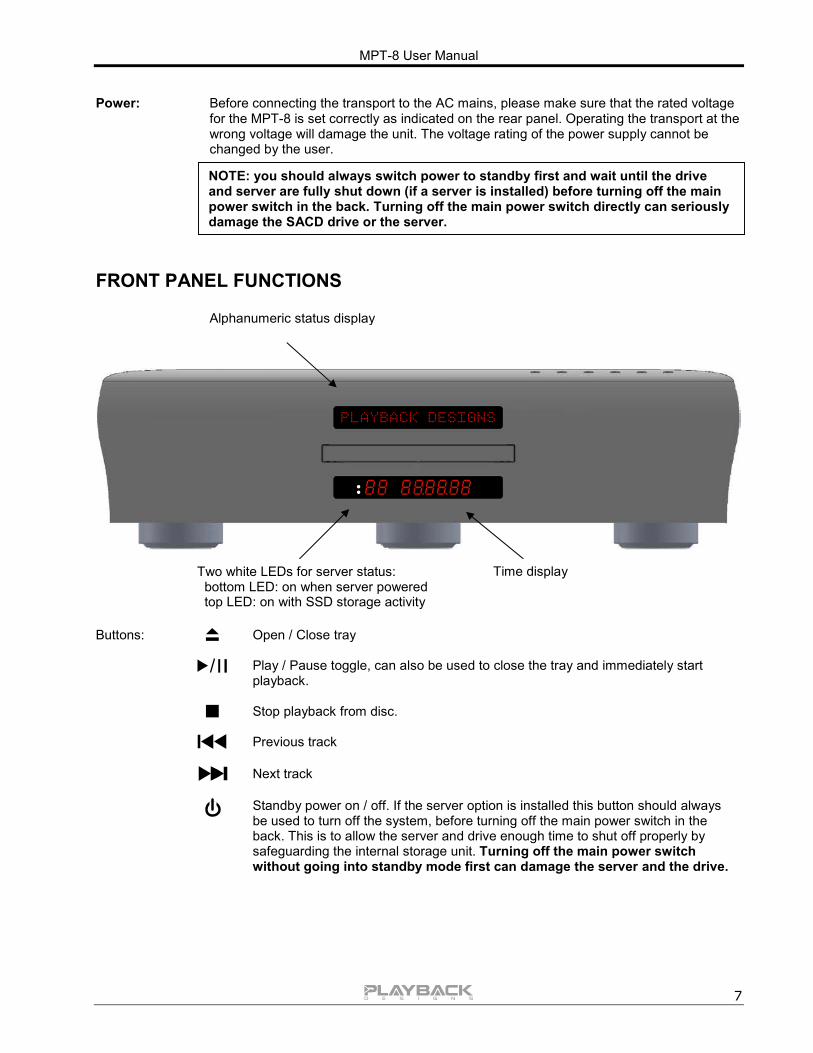
FRONT PANEL FUNCTIONS
Buttons: Open / Close tray
Play / Pause toggle, can also be used to close the tray and immediately startplayback.
Stop playback from disc.
Previous track
Next track
Standby power on / off. If the server option is installed this button should alwaysbe used to turn off the system, before turning off the main power switch in theback. This is to allow the server and drive enough time to shut off properly bysafeguarding the internal storage unit. Turning off the main power switchwithout going into standby mode first can damage the server and the drive.
Alphanumeric status display
Time displayTwo white LEDs for server status: bottom LED: on when server powered top LED: on with SSD storage activity
NOTE: you should always switch power to standby first and wait until the driveand server are fully shut down (if a server is installed) before turning off the mainpower switch in the back. Turning off the main power switch directly can seriouslydamage the SACD drive or the server.

MPT-8 User Manual
8
REMOTE CONTROL UNIT (included with companion product MPD-8 DAC)
DISC
MUTE
DAC PRE
PHSE
DIM
LAYR
TIME
All others
Opens the settings menu on front panel. Press the DISC button firstto select the MPT-8 settings.
During normal operation these up and down arrows directly below theDISC button toggle through the active inputs of the MPT-8.During settings display these buttons toggle through the settingsmenu.
Open / close tray
No function on MPT-8.
Dims display on front panel.
If these buttons are pressed for less than 1 second they allow you tojump tracks in sequential order. If during normal playback they areheld for more than 1 second the player enters Scan Mode and fastforwards or fast reverses while the button is being pressed.
Stops the transport.
Starts playback. Can also be used to close the tray and immediatelystart playback.
Pauses playback. Press the play button to continue playback.
This toggles the layer selection for SACD discs. In order to changethe layer the player must be stopped. The first time this button ispressed the current layer is displayed. Each subsequent press of thebutton will pre-select another layer. If then the button is not pressedfor more than one second the player will switch to the chosen layer ifavailable. This has no effect for CD’s.
This toggles the time display during playback between two states: Elapsed time Remaining time on active track
The first time this button is pressed it will indicate the currentlyselected state without changing it. If during the next 5 seconds thebutton is pressed again it will toggle to the next state.
This toggles through two Repeat modes: Repeat currently playingtrack or Repeat entire disc
Numeric buttons:Pressing any numeric button with a single digit will locate thetransport to the beginning of the chosen track and start playback.The +10 button can be used to access tracks higher than 9. Forinstance, track 23 can be accessed by pressing: +10 and +10 againand then 3.
No function on MPT-8.
MPT-8 User Manual
9
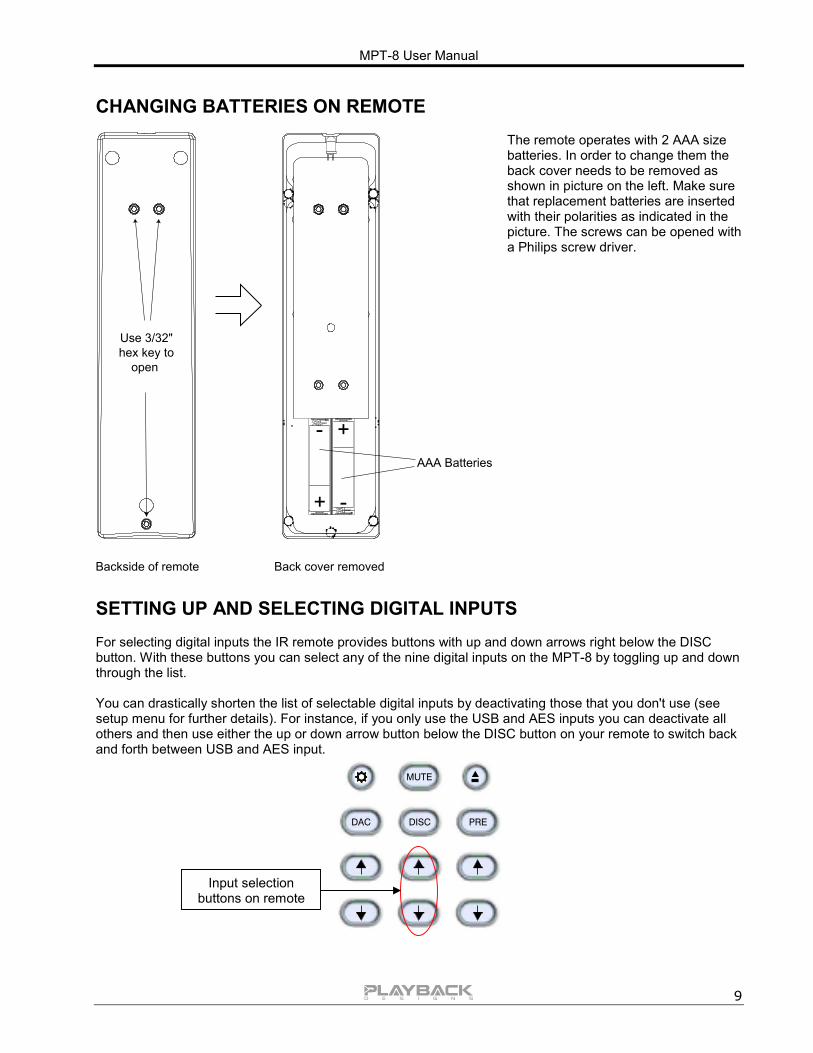
CHANGING BATTERIES ON REMOTE
Use 3/32"hex key to
open
-
+
+
-
Back cover removedBackside of remote
AAA Batteries
The remote operates with 2 AAA sizebatteries. In order to change them theback cover needs to be removed asshown in picture on the left. Make surethat replacement batteries are insertedwith their polarities as indicated in thepicture. The screws can be opened witha Philips screw driver.
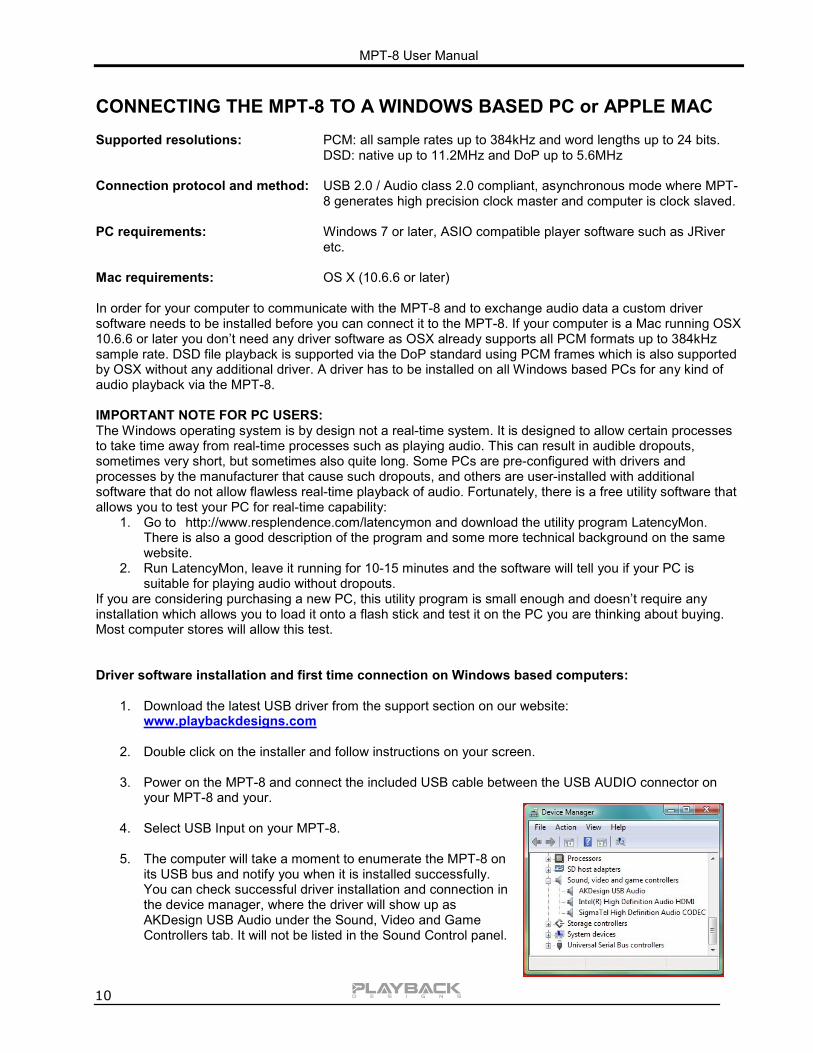
SETTING UP AND SELECTING DIGITAL INPUTSFor selecting digital inputs the IR remote provides buttons with up and down arrows right below the DISCbutton. With these buttons you can select any of the nine digital inputs on the MPT-8 by toggling up and downthrough the list.
You can drastically shorten the list of selectable digital inputs by deactivating those that you don't use (seesetup menu for further details). For instance, if you only use the USB and AES inputs you can deactivate allothers and then use either the up or down arrow button below the DISC button on your remote to switch backand forth between USB and AES input.
DISC
MUTE
DAC PRE
Input selectionbuttons on remote
MPT-8 User Manual
10
CONNECTING THE MPT-8 TO A WINDOWS BASED PC or APPLE MACSupported resolutions: PCM: all sample rates up to 384kHz and word lengths up to 24 bits.
DSD: native up to 11.2MHz and DoP up to 5.6MHz
Connection protocol and method: USB 2.0 / Audio class 2.0 compliant, asynchronous mode where MPT-8 generates high precision clock master and computer is clock slaved.
PC requirements: Windows 7 or later, ASIO compatible player software such as JRiveretc.
Mac requirements: OS X (10.6.6 or later)
In order for your computer to communicate with the MPT-8 and to exchange audio data a custom driversoftware needs to be installed before you can connect it to the MPT-8. If your computer is a Mac running OSX10.6.6 or later you don’t need any driver software as OSX already supports all PCM formats up to 384kHzsample rate. DSD file playback is supported via the DoP standard using PCM frames which is also supportedby OSX without any additional driver. A driver has to be installed on all Windows based PCs for any kind ofaudio playback via the MPT-8.
IMPORTANT NOTE FOR PC USERS:The Windows operating system is by design not a real-time system. It is designed to allow certain processesto take time away from real-time processes such as playing audio. This can result in audible dropouts,sometimes very short, but sometimes also quite long. Some PCs are pre-configured with drivers andprocesses by the manufacturer that cause such dropouts, and others are user-installed with additionalsoftware that do not allow flawless real-time playback of audio. Fortunately, there is a free utility software thatallows you to test your PC for real-time capability:
1. Go to http://www.resplendence.com/latencymon and download the utility program LatencyMon.There is also a good description of the program and some more technical background on the samewebsite.
2. Run LatencyMon, leave it running for 10-15 minutes and the software will tell you if your PC issuitable for playing audio without dropouts.
If you are considering purchasing a new PC, this utility program is small enough and doesn’t require anyinstallation which allows you to load it onto a flash stick and test it on the PC you are thinking about buying.Most computer stores will allow this test.
Driver software installation and first time connection on Windows based computers:
1. Download the latest USB driver from the support section on our website:www.playbackdesigns.com
2. Double click on the installer and follow instructions on your screen.
3. Power on the MPT-8 and connect the included USB cable between the USB AUDIO connector onyour MPT-8 and your.
4. Select USB Input on your MPT-8.
5. The computer will take a moment to enumerate the MPT-8 onits USB bus and notify you when it is installed successfully.You can check successful driver installation and connection inthe device manager, where the driver will show up asAKDesign USB Audio under the Sound, Video and GameControllers tab. It will not be listed in the Sound Control panel.
MPT-8 User Manual
11
6. Configure your player software to send audio data to the ASIO interface. Depending on your playersoftware this may be identified as “AKDesign USB ASIO” or simply as “ASIO”. Some players mayneed a plug-in for ASIO compatible playback.
7. For best performance and bit perfect reproduction make sure to set all volume controls in thecomputer playback software to exactly 0db (wide open), turn off all effects or equalizer that might berunning in your playback software. Control the volume only with your analog pre-amp.
Connecting Apple computers:No driver needs to be installed. If you are planning to play DSD files make sure your playback software sendsthem via DoP to the MPT-8
During playback with PCWhen changing songs from within your player software running on your computer, the USB protocolautomatically communicates all necessary sample rate changes to the MPT-8. The front panel of the MPT-8always indicates the true sample rate during file playback. This system will never perform any sample rateconversion or any signal processing that could adversely affect the sonic performance, but rather use theexact bits from your file and convert them directly to analog.
During playback with MacThe native OSX operating system and iTunes do not understand the needs of audiophile consumers andinsist on sample rate conversion. When connecting the MPT-8 OSX will automatically select the highestpossible sample rate (384kHz) and convert all your songs to this rate before playing them out through USB.This will result in degraded performance. You can manually select the sample rate in the Audio/MIDI Setuputility to correspond with the native sample rate of the song, but this can be a tedious process if your librarycontains songs with more than 1 sample rate. Alternatively, 3rd party plug-ins for iTunes exist that automatethis process and always select the correct sample rate for bit perfect playback.
Playback of DSD filesThe driver software and MPT-8 hardware are designed to support playback of DSD files at sample rates upto 11.2MHz. You will need a playback software running on your computer that can read DSD files and playthem to the USB driver. On the Mac platform you will have to use a playback software that supports the DoPstandard for playing DSD files.
General notes1. For best performance and bit perfect reproduction make sure to set all volume controls in the
playback software, control panel to exactly 0db (wide open), turn off all operating system sounds,effects or equalizer that might be running in your playback software or Windows / OSX. Control thevolume only with your analog pre-amp.
2. While the MPT-8 has no problem supporting playback via USB while it is switched to a different input(i.e. disc playback, AES or Coax input) it is a good idea to stop playback on your computer beforeselecting another input. The clock management in the MPT-8 may not provide the correct frequencyto the USB port if it is not selected. The computer software may have a problem with that and maymalfunction. So when not listening to the USB input, stop playback on your computer.

MPT-8 User Manual
12
SETUP MENUThe MPT-8 has several options that can be displayed and set via remote control. By pressing the DISC buttonon the remote first and then the SETTINGS button within 5 seconds the top display starts to flash whiledisplaying the first item in the setup menu. Use the arrow buttons to go to the next setting.
DISC
MUTE
DAC PRE
To change any settings in the menu the PLAY button can be pressed. Once you have programmed allsettings you can exit the menu by pressing the SETTINGS button again.
The following options are available in sequence:
1. List of 8 individual digital inputs: each input can be turned off so it no longer is available in theselection during normal operation. For instance, if you only use two inputs you can turn off all others.You can then switch between your two inputs with the arrow buttons on the remote.If the internal server option is installed and activated the external USB input is automatically turned off(see also setting 8 below).
2. Serial number of your MPT-8. This option is not user programmable.
3. Firmware version. This option is not user programmable.
4. PLINK OUT: if you want to connect your MPT-8 to a classic Playback Designs DAC (such as MPS-5)you need to select the "Classic" format. All other products use the "Sonoma" format.
5. PLINK IN: if you want to connect a classic Playback Designs source (such as MPS-5) you need toselect the "Classic" format. All other products use the "Sonoma" format.
6. IR LOCK: with IR control there is always a chance for conflicts where 2 different machines use thesame codes. This feature allows you to disable the IR commands for the MPT-8.
7. HOURS: this indicates how many hours your MPT-8 has been operating during its life.
8. SERVER OPTION: If the internal server option (Syrah or Roon) is installed this option must be turnedon. If the server option is not installed this setting should be turned off.
RECORDING WITH THE MPT-8The built-in recording feature allows you to record any digital audio through its bidirectional USB Audiointerface. For this purpose Playback Designs offers an easy to use software application that can be installedon any Windows PC. Download it from www.playbackdesigns.com and refer to its user manual for moredetails.
2.
1.
3.
MPT-8 User Manual
13
EXTERNAL CLOCKA unique feature of the MPT-8 is its elaborate and sophisticated clock generator which does not require to belocked to an external source. It completely shields any incoming digital audio stream from its sensitive internalclock circuitry through various stages of buffering with unique control algorithms. This removes any incomingjitter from external sources so well that no complicated setup with master – slave clocking configurations areneeded, as is often the case with other equipment. In fact, the MPT-8 performs equally well with jitterysources as with higher quality ones. For this reason the MPT-8 does not require an external clock nor does itrequire to be set up as a clock master.
BREAKING IN THE MPT-8Since the MPT-8 does not have an analog output stage a break in period is not as critical with this machine.However, various parts can still benefit from a break in. For this it is recommended to simply leave the unitpowered on without playing any audio. Typical break in periods are 300 - 500 hours.
SPECIFICATIONSPower Supply
North America model………AC 120V, 60HzAsia, Europe model………. AC 230V, 50HzJapan model................... AC 100V, 50/60HzConsumption………………..........100W max.
Operating Temperature……………… +5°C to +30°C
Operating Humidity……………………. 5% to 85%
Mains fuse: 1.6A / 250V slow blow, 20mm
Ext. dimensions (W x H x D) 46 x 13 x 43 cm18.1 x 5.1 x 16.9 inches
Weight……………………………………..17kg / 37 lbBatteries for remote control unit……………. 2x AAA
MPT-8 User Manual
14
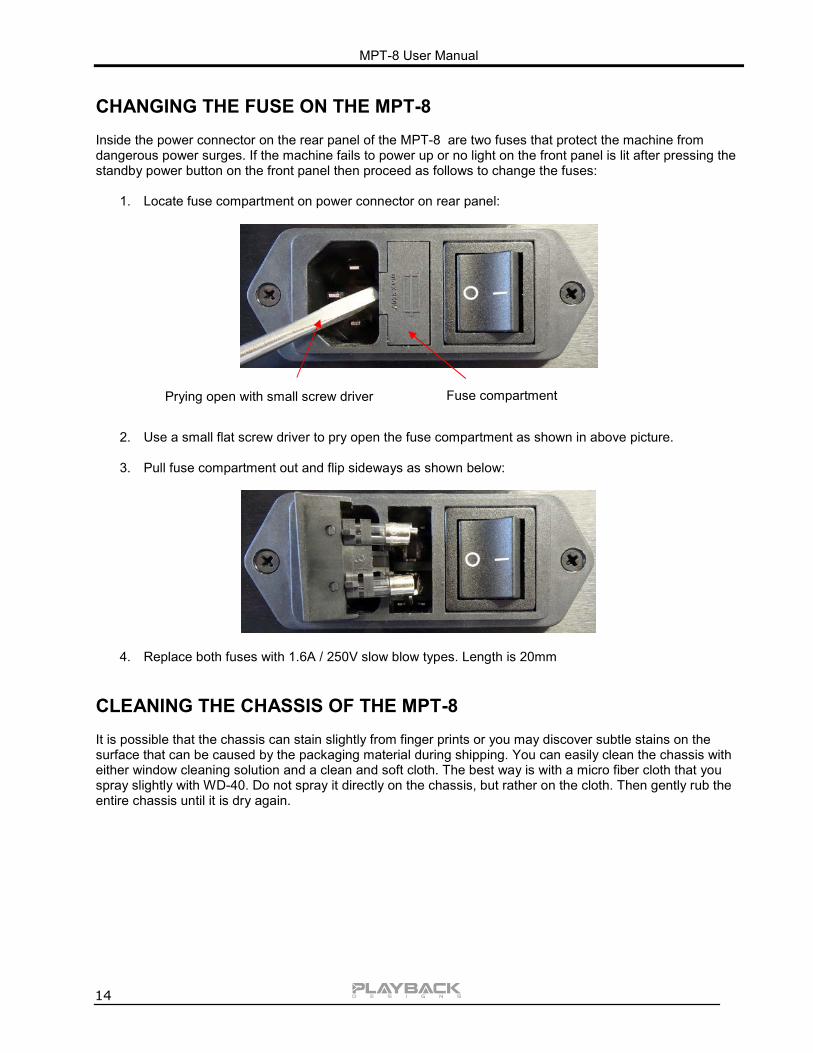
CHANGING THE FUSE ON THE MPT-8Inside the power connector on the rear panel of the MPT-8 are two fuses that protect the machine fromdangerous power surges. If the machine fails to power up or no light on the front panel is lit after pressing thestandby power button on the front panel then proceed as follows to change the fuses:
1. Locate fuse compartment on power connector on rear panel:
2. Use a small flat screw driver to pry open the fuse compartment as shown in above picture.
3. Pull fuse compartment out and flip sideways as shown below:
4. Replace both fuses with 1.6A / 250V slow blow types. Length is 20mm
CLEANING THE CHASSIS OF THE MPT-8It is possible that the chassis can stain slightly from finger prints or you may discover subtle stains on thesurface that can be caused by the packaging material during shipping. You can easily clean the chassis witheither window cleaning solution and a clean and soft cloth. The best way is with a micro fiber cloth that youspray slightly with WD-40. Do not spray it directly on the chassis, but rather on the cloth. Then gently rub theentire chassis until it is dry again.
Fuse compartmentPrying open with small screw driver
MPT-8 User Manual
15
UPGRADING THE FIRMWARE IN YOUR MPT-8Playback Designs is constantly innovating new algorithms and methods for audio processing and from time totime may release new firmware for the MPT-8 that may further enhance the sonic performance or add newfeatures. New releases will be distributed as audio wave files. They can be played into the MPT-8 via its USBinput just like any other audio file. The MPT-8 processor will automatically detect this file and update thefirmware. No audio will be audible as the processor will automatically set the volume to 0.The MPT-8 contains 2 processors and hence there may be 2 separate files available, one for each processor.It is possible to display the version of the currently installed software (see Setup Menu).
Upgrade Procedure:
1. Power on MPT-8.
2. Connect your computer with the included USB cable to the USB AUDIO input on the rear panel.You can also play it via Roon if have that option installed.
3. Load the wave file with the update firmware into your player software on your computer. AsiTunes on Mac computers is not a bit perfect player you cannot use iTunes for this procedure, butwe have confirmed that Audirvana works perfectly on Mac computers. On the Windows platformwe have verified Foobar and Roon, but JRiver won't play this file.
4. Play the file.
5. The front panel will indicate WRITING FLASH. It is important that at this point you no longer touchthe system, nor your PC, nor the remote, don't change the input, don't turn the power off. Gohave a glass of Playback Designs wine, because it will take about 2 minutes for this to finish.
6. Once playback has finished the front panel will return to either normal display or it will sayWRITING FAILURE. A failure can happen when you didn't follow the instructions in the previoussteps or your PC had a dropout during playback. If this failure happens, don't panic, but follow thenext steps precisely:
a. DO NOT POWER OFF the MPT-8 with the power switch on back.b. Disconnect your computer from the MPT-8.c. Push the RESET button on the back panel. This will put the MPT-8 into standby mode.d. Push the power on button on front panel.e. Re-connect the USB cable.f. play a normal audio file to make sure everything is still working normally.g. Stop playback and go to step 3.
7. If playback of the update file has finished and the front panel does not display any error message,but indicates normal operation then stop playback and disconnect the USB cable.
8. power off the MPT-8 with switch on back panel.
9. power on the MPT-8 and check the software version in the setup menu to confirm everythingworked okay.

MPT-8 User Manual
16
APPENDIX: STREAM-X OPTIONStream-X is an option that can be built into the MPT-8 Dream Player. It offers streaming directly from servicessuch as Tidal, Quobuz, Deezer and vTuner. It can also be used to stream from network storage (NAS) or fromUSB storage that is directly attached its own USB connector (Streamer USB). It is a DLNA renderer andserver and also supports the Roon network protocol. It makes your MPT-8 "roon-ready".
The Stream-X option must be installed in the MPT-8 player by either the factory or an authorized dealer. Allwarranties are void when an end user installs this option.
Supported formats: PCM up to 192kHz in WAVE, WMA, FLAC, AAC, AIFF, Apple Lossless,and MP3 file formatsSingle rate DSD (via DoP) in DSF file format.NOTE: not all DLNA servers support DSD files and depending on yourNAS or DLNA server DSD files may not play correctly through Stream-X.
Supported network protocols: DLNA, UPnP, Roon
Supported streaming services: Tidal, Qobuz, Deezer, vTuner
CONNECTING STREAM-X TO YOUR NETWORK
50/60 Hz100W max.
REMOTENETWORK TOSLINK
PLAYLINKOUT IN COAX
AES INAES OUT
USBAUDIO
RESET
STREAMERNETWORK
STREAMERUSB
MODEL: MPS-8MADE IN U.S.A.
NetworkRouter
Tablet(IPad, Android)
Internet andother network devices
Ethernet cable
Streamer Network: Connect this to your network router and make sure it is connected to the internet andits wireless network is active. The Stream-X needs this network connection to connectand play any streaming media from the internet. It also uses it to connect to your tabletfor remote control or to your Roon server.
Streamer USB: This is where you can plug in any storage device with music files that Stream-X canplay. If you want to use this connector often with USB flash sticks and the back panel ofyour MPT-8 is not so easy to reach within your rack, you can use a short USB extendercable to bring this connection to the front of the product where it is easier to reach.
Stream-X connections on back panel of MPT-8
MPT-8 User Manual
17
PREPARING YOUR TABLET AND CONNECTING IT TO STREAM-XAny Apple iPad or Android tablet can be used to control Stream-X. The Apple iPad Mini is recommended forbest ease of use. To use the tablet it is necessary to download and install an app from a 3rd party vendor(ConversDigital). The Stream-X uses the DLNA protocol and so most DLNA controller can connect withStream-X. But we have worked with this 3rd party vendor to also include features that are not supported inDLNA and so we recommend strongly to use that 3rd party app by ConversDigital.. The following apps areavailable depending on tablet and desired features:
1. mconnect Control HD: this free app can only be used in landscape orientation. It does not supportiPhone. This app gives you all the features that Stream-X is capable of and also offers you the mostcomprehensive user interface with the most important functions are accessible on a single page.This app also incorporates features that are not supported in the standard DLNA protocol, such asfirmware update and complete set of features for all streaming services.
2. mconnect Control: this free app is functionally the same as mconnect Control HD, but it only runs inportrait mode and is also supported on the iPhone. Since it supports smaller screens of phones it hasa layered user interface where various features are in separate pages.This app also incorporates features that are not supported in the standard DLNA protocol, such asfirmware update and complete set of features for all streaming services.
3. mconnect Player: there is also a Lite version. These are general purpose DLNA apps andare,therefore, not free or come with advertising. They do not support our additional features and onlysupport limited streaming services. While they work fine with Stream-X we highly recommend you useeither one of the mconnect Control apps.
Follow these steps:
1. Connect your tablet or phone to the internet.
2. Launch App Store (iPad) or Play Store (Android) and search for "mconnect Control".
3. Install either "mconnect Control" or "mconnect Control HD".
4. Check that your tablet is connected to the same network as Stream-X
5. If not done so already, power on your Stream-X (select STREAMER input on your MPT-8). After afresh power up, it may take a few seconds to start. Just wait until the front panel indicates a validsample rate.
CONTROLLING STREAM-XIn the following guideline we will use the mconnect Control HD app. Follow these steps:
1. Connect your tablet or phone to the internet and make sure it is on the same network as Stream-X.
2. Launch App Store (iPad) or Play Store (Android) and search for "mconnect Control".
3. Install either "mconnect Control" or "mconnect Control HD".
4. If not done so already, power on your Stream-X (select STREAMER input on your MPT-8). After afresh power up, it may take a few seconds to start. Just wait until the front panel indicates a validsample rate.
5. Launch the mconnect Control app. The following screen presents itself:

MPT-8 User Manual
18
6. If you launched the app for the first time it is possible that Stream-X is not yet connected to the app.Just press the button in top left corner "Play to" and select Stream-X from the list that appears below.
7. Once you are connected to the Stream-X you can select your music in the Library section on the rightside of the screen: Deezer, Tidal and Qobuz are all streaming services with various degrees of audio quality. All
3 offer high resolution streaming. If you select one of those in the list you will be prompted foryour account info. If you don't have an account you will have to create one first by going tothe corresponding website.
vTuner is a collection of free radio stations from around the world.
Below the list of streaming services you find a list of computers and storage devices on your network.If you see a line "STREAM-X Server" as in the above screen shot, it means that there is a USB stickconnected directly to the Stream-X module (Streamer USB connector on back panel). In this case theStream-X module acts as a server. Tapping on any of these lines will allow you to select any songthat this particular storage device contains.In this list you can also see a list of computers and other DLNA or UPnP servers with storage thatmight contain playable audio files.
The volume button to the left of the transport keys can be used to directly control the analog outputvolume of the MPT-8 if its volume is enabled (see setup menu of MPT-8).
8. In the upper right corner you can select the view between Browser, Queue and Favorites:
The browser allows you to browse and select streaming services or files in the list of storage The Queue page shows your current list of music playing and allows you to create playlists. The Favorites page is a list of your favorite music and playlists. Here you can also edit
playlists.
Selector to select andmanage your audio
Refreshdisplay
List ofstreamingservices
List ofstorage,serversonnetwork
Press "Play to" to selectand connect to Stream-X
Settings
Volumecontrol
Press torevealplaybackoptions
MPT-8 User Manual
19
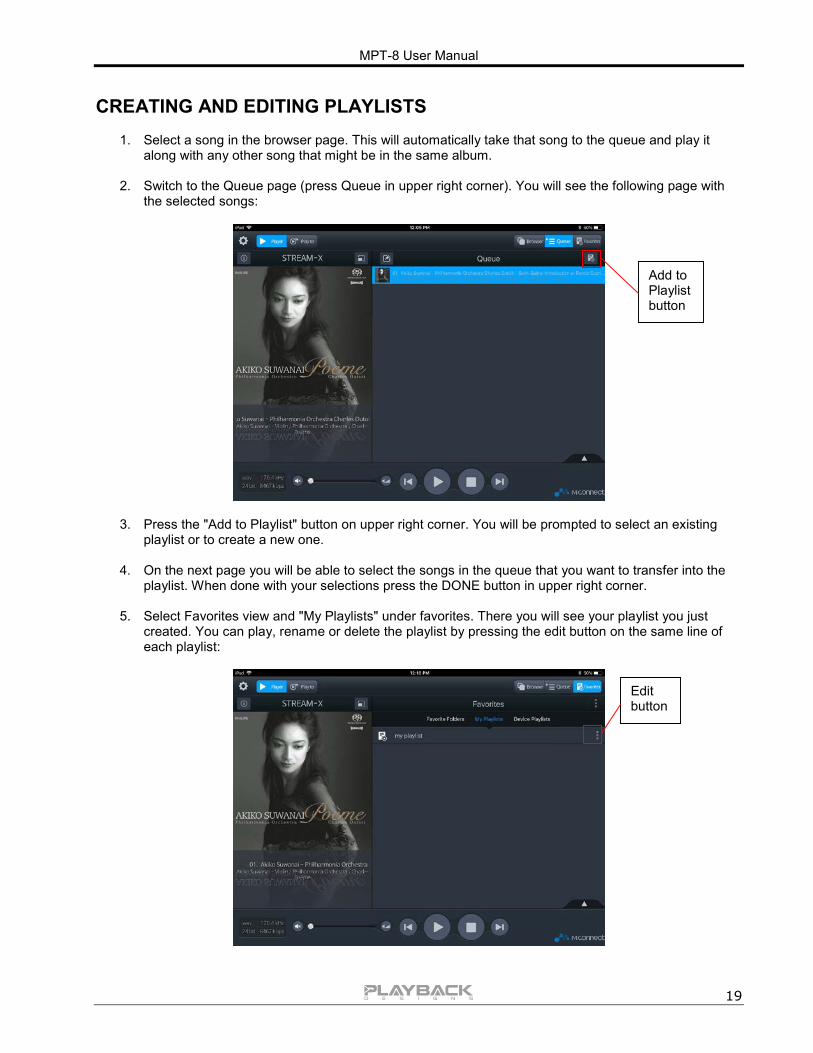
CREATING AND EDITING PLAYLISTS1. Select a song in the browser page. This will automatically take that song to the queue and play it
along with any other song that might be in the same album.
2. Switch to the Queue page (press Queue in upper right corner). You will see the following page withthe selected songs:
3. Press the "Add to Playlist" button on upper right corner. You will be prompted to select an existingplaylist or to create a new one.
4. On the next page you will be able to select the songs in the queue that you want to transfer into theplaylist. When done with your selections press the DONE button in upper right corner.
5. Select Favorites view and "My Playlists" under favorites. There you will see your playlist you justcreated. You can play, rename or delete the playlist by pressing the edit button on the same line ofeach playlist:
Add toPlaylistbutton
Editbutton
MPT-8 User Manual
20
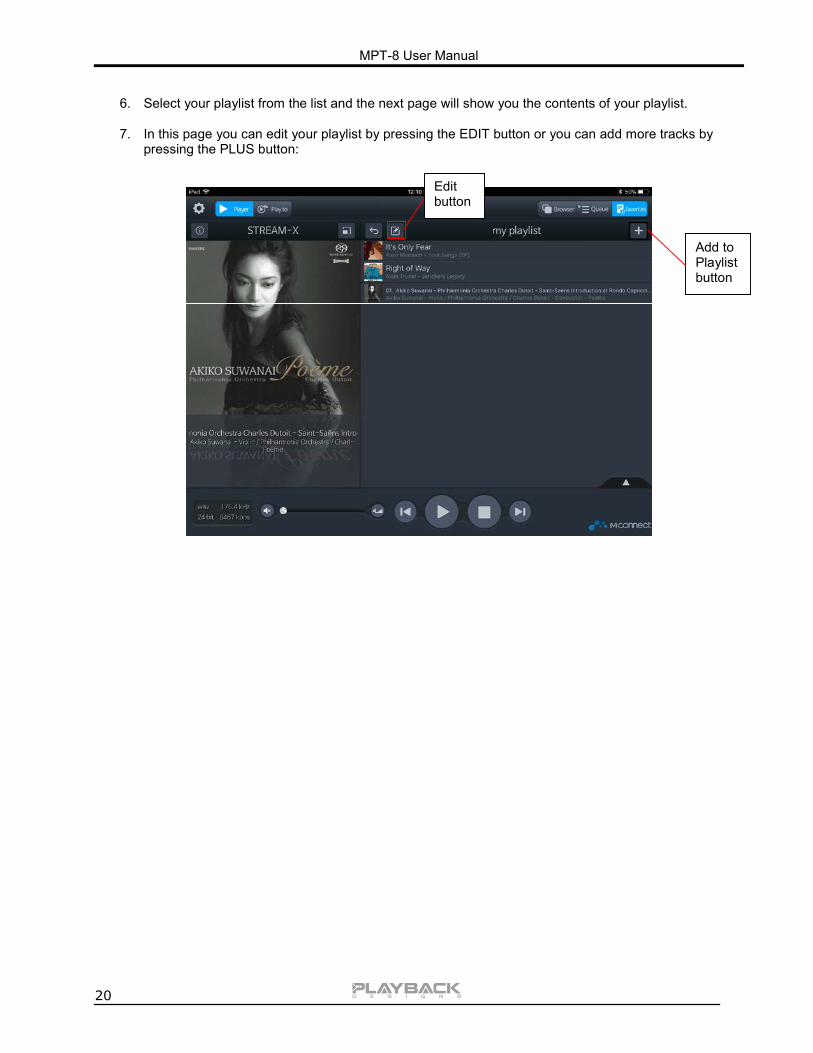
6. Select your playlist from the list and the next page will show you the contents of your playlist.
7. In this page you can edit your playlist by pressing the EDIT button or you can add more tracks bypressing the PLUS button:
Add toPlaylistbutton
Editbutton