endeca rad toolkit for asp.net: developer's guide
TRANSCRIPT
Endeca RAD Toolkit for ASP.NETDeveloper's Guide
Version 2.1.3 • March 2012


Contents
Preface.............................................................................................................................7About this guide............................................................................................................................................7Who should use this guide............................................................................................................................7Conventions used in this guide.....................................................................................................................8Contacting Oracle Endeca Customer Support..............................................................................................8
Chapter 1: Installing and uninstalling the RAD Toolkit for ASP.NET......9Prerequisites for installing the RAD Toolkit for ASP.NET .............................................................................9Installing the RAD Toolkit for ASP.NET.......................................................................................................10Adding the RAD Toolkit for ASP.NET to Visual Studio................................................................................10Uninstalling the RAD Toolkit for ASP.NET ..................................................................................................11Deploying the RAD Toolkit for ASP.NET reference application...................................................................11
Chapter 2: Overview of the RAD Toolkit for ASP.NET............................13Components in the RAD Toolkit for ASP.NET.............................................................................................13The RAD API for ASP.NET to the Endeca MDEX Engine...........................................................................13Endeca data source controls......................................................................................................................14Endeca user interface controls...................................................................................................................15Endeca Workbench instrumentation controls.............................................................................................15Reference application.................................................................................................................................16Page life cycle events for RAD Toolkit controls...........................................................................................16Record class generation utility....................................................................................................................17
Chapter 3: Creating an application using Endeca server controls......19High level process of creating an application with server controls..............................................................19Adding Endeca data source controls to a Web page..................................................................................19
Creating a NavigationDataSource control...........................................................................................19Creating a MetadataDataSource control.............................................................................................24Creating a DimensionSearchDataSource control................................................................................27Creating a CompoundDimensionSearchDataSource control..............................................................29Creating a RecordDetailsDataSource control......................................................................................32Creating an AggregateRecordDetailsDataSource control...................................................................35Refreshing a data source control.........................................................................................................37
Working with Endeca user interface controls..............................................................................................38Creating a GuidedNavigation control...................................................................................................38GuidedNavigation control templates....................................................................................................39Creating a Breadcrumbs control..........................................................................................................41Breadcrumbs control templates...........................................................................................................43Creating a Pager control......................................................................................................................46Pager control templates.......................................................................................................................48Working with a tag cloud......................................................................................................................51
Setting a dimension to be exposed on a Web page....................................................................................54Excluding a dimension from the navigation menu......................................................................................55Renaming dimensions or dimension values before displaying them on a page.........................................55Generating the "More..." link ......................................................................................................................57Displaying query results on a Web page.....................................................................................................57Displaying nested record properties...........................................................................................................58Displaying total record count.......................................................................................................................58
Chapter 4: Creating an application based on the reference application.61High level process of creating an application from a reference application................................................61Using reference application controls in your application.............................................................................61
Chapter 5: Overview of building URLs...................................................63About building URLs...................................................................................................................................63
iii

About URLs in the reference application....................................................................................................65About URL serialization..............................................................................................................................65Customizing URL serialization....................................................................................................................65Creating a UrlManager and registering data sources and commands.......................................................66Initializing a UrlManager.............................................................................................................................67Building a URL to toggle a dimension and display its dimension values....................................................68Building a URL to a record details page.....................................................................................................69Building a URL to an aggregate record details page..................................................................................70Building a URL using the BuildUrl method..................................................................................................72Adding parameters to all URLs produced by a UrlManager.......................................................................73Adding parameters to a URL on a per-URL basis......................................................................................74
Chapter 6: Using the RAD API for programmatic querying..................75Executing a navigation command...............................................................................................................75Executing a records detail query................................................................................................................77Executing an aggregated records query.....................................................................................................78Executing a dimension search query..........................................................................................................78Executing a compound dimension search query .......................................................................................79Executing a metadata query.......................................................................................................................80
Chapter 7:Integrating a preview application into Oracle Endeca Workbench.81Integrating the RAD ASP.NET reference application into Endeca Workbench...........................................81Integrating a custom application into Endeca Workbench..........................................................................82
Endeca RAD Toolkit for ASP.NETiv

Copyright and disclaimer
Copyright © 2003, 2012, Oracle and/or its affiliates. All rights reserved.
Oracle and Java are registered trademarks of Oracle and/or its affiliates. Other names may betrademarks of their respective owners. UNIX is a registered trademark of The Open Group.
This software and related documentation are provided under a license agreement containing restrictionson use and disclosure and are protected by intellectual property laws. Except as expressly permittedin your license agreement or allowed by law, you may not use, copy, reproduce, translate, broadcast,modify, license, transmit, distribute, exhibit, perform, publish or display any part, in any form, or byany means. Reverse engineering, disassembly, or decompilation of this software, unless required bylaw for interoperability, is prohibited.
The information contained herein is subject to change without notice and is not warranted to beerror-free. If you find any errors, please report them to us in writing.
If this is software or related documentation that is delivered to the U.S. Government or anyone licensingit on behalf of the U.S. Government, the following notice is applicable:
U.S. GOVERNMENT END USERS: Oracle programs, including any operating system, integratedsoftware, any programs installed on the hardware, and/or documentation, delivered to U.S. Governmentend users are "commercial computer software" pursuant to the applicable Federal Acquisition Regulationand agency-specific supplemental regulations. As such, use, duplication, disclosure, modification, andadaptation of the programs, including any operating system, integrated software, any programs installedon the hardware, and/or documentation, shall be subject to license terms and license restrictionsapplicable to the programs. No other rights are granted to the U.S. Government.
This software or hardware is developed for general use in a variety of information managementapplications. It is not developed or intended for use in any inherently dangerous applications, includingapplications that may create a risk of personal injury. If you use this software or hardware in dangerousapplications, then you shall be responsible to take all appropriate fail-safe, backup, redundancy, andother measures to ensure its safe use. Oracle Corporation and its affiliates disclaim any liability forany damages caused by use of this software or hardware in dangerous applications.
This software or hardware and documentation may provide access to or information on content,products and services from third parties. Oracle Corporation and its affiliates are not responsible forand expressly disclaim all warranties of any kind with respect to third-party content, products, andservices. Oracle Corporation and its affiliates will not be responsible for any loss, costs, or damagesincurred due to your access to or use of third-party content, products, or services.
Rosette® Linguistics Platform Copyright © 2000-2011 Basis Technology Corp. All rights reserved.
Teragram Language Identification Software Copyright © 1997-2005 Teragram Corporation. All rightsreserved.
v

Preface
Oracle Endeca's Web commerce solution enables your company to deliver a personalized, consistentcustomer buying experience across all channels — online, in-store, mobile, or social. Whenever andwherever customers engage with your business, the Oracle Endeca Web commerce solution delivers,analyzes, and targets just the right content to just the right customer to encourage clicks and drivebusiness results.
Oracle Endeca Guided Search is the most effective way for your customers to dynamically exploreyour storefront and find relevant and desired items quickly. An industry-leading faceted search andGuided Navigation solution, Oracle Endeca Guided Search enables businesses to help guide andinfluence customers in each step of their search experience. At the core of Oracle Endeca GuidedSearch is the MDEX Engine,™ a hybrid search-analytical database specifically designed forhigh-performance exploration and discovery. The Endeca Content Acquisition System provides a setof extensible mechanisms to bring both structured data and unstructured content into the MDEX Enginefrom a variety of source systems. Endeca Assembler dynamically assembles content from any resourceand seamlessly combines it with results from the MDEX Engine.
Oracle Endeca Experience Manager is a single, flexible solution that enables you to create, deliver,and manage content-rich, cross-channel customer experiences. It also enables non-technical businessusers to deliver targeted, user-centric online experiences in a scalable way — creating always-relevantcustomer interactions that increase conversion rates and accelerate cross-channel sales. Non-technicalusers can control how, where, when, and what type of content is presented in response to any search,category selection, or facet refinement.
These components — along with additional modules for SEO, Social, and Mobile channel support —make up the core of Oracle Endeca Experience Manager, a customer experience management platformfocused on delivering the most relevant, targeted, and optimized experience for every customer, atevery step, across all customer touch points.
About this guideThis guide describes the major tasks involved in developing an Endeca application using the RapidApplication Development (RAD) Toolkit for ASP.NET.
This guide assumes that you have read the Oracle Endeca Guided Search Concepts Guide and thatyou are familiar with Endeca’s terminology and basic concepts.
This guide covers the main features of the RAD Toolkit for ASP.NET. This guide is not a replacementfor the Endeca Basic Development Guide or the Endeca Advanced Development Guide.
Who should use this guideThis guide is intended for ASP.NET developers who are building Endeca applications using the RapidApplication Development (RAD) Toolkit for ASP.NET.
This guide assumes that you are familiar with C#, the Microsoft .NET Framework, Microsoft VisualStudio, and Web development concepts.

If you are a new user of Oracle Endeca Guided Search and you are not familiar with developing Endecaapplications, read this guide in conjunction with the Endeca Basic Development Guide and the EndecaAdvanced Development Guide, available for download from the Oracle Technology Network (OTN).Those guides provide detailed feature descriptions that are not fully covered in this version of theEndeca Developer's Guide for the RAD Toolkit for ASP.NET.
If you are an existing user of Oracle Endeca Guided Search and you are familiar with developingEndeca applications, this guide should provide enough information to help you build a new applicationusing the RAD Toolkit for ASP.NET.
Also, see the Endeca API Reference for the RAD Toolkit for ASP.NET. In a default installation, this islocated in the C:\Endeca\RADToolkits\version\ASP.NET\doc directory. This file containsreference information for the RAD API, the Endeca data source, and Endeca user interface controls.
Conventions used in this guideThis guide uses the following typographical conventions:
Code examples, inline references to code elements, file names, and user input are set in monospacefont. In the case of long lines of code, or when inline monospace text occurs at the end of a line, thefollowing symbol is used to show that the content continues on to the next line: ¬
When copying and pasting such examples, ensure that any occurrences of the symbol and thecorresponding line break are deleted and any remaining space is closed up.
Contacting Oracle Endeca Customer SupportOracle Endeca Customer Support provides registered users with important information regardingOracle Endeca software, implementation questions, product and solution help, as well as overall newsand updates.
You can contact Oracle Endeca Customer Support through Oracle's Support portal, My Oracle Supportat https://support.oracle.com.
Endeca ConfidentialEndeca RAD Toolkit for ASP.NET Developer's Guide
| Preface8

Chapter 1
Installing and uninstalling the RAD Toolkitfor ASP.NET
This section provides system prerequisites, installation procedures, and deployment procedures forthe Endeca RAD Toolkit for ASP.NET.
Prerequisites for installing the RAD Toolkit for ASP.NETThis topic describes the software prerequisites that must be in place before you install the RAD Toolkitfor ASP.NET.
Software compatibility
To determine the compatibility of the RAD Toolkit for ASP.NET with other Endeca installation packages,see the Oracle Endeca Guided Search Compatibility Matrix available on the Oracle TechnologyNetwork.
Operating system requirements
The RAD Toolkit for ASP.NET is supported on Windows Server 2003 and Windows Server 2008.
Software requirements
The following software must be installed before you install the RAD Toolkit for ASP.NET:
• Microsoft .NET Framework. The RAD Toolkit for ASP.NET supports the following versions of theMicrosoft .NET Framework (both 32-bit and 64-bit): 2.0 with SP1, 3.0, and 3.5.
• Microsoft Visual Studio 2005 with Service Pack 1 (any edition) or Visual Studio 2008.• On machines running the RAD Toolkit for ASP.NET reference application, you need Internet
Information Services (IIS) 5.1 or later.
Note: The Endeca Presentation and Logging APIs for .NET are part of the RAD Toolkit installationand are installed into <installationpath>\Endeca\RADToolkits\<version>\ASP.NET\bin.
Unsupported software
Microsoft .NET Framework version 1.1 is not supported.
Optional software
If you want to use the Analytics capabilities of the Endeca data source controls, refer to EnablingEndeca Analytics.
Installing the RAD Toolkit for ASP.NETThis topic describes how to install the Endeca RAD Toolkit for ASP.NET.
Before starting this procedure, see "Prequisites for installing the RAD Toolkit for ASP.NET".
To install the RAD Toolkit for ASP .NET:
1. In your local environment, locate the installation file for the RAD Toolkit for ASP.NET software thatyou downloaded from the Oracle Software Delivery Cloud.
2. Double click the appropriate installation file, and on the Welcome screen, click Next.
3. On the Select Installation Folder screen, either accept the default installation location, or clickBrowse... and browse to the directory where you want to install. Oracle recommends that youaccept the default installation path of C:\Endeca\RADToolkits\<version>\ASP.NET.
4. On the Ready to Install screen, click Install.
5. Click Finish.
After performing this task, go on to "Adding the RAD Toolkit for ASP.NET to Visual Studio".
Adding the RAD Toolkit for ASP.NET to Visual StudioThis procedure adds the Endeca data source controls and Endeca user interface controls to theToolbox window of Visual Studio and also adds references from your Web site project to Endeca DLLfiles.
Note: This procedure describes how to add the RAD Toolkit to Visual Studio 2005.The proceduremay be slightly different in Visual Studio 2008.
To add the RAD Toolkit for ASP.NET to Visual Studio:
1. Start Visual Studio and open your Web site.
2. In the Toolbox window, right-click the Standard tab and select Add Tab.
3. Type Endeca RAD Toolkit.
4. Right-click in the grey box under the entry for the RAD Toolkit.
Note: The grey box contains the text "There are no usable controls in this group..."
5. Select Choose Items...
6. On the .NET Framework Components tab of the Choose Toolbox Items dialog, click Browse....
7. Browse to <installationpath>\Endeca\RADToolkits\version\ASP.NET\bin\Endeca.Web.dll and click Open.
8. Browse to <installationpath>\Endeca\RADToolkits\version\ASP.NET\bin\Endeca.Web.UI.WebControls.dlland click Open.
9. Click OK.
Endeca ConfidentialEndeca RAD Toolkit for ASP.NET Developer's Guide
Installing and uninstalling the RAD Toolkit for ASP.NET | Installing the RAD Toolkit for ASP.NET10

The Endeca data source controls and the Endeca user interface controls display in the Toolboxunder Endeca RAD Toolkit.
10. In the Solution Explorer window, right-click your Web site.
11. Select Add Reference....
12. In the Add Reference dialog, select the Browse tab.
13. Browse to the Endeca DLL files for the RAD Toolkit installation. In a default installation, these arein <installation path>\Endeca\RADToolkits\version\ASP.NET\bin.
14. Select Endeca.Navigation.dll, Endeca.Navigation.AccessControl.dll,Endeca.Data.dll, and Endeca.Logging.dll.You do not need to select Endeca.Web.dllor Endeca.Web.UI.WebControls.dll.Visual Studio copies the directory's contents into the Web site project.
Uninstalling the RAD Toolkit for ASP.NETThis topic describes how to uninstall the Endeca RAD Toolkit from a system.
To uninstall the RAD Toolkit for ASP.NET:
1. From the Windows Control Panel, select Add or Remove Programs.
2. Select Endeca RAD Toolkit .NET from the list of installed software.
3. Click Remove and click Yes to confirm the removal.
4. Start Visual Studio and open your Web site.
5. In the Toolbox window, right-click the Endeca RAD Toolkit tab and select Delete Tab.
Deploying the RAD Toolkit for ASP.NET referenceapplication
After connecting the reference application to an MDEX Engine, you can choose to run the applicationin Postback mode, the URL mode, the RAD Toolkit Server Controls Postback mode, or the RAD ToolkitServer Controls URL mode by clicking the corresponding link in the header of the reference application.
These instructions assume a typical system configuration that includes IIS 5.1, IIS 6 Manager, andthe .NET Framework 2.0.There may be minor configuration differences if you are using other versionsof IIS, IIS Manager, or the .NET Framework.
Note: Make sure that you have enabled the ASP.NET 2.0 Web Service Extension in IIS beforedeploying the reference application.
To deploy the RAD Toolkit for ASP.NET reference application:
1. From the Windows Control Panel, select Administrative Tools > Internet Information Services(IIS6) Manager.
2. In the IIS tree pane, expand the machine icon for the local machine, then expand the Web Sitesdirectory.
3. Right click the Default Web Site and select New > Virtual Directory....
Note: If you are using IIS 7, you should create an Application rather than a Virtual Directory.
Endeca RAD Toolkit for ASP.NET Developer's GuideEndeca Confidential
11Installing and uninstalling the RAD Toolkit for ASP.NET | Uninstalling the RAD Toolkit for ASP.NET
4. Complete the Virtual Directory Creation Wizard as follows:
a) Click Next.b) Type an alias name such as RAD.c) Click Next.d) In the Web Site Content Directory screen, click Browse and locate the reference application
that is packaged with the RAD Toolkit for ASP.NET. This is in <installationpath>\Endeca\RADToolkits\version\ASP.NET\reference\RadAspNetRef.
e) Click Next.f) In the Access Permissions window, leave the default settings in place.g) Click Next, and then click Finish.
5. In the IIS tree pane, expand the machine icon and locate the virtual directory named RAD that youcreated in the step above.
6. Right click RAD and select Properties.
7. Select the Virtual Directory tab and perform the following tasks:
a) Under the Application Settings section, click Create.b) From the Execute permissions list, select Scripts only.c) Click Apply.
8. Select the Documents tab and perform the following tasks:
a) Check Enable default content page.b) Click Add....c) In the Default content page field, type GuidedNavigation.aspx.d) Click OK.e) Select GuidedNavigation.aspx and click Move Up until the file is at the top position.
9. Select the ASP.NET tab and from the ASP.NET version list, select 2.0.x or later.
10. Click OK.
11. Restart IIS. (Right click the machine name icon in IIS. Select All Tasks from the submenu andselect Restart IIS.)
12. On your Windows machine, start Internet Explorer and navigate tohttp://hostname/RAD/GuidedNavigation.aspx.
13. If you have an MDEX Engine running and want to view its records in the reference application,provide the host and port information of the machine running an MDEX Engine and click Go.
Endeca ConfidentialEndeca RAD Toolkit for ASP.NET Developer's Guide
Installing and uninstalling the RAD Toolkit for ASP.NET | Deploying the RAD Toolkit for ASP.NETreference application
12
Chapter 2
Overview of the RAD Toolkit for ASP.NET
This section provides an overview of the RAD Toolkit for ASP.NET including its data source controls,user interface controls, the reference application, and life cycle events.
Components in the RAD Toolkit for ASP.NETThe Rapid Application Development (RAD) Toolkit for ASP.NET provides a set of Web server controlsto build Endeca applications and also provides the RAD API to the Endeca MDEX Engine.
The RAD Toolkit for ASP.NET is made up of the following components:
• RAD API for ASP.NET• A set of data source controls• A set of user interface controls• A reference application• Documentation
The RAD API for ASP.NET to the Endeca MDEX EngineThe RAD API for ASP.NET provides a simplified interface to the Endeca MDEX Engine and makesprogramming more friendly to the typical .NET developer.
Endeca assemblies
The RAD API is made up of the following assemblies:
• Endeca.Data.dll -- This is the RAD API itself. It is an abstraction of the Endeca PresentationAPI that includes both input and output types and presents a standard interface for .NET developers.
• Endeca.Web.dll -- This contains the Endeca data source controls.• Endeca.Web.UI.WebControls.dll -- This contains the Endeca user interface controls and
Endeca Workbench instrumentation controls.
These assemblies must reside in your Web site project with Endeca.Navigation.dll,Endeca.Navigation.AccessControl.dll, and Endeca.Logging.dll.

Interaction of the RAD API for .NET and the Presentation API for .NET
Endeca is not yet deprecating the Presentation API for .NET or the Endeca Basic Development Guideand Endeca Advanced Development Guide. Endeca is adding the RAD API for ASP.NET as a layeron top of the Presentation API for .NET to make programming more friendly to the typical .NETdeveloper. This layer of abstraction provides a simplified interface. The RAD API for ASP.NET isintended for use by all .NET customers.
The following diagram illustrates the interaction of the RAD API for .NET layer on top of the PresentationAPI for .NET:
Class diagrams
The documentation includes two class diagrams that illustrate the input and output types of the RADAPI for .NET. These diagrams are <installationpath>\Endeca\RADToolkits\version\ASP.NET\doc\InputTypes.png andOutputTypes.png.
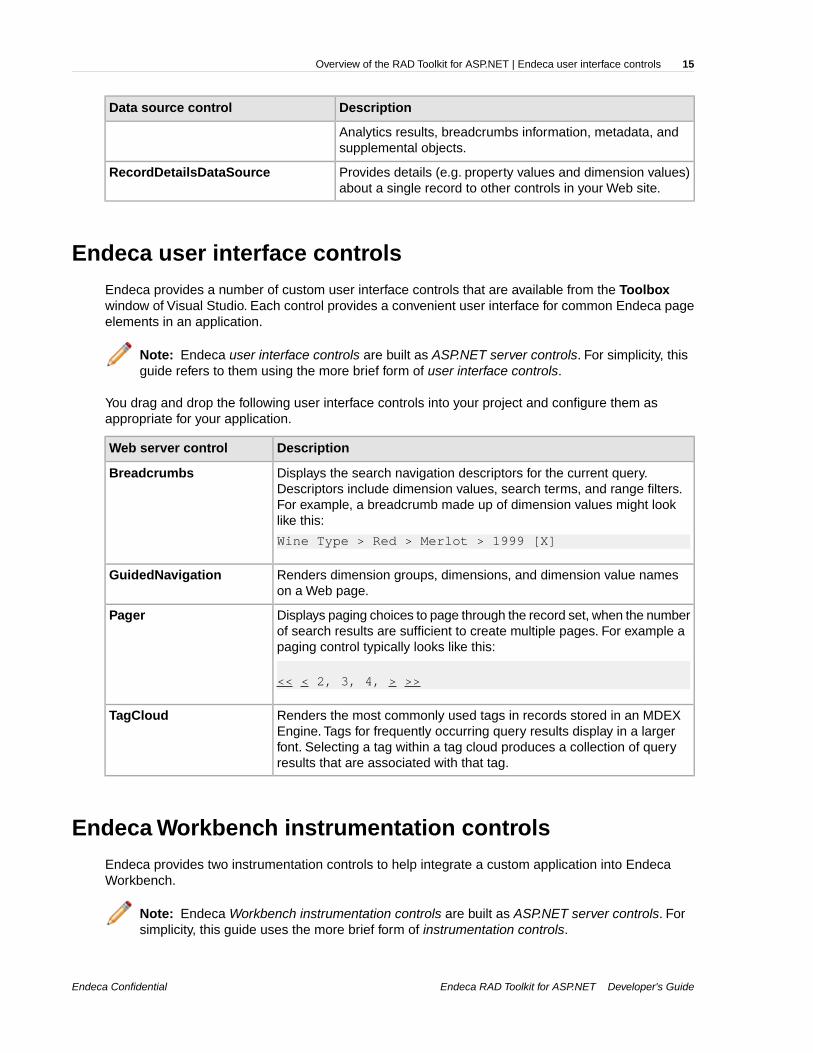
Endeca data source controlsEndeca provides data source controls that are available from the Toolbox window of Visual Studio.Each data source control provides design-time views of source data in the MDEX Engine. This datacan be bound to by other ASP.NET controls in your application.
Note: Endeca data source controls are built as ASP.NET data source server controls. Forsimplicity, this guide uses the more brief form of data source control.
The data source controls provide representative MDEX Engine data by performing round trip queriesto the MDEX Engine at design time.
You drag and drop any of following data source controls into your project and configure the data sourcecontrols for your application:
DescriptionData source control
Provides details about a single aggregate record to othercontrols in your Web site.
AggregateRecordDetailsDataSource
Provides records produced by compound dimension searchto other controls in your Web site.
CompoundDimensionSearchDataSource
Provides results produced by dimension search to othercontrols in your Web site.
DimensionSearchDataSource
Provides record metadata such as search keys, sort keys,aggregation keys and so on.
MetadataDataSource
Provides navigation query information, including dimensionrefinements, record results, aggregated record results,
NavigationDataSource
Endeca ConfidentialEndeca RAD Toolkit for ASP.NET Developer's Guide
Overview of the RAD Toolkit for ASP.NET | Endeca data source controls14
DescriptionData source control
Analytics results, breadcrumbs information, metadata, andsupplemental objects.
Provides details (e.g. property values and dimension values)about a single record to other controls in your Web site.
RecordDetailsDataSource
Endeca user interface controlsEndeca provides a number of custom user interface controls that are available from the Toolboxwindow of Visual Studio. Each control provides a convenient user interface for common Endeca pageelements in an application.
Note: Endeca user interface controls are built as ASP.NET server controls. For simplicity, thisguide refers to them using the more brief form of user interface controls.
You drag and drop the following user interface controls into your project and configure them asappropriate for your application.
DescriptionWeb server control
Displays the search navigation descriptors for the current query.Descriptors include dimension values, search terms, and range filters.
Breadcrumbs
For example, a breadcrumb made up of dimension values might looklike this:
Wine Type > Red > Merlot > 1999 [X]
Renders dimension groups, dimensions, and dimension value nameson a Web page.
GuidedNavigation
Displays paging choices to page through the record set, when the numberof search results are sufficient to create multiple pages. For example apaging control typically looks like this:
<< < 2, 3, 4, > >>
Pager
Renders the most commonly used tags in records stored in an MDEXEngine. Tags for frequently occurring query results display in a larger
TagCloud
font. Selecting a tag within a tag cloud produces a collection of queryresults that are associated with that tag.
Endeca Workbench instrumentation controlsEndeca provides two instrumentation controls to help integrate a custom application into EndecaWorkbench.
Note: Endeca Workbench instrumentation controls are built as ASP.NET server controls. Forsimplicity, this guide uses the more brief form of instrumentation controls.
Endeca RAD Toolkit for ASP.NET Developer's GuideEndeca Confidential
15Overview of the RAD Toolkit for ASP.NET | Endeca user interface controls

You drag and drop the following instrumentation controls into any page that requires instrumentationand configure the controls as appropriate for your application. See the Oracle Endeca WorkbenchAdministrator's Guide for more information about instrumenting an application.
DescriptionWeb server control
Instruments a Web page to provide navigation state toEndeca Workbench.
WebStudioNavigationInstrumentation
Instruments a Web page to provide record details stateto Endeca Workbench.
WebStudioRecordInstrumentation
Reference applicationThe RAD Toolkit for ASP.NET provides a reference application that can be run in Postback mode,URL mode, RAD Toolkit Server Controls Postback mode, or RAD Toolkit Server Controls URL mode.Like other Endeca reference applications, the RAD Toolkit reference application provides a simplefront-end interface that allows you to connect to an MDEX Engine and examine a record set.
Installation locations
By default, the installer places the reference application inC:\Endeca\RADToolkits\version\ASP.NET\reference\RadAspNetRef. This directoryincludes the files for all modes of the reference application. The start page for the Postback mode isGuidedNavigation.aspx. The start page for the URL parameter mode isGuidedNavigationUrl.aspx.
Differences between the reference application modes
The Postback mode of the reference application uses HTTP POST requests, not HTTP GET requestsfor each query in an application.
The URL parameter mode uses URL query parameters to generate an HTTP GET request for eachchange in the navigation state. This means that any change to the navigation state (i.e. any searchor navigation request) is reflected in the URL itself and all information about the navigation statedisplays in the URL.
Both modes of the reference application have a RAD Toolkit Server Controls mode. The RAD ToolkitServer Controls modes use the Endeca user interface and data source controls that are included withthe RAD Toolkit for ASP.NET.
Deployment
You can deploy the reference application by following the instructions in "Deploying the RAD ASP.NETreference application".
Page life cycle events for RAD Toolkit controlsFirst, by way of disclaimer, this topic does not go into detail about the core concepts of ASP.NET suchas general page life cycle stages or life cycle events for data bound controls. For background informationabout page life cycle stages and page events, you can refer to the MSDN article titled "ASP.NET PageLife Cycle Overview" at http://msdn2.microsoft.com/en-us/library/ms178472.aspx.
Endeca ConfidentialEndeca RAD Toolkit for ASP.NET Developer's Guide
Overview of the RAD Toolkit for ASP.NET | Reference application16

This topic assumes you have read the MSDN information and goes on to describe where the Endecadata source controls plug into the ASP.NET page life cycle events.
RaisePostbackEvent
This is the first event in the life cycle that typically affects your page and the state of the queries on it.All postback events such as button clicks and drop downs selected are handled at this stage. It iscommon practice to programmatically update parameters on your data source in this event.
PreRender event
The Endeca data source controls perform a number of operations in the PreRender event of the pageevent life cycle.The data source executes a query during this event only if another control on the pagerequests data from the data source. When a control on the page is bound to a data source, it definesa DataSourceView from which it gets its data. If the DataSourceView is not yet populated withfresh data (based on the current filter set of the query), it calls ExecuteSelect to query the MDEXEngine for fresh data.
Any control that is bound to an Endeca data source, for example, a Repeater control, aGuidedNavigation control, and so on, also fetches its data during the PreRender page event.
Record class generation utilityThe RAD Toolkit includes a utility for code-generating a strongly-typed record class.
The ASP.NET\bin\recgen.exe utility queries an MDEX Engine for records and creates a classfeaturing the record’s properties as strongly typed members. If you provide the class's type name asan argument to either the NavigationCommand.TypeNames.RecordTypeName or the Naviga¬tionDataSource.RecordTypeName property, the RAD Toolkit then serializes records into thisclass instead of its default Endeca.Data.Record class.
Type recgen /? at the command line for more information.
Endeca RAD Toolkit for ASP.NET Developer's GuideEndeca Confidential
17Overview of the RAD Toolkit for ASP.NET | Record class generation utility


Chapter 3
Creating an application using Endeca servercontrols
This section provides an overview of how to create an Endeca front-end application using the Endecadata source controls and the Endeca user interface controls.
High level process of creating an application with servercontrols
The basic workflow is as follows:
1. Create (or open) your ASP.NET Web site in Visual Studio.2. Add Endeca data source controls to the Web site so you can bind other controls to MDEX Engine
query results.3. Add Endeca user interface controls to the Web site so you can provide search and navigation
features such as Guided Navigation controls, paging controls, breadcrumb controls, and so on.4. Add other Visual Studio .NET controls to build search boxes, display record results, and so on.5. Test and deploy your Web site.
Adding Endeca data source controls to a Web pageThis section describes how to create and configure the Endeca data source controls available in theRAD Toolkit for ASP.NET. Other ASP.NET controls can bind to the Endeca data source controls andaccess Endeca query results.
On each data source, you can check the Preview Endeca data option to populate a control withrepresentative data from the MDEX Engine. This option gives you a design time view of the data thatthe control provides to other controls on the page. If this option is unchecked, the user interface controlspopulate themselves with placeholder data.
Creating a NavigationDataSource controlYou create and configure a NavigationDataSource control in order to provide MDEX Engine recordsto other controls in your Web site.

In other words, the NavigationDataSource provides design time functionality to populate the othercontrols (e.g. user interface controls) with all the properties in an Endeca record.
Note: In addition to configuring the NavigationDataSource according to the procedure below,you can also configure the NavigationDataSource using the Properties window of Visual Studio.
To create and configure an Endeca NavigationDataSource control:
1. Open your Web site in Visual Studio.
2. In the Toolbox window, expand the Endeca RAD Toolkit tab.
3. Drag the NavigationDataSource on to the Design tab of your Web page.
4. From the Smart Tag, check Preview Endeca data to populate other controls you add later withrepresentative data from the MDEX Engine.
5. From the Smart Tag, select Configure Data Source....
6. On the Choose Endeca server screen, do the following:
a) Specify the host and port on which the MDEX Engine is running.These are the only two requiredvalues to finish the wizard. If you do not need any additional configuration, click Finish.For example, the most basic configuration looks like this:
b) If you are connecting to the MDEX Engine via SSL, click Browse... to locate the Web application'sprivate certificate file (typically a PEM file).
c) Check Save server in web.config if you want the data source to refer to the web.config filefor host and port information. If unchecked, the host and port information is set as a property ofthe data source.
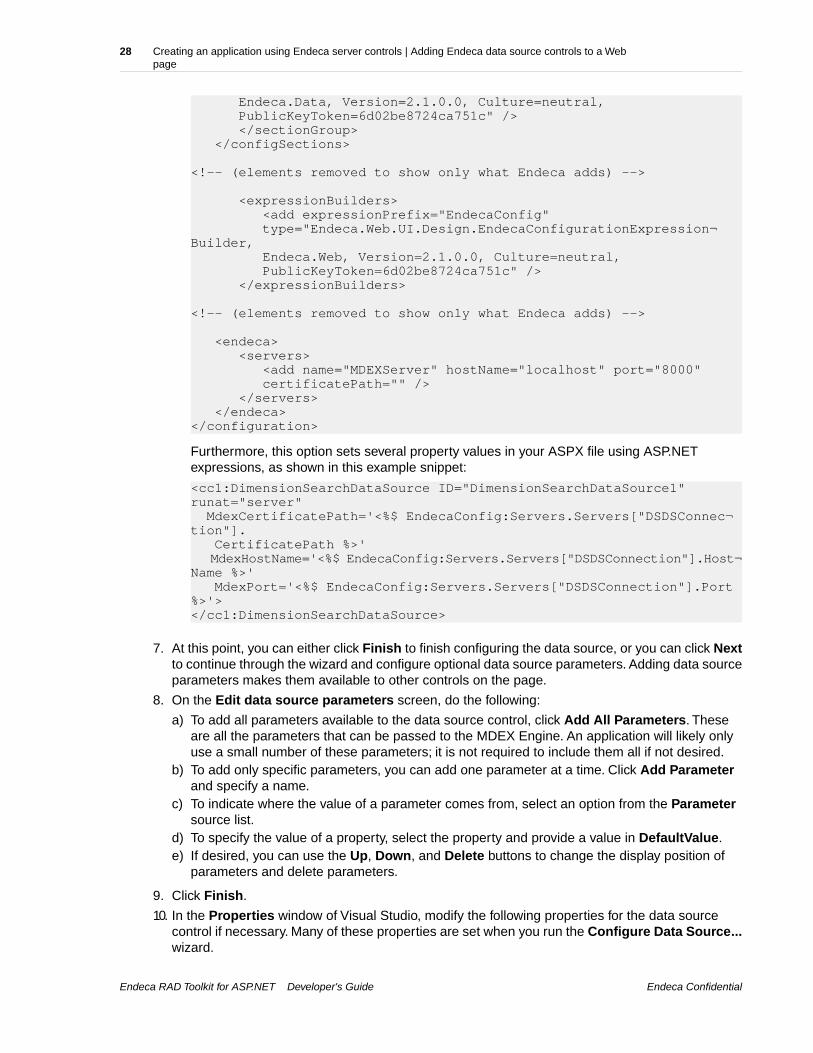
d) If you checked Save server in web.config, specify the name of a server on which the file isstored.This option adds <configSections>, <expressionBuilders>, and <endeca> to yourweb.config file as shown in this example:
<configuration> <configSections> <sectionGroup name="endeca" type="Endeca.Data.Configuration.EndecaSectionGroup, Endeca.Data, Version=2.1.0.0, Culture=neutral, PublicKeyToken=6d02be8724ca751c" > <section name="servers" type="Endeca.Data.Configuration.ServersSection, Endeca.Data, Version=2.1.0.0, Culture=neutral, PublicKeyToken=6d02be8724ca751c" /> </sectionGroup> </configSections>
<!-- (elements removed to show only what Endeca adds) -->
Endeca ConfidentialEndeca RAD Toolkit for ASP.NET Developer's Guide
Creating an application using Endeca server controls | Adding Endeca data source controls to a Webpage
20

<expressionBuilders> <add expressionPrefix="EndecaConfig" type="Endeca.Web.UI.Design.EndecaConfigurationExpression¬Builder, Endeca.Web, Version=2.1.0.0, Culture=neutral, PublicKeyToken=6d02be8724ca751c" /> </expressionBuilders>
<!-- (elements removed to show only what Endeca adds) -->
<endeca> <servers> <add name="MDEXServer" hostName="localhost" port="8000" certificatePath="" /> </servers> </endeca></configuration>
Furthermore, this option sets several property values in your ASPX file using ASP.NETexpressions, as shown in this example snippet:
<cc1:NavigationDataSource ID="NavigationDataSource1" runat="server" MdexCertificatePath='<%$ EndecaConfig:Servers.Servers["MDEXServ¬er"].CertificatePath %>' MdexHostName='<%$ EndecaConfig:Servers.Servers["MDEXServer"].HostName %>' MdexPort='<%$ EndecaConfig:Servers.Servers["MDEXServer"].Port %>'></cc1:NavigationDataSource>
7. At this point, you can either click Finish to finish configuring the data source, or you can click Nextto continue through the wizard and configure optional data source parameters and specify optionalAnalytics query information. Adding data source parameters makes them available to other controlson the page.
8. On the Edit data source parameters screen, do the following:
a) To add all parameters available to the NavigationDataSource control, click Add All Parameters.These are all the parameters that can be passed to the MDEX Engine. An application will likelyonly use a small number of these parameters; it is not required to include them all if not desired.
b) To add only specific parameters, you can add one parameter at a time. Click Add Parameterand specify a name.
c) To indicate where the value of a parameter comes from, select an option from the Parametersource list.
d) To specify the value of a property, select the property and provide a value in DefaultValue.e) If desired, you can use the Up, Down, and Delete buttons to change the display position of
parameters and delete parameters.
9. At this point, you can either click Finish to finish configuring the data source, or you can click Nextto continue through the wizard and specify optional Analytics query information. Adding an Analyticsquery makes the results of that query available to the data source and other controls on the page.
10. On the Configure analytics query screen, do the following:
a) Specify the syntax of one or more Analytics queries to run against the MDEX Engine.Here is a simple example query that averages a property and groups the results by theP_Winery property:
RETURN AvgPriceTableAS SELECT AVG(@AvgPrice) AS AvgPriceGROUP BY P_Winery
Endeca RAD Toolkit for ASP.NET Developer's GuideEndeca Confidential
21Creating an application using Endeca server controls | Adding Endeca data source controls to a Webpage
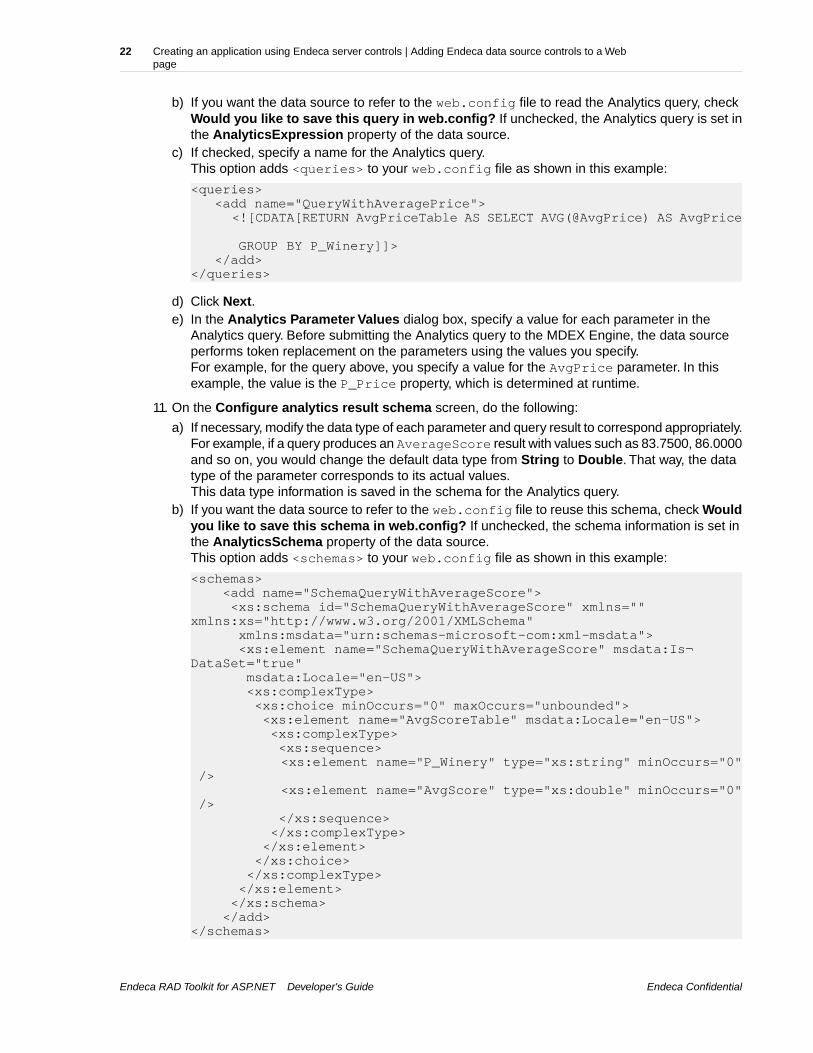
b) If you want the data source to refer to the web.config file to read the Analytics query, checkWould you like to save this query in web.config? If unchecked, the Analytics query is set inthe AnalyticsExpression property of the data source.
c) If checked, specify a name for the Analytics query.This option adds <queries> to your web.config file as shown in this example:
<queries> <add name="QueryWithAveragePrice"> <![CDATA[RETURN AvgPriceTable AS SELECT AVG(@AvgPrice) AS AvgPrice
GROUP BY P_Winery]]> </add></queries>
d) Click Next.e) In the Analytics Parameter Values dialog box, specify a value for each parameter in the
Analytics query. Before submitting the Analytics query to the MDEX Engine, the data sourceperforms token replacement on the parameters using the values you specify.For example, for the query above, you specify a value for the AvgPrice parameter. In thisexample, the value is the P_Price property, which is determined at runtime.
11. On the Configure analytics result schema screen, do the following:
a) If necessary, modify the data type of each parameter and query result to correspond appropriately.For example, if a query produces an AverageScore result with values such as 83.7500, 86.0000and so on, you would change the default data type from String to Double. That way, the datatype of the parameter corresponds to its actual values.This data type information is saved in the schema for the Analytics query.
b) If you want the data source to refer to the web.config file to reuse this schema, check Wouldyou like to save this schema in web.config? If unchecked, the schema information is set inthe AnalyticsSchema property of the data source.This option adds <schemas> to your web.config file as shown in this example:
<schemas> <add name="SchemaQueryWithAverageScore"> <xs:schema id="SchemaQueryWithAverageScore" xmlns="" xmlns:xs="http://www.w3.org/2001/XMLSchema" xmlns:msdata="urn:schemas-microsoft-com:xml-msdata"> <xs:element name="SchemaQueryWithAverageScore" msdata:Is¬DataSet="true" msdata:Locale="en-US"> <xs:complexType> <xs:choice minOccurs="0" maxOccurs="unbounded"> <xs:element name="AvgScoreTable" msdata:Locale="en-US"> <xs:complexType> <xs:sequence> <xs:element name="P_Winery" type="xs:string" minOccurs="0" /> <xs:element name="AvgScore" type="xs:double" minOccurs="0" /> </xs:sequence> </xs:complexType> </xs:element> </xs:choice> </xs:complexType> </xs:element> </xs:schema> </add></schemas>
Endeca ConfidentialEndeca RAD Toolkit for ASP.NET Developer's Guide
Creating an application using Endeca server controls | Adding Endeca data source controls to a Webpage
22

12. Click Finish.
13. In the Properties window of Visual Studio, modify the following properties for the data sourcecontrol if necessary. Many of these properties are set when you run the Configure Data Source...wizard.
DescriptionProperty
Optional. Invokes a wizard where you specify theparameters used in an Analytics expression.
AnalyticsExpressionParameters
Optional. Specifies a path to the Web application'sprivate certificate file (typically a PEM file) if you areconnecting to the MDEX Engine via SSL.
MDEXCertificatePath
Required. Specifies the host on which the MDEX Engineis running.
MDEXHostName
Required. Specifies the port on which the MDEX Engineis running.
MDEXPort
Optional. Specifies a custom type for use by recordsreturned by this data source. The default value forRecordTypeName is Endeca.Data.Record.
RecordTypeName
Optional. Specifies a collection of parameters to usewhen the data source queries the MDEX Engine.
SelectParameters
Optional. Specifies one or more dimensions, by ID, toalways expose and keep exposed on the page. A
PermanentRefinementConfigs
dimension cannot be collapsed if a user clicks it. Clickthe Browse... option to invoke the RefinementConfigCollection Editor. This editor allows you to specify aDimensionValueId for each dimension you want toexpose.
Optional. Specifies either the syntax of an Analyticsexpression or specifies a property that points to the
AnalyticsExpression
expression in the web.config file.Typically, you createan Analytics expression in the Configure analyticsquery screen of the configuration wizard.
Optional. Specifies the attributes of the schema for theAnalyticsExpression.
AnalyticsSchema
Optional. Specifies the filter that evaluates whichdynamic business rules the MDEX Engine runs.
BusinessRulesFilter
Optional. Specifies the time used to determine whetherthe MDEX Engine runs dynamic business rules that havea time trigger.
BusinessRulesPreviewTime
Optional. Specifies whether the MDEX Engine shouldcompute alternative phrasings for the current record
EnableComputeAlternativePhrasing
search query.The default value for EnableComputeAl¬ternativePhrasing is False.
Optional. Specifies whether a full-text search should turnon the Did You Mean? feature. Only used if a full-text
EnableDidYouMean
search query is being made. The default value for En¬ableDidYouMean is False.
Endeca RAD Toolkit for ASP.NET Developer's GuideEndeca Confidential
23Creating an application using Endeca server controls | Adding Endeca data source controls to a Webpage
DescriptionProperty
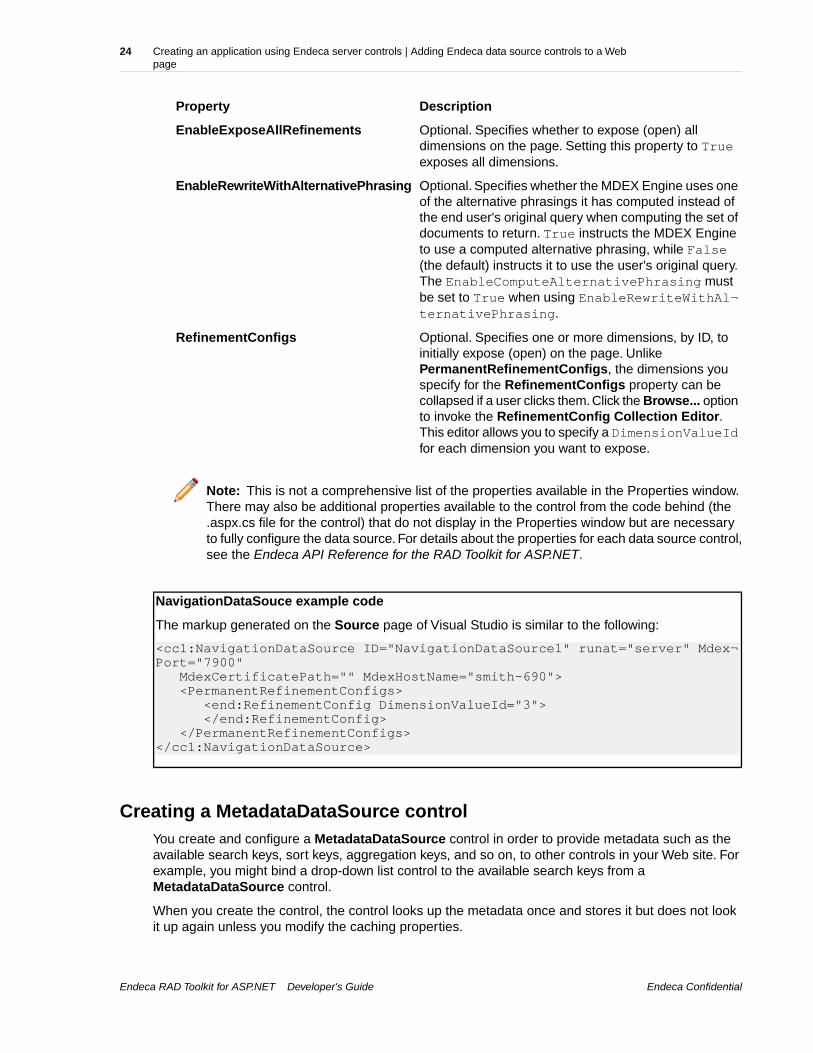
Optional. Specifies whether to expose (open) alldimensions on the page. Setting this property to Trueexposes all dimensions.
EnableExposeAllRefinements
Optional. Specifies whether the MDEX Engine uses oneof the alternative phrasings it has computed instead of
EnableRewriteWithAlternativePhrasing
the end user's original query when computing the set ofdocuments to return. True instructs the MDEX Engineto use a computed alternative phrasing, while False(the default) instructs it to use the user's original query.The EnableComputeAlternativePhrasing mustbe set to True when using EnableRewriteWithAl¬ternativePhrasing.
Optional. Specifies one or more dimensions, by ID, toinitially expose (open) on the page. Unlike
RefinementConfigs
PermanentRefinementConfigs, the dimensions youspecify for the RefinementConfigs property can becollapsed if a user clicks them. Click the Browse... optionto invoke the RefinementConfig Collection Editor.This editor allows you to specify a DimensionValueIdfor each dimension you want to expose.
Note: This is not a comprehensive list of the properties available in the Properties window.There may also be additional properties available to the control from the code behind (the.aspx.cs file for the control) that do not display in the Properties window but are necessaryto fully configure the data source. For details about the properties for each data source control,see the Endeca API Reference for the RAD Toolkit for ASP.NET.
NavigationDataSouce example code
The markup generated on the Source page of Visual Studio is similar to the following:
<cc1:NavigationDataSource ID="NavigationDataSource1" runat="server" Mdex¬Port="7900" MdexCertificatePath="" MdexHostName="smith-690"> <PermanentRefinementConfigs> <end:RefinementConfig DimensionValueId="3"> </end:RefinementConfig> </PermanentRefinementConfigs></cc1:NavigationDataSource>
Creating a MetadataDataSource controlYou create and configure a MetadataDataSource control in order to provide metadata such as theavailable search keys, sort keys, aggregation keys, and so on, to other controls in your Web site. Forexample, you might bind a drop-down list control to the available search keys from aMetadataDataSource control.
When you create the control, the control looks up the metadata once and stores it but does not lookit up again unless you modify the caching properties.
Endeca ConfidentialEndeca RAD Toolkit for ASP.NET Developer's Guide
Creating an application using Endeca server controls | Adding Endeca data source controls to a Webpage
24

To create and configure an Endeca MetadataDataSource control:
1. Open your Web site in Visual Studio.
2. In the Toolbox window, expand the Endeca RAD Toolkit tab.
3. Drag the MetadataDataSource on to the Design tab of your Web page.
4. Select the MetadataDataSource and click the Smart Tag.
5. Check Preview Endeca data to populate other controls you add later with representative data fromthe MDEX Engine
6. Select Configure Data Source....
7. On the Choose Endeca server screen, do the following:
a) Specify the host and port on which the MDEX Engine is running.These are the only two requiredvalues to finish the wizard. If you do not need any additional configuration, click Finish.For example, the most basic configuration looks like this:
b) If you are connecting to the MDEX Engine via SSL, click Browse... to locate the Web application'sprivate certificate file (typically a PEM file).
c) Check Save server in web.config if you want the MetadataDataSource to refer to theweb.config file for host and port information. If unchecked, the host and port information isset as a property of the MetadataDataSource.
d) If you checked Save server in web.config, specify the name of the server on which the file isstored.This option adds <configSections>, <expressionBuilders>, and <endeca> to yourweb.config file as shown in this example:
<configuration> <configSections> <sectionGroup name="endeca" type="Endeca.Data.Configuration.EndecaSectionGroup, Endeca.Data, Version=2.1.0.0, Culture=neutral, PublicKeyToken=6d02be8724ca751c" > <section name="servers" type="Endeca.Data.Configuration.ServersSection, Endeca.Data, Version=2.1.0.0, Culture=neutral, PublicKeyToken=6d02be8724ca751c" /> </sectionGroup> </configSections>
<!-- (elements removed to show only what Endeca adds) -->
<expressionBuilders> <add expressionPrefix="EndecaConfig" type="Endeca.Web.UI.Design.EndecaConfigurationExpression¬Builder, Endeca.Web, Version=2.1.0.0, Culture=neutral,
Endeca RAD Toolkit for ASP.NET Developer's GuideEndeca Confidential
25Creating an application using Endeca server controls | Adding Endeca data source controls to a Webpage

PublicKeyToken=6d02be8724ca751c" /> </expressionBuilders>
<!-- (elements removed to show only what Endeca adds) -->
<endeca> <servers> <add name="MDEXServer" hostName="localhost" port="8000" certificatePath="" /> </servers> </endeca></configuration>
Furthermore, this option sets several property values in your ASPX file using ASP.NETexpressions, as shown in this example snippet:
<cc1:MetadataDataSource ID="MetadataDataSource1" runat="server" Mdex¬Port="7900" MdexCertificatePath='<%$ EndecaConfig:Servers.Servers["MetadataDSCon¬nection"]. CertificatePath %>' MdexHostName='<%$ EndecaConfig:Servers.Servers["MetadataDSConnec¬tion"]. HostName %>' MdexPort='<%$ EndecaConfig:Servers.Servers["MetadataDSConnec¬tion"].Port %>' /></cc1:MetadataDataSource>
8. Click Finish.
9. In the Properties window of Visual Studio, modify the following properties for theMetadataDataSource control if necessary:
DescriptionProperty
Optional. Specifies the length of time, in seconds, that data retrieved bythis data source is cached. The default value for CachingDuration is0.
CacheDuration
Optional. Specifies the cache expiration behavior that, when combinedwith the duration, describes the behavior of the cache that the data source
CacheExpirationPolicy
control uses.The default value for CacheExpirationPolicy is Slid¬ing.
Optional. Specifies a user-defined key dependency that is linked to alldata items cached by this control. The default value is empty.
CacheKeyDependency
Optional. Specifies whether the data retrieved by this data source shouldbe fetched once and cached in the ASP.NET cache object rather than
EnableCaching
fetched each time from the MDEX Engine. Settting this property to Truefetches the data once from the MDEX Engine and then stores that datain the ASP.NET cache. Setting this value to False fetches the data fromthe MDEX Engine each time. The default value for EnableCaching isFalse.
Note: This is not a comprehensive list of the properties available in the Properties window.There may also be additional properties available to the control from the code behind (the.aspx.cs file for the control) that do not display in the Properties window but are necessaryto fully configure the data source. For details about the properties for each data source control,see the Endeca API Reference for the RAD Toolkit for ASP.NET.
Endeca ConfidentialEndeca RAD Toolkit for ASP.NET Developer's Guide
Creating an application using Endeca server controls | Adding Endeca data source controls to a Webpage
26

MetadataDataSource example code
The markup generated on the Source page of Visual Studio is similar to the following:
<cc1:MetadataDataSource ID="MetadataDataSource1" runat="server" MdexCertificatePath="" />
Creating a DimensionSearchDataSource controlYou create and configure a DimensionSearchDataSource control in order to provide results producedby dimension search to other controls in your Web site.
To create and configure an Endeca DimensionSearchDataSource control:
1. Open your Web site in Visual Studio.
2. In the Toolbox window, expand the Endeca RAD Toolkit tab.
3. Drag the DimensionSearchDataSource on to the Design tab of your Web page.
4. From the Smart Tag, check Preview Endeca data to populate other controls you add later withrepresentative data from the MDEX Engine.
5. From the Smart Tag, select Configure Data Source....
6. On the Choose Endeca server screen, do the following:
a) Specify the host and port on which the MDEX Engine is running.These are the only two requiredvalues to finish the wizard. If you do not need any additional configuration, click Finish.For example, the most basic configuration looks like this:
b) If you are connecting to the MDEX Engine via SSL, click Browse... to locate the Web application'sprivate certificate file (typically a PEM file).
c) Check Save server in web.config if you want the data source to refer to the web.config filefor host and port information. If unchecked, the host and port information is set as a property ofthe data source.
d) If you checked Save server in web.config, specify the name of a server on which the file isstored.This option adds <configSections>, <expressionBuilders>, and <endeca> to yourweb.config file as shown in this example:
<configuration> <configSections> <sectionGroup name="endeca" type="Endeca.Data.Configuration.EndecaSectionGroup, Endeca.Data, Version=2.1.0.0, Culture=neutral, PublicKeyToken=6d02be8724ca751c" > <section name="servers" type="Endeca.Data.Configuration.ServersSection,
Endeca RAD Toolkit for ASP.NET Developer's GuideEndeca Confidential
27Creating an application using Endeca server controls | Adding Endeca data source controls to a Webpage
Endeca.Data, Version=2.1.0.0, Culture=neutral, PublicKeyToken=6d02be8724ca751c" /> </sectionGroup> </configSections>
<!-- (elements removed to show only what Endeca adds) -->
<expressionBuilders> <add expressionPrefix="EndecaConfig" type="Endeca.Web.UI.Design.EndecaConfigurationExpression¬Builder, Endeca.Web, Version=2.1.0.0, Culture=neutral, PublicKeyToken=6d02be8724ca751c" /> </expressionBuilders>
<!-- (elements removed to show only what Endeca adds) -->
<endeca> <servers> <add name="MDEXServer" hostName="localhost" port="8000" certificatePath="" /> </servers> </endeca></configuration>
Furthermore, this option sets several property values in your ASPX file using ASP.NETexpressions, as shown in this example snippet:
<cc1:DimensionSearchDataSource ID="DimensionSearchDataSource1" runat="server" MdexCertificatePath='<%$ EndecaConfig:Servers.Servers["DSDSConnec¬tion"]. CertificatePath %>' MdexHostName='<%$ EndecaConfig:Servers.Servers["DSDSConnection"].Host¬Name %>' MdexPort='<%$ EndecaConfig:Servers.Servers["DSDSConnection"].Port %>'></cc1:DimensionSearchDataSource>
7. At this point, you can either click Finish to finish configuring the data source, or you can click Nextto continue through the wizard and configure optional data source parameters. Adding data sourceparameters makes them available to other controls on the page.
8. On the Edit data source parameters screen, do the following:
a) To add all parameters available to the data source control, click Add All Parameters. Theseare all the parameters that can be passed to the MDEX Engine. An application will likely onlyuse a small number of these parameters; it is not required to include them all if not desired.
b) To add only specific parameters, you can add one parameter at a time. Click Add Parameterand specify a name.
c) To indicate where the value of a parameter comes from, select an option from the Parametersource list.
d) To specify the value of a property, select the property and provide a value in DefaultValue.e) If desired, you can use the Up, Down, and Delete buttons to change the display position of
parameters and delete parameters.
9. Click Finish.
10. In the Properties window of Visual Studio, modify the following properties for the data sourcecontrol if necessary. Many of these properties are set when you run the Configure Data Source...wizard.
Endeca ConfidentialEndeca RAD Toolkit for ASP.NET Developer's Guide
Creating an application using Endeca server controls | Adding Endeca data source controls to a Webpage
28

DescriptionProperty
Optional. Specifies a path to the Web application's privatecertificate file (typically a PEM file) if you are connecting to theMDEX Engine via SSL.
MDEXCertificatePath
Required. Specifies the host on which the MDEX Engine isrunning.
MDEXHostName
Required. Specifies the port on which the MDEX Engine isrunning.
MDEXPort
Optional. Specifies a collection of parameters to use when thedata source queries the MDEX Engine.
SelectParameters
Optional. Specifies the number of results to return for thedimension search.
DimensionValuesPerDimension
Optional. Specifies the Endeca Query Language expression forthe dimension search.
EqlExpression
Optional. Specifies the record filter for the dimension search.RecordFilter
Specifies a search mode for each dimension search operationin a query. Valid search modes are the following: All, AllAny,
SearchMode
AllPartial, Any, Boolean, Partial, PartialMax. See "Valid searchmodes" in the Endeca Basic Development Guide for a definitionof each mode.
Required. Specifies the search terms for the dimension search.SearchTerms
Note: This is not a comprehensive list of the properties available in the Properties window.There may also be additional properties available to the control from the code behind (the.aspx.cs file for the control) that do not display in the Properties window but are necessaryto fully configure the data source. For details about the properties for each data source control,see the Endeca API Reference for the RAD Toolkit for ASP.NET.
DimensionSearchDataSouce example code
The markup generated on the Source page of Visual Studio is similar to the following:
<cc1:DimensionSearchDataSource ID="DimensionSearchDataSource1" runat="server" MdexPort="7900" MdexCertificatePath="" MdexHostName="smith-690"></cc1:DimensionSearchDataSource>
Creating a CompoundDimensionSearchDataSource controlYou create and configure a CompoundDimensionSearchDataSource control in order to provideresults produced by compound dimension search to other controls in your Web site.
To create and configure an Endeca CompoundDimensionSearchDataSource control:
1. Open your Web site in Visual Studio.
2. In the Toolbox window, expand the Endeca RAD Toolkit tab.
3. Drag the CompoundDimensionSearchDataSource on to the Design tab of your Web page.
Endeca RAD Toolkit for ASP.NET Developer's GuideEndeca Confidential
29Creating an application using Endeca server controls | Adding Endeca data source controls to a Webpage

4. From the Smart Tag, check Preview Endeca data to populate other controls you add later withrepresentative data from the MDEX Engine.
5. From the Smart Tag, select Configure Data Source....
6. On the Choose Endeca server screen, do the following:
a) Specify the host and port on which the MDEX Engine is running.These are the only two requiredvalues to finish the wizard. If you do not need any additional configuration, click Finish.For example, the most basic configuration looks like this:
b) If you are connecting to the MDEX Engine via SSL, click Browse... to locate the Web application'sprivate certificate file (typically a PEM file).
c) Check Save server in web.config if you want the data source to refer to the web.config filefor host and port information. If unchecked, the host and port information is set as a property ofthe data source.
d) If you checked Save server in web.config, specify the name of a server on which the file isstored.This option adds <configSections>, <expressionBuilders>, and <endeca> to yourweb.config file as shown in this example:
<configuration> <configSections> <sectionGroup name="endeca" type="Endeca.Data.Configuration.EndecaSectionGroup, Endeca.Data, Version=2.1.0.0, Culture=neutral, PublicKeyToken=6d02be8724ca751c" > <section name="servers" type="Endeca.Data.Configuration.ServersSection, Endeca.Data, Version=2.1.0.0, Culture=neutral, PublicKeyToken=6d02be8724ca751c" /> </sectionGroup> </configSections>
<!-- (elements removed to show only what Endeca adds) -->
<expressionBuilders> <add expressionPrefix="EndecaConfig" type="Endeca.Web.UI.Design.EndecaConfigurationExpression¬Builder, Endeca.Web, Version=2.1.0.0, Culture=neutral, PublicKeyToken=6d02be8724ca751c" /> </expressionBuilders>
<!-- (elements removed to show only what Endeca adds) -->
<endeca> <servers> <add name="MDEXServer" hostName="localhost" port="8000"
Endeca ConfidentialEndeca RAD Toolkit for ASP.NET Developer's Guide
Creating an application using Endeca server controls | Adding Endeca data source controls to a Webpage
30

certificatePath="" /> </servers> </endeca></configuration>
Furthermore, this option sets several property values in your ASPX file using ASP.NETexpressions, as shown in this example snippet:
<cc1:CompoundDimensionSearchDataSource ID="CompoundDimensionSearchData¬Source1" runat="server" MdexCertificatePath='<%$ EndecaConfig:Servers.Servers["CmpdDim¬Search"].CertificatePath %>' MdexHostName='<%$ EndecaConfig:Servers.Servers["CmpdDimSearch"].Host¬Name %>' MdexPort='<%$ EndecaConfig:Servers.Servers["CmpdDimSearch"].Port %>'></cc1:CompoundDimensionSearchDataSource>
7. At this point, you can either click Finish to finish configuring the data source, or you can click Nextto continue through the wizard and configure optional data source parameters. Adding data sourceparameters makes them available to other controls on the page.
8. On the Edit data source parameters screen, do the following:
a) To add all parameters available to the data source control, click Add All Parameters. Theseare all the parameters that can be passed to the MDEX Engine. An application will likely onlyuse a small number of these parameters; it is not required to include them all if not desired.
b) To add only specific parameters, you can add one parameter at a time. Click Add Parameterand specify a name.
c) To indicate where the value of a parameter comes from, select an option from the Parametersource list.
d) To specify the value of a property, select the property and provide a value in DefaultValue.e) If desired, you can use the Up, Down, and Delete buttons to change the display position of
parameters and delete parameters.
9. Click Finish.
10. In the Properties window of Visual Studio, modify the following properties for the data sourcecontrol if necessary. Many of these properties are set when you run the Configure Data Source...wizard.
DescriptionProperty
Optional. Specifies a path to the Web application's privatecertificate file (typically a PEM file) if you are connecting to theMDEX Engine via SSL.
MDEXCertificatePath
Required. Specifies the host on which the MDEX Engine isrunning.
MDEXHostName
Required. Specifies the port on which the MDEX Engine isrunning.
MDEXPort
Optional. Specifies a collection of parameters to use when thedata source queries the MDEX Engine.
SelectParameters
Optional. Specifies the number of results to return for thecompound dimension search.
DimensionValuesPerDimension
Optional. Specifies the Endeca Query Language expression forthe compound dimension search.
EqlExpression
Endeca RAD Toolkit for ASP.NET Developer's GuideEndeca Confidential
31Creating an application using Endeca server controls | Adding Endeca data source controls to a Webpage

DescriptionProperty
Optional. Specifies the record filter for the compound dimensionsearch.
RecordFilter
Optional. Specifies a search mode for each compound dimensionsearch operation in a query. Valid search modes are the
SearchMode
following: All, AllAny, AllPartial, Any, Boolean, Partial, PartialMax.See "Valid search modes" in the Endeca Basic DevelopmentGuide for a definition of each mode.
Required. Specifies the search terms for the dimension search.SearchTerms
Note: This is not a comprehensive list of the properties available in the Properties window.There may also be additional properties available to the control from the code behind (the.aspx.cs file for the control) that do not display in the Properties window but are necessaryto fully configure the data source. For details about the properties for each data source control,see the Endeca API Reference for the RAD Toolkit for ASP.NET.
CompoundDimensionSearchDataSouce example code
The markup generated on the Source page of Visual Studio is similar to the following:
<cc1:CompoundDimensionSearchDataSource ID="CompoundDimensionSearchData¬Source1" runat="server" MdexCertificatePath='<%$ EndecaConfig:Servers.Servers["CmpdDim¬Search"].CertificatePath %>' MdexHostName='<%$ EndecaConfig:Servers.Servers["CmpdDimSearch"].HostName %>' MdexPort='<%$ EndecaConfig:Servers.Servers["CmpdDimSearch"].Port %>'></cc1:CompoundDimensionSearchDataSource>
Creating a RecordDetailsDataSource controlYou create and configure a RecordDetailsDataSource control in order to provide record detailinformation (property values and dimension values) about a single record to other controls in yourWeb site.
To create and configure an Endeca RecordDetailsDataSource control:
1. Open your Web site in Visual Studio.
2. In the Toolbox window, expand the Endeca RAD Toolkit tab.
3. Drag the RecordDetailsDataSource on to the Design tab of your Web page.
4. From the Smart Tag, check Preview Endeca data to populate other controls you add later withrepresentative data from the MDEX Engine.
5. From the Smart Tag, select Configure Data Source....
6. On the Choose Endeca server screen, do the following:
a) Specify the host and port on which the MDEX Engine is running.These are the only two requiredvalues to finish the wizard. If you do not need any additional configuration, click Finish.For example, the most basic configuration looks like this:
Endeca ConfidentialEndeca RAD Toolkit for ASP.NET Developer's Guide
Creating an application using Endeca server controls | Adding Endeca data source controls to a Webpage
32

b) If you are connecting to the MDEX Engine via SSL, click Browse... to locate the Web application'sprivate certificate file (typically a PEM file).
c) Check Save server in web.config if you want the data source to refer to the web.config filefor host and port information. If unchecked, the host and port information is set as a property ofthe data source.
d) If you checked Save server in web.config, specify the name of a server on which the file isstored.This option adds <configSections>, <expressionBuilders>, and <endeca> to yourweb.config file as shown in this example:
<configuration> <configSections> <sectionGroup name="endeca" type="Endeca.Data.Configuration.EndecaSectionGroup, Endeca.Data, Version=2.1.0.0, Culture=neutral, PublicKeyToken=6d02be8724ca751c" > <section name="servers" type="Endeca.Data.Configuration.ServersSection, Endeca.Data, Version=2.1.0.0, Culture=neutral, PublicKeyToken=6d02be8724ca751c" /> </sectionGroup> </configSections>
<!-- ...(elements removed to show only what Endeca adds)... -->
<expressionBuilders> <add expressionPrefix="EndecaConfig" type="Endeca.Web.UI.Design.EndecaConfigurationExpression¬Builder, Endeca.Web, Version=2.1.0.0, Culture=neutral, PublicKeyToken=6d02be8724ca751c" /> </expressionBuilders>
<!-- ...(elements removed to show only what Endeca adds)... -->
<endeca> <servers> <add name="MDEXServer" hostName="localhost" port="8000" certificatePath="" /> </servers> </endeca></configuration>
Furthermore, this option sets several property values in your ASPX file using ASP.NETexpressions, as shown in this example snippet of a NavigationDataSource control:
<cc1:RecordDetailsDataSource ID="RecordDetailsDataSource1" runat="server" MdexCertificatePath='<%$ EndecaConfig:Servers.Servers["RDDSConnection"].CertificatePath %>'
Endeca RAD Toolkit for ASP.NET Developer's GuideEndeca Confidential
33Creating an application using Endeca server controls | Adding Endeca data source controls to a Webpage

MdexHostName='<%$ EndecaConfig:Servers.Servers["RDDSConnection"].Host¬Name %>' MdexPort='<%$ EndecaConfig:Servers.Servers["RDDSConnection"].Port %>'></cc1:RecordDetailsDataSource>
7. At this point, you can either click Finish to finish configuring the data source, or you can click Nextto continue through the wizard and configure optional data source parameters. Adding data sourceparameters makes them available to other controls on the page.
8. On the Edit data source parameters screen, do the following:
a) To add all parameters available to the data source control, click Add All Parameters. Theseare all the parameters that can be passed to the MDEX Engine. An application will likely onlyuse a small number of these parameters; it is not required to include them all if not desired.
b) To add only specific parameters, you can add one parameter at a time. Click Add Parameterand specify a name.
c) To indicate where the value of a parameter comes from, select an option from the Parametersource list.
d) To specify the value of a property, select the property and provide a value in DefaultValue.e) If desired, you can use the Up, Down, and Delete buttons to change the display position of
parameters and delete parameters.
9. Click Finish.
10. In the Properties window of Visual Studio, modify the following properties for the data sourcecontrol if necessary. Many of these properties are set when you run the Configure Data Source... wizard.
DescriptionProperty
Optional. Specifies a path to the Web application's private certificatefile (typically a PEM file) if you are connecting to the MDEX Enginevia SSL.
MDEXCertificatePath
Required. Specifies the host on which the MDEX Engine is running.MDEXHostName
Required. Specifies the port on which the MDEX Engine is running.MDEXPort
Optional. Specifies a collection of parameters to use when the datasource queries the MDEX Engine.
SelectParameters
Required. Specifies the identifier for a record whose details youwant to display.
Identifier
Note: This is not a comprehensive list of the properties available in the Properties window.There may also be additional properties available to the control from the code behind (the.aspx.cs file for the control) that do not display in the Properties window but are necessaryto fully configure the data source. For details about the properties for each data source control,see the Endeca API Reference for the RAD Toolkit for ASP.NET.
RecordDetailsDataSouce example code
The markup generated on the Source page of Visual Studio is similar to the following snippet. Thisexample sets the Identifier when a user clicks a record in a ListBox control.
<cc1:RecordDetailsDataSource ID="RecordDetailsDataSource1" runat="server"
Endeca ConfidentialEndeca RAD Toolkit for ASP.NET Developer's Guide
Creating an application using Endeca server controls | Adding Endeca data source controls to a Webpage
34

MdexHostName="smith-690"> <SelectParameters> <asp:ControlParameter ControlID="LinkButton1" Name="Identifier" PropertyName="Text" /> </SelectParameters></cc1:RecordDetailsDataSource>
Creating an AggregateRecordDetailsDataSource controlYou create and configure an AggregateRecordDetailsDataSource control in order to provide detailsabout a single aggregate record to other controls in your Web site.
You specify an AggregationKey property and any other properties necessary to describe the set ofaggregate records to return from the MDEX Engine.These properties may include SelectedDimen¬sionValueIds, EqlExpression, RecordFilter, and so on. Together these properties build upthe navigation state of an aggregate record query submitted to the MDEX Engine.
The MDEX Engine returns an aggregate record in an AggregateRecordsResult object. The Ag¬gregateRecordsResult object contains the AggregateRecord object, which contains a collectionof Record objects and the properties and dimensions of a single representative record.
To create and configure an Endeca AggregateRecordDetailsDataSource control:
1. Open your Web site in Visual Studio.
2. In the Toolbox window, expand the Endeca RAD Toolkit tab.
3. Drag the AggregateRecordDetailsDataSource on to the Design tab of your Web page.
4. From the Smart Tag, check Preview Endeca data to populate other controls you add later withrepresentative data from the MDEX Engine
5. From the Smart Tag, select Configure Data Source....
6. On the Choose Endeca server screen, do the following:
a) Specify the host and port on which the MDEX Engine is running.These are the only two requiredvalues to finish the wizard. If you do not need any additional configuration, click Finish.For example, the most basic configuration looks like this:
b) If you are connecting to the MDEX Engine via SSL, click Browse... to locate the Web application'sprivate certificate file (typically a PEM file).
c) Check Save server in web.config if you want the data source to refer to the web.config filefor host and port information. If unchecked, the host and port information is set as a property ofthe data source.
d) If you checked Save server in web.config, specify the name of a server on which the file isstored.
Endeca RAD Toolkit for ASP.NET Developer's GuideEndeca Confidential
35Creating an application using Endeca server controls | Adding Endeca data source controls to a Webpage
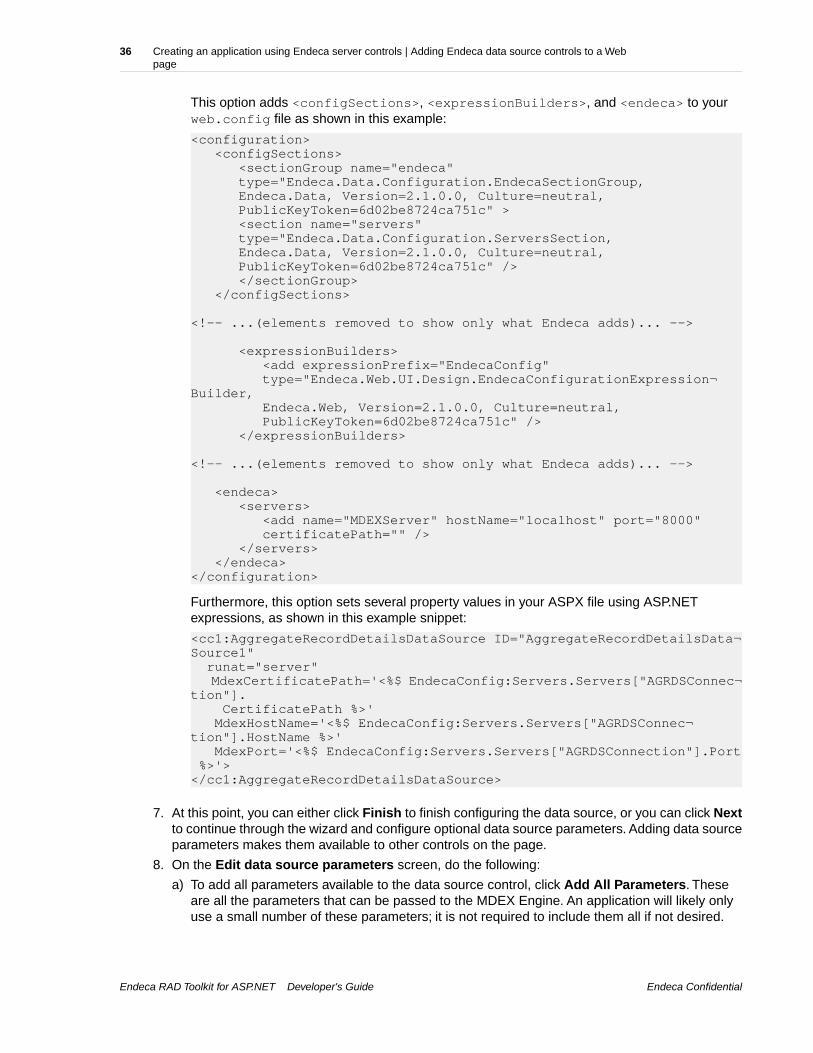
This option adds <configSections>, <expressionBuilders>, and <endeca> to yourweb.config file as shown in this example:
<configuration> <configSections> <sectionGroup name="endeca" type="Endeca.Data.Configuration.EndecaSectionGroup, Endeca.Data, Version=2.1.0.0, Culture=neutral, PublicKeyToken=6d02be8724ca751c" > <section name="servers" type="Endeca.Data.Configuration.ServersSection, Endeca.Data, Version=2.1.0.0, Culture=neutral, PublicKeyToken=6d02be8724ca751c" /> </sectionGroup> </configSections>
<!-- ...(elements removed to show only what Endeca adds)... -->
<expressionBuilders> <add expressionPrefix="EndecaConfig" type="Endeca.Web.UI.Design.EndecaConfigurationExpression¬Builder, Endeca.Web, Version=2.1.0.0, Culture=neutral, PublicKeyToken=6d02be8724ca751c" /> </expressionBuilders>
<!-- ...(elements removed to show only what Endeca adds)... -->
<endeca> <servers> <add name="MDEXServer" hostName="localhost" port="8000" certificatePath="" /> </servers> </endeca></configuration>
Furthermore, this option sets several property values in your ASPX file using ASP.NETexpressions, as shown in this example snippet:
<cc1:AggregateRecordDetailsDataSource ID="AggregateRecordDetailsData¬Source1" runat="server" MdexCertificatePath='<%$ EndecaConfig:Servers.Servers["AGRDSConnec¬tion"]. CertificatePath %>' MdexHostName='<%$ EndecaConfig:Servers.Servers["AGRDSConnec¬tion"].HostName %>' MdexPort='<%$ EndecaConfig:Servers.Servers["AGRDSConnection"].Port %>'></cc1:AggregateRecordDetailsDataSource>
7. At this point, you can either click Finish to finish configuring the data source, or you can click Nextto continue through the wizard and configure optional data source parameters. Adding data sourceparameters makes them available to other controls on the page.
8. On the Edit data source parameters screen, do the following:
a) To add all parameters available to the data source control, click Add All Parameters. Theseare all the parameters that can be passed to the MDEX Engine. An application will likely onlyuse a small number of these parameters; it is not required to include them all if not desired.
Endeca ConfidentialEndeca RAD Toolkit for ASP.NET Developer's Guide
Creating an application using Endeca server controls | Adding Endeca data source controls to a Webpage
36

b) To add only specific parameters, you can add one parameter at a time. Click Add Parameterand specify a name.
c) To indicate where the value of a parameter comes from, select an option from the Parametersource list.
d) To specify the value of a property, select the property and provide a value in DefaultValue.e) If desired, you can use the Up, Down, and Delete buttons to change the display position of
parameters and delete parameters.
9. Click Finish.
10. In the Properties window of Visual Studio, modify the following properties for the data source controlif necessary. Many of these properties are set when you run the Configure Data Source... wizard.
DescriptionProperty
Required. Specifies the property or dimension by which recordsshould be aggregated.
AggregationKey
Optional. Specifies the Endeca Query Language expression for theaggregate record's record list.
EqlExpression
Required. Specifies the identifier for an aggregate record whosedetails you want to display.
Identifier
Optional. Specifies the record filter for the aggregate record list.RecordFilter
Optional. Specifies a path to the Web application's private certificatefile (typically a PEM file) if you are connecting to the MDEX Enginevia SSL.
MDEXCertificatePath
Required. Specifies the host on which the MDEX Engine is running.MDEXHostName
Required. Specifies the port on which the MDEX Engine is running.MDEXPort
Optional. Specifies a collection of parameters to use when the datasource queries the MDEX Engine.
SelectParameters
Note: This is not a comprehensive list of the properties available in the Properties window.There may also be additional properties available to the control from the code behind (the.aspx.cs file for the control) that do not display in the Properties window but are necessaryto fully configure the data source. For details about the properties for each data source control,see the Endeca API Reference for the RAD Toolkit for ASP.NET.
AggregateRecordDetailsDataSouce example code
The markup generated on the Source page of Visual is similar to the following snippet:
<cc1:AggregateRecordDetailsDataSource ID="RecordDetailsDataSource1" runat="server" MdexHostName="smith-690"></cc1:AggregateRecordDetailsDataSource>
Refreshing a data source controlIf you update the records in the MDEX Engine, you can refresh the data source connection to pick upthe updates.
To refresh an Endeca data source control:
Endeca RAD Toolkit for ASP.NET Developer's GuideEndeca Confidential
37Creating an application using Endeca server controls | Adding Endeca data source controls to a Webpage

1. Select the Endeca data source and click the Smart Tag.
2. Click Refresh Schema.
Working with Endeca user interface controlsThis section describes how to create and configure the Endeca user interface controls (Breadcrumbs,GuidedNavigation, Pager, and TagCloud) available in the RAD Toolkit for ASP.NET.
Creating a GuidedNavigation controlYou create and configure a GuidedNavigation control in order to render dimension groups, dimensions,and dimension values on a Web page.
You must have created a NavigationDataSource control before performing this task.
To create a GuidedNavigation control:
1. Open your Web site in Visual Studio.
2. In the Toolbox window, expand the Endeca RAD Toolkit tab.
3. Drag the GuidedNavigation control on to the Design tab of your Web page.
4. Select the GuidedNavigation control and click the Smart Tag.
5. From the Choose Data Source list, select a NavigationDataSource control.If you checked Preview Endeca Data on the NavigationDataSource, then the GuidedNavigationcontrol displays actual dimension and dimension value names rather than the placeholder names.
6. In the Properties window of Visual Studio, modify the following properties for the GuidedNavigationcontrol:
DescriptionProperty
Required. This is set to DimensionStatesResult and is notavailable to modify.
DataMember
Optional. Specifies the name of the UrlManager that buildsURLs for the control.
UrlManagerId
Optional. Excludes the dimension values you specify by ID anddisplays all other dimension values. Do not use this property in
ExclusionDimensionIds
conjunction with the InclusionDimensionIds property; useone or the other but not both. By default, the GuidedNavigationcontrol includes all dimensions for display.
Optional. Displays only the dimension values you specify by IDand no other dimension values. Do not use this property in
InclusionDimensionIds
conjunction with the ExclusionDimensionIds property; useone or the other but not both. By default, the GuidedNavigationcontrol includes all dimensions for display.
Optional. Specifies whether any implicit dimension values displayin the control. Choosing True displays implicit dimensions. See
ShowImplicitDimensionValues
the Endeca Basic Development Guide for more informationabout implicit dimensions. The default value for ShowImplic¬itDimensionValues is False.
Endeca ConfidentialEndeca RAD Toolkit for ASP.NET Developer's Guide
Creating an application using Endeca server controls | Working with Endeca user interface controls38

DescriptionProperty
Optional. Specifies whether any dimension values display in thecontrol. Choosing False means the control does not display
ShowRefinements
any dimension values.The default value for ShowRefinementsis True.
Optional. Specifies whether a selected dimension value displaysin the control. Choosing True displays the selected dimension
ShowSelectedDimensionValues
values along with an [X] next to the value and also closes theparent dimension. Clicking the [X] removes the dimension valuefrom the query. (This removal feature is essentially an inlinebreadcrumb for the GuidedNavigation control.) ChoosingFalse does not display the selected dimension value in thecontrol. The default value for is False.
GuidedNavigation example code
The markup generated on the Source page is similar to the following:
<cc2:GuidedNavigation ID="GuidedNavigation1" runat="server" DataSourceID="NavigationDataSource1" ShowRefinements="True"></cc2:GuidedNavigation>
Here is an example GuidedNavigation control as rendered on a Web page:
GuidedNavigation control templatesThe GuidedNavigation control supports several templates that allow you to modify the defaultpresentation of the control. Each template in the control has default markup that is part of the Ende¬ca.Web.UI.WebControls assembly.You can over ride the default presentation as necessary byproviding your own markup in the templates.
DescriptionTemplate name
This template defines how dimension groups display. The defaultmarkup for the template is:
<DimensionStateGroupTemplate> <div class="DimensionGroupName">
DimensionStateGroupTem¬plate
<%# Eval("Name") %> </div></DimensionStateGroupTemplate>
Endeca RAD Toolkit for ASP.NET Developer's GuideEndeca Confidential
39Creating an application using Endeca server controls | Working with Endeca user interface controls

DescriptionTemplate name
This template defines how dimensions display.The default markupfor the template is:
<DimensionStateTemplate> <asp:LinkButton runat="server" Command¬
DimensionStateTemplate
Name="ToggleDimensionStateExposure" Visible='<%# Eval("IsRefinable") %>'> <%# Eval("Dimension.DisplayName") %> </asp:LinkButton> <asp:Label runat="server" Visible='<%# !(bool)Eval("IsRefinable") %>'> <%# Eval("Dimension.DisplayName") %> </asp:Label></DimensionStateTemplate>
This template defines how dimension values display. The defaultmarkup for the template is:
<RefinementDimensionValueTemplate> <asp:LinkButton runat="server" CommandName="Se¬
RefinementDimensionVal¬ueTemplate
lectDimensionValue"> <%# Eval("DisplayName") %> </asp:LinkButton><asp:Label runat="server" class="RecordCount" Visible='<%# Container.DataItem.Record¬Count.HasValue %>'> (<%# Eval("RecordCount") %>) </asp:Label></RefinementDimensionValueTemplate>
This template defines how selected dimension values display.The default markup for the template is:
<SelectedDimensionValueTemplate> <asp:Label runat="server"><%# Eval("Display¬
SelectedDimensionValueTem¬plate
Name") %></asp:Label> <asp:LinkButton runat="server" CommandName="Re¬moveDimensionValue">[x]</asp:LinkButton></SelectedDimensionValueTemplate>
This template defines how implicit dimension values display (ifthey are enabled for display).The default markup for the templateis:
<ImplicitDimensionValueTemplate> <asp:Label runat="server"><%# Eval("Display¬
ImplicitDimensionValueTem¬plate
Name") %></asp:Label></ImplicitDimensionValueTemplate>
This template defines how the default More... link displays whenadditional dimension values can be selected.The default markupfor the template is:
<ShowMoreDimensionValuesTemplate> <asp:LinkButton runat="server" Command¬
ShowMoreDimensionValuesTem¬plate
Name="ShowMore">More...</asp:LinkButton></ShowMoreDimensionValuesTemplate>
Endeca ConfidentialEndeca RAD Toolkit for ASP.NET Developer's Guide
Creating an application using Endeca server controls | Working with Endeca user interface controls40
Creating a Breadcrumbs controlYou create and configure a Breadcrumbs control in order to display the search and navigationdescriptors for a query. Descriptors include dimension value paths (including inert dimensions), searchterms, and range filters.
You must have created a NavigationDataSource control before performing this task.
The Breadcrumbs control supports two modes to render bread crumbs -- standard mode and alternatemode. Standard mode separates search and navigation descriptors with the > sign, and you removeall search and navigation descriptors (the full path) by clicking the Remove link in a breadcrumb.
In alternate mode, each search and navigation descriptor after the root dimension is separated by anX (the separator is configurable as text or an image of your choice), and you remove search andnavigation descriptors by clicking the X for a particular search or navigation descriptor in a query. Forexample, in a breadcrumb such as Wine Type > Red (X) > Merlot (X), you click X to deleteone navigation descriptor at a time.
To create a Breadcrumbs control:
1. Open your Web site in Visual Studio.
2. In the Toolbox window, expand the Endeca RAD Toolkit tab.
3. Drag the Breadcrumbs control on to the Design tab of your Web page.
4. Select the Breadcrumbs control and click the Smart Tag.
5. From the Choose Data Source list, select an NavigationDataSource on the page.
6. You can run the Configure Data Source wizard to modify the data source you selected above.This step is typically unnecessary.
7. In the Properties window of Visual Studio, modify the following properties for the Breadcrumbscontrol:
DescriptionProperty
Required. This is set to AppliedFiltersRe¬sult and cannot be modified.
DataMember
Optional. Specifies the name of the UrlManagerthat builds URLs for the control.
UrlManagerId
Optional. Specifies a title for the control ifbreadcrumbs exist. If there are no breadcrumbs
Title
to display the value of TitleWhenEmpty displays.The default value for Title is an empty string.
Optional. Specifies a title for the control to displayif breadcrumbs do not exist. The default value forTitleWhenEmpty is an empty string.
TitleWhenEmpty
Optional. Excludes the dimension values youspecify by ID and displays all other dimension
ExclusionDimensionIds
values in a breadcrumb. Do not use this propertyin conjunction with the InclusionDimension¬Ids property; use one or the other but not both.By default, the Breadcrumbs control includes alldimensions for display in a breadcrumb path.
Optional. Displays only the dimension values youspecify by ID and no other dimension values in a
InclusionDimensionIds
breadcrumb. Dimension values display in the
Endeca RAD Toolkit for ASP.NET Developer's GuideEndeca Confidential
41Creating an application using Endeca server controls | Working with Endeca user interface controls

DescriptionProperty
breadcrumb in the same order you specify themin the array. Do not use this property in conjunctionwith the ExclusionDimensionIds property;use one or the other but not both. By default, theBreadcrumbs control includes all dimensions fordisplay.
Optional. Specifies text that precedes the list ofDid You Mean options (i.e. search adjustments).
SuggestedSearchAdjustmentCaption
Optional. Use only if UseAlternateRenderingis set to True. Browse to an image file you want
RemoveImageUrl
the user to click to remove a breadcrumb. If youspecify RemoveImageUrl and RemoveLinkText,the image takes precedence over the link text.
Optional. Use only if UseAlternateRenderingis set to True. Specify text that you want to use
RemoveLinkText
to for the link to remove a breadcrumb. (This isoften simply an X.)
Optional. Specifies what separator to use betweennavigation descriptors in the control. The defaultvalue for Separator is the > sign.
Separator
Optional. Specifies whether dimension valuesdisplay in breadcrumbs. True enables display
ShowSelectedDimensionValues
and False disables display. The default value forShowSelectedDimensionValues is True. Ifthis is False the ShowFullyInertDimensionsand ShowPartiallyInertDimensions settings donot apply.
Optional. Specifies whether inert dimensionsdisplay in breadcrumbs. A fully inert dimension
ShowFullyInertSelectedDimensionValues
shows every dimension value selected as part ofthe breadcrumb. (Typically clicking on an inertdimension changes the dimension tree but doesnot change record results. Therefore inertdimensions usually do not appear in breadcrumbs.However, there may be cases where you want toset ShowFullyInertSelectedDimensionVa¬lues to True to show each inert dimensionselected in a breadcrumb trail.) The default valuefor ShowFullyInertSelectedDimensionVa¬lues is True.
Optional. Specifies whether inert dimensionsdisplay in breadcrumbs. A partially inert dimension
ShowPartiallyInertSelectedDimensionValues
shows only the leaf dimension value in thebreadcrumb rather than the entire path to the leaf.In other words, the first dimensions in the path arenormal dimensions and the leaf dimension is inert.The default value for ShowPartiallyInertSe¬lectedDimensionValues is True.
Endeca ConfidentialEndeca RAD Toolkit for ASP.NET Developer's Guide
Creating an application using Endeca server controls | Working with Endeca user interface controls42

DescriptionProperty
Optional. Specifies whether range filters displayin breadcrumbs.True enables display and False
ShowRangeFilters
disables display. The default value forShowRangeFilters is True.
Optional. Specifies whether the search terms in aquery display in breadcrumbs. True enables
ShowSearches
display and False disables display. The defaultvalue for ShowSearches is True.
Optional. Specifies whether to use standard modebreadcrumbs or alternate mode breadcrumbs.
UseAlternateRendering
True enables alternate mode. If you set this toTrue, you can also specify a value for Re¬moveImageUrl or RemoveLinkText. If youspecify neither property, the default separator foralternate rendering is an X. The default value forUseAlternateRendering is False.
Breadcrumbs example code
The markup generated on the Source page is similar to the following
<cc2:Breadcrumbs ID="Breadcrumbs1" runat="server" DataSourceID="Navigation¬DataSource1" RemoveImageUrl="~/Resources/x.gif" UseAlternateRendering="True"></cc2:Breadcrumbs>
When navigating the sample wine data set, the control in the above example renders on a Web pagelike this:
Breadcrumbs control templatesThe Breadcrumbs control supports several templates that allow you to modify the default presentationof the control. Each template in the control has default markup that is part of the Endeca.Web.UI.We¬bControls assembly.You can over ride the default presentation as necessary by providing your ownmarkup in the templates.
DescriptionTemplate name
This template defines how the first dimension value in a breadcrumbdisplays.The formatting you specify applies only to the first dimensionin the breadcrumb path. The default markup for the template is:
<FirstDimensionValueTemplate> <asp:Button runat="server" Text="Remove"
FirstDimensionValueTem¬plate
CommandName="RemoveDimensionValue" /> <%# Eval("DisplayName") %></FirstDimensionValueTemplate>
Endeca RAD Toolkit for ASP.NET Developer's GuideEndeca Confidential
43Creating an application using Endeca server controls | Working with Endeca user interface controls

DescriptionTemplate name
For example:
<FirstDimensionValueTemplate> <asp:LinkButton runat="server" Text="[Remove]"
CommandName="RemoveDimensionValue" /> <%# Eval("DisplayName") %></FirstDimensionValueTemplate>
This template defines how dimension values display that occurbetween the first and last dimension values (the intermediates).The
IntermediateDimensionVa¬lueTemplate
formatting you specify applies to all the intermediate dimensions.You write the template once and it can be rendered any number oftimes for each intermediate dimension in a breadcrumb path. Thedefault markup for the template is:
<IntermediateDimensionValueTemplate>> <asp:LinkButton runat="server" CommandName="SelectDimensionValue" > <%# Eval("DisplayName") %> </asp:LinkButton></IntermediateDimensionValueTemplate>
This template defines how the last dimension value in a breadcrumbdisplays.The formatting you specify applies only to the last dimensionin the breadcrumb path. The default markup for the template is:
<LastDimensionValueTemplate> > <%# Eval("DisplayName") %></LastDimensionValueTemplate>
LastDimensionValueTem¬plate
For example:
<LastDimensionValueTemplate> <%# Eval("DisplayName")%> <asp:LinkButton runat="server" Text="(x)" Com¬mandName="SelectParentDimensionValue" /></LastDimensionValueTemplate>
This template defines how range values display. For example, thistemplate replaces the default display with boundaries of the selectedrange.
<RangeBreadcrumbTemplate> <asp:Button runat="server" Text="Remove" Com¬
RangeBreadcrumbTemplate
mandName="RemoveRangeFilter" />
<span class="Caption">Range: </span> <asp:PlaceHolder runat="server" Visible='<%# Container.DataItem.Operator == RangeFilterOperator.Between %>'> <%# Eval("Bound1") %> <= <%# Eval("Prop¬ertyName") %> <= <%# Eval("Bound2") %> </asp:PlaceHolder>
<asp:PlaceHolder runat="server" Visible='<%# Container.DataItem.Operator == RangeFilterOperator.LessThan %>'>
Endeca ConfidentialEndeca RAD Toolkit for ASP.NET Developer's Guide
Creating an application using Endeca server controls | Working with Endeca user interface controls44

DescriptionTemplate name
<%# Eval("PropertyName") %> < <%# Eval("Bound1") %> </asp:PlaceHolder>
<asp:PlaceHolder runat="server" Visible='<%# Container.DataItem.Operator == RangeFilterOperator.LessThanOrEqual %>'> <%# Eval("PropertyName") %> <= <%# Eval("Bound1") %> </asp:PlaceHolder>
<asp:PlaceHolder runat="server" Visible='<%# Container.DataItem.Operator == RangeFilterOperator.GreaterThan %>'> <%# Eval("PropertyName") %> > <%# Eval("Bound1") %> </asp:PlaceHolder>
<asp:PlaceHolder runat="server" Visible='<%# Container.DataItem.Operator == RangeFilterOperator.GreaterThanOrEqual %>'> <%# Eval("PropertyName") %> => <%# Eval("Bound1") %> </asp:PlaceHolder>
</RangeBreadcrumbTemplate>
This template defines how search terms display. In this example, thetemplate replaces the default display with an auto correction option;however, it does not include a Did You Mean option.
<SearchBreadcrumbTemplate> <asp:Button runat="server" Text="Remove" Com¬
SearchBreadcrumbTemplate
mandName="RemoveSearch" /> <span class="Caption">Search: </span><span><%# Eval("Search.Terms") %></span>
<asp:Repeater runat="server" DataSource='<%# Eval ("AppliedSearchAdjustments") %>'> <ItemTemplate> <span class="Caption">> Corrected To: </span> <span><%# Eval("Terms") %></span> </ItemTemplate> </asp:Repeater></SearchBreadcrumbTemplate>
This template defines how Did You Mean options display.The defaultmarkup for the template is:
<SuggestedSearchAdjustmentTemplate> <span runat="server" class="Caption" visi¬
SuggestedSearchAdjust¬mentTemplate
ble='<%# Container.DataItemIndex > 0 %>'> or </span> <asp:LinkButton runat="server" Text='<%# Eval("Terms") %>'
Endeca RAD Toolkit for ASP.NET Developer's GuideEndeca Confidential
45Creating an application using Endeca server controls | Working with Endeca user interface controls

DescriptionTemplate name
CommandName="ApplyAdjustment" /></SuggestedSearchAdjustmentTemplate>
Creating a Pager controlYou create and configure a Pager control in order to provide paging controls on a Web page.You canset the number of results to display per page.
You must have created a NavigationDataSource control before performing this task.
By default, a NavigationDataSource returns a maximum of ten records for display on a Web page.Additional results can be displayed on Next or Previous pages as provided by the control.You modifythe items per page value on the NavigationDataSource, not the Pager control. The Pager controlshould provide an items per page choice that is equal to the default items per page property of theNavigationDataSource.
By default, the Pager control displays choices of 10, 20, or 30 items per page. To override this setting,use the ItemsPerPageChoices property. For example, if you change ItemsPerPageChoices to50,100,150 then the user can choose to display a maximum of 50 records, 100 records, or 150records on a results page.
To create a Pager control:
1. Open your Web site in Visual Studio.
2. In the Toolbox window, expand the Endeca RAD Toolkit tab.
3. Drag the Pager control on to the Design tab of your Web page.
4. Select the Pager and click the Smart Tag.
5. From the Choose Data Source list, select a NavigationDataSource control.
6. In the Properties window of Visual Studio, modify the following properties for the Paging control:
DescriptionProperty
Optional. Specifies the number of results per page available to theuser. Clicking one of the page sizes displays that number of results
ItemsPerPageChoices
per page. To modify the default number of results per page, change10,20,30 to page size values of your choice. For example, changingthis property to 50,100,150 creates three page size options inincrements of 50, 100, and 150 records per page.
Optional. Specifies a caption before listing the items per pagechoices, for example, Results Per Page.
ItemsPerPageChoicesLabel
Optional. Specifies a caption before listing the offset choices, forexample, Page.
OffsetChoicesLabel
Optional. Specifies whether to render the control in a table format.The default value is False.
RenderInTable
Optional. Specifies the marker the user clicks for next block of pages.The default value for NextBlockText is >>. For example, if the
NextBlockText
PageButtonCount is 5, then clicking >> moves the set of pagesfrom 1-5 to 6-11, and so on.
Endeca ConfidentialEndeca RAD Toolkit for ASP.NET Developer's Guide
Creating an application using Endeca server controls | Working with Endeca user interface controls46

DescriptionProperty
Optional. Specifies the marker the user clicks for the next page ofresults. The default value for NextPageText is >.
NextPageText
Optional. Specifies the number of pages that display when a userclicks >> (indicated by the NextBlockText property) or the user
PageButtonCount
clicks << (indicated by the PreviousBlockText property). Thedefault value for PageButtonCount is 5.
Optional. Specifies the marker the user clicks for previous block ofpages. The default value for PreviousBlockText is <<. For
PreviousBlockText
example, if the PageButtonCount is 5, then clicking >> moves theset of pages from 1-5 to 6-11, and so on. The default value for Pre¬viousBlockText is <<.
Optional. Specifies the marker the user clicks for the previous pageof results. The default value for PreviousPageText is <.
PreviousPageText
Required. Select RecordsResult if you want the number of resultsper page to be based on record count. Select AggregateRecord¬
ItemsType
sResult if you want the number of results per page to be based onaggregate records.
Optional. Specifies the name of the UrlManager that builds URLsfor the control.
UrlManagerId
Optional. Specifies an image that the user clicks for next block ofpages. Setting an image for NextBlockImageUrl overrides thevalue of NextBlockText.
NextBlockImageUrl
Optional. Specifies an image that the user clicks for the next pageof results. Setting an image for NextPageImageUrl overrides thevalue of NextPageText.
NextPageImageUrl
Optional. Specifies an image that the user clicks for previous blockof pages. Setting an image for PreviousBlockImageUrl overridesthe value of PreviousBlockText.
PreviousBlockImageUrl
Optional. Specifies an image that the user clicks for the previouspage of results. Setting an image for PreviousPageImageUrloverrides the value of PreviousPageText.
PreviousPageImageUrl
Pager example code
The code generated on the Source page is similar to the following:
<cc2:Pager ID="Pager1" runat="server" DataMember="RecordsResult" DataSource ID="NavigationDataSource1" ItemsPerPageChoices="10,20,30"></cc2:Pager>
Here is an example Pager control as rendered on a Web page:
Endeca RAD Toolkit for ASP.NET Developer's GuideEndeca Confidential
47Creating an application using Endeca server controls | Working with Endeca user interface controls

Pager control templatesThe Pager control supports several templates that allow you to modify the default presentation of thecontrol. Each template in the control has default markup that is part of the Endeca.Web.UI.WebCon¬trols assembly.You can override the default presentation as necessary by providing your ownmarkup in the templates.
DescriptionTemplate name
This template defines the page size choices available to the user. Thedefault markup for the template is:
<ItemsPerPageChoiceTemplate> <asp:LinkButton runat="server" CommandArgument="<%#
ItemsPerPage¬ChoiceTemplate
Container.DataItem.ItemsPerPage %>" Command¬Name="ChangeItemsPerPage" Visible='<%# !Container.DataItem.IsSelected %>'> <%# Container.DataItem.ItemsPerPage %></asp:LinkButton> <asp:Label ID="Label2" runat="server" Text="<%# Container.DataItem.ItemsPerPage %>" Visible='<%# Container.DataItem.IsSelected %>'/></ItemsPerPageChoiceTemplate>
This template defines the user interface element the user clicks for nextblock of pages. The default markup for the template is:
<NextBlockTemplate> <asp:LinkButton runat="server" CommandArgument="<%#
NextBlockTemplate
Container.Offset %>" CommandName="ChangeOffset" > <%# Container.Text %></asp:LinkButton></NextBlockTemplate>
In this example, this template replaces the default element of >> with linkedtext that displays Next Block.
<NextBlockTemplate> <asp:LinkButton runat="server" Text="Next Block" CommandName="ChangeOffset" CommandArgument="<%# Container.Offset %>"> </asp:LinkButton></NextBlockTemplate>
This template defines the user interface element the user clicks for the nextpage of results. The default markup for the template is:
<NextPageTemplate> <asp:LinkButton runat="server" CommandArgument="<%#
NextPageTemplate
Container.Offset %>" CommandName="ChangeOffset" > <%# Container.Text %></asp:LinkButton></NextPageTemplate>
In this example, this template replaces the default element of > with linkedtext that displays Next Page.
<NextPageTemplate> <asp:LinkButton ID="NextPageId1" runat="server" Text="Next Page"
Endeca ConfidentialEndeca RAD Toolkit for ASP.NET Developer's Guide
Creating an application using Endeca server controls | Working with Endeca user interface controls48

DescriptionTemplate name
CommandName="ChangeOffset" CommandArgument="<%# Container.Offset %>"> </asp:LinkButton></NextPageTemplate>
This template defines the user interface element the user clicks for previousblock of pages. The default markup for the template is:
<PreviousBlockTemplate> <asp:LinkButton runat="server" CommandArgument="<%#
PreviousBlockTem¬plate
Container.Offset %>" CommandName="ChangeOffset" > <%# Container.Text %></asp:LinkButton></PreviousBlockTemplate>
In this example, this template replaces the default element of << with linkedtext that displays Previous Block.
<PreviousBlockTemplate> <asp:LinkButton runat="server" Text="Previous Block"
CommandName="ChangeOffset" CommandArgument="<%# Container.Offset %>"> </asp:LinkButton></PreviousBlockTemplate>
This template defines the user interface element the user clicks for theprevious page of results. The default markup for the template is:
<PreviousPageTemplate> <asp:LinkButton runat="server" CommandArgument="<%#
PreviousPageTem¬plate
Container.Offset %>" CommandName="ChangeOffset" > <%# Container.Text %></asp:LinkButton></PreviousPageTemplate>
In this example, this template replaces the default element of < with linkedtext that displays Previous Page.
<PreviousPageTemplate> <asp:LinkButton ID="NextPageId1" runat="server" Text="Previous Page" CommandName="ChangeOffset" CommandArgument="<%# Container.Offset %>"></asp:LinkButton></PreviousPageTemplate>
This template defines what to display when no results are returned. Thedefault markup for the template is:
<NoResultsTemplate> 0 Matching Records</NoResultsTemplate>
NoResultsTemplate
In this example, the template replaces "0 matching records" with "Noresults".
<NoResultsTemplate> <div>No results</div></NoResultsTemplate>
Endeca RAD Toolkit for ASP.NET Developer's GuideEndeca Confidential
49Creating an application using Endeca server controls | Working with Endeca user interface controls

DescriptionTemplate name
This template defines the list of pages to display. This is typically < 1,2, 3, 4, > and so on. The default markup for the template is:
<OffsetChoiceTemplate> <asp:LinkButton runat="server" CommandArgument="<%#
OffsetChoiceTem¬plate
Container.DataItem.Offset %>" CommandName="ChangeOffset" Visible='<%# !Contain¬er.DataItem.IsSelected %>'> <%# Container.DataItem.DisplayValue %></asp:LinkButton> <asp:Label ID="Label1" runat="server" Text='<%# Container.DataItem.DisplayValue %>' Vis¬ible='<%# Container.DataItem.IsSelected %>'/></OffsetChoiceTemplate>
For example:
<OffsetChoiceTemplate> <asp:LinkButton runat="server" Visible="<%# !Contain¬er.DataItem.IsSelected %>" Text="<%# Container.DataItem.DisplayValue %>" CommandName="ChangeOffset" CommandArgument="<%# Container.DataItem.Offset %>"></asp:LinkButton> <asp:Label runat="server" Visible="<%# Contain¬er.DataItem.IsSelected %>" Text="<%# Container.DataItem.DisplayValue %>"></asp:Label></OffsetChoiceTemplate>
This template defines the three data items that indicate the first index ofpage results, last index page, and total number of results. The defaultmarkup for the template is:
<PagerResultsTemplate> Results <asp:Label runat="server"
PagerResultsTem¬plate
Text="<%# Container.PagingInfo.FirstIndexOfPage %>" /> - <asp:Label runat="server" Text="<%# Container.PagingInfo.LastIn¬dexOfPage %>" /> of <asp:Label ID="Label3" runat="server" Text="<%#
Container.PagingInfo.TotalItemCount %>" /></PagerResultsTemplate>
In this example, this information displays similar to Results 1 - 10 of596 where 1 is the first index, 10 is the last index and 596 is the totalnumber of results. For example:
<PagerResultsTemplate> <span>Results:</span> <asp:Label ID="firstIndexId1" runat="server" Text="<%# Container.PagingInfo.FirstIndexOfPage %>"/> <span>-</span> <asp:Label ID="lastIndexId1" runat="server" Text="<%# Container.PagingInfo.LastIndexOfPage %>"/> <span>of</span> <asp:Label ID="totalRecordsId1" runat="server" Text="<%#
Endeca ConfidentialEndeca RAD Toolkit for ASP.NET Developer's Guide
Creating an application using Endeca server controls | Working with Endeca user interface controls50
DescriptionTemplate name
Container.PagingInfo.TotalItemCount %>"/></PagerResultsTemplate>
Working with a tag cloudA TagCloud control renders the most frequently used tags or most relevant tags in a dimension as aWeb page control. When an application user clicks a tag, the control produces query results thatcorrespond with the selected tag, and the control produces a new set of tags to refine subsequentqueries within the dimension.
Dimension requirements
There are several requirements for the dimension that you associate with a TagCloud control:
• The dimension must be exposed.To expose the dimension, either a user can select the dimension,or you, the developer, can set the dimension to be exposed. If a dimension is not exposed, thetag cloud does not have any tags to render on the page and outputs the EmptyTemplate.
• The dimension must be identified to the TagCloud control.• The dimension must have Compute refinement statistics enabled to calculate the correct tag
size. If this is not enabled, all tags render as the same size.You enable the Compute refinementstatistics option on the Dimension editor of Developer Studio. See Endeca Developer Studio Helpfor details.
Typical use case for a tag cloud
In a typical use case for a tag cloud, you create a dimension of extracted terms that spans the entirerecord set for your application and associate that dimension of extracted terms with the TagCloudcontrol.
In addition to the items listed in the "Dimension requirements" section, this use case relies on thefollowing additional tasks:
• Create a dimension of extracted terms. For more information, see the "Implementing Term Discoveryand Cluster Discovery" chapter of the Endeca Relationship Discovery Guide.
• Exclude the dimension of extracted terms from the navigation menu of the Web page. Thisdimension is simply a container for the extracted terms and not the kind of dimension a user wouldclick on to navigate. As such, you exclude it from the navigation menu.
Creating a TagCloud control
You create a TagCloud control and associate it with one dimension. The TagCloud control createstags based on the dimension values in that dimension.
You must have created a NavigationDataSource control before performing this task.
To create a TagCloud control:
1. Open your Web site in Visual Studio.
2. In the Toolbox window, expand the Endeca RAD Toolkit tab.
3. Drag the TagCloud control on to the Design tab of your Web page.
4. Select the TagCloud control and click the Smart Tag.
5. From the Choose Data Source list, select a NavigationDataSource on the page.
Endeca RAD Toolkit for ASP.NET Developer's GuideEndeca Confidential
51Creating an application using Endeca server controls | Working with Endeca user interface controls

6. In the Properties window of Visual Studio, modify the following properties for the TagCloud control:
DescriptionProperty
Required.You can set this to DimensionStatesResult and specifya number for the DimensionID property. Alternatively, you can identify
DataMember
the dimension for the tag cloud by specifying the DataMember asDataMember='DimensionStatesResult.RefinableDimension¬States["Name"]' where Name is the actual name of the dimension.For example, DataMember='DimensionStatesResult.Refin¬ableDimensionStates["Region"]' bases the tag cloud on theRegion dimension in the sample wine application.
Required if you set DataMember to DimensionStateResult. Specifythe ID of the dimension you want to create the control for. (You can
DimensionID
determine a dimension ID by looking at the Dimensions View ofDeveloper Studio or you can examine your dimensions.xml file afterrunning Forge.)
Optional. Specifies the name of the UrlManager that builds URLs forthe control.
UrlManagerId
Optional. Specify a number to restrict the total number of tags thatdisplay in the tag cloud. For example, if you specify 7, then the tag cloud
MaximumNumberOfTags
contains up to a maximum of 7 tags. It is good practice to restrict thenumber of tags if the dimension has many dimension values.
Optional. Choose an option to specify what happens when a tag isclicked. Choose Navigate to indicate that clicking the tag is the same
SelectAction
as navigating to the dimension value of the same name. Choose Searchto indicate that clicking the tag performs a search for the text of the tagname within the dimension. If you set SelectAction to Search, alsoset SearchKey and SearchMode to specify what search mode is usedwhen a search is performed. The default value for SelectAction isNavigate.
Optional. Use when SelectAction is set to Search. Specify thename of the Endeca property or Endeca search interface to search on.The default value for SearchKey is All.
SearchKey
Optional. Use when SelectAction is set to Search. Choose one ofthe standard Endeca match modes for the tag cloud. For more
SearchMode
information about match modes, see the Endeca Basic DevelopmentGuide.
Optional. Specify what the display of tags is based on within adimension. Select Frequency to display tags based on record count.
Sizing
The greater the number of records that contain a tag, the larger the tagsize on a Web page. Or select Relevancy to calculate the relevanceof a tag based on its frequency in the current result set as comparedto its frequency across the entire dataset (an implementation of the FMeasure algorithim). The default value for Sizing is Frequency.
Optional. Choose either Alphabetical to list tags alphabetically, orchoose Default to list tags in the order returned from the MDEXEngine. The default value for SortType is Alphabetical.
SortType
Optional. Specify the number of distinct sizes for tags in the controls.You can choose a value from 1 to 9. For example, if you specify 7 , you
TagSizeCount
Endeca ConfidentialEndeca RAD Toolkit for ASP.NET Developer's Guide
Creating an application using Endeca server controls | Working with Endeca user interface controls52

DescriptionProperty
can have up to 7 different sized tags in the tag cloud. If you want a valueof 10 or greater, you have to customize your page's CSS to supportthat sizing. The default value for TagSizeCount is 6.
TagCloud example code
In a simple case, the mark up generated on the Source page of Visual Studio is similar to the following(your dimension ID varies):
<cc2:TagCloud runat="server" DataSourceID="NavigationDataSource1" DimensionId="3"></cc2:TagCloud>
Here is an example TagCloud control as rendered on a Web page:
TagCloud control templates
The TagCloud control supports several templates that allow you to modify the default presentation ofthe control. Each template in the control has default markup that is part of the Endeca.Web.UI.We¬bControls assembly.You can override the default presentation as necessary by providing your ownmarkup in the templates.
DescriptionTemplate name
This template defines the dimension value name with the contents of thetemplate. The default markup for the template is:
<DimensionValueTemplate> <asp:LinkButton runat="server"
DimensionValueTem¬plate
CssClass='<%# "Tag" + Container.TagSize + " " + (Container.DataItemIndex % 2 == 0 ? "Item" : "AlternatingItem") %>' CommandName='<%# TagCloud.SelectAction == Tag¬CloudSelectAction.Navigate ? "SelectDimensionValue" : "SearchForDimensionVal¬ue" %>' Text='<%# Eval("DisplayName") %>' /></DimensionValueTemplate>
Here is an example that creates a tag cloud with dimension value namesand their corresponding number of records in parentheses:
<DimensionValueTemplate> <asp:LinkButton runat="server" CssClass ='<%# "Tag" + Container.TagSize %>' OnClick="Navigate" CommandArgument='<%# Eval("Id") %>'> <%# Container.RecordCount%> </asp:LinkButton> <span>(<%# Container.DataItem.RecordCount %>)</span>
</DimensionValueTemplate>
Endeca RAD Toolkit for ASP.NET Developer's GuideEndeca Confidential
53Creating an application using Endeca server controls | Working with Endeca user interface controls

DescriptionTemplate name
This example relies on you defining a method for Navigation:
protected void Navigate(object sender, EventArgs e) { NavigationDataSource navDatasource = BindingUtili¬ty.FindDataSource<NavigationDataSource>("dsNav", this);
LinkButton link = (LinkButton)sender; navDatasource.SelectedDimensionValueIds.Add(link.Com¬mandArgument); }
This template defines the default tag separator (a space) with the contentsof the template. The default markup for the template is:
<SeparatorTemplate> </SeparatorTemplate>
SeparatorTemplate
Here is an example that replaces the space with | between tags:
<SeparatorTemplate>|</SeparatorTemplate>
This template defines the content to display if the tag cloud is empty. Thedefault markup for the template is:
<EmptyTemplate></EmptyTemplate>
EmptyTemplate
Here is an example that adds the text No tags available. to anotherwise empty control area:
<EmptyTemplate>No tags available.</EmptyTemplate>
Setting a dimension to be exposed on a Web pageIn some scenarios, you may want to force a dimension to be exposed (open) on a Web page. This isnecessary, for example, when using a TagCloud control.
To set a dimension to be exposed on a Web page:
1. Open your Web site in Visual Studio.
2. Select the NavigationDataSource control on the page.
3. In the Properties window of Visual Studio, locate the PermanentRefinementConfigs property.
4. In its value field, click Browse....The RefinementConfig Collection Editor displays.
5. In the RefinementConfig Collection Editor, click Add.
6. Specify a value for the DimensionValueId property that identifies the dimension you want to beexposed.
7. Click OK.
Endeca ConfidentialEndeca RAD Toolkit for ASP.NET Developer's Guide
Creating an application using Endeca server controls | Setting a dimension to be exposed on a Webpage
54

Open dimension example code
The mark up generated on the Source page of Visual Studio is similar to the following (your dimensionvaries):
<PermanentRefinementConfigs> <end:RefinementConfig DimensionValueId="3"> </end:RefinementConfig></PermanentRefinementConfigs>
Excluding a dimension from the navigation menuIn some scenarios, you may want to exclude a dimension from the navigation menu of a Web page.This is necessary, for example, if you create a dimension of extracted terms for use with a TagCloudcontrol. In this case, the extracted terms span the entire data set and the dimension serves as acontainer for the terms; you do not want application users to navigate to that dimension.
You must have already created and configured a GuidedNavigation control before performing thistask.
To exclude a dimension from a navigation menu:
1. Open your Web site in Visual Studio.
2. Select the GuidedNavigation control on the page.
3. In the Properties window of Visual Studio, locate the ExclusionDimensionIds property.
4. In its value field, click Browse....The String Collection Editor displays.
5. Specify the dimension ID that you want to exclude from the navigation menu.
6. Click OK.
Exclude dimension example code
The markup generated on the Source page of Visual Studio is similar to the following (your dimensionID will vary):
<cc2:GuidedNavigation runat="server" DataSourceID="NavigationDataSource1" ExclusionDimensionIds="3"></cc2:GuidedNavigation>
Renaming dimensions or dimension values beforedisplaying them on a page
You can rename dimensions and dimension values before displaying them on a Web page.Yourename a dimension in the dimensions.xml file and rename a dimension value using DeveloperStudio. In either case, you add a DisplayName property to the dimension or dimension value. Thisis part of your MDEX Engine configuration. If the property exists, the RAD Toolkit displays the newname in your application.
You may want to rename dimensions or dimension values before displaying them on a Web page intwo cases:
Endeca RAD Toolkit for ASP.NET Developer's GuideEndeca Confidential
55Creating an application using Endeca server controls | Excluding a dimension from the navigation menu

• For internationalization, where you need one MDEX Engine to serve dimensions or dimensionvalues with varying locale designations.
• As a workaround in cases where EQL places name restrictions on dimensions or dimension valuesthat you do not want to affect your Web site (i.e. EQL does not allow spaces in names but youmay need spaces in names).
To rename a dimension or dimension value before displaying it on a page:
1. To rename a dimension:
a) Open the dimensions.xml file in a text editor. (This file is typically stored in the forge_inputdirectory.)
b) Locate the dimension you want to rename by its DIMENSION element.c) In the DIMENSION element, add a PROP element with a NAME="DisplayName" attribute as
shown in the next step.d) Specify the new display name in the PVAL element. This example renames the Price Range
dimension to the Price dimension.
<DIMENSION NAME="Price Range" SRC_TYPE="INTERNAL"> <DIMENSION_ID ID="10"/> <DIMENSION_NODE> <DVAL TYPE="EXACT"> <DVAL_ID ID="10"/> <SYN CLASSIFY="FALSE" DISPLAY="TRUE" SEARCH="FALSE">Price Range</SYN> <PROP NAME="DisplayName"> <PVAL>Price</PVAL> </PROP> </DVAL>
<!-- Other dimension values removed from the example. -->
</DIMENSION>
e) Save and close the dimensions.xml file.
2. To rename dimension values, see the "Providing additional descriptive information for a dimensionvalue" topic in the Endeca Developer Studio Help. When following the procedure in the EndecaDeveloper Studio Help, add a property called DisplayName to the dimension value with a nameyou want to display on the Web page.
Note: If you prefer to use a property with a name other than displayName, define theproperty in web.config using a different propertyName value as shown below. Theexample uses displayName_en_us instead of displayName.
<endeca> <displayName propertyName="displayName_en_us" /></endeca>
3. Open the web.config file for your Web site and add the following displayName section:
<configSections>
<!-- Other sections removed from the example. -->
<section name="displayName" type="Endeca.Data.Configuration.Display¬NameSection, Endeca.Data, Version=2.1.0.0, Culture=neutral, PublicKeyTo¬ken=6d02be8724ca751c" />
Endeca ConfidentialEndeca RAD Toolkit for ASP.NET Developer's Guide
Creating an application using Endeca server controls | Renaming dimensions or dimension valuesbefore displaying them on a page
56

</sectionGroup></configSections>
4. Run a baseline update.
Generating the "More..." linkThe Presentation API for .NET handles the "More..." link differently than the RAD API for ASP.NET.
The Presentation API for .NET generates the "More..." link in situations where all of the following occur:
• You select the Enable dynamic ranking option in the Dimension editor of Developer Studio.• You select the Generate "More..." dimension value option in the Dimension editor of Developer
Studio.• The MDEX Engine returns query results with more dimension values than the cut off threshold
you specified in Maximum dimension values to return.
However, the RAD API ignores the Generate "More..." dimension value option in Developer Studioand automatically generates a "More..." link when either:
• You select Enable dynamic ranking in Developer Studio and the MDEX Engine returns moredimension values than the cut off threshold allows.
• You use RefinementConfigs to set a limit on the number of dimension values to return, and theMDEX Engine returns more dimension values than the cut off threshold allows.
To control which dimensions will display a "More…" link, override theShowMoreDimensionValuesTemplate in the GuidedNavigation control.
Note: In a future release of Developer Studio, the Generate "More..." dimension value optionwill be phased out.
Displaying query results on a Web pageMany Visual Studio controls allow you to display query results on a Web page. For example, using aDataList control to display results is one expedient way that is described here.
You must have already created and configured a NavigationDataSource control.
To display query results on a Web page:
1. Open your Web site in Visual Studio.
2. In the Toolbox window, expand the Data tab.
3. Drag a DataList control onto the Design page.
4. Select the DataList control and click the Smart Tag.
5. From the Choose Data Source list, select an Endeca data source control. Typically this is theNavigationDataSource on the page.
6. In the Properties window of Visual Studio, modify the following properties for the DataList control:
Endeca RAD Toolkit for ASP.NET Developer's GuideEndeca Confidential
57Creating an application using Endeca server controls | Generating the "More..." link

DescriptionProperty
Required. Set this to RecordsResult.Records to display Endecarecords or set it to AggregateRecordsResult.AggregateRecordsto display aggregated records.
DataMember
7. Select the DataList control and click the Smart Tag.
8. Select Refresh Schema.
If you build the Web site at this point, the data items available to RecordsResult.Records or Ag¬gregateRecordsResult.AggregateRecords display in the DataList control.You can iterateover these collections to extract and display additional record information. For instructions, see"Displaying nested record properties".
Displaying nested record propertiesAn Endeca Record object contains dimension values and properties.You can iterate over thesecollections, using one or more Repeater controls, to extract and display additional Record properties.This topic describes one way to extract and display the nested properties.
To display nested record properties:
1. Open your Web site in Visual Studio.
2. In the Toolbox window, expand the Data tab.
3. Drag a Repeater control onto the Design page.
4. From the Smart Tag, select an Endeca data source control.The RecordDetailsDataSource returnsa single Endeca record, so it is convenient for this example.
5. Select the Repeater control and then select the Source page of Visual Studio.
6. Add .NET Eval expressions as necessary to iterate over each Record property that you want toexpose on the Web page. See the Endeca API Reference for the RAD Toolkit for ASP.NET for theavailable properties of an Endeca Record.
Displaying total record countYou can use common Visual Studio controls to display the total number of records that match a query.
You must have already created and configured a NavigationDataSource control.
To display total record count:
1. Open your Web site in Visual Studio.
2. In the Toolbox window, expand the Data tab.
3. Drag a FormView control onto the Design page.
4. Select the FormView control and click the Smart Tag.
5. From the Choose Data Source list, select an Endeca data source control. Typically this is theNavigationDataSource on the page.
6. In the Properties window of Visual Studio, modify the following properties for the FormView control:
Endeca ConfidentialEndeca RAD Toolkit for ASP.NET Developer's Guide
Creating an application using Endeca server controls | Displaying nested record properties58

DescriptionProperty
Required. Set this to RecordsResult to display Endecarecords.
DataMember
7. Select the FormView control and clickEdit Templates.
8. Drag a Label control into the ItemTemplate.
9. Select the Label control and click Edit Templates.
10. In Bindable properties, select Text.
11. Click the Field Binding option, and from the Bound to list, select TotalRecordCount.
12. Click OK.
13. Next to the Label control, add descriptive text, such as, Total records returned:
14. On the FormView control, select End Template Editing.
When you build your Web site, you see the total record count displayed on the page.
Record count example code
The markup generated on the Source page of Visual Studio is similar to the following:
<asp:FormView ID="FormView1" runat="server" DataSourceID="NavigationData¬Source1" DataMember="RecordsResult"> <ItemTemplate> <asp:Label ID="Label1" runat="server" Text='<%# Eval("TotalRecord¬Count") %>'></asp:Label> Total Record Count </ItemTemplate></asp:FormView>
Endeca RAD Toolkit for ASP.NET Developer's GuideEndeca Confidential
59Creating an application using Endeca server controls | Displaying total record count

Chapter 4
Creating an application based on thereference application
This section provides a brief overview of how to create an Endeca front-end application using the RADASP.NET reference application as a starting point. In this scenario, the reference application acts asa template that you copy and modify as needed until it meets your application requirements.
High level process of creating an application from areference application
The basic workflow is as follows:
1. Copy the reference application from <installation path>\Endeca RAD Toolkit.NET\reference\RadAspNet to a staging area.
2. Apply your custom cascading style sheet (CSS) to the Web pages.3. Modify the pages and controls for your requirements. This is the bulk of the work. In this step, you
modify the refence application's search and navigation features such as dimension controls, pagingcontrols, breadcrumb controls, and so on.
4. Delete any pages and controls that are not necessary in your application.5. Test and deploy your Web site.
Using reference application controls in your applicationIn cases where you need only a few user controls, you probably do not want to create an Endecaapplication based on the reference application. For example, you might already have a partial applicationrunning and you simply want to copy individual user controls from the reference application and reusethem in your application.
Endeca provides user controls in the reference application for search boxes, record details, rangefilters, dynamic business rules, and so on that can be reused.
To use reference application controls in your application:
1. Open Windows Explorer and go to one of the following locations:
• If your application uses HTTP postbacks, go to <installationpath>\Endeca\RADToolkits\version\ASP.NET\reference\RadAspNetRef\Resources\UserControls.

• If your application uses URL query parameters, go to <installationpath>\Endeca\RADToolkits\version\ASP.NET\reference\RadAspNetRef\ResourcesUrl\UserControls.
2. Identify a user control you want and copy both the ASCX and ASCX.CS file for the control to adirectory of your choice within your Web site directory structure. It is useful to create a\UserControls directory, or something similar, if you do not already have one in place.
3. Open your Web site in Visual Studio.
4. In the Solution Explorer, right-click your Web site and select Add > Existing Item....
5. Browse to the ASCX and ASCX.CS file for the user control, select the files, and click Open.You may or may not get dependency errors for missing helper classes and methods. If you do,copy help code from <installationpath>\Endeca\RADToolkits\version\ASP.NET\reference\RadAspNetRef\App_Code
The user control displays in the Solution Explorer file list but not in the Toolbox window. Also, no designtime data is sent to the user control. It displays as "databound" in the Design tab of Visual Studio.
Endeca ConfidentialEndeca RAD Toolkit for ASP.NET Developer's Guide
Creating an application based on the reference application | Using reference application controls inyour application
62

Chapter 5
Overview of building URLs
The RAD Toolkit for ASP.NET provides classes to build URLs in your application. This can includelinks to dimensions, dimension values, records, aggregate records, and so on. The classes in Ende¬ca.Web.Url do this work, especially the UrlManager class and the UrlBuilder class.This sectiondescribes how to work with these classes.
About building URLsThis topic describes the basics of building and serializing URLs.
Note: This guide describes the basic tasks involved in building URLs using the RAD Toolkit forASP.NET. If you are using the URL Optimization API with your application, there are someimportant additional considerations to ensure properly optimized URLs. For details, please referto the URL Optimization API for the RAD Toolkit for ASP.NET Developer's Guide.
The process to build URLs
The high-level process to build a URL is as follows:
1. Create a UrlManager object and register the data sources and commands on your page. Theprimary function of UrlManager is to keep track of the commands that contribute to the URL thatis getting built.
2. Initialize the UrlManager with the state encoded in a URL by calling InitializeFrom(String).This state is setting up the commands properly to fetch the correct data to render on the page.Youare taking the state encoded in a URL, copying that state, and modifying that state to build additionalURLs.
3. Build a new URL by modifying the copies of commands registered with the UrlManager. Thismodification may include toggling dimensions, and selecting dimensions, dimension values, addingrecords, adding parameters, or any other change that represents a new URL in an application.
You can use the convenience methods in UrlBuilder to build URLs such as
• SelectDimensionValue
• SelectParentDimensionValue
• SelectRecord
• SelectAggregateRecord
You can use the more generic BuildUrl method. (Behind the scenes, the convenience methods callBuildUrl.)

The following diagram illustrates steps 1 and 2.
• The first box represents an empty NavigationDataSource with an ID of dsNav.• The second box represents the default UrlManager that registers the empty NavigationData¬Source and then initializes itself from the current base URL.
• The third box represents the data source populated with the parameters from the current URL
The following diagram illustrates step 3.
• The first box represents a data source populated with a navigation state of two dimension valueIDs (123 and 456).
• The second box represents a UrlManager that builds a new URL based on a copy of the navigationstate (123 and 456)and includes the addition of another dimension value ID (789).
Endeca ConfidentialEndeca RAD Toolkit for ASP.NET Developer's Guide
Overview of building URLs | About building URLs64

About URLs in the reference applicationThe reference application located in \installationpath\Endeca\RADToolkits\version\ASP.NET\reference\RadAspNetRef makes extensiveuse of BuildUrl and the convenience methods to build URLs.
Examine the files in \installationpath\Endeca\RADToolkits\version\ASP.NET\reference\RadAspNetRef\Resources\Url\UserControlsfor typical URL examples.
About URL serializationThe UrlManager serializes each data source and command into a URL query string. To do this, theUrlManager relies on default classes provided with the API.
The UrlManager's default UrlProvider is the BasicUrlProvider. The BasicUrlProviderserializes each data source using, by default, UrlCommandSerializationProvider. Theseserialized data sources become the query parameters on the URL where the name of the parameteris the data source ID. The value is the serialized data source string.
To help illustrate which classes are responsible for each part of serialization, here is an example ofan Endeca URL:
http://localhost:port/RadAspNetRef/Url.aspx?
dsNav1=Nrc:id-6200,N:8021&dsNav2=Nrc:id-2,N:4294960252
The section of the URL starting with the question mark, that is,?dsNav1=Nrc:id-6200,N:8021&dsNav2=Nrc:id-2,N:4294960252, represents the Endeca¬Command in the URL and it is serialized by UrlCommandSerializationProvider.The entire URLis then serialized by BasicUrlProvider.
Customizing URL serializationURL serialization happens entirely as an implementation detail if you are using the default classesprovided with the API.
If you want to customize how EndecaCommand objects are serialized within a URL, you can subclassand customize CommandSerializationProvider. Similiarly, if you want to customize the way theentire URL is serialized, you can subclass and customize UrlProvider and set the UrlManager.Url¬Provider property.You can subclass and customize either one or both of these classes.
If you customize the CommandSerializationProvider, you specify the new provider in theapplication's Web.config file as shown in this example:
<commandSerialization defaultProvider="Postback"> <providers> <add name="Postback" type="Endeca.Data.DefaultCommandSerializationProvider, Endeca.Data" /> <add name="Url" type=MyNameSpace.MyCommandSerializationProvider" /> </providers></commandSerialization>
Endeca RAD Toolkit for ASP.NET Developer's GuideEndeca Confidential
65Overview of building URLs | About URLs in the reference application

If you customize the UrlProvider, you specify the assembly-qualified type name for the new providerin the application's Web.config file as shown in this example:
<urlProvider defaultType="MyNameSpace.MyUrlProvider, MyAssembly" />
You can also override this default setting with a line of code similar to the following:
UrlManager.Default.UrlProvider = new MyUrlProvider()
Creating a UrlManager and registering data sources andcommands
You register data sources and commands with a UrlManager so the UrlManager can constructURLs based on the state of these objects and initialize these objects from the state encoded in a URL.The registration should happen early in a page's life cycle, such as during the Page_Load or OnInitmethods.
The example below requires the following statements at the top of your code:
using System;using Endeca.Data;using Endeca.Web.UI;using RadAspNetRef;using Endeca.Web.Url;
This procedure assumes you have already created data sources or commands in your application andassigned them an ID.
For example, this snippet shows two data sources, each with an ID value:
<end:NavigationDataSource ID="dsNav" runat="server" MdexHostName="<%$ Snippet:_mdex.MdexHostName %>" MdexPort="<%$ Snippet:_mdex.MdexPort %>"></end:NavigationDataSource>
<end:RecordDetailsDataSource ID="dsRecordDetails" runat="server" MdexHostName="<%$ Snippet:_mdex.MdexHostName %>" MdexPort="<%$ Snippet:_mdex.MdexPort %>"></end:RecordDetailsDataSource>
There are two ways of creating a UrlManager. The first way is by calling UrlManager.Get andspecifying a name as input. If a UrlManager by that name does not exist, the method creates it. Thesecond way uses a convenience property named Default to create the UrlManager with a nameof "Default". This is the equivalent to the first way of calling UrlManager.Get("Default"); however,the convenience property simply allows you to create the UrlManager in one line of code.
After creating the UrlManager, you register one or more data sources and commands with it.Youregister a data source or command by calling UrlManager.Register. The input to Register isan interface called ICommandProvider that allows access to both data sources and commands.
To register data sources and commands:
1. Create a UrlManager object using either of the ways described above.
Endeca ConfidentialEndeca RAD Toolkit for ASP.NET Developer's Guide
Overview of building URLs | Creating a UrlManager and registering data sources and commands66

2. Register each data source or command in the application by calling Register and specifying eachdata source ID.
Example of registering data sources
// Create a new UrlManager with the name Default if it // does not exist already.UrlManager.Get("Default");
// Registers a data source named dsNav with the UrlManager // named Default.UrlManager.Register(dsNav);
// Registers a data source named dsRecDetails with the // UrlManager named Default.UrlManager.Register(dsRecDetails);
This example is logically equivalent to the example above but shorter:
// The API provides a convenience method called Default // to create a new instance of UrlManager. // This creates a UrlManager and registers two data sources // with it. UrlManager.Default.Register(dsNav);UrlManager.Default.Register(dsRecDetails);
Go on to "Initializing a UrlManager".
Initializing a UrlManagerAfter registering data sources and commands, you initialize the UrlManager by calling Initialize¬From. This call uses the current URL in an application to populate the data sources and commandsregistered with UrlManager with state encoded in a URL. The initialization should happen early in apage's life cycle, such as during the Page_Load or OnInit methods.
The example below requires the following statements in your code:
using System;using Endeca.Data;using Endeca.Web.UI;using RadAspNetRef;using Endeca.Web.Url;
To initialize a UrlManager:
Add code to call InitializeFrom and provide Request.Url.
Example of initializing a UrlManager
// The API provides a convenience method called Default // to create a new instance of UrlManager. // This creates a UrlManager and registers two data sources with it. UrlManager.Default.Register(dsNav);UrlManager.Default.Register(dsRecDetails);
// Initialize the UrlManager with state from the Request.Url.UrlManager.Default.InitializeFrom(Request.Url);
Endeca RAD Toolkit for ASP.NET Developer's GuideEndeca Confidential
67Overview of building URLs | Initializing a UrlManager

Building a URL to toggle a dimension and display itsdimension values
You can build a URL that toggles a dimension open or closed by calling UrlBuilder.ToggleDimen¬sionStateExposure and you can build URLs for the dimension values within it by calling Select¬DimensionValue.
The example below requires the following statements in your code:
<%@ Register TagPrefix="end" Assembly="Endeca.Web" Namespace="Endeca.Web.UI" %><%@ Register TagPrefix="end" Assembly="Endeca.Web.UI.WebControls" Namespace="Endeca.Web.UI" %><%@ Import Namespace="Endeca.Data" %><%@ Import Namespace="Endeca.Web.Url" %>
This procedure assumes you have already created data sources or commands in your application andassigned them an ID.
The ToggleDimensionStateExposure method builds a URL for the dimension you want to toggleand SelectDimensionValue builds a URL for each dimension value within that dimension.
To build a URL to toggle a dimension open or closed:
1. To build URLs for each dimension, create a repeater control with the following markup:
a) Specify the data source for the dimension.b) Specify DimensionStatesResult as the DataMember property.c) Call ToggleDimensionStateExposure and identify the dimension to toggle. The method is
overloaded, so you can identify the dimension either by DimensionState or by context path.
2. To build URLs for each dimension value, create a nested repeater control within the repeater thatcontains ToggleDimensionStateExposure, and add the following markup:
a) Specify the data source for the dimension values.b) Call SelectDimensionValue and identify the dimension. The method is overloaded, so you
can identify the dimension either by DimensionValue or by context path.
Example markup for toggleing a dimension and showing its dimension values
<asp:Repeater runat="server" DataSourceID="dsLeft" DataMember="DimensionStatesResult.RefinableDimensionStates"> <ItemTemplate> <a href="<%# UrlManager.Default.Urls.ToggleDimensionStateExpo¬sure(dsLeft.ID, Container.DataItem) %>"> <%# Eval("Dimension.DisplayName") %> </a> <br /> <asp:Repeater runat="server" DataSource='<%# Eval("Refinements") %>'>
<ItemTemplate> <a style="margin-left: 10px" href="<%# UrlManager.Default.Urls.SelectDimensionVal¬ue(dsLeft.ID, Container.DataItem) %>"> <%# Eval("DisplayName") %> </a> <br /> </ItemTemplate>
Endeca ConfidentialEndeca RAD Toolkit for ASP.NET Developer's Guide
Overview of building URLs | Building a URL to toggle a dimension and display its dimension values68

</asp:Repeater> </ItemTemplate></asp:Repeater>
Building a URL to a record details pageYou can build a URL for a record details page by calling the convenience method UrlBuilder.Se¬lectRecord. This method requires a record details data source ID and a record object as input.Youcan build the URL on the current page of an application, for example, Default.aspx, or you canbuild a URL that links to another page such as RecordDetails.aspx by setting the page name inthe UrlManager.BaseUrl property.
The example below requires the following statements in your code:
using System;using Endeca.Data;using Endeca.Web.UI;using RadAspNetRef;using Endeca.Web.Url;
This procedure also assumes you have already created data sources or commands in your applicationand assigned them an ID.
To build a URL to a record details page:
1. Create a repeater control and specify RecordsResult as the DataMember property.
Note: You are not required to create a repeater to call SelectRecord. Also, steps 1 and2 are in the procedure to provide context for a typical use case. If you do not need this context,you can skip to step 3.
2. Create a nested repeater control and specify the data source, in this case, Records.
3. Create a hyperlink, and within it, call SelectRecord.
4. Provide SelectRecord with input parameters that specify the ID of the record details data sourceand the Endeca record to build the URL for.See the first example below for the markup.
5. In the code behind for the markup, do the following:
a) If you want to build a URL to a page different from the current page, specify a relative path tothe application root in the UrlManager.BaseUrl property. This property value should beginwith a tilde then slash (~/) followed by a path relative to the root of the Web application.
b) Create a UrlManager on the record details page indicated by UrlManager.BaseUrl.c) Register a RecordDetailsDataSource on the record details page by calling UrlManag¬
er.Register and provide a record details data source (or command).This call is usually doneas part of page configuration during a page's Page_Load or OnInit methods.
d) Call InitializeFrom and provide the Request.Url.
See the second example below for the code behind.
6. Register each data source in the application by calling Register and specifying each data sourceID.
Endeca RAD Toolkit for ASP.NET Developer's GuideEndeca Confidential
69Overview of building URLs | Building a URL to a record details page

Example of building a record details page URL
This example shows the markup that calls SelectRecord to build a record details URL. Note thatfor the example, recDetailsDataSource.ID is pseudo-code.Your mark up should refer to arecord details data source either as a string or by its ID.
<asp:Repeater ID="rptRecordResult" runat="server" DataMember="RecordsResult"
DataSourceID="NavDataSource"> <ItemTemplate> <asp:Repeater ID="rptRecord" runat="server" Data¬Source='<%#Eval("Records") %>'> <ItemTemplate> <div> <asp:HyperLink ID="HyperLink2" NavigateUrl='<%# UrlManager.Get("recDetailsUrlManager").Urls.SelectRecord (recDetailsDataSource.ID, Container.DataItem) %>' runat="server"> <%# GetRecordTitle(Container.DataItem) %> </asp:HyperLink> </div> </ItemTemplate> </asp:Repeater> </ItemTemplate></asp:Repeater>
This example shows the code behind that supports the mark up. This is in the page's Page_Loadmethod. Note the use of BaseUrl that builds the link on the RecordDetails.aspx page.
recDetailsDataSource = new RecordDetailsDataSource();recDetailsDataSource.ID = "recDetailsDataSource";
UrlManager.Get("recDetailsUrlManager").BaseUrl = "~/Records/RecordDetails.aspx";UrlManager.Get("recDetailsUrlManager").Register(NavDataSource);UrlManager.Get("recDetailsUrlManager").Register(recDetailsDataSource);
UrlManager.Get("DefaultPageManager").Register(NavDataSource);UrlManager.Get("DefaultPageManager").InitializeFrom(Request.Url);
Building a URL to an aggregate record details pageYou can build a URL for an aggregate record details page by calling the convenience method Url¬Builder.SelectAggregateRecord.This method requires an aggregate record details data sourceID and an aggregate record object as input.You can build the URLthat links to the current page of anapplication, for example, Default.aspx, or you can build a URL that links to another page such asAggRecordDetails.aspx by setting the page name in the UrlManager.BaseUrl property.
The example below requires the following statements at the top of your code behind:
using System;using Endeca.Data;using Endeca.Web.UI;using RadAspNetRef;using Endeca.Web.Url;
This procedure also assumes you have already created data sources or commands in your applicationand assigned them an ID.
Endeca ConfidentialEndeca RAD Toolkit for ASP.NET Developer's Guide
Overview of building URLs | Building a URL to an aggregate record details page70

To build a URL to an aggregate record details page:
1. Create a repeater control and specify AggregateRecordsResult as the DataMember property.
Note: You are not required to create a repeater to call SelectAggregateRecord. Also,steps 1 and 2 are in the procedure to provide context for a typical use case. If you do notneed this context, you can skip to step 3.
2. Create a nested repeater control and specify the data source, in this case, AggregateRecords.
3. Create a hyperlink and in a data binding expression, assign UrlManager.SelectAggregateRe¬cord to the NavigateUrl property.
4. Provide SelectAggregateRecord with input parameters that specify the ID of the aggregaterecord details data source, the navigation data source, and the Endeca aggregate record to buildthe URL for.See the first example below for the markup.
5. In the code behind for the markup, do the following:
a) If you want to build a URL to a page different from the current the page, specify a relative pathto the application root in the UrlManager.BaseUrl property.This property value should beginwith a tilde then slash (~/) followed by a path relative to the root of the Web application.
b) Create a UrlManager on the aggregate record details page indicated by UrlManag¬er.BaseUrl.
c) Register a UrlManager on the aggregate record details page by calling UrlManager.Regis¬ter and provide an aggregate record details data source (or command). This call is usuallydone as part of page configuration during a page's Page_Load or OnInit methods.
d) Call InitializeFrom and provide the Request.Url.
See the second example below for the code behind.
6. Register each data source in the application by calling Register and specifying each data sourceID.
Example of building an aggregate record details page URL
This example shows the mark up that calls SelectAggregateRecord to build an aggregate recorddetails URL. Note that for the example, aggRecDetailsDataSource.ID and NavDataSource.IDis pseudo-code.Your markup should refer to an aggregate record details data source and navigationdata source either as a string or by its ID.
<asp:Repeater ID="Repeater3" runat="server" DataMember="AggregateRecordsRe¬sult" DataSourceID="NavDataSource"> <ItemTemplate> <asp:Repeater ID="rptRecord" runat="server" DataSource='<%#Eval("Ag¬gregateRecords") %>'> <ItemTemplate> <div> <asp:HyperLink ID="HyperLink1" NavigateUrl='<%# UrlManag¬er.Get ("aggRecDetailsUrlManager").Urls.SelectAggregateRecord (aggRecDetailsDataSource.ID,NavDataSource.ID, Contain¬er.DataItem) %>' runat="server"> <%# GetRecordTitle(Container.DataItem) %> </asp:HyperLink> </div> </ItemTemplate>
Endeca RAD Toolkit for ASP.NET Developer's GuideEndeca Confidential
71Overview of building URLs | Building a URL to an aggregate record details page

</asp:Repeater> </ItemTemplate></asp:Repeater>
This example shows the code behind that supports the mark up. This is in the page's Page_Loadmethod. Note the use of BaseUrl that builds the link on the RecordDetails.aspx page.
aggRecDetailsDataSource = new AggregateRecordDetailsDataSource();aggRecDetailsDataSource.ID = "aggRecDetailsDataSource";
UrlManager.Get("aggRecDetailsUrlManager").BaseUrl = "~/AggRecords/AggRecordDetails.aspx";UrlManager.Get("aggRecDetailsUrlManager").Register(NavDataSource);UrlManager.Get("aggRecDetailsUrlManager").Register(aggRecDetailsDataSource);
UrlManager.Get("DefaultPageManager").Register(NavDataSource);UrlManager.Get("DefaultPageManager ").InitializeFrom(Request.Url);
Building a URL using the BuildUrl methodIn addition to the convenience methods in UrlBuilder that build URLs, such as SelectParentDi¬mensionValue, SelectDimensionValue, SelectRecord, and so on, you can also use Url¬Builder.BuildUrl method to construct a URL. This method provides a flexible way to customizeURLs if the convenience methods are not suitable.
The example below requires the following statements at the top of your code:
<%@ Register TagPrefix="end" Assembly="Endeca.Web" Namespace="Endeca.Web.UI" %><%@ Register TagPrefix="end" Assembly="Endeca.Web.UI.WebControls" Namespace="Endeca.Web.UI" %><%@ Import Namespace="Endeca.Data" %><%@ Import Namespace="Endeca.Web.Url" %>
This procedure assumes you have already created data sources or commands in your application andassigned them an ID.
The UrlBuilder.BuildUrl method takes a delegate that takes a CommandActionInfo.You writethe body of the delegate to copy an EndecaCommand, using CommandActionInfo.Get<T> andthen modify the copy so it can serve as the basis for a new URL.
To build a URL using BuildUrl:
1. Add code that calls BuildUrl on the UrlManager.
2. Create a delegate that takes CommandActionInfo.
3. In the delegate, add code to copy an EndecaCommand by calling Get and then specifying a datasource ID as input.
This copy becomes the basis of a new URL.
4. Add additional code to configure the URL as desired. There is a large amount of potentialconfiguration you could perform at this point to build a URL. It may be useful to browse the examplesin the reference application for typical use cases.
5. Optionally, add parameters to a URL. See the "Adding parameters ..." topics.
Endeca ConfidentialEndeca RAD Toolkit for ASP.NET Developer's Guide
Overview of building URLs | Building a URL using the BuildUrl method72

Example building a URL
This example shows the markup for a URL that clears all the dimensions and dimension values whenan end user clicks Reset.
<a href="<%= UrlManager.Default.Urls.BuildUrl(delegate(CommandActionInfo i) { NavigationCommand cmd = i.Get<NavigationCommand>( dsRight.ID ); cmd.RefinementConfigs.Clear(); cmd.SelectedDimensionValueIds.Clear(); }) %>"> Reset </a>
Adding parameters to all URLs produced by a UrlManagerYou can add parameters to all the URLs produced by a particular instance of a UrlManager. Thisapproach provides a way to add parameters to URLs produced by an instance of a UrlManagerrather than adding parameters on a per-URL basis using the UrlBuilder.BuildUrl. The mannerin which these parameters are encoded in the URL depends on the UrlProvider implementationassociated with the UrlManager.
The example below requires the following statements in your code:
using System;using Endeca.Data;using Endeca.Web.UI;using RadAspNetRef;using Endeca.Web.Url;
This procedure also assumes you have already created data sources or commands in your applicationand assigned them an ID.
To add parameters to all URLs produced by a UrlManager:
1. Create a UrlManager and register data sources or commands with it. For details, see "Creatinga UrlManager and registering data sources and commands".
2. Initialize the UrlManager. For details, see "Initializing a UrlManager".
3. Call the Add method and provide a string specifying the key-value pair for the parameter you wantto add. Repeat for any additional parameters you want the UrlManager to create.
Example of adding parameters to all URLs
This example shows the code to check if a URL has a SessionID parameter. If not, it adds theSessionID to all URLs produced by the UrlManager. This code is in the page's Page_Load method.
// The API provides a convenience method called Default // to create a new instance of UrlManager named "Default". // This creates a UrlManager and registers two data sources // with it.UrlManager.Default.Register(dsLeft);UrlManager.Default.Register(dsRight);
// Provide the UrlManager with state from the Request.Url.UrlManager.Default.InitializeFrom(Request.Url);
// Logic to check if the SessionID parameter is
Endeca RAD Toolkit for ASP.NET Developer's GuideEndeca Confidential
73Overview of building URLs | Adding parameters to all URLs produced by a UrlManager
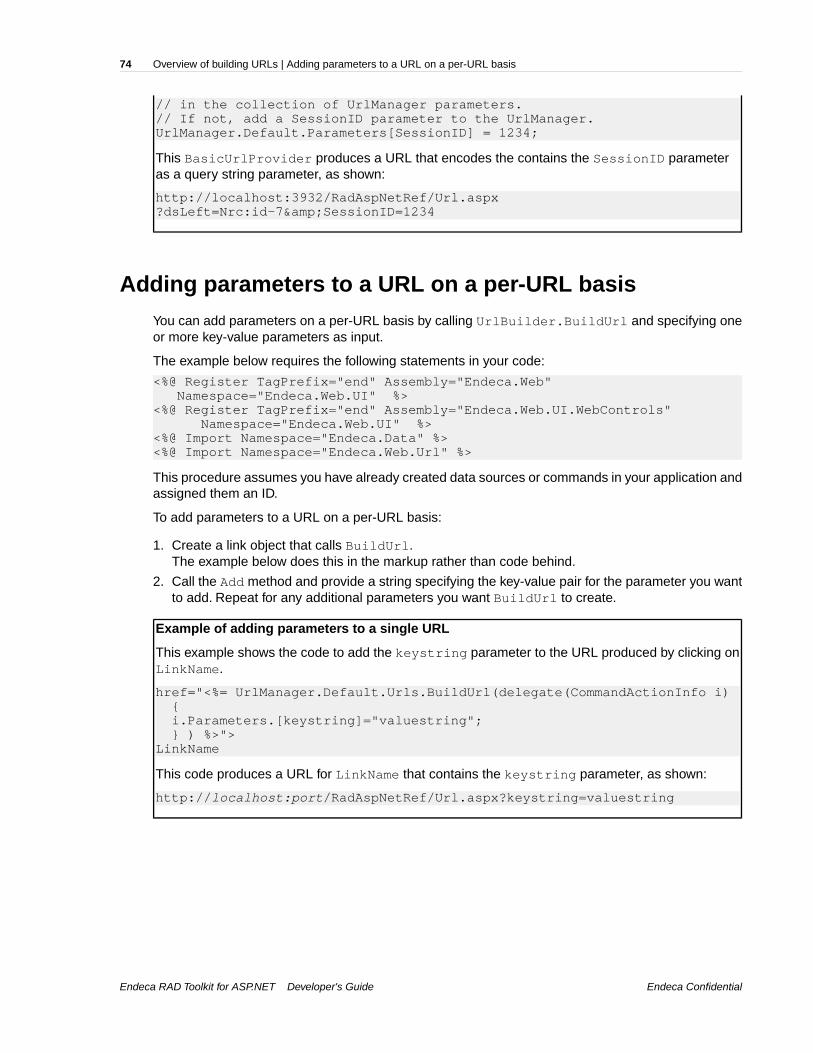
// in the collection of UrlManager parameters.// If not, add a SessionID parameter to the UrlManager.UrlManager.Default.Parameters[SessionID] = 1234;
This BasicUrlProvider produces a URL that encodes the contains the SessionID parameteras a query string parameter, as shown:
http://localhost:3932/RadAspNetRef/Url.aspx?dsLeft=Nrc:id-7&SessionID=1234
Adding parameters to a URL on a per-URL basisYou can add parameters on a per-URL basis by calling UrlBuilder.BuildUrl and specifying oneor more key-value parameters as input.
The example below requires the following statements in your code:
<%@ Register TagPrefix="end" Assembly="Endeca.Web" Namespace="Endeca.Web.UI" %><%@ Register TagPrefix="end" Assembly="Endeca.Web.UI.WebControls" Namespace="Endeca.Web.UI" %><%@ Import Namespace="Endeca.Data" %><%@ Import Namespace="Endeca.Web.Url" %>
This procedure assumes you have already created data sources or commands in your application andassigned them an ID.
To add parameters to a URL on a per-URL basis:
1. Create a link object that calls BuildUrl.The example below does this in the markup rather than code behind.
2. Call the Add method and provide a string specifying the key-value pair for the parameter you wantto add. Repeat for any additional parameters you want BuildUrl to create.
Example of adding parameters to a single URL
This example shows the code to add the keystring parameter to the URL produced by clicking onLinkName.
href="<%= UrlManager.Default.Urls.BuildUrl(delegate(CommandActionInfo i) { i.Parameters.[keystring]="valuestring"; } ) %>">LinkName
This code produces a URL for LinkName that contains the keystring parameter, as shown:
http://localhost:port/RadAspNetRef/Url.aspx?keystring=valuestring
Endeca ConfidentialEndeca RAD Toolkit for ASP.NET Developer's Guide
Overview of building URLs | Adding parameters to a URL on a per-URL basis74

Chapter 6
Using the RAD API for programmaticquerying
This section provides examples of how to use the RAD API to programmatically query an MDEX Engineusing all of the basic query types. The examples build each type of Command object and execute thecommand. The MDEX Engine returns a NavigationResult object to your application.
Executing a navigation commandThis example code connects to an MDEX Engine, creates and executes a NavigationCommand,and examines various ways that the output types can be used. Note that the NavigationCommandobject is the most efficient command to be used when seeking multiple result collections from a query.
This example requires the following includes at the top of your code:
using System.Collections.ObjectModel;using System.Collections.Generic;using Endeca.Data;using Endeca.Data.Provider;using Endeca.Data.Provider.PresentationApi;
To build a NavigationCommand:
Add code similar to following example:
// A PresentationApiConnection is an EndecaConnection that uses the // legacy presentation API as a transport.// Future EndecaConnections can use XQuery or other transport mechanismsPresentationApiConnection conn = new PresentationApiConnection("localhost", 8000);
// A NavigationCommand represents a query to the engine that requests everything //except record/aggregate record details and single/compound dimension searchNavigationCommand cmd = new NavigationCommand(conn);
// ...additional code not shown to set Navigation Command values...
// NavigationResult contains Records, AggregateRecords, Dimensions, Breadcrumbs, // Analytics, BusinessRules, MetaData, and Supplemental ObjectsNavigationResult res = cmd.Execute();

/// Example using Records output typesRecordsResult recordsRes = res.RecordsResult;
// How many total records there are for this navigation statelong totalNumberOfRecords = recordsRes.TotalRecordCount;ReadOnlyCollection<Record> records = recordsRes.Records;// loop through each record and get some variables that we might want to outputforeach (Record r in records){ string name = r["P_Name"]; // get string value for property P_Name string vintage = r["Vintage"]; // works for dimensions (Vintage), too
// This collection has all dimension values for the Flavors dimension
ReadOnlyCollection<DimensionValue> dimvals = r.DimensionValues.ByDi¬mensionName["Flavors"]; foreach (DimensionValue dv in dimvals) { string dimensionValueName = dv.Name; // the name of each flavor
// In order to select one of the DimensionValues simply add it to a NavigationCommand // cmd.SelectDimensionValue(dv); }}
////// Example using DimensionState output types/// DimensionStatesResult dimensionRes = res.DimensionStatesResult;// IndexedCollection is just like a normal collection except it has lookup by Name // or Id RefinableDimensionStates are DimensionStates that have refinements
// and are neither fully selected or fully implicitIndexedCollection<DimensionState> dimensionStates = dimensionRes.Refin¬ableDimensionStates;foreach (DimensionState d in dimensionStates){ string dimensionName = d.Dimension.DisplayName;
// loop through available refinement dimension values for this dimension state // note that choices are only available if the dimension is expanded foreach (DimensionValue dv in d.Refinements) { string dimensionValueName = dv.Name;
// In order to select one of the DimensionValues simply add it to a // NavigationCommand cmd.SelectDimensionValue(dv); }}
////// Example using applied filters to output selected dimension values as breadcrumbs
Endeca ConfidentialEndeca RAD Toolkit for ASP.NET Developer's Guide
Using the RAD API for programmatic querying | Executing a navigation command76

/// AppliedFiltersResult filtersResult = res.AppliedFiltersResult;// for this example, we only care about selected dimension valuesDimensionValueCollection selectedDimensionValues = filtersResult.Dimen¬sionValues;// each dimension value knows its path from the root dimension value to itselfforeach (DimensionValue dimval in selectedDimensionValues){ // for each dimension value, we'll use its path to get out the variables needed to make a // breadcrumb with [Remove] on the left that will remove the whole breadcrumb, // and links under each dimension value in the middle to navigate back
// up the hierachy to that location. // For example: "[Remove] Wine Type > __Red__ > Beaujolais DimensionValuePath dimvalPath = dimval.DimensionValuePath;
// We can use the encoded state of the DimensionValue to perform oper¬ations // on the state such as removing, adding, and selecting ancestors
// Remove in this example removes the last dimension value in the breadcrumb string removeContext = dimvalPath.Last.ContextPath;
// The removal can be performed by calling Remove on the Navigation¬Command // with either the full DimensionValue or the context path. // The context path is useful when you will not have the full Dimen¬sionValue object // cmd.RemoveDimensionValue(removeContext); // or // cmd.RemoveDimensionValue(dimvalPath.Last);
string rootName = dimvalPath.First.Name; // the intermediate dimension values are between the root and descriptor
foreach (DimensionValue intermediate in dimvalPath.Intermediates) { string intermediateName = intermediate.Name; // when you click on the intermediate dimension value you'll navigate there string selectContext = intermediate.ContextPath; // cmd.SelectDimensionValue(selectContext); // or // cmd.SelectDimensionValue(intermediate); } string descriptorName = dimvalPath.Last.Name;}
Executing a records detail queryThis example executes a query using a record ID as input and returns the corresponding single record.
Endeca RAD Toolkit for ASP.NET Developer's GuideEndeca Confidential
77Using the RAD API for programmatic querying | Executing a records detail query

This example requires the following includes at the top of your code:
using System.Collections.ObjectModel;using System.Collections.Generic;using Endeca.Data;using Endeca.Data.Provider;using Endeca.Data.Provider.PresentationApi;
To connect to an MDEX Engine and execute a records detail query:
Add code similar to following example:
PresentationApiConnection conn = new PresentationApiConnection("localhost", 8000);RecordDetailsCommand r = new RecordDetailsCommand(conn);
r.Identifier = "45728";
Record rec = r.Execute();
Executing an aggregated records queryThis example executes an aggregated records query against the MDEX Engine and returns a singleAggregateRecord.
This example requires the following includes at the top of your code:
using System.Collections.ObjectModel;using System.Collections.Generic;using Endeca.Data;using Endeca.Data.Provider;using Endeca.Data.Provider.PresentationApi;
To connect to an MDEX Engine and execute an aggregated records query:
Add code similar to following example:
PresentationApiConnection conn = new PresentationApiConnection("localhost", 8000);AggregateRecordDetailsCommand cmd = new AggregateRecordDetailsCom¬mand(conn);
cmd.AggregationKey = "P_Winery";cmd.Identifier = "43444";
AggregateRecord arec = cmd.Execute();
Executing a dimension search queryThis example executes a dimension search query against an MDEX Engine and returns name, ID,group, and child dimension values.
This example requires the following includes at the top of your code:
using System.Collections.ObjectModel;using System.Collections.Generic;using Endeca.Data;
Endeca ConfidentialEndeca RAD Toolkit for ASP.NET Developer's Guide
Using the RAD API for programmatic querying | Executing an aggregated records query78
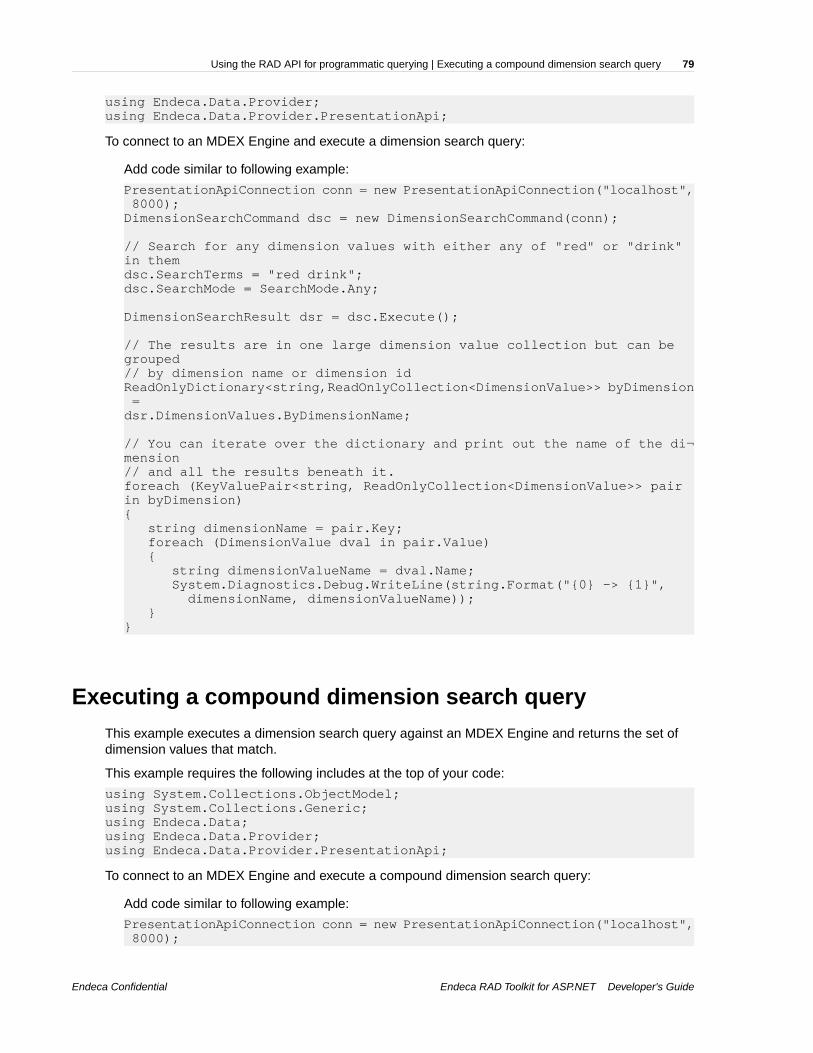
using Endeca.Data.Provider;using Endeca.Data.Provider.PresentationApi;
To connect to an MDEX Engine and execute a dimension search query:
Add code similar to following example:
PresentationApiConnection conn = new PresentationApiConnection("localhost", 8000);DimensionSearchCommand dsc = new DimensionSearchCommand(conn);
// Search for any dimension values with either any of "red" or "drink" in themdsc.SearchTerms = "red drink";dsc.SearchMode = SearchMode.Any;
DimensionSearchResult dsr = dsc.Execute();
// The results are in one large dimension value collection but can be grouped // by dimension name or dimension idReadOnlyDictionary<string,ReadOnlyCollection<DimensionValue>> byDimension = dsr.DimensionValues.ByDimensionName;
// You can iterate over the dictionary and print out the name of the di¬mension // and all the results beneath it.foreach (KeyValuePair<string, ReadOnlyCollection<DimensionValue>> pair in byDimension){ string dimensionName = pair.Key; foreach (DimensionValue dval in pair.Value) { string dimensionValueName = dval.Name; System.Diagnostics.Debug.WriteLine(string.Format("{0} -> {1}", dimensionName, dimensionValueName)); }}
Executing a compound dimension search queryThis example executes a dimension search query against an MDEX Engine and returns the set ofdimension values that match.
This example requires the following includes at the top of your code:
using System.Collections.ObjectModel;using System.Collections.Generic;using Endeca.Data;using Endeca.Data.Provider;using Endeca.Data.Provider.PresentationApi;
To connect to an MDEX Engine and execute a compound dimension search query:
Add code similar to following example:
PresentationApiConnection conn = new PresentationApiConnection("localhost", 8000);
Endeca RAD Toolkit for ASP.NET Developer's GuideEndeca Confidential
79Using the RAD API for programmatic querying | Executing a compound dimension search query

CompoundDimensionSearchCommand dsc = new CompoundDimensionSearchCom¬mand(conn);
// Search for sets of dimension values with "red" and "drink" in themdsc.SearchTerms = "red drink";
CompoundDimensionSearchResult dsr = dsc.Execute();
// The results are DimensionValueCollections where each value matches one of the terms in the searchReadOnlyCollection<DimensionValueCollection> compoundDimVals = dsr.Com¬poundDimensionValues;
foreach(DimensionValueCollection dvcol in compoundDimVals){ // The contents of this loop are a single compound result int count = 0; foreach (DimensionValue dval in dvcol) { System.Diagnostics.Debug.Write(string.Format("{0} -> {1} ", dval.Dimension.Name, dval.Name));
if (count++ < dvcol.Count-1) { System.Diagnostics.Debug.Write(" and "); } } System.Diagnostics.Debug.WriteLine("");}
Executing a metadata queryThis example executes a metadata query and returns key properties, search keys, sort keys and rollup keys (aggregation keys).
This example requires the following includes at the top of your code:
using System.Collections.ObjectModel;using System.Collections.Generic;using Endeca.Data;using Endeca.Data.Provider;using Endeca.Data.Provider.PresentationApi;
To connect to an MDEX Engine and execute a metadata query:
Add code similar to following example:
PresentationApiConnection conn = new PresentationApiConnection("localhost", 8000);MetadataCommand mdc = new MetadataCommand(conn);
MetadataResult mdr = mdc.Execute();
Endeca ConfidentialEndeca RAD Toolkit for ASP.NET Developer's Guide
Using the RAD API for programmatic querying | Executing a metadata query80

Chapter 7
Integrating a preview application into OracleEndeca Workbench
This section describes how to integrate either the RAD ASP.NET reference application or a customapplication into Oracle Endeca Workbench (known as Web Studio prior to version 6.0.x). Onceintegrated, an application becomes the preview application that you use to test dynamic businessrules.
Integrating the RAD ASP.NET reference application intoEndeca Workbench
In a default Oracle Endeca Guided Search installation, the JSP reference application is incorporatedinto the Rule Manager page of Endeca Workbench.The JSP reference application acts as the previewapplication for working with dynamic business rules.You can however substitute the RAD ASP.NETreference application in place of the JSP reference application and use the RAD reference applicationas the preview application.
Before starting the task below, make sure your reference application is running.
You integrate the RAD ASP.NET reference application into Endeca Workbench by changing the URLmappings on the Preview App Settings page of Endeca Workbench.
Note: The URL mode and RAD Toolkit Server Controls URL modes are both supported inEndeca Workbench. The Postback and RAD Toolkit Server Controls Postback modes are notsupported in Endeca Workbench.
To integrate the RAD ASP.NET reference application into Endeca Workbench:
1. Log in to Endeca Workbench, and under Application Settings, select the Preview App Settingspage.
2. Replace the URL Mapping values with the following URLs:
Example URL MappingURL Type
http://hostname:port/RAD/GuidedNavigationUrlServerControls.aspx?En¬decaHostName=MDEXEngineHost&EndecaPort=MDEX¬
SearchURL
EnginePort&dsNav=Ntk:${key}%7c${terms}%7c1%7c,Nmpt:${preview¬time},Nmrf:${rulefilter}

Example URL MappingURL Type
http://hostname:port/RAD/GuidedNavigationUrlServerControls.aspx?En¬decaHostName=MDEXEngineHost&EndecaPort=MDEX¬EnginePort&dsNav=N:${nav},Nmpt:${previewtime},Nmrf:${rulefilter}
NavigationURL
http://hostname:port/RAD/GuidedNavigationUrlServerControls.aspx?En¬decaHostName=MDEXEngineHost&EndecaPort=MDEX¬
SearchandNavigationURL
EnginePort&dsNav=Ntk:${key}%7c${terms}%7c1%7c,N:${nav},Nmpt:${pre¬viewtime},Nmrf:${rulefilter}
http://hostname:port/RAD/GuidedNavigationUrlServerControls.aspx?En¬decaHostName=MDEXEngineHost&EndecaPort=MDEXEnginePort&dsRecordDe¬tails=R:${record}
RecordURL
Notes:
• If you copy the URLs, remove the line breaks when you paste them into Endeca Workbench.• The syntax of the URL mappings is documented in the Oracle Endeca Workbench Help. See
"Providing or confirming preview application URLS".• In the examples above, the directory /RAD refers to the virtual directory name of the RAD
ASP.NET reference application. The page name for the reference application can be eitherGuidedNavigationUrlServerControls.aspx (as in the examples) or GuidedNavigationUrl.aspx.
3. You may also need to declare the Javascript domain in GuidedNavigationUrlServerControls.aspxor GuidedNavigationUrl.aspx (depending on which page you specified in the Preview App Settingspage in Endeca Workbench). For details, see the Oracle Endeca Workbench Administrator's Guide.
4. On the Preview App Settings page, click Save Changes.
5. Navigate to the Rule Manager page.
The RAD ASP.NET reference application displays in the preview application pane.
Integrating a custom application into Endeca WorkbenchIn a default Oracle Endeca Guided Search installation, the JSP reference application is incorporatedinto the Rule Manager page of Endeca Workbench.The JSP reference application acts as the previewapplication for working with dynamic business rules.You can however substitute your own customapplication in place of the JSP reference application and use it as the preview application.
You integrate a custom application into Endeca Workbench by changing the URL mappings in EndecaWorkbench, by enabling WebStudioCommandSerializationProvider, and by addinginstrumentation server controls.
Note: The URL mode and RAD Toolkit Server Controls URL modes are both supported inEndeca Workbench. The Postback and RAD Toolkit Server Controls Postback modes are notsupported in Endeca Workbench.
To integrate a custom application into Endeca Workbench:
1. Navigate to the reference\RadAspNetRef\App_Code\RadAspNetRefUrl subdirectory ofyour RAD Toolkits installation.
For example:C:\Endeca\RADToolkits\version\ASP.NET\reference\RadAspNetRef\App_Code\RadAspNetRefUrl
Endeca ConfidentialEndeca RAD Toolkit for ASP.NET Developer's Guide
Integrating a preview application into Oracle Endeca Workbench | Integrating a custom application intoEndeca Workbench
82

2. Copy the WebStudioUrlCommandSerializationProvider.cs file to the App_Code directoryof your application.
3. Open the Web.config file for the custom application that you want to integrate into EndecaWorkbench. In the <configSections> element, add the following snippet:
<configSections> <sectionGroup name="endeca" type="Endeca.Data.Configuration.EndecaSec¬tionGroup, Endeca.Data, Version=2.1.0.0, Culture=neutral, PublicKeyTo¬ken=6d02be8724ca751c" > <section name="commandSerialization" type="Endeca.Data.Configuration.CommandSerializationSection, Endeca.Data, Version=2.1.0.0, Culture=neutral, PublicKeyTo¬ken=6d02be8724ca751c" /> ...
4. Also in the Web.config file, add the following snippet immediately after the <endeca> element:
<endeca> <commandSerialization> <providers> <add name="Url" type="RadAspNetUrlRef.WebStudioUrlCommandSerial¬izationProvider" /> </providers> </commandSerialization>
<!-- Other elements removed from the example. -->
</endeca>
For an example, see the Web.config file for the RAD ASP.NET reference application.
5. Open the home page for your custom application, or any page in your application that requiresinstrumentation, and do the following:
a) For navigation instrumentation, drag the WebStudioNavigationInstrumentation control on tothe Design tab of your page.
b) From the Smart Tag of the WebStudioNavigationInstrumentation control, select theNavigationDataSource data source.
c) For record instrumentation, drag the WebStudioRecordInstrumentation control on to theDesign tab of your page.
d) From the Smart Tag of the WebStudioRecordInstrumentation control, select theRecordDetailsDataSource data source.
e) In the markup for the WebStudioRecordInstrumentation control, modify the RecordSpecProp¬erty to reflect the spec ID of records in your data set, and the RecordNameProperty propertiesto reflect the name.
Note: You may also need to declare the Javascript domain for the pages that areinstrumented. For details, see the Oracle Endeca Workbench Administrator's Guide.
6. Log in to Endeca Workbench, and under Application Settings, select the Preview App Settingspage.
7. Replace the URL Mapping values with the following URLs:
Example URL MappingURL Type
http://hostname:port/AppName/PageName.aspx?EndecaHostName=MDEX¬EngineHost&EndecaPort=MDEX¬
SearchURL
Endeca RAD Toolkit for ASP.NET Developer's GuideEndeca Confidential
83Integrating a preview application into Oracle Endeca Workbench | Integrating a custom application intoEndeca Workbench

Example URL MappingURL Type
EnginePort&dsNav=Ntk:${key}%7c${terms}%7c1%7c,Nmpt:${preview¬time},Nmrf:${rulefilter}
http://hostname:port/AppName/PageName.aspx?EndecaHostName=MDEX¬EngineHost&EndecaPort=MDEXEnginePort&dsNav=N:${nav},Nmpt:${pre¬viewtime},Nmrf:${rulefilter}
NavigationURL
http://hostname:port/AppName/PageName.aspx?EndecaHostName=MDEX¬EngineHost&EndecaPort=MDEX¬
SearchandNavigationURL
EnginePort&dsNav=Ntk:${key}%7c${terms}%7c1%7c,N:${nav},Nmpt:${pre¬viewtime},Nmrf:${rulefilter}
http://hostname:port/AppName/PageName.aspx?EndecaHostName=MDEX¬EngineHost&EndecaPort=MDEXEnginePort&dsRecordDetails=R:${record}
RecordURL
Notes:
• If you copy the URLs, remove the line breaks when you paste them into Endeca Workbench.• The syntax of the URL mappings are documented in the Oracle Endeca Workbench Help. See
"Providing or confirming preview application URLS".• In the examples above, the directory /AppName refers to the virtual directory name of the
custom application. The file PageName.aspx refers to the home page of your application.
8. On the Preview App Settings page, click Save Changes.
9. Navigate to the Rule Manager page of Endeca Workbench.
The custom application displays in the preview application pane.
Endeca ConfidentialEndeca RAD Toolkit for ASP.NET Developer's Guide
Integrating a preview application into Oracle Endeca Workbench | Integrating a custom application intoEndeca Workbench
84

Index
A
aggregated records query example 78AggregateRecordDetailsDataSource control 35application
creating 61deploying 11
B
Breadcrumbs control 41Breadcrumbs control templates 46building a query 75building URLs
overview 63
C
components in the RAD Toolkit 13compound dimension search query example 79CompoundDimensionSearchDataSource control 29creating
a Breadcrumbs control 41a CompoundDimensionSearchDataSource control29a DimensionSearchDataSource control 27a GuidedNavigation control 38a MetadataDataSource control 24a NavigationDataSource control 20a Pager control 46a RecordDetailsDataSource control 32a TagCloud control 51an AggregateRecordDetailsDataSource control 35an application from the reference 61
D
data source controlsintroduced 14
deployingreference application 11
dimension search query example 79Dimensions control templates 40DimensionSearchDataSource control 27displaying
query results 57record count 58
E
excluding dimensionsfrom a page 55
F
fully inert dimensionsdisplaying in breadcrumbs 41
G
GuidedNavigation control 38
I
inert dimensionsdisplaying in breadcrumbs 41
installation prerequisites 9installing the RAD Toolkit 10instrumentation controls
introduced 16WebStudioNavigationInstrumentation 16WebStudioRecordInstrumentation 16
M
metadata query example 80MetadataDataSource control 24
N
navigation command example 75NavigationDataSource control 20
O
open dimensions 54
P
page eventPreRender 17
Pager control 46Pager control templates 51parameters
adding to a URL 73PreRender page event 17
Q
query examples 75
R
RAD API 13

RAD Toolkitcomponents in 13installation 10installation prerequisites 9introduction 13RAD API 13uninstalling 11
record class generation utility 17RecordDetailsDataSource control 32records detail query example 78reference application 16
copying as template 61copying controls 61deploying 11
refreshinga data source control 37
registering data sources 66
S
server controlsintroduced 15
T
TagCloud control 51TagCloud control templates 54
U
uninstalling the RAD Toolkit 11UrlManager
initializing 67
V
version compatibility 9Visual Studio
integration 10
W
workflowcreating an application 19
Endeca RAD Toolkit for ASP.NET86
Index