you can do the rubik's cube - lesson 1 - meeting the cube
TRANSCRIPT
Lesson 1Meeting the Cube
How To Solve The Rubik's® Cube Instructional Curriculum
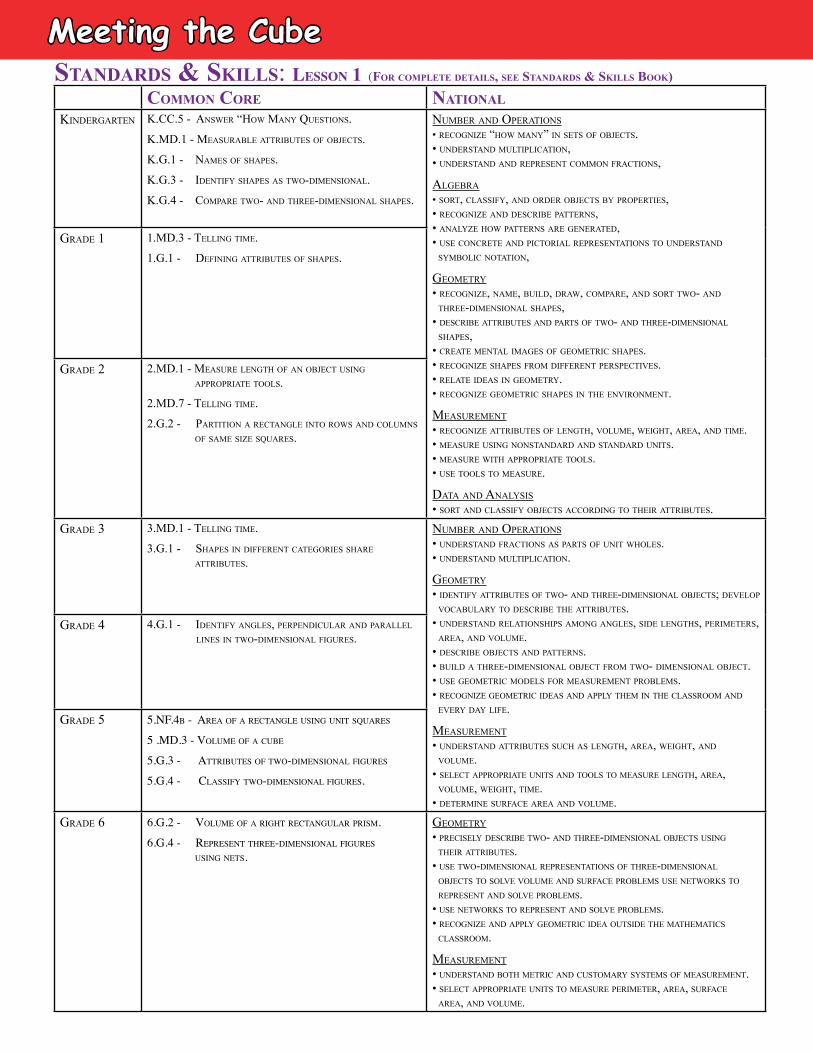
Meeting the CubeStandardS & SkillS: Lesson 1 (For complete detailS, See StandardS & SkillS Book)
common core nationalKindergarten K.CC.5 - answer “How Many Questions.
K.Md.1 - Measurable attributes of objeCts.
K.g.1 - naMes of sHapes.
K.g.3 - identify sHapes as two-diMensional.
K.g.4 - CoMpare two- and tHree-diMensional sHapes.
nuMber and operations• reCognize “How Many” in sets of objeCts.• understand MultipliCation,• understand and represent CoMMon fraCtions,
algebra• sort, Classify, and order objeCts by properties,• reCognize and desCribe patterns,• analyze How patterns are generated,• use ConCrete and piCtorial representations to understand
syMboliC notation,
geoMetry• reCognize, naMe, build, draw, CoMpare, and sort two- and
tHree- diMensional sHapes, • desCribe attributes and parts of two- and tHree- diMensional
sHapes,• Create Mental iMages of geoMetriC sHapes.• reCognize sHapes froM different perspeCtives.• relate ideas in geoMetry.• reCognize geoMetriC sHapes in tHe environMent.
MeasureMent• reCognize attributes of lengtH, voluMe, weigHt, area, and tiMe.• Measure using nonstandard and standard units.• Measure witH appropriate tools.• use tools to Measure.
data and analysis• sort and Classify objeCts aCCording to tHeir attributes.
grade 1 1.Md.3 - telling tiMe.
1.g.1 - defining attributes of sHapes.
grade 2 2.Md.1 - Measure lengtH of an objeCt using appropriate tools.
2.Md.7 - telling tiMe.
2.g.2 - partition a reCtangle into rows and ColuMns of saMe size sQuares.
grade 3 3.Md.1 - telling tiMe.
3.g.1 - sHapes in different Categories sHare attributes.
nuMber and operations• understand fraCtions as parts of unit wHoles.• understand MultipliCation.
geoMetry• identify attributes of two- and tHree- diMensional objeCts; develop
voCabulary to desCribe tHe attributes.• understand relationsHips aMong angles, side lengtHs, periMeters,
area, and voluMe.• desCribe objeCts and patterns.• build a tHree-diMensional objeCt froM two- diMensional objeCt.• use geoMetriC Models for MeasureMent probleMs.• reCognize geoMetriC ideas and apply tHeM in tHe ClassrooM and
every day life.
MeasureMent• understand attributes suCH as lengtH, area, weigHt, and
voluMe.• seleCt appropriate units and tools to Measure lengtH, area,
voluMe, weigHt, tiMe.• deterMine surfaCe area and voluMe.
grade 4 4.g.1 - identify angles, perpendiCular and parallel lines in two- diMensional figures.
grade 5 5.NF.4b - AreA oF A rectANgle usiNg uNit squAres
5 .MD.3 - VoluMe oF A cube
5.g.3 - Attributes oF two-DiMeNsioNAl Figures
5.g.4 - clAssiFy two-DiMeNsioNAl Figures.
grade 6 6.g.2 - VoluMe oF A right rectANgulAr prisM.
6.g.4 - represeNt three-DiMeNsioNAl Figures usiNg Nets.
geoMetry• preCisely desCribe two- and tHree-diMensional objeCts using
tHeir attributes.• use two-diMensional representations of tHree-diMensional
objeCts to solve voluMe and surfaCe probleMs use networKs to represent and solve probleMs.
• use networKs to represent and solve probleMs.• reCognize and apply geoMetriC idea outside tHe MatHeMatiCs
ClassrooM.
MeasureMent• understand botH MetriC and CustoMary systeMs of MeasureMent.• seleCt appropriate units to Measure periMeter, area, surfaCe
area, and voluMe.
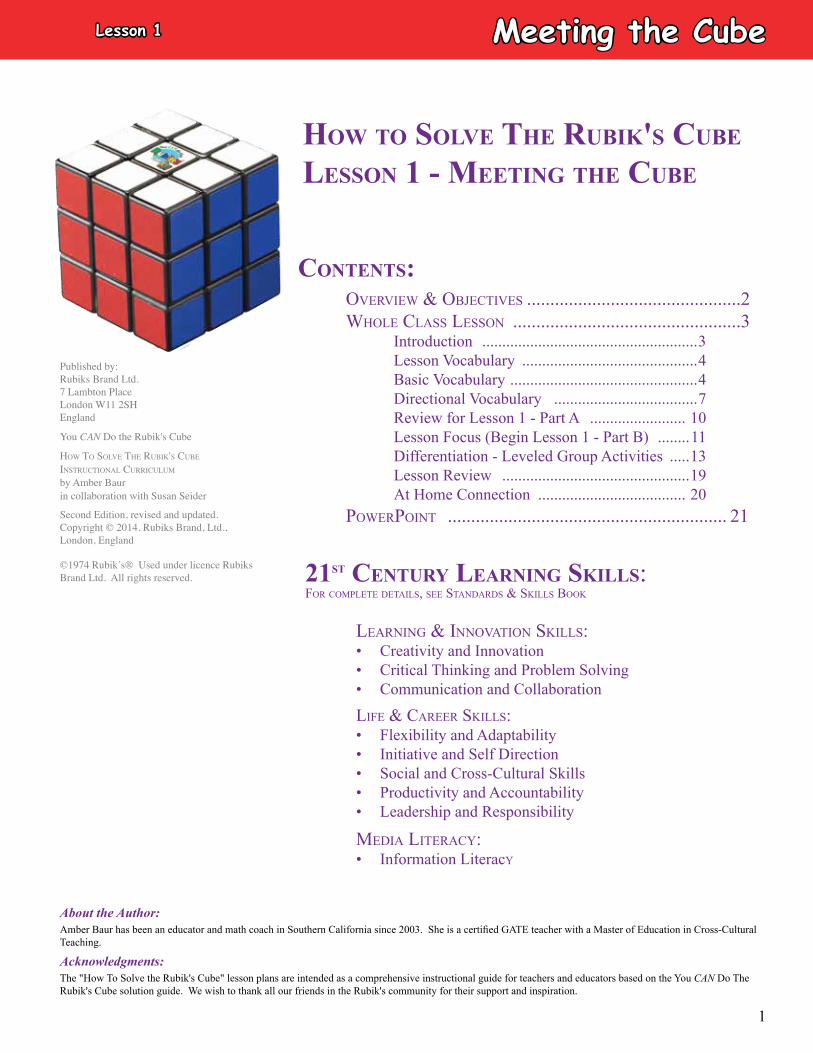
How to Solve tHe ruBik'S cuBe
leSSon 1 - meeting tHe cuBe
1
contentS:overview & objeCtives ..............................................2wHole Class lesson .................................................3
Introduction ......................................................3 Lesson Vocabulary ............................................4Basic Vocabulary ...............................................4Directional Vocabulary ....................................7Review for Lesson 1 - Part A ........................ 10Lesson Focus (Begin Lesson 1 - Part B) ........11 Differentiation - Leveled Group Activities .....13 Lesson Review ...............................................19 At Home Connection ..................................... 20
powerpoint ............................................................ 21
Meeting the CubeLesson 1
Acknowledgments:The "How To Solve the Rubik's Cube" lesson plans are intended as a comprehensive instructional guide for teachers and educators based on the You CAN Do The Rubik's Cube solution guide. We wish to thank all our friends in the Rubik's community for their support and inspiration.
21St century learning SkillS: for CoMplete details, see standards & sKills booK
About the Author: Amber Baur has been an educator and math coach in Southern California since 2003. She is a certified GATE teacher with a Master of Education in Cross-Cultural Teaching.
learning & innovation sKills:• Creativity and Innovation• Critical Thinking and Problem Solving• Communication and Collaboration
life & Career sKills:• Flexibility and Adaptability• Initiative and Self Direction• Social and Cross-Cultural Skills• Productivity and Accountability• Leadership and Responsibility
Media literaCy:• Information Literacy
Published by:Rubiks Brand Ltd.7 Lambton PlaceLondon W11 2SHEngland
You CAN Do the Rubik's Cube
how to solVe the rubik's cube iNstructioNAl curriculuM by Amber Baurin collaboration with Susan Seider
Second Edition, revised and updated.Copyright © 2014, Rubiks Brand, Ltd., London, England
©1974 Rubik’s® Used under licence Rubiks Brand Ltd. All rights reserved.
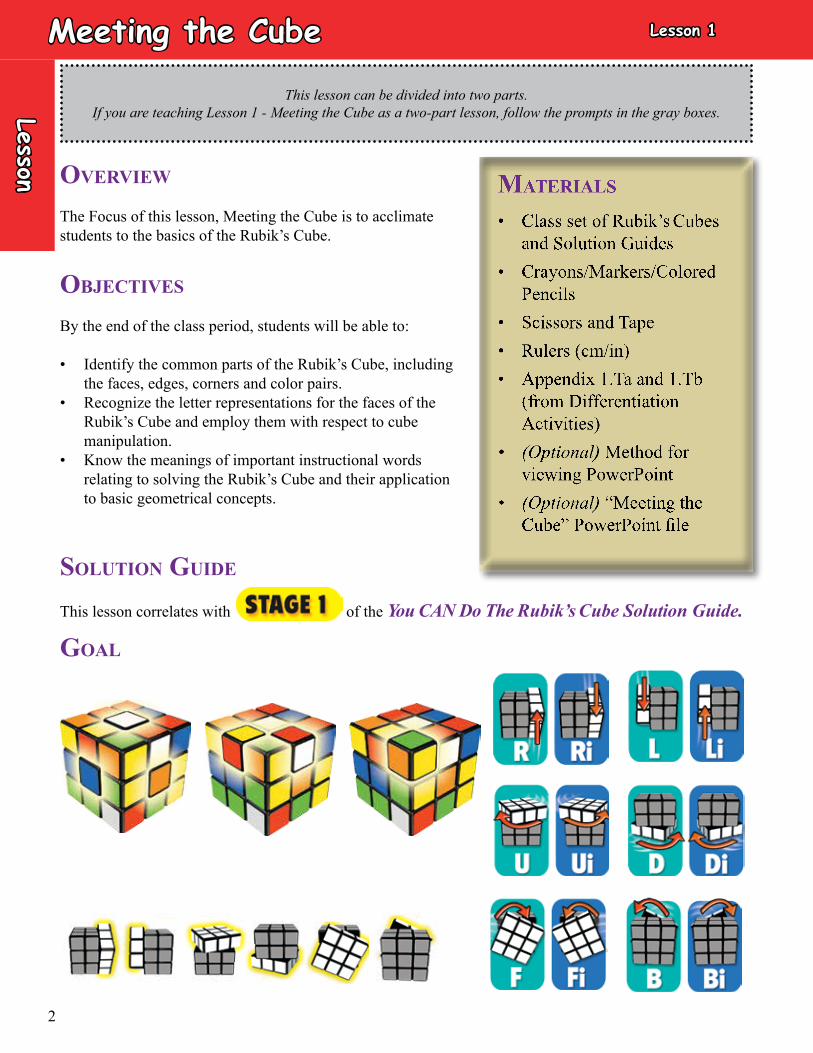
goal
Meeting the Cube
This lesson can be divided into two parts.If you are teaching Lesson 1 - Meeting the Cube as a two-part lesson, follow the prompts in the gray boxes.
Materialsoverview
The Focus of this lesson, Meeting the Cube is to acclimate students to the basics of the Rubik’s Cube.
oBjectiveS
By the end of the class period, students will be able to:
• Identify the common parts of the Rubik’s Cube, including the faces, edges, corners and color pairs.
• Recognize the letter representations for the faces of the Rubik’s Cube and employ them with respect to cube manipulation.
• Know the meanings of important instructional words relating to solving the Rubik’s Cube and their application to basic geometrical concepts.
Solution guide
This lesson correlates with of the You CAN Do The Rubik’s Cube Solution Guide.
Lesson
Lesson 1
2
Less
on
introduction
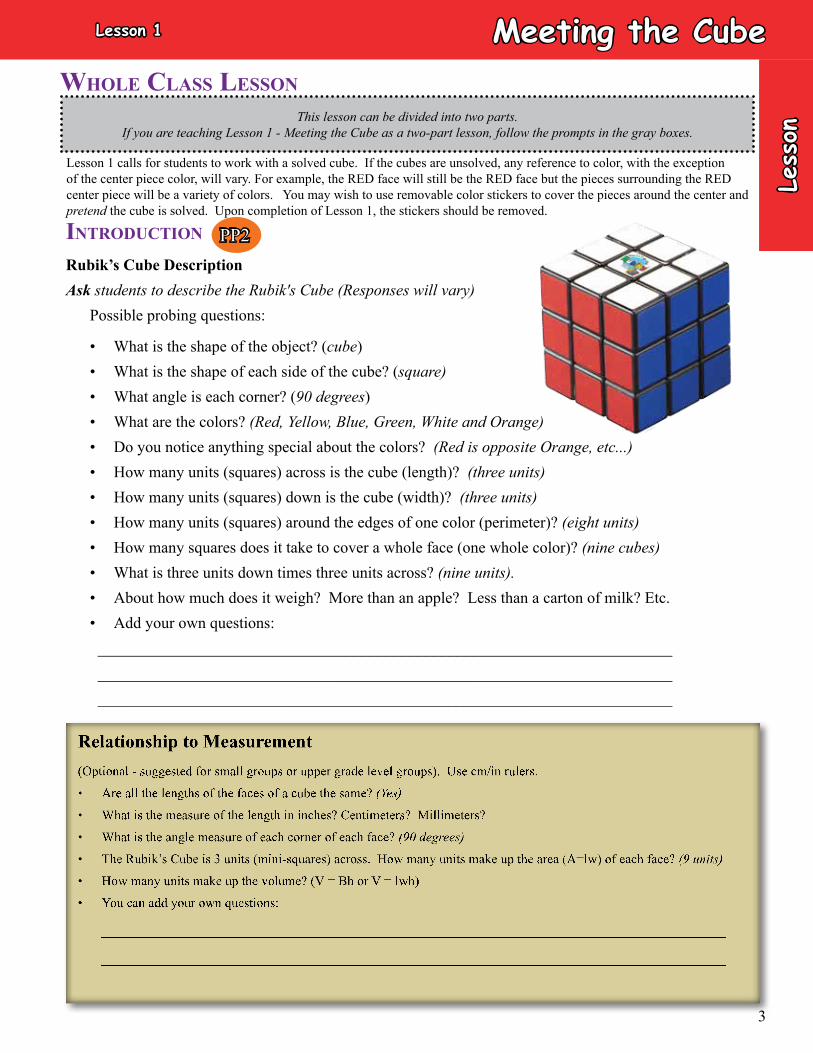
Rubik’s Cube Description
Ask students to describe the Rubik's Cube (Responses will vary) Possible probing questions:
• What is the shape of the object? (cube)• What is the shape of each side of the cube? (square)• What angle is each corner? (90 degrees)• What are the colors? (Red, Yellow, Blue, Green, White and Orange)• Do you notice anything special about the colors? (Red is opposite Orange, etc...)• How many units (squares) across is the cube (length)? (three units)• How many units (squares) down is the cube (width)? (three units)• How many units (squares) around the edges of one color (perimeter)? (eight units)• How many squares does it take to cover a whole face (one whole color)? (nine cubes)• What is three units down times three units across? (nine units). • About how much does it weigh? More than an apple? Less than a carton of milk? Etc.• Add your own questions:
________________________________________________________________________ ________________________________________________________________________ ________________________________________________________________________
This lesson can be divided into two parts.If you are teaching Lesson 1 - Meeting the Cube as a two-part lesson, follow the prompts in the gray boxes.
wHole claSS leSSon
PP2
Less
on
Lesson 1 Meeting the Cube
3
Lesson 1 calls for students to work with a solved cube. If the cubes are unsolved, any reference to color, with the exception of the center piece color, will vary. For example, the RED face will still be the RED face but the pieces surrounding the RED center piece will be a variety of colors. You may wish to use removable color stickers to cover the pieces around the center and pretend the cube is solved. Upon completion of Lesson 1, the stickers should be removed.
leSSon vocaBulary
After each instruction, walk around and check to be sure students have completed the instruction accurately.
Basic VocaBuLary
FACE – Faces are the flat area of the cube. The color of the face is based on the color of the center square. Tell students:
• Point to the face covered in BLUE. Say: This is the BLUE face.
• Point to the face covered in RED. Say: This is the RED face.
• Point to the face covered in GREEN. Say: This is the GREEN face.
• Point to the face covered in YELLOW. Say: This is the YELLOW face.
• Point to the face covered in ORANGE. Say: This is the ORANGE face.
• Point to the face covered in WHITE. Say: This is the WHITE face.
Ask students: How many colors are there? (Six)
Ask students: How many faces are there? (Six)
Ask students if they know what the term opposite means? (the other side, the other face, etc.)
PP3
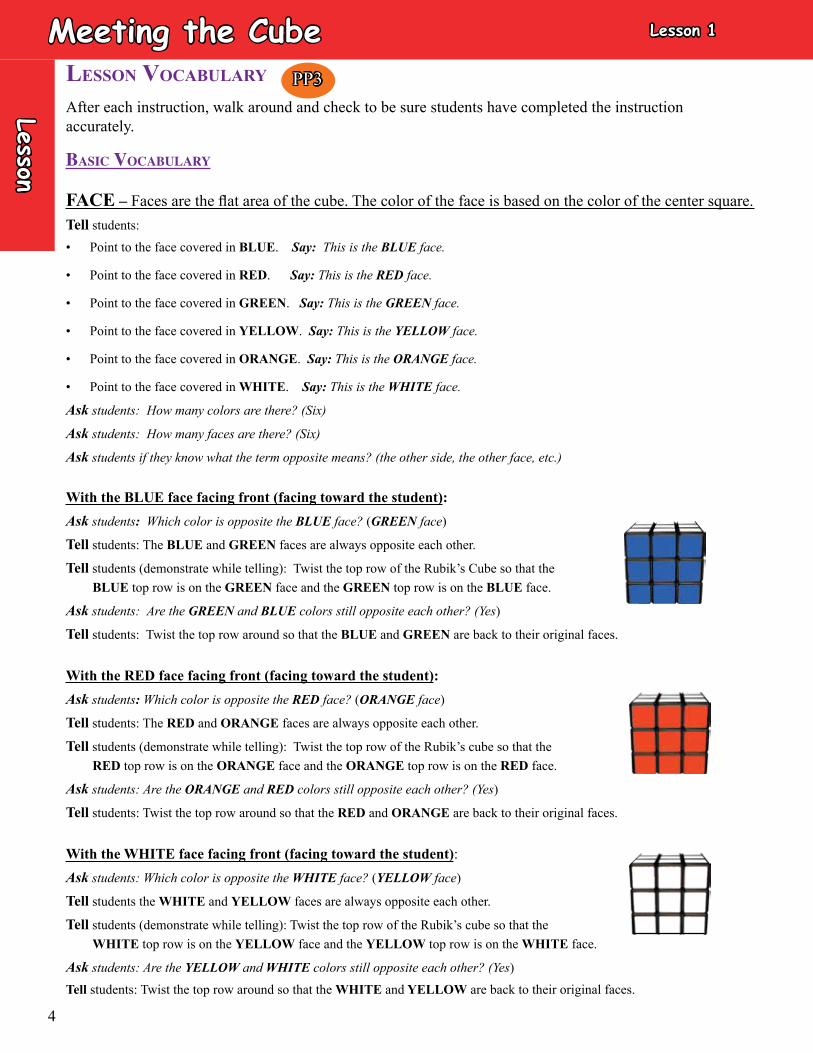
With the BLUE face facing front (facing toward the student):Ask students: Which color is opposite the BLUE face? (GREEN face)
Tell students: The BLUE and GREEN faces are always opposite each other.
Tell students (demonstrate while telling): Twist the top row of the Rubik’s Cube so that the BLUE top row is on the GREEN face and the GREEN top row is on the BLUE face.
Ask students: Are the GREEN and BLUE colors still opposite each other? (Yes)
Tell students: Twist the top row around so that the BLUE and GREEN are back to their original faces.
With the RED face facing front (facing toward the student):Ask students: Which color is opposite the RED face? (ORANGE face)
Tell students: The RED and ORANGE faces are always opposite each other.
Tell students (demonstrate while telling): Twist the top row of the Rubik’s cube so that the RED top row is on the ORANGE face and the ORANGE top row is on the RED face.
Ask students: Are the ORANGE and RED colors still opposite each other? (Yes)
Tell students: Twist the top row around so that the RED and ORANGE are back to their original faces.
With the WHITE face facing front (facing toward the student):Ask students: Which color is opposite the WHITE face? (YELLOW face)
Tell students the WHITE and YELLOW faces are always opposite each other.
Tell students (demonstrate while telling): Twist the top row of the Rubik’s cube so that the WHITE top row is on the YELLOW face and the YELLOW top row is on the WHITE face.
Ask students: Are the YELLOW and WHITE colors still opposite each other? (Yes)
Tell students: Twist the top row around so that the WHITE and YELLOW are back to their original faces.
Lesson
Lesson 1Meeting the Cube
4
BaSic vocaBulary...
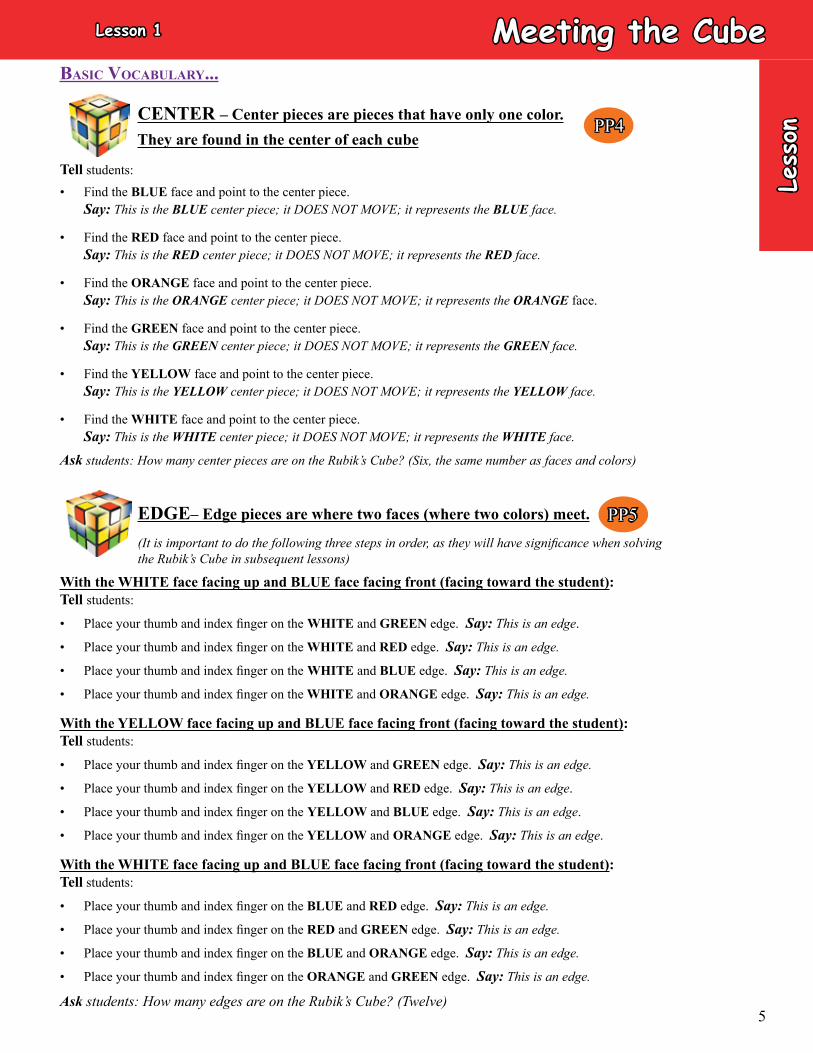
CENTER – Center pieces are pieces that have only one color. They are found in the center of each cube
Tell students:
• Find the BLUE face and point to the center piece. Say: This is the BLUE center piece; it DOES NOT MOVE; it represents the BLUE face.
• Find the RED face and point to the center piece. Say: This is the RED center piece; it DOES NOT MOVE; it represents the RED face.
• Find the ORANGE face and point to the center piece. Say: This is the ORANGE center piece; it DOES NOT MOVE; it represents the ORANGE face.
• Find the GREEN face and point to the center piece. Say: This is the GREEN center piece; it DOES NOT MOVE; it represents the GREEN face.
• Find the YELLOW face and point to the center piece. Say: This is the YELLOW center piece; it DOES NOT MOVE; it represents the YELLOW face.
• Find the WHITE face and point to the center piece. Say: This is the WHITE center piece; it DOES NOT MOVE; it represents the WHITE face.
Ask students: How many center pieces are on the Rubik’s Cube? (Six, the same number as faces and colors)
PP4
EDGE– Edge pieces are where two faces (where two colors) meet.
(It is important to do the following three steps in order, as they will have significance when solving the Rubik’s Cube in subsequent lessons)
With the WHITE face facing up and BLUE face facing front (facing toward the student):Tell students:
• Place your thumb and index finger on the WHITE and GREEN edge. Say: This is an edge.
• Place your thumb and index finger on the WHITE and RED edge. Say: This is an edge.
• Place your thumb and index finger on the WHITE and BLUE edge. Say: This is an edge.
• Place your thumb and index finger on the WHITE and ORANGE edge. Say: This is an edge.
With the YELLOW face facing up and BLUE face facing front (facing toward the student):Tell students:
• Place your thumb and index finger on the YELLOW and GREEN edge. Say: This is an edge.
• Place your thumb and index finger on the YELLOW and RED edge. Say: This is an edge.
• Place your thumb and index finger on the YELLOW and BLUE edge. Say: This is an edge.
• Place your thumb and index finger on the YELLOW and ORANGE edge. Say: This is an edge.
With the WHITE face facing up and BLUE face facing front (facing toward the student):Tell students:
• Place your thumb and index finger on the BLUE and RED edge. Say: This is an edge.
• Place your thumb and index finger on the RED and GREEN edge. Say: This is an edge.
• Place your thumb and index finger on the BLUE and ORANGE edge. Say: This is an edge.
• Place your thumb and index finger on the ORANGE and GREEN edge. Say: This is an edge.
Ask students: How many edges are on the Rubik’s Cube? (Twelve)
PP5
Less
on
Lesson 1 Meeting the Cube
5
BaSic vocaBulary...
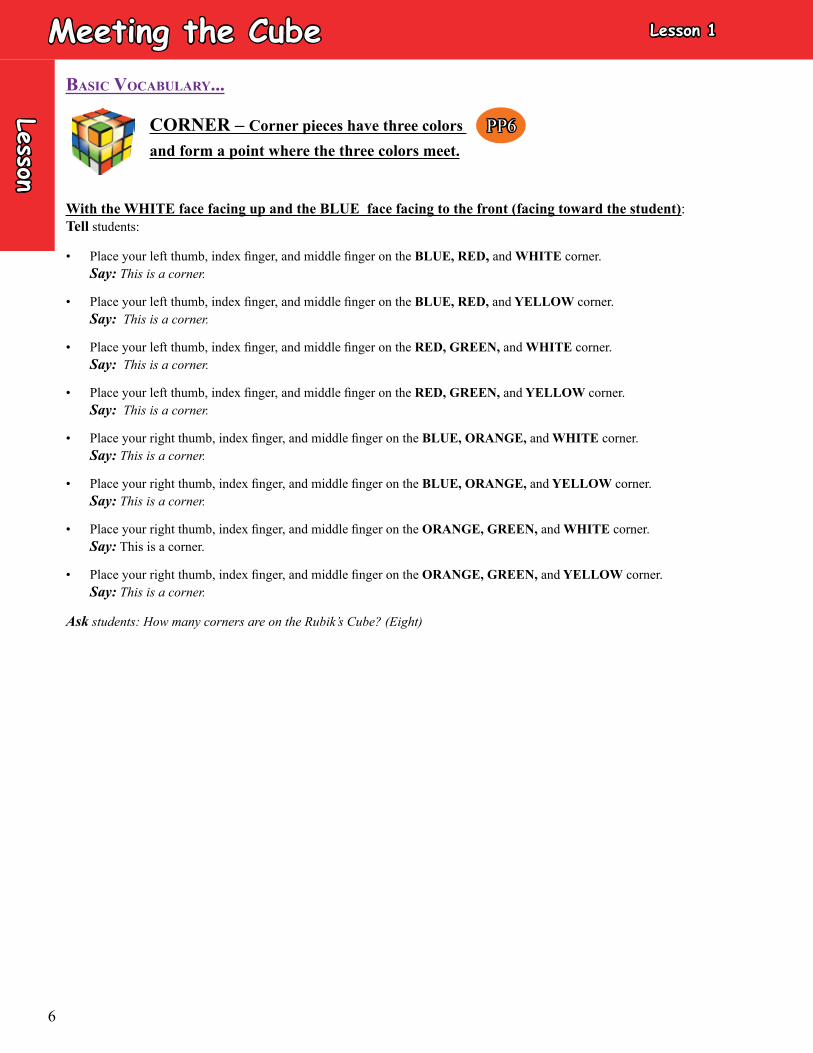
CORNER – Corner pieces have three colors and form a point where the three colors meet.
With the WHITE face facing up and the BLUE face facing to the front (facing toward the student):Tell students:
• Place your left thumb, index finger, and middle finger on the BLUE, RED, and WHITE corner. Say: This is a corner.
• Place your left thumb, index finger, and middle finger on the BLUE, RED, and YELLOW corner. Say: This is a corner.
• Place your left thumb, index finger, and middle finger on the RED, GREEN, and WHITE corner. Say: This is a corner.
• Place your left thumb, index finger, and middle finger on the RED, GREEN, and YELLOW corner. Say: This is a corner.
• Place your right thumb, index finger, and middle finger on the BLUE, ORANGE, and WHITE corner. Say: This is a corner.
• Place your right thumb, index finger, and middle finger on the BLUE, ORANGE, and YELLOW corner.Say: This is a corner.
• Place your right thumb, index finger, and middle finger on the ORANGE, GREEN, and WHITE corner.Say: This is a corner.
• Place your right thumb, index finger, and middle finger on the ORANGE, GREEN, and YELLOW corner.Say: This is a corner.
Ask students: How many corners are on the Rubik’s Cube? (Eight)
PP6
Lesson
Lesson 1Meeting the Cube
6
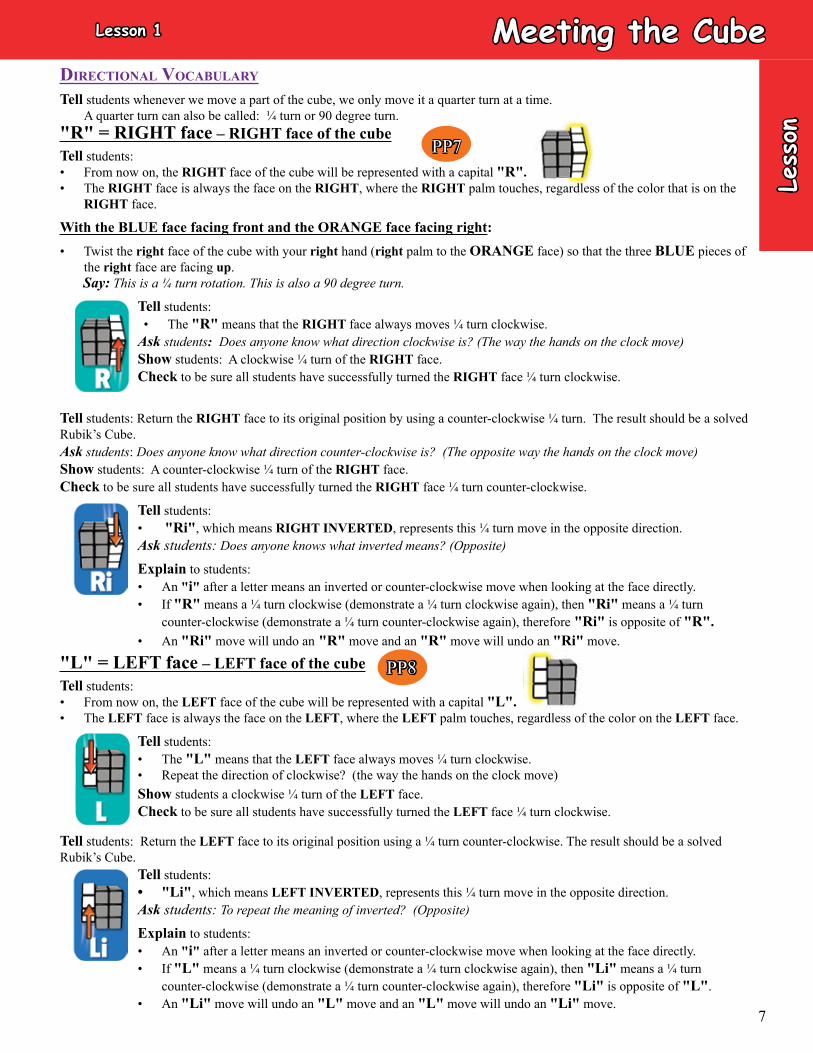
"L" = LEFT face – LEFT face of the cubeTell students:• From now on, the LEFT face of the cube will be represented with a capital "L".• The LEFT face is always the face on the LEFT, where the LEFT palm touches, regardless of the color on the LEFT face.
Tell students:• The "L" means that the LEFT face always moves ¼ turn clockwise.• Repeat the direction of clockwise? (the way the hands on the clock move)Show students a clockwise ¼ turn of the LEFT face.Check to be sure all students have successfully turned the LEFT face ¼ turn clockwise.
Tell students: Return the LEFT face to its original position using a ¼ turn counter-clockwise. The result should be a solved Rubik’s Cube.
Tell students:• "Li", which means LEFT INVERTED, represents this ¼ turn move in the opposite direction.Ask students: To repeat the meaning of inverted? (Opposite)
Explain to students: • An "i" after a letter means an inverted or counter-clockwise move when looking at the face directly.• If "L" means a ¼ turn clockwise (demonstrate a ¼ turn clockwise again), then "Li" means a ¼ turn
counter-clockwise (demonstrate a ¼ turn counter-clockwise again), therefore "Li" is opposite of "L".• An "Li" move will undo an "L" move and an "L" move will undo an "Li" move.
"R" = RIGHT face – RIGHT face of the cubeTell students:• From now on, the RIGHT face of the cube will be represented with a capital "R".• The RIGHT face is always the face on the RIGHT, where the RIGHT palm touches, regardless of the color that is on the
RIGHT face.
With the BLUE face facing front and the ORANGE face facing right:• Twist the right face of the cube with your right hand (right palm to the ORANGE face) so that the three BLUE pieces of
the right face are facing up. Say: This is a ¼ turn rotation. This is also a 90 degree turn.
Tell students:• The "R" means that the RIGHT face always moves ¼ turn clockwise.
Ask students: Does anyone know what direction clockwise is? (The way the hands on the clock move)Show students: A clockwise ¼ turn of the RIGHT face.Check to be sure all students have successfully turned the RIGHT face ¼ turn clockwise.
Tell students: Return the RIGHT face to its original position by using a counter-clockwise ¼ turn. The result should be a solved Rubik’s Cube.Ask students: Does anyone know what direction counter-clockwise is? (The opposite way the hands on the clock move) Show students: A counter-clockwise ¼ turn of the RIGHT face.Check to be sure all students have successfully turned the RIGHT face ¼ turn counter-clockwise.
Tell students:• "Ri", which means RIGHT INVERTED, represents this ¼ turn move in the opposite direction.Ask students: Does anyone knows what inverted means? (Opposite)
Explain to students:• An "i" after a letter means an inverted or counter-clockwise move when looking at the face directly.• If "R" means a ¼ turn clockwise (demonstrate a ¼ turn clockwise again), then "Ri" means a ¼ turn
counter-clockwise (demonstrate a ¼ turn counter-clockwise again), therefore "Ri" is opposite of "R".• An "Ri" move will undo an "R" move and an "R" move will undo an "Ri" move.
directional vocaBulary
Tell students whenever we move a part of the cube, we only move it a quarter turn at a time. A quarter turn can also be called: ¼ turn or 90 degree turn.
PP7
PP8
Less
on
Lesson 1 Meeting the Cube
7
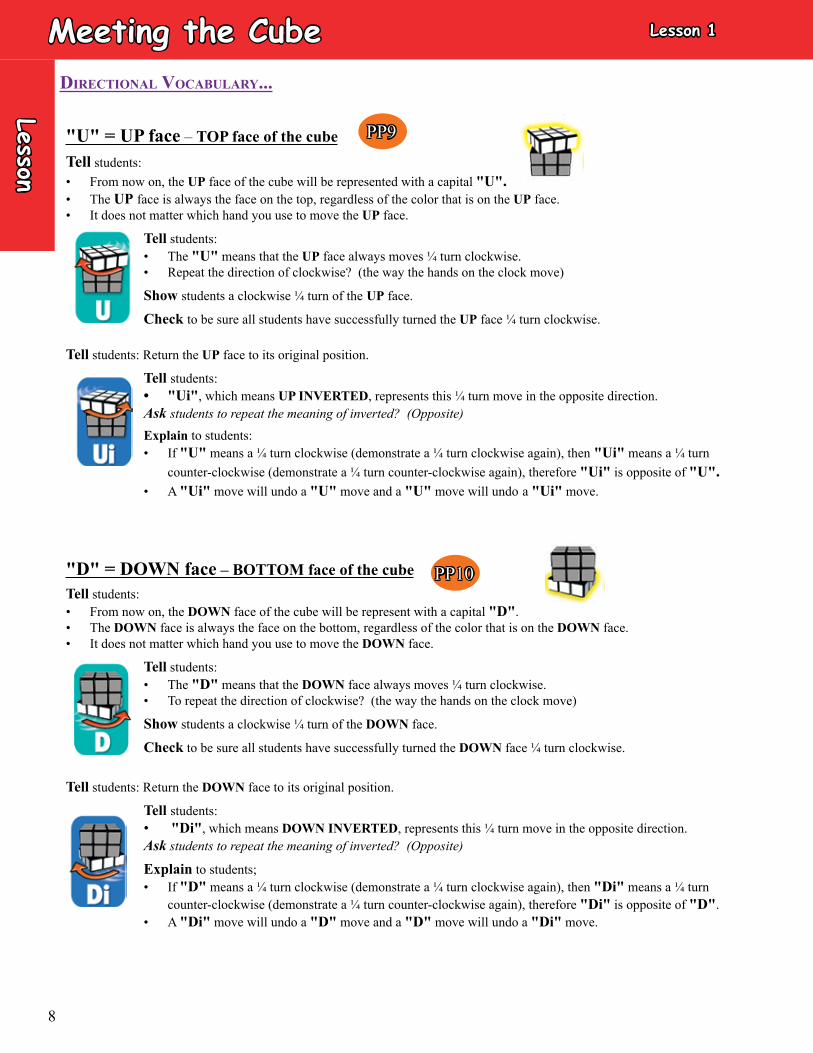
"D" = DOWN face – BOTTOM face of the cubeTell students:• From now on, the DOWN face of the cube will be represent with a capital "D".• The DOWN face is always the face on the bottom, regardless of the color that is on the DOWN face.• It does not matter which hand you use to move the DOWN face.
Tell students:• The "D" means that the DOWN face always moves ¼ turn clockwise.• To repeat the direction of clockwise? (the way the hands on the clock move)
Show students a clockwise ¼ turn of the DOWN face.
Check to be sure all students have successfully turned the DOWN face ¼ turn clockwise.
Tell students: Return the DOWN face to its original position.
Tell students:• "Di", which means DOWN INVERTED, represents this ¼ turn move in the opposite direction.Ask students to repeat the meaning of inverted? (Opposite)
Explain to students;• If "D" means a ¼ turn clockwise (demonstrate a ¼ turn clockwise again), then "Di" means a ¼ turn
counter-clockwise (demonstrate a ¼ turn counter-clockwise again), therefore "Di" is opposite of "D".• A "Di" move will undo a "D" move and a "D" move will undo a "Di" move.
"U" = UP face – TOP face of the cubeTell students:• From now on, the UP face of the cube will be represented with a capital "U".• The UP face is always the face on the top, regardless of the color that is on the UP face.• It does not matter which hand you use to move the UP face.
Tell students: • The "U" means that the UP face always moves ¼ turn clockwise.• Repeat the direction of clockwise? (the way the hands on the clock move)
Show students a clockwise ¼ turn of the UP face.
Check to be sure all students have successfully turned the UP face ¼ turn clockwise.
Tell students: Return the UP face to its original position.
Tell students:• "Ui", which means UP INVERTED, represents this ¼ turn move in the opposite direction.Ask students to repeat the meaning of inverted? (Opposite)Explain to students:• If "U" means a ¼ turn clockwise (demonstrate a ¼ turn clockwise again), then "Ui" means a ¼ turn
counter-clockwise (demonstrate a ¼ turn counter-clockwise again), therefore "Ui" is opposite of "U".• A "Ui" move will undo a "U" move and a "U" move will undo a "Ui" move.
8
PP9
directional vocaBulary...
Lesson
PP10
Lesson 1Meeting the Cube
PP12
9
directional vocaBulary...
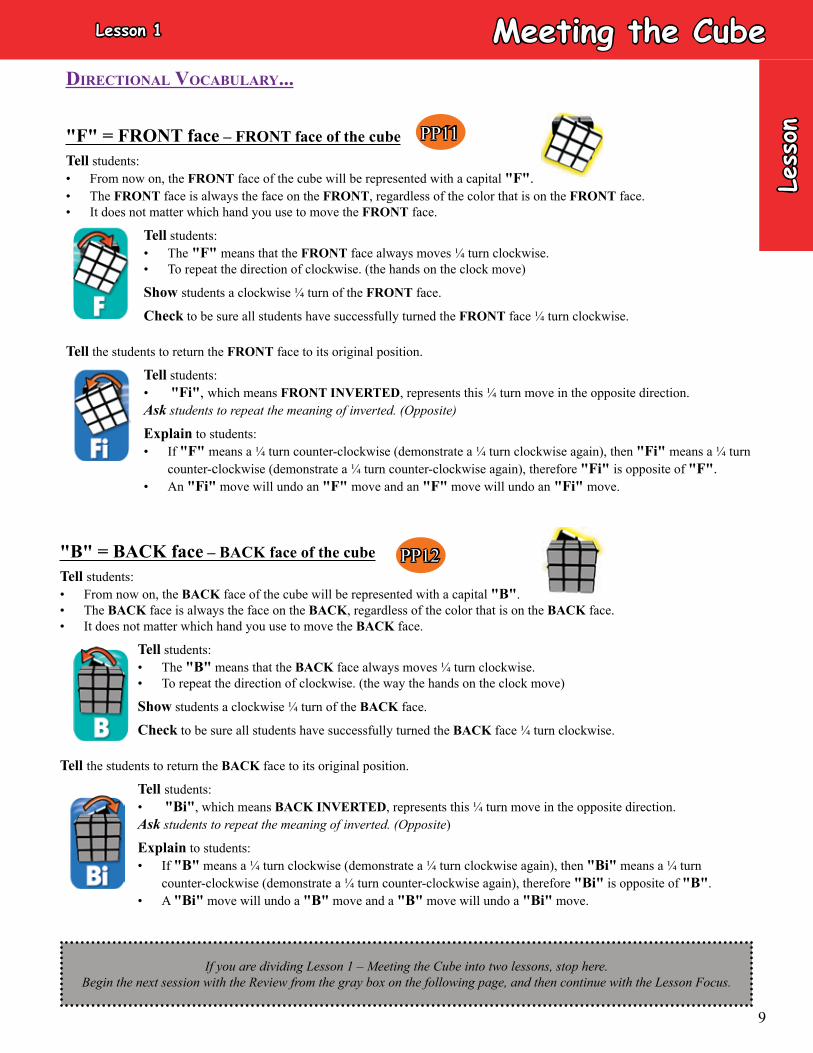
"F" = FRONT face – FRONT face of the cubeTell students:• From now on, the FRONT face of the cube will be represented with a capital "F".• The FRONT face is always the face on the FRONT, regardless of the color that is on the FRONT face.• It does not matter which hand you use to move the FRONT face.
Tell students:• The "F" means that the FRONT face always moves ¼ turn clockwise.• To repeat the direction of clockwise. (the hands on the clock move)
Show students a clockwise ¼ turn of the FRONT face.
Check to be sure all students have successfully turned the FRONT face ¼ turn clockwise.
Tell the students to return the FRONT face to its original position.
Tell students:• "Fi", which means FRONT INVERTED, represents this ¼ turn move in the opposite direction.Ask students to repeat the meaning of inverted. (Opposite)
Explain to students:• If "F" means a ¼ turn counter-clockwise (demonstrate a ¼ turn clockwise again), then "Fi" means a ¼ turn
counter-clockwise (demonstrate a ¼ turn counter-clockwise again), therefore "Fi" is opposite of "F".• An "Fi" move will undo an "F" move and an "F" move will undo an "Fi" move.
PP11
If you are dividing Lesson 1 – Meeting the Cube into two lessons, stop here. Begin the next session with the Review from the gray box on the following page, and then continue with the Lesson Focus.
Less
on
Lesson 1 Meeting the Cube
"B" = BACK face – BACK face of the cubeTell students:• From now on, the BACK face of the cube will be represented with a capital "B".• The BACK face is always the face on the BACK, regardless of the color that is on the BACK face.• It does not matter which hand you use to move the BACK face.
Tell students:• The "B" means that the BACK face always moves ¼ turn clockwise.• To repeat the direction of clockwise. (the way the hands on the clock move)
Show students a clockwise ¼ turn of the BACK face.
Check to be sure all students have successfully turned the BACK face ¼ turn clockwise.
Tell the students to return the BACK face to its original position.
Tell students:• "Bi", which means BACK INVERTED, represents this ¼ turn move in the opposite direction.Ask students to repeat the meaning of inverted. (Opposite)
Explain to students:• If "B" means a ¼ turn clockwise (demonstrate a ¼ turn clockwise again), then "Bi" means a ¼ turn
counter-clockwise (demonstrate a ¼ turn counter-clockwise again), therefore "Bi" is opposite of "B".• A "Bi" move will undo a "B" move and a "B" move will undo a "Bi" move.
10
If you are dividing Lesson 1 – Meeting the Cube into two lessons, this is the beginning of Lesson 1 – Meeting the Cube, Part 2.
Begin Part 2 with the Review from this gray box, and then continue with the Lesson Focus.
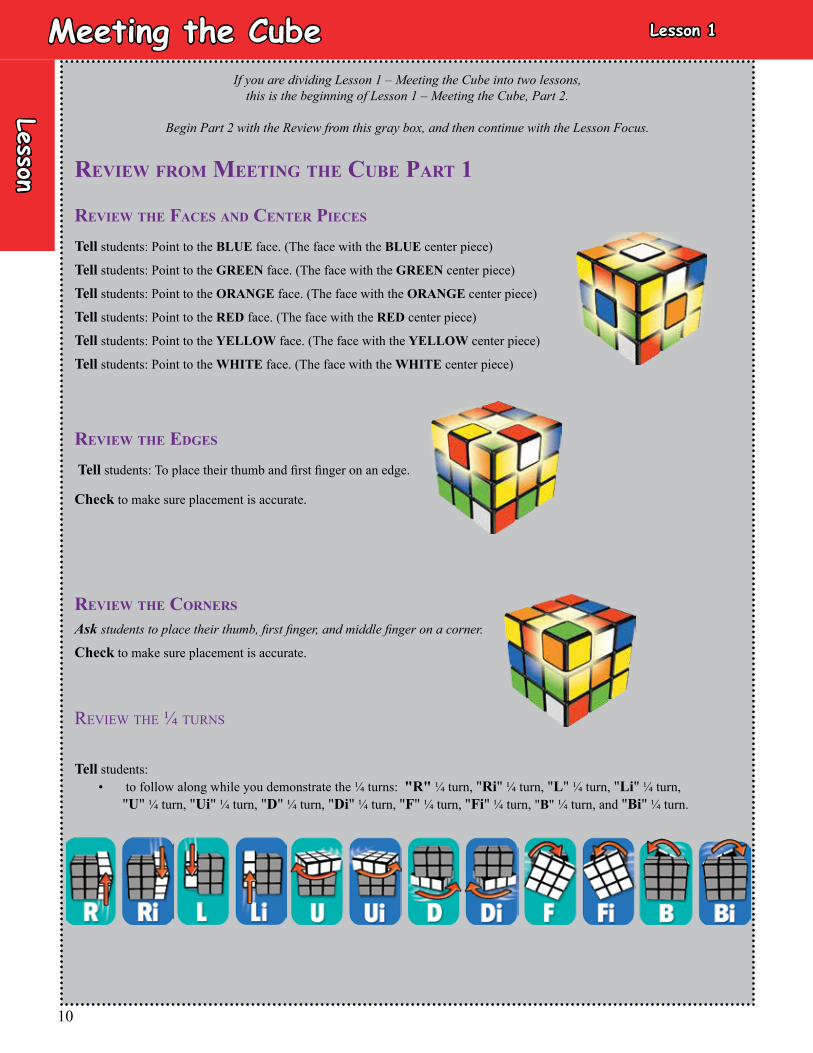
review tHe FaceS and center pieceS
Tell students: Point to the BLUE face. (The face with the BLUE center piece)
Tell students: Point to the GREEN face. (The face with the GREEN center piece)
Tell students: Point to the ORANGE face. (The face with the ORANGE center piece)
Tell students: Point to the RED face. (The face with the RED center piece)
Tell students: Point to the YELLOW face. (The face with the YELLOW center piece)
Tell students: Point to the WHITE face. (The face with the WHITE center piece)
review tHe edgeS
Tell students: To place their thumb and first finger on an edge.
Check to make sure placement is accurate.
review tHe cornerS
Ask students to place their thumb, first finger, and middle finger on a corner.
Check to make sure placement is accurate.
review tHe ¼ turns
Tell students:• to follow along while you demonstrate the ¼ turns: "R" ¼ turn, "Ri" ¼ turn, "L" ¼ turn, "Li" ¼ turn,
"U" ¼ turn, "Ui" ¼ turn, "D" ¼ turn, "Di" ¼ turn, "F" ¼ turn, "Fi" ¼ turn, "B" ¼ turn, and "Bi" ¼ turn.
review From meeting tHe cuBe part 1
Lesson
Lesson 1Meeting the Cube

leSSon FocuS
Once the ¼ turn vocabulary has been introduced, lead students in the following chant to review and practice each ¼ turn with its coordinating letter representation.
Part 1Tell students: To set their Rubik’s Cube aside. Pass out copies of Appendix 1.Ta
Ask students: If anyone knows the chorus of the Military Cadence? (♫“LEFT, LEFT, LEFT, RIGHT,
LEFT”♫)
Tell students: Repeat the first part of the cadence after you without making any moves on the cube:
• Teacher – ♫ LEFT, LEFT, LEFT, RIGHT, LEFT ♫• Students – ♫ LEFT, LEFT, LEFT, RIGHT, LEFT ♫
Ask students: To look at the handout and follow along with you.
With the WHITE face UP, the YELLOW face DOWN, and the BLUE face FRONT:
Tell students to repeat the cadence after you, while making the ¼ turn moves on the cube:
• Teacher – ♫ LEFT, LEFT, LEFT, RIGHT, LEFT ♫• Students –♫ LEFT, LEFT, LEFT, RIGHT, LEFT ♫
Repeat 4x (after 4x the cube should end in the solved position)
Tell students you are going to add to the cadence to make a Rubik’s Cube cadence to practice the letter representations.
Tell students to repeat the cadence after you, while making the ¼ turn moves on the cube:
• Teacher – ♫ UP, UP, UP, DOWN, UP ♫• Students – ♫ UP, UP, UP, DOWN, UP ♫
Repeat 4x (after 4x the cube should end in the solved position)
Tell students to repeat the cadence after you, while making the ¼ turn moves on the cube:
• Teacher – ♫ FRONT, FRONT, FRONT, BACK, FRONT ♫• Students – ♫ FRONT, FRONT, FRONT, BACK, FRONT ♫
Repeat 4x (after 4x the cube should end in the solved position)
Repeat Rubik’s Cube Cadence if necessary.
If you are dividing Lesson 1 – Meeting the Cube into two lessons, stop here. Begin the next session with the Review from gray box on the previous page, and then continue with the Lesson Focus below.
PP13
PP15
PP13
PP14Le
sson
Lesson 1 Meeting the Cube
11
Lesson
Part 2
Pass out copies of Appendix 1.Tb
Ask students: To look at the handout and follow along with you.
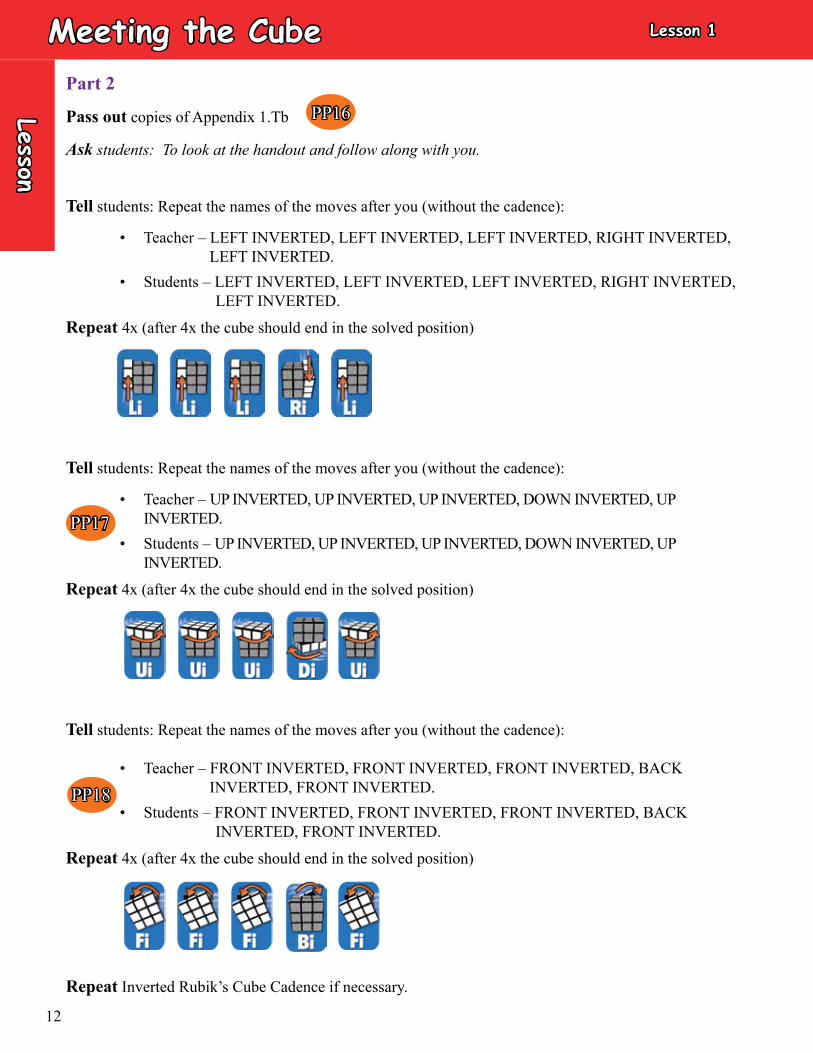
Tell students: Repeat the names of the moves after you (without the cadence):
• Teacher – LEFT INVERTED, LEFT INVERTED, LEFT INVERTED, RIGHT INVERTED, LEFT INVERTED.
• Students – LEFT INVERTED, LEFT INVERTED, LEFT INVERTED, RIGHT INVERTED,LEFT INVERTED.
Repeat 4x (after 4x the cube should end in the solved position)
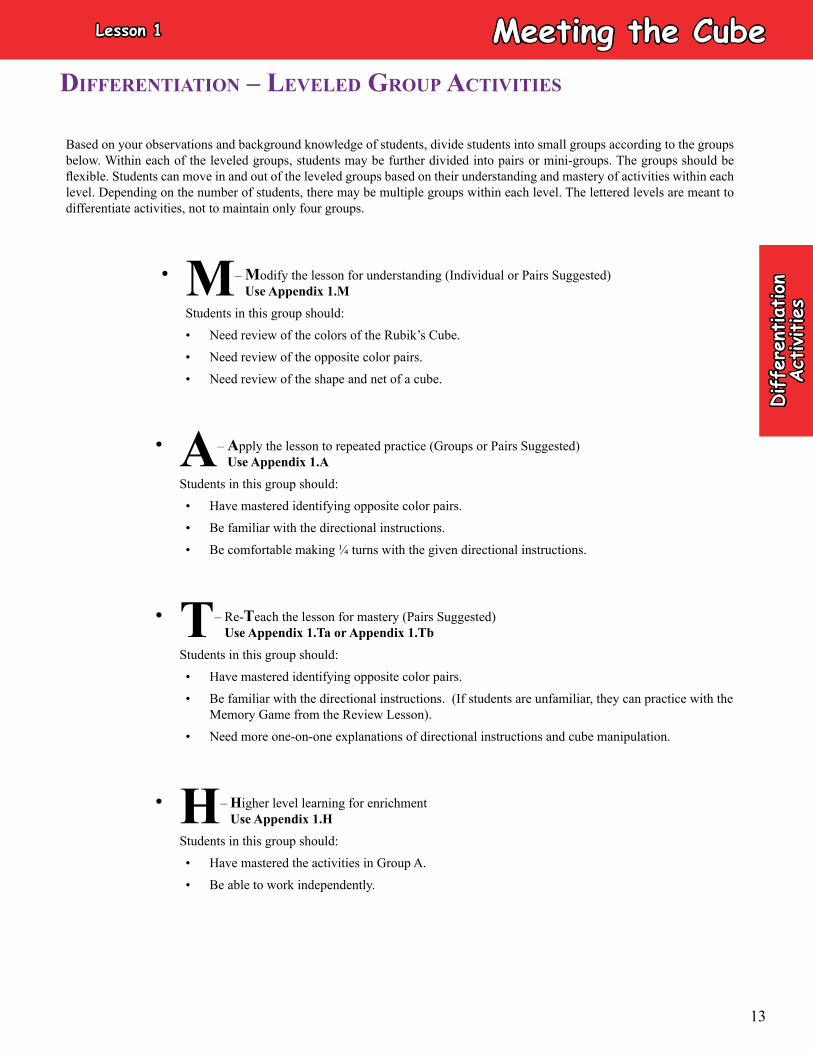
Tell students: Repeat the names of the moves after you (without the cadence):
• Teacher – UP INVERTED, UP INVERTED, UP INVERTED, DOWN INVERTED, UP INVERTED.
• Students – UP INVERTED, UP INVERTED, UP INVERTED, DOWN INVERTED, UP INVERTED.
Repeat 4x (after 4x the cube should end in the solved position)
Tell students: Repeat the names of the moves after you (without the cadence):
• Teacher – FRONT INVERTED, FRONT INVERTED, FRONT INVERTED, BACK INVERTED, FRONT INVERTED.
• Students – FRONT INVERTED, FRONT INVERTED, FRONT INVERTED, BACK INVERTED, FRONT INVERTED.
Repeat 4x (after 4x the cube should end in the solved position)
Repeat Inverted Rubik’s Cube Cadence if necessary.
PP18
PP17
PP16
Lesson 1Meeting the Cube
12
Diff
eren
tiat
ion
Act
ivities
Based on your observations and background knowledge of students, divide students into small groups according to the groups below. Within each of the leveled groups, students may be further divided into pairs or mini-groups. The groups should be flexible. Students can move in and out of the leveled groups based on their understanding and mastery of activities within each level. Depending on the number of students, there may be multiple groups within each level. The lettered levels are meant to differentiate activities, not to maintain only four groups.
• M – Modify the lesson for understanding (Individual or Pairs Suggested) Use Appendix 1.M
Students in this group should:
• Need review of the colors of the Rubik’s Cube.
• Need review of the opposite color pairs.
• Need review of the shape and net of a cube.
• A – Apply the lesson to repeated practice (Groups or Pairs Suggested) Use Appendix 1.A
Students in this group should:
• Have mastered identifying opposite color pairs.
• Be familiar with the directional instructions.
• Be comfortable making ¼ turns with the given directional instructions.
• T – Re-Teach the lesson for mastery (Pairs Suggested) Use Appendix 1.Ta or Appendix 1.Tb
Students in this group should:
• Have mastered identifying opposite color pairs.
• Be familiar with the directional instructions. (If students are unfamiliar, they can practice with the Memory Game from the Review Lesson).
• Need more one-on-one explanations of directional instructions and cube manipulation.
• H – Higher level learning for enrichment Use Appendix 1.H
Students in this group should:
• Have mastered the activities in Group A.
• Be able to work independently.
diFFerentiation – leveled group activitieS
Lesson 1 Meeting the Cube
13

Differentiation Activities
14
Rubik's Cube NetAppendix 1.MLesson 1Meeting the Cube
Directions:1. Cut along the dotted lines.2. Fold on the bold lines and fold tabs inward.3. Tape or glue the edges together using the tabs to form a cube.
White White White
White White White
White White White
Red Red Red
Red Red Red
Red Red Red
Yellow Yellow Yellow
Yellow Yellow Yellow
Yellow Yellow Yellow
Green
Green
Green
Green
Green
Green
Green
Green
Green
Blue
Blue
Blue
Blue
Blue
Blue
Blue
Blue
Blue
Orange Orange
Orange
Orange
Orange
Orange Orange
Orange
Orange
Diff
eren
tiat
ion
Act
ivities
15
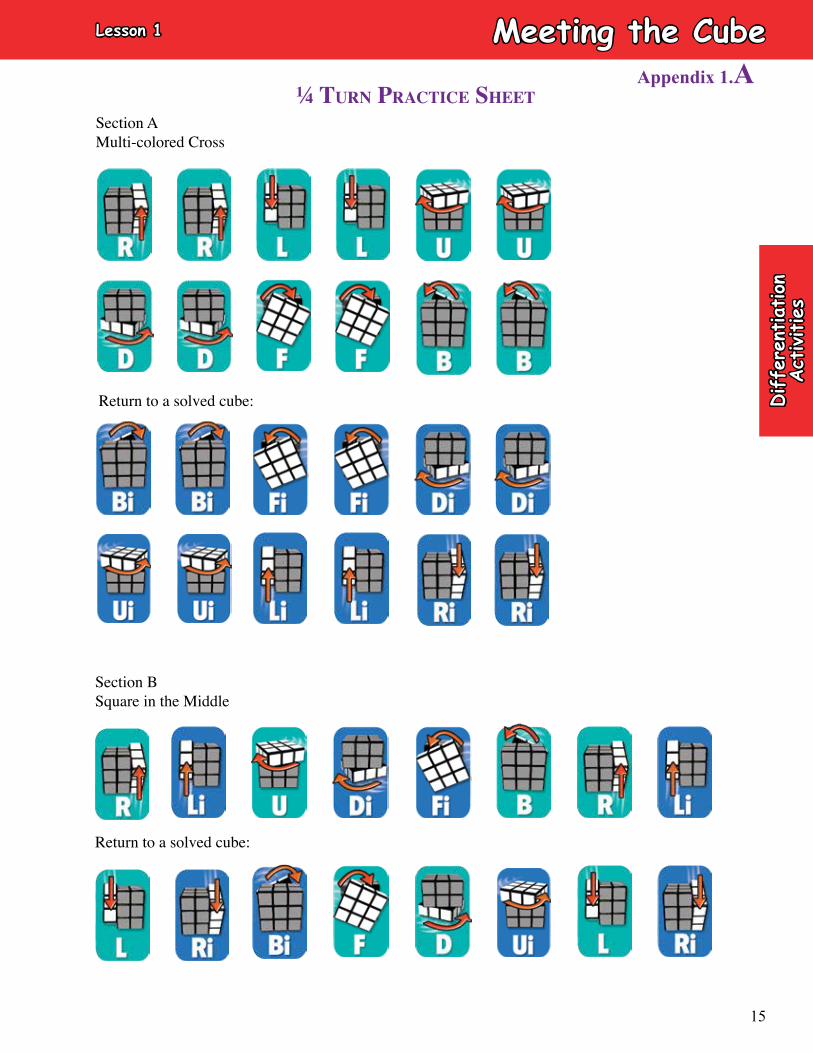
¼ Turn PracTice sheeTAppendix 1.A
Lesson 1 Meeting the Cube
Section AMulti-colored Cross
Return to a solved cube:
Return to a solved cube:
Section BSquare in the Middle
Differentiation Activities
16
Appendix 1.Ta
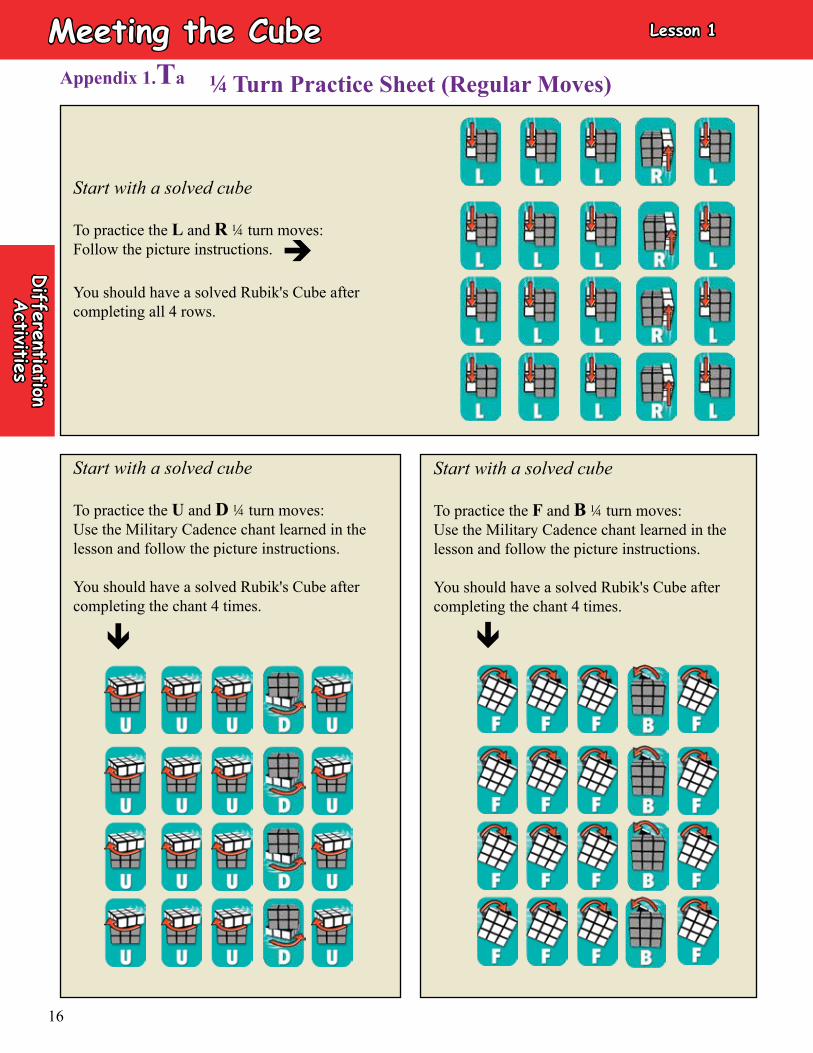
Start with a solved cube
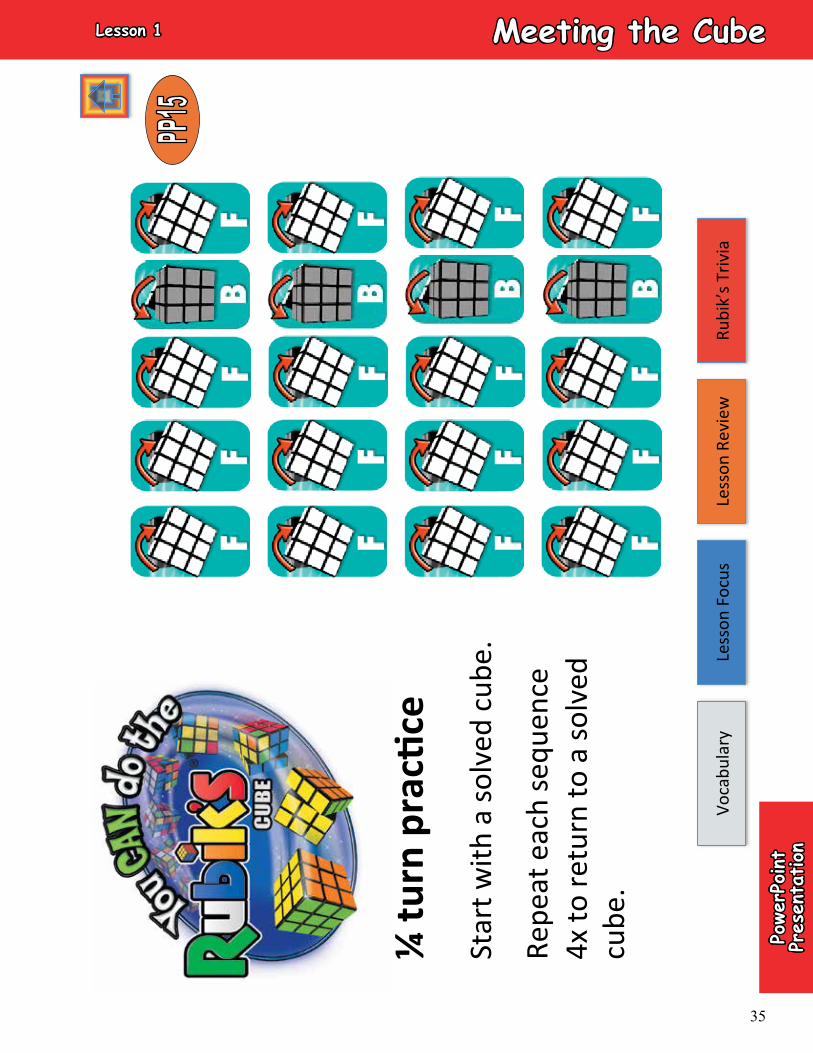
To practice the F and B ¼ turn moves:Use the Military Cadence chant learned in the lesson and follow the picture instructions.
You should have a solved Rubik's Cube after completing the chant 4 times.
¼ Turn Practice Sheet (Regular Moves)
Start with a solved cube
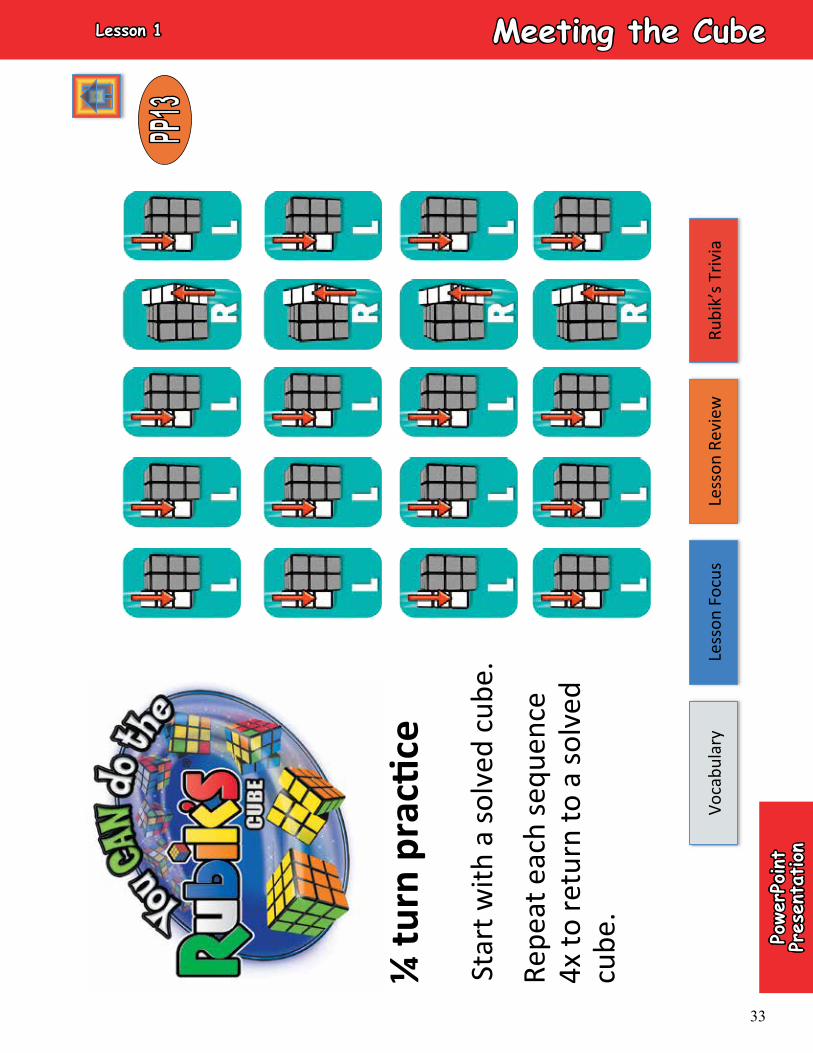
To practice the L and R ¼ turn moves:Follow the picture instructions.
You should have a solved Rubik's Cube after completing all 4 rows.
Start with a solved cube
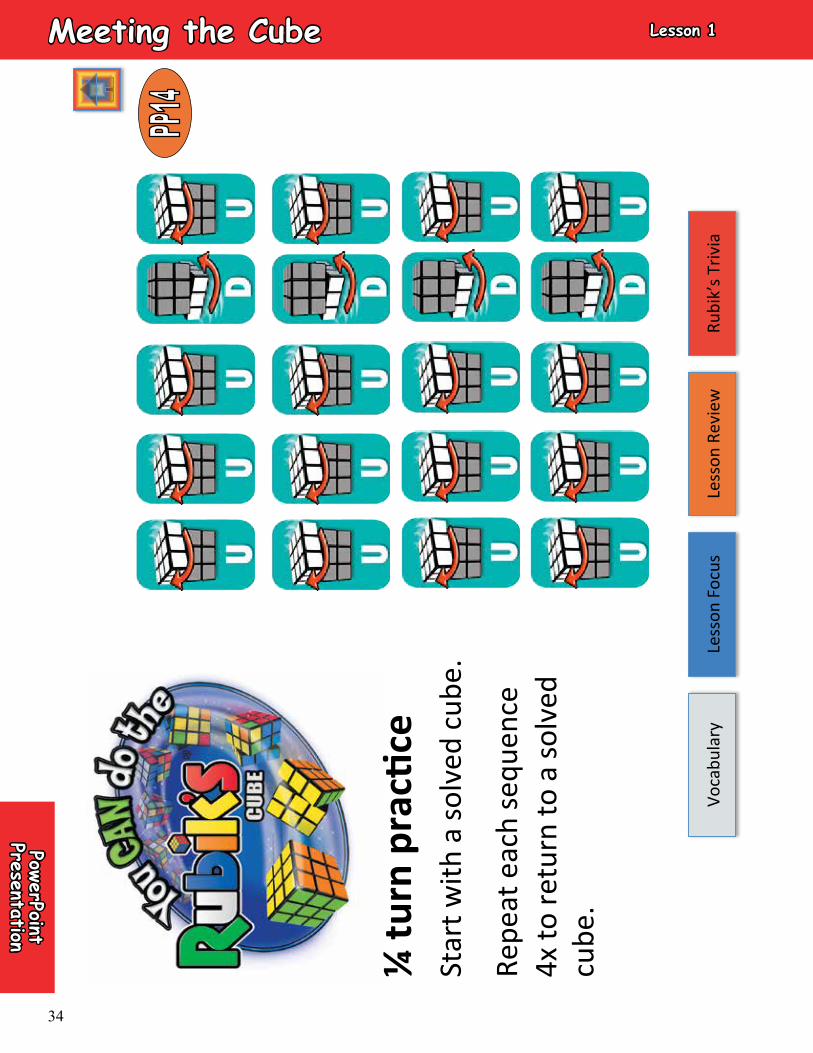
To practice the U and D ¼ turn moves:Use the Military Cadence chant learned in the lesson and follow the picture instructions.
You should have a solved Rubik's Cube after completing the chant 4 times.
è
Lesson 1Meeting the Cube
è è
Diff
eren
tiat
ion
Act
ivities
17
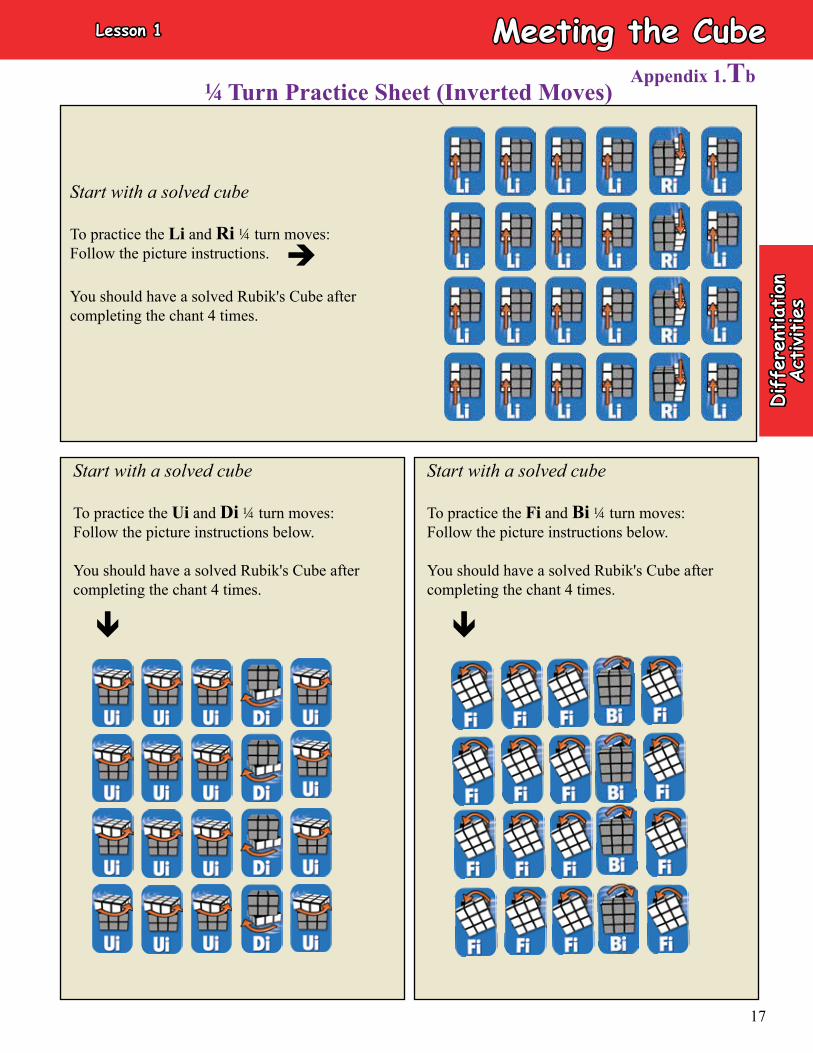
¼ Turn Practice Sheet (Inverted Moves)
Start with a solved cube
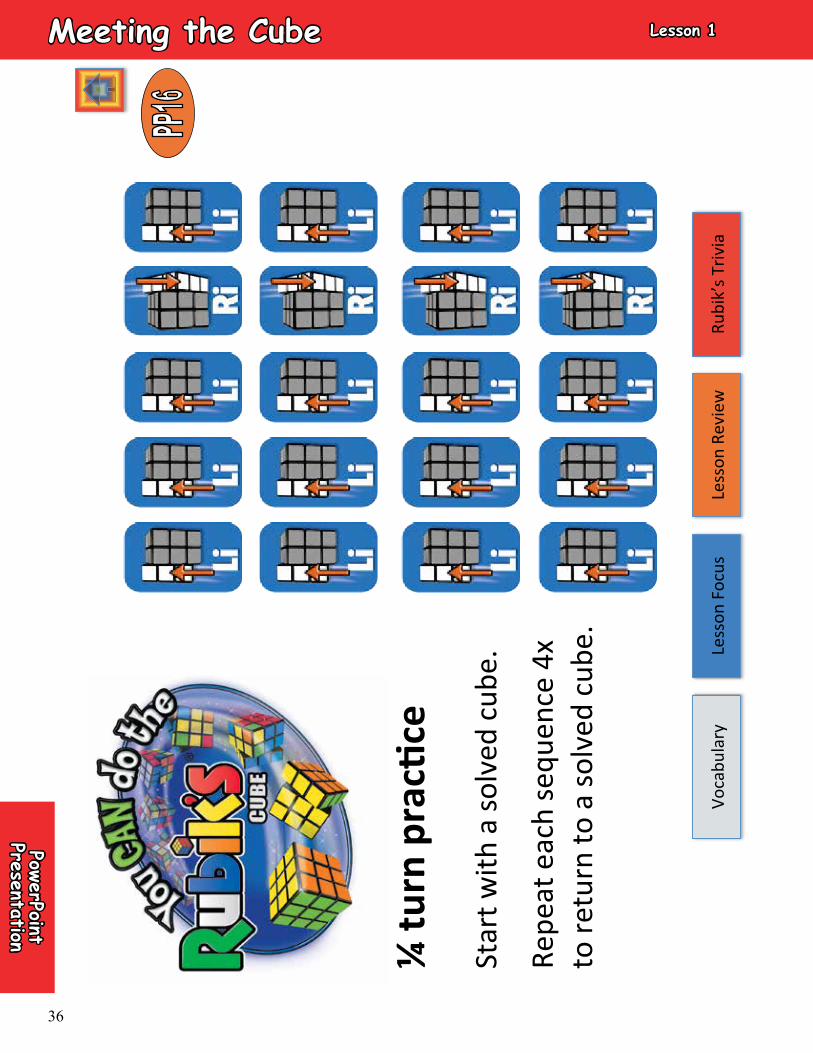
To practice the Li and Ri ¼ turn moves:Follow the picture instructions.
You should have a solved Rubik's Cube after completing the chant 4 times.
Start with a solved cube
To practice the Ui and Di ¼ turn moves:Follow the picture instructions below.
You should have a solved Rubik's Cube after completing the chant 4 times.
Start with a solved cube
To practice the Fi and Bi ¼ turn moves:Follow the picture instructions below.
You should have a solved Rubik's Cube after completing the chant 4 times.
Appendix 1.Tb
Lesson 1 Meeting the Cube
èè
è
Differentiation Activities
18
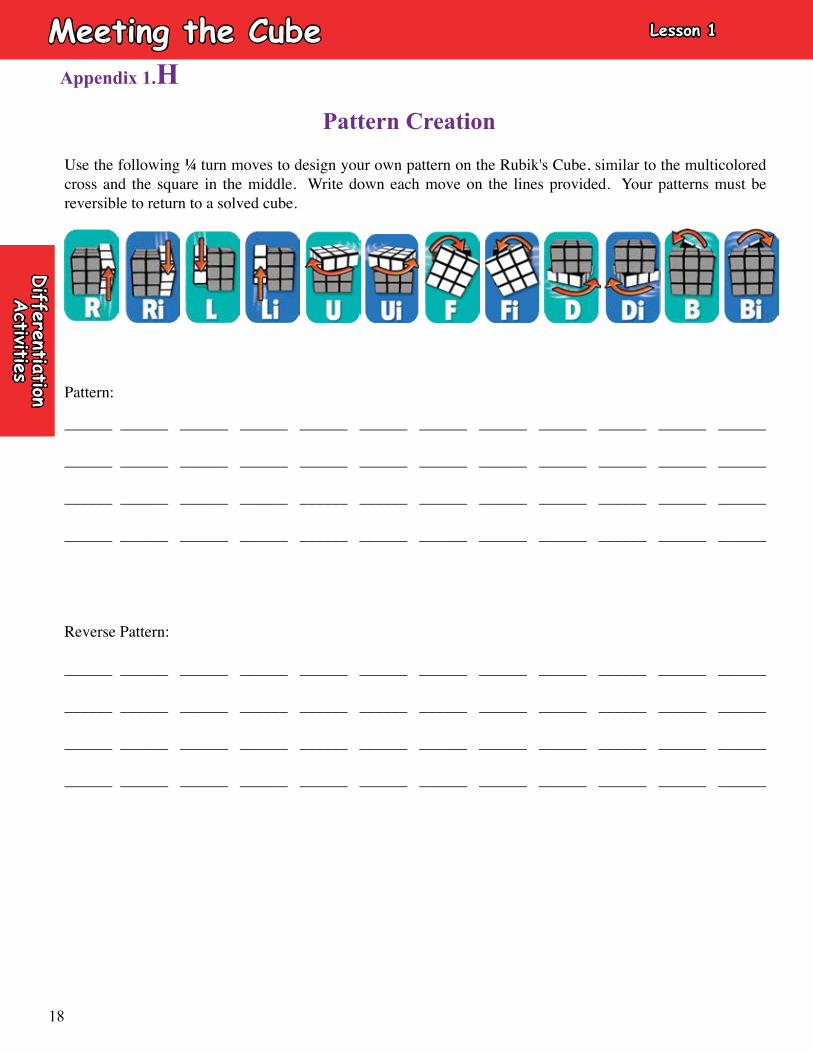
Pattern Creation
Appendix 1.HLesson 1Meeting the Cube
Use the following ¼ turn moves to design your own pattern on the Rubik's Cube, similar to the multicolored cross and the square in the middle. Write down each move on the lines provided. Your patterns must be reversible to return to a solved cube.
Pattern:
______ ______ ______ ______ ______ ______ ______ ______ ______ ______ ______ ______
______ ______ ______ ______ ______ ______ ______ ______ ______ ______ ______ ______
______ ______ ______ ______ ______ ______ ______ ______ ______ ______ ______ ______
______ ______ ______ ______ ______ ______ ______ ______ ______ ______ ______ ______
Reverse Pattern:
______ ______ ______ ______ ______ ______ ______ ______ ______ ______ ______ ______
______ ______ ______ ______ ______ ______ ______ ______ ______ ______ ______ ______
______ ______ ______ ______ ______ ______ ______ ______ ______ ______ ______ ______
______ ______ ______ ______ ______ ______ ______ ______ ______ ______ ______ ______

Review
19
Review the Faces
Tell students: Point to the BLUE face. (the face with the BLUE center piece)
Tell students: Point to the GREEN face. (the face with the GREEN center piece)
Tell students: Point to the ORANGE face. (the face with the ORANGE center piece)
Tell students: Point to the RED face. (the face with the RED center piece)
Tell students: Point to the YELLOW face. (the face with the YELLOW center piece)
Tell students: Point to the WHITE face. (the face with the WHITE center piece)
Review the Edges and CornersTell students: To place their thumb and index finger on an edge. Check to make sure placement is accurate.
Tell students: To place their thumb, index finger, and middle finger on a corner. Check to make sure placement is accurate.
Review the ¼ turns
• "R" ¼ turn, "Ri" ¼ turn• "L" ¼ turn, "Li" ¼ turn
• "U" ¼ turn, "Ui" ¼ turn• "D" ¼ turn, "Di" ¼ turn
• "F" ¼ turn, "Fi" ¼ turn• "B" ¼ turn, and "Bi" ¼ turn
review PP19 PP20
PP21 PP22
PP23
ruBik’S trivia
Question: The Rubik’s Cube was created in 1974. How old is the Rubik’s Cube now?
Answer: As of 2013, the Rubik’s® Cube was 39 years old. (In 2014, 40; in 2015, 41…)
PP24
evaluation
Each student should be able to:• Identify the faces, edges, and corners by color and position.
• Make and recognize ¼ turns with relationship to the ¼ turn letter representations (i.e. "R", "Ri", "L", "Li", etc.)• Understand that the Rubik’s Cube is a geometrical cube with 6 faces, 8 corners and 12 edges.• Understand that each small cube within the cube represents “units” of measurement. Therefore, the
Rubik’s cube is 3 units long and 3 units wide.
Lesson 1 Meeting the Cube
At H
ome
Connection
20
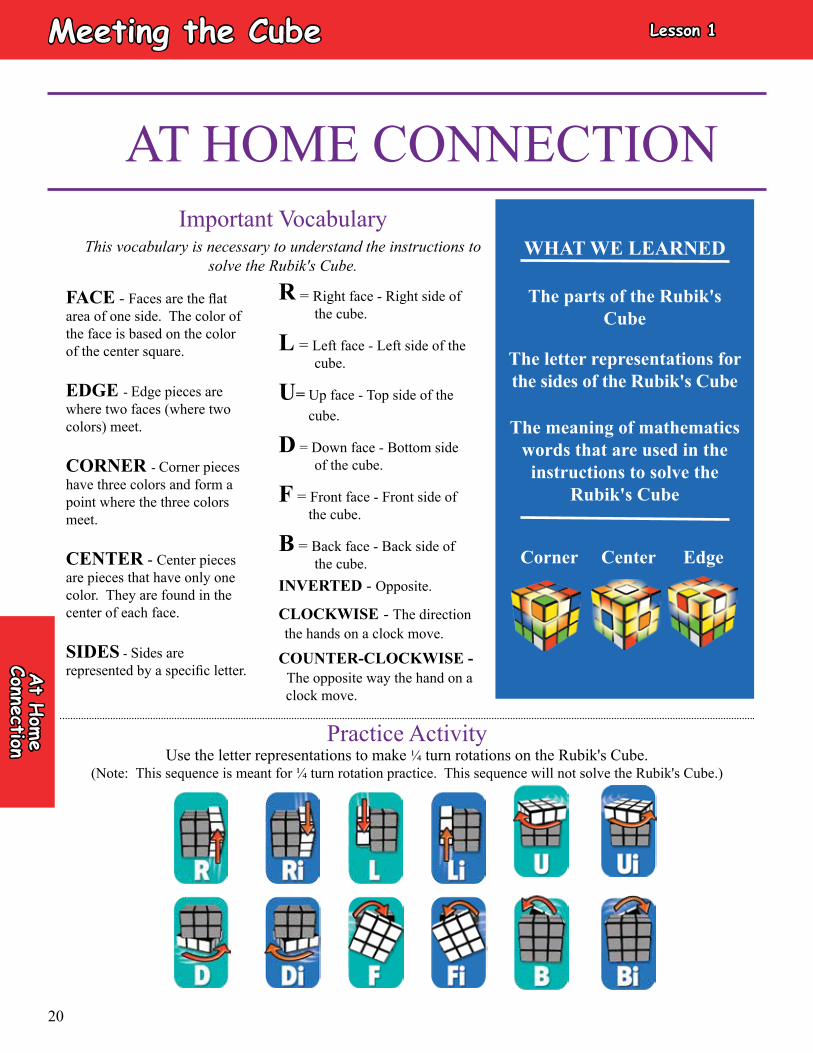
Practice ActivityUse the letter representations to make ¼ turn rotations on the Rubik's Cube.
(Note: This sequence is meant for ¼ turn rotation practice. This sequence will not solve the Rubik's Cube.)
at HoMe ConneCtionImportant Vocabulary
This vocabulary is necessary to understand the instructions to solve the Rubik's Cube.
FACE - Faces are the flat area of one side. The color of the face is based on the color of the center square.
EDGE - Edge pieces are where two faces (where two colors) meet.
CORNER - Corner pieces have three colors and form a point where the three colors meet.
CENTER - Center pieces are pieces that have only one color. They are found in the center of each face.
SIDES - Sides are represented by a specific letter.
R = Right face - Right side of the cube.
L = Left face - Left side of the cube.
U= Up face - Top side of the cube.
D = Down face - Bottom side of the cube.
F = Front face - Front side of the cube.
B = Back face - Back side of the cube.
INVERTED - Opposite.
CLOCKWISE - The direction the hands on a clock move.
COUNTER-CLOCKWISE - The opposite way the hand on a clock move.
WHAT WE LEARNED
The parts of the Rubik's Cube
The letter representations for the sides of the Rubik's Cube
The meaning of mathematics words that are used in the instructions to solve the
Rubik's Cube
Corner Center Edge
Lesson 1Meeting the Cube
Powe
rPoint
Pr
esen
tation
Less
on 1
Vocabulary
Lesson Focus
Lesson Review
Rubik’s Trivia
Mee
)ng
the
Cube
powerpoint
21
Lesson 1 Meeting the Cube

PowerPoint Presentation
22
Vocabulary
Lesson Focus
Lesson Review
Rubik’s Trivia
Shap
e
Colo
rs
Opp
osite
s Le
ngth
Pe
rimet
er
Face
• Cube – Three-‐Dimensional
• R
ED
, , B
LUE,
GR
EE
N, W
HIT
E, O
RA
NG
E
• R
ED is opposite O
RA
NG
E
WH
ITE
is opposite
B
LUE is opposite G
RE
EN
• 3 units long; 3 units wide
• 8 units (perimeter of a face)
• 9 units (area of a face)
Lesson 1Meeting the Cube
Powe
rPoint
Pr
esen
tation
23
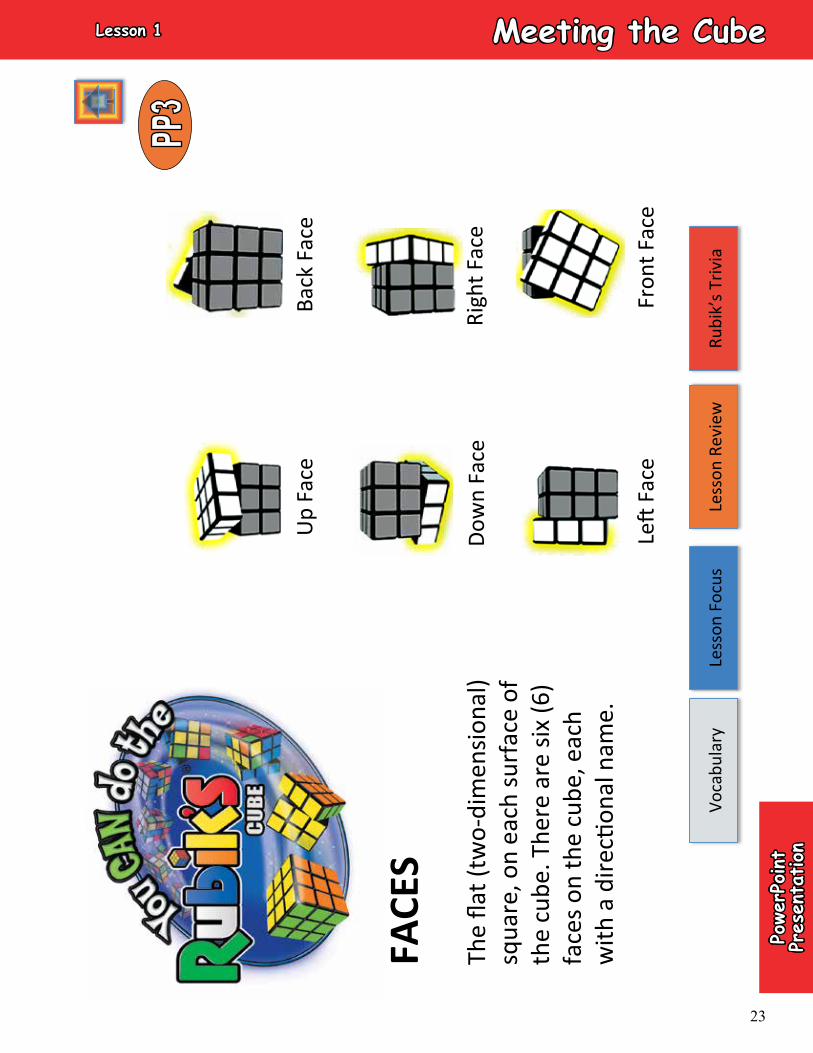
FACE
S
Vocabulary
Lesson Focus
Lesson Review
Rubik’s Trivia
The flat (two-‐dimensional)
square, on each surface of
the cube. There are six (6)
faces on the cube, each
with a direcNonal name.
Up Face
Back Face
Down Face
Right Face
LeQ Face
Front Face
Lesson 1 Meeting the Cube
PowerPoint Presentation
24
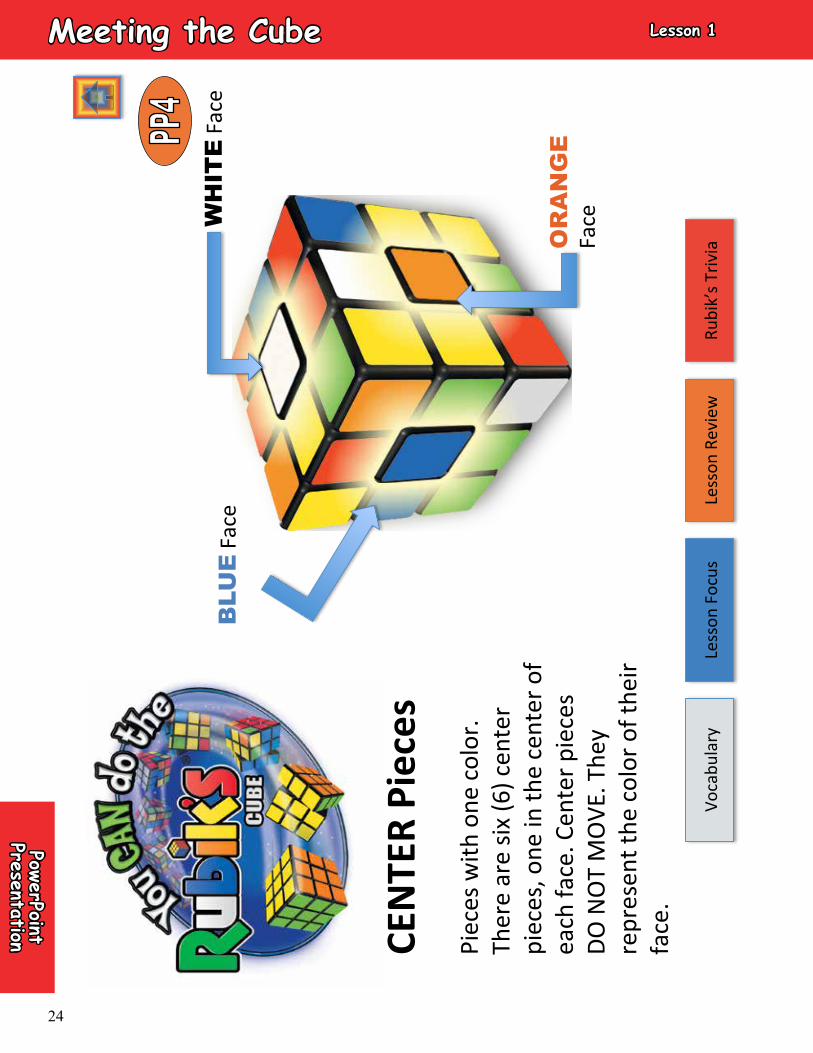
CEN
TER
Piec
es
Pieces with one color.
There are six (6) center
pieces, one in the center of
each face. Center pieces
DO NOT MOVE. They
represent the color of their
face.
BLU
E Face
WH
ITE Face
OR
AN
GE
Face
Vocabulary
Lesson Focus
Lesson Review
Rubik’s Trivia
Lesson 1Meeting the Cube
Powe
rPoint
Pr
esen
tation
25
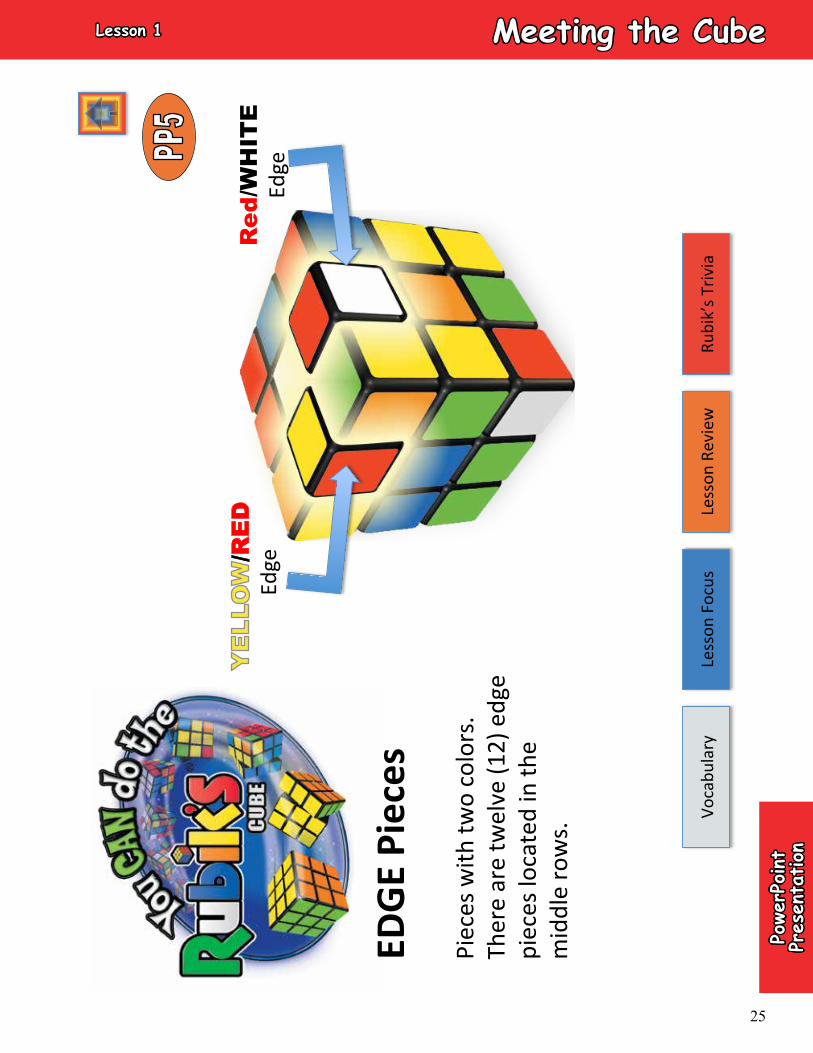
Pieces with two colors.
There are twelve (12) edge
pieces located in the
middle rows.
/RE
D
Edge
Red
/WH
ITE
Edge
Vocabulary
Lesson Focus
Lesson Review
Rubik’s Trivia
EDG
E Pi
eces
Lesson 1 Meeting the Cube

PowerPoint Presentation
26
Meeting the Cube
CORN
ER P
iece
s Pieces with three (3) colors.
There are eight (8) corner
pieces located on the
corners.
GR
EE
N/O
RA
NG
E/
Corner
Vocabulary
Lesson Focus
Lesson Review
Rubik’s Trivia
Lesson 1
Powe
rPoint
Pr
esen
tation
27
Meeting the Cube
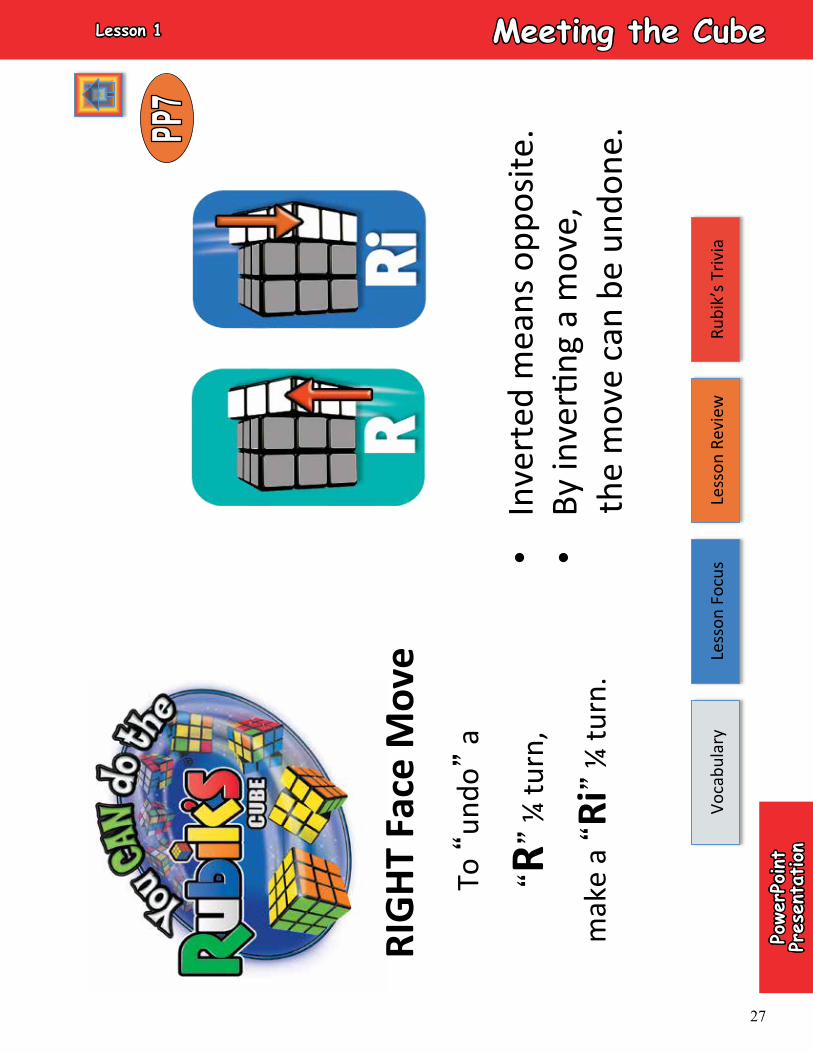
RIG
HT F
ace
Mov
e To “undo” a
“R” ¼ turn,
make a “Ri” ¼ turn.
• Inverted means opposite.
• By inverNng a move,
the move can be undone.
Vocabulary
Lesson Focus
Lesson Review
Rubik’s Trivia
Lesson 1
PowerPoint Presentation
28
Meeting the Cube
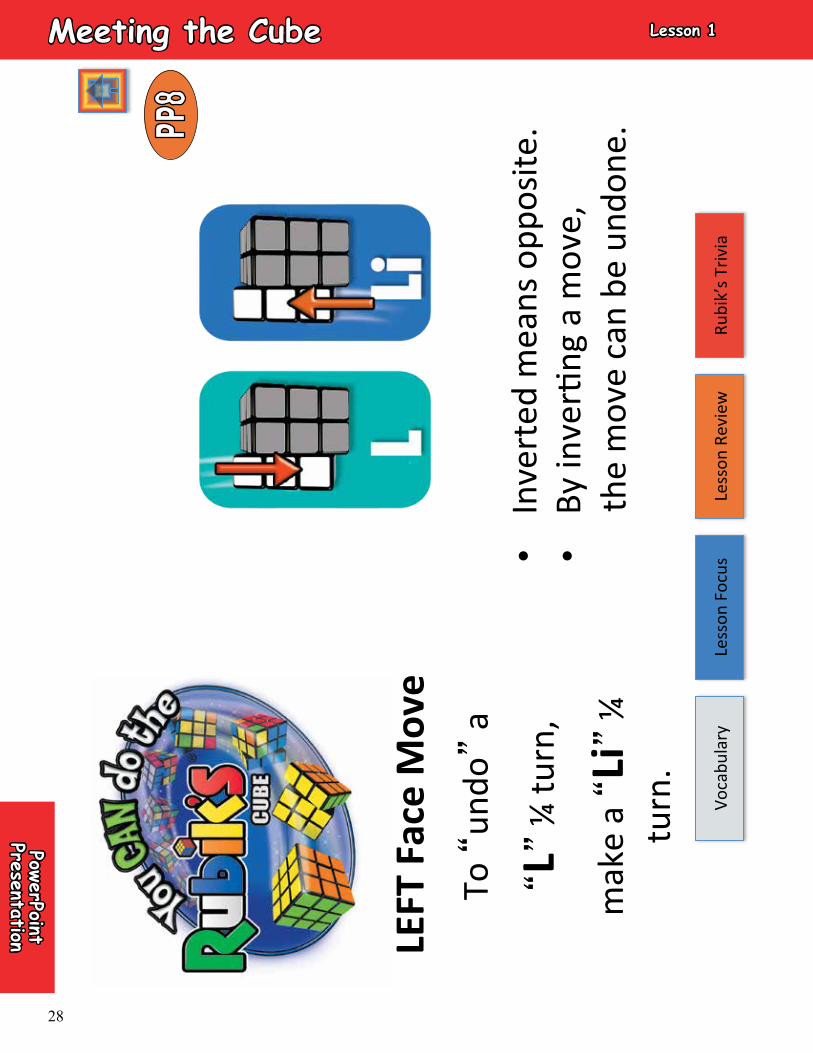
LEFT
Fac
e M
ove
To “undo” a
“L” ¼ turn,
make a “Li” ¼
turn.
• Inverted means opposite.
• By inverNng a move,
the move can be undone.
Vocabulary
Lesson Focus
Lesson Review
Rubik’s Trivia
Lesson 1
Powe
rPoint
Pr
esen
tation
29
Meeting the Cube
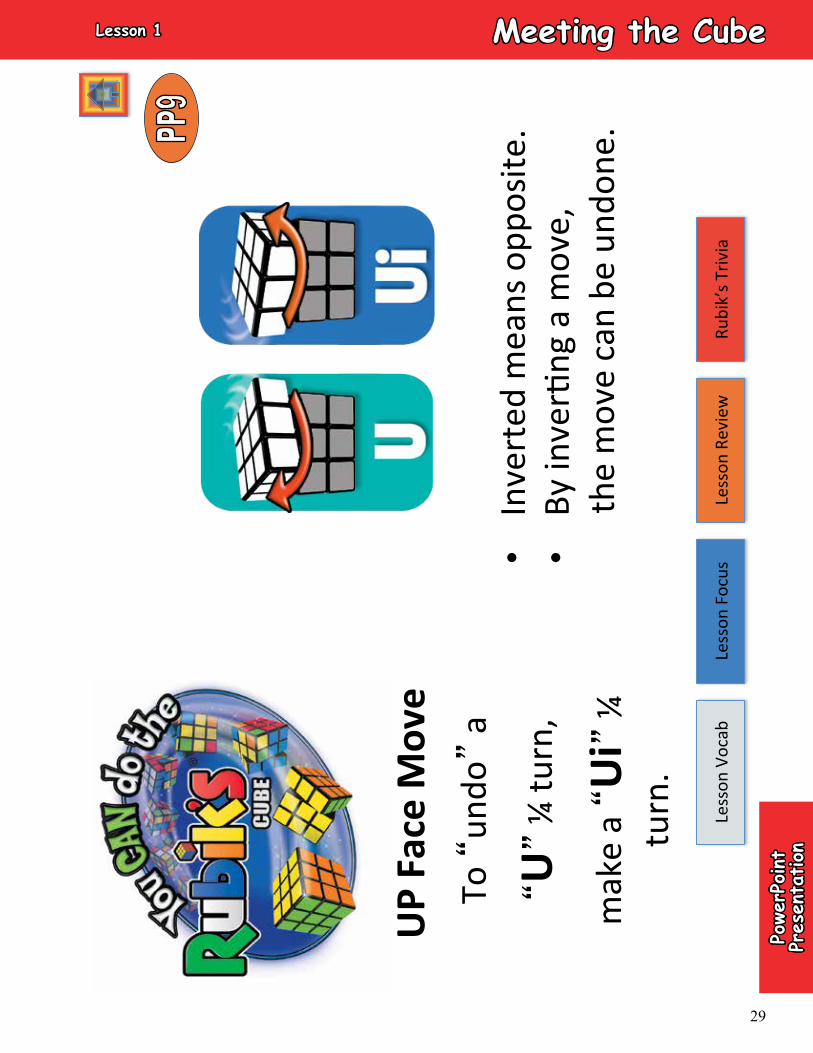
UP
Face
Mov
e To “undo” a
“U” ¼ turn,
make a “U
i” ¼
turn.
• Inverted means opposite.
• By inverNng a move,
the move can be undone.
Lesson Vocab
Lesson Focus
Lesson Review
Rubik’s Trivia
Lesson 1
PowerPoint Presentation
30
Meeting the Cube
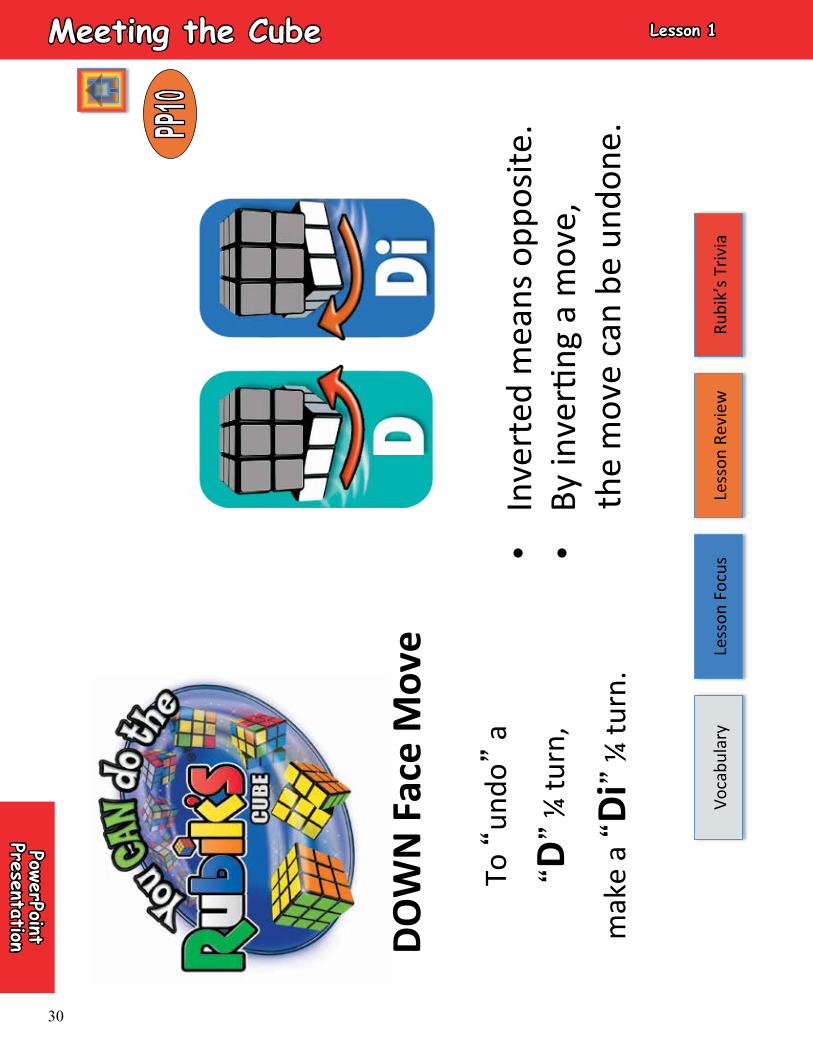
DOW
N F
ace
Mov
e
To “undo” a
“D” ¼ turn,
make a “Di” ¼ turn.
• Inverted means opposite.
• By inverNng a move,
the move can be undone.
Vocabulary
Lesson Focus
Lesson Review
Rubik’s Trivia
Lesson 1
Powe
rPoint
Pr
esen
tation
31
Meeting the Cube
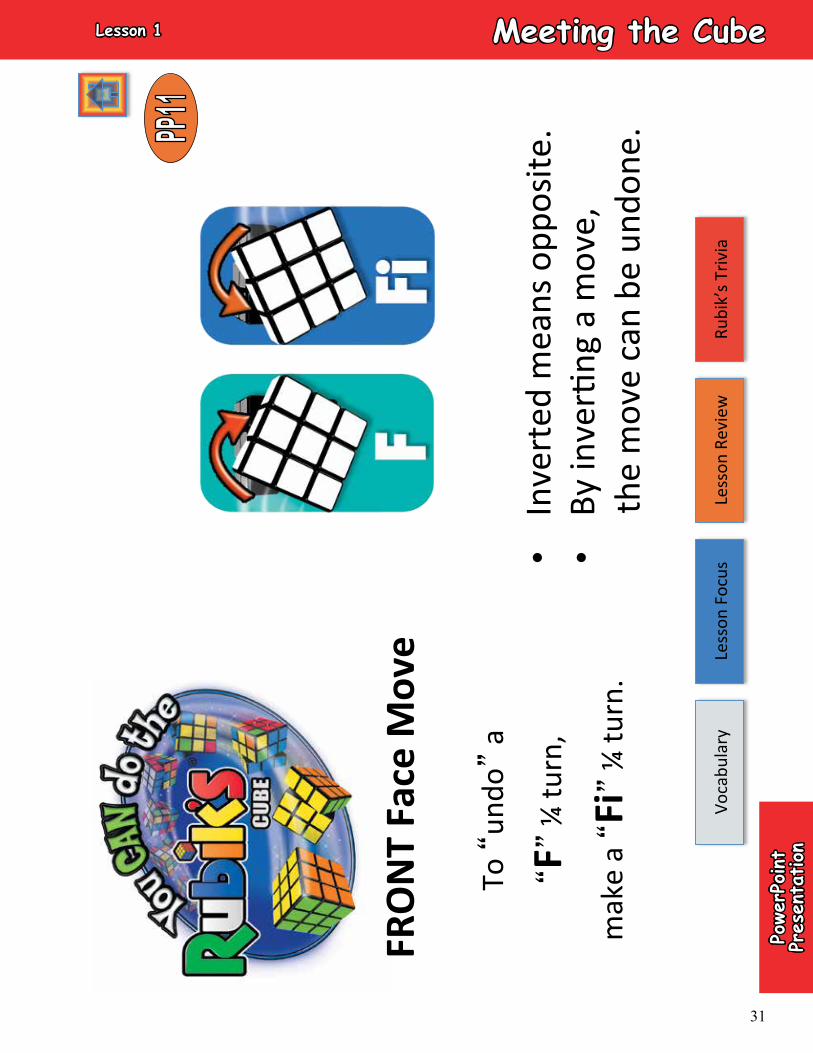
FRO
NT
Face
Mov
e
To “undo” a
“F” ¼ turn,
make a “Fi” ¼ turn.
• Inverted means opposite.
• By inverNng a move,
the move can be undone.
Vocabulary
Lesson Focus
Lesson Review
Rubik’s Trivia
Lesson 1

PowerPoint Presentation
32
Meeting the Cube
BACK
Fac
e M
ove
To “undo” a
“B” ¼ turn,
make a “Bi” ¼ turn.
• Inverted means opposite.
• By inverNng a move,
the move can be undone.
Vocabulary
Lesson Focus
Lesson Review
Rubik’s Trivia
Lesson 1
Powe
rPoint
Pr
esen
tation
33
Meeting the Cube
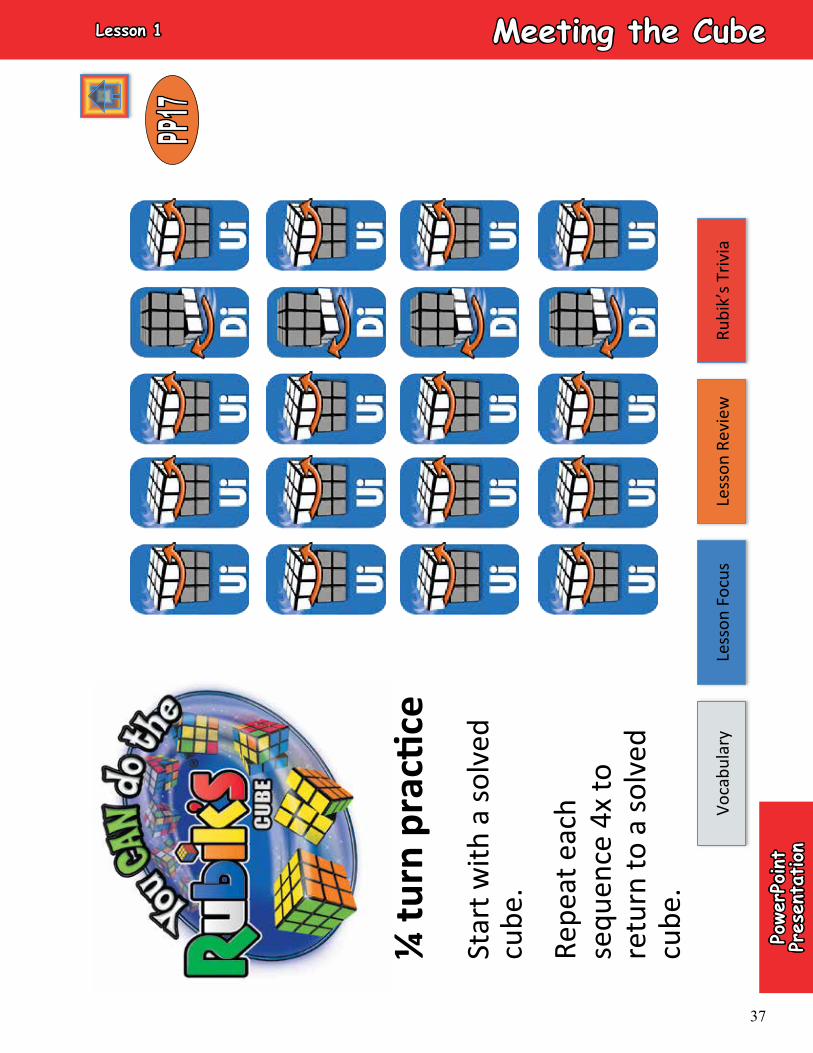
¼ tu
rn p
rac)
ce
Start with a solved cube.
Repeat each sequence
4x to return to a solved
cube.
Vocabulary
Lesson Focus
Lesson Review
Rubik’s Trivia
Lesson 1
PowerPoint Presentation
34
Meeting the Cube
Start with a solved cube.
Repeat each sequence
4x to return to a solved
cube.
Vocabulary
Lesson Focus
Lesson Review
Rubik’s Trivia
¼ tu
rn p
rac)
ce
Lesson 1
Powe
rPoint
Pr
esen
tation
35
Meeting the Cube
¼ tu
rn p
rac)
ce
Start with a solved cube.
Repeat each sequence
4x to return to a solved
cube.
Vocabulary
Lesson Focus
Lesson Review
Rubik’s Trivia
Lesson 1
PowerPoint Presentation
36
Meeting the Cube
¼ tu
rn p
rac)
ce
Start with a solved cube.
Repeat each sequence 4x
to return to a solved cube.
Vocabulary
Lesson Focus
Lesson Review
Rubik’s Trivia
Lesson 1
Powe
rPoint
Pr
esen
tation
37
Meeting the Cube
¼ tu
rn p
rac)
ce
Start with a solved
cube.
Repeat each
sequence 4x to
return to a solved
cube.
Vocabulary
Lesson Focus
Lesson Review
Rubik’s Trivia
Lesson 1

PowerPoint Presentation
38
Meeting the Cube
¼ tu
rn p
rac)
ce
Start with a solved cube.
Repeat each sequence 4x to
return to a solved cube.
Vocabulary
Lesson Focus
Lesson Review
Rubik’s Trivia
Lesson 1
Powe
rPoint
Pr
esen
tation
39
Meeting the Cube
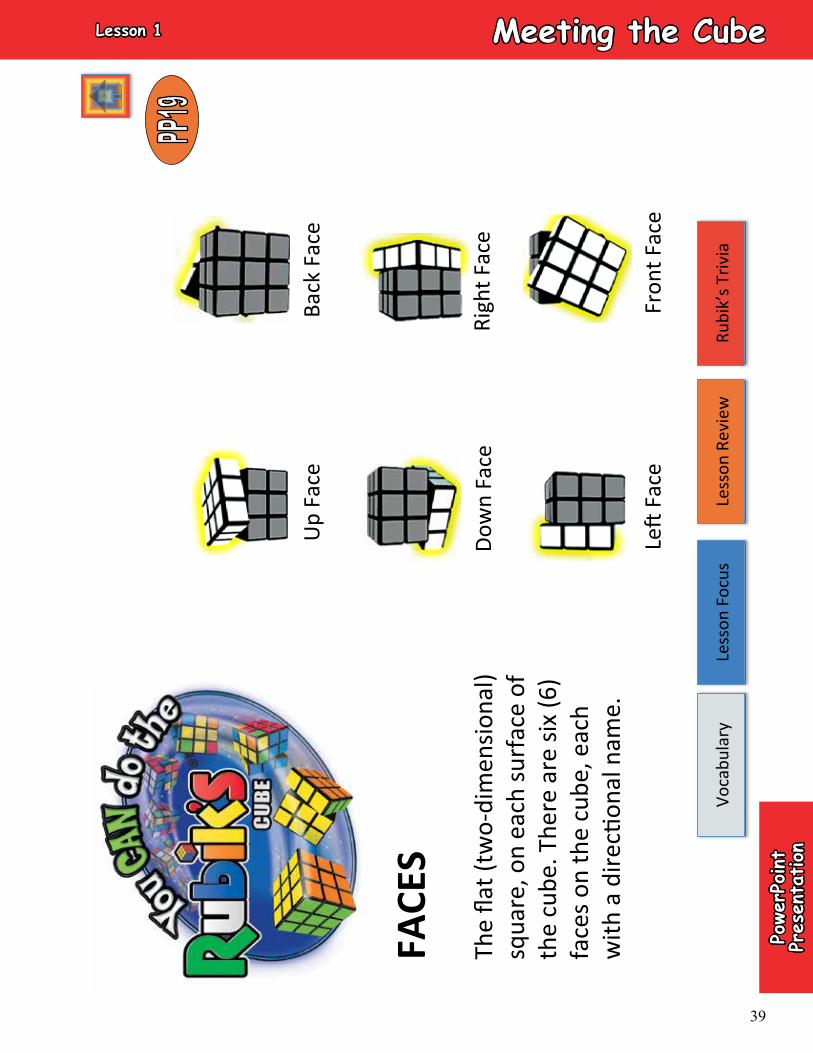
FACE
S
Up Face
Back Face
Down Face
Right Face
Vocabulary
Lesson Focus
Lesson Review
Rubik’s Trivia
LeQ Face
Front Face
The flat (two-‐dimensional)
square, on each surface of
the cube. There are six (6)
faces on the cube, each
with a direcNonal name.
Lesson 1
PowerPoint Presentation
40
Meeting the Cube
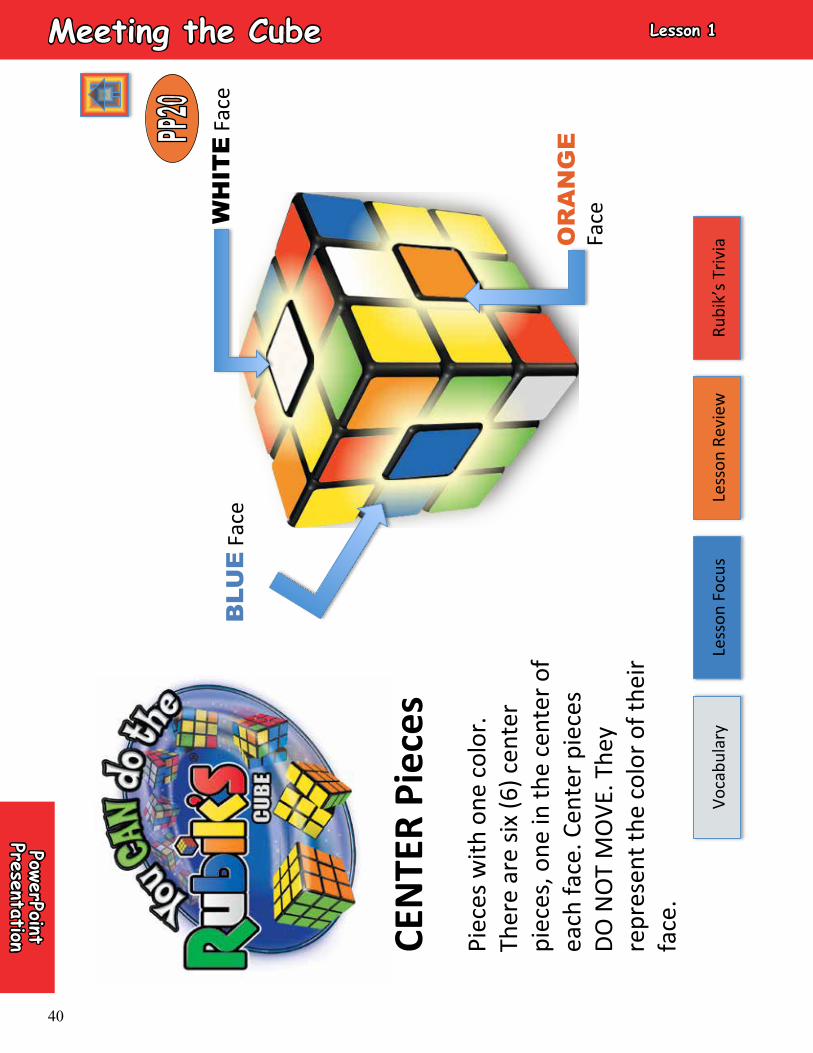
CEN
TER
Piec
es
Pieces with one color.
There are six (6) center
pieces, one in the center of
each face. Center pieces
DO NOT MOVE. They
represent the color of their
face.
BLU
E Face
WH
ITE Face
OR
AN
GE
Face
Vocabulary
Lesson Focus
Lesson Review
Rubik’s Trivia
Lesson 1
Powe
rPoint
Pr
esen
tation
41
Meeting the Cube
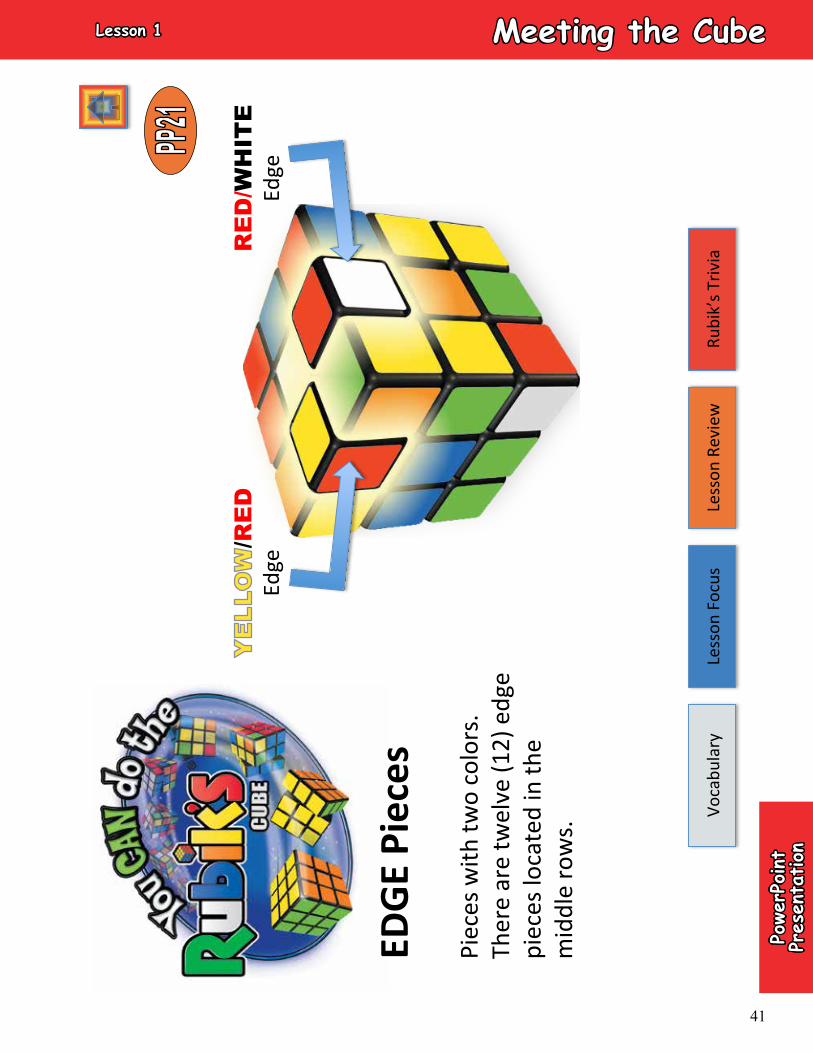
Pieces with two colors.
There are twelve (12) edge
pieces located in the
middle rows.
/RE
D
Edge
RE
D/W
HIT
E
Edge
Vocabulary
Lesson Focus
Lesson Review
Rubik’s Trivia
EDG
E Pi
eces
Lesson 1

PowerPoint Presentation
42
Meeting the Cube
CORN
ER P
iece
s Pieces with three colors.
There are eight (8) corner
pieces located on the
corners.
GR
EE
N/O
RA
NG
E/
Corner
Vocabulary
Lesson Focus
Lesson Review
Rubik’s Trivia
Lesson 1
Powe
rPoint
Pr
esen
tation
43
Meeting the Cube
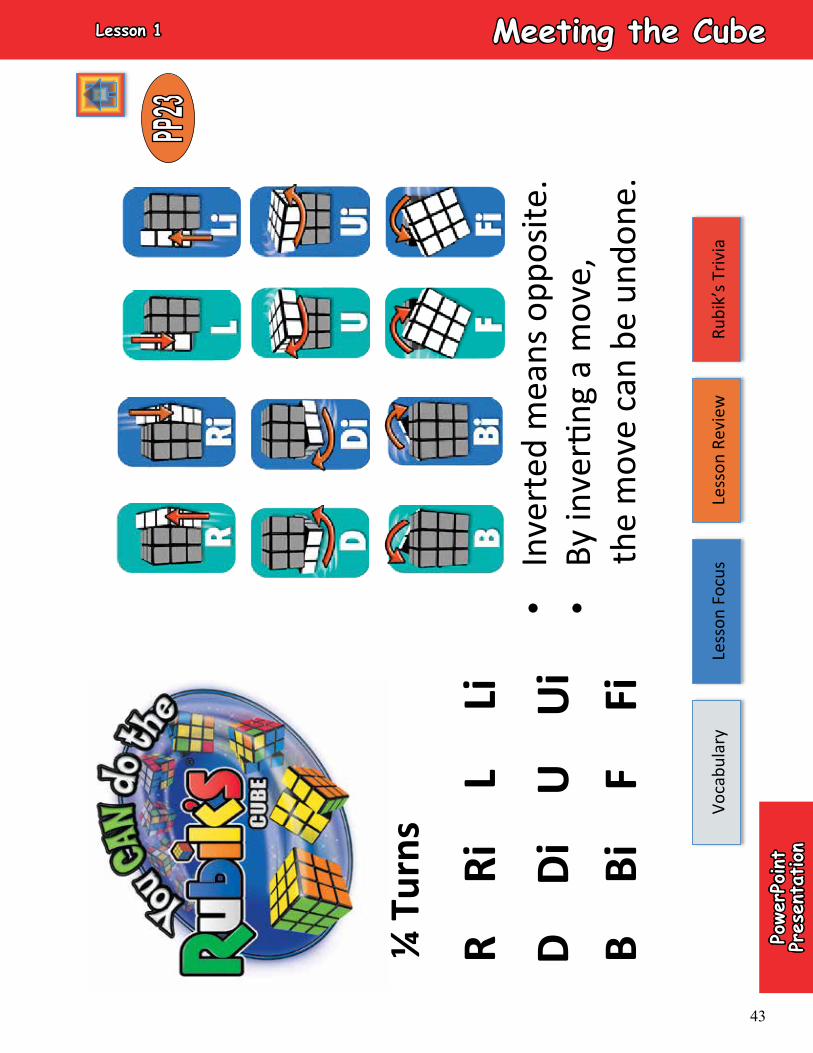
¼ T
urns
• Inverted means opposite.
• By inverNng a move,
the move can be undone.
Vocabulary
Lesson Focus
Lesson Review
Rubik’s Trivia
R Ri
L Li
D Di
U
Ui
B Bi
F Fi
Lesson 1
PowerPoint Presentation
44
Meeting the Cube
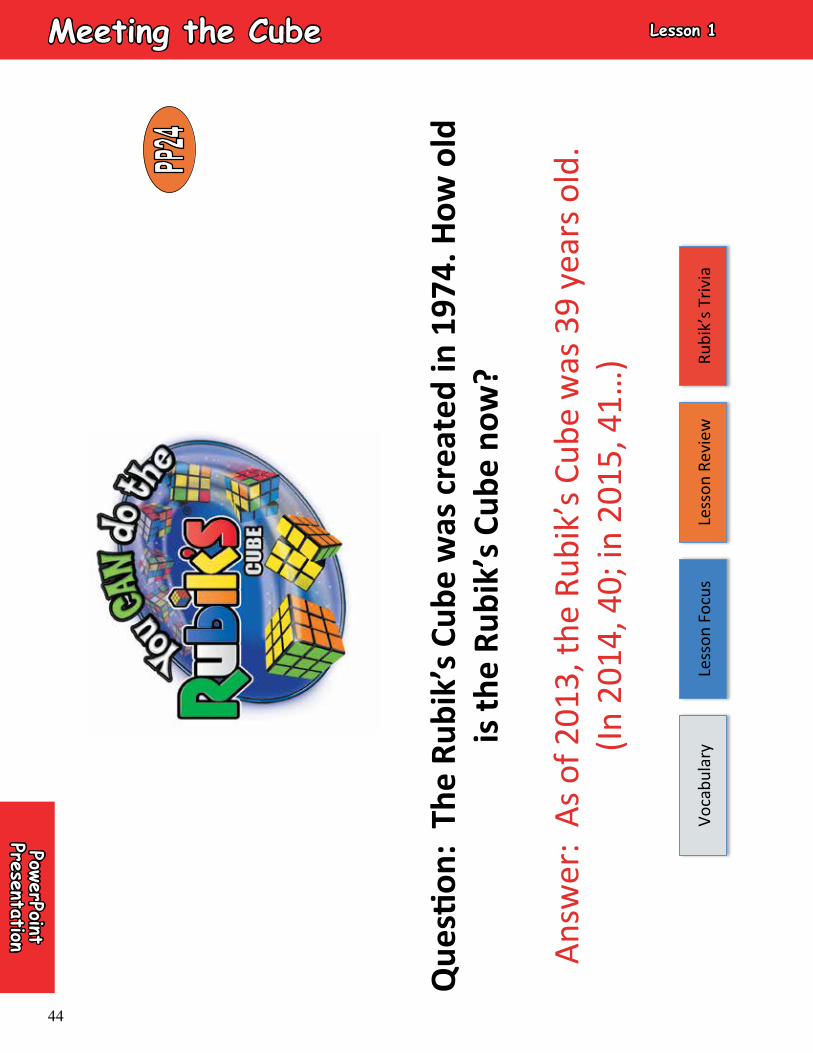
Que
s)on
: Th
e Ru
bik’
s Cub
e w
as c
reat
ed in
197
4. H
ow o
ld
is th
e Ru
bik’
s Cub
e no
w?
Answer: As of 2013, the Rubik’s Cube was 39 years old.
(In 2014, 40; in 2015, 41…)
Vocabulary
Lesson Focus
Lesson Review
Rubik’s Trivia
Lesson 1

Meeting the CubeQuarTer Turn - reference sheeT
©1974 Rubik’s® Used under licence Rubiks Brand Ltd. All rights reserved.