windows movie maker
TRANSCRIPT
Editing clipsYou have several options for editing clips:
Splitting a clip. You can split a video clip into two clips.This is useful if you want to insert either a picture or a video transition in the middle of a clip. You can split a clip that appears on the storyboard/timeline of a current project, or you can split the clip in the Contents pane.
Combining clips. You can combine two or more contiguous video clips. Contiguous means the clips were captured together so that the end time of one clip is the same as thestart time of the next clip. Combining clips is useful if you have several short clips and you want to view them as one clip on the storyboard/timeline. Similar to splitting a clip, you can combine contiguous clips in the Contents pane or on the storyboard/timeline.
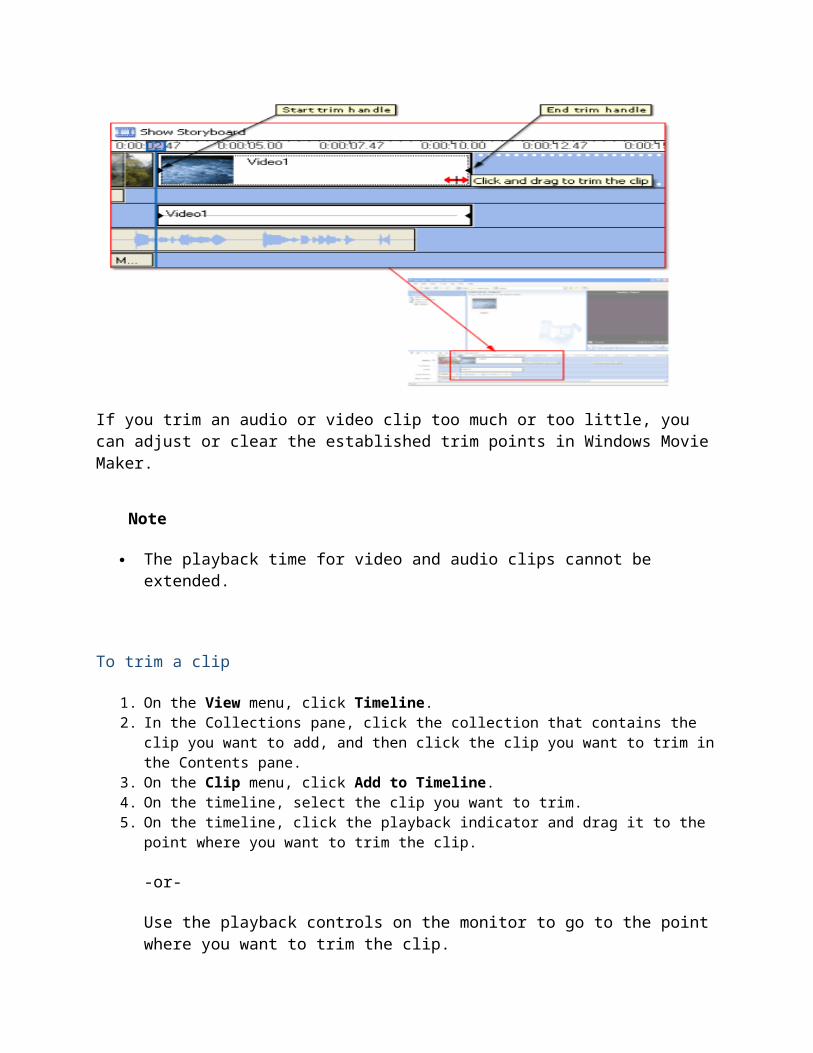
Trimming a clip. You can hide parts of a clip you do not want in your project. For example, you can trim the beginning or end of a clip. Trimming does not remove the information from the source material; you can clear the trimpoints to return the clip to its original length at any time. Clips can only be trimmed after they have been added to the storyboard/timeline. You cannot trim clips in the Contents pane.
Drag the trim handles, which are shown in the following illustration, to trim the unwanted portions of the clip.

Creating clips. You also create clips from video clips afterthey have been imported or captured in Windows Movie Maker. This lets you create clips at any time when working in Windows Movie Maker. By separating video clips into smaller clips, you can easily find a particular part of your captured or imported video to use in your movie.
Splitting and combining clipsYou can split or combine audio, video, and pictures into smaller,more manageable clips. When you split a video or audio clip, the large clip is divided into two smaller clips. For example, if youhave a video clip, and you want to insert a video transition in the middle of it, you can split the video clip at the point whereyou want to insert the video transition and then add the desired transition.
The following table indicates where you can split the different types of digital media files in Windows Movie Maker.
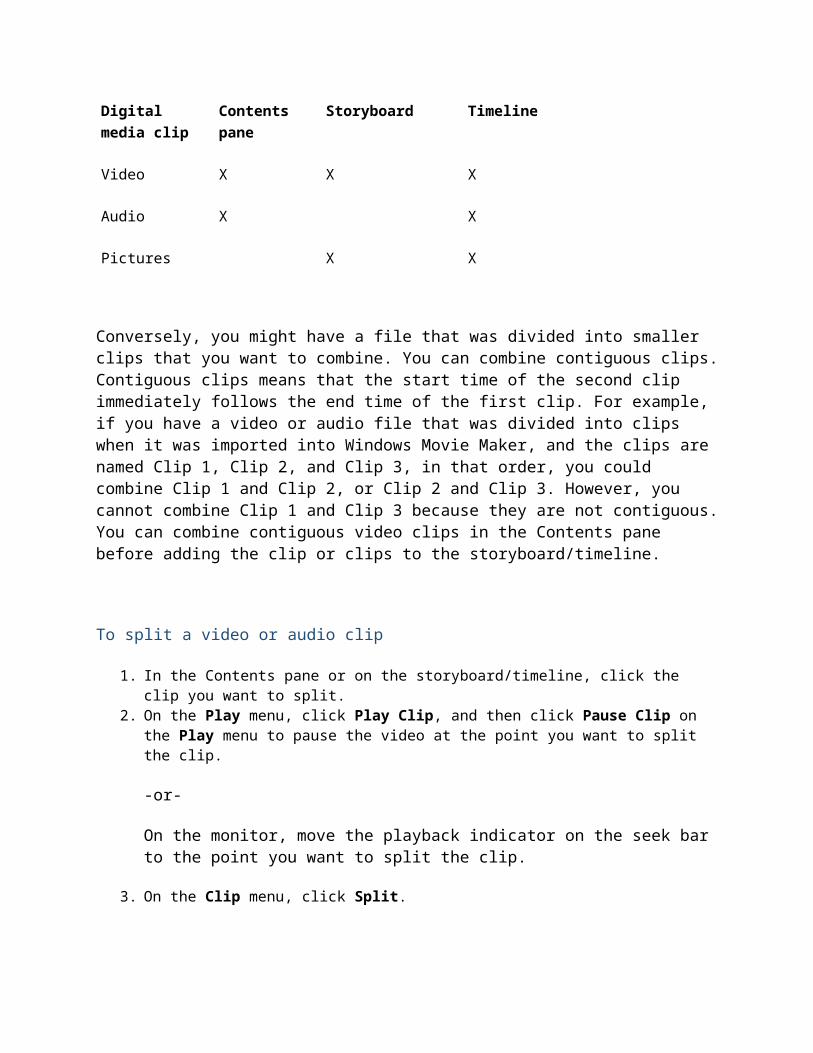
Digital media clip
Contents pane
Storyboard Timeline
Video X X X
Audio X X
Pictures X X
Conversely, you might have a file that was divided into smaller clips that you want to combine. You can combine contiguous clips.Contiguous clips means that the start time of the second clip immediately follows the end time of the first clip. For example, if you have a video or audio file that was divided into clips when it was imported into Windows Movie Maker, and the clips are named Clip 1, Clip 2, and Clip 3, in that order, you could combine Clip 1 and Clip 2, or Clip 2 and Clip 3. However, you cannot combine Clip 1 and Clip 3 because they are not contiguous.You can combine contiguous video clips in the Contents pane before adding the clip or clips to the storyboard/timeline.
To split a video or audio clip
1. In the Contents pane or on the storyboard/timeline, click the clip you want to split.
2. On the Play menu, click Play Clip, and then click Pause Clip on the Play menu to pause the video at the point you want to split the clip.
-or-
On the monitor, move the playback indicator on the seek bar to the point you want to split the clip.
3. On the Clip menu, click Split.
To combine a split audio or video clip
1. In the Contents pane or on the storyboard/timeline, hold down theCTRL key, and then select the contiguous clips you want to combine.
2. On the Clip menu, click Combine.
The name and property information of the first clip in the group is used for the new clip and the time is adjusted accordingly.
Note
To select consecutive clips, click the first clip, press and holddown the SHIFT key, and then click the last clip. To select one clip at a time, press and hold down the CTRL key, and then click each clip that you want to combine.
Trimming clipsBy trimming clips, you can edit the starting and ending point—andtherefore the length—of any video or audio clips that you have added to your project on the timeline. When trimming, you can setthe start and end trim points. The start trim point determines when the clip will begin to play, and the end trim point determines when the clip will stop playing in your project.
By trimming clips, you can hide unwanted parts of an audio or video clip or file. When you trim a clip, the information is not removed; it is hidden from your audience, so unwanted parts do not appear in your project and final saved movie. You can drag the trim handles, which are shown in the following illustration, to trim the unwanted parts of the clip.
If you trim an audio or video clip too much or too little, you can adjust or clear the established trim points in Windows Movie Maker.
Note
The playback time for video and audio clips cannot be extended.
To trim a clip
1. On the View menu, click Timeline. 2. In the Collections pane, click the collection that contains the
clip you want to add, and then click the clip you want to trim inthe Contents pane.
3. On the Clip menu, click Add to Timeline. 4. On the timeline, select the clip you want to trim. 5. On the timeline, click the playback indicator and drag it to the
point where you want to trim the clip.
-or-
Use the playback controls on the monitor to go to the point where you want to trim the clip.
6. Do the following: When the playback indicator is at the point where you want
the selected video or audio clip to start playing back, on the Clip menu, click Set Start Trim Point.
When the playback indicator is at the point where you want the selected video or audio clip to stop playing back, on the Clip menu, click Set End Trim Point.
Note
You can also drag the trim handles to set the start and end trim points. The trim handles appear when the clip is selected on the timeline.
To clear trim points
1. On the timeline with a project opened, click the trimmed clip. 2. On the Clip menu, click Clear Trim Points.
Creating clipsCreating clips lets you separate your video clips into smaller, more manageable pieces.
Clips can be created when you originally import a video file intoWindows Movie Maker if you have selected the Create clips for video files check box. However, if this check box is not selectedwhen you import a video file, the file is imported as a single clip rather smaller multiple clips. You can then use clip detection later to divide a video file into smaller clips.
Clips are created in a variety of ways, depending on the video file and video source.
Video from a DV camera. If you capture video from a DV camera that is connected to an IEEE 1394 port, clips are created based on the time stamp inserted in the video by theDV camera. If no time stamp or other markers are present, the resulting video file is divided into clips based on eachsignificant frame change in the video.

If you import an existing DV-AVI file into Windows Movie Maker and time stamp markers appear in the AVI video file, the file is also separated into smaller clips according to time stamp information.
Capturing video from an analog video camera or Web camera. If you capture video from an analog camera or Web camera, a clip is created when there is a substantial change in one frame of the video compared to the next frame. This method is used for both live and existing content from an analog source.
The size and duration of the clips is based on the duration of the entire video file. Therefore, video files that are longer in length will have clips that are longer in durationcompared to the clips created when a shorter video file is clip detected.
Windows Media files. If you import a Windows Media file withan .asf or .wmv file name extension that has file markers inserted, a clip is created for each marker. The markers help to divide the file into manageable sizes.
If the source Windows Media file contains no markers or onlyone marker, a clip is created when there is a substantial change in one frame of the video compared to the next frame.
The time it takes to detect clips in a video file increases as the length of the video file increases. If you click Cancel whileclip detection is occurring, clip detection stops at the current point in the video file, the clips that have been detected appear, and the last clip contains the portion of the video file that remained when clip detection was cancelled. You can later click the last clip and then create new clips starting from the last clip at which clip creation was originally cancelled.
To create clips for an existing video clip
1. In the Contents pane, select the video clip for which you want todetect clips.

2. On the Tools menu, click Create Clips.
Note
The video clip is divided into clips according to the video source. If the video clip is from a DV camera, clips are created based on the time stamps inserted by the DV camera. If time stamps or other file markers are not present, clips are based on each significant frame change in the video. If the video clip is from an analog source, clips are created based on each significant frame change in the video.
Using video transitions, video effects, and titlesYou can enhance your movies by adding different elements to your movie, such as the following:
Video transitions. A video transition controls how your movie plays from one video clip or picture to the next. You can add a transition between two pictures, video clips, or titles, in any combination, on the storyboard/timeline. The transition plays before the one clip ends and while the other clip starts to play. Windows Movie Maker contains various transitions you can add to your project. Transitionsare stored in the Video Transitions folder in the Collections pane.
Video effects. A video effect determines how a video clip, picture, or title displays in your project and final movie. Video effects let you add special effects to your movie. A video effect is applied for the entire duration that the video clip, picture, or title displays in your movie. You can add any of the video effects that appear in the Video Effects folder in the Collections pane.
Titles and credits. Titles and credits let you enhance your movie by adding text-based information to your movie. You can add whatever text you want, but you may want to include information such as the title of your movie, your name, the

date, and so forth. You can change the appearance of the title or credit, in addition to changing the title animation, which determines how your title or credit displays in your movie.
Working with video transitionsA video transition controls how your movie plays from one video clip or picture to the next. You can add a transition between twopictures, video clips, or titles, in any combination, on the storyboard/timeline. The transition plays before the one clip ends and while the other clip starts to play. Windows Movie Makercontains various transitions you can add to your project. Transitions are stored in the Video Transitions folder in the collections pane.
You can change the playback duration of a video transition up to the duration of the shorter of the two adjacent clips. If you drag the video clip or picture on the timeline that you want to transition to over the clip or picture that you want to transition from, a cross-fade is added as the default transition between the two clips. There will be a straight cut (no fade) between two clips if you do not create a transition.
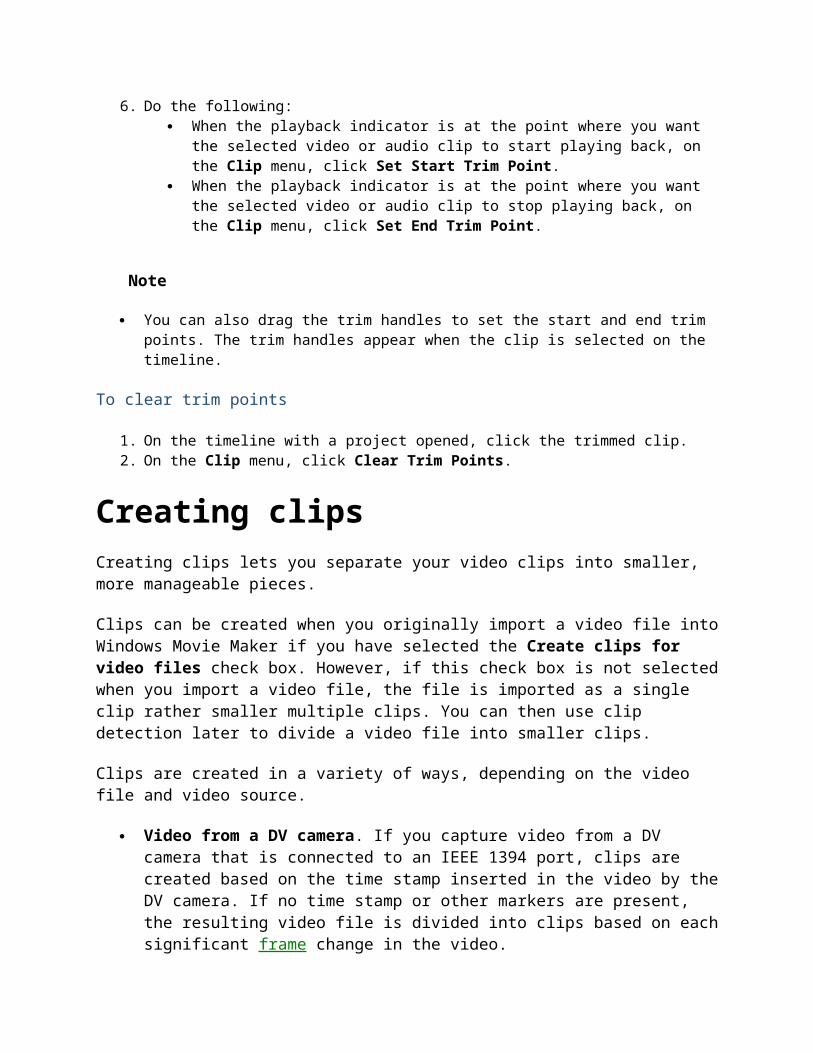
Any transitions you add appear on the Transition track of the timeline. To see this track, you must expand the Video track. Thevideo transition length is determined by the amount of overlap between two clips. The following illustration displays a project on the timeline with an added video transition.
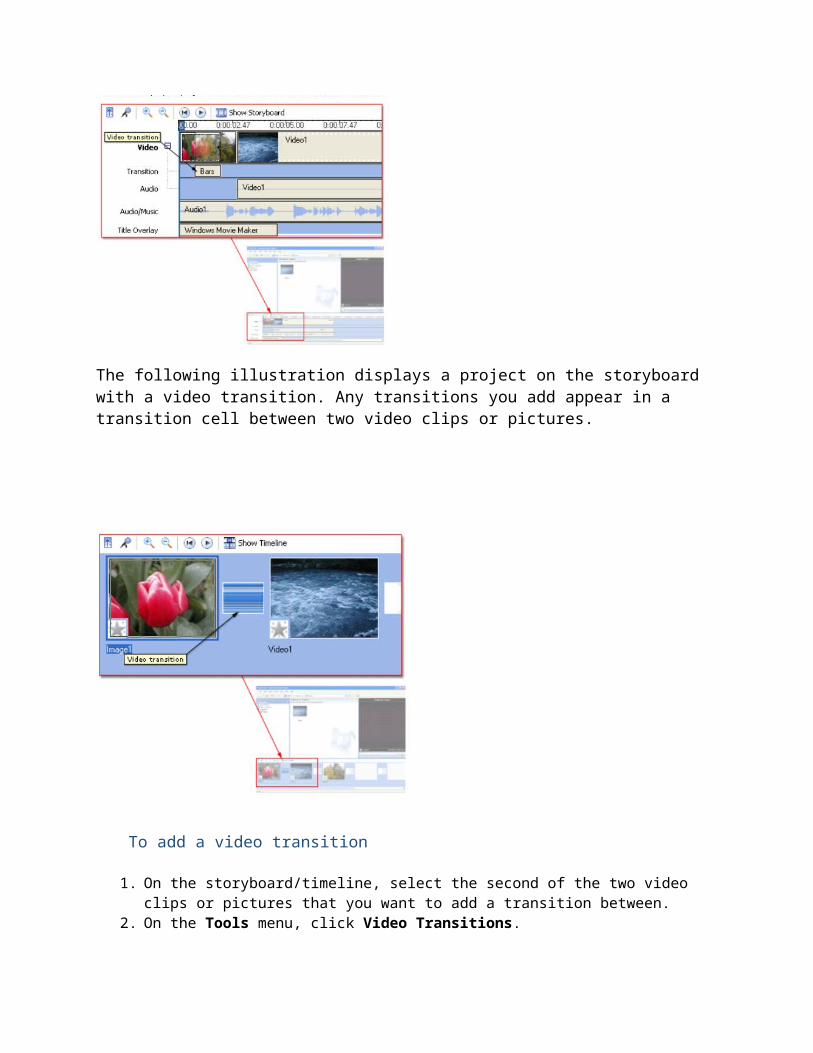
The following illustration displays a project on the storyboard with a video transition. Any transitions you add appear in a transition cell between two video clips or pictures.
To add a video transition
1. On the storyboard/timeline, select the second of the two video clips or pictures that you want to add a transition between.
2. On the Tools menu, click Video Transitions.

–or-
In the Movie Tasks pane, under Edit Movie, click View video transitions.
3. In the Contents pane, click the video transition you want to add.4. On the Clip menu, click Add to Timeline or Add to Storyboard.
Note
You can also add a video transition by dragging it to the timeline and dropping it between the two clips on the Video track. Or, on the storyboard, you can drag the video transition to the video transition cell between two video clips or pictures.
To change the video transition duration
On the Transition track of the timeline, do one of the following: To increase the transition duration, drag the beginning of
the transition towards the beginning of the timeline. To decrease the transition duration, drag the beginning of
the transition towards the end of the timeline.
Note
To view the Transition track of the timeline, expand the Video track. The original default time the transition appears is determined by the value for the Transition duration box on the Advanced tab of the Options dialog box.
To remove a video transition
1. Do one of the following: On the storyboard, select the transition cell that contains
the transition you want to remove. On the timeline, click the transition that you want to
remove on the Transition track. 2. On the Edit menu, click Delete.
Using video effects

A video effect determines how a video clip, picture, or title displays in your project and final movie. Video effects let you add special effects to your movie. For example, you might have video that you captured that you want to age, so it has a classic, old-time movie look. You can add one of the Film Age video effects to a video clip or picture. A video effect is applied for the entire duration that the video clip, picture, or title displays in your movie. You can add any of the video effects that appear in the Video Effects folder in the Collections pane.
Video effects are maintained when you split, cut, copy, or move avideo clip or picture. For example, if you add the Grayscale video effect, and then split the clip, the Grayscale video effectis applied to both clips. However, if you combine two video clips, the video effects that were associated with the first clipare applied to the new combined clip, and the video effects that were associated with the second clip are removed.
The following illustration shows a project on the timeline with an added video effect. An icon appears on the video clip or picture that you applied the effect to on the Video track.
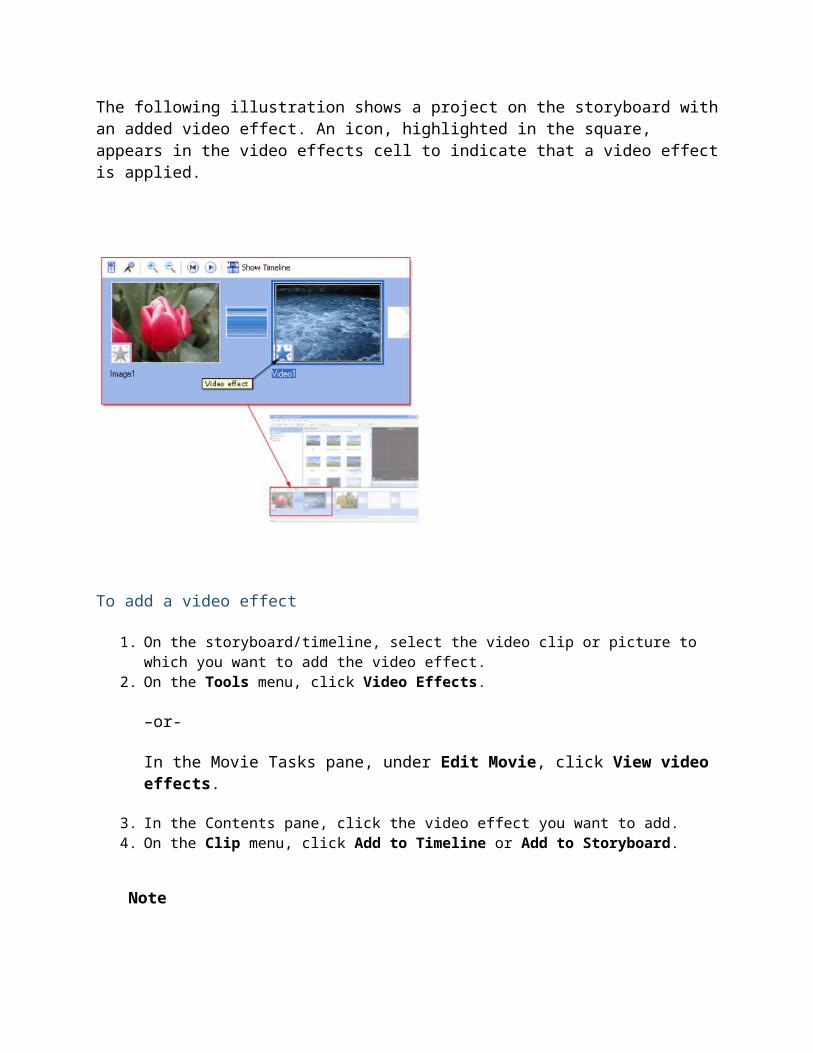
The following illustration shows a project on the storyboard withan added video effect. An icon, highlighted in the square, appears in the video effects cell to indicate that a video effectis applied.
To add a video effect
1. On the storyboard/timeline, select the video clip or picture to which you want to add the video effect.
2. On the Tools menu, click Video Effects.
–or-
In the Movie Tasks pane, under Edit Movie, click View video effects.
3. In the Contents pane, click the video effect you want to add. 4. On the Clip menu, click Add to Timeline or Add to Storyboard.
Note

You can also add an effect by dragging the effect and dropping iton the picture or video clip on the Video track of the timeline or to the video effect cell of the video clip or picture on the storyboard.
To remove a video effect
1. Select the video clip or picture in the storyboard/timeline that you want to remove a video effect from.
2. On the Clip menu, point to Video, and then click Video effects. 3. In the Displayed effects area, click the effect you want to
remove, and then click Remove.
Note
You can also remove a video effect by selecting the video effect cell in the storyboard that contains the effect you want to remove, and then pressing the DELETE key.
Changing video effectsThis dialog box provides settings for adding and removing video effects for the selected digital media clip on the Video track ofthe timeline or on the selected video clip, picture, or title on the storyboard.
The following options are available in this dialog box.
Available effects
Lists the video effects you can add to the selected video, picture, or title.
Add
Click to add the video effect to the currently selected video, picture, or title.
Displayed effects
Lists the video effects that are added to the currently selected video, picture, or title. These video effects are displayed when the picture, title, or video plays in your final movie.
Move Up
Click to move the video effect up in the list. For example, if you applied the Fade In, From Black video effect and then appliedthe Fade In, From White video effect and wanted the Fade In, FromWhite to play first, you could click the Fade In, From White effect and click the Move Up button, so it plays first.
Move Down
Click to move the video effect down in the list. For example, if you applied the Fade In, From Black video effect and then appliedthe Fade In, From White video effect and wanted the Fade In, FromWhite to play last, you could click the Fade In, From White effect and click the Move Down button, so it plays last.
Remove
Click to remove the selected video effect in the Displayed effects box, so the video effect is not displayed in the project and final movie.
To add or remove video effects
1. On the Video track of the timeline or on the storyboard, click the video clip, picture, or titles that you want to add a video effect to or remove a video effect from.
2. On the Clip menu, point to Video, and then click Video Effects. 3. Do one the following:
To remove a video effect, in the Displayed effects area, click the effect, and then click Remove. Repeat as necessary.
To add a video effect, in the Available effects area, click the effect you want to add, and then click Add. Repeat as necessary.
Note
If you add multiple video effects, you can change the order in which they display by using the Move Up or Move Down buttons. To quickly add a video effect, you can drag a video effect and drop it on a video clip, picture, or title on the storyboard/timeline.