sbm 4716 bread maker instruction manual
TRANSCRIPT
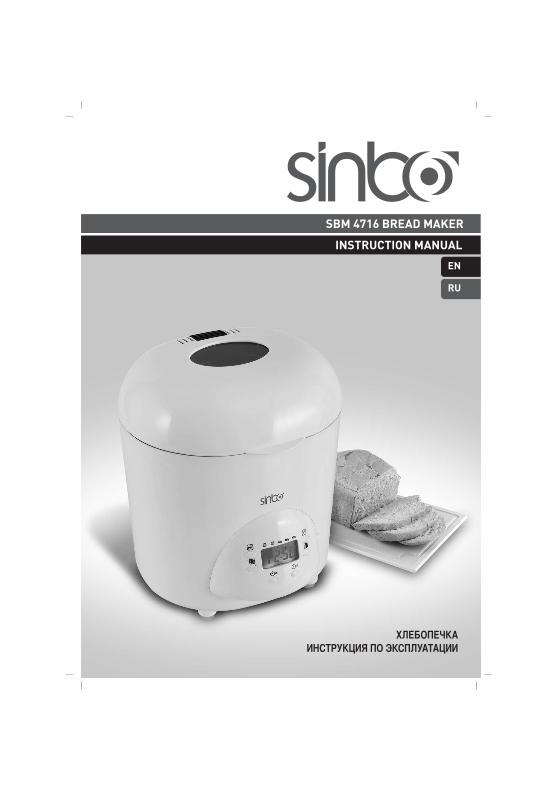
SBM 4716 BREAD MAKER
INSTRUCTION MANUAL
EN
RU

- 1 -
- 2 -
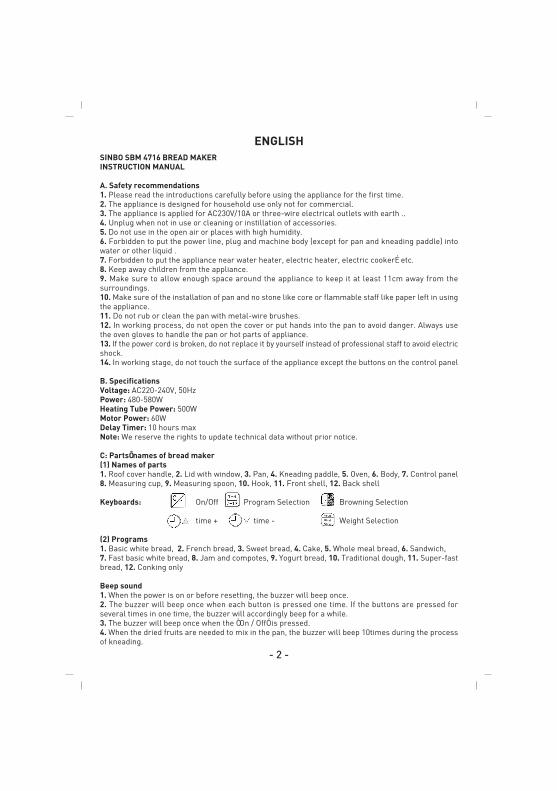
ENGLISHSINBO SBM 4716 BREAD MAKERINSTRUCTION MANUAL
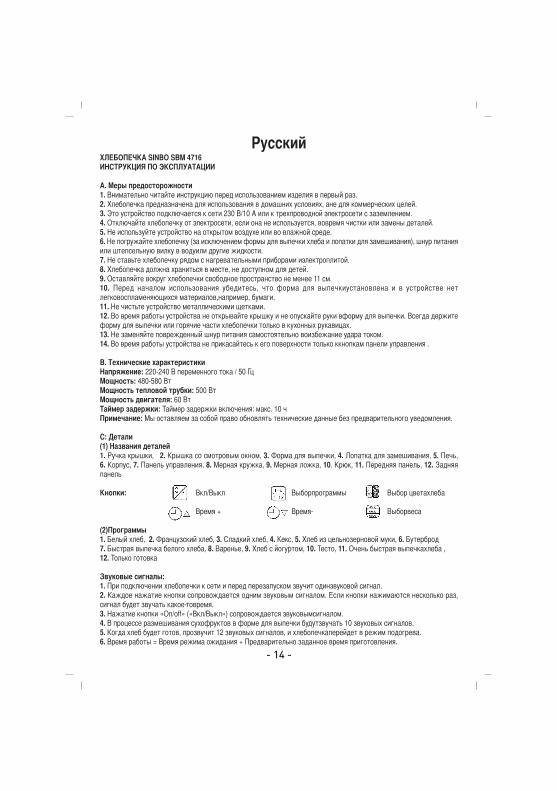
A. Safety recommendations1. Please read the introductions carefully before using the appliance for the first time.2. The appliance is designed for household use only not for commercial.3. The appliance is applied for AC230V/10A or three-wire electrical outlets with earth ..4. Unplug when not in use or cleaning or instillation of accessories.5. Do not use in the open air or places with high humidity.6. Forbidden to put the power line, plug and machine body (except for pan and kneading paddle) intowater or other liquid .7. Forbidden to put the appliance near water heater, electric heater, electric cooker…etc.8. Keep away children from the appliance.9. Make sure to allow enough space around the appliance to keep it at least 11cm away from thesurroundings.10. Make sure of the installation of pan and no stone like core or flammable staff like paper left in usingthe appliance.11. Do not rub or clean the pan with metal-wire brushes.12. In working process, do not open the cover or put hands into the pan to avoid danger. Always usethe oven gloves to handle the pan or hot parts of appliance.13. If the power cord is broken, do not replace it by yourself instead of professional staff to avoid electricshock.14. In working stage, do not touch the surface of the appliance except the buttons on the control panel
B. SpecificationsVoltage: AC220-240V, 50HzPower: 480-580WHeating Tube Power: 500WMotor Power: 60WDelay Timer: 10 hours maxNote: We reserve the rights to update technical data without prior notice.
C: Parts’ names of bread maker(1) Names of parts1. Roof cover handle, 2. Lid with window, 3. Pan, 4. Kneading paddle, 5. Oven, 6. Body, 7. Control panel8. Measuring cup, 9. Measuring spoon, 10. Hook, 11. Front shell, 12. Back shell
Keyboards: On/Off Program Selection Browning Selection
time + time - Weight Selection
(2) Programs1. Basic white bread, 2. French bread, 3. Sweet bread, 4. Cake, 5. Whole meal bread, 6. Sandwich,7. Fast basic white bread, 8. Jam and compotes, 9. Yogurt bread, 10. Traditional dough, 11. Super-fastbread, 12. Conking only
Beep sound1. When the power is on or before resetting, the buzzer will beep once.2. The buzzer will beep once when each button is pressed one time. If the buttons are pressed forseveral times in one time, the buzzer will accordingly beep for a while.3. The buzzer will beep once when the “On / Off” is pressed.4. When the dried fruits are needed to mix in the pan, the buzzer will beep 10times during the processof kneading.
- 3 -
5. When the bread making is done, the buzzer will beep 12 times to do reminding and then go into thestatus of keeping warm.6. Working time= Stand by time + Original set work timeMemory time: After Power is cut off, it can remember to return to status before power down at least20min’s.
Notice: The inner temperature of the bread maker has to be cool down below 45? before normalkneading for another time.
D: IngredientsChoosing ingredients plays an important role in the bread making which can make effect on whetheryou can make delicious breads or not. Here are some reference.
1. Bread flourBread flour is kinds of gluten flour (sometimes called gluten flour or strong flour with high proteincontent) which can help in remain the dough’s strength in yeasting. Compared to general flour, breadflour contains high gluten with good fibrous tissue which should been the best choice as bread makingingredients for soft and delicious breads.
2. All-purpose flourAll-purpose flour is made of soft and hard wheat which is suitable for fast bread and cake.
3. Rye flourRye flour is a kind of high-fiber flour which is similar to whole meal flour, also called graham flour.And it has to be mixed with bread flour to rise the bread as big as possible.
4. Whole meal flourThe whole meal flour is made from grinded kernels with cereal and bran. Whole meal flour is heavierthan all-purpose flour with richer nutrition, heavier bread, smaller size and thicker crust. For most oftime, the whole meal flour is always mixed with bread flour to make high-quality and delicious breads.Thus, our appliance has been set to make the whole meal breads with long time stirring and yeasting.
5. Cake flourThe cake flour is made from the grinded soft wheat or low-protein wheat as the special cake ingredients.Due to the wheat’s original places, living seasons, grind techniques and different storage life, flourshave large differences in yeasting and water sucking although it seems like all of the flours lookssimilar.
6. Cornmeal/OatmealCornmeal and oatmeal are the adding ingredients which are relatively made from grinded corns andoats in order to increase breads’ flavor and taste.
7. YeastBaker’s yeast exists in several forms: fresh in small cubes, dried and active to be rehydrated or driedand instant. Fresh yeast is sold in supermarkets, but you can also buy fresh yeast from your localbaker’s. In its fresh or instant dried form, yeast should be added directly to the baking pan of your breadmaker with the other ingredients. Remember to crumble the fresh yeast with your fingers to make itdissolve more easily. Only active dried yeast must be mixed with a little tepid water before use.
The following methods can help you tell whether your yeast is fresh or not:(1) Pour 1/2 glass of water?40-50??into measuring cup(2) Put one spoon of sugar into water and stir to be dissolved, and then scatter 2 spoons of yeast on thesurface of water
- 4 -
(3) Put the cup of water on a warm place for 10 min without any stirring(4) The bubbles produced by the yeast will reach the mark of 1CUP. If it wouldn’t, your yeast is not fresh.
8. SaltSalt gives taste to food and regulate the yeast’s activity. It should not come into contact with the yeast.Thanks to salt, the dough is firm, compact and does not rise too quickly. It also improves the structureof the dough. Do not use coarse salt or salt substitutes.
9. Fats and oilsFats make the bread softer and tastier. It also stores better and longer. Too much fat slows down rising.If you use butter, cut it into tiny pieces that it is distributed eventually throughout he preparation, orsoften it.
10. Baking powderBaking powder is mainly used to yeast fast breads and cakes which do not need yeasting time owingto its making use of principles of chemistry to soften food.
11. SodaJust like the baking powder.
12. SugarUse white sugar, brown sugar or honey. Do not use unrefined sugar or lumps. Sugar acts as food forthe yeasts, gives the bread its good taste and improve browning of the crust. Artificial sweetenerscannot be substituted for sugar as the yeast will not react with them.
13. EggsEggs make the dough richer, improve the color of the bread and encourage the development of the soft,white part. If you use eggs, reduce the quantity of liquid you use proportionally.
14. WaterWater rehydrates and activates the yeast. It also hydrates the starch in the flour and helps the soft,white part to form. Water can be totally or partially replaced with milk or other liquids. Use liquids atroom temperature.
15. Weighing in bread-makingOne important step in bread-making ingredients is the weighing of ingredients with the specifiedmeasuring cup and spoon which will even influence the effect of the breads.(1) Weighing of liquid ingredientsWater, milk and milk powder liquor should be measured by specific cup and you should look the scalemarks on the cup horizontally to read.Measuring cup should be cleaned carefully to make sure of no other powder left when measuring oilor adding ingredients.(2) Measuring of dried powderThe dried powder measured by measuring cup or spoon should in the natural and loosen state and themouth of the measuring cup should be stroked off to make sure of precise measurement.(3) The order of ingredientsGenerally speaking, the order should be: liquid, egg plus salt, milk powder. The flour shouldn’t completelytouched by liquid and then put the yeast on the dried flour (no touch of yeast and salt). Fruit is put intothe pan when the buzzer beeps after the dough being stirred for a while. No perishable ingredients likeeggs or fruits if you use the function of long timing.
16. Other ingredientsYou can add ingredients according to your own flavor like dried fruit, cheese, nuts, yogurt, whole meal
- 5 -
powder, vanilla and spice. What you should pay attention to is the amount of water. For example, cheese,milk and fresh fruit contain a lot amount of water which will over-humidify the dough, so we shouldadjust accordingly such as the replacement of dried cheese or dried milk.You will naturally understand whether the water is proper for the dough with the method to add wateror flavor after being familiar to the functions of bread maker.Another point is that you should remember the amount of salt which can influence the yeasting speed.And some ingredients can be mixed in the very beginning like dried milk powder and yogurt while somelike dough, nut let and dried fruit have to be added when the buzzer beeps in stirring.
E: Principle and Bread-making stepsBread is a kind of soft baking food which is yeasting, shaping, rising and baking with proper sugar, oil,milk powder, eggs, fruit and additives based on the ingredients of flour, yeast, salt and water.Here is the work theory of household bread maker: the appliance imitates the operating procedure ofbakeries or bread factories with artificial intelligence, which can render it easy to make breads at home.The appliance can be pressed to automatically finish the tasks of kneading, yeasting, rest, rising, bakingand warming in the basis of all ingredients on the introduction book. The operating of dough-stirringis complete with the usage of unidirectional drive and the control of dough-yeasting and baking-temperature is gorgeous with the application of MCU.Operating process: Once the appliance is started, MCU will automatically examine whether the workenvironment and temperature transmitter are normal to operate or not. After examined, the motorstarts to stir the ingredients via drive system and the program starts to control the tubes’ heating, theoven’s work temperature and the yeasting. At the same time, the yeast in the dough is blooming toproduce lots of carbon oxidation which realize the bread soft and expanding. The flour in the pan iscompletely mixed with all ingredients during the stirring-operation and then expands into the largestsize during the rising-operation so as to be baked finally into bread.The control system consists of power panel and control panel, which is the nerve center of the appliancememorizing all sorts of bread 0r cake making methods. For your own preference, the functions ofyeasting and baking as well as stirring via on/off of motor can be chosen to make the breads withshallow or deep color or different crust with different thickness.The dough is heated via heating tube in the pan to make the oven reach the yeasting or baking temperatureand then the control panel is received the temperature feedback via transducer so as to control theon/off operating of heating tube. When the thermistor goes wrong, the tube will be heating constantlywhich result in the operation of yeasting. And when the oven temperature exceeds some certain degree,the fuse will be broken to protect the appliance.
The following formulas for reference:1. Measure the ingredients before put into the pan2. With water at 20?3. Mount the pan and close the cover4. Plug in and beep once5. Choose the program and press “no/off” button6. Beep 10times when the bread is finished and automatically get into the one hour’ warming operation(expect program 7,8,10)7. If the function of warming is not needed, you can press the “on/off” button for 3 seconds to finish theprogram.8. Finishing the bread making, use the hook to catch the hook and then hold the handle to lift the panwith the hand cloth.9. pour out the bread and stirring paddle from the pan (avoid burning hands)10. Cut into slices after cooling down
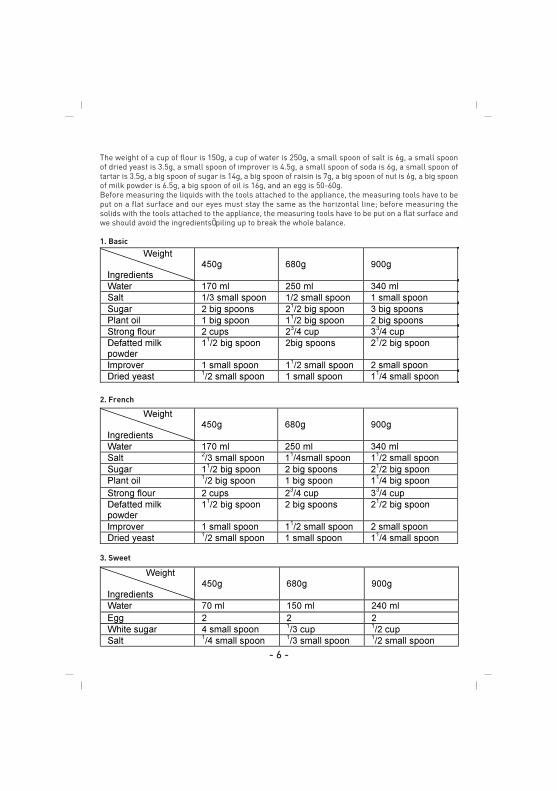
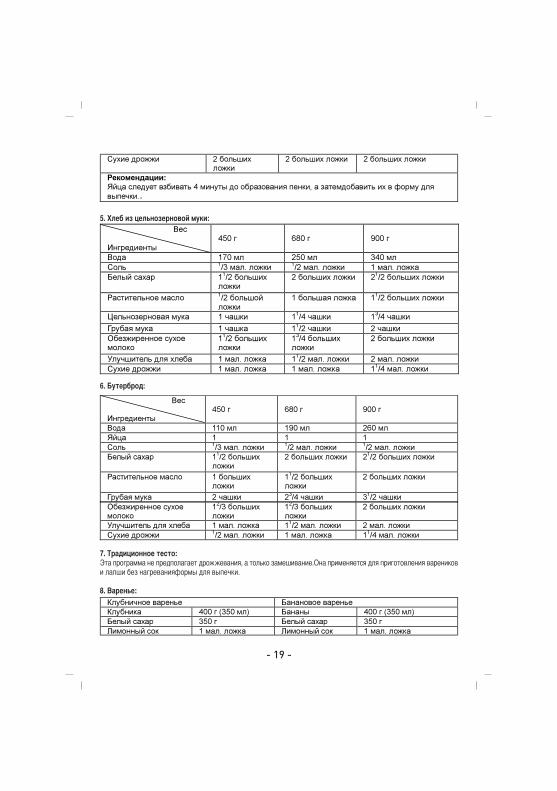
F: Recommended Recipes: (The following recipes are just for reference which you can adjust to meetyour own taste and flavor.?The measuring rang of the following cup is 250ml, the small spoon is 5ml, and the big spoon is 15ml.
- 6 -
The weight of a cup of flour is 150g, a cup of water is 250g, a small spoon of salt is 6g, a small spoonof dried yeast is 3.5g, a small spoon of improver is 4.5g, a small spoon of soda is 6g, a small spoon oftartar is 3.5g, a big spoon of sugar is 14g, a big spoon of raisin is 7g, a big spoon of nut is 6g, a big spoonof milk powder is 6.5g, a big spoon of oil is 16g, and an egg is 50-60g.Before measuring the liquids with the tools attached to the appliance, the measuring tools have to beput on a flat surface and our eyes must stay the same as the horizontal line; before measuring thesolids with the tools attached to the appliance, the measuring tools have to be put on a flat surface andwe should avoid the ingredients’ piling up to break the whole balance.
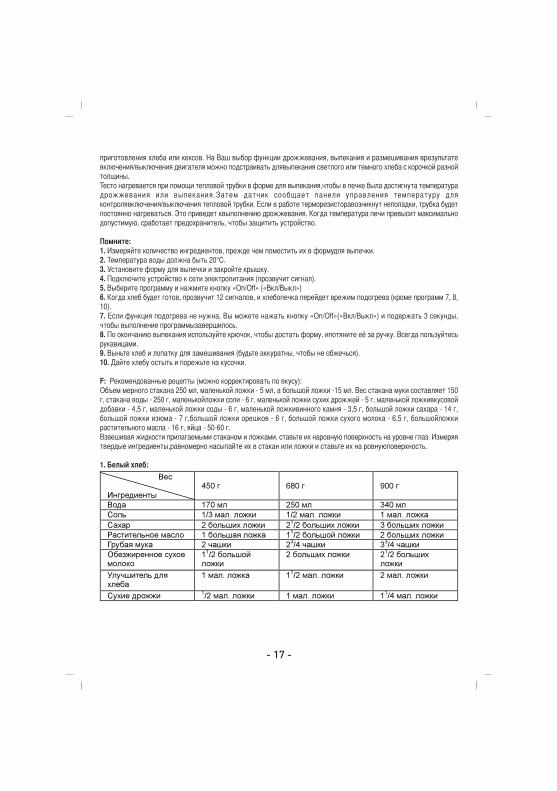
1. Basic
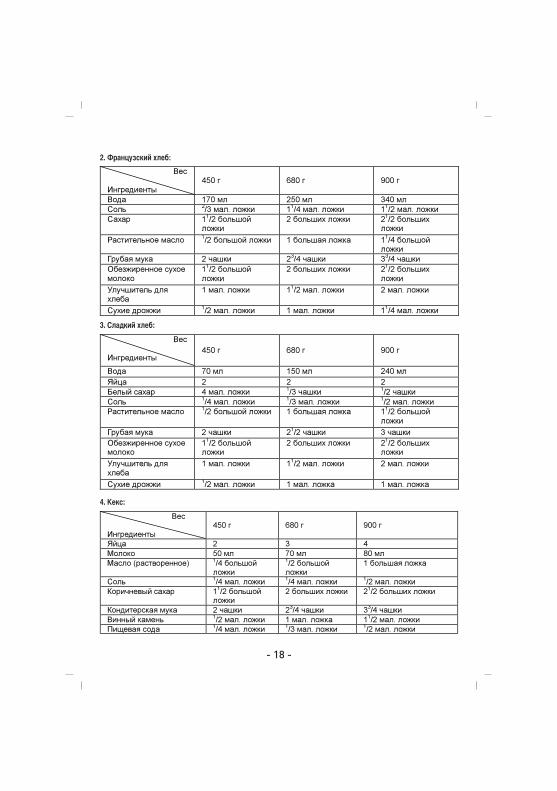
2. French
3. Sweet

- 7 -
4. Cake:
5. Whole Wheat:
6. Sandwich:
- 8 -
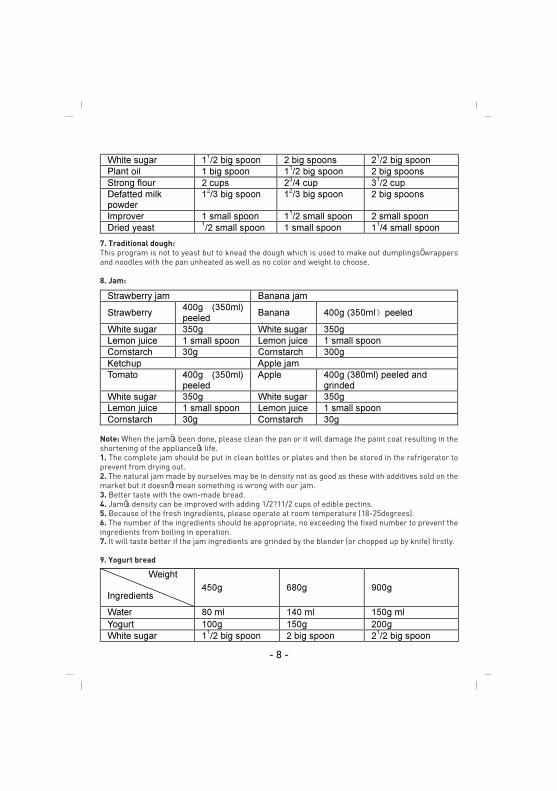
7. Traditional dough:This program is not to yeast but to knead the dough which is used to make out dumplings’ wrappersand noodles with the pan unheated as well as no color and weight to choose.
8. Jam:
Note: When the jam’s been done, please clean the pan or it will damage the paint coat resulting in theshortening of the appliance’s life.1. The complete jam should be put in clean bottles or plates and then be stored in the refrigerator toprevent from drying out.2. The natural jam made by ourselves may be in density not as good as these with additives sold on themarket but it doesn’t mean something is wrong with our jam.3. Better taste with the own-made bread.4. Jam’s density can be improved with adding 1/2?11/2 cups of edible pectins.5. Because of the fresh ingredients, please operate at room temperature (18-25degrees).6. The number of the ingredients should be appropriate, no exceeding the fixed number to prevent theingredients from boiling in operation.7. It will taste better if the jam ingredients are grinded by the blender (or chopped up by knife) firstly.
9. Yogurt bread
- 9 -
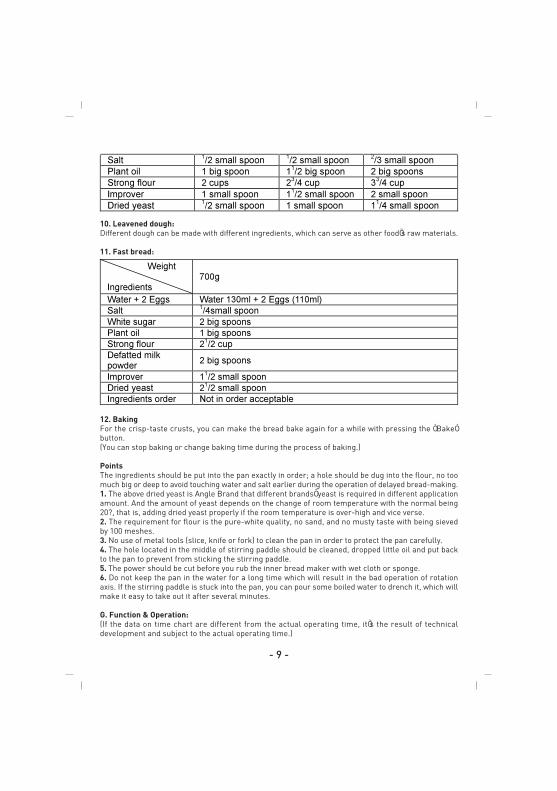
10. Leavened dough:Different dough can be made with different ingredients, which can serve as other food’s raw materials.
11. Fast bread:
12. BakingFor the crisp-taste crusts, you can make the bread bake again for a while with pressing the “Bake”button.(You can stop baking or change baking time during the process of baking.)
PointsThe ingredients should be put into the pan exactly in order; a hole should be dug into the flour, no toomuch big or deep to avoid touching water and salt earlier during the operation of delayed bread-making.1. The above dried yeast is Angle Brand that different brands’ yeast is required in different applicationamount. And the amount of yeast depends on the change of room temperature with the normal being20?, that is, adding dried yeast properly if the room temperature is over-high and vice verse.2. The requirement for flour is the pure-white quality, no sand, and no musty taste with being sievedby 100 meshes.3. No use of metal tools (slice, knife or fork) to clean the pan in order to protect the pan carefully.4. The hole located in the middle of stirring paddle should be cleaned, dropped little oil and put backto the pan to prevent from sticking the stirring paddle.5. The power should be cut before you rub the inner bread maker with wet cloth or sponge.6. Do not keep the pan in the water for a long time which will result in the bad operation of rotationaxis. If the stirring paddle is stuck into the pan, you can pour some boiled water to drench it, which willmake it easy to take out it after several minutes.
G. Function & Operation:(If the data on time chart are different from the actual operating time, it’s the result of technicaldevelopment and subject to the actual operating time.)
- 10 -
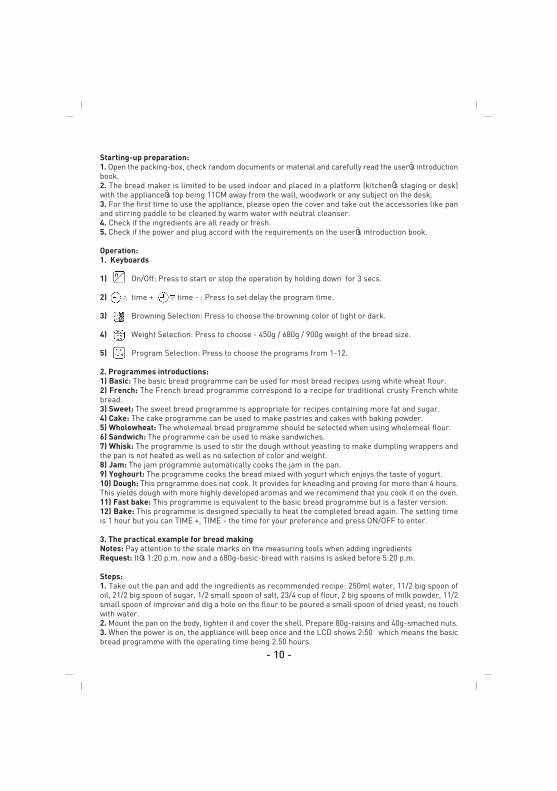
Starting-up preparation:1. Open the packing-box, check random documents or material and carefully read the user’s introductionbook.2. The bread maker is limited to be used indoor and placed in a platform (kitchen’s staging or desk)with the appliance’s top being 11CM away from the wall, woodwork or any subject on the desk.3. For the first time to use the appliance, please open the cover and take out the accessories like panand stirring paddle to be cleaned by warm water with neutral cleanser.4. Check if the ingredients are all ready or fresh.5. Check if the power and plug accord with the requirements on the user’s introduction book.
Operation:1. Keyboards
1) On/Off: Press to start or stop the operation by holding down for 3 secs.
2) time + time - : Press to set delay the program time.
3) Browning Selection: Press to choose the browning color of light or dark.
4) Weight Selection: Press to choose - 450g / 680g / 900g weight of the bread size.
5) Program Selection: Press to choose the programs from 1-12.
2. Programmes introductions:1) Basic: The basic bread programme can be used for most bread recipes using white wheat flour.2) French: The French bread programme correspond to a recipe for traditional crusty French whitebread.3) Sweet: The sweet bread programme is appropriate for recipes containing more fat and sugar.4) Cake: The cake programme can be used to make pastries and cakes with baking powder.5) Wholewheat: The wholemeal bread programme should be selected when using wholemeal flour.6) Sandwich: The programme can be used to make sandwiches.7) Whisk: The programme is used to stir the dough without yeasting to make dumpling wrappers andthe pan is not heated as well as no selection of color and weight.8) Jam: The jam programme automatically cooks the jam in the pan.9) Yoghourt: The programme cooks the bread mixed with yogurt which enjoys the taste of yogurt.10) Dough: This programme does not cook. It provides for kneading and proving for more than 4 hours.This yields dough with more highly developed aromas and we recommend that you cook it on the oven.11) Fast bake: This programme is equivalent to the basic bread programme but is a faster version.12) Bake: This programme is designed specially to heat the completed bread again. The setting timeis 1 hour but you can TIME +, TIME - the time for your preference and press ON/OFF to enter.
3. The practical example for bread makingNotes: Pay attention to the scale marks on the measuring tools when adding ingredientsRequest: It’s 1:20 p.m. now and a 680g-basic-bread with raisins is asked before 5:20 p.m.
Steps:1. Take out the pan and add the ingredients as recommended recipe: 250ml water, 11/2 big spoon ofoil, 21/2 big spoon of sugar, 1/2 small spoon of salt, 23/4 cup of flour, 2 big spoons of milk powder, 11/2small spoon of improver and dig a hole on the flour to be poured a small spoon of dried yeast, no touchwith water.2. Mount the pan on the body, tighten it and cover the shell. Prepare 80g-raisins and 40g-smached nuts.3. When the power is on, the appliance will beep once and the LCD shows 2:50 which means the basicbread programme with the operating time being 2.50 hours.

- 11 -
4. Press Program Selection to display 1 to choose basic bread.5. Press the key to let the mark located under the position of 680g which means that you choosethe 680g bread and the LCD accordingly shows the operating time 2:55.6. Press key to select dark or light. (The default color is light.)7. The request is that the bread can be made at 5:25 p.m. which needs the appliance to delay theprogramme. Thus you can press to adjust to time 4:05 thus the bread will be completed within4.05 hours.8. Press to start the appliance and then the LCD shows it will cost 4.05 hours and starts to countdown and the LCD back light start to flash .9. When the buzzer beeps 10 times constantly, open the cover and add the ready fruits into the pan.10. Bread will be ready at 5:25p.m.
Notice: Bread preparation is very sensitive to temperature and humidity conditions another bread isto be made only after the machine to be cool down .The temp is above 45?,LCD will show “HHH” except 12 program, buzzer beeps constantly
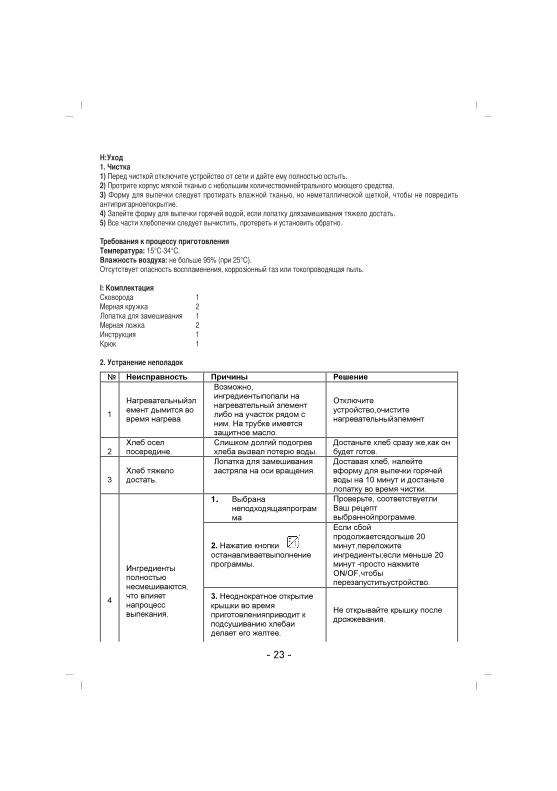
H: Maintenance1. Cleaning1) Pull out the power plug and cool down the appliance completely before cleaning.2) Wipe the body by soft cloth with little neutral cleanser.3) The pan should be wiped with wet cloth not the attrition sex scavenger (steel brush) to protect thestick coating.4) Pour hot water into the pan if the stirring paddle is hard to lift and no attrition sex scavenger to wipein case of damaging the stick coating.5) All parts should be mounted back to the appliance after cleaning and wiping.
Operating environmentTemperature : 15˚C-34˚C.Air humidity: Less than 95% (at 25˚C) .No inflammability, corrosivity gas or electricity-conduction dust existing.
I: Accessories listPan 1Measuring cup 2Stirring paddle 1Measuring spoon 2Introduction book 1Hook 1
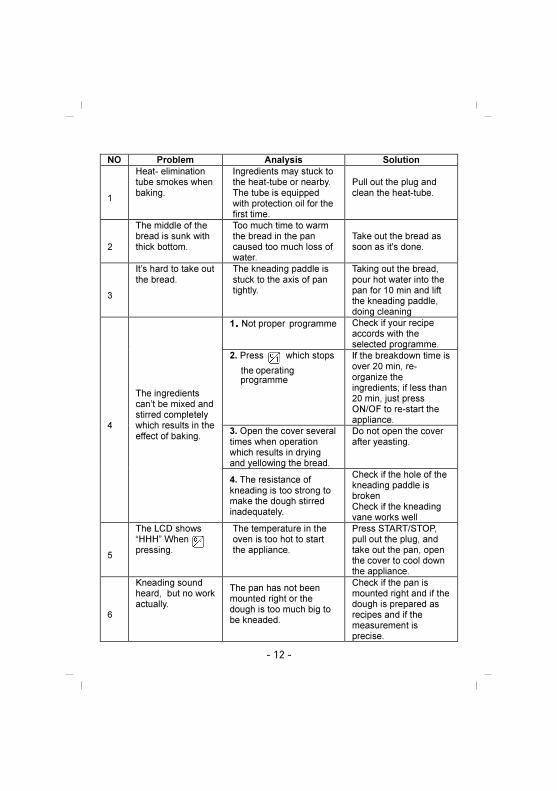
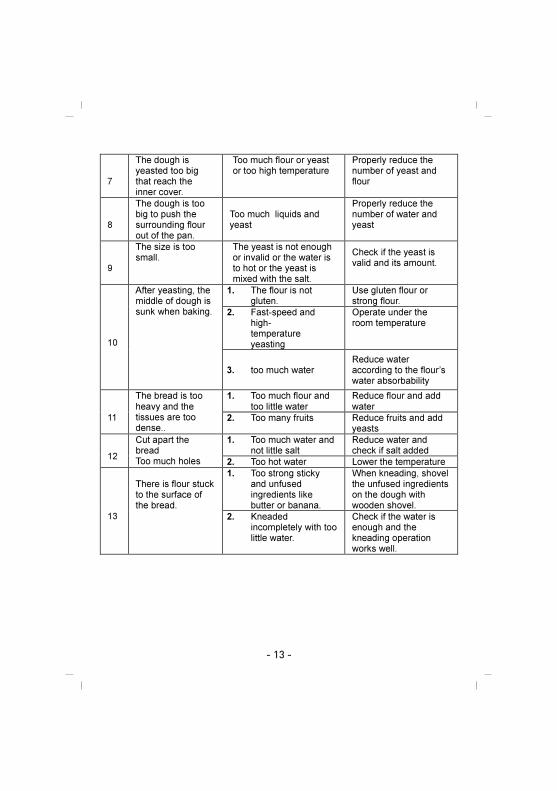
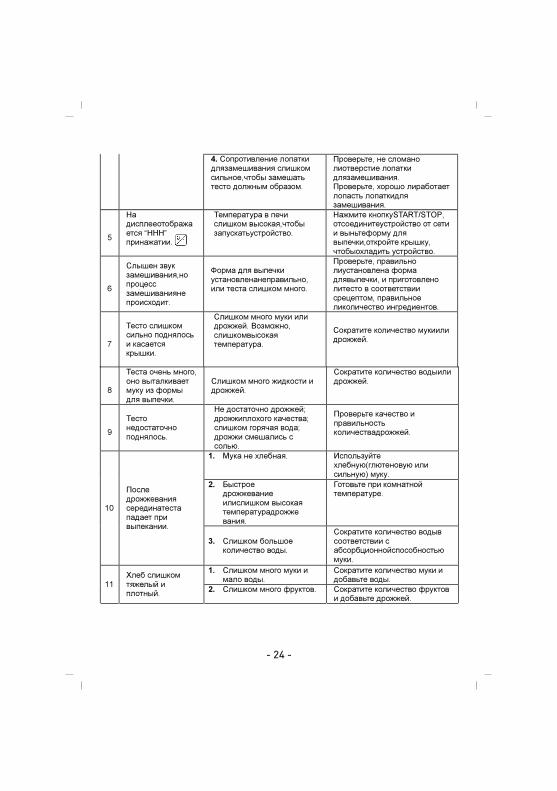
2. Troubleshooting guide for bread maker
- 12 -
- 13 -


Made in P.R.C. Produced at : 02-2016
United Favour Development LimitedUnit B, 10/F Lee May Building 788-790Nathan Road, Mongkok, Kowloon, HK.