unis v4 software guide - holars as
TRANSCRIPT

1
UNIS v4
SOFTWARE GUIDE
UNION COMMUNITY
Version 4.1.0.0 2016-05-04

2
1. Before Starting Program .............................................................................................. 6 1.1 Product Introduction ..................................................................................... 6
1.1.1 Outline ...................................................................................................... 6 1.1.2 Product Configuration ............................................................................ 6 1.1.3 Minimum & Recommended Specification ............................................ 6 1.1.4 Product Support Information ................................................................ 7
1.2 Product Installation ....................................................................................... 7 1.3 Authentication Method ................................................................................ 10 1.4 Procedures for Fingerprint Recognition Sensor Use ................................ 11 1.5 Fingerprint Registration Procedures ......................................................... 15
2. Remote Manager Use Guide ...................................................................................... 18 2.1 Start Program ............................................................................................... 18 2.2 Menu Configuration ..................................................................................... 20
2.2.1 Main Screen View .................................................................................. 20 2.2.2 Monitoring ............................................................................................. 21
2.2.2.1 Access Log List ............................................................................... 22 2.2.2.1.1 List Clear .......................................................................... 23 2.2.2.1.2 Setting Columns .............................................................. 23
2.2.2.2 Remote Manager ........................................................................... 24 2.2.2.3 Status .............................................................................................. 24 2.2.2.4 Event List ........................................................................................ 25
2.2.3 Terminal Management ......................................................................... 26 2.2.3.1 Add Terminal .................................................................................. 29 2.2.3.2 Delete Terminal ............................................................................. 32 2.2.3.3 Upgrade Firmware ......................................................................... 33 2.2.3.4 Setup Options ................................................................................ 35 2.2.3.5 Assign Admins ................................................................................ 44 2.2.3.6 Download customized file ............................................................ 45
2.2.4 User Management ................................................................................. 48 2.2.4.1 Add User ......................................................................................... 50 2.2.4.2 Delete User ..................................................................................... 59 2.2.4.3 Send User Information to the terminal ...................................... 59 2.2.4.4 Terminal User Management ......................................................... 61 2.2.4.5 Mobile Card Issue Management .................................................. 62
2.2.4.5.1 Mobile Card Batch Apply ................................................ 62 2.2.4.5.2 Mobile Card Issue History ............................................. 63
2.2.5 Visitor Management ............................................................................. 63 2.2.5.1 Add Visitor ...................................................................................... 66 2.2.5.2 Delete Visitor ................................................................................. 69
2.2.6 Blacklist Management .......................................................................... 70 2.2.6.1 Delete Blacklisted User ........................................................................ 74 2.2.6.2 Blacklist Download ............................................................................... 75 2.2.7 Access Control ....................................................................................... 76
2.2.7.1 How to use Wizard ........................................................................ 77 2.2.7.2 How to register manually ............................................................. 82
2.2.7.2.1 Add Time Zone ................................................................ 82 2.2.7.3 Add Access Time ............................................................................ 83 2.2.7.4 Add Access Area ............................................................................. 84 2.2.7.5 Add Access Group .......................................................................... 85 2.2.7.6 Delete .............................................................................................. 85

3
2.2.7.7 Transfer to Terminal ..................................................................... 86 2.2.8 Position Shaping (E_Map) ................................................................... 87
2.2.8.1 How to set Positioning Shaping................................................... 88 2.2.8.1.1 How to use Wizard.......................................................... 88 2.2.8.1.2 How to register manually .............................................. 92
2.2.8.1.2.1 Set Terminal Layout ................................................ 92 2.2.8.1.2.2 Set Global Layout .................................................... 93
2.2.9 TNA Settings .......................................................................................... 95 2.2.9.1 TNA Settings................................................................................... 96
2.2.9.1.1 How to use Wizard.......................................................... 97 2.2.9.1.2 Shift Config .................................................................... 102 2.2.9.1.3 Set Schedule .................................................................. 107 2.2.9.1.4 Apply Schedule .............................................................. 109 2.2.9.1.5 Rate of Pay .................................................................... 110
2.2.9.2 Set Special Shift ........................................................................... 111 2.2.9.3 TNA Management ........................................................................ 113
2.2.9.3.1 Process Transactions .................................................... 113 2.2.9.3.2 Modify Hours ................................................................. 114 2.2.9.3.3 Output Period Result .................................................... 115 2.2.9.3.4 Output Person Result ................................................... 117
2.2.9.4 TNA Reports ................................................................................. 119 2.2.9.5 Break Reports .............................................................................. 121 2.2.9.6 Summary Management ............................................................... 123
2.2.9.6.1 Process Totals ............................................................... 123 2.2.9.6.2 Modify Total Hours ....................................................... 124 2.2.9.6.3 Output Person Summary ............................................. 125 2.2.9.6.4 Output Period Summary .............................................. 126
2.2.9.7 Transfer Work Result to another ............................................... 127 2.2.10 Meal Management .............................................................................. 132
2.2.10.1 Meal Record Query ............................................................... 132 2.2.10.2 Statistics of Total Meal ........................................................ 133 2.2.10.3 Individual Total Meal ........................................................... 134 2.2.10.4 Set Meal Management ......................................................... 135
2.2.10.4.1 How to use Wizard........................................................ 135 2.2.10.4.1.1 Initialization ........................................................... 135 2.2.10.4.1.2 Meal Code 1 ............................................................ 136 2.2.10.4.1.3 Meal Code 2 ............................................................ 137 2.2.10.4.1.4 Setting Meal Cost .................................................. 138
2.2.10.4.2 Meal Code 1 ................................................................... 139 2.2.10.4.3 Meal Code 2 ................................................................... 140 2.2.10.4.4 Setting Meal Cost .......................................................... 141
2.2.11 Setting and management of the Side Menu .................................... 142 2.2.11.1 Menu Tree ............................................................................. 142 2.2.11.2 Main Menu ............................................................................. 142
2.2.11.2.1 System............................................................................ 142 2.2.11.2.1.2 Database Backup ................................................... 143 2.2.11.2.1.3 Controlling the server service .............................. 143
2.2.11.2.2 Log .................................................................................. 144 2.2.11.2.2.1 Log Management ................................................... 144 2.2.11.2.2.2 Create log file ......................................................... 151

4
2.2.11.2.2.3 Merge log file ......................................................... 152 2.2.11.2.3 Import/Export data ...................................................... 152
2.2.11.2.3.1 Data Query ............................................................. 152 2.2.11.2.3.2 Import User From File ........................................... 155 2.2.11.2.3.3 Import Log From File ............................................ 157 2.2.11.2.3.4 User In/Out Board ................................................ 159
2.2.11.2.4 Transfer to terminal ..................................................... 161 2.2.11.2.4.1 Terminal Control .................................................... 161 2.2.11.2.4.2 Lockdown Terminals ............................................. 162 2.2.11.2.4.3 Release Lockdown Terminals .............................. 163 2.2.11.2.4.4 Door Control ........................................................... 164 2.2.11.2.4.5 Message Broadcast ............................................... 165
2.2.11.2.5 Management .................................................................. 166 2.2.11.2.5.1 Company Management ......................................... 166 2.2.11.2.5.2 Holiday Management ............................................ 169 2.2.11.2.5.3 Authority Management ......................................... 170 2.2.11.2.5.4 Anti Pass Back Management ................................ 171 2.2.11.2.5.5 User Batch Editing ................................................. 173
2.2.11.2.6 Settings .......................................................................... 174 2.2.11.2.6.1 Wiegand Format Setting ...................................... 174 2.2.11.2.6.2 Smart Card Layout Setting ................................... 178 2.2.11.2.6.3 Issue Smart Card ................................................... 180 2.2.11.2.6.4 Access Group Shift Settings ................................. 181 2.2.11.2.6.5 Mobile Card Admin Setting .................................. 182 2.2.11.2.6.6 DVR Setting ............................................................ 185
2.2.11.2.7 Information ................................................................... 186 2.2.11.2.7.1 Program Information ............................................ 186 2.2.11.2.7.2 Program Help ......................................................... 186
2.2.11.3 Start Home ............................................................................ 186 2.2.11.4 Environment Settings .......................................................... 187
2.2.11.4.1 Local Environment Setting .......................................... 187 2.2.11.4.1.1 General ................................................................... 187 2.2.11.4.1.2 Server Connection ................................................. 189 2.2.11.4.1.3 Alarm Option Setting ............................................ 190 2.2.11.4.1.4 Picture Popup......................................................... 191
2.2.11.4.2 Server Environment Setting ........................................ 192 2.2.11.4.2.1 General ................................................................... 192 2.2.11.4.2.2 Fingerprint ............................................................. 195 2.2.11.4.2.3 Emergency .............................................................. 197 2.2.11.4.2.4 Necessary Contents .............................................. 199
2.2.11.4.3 Password Security Setting .......................................... 200 2.2.11.4.4 Mail Environment .......................................................... 201 2.2.11.4.5 TNA Settings .................................................................. 203 2.2.11.4.6 Other Module ................................................................. 204
3. Appendix .................................................................................................................... 205 3.1 Verifying UNIS Normal Operation ............................................................ 205 3.2 Anti Pass Back Configuration.................................................................... 206 3.3 TNA Settings ............................................................................................... 211
3.3.1 Example of TNA Settings (General Workplace) .............................. 212 3.3.2 Example of TNA Settings (Public Office) ......................................... 218

5
3.3.3 Example of TNA Settings (Night Shift) ............................................ 225 3.3.4 Example of TNA Settings (Shift Work) ............................................. 231 3.3.5 Example of TNA Settings (Multiple Going to and Leaving from Work) 239 3.3.6 Wiegand Setting.................................................................................. 247 3.3.7 Shift Config - Advanced Settings(Shift) ........................................... 252 3.3.8 How to set the query items ............................................................... 253
3.4 Face Authentication in Server Mode ........................................................ 255 3.4.1 Introduction ........................................................................................ 255 3.4.2 Activating License ............................................................................... 255 3.4.3 Deactivating License .......................................................................... 262

6
1. Before Starting Program 1.1 Product Introduction
1.1.1 Outline
UNIS v4 is a program that effectively operates a fingerprint recognition, card, a face recognition, and mobile card terminal. It integrates and manages each terminal and users through network. Real-time monitoring of authentication status is allowed, and authentication record of users can be searched and viewed.
This manual explains how to install UNIS that can monitor and manage a terminal by linking with the terminal.
1.1.2 Product Configuration
1.1.3 Minimum & Recommended Specification
Menu Minimum Specification Recommended Specification Process (CPU) Pentium 4 3.0 Pentium 4 Dual Core, 1.6Ghz or
higher
OS Windows XP or higher Windows 7 or higher Memory (RAM) DDR2 2048MB or higher DDR2 4096MB or higher

7
1.1.4 Product Support Information
Company: UNION COMMUNITY CO.,LTD. Home page Address: http://www.virditech.com/ Address: Please refer our homepage Contact number: 1800 - 6830
1.2 Product Installation
If the program CD is inserted, installation process starts automatically.
If installation process does not start automatically, run Setup.exe in CD to start manually.
1. Installation

8
Select the installation path: the default installation path-C: � Program Files � UNIS

9
Server: The full version installed on the main PC (server version) Client: Main PC Other Remote Manager Client version only for program management

10
Installation Complete
※ Firewall exception handling in each OS Type: After installation, the program does not run and Terminal disconnection Exception handling for your PC's firewall please.
▶Regarding to how to the firewall exemption from operating system, please refer Microsoft Homepage below and find the user guide in each OS Type.
(http://windows.microsoft.com/en-US/windows-8/Windows-Firewall-from-start-to-finish)
1.3 Authentication Method
The following authentication methods are supported and a combination of these methods can also be used.
��Fingerprint Authentication
This is a method that confirms authentication rights using fingerprint.
��1:1 authentication
As a method that enters fingerprint after entering ID, a registered fingerprint that corresponds to ID and an entered fingerprint are compared on 1:1 basis. Authentication process time is short.

11
��1:N authentication
This is a method that authenticates fingerprint from the entire registered fingerprints without entering an ID. This method is simple but processing time is long compared to 1:1 authentication method when there are many users.
��Fingerprint card authentication (TOC)
After storing user’s fingerprint information in the smart card, the fingerprint entered during authentication and the fingerprint stored in the smart card are compared for authentication. Since a storage medium other than smart card is not required, system security can be increased.
��Password Authentication
This is a method that checks access rights using 4~8 digits password. It is used when fingerprint cannot be used.
��Card Authentication
This is a method that authenticates using RF card that a user has. Card number must be registered in the system to use it.
��Face Authentication
This is a method that authenticates registering a user’s face in a system. It can be used with the terminal that supports the face authentication functions.
��Mobile Key Authentication
This is a method that authenticates in a smart phone. This function can be used with the terminal that supports the mobile key function. Regarding to the method for using the mobile key, please refer the user manual.
1.4 Procedures for Fingerprint Recognition Sensor Use
��Basics of Fingerprint Registration
Fingerprint registration is the most important process in using the fingerprint recognition device. Fingerprint must be accurately and properly registered in order to successfully recognize fingerprint.
��Fingers Used during Registration
The use of index finger, middle finger and ring finger is recommended for registration. However, the use of thumb and little finger should be avoided. As it is difficult to place thumb and little finger on the fingerprint recognition sensor window properly, it is difficult to acquire accurate fingerprint image.

12
��Proper Fingerprint Input Procedures
1) When the fingerprint recognition sensor blinks, place the finger on the sensor window.
2) After placing the fingertip at the fixing guide of the sensor window top as shown in the figure, place and fix the finger tightly between the fixing guides of the sensor window top and bottom.
Figure 1 [ Proper Fingerprint Input Method ]
3) Press with adequate pressure as if stamping with finger. Do not apply too weak or too much force.
4) The finger should not be leaned to top, bottom, left and right of the fingerprint recognition sensor window as shown in the figure. Do not input only the fingertip or do not input fingerprint while rotating finger.
Figure 2 [ Improper Fingerprint Input Method ]
��Proper fingerprint registration method
When fingerprint is entered, fingerprint registration can be adjusted after viewing the acquired fingerprint image condition as in the following descriptions. The following are required fingerprint image conditions.
��Fingerprint core location
The fingerprint core area represents the ridge area where bending is the largest. The area inside blue circle in the below fingerprint image represents the core area. In general, such core area is located in the center of fingerprint. Using fingerprint core position shown during fingerprint registration, the finger can be placed so that the center area of fingerprint can coincide with the center of the sensor window. It is necessary to acquire fingerprint whose core

13
is located in the center of an image captured during registration process. Registered fingerprint should not be twisted and it must be directed vertically.
Finger 3 [ Proper Fingerprint Core Position ]
Finger 4 [ Improper Fingerprint Core Position ]
Figure 5 [ Wrong Direction Input ]
��Fingerprint image quality
Fingerprint image quality is determined by the condition of fingerprint image ridge pattern. Fingerprint with large-sized scar, fingerprint with poor condition due to eczema, dry fingerprint and wet fingerprint usually produce low-quality image.
Figure 6 [ Wet Fingerprint ]
The fingerprint images shown above are produced due to wet finger or due to excessive applied pressure during fingerprint input. The solution to the above condition would be to reduce the applied pressure or wipe the wet finger with towel. Doing these things can help produce good-quality image.

14
Figure 7 [ Dry Fingerprint ]
The fingerprint images shown above are produced due to dry finger or due to insufficient applied pressure during fingerprint input. Apply stronger pressure or blow into the finger to produce good-quality fingerprint image. (Especially during winter)
Figure 8 [ Fingerprint with Scar ]
The above fingerprint images are produced due to scar or eczema in the finger. If these fingerprints are registered, authentication may be denied after scar or eczema is healed. Therefore, avoid such types of fingers and use other finger for fingerprint registration.
The following are three conditions that need to be satisfied to produce good-quality fingerprint during registration.
1. Core area of fingerprint image is located in the center of picture.
2. Fingerprint image fills the entire picture.
3. Ridge (black line) and valley line (white line) of fingerprint are expressed clearly.
��False Rejection and False Access
Many problems can occur if fingerprint image quality is poor or fingerprint area without special characteristics is registered due to the non-central location of the core.
1) False rejection
This event represents a case when authentication trial for a registered fingerprint fails. If the condition of a registered fingerprint image is poor, even properly entered user fingerprint can be rejected for authentication. It should be noted that even if a fingerprint image is registered properly, an improperly entered fingerprint can still be rejected for authentication. Factors such as fingerprint input condition and fingerprint image quality affect the occurrence of this event.
2) False access
This event represents a case when another person’s fingerprint is authenticated. In general, this event can occur frequently when a fingerprint with insufficient characteristics is registered due to missing core. It can also occur when fingerprint types are similar.

15
3) Authentication security level
This is a value set as criteria to determine authentication through matching between entered fingerprint and registered fingerprint. If authentication security level is lowered, false rejection rate decreases while false access rate increases. On the contrary, if authentication security level is raised, false rejection rate increases while false access rate decreases. For such reasons, each location with a fingerprint authentication system uses a suitable security level. The default security level setting can be used for general purpose fingerprint authentication systems.
1.5 Fingerprint Registration Procedures
These are procedures to register a fingerprint using the fingerprint recognition sensor with the Remote program.
1) This is the initial fingerprint registration window.
To skip the initial window, uncheck the box.
2) Select a finger whose fingerprint is to be registered.

16
3) Place the finger on the fingerprint recognition sensor
4) Briefly remove the finger from the fingerprint recognition sensor.
5) Place the finger on the fingerprint recognition sensor again
6) If fingerprint is entered properly, “OK!” is displayed to proceed to the next step.

17
7) Registered fingers are displayed in green. If fingerprint registration is completed, press Next button.
8) Fingerprint input was completed.
Press Finish button to finish fingerprint input.
※ The number of fingerprints can be changed at [Server Environment Setting].

18
2. Remote Manager Use Guide 2.1 Start Program
Only users registered as the administrator can use Remote Manager, as no registered administrator is available during the initial installation, logon is allowed as the master administrator.
To start Remote Manager program, double click icon on desktop.
1) Log in for a Master Manager: Click “Master Log Check Box”, and enter the pass word. (Default value is “1”.)
2) Log in for User having the administration authority: After entering the manager ID, enter password or authenticate with your finger.
Regarding to the password for the initial master manager, modify in [Main Menu] – [System] – [Change Master Password] in Menu which at the right side.

19

20
2.2 Menu Configuration 2.2.1 Main Screen View
It is the screen that arranges a frequently used menu screen. When clicking the button, it moves to the screen that the user wants.
The button for TNA and Meal menu is activated when connecting with USB Lock.
But in case of less than 10 people in the foreign web site, TNA and Meal menu can be managed without USB Lock.
(USB Lock)

21
2.2.2 Monitoring Authentication record status of a user authenticated by the fingerprint recognition terminal, access status of Remote manager and terminal connection status are monitored in real-time.
Server connection status: It displays the network connection status of the authentication server and data server. Periodically, check the status of the connection and attempt to connect when disconnecting. (It displays green when connecting in normal, otherwise does red when in abnormal)

22
2.2.2.1 Access Log List
Access Log List of a user is displayed.
��Time: Access date and time are displayed.
��Terminal ID: ID of a terminal that authenticated is displayed.
��User ID: ID of an authenticated user is displayed.
��Name: Name of an authenticated user is displayed.
��Emp NO.: Employee Number of an authenticated user is displayed.
��Branch: The branch information for an authenticated user is displayed.
��Location: A User’s current location can be checked. (Only applied when using Anti Pass back)
��Access Group: Access Group of an authenticated user is displayed.
��Class: Users and visitors
��Mode: It displays the authentication mode among general/F1/F2/F3/F4.
( ex . [Terminal Information]-Functional Separation Meal: Breakfast, Lunch, Dinner Show, etc., if A/T: Attend, Leave, Out, In Display, etc. )
��Type: From 1:N/1:1/fingerprint card/card/password, a type that authenticated is displayed.
��Result: Authentication result is displayed as success/failure.
��External Device: Check option for external device if it is not connected leave with blank.
��Pass Count: if person over then, excessive number of people will be displayed (Only by using Tail Gate)

23
2.2.2.1.1 List Clear
Click the right button of the mouse in the authentication log list and select “List Clear” in pop-up menu. The authentication log list, which is printed in real-time, is cleared
2.2.2.1.2 Setting Columns
Click the right button of the mouse in the authentication log list and Select “Set Columns” in the pop-up menu. Select only the field to be shown in the field list.

24
2.2.2.2 Remote Manager
It displays the access status of a client (Remote Manager), who is connected with the server.
��Client ID: ID of a client connected to the server is displayed.
��Admin ID: ID of an administrator who is using a client is displayed.
��IP address: IP of a client computer is displayed.
��Version: The version is displayed to a client connected to the server.
2.2.2.3 Status
Terminal connection status is displayed.
��Connection: If a terminal is connected, green lamp is displayed.
��Disconnection: If a terminal is disconnected, red lamp is displayed.
※ Client connection status and whether to use the terminal state can be set to [Tool]-[Environment Settings]-[Local Environment Setting].
※ Door Control
- Select the connected terminal, click the button of the mouse and then click the pop-up menu. After that, control the door.

25
1) Open Door: Release door unlock for a second. 2) Door Unlock: Activate the door lock to the unlocked state. 3) Door Lock: Activate the door lock to the locked state. 4) Setup Options: When the terminal is connected, it checks the Setup Options and applies. (Reference: Setup Options)
2.2.2.4 Event List
It displays the various event lists of the terminal.
��Time: It displays the time information for the event occurred.
��Terminal ID: Terminal ID is displayed.
��Name: Terminal name is displayed.
��Partition: It means the independent security zone that consists of many zones. (Only for MCP040) Partition number #01~04
��Account: The account number that set in ‘Partition Setting’ (Only for MCP040).

26
��Class: The class of the events is displayed. (open/close, Access Control, System Trouble, Alarm)
��Event: The type of the event is displayed.
��Qualifier: Alarm or Restoration
��ID: User number, Area code, 000-999 (System event is always 000.)
If the user number exceeds 999, the maximum value is less than 999. (Only for MCP040)
��Remark: The brief information for the authenticated user is displayed.
2.2.3 Terminal Management
Terminal addition/change/deletion & setting value change for each terminal can be made.
A terminal must be registered in advance for connection with the server.
��Add Terminal: Select [Add Terminal] in the [Terminal Management] menu.
��Modify Terminal: Double click a terminal to be changed at the terminal list window.
��Delete Terminal: After checking a terminal to be deleted at the terminal list window, select [Delete Terminal].

27
��ID: Terminal ID is displayed.
��Name: Terminal name is displayed.
��Branch: Installation Branch of a terminal is displayed.
��Function: The function set in a terminal is displayed; time/Attendance management, meal service management and school management
��Enter Zone: Anti pass back Enter Zone of a terminal is displayed
��Exit Zone: Anti pass back Exit Zone of a terminal is displayed.
※ Area entrance / exit details, [Anti Pass Back Management] ,[ex1)Anti Pass Back]
��Remote Manager: The remote control of the access door is displayed. (0: Allow to use all the functions, 1: Prevent to use all the functions, 2: Allow only door open)
��Location: Installation location of a terminal is displayed.
��IP Address: Terminal’s IP address is displayed.
��Version: Terminal’s firmware version is displayed.
��Time zone: The time zone of the terminal is displayed.
��Class: The type of General / Controller / Dummy Reader is displayed.
- Click the right button of the mouse in the list.
��Find: Select the item and option to find and search them.

28
��Find contents: Enter to the terminal to find.
��Find Option: Choose the option to find in ID or name.
��Upper, Lopper case: In case of English, select whether classifying captial and small letter.
��Full Char: Select if searching with the full name of the terminal or not. If not checking, search a majority of terminals including the similar words.
��Set Columns: Set the option to print from the list.
��Refresh: Update the list information.
��Save: Save the currently displayed terminal list as CSV file.

29
2.2.3.1 Add Terminal
▶ Basic Information
��ID: Assign ID to a terminal.
��Name: Assign a name to a terminal.
��Branch: Select a branch registered at Branch Management.
��Install type: Enter the installation type of the terminal. (Fixed: The terminal for General installation, Portable: The terminal with the power and back-up battery)
��Location: Enter a location where a terminal is installed.

30
��Other: Enter other items on a terminal.
��Reg. Date: Set the date and time of terminal registration.
��Door control: It gives the control authority for the terminal in the list. 1) Allow all functions: Allow Door open/lock/unlock control available. 2) Disabled: Not allow Door open/lock/unlock control (UI: Not indicated) 3) Remote door open only: Allow only Door open control available.
��Type: The type of General, Controller, and Dummy reader is displayed.
1) General: General Reader Terminal 2) Controller: Controllers such as MCP040 etc. 3) Dummy reader: Only terminal that passes the card number without the authentication as there is no process to authenticate.
��Time Zone: Standard time in the world to the information terminal Time Zone setting (world standard time-based time synchronization of the handset)
��Terminal Function Assignment
��T/A: Check this if terminal function is Time/Attendance. ��Meal: Check this if terminal function is meal service management. ��School: Check this if terminal function is school management.
��Anti Pass Back(※ See detailed setting an example: [ex1)Anti Pass Back)
��Enter Zone: Set a code registered at [Anti Pass Back Management]
��Exit Zone: Set a code registered at [Anti Pass Back Management]
��Soft Pass Back: Check whether Soft Pass Back is or not.
(Even if it has the limitation of the Pass Back, it processes the authentication success in the terminal or the server and it alarms the current status in the monitoring screen.
��Function Assignment
UNIS S/W can basically use one DVR and a license should be purchased to use multi DVR.
(To assign, DVR Setting should be registered in advance.)
��DVR ID: Select the DVR ID corresponding to the terminal. ��DVR IP: Enter the DVR IP address .�
��CH1: Select the Channel 1. ��CH2: Select the Channel 2.

31
��Assign Terminal Administrator
A list of users with rights of at [ Admin Authority Management ] is displayed at “Unassigned Admin”.
After selecting a user to be assigned as an administrator, move the selected user to “Assigned
Admin” list with the button.
: Designate a manager by moving the left to the right.
: Release a manager by moving the right to the left.
: Designate all the manager by moving the left to the right.
: Release all the manager by moving the right to the left.

32
2.2.3.2 Delete Terminal
After confirming to delete the terminal information, delete the registered device.

33
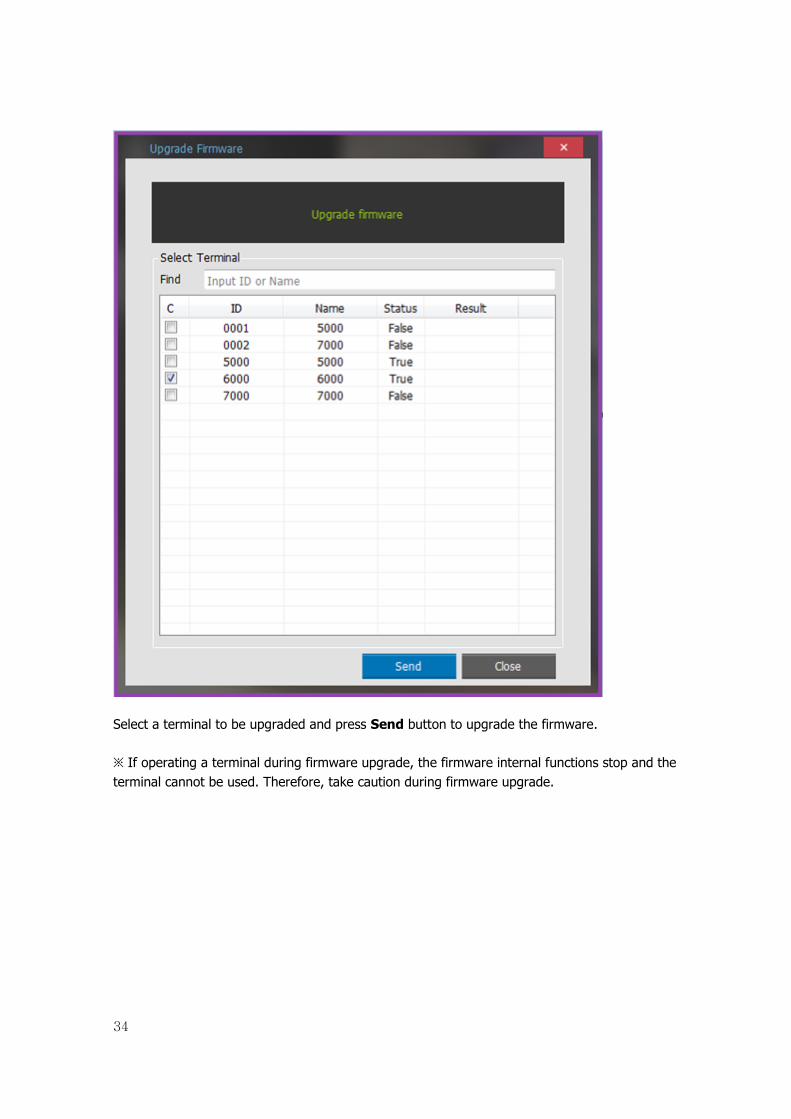
2.2.3.3 Upgrade Firmware
Terminal firmware can be upgraded.
Find the path which has the firmware file, choose that file and press Open button.
34
Select a terminal to be upgraded and press Send button to upgrade the firmware.
※ If operating a terminal during firmware upgrade, the firmware internal functions stop and the terminal cannot be used. Therefore, take caution during firmware upgrade.
35
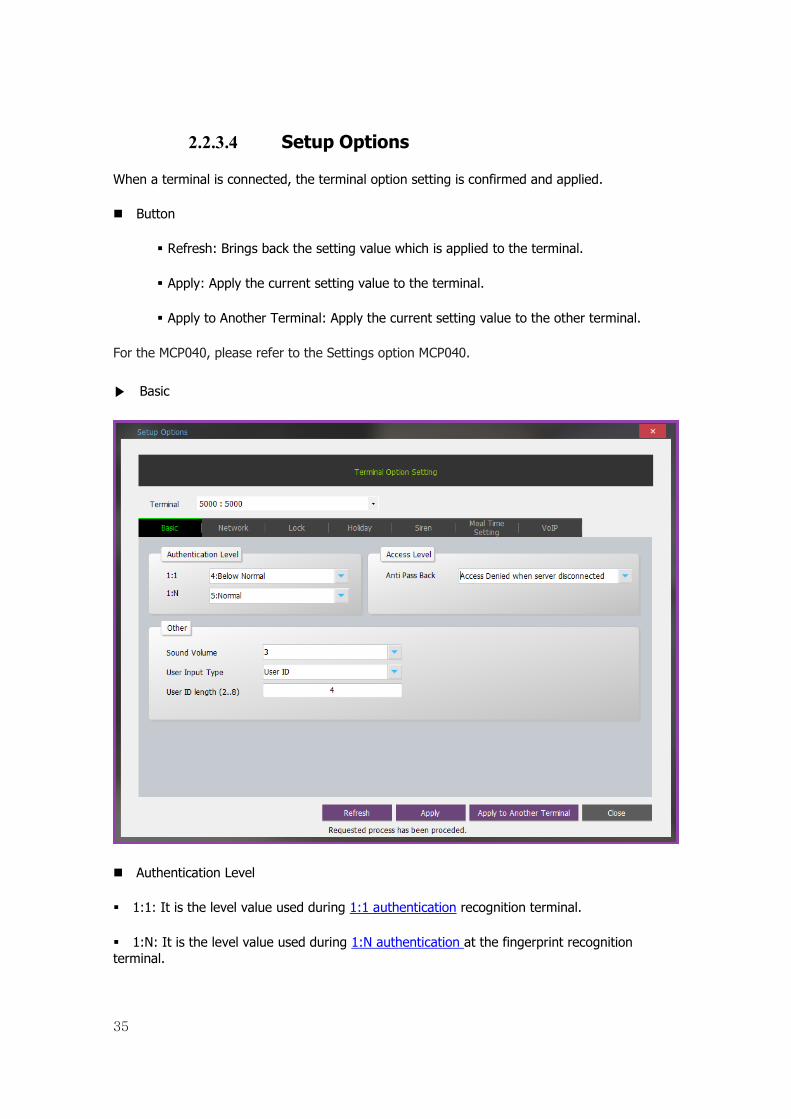
2.2.3.4 Setup Options
When a terminal is connected, the terminal option setting is confirmed and applied.
��Button
� Refresh: Brings back the setting value which is applied to the terminal.
� Apply: Apply the current setting value to the terminal.
� Apply to Another Terminal: Apply the current setting value to the other terminal.
For the MCP040, please refer to the Settings option MCP040.
▶�Basic
��Authentication Level
� 1:1: It is the level value used during 1:1 authentication recognition terminal.
� 1:N: It is the level value used during 1:N authentication at the fingerprint recognition terminal.

36
��Access Level
� Anti Pass Back: It is the anti pass back assigned value.(※ See detailed setting an example: [ex1)Anti Pass Back] )
- Not Use: Anti pass back is not set at a terminal.
- Access Allowed When server disconnected: Access allowed for all users in case of communication disconnection.
- Access Denied when server disconnected: Access prohibited for all users in case of communication disconnection.
�� Authentication Restriction: User authentication method in devices that are limited to a fingerprint and password.
��Others
� Sound Volume(0~20): Specifies the sound volume of the terminal (authentication notification sound) - AC1000 ~ AC6000: Volume value 0 ~ 5 / AC7000: Volume value 0-15
� User ID Length (2~8): Specifies The ID length of a user assigned in the terminal.
� User Key: The type of the number to be entered during 1:1 authentication is assigned; user ID or Unique ID. User ID is the default key used in the program and it can be up to an 8-digit number.
※. If a key over 9-digit is required, use Unique ID as key.
37
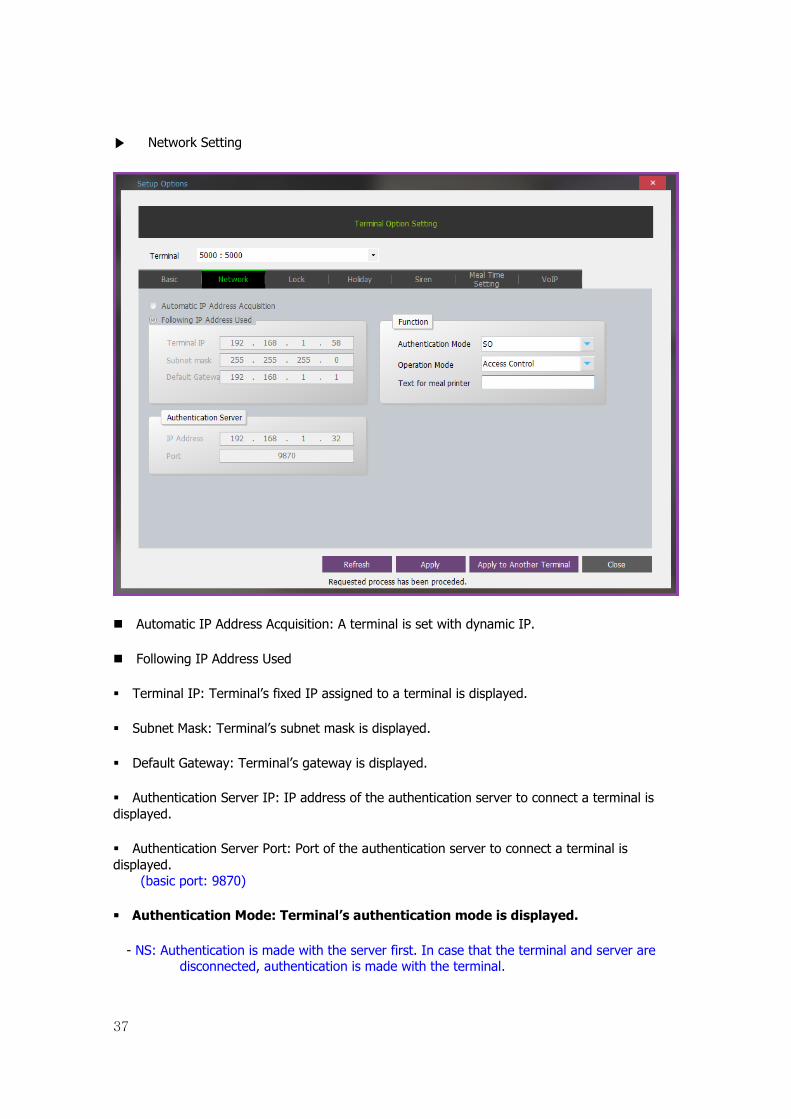
▶ Network Setting
��Automatic IP Address Acquisition: A terminal is set with dynamic IP.
��Following IP Address Used
� Terminal IP: Terminal’s fixed IP assigned to a terminal is displayed.
� Subnet Mask: Terminal’s subnet mask is displayed.
� Default Gateway: Terminal’s gateway is displayed.
� Authentication Server IP: IP address of the authentication server to connect a terminal is displayed.
� Authentication Server Port: Port of the authentication server to connect a terminal is displayed. (basic port: 9870)
� Authentication Mode: Terminal’s authentication mode is displayed.
- NS: Authentication is made with the server first. In case that the terminal and server are disconnected, authentication is made with the terminal.

38
- SN: Authentication is made with the terminal first. In case an authenticated user is not available in the terminal, authentication is made with the server.
- NO: Authentication is made only with the server. If the terminal disconnects the server, the authentication cannot be authenticated.
- SO: Authentication is made only with the terminal.
� Operation Mode: It displays the operation mode; Access Control, TNA, Meal, Shift and People Count. (Shift and People count functions are only applied in the special terminal and firm ware.)
� The text for Meal Printer: Set the text to be printed to the Meal Printer which is connected in the terminal.
▶ Locking Setting
This function is used for opening/locking setting of an entrance/exit if a terminal is used at entrance/exit.
��Locking Terminal: It is used to restrict user access (authentication) by a terminal.
��Unlocking Terminal: It is used to leave a terminal open without authentication restriction.

39
��Time Setting Procedures
1) Drag the left and right borders of that appears after clicking the mouse button in the slider (grid square) to adjust the time. Or, enter a time value directly by pressing the enter key to complete the setting. (Up to 3 is available.) The locking time and opening time cannot be duplicated.
2) Set the day of the week, click Apply button, and then it is applied on that day.
3) When clicking the right button of the mouse in the timeline (slider), the menu will pop up.
These are the values in timeline control and they are fixed in English, even when clicking the mouse right-click in the menu.
� Initialize: Initialize the set time.
� Show Value: Show the set time.
� Display: Modify the timeline value.
��Holiday can be set and assigned as Holiday 1~3.
1) In case of applying lock/unlock setting only in Holidays (holidays, national holidays, etc.) and special holiday, Holiday 1, Holiday 2 and Holiday 3 schedule is registered in the menu.
2) Holidays must be registered and Add / Delete from the menu to add the date / apply, please.

40
▶ Holiday Setting
1) Select a number to set from the list and assign the holiday type.
2) Holiday type can be classified and assigned as holiday 1~3.
3) Select a date to be set as holiday and press Registration button to assign it as holiday.
※Up to 100 holiday registrations can be made. Two or more of the same date that the holiday will be designated as case number. (Sequential)

41
▶ Siren
� Set alerts and let the siren sound every set time.
1) Retrieve: Bring back the Siren configuration information from the saved file (Alarm.dat) in the installation path.
2) Save to File: Save the Siren information in the installation path. (Alarm.dat)
3) Alarm Time: Set the time to start alarm.
4) Settings: Select the periodic cycle (day).
5) Duration: Set the time to sound alarm. (Unit: Second 0~15)
6) Notes: Enter the note about alarm.
7) Use the entered details with Add / Modify / Delete button to manage in the left list.

42
▶ Meal Time Setting
� When using the Meal Time Settings mode, designate the meal time in the server in case of using the meal time mode. (non-redundant)
� Breakfast, Lunch, Dinner, Snack, and Late Night Meal can be set.

43
▶VoIP
� Set the server access account of SIP for voIP or exchanger.
Address: Enter the server address of exchanger or SIP Server.
ID: Enter the server ID of exchanger or SIP Server.
Password: Enter the server password of exchanger or SIP Server.

44
2.2.3.5 Assign Admins
A terminal that can be managed by each administrator is assigned. A terminal administrator is a user who can use terminal menus. In case more than one administrator is registered in a terminal, the administrator authentication process is required to enter the setting menu.
After selecting an administrator, select a terminal to be registered from [Unassigned Terminal]
list and press the button to move it to Assigned Terminal list.
The user’s list having the authority displays from
.
After designating the terminal admistrator and sending the user from terminal, the designation is applied.

45
2.2.3.6 Download customized file
Download customized file is the function that a user can separately specify file and send it to the terminal. Defined Text File(.csv)/Backgroud image File(.jpg)/Success voice File(.wav)/Fail voice File(.wav)/Movie File(.mp4) Please refer to the terminal introduction for the defined file.
1. Defined Text File
After specifying a file as a Defined Text File (.csv) and selecting the CSV file (.csv), press OK button to display the selecting terminal window.
After selecting the terminal on terminal list window click Send and file is sent and the results of download appear.

46
CSV file is created after text which will change in excel file with firmware is changed to make csv file.
If changing back from the defined text to the default text, select Application - Display - User Text in the Terminal menu and clear the mark in the check box.
2. Modifying Background Image File
Designate the File type as the background image file(.jpg) and select the image file(.jpg).
Press OK button to display the terminal window. Select the terminal in the terminal list window. After that, press Send again and the file is transferred and the result of the download is displayed.
At this time the file name is applicable to file within only 15 words. and JPG file of 320* 240 can be sent. If data of other format is downloaded there is an "version error" in the result of download. If,Backgroud image File to change back to the default: Application – Display and choose to enter the menu.

47
3. Modifying the Voice File
When a file is specified with ‘success voice file (.wav)’, select Wav file (.wav) and click OK button to display the selecting terminal window.
Press Send button to transfer the file and display the downloaded result.
At this time, choose file name within 15 words including extension name, send Wav file of 8 KHz ,16 bit mono. If date other format is downloaded version error is displayed on the monitor. In case of fail voice, change in the same way by designating file type as (.wav) If changing back to the default voice from the defined voice, select Operation method – Window setting in the terminal and clear the mark in the check box.
To change back to the default in the Custom Voice Voice [operating system] from the terminal - [Screen Settings] to enter the menu to place a checkmark in the "Use your voice 'item unchecked.
4. Setting the Movie File
When a file is specified with movie file (.mp4), select the movie file (.mp4) and click OK button to display the selecting terminal window.

48
Press Send button in the terminal list to transfer the file and display the downloaded result.
At this time, use the file name within 15 words including the extension and only transfer MP4 file. If the data of another format is download, “version error” is displayed in the results.
2.2.4 User Management
It is a list of registered users.
▶ Add User: Select Add User in User Management. �
▶ Modify User: Double click a user to be changed in the user list window.
▶ Delete User: After checking a user to be deleted in the user list, select Delete User.
���ID: User ID is displayed. �
��Name: User name is displayed.
��Unique ID: User’s Unique ID is displayed.
��Branch: User’s affiliated business location is displayed.
��Department: User’s affiliated department is displayed.
��Title: User’s title in a company is displayed.
��Authority: User’s administration authority is displayed.

49
��Access Group: User’s access control group is displayed.
��T/A Code: User’s time/attendance code is displayed.
��Meal Code: User’s meal service code is displayed.
��Payroll Code: User’s hourly wage code is displayed.
��The number of the fingerprints: The number of user’s fingerprints is displayed.
��The number of the card: The number of the user’s cards is displayed.
��The number of the face: The number of the user’s faces is displayed.
If any authentication method is not registered, the user is displayed as the color which is designated in [Authentication type non-registered user record color] from [Environment] – [General].
▶ Pop-up menu
��Click the button of the mouse in the list.
��Refresh: Update the list information
��Set Columns: Set the item to print from the list
��Find: Select the item and option to find and search them.
��Save: Save the currently displayed list of users as CSV file.

50
2.2.4.1 Add User
▶ Basic information
��ID: Assign ID to a user. (MAX 8)
��Name: Enter user’s name.
��Employee ID: Enter user’s Employee ID (More than 9 digits are available [User Key])
��Branch: Assign the business location code registered at Branch Registration.
��Department: Assign the department code registered at Department Registration.
��Title: Assign position code registered at Title Registration.

51
��Authority: Assign the administration authority code registered at Admin Authority Management.
��Access Group: Assign access group code registered at Access Group Setting.
��Schedule: Assign time/attendance code.
��Meal Code: Assign meal service code
��Pay Rate: Assign pay Rate.
▶ Extended information
��Telephone: Enter telephone number.
��Email Address: Enter email address.
��Address: Enter the address of user’s residence.
��Other: Enter other items.
��Reg. Date: User registration date and time are automatically entered.
��Location: Display the area where the user is currently located when using Anti Pass Back function. ( ※[Anti Pass Back Management],[ex1)Anti Pass Back] )
��User Message: Enter the user message to display in the terminal when authenticating. (※ Display ID when its authorized with user information from the computer, only with AC2100)
��Notice: When authenticating a user, enter the notice to display in the terminal.
(After entering the notice, if the employee authenticates the check setting, the notice is sent to terminal. Only 5000 and 6000 terminals are supported.
��Picture Registration: Click Add button to register the photo a user wants. (Recommended Size: 320 x* 240). The registered picture size is limited to less than 7Kbytes. If a user is connecting a USB camera button to enter the real-time video, pictures can be obtained.
▶ Setting the Restriction
��Access Date Range ��No Restriction Period: Allow a user’s access at all times. ��Access Allowed Period: Set a user’s access period. ���Restriction Period: Set a user’s access restriction period. (※ If it is the terminal period of limitations, a user cannot access with "invalid entry the term”.)
��Exemption antipassback: Check a user’s anti-pass back option.

52
��Setting the limitation for administration authority: In case of log in as a master administrator, it provides access data range to the user having the management authority.
As it is shown above, a master administrator selects the access list to give the authority. If the administrator who gets the authority from the master logs in again, he only can select the access group that the master gives authority to.
▶ Remote Access Password Information
��Remote Access not available: Even if a user is registered as the administrator, the user can’t log in UNIS.
��Initialization: Initialize the password as the designated value in the environment setting.
*The maximum digits of the password are 30.

53
▶ Other information
��ACU Partition: If a user is the partition which is connected with MCP040, only checked partition is allowed to access.
��VOIP: It sets Voip account information.
▶ Authentication Method
��Combine the authentication methods such as fingerprint, fingerprint card, password, card, face, mobile card, and etc.
��In case of the fingerprint card, others cannot be used.
��If a user uses the password, the OR combination with others is available for only 2 methods.
��Except for that, the maximum 3 authentication methods are available.
��Registration level: Set the available standard value when registering the fingerprint.
��Authentication level: Set the available standard value when authenticating the fingerprint.
��Fingerprint registration: Through the wizard, a user can register the fingerprint or delete it.

54
��Delete: Delete all the registered fingerprints.
��Duress fingerprint: If a user is threatened by somebody in outbreak situation, in case of registering your fingerprints, the user can get the alerts and mail from real-time log using your duress fingerprint.
��1:N: This is a method that authenticates fingerprint. A user can set 1:1 or 1:N. (1:N is the method that can be authenticated without entering ID when authenticating the fingerprint.)
��Alarm setting for Duress finger
Select the Duress alarm in [Environment] – [Local Environment] – [Alarm Popup]
as it is shown below.

55
��Mail Setting for Duress fingerprint
Select the duress fingerprint in [Tool] – [Environment] – [Mail Environment]
��Terminal Password Information (Password registration): Register the password as your authentication method.
��Card information (Card registration): Press Card Reader button and let the card read in the smart fingerprint reader. After the card number appears, press Add button and register the card.
��Face information
��1:N Face: When authenticating with your face, it is available to do Face Authentication directly without entering ID or pressing the function key. (Now, only terminal authentication is available)
��Register: Register a user’s face with the terminal AC7000 (Data is saved in the server.)
1) Press Register button to start to register a user’s face. 2) Select the terminal to register in the list and press Start button to keep processing.

56
3) Select the registration method in the terminal AC7000. - General registration: 15° (Up), 8° (Up), 0° (Front), -5° (Below), -15(Below), a total of five registration of face angles. - Simple registration: 15° (Up), 0° (Front), -15(Below), a total of three registration of face angles.

57
4) Press Start button, show your face in the screen and register in each steps according to the guide.
5) After completing the face registration, press Finish button and finish registration.
��Add Face Registration: Press Add button to register additionally. (It only activates when the face data is registered in advance.)
��Delete Face Registration: Press Delete button to delete the registered data of face information.

58
���Mobile Card Information
��To use the mobile card, a user should register the administrator first. (Refer Mobile Card Administrator Setting)
��Period Setting: Set the period of mobile card access. (Up to 1 year from the current time ��Country Code: Country code for the international phone call. ��Mobile number: A User’s mobile number ��Immediately issued when the register: After checking the corresponding menu, if the mobile card is not issued, it transfers the mobile card sending message in SMS when adding or deleting the user. ��Discard: Discard the issued mobile card.
** If a user wants to check whether mobile card is issued or not, double click the corresponding user in the list and the user can find it. In case of the user whose mobile card has already been issued, the window in Mobile Card Information is deactivated.

59
2.2.4.2 Delete User
��After checking the user’s information to delete, delete the user from the list.
2.2.4.3 Send User Information to the terminal
When sending user information, only the users authorized for authentication are sent to the applicable terminal. Any unauthorized user is deleted from the selected terminal. For the user skipped due to absence of authorization for authentication, the number of users skipped is indicated in the status column of terminal list.

60
After selecting a terminal to receive information, Press Send button.
※ After entering the terminal’s ID or name to transfer, press F3 or Search button to search the corresponding terminal.
※ When transferring the user’s name from the terminal, a maximum 16 bytes only can be transferred.
※ Check the terminal to transfer after checking all the employees - For the employees who have no Right to Access ([Access Control]), its transmission is automatically skipped.
※ Visitor is not transmitted to the terminal.(See [Add Visitor] )

61
2.2.4.4 Terminal User Management
User information stored in a terminal can be inquired or loaded to the server.
User information stored in a terminal does not include the user’s name.
Information of a user who is already registered in the server cannot be loaded.
(But a user can bring the corresponding user in [Tool]-[Environment]-[Server Environment]-Check [All terminal to overwrite users]
��Recall: Recall the user information stored in a terminal.
��Delete: Delete a checked user from a terminal.
��Delete All Delete all the users from the terminal.
��Retrieve: Bring the imported user information back to the server.
��Close: Close the current window.

62
2.2.4.5 Mobile Card Issue Management 2.2.4.5.1 Mobile Card Batch Apply
It searches the users whose mobile card expiration date is less than a month or mobile card is not issued yet and issues the mobile card for them.
��Search: Select a target to search.
�� Apply: Click Apply button, and issue the mobile card at once for the inquired user.

63
2.2.4.5.2 Mobile Card Issue History
It searches the issue history of the mobile card.
2.2.5 Visitor Management
It is a list of registered visitors.
▶ Add Visitor: Select [Add Visitor] from [Visitor]. Visitor ID is distinguished from User ID.
▶ Delete Visitor: After checking a visitor to be deleted from the visitor list window, select [Delete Visitor].

64
��ID: Visitor’s ID is displayed.
��Name: Visitor’s name is displayed.
��Social Number: Visitor’s social number is displayed.
��Visitor's Company: Visitor’s company: number is displayed.
��Other Info: Visitor Other Info is displayed.
��Access Group: Visitor’s access group is displayed.
��Host Branch: Visitor’s visiting branch is displayed.
��Host Department: Visitor’s visiting department is displayed.
��Host: Visitor’s visiting target is displayed.
��Purpose for Visit: Visitor’s visiting purpose is displayed.
��Fingerprint Count: It indicates the number of the visitor’s registered fingerprints.
��Card Count: It indicates the number of the visitor’s registered cards.

65
��Click the right button of the mouse in the list.
� Refresh: Update the list information.
� Set Columns: Set the item to print from the list.
� Find: Select the item and option to find and search them.
� Save: Save the visitor’s list as CSV file.

66
2.2.5.1 Add Visitor
��Basic information
��ID: Assign visitor’s ID.
��Name: Enter visitor’s name.
��Social Number: Enter visitor’s social number. (But Serial number should be the only value in users and visitors.)
��Visitor’s Company: Enter visitor’s company.
��Visitor Information: Enter visitor’s information.
��Telephone: Enter visitor’s telephone number.
��Email Address: Enter visitor’s email address.
��Address: Enter visitor’s mailing address.

67
��Other: Enter other required items.
��Reg. Date: Visitor’s registration date and hour are entered automatically.
��Location: a visitor tells the current position information.( ※[Anti Pass Back Management],[ex1)Anti Pass Back] )
��Authentication Type
��Combine the authentication methods such as fingerprint, fingerprint card, password, card, face, mobile card, and etc.
��In case of the fingerprint card, others cannot be used.
��If using the password, the OR combination with others is available for only 2 methods.
��Except for that, the maximum 3 authentication methods are available.
��Visiting information
��Host Branch: Assign a business location registered at [Branch Registration].
��Host Department: Assign a department registered at [Department Registration].
��Host: Enter visitor’s visiting person.
��Purpose for Visit: Enter visitor’s visit purpose.
��Access Group: Assign an access group registered at [Access Group Registration].
��Visit Period: Assign visitor’s visit period. Visit is allowed only during the assigned period.
��Fingerprint Information: Press the button to register the fingerprint.
Refer to [Fingerprint Registration Procedures] for more information on fingerprint registration procedures.
��1:N Authentication Permission: Authentication is made only with fingerprint without fingerprint recognition terminal keypad input.
��Password Information: Register a password to be used for authentication.
��Card Information: Press Reading button to read a card in the smart fingerprint reader. After the card number appears, press Add button to register a card.
��Picture Registration: Press Add button to register the desired picture.

68
(Recommended Size: 320 x* 240) The picture size to be able to is limited to less than a 7Kbytes. If a user is connecting a USB camera button, press the real-time video button to gain the picture. ��Visit Finish: Delete the visitor in the list and add him to the visitor’s history.
��Visitor Lookup: Press Visit Finish button to search the deleted visitor’s list from the list.
※ Visitor information cannot be transmitted to the terminal, and only Authentication server is available.
��Select: Display the selected visitor in the visitor’s information. (The applied item reflects only the corresponding column. ��Delete: Delete the selected visitor.

69
2.2.5.2 Delete Visitor
��After checking a visitor to delete from the visitor list window, select Delete.

70
2.2.6 Blacklist Management
Blacklist Management to blacklist the registered users and visitors is classified as a feature at stores when needing to restrict a certain users access. If a user checks the existing information on the registered users and visitors in the bottom of the toggle button, it appears in the blacklist. When this user / visitor management views are cleared from the blacklist, it will be moved. From then on, it attempts to authenticate and the authentication will fail. After checking Alarm and Mail [Blacklist attempts authentication], the alarm and mailing services are also available.
��How to set up
��Check [Use blacklist user management] from [Tool] – [Environment] – [Server Environment]-[User] as it is shown below.
��Double click the user information to designate the blacklist from the user list to press Change blacklist button and then it is changed like below.
��Click the classified user in [Blacklist Management] to check the information like below.

71
��Delete Blacklist: Press Remove from Blacklist button to delete the blacklist.
(It is available to modify the information of access group.)

72
� Confirm Authentication Log
��Blacklist following an authentication result before registering as "success" normal access is possible, but once registered as authentication failures "blacklist attempts authentication " to display the results.
��Additional notification function: mail service, an alarm message display
��Check the use of mail service and [Blacklisted User Attempted Authentication] from [Tool] – [Environment] – [Mail Environment] to forward the related contents into the mail as below.

73
��Check [Blacklisted User Attempted Authentication] in [Tool] – [Environment] – [Alarm popup] – [Select popup alarm] to display the alarm window in the monitoring screen as below.

74
2.2.6.1 Delete Blacklisted User
Delete the selected user in the blacklist. All the information of the deleted user is deleted.

75
2.2.6.2 Blacklist Download
Transfer the selected blacklist user to the terminal.

76
2.2.7 Access Control
An administrator uses the access control function to restrict user’s access by a date of the week.
Time Zone, Access Hour, Access Area and Access Group that are lower functions of Access Control are configured as tab to show their setting values.
To set the Access Control, use [Wizard] function or Set [Time Zone][Access Time][Access Area][Access Group] directly.
77
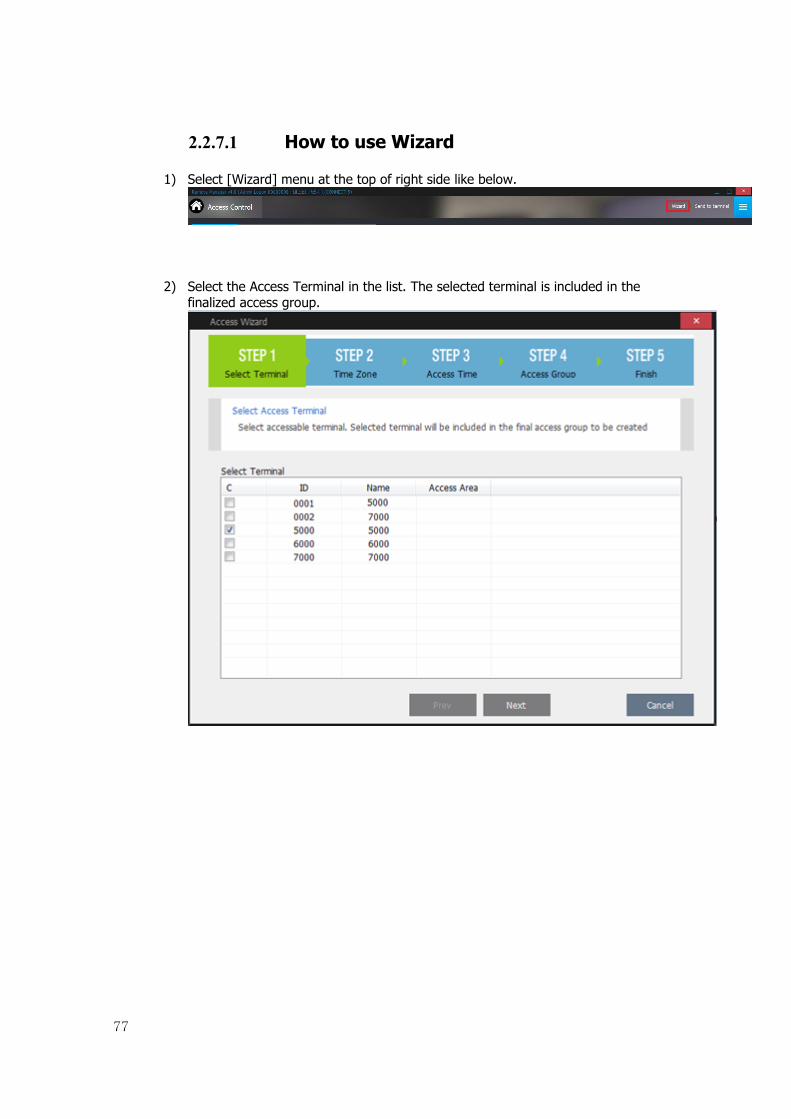
2.2.7.1 How to use Wizard
1) Select [Wizard] menu at the top of right side like below.
2) Select the Access Terminal in the list. The selected terminal is included in the finalized access group.

78
3) Select the time zone. (Default is selected basically.)

79
4) Designate the Access Time in each day.

80
5) Enter the Access group name.

81
6) Press Finish button to finish the setting. (But, if the additional registration is needed, press Add new button.
��Set access group to terminal: Transfer the access group to the terminal after finishing [Wizard].
��Set access group to user: Set the access group after finishing [Wizard].

82
2.2.7.2 How to register manually 2.2.7.2.1 Add Time Zone
The Maximum possible 12 times zone to access per day can be set according to codes.
Registration Procedures
1) Enter a desired code number (fixed 4-digit) and name.
2) Set the authentication method to use if needed. (If not, it activates in the authentication method that is set previously in the user information.)
3) Check the time zone to use and enter the time range value.
If a time zone is assigned, the precise time of the time zone is displayed at Time Zone Setting.

83
2.2.7.3 Add Access Time
Access time for weekday and holiday is set according to codes. The set value will be applied when setting the access group.
After entering the desired code and name, set a time zone code set at [Add Time Zone] according to dates of the week and holidays. Holiday setting [Holiday Management] code is registered in the holidays.
※ See detailed setting an example: [ex1)Access Control]

84
2.2.7.4 Add Access Area
A terminal that allows access according to codes is set. The setting value is used for access group setting.
Enter the desired code and name, select the access time to be used in the access area and select the terminal available.

85
2.2.7.5 Add Access Group
Set the Access Area to be included in Access Group.
Enter the desired code and name to select the desired code from the registration code in [Add Access Area]
2.2.7.6 Delete
This function deletes the selected Access Group information in the Access Control list.
1. In case of deleting the Time zone
2. In case of deleting the Access Time

86
3. In case of deleting the Access Area
4. In case of deleting the Access Group
2.2.7.7 Transfer to Terminal
After setting access authority, it transfers to the terminal.
After selecting a terminal to transfer, press Send button.

87
2.2.8 Position Shaping (E_Map)
Terminal state can be monitored in real-time from a registered drawing position.
In order to do this, the position of all terminals along with the drawings must be designated.
Only JPEG, BMP, PNG file can be registered in position shaping.
When a user double-clicks the terminal event list, it moves the map that the corresponding terminal exists in.

88
2.2.8.1 How to set Positioning Shaping 2.2.8.1.1 How to use Wizard
1) Click Wizard at the top menu.
2) Select the image of the entire layout.

89
3) Press Register button to select the layout image to use in the area and place the terminal. To place the terminal in the layout, drag the corresponding terminal in the left into the layout with your mouse.

90
4) Drag each drawing position in the list to place in an entire layout.

91
5) Press Finish button to finish setting.

92
2.2.8.1.2 How to register manually 2.2.8.1.2.1 Set Terminal Layout
Click on Set Terminal Position at the top menu. Then, the above screen appears, click Select Image to select the background drawing to select a background image.
If needing to move the location, click the corresponding terminal with your mouse to place the proper location. When a user double-clicks the terminal icon, check the detailed registration information.

93
2.2.8.1.2.2 Set Global Layout
If the position of each drawing is designated at the entire drawing, the position of a drawing can be viewed at a glance during monitoring. Drawing position designation can be registered only for a drawing with a designated terminal position.
After selecting a background image by clicking on the image button, continue with the work being done.
Select a drawing to be placed by performing a right mouse click on the entire drawing. To change the position of an item, move it while clicking down on it.
If an item is double-clicked, the information of the corresponding item is displayed. When drawing position designation is completed, press Save button in order to save it.
The following are the descriptions on the signals displayed on a terminal.

94
: It marks the status of disconnected network. (It marks caution on screen.)
: It marks the cover opening of terminal. (It marks caution on screen.)
: It marks the fire detection of terminal. (It marks caution on screen.)
: It marks the panic detection of terminal. (It marks caution on screen.)
: It marks the crisis detection of terminal. (It marks caution on screen.)
: It marks the abnormal door opening. (It marks caution on screen.)
: It marks the prevention of door opening. (It marks caution on screen.)
: It marks the Lock error. (It marks caution on screen.)
: It marks the lock of terminal. (It marks notice on screen.)
: It marks the status of the designated external signal. (It marks notice on screen.)
: The status for unlock of terminal (It marks notice on screen.)
: It marks that the door is closed which is connected to the terminal. (It marks normal on screen.)
: It marks that the door is opened which is connected to the terminal. (It marks normal on screen.)
: It marks the status of normal condition of terminal. (It marks normal on screen.)
The following are the descriptions on the signals displayed on a terminal.
: Represents warning state
: Represents notice state
: Represents normal state.

95
The priority of signals displayed at a drawing is determined in the order of warning>notice>normal. If at least one terminal becomes the state of priority depending on the state of terminals that belonged to a drawing, the drawing signal is then changed.
2.2.9 TNA Settings
The menu will include TNA settings, Set Special shift
▶Set Special Shift: A user can easily change the settings through the applicable menu if the user needs to assign special work separately from the work schedule registered in Work Mode Registration menu.
▶ Process Transaction: Time & attendance is calculated and applied based on the value registered in Time & Attendance Setup.
▶ Modify Hours: In the event there is any change in the result after processing the employee’s time & attendance, a user can manually input-modify the value by double-clicking the applicable time in the menu.
▶ Output Period Result: Search the result of time & attendance processing for period. A user can save in file and print the inquired data.
▶ Output Person Result: Search the result of time & attendance processing for personal. A user can save in file and print the inquired data.
▶ Attendance Reports: Inquire the working status by query options. A user can inquire the list of tardiness, early leave, absence respectively, and print or save them in a file.

96
▶ Break Reports: A user can inquire the hours excluded from basic work hours due to going out or early leave out of the time & attendance processed.
▶ Process Totals: A user can count the result of daily time & attendance processed within a certain period.
▶ Modify Total Hours: In the event there is any change in the employee after the completion of time & attendance count, a user can manually input-modify the value by double-clicking the applicable time.
▶ Output Period Summary: Search the result of total hours for period. A user can save in file and print the inquired data.
▶ Output Person Summary: Search the result of total hours for personal. A user can save in file and print the inquired data.
▶ Transmit Work Result to another DB: All the time and attendance results can be transferred to a separate external DB.
(※ For more information on setting method, refer to: [ex5)TNA Settings] )
2.2.9.1 TNA Settings
Place the mouse in TNA Settings menu to show the submenu.

97
2.2.9.1.1 How to use Wizard
1) Set the standard business hours
Enter the arrival time and departure time.

98
2) Set hours that do not fall in standard business hours
Set the time if the over time exists. Check the check box to work and set the start time and end time. If the time passes 24 hours, select “eve, Today, next” before the time.

99
3) Enter information
Enter the work name. If a user wants to add the work time, click Add new button.
� Only work time that is registered in Wizard is printed. � To set the work schedule, it cannot be returned into the enter information when
clicking Next button.

100
4) Set Schedule
Set the circulating working schedule and working day of the week.

101
5) Finish
Enter the work name and finish setting. (A user can register the employee’s TNA setting and rate of pay later.)
6) Apply Schedule
Refer Apply Schedule
7) Rate of Pay
Refer Rate of Pay
102
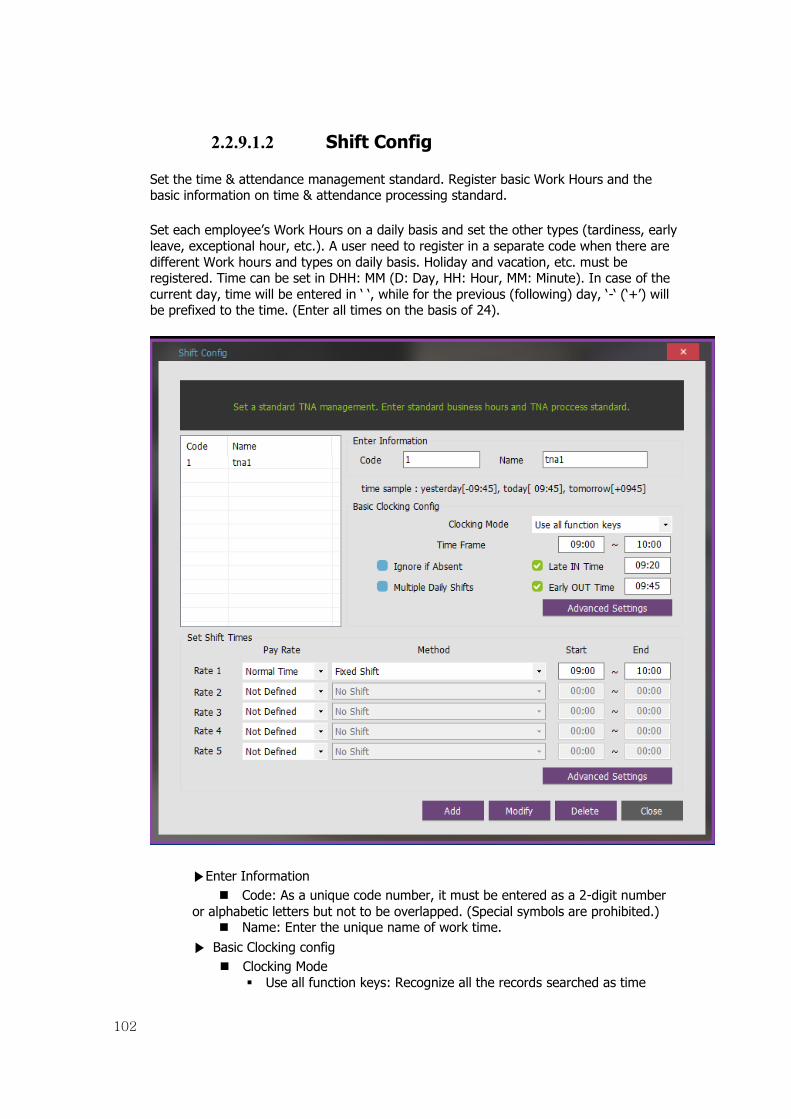
2.2.9.1.2 Shift Config
Set the time & attendance management standard. Register basic Work Hours and the basic information on time & attendance processing standard.
Set each employee’s Work Hours on a daily basis and set the other types (tardiness, early leave, exceptional hour, etc.). A user need to register in a separate code when there are different Work hours and types on daily basis. Holiday and vacation, etc. must be registered. Time can be set in DHH: MM (D: Day, HH: Hour, MM: Minute). In case of the current day, time will be entered in ‘ ‘, while for the previous (following) day, ‘-‘ (‘+’) will be prefixed to the time. (Enter all times on the basis of 24).
▶Enter Information ��Code: As a unique code number, it must be entered as a 2-digit number
or alphabetic letters but not to be overlapped. (Special symbols are prohibited.) ��Name: Enter the unique name of work time.
▶ Basic Clocking config ��Clocking Mode
��Use all function keys: Recognize all the records searched as time
103
& attendance record from [Log]-[Log Management]-[Access Log]. ��Use attend and leave keys: Recognize first and last log of the
arrival and depart logs searched from [Log]-[Log Management]-[Access Log].
��Time Frame: The record of sign in/out within the relevant zone is
processed as time & attendance. - any range other than 24 hours can be assigned (When one works
longer than a day and time for leaving work is beyond 24 hours, treat it by simply adjusting the zone)
If the time is over the 24 hours range, a user should delete the ‘ ‘ blank before the time when entering the symbol.
For example) [ 00:00] ~ [ 00:00] => [ 05:00] ~ [+04:00]
��Ignore if Absent (Only for Holiday): It does not treat as absence although one is absent on a certain day. (That is, it is applied to holiday, vacation, etc.)
��Late IN Time/Early OUT Time: Tardiness and early leave are calculated based on the input time. ��Multiple Daily Shifts: Apply in case the number of sign in/out during the day exceeds 1. For example, it can be set up when summing the Work hours by calculating from each sign in/out within the range of morning shift/afternoon shift work divided into morning shift - break - afternoon shift. Divided into a maximum of 4 zones (8 sub divisions) . (※ For more information on setting method, refer to: [ex5)TNA Settings] ) � Advanced Settings: A user can additionally set automatic creation of sign in/out, exclusion of going out/early leave, fixed time excluded (lunch time, etc.), and multiple sign in/out zones.

104
��Time Frame: Process the record of sign in/out within the applicable zone as time & attendance. - Assignment of the range other than 24 hours is available (In the event work hours do not exist within 24 hours due to work that exceeds 1 day, it can be processed with real time by adjusting the processing zone)
��Auto Clock: Sign in/out can be automatically recognized when there is no sign in/out time. - (For example, if a user arrives after 10:00, the lateness time is not calculated. The arrival time should be admitted as 10:00.)
� Auto Clock IN: Applicable input time can be automatically recognized as sign-in time when there is no sign-in record. -For example, if the setting time is 10:00, the arriving reports after 10:00 are neglected and it is considered to arrive at 10:00.
� Auto Clock OUT: Applicable input time can be automatically recognized as sign-out time when there is no sign-out record. -For example, if the setting time is 15:00, the leaving reports before 15:00 are neglected and it is considered to leave at 15:00.
��Out of Office Settings: Set in case the network hours except vacant time out of work hours should be calculated
� Deduct Break Time: Check if a user wants to exclude the leave-time.

105
� Clocking Mode:
Use all function key – Calculate in all logs regardless of the authentication mode. Use attend and leave keys – Calculate the authenticated logs according to leave and return mode.
� Break by LEAVE record: Check if a user wants to exclude the leave- time in the middle of the working time because of outside work.
� Clocking Mode:
Use all function key - Calculate in all logs regardless of the authentication mode. Use attend and leave keys – Calculate the authenticated logs according to IN/OUT mode.
��Break Times: Set in case there is fixed exceptional times such as lunch time, tea break, etc.
� Exceptional 1~5: Configurable up to five zones
��Set Multi Daily Shift Times: Apply in case there occurs sign in/out at least two times a day, that is, work schedule is divided into morning shift work-break-afternoon shift work. Each sign in/out time is summed up within the range of morning/afternoon shift works. Maximum of 4 zones (8 sub divisions) available. (※ For more information on setting method: ex5)TNA Settings )
� Zones 1~4: Set and assign the time in the zone wider than the range of Work Hours Registration so that the authenticated record of sign in/out within the zone can be recognized as time & attendance. Before setting, refer to ex5)TNA Settings
�� Set: Save the settings.
��Cancel: Close the data without saving them.
��Set Shift Times: According to the option, it is divided as 5 types.
� Pay Rate: Select Normal Time, Time Before Shift, Overtime 1 Hours, Overtime 2 Hours, Off Day Hours, or Overtime 3 Hours
� Method - No Shift: No calculate working hours - Fixed Shift: Admit Start and End section to the corresponding working hours. - Actual Time: On the basis of the user’s authentication log, all the range of IN/OUT is handled.

106
- Overtime: On the basis of the attendance logs, [End] is admitted as the working hours after [Start] passes.
� Start, End: It should be entered precisely because the standard is the time to specify Pay Rate and and enter the time range.
� Advanced Settings:
A user can detaily set the time unit, minimum time, maximum time and etc. about from Rate 1 to Rate 5 as the user enter above. (※ For more information on setting method: ex5)TNA Settings)
� Add Newly register the input data.
� Modify: Modify and save the modified data.
� Delete: Delete the registered data.
� Close: Close the relevant window.

107
2.2.9.1.3 Set Schedule
When Work Hours setup is completed, register the work mode in accordance with the work schedule. Register the work schedule in a unique mode relating to the rotation working day using the registered Work Hours Registration Code. Rotation schedule can be registered up to 30 days.
��Enter information
� Code: Enter unique code number (4-digit integer and alphabetic letters) / Name: Enter the title of distinguishable work mode.
��Define Holidays
� Holiday: [ Data Management ] - Assign the holiday code registered in [ Holiday Information ] (※ For more information on setting method: Holiday Management)
� Holiday Shift: Assign holiday code registered in [ Shift Config ] - With this setup, time and attendance is processed in the way of calculating the hours assigned in Work Hours registration on the assigned holiday (date).

108
� Set Schedule
� Start Date: Select the date to start the schedule registration (It becomes the starting day of rotation schedule)
� Repeat After: Select the number of days for rotation (Normally in the unit of 7 days) - Set the number of days repeated in accordance with the Work Hours registered in [ Shift Config ] - With the number of set days selected, the number of set days is displayed on the list starting from the reference date at the bottom frame on the screen. - With the assigned work mode double-clicked, the work code registered in [ Shift Config ] is displayed. - With the entry column double-clicked, an input window pops up. Enter the code directly and then the user can enter data quickly by moving an input window using lower/upper keys. When the selected work day code is different from the input code, priority is given to the code that was entered directly. - Assign all the days so that there is no unassigned date by work days.
��Pay Rate Rules
� : Set in more detail the added/deducted hours and counting processing, etc. at the time of processing time & attendance for Normal Time Detail, Time Before Shift Detail, Overtime1 Hours Detail, Overtime2 Hours Detail, Off Day Hours Detail, Overtime3 Hours Detail respectively. (※ For more information on setting method: Pay Rate Rules )
� Add: Newly register the input data.
� Modify: Modify and save the modified data.
� Delete: Delete the registered data.
� Close: Close the relevant window.

109
2.2.9.1.4 Apply Schedule
In Employee’s Time & Attendance Assignment, a user can assign the time & attendance code of the registered employees on a lump sum basis. Check the applicable user in the check box in the screen below, select the applicable code in the time & attendance Assignment list (Code registered in( [Set Schedule] , and then apply by clicking Set button. For your reference, the user can also directly assign the time & attendance code of the applicable employee in the employee registration information.
��Apply Schedule: Select applicable work mode (※ For more information on setting method: [Set Schedule])
��Set: Click the button, then the applicable data is applied to the user checked above.

110
��Close: Close the relevant window.
2.2.9.1.5 Rate of Pay
Set pay unit and pay rate.
▶ Enter Information
��Code: Input a unique code number (4-digit integer)/ Name: Input the title of distinguishable amount payable. ��Name: Enter the name of the rate of pay. (4-digit.) ▶ Pay unit ��Time unit: Paid the payment in time unit. ��30 Min: Paid the payment in 30 min unit. ��15 Min: Paid the payment in 15 min unit.

111
��10 Min: Paid the payment in 10 min unit ��1 Min: Paid the payment in 10 min unit
▶ Pay Rate ��Normal Time: Pay rate set in Normal Time ��Time before: Pay rate set in Time before. ��Overtime 1 Hours: Pay rate set in Overtime 1 Hours. ��Overtime 2 Hours: Pay rate set in Overtime 2 Hours. ��Off Day Hours: Pay rate set in Off Day Hours. ��Overtime 3 Hours: Pay rate set Overtime 3 Hours.
2.2.9.2 Set Special Shift
In the event special shift, work must be assigned separately from the work schedule registered in Work Mode Registration menu, work schedule previously registered is displayed as shown in the following figure by entering the applicable date and clicking Query. Upon double-clicking the applicable work code on the date of special work, it moves to Modify mode. Apply it by clicking save button after entering the work code to be modified. The modified data is processed in shade so as to be easily distinguished. Use this menu should you wish to apply other codes in part besides basic work mode. When there is any change, you can apply it to time & attendance again after performing modification work in advance.
��Search Option
� Branch: Query by work center available

112
� Department: Query by department available
� Start Date: 30-day work schedule is inquired based on the starting date.
� Search: Inquire the result in accordance with query option.
※ With the work code double-clicked on the special work day, a user can proceed to Modify mode - Click Save, then the modified data is distinguished in shade.
� Save: Modify and save the modified data.
� Print: Print the corresponding inquired list.
� Save to File: Save the corresponding inquired list as CSV file.
� Close: Close the relevant window.
※ Tip1: With your mouse right-clicked on Modify screen, [Select Shift] window pops up as follow.

113
2.2.9.3 TNA Management 2.2.9.3.1 Process Transactions
A user can apply the time & attendance calculated based on the registered settings. When time & attendance setup is completed, be sure to execute time & attendance processing for obtaining the result such as sign in/out, etc. before inquiring the result of time & attendance. To treat time & attendance, be sure to Assign work period, select the applicable employee in the check box, and click (lump sum, in part) processing. Afterwards, ‘Complete’ message pops up on Result column. The processed result can be checked in [Output Period Result] menu.
�

114
��Set Period
� Set the work period to be processed for time & attendance. (Maximum of 31 days)
� The date of the process transactions cannot include the future date.
� Ignore Modifications: After checking the applicable option, at the time of time & attendance processing, the modified record manually input in Time & Attendance Result Modify menu among the previously processed time & attendance is automatically changed (deleted) into time & attendance record.
��Process: When selecting the employee to treat time & attendance after checking his/her name, ‘Complete’ message pops up on Result.
��Close: Close the relevant window.
2.2.9.3.2 Modify Hours
In the event there is any change in the employee’s time & attendance result after processing, a user can manually input-modify the new value after double-clicking the applicable time on the menu. In case of entering modified sign in/out time, the user needs to enter the modified value along with tardiness, early leave, basic work hours, etc. altogether. (Not automatically calculated) Of the items, the item equivalent to employee information is not modified. Modify it from the user information, and then treat the time & attendance again.
��Search Option
� Branch: Query by work center available

115
� Department: Query by department available
� Search Period: Set the period to be inquired. (Maximum of 31 days)
� Search all record: Inquire about all records equivalent to the query option.
� incomplete record:
��Search: Print out the result equivalent to the query option.
※ Switch to modify mode by double-clicking the time to be modified - Apply by clicking Modify button after entering the data
��Save: Save the modified data.
��Settings: The Item inquired can be edited by the user. (※ For more information on how to set up: How to set query items])
2.2.9.3.3 Output Period Result
It inquires the result of the process transactions for period. The inquired data can be saved in a file and printed out.
�� Search Option
�� Branch: Query by work center available
�� Department: Query by department available

116
�� Search Period: Set the period to be inquired. (Maximum of 31 days)
�� Search all record: Inquire all records equivalent to the query option.
�� incomplete record:
� Search: Print out the result equivalent to the query option.
� Save to File: The inquired screen can be printed out. Click the button so that Print Preview screen pops up as follow. Click Print button to get a printout.
� Save to File: The inquired data can be saved in a file (Excel CSV form). Click the button, and then save them as follow;

117
2.2.9.3.4 Output Person Result
It searches the result of the process transactions for personal. The inquired data can be saved in a file and printed out.
��Search Option
� Select Employee: Search each employee
� Search Period: Set the period to be inquired. (Maximum of 31 days)
� Search all record: Inquire all records equivalent to the query option.
� Incomplete record:
� Search: Print out the result equivalent to the query option.
� Print: The inquired screen can be printed out. Click the button so that Print Preview screen pops up as follow. Click Print button to get a printout.

118
� Settings: The Item inquired can be edited by the user (※ For more information on how to set up: How to set query items )
� Save to File: The inquired data can be saved in a file (Excel CSV form). Click the button, and then save them as follow;

119
2.2.9.4 TNA Reports
Inquire attendance status by query options. The list of tardiness, early leave, and absence can each be inquired, printed out, and saved in a file. Search Late Arrivals: Inquire the employee who arrives late at the first tap like the picture below.

120
Search Early Department: Inquire the employee who departs early at the second tap like the picture below.
Search for Absenteeism: Inquire the employee who was absent at the third tap like the picture below.
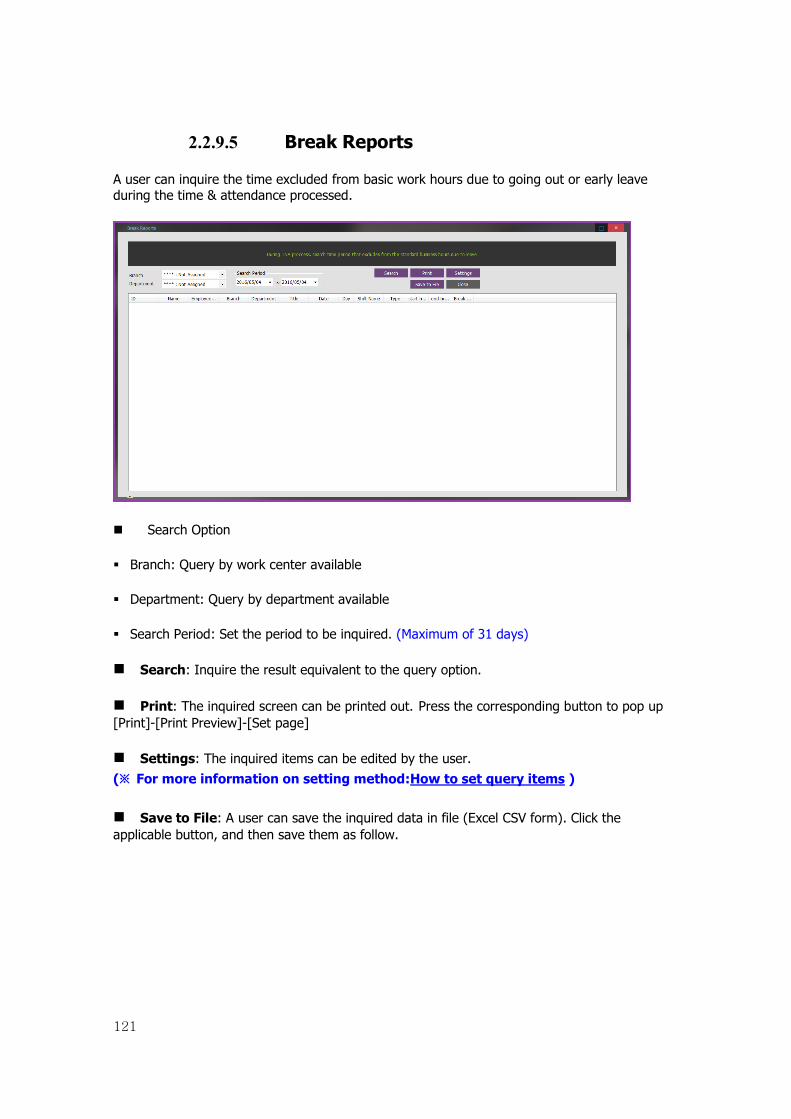
121
2.2.9.5 Break Reports
A user can inquire the time excluded from basic work hours due to going out or early leave during the time & attendance processed.
�� Search Option
� Branch: Query by work center available
� Department: Query by department available
� Search Period: Set the period to be inquired. (Maximum of 31 days)
� Search: Inquire the result equivalent to the query option.
� Print: The inquired screen can be printed out. Press the corresponding button to pop up [Print]-[Print Preview]-[Set page]
� Settings: The inquired items can be edited by the user. (※ For more information on setting method:How to set query items )
� Save to File: A user can save the inquired data in file (Excel CSV form). Click the applicable button, and then save them as follow.

122

123
2.2.9.6 Summary Management 2.2.9.6.1 Process Totals
A user can count the result of daily time & attendance processing within a certain period. Set the counted dates and click Process button, and then time & attendance data for the employees checked on the employee list is counted. Processing result can be checked in [Output Period Summary] menu.

124
��Set Period
� Summary Date: Select the month to be counted and the unit of week (1st week ~ 5th week). The applicable period is selected in date zone. The period can be adjusted in the unit of day.
� Ignore Modifications: After checking the applicable option, the modified record manually entered in Time & Attendance Result Modify menu among the previously processed time & attendance is automatically changed (deleted) into time & attendance record.
� Process: When selecting the employee to treat time & attendance after checking his/her name, ‘Complete’ message pops up on Result.
� Close: Close the relevant window.
2.2.9.6.2 Modify Total Hours
In the event there is any change in the employee’s time & attendance result after counting, a user can manually input-modify the new value after double-clicking the applicable time. In case of entering each modified time, a user need to enter all times such as tardiness, early leave, basic work hours, etc. altogether. (Not automatically calculated)
Of the items, the item equivalent to employee information is not modified. Modify it from the user information, and then treat the time & attendance again.
� Search Option
� Branch: Query by work center available.
� Department: Query by department available.

125
� Search Period: Select the period to be inquired in the unit of month and week.
� Search: Output the result equivalent to the query option.
※ With the time to be modified double-clicked, the user can proceed to Modify mode - Apply it by clicking Modify button after entering the data.
� Save: Save the modified data.
� Settings: The inquired item can be edited by the user. (※ For more information on setting method:How to set the query items )
2.2.9.6.3 Output Person Summary
Inquire the data counted. The inquired data can be saved in a file and printed out.
� Search Option
�� Branch: Query by work center available
�� Department: Query by department available
�� Search Period: Select the period to be inquired in month and week units.
(Maximum of 31 days.)
��Search: The result for the search option can be printed out.

126
� Print: The inquired screen can be printed out. Click the button so that Print Preview screen will pop up. Click Print button to get a printout.
� Settings: The inquired item can be edited by the user. (※ For more information on setting method:How to set query items )
� Save to File: The inquired data can be saved in file (Excel CSV form). Click the button and then save them as follow.
2.2.9.6.4 Output Period Summary
It inquires the result of total hours for period. A user can save in file and print the inquired data.
� Search option
� Select Employee: Inquire each employee
� Search Period: Set the period to be inquired. (Maximum of 31 days)
� Search all record: Inquire all record equivalent to every option.
� Incomplete record:
� Search: The result of the search option can be printed out.
� Print: The inquired screen can be printed out. Click the button so that Print Preview screen will pop up. Click Print button to get a printout.

127
� Settings: The inquired item can be edited by the user. The user can edit the search options. (※ For more information on setting method: How to set the query items)
� Save to File: The inquired data can be saved in file (Excel CSV form). Click the button and then save them as follow.
2.2.9.7 Transfer Work Result to another
All the time and attendance results can be transferred to a separate external DB. However, external DB can be used when it is registered as UNIS_Work in ODBC Manager. External DB table should be created in the same property. (Refer. Table Layout). After selecting the menu and setting the period, a user can transfer Work Result, Work Summary, and Except Record to the designated DB.
* For further information on table property, contact the manager.
� Transfer Option
�� Trans Work Result: Transfer all the time & attendance results (Contents of wWorkResult Table).
�� Trans Work Summary: Transfer all the time and attendance sums (Contents of wWorkSummary Table).
�� Trans Except Record: Transfer all the exceptional records (Contents of wExceptRecord Table).
� Transfer: Transfer all the data created within the designated period.
� Close: Complete transferring the time and attendance results.

128
Ex) Transfer Work Result to another
Desired results and attendance data can be sent to DB. Be sent to DB is supposed to be registered in the ODBC Administrator.
1. [Control Panel] → [Administrative Tools] → [data (ODBC)] execution.
2. In the System DSN Add button.

129
3. “Microsoft Access Driver(*.mdb)” select, click Finish.
4. Input Data Source Name “UNIS_WORK” and click select.

130
5. Be transmitted in the database, select the path and name of the database, then click OK.
6. Click OK.

131
7.Attendance results, click the Transfer menu.
8. Be transmitted and transmit the data set period, then Send button.
� Trans Data
- Trans Work Result: Transaction Reports send Prerequisites: Receive DB table layout = wWorkResult table layout format
- Trans Work Summary: Summary Reports send Prerequisites: Receive DB table layout = wWorkSummary table layout format
- Trans Except Record: Except Record send Prerequisites: Receive DB table layout = wExceptRecord table layout format
9. Edit the UNIS.INI file in the UNIS installation path as follow.

132
- Enter DB access information that has done the connection setting from UNIS_WORK in
ODBC.
10. Restart UNIS_Server.
2.2.10 Meal Management 2.2.10.1 Meal Record Query
Under the terms of user-selected query to look for water logged.
��Period Setting: Set the period of the meal registration.
��Basic Condition: All the search. Search for the department and the terminal the user.
��Detail Condition: Department, Terminal, User
��Meal: Breakfast, Lunch, Dinner, Snack, Late Night Meal
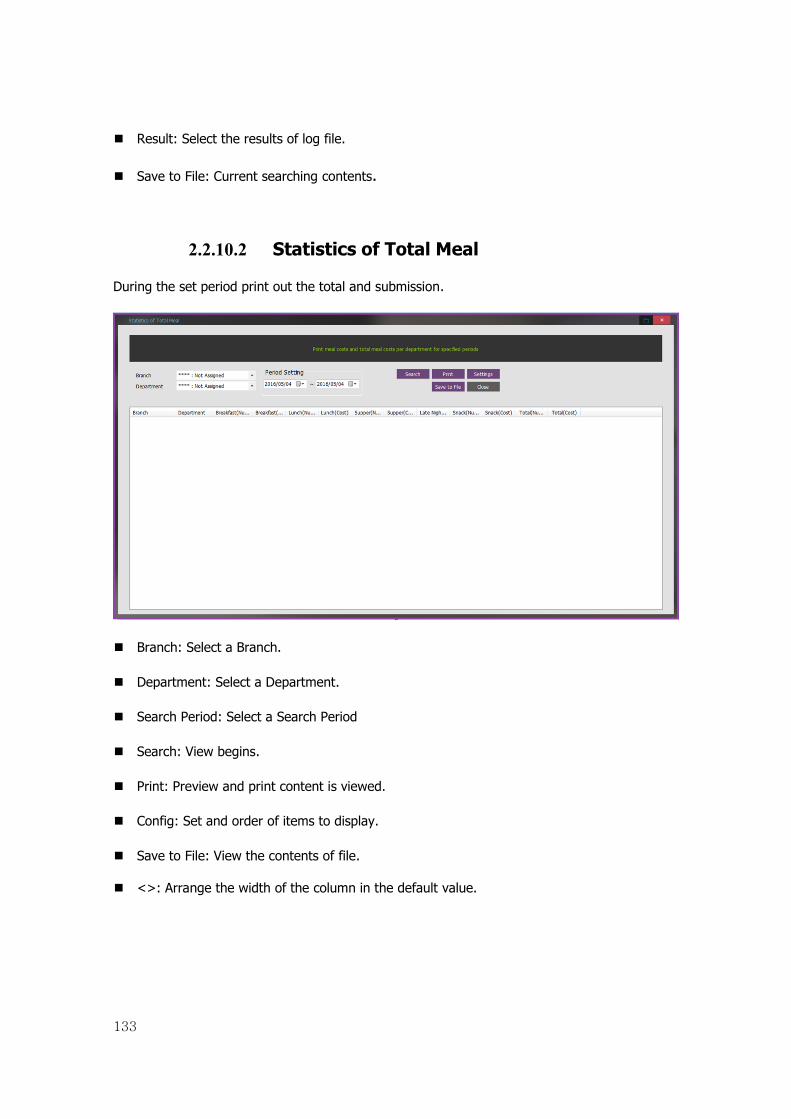
133
��Result: Select the results of log file.
��Save to File: Current searching contents.
2.2.10.2 Statistics of Total Meal
During the set period print out the total and submission.
��Branch: Select a Branch.
��Department: Select a Department.
��Search Period: Select a Search Period
��Search: View begins.
��Print: Preview and print content is viewed.
��Config: Set and order of items to display.
��Save to File: View the contents of file. ��<>: Arrange the width of the column in the default value.

134
2.2.10.3 Individual Total Meal
Set the information on each meal. Set the information about each meal and combinated with meal code.
��Branch: Select a Branch.
��Department: Select a Department.
��Search Period: Select a Search Period.
��Search: View begins.
��Print: Preview and print content is viewed.
��Config: Sets and order of items to display.
��Save to File: Views the contents of file.
��<>: Arrange the width of the column in the default value.

135
2.2.10.4 Set Meal Management 2.2.10.4.1 How to use Wizard 2.2.10.4.1.1 Initialization
Select whether the code value of all the meal is initialized or not.

136
2.2.10.4.1.2 Meal Code 1
Set the information on each meal.
Enter Code, Name, Meal type, Meal time, Limit meal and etc to register Add button.

137
2.2.10.4.1.3 Meal Code 2
Set a meal code in combination with an original meal code.
Set Code, Name, Day limit, Monthly limit, and Period Setting to check the applying meal in the left list.

138
2.2.10.4.1.4 Setting Meal Cost
Set the cost of meal for each meal.

139
2.2.10.4.2 Meal Code 1
Set the information on each meal. Set the information about each meal combinating with meal code.
��Code: A unique code. (4 digits)
��Name: Code name.
��Meal: Select of Breakfast, Lunch, Dinner, Snack, and Late Night Meal.
��Meal Time: Hours of eating meal
��Limit Meal: The number of duplicated certificate of meals. However, when setting to 0, no limit the number of meals.
��Set: If the code does not exist, insert, otherwise update.
��Delete: Delete Code.

140
2.2.10.4.3 Meal Code 2
Set a meal code in combination with an original meal code.
��Code: A unique code. (4 digits)
��Name: Code name.
��Day Limit: The number of times to eat a day. However, when setting to 0, no limit to the number.
��Monthly Limit: The number of times to eat a month. If setting to 0, no limit the number of times.
��Period Setting: Set the specified period to eat.
��Set: If the code exists, modify setting a user want. Otherwise, make the new code.
��Delete: Delete Code.
��Initialization: Initialize the screen setting. It doesn’t affect the existing DB.

141
2.2.10.4.4 Setting Meal Cost
Set the cost of meal for each meal .
��Same Price: In case that a user checks each meal, set the meal cost for all of the menu to setting costs on menu1.
��Menu1, Menu2, Menu3, Menu4: The cost of each menu.

142
2.2.11 Setting and management of the Side Menu 2.2.11.1 Menu Tree
- Click button at the top of right side and use Menu Tree to find all the menu and access easily.
2.2.11.2 Main Menu 2.2.11.2.1 System 2.2.11.2.1.1 Change Master Password
- Click button at the top of right side to change the password of the master administrator from the system menu in the main menu.
** The maximum length to enter is 30 digits and English/Number/Symbol is available.

143
2.2.11.2.1.2 Database Backup
- Database Backup, which is in system menu in the main menu when
clicking button at the top of right side, is only supported in case of MS-ACCESS(MDB).
2.2.11.2.1.3 Controlling the server service
- Click button to monitor and control the server window setting in the system menu in the main menu.
��UNIS_Server Service: Control UNIS Authentication Server Service. - Auto Start: If the service stops, it restarts automatically. - Stop: Stop the running service. ��UDB Server Service: Control the database server service. ��UWorker Service: Control the TNA server service. ��Command Service: Control command generation and treatment server service.

144
2.2.11.2.2 Log 2.2.11.2.2.1 Log Management 1) Access Log
Click button to search the user’s access log in the log menu in main menu.
��Period: Set the period to search. For entire period search, uncheck the check box in
.
��Condition: Set the search condition. Set a desired condition from all search Terminal / User / Visitor / Access Group search. (Searching in Group is the log the currently stored employee’s information). ��Details Condition: Set the detailed search condition of the set condition. Detailed assignment is used for searching by ID.
��Result: Set the search condition for each authentication result. Search All/ Success/ Failure of authentication results are set.
��Mode: Set a desired Mode from Search All, Attend, Leave, Out, In, Breakfast, Lunch, Dinner, Supper and Snack.
�� Search: Search authentication records to satisfy search conditions. �� Delete: Delete authentication records to satisfy search conditions. ※The deleted authentication log is re-uploaded from terminal. (In case of storing the authentication log in the terminal.) ��Save to File: Save searched records as CSV file.

145
��Print: Click Print button to activate the print menu button.
- Print preview: Preview the paper to print. - Print Setup: Set the paper to print. - Print: Print from the printer.
�� Retrieve from Terminal: It brings authentication logs stored in a terminal to the server. When a terminal operates in S/N mode or N/S mode, it stores authentication logs in the terminal’s internal memory if connection to the server is disconnected.
��After checking a desired terminal, press Receive button to get the authentication logs.
��Get all logs again: It gets all authentication logs stored in a terminal again.
z When double-clicking the authentication records, if the corresponding terminal has DVR setting, the viewer of the recording video displays.

146
2) Server Audit Log
The administrator who is logged on Remote Manager can search work details such as registration / modification/ deletion.

147
3) Terminal Audit Log
A terminal administrator searches details of operations executed at a terminal.
Retrieve from Terminal: It retrieve the audit log which is saved in the terminal into the server.
A user can check the logs that the administrator has done in the terminal.
Date: The time when the operation occurs.
Terminal ID: Display the terminal number.
Admin ID: Display the terminal administrator’s ID.
User Name: Display the administrator’s name.
Detail: Display the detail of operation.
(Add User, Delete User, Add Fingerprint, Delete Fingerprint, Control Default, Control Access, Initialization overally, Initialization setting, Initialization authentication log, and etc.)

148
4) Admin Logon Log
It searches logon logs to Remote Manager by an administrator.
5) Search Event Log
It searches Event Log.
Condition and Detaliled Condition

149
1) Terminal State A. Terminal Disconnected B. Terminal Connected C. Terminal Locked D. Terminal Unlocked E. Terminal Tamper F. Terminal Attached G. Terminal Lockdowned
2) Door State A. Door Open B. Door Close C. Door Unlock D. Door Locked E. Door Forced F. Door Not Closed G. Door Restored H. Lock Error I. Not Monitoring
3) User Operation A. Remote Door Open B. Remote Door Unlock C. Remote Door Lock D. Remote User Attempt
4) Emergency State A. Fire Sensor Start B. Fire Sensor End C. Panic Sensor Start D. Panic Sensor End E. Crisis Sensor Start F. Crisis Sensor End
5) External Sensor A. External Sensor 1 Start B. External Sensor 1 End C. External Sensor 2 Start D. External Sensor 2 End E. External Sensor 3 Start F. External Sensor 3 End G. External Sensor 4 Start H. External Sensor 4 End

150
6) Search temporary record
Search or delete the record in UNIS_Temp.
When authentication log is delivered to the server, the server functions stores the log in UNIS main DB. If any problem occurs in this case, the record is temporarily stored in local DB (UNIS_Temp.mdb) so as to allow regular checking. The record is deleted after being stored in the main DB. Therefore, it is normal to be empty at all times.
7) Search terminal command
In the event of giving special command to the terminal such as user sync, etc. related with the interface with the other system, the applicable command language is stored in [tCommandDown] table, treated in order, and then deleted. Therefore, it is normal to be empty.

151
2.2.11.2.2.2 Create log file
��Create Log file is the function that saves file by cutting log file within the fixed period when
a user click the button at the top of right side. The saved log file activates as a log with the merge function in another system.
��Log file name that is saved is created into the period ended date (YYYYMMDD).
Ex9) Create log file
Save the part of log file to make file.
1. Click Create button after setting the period.
2. Press Save button after specifying the location where a user want to save the file and file name.

152
2.2.11.2.2.3 Merge log file
Click button at the top of right side, and a user can apply the log data in [Merge Log File] in the log menu.
Select the corresponding log file, click Merge button and add it.
2.2.11.2.3 Import/Export data
2.2.11.2.3.1 Data Query
When clicking button at the top of right side, Data Query menu displays.
Data Query menu can search and save the information of users and visitors who are registered in UNIS according to the detailed condition.
��Condition: User, Visitor
��Detail: Branch, Department, Access Group, Authority, T/A Code, Meal Code and Payroll Code

153
��Code: Details of the selected item from the registered code
��Authentication Type: Search in the combination of fingerprints, password, face, fingerprint card, card, mobile card and And/or condition.
Save to File: Click the button below to save the queried information.
Press Copy to USB button to export user to USB.
��Assigned Administrator: Only add the terminal administrator in the list. ��Copy: The selected user from USB is saved in uniuser folder. The copied user data in USB can import the user to the terminal from USB by using User Import function. Press Send to Terminal button to transfer the information into the terminal.

154

155
2.2.11.2.3.2 Import User From File
When clicking button at the top of right side, Import User displays.
This is the function that imports the user’s information from CSV file in case there are a lot of users to register.
① Press Set button to set the field to register.
To register normally, field name should be matched same on the base of the file.
② Press Open button to import CSV file where user information is entered.

156
③ For CSV file edit method, refer to [ Data Query ]
④ As shown in the figure below, the user ID to be registered is automatically checked. (User ID already registered is not saved).
1) The check mark (V) is automatically deleted for the previously registered user. 2) The check mark (V) is done for the newly registered user. 3) The result status success: Normal Treatment, Overlap: Non Treatment

157
2.2.11.2.3.3 Import Log From File
If the AC6000 terminal device is stored in an authentication record with the mainframe can bring it into the USB stick. ng
① After plugging in the USB memory AC6000 device to enter the menu below. ※ See the AC6000 User Guide for detailed instructions
② Select the event log (the menu features "event log" part is supported.) USB to save the log records.
③ After plugging in USB to your PC, check the imported file to extract the extrusion below. - ac6000 > data > 00000001_logdata.tar Folder Extract - File Name: Terminal ID8byte_logdata.tar (not change) - 00000001_logdata.tar creating folders - ac6000 > data > 00000001_logdata.tar > 00000001_logdata.tar
*In case of AC2200, AC2200 > Data > Terminal ID > log.dat

158
④ UNIS - [ Data Management ] - [ Import Log From File ] - [ Open ] - 00000001_logdata.tar Choose Folder - [OK]
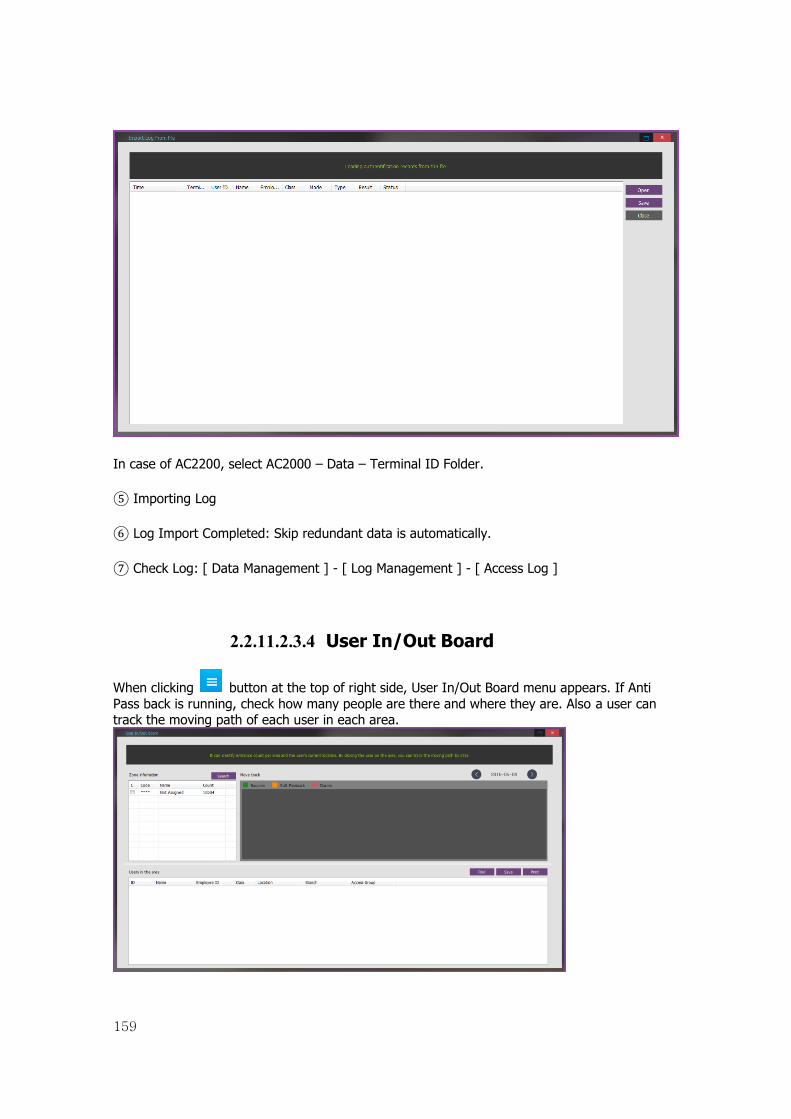
159
In case of AC2200, select AC2000 – Data – Terminal ID Folder.
⑤ Importing Log
⑥ Log Import Completed: Skip redundant data is automatically.
⑦ Check Log: [ Data Management ] - [ Log Management ] - [ Access Log ]
2.2.11.2.3.4 User In/Out Board
When clicking button at the top of right side, User In/Out Board menu appears. If Anti Pass back is running, check how many people are there and where they are. Also a user can track the moving path of each user in each area.

160
To check the user in that area, click Search button after checking the corresponding area.
If selecting the user, check the moving path of corresponding date.

161
2.2.11.2.4 Transfer to terminal 2.2.11.2.4.1 Terminal Control
� When clicking button at the top of right side, Reset terminal emergency status menu appears. This function removes the situation manually when use following settings (fire/panic/emergency etc.) in server option. But ,in case of [ Tools ]-[ Environment Settings ]-[ Alarm Option Settiong ], [Automatically terminates] choosing the option is automatically rested the status in accordance with option.

162
2.2.11.2.4.2 Lockdown Terminals
� When clicking button at the top of right side, Lockdown Terminals appears. Access is blocked in specified terminal. Access door will not open even pressing exit control. Also in case of the emergency status such as fire, Access door is not open even if the terminal status is deleted.

163
2.2.11.2.4.3 Release Lockdown Terminals
� When clicking button at the top of the right side, Lockdown Terminals menu appears. It releases the lockdown terminals function.

164
2.2.11.2.4.4 Door Control
� When clicking button at the top of right side, Door Control appears.
� Open the door control: All the door of the selected terminal is opened for a second.
� Release the door lock: Delete all the door lock of the selected terminal.
� Set the door lock: Set all the door lock of the selected terminal.

165
2.2.11.2.4.5 Message Broadcast
When clicking button at the top of the right side, Message Broadcast menu displays. An announcement function is only supported in AC5000, AC6000 and type an announcement as shown in below and send to the corresponding terminal, it will display on the LCD screen.
Message: Simply enter the contents to be announced.
Period: Set the period of announcement.
Time zone: Set the time zone of announcement.
Select the terminal to apply the notice and then send it by pressing Set button.

166
2.2.11.2.5 Management 2.2.11.2.5.1 Company Management
When clicking button at the top of the right side, Company Management menu appears. It can manage the Branch information, Department information and Title information.
1) Branch Management
After registering Branches, they are used when entering user/terminal/visitor information.

167
� Input Information
� Code: Enter a 4-digit unique number.
� Name: Enter business location name
� Add: Register entered business location information � Modify: Modify business location information. � Delete: Delete business location information.
2) Department Management
After registering departments, they are used when entering employee/visitor information.

168
� Input Information
��Code: Enter a 4-digit unique number.
��Name: Enter department name. ��Add: It registers entered business location information ��Modify: It modifies business location information. � Delete: It deletes business location information.
3) Title Management
After registering positions, they are used when entering employee/visitor information.
�

169
��Input Information
�� Code: Enter a 4-digit unique number.
�� Name: Enter position name. �� Add: It registers entered position information.
�� Modify: It modifies position information. �� Delete: It deletes position information.
2.2.11.2.5.2 Holiday Management
When clicking button at the top of the right side, Holiday Management menu appears. A user can add the public holidays. These dates will be used in access control in TNA management.

170
� Input Information
� Code: Enter a 4-digit unique number.
� Name: Enter a name suitable to the code.
� Add/Delete Holiday
After entering a code, enter and press Add button.
After entering all holidays, press Register button to assign holidays to their applicable codes.
※ As some holidays such as New Year’s Day and Thanksgiving Day in lunar calendar change every year, it is necessary to set these holidays every year.
2.2.11.2.5.3 Authority Management
When clicking button at the top of the right side, Authority Management menu appears. This function limits the administrator’s authority to use Remote Manager.

171
After setting a range that can be managed by assigning a range
at set detailed items.
**** A general user cannot make change, and the default setting is assigned to all users.
All administrators can search general users but only the upper level administrator can make a change.
2.2.11.2.5.4 Anti Pass Back Management
When clicking button at the top of the right side, Antipass Back Management menu appears. It registers AntiPass Back after specifying area where requires security and code per area.
Entrance and exit exist in a zone, and only a person who enters through the entrance can leave through the exit.
For example, when a person moves from zone 1 to zone 2, that person goes .
Here, the terminal 1 becomes both the exit of zone 1 and the entrance of zone 2. Only a person
who enters through can leave through .
Select Menu->Data Management->Anti Pass Back.

172
Anti pass back code is registered.
� Input Information
� Code: Enter a 4-digit unique number.
� Name: Enter anti pass back name.
Add: Register entered anti pass back information. Modify: Modify anti pass back information. Delete: Deletes anti pass back information.
Registered anti pass back information is registered as Enter zone / Exit zone ( [Add Terminal] )during terminal registration.
※ See detailed setting an example: [ex1)Anti Pass Back]

173
2.2.11.2.5.5 User Batch Editing
When clicking button at the top of the right side, User Batch Editing appears. It arranges the user access group, TNA and meal codes in batches.
Target: Search the user or visitor who meets that condition.
Department: Select Access group, Work code or Meal code
Function: Modify the checked user into the selected function in batches.

174
2.2.11.2.6 Settings 2.2.11.2.6.1 Wiegand Format Setting
When clicking button at the top of the right side, Wiegand Format Setting appears. It sets wiegend in/out format and import and export from the terminal.
��Set Wiegand Out
Wiegand support is available in the terminal for connecting external wiegand card readers or controllers. Note that in UNIS a fully customizable setting for Wiegand Input and Wiegand Output can be programmed. Standard 26bit, 34bit Wiegand, as well as a variety of settings are available in your environment. In addition, the parity, number of bits, data fields can be set and downloaded to the terminal. Here is how to set up for Wiegand Output.
�� Bit Length: Length (Unused / St. 26bit / St. 34bit / Customize 중 선택) - Unused : When Disabled - St. 26bit : When the standard 26bit - St. 34bit : When the standard 34bit - Customize : Users when any designated date
�� Custom Size: settings is Bit Length - [Customize] then Length select( Range: 1~128bit )
���Port State: Active Low(Basic) / Active High

175
�� Site Code: if necessary, user settings (Settings range from the terminal: 0~255, UNIS can enter a range of others)
※ Tip: 26bit - 3byte(Site Code: 1byte + UID: 2byte) / 34bit - 4byte(Site Code: 1byte + UID: 3byte)
��� Send Fail: Authentication success signal + failure signal will be sent - Not Anything : When Disabled - Send Fail Data : failure signal will be sent - Invert Parity : Failure signal transmission E / 0 as opposed to output (E:Even Parity/O:Odd Parity)
��� Fail Data: settings is Send Fail - [Send Fail Data] then Fail Data format input
※ Tip: Fail Data: If entering 1234, 1=SiteCode/ 234=UID (ID: 3-digit)
�� Bypass: If YES , Wiegand card readers to transfer card data is entered. It is transfer the input value itself.(NO(Basic)) Interval Time(us): 0 (설정하지 않을 경우 보통 2ms)
�� Width Time(us): 0 (if a user do not set, Usually 50μs)
��Field Type
�� : Site Code (1byte(=8bit))
� : User ID data, Specifies the length of digits
� : Data value to 0 if a user needs to specify a fixed
�� : Data value to 1 if a user needs to specify a fixed
�� : Verify the accuracy of odd bit
� : Verify the accuracy of even bit
� Set Field: Field Type value set to the right, select the item and to specify one.
Set Parity: Verify the accuracy range of Even Parity and Odd Parity
※ Tip: 26bit = Except for Even Parity , 12bit Specify +Except for Odd Parity , 12bit Specify
� Set Wiegand In
Wiegand support is available in the terminal for connecting external wiegand card readers or controllers. Note that in UNIS a fully customizable setting for Wiegand Input and Wiegand Output can be programmed. Standard 26bit, 34bit Wiegand, as well as a variety of settings are
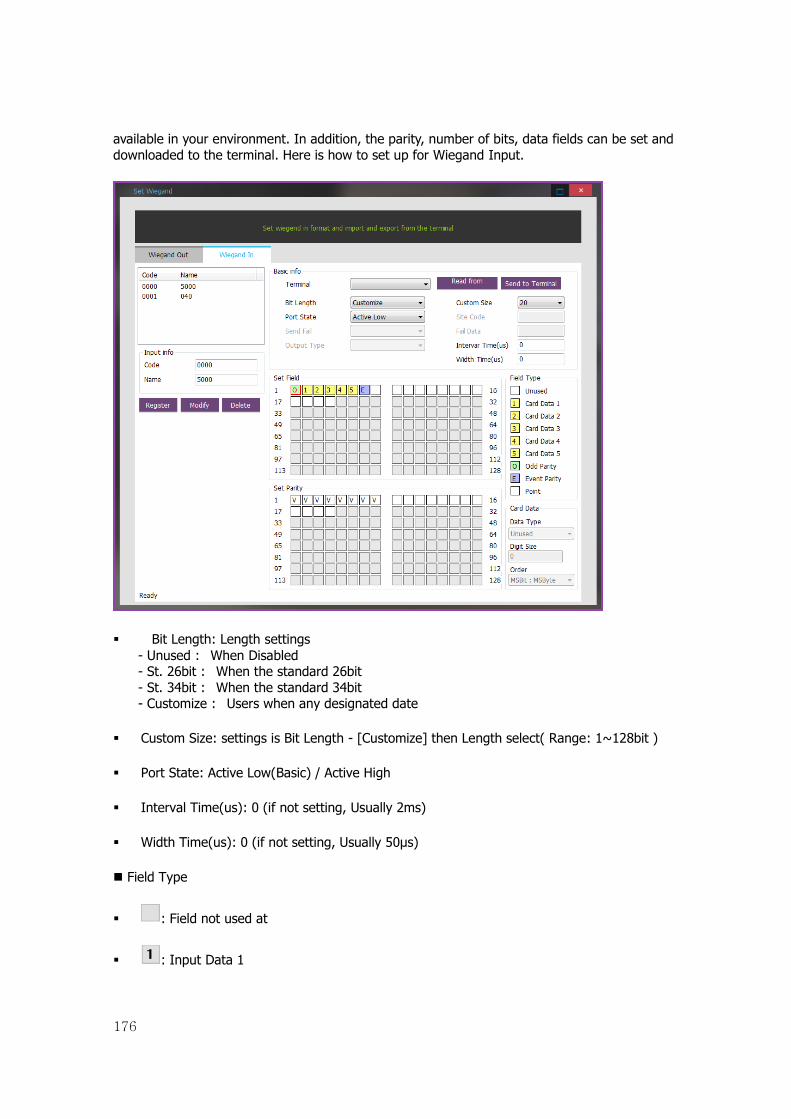
176
available in your environment. In addition, the parity, number of bits, data fields can be set and downloaded to the terminal. Here is how to set up for Wiegand Input.
� Bit Length: Length settings - Unused : When Disabled - St. 26bit : When the standard 26bit - St. 34bit : When the standard 34bit - Customize : Users when any designated date
� Custom Size: settings is Bit Length - [Customize] then Length select( Range: 1~128bit )
� Port State: Active Low(Basic) / Active High
� Interval Time(us): 0 (if not setting, Usually 2ms)
� Width Time(us): 0 (if not setting, Usually 50μs)
� Field Type
� : Field not used at
� : Input Data 1

177
� : Input Data 2
� : Input Data 3
� : Input Data 4
� : Input Data 5
� : Verify the accuracy of odd bit
� : Verify the accuracy of even bit
� Set Field: Field Type value set to the right, select the item and to specify one.
� Set Parity: Verify the accuracy range of Even Parity and Odd Parity
※ Tip: 26bit = Except for Even Parity , 12bit Specify +Except for Odd Parity , 12bit Specify
� Card Data
� Card Data Specifies the type specified in the [Set Field] - Unused : When Disabled - Binary : When Binary - Decimal String : When Decimal - Hexa String : When Hexa
� Digit Size
� Bit Order: Data transmission (MSB(Basic): Sequential Transfer / LSB: Reverse Transfer)
※ Tip: MSB: Most Significant Bit: The most significant bit: the first digit of binary numbers LSB: Least Significant Bit: Least significant bit: the last digit of binary numbers

178
2.2.11.2.6.2 Smart Card Layout Setting
When clicking button at the top of the right side, Smart Card Layout Setting appears. It requires master authority, which set card layout.
� Card Information: Set up card type and card capacity.
�� Card Capacity (Card Sector): 1K (16ea) , 4K (64ea) , 8K (128ea) of select
�� Card Type: Standard Card / FP-Card
� Standard Card
� Authentication Type: In case of the general card select the method - Card Serial No: Select a smart card to authenticate to the serial. - Card Data: Use of smart cards to authenticate specific data is to select.. - MAD:If a user must choose how to use MAD.

179
� Serial Number Type: If a user chooses an authentication method [Card Serial No] - Default: 8-digit display with hex - Hexa String: Changing the order of Byte / 8-digit display with hex - Decimal String: hex to 10-digit display with decimal number - 3.5 Decimal : Change the hexadecimal number (8 digits) into decimal number (10 digits).
� Sector information: If a user chooses an authentication method [Card Data] or [MAD] - Sector: [Card Information] depending on card capacity, 000~127 select - Block: 0~2 block - Data Start / Data Length: Start of the data sequence number / Data Full length - Key Type: KEY A or KEY B - Key Value - Size of summary card
� Press Add button to save the entered sector information.
� After choosing the data on the list below press Delete button to delete it.
� Press Clear button to delete the entered sector information.
� Press Send to Terminal button to send the setting information to the terminal.

180
2.2.11.2.6.3 Issue Smart Card
When clicking button at the top of the right side, Issue Smart Card appears. This function sets card format in advance when using fingerprint card. Set a site key value of the specified sector and block, in order to access via card according to the format which will be decided at a later stage.
※ Registered card layout information correction and confirmation: [Main Menu]-[Settings]-[Issue Smart Card].

181
2.2.11.2.6.4 Access Group Shift Settings
When clicking button at the top of the right side, Access Group shift Settings appear. This function sets pertinent data where access group is not fixed or is changed regularly. All the users in those group will be changed to a modified group at a specified date accordingly.
��Access Group Shift Settings
�� Set Access Group: Choose the shift access group.
�� Start Date: Choose the start date which will be applied to access group.
�� Repeat After: Choose the date from start date.
�� Access Shift Code: By Double clicking the entering part choose the shift code on list. - Double click [Enter Directly] to enter the code directly.
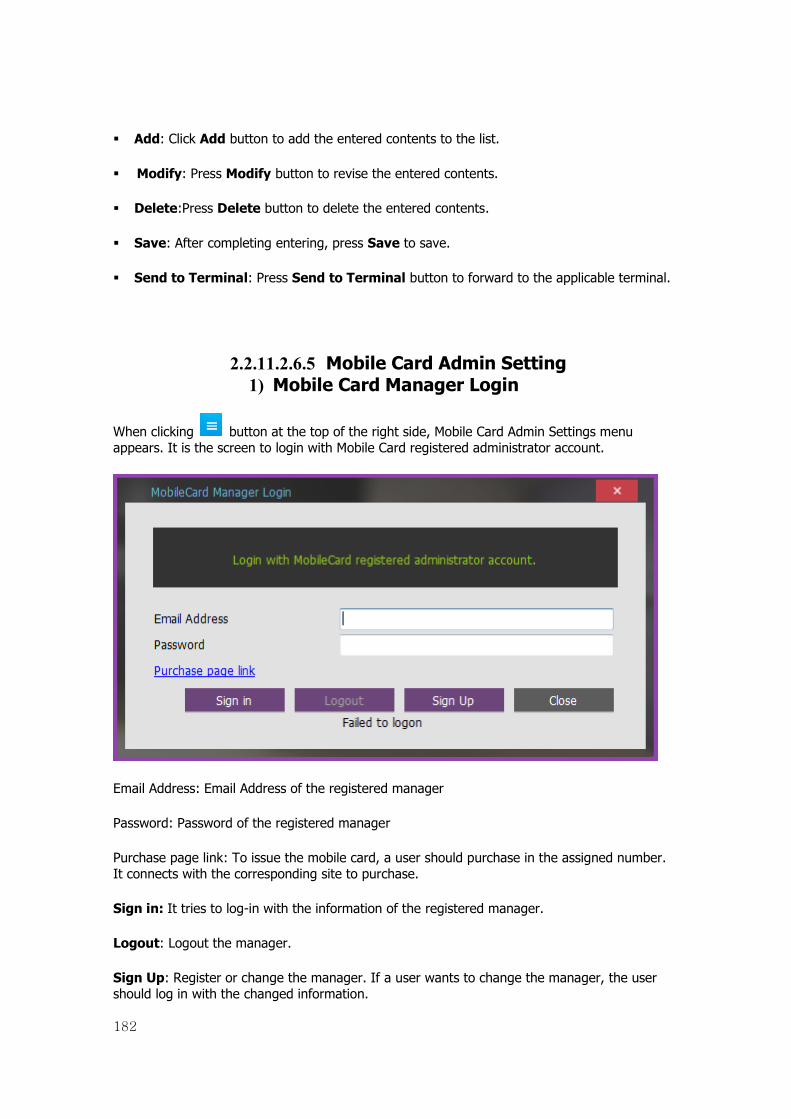
182
� Add: Click Add button to add the entered contents to the list.
� Modify: Press Modify button to revise the entered contents.
� Delete:Press Delete button to delete the entered contents.
� Save: After completing entering, press Save to save.
� Send to Terminal: Press Send to Terminal button to forward to the applicable terminal.
2.2.11.2.6.5 Mobile Card Admin Setting 1) Mobile Card Manager Login
When clicking button at the top of the right side, Mobile Card Admin Settings menu appears. It is the screen to login with Mobile Card registered administrator account.
Email Address: Email Address of the registered manager
Password: Password of the registered manager
Purchase page link: To issue the mobile card, a user should purchase in the assigned number. It connects with the corresponding site to purchase.
Sign in: It tries to log-in with the information of the registered manager.
Logout: Logout the manager.
Sign Up: Register or change the manager. If a user wants to change the manager, the user should log in with the changed information.

183
Close: Close the log in screen.
2) Mobile Card Manager Settings
Server DNS: Mobile card Server Address
Client Secret Key: The security value that treats internally.
Email Address: Email Address of the mobile card manager (If the site code is issued, Email information to use as the corresponding manager.
Password: Manager Password
Country Code / Mobile Number: Country code or Mobile number of the manager.
Customer name: Customer name to use the mobile card

184
Site Code: The issued site code when registering the corresponding customer (In case of log in as the corresponding manager when selecting as the customer name, the site code was given automatically from the mobile card server.
Time zone: The time information to use the mobile card service.
Apply: Register/Modify the information of the registered manager.
renewal list: Renewal Management about the user who got the mobile card.
3) Renewal list
Automatically renew setting of user renewal list and mobile card expiration date.
� Expiration Date Range: Search the user to issue the mobile card with the
following condition. � Automatic Renewal: Select the inquired user, set whether automatic renewal or
not and reflect the list pressing the Modify button. And then the setting information of automatic renewal applies in the mobile card server.
� Manual synchronization: If bringing back the users from the terminal after uploading, when only running NIS B Plus and the terminal, it synchronizes the information such as mobile card access period and KeyNo from the mobile card server.

185
2.2.11.2.6.6 DVR Setting
When clicking button at the top of the right side, DVR Configuration menu appears. It can set a various of DVR in advance and select the DVR when registering the terminal.
� DVR configuration
� DVR ID: DVR serial number which can set from 1 to 10
� DVR_IP: DVR IP address
�� DVR Port: DVR Port number
� DVR Login ID: DVR Login ID to access DVR
� DVR Login Password: DVR Login Password to access
� DVR Previous Play time: Set from 0 to 1800 per seconds and set the play time before the event occurs when playing the video.
� Add: Add the DVR setting information additionally.
� Modify: Modify the selected setting information.

186
� Delete: Delete the selected registration information.
2.2.11.2.7 Information 2.2.11.2.7.1 Program Information
When clicking button, Program information menu appears. It shows the version information of each module.
2.2.11.2.7.2 Program Help
When clicking button at the top of right side, Program Help menu appears.
2.2.11.3 Start Home
When clicking button, Start Home menu appears. It moves to main menu.

187
2.2.11.4 Environment Settings 2.2.11.4.1 Local Environment Setting
When clicking button, Environment menu appears like below.
2.2.11.4.1.1 General
▶ Set Basic
��Language: It supports English, Korean and Japanese basically. In addition, a user can set the custom language. To set the additional language, open Lanuguage.xml file in Config folder in UNIS installation path and add Addition section.

188
Path) C:�Program Files (x86)�UNIS�Config�Language.xml ��Font: Set the font. ��Display as the positioning shaping: Display the terminal location in the positioning
shaping. ��Startup Authentication List Count: In monitoring viewer, when starting the program, it
marks as the latest authentication list count. The maximum count is 99999. ��Authentication failure log color on monitoring viewer: In monitoring viewer, it is
marked as the color which sets the authentication failure log in. ��Authentication type non-registered user record color: In the employee management
screen, the user whose authentication method is not registered is marked as the following color.
▶ Restriction
��Door Control �Allow all functions: The pop-up menu about the terminal control is available in the
terminal list in the monitoring viewer. �Disabled: The pop-up menu about the terminal control is not available in the terminal
list in the monitoring viewer. Remote door open only: The pop-up menu for door open is only allowed.
�� The maximum number of monitoring lists: Enter the maximum number of lists to be displayed on the monitoring screen.
�� The maximum number of search list outputs: Enter the maximum number of lists to be displayed in the authentication record search screen.
▶ Real-time Monitoring Item ��Remote admin log on monitoring: Admin log on status is displayed in the monitor. �� Terminal connection monitoring: Terminal status is displayed in the monitor.

189
2.2.11.4.1.2 Server Connection
▶ Authentication Server
��IP Address: Enter authentication server IP address (UNIS_Server) ��Connection Port: Enter the authentication server socket port number
▶ Database Server ��IP Address: Enter server database IP address (IP address of a PC installed as the
server during program installation) (UDB_Server) ��Port: Enter the socket port number for connection to the database server. ��Database connection information: It changes the database account information which
is currently connecting. When changing the access information, a user should do in caution and it is only changed by the master administrator.

190
2.2.11.4.1.3 Alarm Option Setting
�� The number of maximum pop up of alarm’s window (0~50): When it happens alarm,
the number of maximum pops up alarm’s window is displayed. �� The size of pop up window’s alarm (0.2): It inputs the size of pop up. �� Notice board of window’s time (Maximum: 600 sec): The time from open to close
automatically if admin do not check after showing the pop up window (If it is set up “0”, there is no closing automatically)
▶ Setting alarm sound
�� Not Used: No alarm sound �� Buzz: When selecting, it happens “PPiiic~PPiiic” �� Sound: Play the selected WAVE file as below
▶ Alarm Select �� Alarm for matching fail ���Alarm for disconnect �� Alarm for cover open �� Alarm for door forced �� Alarm for door open �� Alarm for lock error ��Blacklisted User Attempted Authentication ��Duress
▶ ACU Select popup alarm

191
2.2.11.4.1.4 Picture Popup
�� Max Popup Window(0~50 Enter the maximum number of pop-ups to be displayed �� Popup Window Size (0~2): Set pop-up window size. �� Popup Time (0~100): Enter a time in seconds for which a pop-up window is opened. ��Reg picture in main: Set the size of the picture popup window. ��Top Most: Place the picture popup window at the most top of the window.
▶ Popup Location ��Auto Position: Select the popup location. When checking the Auto Position, the window
pop-up appears in order.
▶ Terminal ��Select the terminal to popup the picture.

192
2.2.11.4.2 Server Environment Setting 2.2.11.4.2.1 General
▶ User
�� User ID used as Unique ID (Automatic creation): If Unique ID is not used separately, it is replaced by user ID.
��Allow terminal to overwrite users : When importing from the terminal user management, the user information is overwritten.
� Auto synchronize terminal when user info is modified.: If the user information is modified, the automatically modified information sends to the terminal,
� Use blacklist user management: Check status of the blacklist.
▶ Authentication ��Automatically upload log data from terminal
: When connecting the terminal, non transmitted authentication log data is sent from the terminal.
�� Save only successful authentication log: Authentication failure event can be checked only in monitor but it is not saved. ▶ Door
�� Save log for door open and close status : It decides to save log data such as authentication success, inside open, compulsory open with remote.

193
▶ Transfer picture when record is sent �� Transfer picture when record is sent: Send picture images with transmitting verified
log data. (B_picture field should be in the external transmission table.) � Include authentication data: When inputting or outputting the user information, it is
done including the authentication data.
▶ Access control ��Restrict the use of access control admin.: The master administrator gives
the access authority to the user who has management authority. (Refer [Add User])
��Non assigned access user not allowed to access: If the access group is not assigned, it restrict the access.
��Blocking Time (Sec): Set the time value that restricts the authentication consecutively.
▶ Picture Information
���Saving path to picture log (dat): terminal input / specify path to save the release of photographs taken.
�� Saving path to picture log (JEPG): time of path appointing, save in/out capture image by Jpeg.
▶ Security
��Using the encrypted packets: Use the Seed encrypted packets. ��User Information Encryption: Encrypt user name, serial number, password in remote
access log-in.
▶ Other ��Language: Set the server language such as mail. ��Logo picture to home screen: Change the logo picture in mail screen. � Clear Server Connect Info: Delete all connected information from UNIS_Server
Database.
※ Error will occur during multiple connection from UNIS_Sever.

194
�� DDNS: Set DDNS server information.
� Enable: Set whether a user uses DDNS server or not.
�� Host: Set Host ID.
�� Update Term: Set the information update term from Host server to DDNS Server.
� Contract No.: Press Apply button to get the contract number from DDNS Server.
�� Terminal Connection Setting
��� port: Enter socket port number to connect terminal to server. (Basic Port: 9870)
�� Connection status check interval: Connection status between terminal and server is checked with a time interval in setting.
��Set cipher
��� Terminal ID Length (1~8): Set the desired number of ID digit.
�� User ID Length (1~8): Set the desired number of ID digit.
� Unique ID Length (1~20): Set the desired number of ID digit.
���� Visitor ID Range: When adding a visitor, ID is added in the corresponding range in order.
��Archive Period: Data Management > It specifies the numbers of days for data storage that is inquired at Data Management.

195
� Store Access Log: A standard unit is days, if setting 0, period for storage is unlimited. (100 = It means that records are deleted automatically after storage record for 100days)
���� Store Event Log: A standard unit is days, if setting 0, period for storage is unlimited.
���� Store Terminal Commands: A standard unit is days, if setting 0, period for storage is unlimited
2.2.11.4.2.2 Fingerprint
�� Set Finger Order : If the number of fingerprint is limited to send to the terminal, send fingerprints according to the priority of fingerprint.

196
� Allow similar fingerprints to be registered.
: When registering the user’s fingerprint, register without checking the similar fingerprint. ��If a user allows the similar fingerprint, the user cannot search with the user’s fingerprint. It means if a user checks “Allow similar fingerprints to be registered”, “Find user from fingerprint” deactivates like the picture below.
��If a user doesn’t allow the similar fingerprint, the user search is set automatically with the fingerprints. It means if a user doesn’t check “Allow similar finger prints to be registered”, “Find user from fingerprint” deactivates like the picture below.
� Force user to enroll set No. of fingerprints (see value below) : Register fingerprints as many as the number of fingerprints when checked.
� Find user from fingerprint : Allow to find the user in the list with the fingerprint when searching for the user.
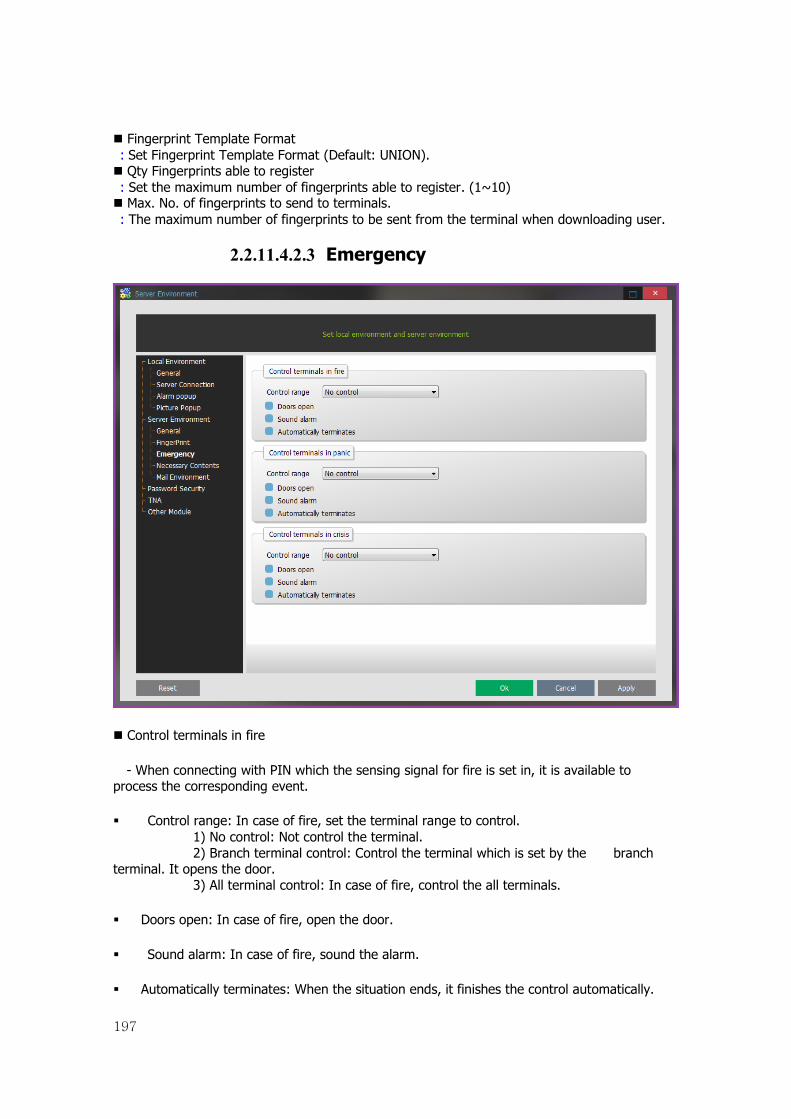
197
� Fingerprint Template Format : Set Fingerprint Template Format (Default: UNION). � Qty Fingerprints able to register : Set the maximum number of fingerprints able to register. (1~10) � Max. No. of fingerprints to send to terminals. : The maximum number of fingerprints to be sent from the terminal when downloading user.
2.2.11.4.2.3 Emergency
� Control terminals in fire
- When connecting with PIN which the sensing signal for fire is set in, it is available to process the corresponding event.
� Control range: In case of fire, set the terminal range to control. 1) No control: Not control the terminal. 2) Branch terminal control: Control the terminal which is set by the branch terminal. It opens the door. 3) All terminal control: In case of fire, control the all terminals.
� Doors open: In case of fire, open the door.
�� Sound alarm: In case of fire, sound the alarm.
� Automatically terminates: When the situation ends, it finishes the control automatically.

198
��Control terminals in panic
- When connecting with PIN which panic status signal is set in, it is available to process the corresponding event.
��Control range: In case of fire, set the terminal range to control. 1) No control: Not control the terminal. 2) Branch terminal control: Control the terminal which is set by the branch terminal. It opens the door. 3) All terminal control: In case of fire, control the all terminals.
��Doors open: In case of fire, open the door.
��Sound alarm: In case of fire, sound the alarm.
�� Automatically terminates: When the situation ends, it finishes the control automatically.
��Control terminals in crisis
- When connecting with PIN which the sensing signal for fire is set in, it is available to process the corresponding event.
��Control range: In case of fire, set the terminal range to control. 1) No control: Not control the terminal. 2) Branch terminal control: Control the terminal which is set by the branch terminal. It opens the door. 3) All terminal control: In case of fire, control the all terminals.
��Doors open: In case of fire, open the door.
��Sound alarm: In case of fire, sound the alarm.
��Automatically terminates: When the situation ends, it finishes the control automatically

199
2.2.11.4.2.4 Necessary Contents
Set the necessary contents when registering a user, visitor, and terminal information.

200
2.2.11.4.3 Password Security Setting
[Remote Access Password Info] can be set up at [2.2.3.1. Add User]
��Password Use Options
��Password Available Days: A user can login a designated password during this period.
��Authentication Failure Allowing Option: The number of possible re-entry as password isn’t matched.
��Password Change required at the first log-on: When login at first, a user should change your password exactly.
��Case-insensitive: If checking this option, when inputting a password, It ignores Caps Lock(Capital)
��Initial Value
��Initialization Method: Defined Value - (Default:1234) Administrator can set it. / Employee ID is designated automatically.
��Initial Value: Initial value to that extent that initialization method is designated value.

201
��Password Generation
��Previous Password not Allowed: Previous password is not allowed to re-try.
��Consecutive Characters not Allowed: Consecutive Characters are not allowed. ( ex. 1111 is not possible)
��Not allowed with the same ID and Password: If ID and password are same, a user is not allowed to input.
��Password Length Limitation: Setting password Length
��Character Limitation for Password: If checking this menu, a user can set Password Character Limitation
��Password Character Limitation
��Uppercase Use Required: As inputting your password, Uppercase is required
��Lowercase Use Required: As inputting your password, Lowercase is required.
��Number Use Required: As inputting your password, Number is required.
��Special Character Use Required: As inputting your password, a special character is required.
2.2.11.4.4 Mail Environment
Terminal disconnected, Terminal Tamper, Door Forced, Door Not Closed, Lock Error, Emergency State, External Sensor, Blacklisted User Attempted Authentics. If event occurs that e-mail address to send details to set.
��Use mail Service: Used to check availability.
��Attach Picture: Check whether attach picture to log mail during sending.
��Security Type: Set No Security, TLS or SSL.
��Mail config
��Mail Server: SMTP Mail Server ( ex. smtp.mail.nate.com )
��Mail Port: Basic 25 ( Depending on the mail server change )
��Mail ID: Mail account, enter your login ID ( ex. [email protected] )
��Mail PWD: Enter email account password
��Mail_FROM: mail account type (may be classified as spam, enter the correct email account)

202
※ Tip: Can be filtered to spam mail, accept email address from spam mail setting
��Sender: Settings displayed on the sender name (ex. Access Control Manager)
��Mail_TO: Enter the recipient email address( ex. [email protected] )
��Mail_CC: Reference is receiving the input of the mail account ( ex. [email protected] )
��Mail_BCC: BCC is the input of the mail account ( ex. [email protected] )
※ In case of many receivers, put ‘;’ before each people name.
��Select mail: Be sent to the event, select the item ( Terminal disconnected, Terminal Detached, Door Forced , Door Not Closed, Lock Error, Emergency State, External Sensor )
�� Press Apply button to send the test mail to the setting mail account.
��Setting an example
��Example) The list of sending mail.

203
2.2.11.4.5 TNA Settings
��Time and Attendance setting ��Auto Process Time: Set the time and attendance time in 1 times daily automatically. ��No. Decimals (Currency): The number of decimals to be able to enter when registering payment according to working hours. ��Time Displayed As: Set the type of time display. ��No. of Decimals: Set the number of decimals of time display. ��Pay period: Total Period ��First Day of Week: Set the first day of week ��Calculate Daily: The last day of time and attendance.

204
��Calculate From: The last day of calculating total working hours.
��Using Neis This is the function that connects with the external system and the result of time&attendance. And then a user should start from the server. After setting whether using or not, setting the path, a user should restart in uWorkServer. The result of time&attendance is saved in the designated format in the corresponding path when processing time&attendance.
2.2.11.4.6 Other Module
��Setting Paxton Net2 This is the function that sets the synchronization with Net2 Software. ��Used: Whether or not to use synchronization. ��IP Address: Server IP address which Net2 is installed in. ��Port: The server port which Net2 is installed in. ��ID: Net2 access ID ��Password: Net2 access password

205
3. Appendix 3.1 Verifying UNIS Normal Operation
1.Verifying the process operation
2. Check the operating status: [Control Panel]-[Administrative Tools]-[Service]

206
3.2 Anti Pass Back Configuration
Configure in the following order to use Anti PassBack function.
1. [Menu]-[Anti Pass Back Management]
2. Add the area in accordance with terminal location as follow.
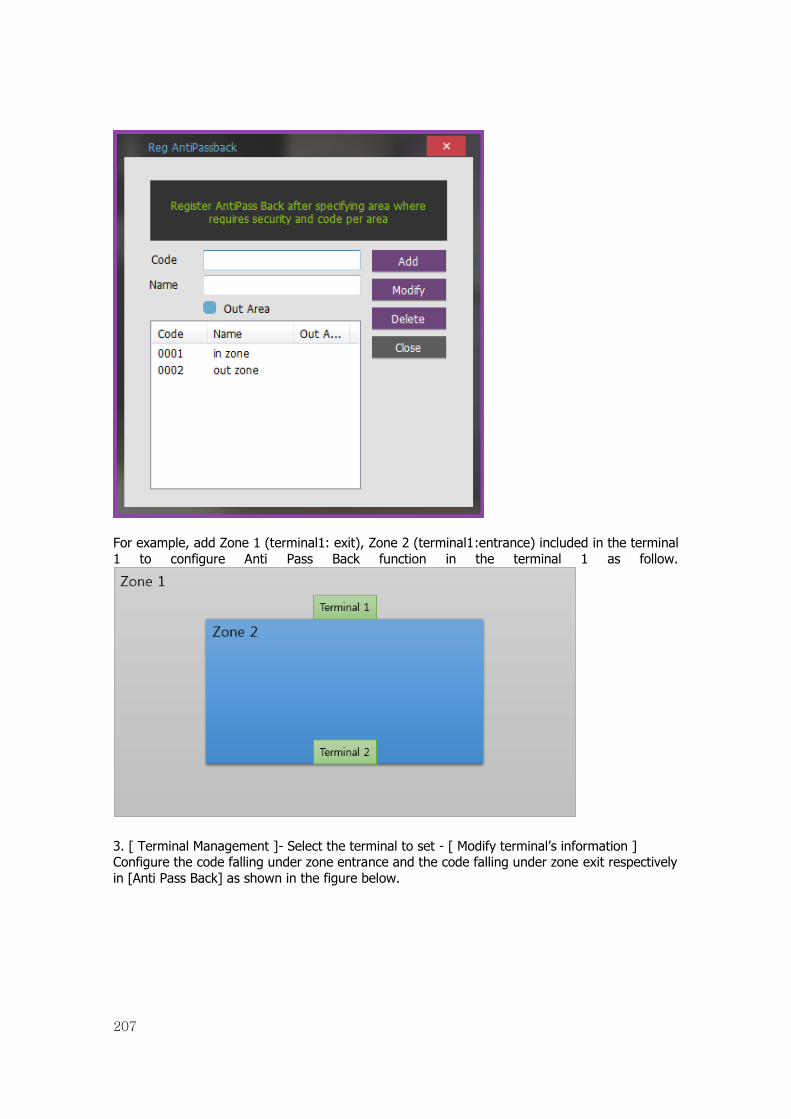
207
For example, add Zone 1 (terminal1: exit), Zone 2 (terminal1:entrance) included in the terminal 1 to configure Anti Pass Back function in the terminal 1 as follow.
3. [ Terminal Management ]- Select the terminal to set - [ Modify terminal’s information ] Configure the code falling under zone entrance and the code falling under zone exit respectively in [Anti Pass Back] as shown in the figure below.

208
4. [Setup Options]-[Basic]: Completion of Setup Select one option from Access Allowed or Access Denied in the case of Not Used -> Server Disconnected in order to use [Anti Pass Back] function as shown in the figure below. -Access allowed when server disconnected: Set whether or not access is allowed when communication with server is disconnected during the use of Anti Pass Back. In case of disconnection, access is allowed for all. -Access denied when server disconnected: When communication with server is disconnected during the use of Anti Pass Back, access is denied for all.

209
5. Authentication with Anti Pass Back [Location] information is indicated as "unassigned" in user information as shown in the figure below.

210
When authenticating with terminal1 in Zone 1, user location information is changed into Zone 2.
When attempting re-authentication with terminal 1 in Zone 1 instead of accessing zone 2, the access is in fact not allowed.

211
3.3 TNA Settings
※ Check Points before Attendance Setting 1. [TNA]-[TNA Settings] 2. Move to [Add Terminal] - Functional Division as below, and then set to TNA ( For more detailed method of setting: [Add Terminal] ) 3. As shown in No, 2 above, the record authenticated at the terminal appointed as attendance management terminal is acknowledged as the attendance record.
Examples by Workplaces and Attendances
1. General Workplace: Example of Attendance Basic Setting ▶ Move to [General Workplace]
2.. Public Office: Example of Attendance Setting at Public Office such as Overtime Work. ▶ Move to [Public Office]
3. Night Shift: Example of the case where the range of attendance per day is 24 hours like frequent night shifts ▶ Move to [Night Shift]
4. Shift Work: Example of the case where the range of Going to and Leaving from Work is complicated like three-shift work, etc. ▶ Move to [Shift Work]
5. Multiple Going to and Leaving from Work: Applicable when the frequency of Going to and Leaving from Work is one or more times per work day. For example, it is the case where the work is divided into Morning work - Break - Afternoon work and the Times when going to and leaving from work is added to the range of Morning/Afternoon Work Range respectively ▶ Move to [Multiple Going to and Leaving from Work]

212
3.3.1 Example of TNA Settings (General Workplace)
General Workplace: Example of Attendance Basic Setting ☞ Please set up following the mark
1. [TNA Settings]: Set/add time as below from [Shift Config]
① Code: Enter a two-character code consisting of digits or English alphabet letters without overlapping (Special characters are not allowed) / Name: Code Name ☞ Code: 11 / Name: Enter the ordinary days (ex. Working day, normal day, etc.)
② Clocking Mode - Use all function keys: Acknowledge all the records inquired in [Log Management]-[Access Log]as the attendance record - Use attend and leave keys: Acknowledge the first and last among the records, [Mode] of which inquired in [Log Management]-[Access Log] are Going to and Leaving from Work data

213
☞ Set [Use all function keys]
③ Time Frame: Process the record of Going to and Leaving from Work within the applicable zone as the attendance ☞ Normally set to 06:00~+06:00 (In the event of going to work at 05:59 and going from work at 06:01 on the following day, it is not recorded as attendance)
④ Set Shift Times: Split into a maximum of five types depending on options ☞ Normal Time: 09:00~18:00 (Times of going to work and leaving from work to be entered accurately) ☞ etc, In the event of counting Time Before Shift, Overtime1 Hours, Overtime2 Hours enter the applicable time ※Note: The range of time zones of [Start] and [End] must be within the time range input in No.
��Add: Click this button to register the input data.
2. [TNA Settings]: Register the work type in accordance with the work schedule as follow in [Set Schedule]

214
① Code: Enter a four-character code consisting of digits or English alphabet letters without overlapping (Special characters are not allowed) / Name: Code Name ☞ Code: 1111 / Name: Enter Code Name
② Repeat After: Select the number of days revolving repeatedly (Normally in the unit of 7 days) ☞ Select 7 days (Normally repeated in the unit of 7 days)
③ Set Shift: Double-click to inquire the work code registered in [ Shift Config ] ☞ Double-click to designate the registered code
��Add: Click this button to register the input data.

215
3. [TNA Settings]: Designate the attendance codes registered as follow on a lump sum basis in [Apply Schedule].
① Apply Schedule: Select the work type to be applied ☞ Select the attendance code
② Check box: Check the applicable employee ☞ Check All Employees

216
� Set: Click this button to have the applicable contents to be applied to the employee checked as above.
4. [TNA]: Attendance is counted and applied based on the set value registered as follow in [Process Transanctions]
① Set Period: Designate the subject period of attendance processing. (Maximum Period: 31 days)

217
☞ Normally in the unit of a day or seven days (The data of attendance processed must exist during the applicable period)
② Check box: Check the applicable employee ☞ Check All Employees
�� : Press button to display complete message on the processing result after processing.
5. [TNA]: Inquire the attendance results as follow from [Output Period Result]
① ① Search Period: Designate the subject period of attendance processing. (Maximum Period: 31 days) ☞ Normally in the unit of a day or seven days (The data of attendance processed must exist during the applicable period)
② Search: Output the results..
③ Transaction Reports
Date Arrival Time
Departure Time
Late After Time
Early Departure Time
Normal Time
Time Before Shift
Overtime1 Hours
Attendance Setting Value 09:00 18:00 After
09:00 Before 18:00 9Hours Before 09:00 After 18:00
2010-05-06 09:01 18:42 00:01 00:00 08:59 00:00 00:42 2010-05-07 08:48 20:31 00:00 00:00 09:00 00:12 02:31

218
3.3.2 Example of TNA Settings (Public Office)
Public Office Excessive Work: Example of Public Office Attendance Setting such as Excessive Work Hours. ☞ Please set up following the mark.
1. [TNA Settings]: Set/add time as below from [Shift Config]
① Code: Enter a two-character code consisting of digits or English alphabet letters without overlapping (Special characters are not allowed) / Name: Code Name ☞ Code: 01 / Name: Enter the ordinary days (ex. Date of Work, Weekday, etc.)
② Clocking Mode - Use all function keys: Acknowledge all the records inquired in [Log Management]-[Access Log]as the attendance record - Use attend and leave keys: Acknowledge the first and last among the records, [Mode] of which inquired in [Log Management]-[Access Log] are Going to and Leaving from Work data ☞ Set [Use all function keys]

219
③ Time Frame: Process the record of Going to and Leaving from Work within the applicable zone as the attendance ☞ Normally set to 04:00~+04:00 (In the event of going to work at 03:59 and leaving from work at 05:01 on the following day, it is not recorded as attendance)
④ Set Shift Times: Split into a maximum of five types depending on option ☞ Normal Time: 09:00~18:00 (Times of going to work and leaving from work to be entered accurately) ☞ Time Before Shift: 04:00~09:00 / ☞ Overtime1 Hours: 18:00~+04:00 (Omit entry if counting is not necessary) ☞ Overtime3 Hours: 04:00~09:00 / ☞ Overtime3 Hours: 18:00~+04:00 (All the hours other than basic work are summed up as excessive hours) ※Note: The range of time zones of [Start] and [End] must be within the time range input in No.
� Add: Click this button to register the input data.
2. [TNA Settings]: Register the work type in accordance with the work schedule as follow in [Set Schedule]

220
① Code: Enter a four-character code consisting of digits or English alphabet letters without overlapping (Special characters are not allowed) / Name: Code Name ☞ Code: 1111 / Name: Enter Code Name
② Repeat After: Select the number of days revolving repeatedly (Normally in the unit of 7 days) ☞ Select 7 days (Normally repeated in the unit of 7 days)
③ Set Shift: Double-click to inquire the work code registered in [ Shift Config ] ☞ Double-click to designate the registered code
④ Overtime3 Hours Detail: Set the public office overtime work standard

221
☞ Rounding: The entered time information processing unit ☞ Add. Hours: When the conditions are met, add as set time.
☞ Add. Hours After: The set time based on the over time. ☞ Del. Hours: One hour is deducted for the overtime work period ☞ Del. Hours After: The set time based on the deducted time ☞ Min. Time: Acknowledge as overtime work when the work time is at least one hour ☞ Max. Time: Acknowledges a maximum of four hours per day ☞ Rate: Rate the time base on the minimum time.
- Define Pay Period Rules: When processing TNA, the detailed setting and contents are same. ☞ Transfer to : Add the corresponding over time to the other working time.
� Set: Save the set value.
3. [TNA Settings]: Designate the attendance codes registered as follow on a lump sum basis in [Apply Schedule]

222
① Apply Schedule: Select the work type to be applied ☞ Select the attendance code
② Check box: Check the applicable employee ☞ Check All Employees
� Set: Click this button to have the applicable contents to be applied to the employee checked as above.

223
4. [TNA]: Attendance is counted and applied based on the set value registered as follow in [Process Transactions]
① Set Period: Designate the subject period of attendance processing. (Maximum Period: 31 days) ☞ Normally in the unit of a day or seven days (The data of attendance processed must exist during the applicable period)
② Check box: Check the applicable employee ☞ Check All Employees
� Process: Press Process button to display ‘complete’ message on the processing result after processing.
5. [TNA]: Inquire the attendance results as follow from [Output Period Result]
① Search Period: Designate the subject period of attendance processing. (Maximum Period: 31 days) ☞ Normally in the unit of a day or seven days (The data of attendance processed must exist during the applicable period)
② Search: Output the results.
③ Transaction Reports ☞ Overtime3 Hours: Hours other than the basic work, acknowledges a maximum of four hours per day (For a minimum of at least one hour, basically one hour is deductible)
Time Arrival Time
Departure Time
Late After Time
Early Departure
Time Normal Time
Time Before Shift
Overtime1 Hours Overtime3 Hours
Attendance Setting Value
09:00 18:00 After09:00 Before18:00 9Hours Before09:00 After18:00 Time Before Shift+Overtime1
CASE1
07:20 +01:25 00:00 00:00 09:00 01:40 07:25 04:00 ☞ Overtime3 Hours =1:40+7:25 = 9:05 (Del. Hours 1, Max. Time 4) ▷ 4:00 11:02 +01:05 02:02 00:00 06:58 00:00 07:05 04:00 ☞ Overtime3 Hours = 07:05 (Del. Hours 1, Max. Time 4) ▷ 4:00
CASE2 12:41 22:55 03:41 00:00 05:19 00:00 04:55 03:55 ☞ Overtime3 Hours = 04:55 (Del. Hours 1) ▷ 3:55
CASE3 08:50 19:33 00:00 00:00 09:00 00:10 01:33 00:00 ☞ Overtime3 Hours = 00:10 + 01:33 = 01:43 (Del. Hours 1, Min. Time 1) ▷ 00:00 08:41 19:27 00:00 00:00 09:00 00:19 01:27 00:00

224
☞ Overtime3 Hours = 00:19+ 01:27 = 01:46 (Del. Hours 1, Min. Time 1) ▷ 00:00 ☞ Overtime3 Hours: Time other than Basic Work Time, Acknowledge a maximum of four hours per day (Del. Hours 1)
Time Arrival Time
Departure Time
Late After Time
Early Departure
Time Normal Time
Time Before Shift
Overtime1 Hours Overtime3 Hours
Attendance Setting Value 09:00 18:00 After09:00 Before18:00 9Hours Before09:00 After18:00 Time Before
Shift+Overtime1
CASE4
08:41 19:27 00:00 00:00 09:00 00:19 01:27 00:46 ☞ Overtime3 Hours = 00:19+ 01:27= 01:46 (Del. Hours 1) ▷ 00:46 07:15 15:13 00:00 02:47 06:13 01:45 00:00 00:45
☞ Overtime3 Hours = 01:45 (Del. Hours 1) ▷ 00:45

225
3.3.3 Example of TNA Settings (Night Shift)
Night Shift: Example of the case where the range of attendance per day is 24 hours like frequent night shifts. ☞ Please set up following the mark
1. [TNA Settings]: Set/add time as below from [Shift Config]
① Code: Enter a two-character code consisting of digits or English alphabet letters without overlapping (Special characters are not allowed) / Name: Code Name ☞ Code: 44 / Name: Enter the ordinary days (ex. Working day, normal day, etc.)
② Clocking Mode - Use all function keys: Acknowledge all the records inquired in [Log Management]-[Access Log]as the attendance record - Use attend and leave keys: Acknowledge the first and last among the records, [Mode] of which inquired in [Log Management]-[Access Log] are Going to and Leaving from Work data.

226
☞ Set [Use all function keys]
③ Time Frame: Process the record of Going to and Leaving from Work within the applicable zone as the attendance ☞ Normally set to 06:00~+12:00 that is night shift time zone (In the event of going to work at 05:59 and going from work at 13:01 on the following day, it is not recorded as attendance)
④ Set Shift Times: Split into a maximum of five types depending on options ☞ Normal Time: All hours from the time when going to work until the time when leaving from work (Count it as the record of Going to and Leaving from Work within the applicable zone) ※If there is Basic Work Time Standard, set in the same way as general workplace
� Add: Click this button to register the input data.
2. [TNA Settings]: Register the work type in accordance with the work schedule as follow in [Set Schedule]

227
① Code: Enter a four-character code consisting of digits or English alphabet letters without overlapping (Special characters are not allowed) / Name: Code Name ☞ Code: 1111 / Name: Enter Code Name
② Repeat After: Select the number of days revolving repeatedly (Normally in the unit of 7 days) ☞ Select 7 days (Normally repeated in the unit of 7 days)
③ Set Shift: Double-click to inquire the work code registered in [ Shift Config ] ☞ Double-click to designate the registered code
� Add: Click this button to register the input data.
3. [TNA Settings]: Designate the attendance codes registered as follow on a lump sum basis in [Apply Schedule]

228
① Apply Schedule: Select the work type to be applied ☞ Select the attendance code
② Check box: Check the applicable employee ☞ Check All Employees
� Set: Click this button to have the applicable contents to be applied to the employee checked as above.
4. [TNA]: Attendance is counted and applied based on the set value registered as follow in [Process Transactions].

229
① Set Period: Designate the subject period of attendance processing. (Maximum Period: 31 days) ☞ Normally in the unit of a day or seven days (The data of attendance processed must exist during the applicable period)
② Check box: Check the applicable employee ☞ Check All Employees
� Process: button to display ‘complete’ message on the processing result
after processing
5. [TNA]: Inquire the attendance results as follow from [Output Period Summary]
① Search Period: Designate the subject period of attendance processing. (Maximum Period: 31 days)

230
☞ Normally in the unit of a day or seven days (The data of attendance processed must exist during the applicable period)
② Search: Output the results.
☞ Identify Access Log
③ Transaction Reports ☞ Calculation Standard: Record of going to work and leaving from work between 06:00 and +12:00
NO Date of Work Arrival Time Departure Time Normal Time 1 2010-04-05 08:53 +11:12 26:19 2 2010-04-06 18:43 +11:37 16:54 3 2010-04-07 - - 00:00 4 2010-04-08 08:41 +11:33 26:52 5 2010-04-09 18:35 +11:56 17:21
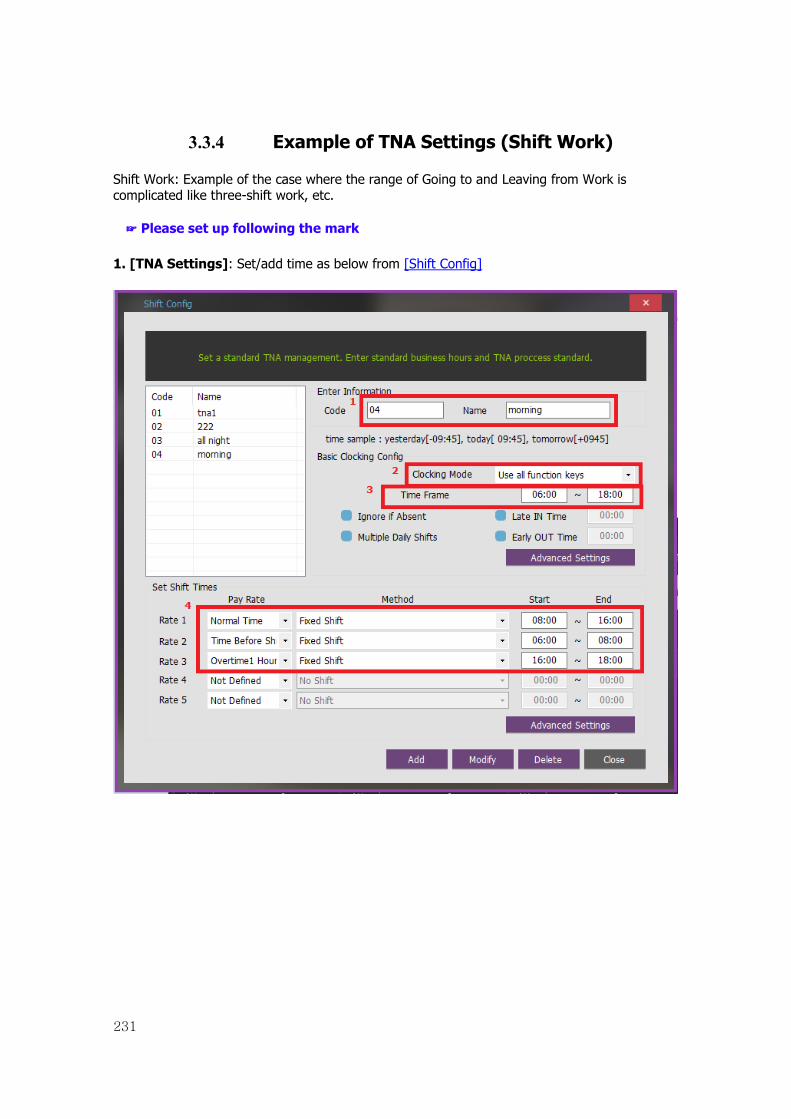
231
3.3.4 Example of TNA Settings (Shift Work)
Shift Work: Example of the case where the range of Going to and Leaving from Work is complicated like three-shift work, etc. ☞ Please set up following the mark
1. [TNA Settings]: Set/add time as below from [Shift Config]

232

233
① Code: Enter a two-character code consisting of digits or English alphabet letters without overlapping (Special characters are not allowed) / Name: Code Name ☞ Code: 11 / Name: Enter the ordinary days (ex. Working day, normal day, etc.)
② Clocking Mode - Use all function keys: Acknowledge all the records inquired in [Log Management]-[Access Log]as the attendance record - Use attend and leave keys: Acknowledge the first and last among the records, [Mode] of which inquired in [Log Management]-[Access Log] are Going to and Leaving from Work data ※ Authentication record used for attendance is applied when such authentication was successful(The record of failure in authentication is disregarded from the attendance) ☞ Set to [Use all function keys]
③ Time Frame: Process the record of Going to and Leaving from Work within the applicable zone as the attendance ☞ Normally set in broad range to 06:00~18:00 so as to include basic work range (In the event of going to work at 05:59 and going from work at 18:01, it is not recorded as attendance)
④ Set Shift Times ☞ Normal Time: 08:00~16:00 (Times of going to work and leaving from work to

234
be entered accurately) Enter the time in accordance with each shift work time ☞ ☞ etc, In the event of counting Time Before Shift, Overtime1 Hours, Overtime2 Hours enter the applicable time ※Note: The range of time zones of [Start] and [End] must be within the time range input in No.
� Add: Click this button to register the input data.
2. [TNA Settings]: Register the work type in accordance with the work schedule as follow in [Set Schedule]
① Code: Enter a four-character code consisting of digits or English alphabet letters without overlapping (Special characters are not allowed) / Name: Code Name ☞ Code: 0001 / Name: A Team (Name of the subject group replaced)

235
② Repeat After: Select the number of days revolving repeatedly (Normally in the unit of 7 days) ☞ Select 7 days (Normally repeated in the unit of 7 days)
③ Set Shift: Double-click to inquire the work code registered in [ Shift Config ] ☞ Double-click to designate the registered code
� Add: Click this button to register the input data.
3. [TNA Settings]: Designate the attendance codes registered as follow on a lump sum basis in [Apply Schedule]
① Apply Schedule: Select the work type to be applied ☞ Select the attendance code

236
② Check box: Check the applicable employee ☞ Check All Employees
③ Set: Click this button to have the applicable contents to be applied to the employee checked as above.
4. [TNA]: Attendance is counted and applied based on the set value registered as follow in [Process Transactions].
.
① Set Period: Designate the subject period of attendance processing. (Maximum Period: 31 days) ☞ Normally in the unit of a day or seven days (The data of attendance processed must exist during the applicable period)
② Check box: Check the applicable employee ☞ Check the group to be processed for attendance

237
� Process: Press Process button to display complete message on the processing result after processing.
5. [TNA]: Inquire the attendance results as follow from [Output Period Result]
① Search Period: Designate the subject period of attendance processing. (Maximum Period: 31 days) ☞ Normally in the unit of a day or seven days (The data of attendance processed must exist during the applicable period)
② Search: Output the results.
☞ Identify Access Log

238
③ Transaction Reports ☞ Calculation Standard: Processing the attendance by shift work time zones
Work Type Time Before Shift Normal Time Overtime1 Hours Morning 06:00~08:00 08:00~16:00 16:00~18:00
Day 14:00~16:00 16:00~+00:00 +00:00~+02:00 Night 22:00~+00:00 +00:00~+08:00 +08:00~+10:00
Date Work Type Arrival Time Departure Time Normal Time Time Before Shift Overtime1 Hours
2010-01-01 Morning 7:31 16:59 8:00 0:29 0:59 2010-01-02 Morning 7:19 17:39 8:00 0:41 1:39 2010-01-03 Morning 6:22 17:22 8:00 1:38 1:22 2010-01-04 Night 23:49 +8:49 8:00 0:11 0:49 2010-01-05 Night 23:19 +9:34 8:00 0:41 1:34 2010-01-06 Holiday - - - - - 2010-01-07 Day 15:37 +1:47 8:00 0:23 1:47 2010-01-08 Day 15:09 +1:53 8:00 0:51 1:53 2010-01-09 Day 14:58 +1:49 8:00 1:02 1:49

239
2010-01-10 Night 22:55 +8:40 8:00 1:05 0:40 2010-01-11 Holiday - - - - - 2010-01-12 Morning 7:40 16:15 8:00 0:20 0:15
3.3.5 Example of TNA Settings (Multiple Going to and Leaving from Work)
Multiple Going to and Leaving from Work: Applicable when the frequency of Going to and Leaving from Work is one or more times per workday. For example, it is the case where the work is divided into Morning work - Break - Afternoon work and the Times when going to and leaving from work is added to the range of Morning/Afternoon Work Range respectively. ☞ Please set up following the mark
1. [TNA Settings]: Set/add time as below from [Shift Config]

240
① Code: Enter a two-character code consisting of digits or English alphabet letters without overlapping (Special characters are not allowed) / Name: Code Name ☞ Code: Individual Entry / Name: Multiple going to and leaving from work
② Clocking Mode - Use all function keys: Acknowledge all the records inquired in [Log Management]-[Access Log]as the attendance record - Use attend and leave keys: Acknowledge the first and last among the records, [Mode] of which inquired in [Log Management]-[Access Log] are Going to and Leaving from Work data ※ Authentication record used for attendance is applied when such authentication was successful(The record of failure in authentication is disregarded from the attendance) ☞ Set to [Use all function keys]
③ Time Frame: Process the record of Going to and Leaving from Work within the applicable zone as the attendance ☞ Normally set in broad range to 06:00~18:00 so as to include basic work range (In the event of going to work at 05:59 and going from work at 06:01 on the following day, it is not recorded as attendance)
④ Set Shift Times ☞ Shift1: Early Departure Time 08:00~12:00 ☞ Shift2: Overtime1 Hours 14:00~18:00 ※Recognize the times when going to and leaving from work for early leave work as Morning Work, and those for overtime work as Afternoon Work ☞ Shift3: Normal Time 08:00~12:00 ☞ Shift4: Normal Time 14:00~18:00 ※These are the settings to seek the basic work time by summing up the early leave work and overtime work hours as set above
⑤ Advanced Settings(Clocking)

241
☞ ① 1st Band: 06:00~13:00 / 2nd Band: 13:00~22:00 ☞ Broadly set Normal Time so as to include the time zones 08:00~12:00 and 14:00~18:00 ☞ The hours of 1st Band and 2nd Band may not be overlapped
� Set: Click this button to register the input data.
⑥ Advanced Settings(Shift)

242
☞ Set the applicable zones to 1st Band, 2nd Band, Not Defined, Not Defined for the Shift1 through Shift4 settings as above
�� Set: Click this button to register the input data.
�� Add: Click this button to register the input data.
2. [TNA Settings]: Register the work type in accordance with the work schedule as follow in [Set Schedule]

243
① Code: Enter a four-character code consisting of digits or English alphabet letters without overlapping (Special characters are not allowed) / Name: Code Name ☞ Code: 1111 / Name: Enter Code Name
② Repeat After: Select the number of days revolving repeatedly (Normally in the unit of 7 days) ☞ Select 7 days (Normally repeated in the unit of 7 days)
③ Set Shift: Double-click to inquire the work code registered in [ Shift Config ] ☞ Double-click to designate the registered code
� Add: Click this button to register the input data.
3. [TNA Settings]: Designate the attendance codes registered as follow on a lump sum basis in [Apply Schedule]

244
① Apply Schedule: Select the work type to be applied ☞ Select the attendance code
② Check box: Check the applicable employee ☞ Check All Employees
� Set: Click this button to have the applicable contents to be applied to the employee checked as above.
4. [TNA]: Attendance is counted and applied based on the set value registered as follow in [Process Transactions]

245
① Set Period: Designate the subject period of attendance processing. (Maximum Period: 31 days) ☞ Normally in the unit of a day or seven days (The data of attendance processed must exist during the applicable period)
② Check box: Check the applicable employee ☞ Check All Employees
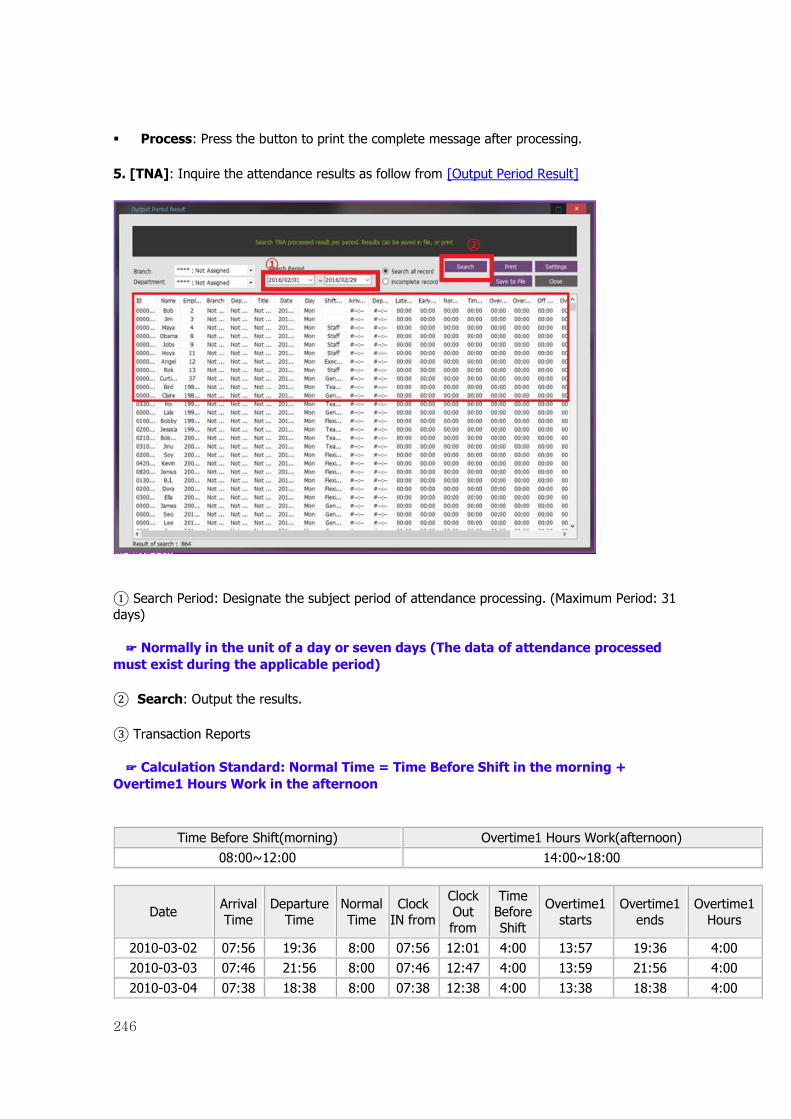
246
�� Process: Press the button to print the complete message after processing.
5. [TNA]: Inquire the attendance results as follow from [Output Period Result]
① Search Period: Designate the subject period of attendance processing. (Maximum Period: 31 days) ☞ Normally in the unit of a day or seven days (The data of attendance processed must exist during the applicable period)
② Search: Output the results.
③ Transaction Reports ☞ Calculation Standard: Normal Time = Time Before Shift in the morning + Overtime1 Hours Work in the afternoon
Time Before Shift(morning) Overtime1 Hours Work(afternoon) 08:00~12:00 14:00~18:00
Date Arrival Time
Departure Time
Normal Time
Clock IN from
Clock Out from
Time Before Shift
Overtime1 starts
Overtime1 ends
Overtime1 Hours
2010-03-02 07:56 19:36 8:00 07:56 12:01 4:00 13:57 19:36 4:00 2010-03-03 07:46 21:56 8:00 07:46 12:47 4:00 13:59 21:56 4:00 2010-03-04 07:38 18:38 8:00 07:38 12:38 4:00 13:38 18:38 4:00

247
2010-03-05 07:27 19:47 8:00 07:27 12:55 4:00 13:25 19:47 4:00 2010-03-06 13:22 19:04 4:00 - - 0:00 13:22 19:04 4:00
※When the number of multiple zones is at least three, it is impossible to inquire the record of going to and leaving from work in the morning and afternoon as above respectively ☞ Final time when going to work and leaving from work and total basic work hours can be checked by designating the basic work time setting only
3.3.6 Wiegand Setting
The following is an example of setting the 26bit Wiegand for. Part of the default settings below for other options if a user needs to input: [Set Wiegand Out Format] ¹× [Set Wiegand In Format]. Please refer to the section.
1. [Set Wiegand Out Format]: 26bit

248
① Enter Information: Code(Numeric format) / Name Code: 0001 / Name: 26bit_01
② Bit Length: Customize select / Custom Size: 26bit Customize / 26bit
③ Field Type: First, select . As shown above, Set Field area, click once. Other type is the same way too. ☞ E: 1bit / S: 8bit / D: 16bit / O: 1bit
④ Set Field: Is set as shown above..
⑤ Set Parity: First, ¨ê Set Field area select , specified - From second bit to 13th bit. Next
select, specified - From 14th bit to 25th bit E: 2bit~13bit / O: 14bit~25bit
⑥ Click Register button to complete.
2. [Set Wiegand In Format- A]: 26bit (Card Data - 0×B2 0×34 0×74 -> 0×B2 0×34 0×74 input)
① Enter Information: Code(Numeric format) / Name ☞ Code: 0001 / Name: 26bit_01

249
② Bit Length: Customize select / Custom Size: 26bit ☞ Customize / 26bit
③ Field Type: First, select . As shown above, click ④ Set Field area and set. Other type is the same way too. ☞ E: 1bit / 1 (Card Data 1): 8bit / 2 (Card Data 2): 8bit / 3 (Card Data 3): 8bit / O: 1bit
④ Set Field: Set as shown above.
⑤ Set Parity: First select on ④ Set Field area and specify – From second bit to 13 th bit.
Next select and specify – From 14th bit to 25 ☞ E: 2bit~13bit / O: 14bit~25bit
⑥ Card Data: Card Number (0×B2 0×34 0×74) Type and Each digit Set, ④ Set Field area click, is set as shown above. , this is enter the same way too. ☞ 1 (Card Data 1): Data Type - Hexa String / Digit Size - 2 / Bit Order - MSB ☞ 2 (Card Data 2): Data Type - Hexa String / Digit Size - 2 / Bit Order - MSB ☞ 3 (Card Data 3): Data Type - Hexa String / Digit Size - 2 / Bit Order - MSB
⑦ Click Register the button: Completed
3. [Set Wiegand In Format- B]: 26bit (Card Data- 0×B2 0×34 0×74 를 0011678836(Decimal) input)

250
① Enter Information: Code(Numeric format) / Name ☞ Code: 0002 / Name: 26bit_02
② Bit Length: Customize select / Custom Size: 26bit ☞ Customize / 26bit
③ Field Type: First, select . As shown above, ④ Set Field area, click once. Other type is the same way too. ☞ E: 1bit / 1 (Card Data 1): 24bit / O: 1bit
④ Set Field: Is set as shown above.
⑤ Set Parity: First, select on Set Field area and specify - From second bit to 13th bit .
Next select, specified - From 14th bit to 25th bit
☞ E: 2bit~13bit / O: 14bit~25bit
⑥ Card Data: Card Number (0×B2 0×34 0×74) Type and Each digit Set, ④ Set Field area click, is set as shown above. ☞ 1 (Card Data 1): Data Type - Decimal String / Digit Size - 10 /Bit Order - MSB
⑦ Click Register button to complete.
4. [Set Wiegand In Format- C]: 26bit (Card Data- 0×B2 0×34 0×74 -> 178,13428(Decimal) input)

251
① Enter Information: Code(Numeric format) / Name ☞ Code: 0003 / Name: 26bit_03
② Bit Length: Customize select / Custom Size: 26bit ☞ Customize / 26bit
③ Field Type: First, select . As shown above, ④ Set Field area, click once. Other type is the same way too. ☞ E: 1bit / 1 (Card Data 1): 8bit / 2 (Card Data 2): 16bit / O: 1bit
④ Set Field: Set as shown above.
⑤ Set Parity: Set Parity: First, select on ④Set Field area and specify - From second bit to
13th bit . Next select and specify - From 14th bit to 25th bit
☞ E: 2bit~13bit / O: 14bit~25bit
⑥ Card Data: Set Card Number 0×B2 0×34 0×74 Type and Each digit, and click on ④ Set Field area as it is shown above. has the same way. ☞ 1 (Card Data 1): Data Type - Decimal String / Digit Size - 3 / Bit Order - MSB ☞ 2 (Card Data 2): Data Type - Decimal String / Digit Size - 5 / Bit Order - MSB
⑦ Click Register button to complete.

252
3.3.7 Shift Config - Advanced Settings(Shift)
In [Shift Config]- [Set Shift Times], set details the 1st through 5th work hours set in. Set the unit of time calculation, minimum/maximum time, and etc.
��Shift 1 ~ Shift 5
�� Pay Rate: [Shift Config]- Title of the work set in [Set Shift Times] (Inactive Window)
��� Rounding: Enable to set in accordance with time & attendance calculation standard such as applying all the minute units, rounding off 10 minutes, etc.
��Min. Time: Minimum time recognized. That is, if the basic work hours are 9 hours and the minimum one hour’s work can be recognized as basic work, then the minimum time will be 1 hour. So if the basic work hour is 59 minutes, it cannot be recognized as basic work.

253
��Max. Time: Maximum time recognized. That is, if the basic work hours are 9 hours, although one worked for 13 hours as overtime work, the work hours recognized is 10 hours only where the maximum time is specified as 10 hours.
��Rate: Ratio of Extra Hourly Pay by Work Hours Zone for Calculation (Basic 100%, setting is changed in case night shift work, etc. is added)
��Select Range: [Shift Config]-Apply the zone value set in [Multiple going to and leaving from work)] Checking this item activates the setting window.
��Shift Auto OUT: Recognized as sign-out if there is no record of sign-out for Multiple Sign in/out Zone Setup.
3.3.8 How to set the query items
Query item can be seen by setting it in accordance with the user management format. Click the button as follow; select the item to be inquired, and click Apply button. Only then will the selected items be displayed on the list. Essential items can be moved to other positions, but the item itself may not be excluded from selection.
� Settings: Press the button to bring up the following window.

254
Check the desired item on the [Search Column] list, and then save it by clicking Apply button.
� Cancel: Close the window without saving the modified data.
� Reset: As the basic item inquired initialize the checked item.
� Move Up: Move the checked item to the front.
� Move Down: Move the checked item to the end.
� Move to Top: Move the checked item to the very front.
� Move to Bottom: Move the checked item to the very end.

255
3.4 Face Authentication in Server Mode 3.4.1 Introduction
This document is based on the Activation.pdf document from NEURO technology Co.,Ltd, which provides face authentication algorithm. For more detailed information, refer Activation.pdf.
3.4.2 Activating License
3.4.2.1 Activate with Activation Wizard program. Unzip a file in UNIS installation path after downloading the license activation program to show the following file. (If unzipping a file in the path including characters, not English, a user can fail the gain of license in UNIS. (A user should unzip a file in the English folder.)
When running the program Activation Wizard.exe, the following window appears.
Press Yes button to show the following picture like below. According to license type, select a mode. Select Single PC with Licensing Service and Finish button.

256
Press Finish button, the following license activation screen appears like below.

257
When checking the detailed information tap from task manager, ‘pg.exe’, which is Activation service program, runs.
※ ‘pg.exe’ is the program that communicates the face authentication SDK and API. If a user does the forced termination, the function of face authentication is not worked. Please be careful. To activate the license, press Browse button and attach the issued license file (*.sn).
** When using USB dongle license, the serial license (*.sn) is not needed. In general, attach *.sn file as the following picture below.

258

259
When pressing Open button, the file is added as below.
When pressing Next button, the following window appears. And when pressing Activate, the license file appears.
※ When pressing Activate button, the fixed license activates in the corresponding PC. After that, the corresponding license cannot be used in the other PC, please be careful.

260
After completing , “Activated” appears on the status window.
When pressing Finish button, Licenses folder is created and the license file appears as below.
※ Please Keep your license file after the separate backup not to be deleted because it affects the face authentication action and it is used in Deactivate. 3.4.2.2 Activation Error If attempting to activate or deactivate your license several times, a user may encounter the following error.

261
If an error occurs, please send an activation request to Neurotechnology's customer support email ([email protected]) directly, as the screen messages above. 3.4.2.3 Activating in Web site Activate the license through the link site below with computer id file. http://www.neurotechnology.com/cgi-bin/nla.cgi Regarding to how to create Computer id file, please refer to "2.2.1 Single computer license" items, which is Activation.pdf file.
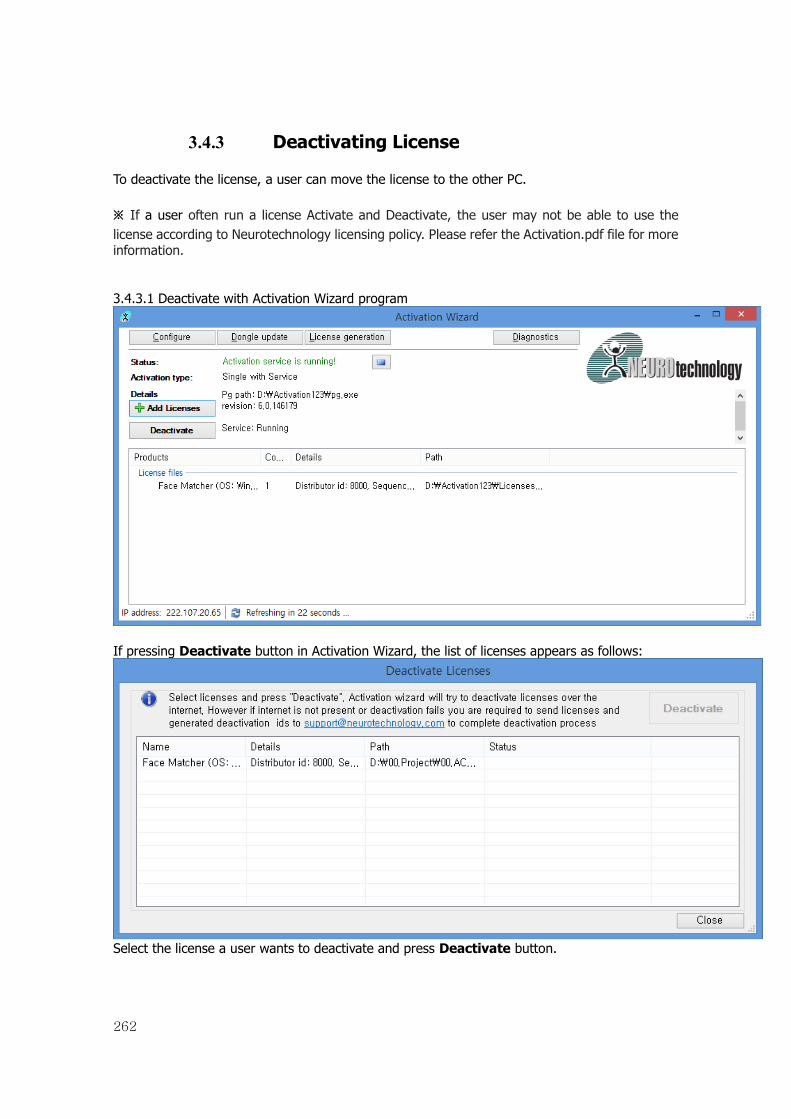
262
3.4.3 Deactivating License
To deactivate the license, a user can move the license to the other PC. ※ If a user often run a license Activate and Deactivate, the user may not be able to use the license according to Neurotechnology licensing policy. Please refer the Activation.pdf file for more information. 3.4.3.1 Deactivate with Activation Wizard program
If pressing Deactivate button in Activation Wizard, the list of licenses appears as follows:
Select the license a user wants to deactivate and press Deactivate button.
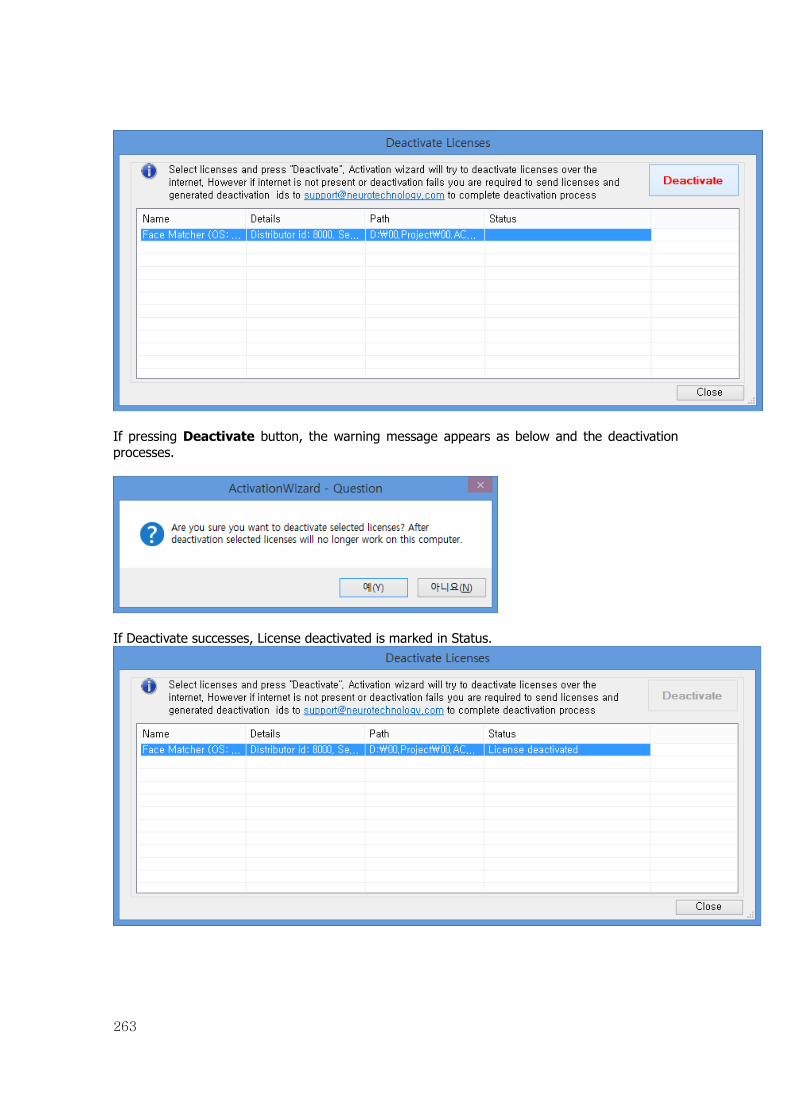
263
If pressing Deactivate button, the warning message appears as below and the deactivation processes.
If Deactivate successes, License deactivated is marked in Status.

264
3.4.3.2 Deactivation Error If the deactivation fails, the following message appears as below.
After that, “Deactivationlds” folder is created in the same folder and the following two files are created.
please send a deactivation request by sending the two files to Neurotechnology's customer support email ([email protected]) directly. 3.4.3.3 Deactivation with Website With the files generated from items, a user can proceed to deactivate from the following site. http://www.neurotechnology.com/cgi-bin/nlz.cgi