printsphere autopilot 1.2 script development tutorial
TRANSCRIPT

PrintSphere AutoPilot 1.2
Script Development Tutorial
DRAFT Version 1.2.4
July 4, 2018
Agfa Graphics/Prepress Software R&D

2
Revisions
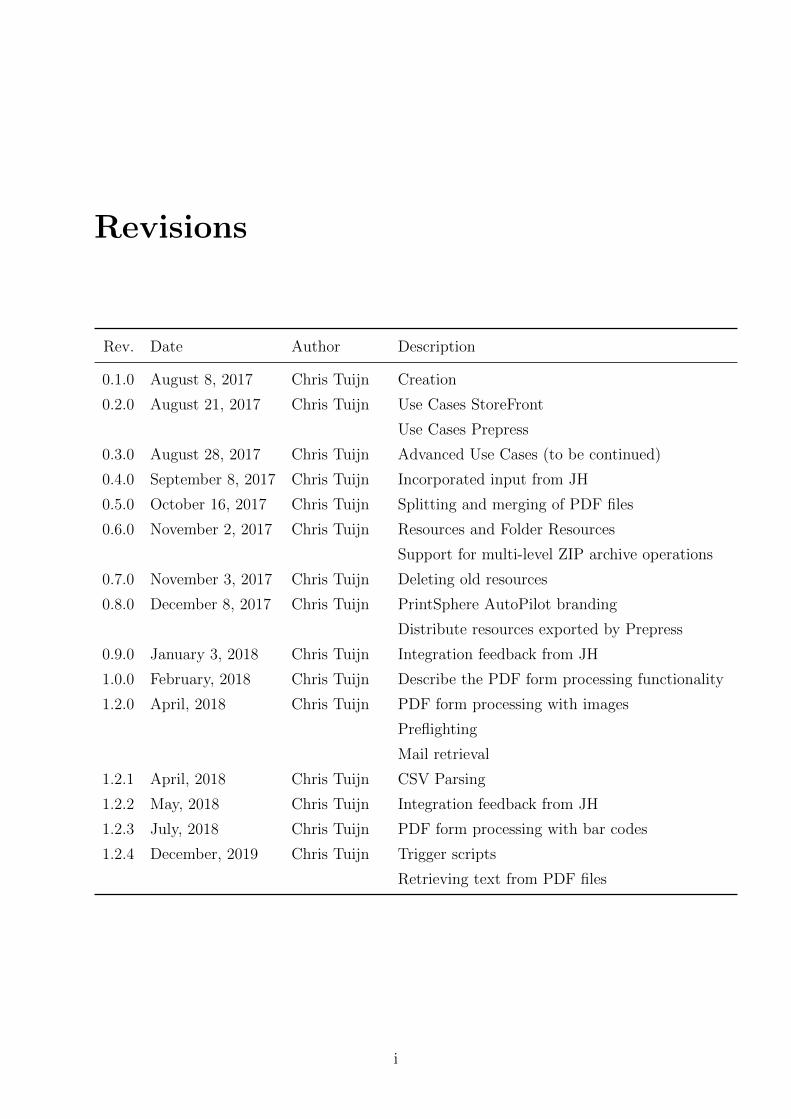
Rev. Date Author Description
0.1.0 August 8, 2017 Chris Tuijn Creation
0.2.0 August 21, 2017 Chris Tuijn Use Cases StoreFront
Use Cases Prepress
0.3.0 August 28, 2017 Chris Tuijn Advanced Use Cases (to be continued)
0.4.0 September 8, 2017 Chris Tuijn Incorporated input from JH
0.5.0 October 16, 2017 Chris Tuijn Splitting and merging of PDF files
0.6.0 November 2, 2017 Chris Tuijn Resources and Folder Resources
Support for multi-level ZIP archive operations
0.7.0 November 3, 2017 Chris Tuijn Deleting old resources
0.8.0 December 8, 2017 Chris Tuijn PrintSphere AutoPilot branding
Distribute resources exported by Prepress
0.9.0 January 3, 2018 Chris Tuijn Integration feedback from JH
1.0.0 February, 2018 Chris Tuijn Describe the PDF form processing functionality
1.2.0 April, 2018 Chris Tuijn PDF form processing with images
Preflighting
Mail retrieval
1.2.1 April, 2018 Chris Tuijn CSV Parsing
1.2.2 May, 2018 Chris Tuijn Integration feedback from JH
1.2.3 July, 2018 Chris Tuijn PDF form processing with bar codes
1.2.4 December, 2019 Chris Tuijn Trigger scripts
Retrieving text from PDF files
i

ii
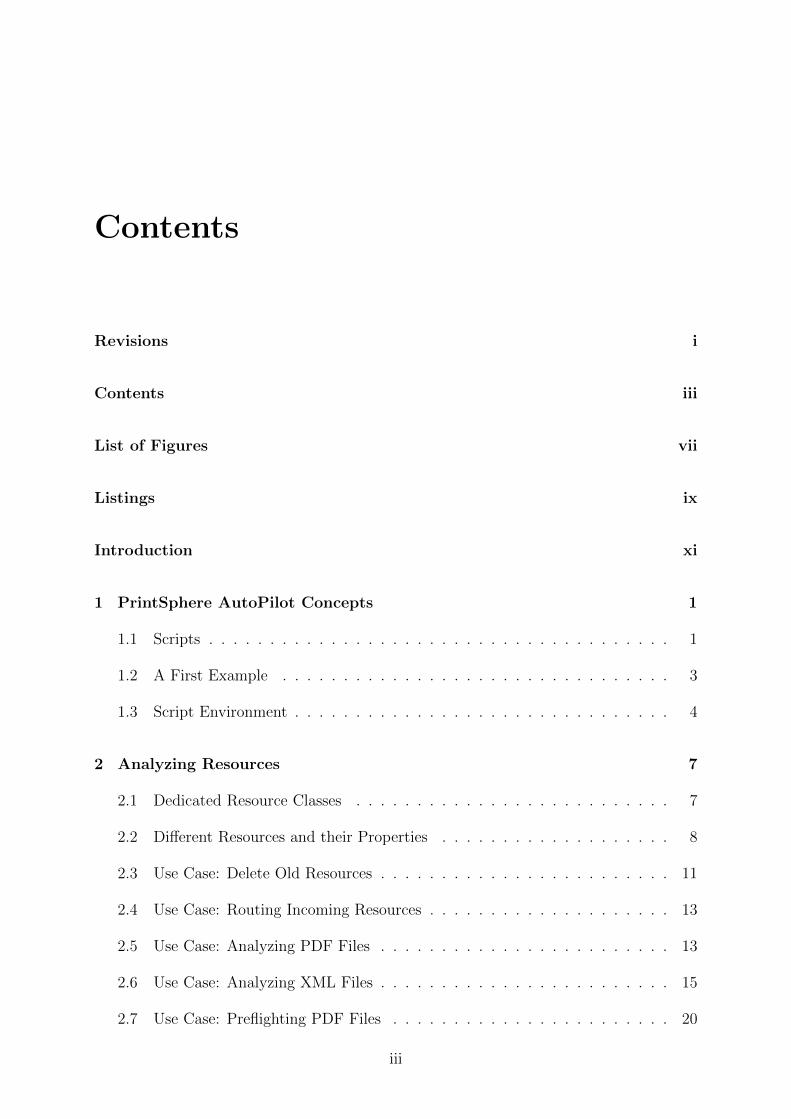
Contents
Revisions i
Contents iii
List of Figures vii
Listings ix
Introduction xi
1 PrintSphere AutoPilot Concepts 1
1.1 Scripts . . . . . . . . . . . . . . . . . . . . . . . . . . . . . . . . . . . . . . 1
1.2 A First Example . . . . . . . . . . . . . . . . . . . . . . . . . . . . . . . . 3
1.3 Script Environment . . . . . . . . . . . . . . . . . . . . . . . . . . . . . . . 4
2 Analyzing Resources 7
2.1 Dedicated Resource Classes . . . . . . . . . . . . . . . . . . . . . . . . . . 7
2.2 Different Resources and their Properties . . . . . . . . . . . . . . . . . . . 8
2.3 Use Case: Delete Old Resources . . . . . . . . . . . . . . . . . . . . . . . . 11
2.4 Use Case: Routing Incoming Resources . . . . . . . . . . . . . . . . . . . . 13
2.5 Use Case: Analyzing PDF Files . . . . . . . . . . . . . . . . . . . . . . . . 13
2.6 Use Case: Analyzing XML Files . . . . . . . . . . . . . . . . . . . . . . . . 15
2.7 Use Case: Preflighting PDF Files . . . . . . . . . . . . . . . . . . . . . . . 20
iii
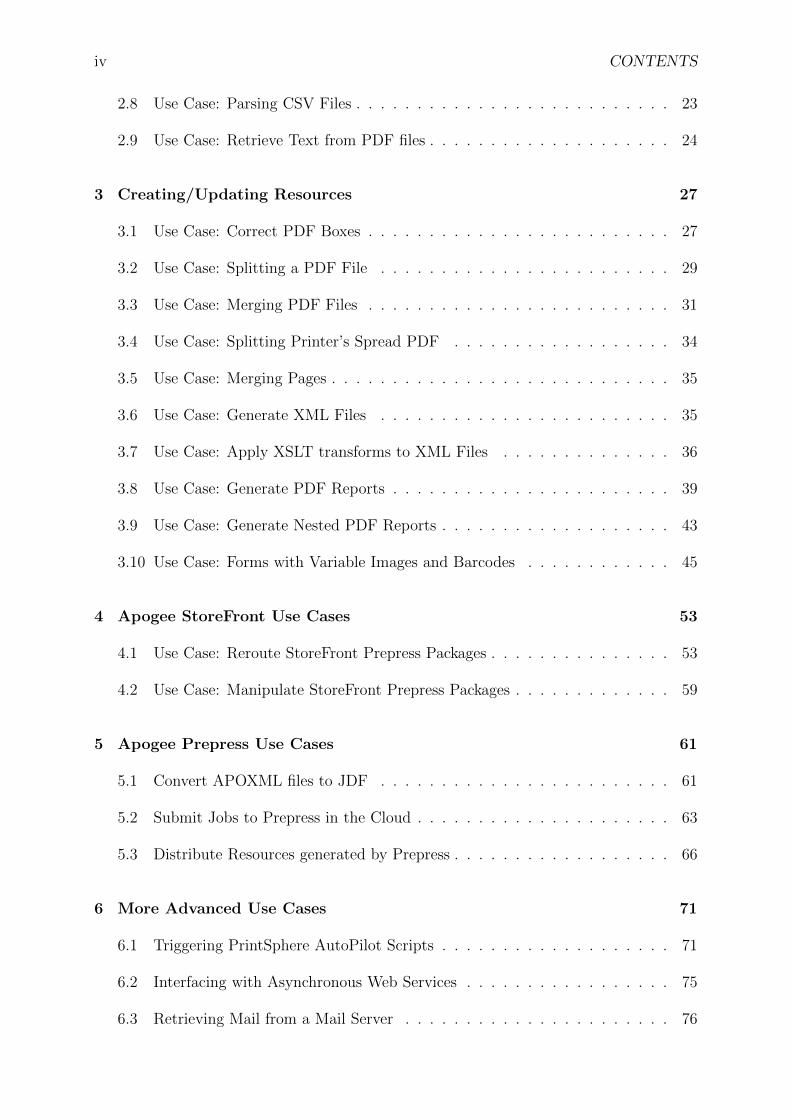
iv CONTENTS
2.8 Use Case: Parsing CSV Files . . . . . . . . . . . . . . . . . . . . . . . . . . 23
2.9 Use Case: Retrieve Text from PDF files . . . . . . . . . . . . . . . . . . . . 24
3 Creating/Updating Resources 27
3.1 Use Case: Correct PDF Boxes . . . . . . . . . . . . . . . . . . . . . . . . . 27
3.2 Use Case: Splitting a PDF File . . . . . . . . . . . . . . . . . . . . . . . . 29
3.3 Use Case: Merging PDF Files . . . . . . . . . . . . . . . . . . . . . . . . . 31
3.4 Use Case: Splitting Printer’s Spread PDF . . . . . . . . . . . . . . . . . . 34
3.5 Use Case: Merging Pages . . . . . . . . . . . . . . . . . . . . . . . . . . . . 35
3.6 Use Case: Generate XML Files . . . . . . . . . . . . . . . . . . . . . . . . 35
3.7 Use Case: Apply XSLT transforms to XML Files . . . . . . . . . . . . . . 36
3.8 Use Case: Generate PDF Reports . . . . . . . . . . . . . . . . . . . . . . . 39
3.9 Use Case: Generate Nested PDF Reports . . . . . . . . . . . . . . . . . . . 43
3.10 Use Case: Forms with Variable Images and Barcodes . . . . . . . . . . . . 45
4 Apogee StoreFront Use Cases 53
4.1 Use Case: Reroute StoreFront Prepress Packages . . . . . . . . . . . . . . . 53
4.2 Use Case: Manipulate StoreFront Prepress Packages . . . . . . . . . . . . . 59
5 Apogee Prepress Use Cases 61
5.1 Convert APOXML files to JDF . . . . . . . . . . . . . . . . . . . . . . . . 61
5.2 Submit Jobs to Prepress in the Cloud . . . . . . . . . . . . . . . . . . . . . 63
5.3 Distribute Resources generated by Prepress . . . . . . . . . . . . . . . . . . 66
6 More Advanced Use Cases 71
6.1 Triggering PrintSphere AutoPilot Scripts . . . . . . . . . . . . . . . . . . . 71
6.2 Interfacing with Asynchronous Web Services . . . . . . . . . . . . . . . . . 75
6.3 Retrieving Mail from a Mail Server . . . . . . . . . . . . . . . . . . . . . . 76

CONTENTS v
7 Troubleshooting AutoPilot Scripts 81

vi CONTENTS
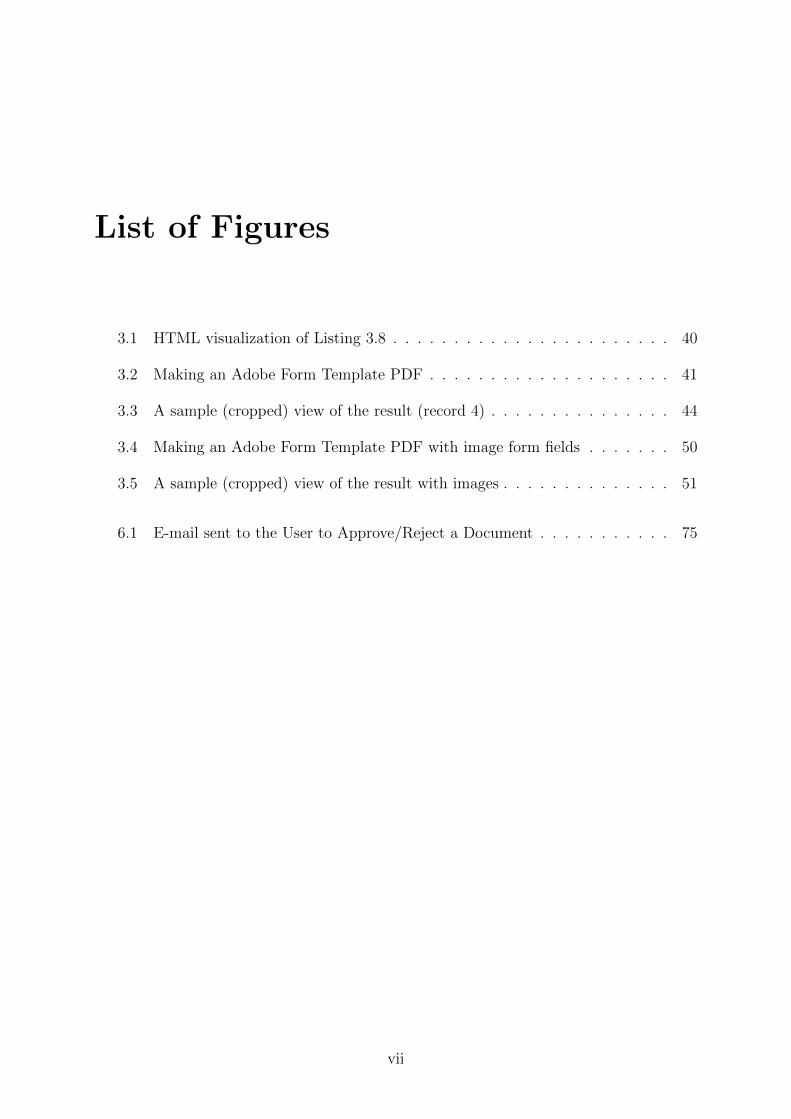
List of Figures
3.1 HTML visualization of Listing 3.8 . . . . . . . . . . . . . . . . . . . . . . . 40
3.2 Making an Adobe Form Template PDF . . . . . . . . . . . . . . . . . . . . 41
3.3 A sample (cropped) view of the result (record 4) . . . . . . . . . . . . . . . 44
3.4 Making an Adobe Form Template PDF with image form fields . . . . . . . 50
3.5 A sample (cropped) view of the result with images . . . . . . . . . . . . . . 51
6.1 E-mail sent to the User to Approve/Reject a Document . . . . . . . . . . . 75
vii

viii LIST OF FIGURES
Listings
1.1 Sorting Files . . . . . . . . . . . . . . . . . . . . . . . . . . . . . . . . . . . 3
2.1 Listing Resources in a PrintSphere Folder . . . . . . . . . . . . . . . . . . . 8
2.2 Transforming ZIP files . . . . . . . . . . . . . . . . . . . . . . . . . . . . . 10
2.3 Delete Old Resources . . . . . . . . . . . . . . . . . . . . . . . . . . . . . . 12
2.4 Sorting PDF Files . . . . . . . . . . . . . . . . . . . . . . . . . . . . . . . . 14
2.5 Sample XML Setup file . . . . . . . . . . . . . . . . . . . . . . . . . . . . . 16
2.6 Parsing an XML File . . . . . . . . . . . . . . . . . . . . . . . . . . . . . . 18
2.7 Output of the Parse XML Script . . . . . . . . . . . . . . . . . . . . . . . 19
2.8 Accessing the PrintSphere AutoPilot Preflight Engine . . . . . . . . . . . . 22
2.9 Parsing a CSV File . . . . . . . . . . . . . . . . . . . . . . . . . . . . . . . 24
2.10 Extracting Text from a PDF File . . . . . . . . . . . . . . . . . . . . . . . 25
3.1 Correcting PDF Boxes . . . . . . . . . . . . . . . . . . . . . . . . . . . . . 27
3.2 Splitting a PDF File . . . . . . . . . . . . . . . . . . . . . . . . . . . . . . 29
3.3 Merging PDF Files . . . . . . . . . . . . . . . . . . . . . . . . . . . . . . . 31
3.4 Splitting Printer’s Spreads . . . . . . . . . . . . . . . . . . . . . . . . . . . 34
3.5 Apply XSLT Transform to an XML File . . . . . . . . . . . . . . . . . . . 36
3.6 XSLT Script . . . . . . . . . . . . . . . . . . . . . . . . . . . . . . . . . . . 37
3.7 XML Input for XSLT Transform . . . . . . . . . . . . . . . . . . . . . . . . 37
3.8 Output HTML of XSLT Transform . . . . . . . . . . . . . . . . . . . . . . 38
3.9 XML Input for generating PDF Reports . . . . . . . . . . . . . . . . . . . 40
3.10 Script for generating PDF Reports . . . . . . . . . . . . . . . . . . . . . . 42
3.11 Script for generating PDF Reports with variable images . . . . . . . . . . . 48
3.12 XML Input for generating PDF Reports with images . . . . . . . . . . . . 49
4.1 Rerouting StoreFront Prepress Jobs . . . . . . . . . . . . . . . . . . . . . . 53
5.1 Sample APOXML file . . . . . . . . . . . . . . . . . . . . . . . . . . . . . . 61
5.2 Convert APOXML files to JDF . . . . . . . . . . . . . . . . . . . . . . . . 62
5.3 Submit a Job to Apogee Prepress . . . . . . . . . . . . . . . . . . . . . . . 63
5.4 Distribute Resources generated by Prepress . . . . . . . . . . . . . . . . . . 67
6.1 Trigger AutoPilot Scripts from an e-mail . . . . . . . . . . . . . . . . . . . 72
ix

x LISTINGS
6.2 Template for e-mail boddy . . . . . . . . . . . . . . . . . . . . . . . . . . . 74
6.3 Retrieve Mail Messages from a Mail Server . . . . . . . . . . . . . . . . . . 77
Introduction
PrintSphere vs. PrintSphere AutoPilot
PrintSphere is an on-line storage platform that implements easy integration with existing
products of the Agfa Apogee family such as Apogee Prepress and Apogee StoreFront.
Agfa customers can subscribe to the PrintSphere storage service and manage their data
on-line. They can use the existing stand-alone applications to synchronize their data on
the Windows or Mac platforms or use the dedicated Android and IOS apps to access the
remote data on their mobile devices.
From within Apogee Prepress, it is possible to use the PrintSphere platform to receive
input files from existing customers. In Apogee StoreFront, it is possible to export the
Prepress jobs that result from a StoreFront Order to a PrintSphere folder. PrintSphere can
also be used to manage image resources that can be used in the on-line editor embedded
in the StoreFront platform.
PrintSphere AutoPilot has been created on top of PrintSphere to allow even more au-
tomation possibilities. In the PrintSphere AutoPilot back-end (called SphereCenter), it is
now possible to create scripts that can watch incoming resources in PrintSphere AutoPilot
folders. These scripts can then manipulate those resources and generate output in various
PrintSphere output folders (in a PrintSphere AutoPilot context known as OutputLoca-
tions).
Organization of this document
This document can be used as a tutorial for Script developers to create their own Scripts.
In the first chapter, a number of basic concepts will be explained that are important to
understand how Scripts will be run in the PrintSphere AutoPilot environment. In the
subsequent chapters, a number of demo scripts will be presented that use the concepts
xi

xii INTRODUCTION
explained in the first chapter.
This document will not cover all the available PrintSphere AutoPilot calls in details.
For this, we refer to the on-line javadoc documentation. The purpose of this tutorial
is, however, to give the necessary knowledge to modify existing Scripts and create new
Scripts using the on-line javadoc documentation.
As a prerequisite to start modifying Scripts, one should have basic scripting/programming
skills and be familiar with the JavaScript syntax and semantics. To develop Scripts from
scratch, one should be more experienced in scripting and have a good understanding of
the PrintSphere AutoPilot functionality/architecture. This document can be of great help
in this perspective.
Chapter 1
PrintSphere AutoPilot Concepts
1.1 Scripts
A PrintSphere AutoPilot Script is essentially a text file consisting of JavaScript code that
conforms to a number of specific PrintSphere AutoPilot constraints. The Scripts can be
created by a Script developer and uploaded/edited in the PrintSphere back-end called
SphereCenter.
Once the Script has been uploaded to SphereCenter, it can be activated to be run. During
this activation process, a number of parameters need to be specified:
1. the incoming folder (called the InputFolder)
2. the outputfolders (called the OutputLocations)
3. the instance parameters
4. (optional) auxiliary resources
After activation of the Scripts, the Scripts can be run if they receive specific triggers. We
currently support the following triggers:
1. incoming files: this happens when a PrintSphere user drops files in the PrintSphere
InputFolder. It should be clear this typically happens directly on the PrintSphere
Server or, indirectly, via the synchronization clients by dropping a file in a local
folder.
1
2 CHAPTER 1. PRINTSPHERE AUTOPILOT CONCEPTS
2. notification via dedicated URL’s: Script can also be triggered by means of a ded-
icated URL. It is possible to pass parameters to the Script (using either URL pa-
rameters of data forms using http POST calls).
3. timer based events
When an active Script has been triggered, it will be run after a reasonable amount of time.
How quickly the Script will be run, depends on the load of the PrintSphere AutoPilot
server. If the load is not too high, a Script should be run within several minutes after a
trigger has been received.
When exactly the triggers result in the running of a specific Script also depends on the
Execution Type of the Script. We currently support the following Execution Types:
• Immediate Execution: this is the common Execution Type. In this case, the Script
becomes runnable if either a new input file arrives or if the Script is triggered through
an URL. When the Script is run, all the files that are available at that time will be
available as Input Resources.
• Scheduled Execution: in this case, the Script will only be run at particular times
specified by the scheduling parameters in the GUI (StoreCenter). This means that
the arrival of a new file does not trigger the Script. When run, the files that have
been delivered will be made available as Input Resources.
• Delayed Execution: in this case, the Script will be run a specified time (called the
Execution Delay) after the arrival of a specific file. If a new file arrives before the
previous file has been resulted in a run of the Script, the Execution Delay will be
reset.
• Delayed Execution (Same Name): in this case, the Script will only be run a specified
time (called the Execution Delay) after the arrival of a group of files that belong
together (and have a specific naming convention).
• Delayed Execution (After the First File): in this case, the Script will be run a
specific time (called the Execution Delay) after the arrival of a file belonging to a
given group. If a new file arrives before the previous files of the same group have
resulted in the running of the Script, the Execution Delay will be reset.
1.2. A FIRST EXAMPLE 3
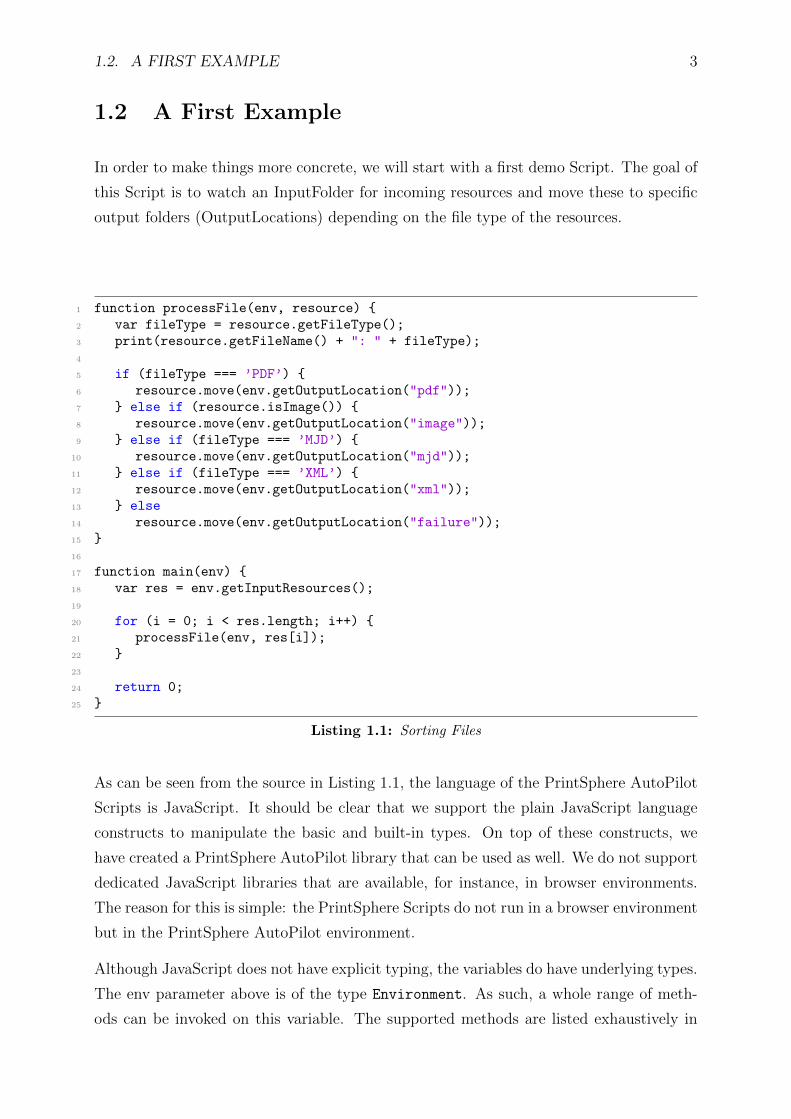
1.2 A First Example
In order to make things more concrete, we will start with a first demo Script. The goal of
this Script is to watch an InputFolder for incoming resources and move these to specific
output folders (OutputLocations) depending on the file type of the resources.
1 function processFile(env, resource) {2 var fileType = resource.getFileType();3 print(resource.getFileName() + ": " + fileType);4
5 if (fileType === ’PDF’) {6 resource.move(env.getOutputLocation("pdf"));7 } else if (resource.isImage()) {8 resource.move(env.getOutputLocation("image"));9 } else if (fileType === ’MJD’) {
10 resource.move(env.getOutputLocation("mjd"));11 } else if (fileType === ’XML’) {12 resource.move(env.getOutputLocation("xml"));13 } else14 resource.move(env.getOutputLocation("failure"));15 }16
17 function main(env) {18 var res = env.getInputResources();19
20 for (i = 0; i < res.length; i++) {21 processFile(env, res[i]);22 }23
24 return 0;25 }
Listing 1.1: Sorting Files
As can be seen from the source in Listing 1.1, the language of the PrintSphere AutoPilot
Scripts is JavaScript. It should be clear that we support the plain JavaScript language
constructs to manipulate the basic and built-in types. On top of these constructs, we
have created a PrintSphere AutoPilot library that can be used as well. We do not support
dedicated JavaScript libraries that are available, for instance, in browser environments.
The reason for this is simple: the PrintSphere Scripts do not run in a browser environment
but in the PrintSphere AutoPilot environment.
Although JavaScript does not have explicit typing, the variables do have underlying types.
The env parameter above is of the type Environment. As such, a whole range of meth-
ods can be invoked on this variable. The supported methods are listed exhaustively in
4 CHAPTER 1. PRINTSPHERE AUTOPILOT CONCEPTS
the PrintSphere AutoPilot javadoc documentation. When saving/updating a Script in
SphereCenter, the system will carry out a JavaScript syntax check. Type checking and
parameter checking will not be carried out at this stage; these problems will pop up as
run-time errors after activation of the Script.
The PrintSphere environment is made available as the first parameter to the main func-
tion; this function is mandatory for all PrintSphere AutoPilot Scripts and will become
the main entry point when a Script is being run.
In order to retrieve the resources that are available in the InputFolder, we call the method
getInputResources. This method returns a list of elements of type Resource. In the
Script above, we will loop through the list of resoures and call a function processFile. In
this function, we will then move the resource to a specific OutputLocation.
We first determine, however, the file type by calling the method getFileType on the
Resource variable. This method will return the fileType as a string. The getFileType
method will look at the resource and try to retrieve the fileType based on the first few
bytes of the file. It does not use the file extension. There are also calls to get the file
extension but it usually is more safe to look at the file itself.
We then use an if/then/else statement to move the resource to a specific OutputFolder
depending on the file type. To this end, we call the method getOutputLocation with
a label as parameter. During Script activation, we can associate a number of output
folders with a Script and refer to these by means of a dedicated label. The move method
on resource will then move the input resource directly to the OutputLocation with the
specified label.
1.3 Script Environment
As is shown in the previous section, the environment provides the link between the Script
and the PrintSphere AutoPilot environment.
A number of methods on Environment provide access to data that are related to that
specific Script activation:
1. getInputResources
2. getOutputLocation
3. getScriptData
1.3. SCRIPT ENVIRONMENT 5
4. getAuxiliaryResource
5. getNotificationUrl
6. getPostedResources
A second class of methods provide access to general resources on the PrintSphere AutoPi-
lot Server:
1. getMailService
2. newHttpSession
In addition, there are a number of methods available on Environment that gives access to
dedicated functionality to, for instance, manipulate ZIP files, create files of various types
(XML, text files etc.).

6 CHAPTER 1. PRINTSPHERE AUTOPILOT CONCEPTS
Chapter 2
Analyzing Resources
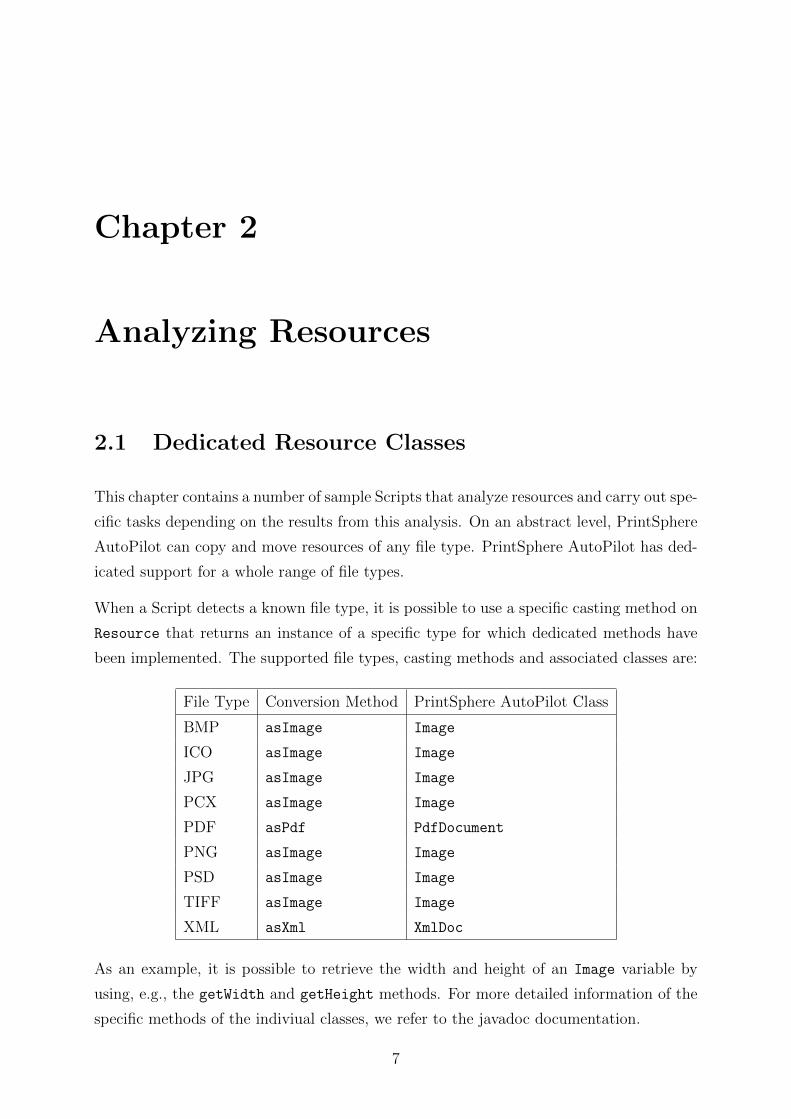
2.1 Dedicated Resource Classes
This chapter contains a number of sample Scripts that analyze resources and carry out spe-
cific tasks depending on the results from this analysis. On an abstract level, PrintSphere
AutoPilot can copy and move resources of any file type. PrintSphere AutoPilot has ded-
icated support for a whole range of file types.
When a Script detects a known file type, it is possible to use a specific casting method on
Resource that returns an instance of a specific type for which dedicated methods have
been implemented. The supported file types, casting methods and associated classes are:
File Type Conversion Method PrintSphere AutoPilot Class
BMP asImage Image
ICO asImage Image
JPG asImage Image
PCX asImage Image
PDF asPdf PdfDocument
PNG asImage Image
PSD asImage Image
TIFF asImage Image
XML asXml XmlDoc
As an example, it is possible to retrieve the width and height of an Image variable by
using, e.g., the getWidth and getHeight methods. For more detailed information of the
specific methods of the indiviual classes, we refer to the javadoc documentation.
7

8 CHAPTER 2. ANALYZING RESOURCES
Please note that the JDF format is not included in the above list because it is treated as
an ordinary XML format. We currently do not have a specific class to manipulate JDF
files; to get information out of JDF files, one should make use of the XmlDoc methods.
2.2 Different Resources and their Properties
All files and folders in a PrintSphere environment are in the Scripts accessible as instances
of the class Resource. In the previous chapter, we already introduced the InputResource
variables. These trigger that a specific Script can be run. As we will see later on, it
is also possible to create new resources. These will also be instances of the Resource
class. Contrary to the InputResources, these will typically be created in a temporary
folder (on the PrintSphere AutoPilot server) that will be associated with a specific Script
instantiation. When the Script is deactivated, this folder and is content will be removed.
As already explained above, an OutputLocation will be associated with a specific Print-
Sphere folder belonging to a particular PrintSphere account. It is possible to retrieve
all resources that are available in a specific OutputLocation. This can be realized by
retrieving an instance of FolderResource associated with the OutputLocation. Such
a FolderResource instance is also a Resource and it is possible to get a list of the
Resources in this folder. The following code snippet (see Listing 2.1) illustrates how this
can be done. Please note that, although the main use of OutputLocation instances is to
get a context to create new resources, it is also possible to create an OutputLocation for
the sole purpose of getting access to its resoures.
Please note that the Script in Listing 2.1 is not associated with an input folder. Therefore,
it cannot be triggered by incoming resources. Running this Script can be either done
manually by clicking the Tools→Run Script button (in the Active Scripts→General tab
in SphereCenter) or by using the URL triggering mechanism (the URL to trigger the
Script can be found in the Active Scripts→General tab).
1
2 function listResources(env, folder, indent) {3 var list = folder.getChildren();4 var i;5
6 for (i = 0; i < list.length; i++) {7 var resource = list[i];8
9 if (resource.isFolder()) {10 print(indent + "Folder: " + resource.getFileName());
2.2. DIFFERENT RESOURCES AND THEIR PROPERTIES 9
11 listResources(env, resource, indent + "-");12 } else13 print(indent + "File: " + resource.getFileName());14 }15 }16
17 function main(env) {18 var location = env.getOutputLocation("library");19 var folder = location.asFolder();20 listResources(env, folder, "");21 }
Listing 2.1: Listing Resources in a PrintSphere Folder
There are many methods on Resource level that allow you to retrieve Resource properties.
The most important are:
1. getFileName, getPathFileName, getBaseFileName
2. getCreationDate, getModificationDate: these call return a Java Date instance
3. getExtension, getFileType: to retrieve the filename extension and type respec-
tively. the getFileType method opens the file and retrieves the type based on the
first few bytes (magic number).
4. exists, isFolder, isReadable, isWritable
For an exhaustive list, we refer to the javadoc documentation.
It is also possible to associate custom attributes with a specific Resource instance. These
custom attributes can be set or retrieved during the life time of the instance. They are
not persisted when saving the Resource. There are some built-in attributes that are used
by the PrintSphere AutoPilot library. An example of such an attribute is the ”zippath”
attribute. When extracting files from a ZIP archive (via the extractZipFile method
on an Environment instance), the ”zippath” will be set to indicate the relative path
(position) of each resource within the ZIP archive. When creating a ZIP archive (with
the newZipFile method), the ”zippath” will be used to determine the path in the new
ZIP archive. If the ”zippath” attribute is not set, the resource will be put on the top level
of the ZIP archive.
For the specific case of the ”zippath” attribute, we added a number of convenience meth-
ods on Resource to set and retrieve this path:
1. setZipPath: to set the path
10 CHAPTER 2. ANALYZING RESOURCES
2. setZipPathList: to set the path by a list of strings (example below)
3. getZipPath: will return the path of a given resource (e.g., ”folder1/folder2” )
4. getZipPathList: will return the path as a list of string (e.g., [ ”folder1”, ”folder2”])
To illustrate the above, we will now implement a Script that will adapt ZIP archives in
the following way: all files will be kept as they are with the exception of ”.com” and
”.exe” files. They will be moved to a top-level folder in the ZIP archive with the name
”potentially-harmful”.
Please note that the underlying ZIP library will only preserve a folder in a ZIP file if it
contains actual resources. As a consequence, all empty folders in the original ZIP file will
not be preserved in the result.
1 function processZipArchive(env, zipfile) {2 var list = env.extractZipFile(zipfile);3 if ((list == null) || (list.length == 0))4 return null;5 var i;6 for (i = 0; i < list.length; i++) {7 var resource = list[i];8 if (!resource.isFolder()) {9 var extension = resource.getExtension();
10 if ((extension == "com") || (extension == "exe"))11 resource.setAttribute("zippath", "potentially-harmful");12 // or the equivalent: resource.setZipPath("potentially-harmful");13 }14 }15 var newzipfile = env.newZipFile(zipfile.getBaseFileName() + "-new.zip",
list);16 return newzipfile;17 }18
19 function main(env) {20 var resources = env.getInputResources();21 var i;22 for (i = 0; i < resources.length; i++) {23 var type = resources[i].getFileType();24 if (type == ’ZIP’) {25 var result = processZipArchive(env, resources[i]);26 if (result == null) {27 print("Error: " + resources[i].getFileName() + ": processing
failed");28 resources[i].move(env.getOutputLocation("error"));29 } else {30 resources[i].release();31 result.move(env.getOutputLocation("success"));32 }33 } else {
2.3. USE CASE: DELETE OLD RESOURCES 11
34 print("Error: " + resources[i].getFileName() + " is not a ZIP file");35 resources[i].move(env.getOutputLocation("error"));36 }37 }38 }
Listing 2.2: Transforming ZIP files
2.3 Use Case: Delete Old Resources
To further illustrate the above, we now will make a Script (see Listing 2.3) to delete the
resources in a PrintSphere folder that are older than 100 days. In order to prevent the
Script from running too often, we will build in a mechanism that will only perform the
check if the Script has not been run the last 15 minutes.
In line 57 of the Script, we have defined the Script parameters in the vars variable. This
is a JSON dictionary containing parameters that can be defined in the SphereCenter
GUI when instantiating the Script. In our case, this structure contains 2 fields: nrDays,
which contains the number of days a Resource should exist before it is deleted and,
runEveryMintues, which contains the time in minutes that must be elapsed before the
checking will be done again. By default, the values that are defined in the Script will be
used.
In line 45 of the Script (in the main function), we first check whether the checks should
be carried out by calling the function mustRun. In order to know when the checking has
been done the last time, we always store the date in milliseconds after running the checks
in the Script data environment. This data environment is a data structure (most often a
JSON dictionary) that is preserved between different runs of the Script.
In the method getDateLastRun (see line 1), we will retrieve this date in milliseconds. If
the getScriptData method on the Environment instance returns null, we know that the
dictionary has not yet been initialized. In this case, we initialize it and put the last date
to 0 (which corresponds to January 1, 1970 midnight).
If the retrieved date is less than the current date minus vars.runEveryMinutes ∗ 60000
(the latter expression denotes the number of milliseconds in the given amount of minutes),
we can safely continue the Script, otherwise we return.
We then retrieve in lines 49-50 the FolderResource corresponding to the OutputLocation
with label ”library”. In line 51, we calculate the cleanupDate. When doing the cleanup
operation, we will always check whether the modification date of the resources is older
12 CHAPTER 2. ANALYZING RESOURCES
than the cleanupDate. (As can be seen in the source, the cleanupDate denotes the
current date in milliseconds minus the number of milliseconds in the specified number of
days (cfr. vars.nrDays).
Then we call on line 53 the function deleteResourcesOlderThan. This function will,
as can be seen in line 29, iterate recursively over the folders (similar to the Script in
Listing 2.1) and check which resources should be deleted.
After carrying out the clean up procedure, we update the lastDate in the Script data
environment by calling on line 54 the function setDateLastRun (defined on line 20).
1 function getDateLastRun(env) {2 var data = env.getScriptData();3 if (data == null) {4 data = new Map();5 env.setScriptData(data);6 data.lastDate = 0;7 }8
9 if (data.lastDate)10 return data.lastDate;11 else12 return 0;13 }14
15 function mustRun(env, milliSeconds) {16 var lastDate = getDateLastRun(env);17 return lastDate < (Date.now() - milliSeconds);18 }19
20 function setDateLastRun(env) {21 var data = env.getScriptData();22 if (data == null) {23 data = new Map();24 env.setScriptData(data);25 }26 data.lastDate = Date.now();27 }28
29 function deleteResourcesOlderThan(env, folder, cleanupDate) {30 var list = folder.getChildren();31 var i;32 for (i = 0; i < list.length; i++) {33 var resource = list[i];34
35 if (resource.isFolder()) {36 deleteResourcesOlderThan(env, resource, cleanupDate);37 } else if (resource.getModificationDate().getTime() < cleanupDate) {38 print("Deleting file: " + resource.getPathFileName());39 resource.delete();

2.4. USE CASE: ROUTING INCOMING RESOURCES 13
40 }41 }42 }43
44 function main(env) {45 if (!mustRun(env, vars.runEveryMinutes * 60000)) {46 print("No need to run right now");47 return;48 }49 var location = env.getOutputLocation("library");50 var folder = location.asFolder();51 var cleanupDate = Date.now() - (vars.nrDays * 24 * 60 * 60 * 1000);52
53 deleteResourcesOlderThan(env, folder, cleanupDate);54 setDateLastRun(env);55 }56
57 var vars = {58 nrDays: 100,59 runEveryMinutes: 1560 };
Listing 2.3: Delete Old Resources
2.4 Use Case: Routing Incoming Resources
In this use case we want to sort incoming files in different locations depending on their
file type. This use case has already been discussed in Listing 1.1 (section 1.2).
In this Script, all PDF files end up in a specific directory. The Script of the following
section will expect PDF files as input and carry out specific operations depening on the
properties of the PDF files. Since, in PrintSphere AutoPilot, it is possible to use an output
location of one Script as the input location of another Script, we would be able to chain
the two Scripts. This can be generalized to more complex setups with multiple Scripts.
Note that the PrintSphere AutoPilot server will not allow to create circular dependencies
as these might lead to infinite loops.
2.5 Use Case: Analyzing PDF Files
In this use case, we sort incoming PDF files in different folders depending on their page
size.
If the incoming file is not a PDF file, it will be moved to te failure folder. If the page
size of the first page of the PDF file is A3, A4 or A5, it will be moved to the a3, a4 or a5
14 CHAPTER 2. ANALYZING RESOURCES
folder. If the size of the PDF file is less than 300 points (i.e. 1/72 of an inch) in width
and height, it will be moved to the businesscard folder. Other PDF files will be moved to
the failure folder. The source of this Script is shown in Listing 1.1.
1 function match(width, height, format) {2 var w;3 var h;4 if (format === "a5") {5 w = 420;6 h = 595;7 } else if (format === "a4") {8 w = 595;9 h = 842;
10 } else if (format === "a3") {11 w = 842;12 h = 1192;13 } else14 return false;15 return Math.abs(w - width) + Math.abs(h - height) < (w + h) / 100;16 }17
18 function processFile(env, resource) {19 var fileType = resource.getFileType();20 print(resource.getFileName() + ": " + fileType);21
22 if (fileType === ’PDF’) {23 var pdf = resource.asPdf();24 var trimbox = pdf.getTrimBox(1);25 var width = trimbox.getWidth();26 var height = trimbox.getHeight();27 if (width > height) {28 var tmp = width;29 width = height;30 height = tmp;31 }32 if (match(width, height, "a5"))33 resource.move(env.getOutputLocation("a5"));34 else if (match(width, height, "a4"))35 resource.move(env.getOutputLocation("a4"));36 else if (match(width, height, "a3"))37 resource.move(env.getOutputLocation("a3"));38 else if ((width < 300) && (height < 300))39 resource.move(env.getOutputLocation("businesscard"));40 else41 resource.move(env.getOutputLocation("failure"));42 } else {43 if (!resource.move(env.getOutputLocation("failure")))44 resource.release();45 }46 }47
48 function main(env) {
2.6. USE CASE: ANALYZING XML FILES 15
49 var res = env.getInputResources();50
51 for (i = 0; i < res.length; i++) {52 processFile(env, res[i]);53 }54
55 return 0;56 }
Listing 2.4: Sorting PDF Files
As usual, the main function (line 48) iterates over the incoming input resources and then
processes them individually by calling the function processFile. In line 19, we first
retrieve the file type and then treat the different cases.
In line 23, we know that the Resource is a PDF file and thus can safely call the conversion
method asPdf. This returns an instance of the class PdfDocument on which dedicated
PDF-related methods can be called. In order to do the required testing, we first refer
the trim box, which returns a variable of the Rectangle class. We now can retrieve the
width and height in points by calling the getWidth and getHeight methods on the trim
box variable. In order to make abstraction of the orientation (landscape of portrait), we
swap the width and height if the width is bigger than the height.
In line 32, we call the function match which checks whether the width and height match
the specified ISO format within a given tolerance.
In the subsequent steps, we carry out the required steps and move the resource to the
associated folder if the check is successful.
The Script to sort files of any type (see Listing 1.1) and the Script to sort PDF files (see
Listing 2.4) can be combined in one Script in a rather straightforward way. PrintSphere
AutoPilot also allows, however, to use the resources that have been output in a folder by
one Script as input for a second Script. We thus can achieve a chaining of Scripts into
a real work-flow. This cascading approach allows a higher reusability of Scripts, but this
comes at some overhead.
2.6 Use Case: Analyzing XML Files
2.6.1 Introduction
The PrintSphere AutoPilot scripting library provides several ways to parse and query
XML files. In order to parse an XML value, the Resource object must first be converted
16 CHAPTER 2. ANALYZING RESOURCES
to an XmlDoc object via the asXml method.
On the XmlDoc objects, several methods are supported to query the underlying XML
document.
A first way to query an XML File is by traversing the XML document manually. First,
your can retrieve the root of the document by calling the method getRoot which returns
an object of type XmlNode. On XmlNode level, several methods are supported allowing to
retrieve the type, the value and possible attributes.
1. isElement, isAttribute, isText: methods that check whether a node is an Ele-
ment node, Attribute node or Text node
2. getValue: a method that returns the node name in case of an Element node, the
attribute value in case of an Attribute node and the text value in case of a Text
node
3. getAttributeValue: if the node is an Element node, this method returns the value
of a given attribute (if it is defined)
If the node is an Element node, it is possible to query for child nodes with a particular
name with the method getElementsByTagName. This method returns a list of XmlNode
objects of Element children nodes with a given name.
If one is only interested in the first child element of with a given name, one can use the
method getElement.
The above methods allow to traverse a XML document manually. If one wants to directly
access nodes with an XPath expression, one can use the [xpath method. This method
expects an XPath 2.0 expression and, when called, will return a list of objects of type
XmlNode that match the given XPath expression.
2.6.2 Parsing an XML File
To illustrate the above, we will first write a Script (see Listing 2.6) to parse a simple XML
setup file (see Listing 2.5), retrieve some values and write them to the output.
1 <?xml version="1.0" encoding="UTF-8" ?>2 <JiraData>
2.6. USE CASE: ANALYZING XML FILES 17
3 <homedir>d:/Web2Print/Project Plan/Apogee Web2Print 1.0/</homedir>4 <jira server="http://issuetracking.agfa.net" username="johndoe"
password="acracadabra"/>5 <project name="Apogee StoreFront 4.0" startdate="1-01-2017"
group="AWP_R&D">6 <jira key="AWP" relversion="4.0.0" altversion="5.0.0"/>7 <submsprojects>8 <submsproject>Infrastructure</submsproject>9 <submsproject>FrontEnd</submsproject>
10 <submsproject>FrontEnd#Web2Print</submsproject>11 <submsproject>On-line Editing</submsproject>12 <submsproject>BackEnd</submsproject>13 <submsproject>BackEnd#Web2Print</submsproject>14 <submsproject>Domain Model</submsproject>15 <submsproject>Design Administration</submsproject>16 <submsproject>Design Administration#Administrator</submsproject>17 <submsproject>Design Administration#Designer</submsproject>18 <submsproject>Design Administration#Versioning</submsproject>19 <submsproject>Design Administration#Web2Print</submsproject>20 <submsproject>EQAP</submsproject>21 <submsproject>Deployment</submsproject>22 </submsprojects>23 <bugs>24 <fixfor>25 <relversion>1.0.0-sprint-37</relversion>26 <relversion>1.0.0-sprint-38</relversion>27 <relversion>1.0.0-sprint-38.5</relversion>28 <relversion>1.0.0-sprint-38.6</relversion>29 <relversion>1.0.0-sprint-40</relversion>30 <relversion>1.0.0-sprint-40.12</relversion>31 <relversion>1.0.0-sprint-41</relversion>32 <relversion>1.0.0-sprint-42</relversion>33 </fixfor>34 </bugs>35 </project>36 </JiraData>
Listing 2.5: Sample XML Setup file
In the processFile function, we will process any incoming resource and print out some
relevant fields.
After the check on line 19 to see whether the resource is an XML file, we carry out the
usual conversion method which returns an object of class XmlDoc. From this resource, we
retrieve the root node with method getRoot and get as result an object of type XmlNode.
In order to streamline the error processing, we have put the processing code in an excep-
tion handling statement (with try/catch). For convenience, we implemented 2 functions
getElement and getAttributeValue that retrieve from an XmlNode an element by name
and an attribute by value respectively. In case of failure, we return an exception (which,
in this case, is an expression that contains a string with a description of the error). When
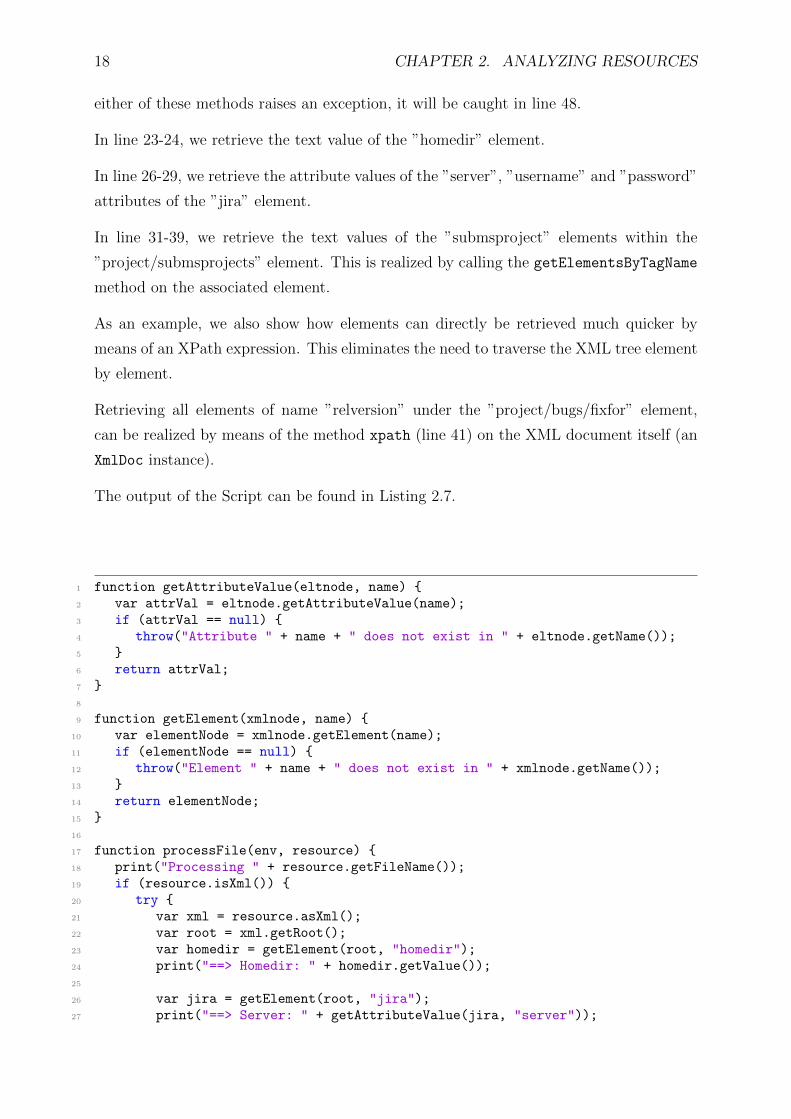
18 CHAPTER 2. ANALYZING RESOURCES
either of these methods raises an exception, it will be caught in line 48.
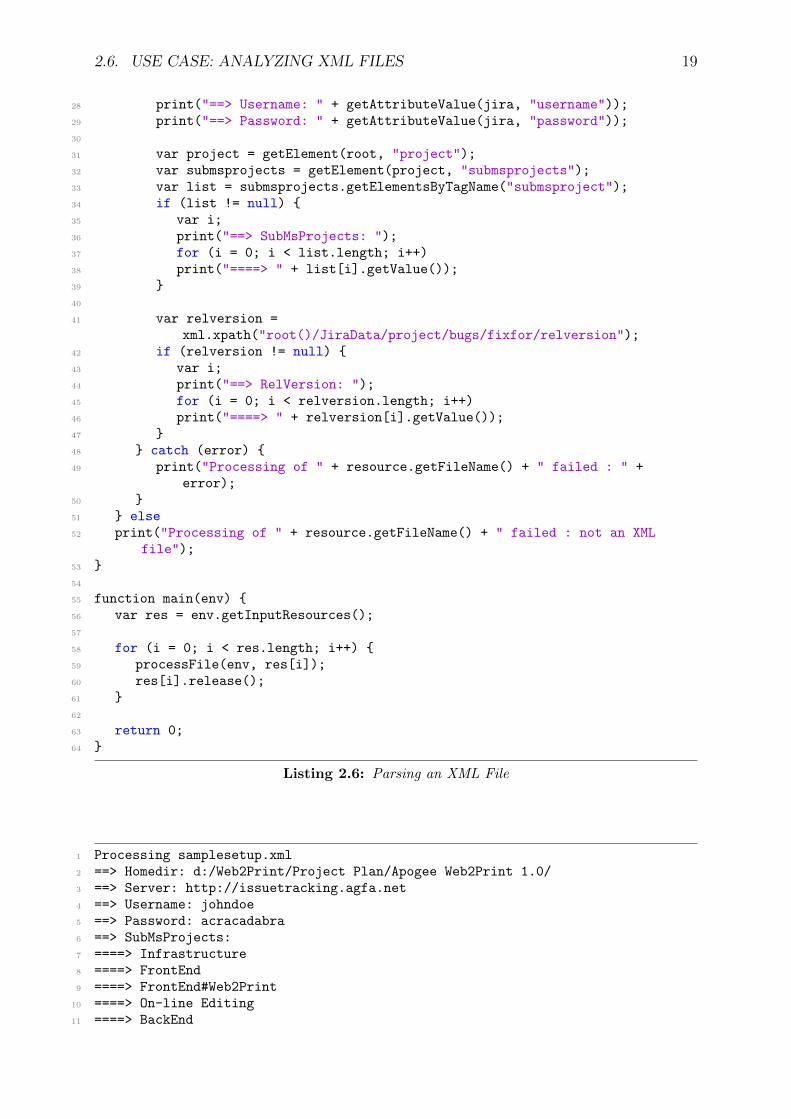
In line 23-24, we retrieve the text value of the ”homedir” element.
In line 26-29, we retrieve the attribute values of the ”server”, ”username” and ”password”
attributes of the ”jira” element.
In line 31-39, we retrieve the text values of the ”submsproject” elements within the
”project/submsprojects” element. This is realized by calling the getElementsByTagName
method on the associated element.
As an example, we also show how elements can directly be retrieved much quicker by
means of an XPath expression. This eliminates the need to traverse the XML tree element
by element.
Retrieving all elements of name ”relversion” under the ”project/bugs/fixfor” element,
can be realized by means of the method xpath (line 41) on the XML document itself (an
XmlDoc instance).
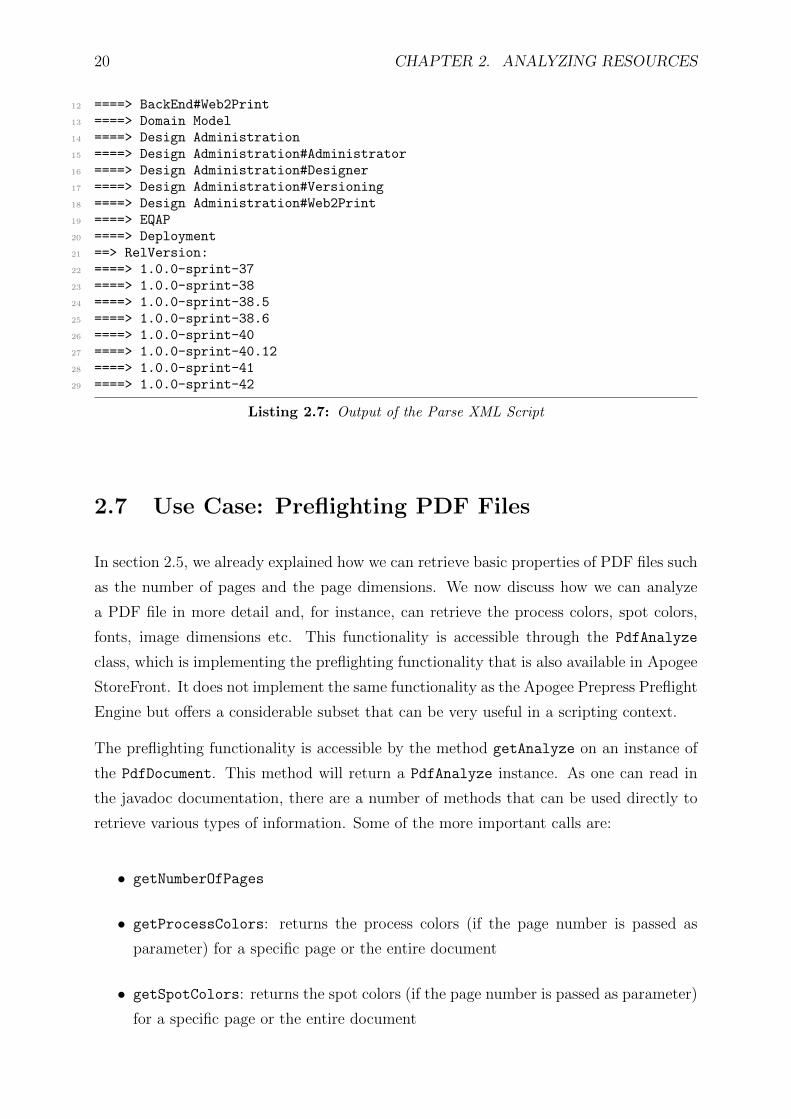
The output of the Script can be found in Listing 2.7.
1 function getAttributeValue(eltnode, name) {2 var attrVal = eltnode.getAttributeValue(name);3 if (attrVal == null) {4 throw("Attribute " + name + " does not exist in " + eltnode.getName());5 }6 return attrVal;7 }8
9 function getElement(xmlnode, name) {10 var elementNode = xmlnode.getElement(name);11 if (elementNode == null) {12 throw("Element " + name + " does not exist in " + xmlnode.getName());13 }14 return elementNode;15 }16
17 function processFile(env, resource) {18 print("Processing " + resource.getFileName());19 if (resource.isXml()) {20 try {21 var xml = resource.asXml();22 var root = xml.getRoot();23 var homedir = getElement(root, "homedir");24 print("==> Homedir: " + homedir.getValue());25
26 var jira = getElement(root, "jira");27 print("==> Server: " + getAttributeValue(jira, "server"));
2.6. USE CASE: ANALYZING XML FILES 19
28 print("==> Username: " + getAttributeValue(jira, "username"));29 print("==> Password: " + getAttributeValue(jira, "password"));30
31 var project = getElement(root, "project");32 var submsprojects = getElement(project, "submsprojects");33 var list = submsprojects.getElementsByTagName("submsproject");34 if (list != null) {35 var i;36 print("==> SubMsProjects: ");37 for (i = 0; i < list.length; i++)38 print("====> " + list[i].getValue());39 }40
41 var relversion =xml.xpath("root()/JiraData/project/bugs/fixfor/relversion");
42 if (relversion != null) {43 var i;44 print("==> RelVersion: ");45 for (i = 0; i < relversion.length; i++)46 print("====> " + relversion[i].getValue());47 }48 } catch (error) {49 print("Processing of " + resource.getFileName() + " failed : " +
error);50 }51 } else52 print("Processing of " + resource.getFileName() + " failed : not an XML
file");53 }54
55 function main(env) {56 var res = env.getInputResources();57
58 for (i = 0; i < res.length; i++) {59 processFile(env, res[i]);60 res[i].release();61 }62
63 return 0;64 }
Listing 2.6: Parsing an XML File
1 Processing samplesetup.xml2 ==> Homedir: d:/Web2Print/Project Plan/Apogee Web2Print 1.0/3 ==> Server: http://issuetracking.agfa.net4 ==> Username: johndoe5 ==> Password: acracadabra6 ==> SubMsProjects:7 ====> Infrastructure8 ====> FrontEnd9 ====> FrontEnd#Web2Print
10 ====> On-line Editing11 ====> BackEnd
20 CHAPTER 2. ANALYZING RESOURCES
12 ====> BackEnd#Web2Print13 ====> Domain Model14 ====> Design Administration15 ====> Design Administration#Administrator16 ====> Design Administration#Designer17 ====> Design Administration#Versioning18 ====> Design Administration#Web2Print19 ====> EQAP20 ====> Deployment21 ==> RelVersion:22 ====> 1.0.0-sprint-3723 ====> 1.0.0-sprint-3824 ====> 1.0.0-sprint-38.525 ====> 1.0.0-sprint-38.626 ====> 1.0.0-sprint-4027 ====> 1.0.0-sprint-40.1228 ====> 1.0.0-sprint-4129 ====> 1.0.0-sprint-42
Listing 2.7: Output of the Parse XML Script
2.7 Use Case: Preflighting PDF Files
In section 2.5, we already explained how we can retrieve basic properties of PDF files such
as the number of pages and the page dimensions. We now discuss how we can analyze
a PDF file in more detail and, for instance, can retrieve the process colors, spot colors,
fonts, image dimensions etc. This functionality is accessible through the PdfAnalyze
class, which is implementing the preflighting functionality that is also available in Apogee
StoreFront. It does not implement the same functionality as the Apogee Prepress Preflight
Engine but offers a considerable subset that can be very useful in a scripting context.
The preflighting functionality is accessible by the method getAnalyze on an instance of
the PdfDocument. This method will return a PdfAnalyze instance. As one can read in
the javadoc documentation, there are a number of methods that can be used directly to
retrieve various types of information. Some of the more important calls are:
• getNumberOfPages
• getProcessColors: returns the process colors (if the page number is passed as
parameter) for a specific page or the entire document
• getSpotColors: returns the spot colors (if the page number is passed as parameter)
for a specific page or the entire document
2.7. USE CASE: PREFLIGHTING PDF FILES 21
• getTrimBox: returns the trim box; if it is not defined, the call falls back to the
media box (which is always available)
• getPageBox: returns the PDF page box of the specified type of the specified page.
If the specified box is not available, null will be returned
• getMinimumBinaryResolution: gets the resolution of the black and white image
element with the lowest resolution on the page with the given page number
• getMinimumContoneResolution: gets the resolution of the contone image element
with the lowest resolution on the page with the given page number
• getOutputIntents: retrieves the output intents that are defined in the PDF file
In addition to retrieving this type of information explicitly, it is also possible to define rules
and detect warnings or errors in any PDF document based on these rules. The rules can be
specified by manipulating the so-called preflight configuration. The preflight configuration
(a PreflightConfig instance) can be retrieved via the getPreflightConfig call. There
are several methods that allow to update the preflight configuration.
We can distinguish between different types of preflight checking:
• color space preflighting: this will raise warning or error alerts if objects with specific
properties are available in the PDF file. The properties that determine the behavior
or: an object is an image or not, an object is in RGB/Lab space or not, an object
has an ICC profile or not. For each of the different combinations (8 in total) one
can specify whether one wants to do nothing, report a warning or report an error.
• resolution checks on images: a warning and error resolution threshold will be spec-
ified separately for contone and binary images. If the minimum resolution of an
image is less than the warning threshold, a warning alert will be generated. If the
minimum resolution is smaller than the error threshold (which should be smaller
than the warning threshold), an error will be raised.
• font checks: non-embedded fonts can be flagged as well. It is also possible that the
check should exclude the Base14 fonts or Courier fonts.
• output intent checks: this check will verify whether the output intents in the doc-
ument have color spaces with or without ICC profile that causes warning or errors
for either images or non-image objects (as defined for the color space preflighting)
22 CHAPTER 2. ANALYZING RESOURCES
It is obvious that the preflighting information can be used to determine the logic/flow
of the PrintSphere AutoPilot scripts. To show how the preflight information can be re-
trieved, we now give a function (see Listing 2.8) from a script we developed to gather
preflight information.
1 function configPreflight(analyzer) {2 var PreflightAlert =
Java.type("com.agfa.awp.pdfutils.preflight.PreflightAlert");3 var preflightConfig = analyzer.getPreflightConfig();4 preflightConfig.setColorSpacePreflightStatus(true, false, true,
PreflightAlert.PreflightStatus.WARNING); // Image - non-ICC - RGB5 preflightConfig.setColorSpacePreflightStatus(true, false, false,
PreflightAlert.PreflightStatus.WARNING); // Image - non-ICC - non-RGB6 preflightConfig.setColorSpacePreflightStatus(false, false, true,
PreflightAlert.PreflightStatus.WARNING); // Object - non-ICC - RGB7 preflightConfig.setColorSpacePreflightStatus(false, false, false,
PreflightAlert.PreflightStatus.WARNING); // Object - non-ICC - non-RGB8 }9
10 function processErrorFile(env, resource, phase) {11 print(phase + ": an error occurred during the processing of " +
resource.getFileName());12 res.move(env.getOutputLocation("error"));13 }14
15 function processPreflightCheck(env, resource) {16 if (resource.isPdf()) {17 var pdfresource = resource.asPdf();18 var analyzer = pdfresource.getAnalyzer();19 configPreflight(analyzer);20 if (analyzer == null) {21 processErrorFile(env, resource, ’PREFLIGHT’);22 return false;23 }24 var nrPages = analyzer.getNumberOfPages();25 print("File: " + resource.getFileName());26 for (var j = 1; j <= nrPages; j++) {27 print("Page " + j + ":");28 print("==> PROCESSCOLORS: " + analyzer.getProcessColors(j).toString());29 print("==> SPOTCOLORS: " + analyzer.getSpotColors(j).toString());30 var tmpalerts = analyzer.getPreflightAlerts(j);31 var imagealerts = tmpalerts.getImagePreflightAlerts();32 print("==> IMAGEPREFLIGHTALERTS: " + imagealerts);33 for each (var tmpalert in imagealerts) {34 print("isWarning: " + tmpalert.isWarning());35 print("resolution: " + tmpalert.getResolution());36 print("type: " + tmpalert.getObjectType());37 }38 var fontalerts = tmpalerts.getFontPreflightAlerts();39 print("==> FONTPREFLIGHTALERTS: " + fontalerts);40 for each (var tmpalert in fontalerts) {
2.8. USE CASE: PARSING CSV FILES 23
41 print("isWarning: " + tmpalert.isWarning());42 print("font: " + tmpalert.getFontName());43 }44 }45 return true;46 } else {47 processErrorFile(env, resource, ’PREFLIGHT’);48 return false;49 }50 }51
52 function main(env) {53 var resources = env.getInputResources();54 for (var i = 0; i < resources.length; i++) {55 if (processPreflightCheck(env, resources[i]))56 resources[i].move(env.getOutputLocation("processed"));57 }58 }
Listing 2.8: Accessing the PrintSphere AutoPilot Preflight Engine
2.8 Use Case: Parsing CSV Files
For simple record based input, one often prefers the CSV format over XML because of
its simplicity. Therefore, we also added support for parsing CSV files in PrintSphere
AutoPilot. The script in Listing 2.9 illustrates how one can parse a CSV file.
This script parses all text files with a ”.csv” extension that are put in the input folder.
To start the parsing, we first access on line 2 the associate input resource as CsvDoc with
the method asCsv (available on Resource instances).
We now can optionally specify the CSV separator; this often is a semi-colon. In our case,
it is a comma and therefore we call the method setSeparator on the CsvDoc instance
with ”,” as parameter.
By default, the CSV parser assumes that the CSV files are UTF-8 encoded. If this is
not the case, it is possible to specify the character set name (or character encoding) by
means of the setCharSetName mehthod. To illustrate this, we set in line 6 the character
encoding to ”Shift JIS” (which is an encoding typically used for Japanese content).
Then we can start calling the getLine method (line 10) on the CsvDoc instance to retrieve
the successive lines in the CSV file. This method will return a list of strings corresponding
to the different fields. null will be returned in case of an error or if the last line has been
read.

24 CHAPTER 2. ANALYZING RESOURCES
When the close method is called (line 17), the next call to getLine will start parsing
the file from the beginning again.
1 function processCsv(env, resource) {2 var csv = resource.asCsv();3 csv.setSeparator(’,’);4 if (resource.getFileName() == "test3.csv") {5 print("Setting character encoding...");6 csv.setCharSetName("Shift_JIS");7 }8 var line;9 print("Parsing " + resource.getFileName());
10 while ((line = csv.getLine()) != null) {11 var output = "";12 for (var i = 0; i < line.length; i++) {13 if ((line[i] == "\u00A9") || (line[i] == "Order ID"))14 print("Detected " + line[i] + " in column " + i);15 output += " => " + line[i];16 }17 print(output);18 }19 csv.close();20 }21
22 function main(env) {23 var resources = env.getInputResources();24 for (var i = 0; i < resources.length; i++) {25 var resource = resources[i];26 print("File: " + resource.getFileName() + ", extension: " +
resource.getExtension());27 if (resource.getExtension() == "csv")28 processCsv(env, resource);29 resource.release();30 }31 }
Listing 2.9: Parsing a CSV File
2.9 Use Case: Retrieve Text from PDF files
Since version 1.2.4 of PrintSphere AutoPilot, we added a method to the PdfDocument class
extractMarkedText() to retrieve all strings optionally matching a leading and trailing
pattern and occurring within sections that are marked with a specific PDF mark. This
method has the following parameters:
• tag: the text mark; if this parameter is null, all strings will be returned.
2.9. USE CASE: RETRIEVE TEXT FROM PDF FILES 25
• start: if null, no filtering will be applied at the start of the string.
• end: if null, no filtering will be applied at the end of the string.
The method returns a list of string lists. The toplevel list will contain an entry for each
page (page 1 corresponding to index 0). Each string lists will contain all text strings on
the associated page that are filtered out.
1 function processPdf(env, pdfresource) {2 var marklist = pdfresource.extractMarkedText("/APX_PDFImposer", "%%", "%%");3 if (marklist != null) {4 for (var i = 0; i < marklist.length; i++) {5 print("=====> Page: " + (i + 1));6 for (var j = 0; j < marklist[i].length; j++) {7 print("=======> " + marklist[i][j]);8 }9 }
10 }11 }12
13 function main(env) {14 var resources = env.getInputResources();15 for (var i = 0; i < resources.length; i++) {16 if (resources[i].isPdf()) {17 processPdf(env, resources[i].asPdf());18 }19 resources[i].release();20 }21 }
Listing 2.10: Extracting Text from a PDF File
This functionality can be used, for example, to retrieve text marks from an imposed PDF
file that has been generated by Apogee Prepress. Since text belonging to the imposed
pages would also be picked up, it it necessary to apply some extra filtering to retain the
requested strings. A typical solution for this problem would be to add in Apogee Prepress
a prefix and suffix to the text mark (like, e.g., ”%%”) and filter for these.
In Listing 2.10, we display a very simple script that prints out these text marks.

26 CHAPTER 2. ANALYZING RESOURCES

Chapter 3
Creating/Updating Resources
3.1 Use Case: Correct PDF Boxes
Each page in a PDF file can have one or more page boxes defined (MediaBox, BleedBox,
TrimBox and ArtBox). Not all these boxes must be present but the MediaBox must
always be defined. In the following example, we will develop a script that processes PDF
files and normalizes the page boxes. As an example, we will force a bleed of 10 units in
all directions and remove the art box.
The source of this script can be found in Listing 3.1.
1 function printBox(page, name, box) {2 print("Page: " + page + ", Name: " + name + ", Left: " + box.getLeft() + ",
Bottom: " + box.getBottom() + ", Right: " + box.getRight() + ", Top: " +box.getTop());
3 }4
5 function processFile(env, resource) {6 if (resource.getFileType() === ’PDF’) {7 var pdf = resource.asPdf();8 var nrpages = pdf.getNrPages();9 print("Nr of pages: " + nrpages);
10 var i;11 for (i = 1; i <= nrpages; i++) {12 var trimbox = pdf.getTrimBox(i);13 printBox(i, "trim", trimbox);14 var trimleft = trimbox.getLeft();15 var trimbottom = trimbox.getBottom();16 var trimright = trimbox.getRight();17 var trimtop = trimbox.getTop();18
27
28 CHAPTER 3. CREATING/UPDATING RESOURCES
19 if (pdf.isPageBoxDefined(i, "trim"))20 print("Page " + i + ": trim box defined");21 else22 print("Page " + i + ": trim box not defined");23
24 pdf.setPageBox(i, "trim", trimleft, trimbottom, trimright, trimtop);25
26 var newleft = trimleft - vars.bleed;27 var newbottom = trimbottom - vars.bleed;28 var newright = trimright + vars.bleed;29 var newtop = trimtop + vars.bleed;30
31 pdf.setPageBox(i, "bleed", newleft, newbottom, newright, newtop);32
33 var mediabox = pdf.getMediaBox(i);34 printBox(i, "media", mediabox);35 var medialeft = mediabox.getLeft();36 var mediabottom = mediabox.getBottom();37 var mediaright = mediabox.getRight();38 var mediatop = mediabox.getTop();39
40 if (newleft < medialeft)41 medialeft = newleft;42 if (newbottom < mediabottom)43 mediabottom = newbottom;44 if (mediaright < newright)45 mediaright = newright;46 if (mediatop < newtop)47 mediatop = newtop;48
49 pdf.setPageBox(i, "media", medialeft, mediabottom, mediaright,mediatop);
50 pdf.setPageBox(i, "crop", medialeft, mediabottom, mediaright,mediatop);
51 pdf.clearPageBox(i, "art");52 }53
54 var newresource = pdf.saveAs(resource.getBaseFileName() + "-out.pdf");55
56 newresource.move(env.getOutputLocation("success"));57 resource.move(env.getOutputLocation("success"));58 } else {59 resource.move(env.getOutputLocation("failure"));60 }61 }62
63 function main(env) {64 var res = env.getInputResources();65
66 for (i = 0; i < res.length; i++) {67 processFile(env, res[i]);68 }69
70 return 0;71 }72
3.2. USE CASE: SPLITTING A PDF FILE 29
73 var vars = {74 "bleed" : 1075 };
Listing 3.1: Correcting PDF Boxes
The main function (line 63) consists of the usual iteration over the input resources. The
processing is done in the function processFile. In case of a PDF file, we iterate over all
the pages and retrieve for each page the TrimBox with the getTrimBox method that is
called on the PdfDocument and has the page number as parameter. Note that, in PDF
terms, the first page has index 1. Also, the method always returns a TrimBox, even if it
is not defined on that page. In that case, it falls back to the MediaBox (which always
must be defined). As an illustration, we also print out whether the TrimBox has been
defined or not with the method isPageBoxDefined. This method has the box type and
page number has parameters (the box type being a string with one of the values ”media”,
”bleed”, ”trim” or ”art”).
The getTrimBox method returns a Rectangle and we retrieve the left, right, bottom and
up values by the appropriate methods (see lines 14-17).
We then calculate the bleed starting from this TrimBox values in lines 26-29. In line 32,
we then update the BleedBox with the method setPageBox.
Next, we retrieve the MediaBox and make sure that the MediaBox contains the BleedBox.
If this is not the case, we calculate a new MediaBox (lines 41-48) and, finally, update the
MediaBox.
Then, we set the CropBox to the MediaBox (line 49/50) and clear the ArtBox with the
clearPageBox method in line 51.
3.2 Use Case: Splitting a PDF File
We now will create a script (see Listing 3.2) that splits a PDF file in different chunks. This
is an operation that is often used when one wants to split big unmanageable PDF files
in smaller parts. We assume that the maximum number of pages of a chunk is defined
in the blocksize field of the vars variable (this variable contains fixed default Script
parameters that can be defined in SphereCenter when instantiating a script).
1 function splitPdf(env, res) {2 if (res.isPdf()) {
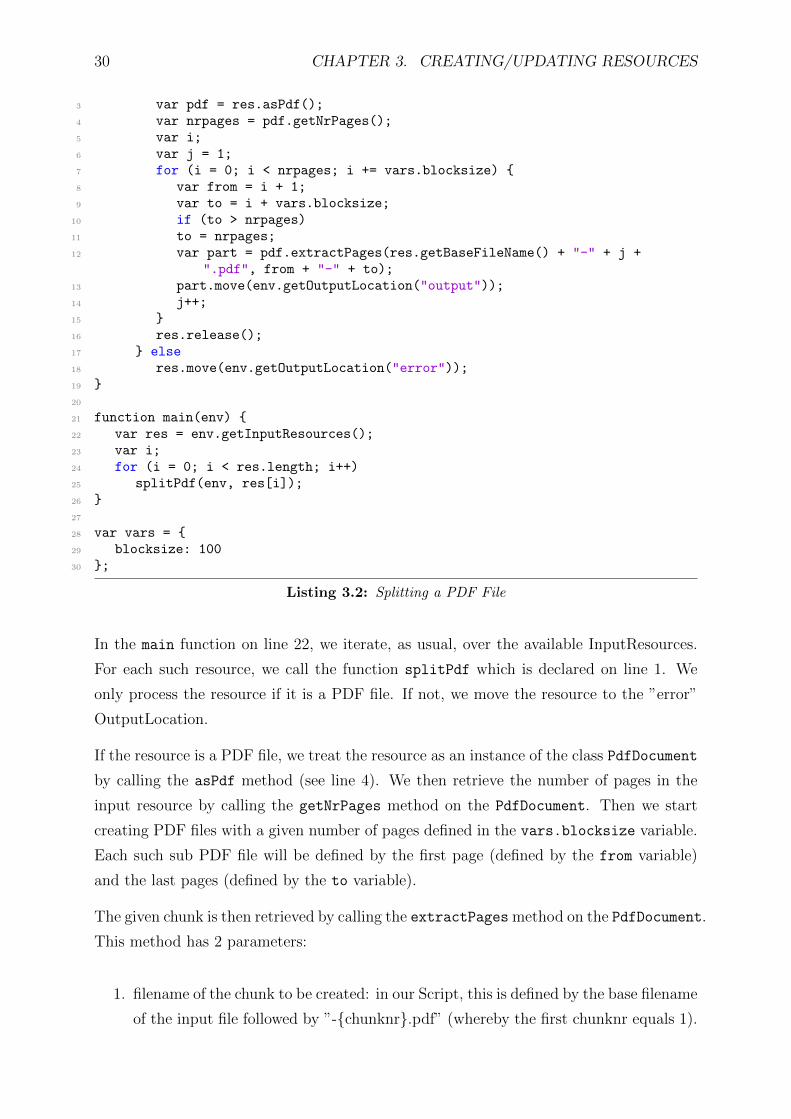
30 CHAPTER 3. CREATING/UPDATING RESOURCES
3 var pdf = res.asPdf();4 var nrpages = pdf.getNrPages();5 var i;6 var j = 1;7 for (i = 0; i < nrpages; i += vars.blocksize) {8 var from = i + 1;9 var to = i + vars.blocksize;
10 if (to > nrpages)11 to = nrpages;12 var part = pdf.extractPages(res.getBaseFileName() + "-" + j +
".pdf", from + "-" + to);13 part.move(env.getOutputLocation("output"));14 j++;15 }16 res.release();17 } else18 res.move(env.getOutputLocation("error"));19 }20
21 function main(env) {22 var res = env.getInputResources();23 var i;24 for (i = 0; i < res.length; i++)25 splitPdf(env, res[i]);26 }27
28 var vars = {29 blocksize: 10030 };
Listing 3.2: Splitting a PDF File
In the main function on line 22, we iterate, as usual, over the available InputResources.
For each such resource, we call the function splitPdf which is declared on line 1. We
only process the resource if it is a PDF file. If not, we move the resource to the ”error”
OutputLocation.
If the resource is a PDF file, we treat the resource as an instance of the class PdfDocument
by calling the asPdf method (see line 4). We then retrieve the number of pages in the
input resource by calling the getNrPages method on the PdfDocument. Then we start
creating PDF files with a given number of pages defined in the vars.blocksize variable.
Each such sub PDF file will be defined by the first page (defined by the from variable)
and the last pages (defined by the to variable).
The given chunk is then retrieved by calling the extractPages method on the PdfDocument.
This method has 2 parameters:
1. filename of the chunk to be created: in our Script, this is defined by the base filename
of the input file followed by ”-{chunknr}.pdf” (whereby the first chunknr equals 1).

3.3. USE CASE: MERGING PDF FILES 31
2. extract pattern: this defines the pages to be extracted. In our case, these pages are
page from to (and including) page to. In this case, the extract pattern must be
”{from}-{to}”.
The result of this method is a variable of type Resource that is moved to the ”output”
OutputLocation.
3.3 Use Case: Merging PDF Files
In the following Script, we will merge an number of PDF Files together. In order to
know how many files have to be combined and in which order they have to be com-
bined, we assume that the filenames are built up as follows: ”{header}{space} {pdfnr}-{totalnrofpdfs}.pdf”. The filename thus should consist of the following parts:
• header: any sequence of characters
• space: a blanc space
• a hyphen
• pdfnr: the number of the PDF file
• totalnrofpdfs: the total number of PDF files to be combined
As an example, the PDF files ”abc 1-3.pdf”, ”abc 2-3.pdf” and ”abc 3-3.pdf” should be
combined together in one PDF file named ”abc.pdf”.
In Listing 3.3, we show how this functionality could be implemented.
1 function merge(env, filename, infos) {2 print("Merging file " + filename);3 if (infos && (infos.length > 0)) {4 var sortedfiles = [];5
6 // First check whether all files are present7 var nrfiles = infos[0][2];8
9 print("Nrfiles: " + nrfiles);10 print("Available files: " + infos.length);11
12 if (infos.length < nrfiles)13 return;14

32 CHAPTER 3. CREATING/UPDATING RESOURCES
15 var i;16
17 for (i = 0; i < nrfiles; i++) {18 var j;19 var present = false;20 for (j = 0; j < infos.length; j++)21 if (infos[j][1] == i + 1) {22 present = true;23 sortedfiles[i] = infos[j];24 break;25 }26 if (!present)27 return;28 }29
30 // All files are present, so we can start combining31 print("All files are present: " + filename);32
33 if (sortedfiles.length == 1) {34 sortedfiles[0][0].move(env.getOutputLocation("output"), filename +
".pdf");35 } else {36 var appendlist = [];37 for (i = 1; i < sortedfiles.length; i++)38 appendlist.push(sortedfiles[i][0]);39
40 var mergedpdf = sortedfiles[0][0].asPdf().appendDocuments(filename +".pdf", appendlist);
41
42 mergedpdf.move(env.getOutputLocation("output"));43
44 for (i = 0; i < sortedfiles.length; i++) {45 print("Deleting files: " + sortedfiles[i][0].getFileName());46 sortedfiles[i][0].release();47 }48 }49 }50 }51
52 function getInfo(basefilename) {53 var re = new RegExp(’^(.+) ([0-9]+)-([0-9]+)$’);54 print(’getInfo: ’ + basefilename);55 var list = re.exec(basefilename);56 if (list)57 print(’getInfo: :’ + list[0] + ’:’ + list[1] + ’:’ + list[2] + ’:’ +
list[3]);58 return list;59 }60
61 function main(env) {62 print("Script run");63 var res = env.getInputResources();64 var i;65 var dict = {};66 for (i = 0; i < res.length; i++) {67 if (!res[i].isPdf()) {

3.3. USE CASE: MERGING PDF FILES 33
68 res[i].move(env.getOutputLocation("error"));69 print(’Rejected file ’ + res[i].getFileName() + ’: not a PDF file’);70 break;71 }72 var info = getInfo(res[i].getBaseFileName());73 if (!info) {74 res[i].move(env.getOutputLocation("error"));75 print(’Rejected file ’ + res[i].getFileName() + ’: filename does not
match the required pattern’);76 } else {77 if (!dict[info[1]])78 dict[info[1]] = [];79 dict[info[1]].push([res[i], info[2], info[3]]);80 }81 }82 for (var key in dict)83 merge(env, key, dict[key]);84 }
Listing 3.3: Merging PDF Files
In the main function (line 61), we iterate over the available input resources (line 66) and
proceed as follows:
1. if the resource is not a PDF file (line 67), it is rejected and moved to the ”error”
OutputLocation
2. in line 72, we call the function getInfo that splits the filename in its components.
If the filename does not match the requirements, an null is returned, the file is
rejected and moved to the ”error” OutputLocation.
In the getInfo function, the filename is being analyzed. For this purpose, we create
a standard Javascript object of the class RegExp and pass a string that defines the
regular expression. We then call the exec method on the RegExp instance with the
filename as parameter. If the filename matches the specified regular expression, this
call will return a list of 4 elements:
(a) the filename
(b) the first expression in brackets, corresponding to the {header}
(c) the second expression in brackets, corresponding to the {pdfnr}
(d) the third expression in brackets, corresponding to the {totalnrofpdfs}
If the filename did not match the regular expression, null will be returned.
3. if the filename matches the required pattern, an array is returned that consists of
the filename, {header}, {pdfnr} and {totalnrofpdfs}. These arrays are stored in a

34 CHAPTER 3. CREATING/UPDATING RESOURCES
dictionary that uses the headers as keys. In the values, we build up an array of
entries for each file. The entry itself consists of a reference to the file Resource, the
{pdfnr} and the {totalnrofpdfs}. This in effect groups all incoming files that should
be merged together in one PDF file.
In line 82, we iterate over all keys in that dictionary and carry out the merge operation
by calling the function merge.
In the merge function (line 1), we first check whether all files to be merged into one file
are already present (line 4-27). If this is not the case, we return and delay the merging
to a next run of the Script. While checking whether all files are available, we build up an
array sortedfiles that consists of the file Resources.
If all files are available, we take the first element of the sortedfiles array. If there is
only one file to be combined, we move this Resource to the ”output” OutputLocation.
Otherwise, we build up a list of PDF files to be appended to the first PDF file (lines
37-38). Then we convert the first Resource to a PdfDocument instance and carry out the
merging by calling the method appendDocuments on the PdfDocument instance. This
will generate a new Resource which will be the combination of all the PDF files. This
Resource will be moved to the ”output” OutputLocation (line 42); finally, all the input
files will be deleted by calling the release method on the associated InputResources.
3.4 Use Case: Splitting Printer’s Spread PDF
Occasionally, page layout software (such as Adobe’s InDesign) produces PDF files that
contain Printer’s Spreads. In order to submit such PDF files to workflow software, it often
is necessary to split the Printer’s Spread pages into individual pages.
PrintSphere AutoPilot has a method splitPrinterSpread on PdfDocument instances
that splits the Printer’s Spreads. We assume that the first page contains a spread con-
sisting of the last pages and the first page. The trimboxes of the extracted pages are
obtained by cutting the original trimboxes exactly in half (vertically).
Listing 3.4 contains a Script that shows this functionality.
1 function splitPrinterSpread(env, res) {2 if (res.isPdf()) {3 var pdf = res.asPdf();4 var newpdf = pdf.splitPrinterSpread(res.getBaseFileName() +
3.5. USE CASE: MERGING PAGES 35
"-split.pdf");5 if (newpdf) {6 newpdf.move(env.getOutputLocation("success"));7 res.release();8 } else {9 print("splitPrinterSpread failed on " + res.getFileName());
10 res.move(env.getOutputLocation("error"));11 }12
13 } else {14 print("splitPrinterSpread failed on " + res.getFileName() + ": not a PDF
file");15 res.move(env.getOutputLocation("error"));16 }17 }18
19 function main(env) {20 var res = env.getInputResources();21 var i;22 for (i = 0; i < res.length; i++) {23 splitPrinterSpread(env, res[i]);24 }25 }
Listing 3.4: Splitting Printer’s Spreads
3.5 Use Case: Merging Pages
PrintSphere AutoPilot can also combine page pairs onto one page. This can be useful in
a number of circumstances:
1. to generate a Printer’s Spread file: this is the inverse operation of the functionality
described in the previous use case (section 3.4).
2. to make a booklet
3. to impose pages together for printing to apply a cut and stack operation afterwards;
this method is supported for both single and two-sided printed.
3.6 Use Case: Generate XML Files
TO BE COMPLETED
36 CHAPTER 3. CREATING/UPDATING RESOURCES
3.7 Use Case: Apply XSLT transforms to XML Files
We now will create a Script that applies a fixed XSLT transform to the incoming XML files
and, for each XML file, produces an HTML file which visualizes the data it contains. The
fixed XSLT transform will be defined by an XML file that is available as a PrintSphere
resource.
In the Script itself, this resource can be retrieved by the method getAuxiliaryResource
of the Script environment (which is an object of the Environment class). This method
requires a string (label) as parameter. In SphereCenter, one will be able to specify -
during the activation of the Script - a PrintSphere resource for each label that is referred
to in the Script.
1 function processFile(env, xslt, resource) {2 if (resource.isXml()) {3 var result = env.applyXSLT(resource.getBaseFileName() + ".html",
resource, xslt);4 if (result != null)5 result.move(env.getOutputLocation("success"));6 else7 print("Processing of " + resource.getFileName() + " failed");8 } else9 print("Processing of " + resource.getFileName() + " failed: not an XML
file");10 resource.release();11 }12
13 function main(env) {14 var res = env.getInputResources();15 var xslt = env.getAuxiliaryResource("xslt");16
17 var i;18 for (i = 0; i < res.length; i++) {19 processFile(env, xslt, res[i]);20 }21
22 return 0;23 }
Listing 3.5: Apply XSLT Transform to an XML File
In the main function of the Script, we first retrieve the input resources and the auxiliary re-
source (with label ”xslt”) with the methods getInputResources and getAuxiliaryResource.
We then call in line 19 for each input resource the processFile function which has the
environment, the auxiliary resource and the input resource has parameters.
3.7. USE CASE: APPLY XSLT TRANSFORMS TO XML FILES 37
In the processFile method we then first check whether the input resource is an XML
file. If this is the case, we call the method applyXSLT on the environment to transform
the XML file with the XSLT resource. If this call is succesful, it will return an object of
class Resource. This resource will then be moved to the ”success” folder. In all other
cases, we print out an error log.
As an example, we used the following XSLT Script (Listing 3.6) and applied it on the
following XML file (Listing 3.7). This produced the HTML file shown in Listing 3.8.
1
2 <?xml version="1.0" encoding="ISO-8859-1"?>3 <xsl:stylesheet version="1.0" xmlns:xsl="http://www.w3.org/1999/XSL/Transform">4 <xsl:template match="/">5 <html>6 <body>7 <h1>Indian Languages details</h1>8 <table border="1">9 <tr>
10 <th>Language</th>11 <th>Family/Origin</th>12 <th>No. of speakers</th>13 <th>Region</th>14 </tr>15 <xsl:for-each select="languages-list/language">16 <tr>17 <td><xsl:value-of select="name"/></td>18 <td><xsl:value-of select="family"/></td>19 <td><xsl:value-of select="users"/></td>20 <td><xsl:value-of select="region"/></td>21 </tr>22 </xsl:for-each>23 </table>24 </body>25 </html>26 </xsl:template>27 </xsl:stylesheet>
Listing 3.6: XSLT Script
1 <?xml version="1.0" encoding="utf-8" ?>2 <languages-list>3 <language id = "1">4 <name>Kannada</name>5 <region>Karnataka</region>6 <users>38M</users>7 <family>Dravidian</family>8 </language>9 <language id = "2">
10 <name>Telugu</name>

38 CHAPTER 3. CREATING/UPDATING RESOURCES
11 <region>Andra Pradesh</region>12 <users>74M</users>13 <family>Dravidian</family>14 </language>15 <language id = "3">16 <name>Tamil</name>17 <region>TamilNadu</region>18 <users>61M</users>19 <family>Dravidian</family>20 </language>21 <language id = "4">22 <name>Malayalam</name>23 <region>Kerela</region>24 <users>33M</users>25 <family>Dravidian</family>26 </language>27 <language id = "5">28 <name>Hindi</name>29 <region>Andaman and Nicobar Islands, North india, Parts of North
east</region>30 <users>442M</users>31 <family>Indo Aryan</family>32 </language>33 <language id = "6">34 <name>Assamese</name>35 <region>Assam, Arunachal Pradesh</region>36 <users>13M</users>37 <family>Indo Aryan</family>38 </language>39 </languages-list>
Listing 3.7: XML Input for XSLT Transform
1 <?xml version="1.0" encoding="UTF-8" ?>2 <html>3 <body>4 <h1>Indian Languages details</h1>5 <table border="1">6 <tr>7 <th>Language</th>8 <th>Family/Origin</th>9 <th>No. of speakers</th>
10 <th>Region</th>11 </tr>12 <tr>13 <td>Kannada</td>14 <td>Dravidian</td>15 <td>38M</td>16 <td>Karnataka</td>17 </tr>18 <tr>19 <td>Telugu</td>20 <td>Dravidian</td>21 <td>74M</td>
3.8. USE CASE: GENERATE PDF REPORTS 39
22 <td>Andra Pradesh</td>23 </tr>24 <tr>25 <td>Tamil</td>26 <td>Dravidian</td>27 <td>61M</td>28 <td>TamilNadu</td>29 </tr>30 <tr>31 <td>Malayalam</td>32 <td>Dravidian</td>33 <td>33M</td>34 <td>Kerela</td>35 </tr>36 <tr>37 <td>Hindi</td>38 <td>Indo Aryan</td>39 <td>442M</td>40 <td>Andaman and Nicobar Islands, North india, Parts of North
east</td>41 </tr>42 <tr>43 <td>Assamese</td>44 <td>Indo Aryan</td>45 <td>13M</td>46 <td>Assam, Arunachal Pradesh</td>47 </tr>48 </table>49 </body>50 </html>
Listing 3.8: Output HTML of XSLT Transform
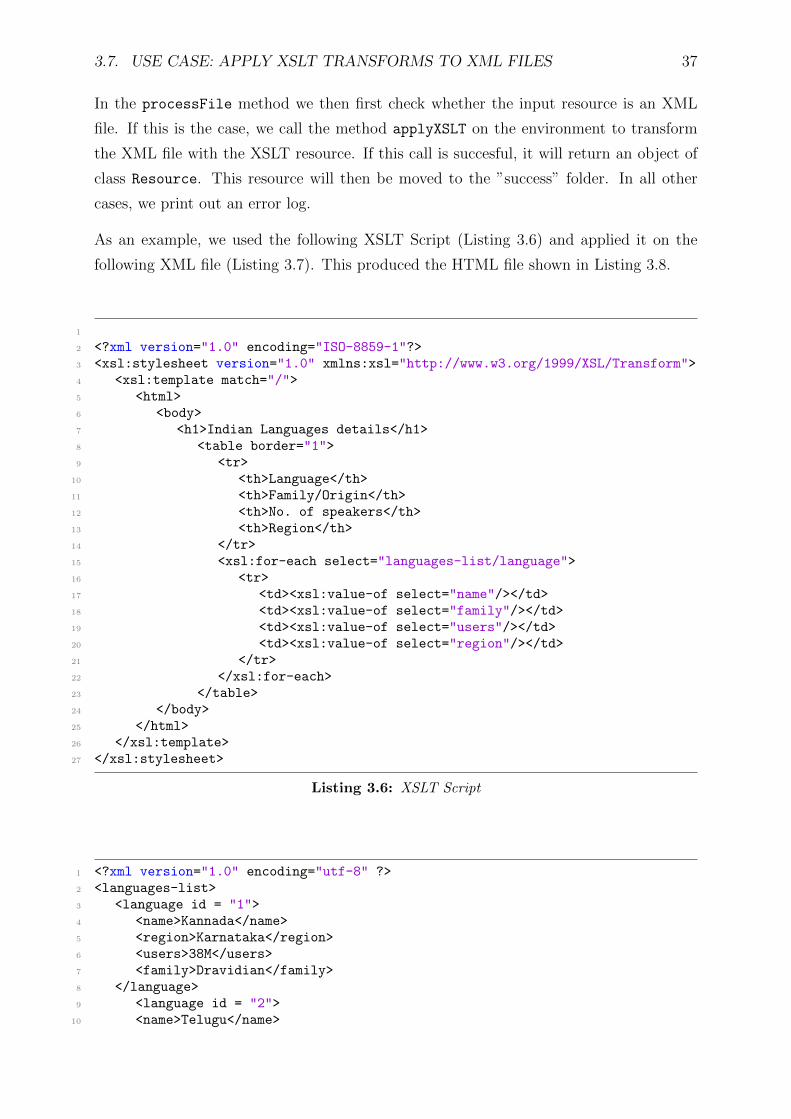
Figure 3.1 shows how this HTML is displayed in a browser.
3.8 Use Case: Generate PDF Reports
PrintSphere AutoPilot also supports PDF reporting functionality. This can be handy if
you want to generate a PDF representation from a list of data records that are defined
by means of a number of text fields. Consider, for instance, a list of travellers with their
name, phone number and destination. We now show how we can make special luggage
tags.
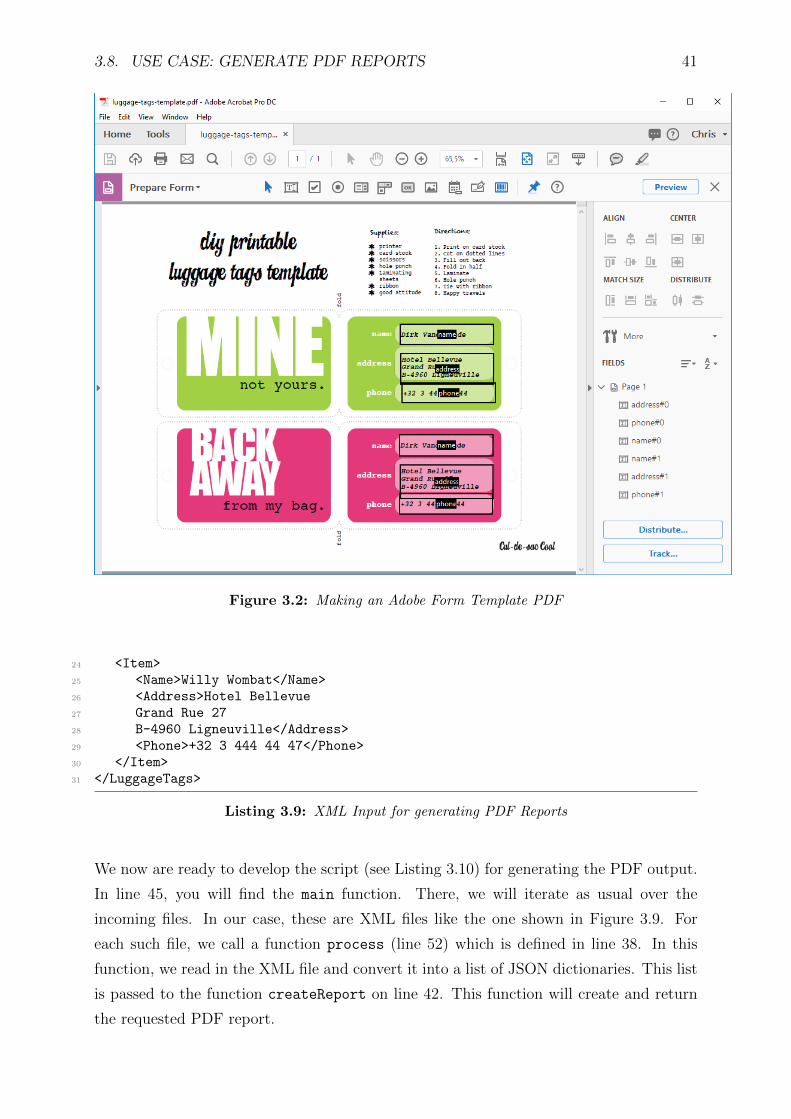
In order to proceed, we first need to create a PDF form template. This best can be done by
first creating a design in your favourite page editing software (like Microsoft Word, Adobe
InDesign etc.) and then generate a PDF from this software. You then have to define a
number of form fields on this template in Adobe Acrobat Professional (see Figure 3.2).
40 CHAPTER 3. CREATING/UPDATING RESOURCES
Figure 3.1: HTML visualization of Listing 3.8
In this example, we will embed form fields with the names ”name”, ”address” and ”phone”.
A you will see, we will print for each record 2 tags on one page (one in green and one in
pink).
We now need an XML file that contains the data records for which we will generate the
tags. In Listing 3.9, we give a sample XML file with 4 records.
1 <?xml version="1.0" encoding="UTF-8"?>2 <LuggageTags>3 <Item>4 <Name>Roger Rabbit</Name>5 <Address>Hotel Bellevue6 Grand Rue 277 B-4960 Ligneuville</Address>8 <Phone>+32 3 444 44 44</Phone>9 </Item>
10 <Item>11 <Name>Tazmanian Devil</Name>12 <Address>Hotel Bellevue13 Grand Rue 2714 B-4960 Ligneuville</Address>15 <Phone>+32 3 444 44 45</Phone>16 </Item>17 <Item>18 <Name>Daffy Duck</Name>19 <Address>Hotel Bellevue20 Grand Rue 2721 B-4960 Ligneuville</Address>22 <Phone>+32 3 444 44 46</Phone>23 </Item>
3.8. USE CASE: GENERATE PDF REPORTS 41
Figure 3.2: Making an Adobe Form Template PDF
24 <Item>25 <Name>Willy Wombat</Name>26 <Address>Hotel Bellevue27 Grand Rue 2728 B-4960 Ligneuville</Address>29 <Phone>+32 3 444 44 47</Phone>30 </Item>31 </LuggageTags>
Listing 3.9: XML Input for generating PDF Reports
We now are ready to develop the script (see Listing 3.10) for generating the PDF output.
In line 45, you will find the main function. There, we will iterate as usual over the
incoming files. In our case, these are XML files like the one shown in Figure 3.9. For
each such file, we call a function process (line 52) which is defined in line 38. In this
function, we read in the XML file and convert it into a list of JSON dictionaries. This list
is passed to the function createReport on line 42. This function will create and return
the requested PDF report.
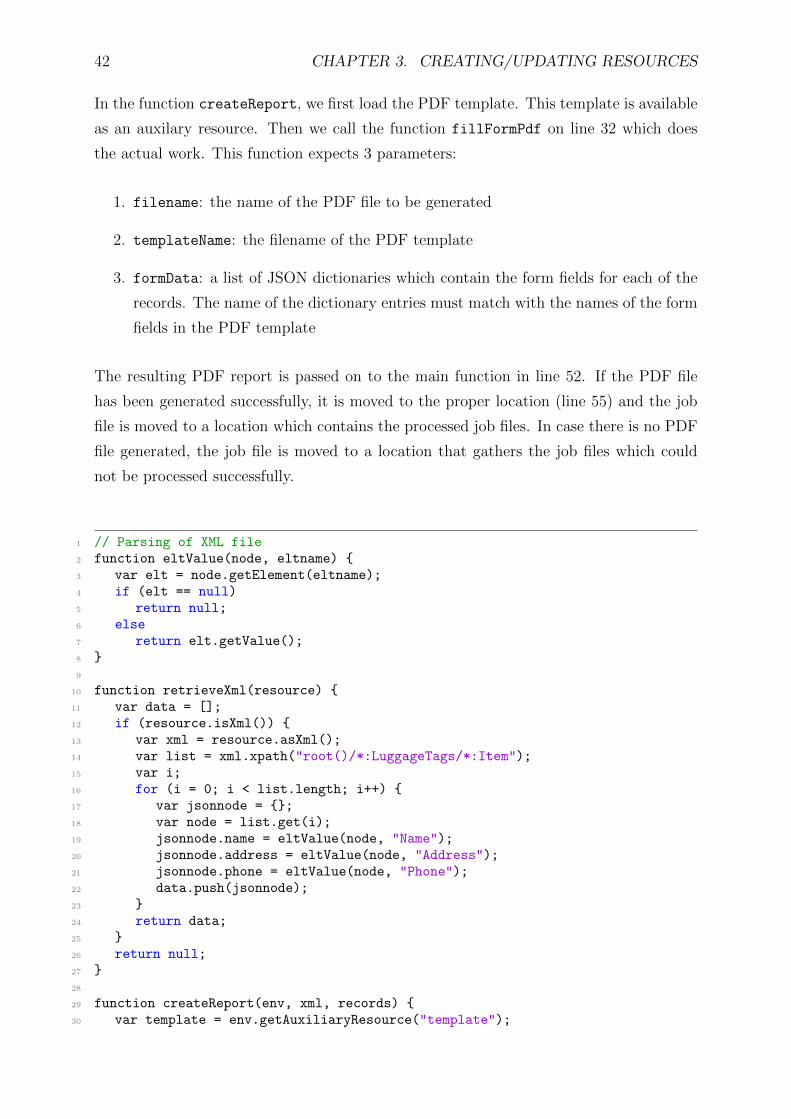
42 CHAPTER 3. CREATING/UPDATING RESOURCES
In the function createReport, we first load the PDF template. This template is available
as an auxilary resource. Then we call the function fillFormPdf on line 32 which does
the actual work. This function expects 3 parameters:
1. filename: the name of the PDF file to be generated
2. templateName: the filename of the PDF template
3. formData: a list of JSON dictionaries which contain the form fields for each of the
records. The name of the dictionary entries must match with the names of the form
fields in the PDF template
The resulting PDF report is passed on to the main function in line 52. If the PDF file
has been generated successfully, it is moved to the proper location (line 55) and the job
file is moved to a location which contains the processed job files. In case there is no PDF
file generated, the job file is moved to a location that gathers the job files which could
not be processed successfully.
1 // Parsing of XML file2 function eltValue(node, eltname) {3 var elt = node.getElement(eltname);4 if (elt == null)5 return null;6 else7 return elt.getValue();8 }9
10 function retrieveXml(resource) {11 var data = [];12 if (resource.isXml()) {13 var xml = resource.asXml();14 var list = xml.xpath("root()/*:LuggageTags/*:Item");15 var i;16 for (i = 0; i < list.length; i++) {17 var jsonnode = {};18 var node = list.get(i);19 jsonnode.name = eltValue(node, "Name");20 jsonnode.address = eltValue(node, "Address");21 jsonnode.phone = eltValue(node, "Phone");22 data.push(jsonnode);23 }24 return data;25 }26 return null;27 }28
29 function createReport(env, xml, records) {30 var template = env.getAuxiliaryResource("template");
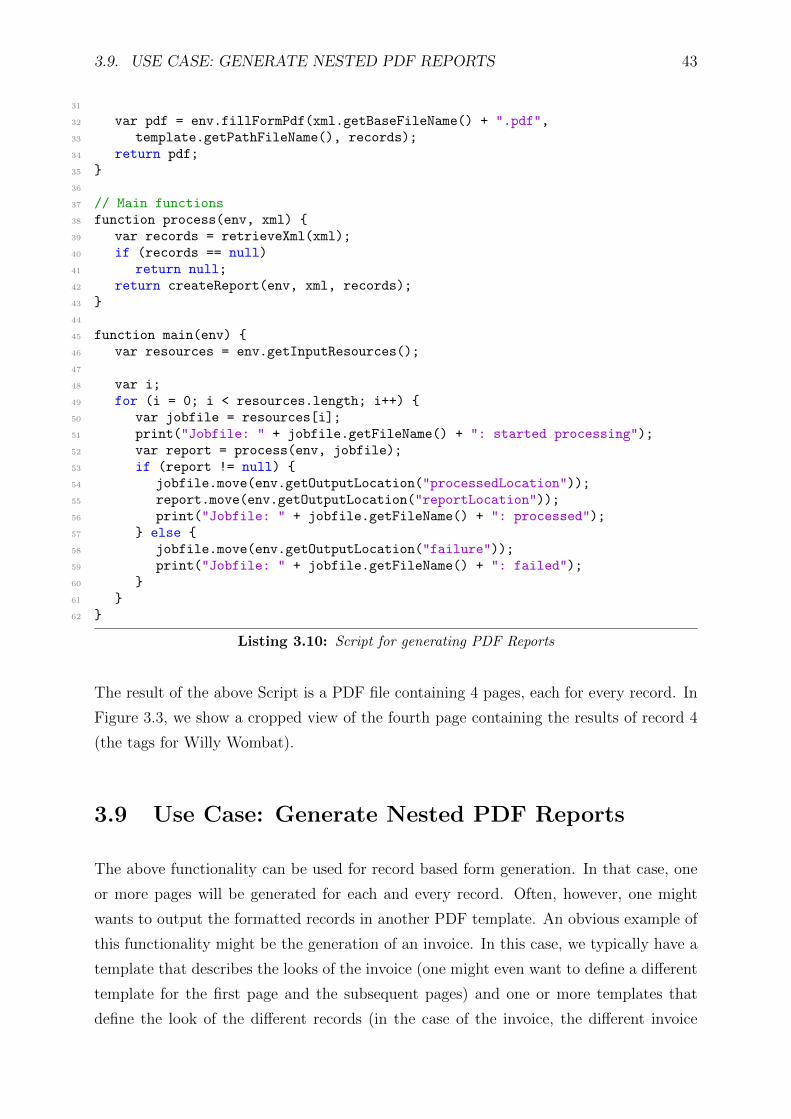
3.9. USE CASE: GENERATE NESTED PDF REPORTS 43
31
32 var pdf = env.fillFormPdf(xml.getBaseFileName() + ".pdf",33 template.getPathFileName(), records);34 return pdf;35 }36
37 // Main functions38 function process(env, xml) {39 var records = retrieveXml(xml);40 if (records == null)41 return null;42 return createReport(env, xml, records);43 }44
45 function main(env) {46 var resources = env.getInputResources();47
48 var i;49 for (i = 0; i < resources.length; i++) {50 var jobfile = resources[i];51 print("Jobfile: " + jobfile.getFileName() + ": started processing");52 var report = process(env, jobfile);53 if (report != null) {54 jobfile.move(env.getOutputLocation("processedLocation"));55 report.move(env.getOutputLocation("reportLocation"));56 print("Jobfile: " + jobfile.getFileName() + ": processed");57 } else {58 jobfile.move(env.getOutputLocation("failure"));59 print("Jobfile: " + jobfile.getFileName() + ": failed");60 }61 }62 }
Listing 3.10: Script for generating PDF Reports
The result of the above Script is a PDF file containing 4 pages, each for every record. In
Figure 3.3, we show a cropped view of the fourth page containing the results of record 4
(the tags for Willy Wombat).
3.9 Use Case: Generate Nested PDF Reports
The above functionality can be used for record based form generation. In that case, one
or more pages will be generated for each and every record. Often, however, one might
wants to output the formatted records in another PDF template. An obvious example of
this functionality might be the generation of an invoice. In this case, we typically have a
template that describes the looks of the invoice (one might even want to define a different
template for the first page and the subsequent pages) and one or more templates that
define the look of the different records (in the case of the invoice, the different invoice

44 CHAPTER 3. CREATING/UPDATING RESOURCES
Figure 3.3: A sample (cropped) view of the result (record 4)
lines).
In order to implement this functionality, we have to call the method fillNestedFormPdf
of the Script environment with the following parameters:
1. filename: the name of the PDF file to be generated
2. headerTemplateNameFirst: the filename of the PDF template for the first page
3. headerTemplateNameNext: the filename of the PDF template to be used for the
subsequent pages
4. headerData: a JSON dictionary that contains the form fields to be filled in the
headerTemplates
5. formTemplateName: a PDF file that contains a number of pages that each contain
a form template for a specific record type
6. formData: a list of JSON dictionaries which contain the form fields for each of the
records. A field with the name ”template” must be defined in each record that will
contain the page number of the form template to be used (the page number must
be passed as a string and the first page in the formTemplate file corresponds with
”1”). The names of the other dictionary entries must match with the names of the
form fields defined on the associated page in the form template file.
In order to define where the records will be put, the header template files must each
contain a form field with the name ”box”. Within these boxes, the records will be added
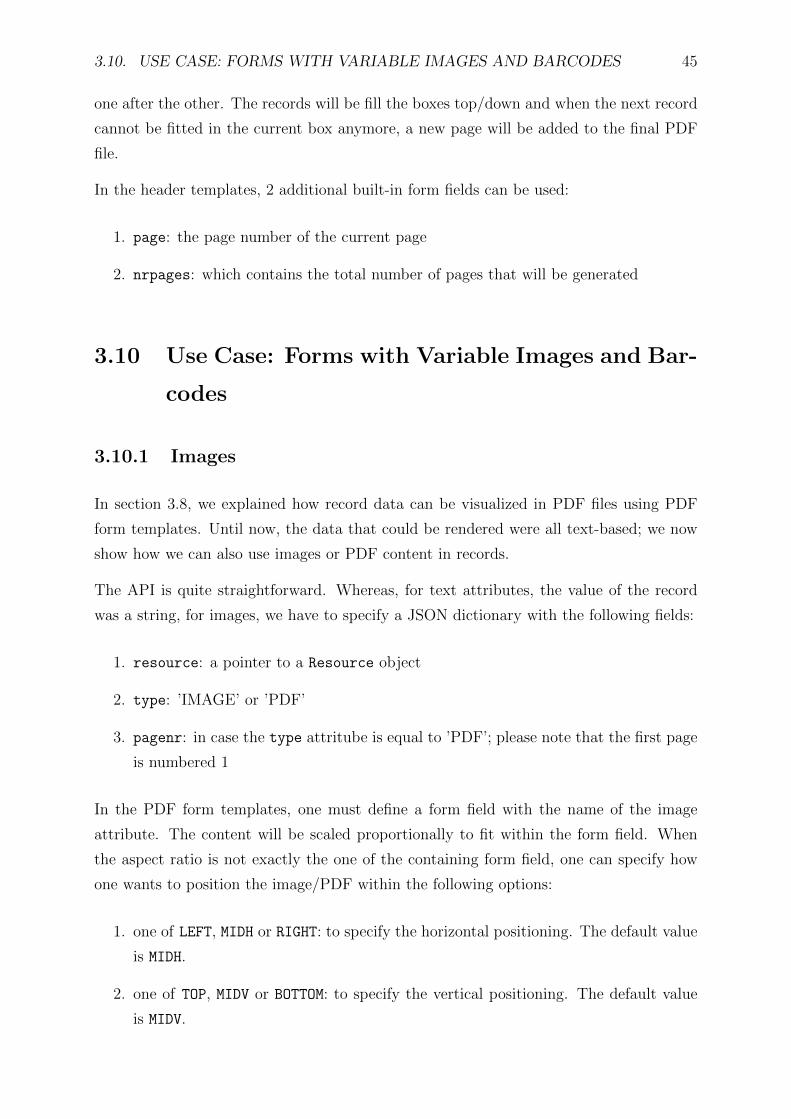
3.10. USE CASE: FORMS WITH VARIABLE IMAGES AND BARCODES 45
one after the other. The records will be fill the boxes top/down and when the next record
cannot be fitted in the current box anymore, a new page will be added to the final PDF
file.
In the header templates, 2 additional built-in form fields can be used:
1. page: the page number of the current page
2. nrpages: which contains the total number of pages that will be generated
3.10 Use Case: Forms with Variable Images and Bar-
codes
3.10.1 Images
In section 3.8, we explained how record data can be visualized in PDF files using PDF
form templates. Until now, the data that could be rendered were all text-based; we now
show how we can also use images or PDF content in records.
The API is quite straightforward. Whereas, for text attributes, the value of the record
was a string, for images, we have to specify a JSON dictionary with the following fields:
1. resource: a pointer to a Resource object
2. type: ’IMAGE’ or ’PDF’
3. pagenr: in case the type attritube is equal to ’PDF’; please note that the first page
is numbered 1
In the PDF form templates, one must define a form field with the name of the image
attribute. The content will be scaled proportionally to fit within the form field. When
the aspect ratio is not exactly the one of the containing form field, one can specify how
one wants to position the image/PDF within the following options:
1. one of LEFT, MIDH or RIGHT: to specify the horizontal positioning. The default value
is MIDH.
2. one of TOP, MIDV or BOTTOM: to specify the vertical positioning. The default value
is MIDV.
46 CHAPTER 3. CREATING/UPDATING RESOURCES
In case the content resource is a page of a PDF file, one can also specify what area of the
PDF file will be shown by specifying one of the PDF boxes (the region outside the box
will be clipped):
1. CROP (default value)
2. MEDIA
3. BLEED
4. TRIM
The options are part of the name field of the form field and or specified after the base
name (separated with a colon). For a PDF-based form field with name ’animal’ of which
only the trim box should be visualized in the center (both horizontally and vertically),
the name would be: ’animal:MIDH:MIDV:TRIM’.
Images and PDF content can be stacked on top of each other. In order to know the order
in which images should be drawn, we introduced the level concept. The level must be an
integer (and can be negative). The image form fields with the lowest level, will be drawn
first. The level is specified as an integer. In the above animal example, is one would like to
assign level 5 to the form field, the name would become: ’animal:MIDH:MIDV:TRIM:5’.
Note that the order of the options is arbitrary. Also note that the images fields will always
be put on top of the original content and the text fields.
3.10.2 Barcodes
For barcodes, the JSON dictionary looks as follows:
1. type: ’BARCODE’
2. subtype: one of ’QRCODE’, ’EAN-8’, ’EAN-13’, ’UPC-A’, ’UPC-E’
3. text: the content to be encoded in the bar code. The required text can depend on
the subtype. For ’EAN-8’ the text should consist out of 8 digits; for ’EAN-13’, it
should consist out of 13 digits. For ’UPC-A’ the text should consist out of 12 digits;
for ’UPC-E’, it should consist out of 6 digits.
The QR codes will be default by in black and produce a white background. The traditional
barcodes (line patterns) will be printed in black and have a transparent background. It
3.10. USE CASE: FORMS WITH VARIABLE IMAGES AND BARCODES 47
is possible to alter this behavior by specifying custom colors. These have to be passed as
a string in hexadecimal format, e.g., ’#ff00ff’ (magenta).
For QR codes you can specify:
1. color: color for the squares in the QR code
2. bgcolor: color for the background
For the traditional barcodes you can specify:
1. color: color for the lines
2. textcolor: color of the encoded content (text)
Depending on the subtype of the bar code, additional
elds are supported:
1. subtype: ’QRCODE’
(a) charset: one of the problems with QR codes is that the encoding of the text is
not specified by the standard. This parameter allows to specify the encoding.
It should be one of ’Shift JIS’, ’Cp437’, ’ISO-8859-1’, ’ISO-8859-16’. When not
specified, the default is ’ISO-8859-1’
2. subtype: ’EAN-8’, ’EAN-13’, ’UPC-A’, ’UPC-E’
(a) suppltype: one of ’SUPP2’, ’SUPP5’. When de
ned, this will add a supplementary small barcode next to the main barcode.
(b) suppltext: the supplementary barcode text. For ’SUPP2’, this text should
consist out of 2 digits; for ’SUPP5’, it should consist out of 5 digits.
3.10.3 Example
Listing 3.11 shows how the above luggage tag generation script (Listing 3.10) can be
extended to support variable images.
48 CHAPTER 3. CREATING/UPDATING RESOURCES
1 // Parsing of XML file2 function eltValue(node, eltname) {3 var elt = node.getElement(eltname);4 if (elt == null)5 return null;6 else7 return elt.getValue();8 }9
10 function eltImageValue(env, node, eltname) {11 var imagename = eltValue(node, eltname);12 if (imagename == null)13 return null;14 var filename = "./looneytunes/" + imagename;15 var location = env.getOutputLocation("ImageLocation");16 var folder = location.asFolder();17 var resource = folder.getResource(filename);18 if (resource.exists() && resource.isImage()) {19 var result = {};20 result.resource = resource;21 result.type = "IMAGE";22 return result;23 } else24 return null;25 }26
27 function retrieveXml(env, resource) {28 var data = [];29 if (resource.isXml()) {30 var xml = resource.asXml();31 var list = xml.xpath("root()/*:LuggageTags/*:Item");32 var i;33 for (i = 0; i < list.length; i++) {34 var jsonnode = {};35 var node = list.get(i);36 jsonnode.name = eltValue(node, "Name");37 jsonnode.address = eltValue(node, "Address");38 jsonnode.phone = eltValue(node, "Phone");39 jsonnode.image = eltImageValue(env, node, "Image");40 data.push(jsonnode);41 }42 return data;43 }44 return null;45 }46
47 function createReport(env, xml, records) {48 var template = env.getAuxiliaryResource("template");49
50 var pdf = env.fillFormPdf(xml.getBaseFileName() + ".pdf",51 template.getPathFileName(), records);52 return pdf;53 }54
55 // Main functions
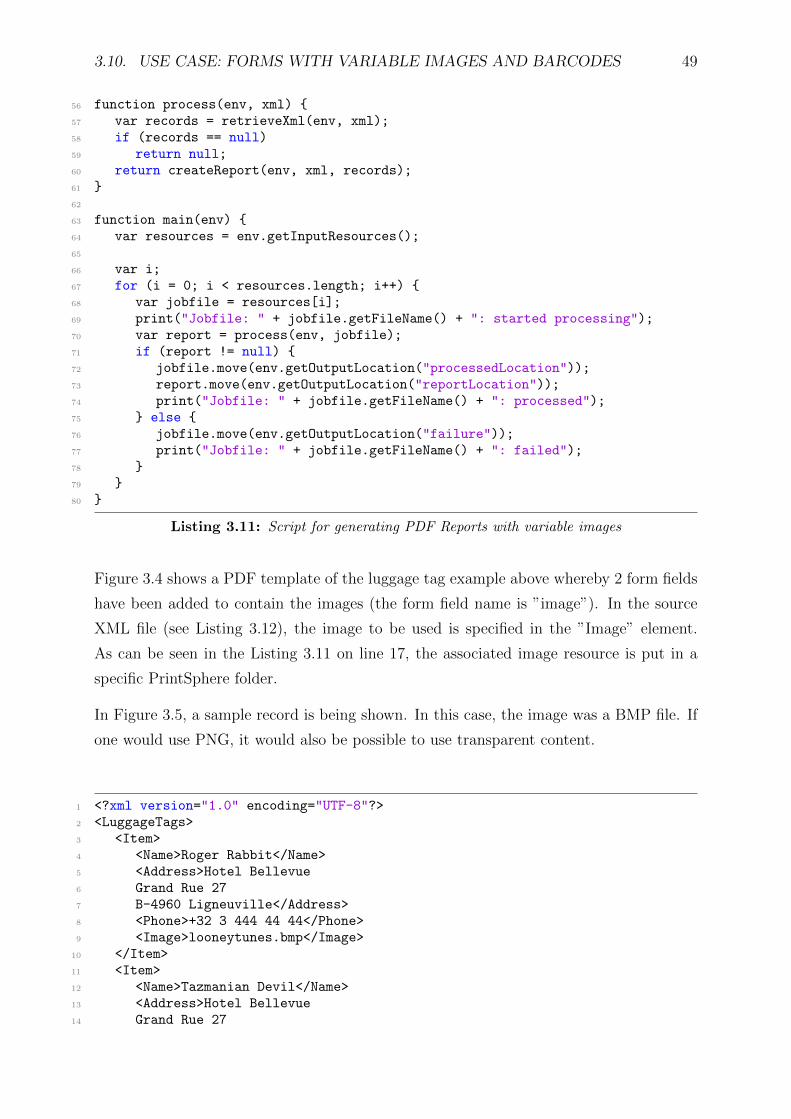
3.10. USE CASE: FORMS WITH VARIABLE IMAGES AND BARCODES 49
56 function process(env, xml) {57 var records = retrieveXml(env, xml);58 if (records == null)59 return null;60 return createReport(env, xml, records);61 }62
63 function main(env) {64 var resources = env.getInputResources();65
66 var i;67 for (i = 0; i < resources.length; i++) {68 var jobfile = resources[i];69 print("Jobfile: " + jobfile.getFileName() + ": started processing");70 var report = process(env, jobfile);71 if (report != null) {72 jobfile.move(env.getOutputLocation("processedLocation"));73 report.move(env.getOutputLocation("reportLocation"));74 print("Jobfile: " + jobfile.getFileName() + ": processed");75 } else {76 jobfile.move(env.getOutputLocation("failure"));77 print("Jobfile: " + jobfile.getFileName() + ": failed");78 }79 }80 }
Listing 3.11: Script for generating PDF Reports with variable images
Figure 3.4 shows a PDF template of the luggage tag example above whereby 2 form fields
have been added to contain the images (the form field name is ”image”). In the source
XML file (see Listing 3.12), the image to be used is specified in the ”Image” element.
As can be seen in the Listing 3.11 on line 17, the associated image resource is put in a
specific PrintSphere folder.
In Figure 3.5, a sample record is being shown. In this case, the image was a BMP file. If
one would use PNG, it would also be possible to use transparent content.
1 <?xml version="1.0" encoding="UTF-8"?>2 <LuggageTags>3 <Item>4 <Name>Roger Rabbit</Name>5 <Address>Hotel Bellevue6 Grand Rue 277 B-4960 Ligneuville</Address>8 <Phone>+32 3 444 44 44</Phone>9 <Image>looneytunes.bmp</Image>
10 </Item>11 <Item>12 <Name>Tazmanian Devil</Name>13 <Address>Hotel Bellevue14 Grand Rue 27
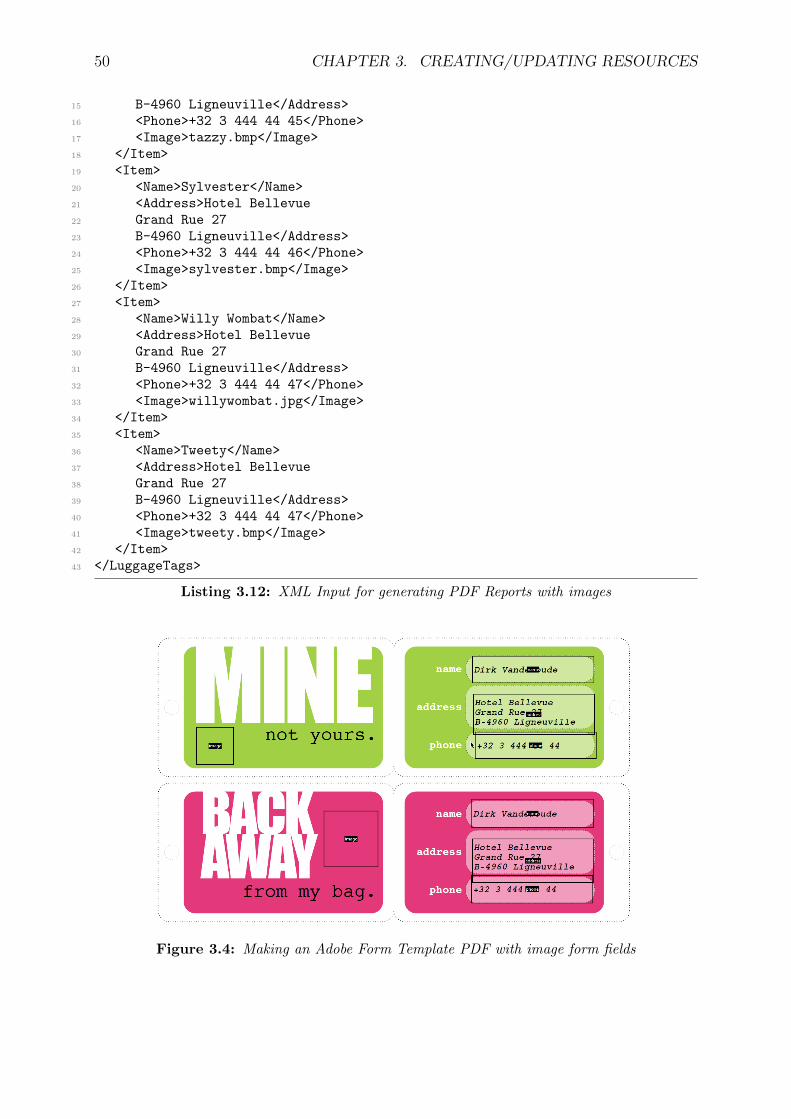
50 CHAPTER 3. CREATING/UPDATING RESOURCES
15 B-4960 Ligneuville</Address>16 <Phone>+32 3 444 44 45</Phone>17 <Image>tazzy.bmp</Image>18 </Item>19 <Item>20 <Name>Sylvester</Name>21 <Address>Hotel Bellevue22 Grand Rue 2723 B-4960 Ligneuville</Address>24 <Phone>+32 3 444 44 46</Phone>25 <Image>sylvester.bmp</Image>26 </Item>27 <Item>28 <Name>Willy Wombat</Name>29 <Address>Hotel Bellevue30 Grand Rue 2731 B-4960 Ligneuville</Address>32 <Phone>+32 3 444 44 47</Phone>33 <Image>willywombat.jpg</Image>34 </Item>35 <Item>36 <Name>Tweety</Name>37 <Address>Hotel Bellevue38 Grand Rue 2739 B-4960 Ligneuville</Address>40 <Phone>+32 3 444 44 47</Phone>41 <Image>tweety.bmp</Image>42 </Item>43 </LuggageTags>
Listing 3.12: XML Input for generating PDF Reports with images
Figure 3.4: Making an Adobe Form Template PDF with image form fields
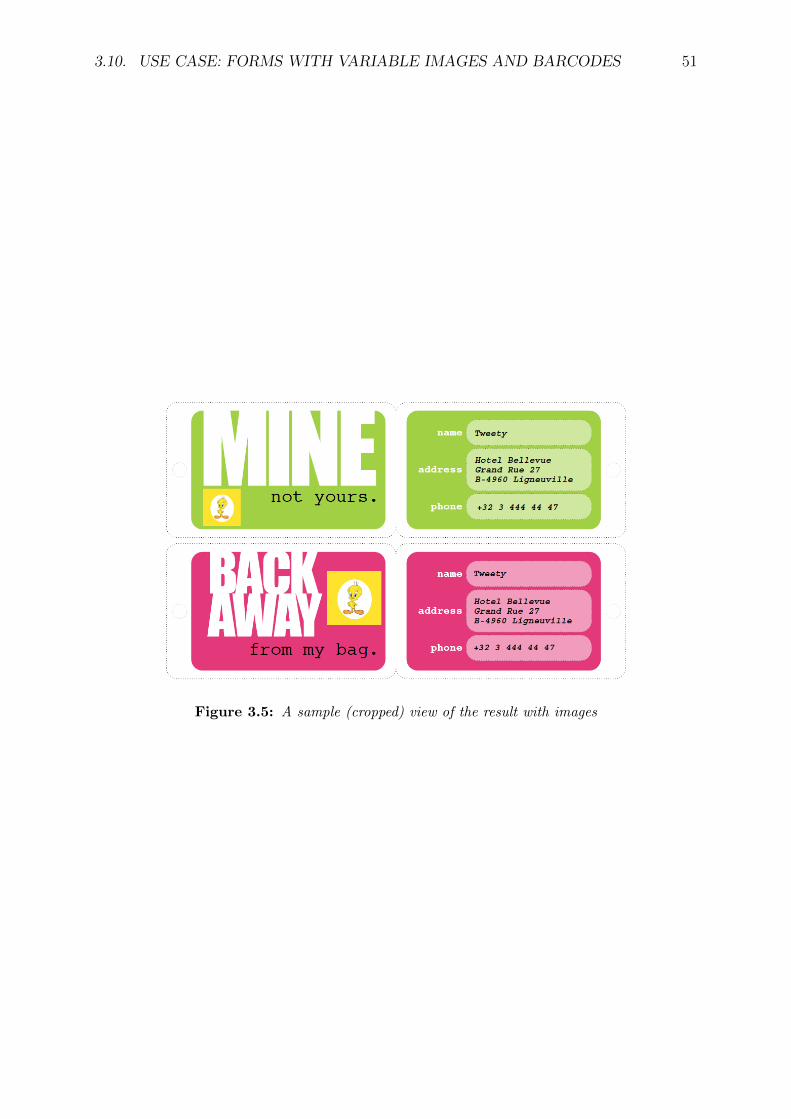
3.10. USE CASE: FORMS WITH VARIABLE IMAGES AND BARCODES 51
Figure 3.5: A sample (cropped) view of the result with images

52 CHAPTER 3. CREATING/UPDATING RESOURCES
Chapter 4
Apogee StoreFront Use Cases
4.1 Use Case: Reroute StoreFront Prepress Packages
Apogee StoreFront is an online service that enables printing organizations to setup their
own Web2Print shops. Orders that are placed with these shops typically consist of items
to be printed (and possibly other non-print items). For each order item, the system will
generate a prepress job that will be processed by the prepress system of the printing
organization.
When connected to the Apogee Prepress system, Apogee StoreFront will typically generate
so-called MJD file which, essentially, is a MIME package consisting of a JDF file and a
PDF file. In case of non-print items, the system will generate plain JDF files.
By default, these job orders will be downloaded automatically from the Apogee StoreFront
Service by the Apogee Prepress System. It is, however, also possible to export the job
orders to a PrintSphere volume. This opens the possibility to send the job orders to other
prepress systems, also forward the job orders to MIS systems or manipulate/change the
job orders before they are forwarded to either prepress or MIS systems.
In the Script we are now going to develop, we will analyze the generate job orders and to
treat them differently based on the type of job order. In order to do this, we will have to
unpack the MJD files and analyze the associated JDF job tickets.
1 function findResource(list, filetype) {2 var i;
53
54 CHAPTER 4. APOGEE STOREFRONT USE CASES
3 for (i = 0; i < list.length; i++) {4 var type = list[i].getFileType();5 if (type == filetype)6 return list[i];7 }8 return null;9 }
10
11 function findgenid(list, key) {12 var i;13 for (i = 0; i < list.length; i++) {14 if (list[i].getAttributeValue("IDUsage") == key) {15 return list[i].getAttributeValue("IDValue");16 }17 }18 return null;19 }20
21 function mailGadgetSupplier(env, store, jdfresource) {22 print("Mailing the gadget supplier " + vars.gadgetSupplierEMail);23
24 var mailService = env.getMailService();25 var message = mailService.newMessage();26
27 message.setFrom(vars.printerEMail);28 message.setTo([vars.gadgetSupplierEMail]);29 // message.setCc([ "[email protected]" ]);30 // message.setBcc([ "[email protected]" ]);31
32 message.setSubject("Order from " + vars.printerName + " via " + store);33
34 message.setBody("Dear supplier,\n\nPlease carry out the accompanying order.The details can be found in the attachment.\n\nWith kind regards,\n\n" +vars.printerName + "\n");
35
36 message.addAttachment(jdfresource, jdfresource.getFileName());37
38 if (!mailService.send(message))39 print("Mail sending failed");40 }41
42 function informPrinterAdministrator(env, store, jdfresource) {43 // Via IFTTT44
45 print("Informing Printer Administrator " + jdfresource.getFileName());46 var url = vars.iftttURLPrinterAdministrator;47 var value1 = store;48 var value2 = "A non-print product has been ordered on " + value1 + ".<br>A
mail has been sent to your gadget supplier to fulfill the order.";49 var value3 = jdfresource.getShareURL(); // + "/download?nodisposition=1";50
51 var httpSession = env.newHttpSession();52
53 var httpCommand = httpSession.newCommand("GET", url, null);54 httpCommand.setAttrNameValue("value1", value1);55 httpCommand.setAttrNameValue("value2", value2);

4.1. USE CASE: REROUTE STOREFRONT PREPRESS PACKAGES 55
56 httpCommand.setAttrNameValue("value3", value3);57
58 var httpResult = httpSession.executeCommand(httpCommand);59 print("Result: " + httpResult.getResult());60 }61
62 function analyzeJDF(env, jdfresource, pdfresource) {63 var xmldoc = jdfresource.asXml();64
65 var jdfnodes = xmldoc.getElementsByTagName("JDF");66 if ((jdfnodes == null) || (jdfnodes.length < 1))67 return false;68 var rootnode = jdfnodes[0];69 var idlist = rootnode.getElementsByTagName("GeneralID");70
71 var type = findgenid(idlist, "StoreFrontOrderItemType");72 var itemid = findgenid(idlist, "StoreFrontOrderIDItem");73 var agfatemplate = rootnode.getAttributeValue("agfa:TicketTemplateName");74 var store = findgenid(idlist, "StoreFrontStoreName");75
76 if (type == "NON_PRINTED") {77 print("==> Non Printed Product");78 var jdfcopy = jdfresource.copy(env.getOutputLocation("gadgetLocation"));79 mailGadgetSupplier(env, store, jdfresource);80 informPrinterAdministrator(env, store, jdfcopy);81 } else {82 print("==> " + type);83 if (agfatemplate == vars.posterTicketTemplateName) {84 // Send the individual files to the poster workflow system85
86 jdfresource.move(env.getOutputLocation("posterLocation"));87 if (pdfresource != null)88 pdfresource.move(env.getOutputLocation("posterLocation"));89 } else {90 // Send the MJD to Prepress91
92 var newlist = [jdfresource];93 if (pdfresource != null)94 newlist.push(pdfresource);95 var mjdresource = env.newMJDFile(newlist, itemid + ".mjd");96 mjdresource.move(env.getOutputLocation("prepressLocation"));97 }98 }99 }
100
101 function processFile(env, resource) {102 var jdfresource = null;103 var pdfresource = null;104
105 var fileType = resource.getFileType();106
107 if (fileType == ’XML’)108 jdfresource = resource.copy(resource.getFileName());109 else if (fileType === ’MJD’) {110 var list = env.extractMJDFile(resource);111 if (list != null) {

56 CHAPTER 4. APOGEE STOREFRONT USE CASES
112 jdfresource = findResource(list, ’XML’);113 pdfresource = findResource(list, ’PDF’);114 }115 } else if (fileType == ’ZIP’) {116 var list = env.extractZipFile(resource);117 var mjdresource = null;118 if (list != null) {119 jdfresource = findResource(list, ’XML’);120 pdfresource = findResource(list, ’PDF’);121 mjdresource = findResource(list, ’MJD’);122 }123 if (mjdresource != null) {124 var list2 = env.extractMJDFile(mjdresource);125 jdfresource = findResource(list2, ’XML’);126 pdfresource = findResource(list2, ’PDF’);127 }128 } else {129 print(resource.getFileName() + ": not a prepress job file");130 }131
132 if (jdfresource != null)133 analyzeJDF(env, jdfresource, pdfresource);134
135 resource.release();136 }137
138 function main(env) {139 var res = env.getInputResources();140
141 for (i = 0; i < res.length; i++) {142 processFile(env, res[i]);143 }144
145 return 0;146 }147
148 var vars = {149 "posterTicketTemplateName": "PostersAndSigns",150 "gadgetSupplierEMail": "[email protected]",151 "printerEMail": "[email protected]",152 "printerName": "Flandria Printing",153 "iftttURLPrinterAdministrator":
"https://maker.ifttt.com/trigger/printsphere_trigger/with/key/..."154 };
Listing 4.1: Rerouting StoreFront Prepress Jobs
4.1.1 Detailed Requirements
When preprocessing the Prepress jobs that have been generated by Apogee StoreFront,
the following routing must be realized:
4.1. USE CASE: REROUTE STOREFRONT PREPRESS PACKAGES 57
1. For the non-print order items, a mail must be sent to the person that will carry
out the fulfillment (this person is referred to in the Script as the GadgetSuppier).
In this case, the Printer Administrator must also be informed via an App of the
IFTTT Service. This App can be triggered by a specific URL.
2. In case the order item is a poster (we assume that these products have a dedi-
cated Prepress TicketTemplate name), the PDF file should be sent to a specific
PrintSphere folder (that will be mapped to another workflow system).
3. All the other jobs will be processed by Apogee Press. The associated job file (MJD)
should, in this case, be moved to a specific PrintSphere folder (that will be mapped
to an input folder of the Prepress system).
4.1.2 Structure of the Script
In lines 148-154, the vars variable has been declared. This variable is a JSON object with
several fields that are treated as Script parameters. In SphereCenter, these fields can be
specified by a non-technical user in the GUI for activating a Script.
The main processing loop can be found in lines 138-146. There, a function processFile
is called that does the main work. The goal of this function is to identify both the JDF
and PDF files (if applicable). In case the input file is an MJD file, the JDF and PDF
files will be extracted from the MJD archive. The same is done in case the input file is
a ZIP file. In case the MJD file itself is zipped, we first retrieve the MJD file from the
ZIP file and then extract the JDF/PDF files from the MJD file. In case of a plain JDF
submission (which typically happens in case of a non-print order item), the JDF file is
put aside.
Then the function analyzeJDF is called in which the further processing will be done. In
line 63, the JDF file is converted to an XmlDoc and a number of parameters are retrieved
from the JDF file that will allow the identification of the job. A number of StoreFront-
specific parameters are stored in the JDF in the so-called GeneralID elements with the
IDUsage/IDValue attributes; in line 11, a convenience function findgenid has been im-
plemented that retrieves these parameters. The TicketTemplate name, on the other hand,
is retrieved on line 73 (and stored in the proprietary agfa:TicketTemplateName attribute
on JDF root level.
If the StoreFront item type is ”NON PRINTED” (line 76), we copy the JDF file to the
PrintSphere location with label ”gadgetLocation”. As pointed out before, we also mail
58 CHAPTER 4. APOGEE STOREFRONT USE CASES
the GadgetSupplier and inform the Printer Administrator using the mailGadgetSupplier
and informPrinterAdministrator functions.
If the ticket template name has the value ”PostersAndSigns” (this value is stored in the
vars variable as vars.posterTicketTemplateName), the PDF resource is moved to the
PrintSphere location with label ”posterLocation”.
In all other cases, an MJD file is created with the JDF and PDF files.
4.1.3 Sending a Mail
In line 21, we find the mailGadgetSupplier function. In order to send an e-mail with
PrintSphere AutoPilot, we first have to retrieve the default mailService (an instance of
the class MailService). We then (line 25) can create a new message using the newMessage
method and set the From, To, Subject and Body of the message using the appropriate
functions (see lines 27-34). On line 36, we then attach the JDF file (available as a resource)
as an attachment of the mail; the addAttachment method also expects a second parameter
that contains the name of the attachment (as it will be shown in the mail client).
Sending the message, at the end, can be done with the method send (line 38).
4.1.4 Connecting to an HTTP Service
In this use case, we have to inform the Printer Administrator by triggering an App of the
IFTTT Service (we use the IFTTT App called WebHooks). Trigger the App can be done
by executing a http GET call on a specific URL with several parameters called value1,
value2 and value3. The semantics of these parameters depends on the actual IFTTT
Script. In our example, they contain the StoreFront Store name, the body content of the
message and the Share URL of the JDF resource. Note that producing an anonymous
share URL on a PrintSphere resource is done with the method getShareURL (see line 49).
In order to issue an HTTP call, we first have to create an HTTP session (using the
newHttpSession method on the Environment, see line 51). Then, the specific HTTP
command can be created with the newCommand method. This method has 3 parameters:
the type of HTTP call (i.e., GET or POST), the URL and the name of the resulting
Resource. If the last parameter is null, the result will be available in memory as a String
with the getResult method. The URL parameters can be set with the setAttrNameValue
method (lines 54-56). The method executeCommand (method of the HttpSession object)
will then execute the HTTP command. The result can be, as already said, retrieved with
4.2. USE CASE: MANIPULATE STOREFRONT PREPRESS PACKAGES 59
the getResult method.
When the IFTTT App has been triggered, it will be executed with the passed parameters.
In our case, we connected the WebHooks App to the ”Send E-mail” IFTTT App to send
an e-mail based on the passed parameters. Note that it would also be possible to connect
with any other IFTTT App that would notify the Printer Administrator.
4.2 Use Case: Manipulate StoreFront Prepress Pack-
ages
When one has different workflow systems connected to the Apogee StoreFront account,
het system to be used will often be determined by the type of the order item. This
functionality has already been shown in the previous use case (see Section 4.1).
In case we would have to interface with a non-JDF compliant workflow, we might be
forced to create a non-standard job ticket using the information in the original JDF file.
The functionality to create XML, JSON or text files in PrintSphere AutoPilot could be
used to realize this.
Another typical use case might consist of interfacing with a third party MIS system. In
this case, the PrintSphere AutoPilot Script would analyze the incoming jobs and inform
the MIS (via, e.g., HTTP) on the created jobs. Afterwards, the PrintSphere AutoPilot
Script will then typically copy the incoming job tickets to the Prepress input folder.
TO DO: implement a sample Script to create a dedicated job ticket in XML

60 CHAPTER 4. APOGEE STOREFRONT USE CASES
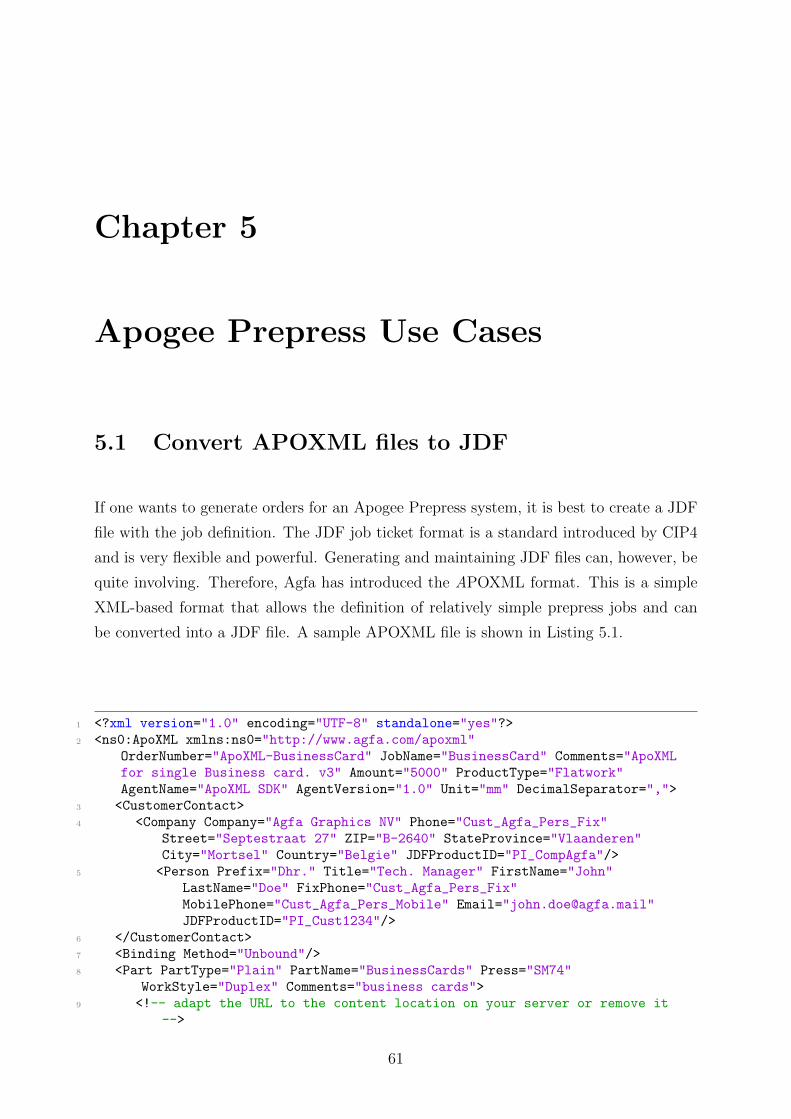
Chapter 5
Apogee Prepress Use Cases
5.1 Convert APOXML files to JDF
If one wants to generate orders for an Apogee Prepress system, it is best to create a JDF
file with the job definition. The JDF job ticket format is a standard introduced by CIP4
and is very flexible and powerful. Generating and maintaining JDF files can, however, be
quite involving. Therefore, Agfa has introduced the APOXML format. This is a simple
XML-based format that allows the definition of relatively simple prepress jobs and can
be converted into a JDF file. A sample APOXML file is shown in Listing 5.1.
1 <?xml version="1.0" encoding="UTF-8" standalone="yes"?>2 <ns0:ApoXML xmlns:ns0="http://www.agfa.com/apoxml"
OrderNumber="ApoXML-BusinessCard" JobName="BusinessCard" Comments="ApoXMLfor single Business card. v3" Amount="5000" ProductType="Flatwork"AgentName="ApoXML SDK" AgentVersion="1.0" Unit="mm" DecimalSeparator=",">
3 <CustomerContact>4 <Company Company="Agfa Graphics NV" Phone="Cust_Agfa_Pers_Fix"
Street="Septestraat 27" ZIP="B-2640" StateProvince="Vlaanderen"City="Mortsel" Country="Belgie" JDFProductID="PI_CompAgfa"/>
5 <Person Prefix="Dhr." Title="Tech. Manager" FirstName="John"LastName="Doe" FixPhone="Cust_Agfa_Pers_Fix"MobilePhone="Cust_Agfa_Pers_Mobile" Email="[email protected]"JDFProductID="PI_Cust1234"/>
6 </CustomerContact>7 <Binding Method="Unbound"/>8 <Part PartType="Plain" PartName="BusinessCards" Press="SM74"
WorkStyle="Duplex" Comments="business cards">9 <!-- adapt the URL to the content location on your server or remove it
-->
61

62 CHAPTER 5. APOGEE PREPRESS USE CASES
10 <Pages URL="file://be.local/.../Content/BusinessCardCMYK_DS.pdf"PageCount="2" PageWidth="85" PageHeight="55"/>
11 <Color NrColors="4"/>12 <PaperStock StockName="businesscardbrand" Weight="200" Grade="2"
Thickness="0,2" SheetWidth="707" SheetHeight="500"/>13 </Part>14 </ns0:ApoXML>
Listing 5.1: Sample APOXML file
PrintSphere AutoPilot has built-in support to convert APOXML files to the JDF for-
mat. In Listing 5.2, we show how this can be done. To this end, we use the method
apoXML2JDF on the Environment object (see line 5) that converts an XML resource into
a JDF Resource file. The first parameter to this method is the filename of the JDF
Resource that will be created and the second parameter is the XML Resource (Resource
object and not the XmlDoc). The method returns the generated Resource.
1 function processFile(env, resource) {2 print("Processing " + resource.getFileName());3 var xml = resource.asXml();4 if (xml) {5 var jdf = env.apoXML2JDF(resource.getBaseFileName() + ".jdf", resource);6
7 if (jdf != null) {8 jdf.move(env.getOutputLocation("success"));9 resource.release();
10 } else11 resource.move(env.getOutputLocation("failure"));12 } else13 resource.move(env.getOutputLocation("failure"));14 }15
16 function main(env) {17 var res = env.getInputResources();18
19 for (i = 0; i < res.length; i++) {20 processFile(env, res[i]);21 }22
23 return 0;24 }
Listing 5.2: Convert APOXML files to JDF
5.2. SUBMIT JOBS TO PREPRESS IN THE CLOUD 63
5.2 Submit Jobs to Prepress in the Cloud
5.2.1 General
We now write a Script that shows how a submitted PS/PDF file can be normalized in
Apogee Prepress and how, in addition, specific preflight actions can be executed. We
therefore use built-in PrintSphere AutoPilot functions that assume that a Prepress sys-
tems is available in the PrintSphere AutoPilot Cloud. On this Apogee Prepress system,
the same resources have been installed as those used in Apogee Bridge.
The required processing can be selected by choosing the right Ticket Template. In our
Script, this must be specified in vars.TicketTemplateName. Depending on the selected
Ticket Template, different processing will take place and different resources will be gen-
erated.
Apogee Bridge currently supports 3 different Ticket Templates:
1. ApogeeBridge Normalizer
2. ApogeeBridge Preflight
3. ApogeeBridge Render
4. In the future, Ticket Templates to access the InkSave and ContraVision functionality
will be added as well.
In Listing 5.3, you will find the Script that implements this functionality.
1 function initJobId(env) {2 var data = env.getScriptData();3 if (data == null) {4 print("data not initialized");5 data = new Map();6 env.setScriptData(data);7 }8 if (!data.containsKey("jobIdCounter"))9 data.jobIdCounter = vars.jobIdCounter;
10 }11
12 function newJobId(env) {13 var data = env.getScriptData();14 var newId = vars.jobIdPrefix + data.jobIdCounter;
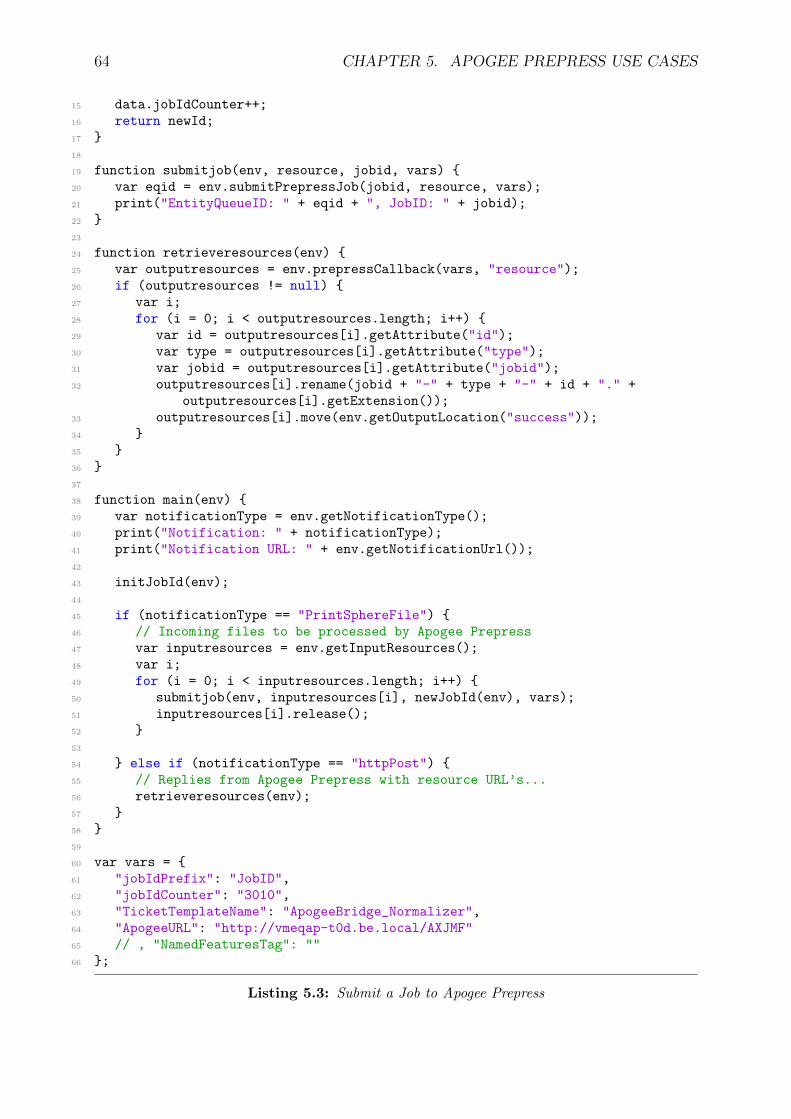
64 CHAPTER 5. APOGEE PREPRESS USE CASES
15 data.jobIdCounter++;16 return newId;17 }18
19 function submitjob(env, resource, jobid, vars) {20 var eqid = env.submitPrepressJob(jobid, resource, vars);21 print("EntityQueueID: " + eqid + ", JobID: " + jobid);22 }23
24 function retrieveresources(env) {25 var outputresources = env.prepressCallback(vars, "resource");26 if (outputresources != null) {27 var i;28 for (i = 0; i < outputresources.length; i++) {29 var id = outputresources[i].getAttribute("id");30 var type = outputresources[i].getAttribute("type");31 var jobid = outputresources[i].getAttribute("jobid");32 outputresources[i].rename(jobid + "-" + type + "-" + id + "." +
outputresources[i].getExtension());33 outputresources[i].move(env.getOutputLocation("success"));34 }35 }36 }37
38 function main(env) {39 var notificationType = env.getNotificationType();40 print("Notification: " + notificationType);41 print("Notification URL: " + env.getNotificationUrl());42
43 initJobId(env);44
45 if (notificationType == "PrintSphereFile") {46 // Incoming files to be processed by Apogee Prepress47 var inputresources = env.getInputResources();48 var i;49 for (i = 0; i < inputresources.length; i++) {50 submitjob(env, inputresources[i], newJobId(env), vars);51 inputresources[i].release();52 }53
54 } else if (notificationType == "httpPost") {55 // Replies from Apogee Prepress with resource URL’s...56 retrieveresources(env);57 }58 }59
60 var vars = {61 "jobIdPrefix": "JobID",62 "jobIdCounter": "3010",63 "TicketTemplateName": "ApogeeBridge_Normalizer",64 "ApogeeURL": "http://vmeqap-t0d.be.local/AXJMF"65 // , "NamedFeaturesTag": ""66 };
Listing 5.3: Submit a Job to Apogee Prepress
5.2. SUBMIT JOBS TO PREPRESS IN THE CLOUD 65
5.2.2 Setup of the Script and Main Function
As already indicated before, the vars variable contains a number of parameters that will
determine the behavior of the Script. The vars variable is a read-only JSON structure
that remains unchanged in successive runs of the Script. Each time an incoming PS/PDF
file arrives, we will create a new Prepress jobs with a unique JobID. Since we want to
base this JobID on a sequence number, we need to keep track of the calls we have already
executed. Therefore, we need a data context that can be updated and the updates of
which will be available during successive calls of the Script.
For each activated Script, PrintSphere AutoPilot has created such a data context. This
data context (which is a JSON structure) can be accessed via the getScriptData method
on the Environment object.
In the function initJobId, we will retrieve the data context and check whether the
sequence counter of the next Prepress job has already been set. If this is not the case,
this means the Script is running for the first time and we initialize the data.jobIdCounter
tot the initial value specified in vars.jobIdCounter.
Contrary to the other scripts we have described so far, we will also check in the main func-
tion what triggered the execution of the Script. It could be the arrival of a new incoming
PS/PDF file or it could be a trigger that is generated by the underlying Apogee Pre-
press system to inform us that a previous job has been completed and that the resources
are ready. The notification type can be retrieved by calling the getNotificationType
method of the Environment object. If the notification type is equal to ”PrintSphereFile”,
incoming files were the trigger. In our Script, we then call the function submitjob to
submit a job to the Prepress system.
If the notification type is equal to ”httpPost”, an HTTP POST call to the Script’s noti-
fication URL has been the trigger. In our case, the underlying Apogee Prepress system
informed the Script a specific task has been completed and that the resources are ready
to be downloaded. In that case, we will call the retrieveresources function.
5.2.3 Submitting the Job
In the function newJobId, we first will calculate the JobID we will use (which will be based
on the data.jobIdCounter. We then increment the data.jobIdCounter and return the
calculated JobID.
66 CHAPTER 5. APOGEE PREPRESS USE CASES
To submit a job to Prepress, we use the built-in submitPrepressJob method of the
Environment object. This function has three parameters:
1. jobid: the JobId we will give to the newly created Prepress job
2. resource: the submitted resource (typically a PS/PDF file)
3. vars: a JSON structure that contains a number of important variables (such as the
TicketTemplateName and optionally the NamedFeatureTag)
This method submits the job to the Prepress system (via JMF) and returns immediately.
The Prepress system will notify the PrintSphere AutoPilot server later on the progress of
the submitted job. The call to submitPrepressJob will return a JMF ID (known as the
QueueEntryID); this ID will be available in the callback of the Prepress system and will
allow to relate the created job to future responses.
5.2.4 Retrieving the Resources
When the Prepress system informed us that the job has been finished, we can call the built-
in prepressCallback function of the Environment to retrieve the generated resources.
This method will return a list of generated resources (of type Resource). These resources
will have certain metadata that will allow to identify what they really are. For the details,
we refer to the source example. The metadata can be retrieved using the getAttribute
method on the Resource objects.
5.3 Distribute Resources generated by Prepress
5.3.1 General
We now develop a Script that can notify users that specific Resources have been generated
by a Prepress job and share these Resources by PrintSphere. Although this Script can
be used in non-Prepress environments as well, we include it in this chapter because it
shows how PrintSphere AutoPilot can complement Apogee Prepress to realize further
automation.
The idea is that, in Prepress, Resources (typically PDF files or rendered images) gen-
erated by a specific job are exported at a specific location that is synchronized with

5.3. DISTRIBUTE RESOURCES GENERATED BY PREPRESS 67
the PrintSphere server. This synchronization will typically be realized by a PrintSphere
stand-alone client (available on PC and Mac). The Script expects that the Resources are
put in folders of which the name maps to the e-mail address of a specific person. When
resources are dropped in such a folder, the Script will pick-up these resources and move
them to an output location (that reflects the same structure as the input folder). The
first time a Resource is created for a specific user, a mail will be sent to this user that
contains a PrintSphere Share URL of this user’s folder.
5.3.2 The Script
1 function mustSendEmail(env, email) {2 var data = env.getScriptData();3 if (data == null) {4 data = new Map();5 env.setScriptData(data);6 }7
8 if (data[email]) {9 data[email] = data[email] + 1;
10 return false;11 } else {12 data[email] = 1;13 return true;14 }15 }16
17 function sendEmail(env, addressee, location) {18 print("Sending email to " + addressee);19
20 var mailService = env.getMailService();21 var mailMessage = mailService.newMessage();22 mailMessage.setFrom(vars.mailSender);23 mailMessage.setTo([addressee]);24 mailMessage.setSubject(vars.mailSubject);25 mailMessage.setBody(vars.mailBody + getShareURL(env, addressee, location));26 mailService.send(mailMessage);27 }28
29 function getChild(folder, resourcename) {30 var children = folder.getChildren();31 var i;32 for (i = 0; i < children.length; i++) {33 if (children[i].getFileName() == resourcename)34 return children[i];35 }36 return null;37 }38
39 function getShareURL(env, emailaddress, location) {40 var parent = location.asFolder();
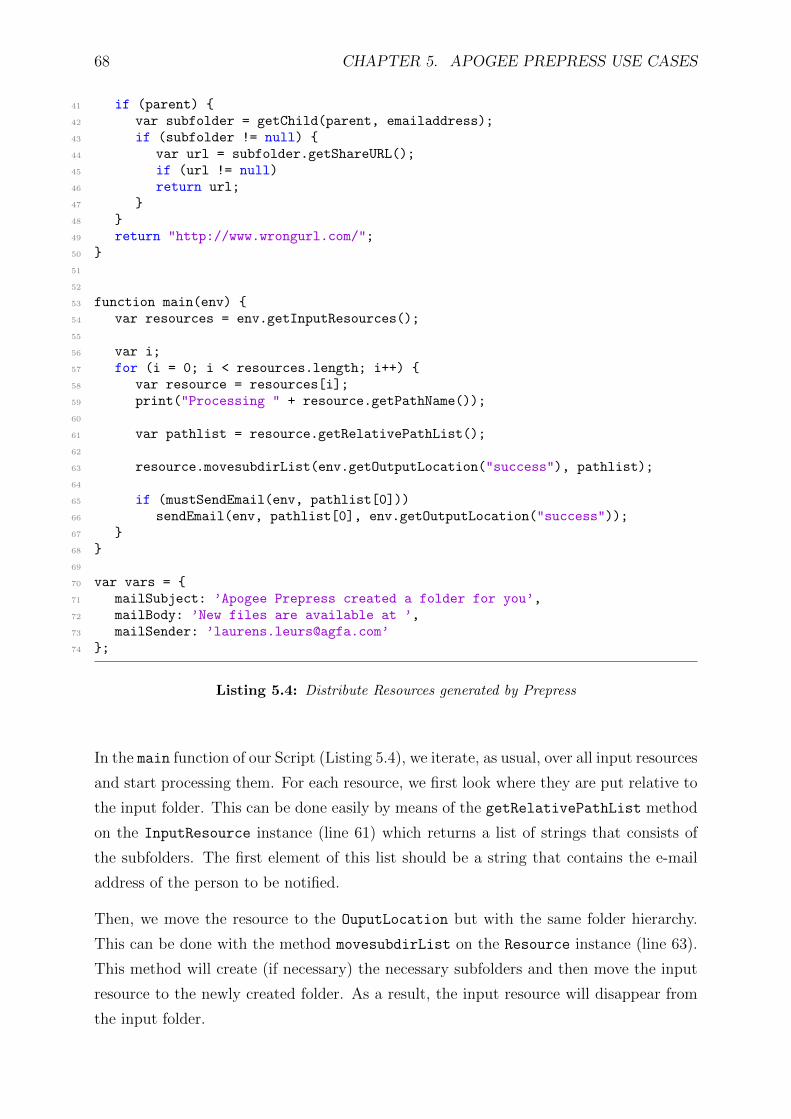
68 CHAPTER 5. APOGEE PREPRESS USE CASES
41 if (parent) {42 var subfolder = getChild(parent, emailaddress);43 if (subfolder != null) {44 var url = subfolder.getShareURL();45 if (url != null)46 return url;47 }48 }49 return "http://www.wrongurl.com/";50 }51
52
53 function main(env) {54 var resources = env.getInputResources();55
56 var i;57 for (i = 0; i < resources.length; i++) {58 var resource = resources[i];59 print("Processing " + resource.getPathName());60
61 var pathlist = resource.getRelativePathList();62
63 resource.movesubdirList(env.getOutputLocation("success"), pathlist);64
65 if (mustSendEmail(env, pathlist[0]))66 sendEmail(env, pathlist[0], env.getOutputLocation("success"));67 }68 }69
70 var vars = {71 mailSubject: ’Apogee Prepress created a folder for you’,72 mailBody: ’New files are available at ’,73 mailSender: ’[email protected]’74 };
Listing 5.4: Distribute Resources generated by Prepress
In the main function of our Script (Listing 5.4), we iterate, as usual, over all input resources
and start processing them. For each resource, we first look where they are put relative to
the input folder. This can be done easily by means of the getRelativePathList method
on the InputResource instance (line 61) which returns a list of strings that consists of
the subfolders. The first element of this list should be a string that contains the e-mail
address of the person to be notified.
Then, we move the resource to the OuputLocation but with the same folder hierarchy.
This can be done with the method movesubdirList on the Resource instance (line 63).
This method will create (if necessary) the necessary subfolders and then move the input
resource to the newly created folder. As a result, the input resource will disappear from
the input folder.

5.3. DISTRIBUTE RESOURCES GENERATED BY PREPRESS 69
Then, on line 65, we call our own function mustSendEmail that checks whether we need
to send an e-mail to the person with this address. Such an element should only be sent if
this person has not yet received such an e-mail (in other words, when it is the first time
that a Resource appears in this person’s folder).
The function mustSendEmail is defined in line 1. In order for the Script to recall whether
a mail has already been sent to a specific user, we keep track of the number of messages
sent out to the different users by putting them in a JSON dictionary that survives between
different runs of the same Script. This data structure is put, exactly as how it is done in
the Script of Listing 2.3, in the Script data environment. Note that it is possible to clear
this data structure for a particular Script instance in the SphereCenter GUI by clicking
on the ’Reset Script Data’ item of the Tools menu (available under the cogwheel icon
of the ’Active Scripts’→’General’ screen). As a result of this action, all users will start
receiving one e-mail as soon as there appears a new resource in their folder. The logic of
this function is quite simple. If the data structure has not yet been set (which will always
be the case if the Script is first instantiated or whether the Script data have been reset),
it creates a map and puts in the Script data environment. For each e-mail address, we
will keep track of the number of resources that already have been processed by keeping
a dictionary item of which the key is the e-mail address and the value is an integer. If
an entry with this e-mail address is not yet available (which is checked in line 8), we will
add an entry with the value 1 in the dictionary and return true; in the other case (line
9), we will increase the value associated by the e-mail address by 1 and return false.
On line 66, we then send, if necessary, an e-mail to the person which contains a share URL
pointing to this person’s PrintSphere folder (under the OutputLocation) by calling our
own function sendEmail. In this function (line 17), we retrieve the MailService (method
on the Environment instance). Then, we create a new MailMessage instance by calling
the newMessage method on the MailService instance. we then set both the sender and
receiver’s e-mail address via the methods setFrom and setTo. On line 24, we set the mail
subject (in this Script, we assume that this subject is set as a Script parameter).
On line 25, we then set the body of the mail with the method setBody. This method
expects a string (containing the text lines of the mail body) as parameter. In our case,
this body text consists of a fixed string defined as Script parameter followed by the share
URL of the person’s resource folder. This share URL is built in the function getShareURL
on line 39. To calculate the share URL, we first retrieve the FolderResource instance
from the OutputLocation. This can be done by calling the method asFolder on the
OutputLocation instance. On line 42, we retrieve the subfolder of which the name is
equal to the person’s e-mail address (through the function getChild which is defined on

70 CHAPTER 5. APOGEE PREPRESS USE CASES
line 29). Once the ResourceFolder instance corresponding to this subfolder has been
retrieved, we call the method getShareURL to calculate a share URL from this subfolder.
On line 45, we then return the share URL.
In the function sendEmail, we now have set all relevant fields of the MailMessage instance
and can send out the mail by calling the send method on the MailService instance which
has the MailMessage instance as parameter.
5.3.3 Possible improvements
One way to proceed would be to define an additional dictionary level per job. In fact, our
Script already supports additional subfolder levels as it is right now. Of course, we will
have to let Prepress know where to put the resources (this can be done in the Prepress
Client by editing the settings of the job’s Export TP). We could set up Prepress such that
the name of the additional subfolder would correspond to the Prepress job’s name. The
Script could then be adapted to create a share URL for each job folder and to send out
a e-mail each time the first resource of a new job arrives.
Chapter 6
More Advanced Use Cases
Until now, most scripts have been triggered by incoming files. There can be cases, how-
ever, in which another triggering mechanism is needed. To tackle these situations, each
activated Script will have a unique HTTP URL associated with it. When this URL is
submitted to the PrintSphere AutoPilot server (with either GET or POST method), the
associated Script will be called. The caller can add attribute/value pairs to the URL
which will be accessible in the Script. It is also possible to upload data to the Script
environment if one submits a POST call with form data.
A first example where this alternate triggering can be useful is if an external system wants
to trigger a specific action. This can be an external server such as the IFTTT server that
calls a Script if certain conditions are met. Another use case where triggering a Script
with an URL will be useful is to interface with a web servers that provide asynchronous
feedback after a specific web service has been called. This type of servers will typically
acknowledge the call (with status 200) and will, later on, call you back with the results.
6.1 Triggering PrintSphere AutoPilot Scripts
As a first use case to trigger AutoPilot scripts with notification URL’s, we are considering
a system that sends an e-mail to a customer with a document in attachment that has to
be approved or rejected. In the e-mail, we embed 2 URL’s: an approve URL and a reject
URL. If the user clicks on either of these URL’s, the underlying Script will be triggered
with an approve or reject action.
It is important to realize that when the URL is called, the AutoPilot server will just
71

72 CHAPTER 6. MORE ADVANCED USE CASES
register the action. If there is a communication or encoding problem with the URL, it
will report an error. If not, the associated script will be scheduled to run. This will be
done at a later stage.
It is then up to the script to implement the logic that is expected.
In the current version, calling the notification URL will always result in a JSON reply. In
future versions, we consider to reply with HTML that can be displayed properly in the
browser and can be determined by the calling URL.
1 function replaceAll(source, dict) {2 if (dict == null)3 return source;4 for (var key in dict) {5 source = source.replace(new RegExp(’\\{\\$’ + key + ’\\}’, ’g’),
dict[key]);6 }7 return source;8 }9
10 function sendMessage(env, from, to, cc, subject, body, resource) {11 var mailService = env.getMailService();12 var message = mailService.newMessage();13 print("From: " + from);14 print("To: " + to[0]);15 print("Cc: " + cc[0]);16
17 if (from == null)18 return false;19 message.setFrom(from);20 if (to == null)21 return false;22
23 message.setTo(to);24
25 if ((cc != null) && (cc.length > 0))26 message.setCc(cc);27 message.setSubject(subject);28 if (body != null)29 message.setBodyHtml(body);30 if (resource != null)31 message.addAttachment(resource, resource.getFileName());32 return mailService.send(message);33 }34
35 function processFile(env, httpSession, resource) {36 print("Mailing " + resource.getFileName());37
38 var dict = {};39 dict.url = env.getNotificationUrl();40 dict.docname = resource.getFileName();41 dict.docid = encodeURI(’1234’); // hardcoded for now
6.1. TRIGGERING PRINTSPHERE AUTOPILOT SCRIPTS 73
42 dict.projectname = ’Test Project’;43
44 var subjecttemplate = "AutoPilot: approval of {$docname} (project:{$projectname})";
45 var subject = replaceAll(subjecttemplate, dict);46 var body = null;47
48 var templateresource = env.getAuxiliaryResource("template");49 if (templateresource != null) {50 var bodytemplate = templateresource.getText();51 if (bodytemplate != null) {52 body = replaceAll(bodytemplate, dict);53 }54 }55 sendMessage(env, "[email protected]", ["[email protected]"], [],
subject, body, resource);56 }57
58 function main(env) {59 var notificationType = env.getNotificationType();60 if (notificationType == "httpGet") {61 var map = env.getFormParameters();62 if (map == null) {63 return;64 }65 for (var entry in map) {;66 print(entry + " -> " + map[entry]);67 }68 } else {69 var res = env.getInputResources();70 var session = env.newHttpSession();71 mailService = env.getMailService();72
73 for (var i = 0; i < res.length; i++) {74 if (res[i].isPdf() || res[i].isImage()) {75 processFile(env, session, res[i]);76 } else {77 res[i].move(env.getOutputLocation("failure"));78 }79 res[i].release();80 }81 }82 return 0;83 }
Listing 6.1: Trigger AutoPilot Scripts from an e-mail
In the main routine of Listing 6.1 on line 58, we first check what triggered the running of
the Script. In case the script is triggered by a HTTP GET, we process the arguments of
the URL and print them out. It is here that that the logic must be put that is triggered
by clicking either APPROVE or REJECT in the example above. By analyzing the URL
parameters, we can see whether it was an APPROVE or REJECT and for what document.
74 CHAPTER 6. MORE ADVANCED USE CASES
In case the Script was triggered by an incoming file, we will send out a mail (with ap-
proval/reject links embedded) to the customer. Most of the time, additional processing
will take place before we submit the document for approval. To keep this example simple,
we mail the file directly (at least if it is a PDF file or image).
In the function on line 35, we will first generate the body of our e-mail. Since the body
can be quite complex, we chose to supply if as a text file in PrintSphere. This resource
will become accessible as an Auxiliary Resource (which is retrieved on line 48).
In Listing /refbodytemplate, we show the body template of the e-mail.
1 <!DOCTYPE HTML PUBLIC "-//W3C//DTD HTML 4.01 Transitional//EN""http://www.w3.org/TR/html4/loose.dtd">
2 <html lang="en">3 <head>4 </head>5 <body>6 <h1>Document Approval</h1>7 <h4>Project Name: {$projectname}</h4>8 <h4>Document Name: {$docname}</h4>9 <p>If you agree with the attached document, please click
10 <a href="{$url}?action=APPROVE&docid={$docid}">APPROVE</a>.11 </p>12 <p>If you want to reject the attached document, please click13 <a href="{$url}?action=REJECT&docid={$docid}">REJECT</a>.14 </p>15 <p>Pleas note that after clicking, you will be directed to the browser16 and will receive a rather technical message. This is normal; after17 clicking, the AutoPilot engine will trigger your Script and execute the18 required logic. In this case, you will also receive a confirmation19 e-mail.20 </p>21 </body>
Listing 6.2: Template for e-mail boddy
Both subject line template and body template contain variables that can be replaced by
calling the method replaceAll (see lines 45 and 52). The variables to be replaced or put
in a dictionary which is passed to the replaceAll call. For the example here, we use the
following variables:
• docname
• docid: the document Id. In our case, we use a fixed id. Since this variable will be
used to build the URL, we have to encode it (see line 41). If we use only digits, this
is, of course, not necessary.
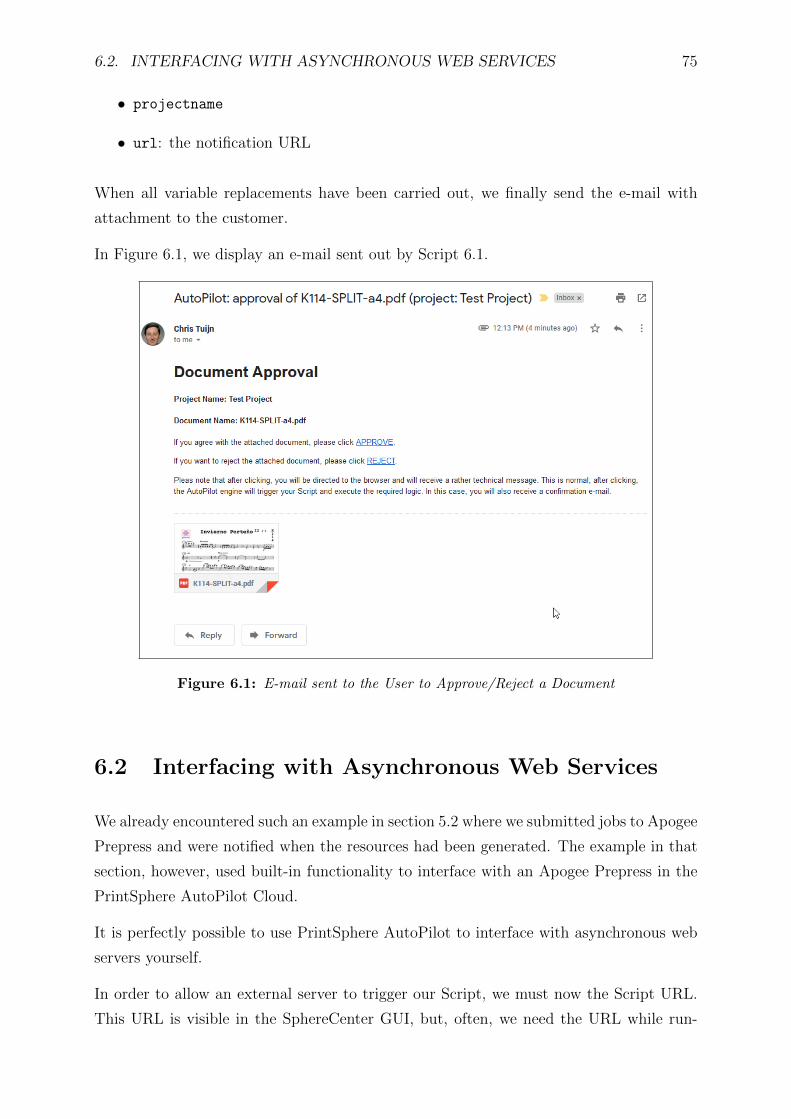
6.2. INTERFACING WITH ASYNCHRONOUS WEB SERVICES 75
• projectname
• url: the notification URL
When all variable replacements have been carried out, we finally send the e-mail with
attachment to the customer.
In Figure 6.1, we display an e-mail sent out by Script 6.1.
Figure 6.1: E-mail sent to the User to Approve/Reject a Document
6.2 Interfacing with Asynchronous Web Services
We already encountered such an example in section 5.2 where we submitted jobs to Apogee
Prepress and were notified when the resources had been generated. The example in that
section, however, used built-in functionality to interface with an Apogee Prepress in the
PrintSphere AutoPilot Cloud.
It is perfectly possible to use PrintSphere AutoPilot to interface with asynchronous web
servers yourself.
In order to allow an external server to trigger our Script, we must now the Script URL.
This URL is visible in the SphereCenter GUI, but, often, we need the URL while run-

76 CHAPTER 6. MORE ADVANCED USE CASES
ning the Script. The URL can be retrieved by the getNotificationUrl method on the
Environment object.
TO BE COMPLETED
6.3 Retrieving Mail from a Mail Server
In previous chapters, we already showed that scripts can be triggered in different ways.
The most straightforward way is the arrival of resources in PrintSphere, but it is also
possible to trigger scripts explicitly by calling a URL or by calling scripts at regular times
using the so-called Scheduled Execution functionality.
As another variation on the same theme, one might want to run a script when a mail has
arrived in the inbox of a particular user. Although there currently is no direct support
to trigger scripts in this way, it is possible to realizing this functionality by directly
connecting to external mail servers using the ClientMailService functionality.
6.3.1 Retrieving Mail Messages
We first will implement a function retrievemailscript (see line 12 of Listing 6.3)
that retrieves, analyzes and extracts mail messages that have arrived in a specific In-
box. All available functionality related to the retrieval of e-mails is accessible via a
ClientMailService instance which can be created with the newClientMailService
method on the Environment. This method has the following parameters:
1. host: the hostname of the mail server; for Google Mail, for instance, the hostname
is ”imap.google.mail”.
2. user: the user name of the mail account
3. password: the password of the mail account
4. protocol: the protocol that will be used. One of:
(a) ”pop3”: for a mail server using the POP3 protocol
(b) ”pop3s”: for a mail server using the secure version of the POP3 protocol
(c) ”imap” : for a mail server using the IMAP protocol
(d) ”imaps”: for a mail server using the secure version of the IMAP protocol
6.3. RETRIEVING MAIL FROM A MAIL SERVER 77
In the main function of Script 6.3 (line 32), we first create a ClientMailService instance.
In this example, we retrieve mails from the Google Mail server with the secure IMAP
protocol. The retrievemails function is called in line 42 and defined in line 12.
We first retrieve all e-mail from the Inbox with the getEmailsFromInbox method. We
do this here for simplicity but one should note that retrieving all messages from an Inbox
might be a heavy operation if we have a lot of mails in the Inbox; it therefore is (as we
will see shortly) better to reduce the messages to be retrieved by specifying a number of
conditions (such as the sender of the message and the mail address of the recipient).
We then (line 17) iterate over the retrieved list of messages and do the following:
• retrieve the sender with the getFrom method (line 18). Please note that the for-
mat can be in the so-called display format, which represents the addresses as,
e.g., ”John Doe <[email protected]>”. In order to convert these strings to the
plain address (”[email protected]”), one can use one of the convenience methods
normalizeAddress or normalizeAddresses which work on a single address or an
array of addresses.
• retrieve the mail message subject (or title) with the getSubject method
• retrieve the body text of the mail message with the getBody method. Please note
that it is not always trivial to determine what the body text of a mail message is
(in case there are multiple attachments). We always return the first object of the
mail message which has the ”text/plain” mime type.
• retrieve the date on which the message was sent with the getDate method (line 20)
• retrieve the list of attachments with the getAttachments method (line 22). Each
attachment will be saved as a Resource in the temporary PrintSphere folder. In
order to preserve these attachments, they can be modified and/or moved to output
locations. Please note that the getFileName method will return the file name of
the resource in the temporary file system. This file name can differ from the actual
attachment. The attachment name can be retrieved with the getOriginalFileName
method.
In line 49, we finally call the close method on the ClientMailService. This will close
the connection to the mail server.
1 function deletemails(env, service, from, to, folder) {

78 CHAPTER 6. MORE ADVANCED USE CASES
2 var messages = service.getEmailsFromInbox(from, to);3 var i;4 for (i = 0; i < messages.length; i++) {5 var message = messages[i];6 service.copyToFolder(message, folder);7 message.markForDelete();8 }9 service.expunge();
10 }11
12 function retrievemails(env, service) {13 var messages = service.getEmailsFromInbox();14 var i;15 for (i = 0; i < messages.length; i++) {16 var message = messages[i];17 var from = message.getFrom();18 print("From: " + message.getFrom() + ", Title: " + message.getSubject());19 print("Body: " + message.getBody());20 var date = message.getDate();21 print("Date: " + date);22 var attachments = message.getAttachments();23 var j;24 for (j = 0; j < attachments.length; j++) {25 var attachment = attachments[j];26 print("Attachment: " + attachment.getPathFileName());27 attachment.move(env.getOutputLocation("attachments"),
attachment.getOriginalFileName());28 }29 }30 }31
32 function main(env) {33 var service = env.newClientMailService("imap.gmail.com",34 "[email protected]", "????",35 "imaps");36
37 var selection = 1;38
39 switch(selection) {40 case 1:41 default:42 retrievemails(env, service);43 break;44 case 2:45 deletemails(env, service,46 "[email protected]", "[email protected]", "Trash");47 break;48 }49
50 service.close();51 }
Listing 6.3: Retrieve Mail Messages from a Mail Server
6.3. RETRIEVING MAIL FROM A MAIL SERVER 79
6.3.2 Copy and Remove Mail Messages
We now make a function deletemails (line 1 of the script in Listing 6.3) that will retrieve
all messages that came from a specific user and move these messages to a specific folder
on the mail server. Please note that this functionality is only available for mail servers
that use the IMAP protocol.
In line 2, we first retrieve the mail messages that are sent from a particular user to a partic-
ular e-mail address. Sometimes, mails of different recipients can be managed by the same
mail server account. In Google Mail, for instance, all mails sent to ”[email protected]”
and ”[email protected]” will end up in the same Inbox. By filtering on the recip-
ient address, we can distinguish between the mails sent to either e-mail address.
We then iterate over the retrieved messages (line 4) and copy each mail message to a
separate folder on the e-mail server by using the copyToFolder method which is called
on the MailClientService and has 2 parameters:
1. message: an instance of ClientMailMessage
2. folder: a String that contains the folder name
Then, we mark the message as deleted (in line 7) with the markForDelete method.
Eventually, we call in line 9 the expunge method on the ClientMailService instance;
this operation will effectively delete the messages that are marked as deleted.
6.3.3 Script to Process Incoming Mail Messages
We now will develop a Script that will watch the incoming mail messages that are subject
to a number of constraints. For each such message, we will create a separate folder with
the attachments and generate an XML file that contains the metadata, subject, body and
references to the attachments.
These XML files (together with the attachments) can then be used to trigger other scripts.

80 CHAPTER 6. MORE ADVANCED USE CASES
Chapter 7
Troubleshooting AutoPilot Scripts
81

82 CHAPTER 7. TROUBLESHOOTING AUTOPILOT SCRIPTS