nintex workflow 2007 sdk 1.2 - baixardoc
TRANSCRIPT
Nintex Workflow 2007 Software Development Kit
Page 2 of 235 www.nintex.com [email protected] connect.nintex.com
© 2008 Nintex LLC, All rights reserved. Errors and omissions excepted.
Software Development Kit v1.2
OVERVIEW
Welcome to the Nintex Workflow 2007 Software Development Kit (SDK). This document is intended for developers and
includes API documentation as well as technical "how to's" and code examples.
This SDK will be updated to include new API documentation and practical examples as they become available. Please submit
all feedback to [email protected].
To download the latest version of the Nintex Workflow 2007 software development kit and supporting resources please see
http://www.nintex.com/Nproducts/Workflow2007SDK.aspx.
WHAT’S NEW?
Section on creating custom task forms for the Flexi Task action
Updated the task form example to support Flexi Task action
New web service methods: ProcessFlexiTaskResponse2 and GetOutcomesForFlexiTask
Updated web service methods with a more descriptive return type: ProcessTaskResponse3,
ProcessFlexiTaskResponse2
Added descriptions for web service methods AddLongTermDelegationRule, DeleteLongTermDelegationRule and
the PublishFromNWF* and SaveFromNWF* methods
Page 3 of 235 www.nintex.com [email protected] connect.nintex.com
© 2008 Nintex LLC, All rights reserved. Errors and omissions excepted.
Software Development Kit v1.2
SUPPORT RESOURCES
This section lists a range of software required to successfully develop for and extend Nintex Workflow.
Nintex Connect
The Nintex Connect site provides a forum for discussing the use and development of Nintex Workflow 2007, along with
additional examples and downloads.
Download: http://connect.nintex.com
Microsoft .NET Framework 3.0 Redistributable Package
The Microsoft® .NET Framework version 3.0 redistributable package installs the common language runtime and associated
files required to run applications developed to target the .NET Framework 3.0.
Download: http://www.microsoft.com/downloads/details.aspx?FamilyId=10CC340B-F857-4A14-83F5-
25634C3BF043&displaylang=en
Visual Studio 2005 extensions for .NET Framework 3.0 (Windows Workflow Foundation)
This addin provides developers with support for building workflow-enabled applications using Windows Workflow
Foundation. Compatible with the released versions of the 2007 Microsoft Office system, Microsoft Windows Vista, and the
.NET Framework 3.0 Runtime Components.
Download: http://www.microsoft.com/downloads/details.aspx?FamilyId=5D61409E-1FA3-48CF-8023-
E8F38E709BA6&displaylang=en
Microsoft® Visual Studio® 2005 Team Suite Service Pack 1
This download installs Service Pack 1 for Microsoft® Visual Studio® 2005 Standard and Professional, and Team editions.
Download: http://www.microsoft.com/downloads/details.aspx?FamilyId=BB4A75AB-E2D4-4C96-B39D-
37BAF6B5B1DC&displaylang=en
Visual Studio 2005 Service Pack 1 Update for Windows Vista
The Visual Studio 2005 Service Pack 1 Update for Windows Vista addresses areas of Visual Studio impacted by Windows
Vista enhancements.
Download: http://www.microsoft.com/downloads/details.aspx?FamilyID=90e2942d-3ad1-4873-a2ee-
4acc0aace5b6&displaylang=en
Page 4 of 235 www.nintex.com [email protected] connect.nintex.com
© 2008 Nintex LLC, All rights reserved. Errors and omissions excepted.
Software Development Kit v1.2
HOW TO – INTERACTING AND EXTENDING NINTEX WORKFLOW
This section contains a number of examples demonstrating how to extend Nintex Workflow 2007 to meet custom business
requirements.
This section contains the following examples
1. InfoPath Forms Integration
2. Create a Custom Workflow Action – Overview
3. Create a Custom Workflow Action –Step by Step Guide
4. Create a Custom Task Response Form
5. Create a Custom Flexi Task Response Form
6. Export Workflow History
7. BizTalk Integration
8. Re-brand Nintex Workflow
9. Create custom context data items
10. Use the Error Handling Panel
11. Deploying a Nintex Workflow as part of a SharePoint solution package (WSP).
12. Deploying a custom workflow action as part of a SharePoint solution package (WSP).
13. Create an Inline Function
Page 5 of 235 www.nintex.com [email protected] connect.nintex.com
© 2008 Nintex LLC, All rights reserved. Errors and omissions excepted.
Software Development Kit v1.2
HOW TO: INFOPATH FORM INTEGRATION
SKILL LEVEL: INTERMEDIATE
OVERVIEW
This example will demonstrate the integration of Nintex Workflow into an InfoPath form. For the example we will be using
a basic expense form and business process; the form will collect some user details and details of an expense claim. The
form will then be submitted to a workflow for routing and approval.
The approval process will be integrated directly into the InfoPath form which will contain business logic to ensure the form
is not updated incorrectly. Please note that this example requires Microsoft Office 2007 InfoPath as some of the
functionality is not available in Microsoft Office 2003 InfoPath.
When integrating InfoPath and Nintex Workflow the two technologies do not directly interact with each other, they
communicate via SharePoint. This interaction is achieved via columns on the library; InfoPath writes key status information
to the columns and Nintex Workflow reads and writes back to the same columns allowing data to be shared.
The full example provided has hard coded data sources configured to communicate with the example SharePoint web
server http://development.nintex.com. When using this example file you will be required to change the data sources to
point to a valid URL in your environment.
Note: The provided examples have been developed with InfoPath Form Services enabled, which would allow the forms to
be used in InfoPath or a web client.
REQUIREMENTS
This example requires the following technologies and/or applications:
Windows SharePoint Services 3.0
Nintex Workflow 2007
Office InfoPath 2007
You may receive warning messages about the publishing location of the provided SDK example InfoPath Form. You should
ignore the messages and once the form is loaded, republish it and then open the form from its published location.
SUMMARY
This is a quick summary of the steps and procedures required to complete this example.
1. Form data
2. Form UI
3. Add data connections to Nintex Workflow
4. Add business logic (rules)
5. Publish the form
6. Create workflow
Page 6 of 235 www.nintex.com [email protected] connect.nintex.com
© 2008 Nintex LLC, All rights reserved. Errors and omissions excepted.
Software Development Kit v1.2
SUPPLIED EXAMPLES
This example contains two InfoPath forms, the first is a completed version which has all the business logic integrated and
the second is a shell form only containing the UI elements.
Files
1. {SDK Location}\Examples\InfoPathExpenseIntegration\expenses_full.xsn
2. {SDK Location}\Examples\InfoPathExpenseIntegration\expenses_basic.xsn
STEPS AND PROCEDURES
This example will use expenses_full.xsn as a starting point; this file can be found in the directory for the example.
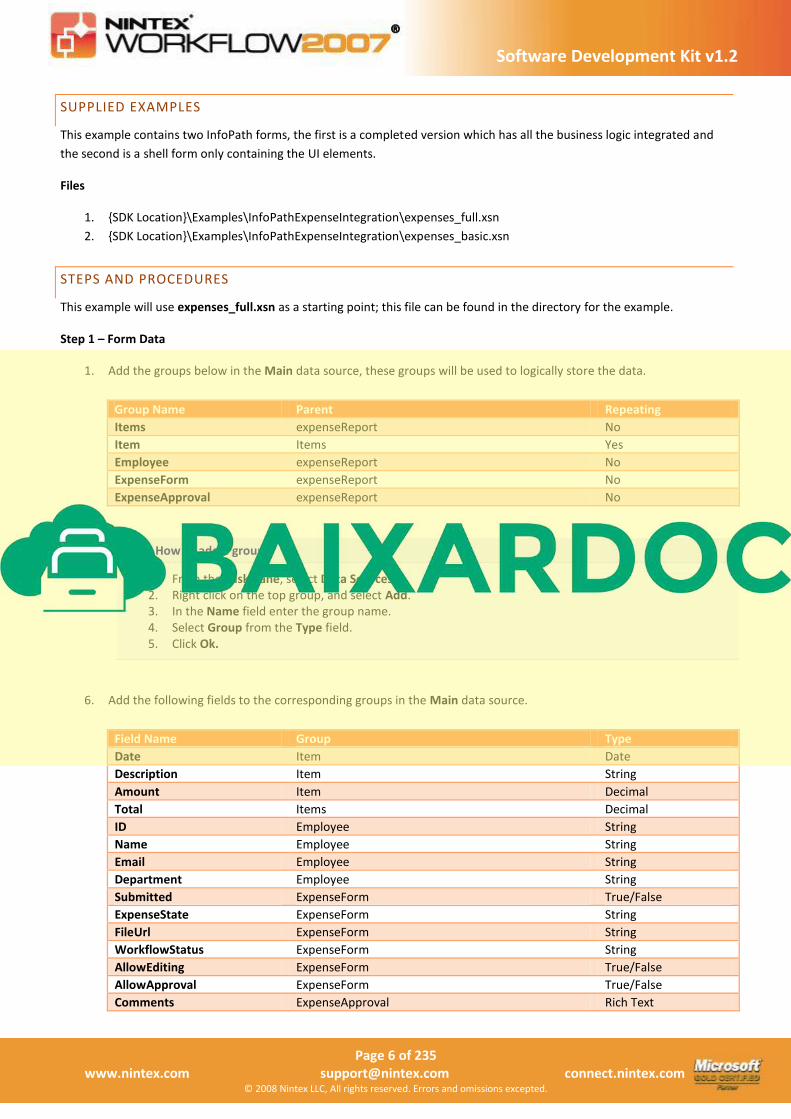
Step 1 – Form Data
1. Add the groups below in the Main data source, these groups will be used to logically store the data.
Group Name Parent Repeating
Items expenseReport No
Item Items Yes
Employee expenseReport No
ExpenseForm expenseReport No
ExpenseApproval expenseReport No
Tip: How to add a group
1. From the Task Pane, select Data Sources.
2. Right click on the top group, and select Add.
3. In the Name field enter the group name.
4. Select Group from the Type field.
5. Click Ok.
6. Add the following fields to the corresponding groups in the Main data source.
Field Name Group Type
Date Item Date
Description Item String
Amount Item Decimal
Total Items Decimal
ID Employee String
Name Employee String
Email Employee String
Department Employee String
Submitted ExpenseForm True/False
ExpenseState ExpenseForm String
FileUrl ExpenseForm String
WorkflowStatus ExpenseForm String
AllowEditing ExpenseForm True/False
AllowApproval ExpenseForm True/False
Comments ExpenseApproval Rich Text
Page 7 of 235 www.nintex.com [email protected] connect.nintex.com
© 2008 Nintex LLC, All rights reserved. Errors and omissions excepted.
Software Development Kit v1.2
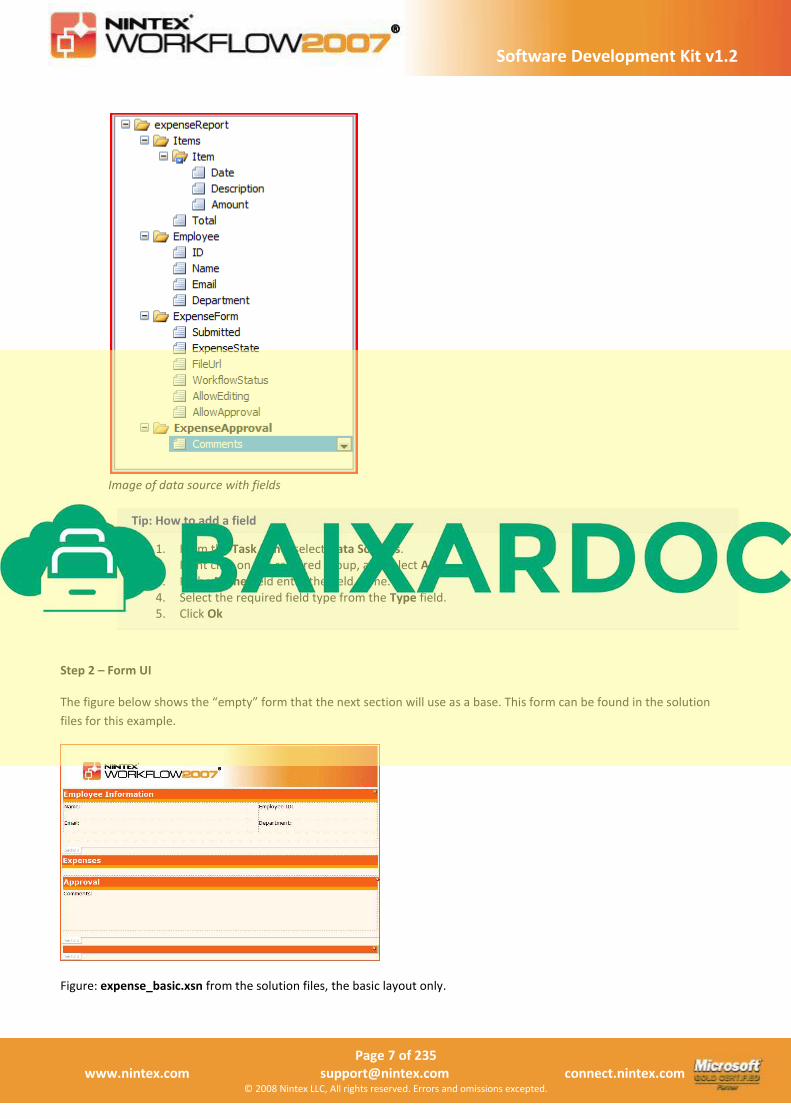
Image of data source with fields
Tip: How to add a field
1. From the Task Pane, select Data Sources.
2. Right click on the required group, and select Add.
3. In the Name field enter the field name.
4. Select the required field type from the Type field.
5. Click Ok
Step 2 – Form UI
The figure below shows the “empty” form that the next section will use as a base. This form can be found in the solution
files for this example.
Figure: expense_basic.xsn from the solution files, the basic layout only.
Page 8 of 235 www.nintex.com [email protected] connect.nintex.com
© 2008 Nintex LLC, All rights reserved. Errors and omissions excepted.
Software Development Kit v1.2
1. Bind the form sections to the appropriate data sources.
a. Bind the Employee Information section to expenseReport/Employee. When the Department field has
been added, change the control element from a text box to a drop-down list box and configure some
sample department names.
b. Bind the Approval section to expenseReport/ExpenseApproval
c. Bind the Submit section (the last section on the form [the large orange section]) to expenseReport
Tip: How to bind a field/control
1. An unbound field/control will have a red cross next to it ( ), when you hover over the red cross the
following message will be displayed.
2. Right click on the unbound field/control and select Change Binding ( ).
3. Fromt the Selection Binding pop up window select the required field or group and click OK.
Note: When binding a field control you must always bind it to a field in the data source. However controls
such as the Section control can be bound to a group in the data source.
2. Add the fields to the surface area:
a. Add fields ID, Name, Email and Department to the Employee Information section.
b. Add field Item as a Repeating Table to the section Expenses. Display the footer on the repeating table
(Repeating table properties | Display | Options | Include Footer). Add the Total field to the repeating
table footer. Set the Total field’s default value to sum(Amount) (this will calculate each item in the
expense from and give us a single total).
c. Add field Comments to the Approval section.
Tip: How add a field to the design area
To add a field from the data source tool pane, you can simply drag and drop it on to the design area. Once it is
there you can adjust the size and properties (including validation rules, conditional formatting, etc).
Tip: How to set a default value on a field
You can set the default value for a field control from the properties window for the control. The following
steps show how to set the default for a text field control.
1. Right click on the text box.
2. Click Text Box Properties.
3. In the properties window enter the default value into the Value field under the heading Default
Value.
Note: Default values can be calculated, which allows you to use a combination of lookups, functions and hard
coded values.
4. Add buttons to control the approval process. These buttons will be used for the key actions on the form (submit,
approve and reject).
a. Add two buttons to the Approval section titled Approve and Reject
b. Add a button to the last section of the form titled Submit.
The form UI has now been designed. Next we need to configure the form to communicate with the Nintex Workflow web
service.
Page 9 of 235 www.nintex.com [email protected] connect.nintex.com
© 2008 Nintex LLC, All rights reserved. Errors and omissions excepted.
Software Development Kit v1.2
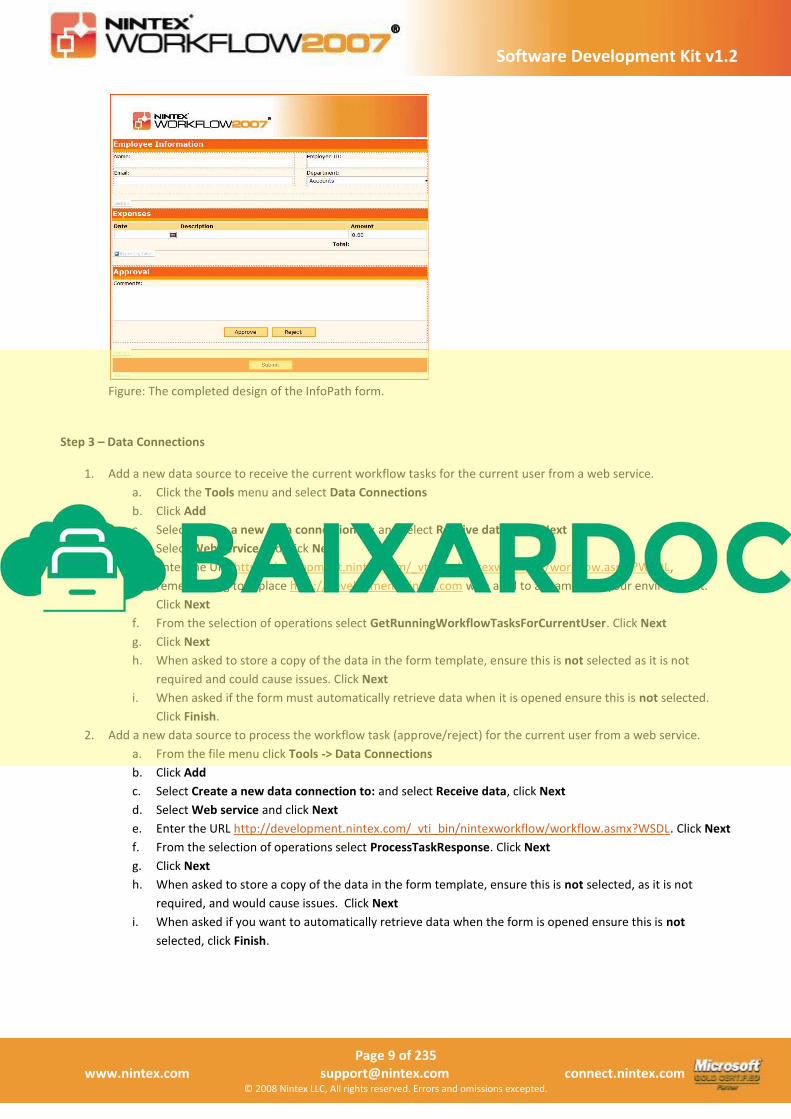
Figure: The completed design of the InfoPath form.
Step 3 – Data Connections
1. Add a new data source to receive the current workflow tasks for the current user from a web service.
a. Click the Tools menu and select Data Connections
b. Click Add
c. Select Create a new data connection to: and select Receive data. Click Next
d. Select Web service and click Next
e. Enter the URL http://development.nintex.com/_vti_bin/nintexworkflow/workflow.asmx?WSDL,
remembering to replace http://development.nintex.com with a url to a teamsite in your environment.
Click Next
f. From the selection of operations select GetRunningWorkflowTasksForCurrentUser. Click Next
g. Click Next
h. When asked to store a copy of the data in the form template, ensure this is not selected as it is not
required and could cause issues. Click Next
i. When asked if the form must automatically retrieve data when it is opened ensure this is not selected.
Click Finish.
2. Add a new data source to process the workflow task (approve/reject) for the current user from a web service.
a. From the file menu click Tools -> Data Connections
b. Click Add
c. Select Create a new data connection to: and select Receive data, click Next
d. Select Web service and click Next
e. Enter the URL http://development.nintex.com/_vti_bin/nintexworkflow/workflow.asmx?WSDL. Click Next
f. From the selection of operations select ProcessTaskResponse. Click Next
g. Click Next
h. When asked to store a copy of the data in the form template, ensure this is not selected, as it is not
required, and would cause issues. Click Next
i. When asked if you want to automatically retrieve data when the form is opened ensure this is not
selected, click Finish.
Page 10 of 235 www.nintex.com [email protected] connect.nintex.com
© 2008 Nintex LLC, All rights reserved. Errors and omissions excepted.
Software Development Kit v1.2
3. Add a new data source to submit the form to a SharePoint library.
a. From the file menu click Tools -> Data Connections
b. Click Add
c. Select Create a new data connection to: and select Submit data, click Next
d. Select To a document library on a SharePoint site, and click Next
e. Enter the URL http://development.nintex.com/myformlibrary, click Next (please note that the form library
“myformlibrary” is a standard Form Library with no extra columns).
f. For the File name enter the function concat("Expenses - ", now(), " - ", userName()). click Next
g. Click Finish.
Step 4 – Business Logic (Rules)
1. Configure the open behavior for the form:
a. From Tools | Form Options select Open and Save, the click on Rules…
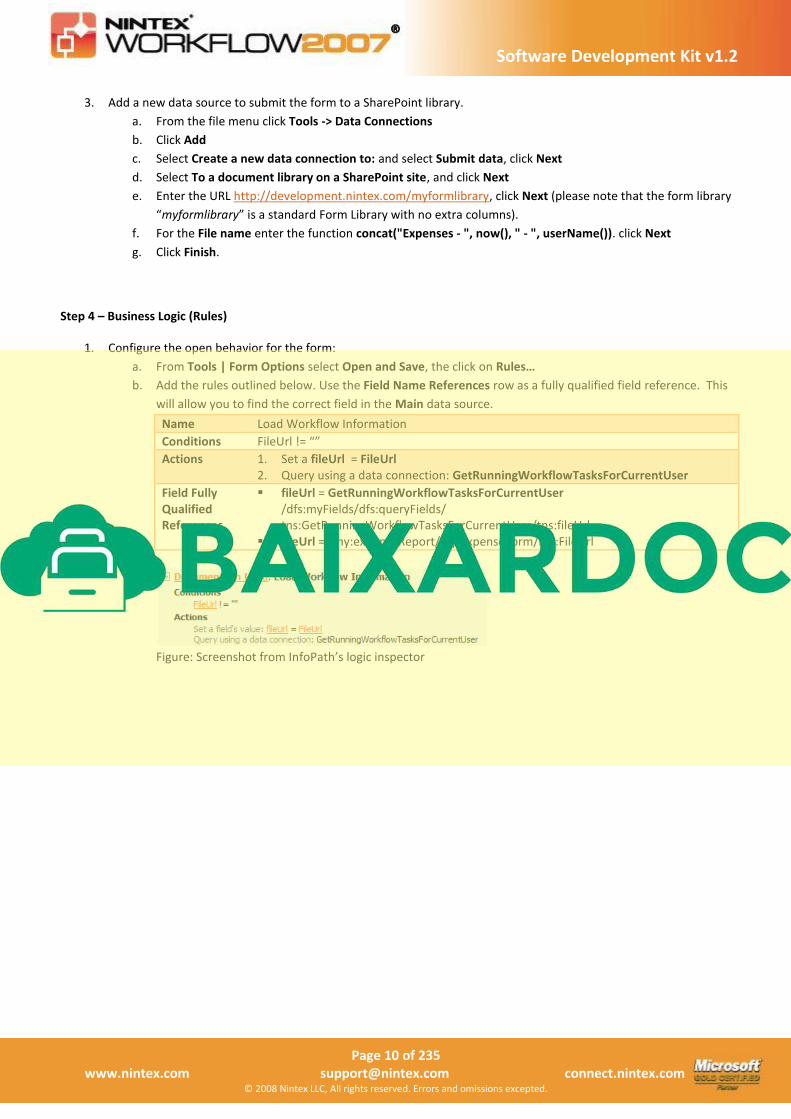
b. Add the rules outlined below. Use the Field Name References row as a fully qualified field reference. This
will allow you to find the correct field in the Main data source.
Name Load Workflow Information
Conditions FileUrl != “”
Actions 1. Set a fileUrl = FileUrl
2. Query using a data connection: GetRunningWorkflowTasksForCurrentUser
Field Fully
Qualified
References
fileUrl = GetRunningWorkflowTasksForCurrentUser
/dfs:myFields/dfs:queryFields/
tns:GetRunningWorkflowTasksForCurrentUser/tns:fileUrl
fileUrl = /my:expenseReport/my:ExpenseForm/my:FileUrl
Figure: Screenshot from InfoPath’s logic inspector