korg pa900 1.2 user's manual (e2)
TRANSCRIPT

User ManualENGLISH | OS Ver. 1.2 2E


• Read these instructions.• Keep these instructions.• Heed all warnings.• Follow all instructions.• Do not use this apparatus near water.• Clean only with dry cloth.• Do not block any ventilation openings, install in accordance with the manu-
facturer’s instructions.• Do not install near any heat sources such as radiators, heat registers, stoves, or
other apparatus (including amplifiers) that produce heat.• Protect the power cord from being walked on or pinched particularly at plugs,
convenience receptacles, and the point where they exit from the apparatus.• Only use attachments/accessories specified by the manufacturer.• Unplug this apparatus during lightning storms or when unused for long peri-
ods of time.• Refer all servicing to qualified service personnel. Servicing is required when
the apparatus has been damaged in any way, such as power-supply cord orplug is damaged, liquid has been spilled or objects have fallen into the appara-tus, the apparatus has been exposed to rain or moisture, does not operate nor-mally, or has been dropped.
• Turning off the standby switch does not completely isolate this product fromthe power line so remove the plug from the socket if not using it for extendedperiods of time, or before cleaning. Please ensure that the mains plug or appli-ance couple remains readily accessible.
• Mains powered apparatus shall not be exposed to dripping or splashing and thatno objects filled with liquids, such as vases, shall be placed on the apparatus.
• Install this product near the wall socket and keep the power plug easily acces-sible.
• Do not install this equipment on the far position from wall outlet and/or con-venience receptacle.
• WARNING – Date/time Lithium button cell battery inside. Danger of explo-sion if battery is incorrectly replaced. Replace only with the same or equiva-lent type. The internal date/time Lithium button cell battery is userreplaceable.
• Do not expose batteries to excessive heat, such as direct sunshine, fire or the like.• Dispose of used batteries according to the battery manufacturer’s instructions.• Do not install this equipment in a confined space such as a box for the convey-
ance or similar unit.• When a cart is used, use caution when moving the cart/apparatus combina-
tion to avoid injury from tip-over.
The lightning flash with arrowhead symbol within an equi-lateral triangle, is intended to alert the user to the presence ofuninsulated “dangerous voltage” within the product’s enclo-sure that may be of sufficient magnitude to constitute a riskof electric shock to persons.
The exclamation point within an equilateral triangle isintended to alert the user to the presence of important oper-ating and maintenance (servicing) instructions in the litera-ture accompanying the product.
Important safety instructions

Automatic Power-OffTo avoid wasting power, Pa900 will by default automatically turns to standby aftertwo hours of non-active use (playing, pressing buttons or using the touch-screen).Please save your data (Performances, Styles, Songs, and so on) before taking a pro-longed pause.
Data HandlingData in memory may sometimes be lost due to incorrect user action. Be sure tosave important data to the internal hard disk or to an external USB device. Korgwill not be responsible for damages caused by data loss.
CleaningIf the exterior becomes dirty, wipe it with a clean, dry cloth. Do not use liquidcleaners such as benzene or thinner, or cleaning compounds or flammable pol-ishes.Use a soft cotton cloth to clean the display. Some materials, such as paper towels,could cause scratches and damage it. Computer wipes are also suggested, providedthey are specifically designed for LCD screens.Do not spray any liquids on the LCD screen directly. Always apply the solution toyour cloth first, then clean the screen.
Example screensSome pages of the manuals show LCD screens along with an explanation of func-tions and operations. All sound names, parameter names, and values are merelyexamples and may not always match the actual display you are working on.
DisclaimerThe information contained in this manual have been carefully revised andchecked through. Due to our constant efforts to improve our products, the specifi-cations might differ to those in the manual. Korg is not responsible for any differ-ence found between the specifications and the contents of the instruction manual– the specifications being subject to change without prior notice.
TrademarksMac is a registered trademark of Apple, Inc. MS-DOS and Windows are registeredtrademarks of Microsoft Corporation. TC-Helicon is a registered trademark ofTC-Helicon Vocal Technologies Ltd. All other trademarks or registered trade-marks are the property of their respective holders.
Open Source noticePortions of this product’s software are copyright ©2007 “The FreeType Project”(www.freetype.org). All rights reserved.
LiabilityKorg products are manufactured under strict specifications and voltages requiredby each country. These products are warranted by the Korg distributor only ineach country. Any Korg product not sold with a warranty card or carrying a serialnumber disqualifies the product sold from the manufacturer's/distributor's war-ranty and liability. This requirement is for your own protection and safety.
Service and User’s AssistanceFor service, please contact your nearest Authorized Korg Service Center. For moreinformation on Korg products, and to find software and accessories for your key-board, please contact your local Authorized Korg distributor. For up-to-dateinformation, please point your web browser to www.korg.com.
Copyright © 2013 KORG Italy Spa. Printed in China.
THE FCC REGULATION WARNING (USA)This equipment has been tested and found to comply with the limits for a Class B digital device, pursuant to Part 15 of the FCC Rules. These limits are designed to provide reasonable protection against harmful interference in a residential installation. This equipment generates, uses, and can radiate radio frequency energy and, if not installed and used in accordance with the instructions, may cause harmful interference to radio communications. However, there is no guarantee that interference will not occur in a particular installation. If this equipment does cause harmful interference to radio or television reception, which can be determined by turning the equipment off and on, the user is encouraged to try to correct the interference by one or more of the following measures:• Reorient or relocate the receiving antenna.• Increase the separation between the equipment and receiver.• Connect the equipment into an outlet on a circuit different from that to which the
receiver is connected.• Consult the dealer or an experienced radio/TV technician for help.Unauthorized changes or modification to this system can void the user’s authority to operate this equipment.
CE MARK FOR EUROPEAN HARMONIZED STANDARDSCE mark which is attached to our company’s products of AC mains operated apparatus until December 31, 1996 means it conforms to EMC Directive (89/336/EEC) and CE mark Directive (93/68/EEC).And, CE mark which is attached after January 1, 1997 means it conforms to EMC Directive (89/336/EEC), CE mark Directive (93/68/EEC) and Low Voltage Directive (73/23/EEC).Also, CE mark which is attached to our company’s products of Battery operated apparatus means it conforms to EMC Directive (89/336/EEC) and CE mark Directive (93/68/EEC).
IMPORTANT NOTICE TO CONSUMERSThis product has been manufactured according to strict specifications and voltage requirements that are applicable in the country in which it is intended that this product should be used. If you have purchased this product via the internet, through mail order, and/or via a telephone sale, you must verify that this product is intended to be used in the country in which you reside.WARNING: Use of this product in any country other than that for which it is intended could be dangerous and could invalidate the manufacturer's or distributor's warranty.Please also retain your receipt as proof of purchase otherwise your product may be disqualified from the manufacturer's or distributor's warranty.
NOTICE REGARDING DISPOSAL (EU)If this symbol is shown on the product, manual, battery, or package, you must dispose of it in the correct manner to avoid harm to human health or damage to the environment. Contact your local administrative body for details on the correct disposal method. If the battery contains heavy metals in excess of the regulated amount, a chemical symbol is displayed below the symbol on the battery or battery package.
PERCHLORATE (CALIFORNIA, USA)Perchlorate Material – special handling may apply.See www.dtsc.ca.gov/hazardouswaste/perchlorate.

1Table of Contents
Intr
oduc
tion
IntroductionWelcome! . . . . . . . . . . . . . . . . . . . . . . . . . . . . . . . . . . . . . . . . . . . . 6What’s in the box . . . . . . . . . . . . . . . . . . . . . . . . . . . . . . . . . . . . . . .7About this manual . . . . . . . . . . . . . . . . . . . . . . . . . . . . . . . . . . . . . .7Contacts . . . . . . . . . . . . . . . . . . . . . . . . . . . . . . . . . . . . . . . . . . . . . . .7Making a safety copy of your data . . . . . . . . . . . . . . . . . . . . . . . . .7Restoring the original factory data . . . . . . . . . . . . . . . . . . . . . . . . .7Loading the Operating System . . . . . . . . . . . . . . . . . . . . . . . . . . . .7
Overview . . . . . . . . . . . . . . . . . . . . . . . . . . . . . . . . . . . . . . . . . . . . 8FFront Panel . . . . . . . . . . . . . . . . . . . . . . . . . . . . . . . . . . . . . . . . . . .8Rear Panel . . . . . . . . . . . . . . . . . . . . . . . . . . . . . . . . . . . . . . . . . . . 19
Start up . . . . . . . . . . . . . . . . . . . . . . . . . . . . . . . . . . . . . . . . . . . . 21Connecting the AC power cord . . . . . . . . . . . . . . . . . . . . . . . . . 21Turning the instrument on (or in standby) . . . . . . . . . . . . . . . 21Controlling the Volume . . . . . . . . . . . . . . . . . . . . . . . . . . . . . . . . 21The X-Fader slider . . . . . . . . . . . . . . . . . . . . . . . . . . . . . . . . . . . . 21Headphones . . . . . . . . . . . . . . . . . . . . . . . . . . . . . . . . . . . . . . . . . . 21Loudspeakers . . . . . . . . . . . . . . . . . . . . . . . . . . . . . . . . . . . . . . . . . 22Audio Outputs . . . . . . . . . . . . . . . . . . . . . . . . . . . . . . . . . . . . . . . . 22MIDI connections . . . . . . . . . . . . . . . . . . . . . . . . . . . . . . . . . . . . . 22Damper pedal . . . . . . . . . . . . . . . . . . . . . . . . . . . . . . . . . . . . . . . . 22Assignable pedal . . . . . . . . . . . . . . . . . . . . . . . . . . . . . . . . . . . . . . 22The music stand . . . . . . . . . . . . . . . . . . . . . . . . . . . . . . . . . . . . . . 22
Glossary of Terms . . . . . . . . . . . . . . . . . . . . . . . . . . . . . . . . . . . 23Sound . . . . . . . . . . . . . . . . . . . . . . . . . . . . . . . . . . . . . . . . . . . . . . . 23Style . . . . . . . . . . . . . . . . . . . . . . . . . . . . . . . . . . . . . . . . . . . . . . . . . 23Pad . . . . . . . . . . . . . . . . . . . . . . . . . . . . . . . . . . . . . . . . . . . . . . . . . . 23Keyboard tracks . . . . . . . . . . . . . . . . . . . . . . . . . . . . . . . . . . . . . . 23Performance . . . . . . . . . . . . . . . . . . . . . . . . . . . . . . . . . . . . . . . . . 24Sequencer . . . . . . . . . . . . . . . . . . . . . . . . . . . . . . . . . . . . . . . . . . . . 24Player . . . . . . . . . . . . . . . . . . . . . . . . . . . . . . . . . . . . . . . . . . . . . . . 24The LOGO decoder . . . . . . . . . . . . . . . . . . . . . . . . . . . . . . . . . . . 24
Interface basics . . . . . . . . . . . . . . . . . . . . . . . . . . . . . . . . . . . . . 25Color TouchView graphical user interface . . . . . . . . . . . . . . . . 25Operative modes . . . . . . . . . . . . . . . . . . . . . . . . . . . . . . . . . . . . . . 27Selected, highlighted items . . . . . . . . . . . . . . . . . . . . . . . . . . . . . 27Non-available, grayed-out parameters . . . . . . . . . . . . . . . . . . . 27Shortcuts . . . . . . . . . . . . . . . . . . . . . . . . . . . . . . . . . . . . . . . . . . . . 27
Easy Mode . . . . . . . . . . . . . . . . . . . . . . . . . . . . . . . . . . . . . . . . . . 28The Style Play page in detail . . . . . . . . . . . . . . . . . . . . . . . . . . . . 29The Song Play page in detail . . . . . . . . . . . . . . . . . . . . . . . . . . . . 30
Quick GuideTurning the instrument on . . . . . . . . . . . . . . . . . . . . . . . . . . . 32Turning the instrument on and viewing the main screen . . . 32
Connecting and calibrating the Damper pedal . . . . . . . . 33Programming the Damper pedal . . . . . . . . . . . . . . . . . . . . . . . . 33
Playing the Demo . . . . . . . . . . . . . . . . . . . . . . . . . . . . . . . . . . . 35Starting and stopping the Demo . . . . . . . . . . . . . . . . . . . . . . . . . 35
Playing Sounds . . . . . . . . . . . . . . . . . . . . . . . . . . . . . . . . . . . . . 37Selecting a Sound and playing it on the keyboard . . . . . . . . . . 37Playing two or three Sounds at the same time . . . . . . . . . . . . . 39Playing different Sounds with your left and right hand . . . . . 41Changing the split point . . . . . . . . . . . . . . . . . . . . . . . . . . . . . . . 43
Raising or lowering the Upper octave . . . . . . . . . . . . . . . . . . . . 44
Selecting and saving Performances . . . . . . . . . . . . . . . . . . . 45Selecting a Performance . . . . . . . . . . . . . . . . . . . . . . . . . . . . . . . . 45Saving your settings to a Performance . . . . . . . . . . . . . . . . . . . . 46
Selecting and saving the “My Setting” Performance . . . 48Selecting the startup parameters (the "My Setting"
Performance) . . . . . . . . . . . . . . . . . . . . . . . . . . . . . . . . . . . . . . . 48Saving the startup parameters into the "My Setting"
Performance . . . . . . . . . . . . . . . . . . . . . . . . . . . . . . . . . . . . . . . . 48
Drawbars . . . . . . . . . . . . . . . . . . . . . . . . . . . . . . . . . . . . . . . . . . . 49Choosing a Drawbars Preset . . . . . . . . . . . . . . . . . . . . . . . . . . . . 49Editing the Drawbars Preset . . . . . . . . . . . . . . . . . . . . . . . . . . . . 50
Selecting and playing Styles . . . . . . . . . . . . . . . . . . . . . . . . . 52Selecting and playing a Style . . . . . . . . . . . . . . . . . . . . . . . . . . . . 52Tempo . . . . . . . . . . . . . . . . . . . . . . . . . . . . . . . . . . . . . . . . . . . . . . . 54Intro, Variation, Fill, Break, Ending . . . . . . . . . . . . . . . . . . . . . . 55Single Touch Settings (STS) . . . . . . . . . . . . . . . . . . . . . . . . . . . . . 56The Pads . . . . . . . . . . . . . . . . . . . . . . . . . . . . . . . . . . . . . . . . . . . . . 57Adjusting the balance between the Style and the keyboard . . 58Adjusting the volume of the separate tracks . . . . . . . . . . . . . . . 58Turning the Style tracks on/off . . . . . . . . . . . . . . . . . . . . . . . . . . 59Adding harmony notes to your right-hand melody with
the ENSEMBLE function . . . . . . . . . . . . . . . . . . . . . . . . . . . . . 60The Chord Sequencer . . . . . . . . . . . . . . . . . . . . . . . . . . . . . . . . . . 62
Song Play . . . . . . . . . . . . . . . . . . . . . . . . . . . . . . . . . . . . . . . . . . . 64Selecting a Song to play . . . . . . . . . . . . . . . . . . . . . . . . . . . . . . . . 64Playing back a Song . . . . . . . . . . . . . . . . . . . . . . . . . . . . . . . . . . . . 66Changing the tracks’ volume . . . . . . . . . . . . . . . . . . . . . . . . . . . . 67Turning the Song tracks on/off . . . . . . . . . . . . . . . . . . . . . . . . . . 69Soloing a track . . . . . . . . . . . . . . . . . . . . . . . . . . . . . . . . . . . . . . . . 70Removing the Melody track from a Standard MIDI File or
the Lead Vocal from an MP3 file . . . . . . . . . . . . . . . . . . . . . . . 70Mixing two Songs . . . . . . . . . . . . . . . . . . . . . . . . . . . . . . . . . . . . . 72
The SongBook . . . . . . . . . . . . . . . . . . . . . . . . . . . . . . . . . . . . . . 73Selecting the desired Entry from the Main List . . . . . . . . . . . . . 73Displaying Artist or Genre . . . . . . . . . . . . . . . . . . . . . . . . . . . . . . 74Sorting Entries . . . . . . . . . . . . . . . . . . . . . . . . . . . . . . . . . . . . . . . . 75Searching for Entries . . . . . . . . . . . . . . . . . . . . . . . . . . . . . . . . . . . 75Adding Entries . . . . . . . . . . . . . . . . . . . . . . . . . . . . . . . . . . . . . . . . 77Editing the Entries . . . . . . . . . . . . . . . . . . . . . . . . . . . . . . . . . . . . . 77Creating a Custom List . . . . . . . . . . . . . . . . . . . . . . . . . . . . . . . . . 79Selecting and using a Custom List . . . . . . . . . . . . . . . . . . . . . . . 81Synchronizing the SongBook with external software . . . . . . . . 81
Singing with a microphone . . . . . . . . . . . . . . . . . . . . . . . . . . 82Connecting a microphone . . . . . . . . . . . . . . . . . . . . . . . . . . . . . . 82Setting up your voice tone . . . . . . . . . . . . . . . . . . . . . . . . . . . . . . 83Choosing a Voice Processor Preset . . . . . . . . . . . . . . . . . . . . . . . 85Applying harmony to your voice while playing with
the Styles . . . . . . . . . . . . . . . . . . . . . . . . . . . . . . . . . . . . . . . . . . . 86Applying harmony to your voice while playing with a Song . 86Balancing the voice, effects and tracks level . . . . . . . . . . . . . . . 87Soloing your voice (Talk) . . . . . . . . . . . . . . . . . . . . . . . . . . . . . . . 87
Recording a new Song (Standard MIDI File) . . . . . . . . . . . 88Preparing the Style and Sounds . . . . . . . . . . . . . . . . . . . . . . . . . . 88Accessing the Backing Sequence (Quick Record) mode . . . . . 88Setting the Record parameters . . . . . . . . . . . . . . . . . . . . . . . . . . . 90
Table of Contents

2 Table of Contents
Recording . . . . . . . . . . . . . . . . . . . . . . . . . . . . . . . . . . . . . . . . . . . . 90Second-take recording (Overdubbing) . . . . . . . . . . . . . . . . . . . . 92Saving a Song . . . . . . . . . . . . . . . . . . . . . . . . . . . . . . . . . . . . . . . . . 92
Recording a new Song (MP3 file) . . . . . . . . . . . . . . . . . . . . . .94
Searching files and musical resources . . . . . . . . . . . . . . . . .96How to use the Search function . . . . . . . . . . . . . . . . . . . . . . . . . . 96Notes about searching . . . . . . . . . . . . . . . . . . . . . . . . . . . . . . . . . . 98
ReferenceSelecting elements . . . . . . . . . . . . . . . . . . . . . . . . . . . . . . . . 100Style Select window . . . . . . . . . . . . . . . . . . . . . . . . . . . . . . . . . . . 100Sound Select window . . . . . . . . . . . . . . . . . . . . . . . . . . . . . . . . . . 101Performance Select window . . . . . . . . . . . . . . . . . . . . . . . . . . . . 102Pad Select window . . . . . . . . . . . . . . . . . . . . . . . . . . . . . . . . . . . . 102STS Select . . . . . . . . . . . . . . . . . . . . . . . . . . . . . . . . . . . . . . . . . . . 103Song Select window . . . . . . . . . . . . . . . . . . . . . . . . . . . . . . . . . . . 103
Style Play mode . . . . . . . . . . . . . . . . . . . . . . . . . . . . . . . . . . . 106Start-up settings . . . . . . . . . . . . . . . . . . . . . . . . . . . . . . . . . . . . . . 106How Styles, Variations, Performances and STSs are linked
together . . . . . . . . . . . . . . . . . . . . . . . . . . . . . . . . . . . . . . . . . . . 106Styles and Pads . . . . . . . . . . . . . . . . . . . . . . . . . . . . . . . . . . . . . . . 106Master Volume and Balance . . . . . . . . . . . . . . . . . . . . . . . . . . . 106Factory, Favorite and User Styles . . . . . . . . . . . . . . . . . . . . . . . 106Main page . . . . . . . . . . . . . . . . . . . . . . . . . . . . . . . . . . . . . . . . . . . 107STS Name panel . . . . . . . . . . . . . . . . . . . . . . . . . . . . . . . . . . . . . . 109Volume panel . . . . . . . . . . . . . . . . . . . . . . . . . . . . . . . . . . . . . . . . 109Pad panel . . . . . . . . . . . . . . . . . . . . . . . . . . . . . . . . . . . . . . . . . . . . 111Split panel . . . . . . . . . . . . . . . . . . . . . . . . . . . . . . . . . . . . . . . . . . . 112Sub-Scale panel . . . . . . . . . . . . . . . . . . . . . . . . . . . . . . . . . . . . . . . 112Mic panel . . . . . . . . . . . . . . . . . . . . . . . . . . . . . . . . . . . . . . . . . . . . 113Edit menu . . . . . . . . . . . . . . . . . . . . . . . . . . . . . . . . . . . . . . . . . . . 113Edit page structure . . . . . . . . . . . . . . . . . . . . . . . . . . . . . . . . . . . . 113Mixer/Tuning: Volume/Pan . . . . . . . . . . . . . . . . . . . . . . . . . . . . 114Mixer/Tuning: FX Send . . . . . . . . . . . . . . . . . . . . . . . . . . . . . . . 115Mixer/Tuning: EQ Gain . . . . . . . . . . . . . . . . . . . . . . . . . . . . . . . 115Mixer/Tuning: EQ Control . . . . . . . . . . . . . . . . . . . . . . . . . . . . 116Mixer/Tuning: Tuning . . . . . . . . . . . . . . . . . . . . . . . . . . . . . . . . 116Mixer/Tuning: Sub Scale . . . . . . . . . . . . . . . . . . . . . . . . . . . . . . . 117Effects: A/B FX Configuration . . . . . . . . . . . . . . . . . . . . . . . . . . 119Effects: Master 1, 2 . . . . . . . . . . . . . . . . . . . . . . . . . . . . . . . . . . . . 119Track Controls: Mode . . . . . . . . . . . . . . . . . . . . . . . . . . . . . . . . . 120Track Controls: Drum Edit . . . . . . . . . . . . . . . . . . . . . . . . . . . . 121Track Controls: Easy Edit . . . . . . . . . . . . . . . . . . . . . . . . . . . . . . 122Keyboard/Ensemble: Key/Velocity Range . . . . . . . . . . . . . . . . 123Keyboard/Ensemble: Ensemble . . . . . . . . . . . . . . . . . . . . . . . . . 123Keyboard/Ensemble: Keyboard Control . . . . . . . . . . . . . . . . . 124Pad/Switch: Pad . . . . . . . . . . . . . . . . . . . . . . . . . . . . . . . . . . . . . . 125Pad/Switch: Switch . . . . . . . . . . . . . . . . . . . . . . . . . . . . . . . . . . . . 125Style Controls: Drum/Fill . . . . . . . . . . . . . . . . . . . . . . . . . . . . . . 126Style Controls: Keyboard Range On/Off / Wrap Around . . . 126Page menu . . . . . . . . . . . . . . . . . . . . . . . . . . . . . . . . . . . . . . . . . . . 127Write Performance dialog box . . . . . . . . . . . . . . . . . . . . . . . . . . 128Write Single Touch Setting dialog box . . . . . . . . . . . . . . . . . . . 128Write Current Style Settings dialog box . . . . . . . . . . . . . . . . . . 129The Favorite banks . . . . . . . . . . . . . . . . . . . . . . . . . . . . . . . . . . . . 129
Style/Pad Record mode . . . . . . . . . . . . . . . . . . . . . . . . . . . . 130Recording Styles and Pads . . . . . . . . . . . . . . . . . . . . . . . . . . . . . 130Style/Pad Import/Export . . . . . . . . . . . . . . . . . . . . . . . . . . . . . . . 132Entering the Style/Pad Record mode . . . . . . . . . . . . . . . . . . . . 132Exit by saving or deleting changes . . . . . . . . . . . . . . . . . . . . . . . 132Listening to the Style while in Edit mode . . . . . . . . . . . . . . . . . 132
List of recorded events . . . . . . . . . . . . . . . . . . . . . . . . . . . . . . . . .133Main page - Record 1 . . . . . . . . . . . . . . . . . . . . . . . . . . . . . . . . . .133Main page - Record 2/Cue . . . . . . . . . . . . . . . . . . . . . . . . . . . . .137Main page - Guitar Mode . . . . . . . . . . . . . . . . . . . . . . . . . . . . . .138Style/Pad Record procedure . . . . . . . . . . . . . . . . . . . . . . . . . . . .142Edit menu . . . . . . . . . . . . . . . . . . . . . . . . . . . . . . . . . . . . . . . . . . .144Edit page structure . . . . . . . . . . . . . . . . . . . . . . . . . . . . . . . . . . . .144Event Edit: Event Edit . . . . . . . . . . . . . . . . . . . . . . . . . . . . . . . . .145Event Edit: Filter . . . . . . . . . . . . . . . . . . . . . . . . . . . . . . . . . . . . . .147Style/Pad Edit: Quantize . . . . . . . . . . . . . . . . . . . . . . . . . . . . . . .148Style/Pad Edit: Transpose . . . . . . . . . . . . . . . . . . . . . . . . . . . . . .148Style/Pad Edit: Velocity . . . . . . . . . . . . . . . . . . . . . . . . . . . . . . . .149Style/Pad Edit: Cut . . . . . . . . . . . . . . . . . . . . . . . . . . . . . . . . . . . .150Style/Pad Edit: Delete . . . . . . . . . . . . . . . . . . . . . . . . . . . . . . . . . .150Style/Pad Edit: Delete All . . . . . . . . . . . . . . . . . . . . . . . . . . . . . .151Style/Pad Edit: Copy from Style . . . . . . . . . . . . . . . . . . . . . . . . .151Style/Pad Edit: Copy from Pad . . . . . . . . . . . . . . . . . . . . . . . . . .152Style Element Track Controls: Sound/Expression . . . . . . . . . .153Style Element Track Controls: Keyboard Range . . . . . . . . . . .154Style Element Track Controls: Noise/Guitar . . . . . . . . . . . . . .154Pad Track Controls: Sound/Expression . . . . . . . . . . . . . . . . . .155Style Element/Pad Chord Table: Chord Table . . . . . . . . . . . . .156Style Track Controls: Type/Trigger/Tension . . . . . . . . . . . . . .156Import: Import Groove . . . . . . . . . . . . . . . . . . . . . . . . . . . . . . . .157Import: Import SMF . . . . . . . . . . . . . . . . . . . . . . . . . . . . . . . . . .157Export SMF . . . . . . . . . . . . . . . . . . . . . . . . . . . . . . . . . . . . . . . . . .160Page menu . . . . . . . . . . . . . . . . . . . . . . . . . . . . . . . . . . . . . . . . . . .161Write Style/Pad dialog box . . . . . . . . . . . . . . . . . . . . . . . . . . . . .162Copy Key/Chord dialog box . . . . . . . . . . . . . . . . . . . . . . . . . . . .162Copy Sounds dialog box . . . . . . . . . . . . . . . . . . . . . . . . . . . . . . .162Copy Expression dialog box . . . . . . . . . . . . . . . . . . . . . . . . . . . .163Copy Key Range dialog box . . . . . . . . . . . . . . . . . . . . . . . . . . . .163Copy Chord Table dialog box . . . . . . . . . . . . . . . . . . . . . . . . . . .163Overdub Step Recording window . . . . . . . . . . . . . . . . . . . . . . .164
Song Play mode . . . . . . . . . . . . . . . . . . . . . . . . . . . . . . . . . . . 165Transport controls . . . . . . . . . . . . . . . . . . . . . . . . . . . . . . . . . . . .165MIDI Clock . . . . . . . . . . . . . . . . . . . . . . . . . . . . . . . . . . . . . . . . . .165Tempo Lock . . . . . . . . . . . . . . . . . . . . . . . . . . . . . . . . . . . . . . . . . .165Master Volume, Balance, X-Fader . . . . . . . . . . . . . . . . . . . . . . .165Track parameters . . . . . . . . . . . . . . . . . . . . . . . . . . . . . . . . . . . . .165Standard MIDI Files and Sounds . . . . . . . . . . . . . . . . . . . . . . . .166Keyboard, Pad and Player tracks . . . . . . . . . . . . . . . . . . . . . . . .166Main page (Normal view) . . . . . . . . . . . . . . . . . . . . . . . . . . . . . .167STS Name panel . . . . . . . . . . . . . . . . . . . . . . . . . . . . . . . . . . . . . .169Volume panel . . . . . . . . . . . . . . . . . . . . . . . . . . . . . . . . . . . . . . . .169Pad panel . . . . . . . . . . . . . . . . . . . . . . . . . . . . . . . . . . . . . . . . . . . .170Split panel . . . . . . . . . . . . . . . . . . . . . . . . . . . . . . . . . . . . . . . . . . .170Sub-Scale panel . . . . . . . . . . . . . . . . . . . . . . . . . . . . . . . . . . . . . . .170Jukebox panel . . . . . . . . . . . . . . . . . . . . . . . . . . . . . . . . . . . . . . . .170Mic panel . . . . . . . . . . . . . . . . . . . . . . . . . . . . . . . . . . . . . . . . . . . .171Edit menu . . . . . . . . . . . . . . . . . . . . . . . . . . . . . . . . . . . . . . . . . . .171Edit page structure . . . . . . . . . . . . . . . . . . . . . . . . . . . . . . . . . . . .171Mixer/Tuning: Volume/Pan . . . . . . . . . . . . . . . . . . . . . . . . . . . .172Mixer/Tuning: FX Send . . . . . . . . . . . . . . . . . . . . . . . . . . . . . . . .172Mixer/Tuning: EQ Gain . . . . . . . . . . . . . . . . . . . . . . . . . . . . . . .172Mixer/Tuning: EQ Control . . . . . . . . . . . . . . . . . . . . . . . . . . . . .173Mixer/Tuning: Tuning . . . . . . . . . . . . . . . . . . . . . . . . . . . . . . . . .173Effects: A/B FX Configuration . . . . . . . . . . . . . . . . . . . . . . . . . .173Effects: Master 1, 2 . . . . . . . . . . . . . . . . . . . . . . . . . . . . . . . . . . . .174Track Controls: Mode . . . . . . . . . . . . . . . . . . . . . . . . . . . . . . . . .174Track Controls: Drum Edit . . . . . . . . . . . . . . . . . . . . . . . . . . . . .174Track Controls: Easy Edit . . . . . . . . . . . . . . . . . . . . . . . . . . . . . .174Keyboard/Ensemble: Key/Velocity Range . . . . . . . . . . . . . . . .174

3Table of Contents
Intr
oduc
tion
Keyboard/Ensemble: Ensemble . . . . . . . . . . . . . . . . . . . . . . . . 174Keyboard/Ensemble: Keyboard Control . . . . . . . . . . . . . . . . . 174Pad/Switch: Pad . . . . . . . . . . . . . . . . . . . . . . . . . . . . . . . . . . . . . . 174Pad/Switch: Assignable Switch . . . . . . . . . . . . . . . . . . . . . . . . . 175Jukebox Editor . . . . . . . . . . . . . . . . . . . . . . . . . . . . . . . . . . . . . . . 175Page menu . . . . . . . . . . . . . . . . . . . . . . . . . . . . . . . . . . . . . . . . . . 176
Sequencer mode . . . . . . . . . . . . . . . . . . . . . . . . . . . . . . . . . . . 177Transport controls . . . . . . . . . . . . . . . . . . . . . . . . . . . . . . . . . . . 177Standard MIDI Files and MP3 . . . . . . . . . . . . . . . . . . . . . . . . . 177Songs and Voice Processor Presets . . . . . . . . . . . . . . . . . . . . . 177Sequencer Play - Main page . . . . . . . . . . . . . . . . . . . . . . . . . . . 177Entering Record mode . . . . . . . . . . . . . . . . . . . . . . . . . . . . . . . . 179Record mode: Multitrack Sequencer page . . . . . . . . . . . . . . . 180Record mode: Step Record page . . . . . . . . . . . . . . . . . . . . . . . . 182Record mode: Backing Sequence (Quick Record) page . . . . 184Record mode: Step Backing Sequence page . . . . . . . . . . . . . . 187Edit menu . . . . . . . . . . . . . . . . . . . . . . . . . . . . . . . . . . . . . . . . . . . 189Edit page structure . . . . . . . . . . . . . . . . . . . . . . . . . . . . . . . . . . . 189Mixer/Tuning: Volume/Pan . . . . . . . . . . . . . . . . . . . . . . . . . . . 190Mixer/Tuning: FX Send . . . . . . . . . . . . . . . . . . . . . . . . . . . . . . . 190Mixer/Tuning: EQ Gain . . . . . . . . . . . . . . . . . . . . . . . . . . . . . . . 190Mixer/Tuning: EQ Control . . . . . . . . . . . . . . . . . . . . . . . . . . . . 190Mixer/Tuning: Tuning . . . . . . . . . . . . . . . . . . . . . . . . . . . . . . . . 191Mixer/Tuning: Sub Scale . . . . . . . . . . . . . . . . . . . . . . . . . . . . . . 191Effects: A/B FX Configuration . . . . . . . . . . . . . . . . . . . . . . . . . 191Effects: Master 1, 2 . . . . . . . . . . . . . . . . . . . . . . . . . . . . . . . . . . . 192Track Controls: Mode . . . . . . . . . . . . . . . . . . . . . . . . . . . . . . . . 192Track Controls: Drum Edit . . . . . . . . . . . . . . . . . . . . . . . . . . . . 192Track Controls: Easy Edit . . . . . . . . . . . . . . . . . . . . . . . . . . . . . 192Event Edit: Event Edit . . . . . . . . . . . . . . . . . . . . . . . . . . . . . . . . 192Event Edit: Filter . . . . . . . . . . . . . . . . . . . . . . . . . . . . . . . . . . . . . 194Song Edit: Quantize . . . . . . . . . . . . . . . . . . . . . . . . . . . . . . . . . . 194Song Edit: Transpose . . . . . . . . . . . . . . . . . . . . . . . . . . . . . . . . . 195Song Edit: Velocity . . . . . . . . . . . . . . . . . . . . . . . . . . . . . . . . . . . 195Song Edit: Cut/Insert Measures . . . . . . . . . . . . . . . . . . . . . . . . 196Song Edit: Delete . . . . . . . . . . . . . . . . . . . . . . . . . . . . . . . . . . . . . 196Song Edit: Copy . . . . . . . . . . . . . . . . . . . . . . . . . . . . . . . . . . . . . . 197Song Edit: Move . . . . . . . . . . . . . . . . . . . . . . . . . . . . . . . . . . . . . 197Song Edit: RX Convert . . . . . . . . . . . . . . . . . . . . . . . . . . . . . . . . 197Page menu . . . . . . . . . . . . . . . . . . . . . . . . . . . . . . . . . . . . . . . . . . 198Song Select window . . . . . . . . . . . . . . . . . . . . . . . . . . . . . . . . . . 199Save Song window . . . . . . . . . . . . . . . . . . . . . . . . . . . . . . . . . . . 199
Sound mode . . . . . . . . . . . . . . . . . . . . . . . . . . . . . . . . . . . . . . . 201The MIDI channel . . . . . . . . . . . . . . . . . . . . . . . . . . . . . . . . . . . 201How to select oscillators . . . . . . . . . . . . . . . . . . . . . . . . . . . . . . . 201Sounds, Drum Kits, Digital Drawbars . . . . . . . . . . . . . . . . . . . 201Main page . . . . . . . . . . . . . . . . . . . . . . . . . . . . . . . . . . . . . . . . . . . 201Digital Drawbars page . . . . . . . . . . . . . . . . . . . . . . . . . . . . . . . . 203Edit menu . . . . . . . . . . . . . . . . . . . . . . . . . . . . . . . . . . . . . . . . . . . 204Edit page structure . . . . . . . . . . . . . . . . . . . . . . . . . . . . . . . . . . . 204Basic: Sound Basic . . . . . . . . . . . . . . . . . . . . . . . . . . . . . . . . . . . . 204Basic: OSC Basic . . . . . . . . . . . . . . . . . . . . . . . . . . . . . . . . . . . . . 206Basic: Vel/Key Zone . . . . . . . . . . . . . . . . . . . . . . . . . . . . . . . . . . 208Basic: Damper Mode . . . . . . . . . . . . . . . . . . . . . . . . . . . . . . . . . 208Basic: Damper Trigger . . . . . . . . . . . . . . . . . . . . . . . . . . . . . . . . 209Basic: EQ . . . . . . . . . . . . . . . . . . . . . . . . . . . . . . . . . . . . . . . . . . . 210DrumKit: Sample Setup (Drum Kits) . . . . . . . . . . . . . . . . . . . 210DrumKit: EQ (Drum Kits) . . . . . . . . . . . . . . . . . . . . . . . . . . . . 212DrumKit: Voice Mixer (Drum Kits) . . . . . . . . . . . . . . . . . . . . 212Pitch: Pitch Mod . . . . . . . . . . . . . . . . . . . . . . . . . . . . . . . . . . . . . 213Pitch: Pitch EG . . . . . . . . . . . . . . . . . . . . . . . . . . . . . . . . . . . . . . 215Filter: Filter Type . . . . . . . . . . . . . . . . . . . . . . . . . . . . . . . . . . . . 217Filter: Filter Mod . . . . . . . . . . . . . . . . . . . . . . . . . . . . . . . . . . . . . 218
Filter: Filter LFO . . . . . . . . . . . . . . . . . . . . . . . . . . . . . . . . . . . . . 219Filter: Filter EG . . . . . . . . . . . . . . . . . . . . . . . . . . . . . . . . . . . . . . 220Amp: Amp Level/Pan . . . . . . . . . . . . . . . . . . . . . . . . . . . . . . . . . 222Amp: Amp Mod . . . . . . . . . . . . . . . . . . . . . . . . . . . . . . . . . . . . . 222Amp: Amp EG . . . . . . . . . . . . . . . . . . . . . . . . . . . . . . . . . . . . . . . 223LFO: LFO1 . . . . . . . . . . . . . . . . . . . . . . . . . . . . . . . . . . . . . . . . . . 225LFO: LFO2 . . . . . . . . . . . . . . . . . . . . . . . . . . . . . . . . . . . . . . . . . . 226Effects: “B” FX Config . . . . . . . . . . . . . . . . . . . . . . . . . . . . . . . . . 226Effects: Master 1 / Reverb . . . . . . . . . . . . . . . . . . . . . . . . . . . . . . 227Effects: Master 2 / Chorus . . . . . . . . . . . . . . . . . . . . . . . . . . . . . 227Page menu . . . . . . . . . . . . . . . . . . . . . . . . . . . . . . . . . . . . . . . . . . 227Write Sound dialog box . . . . . . . . . . . . . . . . . . . . . . . . . . . . . . . 228Copy Oscillator dialog box . . . . . . . . . . . . . . . . . . . . . . . . . . . . . 228Copy Drum Kit dialog box . . . . . . . . . . . . . . . . . . . . . . . . . . . . . 228AMS (Alternate Modulation Source) list . . . . . . . . . . . . . . . . . 229
Sampling mode . . . . . . . . . . . . . . . . . . . . . . . . . . . . . . . . . . . .231Entering and exiting the Sampling mode . . . . . . . . . . . . . . . . 231Creating new Sounds from the Samples . . . . . . . . . . . . . . . . . 231Creating new Drum Kits from the Samples . . . . . . . . . . . . . . . 232Creating new Sounds from an Audio Groove . . . . . . . . . . . . . 232Edit menu . . . . . . . . . . . . . . . . . . . . . . . . . . . . . . . . . . . . . . . . . . . 233Sampling: Edit . . . . . . . . . . . . . . . . . . . . . . . . . . . . . . . . . . . . . . . 233Sampling: Loop Edit . . . . . . . . . . . . . . . . . . . . . . . . . . . . . . . . . . 234Sampling: Sampling Info . . . . . . . . . . . . . . . . . . . . . . . . . . . . . . 235Time Slice . . . . . . . . . . . . . . . . . . . . . . . . . . . . . . . . . . . . . . . . . . . 236The Time Slice procedure . . . . . . . . . . . . . . . . . . . . . . . . . . . . . 239The Extend procedure . . . . . . . . . . . . . . . . . . . . . . . . . . . . . . . . 240Multisample: Edit MS . . . . . . . . . . . . . . . . . . . . . . . . . . . . . . . . . 240Multisample: Key Assign . . . . . . . . . . . . . . . . . . . . . . . . . . . . . . 241Page menu . . . . . . . . . . . . . . . . . . . . . . . . . . . . . . . . . . . . . . . . . . 241Write Sample dialog box . . . . . . . . . . . . . . . . . . . . . . . . . . . . . . 243Write MultiSample dialog box . . . . . . . . . . . . . . . . . . . . . . . . . 243Write Slice dialog box . . . . . . . . . . . . . . . . . . . . . . . . . . . . . . . . . 244Delete Sample dialog box . . . . . . . . . . . . . . . . . . . . . . . . . . . . . . 244Delete Multisample dialog box . . . . . . . . . . . . . . . . . . . . . . . . . 244Export Sample page . . . . . . . . . . . . . . . . . . . . . . . . . . . . . . . . . . . 245Export Multisample page . . . . . . . . . . . . . . . . . . . . . . . . . . . . . . 245Merging Samples from various sources . . . . . . . . . . . . . . . . . . 245
Global mode . . . . . . . . . . . . . . . . . . . . . . . . . . . . . . . . . . . . . . .246Overview on the Global mode . . . . . . . . . . . . . . . . . . . . . . . . . . 246Main page . . . . . . . . . . . . . . . . . . . . . . . . . . . . . . . . . . . . . . . . . . . 246Edit menu . . . . . . . . . . . . . . . . . . . . . . . . . . . . . . . . . . . . . . . . . . . 246Edit page structure . . . . . . . . . . . . . . . . . . . . . . . . . . . . . . . . . . . 246General Controls: Basic . . . . . . . . . . . . . . . . . . . . . . . . . . . . . . . 247General Controls: Interface . . . . . . . . . . . . . . . . . . . . . . . . . . . . 248General Controls: Lock . . . . . . . . . . . . . . . . . . . . . . . . . . . . . . . . 249General Controls: Clock & Power . . . . . . . . . . . . . . . . . . . . . . . 251Mode Preferences: Style . . . . . . . . . . . . . . . . . . . . . . . . . . . . . . . 252Mode Preferences: Song & Sequencer . . . . . . . . . . . . . . . . . . . 253Mode Preferences: Media . . . . . . . . . . . . . . . . . . . . . . . . . . . . . . 254Controllers: Hand Controllers . . . . . . . . . . . . . . . . . . . . . . . . . . 255Controllers: Foot Controllers . . . . . . . . . . . . . . . . . . . . . . . . . . 255Tuning: Basic . . . . . . . . . . . . . . . . . . . . . . . . . . . . . . . . . . . . . . . . 256Tuning: Transpose Control . . . . . . . . . . . . . . . . . . . . . . . . . . . . 256Tuning: Scale . . . . . . . . . . . . . . . . . . . . . . . . . . . . . . . . . . . . . . . . 257MIDI: General Controls . . . . . . . . . . . . . . . . . . . . . . . . . . . . . . . 258MIDI: MIDI In Controls . . . . . . . . . . . . . . . . . . . . . . . . . . . . . . 259MIDI: MIDI In Channels . . . . . . . . . . . . . . . . . . . . . . . . . . . . . . 260MIDI: MIDI Out Channels . . . . . . . . . . . . . . . . . . . . . . . . . . . . 261MIDI: Filters . . . . . . . . . . . . . . . . . . . . . . . . . . . . . . . . . . . . . . . . . 261Audio & Video: MP3 / Speakers . . . . . . . . . . . . . . . . . . . . . . . . 262Audio & Video: Limiter . . . . . . . . . . . . . . . . . . . . . . . . . . . . . . . 262Audio & Video: Master EQ . . . . . . . . . . . . . . . . . . . . . . . . . . . . 263

4 Table of Contents
Audio & Video: Video Out . . . . . . . . . . . . . . . . . . . . . . . . . . . . . 264Audio & Video: Audio In . . . . . . . . . . . . . . . . . . . . . . . . . . . . . . 264Mic: Preset . . . . . . . . . . . . . . . . . . . . . . . . . . . . . . . . . . . . . . . . . . . 265Mic: Harmony . . . . . . . . . . . . . . . . . . . . . . . . . . . . . . . . . . . . . . . 265Mic: Harmony Voices . . . . . . . . . . . . . . . . . . . . . . . . . . . . . . . . . 267Mic: Effects . . . . . . . . . . . . . . . . . . . . . . . . . . . . . . . . . . . . . . . . . . 268Mic: Global Setup . . . . . . . . . . . . . . . . . . . . . . . . . . . . . . . . . . . . . 269Mic: Global Dynamics / EQ . . . . . . . . . . . . . . . . . . . . . . . . . . . . 269Harmony and Tuning with the Voice Processor . . . . . . . . . . . 270Touch Panel Calibration . . . . . . . . . . . . . . . . . . . . . . . . . . . . . . . 274Page menu . . . . . . . . . . . . . . . . . . . . . . . . . . . . . . . . . . . . . . . . . . . 274Write Quarter Tone SC Preset dialog box . . . . . . . . . . . . . . . . 275Write Midi Preset dialog box . . . . . . . . . . . . . . . . . . . . . . . . . . . 275Write Limiter Preset dialog box . . . . . . . . . . . . . . . . . . . . . . . . . 275Write Master EQ Preset dialog box . . . . . . . . . . . . . . . . . . . . . . 275Write Voice Processor Preset dialog box . . . . . . . . . . . . . . . . . 276
Media mode . . . . . . . . . . . . . . . . . . . . . . . . . . . . . . . . . . . . . . . 277Storage devices and internal memory . . . . . . . . . . . . . . . . . . . . 277Supported device . . . . . . . . . . . . . . . . . . . . . . . . . . . . . . . . . . . . . 277Selecting and deselecting files . . . . . . . . . . . . . . . . . . . . . . . . . . 277Searching files . . . . . . . . . . . . . . . . . . . . . . . . . . . . . . . . . . . . . . . . 277Preferences . . . . . . . . . . . . . . . . . . . . . . . . . . . . . . . . . . . . . . . . . . 277File types . . . . . . . . . . . . . . . . . . . . . . . . . . . . . . . . . . . . . . . . . . . . 278Media structure . . . . . . . . . . . . . . . . . . . . . . . . . . . . . . . . . . . . . . 279Main page . . . . . . . . . . . . . . . . . . . . . . . . . . . . . . . . . . . . . . . . . . . 280Page structure . . . . . . . . . . . . . . . . . . . . . . . . . . . . . . . . . . . . . . . . 280Navigation tools . . . . . . . . . . . . . . . . . . . . . . . . . . . . . . . . . . . . . . 280Load . . . . . . . . . . . . . . . . . . . . . . . . . . . . . . . . . . . . . . . . . . . . . . . . 281Save . . . . . . . . . . . . . . . . . . . . . . . . . . . . . . . . . . . . . . . . . . . . . . . . 284Copy . . . . . . . . . . . . . . . . . . . . . . . . . . . . . . . . . . . . . . . . . . . . . . . . 288Delete . . . . . . . . . . . . . . . . . . . . . . . . . . . . . . . . . . . . . . . . . . . . . . . 289Format . . . . . . . . . . . . . . . . . . . . . . . . . . . . . . . . . . . . . . . . . . . . . . 290Utility . . . . . . . . . . . . . . . . . . . . . . . . . . . . . . . . . . . . . . . . . . . . . . . 290USB . . . . . . . . . . . . . . . . . . . . . . . . . . . . . . . . . . . . . . . . . . . . . . . . 292Page menu . . . . . . . . . . . . . . . . . . . . . . . . . . . . . . . . . . . . . . . . . . . 293Care of mass storage devices . . . . . . . . . . . . . . . . . . . . . . . . . . . 294Merging Samples from various sources . . . . . . . . . . . . . . . . . . 294
SongBook . . . . . . . . . . . . . . . . . . . . . . . . . . . . . . . . . . . . . . . . . 295Book . . . . . . . . . . . . . . . . . . . . . . . . . . . . . . . . . . . . . . . . . . . . . . . . 295Custom List . . . . . . . . . . . . . . . . . . . . . . . . . . . . . . . . . . . . . . . . . . 297List Edit . . . . . . . . . . . . . . . . . . . . . . . . . . . . . . . . . . . . . . . . . . . . . 298Book Edit 1 . . . . . . . . . . . . . . . . . . . . . . . . . . . . . . . . . . . . . . . . . . 299Book Edit 2 . . . . . . . . . . . . . . . . . . . . . . . . . . . . . . . . . . . . . . . . . . 300Book Edit 3 . . . . . . . . . . . . . . . . . . . . . . . . . . . . . . . . . . . . . . . . . . 301Info . . . . . . . . . . . . . . . . . . . . . . . . . . . . . . . . . . . . . . . . . . . . . . . . . 302Page menu . . . . . . . . . . . . . . . . . . . . . . . . . . . . . . . . . . . . . . . . . . . 302
Lyrics, Score, Markers . . . . . . . . . . . . . . . . . . . . . . . . . . . . . . 304Selected Player . . . . . . . . . . . . . . . . . . . . . . . . . . . . . . . . . . . . . . . 304Lyrics page . . . . . . . . . . . . . . . . . . . . . . . . . . . . . . . . . . . . . . . . . . . 304Score page . . . . . . . . . . . . . . . . . . . . . . . . . . . . . . . . . . . . . . . . . . . 306Markers page . . . . . . . . . . . . . . . . . . . . . . . . . . . . . . . . . . . . . . . . 307
MIDI . . . . . . . . . . . . . . . . . . . . . . . . . . . . . . . . . . . . . . . . . . . . . . 308What is MIDI? . . . . . . . . . . . . . . . . . . . . . . . . . . . . . . . . . . . . . . . 308What is MIDI Over USB? . . . . . . . . . . . . . . . . . . . . . . . . . . . . . . 308Standard MIDI Files . . . . . . . . . . . . . . . . . . . . . . . . . . . . . . . . . . 309The General MIDI standard . . . . . . . . . . . . . . . . . . . . . . . . . . . . 309The Global channel . . . . . . . . . . . . . . . . . . . . . . . . . . . . . . . . . . . 309The Chord 1 and Chord 2 channels . . . . . . . . . . . . . . . . . . . . . 309The Control channel . . . . . . . . . . . . . . . . . . . . . . . . . . . . . . . . . . 309MIDI Presets . . . . . . . . . . . . . . . . . . . . . . . . . . . . . . . . . . . . . . . . . 309Connecting Pa900 to a Master keyboard . . . . . . . . . . . . . . . . . 310
Connecting Pa900 to a MIDI accordion . . . . . . . . . . . . . . . . . .310Connecting Pa900 to an external sequencer . . . . . . . . . . . . . . .311Playing another instrument with Pa900 . . . . . . . . . . . . . . . . . .312
AppendixFactory data . . . . . . . . . . . . . . . . . . . . . . . . . . . . . . . . . . . . . . . 314Styles . . . . . . . . . . . . . . . . . . . . . . . . . . . . . . . . . . . . . . . . . . . . . . . .314Style Elements . . . . . . . . . . . . . . . . . . . . . . . . . . . . . . . . . . . . . . . .317Style and Player controls . . . . . . . . . . . . . . . . . . . . . . . . . . . . . . .317Single Touch Settings (STS) . . . . . . . . . . . . . . . . . . . . . . . . . . . .317Sounds . . . . . . . . . . . . . . . . . . . . . . . . . . . . . . . . . . . . . . . . . . . . . .318DNC Sounds . . . . . . . . . . . . . . . . . . . . . . . . . . . . . . . . . . . . . . . . .331Drum Kits . . . . . . . . . . . . . . . . . . . . . . . . . . . . . . . . . . . . . . . . . . .333Multisamples . . . . . . . . . . . . . . . . . . . . . . . . . . . . . . . . . . . . . . . . .334Drum Samples . . . . . . . . . . . . . . . . . . . . . . . . . . . . . . . . . . . . . . . .341Pads . . . . . . . . . . . . . . . . . . . . . . . . . . . . . . . . . . . . . . . . . . . . . . . . .348Effects . . . . . . . . . . . . . . . . . . . . . . . . . . . . . . . . . . . . . . . . . . . . . . .351MIDI Preset . . . . . . . . . . . . . . . . . . . . . . . . . . . . . . . . . . . . . . . . . .353
Assignable parameters . . . . . . . . . . . . . . . . . . . . . . . . . . . . . 354List of Pedal/Footswitch functions . . . . . . . . . . . . . . . . . . . . . . .354List of Assignable Knob functions . . . . . . . . . . . . . . . . . . . . . . .355List of Assignable Switches functions . . . . . . . . . . . . . . . . . . . .356Scales . . . . . . . . . . . . . . . . . . . . . . . . . . . . . . . . . . . . . . . . . . . . . . . .356
Effects . . . . . . . . . . . . . . . . . . . . . . . . . . . . . . . . . . . . . . . . . . . . 357Dynamic Modulation sources . . . . . . . . . . . . . . . . . . . . . . . . . . .357Dynamics (Dynamic) . . . . . . . . . . . . . . . . . . . . . . . . . . . . . . . . . .358EQ and Filters (EQ/Filter) . . . . . . . . . . . . . . . . . . . . . . . . . . . . . .361Overdrive, Amp models, and Mic models (OD Amp Mic) . .368Chorus, Flanger, and Phaser (Cho/Fln Phaser) . . . . . . . . . . . .373Modulation and Pitch Shift (Mod./P.Shift) . . . . . . . . . . . . . . .379Delay . . . . . . . . . . . . . . . . . . . . . . . . . . . . . . . . . . . . . . . . . . . . . . . .390Reverb and Early Reflections (Reverb ER) . . . . . . . . . . . . . . . .400Mono-Mono Serial (Mono-Mono) . . . . . . . . . . . . . . . . . . . . . .402Double Size . . . . . . . . . . . . . . . . . . . . . . . . . . . . . . . . . . . . . . . . . .419
Installing the Korg USB MIDI Driver . . . . . . . . . . . . . . . . . 428Connecting Pa900 to a personal computer . . . . . . . . . . . . . . . .428KORG USB-MIDI Driver system requirements . . . . . . . . . . .428Please note before use . . . . . . . . . . . . . . . . . . . . . . . . . . . . . . . . .428Windows: Installing the KORG USB-MIDI Driver . . . . . . . .428Mac OS X: Installing the KORG USB-MIDI Driver . . . . . . . .429
MIDI Data . . . . . . . . . . . . . . . . . . . . . . . . . . . . . . . . . . . . . . . . . 430MIDI Controllers . . . . . . . . . . . . . . . . . . . . . . . . . . . . . . . . . . . . .430
Recognized chords . . . . . . . . . . . . . . . . . . . . . . . . . . . . . . . . . 431
Replacing the clock backup battery . . . . . . . . . . . . . . . . . 433Precautions . . . . . . . . . . . . . . . . . . . . . . . . . . . . . . . . . . . . . . . . . .433Installation . . . . . . . . . . . . . . . . . . . . . . . . . . . . . . . . . . . . . . . . . . .433
Installing a microSD card . . . . . . . . . . . . . . . . . . . . . . . . . . . 435Precautions . . . . . . . . . . . . . . . . . . . . . . . . . . . . . . . . . . . . . . . . . .435Installation . . . . . . . . . . . . . . . . . . . . . . . . . . . . . . . . . . . . . . . . . . .435Accessing the microSD card . . . . . . . . . . . . . . . . . . . . . . . . . . . .436Removal . . . . . . . . . . . . . . . . . . . . . . . . . . . . . . . . . . . . . . . . . . . . .436
Shortcuts . . . . . . . . . . . . . . . . . . . . . . . . . . . . . . . . . . . . . . . . . . 437
Troubleshooting . . . . . . . . . . . . . . . . . . . . . . . . . . . . . . . . . . . 438
Technical specifications . . . . . . . . . . . . . . . . . . . . . . . . . . . . 439
MIDI Implementation Chart . . . . . . . . . . . . . . . . . . . . . . . . 440
Index . . . . . . . . . . . . . . . . . . . . . . . . . . . . . . . . . . . . . . . . . . . . . 441


6 Welcome!
Welcome to the world of Korg Pa900 Professional Arranger!Pa900 is one the most powerful arranger available today, both forprofessional and home entertainment use.
Here are some of the features of your new instrument:
Physical Features and User Experience• 61 semi-weighted keys with velocity and aftertouch.
• Slim and compact, lightweight, elegant cabinet design.
• Wide 7" TFT graphic touch screen display. ProfessionalTouchView™ graphic interface for direct access to the on-screen controls and to the musical resources.
• High-quality two-way integrated amplification, and high-quality output (DAC) audio converters.
• RX (Real eXperience) Technology, the cutting edge enginethat drives every aspect of the Pa900 – from the synthesis tothe display and how it all works together.
• Three assignable switches, an assignable knob, a joystickand an assignable pedal ensure total control for all the vari-ous levels of articulation of the sound.
Sounds and Effects• Powerful sound generation system, for crystal-clear, realis-
tic sounds.
• DNC (Defined Nuance Control) Sounds, more realistic andvivid than ever.
• 192 MB of Sample memory for User PCM Samples. Sam-pling function to edit imported Samples.
• 128 voices of polyphony.
• General MIDI Level 2 Sound-compatible. Enhanced Soundcompatibility for GM Songs.
• More than 1,100 Sounds, including a Stereo Piano and 77Drum Kits.
• 320 Performance locations, plus 4 Single Touch Settings(STS) for each Style and SongBook Entry, for fast setting ofkeyboard sounds and effects.
• Four Stereo Master FX, with 125 effect types, including aselection of fine guitar effects created using Korg’s REMS™(Resonant structure and Electronic circuit Modeling Sys-tem) technology, to deliver truly great sounding effects.
• Mastering Limiter and Final 4-band Parametric EQ
Styles and Songs• Over 400 Factory Styles with 4 Variations and 4 Fill In +
Break, plus 12 Favorite and 3 User Style banks for unlim-ited storage of your custom Styles and settings.
• Style and Pad Record, including the enhanced “GuitarMode 2” for even more realistic guitar parts.
• “Chord Sequencer” function to record on-the-fly any chordprogression.
• XDS Double Player with X-Fader. Plays Standard MIDIFiles and MP3 files.
• Full-featured 16-track sequencer. Quick Record function torecord playing with the Styles.
• Lyrics, Score and Marker display. Multi-lingual extendedcharacter set. Enhanced compatibility with Lyrics in graph-ical format (+G) for Standard MIDI Files and MP3 files.
• MP3 recorder. MP3 player with Vocal Remover.
• Fully editable SongBook music database, for fast songretrieving.
Microphone and Vocal Effects• High-quality microphone preamplifier, to connect a
dynamic microphone.
• Sophisticated TC-Helicon Voice Processor, with dedicatedprofessional effects, including a 3-voice harmonizer.
Other Features• Search function, for instant retrieving of any musical
resource or file.
• Operating System updates, to load new features andenhancements. Don’t let your instrument get old!
• Generous internal memory, to store the greatest amount ofdata, including a slot for an (optional) microSD card.
• USB 2.0 High Speed Host port, for connecting externaldevices like hard disks, CD-ROM drives, USB memorysticks, etc.
• USB 2.0 High Speed Device port, to connect a personalcomputer to your Pa900. This port can be used for filetransfer or for MIDI connection (without the need of adedicated MIDI interface for the personal computer).
Welcome!

7Welcome!What’s in the box
Intr
oduc
tion
What’s in the box
After you buy your Pa900, please check that all the followingitems are included in the package. If any of the following items ismissing, please contact your Korg dealer immediately.
• Pa900
• Music stand
• Power cable
• Quick Guide
• Accessory Disc (containing the Video manuals, additionalmanuals, an USB driver)
About this manual
This manual contains all the informations divided in four sec-tions:
• An Introduction, containing an overview of the instru-ment and of basic operations.
• A Quick Guide, containing a series of practical guides.
• A Reference Guide, with each page and parameterdescribed in detail.
• An Appendix, with a list of data and useful information forthe advanced user.
In addition, in the DVD that comes with the instrument (as wellas in our web site) you will find a multilingual Video Manual,showing how to use your Pa900 in easy steps.
Contacts
Your preferred Korg dealer not only delivers this keyboard, butalso a whole bunch of hardware and software accessories, as wellas service information. You should ask them for any help shouldyou eventually need.
Our international web site is www.korg.com. Korg distributorsaround the world may have their own web page on the internet.A list of all Korg Distributors can be found in our dedicated website (www.korg.co.jp/English/Distributors/).
Making a safety copy of your data
Making a safety copyIn case you like to customize your Musical Resources (Sounds,Performances and Styles), we suggest you use the Media > Utility> Backup Resources command to make frequent backup copiesinto compact archives.
Also, you can use the Media > Save All command to save filesthat you can separately reload one by one.
Restoring a safety copyTo restore a backup, use the Media > Utility > Restore Resources.
If you saved your data with the Media > Save All command, usethe Media > Load operations to reload them.
Restoring the original factory data
In case you want to restore the original factory data, use theMedia > Utility > Factory Restore command.
Warning: This operation will overwrite all the Factory, Local,Favorite and User data!
Loading the Operating System
Your Pa900 can be constantly updated as new versions of theoperating system are released by Korg. You can download theoperating system from our web site. Please, read the instructionssupplied with the operating system on the site.
You can see which version of the operating systems is installed inyour Pa900 by going to the Media > Utility page.
Warning: Do not install an OS other than the official OS suppliedby Korg for the Pa900. Trying to install an OS created for differentmodels or downloaded from unofficial web sites may cause dataloss and permanent damage to the instrument. Korg is not respon-sible for any damage caused by improper installation of the OS.

8 OverviewFFront Panel
Overview
Phones
FFront Panel
SpeakersThe integrated speakers give a faithful reproduction of the soundof Pa900. They are automatically deactivated when inserting ajack into the PHONES connector. They can be manually deacti-vated with the “Speakers On/Off ” parameter you can find in theGlobal > Audio & Video > MP3/Speakers page.
Headphones
PHONES
Connect a pair of headphones to this output. You can use head-phones with an impedance of 16-200 Ohms (50 Ohms sug-gested). Use a headphone splitter to connect more than one pairof headphones.
When connecting a jack to this connector, the integrated speak-ers are automatically turned off. The AUDIO OUT will howevercontinue to work.
Joystick LeverThe joystick is on the left side of thefront panel.
JOYSTICK
This joystick triggers different func-tions, depending on the direction it ismoved towards.
X (+/–) Move the joysticktowards the left (–) to lower the pitch, or towardsthe right (+) to raise it. This effect is called thePitch Bend.
Y+ Move the joystick forward to trigger Modulation

9OverviewFFront Panel
Intr
oduc
tion
Y– Move the joystick backward, to trigger the func-tion assigned in Sound mode.
Volume ControlsUse these knobs to control themaster volume, and to balancebetween the Keyboard and theStyle or the Song.
MASTER VOLUME
This knob controls the overall volume of the instrument, both of theintegrated speakers, the AUDIO OUT and the PHONES outputs. Italso controls the volume of the AUDIO IN inputs in the final mix.
BALANCE
While in Style Play and Song Play mode, this knob usually bal-ances the volume of the Keyboard (KBD) tracks against the Style(ACC, Accompaniment), Song and Pad tracks. This is a relative
control, whose effective maximum value is determined by theMASTER VOLUME knob position.
When moved, a magnified version of a virtual slider appears inthe display, for more accurate adjustment.
It can be programmed to work as the volume control for theAccompaniment/Song tracks only, leaving the Keyboard tracksunchanged (in the Controllers > Hand Controllers page of theGlobal mode).
Note: This does not work in the Sequencer and Sound modes.
Assignable Knob
ASSIGNABLE KNOB Freely assignable knob, that can be programmed inthe Global > Controllers > Hand Controllers page.

10 OverviewFFront Panel
Mode SelectionEach of these buttons recalls one of the instrument’s operatingmodes. When selected, each mode excludes all the others.
STYLE PLAY
Style Play mode, where you can play Styles (eight tracks of auto-matic accompaniments) and play up to four Keyboard tracksand four Pad tracks. In the main page, Keyboard tracks areshown on the right half of the display.
You can recall the main page by pressing EXIT from any of theStyle Play edit pages. If you are in a different operating mode,press STYLE PLAY to recall the Style Play mode. If Keyboardtracks are not shown in the display, press the TRACK SELECTbutton to see them.
This operating mode is automatically selected when turning theinstrument on. The “My Setting” Performance will be automati-cally selected.
SONG PLAY
Song Play mode, where you can play back Songs in StandardMIDI File (MID or KAR) or MP3 format. In addition to theSong tracks, you can play up to four Keyboard tracks and fourPads along with the Song(s). In the main page, Keyboard tracksare shown in the right half of the display.
You can recall the main page of this mode by pressing EXITfrom any of the Song Play edit pages. If you are in a differentoperating mode, press SONG PLAY to recall the Song Playmode. Use the TRACK SELECT button to cycle between theKeyboard and Song tracks.
SEQUENCER
Sequencer mode, where you can play, record or edit Songs (in Stan-dard MIDI File format). The Backing Sequence (Quick Record)mode lets you record a new Song based on the Keyboard and Styletracks, and save it as a Standard MIDI File.
Note: While in this mode, you cannot play MP3 files.
SOUND
Sound mode, to play single Sounds on the keyboard, or editthem.
User Sounds may be based on User PCM Samples to be loadedinto the dedicated Sample RAM memory.
Note: Pa900 cannot load compressed User PCM Samples fromother Pa-Series models.
While in any other operating mode, keep the SHIFTbutton pressed and press this button, to send the Sound assignedto the selected track to the Sound mode.
Press the STYLE PLAY and SONG PLAY buttons together toselect the Demo mode. This mode lets you listen to some Demo
Songs, to let you experience the sonic power of the Pa900. Toexit from this mode, press any of the MODE buttons.
Special Mode ButtonsThese buttons are used to recall global settings and manage files.
GLOBAL
This button recalls the Global mode, where you can adjust vari-ous global settings. Most Global settings are automatically mem-orized as soon as you edit them. This mode overlaps anyoperating mode, that will still remain active in the background.Press EXIT to go back to the underlying operating mode.
MEDIA
This button recalls the Media mode, where you can perform var-ious operations on files and storage devices (Load, Save, Format,etc…). This mode overlaps any operating mode, that stillremains active in the background. Press EXIT to go back to theunderlying operating mode.
The internal memory contains an area where to save data(“DISK [KORG DISK]”).
You can install an (optional) microSD card in the dedicated sloton the back of the instrument, and gain access to the SD unit(“SD [KORG SD]”). See for information on how to install amicroSD card.
Style SectionHere you can select a Style, and activate the automatic selectionof STSs.
STYLE buttons
Use these buttons to open the Style Select window and choose aStyle. See “Style Select window” on page 100.
The FAVORITE/USER button gives access to twelve FavoriteStyle banks and three User Style banks. You can use User loca-tions to temporarily load new Styles from an external device, orsave newly created or edited Styles.
Favorite locations, too, can be used to load new Styles from anexternal device, or to save newly created or edited Styles, but inaddition you can edit the names of these Style banks, so that youcan create a custom set of Styles. See “The Favorite banks” onpage 129.
DEMO

11OverviewFFront Panel
Intr
oduc
tion
Each button (Style banks) contains five pages, each with up toeight Styles. Repeatedly press a STYLE button to cycle betweenthe available pages.
By keeping one of these buttons pressed for about one sec-ond, the “Write Current Style Settings” dialog box will appear.
STS MODE
This button lets you cycle between the following functions.
On When a Style is selected, STS 1 is also automati-cally selected. The Keyboard’s sounds and effectswill change, along with the Style’s sounds andeffects.
Flashing Variation/STS Link function activated. This func-tion makes each Variation recall the correspond-ing STS when selected. For example, selectVariation 2, and STS 2 will be automaticallyrecalled; select Variation 3, and STS 3 will beautomatically recalled.
Off When you select a Style, the Style’s sounds andeffects will change. The Keyboard’s sounds andeffects will not change.
Memory, Bass Inversion, Manual Bass, Chord SequencerThese buttons let you decide what should remain in memory,and how to play the bass. In addition, they have the ChordSequencer as a second function.
MEMORY
This button allows you to choose whether the Lower notes and/or chord triggering the accompaniment will remain in memoryafter raising your hand from the keyboard.
On Depending on the setting of the “Memory Mode”parameter (in the Global > Mode Preferences >Style), the sound on the left of the split point(Lower), and/or the chords for the automaticaccompaniment can kept in memory even whenyou raise your hand from the keyboard.
Off Both the sound and chord are released as soon asyou raise your hand from the keyboard.
Note: This function can be automatically activated by playing thekeyboard harder, by setting the “Velocity Control” parameter (inthe Global > Mode Preferences > Style page).
You can jump to the Global > Mode Preferences > Stylepage by keeping SHIFT pressed and pressing the MEMORY but-ton.
BASS INV. (Bass Inversion)
This button turns the Bass Inversion function on or off.
On The lowest note of a chord played in invertedform will always be detected as the root note of
the chord. Thus, you can specify to the arrangercomposite chords such as “Am7/G” or “F/C”.
Off The lowest note is scanned together with theother chord notes, and is not always consideredas the root note.
Note: This function can be automatically activated by playing thekeyboard harder. See “Velocity Control” on page 252.
M. BASS (Manual Bass)
This button turns the Manual Bass function on or off.
On The automatic accompaniment stops playing(except for the Drum and Percussion tracks), andyou can manually play the Bass track on theLower part of the keyboard. You can start theautomatic accompaniment again after pressingthis button to turn off the Manual Bass function.
Off The bass track is automatically played by the Style.
Note: When you press the MANUAL BASS button, the Bass trackvolume is automatically set to its maximum value. The volume isautomatically set back to the original value when the MANUALBASS button is deactivated.
While a Style is in play, you can use this section as a ChordSequencer and record a looping sequence of chords. The chordswill drive the arranger, leaving your hands free for solo playing.
RECORD (BASS INV. + M. BASS): Press these buttons togetherto start recording the Chord Sequence. Recording will start fromthe next measure. Press these buttons again to stop recording.
PLAY/STOP (MEMORY + BASS INV.): Press these buttonstogether to let the Chord Sequence play in loop, and automati-cally drive the arranger. The Chord Sequence will start on thenext measure. Press these buttons again to stop the sequence.
The Chord Sequence will remain in memory up until you recorda new Chord Sequence, or you turn the Pa900 off.
Record, Track SelectUse the RECORD and TRACK SELECT buttons to create or editStyles, Songs or Sounds, or select track groups.
RECORD
This button sets the instrument to the Record mode (which onedepends on the current operating mode).
TRACK SELECT
Depending on the operating mode, this button switches betweenthe various track views.
STYLE PLAY MODE
Toggles between Keyboard and Style tracks.
SONG PLAY MODE
Toggles between Keyboard tracks, Song tracks 1-8, and Song tracks 9-16.
CHORD SEQUENCER (PLAY/STOP AND RECORD)

12 OverviewFFront Panel
SEQUENCER MODE
Toggles between Song tracks 1-8 and Song tracks9-16.
STS SectionUse the STS (Single Touch Settings) buttons to assign Sounds tothe keyboard.
STS 1-4 buttons
These buttons allow to select up to four Single Touch Settings(abbreviated as STS). Each of the Styles and SongBook Entriesincludes four Single Touch Settings (STS), to automatically con-figure Keyboard tracks and effects at the touch of a finger.
By keeping one of these buttons pressed for about one sec-ond, the “Write Single Touch Setting” dialog box will appear.
Note: STS contained inside Factory Styles are usually write-pro-tected (unless you uncheck the “Factory Style and Pad Protect”option in the Global > Mode Preferences > Media page)
Search, ShiftUse the SEARCH and SHIFT buttons to search the memory’scontent or activate a button’s seconds function.
SEARCH
Press this button to open the Search window, and look for aspecified file or musical resource. The Search window appearsslightly different depending on the context.
SHIFT
With this button held down, pressing certain other buttons givesaccess to a second function. The list of shortcuts is in the Appen-dix.
Assignable Switches
ASSIGNABLE SWITCH
Freely assignable switches, that can beprogrammed in the Pad/AssignableSwitch > Switch page of the Style Play orSong Play mode.
PadsHere you can play (and stop) the Pads, i.e. single sounds or loop-ing sequences.
PAD 1-4STOP
Each Pad button corresponds to a dedicated Pad track. Use thesebuttons to trigger up to four sounds or sequences at the sametime.
• Press a single PAD button to trigger a single sound orsequence.
• Press more PAD buttons to trigger several sounds orsequences.
Sequences will play up to the end. Then, they will stop or con-tinue repeating, depending on their “One Shot/Loop” status (seethe “Pad Type” parameter in the Pad Record mode).
You can stop all sounds or sequences at the same time, or justsome of them:
• Press STOP (in the PAD section) to stop all sequences atonce.
• Press a single PAD button to stop the correspondingsequence.
About Pad synchronization. In Style Play mode, Pads are syn-chronized to the Style’s Tempo. In Song Play mode, they are syn-chronized to the latest Player you set to play. For example,assume you pressed PLAYER 2-PLAY; when pressing one of thePAD buttons, it will play in sync with Player 2.
Note: There is no synchronization with MP3 files. Pads can onlybe synchronized to the Tempo of the latest selected Standard MIDIFiles. Therefore, when an MP3 file is assigned to the latest selectPlayer, Pads will synchronize to the Tempo of the latest StandardMIDI File that has been played back.
About the Play command of Players and the Pads. When youpress one of the PLAY buttons to start the corresponding Player,all Pads will stop playing.
You can jump to the Style Play > Pad/Assignable Switchpage by keeping SHIFT pressed, and pressing one of the PADbuttons.
Players ControlsPa900 is equipped with two players (Player 1 and Player 2), eachwith its own set of transport controls. The Player 1 group is alsoused for the Sequencer mode.
SELECT
Press this button to open the Song Select window and choose aSong. This is the same as touching the Song name in the display.
<< and >>
Rewind and Fast Forward commands. If you use them while theSong is in play, they make it scroll back or forward.
When pressed once, these buttons move the Song to the previousor following measure (with a Standard MIDI File) or to the previ-ous or next second (with an MP3 file). When kept pressed, theymake the Song scroll continuously, until you release them.

13OverviewFFront Panel
Intr
oduc
tion
In Sequencer mode, if you set a “Start from” measure other than1, when pressing the << button the Song rewinds up to that mea-sure instead of the first one (see “Start from” on page 178).
In Jukebox mode (Player 1), keep the SHIFT buttonpressed, and press these buttons to scroll to the previous or nextSong in the Jukebox list (see “Jukebox Editor” on page 175).
(HOME)
Sends the Song Position back to the beginning of the Song.
In Sequencer mode, if you set a “Start from” measure other than1, the Song Position goes back to that measure (see “Start from”on page 178).
(PLAY/STOP)
Starts or stops the Song from the current Song Position.In Song Play mode, pressed while keeping SHIFT
pressed, starts both players at the same time.
X-FADER
In Song Play mode, this slider bal-ances the volume of the two on-board Players. When fully on theleft, only Player 1 can be heard.When fully on the right, only Player 2 can be heard. When in themiddle, both Players play at full volume.
This slider also selects the Lyrics, Score and Markers from one ofthe Players.
Note: This slider does not work in Style Play, Sequencer or Soundmode.
PLAYER 2 TRANSPORT CONTROLS
Transport controls for Player 2. See instructions for Player 1above.
Style ElementsThis section contains the separate elements of a Style (Intro,Variation, etc.).
INTRO 1-3 buttons
These buttons turn the corresponding Intro on. After pressingone of these buttons, start the Style, and it will begin with theselected Intro. The INTRO LED will automatically go off at theend of the Intro.
At the end of the Intro, the Variation whose LED was blinkingwill be selected.
Press one of the INTRO buttons twice (LED blinking) to let thecorresponding Intro play in loop, and select any other Style ele-ment (Intro, Variation, Ending) to exit the loop (or press thesame button again).
Note: Intro 1 plays a sequence including a chord progression, whileIntro 2 plays a fixed chord. Intro 3 is usually a one-bar Count In.
VARIATION 1-4 buttons
Each of these buttons selects one of the four Variations of thecurrent Style. The higher the Variation number, the denser thearrangement.
You can jump to the Style Play > Drum Map page bykeeping SHIFT pressed and pressing one of the VARIATIONbuttons.
AUTO FILL
This button allows to turn the Auto Fill function on or off.
On When selecting a different Variation, the Fill hav-ing the same number of the previous Variation isautomatically selected. For example, if going fromVariation 2 to Variation 3, Fill 2 is automaticallyselected.
Off When choosing a Variation, no fill is selected.
BREAK
This button triggers a break. Press it twice (LED blinking) to letit play in loop. Press it again or select any other Style Element(Intro, Variation, Ending) to exit from the loop.
ENDING 1-3 buttons
While the Style is running, these three buttons trigger an End-ing, and stop the Style. Press one of them, and the Style will stoprunning with an Ending.
Press them twice (LED blinking) to let them play in loop, andselect any other Style element (Intro, Variation…) to exit theloop (or press the same button again).
Note: Ending 1 plays a sequence including a chord progression,while Ending 2 plays a fixed chord. Ending 3 starts immediately,and is just two measures long.
Style ControlsUse these buttons to start/stop the accompaniment.
FADE IN/OUT
When a Style or Song is not playing, press this button to start itwith the volume “fading in” (the volume goes from zero to maxi-mum).
When a Style or Song is playing back, press this button to stop itwith the volume “fading out” (the volume gradually decreases).
You don’t need to press START/STOP or PLAY/STOP to start orstop the Style or Song.
Note: This does not work in Sequencer mode.
You can jump to the Global > General Controls page bykeeping SHIFT pressed and pressing the FADE IN/OUT button.
TAP TEMPO/RESET
This is a double-function button, acting in a different waydepending on whether the Style is running or not.

14 OverviewFFront Panel
Note: This button only works while in Style Play mode.
Tap Tempo: When the Style is not playing, you can “beat” thetempo on this button. Tap as many times as the Time Signature’snumerator (for example, four times with a 4/4 Time Signature, orthree times with a 3/4 one). At the end, the accompanimentstarts playing, using the “tapped in” tempo.
Reset: If you press this button while the Style is playing back, theStyle pattern goes immediately back to the beginning of measure1.
START/STOP
Starts or stops the Style.
Note: This function can be automatically activated by playing thekeyboard harder, by setting the “Velocity Control” parameter (inthe Global > Mode Preferences > Style page).
You can reset all ‘frozen’ notes and controllers on thePa900 and any instrument connected to its MIDI OUT or the USBDevice port, by using the “Panic” (SHIFT + START/STOP) keycombination. Just press SHIFT + START/STOP to stop all notesand reset all controllers.
SYNCHRO START / STOP button
These buttons turn the Synchro Start and Synchro Stop func-tions on or off. With this feature, you can choose to press theSTART/STOP button to start and/or stop a Style, or just play thekeyboard in the Chord Scan area.
Note: This button only works while in Style Play mode.
Start On, Stop Off
In this situation, just play a chord in the chordrecognition area to automatically start the Style. Ifyou like, turn one of the INTROs on before start-ing the Style.
Start On, Stop On
When both LEDs are lit, raising your hands fromthe keyboard will momentarily stop the Style. Ifyou play a chord again, the Style will start again.
Start Off, Stop On
In this case, raising your hands from the keyboardwill stop the Style.
Start Off, Stop Off
All Synchro functions are turned off.
You can jump to the Global > MIDI > General Control bykeeping the SHIFT button pressed and pressing the SYNCHROSTART/STOP button.
SongBookThe SongBook is a database of song titles, that canautomatically choose the more appropriate Style,Standard MIDI File or MP3 file for you.
SONGBOOK
While you are in Style Play or Song Play mode, press this buttonto open the SongBook. While the SongBook is shown on the dis-play, you can browse through the music database.
By keeping this button pressed for about one second, a newSongBook Entry with the current settings is added to the data-base. You will be able to give it a name and save.
You can jump to the SongBook > Custom List page bykeeping SHIFT pressed and pressing the SONGBOOK button.
EnsembleThe Ensemble function automatically harmonizesthe melody you play with your right hand.
ENSEMBLE
This button turns the Ensemble function on or off. When on, theright-hand melody is harmonized with the left-hand chords.
Note: The Ensemble function only works when the keyboard is inSPLIT mode.
You can jump to the Style Play > Keyboard/Ensemblepage by keeping SHIFT pressed and pressing the ENSEMBLEbutton.
Display and Brightness Controls
COLOR TOUCHVIEW™ GRAPHICAL DISPLAY
Use this display to interact with the instrument. To adjust thedisplay brightness, keep the MENU button pressed, and turn theDIAL counter-clockwise to make the display darker, or clock-wise to make it brighter.
Data Entry and NavigationThe VALUE DIAL can beused to assign a differentvalue to the parameterselected in the display, or toscroll a list of files in the SongSelect, SongBook, Search andMedia pages.
VALUE DIAL
Turn the dial clockwise toincrease the value of theselected parameter. Turn itcounter-clockwise to decrease its value.
When used while pressing the MENU button, this con-trol always acts as a Display Brightness control.

15OverviewFFront Panel
Intr
oduc
tion
EXIT
Use this button to perform various actions, leaving from the cur-rent status:• Exit the Edit menu page, without selecting any item.• Make the page menu disappear, without selecting any
item.• Return to the main page of the current operating mode.• Exit the Global or Media edit environment, and return
to the current page of the current operating mode.• Exit from the SongBook mode.• Exit from the Lyrics, Score and Marker pages.• Exit from a Style, Pad, Performance or Sound Select
window.
MENU
This button opens the edit menu page for the current operatingmode. After opening an edit menu, you can jump to one of theedit sections by touching the corresponding button in the dis-play.
Otherwise, press EXIT to return to the main page of the currentoperating mode, or the current page of the underlying operatingmode.
Lyrics, Score, MarkerUse these buttons to access the Lyrics, Score or Marker pages.Use the X-Fader to select either Player 1 or Player 2.
LYRICS
This button recalls the Lyrics page for the Song or the Style.
SCORE
Press this button to open the Score page (in Song Play mode).
MARKER
Press both the LYRICS and SCORE buttons together to open theMarker page (in Song Play mode).
Tempo SectionThe TEMPO and METRO buttons can be used to control theTempo and the Metronome.
TEMPO +/– buttons
TEMPO– decreases the speed of the Style or Song. TEMPO+increases it.
Press both buttons together to reset the Tempo to the valuememorized in the Style or Standard MIDI File. With MP3 files,the original speed of the file is recalled (value reset to “0”).
TEMPO LOCK
This button turns the Tempo Lock function on or off.
On When you select a different Style or Performance,or select a different Song, the Tempo will notchange. You can still manually change it, by usingthe TEMPO +/– buttons, or select the Tempovalue and change it by using the VALUE dial.
Off When you select a different Style or Performance,or select a different Song, the memorized Tempowill be automatically selected.
Note: This button does not work with MP3 files.
You can jump to the Global > General Controls > Lockpage by keeping SHIFT pressed and pressing this button.
METRO
Use this button to turn the Metronome on or off.
You can jump to the Global > General Controls > Basicpage by keeping SHIFT pressed, and pressing this button.
Sound Select
SOUND SELECT
Use this button to open the Sound Select window and select aSound to be assigned to the selected track. This is the same astouching a Sound name in the display. Repeatedly press it tocycle between the Sound bank pages.
For each type of Sounds there are several Sound banks, that canbe selected by touching the side tabs. Each Sound bank containsvarious pages, each with up to eight Sounds, that can be selectedby touching the lower tabs.
Sounds of the Factory type are usually write-protected (unlessyou uncheck the “Factory Sound Protect” option in the Global >Mode Preferences > Media page). Sounds of the Legacy type arestandard Factory Sounds allowing greater compatibility witholder Pa-Series instruments. Factory Sounds of the GM typeallow for compatibility with General MIDI sounds. Sounds ofthe User type are locations where you can load new Sounds froman external device, or save new or edited Sounds. The User DKtype is where you can load new Drum Kits, or save new or editedDrum Kits.
Chord Scan and Keyboard SplitUse these buttons to choose chord recognition and keyboardsplitting.
CHORD SCAN section
In Style Play, Song Play and Sequencer-Backing Sequence mode,use these buttons to define the way chords are recognized.
LOWER Chords are detected below the split point. Thenumber of notes you should play to form a chordis defined by the Chord Scan Mode parameter(see “Chord Recognition” on page 252).
UPPER Chords are detected above the split point. Youmust always play three or more notes to let thearranger recognize a chord.

16 OverviewFFront Panel
FULL (both LEDs On)Chords are detected on the full keyboard range.You must always play three or more notes to letthe arranger recognize a chord. (You can use thismode even when the Split keyboard mode isselected). A Fingered or Expert Chord Recogni-tion Mode is automatically selected (see “ChordRecognition” on page 252).
OFF No chords detected. After pressing START/STOP,only the Drum and Percussion accompanimenttracks will play.
SPLIT
In Style Play, Song Play and Sequencer-Backing Sequence mode,use this button to define how the four Keyboard tracks are posi-tioned on the keyboard, and how chords are recognized by thearranger.
Note: One of the Chord Scan options must be selected for theaccompaniment to play.
On The Lower track plays below the split point, whilethe Upper 1, Upper 2 and Upper 3 tracks playabove it. This is called the Split keyboard mode.
By default, turning on the Split mode automati-cally selects the Lower chord scanning mode (seeabove). In this mode, chords are detected belowthe split point. The number of notes you shouldplay to form a chord is defined by the “ChordRecognition” parameter (see page 252).
Off The Upper 1, Upper 2 and/or Upper 3 tracks playover the whole keyboard range. The Lower trackdoes not play. This is also called the Full key-board mode.
By default, turning off the Split mode automati-cally selects the Full chord scanning mode (seeabove). In this mode, chords are detected over thefull keyboard range. You must always play threeor more notes to let the arranger recognize achord (see “Chord Recognition” on page 252).
By keeping this button pressed for about one second, theSplit Point window appears. When there, play the new split pointon the keyboard.
Transpose Section
Use these buttons to transpose the Sounds.
UPPER OCTAVE
Use these buttons to transpose the Upper tracks in steps of onewhole octave (12 semitones; max ±3 octaves). The octave trans-position value is always shown (in octaves) next to the Sound’sname.
Press both buttons together, to reset the Octave Transpose to thesaved value.
– Lowers the selected track by one octave.
+ Raises the selected track by one octave.
You can jump to the Style Play > Mixer/Tuning > Tuningpage by keeping SHIFT pressed and pressing one of the UPPEROCTAVE buttons. Hint: Go to the Tuning page to separatelytranspose each track.
TRANSPOSE
These buttons transpose the whole instrument in steps of onesemitone (Master Transpose). The transpose value is usuallyshown in the page header.
Press both buttons together, to reset the Master Transpose to zero.
Note: You can also transpose MP3 files. Keep in mind, however,that transposition always remains inside the range -5…+6 semi-tones. This range is enough to cover all keys, but allows to avoidexcessive audio degradation. Any further transposing will bereversed to fit the range. So, you might see a +7 transpose value(Just Fifth Up) shown in the display, but the MP3 will actually play5 semitones lower (Just Fourth Down).
♭ Lowers the Master Transpose in steps of onesemitone.
♯ Raises the Master Transpose in steps of one semi-tone.
You can jump to the Global > Tuning > Transpose Con-trol page by keeping SHIFT pressed, and pressing one of theTRANSPOSE buttons.
Performance Select SectionUse these buttons to select a Performance. Performances memo-rize all Sounds assigned to the keyboard, most control panel set-tings, and an associated Style.
MY SETTING
This is a special direct-access Performance, that is automaticallyselected when the instrument is turned on. When pressing thisbutton, the Performance is immediately selected.
Keep this button pressed for about one second to save thecurrent settings into the My Setting Performance.
PERFORMANCE buttons
Use these buttons to open the Performance Select window, andselect a Performance.
Each Performance bank contains five pages, each with up toeight Performances. Repeatedly press a PERFORMANCE buttonto cycle between the available pages.
All Performances can be freely customized, by accessing the editpages of the Style Play and Song Play modes by pressing theMENU button.
By keeping one of these buttons pressed for about one sec-ond, the “Write Performance” dialog box will appear.

17OverviewFFront Panel
Intr
oduc
tion
STYLE CHANGE
This button turns the Style Change function on or off.
On When you select a Performance, the Style mightchange according to which Style is memorizedonto the Performance.
Off When you select a Performance, the Style willremain the same. Only Keyboard tracks (Sounds,Effects…) will be changed.
Mic Setting SectionUse these buttons to check the audio input level, set the volumeof the microphone input and effects, and turn the microphoneand harmony voices on or off.
AUDIO IN LED
This LED shows the level of the audio signal entering theAUDIO IN connectors (either mic or line). Three different col-ors (green, orange, red) show the level. Try to keep the level sothat this LED remains on green most of the time, with orangeappearing at signal peaks. Never go to red.
Off: No signal entering.
Green: Low- to mid-level signal entering. If the LEDturns off too often, the input gain is too low.When a microphone is connected to the LEFTconnector, use the MIC GAIN control to increasethe input level. When a line-level device is con-nected, use the source device’s own volume con-trol.
Orange: Slight overload in the signal path. This is fine if itturns on only on signal peaks.
Red: Clipping is occurring in the signal path. Use theMIC GAIN control and/or the source device’svolume control to lower the input level.
See “AUDIO IN Section” on page 20 for moreinformation on the AUDIO IN connectors.
MIC VOLUME
Use this knob to set the overall volume of the microphone signal(including the Voice Processor effects). This is equivalent to theMIC/IN track you can see in the Volume pane of the main dis-play.
FX LEVEL
Use this knob to set the volume of the Delay and Reverb sectionsof the Voice Processor.
MIC ON/OFF
Press this button to turn the microphone input on or off. TheLED shows the status of the microphone section.
If you keep the SHIFT button pressed, and press this but-tons, the Global > Mic > Global Setup page will appear (see“Mic: Global Setup” on page 454).
HARMONY
Turns the Voice Harmony effect on or off. This adds harmoniza-tion voices to the lead voice.
If you keep the SHIFT button pressed, and press this but-ton, the Global > Mic > Harmony page will appear (see “Mic:Harmony” on page 450).
PRESET
Use this button to open the Voice Processor Preset Select win-dow and select a Preset to be assigned to the microphone signalentering the LEFT input. This is the same as touching a Presetname in the display.
For each type of Preset there are several Preset banks, that can beselected by touching the side tabs. Each Preset bank may containup to eight Presets.
By keeping this button pressed for about one second, the“Write Voice Processor Preset” dialog box will appear.
USB Host connectorUse this connector to connect USB mass storage devices.
USB HOST(F) CONNECTOR
This is a USB Type A (Master/Host) connector, USB 2.0 compli-ant (High Speed). Use it to connect to the Pa900 an USB FlashMemory stick, an external CD-ROM drive, an USB hard disk. Toaccess the connected device, go to the Media edit mode (see“Media mode” on page 277).

18 OverviewFFront Panel
Standby On/Off
STANDBY
Use this button to let the instrument exit (LED off)or enter (LED on) standby.
Press it briefly to let the instrument exit standby. In case thereare User Sounds based on User PCM Samples, loading may takesome time.
Keep it pressed for about one second to let it enter standby.
Warning: When the instrument is in standby mode, it is still con-nected to the power line. Accessing the inside of the instrument canbe dangerous. To completely disconnect the instrument from thepower, unplug the power plug from the power socket on the wall.
Note: To avoid wasting power, Pa900 will by default automaticallyenter standby mode after two hours of non-active use (playing,pressing buttons or using the touch-screen). Please save your data(Performances, Styles, Songs, and so on) before taking a prolongedpause. You can change the auto power-off timer in Global > Gen-eral Controls > Clock & Power.

19OverviewRear Panel
Intr
oduc
tion
Rear Panel
Music stand
Music stand holes
A music stand comes standard with your Pa900. Insert its legsinto these two dedicated holes.
Video
VIDEO OUT
You can connect Pa900 to a TV or video monitor.
Pa900 is compatible with the NTSC, PAL andSECAM TV standard. When connecting a SECAM-compliant TV set, select the PAL standard. However,in this latter case, the image will be shown in black and white.
1. Connect the instrument’s video output to the video input ofthe television set. Depending on the type of television set, youcan use a cable of the type “RCA-to-RCA” (if the television set isequipped with a Video Composite input), or “RCA-to-SCART”(if the television set is equipped with a SCART connector). Youcan buy the needed cables at a store that sells television equip-ment.
2. Turn the instrument on, and press the GLOBAL button to gainaccess to the Global mode. Go to the Audio & Video > VideoOut page, and select the video standard (PAL or NTSC).
3. Turn the television set on, and tune it on the correct AV input.
4. In the same page of the Global, use the Colors parameter tochoose the preferred set of colors for the lyrics and the back-ground.
USB Device ConnectorUse this connector to connect Pa900 to a personalcomputer.
DEVICE
This is a USB Type B (Slave/Device) connector, USB 2.0 (HighSpeed). Use it to connect the Pa900 to a personal computer, andtransfer data to/from its internal memory (Disk). You can enableUSB connection in the “USB” page of the Media mode.
MIDI over USB is supported, so you can use this connectorinstead of the MIDI ports. The drivers for PC and Mac, neededto make full use of this type of connection, are supplied in theAccessory Disc that comes with the instrument, or can be down-loaded from our web site.
PedalsUse these connectors to connect varioustypes of pedals.
ASSIGNABLE
Use this port to connect a continuous- or footswitch-type pedal,like the (optional) Korg EXP-2, XVP10, PS-1 or PS-3. To pro-gram and calibrate it, go to the Controllers > Foot Controllerspage of the Global mode.
DAMPER
Use this to connect a Damper pedal, like the (optional) KorgPS1, PS3 or DS1H. To change its polarity and calibrate it, go tothe Controllers > Foot Controllers page of the Global mode.
Note: Half-pedalling on Piano Sounds is available when connect-ing a DS1H Damper pedal.
MIDI InterfaceThe MIDI interface allows your Pa900to be connected to external controllers(master keyboard, MIDI guitar, windcontroller, MIDI accordion…), to aseries of expanders, or to a computerrunning a sequencer.
OUT
This connector sends MIDI data generated by Pa900’s keyboard,controllers, and/or the internal player. Connect it to anexpander’s or computer’s MIDI IN.
IN
This connector receives MIDI data from a computer or a con-troller. Connect it to an external controller’s or computer’s MIDIOUT.
AUDIO OUT SectionUse these connectors to send the audio signal(sound) to a mixer, a PA system, a set of pow-ered monitors, or your hi-fi system.

20 OverviewRear Panel
LEFT, RIGHT
Use these line-level outputs to send the final stereo mix to anexternal device. Connect either of them to output the signal inmono. Adjust the output level with the MASTER VOLUMEknob.
Connect two mono cables to these outputs. Connect the otherend of the cables to a stereo channel of your mixer, two monochannels, two powered monitors, or the CD, LINE IN or TAPE/AUX input of your audio system. Don’t use the PHONO inputsof your audio system!
Connecting a jack to these outputs will not deactivates the inte-grated speakers. This way, you can continue to monitor yourplaying, while the signal is sent to the main mixer.
AUDIO IN SectionUse these connectors to connect adynamic microphone, another key-board/synthesizer, or a CD player.
LEFT, RIGHT
Use these connectors to connect a line-level input source, suchas a CD player or a synthesizer, or a dynamic microphone. Thesignal routing, and the correct impedence for these inputs, canbe selected with the “Input Routing” parameter in the Global >Audio & Video > Audio In page (see page 264).
• When the “Input Routing” parameter is set to “Left In to VoiceProcessor”, you can connect a dynamic microphone to the LEFTaudio input, and a mono line-level source to the RIGHT audioinput. Use the MIC GAIN knob to adjust the input gain. Set thevolume level of the microphone signal in the mix by using the
MIC VOLUME knob, while watching at the AUDIO IN LED onthe control panel (see “Mic Setting Section” on page 17).
• When the “Input Routing” parameter is set to “Audio Ins toDirect Out”, you can connect a line-level input source to theLEFT and RIGHT audio inputs. Use the source’s output volumecontrol to adjust the input level, while watching at the AUDIOIN LED on the control panel.
MIC GAIN
Use this controls to adjust the input sensitivity of the LEFT con-nector (from 0 to +40dB) when it is set to the microphone inputsensitivity (see above). You can check the input level by watchingat the AUDIO IN LED on the control panel (see “Mic SettingSection” on page 17).
PowerThis is where you connect Pa900 to the power line.
ACV cable connector
Plug the supplied AC cable into this con-nector. When the cable is connected, theinstrument is in standby mode. To let itenter or exit standby, use the STANDBYswitch located on the front panel.
Warning: When the instrument is in standby mode, it is still con-nected to the power line. Accessing the inside of the instrument canbe dangerous. To completely disconnect the instrument from thepower, unplug the power plug from the power socket on the wall.

21Start upConnecting the AC power cord
Intr
oduc
tion
Connecting the AC power cord
Connect the supplied power cord to thededicated socket on the rear of the instru-ment. Then, plug it into a wall socket. Youdon’t need to worry about the local volt-age, since the Pa900 uses a universalpower adapter.
When the cable is connected to the power, the instrument auto-matically enters standby mode.
Turning the instrument on (or in standby)
Press the STANDBY button on the front panel to letthe instrument exit standby. The display will lightup, showing the boot procedure.
Note: When the instrument exits standby, User PCMSamples used by some User Sounds may be automati-cally loaded. Loading them may take some time.
Keep the STANDBY button pressed for about one second to letthe instrument enter standby.
Warning: When putting the instrument in standby, all data con-tained in RAM (Song recorded or edited in Sequencer mode, theChord Sequence, Samples in edit and not yet saved) will be lost.MIDI Grooves generated by the Time Slice function will be lost,too.
On the contrary, data contained in the internal memory (Factorydata, User Sounds, Performances, Styles and Multisamples) will bepreserved. Saved Samples will be preserved as well.
Controlling the Volume
Master VolumeUse the MASTER VOLUME knob to control theoverall volume of the instrument. This knob con-trols the volume of the sound going to the inte-grated speakers, the AUDIO OUT and PHONESconnectors.
Note: Begin at a moderate level, then raise the MASTER VOL-UME up. Don’t keep the volume at an uncomfortable level for toolong.
Keyboard, Style Accompaniment and SongVolumeBy default, the BALANCE knob balancesthe volume of the Keyboard (KBD) tracks,against the Style’s Accompaniment (ACC),Song and Pad tracks.
• When in Style Play mode, this knobbalances between the Keyboard tracks, and the Style andPad tracks.
• When in Song Play mode, this knob balances between theKeyboard tracks, and the Player and Pad tracks.
This is a relative control, whose effective maximum level isdetermined by the MASTER VOLUME knob position.
When moved, a magnified version of the virtual slider appears inthe display, for more accurate positioning.
As an alternative, the knob can be used to control the Style/SongVolume without affecting the Keyboard tracks (choose thedesired behavior by editing the “Balance Control” parameter inthe Global > Controllers > Hand Control page).
Note: This knob only works in Style Play and Song Play mode; itdoes not work in Sequencer mode.
The X-Fader slider
The X-FADER slider sets the relative volume of the two onboardplayers (Player 1 and Player 2).
• Move it fully to the left to set Player 1 to the maximum leveland Player 2 to zero.
• Move it fully to the right to set Player 1 to zero and Player 2to the maximum level.
• Move it to the center to set both Players at the same level.
This slider also selects the Harmony source, as well as the Lyrics,Score and Markers of one of the two players.
Headphones
Connect a pair of headphones to the PHONES output, on the left sideof the keyboard (under the joystick). You can use headphones with animpedance of 16-200 Ohms (50 Ohms suggested). Use a headphonesplitter to connect more than one pair of headphones.
Note: When connecting the headphones, the speakers are automat-ically deactivated.
Start up
Player 2Player 1

22 Start upLoudspeakers
Loudspeakers
Pa900 is fitted with four powerful, high-quality integrated speak-ers and a bass-reflex box, powered by a 20+20 Watt amplificationsystem.
The overall volume can be controlled via the MASTER VOL-UME knob.
Speakers can be deactivated with the “Speakers On/Off ” param-eter, that you can find in the Global > Audio & Video: MP3/Speakers page.
Audio Outputs
Audio outputs allow for connecting Pa900 to an external ampli-fication system. The overall volume can be controlled via theMASTER VOLUME knob.
MIDI connections
You can play the internal sounds of your Pa900 with an externalcontroller, i.e. a master keyboard, a MIDI guitar, a wind control-ler, a MIDI accordion, or a digital piano.
You can also control other MIDI devices with Pa900, or connectit to a computer for use with an external sequencer.
As an alternative to the MIDI connectors, you can use the USBDevice port for direct connection to a personal computer.
See the “MIDI” chapter on page 308 for more information onMIDI connections.
Damper pedal
Connect a Damper (Sustain) pedal to the DAMPER connectoron the back panel. Use an (optional) Korg PS1, PS3 or DS1Hfootswitch pedal, or a compatible one. With the Korg DS1H,half-pedalling can be used on some Grand Piano sounds. To cal-ibrate and switch the Damper polarity, go to the Controllers >Foot Controller page of the Global mode.
Assignable pedal
Connect either a footswitch or an expression pedal to theASSIGNABLE connector on the back panel. Use an (optional)Korg PS1 or PS3 footswitch pedal, a Korg EXP-2 expressionpedal, a Korg XVP-10 volume pedal, or a compatible one. To cal-ibrate the pedal, go to the Controllers > Foot Controller page ofthe Global mode.
The music stand
A music stand comes standard with your Pa900. Insert its legsinto the two dedicated holes on the rear panel, as shown in theillustration:

23Glossary of TermsSound
Intr
oduc
tion
Before you begin, take a few moments to familiarize yourselfwith the names and terms we will be using to talk about the vari-ous elements of the Pa900.
In this section, you will find a brief description of various keyelements of the Pa900. A professional arranger (Pa) keyboarduses different terminology than a traditional synthesizer orworkstation. By familiarizing yourself with the names and func-tions in this section, you will get a better understanding of howall the different parts of the Pa900 work together to create a real-istic musical performance. This will also help you to get the mostout of the rest of the manual.
Sound
A Sound is the most basic unit of an Arranger Keyboard perfor-mance. A Sound is basically a playable instrument timbre (piano,bass, sax, guitar…) that can be edited, saved, recalled andassigned to any track. An individual Sound can be played on thekeyboard in the Sound mode. In the Style Play, Song Play orSequencer mode, Sounds may be freely assigned to Sequencertracks, Style tracks, or Keyboard tracks.
Style
The Style is the heart of a professional arranger keyboard. At itsbasic level, a Style will consist of up to eight parts, or “Tracks”.
DrumsThe Drum track will provide a repeating rhythmic phrase,played by the standard instruments of a Drum Kit.
PercussionAn additional rhythmic phrase played by various percussioninstruments (conga, shaker, cowbell, etc.) is provided by the Per-cussion track.
Bass & AccompanimentThe Bass track and the (up to) five additional Accompanimenttracks will each play musical phrases that are musically related toand in sync with the Drum and Percussion tracks. However, thenotes being played by these tracks will change to follow thechord progression that you play on the keyboard.
Again, any Sound you choose may be assigned to any track in aStyle.
VariationFor each Style, there are four Variations, to be used for the Verse,Bridge and Chorus of a song. In general, each Variation is aslightly different version of the others. As you progress fromVariation one to Variation four, the arrangements will becomemore complex, and more parts (Tracks) may be added. Thisallows your performance to have a more dynamic arrangement,without losing the original “feel” of the Style.
Fill-in & BreakDuring a performance, a drummer may often perform a “fill” -such as when transitioning from a verse to a chorus – addingextra dynamics and keeping the beat from getting too repetitive.The Pa900 offers four Fill-ins specifically programmed for eachStyle, that may be automatically recalled when choosing the cor-responding Variation (Auto Fill). A Fill-in may be drums aloneor drums with instrumentation. Then, there is even a silent“break”.
Intro & EndingEach Style also allows you to complete your performance with aset of musical introductions and endings. A long and short ver-sion of the Intro and Ending are usually provided, with the for-mer more harmonically elaborated, and the latter with a fixedchord. A “count-in” Style Intro is also provided, as well as thequick Ending 3.
Pad
Pads are single sounds or single-track patterns, that can be trig-gered by using the dedicated PAD buttons. They can be used toplay in realtime single sounds, as well as short, cycling sequencesthat play in time with the Style or Standard MIDI File, and aretransposed according to the recognized chords.
Keyboard tracks
In addition to the Style and Pad tracks, up to four additionalparts can be played on the keyboard in real-time. Each of theseKeyboard tracks can be limited to a particular range of keys orvelocities, but in general up to three can be assigned to playabove the split point (Upper), and one below (Lower). Thisallows the Upper Sounds to be layered together. The split pointcan be set to any note on the keyboard. In addition to perform-ing along with a Style, these same Keyboard tracks will allow youto play along with the Players.
STS (Single Touch Settings)Single Touch Settings allow you to instantly change the soundsassigned to each of the Keyboard tracks with a single buttonpress, allowing for wide variation in sounds during a perfor-
Glossary of Terms

24 Glossary of TermsPerformance
mance. Four STS (Single Touch Settings) can be saved with eachStyle or SongBook Entry.
EnsembleBy turning the Ensemble feature on, a single note played on oneof the Keyboard tracks will be embellished by additional notes tocreate a complete chord voicing. The Ensemble knows whichnotes to add by looking at the chord that you are playing. Inaddition, the Ensemble parameters allow you to select the type ofvoicing that will be added – from a simple one-note harmony toa full “Brass” section – even a marimba-style trill!
Performance
The Performance is the most encompassing setting on the Pa900– a single setting that can remember a Style (with all the appro-priate sounds), the Keyboard tracks (with all the appropriatesounds) and all their Tempo, transposition, effects, etc… A Per-formance can be stored in one of the Performance bank loca-tions, or it can be saved in a “database” format using theSongBook function.
Sequencer
The Sequencer acts as a recorder, so you can capture and play-back your performances. The Pa900 sequencer can function indifferent modes. In the Backing Sequence mode, each Style ele-ment and each Keyboard and Pads element can be recorded on aseparate track in a single pass. This can be a big help in getting asong recorded quickly. The sequencer can also behave as a tradi-tional 16-track linear sequencer, where each track is recordedindividually one at a time.
Player
The Player lets you playback your performances or any StandardMIDI File or MP3 file.
The LOGO decoder
On the front panel of your Pa900 you have probably noticed aseries of logos, and may have even wondered what they stand for.Well, here is a quick explanation of each one.
General MIDI (GM) is a standard that ensuresthe compatibility of sounds and messagesbetween GM compatible instruments availablefrom different manufacturers. For example,
sequenced songs created on any GM equipped product andsaved in the GM format will playback correctly on the Pa900.
General MIDI 2 extends the basic features of the General MIDI,allowing for 256 Sounds and 9 Drum Kits (instead of 128 and 1).
RX Technology is the cutting edge engine thatdrives every aspect of the Pa900 – from thesynthesis to the display and how it all workstogether.
DNC (Defined Nuance Control) is the way offine-controlling Korg’s powerful sound engine.Every nuance and every detail of the sound can beassigned to a different control, be it the keyboard
velocity or a physical controller.
TouchView is the sophisticate technologyallowing for touching the objects in thedisplay, instead of pointing to them
through an external device (a mouse, a series of buttons). Gostraight to the musical elements, instead of catching keys some-where on the control panel.
TC-Helicon is the world’s leading com-pany in vocal processing. Korg part-nered with them for the outstading
Voice Processor tecnologies included in our Pa-Series instru-ments.

25Interface basicsColor TouchView graphical user interface
Intr
oduc
tion
Color TouchView graphical user interface
Pa900 features our exclusive easy-to-use TouchView graphicinterface, based on a touch‐panel LCD screen. By touching itemson the LCD screen, you can select pages, tabs, and parameters,and set parameter values via on‐screen menus and buttons. Hereare the basic elements of the user interface.
Menus and sectionsPages are grouped in sections, to be selected by touching the cor-responding buttons in the Edit menu that opens up when youpress the MENU button.
PagesParameters are grouped into separate pages, to be selected bytouching the corresponding tabs on the lower area of the display.
Overlapping windowsSeveral windows, like the Style Select or Pad Select, the Global,the Media, or the Lyrics, overlap the current window. After youselect an item in the window, or press the EXIT button, the win-dow closes, and the underlying page is shown again. (The fol-lowing example is the Sound Select window).
Dialog boxesSimilar to selecting windows, dialog boxes overlap the underlay-ing page. Touch one of the button on the display to give Pa900 ananswer, and the dialog box will close.
Page menusTouch the icon on the upper right corner of each page, and amenu with suitable commands for the current page will appear.Touch one of the available commands to select it. (Or, touch any-where else on the screen to make it disappear, with no commandselected).
Interface basics

26 Interface basicsColor TouchView graphical user interface
Pop-up menusWhen an arrow appears next to a parameter name, touch it toopen a pop-up menu. Select any of the available options (or any-where else on the screen to make the menu disappear).
CheckboxesThis kind of parameters are on/off switches. Touch them tochange their status.
Numeric fieldsWhen a numeric value can be edited, touch it a second time toopen the Numeric Keypad.
The virtual numeric keypad works exactly as the numeric key-pad of a personal computer.
As an alternative, touch a numeric field and keep it held. Thenmove your fingers up (or right) to increase the value, or move itdown (or left) to decrease it.
This also includes the Tempo numeric field in the main page ofthe Style Play, Song Play, and Sequencer modes.
Editable names
When the (Text Edit) button appears next to a name, touchit to open the Text Edit window and edit the name.
The virtual keyboard works exactly as a personal computer’skeyboard. Some of the symbols are context-sensitive, and onlyappear when they can actually be used.
Lists and scrollbarsFiles on storage media, as well as other kinds of data, are shownas lists. Use the scrollbar to scroll the list content. Also, you canuse the VALUE DIAL to scroll.
When the Name label is selected, keep the SHIFT button pressedwhile touching one of the arrows on the scrollbar, to scroll to thenext or previous alphabetic section.
Virtual slidersTo change a virtual slider’s position, select it, then use theVALUE dial to change its position. As an alternative, touch aslider with your fingers and keep it held; then move it up ordown to change its position.
= On
= Off
List Scrollbar

27Interface basicsOperative modes
Intr
oduc
tion
Virtual knobsTo change a virtual knob’s position, select it, then use the VALUEdial to change its position. As an alternative, touch a knob withyour finger and keep it held; then move your fingers up (orright) to rotate it clockwise, or move it down (or left) to rotatethe knob counter-clockwise.
Virtual drawbarsTo change a virtual drawbar’s position, touch it with your fingersand keep it held. Then move it up or down to change its position.
As an alternative, select it, then use the VALUE DIAL to changeits position.
IconsVarious icons help identifying the type of a file, a Song, a folder.For example:
Folder
File of Style bank
Standard MIDI File
Operative modes
The pages of Pa900 are grouped in various operating modes.Each mode is accessed by pressing the corresponding button inthe MODE section on the control panel.
Each operating mode is marked with a different color code, thathelps you understand at first sight where you are.
Two special modes (Global and Media) overlap the currentoperating mode, that remains active in the background.
The Record mode can be accessed from the Style Play andSequencer modes, and allows for creating new Styles or Songs. Itcan also be accessed from the Sound mode, where allows you toedit Samples.
Selected, highlighted items
Any operation on parameters, data or list entries, is executed onhighlighted items. First select the parameter or item, then exe-cute the operation.
Non-available, grayed-out parameters
When a parameter or command is not currently available, it isshown in grey on the display. This means it cannot be selected,but may become available when a different option is selected, oryou switch to a different page.
Shortcuts
Some commands or pages can be recalled by keeping the SHIFTbutton pressed, and pressing other buttons or elements in thedisplay. See the “Shortcuts” chapter on page “Shortcuts” onpage 437 for a list of available shortcuts.

28 Easy Mode
If you have never used an arranger before, we suggest you toswitch to the Easy Mode. Easy Mode allows you to play Stylesand Songs with a simple user interface, free from the manyadvanced parameters that you will want to learn at a later date.
Turning the Easy Mode onTouch the little rectangle on the top right corner of the display,to open the page menu:
Touch the “Easy Mode” menu item, to make the checkmarkappear:
At this point, the Easy Mode has been activated, and the ele-ments in the display appear less crowded:
Turning the Easy Mode offReverse the above operation when you want to deactivate theEasy Mode.
Easy Mode
The page menu

29Easy ModeThe Style Play page in detail
Intr
oduc
tion
The Style Play page in detail
To see this page, press the STYLE PLAY button.
Notes:
• There are three Sounds for the right hand (Upper 1, Upper 2,Upper 3), and a single Sound for the left hand (Lower). Theirnames are abbreviated as UP1, UP2, UP3, LOW, and are shownon the right side of the display.
• Right hand (Upper) and left hand (Lower) Sounds are sepa-rated by the Split Point.
• Performances and STSs are collections of Sounds. Just chooseone of them to change all the keyboard’s Sounds.
• Choose a Style to change the musical style of the accompani-ment patterns.
Sound icon and status. If the icon appears, the Sound
is in mute and cannot be heard. If the icon does not appear, the Sound is in play and can be heard. See page 39
Sounds assigned to the right hand (UP1 to UP3) and to the left hand (LOW). Touch the Sound’s name to open the Sound Select window and choose a different Sound.
Style name and info. Touch the Style’s name toopen the Style Select window and choose a dif-
ferent Style.
Tempo. Use theTEMPO buttons to
change it.
Length of the accompaniment pat-tern, and current beat.
Performance or STS. Touch it to openthe Performance Select window and
choose a different Performance.Sounds on the keyboard will change.
Single Touch Settings (STS). Touch one of them to choose it, or use the dedicated buttons on the control panel. Sounds on the keyboard will change.
Split Point. Touch here and play a note to set the new split point. See page 43
Mic Talk. Touch here to lower the background music and talk to your audience.Voice Processor Preset. Touch here to
choose a different Preset.

30 Easy ModeThe Song Play page in detail
The Song Play page in detail
To see this page, press the SONG PLAY button.
Notes:
• As in Style Play mode, there are three Sounds for the right hand(Upper 1, Upper 2, Upper 3), and one Sound for the left hand(Lower). Their names are abbreviated as UP1, UP2, UP3, LOW,and are shown in the right side of the display.
• Right hand (Upper) and left hand (Lower) Sounds are sepa-rated by the Split Point.
• Performances and STSs are collections of Sounds. Just chooseone of them to change all the keyboard’s Sounds.
• Available STSs depend on the Style or SongBook Entry you lastselected.
• Since there are two onboard Players, you can play two Songs atthe same time. Mix them using the X-Fader on the control panel.
• Touching a Song name in the display is the same as to press oneof the SELECT buttons on the control panel. Each Player has itsown SELECT and transport buttons.
Sound icon and status. If the icon appears, the Sound
is in mute and cannot be heard. If the icon does not appear, the Sound is in play and can be heard. See page 39
Sounds assigned to the right hand (UP1 to UP3) and to the left hand (LOW). Touch the Sound’s name to open the Sound Select window and choose a different Sound.
Song assigned to Player 1. Touch it to open theSong Select window and choose a different Song.
Tempo. Use theTEMPO buttons to
change it.
Meter (or Time Signature) and cur-rent beat.
Performance or STS. Touch it to openthe Performance Select window and
choose a different Performance.Sounds on the keyboard will change.
Single Touch Settings (STS). Touch one of them to choose it, or use the dedicated buttons on the control panel. Sounds on the keyboard will change.
Split Point. Touch here and play a note to set the new split point. See page 43
Mic Talk. Touch here to lower the background music and talk to your audience.Voice Processor Preset. Touch here to
choose a different Preset.
Song assigned to Player 2. Touch it toopen the Song Select window and
choose a different Song.


32 Turning the instrument onTurning the instrument on and viewing the main screen
First of all, turn the instrument on and familiarize with the main screen. You can also listen to thedemos.
Turning the instrument on and viewing the main screen
1 Turn Pa900 on (exit from standby) by pressing the STANDBY button located in the con-trol panel.
After you turn the instrument on, a welcome screen is shown for some seconds, then the maindisplay appears.
2 When you want to put Pa900 to standby, keep the STANDBY button pressed for aboutone second, and release it when the screen appears dimmed.
After having pressed the STANDBY button, the display brightness will be dimmed. At this point,the shutdown procedure will begin and last for a few seconds. Please do not disconnect thepower cable during this procedure.
Turning the instrument on
Standby (On/Off ) buttonDisplay

33Connecting and calibrating the Damper pedalProgramming the Damper pedal
Qui
ck G
uide
If you want to play Piano, you will want to connect a Damper pedal to sustain notes while playing.You can connect a Korg PS1, PS3 or DS1H to the DAMPER connector on the back of the instrument.
The difference between the PS1/PS3 footswitch, and a dedicated Damper pedal like the DS1H, is thatthis latter also supports all the nuances of half-pedalling; you can experiment how it works by gradu-ally pressing it down, and gradually depressing it up while playing the Grand Piano RX Sound.
Programming the Damper pedal
Calibrating the Damper pedal will let you use the full run of the pedal, without “dead spots”. Also, thismight be the only way to connect a third-party Damper pedal that seems to work in reverse, sustain-ing the notes when they are not pressed!
1 Connect the Damper pedal to the DAMPER connector on the back of the instrument.
2 Press the GLOBAL button to access the Global mode.
Global mode is where you can set some global parameters, like this one, the Master Tuning orthe Date & Time. These settings are not tied to any specific operative mode, so they are pro-grammed in these separate pages.
3 Touch the Controllers button to access the Controllers section of the Global mode.
If you have not yet chosen a different page, the “Hand Controller” page will appear (being thefirst one in the Controllers section).
Connecting and calibrating the Damper pedal
Damper and Assignable pedal connectors
Menu of the Global mode

34 Connecting and calibrating the Damper pedalProgramming the Damper pedal
4 Touch the Foot Contr. tab to select the “Foot Controllers” page.
This is the page where you can program the Assignable Pedal/Footswitch and the Damper ped-als.
5 Touch the “Calibration” button in the Damper section, to make the “Damper & Pedal/Footswitch Calibration” dialog box appear.
6 Fully press the Damper pedal down, and while continuing to press touch the “Push”button to confirm the maximum value.
7 When the following dialog box appears, release the pedal.
8 Touch the “Push” button in the display to confirm the minimum value.
Check if the pedal is working properly. In case it isn’t, repeat the procedure.
9 Press the EXIT button to return to the previous operative mode.

35Playing the DemoStarting and stopping the Demo
Qui
ck G
uide
Listen to the built-in Demo Songs to appreciate the power of Pa900. There are several Demo Songs tochoose from.
Starting and stopping the Demo
Here is how to start, choose and stop the Demo Songs.
1 Press the STYLE PLAY and SONG PLAY buttons together.
The LED of the two buttons will start blinking. Pa900 will be set in Demo mode.
At this point, if no other button is pressed, all the Demo Songs will be played back.
2 In case you want to listen to a specified Demo Song, select one of the available optionson the display (Full Songs, Solo Instruments, Styles).
Playing the Demo
Demo buttons

36 Playing the DemoStarting and stopping the Demo
3 Choose one of the Demo. To stop it, touch the STOP button on the display.
4 Exit from the Demo mode by pressing any one of the MODE buttons.

37Playing SoundsSelecting a Sound and playing it on the keyboard
Qui
ck G
uide
You can play up to three sounds at the same time on the keyboard. You can also split the keyboard intwo parts, to play up to three sounds with your right hand (Upper) and one with your left hand(Lower).
Selecting a Sound and playing it on the keyboard
1 Be sure the Upper 1 track is selected and set to play.
Note: Be sure tracksUpper 2 and Upper 3 aremuted and are not playing. Ifyou hear more than onesound, see also page 39 forhow to mute tracks.
2 If you want to play the Sound on the whole keyboard, be sure the keyboard is in FullUpper mode (i.e., the SPLIT LED is turned off). If it is split in two parts, press the SPLITbutton to turn its LED off.
Playing Sounds
Performance section
Split button
i
A selected track is shown with a white back-ground. In this example, the Upper 1 track is selected. If it is not selected, touch it once to select it.
The fact that there isn’t a icon over the bank icon means that the Upper 1 track is set to play. If it is muted, touch the bank icon to set it to play.
(Full) Upper

38 Playing SoundsSelecting a Sound and playing it on the keyboard
3 Touch the Upper 1 track’s area in the display to open the Sound Select window.
Note: You can also openthe Sound Select window byfirst touching the track towhich to assign the newSound, then pressing theSOUND SELECT
4 Select a Sound from the Sound Select window, then press the EXIT button to close thewindow.
5 Play the Sound on the keyboard.
Note: Selection windowsmay automatically closeafter a selection. To do this,uncheck the “Display Hold”box in the Global > GeneralControls > Interface page. Inthis case, press the EXIT but-ton only if you don’t makeany selection but want toclose the window.
i
The selected Sound is highlighted.Touch a Sound’s name to select it.
Touch one of the side tabs to select adifferent Sound bank.
Touch one of the lower tabs to selecta different Sound page.
A Previous and Next Page pair of button may appear in this area, when more than six pages are available. As an alternative, repeatedly press the SOUND button to cycle between the pages.
The currently selected Sound appears in the page header.
Target track for the selected Sound
Sound bank icon
Sound’s nameType of Sounds.
The Sound Select win-dow closes, and the
main screen appearsagain, with the selected
Sound assigned to theUpper 1 track.
i

39Playing SoundsPlaying two or three Sounds at the same time
Qui
ck G
uide
Playing two or three Sounds at the same time
You can layer all three Upper tracks and play them on the keyboard.
1 Touch the icon in the Upper 2 status box, to set the Upper 2 track to play.
2 Play the keyboard.
3 Touch the icon in the Upper 3 status box, to set the Upper 3 track to play.
4 Play the keyboard.
5 Touch the bank icon in the Upper 3 status box, to mute the Upper 3 track again.
Please note how the icon appears in the Upper 2 and Upper 3 status boxes. These tracks will not be heard.
After touching in this area, the icon disappears. The Upper 2 track will be set to play and will be heard.
Note how the ‘Dark Pad’ Sound (assigned to the Upper 2 track) has been layered with the ‘Grand Piano RX’ (assigned to the Upper 1 track).
As above, after touch-ing in this area, the
icon disap-pears. The Upper 3 track will be set to play and will be heard.
Note how the ‘Strings Ens.2 GM’ Sound (assigned to the Upper 3 track) has been added to the ‘Dark Pad’ (assigned to the Upper 2 track) and the ‘Grand Piano RX’ (assigned to the Upper 1 track).

40 Playing SoundsPlaying two or three Sounds at the same time
6 Play the keyboard.
7 Touch the bank icon in the Upper 2 status box, to mute the Upper 2 track again.
8 Play the keyboard.
Note how the ‘Strings Ens.2 GM’ Sound (assigned to the Upper 3 track) has been muted again. Only tracks Upper 1 and Upper 2 can be heard at this time.
Note how the ‘Dark Pad’ Sound (assigned to the Upper 2 track) has been muted again. Only track Upper 1 can be heard at this time.

41Playing SoundsPlaying different Sounds with your left and right hand
Qui
ck G
uide
Playing different Sounds with your left and right hand
You can play a single Sound with your left hand, in addition to playing up to three Sounds with yourright hand.
1 Press the SPLIT button to turn its LED on, and split the keyboard in the Lower (lefthand) and Upper (right hand) parts.
2 Be sure the Lower track is set to play.
3 Play the keyboard.
LowerUpper
If the Lower track is muted, touch its icon to make it disappear from this area.
If the Bass & Lower Backing function is turned on, and the Style is not running, the Lower track will always play.
Note how the keyboard is split in two parts, each playing different sounds.
Lower Upper

42 Playing SoundsPlaying different Sounds with your left and right hand
4 Return to the full keyboard playing mode by pressing the SPLIT button to turn its LEDoff.
5 Play the keyboard.
(Full) Upper
Note how the keyboard once again plays the Upper tracks over the entire length of the keyboard.
Upper

43Playing SoundsChanging the split point
Qui
ck G
uide
Changing the split point
If you are not comfortable with the selected split point, you may set the split point to a different key.
1 Touch the Split tab to see the Split Point panel.
Hint: As an alternative,keep the SPLIT buttonpressed to open the SplitPoint dialog.
2 Touch the keyboard in the display, then play the lowest note of the Upper section onthe keyboard.
3 As an alternative, touch the Split Point parameter to select it, and use the VALUE dial toselect the new split point.
When you change the split point, the “Global” parameter is automatically unchecked. This isbecause you are setting a “local” or “temporary” split point, and not the “global” one, used acrossthe whole instrument.
To change the “global” split point, go to the Global > Mode Preferences > Style page, and set the“Split Point” parameter.
You can save the “local” split point into a Performance, as described in the following pages (see“Saving your settings to a Performance” on page 46).
i
LowerUpper

44 Playing SoundsRaising or lowering the Upper octave
Raising or lowering the Upper octave
If all Upper tracks sound too high or too low, you can quickly change which octave they are playingin.
1 Use the UPPER OCTAVE buttons on the control panel, to transpose all Upper tracks atthe same time.
Note: The Octave Trans-pose value for each of thekeyboard track is shownunder the Sound’s name.
2 Press both UPPER OCTAVE buttons together to reset the octave to the value saved inthe current Performance.
i
Each time you press this button, thepitch will be lowered by one octave.
Each time you press this button, the pitch will be raised by one octave.

45Selecting and saving PerformancesSelecting a Performance
Qui
ck G
uide
Performances are the musical heart of Pa900. Unlike selecting single Sounds, selecting a Perfor-mance will recall several Sounds at the same time, the needed effects and transpositions, plus manymore parameters useful for playing in a musical situation (like the Assignable Switches). Performancecan be considered a snapshot of the current situation.
You can save these settings to a Performance memory location. While many Performances are alreadysupplied with the instrument, you can customize each of them to your own taste, and then save themin their customized version.
Note: Style tracks are savedto a third object called theStyle Settings.
Similar to Performances, but dedicated to the Styles and SongBook Entries, you can also save yoursettings to a Single Touch Setting (STS), which will store all the settings for the Keyboard tracks.Four STSs are supplied with each Style and SongBook Entry, and can be selected with the four dedi-cated buttons under the display.
Please note that settings saved in the "My Setting" Performance are automatically selected whenthe instrument is turned on (exit from standby). This means you can save your preferred startupsettings to this Performance (see below for more information).
Selecting a Performance
1 Touch the Performance area in the display, to open the Performance Select window.
Hint: You can also openthe Performance Select win-dow by pressing one of thebuttons in the PERFOR-MANCE section. This will letyou jump directly to thedesired Performance bank.
Selecting and saving Performances
Performance sectionSingle Touch Settings (STS) section
i
The selected Performance is high-lighted. Touch a Performance name
to select it.
Touch one of the side tabs to select adifferent Performance bank.
Touch one of the lower tabs to select a different Performance page.

46 Selecting and saving PerformancesSaving your settings to a Performance
2 Select one of the Performances in the Performance Select window, then press the EXITbutton to close the window.
Note: Selection windows may automatically close after a selection. To do this, uncheck the “DisplayHold” box in the Global > General Controls > Interface page. In this case, press the EXIT buttononly if you don’t make any selection but want to close the window.
3 Play the keyboard.
Note: If theLED of the STYLECHANGE buttonis turned on,selecting a Per-formance may automati-cally select a different Styleand its settings (Sounds,Effects for the Style tracks…)
Saving your settings to a Performance
The Sounds and Effects assigned to the Keyboard tracks, together with the parameters you can accessby pressing the MENU button while in Style Play and Song Play mode, can be saved into a single Per-formance, to be quickly recalled at a later time.
Hint: To open the WritePerformance dialog box, youcan also choose the ‘WritePerformance’ commandfrom the page menu.
1 Keep one of the PERFORMANCE buttons pressed for about one second to open theWrite Performance dialog box.
After pressing the EXIT button, the Performance Select window closes, and the main screen appears again. Sounds, Effects, and other settings, change accord-
ing to the setting memorized in the selected Performance.
iSettings memorized in the selected Performance have been selected. Sounds, effects and other settings have been recalled.
i

47Selecting and saving PerformancesSaving your settings to a Performance
Qui
ck G
uide
2 If you like, you may assign a new name to the Performance.
3 Select a bank and Performance location in memory, where you would like to save thePerformance.
4 When you have edited the name to the Performance, and selected the target location,touch OK to save the Performance to memory (or Cancel to stop the operation).
Warning: Saving a Per-formance to an already usedlocation overwrites any exist-ing data at that location. Theold data are lost. Make abackup of all your importantdata.
Touch the (Text Edit) symbol to open the
Text Edit dialog box.
Use the alphabetic characters to enter text.
Use the ‘<–’ and ‘–>’buttons or the DIAL to
move the cursor.
Touch the Shift key to switch between capitals
and small characters.
Touch the ‘Backspace’ symbol to delete just a single character, ‘Clear’ to delete the whole string.
When done, touch OK to confirm the new name, or Cancel to abandon all changes.
The selected Perfor-mance location is high-lighted. Touch a Performance’s name to select it.
Touch one of the side tabs to select a different Performance bank.
Touch one of the lower tabs to select a different Performance page.
!

48 Selecting and saving the “My Setting” PerformanceSelecting the startup parameters (the "My Setting" Performance)
There is a special Performance, where you can save your preferred startup settings for things like Key-board Sounds, Effects, Transposition, Assignable Switches. This Performance is automaticallyselected when the instrument is turned on (exit from standby). It is called the “My Setting” Perfor-mance.
Selecting the startup parameters (the "My Setting" Performance)
After having done some changes to the Sounds, transposition, or other parameters, you can return tothe startup situation by pressing the MY SETTING button in the control panel.• Press the MY SETTING button to recall the “startup” settings.
Saving the startup parameters into the "My Setting" Performance
You can save the startup settings (Sounds and other settings, including most of the settings on thecontrol panel) into this special Performance.• Keep the MY SETTING button pressed for about one second, until the “Write Startup
Settings” dialog box appears, then touch the OK button to confirm saving to memory.
Selecting and saving the “My Setting” Performance
‘My Setting’ Performance

49DrawbarsChoosing a Drawbars Preset
Qui
ck G
uide
A special type of Sounds in the Pa900 is the Drawbars. This Sound emulates the classic tonewheelorgans of the past. You can drag the virtual drawbars on the display to adjust their position, and thensave these settings to a Performance, that can be considered the equivalent of an organ’s “preset”.
Choosing a Drawbars Preset
Here is how to select and use the Drawbars.
1 Press the ORGAN button in the PERFORMANCE section to open the Performance Selectwindow, and choose the “DWB Organ Y+” Performance.
While you could assign the DRAWBARS Sound to an Upper track, choosing a Performance willalso give you all the preset settings for the drawbars.
2 Play the keyboard to hear a realistic electro-magnetic organ sound.
Different drawbar settings may be stored with each Performance. So, selecting a different Perfor-mance will select different settings for the Drawbars Organ.
Drawbars
Organ Performance bank

50 DrawbarsEditing the Drawbars Preset
Editing the Drawbars Preset
You can edit the Drawbars settings memorized in the selected Performance, and save it to the same ora new Performance.
1 While in the main screen, touch the DRAWBARS Sound to open the Sound Select win-dow, then touch the selected DRAWBARS Sound to open the Drawbars Setting page.
2 Drag the virtual sliders to change the various drawbar settings. Select different param-eters in this page, and change their settings to see how each setting affects the sound.
Hint: As an alternative todragging the virtual sliders tochange drawbar values, youcan touch a drawbar in thedisplay and use the VALUEDIAL to change it.
i
Check this checkboxto turn Percussionon. Percussion will
make the soundmore aggressive
Experiment with thePercussion’s settings
Turn the Rotary effect on or off, and listen to how much more lively it makes the sound
Experiment with the Rotary speed

51DrawbarsEditing the Drawbars Preset
Qui
ck G
uide
3 Touch the “Tone/Noise” tab, and try the sound parameters of the second page.
4 When you have found some settings that you like, keep one of the ORGAN Perfor-mance buttons pressed to open the Write Performance window, and save your settingsto a Performance.
5 Press the EXIT button to go back to the main page.
Leakage from adja-cent tonewheels, mak-
ing the sound richer
Timbre
Volume of the noise generated when pressing or releasing the keys

52 Selecting and playing StylesSelecting and playing a Style
Pa900 is an arranger, i.e. a musical instrument providing automatic accompaniments, or arrange-ments. Each arrangement style is called, as a consequence, a Style.
A Style is made of several Style Elements (Intro, Variation, Fill, Break, Ending), corresponding to thevarious sections of a song. By selecting Style Elements, you can make your playing more varied andmusical.
When selecting a Style, Sounds, Effects and various configuration parameters for the Style tracks arealso selected. These are called the Style Settings. Selecting a Style also selects the four Pads it contains.Pads are single sounds or single-track patterns, that can be triggered with the dedicated PAD buttons.
If the STS MODE LED is turned on, the first of the four Single Touch Settings (STS) associated to theStyle is also selected, and Keyboard tracks, Effects and some other useful parameters are automaticallyconfigured.
Use the Style controls to start or stop the Style.
Selecting and playing a Style
1 Touch the Style area in the display. The Style Select window appears.
Hint: You can also openthe Style Select window bypressing one of the buttons ofthe STYLE section. This will letyou jump directly to thedesired Style bank.
Selecting and playing Styles
Style Select Section
Style ControlsStyle Elements
i
The selected Style is highlighted.Touch a Style’s name to select it.
Touch one of the side tabs to select adifferent Style bank.
Touch one of the lower tabs to select a different Style page.
Type of Style.

53Selecting and playing StylesSelecting and playing a Style
Qui
ck G
uide
2 Select a Style from the Style Select window.
3 Be sure one of the Chord Scan modes is selected.
4 Press the SYNCHRO-START/STOP button to turn the START LED on.
This will turn the Synchro-Start function on, and let the accompaniment start as soon as youplay a chord on the keyboard.
Note: You could simplypress START/STOP to start theStyle, but the Synchro-Startfunction allows you to makethe Style start in sync withyour playing on the key-board. Therefore, it may beconsidered a “more musical”way of starting a Style.
5 Play the keyboard.
Note: The chord scanarea depends on the status ofthe SPLIT LED and the ChordRecognition parameter (seeGlobal > Mode Preferences >Style).
6 Press START/STOP to stop the Style.
After pressing the EXIT button, the Style Select window closes, and the main screen appears again, with the selected
Style ready to go.
For chord scanning to work, either of both LEDs must be turned on. Lower: chords are recognized on the left of the split point; Upper: chords are recognized on the right of the split point; Full (both LEDs on): chords are recognized on the whole key-board. Off: only the Drum track can be heard.
i
START LED STOP LED
When the Syncho-Start function is turned on, the Style starts playing as soon as you play a note or chord in the chord scan area. Play chords with your left hand, and the melody with your right hand. The arranger will follow your playing.
i

54 Selecting and playing StylesTempo
Tempo
While a Tempo setting is saved with each Style or Performance, you can change it to be whatever youlike. You can use either of the following two methods.
Hint: As an alternative tousing the TEMPO buttons,hold the Tempo value in thedisplay, then move your fin-ger up/down or left/right (orchange the value with theVALUE dial).
• Use the TEMPO + or – buttons to change the Tempo value.
• Press the TEMPO – and + buttons together to recall the saved Tempo value.
• As an alternative, keep the SHIFT button pressed, and use the VALUE dial to change theTempo. The selected tempo will be shown in a small window.
• If you like to keep the currently selected Tempo value unchanged, turn on the LED of
the TEMPO (LOCK) button.
When the Tempo Lock function is turned on, the Tempo will not change when selecting a differ-ent Style (or a different Song in Song Play mode).
i

55Selecting and playing StylesIntro, Variation, Fill, Break, Ending
Qui
ck G
uide
Intro, Variation, Fill, Break, Ending
When playing Styles, you can select various “Style Elements” to cover the various sections of a song. AStyle is made of three Intros (or two Intros and a Count-In), up to four basic patterns (Variations),four Fills, a Break, and three Endings.
1 Make sure the SYNCHRO-START LED is turned on (otherwise, press the button to turn it on).
Activating the Synchro Start function is not mandatory, but it might be handy.
2 Press one of the INTRO buttons to set the corresponding Intro to play.
3 Play the keyboard.
4 Be sure the LED of the AUTO FILL button is turned on.
When the Auto Fill function is turned on, a Fill is automatically performed before switching to adifferent variation.
5 While playing, press one of the VARIATION buttons, to select a different variation ofthe basic pattern.
If you turned the Auto Fill function on in the previous step, a Fill will be performed before theVariation begins.
The Style starts with the selected Intro. When the Intro is com-pleted, the basic pattern (selected Variation) starts to play.
When the Fill ends, the selected Variation will start playing.

56 Selecting and playing StylesSingle Touch Settings (STS)
6 When you like to stop playing, press one of the ENDING buttons to stop the Style withan Ending.
Single Touch Settings (STS)
Each Style or SongBook Entry may come with up to four Keyboard track settings, called the STS(short for “Single Touch Settings”). STSs are very similar to Performances, but they are fine-tuned tothe Style or SongBook Entry they are associated to.
If the STS MODE LED is turned on, STS #1 is automatically selected when choosing a Style. STS #1 isalso recalled each time a SongBook Entry is selected.
1 In case it is not shown, touch the STS Name tab to see the STS Name panel.
2 Press one of the four STS buttons under the display, or touch the name of an STS in theSTS panel in the display.
3 Play the keyboard.
4 Try all the other STSs, and see how settings change with each of them.
5 You can also link the STSs to the Variations. First of all press the STS MODE button, tomake its LED flash.
When the Ending is fin-ished, the Style automati-cally stops.
Settings memorized in the selected STS have been selected. Sounds, effects and other settings have been recalled.

57Selecting and playing StylesThe Pads
Qui
ck G
uide
6 Then press the various VARIATION buttons, and see how an STS is automaticallyselected when the corresponding Variation is selected.
7 Press the STS MODE again to turn its LED on (or off).
The Pads
Each Style or SongBook Entry can assign different sounds or patterns to the four PADS. These soundsor patterns can be played along with the Keyboard and Style tracks.
1 If you want to see which sounds or patterns are associated to the four Pads for the cur-rent Style, touch the Pad tab to see the Pad panel.
Hint: You can open thePad Select window to assigna different sound or patternto the Pads, by pressing SHIFT+ one of the PADs.
2 Press one of the four PADS to play the corresponding Pad.
3 If the selected PAD triggers an endless sound or pattern (i.e. an applause, or a guitararpeggio), press the same PAD button again to stop it.
4 Select a different Style, and see how the sounds or patterns assigned to the PADSchange.
5 Press more PAD buttons at once, to play two or more sounds or patterns at the sametime.
6 Press STOP to stop all the Pads at the same time.
i

58 Selecting and playing StylesAdjusting the balance between the Style and the keyboard
Adjusting the balance between the Style and the keyboard
Balancing between the Keyboard and Style tracks may be useful, to gently fade them and adjust theirrespective volume.• While the Style is playing, use the BALANCE knob to balance between the Keyboard
(KBD) and Style’s Accompaniment (ACC) volume.
This knob also balances between the Keyboard and the Pad tracks. Also, it balances between theKeyboard and the Song tracks (in Song Play mode).
Adjusting the volume of the separate tracks
You can adjust the volume of each of the Style and Keyboard tracks, for example to soften the bass alittle, or to make the keyboard solo louder.
1 Touch the Volume tab to see the Volume panel.
2 Hold & drag the Virtual Sliders in the display to adjust each Keyboard track’s volume.

59Selecting and playing StylesTurning the Style tracks on/off
Qui
ck G
uide
3 To separately adjust each Style track, press the TRACK SELECT button to change thetrack’s view.
Hint: As an alternative,you can change each track’svolume, by touching a track’sarea to select it, then usingthe VALUE dial to change thevolume.
4 To return to the Keyboard Tracks view, press the TRACK SELECT button again.
Turning the Style tracks on/off
You may easily turn on or off any Style track while you are playing. For example, try muting allaccompaniment tracks, while drums and bass continue to play.
Note: While in the Nor-mal view of the Style Playmode, you can see Styletracks grouped in just three“grouped” tracks. To see eachStyle track as separate, indi-vidual tracks, just press theTRACK SELECT button.
1 Be sure the Volume panel is shown, or touch the Volume tab to show it.
2 While the Style is playing, touch the Play button to set the track to Mute.
3 To set the tracks back to the Play status, touch the Mute icon on the muted track.
i
In Style view, all separateStyle tracks are shown, and
their volume can beadjusted by dragging the
corresponding sliders.
i
Mute the ACCOMP track. All accompaniment tracks will go silent (apart from Drum, Percussion and Bass).
Set the ACCOMP track to Play. All accompaniment tracks will return to their original volumes.

60 Selecting and playing StylesAdding harmony notes to your right-hand melody with the ENSEMBLE function
4 To mute/unmute each single Style track, first press TRACK SELECT to switch to the StyleTracks view, then repeat the above procedure.
5 Press the TRACK SELECT button again to go back to the Normal view.
Adding harmony notes to your right-hand melody with theENSEMBLE function
Chords played with your left hand may be applied to the right-hand melody.
1 Press the SPLIT button to turn its LED on and split the keyboard.
The Ensemble function only works in Split mode.
2 Press the ENSEMBLE button to turn its LED on.
3 Play chords with the left hand and single notes in the right hand.
4 To select a different harmonization style, keep the SHIFT button pressed, and press theENSEMBLE button to open the Ensemble page.
This is a fast ‘shortcut’ to recall this page. The longer procedure would have consisted in access-ing the Edit mode by pressing the MENU button, touching the Keyboard/Ensemble section, andthen going to the Ensemble page.
Notice how the right hand is automatically harmonized, accord-ing to the chords composed with your left hand.
While the Ensemble parameter is selected, use the VALUE dial to select one of the available harmo-nization types.

61Selecting and playing StylesAdding harmony notes to your right-hand melody with the ENSEMBLE function
Qui
ck G
uide
5 When the right harmonization type has been selected, press the EXIT button to goback to the main page.
6 Press the ENSEMBLE button again to turn its LED off. The automatic harmonization willbe turned off.
While in an Edit page, press EXIT to go back to the Main page of the cur-rent operating mode.

62 Selecting and playing StylesThe Chord Sequencer
The Chord Sequencer
In case you need both hands free for playing a solo while a Style is playing, you can record a ChordSequence and let Pa900 play the chords for you.
1 Press the START/STOP button to set the Style to play.
2 Press the BASS INV. and M. BASS (RECORD) buttons together to start recording.
3 Start recording your Chord Sequence at the beginning of the next measure.
While recording, you will see a red flashing icon in the display.
4 Play the chords in the chord scan area.
The chord scan area is under the Split Point if the SPLIT LED is turned on. Usually, it is over thewhole keyboard if the SPLIT LED is turned off. The chord scan area also depends on the statusof the Chord Recognition parameter (Global > Mode Preferences > Style).
Hint: You can avoid stop-ping the Chord Sequencerafter recording, and immedi-ately set the Sequence toplay, as explained in the fol-lowing step.
5 When the Chord Sequence is done, press the BASS INV. and MAN. BASS (RECORD) but-tons together again to stop recording.
6 Press the MEMORY and BASS INV. (PLAY/STOP) buttons to start playback.
The LED of the two buttons will start flashing. The Chord Sequence will be played back in loopstarting from the next measure. Recorded chords will be sent to the arranger, and the Style willplay with the recorded chords.
7 Play your solo part, while the Chord Sequencer plays the chords for you.
During Chord Sequence looping, you can freely select any Fill or Variation, as if you where play-ing chords with your hands.
i

63Selecting and playing StylesThe Chord Sequencer
Qui
ck G
uide
8 Press the MEMORY and BASS INV. (PLAY/STOP) buttons together again to stop play-back of the recorded Chord Sequence.
The last chord played by the Chord Sequence remains in memory. The Chord Sequence willremain in memory up until you record a new Chord Sequence, or you set Pa900 to standby.

64 Song PlaySelecting a Song to play
Pa900 is equipped with two onboard Players that can be run at the same time to mix different Songs.The Players can read Songs in Standard MIDI File (MID), Karaoke™ (KAR) and MP3 format.
It may be of great interest to singers and guitar players to know that if a Standard MIDI File or an MP3file contains lyrics and chords, they can be seen in the display. Lyrics can also be seen on an externalvideo monitor. Lyrics in the graphical “+G” format are also supported.
In addition to lyrics and chords, with Standard MIDI Files and Karaoke files you can also see the scorein traditional notation, as well as the markers, to quickly jump to any section of a Song.
Selecting a Song to play
1 Press the SONG PLAY button to switch to the Song Play mode.
Hint: In Style Play mode,you can pre-select the Songto be assigned to the Player.This way, you will be ready tostart it, as soon as you switchto Song Play mode.
Song Play
Player controls
The SONG PLAY button
i
The Song area of the Style Play main page.
After pressing the SONG PLAY but-ton, the main page of the Song
Play mode appears.

65Song PlaySelecting a Song to play
Qui
ck G
uide
2 Touch the Player 1 area to open the Song Select window.
This window is very similar to the one you can see when pressing the MEDIA button on the con-trol panel, and touching the Load tab to see the Load page. This page is, however, “filtered” toonly show Song files.
Hint: As an alternative,you can open the Song Selectwindow by pressing theSELECT button in the PLAYER1 section on the controlpanel.
3 Scroll through the list and select the Song to play.
4 When the Song is selected, touch the Select button to confirm your selection; this willautomatically close the Song Select window.
i
The selected Song is high-lighted. Touch a Song’s
name to select it.
Use the scroll bar or the VALUE DIAL to see all the Songs in the list. Keep SHIFT pressed and touch the Up/Down arrow to jump to the next/previous alphabetic section.
Use the Open and Close buttons to browse through the folders.
Use the Device pop-up menu to selectone of the available mass-storage devices.
Use the Locate button to ‘locate’ and go to the folder of the selected Song.
Touch the Select button to select the high-lighted Song, and assign it to the Player.
After touching the Select button in the display, the main page of the Song Play mode will appear again.
Selected Song

66 Song PlayPlaying back a Song
Playing back a Song
Once a Song has been selected, it may be played back by the Player.
1 Be sure the X-Fader is completely moved to the left (toward Player 1).
2 Press the (PLAY/STOP) button in the PLAYER 1 section to start playback.
3 Use the PLAYER 1 control section to control the Song’s playback.
4 When you want to stop the song and go back to the beginning, press the (HOME)button.
Note: In any case, thePlayer will automatically stopwhen the end of the Song isreached.
After pressing the (PLAY/STOP) button, the but-ton’s LED turns on, and the measure counter begins to show the current measure number.
Press the REWIND button once to goback.Keep it pressed to go back more.
Press the FAST FORWARD button once to goforward.Keep it pressed to go forward more.
Press the PLAY/STOP button to stop the Song at the current position. Press it again to resume playback.
Press the HOME button to move to the beginning of the Song.
Press the SELECT button toopen the Song Select window.
iWhen the Song is stopped, the LED on the PLAY/STOP button turns off.

67Song PlayChanging the tracks’ volume
Qui
ck G
uide
Changing the tracks’ volume
While playing back a Standard MIDI File, you may wish to change each track’s volume, to create a mix“on the fly”.
1 Be sure the Volume panel is shown, or touch the Volume tab to show it.
2 As seen for the Styles, you can hold & drag the Virtual Sliders on the display to adjusteach track’s volume. Use the TRACK SELECT button to cycle between track groups.
3 In Normal view, you can adjust each Keyboard track’s volume.
Hint: As an alternative,you can change each track’svolume, by touching a track’sarea to select it, then usingthe VALUE dial to change thevolume.
Use the TRACKSELECT button to
cycle between differ-ent groups of tracks
i
Keyboard tracks

68 Song PlayChanging the tracks’ volume
4 Press the TRACK SELECT button once to see tracks 1-8 (Track 1-8 view).
Note: Changes to Songtracks will not be saved, andare reset each time you pressthe (Home) button, or youselect a different Marker. Tosave changes, you must editthe Song in Sequencer mode.
5 Press TRACK SELECT once again to see tracks 9-16 (Track 9-16 view).
6 Press TRACK SELECT again, to return to the Normal view (Keyboard tracks).
7 Press the (PLAY/STOP) button to start the Song.
8 While listening to the Song, switch from Normal view to Track 1-8 and Track 9-16 view,to see which tracks are playing.
To see if a track is playing, look at the label with its name, and see if it is changing color.
i
In Track 1-8 view, the first 8 tracksof the selected Song are shown.
In Track 9-16 view, the secondgroup of 8 tracks of the selected
Song are shown.
Keyboard tracks

69Song PlayTurning the Song tracks on/off
Qui
ck G
uide
• Touch each track’s channel strip, to see each track’s detail in the Track Info line.
• Also, you can see which type of Sound is assigned to each track in the Sound area of theTrack 1-8 and Track 9-16 views.
Turning the Song tracks on/off
While playing back a Standard MIDI File, you may wish to mute one or more tracks, for example tosing along with the Song, or play an instrumental part live on the keyboard.
To mute/unmute Song tracks you simply touch the Play/Mute icon in the Volume panel.
Selected track Assigned Sound. Touch it to open the Sound Select window.
Sound bank Program Change
Octave Transpose
Sound bank icons. Touch to open the Sound Select window.

70 Song PlaySoloing a track
Soloing a track
Opposite to the above, you may want to make a single track of a Standard MIDI File play alone. Thisis called the Solo function.
1 While the Song is playing, keep the SHIFT button pressed and touch the track you wantto listen to in Solo mode.
2 To set all tracks back to the Play status, keep the SHIFT button pressed again, andtouch the track that is currently in Solo mode.
Please remember that you can also use the Solo function in Style Play and Sequencer mode. TheSolo command can also be selected from the page menu.
Removing the Melody track from a Standard MIDI File or the LeadVocal from an MP3 file
If you want to sing along with a Song (in Standard MIDI File or MP3 format), you can remove theMelody track or the Lead Vocal from the Song. Please note that removing the Lead Vocal from anMP3 file may be more or less effective, depending on the Song.
Programming the Assignable Switches
Hint: You can open thispage by keeping the SHIFTbutton pressed and pressingone of the ASSIGNABLESWITCHES.
1 Program the Assignable Switches as the Song-Melody and Vocal Remover switches.
Press the MENU button, and choose the “Pad/Assignable Switch” section. Then touch theSwitch tab to open the “Switch” page. While in this page, assign the Song-Melody function to theASSIGNABLE SWITCH 1, and the Vocal Remover function to the ASSIGNABLE SWITCH 2:
Note: The AssignableSwitches’ assignment can besaved into each Performanceor STS.
2 Press the EXIT button to return to the main page of the Song Play mode.
Using the Assignable Switches with a Song
1 Assign a Song (either in Standard MIDI File or MP3 format) to Player 1.
2 Start Player 1.
3 Press the ASSIGNABLE SWITCH 1 to mute the Melody track, or the ASSIGNABLESWITCH 2 to activate the Vocal Remover, and remove the Melody track or the originallead singer’s voice.
Listen how the Melody track disappears. If it is the wrong track, continue to the instructionsbelow to select a different track.
Or, listen to how the original lead singer’s voice is reduced or totally removed.
i
i

71Song PlayRemoving the Melody track from a Standard MIDI File or the Lead Vocal from an MP3 file
Qui
ck G
uide
4 When done, you can press the ASSIGNABLE SWITCH 1 to unmute the Song’s Melodytrack and let the original MIDI instrument play the Melody line again, or press theASSIGNABLE SWITCH 2 to deactivate the Vocal Remover and let the original leadsinger’s voice appear again.
5 Stop the Player.
Choosing a different Melody trackYou can choose a different Melody track, in case the Standard MIDI Files does not use a standard con-figuration of tracks.
1 Keep the SHIFT button pressed and press the SONG PLAY button to open the Global >Mode Preferences > Song Play & Sequencer page.
2 Choose a different Melody track.
3 When done, press EXIT to return to the main page.

72 Song PlayMixing two Songs
Mixing two Songs
You can select two Songs at the same time, and mix them by using the X-FADER slider.
1 Touch the Player 1 area to open the Song Select window and select the Song to beplayed by Player 1. Touch Select to confirm.
2 Once a Song is assigned to Player 1, touch the Player 2 area once to select it, and a sec-ond time to open the Song Select window. Select a Song to be assigned to Player 2, andtouch Select to confirm.
3 Keep the SHIFT button pressed, and press any of the two (PLAY/STOP) buttons, tostart both Players at the same time.
Hint: You don’t need tostart both players at thesame time. You can start thefirst Song – then start the sec-ond one when the first one isnear to the end. This way, youcan use the X-FADER slider togently crossfade between theend of one Song and thebeginning of the followingone.
4 During playback, move the X-Fader, to mix between the two Songs.
5 During playback, you may control each Player separately, by using the dedicatedPlayer controls.
6 Press the relevant (PLAY/STOP) button to stop the corresponding Player.
i

73The SongBookSelecting the desired Entry from the Main List
Qui
ck G
uide
One of the most powerful features of Pa900 is the onboard music database, that allows you to organizeyour Styles and Songs for easy retrieving. Each Entry of this database may include the artist, title,genre, number, key, tempo, and meter (time signature) of a specified song. When selecting one of theEntries, the associated Style, Standard MIDI File or MP3 file – as well as the Style Play or Song Playmode – is automatically recalled. A Voice Processor Preset is also recalled.
In addition to helping you organize your shows, the SongBook allows you to assign up to four Pads,and up to four STSs to each Entry. Also, you can link a text file to any Entry, to be used as the Lyrics ofa song, even if there are no Lyrics events in the associated Standard MIDI File or MP3 file, or if youprefer to play the song live with the backing of the Styles.
You can add your own Entries to the SongBook, as well as edit the existing ones. Korg has already sup-plied some hundred Entries as standard. Furthermore, the SongBook allows you to create various cus-tom lists, that may suit your different types of show.
Selecting the desired Entry from the Main List
A large database is already included with the instrument, and you can later customize it. You maybrowse through this database in a variety of ways.
1 While you are in Style Play or Song Play mode, press the SONGBOOK button to openthe SongBook window.
The SongBook
The SONGBOOK button
Touch this checkboxto turn the view filter
on.
Touch this button toedit the view filter.
Adds the selected Entry to the Custom List (if acti-vated – see page 79).
Touch this button to select the current Entry to play.
Use the scroll bar or the VALUE DIAL to see all the Songs in the list. Keep SHIFT pressed and touch the Up/Down arrow to jump to the next/previous alphabetic section.SongBook Main List
Style, Standard MIDI File(s) or MP3 file(s) currently assigned to the arranger or player(s)

74 The SongBookDisplaying Artist or Genre
2 Browse through the Entries.
Icons in the Type column will help you identify the type of the Entry. The Genre column isshown by default, but you can switch to the Artist column (see “Displaying Artist or Genre”below).
3 When the Entry you are looking for becomes visible in the display, select it and touchthe Select button in the display.
After selecting an Entry, the corresponding Style, MID, KAR or MP3 file will be recalled,together with the relevant operating mode (Style Play or Song Play). Up to four STSs and fourPads will also be recalled. Any TXT file associated with the Entry can be seen in the Lyrics page.
The selected Style, MID, KAR or MP3 file will be shown in the top area of the screen.
Displaying Artist or Genre
For space matters, either the Genre or Artist column can be seen in the display. You cannot see both atthe same time.
1 Touch the page menu icon to open the page menu.
Note: The Artist and Keyfields of all supplied Entrieshave been intentionally leftempty.
2 Choose Show Artist (now Genre) to switch from Genre to Artist in the List view. The Art-ist column will be shown.
3 Open the page menu again, and choose the Show Genre (now Artist) item. The Genrecolumn will be shown again.
i

75The SongBookSorting Entries
Qui
ck G
uide
Sorting Entries
You can change the order of the Entries shown in the display.
1 You can change the sorting order by touching one of the labels in a list of names.
You can do the same by touching the Type, Name, Genre, Artist, Key, Number, Tempo or Meterlabel.
2 Each time you touch the same label again, the order changes between ascending anddescending.
Searching for Entries
The SongBook database may be really huge. You can, however, look for (say) specific artists or songtitles, using the filtering functions.
1 Touch the Filter button in the display, to open the Filter dialog box.
2 Touch the (Text Edit) button next to the search criteria (even more than one) youwant to enter.
Touch the Name label…
…to alphabetically reorderthe names in the list.
Available search criteria. “Genre” and “Artist” are both consid-ered, even though only one of them may be shown in the List

76 The SongBookSearching for Entries
For example, you may want to find all songs containing the word “love” in the title (in any posi-tion in the string). If so, select the ‘Name’ criterion, and enter the word ‘love’. Capitals are not rel-evant for the search.
3 Touch OK in the display, and close the Text Edit dialog box. The entered text is now thesearch criteria.
4 Touch OK to close the Filter dialog box and return to the SongBook page.
Once the Filter dialog box has been closed by touching OK, the Filtered check box is automati-cally checked, and the filter is activated. Only Entries matching the entered criterion are seen inthe Main List.
5 To see the whole SongBook database again, touch the Filtered check box again, tomake the check mark disappear.

77The SongBookAdding Entries
Qui
ck G
uide
Adding Entries
You can add your own Entries to the SongBook database.
1 Go to the Style Play or Song Play mode, depending on the type of Entry you want toadd to the SongBook database.
2 Select the Style, Standard MIDI File or MP3 file to be added to the SongBook.
Assign the Song to Player 1 (only Songs assigned to Player 1 will be saved to the SongBookEntry.
3 Edit the Keyboard and Style tracks the way you prefer, by selecting different Soundsand Effects, or editing any other relevant parameter.
Please note that changes to Standard MIDI File tracks will not be saved as SongBook data. Onlythe data included in the Standard MIDI File will be used.
4 Choose a Voice Processor Preset.
5 When ready, keep the SONGBOOK button pressed for about one second to create anew SongBook Entry with the current settings.
6 Touch the (Text Edit) button to assign a name to the Entry, then touch OK to savethe Entry to the SongBook database.
Editing the Entries
You can edit any SongBook Entry and customize it according to your taste. When done, you can over-write the current Entry or save it as a new Entry.
1 Press the SONGBOOK button to access the SongBook pages.
2 Touch the Book Edit 1 tab to see the Book Edit 1 page and see the linked MusicalResources.

78 The SongBookEditing the Entries
While in the Book Edit 1 page, you will be able to see the name of the selected Style or Song, andchoose whether to replace them or not.
3 When done with this page, touch the Book Edit 2 tab to see the Book Edit 2 page andedit the SongBook database details.
4 Touch the (Text Edit) button next to the field(s) you want to edit. Set all the otherparameters.
Note: The Master Trans-pose might not change, if aLock is preventing it. SeeGlobal > General Controls >Locks.
You can write the Genre and Artist name. Select a Tempo matching the Song’s Tempo, and selectthe Meter (Time Signature) and Key of the Song. You can also specify a Master Transpose value,to be automatically selected when selecting the Entry.
5 When done with this page, touch the Book Edit 3 tab to go to the Book Edit 3 page,where you can and set the Synchro and Memory parameters, and link a text file to theEntry.
Name of the EntryName of the Style or Song file linked to the Entry.
If checked, the current Style track settings, or the path of theSong file (shown on the right), are saved with the Entry. If
unchecked, current settings are left unchanged.This parameter is automatically checked when touching the
New Song button to create a new Entry.
If checked, you can either save all the current STSs into theEntry, or choose a single STS where to save the current Key-
board track settings.
If checked, you can save the current Voice Pro-cessor Preset into the Entry. If left unchecked,
current settings are left unchanged.
Song Selection num-ber (ID number for numeric selection)
(This is just an indi-cator). When it appears checked, the VP Preset you are saving corre-sponds to the Global Voice Processor Pre-set.
Database Entry’s parameters
i
Text file linked to the Entry. This text will be seen in the same way of ordinary Lyrics in the display (or in the external monitor).
Synchro (for Style) and Memory (for Styleand Songs) On/Off status

79The SongBookCreating a Custom List
Qui
ck G
uide
6 After having filled up all the desired fields (be as comprehensive as you can), touch theWrite button in the display to open the Write dialog box.
7 Touch the (Text Edit) button to assign a name to the Entry, then touch OK to savethe Entry to the SongBook database.
Creating a Custom List
You can create several Custom Lists in the SongBook, to make a set of Entries suitable for your vari-ous shows. Before starting a new Custom List, be sure you have added all needed Entries to the Song-Book main database (see “Adding Entries” above).
1 While in SongBook mode, open the page menu and check the ‘Enable List Edit’ item.
2 Select a Custom List to be edited.
To edit an existing list, touch the Custom List tab to open the Custom List page, and select one ofthe available Custom Lists. To create a new list, touch the List Edit tab to open the List Edit page,and touch the New List button to create a new, blank list.
Entry’s name. By default it is the same name of the associated Style, Stan-dard MIDI File of MP3 file. The name can be up to 16 characters long.
Select Rename/Overwrite to replace anexisting Entry. This option is automati-cally selected when editing an existing
Entry; it cannot be selected when savinga new Entry. Warning: the older Entry
will be deleted!
Select New Song to add a new Entry tothe SongBook database. This option is
automatically selected when a new Entryhas been created (by touching the New
Song button).
After you check the‘Enable List Edit’ item,
the List Edit pagebecomes available.

80 The SongBookCreating a Custom List
3 Touch the Book tab to open the Book page and see the full database. Use the varioussorting, searching and filtering options (seen above) to find the Entries you are lookingfor. Touch the Add to List button when the desired Entry has been selected.
4 When finished adding Entries to the Custom List, touch the List Edit tab to go to the ListEdit page, and use the various commands to edit the list.
5 When the Custom List is ready, touch the Write button in the display to save it to mem-ory. Assign a new name to the Custom List.
6 When finished editing the Custom List, open the page menu and uncheck the ‘EnableList Edit’ item.
Touch this checkboxto turn the view filter
on (if any).
Touch this button to edit the view filter.
Use the scroll bar or the VALUE DIAL to see all the Songs in the list. Keep SHIFT pressed and touch the Up/Down arrow to jump to the next/pre-vious alphabetic sec-tion.
SongBook list
Adds the highlighted Entry to the Custom List.
Use the vertical arrowsto move the selected
Entry up or down in thelist.
Touch Del Song to deletethe selected Entry.
Touch New List to create a new Custom List. Touch Del List to delete the current Custom List. Warning: Del List will delete the current Custom List.
Touch Write to save the current Custom List.
Select an Entry to be edited from the list
List name Scrollbar
Touch the (Text Edit) symbol to open the
Text Edit dialog box.
Use alphabetic char-acters to enter text.
Use thearrows or the VALUE DIALto move the cursor.
Touch the Shift key to switch between capitals and small
characters.
Touch Delete to delete just a single character, Clear to delete the whole string.
When done, touch OK to confirm the new name, or Cancel to abandon all
changes.

81The SongBookSelecting and using a Custom List
Qui
ck G
uide
Selecting and using a Custom List
After having created one or more Custom Lists, you can select one and use it for your show.
1 Touch the Custom List tab to select the Custom List page.
2 Use the List pop-up menu to select one of the available Custom Lists.
3 Select one of the Entries in the list (it turns blue), then touch the Select button in thedisplay to confirm selection (the selected Entry turns green). Press the PLAY button tostart playing back the selected Song.
Synchronizing the SongBook with external software
Additional software has been created to work with the SongBook. You can use Korg’s own SongBookEditor to edit single entries, the SongBook database and the Custom Lists on a Windows PC. You canalso use BauM Software’s SongBook+ for iPad, or Zubersoft’s MobileSheets for Android, to synchro-nize the SongBook entries with a tablet, and read lyrics and sheet music on the wider tablet display.
Other software is under development. Please check our web site regularly, for news about theirrelease.
Use the List pop-up menu to selectone of the available Custom Lists.
Touch Next to select the next Entry in the list. (This command can also be assigned to an Assignable Switch).
Touch Select to set the highlighted Entry to play (if different than the one auto-matically selected).
Entry in play. To select a dif-ferent one, highlight it and touch the Select button in the display.

82 Singing with a microphoneConnecting a microphone
Pa900 features a high-quality microphone input for a dynamic microphone. It also features a powerfuldigital voice processor, based on technologies developed by TC Helicon, including dedicated effectsand three-part harmonization.
Connecting a microphone
To sing along with the Pa900, you must first connect a dynamic microphone to the LEFT audio input(the one that goes into the Voice Processor).
1 Press the GLOBAL button, touch the “Audio & Video” button in the display, then touchthe Audio In tab to reach the “Audio In” page.
Be sure the “Input Routing” is set to “Left In to Voice Processor”.
2 Press the EXIT button to return to the main screen.
3 Turn the Microphone input off by using the dedicated MIC on/off switch on the controlpanel, and lower the MIC VOLUME knob all way down.
Note: Keeping the micro-phone level low helps avoid-ing feedback. Feedback iscaused by audio generatedby the Pa900, returning to theaudio circuitry via the micro-phone.
Singing with a microphone
Left Audio (Microphone) input Microphone controls
i

83Singing with a microphoneSetting up your voice tone
Qui
ck G
uide
4 Connect a microphone.
5 Turn the MIC switch on, and slightly increase the MIC VOLUME level. Sing into themicrophone, and adjust the MIC GAIN until you achieve the correct settings.
6 When the AUDIO IN LED shows the correct input level, use the MIC VOLUME knob to setthe microphone volume in the mix.
Setting up your voice tone
You can add equalization, compression and gate to the microphone signal, to make your voice tonallypleasant and dynamically even. While these effects cannot be considered a replacement for somegood training, they can fix a few common problems in a live context.
Hint: You can keep theSHIFT button pressed, andpress the MIC button, to jumpto the Global Mic Setup page.
1 In case your voice is “boomy”, go to the Global > Mic > Global Setup page, by pressingthe GLOBAL button, then touching the Mic button in the display, and then (if it is notselected) the Global Setup tab.
The Global Setup page appears in the display.
Adjust the input level by using the MIC GAIN knob next to the LEFT audio input. Sing into the microphone, and watch at the AUDIO IN LED on the control panel – it ought to stay green. If it goes orange too often (or even red), turn down the input gain; if it turns off too often, increase
the input gain. No hint of distortion should be heard in the audio system when you sing.
While you adjust the gain,gradually increase the Micro-phone volume, by using the
MIC VOLUME knob.
i

84 Singing with a microphoneSetting up your voice tone
2 To filter out the “boominess”, use the “Low Cut Freq.” parameter and remove some bassfrequencies.
Start with the lowest frequency, and then try to up in case it does not solve the problem. In somecases, boominess can be solved by singing a bit farther from the microphone.
3 Then, touch the Global Dyn./EQ tab and adjust the level and tone of your voice.
The Global Dynamics/EQ page appears.
4 Adjust the Compression and Gate settings for your voice.
Adjust the Compressor’s Threshold and Ratio parameters, so that your voice sounds full andeven. Use the Gate control to reduce the risk of feedback and the amount of environmental noise(from other musicians on stage, from the audience…).
Hint: You can also accessthe EQ from the Mic panel ofthe main screen.
5 Then adjust the Equalization settings.
Use the EQ controls to adjust your tone. Increasing the High band gain adds an airy brightness,or “sizzle” to your voice; it can also increase sibilance. Increasing the Low band gain gives more“body” to your voice, but it can also increase “mud” due to the proximity effect from singingclosely into a cardioid microphone. Increasing the Mid band gain increase the presence of yourvoice in the mix, but it can also make it sound a bit nasal.
6 Press the EXIT button to return to the main page.
7 Since dynamics and EQ can alter the volume level, adjust the volume levels again withthe MIC VOLUME knob.
i

85Singing with a microphoneChoosing a Voice Processor Preset
Qui
ck G
uide
Choosing a Voice Processor Preset
You can add several effects to your voice, and you can set them up quickly through the Voice Proces-sor Presets. These are memories containing all the settings for the Voice Processor effects. You cancustomize these memories at will.
1 Press the PRESET button in the MIC SETTING sections, and choose one of the Presetsfrom the VP Preset Select window.
Voice Processor Presets (VP Presets) are settings for the various Voice Processor effects. Byselecting a Preset, all processing parameters may change.
While a Global VP Preset is assigned globally, a “local” VP Preset can be assigned to each Perfor-mance, Style or SongBook Entry. When selecting one of these elements, the VP Preset maychange, changing the type of processing applied to your voice. You can choose a VP Preset in theMic tab of the main screen.
2 Sing into the microphone to listen to the effects.
3 Adjust the level of the Reverb or Delay effect, by using the FX LEVEL knob in the MICSETTING section of the control panel.
4 Choose a different Preset, and listen to how the effects have changed.
Press the PRESET button or touch the VP Preset name to select a VP Preset
When the Global option is checked, the Global VP Pre-set is used instead of the “local” one.

86 Singing with a microphoneApplying harmony to your voice while playing with the Styles
Applying harmony to your voice while playing with the Styles
You can let Pa900 add automatically-generated harmonies to your lead voice, with up to three backingvoices. Each VP Preset may contain a different harmonization style (for example, changing the num-ber of voices, or the way notes are reveiced from the keyboard, a Style or a Song).
Here, we will use a VP Preset set to sing over a Style.
1 Press the STYLE PLAY button to go to the Style Play mode, and choose the desiredStyle.
2 Select the VP Preset “Chord 3 Voices”.
Note: You can also usethis VP Preset in Song Playmode, and play harmonynotes in the Chord Scan ofthe keyboard.
This VP Preset expects you play chords, and receives notes from the Chord Scan area of the key-board (the Harmony Mode is “Chord”).
3 Play some chords, to let the Voice Processor create new voices based on them, and singalong with the chords you play on the keyboard.
Harmonizing will add chord notes to the note you are singing.
4 Stop the Style.
5 Press the HARMONY button again, to turn its LED off.
Applying harmony to your voice while playing with a Song
Harmony notes can be received from a Song’s track. Here is how to use a VP Preset set to sing over aSong.
1 Press the SONG PLAY button to go to the Song Play mode, and choose the desiredSong.
2 Select the VP Preset “Notes 3 Voices”.
Note: You can also usethis VP Preset in Style Playmode, and play harmonynotes over the full keyboard.
This VP Preset expects notes from Track #5 of the Standard MIDI File (the Harmony Mode is“Notes”). To choose a different track keep the SHIFT button pressed and press the HARMONYbutton to see the Harmony page. Use the “Song Control” parameter to choose a different track.
3 Sing along with the Song, and let the Voice Processor create new voices based on theHarmony track of the Song.
4 Stop the Song.
5 Press the HARMONY button again, to turn its LED off.
i
i

87Singing with a microphoneBalancing the voice, effects and tracks level
Qui
ck G
uide
Balancing the voice, effects and tracks level
When all effects have been set, you can balance your voice against the effects, the Styles and the Songs.
1 If you like, start a Style or Song.
2 Adjust the microphone’s final volume by using the MIC VOLUME knob.
The position of the MIC VOLUME knob is not saved to memory, so it remains consistent whenselecting different Styles, Performances, Songs or Voice Processor settings.
3 If you are using the Harmony function, adjust the level of the harmony voices by usingthe “Harmony Level” parameter in the Mic panel of the main page.
By default, this control is also assigned to the ASSIGNABLE KNOB.
4 Set the voice effects’ level by using the dedicated FX LEVEL knob.
Soloing your voice (Talk)
Sometimes, during a live show, you might like to talk to your audience. Use the Talk function to atten-uate the music, and let your voice pass through clean and clear.
1 While in the main page of the Style Play or Song Play mode, touch the Mic tab to seeVoice Processor’s settings.
2 During playback, turn the Talk function On.
3 Sing or talk into the microphone.
You’ll hear that then background music has been made softer, while your voice will be heardloud and proud.
4 When done, turn the Talk function Off.
The background music returns to the original volume.

88 Recording a new Song (Standard MIDI File)Preparing the Style and Sounds
There are several ways to create a Song on the Pa900. The easiest and fastest is to use the Styles torecord what you are playing in realtime on the keyboard, while the arranger gives you the accompani-ment tracks.
Preparing the Style and Sounds
Before accessing the Record mode, we suggest you prepare the Style and Sounds with which to recordyour Song.
1 Select a Style with which you want to record.
2 Select the Sounds by choosing a Performance or STS.
That’s all! You are ready to access Record mode.
Accessing the Backing Sequence (Quick Record) mode
1 Press the SEQUENCER button to switch to the Sequencer mode.
Recording a new Song (Standard MIDI File)
Style ControlsStyle Elements
Player controlsSEQUENCER button
After pressing theSEQUENCER button, the mainpage of the Sequencer mode
appears.

89Recording a new Song (Standard MIDI File)Accessing the Backing Sequence (Quick Record) mode
Qui
ck G
uide
2 Press the RECORD button to open the Song Record Mode Select dialog box.
3 Select the Backing Sequence (Quick Record) option and touch OK to enter the BackingSequence Record mode.
Press the RECORD button, toopen the Song Record Mode
Select dialog box
After having chosen the Backing Sequence(Quick Record) option, the Backing
Sequence Record page appears.

90 Recording a new Song (Standard MIDI File)Setting the Record parameters
Setting the Record parameters
When you enter Backing Sequence Record, the latest selected Style and Sounds are already selected,and all tracks are ready to record. You could simply start recording as if you were playing in realtimewith the Styles. However, there are some further settings that you may want to do.• If you like, adjust any editable parameter in the display.
Recording
1 Select the Style Element you wish to use before starting to play.
2 Start recording, by pressing the START/STOP button.
Note: If you do not wishto start the Song with theStyle already playing, youcan simply start recording by
pressing the PLAY/STOP button in the PLAYER 1section, then start the Styleonly at a later time. The Stylewill start at the beginning ofthe following measure.
3 Play as if you were performing live with the Styles.
During recording, select any Style Element (Intro, Variation, Break, Ending…) you like. You canalso press START/STOP to stop the Style, and press it again to start the Style again!
Please remember that, while recording in Backing Sequence Record mode, you cannot use theSYNCHRO, TAP TEMPO/RESET, BALANCE controls.
Touch the Style parame-ter (or the STYLE button)to open the Style Select
window, and select a dif-ferent Style.
Track(s) status. ‘Rec’ means they are ready to record. ‘Play’ means they are recorded and you
can hear them. ‘Mute’ means they cannot be heard.
Measure counter. The negative number ( -1) is the precount, after which you can start recording.
Style’s Tempo. Change it, if you like.
Grouped tracks. During Quick Record, you cannot access each separate Songtrack. For ease of use, just two ‘master’ tracks are provided: Kbd/Pad (Key-
board/Pads) and Ch/Acc (Chord/Accompaniment).
Style’s Meter (or Time Signature). It’s just an indicator, you cannot change it.
Touch the Perf/STS parameter to open the Performance Select win-dow, and select a differ-ent Performance (as seen on page 45). As an alter-native, you use the PER-FORMANCE or STS buttons.
Select any of the Variations before starting to record. Select one of the Intros to start with an introduction.
i

91Recording a new Song (Standard MIDI File)Recording
Qui
ck G
uide
4 When finished recording your Song, press the (PLAY/STOP) button in the PLAYER1 section to exit recording, and return to the main page of the Sequencer mode.
5 While in the main page of the Sequencer mode, press the (PLAY/STOP) button inthe PLAYER 1 section to listen to the recorded Song.
The Backing Sequence Song has been converted to an ordinary Song (in Standard MIDI File, or“MID”, format). If you like it, you can save it. You can then read it in Song Play mode, or transferit to any external sequencer.
6 If you want to edit the Song, press MENU to access Edit mode.
After pressing the PLAY/STOP button, the mainpage of the Sequencer mode will appear again.

92 Recording a new Song (Standard MIDI File)Second-take recording (Overdubbing)
Second-take recording (Overdubbing)
You may want to record an additional “grouped” track, or replace a bad-recorded track with a newone. A good idea may be to record all chords and Style Element changes during the first take, thenrecord Keyboard tracks and Pads during the second take.
1 Press the RECORD button to enter Record mode again. When the Song Record ModeSelect dialog box appears, select Backing Sequence (Quick Record) again.
2 If you are recording just one of the “grouped” tracks, set to Play the track to be pre-served.
3 Repeat the recording procedure, and press the (PLAY/STOP) button in the PLAYER1 section to stop recording and return to the main page of the Sequencer mode.
4 While in the main page of the Sequencer mode, press the (PLAY/STOP) button inthe PLAYER 1 section to listen to the recorded Song.
Again, the Backing Sequence Song has been converted to an ordinary Song.
Saving a Song
After having recorded a Song that you like, it is a good idea to save it, to avoid losing it when theinstrument is turned off (or put in standby).
1 While in the main page of the Sequencer mode, touch the page menu icon to open thepage menu.

93Recording a new Song (Standard MIDI File)Saving a Song
Qui
ck G
uide
2 Select the Save Song command to open the Save Song window.
This window is very similar to the one you can see when pressing the MEDIA button on the con-trol panel, and touch the Save tab to see the Save page. This page is, however, “filtered” to onlysee Song files.
3 Select a device and folder where you want to save your Song.
4 Touch the Save button in the display to open the Save Song dialog box.
5 Touch OK in the display to save the Song, or Cancel to stop the Save operation.
After you select the Save songcommand, the Save Song page
appears.
If a Song is selected (highlighted) itwill be overwritten. If no Song is
selected, a new Song file will be cre-ated on the target device.
To deselect a selected Song, touchanywhere else in the Song list, or
select the same storage deviceagain.
Use the scroll bar to see all Songs in the list. Keep SHIFT pressed and touch the Up/Down arrow to scroll to the next/pre-vious alphabetic section. As an alterna-tive, you can use the VALUE DIAL.
Use the Open and Close buttons to browse through the folders.
Use the Device pop-up menu to select one ofthe available storage devices
Touch the Save button to save the Song to the current folder.
In case you prefer to exit this page without saving the Song, press the EXIT button.
Touch the Text Editicon to edit the Song’s
name.

94 Recording a new Song (MP3 file)
With Pa900, you can record your performance as an MP3 file. Keep in mind what follows:
Note: You cannot enterMP3 Record mode while inSequencer or Media mode.
• All you play on the keyboard, the Styles and the Standard MIDI Files performed by the Players willbe recorded.
• Any audio signal entering the Audio Inputs is recorded (single microphone input with the “Mic Into Voice Processor” option selected, or the Left and Right line inputs with the “Audio In to DirectOut” option selected. See “Audio & Video: Audio In” on page 264). Harmony voices generated by theVoice Processor will be also recorded.
• You will not be able to load MP3 files while recording an MP3 Song, and you will not be able torecord an MP3 Song while an MP3 file is playing.
You will then be able to play the resulting MP3 files using the Players, as with any other MP3 file.
1 To access recording, keep the SHIFT button pressed, and press the RECORD button.
The MP3 Record dialog box will appear.
When not recording, the status shown is Idle.
Note: MP3 files recordedwith lower sampling ratesmay not sound very good.This is a problem that cannotbe avoided with MP3 files.
2 Choose the preferred MP3 audio quality option, by means of the “Quality” pop-upmenu.
The higher the sound quality, the larger the MP3 file that will be generated.
3 Use the “Device” parameter to choose a location where to temporary store therecorded MP3 file.
This is not the final destination of your file, since you will be able to choose a different locationafter recording. However, be sure there is enough space for the temporary file, by checking the“Free space” parameter.
The default device is automatically selected as the recording unit; use the Device pop-up menuto choose a different one. You can record to the internal memoryor to a device connected to oneof the USB ports.
4 When done, touch the “Rec” button in the display to start recording.
The “Rec” button changes to “Stop”, and can be touched again to stop recording. Also, the “Idle”label changes to “Recording”.
5 Start playing and singing your Song.
You can record everything you play; in addition, you can record your vocals. In other words, youcan record your whole performance.
Recording a new Song (MP3 file)
i
i

95Recording a new Song (MP3 file)
Qui
ck G
uide
6 If you like, you can press the EXIT button to exit this dialog box and navigate throughthe Style Play and Song Play pages, without stopping to record.
7 To access the dialog box again, and see the file length or stop recording, pressSHIFT+REC again.
During recording, if you exit from the MP3 Record dialog box while still recording, ared recorder icon will flash in the display.
During recording, you can use this dialog box to see the Recording time, file length,and the remaining space on disk. Maximum recording time depends on the available space inthe selected device.
8 Touch “Stop” to stop recording.
After touching “Stop”, recording will stop, and the following dialog box will appear:
9 Touch the (Text Edit) button to give the MP3 file a name.
10 Touch the “Browse” button to select a device and directory where to save the file.
11 Touch the “Save” button to save the file.
After saving, you can listen to the MP3 file in Song Play mode, as you do with any other Song.
The MP3 file can also be moved to a personal computer for further editing, by copying it to anUSB memory stick.

96 Searching files and musical resourcesHow to use the Search function
With Pa900, you can press the SEARCH button to search for files or musical resources.
How to use the Search function
Depending on the page you are in, you can search for different types of data. For example, while inMedia mode you can only search for files, while in Style Play or Song Play mode you can search forseveral different types of data (Styles, Songs, Lyrics…).
There are some pages where the Search function is not available, since there are no relevant data tosearch for that page (for example, the pages of the Global mode).
Here is the general procedure.
1 Press the SEARCH button to open the Search window.
2 If needed, touch the “Type” pop-up menu, and choose the type of item you are lookingfor.
When choosing Files, Songs or Lyrics, the “Browse” button will be activated, to allow for search-ing files in the disks.
Searching files and musical resources

97Searching files and musical resourcesHow to use the Search function
Qui
ck G
uide
3 In case you are searching for a file in a disk, touch the “Browse” button to open theMedia window.
4 Type the name of the file to be searched.
There is no difference between upper and lower cases (“LOVE” is the same as “Love” or “love”).
5 When finished entering the name, touch the “Search” button.
Note: Only one search a-time can be carried on. Pleasewait for the current search tobe completed, or touch theStop button in the display tostop the current search anddo a new one.
After a while, the list of files found begins to appear in the display.
Hint: You can touch theCancel button in the display,or press the EXIT button in thecontrol panel, to exit fromthis window and carry onother operations. The searchwill continue in the back-ground.
After you have touched the “Search” button, its name changes to “Stop”. If needed, touch thisbutton to stop the ongoing search. The name of the button reverts to “Search”. Any file found willremain in the display, until you do a new search.
The time needed to complete a search depends on the size of the device(s) and the number of files.
Use the Open and Close buttons to browse
through the folders
Use the Device pop-upmenu to select one of theavailable storage devices
In case you are lost among the direc-tories, touch the “Root” button to go to the root of the selected device
When you see the folder contain-ing the file you are looking for, touch it, then touch the Select button to close the Media win-dow. The name of the selected folder will be shown in the title bar of the Search window.
i
i

98 Searching files and musical resourcesNotes about searching
6 You can touch one of the found items to select it, and then touch the “Info” button tosee information on it.
Touch OK to close the Info dialog box.
7 If you want to return to the main Search page and type a search string again, touch the
icon. Otherwise,
8 If you have found what you were looking for, touch its name and then touch the“Select” command.
9 You can exit from the Search window at any time, by pressing the EXIT or SEARCH but-ton.
Notes about searching
WildcardsDuring search, the string entered will be search as a whole word or as part of a word. For example, ifyou entered “love”, Pa900 will find “Love” and “LoveSong”, or any other word containing the string“love”.
You can use the wildcards “?” (any single character) and “*” (any sequence of characters) to searchexactly that string. For example, “*love” will find “MyLove”, but not “LoveSong”. “??love” will find“MyLove” but not “TrueLove”.
Also, if you are looking for words that can be spelled in a slightly different way, you can use the “?”wildcard to find all occurrences; “gr?y” will find out both “gray” and “grey”.


100 Selecting elementsStyle Select window
The following windows are shown in the various operatingmodes, whenever you try to select a Sound, Performance, Styleor Song.
Style Select window
To open the Style Select window, touch the Style area whereas itappears in the display, or one of the buttons in the STYLE sec-tion on the control panel.
Press EXIT to exit from this page and go back to the previouspage without selecting any Style.
Note: Depending on the status of the “Auto Select” parameter (seepage 248), a Style may be immediately selected when pressing oneof the STYLE buttons. The latest selected Style for that bank will beselected.
Style sets
Selected set of Styles. Factory Styles are Styles supplied as stan-dard. Fav/User are Favorite Styles (locations for custom-madeStyles with editable names) and User Styles (locations for cus-tom-made Styles with fixed names).
Side tabs (banks)
Use these tabs to select a bank of Styles. Favorite tabs can berenamed (see “Renaming the Favorite banks” on page 129).
Lower tabs (pages)
Use these tabs to select one of the available pages in the selectedbank.
Styles
Touch one of these buttons in the display to select a Style. Unlessthe “Display Hold” parameter (see page 248) is turned on, thewindow automatically closes shortly after you select a Style.
After selecting a Style from this window, and another Style isplaying, the name of the new Style name begins to flash, mean-ing it is ready to start playing at the beginning of the next mea-sure.
Style Select page menuTouch the page menu icon to open the menu. Touch a commandto select it. Touch anywhere in the display to close the menuwithout selecting a command.
Copy and Paste
Use this command to copy the selected Style to a different selec-tion,
1. Select the Style to be copied. To select more items, keep theSHIFT button pressed and touch all the item to be selectedfor copying. Hint: You can deselect one of the selected itemsby touching it while still keeping the SHIFT button pressed.You can deselect all by touching a single item.
2. Choose the Copy and Paste command.
3. Select the target location. In case you are copying morethan a single item, all subsequent items will sequentiallyfollow the first one. If there aren’t enough locations avail-able, the procedure will be cancelled. Warning: If you con-firm, any Style already existing at the target location will beoverwritten!
Rename
Use this command to edit the name of the selected item. Pleasekeep in mind that you can only rename non-protected items.
1. Select the Style to be renamed,
2. Choose the Rename command, and use the virtual key-board to edit the name.
3. When done, touch OK to confirm.
Delete
Choose this command to delete the selected item. Please keep inmind that you can only delete non-protected items.
1. Select the Style to be deleted. To select more items, keep theSHIFT button pressed and touch all the item to be selectedfor deleting. Hint: You can deselect one of the selected itemsby touching it while still keeping the SHIFT button pressed.You can deselect all by touching a single item.
2. Choose the Delete command, and confirm deletion. Warn-ing: Unless you have a copy of it, the deleted item will be goneforever!
Selecting elements
Side tabs (banks)
Lower tabs (pages)
Style sets
Styles

101Selecting elementsSound Select window
Refe
renc
e
Rename Favorite
Choose this command to edit the name of the Favorite Stylebanks.
The assigned name can be spanned over two lines, by separatingthem with the paragraph character (¶). For example, to write“World Music” on two lines, enter “World¶Music”.
Be careful not to write words exceeding the width of the side tabsof the Style Select window.
1. Choose the Rename Favorite command.
2. Touch the (Text Edit) symbol next to the bank to berenamed.
3. Use the virtual keyboard to edit the name.
4. When done, touch OKto confirm.
Select All (Bank)
Choose this command to select all items in the current bank.
You can deselect one of the selected items by touching it whilekeeping the SHIFT button pressed. You can delect all by touch-ing any single item.
Sound Select window
To open the Sound Select window, touch the Sound area whereasit appears in the display, or the SOUND SELECT button of thecontrol panel.
Press EXIT to exit from this page and go back to the previouspage without choosing any Sound.
Sound sets
Selected set of Sounds. Factory Sounds are the Sounds suppliedas standard. Legacy Sounds are Sounds compatible with olderPa-Series models. GM are Drum Kits mapped according to theGeneral MIDI 2 or XG standards. User Sounds are custom-cre-ated or edited Sounds.
Side tabs (banks)
Use these tabs to select a bank of Sounds.
Lower tabs (pages)
Use these tabs to select one of the available pages in the selectedbank.
Previous/Next tabs
Scroll the lower tabs to the left or the right, when additional tabsare available but cannot be seen in the display.
Sounds
Touch one of these buttons in the display to select a Sound.Unless the “Display Hold” parameter (see page 248) is turnedon, the window automatically closes shortly after you select aSound.
Program Change
Program Change number. Shown only when the “Show” param-eter is turned on in Global mode. (See page 248).
Sound Select page menuTouch the page menu icon to open the menu. Touch a commandto select it. Touch anywhere in the display to close the menuwithout selecting a command.
The commands are the same seen for the Style Select window’spage menu, apart for a difference with the Delete command.
Delete
Choose this command to delete the selected Sound.
1. Select the Sound to be deleted. To select more items, keepthe SHIFT button pressed and touch all the item to beselected for deleting. Hint: You can deselect one of theselected items by touching it while still keeping the SHIFTbutton pressed. You can deselect all by touching a single item.
2. Choose the Delete command, and confirm deletion. Warn-ing: Unless you have a copy of it, the deleted item will be goneforever!
Note: This command does not delete any User PCM Sample usedby User Sounds. In case you need more free PCM Sample memory,and you know there are unused Samples and Multisamples inmemory, use the “Not assigned to any Multisample/Drumkit”option of the “Delete” command in the Sampling mode to cleanmemory (see page 244).
Side tabs (banks)
Lower tabs (pages)
Sound sets
SoundsIf more than five pages are available, the Previous/Next tabs are shown in this area

102 Selecting elementsPerformance Select window
Performance Select window
To open the Performance Select window, touch the Performancearea whereas it appears in the display, or one of the PERFOR-MANCE buttons on the control panel. Use the PERFOR-MANCE buttons to go directly to the selected bank.
Press EXIT to exit from this page and go back to the previouspage without selecting any Performance.
Note: Depending on the status of the “Auto Select” parameter (seepage 248), a Performance may be immediately selected whenpressing one of the PERFORMANCE buttons. The latest selectedPerformance for that bank will be selected.
Side tabs (banks)
Use these tabs to select a bank of Performance. Each tab corre-sponds to one of the PERFORMANCE buttons on the controlpanel.
Lower tabs (pages)
Use these tabs to select one of the available pages in the selectedbank.
If you press again the same PERFORMANCE button on the con-trol panel, the next page in the same bank is selected. This way,you do not need to touch one of the corresponding tabs in thedisplay in order to select a different page.
Performances
Touch one of these buttons in the display to select a Perfor-mance. Unless the “Display Hold” parameter (see page 248) isturned on, the window automatically closes shortly after youselect a Performance.
Performance Select page menuTouch the page menu icon to open the menu. Touch a commandto select it. Touch anywhere in the display to close the menuwithout selecting a command.
The commands are the same seen for the Style Select window’spage menu.
Pad Select window
Touch the Pad area whereas it appears in the display, to open thePad Select window.
Press EXIT to exit from this page and go back to the previouspage without selecting any Pad.
Pad sets
Selected set of Pads. Hit are single-note, pre-programmed fac-tory Pads. Sequence are sequence-based, pre-programmed fac-tory Pads. Local are like Factory Pads, but contain Padscustomized for the music of your Country. User can be eithersingle-note or sequence-based Pads, and can be user-created ormodified.
Side tabs (banks)
Use these tabs to select a bank of Pads.
Lower tabs (pages)
Use these tabs to select one of the available pages in the selectedbank.
Pad
Touch one of these buttons in the display to select a Pad. Unlessthe “Display Hold” parameter (see page page 248) is turned on,the window automatically closes short after you select a Pad.
Side tabs (banks)
Lower tabs (pages) PerformancesSide tabs (banks)
Lower tabs (pages)
Pad sets
Pads

103Selecting elementsSTS Select
Refe
renc
e
Pad Select page menuTouch the page menu icon to open the menu. Touch a commandto select it. Touch anywhere in the display to close the menuwithout selecting a command.
The commands are the same seen for the Style Select window’spage menu.
STS Select
To select one of the four STS associated with the current Style orthe selected SongBook Entry, use the four STS buttons on thecontrol panel.
As an alternative, touch the STS name tab in the main page ofthe Style Play or Song Play mode, where you can see the name ofthe available STSs.
The STS’s name can also be seen in the Lyrics and Markers page:
Song Select window
This page appears when you touch the Song name in the display,or press the SELECT button in one of the PLAYER sections onthe control panel.
Press EXIT to exit from this page and go back to the main pageof the Song Play operating mode without selecting a Song.
While in this page, you can select a Standard MIDI File, Kara-oke, MP3 or Jukebox file.
Directory
This is the list of the selected device’s content.
Use the scrollbar to scroll the list items. As an alternative, youcan scroll the list using the VALUE dial.
When the Name label is selected on top of the list, keep theSHIFT button pressed and touch one of the arrows to jump tothe previous or next alphabetical section.
You can touch one of the labels on top of the list, to reorder thelist items accordingly. By touching the label again, the order ofthe files will switch between ascending and descending.
A list can contain several different types of files or folders.
A file or folder may be in one of the following status. (See “Pro-tect” and “Unprotect” on page 293 for information on how tochange the file status).
Page menu icon
Touch the page menu icon to open the menu. See “Song Selectpage menu” on page 104 for more information.
Song path
Directory
Storage device
Page menu
Type icon File/folder type
Standard MIDI File (MID)
Karaoke file (KAR)
MPEG Layer 3 (MP3)
Jukebox file (JBX)
Folder
Status icon File/folder status
Protected
– Unprotected
Type of the fileor folder
File status
File or folder name

104 Selecting elementsSong Select window
Storage device
Use this menu to select one of the available storage devices.
The actual name (label) of the device appears within squarebrackets ([]).
Song path
This line shows the current device path.
Open
Opens the selected folder (item whose icon looks like this one:).
Close
Closes the current folder, returning to the parent (“upper”)folder.
Locate
Touch this button to go back to the folder containing the selectedSong. This is useful to quickly locate it, after you have browsedthrough long directories and “dug” into different folders.
Select
Selects the highlighted item in the display. If a Song is alreadyplaying, it stops, and the new Song is ready to play. You willreturn to the main page.
Play All
When you touch this button, all Standard MIDI Files and MP3files contained in the current directory are added to a new Juke-box list, that is automatically assigned to Player 1. The order inwhich they are played depends on the current sorting method,i.e., how the files are shown in the display.
You can use this Jukebox list as any other list of this type (i.e.,start the playback with PLAY/STOP, jump to the next Song inthe list with SHIFT + >>, edit it in the Jukebox page…).
Note: A Jukebox list can include up to 127 Songs. If your foldercontains more items, only the first 127 will be considered.
Hint: If you don’t want the list to be deleted when setting theinstrument to standby, go to the Jukebox page and save it as a“.JBX” file.
Selecting a Song by its ID numberEach Song in a folder on a device (up to 9,999) has a progressiveID number assigned. When the “Show Song Number” option isselected in the Song Select page menu (see below), you can seethis number before the Song’s name in the Song Select window.You can use this number to select the Song by composing thecorresponding number, speeding up the Song retrieval when youare using an hard disk filled with midifiles.
While in the Song Select window, press the SELECT button inthe corresponding PLAYER section to open the keypad, andenter the number corresponding to the Song to be selected.
While in any page of the Song Play mode, press the SELECT but-ton in the corresponding PLAYER section twice to open the key-pad.
Note: If no Song corresponds to the dialed number, the “Song notavailable” message will appear.
Note: While the directory may contain more than 9999 files, youcan’t select Songs outside the 0001-9999 range when using thenumeric keypad.
Song Select page menuTouch the page menu icon to open the menu. Touch a commandto select it. Touch anywhere in the display to close the menuwithout selecting a command.
Export Song List
Select this command to save the current list as a text file. Thisway, you will be able to print a list of Songs, to see which numbermatches each Song.
1. While in the Song Select window, select the folder whoseSong list you wish to save as a text file.
2. Select the Export Song List command from the page menu.
3. A dialog box will appear, asking you to select one of theavailable storage devices.
4. Select one of the options, and touch OK to confirm.
Note: The text file will contain a list of “*.mid”, “*.kar”, “.mp3”and “*.jbx” files only. Folders and other types of files will not beincluded.
When saved, the text file will be named after the selected folder.For example, a folder named “Dummy” will generate a“Dummy.txt” file. If a file with the same name already exists in thetarget, it will be overwritten without waiting for any confirmation.A file containing the list of all valid files contained into the root ofthe disk will generate a “Root.txt” file.
The list will include the progressive number assigned to each Song,the file names, the total number of files in the list.
To correctly display and print the list on a personal computer, use afixed size (i.e., non-proportional) character in your text editor.
Device Type
USB Optional device connected to the rear USB Host port

105Selecting elementsSong Select window
Refe
renc
e
Show Song Number
Check this option to make the Song’s progressive ID numberappear in the list, next to each Song.
Show Song Extension
Check this option to make the file extension (“*.mid”, “*.kar”,“*.jbx”, “*.mp3”) appear in the list, at the end of each Song’sname.
Create New Folder
This command will let you create a new generic folder in theroot of any device, or inside any other generic folder. You can’tcreate a “.SET” folder with this command, since this type offolder is reserved to the Save operations (and can be created withthe New SET button in any Save page).
By touching the (Text Edit) button you can open the TextEdit window. Enter the name, then touch OK to confirm andclose the Text Edit window.
Rename
(Only available when an item is selected in a list) Use this func-tion to change the name of an existing file or folder. You cannotchange the 3-character extension of files and “.SET” folders,since they are used to identify the type of file or folder.
Touch the (Text Edit) button to open the Text Edit window.Enter the new name, then touch OK to confirm and close theText Edit window.
Delete
(Only available when an item is selected in a list) Use this com-mand to delete the selected file or folder.

106 Style Play modeStart-up settings
The Style Play mode is the boot-up operating mode. When inthis mode, you can play along with the Styles (i.e. automaticaccompaniments), using up to four tracks (Upper 1-3 andLower) to play on the keyboard. You can choose differentSounds and Effects by selecting Performances and STSs. FourPads will provide single-shot sounds or repeating patterns insync with the Style. You can also use the SongBook to automati-cally select Styles suited for a particular song.
Start-up settings
Since the “My Setting” Performance is automatically selectedwhen turning the instrument on, you can save your preferredstart-up settings to it.
Select the Sounds, Effects, and other settings you would like tosee automatically selected when turning the instrument on.Then keep the MY SETTING button pressed for about one sec-ond. When the Write Startup Settings window appears, confirmby touching OK.
Note: If you like some settings to be preserved even when choosingdifferent Performances, STSs and Styles, turn on the desired“locks” to avoid changes to the selected parameters (see “GeneralControls: Lock” on page 249).
How Styles, Variations, Performances andSTSs are linked together
Styles, Variations, Performances and STSs are linked in manyways.
• When the STS MODE LED is steadily on or blinking, selectinga Style also changes the Keyboard tracks (STS 1 is automaticallyselected). Performance settings are overridden.
• When the STS MODE LED is blinking, selecting a Variationalso select the corresponding STS.
• When the STYLE CHANGE LED is on, selecting a Perfor-mance also selects a Style (the one memorized with the Perfor-mance).
• Current track settings can be saved either to a Performance, anSTS, or the Style Settings, depending on the Write command youselect.
Styles and Pads
Each Style includes four Pads. Each time you select a Style, thefour Pads it contains are assigned to the four PAD buttons. TheStyle and the Pads will play using the same Tempo value.
Master Volume and Balance
While the MASTER VOLUME knob controls the general vol-ume of the instrument, you can use the BALANCE knob to bal-ance the Style’s Accompaniment and Pad tracks against theKeyboard tracks.
Note: As an alternative, the BALANCE knob can also work as avolume control. See “Balance Slider” on page 255.
Factory, Favorite and User Styles
There are three different types of Style locations:
• Factory Style banks are the preloaded Styles, that you can’tusually edit (unless you want to do so by turning off theprotection, see “Factory Style and Pad Protect” onpage 254).
• Favorite Style banks are Styles that can be loaded from anexternal device, or can be created or edited in Style Recordmode. You can rename the tabs in the Style Select windowto create places for custom banks, or for additional musicgenres that are not already included among the suppliedbanks. See “The Favorite banks” on page 129 for informa-tion on how to manage these Styles.
• User Style banks are, like the Favorite banks, Styles loadedfrom an external device, created or edited by yourself (theUser). These are banks conceived as a ‘workbench’ – a placewhere to manage Styles and banks before saving them to afinal location. See the “Style/Pad Record mode” chapter forinformation on how to edit or create Styles.
Style Play mode
Overall instrument’svolume
Balance of Style and Pad tracks against the Keyboard tracks

107Style Play modeMain page
Refe
renc
e
Main page
This is the page you see when you turn the instrument on.
To access this page from another operating mode, press theSTYLE PLAY button.
To return to this page from one of the Style Play edit pages, pressthe EXIT button.
Details on individual tracks can be seen by pressing the Vol-ume tab. Use the TRACK SELECT button to switch betweenNormal view (Keyboard tracks, grouped Style tracks) andStyle view (individual Style tracks). (See “Volume panel”starting from page 109).
Page headerThis line shows the current operating mode, transposition andrecognized chord.
Operating mode name
Name of the current operating mode.
Master transpose
Master transpose value in semitones. This value can be changedby using the TRANSPOSE buttons on the control panel.
Note: Transpose may automatically change when selecting a differ-ent Performance or Style. It may also change when loading a Stan-dard MIDI File generated with an instrument of the Korg Pa-Series.
To avoid transposition, the Master Transpose is “locked” bydefault. If you want to unlock it, change the Master TransposeLock parameter’s status (see “General Controls: Lock” onpage 249).
Recognized chord
Displays the recognized chord, when you play a chord on thekeyboard. If no chord abbreviation is shown, check if at least oneof the LEDs in the CHORD SCAN section is turned on.
You can choose how chords are recognized by using the CHORDSCAN buttons and the “Chord Recognition” parameter in theGlobal > Style page (see page 252).
Page menu iconTouch the page menu icon to open the menu. See “Page menu”on page 127 for more information.
Style areaThis is where the Style name is shown, together with its Tempoand Meter (Time Signature) parameters.
Style name
Currently selected Style. Touch the Style name (or press one ofthe buttons in the STYLE section) to open the Style Select win-dow.
Style bank
Bank the current Style belongs to.
Style Element meter
Meter (time signature) of the current Style Element.
Measure length/number
While the Style is playing, an ‘M’ appears, to show the currentmeasure number of the current Style Element playing. While it isin stop, an ‘L’ appears, to show the length (total number of mea-sures) of the current Style Element.
Current beat
Beat number currently playing.
Current Tempo
Metronome Tempo (from 30 to 250). Use the TEMPO buttons tochange the Tempo value.
As an alternative, keep the SHIFT button pressed and use theVALUE DIAL to change the Tempo. Also, you can touch theTempo field and drag it with your finger, or change it with theVALUE DIAL.
To recall the Tempo stored in the current Style, press theTEMPO buttons together.
Style area Page header Page menu icon
Songarea
Perfor-mance/
STS area
Keyboard tracks area
Panels
Operating mode Master Transpose (in semitones)
Recognized chord
Style name
Style Element meter
Style bank
Measure length/number
Current Tempo
Current beat

108 Style Play modeMain page
You can prevent Tempo from changing by turning the TEMPOLOCK LED on.
Note: Since Style Elements may contain Tempo Change data,Tempo may change while a Style Element is playing.
Songs areaThis is where the Songs assigned to the onboard Players areshown.
Song name
Name of the Songs assigned to the Players. You can select Songswhile playing Styles, to have them ready when switching to SongPlay mode.
Performance/STS areaThis is where the latest selected Performance or STS name isshown.
Selected Performance or STS
This is the latest selected Performance (Perf) or Single TouchSetting (STS#).
Touch the name to open the Performance Select window (see“Performance Select window” on page 102). As an alternative,use the PERFORMANCE section to select a different Perfor-mance.
To select a different STS, use the four STS buttons under the dis-play, or the STS panel in the display.
Keyboard tracks areaThis is where Keyboard tracks are shown.
Sound name
Name of the Sound assigned to the corresponding Keyboardtrack.
• If the track is already selected (white background), touch theSound name to open the Sound Select window.
• If the track is not selected (dark background), first select it,then touch the Sound name to open the Sound Select window.
You can also open the Sound Select window by using theSOUND SELECT button on the control panel.
For more information about the Sound Select window, see“Sound Select window” on page 101.
Keyboard track octave transpose
Non editable. Octave transpose of the corresponding track. Toindividually edit the octave transpose for each track, go to the“Mixer/Tuning: Tuning” edit page (see page 116).
You can also transpose all Upper tracks by using the UPPEROCTAVE buttons on the control panel.
Bass & Lower Backing icon
When the Bass & Lower Backing function isactive, the Backing icon appears in the Lowertrack Sound area (see “Bass & Lower Backing” on page 253).
Keyboard track name
Non editable. Name of the corresponding track:
Sound bank’s icon
This picture illustrates the bank the current Sound belongs to.
Keyboard track status
Play/mute status of the current track. Select the track, then touchthis area to change the track status.
No icon Play status. The track can be heard.
Mute status. The track cannot be heard.
PanelsThe lower half of the main page contains the various panels, youcan select by touching the corresponding tabs. See more infor-mation in the relevant sections, starting from page 109.
Song name
Selected Performance or STS
Soundname Track name
Track’s octave transpose
Sound bank’s icon
Track status
Abbreviation Track Hand
UP1 Upper 1 Right hand (or both when in Full Key-board mode)
UP2 Upper 2
UP3 Upper 3
LOW Lower Left hand
Volume panel
Tabs

109Style Play modeSTS Name panel
Refe
renc
e
STS Name panel
Touch the STS Name tab to select this panel. Single Touch Set-tings (STS) are memory locations intended for quickly choosingKeyboard Sounds, contained in each Style or SongBook Entry.While in this panel, you can see the name of the four STSsbelonging to the latest selected Style or SongBook Entry. Touchone of the names to select the corresponding STS.
Note: You cannot edit the STS names in this panel. To edit a name,select the STS to be renamed, then select the Write Single TouchSetting command from the page menu (see “Write Single TouchSetting dialog box” on page 128).
Volume panel
Touch the Volume tab to select this panel. This is where you canset the volume of each track, and mute/unmute them.
Changing the tracks’ volumeYou can change the volume of each track by dragging the slidersin the display. You can also change the volume by touching atrack’s slider, then using the VALUE DIAL.
Changing the Play/Mute statusPlay/mute status of the current track. Select the track, then touchthis area to change its status.
Play status. The track can be heard.
Mute status. The track cannot be heard.
Saving the track’s volume and play/mutestatusEach set of tracks can be saved into a different memory. Thisallows for a great flexibility when mixing Keyboard and Accom-paniment tracks through the use of Performances, STSs andStyles.
• The volume and play/mute status of the Keyboard tracks canbe saved to a Performance or STS (see “Write Performance” onpage 127 and “Write Single Touch Setting” on page 127).
• The volume and play/mute status of the separate Style trackscan be saved to the current Style Settings (see “Write CurrentStyle Settings” on page 127).
• The offset volume of the grouped Style tracks is automaticallysaved to the Global.
Track namesUnder the sliders, a label for each track is shown. Usethe TRACK SELECT button to switch between the
Sliders
Track status icons

110 Style Play modeVolume panel
Normal (grouped Style tracks, Keyboard tracks) and the StyleTracks view (separate Style tracks).
Normal viewIn Normal view you can see the grouped Style tracks (Play/Muteonly), and the separate controls for the Keyboard tracks:
Grouped Style tracks
In the Normal view, Style tracks are grouped together (Dr/Perc,Accomp, Bass groups), to allow for instant play/mute of severaltracks at the same time.
Changing the volume of the grouped Style tracks can be done (asa general control) in the Global mode > Mode Preferences >Style page (see “Style Tracks Global Volume” on page 253).
Keyboard tracks
Here you can separately control the volume and play/mute statusof each Keyboard track.
Style Tracks viewPress the TRACK SELECT button to switch from the Normalview to the Style Tracks view. In this view, individual Style tracksare shown in the lower half of the display, while the upper half ofthe main page changes to show parameters for the selected Styletrack.
Press TRACK SELECT again to return to the Normal view (Key-board tracks, grouped Style tracks, Mic/In controls).
Style tracks Volume
Here you can change the volume and play/mute status of eachone of the individual Style tracks.
Original Style Sounds
This parameter lets you decide if the Style has to play the Soundssaved in the Performance or Style Settings, or the ones saved ineach Style Element.
Note: When assigning a Sound to a Style track, the “Original StyleSounds” parameter is automatically turned off to allow its use.
Note: This parameter can be saved with the Performance or StyleSettings.
On Style tracks always use the original Soundsrecorded inside each Style Element. If you assigna different Sound to a Style track, this parameteris automatically set to Off.
Off You can assign different Sounds to each Styletrack, and save them in a Performance or StyleSettings. The selected Sounds remain the samefor all Style Elements. These Sounds can be savedinto a Performance or Style Settings with the“Write Performance” or “Write Current Style Set-tings” commands (see page 127). AssignedSounds are shown in the Sounds area of this page.
Selected Track Info areaThis line lets you see the Sound assigned to the selected track. Itappears both in the main page, and in several edit pages.
Track Description
Normal View
DR/PERC (*)
(*).Volume for these grouped tracks is a global offset, that can be adjusted in the Global > Mode Preferences > Style page.
Grouped Drum and Percussion tracks.
ACCOMP (*) Grouped Accompaniment tracks (Acc1-5).
BASS (*) Grouped Bass Style track.
LOWER Lower track.
UPPER1…3 Upper tracks.
Style Tracks View
DRUM Drum Style track.
PERC Percussion Style track.
BASS Bass Style track.
ACC1…5 Accompaniment Style tracks.
Grouped Style tracks Keyboard tracks
Grouped Style Tracks
Selectedtrack
info area
Sounds area
Style tracks Volume
Track name
Sound name
Sound bank
Program Change sequence

111Style Play modePad panel
Refe
renc
e
Track name
Name of the selected track.
Sound name
Sound assigned to the selected track. Touch anywhere in thisarea to open the Sound Select window, and select a differentSound.
Sound bank
Bank of the selected Sound.
Program Change
Program Change number sequence (Bank Select MSB, BankSelect LSB, Program Change).
Sounds areaThis area lets you see the Sound bank’s icon and octave transpo-sition for the eight Style tracks.
Style track’s octave transpose icon
Non editable. Octave transpose of the corresponding track. Tochange the octave transpose, use the UPPER OCTAVE buttons,or go to the “Mixer/Tuning: Tuning” edit page (see page 116).
Sound bank’s icon
This picture illustrates the bank the current Sound belongs to.Touch an icon a first time to select the corresponding track(detailed information are shown on the Selected Track Info area,see above). Touch it a second time to open the Sound Select win-dow.
Pad panel
Touch the Pad tab to select this panel. This is where you canassign a different Hit or Sequence Pad to each of the four pads,and see at a glance how pads are programmed. For more options,go to the “Pad/Switch: Pad” page (see page 125).
Pad assignment
Name of the Hit or Sequence assigned to each Pad. Touch thebox to make the Pad Select window appear (see “Pad Select win-dow” on page 102).
When the lock is open, Pads could automatically change whenchoosing a Style or SongBook Entry.
Pads lock icon ( )
Close this lock to prevent Pads from changing when choosing adifferent Style or SongBook Entry.
Style track’s octave transpose icon
Sound bank’s icon

112 Style Play modeSplit panel
Split panel
Touch the Split tab to select this panel. This is where you can setthe split point and activate the Bass Inversion.
Split Point
Use this parameter to select a different split point. A full-rangepiano keyboard is shown in the display, divided at the selectedsplit point. Upper tracks play on the right of this point, while theLower track plays on the left.
Keyboard diagram
Touch anywhere on the keyboard diagram. A message willappear, asking you to press the new split point on the keyboardof your Pa900 (or to press the EXIT button to close the messagewith no changes).
Global
There is a global split point, and a “local” one, that can be mem-orized into the Performances and STSs.
On You are editing the global split point. The globalsplit point is considered when selecting a Perfor-mance or STS that does not contain a “local” splitpoint.
Off You are editing the “local” split point memorizedin the current Performance or STS.
Sub-Scale panel
Touch the Sub-Scale tab to select this panel. This panel replicatesthe “Mixer/Tuning: Sub Scale” edit page (see page 117). .
With the “Quarter Tone” button not pressed
With the “Quarter Tone” button pressed

113Style Play modeMic panel
Refe
renc
e
Mic panel
Touch the Mic tab to select this panel. This is where you can setthe various Voice Processor options.
Note: Depending on the audio input routing, the microphone inputmight not work, whichever the status of the switches in this page.See “Audio & Video: Audio In” on page 264.
VP Preset
Use this pop-up menu to select one of the available Voice Proces-sor Presets. Selecting a Preset may change all the Voice Processorparameters. Presets can be freely edited (see “Mic: Preset” onpage 265).
Global
You can choose a global VP Preset, and a “local” one, that can bememorized into a Performance, STS or SongBook Entry.
On You are choosing the global VP Preset, that willbe considered when selecting a Performance, STSor SongBook Entry that does not contain a“local” split point.
Off You are choosing the “local” VP Preset memo-rized in the current Performance, STS or Song-Book Entry.
Mic Talk On/Off
Use this switch to soften all music generated by the Pa900, andspeak in the microphone at normal level. This is useful toaddress your audience, while automatically lowering the back-ground music volume.
On While this switch is pressed, all the Voice Proces-sor modules are momentarily turned off. TheTalk function can be programmed in the Talksection of the Global > Mic > Global Setup page(see “Mic: Global Setup” on page 454).
Off Release this switch to return to the original set-tings.
Harmony Level
Use this knob to adjust the level of the Harmony voices. Bydefault, this control is assigned to the ASSIGNABLE KNOB.
EQ (Low / Mid / Hi)
Use these knobs to adjust the level of the corresponding Equal-ization bands. The Equalizer has effect on the Lead voice only.
Edit menu
From any page, press the MENU button to open the Style Playedit menu. This menu gives access to the various Style Play editsections.
When in the menu, select an edit section, or press EXIT orSTYLE PLAY to exit the menu and return to the main page. Toreturn to the main page, you can also select the Main Page menuitem.
When in an edit page, press EXIT or the STYLE PLAY button toreturn to the main page of the Style Play operating mode.
Each item in this menu corresponds to an edit section. Each editsection groups various edit pages, that may be selected by touch-ing the corresponding tab on the lower part of the display.
Edit page structure
All edit pages share some basic elements.
Operating mode
This indicates that the instrument is in Style Play mode.
Edit section
This identifies the current edit section, corresponding to one ofthe items of the edit menu (see “Edit menu” on page 113).
Operating mode Edit sectionSelected track info
Page menu icon
Parameters area
Tabs

114 Style Play modeMixer/Tuning: Volume/Pan
Page menu icon
Touch this icon to open the page menu (see “Page menu” onpage 127).
Parameters area
Each page contains various parameters. Use the tabs to selectone of the available pages. For detailed information on the vari-ous types of parameters, see sections starting below.
Tabs
Use tabs to select one of the edit pages of the current edit section.
Mixer/Tuning: Volume/Pan
This page lets you set the volume and pan for each of the Key-board or Style tracks. Volume settings are the same as in the Vol-ume panel of the main page.
Use the TRACK SELECT button to switch from the Keyboard tothe Style tracks, and vice versa.
Upper Volume Link
With this parameter, you define if changing the volume of one ofthe Upper tracks proportionally changes the volume of the otherUpper tracks.
On When changing the volume of one of the Uppertracks, volume for the other Upper tracks changesproportionally.
Off When changing the volume of one of the Uppertracks, only that track’s volume is changed. Theother Upper tracks are left unchanged.
Dry
Use this checkbox to turn the dry (direct) track signal on or offfrom the outputs.
On When checked, the direct signal coming from thetrack is sent to the output, mixed with the MasterFXs.
Off When unchecked, the direct signal coming fromthe track is removed from the audio output, andonly sent to the Master FXs. The effected signalwill still be panned (in stereo FXs only) accordingto the Pan value.
Pan
Track position in the stereo field.
L-64…L-1 Left stereo channel.
C 00 Center.
R+1…R+63 Right stereo channel.
Volume
Track’s volume. This is the volume of each track, as saved in theStyle (Style Settings), Performance or STS. It may change whenchoosing a different Style, Performance or STS.
0…127 MIDI value of the track’s volume.
Play/Mute icon
Track’s play/mute status.
Play status. The track can be heard.
Mute status. The track cannot be heard.
Track L/R Out
Master FX
Track L/R Out
Master FX

115Style Play modeMixer/Tuning: FX Send
Refe
renc
e
Mixer/Tuning: FX Send
Pa900 includes two groups of effects (FX A and FX B). While inStyle Play mode, the A group is reserved to the Style and Padtracks, the B group to the Keyboard tracks.
Choosing and editing the effects is done in the dedicated Effectsection (see “Effects: A/B FX Configuration” on page 119).
This page lets you set the level of the track’s signal going to theMaster FX processors. The Master FX processors are connectedin parallel with the dry/direct signal, so you can decide theamount of direct signal that will be sent to the Master FX proces-sors.
In case you do not want to hear the direct signal, just set the Dryparameter to Off (see “Dry” above).
You can assign to the Master FXs any kind of available effects,but we found it convenient to arrange them in the following way,for most of the Styles, STS and Performances included with thePa900:
A-Master 1 Reverb processor for the Style and Pad tracks.
A-Master 2 Modulating FX processor for the Style and Padtracks.
B-Master 1 Reverb processor for the Keyboard tracks.
B-Master 2 Modulating FX processor for the Keyboardtracks.
Use the TRACK SELECT button to switch from Keyboard toStyle tracks, and vice-versa.
FX Group
This indicates the FX group (A or B) assigned to the group oftracks shown.
Send level (Master 1, Master 2)
0…127 Level of the track (direct) signal sent to the corre-sponding Master FX effect processor.
Play/Mute icon
Track’s play/mute status.
Play status. The track can be heard.
Mute status. The track cannot be heard.
Mixer/Tuning: EQ Gain
In this page you can set the three-band equalization (EQ) foreach individual track.
Use the TRACK SELECT button to switch from the Keyboard tothe Style tracks, and vice-versa.
Hi (High) Gain
This parameter lets you adjust the high frequencies equalizationon each individual track. This is a shelving curve filter. Valuesare shown in decibels (dB).
-18…+18dB High gain value in decibels.
Mid (Middle) Gain
This parameter lets you adjust the middle frequencies equaliza-tion on each individual track. This is a bell curve filter. Valuesare shown in decibels (dB).
-18…+18dB Middle gain value in decibels.
Low Gain
This parameter lets you adjust the low frequencies equalizationon each individual track. This is a shelving curve filter. Valuesare shown in decibels (dB).
-18…+18dB Low gain value in decibels.
Play/Mute icon
Track’s play/mute status.
Play status. The track can be heard.
Mute status. The track cannot be heard.

116 Style Play modeMixer/Tuning: EQ Control
Mixer/Tuning: EQ Control
This page lets you reset or bypass the track’s equalization, pro-grammed in the previous page.
Use the TRACK SELECT button to switch from the Keyboard tothe Style tracks, and vice-versa.
Reset All Tracks button
Touch this button to reset (i.e., “flatten”) equalization for alltracks (both Realtime and Style tracks).
Track Reset buttons
Use these buttons to reset (i.e., “flatten”) equalization for the cor-responding track.Bypass
Check any of these checkboxes to bypass the equalization for thecorresponding track. When bypassed, equalization has no effect onthe track, but all parameters are preserved. When the box isunchecked, equalization is activated again.
On The bypass function is engaged, so no equaliza-tion is active on the corresponding track.
Off The bypass function is not engaged, so the equal-ization is active on the corresponding track.
Input Trim
This knob allows you to limit the level of the signal passingthrough the equalizer. Extreme equalization values can overloadthe audio circuits and lead to distortion. This control lets you setequalization as desired, and at the same time avoid overloading.
0…99 Limiting value. The higher, the most effective it is.Play/Mute icon
Track’s play/mute status.
Play status. The track can be heard.
Mute status. The track cannot be heard.
Mixer/Tuning: Tuning
This page is where you can set the octave transpose and fine tun-ing for each track. Plus, you can program the Pitch Bend rangefor each track.
Use the TRACK SELECT button to switch from the Keyboard tothe Style tracks, and vice-versa.
PB Sensitivity
These parameters show the Pitch Bend range for each track, insemitones.
1…12 Maximum up/down pitch bend range (in semi-tones). 12 = ±1 octave.
0 No pitch bend allowed.
Oct(ave) Transpose
This is the octave transpose value.
-3 Lowest octave.
0 Standard tuning.
+3 Highest octave.
Detune
This is the fine tuning value.
-64 Lowest pitch.
00 Standard tuning.
+63 Highest pitch.
Play/Mute icon
Track’s play/mute status.
Play status. The track can be heard.
Mute status. The track cannot be heard.
Track Reset buttons

117Style Play modeMixer/Tuning: Sub Scale
Refe
renc
e
Mixer/Tuning: Sub Scale
You can assign a different scale (a sub-scale) to the Keyboardtracks, the Upper tracks or all tracks. This will allow, for exam-ple, to play a solo with a particular Quarter Tone tuning, whilethe backing tracks play in the Equal tuning.
This page is where you can program the sub-scale for theselected tracks; a different sub-scale can be associated to eachPerformance or STS. Track selection is general, and can be donewith the “Scale Mode” parameter of the Global > Mode Prefer-ences > Style page (see page 252).
The remaining tracks will use the basic scale set in the Global> Tuning > Scale page (see “Main Scale” on page 257). This isthe “standard” scale of the instrument.
With the “Quarter Tone” button not pressed
With the “Quarter Tone” button pressed
Note: Quarter Tone selection can be received via MIDI (i.e., froman external sequencer or controller). Conversely, selection of Quar-ter Tone settings can be sent by the Pa900 to an external MIDIrecorder as System Exclusive data.
Scale
Selected scale. See “Scales” on page 356 for a list of the availablescales. When selecting the User scale, the keyboard diagrambecomes active, letting you program a custom scale (see “How tocreate a custom scale by fine-tuning each note of the User scale”below).
KeyThis parameter is needed by some scales to set the preferredkey (see “Scales” on page 356).
Quarter Tone
Press the Quarter Tone button in the display to make the key-board diagram active. In the display, touch any note you want tolower a quarter tone, making a big dot appear on the note dia-gram. Touch the note again to make the dot disappear.
Touch one of the four SC Preset buttons to recall the corre-sponding preset, and touch any note you want to lower a quartertone down, making a big dot appear on the detuned note in thediagram. Touch the note again to make the dot disappear.
Scale alteration made in this page is momentary and is notmemorised. It is only meant to allow for fast scale alterationwhile playing.
To make realtime changes faster, you can also assign the QuarterTone function to the footswitch or an Assignable Switch (seebelow “How to use the Quarter Tone function with a footswitchor Assignable Switch” for more information).
The use of SC Presets allows for immediate recall of previouslyprogrammed Quarter Tone scales (see below “How to use theQuarter Tone function with the SC Presets” for more informa-tion).
SC Preset buttons
These buttons only appear when the “Quarter Tone” parameter ischecked. Use these buttons to recall the corresponding customscale presets. See “How to use the Quarter Tone function withthe SC Presets” below for information on how to use them.
Keyboard diagram
When “Quarter Tone” is checked, this diagram allows for lower-ing each note of a quarter tone. When a User scale is selected, itallows you to fine-tune each note’s pitch.
Scale lock icon
When locked, Scale parameters remain unchanged when select-ing a different Performance or STS.
For more information on parameter locks, see “General Con-trols: Lock” on page 249.
How to create a custom scale by fine-tuningeach note of the User scaleWhen the User scale is selected, the keyboard diagram becomesactive. You can then change each note tuning in cents of a semi-tone (within a range of ±99 cents, referred to Equal tuning). Thisway, you can create a custom scale, that you can save to a Perfor-mance or STS.
After having selected the User scale, touch a note in the key-board diagram, and use VALUE DIAL to adjust the selected notetuning in cents.
Fine tuning values

118 Style Play modeMixer/Tuning: Sub Scale
Note: These settings can be saved to a Performance or STS, asdescribed below.
How to use the Quarter Tone function withthe SC PresetsWhen the “Quarter Tone” button is pressed, four “SC Preset”buttons appear, and you can select one of four SC Presets torecall a preset custom scale.
1. Program and save a custom scale into an SC Preset.
To do so, go to the Global mode, and reach the “Tuning:Scale” page. When programming is done, choose the“Write SC Preset” command from the page menu, thenselect one of the preset locations where to save the currentsettings (see “Write Quarter Tone SC Preset dialog box” onpage 275).
2. Return to this page, and touch the “Quarter Tone” button tomake the “SC Preset” buttons appear.
3. Touch one of the “SC Preset” buttons to recall a preset cus-tom scale.
Each preset contains custom detuning of each note of thescale, and memorizes the selected degree(s) of the scale.
When no preset is selected, the default scale is automati-cally recalled. This scale assigns a -50 cent value to allnotes, and turns all scale degrees off.
You can also select an SC Preset by assigning the relevantfunction to an Assignable Switch (see “Pad/Switch: Switch”on page 125) or Assignable Footswitch (see “Controllers:Foot Controllers” on page 255).
4. Use the keyboard diagram to turn the note detuning on oroff.
Make a big dot appear to detune the corresponding note, ormake it disappear to reset tuning.
5. Reset the original scale.
Touch the “Quarter Tone button again, to deselect it andrecall the main scale.
How to use the Quarter Tone function with afootswitch or Assignable SwitchYou can assign the “Quarter Tone” function to a footswitch or anAssignable Switch, to program a custom scale in realtime, forexample to allow for those sudden scale changes typical of theArabic music. These changes are not saved anywhere, so thescale is easily “wiped-out” when selecting a different Perfor-mance or STS, or when pressing the Quarter Tone pedal again.
Note: While in Style Play mode, you can create a custom scale, tobe assigned to a Performance or STS, simply by selecting and edit-ing a User scale, and saving any change to a Performance or STS.See “How to create a custom scale by fine-tuning each note of theUser scale” above.
While in Global mode, you can create a custom scale and save it toone of the four SC Presets, and recall it by touching one of the SCPreset buttons in the display. Then, you can start your realtimescale editing from the selected preset. See “How to use the QuarterTone function with the SC Presets” above.
1. Program the footswitch or an Assignable Switch to be theQuarter Tone switch.
Simply go to the Global mode, and reach the “Controllers:Foot Controllers” page. There, you will find the “Pedal/Footswitch” parameter, to which you can assign the Quar-ter Tone function.
2. Lower some note pitches.
Keep the Quarter Tone pedal pressed. The keyboard willnot play at this time. Press the notes you want to lower aquarter tone. Release the pedal.
3. Play with your new scale.
Notes you pressed on step 2 are now lowered of a quartertone.
4. Reset the original scale.
Press and release the Quarter Tone pedal again, withoutplaying any note. All pitches will be reset, and the scaleselected by the Performance or STS will be recalled.

119Style Play modeEffects: A/B FX Configuration
Refe
renc
e
Effects: A/B FX Configuration
This page allows you to select the A (Style and Pads) and B (Key-board) groups of effects. Please use the “FX A” and “FX B” sidetabs to switch from one group to the other one.
FX Groups (FX A, FX B)Pa900 includes two groups of effects (FX A and FX B). There aretwo master FXs for group. In Style Play mode, the A group isreserved to the Style and Pad tracks, the B group to the Realtime(Keyboard) tracks.
Master FX 1, 2
Effects assigned to the corresponding effect processors. Usually,FX1 are reverbs, while FX2 are modulating effects (chorus,flanger, delay…). For a list of the available effects, see in theAppendix.
Effects assigned to both FX groups can be saved to a Perfor-mance. Effect assigned to the FX A group (Style and Pad tracks)can be saved to the Style Settings. Effects assigned to the FX Bgroup (Keyboard tracks) can be saved to an STS.
W/D
Use this parameter to set the amount of the effect (Wet) againstthe non-effected (Dry) signal coming from the track.
MFX2 to MFX1
Amount of the MFX2 effect going back to the input of the MFX1effect.
M.T. (Modulating Track)
Source track for modulating MIDI messages. You can modulatean effect parameter with a MIDI message generated by an inter-nal physical controller.
Effects: Master 1, 2
These pages contain the editing parameters for the four effectprocessors. Here is an example of the FX A page, with the ReverbWet Plate effect assigned.
Selected effect
Select one of the available effects from this pop-up menu.
FX parameters
Parameters may be different, depending on the selected effect.See the relevant chapter in the Appendix for a list of the availableparameters for each effect type.
Wet/Dry
Use this parameter to set the amount of the effect (Wet) againstthe non-effected (Dry) signal coming from the track.
Src (Source)
Modulation source. To select the track generating this message,see the “M.T. (Modulating Track)” parameters found in the“Effects: A/B FX Configuration” page (see above). See the rele-vant chapter in the Appendix for a list of the modulationsources.
FX group
Selected effect
FX parameters
FX group

120 Style Play modeTrack Controls: Mode
Track Controls: Mode
This page lets you connect each track to the internal sound gen-erator and to external MIDI devices. This is very useful to let aStyle track drive an external expander, or play a digital pianowith one of Pa900’s Keyboard tracks. In addition, here you canset the polyphony mode for each track.
Int./Ext. (Internal/External)
Internal The track plays the sounds generated by theinternal sound engine. It does not play an exter-nal instrument connected to the MIDI OUT.
External The track plays an external instrument connectedto the MIDI OUT. The connected device mustreceive on the MIDI channel associated with thistrack on the Pa900 (see “MIDI: MIDI Out Chan-nels” on page 261).
A track set to this status cannot play the internalsounds.
Instead of the assigned Sound name, the <E: aaa.bbb.ccc> indicator is shown on a track’sarea in the Main page:
This indicator begins with a remark saying thetrack is in External (”E”) mode, and continueswith a strings of transmitted Control Change andProgram Change data. This will let you knowwhat the track is transmitting to the MIDI OUT.In the following example, CC#0 is the ControlChange 0 (Bank Select MSB), CC#32 is the Con-trol Change 32 (Bank Select LSB), PC is the Pro-gram Change:
When touching the Sound area, the numeric key-pad appears, instead of the Sound Select window.You can enter the Control Change/ProgramChange bundle shown above, separating the threeparts with a dot (.).
Both The track plays both the internal sounds and anexternal instrument connected to the MIDI OUT.
Type
Drum Drum/Percussion track. Set a track to Drummode if you wish to separately adjust the volumeand set a different output for each percussivefamily of the assigned Drum Kit Sound. (See“Track Controls: Drum Edit” on page 121).
Note: Tracks set to Drum or Percussion mode whilein Style Record (see “Track Type” on page 156) can-not be edited here. This option appears in grey.Other Style tracks cannot be set to Drum modehere.
Note: Drum Kits are not affected by transposewhichever the type of track they are assigned to.
Hint: Set a track to Drum mode, if you don’t wantthe assigned Sound to be transposed (it will behaveas a Drum Kit).
Poly Tracks of this kind are polyphonic, i.e. they canplay more than one note at the same time.
Mono Tracks of this kind are monophonic, i.e. each newnote stops the previous note.
Mono Right A Mono track, but with priority assigned to therightmost (highest) note.
Mono Left A Mono track, but with priority assigned to theleftmost (lowest) note.
Play/Mute icon
Track’s play/mute status.
Play status. The track can be heard.
Mute status. The track cannot be heard.
Control Change/Program Change area
CC#0 value CC#32 value PC value

121Style Play modeTrack Controls: Drum Edit
Refe
renc
e
Track Controls: Drum Edit
In this page you can adjust the volume and edit the main param-eters for each family of Drum and Percussion instrument for theselected track. A list of families is shown below.
These parameters can be accessed only on tracks set to the Drummode (see above). Use them on tracks with a Drum Kit assigned,or you will not be able to hear any change.
Hint: Use the TRACK SELECT button to cycle between the trackgroups. After selecting a track, choose the “Solo Track” commandfrom the page menu to avoid listening to the other tracks duringediting.
Note: All values are offsets referred to the value of the originalSounds.
Family Select
Use these icons/buttons to select the drum family you want toedit. These buttons are only accessible when you select a Drumtrack.
Overview of the current parameter
Under the icons of the Drum families you can see the value ofthe selected parameter for all the families. This will let you com-pare the value of the selected family with all the others. The val-ues are shown in grey (non editable).
Drum Edit parameters
Use these parameters to adjust the offset value.
0…127 Volume (see above).
-64…0…+63 Offset value for all sound generation parameters. ‘0’means no change to the original value memorized inthe Drum or Percussive instrument, while any othervalue means a decrease or increase to the originalvalue.
Select
Use these buttons to select the track to edit. The button corre-sponding to the selected track turns green.
Reset Family
Touch this button to reset all changes to the selected family.
Reset Track
Touch this button to reset all changes to percussive instrumentvolumes in the selected track.
Play/Mute icon
Track’s play/mute status.
Play status. The track can be heard.
Mute status. The track cannot be heard.
How to edit a single Drum FamilyHere is a quick example of the use of the Drum Volume func-tion.
1. While in this page, press TRACK SELECT to see individualStyle tracks.
2. Touch the “Select” button, in the display, corresponding tothe Drum track to edit.
3. Press START/STOP to let the Style go.
4. If you like, choose the “Solo Track” command from thepage menu to solo the Drum track.
Drum family icon Drum family
Kick drums
Snare drums
Toms
Hi-Hat cymbals
Ride, Crash and other cymbals
Low-pitched percussions
High-pitched percussions
Special effects
Sound parameters Meaning
Volume Instrument’s Volume.
EQ Hi Equalization, High band.
EQ Mid Equalization, Middle band.
EQ Low Equalization, Low band.
Attack Attack time. This is the time during which the sound goes from zero (at the moment when you strike a key) to it’s maximum level.
Decay Decay time. Time to go from the final Attack level to the minimum level.
Cutoff Filter cutoff. This sets the sound brightness.
Resonance Use the Filter Resonance to boost the cutoff fre-quency.
Fine Tune Fine instrument tuning.
Coarse Tune Coarse instrument tuning.
MFX 1 Send Scales the Send level to the Master FX1.
MFX 2 Send Scales the Send level to the Master FX2.

122 Style Play modeTrack Controls: Easy Edit
5. While listening to the Style, select the Snare family, thenselect the Volume parameter, and use the VALUE DIAL toturn the volume completely off.
You’ll notice how all snares stops sounding.
6. Touch the Reset Track button in the display to recall theoriginal Snare’s volume.
Track Controls: Easy Edit
In this page you can edit the main parameters of the Soundsassigned to each track.
Hint: Use the TRACK SELECT button to cycle between the trackgroups. After selecting a track, choose the “Solo Track” commandfrom the page menu to avoid listening to the other tracks duringediting.
Note: All values are offsets referred to the value of the originalSound.
Easy Sound Edit parameters
Use these knobs to adjust the offset value.
-64…0…+63 Offset value. ‘0’ means no change to the original valuememorized in the Sound, while any other valuemeans a decrease or increase to the original value.
Portamento knob and switch
Use the Time knob to adjust the speed of the portamento (a slidebetween notes). Check the box to turn portamento on, oruncheck it to turn portamento off.
Select
Use these buttons to select the track to edit. The button corre-sponding to the selected track turns green.
Reset Track
Touch this button to reset all changes to Sound parameters in theselected track.
Reset All Tracks
Touch this button to reset all changes to Sound parameters in alltracks.
Play/Mute icon
Track’s play/mute status.
Play status. The track can be heard.
Mute status. The track cannot be heard.
How to adjust sound parameters for a singleSoundHere is a quick example of the use of the Easy Sound Edit func-tion.
1. If needed, while in this page press TRACK SELECT to seeKeyboard tracks.
2. Touch the “Select” button, in the display, corresponding tothe Upper 1 track.
3. While playing on the keyboard to hear the Sound, selectthe Cutoff knob, and use the VALUE DIAL to turn its valuecompletely off.
You’ll notice how the filter progressively cuts out high fre-quencies, making the sound darker and mellower.
4. Touch the Reset Track button in the display to recall theoriginal Cutoff value.Sound parameters Meaning
Attack Attack time. This is the time during which the sound goes from zero (at the moment when you strike a key) to it’s maximum level.
Decay Decay time. Time to go from the final Attack level to the beginning of the Sustain.
Release Release time. This is the time during which the sound goes from the sustaining phase, to zero. The Release is triggered by releasing a key.
Cutoff Filter cutoff. This sets the sound brightness.
Resonance Use the Filter Resonance to boost the cutoff fre-quency.
LFO Depth Intensity of the Vibrato (LFO).
LFO Speed Speed of the Vibrato (LFO).
LFO Delay Delay time before the Vibrato (LFO) begins, after the sound starts.

123Style Play modeKeyboard/Ensemble: Key/Velocity Range
Refe
renc
e
Keyboard/Ensemble: Key/Velocity Range
This page lets you program a key and dynamic (velocity) rangefor each of the Keyboard tracks.
Key range is useful to create a set of Keyboard tracks playing indifferent zones of the keyboard. For example, you may haveFrench Horns and Woodwinds playing in the center range of thekeyboard, while only Woodwinds play on the higher range.
Velocity range is useful to create a sound made of up to threedynamic layers, assigning each of the Upper tracks to a differentdynamic range.
As an example, you may assign the El.Piano 1 Sound to theUpper 1, and the El.Piano 2 Sound to the Upper 2 track. Then,set Upper 1 to [Bottom=0, Top=80], and Upper 2 to [Bot-tom=81, Top=127]. The El.Piano 1 will play when playing softer,the El.Piano 2 when playing louder.
Top/Bottom Key (Key Range)
This parameter pair sets the Top and Bottom key range for thetrack.
C-1…G9 Selected key.
Top/Bottom Vel. (Velocity Range)
This parameter pair sets the Top and Bottom dynamic range forthe track.
0 Lowest velocity value.
127 Highest velocity value.
Play/Mute icon
Track’s play/mute status.
Play status. The track can be heard.
Mute status. The track cannot be heard.
Keyboard/Ensemble: Ensemble
This page lets you program the Ensemble function. This func-tion harmonizes the right-hand melody (played in realtime)using the recognized chords played by the left hand.
The Ensemble works both in the Style Play and the Song Playmodes. Chords are always recognized in the Lower Chord Scanarea.
Note: The Ensemble function only works when the keyboard is inSplit mode.
Ensemble
Harmonization type.
Duet Adds a single note to the melody.
Close Adds a closed-position chord to the melody.
Open 1 Adds an open-position chord to the melody.
Open 2 As the above, but with a different algorithm.
Block Block harmonization – very typical of jazz music.
Power Ensemble
Adds a fifth and an octave to the melody, as heardin hard rock.
Third Up This option adds a third over the melody note(depending on the recognized chord).
Fourths LO Typical of jazz, this option adds two perfectfourths under the melody.
Fourths UP As the above, but with notes added over the mel-ody.
Fifths This adds two fifths below the original note.
Octave Adds an octave to the melody.
Dual This option adds to the melody line a secondnote, at a fixed interval set with the “Note”parameter. When selecting this option, a transpo-sition value appears (-24…+24 semitones to theoriginal note).
Brass Typical Brass section harmonization.
Reed Typical Reed section harmonization.

124 Style Play modeKeyboard/Ensemble: Keyboard Control
Trill When two notes are played on the keyboard, thisoption trills them. If three or more notes areplayed, only the last two are trilled. You can setthe trill speed by using the Tempo parameter (seebelow).
Repeat The played note is repeated in sync with theTempo parameter (see below). When playing achord, only the last note is repeated.
Echo As the Repeat option, but with the repeated notesfading away after the time set with the Feedbackparameter (see below).
AutoSplit1 If more than a single Upper track is in play, theUpper 1 track plays the melody in mono, whilethe other Upper tracks play the chord notes.
If only the Upper 1 track is in play, it plays poly-phonically all the chord notes.
AutoSplit2 Similar to AutoSplit1, but the Upper 1 trackalways plays the uppermost note.
Note Velocity
This parameter sets the velocity difference between the right-hand melody and the added harmonization notes.
-10…0 Subtracted velocity value.
Tempo
Note: This parameter only appears when the Trill, Repeat or Echooptions are selected.
Note value for the Trill, Repeat or Echo Ensemble options. Thisis in sync with the Metronome Tempo.
Feedback
Note: This parameter only appears when the Echo option isselected.
This parameter sets how many times the original note/chord isrepeated by the Echo option.
Ensemble Track Assign
Use these parameters to separately set Upper tracks for theEnsemble function.
Off There is no harmonization on this track.
Normal This track is included in the harmonization.
Mute This track only plays the Ensemble notes, but notthe original note.
Play/Mute icon
Track’s play/mute status.
Play status. The track can be heard.
Mute status. The track cannot be heard.
Keyboard/Ensemble: Keyboard Control
This page lets you enable/disable the Damper and Expressionpedals, plus the Joystick, for each of the Upper Keyboard tracks.
Damper
On When you press the Damper pedal and releasethe keys, the track’s sound is kept sustained.
Off The Damper pedal is not active on any track setto this status.
Joystick X
This enables/disables the left/right movement of the Joystick(Pitch Bend, and sometimes a Sound parameter’s control; forPitch Bend settings, see “Mixer/Tuning: Tuning” on page 116).
Joystick Y
This enables/disables the front/rear movement of the Joystick(Y+: Modulation, and sometimes a different Sound parameter’scontrol; Y-: Various controls, or non-active).
Expression
This parameter allows you to switch the Expression control on/off on each individual Keyboard track. The Expression control isa relative level control, always subtracted from the Volume valueof the track.
As an example, imagine you have a Piano sound assigned toUpper 1, and a Strings sound assigned to Upper 2. If you turnthe Expression switch on on Upper 2, and off on Upper 1, youcan use a continuous pedal to control only the Strings’ volume,while the Piano remains unchanged.
To program a pedal or Assignable Slider to act as an Expressioncontrol, see “Controllers: Foot Controllers” on page 255. You canonly assign this function to a volume-type pedal, not to a switch-type one. Assign the “KB Expression” option to the pedal orAssignable Slider.
Play/Mute icon
Track’s play/mute status.
Play status. The track can be heard.
Mute status. The track cannot be heard.

125Style Play modePad/Switch: Pad
Refe
renc
e
Pad/Switch: Pad
This page lets you select a different hit sound or sequence foreach of the four PAD buttons.
Assignments can be saved into the current Style Settings orSongBook Entry.
Note: Each Style or SongBook Entry can change the Pad assign-ment.
Pad assignment
Name of the Hit or Sequence assigned to each Pad. Touch thebox to make the Pad Select window appear (see “Pad Select win-dow” on page 102).
Note: You can also choose Hits or Sequences from the Pad panel ofthe main page.
Volume
Volume for each of the four Pad tracks.
0…127 Volume level.
Pan
Pan for each of the four Pad tracks.
-64…-1 Left stereo channel.
0 Center.
+1…+63 Right stereo channel.
FX Send (Master 1, 2)
Send level to the Master FX processors for each of the four Padtracks. The Pads share the FX A group with the Style tracks.
0…127 Level of the Pad track (direct) signal sent to theeffect processor.
EQ Gain [dB] (Hi, Mid, Low)
Equalization for each of the four Pad tracks.
-18.0…+0.0…18.0Gain value of the High, Middle, or Low band.
Pad lock icon
This lock avoids selecting a different Style or SongBook Entrychanges also the Hit or Sequence Pads assigned to the Pads.
For more information on parameter locks, see “General Con-trols: Lock” on page 249.
Pad/Switch: Switch
This page lets you select a different function for each of theASSIGNABLE SWITCH buttons.
Assignable Switches can be saved into a Performance, STS orSongBook Entry.
Switch 1, 2, 3
Each of the ASSIGNABLE SWITCH buttons. Use these pop-upmenus to assign a function to each switch. See “List of Assign-able Switches functions” on page 356.
Assignable Switch lock icon
This lock avoids selecting a different Performance or STSchanges also the functions assigned to the switches.
For more information on parameter locks, see “General Con-trols: Lock” on page 249.

126 Style Play modeStyle Controls: Drum/Fill
Style Controls: Drum/Fill
In this page you can select various general parameters for theStyle.
Drum Mapping (Var.1…Var.4)
The Drum Mapping lets you select an alternative arrangement ofpercussive instruments for the selected Drum Kit, without anyadditional programming. Just select a Drum Map, and some per-cussive instruments will be replaced with different instruments.
Off Standard mapping.
Drum Mapping 1…7
Drum Map number. Mapping 1 is “soft-sound-ing”, while mapping 7 is “loud-sounding”.
Kick and Snare Designation
The Kick Designation replaces the original Kick (Bass Drum)sound with a different Kick of the same Drum Kit, while theSnare Designation replaces the original Snare Drum sound witha different Snare of the same Drum Kit.
Hint: Select different Designations while listening to the Style, andsee how they affect the Style. When you like the result, save yoursetting to a Performance or Style Settings.
Off Original Kick or Snare.
Type 1…3 Kick or Snare replacing the original one.
Track status
Track play/mute status. Touch these icons to change it.
Play status. The track can be heard.
Mute status. The track cannot be heard.
Style Controls: Keyboard Range On/Off /Wrap Around
In this page you can program the Wrap Around point, and turnon/off the Keyboard Range included in each Style tracks.
Keyboard Range On/Off
This parameter is an on/off switch for the Key Range parametermemorized inside each Style Element track.
On The Keyboard Range is considered – provided ithas been programmed (see “Style Element TrackControls: Keyboard Range” on page 154 in StyleRecord mode). When a track goes over the loweror higher Keyboard Range point, it is automati-cally transposed, to stay in the programmedrange.
Off No Keyboard Range used.
Wrap Around
The wrap-around point is the highest key range limit for thebacking track. The accompaniment patterns will be transposedaccording to the detected chord. If the chord is too high, theStyle tracks might play in a range that is too high, and thereforeunnatural. If, however, it reaches the wrap-around point, it willbe automatically transposed an octave lower.
The wrap-around point can be individually set for each track insemitone steps up to a maximum of 12 semitones, relative to thechord root set in Style Record mode (see “Key/Chord” onpage 135).
It is advisable to set different Wrap Around points for each track,to avoid all tracks “jump” to a different octave at the same time.We suggest to consider the actual range of the real instrument.
1…12 Maximum transposition (in semitones) of thetrack, referred to the original key of the Style pat-tern.
Play/Mute icon
Track’s play/mute status.
Play status. The track can be heard.
Mute status. The track cannot be heard.

127Style Play modePage menu
Refe
renc
e
Page menu
Touch the page menu icon to open the menu. Touch a commandto select it. Touch anywhere in the display to close the menuwithout selecting a command.
Write Performance
Select this command to open the Write Performance dialog box,and save most of the current control panel settings to a Perfor-mance.
See “Write Performance dialog box” on page 128 for more infor-mation.
Write Single Touch Setting
Select this command to open the Write Single Touch Setting(STS) dialog box, and save Keyboard track settings to one of theSingle Touch Settings (STS) of the current Style.
See “Write Single Touch Setting dialog box” on page 128 formore information.
Write Current Style Settings
Select this command to open the Write Current Style Settingsdialog box, and save Style track settings to the current Style.
See “Write Single Touch Setting dialog box” on page 128 formore information.
Solo Track
Select the track to be soloed, and check this item. You will hearonly the selected track, and the ‘Solo’ warning will flash on thepage header.
Uncheck this item to exit the Solo function.
The Solo function works in a slightly different way, dependingon the selected track:
• Keyboard track: The selected Keyboard track is the only trackyou can hear when playing on the keyboard. All other Keyboardtracks are muted. The status of the Style tracks is unaffected.
• Style track: The selected track is the only Style track you canhear. All other Style tracks are muted. The status of the Keyboardtracks is unaffected.
• Grouped Style tracks: The Solo function does not work on thesespecial tracks.
Keep the SHIFT button pressed and touch one of thetracks to solo it. Do the same on a soloed track to deactivate theSolo function.
Copy/Paste FX
You can copy a single effect (Master 1, Master 2), or both effectsof an FX group (A or B). You can copy them between differentelements (for example, between Styles and Performances, orSTSs and Songs or Sounds).
Note: This operation only copies the parameters of the “Effects”section. Parameters contained in other sections, like “Dry” or “FXSend”, are not copied. Please note that these parameters are rele-vant in the overall sound of the effect, so please fine-tune them.
To copy a single effect:
1. Select the source Performance, STS, Style, Song or Sound.
2. Choose the source FX group (A or B) by touching the cor-responding side tab.
3. Go to the page of the single effect you want to copy (Master1, Master 2).
4. Choose the “Copy FX” command from the page menu.
5. Select the target Performance, STS, Style, Song or Sound,
6. Choose the same FX group (A or B) as the target by touch-ing the corresponding side tab.
7. Go to the page of the single effect you want to paste (Master1, Master 2).
8. Choose the “Paste FX” command from the page menu.
To copy all the effects in an FX group:
1. Select the source Performance, STS, Style, Song or Sound,then go to the Effects > A/B FX Config page, to copy all theeffects.
2. Choose the source FX group (A or B) by touching the cor-responding side tab.
3. Choose the “Copy FX” command from the page menu.
4. Select the target Performance, STS, Style, Song or Sound,then go to the page of the Effects > A/B FX Config page.
5. Choose the FX group (A or B) as the target by touching thecorresponding side tab.
6. Choose the “Paste FX” command from the page menu.
Easy Mode
Easy Mode allows you to use the Style Play and Song Play modeswith an easier-to-use user interface. It is recommended to begin-ners, and to professionals alike that do not want to deal with theextra parameters of the Advanced mode.
At any time, you can manually turn the Easy Mode on/off withthe Easy Mode command in the page menu of the Style Play andSong Play modes.

128 Style Play modeWrite Performance dialog box
Write Performance dialog box
Open this window by keeping one of the PERFORMANCE but-tons pressed for about one second, or by choosing the Write Per-formance item from the page menu. Here, you can save all tracksettings, the selected Style, and various Style settings to a Perfor-mance.
Name
Name of the Performance to be saved. Touch the (Text Edit)button next to the name to open the Text Edit window.
Perf Bank
Target bank of Performances. Each bank corresponds to one ofthe PERFORMANCE buttons. Use the VALUE DIAL to select adifferent bank.
Performance
Target Performance location in the selected bank. Use theVALUE DIAL to select a different location.
Select… button
Touch this button to open the Performance Select window, andselect a target location.
Write Single Touch Setting dialog box
Open this window by keeping one of the STS buttons pressed forabout one second, or by choosing the Write Single Touch Settingitem from the page menu. Here, you can save Keyboard tracksettings, and the selected Voice Processor Preset, to one of thefour single Touch Settings (STS) belonging to the current Style.
Note: When the “Factory Style and Pad Protect” option is checkedin the Global > Mode Preferences > Media page, you cannot writean STS over a Factory Style. The “Write Single Touch Setting”command in the page menu is greyed out and cannot be selected.All original settings of the Factory Styles will be left untouched.
Name
Name of the STS to be saved. Touch the (Text Edit) buttonnext to the name to open the Text Edit window.
Current Style
Non editable. Settings are saved in one of the four STSs belong-ing to the current Style. This parameter displays the name of the“parent” Style.
STS
Target STS location. The name of the STS currently saved at thetarget location is shown. Use the VALUE DIAL to select a differ-ent location.

129Style Play modeWrite Current Style Settings dialog box
Refe
renc
e
Write Current Style Settings dialog box
Open this window by keeping one of the STYLE buttons pressedfor about one second, or by selecting the Write Style Settingsitem from the page menu. Here, you can save Style track settingsto the Style Settings of the current Style.
Note: When the “Factory Style and Pad Protect” option is checkedin the Global > Mode Preferences > Media page, you cannot writeany Style Settings onto Factory Styles. The “Write Current StyleSettings” command in the page menu is greyed out and cannot beselected. All original settings of the Factory Styles will be leftuntouched.
Style bank
Non editable. Bank of Styles the current Style belongs to.
Current Style
Non editable. Name of the current Style.
The Favorite banks
You can create a custom set of Styles, made of up to twelveFavorite banks. You can assign a different name to the tabs thatappear in the Style Select window, in order to add musical genresnot included among the Factory Styles.
The Favorite Styles are contained in twelve files, automaticallycreated by the Pa900 inside the Style folder in the SYS area of theinternal storage memory. Even if different bank names canappear in the display, these files have fixed names:
Creating the Favorite banksThere are various ways to create the Favorite banks:
• While in Style Play mode, you can copy & paste any Styleinto the Favorite banks, as an alternative to the User Stylebanks. See the “Selecting” chapter for more information onthe Copy & Paste operations.
• While in Style Record mode, you can write the new oredited Style to the Favorite banks, as an alternative to theUser Style banks. See the “Style Record” chapter for moreinformation on saving a Style.
• While in Media mode, you can load any Style into theFavorite banks, as an alternative to the User Style banks.See the “Media” chapter for more information on the Loadoperations.
Renaming the Favorite banksWhile the Style Select window is in the display, you can choosethe “Rename Favorite” command from the page menu, andassign the Favorite Style tabs any name you like.
The assigned name can be spanned over two lines, by separatingthem with the paragraph character (¶). For example, to write“World Music” on two lines, enter “World¶Music”.
Be careful not to write words exceeding the width of the side tabsof the Style Select window.
File Name FAVORITE Banks
FAVORITE01…12.STY Bank 1…12

130 Style/Pad Record modeRecording Styles and Pads
By entering the Style/Pad Record mode, you can create your ownStyles or Pads, or edit an existing Style or Pad.
Recording Styles and Pads
Styles and Pads share most of the same structure and recording/editing operations. Here is how they are made.
The Style’s structureThe term “Style” relates with music sequences automaticallyplayed by the arranger of the Pa900. A Style consists of a pre-defined number of Style Elements (E) (Pa900 features fifteendifferent Style Elements: Variation 1-4, Intro 1-3, Fill 1-4, Break,Ending 1-3). When playing, most of these Style Elements can bedirectly selected by using the corresponding buttons on the con-trol panel.
To explain the Style structure, we can use a tree structure, asshown in the following diagram:
Each Style Element is made up of smaller units, called ChordVariations (CV), but not all of them have the same number ofCVs. Variations 1-4 have up to 6 CVs each, while the other StyleElements have only up to 2 CVs.
When you play in the chord recognition area (Lower, Upper orFull, depending on the On or Off status of the SPLIT button), thearranger scans the keyboard and determines which chord youare playing. Then, depending on the selected Style Element, itdetermines which Chord Variation (CV) should be played forthe scanned chord. Which Chord Variation corresponds to eachscanned chord is a setting of the Style: the Chord VariationTable. Each Style Element contains a Chord Variation Table,whose prototype is the following:
After deciding what CV to play, the arranger triggers the rightsequence for each track. Since each sequence is written in a par-ticular key (for example, CMajor, GMajor or Emin), the arrangertransposes it according to the scanned chord. Notes in thesequence are carefully transposed, to make them work fine withall recognized chords.
Going deeper into the Style structure, we can see that eachChord Variation is made up of Track Sequences, and the Pa900supports 8 different tracks. DRUM and PERC are used for drumand percussion sequences, BASS for bass and ACC1-5 are for
Style/Pad Record mode
P op Balla d
Va ri ation 1
CV1
Dr um P erc Bass Acc1 Acc2 Acc3 Acc4 Acc5
CV2
CV3
CV4
CV5
CV6
Va ri ation 2
Va ri ation 3
Va ri ation 4
Intro1
CV1
CV2
Intro 2
Intro 3/C.In
Fill 1
Fill 2
Break
Fill 3
Fill 4
Ending 1
Ending 2
Ending 3
Chord Chord Variations (CVs)
Variation 1-4Intro 1-2, Count-In, Fill 1-4, Break,
Ending 1-3
Major
CV1 – CV6 CV1 – CV2
6
M7
M7(b5)
sus
sus2
M7sus
m
m6
m7
m7(b5)
m((M7)
7
7(b5)
7sus4
dim
dim(M7)
#5
7(#5)
M7(#5)
1+5
1+8
b5
dim7

131Style/Pad Record modeRecording Styles and Pads
Refe
renc
e
accompaniment sequences (string, guitar, piano or other accom-paniment instruments).
Just to summarize, when you play a chord on the chord recogni-tion area, the arranger determines which Style Element is used,then determines which Chord Variation should be used for theplayed chord, then Style sequences for every track of that ChordVariation are transposed from the original chord to the recog-nized chord, and so on every time you play a chord.
The Pad’s structureA Pad is basically a single-track Style. Most of what applies toStyle recording also applies to Pad recording.
There are two different categories of Pads:
• “Hit” Pads. While they aremostly used as non-transpos-ing events, they can also betransposing notes or chords.Basically, they are single-noteor single-chord Sequences(see below).
• “Sequence” Pads, i.e., complexsingle-track patterns, that canbe transposed by playing dif-ferent chords on the keyboard– exactly as a Style track. Theyare roughly equivalent to sin-gle-element, single-track,multi-chord variation Styles(see illustration).
Each Pad is made up of up to six smaller units, called ChordVariations (CV). Each Chord Variation is made of a single track(the Pad track).
Exactly as with the Styles, when playing a chord in the chord rec-ognition area, the corresponding Chord Variation is recalled.Recognized chords are associated to a Chord Variation by meansof the Chord Variation Table. Each Pad contains a Chord Varia-tion Table.
As with the Styles, the Note Transposition Tables (NTT) appliesto the Pads.
The same differences between the different types of tracksapplies (see “Track Type” on page 155).
Ordinary, Guitar and Drum tracksThere are different types of tracks (see “Track Type” onpage 156), and each of them is treated in a different way by thearranger;
• Acc (Accompaniment) and Bass tracks: When a chord isrecognized, the programmed chord notes are transposed toa suitable scale, according to the Note TranspositionTables (NTT) The NTT allows you to record just someChord Variations, and have all the notes play in the rightplace, avoiding dissonances and transposing the patternnotes to the notes of the recognized chord.
• Drum & and Perc (Percussion) tracks: No transposition isapplied.The original pattern plays always.
• Gtr (Guitar) tracks: When a chord is recognized, thearranger triggers single notes, strumming and arpeggios ona “virtual guitar”, keeping care of the way notes are playedon the guitar keyboard. Note that inside a Guitar track youcan also have some parts typical of an Acc track - a usefuladdition for short “free-form” passages.
What to record in a StyleRecording a Style means recording tracks, inside a series ofChord Variations, inside a series of Style Elements, inside theStyle itself.
You don’t have to record all Chord Variations for all Style Ele-ments. It is often only needed to record a single Chord Variationfor each Style Element. Exceptions are the Intro 1 and Ending 1,where we suggest to record both a Major and minor Chord Vari-ations.
What to record in a PadRecording a Pad is a matter of recording a single track, inside aseries of Chord Variations, inside the Pad itself.
You don’t need to record all Chord Variations. It is often onlyneeded to record just a Chord Variation.
Pattern data vs. track dataWhile the Style/Pad Record mode is where you can create or editthe music patterns, track parameters (like Volume, Pan, OctaveTranspose, FX settings…) are to be edited in Style Play mode.
• After having created or edited music patterns in Style/PadRecord mode, save them by selecting the “Write Style” or“Write Pad” command from the page menu of the StyleRecord mode (see “Write Style/Pad dialog box” onpage 162).
• After having edited track parameters in Style Play mode,save them to the Style Settings by selecting the “Write Cur-rent Style Settings” command from the page menu of theStyle Play mode (see “Write Current Style Settings dialogbox” on page 129).
SoundsThere are two ways of assigning Sounds to the Style tracks.
• While in Style Record mode you can assign differentSounds to each Style Element in the “Style Element TrackControls: Sound/Expression” page (see “Sounds area” onpage 137). You can assign a Sound to the Pad in the samepage of the Pad Record mode.
• While in Style Play mode, you can assign a single Sound tothe Style Settings (together with the other track parame-ters), that remains the same for all Style Elements.
Which Sounds are used by the Style tracks depends on the statusof the “Original Style Sounds” parameter (see page 110).
Note: When assigning a Sound in Style Play mode, the “OriginalStyle Sounds” parameter is automatically turned off.
Pad
CV1
Pad Track
CV2
CV3
CV4
CV5
CV6

132 Style/Pad Record modeStyle/Pad Import/Export
Style/Pad Import/Export
As an alternative to creating Styles on the Pa900, you can importa Standard MIDI Files (SMF) from your computer to a Pa900’sStyle. See “Import: Import SMF” on page 157 and “Export SMF”on page 160.
Entering the Style/Pad Record mode
While in the Style Play operating mode, press the RECORD but-ton. The following page will appear in the display:
You can edit Factory Styles or Pads, assuming the status of the“Factory Style and Pad Protect” parameter in the Global > ModePreferences > Media page is set to Off (see page 254)
• Select Record/Edit Current Style to edit the current Style.
• Select Record New Style to start from a new, empty Style.Default Style Settings will be recalled. When finishedrecording, you will save the new Style onto a Favorite orUser Style location. (Styles may also be saved onto FactoryStyle locations only when the “Factory Style and Pad Pro-tect” parameter is set to Off).
• Select Record/Edit Pad to select an existing Pad to edit.
• Select Record New Pad to start from a new, empty Pad.When finished recording, you will save the new Pad into aUser Pad location. (Pads can be saved into Factory Padlocations only when the “Factory Style and Pad Protect”parameter is set to Off).
After having edited the Style or Pad, please save it (see “Exit bysaving or deleting changes” below) and exit the Style/Pad Recordmode.
Then, edit the Style or Pad track settings.
• With a Style: Go to the Style Play mode, edit the Style Settingsto adjust track settings (Tempo, Volume, Pan, FX Send… seepage 113 and following in the “Style Play mode” chapter) andsave it by selecting the “Write Current Style Settings” from thepage menu (see “Write Current Style Settings dialog box” onpage 129).
• With a Pad: Go to the Pad page of the Style Play or Song Playmode, assign the new Hit or Sequence to a Pad button, andadjust the various Pad settings (Volume, Pan, and FX Send… see“Pad/Switch: Pad” on page 125). Finally, save the Pad settings byselecting the “Write Current Style Settings” command from thepage menu.
Note: After a record or edit operation, the memory is automati-cally reorganized. Therefore, when you press START/STOP there isa delay before you can actually listen to the Style. This delay ishigher with a Style containing more MIDI events.
Note: While in Record mode, the footswitch is disabled. On thecontrary, volume/expression-type pedals can be used.
Exit by saving or deleting changes
When finished editing, you can save your Style or Pad in mem-ory, or abort any change.
• To save changes, select the “Write Style/Pad” command fromthe page menu (see “Write Style/Pad dialog box” on page 162).
• To abort all changes, select the “Exit from Record” commandfrom the page menu, or press the RECORD button, to exit fromrecord and return to the main page of the Style Play mode.
Hint: Save often while recording, to avoid accidentally losing yourchanges to the Style/Pad.
Listening to the Style while in Edit mode
While you are in Style/Pad Record mode, you can listen to theselected Chord Variation or to the whole Style or Pad, dependingon the page you are in.
To select a Chord Variation, go to the Main page of the Record/Edit mode. For more details, see “Element (Style Element)” and“Chord Var (Chord Variation)” on page 134.
• When you are in the Main, Event Edit, Quantize, Transpose,Velocity, or Delete pages, you can listen to the selected ChordVariation. Press START/STOP to check how it works. PressSTART/STOP again to stop the playback.
• When you are in the Sounds/Expression, Keyboard Range,Chord Table, Trigger/Tension, Delete All, Copy, Style/PadElement Controls or Style/Pad Control pages, you can lis-ten to the whole Style or Pad. Press START/STOP and playsome chords to do your tests. Select any Style/Pad Elementusing the control panel buttons (VARIATION 1-4, INTRO1-3, AUTO FILL, BREAK, ENDING 1-3). Press START/STOP again to stop the playback.
• When you are in the Guitar Mode page, you can listen to thepattern you are programming, played in the selected Key.
Note: When entering Style Record mode, the Chord Recognitionmode changes according to the mode that was selected while inStyle Play mode. For a chord to be recognized, a minimum of threenotes must be played.
Note: In this mode, the pattern is always played back in loop, evenif the “Pad Type” parameter is set to “One Shot” (see page 155).
Chord Recognition Mode
Style Play mode Style Record mode Notes (min.)
One Finger Fingered 3
Fingered Fingered 3
Expert Expert 3

133Style/Pad Record modeList of recorded events
Refe
renc
e
List of recorded events
The Style/Pad Record mode filters out some events that maycause wrong operation of the Style or Pad. Here are the recordedevents.
Note: Some Control Change messages cannot be recorded directlyby using the integrated controls of Pa900.
All allowed controllers can be assigned to an Assignable Pedal/Slider/Switch.
MIDI Control Change messaged inserted by using a software onan external computer are imported when using the Import func-tion (“Import: Import SMF” on page 157).
Some controllers are reset at the end of the pattern.
Main page - Record 1
After having pressed the RECORD button, and having chosenwhether you want to edit an existing Style or create a new one,the main page of the Style Record mode appears, with the tab“Record 1” selected.
Style Record
Pad Record
Page headerThis line shows the current operating mode and transposition.
Operating mode name
Name of the current operating mode.
Master Transpose
Master Transpose value in semitones. This value can be changedusing the TRANSPOSE buttons on the control panel.
Control function CC#
Allowed
Note On
RX Noise On
Pitch Bend
Channel After Touch
Modulation 1
Breath 2
Pan 10
Expression 11
CC#12 12
CC#13 13
Damper (Hold 1) 64
Filter Resonance (Harmonic Content) 71
Low Pass Filter Cutoff (Brightness) 74
CC#80 (General Purpose #5) 80
CC#81 (General Purpose #6) 81
CC#82 (General Purpose #7) 82
Page header Page menu icon
Selected track info area
Key/Chord area Track volume/status area
Recording parameters area
Page sub-header
NTT area
Page header Page menu icon
Selected track info area
Track volume/status area Key/Chord area
Recording parameters area
Page sub-header
NTT area
Operating mode Master Transpose (in semitones)

134 Style/Pad Record modeMain page - Record 1
Page menu iconTouch this icon to open the page menu. See “Page menu” onpage 161.
Page sub-headerThis area shows some performing info on the Style/Pad.
Style in record/edit
Name of the Style currently in edit or record.
Beat counter
This indicator shows the current beat.
Measure number
Current measure you are recording.
Recording parameters area
Element (Style Element)
(Style only) This parameter lets you select a Style Element forediting. Each Style Element corresponds to a button on the con-trol panel carrying the same name. After selecting a Style Ele-ment, select a Chord Variation for actual editing (see below).
Var1…End3 This is the selected Style Element
Chord Var (Chord Variation)
This parameter lets you select a Chord Variation for editing(inside the selected Style Element or Pad).
Note: When this parameter and the assigned value is in small let-ters (cv1…cv6), the Chord Variation is empty; when it is in capi-tals (CV1…CV6), it is already recorded.
• If the Style Element is Var1, Var2, Var 3 or Var4, you can selectone of 6 Chord Variations to edit.
• If the Style Element is Intro1, Intro2, Intro3, Fill1, Fill2, Fill3,Fill4, Ending1, Ending2 or Ending3, you can select one of 2Chord Variations to edit.
• With a Pad you can choose one of the six available Chord Vari-ations (CV1 … CV6).
Resolution
Use this parameter to set the quantization during recording.Quantization is a way of correcting timing errors; notes playedtoo soon or too later are moved to the nearest axis of a rhythmic“grid”, set with this parameter, thus playing perfectly in time.
Note: To quantize after recording, use the Quantize function in theEdit section (see “Style/Pad Edit: Quantize” on page 148).
High No quantization applied.
(1/32)… (1/8)
Grid resolution, in musical values. For example,when you select 1/16, all notes are moved to thenearest 1/16 division. When you select 1/8, all
notes are moved to the nearest 1/8 division. A ‘3’after the quantization value means triplet.
Pad Sync
(Pad only) This parameter allows you to set a synchronizationmode for the Pad’s pattern.
Off No synchronization. The sequence will start assoon as you press the PAD button.
Continued The pattern will start immediately, in sync withthe arranger’s or active player’s tempo. Depend-ing on the current position of the beat counter, itmight not start from its very beginning; instead,it will continue from the current position.
For example, if the arranger’s or player’s beatcounter shows the third beat, and is playing tick91, the Pad will start from its third beat, at tick 91.
This works exactly as if it was a Fill.
Beat The sequence will start at the next beat, in syncwith the arranger’s or player’s tempo. It will startfrom its very beginning (i.e., tick 1 or measure 1).
Rec Length (Recording Length)
This parameter sets the recording length (in measures) of theselected track. Its value is always equal to, or a divider of, theChord Variation Length (see next parameter).
This is not the total length of the Chord Variation, but just of thecurrent track. For example, you may have a Chord Variationeight measures long, with a drum pattern repeating each twomeasures. If so, set the CV Length parameter to “8”, and the RecLength parameter to “2” before starting recording the Drumtrack. When playing back the Style, saving it or executing anyedit operation on the Style, the 2-measures pattern will beextended to the full 8-measures length of the Chord Variation.
Warning: If you assign a value lower than Rec Length to CVLength, the value of Rec Length is not immediately updated in thedisplay. Therefore, you are still free of changing the value of CVLength, before the measures exceeding its value are deleted. Formore details, see the warning in “CV Length (Chord VariationLength)” below.
However, if you press START/STOP to begin recording, the realRec Length value is changed to the new one, even if the display stillshows the old value.
Style/Pad in record/edit Beat counter Measure number
No quantiza-tion
1/16
1/8
The beat counter

135Style/Pad Record modeMain page - Record 1
Refe
renc
e
For example, you may have CV Length = 4 and Rec Length = 4. Ifyou set CV Length to 2, and press START/STOP to begin record-ing, Rec Length is still shown as 4, but it is in reality set to 2, andrecording will cycle for just 2 measures. After you press START/STOP to stop recording, Rec Length is updated to 2, and all mea-sures after the second measure are deleted.
CV Length (Chord Variation Length)
This parameter sets the total length (up to 32 measures) for theselected Chord Variation. When playing a Style, this will be thelength of the accompaniment pattern, when the chord corre-sponding to the Chord Variation is recognized on the keyboard.
Warning: If you reduce the Chord Variation Length after record-ing, any measure after the selected length will be deleted. Be verycareful when setting the CV Length to a lower value after record-ing! If it happens, we suggest to exit from record without saving(see “Exit from Record” on page 161).
Tempo
Select this parameter to use the TEMPO controls to set theTempo value.
Hint: You can always change the Tempo, when other parametersare selected, by keeping the SHIFT button pressed, and rotating theDIAL.
Note: When recording Tempo, old data is always replaced by thenew data.
Note: The actual Tempo of the Style will be the one shown whensaving the Style Settings in Style Play mode (see “Current Tempo”on page 107).
Meter
This is the meter (time signature) of the Style Element or the PadSequence. You can edit this parameter only when the Style Ele-ment or Pad is empty, i.e. before you begin recording anything.
Selected track info areaThis line lets you see the Sound assigned to the selected track.
Track name
Name of the selected track.
Drum…Acc5 Style track.
Sound name
Sound assigned to the selected track. You can touch the name toopen the Sound Select window, and select a different Sound.
Sound bank
Bank the selected Sound belongs to.
Program Change
Program Change number sequence (Bank Select MSB, BankSelect LSB, Program Change).
Key/Chord area
Key/Chord
This parameter pair allows you to define the track’s original keyand chord type, for the current Chord Variation. When playingthe pattern back, this chord will be played back exactly as it wasrecorded, without any NTT processing (see above).
Note: To conform to Korg specifications, it is advisable to recordboth the “Major” and “minor” Chord Variations for the Intro 1 andEnding 1 Style Elements.
When you select a track, the original key/chord assigned to theselected track will be shown. All recorded tracks will play backon that key/chord. For example, if the original key/chord for theAcc1 track is A7th, when selecting the Acc1 track all the remain-ing tracks will play on the A7th key/chord.
In the example above, you will record the Acc1 track in theAMajor key, with notes pertaining to the A7th scale. This exactpattern will be recalled, when an A7th chord will be recognized.
Note: This does not apply to Guitar Mode, relying on a differentrule. See “Main page - Guitar Mode” on page 138 for more infor-mation.
Track name
Sound name
Sound bank
Program Change sequence

136 Style/Pad Record modeMain page - Record 1
NTT Area
NTT Type/Table
NTTs (Note Transposition Tables) are the sophisticated algo-rithms that allow Korg arrangers to convert recognized chordsinto musical patterns. The Note Transposition Table (NTT)determines how the arranger will transpose pattern notes, whena chord is recognized that does not exactly match the originalchord of a Chord Variation. For example, if you only recorded aChord Variation for the CMaj chord, when a CMaj7 is recog-nized on the keyboard the arranger must transpose some notesto create the missing 7th.
Note: These parameters cannot be selected with Drum or Percus-sion tracks, and are therefore greyed out.
Note: NTT parameters are separately programmed for each trackof the Style Element.
There are two general types of NTTs:
• When Parallel types are selected, notes are transposed insidethe area set by the Wrap Around parameter. These tables are ide-ally suited to melody parts.
• When Fixed types are selected, the arranger moves as few notesas possible, making legato lines and chord changes more natural.They are ideally suited to chord tracks (strings, piano etc…).
Note: To conform to Korg specifications, it is advisable to set theNTT to “No Transpose” on the Intro 1 and Ending 1.
Parallel/Root The root note (in CMaj = C) is transposed to themissing notes.
Parallel/Fifth The 5th note (in CMaj = G) is transposed to themissing notes.
Parallel/i-SeriesAll original patterns must be programmed on the“Maj7” or “min7” chords. When loading old Korgi-Series Styles, this option is automaticallyselected.
Parallel/No TransposeThe chord is not modified, and is moved to thenew key unchanged. The pattern plays exactly therecorded notes, and is moved to the new key as is.This is the standard setting of Intro 1 and Ending1 in Korg’s original Styles (where a chord progres-sion is usually recorded, and should remainunchanged in any key).
Fixed/Chord This table moves as few notes as possible, makinglegato lines and chord changes more natural. It isideally suited to chord tracks (strings, pianoetc…). Contrary to the Parallel mode, the pro-grammed chord is not transposed according tothe Wrap Around parameter, but always staysaround its original position, looking for commonnotes between the chords.
Fixed/No Transpose
The programmed notes can only be transposedby the Master Transpose. They are never trans-posed when chords are changed.
as written as played back
as written as played back
As recorded with NTT = Root or 5t h (Key/Chord = C)
When you play a C7with NTT = Root
When you play a C7with NTT = 5th
As recorded with NTT = i-Series (Key/Chord = CM7 )
When you play a Cwith NTT = i-Series
When you play a C7 with NTT = i-Series

137Style/Pad Record modeMain page - Record 2/Cue
Refe
renc
e
Delete Note buttonUse this command to delete a single note or a single percussiveinstrument from a track. For example, to delete a snare, keep theD2 note (corresponding to the snare) pressed.
1. Select a track.
2. Touch the “Delete Note” button, and keep it pressed.
3. Press START/STOP to start the Style.
4. When you reach the passage containing the note to bedeleted, play the note on the keyboard. Keep it pressed, upto the last note to be deleted.
5. When finished, release the Delete button and the note to bedeleted, and press START/STOP again to stop the Style.
Note: If the note is at the beginning of the pattern, press thenote before starting the Style.
Tracks volume/status area
Virtual slider(s)
Drag a virtual sliders on the display to change the volume of thecorresponding track.
As an alternative, touch a track to select it, and use VALUE DIALto change the value.
Track status icons
Status of tracks. Touch this icon to change the status.
Play status. The track can be heard.
Mute status. The track cannot be heard.
Record status. After starting recording, the trackwill receive notes from the keyboard and theMIDI IN connector.
Track names
(Style only) Under the sliders, a label for each track is shown.
Drum…Acc5 Shown Style tracks.
Main page - Record 2/Cue
(Style only) While in the main page, touch the “Record 2/Cue”tab to see this page. Most parameters in this page are the same asin “Main page - Record 1”. In addition, here you can see andselect Sounds for each Style track, and the Cue mode for theStyle Element.
Sounds areaThis area lets you see Sounds and octave transposition for theeight Style tracks.
Octave transpose icon
Non editable. This indicator shows the track’s octave transposi-tion. Tracks will be recorded with the selected octave transposi-tion. To change this value, use the UPPER OCTAVE buttons, orgo to the “Mixer/Tuning: Tuning” edit page in the Style Playmode (see page 116). Save this value to the Style Settings.
Sound bank’s icon
This picture illustrates the bank the current Sound belongs to.Touch an icon a first time to select the corresponding track(detailed information are shown on the Selected Track Info area,see the “Main page - Record 1” page above). Touch it a secondtime to open the Sound Select window.
Note: These Sounds can be replaced by Sounds selected by a Per-formance, provided the “Original Style Sounds” parameter is leftunchecked in Style Play mode (see page 110).
Sounds area
Cue area
Octave transpose icon
Sound bank’s icon

138 Style/Pad Record modeMain page - Guitar Mode
Cue area
Cue mode for [Style element]
This parameter lets you decide how the current Style Elementwill enter after it has been selected. This setting is only availablefor the ‘Variation’ and ‘Fill’ Style Elements.
Immediate, first measure
The Style Element enters immediately, and beginsfrom the first measure. Only available on Fills.
Immediate, current measure
The Style Element enters immediately, and beginsfrom the current measure. Only available on Fills.
Next measure, first measureThe Style Element enters at the beginning of thenext measure, and begins from the first measureof the new pattern. Available on both Fills andVariations.
Next measure, current measureThe Style Element enters at the beginning of thenext measure, and begins from the current mea-sure. Only available on Variations.
Main page - Guitar Mode
While in the main page, and a Guitar track has been selected,touch the “Guitar Mode” tab to see this page. This is where youcan access Guitar Mode programming:
Note: To access this page, a Guitar track must first be selected (see“Track Type” on page 156). The Pad track must be of Guitar type(Pad Track Controls > Sound/Expression page, see “Track Type”on page 155). Otherwise, the Guitar Mode tab will remain grey(not selectable).
Note: When programming a Guitar track from an externalsequencer, you must be sure the Guitar tracks is associated to theright channel. Go to the Global > MIDI > MIDI IN Channels page,and assign the corresponding Style track (usually Acc1 ~ Acc5) tothe same channel of the Guitar track on the external sequencer.Then, go to the Style Record > Style Track Controls > Type/Ten-sion/Trigger page, and set the track as a track of type “Gtr” (see“Track Type” on page 156).
Guitar Mode allows for easy creation of realistic rhythm guitarparts, without the artificial, unmusical playing typical of MIDIprogramming of guitar parts. Just record a few measures, andyou will end up with realistic rhythm guitar tracks, where eachchord is played according to its real position on the guitar, andnot generated by simply transposing a written pattern.
Recording overviewRecording a Guitar track is unlike recording the other tracks,where you play exactly all the notes of a melody line or all thechords of an accompaniment part. With Guitar tracks you can:
a) play the keys corresponding to the strumming modes,
b) play an arpeggio using the six keys corresponding to the sixguitar strings (and the special keys corresponding to the rootand fifth notes),
c) play RX Noises to add realism to the pattern,
d) add regular patterns, for short melodic passages without wast-ing an Acc track,
e) use the finest MIDI programing to select Chord Shapes, andrecreate any nuance of a guitar performance.
The following sections describe the various control keys avail-able for this guitar simulation.

139Style/Pad Record modeMain page - Guitar Mode
Refe
renc
e
Recording strumming typesThe octave from C1 to B1 is devoted to selecting a strummingtype. By pressing these keys, you play fast strumming samples:
Recording single stringsThe octave from C2 to B2 is devoted to selecting a single string(or more than one) for playing arpeggios or power chords. Youcan either play a free arpeggio with the six guitar chordsassigned to the C~A keys, or play one of the faster sampledarpeggios on the higher keys. The root note is always availableon the C# key, while the fifth note is always assigned to the D#key; with them, you can always play the lowest notes of an arpeg-gio.
This octave also includes an ‘all mute’ key (F#):
Recording RX NoisesFurther on, the upper octaves are used to trigger RX Noises:
Selecting a CapoTogether with strumming types, single strings and RX Noises,you can choose a Capo (“capotasto”). Note that this might pre-vent some single strings to sound, depending on the composedchord. You can always see which strings are playing and whichare not, as described in “Diagram” on page 141.
Recording a regular patternTogether with strums and arpeggios, you can record regular pat-terns, exactly as if the track was of Acc type (see “Track Type” onpage 156). This will save an Accompaniment track, when all youneed is just to record some short melodic passages (for example,the closing of a strumming pattern).
61-keys76-keys
Full Up
Full Down Mute
Full Up Mute
Full Down
Full Down Mute Body
Full Down Slow Mute
Full Up Slow
Full Down Slow
Up 4-Strings
Down 4-Strings
Down Mute 4-Strings
Up Mute 4-Strings
61-keys76-keys
IV String (D)
V String (A) II String (B)
Down/Up 4-Strings
Full Down/Up
All Mute
VI String (E)
III String (G)
I String (e)
RecognizedChord Root
Recognized ChordFifth Power Chord
61-keys76-keys
RX Noises

140 Style/Pad Record modeMain page - Guitar Mode
You can record the pattern by playing it in the range shown bythe diagram.
Recording a Chord ShapeYou can finely choose Chord Shapes by using MIDI messages.When you play a C0 note with the velocity value shown in thefollowing table, a chord is played in a particular position and ona certain number of strings.
Vel. Range from Str. to Str. Position
0 6 Strings I VI 0
1 6 Strings I VI 0
2 6 Strings I VI 1
3 6 Strings I VI 2
4 6 Strings I VI 3
5 6 Strings I VI 4
6 6 Strings I VI 5
7 5 Strings Bass II VI 0
8 5 Strings Bass II VI 1
9 5 Strings Bass II VI 2
10 5 Strings Bass II VI 3
11 5 Strings Bass II VI 4
12 5 Strings Bass II VI 5
13 5 Strings Treble I V 0
14 5 Strings Treble I V 1
15 5 Strings Treble I V 2
16 5 Strings Treble I V 3
17 5 Strings Treble I V 4
18 5 Strings Treble I V 5
19 4 Strings Bass III VI 0
20 4 Strings Bass III VI 1
21 4 Strings Bass III VI 2
22 4 Strings Bass III VI 3
23 4 Strings Bass III VI 4
24 4 Strings Bass III VI 5
25 4 Strings Middle II V 0
26 4 Strings Middle II V 1
27 4 Strings Middle II V 2
28 4 Strings Middle II V 3
29 4 Strings Middle II V 4
30 4 Strings Middle II V 5
31 4 Strings Treble I IV 0
32 4 Strings Treble I IV 1
33 4 Strings Treble I IV 2
61-keys76-keys
34 4 Strings Treble I IV 3
35 4 Strings Treble I IV 4
36 4 Strings Treble I IV 5
37 3 Strings Bass IV VI 0
38 3 Strings Bass IV VI 1
39 3 Strings Bass IV VI 2
40 3 Strings Bass IV VI 3
41 3 Strings Bass IV VI 4
42 3 Strings Bass IV VI 5
43 3 Strings MiddleBas III V 0
44 3 Strings MiddleBas III V 1
45 3 Strings MiddleBas III V 2
46 3 Strings MiddleBas III V 3
47 3 Strings MiddleBas III V 4
48 3 Strings MiddleBas III V 5
49 3 Strings MiddleTreble II IV 0
50 3 Strings MiddleTreble II IV 1
51 3 Strings MiddleTreble II IV 2
52 3 Strings MiddleTreble II IV 3
53 3 Strings MiddleTreble II IV 4
54 3 Strings MiddleTreble II IV 5
55 3 Strings Treble I III 0
56 3 Strings Treble I III 1
57 3 Strings Treble I III 2
58 3 Strings Treble I III 3
59 3 Strings Treble I III 4
60 3 Strings Treble I III 5
61 2 Strings Bass V VI 0
62 2 Strings Bass V VI 1
63 2 Strings Bass V VI 2
64 2 Strings Bass V VI 3
65 2 Strings Bass V VI 4
66 2 Strings Bass V VI 5
67 2 Strings MiddleBas IV V 0
68 2 Strings MiddleBas IV V 1
69 2 Strings MiddleBas IV V 2
70 2 Strings MiddleBas IV V 3
71 2 Strings MiddleBas IV V 4
72 2 Strings MiddleBas IV V 5
73 2 Strings Middle III IV 0
74 2 Strings Middle III IV 1
75 2 Strings Middle III IV 2
76 2 Strings Middle III IV 3
77 2 Strings Middle III IV 4
78 2 Strings Middle III IV 5
79 2 Strings MiddleTreble II III 0
80 2 Strings MiddleTreble II III 1
81 2 Strings MiddleTreble II III 2
82 2 Strings MiddleTreble II III 3
83 2 Strings MiddleTreble II III 4
84 2 Strings MiddleTreble II III 5
85 2 Strings Treble I II 0
86 2 Strings Treble I II 1
Vel. Range from Str. to Str. Position

141Style/Pad Record modeMain page - Guitar Mode
Refe
renc
e
Choosing a Key/Chord for Intro 1 and Ending 1The pattern is recorded in the key indicated by the Key/Chordpair of parameters. However, this parameter is only used forplayback by the Intro 1 and Ending 1 Style Elements. All otherStyle Elements will be played back according to the recognizedchord.
With Intro 1 and Ending 1 (both Chord Variation 1 and 2) youcan also prefer to enter a chord progression, to be played on thelowest MIDI octave (C-1 ~ B-1). Chord types are inserted byusing velocity values, as shown in the following table:
Playing back the patternWhen in Stye Play mode, the recorded Guitar pattern is trans-posed according to the chord recognized on the keyboard. Theway it is transposed depends on the programmed pattern, withthe chosen positions, strumming mods, etc…
Guitar mode parametersHere is a detailed description of the parameters of the GuitarMode page.
Key/Chord
This parameter pair allows you to define the track’s original keyand chord type. This parameter works in a different way than theother tracks. While with other tracks this is always the referencekey used for NTT transposition, with Guitar tracks there is a dif-ference, whether you are recording a Chord Variation containedin an Intro 1 or Ending 1 Style Element, or any other ChordVariation:
• With Intro 1 and Ending 1, this chord will be used as thereference key for the chord progression.
• With all the other Chord Variations, this chord will be usedonly for listening during recording. During playback inStyle Play mode, the chord will follow chord recognition.
Capo - Fret
A capo (from the Italian “capotasto”, “head of fingerboard”) is amovable bar attached to the fingerboard of the guitar, to uni-formly raise the pitch of all the strings. Its use makes the stringsshorter, therefore changing the timbre and position of the chords(but not its shape).
0 Open string – no capo.
I…X Position of the capo over the fingerboard (i.e., “I”corresponds to the first fret, “II” to the secondone, and so on).
Strings - High/Low
Use this pair of parameters to choose the strings the pattern willbe played on.
1…6 Position of the capo over the fingerboard (i.e., “I”corresponds to the first fret, “II” to the secondone).
Diagram
The diagram shows how a chord would be composed on the fin-gerboard. Here is the meaning of the various symbols:
Red dot Fingered string (i.e., played note).
White dot Fifth, playing on the D#2 key.
X Non played or muted note.
Light grey bar Barré (a finger crossing all the strings, like amobile capo).
Dark grey bar Capo.
87 2 Strings Treble I II 2
88 2 Strings Treble I II 3
89 2 Strings Treble I II 4
90 2 Strings Treble I II 5
Vel. Chord Type Vel. Chord Type
1 Major 2 Major 6th
3 Major 7th 4 Major 7th flatted 5th
5 Suspended 4th 6 Suspended 2nd
7 Major 7th suspended 4th 8 Minor
9 Minor 6th 10 Minor 7th
11 Minor 7th flatted 5th 12 Minor major 7th
13 Dominant 7th 14 7th flatted 5th
15 7th suspended 4th 16 Dimished
17 Diminished major 7th 18 Augmented
19 Augmented 7th 20 Augmented major 7th
21 Major w/o 3rd 22 Major w/o 3rd and 5th
23 Flatted 5th 24 Diminished 7th
Vel. Range from Str. to Str. Position

142 Style/Pad Record modeStyle/Pad Record procedure
Style/Pad Record procedure
There are two different methods for recording a Style/Pad: Real-time and Step.
• Realtime Recording allows you to record Style/Pad patternsin realtime.
• Step Recording allows you to create a new Style/Pad byentering single notes or chords in each track. This is veryuseful when transcribing an existing score, or needing ahigher grade of detail, and is particularly suitable to createdrum and percussion tracks.
In addition, you can program a Style/Pad on a personal com-puter, and then import it via the Import function (see “Import:Import SMF” on page 157).
Preparing to record1. If you like to edit an existing Style/Pad, select it.
2. Press the RECORD button to enter the Style/Pad Recordmode. You are prompted to either select the Current Styleor an existing Pad, or create a New Style or Pad.
Select “Record/Edit Current Style” or “Record/Edit CurrentPad” if you want to edit the current Style/Pad, or make anew Style/Pad starting from an existing one. Select “RecordNew Style/Pad” if you want to start from scratch with anempty Style/Pad.
3. After you select your preferred option, the main page of theStyle/Pad Record mode will appear.
4. Use the Element (Style Element) (Style only) and Chord Var(Chord Variation) parameters, to select the Chord Varia-tion to be recorded/edited.
Note: For more information on the Style Elements and ChordVariations, and the Style/Pad structure in general, see “TheStyle’s structure” on page 130 or “The Pad’s structure” onpage 131.
5. Use the Rec Length (Recording Length) parameter to setthe length (in measures) of the pattern to record.
6. Use the Meter parameter to set the Style Element’s or Pad’smeter (time signature).
Note: You can edit this parameter only if you selected the“Record New Style/Pad” option when entering the Recordmode, or when editing an empty Style Element.
7. Select the Tempo parameter and set the Tempo.
8. (Style only) Touch the Record 2 tab to see the Sounds area.Here you can assign the right Sound to each Style track.
(Pad only) Press the SOUND button to select a Sound to beassigned to the Pad track.
9. If needed, set the Octave Transpose for each track. Note:The Octave Transpose will affect only the notes coming fromthe keyboard, and not from the arranger.
10. At this point, if you want to do a Realtime Recording go onreading “Realtime Record procedure” below. Otherwise, ifyou prefer to do a Step Record, jump to “Step Record pro-cedure” on page 143.
Realtime Record procedure1. Select the track to record. Its status icon will turn to
‘Record’. (For more details, see “Tracks volume/status area”on page 137).
Note: When entering the Record mode, a track is alreadyin Record status. When you press START/STOP afterentering the Record mode, you can immediately startrecording.
If you like, you can try your part before recording:
• Mute the track, by repeatedly touching its icon status,until the (Mute) status icon appears.
• Press START/STOP to let any recorded track play back,and practice on the keyboard.
• When you have finished practicing, press START/STOPto stop the arranger, and unmute the track by repeatedlytouching its icon status, until the (Record) status iconappears again.
2. While the shown status icon is Record, press START/STOPto begin recording. A 1-bar precount will play before therecording actually begins. When it begins, play freely. Thepattern will last for some measures, according to the RecLength value, then restart.
Since the recording will happen in overdub, you can addnotes on any following passage. This is very useful torecord different percussive instruments at any cycle on aDrum or Percussion track.
Note: While recording, the track’s Keyboard Range (seepage 154) is ignored, and notes can be recorded and playedback over the whole keyboard range. The Local parameter(see “Local Control On” on page 259) is also automaticallyset to On, to allow playing on the keyboard.
3. When finished recording, press START/STOP to stop thearranger. Select a different track, and go on recording thefull Chord Variation.
Note: You can select a different track only when the arrangeris not running.
4. When finished recording the Chord Variation, select a dif-ferent Chord Variation or Style Element (Style only) to goon recording the full Style/Pad.
5. When finished recording the new Style/Pad, select the“Write Style/Pad” command from the page menu, to openthe Write Style/Pad dialog box (see “Write Style/Pad dialogbox” on page 162) and save it to memory.
To exit the Style/Pad Record mode without saving anychange, select the “Exit from Record” command from thepage menu, or press the RECORD button.

143Style/Pad Record modeStyle/Pad Record procedure
Refe
renc
e
Step Record procedure1. While in the main page of the Style/Pad Record mode,
select the “Overdub Step Recording” command from thepage menu, to enter the Overdub Step Record mode.
2. The “Pos” parameter shows the current position.
• If you do not want to insert a note or chord at the currentposition, insert a rest instead, as shown in step 4.
• To jump to the next measure, filling the remaining beatswith rests, touch the Next M. button in the display.
3. To change the step value, use the “Step Time values” area inthe display.
4. Insert a note, rest or chord at the current position.
• To insert a single note, just play it on the keyboard. Theinserted note length will match the step length. You maychange the velocity and relative duration of the note, byediting the “Duration” and “Velocity” parameters (seepage 164).
• To insert a rest, just touch the Rest button in the display.Its length will match the step value.
• To tie the note to be inserted to the previous one, touchthe Tie button in the display. A note will be inserted, tied tothe previous one, with exactly the same name. You don’tneed to play it on the keyboard again.
• To insert a chord or a second voice, see “Chords and sec-ond voices in Step Record mode” on page 183.
5. After inserting a new event, you may go back by touchingthe Back button in the display. This will delete the previ-ously inserted event, and set the step in edit again.
6. When the end of the pattern is reached, the “End of Loop”event is shown, and the recording restarts from the“001.01.000” position. Any note exceeding the patternlength, inserted at its end, will be reduced to fit the totallength of the pattern.
At this point, you may go on, inserting new events in over-dub mode (the previously inserted events will not bedeleted). This is very useful when recording a drum or per-cussion track, where you may want to record the bass drumon a first cycle, the snare drum on the second cycle, and thehi-hat and cymbals during the following cycles.
7. When finished recording, touch the Done button in thedisplay to exit the Step Record mode.
A dialog box appears, asking you to either cancel, discardor save the changes.
If you touch Cancel, exit is canceled, and you can continueediting. If you choose No, changes are not saved, and theStep Record window is closed. If you choose Yes, changesare saved, and the Step Record window is closed.
8. When back to the main page of the Style Record mode, youmay turn all tracks to the play status, then press START/STOP to listen to the Style. Press START/STOP again tostop the playback.
9. From the main page of the Style Record mode, select the“Write Style/Pad” command to save, or the “Exit fromRecord” command to exit from the Style/Pad Record mode(see “Write Style/Pad dialog box” on page 162), or by can-celing any change.
Chords and second voicesWith Pa900, you are not limited to inserting single notes in atrack. There are several ways to also insert chords and doublevoices. For more information, see “Chords and second voices inStep Record mode” on page 183.

144 Style/Pad Record modeEdit menu
Edit menu
From any page (apart for Step Record), press the MENU buttonto open the Style Record or Pad edit menu. This menu givesaccess to the various Style/Pad Record edit sections.
When in the menu, select an edit section, or press EXIT to exitthe menu and return to the main page. To return to the mainpage, you can also select the Main Page menu item.
When in an edit page, press the EXIT button to return to themain page of the Style Record mode.
Style Record menu
Pad Record menu
Note: While the Style/Pad is in play, you cannot access the Editsection pages from the main page (see page 133). Stop the playbackbefore pressing MENU.
Note: When switching from the Edit section pages (Quantize,Transpose, Velocity, Delete) to the other pages, or vice-versa, theStyle (if in play) is automatically stopped.
Edit page structure
Most edit pages share some basic elements.
Other pages have a slightly different structure.
Operating mode
This indicates that the instrument is in Style/Pad Record mode.
Edit section
This identifies the current edit section, corresponding to one ofthe items of the edit menu (see “Edit menu” on page 144).
Chord
(Style only) Chord in edit.
Selected Style Element
(Style only) In Style Record mode, edits always happen on theselected Style Element.
Page menu icon
Touch this icon to open the page menu (see “Page menu” onpage 161).
Operating mode Edit section
Selected track info
Page menu icon
Parameters areaTabs
Selected Style Element
Chord
Operating mode Edit section
Page menu icon
Track statusTabs
Chord
Parameters area

145Style/Pad Record modeEvent Edit: Event Edit
Refe
renc
e
Parameters area
Each page contains various parameters. Use the tabs to selectone of the available pages. For detailed information on the vari-ous types of parameters, see sections starting from page 145.
Track status
Use these buttons to mute/unmute tracks while editing.
Tabs
Use tabs to select one of the edit pages of the current edit section.
Event Edit: Event Edit
The Event Edit is the page where you can edit each single MIDIevent of the selected Chord Variation. You can, for example,replace a note with a different one, or change its playing strength(i.e., velocity value). See “Event Edit procedure” on page 146 formore information on the event editing procedure.
Page headerSee “Page header” on page 133.
Page menu iconTouch this icon to open the page menu. See “Page menu” onpage 161.
Page sub-headerThis area shows some performing info on the Song.
Selected track
(Style only) Name of the track in edit. Use the Track pop-upmenu to select one of the Style tracks.
SE/CV (Style Element/Chord Variation)
Selected Style Element (Style only) and Chord Variation. Thisparameter cannot be edited. To select a different Style Elementand Chord Variation, press EXIT to go back to the main page ofthe Style/Pad Record mode (see “Main page - Record 1” onpage 133).
Event listUse the Event list to see all events contained in the selected trackin the selected Style Element.
Use the scrollbar to browse through the events. You can alsoscroll by using the SHIFT + VALUE DIAL combination.
Page header Page menu icon
Trackpop-up
menu
Tabs
Eventlist
Page sub-header
Scrollbar
Chord
Selected track Selected Style Element
Selected Chord Variation
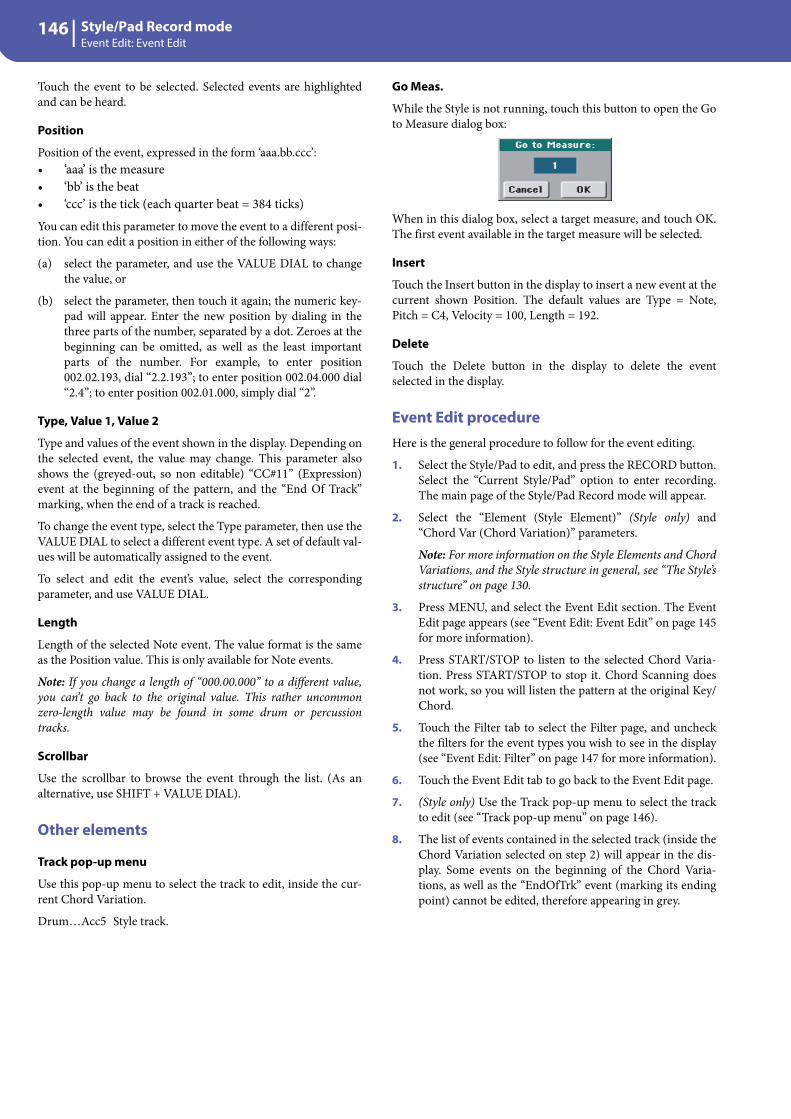
146 Style/Pad Record modeEvent Edit: Event Edit
Touch the event to be selected. Selected events are highlightedand can be heard.
Position
Position of the event, expressed in the form ‘aaa.bb.ccc’:• ‘aaa’ is the measure• ‘bb’ is the beat• ‘ccc’ is the tick (each quarter beat = 384 ticks)You can edit this parameter to move the event to a different posi-tion. You can edit a position in either of the following ways:
(a) select the parameter, and use the VALUE DIAL to changethe value, or
(b) select the parameter, then touch it again; the numeric key-pad will appear. Enter the new position by dialing in thethree parts of the number, separated by a dot. Zeroes at thebeginning can be omitted, as well as the least importantparts of the number. For example, to enter position002.02.193, dial “2.2.193”; to enter position 002.04.000 dial“2.4”; to enter position 002.01.000, simply dial “2”.
Type, Value 1, Value 2
Type and values of the event shown in the display. Depending onthe selected event, the value may change. This parameter alsoshows the (greyed-out, so non editable) “CC#11” (Expression)event at the beginning of the pattern, and the “End Of Track”marking, when the end of a track is reached.
To change the event type, select the Type parameter, then use theVALUE DIAL to select a different event type. A set of default val-ues will be automatically assigned to the event.
To select and edit the event’s value, select the correspondingparameter, and use VALUE DIAL.
Length
Length of the selected Note event. The value format is the sameas the Position value. This is only available for Note events.
Note: If you change a length of “000.00.000” to a different value,you can’t go back to the original value. This rather uncommonzero-length value may be found in some drum or percussiontracks.
Scrollbar
Use the scrollbar to browse the event through the list. (As analternative, use SHIFT + VALUE DIAL).
Other elements
Track pop-up menu
Use this pop-up menu to select the track to edit, inside the cur-rent Chord Variation.
Drum…Acc5 Style track.
Go Meas.
While the Style is not running, touch this button to open the Goto Measure dialog box:
When in this dialog box, select a target measure, and touch OK.The first event available in the target measure will be selected.
Insert
Touch the Insert button in the display to insert a new event at thecurrent shown Position. The default values are Type = Note,Pitch = C4, Velocity = 100, Length = 192.
Delete
Touch the Delete button in the display to delete the eventselected in the display.
Event Edit procedureHere is the general procedure to follow for the event editing.
1. Select the Style/Pad to edit, and press the RECORD button.Select the “Current Style/Pad” option to enter recording.The main page of the Style/Pad Record mode will appear.
2. Select the “Element (Style Element)” (Style only) and“Chord Var (Chord Variation)” parameters.
Note: For more information on the Style Elements and ChordVariations, and the Style structure in general, see “The Style’sstructure” on page 130.
3. Press MENU, and select the Event Edit section. The EventEdit page appears (see “Event Edit: Event Edit” on page 145for more information).
4. Press START/STOP to listen to the selected Chord Varia-tion. Press START/STOP to stop it. Chord Scanning doesnot work, so you will listen the pattern at the original Key/Chord.
5. Touch the Filter tab to select the Filter page, and uncheckthe filters for the event types you wish to see in the display(see “Event Edit: Filter” on page 147 for more information).
6. Touch the Event Edit tab to go back to the Event Edit page.
7. (Style only) Use the Track pop-up menu to select the trackto edit (see “Track pop-up menu” on page 146).
8. The list of events contained in the selected track (inside theChord Variation selected on step 2) will appear in the dis-play. Some events on the beginning of the Chord Varia-tions, as well as the “EndOfTrk” event (marking its endingpoint) cannot be edited, therefore appearing in grey.

147Style/Pad Record modeEvent Edit: Filter
Refe
renc
e
9. Scroll though the various events by using the scrollbar.
10. Select an event to be edited by touching it in the display.This is usually a note, that you can edit.
For more information on the event types and their val-ues, see “Event Edit: Event Edit” on page 145.
11. Edit the event.
• Select the “M” parameter. Use VALUE DIAL to changethe event’s position.
• Select the Type parameter. You may use VALUE DIAL tochange the event type, as well as its Value 1 and Value 2.
• If a Note event is selected, select the Length parameter,and use VALUE DIAL to change the event’s length.
12. You may use the Go Meas. command to go to a differentmeasure (see “Go Meas.” on page 146)
13. As described in step 4, you may press START/STOP to lis-ten how the pattern sounds after your changes. PressSTART/STOP again to stop the pattern running.
14. Touch the Insert button in the display to insert an event atthe Position shown in the display (a Note event with defaultvalues will be inserted). Touch the Delete button in the dis-play to delete the selected event.
15. When editing is complete, you may select a different trackto edit (go to step 7).
16. When finished editing the selected Chord Variation, pressEXIT to go back to the main page of the Style Recordmode, then go to step 2 to select and edit a different ChordVariation.
17. When finished editing the whole Style, select the “WriteStyle/Pad” command from the page menu to open theWrite Style/Pad dialog box (see “Write Style/Pad dialogbox” on page 162), or select the “Exit from Record” com-mand to cancel all changes.
• Touch the (Text Edit) button to enter the Text Editdialog box. Enter a name and confirm by selecting OK.
• Select a target memory location where to save the Style/Pad. The name of the Style/Pad already existing at theselected location is shown after the Bank-Location number.
Warning: If you select an existing Style/Pad and confirmwriting, the older Style/Pad is deleted and replaced by thenew one. Save the Styles/Pads you don’t want to lose to astorage device, before overwriting them.
18. Touch OK to save the Style/Pad to the internal memory, orCancel to delete any changes made in Style/Pad Recordmode. When the “Are you sure?” message appears, touchOK to confirm, or Cancel to go back to the “Write Style” or“Write Pad” dialog box.
Event Edit: Filter
This page is where you can select the event types to be shown inthe Event Edit page.
Turn On the filter for all event types you do not wish to see inthe Event Edit page.
Note: Some of the events are “ghosted”, and non editable, since thecorresponding events are not editable in a Style/Pad.
Note/RX Noise
Notes and RX Noises.
Control Control Change events. Only the following Con-trol Change numbers are allowed with Styles/Pads.
Tempo/Meter Tempo and Meter (time signature) changes (Mas-ter Track only).
Pitch Bend Pitch Bend events.
Control function CC# (Control Change Number)
Modulation 1 1
Modulation 2 2
Pan 10
Expression(a)
(a). Expression events cannot be inserted at the starting Position (001.01.000). AnExpression value is already among the default “header” parameters of the Style Ele-ment or Pad Track.
11
CC#12 12
CC#13 13
Ribbon 16
Damper 64
Filter Resonance 71
Low Pass Filter Cutoff 74
CC#80 80
CC#81 81
CC#82 82

148 Style/Pad Record modeStyle/Pad Edit: Quantize
Style/Pad Edit: Quantize
The quantize function may be used to correct any timing mis-take after recording, or to give the pattern a “groovy” feeling.
After setting the various parameters, touch Execute.
Track
(Style only) Use this parameter to select a track.
All All tracks selected.
Drum…Acc5 Selected track.
E / CV (Style Element/Chord Variation)
Use these parameters to select the Style Element (Style only) andChord Variation for editing.
Resolution
This parameter sets the quantization after recording. For exam-ple, when you select 1/8, all notes are moved to the nearest 1/8division. When you select 1/4, all notes are moved to the nearest1/4 division.
(1/32)… (1/4)
Grid resolution, in musical values. A “b…f ” char-acter added after the value means swing-quanti-zation. A “3” means triplet.
Start / End Tick
Use these parameters to set the starting and ending points of therange to quantize.
If a Chord Variation is four measures long, and you want toselect it all, the Start will be positioned at 1.01.000, and the Endat 5.01.000.
Bottom / Top Note
Use these parameters to set the bottom and top of the keyboardrange to quantize. If you select the same note as the Bottom and
Top parameters, you can select a single percussive instrument ina Drum or Percussion track.
Note: These parameters are available only when a Drum or Per-cussion track is selected.
Execute
Touch this button to execute the operation set in this page.
Track status icon
Status of tracks. Touch this icon to change the status.
Play status. The track can be heard.
Mute status. The track cannot be heard.
Track names
Under the buttons, a label for each track is shown.
Style/Pad Edit: Transpose
In this page you can transpose the selected track(s).
Note: After transposing, please don’t forget to readjust the “Key/Chord” parameter in the main page of the Style Record mode (seepage 135).
After setting the various parameters, touch Execute.
Track
(Style only) Use this parameter to select a track.
All All tracks selected, apart for tracks set in Drummode (like the Drum and Percussion tracks). Thewhole selected Chord Variation will be trans-posed.
Drum…Acc5 Single selected track.
E / CV (Style Element/Chord Variation)
Use these parameters to select the Style Element (Style only) andChord Variation for editing.
Value
Transpose value (±127 semitones).
Start / End Tick
Use these parameters to set the starting and ending points of therange to be transposed.
No quantiza-tion
1/8
1/4

149Style/Pad Record modeStyle/Pad Edit: Velocity
Refe
renc
e
If a Chord Variation is four measures long, and you want toselect it all, the Start will be positioned at 1.01.000, and the Endat 5.01.000.
Bottom / Top Note
Use these parameters to set the bottom and top of the keyboardrange to be transposed. If you select the same note as the Bottomand Top parameters, you can select a single percussive instru-ment in a Drum or Percussion track. Since in a Drum Kit eachinstrument is assigned to a different note of the scale, transpos-ing a percussive instrument means assigning the part to a differ-ent instrument.
Execute
Touch this button to execute the operation set in this page.
Track status icon
Status of tracks. Touch this icon to change the status.
Play status. The track can be heard.
Mute status. The track cannot be heard.
Track names
Under the buttons, a label for each track is shown.
Style/Pad Edit: Velocity
In this page you can change the velocity (dynamics) value ofnotes in the selected track. An Advanced mode is available,allowing you to select a velocity curve for the selected range.This is useful to create fade-ins or fade-outs.
After setting the various parameters, touch Execute.
Note: When an RX Sound is assigned to the track being edited, theresulting sound may change, since this kind of Sounds is made ofseveral different layers triggered by different velocity values.
Also, a fade-out may result in the level “jumping” up next to thezero, since a higher-level layer may be selected by low velocity val-ues.
Track
(Style only) Use this parameter to select a track.
All All tracks selected. The velocity for all notes ofthe whole selected Chord Variation will bechanged.
Drum…Acc5 Selected track.
E / CV (Style Element/Chord Variation)
Use these parameters to select the Style Element (Style only) andChord Variation for editing.
Value
Velocity change value (±127).
Start / End Tick
Use these parameters to set the starting and ending points of therange to be modified.
If a Chord Variation is four measures long, and you want toselect it all, the Start will be positioned at 1.01.000, and the Endat 5.01.000.
Bottom / Top Note
Use these parameters to set the bottom and top of the keyboardrange to be modified. If you select the same note as the Bottomand Top parameters, you can select a single percussive instru-ment in a Drum or Percussion track.
Advanced
When this checkbox is checked, the “Intensity”, “Curve”, “StartVelocity Value” and “End Velocity Value” parameters can beedited.
Intensity
(Only available in Advanced mode). Use this parameter to specifythe degree to which the velocity data will be adjusted toward thecurve you specify in “Curve”.
0…100% Intensity value. With a setting of 0 [%], the veloc-ity will not change. With a setting of 100 [%], thevelocity will be changed the most.
Curve
(Only available in Advanced mode). Use this parameter to selectone of the six curves, and to specify how the velocity will changeover time.
Start / End Vel. Value
(Only available in Advanced mode). Velocity change at the start-ing and ending ticks of the selected range.
0…100 Velocity change in percentage.
Execute
Touch this button to execute the operation set in this page.
StartValue
Curve 1
Velocity
Start Value = 0%, End Value = 100%
127
1EndValue
StartValue
Curve 2
Velocity
127
1EndValue
StartValue
Curve 3
Velocity
127
1EndValue
StartValue
Curve 4
Velocity
127
1EndValue
StartValue
Curve 5
Velocity
127
1EndValue
StartValue
Curve 6
Velocity RANDOM
127
1EndValue

150 Style/Pad Record modeStyle/Pad Edit: Cut
Track status icon
Status of tracks. Touch this icon to change the status.
Play status. The track can be heard.
Mute status. The track cannot be heard.
Track names
Under the buttons, a label for each track is shown.
Style/Pad Edit: Cut
This function lets you quickly delete a selected measure (or aseries of measures) from the selected Chord Variation. All fol-lowing events are moved back, to replace the cut measure(s).
After setting the various parameters, touch Execute.
E / CV (Style Element/Chord Variation)
Use these parameters to select the Style Element (Style only) andChord Variation for editing.
Start
First measure to be cut.
Length
Number of measures to be cut.
Execute
Touch this button to execute the operation set in this page.
Track status icon
Status of tracks. Touch this icon to change the status.
Play status. The track can be heard.
Mute status. The track cannot be heard.
Track names
Under the buttons, a label for each track is shown.
Style/Pad Edit: Delete
This page is where you can delete MIDI events out of the Style/Pad. This function does not remove measures from the pattern.To remove whole measure, use the Cut function (see “Style/PadEdit: Cut” on page 150)
After setting the various parameters, touch Execute.
Track
(Style only) Use this parameter to select a track.
All All tracks selected. After deletion, the selectedChord Variation will remain empty.
Drum…Acc5 Selected track.
E / CV (Style Element/Chord Variation)
Use these parameters to select the Style Element (Style only) andChord Variation for editing.
Event
Type of MIDI event to delete.
All All events. The measures are not removed fromthe Chord Variation.
Note All notes in the selected range.
Dup.Note All duplicate notes. When two notes with thesame pitch are encountered on the same tick, theone with the lowest velocity is deleted.
After Touch After Touch events.
Pitch Bend Pitch Bend events.
Prog.Change Program Change events, excluding the bundledControl Change #00 (Bank Select MSB) and #32(Bank Select LSB).
Note: This kind of data is automatically removedduring recording.
Ctl.Change All Control Change events, for example BankSelect, Modulation, Damper, Soft Pedal…
CC00/32…CC127Single Control Change events. Double ControlChange numbers (like 00/32) are MSB/LSB bun-dles.
Note: Some CC data are automatically removedduring recording. See the table on page 133 formore information on the allowed data.

151Style/Pad Record modeStyle/Pad Edit: Delete All
Refe
renc
e
Start / End Tick
Use these parameters to set the starting and ending points of therange to delete.
If a Chord Variation is four measures long, and you want toselect it all, the Start will be positioned at 1.01.000, and the Endat 5.01.000.
Bottom / Top Note
Use these parameters to set the bottom and top of the keyboardrange to delete. If you select the same note as the Bottom andTop parameters, you can select a single percussive instrument ina Drum or Percussion track.
Note: These parameters are available only when the All or Noteoption is selected.
Execute
Touch this button to execute the operation set in this page.
Track status icon
Status of tracks. Touch this icon to change the status.
Play status. The track can be heard.
Mute status. The track cannot be heard.
Track names
Under the buttons, a label for each track is shown.
Style/Pad Edit: Delete All
This function lets you quickly delete a selected Style Element orChord Variation, or the whole Style.
After setting the various parameters, touch Execute.
Track
(Style only) Use this parameter to select a track.
All All tracks of the selected Style, Style Element orChord Variation.
Drum-Acc5 Single track of the selected Style, Style Element orChord Variation.
E / CV (Style Element/Chord Variation)
Use these parameters to select the Style Element (Style only) andChord Variation for editing.
All All Style Elements, i.e. the whole Style. When E/Track=All and CV=All, the whole Style is deleted,and all parameters are set to the default status.
Var1…CountIn
Single Style Element.
V1-CV1…CI-CV2
Single Chord Variation.
Execute
Touch this button to execute the operation set in this page.
Track status icon
Status of tracks. Touch this icon to change the status.
Play status. The track can be heard.
Mute status. The track cannot be heard.
Track names
Under the buttons, a label for each track is shown.
Style/Pad Edit: Copy from Style
Here you can copy a track, Chord Variation or Style Elementinside the same Style, or from a different one. Furthermore, youcan copy a whole Style.
Warning: The Copy operation deletes all data at the target loca-tion (overwrite).
After setting the various parameters, touch Execute.
Note: If you copy too many events on the same tick, the “Too manyevents!” message appears, and the copy operation is aborted.
Note: When you copy over an existing Chord Variation, ProgramChange data is not copied, to leave the original Sounds unchangedfor that Chord Variation.
From Style
Choose this option to select the source Style to copy the track,Chord Variation or Style Element from. Touch the Select buttonto open the Style Select window and select the source Style.
From… To E/CV (Style Element/Chord Variation)
Use these parameters to select the source and target Style Ele-ments or Chord Variations.
Note: You can’t copy from a Variation to a different Style Element(or vice-versa), because of their different structure.

152 Style/Pad Record modeStyle/Pad Edit: Copy from Pad
All All Style Elements, i.e. the whole Style. You can’tchange the target, that is automatically set to All.
Var1…End2 Single Style Element.
V1-CV1…E2-CV2
Single Chord Variation.
From… To Track
Use this parameter to select the source and target track to copy.You can double a track, to strengthen a pattern.
All All tracks of the selected Style, Style Element orChord Variation.
Drum-Acc5 Single track of the selected Style, Style Element orChord Variation.
Execute
Touch this button to execute the operation set in this page.
Track status icon
Status of tracks. Touch this icon to change the status.
Play status. The track can be heard.
Mute status. The track cannot be heard.
Track names
Under the buttons, a label for each track is shown.
Copying to a Chord Variation of a differentlengthYou can copy a Chord Variation to a different one of a differentlength. Just keep in mind the following:
• If the source length is a divider of the target length, thesource Chord Variation will be multiplied to fit the targetChord Variation. For example, if the source is 4-measureslong, and the target 8-measures, the source will be copiedtwo times.
• If the source length is not a divider of the target length, thesource Chord Variation will be copied for as many mea-sures as can fit the target Chord Variation. For example, ifthe source is 6-measures long, and the target 8-measures,the source will be copied once, then the first 2 measureswill be copied to fit the remaining 2 measures.
Note: Avoid copying to a Chord Variation with a different meter(time signature), for example a 4/4 Chord Variation onto a 3/4one.
Style/Pad Edit: Copy from Pad
Here you can copy a Chord Variation from a Pad. Furthermore,you can copy a whole Pad.
Warning: The Copy operation deletes all data at the target loca-tion (overwrite).
After setting the various parameters, touch Execute.
Note: If you copy too many events on the same “tick”, the “Toomany events!” message appears, and the copy operation is aborted.
Note: When you copy over an existing Chord Variation, ProgramChange data is not copied, to leave the original Sounds unchangedfor that Chord Variation.
From Pad
Choose this option to select the source Pad to copy the ChordVariation from. Touch the Select button to open the Pad Selectwindow and select the source Pad.
From CV (Chord Variation)
Use this parameter to select the source Chord Variation.
All All Chord Variations, i.e. the whole Pad. You can’tchange the target, that is automatically set to All.
CV1…CV6 Single Chord Variation.
To CV (Chord Variation)
Use this parameter to select a target Chord Variation inside thecurrent Style/Pad.
CV1…CV6 Target Chord Variation. Automatically set to Allif the “From CV” parameter is also set to All.
To Track
(Style only) Use this parameter to select the target track to copy.
All All tracks of the selected Style, Style Element orChord Variation.
Drum-Acc5 Single track of the selected Style, Style Element orChord Variation.
Execute
Touch this button to execute the operation set in this page.
1 2 3 4
1 2 3 4 1 2 3 4
1 2 3 4
1 2 3 4 5 6 1 2
5 6

153Style/Pad Record modeStyle Element Track Controls: Sound/Expression
Refe
renc
e
Style Element Track Controls: Sound/Expression
In this page you can assign a different Sound to each track of theselected Style Element. Each Style Element can have differentSound; after saving the new Style, please don’t forget to check the“Original Style Sounds” parameter in the Style Play mode (seepage 110), to let the Style select the Sound bypassing the StyleSettings.
In this page you can also check and modify the Expression(CC#11) value for each of the Style Element tracks. This lets youreduce the relative level of a track in a single Style Element, with-out reducing the overall Volume of the Style. This is a very usefulcontrol, when you have different Sounds assigned to the sametrack in different Style Elements, and the internal level of theseSounds must be different.
When in this page, press the corresponding button on thecontrol panel to select a Style Element (VARIATION1 …ENDING3).
To copy the settings of this page to another Style Element, usethe “Copy Sound” and “Copy Expression” commands from thepage menu (see “Copy Sounds dialog box” and “Copy Expres-sion dialog box” starting from page 162).
Selected Track Info areaSee “Selected track info area” on page 135 for detailed informa-tion.
Sounds areaSee “Sounds area” on page 137 for detailed information.
Expression area
Expression Monitor
You can use these indicators to check if CC#11 (Expression)messages are contained in a track. Expression messages con-tained in a track can vary the volume of the track. It is very diffi-cult to catch them out – unless you carefully read all the eventsin the Event Edit page.
This monitor should help you keeping track of them, and let youaccess Event Edit only on the tracks containing the messages.Press the START/STOP button to start playback, and look at theindicators. When one of them lights up, you can enter Event Editon the corresponding track, and edit or remove the Expressionmessages.
Expression
Use these knobs to set the Expression (CC#11) value for the cor-responding track. This value can be seen at the beginning of theEvent Edit list (see “Event Edit: Event Edit” on page 145).
Different Expression values can be defined for each Style Ele-ment. This way, you can set a different volume in each Style Ele-ment, relative to the general Volume value set in the StyleHeader.
Expression levelingYou can quickly and easily adjust the Expression level of alltracks in a Style Element (Variation, Intro…). This allows for amore precise control over the volume level of all Style Element.
1. While in this page, select one of the Style Elements bypressing its button in the control panel.
2. Keep the SHIFT button pressed, and press the TEMPO+button to increase the Expression value of all the Style Vari-ation’s tracks, TEMPO- to decrease it.
3. Release the SHIFT button.
4. Repeat the above operation with all the desired Style Ele-ments.
Note: A track’s volume may be changed by an Expression eventcontained in a track. To check if any of these events exist in a track,let the Style Element play and look at the Expression Monitor inthis same page. If one or more Expression events are found, go tothe Event Edit page and delete it (or them)
Volume areaUse these controls to set the volume and status of each track. Seepage 137 for more information.
The Volume value is the same for the whole Style. Use theExpression controls to adjust the relative balance between tracksin each Style Element.
Selected Style Element
Expression level

154 Style/Pad Record modeStyle Element Track Controls: Keyboard Range
Style Element Track Controls: KeyboardRange
The Keyboard Range automatically transposes any pattern notethat would otherwise play too high or too low in pitch, com-pared to the original acoustic instrument, when transposed bythe arranger. This will result in a more natural sound for eachaccompaniment instrument.
For example, the lower limit for a guitar is E2. If you play a chordunder the E2, the transposed pattern could exceed this limit, andsound unnatural. A Bottom limit set to E2 for the guitar trackwill solve the problem.
Different Keyboard Range values can be set for each Style Ele-ment.
Note: The Keyboard Range is ignored while recording. The selectedtrack can be recorded and played back on the full range of the key-board.
When in this page, press the corresponding button on thecontrol panel to select a Style Element (VARIATION1 …ENDING3).
To copy the settings of this page to another Style Element, usethe “Copy Keyboard Range” command from the page menu (see“Copy Key Range dialog box” on page 163).
Top/Bottom
Use these parameters to set the bottom and top of the keyboardrange for the corresponding track of the current Style Element.
Volume areaUse these controls to set the volume and status of each track. Seepage 137 for more information.
Style Element Track Controls: Noise/Guitar
The Noise/Guitar page is where you can set the RX Noise leveland the ‘human feel’ of Guitar tracks.
RX Noise
Use these controls to adjust the volume of RX Noises in the cor-responding tracks. This control applies to all types of tracks(provided the Sound includes RX Noises).
Humanize GTR
Use these controls to apply a random value to the position,velocity and length of notes of Guitar tracks (see “Track Type”on page 156). This control has no effect on other types of track.

155Style/Pad Record modePad Track Controls: Sound/Expression
Refe
renc
e
Pad Track Controls: Sound/Expression
In this page you can assign a Sound to the Pad track, adjust itsVolume (CC#07) and Expression (CC#11) values, and set vari-ous other parameters, like the Keyboard Range, Track Type,Trigger Mode, Tension and Wrap Around.
Sound/Bank
Sound assigned to the Pad track.
Volume
Use this slider to set the Volume (CC#07) value for the Pad track.This value is not saved with the Pad, and is only used to test thePad’s volume during editing or recording.
Pad Type
Use this parameter to decide if the Pad will play once or if it willloop.
Note: While in Pad Record mode, the pattern is always playedback in loop, even if this parameter is set to “One Shot”.
One Shot When you press one of the PAD buttons, the cor-responding Pad is only played once. This is usefulfor playing Hits or Sequences that must only playonce.
Loop When you press one of the PAD buttons, the cor-responding Pad plays up to the end, then contin-ues playing from the start. Press STOP in thePAD section to stop it playing. This is useful forplaying cyclic sequences.
Keyboard Range
The Keyboard Range automatically transposes any pattern notethat would otherwise play too high or too low in pitch, com-pared to the original acoustic instrument, when transposed bythe arranger. This will result in a more natural sound for the Padinstrument.
Note: The Keyboard Range is ignored while recording. The Padtrack can play on the full range of the keyboard.
Trigger Mode
(Not available if Track Type = Drum). This setting lets you definehow Bass and Acc-type tracks are retriggered when the chord ischanged.
Off Each time you play a new chord, current noteswill be stopped. The track will remain silent untila new note will be encountered in the pattern.
Rt (Retrigger) The sound will be stopped, and newnotes matching the recognized chord will beplayed back.
Rp (Repitch) New notes matching the recognizedchord will be played back, by repitching notesalready playing. There will be no break in thesound. This is very useful on Guitar and Basstracks.
Track Type
Use this parameter to set the type of the Pad track.
Drum Drum track. This type of track is not transposedby the arranger, and is used for Drum Kits, or fortracks that you don’t want to be transposed whenplaying a different chord.
Bass Bass track. This type of track always plays theroot when changing chord.
Acc Accompaniment track. This type of track can beused freely, for melodic or harmonic accompani-ment patterns.
Expression
Use this knob to set the Expression (CC#11) value for the Padtrack. This value can be seen at the beginning of the Event Editlist.
The Expression is useful to balance the Pad with the other Pads.For example, if you want the Pad you are recording to be mel-lower than the average, just lower the Expression value.
Tension
Tension adds notes (a 9th, 11th and/or 13th) that have actuallybeen played, even if they haven't been written in the Pad pattern.This parameter specifies whether or not the Tension included inthe recognized chord will be added to an Acc-type track.
On The Tension will be added.
Off No Tension will be added.
RX Noise
Use these controls to adjust the volume of RX Noises in the cor-responding tracks. This control applies to all types of tracks(provided the Sound includes RX Noises).
Humanize GTR
Use these controls to apply a random value to the position,velocity and length of notes of Guitar tracks (see “Track Type”on page 155). This control has no effect on other types of track.
Wrap Around
The wrap-around point is the highest register limit for the Padtrack. The Pad pattern will be transposed according to thedetected chord. If the chord is too high, the Pad track might playin a register that is too high, and therefore unnatural. If, how-ever, it reaches the wrap-around point, it will be automaticallytransposed an octave lower.
The wrap-around point can be individually set in semitone stepsup to a maximum of 12 semitones, relative to the chord root setin the main page of the Pad Record mode (see “Key/Chord” onpage 135).

156 Style/Pad Record modeStyle Element/Pad Chord Table: Chord Table
1…12 Maximum transposition (in semitones) of thetrack, referred to the original key of the Pad pat-tern.
Style Element/Pad Chord Table: ChordTable
This is the page where you can assign a Chord Variation to eachof the most important recognized chord. When a chord is recog-nized, the assigned Chord Variation will be automaticallyselected by the arranger to play the accompaniment.
When in this page, press the corresponding button on thecontrol panel to select a Style Element (VARIATION1 …ENDING3).
Chord / Chord Variation
Use these parameters to assign a Chord Variation to each of themost important chords.
Style Track Controls: Type/Trigger/Tension
In this page you can set the Mode, Trigger mode for the Styletracks, and activate/deactivate the Tension for the Accompani-ment tracks.
When in this page, press the corresponding button on thecontrol panel to select a Style Element (VARIATION1 …ENDING3).
Track Type
Use this parameter to set the type of the corresponding track.
Drum Drum track. This type of track is not transposedby the arranger, and is used for Drum Kits madeof Drum sounds. It can be affected by the DrumMapping of the Style Play mode (see “DrumMapping (Var.1…Var.4)” on page 126).
Perc Percussion track. This type of track cannot betransposed, and is used for Drum Kit made ofPercussion sounds. It is NOT affected by theDrum Mapping.
Bass Bass track. This type of track always plays theroot when changing chord.
Acc Accompaniment track. This type of track can beused freely, for melodic or harmonic accompani-ment patterns.
Gtr Guitar track. This type of track uses Guitar Modeto create guitar strumming (see “Main page -Guitar Mode” on page 138). When this type isselected, the “Tension” parameter can no longerbe edited.
Trigger Mode
This setting lets you define how Bass and Acc-type tracks areretriggered when the chord is changed.
Off Each time you play a new chord, current noteswill be stopped. The track will remain silent untila new note will be encountered in the pattern.
Rt (Retrigger) The sound will be stopped, and newnotes matching the recognized chord will beplayed back.
Rp (Repitch) New notes matching the recognizedchord will be played back, by repitching notesalready playing. There will be no break in thesound. This is very useful on Guitar and Basstracks.
Tension
Tension adds notes (a 9th, 11th and/or 13th) that have actuallybeen played to the accompaniment, even if they haven't beenwritten in the Style pattern. This parameter specifies whether ornot the Tension included in the recognized chord will be addedto the Acc-type tracks.
On The Tension will be added.
Off No Tension will be added.

157Style/Pad Record modeImport: Import Groove
Refe
renc
e
Import: Import Groove
The Import Groove function allows the loading of MIDIGrooves (“.GRV” files). By importing these data to a track, andassigning the Sound based on the sliced samples to the sametrack, you can play the original audio groove, and freely changeits Tempo.
Note: After importing a groove generated by a melody line (not bya percussive groove), the imported groove and samples will not betransposed together with the other Style tracks. Audio data cannotbe transposed by the arranger.
Note: Please execute the Import Groove operation before settingthe instrument to standby. All “.GRV” files generated by a TimeSlice operation are deleted when the instrument enters standby.
From
Use this parameter to select one of the MIDI Groove patterns(“.GRV” files) generated when saving data after a Time Sliceoperation.
To E/CV (Style Element/Chord Variation)
Use this parameter to select the target Style Element (Style only)and Chord Variation.
To Track
(Style only) Use this parameter to select the target track insidethe selected Chord Variation. The Percussion track is usuallysuggested, since the Drum track is still suitable for standardDrum Kit sounds (count-in, break etc.). After importing theMIDI Groove pattern, assign the Sound, to which the slicedsamples are assigned, to the track playing the MIDI Groove pat-tern.
Import: Import SMF
The Import SMF function allows you to import MIDI data froma Standard MIDI File (SMF) created on your preferred externalsequencer, and transform them in a Chord Variation.
Note: You cannot use this function to import data from anygeneric Song. The Standard MIDI File to be imported must be pro-grammed as if it was one of Pa900’s Chord Variations.
When importing an SMF, parameters like CV Length, Meter,Tempo Changes, Program Changes and Expression are recog-nized. These parameters will be imported as the header of theStyle Element containing the Chord Variation, provided the“Initialize” parameter is checked, or the Style Element is empty.
Hint: It is a good idea to check the “Initialize” parameter whenimporting the first Chord Variation of a Style Element, anduncheck it when importing the following Chord Variations.
• Sounds assigned to each track can be imported, provided theProgram Change, Bank Select MSB and LSB events are on thefirst ‘tick’ of the SMF. These data are loaded in the Style Ele-ment’s header, and not as Sounds assigned to the Style Perfor-mance.
Note: Sounds in the Style Element header can be overridden bySounds assigned to the Style Settings, by checking the “OriginalStyle Sound” parameter in the main page of the Style Play mode(Style Track view).
• If the above data was not found on the first tick of the importedSMF, Sounds must be manually assigned to each track. You cando this in the “Record 1” or “Record 2”, or the “Sound/Expres-sion” page of the Style Record mode,.
• Key/Chord, Chord Table, Expression, and any other Style Vari-ation parameter, must be manually programmed in the relevantStyle Record pages.
• The starting Tempo, and each track’s Volume, must be pro-grammed as Style Settings data, and then saved in the Style Set-tings.
• Meter (time signature) Change is not allowed, therefore notrecognized.
• The Chord Variation length is the same as the imported SMF.You can change length by changing the value of the CV Lengthparameter, on the main page of the Style/Pad Record mode.

158 Style/Pad Record modeImport: Import SMF
Hint: If a note extends beyond the last measure of the Chord Vari-ation, an additional measure is appended (for example, if a noteextends after the end of the fourth measure in a 4-measure pat-tern, a 5-measure Chord Variation will be generated). If so, changethe CV Length value to reset the Chord Variation length. Theexceeding note will be cut, to fit the new pattern length.
When programming a Chord Variation on an externalsequencer, please assign each Style track to the correct MIDIchannel, according to the following table.
When programming a Chord Variation on the externalsequencer, please assign the Pad track to the MIDI channel #10.
Note: Only SMF in format 0 can be loaded.
From Song
This is the name of the Standard MIDI File to be loaded. Touchthe Select button to open the file selector, and select an “.SMF”file.
Select
Touch this button to open the file selector and load the SMF.
Initialize
Check this parameter if you want all settings of the target StyleElement (i.e., Key/Chord, Chord Table, Sounds…) are resetwhen loading the SMF.
Hint: It is a good idea to check the “Initialize” parameter whenimporting the first Chord Variation of a Style Element, anduncheck it when importing the following Chord Variations.
To E/CV
Use this parameter to select a target Chord Variation.
Execute
After setting all parameters in this page, touch this button toimport the Standard MIDI File into the target Chord Variation.
Importing an SMF separated by Markers intoa StyleAs an alternative to importing single Chord Variations, you canimport a whole Style as an SMF separated by Markers, i.e., a sin-gle SMF containing all the Chord Variations (Variation 1, Varia-tion 2, etc.) each one separated by a Marker (the same eventsused in Song Play mode).
1. While in this page, touch the Select button, and choose theStandard Midi File to be imported.
2. Keep the SHIFT button pressed.
3. Without releasing the SHIFT button, touch the Executebutton in the display.
4. Release the SHIFT button.
When creating a new Style, we suggest to check the “Initialize”checkbox. Do not check it if the SMF you are loading was previ-ously exported from a Style to be edited; in this case, it is veryimportant to keep all the previous settings.
Style Tracks and MIDI Channels must be lined as in the previoustable, as per Korg’s standard Style format definition.
Note: Tracks/MIDI Channels other than the above mentioned areignored during the import procedure.
For a list of MIDI events supported during the import opera-tions, please see “List of recorded events” on page 133. If any, thefollowing events are stripped off and automatically transferred tothe Style Element header during the import procedure:
• Time signature (this event is mandatory)
• Control Change bundle #00-32 (Bank Select MSB/LSB)
• Program Change
• Control Change #11 (Expression)
Control Change 00, Control Change 32 and Program Changemessages must be placed at the very beginning of each ChordVariation (tick 0).
Style Track MIDI Channel
Bass 09
Drum/Pad 10
Percussion 11
Accompaniment 1 12
Accompaniment 2 13
Accompaniment 3 14
Accompaniment 4 15
Accompaniment 5 16

159Style/Pad Record modeImport: Import SMF
Refe
renc
e
Whenever they are not saved in the SMF, Program Change, Con-trol Change 00, 11 and 32, can be still programmed in StyleRecord mode, by using the edit features available.
Warning: Pa900 can only handle SMF format 0 (Zero). If you arein trouble importing your file, maybe your sequencer (or DAW) isexporting using SMF format 1. Please refer to the software’s user’smanual.
The naming structure for the Markers inside the SMF is“EnCVn”, whose single components are shown in the followingtable:
Warning: It is mandatory not to use capital letters in Markernames. Some examples of valid names:
‘i1cv2’ = Intro1 – Chord Variation 2
‘v4cv3’ = Variation 4 – Chord Variation 3
Examples of non accepted names:
‘V1cv2’, ‘v1CV2’, ‘intro i1cv2’, ‘v1cv1 chorus’
The order of the Chord Variations inside the SMF is not relevant.They can be freely placed inside the SMF.
At the end of this page you can find a screenshot of a test file cre-ated in Steinberg Cubase, just as an example of how a SMF sepa-rated by Markers can look like. Considering analogies betweenactual workstations, it will not look much different in otherapplications like Logic, Digital Performer, Pro Tools or Sonar.
Component Meaning
E Style Element (‘v’ = variation, ‘i’ = intro, ‘f’ = fill, ‘e’ = ending)
n Style Element number (‘1’~’4’ for variations, ‘1’~’2’ for all other style elements)
CV Chord Variation (‘cv’ = chord variation – no other choices allowed)
n Chord Variation number [1~6 for Variations, 1~2 for all oth-ers]

160 Style/Pad Record modeExport SMF
Export SMF
The Export SMF function allows you to export a Chord Varia-tion as a Standard MIDI File (SMF), and edit it on your preferredexternal sequencer.
To Song
This (non editable) parameter shows the name of the StandardMIDI File to be generated. The (automatically assigned) namewill be the same of the exported Chord Variation.
From E/CV
Use this pop-up menu to select one of the available Chord Varia-tions from the current Style.
Execute
After selecting a Chord Variation, touch this button to export itas a Standard MIDI File. A standard file selector will appear.Select the target device and directory, then touch Save. After youtouch Save, a dialog box appears, letting you assign a name to thefile.
Exporting a Style as an SMF separated byMarkersAs an alternative to exporting single Chord Variations to indi-vidual Standard MIDI Files, you can export a whole Style as anSMF separated by Markers, i.e., a single SMF containing all theChord Variations (Variation 1, Variation 2, etc.) each one sepa-rated by a Marker (the same events used in Song Play mode).
1. While in this page, keep the SHIFT button pressed.
2. Without releasing the SHIFT button, touch the Executebutton in the display.
3. Release the SHIFT button.
4. Assign a name to the Standard Midi File where to save theStyle in edit.
This operation creates, in the selected device, an SMF format 0(Zero), containing all the MIDI data included in the selectedStyle, with each Chord Variation starting from a differentMarker (named as per the naming convention explained in theImport section above).
Each Chord Variation will include, at the very beginning (tick 0),the following informations:
• Time signature
• Control Change bundle #00-32 (Bank Select MSB/LSB)
• Program Change
• Control Change #11 (Expression)

161Style/Pad Record modePage menu
Refe
renc
e
Page menu
Touch the page menu icon to open the page menu. Touch a com-mand to select it. Touch anywhere in the display to close themenu without selecting a command.
Style Record
Pad Record
Write Style/Pad
Select this command to open the Write Style or Write Pad dialogbox, and save the Style/Pad to the internal memory.
See “Write Style/Pad dialog box” on page 162 for more informa-tion.
Undo
Only available in Record mode. While in Record mode, cancelsthe latest recorded data and restores the previous situation.Selected a second time, it restores recorded data again (“Redo”function).
Delete Pad Track
Only available in the Main page of the Pad Record mode. Selectthis command to delete the Pad track.
Copy Key/Ch (Copy Key/Chord) button
Select this command to open the Copy Key/Chord dialog box,and copy Key/Chord settings of the currently selected track to allother tracks of the same Chord Variation, or to the whole Style.
See “Copy Key/Chord dialog box” on page 162 for more infor-mation.
Copy Sound
(Only available in some edit pages). While the Style ElementTrack Control edit section is selected, use this command to openthe Copy Sound dialog box and copy all Sounds assigned to thecurrent Style Element tracks to a different Style Element.
See “Copy Sounds dialog box” on page 162 for more informa-tion.
Copy Expression
(Only available in some edit pages). While the Style ElementTrack Control edit section is selected, use this command to openthe Copy Expression dialog box and copy all Expression valuesassigned to the current Style Element tracks to a different StyleElement.
See “Copy Expression dialog box” on page 163 for more infor-mation.
Copy Keyboard Range
(Only available in some edit pages). While the Style ElementTrack Control edit section is selected, use this command to openthe Copy Keyboard Range dialog box and copy all KeyboardRange values for the current Style Element tracks to a differentStyle Element.
See “Copy Key Range dialog box” on page 163 for more informa-tion.
Copy Chord Table
Only available while in the Style Element Chord Table page. Selectthis command to open the Copy Chord Table dialog box (see“Copy Chord Table dialog box” on page 163).
Delete Current Track
(Only available in the Main Record pages). Select this commandto delete the selected track.
Overdub Step Recording
(Only available in the Main Record pages). Select this commandto open the Overdub Step recording window (see “Overdub StepRecording window” on page 164).
Solo Track
Select the track to be soloed, then check this item. You will hearonly the selected track, and the ‘Solo’ warning will flash on thepage header.
Uncheck this item to exit the Solo function.
Keep the SHIFT button pressed and touch one of thetracks to solo it. Do the same on a soloed track to deactivate theSolo function.
Exit from Record
Select this command to exit from Record without saving changesto the Style.

162 Style/Pad Record modeWrite Style/Pad dialog box
Write Style/Pad dialog box
Open this window by choosing the Write Style or Write Pad itemfrom the page menu. Here you can save the recorded or editedStyle/Pad to memory.
Name
Name of the Style/Pad to be saved. Touch the (Text Edit)button next to the name to open the Text Edit window.
Style/Pad Bank
Target bank of Styles/Pad. Use the Select button on the display,or the VALUE DIAL to select a different bank.
Style
Target Style/Pad location in the selected bank. Use the Selectbutton on the display, or the VALUE DIAL to select a differentlocation.
Note: A User or Favorite Style, or a User Pad, is usually promptedwhen writing a Style/Pad. However, you can overwrite a FactoryStyle/Pad when the “Factory Style and Pad Protect” parameter isleft unchecked (see page 254).
Select… button
Touch this button to open the Style/Pad Select window, andselect a target location.
While in the Style/Pad Select window, use the buttons on top ofthe window to select either the User or the Favorite banks.
Copy Key/Chord dialog box
(Style only) Open this window by choosing the Copy Key/Chorditem from the page menu. Here you can copy Key/Chord settingsof the currently selected track to all other tracks of the sameChord Variation, or to the whole Style. This function is useful tospeed-up pattern programming, and to avoid having differenttracks in different keys within the same Chord Variation.
Current Chord Variation Tracks
The Key/Chord of the current track will be cop-ied to all tracks of the current Chord Variation.
All Style Tracks
The Key/Chord of the current track will be cop-ied to all tracks of the Style (i.e., all Chord Varia-tions).
Copy Sounds dialog box
(Style only) Open this window by choosing the Copy Soundsitem from the page menu. Here you can copy all Soundsassigned to the current Style Element tracks to a different StyleElement.
From Style Element
Non editable. Currently selected Style Element.
To Style Element
Target Style Element.
All Settings will be copied to all Style Element of theStyle in edit.
Var1…CountIn
Single Style Element where to copy settings to.

163Style/Pad Record modeCopy Expression dialog box
Refe
renc
e
Copy Expression dialog box
(Style only) Open this window by choosing the Copy Expressionitem from the page menu. Here you can copy all Expression val-ues assigned to the current Style Element tracks to a differentStyle Element.
From Style Element
Non editable. Currently selected Style Element.
To Style Element
Target Style Element.
All Settings will be copied to all Style Element of theStyle in edit.
Var1…CountIn
Single Style Element where to copy settings to.
Copy Key Range dialog box
(Style only) Open this window by choosing the Copy KeyboardRange item from the page menu. Here you can copy all Key-board Range values for the current Style Element tracks to a dif-ferent Style Element.
From Style Element
Non editable. Currently selected Style Element.
To Style Element
Target Style Element.
All Settings will be copied to all Style Element of theStyle in edit.
Var1…CountIn
Single Style Element where to copy settings to.
Copy Chord Table dialog box
(Style only) Open this window by choosing the Copy ChordTable item from the page menu. Here you can copy the ChordTable of the current Style Element to a different Style Element.
To Style Element
Target Style Element.
All Settings will be copied to all Style Element of theStyle in edit.
Var1…CountIn
Single Style Element where to copy settings to.

164 Style/Pad Record modeOverdub Step Recording window
Overdub Step Recording window
The Step Record allows you to create a new Style/Pad by enteringsingle notes or chords to each track, by playing them on the key-board one at a time, with no need to play on time. This is veryuseful when transcribing an existing score, or needing a highergrade of detail, and is particularly suitable to create drum andpercussion tracks.
To access this page, select the “Overdub Step Recording” com-mand from the page menu.
Track (Selected track)
Name of the selected track in record.
DRUM…ACC5
Style track.
SE (Selected Style Element)
See “Element (Style Element)” on page 134.
CV (Selected Chord Variation)
See “Chord Var (Chord Variation)” on page 134.
Pos (Position)
This is the position of the event (note, rest or chord) to beinserted.
Event list
Previously inserted events. You may delete this event, and set itin edit again, by touching the Back button.
Step Time values
Length of the event to be inserted.
… Note value.
Standard (–) Standard value of the selected note.
Dot (.) Augments the selected note by one half of itsvalue.
Triplet (3) Triplet value of the selected note.
Meter
Meter (time signature) of the current measure. This parametercannot be edited. You can set the Meter in the main page of theStyle Record mode, before actually starting recording (see step 6on page 142 for more information).
Free Memory
Remaining memory for recording.
Duration
Relative duration of the inserted note. The percentage is alwaysreferred to the step value.
25% Staccatissimo.
50% Staccato.
85% Ordinary articulation.
100% Legato.
Velocity
Set this parameter before entering a note or chord. This will bethe playing strength (i.e., velocity value) of the event to beinserted.
Kbd Keyboard. You can select this parameter, by turn-ing all counter-clockwise the dial. When thisoption is selected, the playing strength of theplayed note is recognized and recorded.
1…127 Velocity value. The event will be inserted withthis velocity value, and the actual playingstrength of the note played on the keyboard willbe ignored.
Rest
Touch this button to insert a rest.
Tie
Touch this button to tie the note to be inserted to the previousnote.
Back
Goes to the previous step, erasing the inserted event.
Next M. (Next Measure)
Goes to the next measure, and fills the remaining space withrests.
Done
Exits the Step Record mode. If you have inserted some notes, adialog box appears, asking you to either cancel, discard or savethe changes.
If you touch Cancel, exit is canceled, and you can continue edit-ing. If you choose No, changes are not saved, and the StepRecord window is closed. If you choose Yes, changes are saved,and the Step Record window is closed.

165Song Play modeTransport controls
Refe
renc
e
The Song Play operating mode is where you can listen to Songs,while reading Lyrics and Chords (where available). An automati-cally-generated Score can also be seen for Standard MIDI Files,and Markers can let you quickly jump to a Song section. You canmix two Songs by using the X-FADER.
Songs can be in Standard MIDI File, Karaoke™ or MP3 format.The MP3+G format is also supported.
You can play along with the Song with up to four Keyboardtracks (Upper 1-3, Lower) and four Pads. You can select differentSounds and Effects for Keyboard tracks by selecting Perfor-mances and STSs.
While in Song Play mode, you can use the SongBook to auto-matically select Songs for a desired music genre. With each Songentry in the SongBook, up to four STSs are also selected.
Song Play mode can also be used in Easy Mode.
Transport controls
You can use a separate set of transport controls for each of thetwo onboard players. Use the PLAYER 1 controls for Player 1,and PLAYER 2 controls for Player 2.
If you want both players to play together, keep the SHIFT buttonpressed and press one of the (PLAY/STOP) controls tomake both players start in sync.
If one of the players is already playing, you can start the otherplayer by pressing the other (PLAY/STOP) control; thesecond player will start at the next measure.
The two players’ Tempo value is linked together. The Tempodata written into the Songs are ignored. Adjust the Tempo usingthe TEMPO buttons.
MIDI Clock
In Song Play mode the MIDI Clock is always generated by theinternal Player 1, even if the Clock parameter is set to MIDI orUSB mode in the Global > MIDI > General Controls page (see“Clock Source” on page 259). While in this mode, Pa900 cannotreceive MIDI Clock messages from the MIDI IN.
Pa900 only transmits to the MIDI OUT and USB port the MIDIClock messages generated by Player 1. For MIDI Clock messagesto be sent, the “Clock Send” parameter must be activated in theGlobal > MIDI > General Controls page (see “Clock Send” onpage 258).
Tempo Lock
If you don’t want the Tempo value to change when selecting anew Song, turn on the Tempo Lock function by using theTEMPO LOCK buttons on the control panel. When this button’sLED is turned on, you can still manually change the Tempo withthe TEMPO +/– buttons, or by touching the Tempo field andusing the VALUE DIAL.
Master Volume, Balance, X-Fader
While the MASTER VOLUME knob controls the general vol-ume of the instrument, you can use the BALANCE knob to bal-ance the Song and Pad tracks against the Keyboard tracks.
Use the X-FADER to mix between Player 1 and Player 2. Move itto the center for the maximum volume of both players.
Note: When this slider is fully moved to the right or the left, differ-ent Lyrics, Chords, Score and Markers can be shown, and a differ-ent can be selected.
Track parameters
Changes to Keyboard tracks can be saved to a Performance. Youcan then recall different settings by just selecting a single Perfor-mance.
Settings for Song tracks, like Pan, Volume and FX Sends, dependon each individual Standard MIDI File. Changes to Song tracksmade in Song Play mode cannot be saved to a Standard MIDIFile, and are only intended for realtime control.
To make permanent changes Song tracks, edit and save the Stan-dard MIDI File in Sequencer mode.
Song Play mode
Overall instrument’svolume
Balance of Songs and Pads against the Keyboard tracks
Player 1 Player 2

166 Song Play modeStandard MIDI Files and Sounds
Standard MIDI Files and Sounds
The native Song file format of Pa900 is the Standard MIDI File(SMF), an universal standard set by all manufacturers. Filenameextension is .MID, but Pa900 can also read files with the .KARextension. You can read these files with any musical instrumentor computer.
Even if the Standard MIDI File format is standard, differencesmay appear in sounds when playing the various files. If yourecorded a Song on the Pa900 in Sequencer mode using onlyGeneral MIDI sounds (i.e., those of the “GM” type), you can beconfident you can play the same Song on virtually any othermusical instrument or computer. If you used Korg nativesounds, you may not find the same sounds on instruments fromother manufacturers.
When you read Standard MIDI Files in Song Play mode, there isno problem reading files made using only General MIDI sounds.Sounds could be different when playing a Song made on a differ-ent instrument: despite the wide compatibility of Pa900 withother standards (like GS or XG), differences may arise.
Should this happen, load the Standard MIDI File in Sequencermode, then manually reassign the non-matching Sounds, replac-ing them with similar Sounds on the Pa900. Finally, save theStandard MIDI File again, and you will be able to play it in SongPlay mode with the correct Sounds.
Keyboard, Pad and Player tracks
Pa900 is equipped with a double player. Each Song can play up toa maximum of 16 Song tracks, for a total of 32 tracks. In addi-tion, you can play the keyboard with four additional Keyboardtracks (Upper 1-3 and Lower).
When the Volume panel is shown in the main page of the SongPlay mode (see illustration below), you can adjust the Volumeand Play/Mute status of these tracks, but please keep in mindthat these changes will not be saved in the Standard MIDI File.
While in Song Play mode, you can select Performances or STSs.STSs are from the latest selected Style; choose a different Style toselect a different set of STSs. You can see the name of the avail-able STSs when the STS Name panel is shown in the main pageof the Song Play mode (see illustration):
Selecting a different Style or SongBook Entry may also changethe Pads.
When entering Song Play mode from the Style Play mode, Key-board and Pad tracks remain the same they were in Style Playmode.
Keyboard tracks
STS names

167Song Play modeMain page (Normal view)
Refe
renc
e
Main page (Normal view)
Press the SONG PLAY button to access this page from anotheroperating mode.
Note: When switching from Style Play to Song Play mode, varioustrack parameters and settings may change.
To return to this page from one of the Song Play edit pages, pressthe EXIT or SONG PLAY button.
Details on individual tracks can be seen by touching the Volumetab. To switch between Keyboard tracks (Normal view) and Songtracks (Song Tracks views), use the TRACK SELECT button.Pressed a first time, you will see tracks 1-8; a second press willshow tracks 9-16; pressed again will go back to Keyboard tracks.
Page headerThis line shows the current operating mode, transposition andrecognized chord.
Operating mode name
Name of the current operating mode.
Master Transpose
Master Transpose value in semitones. This value can be changedusing the TRANSPOSE buttons on the control panel.
Note: You can also transpose MP3 files. Keep in mind, however,that transposition always remains inside the -5…+6 semitonesrange. This is enough to cover all keys, while avoiding excessiveaudio degradation. Any further transposing will be reversed to fitthe range. So, you might see a +7 transpose value (Just Fifth Up)shown in the display, but the MP3 will actually play 5 semitoneslower (Just Fourth Down).
Note: Transpose may automatically change when selecting a differ-ent Performance. It may also change when loading a StandardMIDI File generated with an instrument of the Korg Pa-Series.
To avoid transposing, “lock” the Master Transpose parameter inthe Global (see “General Controls: Lock” on page 249).
Recognized chord
This displays the recognized chord when you play a chord on thekeyboard. If no chord abbreviation is shown, it means that nochord recognition mode has been selected by using the CHORDSCAN buttons.
Page menu iconTouch the page menu icon to open the menu. See “Page menu”on page 176 for more information.
Songs areaThis is where the Song names are shown, together with parame-ters depending on the selected type of Song.
This is how a Song’s area appears when a Standard MIDI File orKaraoke file has been selected:
And this is how it appears when an MP3 File has been selected:
Ply 1/2
A different Song may be assigned to each of the two onboardplayers (Ply 1 and Ply 2). Each player has its own parameters.
Song type icon
Songs of different types can be assigned to the players. This iconshows the file type.
Standard MIDI File, often abbreviated as SMF(file extension: *.MID or *.KAR). The SMF(*.MID) is the industry standard song format,used by Pa900 as its basic Song format whenrecording a new Song. A MIDI Karaoke File(*.KAR) is an extension of the SMF format.
MPEG Layer-3 format, or MP3 (file extension:*.MP3). This is a compressed audio file, that maybe generated on any personal computer, or by thePa900 itself.
A Jukebox file (file extension: *.JBX) can beassigned to Player 1, but its name will not beshown in this area. The JBX icon will appear
Songs area Page header Page menu icon
Stylearea
Perf./STS area
Keyboard tracks area
Panels
Operating mode Master Transpose (in semitones)
Recognized chord
Song name
Meter Current measure
Song type icon
Tempo
Song name
Total time Elapsed time
Song type icon
Tempo variation

168 Song Play modeMain page (Normal view)
instead, together with the name of the currentlyselected Song, in the Jukebox list.
Note: To create or edit a Jukebox file, go to theJukebox Edit page (see page 175).
Song name
Displays the name of the Song assigned to the correspondingPlayer.
• If the Player is already selected (white background), touch theSong name to open the Song Select window.
• If the player is not selected (dark background), first select it,then touch the Song name to open the Song Select window.
When the Song Select window appears, you can select a singleSong or a Jukebox file (see “Song Select window” on page 103).
If you select another Song while a Song is playing, the previousSong will stop, and the new Song will be selected and be ready toplay.
To select a Song, you can also press the SELECT button (on thecontrol panel) corresponding to the desired Player. Press it a sec-ond time to select a Song by dialing in its ID number (see“Selecting a Song by its ID number” on page 104).
Meter
This parameter only appears when a Standard MIDI File or Kara-oke file has been selected.
Current Song’s meter (time signature).
Measure number
This parameter only appears when a Standard MIDI File or Kara-oke file has been selected.
Current measure number.
Tempo
This parameter only appears when a Standard MIDI File or Kara-oke file has been selected.
Metronome Tempo. Select this parameter and use the TEMPO+and TEMPO– buttons to change the Tempo. As an alternative,touch this parameter and drag with your finger.
Total time
This parameter only appears when an MP3 file has been selected.
Total length (in minutes:seconds) of the selected MP3 file.
Elapsed time
This parameter only appears when an MP3 file has been selected.
Elapsed time (in minutes:seconds) of the MP3 file currently inplay.
Tempo variation
This parameter only appears when an MP3 file has been selected.
Variation of the original MP3 file’s tempo, inside a range of±30% of the original tempo. When Tempo is changed, MP3 files
are smoothly accelerated or slowed down (inside a range of±30% of the original tempo). This may seem trivial, but it isreally rocket-science instead, and it is made possible by Korgsophisticated time-stretching algorithms.
Style areaCurrently selected Style. You can select a Style while playingSongs, to have it ready when switching to Style Play mode. Also,this lets you change the Pads and STSs (both are recalled byselecting a Style).
Touch the Style name to open the Style Select window. As analternative, use the buttons in the STYLE section of the controlpanel.
Performance/STS areaThis is where the Performance or STS name is shown.
Selected Performance or STS
This is the latest selected Performance or Single Touch Setting.
Touch the name to open the Performance Select window. As analternative, use the PERFORMANCE section to select a differentPerformance.
To select a different STS from the latest selected Style, use thefour STS buttons under the display.
Keyboard tracks areaThis is where Keyboard tracks are shown.
Sound name
Name of the Sound assigned to the corresponding Keyboardtrack.
• If the track is already selected (white background), touch theSound name to open the Sound Select window.
Selected Style
Selected Performance or STS
Soundname
Track name
Track’s octave transpose
Sound bank’s icon
Track status

169Song Play modeSTS Name panel
Refe
renc
e
• If the track is not selected (dark background), first select it,then touch the Sound name to open the Sound Select window.
You can also open the Sound Select window by using theSOUND SELECT button on the control panel.
For more information about the Sound Select window, see“Sound Select window” on page 101.
Keyboard track octave transpose
Non editable. Octave transpose of the corresponding track. Toindividually edit the octave transpose for each track, go to the“Mixer/Tuning: Tuning” edit page of the Song Play mode (see“Mixer/Tuning: Tuning” on page 116 for more details).
You can also transpose all Upper tracks by using the UPPEROCTAVE buttons on the control panel.
Keyboard track name
Non editable. Name of the corresponding track:
Sound bank’s icon
This icon shows the bank the current Sound belongs to.
Keyboard track status
Play/mute status of the current track. Touch this icon to changethe status.
No icon Play status. The track can be heard.
Mute status. The track cannot be heard.
PanelsThe lower half of the main page contains the various panels, youcan select by touching the corresponding tabs. See more infor-mation in the relevant sections, starting from page 169.
STS Name panel
Select this panel to see the name of the four available STSs. See“STS Name panel” on page 109 for details.
Volume panel
Touch the Volume tab to select this panel. This is where you canset the volume of each track, and mute/unmute tracks.
Changing the tracks’ volume and play/mutestatusYou can change the volume and play/mute status of each track inthe same way seen for the Style (see “Volume panel” on page 109for details).
Saving the tracks’ volume and play/mutestatusEach set of tracks can be saved into a different structure. Thisallows for a great flexibility when mixing Keyboard and Songtracks through the use of Performances, STSs and StandardMIDI Files.
• The status of Keyboard tracks can be saved to a Performanceor STS (see “Write Performance” on page 127 and “Write SingleTouch Setting” on page 127).
• The status of the Song tracks can saved as a general setting inthe Global > Mode Preferences > Song & Sequencer page (see“Save Trk & FX” on page 253).
Abbreviation Track Hand
UP1 Upper 1 Right hand
UP2 Upper 2
UP3 Upper 3
LOW Lower Left hand
Volume panel
Tabs
Virtual sliders
Track status icons

170 Song Play modePad panel
This allows for leaving the track status unchanged even whenplaying a different Standard MIDI File. You can leave, for exam-ple, the bass track in mute, and let your bassist play it live for thewhole show.
However, an exception to the above is when reading a StandardMIDI File created with a Pa-Series instrument. These files doinclude special commands to force the Play/Mute status of eachtrack.
Track namesUnder the sliders, a label for each track is shown. Use theTRACK SELECT button to switch between the Keyboard Traksand the Song Tracks 1-8 and Song Tracks 9-16 views.
Pad panel
Select this panel to see which Hit or Sequence Pads are assignedto the four Pads. See “Pad panel” on page 111 for details.
Split panel
Select this panel to adjust the split point for the Keyboard tracks.See “Split panel” on page 112 for details.
Sub-Scale panel
Select this panel to select a secondary scale for the Keyboardtracks. See “Mixer/Tuning: Sub Scale” on page 117 for details.
Jukebox panel
When a Jukebox (JBX) file is assigned to Player 1, you can usethe list shown in this panel to browse the Jukebox list, and touchthe Select button in the display to select a Song to play. This way,you can select any Song in the list as your starting Song, andmanually change the order of the Songs to play.
Note: A Jukebox file can be assigned to Player 1 only.
Note: This panel is only available after loading a Jukebox file.
Hint: To create or edit a Jukebox file, go to the Jukebox Edit page(see page 175). A quick way to create a Jukebox list is to touch the“Play All” button in the Song Select window (see page 104).
Warning: If you delete a Song included in the Jukebox list cur-rently in play, the Player will stop, and the “No Song” message willappear. At this point, you can select the JukeBox tab to open theJukebox panel, and select a different Song.
As an alternative, you can select the next Song by pressing SHIFT+ >> (FAST FORWARD) in the PLAYER section of the controlpanel, then press (PLAY/STOP) in the PLAYER sectionagain.
Abbreviation Track
UPPER1…3 Upper tracks. Volume and play/mute status memo-rized into a Performance or STS.
LOWER Lower track. Volume and play/mute status memorized into a Performance or STS.
T01…T16 Song tracks. Volume memorized into a Standard MIDI File. Play/mute status memorized as a general setting.
Song list Jukebox fileSelected Song

171Song Play modeMic panel
Refe
renc
e
Song list
Use this list to browse through the Songs in the Jukebox list. Usethe scrollbar to scroll the list.
Selected Song
Name of the Song currently in play. You can select a differentSong from the list, and touch the Select button in the display toselect it for playback.
Select button
Touch this button to select the Song highlighted in the list, andassign it to the player. If a Song is already playing, it will bestopped, and the selected Song will start playing back.
Jukebox file
Name of the selected Jukebox file. To edit this file, see “JukeboxEditor” on page 175.
Transport controls for the JukeboxWhen you select a Jukebox file, Player 1 transport controlsbehave in a slightly different way than with single Songs.
<< and >> Pressed alone, these buttons are the Rewind andFast Forward commands.
Keep the SHIFT button pressed, and pressthese buttons to scroll to the previous or nextSong in the Jukebox list.
(HOME) Returns to measure 1 of the current Song.
(PLAY/STOP)
Starts or stops the current Song. When you stopthe Song, it is stopped at the current position.Press HOME to go back to measure 1 of the cur-rent Song.
If the Jukebox panel is open, you can select theSong from which to start. See “Jukebox panel”above.
Mic panel
Touch the Mic tab to select this panel. Parameters are the sameseen for the Style Play mode (see “Mic panel” on page 113).
Edit menu
From any page, press the MENU button to open the Song Playedit menu. This menu gives access to the various Song Play editsections.
When in the menu, select an edit section, or press EXIT orSONG PLAY to exit the menu.
When in an edit page, press the EXIT or SONG PLAY button togo back to the main page of the Song Play operating mode.
Each item in this menu corresponds to an edit section. Each editsection groups various edit pages, that may be selected by touch-ing the corresponding tab on the lower part of the display.
Note: Some of the edit parameters are only meant for realtime use.As a general rule, Keyboard track parameters can be saved to aPerformance or SongBook STS, while Song track’s Play/Mute sta-tus and FX settings can be saved as a general setting in the Global> Mode Preferences > Song & Sequencer page (see “Save Trk &FX” on page 253).
Edit page structure
All edit pages share some basic elements, already described forthe Style Play mode (see “Edit page structure” on page 113 fordetails).

172 Song Play modeMixer/Tuning: Volume/Pan
Mixer/Tuning: Volume/Pan
This page lets you set the volume and pan for each of the Key-board or Song tracks.
Note: The play/mute status of a Song track may be reset whenselecting a Song created on a Pa-Series instrument.
Use the TRACK SELECT button to switch from the Keyboard tothe Song tracks, and vice versa.
Parameters
The parameters shown in this page are the same already seen forthe Style Play mode. See “Mixer/Tuning: Volume/Pan” onpage 114 for details.
Mixer/Tuning: FX Send
Pa900 is equipped with two groups of effect processors (A andB). In Song Play mode, these groups can be used to process Key-board, Pad and MIDI tracks.
• Keyboard tracks always use the effects of the FX B group.
• Pad tracks always use the effects of the FX A group.
• Standard MIDI Files and Karaoke files can only use theeffects of the FX A group.
• Standard MIDI Files created on a Pa-Series instrument (inSequencer mode) can use effects of the FX A and B groups.
Choosing and editing the effects is done in the dedicated Effectsection (see “Effects: A/B FX Configuration” on page 173).
In case you do not want to hear the direct signal, just set the Dryparameter to Off (see the “Dry” parameter above).
You can assign to the Master FXs any kind of available effects,but we suggest you assign the effects based on this scheme:
A-Master 1 Reverb processor for the Song tracks.
A-Master 2 Modulating FX processor for the Song tracks.
B-Master 1 Reverb processor for the Keyboard tracks.
B-Master 2 Modulating FX processor for the Realtime (Key-board) tracks.
Use the TRACK SELECT button to switch from Keyboard toSong tracks, and vice-versa.
Note: When you stop, then start the Song again, or select a differ-ent Song, the default Song track settings are selected again. Youcan, however, pause the Song, change the effects, then exit frompause and start the Song again. Edit the Song in Sequencer modeto permanently change the effects.
Note: Track FX setting can be saved as a general setting in theGlobal > Mode Preferences > Song & Sequencer page (see “SaveTrk & FX” on page 253). This will help adapting the Pa900’s soundto personal taste for any Standard MIDI File (excluding thosesaved by a Pa-Series instrument, that may override the generalpreferences).
Parameters
The parameters shown in this page are the same already seen forthe Style Play mode. See “Mixer/Tuning: FX Send” on page 115for details.
Mixer/Tuning: EQ Gain
In this page you can set the three-band equalization (EQ) foreach individual track.
Use the TRACK SELECT button to switch from the Keyboard tothe Song tracks, and vice-versa.
Hint: Track EQ can be saved as a general setting in the Global >Mode Preferences > Song & Sequencer page (see “Save Trk & FX”on page 253). This will help adapting the Pa900's sound to personaltaste for any Standard MIDI File you will ever play (excluding thosesaved by a Pa-Series instrument, that may override the generalpreferences). Need a lighter Bass track? Save the right equalization,and the Bass will stay light with all the subsequent Songs.
Parameters
The parameters shown in this page are the same already seen forthe Style Play mode. See “Mixer/Tuning: EQ Gain” on page 115for details.

173Song Play modeMixer/Tuning: EQ Control
Refe
renc
e
Mixer/Tuning: EQ Control
This page lets you reset or bypass track equalization, pro-grammed in the previous page.
Use the TRACK SELECT button to switch from the Keyboard tothe Song tracks, and vice-versa.
Parameters
The parameters shown in this page are the same already seen forthe Style Play mode. See “Mixer/Tuning: EQ Control” onpage 116 for details.
Mixer/Tuning: Tuning
Parameters in this page let you set various tuning settings. Allparameters in this page are the same found in Global mode. See“Mixer/Tuning: Tuning” on page 116 for details.
Parameters
The parameters shown in this page are the same already seen forthe Style Play mode. See “Mixer/Tuning: Tuning” on page 116for details.
Note: Song track values edited in this page are not saved, and areonly intended for realtime use.
Effects: A/B FX Configuration
This page allows you to select the effects for the A (Song) and B(Keyboard) FX groups. You can use the “FX A” and “FX B” sidetabs to switch from one group to the other one. (Songs created inSequencer mode on a Pa-Series instrument can also use the B FXgroup).
The effect types and the FX matrix are the same seen for theStyle Play mode (see “Effects: A/B FX Configuration” onpage 119),
Note: The default effect settings can be saved as a general setting inthe Global > Mode Preferences > Song & Sequencer page (see“Save Trk & FX” on page 253).
Note: When you stop the Song, or select a different Song, thedefault effects are selected again. You can, however, stop the Song,change the effects, then start the Song again with the new effects.Edit the Song in Sequencer mode to permanently change theeffects.
Parameters
The parameters shown in this page are the same already seen forthe Style Play mode. See “Effects: A/B FX Configuration” onpage 119 for details.
M.T. (Modulating Track)
Source track for modulating MIDI messages. You can modulatean effect parameter with a MIDI message generated by an inter-nal physical controller, or a MIDI message coming from a Songtrack.
FX group

174 Song Play modeEffects: Master 1, 2
Effects: Master 1, 2
These pages contain the editing parameters for the effect proces-sors. Here is an example of the FX A page, with the Reverb Halleffect assigned.
Parameters
The parameters shown in this page are the same already seen forthe Style Play mode. See “Effects: Master 1, 2” on page 119 fordetails.
Track Controls: Mode
These parameters let you set the Internal/External, and the Poly/Mono status of Song tracks.
Parameters
The parameters shown in this page are the same already seen forthe Style Play mode. See “Track Controls: Mode” on page 120 fordetails.
Note: These parameters can be saved as a general setting in theGlobal > Mode Preferences > Song & Sequencer page (see “SaveTrk & FX” on page 253).
Track Controls: Drum Edit
These parameters let you adjust the volume and edit the mainparameters for each percussive instrument family.
Drum Edit parameters
The parameters shown in this page are the same already seen forthe Style Play mode. See “Track Controls: Drum Edit” onpage 121 for details.
Note: Song track values edited in this page are not saved, and areonly intended for realtime use.
Track Controls: Easy Edit
These parameters let you “fine-tune” edit parameters for Soundsassigned to the tracks.
Easy Sound Edit parameters
The parameters shown in this page are the same already seen forthe Style Play mode. See “Track Controls: Easy Edit” on page 122for details.
Note: Song track values edited in this page are not saved, and areonly intended for realtime use.
Keyboard/Ensemble: Key/Velocity Range
These parameters let you select a note and velocity range for theKeyboard tracks.
Parameters
The parameters shown in this page are the same already seen forthe Style Play mode. See “Keyboard/Ensemble: Key/VelocityRange” on page 123 for details.
Keyboard/Ensemble: Ensemble
This page lets you program the Ensemble function.
Parameters
The parameters shown in this page are the same already seen forthe Style Play mode. See “Keyboard/Ensemble: Ensemble” onpage 123 for details.
Keyboard/Ensemble: Keyboard Control
These parameters let you set parameters for the Keyboard tracks.
Parameters
The parameters shown in this page are the same already seen forthe Style Play mode. See “Keyboard/Ensemble: Keyboard Con-trol” on page 124 for details.
Pad/Switch: Pad
This page lets you select a different hit sound or sequence foreach of the four PAD buttons.
Parameters
The parameters shown in this page are the same already seen forthe Style Play mode. See “Pad/Switch: Pad” on page 125 fordetails.
Selected effect
FX parameters
FX group

175Song Play modePad/Switch: Assignable Switch
Refe
renc
e
Pad/Switch: Assignable Switch
This page lets you select a different function for each of theASSIGNABLE SWITCH buttons.
Parameters
The parameters shown in this page are the same already seen forthe Style Play mode. See “Pad/Switch: Switch” on page 125 fordetails.
Jukebox Editor
The Jukebox function lets you play a list of Songs (127 max), atthe touch of a button. You can play a Jukebox file by assigning itto Player 1, after having selected it in the Song Select page, just asif it was an ordinary Song (see “Jukebox panel” on page 170).
In this page you can create, edit and save a Jukebox file. A Juke-box list can contain Standard MIDI Files, Karaoke™ files, andMP3 files.
If a Jukebox file is already selected, you will enter this page withthat file ready to be edited. Otherwise, you will enter this pagewith an empty list.
To create a new Jukebox file, touch Del All to remove all Songsfrom the current list. Add new Songs, then touch Save and entera different name before confirming. A new Jukebox file will besaved to the storage device.
Move Up/Down
Use these button to move the selected item up or down in thelist.
Add
Adds a Song at the end of the current list. You can add up to 127Songs to a list. When this button is pressed, a standard file selec-tor opens up in the display.
Note: A Jukebox list can include only Songs contained in the samefolder.
Hint: Instead of a single Song, you can select a Jukebox file, andadd its whole content to the current Jukebox list.
Insert
Inserts a Song at the current position (i.e., between the selecteditem and the preceding one). All subsequent Songs are moved tothe next higher-numbered slot. You can add up to 127 Songs to alist.
Note: A Jukebox list can include only Songs contained in the samefolder.
Hint: Instead of a single Song, you can select a Jukebox file, andinsert its whole content to the current Jukebox list.
Delete
This command lets you delete the selected Song from the list.
Del All
Select this command to delete the whole Jukebox list.
Save
Touch this button to save the Jukebox file. The Save Jukebox Filedialog box appears, allowing you to edit the name and save yourfile.
Touch the (Text Edit) button to open the Text Edit window,and edit the name.
If you are editing an existing list, and do not change its name, theold file is overwritten. If you change it, a new file will be createdin the storage device.
If you are saving a new list, the “NEWNAME.JBX” name is auto-matically assigned, and you can edit it.
Note: You can save your “.JBX” file only in the same folder as theSong files included in the list.

176 Song Play modePage menu
Page menu
Touch the page menu icon to open the menu. Touch a commandto select it. Touch anywhere in the display to close the menuwithout selecting a command.
Write Performance
Select this command to open the Write Performance dialog box,and save most of the current control panel settings to a Perfor-mance.
See “Write Performance dialog box” on page 128 for more infor-mation.
Save Song Marker Ply.1/2
Select this command to save the markers created in the corre-sponding Player (see “Markers page” on page 307).
Export Jukebox List
Only available when a Jukebox list is selected. Select this com-mand to save the current Jukebox list as a text file to a storagedevice. Here is how it works.
1. While a Jukebox file is assigned to the player, select theExport Jukebox List command from the page menu.
2. A dialog box will appear, asking you to select either theinternal disk or a storage device connected to one of theUSB Host ports.
3. Select an option, and touch OK to confirm.
Note: When saved, the text file will be named after the selectedJukebox file. For example, a Jukebox file named “Dummy.jbx” willgenerate a “Dummy.txt” file. A new, unnamed Jukebox file willgenerate a “New_name.txt” file. If a file with the same namealready exists on the target device, it will be overwritten withoutwaiting for any confirmation.
The list will include the progressive number assigned to each Song,the file names, the total number of files in the list.
For the correct display and printing of the list on a personal com-puter, use a fixed size (i.e., non-proportional) character in yourtext editor.
Solo Track
Select the track of the current Player to be soloed, and check thisitem. You will hear only the selected track, and the ‘Solo’ warningwill flash on the page header.
Uncheck this item to exit the Solo function.
The Solo functions works in a slightly different way, dependingon the selected track:
• Keyboard track: The selected Keyboard track is the only trackyou can hear when playing on the keyboard. All other Keyboardtracks are muted. Song tracks are left in play status.
• Song track: The selected track is the only Song track you canhear. All other Song tracks are muted. Keyboard tracks are left inplay status.
Keep the SHIFT button pressed and touch one of thetracks to solo it. Do the same on a soloed track to deactivate theSolo function.
Copy/Paste FX
Use this command to copy a single effect, or both effects of anFX group (A or B). See “Copy/Paste FX” on page 127 for detailedinstructions.
Easy Mode
Easy Mode allows you to use the Style Play and Song Play modeswith an easier-to-use user interface. It is recommended to begin-ners, and to professionals alike that do not want to deal with theextra parameters of the Advanced mode.
At any time, you can manually turn the Easy Mode on/off withthe Easy Mode command in the page menu of the Style Play andSong Play modes.

177Sequencer modeTransport controls
Refe
renc
e
The Sequencer operating mode is the full-featured onboardsequencer, where you can create a Song from scratch, or edit it.You can also use this mode to edit the initial parameters of aStandard MIDI File, either made with an external sequencer orwith Pa900’s own sequencer.
You can save the new or edited Song as a Standard MIDI File(SMF, i.e., a file with the “.MID” extension), and play it backeither in Song Play or Sequencer mode – or on any externalsequencer.
Transport controls
To play back a Song, use the PLAYER 1 transport controls (i.e.,the one on the left side of the PLAYER area). While in Sequencermode, Player 2 controls are deactivated.
Standard MIDI Files and MP3
The Songs and the Standard MIDI File formatThe native Song format for Pa900 is the Standard MIDI File(“.MID” file).
When saving a Song as a SMF, a setup measure is automaticallyinserted at the beginning of the Song. This measure containsvarious Song initialization parameters.
When an SMF is loaded, the setup measure is automaticallyremoved.
Sequencer mode and the MP3While in Sequencer mode, you cannot load nor record MP3files. This mode only allows for editing of the Standard MIDIFiles.
Songs and Voice Processor Presets
You can use the Voice Processor while in Sequencer mode. Forthis, just two settings are needed:
• Select the Song track where you are recording chords forthe Voice Processor (see “Song Control” on page 266).
• Select the desired Voice Processor Preset.
Sequencer Play - Main page
Press the SEQUENCER button to access this page from anotheroperating mode. In this page you can load a Song, and play itback using the PLAYER 1 transport controls.
Note: When switching from Style Play to Sequencer mode, theSequencer Setup is automatically selected, and various trackparameters may change.
To return to this page from any of the Sequencer edit pages,press the EXIT or SEQUENCER button.
To switch between Song tracks 1-8 and 9-16, use the TRACKSELECT button.
Page headerThis line shows the current operating mode and transposition.
Operating mode name
Name of the current operating mode.
Master Transpose
Master transpose value in semitones. This value can be changedusing the TRANSPOSE buttons on the control panel.
Note: Transpose may be automatically changed when loading aStandard MIDI File generated with an instrument of the Korg Pa-Series.
Page menu iconTouch the page menu icon to open the menu. See “Page menu”on page 198 for more information.
Sequencer mode
Song area Page header Page menu icon
Selectedtrack info
area
Soundsarea
Track volume/status area
Operating mode Master Transpose (in semitones)

178 Sequencer modeSequencer Play - Main page
Song areaThis is where the Song name is shown, together with its tempoand meter (time signature) parameters, and the current measure.
Song name
Displays the name of the selected Song. “NEWSONG” meansthat a new (blank) Song is selected, and you can record it.
Touch the Song name to make the Song Select window appear,allowing for selection of a different Song (see “Song Select win-dow” on page 103).
To select a Song, you can also press the SELECT button in thePLAYER 1 section of the control panel. Press SELECT a secondtime to select a Song by dialing in its ID number (see “Selecting aSong by its ID number” on page 104).
Note: Only Standard MIDI Files can be loaded. MP3 files cannotbe loaded in Sequencer mode.
Meter
Current meter (time signature).
Measure number
Current measure number.
Tempo
Metronome Tempo. Select this parameter and use the TEMPObuttons to change Tempo. As an alternative, when a differentparameter is selected, or you are in a different page, keep theSHIFT button pressed and use the DIAL to change Tempo forthe sequencer.
Start from
When checked, the measure shown by this parameter is a tem-porary start point of the song, instead of measure 1. When youpress the (HOME) button, or use the << (REWIND) buttonto go back to the beginning, the Song returns to this point.
Tempo (Tempo mode)
Use this menu to select the Tempo change mode.
Manual In this mode, you can change Tempo by using theTEMPO buttons. The Song will be played backusing the manually selected tempo.
Auto Tempo recorded in the Song will be used.
Selected track info areaThis line lets you see the Sound assigned to the selected track.Not only it is shown on the main page, but also in several editpages.
Track name
Name of the selected track.
Sound name
Sound assigned to the selected track. Touch anywhere in thisarea to open the Sound Select window, and select a differentSound.
Sound bank
Bank the selected Sound belongs to.
Program Change
Program Change number sequence (Bank Select MSB, BankSelect LSB, Program Change).
Sounds areaThis area lets you see Sounds and octave transposition for theeight tracks currently displayed.
Song track octave transpose
Non editable. Octave transpose of the corresponding track. Toedit the octave transpose, go to the “Mixer/Tuning: Tuning” editpage (see page 116 for programming information).
Sound bank’s icon
This picture illustrates the bank the current Sound belongs to.Touch an icon a first time to select the corresponding track(detailed information are shown on the Selected Track Info area,see above). Touch it a second time to open the Sound Select win-dow.
Song name TempoMeasure number
Beat counter
Track name
Sound name
Sound bank
Program Change sequence
Song track octave transpose icon
Sound bank’s icon

179Sequencer modeEntering Record mode
Refe
renc
e
Track volume/status areaThis area is where you can set the volume of each Song track,and mute/unmute tracks.
Volume and virtual sliders
Drag the sliders to adjust the volume of the correspondingtracks. You can also change the volume by touching a slider andusing the VALUE DIAL.
Use the TRACK SELECT button to switch between Song Tracks1-8 and Song Tracks 9-16,
Track status icon
Play/mute status of the current track. Select the track, then touchthis area to change the track status. The status of Song tracks issaved when saving the Song.
Play status. The track can be heard.
Mute status. The track cannot be heard.
Track names
Under the sliders, a label for each track is shown. Use theTRACK SELECT button to switch between tracks 1-8 and 9-16.
Entering Record mode
To enter Record mode, press the RECORD button while you arein Sequencer mode. The following dialog box will appear:
Select one of the three available recording options and touch OK(or Cancel if you don’t want to enter Record mode).
Multitrack Sequencer
Full-featured sequencer. Select this option forclassic multitrack recording. (See “Record mode:Multitrack Sequencer page” on page 180).
Backing Sequence (Quick Record)
Easy way of recording. Just play with Styles, andrecord your realtime performance.
Step Backing Sequence
Step-record. Edit chords and controls for theStyle. Very useful if you are not a keyboard player.
Abbreviation Track
T01…T16 Song tracks. Volume memorized into a Standard MIDI File. Play/mute status memorized into the Standard MIDI File as well, and can be read in Song Play mode.
Virtual sliders

180 Sequencer modeRecord mode: Multitrack Sequencer page
Record mode: Multitrack Sequencer page
While in Sequencer mode, press the RECORD button and selectthe “Multitrack Sequencer” option. The Multitrack Sequencerpage appears.
See “Multitrack recording procedure” on page 181 for informa-tion on the record procedure.
Page headerSee “Page header” on page 177.
Page menu iconSee “Page menu icon” on page 177.
Page sub-headerThis area shows some performing info on the Song.
Song name
Name of the Song in record.
Free memory %
Percentage of remaining memory available for recording.
Beat counter
This indicator shows the current beat inside the current mea-sure.
Measure number
Current measure you are recording.
Recording parameters area
Rec mode (Recording mode)
Set this parameter before starting record, to select a recordingmode.
Overdub The newly recorded events will be mixed to anyexisting events.
Overwrite The newly recorded events will replace any exist-ing events.
Auto Punch Recording will automatically begin at the “Start”position, and stop at the “End” position.
Note: The Auto Punch function will not work onan empty Song. At least one track must already berecorded.
PedalPunch Recording will begin when pressing a pedal set tothe “Punch In/Out” function, and will finishwhen pressing the same pedal again.
Note: The Pedal Punch function will not work on anempty Song. At least one track must already be recorded.
Start from
When checked, the measure shown by this parameter is a tem-porary start point of the song, instead of measure 1. When youpress the (PLAY/STOP) button to stop recording, or usethe << (REWIND) button to go back to the beginning, the Songreturns to this point.
Resolution
Use this parameter to set the quantization during recording.Quantization is a way of correcting timing errors; notes playedtoo soon or too late are moved to the nearest axis of a rhythmic“grid”, set with this parameter, thus playing perfectly in time.
High No quantization applied.
(1/32)… (1/8)
Grid resolution, in musical values. For example,when you select 1/16, all notes are moved to thenearest 1/16 division. When you select 1/8, allnotes are moved to the nearest 1/8 division.
Start/End
Start and End locators. These parameters area available onlywhen the “Auto Punch” recording mode is selected. They set thestarting and ending points of the Punch recording.
Tempo
Select this parameter, and use the TEMPO controls to set theTempo value.
Meter
This is the basic meter (or time signature) of the Song. You canedit this parameter only when the Song is empty, i.e., before youbegin recording anything. To insert a meter change in the mid-dle of the Song, use the “Insert Measure” function (seepage 196).
Page header Page menu icon
Selectedtrack
info area
Soundsarea
Tracks volume/status area
Recording parameters area
Page sub-header
Song name Beat counter Measure numberFree memory %
No quantiza-tion
1/16
1/8

181Sequencer modeRecord mode: Multitrack Sequencer page
Refe
renc
e
Tempo (Tempo mode)
This parameter sets the way tempo events are read or recorded.
Manual Manual reading. The latest manual Tempo setting(made using the TEMPO buttons) is consideredthe current Tempo value. No Tempo changeevents will be recorded. This is very useful whenyou want to record the Song at a much slowerspeed than the actual Tempo.
Auto Auto reading. The Sequencer plays back allrecorded Tempo events. No Tempo change eventsare recorded.
Record All Tempo changes made during recording willbe recorded to the Master Track.
Note: Tempo is always recorded in overwrite mode(old data is replaced by the new data).
Selected track info areaThis line lets you see the Sound assigned to the selected track.See “Selected track info area” on page 178 for more information.
Sounds areaThis area lets you see Sounds and octave transposition for theeight tracks currently displayed. See “Sounds area” on page 178for more information.
Track volume/status areaThis area is where you can set the volume of each Song track,and change track status. See “Track volume/status area” onpage 179.
Track status icons
Play/mute/record status of the current track. Select the track,then touch this area to change its status.
Play status. The track can be heard.
Mute status. The track cannot be heard.
Record status. After pressing (PLAY/STOP) to start recording, the track will receivenotes from the keyboard and the MIDI IN orUSB Device connector.
Multitrack recording procedureHere is the general procedure to follow for the MultitrackRecording.
1. Press the SEQUENCER button to enter Sequence mode.
2. Press the RECORD button, and select the “MultitrackSequencer” option to enter the Multitrack Record mode.Now you can prepare your recording parameters. (Formore details, see “Record mode: Multitrack Sequencerpage” on page 180).
3. Be sure the Overdub or Overwrite recording options isselected (see “Rec mode (Recording mode)” on page 180).
4. Set the Tempo. There are two ways of changing Tempo:
• Use the TEMPO buttons to change the tempo
• Touch the “Tempo” parameter, and use the VALUE DIALto change Tempo.
5. Use the TRACK SELECT button to switch between SongTracks 1-8 and Song Tracks 9-16, and assign the desiredSound to each track (see “Sound bank’s icon” on page 178).
6. Select the track to be recorded. Its status icon will automat-ically change to Record (see “Track status icons” onpage 181).
7. If this is a second-pass recording, use the “Start from”parameter to enter a measure where you want to startrecording.
8. Press the METRO button to turn the metronome on, andstart practicing.
9. Press (PLAY/STOP) to start recording. After a 1-barprecount, the recording actually begins. After the precount,play freely.
• If you selected the Auto Punch recording mode, therecording will begin only when reaching the Start point.
• If you selected the Pedal Punch recording mode, press thepedal when you want to begin recording. Press it again tofinish recording.
Note: The Punch functions will not work on an empty Song.At least one track must already be recorded.
10. When finished recording, press (PLAY/STOP) tostop the sequencer. Select a different track, and go onrecording the whole Song.
11. When finished recording the new Song, either press theRECORD button, or select the “Exit from Record” com-mand from the page menu (see page 199).
Warning: Save the Song to a storage device, to avoid losing itwhen the instrument enters standby.
Note: When exiting the Record mode, the Octave Transposeis automatically reset to “0”.
12. If you wish, edit the new Song, by pressing the MENU but-ton, and selecting the various edit pages.

182 Sequencer modeRecord mode: Step Record page
Record mode: Step Record page
The Step Record allows you to create a new Song by entering sin-gle notes or chords to each track. This is very useful when tran-scribing an existing score, or needing a higher grade of detail,and is particularly suitable to create drum and percussion tracks.
To access this page, select the “Overdub Step Recording” or“Overwrite Step Recording” command from the page menu.
In Overdub Step Recording mode you will add to existingevents, while in Overwrite Step Recording mode you will over-write all existing events.
See “Step Record procedure” below, for information on therecord procedure.
Page headerThis line shows the current operating mode.
Page sub-header
Track
Name of the selected track in record.
Tr01…Tr16 Song track.
Pos (Position)
This is the position of the event (note, rest or chord) to beinserted.
Step Time area
Step Time
Length of the event to be inserted.
… Note value.
Standard (–) Standard value of the selected note.
Dot (.) Augments the selected note length by one half ofits value.
Triplet (3) Triplet value of the selected note.
Note parameter area
Meter
Meter (Time Signature) of the current measure. This parametercannot be edited. You can set a Meter change by using the Insertfunction of the Edit menu, and inserting a new series of mea-sures with a different Meter (see “Song Edit: Cut/Insert Mea-sures” on page 196).
Free Memory
Available memory for recording.
Duration
Relative duration of the inserted note. The percentage is alwaysreferred to the step value.
50% Staccato.
85% Ordinary articulation.
100% Legato.
Velocity
Set this parameter before entering a note or chord. This will bethe playing strength (i.e., velocity value) of the event to beinserted.
Kbd Keyboard. You can select this parameter, by turn-ing the VALUE DIAL all counter-clockwise.When this option is selected, the playing strengthof the played note is recognized and recorded.
1…127 Velocity value. The event will be inserted withthis velocity value, and the actual playingstrength of the note played on the keyboard willbe ignored.
Event list area
List of inserted events
Previously inserted events. You may delete the last of theseevents, and make it ready for a new event, by touching the Backbutton in the display.
Position Position where the event has been inserted. Thevalue is shown in the “measure.beat.tick” format.
Note/RX Noise
Name of the inserted Note or RX Noise. Whenentering a chord, a series of dots is shown afterthe name of the root note.
Vel. Velocity of the inserted event.
Dur.% Percentage duration of the inserted event.
Buttons
Rest
Touch this button to insert a rest.
Tie
Touch this button to tie the note to be inserted to the previousone. A note with the same pitch, and the specified length, will becreated, and tied to the previous one.
Page header Note parameters
Steptime
Buttons
Page sub-header
Event list

183Sequencer modeRecord mode: Step Record page
Refe
renc
e
Back
Goes to the previous step, erasing the inserted event.
Next M. (Next Measure)
Goes to the next measure, and fills the remaining space withrests.
Done
Exits the Step Record mode.
Step Record procedureHere is the general procedure to follow for the Step Recording.
1. Press the SEQUENCER button to enter Sequencer mode.
2. Press the RECORD button, and select the “MultitrackSequencer” option to enter the Multitrack Record mode.From the page menu, select the “Overdub Step Recording”or “Overwrite Step Recording” mode. At this point, theStep Record window will appear in the display.
3. The next event will be entered at the position shown by thePos indicator in the upper right corner of the display.
• If you don’t want to insert a note at this position, insert arest instead, as shown in step 5.
• To jump to the next measure, filling the remaining beatswith rests, touch the Next M. button in the display.
4. To change the step value, use the Step Time parameters.
5. Insert a note, rest or chord at the current position.
• To insert a single note, just play it on the keyboard. Theinserted note length will match the step length. You maychange the velocity and relative duration of the note, byediting the Velocity and Duration parameters. See “Veloc-ity” and “Duration” on page 182.
• To insert a rest, just touch the Rest button in the display.Its length will match the step value.
• To tie the note to be inserted to the previous one, touchthe Tie button in the display. A note will be inserted, tied tothe previous one, with exactly the same pitch. You don’tneed to play it on the keyboard again.
• To insert a chord or a second voice, see “Chords and sec-ond voices in Step Record mode” on page 183.
6. After inserting a new event, you may go back by touchingthe Back button in the display. This will delete the previ-ously inserted event, and set the step in edit again.
7. When finished recording, touch the Done button in thedisplay. A dialog box appears, asking you to either cancel,discard or save the changes.
If you touch Cancel, exit is canceled, and you can continueediting. If you choose No, changes are not saved, and theStep Record window is closed. If you choose Yes, changesare saved, and the Step Record window is closed.
8. From the main page of the Multitrack Recording mode,either select the “Exit from Record” command from thepage menu, or press the RECORD button to exit the Recordmode.
9. While in the main page of the Sequencer mode, you maypress the (PLAY/STOP) button in the PLAYER 1 sec-tion to listen to the Song, or select the Save Song commandfrom the page menu to save the Song to a storage device(see “Save Song window” on page 199).
Chords and second voices in Step RecordmodeYou are not obliged to insert single notes in a track. There areseveral ways to insert chords and double voices. Lets look atsome.
Entering a chord. Simply play a chord instead of a single note.The event name will be the first note of the chord you pressed,followed by the “…” abbreviation.
Entering a chord made of notes with different velocity values.You can make the upper or lower note of a chord, for example,louder than the remaining ones, to let the most important stand out from the chord. Here is how to insert a three-note chord:
1. Edit the first note’s Velocity value.
2. Press the first note and keep it pressed.
3. Edit the second note’s Velocity value.
4. Press the second note and keep it pressed.
5. Edit the third note’s Velocity value.
6. Press the third note, then release all notes.
Entering a second voice. You can insert passages where onenote is kept pressed, while another voice moves freely.
Ex. 1:
Step Time =
Step Time =
On
Press E and C
On
Press G
Off
Off
Release G and C
Release E (continue holding C)

184 Sequencer modeRecord mode: Backing Sequence (Quick Record) page
Ex.2:
Ex.3:
Record mode: Backing Sequence (QuickRecord) page
Backing Sequence (Quick Record) mode allows you to quicklyrecord your live performance with the backing of the Styles. Tomake things easier, just two grouped tracks are provided: Kbd/Pad (Keyboard and Pads) to record keyboard and pads, and Ch/Acc (Chords/Accompaniment) to record chords and the accom-paniment provided by the Style.
While in Sequencer mode, press the RECORD button and selectthe “Backing Sequence (Quick Record)” option. The BackingSequence (Quick Record) page appears.
See “Backing Sequence (Quick Record) recording procedure” onpage 186 for information on the record procedure.
Page headerSee “Page header” on page 177. Here, this line also shows therecognized chord.
Page menu iconSee “Page menu icon” on page 177.
Page sub-headerSee “Page sub-header” on page 180.
Recording parameters area
Style
This parameter shows the selected Style. Either touch it, or pressthe STYLE button in the SELECTION section to open the StyleSelect window and select a different Style (see “Style Select win-dow” on page 100).
Free memory
Percentage of remaining memory for recording.
Step Time = Step Time = Step Time =
Press F and C Press G
(continue holding C)
OffOn OnRelease F
(continue holding C)
Step Time = Step Time =
Press E
(continue holding C)
OffOnRelease E and C
Step Time = Step Time =
Press D
(continue holding C)
Off OnRelease G
(continue holding C)
Step Time =
OffRelease D
(continue holding C)
Step Time = Step Time =
On
Press C
On
Press G (continue holding C)
Off
Release G and C
Tie
Page header Page menu icon
Selectedtrack
info area
B.S.grouped
tracksarea
Track volume/status area
Recording parameters area
Page sub-header

185Sequencer modeRecord mode: Backing Sequence (Quick Record) page
Refe
renc
e
Resolution
Use this parameter to set the quantization during recording.Quantization is a way of correcting timing errors; notes playedtoo soon or too late are moved to the nearest axis of a rhythmic“grid”, set with this parameter, thus playing perfectly in time.
High No quantization applied.
(1/32)… (1/8)
Grid resolution, in musical values. For example,when you select 1/8, all notes are moved to thenearest 1/8 division. When you select 1/4, allnotes are moved to the nearest 1/4 division.
Chord/Acc Track, Kbd/Pad Track
These parameters let you define grouped track status duringrecording. This status is reflected by the big status indicatorabove the track sliders.
Play The Backing Sequence track is set to play. If thereare recorded data, they will be heard whilerecording the other Backing Sequence track.
Mute The Backing Sequence track is muted. If thistracks has already been recorded, it will not beheard during recording of the other BackingSequence track.
Rec The Backing Sequence track is in record. All pre-viously recorded data will be deleted. After press-ing (PLAY/STOP) to start recording, thetrack will receive notes from the keyboard, theMIDI IN or the USB Device connector.
Chord/Acc: This Backing Sequence track groups all Style tracks,together with recognized chords and Style controls and StyleElements selection. After finishing recording, they will be savedas Song tracks 9-16, as in the following table:.
Kbd/Pad: This Backing Sequence track includes the four Key-board tracks and the four Pads. After finishing recording, theywill be saved as Song tracks 1-8, as in the following table:
Tempo
Metronome Tempo. Select this parameter and use the VALUEDIAL to change Tempo. You can always change Tempo using theTEMPO buttons.
Meter
(Non Editable). This parameter shows the meter (or time signa-ture) of the selected Style for reference.
PERF or STS (Performance or STS)
This parameter shows the selected Performance or STS (depend-ing on the latest item selected).
To select a Performance, either touch it, or press one of the PER-FORMANCE buttons to open the Performance Select windowand select a different Performance (see “Performance Select win-dow” on page 102).
To select an STS (Single Touch Setting), use the four STS buttonsunder the display.
Backing Sequence tracks area
Backing Sequence tracks status indicators
These giant indicators show the status of the Backing Sequencetracks. They reflect the status of the Kbd/Pad and Ch/Accparameters (see “Chord/Acc Track, Kbd/Pad Track” above).
Selected track info areaThis line lets you see the Sound assigned to the selected track.See “Selected track info area” on page 178 for more information.
Track volume/status areaThis area is where you can set the volume of each single Key-board track, and mute/unmute tracks.
Sliders (track volume)
Graphical display of each track’s volume.
Chord/Acc track Song track/Channel
Bass 9
Drum 10
Percussion 11
Accompaniment 1 12
Accompaniment 2 13
Accompaniment 3 14
Accompaniment 4 15
Accompaniment 5 16
High (noquantization)
1/16
1/8
Kbd/Pad track Song track/Channel
Upper 1 1
Upper 2 2
Upper 3 3
Lower 4
Pad 1 5
Pad 2 6
Pad 3 7
Pad 4 8

186 Sequencer modeRecord mode: Backing Sequence (Quick Record) page
Individual track status icons
While you can use the Kbd/Pad Backing Sequence track tochange the status of all Keyboard tracks at once, you can alsochange the status of each separate track. Touch this icon tochange the status of the corresponding individual track.
Play status. The track can be heard.
Mute status. The track cannot be heard.
Track names
Under the sliders, a label for each track is shown.
Backing Sequence (Quick Record) recordingprocedureHere is the general procedure to follow for the Backing Sequence(Quick) Recording.
1. Press the SEQUENCER button to enter the Song mode.
2. Press the RECORD button, and select the “BackingSequence (Quick Record)” option to enter the BackingSequence (Quick Record) mode. Now you can prepare yourrecording parameters. (For more details, see “Recordmode: Backing Sequence (Quick Record) page” onpage 184).
3. The latest selected Style is currently selected. If it is not theright one, select a different Style to start recording with.(See “Style Select window” on page 100).
4. The latest selected Performance or STS is currentlyselected. If you prefer, select a different Performance orSTS. (See “Performance Select window” on page 102, and“STS Select” on page 103).
5. Select the status of the Backing Sequence tracks, by usingthe Kbd/Pad and Ch/Acc parameters. (Kbd/Pad stays forKeyboard and Pads; Ch/Acc stays for Chord and Accompa-niment, i.e. the Style tracks). To record all you play on thekeyboard, plus the automatic accompaniment, leave theirstatus to Rec (see “Track status icons” on page 181).
Warning: Tracks set to REC are automatically overwrittenwhen starting recording. Set a track to the PLAY or MUTEstatus, when you don’t want to delete it. For example, if youare recording a keyboard part on an existing Style track, setthe Ch/Acc parameter to PLAY, and the Kbd/Pad track toREC.
6. Start recording by pressing the left (PLAY/STOP)button (or the START/STOP button, if you want the Styleto start immediately).
• By pressing the left (PLAY/STOP) button (or theSTART/STOP button), you can record a keyboard introwith no Style playing. After a count-in, start recording.
Play a solo intro, then start the auto-accompaniment bypressing the START/STOP button.
• By pressing the START/STOP button you can start theStyle right at the beginning of the Song.
Since you can use any Style control, you could start with theusual combinations (INTRO, ENDING…).
Note: While in Backing Sequence mode, you can’t record theSYNCHRO, TAP TEMPO/RESET, MANUAL BASS, BAL-ANCE controls.
7. Play your music. While recording you can even change theStyle, or stop it by pressing START/STOP or one of theENDINGs. While recording you can even start the styleagain, by pressing START/STOP.
8. When finished recording your performance, press the (PLAY/STOP) button in the PLAYER 1 section. You
will go back to the Sequencer Play Main page (see“Sequencer Play - Main page” on page 177).
At this point, you may press the (PLAY/STOP) but-ton in the PLAYER 1 section to listen to the new Song.
You may also edit the Song by pressing the MENU button(see “Edit menu” on page 189).
9. Save the song to a storage device (see “Save Song window”on page 199).
Warning: The recorded Song will be deleted when the instru-ment enters standby, switching to the Style Play or Song Playmode, or entering Record again. If you wish to preserve it,save the Song to a storage device.
Abbreviation Track
MIC/IN Microphone audio input
UPPER1…3 Upper tracks.
LOWER Lower track.

187Sequencer modeRecord mode: Step Backing Sequence page
Refe
renc
e
Record mode: Step Backing Sequence page
The Step Backing Sequence mode allows you to enter singlechords, to create or edit the Style (Chord/Acc) part of a Song.This mode lets you enter chords even if you are not a keyboardplayer, or fix any error made playing chords or selecting Stylecontrols, during a Backing Sequence (Quick Record) recording.
In this mode, you can only edit Songs created using the BackingSequence (Quick Record) recording mode. When saving a Songcreated using the Backing Sequence (Quick Record) recordingmode, all Chord/Acc data is preserved, and can be loaded later,to be edited again by using the Step Backing Sequence mode.
While in Sequencer mode, press the RECORD button and selectthe “Step Backing Sequence” option. The Step Backing Sequencewindow appears.
See “Step Backing Sequence procedure” on page 189 for infor-mation on the record procedure.
Page menu iconTouch the page menu icon to open the menu. See “Step BackingSequence page menu” on page 188 for more information.
Parameters area
Side arrow ( )
The small arrow next to a parameter means that its value is effec-tive at the current position. For example, if you are at the“003.01.000” position, and an arrow lights up next to the Chordparameter, this means that a chord change happens at the“003.01.000” position.
Measure
This parameter shows the current position of the Step Editor. Togo to a different position within the Song, use one of the follow-ing systems:
• Select this parameter, then use the VALUE DIAL to go to adifferent measure.
• Use the Measure buttons in the display to move to a differ-ent measure. Use the Step buttons in the display to move insteps of 1/8 (192 ticks). Use the Event buttons in the displayto jump to the next event.
The locator value is shown in the “measure.beat.tick” format.
Measure Measure or bar number.
Beat Divider in the Time Signature ratio (e.g., a quar-ter in a 3/4 time).
Tick Smallest position value. Both Pa900 internal play-ers feature a resolution of 384 ticks per quarter.
Style
This is the latest selected Style. To insert a Style change at thecurrent position, touch the Style name to open the Style Selectwindow, or follow the standard selecting procedure using theSTYLE SELECT buttons.
Note: Any Style Change inserted after the beginning of the mea-sure (i.e., to a position other than Mxxx.01.000) will be effective atthe following measure. For example, if a Style Change event hasbeen inserted at M004.03.000, the selected Style will be effectivelyselected at M005.01.000. (This works exactly as in Style Playmode).
Note: When inserting a Style Change, you may also insert aTempo Change at the same position. A Style Change will not auto-matically insert the Style’s Tempo.
Performance
This is the latest selected Performance. Select a Performance torecall the Style it links to. To insert a Performance change at thecurrent position, touch the Performance name to open the Per-formance Select window, or follow the standard selecting proce-dure using the PERFORMANCE section.
Note: The STYLE CHANGE LED is automatically turned onwhen entering the Chord/Acc Step Mode. This means that selectinga Performance automatically selects the Style memorized in thePerformance.
The STS MODE and STS buttons are automatically disabled,meaning that you can’t change Keyboard tracks while in Chord/Acc Step Mode.
Tempo
This is the Tempo Change parameter. To insert a Tempo Changeevent at the current position, select this parameter and use theVALUE DIAL to change its value.
Chord
The chord parameter is divided in four separate parts:
Select one of the parts, then use the VALUE DIAL to modify it.As an alternative, you can play a chord, and it will be automati-cally recognized. While recognizing a chord, the status of theBass Inversion parameter will be considered.
The lack of a chord (--) means that the accompaniment will notplay at the current position (apart for the Drum and Percussiontracks). To select the “--” option, select the Name part of theChord parameter, then use VALUE DIAL to select the very lastvalue (C…B, Off).
Parameters area“Soft” transport buttons
Page menu icon
Name Type Extension

188 Sequencer modeRecord mode: Step Backing Sequence page
Note: If you replace a chord with a different one, please rememberthat the Lower track (if recorded) will not be automaticallychanged, and may cause a dissonance against the accompaniment.
Style Element
This is the Style Element (i.e., a Variation, Fill, Intro, or Ending).The length of the selected Style Element is always shown by the“Length” parameter (see below).
“Off ” means that the accompaniment will not play at theselected position – only Keyboard and Pad tracks will play.
Hint: Insert a Style Element Off event exactly where the automaticaccompaniment must stop (at the end of the Song).
Length
This parameter will let you know where to place the followingStyle Element Change. For example, if you inserted an Introevent lasting for 4 measures, you can insert 4 empty measureafter this event, and a Variation event at the end of the Intro,beginning at the 4th empty measure.
Del (Delete) button
When a side arrow ( ) is shown next to a parameter, there is anevent at the current position. You can touch the Del button nextto it, to delete the event at the current position.
Hint: To delete all events starting from the current position, selectthe “Delete All from Selected” command from the page menu (seebelow).
“Soft” transport buttons
Previous or Next Event
Use these buttons to move to the previous or next recordedevent.
Previous or Next Step
Use these buttons to go to the previous or next step (1/8, or 192ticks). If an event is located before the previous or next step, thelocator stops on that event. For example, if you are positioned onM001.01.000, and no event exists before M001.01.192, the > but-ton moves to the M001.01.192 location. If an event exists onM001.01.010, the > button stops to the M001.01.010 location.
These commands are effective even if the Measure parameter isnot selected.
Previous or Next Measure
Use these buttons to move to the previous or following measure.These commands are effective even if the Measure parameter isnot selected.
Done button
Done
Touch this button to exit the Step Backing Sequence mode. Allchanges will be saved to memory.
Hint: Save the Song to a storage device, by selecting the “SaveSong” command from the page menu, to avoid losing it when theinstrument enters standby.
Step Backing Sequence page menuTouch the page menu icon to open the menu. Touch a commandto select it. Touch anywhere in the display to close the menuwithout selecting a command.
Insert Measure
Use this command to insert an empty measure starting from thecurrent measure. All Chord/Acc events contained in the currentmeasure will be moved to the following measure. The event atthe Mxxx.01.000 position (i.e., exactly at the beginning of themeasure, like a Time Signature or Style change) will not bemoved.
Cut Measure
Use this command to delete the current measure. All Chord/Accevent contained in the following measures will be moved onemeasure back.
Delete All from Selected
Use this command to delete events of all types, starting from thecurrent position.
Note: All events on the very first tick (M001.01.000), like Perf,Style, Tempo, Chord, Style Element selection, cannot be deleted.
Delete All Styles/Perfs from SelectedDelete All Styles Elements from SelectedDelete All Chords from SelectedDelete All Tempos from Selected
Select one of these commands to delete all events of the corre-sponding type, starting from the current position to the end ofthe Song. To delete all events of the same type from the wholeSong, go back to the M001.01.000 position, and select one ofthese commands.
Note: All events on the very first tick (M001.01.000), like Perf,Style, Tempo, Chord, Style Element selection, cannot be deleted.

189Sequencer modeEdit menu
Refe
renc
e
Step Backing Sequence procedureHere is the general Step Backing Sequence recording procedure.
Hint: Before entering Step Backing Sequence mode to edit an exist-ing Song, select the “Save Song” command from the page menu,and save the Song to a storage device. This way, you will have acopy of the Song, in case you don’t like the results of your editing.
1. While in Sequencer mode, press the RECORD button, andchoose the “Step Backing Sequence” recording option.
2. Select the Measure parameter, and go to the desired posi-tion in the Song, by using the VALUE DIAL. Alternatively,you can move the locator using the “soft” transport buttonsin the display. See ““Soft” transport buttons” on page 188.
3. Select the parameter type (Style, Performance, Tempo…) toinsert, edit or delete at the current position. If an arrow ( )appears next to a parameter, the shown event has beeninserted at the current position.
4. Use the VALUE DIAL to modify the selected event. Deleteit by touching the Del button next to the event. When edit-ing a parameter without the arrow ( ) next to it, a newevent is inserted at the current position.
5. Exit the Step Backing Sequence recording mode, by touch-ing the Done button in the display.
6. Press (PLAY/STOP) in the PLAYER 1 section to lis-ten to the result of your editing. If it is fine, save the Song toa storage device.
Edit menu
From any page, press the MENU button to open the Sequencer editmenu. This menu gives access to the various Sequencer edit sections.
When in the menu, select an edit section, or press EXIT to exitthe menu.
When in an edit page, press EXIT or the SEQUENCER button togo back to the main page of the Sequencer operating mode.
Each item in this menu corresponds to an edit section. Each editsection groups various edit pages, that may be selected by touch-ing the corresponding tab on the lower part of the display.
Edit page structure
All edit pages share some basic elements.
Operating mode
This indicates that the instrument is in Sequencer mode.
Edit section
This identifies the current edit section, corresponding to one ofthe items of the edit menu (see “Edit menu” on page 189).
Page menu icon
Touch this icon to open the page menu (see “Page menu” onpage 198).
Parameters area
Each page contains various parameters. Use the tabs to selectone of the pages. For detailed information on the various typesof parameters, see sections starting below.
Operating mode Edit section
Selected track info
Page menuicon
Param-eters area
Tabs

190 Sequencer modeMixer/Tuning: Volume/Pan
Tabs
Use tabs to select one of the edit pages of the current edit section.
Mixer/Tuning: Volume/Pan
This page lets you set the volume and pan for each Song track.
Use the TRACK SELECT button to switch between Song tracks1-8 and 9-16.
Parameters
All parameters in this page are the same found in the same pageof the Song Play mode (see “Mixer/Tuning: Volume/Pan” onpage 172).
Mixer/Tuning: FX Send
This page lets you set the level of the track’s direct (uneffected)signal going to the Internal FX processors.
Use the TRACK SELECT button to switch between Song tracks1-8 and 9-16, and vice-versa.
FX Groups
Use this pop-up menu to select one of the two FX groups (A orB).
Pa900 includes two groups of effects (FX A and FX B). While inSong Play mode, the A group is reserved to the Song and Padtracks, the B group to the Keyboard tracks.
However, Songs created in Sequencer mode could also assign theB group to the Song tracks.
Parameters
All parameters in this page are the same found in the same pageof the Style Play mode (see “Mixer/Tuning: FX Send” onpage 172).
Mixer/Tuning: EQ Gain
In this page you can set the three-band equalization (EQ) foreach individual track.
Use the TRACK SELECT button to switch between Song tracks1-8 and 9-16, and vice-versa.
Parameters
All parameters in this page are the same found in the same pageof the Song Play mode (see “Mixer/Tuning: EQ Gain” onpage 172).
Mixer/Tuning: EQ Control
This page lets you reset or bypass track equalization, pro-grammed in the previous page.
Use the TRACK SELECT button to switch between Song tracks1-8 and 9-16, and vice-versa.
Parameters
All parameters in this page are the same found in the same pageof the Song Play mode (see “Mixer/Tuning: EQ Control” onpage 173).

191Sequencer modeMixer/Tuning: Tuning
Refe
renc
e
Mixer/Tuning: Tuning
Parameters
All parameters in this page are the same found in Global mode.See “Mixer/Tuning: Tuning” on page 116).
Mixer/Tuning: Sub Scale
This page lets you program an alternative scale for the selectedtracks (via the “Track Assign” parameter). The remaining tracks(if any) use the basic scale set in Global mode (see “Main Scale”on page 257).
Note: Quarter Tone selection and activation of the Sub-Scale oneach track of a Song, can be received by MIDI (i.e., by an externalsequencer or controller). Conversely, selection of Quarter Tone set-tings, or activation of the Sub-Scale on each track of the Song, canbe sent by the Pa900 to an external MIDI recorder as SystemExclusive data.
Parameters
All parameters in this page are the same found in Global mode.See “Mixer/Tuning: Sub Scale” on page 117.
Track Assign
Check the parameter corresponding to each track where theSub-Scale must be used.
Play/Mute icon
Track’s play/mute status.
Play status. The track can be heard.
Mute status. The track cannot be heard.
Effects: A/B FX Configuration
This page allows you to select the effects for the A (Song) and B(Keyboard) FX groups. You can use the “FX A” and “FX B” sidetabs to switch from one group to the other one. Songs created inSequencer mode on a Pa-Series instrument can also use the B FXgroup.
The effect types and the FX matrix are the same seen for theStyle Play mode (see “Effects: A/B FX Configuration” onpage 119).
Note: When you stop the Song, or select a different Song, thedefault effects are selected again. You can, however, stop the Song,change the effects, then start the Song again. Save the Song to per-manently change the effects.
FX Group
Use these side tabs to choose the FX group (A or B) for the cor-responding track.
Pa900 includes two groups of effects (FX A and FX B). While inSong Play mode, the A group is reserved to the Song and Padtracks, the B group to the Realtime (Keyboard) tracks.
However, Songs created in Sequencer mode could also assign theB group to the Song tracks.
Parameters
All parameters in this page are the same found in the same pageof the Song Play mode (see “Effects: A/B FX Configuration” onpage 173).

192 Sequencer modeEffects: Master 1, 2
Effects: Master 1, 2
These pages contain the editing parameters for the effect proces-sors. Here is an example of the FX A page, with the Reverb Halleffect assigned.
Selected effect
Select one of the available effects from this pop-up menu. This isequivalent to the “FX Group” parameters found in the “Effects:A/B FX Configuration” page (see above).
Parameters
The parameters shown in this page are the same already seen forthe Style Play mode. See “Effects: Master 1, 2” on page 119 fordetails.
Track Controls: Mode
Parameter
See “Track Controls: Mode” on page 120.
Track Controls: Drum Edit
Parameter
See “Track Controls: Drum Edit” on page 121.
Track Controls: Easy Edit
Parameter
See “Track Controls: Easy Edit” on page 122.
Event Edit: Event Edit
The Event Edit is the page where you can edit each single MIDIevent of the selected track. You can, for example, replace a notewith a different one, or change its playing strength. See also“Event Edit procedure” on page 193 for more information on theevent editing procedure.
Position
Position of the event, expressed in the form ‘aaa.bb.ccc’:
• ‘aaa’ is the measure
• ‘bb’ is the beat
• ‘ccc’ is the tick (each quarter beat = 384 ticks)
You can edit this parameter to move the event to a different posi-tion. You can edit a position in either of the following ways:
(a) select the parameter, and use the VALUE DIAL to changethe value, or
(b) select the parameter, then touch it again; the numeric key-pad will appear. Enter the new position by dialing in thethree parts of the number, separated by a dot. Zeroes at thebeginning can be omitted, as well as the least importantparts of the number. For example, to enter position002.02.193, dial “2.2.193”; to enter position 002.04.000 dial“2.4”; to enter position 002.01.000, simply dial “2”.
Type
Type of the event shown in the display. To edit it, select the param-eter and use the VALUE DIAL to change its value.
This parameter also shows the (non editable) “End Of Track”marking, when the end of the track is reached.
Value 1 and 2
Values of the event shown in the display. Depending on theselected event, the meaning may change.
Here are the events contained in ordinary tracks (1-16).
Type First value Second value
Note Note name Velocity
RX Noise Note name Velocity
Prog Program Change number –
Ctrl Control Change number Control Change value
Bend Bending value –
Aftt Mono (Channel) Aftertouch value –
PAft Note to which the Aftertouch is applied
Poly Aftertouch value
Scrollbar

193Sequencer modeEvent Edit: Event Edit
Refe
renc
e
And here are the events contained in the Master track.
To edit the event Type and Values, select the parameter and usethe VALUE DIAL to change their value. In case of numeric val-ues, you can also press them twice to open the numeric keypad.
Length
Length of the selected Note event. The value format is the sameas the Position value. Edit it in the same way.
Note: If you change a length of “000.00.000” to a different value,you can’t go back to the original value. This rather uncommonzero-length value may be found in the drum and percussion tracksof Songs made in Backing Sequence mode.
Track
Use this pop-up menu to select the track to edit.
Track 1…16 One of the ordinary tracks of the Song. Thesetracks contains musical data, like notes and con-trollers.
Master This is a special track, containing Tempochanges, Meter changes, Scale and Transposedata, and the effect parameters.
Scrollbar
Use the scrollbar to browse the event through the list. You canalso scroll by using the SHIFT + DIAL combination.
Go/Catch
This is a dual-function command.
• While the sequencer is not running, it works as a Go to Mea-sure command. Touch it to open the Go to Measure dialog box:
When in this dialog box, select a target measure, and touch OK.The first event available in the target measure will be selected.
• While the sequencer is running, it works as a Catch Locatorcommand. Touch it to show the event that is currently playing.
Insert
Touch the Insert button in the display to insert a new event at thecurrent shown Position. The default values are Type = Note,Pitch = C4, Velocity = 100, Length = 192.
Note: You can’t insert new events in an empty, non-recorded Song.To insert an event, you must first insert some empty measures byusing the Insert Measure function (see “Song Edit: Cut/Insert Mea-sures” on page 196).
Delete
Touch the Delete button in the display to delete the eventselected in the display.
Note: The “End of Track” event cannot be deleted.
Event Edit procedureHere is the general event editing procedure.
1. While in the Event Edit page, press (PLAY/STOP) inthe PLAYER 1 section to listen to the Song. Press it again tostop the Song.
2. Select the Filter page, and turn “Off ” the filter for the eventtypes you wish to see in the display (see “Event Edit: Filter”on page 194 for more information).
3. Return to the Event Edit page.
4. Use the “Track” pop-up menu to select the track to edit.The list of events contained in the selected track will appearin the display.
For more information on the event types and their values, seeabove.
5. Select the “Position” parameter. Use the VALUE DIAL (ortouch the parameter again to open the numeric keypad) tochange the event’s position.
6. Select the “Type” parameter and use the VALUE DIAL tochange the event type. Select the “Value 1 and 2” parame-ters and use the VALUE DIAL (or touch the parameteragain to open the numeric keypad) to modify the selectedvalue.
Type First value Second value
Tempo Tempo change –
Volume Master Volume value –
Meter Meter (time signature)
change(*)
(*). Meter changes can’t be edited or inserted separately from a measure. To inserta Meter change, use the Insert function in the Edit section and insert a series ofmeasures with the new meter. Existing data can then be copied or entered to thesemeasures
–
KeySign Key Signature(†)
(†). This is the key signature shown in the Score. If this event is missing, the Scorewill be shown as if it was in the key of C Major.
–
Scale One of the available preset Scales
Root note for the selected Scale
UScale (User Scale) Altered note Note alteration(‡)
(‡). To edit User Scale and Quarter Tone settings, select the first value, then selectthe scale’s degree to edit. Edit the second value to change the tuning of the selectednote of the scale.
QT (Quarter Tone) Altered note Note alteration (0,
50)(b)
QT Clear (Quarter Tone Clearing)
Reset of all Quarter Tone (QT) changes
–

194 Sequencer modeEvent Edit: Filter
7. In the case of a Note event, select the Length parameter,and use the VALUE DIAL (or touch the parameter again toopen the numeric keypad) to change the event’s length.
• While the sequencer is not running, you may touch theGo/Catch button in the display to go to a different measure(see “Go/Catch” above)
• While the sequencer is running, you may use the Go/Catch button in the display to see the currently playingevent in the display (see “Go/Catch” above).
• Use the PLAYER 1 transport controls to listen to theSong.
8. Touch the Insert button in the display to insert an event atthe Position shown in the display (a Note event with defaultvalues will be inserted). Touch the Delete button in the dis-play to delete the selected event.
9. When the editing is complete, you may select a differenttrack (go to step 4).
10. When finished editing the whole Song, select the Save Songcommand from the page menu to save the Song to a storagedevice. See “Save Song window” on page 199 for moreinformation on saving a Song.
Event Edit: Filter
This page is where you can select the event types to be shown inthe Event Edit page.
Turn On the filter for all event types you do not wish to see inthe Event Edit page.
Note/RX Noise
Notes and RX Noises.
Program Program Change events.
Control Control Change events.
Tempo/Meter Tempo and Meter (time signature) changes (Mas-ter Track only).
After Touch Mono (Channel) Aftertouch events.
Poly After Touch
Poly Aftertouch events.
Pitch Bend Pitch Bend events.
Pa Controls Controls exclusive to Pa900, like the Scale set-tings. These controls are recorded to the MasterTrack, and saved as System Exclusive data.
Song Edit: Quantize
The quantize function corrects any rhythm error after recording.
After setting the various parameters, touch Execute to start theoperation.
Track
Use this parameter to select a track.
All Quantize will apply to all tracks.
Track 1…16 Quantize will apply only to the selected track.
Resolution
This parameter sets the quantization value. For example, whenyou select a 1/8-note, all notes are moved to the nearest 1/8 divi-sion. When you select 1/4, all notes are moved to the nearest 1/4division.
(1/32)… (1/4)
Grid resolution, in musical values. A “b…f ” char-acter added after the value means swing-quanti-zation. A “3” means triplet.
Start / End Tick
Use these parameters to set the starting and ending points of therange to be quantized.
If you wish to select a four-measure sequence starting at thebeginning of the Song, the Start will be positioned at 1.01.000,and the End at 5.01.000.
No quantiza-tion
1/8
1/4

195Sequencer modeSong Edit: Transpose
Refe
renc
e
Bottom / Top Note
Use these parameters to set the bottom and top note of the key-board range to quantize. If you select the same note as the Bot-tom and Top parameters, you can select a single percussiveinstrument in a Drum track.
Note: These parameters are available only when a Drum track isselected.
Song Edit: Transpose
Here you can transpose the Song, a track or a part of a track.
After setting the various parameters, touch Execute to start theoperation.
Track
Use this parameter to select a track.
All All tracks selected (apart for Drum tracks).
Track 1…16 Selected track.
Value
Transpose value (±127 semitones).
Start / End Tick
Use these parameters to set the starting and ending points of therange to transpose.
If you wish to select a four-measure sequence starting at thebeginning of the Song, the Start will be positioned at 1.01.000,and the End at 5.01.000.
Bottom / Top Note
Use these parameters to set the bottom and top of the keyboardrange to transpose. If you select the same note as the Bottom andTop parameters, you can select a single note, or a single percus-sive instrument in a Drum track.
Song Edit: Velocity
Here you can change the Velocity value for the notes. AnAdvanced mode is available, allowing you to select a velocitycurve for the selected range. This is useful to create fade-ins orfade-outs.
After setting the various parameters, touch Execute to start theoperation.
Track
Use this parameter to select a track.
All All tracks selected.
Track 1…16 Selected track.
Value
Velocity change value.
Start / End Tick
Use these parameters to set the starting and ending points of therange to edit.
If you wish to select a four-measure sequence starting at thebeginning of the Song, the Start will be positioned at 1.01.000,and the End at 5.01.000.
Bottom / Top Note
Use these parameters to set the bottom and top of the keyboardrange to edit. If you select the same note as the Bottom and Topparameters, you can select a single percussive instrument in aDrum track.
Advanced
When this checkbox is checked, the “Intensity”, “Curve”, “StartVelocity Value” and “End Velocity Value” parameters can beedited.
Intensity
(Only available in Advanced mode). Use this parameter to specifythe degree to which the velocity data will be adjusted toward thecurve you specify in “Curve”.
0…100% Intensity value. With a setting of 0 [%], the veloc-ity will not change. With a setting of 100 [%], thevelocity will be changed the most.

196 Sequencer modeSong Edit: Cut/Insert Measures
Curve
(Only available in Advanced mode). Use this parameter to selectone of the six curves, and to specify how the velocity will changeover time.
Start / End Vel. Value
(Only available in Advanced mode). Velocity change at the start-ing and ending ticks of the selected range.
0…100 Velocity change in percentage.
Song Edit: Cut/Insert Measures
In this page you can cut or insert measures from the Song.
After selecting the Start and Length parameters, touch Executeto start the operation.
After the Cut, the following measures are moved back, to fill thecut measures.
After the Insert, the following measures are pushed forward toaccommodate the inserted measures.
Start
First measure where to begin cutting/inserting.
Length
Number of measures to be cut/inserted.
Meter
Meter (time signature) of the measures to be inserted.
Song Edit: Delete
This page is where you can delete MIDI events from the Song.
After setting the various parameters, touch Execute to start theoperation.
Track
Use this parameter to select a track.
All All tracks selected.
Track 1…16 Selected track.
Master Master track. This is where the Tempo, Scale andEffect events are recorded.
Event
Type of MIDI event to delete.
All All events. Measures will not be removed fromthe Song, and will remain empty.
Note All notes in the selected range.
Dup.Note All duplicate notes. When two notes with thesame pitch are encountered on the same tick, theone with the lowest velocity is deleted.
After Touch After Touch events.
Pitch Bend Pitch Bend events.
Prog.Change Program Change events, excluding the bundledControl Change #00 (Bank Select MSB) and #32(Bank Select LSB).
Ctl.Change All Control Change events, for example BankSelect, Modulation, Damper, Soft Pedal…
CC00/32…CC127Single Control Change events. Double ControlChange numbers (like 00/32) are MSB/LSB bun-dles.
Start / End Tick
Use these parameters to set the starting and ending points of therange to edit.
If you wish to select a four-measure sequence starting at thebeginning of the Song, the Start will be positioned at 1.01.000,and the End at 5.01.000.
Bottom / Top Note
Use these parameters to set the bottom and top of the keyboardrange to delete. If you select the same note as the Bottom and
StartValue
Curve 1
Velocity
Start Value = 0%, End Value = 100%
127
1EndValue
StartValue
Curve 2
Velocity
127
1EndValue
StartValue
Curve 3
Velocity
127
1EndValue
StartValue
Curve 4
Velocity
127
1EndValue
StartValue
Curve 5
Velocity
127
1EndValue
StartValue
Curve 6
Velocity RANDOM
127
1EndValue

197Sequencer modeSong Edit: Copy
Refe
renc
e
Top parameters, you can select a single note, or a single percus-sive instrument in a Drum track.
Note: These parameters are available only when the All or Noteoptions are selected.
Song Edit: Copy
Here you can copy tracks or phrases.
After setting the various parameters, touch Execute to start theoperation.
Note: If you copy too many events on the same “tick”, the “Toomany events!” message appears, and the copy operation is aborted.
Mode
Use this parameter to select the Copy mode.
Merge Copied data are merged with the data at the tar-get position.
Overwrite Copied data replace all data at the target position.
Warning: Deleted data cannot be recovered!
From Track… To Track
Use these parameters to select the source and target track tocopy.
All All tracks. The target track cannot be selected.
Track 1…16 Selected source and target tracks.
Start Measure… End Measure
These parameters are the starting and ending measure to copy.For example, if From Measure=1 and To Measure=4, the firstfour measures are copied.
To Measure
This parameter is the first of the target measures.
Repeat Times
Number of times the copy must be executed. Copies will be con-secutive.
Song Edit: Move
Here you can shift a track forward or backward by just a fewticks or whole measures.
After setting the various parameters, touch Execute to completethe operation.
Track
Use these parameters to select the track you want to move.
Track 1…16 Selected track.
Start / End Tick
These parameters set the starting and ending point of the rangeto move.
To Tick
This parameter allows you to set the target starting point of themoved track.
Song Edit: RX Convert
You can use the RX Convert page to convert notes of the midifileinto RX Noises, and vice-versa. This will help programmingSongs on an external sequencer.
After having chosen a track to convert, touch Execute to com-plete the operation.
Track
Use these parameters to select the track containing the notes orRX Noises you want to convert.
RX Note Velocity
Use this parameter to adjust the volume level of the RX Noises inthe selected track(s).

198 Sequencer modePage menu
Add RX Noises to Guitar track
Use this parameter to automatically analyze the Standard MIDIFile, and add RX Noises to Guitar tracks. This command scans asingle track or the whole Standard MIDI File, looking for guitarstrumming played by nylon, steel or electric guitars.
After scanning, a suitable Guitar sound will be automaticallyassigned to the relevant tracks, and RX Noises automaticallyadded where needed.
Convert RX Noises to MIDI Notes
Use this parameter to convert the RX Noises contained in theselected track to ordinary MIDI Notes.
Convert MIDI Notes to RX Noises
Use this parameter to convert all the relevant MIDI Notes in theselected track to RX Noises.
Page menu
Touch the page menu icon to open the menu. Touch a commandto select it. Touch anywhere in the display to close the menuwithout selecting a command.
Load Song
Select this command to open the Song Select window, and load aSong to the sequencer. (See “Song Select window” on page 199).
Save Song
Select this command to save the new or edited Song to a storagedevice as a Standard MIDI File. The file is automatically addedthe “.MID” extension. After selecting this command, the SaveSong page appears (see “Save Song window” on page 199).
Warning: Turning the instrument off will delete the Song frommemory. Save your Song to a storage device to avoid losing it.
Warning: The Song is also lost when switching from Sequencer toStyle Play or Song Play mode, without previously saving the Songto a storage device.
Undo
When selecting this command, the latest operation is canceled,and data are reverted to the previous situation.
Overdub Step Recording
Only available in Record mode. Select this command to enterOverdub Step Record mode. This recording mode lets you enterevents one at a time, adding events to the existing events. (See“Record mode: Step Record page” on page 182).
Overwrite Step Recording
Only available in Record mode. Select this command to enterOverwrite Step Record mode. This recording mode lets youenter events one at a time, overwriting all existing events. (See“Record mode: Step Record page” on page 182).

199Sequencer modeSong Select window
Refe
renc
e
Delete Song
Select this command to delete the Song and create a new, blankSong.
Delete Current Track
Select this command to delete the track currently selected in theTrack area (see “Track volume/status area” on page 181).
Solo Track
Select the track to be soloed, and check this item. You will hearonly the selected track, and the ‘Solo’ warning will flash on thepage header.
Uncheck this item to exit the Solo function.
Keep the SHIFT button pressed and touch one of thetracks to solo it. Do the same on a soloed track to deactivate theSolo function.
Copy/Paste FX
Use this command to copy a single effect, or both effects of anFX group (A or B). See “Copy/Paste FX” on page 127 for detailedinstructions.
Exit from Record
Only available in Record mode. Select this command to exit theRecord mode, and go back to the Main page of the SequencerPlay mode (see “Sequencer Play - Main page” on page 177).
Song Select window
This window appears when you select the “Load Song” com-mand from the page menu, or press the SELECT button in thePLAYER 1 section of the control panel. See “Song Select win-dow” on page 103 for details.
Save Song window
The recorded Song is lost when the instrument enters standby.The Song is also lost when you overwrite it in Record mode,or if you confirm the warning message when switching to theStyle Play or Song Play mode. You must save to a storage deviceany Song you wish to preserve.
This window appears when you select the “Save Song” commandfrom the page menu.
Press EXIT to cancel saving and go back to the main page of theSequencer operating mode.
Song path
This line shows the path of the location where you are saving theSong.
Directory
This is the list of the selected device’s content.
Detailed information about this type of page can be read in“Song Select window” on page 103.
Storage device
Use this menu to select one of the available storage devices.
The actual name (label) of the device appears within squarebrackets ([]).
Open
Opens the selected folder (item whose icon looks like this: ).
Close
Closes the current folder, returning to the parent (“upper”)folder.
Device Type
DISK Internal memory
SD Optional device inserted in the microSD slot
USB Optional device connected to the USB Host port
Songpath
Directory
Storage device
Type of thefile or folder
File status
File or folder name
File size
Modification date

200 Sequencer modeSave Song window
Locate
Touch this button to see the Song assigned to the Sequencer.This is useful to quickly locate it, after you have browsedthrough long directories and “dug” into different folders.
Save
Touch this button to open the Save Song dialog box, and save theSong to the current directory.
• If no file has been selected in the display, prior to touchingSave, the “NewSong” default name will be automatically assignedto the Song.
Note: If a file is selected, just touch the storage device name todeselect it.
• If a file has been selected in the display, prior to touching Save,the name of the selected file will be automatically assigned to theSong.
In any of the above situations, touch the (Text Edit) buttonto edit the Song name.
Warning: If a file with the same name is already in the currentdirectory, a message will warn you. If you confirm, the existing filewill be overwritten. Select a file before saving only if you want tooverwrite it (i.e., in case you are saving changes to an existing file).
Empty measure at the beginning of the Stan-dard MIDI FileWhen saving a Song as a Standard MIDI File, an empty measureis automatically inserted to the beginning of the Song. This mea-sure contains various Song initialization parameters.
Play/Mute status saved with the SongWhen saving a Song, the Play/Mute status is saved with theSong. This status is preserved also when playing back the sameSong in Song Play mode.
Master Transpose saved with the SongWhen saving a Song, the Master Transpose value is saved withthe Song. Since this value is saved as System Exclusive data, it ispreserved also when playing back the Song in Song Play mode.
Hint: Since the Master Transpose is a global parameter, loading aSong with a non-standard transposition may result in unwantedtransposing when loading other Songs that do not contain theirown transposition data. To transpose a Song it is advisable to usethe Transpose function in the Edit section of the Sequencer mode(see “Song Edit: Transpose” on page 195).
You may also lock the Master Transpose, to avoid unwanted trans-position. See “General Controls: Lock” on page 249 of the Globalchapter.
As a general rule, you should use the Master Transpose (TRANS-POSE buttons on the control panel) when you need to transposeKeyboard tracks together with the Song. You should use the Editmode Transpose function (see “Song Edit: Transpose” on page 195)when only the Song has to be transposed.
Note: The Master Transpose value is always shown on the pageheader:
Save Song procedure1. If you are in Record mode, stop the sequencer and exit
from the Record mode. Then go back to the main page ofthe Sequencer Play mode (see “Sequencer Play - Mainpage” on page 177).
2. Select the Save Song command from the page menu. TheSave Song page appears.
3. Select the folder where you want to save the Song into. Usethe Open and Close commands to browse open or closefolders. Use the scrollbar to browse through the files.
4. When you are in the directory where you want to save yourSong to, touch the Save button in the display.
• To overwrite an existing file, select it before touchingSave.
• To create a new file, do not select any file before touchingSave. The “NewSong” (“NEWSONG.MID” on a storagedevice) name will be automatically assigned to the Song.
5. After touching the Save button, the Save Song dialog boxwill appear.
6. If you like, touch the (Text Edit) button to edit thename.
7. Touch OK to confirm saving, or Cancel to stop the Saveoperation.

201Sound modeThe MIDI channel
Refe
renc
e
The Sound operating mode is where you can listen to individualSounds, and edit them. In this mode, the selected Sound canalways be played across the full keyboard range.
Details on how to select a Sound are included in the “Selectingelements” chapter (see “Sound Select window” on page 101).
While in a different operating mode, you can easily select theSound to be edited when switching to the Sound mode. Justselect the track the Sound to be edited is assigned to, then keepthe SHIFT button pressed while pressing the SOUND button.
Hint: This is also useful to see the Bank Select/Program Changenumbers when programming a Song on an external sequencer.
The MIDI channel
In Sound mode, Pa900 receives and transmits on the same chan-nel of the Upper 1 track. If the Global channel is assigned, notescan also be received on this channel. See “MIDI: MIDI In Chan-nels” on page 260 and “MIDI: MIDI Out Channels” on page 261for more information.
How to select oscillators
While in an edit page requiring an oscillator to be selectedfor editing, use the vertical row of buttons on the right(1…24 max) to select one of the available oscillators. Thenumber of available oscillators depends on the “OscillatorsCount” parameter (see page 205).
If you cannot see the desired oscillator, touch the scrollarrow, until the hidden oscillator is shown in the display.
When oscillators cannot be select, since the parametercontained in the current page are global and valid for thewhole Sound, these buttons are greyed out, and cannot beselected.
Sounds, Drum Kits, Digital Drawbars
Pa900 features three different types of Sounds:
• Ordinary Sounds. These are normal instrument Sounds,like pianos, strings, basses.
• Drum Kits. These are drum and percussion kits, whereeach note of the keyboard is a different percussive instru-ment. You can find Drum Kits in the Drum & SFX andUser Dk banks.
• Digital Drawbars. These are Sounds with a very complexstructure, and a special usage, whose settings are saved intoa Performance. See “Digital Drawbars page” on page 203for more information.
Before pressing MENU to access the edit pages, you shouldselect a Sound of the type you wish to edit or create.
Note: Notes pointing to special Drum Kit features are marked bythe icon.
Main page
Here is the main page of the Sound operating mode.
Page headerThis line shows the current operating mode and transposition.
Operating mode name
Name of the current operating mode.
Master transpose
Master transpose value in semitones. This value can be changedusing the TRANSPOSE buttons on the control panel.
Page menu iconTouch the page menu icon to open the menu. See “Page menu”on page 227 for more information.
Sound Info areaThis is where basic details for the Sound are shown. Touch any-where in this area to open the Sound Select window.
Sound name
Name of the Sound assigned to the corresponding Keyboardtrack.
Bank
Bank the current Sound belongs to.
Sound mode
Page header Page menu icon
RealtimeControls
area
FX area Voice Assign Mode area
Sound Info
area
Operating mode Master Transpose (in semitones)

202 Sound modeMain page
Bank Select / Program Change sequence
Bank Select MSB / Bank Select LSB / Program Change numbers,in the form “CC00.CC32.PC”.
CC00 This section shows the value of the ControlChange (CC) 00 message (or Bank Select MSB)for the selected Sound.
CC32 This section shows the value of the ControlChange (CC) 32 message (a.k.a. Bank Select LSB)for the selected Sound.
PC This section shows the value of the ProgramChange (PC) message for the selected Sound.Values are in the standard 0-127 MIDI number-ing format.
Note: Some manufacturers could use the 1-128numbering system; when connecting your Pa900 toan instrument of this kind, increment the PC valueby 1 unit.
Octave Transpose icon
Octave transpose value. Use the UPPER OCTAVE buttons tochange this value.
Realtime Controls areaControls in this area allow you to edit the main parameters of theSounds assigned to each track. Touch one of them, and modifyits value by using the VALUE DIAL controls (or moving yourfinger).
Note: All values refer to the original values of the Sound.
Note: When selecting the Write Sound command from the pagemenu, current parameter values, after editing the Realtime Con-trols, are saved with the Sound. After saving, Realtime Controls areset back to the default position.
Note: After selecting a different Sound, Realtime Control valuesare automatically set to zero.
Attack Attack time. This is the time during which thesound goes from zero (at the moment when youstrike a key) to it’s maximum level.
Decay Decay time. Time to go from the final Attack levelto the beginning of the Sustain.
Release Release time. This is the time during which thesound goes from the sustaining phase, to zero.The Release is triggered by releasing a key.
Cutoff Filter cutoff. This sets the sound brightness.
LFO Depth Intensity of the Vibrato (LFO).
LFO Speed Speed of the Vibrato (LFO).
LFO Delay Delay time before the Vibrato (LFO) begins, afterthe sound starts.
Resonance Use the Filter Resonance to boost the cutoff fre-quency.
Voice Assign Mode
Poly
The Sound will play polyphonically, allowing you play chords.
Mono
The Sound will play monophonically, producing only one note ata time.
Legato
This parameter is available when the Mono option is selected.
Note: If “Legato” is On, certain multisamples or keyboard locationsmay produce an incorrect pitch.
On Legato is on. When multiple note-on’s occur, thefirst note-on will retrigger the sound, and the sec-ond and subsequent note-on’s will not retrigger.
When legato is on, multiple note-on’s will notretrigger the voice. If one note is already on andanother note is turned on, the first voice will con-tinue sounding. The oscillator sound, envelope,and LFO will not be reset, and only the pitch ofthe oscillator will be updated. This setting iseffective for wind instrument sounds and analogsynth-type sounds.
Off Legato is off. Notes will always be retriggeredwhen note-on occurs.
When legato is off, multiple note-on’s will retriggerthe voice at each note-on. The oscillator sound,envelope, and LFO will be reset (and retriggered)according to the settings of the Sound.
Hold
Use this parameter to keep the notes sustained even after releas-ing the keys.
Note: Please remember the Hold must be On before playing thenote to be held.
FX AreaIn Sound mode, two Master effect processors (MFX1 and MFX2)are available.
On/Off
Use this button to turn on or off the corresponding effect.
Selected Effect
Non editable. This shows the effect assigned to the correspond-ing FX processor. To select a different effect, see “Effects: “B” FXConfig” on page 226.
Send
Use this knob to adjust the level of the dry sound sent to the cor-responding effect.
Amount
Volume of the effect that is added to the dry (non-effected) sig-nal.

203Sound modeDigital Drawbars page
Refe
renc
e
Digital Drawbars page
DIGITAL DRAWBARS are different from ordinary Sounds.Their parameters are not saved as a new Sound, but can be savedto a Performance. Therefore, when entering the Digital Draw-bars page, the MENU button is disabled.
Note: In Style Play and Backing Sequence mode, only a DigitalDrawbar Sound is available for the Keyboard tracks, and one forthe Style tracks. Save them to a Performance (see “Write Perfor-mance dialog box” on page 128).
Note: In Song Play mode, there is a Digital Drawbars Sound forthe Keyboard tracks, one for Song tracks 1-8, another one for Songtracks 9-16.
Note: In Sequencer mode there is a Digital Drawbars Sound forSong tracks 1-8, one for Song tracks 9-16.
When you select the special DRAWBARS Sound in the OrganSound bank, the Drawbars Setting page appears, and the currentsetting is assigned to the selected track.
To edit the Drawbars, drag the virtual sliders in the display. Asan alternative, touch a slider and drag it on the display, or use theVALUE DIAL controls to change its value.
Each foot refers to the pipe length in a pipe organ, in which thesound is produced by pipes of different length. Longer pipesmean a lower sound; therefore, the 16’ drawbar produces thelowest pitched sound, while the 1’ drawbar produces the highestpitched sound.
Percussion/Rotary tabPercussion adds a percussive sound to the attack segment of theorgan sound. Rotary adds the effect of a rotating speaker.
On/Off
Use this parameter to turn percussion on or off.
Foot
Use this parameter to select a percussion register.
4’ Percussion added to the 4’ foot.
22/3’ Percussion added to the 22/3’ foot.
Mode (Percussion Mode)
This parameters lets you decide if the percussion sound has to betriggered on the first note of a group of held notes, or to all notes.
All The percussive attack is played on all notes of achord.
1st The percussive attack is played only on the firstnote of a chord or a group of held notes. Releaseall notes to trigger the percussion again.
Volume (Percussion Volume)
Level of the percussive sound.
0…99 Level.
Length (Percussion Length)
Decay speed of the percussive sound.
0…99 Decay time.
Rotor On/Brake
Touch this button to start or stop the rotating speaker.
Speed Slow/Fast
Touch this button to switch the rotating speaker’s speed (fromslow to fast, or vice-versa).
Note: The “Rotor On/Brake” and “Speed Slow/Fast” parametersare only available when a Rotary effect has been assigned to one ofthe FX slots (effects #63 or #133).
Tone/Noise tabTone is the timbre of the sound. Noises are mechanical noisesfrom the keyboard and the tonewheels.
Wave (Drawbar Wave)
Tone
Waveshape of the drawbars, producing the base timbre.
Mellow A mellow-sounding synthetic wave.
Hard A harder-sounding synthetic wave.
Leakage
Leakage from adjacent tonewheels, making the sound richer.
Key On
Noise of the keypress.
Key Off
Noise of the key release.

204 Sound modeEdit menu
Edit menu
From any page, press the MENU button to open the Sound editmenu. This menu gives access to the various Sound edit sections.
When in the menu, select an edit section, or press EXIT orSOUND to exit the menu and return to the main page. To returnto the main page, you can also select the Main Page menu item.
When in an edit page, press EXIT or the SOUND button toreturn to the main page of the Sound operating mode.
• When an ordinary Sound is selected:
• When a Drum Kit is selected, the “Basic” section isreplaced by the “DrumKit” section:
Each item in this menu corresponds to an edit section. Each editsection groups various edit pages, that may be selected by touch-ing the corresponding tab on the lower part of the display.
Edit page structure
All edit pages share some basic elements.
Operating mode
This indicates that the instrument is in Sound mode.
Edit section
This identifies the current edit section, corresponding to one ofthe items of the edit menu (see “Edit menu” on page 204).
Page menu icon
Touch this icon to open the page menu (see “Page menu” onpage 227).
Selected oscillator
Use these buttons to select the oscillator to edit.
Parameters area
Each page contains various parameters. Use the tabs to selectone of the available pages. For detailed information on the vari-ous types of parameters, see sections starting from page 204.
Tabs
Use tabs to select one of the edit pages of the current edit section.
Basic: Sound Basic
Here you can make basic settings for the Sound, such as basicoscillator settings, the oscillator count, and the polyphonicmode.
Operating mode Edit section
Selected oscillator
Page menu icon
Parame-ters area
Tabs

205Sound modeBasic: Sound Basic
Refe
renc
e
Oscillator Count
Oscillators Count
Use this box to specify the number of oscillators (up to 24) theSound is based on.
The total amount of polyphony varies depending on the numberof oscillators used by the Sound (a maximum of 128 with only 1oscillator per voice).
Note: When editing the Grand Piano sound, keep in mind Oscilla-tors 10~15 can only be heard when the Damper pedal is depressed.
Low priority
Use this parameter to decide if the highest-numbered oscillatorsmust be turned off when more polyphony voices are needed.Keep in mind that, with a dense polyphony, missing oscillatorsmight not even be heard.
0 No oscillator will be turned off in any case.
1 The highest-numbered oscillator will be turnedoff, if needed.
2 The two highest-numbered oscillators can beturned off, one after the other, if needed.
[n]…24 The n-numbered oscillators (up to 24) can beturned off, one after the other, if needed.
Transpose Range
Top/Bottom Key
Use these parameters to set a range for transposition. Inside thisrange notes are transposed. Outside this range, they are nottransposed. This is useful to avoid RX Sounds being transposedwhen transposing a Sound.
Note: Set these (general) values so that all RX Noises assigned toany Oscillator fall out of the Transpose Range. For example, if youassigned an RX Noise to a G7 on OSC1, and an RX Noise to an A7on OSC2, set the “Top Key” value no higher than F#7 (just belowthe lowest RX Noise).
Voice Assign Mode
Poly/Mono
This is the polyphonic mode of the Sound.
Poly The Sound will play polyphonically, allowing youto play chords.
Mono The Sound will play monophonically, producingonly one note at a time.
Single Trigger
This parameter is available when the selected mode is Poly.
On When the same note is played repeatedly, the pre-vious note will be silenced before the next note issounded, so that the notes do not overlap.
Off When the same note is played repeatedly, the pre-vious note will not be silenced before the nextnote is sounded.
Legato
This parameter is only available when the selected mode isMono. It is the same found on the main page of the Sound mode.
See “Legato” on page 202 for information on this parameter.
Priority
This parameter is available when the selected mode is Mono. Itspecifies which note will be given priority to play when two ormore notes are played simultaneously.
Low Lowest note will take priority.
High Highest note will take priority.
Last Last note will take priority.
Hold
Use this parameter to keep the notes sustained even after releas-ing the keys.
Legato as OSC TriggerThe parameters included in this section are to be consideredwhen a note is played ‘legato’, i.e., with no gap with the previousnote. These parameters are valid for the whole Sound (all oscilla-tors).
Max Time
This delay allows notes to be considered Legato, even if there is asmall gap before them. This is useful to avoid some notes in achord are played Legato, and some others Staccato.
1…999 ms Notes played with a small gap are still consideredLegato notes. A value of approx. 15 ms is usuallyconsidered effective when playing chords.
Max Range
This is the range (in semitones) within the Legato is considered.If you play a wider interval, the note is considered Staccato. Thisis typical of some acoustic instruments, where legato is only pos-sible within a small interval, but not on wider ones.
As an example, please try the Sound “Nylon Guitar DNC”, wherethe Max Range is 5 semitones. Play legato with intervals smallerthan 5 semitones, and you will hear how smoother legato noteswill become. Play legato with wider intervals, and legatosmoothing will be lost.
1…127 st Max range in semitones.

206 Sound modeBasic: OSC Basic
Basic: OSC Basic
The multisample(s) on which the Sound will be based can beselected here for each of the sixteen oscillators. Each oscillatorcan use 1 or 2 multisamples, each one assigned to the High orLow layer.
OSC Multisample
High/Low Bank/Num
Use these parameters to select a different multisample for each ofthe High and Low layers. You can use velocity to switch betweenthe two multisamples. Offset and Level can be adjusted indepen-dently for the High and Low multisamples.
The High and Low pop-up menus is where you select the bank(ROM or RAM), while the numeric field under it is for selectingthe multisample inside the selected bank. The Sound nameappears on its right.
The multisample you select for the High layer will be triggeredby velocities higher than the value of the “Velocity MultisampleSwitch Low-High” parameter (see page 206). If you do not wishto use velocity switching, set the switch to a value of 001, andselect only the High multisample.
ROM The Factory bank. The Factory area of the inter-nal memory contains 834 different multisamples(preset multisamples), supplied by Korg as stan-dard.
RAM RAM multisample, read from the RAM. Theseare user-loaded multisamples.
Note: If you create a new Sound based on a RAMmultisample, the RAM samples must be loadedfrom the internal memory or from a connectedUSB pen driver.
In case samples are not loaded, no sound will beheard, even if the Sound can be selected and itsname appears in the display.
Note: Each multisample has an upper note range limit, and cannotproduce sound when played above that limit.
Offset
These parameters specify the point where the multisample(s)will begin to play. For some multisamples this parameter will notbe available.
Off The sound will start from the beginning of themultisample waveform.
1st…6th The sound will begin from the offset location pre-determined for each sample.
No Attack The initial portion of the multisample is ignored.
AMS Activates the Alternate Modulation Source (seebelow).
PseudoRandom
(Only works when more than one Offset point isavailable in the multisample). Randomly selectsone of the available Offset points (includingAttack and Off).
Level
These parameters specify the level of each multisample.
0…127 Multisample level.
Note: Depending on the multisample, high settings of this parame-ter may cause the sound to distort when a chord is played. If thisoccurs, lower the level.
Octave
Use this parameter to adjust the pitch of the selected oscillator inoctave units. The normal octave of the multisample is “0”.
-2…+1 Octave transposition.
Transpose
Use this parameter to adjust the pitch of the selected oscillator insemitone steps over a range of ±1 octave.
-12…+12 Transposition in semitones.
Tune
Use this parameter to adjust the pitch of the sample in one-centsteps (a semitone is 100 cents) over a range of ±1 octave.
-1200…+1200
Fine-tune value in cents.
Velocity Multisample Switch Low-High
This is the velocity value dividing the High and Low layers forthe selected oscillator. Notes struck harder than this value will beplayed by the High multisample.
AMS / Offset Intensity by AMS
(Only available when the AMS option is selected in the “Offset”parameter.) Alternate Modulation Source for the Offset. See“AMS (Alternate Modulation Source) list” on page 229.
When the “Offset Intensity by AMS” parameter has a positivevalue, the selected Offset point will depend on the AMS value.For example, if the selected AMS is the Velocity, when playingsoftly you will select the Off or 1st Offset, when playing loudlyyou will select the 6th or No Attack Offset.
When the “Offset Intensity by AMS” parameter has a negativevalue, the selection will happen in reverse (higher-numberedOffsets will be selected before the lowest-numbered ones).
OSC Trigger ModeOSC Trigger parameters are used to set the condition to triggerthe selected Oscillator. For example, a Normal Oscillator will

207Sound modeBasic: OSC Basic
Refe
renc
e
always play, while a Legato Oscillator will only play when a noteis played Legato.
Mode
This is the trigger that allows the selected Oscillator to play.
Normal The Oscillator always plays when a key is pressed(unless the “OSC Off when Sound Controllers areOn” parameter is checked).
Legato The Oscillator only plays when the note is played‘legato’. The delay and pitch interval from the pre-vious note are also to be considered, as set in theSound > Basic page (see “Legato as OSC Trigger”above).
Staccato The Oscillator only plays when the note is NOTplayed legato (it is the opposite of the abovechoice).
Sound Controller 1
The Oscillator only plays after a switch or foot-switch programmed as the Sound Controller 1has been pressed. Press and release it, and thenext note will also trigger the selected Oscillator.If you keep it pressed, the Oscillator will continueto be triggered until you release the controller.
Note: In Sequencer and Sound mode, the Assign-able Switch 1 is automatically assigned to SoundController 1.
Hint: This (like the following Sound Controllers) isespecially useful to enable a different nuance to thefollowing note(s).
Sound Controller 2
As the above, but with a switch or footswitch pro-grammed as the Sound Controller 2.
Note: In Sequencer and Sound mode, the Assign-able Switch 2 is automatically assigned to SoundController 2.
Sound Controller Y+
As the above, but with the Joystick, assigned asthe Sound Controller, pushed at least half-wayforward (value 64). The controller is turned offwhen the Joystick is released. This control isequivalent to a CC#01 (Modulation) ControlChange message.
Sound Controller Y-
As the above, but with the Joystick, assigned asthe Sound Controller, pulled at least half-wayback (value 64). The controller is turned off whenthe Joystick is released. This control is equivalentto a CC#02 (Breath Controller) Control Changemessage.
Cycle 1 All Oscillators with this same trigger modeassigned will play in cycle. For example, if Oscil-lators 1, 2 and 4 are assigned the Cycle 1 triggermode, the following note will trigger Oscillator 1,then 2, then 4, then 1 again.
Hint: This is especially useful to trigger differentsound nuances or create vector-like soundsequences.
Cycle 2 As the above, for use with a different (and paral-lel) group of Oscillators. Having two Cycle Trig-ger Modes allows for cycling stereo multisamples.
Random As the above, but with a random selection ofOscillators within the assigned group.
After Touch Trigger On
The Oscillator starts playing when an AfterTouch message with a value of at least 90 isreceived. The Velocity value is the same as the lat-est Note On message. The Oscillator will stopplaying when the After Touch value falls back tozero.
Hint: This (like the following Triggers) is especiallyuseful to trigger harmonics or growls when a noteis already playing.
Y+ Trigger On
As the above, but with the Joystick, assigned asthe Sound Controller, pushed at least half-wayforward (value 64). The controller is turned offwhen the Joystick is released. This control isequivalent to a CC#01 (Modulation) ControlChange message.
Y- Trigger On
As the above, but with the Joystick, assigned asthe Sound Controller, pulled at least half-wayback (value 64). The controller is turned off whenthe Joystick is released. This control is equivalentto a CC#02 (Breath Controller) Control Changemessage.
Legato Up Like Legato, but is only activated when the sec-ond note is out of the “Max Range” value (seepage 205) and it is higher than the first one.
Legato Down Like Legato, but is only activated when the sec-ond note is out of the “Max Range” value (seepage 205) and it is lower than the first one.
Delay
This parameter sets a delay time from the note-on to the realbeginning of the sound. With a setting of KeyOff, the sound willbegin when note-off occurs. This is useful to create sounds suchas the “click” that is heard when a harpsichord note is released.In this case, set the “Sustain” parameter to 0 (see page 220).
0…5000ms Delay time in milliseconds.
Key Off The sound will begin when the note is released.The note velocity is read from the Key On Veloc-ity.
Key Rel Key Release. The sound will begin when the noteis released. The note velocity is read from the KeyOff Velocity.
Nat Rel Natural Release. The sound will begin when thenote is released. The note starts from the currentvolume of the sound. If the sound’s volume isalready at zero, this oscillator is not retriggered.
OSC Off when Sound Controllers are On
This ‘mirrors’ the way Sound Controllers work. With this param-eter checked, the current Oscillator will not play when one of the

208 Sound modeBasic: Vel/Key Zone
Sound Controllers (Sound Controller 1, Sound Controller 2,Sound Controller Y+, Sound Controller Y-) is activated. Itshould be applied to Oscillators with Normal, Legato, Staccato,Cycle 1, Cycle 2, Random, After Touch Trigger On, Y+ TriggerOn, Y- Trigger On, Legato Up and Legato Down trigger modes,that can be turned off by using a switch, footswitch, or the Joy-stick, programmed as a Sound Controller.
Basic: Vel/Key Zone
Here you can set a note and velocity range “window” for theselected oscillator.
Velocity Zone
Here you can specify the velocity range for the selected oscillator.
Note: You cannot set the Bottom Velocity higher than the TopVelocity, nor the Top Velocity lower than the Bottom Velocity.
0…127 Assigned velocity.
Keyboard Range
Here you can specify the note range for the selected oscillator.
Note: You cannot set the Bottom Key higher than the Top key, northe Top Key lower than the Bottom key.
C-1…G9 Assigned note.
Scaled Velocity
Use these parameters to scale velocity values received by theoscillator. By using the “Velocity Zone” function (see above), anoscillator may be limited to a restricted range (say, 10 to 20), thatmay result in weak dynamics when the associated sample is trig-gered.
By assigning a different value to these parameters, the restrictedrange will be converted to a wider range (for example, the lowestrange value of 10 may be converted to a Scaled Velocity value of0, and the highest range value of 20 may be converted to a ScaledVelocity value of 127). All values included between the mini-mum and maximum value are scaled accordingly.
As a consequence, you can create an RX Sound of guitar, byassigning the guitar fret noise to the 10~20 velocity range. Whena dynamics value between 10~20 is received, the real velocityvalue is scaled to the Scaled Velocity values, and plays louder.
0…127 Assigned velocity value.
Basic: Damper Mode
Here you can program how the Damper pedal works, the Reso-nance/Halo effect, and the range within the Note Off message isnot sent to the selected Oscillator:
Damper ModeHere you can program the Damper Mode for each Oscillator.
Damper Mode
This parameter determines how the Damper pedal works.
Normal The Damper pedal works as usual: by keeping itpressed, the note decay is lengthened, to simulatethe longer note decay of an acoustic piano.
Damper Off The Damper pedal is deactivated for the selectedOscillator.
Hint: Set the Damper to Damper Off, if you plan touse the selected Oscillator in the Damper Triggerpage to trigger sounds. Check the Sound “Harmon-ica DNC”, and see how the Damper Trigger isused.
Resonance/Halo
The Damper pedal enables a multisample, nor-mally used for the Piano Resonance/Halo effect.If the pedal is pressed when the note is alreadyplaying, the speed at which the multisampleappears and disappears, and the volume it canreach, depend on the “Resonance/Halo” parame-ters programmed below.
Hint: This Damper mode is much more realisticthan the Normal mode, but also ‘steals’ more notesfrom the overall polyphony, and is especially sug-gested for solo piano playing.
Note: Half-pedaling, as well as Damper messagesreceived via MIDI (as Control Change #64), con-trol the level of the Resonance/Halo effect.

209Sound modeBasic: Damper Trigger
Refe
renc
e
Repedaling This mode acts as the Normal mode, but alsoenables the Damper pedal effect when the pedalis pressed after the note has been released (NoteOff). In this case, the Damper effect starts fromthe current Release level, and decays slowly.
Warning: Do not use Sounds with the “Repedal-ing” assigned to any Oscillator in a Style, or thesustained sound could cause unwanted disso-nances. The “Grand Piano RX” Sound is an exam-ple of this kind of Sounds to be avoided in a Styletrack.
Resonance/HaloHere you can program the Resonance/Halo effect that is enabledby the “Resonance/Halo” Damper Mode (see above). Theseparameters only affect the Resonance/Halo that is enabled whenpressing the Damper pedal down when a note is already playing.
Attack Time
Time needed to the Resonance/Halo to reach the maximum levelafter the Damper pedal has been pressed.
0…99 Attack time as a value relative to the current AmpEnv Attack value.
Release Time
Time needed to the Resonance/Halo to extinguish after theDamper pedal has been released.
0…99 Release time as a value relative to the currentAmp Env Release value.
Volume Scaling
Volume of the Resonance/Halo effect, relative to the currentlevel of the sound (as determined by the sum of the MultisampleVolume, Velocity value and current Amp Env value).
0% No volume at all.
1…100% Volume expressed as a percentage of the currentsound level.
No Note Off Range
From Note
Like in an acoustic piano, the dampers can only dampen stringsup to a certain pitch. Starting from that pitch, it is as if theDamper was always pressed down.
Note: This parameter only affects the Normal Damper mode. Ithas no effect on the Resonance/Halo mode.
C#-1…G9 Note starting from which the Damper is alwayspressed down. In an acoustic piano, this is usuallyset to G6.
Basic: Damper Trigger
Here you can set the notes triggered by pressing and releasingthe Damper Pedal. The parameters in this page have effect onthe Sound as a whole, and not on a single Oscillator.
As warned by the message on the lower area of the display, theseparameters have no effect if the assigned note falls inside of theTranspose Range programmed in the “Basic: Sound Basic” page(see “Transpose Range” on page 205). Please either choose a noteout of that range, or modify the Transpose Range, so that thenote is either higher or lower than that range.
Damper On TriggerPressing down the Damper pedal (Damper On) can play a spe-cial sample assigned to a particular note (for example, pedaldown squeaking in the Sound “Grand Piano RX”, breathing in inthe Sound “Harmonica DNC” …).
Note
Note where the special Damper On sample is located.
Velocity
Fixed velocity of the special Damper On sample.
Note Off on Damper Off
If checked, the special Damper On sample stops playing whenthe Damper pedal is released.
Damper Off TriggerReleasing the Damper pedal (Damper Off) can play a specialsample assigned to a particular note (for example, Damper pedalrelease noise in the Sound “Grand Piano RX”).
Note
Note where the special Damper Off sample is located.
Velocity
Fixed velocity of the special Damper Off sample.
Damper Trigger Sample
Transpose Range

210 Sound modeBasic: EQ
Basic: EQ
In this page, you can set the semi-parametric three-band equal-izer for the selected oscillator.
Enable
Check this box to activate the equalizer on the selected oscillator.
TRIM
This knob allows you to limit the level of the signal passingthrough the equalizer. Extreme equalization values can overloadthe audio circuits and lead to distortion. This control lets you setequalization as desired, and at the same time avoid overloading.
0…99 Limiting value. The higher, the most effective itis.
Low Gain
Low frequencies equalization. This is a shelving curve filter. Val-ues are shown in decibels (dB).
-18…+18dB Low gain value in decibels.
Mid (Middle) Gain
Middle frequencies equalization. This is a bell curve filter. Valuesare shown in decibels (dB).
-18…+18dB Middle gain value in decibels.
Mid (Middle) Freq
Centre frequency of the middle frequencies equalization.
-0.100…+10 kHz
Centre frequency in kHz.
Hi (High) Gain
High frequencies equalization. This is a shelving curve filter.Values are shown in decibels (dB).
-18…+18dB High gain value in decibels.
DrumKit: Sample Setup (Drum Kits)
This page appears when you edit a Drum Kit. Here you canselect a different percussive sample for each key and layer.
Drum Kits use only one oscillator.
Key
Key
Key in edit. To select a key, you can press a key on the keyboardwhile this parameter is selected.
Layers
Number of layers assigned to the selected key. Depending on thenumber of selected layers, you can have a different number ofvelocity switches.
Assign
Use this parameter to turn the sample on/off.
On The sample is assigned to the selected key.
Off The sample is not assigned. The sample assignedto the next highest assigned key is used instead.
Layer Selector & Velocity Sample Switch
Selected Layer
Use these radio buttons to select the layer to edit. The availablelayers depends on the “Layers” parameter.
Velocity Switches
Each of these values separates the two adjacent layers for theselected sample/key. Notes stricken harder than a velocity switchwill be played by the layer on the right, while notes strickensofter are played by the layer on the left.
The first and last values are not editable, and are always 001 and127 (respectively).
Drum Sample
Bank/Num/Name
Use these parameters to select a different Drum Sample for eachlayer. You can use velocity to switch between the available sam-ples. Offset and Level can be adjusted independently for the var-ious drum samples.
SelectedLayer
VelocitySwitches

211Sound modeDrumKit: Sample Setup (Drum Kits)
Refe
renc
e
The pop-up menu is where you select the bank (ROM or RAM),while the numeric field under it is for selecting the sample insidethe selected bank. The sample name appears on its right.
The sample you select for the current layer will be triggered byvelocities higher than the value of the “Velocity Switches”parameter (see page 210). If you do not wish to use velocityswitching, assign just one layer to the selected key, and assign asample only to Layer 1.
ROM The Factory bank. The internal Factory area ofthe Flash-ROM memory contains 1065 differentsamples (preset samples), supplied by Korg asstandard.
RAM RAM sample, read from the RAM. These areuser-loaded samples.
Note: If you create a new Drum Kit based on RAMsamples, the RAM samples must be loaded fromthe internal memory or from a device connected tothe USB Host port.
In case samples are not loaded, no sound will beheard, even if the Drum Kit can be selected and itsname appears in the display.
Note: Each sample has an upper note range limit, and may notproduce sound when played above that limit.
Rev (Reverse)
The sample will be played in reverse. In the case of Factory(Flash-ROM) or User (RAM) samples that were originally speci-fied to loop, the sample will be played back in “one-shot” reversemode. If the sample was originally set to reverse, it will playbackwithout change.
On The sample will playback in reverse.
Off The sample will play back normally.
Ofs (Offset)
These parameters specify the point where the sample will beginto play. For some samples this parameter will not be available.
Off The sound will start from the beginning of thesample.
1st…6th The sound will begin from the offset locationpre-determined for each sample.
NoAtk The initial portion of the multisample is ignored.
AMS Activates the Alternate Modulation Source (seebelow).
PseudoRandom
(Only works when more than one Offset point isavailable in the multisample). Randomly selectsone of the available Offset points (includingAttack and Off).
AMS / Int(ensity)
(Only available when the AMS option is selected in the “Offset”parameter.) Alternate Modulation Source for the Offset. See“AMS (Alternate Modulation Source) list” on page 229.
When the “Intensity” parameter has a positive value, the selectedOffset point will depend on the AMS value. For example, if theselected AMS is the Velocity, when playing softly you will selectthe Off or 1st Offset, when playing loudly you will select the 6thor No Attack Offset.
When the “Intensity” parameter has a negative value, the selec-tion will happen in reverse (higher-numbered Offsets will beselected before the lowest-numbered ones).
Level
This parameter specifies the level of the sample. For more infor-mation, see “Level” on page 206.
Attack
This parameter is an offset to the selected sample’s EG Attack.
Decay
This parameter is an offset to the selected sample’s EG Decay.
Cutoff
This parameter sets the cutoff frequency for the filter applied tothe selected sample.
Resonance
This parameter sets the resonance for the filter applied to theselected sample.
Transpose
This parameter transposes the selected sample. Use it to changethe pitch of the selected key.
0 No transposition applied.
-64…+63 Transpose value in semitones.
Tune
Use this parameter to fine-tune the assigned sample.
0 Original tuning.
-99…+99 Fine-tuning value in cents (1/100 of a semitone).

212 Sound modeDrumKit: EQ (Drum Kits)
DrumKit: EQ (Drum Kits)
This page appears when you edit a Drum Kit. In this page, youcan set the semi-parametric three-band equalizer for theselected key, layer and Drum sample.
KeySee “Key” on page 210.
Layer Selector & Velocity Sample SwitchSee “Layer Selector & Velocity Sample Switch” on page 210.
Drum Sample Equalizer
Enable
Check this box to activate the equalizer on the selected oscillator.
TRIM
This knob allows you to limit the level of the signal passingthrough the equalizer. Extreme equalization values can overloadthe audio circuits and lead to distortion. This control lets you setequalization as desired, and at the same time avoid overloading.
0…99 Limiting value. The higher, the most effective it is.
Low Gain
Low frequencies equalization. This is a shelving curve filter. Val-ues are shown in decibels (dB).
-18…+18dB Low gain value in decibels.
Mid (Middle) Gain
Middle frequencies equalization. This is a bell curve filter. Valuesare shown in decibels (dB).
-18…+18dB Middle gain value in decibels.
Mid (Middle) Freq
Centre frequency of the middle frequencies equalization.
-0.100…+10 kHz
Centre frequency in kHz.
Hi (High) Gain
High frequencies equalization. This is a shelving curve filter.Values are shown in decibels (dB).
-18…+18dB High gain value in decibels.
DrumKit: Voice Mixer (Drum Kits)
This page appears when you edit a Drum Kit. Here you can setvarious parameters for the different percussive sample assignedto the selected key and layer.
KeySee “Key” on page 210.
Voice Assign Mode
Single Trigger
Use this parameter to set the sample as a single-triggered one.
On When the same key (note) is played repeatedly,the previous note will be stopped before the newnote is triggered, so that they will not overlap.
Off When the same key (note) is played repeatedly,the previous note will not be stopped before thenew note is triggered.
Exclusive Group
Exclusive Groups are sets of mutually exclusive keys, stoppingeach other. For example, if the Open Hi-Hat and Closed Hi-Hatare assigned the same Exclusive Group, playing an Open Hi-Hatwill stop the Closed Hi-Hat playing.
None No Exclusive Group assigned. The selected keywill not be stopped by any other key.
1…127 Exclusive Groups assigned to the selected key.When you play this key, all other keys assigned tothe same Exclusive Group will be stopped, andthis key will be stopped by other keys assigned tothe same Exclusive Group.
Enable Note On Receive
Use this parameter to enable/disable the reception of the NoteOn (Key On) message.
On The Note On message is normally received.
Off The Note On message is not received. Therefore,the corresponding key is muted.
Enable Note Off Receive
Use this parameter to enable/disable the reception of the NoteOff (Key Off) message.
On The sound will stop as soon as you release thekey.

213Sound modePitch: Pitch Mod
Refe
renc
e
Off The sound will continue playing up to the end ofthe sample. The Note Off message is ignored.
Mixer
Pan
This parameter sets the position in the stereo panorama of theselected key.
Send to MFX1, MFX2
These parameters set the MFX1 or MFX2 send level for theselected key.
Pitch: Pitch Mod
Here you can make pitch settings for each oscillator. These set-tings specify how keyboard location will affect the pitch of eachoscillator, and select the controllers that will affect the oscillatorpitch and specify the depth of control. You can also specify theamount of pitch change produced by the Pitch EG and by LFO1and LFO2, switch portamento on/off and specify how it willapply.
Pitch
Pitch Slope
Normally you will leave this parameter at +1.0. Positive (+) val-ues will cause the pitch to rise as you play higher notes, and neg-ative (–) values will cause the pitch to fall as you play highernotes.
With a value of 0, there will be no change in pitch, and the C4pitch will sound regardless of the keyboard location you play.
The diagram shows how the Pitch Slope and pitch are related:
-1.0…+2.0 Pitch slope value.
Pitch Bend Mode
The Pitch Bend can work in different ways, depending on theselected option.
Normal Linear bending.
Fixed Scale When this parameter is turned on on an oscilla-tor, Pitch Bend and Sub Scale have no effect on itstuning. The relevant parameters are greyed outand non-selectable. This is useful when assign-ing to the oscillator a noise (like the breath noiseof a reed) with a fixed frequency, that must notchange on different notes and different pitches.
Highest Pitch Bend only
On this oscillator, Pitch Bend is only activated onthe highest note currently playing on the key-board.
Pitch
Key
2oct1oct1oct
C4 C5
+2
+1
0
–1

214 Sound modePitch: Pitch Mod
Lowest Pitch Bend only
On this oscillator, Pitch Bend is only activated onthe lowest note currently playing on the key-board.
Ribbon to Pitch
Pitch Bend range assigned to the Ribbon Controller message(CC#16). The Ribbon Controller message can be received fromMIDI or contained in a Standard MIDI File.
-12…0…+12 Maximum bending, when touching the extremeleft or right of the Ribbon Controller.
JS (+X)
This parameter specifies how the pitch will change when the joy-stick is moved all the way to the right. A setting of 12 produces 1octave of change.
For example if you set this to +12 and move the joystick all theway to the right, the pitch will rise one octave above the originalpitch.
-60…+12 Maximum pitch change in semitones.
JS (–X)
This parameter specifies how the pitch will change when the joy-stick is moved all the way to the left. A setting of 12 produces 1octave of change.
For example, if you set this to -60 and move the joystick all theway to the left, the pitch will fall five octaves below the originalpitch. This can be used to simulate the downward swoops that aguitarist produces using the tremolo arm.
-60…+12 Maximum pitch change in semitones.
AMS (Alternate Modulation Source)
This parameter selects the source that will modulate the pitch ofthe selected oscillator. See “AMS (Alternate Modulation Source)list” on page 229.
Intensity
This parameter specifies the depth and direction of the effectproduced by “AMS”. With a setting of 0, no modulation will beapplied. With a setting of 12.00, the pitch will change up to oneoctave.
For example, if you set “AMS” to After Touch and apply pressureto the keyboard, the pitch will rise if this parameter is set to apositive (+) value, or fall if this parameter is set to a negative (–)value. The range is a maximum of one octave.
-12.00…+12.00
Parameter value.
Pitch EGThe Pitch EG (Envelope Generator) is unique to all oscillators.
Velocity Intensity
This parameter specifies the depth and direction of the modula-tion that the pitch EG specified on “Pitch: Pitch EG” will apply tothe pitch. With a setting of 12.00, the pitch will change a maxi-mum of ±1 octave.
-12.00…+12.00
Parameter value.
Pitch EG AMS (Alternate Modulation Source)
This parameter selects the source that will modulate the pitchEG of the selected oscillator. See “AMS (Alternate ModulationSource) list” on page 229).
Pitch EG Intensity
This parameter specifies the depth and direction of the effectthat “AMS” will have. For example, if you set “AMS” to Velocityand set this value to +12.00, the velocity will control the range ofpitch change produced by the pitch EG in a range of ±1 octave.As you play more softly, the pitch change will draw closer to thepitch EG levels.
Note: “Intensity” (Pitch EG) and AMS will be added to determinethe depth and direction of the pitch modulation applied by thepitch EG.
Portamento
Enabled
This parameter turns the portamento effect (smooth change inpitch from one note to the next) on/off, and specifies how it willbe applied.
Note: Portamento will also be switched when CC#65 (PortamentoSW) is received.
On Portamento will be applied.
Off Portamento will not be applied.
Fingered
This parameter specifies whether the portamento effect restartsor not with each note played.
On Portamento will restart with each note.
Off Portamento will not restart with each note.
Time
This parameter sets the portamento time. Increasing the valuewill produce a slower change in pitch.
000…127 Portamento time in MIDI value.
LFO 1/2
LFO1/2 Int
Intensity of the corresponding LFO.
-12…0…+12 Parameter value. Negative values invert the LFOshape.
Pitch change (level)
Softly played(Intensity (Pitch EG) setting)
Strongly played with anegative (–) value
Strongly played witha positive (+) value
Note-onNote-off
Note-onNote-off
Note-onNote-off

215Sound modePitch: Pitch EG
Refe
renc
e
JS+Y
Intensity of the corresponding LFO when the joystick is pushedforward.
-12…0…+12 Parameter value. Negative values invert the LFOshape.
AMS / Intensity
Alternate Modulation Source for the LFO. See “AMS (AlternateModulation Source) list” on page 229. Use the “Intensity”parameter to set the intensity of the modulation.
Pitch: Pitch EG
Here you can make settings for the pitch EG, which creates time-variant changes in the pitch of the oscillators. The depth of pitchchange produced by these EG settings on the oscillators isadjusted by the “Intensity (AMS1/2 Intensity)” parameter (seepage 216).
DiagramThe diagram on top of the page shows the Pitch envelope line.
LevelThese parameters specify the amount of pitch change. The actualamount of pitch change will depend on the “Intensity (AMS1/2Intensity)” parameter (see below). For example, with an “Inten-sity” setting of +12.00, a “Level” setting of +99 would raise thepitch one octave, and a “Level” setting of –99 would lower thepitch one octave.
Start Level
Specifies the amount of pitch change at note-on.
-99…+99 Parameter value.
Attack Level
Specifies the amount of pitch change when the attack time haselapsed.
-99…+99 Parameter value.
Release Level
Specifies the amount of pitch change when the release time haselapsed.
-99…+99 Parameter value.
TimeThese parameters specify the time over which the pitch changewill occur.
See diagram above.
Note-on Note-off
Attack Time
Decay Time
Start Level Release Level
Release Time
Attack Level +99 = approximately 1 octave
–99 = approximately 1 octave
0 = pitch when key is held (sustained)
Time
Time-varying pitch settings (when Pitch EG Intensity = +12.00)

216 Sound modePitch: Pitch EG
Attack Time
Specifies the time over which the pitch will change from note-onuntil it reaches the pitch specified as the attack level.
0…99 Parameter value.
Decay Time
Specifies the time over which the pitch will change after reachingthe attack level until it reaches the normal pitch.
0…99 Parameter value.
Release Time
Specifies the time over which the pitch will change from note-offuntil it reaches the pitch specified as the release level.
0…99 Parameter value.
Level Modulation
AMS1/2 (Alternate Modulation Source 1/2)
These parameters select the source that will control the pitch EG“Level” parameters (“AMS (Alternate Modulation Source) list”on page 229).
Intensity (AMS1/2 Intensity)
These parameters specify the depth and direction of the effectapplied by “AMS1”. With a setting of 0, the levels specified by“Level” will be used.
For example, if “AMS1” is Joystick Y+, moving the Joystick in theupper direction to turn it on will change the “Level” parametersof the Pitch EG. As the absolute value of “Intensity” is increased,the pitch EG levels will change more when the Joystick isreleased. The direction of the change is specified by “St (StartLevel Swing)” and “At (Attack Level Swing)”. When the Joystickis released, the pitch EG levels will return to their own settings.
If “AMS1” is set to Velocity, increasing the absolute value of“Intensity” will produce increasingly wider change in pitch EGlevels for strongly-played notes. The direction of the change isspecified by “St (Start Level Swing)” and “At (Attack LevelSwing)”. As you play more softly, the pitch change will drawcloser to the pitch EG levels.
-99…+99 Parameter value.
St (Start Level Swing)
This parameter specifies the direction of change in “Start Level”caused by “AMS1/2”. If “Intensity” is a positive (+) value, a set-ting of + will raise the EG level, and a setting of – will decrease it.With a setting of 0 there will be no change.
At (Attack Level Swing)
This parameter specifies the direction of change in “AttackLevel” caused by “AMS1/2”. If “Intensity” is a positive (+) value, asetting of + will raise the EG level, and a setting of – will decreaseit. With a setting of 0 there will be no change.
Time Modulation
AMS (Alternate Modulation Source)
This parameter selects the source that will control the “Time”parameters of the pitch EG (see “AMS (Alternate ModulationSource) list” on page 229).
Intensity (AMS Intensity)
This parameter specifies the depth and direction of the effectthat “AMS” will have on the “Time” parameters. With a setting of0, the pitch EG times will be just as specified by the “Time” set-tings.
The alternate modulation value at the moment that the EGreaches each point will determine the actual value of the EG timethat comes next.
For example, the decay time will be determined by the alternatemodulation value at the moment that the attack level is reached.
When this parameter is set to values of 16, 33, 49, 66, 82, or 99,the specified EG times will speed up as much as 2, 4, 8, 16, 32, or64 times respectively (or slowed down to 1/2, 1/4, 1/8, 1/16, 1/32,or 1/64 of the original time).
For example if “AMS” is set to Velocity, increasing the absolutevalue of “Intensity” will allow strongly-played notes to increasethe changes in pitch EG “Time” values. The direction of thechange is specified by “At (Attack Time Swing)” and “Dc (DecayTime Swing)”. As you play more softly, the pitch EG times willmore closely approach the actual settings of the pitch EG.
-99…+99 Parameter value.
At (Attack Time Swing)
This parameter specifies the direction in which “AMS” will affectthe “Attack Time” parameter. With positive (+) values of “Inten-sity”, a setting of + will cause the time to be lengthened, and asetting of – will cause the time to be shortened. With a setting of0 there will be no change.
Dc (Decay Time Swing)
Specify the direction in which “AMS” will affect the “DecayTime”. With positive (+) values of “Intensity”, a setting of + willcause the time to be lengthened, and a setting of – will cause thetime to be shortened. With a setting of 0 there will be no change.
Pitch EG change (level) (AMS=JS-Y/Velocity, Intensity= positive (+) value
Note-onNote-off
Note-onNote-off
Note-onNote-off
A note played softly with Start Level Swing set at 0, Attack Level Swing set to +, the Joystick pulled on
A note played strongly with Start Level Swing set to 0, Attack Level Swing set to +, the Joystick pulled on
A note played strongly with Start Level Swing set to 0, Attack Level Swing set to –, the Joystick pulled on
Pitch EG changes (Time) (AMS = Velocity, Intensity = positive (+) value)
Note-onNote-off
Note-onNote-off
Note-onNote-off
A note played softly with Attack Time Swing set to + and Decay Time Swing set to
A note played strongly with Attack Time Swing set to + and Decay Time Swing set to +
A note played strongly with Attack Time Swing set to – and Decay Time Swing set to –

217Sound modeFilter: Filter Type
Refe
renc
e
Filter: Filter Type
Here you can make settings for the filters that will be used by theoscillators. You can select either a 24 dB/octave low pass filterwith resonance, or a series connection of a 12 dB/octave low passfilter and a 12 dB/octave high pass filter.
Filter Type
This parameter selects the type of filter (Low Pass Resonant, LowPass & High Pass) for the selected oscillator.
Low Pass Resonance
When the Low Pass filter type is selected, only fil-ter A will be activated.
Low Pass & High Pass
When the Low Pass & High Pass filter type isselected, the filter B will be activated.
Trim
Use this parameter to adjust the level at which the audio signaloutput from the selected oscillator is input to filter A.
Note: If this value is raised, the sound may distort if Resonance isset to a high value or when you play a chord.
00…99 Trim level.
Filter A
Frequency (Cutoff Frequency A)
This parameter specifies the cutoff frequency of filter A.
00…99 Cutoff frequency value.
Resonance (Resonance A)
The resonance emphasizes the overtone components that lie inthe region of the cutoff frequency specified by “Frequency”, pro-ducing a more distinctive sound. Increasing this value will pro-duce a stronger effect.
00…99 Resonance value.
Res. Mod. by AMS (Resonance modulated by AMS)
Selects the source that will control the “Resonance” level. See“AMS (Alternate Modulation Source) list” on page 229.
Intensity (AMS Intensity)
This parameter specifies the depth and direction of the effectthat “Res. Mod. by AMS (Resonance modulated by AMS)” willhave on the resonance level specified by “Resonance (ResonanceA)”.
For example if Velocity has been selected, changes in keyboardvelocity will affect the resonance.
With positive (+) values, the resonance will increase as you playmore strongly, and as you play more softly the resonance willapproach the level specified by the “Resonance” setting.
With negative (–) values, the resonance will decrease as you playmore strongly, and as you play more softly the resonance willapproach the level specified by the “Resonance” setting.
The resonance level is determined by adding the “Resonance”and “Intensity (AMS Intensity)” values.
-99…+99 Parameter value.
Filter B
Frequency (Cutoff Frequency B)
This parameter specifies the cutoff frequency of filter B. Thisparameter will be displayed when “Filter Type” is set to Low Pass& High Pass.
00…99 Cutoff frequency value.
Frequency
Level
Low Pass
12dB/oct
24dB/oct
This is a filter that cuts the high-frequency region above the cutoff frequency.This is the most common type of filter, and is used to cut part of the overtone components, making an originally bright timbre sound more mellow (darker).When the “Filter Type” is Low Pass Resonance, the cutoff will have a steeper slope.
The effect of resonance
Low PassLevel
Low resonance value High resonance value
Level
Frequency
High Pass
This filter cuts the low-frequency range that lies below the cutoff frequency. By cutting the lower overtones, it lightens the tone.
12dB/oct

218 Sound modeFilter: Filter Mod
Filter: Filter Mod
These settings let you apply modulation to the cutoff frequency(“Frequency”) of the filter for the selected oscillator to modifythe tone.
When “Filter Type” is Low Pass Resonance, parameters for filterB will not be editable (greyed out).
Keyboard Tracking
Key Low/High
These settings specify keyboard tracking for the cutoff frequencyof the filter for the selected oscillator. The way in which the cut-off frequency is affected by the keyboard location you play canbe specified by the “Key Low”, “Key High”, “Ramp Low” and“Ramp High” parameters.
Keyboard tracking will apply to the range below the specifiedLow note number, and above the specified High note number.
C–1…G9 Lowest/Highest note in the range.
Ramp Low/High
These parameter specifies the angle of keyboard tracking.
If “Intensity to A” and “Intensity to B” are set to +50, “RampLow” is set to –62 and “Ramp High” is set to +62, the angle of thechange in cutoff frequency will correspond to the keyboard loca-tion (pitch). This means that the oscillation that occurs whenyou increase the “Resonance (Resonance A)” will correspond tothe keyboard location.
If you set “Ramp Low” to +43 and “Ramp High” to –43, the cut-off frequency will not be affected by keyboard location. Use thissetting when you do not want the cutoff frequency to change foreach note.
-99…+99 Angle value.
Here is how cutoff frequency is affected by keyboard locationand the Ramp setting (“Intensity to A” and “Intensity to B” =+50):
Tracking to A/B
These parameters specify the note numbers at which keyboardtracking will begin to apply, and set the “Intensity to A” and“Intensity to B” parameters to specify the depth and direction ofthe change applied to filters A and B.
For the range of notes between “Key Low” and “Key High”, thecutoff frequency will change according to the keyboard location(pitch).
-99…+99 Parameter value.
Filter EG
Velocity to A
This parameter specifies the depth and direction of the effectthat velocity will have on the time-varying changes created bythe filter EG (as set on “Filter: Filter EG”) to control the filter Acutoff frequency.
With positive (+) values, playing more strongly will cause the fil-ter EG to produce greater changes in cutoff frequency. With neg-ative (–) values, playing more strongly will also cause the filterEG to produce greater changes in cutoff frequency, but with thepolarity of the EG inverted.
99…+99 Value of the Velocity to A parameter.
Velocity to B
This parameter specifies the depth and direction of the effectthat velocity will have on the time-varying changes created bythe filter EG to control the filter B cutoff frequency (see “Veloc-ity to A”).
99…+99 Value of the Velocity to B parameter.
Int to A (Intensity to A)
Specifies the depth and direction of the effect that the time-vary-ing changes created by the filter 1 EG will have on the filter Acutoff frequency.
With positive (+) settings, the sound will become brighter whenthe EG levels set by Filter EG “Level” and “Time” parameters arein the “+” area, and darker when they are in the “–” area.
With negative (–) settings, the sound will become darker whenthe EG levels set by Filter EG “Level” and “Time” parameters arein the “+” area, and brighter when they are in the “–” area.
-99…+99 Parameter value.
Int to B (Intensity to B)
Specifies the depth and direction of the effect that the time-vary-ing changes created by the filter EG will have on the filter B cut-off frequency (see “Int to A (Intensity to A)”).
-99…+99 Parameter value.
Cutoff frequency
Key
Low Ramp=+99
Low Ramp=+43
Low Ramp=0
Low Ramp=–62
Low Ramp=–99
High Ramp=+99
High Ramp=+62
High Ramp=0
High Ramp=–43
High Ramp=–99
Low Key High Key
hanges in cutoff frequency
oftly played Strongly playedSetting to –
Strongly playedSetting to +
Note-onNote-off
Note-onNote-off
Note-onNote-off

219Sound modeFilter: Filter LFO
Refe
renc
e
AMS (EG Alternate Modulation Source)
Selects the source that will control the depth and direction of theeffect that the time-varying changes produced by the filter EGwill have on the cutoff frequency of filters A and B. See “AMS(Alternate Modulation Source) list” on page 229.
Int to A (Intensity to A)
Specifies the depth and direction of the effect that “AMS” willhave on filter A. For details on how this will apply, refer to “Int toA (Intensity to A)”.
Int to B (Intensity to B)
Specifies the depth and direction of the effect that “AMS” willhave on filter B. For details on how this will apply, refer to “Int toA (Intensity to A)”.
Note: The sum of the settings for “Velocity to A/B”, “Intensity to A/B”, and “(AMS) Intensity to A/B” will determine the depth anddirection of the effect produced by the filter EG.
Filter A/B Modulation
AMS1 (Alternate Modulation Source 1 for filter A/B)
Selects the source that will control modulation of the filter Acutoff frequency. See “AMS (Alternate Modulation Source) list”on page 229.
Note: The filter B parameters will be displayed when “Filter Type”on page 217 is Low Pass & High Pass.
Intensity (Intensity to AMS1)
Specifies the depth and direction of the effect that “AMS1” willhave.
When “AMS1” is JS X, a positive (+) value for this parameter willcause the cutoff frequency to rise when the joystick is movedtoward the right, and fall when the joystick is moved toward theleft. With a negative (–) value for this parameter, the oppositewill occur.
This value is added to the setting of the Filter A “Frequency”.
AMS2 (Alternate Modulation Source 2 for filter A/B)
Selects the source that will control modulation of the filter Acutoff frequency (see “AMS (Alternate Modulation Source) list”on page 229).
Intensity (Intensity to AMS2)
Specifies the depth and direction of the effect that the selectedsource will have (see “Intensity (Intensity to AMS1)” onpage 219).
Filter: Filter LFO
Here you can use the filter LFO to apply cyclic modulation to thecutoff frequency of the filter (for the selected oscillator) to createcyclical changes in tone.
LFO 1
Intensity to A
Specifies the depth and direction of the modulation that LFO1(set on “LFO: LFO1”) will have on the cutoff frequency of filterA. Negative (–) settings will invert the phase.
-99…+99 Parameter value.
Intensity to B
Specify the depth and direction of the modulation that LFO1will have on the cutoff frequency of filter B (see “Intensity to A”).
-99…+99 Parameter value.
JS (Joystick) –Y Intensity to A
By moving the joystick in the Y direction (toward yourself), youcan control the depth at which LFO1 modulates the cutoff fre-quency of filter A. This parameter specifies the depth and direc-tion of the control.
Higher settings of this parameter will produce greater increasesin the effect of LFO1 on the filter when the joystick is movedtoward yourself.
-99…+99 Parameter value.
JS (Joystick) –Y Intensity to B
By moving the joystick in the Y direction (toward yourself), youcan control the depth at which LFO1 modulates the cutoff fre-quency of filter B. This parameter specifies the depth and direc-tion of the control (see “JS (Joystick) –Y Intensity to A”).
AMS (Filter LFO1 Alternate Modulation Source)
Select a source that will control the depth and direction of cutofffrequency change for both filters A and B. See “AMS (AlternateModulation Source) list”.
Change in cutoff
Low setting High setting

220 Sound modeFilter: Filter EG
Intensity to A
Specifies the depth and direction of the effect that “AMS” willhave on filter A.
For example if “AMS” is Joystick Y+, higher settings of thisparameter will allow greater change to be applied to LFO1 whenyou move the Joystick up in the Y axis.
-99…+99 Parameter value.
Intensity to B
Specifies the depth and direction of the effect that “AMS” willhave on filter B (see “Intensity to A”).
LFO 2Adjusts the depth of the cyclic modulation applied by LFO2 (seton “LFO: LFO2”) to the cutoff frequency of filters A and B. Formore information on the parameters see “LFO 1” above.
Filter: Filter EG
Here you can make settings for the EG that will produce time-varying changes in the cutoff frequency of filters A and B for theselected oscillator. The depth of the effect that these settings willhave on the filter cutoff frequency is determined by the “Veloc-ity” and “Intensity” parameters.
DiagramThe diagram on top of the page shows the Filter envelope line.
Filter envelope
LevelThese are the envelope segment levels. The result will depend onthe filter that was selected in “Filter Type”. For example, with theLow Pass Resonance filter, positive (+) values of EG Intensitywill cause the tone to be brightened by positive (+) levels, anddarkened by negative (–) levels.
Start
This parameter specifies the change in cutoff frequency at thetime of note-on.
-99…+99 Level value.
Attack
This parameter specifies the change in cutoff frequency after theattack time has elapsed.
-99…+99 Level value.
Break (Break Point)
This parameter specifies the change in cutoff frequency after thedecay time has elapsed.
-99…+99 Level value.
Sustain
This parameter specifies the change in cutoff frequency that willbe maintained from after the slope time has elapsed until note-off occurs.
-99…+99 Level value.
Release
This parameter specifies the change in cutoff frequency that willoccur when the release time has elapsed.
-99…+99 Level value.
TimeThese parameters specify the time over which the filter changewill occur.
Attack
This parameter specifies the time over which the level willchange from note-on until the attack level is reached.
0…99 Time value.
Decay
This parameter specifies the time over which the level willchange from the attack level to the break point level.
0…99 Time value.
Slope
This parameter specifies the time over which the level willchange after the decay time has elapsed until the sustain level isreached.
0…99 Time value.
Release
This parameter specifies the time over which the level willchange after note-on occurs until the release level is reached.
0…99 Time value.
Note-on
Note-off
AttackTime
StartLevel Decay
TimeReleaseTime
ReleaseLevel
Attack Level
The specifiedcutofffrequency
Sustain Level
Time
BreakPointLevel
SlopeTime

221Sound modeFilter: Filter EG
Refe
renc
e
Level Modulation
AMS (Alternate Modulation Source)
This parameter selects the source that will control the “Level”parameters of the filter EG (“AMS (Alternate ModulationSource) list” on page 229).
Intensity (AMS Intensity)
This parameter specifies the depth and direction of the effectapplied by “AMS”. With a setting of 0, the levels specified by“Frequency (Cutoff Frequency A)” will be used.
For example, if “AMS” is Velocity, and you set “St (Start LevelSwing)”, “At (Attack Level Swing)” and “Br (Break Level Swing)”to + and set “Intensity” to a positive (+) value, the EG levels willrise as you play more strongly. If “Intensity” is set to a negative (–) values, the EG levels will fall as you play more strongly.
-99…+99 Intensity value.
St (Start Level Swing)
This parameter specifies the direction in which “AMS” will affect“Start”. When “Intensity” has a positive (+) value, a setting of +for this parameter will allow “AMS” to raise the EG level, and asetting of – will allow “AMS” to lower the EG level. With a settingof 0 there will be no change.
At (Attack Level Swing)
This parameter specifies the direction in which “AMS” will affect“Attack”. When “Intensity” has a positive (+) value, a setting of +for this parameter will allow “AMS” to raise the EG level, and asetting of – will allow “AMS” to lower the EG level. With a settingof 0 there will be no change.
Br (Break Level Swing)
This parameter specifies the direction in which “AMS” will affect“Break (Break Point)”. When “Intensity” has a positive (+) value,a setting of + for this parameter will allow “AMS” to raise the EGlevel, and a setting of – will allow “AMS” to lower the EG level.With a setting of 0 there will be no change.
Time Modulation
AMS1/2
Use this parameter to select the source that will control the“Time” parameters of the filter EG. See “AMS (Alternate Modu-lation Source) list” on page 229.
Int (AMS Intensity)
This parameter specifies the depth and direction of the effectthat “AMS1/2” will have.
For example, if “AMS1/2” is set to FltKTr +/+, the EG “Time”parameters will be controlled by the Keyboard Tracking settings.With positive (+) values of this parameter, positive (+) values of“Ramp Low/High” will lengthen the EG times, and negative (–)values of “Ramp Low/High” will shorten the EG times. Thedirection of change is specified by “At (Attack Time Swing)”, “Dc(Decay Time Swing)”, “Sl (Slope Time Swing)”, and “Rl (ReleaseTime Swing)”.
With a setting of 0, the times specified by “Frequency (CutoffFrequency A)” will be used.
If “AMS1/2” is set to Velocity, positive (+) values of this parame-ter will cause EG times to lengthen as you play more strongly,and negative (–) values will cause EG times to shorten as youplay more strongly.
-99…+99 Intensity value.
At (Attack Time Swing)
This parameter specifies the direction in which “AMS1/2” willaffect the attack time. With positive (+) values of “Intensity”, set-ting this parameter to + will allow AMS to lengthen the time,and setting this parameter to – will allow AMS to shorten thetime. With a setting of 0 there will be no change.
Dc (Decay Time Swing)
This parameter specifies the direction in which “AMS1/2” willaffect the decay time. With positive (+) values of “Intensity”, set-ting this parameter to + will allow AMS to lengthen the time,and setting this parameter to – will allow AMS to shorten thetime. With a setting of 0 there will be no change.
Sl (Slope Time Swing)
This parameter specifies the direction in which “AMS1/2” willaffect the slope time. With positive (+) values of “Intensity”, set-ting this parameter to + will allow AMS to lengthen the time,and setting this parameter to – will allow AMS to shorten thetime. With a setting of 0 there will be no change.
Rl (Release Time Swing)
This parameter specifies the direction in which “AMS1/2” willaffect the release time. With positive (+) values of “Intensity”,setting this parameter to + will allow AMS to lengthen the time,
Filter 1 EG changes (level) (AMS = Velocity, Intensity = a positive (+) value)
Note-onNote-off
Note-onNote-off
Note-onNote-off
Softly played note with Start Level Swing, Attack Level Swing, and Break Level Swing set to +
Strongly played note with Start Level Swing, Attack Level Swing, and Break Level Swing set to +
Strongly played note with Start Level Swing, Attack Level Swing, and Break Level Swing set to –
Filter 1 EG changes (Time) (AMS = Velocity, Intensity = a positive (+) value)
Note-onNote-off
Note-onNote-off
Note-onNote-off
Softly played note with Attack, Decay, Slope and Release Level Swings set to +
Strongly played note with Attack, Decay, Slope and Release Level Swings set to +
Strongly played note with Attack, Decay, Slope and Release Level Swings set to –

222 Sound modeAmp: Amp Level/Pan
and setting this parameter to – will allow AMS to shorten thetime. With a setting of 0 there will be no change.
Amp: Amp Level/Pan
These parameters control the volume and pan of the selectedoscillator.
Amp Level
Volume of the selected oscillator.
Note: The volume of a Sound can be controlled by CC#7 (volume)and #11 (expression). The resulting level is determined by multi-plying the values of CC#7 and #11. The Global MIDI channel isused for control.
0…127 Volume level.
Pan
Pan (stereo position) of the selected oscillator.This parameter is not available when editing a Drum Kit.Use the individual Pan control for each key (see “Pan” onpage 213).
Random The sound will be heard from a different locationat each note-on.
L001 Places the sound at far left.
C064 Places the sound in the center.
R127 Places the sound to far right.
Note: This can be controlled by CC#10 (panpot). A CC#10 value of0 or 1 will place the sound at the far left, a value of 64 will place thesound at the location specified by the “Pan” setting for each oscilla-tor, and a value of 127 will place the sound at the far right. This iscontrolled on the global MIDI channel.
Pan modulation
AMS (Alternate Modulation Source)
Selects the source that will modify pan (see “AMS (AlternateModulation Source) list” on page 229). This change will be rela-tive to the “Pan” setting.
Intensity
Specifies the depth of the effect produced by “AMS”. For exam-ple, if “Pan” is set to C064 and “AMS” is Note Number, positive(+) values of this parameter will cause the sound to move towardthe right as the note numbers increase beyond the C4 note (i.e.,
as you play higher), and toward the left as the note numbersdecrease (i.e., as you play lower). Negative (–) values of thisparameter will have the opposite effect.
-99…+99 Parameter value.
Amp: Amp Mod
These settings allow you to apply modulation to amp (for eachoscillator) to modulate the volume.
Keyboard TrackingThese parameters let you use keyboard tracking to adjust thevolume of the selected oscillator. Use the “Key” and “Ramp”parameters to specify how the volume will be affected by thekeyboard location that you play.
Key Low/High
These settings specify the note number at which keyboard track-ing will begin to apply. The volume will not change between“Key Low” and “Key High”.
Keyboard tracking will apply to the range below the specifiedLow note number, and above the specified High note number.
C–1…G9 Lowest/Highest note in the range.
Ramp Low/High
These parameters specify the angle of keyboard tracking.
With positive (+) values of the “Ramp Low” parameter, the vol-ume will increase as you play notes below the “Key Low” notenumber. With negative (–) values, the volume will decrease.
With positive (+) values of the “Ramp High” parameter, the vol-ume will increase as you play notes above the “Key High” notenumber. With negative (–) values, the volume will decrease.
-99…+99 Angle value.
Here is an example of volume changes produced by keyboardlocation and “Ramp” settings:
Volume
Key
Ramp Low=+99
Ramp Low=0
Ramp Low=—99
Ramp High=+99
Ramp High=0
Ramp High=—99
Key Low Key High

223Sound modeAmp: Amp EG
Refe
renc
e
Amp ModulationThese parameters specify how the volume of the selected oscilla-tor will be affected by velocity.
Velocity Intensity
With positive (+) values, the volume will increase as you playmore strongly. With negative (–) values, the volume will decreaseas you play more strongly.
-99…+99 Intensity value.
AMS (Alternate Modulation Source)
Selects the source that will control the volume of the amp for theselected oscillator (See “AMS (Alternate Modulation Source)list” on page 229). “Velocity” cannot be selected.
Intensity
This parameter specifies the depth and direction of the effectthat “AMS” will have. The actual volume will be determined bymultiplying the value of the changes produced by the amp EGwith the values of Alternate Modulation etc., and if the levels ofthe amp EG are low, the modulation applied by Alternate Modu-lation will also be less.
For example, if “AMS” is set to Joystick Y+, positive (+) values ofthis parameter will cause the volume to increase when you movethe Joystick up in the Y axis. However if the EG settings etc. havealready raised the volume to its maximum level, the volume can-not be increased further.
With negative (–) values of this parameter, the volume willdecrease when pressure is applied to the keyboard.
-99…+99 Intensity value.
Amp: Amp EG
These parameters let you create time-varying changes in the vol-ume of the selected oscillator.
DiagramThe diagram on top of the page shows the Amplitude envelopeline.
LevelThese parameters are the level of the envelope segment.
Start
This parameter specifies the volume level at note-on. If you wantthe note to begin at a loud level, set this to a high value.
0…99 Level value.
Attack
This parameter specifies the volume level that will be reachedafter the attack time has elapsed.
0…99 Level value.
Break
This parameter specifies the volume level that will be reachedafter the decay time has elapsed.
0…99 Level value.
Sustain
This parameter specifies the volume level that will be maintainedfrom after the slope time has elapsed until note-off occurs.
0…99 Level value.
TimeThese parameters specify the time over which the volumechange will occur.
Attack
This parameter specifies the time over which the volume willchange after note-on until it reaches the attack level. If the startlevel is 0, this will be the rise time of the sound.
0…99 Time value.
Decay
This parameter specifies the time over which the volume willchange from when it reaches the attack level until it reaches thebreak point level.
0…99 Time value.
Volume change (with positive (+) values of this parameter)
Softly played Strongly played
Note-onNote-off
Note-onNote-off
Note-on
Note-off
AttackTime
DecayTime
Release Time
Attack Level
SustainLevel
Time
Break Point
StartLevel
SlopeTime
Amplifier EG
Volume

224 Sound modeAmp: Amp EG
Slope
This parameter specifies the time over which the volume willchange from when it reaches the break point level until it reachesthe sustain level.
0…99 Time value.
Release
This parameter specifies the time over which the volume willchange after note-off until it reaches 0.
0…99 Time value.
Level Modulation
AMS (Alternate Modulation Source)
This parameter specifies the source that will control the “Level”parameters of the amp EG. See “AMS (Alternate ModulationSource) list” on page 229.
Intensity
This parameter specifies the depth and direction of the effectthat “AMS” will have. For example, if “AMS” is Velocity, setting“St (Start Level Swing)”, “At (Attack Level Swing)” and “Br(Break Point Level Swing)” to + and setting “Intensity” to a posi-tive (+) value will cause the amp EG volume levels to increase asyou play more strongly. Setting “Intensity” to a negative (–) val-ues will cause the amp EG volume levels to decrease as you playmore strongly. With a setting of 0, the levels will be as specifiedon “Amp: Amp EG”.
-99…+99 Intensity value.
St (Start Level Swing)
This parameter specifies the direction in which “AMS” willchange “Start”. If “Intensity” is set to a positive (+) value, settingthis parameter to + will allow AMS to increase the EG level, andsetting this parameter to – will allow AMS to decrease the EGlevel. With a setting of 0, no change will occur.
At (Attack Level Swing)
This parameter specifies the direction in which “AMS” willchange “Attack”. If “Intensity” is set to a positive (+) value, set-ting this parameter to + will allow AMS to increase the EG level,and setting this parameter to – will allow AMS to decrease theEG level. With a setting of 0, no change will occur.
Br (Break Point Level Swing)
This parameter specifies the direction in which “AMS” willchange “Break”. If “Intensity” is set to a positive (+) value, settingthis parameter to + will allow AMS to increase the EG level, andsetting this parameter to – will allow AMS to decrease the EGlevel. With a setting of 0, no change will occur.
Time ModulationThese parameters let you use an alternate modulation source tomodify the amp EG times that were specified in “Time” onpage 223.
AMS1 (Alternate Modulation Source 1 - Time)
This parameter specifies the source that will control the “Time”parameters of the amp EG (see “AMS (Alternate ModulationSource) list” on page 229). With a setting of Off, there will be nomodulation.
Intensity
This parameter specifies the depth and direction of the effectthat “AMS1” will have. For example, if “AMS1(T)” is Amp KTrk+/+, the (Amp) Keyboard Track settings (see “Keyboard Track-ing” on page 222) will control the EG “Time” parameters. Withpositive (+) values of this parameter, positive (+) values of“Ramp (Ramp Setting) will cause EG times to be lengthened,and negative (–) values of “Ramp (Ramp Setting)” will cause EGtimes to be shortened. The direction of the change is specified by“At (Attack Time Swing)”, “Dc (Decay Time Swing)”, “Sl (SlopeTime Swing)”, and “Rl (Release Time)”.
When “AMS1(T)” is Velocity, positive (+) values will cause EGtimes to lengthen as you play more strongly, and negative (–)values will cause EG times to shorten as you play more strongly.With a setting of 0, the EG times will be as specified by the“Level” parameters (see page 223).
At (Attack Time Swing)
This parameter specifies the direction of the effect that “AMS1”will have on “Attack”. With positive (+) values of “Intensity”, set-ting this parameter to + will allow AMS1 to lengthen the time,and setting it to – will allow AMS1 to shorten the time. With asetting of 0 there will be no effect.
Dc (Decay Time Swing)
This parameter specifies the direction of the effect that “AMS1”will have on “Decay”. With positive (+) values of “Intensity”, set-ting this parameter to + will allow AMS1 to lengthen the time,and setting it to – will allow AMS1 to shorten the time. With asetting of 0 there will be no effect.
Amp 1 EG changes (Level) (AMS=Velocity, Intensity = a positive (+) value)
Note-onNote-off
Note-onNote-off
Note-onNote-off
Softly played note when Start Level Swing=0 and Attack Level Swing and Break Level Swing are set to +
Strongly played note when Start Level Swing=0 and Attack Level Swing and Break Level Swing are set to +
Strongly played note when Start Level Swing=0 and Attack Level Swing and Break Level Swing are set to +
Amp 1 EG changes (Time) (AMS=Velocity, Intensity= a positive (+) value)
Amp 1 EG changes (Time)(AMS=Amp KTrk +/+, Intensity = a positive (+) value)(When Amp Keyboard Track “Low Ramp”= a positive (+) value, and “High Ramp” = a positive (+) value)
Note-onNote-off
Note-onNote-off
Note-onNote-off
Note-onNote-off
Note-onNote-off
Note-onNote-off
Low-pitched note played with Attack, Decay, Slope, and Release Time Swing at +
Softly played note with Attack, Decay, Slope and Release Time Swing at +
High -pitched note played with Attack, Decay, Slope, and Release Time Swing at –
Strongly played note with Attack, Decay, Slope and Release Time Swing at +
Strongly played note with Attack, Decay, Slope and Release Time Swing at –

225Sound modeLFO: LFO1
Refe
renc
e
Sl (Slope Time Swing)
This parameter specifies the direction of the effect that “AMS1”will have on “Slope”. With positive (+) values of “Intensity”, set-ting this parameter to + will allow AMS1 to lengthen the time,and setting it to – will allow AMS1 to shorten the time. With asetting of 0 there will be no effect.
Rl (Release Time)
This parameter specifies the direction of the effect that “AMS1”will have on “Release”. With positive (+) values of “Intensity”,setting this parameter to + will allow AMS1 to lengthen the time,and setting it to – will allow AMS1 to shorten the time. With asetting of 0 there will be no effect.
AMS2 (Alternate Modulation Source 2)
This is another alternate modulation source for the Amp EG. Seeabove “AMS1” parameters.
LFO: LFO1
In this and the next page you can make settings for the LFO thatcan be used to cyclically modulate the Pitch, Filter, and Amp ofeach oscillator. There are two LFO units for each oscillator. Bysetting the LFO1 or LFO2 Intensity to a negative (–) value forPitch, Filter, or Amp, you can invert the LFO waveform.
Waveform
This parameter selects the LFO waveform. The numbers thatappear at the right of some of the LFO waveforms indicate thephase at which the waveform will begin.
Frequency
Set the LFO frequency. A setting of 99 is the fastest.
00…99 Frequency rate.
Offset
This parameter specifies the central value of the LFO waveform.For example, with a setting of 0 as shown in the following dia-gram, the vibrato that is applied will be centered on the note-onpitch. With a setting of +99, the vibrato will only raise the pitchabove the note-on pitch, in the way in which vibrato is appliedon a guitar.
When “Waveform” is set to Guitar, the modulation will occuronly in the positive (+) direction even if you set “Offset” to 0.
Here are offset settings and pitch change produced by vibrato:
-99…+99 Offset value.
Key Sync
This parameter specifies if the LFO is synchronized to keystrokes.
On The LFO will start each time you play a note, andan independent LFO will operate for each note.
Off The LFO effect that was started by the first-played note will continue to be applied to eachnewly-played note. (In this case, Delay and Fadewill be applied only to the LFO when it is firststarted).
Fade
This parameter specifies the time from when the LFO begins toapply until it reaches the maximum amplitude. When “KeySync.” is Off, the fade will apply only when the LFO is firststarted.
Here is how “Fade” affects the LFO (when “Key Sync” is On):
00…99 Fade rate.
Delay
This parameter specifies the time from note-on until the LFOeffect begins to apply. When “Key Sync” is Off, the delay willapply only when the LFO is first started.
0…99 Delay time.
Frequency ModulationYou can use two alternate modulation sources to adjust thespeed of the LFO1 for the selected oscillator.
Triangle wave
Phase will changerandomly at each key-in
Sawtooth down Ø
Square wave
Sine wave
Guitar vibrato
Triangle 0
Triangle 90
TriangleRandom
Saw 0
Saw 180
Square
Sine
Guitar
ExponentialTriangle
ExponentialSaw Down
ExponentialSaw Up
Step Triangle – 4
Step Triangle – 6
Step Saw – 4
Step Saw – 6
Random1 (S/H):Conventional sample & hold (S/H) in which the level changes randomly at fixed intervals of timeRandom2 (S/H):Both the levels and the time intervals will change randomly.Random3 (S/H):The maximum level and minimum level will alternate at random intervals of time (i.e., a square wave with random period).
Random4 (Vector)Random5 (Vector)Random6 (Vector)These types cause Random 1–3 to change smoothly. They can be used to simulate the instability of acoustic instruments etc.
offset = –99 offset = 0 offset = +99Pitch
Pitch at note-on
Note-on Note-offFade
Delay

226 Sound modeLFO: LFO2
AMS1 (Alternate Modulation Source1)
Selects the source that will adjust the frequency of the selectedoscillator LFO1 (see “AMS (Alternate Modulation Source) list”on page 229). LFO1 can be modulated by LFO2.
Intensity (AMS1 Intensity)
This parameter specifies the depth and direction of the effectthat “AMS1(F)” will have. When this parameter is set to a valueof 16, 33, 49, 66, 82, or 99, the LFO frequency being can beincreased by a maximum of 2, 4, 8, 16, 32, or 64 times respec-tively (or decreased by 1/2, 1/4, 1/8, 1/16, 1/32, or 1/64 respec-tively).
For example, if “AMS1(F)” is Note Number, positive (+) valuesof this parameter will cause the oscillator LFO to speed up as youplay higher notes. Negative (–) values will cause the oscillatorLFO to slow down as you play higher notes. This change will becentered on the C4 note.
If “AMS1(F)” is set to JS +Y, raising the value of this parameterwill cause the oscillator LFO1 speed to increase as the joystick ismoved away from yourself. With a setting of +99, moving thejoystick all the way away from yourself will increase the LFOspeed by approximately 64 times.
-99…+99 Intensity value.
AMS2 (Alternate Modulation Source2)Intensity (AMS2 Intensity)
Make settings for a second alternate modulation source that willadjust the frequency of the oscillator LFO1 (see above “AMS1 (Alter-nate Modulation Source1)” and “Intensity (AMS1 Intensity)”).
Frequency MIDI/Tempo Sync
MIDI/Tempo Sync
This parameter enables/disables the LFO synchronization withSequencer 1 Tempo.
On The LFO frequency will synchronize to thetempo (MIDI Clock) of Sequencer 1. In this case,the values you specified for “Frequency” (seepage 225) and “Frequency Modulation” (seepage 225) will be ignored.
Base Note
When “MIDI/Tempo Sync” is On, these parameters set a notelength relative to “q (Tempo)” and the multiple (“Times”) thatwill be applied to it. These parameters will determine the fre-quency of the LFO1. For example if “Base Note” is q (quarternote) and “Times” is 04, the LFO will perform one cycle everyfour beats.
Even if you change the “q (Tempo)” setting of Sequencer 1, theLFO will always perform one cycle every four beats.
This parameter is not available when editing a Drum Kit.
Note Note value.
Times
This parameter is not available when editing a Drum Kit.
1...16 Beats before restarting the cycle.
LFO: LFO2
Here you can make settings for the LFO2, which is the secondLFO that can be applied to the selected oscillator. See “LFO:LFO1” for more information on the parameters value.
However in “Frequency Modulation”, the LFO cannot beselected as a modulation source in “AMS1” or “AMS2.”
Effects: “B” FX Config
This page allows you to select the effects for the Sound (BGroup). The effect types and the FX matrix are the same seen forthe Style Play mode (see “Effects: A/B FX Configuration” onpage 119 of the User’s Manual).
FX Name
Use this pop-up menu to choose one of the available effects. Fora list of the available effects, see “Effects” on page 351.
FX parameters
All other parameters in this page are the same seen for the StylePlay mode (see “Effects: A/B FX Configuration” on page 119 inthe User’s Manual).
Send to Master
Use these parameters to set the level of the Sound signal goingfrom the Insert FX to the Master FXs.
0…127 Level of the sent signal.
Dry
Use this checkbox to mix the dry, direct Sound signal to the effects.

227Sound modeEffects: Master 1 / Reverb
Refe
renc
e
Effects: Master 1 / Reverb
In this page you can edit the effect assigned to the Master FX 1effect processor (usually Reverb). See “Effects” on page 357 formore information.
Effects: Master 2 / Chorus
In this page you can edit the effect assigned to the Master FX 2effect processor (usually Chorus). See “Effects” on page 357 formore information.
Page menu
Touch the page menu icon to open the menu. Touch a commandto select it. Touch anywhere in the display to close the menuwithout selecting a command.
Write Sound
Select this command to open the Write Sound dialog box, andsave all editing parameters to a Sound.
See “Write Sound dialog box” on page 228 for more information.
Solo Oscillator
Select this command to solo the selected oscillator, and mute theother oscillators. Select it again to unmute the other oscillators.
When this function is activated, the “Solo OSC [n]” indicator (n= oscillator number) blinks on the page header. While in this sit-uation, you can select a different oscillator to be soloed.
Swap LFO
Select this command to replace LFO1 with LFO2, and vice-versa.
Copy Oscillator
Select this command to copy all settings between oscillators. See“Copy Oscillator dialog box” on page 228 for more information.
Copy/Paste FX
Use this command to copy a single effect, or both effects of anFX group (A or B). See “Copy/Paste FX” on page 127 for detailedinstructions.
Copy Drum Kit
Select this command to copy the Drum Kit from a differentDrum Kit. See “Copy Drum Kit dialog box” on page 228 formore information.
Init Sound
Select this command to delete all parameters, and set them to adefault value.
Compare
When this command is checked, original Sound parameter valuesare temporarily recalled, to compare them with edited parameters.You cannot edit the Sound while you are in Compare mode.
While this function is on, the Compare indicator blinks on thepage header.

228 Sound modeWrite Sound dialog box
Write Sound dialog box
Open this window by selecting the Write Sound item from thepage menu. Here, you can save all Sound parameters to a Soundlocation in memory.
Warning: If you write over an existing Sound, the Sound will bedeleted and replaced by the one you are saving (“overwrite”).Please save on a storage device any User Sound you don’t want tolose.
Note: Drum Kits cannot be written over standard Sounds, nor viceversa.
Note: To save over a Factory Sound location, unckeck the “FactorySound Protect” command in the Global > Mode Preferences >Media page (see page 254).
Warning: When replacing a Factory Sound, please be warnedthat all Performance, STSs, Styles and Songs making use of itwill be modified as well. Use this feature with great care!
To restore the original data, please use the “Factory Restore” com-mand in the Utility page of the Media mode (see page 291 for moreinformation).
Name
Name of the Sound to be saved. Touch the (Text Edit) but-ton next to the name to open the Text Edit window.
Sound Bank
Target bank of Sounds. Use the VALUE controls to select a dif-ferent bank.
Sound
Target Sound location in the selected bank. Use the VALUE con-trols to select a different location.
Select…
Touch this button to open the Sound Select window, and select atarget location.
Copy Oscillator dialog box
Open this window by selecting the Copy Oscillator item fromthe page menu. Here, you can copy all settings between oscilla-tors.
From Sound
Touch this button to open the Sound Select window, and selectthe source Sound.
From Oscillator
Select the source oscillator to copy from.
To Oscillator
Target oscillator where to copy the source settings to.
Copy Drum Kit dialog box
Open this window by selecting the Copy Drum Kit item fromthe page menu. Here, you can copy settings from a range of keysof a Drum Kit.
From Drum Kit
Touch this button to open the Sound Select window, and selectthe source Drum Kit.
From Key
Select the source range of keys to copy from.
To Key
Target key. Settings are copied starting from this key, andupwards.

229Sound modeAMS (Alternate Modulation Source) list
Refe
renc
e
AMS (Alternate Modulation Source) list
Flt KTrk +/+ (Filter Keyboard Track +/+)
Flt KTrk +/– (Filter Keyboard Track +/)
Flt KTrk 0/+ (Filter Keyboard Track 0/+)
Flt KTrk +/0 (Filter Keyboard Track +/0)
Amp KTrk +/+ (Amp Keyboard Track +/+)
Amp KTrk +/– (Amp Keyboard Track +/–)
Amp KTrk 0/+ (Amp Keyboard Track 0/+)
Amp KTrk +/0 (Amp Keyboard Track +/0)
+/+ The direction of the effect will be determined bythe sign (positive or negative) of the “Ramp Low”or “Ramp High” setting.
+/– The direction of the effect will be determined bythe sign of the “Ramp Low” setting, and by theopposite sign of the “Ramp High” setting (50 for asetting of +50, and +50 for a setting of 50).
Off Do not use Alternate Modulation
Pitch EG Pitch EG
Filter EG Filter EG within the same oscillator
Amp EG Amp EG within the same oscillator
LFO1 LFO1 within the same oscillator
LFO2 LFO2 within the same oscillator
Flt KTrk +/+ (Filter Keyboard Track +/+) Filter keyboard tracking within the same oscillator
Flt KTrk +/– (Filter Keyboard Track +/) Filter keyboard tracking within the same oscillator
Flt KTrk 0/+ (Filter Keyboard Track 0/+) Filter keyboard tracking within the same oscillator
Flt KTrk +/0 (Filter Keyboard Track +/0) Filter keyboard tracking within the same oscillator
Amp KTrk +/+ (Amp Keyboard Track +/+) Amp keyboard tracking within the same oscillator
Amp KTrk +/ (Amp Keyboard Track +/) Amp keyboard tracking within the same oscillator
Amp KTrk 0/+ (Amp Keyboard Track 0/+) Amp keyboard tracking within the same oscillator
Amp KTrk +/0 (Amp Keyboard Track +/0) Amp keyboard tracking within the same oscillator
Note Number Note number
Velocity Velocity
Poly AT (Poly After Touch) Polyphonic After Touch (received/transmitted via MIDI or contained in Standard MIDI Files)
Channel AT (Channel After Touch) After Touch (Channel After Touch) (received/transmitted via MIDI or contained in Standard MIDI Files)
Joystick X Joystick X (horizontal) axis
Joystick +Y Joystick +Y (vertical upward) direction (CC#01)
Joystick Y Joystick Y (vertical downward) direction (CC#02)
JS+Y & AT/2 (Joy Stick +Y & After Touch/2) Joystick +Y (vertical upward) direction and After Touch (received/transmitted via MIDI or contained in Stan-dard MIDI Files)
JS–Y & AT/2 (Joy Stick Y & After Touch/2) Joystick Y (vertical downward) direction and After Touch (received/transmitted via MIDI or contained in Standard MIDI Files)
Assign. Pedal Assignable foot pedal (CC#04)
Ribbon Ctl. Ribbon controller (CC#16) (received/transmitted via MIDI or contained in Standard MIDI Files)
CC#18 CC#18
CC#17 CC#17
CC#19 CC#19
CC#20 CC#20
CC#21 CC#21
Damper Damper pedal (CC#64)
CC#65 Portamento switch (CC#65)
Sostenuto Sostenuto pedal (CC#66)
CC#80 CC#80
CC#81 CC#81
CC#82 CC#82
CC#83 CC#83
Tempo Tempo (tempo data from Sequencer 1 clock or external MIDI clock)
Velocity Plus Key On and Key Off Velocity are used
Velocity Exp Velocity with Exponential curve (higher velocity notes are even louder)
Velocity Log Velocity with Logarithmic curve (higher velocity notes are weaker than with the linear Velocity)

230 Sound modeAMS (Alternate Modulation Source) list
0/+ “Ramp Low” will have no AMS effect. The sign ofthe “Ramp High” setting will determine the direc-tion of its effect.
+/0 The sign of the “Ramp Low” setting will deter-mine the direction of its effect. “Ramp High” willhave no AMS effect.
JS +Y & AT/2 (Joy Stick +Y & After Touch/2)
The effect will be controlled by the joystick +Y (verticallyupward) and by after touch. In this case, the effect of after touchwill be only half of the specified intensity.
JS Y & AT/2 (Joy Stick –Y & After Touch/2)
The effect will be controlled by the joystick Y (vertically down-ward) and by after touch. In this case, the effect of after touchwill be only half of the specified intensity.
Note Number
Amp
Key Low Key High
AMS = Amp KTrk +/+AMS Intensity = positive (+) value
Ramp Low= +50
Ramp High= +50
Depth and direction of modulation
zero
+ max
- max
example of AmpKeyboard Track settings
AMS = Amp KTrk +/—AMS Intensity = positive (+) value
Depth and direction of modulation
zero
+ max
- max
AMS = Amp KTrk 0/+AMS Intensity = positive (+) value
Depth and direction of modulation
zero
+ max
- max
AMS = Amp KTrk +/0AMS Intensity = positive (+) value
Depth and direction of modulation
zero
+ max
- max

231Sampling modeEntering and exiting the Sampling mode
Refe
renc
e
The Sampling mode allows you to create new Samples, new Mul-tisamples and new synced Audio Grooves. You can load Sam-ples, Multisamples, Sounds and banks of Sounds from variousformats.
Pa900 can read common file formats, like WAV, AIFF and SF2files, and load data from Korg Trinity and Triton files.
To be used, Samples must be assigned to a Multisample or aDrum Kit. A Multisample allows you to arrange samples intoseparate zones of the keyboard. Drum Kits allows you to assign adifferent sample to each note of the keyboard, with up to sixdynamic layers per note.
Multisamples can then be assigned to Sounds. Sounds createdwith this function can be used as any ordinary Sound, andassigned to any track.
Another powerful feature of the Sampling mode is the TimeSlice, that lets you add realism to MIDI tracks by creating AudioGrooves.
Warning: When loading a “.SET” folder containing User PCMSamples, all existing User PCM Samples are deleted from memory.Save them before loading the folder, by selecting the “PCM” optionduring a Save All operation (see “Saving the full memory content”on page 285 of the User’s Manual).
To see if a “.SET” folder contains User PCM Samples, open it andlook for a “PCM” folder.
Hint: If you want to load new User PCM Samples without deletingthe ones already contained in memory, load single Sounds insteadof a “.SET” folder.
Entering and exiting the Sampling mode
• While in Sound mode, press the RECORD button to enter inSampling mode.
• While in Sampling mode, press the RECORD button to exit theSampling mode, and return to the Sound mode.
Creating new Sounds from the Samples
Here is how to create a new Sounds from new Samples and Mul-tisamples.
1. Create new Samples with the procedures described in thefollowing pages.
2. Select the Write command from the page menu to save theSample in edit. The Write Sample dialog box will appear(see “Write Sample dialog box” on page 243). Assign aname to the new Sample, and confirm saving.
3. After saving, you can load other files to create additionalSamples.
4. When you have created and saved all the needed Samples,press the MENU button and go to the “Multisample” sec-tion, to assign the Sample(s) to a Multisample. Assign eachSample to a different keyboard zone of the Multisample.
5. When finished editing the Multisample, select the Writecommand from the page menu. The Write Multisampledialog box will appear (see “Write MultiSample dialog box”on page 243). Assign a name to the new Multisample, andsave it to the internal memory.
6. Press RECORD to exit the Sampling mode and return tothe Sound mode.
7. Select an ordinary Sound similar to the one you want tocreate.
8. Press MENU and go to the “Basic: OSC Basic” page (seepage 206). Select one of the available layers, then select theRAM bank of Multisamples. Finally, select the new Multi-sample.
9. Select the Write Sound command from the page menu, andsave the Sound to an empty User location.
10. If you want so, assign the new Sound to a track, then selectthe “Write Performance”, “Write Current Style Settings” or“Write STS” command from the page menu, to save theSound to a Performance, Style Settings or STS.
Sampling mode

232 Sampling modeCreating new Drum Kits from the Samples
Creating new Drum Kits from the Samples
Here is how to create a new Drum Kits from new Samples.
1. Create new Samples with the procedures described in thefollowing pages.
2. Select the Write command from the page menu to save theSample in edit. The Write Sample dialog box will appear(see “Write Sample dialog box” on page 243). Assign aname to the new Sample, and confirm saving.
3. After saving, you can load other files to create additionalSamples.
4. When you have created and saved all the needed Samples,press RECORD to exit the Sampling mode and return tothe Sound mode.
5. Select a Drum Kit similar to the one you want to create.
6. Press MENU and go to the “DrumKit: Sample Setup(Drum Kits)” page (see page 210). Select a key and a layer,then select the RAM bank of Samples. Finally, select thenew Samples.
7. Select the Write Sound command from the page menu, andsave the Drum Kit to an empty User DK location.
8. If you want so, assign the new Drum Kit to a track, thenselect the “Write Performance”, “Write Current Style Set-tings” or “Write STS” command from the page menu, tosave the Drum Kit to a Performance, Style Settings or STS.
Hint: Drum Kits are better suited for the Drum or Percussiontrack. Assign them to the Style Settings.
Creating new Sounds from an AudioGroove
Creating an Audio GrooveAfter loading an Audio Groove, you must “slice” it to create a seriesof separate percussive Samples, a Multisample and a MIDI Groove.
1. Go to the Time Slice page. After creating a series of slices,use the Extend function to refine your groove.
2. Select the Write command from the page menu, to save thesliced Samples, a Multisample, a Sound and the MIDIGroove. Choose one of the User Sound locations. TheSound, Multisample, MIDI Groove and sliced Samples aresaved to the internal memory.
3. Press RECORD to exit the Sampling mode and return tothe Sound mode.
Assigning an Audio Grooves to a SoundYou can use the new Multisample and sliced Samples generatedfrom the Audio Groove in a new User Sound.
1. To access the new Multisample for use in a Sound, go to theSound mode.
2. Select an ordinary Sound. Press MENU and go to the“Basic: OSC Basic” page (see page 206). Select one of theavailable layers, then select the RAM bank of Multisamples.Finally, select the new Multisample.
3. Select the Write Sound command from the page menu, andsave the Sound to an empty User location.
Assigning the Audio Groove to Styles or PadsSounds based on the Audio Groove can be used in Styles orPads.
1. Assign the new Sound to a Style track (preferably, theDrum or Percussion track) or to a Pad track, then select the“Save Current Style Perf.” or “Write Pad” command fromthe page menu, to save the Style Settings or the Pad.
2. Use the “Import: Import Groove” function in the Style/PadRecord mode (see page 157) to import the generated MIDIGroove to the Style track you assigned the new Sound to.By playing this MIDI Groove with the new Sound, you’ll beable to play the original audio groove on the keyboard.
Warning: Generated MIDI Grooves will be deleted whenturning the instrument off. Import them to a Style trackbefore turning the instrument off.

233Sampling modeEdit menu
Refe
renc
e
Edit menu
From any page of the Sampling mode, press the MENU buttonto open the Sampling edit menu. This menu gives access to thevarious Sampling edit sections.
When in the menu, select an edit section, or press EXIT to exitthe menu and return to the Sample Edit page. To return to thispage, you can also select the Sample Edit menu item.
Each item in this menu corresponds to an edit section. Each editsection groups various edit pages, that may be selected by touch-ing the corresponding tab on the lower part of the display.
Sampling: Edit
This page allows you to cut, trim or normalize a sample, as wellas edit the loop points. The sample can played on the full key-board.
SM (Sample)Selected sample.
Waveform displayThis is the graphical display of the selected sample waveform,i.e., the one you can hear when playing the keyboard. The areaincluded between the Start and End points is highlighted (darkbackground).
Parameters
Start (Sample Start)
This is the sample start point (in samples). You may edit thispoint, as well as the End point, to shorten the sample. Changingthe Sample Start cuts out the attack portion of the sound.
Note: When moving the “Start” point forward, and reach the“Loop Start” point, this latter is also moved forward.
Warning: When saving the edited sample (Write Sample opera-tion), the segments exceeding the Start and End points are perma-nently removed.
Loop Start
Note: This parameter has no effect, unless you don’t turn the loopon. Use the “Loop On” parameter on the “Sampling: Loop Edit”page to turn the loop on (see page 235).
Use this parameter to adjust the Loop Start point. When youadjust this parameter, an audible click may appear, due to a pitchand/or level mismatch between the starting and ending points ofthe loop. Move the Loop Start and Loop/Sample End point, sothat the click can no longer be heard.

234 Sampling modeSampling: Loop Edit
When editing audio grooves, the Loop Start should match theSample Start point. This parameter usually differs from the Sam-ple Start in ordinary sounds (i.e., a guitar, a piano, a voice…).
End (Sample/Loop End)
This is the sample and loop end point (in samples). You may editthis point, to shorten the sample.
Warning: When saving the edited sample (Write Sample opera-tion), the segments exceeding the Start and End points are perma-nently removed.
Use Zero
If this parameter is turned on, when you move the Start, LoopStart and End points, the selection fall on the nearest zero-cross-ing point (i.e., points where the waveform crosses the x-axis, andgoes from negative to positive, or from positive to negative val-ues). This will make loops more accurate, and will reduce therisk of “clicks”.
OrigNote (Original Note)
Original pitch of the sampled note. While this parameter has noeffect on sound, it will be useful to identify the original pitch ofthe sample and when assigning a sample to the multisample.
For example, if you sample a C4, set this parameter to “C4”.When the sample will be assigned to a keyboard zone of the mul-tisample, it will be transposed (if needed) according to thisparameter, to avoid a change of the original pitch.
ZoomUse these buttons to change the size of the waveform shown inthe diagram. When a button is greyed-out, it means the maxi-mum or minimum value has been reached.
Increase the vertical size.
Decrease the vertical size.
Increase the horizontal size.
Decrease the horizontal size.
Full zoom in.
Full zoom out.
Changing the sample length and findinggood-sounding loop pointsTo adjust the sample length and loop points, check the “LoopOn” parameter, then use the “Start”, “Loop Start” and “End”parameters to create a fine sounding cycling loop.
For example, you may have sampled an audio groove of anexceeding length. Use the “End” parameter to cut the exceedingportion at the end of the sample, and adjust the starting point ofthe loop using the “Start” or “Loop Start” parameters.
Usually, checking the “Use Zero” parameter is a big help, to avoidthe loop clicks due to level mismatches.
Sampling: Loop Edit
The loop is a cycling portion of a sampled sound. It is a tech-nique used to reduce the sampling time, cycling a portion of thesound to create the sustain phase of the sound. After the attackstage, most sounds repeat the same waveform during their sus-tain stage. You may adjust the Loop Start point with the “LoopStart” parameter, and the Loop End point (always matching theSample End point) using the “End” parameter.
This page lets you fine tune the loop points, by watching at theLoop End and Loop Start points matching at the center of thediagram. A good-sounding loop is shown as a continuous, non-breaking line.
SM (Sample)Selected sample.
Loop diagramThis diagram shows the “End” (Loop End) point on the left half,and the “Loop Start” point on the right half of the screen. Use the“End” and “Loop Start” parameters to adjust the loop.
Parameters
Start
See “Start (Sample Start)” on page 233.
Loop Start
See “Loop Start” on page 233.
End
See “End (Sample/Loop End)” on page 234.
Length
Sample End (E)Sample Start (S)
Loop
Loop End (E)Loop Start (L)

235Sampling modeSampling: Sampling Info
Refe
renc
e
Use Zero
See “Use Zero” on page 234.
Loop Lock
This fixes the length of the loop being edited.
Off The “Loop S.” and “End” parameters can beedited separately.
On When the “Loop S.” or “End” parameter is edited,the other one will be automatically adjusted sothat the distance between them (i.e., the looplength) does not change. This is convenient whenyou are creating a rhythm loop to match a spe-cific tempo.
Loop On
Use this parameter to turn the loop on or off.
On The loop is turned on, and the portion of soundincluded between the Loop Start and Loop Endpoints will cycle until a key is kept pressed. If the“Loop Start” point matches the “Start” point, thewhole sample is cycled.
When the loop is turned on, a vertical yellow line,showing the loop point, appears in the waveformdisplay.
Off The loop is turned off. The sound will play fromthe Sample Start to the Sample End point onlyonce, even if you keep a key pressed on the key-board.
CrossfadeWhen looping the pitched sample of a complex sound such asstrings or woodwinds to make the sound sustain, it is necessaryto create a long loop to preserve the rich character of the sound.Crossfade Loop can be used to minimize the difference in pitchand level between the beginning and ending of the loop region,to create a natural-sounding loop. In order to solve such prob-lems, Crossfade Loop causes the sound to change gradually fromthe end to the beginning of the loop.
In practice, here is how it works. A specific length (the “Cross-fade Length” value) of the waveform immediately before thebeginning of the loop is taken and mixed with the end portion.At this time, the waveform level of the portion immediatelybefore the end (the length specified by “Crossfade Length”) willgradually decrease, and the waveform level immediately beforethe beginning of the loop will gradually increase as the two aremixed.
When the “Loop On” parameter is checked, and the “Start” and“Loop S.” parameters have different values, the “Crossfde” buttonbecomes available.
When you touch the Crossfade button, the Crossfade Loop dia-log box appears:
Crossfade Length
In “Crossfade Length,” specify the length of the sample that youwish to crossfade. You can enter it either as the number of sam-ples, or a percentage (%). If you set this as a percentage, thenumber of samples will be calculated automatically.
If you set this to 50%, crossfade will be performed on the secondhalf of the region between loop start and loop end.
The “Crossfade Length” cannot be greater than the smallerlength between the Sample Start – Loop Start points, or the LoopStart – Sample End points.
Curve
Set “Curve” to specify how the volume will change in the cross-faded region.
Linear The volume will change linearly.
Power The volume will change non-linearly. Sometimesa setting of Linear will produce the impressionthat the volume has dropped in the middle of thecrossfade curve. In such cases, use Power.
Sampling: Sampling Info
Use this page to see detailed info on the sample in edit. Generalinformation for the RAM memory is also available.
SM (Sample)Selected sample.
Sampling Info
Samples
Number of samples in memory.

236 Sampling modeTime Slice
Drum Samples
Number of drum samples in memory.
Multisamples
Number of multisamples in memory.
Available Memory
RAM Bank
Pa900 comes with 192MB of Sample RAM. This is the maximumamount of Sample data that can be loaded or recorded.
Mono Time
Remaining sample memory (in seconds). This value is given formono samples. With stereo samples, this time has to be halved.
Bytes
Remaining memory for sampling (in Bytes). This value is givenfor mono samples. With stereo samples, this time has to behalved.
Sample Info
Selected Samples
Size of the selected sample (in samples).
Samples
Total size of the samples in memory (in samples).
Sampling Frequency
Sampling frequency of the selected sample (in Hertz).
Time Slice
The Time Slice function lets you transform a rhythm audiogroove in a series of single percussive samples, to be assigned tothe Drum or Percussion track of a Style or a Song.
How timeslice worksAnalyzing and processing. This function detects the attacks (e.g.,kick and snare) inside a rhythm audio groove (a sample thatloops a drum pattern), and automatically divides the audiogroove into individual percussive samples.
The divided percussive samples will be automatically assigned todifferent keys in a multisample, and the multisample to a Sound.
Within the generated multisample, a separate sample is assignedto a different note on the keyboard, starting from C#3. By play-ing an ascending chromatic scale with this multisample, youcould recreate the original audio groove.
A MIDI Groove will also be created, containing a sequence ofnotes triggering the sliced percussive samples in the same orderas in the original audio groove (i.e., it plays an ascending chro-matic scale starting from C#3).
When you will import this MIDI Groove to the percussive trackof a Style (see “Import: Import Groove” on page 157 of the User’sManual), this sequence will let you adjust the groove’s tempowithout affecting the pitch of the percussive samples.
In addition to changing the groove’s tempo without affecting itspitch, this lets you do the following:
• change the order in which notes are played
• change the timing
• edit the pattern notes to freely recreate a new rhythm loop.
Saving. After the slicing, you can select the Write commandfrom the page menu, to save the Sound based on sliced samples,and the MIDI Groove containing the corresponding MIDIsequence.
• The Sound will be saved to the selected location in the Userarea of the internal memory. You will be able to select it as anordinary Sound, and assign it to the Drum or Percussion track ofa Style.
• The Multisample will be automatically saved to the next freeavailable location.
• Samples will be permanently saved to the internal memory.
• The MIDI Groove will be temporarily saved to the internalmemory, and will be available only when using the Import func-tion of the Style Record mode (see “Import: Import Groove” onpage 157 of the User’s Manual).
Warning: All MIDI Grooves will be delete each time the Pa900 isturned off.

237Sampling modeTime Slice
Refe
renc
e
Ex.1 - Generating samples and MIDI Groove data:
Ex.2 - Varying the groove’s tempo
Ex.3 - Recombining MIDI notes and samples
Sample diagramThis diagram shows the sample waveform and the slices. Here ishow the sample diagram appears before the Slice:
… and the same diagram after the Slice:
A multisample, a program and MIDI Groove data will be created automatically
Original pattern
Generated MIDI Groove
Play in Style Play mode
Execute the Time Slice command
Kick Kick KickSnare Snare
120BPM
120BPM
Sample1 Sample2 Sample3 Sample4 Sample5
C3
Original rhythm sample
Note: Sliced samples and MIDI data are saved with a Write operation.
150BPM
90BPM
Played closer together, but pitch is unchanged
Played further apart, but pitch is unchanged
Note: To vary the groove’s tempo, you must first import the generated MIDI data into the Percussion track (Import function of the Style and Pad Record mode), and assign the new generated Sound to the Per-cussion track.Gaps between sliced samples, when slowing down the tempo, can be automatically filled by the Extend function, smoothing each sample’s tail.
Edit the MIDI data
Note: To recombine notes inside the generated MIDI sequence, you must first import the MIDI data in Style or Pad Record mode, by using the “Import” function. Then, use the Event Edit to change the note order.

238 Sampling modeTime Slice
Metronome Information
Meter
Use this parameter to specify the Meter of the original sample.
Measures
Use this parameter to specify the number of measures of theoriginal sample. Usually, you will load a groove 1- or 2-measureslong.
BPM
This parameter specifies the tempo (in Beats Per Minute) of theoriginal sample. Pa900 automatically calculates this value basedon the Start, End (see page 233), Meter and Measures parame-ters.
The BPM can be only adjusted to values lower than the one auto-matically calculated. This can be useful, for example, when theactual sample is shorter than the entered Meter and Measuresvalues.
In the above example, the actual groove lasts only up to the firsthalf of Measure 2. The recognized tempo is 130, while the realtempo is 100. Set the BPM value to 100, and a rest will be addedto the end of the groove, to allow it to loop seamlessly.
Time SliceSee “The Time Slice procedure” on page 239 for more information.
Release
Adjust the value of this parameter to change the number of rec-ognized attacks, by varying the speed needed to the Slice engineto start working again. For example, in the following example, ifthe Release value is too high (i.e., too long), the second attackmay be lost:
Note: After changing the Release value, you must select the Slicecommand again.
Threshold
This parameter varies the threshold over which the attacks arerecognized (i.e., the Time Slice sensitivity). If it is too low, weakerattacks may be ignored.
Note: After changing the Threshold value, you are not obliged toselect the Slice command again. The Slices value is immediatelychanged.
Attacks
This (non-editable) parameter shows the number of attacks rec-ognized. More than one attack may be recognized in a singleslice. Adjust the Release and Threshold parameters to change thenumber of recognized attacks.
Slices
This (non-editable) parameter shows the number of generatedslices, i.e. generated samples and notes in the midifile. To changethis value, edit the Release and Threshold parameters.
Note: You can have a maximum of 100 slices.
Slice
Select this command to execute the Slice after entering the TimeSlice page, or changing the Release value. This command is“ghosted” (i.e., non-selectable) if no sample has been recorded ofloaded yet.
The Time Slice operation is executed on the sample, from the“Start” to the “End” point set in the Sample Edit / Sample Recordsection.
Extend
See “The Extend procedure” on page 240 for more information.
When using a sliced groove with a tempo slower than the origi-nal, an annoying gap may be heard between a sample and thefollowing one. The Extend function allows you to fix this prob-lem by adding a “tail” to all samples, making their decaysmoother and more musical.
Note: You can use the Extend function only after a Time Sliceoperation.
Note: The Extend function increases the original sample size.
By
Use this parameter to set the length of the “tail” added to thesamples (in percentage). The higher this value, the greater thesize of the samples. A setting of 20-30% is usually suitable tomost grooves.
Caveat: With higher “By” values, the Extend function may addaudible artifacts.
Mode
This parameter specifies if the added “tail” must decay in a linearway, or sustain for a longer time and then fall suddenly.
Normal This option is most suitable for percussive soundwith a short (but not immediate) decay. The “tail”envelope is linear, and the level decays fast.
Meas.1 Meas.2
Before extending…
…and after extending…
Added “tail”

239Sampling modeThe Time Slice procedure
Refe
renc
e
Long This option is most suitable for cymbals, whosesound should be sustained up until the next note.The “tail” envelope is sustained and falls slowly,then falls suddenly next to the end.
Extend
Touch this button to execute the Extend command. After youselect it, it will return “ghosted”, meaning that you can’t select itagain. If you change any of the parameters in this page, it will beavailable again.
The Time Slice procedure
Before executing a Slice operation, you must record or load asample. Then, you may edit the sample on “Sampling: Edit”, thenexecute the Slice operation on this sample.
1. After recording or loading a sample, go to the Time Slicepage.
2. Pa900 automatically calculates the BPM parameter, basedon the given Meter and Measures values. If you know thesedata, set the Meter, Measures and BPM (Beats Per Minute)parameters. This would make the slicing more accurate.
3. Select the “Slice” command.
The original sample will be sliced, and each generated sam-ple assigned to a different key:
A MIDI Groove with the original pattern will also begenerated. The screen will change, to show slices sepa-rated by vertical lines:
4. Test the generated sliced drum kit on the keyboard.
• To test the full pattern at different speed, play a note fromC2 (half speed) to C3 (original speed). See table above.
• To test the single sliced samples, play notes from C#3 andabove. If you play a full chromatic scale, the original pat-tern will be sounded.
Hint: If too many samples have been generated, and the key-board can’t fit them all, use the OCTAVE buttons to trans-pose the keyboard, and listen to samples exceeding the upperlimit.
5. If the Slice didn’t produce satisfactory results, adjust theRelease parameter. If this does not produces good results,try adjusting the Threshold parameter, too. After adjustingthe Release parameter, you must execute the Time Sliceagain.
6. Since a tempo value rounding happens when making aTime Slice operation, and the loop may not be accurate,you may need to adjust both the “Start” and “End” parame-ters of the “Sampling: Edit” page, to make the groove loopflawlessly. After editing these parameters, you must executethe Time Slice again.
Go on experimenting different settings! Editing an audiogroove is a pure matter of experimentation.
7. When the Slice is completed, you can save the sliced sam-ples and the MIDI Groove, or use the Extend function toimprove the quality of the slices.
Select the Write command from the page menu. The WriteSlice dialog box will appear (see “Write Slice dialog box” onpage 244). Assign a name to the new Sound, and save it toan User Sound location.
A MIDI Groove with the same name will also be saved tothe internal memory. Be warned, that this area will bedeleted when turning the instrument off. Convert it to aninternal Style pattern, by using the Import function of theStyle or Pad Record mode, before turning the instrumentoff.
• To improve the quality of the slices, use the Extend func-tion (see “Extend” below).
8. After saving, you may press RECORD to exit the Samplingmode.
9. After exiting the Sampling mode, you may load the gener-ated MIDI Groove by using the Import function of theStyle Record mode (see “Import: Import Groove” onpage 157 of the User’s Manual for more information).
Key Assigned sample/pattern Speed %
C2 Full pattern cycling at half the speed 50%
C#2
Full pattern cycling at various speeds
53%
D2 56%
D#2 60%
E2 63%
F2 67%
F#2 71%
G2 75%
G#2 80%
A2 84%
A#2 89%
B2 94%
C3 Full pattern cycling at the original speed 100%
C#3 and above
Separate sliced samples–
C2…B2: Full pattern at a slower speed
Separate sliced samples
C3: Full pattern at the original speed

240 Sampling modeThe Extend procedure
The Extend procedure
1. Set the By parameter, according to the tempo of the grooveyou will use. If you will slow down the groove very much,assign higher values to this parameter, otherwise you mayassign lower values.
2. Select the Extend Mode. “Long” is more suitable for cym-bals.
3. Select the Extend command.
4. After the Extend operation is complete, test the full patternat different speed, by playing notes from C2 (half speed) toC3 (original speed). See table on page 239.
5. If the Extend didn’t produce satisfactory results, change thesettings. Any previously made change will be deleted.
6. When the Extend is completed, you can save the sliced andextended samples and the resulting MIDI Groove to theinternal memory.
Select the Write command from the page menu. The WriteSlice dialog box will appear (see “Write Slice dialog box” onpage 244). Assign a name to the new Sound, and save it toan User Sound location.
A MIDI Groove with the same name will also be saved to areserved area of the internal memory. Be warned, that thisarea will be deleted when turning the instrument off. Con-vert it to an internal Style pattern, by using the Importfunction of the Style Record mode, before turning theinstrument off.
7. After saving, you may press RECORD to exit the Samplingmode.
8. After exiting the Sampling mode, you may load the gener-ated MIDI Groove by using the Import function of theStyle or Pad Record mode (see “Import: Import Groove” onpage 157 of the User’s Manual for more information).
Multisample: Edit MS
The Multisample is a way of organizing several samples on thekeyboard. Each sample is assigned to a Keyboard Zone (orIndex), with a higher and a lower limit.
A Multisample is then assigned to a Sound (see “Basic: OSCBasic” on page 206), where it is enriched with several perfor-mance parameters, like Amplitude Envelope, LFO, Filters, etc…
MS (MultiSample)Touch this area to open the Choose Multisample window, andselect one of the available multisamples in memory.
Keyboard diagramThis diagram shows the selected Index/Zone (highlighted), andits Original Note (in red). Use the big “–” and “+” button on itsside to scroll the diagram one octave lower or upper.
Multisample Setup
Index
Index number of the selected Zone of the multisample / totalnumber of Zones in the multisample. A Zone always corre-sponds to a single sample.
When you play a note on the keyboard, the corresponding indexnumber is automatically selected.
Sample Number / Name
Number / name of the sample assigned to the selected zone ofthe multisample.
Original Note
Use this parameter to automatically transpose the assigned sam-ple on the keyboard. When you play this note, the sample soundsexactly as it was recorded.
At first, it matches the “OrigNote (Original Note)” valueassigned when editing the sample (see page 234). This will speedup the programming.
The note set with this parameter is also shown in red in the vir-tual keyboard diagram.
Level
Relative level of the selected zone. This value can only be nega-tive.

241Sampling modeMultisample: Key Assign
Refe
renc
e
Pitch
Fine tuning of the selected sample in cents (1 cent = 1/100 of asemitone).
From … To
Range of the selected Zone (or Index). The minimum size is onekey. When reducing the range of a zone, the adjacent one is auto-matically increased to fill the gap.
Hint: To create a silent zone, create it and assign no sample to it.
Buttons
Insert
Touch this button to split the current zone in half, and create anew zone (Index) on the left of the selected one.
Add
Touch this button to add a new zone (Index) after the last one.
Delete
Touch this button to delete the selected Zone/Index. The zoneon the right of the deleted one is automatically extended to fillthe gap.
Multisample: Key Assign
Use this page to see and edit the samples assigned to each Key-board Range/Index in the multisample. This page gives a betterdisplay of the assigned samples and their range on the keyboard.
MS (MultiSample)See “MS (MultiSample)” on page 240.
Sample listList of samples assigned to the selected multisample. Use the bigbutton with an arrow on top and to the bottom of the list toscroll the list up or down.
Keyboard rangesNext to each sample name the low and high Zone limits appear.Edit these values to change the Zone range. The Original Note isshown in red.
Page menu
Touch the page menu icon to open the menu. Touch a commandto select it. Touch anywhere in the display to close the menuwithout selecting a command.
Write
Select this command to open the Write Sample, Write Multisam-ple or Write Slice dialog box (depending on the page you are in),and do the following:
• Write Sample: Saves the sample to the internal memory. See“Write Sample dialog box” on page 243, for more information.
• Write Multisample: Saves the multisample to the internalmemory. See “Write MultiSample dialog box” on page 243 formore information.
• Write Slice: After a Time Slice opration, saves the Sound, Mul-tisample and the sliced Samples to the internal memory. See“Write Slice dialog box” on page 244 for more information.
Delete
Select this command to open the Delete Sample or Delete Multi-Sample dialog box (depending on the page you are in):
• Delete Sample: Deletes one or all Samples and Multisamplesfrom the internal memory. See “Delete Sample dialog box” onpage 244 for more information.
• Delete MultiSample: Deletes a Multisample, or all Samples andMultisamples from memory. See “Delete Multisample dialogbox” on page 244 for more information.
Normalize
Select this command to automatically rescale the level of theselected sample. Peaks will be raised to -0dB (i.e., maximum vol-ume before clipping), while the remaining parts of the samplewill be proportionally raised.
Normalization optimizes the sample’s level relative to other sam-ples, making all samples sound more uniformly. It also helpsoptimizing signal/noise ratio, by preventing further stages ofamplification from increasing any residual noise.
Cut
Select this command to cut the selected part of the sample(inside the “Start” and “End” points).
Trim/Crop
Select this command to cut all parts of the sample out of theselected range (i.e., out of the “Start” and “End” points).
Samplelist
Keyboard ranges

242 Sampling modePage menu
Select All
Use this command to select the whole sample.
Init Multisample
Only available in the Multisample page. Select this command tocreate a new, blank multisample. Only one Zone will be avail-able, with no sample assigned.
Load Sample
Use this command to load single samples (mono or stereo), inKSF, AIFF or WAVE format.
Warning: By loading new samples, the sample currently in editwill be lost if not saved. Before loading, use the Write command tosave the sample in edit, if not yet saved, to the internal memory.
The samples are loaded to the editor. Before leaving the Sam-pling mode, use the Write command to save any unsaved sampleto the internal memory as a New Sample.
• “KSF” is Korg’s native sample format, used by the Trinityand Triton series of workstations, as well as the Pa-seriesarrangers. The file name must have the “.KSF” extension.
• “AIFF” is the Apple Mac’s preferred format for audio. Thefile name must have the “.AIF” extension.
• “WAVE” is the Microsoft Windows preferred format foraudio. The file name must have the “.WAV” extension.
Note: You can only load samples in a 8 or 16-bit resolution, and asampling frequency rate from 11,025 to 48,000Hz. Loaded samplesalways preserve their original resolution.
Note: If the sample exceeds the maximum size allowed by thePa900 (1,048,576 samples, corresponding to 1 Megasample, eithermono or stereo), it will be truncated. A warning will appear in thedisplay.
Hint: While in this window, you can use the Search function,allowing for searching a Sample file in the various media.
Import
Use the Import command to import Sounds and Multisamples(including the contained Samples) in formats other than thenative Pa-Series format.
With this command, you can import the following formats:
• “PCG” is Korg’s native Program format, used by the Tritonseries of workstations. The file name has the “.PCG” exten-sion. Note that Drum Kits cannot be imported.
When importing a PCG file, you can choose between a sin-gle Program or a whole bank:
Choose Program to choose a single Program (correspond-ing to a Pa-Series Sound); touch the Program number anddial in the corresponding number. Choose a target Soundlocation where to load the imported Program.
Choose Bank to import all the Programs from the selectedbank. Touch the Sound Bank name to choose a target bankwhere to load the imported Programs.
• “KMP” is Korg’s native multisample format, used by theTrinity and Triton series of workstations. The file name hasthe “.KMP” extension.
• “SF2” is a sound bank format by Creative Labs. The filename has the “.SF2” extension. Multisample data areimported. Due to the deep differences with Korg’s own fomat,some Instruments from the SF2 file could not be imported(for example, Instruments with overlapping zones).
When importing an SF2 file, you can choose between a sin-gle Multisample or the whole bank:

243Sampling modeWrite Sample dialog box
Refe
renc
e
Choose MultiSample to choose a single Multisample (i.e.,SF2 Instruments); touch the Multisample number and dialin the corresponding number.
Choose Complete bank to import all the Multisamplesfrom the selected bank.
Check Override Sample Names if you want to assign theSample names a progressive number. In this case, whenimporting a Multisample whose name is, for example,“Piano”, you will have all Samples renamed as “Piano_001”,“Piano_002”, and so on.
Hint: If you get a messages warning there isn’t enough mem-ory to load all Samples or resources, return to the main Sam-pling page and choose the Delete command to clean theSample memory, then retry. Please note that importing singleMultisamples is the safest way to avoid filling the memorywith unnecessary data.
Imported Sounds and Multisamples are automatically stored inthe internal memory, and will not be lost when turning theinstrument off.
Note: While Pa900 and Triton share most of their internal Multi-samples, some of them may differ. While reading a PCG file, Pa900tries to use exactly the same Multisamples as in Triton. If this isnot possible, it looks for a similar Multisample. If this too is notpossible, an <empty> Multisample will be selected. Enter theSound mode, and select a Multisample suitable for the importedProgram.
Note: Not all Triton’s PCG data are imported. Insert FX, EQ,Arpeggio, Combi, Global and Drum Kit data are not loaded.
Note: You cannot import Drum Kits.
Note: Multisample may contain various Samples. They areassigned to the same keys as in the original file.
Hint: When importing a KMP file, take note of the selected Multi-sample name; you will need it in Sound mode, when assigning theMultisample to a new Sound.
Hint: While in this window, you can use the Search function,allowing for searching a Sample file in the various media.
Export
Depending on wheter you are in the “Sample Edit / SampleRecord” or “Multisample” section, this command allows you toexport a sample in one of two popular computer audio file for-mats (WAVE and AIFF), or a multisample in a Korg “.KMP” file.
See “Export Sample page” on page 245, or “Export Multisamplepage” on page 245 for more information.
Exit from Record
Choose this command to exit from the Sampling mode.
Write Sample dialog box
Open this dialog box by selecting the Write command from thepage menu, while in the Sample Edit / Sample Record section. Inthis dialog box you can save the sample to the internal memory,so that it will be preserved when Pa900 is turned off.
To assign a different name to the sample, touch the (TextEdit) button to open the Text Edit window.
In case you are saving a percussive sample, choose a Drum Sam-ple family to be assigned to.
Select an option to choose a memory location where to save thesample:
• Select “Save as a new Sample” to save to a new location.
• Select “Save to” to overwrite an existing location. Warning:The older sample at the same location will be deleted!
Write MultiSample dialog box
Open this dialog box by selecting the Write command from thepage menu, while in the Multisample section. In this dialog boxyou can save the multisample to the internal memory. Multisam-ples are a way to organize samples on the keyboard, and are usedby Sounds as their basis.
To assign a different name to the multisample, touch the (Text Edit) button to open the Text Edit window.
Select an option to select a memory location where to save thesample:
• Select “Save as a new MultiSample” to save to a new loca-tion.
• Select “Save to” to overwrite an existing location. Warning:The older multisample at the same location will be deleted!

244 Sampling modeWrite Slice dialog box
Write Slice dialog box
Open this dialog box by selecting the Write command from thepage menu, while in the Time Slice page. In this dialog box youcan save the Sound, sliced Samples and Multisample generatedby the Time Slice function, together with the generated MIDIGroove.
The Sound will be saved to the selected User bank location in theinternal memory. The Multisample will be saved to a free loca-tion in the same memory. Samples will be saved to the internalmemory.
Note: The MIDI Groove is automatically saved in a reserved, tem-porary location, and is automatically deleted when turning theinstrument off. So, import it (by using the “Import: Import Groove”function in Style or Pad Record mode, see page 157), before turn-ing the instrument off.
Warning: The older Sound at the target location will be deleted!
Name
To assign a different name to the Sound, touch the (TextEdit) button to open the Text Edit window.
Sound Bank
Target bank of Sounds. Each bank corresponds to one of theSOUND buttons. You can use the VALUE dial to select a differ-ent bank.
Sound
Target Sound location in the selected bank. You can use theVALUE dial to select a different location.
Select…
Touch this button to open the Sound Select window, and select atarget location.
Delete Sample dialog box
Open this dialog box by selecting the Delete command from thepage menu, while you are in any page of the Sample Edit/SampleRecord section.
Selected
Select this command, and select a sample number, to delete justone of the samples from the internal memory.
Not assigned to any Multisample/Drumkit
Select this command to delete only samples not yet assigned to aMultisample or Drum Kit.
Note: Use this option with care, since you may delete samples youwould like to preserve, that have not yet been assigned to a multi-sample or drumkit. Use it only when you are sure all desired sam-ples have been assigned to a multisample or drumkit.
All Samples, Multisamples, Drum Samples
Select this command to delete all samples, multisamples anddrum samples from the internal memory. This operation com-pletely resets the RAM, and may be used to “clean-up” any trou-ble.
Delete Multisample dialog box
Open this dialog box by selecting the Delete command from thepage menu, while you are in any page of the Multisample sec-tion.
• Select “Selected”, then a multisample number, to delete justone of the multisamples from memory.
Check the “Delete Unassigned Samples” option, to alsodelete all samples not assigned to a different multisample.By checking this option, all samples assigned to the multi-sample you are deleting, and all samples not assigned to adifferent multisample, will be deleted.
Note: Use this option with care, since you may delete samplesyou would like to preserve, that have not yet been assigned toa multisample or drumkit. Use it only when you are sure all
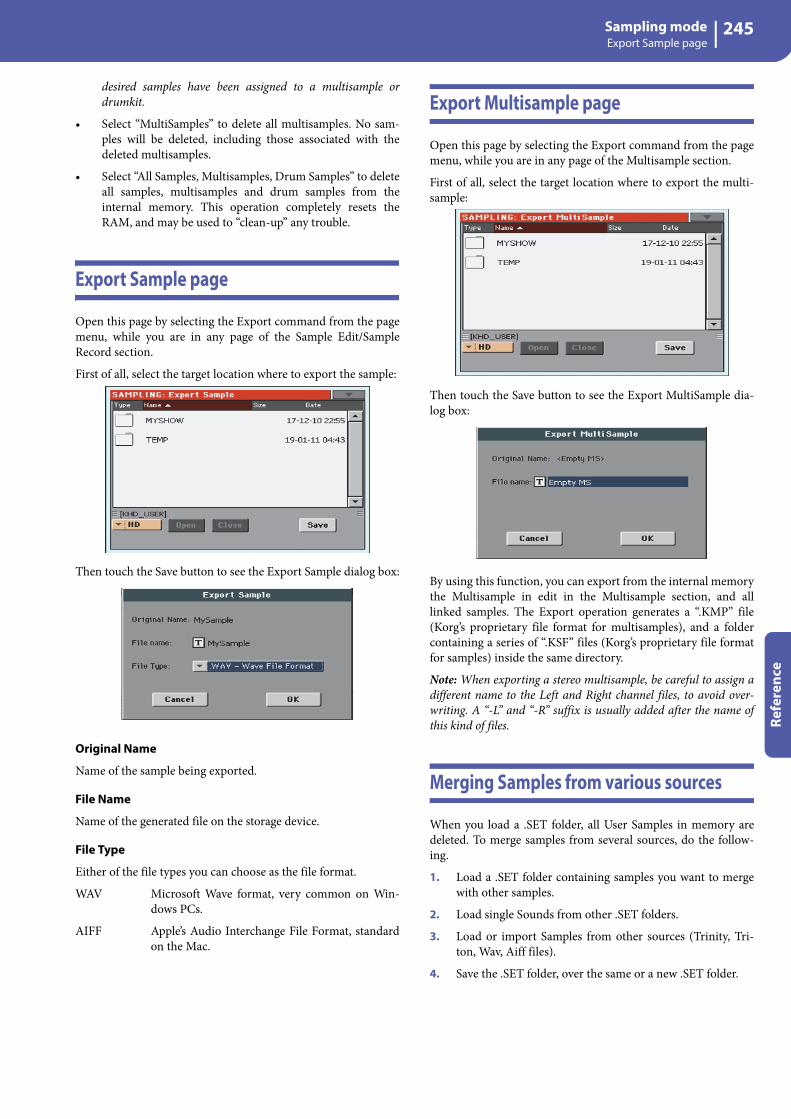
245Sampling modeExport Sample page
Refe
renc
e
desired samples have been assigned to a multisample ordrumkit.
• Select “MultiSamples” to delete all multisamples. No sam-ples will be deleted, including those associated with thedeleted multisamples.
• Select “All Samples, Multisamples, Drum Samples” to deleteall samples, multisamples and drum samples from theinternal memory. This operation completely resets theRAM, and may be used to “clean-up” any trouble.
Export Sample page
Open this page by selecting the Export command from the pagemenu, while you are in any page of the Sample Edit/SampleRecord section.
First of all, select the target location where to export the sample:
Then touch the Save button to see the Export Sample dialog box:
Original Name
Name of the sample being exported.
File Name
Name of the generated file on the storage device.
File Type
Either of the file types you can choose as the file format.
WAV Microsoft Wave format, very common on Win-dows PCs.
AIFF Apple’s Audio Interchange File Format, standardon the Mac.
Export Multisample page
Open this page by selecting the Export command from the pagemenu, while you are in any page of the Multisample section.
First of all, select the target location where to export the multi-sample:
Then touch the Save button to see the Export MultiSample dia-log box:
By using this function, you can export from the internal memorythe Multisample in edit in the Multisample section, and alllinked samples. The Export operation generates a “.KMP” file(Korg’s proprietary file format for multisamples), and a foldercontaining a series of “.KSF” files (Korg’s proprietary file formatfor samples) inside the same directory.
Note: When exporting a stereo multisample, be careful to assign adifferent name to the Left and Right channel files, to avoid over-writing. A “-L” and “-R” suffix is usually added after the name ofthis kind of files.
Merging Samples from various sources
When you load a .SET folder, all User Samples in memory aredeleted. To merge samples from several sources, do the follow-ing.
1. Load a .SET folder containing samples you want to mergewith other samples.
2. Load single Sounds from other .SET folders.
3. Load or import Samples from other sources (Trinity, Tri-ton, Wav, Aiff files).
4. Save the .SET folder, over the same or a new .SET folder.

246 Global modeOverview on the Global mode
The Global mode is where you can set global functions. Thismode overlaps the current operating mode (Style Play, SongPlay, Sequencer, Sound).
Overview on the Global mode
The Global mostly contains a series of global parameters appliedto the whole instrument (or to each separate operating mode) asa whole, that are automatically written to memory after editing.Examples of global parameters are the Master Tuning or thePower Management.
Global mode also contains parameters that are applied to theinstrument as a whole, but can be saved as a “preset”, that canlater be loaded to change all parameters at once. Examples of thiskind of parameters are the MIDI channel assignment, saved intothe MIDI Presets, or the Master EQ settings, saved into the Mas-ter EQ Presets.
Parameters in the Global mode, either automatically memorizedor saved to a preset, are opposed to “local” parameters that youcan access in the other operating modes. Examples of localparameters are the Sounds assigned to a track or the functionassigned to an Assignable Switch, both saved into a Performanceor STS (two types of preset containing musical data relevant tothe selected operating mode).
Note: Saving or loading a “.SET” folder may also save or load theGlobal file. Parameter changing may be avoided by turning theLock on for any single parameter (or groups of parameters in theLock page of the Global mode, see “General Controls: Lock” onpage 249).
Main page
There is no main page in the Global edit mode. When pressingEXIT, you exit the Global mode, and the underlying operatingmode in the background is recalled.
Edit menu
From any page of the Global mode, press the MENU button toopen the Global edit menu. This menu gives access to the vari-ous Global edit sections.
When in the menu, select an edit section, or press EXIT to exitthe Global mode.
When in a page, press EXIT to go back to current operatingmode in the background (Style Play, Song Play, Sequencer,Sound).
Each item in this menu corresponds to an edit section. Each editsection groups various edit pages, that may be selected by touch-ing the corresponding tab on the lower part of the display.
Note: The Global mode is not available while in Record mode(Style Record, Pad Record, Song Record, Sampling).
Edit page structure
All editing pages share some basic elements.
Edit mode
This indicates that the instrument is in Global mode.
Edit section
This identifies the current edit section, corresponding to one ofthe items of the edit menu (see below).
Page menu icon
Touch this icon to open the page menu (see below).
Parameters area
Each page contains various parameters. Use the tabs to selectone of the available pages. For detailed information on the vari-ous types of parameters, see sections starting below.
Tabs
Use tabs to select one of the edit pages of the current edit section.
Global mode
Edit mode Edit sectionPage menu icon
Parame-ters area
Tabs

247Global modeGeneral Controls: Basic
Refe
renc
e
General Controls: Basic
This page contains various general parameters, setting the statusof the keyboard, the fade in/out, and the accelerando/ritardando.
Metronome
Mode
Use this parameter to activate the metronome’s type of accent.
Normal No accent can be heard.
Accent The first beat of each measure is accented.
Bell A bell sound is heard at the first beat of each mea-sure.
Volume
Use this parameter to set the volume of the metronome.
0…127 Volume level.
Meter
Use this parameter to choose the meter (time signature) of theMetronome.
1/1…16/16 Selected Meter.
Global Reverb
Reverb Offset
This is the master offset for all reverbs. Use it to adjust reverbtails to the room where you are playing. Use negative valueswhen you are in a very reverberant room, positive values if theroom is too dry.
By using this global control, you are not obliged to change thereverb time in each single Performance, STS, Style Settings, orSong.
-50 Less reverb.
0 Standard reverb.
+50 More reverb.
Fade In/Out TimeThese parameters allows you to set the speed for the Fade In/Outfunction.
Fade In Time
Time for a full fade in (from zero to maximum volume), afteryou press the FADE IN/OUT button.
5…20 Fade time (in seconds).
Fade Out Time
Time for a full fade out (from maximum volume to zero), afteryou press the FADE IN/OUT button.
5…20 Fade time (in seconds).
Accelerando/RitardandoThese parameters lets you adjust the speed of the Accelerandoand Ritardando functions.
Step
Speed of the Tempo change (from 1 to 6). With higher values,the step change is greater, and the speed will change faster. Withlower values, the step change is smaller, and the speed willchange more slowly.
Curve
Accelerando/ritardando curves (from 1 to 3). Experiment thevarious options, to see the one that best fit your taste.
GlideGlide is a function you can assign to a footswitch. When thepedal is pressed, affected notes on Upper tracks are bent down,according to settings for the Pitch Bend on the same tracks.When the pedal is released, notes return to the normal pitch, atthe speed defined by the “Time” parameter.
To change Pitch Bend values for each Upper track, see the “PBSensitivity” parameter in the Style Play mode (see page 116)
Time
Time needed to notes affected by the Glide to return to the nor-mal pitch.

248 Global modeGeneral Controls: Interface
General Controls: Interface
This page contains parameters related to user interface.
Language
Language
Use this pop-up menu to select one of the available languages forthe on-screen keyboard.
Note: Some of the characters can only be used when editing Song-Book Entry names.
Change button
To apply the selected language to the onscreen keyboard, touchthis button and restart the instrument as described below.
How to select a language
1. Since Pa900 must be restarted at the end of this procedure,be sure to first save all unsaved data.
2. While in this page, select a language from the pop-upmenu.
3. The “Change” word will start flashing in red. Touch it.
4. A message will ask you to reboot the Pa900. Touch OK toclose the message window.
5. Set Pa900 to standby, then on again.
Background Color
Color
Use this parameter to choose a different color scheme for thedisplay.
Display Hold
On/Off
When this parameter is checked, if you open a temporary win-dows (like the Sound Select window), it remains in the displayuntil you press EXIT or an operating mode button. When it isnot checked, any temporary window closes after a certain time.
Program Change
Show
Check this parameter to show Program Change numbers next toSound names in the Sound Select window. By default, thisparameter is turned on.
Note: Program Change numbers are always shown in the variousTrack Info areas.
Track Activity
Show
Use this parameter to turn on/off the Track Activity display.When it is turned on, you can monitor events coming from thetracks or the MIDI inputs. Incoming events are shown by thecolor changing on each track’s label.
Auto Select
Style
When this parameter is checked, the latest selected Style isimmediately selected when pressing the STYLE button corre-sponding to the bank.
This way, you can assign your preferred Style to each controlpanel’s button, and select it just with a single press.
However, the Style Select window still appears when you pressone of the STYLE buttons corresponding to the bank, so you canselect a different item if desired.
Performance
When this parameter is checked, the latest selected Performanceselected in a bank is immediately selected when pressing thePERFORMANCE button corresponding to the bank.
This way, you can assign your preferred Performance to eachcontrol panel’s button, and select it just with a single press.
However, the Performance Select window still appears when youpress one of the PERFORMANCE buttons corresponding to thebank, so you can select a different item if desired.
Save
Touch this button to save the current Style and Performanceassignment. You will find the saved assignment when turningthe instrument on again.

249Global modeGeneral Controls: Lock
Refe
renc
e
General Controls: Lock
This page, split in more panes that can be selected by means ofthe corresponding side tabs, contains all the available locks.Locks prevent parameter values to be changed when choosing adifferent Performance, Style or STS.
Locks
All the available locks, listed below. Lock them to preventchanges due to selecting different elements. These locks are alsofound in various other pages, next to the locked parameter.
Hint: To save the status of parameters that have to remainunchanged, set them and save the MY SETTING Performance(automatically selected when turning the instrument on). Afterhaving saved the startup Performance, go to these pages and lockthe parameters that must remain unchanged.
Tuning pane
Master Transpose
When this lock is closed, Master Transpose is notautomatically changed when selecting a differentPerformance or Style, or a different SongBookEntry. Also, this lock prevents a Standard MIDIFile generated with an instrument of the Korg Pa-Series to change the Master Transpose.
(See “Master transpose” on page 107).
Sub Scale/Quarter Tone
When locked, selecting a Performance or STS, ora SongBook Entry, will not change the Sub-Scaleor Quarter Tone value.
(See “Sub-Scale panel” on page 112).
SubScale/Quarter Tone from STS
When locked, selecting an STS will not changethe Sub-Scale or Quarter Tone settings. The STSwill change sounds and effects but not the scale.
(See “Sub-Scale panel” on page 112).
Auto Octave Depending on the status of this lock, the Uppertracks can be automatically transposed whenturning the SPLIT on and off.
• If locked, turning the SPLIT on or off will notchange the Upper tracks transposition.
• If unlocked, when turning the SPLIT button off(Full keyboard mode) the Upper tracks OctaveTranspose will be automatically set to “0”. When
turning the SPLIT button on (Split keyboardmode) the Upper tracks Octave Transpose will beautomatically set to “-1”.
Control pane
Assignable Switches
When locked, selecting a Performance or STSwill not change the functions assigned to theAssignable Switches.
(See “Pad/Switch: Switch” on page 125).
Upper 1 FXs In Sound mode, you can assign a Sound to the FXB Group. When you assign a new Sound to theUpper 1 track, the FX B settings and Master FXsend levels saved with that Sound can be auto-matically selected, overriding Performance/STSsettings for this track. Whether Sound or Perfor-mance/STS effect parameters will be considered,it depends on the status of this lock.
• If the Upper 1 FX Lock is turned on, whenassigning a new Sound to the Upper 1 track, Per-formance/STS parameters are left untouched;selected effects, and FX Send values, are notchanged.
• If the Upper 1 FX Lock is turned off, whenassigning a new Sound to the Upper 1 track,Sound parameters are considered; selectedeffects, and FX Send values, are changed accord-ing to the Sound’s stored data.
Note: If the effects associated to the selected Soundare not compatible with the effects already assignedto the FX B block, the Master FX Send values onthe other Keyboard tracks will be automatically setto zero.
For example, assume a chorus effect is assigned tothe Master 2 FX processor. If the new Soundassigns a distortion effect to the Master 2 FX pro-cessor, the Master 2 FX Send value on the Upper 2,Upper 3, and Lower tracks will be set to zero, toavoid these tracks sound in the wrong way. Thisway, the Upper 1 track (usually the most importantone for solo playing) will sound with the neededeffect, while the other Keyboard tracks will justsound dry.
Pad When locked, selecting a Style or SongBookEntry will not change the Pad assignment.
(See “Pad/Switch: Pad” on page 125).

250 Global modeGeneral Controls: Lock
Lower When this lock is closed, the Lower track remainsunchanged when a different Style, Performanceor STS is selected.
This is useful if, for example, you prefer to alwaysplay with the left hand muted and reserved onlyto the chords.
Hint: If you want the same Lower settings to beused during all your shows, save your preferredLower settings to the MY SETTING Performance(automatically selected on startup).
Keyboard Mode (Split)/Accompaniment
When this lock is closed, the status of the SPLITbutton (therefore of the keyboard mode) and theACCOMP. button remains unchanged when adifferent Performance or STS is selected.
This is useful if, for example, you prefer to alwaysplay in Full Keyboard, with chords recognized onthe whole keyboard range.
Hint: If you want the same Keyboard Mode andLower Scanning settings to be used during all yourshows, save your preferred settings to the MY SET-TING Performance (automatically selected onstartup), then close this lock.
Style pane
Style Tracks Volume
When this lock is closed, the Style tracks’ volumedo not change when a different Style is selected.
This is useful when you create your own UserStyles, and prefer to dynamically adjust the vol-ume by using the sliders as in a mixer. It is notrecommended with Factory Styles, each onealready mixed at its best right at the factory.
Style Tracks Play/Mute Lock
When this lock is closed, selecting a Style doesnot cause the Play/Mute status of the Style tracksto be changed. This way, you can, for example,turn the bass track off during a whole show, toallow your bassist to play the part live. Also, youcould mute all Acc tracks, to only play with theDrum and Bass tracks.
Style Element When this lock is closed, the selected Style Ele-ment (Variation, Intro…) will not change whenchoosing a different Style.
This lock has no effect on the Styles automaticallyselected when choosing a SongBook Entry. TheStyle Element memorized in the SongBook Entryis always selected.
Bass Inversion
When locked, selecting a Performance or STSwill not change the Bass Inversion status.
(See “BASS INV. (Bass Inversion)” on page 11).
Manual Bass When locked, selecting a Performance or STSwill not change the Manual Bass status.

251Global modeGeneral Controls: Clock & Power
Refe
renc
e
General Controls: Clock & Power
Date & TimePa900 includes a battery-backed system calendar and clock. Thisallows for automatically adding a time-stamp to the files whenthey are created or edited.
Note: When you edit a resource file (Sounds, Styles…), all items inthe same bank have their modification date changed. For example,if you edit a single Style in the “Pop” bank, all Styles in that bankwill take the new modification date.
Month
Use this pop-up menu to choose a month.
Day
Use this numeric field to input the day of the month.
Year
Use this numeric field to input the year.
Time
Use these numeric fields to input the time, in the “hour:min-ute:second” format.
Apply
After having edited all calendar and time fields, touch this but-ton to apply the changes.
Auto Power OffPa900 can automatically enter standby after two hours of beingunused, to save power and help preserving the environment.
On
When this parameter is checked, a few minutes before automaticstandby a message will warn you that the instrument is going tobe put in standby. All unsaved data currently in editing orrecording will be lost.
At this message, you can let the instrument enter standby, or youcan touch the display, press any button on the display, or play thekeyboard to leave it turned on and continue using it.

252 Global modeMode Preferences: Style
Mode Preferences: Style
In this page you can set various general parameters for the StylePlay mode.
Split Point
Use this parameter to select the global split point. This point isindependent of any Performance or STS.
See “Split panel” on page 112 for more information.
Chord Recognition
This parameter defines how chords are recognized by the auto-accompaniment engine.
Depending on the status of the CHORD SCAN section, theChord Recognition mode is automatically set as in the followingtable:
One Finger You can compose a chord using a simplifiedchord playing technique:
• Play a single note for a Major chord to be recog-nized.
• Play the root note, plus a white key on the left,for a 7th. For example, play C3 + B2 for a C7.
• Play the root note, plus a black key on the left,for a Minor chord. For example, play C3 + Bb2for a C minor.
• Play the root note, plus a white and a black keyon the left, for a Minor 7th. For example, play C3+ B2 + Bb2 for a C min 7.
Fingered (1 Note)
With the Lower chord scan mode, play one ormore notes to compose a chord. A full Majorchord will be recognized when a single note isplayed.
With the Full or Upper chord scan mode, play atleast three notes to compose a chord.
Fingered (3 Notes)
Always play three or more notes for a chord to berecognized.
Expert With the Lower chord scan mode, play two ormore notes for a chord to be recognized. With theFull or Upper chord scan mode, play at least threenotes.
If you play just one note, a unison will be played.If you play a fifth, a “root+5th” chord will beplayed.
With this mode, you can play rootless and slashedchords, often used in jazz, fusion, modern popand light music. This type of chord recognition isvery useful to play piano chords typical of jazzpiano players. You don’t always need to play theroot note, doubling the note already played by thebass track.
Velocity Control
Set this parameter to trigger one of the following functions sim-ply by playing louder with your left hand. When playing with avelocity value higher than the value set by the “Velocity ControlValue” parameter (see page 252), the selected function will beactivated.
This function only works when the SPLIT LED is turned on.
Off The function is turned off.
Break When playing with a velocity higher than thetrigger value on the Lower track, the Break isautomatically triggered.
Start/Stop You can start or stop the Style by playing harderon the keyboard.
Bass Inversion When playing with a velocity higher than thetrigger value, the Bass Inversion function will beactivated or deactivated.
Memory When playing with a velocity higher than thetrigger value, the Memory function will be acti-vated or deactivated.
Velocity Control Value
Use this parameter to set a velocity threshold over which to auto-matically trigger the Style Start/Stop or select one of the otherfunctions (see “Velocity Control” above).
Scale Mode
This parameter defines which tracks are affected by the selectedalternative scale (see “Scales” on page 356).
Keyboard Tracks
The scale will affect all Keyboard tracks.
Upper Tracks The scale will only affect Upper 1-3 Keyboardtracks.
All Tracks The scale will affect all tracks (Keyboard, Style,Pads).
Chord Recognition Mode
CHORD SCAN = LOWERCHORD SCAN = UPPER/FULL KEYBOARD (LOWER+UPPER)
One Finger Fingered (3 Notes)
Fingered (1 Note) Fingered (3 Notes)
Fingered (3 Notes) Fingered (3 Notes)
Expert Expert

253Global modeMode Preferences: Song & Sequencer
Refe
renc
e
Memory Mode
This parameter sets the way the MEMORY button works.
Chord When the MEMORY LED is on, recognizedchords are kept in memory even when raisingyour hand from the keyboard. When the LED isoff, chords are reset when raising your hand.
Chord + Lower
When the MEMORY LED is on, recognizedchords are kept in memory, and the Lower soundis held until the next note or chord is played.When the LED is off, both the chord (and there-fore the accompaniment) and Lower sound arecut when raising the hand from the keyboard.
Fixed Arr. + Lower
When the MEMORY LED is on, recognizedchords are kept in memory, and the Lower soundis held until the next note or chord is played.
When the MEMORY LED is off, the Lower soundis cut when raising the hand from the keyboard;on the contrary, the chord is kept in memory (sothat the accompaniment can continue to play).
Bass & Lower Backing
With this function, you can play a simple accompaniment withyour left hand. For this to work, the SPLIT LED must be turnedon, and the Style must not be running. By default, this functionis turned on.
On When the Style is not running, and you play achord with your left hand, the chord is played bythe Lower Sound (even if it is muted), while thechord root is played by the Bass Sound. Whenyou start the Style, the normal behavior isrestored.
When the Bass & Lower Backingfunction is active, the Backingicon appears in the Lower track Sound’s area.
Off No Bass Sound is added when the Style is notrunning. The Lower track can be heard only if itis not muted.
Style Tracks Global Volume
In Style Play mode, the volume of the grouped Style tracks is aglobal offset of the values memorized in the Style. When youchoose a different Style, this offset will not change, and the aver-age volume of the Style tracks remains the same.
These controls allows you to globally set the balance between theDrum/Percussion, Bass and Accompaniment tracks. For exam-ple, if you prefer Drums and Bass to be prominent to make themhave more ‘punch’, you can lower the grouped Accompanimenttracks.
Changes are not memorized to a Performance or to the currentStyle Settings. Instead, they are memorized as a global parame-ter.
0…127 Volume level.
Mode Preferences: Song & Sequencer
In this page, you can set various general parameters for the SongPlay and Sequencer modes.
SMF Melody Track
This parameter lets you select the Song’s Melody track for Stan-dard MIDI Files. This track can then be muted by using the“Song Melody - Mute” function, assignable to an AssignableSwitch or Footswitch.
Drum & Bass Mode - Drum
This parameter lets you select the Song’s Drum track. This trackis left set to play (together with the Bass track) when selectingthe “Drum&Bass” function, assignable to an Assignable Switchor Footswitch.
Drum & Bass Mode - Bass
This parameter selects the Song’s Bass track. This track is left setto play (together with the Drum track) when selecting the“Drum&Bass” function, assignable to an Assignable Switch orFootswitch.
Fast Play
When checked, this function allows to skip any empty setupbeats at the beginning of a Standard MIDI File, and immediatelystart from the first note. While the beats are skipped, setup datathey may contain are read and considered.
Please note that, being audio data, any empty space at the begin-ning of an MP3 file cannot be skipped.
Note: When Pa900 is driving an external musical instrument, thefast transfer of MIDI data to the MIDI OUT or USB port maycause a delay to the Song’s start. Therefore, we suggest to turn thisfunction off when Pa900 is hooked to other instruments.
Save Trk & FX
Touch this button to save the global parameters for the Song Playmode.
When touching this button, you are saving the following param-eters:
• Play/Mute status of the Song tracks
• Default effect settings
• EQ settings for the Song tracks
• Internal/External status of the Song tracks

254 Global modeMode Preferences: Media
Mode Preferences: Media
This page includes various settings for the Media mode.
Media Preferences
Media Protect
When on, this parameter protects the internal “KORG [KORGDISK]” disk unit from writing.
Global Protect
When on, this parameter protects the global parameters fromchanges when loading data from disk.
Note: Global data from other Pa-Series models are not loaded evenwithout protection.
Factory Style and Pad Protect
When On, this parameter protects the Factory Styles and Fac-tory Pads (named “Hit”, “Sequence” and “Local” in the Pad Selectwindow) from being overwritten when loading data from adevice. Furthermore, you can’t access these banks when savingdata.
Also, when this option is checked, you cannot write any STS(Single Touch Setting) or Style Settings onto the Factory Styles.The “Write Single Touch Setting” and “Write Current Style Set-tings” command in the page menu are greyed out and cannot beselected. All original settings of the Factory Styles will be leftuntouched.
When Off, you can load or save User Styles or Pads into the Fac-tory Style banks and Factory Pad banks. This way, you can cus-tomize your Factory Style and Pad banks. A Save All procedurealso saves the Favorite and User Style, and the User Pad banks.
Note: This parameter is automatically set to On when the instru-ment enters standby.
Note: Should you accidentally delete some Factory Data, reloadthe Backup data or use the Factory Restore procedure (Media >Utility).
Factory Sound Protect
When On, this parameter prevents writing edited Sounds fromthe Sound mode into the Factory locations (Factory, Legacy, GMbanks). When Off, you can freely save edited Sounds either inthe Factory or User Sound area.
Warning: Use this feature with great care! Reorganizing the Fac-tory Sounds may make both Styles and Standard MIDI Files playwith the wrong Sounds!
Note: This parameter is automatically set to On when the instru-ment enters standby.
Note: Should you accidentally delete some Factory Data, reloadthe Backup data or use the Factory Restore procedure (Media >Utility).
Hide Unknown Files
When this option is checked, non-proprietary files are hiddenwhen using Media operations, therefore making browsing direc-tories easier.
Show Columns
Size
When checked, the Size column is shown in the File Selectorwhen using Media operations.
Date
When checked, the Date column is shown in the File Selectorwhen using Media operations.

255Global modeControllers: Hand Controllers
Refe
renc
e
Controllers: Hand Controllers
In this page you can program those controls you can operatewith your hands.
Keyboard Settings
Velocity Curve
This parameter sets the sensitivity of the keyboard to your touch.
Fixed No dynamic control available. Dynamic valuesare fixed, as in classic organs. When this option ischosen, you can set the fixed velocity value:
Soft1 … Hard3
Curves, from the lightest one to the hardest one.
Balance Control
Balance Slider
The BALANCE knob can either be used to mix between theKeyboard and Accompaniment/Song tracks, or to control theAccompaniment/Song Volume without changing the Keyboardtracks. This is always a relative control, whose effective maxi-mum value is determined by the MASTER VOLUME sliderposition.
Note: The BALANCE knob only works in the Style Play and SongPlay modes.
Acc/Song - Kbd Balance
While in Style Play and Song Play mode, theBALANCE knob balances the volume of the Key-board (Kbd) tracks against the Style (Accompani-ment), Song and Pad tracks.
Acc/Song Volume
While in Style Play and Song Play mode, theBALANCE knob controls the volume of the Style(Accompaniment), Song and Pad tracks.
Controllers: Foot Controllers
This page lets you select a function to the Assignable Pedal/Foot-switch, and select the polarity for the Damper and AssignablePedal/Footswitch.
The following (optional) Korg pedals are compatible with Pa900:
Pedal/Footswitch
Function
Function assigned to a continuous (i.e., volume/expression)pedal, or to a footswitch, connected to the ASSIGNABLEPEDAL connector. See page 354 for a list of the assignable func-tions. The first functions are switch-type functions, while theremaining (starting from Master Volume) are continuous-likefunctions.
Calibration
Use this button to calibrate and choose the polarity of the pedal/footswitch.
1. Connect the pedal or footswitch to the ASSIGNABLEPEDAL connector on the back of the instrument.
2. Go to this page, and touch the “Calibration” button in thedisplay. The following dialog box appears:
3. You are asked to set the pedal to the maximum value. Pressthe footswitch, or press the pedal to the maximum position(usually front pressed).
Type Model
Continuous (Volume/Expression)
EXP-2, XVP-10
Switch PS-1, PS-3
Damper DS-1H (supporting half-pedalling)

256 Global modeTuning: Basic
4. Touch the “Push” button in the display to confirm the max-imum value. The following dialog box appears:
5. You are now asked to set the pedal to the minimum value.Release the footswitch, or press the pedal to the minimumposition (usually back pressed).
6. Touch the “Push” button in the display to confirm the min-imum value.
7. Check if the pedal or footswitch is working properly, andassign it a function.
Note: After loading a new Operating System, an older Global file,a “SET” folder containing a Global file, or a Backup file, you mightneed to re-calibrate the pedal/footswitch.
Damper
Calibration
Use this button to calibrate the action of the Damper pedal, andset its polarity. See above for details about the procedure.
Tuning: Basic
This is the general tuning of the instrument.
Global Tuning
Master Tuning
This is the master tuning of the instrument (in cents of a semi-tone). Use it to adapt your keyboard tuning to an acoustic instru-ment, for example an acoustic piano.
-100 Lowest pitch (half-semitone down).
0 Standard pitch (A4=440Hz).
+100 Highest pitch (half-semitone up).
Tuning: Transpose Control
This page is where you can select to which tracks the MasterTranspose is applied to, and adjust some related parameter.
Transpose Control
Transpose applies to Style and Kbd tracks
Use this parameter to turn the Master Transpose on or off, anddefine the way it is applied, to Style and Keyboard tracks.
Off No Master Transpose is applied to Style and Key-board tracks. Chords shown in the Lyrics pageare, however, transposed.
In Sync When you press either the TRANSPOSE [ ] or[ ] buttons, the new transpose setting will nottake effect until the first beat of the next measureis reached.

257Global modeTuning: Scale
Refe
renc
e
In Realtime When you press either the TRANSPOSE [ ] or[ ] buttons, the new transpose setting will occurwhen the next note is played for both the Styleand Keyboard tracks individually.
The next key or chord you press will sound withthe new transpose setting applied. (Note that ifyou play a Keyboard track prior to a new chord,the Keyboard track will play in the new key as theStyle will continue to play in the old key until anew chord is entered).
Transpose applies to Player
This checkbox lets you turn the Master Transpose on or off forthe onboard Player.
Transpose applies to Midi In notes
This checkbox lets you turn the Master Transpose on or off forNote messages received from MIDI IN.
Position
Scale and Transpose position
The Scale and Transpose Position allows you to define the rela-tion between the Scale and the Master Transpose.
Post-KB/Pre-Scale
When this option is selected, notes will be trans-posed immediately after they leave the keyboard.The Scale will be applied to the transposed notes.For example, if you altered an E, and then set theMaster Transpose to +1, the E key will play F, andthe altered key will be E (that will play analtered E).
Post-KB & Scale
When this option is selected, all notes are trans-posed immediately before they enter the internaltone generator, or are sent to the MIDI OUT, butafter the Scale. For example, if you altered an E,and set the Master Transpose to +1, the alteredkey will still be E (that will play an altered F).
Standard MIDI File and chord transposeWhen changing the Master Transpose, chord abbreviations con-tained in a Standard MIDI File are transposed and correctlyshown in the display. Master Transpose must be activated on thePlayers, but not on the Keyboard.
Note: Chords contained in a linked TXT file or shown when load-ing a CDG file are not transposed.
Drum Kits and transposeDrum Kits are never transposed. If you want that any Sound isnot transposed as well, assign them to a track set to the Drummode in Style Play/Song Play > Track Control > Mode (see“Type” on page 120).
Tuning: Scale
This page lets you select the main scale of the instrument.
Main Scale
Main Scale
This parameter lets you set the main scale for the whole instru-ment, apart for those tracks where a different sub-scale has beenselected by a Performance or STS (see “Scale” on page 117, StylePlay mode).
See “Scales” on page 356 for a list of the available scales.
Note: You cannot select a User scale in Global mode.
Key
This parameter is needed by some scales to set the preferred key.
ScaleTone
generatorTranspose
ScaleTone
generatorTranspose

258 Global modeMIDI: General Controls
User Quarter Tone SubScaleThis section is where you can program the Quarter Tone scale,and save up to four Quarter Tone Scale (SC) Presets.
SC Preset buttons
Touch these buttons to recall the corresponding presets. Each pre-set contains a custom detuning of each note of the scale (shown inthe upper scale diagram). It also memorizes the selected degree(s)of the scale (shown in the lower scale diagram).
When no preset is selected, the default scale is automaticallyrecalled. This scale assigns a -50 cent value to all notes, and turnsall scale degrees off.
You can also select an SC Preset by assigning the relevant func-tion to an Assignable Switch or Assignable Footswitch.
To save the current scale programming to a preset, while in thispage choose the “Write Quarter Tone SC Preset” command fromthe page menu, then select one of the preset locations where tosave the current settings (see “Write Quarter Tone SC Preset” onpage 274).
Upper scale diagram
Use this diagram to set the detuning of each note of the scale.
-99…0…+99 Note detuning in cents. Zero is no detuning, ±50is a full quarter tone up or down, ±99 is nearlyone whole semitone up or down.
Lower scale diagram
Use this scale to turn detuning on or off. Applied detuning willdepend on the programming set with the Upper scale diagram,or recalled by selecting one of the SC Presets.
When a note is detuned, a black dot appears in the correspond-ing note of the diagram.
MIDI: General Controls
This page allows you to select a MIDI Preset and set globalparameters for the MIDI communication.
MIDI Preset
Preset
MIDI channels can be automatically configured by selecting aMIDI Preset. Each of them lets you automatically assign a valueto various MIDI parameters, to allow an easier connection witha particular MIDI controller.
For detailed information about the preloaded MIDI Presets, see“MIDI Preset” on page 353.
After selecting a MIDI Preset, you can apply any changes to eachchannel’s settings. To store the changes in memory, select the“Write Midi Preset” command in the page menu to save it tomemory (see “Write Midi Preset dialog box” on page 275).
Hint: You can restore the original MIDI Presets by using the “Fac-tory Restore” command and choosing the “Global” option (page“Utility” of the Media mode, see page 291). Please consider thiswill reset all the Global data.
General ControlsUse these parameters to set MIDI Clock and Local Off.
Clock Send
Use this parameter to turn the clock information on the MIDIOUT or USB Device port on or off.
Note: This parameter is automatically set to On when the instru-ment enters standby.
Off The Pa900 does not send the MIDI Clock signal.You cannot slave another instrument to thePa900, even when connected to the MIDI OUTor USB Device port.
On The Pa900 sends the MIDI Clock signal. You canslave another instrument to the Pa900 Tempo,Start/Stop and Play/Stop commands. Connect theother instrument to the Pa900 MIDI OUT orUSB Device port.

259Global modeMIDI: MIDI In Controls
Refe
renc
e
Clock Source
This parameter selects the MIDI Clock source for the Style Playand Sequencer modes.
Note: In Song Play mode, the Internal clock is always used.
Note: This parameter is always set to “Internal” when the instru-ment enters standby.
Internal Internal, i.e. the clock generated by the Pa900Arranger and Player internal metronome.
External MIDI External from the MIDI IN port. In Style Play orSequencer mode, the Pa900 is slaved to an exter-nal device connected to its MIDI IN port. TheStart/Stop and Play/Stop commands, as well asthe metronome tempo, cannot be selected fromthe control panel of the Pa900. Use the externaldevice to set the tempo and start or stop thesequencer or arranger.
External USB As the above, but referred to the USB Device port.See “Installing the Korg USB MIDI Driver” onpage 428 for information on how to configure yourcomputer for MIDI Over USB communication.
Local Control On
The Local parameter turns the keyboard on or off.
Note: This parameter is automatically set to On when the instru-ment enters standby.
On When you play the keyboard, MIDI data is sentto the internal sound generator. If tracks areassigned to a MIDI OUT channel, data is alsosent to the MIDI OUT or USB Device port.
Off The keyboard is connected to the MIDI OUT orUSB Device port, but cannot play the internalsound generator.
This is very useful when working with an exter-nal sequencer, to send notes and various MIDImessages from the integrated keyboard and con-trollers to the external sequencer, and then let thesequencer send them back to the sound genera-tor, without overlapping. See the MIDI chapter.
Note to RX Noise
RX Noises are special sounds that allow Sounds to be more real-istic. They are usually located above C7, depending on theSound.
When this parameter is turned on, notes received from MIDI, orperformed by the internal Player, in the RX Noises range, arerecognized and converted to RX Noises. When off, notes are notrecognized.
Note: This parameter is automatically turned on when the instru-ment is set to standby.
MIDI: MIDI In Controls
This page lets you program parameters for the MIDI IN andUSB Device port, like the Chord Recognition channel. All theseparameters can be saved into a MIDI Preset.
Midi In Controls
Midi In Octave Transpose
Use this parameter to determine if notes received on the MIDIIN or USB Device ports have to be transposed.
On Notes received on the MIDI IN or USB Deviceport are transposed according to the OctaveTranspose setting for each track.
Off Data received on the MIDI IN or USB Deviceport are not transposed.
Track Mute Active
Use this parameter to determine if data received on the MIDI INor USB Device port can be played by muted tracks.
On No data received on the MIDI IN or USB Deviceport can play on a muted track.
Off Data received on the MIDI IN or USB Deviceport can play on a muted track.
Chord 1 Midi ChannelChord 2 Midi Channel
Notes entering these channels on the MIDI IN or USB Deviceport, are sent to the Arranger.
There are two separate Chord channels. This is very useful whenyou have to send chords to Pa900 over two different channels(something very common on MIDI accordions).
Off Data received on the MIDI IN or USB Deviceport are not sent to the Arranger.
1…16 Data received on these channels via the MIDI INor USB Device port are sent to the Arranger.
Upper Octave Transp (Transpose)
Octave transposition of data received on the MIDI IN or USBDevice port for the Upper tracks. For example, if you select the+1 value, a C4 received via MIDI will play a C5 on the Pa900.
This parameter may be useful to many MIDI accordion players,whose MIDI interface may transmit on an unexpected octave.
-2…+2 Octave transpose value.

260 Global modeMIDI: MIDI In Channels
Lower Octave Transp (Transpose)
Octave transposition of data received on the MIDI IN or USBDevice port for the Lower track. For example, if you select the +1value, a C4 received via MIDI will play a C5 on the Pa900.
This parameter may be useful to many MIDI accordion players,whose MIDI interface may transmit on an unexpected octave.
-2…+2 Octave transpose value.
Midi In Velocity Value
Use this parameter to set a fixed velocity (dynamics) value for allreceived MIDI notes. This is useful when playing the Pa900 withan organ or a MIDI Accordion.
Normal Received velocity values are left unchanged.
40…127 All received velocity values are converted to theselected value.
Voice Processor Midi controls
Midi In Channel
Notes received on this channel are sent to the Harmony sectionof the Voice Processor.
Off No data is sent to the Voice Processor.
1…16 Data received on this channel via the MIDI IN orUSB Device port is sent to the Voice Processor.
Octave Transpose In
Octave transpose for all notes received via MIDI by the Har-mony section of the Voice Processor.
-2…+2 Octave transpose value.
In Note Range-High
This is the highest note that can be received by the Harmony sec-tion of the Voice Processor. Notes received over this note are notrecognized.
B-1…G9 Highest note.
In Note Range-Low
This is the lowest note that can be received by the Harmony sec-tion of the Voice Processor. Notes received under this note arenot recognized.
C-1…G#8 Highest note.
MIDI: MIDI In Channels
In this page, you can assign Pa900 tracks to any of the MIDIchannels received on the MIDI IN and USB Device ports. Allthese parameters can be saved into a MIDI Preset.
Channels
You can assign to each channel one of the following tracks:
Off No track assigned.
Lower Keyboard’s Lower track.
Upper 1…3 One of the Keyboard’s Upper tracks.
Pad 1…4 One of the Pad tracks.
Drum Style’s Drum track.
Percussion Style’s Percussion track.
Bass Style’s Bass track.
Acc 1…5 One of the Style’s Auto-accompaniment tracks.
Ply 1/2 Tr 01…16
One of the Players’ tracks.
Global Special channel to simulate the Pa900’s integratedcontrols (keyboard, pedals, joystick) with anexternal keyboard or controller. MIDI messagescoming on this channel are seen as if they weregenerated by Pa900’s integrated controllers.
Control On this special channel, the Pa900 receives MIDImessages to remotely select Styles, Performances,STS, Style Elements and SongBook Entries. Seetables on page 430 and following for more infor-mation on the received data

261Global modeMIDI: MIDI Out Channels
Refe
renc
e
MIDI: MIDI Out Channels
In this page, you can assign Pa900 tracks to any of the MIDIchannels sent to the MIDI OUT and USB Device ports. All theseparameters can be saved into a MIDI Preset.
Channels
You can assign to each channel one of the following tracks:
Off No track assigned.
Lower Keyboard’s Lower track.
Upper 1…3 One of the Keyboard’s Upper tracks.
Pad 1…4 One of the Pad tracks.
Drum Style’s Drum track.
Percussion Style’s Percussion track.
Bass Style’s Bass track.
Acc 1…5 One of the Style’s Auto-accompaniment tracks.
Ply 1/2 Tr 01…16
One of the Players’ tracks.
Chord Use this channel to send notes recognized by theChord Recognition engine to the MIDI OUT andUSB Device port. This is useful, for example, tocontrol an external Harmonizer from the Pa900,using the Lower track to play chords, even if thetrack is muted.
Control When this special channel is assigned to one ofthe MIDI OUT channels, MIDI messages are senton this channel when choosing a SongBookEntry. The messages sent when selecting a Song-Book Entry are the following:
• An initialization strings, made of the NRPNControl Change messages #99 (MSB, with value2) and #98 (LSB, with value 64) in fast succession.
• A selection string, made of the two ControlChange messages CC#06 (Data Entry MSB) forthe thousands and hundreds, and CC#38 (DataEntry LSB) for the tens and units. The range ofthe Data Entry controls, in this case, is 0~99(instead of the typical 0~127).
This type of data can be used by external editorsto receive informations from the SongBook.
MIDI: Filters
Use this page to set up to 8 filters for the MIDI data received orsent by the Pa900 on the MIDI and USB Device ports. All theseparameters can be saved into a MIDI Preset.
Midi In Filters
Selected MIDI IN filters. Filters are applied to all MIDI channelsat the same time.
Off No filter.
Pitch Bend Pitch Bend.
MonoTouch Mono (or Channel) After Touch.
PolyTouch Poly After Touch.
PrgChange Program Change.
SysExcl System Exclusive.
All CC All Control Change messages.
0…127 Control Change message #0…127. See “MIDIData” on page 430 for a list of available ControlChange messages.
Notes Note events.
Midi Out Filters
Selected MIDI OUT filters. See above for information on eachfilter type.

262 Global modeAudio & Video: MP3 / Speakers
Audio & Video: MP3 / Speakers
This page lets you define various parameters for the MP3 playerand the speakers.
MP3 Player
Volume
Use this parameter to set the maximum volume for the MP3Player. This control lets you balance MP3 files against SMFSongs and Styles.
0…100 Max volume in percentage.
Speakers
Speakers On/Off
Use this checkbox to turn the integrated speakers on or off.
Audio & Video: Limiter
The Limiter allows for an increased loudness of the MIDI tracks(Styles and Songs), by compressing the signal exceeding adefined threshold. MP3 files are not affected by the Limiter(since they are usually already “produced”, and do not need topass through the Limiter again).
All these parameters can be saved into a Limiter Preset,
Limiter Preset
Use this pop-up menu to choose one of the available LimiterPresets, and automatically reconfigure the EQ parameters.
On/Off
This is the on/off switch for the Limiter section.
Ratio
Sets the signal compression ratio. Compression is applied onlywhen the signal level exceeds the Threshold value. 1.0:1 meansno compression.
Threshold
Sets the level above which compression is applied. 0dB means nosignal processed.
Attack
Sets the attack time. A higher attack time will cause the compres-sion to be applied more slowly, and not react fast enough fornotes with faster transients.
Release
Sets the release time. A higher release time will cause the com-pression to be released more slowly; this may help sustaininglonger notes.
Gain Adjust
Sets the output gain. Use it to compensate for the gain losscaused by compression.
Diagram
Use these indicators to check the level of the audio entering andcoming out of the Limiter.
• If the input level is too high, decrease the level of the Sounds,Styles and/or Songs that are playing.
• If the output level is too high, decrease the level of the “GainAdjust” control.

263Global modeAudio & Video: Master EQ
Refe
renc
e
• Look at the gain reduction indicator, to understand the amountof limiting going on. Excessive limiting may dramatically changethe quality of the musical program.
Audio & Video: Master EQ
In this page you can access the fully parametric Master EQ. ThisEQ is placed at the end of the audio path, just before the audiooutputs. Both MIDI tracks (Styles and Songs) and MP3 files areequalized.
This is a full spectrum frequency equalization, positioned at theend of the signal chain, just before the Left & Right audio out-puts. It gives you the power to design EQ curves and shape yoursound. Master EQ features four fully programmable bands withfully adjustable gain, frequency, and Q parameters.
All these parameters can be saved into a Master EQ Preset.
EQ Preset
Use this pop-up menu to choose one of the available EQ Presets,and automatically reconfigure the EQ parameters.
On/Off
This is the on/off switch for the EQ section.
Diagram
Use these indicators to check the EQ curve, and the level of theaudio entering and coming out of the Master EQ.
• If the input level is too high, decrease the level of the “InputTrim” parameter.
• If the output level is too high, decrease the level of the “Gain”controls.
• Keep in mind that boosting the Gain is not always the best wayof making your sound appear louder; cutting the Gain of someband may make the other bands appear louder.
Input Trim
Use this knob to adjust the level of the signal entering the EQ.Excessive amount of signal may cause distortion when boostingthe EQ bands.
Q
‘Quality’ of the EQ filter; higher values correspond to narrower,more accurate filters. Use higher values for near-surgical correc-tion on isolated frequencies, lower values for more musical,softer equalization.
Freq
Center frequency of the corresponding band. Center it on theproblematic frequency, or the harmonics you want to emphasizeor attenuate.
Gain
Gain of the corresponding band. Use it to make the frequenciesstronger or weaker.
Band Value
All Bands 0.5…10
Band Value
Low 20Hz…1kHz
Mid-Low 50Hz…10kHz
Mid-High 300Hz…10kHz
High 500Hz…20kHz
Band Value
All Bands -18…0…+18dB

264 Global modeAudio & Video: Video Out
Audio & Video: Video Out
Use this page to adjust the Video Out parameters.
System
Selects the video standard (PAL or NTSC).
PAL Used in most European, South American, Asianand African Countries. This setting can be usedalso with SECAM TV sets (used in France, Rus-sia, and some Countries of Africa); in this lattercase, however, the picture is shown in black &white.
NTSC Used in North America, Central America andpart of South America. It is also used in Japan,Korea, Taiwan, Philippines and Burma.
Colors
Selects a color set for the lyrics and background.
1…5 Color set. Try them to find the one you feel mostcomfortable with.
External Video
Reset to Text Only at startup. Use this parameter to decide whatto show in the monitor connected to the Video Out port.
Text Only Only Lyrics and Chords (if any) are shown in theexternal display.
Mirror The internal display of the Pa900 is duplicated(“mirrored”) to the external display.
Audio & Video: Audio In
This page lets you route the Audio Inputs to the Voice Processorand/or the audio outputs.
Microphone (Left In) to Voice Processor
Microphone off, L-R Line In
Input Routing
Use this pop-up menu to choose the routing of the Audio Inputsignals.
Left In to Voice Processor
The Left audio input goes to the Voice Processor,then to the audio outputs. The Right audio signalis replicated on both Audio Outs. Both inputs arerecorded when recording an MP3 Song.
Audio Ins to Direct Out
The Left and Right audio inputs go to the finalmix, together with the sounds generated by thePa900. No Voice Processor effect is applied.

265Global modeMic: Preset
Refe
renc
e
Mic: Preset
The Voice Processor applies effects and three-part harmony toyour voice. The dedicated controllers in the MIC SETTING sec-tion on the control panel allows you to quickly access the mostoften used functions.
In addition, in these pages you can edit the various effects andharmony styles, and save them into a Voice Processor Preset (VPPreset). With the latest two pages, you can edit the general set-tings for the singer’s voice.
This page allows you to select a VP Preset, as well as turning onor off the various Voice Processor modules.
Preset
Current Voice Processor Preset
Use this parameter to select a Voice Processor Preset. A VP Pre-set is the programming of all Voice Processor’s harmony andeffect parameters. The Current Voice Processor Preset is the VPPreset that is currently selected and can be edited.
A VP Preset can be recalled by a Style, a Performance, a Song-Book Entry, or can be manually selected by pressing the PRESETbutton in the MIC SETTING on the control panel. This Preset isalternative to the Global VP Preset (see “Global Voice ProcessorPreset” on page 269) that is used when no selection is saved in aStyle, Performance or SongBook Entry.
If you wish to save your VP Preset settings, keep the PRESETbutton pressed for about one second, or select the “Write VoiceProcessor Preset” command from the page menu (see page 274).The saved Preset will appear in the list of the available Presets.
Harmony Voices On/OffThese are “switches” for the voices generated by the Harmonysection.
V1…V3
These checkboxes allow turning each of the three HarmonyVoices on or off.
This is the same as the “Voice On/Off ”checkbox in the “Mic:Harmony Voices” page (see page 267).
Master On/OffThese are “switches” for the various Voice Processor sections.
Lead
This checkbox allows turning the Lead voice on or off. This isuseful in creating Presets where you want to hear harmonyvoices only.
Harmony
This checkbox allows the enabling/disabling of the Harmonymodule.
Effects
This checkbox allows the enabling/disabling of the Voice Proces-sor Effects module.
Mic: Harmony
In this page you can define general parameters for the Harmonymodule.
Harmony
Harmony On/Off
This checkbox allows enabling/disabling of the Harmony mod-ule. It is the same control found in the “Preset” page.
Harmony Mode
This parameter changes the Preset’s harmony mode. The avail-able options are: Scalic, Chord, Shift, and Notes. See “Harmonyand Tuning with the Voice Processor” on page 270 for a fulldescription of each harmony mode.
Root
(Only available in Scalic mode). In Scalic presets this sets thescale root.
Type
In Scalic presets this sets the scale type. If the selected type isCustom, a Custom Map can be used (see “Custom Voice Map-ping” on page 267).
PB Assign
Pitch Bend control assignment. Allows assignment of the pitchbend to Pitch (applicable in Notes and Chord harmony modes).

266 Global modeMic: Harmony
Note: For this to work, a value other than zero must be assigned tothe “Pitch Bend Range” in the “Mic: Global Setup” page (seepage 269).
Note Octave Transpose
This transposes the harmony voices in Notes mode; the valuecorresponds to octaves (±4). When receiving notes from MIDI,this value is summed to the value of the “Octave Transpose In”parameter, found in the “MIDI: MIDI In Controls” page (seepage 259).
This is useful when used in conjunction with the “In NoteRange-High” and “In Note Range-Low” parameters, also foundin the “MIDI: MIDI In Controls” page, that limit the note inputto a particular range, that could result too low or too high for theharmony notes (see page 260).
Portamento
This is defined in milliseconds as the time to reach a target notewhen a harmony voice needs to change pitch.
Harmony Voices EnvelopeThe envelope lets you set a different Attack and Release time forthe harmony voices.
Note: The envelope can only work in Notes mode.
Attack
Sets the envelope attack time for harmony voices. Available onlyin Notes mode.
Release
Sets the envelope release time for harmony voices. Available onlyin Notes mode.
Harmony Note InputWhen the Harmony Mode is Chord, harmony notes are alwaysreceived from the Chord Scanning area.
When the Harmony Mode is set to Notes, harmony notes can bereceived from a source different than the Chord Scanning area.This way, you can continue sending chords to the Arranger withyour left hand, while, for example, sending notes to the Har-mony module with your right hand.
Source
This is the harmony notes source for the Style Play mode. It isthe harmony notes source for the Song Play mode, when the“Song Control” parameter is set to Keyboard.
Note: When the Harmony Mode is Chord, the Source is always theChord Scanning area.
Hint: To continue playing harmony notes on the keyboard whenswitching between Style Play and Song Play modes, set Source =Chord Scan, Song Control = Keyboard.
Chord Scan Notes are received from the same chord scanningarea dedicated to the Arranger. For example, ifthe Lower chord scanning mode is selected onthe control panel, harmony notes are receivedfrom the Lower area of the keyboard.
Lower Notes are received from the Lower area of thekeyboard.
Upper Notes are received from the Upper area of thekeyboard.
Full Keyb. Notes are received from the full range of the key-board.
Song Control
This is the harmony notes source for the Song Play mode.
Off Notes are not received when in Song Play mode.
Ply 1+2 Track [n]
Notes are received from the selected track fromeither Player.
Keyboard Notes are received from the Keyboard. The rangeis the one defined by the “Source” parameter (seeabove).
Level
Level knob
Sets the overall harmony voices level.

267Global modeMic: Harmony Voices
Refe
renc
e
Mic: Harmony Voices
The Voice Processor can add up to three Harmony Voices to theLead voice. Here you can adjust parameters for each individualvoice.
Voice Select buttons
V1…V3
Use these buttons to select one of the three available voices forediting.
Individual Voice Basic
Voice On/Off
This checkbox allows enabling/disabling of the selected Har-mony Voice. It is the same control found on the “Preset” page.
Gender
This parameter sets the formant of the Harmony Voice. Use it toalter the character of the voice ranging from -50 (a big personwith a deep voice) to 0 (no change) to +50 (mice/alien sound).
Voicing
This parameter is used to set the voicing of the selected voice.This parameter means different things depending on the har-mony mode of the preset.
Scalic Mode Presets
In this mode the Voicing parameter specifies the interval of theharmony note with respect to the input note in the scale. Therange of values goes from --8, which is 2 octaves below the inputnote, to ++8 which is two octaves above the input note. Forexample, a setting of +3 will result in a harmony voice a thirdabove the input voice, related to the current scale.
Chord Mode Presets
In this mode the Voicing parameter specifies the relation of theharmony note to the input note with respect to the currentchord. In Chord mode presets, the harmony voices are alwaysnotes in the chord. A setting of Up1 will result in the harmonyvoice being the next note above the input voice in the chord. Forinstance, if the chord was C Major and the input note was an E,an Up1 setting would produce a G harmony voice, just above theinput E.
The range of values goes from Down 5 to Unison to Up6. Addi-tional values are Root1 and Root2 which give the root of the rec-ognized chord as the harmony voice, and Bass1 and Bass2 (bass
voicing) which give the lowest note received. Root2 and Bass2are the higher pitch Root and Bass settings.
Shift Mode Presets
In this mode the voices are shifted relative to the input note. Thevalues range from -24 semitones to +24 semitones.
Notes Mode Presets
In this mode there is no selectable voicing, since harmony voicesexactly play received notes.
Smooth
Sets how much of the input pitch nuance is applied to the outputvoice.
Pan/Level
Level knob
Sets the output level of the selected voice. Please note that thereis also a master harmony voice level found in the “Harmony”page.
Pan knob
Adjusts the pan for the selected voice. L64 (panned fully left) toR63 (panned fully right).
Custom Voice MappingThis area is only available in Scalic Mode, when Type is Custom(see “Mic: Harmony” on page 265).
Scale mode harmonies are basically pitch maps. For each inputnote in a scale you can define a resulting harmony note. TheVoice Processor has pre-defined pitch maps for all the offeredscale roots, types, and intervals.
The Custom voicing feature allows you to create your own pitchmaps. For example, you could define a pitch map so that a Cinput produces an E output and a D input produces an A output.The best way to work with custom voicing is as follows:
• For a given harmony voice, select the scale root, type, andinterval that most closely matches the desired voicing.
• Go to the “Note In” parameter and select the input note thatrequires a different harmony note.
• Go to the “Note Out” parameter and change the harmony noteas desired.
• Select various other input notes and remap as desired. Repeatthe above steps for each harmony voice. You can also copy a mapfrom a voice to other voices.
• The custom map can be transposed under the Harmony pageby changing the “Root” parameter.
Note In
Incoming note.
C … B Original note.
Note Out
Resulting note when applying the custom map.
±24 Number of semitones above or under thereceived note.
Voice Select buttons

268 Global modeMic: Effects
UNI Unison. The same note received on the input issent to the output.
NC No Change. The harmony voice will keep its pre-vious pitch until the lead voice pitch changes to anon “NC” note.
Copy to… button
Use this button to copy the current custom map to other voices.When you touch the button, the Copy Custom Voice Mappingdialog box appears:
Check all desired target voices, then touch OK to confirm thecopy.
Mic: Effects
This page allows to adjust the various effect parameters for theVoice Processor.
FX Mix
Lead to Delay knob
Lead to Delay effects send.
Harmony to Delay knob
Harmony to Delay effects send.
Reverb Level knob
Sets the overall volume of the Reverb effect.
FX Level knob
Sets the overall volume of the Delay effect.
Delay
Type
Use this parameter to select a Delay type.
Mono Mono delay.
Stereo Maintains the panning of the sends.
PingPong1 Sends the lead voice to the left effect end only.
PingPong2 Sends the lead voice to the sends depending onthe lead pan setting.
Delay
Only available when Src = Manual (see below). Use this parame-ter to fine adjust (in milliseconds) the current delay time.
Feedback
Delay feedback amount.
Src (Source)
Use this parameter to set the source of the tempo for the delay.
MIDI Tempo is received from MIDI.
Manual The delay time is set using the “Delay” parameter.
R (Ratio)
Sets the ratio between the tempo and the resulting delay. Forexample, “1:2” means that for each quarter note at the currenttempo, the delay plays two notes. A value of “1:4” means that foreach quarter note at the current tempo, the delay plays fournotes, and so on.
Hi Freq Damp (High Frequency Damping)
High Frequency Damping.
Reverb
Type
The list of reverb types includes the following acoustic simula-tions.
Pre Delay
Reverb Pre-delay time. Sets the delay time prior to the reverboutput. Large rooms typically have reverbs that start much laterthan the initial signal.
Reverb Time
Reverb Decay Time. Length or the Reverb.
Pre LEQ Gain
Reverb pre-equalization of the low frequencies. Specifies thecharacteristics of the reverbs low frequencies.
Pre HEQ Gain
Reverb pre-equalization of the high frequencies. Specifies thecharacteristics of the reverbs high frequencies.
Hall Smooth Hall
Wet Plate Dry Plate
Room Bright Room
Early Reflections

269Global modeMic: Global Setup
Refe
renc
e
Mic: Global Setup
In this page you can select a Voice Processor Preset, and set somegeneral parameters for your voice. These parameters are generalsetting, that will not change when a different Preset is selected.
Setup
Global Voice Processor Preset
This VP Preset will be chosen when selecting a Performance orSTS making use of the global VP Preset, instead of a “local” one.The use of a global VP Preset is shown in the Mic panel of themain screen.
Lead Setting
Low Cut Frequency
A low-cut filter can be activated on the Lead Voice. This filterallows for a cleaner signal from the microphone, by “cutting out”pops, room rumble and mic handling noise.
Off No low-cut filter applied.
60, 80, 120Hz Filter set to different frequencies. The frequenciesbelow the set value are cut out.
Pan/Volume
Pan knob
Adjusts panning for the Lead voice. L64 (panned fully left) toR63 (panned fully right).
Level knob
This parameter sets the Lead voice level.
Off Lead voice is turned off.
-30dB … 0dB Lead voice level.
Harmony Settings
Pitch Bend Range
Sets the range (in semitones) that pitch bend will alter the pitchof the harmonies in Notes mode.
Talk
The Talk function can be used when having to address the audi-ence, speaking over the background music.
Mic Talk button
On/off switch for the Talk function. This is the same switch youcan find in the Mic panel of the Style Play and Song Play modes.
This parameter is automatically set to off when turning the instru-ment on.
Note: When you deactivate the Talk function, the Voice ProcessorPreset is recalled. Any unsaved change to the Preset will be lost.
Auto (AutoTalk)
When this parameter is checked, the Talk function automaticallyengages when the Player or Arranger is stopped. This way, youcan talk to the audience between two songs, without the need totouch the Mic Talk button.
Master Volume Attenuation knob
Use this knob to set the volume level reduction of the back-ground music when the Talk function is engaged. 0dB corre-sponds to no level reduction.
Mic: Global Dynamics / EQ
In this page you can adjust parameters for the Compressor/Gateand Equalizer, applied to the Lead and Harmony voices.
Assign
Dyn
Compressor/Gate assignment. The options are Off, Lead + Har-mony, Harmony or Lead. The compressor has auto-makeupgain, so there are no output levels problems when selecting a dif-ferent option.
DynamicsThe Voice Processor has dynamics processing optimized forvocals.
Threshold knob
Compressor Threshold. Range: 0 to -60 dB.

270 Global modeHarmony and Tuning with the Voice Processor
Ratio knob
Compression ratio. Range: 1.1:1 to 64:1.
Gate knob
Gate Threshold. Range: Off, -70dB to 0dB
EQThe Voice Processor has an extremely flexible 3-band EQ withfrequency and gain-adjustable high and low shelving bands, aswell as a fully parametric band with Q control.
Low Frequency
Low Shelving Frequency center frequency. Range:80Hz…16kHz.
Low Gain knob
Low Shelving Frequency cut/boost. Range: ±12 dB.
Mid Q knob
Resonance of the midband. Range is .1 (wide band) to 10 (verynarrow band).
Mid Frequency
Mid Band Frequency center frequency. Range: 80Hz…16kHz.
Mid Gain knob
Mid Band Frequency cut/boost. Range: ±12 dB.
High Frequency
High Shelving Frequency center frequency. Range:80Hz…16kHz.
High Gain knob
High Shelving Frequency cut/boost. Range: ±12 dB.
Harmony and Tuning with the VoiceProcessor
HarmonyHere's where we can go into a little more depth about harmonies.We've tried to keep it practical, focusing on what Voice Proces-sor can do for you.
Harmony Modes
The Voice Processor has four different harmony modes, whichgive four unique methods of creating harmony. Once we get intodescribing the more complex harmony modes, we’ll be showingyou examples based on the C major scale. If you are unfamiliarwith this scale we’ve shown C major here.
Notes Mode
In this mode, you provide the Voice Processor with specific noteinformation to determine the pitch of the harmony voices. Thisis the most direct and flexible way of creating harmonies, allow-ing you to weave complex melodies and counter harmonies irre-spective of your lead vocal.
Shift Mode
Also known as “Fixed Interval”, this takes the pitch of your leadvoice and creates harmonies a set number of semitones away,based on that pitch. The method of creating harmonies, using afixed number of semitones relative to an input note or pitch, iscalled chromatic harmony, the theory of which we’ll go into later.We consider this type of harmonizing to be non-intelligentbecause Voice Processor is not set to any particular key or scale.These are pure, parallel harmonies. The most common shift har-mony voices are the 5th (7 semitones) and octave (12 semi-tones), ranging from two octaves below the input to two octavesabove the input pitch.
Below is the C Major scale, showing third above chromatic scaleharmony, as used in Voice Processor Shift Mode.
Black = Lead, Grey = Harmony

271Global modeHarmony and Tuning with the Voice Processor
Refe
renc
e
Chord (Chordal) Mode
Chordal harmonies take your chord information to create intelli-gent, diatonic harmonies based on your voice. To make Chordalharmonies, you need to input in real time the chords of the song.This may be done either by playing on the keyboard, via MIDI orthrough a programmed sequence of chords included in the Har-mony Track of a Song.
In Chordal mode the Voice Processor will only create harmonyvoices that fall on the notes of the chord. Chordal harmonies are“intelligent” because they decipher the chord you’re playing andthe note you’re singing to produce musically pleasing harmonies.When one note above is defined as a harmony voice (Up1), thenext note from the chord above the input note is output for thatharmony voice.
The subsequent illustration shows the harmony notes for the Cmajor scale with a voicing selection of a C major chord and asingle “one above”.
Root: C, Chord Type: Maj, Voicing: Up1
Black = Lead & Grey = Harmony
You might have noticed that each harmony note can cover morethan one input note, or that each input note doesn’t necessarilyhave a unique harmony note. For instance, C and D both have Eas the 3rd above, E and F share G, and so on. This gives a morestepped sound to the harmony as the changes are both greater inmagnitude and less frequent than when using other harmonymethods (shift mode for example). The benefit of this method isthat it is very easy to integrate vocal harmonies into your songs ifyou already know their chord progressions! The following liststhe chords available with respect to the root of “C”:
Major C E G
6 C E G A
Maj7 C E G B
M7sus4 C F G B
min C Eb G
min6 C Eb G A
min7 C Eb G Bb
min7b5 C Eb Gb Bb
dim C Eb Gb [Bbb (= A)]
7 C E G Bb
7b5 C E Gb Bb
aug C E G#
aug7 C E G# Bb
sus4 C F G
sus2 C D G
7sus4 C F G Bb

272 Global modeHarmony and Tuning with the Voice Processor
Scale (Scalic) mode
Harmonies use key and scale information to create musicallycorrect, diatonic harmonies. Most popular music uses a singlescale, so you usually only have to input the information at thebeginning of your song. “Scalic” harmonies are more dynamicthan the chordal harmonies because there are unique harmonynotes for each input note. The subsequent illustration shows theharmony notes for the C major scale with a voicing selection of aC major scale and a single “third above” harmony voice. You cansee from the next diagram that the “Scalic” harmonies are intelli-gent and closely follow your lead voice for a tighter sound.
Black = Lead, Grey = Harmony
Under the Harmony page, is a parameter called “Smooth”. Whenset to 100% the harmony voices follow your input pitch, errorsand all, but when set to 0% the harmonies will jump directly tothe scalic harmony notes, kind of like a hard pitch correction onthe harmony voice. Setting the Smooth parameter between 0 and100% is like having variable amounts of pitch correction on theharmonies. Voice Processor has five preprogrammed harmonyscales: three major, three minor and one custom per preset. To
create a custom scale or pitch map see the parameter descriptionunder “Custom Voice Mapping” on page 267.
It is also tricky to pick out the key in some songs. An example is“Sweet Home Alabama”. Listening, you might think this song isin the key of “D”, as that’s the first chord, but the harmonies actu-ally work best in the key of “G” – try running the song throughVoice Processor to hear for yourself.
Setting the scale can also take a bit of practice: for songs centeredaround the third or root of the scale it might not sound likethere’s any noticeable differences between the three major orthree minor scales. This is because your song doesn’t hit any ofthe scale’s altered notes. A melody centered around the fifth ofthe scale, (such as B in the key of E), highlights the differencesbetween the scales. Try the “Sha Lala Lala … La Tee Daa” chorusof Van Morrison’s “Brown Eyed Girl” (key: E, scale: major, 3rdabove voicing) with each major scale to hear the audible differ-ence between them. For the minor scales, Santana’s “Evil Ways”(key: G, scale: minor, 3rd above voicing) highlights the differ-ences between the three minor scales.
The following table illustrates the third and fifth above for agiven input note to illustrate the differences between the six dif-ferent scales. “nc” means no change, in that the harmony voicewill simply keep its previous pitch until the lead voice pitchchanges to a non “nc” note.
Lead Voice C C# D Eb E F F# G G# A Bb B
MAJ1 3rd above E nc F nc G A nc B nc C D D
5th above G nc A nc B C nc D nc E F F
MAJ2 3rd above E nc F nc G A nc C nc C D D
5th above G nc A nc C C nc E nc E F F
MAJ3 3rd above E nc F nc G A nc Bb nc C D D
5th above G nc A nc Bb C nc D nc E F F
MIN1 3rd above Eb nc F G nc Ab nc Bb C nc D nc
5th above G nc Bb Bb nc C nc D Eb nc F nc
MIN2 3rd above Eb nc F G nc A nc Bb C nc D nc
5th above G nc A Bb nc C nc D Eb nc F nc
MIN3 3rd above Eb nc F G nc Ab nc B C nc D nc
5th above G nc A Bb nc C nc D Eb nc F nc

273Global modeHarmony and Tuning with the Voice Processor
Refe
renc
e
Diatonic and ChromaticWe've described scalic and chordal harmonies as diatonic, andshift harmonies as chromatic; but what do those words mean?Look at a piano keyboard. Between middle “C” and the next “C”there are twelve keys – 7 white keys and 5 black keys. Each ofthose keys are pitched one semitone apart for a total of, youguessed it, 12 semitones. The chromatic scale uses all twelvesemitone notes opposed to the diatonic scales. Thus there is onlyone chromatic scale, but 12 each of the major, minor, etc. dia-tonic scales (C major, C# major, D major, etc). Most of us havegrown up hearing the traditional “doh ray me fah so la tee doh”diatonic scale, so that harmonies based on the diatonic scalesound correct.
What does this mean, harmony-wise? Diatonic scale harmoniescan only use notes within specified scale or chord, so a “thirdabove” harmony voice actually varies between three and foursemitones above the lead note where the chromatic harmonywould stay exactly four semitones (a major 3rd) above each note.
To recap: we have three different harmony modes that use chro-matic or diatonic scales.
Shifting, which uses the chromatic, 12 semitone scale, changesthe input pitch by a fixed number of semitones:
Chordal, which uses the root, third, fifth and sometimes seventhof the many diatonic scales, pitches the harmony voice to theclosest note contained within the chord:
Scalic, which uses one of many diatonic scales, pitches the har-mony voice to the nearest note contained within the scale:
Theory aside, the best way to get great sound is to experimentwith all of Voice Processor' possible harmony modes. Not onlywill you develop an intuitive sonic sense of what works bestwhere, but by investigating different permutations and combina-tions you could discover some delightful sounds you might oth-erwise have missed.

274 Global modeTouch Panel Calibration
Touch Panel Calibration
From time to time (for example, after loading a new operatingsystem), calibrating your Color TouchView™ display may be nec-essary to make pointing more precise. If so, use this page.
1. When in this page, first touch exactly inside the set ofarrows in the upper left corner of the display.
2. The arrows will subsequently move to the other corners ofthe display. Touch exactly inside them.
3. Finally, touch Save to confirm the new calibration.
• In case you want to exit and cancel the calibration, pressEXIT before completing the procedure.
Hint: To quickly reach this page from any other page, keep theGLOBAL button pressed until this page appears.
Page menu
Touch the page menu icon to open the menu. Touch a commandto select it. Touch anywhere in the display to close the menuwithout selecting a command.
Note: In each Global page, the only available Write Global optionsfrom the page menu are the ones relevant to the content of the cur-rent page. All other Write Global options are greyed out.
Write Quarter Tone SC Preset
Choose this command to open the Write SC Preset dialog box,and save the current scale settings in one of the four available SCPresets.
See “Write Quarter Tone SC Preset dialog box” on page 275 formore information.
Write Midi Preset
Select this command to open the Write Midi Preset dialog box,and save the current MIDI settings into one of the availableMIDI Presets.
See “Write Midi Preset dialog box” on page 275 for more infor-mation.
Write Limiter Preset
Choose this command to save the Limiter settings to one of theavailable Limiter Presets.
See “Write Limiter Preset dialog box” on page 275 for moreinformation.
Write Master EQ Preset
Choose this command to save the Master EQ settings to one ofthe available Master EQ Presets.
See “Write Limiter Preset dialog box” on page 275 for moreinformation.
Write Voice Processor Preset
Choose this command to save the Voice Processor settings toone of the available Voice Processor Presets.
See “Write Voice Processor Preset dialog box” on page 276 formore information.

275Global modeWrite Quarter Tone SC Preset dialog box
Refe
renc
e
Write Quarter Tone SC Preset dialog box
Open this dialog box by selecting the Write Quarter Tone SCPreset item from the page menu. Here, you can save the currentscale settings in one of the four available SC Presets.
To
One of the four available SC Preset locations, where to save cur-rent scale settings.
Write Midi Preset dialog box
Open this dialog box by selecting the Write Midi Preset itemfrom the page menu. Here, you can save all MIDI settings to aMIDI Preset.
Name
Name of the MIDI Preset to be saved. Touch the (Text Edit)button next to the name to open the Text Edit window and mod-ify the name.
Midi Preset
One of the available MIDI Preset locations, where to save cur-rent MIDI settings.
Write Limiter Preset dialog box
Open this dialog box by selecting the Write Limiter Preset itemfrom the page menu. Here, you can save current settings for theLimiter edit section (see starting from page 262).
Name
Name of the Limiter Preset to be saved. Touch the (TextEdit) button next to the name to open the Text Edit window andmodify the name.
Limiter Preset
One of the available locations, where to save current Limiter set-tings.
Write Master EQ Preset dialog box
Open this dialog box by selecting the Write Master EQ Presetitem from the page menu. Here, you can save current settings forthe Master EQ edit section (see starting from page 263).
Name
Name of the Master EQ Preset to be saved. Touch the (TextEdit) button next to the name to open the Text Edit window andmodify the name.
Master EQ Preset
One of the available locations, where to save current Master EQsettings.

276 Global modeWrite Voice Processor Preset dialog box
Write Voice Processor Preset dialog box
Open this dialog box by keeping the PRESET button in the MICSETTING section pressed for about one second, or by selectingthe Write Voice Processor Preset item from the page menu. Here,you can save current settings for the VP Preset in the Mic editsection (see starting from page 265).
Name
Name of the VP Preset to be saved. Touch the (Text Edit)button next to the name to open the Text Edit window and mod-ify the name.
Voice Preset
One of the available locations, where to save the current VP Pre-set settings.

277Media modeStorage devices and internal memory
Refe
renc
e
The Media mode is where you can manage files. This modeoverlaps the current operating mode (Style Play, Song Play,Sequencer, Sound).
Storage devices and internal memory
User-accessible storage devicesDuring a Media operation, files are usually exchanged between astorage device and the internal memory. You can access the fol-lowing mass storage device types:
A device can be selected by using the Device pop-up menu,shown in the lower left corner of most Media pages:
Supported device
Pa900 supports external devices, like hard disks or USB memorysticks, formatted in FAT16 or FAT32 with long file names. NTSF(Windows NT/2000/XP/Vista/7), HFS (Mac OS 9) and HFS+(Mac OS X) formats are not supported.
Selecting and deselecting files
While a file list is shown in the display, you can select any itemby touching it. The selected item is highlighted.
You can deselect all items in any of the following ways:
• Touch an empty area in the file list (if available).
• Touch the Device pop-up icon, and select the currentdevice again.
Searching files
By using the Search function, you can search files and musicalresources in all internal and external devices. For more informa-tion, see the relevant chapter.
Preferences
You can change some global preferences of the Media mode inthe Global > Mode Preferences > Media page (see page 254).
Media mode
Name Media type
DISK [KORG DISK] User-accessible area of the internal memory. This is where you can store Songs and other files.
SD [KORG SD] Optional microSD card inserted into the rear slot.
SD [KORG SD2] Optional microSD card inserted into the rear slot (second partition).
USB USB memory device (like a memory stick) connected to the rear USB Host port.
Device pop-up menu
Device name

278 Media modeFile types
File types
The following tables describe all the file and folder types thePa900 can manage. Here are the files you can read or write withthe Pa900.
Pa900 can also read (but not write) the following types of data.
Extension File/folder type
SET All the User data. (This is a folder containing other fold-ers)
BKP Backup file, created with the “Full Resource Backup” function of the Media > Utility page
GBL Global Setup
VOC Voice Processor Presets
QTP Quarter Tone Scale Presets
MPR MIDI Presets
AUD Limiter and Master EQ Presets
PRF Performance
PCG Sound (Korg Pa-Series)
KMP Multisample
PCM Sample
AIF AIFF audio files
WAV WAVE audio files
STY Style
PAD Pad
SBD SongBook
SBL SongBook’s Custom List
JBX Jukebox
MID Standard MIDI File, SMF
MP3 MP3 file
TXT Plain text file
Extension File type
PKG Operating System and Musical Resource files
KAR Karaoke file
CDG CD+Graphics file
PCG Korg Triton Programs
KSF Korg Trinity/Triton Sample
SF2 SoundFont 2 Bank

279Media modeMedia structure
Refe
renc
e
Media structure
Each device (and the internal memory) can contain files and folders. Data in the Pa900 is slightly more rigidly structured than in a com-puter, due to the pre-configured type of data inside the instrument’s memory. The diagram below shows the global structure of a Pa900device.
Note: Factory Styles and Pads can be seen in Media mode only when the “Factory Style and Pad Protect” parameter is set to Off (seepage 254), and only when loading or saving a single Style bank, or when erasing something.
MYDIR.SET
GLOBAL
PERFORM
SETUP.GBLLIMITER.AUDMASTEREQ.AUDMIDI.MPRQTPRESET.QTPVPPRESET.VOC
BANK01.PRF
1-1 Grand Piano…1-40 Full Strings
BANK….PRF
BANK8.PRF
8-1 Rock Brass…8-40 Rock Strings
SONGBOOK
LISTDB.SBL
SONGDB.SBD
SOUND
USER01.PCG
USERDK.PCG
STYLE
BANK01.STY
1-1 Pop 1…1-40 Pop 40
BANK….STY
USER01.STY
U1-1 User 1…U1-40 User 40
USER02.STY
U2-1 User 1…U2-40 User 40
USER03.STY
U3-1 User 1…U3-40 User 40
BANK15.STY
15-1 Contemp. 1…15-40 Contemp. 40
1 Piano 1…128 SynBrass22
1 Standard Kit…128 Orchestral Kit
USER04.PCG
1 SopranoSax…128 Noise
FAVORITE01.STY
FAVORITE12.STY
1 Favorite 1…40 Favorite 40
1 Favorite 1…40 Favorite 40
FAVORITE….STY
PAD
BANK01(…10).PAD (Hit)
1 Cowbell 1…32 Drumkit F
BANK11(…20).PAD (Sequence)
1 Military 1…32 Circus 2
USER01.PAD
U1-1 User 1…U1-32 User 32
USER….PAD
USER10.PAD
U10-1 User 1…U10-32 User 32
LOCAL01.PAD
L1-1 Local 1…L1-32 Local 32
LOCAL08.PAD
L8-1 Local 1…L8-32 Local 32
LOCAL….PAD

280 Media modeMain page
Main page
There is no main page in the Media mode. When pressing EXIT,you exit the Media mode, and the underlying operating mode inthe background is recalled.
Page structure
All pages share some basic elements.
Mode
This indicates that the instrument is in Media mode.
Page menu icon
Touch this icon to open the page menu (see “Page menu” onpage 293).
Path
Full path of the directory currently shown in the display.
List of files
This area shows the files and folder contained in the selecteddevice.
You can touch one of the heading labels above the list to changethe order in which files are shown. For example, by touching the“Name” label, the list is alphabetically re-ordered according tothe file names. The selected label appears highlighted, showingthe currently selected ordering.
If you touch the highlighted label again, the alphabetic orderchanges from ascending to descending, or vice-versa. The smallarrow next to the label name shows the selected order.
Scrollbar
Use the scrollbar to scroll the list. Touching the arrows will scrollone step at a time, while touching the bar will scroll one page at atime.
Touching the arrows while SHIFT is kept pressed jumps to theprevious or next alphabetical section, or file/folder type(depending on the selected display order).
Device pop-up menu
Use this menu to select one of the available storage devices.
Commands
Commands may be different depending on the shown page.They are detailed in each relevant section.
Tabs
Use tabs to select one of the pages of the current section.
Navigation tools
When in a Media page, you can use any of the following com-mands to browse through the files and folders.
Scrollbar
See “Scrollbar” above.
VALUE DIAL
Use the VALUE DIAL to scroll the list up or down.
Device pop-up menu
See “Device pop-up menu” above.
Load/Save/Copy/Delete button
Executes the media operation.
Open button
Opens the selected folder or directory (whose name begins with
the “ ” icon).
Close button
Closes the current folder or directory, returning to the parent(“upper”) level.
Mode
Path
Page menu icon
List of files
Tabs
Com-mands
Device menu
Scrollbar

281Media modeLoad
Refe
renc
e
Load
In this page you can load User data files (Performances, UserSounds, User Styles, the SongBook, the Global) from an internalor external storage device to the internal memory.
Note: While in this page, only data allowed for loading are shown.All other files are hidden.
Merging dataWhen loading all User data, or all data of a specified type, mostdata loaded from a storage device are merged with data alreadyexisting in memory. For example, if there is data in all threeUSER Style banks in memory (USER01, USER02, USER03), andthere is only the USER01 Style bank in the storage device, theUSER01 bank will be overwritten, while USER02 and USER03banks will be left unchanged.
As a result, there will be a STYLE folder in memory containingthe USER01 bank you just loaded, and the old USER02 andUSER03 banks.
Loading all the User dataYou can load all the User data with a single operation.
1. If loading from an external device, connect the device tothe USB Host port.
2. Use the Device pop-up menu to select the source device.When the device is selected, its content will appear in thedisplay.
3. If the folder you are looking for is inside another folder,select this latter and touch the Open button to open it.Touch the Close button to go back to the parent folder.
4. Select the “.SET” folder containing the data you wish toload, and touch Load to confirm the selection.
To create a new .SET folder with PCM samples from differentsources, see “Merging Samples from various sources” onpage 294.
Loading all data of a specified typeYou can load all data of a specified type with a single operation.
1. If loading from an external device, connect the device tothe USB Host port.
2. Use the Device pop-up menu to select the source device.When the device is selected, its content will appear in thedisplay.
3. If the folder you are looking for is inside another folder,select the latter and touch the Open button to open it.Touch the Close button to go back to the parent folder.
4. Select the “.SET” folder containing the data you wish toload, and touch Open to open the “.SET” folder. A list ofUser data appears (Global, Performance, SongBook,Sounds, Style…).
5. Select the folder containing the type of data you are lookingfor, and touch Load to confirm your selection.

282 Media modeLoad
Loading a single bankYou can load a single bank of data (Sounds, Styles, Perfor-mances) with a single operation. Each bank corresponds to eachof the side tabs in the various Select windows (Style Select, Per-formance Select…).
1. If loading from an external device, connect the device tothe USB Host port.
2. Use the Device pop-up menu to select the source device.When the device is selected, its content will appear in thedisplay.
3. If the folder you are looking for is inside another folder,select this latter and touch the Open button to open it.Touch the Close button to go back to the parent folder.
4. Select the “.SET” folder containing the data you wish toload, and touch Open to open the “.SET” folder. A list ofUser data appears (Global, Performance, SongBook,Sounds, Style…).
5. Select the folder containing the type of data you are lookingfor, and touch Open to open the selected folder. A list ofFavorite/User banks appears.
6. Select the bank file you are looking for, and touch Load toconfirm the selection. A dialog box appears, asking you toselect one of the available User (or Favorite/User Style)banks in memory.
In the example above, the previously selected Style bankwill be loaded into the bank USER 1 in memory. The Stylesalready existing in memory will be deleted and overwritten.
7. Select the target bank, and touch OK to load the sourcebank.
Warning: After confirming, all User data contained in mem-ory are deleted.
Note: You can save space for loading new data by deleting allunused PCM Samples from memory. When Sounds or DrumKits based on external PCM Samples are deleted, you no lon-ger need the now unassigned PCM Samples. Use the “Notassigned to any Multisample/Drumkit” Delete option in theSampling mode to delete all the unassigned Samples (seepage 244).
Note: If you are loading a bank of Sounds, and one or moreSounds or Drum Kits use external PCM Samples, the Sam-ples are automatically loaded (unless they are already inmemory).
Loading a single itemYou can load a single item with a single operation.
1. If loading from an external device, connect the device tothe USB Host port.
2. Use the Device pop-up menu to select the source device.When the device is selected, its content will appear in thedisplay.
3. If the folder you are looking for is inside another folder,select this latter and touch the Open button to open it.Touch the Close button to go back to the parent folder.
4. Select the “.SET” folder containing the data you wish toload, and touch Open to open the “.SET” folder. A list ofUser data appears (Global, Performance, SongBook,Sounds, Style…).
5. Select the folder containing the type of data you are lookingfor, and touch Open to open the selected folder. A list ofbanks appears.

283Media modeLoad
Refe
renc
e
6. Select the bank file you are looking for, and touch Open toopen it. A list of items appears.
7. Select the item you are looking for, and touch Load to con-firm the load. A dialog box appears, asking you to selectone of the available locations in memory.
In the dialog box above, the Style you select from disk willbe loaded into location 01 of the bank Usr01 in memory.Any existing Style at the same location will be deleted andoverwritten.
Empty locations are named “- - - “.
8. Select the target location, and touch OK to load the sourcefile.
Warning: After confirming, the item you are overwriting inmemory will be deleted.
Note: You can save space for loading new data by deleting allunused PCM Samples from memory. When Sounds or DrumKits based on external PCM Samples are deleted, you no lon-ger need the now unassigned PCM Samples. Use the “Notassigned to any Multisample/Drumkit” Delete option in theSampling mode to delete all the unassigned Samples (seepage 244).
Note: If you are loading a Sound or Drum Kit making use ofexternal PCM Samples, the Samples are automaticallyloaded (unless they are already in memory).
Loading Global data from other Pa-SeriesinstrumentsGlobal data (Global, Voice Processor, Limiter, EQ, etc.) cannotbe loaded from other Pa-Series instruments.
Loading Pa3X dataYou can load Pa3X data exactly as if they were Pa900 data, apartfor the Global data. Sounds and Effects can be a bit different.Due to the different order in memory, Styles must be reassignedto SongBook Entries by using the SongBook Editor software(freely available on www.korg.com).
Loading Pa600 dataYou can load Pa600 data exactly as if they were Pa900 data, apartfor the Global data. Due to the different order in memory, Stylesmust be reassigned to SongBook Entries by using the SongBookEditor software (freely available on www.korg.com).
Loading Pa2X/Pa800 dataYou can load Pa2X/Pa800 data exactly as if they were Pa900 data,apart for the Global data. Due to the different order in memory,Styles must be reassigned to SongBook Entries by using theSongBook Editor software (freely available on www.korg.com).
It is not possible to load Pa900 data into a Pa2X/Pa800.
Loading Pa1X dataYou can load Pa1X data exactly as if they were Pa900 data, apartfor the Global data. Due to the different order in memory, Stylesmust be reassigned to SongBook Entries by using the SongBookEditor software (freely available on www.korg.com).
It is not possible to load Pa900 data into a Pa1X.
Loading Pa500/588 dataYou can load Pa500/588 data exactly as if they were Pa900 data,apart for the Global data. Due to the different order in memory,Styles must be reassigned to SongBook Entries by using theSongBook Editor software (freely available on www.korg.com).
It is not possible to load Pa900 data into a Pa500/588.
Loading Pa80/60/50/50SD dataYou can load Pa80/60/50/50SD data exactly as if they were Pa900data, apart for the Global data. The only difference is that the“SOUND” folder of Pa900 is called “PROGRAM” in the Pa80/60/50/50SD. Therefore, to load Sounds from Pa80/60/50/50SDdisks, you must accomplish one of the following operations,either:
• Rename the “PROGRAM” folder “SOUND” (by using apersonal computer) before loading a “.SET” folder; or
• First load the “.SET” folder, then separately load the “.PCG”file from the “PROGRAM” folder.
Loading i-Series dataPa900 is compatible with the Styles of the older i-Series instru-ments. You can load them as if they were ordinary Pa900 data.
1. Copy the old i-Series data into an USB device, or transferthem to the internal storage memory of the Pa900.
2. Press MEDIA to go to the Media mode. Select the Loadpage if needed.
3. While in the Load page, select the device containing the i-Series data from the Device pop-up menu.
4. If you are reading an i30 file, select the “.SET” folder andtouch the Open button in the display.
5. Select the “.STY” folder.
6. At this point, you can load the whole “.STY” folder, or openit and select a single Style.

284 Media modeSave
• To load the whole folder, touch the Load button in thedisplay. If it contains more than 40 Styles, they will beloaded into the USER banks sequentially, otherwise youwill be prompted to select one of the USER Style banks orthe FAVORITE Style banks in memory. Once the targetbank is selected, touch Load to load the bank. The “Are yousure?” message will appear. Touch OK to confirm, or Can-cel to abort.
• To load a single Style, touch Open in the display to openthe “.STY” folder. Since a conversion will be started at thispoint, please wait some seconds for the operation to becompleted.
Select the Style to load, then touch Load. You will beprompted to select a target location in memory. Once thetarget location is selected, touch Load to load the Style. The“Are you sure?” message will appear. Touch OK to confirm,or Cancel to abort.
Note: Loading a whole “.SET” folder from an i30 file maytake some time due to format conversion.
7. Go to the Style Play mode, and select (one of) the loadedStyle. Adjust the Tempo value, then select the “Write Cur-rent Style Settings” to write changes. Touch OK twice toconfirm.
8. Due to the difference in Sounds, you will probably want tomake some adjustments to the old Styles, once they areloaded in Pa900 (changing the Sound, Volume, Pan,Tempo, Drum Mapping, Wrap Around…).
9. To make the Sound assignment to the Style tracks effective,be sure the “Original Style Sounds” parameter is notchecked (see page 110).
10. Save the Style Settings again. Select the “Write CurrentStyle Settings” to write changes. Touch OK to confirm.
Save
In this page, you can save User data from the internal memory toa mass storage device (like an hard disk or an USB memorystick). You can save single files, banks, or all the User and Favor-ite Style files of the internal memory.
Note: While in this page, only data allowed for saving are shown.All other files are hidden.
Here are the various types of files contained in the internalmemory:
The file/folder type…
…contains……and will create on the target device…
All All the User data in memory A .SET folder
Style The FAVORITE 01-12 Styles and the USER 01-03 Styles
A STYLE folder inside a .SET folder
Sound The USER Sounds and Drum Kits
A SOUND folder inside a .SET folder
Pad The USER Pads A PAD folder inside the .SET folder
Perform (Perfor-mances)
The Performances A PERFORM folder inside a .SET folder
SongBook The SongBook database A SONGBOOK folder inside a .SET folder
PCM All the Multisamples con-tained in the internal stor-age memory, and the PCM Samples contained in RAM
A PCM folder inside a .SET folder
Global All global parameters. MIDI Presets, SC Presets, Limiter Presets, Master EQ Presets and VP Presets are also saved.
A GLOBAL folder inside a .SET folder. Inside the GLOBAL folder other folders will be created, to contain the MIDI, SC, Limiter, Master EQ Pre-sets and VP Presets.

285Media modeSave
Refe
renc
e
Creating a new “.SET” folderPa900 proprietary data must be saved in special folders with the“.SET” extension. These special folders can be saved inside ordi-nary folders.
When saving, you can save onto existing “.SET” folders, or youcan create a new folder of this type. Here is how to do it.
1. When the directory of the target device is shown in the dis-play, the “New SET” button appears among the buttonsbelow the file list.
2. Touch the New SET button. A dialog box appears, askingyou to enter a name for the new “.SET” folder.
3. Touch the (Text Edit) button to open the Text Editwindow. Enter the name, then touch OK to confirm andclose the Text Edit window. Note: The “.SET” file nameextension is added automatically.
4. Touch OK to create the new folder and exit the dialog box.
Saving the full memory contentYou can save the full memory content with a single operation.Depending on the status of the “Factory Style and Pad Protect”parameter, you may or may not see the Factory Style and Padbanks (see “Factory Style and Pad Protect” on page 254).
1. If saving to an external device, connect the device to theUSB Host port.
2. The full content (“All”) of the internal memory is alreadyshown. Select it, and touch Save to confirm the selection.The list of files in the target device is shown.
3. If needed, use the Device pop-up menu to select a differenttarget device. When the target device is selected, its contentwill appear in the display.
4. At this point, you can:
• Touch the New SET button and create a new “.SET” folder(see “Creating a new “.SET” folder” on page 285), or
• Select an existing “.SET” folder.
5. Touch Save to confirm. A dialog box appears, asking you toselect the type of data to save:
Save All dialog with the Factory Style and Pad Protect option turned on
Save All dialog with the Factory Style and Pad Protect option turned off
In the dialog box above, check all data type you wish to saveto a storage device.
6. Touch OK to confirm, or Cancel to abort.

286 Media modeSave
Warning: After confirming, all data of the selected type in thetarget folder is deleted.
Saving all data of a specified typeIn addition to the above, you can save all data of a specified typeby selecting the corresponding folder.
1. If saving to an external device, connect the device to theUSB Host port.
2. The full content (“All”) of the internal memory is alreadyshown. Select it, and touch Open to open it. A list of Userdata types appear (each type is a separate folder).
3. Select the folder containing the type of data you wish tosave, and touch Save To to confirm the selection. The list offiles of the target device is shown.
4. If needed, use the Device pop-up menu to select a differenttarget device. When the target device is selected, its contentwill appear in the display.
5. At this point, you can:
• Touch the New SET button and create a new “.SET” folder(see “Creating a new “.SET” folder” on page 285), or
• Select an existing “.SET” folder, and touch Save to con-firm.
Warning: After confirming, all data of the selected type in thetarget folder is deleted.
Saving a single bankYou can save a single User bank with a single operation. Eachbank corresponds to each of the side tabs in the various Selectwindows (Style Select, Performance Select…).
1. If saving to an external device, connect the device to theUSB Host port.
2. The full content (“All”) of the internal memory is alreadyshown. Select it, and touch Open to open it. A list of Userdata types appear (each type is a separate folder).
3. Select the folder containing the type of data you wish tosave, and touch Open to open it. The list of contained bankfiles is shown.
4. Select the bank file to be saved, and touch Save To to con-firm the selection. The list of files of the target device isshown.
5. If needed, use the Device pop-up menu to select a differenttarget device. When the target device is selected, its contentwill appear in the display.
6. At this point, you can:
• Touch the New SET button and create a new “.SET” folder(see “Creating a new “.SET” folder” on page 285), or
• Select an existing “.SET” folder, and touch Save to con-firm.

287Media modeSave
Refe
renc
e
7. A dialog box appears, asking you to select one of the avail-able User (or Favorite/User Style) locations inside thefolder:
In the above dialog box, the previously selected bank ofStyles will be saved to bank User 01 inside the selectedfolder. Three User banks are available.
8. Touch OK to confirm, or Cancel to abort.
Warning: After confirming, the same bank in the targetfolder is deleted.
Saving a single itemYou can save a single User item with a single operation.
1. If saving to an external device, connect the device to theUSB Host port.
2. The full content (“All”) of the internal memory is alreadyshown. Select it, and touch Open to open it. A list of Userdata types appear (each type is a separate folder).
3. Select the folder containing the type of data you wish tosave, and touch Open to open it. The list of contained bankfiles is shown.
4. Select the desired bank file, and touch Open to gain accessto the single items.
5. Once you have selected the file that you want to save, touchSave To to confirm the selection. The list of files of the tar-get device is shown.
6. If needed, use the Device pop-up menu to select a differenttarget device. When the target device is selected, its contentwill appear in the display.
7. At this point, you can:
• Touch the New SET button and create a new “.SET” folder(see “Creating a new “.SET” folder” on page 285), or
• Select an existing “.SET” folder, and touch Save to con-firm.
8. A dialog box appears, asking you to select one of the avail-able User (or Favorite Style) locations inside the selectedfolder
In the above dialog box, the previously selected Style will besaved to location 01 inside the bank Usr01 inside theselected folder.
9. Touch OK to confirm, or Cancel to abort.
Warning: After confirming, the same item in the target folderis deleted.

288 Media modeCopy
Copy
In this page you can copy files and folders. Folders can begeneric or “.SET” folders. In addition, you can copy the contentof the generic folder you are in. You can copy inside the samedevice, or from a device to a different one (both devices must beconnected to the Pa900 during the copy operation).
To preserve data structure integrity, during Copy operations youcan’t open “.SET” folders and copy only one of the files it con-tains. You can only open and go inside generic folders.
Contrary to the Load and Save pages, in this page you may see alltypes of files, and not only Pa-Series supported files (assumingthe “Hide Unknown Files” option is turned off, see page 254).
Copying a folder’s contentIf nothing is selected while a folder is open in the display, youcan copy the folder’s content, without copying the folder itself.
Note: During the Copy procedure, you can’t open a “.SET” folder.You can, however, open any generic folder.
1. If copying from or to an external device, connect the deviceto the USB Host port.
2. Select the source device, by using the Device pop-up menu.
3. If the folder you are looking for is inside another folder,select this latter and touch the Open button to open it.Touch the Close button to go back to the parent folder.
4. To copy the current folder’s content, without copying thefolder itself, do not select anything in the display.
5. Touch Copy To to confirm. The target device appears.
Note: If the selected device is not available, the “Device notfound, or unknown format” message will appear. A differentdevice will be automatically selected.
6. If needed, select the target device, by using the Device pop-up menu.
7. If you want to select a different folder, use the Open andClose buttons to move through the directories.
• To copy into an existing generic folder (not a “.SET”folder), select that folder.
• To copy into the current folder, do not select anything.
8. Once the target is selected, touch Copy.
If a file or folder with the same name of the source dataalready exists at the target location, the “Overwrite” dialogbox will appear (see “Overwriting existing files or folders”on page 289).
During Copy, a dialog box shows the progress of the opera-tion.
Copying a single file or folderYou can copy a single file or folder, from the root or a genericfolder to a different one. You can’t copy single files or foldersfrom inside a “.SET” folder.
1. If copying from or to an external device, connect the deviceto the USB Host port.
2. Select the source device, by using the Device pop-up menu.
3. Select the folder containing the file or folder you wish tocopy. If it is contained in another folder, touch the Openbutton to open it. Touch Close to go back to the previoushierarchic level.
4. Touch Open to open the folder containing the file or folderto be copied.
5. Select the file or folder to be copied, then touch Copy To toconfirm its selection. The target device appears.
Note: If the selected device is not available, the “Device notfound, or unknown format” message will appear. A differentdevice will be automatically selected.
6. If needed, select the target device, by using the Device pop-up menu.
7. When the target device content appears in the display,select the target folder. Touch Open to open a folder, orClose to close it.
8. Once the target is selected, touch Copy.
If a file or folder with the same name of the source dataalready exists at the target location, the “Overwrite” dialogbox will appear (see “Overwriting existing files or folders”below).
Multiple file selectionWhile in the Copy and Delete pages of the Media mode, you canselect several files or folders at the same time before executingthe operation. Files or folders can be selected consecutively (i.e.,in a row), or discontinuously (i.e., with other files or folders inthe middle).
To choose either to select files in a consecutive or discontinueway, use the Mode button on the right of the page command but-tons, to choose an option for the SHIFT button:
Choose this option to select files or folders con-secutively (i.e., in a row).
Choose this option to select files or folders dis-continuously (i.e., with other files or folders inthe middle).

289Media modeDelete
Refe
renc
e
To select more files or folders consecutively:
1. Touch the Mode button to choose the option for theSHIFT button.
2. Select the first file or folder to be selected.
3. Press and keep the SHIFT button pressed.
4. Select the last file or folder to be selected.
5. Release the SHIFT button.
To select more files or folders discontinuously:
1. Touch the Mode button to choose the option for theSHIFT button.
2. Select the first file or folder to be selected.
3. Press and keep the SHIFT button pressed.
4. Select a second file or folder to be selected.
5. While keeping the SHIFT button pressed, continue select-ing the other files or folders to be selected.
6. Release the SHIFT button.
To deselect the files or folders:
• To deselect one or more file or folder, without deselectingeverything, keep SHIFT pressed and touch the file or folderto be deselected.
• To deselect everything, select any other file or folder. Allselected files and folders will be deselected.
Overwriting existing files or foldersWhen copying files, a file or folder with the same name of asource element might be found in the target device. In this case,Pa900 asks you if you want to overwrite it.
When a duplicate file or folder is met, the following dialog boxappears:
Cancel The procedure is interrupted.
No The file or folder is not overwritten. The sourcefile or folder is not copied. The procedure willcontinue with the other files and folders.
Yes The file or folder is overwritten. The procedurewill continue with the other files and folders.
Yes (to) All The file or folder is overwritten. Any followingduplicate file or folders will be overwritten aswell, without this dialog box appearing again.The procedure will continue with the other filesand folders.
Delete
The Delete function lets you delete files and folders from thedevices.
Contrary to the Load and Save pages, in this page you may see alltypes of files, and not only Pa-Series supported files (assumingthe “Hide Unknown Files” option is turned off, see page 254).
Delete procedure1. If erasing from an external device, connect the device to
one of the USB Host ports.
2. If needed, select a different device, by using the Devicepop-up menu.
3. If the file or folder you are looking for is inside anotherfolder, select this latter and touch the Open button to openit. Touch the Close button to go back to the parent folder.
4. Select the file or folder to erase.
5. Touch Delete to delete the selected item.
During erase, a dialog box shows the progress of the opera-tion.
Multiple file selectionSee “Multiple file selection” on page 288 for information on howto select more files or folders to be erased at the same time.

290 Media modeFormat
Format
The Format function lets you initialize a device. Pa900 uses aPC-compliant device format (DOS FAT16 and FAT32):
Warning: When formatting a device, all data it contains is lost for-ever!
Volume Label
Use this parameter to assign a name to an external device to beformatted.
Note: You cannot rename the label (name) of the internal volume.When formatting the internal disk, the label cannot be edited.
Touch the (Text Edit) button to open the Text Edit window.Enter the name, then touch OK to confirm and close the TextEdit window.
Note: When changing the name to a device containing StandardMIDI Files or MP3 files used in the SongBook, the links are bro-ken. We suggest to give the device the same name it had before for-matting. In case you changed the name, please use SongBookEditor (freely available on www.korg.com) to edit the links.
Warning: It is not possibile to change the label (name) of the inter-nal disk when Pa900 is connected to a PC through the USB port. Ifyou try to do it, the original name is restored by Pa900.
Execute button
Touch this button, after having assigned a name to the volume,to execute the Format command.
Format procedure
Here is how to format a device.
1. If formatting an external device, connect the device to theUSB Host port.
2. Choose the device to be formatted by using the Devicepop-up menu in the lower-left corner of the display.
3. Touch the Execute button in the display to confirm format-ting.
4. The “If you confirm, all data in the media will be lost. Areyou sure?” message appears in the display. Touch Yes toconfirm, or No to cancel.
Note: When formatting the hard disk or an external USBdevice, an additional warning appears, to avoid accidentaldata loss.
Utility
This page includes a set of backup and restore utilities. TheBackup command should be used for archiving purpose only,since you will not be able to load individual data from a backupfile. To save data that must remain accessible with the normalMedia > Load operations, for example to load User data afterupdating the Musical Resources, use the Media > Save opera-tions instead.
Full Resource Backup
This command allows you to make a full backup of all the inter-nal data on a target device. A “.BKP” file will be created.
Hint: This command cannot be used to save single items (like asingle Style, a bank of Performances…). To do that, use the Saveoperations instead.
1. In case you are making the backup on an external USBdevice, connect the device to one of the USB Host ports.
Be sure there is enough free space in your target device, orthe Backup procedure will not be completed.
2. Select the “Full Resource Backup” command, then touchthe Execute button in the display. The target deviceappears.
3. If needed, select a different device, by using the Devicepop-up menu.
4. If you wish to save data inside another folder, select this lat-ter and touch the Open button to open it. Touch the Closebutton to go back to the parent folder.
5. Select the folder where to save data, and touch Backup tosave it. If nothing is selected, data will be saved to the cur-rent directory.

291Media modeUtility
Refe
renc
e
After touching Backup, a dialog box will appear, asking youto assign a name to the backup file.
Touch the (Text Edit) button to open the Text Editwindow. Enter the name, and confirm by touching OK.
6. Touch OK to start the backup.
7. When finished, save the (removable) storage device in asafe place.
Full Resource Restore
This command restores data from a backup of the internal Fac-tory and User data, created with the “Full Resource Backup”command.
Hint: This command cannot be used to load single items (like asingle Style, a bank of Performances…). You can only load all data,or full data types. Backups are compact archives, that can only berestored as a full package.
Note: Loading a backup file created with other Pa-Series and i-Series instruments is not allowed.
Warning: Don’t play the keyboard while restoring data, and stayin the Media mode. Wait until the “Wait” message disappears.
1. In case you are restoring from an external USB device, con-nect the device to the USB Host port.
2. Select the Restore Resources command, then touch Exe-cute. The source device appears.
3. If needed, select a different device, by using the Devicepop-up menu.
4. Browse through the files to find the backup file.
5. When the backup file (“.BKP” file) is in the display, select itand touch the Restore command.
6. A dialog box will appear, with a list of types of data to berestored. Only check the types of data you want to restore.
Warning: This command will delete from the internal mem-ory all types of data selected in this dialog box (includingyour custom data).
7. When done, a message appears asking you to restart theinstrument (“Data Restored. Please switch off ”). Set theinstrument to standby mode, then turn it on again.
Factory Restore
In case you want to erase all changes to your Factory and Userdata, and restore your Pa900 to the same condition it was when itwas new, you can use the Factory Restore procedure.
Warning: This command deletes all data from memory (includingyour custom data).
1. Select the Factory Restore command, then touch Execute.
2. A dialog box will appear, with a list of types of data to berestored. Only check the types of data you want to restore.
Warning: This command will delete from the internal mem-ory all types of data selected in this dialog box (includingyour custom data).
3. When done, a message appears asking you to restart theinstrument (“Data Restored. Please switch off ”). Set theinstrument to standby mode, then turn it on again.
OS Version Number
This line shows the installed Operating System version. Fromtime to time, check our web site (www.korg.com), to see if anewer, free version has been released.

292 Media modeUSB
USB
Use this page to enable or disable the USB Device port for filetransfer.
The USB Device port allows you to access the internal storagememory from a personal computer, by just connecting the Pa900to the computer’s USB interface. This way, you can exchange filesbetween the user-accessible area of the internal storage memoryof the Pa900 (DISK device), the microSD card (SD devices), anda personal computer.
Note: The drivers supplied in the Accessory Disc are only for MIDIOver USB connection.
Note: While USB file transfer is enabled, you cannot access otherfunctions on the Pa900. MIDI Over USB is also disabled.
Warning: It is not possibile to change the label (name) of the inter-nal disk or microSD card when Pa900 is connected to a PCthrough the USB port. If you try to do it, the original name isrestored by Pa900.
HD Connection
Usually, the USB Device port is not enabled for file transfer onthe Pa900 (it is always on, however, for MIDI connection).Touch the Enable button to turn it on, or the Disable button(with all the caveats) to turn it off.
1. Connect Pa900 to a personal computer by using a standardUSB cable
2. Touch the “Enable” button to enable file transfer. Pa900becomes the B USB device (called Device or Slave), whilethe personal computer becomes the A USB device (calledthe Host or Master).
When finished, the icon of the internal memory of Pa900will appear among the other storage devices connected tothe computer.
Caveat: Do not modify the structure of the “.SET” folders, oryou will no longer be able to use them on the Pa900. Only usethe USB connection for data exchange purpose, or to modifyordinary folders.
Note: After starting the USB connection, accessing Pa900data from the computer may take some time, depending onthe size of the hard drive and the data contained in the harddrive.
3. When all data has been transferred, disconnect USB com-munication from the computer. On a PC, you usually selectthe dedicated command by clicking on the USB device iconwith the right mouse button. On the Mac, select the USBdevice icon, then select the Eject command or drag it to theeject icon in the Dock.
4. When the Pa900 icon disappears from the computer’s desk-top, touch the “Disable” button on the display of Pa900.
Caveat: Do not disconnect the USB communication beforethe personal computer has really finished transferring files.Sometimes, the on-screen indicator tells the procedure hasbeen completed BEFORE it has really finished.
Disconnecting USB communication (or disconnecting theUSB cable) before data transfer has been completed maycause data loss.

293Media modePage menu
Refe
renc
e
Page menu
Touch the page menu icon to open the menu. Touch a commandto select it. Touch anywhere in the display to close the menuwithout selecting a command.
Create New Folder
This command lets you create a new generic folder. You can’tcreate a “.SET” folder with this command, since this type offolder is reserved to the Save operations (and can be created withthe New SET button in any Save page).
By touching the (Text Edit) button you can open the TextEdit window. Enter the name, then touch OK to confirm andclose the Text Edit window.
Rename
Available only when an item is selected in a file list.
Use this function to change the name of an existing generic fileor folder. To preserve consistency through the data structure,you cannot rename folders and files inside a “.SET” folder. Also,you cannot change the 3-character extension of files and “.SET”folders, since they are used to identify the type of file or folder.
Touch the (Text Edit) button to open the Text Edit window.Enter the new name, then touch OK to confirm and close theText Edit window.
Object(s) info
Select this command to see the size of any selected file or folder.Also, the number of files and directories (folders) it contains areshown.
Note: The single file size is always shown to the right of the filename in any file list (assuming the “Size” parameter is turned on,see page 254):
Device Info
Select this command to see various info on the selected device.To select a different device, use the Device pop-up menu on thelower left corner of most Media pages.
By touching the (Text Edit) button you can open the TextEdit window. Enter the name (label) of the selected device, thentouch OK to confirm and close the Text Edit window.
Warning: If you change the name of a device connected to the USBHost port, and it contains files used by some SongBook Entries,these entries will no longer be able to find the linked resources con-tained in the device. In this case, either restore the original devicename, or use the SongBook Editor software (freely available onwww.korg.com) to edit the links.
Note: You cannot change the name of the internal storage memoryor the internal microSD card.
Protect
Select this command to protect the selected file or folder fromwriting/erasing. The lock icon will appear next to the file orfolder name.
Unprotect
Select this command to unprotect the selected file or folder – ifprotected.

294 Media modeCare of mass storage devices
Care of mass storage devices
The Pa900 can save most of the data contained in memory to theinternal memory, or to external devices (like hard drives or USBmemory sticks) connected to the USB Host port. Here are someprecautions when handling these devices.
Internal memory write protectionYou can protect your internal memory from writing, by usingthe software protection found in Global mode (see “Media Pro-tect” on page 254).
Precautions• Do not remove a device or move the instrument while the
device is operating.
• In order to avoid losing data in case of damage, make abackup copy of the data contained in a device. You canbackup your data to a personal computer, and from there toa backup unit. You can transfer data from the internalmemory of Pa900 (DISK unit) to a personal computer byusing the USB Device connection.
• Do not leave an USB device connected to the USB portswhile carrying the instrument, or it may be damaged.
• Keep the memory devices or the instrument away fromsources of magnetic fields, for example televisions, refriger-ators, computers, monitors, speakers, cellular phones andtransformers. Magnetic fields can alter the contents of thedevices.
• Do not keep memory devices in very hot or wet places, donot expose them to direct sunlight and do not store themwithout use in dusty or dirty places.
• Do not place heavy objects on top of the devices.
• Regular care is recommended with your devices. Defrag-menting and repairing internal devices can be made withany computer utility while the Pa900 is connected via USB.
Possible problems• Magnetic fields, dirt, humidity and usage can damage data
in a device. You can try to recover the data with disk repairutilities for personal computers. It is, however, advisable toalways make a backup copy of your data.
Merging Samples from various sources
When you load a .SET folder, all User PCM Samples in memoryare deleted. So, there is no way to merge different samples byloading complete .SET folders.
To merge samples from several sources, you must load singleSounds or Drum Kits based on User PCM Samples.
Delete all samples and multisamples1. If you want to delete all Samples and Multisamples already
in memory, press the SOUND button to access the Soundmode, then press the RECORD button to access the Sam-pling mode.
2. While in Sampling mode, choose the “Delete” commandfrom the page menu. Choose the “All Samples, MultiSam-ple, DrumSamples” option, and touch OK to delete allSamples and Multisamples.
Warning: Before deleting, be sure to have a copy of anyimportant data you don’t want to lose.
3. To exit from the Sampling mode, choose the “Exit fromRecord” command from the page menu.
Create a new .SET of samples1. Press the MEDIA button to access the Media mode. Go to
the Load page.
2. Open a first .SET folder containing some of the PCM Sam-ples to merge. Open the SOUND folder, then one of theUSER banks, and choose the first of the Sounds or DrumKits based on samples you would like to load. Touch Load,and choose a target User location in memory.
The Sound or Drum Kit is loaded, together with the PCMSamples it is based on.
3. Do the same with any subsequent Sound or Drum Kitwhose Samples you would like to load.
4. When finished loading, save a new .SET folder, being surethe PCM option is checked in the Save All dialog (see “Sav-ing the full memory content” on page 285, or “Saving alldata of a specified type” on page 286).

295SongBookBook
Refe
renc
e
The SongBook is a musical database that allows you to organizesongs and automatically recall the associated “musical resources”(Style, Standard MIDI Files, KAR files, and MP3 files).
The SongBook overlaps the Style Play and Song Play operatingmodes. When you select an entry from the full database or a cus-tom list, the Style Play or Song Play mode is automaticallyselected, depending on the type of file associated with the entry.
In addition to helping you organize your shows, the SongBookallows you to associate a Voice Processor Preset, four Pads, andup to four STSs to each Style, Standard MIDI File or MP3 file, torecall a complete set of Keyboard tracks for realtime playing overa Song. You can also link a separate text file containing lyrics toan entry.
Note: SongBook Entries do not include actual data; they are justpointers to a Style, a Standard MIDI File an MP3 or a TXT file.When you copy a SongBook file, referenced files are not copiedwith it.
Hint: Use the SongBook Editor software (freely available from ourweb site) to edit your SongBook on a PC.
Warning: If you load a SongBook file from a storage device, theexisting one in memory (including the custom lists) is deleted. Saveyour old SongBook file before loading a new one.
Book
The Book page contains the full database of song entries. Whilein this page, you can select an entry, and touch the Select buttonin the display to load it. Then, press the PLAY or START buttonto start the Song or Style.
Each entry of this database may include the song’s author, name,genre, original key, tempo and meter (time signature). Whenselecting one of the entries, the associated Style, Standard MIDIFile or MP3 file is automatically recalled, together with any TXTlined to the entry. Also, a Voice Processor Preset, the STSs andPads may be recalled.
List HeaderThe List Header may change, depending on the type of dataassociated with the selected entry.
• When a Style is associated to the entry, the currentlyselected entry’s name is shown on the left (“N:”), and theassociated Style is shown on the right (“Style:”):
• When a Standard MIDI File or MP3 file is associated to theentry, the list header is split into two parts, with the left halfreferring to Player 1, and the right one referring to Player 2.
Information for the selected entry’s name (“N:”) and theassociated Standard MIDI File or MP3 file (“P1:” or “P2:”)is given for each player:
Note: If you select a different Style or Standard MIDI File or MP3file, the entry’s name field (“N:”) returns blank (---), meaning theentry has been modified.
Full listThis is the full list of the SongBook database. Use the scrollbar(or the VALUE DIAL) to browse through the list.
You can touch one of the heading labels above the list to changethe order in which entries are shown. For example, by touchingthe “Name” label, the list is alphabetically re-ordered accordingto the entry names. The selected label become highlighted,showing the currently selected ordering.
By touching the label again, the order of the files switchesbetween ascending and descending. The small arrow next to thelabel name shows the selected order.
ScrollbarUse the scrollbar (or the VALUE DIAL) to scroll the entries. Youcan keep the SHIFT button pressed while touching the scrollbar,to quickly jump to the next/previous section.
Commands
Filtered
When this box is checked, only entries matching the selected fil-ter criteria are shown in the full list. The box is automaticallychecked when you exit from the Filter dialog box by touchingOK (see below).
SongBook
Full list
Com-mands
List Header
Scroll-bar

296 SongBookBook
Filter…
Touch this button to open the Filter dialog box, and select one ormore filter criteria, to show a restricted set of entries in the mainlist.
Touch the (Text Edit) button next to the search criteria youwant to edit (Name, Genre, or Artist). You can also select aMeter, or a range of Tempo values.
Touch the Clear button next to the search criterion you want todelete or set to a default value.
Touch Clear All to reset all search criteria.
Note: You can also find items in the SongBook database by press-ing the SEARCH button, and using the Search function. However,the Filter function allow for a more refined search.
Add to list
If the “Enable List Edit” command is selected in the page menu,the “Add to list” button becomes available, to let you add entriesto the selected Custom List.
Select an entry, then touch this button to add the selected entryto the current Custom List (see “Custom List” on page 297).
Select
Touch this button to confirm selection of the highlighted entryin the full list. After touching this button, the name of theselected entry appears in the left upper side of the display (“N:”).
When you highlight a song in any of the SongBook lists, its nameappears in reversed text, over a green-blue background. While inthis situation, the song is highlighted, but not yet loaded.
When you touch the Select button in the display, the song will beloaded. The background turns to light green, and the text isturned to boldface, to show the Song has been loaded and readyto play.
To start playback of the Song or Style, press (respectively) eitherthe PLAY or START button.
Numeric selection of entriesWhen in SongBook mode, you can select a SongBook Entry bymeans of an unique number. Numbers associated with eachentry can be programmed in the Book Edit 2 page (see “BookEdit 3” on page 301).
To see the numbers while in the Book page, select the “ShowSong Numbers (now Key)” command from the page menu:
After you select this command, the “Num” column appears:
To see the “Key” column again, select the “Show Key (now SongNumbers)” command from the page menu.
To select a SongBook Entry by entering its number, press theSONGBOOK button again while you are in any page of theSongBook mode. The numeric keypad will appear, allowing youto enter the number corresponding to the desired entry.
Hint: You can export a list of SongBook Entries as a TXT file,including the assigned selection number. You can print this list onpaper as a memo. (See “Export as text file” on page 302).
Selecting SongBook Entries via MIDISongBook Entries can be selected via MIDI (through the specialControl channel), by using the dedicated NRPN Control Changemessages #99 (MSB, with value 2) and #98 (LSB, with value 64).See “Selecting SongBook Entries via MIDI” on next page.
Setting the special Control MIDI channel
A special MIDI channel used as the “Control” channel is neededto send MIDI messages to select the SongBook Entries.
First of all, choose a MIDI Preset to quickly configure the Con-trol channel. Go to the Global > MIDI > General Controls pageand choose a MIDI Preset where to save your settings.
Then, choose a MIDI channel as the “Control” channel. Go tothe Global > MIDI > Midi In Channel page, and assign the Con-trol option to one of the sixteen available MIDI channels (usuallyone of the higher-numbered ones, for example 16).
When done, save this setting to the current MIDI Preset bychoosing the “Write Midi Preset” command from the pagemenu.
Selecting SongBook Entries via MIDI
When you are ready to remotely select SongBook Entries, switchto the Style Play or Song Play mode.
At this point, Pa900 must receive on the special Control channelthe NRPN Control Change messages #99 (MSB, with value 2)and #98 (LSB, with value 64) in fast succession, as an initializa-tion string. This string must be sent only once, unless another

297SongBookCustom List
Refe
renc
e
NRPN control is sent on the same MIDI channel before selectinga different SongBook Entry.
After the initialization string has been sent, you must send theselection string, made of two Control Change messages: CC#06(Data Entry MSB) for the thousands and hundreds, and CC#38(Data Entry LSB) for the tens and units. The range of the DataEntry controls, in this case, is 0~99 (instead of the typical0~127).
The following examples show some typical situations.
• Send the following string to select SongBook Entry #77:
• Send the following string to select SongBook Entry #100:
• Send the following string to select SongBook Entry #2563:
Custom List
Use this page to select and use one of the available Custom Lists.Custom Lists are lists made of entries extracted from the fullSongBook list (as seen in the Book page). They allow the use ofsmaller, customized SongBook lists, suitable for a single gig oryour own music tastes.
Hint: You can jump to this page by keeping SHIFT pressed, andpressing the SONGBOOK button.
List headerSee “List Header” on page 295.
Custom listList of files contained in the selected Custom List. Use the scroll-bar to browse through the list. As an alternative, use the VALUEDIAL.
ScrollbarUse the scrollbar (or the VALUE DIAL) to scroll the entries.
Commands
List pop-up menu
Use this pop-up menu to select one of the available lists.
Next
Touch this button to select the next entry in the list.
Hint: You can assign this command to an Assignable Switch orAssignable Footswitch.
Select
Touch this button to confirm selection of the highlighted entryin the list. After touching this button, the name of the selectedentry appears on the left upper side of the display (“N:”).
Hint: This command is useful to browse through the list, and selectan entry different than the one following in the list.
Initialization string (CC#99, 98)
Thousands and hundreds (00xx)
Tens and units (xx77)
Initialization string (CC#99, 98)
Thousands and hundreds (01xx)
Tens and units (xx00)
Initialization string (CC#99, 98)
Thousands and hundreds (25xx)
Tens and units (xx63)
Custom list
Com-mands
List Header
Scrollbar

298 SongBookList Edit
List Edit
This page is only available after checking the “Enable List Edit”command in the page menu (see page 302).
Use this page to edit the available Custom Lists. A Custom List isa set of SongBook Entries, created by selecting items from thefull list in the Book page.
To add entries to a Custom List, first create or select the list to beedited in this page. Then, go to the Book page, select the entry tobe added, and touch the “Add to list” button. When finished add-ing entries, return to this page and edit the selected list.
List NameName of the selected list. To select a Custom List, go to the “Cus-tom List” page and use the List pop-up menu.
Custom listList of songs contained in the selected Custom List. Use the scroll-bar or the VALUE DIAL to browse through the list.
ScrollbarUse the scrollbar (or the VALUE DIAL) to scroll the entries.
Commands
Move
Use these buttons to move the selected song entry up or down inthe list.
Del Song
Touch this button to delete the selected song entry from the list.
New List
Touch this button to create a new, empty Custom List.
Note: The maximum number of Custom Lists in a SongBook file is256 lists.
Warning: Any unsaved Custom List is lost when creating a newlist using this command.
Del List
Touch this button to delete the current list.
Write
Touch this button to save changes to the selected Custom List.
To assign a different name to the selected list, touch the (Text Edit) button to open the Text Edit window.
Select an option to save the edited Custom List:
• Select Rename/Overwrite to overwrite an existing list,optionally changing its name. Warning: The older list willbe deleted!
• Select New List to save a new Custom List in memory. Thislist will be available in the “Custom List” page.
Custom list
Com-mands
List Name
Scrollbar

299SongBookBook Edit 1
Refe
renc
e
Book Edit 1
The Book Edit 1 page is where you link a “musical resource”(Style or Song) to the SongBook Entry, and choose to save STSsand a Voice Processor Preset to the Entry.
Hint: Use the Filter in the Book page, to quickly find an entry to beedited.
The Book Edit 1 page with a Style-based entry:
The Book Edit 1 page with a Song-based entry:
Header
Name
Name of the selected entry. The name is assigned after you touchthe Write button to save the entry to the SongBook list.
Number (Song Selection Number)
Here you can select a unique number (up to 9,999) to be associ-ated to the current SongBook Entry. By typing this number (byusing the Numeric Keypad) after pressing the SONGBOOK but-ton again, you will be able to quickly recall an entry from theBook page (see “Numeric selection of entries” on page 296).
Assigning a number is not mandatory, but may help you to orga-nize your entries. For example, you can use the different 100s tocreate a different way of categorizing your entries by genre orage.
Resource
Entry
Style, Standard MIDI File or MP3 file associated with the savedentry.
Warning: If you replace this resource with a different one, usingthe same Style location number or Song file path, the SongBook
Entry will no longer point to the right data. Be careful not to deleteor move a Style or a file associated with a SongBook Entry fromthe original location.
Write Current
When checked, the currently selected musical resource (whosetype and name is shown on the right) is saved to the entry.
You can select a different resource by returning to the Style Playor Song Play mode, and selecting a different Style or Song fromthere. Then, press the SONGBOOK button to return to the BookEdit 1 page.
What is saved when touching Write depends on the type of asso-ciated resource:
• When you are saving a Style-based entry, a reference to thelatest selected Style, whose name is shown on the right ofthis parameter, is saved.
A reference to the selected Pads (whose name you can seeby touching the Pad tab in the main page of the Style Playmode) is also saved. Unless changed, Pads are containedinto the selected Style.
The Style Settings and the Pad Settings for the referencedStyle and Pads are saved. If you edited these Settings (bychanging Sounds, Effects, Transpose…), the modified datawill be saved instead of the original.
• When you are saving a Song-based entry, a reference to theMID, KAR or MP3 file assigned to Player 1, whose name isshown on the right of this parameter, is saved.
A reference to the selected Pads (whose name you can seeby touching the Pad tab in the main page of the Song Playmode) is also saved.
The Pad Settings for the referenced Pads are saved. If youedited these Settings, the modified data will be savedinstead of the original.
When this parameter is left unchecked, no new resource will besaved with the entry. The original resources associated with theentry will be preserved when touching Write.
When touching New Song, or keeping the SONGBOOK buttonpressed for about one second to create a new entry, this parame-ter is automatically checked and cannot be modified. A referenceto the associated resource will be saved with the new entry.
STS
Write Current
When saving a SongBook Entry, and this parameter is checked,you can save the STSs of the associated Style into the entry, orthe current Keyboard track settings into a new STS.
All STS All four STSs are saved to the current SongBookEntry. The source STSs are those contained in theStyle currently selected in Style Play mode. If youselected a Performance, its Keyboard track set-tings will be saved as STS #1.
When you touch Write and choose the Rename/Overwrite option, all STSs are overwritten atonce.
Single STS The current Keyboard track settings are saved tothe chosen SongBook STS.

300 SongBookBook Edit 2
When you touch Write and choose the Rename/Overwrite option, only the new STS is overwrit-ten, while the others are left untouched.
• STS Name: Name of the current STS. Touch the
(Text Edit) button to open the Text Edit win-dow, and modify the name.
• To STS Location: One of the four STS availablefor each entry, where you can save the currentKeyboard track settings.
Voice Processor Preset
Entry
Voice Processor Preset associated with the saved entry.
Write Current
When checked, the currently selected VP Preset is saved to theentry.
Global
When checked, the Global VP Preset is used.
Buttons
New Song
Touch this button to create a new entry with the current settings.Settings are copied from the selected Style, Standard MIDI Fileor MP3 file. Also, the selected VP Preset, Pads, STSs and SplitPoint will be saved. The current Keyboard track settings will besaved as STS #1. Any TXT file loaded in the Lyrics pages will besaved as a linked file.
Del Song
Touch this button to delete the current entry.
Write
Touch this button to open the Write Song dialog box, and savethe current entry to the main list of the SongBook.
Note: The maximum number of entries in a SongBook file is 3,000entries.
To assign a different name to the entry, touch the (TextEdit) button to open the Text Edit window.
Select an option to add the new entry to the SongBook:
• Select Rename/Overwrite to overwrite an existing entry,optionally changing its name. Warning: The older entry willbe deleted!
• Select New Song to save a new entry to the SongBook database.
Book Edit 2
The Book Edit 2 page is where you enter information on theGenre, Artist, Key, etc. to the SongBook Entry.
The Book Edit 2 page with a Style-based entry:
The Book Edit 2 page with a Song-based entry:
HeaderThis are includes the same Name, Number and Entry Resourcefields found in the “Book Edit 1” page (see above).
Database
Genre
Music genre associated with the entry.
Artist
Name of the artist of the song associated with the entry.
Key Info
Original key of the entry. The first field is the key name, the sec-ond one is the mode (major or minor).
Tempo/BPM
Basic tempo of the Style, or starting tempo of the Standard MIDIFile associated with the entry. This may change, if a TempoChange event is included with the associated resource.
You can change this value by using the TEMPO buttons on thecontrol panel. Any change will be shown after saving the Entry.
Note: The starting value of a Standard MIDI Files is always con-sidered, and overrides this value.
Note: You can edit this value even if an MP3 is associated to theSongBook Entry. However, this is just an indicative value.

301SongBookBook Edit 3
Refe
renc
e
Meter Info
Basic meter (time signature) of the Style, or starting meter of theStandard MIDI File associated with the entry. This may change,if a Meter Change event is included with the associated resource.
M.Transp. (Master Transpose)
Master Transpose. When the entry is selected, the Master Trans-pose of the whole instrument is automatically changed. TheMaster Transpose value saved in the SongBook Entry overridesany Master Transpose setting contained in the referenced Song.
You can change this value by using the TRANSPOSE buttons onthe control panel. Any change will be shown after saving theEntry.
Note: If the Master Transpose is locked (Global > General Controls> Lock), the Master Transpose will not change.
Book Edit 3
This page is where you select the Synchro and Memory optionsto be memorized, link a “.TXT” file.
The Book Edit 3 page with a Style-based entry:
The Book Edit 3 page with a Song-based entry:
Synchro Start / Synchro Stop / Memory
The status of these functions can be memorized in a SongBookEntry.
Note: If the SongBook Entry is based on a Song, Synchro Start andSynchro Stop are greyed out and cannot be modified, since theyhave no effect on a Song.
Unchanged When selecting this SongBook Entry, the statusof the corresponding function is left unchanged.
Off When selecting this SongBook Entry, the statusof the corresponding function is turned off.
On When selecting this SongBook Entry, the statusof the corresponding function is turned on.
Linked .TXT
You can select a text (.TXT) file, and link it to the Style or Songassociated with the current SongBook Entry. When you selectthis entry, the text file will be automatically loaded.
Text files can be seen on the display. Since there is no automaticsynchronization between this kind of lyrics and the associatedsongs, you must scroll them manually. This can be accomplishedin either of two ways:
• When a “.TXT” file is selected, a special vertical scrollbarappears in the “Lyrics” page. Touch it to scroll through thetext during the performance. See the “Lyrics, Score, Mark-ers” chapter on page 304.
• Scrolling is also possible by means of the Text Page Down/Up command, that can be assigned to a Footswitch orAssignable Switch.
This section of the Book Edit 3 page contains two buttons:
Reset Touch this buttons to unlink the text file from theentry.
Browse Touch this button to open a standard File Selec-tor, and select a “.TXT” file to be linked to thecurrent SongBook Entry.
After selection, the name of the linked text fileappears above the two buttons.
Linked text file

302 SongBookInfo
Info
Use the Info page to see the name of the selected entry, the asso-ciated resource(s), the total number of Songs in the SongBook,the number of filtered entries, the number of available CustomLists, and the number of Songs in the current list.
• In case of an entry based on a Style:
• In case of an entry based on a Song in Standard MIDI Fileor MP3 format:
Selected entryThis parameter shows the currently selected entry. If it is blank(---), the latest selected entry has been modified, or no entry hasbeen selected.
Associated resource
Style, Standard MIDI File or MP3 file associated to the selectedentry.
SongsTotal number of entries in the SongBook list.
Songs after filteringThis parameter shows the number of entries shown in the“Book” page, after applying the selected filter. If no filter isselected, this matches the total number of entries in the Song-Book list (see previous parameter).
Custom ListsThis parameter shows the number of available Custom Lists.
Songs in the Current ListNumber of entries in the selected Custom List.
Page menu
Touch the page menu icon to open the menu. Touch a commandto select it. Touch anywhere in the display to close the menuwithout selecting a command.
Show Artist/GenreSelect this command to toggle between the Artist and Genre col-umn on the SongBook list, appearing in the “Book” and “Cus-tom List” pages.
Show Number/KeySelect this command to toggle between the Number and Key col-umn on the SongBook list, appearing in the “Book” and “Cus-tom List” pages.
Enable List EditSelect this command, and make the checkmark appear, to makethe List Edit page available.
Export as text fileOnly available when the Book or Custom List pages are selected. Selectthis command to open the Export dialog box, and save the Song-Book or Custom List as a text file. The selected filtering will beapplied to the exported list, assuming the Filter button is checked.
The dialog box is a little different, depending on the page whereyou selected this command.
• Selected from the “Book” page:
• Selected from the “Custom List” page:
Touch the (Text Edit) button to open the Text Edit windowand assign a name to the text file to be saved to a storage device.
Then, select either the internal storage memory to save the file.
Selected entry Associated resource
Entries assignedto the Players Associated resources

303SongBookPage menu
Refe
renc
e
• Touch OK to confirm.
Init SongBookSelect this command to erase the SongBook list and start with anew, blank list.
Warning: Before initializing the SongBook list, save the older onewith one of the Media > Save operations.

304 Lyrics, Score, MarkersSelected Player
By pressing the LYRICS button, you can see lyrics in Style Playmode, lyrics and chord abbreviations in Style Play and Song Playmodes. The SCORE button will let you see a traditional score inthe Song Play mode. Pressing both MARKER buttons will giveyou access to the markers in the Song Play mode.
Selected Player
You can always use the Player 1 and Player 2 buttons in the topright corner of the display to select a Player whose Song to show.Player 1 is orange, while Player 2 is blue.
When moving the X-FADER, the shown score may change.When the X-FADER is fully moved to the left, the score forPlayer 1 is shown; when the X-FADER is fully moved to theright, the score for Player 2 is shown instead.
Note: You can have Player 2 selected in the Main page of the SongPlay mode, and Player 1 selected in the Lyrics page, or vice-versa.This way, you can select a Song whose lyrics, score or markers todisplay on the external video monitor, while selecting a differentplayer for editing operations.
Lyrics page
Open the Lyrics page by pressing the LYRICS button. This pageshows the lyrics in Style Play mode, lyrics and chord abbrevia-tions in the Song Play mode.
Viewing lyrics and chords with SongsYou can see the following types of lyrics and chords:
• Lyrics contained in a Standard MIDI File or Karaoke™ fileas Lyrics events, or in an MP3 file with Lyrics (in ID3 for-mat – see www.id3.org).
• Lyrics contained in a “.CDG” file, loaded with an MP3 filewith the same name. When a “.CDG” file exists in the samedirectory as an MP3 file, and shares exactly the same name,it will be loaded with the “MP3” file.
• Lyrics contained in a “.TXT” file, loaded with a StandardMIDI File, Karaoke or MP3 file with the same name. Whena “.TXT” file exists in the same directory as a StandardMIDI File or MP3 file, and shares exactly the same name, itis loaded with the “.MID” or “MP3” file (see “Text filesloaded with Standard MIDI Files and MP3 files” onpage 305).
• Lyrics contained in a “.TXT” file linked to the latest-selected SongBook Entry (see “Linked .TXT” on page 301).
• When no lyrics data is contained in the Song, or linked to aSongBook Entry, you can see lyrics contained in a “.TXT”
file loaded at any time after selecting a Song (see “On-the-fly TXT loading” below).
This is the priority of lyrics data shown in the display:
i) CDG file contained in the same folder as the MP3 file, over-riding…
ii) TXT file linked to a SongBook Entry, overriding…iii) TXT file contained in the same folder as the Standard
MIDI File or MP3 file, recalled by a SongBook Entry, over-riding…
iv) Lyrics events contained in the Standard MIDI File or MP3 file.
Hint: If you do not want to see the TXT file or the CDG file, andprefer to see the Lyrics data, rename or delete the TXT or CDG file,or move it to a different folder.
Viewing lyrics with the StylesLyrics can be associated to a Style as a “.TXT” file. When in thispage, you can see:
• Lyrics contained in a “.TXT” file linked to the latest-selectedStyle-based SongBook Entry (see “Linked .TXT” on page 301).
• Lyrics contained in a “.TXT” file loaded after selecting a Style(see “On-the-fly TXT loading” below).
The Lyrics page in detailLyrics will be shown only if they are compatible with a standardformat that Pa900 can understand.
While the Song is playing, Lyrics contained in a Standard MIDIFile or MP3 file scroll in the display. Chord abbreviations (if any)will appear above the lyrics, in time with the music (dependingon the status of the “Chord” button). Lyrics at the current posi-tion are highlighted.
If the text has been loaded as a “.TXT’ file, it will not scroll auto-matically while the Song is playing back. You must scroll it withthe VALUE DIAL or the vertical scrollbar. As an alternative, youcan use an assignable switch or footswitch, with the Text PageUp or Text Page Down functions assigned, to scroll (respec-tively) to the previous or next text page.
Lyrics, Score, Markers
Song chords Current beatCurrent measure
Master Transpose
STS
Display option
Song name

305Lyrics, Score, MarkersLyrics page
Refe
renc
e
To exit from this page, press either the LYRICS or the EXIT but-ton.
Song chords
Chords contained in the Standard MIDI File (if any). This indi-cator may be easier to read than chords shown within the lyrics.
When changing the Master Transpose, chord abbreviations con-tained in a Standard MIDI File are transposed, and correctlyshown in the display. Master Transpose must be activated on thePlayer, but not on the Keyboard.
Master Transpose
Master transpose value in semitones. This value can be changedusing the TRANSPOSE buttons on the control panel.
Current beat
Standard MIDI Files only. Currently playing beat.
Current measure
Standard MIDI Files only. Current measure number.
STS
Name of the four selected Single Touch Settings (STS). Touchone of them to select it.
Chord
If this button is depressed, chords are shown above lyrics in thedisplay – provided the Standard MIDI File contains them.
ABC
Size of the fonts. You can choose between a smaller and a biggerfont.
CGD
Touch this button to show the lyrics contained in the associatedCDG file.
Text in MP3+CGD filesWhen a “.CDG” file with the same name exists in the same direc-tory as an MP3 file, it will be loaded with the “MP3” file, and canbe seen in the Lyrics page.
As an example, if the file “MYSONG.CDG” exists in the samedirectory as the “MYSONG.MP3” file, it is loaded together withthe matching “.MP3” file.
Text will scroll automatically while the Song is playing back.
Note: When a “.CDG” file is loaded with the Song, it overrides anyincluded Lyrics data.
Text files loaded with Standard MIDI Files andMP3 filesWhen a “.TXT” file with the same name exists in the same direc-tory as a Standard MIDI File or MP3 file, it will be loaded withthe “.MID” or “MP3” file, and can be seen in the Lyrics page.
As an example, if the file “MYSONG.TXT” exists in the samedirectory as the “MYSONG.MID” or “MYSONG.MP3” file, it isloaded together with the matching “.MID” or “.MP3” file.
However, unlike ordinary Lyrics, the text will not scroll automat-ically while the Song is playing back. You must scroll it with thescrollbar or the VALUE DIAL. As an alternative, you can use anassignable switch or footswitch, with the Text Page Up or TextPage Down functions assigned, to scroll (respectively) to the pre-vious or next text page.
Text files must be formatted with non-proportional fonts (likeCourier, Courier New, Monaco, or any other “monospaced”font). Up to 24 characters can fit a single line of text when usingthe bigger font size, 41 when using the smaller font size (see“ABC” above).
Note: When a “.TXT” file is loaded with the Song, it overrides anyincluded Lyrics data.
On-the-fly TXT loadingWhen a Song does not contain any Lyrics metadata or isn’tlinked to any “.TXT” file, the “No lyrics. Press SHIFT and touchhere to load a TXT file” message appears in the display when youpress the LYRICS button.
The same happens while in Style Play mode.
When this message appears, and you want to load a “.TXT” file,keep the SHIFT button pressed and touch the center of the dis-play. A standard file selector will appear, and will let you look fora “.TXT” file to be loaded.
Hint: You can use the Search function to search a “.TXT” file in thevarious storage devices. See the relevant chapter.

306 Lyrics, Score, MarkersScore page
Score page
When you are in Song Play mode, and you are playing a Stan-dard MIDI File, you can open the Score page by pressing theSCORE button.
To exit from this page, press either the SCORE or the EXIT but-ton.
Note: Master or Track Transpose do not affect the Score display.
Song title
Name of the Song.
Tempo
Current Tempo of the Song (in BPM, Beats Per Minute).
Staff
The selected track is shown as traditional music notation.Depending on the content of the track, either notes or chords areshown. Pa900 takes care for you of ‘cleaning-up’ the score, so thatit is always easy to read.
Several automatic operations are carried on to clean-up thescore: Pa900 automatically quantizes to 1/16 notes, detects trip-lets, avoids note overlaps, correctly notates syncopation, anddraws beams according to the time signature. In addition, spac-ing and measure length are dynamic, and single, double and endmeasure bars are automatically added.
If a KeySign (Key Signature) event is found at position‘001.01.000’ of the Song’s Master track, the correct key signatureis also shown.
Currently selected staff marker
This red vertical line shows the approximate position of the play-back, by indicating the current staff in play.
Current measure indicator
This red triangle shows the current measure in play.
Lyrics button
Touch this button to make the lyrics (if available) appear or dis-appear.
Chord button
Touch this button to make the chord symbols (if available)appear or disappear. Chords are shown either according to theEnglish or Italian system, depending on the selected language(see “General Controls: Interface” on page 248).
Note button
Touch this button to make the note name appear or disappearnext to each note. Note names are shown either according to theEnglish or Italian system, depending on the selected language(see “General Controls: Interface” on page 248).
Clef
Touch here to open a pop-up menu, where to choose a clef from.Available clefs are:
Treble Standard Treble clef ( ).
Treble+8 Treble clef with transposition one octave upper.
Treble-8 Treble clef with transposition one octave lower.
Bass Standard Bass clef ( ).
Bass-8 Bass clef with transposition one octave lower.
Play/Mute
Use this button to let the selected track play, or to mute it. If thetrack is muted, the score is still shown, so that you can play orsing it.
Hint: The “Melody Mute” function, that can be assigned to anassignable switch or footswitch, allows for muting the melody trackof a Song (default: Track 4, see “SMF Melody Track” on page 253).If your song has the melody part assigned to the same track, youcan mute or unmute it by using this button, or the assigned switch/pedal.
Selected track
Touch here to open a pop-up menu where to chose the track tobe shown from.
Hint: The backing vocals are often assigned to Track 5.
Song title Tempo
Currentlyselectedstaff (in
red)
Currentmeasureindicator
Touchhere to
turn lyricson/off
Touch here to turn chord symbols on/
off
Touch here to turn notenames on/off
Selected track
Play/Mute
Clef
Chord symbols
Lyrics
Measurenumber

307Lyrics, Score, MarkersMarkers page
Refe
renc
e
Markers page
Open the Marker page by pressing both the MARKER (that is,LYRICS+SCORE) buttons. This page shows the Song Markers inthe Song Play mode and in the SongBook.
Standard Song Markers contained in a Standard MIDI File canbe read with the Pa900, to quickly jump to a given position in theSong. Additionally, you can set your own marker points on-the-fly.
To exit from this page, press the EXIT button.
How to add a marker:
1. Press the MARKER button to open the Markers page.
2. Start the Song by pressing the PLAY/STOP button (how-ever, markers can be added even while the player is notrunning).
3. When you reach the position you want to save as a marker,touch the Add button in the display.
• If you touch Add within the first beats of the measure, thebeginning of the current measure is saved as a marker.
• If you touch Add within the last beat of the measure, thebeginning of the following measure is saved as a marker.
4. Do the same for any following marker.
5. Stop the Song by pressing the PLAY/STOP button.
How to jump to a saved marker:
1. If you like, start the Song again.
2. When you want to jump to a saved marker (while the Songis stopped or playing), touch it in the display. The Song willjump to the saved position at the beginning of the nextmeasure.
How to edit a marker:
1. Touch the marker to be edited in the display.
2. Touch the Edit button in the display to set the marker toedit. The Edit Marker window will appear.
3. While in Edit Marker window, you can edit the name andposition of the marker being edited.
4. Save the markers (as described below).
How to delete a marker:
1. Touch the marker to be deleted in the display.
2. Touch the Delete button in the display to delete the selectedmarker.
3. Save the markers (as described below).
How to save the markers:
Touch the “Save Mk” button in the display to save all markers.
If you are not in the Lyrics/Score page, choose the “Save SongMarker” command from the page menu. The markers will besaved into the Standard MIDI File.
Auto Scroll
Check this parameter if you want the current marker to bealways visible in the display during playback, by making the listof markers scroll automatically.
Don’t check this parameter, if you prefer to prevent the list fromscrolling. This is useful if you want a marker to remain in thedisplay, ready to be selected as soon as you want to jump to itsposition, with no need to scroll the list to catch it out.
STS
Name of the four selected Single Touch Settings (STS). Touchone of them to select it.

308 MIDIWhat is MIDI?
What is MIDI?
Here is a brief overview of MIDI, as related to the Pa900. If inter-ested, you may find more information on the general use ofMIDI in the various specialized magazines and dedicated books.
In generalMIDI stands for Musical Instruments Digital Interface. Thisinterface lets you connect two musical instruments, or a com-puter and various musical instruments.
From a software point of view, MIDI is a protocol that describesmessages for playing notes and controlling them. It is sort of agrammar to let different instruments and computers speak thesame language, and let the one tell the other what to do.
From a physical point of view, MIDI messages can travel acrosstwo different types of connectors on the Pa900:
• The MIDI interface, that is composed of two different connec-tors. The MIDI IN receives data from another device; the MIDIOUT sends data to another device.
• The USB Device port, that replaces both the MIDI IN andOUT connectors with a single port and cable. To use it for MIDIconnection, it is advisable to install the KORG USB-MIDIDriver supplied in the Accessory Disc, or downloadable fromour web site (www.korg.com).
Both these devices are active at the same time. So, you can con-nect the Pa900 to a computer via the USB port, and connectanother instrument’s MIDI IN port to the MIDI THRU port ofthe Pa900.
Channels and messagesBasically, a MIDI or USB cable transmits 16 channels of data.Think to each MIDI channel as a TV channel: the receiver mustbe set on the same channel of the transmitter. The same happenswith MIDI messages: when you send a Note On message onchannel 1, it will be received on channel 1 only. This allows formultitimbricity: you can have more than one sound playing onthe same MIDI instrument.
There are various messages, but here are the most commonlyused:
Note On – This message instructs an instrument to play a noteon a specific channel. Notes have both a name (C4 standing forthe center C) and a number (60 being the equivalent for C4). ANote Off message is often used to say the note has been released.In some case, a Note On with value “0” is used instead.
Together with the Note On message, a Velocity value is alwayssent. This value tells the instrument how loud the note must play.
Pitch Bend (PB) – You can generate this message acting on thejoystick (X direction). The pitch is translated up or down.
Program Change (PC) – When you select a Sound, a ProgramChange message is generated on the channel. Use this message,
together with Control Change 00 and 32, to remotely selectPa900 data from a sequencer or a master keyboard.
Control Change (CC) – This is a wide array of messages, con-trolling most of the instrument parameters. Some examples:
• CC00, or Bank Select MSB, and CC32, or Bank Select LSB.This message pair is used to select a Sound Bank. Togetherwith the Program Change message, they are used to select aSound.
• CC01, or Modulation. This is the equivalent of pressing upthe joystick. A vibrato effect is usually triggered on.
• CC07, or Master Volume. Use this controller to set thechannel’s volume.
• CC10, or Pan. This one sets the channel’s position on thestereo front.
• CC11, or Expression. Use this controller to set the relativevolume of tracks, with the maximum value matching thecurrent setting of the CC07 control.
• CC64, or Damper Pedal. Use this controller to simulate theDamper pedal.
TempoTempo is a global MIDI message, that is not tied to a particularchannel. Each Song includes Tempo data.
LyricsLyrics are non-standard MIDI events, intended to display texttogether with the music. Pa900 can read many of the availableLyrics format on the market.
What is MIDI Over USB?
You can let the Pa900 communicate MIDI data with a computerusing the USB Device port instead of the MIDI ports. This way,you can connect your Pa900 to a personal computer without theneed of a dedicated MIDI interface.Most Pa900 MIDI features can be used on a Windows or Maccomputer with no need of special software. However, for full andeasy use of all MIDI features, we suggest you to install the “KO-RG USB MIDI Driver”, a special software that you can find in theAccessory Disc that comes with your Pa900. Relevant instruc-tions come with the software itself. See “Installing the Korg USBMIDI Driver” on page 428.
MIDI

309MIDIStandard MIDI Files
Refe
renc
e
Standard MIDI Files
Standard MIDI Files (a.k.a. SMF) are a practical way of exchang-ing songs between different instruments and computers. Pa900uses the SMF format as its default song format, so reading a songfrom a computer, or saving a song that a computer software canread, is not a problem at all.
The internal Players are compatible with SMFs format 0 (all datain one track; it is the most common format) and 1 (multitrack).Pa900 can read SMFs in Song Play mode and modify/save themin Sequencer mode. It can save a Song in SMF format 0 fromSequencer mode.
When in Song Play mode, Pa900 can also display SMF lyrics inSolton, M-Live (Midisoft), Tune1000, Edirol, GMX, HitBit, andXF formats, and the chord abbreviations of SMF in Solton, M-Live (Midisoft), GMX, and XF format.
Note: The above trademarks are the property of their respectiveholders. No endorsement is intended by their inclusion in this list.
Standard MIDI Files usually have the “.MID” or “.KAR” filenameextension.
The General MIDI standard
Some years ago, the musical instruments world felt a need forsome further standardization. Then, the General MIDI Standard(GM) was born. This extension of the basic MIDI sets new rulesfor compatibility between instruments:
• A minimum of 16 MIDI channels was required.
• A basic set of 128 Sounds, correctly ordered, was mandatory.
• The Drum Kit had a standard order.
• Channel 10 had to be devoted to the Drum Kit.
A most recent extension is the GM2, that further expands theSounds database. Pa900 is sound-compatible with the GM2standard.
The Global channel
Any channels with the Global option assigned (see “MIDI: MIDIIn Channels” on page 260) can simulate the Pa900 integratedkeyboard. When the Pa900 is connected to a master keyboard,transmission should take place over the Global channel of thePa900.
The MIDI messages received over a Global channel and not overa standard channel are affected by the status of the SPLIT button,as well from the split point. Therefore, if the SPLIT button LEDis lit up, notes arriving to Pa900 over this channel will be dividedby the split point into the Upper (above the split point) andLower (below the split point) parts.
Notes arriving to a Global channel are used for the chord recog-nition of the automatic accompaniment. If the SPLIT LED isturned on, only the notes below the split point will be used.
These notes will be combined with the ones of the special Chord1 and Chord 2 channels.
The Chord 1 and Chord 2 channels
You can set two special Chord channels (see page 260) to sendPa900 notes for chord recognition. These notes will be combinedwith the notes that go through the channel set as Global (Globalnotes are recognized only under the split point, if the SPLIT LEDis lit up).
The Chord channels are not affected by the split point. All thenotes – both above and below the split point – will be sent to thechord recognition.
However, the status of the SPLIT button has a particular effecton the way chords are recognized on the Chord channels:
• When the SPLIT LED is turned on (Lower mode), thechord recognition mode will be set by the “Chord Recogni-tion” parameter in the Global > Mode Preferences > Stylepage (see page 252). You can play a single note to play aMajor chord.
• When the SPLIT LED is turned off (Full Upper mode), thechord recognition mode will always be Fingered or Expert,depending on the previous situation. You have to play atleast three notes in order for the chord to be detected.
These two channels are especially useful for accordion players,that wish to assign a different Chord channel to the chords andthe bass played with the left hand. This way, chords and bass willboth contribute to the formation of chords for the chord recog-nition of the automatic accompaniment.
The Control channel
You can set a MIDI IN channel as the Control channel (seepage 260), to select Styles and Performance from an externaldevice. See the Appendix for a list of messages corresponding toPa900 internal data.
MIDI Presets
You can play Pa900 with an external controller, and use it simplyas a powerful sound generator. To help you configure the MIDIchannels, we have provided a set of MIDI Presets that can beaccessed in the Global > MIDI > General Controls page (see“Preset” on page 258).
We recommend you to consider each MIDI Preset as a startingpoint you can freely tweak. Once you have selected the mostappropriate MIDI Preset for the connection to be made, you canmodify the parameters as needed and save them into a MIDIPreset (see “Write Midi Preset dialog box” on page 275).

310 MIDIConnecting Pa900 to a Master keyboard
Connecting Pa900 to a Master keyboard
You can control Pa900 with a master keyboard or any otherMIDI keyboard. You only need to connect the MIDI OUT con-nector of the master keyboard to the MIDI IN connector ofPa900. The master keyboard will become the integrated key-board of the Pa900 if it transmits over the same channel pro-grammed as Global in Pa900.
If the master keyboard transmits over the Global channel ofPa900, the split point and the status of the SPLIT button in thecontrol panel will affect the notes received from the master key-board.
Connections and settingsTo connect the master keyboard to Pa900 follow this procedure:
1. Connect the MIDI OUT connector of the master keyboardto the MIDI IN connector of the Pa900.
2. Program the master keyboard to transmit over the Globalchannel of Pa900 (see “MIDI: MIDI In Channels” onpage 260).
For information on programming the master keyboard,please see the master keyboard’s own user manual.
3. Select the “Master Keyboard” MIDI Preset. You can do thisby going to the “MIDI: General Controls” page of theGlobal mode. Note that this MIDI Preset will be remainunchanged even when the instrument enters standby.
Note: Settings may change when new Global data is loadedfrom disk. To protect settings from loading, use the GlobalProtect function (see “Global Protect” on page 254).
4. If needed, press one of the buttons in the MODE section togo to the desired operative mode.
Connecting Pa900 to a MIDI accordion
There are various types of MIDI accordions, each one requiringdifferent MIDI settings. Pa900 is provided with a series of“Accordion” MIDI Setups, each one suitable for a different MIDIaccordion (see page 258).
Connection and settingsTo connect the accordion to the Pa900 follow this procedure:
1. Connect the MIDI OUT connector of the accordion to theMIDI IN connector of Pa900.
2. Select one of the available “Accordion” MIDI Preset param-eter. You can do this by going to the “MIDI: General Con-trols” page of the Global mode. Note that this MIDI Presetwill be remain unchanged even when the instrument entersstandby.
Note: Settings may change when new Global data is loadedfrom disk. To protect settings from loading, use the GlobalProtect function (see “Global Protect” on page 254).
3. If needed, press one of the buttons in the MODE section togo to the desired operative mode.
MIDI OUT
MIDI IN

311MIDIConnecting Pa900 to an external sequencer
Refe
renc
e
Connecting Pa900 to an externalsequencer
You can program a new song on an external sequencer, usingPa900 as a multi-timbral expander.
Connections and settingsIn order to connect Pa900 to a computer, you need a computerwith either a MIDI interface or a USB port.
1. In case of an USB connection, install the Korg USB MIDIDriver, as explained in “Installing the Korg USB MIDIDriver” on page 428.
2. Connect Pa900 and the computer either via the USBDevice port, or via the MIDI ports and a MIDI interface, asshown in the following diagram.
3. Activate the “MIDI Thru” function on the externalsequencer. Please refer to the sequencer’s user manual.
4. On Pa900, select the “Extern.Seq.” MIDI Preset. You can dothis by going to the “MIDI: General Controls” page of theGlobal mode. Note that this MIDI Preset will be remainunchanged even when the instrument enters standby.
5. Go to the “MIDI: General Controls” page, and uncheck the“Local Control On” parameter (see page 259). This is calledthe “Local Off status”.
Note: Settings may change when new Global data is loadedfrom disk. To protect settings from loading, use the GlobalProtect function (see “Global Protect” on page 254).
6. Press SEQUENCER to go to the Sequencer mode.
7. Play the keyboard. Notes played on the keyboard will gofrom the MIDI OUT of Pa900 to the MIDI IN of the com-puter/MIDI interface (or from the USB port of Pa900 to theUSB port of the computer).
Notes generated by the computer (i.e. a song played by itssequencer) are sent through the MIDI OUT of the MIDIinterface to the MIDI IN connector of Pa900 (or from theUSB port of the computer to the USB port of Pa900).
The Local OffWhen Pa900 is connected to an external sequencer, we recom-mend you to set the Pa900 in Local Off mode (see “Local Con-trol On” on page 259) to avoid that the notes are simultaneouslyplayed by the keyboard and by the MIDI events sent by theexternal sequencer.
When Pa900 is in Local Off, the keyboard of Pa900 transmitsdata to the external sequencer, but not to the internal sound gen-eration. The sequencer will receive notes played on the keyboardof Pa900 and will send them to the selected track of the song.The track will then transmit data to the internal sound genera-tion of Pa900.
Note: In order to send data to the sound generation of Pa900, the“MIDI Thru” function must be activated in the external sequencer(normally active; the name may be different according to the typeof sequencer). For more information refer to the instructions man-ual of the sequencer.
The SoundsThe song that is played back by the sequencer can select Pa900Sounds through the MIDI messages Bank Select MSB, BankSelect LSB (bank selection, two messages), and Program Change(Sound selection). For a list of Sounds and MIDI values, see“Sounds” on page 318.
A suggestion for those who program songs on computer: eventhough it is not mandatory, for a wider compatibility you shouldset the bass on channel 2, melody on channel 4, drum kit onchannel 10, controls for an harmonizer on channel 5.
MIDI OUT
MIDI IN
MIDI OUT USB DeviceMIDI IN

312 MIDIPlaying another instrument with Pa900
Playing another instrument with Pa900
You can use Pa900 as the master controller for your MIDI setup.
1. Connect the MIDI OUT connector of Pa900 to the otherinstrument’s MIDI IN.
2. Set the other instrument to the same channels you want toplay from Pa900. For example, if you wish to play theUpper 1 and Upper 2 tracks with sounds of the otherinstrument, enable the other instrument to receive on thesame channels Pa900 is transmitting from the Upper 1 andUpper 2 tracks (by default, channels 1 and 2).
3. Set the master volume of the other instrument with its ownvolume controls.
4. Mute/unmute any track right from the Pa900. Adjust eachtrack’s volume by using the Pa900 (sliders on the display).
5. Play the keyboard of Pa900.
The KeyboardThe keyboard of Pa900 can drive up to four tracks via the MIDIOUT (Upper 1-3 and Lower). MIDI output channels are set inGlobal mode (see “MIDI: MIDI Out Channels” on page 261).
As per the default situation (“1-Default” MIDI Preset), each ofPa900 Keyboard tracks transmit on the following channels:
When a track is muted, it cannot transmit any MIDI data to anexternal expander or sequencer connected to the MIDI OUT ofPa900.
To only hear the expander’s sounds, you can lower the MASTERVOLUME control on the Pa900, or set the Keyboard tracks tothe External status (see “Track Controls: Mode” on page 192).
The PlayerAny Player’s track can drive a channel on an external instru-ment. To set each track’s MIDI output channel, see “MIDI: MIDIOut Channels” on page 261.
To only hear the expander’s sounds, you can lower the MASTERVOLUME control on the Pa900, or set the Song tracks to theExternal status (see “Track Controls: Mode” on page 192).
Select the “Player” MIDI Preset to set the channels as follows:
The ArrangerOne of the most interesting aspect of MIDI, is that you can useyour Pa900 to play an external instrument with its onboardarranger. Yes, it’s hard to beat the audio quality of Pa900, but youcould wish to use that old faithful synth you are still accustomedto…
To assign some of the Style tracks of Pa900 to an external instru-ment, set them to the External status (see “Track Controls:Mode” on page 192).
Select the “Default” MIDI Preset to set the channels as follows(this is the default status of Pa900):
Track Out Channel
Upper1 1
Upper2 2
Upper3 3
Lower 4
Track Out Channel
Song 1…16 1…16
Track Out Channel
Bass 9
Drums 10
Percussion 11
Acc1…5 12…16


314 Factory dataStyles
Styles
This list shows the Styles and their posi-tion number inside the bank.
Factory data
# Name
Bank: Pop
1 70's Guitar Pop
2 Shadow Pop
3 Retro Beat
4 Pop Evergreen
5 Pop Hit
6 Pop Beat
7 Standard 8 Beat
8 Standard 16 Beat
9 Guitar Pop
10 Guitar Beat
11 Modern Beat
12 Pop Ballad
13 Pop Chart 1
14 Pop Chart 2
15 Easy Pop 1
16 Easy Pop 2
17 British Pop
18 Slow Latin Pop
19 6/8 Slow Pop
20 12/8 Pop
21 Pop Shuffle 1
22 Pop Shuffle 2
23 Easy Beat 1
24 Easy Beat 2
25 Real 8 Beat
26 Real 16 Beat
27 Soft 8 Beat
28 Soft 16 Beat
29 Analog Beat 1
30 Analog Beat 2
31 8 Beat Analog 1
32 8 Beat Analog 2
33 Pop Funk 1
34 Pop Funk 2
Bank: Ballad
1 Modern Ballad 1
2 Modern Ballad 2
3 Moonlight Ballad
4 Soft Ballad
5 Piano Ballad
6 70's Ballad
7 Easy Ballad
8 Organ Ballad
9 Folk Ballad
10 Orchestral Bld
11 Funky Ballad
12 Blues Ballad
13 Analog Ballad 1
14 Analog Ballad 2
15 Rock Ballad 1
16 Rock Ballad 2
17 Waltz Ballad
18 6/8 Slow
19 6/8 Ballad
20 6/8 Brush Bld
21 Pop Hit Ballad
22 Oriental Ballad
23 Blue Ballad
24 Groove Ballad
Bank: Ballroom
1 Quick Step
2 Paso Dance
3 Jive 1
4 Jive 2
5 Argentina Tango
6 Modern Tango
7 Slow Fox
8 Organ Foxtrot
9 Slow Waltz 1
10 Slow Waltz 2
11 Slow Waltz 3
12 Organ Waltz
13 Foxtrot 1
14 Foxtrot 2
15 Slow Band
16 Big Band Jump
17 Big Band Fox
18 Big Band 40's
19 Fox Shuffle 1
20 Fox Shuffle 2
21 Italian Tango 1
22 Italian Tango 2
23 Twist
24 Hully Gully
25 50's Fox
26 Italian Fox
27 Irish Fox
28 Easy Listening
# Name
Bank: Dance
1 70's Disco Remix
2 70's Disco 1
3 70's Disco 2
4 80's Dance
5 90's Dance
6 Electro Dance
7 Dance Chart 1
8 Dance Chart 2
9 Funky Disco
10 Techno
11 Garage
12 House
13 Club House
14 Club Remix
15 Fashion Funk
16 Dance Fever
17 Barry Dance
18 Sister & Girl
19 Philly Disco
20 Miami Disco
21 Love Disco
22 Dance Motown
23 Dance Mix
24 Soca Dancing
25 Disco Gully
26 Disco Latin
27 Oriental Dance
28 HipHop
29 Euro Trance
Bank: Rock
1 80's Rock
2 Rock Punch
3 Clean Rock
4 Rolling Rock
5 Johnny Rock
6 Rock the Clock
7 Pop Rock
8 English Rock
9 Fire Rock
10 Hard Rock
11 Open Rock 1
12 Open Rock 2
13 Heavy Rock
14 Funky Rock
15 Rock Oldie
# Name

315Factory dataStyles
App
endi
x
16 Rock & Roll
17 South Shuffle
18 Slow Latin Rock
19 Latin Rock 1
20 Latin Rock 2
21 Surf Rock
22 60's Rock
23 Slow Rock 1
24 Slow Rock 2
25 60's Slow Rock
26 6/8 Rock
27 Steely Rock
28 Abbey Rock
29 SouthStrait Rock
30 Rock Cha Cha
Bank: Unplugged
1 Unplugged Heaven
2 Sally Groove
3 Unplugged Ballad 1
4 Unplugged Ballad 2
5 Unplugged Ballad 3
6 Unplugged Slow
7 Acoustic Rock
8 Serenade
9 Unplugged
10 Unplugged Reggae
11 Unplugged 8 Bt
12 Unplugged 16 Bt
13 Unplugged Gtr 1
14 Unplugged Gtr 2
15 Unplugged Gtr 3
16 Unplugged Gtr 4
17 Slide Blues
18 Unplugged Rock
19 Unplugged Latin
20 Unplugged Swing
21 ¾ Unplugged
22 ¾ Acoustic Bld
23 Desert Shuffle
24 Meditando
Bank: Country
1 Easy Country
2 Country Blues
3 Country Strum
4 Country QuikStep
5 Country Beat 1
6 Country Beat 2
7 Country Rock
8 West Coast
9 Finger Picking
10 ¾ Country
11 Modern Country
# Name
12 Country Pop
13 Bar Country
14 Bluegrass
15 Country Boogie
16 Country Shuffle
17 Country 8 Beat
18 Country 16 Beat
19 Country Ballad 1
20 Country Ballad 2
Bank: Traditional
1 German Waltz 1
2 German Waltz 2
3 German Waltz 3
4 Vienna Waltz
5 Italian Waltz
6 Musette Waltz
7 French Waltz
8 Irish Waltz
9 Laendler Waltz
10 German Polka
11 Italian Polka 1
12 Italian Polka 2
13 Italian Polka 3
14 Italian Mazurka 1
15 Italian Mazurka 2
16 Italian Mazurka 3
17 9/8
18 Vahde
19 2/4 Oyun
20 Ciftetelli
21 Halay
22 5/8
23 Oryantal
24 Turkish Pop
25 French March
26 March
Bank: Latin
1 Samba Enredo
2 Samba Brazil
3 Bossa Nova
4 Classic Salsa
5 Classic Mambo
6 Classic Cha Cha
7 Guajira
8 Guaguancò
9 Timba
10 6/8 Afro
11 Bomba
12 Classic Bachata
13 Classic Merengue
14 Cumbia
15 Joropo
# Name
16 Habanera
17 Rhumba 1
18 Rhumba 2
19 Salsa
20 Latin Big Band
21 Cool Latin Jazz
22 Pop Cha Cha
23 Latin Bolero
24 Latin Vocal
25 Meditation Bossa
26 Organ Bossa
27 OrchestralBossa1
28 OrchestralBossa2
29 Cool Bossa
30 Fast Bossa
31 Bachata
32 Mambo
Bank: Lat. Dance
1 Reggaeton 1
2 Reggaeton 2
3 Modern Salsa
4 Latin Dance
5 Lambada
6 Meneaito
7 Macarena
8 Bomba Dance
9 Gipsy Dance
10 Hot Merengue
11 Disco Samba
12 Mambo Party
13 Modern Bachata
14 Disco Cha Cha
15 Bayon
16 Club Latino
17 Modern Bossa
18 Classic Beguine
19 Calypso
20 Andean
21 Reggae 1
22 Reggae 2
23 Limbo
24 Bamba
Bank: Jazz
1 Bigger Band
2 Serenade Band
3 Jazz Club
4 BeBop
5 Medium Big Band
6 Fast Big Band
7 Classic Swing
8 Acoustic Jazz
9 Slow Swing Brush
# Name

316 Factory dataStyles
10 Swing Ballad 1
11 Swing Ballad 2
12 Swing Ballad 3
13 Orchestral Swing
14 Jazz Brush
15 Medium JazzWaltz
16 Slow Jazz Waltz
17 Jazzy Blues
18 Organ Swing
19 Organ Blues
20 Swing Quintet
21 Medium Swing
22 Vocal Swing
23 Moon Swing
24 Soft Jazz
25 Django
26 5/4 Swing
27 Jazz Quartet
28 Stride
29 Dixieland
30 Charleston
31 Vocal Jazz
Bank: Movie & Show
1 Screen EpicMarch
2 Burt's Bounce
3 Orchestral Movie
4 Broadway
5 Show Time
6 Ritz Swing
7 Hollywood 1
8 Hollywood 2
9 Tap Dance
10 Movie Ballad
11 Movie Swing
12 Safari Swing
13 Western Movie
14 Mystery Man
15 Cartoon Time
16 Horror Movie
17 Love Movie
18 Artie's Theme
19 Christmas Waltz
20 Chrismas Swing
21 Theatre Swing
22 Theatre March
23 Love Ballad
24 Army Band
Bank: Funk & Soul
1 Funk R&B
2 Kool Funk
3 Easy Funk
4 Elektrik Funk
# Name
5 Classic Funk
6 Soul Ballad
7 Talkin' Jazz
8 Funky Sisters
9 Rhythm & Blues
10 Blues
11 Soul
12 Gospel
13 Gospel Swing
14 Gospel Shuffle
15 Modern Gospel 1
16 Modern Gospel 2
17 Al Swing
18 Groove
19 Groove Funk
20 Jazz Funk
21 Motown Shuffle 1
22 Motown Shuffle 2
23 Cool Vocal
24 70's Beat Groove
25 Al Funk
26 Urban Funk
Bank: World
1 Spanish Dance
2 4/4 Flamenco
3 ¾ Flamenco
4 Casatchock
5 Greek Rumba
6 Xasapiko
7 Sirtaki
8 Zouk
9 Hawaiian
10 Mexican Waltz
11 Norteno
12 Kebradita
13 Bolero Ranchero
14 Mariachi Polka
15 Mariachi Valz
16 Mariachi Cumbia
17 Alpen Schlager
18 Classic Schlager
19 Modern Schlager
20 Vienna Waltz
21 Tarantella
22 Rumba Napoletana
23 Raspa
24 Mad Ska
25 Celtic Dream
26 Celtic Waltz
27 Celtic Ballad
28 Scottish Reel
29 Banda
30 OrchestralBolero
# Name
31 Minuetto
32 Baroque
33 Orleans
34 Cajun
35 Zydeco
36 Hora
Bank: Contemporary
1 Funky R&B
2 AM : PM
3 Contemporary Bld
4 Island View
5 Fast Smooth Jazz
6 Slow Smooth Jazz
7 Slow & Jazzy
8 Take Beat
9 Swing HipHop
10 Slow Mood
11 Hip Hindi Hop
12 Soft HipHop
13 New Age
14 Kyoto Lounge
15 Jazzy Funk
16 Slow Funk
17 Elektro Pop
18 Modern Latin
19 Folk Beat
20 Wave Jazz
21 Little Shuffle
22 Rap
23 Pop Rock Hit
24 Dance Hit
# Name

317Factory dataStyle Elements
App
endi
x
Style Elements
Note: You can remotely select the various Style Elements on the Pa900, by sending it Program Change messages on the Control channel (see“MIDI: MIDI In Channels” on page 260).
Note: The above Program Change numbers are given according to the 0-127 numbering system.
Style and Player controls
Note: You can remotely send various commands to the Style and Player of the Pa900, by sending it Program Change messages on the Con-trol channel (see “MIDI: MIDI In Channels” on page 260).
Note: The above Program Change numbers are given according to the 0-127 numbering system.
Single Touch Settings (STS)
Note: You can remotely select Single Touch Settings (STS) on the Pa900, by sending it Bank Select MSB (CC#0), Bank Select LSB (CC#32)and Program Change messages on the Control channel (see “MIDI: MIDI In Channels” on page 260). If a Style is already selected, just sendthe Program Change message.
Note: The above Control Change and Program Change numbers are given according to the 0-127 numbering system.
PC Style Element PC Style Element PC Style Element PC Style Element PC Style Element
80 Intro 1 81 Intro 2 82 Intro 3/Count In 83 Variation 1 84 Variation 2
85 Variation 3 86 Variation 4 87 Fill 1 88 Fill 2 89 Fill 3
90 Fill 4 91 Break 92 Ending 1 93 Ending 2 94 Ending 3
PC Style Element PC Style Element PC Style Element PC Style Element PC Style Element
95 Fade In/Out 96 STS Mode 97 Auto Fill 98 Memory 99 Bass Inversion
100 Manual Bass 101 Tempo Lock 102 Style Change 103 Start/Stop (Style) 104 Play/Stop (Player)
CC#0 CC#32 PC STS PC STS PC STS PC STS
The same as the Style to which the STS belongs 64 STS 1 65 STS 2 66 STS 3 67 STS 4

318 Factory dataSounds
Sounds
The following table lists all Pa900 Factory Sounds as they appearin the Sound Select window.
Legend: The table also includes MIDI data used to remotely selectthe Sounds. CC00: Control Change 0, or Bank Select MSB. CC32:Control Change 32, or Bank Select LSB. PC: Program Change.Bank: Sound Select button.
Name CC00 CC32 PC
Factory: Piano
Grand Piano RX 121 10 0
Concert Grand RX 121 13 0
Live Piano RX 121 6 1
Bright Piano RX 121 5 1
Classic Piano 121 4 0
Jazz Piano 121 5 0
Rock Piano 121 8 0
Grand Piano Live 121 12 0
G.Piano Stack 1 121 8 2
G.Piano Stack 2 121 9 2
Honky-Tonk RX 121 2 3
Ragtime Piano 121 3 3
Grand&MovingPad 121 9 0
E. Grand Phaser 121 10 2
Piano & Strings 121 7 0
Piano & Pad 121 4 1
Harpsichord RX 121 6 6
Clav RX 121 5 7
Synth Clav RX 121 6 7
Clav Wah RX 121 2 7
Piano Layers 121 6 2
Grand & FM Stack 121 7 2
Piano & Vibes 121 6 0
Grand RX DEMO 121 11 0
Factory: E. Piano
Tine EP Phaser 121 27 4
Tine EP Dyno 121 28 4
Tine EP Amp/Phas 121 29 4
Wet Tine EP 121 31 4
Dist. Tine EP 121 30 4
Bell Tine EP 121 32 4
Suit Case88 EP1 121 33 4
Suit Case88 EP2 121 34 4
Wurly Logic 121 36 4
Wurly Amp 121 38 4
Wurly Clean 1 121 39 4
Wurly Clean 2 121 41 4
Reed EP Clean 121 37 4
Wurly AmpChorus 121 40 4
Natural Wurly 121 44 4
Wurly RX Noise 121 42 4
VPM E. Piano 121 17 5
Digi E. Piano 121 14 5
Classic Tines 121 9 5
DW8000 EP 121 11 5
Natural EP 121 43 4
E.Piano RX Noise 121 35 4
EP+Damper 1 DNC 121 25 4
EP+Damper 2 DNC 121 26 4
Tine E.Piano RX 121 18 4
Club E. Piano 121 11 4
Suit E.Piano 1 121 20 4
Suit E.Piano 2 121 21 4
Classic Wurly 1 121 17 4
Classic Wurly 2 121 12 4
Tremolo Wurly 121 16 4
R&B E. Piano 121 8 4
FM Pad EP 121 15 5
White Pad EP 121 13 5
Thin E. Piano 121 9 4
Tine E. Piano 121 19 4
Dyno Tine EP 1 121 10 4
Dyno Tine EP 2 121 22 4
Studio EP 121 7 4
Pro Dyno EP 121 5 4
Pro Stage EP 121 6 4
Bell E. Piano 1 121 23 4
Bell E. Piano 2 121 24 4
Road Piano 121 11 2
Factory: Mallet & Bell
Vibraphone 1 121 2 11
Marimba 121 7 12
Marimba Key Off 121 2 12
Xylophone 121 1 13
Glockenspiel 121 2 9
Celesta 121 1 8
Music Box 121 2 10
Balaphon 121 6 12
Kalimba 1 121 2 108
Kalimba 2 121 1 108
Sistro 121 1 9
Orgel 121 1 10
Warm Steel 121 1 114
Vs Bell Boy 121 2 98
Tubular Bell 121 4 14
Bells 121 3 14
Santur 121 1 15
Mallet Clock 121 5 12
Factory: Accordion
Jazz Harm. DNC 121 6 22
Sweet Harm. DNC 121 7 22
Harmonica 1 DNC 121 5 22
Harmonica 2 DNC 121 9 22
Harmonica 3 DNC 121 10 22
Name CC00 CC32 PC

319Factory dataSounds
App
endi
x
Melodica DNC 121 8 22
Classic Musette 121 29 21
Cassotto 16' 121 12 21
Cassotto 121 9 21
Master Accordion 121 23 21
Sweet Musette 121 11 21
French Musette 121 18 21
2 Voices Musette 121 16 21
3 Voices Musette 121 17 21
Accordion16,8,4' 121 3 23
Cassotto Or.Tune 121 13 21
Acc.Clarinet OT 121 19 21
Fisa Master 121 8 21
Harmonica AT 1 121 3 22
Harmonica AT 2 121 4 22
Harmonica 121 2 22
Acc. Piccolo OT 121 21 21
Accordion 16,8' 121 2 23
Acc.16,8,4' Plus 121 8 23
Fisa 16,8' 121 6 21
Accordion 16,4' 121 7 23
Fisa 16,4' 121 7 21
Musette 1 121 3 21
Musette 2 121 4 21
Tango Accordion 121 10 23
Fisa Tango! 121 1 23
Accordion 121 24 21
Acc.16,8' & Bass 121 4 23
Acc. & Acc. Bass 121 9 23
Accordion Bass 121 5 23
Steirisch.Akk.1 121 25 21
Steirisch.Akk.2 121 26 21
Steirisch.Akk.3 121 27 21
Steirisch.Akk.4 121 28 21
Acc.Voice Change 121 6 23
Factory: Organ
DRAWBARS 121 127 16
Jimmy Organ 121 13 18
Classic Perc.Org 121 12 17
Organ Low+1'V. 121 33 16
Perc. Organ 1 121 10 17
Perc. Organ 2V. 121 9 17
Perc. Organ 3V. 121 11 17
Organ 16+51/3 V. 121 36 16
BX3 Rock 1 V. 121 10 16
BX3 Rock 2 V. 121 1 18
BX3 Rock 3 V. 121 5 18
BX3 Rock 4 V. 121 12 18
BX3 Full V. 121 6 16
BX3 Jazz V. 121 20 16
BX3 Jazz Pc. V. 121 9 18
BX3 Gospel V. 121 21 16
Jimmy Organ V. 121 10 18
Name CC00 CC32 PC
Gospel Organ V. 121 13 16
Drawbars Slow V. 121 19 16
Drawbars Fast V. 121 18 16
Drawbars Organ 121 14 16
Jazz Organ 121 8 16
Organ Hi V. 121 17 16
Organ LowPc V. 121 4 17
Organ Low 1 V. 121 4 16
Organ Low 2 V. 121 15 16
Organ Mid V. 121 16 16
Organ HiMix1 V. 121 34 16
Organ HiMix2 V. 121 35 16
Big Theatre Org. 121 30 16
Theatre Organ 1 121 22 16
Theatre Organ 2 121 23 16
Pipe Tutti 1 121 6 19
Pipe Tutti 2 121 8 19
Pipe Tutti 3 121 9 19
Pipe Tutti 4 121 10 19
Church Pipes 121 4 19
Full Pipes 121 5 19
Pipe Mixture 121 3 19
Pipe Flute 1 121 4 20
Pipe Flute 2 121 5 20
Flauto Pipes 121 3 20
Small Pipe 121 2 20
Positive Organ 121 7 19
Factory: Guitar
Concert Gtr DNC 121 20 24
Concert Gtr Pro 121 21 24
ClassicSteel DNC 121 36 25
Classic12Str Pro 121 37 25
Lead Guitar DNC 121 4 29
E.Gtr Ch/Dly DNC 121 35 27
Dist. Gtr 1 DNC 121 13 30
Dist. Gtr 2 DNC 121 14 30
RealNylon Gtr ST 121 16 24
Real Nylon Gtr 121 17 24
Classic12Str DNC 121 38 25
Classic 12Str RX 121 39 25
Stra. Gtr 1 DNC 121 32 27
Stra. Gtr 2 DNC 121 33 27
Crunch Gtr DNC 121 3 29
Chorus Gtr DNC 121 34 27
RealSteel Gtr ST 121 28 25
RealFolk Gtr ST1 121 29 25
RealFolk Gtr ST2 121 30 25
Steel Gtr RX 121 35 25
Jazz Gtr 1 DNC 121 7 26
Jazz Gtr 2 DNC 121 8 26
Soft Jazz Guitar 121 5 26
E.Gtr Amp DNC 121 37 27
Single Coil Pro 121 14 27
Name CC00 CC32 PC

320 Factory dataSounds
Nylon Guitar DNC 121 18 24
Natural Nylon 121 19 24
RealFolk Gtr DNC 121 34 25
Real 12 Strings 121 33 25
Nylon Gtr Pro1 121 8 24
Nylon Gtr Pro2 121 11 24
Nylon Slide Pro 121 14 24
Steel Guitar Pro 121 19 25
12 Strings Pro 121 17 25
Steel 12 Strings 121 5 25
Real Steel Gtr 121 31 25
Real Folk Gtr 121 32 25
Real El. Gtr ST1 121 28 27
Real El. Gtr ST2 121 29 27
Real El. Guitar1 121 30 27
Real El. Guitar2 121 31 27
JazzGtr SlidePro 121 6 26
Club Jazz Gtr 1 121 2 26
Clean Jazz 1 121 22 27
Clean Jazz 2 121 23 27
Pop Steel Gtr 1 121 21 25
Pop Steel Gtr 2 121 22 25
5th Mute Gtr 121 21 28
Stereo Dist.Gtr 121 8 30
Solid Guitar 121 21 27
Steel Slide Pro1 121 13 25
Steel Slide Pro2 121 14 25
Clean Guitar 1 121 20 27
Funk Stein RX1 121 12 28
Clean Funk RX1 121 10 28
Dist. Guitar RX1 121 9 30
Dist. Guitar RX2 121 10 30
Vintage S. 1 121 19 27
Clean Mute Gtr 121 6 28
Ac.Guitar KeyOff 121 5 24
Steel Guitar 1 121 4 25
Steel Guitar 2 121 20 25
Clean Gtr Pro 1 121 13 27
Clean Gtr Pro 2 121 15 27
Dist. Clean Gtr 121 11 30
Chorus Gtr Pro 121 18 27
Pedal Steel 121 4 26
'54 E. Guitar 121 24 27
Single Coil 121 6 27
Stra. Vel. Pro 121 16 27
New Stra.Guitar 121 7 27
Soft Overdrive 121 2 29
Chorus Guitar 121 3 27
Vintage S. 2 121 4 27
Processed E.Gtr 121 5 27
L&R E.Guitar 1 121 9 27
R&R Guitar 121 4 28
Power Chords 121 4 30
Name CC00 CC32 PC
Mute Monster 121 5 30
Disto Mute 121 9 28
Steel Gtr DNC 121 44 25
Nylon Gtr RX1 121 12 24
Nylon Gtr RX2 121 13 24
Steel Guitar RX1 121 15 25
Steel Guitar RX2 121 16 25
12 Strings RX 121 18 25
Concert 12Str RX 121 22 24
Pop SteelGtr RX1 121 24 25
Pop SteelGtr RX2 121 25 25
Vox Wah Chick RX 121 3 120
Funky Wah RX 121 12 27
Power Chords RX 121 15 30
Clean Funk RX2 121 36 27
Clean Funk RX3 121 11 28
Funk Stein RX2 121 13 28
Clean Guitar RX1 121 14 28
Clean Guitar RX2 121 15 28
Clean Guitar RX3 121 16 28
Clean Guitar RX4 121 17 28
Clean Guitar RX5 121 18 28
Clean Guitar RX6 121 20 28
Factory: Strings & Vocal
Violin DNC 121 9 40
Real Violin DNC 121 7 40
Violin Expr. DNC 121 5 40
Conc.Violin DNC 121 6 40
SopranoVox1 DNC 121 4 53
SopranoVox2 DNC 121 5 53
Real Strings 1 121 9 49
Real Strings 2 121 10 49
Movie Str.1 DNC 121 7 49
Movie Str.2 DNC 121 8 49
Archi & Orch. V. 121 24 48
Classic Harp 121 2 46
Violin Expr. 1 121 8 40
Violin Expr. 2 121 2 40
SopranoChoir DNC 121 6 53
Scat Voices DNC 121 20 52
Cycle Scat 1 121 21 52
Cycle Scat 2 121 22 52
Little Boy Voice 121 23 52
Movie Strings 1 121 5 49
Movie Strings 2 121 6 49
Concert Strings 121 11 49
Strings Ens. RX 121 22 48
Concert Str.RX 121 23 48
Full Strings 121 2 49
Ensemble & Solo 121 11 48
Tremolo Strings 121 1 44
Class.Contrabass 121 1 43
Cello 121 1 42
Name CC00 CC32 PC

321Factory dataSounds
App
endi
x
Viola Expr. 121 1 41
Violin & Viola 121 2 41
Violin Expr. 3 121 4 40
Slow Violin 121 3 40
Strings Quartet 121 9 48
Chamber Strings 121 12 48
Orchestra Tutti1 121 14 48
Orchestra Tutti2 121 19 48
Orch. & Oboe 1 121 16 48
Orch. & Oboe 2 121 17 48
Orchestra&Flute 121 20 48
Strings & Horns 121 15 48
Strings & Glock. 121 18 48
Pizz. Ensemble 121 1 45
Pizz. Section 121 2 45
Octave Strings 121 8 48
Spiccato Strings 121 4 49
StrappatoStrings 121 12 49
Symphonic Bows 121 10 48
Analog Strings 1 121 5 50
Synth Strings 1 121 6 50
Scat V.& Bass1 121 17 52
Scat V.& Bass2 121 18 52
Wuuh Choir 121 8 52
Oh-Ah Voices 121 9 52
Femal&Male Scat 121 14 52
Take Voices 1 121 4 52
Ooh Slow Voice 121 3 52
Scat Voices RX 121 19 52
Male Scat 121 16 52
Femal Scat 121 15 52
Grand Choir 121 11 52
Ooh Choir 121 6 52
Ooh Voices 121 2 52
Choir Light 121 12 52
Synth Voices 121 6 54
Full Vox Pad 121 9 91
Vocalesque 121 2 54
Fresh Breath 121 7 91
Vocalscape 121 3 54
Heaven 121 3 91
Airways 121 3 53
Factory: Trumpet & Trbn.
JazzTrumpet1 DNC 121 24 56
JazzTrumpet2 DNC 121 27 56
JazzTrumpet3 DNC 121 28 56
Trumpet Expr.DNC 121 26 56
Jazz Trb. 1 DNC 121 15 57
Jazz Trb. 2 DNC 121 14 57
Jazz Trb. 3 DNC 121 18 57
Soft Trb. DNC 121 16 57
JazzCornet 1 DNC 121 25 56
JazzCornet 2 DNC 121 29 56
Name CC00 CC32 PC
Trb. Expr. DNC 121 17 57
Trombone DNC 121 13 57
Trumpet Expr.1 121 15 56
Trumpet Expr.2 121 4 56
Cornet Expr. 121 21 56
Wah Trumpet 121 2 59
Mute Trumpet 121 5 59
Sweet FlugelHorn 121 12 56
Trombone Expr. 1 121 6 57
Trombone Expr. 2 121 7 57
Trumpet Pro 1 121 10 56
Trumpet Pro 2 121 11 56
Trumpet Pro 3 121 16 56
Trumpet Overb. 121 2 56
Cornet Pro 1 121 22 56
Cornet Pro 2 121 23 56
Trombone Vel. 1 121 8 57
Trombone Vel. 2 121 9 57
Trombone Vel. 3 121 10 57
Flugel Horn Pro 121 13 56
Concert Trumpet 121 19 56
Concert Trp. Pro 121 20 56
Dual Trumpets 121 6 56
Hard Trombone 121 3 57
Trombone Pro Vel 121 11 57
Alp Trumpet 121 17 56
Trumpet 121 14 56
Trumpet Shake Y+ 121 18 56
Trumpet Pitch 121 5 56
Alp Tuba 121 6 58
Tuba Gold 121 2 58
Oberkr. Tuba 121 1 58
Factory: Brass
Big Band Brass 1 121 32 61
Big Band Brass 2 121 4 61
Tight Brass 1 121 27 61
Tight Brass 2 121 29 61
Tight Brass 3 121 2 61
Tight Brass 4 121 12 61
Trpt. & Horns 121 5 60
Trpts &Trombs 121 34 61
Soft Horns 1 121 6 60
Soft Horns 2 121 7 60
Soft Horns 3 121 8 60
Tight Brass Pro 121 28 61
Trumpet Ens2 Y+ 121 36 61
Trumpet Ens. 121 9 61
Trombone Ens. 121 10 61
Trombones 121 11 61
Dyna Brass 1 121 14 61
Trpts & Brass 121 7 61
Fat Brass 121 13 61
Brass of Power 121 30 61
Name CC00 CC32 PC

322 Factory dataSounds
Glenn & Friends 121 3 61
Glenn & Boys 121 6 61
Sax & Brass 121 5 61
Brass & Sax 121 16 61
Mute Ensemble 1 121 3 59
Mute Ensemble 2 121 4 59
Sforzato Brass 121 23 61
Movie Brass 121 20 61
Flute Muted 121 6 73
French Section 121 2 60
Horns & Ensemble 121 4 60
Classic Horns 121 3 60
Synth Brass 1 121 5 62
Electrik Brass 121 4 62
Brass Section 121 31 61
Brass Fall 121 26 61
Brass Impact 121 4 55
Brass Hit 121 25 61
MorphAttackBrass 121 37 61
Factory: Sax
Jazz Sax 1 DNC 121 13 65
Jazz Sax 2 DNC 121 14 65
Jazz Sax 3 DNC 121 16 65
Tenor Sax 1 DNC 121 12 66
Tenor Sax 2 DNC 121 13 66
Tenor Sax 3 DNC 121 14 66
Tenor Sax 4 DNC 121 15 66
Jazz Tenor RX 121 9 66
Alto Sax 1 DNC 121 12 65
Alto Sax 2 DNC 121 17 65
SoftLatinSax DNC 121 18 65
Alto Sax Expr. 121 9 65
Alto Sax RX 121 10 65
Tenor Sax Noise1 121 1 66
Tenor Sax Noise2 121 6 66
Soprano Sax DNC 121 5 64
Sweet Soprano 1 121 3 64
Sweet Soprano 2 121 4 64
Sweet Soprano 3 121 1 64
Soprano Pro 121 2 64
JazzBaritone DNC 121 5 67
Baritone Sax Pro 121 3 67
Baritone Sax 121 4 67
Sweet Alto Sax 1 121 5 65
Sweet Alto Sax 2 121 6 65
Soft Alto Sax 121 7 65
Alto Sax Pro 121 8 65
Tenor Sax Expr.2 121 8 66
Tenor Sax Expr.1 121 7 66
Jazz Tenor 121 10 66
Baritone Growl 121 1 67
Real Sax Ens. RX 121 15 65
Cool Sax Ens. 121 11 65
Name CC00 CC32 PC
Sax Ensemble 121 2 65
Reed of Power 121 11 66
Breath & Key RX 121 2 121
Factory: Woodwind
RealClarinet DNC 121 14 71
JazzClarinet DNC 121 15 71
SoloClarinet DNC 121 16 71
Clarinet 1 DNC 121 13 71
Clarinet 2 DNC 121 19 71
Clarinet 3 DNC 121 20 71
Jazz Flute 1 DNC 121 13 73
Jazz Flute 2 DNC 121 14 73
Classic Oboe 121 2 68
Orch. Flute DNC 121 12 73
Flute DNC 121 11 73
Whistle DNC 121 5 78
Shakuhachi Vel. 121 3 77
Panflute 1 DNC 121 2 75
Panflute 2 DNC 121 3 75
Blown Bottle 121 1 76
Bassoon 121 1 70
Piccolo 121 3 72
Ocarina 121 1 79
Flute Switch 121 2 73
Jazz Flute RX 121 10 73
Jazz Flute Expr. 121 1 73
Flute Dyn. 5th 121 3 73
Flute Frullato 121 4 73
Jazz Clarinet 121 1 71
Clarinet Pro 1 121 8 71
Clarinet Pro 2 121 9 71
Whistle 121 1 78
Whistle RX1 121 3 78
Whistle RX2 121 4 78
Whistle Breathe 121 2 78
Clar & Sax Ens.1 121 17 71
Clar & Sax Ens.2 121 18 71
Double Reed 121 1 68
Orchestra Flute 121 5 73
Woodwinds 121 6 71
Small Orchestra 121 1 72
Clarinet Ens. 121 5 71
Section Winds 1 121 3 71
Section Winds 2 121 4 71
Reeds & Saxes 121 10 71
Factory: Synth Pad
Far memories 121 14 91
Atmoschoir Pad 121 15 91
Step Sequencer 121 7 96
Space Trailer 121 1 103
Warm Pad 121 15 89
Choir-Sequence 121 13 91
Name CC00 CC32 PC

323Factory dataSounds
App
endi
x
Techno Stab DNC 121 3 93
Wave-Sequence 121 4 96
Aerosonic 121 5 96
My Sequencer 121 6 96
Jurassic Pad 121 3 88
Pisco Pad 121 2 99
Tension Scene 121 8 97
Dronas Pad 121 4 93
Bengione 121 1 99
Chiff Touch Pad 121 1 83
Dreaming Coil 121 3 99
Organ Stab DNC 121 4 101
Deep Noise 121 4 127
The Pad 121 4 89
Dark Pad 121 6 89
OB Pad 121 12 89
Analog Pad 1 121 8 89
Analog Pad 2 121 9 89
Dark Anna 121 13 89
Symphonic Ens. 121 14 89
Future Pad 121 5 91
Air Clouds 121 1 97
Tinklin Pad 121 3 97
Pods In Pad 121 4 97
Vintage Sweep 121 7 95
Money Pad 121 5 89
Tsunami Wave 121 6 91
Ravelian Pad 121 8 91
Meditate 121 2 95
Super Sweep 121 4 90
Wave Sweep 121 5 90
Cross Sweep 121 6 90
Digi Ice Pad 121 2 101
Cinema Pad 121 5 95
Virtual Traveler 121 1 88
Motion Ocean 121 1 96
Moon Cycles 121 5 102
Bell Pad 121 6 98
Big Panner 121 4 63
Rave 121 6 97
Moving Bell 121 5 98
Analog Pad 3 121 10 89
Big Sweep Stab 121 12 90
Fresh Air 1 121 2 91
Fresh Air 2 121 11 91
Pop Synth Pad 1 121 4 91
Pop Synth Pad 2 121 12 91
80's Pop Synth 121 2 93
Wave Cycle 121 3 96
Warm Buzz 121 17 89
Next Analog 121 16 89
Double Sweep 121 9 95
Name CC00 CC32 PC
Factory: Synth Lead
Bass Phat Saw 121 12 87
Old Portamento 121 3 80
Power Saw 121 5 81
Octo Lead 121 6 81
Electro Lead 121 2 87
Rich Lead 121 3 87
Thin Analog Lead 121 4 87
Dance Lead 121 4 80
Wave Lead 121 5 80
Sine Wave 121 6 80
Express. Lead 121 5 87
HipHop Lead 121 6 87
Analog Lead 121 7 80
Phat Saw Lead 121 8 81
Glide Lead 121 9 81
Gliding Square 121 9 80
Power Synth 121 3 89
Sine Switch 121 10 80
Cosmic 121 1 93
Fire Wave 121 10 81
Digital PolySix 121 7 90
A Leadload 121 11 87
Noisy Stabb 121 8 90
Mega Synth 121 9 90
Dark Element 121 3 95
Metallic Rez 121 4 84
Synth Pianoid 121 12 81
Arp Angeles 121 2 88
Big & Raw 121 8 87
Caribbean 121 2 96
OB Lead 121 10 87
Port Whine 121 12 80
2VCO Planet Lead 121 13 80
VCF Modulation 121 3 101
Cycle Seq. 1 121 8 96
Cycle Seq. 2 121 9 96
Next Dance DNC 121 13 87
Next Morph Y+ 121 15 87
Bros Buzz Y+ 121 14 87
Factory: Ethnic
Mandolin DNC 121 40 25
Mandolin 121 43 25
Mandolin Orch.1 121 41 25
Mandolin Orch.2 121 42 25
Real Cavaquinho 121 27 24
Cavaquinho 1 121 23 24
Cavaquinho 2 121 24 24
Real Ukulele 121 25 24
Zither 121 9 104
Sitar 121 8 104
Fiddle 121 1 110
Name CC00 CC32 PC

324 Factory dataSounds
Mandolin Trem. 121 11 25
Mandolin Ens. 1 121 26 25
Mandolin Ens. 2 121 27 25
Banjo Key Off 121 1 105
Banjo RX 121 4 105
Sitar Tambou 121 2 104
Kanoun 1 121 5 107
Kanoun 2 121 2 107
Kanoun Trem. 1 121 6 107
Kanoun Trem. 2 121 3 107
Kanoun Mix 121 4 107
Oud 1 121 5 105
Oud 2 121 2 105
Bouzouki 121 5 104
Nay 121 2 72
Clarinet G 121 2 71
Klarnet 1 121 11 71
Klarnet 2 121 12 71
Old Shakuhachi 121 1 77
Kawala 121 1 75
Hichiriki 121 2 111
HighlandBagPipes 121 3 109
Uillean BagPipes 121 2 109
Indian Frets 121 4 104
Zurna 1 121 3 111
Zurna 2 121 1 111
Gamelan 121 1 112
Garbage Mall 121 3 112
Jaw Harp 121 3 105
Ac. Baglama 1 121 7 107
Ac. Baglama 2 121 8 107
Ac. Baglama Grp. 121 9 107
Factory: Bass
Real Ac.Bass RX 121 12 32
Real Ac.Bass 121 13 32
Vintage P.Round 121 17 33
Vintage P. Flat 121 18 33
5 Strings BassRX 121 19 33
Dark E.Bass 1 121 20 33
Dark E.Bass 2 121 24 33
Finger Jazz B.RX 121 21 33
Dark E.Bass DNC 121 22 33
Vintage P. Bass 121 23 33
Vintage P. Pick 121 12 34
Picked Jazz Bass 121 13 34
MM Fretless B.RX 121 8 35
Woofer Pusher 1 121 9 35
Finger Bass DNC 121 16 33
Dark Bs&Slp DNC 121 7 36
Acous. Bass Pro1 121 3 32
Acous. Bass Pro2 121 4 32
Jazz Bass 121 9 32
Acoustic Bass 121 8 32
Name CC00 CC32 PC
Finger Bass 1 121 6 33
Finger Bass 2 121 7 33
Finger Bass 3 121 10 33
Finger Bass 4 121 15 33
Finger Slap 121 12 33
The Other Slap 121 5 37
Thumb Bass 121 1 37
Pick Bass 1 121 7 34
Pick Bass 2 121 8 34
Super Bass 1 121 1 36
Super Bass 2 121 2 36
Sweet Fretless 121 3 35
Finger E.Bass 1 121 2 33
Finger E.Bass 2 121 3 33
Finger E.Bass 3 121 4 33
Fretless Bass 1 121 1 35
Fretless Bass 2 121 2 35
Bass & Ride 1 121 6 32
Bass & Ride 2 121 2 32
Bright Finger B. 121 9 33
Picked E.Bass 1 121 1 34
Picked E.Bass 2 121 2 34
Picked E.Bass 3 121 11 34
Chorus Fing.Bass 121 8 33
Bass Mute 121 5 34
Synth Bass 1 121 18 38
Synth Bass 2 121 15 39
Bass&Gtr Double 121 6 34
FingerB.& Guitar 121 14 33
Bass & Guitar 121 4 34
30303 Bass 121 5 38
Stein Bass 121 3 34
Jungle Rez 121 5 39
Syn Bass Res 121 8 38
Digi Bass 1 121 9 38
Digi Bass 3 121 11 38
Jungle Bass 121 13 38
Hybrid Bass 121 15 38
Digi Bass 2 121 10 38
Organ Pedal 1 121 10 32
Organ Pedal 2 121 11 32
Acous. Bass RX 121 7 32
Finger Bass RX 121 13 33
SlapFing Bass RX 121 4 36
Picked Bass RX 121 10 34
SlapPick Bass RX 121 5 36
FunkSlap Bass RX 121 3 36
Factory: Drum & SFX
Incipit Noises 121 3 119
Legacy: Piano
Grand Piano 121 3 0
M1 Piano 121 2 2
Name CC00 CC32 PC

325Factory dataSounds
App
endi
x
Piano Pad 1 121 2 1
Piano Pad 2 121 3 1
90's Piano 121 3 2
2000's Piano 121 4 2
Chorus Piano 121 5 2
Harpsi 16' RX 121 5 6
Harpsi Korg 121 4 6
Clav Snap 121 3 7
Sticky Clav 121 4 7
Honky-Tonk 121 4 3
Legacy: E. Piano
Vintage EP 121 4 4
Stereo Dig. EP 121 6 5
FM Stack EP 121 16 5
Hybrid EP 121 8 5
Phantom Tine 121 10 5
Soft Wurly 121 13 4
Hard Wurly 121 14 4
Velo Wurly 121 15 4
Sweeping EP 121 12 5
Classic Dig. EP 121 7 5
Syn Piano X 121 5 5
Legacy: Mallet & Bell
Vibraphone 2 121 3 11
Monkey Skuls 121 3 12
Digi Bell 121 4 98
Krystal Bell 121 3 98
Legacy: Accordion
Sweet Harmonica 121 1 22
Akordeon 121 2 21
Cassotto NorTune 121 14 21
Acc. Clarinet NT 121 20 21
Acc. Piccolo NT 121 22 21
Detune Accordion 121 15 21
Musette Clar. 121 5 21
Arabic Accordion 121 10 21
Legacy: Organ
Classic Click 121 4 18
Perc.Short Deca 121 8 18
Rock Organ 2 121 11 18
Dirty B 121 3 18
Killer B 121 2 18
BX3 Short Decay 121 7 17
Super BX Perc. 121 6 18
Gospel Organ 121 9 16
Old Wheels 121 3 17
Dark Organ 1 121 7 16
Dark Organ 2 121 5 16
Rotary Organ 121 8 17
VOX Legend 121 11 16
M1 Organ 121 5 17
Dirty JazzOrgan 121 7 18
Name CC00 CC32 PC
Arabian Organ 121 12 16
Theatre Organ 3 121 24 16
Theatre Organ 4 121 25 16
Tibia 121 26 16
Tibia 16+8+4' 121 27 16
Tibia & Vox 121 28 16
Post Horn Trem. 121 29 16
Tibia & Kinura 121 31 16
Tibia Vox Glock 121 32 16
Techno Org.Bass 121 6 17
Legacy: Guitar
Nylon Bossa 121 4 24
Nylon Vel. Harm. 121 10 24
Spanish Guitar 121 6 24
Nylon Guitar 121 15 24
Brazilian Guitar 121 9 24
Steel Folk Gtr 121 9 25
Guitar Strings 121 7 24
Finger Key Off 121 7 25
Club Jazz Gtr 2 121 3 26
Pop Steel Slide 121 23 25
Finger Tips 121 8 25
Country Nu 121 11 27
Reso Guitar 121 12 25
Tel. Midddle 121 26 27
Clean Funk 121 8 28
Wet Dist. Guitar 121 6 30
Hackbrett 121 6 25
Tel. Bridge 121 27 27
Guitarish 121 8 27
Stra. Gtr Slide 121 17 27
Stra. Chime 121 5 28
Clean Guitar 2 121 25 27
L&R E.Guitar 2 121 10 27
Rhythm E.Guitar 121 7 28
Muted Guitar 121 19 28
E.Gtr Harmonics 121 2 31
Solo Dist.Guitar 121 7 30
Dist. Steel Gtr 121 12 30
Joystick Gtr Y- 121 3 30
Legacy: Strings & Vocal
Strings Ens. 1 121 21 48
Strings Ens. 2 121 3 49
i3 Strings 121 5 48
Stereo Strings 121 3 48
Master Pad 121 2 89
N Strings 121 6 48
Arco Strings 121 7 48
Legato Strings 121 4 48
Double Strings 121 3 45
Arabic Strings 121 13 48
Sweeper Strings 121 1 49
Name CC00 CC32 PC

326 Factory dataSounds
Analog Strings 2 121 2 50
Synth Strings 2 121 1 51
Take Voices 2 121 5 52
Aah Choir 121 7 52
Slow Choir 121 10 52
Cyber Choir 121 2 85
Odissey 121 4 50
Strings Choir 121 13 52
Analog Velve 121 3 50
Ether Voices 121 1 85
Dream Voice 121 5 54
Classic Vox 121 4 54
Doolally 121 2 53
Legacy: Trumpet & Trbn.
Mono Trumpet 121 3 56
Warm Flugel 121 8 56
Pitch Trombone 121 5 57
Soft Trombone 121 4 57
Trombone 121 12 57
BeBop Cornet 121 9 56
Flugel Horn 121 7 56
Dynabone 121 3 58
Ob.Tuba&E.Bass 1 121 4 58
Ob.Tuba&E.Bass 2 121 5 58
Legacy: Brass
Attack Brass 121 8 61
Big BandShake Y+ 121 33 61
Trumpet Ens1 Y+ 121 35 61
Dyna Brass 2 121 22 61
Double Brass 121 24 61
Power Brass 121 21 61
Brass Expr. 121 15 61
Film Brass 121 17 61
Brass Slow 121 18 61
Fanfare 121 19 61
Synth Brass 2 121 5 63
Brass Pad 121 3 63
Netherland Hit 121 8 55
Legacy: Sax
Folk Sax 121 5 66
Breathy Baritone 121 2 67
Alto Breath 121 1 65
Tenor Breath 121 3 66
Breathy Alto Sax 121 3 65
Alto Sax Growl 121 4 65
Soft Tenor 121 2 66
Tenor Growl 121 4 66
Legacy: Woodwind
Folk Clarinet 121 7 71
Flute 121 9 73
Wooden Flute 121 7 73
Bambu Flute 121 8 73
Name CC00 CC32 PC
English Horn 121 1 69
Recorder 1 121 1 74
Recorder 2 121 2 74
Legacy: Synth Pad
Sky Watcher 121 2 90
Vintage Pad 121 11 89
You Decide 121 8 95
Korgmatose 121 13 90
Reoccuring Astra 121 6 95
Astral Dream 121 1 95
Reso Down 121 2 97
Crimson 5ths 121 1 86
Freedom Pad 121 7 89
Noble Pad 121 5 97
Mellow Pad 121 4 95
Lonely Spin 121 1 100
Synth Ghostly 121 2 100
Farluce 121 11 90
Bell Choir 121 7 98
Dance ReMix 121 10 91
Elastick Pad 121 7 97
Legacy: Synth Lead
Motion Raver 121 1 101
Synchro City 121 2 84
Wild Arp 121 6 55
Seq Lead 121 7 81
Old & Analog 121 8 80
Flip Blip 121 7 55
Reso Sweep 121 1 90
Synth Sweeper 121 3 90
Sync Kron 121 3 84
Tecno Phonic 121 10 90
Band Passed 121 3 102
Cat Lead 121 9 87
Pan Reso 121 4 102
Square Rez 121 11 80
Rezbo 121 11 81
Auto Pilot 1 121 14 38
Square Bass 121 7 87
Brian Sync 121 5 84
Arp Twins 121 6 84
LoFi Ethnic 121 7 84
Legacy: Ethnic
Shakuhachi 121 2 77
Mandolin Key Off 121 10 25
War Pipes 121 1 109
Sitar Sitar 121 7 104
Hit in India 121 5 55
Tambra 121 6 104
Indian Stars 121 3 104
Bali Gamelan 121 2 112
Ukulele Gtr 121 26 24
Name CC00 CC32 PC

327Factory dataSounds
App
endi
x
Legacy: Bass
Ac. Bass Buzz 121 1 32
Slap Bass 1 121 6 36
Slap Bass 2 121 6 37
Slap Bass 3 121 7 37
Dyna Slap Bass 121 3 37
Chorus Slap Bass 121 4 37
DarkWoody A.Bass 121 5 32
More Mid! Bass 121 11 33
Woofer Pusher 2 121 6 35
Dark R&B Bass1 121 4 35
Dyna Bass 121 2 37
Ticktacing Bass 121 9 34
Fretless Bass 3 121 7 35
Stick Bass 121 5 33
Dark R&B Bass2 121 5 35
Auto Pilot 2 121 13 39
Bass4 Da Phunk 121 14 39
Dr. Octave 121 16 38
Monofilter Bass 121 11 39
Synth Bass 80ish 121 9 39
Reso Bass 121 12 39
Autofilter Bass 121 10 39
Drive Bass 121 17 38
Nasty Bass 121 6 39
Euro Bass 121 4 39
30303 Square 121 6 38
Bass Square 121 7 38
Phat Bass 121 7 39
Blind As A Bat 121 12 38
Poinker Bass 121 8 39
Legacy: Drum & SFX
Log Drum 121 4 12
Reverse Tom 121 2 117
Reverse Snare 121 3 118
Reverse Cymbal 121 2 119
Dragon Gong 121 1 119
Stadium 121 6 126
Castanets Plus 121 2 115
Timpani 121 1 47
Woodblock 121 3 115
Footstep Walk 121 7 126
GM: Piano
AcousticPiano GM 121 0 0
Ac. Piano Wide 121 1 0
Ac. Piano Dark 121 2 0
Bright Piano GM 121 0 1
Bright PianoWide 121 1 1
E.Grand Piano GM 121 0 2
E. Grand Wide 121 1 2
Honky-Tonk GM 121 0 3
Honky Wide 121 1 3
Name CC00 CC32 PC
E. Piano 1 GM 121 0 4
Detuned EP 1 121 1 4
EP 1 Veloc. Mix 121 2 4
60's E. Piano 121 3 4
E. Piano 2 GM 121 0 5
Detuned EP 2 121 1 5
EP 2 Veloc. Mix 121 2 5
EP Legend 121 3 5
EP Phase 121 4 5
Harpsichord GM 121 0 6
Harpsi OctaveMix 121 1 6
Harpsi Wide 121 2 6
Harpsi Key Off 121 3 6
Clav GM 121 0 7
Pulse Clav 121 1 7
GM: Chrom. Perc.
Celesta GM 121 0 8
Glockenspiel GM 121 0 9
Music Box GM 121 0 10
Vibraphone GM 121 0 11
Vibraphone Wide 121 1 11
Marimba GM 121 0 12
Marimba Wide 121 1 12
Xylophone GM 121 0 13
Tubular Bell GM 121 0 14
Church Bell 121 1 14
Carillon 121 2 14
Dulcimer GM 121 0 15
GM: Organ
Drawbar Org GM 121 0 16
Det. Drawbar Org 121 1 16
It. 60's Organ 121 2 16
Drawbar Org. 2 121 3 16
Perc.Organ GM 121 0 17
Det. Perc. Organ 121 1 17
Perc. Organ 2 121 2 17
Rock Organ GM 121 0 18
Church Organ GM 121 0 19
Church Oct. Mix 121 1 19
Detuned Church 121 2 19
Reed Organ GM 121 0 20
Puff Organ 121 1 20
Accordion GM 121 0 21
Accordion 2 121 1 21
Harmonica GM 121 0 22
Tango Accord.GM 121 0 23
GM: Guitar
Nylon Guitar GM 121 0 24
Ukulele 121 1 24
Nylon Key Off 121 2 24
Nylon Guitar 2 121 3 24
Steel Guitar GM 121 0 25
Name CC00 CC32 PC

328 Factory dataSounds
12 Strings Gtr 121 1 25
Mandolin 121 2 25
Steel Gtr & Body 121 3 25
Jazz Guitar GM 121 0 26
Pedal Steel Gtr 121 1 26
Clean Guitar GM 121 0 27
Det.Clean El.Gtr 121 1 27
Mid Tone Gtr 121 2 27
Muted Guitar GM 121 0 28
Funky Cut El.Gtr 121 1 28
Mute Vel. El.Gtr 121 2 28
Jazz Man 121 3 28
Overdrive Gtr GM 121 0 29
Guitar Pinch 121 1 29
Distortion GtrGM 121 0 30
Feedback DistGtr 121 1 30
Dist. Rhythm Gtr 121 2 30
Gtr Harmonic GM 121 0 31
Guitar Feedback 121 1 31
GM: Bass
Acoustic Bass GM 121 0 32
Finger Bass GM 121 0 33
Finger Slap Bass 121 1 33
Picked E.Bass GM 121 0 34
Fretless Bass GM 121 0 35
Slap Bass 1 GM 121 0 36
Slap Bass 2 GM 121 0 37
Synth Bass 1 GM 121 0 38
Synth Bass Warm 121 1 38
Synth Bass Reso 121 2 38
Clavi Bass 121 3 38
Hammer 121 4 38
Synth Bass 2 GM 121 0 39
SynthBass Attack 121 1 39
SynthBass Rubber 121 2 39
Attack Pulse 121 3 39
GM: Strings
Violin GM 121 0 40
Slow Att. Violin 121 1 40
Viola GM 121 0 41
Cello GM 121 0 42
Contrabass GM 121 0 43
Tremolo Str. GM 121 0 44
Pizzicato Str.GM 121 0 45
Harp GM 121 0 46
Yang Chin 121 1 46
Timpani GM 121 0 47
GM: Ensemble
Strings Ens.1 GM 121 0 48
Strings & Brass 121 1 48
60's Strings 121 2 48
Strings Ens.2 GM 121 0 49
Name CC00 CC32 PC
Synth Strings1GM 121 0 50
Synth Strings 3 121 1 50
Synth Strings2GM 121 0 51
Choir Aahs GM 121 0 52
Choir Aahs 2 121 1 52
Voice Oohs GM 121 0 53
Humming 121 1 53
Synth Voice GM 121 0 54
Analog Voice 121 1 54
Orchestra Hit GM 121 0 55
Bass Hit Plus 121 1 55
6th Hit 121 2 55
Euro Hit 121 3 55
GM: Brass
Trumpet GM 121 0 56
Dark Trumpet 121 1 56
Trombone GM 121 0 57
Trombone 2 121 1 57
Bright Trombone 121 2 57
Tuba GM 121 0 58
Muted Trumpet GM 121 0 59
Muted Trumpet 2 121 1 59
French Horn GM 121 0 60
FrenchHorn Warm 121 1 60
Brass Section GM 121 0 61
Brass Section 2 121 1 61
Synth Brass 1 GM 121 0 62
Synth Brass 3 121 1 62
Analog Brass 1 121 2 62
Jump Brass 121 3 62
Synth Brass 2 GM 121 0 63
Synth Brass 4 121 1 63
Analog Brass 2 121 2 63
GM: Reed
Soprano Sax GM 121 0 64
Alto Sax GM 121 0 65
Tenor Sax GM 121 0 66
Baritone Sax GM 121 0 67
Oboe GM 121 0 68
English Horn GM 121 0 69
Bassoon GM 121 0 70
Clarinet GM 121 0 71
GM: Pipe
Piccolo GM 121 0 72
Flute GM 121 0 73
Recorder GM 121 0 74
Pan Flute GM 121 0 75
Blown Bottle GM 121 0 76
Shakuhachi GM 121 0 77
Whistle GM 121 0 78
Ocarina GM 121 0 79
Name CC00 CC32 PC

329Factory dataSounds
App
endi
x
GM: Syn Lead / Syn Pad
Lead Square GM 121 0 80
Lead Square 2 121 1 80
Lead Sine 121 2 80
Lead Saw GM 121 0 81
Lead Saw 2 121 1 81
Lead Saw & Pulse 121 2 81
Lead Double Saw 121 3 81
Lead Seq. Analog 121 4 81
Calliope GM 121 0 82
Chiff GM 121 0 83
Charang GM 121 0 84
Wire Lead 121 1 84
Voice Lead GM 121 0 85
Fifths Lead GM 121 0 86
Bass & Lead GM 121 0 87
Lead Soft Wrl 121 1 87
New Age Pad GM 121 0 88
Warm Pad GM 121 0 89
Sine Pad 121 1 89
Polysynth GM 121 0 90
Choir Pad GM 121 0 91
Itopia Pad 121 1 91
Bowed Glass GM 121 0 92
Metallic Pad GM 121 0 93
Halo Pad GM 121 0 94
Sweep Pad GM 121 0 95
GM: Synth SFX
Ice Rain GM 121 0 96
Soundtrack GM 121 0 97
Crystal GM 121 0 98
Synth Mallet 121 1 98
Atmosphere GM 121 0 99
Brightness GM 121 0 100
Goblins GM 121 0 101
Echo Drops GM 121 0 102
Echo Bell 121 1 102
Echo Pan 121 2 102
Star Theme GM 121 0 103
GM: Ethnic
Sitar GM 121 0 104
Sitar 2 121 1 104
Banjo GM 121 0 105
Shamisen GM 121 0 106
Koto GM 121 0 107
Taisho Koto 121 1 107
Kalimba GM 121 0 108
Bag Pipes GM 121 0 109
Fiddle GM 121 0 110
Shanai GM 121 0 111
Name CC00 CC32 PC
GM: Percussive
Tinkle Bell GM 121 0 112
Agogo GM 121 0 113
Steel Drums GM 121 0 114
Woodblock GM 121 0 115
Castanets 121 1 115
Taiko Drum GM 121 0 116
Concert BassDrum 121 1 116
Melodic Tom GM 121 0 117
Melodic Tom 2 121 1 117
Synth Drum GM 121 0 118
Rhythm Box Tom 121 1 118
Electric Drum 121 2 118
ReverseCymbalGM 121 0 119
GM: SFX
Gtr FretNoise GM 121 0 120
Guitar Cut Noise 121 1 120
Ac. Bass String 121 2 120
Breath Noise GM 121 0 121
Flute Key Click 121 1 121
Seashore GM 121 0 122
Rain 121 1 122
Thunder 121 2 122
Wind 121 3 122
Stream 121 4 122
Bubble 121 5 122
Bird Tweet GM 121 0 123
Dog 121 1 123
Horse Gallop 121 2 123
Bird Tweet 2 121 3 123
Telephone GM 121 0 124
Telephone 2 121 1 124
Door Creaking 121 2 124
Door 121 3 124
Scratch 121 4 124
Wind Chime 121 5 124
Helicopter GM 121 0 125
Car Engine 121 1 125
Car Stop 121 2 125
Car Pass 121 3 125
Car Crash 121 4 125
Siren 121 5 125
Train 121 6 125
Jetplane 121 7 125
Starship 121 8 125
Burst Noise 121 9 125
Applause GM 121 0 126
Laughing 121 1 126
Screaming 121 2 126
Punch 121 3 126
Name CC00 CC32 PC

330 Factory dataSounds
Heart Beat 121 4 126
Footsteps 121 5 126
Gun Shot GM 121 0 127
Machine Gun 121 1 127
Laser Gun 121 2 127
Explosion 121 3 127
Name CC00 CC32 PC
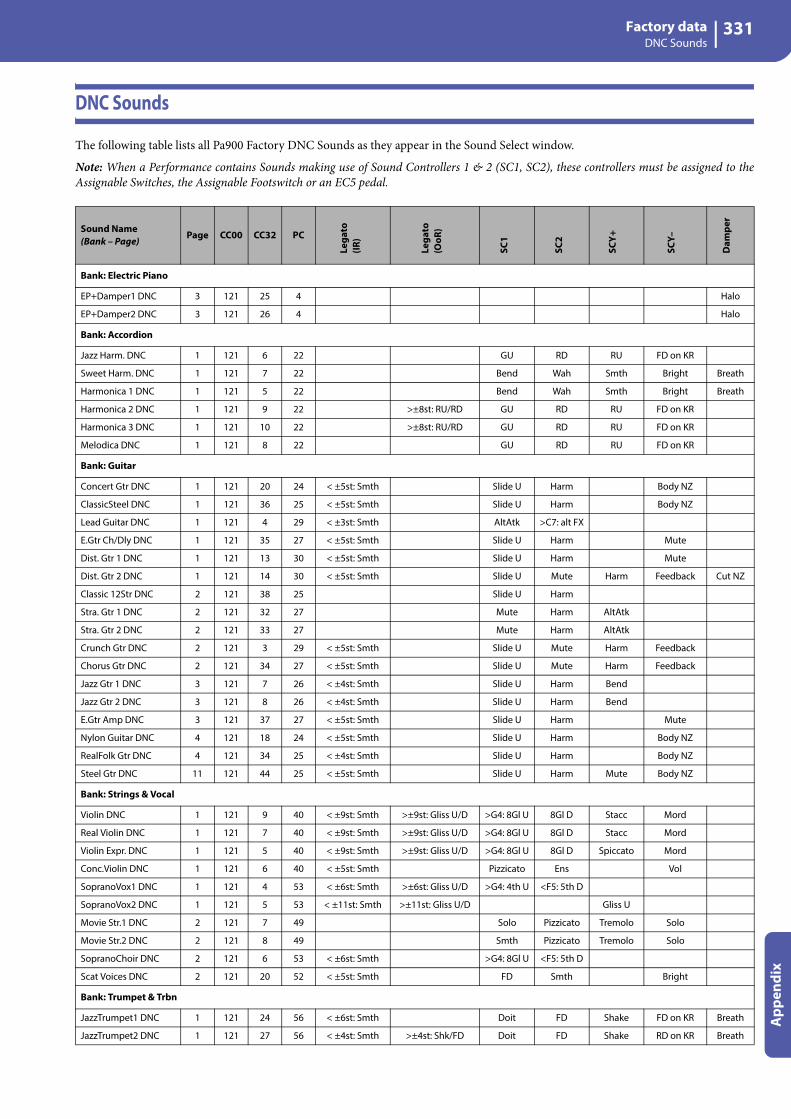
331Factory dataDNC Sounds
App
endi
x
DNC Sounds
The following table lists all Pa900 Factory DNC Sounds as they appear in the Sound Select window.
Note: When a Performance contains Sounds making use of Sound Controllers 1 & 2 (SC1, SC2), these controllers must be assigned to theAssignable Switches, the Assignable Footswitch or an EC5 pedal.
Sound Name(Bank – Page)
Page CC00 CC32 PC
Bank: Electric Piano
EP+Damper1 DNC 3 121 25 4 Halo
EP+Damper2 DNC 3 121 26 4 Halo
Bank: Accordion
Jazz Harm. DNC 1 121 6 22 GU RD RU FD on KR
Sweet Harm. DNC 1 121 7 22 Bend Wah Smth Bright Breath
Harmonica 1 DNC 1 121 5 22 Bend Wah Smth Bright Breath
Harmonica 2 DNC 1 121 9 22 >±8st: RU/RD GU RD RU FD on KR
Harmonica 3 DNC 1 121 10 22 >±8st: RU/RD GU RD RU FD on KR
Melodica DNC 1 121 8 22 GU RD RU FD on KR
Bank: Guitar
Concert Gtr DNC 1 121 20 24 < ±5st: Smth Slide U Harm Body NZ
ClassicSteel DNC 1 121 36 25 < ±5st: Smth Slide U Harm Body NZ
Lead Guitar DNC 1 121 4 29 < ±3st: Smth AltAtk >C7: alt FX
E.Gtr Ch/Dly DNC 1 121 35 27 < ±5st: Smth Slide U Harm Mute
Dist. Gtr 1 DNC 1 121 13 30 < ±5st: Smth Slide U Harm Mute
Dist. Gtr 2 DNC 1 121 14 30 < ±5st: Smth Slide U Mute Harm Feedback Cut NZ
Classic 12Str DNC 2 121 38 25 Slide U Harm
Stra. Gtr 1 DNC 2 121 32 27 Mute Harm AltAtk
Stra. Gtr 2 DNC 2 121 33 27 Mute Harm AltAtk
Crunch Gtr DNC 2 121 3 29 < ±5st: Smth Slide U Mute Harm Feedback
Chorus Gtr DNC 2 121 34 27 < ±5st: Smth Slide U Mute Harm Feedback
Jazz Gtr 1 DNC 3 121 7 26 < ±4st: Smth Slide U Harm Bend
Jazz Gtr 2 DNC 3 121 8 26 < ±4st: Smth Slide U Harm Bend
E.Gtr Amp DNC 3 121 37 27 < ±5st: Smth Slide U Harm Mute
Nylon Guitar DNC 4 121 18 24 < ±5st: Smth Slide U Harm Body NZ
RealFolk Gtr DNC 4 121 34 25 < ±4st: Smth Slide U Harm Body NZ
Steel Gtr DNC 11 121 44 25 < ±5st: Smth Slide U Harm Mute Body NZ
Bank: Strings & Vocal
Violin DNC 1 121 9 40 < ±9st: Smth >±9st: Gliss U/D >G4: 8Gl U 8Gl D Stacc Mord
Real Violin DNC 1 121 7 40 < ±9st: Smth >±9st: Gliss U/D >G4: 8Gl U 8Gl D Stacc Mord
Violin Expr. DNC 1 121 5 40 < ±9st: Smth >±9st: Gliss U/D >G4: 8Gl U 8Gl D Spiccato Mord
Conc.Violin DNC 1 121 6 40 < ±5st: Smth Pizzicato Ens Vol
SopranoVox1 DNC 1 121 4 53 < ±6st: Smth >±6st: Gliss U/D >G4: 4th U <F5: 5th D
SopranoVox2 DNC 1 121 5 53 < ±11st: Smth >±11st: Gliss U/D Gliss U
Movie Str.1 DNC 2 121 7 49 Solo Pizzicato Tremolo Solo
Movie Str.2 DNC 2 121 8 49 Smth Pizzicato Tremolo Solo
SopranoChoir DNC 2 121 6 53 < ±6st: Smth >G4: 8Gl U <F5: 5th D
Scat Voices DNC 2 121 20 52 < ±5st: Smth FD Smth Bright
Bank: Trumpet & Trbn
JazzTrumpet1 DNC 1 121 24 56 < ±6st: Smth Doit FD Shake FD on KR Breath
JazzTrumpet2 DNC 1 121 27 56 < ±4st: Smth >±4st: Shk/FD Doit FD Shake RD on KR Breath
Lega
to(IR
)
Lega
to(O
oR)
SC1
SC2
SCY+
SCY–
Dam
per

332 Factory dataDNC Sounds
Legend:IR = In Range; OoR = Out of Range; RU = Riff Up; KR = Key Release; AltAtk = Alternate Attack; Smth = Smoother Attack; RD = Riff Down; FD = Fall Down; GU = Glide Up; Slide U = Slide Up; Gliss U = Glissato Up; Gliss D = Glissato Down; 8Gl U = Octave Glissato Up; 8Gl D = Octave Glissato Down; Ens = Ensemble; Bend = Bending; Shk = Shake; Stacc = Staccato; Mord = Mordente; Frull = Frullato (flutter tongue); Body NZ = Body Noise; Cut NZ = Cut Noise; Harm = Harmonics; Bright = Brightness; Det = Detune; Vol = Volume.
JazzTrumpet3 DNC 1 121 28 56 < ±6st: Smth >±6st: RU/RD Doit FD Shake FD on KR Breath
Trumpet Expr.DNC 1 121 26 56 < ±6st: Smth Doit FD Shake FD on KR Breath
Jazz Trb.1 DNC 1 121 15 57 < ±12st: Smth Gliss U Gliss D Gliss U FD on KR Breath
Jazz Trb.2 DNC 1 121 14 57 < ±12st: Smth Gliss U FD Gliss U FD on KR Breath
Jazz Trb.3 DNC 1 121 18 57 < ±4st: Smth >±4st: Gliss U/D Gliss U Gliss D Gliss U FD on KR Breath
Soft Trb. DNC 1 121 16 57 < ±5st: Smth Gliss U Gliss D Gliss U FD on KR
JazzCornet 1 DNC 2 121 25 56 < ±12st: Smth Doit FD Gliss D RD on KR Breath
JazzCornet 2 DNC 2 121 29 56 < ±8st: Smth >±8st: RU/RD Doit FD Gliss D RD on KR Breath
Trb. Expr. DNC 2 121 17 57 < ±5st: Smth Gliss U FD Gliss U FD on KR
Trombone DNC 2 121 13 57 < ±12st: Smth Doit FD Bend Bright Breath
Bank: Sax
Jazz Sax 1 DNC 1 121 13 65 < ±12st: Smth GU FD RU FD on KR Breath
Jazz Sax 2 DNC 1 121 14 65 < ±12st: Smth GU RD RU FD on KR Breath
Jazz Sax 3 DNC 1 121 16 65 < ±9st: Smth >±9st: RU/RD GU RD RU FD on KR Breath
Tenor Sax 1 DNC 1 121 12 66 < ±12st: Smth Soft Straight Gliss D Bright Breath
Tenor Sax 2 DNC 1 121 13 66 < ±9st: Smth >±9st: RU/RD GU RD RU FD on KR Breath
Tenor Sax 3 DNC 1 121 14 66 < ±9st: Smth >±9st: RU/RD GU RD RU FD on KR Breath
Tenor Sax 4 DNC 1 121 15 66 < ±9st: Smth >±9st: RU/RD GU RD RU FD on KR Breath
Alto Sax 1 DNC 2 121 12 65 < ±12st: Smth Soft Growl Gliss D Breath
Alto Sax 2 DNC 2 121 17 65 < ±9st: Smth >±9st: RU/RD GU RD RU FD on KR Breath
SoftLatinSax DNC 2 121 18 65 < ±9st: Smth >±9st: RU/RD GU RD RU FD on KR Breath
Soprano Sax DNC 2 121 5 64 < ±9st: Smth >±9st: RU/RD GU RD Breath
JazzBaritone DNC 3 121 5 67 < ±9st: Smth >±9st: RU/RD GU GD FD on KR Breath
Bank: Woodwind
RealClarinet DNC 1 121 14 71 < ±12st: Smth Long RU Long FD Short RU FD on KR Breath
JazzClarinet DNC 1 121 15 71 < ±12st: Smth Long RU Long FD Short RU FD on KR Breath
SoloClarinet DNC 1 121 16 71 < ±5st: Smth Long RU Long FD FD on KR
Clarinet 1 DNC 1 121 13 71 < ±5st: Smth Bend Bend Soft Ensemble Breath
Clarinet 2 DNC 1 121 19 71 < ±8st: Smth >±8st: RU/RD Long RU Long FD Short RU FD on KR Breath
Clarinet 3 DNC 1 121 20 71 < ±8st: Smth >±8st: RU/RD Long RU Long FD Short RU FD on KR Breath
Jazz Flute 1 DNC 1 121 13 73 < ±5st: Smth RU RD Voice FD on KR Breath
Jazz Flute 2 DNC 1 121 14 73 < ±8st: Smth >±8st: Gliss U/D RU RD Frull FD on KR Breath
Orch. Flute DNC 2 121 12 73 < ±5st: Smth RU RD Voice FD on KR Breath
Flute DNC 2 121 11 73 < ±5st: Smth Voice Frull Harm Voice Breath
Whistle DNC 2 121 5 78 Soft GD FD Breath Breath
Panflute 1 DNC 2 121 2 75 < ±12st: Smth GU Mord Attack
Panflute 2 DNC 2 121 3 75 < ±12st: Smth GU Mord Attack
Bank: Synth Pad
Techno Stab DNC 1 121 3 93 Filter Straight Straight
Organ Stab DNC 3 121 4 101 Filter Straight Straight
Bank: Synth Lead
Next Dance DNC 5 121 14 87 Noise Filter Filter
Sound Name(Bank – Page)
Page CC00 CC32 PC
Lega
to(IR
)
Lega
to(O
oR)
SC1
SC2
SCY+
SCY–
Dam
per

333Factory dataDrum Kits
App
endi
x
Drum Kits
The following table lists all Pa900 Factory Drum Kits in order ofBank Select-Program Change number.
Legend: The table also includes MIDI data used to remotely selectthe Drum Kits. CC00: Control Change 0, or Bank Select MSB.CC32: Control Change 32, or Bank Select LSB. PC: ProgramChange.
CC00 CC32 PC Name Sound Bank
120 0 0 Standard Kit GM GM: Drum
120 0 1 Standard Kit RX2 Factory: Drum & SFX
120 0 2 Standard Kit RX3 Factory: Drum & SFX
120 0 3 Ambient Kit RX Factory: Drum & SFX
120 0 4 Pop Std. Kit RX Factory: Drum & SFX
120 0 5 Standard Kit RX1 Factory: Drum & SFX
120 0 6 Standard Kit RX4 Factory: Drum & SFX
120 0 7 Standard Kit Legacy: Drum & SFX
120 0 8 Room Kit GM GM: Drum
120 0 9 HipHop Kit 1 Factory: Drum & SFX
120 0 10 Jungle Kit Factory: Drum & SFX
120 0 11 Techno Kit 1 Factory: Drum & SFX
120 0 12 Room Kit 2 Legacy: Drum & SFX
120 0 13 HipHop Kit 2 Legacy: Drum & SFX
120 0 14 Techno Kit 2 Legacy: Drum & SFX
120 0 15 Techno Kit 3 Legacy: Drum & SFX
120 0 16 Power Kit GM GM: Drum
120 0 17 Power Kit 2 Legacy: Drum & SFX
120 0 18 Power Kit RX1 Factory: Drum & SFX
120 0 19 Power Kit RX2 Factory: Drum & SFX
120 0 24 Electro Kit GM GM: Drum
120 0 25 Analog Kit GM GM: Drum
120 0 26 House Kit 1 Legacy: Drum & SFX
120 0 27 House Kit 2 Legacy: Drum & SFX
120 0 28 House Kit 3 Legacy: Drum & SFX
120 0 30 House Kit RX1 Factory: Drum & SFX
120 0 31 House Kit RX2 Factory: Drum & SFX
120 0 32 Jazz Kit GM GM: Drum
120 0 33 Jazz Kit RX1 Factory: Drum & SFX
120 0 34 Jazz Kit RX2 Factory: Drum & SFX
120 0 35 Jazz Kit RX3 Factory: Drum & SFX
120 0 40 Brush Kit GM GM: Drum
120 0 41 Brush Kit 2 Legacy: Drum & SFX
120 0 42 Brush Kit RX1 Factory: Drum & SFX
120 0 43 Brush Kit RX2 Factory: Drum & SFX
120 0 44 Brush Kit RX3 Factory: Drum & SFX
120 0 48 Orchestra Kit GM GM: Drum
120 0 49 Orchestra Kit Legacy: Drum & SFX
120 0 50 Bdrum&Sdrum Kit Legacy: Drum & SFX
120 0 51 Arabian Kit 1 Factory: Drum & SFX
120 0 56 SFX Kit GM GM: Drum
120 0 57 SFX Kit 2 Factory: Drum & SFX
120 0 58 Synth Kit 2 Factory: Drum & SFX
120 0 59 Synth Kit 1 Factory: Drum & SFX
120 0 60 SFX Kit 1 Factory: Drum & SFX
120 0 64 Percussion Kit Factory: Drum & SFX
120 0 65 Latin Perc.Kit 1 Factory: Drum & SFX
120 0 66 Trinity Perc.Kit Factory: Drum & SFX
120 0 67 i30 Perc. Kit Factory: Drum & SFX
120 0 68 Latin Perc.Kit 2 Factory: Drum & SFX
120 0 69 Standard PercKit Factory: Drum & SFX
120 0 72 HipHop Kit RX Factory: Drum & SFX
120 0 73 Techno Kit RX Factory: Drum & SFX
120 0 74 Dance Kit RX Factory: Drum & SFX
120 0 75 Electro Kit RX1 Factory: Drum & SFX
120 0 76 Electro Kit RX2 Factory: Drum & SFX
120 0 89 Pop Std. Kit 1 Factory: Drum & SFX
120 0 90 Pop Std. Kit 2 Factory: Drum & SFX
120 0 96 Elektro Kit 1 Factory: Drum & SFX
120 0 97 Elektro Kit 2 Factory: Drum & SFX
120 0 117 Arabian Kit 2 Factory: Drum & SFX
120 0 118 Turkish Kit Factory: Drum & SFX
120 0 119 Oriental PercKit Factory: Drum & SFX
120 0 120 Room Kit 1 Factory: Drum & SFX
120 0 121 Power Kit 1 Legacy: Drum & SFX
120 0 122 Electro Kit Factory: Drum & SFX
120 0 123 Analog Kit Factory: Drum & SFX
120 0 125 Brush Kit 1 Legacy: Drum & SFX
127 0 0 Standard Kit1 XG GM: Drum
127 0 9 Standard Kit2 XG GM: Drum
127 0 8 Room Kit XG GM: Drum
127 0 16 Rock Kit XG GM: Drum
127 0 24 Electro Kit XG GM: Drum
127 0 25 Analog Kit XG GM: Drum
127 0 32 Jazz Kit 1 XG GM: Drum
127 0 48 Jazz Kit 2 XG GM: Drum
127 0 40 Brush Kit XG GM: Drum
127 0 17 Classic Kit XG GM: Drum
120 64 0-127 … User DK
CC00 CC32 PC Name Sound Bank

334 Factory dataMultisamples
Multisamples
The following is a list of all Pa900 Factory Multisamples.
* OrigTune: Original Tune, i.e., samples use the natural tuning of the original instrument, instead of the equal tuning. Beating may occur atthe extreme pitch, when the sound is used in conjunction with other sounds.
0 GrandPiano_L
1 GrandPiano_R
2 GrandPiano_L OrigTune
3 GrandPiano_R OrigTune
4 Resonance_L
5 Resonance_R
6 Resonance_L OrigTune
7 Resonance_R OrigTune
8 Piano FX Pedal On L
9 Piano FX Pedal On R
10 Piano FX Pedal Off L
11 Piano FX Pedal Off R
12 Piano FX Key Off L
13 Piano FX Key Off R
14 AcousticPiano L
15 AcousticPiano R
16 Piano M1
17 E.GrandPiano
18 E.Piano FM 1
19 E.Piano FM 1LP
20 E.Piano FM 2
21 E.Piano PO mp
22 E.Piano PO mf
23 E.Piano PO f
24 E.Piano PO f+
25 E.Piano PO ff
26 E.Piano PO ff+
27 E.Piano PO fff
28 E.Piano PO Kof p
29 E.Piano PO Kof f
30 E.Piano Rx KON L
31 E.Piano Rx KON R
32 E.Piano Rx KOF L
33 E.Piano Rx KOF R
34 E.Piano Suit Bright mp
35 E.Piano Suit Bright mf
36 E.Piano Suit Bright f
37 E.Piano Dyno mf
38 E.Piano Dyno f
39 E.Piano Dyno ff
40 E.Piano Dyno Soft
41 E.Piano Dyno SoftLP
42 E.Piano Stage Hard
43 E.Piano Stage HardLP
44 E.Piano Vintage pp
45 E.Piano Vintage p
46 E.Piano Vintage mf
47 E.Piano Vintage f
48 E.Piano Vintage ff
49 E.Piano Vintage fff
50 E.Piano Vintage Koff
51 E.Piano Wurly Soft
52 E.Piano Wurly Hard
53 E.Piano Pad 1
54 E.Piano Pad 1LP
55 E.Piano Pad 2
56 Clavi 1
57 Clavi 2
58 Clavi 3
59 Clavi 4
60 Clavinet GM
61 Harpsichord
62 Harpsichord Key off
63 Gospel Organ Slow L
64 Gospel Organ Slow R
65 Gospel Organ Fast L
66 Gospel Organ Fast R
67 16' 8' LF L
68 16' 8' LF R
69 16' 8' LS L
70 16' 8' LS R
71 16' 8' 51/3 LF L
72 16' 8' 51/3 LF R
73 16' 8' 51/3 LS L
74 16' 8' 51/3 LS R
75 4' 22/3' 2' LF L
76 4' 22/3' 2' LF R
77 4' 22/3' 2' LS L
78 4' 22/3' 2' LS R
79 11/3' 13/5' 1'LF L
80 11/3' 13/5' 1'LF R
81 11/3' 13/5' 1'LS L
82 11/3' 13/5' 1'LS R
83 16' 8' 51/3' Perc LF L
84 16' 8' 51/3' Perc LF R
85 16' 8' 51/3' Perc LS L
86 16' 8' 51/3' Perc LS R
87 Theater Organ 1
88 Theater Organ 2
89 50s E.Organ Bright
90 50s E.Organ Dark
91 E.Organ CX 3
92 E.Organ Perc. O1W
93 E.Organ Fast Click
94 E.Organ Perc. 1
95 E.Organ Perc. 2
96 E.Organ Perc. 3
97 E.Organ Perc. 4
98 Organ 1 M1
99 Organ 2 M1
100 Organ 1
101 Organ 2
102 Organ 2LP
103 Organ 3 Jazz
104 BX3 & Perc. 3rd
105 E.Organ Vox
106 E.Organ Soft
107 E.Organ Full
108 E.Organ Dist
109 Rotary Organ 1
110 Rotary Organ 1LP
111 Rotary Organ 2
112 Super BX3
113 Super BX3LP

335Factory dataMultisamples
App
endi
x
114 Rotor Noise LF L
115 Rotor Noise LF R
116 Rotor Noise LS L
117 Rotor Noise LS R
118 H Organ Leakage
119 H Organ 2nd Harmonic
120 H Organ Click Kon
121 H Organ Click Koff
122 ON-Click (Organ)
123 OFF-Click (Organ)
124 Pipe Flute L
125 Pipe Flute R
126 Pipe Positive
127 Pipe Mixture
128 Pipe Full 1 L
129 Pipe Full 1 R
130 Pipe Full 2
131 E.Organ Church
132 Music Box
133 Music BoxLP
134 Kalimba
135 Kalimba GM
136 Marimba
137 MarimbaLP
138 Xylophone
139 Balaphone
140 Vibraphone1
141 Vibraphone1LP
142 Vibraphone2
143 Celesta
144 Celesta GM
145 CelestaLP
146 Glockenspiel
147 GlockenspielLP
148 Tubular Bell
149 Log Drum
150 Steel Drum Hard
151 Steel Drum GM
152 Steel Drum HardLP
153 Gamelan
154 FM Bell
155 Flute
156 Flute Falls
157 Flute Gliss Up
158 Flute Gliss Down
159 Flute Frull
160 Flute Voice
161 Flute Jazz
162 Flute Vibrato
163 Flute Attack p
164 Flute Attack f
165 Piccolo
166 Pan Flute
167 Pan Flute Attack
168 Tin Whistle
169 Tin Whistle Voice
170 Tin Whistle Attack
171 Whistle Gliss
172 Whistle No Vibr
173 Whistle Sfz Vibr
174 Whistle Sfz No Vibr
175 Whistle Slow Atk Vibr
176 Whistle Breath
177 Shakuhachi
178 Shakuhachi Atk
179 Shakuhachi Mid
180 Shakuhachi High
181 Bottle
182 Bottlizer
183 Shanai GM
184 Recorder
185 Ocarina
186 Clarinet 1 Vibrato p
187 Clarinet 1 Vibrato f
188 Clarinet 1 GlissUp
189 Clarinet 1 Fall
190 Clarinet 2
191 Clarinet 3
192 DoubleReed M1
193 Oboe 1 Vibrato
194 Oboe 2 Straight
195 Oboe key noises
196 Oboe get a breath
197 English Horn
198 Bassoon
199 Baritone Sax mf
200 Baritone Sax f
201 Baritone Sax Growl
202 Baritone Sax GM
203 Tenor Sax p Vib
204 Tenor Sax mf Vib
205 Tenor Sax f Vib
206 Tenor Sax ff Vib
207 Tenor Sax Glissando
208 Tenor Sax Falls
209 Tenor Sax mf Straight
210 Tenor Sax Riff Up
211 Tenor Sax Riff Down
212 Tenor Sax Vibrato
213 Tenor Sax Expressive
214 Tenor Sax mp
215 Tenor Sax mf
216 Tenor Sax Straight
217 Tenor Sax M1
218 Tenor Sax GM
219 Alto Sax Vibrato1
220 Alto Sax Vibrato2
221 Alto Sax Vibrato2 Drive
222 Alto Sax p
223 Alto Sax mf
224 Alto Sax GM
225 Alto Sax Growl
226 Soprano Sax Vibrato
227 Soprano Sax Straight
228 Soprano Sax GM
229 Sax Family Vibrato
230 Sax key on
231 Sax key off
232 Sax breath
233 Musette 1
234 Musette 2
235 Musette 2LP
236 Musette 3L
237 Musette 3 R
238 Accordion 16'
239 Accordion 16' OrigTune
240 Accordion 8'
241 Accordion 8' OrigTune
242 Accordion 4'
243 Accordion 4' OrigTune
244 Accordion preset 1
245 Accordion preset 2
246 Accordion Bassoon
247 Accordion Clarinet
248 Accordion Bandoneon

336 Factory dataMultisamples
249 Accordion Volkst.
250 Accordion Bass
251 Accordion Noise KeyOn
252 Accordion Noise KeyOff
253 Accordion Change Voice
254 Harmonica 1
255 Harmonica 1 Fall
256 Harmonica 2
257 Harmonica 3 Wah
258 Melodica
259 MelodicaKey On
260 MelodicaKey Off
261 Highland Bag Pipes
262 Highland Drones
263 Uilleann Pipes
264 Bag Pipes
265 Bag Pipes GM
266 French Horn T1
267 French Horn Ensemble
268 French Horns GM
269 Tenor Horn
270 Flugel Horn Vibrato
271 Flugel Horn M1
272 Tuba f
273 Tuba ff
274 Tuba GM
275 Tuba Bariton Attack
276 Trombone 1 mf
277 Trombone 1 f
278 Trombone 1 ff
279 Trombone 1 Gliss Up
280 Trombone 1 Fall
281 Trombone 1 Smear
282 Trombone 1 Smear Atk
283 Trombone 2 Vibrato
284 Trombone 3 mf
285 Trombone 3 f
286 Trombone 4 Soft
287 Trombone 4 Bright
288 Trombone 5 Straight fff
289 Trombone Slur Up
290 Trombone Fall
291 Trombone GM
292 Trombone Muted
293 2 Trombones mfL
294 2 Trombones mfR
295 2 Trombones fL
296 2 Trombones fR
297 Classic Trumpet p
298 Classic Trumpet mf
299 Pop Trumpet mf
300 Pop Trumpet f
301 Trumpet Expr.
302 Trumpet Slow mp
303 Trumpet Slow f
304 Trumpet GM
305 Trumpet Tonguing mp
306 Trumpet Tonguing f
307 Trumpet Medium
308 Trumpet Overblown
309 Trumpet Muted
310 Trumpet Muted GM
311 Trumpet Wah wah
312 Trumpet WDH Vib
313 Trumpet WDH Shakes
314 Trumpet WDH Shakes Atk
315 Trumpet WDH Shakes Rel
316 Trumpet Doit
317 Trumpet Fall
318 2 Trumpets mpL
319 2 Trumpets mpR
320 2 Trumpets fL
321 2 Trumpets fR
322 Brass Ensemble Stereo L
323 Brass Ensemble Stereo R
324 Brass Ensemble 1
325 Brass Ensemble 2
326 Brass Ensemble 2LP
327 Brass Ensemble GM
328 Soprano Voice
329 Soprano Voice AD
330 Soprano Voice 5thDW
331 Soprano Voice 4thUP
332 Voice Female Wuh
333 Voice Female Woh
334 Voice Female Wah
335 Voice Female Dah
336 Voice Male Wuh
337 Voice Male Woh
338 Voice Male Wah
339 Voice Male Dah
340 Voice Scat Buh
341 Voice Scat Duh
342 Voice Scat Bah
343 Voice Scat Dah
344 Voice Choir
345 Voice Hoo
346 Voice Pop Ooh
347 Voice Pop Ah
348 Voice Doo
349 Voice DooLP
350 Violin1 Classic
351 Violin1 Gliss Up
352 Violin1 Gliss Dw
353 Violin1 Strings free
354 Violin1 Trill Up
355 Violin 2 Solo Vibrato
356 Violin 2 Straight
357 Violin GM
358 Fiddle GM
359 Viola Expressive mf
360 Viola Expressive f
361 Viola GM
362 Cello & Contrabass
363 Cello GM
364 Violin & Cello
365 Strings Quartet Vibrato1
366 Strings Quartet Vibrato2
367 Pizzicato
368 Strings Ensemble St L
369 Strings Ensemble St R
370 Strings Ensemble GM L
371 Strings Ensemble GM R
372 Strings Ensemble Mono
373 Strings Ensemble Tremolo
374 Pizzicato Ensemble
375 Harp Stereo L
376 Harp Stereo R
377 Harp Atk L
378 Harp Atk R
379 Harp Mono
380 Ac.Gtr muted p L
381 Ac.Gtr muted p R
382 Ac.Gtr muted f L
383 Ac.Gtr muted f R

337Factory dataMultisamples
App
endi
x
384 Ac.Gtr Dwn1 L
385 Ac.Gtr Dwn1 R
386 Ac.Gtr Dwn2 L
387 Ac.Gtr Dwn2 R
388 Ac.Gtr Dwn3 L
389 Ac.Gtr Dwn3 R
390 Ac.Gtr SlideHT Up p L
391 Ac.Gtr SlideHT Up p R
392 Ac.Gtr SlideHT Up f L
393 Ac.Gtr SlideHT Up f R
394 Ac.Gtr Harmonics L
395 Ac.Gtr Harmonics R
396 Ac.Gtr RX noises L
397 Ac.Gtr RX noises R
398 Ac.Gtr finger off L
399 Ac.Gtr finger off R
400 Steel Gtr 1 Pick p
401 Steel Gtr 1 Pick mf
402 Steel Gtr 1 Pick f
403 Steel Gtr 1 Mute
404 Steel Gtr 1 Slide
405 Steel Gtr 2 p
406 Steel Gtr 2 mf
407 Steel Gtr 2 f
408 Steel Gtr 2 Slap
409 Steel Gtr 2 Slide
410 Steel Gtr 12 Strings
411 Steel Gtr Harmonics 1
412 Steel Gtr Harmonics 2
413 Steel Gtr Noise
414 Guitar Fret Noise Off
415 Guitar Noise Off
416 Guitar Body
417 Guitar Noise Attack Off
418 Nylon Gtr1 p L
419 Nylon Gtr1 p R
420 Nylon Gtr1 mf1 L
421 Nylon Gtr1 mf1 R
422 Nylon Gtr1 mf2 L
423 Nylon Gtr1 mf2 R
424 Nylon Gtr1 mf3 L
425 Nylon Gtr1 mf3 R
426 Nylon Gtr1 f L
427 Nylon Gtr1 f R
428 Nylon Gtr1 Slide p L
429 Nylon Gtr1 Slide p R
430 Nylon Gtr1 Slide f L
431 Nylon Gtr1 Slide f R
432 Nylon Gtr1 Harmonics L
433 Nylon Gtr1 Harmonics R
434 Nylon Gtr2 p
435 Nylon Gtr2 mf
436 Nylon Gtr2 f
437 Nylon Gtr2 Atk
438 Nylon Gtr2 GM
439 Stra Pos2 MtS1
440 Stra Pos2 MtS2
441 Stra Pos2 MtS3
442 Stra Pos2 MtS4
443 Stra Pos2 MtS5
444 Stra Pos2 MtS6
445 Stra Pos2 MtL1
446 Stra Pos2 MtL2
447 Stra Pos2 MtL3
448 Stra Pos2 MtL4
449 Stra Pos2 dw1
450 Stra Pos2 dw2
451 Stra Pos2 dw3
452 Stra Pos2 dw4
453 Stra Pos2 dw5
454 Stra Pos2 up1
455 Stra Pos2 up2
456 Stra Pos2 up3
457 Stra Pos2 up4
458 Stra Pos2 up5
459 Stra Pos2 SlideHT p
460 Stra Pos2 SlideHT f
461 Stra Pos2 Harm 12
462 Stra Pos2 Harm 7
463 Stra Pos2 Harm 5
464 Stra Pop2 Ghost UP
465 Stra Pop2 Ghost DW
466 Stra Pop2 Fret Nuances
467 Stra Pop2 Key Off
468 Stra RX1 (Old Compatib)
469 Stra RX2
470 El. Guitar Stra 54 p
471 El. Guitar Stra 54 mf
472 El. Guitar Stra 54 f
473 El. Guitar Stra 54 Slide
474 El. Guitar Tel Mid p
475 El. Guitar Tel Mid mf
476 El. Guitar Tel Mid f
477 El. Guitar Tel Bridge p
478 El. Guitar Tel Bridge mf
479 El. Guitar Tel Bridge f
480 El. Guitar Tel Mt 5th pp
481 El. Guitar Tel Mt 5th p
482 El. Guitar Tel Mt 5th mf
483 El. Guitar Tel Mt 5th f
484 El. Guitar Tel Mt 5th ff
485 El. Guitar Tel Mt 5th Ko
486 El. Guitar Clean Str p
487 El. Guitar Clean Str f
488 El. Guitar Clean Mute
489 El. Guitar Clean Dead
490 El. Guitar Clean Slap
491 El. Guitar Clean Slide
492 El. Guitar Clean GM
493 El. Guitar Fret Noise GM
494 El. Guitar Cut Noise GM
495 El. Guitar Le Neck
496 El. Guitar Le Bridge
497 El. Guitar Le Mute p
498 El. Guitar Le Mute mf
499 El. Guitar Le Ghost1
500 El. Guitar Le Ghost2
501 El. Guitar Harmonics
502 El. Guitar Gliss Down
503 El. Guitar Gliss Up
504 El. Guitar Noise
505 El. Guitar Short Noise
506 El. Guitar Fret Noise
507 El. Guitar Les P.
508 Jazz Guitar1
509 Jazz Guitar2
510 Jazz Gib mellow p
511 Jazz Gib mellow mf
512 Jazz Gib mellow f
513 Pedal Steel Guitar
514 Resonator Guitar
515 Vox Wah Guitar
516 Overdrive GM
517 Dist. Guitar
518 Dist. Guitar GM

338 Factory dataMultisamples
519 Dist. Guitar1 Harmo.
520 Gtr Harmonic GM
521 Dist. Guitar2 Harmo P1
522 Dist. Guitar2 Harmo P2
523 Dist. Guitar2 Mute1
524 Dist. Guitar2 Mute2
525 El. Guitar DistMuted p
526 El. Guitar DistMuted mp
527 El. Guitar PowerChord1
528 El. Guitar PowerChord2
529 El. Guitar PowerChord3
530 Ac.Bass Natural
531 Ac.Bass Natural Key Off
532 Ac.Bass Natural Ghost
533 Acoustic Bass1
534 Acoustic Bass2 mf
535 Acoustic Bass2 f
536 Acoustic Bass3 mp
537 Acoustic Bass3 mp VAR
538 Acoustic Bass3 mf
539 Acoustic Bass3 mf VAR
540 Acoustic Bass3 f
541 Acoustic Bass3 f VAR
542 Acoustic Bass GM
543 Acoustic Bass RX Noises
544 Bass Prec FW Finger
545 Bass Prec RW Finger
546 Bass Prec RW FingerDeads
547 Bass Prec Pick Open mf
548 Bass Prec Pick Open f
549 Bass Prec Pick Dead
550 Bass Sray Finger
551 Bass Sray Harmonics
552 Bass Sray Deads
553 Bass Sray HandNoise
554 Bass Almb Fingered mf
555 Bass Almb Fingered f
556 Bass Fjazz Fingered
557 Bass Fjazz pickmute mf
558 Bass Fjazz pickmute f
559 Bass Fjazz Ghost
560 E.Bass1 Finger
561 E.Bass2 P.B.1
562 E.Bass2 P.B.2
563 E.Bass2 LH Stop
564 E.Bass2 RH Stop
565 E.Bass2 Harmo.
566 E.Bass3 p
567 E.Bass3 mf
568 E.Bass3 f Slap
569 E.Bass4 Pick
570 E.Bass4 Harmo.
571 E.Bass4 Slap
572 E.Bass4 SlapHar
573 E.Bass4 LH Mute
574 E.Bass4 RH Mute
575 E.Bass5 Finger
576 E.Bass6 Finger
577 E.Bass6 FingerLP
578 E.Bass7 Finger
579 E.Bass8 Pick
580 E.Bass9 Pick Muted1
581 E.Bass9 Pick Muted2
582 E.Bass9 Pick
583 E.Bass9 PickLP
584 E.Bass10 Thumb
585 E.Bass11 SlapThumb
586 E.Bass11 SlapThumbLP
587 E.Bass Gliss
588 E.Bass Noise1
589 E.Bass Noise2
590 E.Bass Harmonics
591 E.Bass HarmonicsLP
592 E.Bass Fretless 1
593 E.Bass Fretless 2
594 Finger Bass GM
595 Picked Bass GM
596 Slap Bass1 GM
597 Slap Bass2 GM
598 Fretless Bass GM
599 Sitar 1
600 Sitar2
601 Sitar GM
602 Sitar & Tambura
603 Zither
604 Santur
605 SanturLP
606 Tambura
607 TamburaLP
608 Bouzouki
609 BouzoukiLP
610 Mandolin Dw mf L
611 Mandolin Dw mf R
612 Mandolin Dw f L
613 Mandolin Dw f R
614 Mandolin Up L
615 Mandolin Up R
616 Mandolin
617 MandolinLP
618 Mandolin Tremolo
619 Mandolin Ensemble
620 Banjo
621 Banjo GM
622 BanjoLP
623 Cavaquino p
624 Cavaquino mf
625 Cavaquino f
626 Ukulele
627 Shamisen
628 Shamisen GM
629 Koto
630 Koto GM
631 M.E. Oud
632 M.E. Oud Tek
633 M.E. Kanoun1
634 M.E. Kanoun2
635 M.E. Kanoun Tremolo
636 M.E. Baglama1
637 M.E. Baglama2
638 M.E. Zurna
639 M.E. Klarnet Tek
640 M.E. Klarnet
641 M.E. Nay
642 Mouth Harp1
643 Mouth Harp2
644 Mouth Harp3
645 Mouth Harp4
646 Mouth Harp5
647 Syn Flute Pad
648 Syn Bass Reso
649 Syn Bass FM1
650 Syn Bass FM1LP
651 Syn Bass FM2
652 Syn Bass FM2LP
653 Syn Bass TB

339Factory dataMultisamples
App
endi
x
654 R&B Saw Bass
655 R&B Square Bass
656 Chrom Res
657 NextDance
658 Detuned Super
659 Detuned PWM
660 Synth Brass
661 Pop Synth
662 An.Strings1
663 An.Strings2
664 Analog Vintage
665 White Pad
666 N1 Air Vox
667 SynthBell
668 Ether Bell
669 Ether BellLP
670 Lore
671 Lore NT
672 Space Lore
673 Wave Sweep1
674 Wave Sweep2
675 Wave Sweep3
676 Syn Ghostly
677 Ghost
678 Syn Air Pad
679 Dream Str
680 Syn AirVortex
681 Syn Palawan
682 Syn Clicker
683 Cricket Spectrum
684 Noise1
685 Noise2
686 Noise Pad
687 Swish Terra
688 Gamelan XEQ
689 Saw1
690 Saw2
691 Saw3
692 Pulse 02%
693 Pulse 05%
694 Pulse 08%
695 Pulse 16%
696 Pulse 33%
697 Pulse 40%
698 Square
699 Square MG
700 Square JP
701 Triangle MG
702 Ramp
703 Ramp MG
704 Sine
705 DWGS Syn Sine1
706 DWGS Syn Sine2
707 DWGS Organ1
708 DWGS Organ2
709 DWGS Bell1
710 DWGS Bell2
711 DWGS Bell3
712 DWGS Bell4
713 DWGS Clav.
714 DWGS Digi1
715 DWGS Digi2
716 DWGS Wire1
717 DWGS Wire2
718 DWGS Sync1
719 DWGS Sync2
720 DWGS Sync3
721 Orchestra Hit 1
722 Orchestra Hit 2
723 Orchestra Hit GM L
724 Orchestra Hit GM R
725 Band Hit
726 Impact Hit
727 Brass Fall
728 Vibe Chord
729 Zap1
730 Zap2
731 Stadium
732 Applause
733 Birds1
734 Birds2
735 Crickets
736 Church Bell
737 Thunder
738 Stream
739 Bubble
740 Dog
741 Gallop
742 Laughing
743 Telephone Ring
744 Scream
745 Punch
746 Heart Beat
747 Footstep 1
748 Footstep2
749 Door Creak
750 Door Slam
751 Car Engine
752 Car EngineLP
753 Car Stop
754 Car Pass
755 Car Crash
756 Train
757 Helicopter
758 Gun Shot
759 Machine Gun
760 Laser Gun
761 Explosion
762 Wind
763 Chinese Gong
764 Crash
765 Crash Reverse
766 Crash Reverse GM
767 Orchestra Crash
768 Ride Jazz
769 Ride Edge1
770 Ride Edge2
771 HiHat Closed
772 88 HiHat Open
773 88 Cowbell
774 88 Tom
775 88 Conga
776 88 Crash
777 Tom
778 Tom Brush
779 Tom Process
780 Electric Tom
781 Melodic Tom GM
782 Flexatone
783 Tambourine
784 Agogo Bell
785 Meditation Tree
786 Marc Tree
787 Marc TreeLP
788 Rain Stick

340 Factory dataMultisamples
789 Cowbell
790 Castanet
791 Temple Blocks
792 Orchestra BD
793 Timpani
794 Taiko
795 Djembe Open
796 Djembe Mute
797 Conga
798 Quinto & Bongo
799 Okonkolo
800 Timbales
801 Cowbell & Clave
802 Cabasa
803 Shaker
804 Cabasa & Shaker
805 Dumbek - Djambe - Udu
806 Caxixi
807 Tabla & Baya
808 WoodBlock & Castanet
809 Mix Latin Percussion
810 Kangaroo
811 DJ Eddie Set
812 Claps Natural Set1 L
813 Claps Natural Set1 R
814 Claps Natural Set2 L
815 Claps Natural Set2 R
816 Claps Natural Set3 L
817 Claps Natural Set3 R
818 Snare Ghost
819 Stereo Snares1&2 L
820 Stereo Snares1&2 R
821 Stereo Snare1 L
822 Stereo Snare1 R
823 Stereo Snare2 L
824 Stereo Snare2 R
825 FX SD Large Hall1 L
826 FX SD Large Hall1 R
827 FX SD Large Hall2 L
828 FX SD Large Hall2 R
829 FX Rim Large Hall1 L
830 FX Rim Large Hall1 R
831 FX Rim Large Hall2 L
832 FX Rim Large Hall2 R
833 Click
834 Empty

341Factory dataDrum Samples
App
endi
x
Drum Samples
The following table contains all Pa900Factory Drum Samples.
# Name Family
0 BD 24x14 Bass Drum
1 BD 24x14 GM Bass Drum
2 BD 26 inch Open Bass Drum
3 BD 26 inch Open GM Bass Drum
4 BD Pop1 Bass Drum
5 BD Pop2 Bass Drum
6 BD Acoustic1 p Bass Drum
7 BD Acoustic1 mf Bass Drum
8 BD Acoustic1 f Bass Drum
9 BD Acoustic2 mf Bass Drum
10 BD Acoustic2 mf GM Bass Drum
11 BD Acoustic2 f Bass Drum
12 BD Acoustic2 f GM Bass Drum
13 BD open p Bass Drum
14 BD open mf Bass Drum
15 BD open f Bass Drum
16 BD Peak Bass Drum
17 BD Dry1 Bass Drum
18 BD Dry2 Bass Drum
19 BD Dry3 Bass Drum
20 BD Normal Bass Drum
21 BD SoftRoom Bass Drum
22 BD Jazz Bass Drum
23 BD Jazz GM Bass Drum
24 BD Pillow Bass Drum
25 BD Woofer Bass Drum
26 BD MondoKill Bass Drum
27 BD Terminator Bass Drum
28 BD Tubby Bass Drum
29 BD Gated Bass Drum
30 BD Tight Bass Drum
31 BD Squash Bass Drum
32 BD Soul1 Bass Drum
33 BD Soul2 Bass Drum
34 BD Soul3 dist Bass Drum
35 BD Soul4 noise Bass Drum
36 BD Soul5 Long Bass Drum
37 BD Soul6 Bass Drum
38 BD Dance1 Bass Drum
39 BD Dance2 Bass Drum
40 BD Dance3 Bass Drum
41 BD House1 Bass Drum
42 BD House2 Bass Drum
43 BD House3 Bass Drum
44 BD House4 Bass Drum
45 BD House5 Bass Drum
46 BD Liquid Bass Drum
47 BD Techno1 Bass Drum
48 BD Techno2 Bass Drum
49 BD Hip1 Bass Drum
50 BD Hip2 Bass Drum
51 BD Hip3 Bass Drum
52 BD Hip4 Bass Drum
53 BD Kick1 Bass Drum
54 BD Kick2 Bass Drum
55 Electro Kick Bass Drum
56 BD Ambient Bass Drum
57 BD Ambient Crackle Bass Drum
58 BD Ambient Rocker Bass Drum
59 BD Pop Bass Drum
60 BD Deep Bass Drum
61 BD Deep GM Bass Drum
62 BD Klanger Bass Drum
63 BD Electribe01 Bass Drum
64 BD Electribe02 Bass Drum
65 BD Electribe03 Bass Drum
66 BD Electribe04 Bass Drum
67 BD Electribe05 Bass Drum
68 BD Electribe06 Bass Drum
69 BD Electribe07 Bass Drum
70 BD Electribe08 Bass Drum
71 BD Electribe09 Bass Drum
72 BD Electribe10 Bass Drum
73 BD Electribe11 Bass Drum
74 BD Electribe12 Bass Drum
75 BD Electribe13 Bass Drum
76 BD Electribe14 Bass Drum
77 BD Electribe15 Bass Drum
78 BD Electribe16 Bass Drum
79 BD Electribe17 Bass Drum
80 Syn. BD1 Bass Drum
81 Syn. BD2 Bass Drum
82 Syn. BD3 Bass Drum
83 Syn. BD4 Bass Drum
84 Syn. BD Buzz Bass Drum
85 BD Orchestra Bass Drum
86 BD Orchestra GM Bass Drum
87 Timpani Bass Drum
88 SD LdwVintage S+Rim p Snare Drum
89 SD LdwVintage S+Rim mf Snare Drum
90 SD LdwVintage S+Rim f Snare Drum
91 SD Pop1 p GM Snare Drum
92 SD Pop1 mf GM Snare Drum
93 SD Pop1 f GM Snare Drum
94 SD Pop1 +Rim mf GM Snare Drum
95 SD Pop1 +Rim f GM Snare Drum
96 SD Black Snare Drum
# Name Family
97 SD S Gate1 GM Snare Drum
98 SD S Gate2 Snare Drum
99 SD Wood1 p Snare Drum
100 SD Wood1 mf Snare Drum
101 SD Wood1 f Snare Drum
102 SD Wood2 pp Snare Drum
103 SD Wood2 p Snare Drum
104 SD Wood2 mf Snare Drum
105 SD Wood2 f Snare Drum
106 SD Piccolo1 pp Snare Drum
107 SD Piccolo1 p Snare Drum
108 SD Piccolo1 mf Snare Drum
109 SD Piccolo1 f Snare Drum
110 SD Piccolo2 pp Snare Drum
111 SD Piccolo2 p Snare Drum
112 SD Piccolo2 mf Snare Drum
113 SD Piccolo2 f Snare Drum
114 SD Solid1 p Snare Drum
115 SD Solid1 mf Snare Drum
116 SD Solid1 f Snare Drum
117 SD Solid2 p Snare Drum
118 SD Solid2 mf Snare Drum
119 SD Solid2 f Snare Drum
120 SD Maple1 pp Snare Drum
121 SD Maple1 p Snare Drum
122 SD Maple1 mp Snare Drum
123 SD Maple1 mf Snare Drum
124 SD Maple1 f Snare Drum
125 SD Maple1 ff Snare Drum
126 SD Maple2 pp Snare Drum
127 SD Maple2 p Snare Drum
128 SD Maple2 mp Snare Drum
129 SD Maple2 mf Snare Drum
130 SD Maple2 f Snare Drum
131 SD Maple2 ff Snare Drum
132 SD Brass1 p Snare Drum
133 SD Brass1 mf Snare Drum
134 SD Brass1 f Snare Drum
135 SD Brass2 p Snare Drum
136 SD Brass2 mf Snare Drum
137 SD Brass2 f Snare Drum
138 SD Roll Snare Drum
139 SD Ghost Roll Snare Drum
140 SD Ghost p Snare Drum
141 SD Ghost f Snare Drum
142 SD Snr Ghost1 a Snare Drum
143 SD Snr Ghost1 b Snare Drum
144 SD Snr Ghost2 a Snare Drum
145 SD Snr Ghost2 b Snare Drum
146 SD Snr Ghost2 c Snare Drum
# Name Family

342 Factory dataDrum Samples
147 SD Snr Signature p Snare Drum
148 SD Snr Signature mf Snare Drum
149 SD Snr Signature f Snare Drum
150 SD Snr Signature Rim mf Snare Drum
151 SD Snr Signature Rim f Snare Drum
152 SD Snr Signature Rim1 Snare Drum
153 SD Snr Signature Rim2 Snare Drum
154 SD J Std+Rim p Snare Drum
155 SD J Std+Rim mf Snare Drum
156 SD J Std+Rim f Snare Drum
157 SD Dry1 Snare Drum
158 SD Dry2 Snare Drum
159 SD Dry3 Snare Drum
160 SD Full Room Snare Drum
161 SD Off Center Snare Drum
162 SD Jazz Ring Snare Drum
163 SD Amb.Piccolo Snare Drum
164 SD Paper Snare Drum
165 SD Big Rock Snare Drum
166 SD Yowie Snare Drum
167 SD Trinity1 Snare Drum
168 SD Trinity2 Snare Drum
169 SD Stereo Gate Snare Drum
170 SD Stereo Gate GM Snare Drum
171 SD Processed Snare Drum
172 SD Processed GM Snare Drum
173 SD Cracker Room Snare Drum
174 SD El. Funk1 Snare Drum
175 SD El. Funk2 Snare Drum
176 SD El. Funk3 Snare Drum
177 SD Dance01 Snare Drum
178 SD Dance02 Snare Drum
179 SD Dance03 Snare Drum
180 SD Dance04 Snare Drum
181 SD Dance05 Snare Drum
182 SD Dance06 Snare Drum
183 SD Dance07 Snare Drum
184 SD Dance08 Snare Drum
185 SD Dance09 Snare Drum
186 SD Dance10 Snare Drum
187 SD Dance11 Snare Drum
188 SD Dance12 Snare Drum
189 SD Dance13 Snare Drum
190 SD Dance14 Snare Drum
191 SD Dance15 Snare Drum
192 SD Dance16 Snare Drum
193 SD Dance17 Snare Drum
194 SD Dance18 Snare Drum
195 SD Dance19 Snare Drum
196 SD Dance20 Snare Drum
197 SD Dance21 Snare Drum
198 SD Dance22 Snare Drum
199 SD Dance23 Snare Drum
# Name Family
200 SD Dance23 GM Snare Drum
201 SD Dance24 Snare Drum
202 SD House1 Snare Drum
203 SD House2 Snare Drum
204 SD House3 Snare Drum
205 SD House4 Snare Drum
206 SD BeatBox Snare Drum
207 SD Small Snare Drum
208 SD Rap Snare Drum
209 SD Noise Snare Drum
210 SD Reverse Snare Drum
211 SD Hip1 Snare Drum
212 SD Hip2 Snare Drum
213 SD Hip3 Snare Drum
214 SD Hip4 Snare Drum
215 SD Hip5 Snare Drum
216 SD Hip6 Snare Drum
217 SD Ringy Snare Drum
218 SD Tiny Snare Drum
219 SD Vintage1 Snare Drum
220 SD Vintage2 Snare Drum
221 SD Vintage3 Snare Drum
222 SD Vintage4 Snare Drum
223 SD Vintage5 Snare Drum
224 SD Vintage6 Snare Drum
225 SD AmbiHop Snare Drum
226 SD Brasser Snare Drum
227 SD Chili Snare Drum
228 SD Whopper Snare Drum
229 SD Syn.1 Snare Drum
230 SD Syn.2 Snare Drum
231 SD Syn.3 Snare Drum
232 SD Syn.4 Snare Drum
233 SD Electro Snare Drum
234 SD Orchestra Snare Drum
235 SD Orch. Roll Snare Drum
236 SD JazzBrush1 Snare Drum
237 SD JazzBrush2 Snare Drum
238 SD Brush1 (swirl1) Snare Drum
239 SD Brush1 (swirl2) Snare Drum
240 SD Brush1 (swirl3) Snare Drum
241 SD Brush1 (swirl4) Snare Drum
242 SD Brush1 Snare Drum
243 SD Brush2 (ghost1) Snare Drum
244 SD Brush2 (ghost2) Snare Drum
245 SD Brush2 (ghost3) Snare Drum
246 SD Brush2 Snare Drum
247 SD Brush2 (fill) 4 shots Snare Drum
248 SD Brush2 (fill) 3 shots Snare Drum
249 SD Brush2 (fill) 2 shots Snare Drum
250 SD Brush3 Hit Snare Drum
251 SD Brush3 Tap1 Snare Drum
252 SD Brush3 Tap2 Snare Drum
# Name Family
253 SD Brush3 Swirl Snare Drum
254 SD FX Large Hall1 Snare Drum
255 SD FX Large Hall2 Snare Drum
256 Rim Signature Hi Snare Drum
257 Rim Signature Mid Snare Drum
258 Rim Signature Low Snare Drum
259 Rim Shot p Snare Drum
260 Rim Shot f Snare Drum
261 Rim House1 Snare Drum
262 Rim House2 Snare Drum
263 Rim Synth Snare Drum
264 Rim Synth Click Snare Drum
265 Rim Synth Tamb Snare Drum
266 Rim FX Large Hall1 Snare Drum
267 Rim FX Large Hall2 Snare Drum
268 SideStick mf Snare Drum
269 SideStick f Snare Drum
270 SideStick Dance Snare Drum
271 SideStick Dry Snare Drum
272 SideStick Amb Snare Drum
273 DrumStick Hit Snare Drum
274 DrumStick Hit GM Snare Drum
275 Tom R Vintage Hi Tom
276 Tom R Vintage Mid Tom
277 Tom R Vintage Floor Tom
278 Tom Vintage Room Hi Tom
279 Tom Vintage Room Mid Tom
280 Tom Vintage Room Low Tom
281 Tom Jazz Hi center Tom
282 Tom Jazz Hi center GM Tom
283 Tom Jazz Low center GM Tom
284 Tom1 Open Hi p Tom
285 Tom1 Open Hi p flam Tom
286 Tom1 Open Hi f Tom
287 Tom1 Open Hi f flam Tom
288 Tom1 Open Mid p Tom
289 Tom1 Open Mid p flam Tom
290 Tom1 Open Mid f Tom
291 Tom1 Open Mid f flam Tom
292 Tom1 Open Low p Tom
293 Tom1 Open Low p flam Tom
294 Tom1 Open Low f Tom
295 Tom1 Open Low f flam Tom
296 Tom1 Open Floor p Tom
297 Tom1 Open Floor p flam Tom
298 Tom1 Open Floor f Tom
299 Tom1 Open Floor f flam Tom
300 Tom2 Hi p Tom
301 Tom2 Hi f Tom
302 Tom2 Mid p Tom
303 Tom2 Mid f Tom
304 Tom2 Low p Tom
305 Tom2 Low f Tom
# Name Family

343Factory dataDrum Samples
App
endi
x
306 Tom2 Floor p Tom
307 Tom2 Floor f Tom
308 Tom3 Hi Tom
309 Tom3 Floor Tom
310 Tom4 Hi Tom
311 Tom4 Low Tom
312 Tom4 Floor Tom
313 Tom5 Hi Tom
314 Tom5 Low Tom
315 Tom6 Vintage Hi p Tom
316 Tom6 Vintage Hi mf Tom
317 Tom6 Vintage Hi f Tom
318 Tom6 Vintage Mid p Tom
319 Tom6 Vintage Mid mf Tom
320 Tom6 Vintage Mid f Tom
321 Tom6 Vintage Low p Tom
322 Tom6 Vintage Low mf Tom
323 Tom6 Vintage Low f Tom
324 Tom Processed Tom
325 Tom Jazz Hi Tom
326 Tom Jazz Floor Tom
327 Tom Brush1 (sd open) Tom
328 Tom Brush1 (sd close) Tom
329 Tom Brush2 (sd open) Tom
330 Tom Brush2 (sd close) Tom
331 Tom Brush3 Hi mf Tom
332 Tom Brush3 Hi f Tom
333 Tom Brush3 Hi f GM Tom
334 Tom Brush3 Midmf Tom
335 Tom Brush3 Mid f Tom
336 Tom Brush3 Mid f GM Tom
337 Tom Brush3 Low mf Tom
338 Tom Brush3 Low f Tom
339 Tom Brush3 Low f GM Tom
340 Tom Brush4 Tom
341 E.Tom FM Tom
342 E.Tom Real Tom
343 HH1 Closed pp Hi Hat
344 HH1 Closed p Hi Hat
345 HH1 Closed mf Hi Hat
346 HH1 Closed f Hi Hat
347 HH1 Foot mp Hi Hat
348 HH1 Foot mf Hi Hat
349 HH1 Open mp Hi Hat
350 HH1 Open mf Hi Hat
351 HH2 Closed pp Hi Hat
352 HH2 Closed p Hi Hat
353 HH2 Closed mp Hi Hat
354 HH2 Closed mf Hi Hat
355 HH2 Closed f Hi Hat
356 HH2 Closed ff Hi Hat
357 HH2 Foot p Hi Hat
358 HH2 Foot f Hi Hat
# Name Family
359 HH2 Open p Hi Hat
360 HH2 Open f Hi Hat
361 HH3 Closed1 Hi Hat
362 HH3 Closed2 Hi Hat
363 HH3 Foot Hi Hat
364 HH3 Open1 Hi Hat
365 HH3 Open2 Hi Hat
366 HH3 Sizzle Hi Hat
367 HH4 Closed1 Hi Hat
368 HH4 Closed2 Hi Hat
369 HH4 Foot Hi Hat
370 HH4 Foot Open Hi Hat
371 HH4 Open Hi Hat
372 HH Old Close1 Hi Hat
373 HH Old Open1 Hi Hat
374 HH Old TiteClose Hi Hat
375 HH Old Close2 Hi Hat
376 HH Old Open2 Hi Hat
377 HH House Open1 Hi Hat
378 HH House Open2 Hi Hat
379 HH Hip Hi Hat
380 HH Alpo Close Hi Hat
381 HH Dance1 Hi Hat
382 HH Dance2 Hi Hat
383 HH Syn. Closed Hi Hat
384 HH Syn. Open Hi Hat
385 Ride 20' mp1 Cymbal
386 Ride 20' mp2 Cymbal
387 Ride 20' mf1 Cymbal
388 Ride 20' mf2 Cymbal
389 Ride Edge1 Cymbal
390 Ride Edge2 Cymbal
391 Ride Cup Cymbal
392 Ride Jazz Cymbal
393 Ride Brush1 Cymbal
394 Ride Brush2 Cymbal
395 Ride Brush3 Cymbal
396 Ride Rivet Cymbal
397 Crash 15'edge1 Cymbal
398 Crash 15'edge2 Cymbal
399 Crash 17'edge1 Cymbal
400 Crash 17'edge2 Cymbal
401 Crash 19'open1 Cymbal
402 Crash 19'open2 Cymbal
403 Crash 1 Cymbal
404 Crash 2 Cymbal
405 Crash Reverse Cymbal
406 Crash Dance 99 Cymbal
407 Crash DDD-1 Cymbal
408 Splash 8'edge1 Cymbal
409 Splash 8'edge2 Cymbal
410 Splash Cymbal
411 China Cymbal
# Name Family
412 Orchestra Cymbal Cymbal
413 Finger Snaps Latin Perc.
414 Claps1 Latin Perc.
415 Claps2 Latin Perc.
416 Claps3 Latin Perc.
417 Claps4 Latin Perc.
418 Dance Claps1 Latin Perc.
419 Dance Claps2 Latin Perc.
420 Dance Claps3 Latin Perc.
421 Dance Claps4 Latin Perc.
422 Dance Claps5 Latin Perc.
423 Dance Claps6 Latin Perc.
424 Dance Conga Lo-Open Latin Perc.
425 Dance Conga Hi-Open Latin Perc.
426 Dance Tambourine Ethnic Perc.
427 Syn. Bongo1 Latin Perc.
428 Syn. Bongo2 Latin Perc.
429 Syn. Castanet Latin Perc.
430 Syn. Shaker Ethnic Perc.
431 Syn. Noise SFX
432 Syn. FX1 SFX
433 Syn. FX2 SFX
434 Syn. FX3 SFX
435 Syn. FX4 SFX
436 Syn. FX5 SFX
437 Syn. Perc. Ahh SFX
438 Boom SFX
439 Zap1 SFX
440 Zap2 SFX
441 Vinyl Hit SFX
442 DJ Vinyl Sliced 01 SFX
443 DJ Vinyl Sliced 02 SFX
444 DJ Vinyl Sliced 03 SFX
445 DJ Vinyl Sliced 04 SFX
446 DJ Vinyl Sliced 05 SFX
447 DJ Vinyl Sliced 06 SFX
448 DJ Vinyl Sliced 07 SFX
449 DJ Vinyl Sliced 08 SFX
450 DJ Vinyl Sliced 09 SFX
451 DJ Vinyl Sliced 10 SFX
452 DJ Vinyl Sliced 11 SFX
453 DJ Vinyl Sliced 12 SFX
454 DJ Vinyl Sliced 13 SFX
455 DJ Vinyl Sliced 14 SFX
456 DJ Vinyl Sliced 15 SFX
457 DJ Vinyl Sliced 16 SFX
458 DJ Vinyl Sliced 17 SFX
459 DJ Vinyl Sliced 18 SFX
460 DJ Vinyl Sliced 19 SFX
461 DJ Vinyl Sliced 20 SFX
462 DJ Vinyl Sliced 21 SFX
463 DJ Vinyl Sliced 22 SFX
464 DJ Vinyl Sliced 23 SFX
# Name Family

344 Factory dataDrum Samples
465 DJ Vinyl Sliced 24 SFX
466 DJ Scratch 01 SFX
467 DJ Scratch 02 SFX
468 DJ Scratch 03 SFX
469 DJ Scratch 04 SFX
470 DJ Scratch 05 SFX
471 DJ Scratch 06 SFX
472 DJ Hit Rub SFX
473 DJ Vocal Rub1 SFX
474 DJ Vocal Rub2 SFX
475 DJ BD Rub SFX
476 DJ SD Rub SFX
477 Guiro Long Latin Perc.
478 Guiro Short Latin Perc.
479 Vibraslap Ethnic Perc.
480 Samba Whistle Ethnic Perc.
481 Samba Whistle Lp Ethnic Perc.
482 Cuica Hi Latin Perc.
483 Cuica Lo Latin Perc.
484 Surdo Open GM Latin Perc.
485 Surdo Mute GM Latin Perc.
486 Tumba Open1 mf Latin Perc.
487 Tumba Open1 f Latin Perc.
488 Tumba Open2 mf Latin Perc.
489 Tumba Open2 f Latin Perc.
490 Tumba Open Flam Latin Perc.
491 Tumba Glissando Latin Perc.
492 Tumba Basstone Latin Perc.
493 Tumba O.Slap Flam mf Latin Perc.
494 Tumba O.Slap Flam f Latin Perc.
495 Tumba Muffled Latin Perc.
496 Conga1 Lo Basstone Latin Perc.
497 Conga1 Lo Open mf Latin Perc.
498 Conga1 Lo Open Slap Latin Perc.
499 Conga1 Lo Glissando Latin Perc.
500 Conga1 Lo Muffled Latin Perc.
501 Conga1 Lo Closed Latin Perc.
502 Conga1 Lo Closed Slap Latin Perc.
503 Conga1 Lo Heel Latin Perc.
504 Conga1 Lo Toe Latin Perc.
505 Conga1 Hi Basstone mf Latin Perc.
506 Conga1 Hi Basstonef Latin Perc.
507 Conga1 Hi Open mf Latin Perc.
508 Conga1 Hi Open Slap Latin Perc.
509 Conga1 Hi Muffled Latin Perc.
510 Conga1 Hi Closed Latin Perc.
511 Conga1 Hi Closed Slap Latin Perc.
512 Conga1 Hi Heel Latin Perc.
513 Conga1 Hi Toe Latin Perc.
514 Conga2 Lo Open Latin Perc.
515 Conga2 Lo Mt Slap Latin Perc.
516 Conga2 Lo Slap Latin Perc.
517 Conga2 Hi Open Latin Perc.
# Name Family
518 Conga2 Hi Mute Latin Perc.
519 Conga2 Hi Mt Slap Latin Perc.
520 Conga2 Hi Slap1 Latin Perc.
521 Conga2 Hi Slap2 Latin Perc.
522 Conga2 Heel Latin Perc.
523 Conga2 Toe Latin Perc.
524 Quinto1 Open Latin Perc.
525 Quinto1 Closed Latin Perc.
526 Quinto1 Closed Slap Latin Perc.
527 Quinto1 Toe Latin Perc.
528 Quinto2 Basstone Latin Perc.
529 Quinto2 Open mp Latin Perc.
530 Quinto2 Open Flam Latin Perc.
531 Quinto2 Open Slap Latin Perc.
532 Quinto2 Muffled Latin Perc.
533 Quinto2 C.Slap Flam p Latin Perc.
534 Quinto2 C.Slap Flam f Latin Perc.
535 Quinto2 Heel Latin Perc.
536 Bongo1 Lo Muffled mp Latin Perc.
537 Bongo1 Lo Muffled f Latin Perc.
538 Bongo1 Lo Closed Latin Perc.
539 Bongo1 Lo Flam Latin Perc.
540 Bongo1 Lo MuffledFlam Latin Perc.
541 Bongo1 Lo Stick Latin Perc.
542 Bongo1 Lo StickEdge mf Latin Perc.
543 Bongo1 Lo StickEdgef Latin Perc.
544 Bongo1 Lo StickBounce Latin Perc.
545 Bongo1 Lo Fingernail Latin Perc.
546 Bongo1 Lo Cuptone Latin Perc.
547 Bongo1 Lo Slap Latin Perc.
548 Bongo1 Hi Open mf Latin Perc.
549 Bongo1 Hi Open f Latin Perc.
550 Bongo1 Hi Pops Latin Perc.
551 Bongo1 Hi Hightone Latin Perc.
552 Bongo1 Hi OpenFlam Latin Perc.
553 Bongo1 Hi Fingernail Latin Perc.
554 Bongo1 Hi Stick Latin Perc.
555 Bongo1 Hi StickEdge mf Latin Perc.
556 Bongo1 Hi StickEdgef Latin Perc.
557 Bongo1 Hi StickBounce Latin Perc.
558 Bongo1 Hi Cuptone Latin Perc.
559 Bongo1 Hi Slap Latin Perc.
560 Bongo2 Lo Open a Latin Perc.
561 Bongo2 Lo Open b Latin Perc.
562 Bongo2 Lo Mute Latin Perc.
563 Bongo2 Hi Open a Latin Perc.
564 Bongo2 Hi Open b Latin Perc.
565 Bongo2 Hi Muffled Latin Perc.
566 Bongo2 Hi Slap Latin Perc.
567 Bongo2 Lo Heel Latin Perc.
568 Bongo2 Lo Muffled Latin Perc.
569 Bongo3 Lo Open Latin Perc.
570 Bongo3 Lo Slap Latin Perc.
# Name Family
571 Bongo3 Lo Stick Latin Perc.
572 Bongo3 Hi Open Latin Perc.
573 Bongo3 Hi Slap Latin Perc.
574 Bongo3 Hi Stick1 Latin Perc.
575 Bongo3 Hi Stick2 Latin Perc.
576 Okonkolo Boca Op mp Latin Perc.
577 Okonkolo Chacha Open mp Latin Perc.
578 Okonkolo Chacha Open mf Latin Perc.
579 Okonkolo Chacha Open f Latin Perc.
580 Okonkolo Chacha Open ff Latin Perc.
581 Okonkolo Chacha Slap mp Latin Perc.
582 Okonkolo Chacha Slap mf Latin Perc.
583 Okonkolo Chacha Slap f Latin Perc.
584 Baya Open Latin Perc.
585 Baya Ghe Latin Perc.
586 Baya GheUp a Latin Perc.
587 Baya GheUp b Latin Perc.
588 Baya KaPalm Latin Perc.
589 Baya KaToe a Latin Perc.
590 Baya KaToe b Latin Perc.
591 Baya Nail a Latin Perc.
592 Baya Nail b Latin Perc.
593 Baya Nail c Latin Perc.
594 Baya Ge Latin Perc.
595 Baya Up Latin Perc.
596 Baya UpDown a Latin Perc.
597 Baya UpDown b Latin Perc.
598 Baya Mute1 Latin Perc.
599 Baya Mute2 Latin Perc.
600 Baya Mute3 Latin Perc.
601 Tabla1 Na Latin Perc.
602 Tabla1 Open Latin Perc.
603 Tabla1 Tin Latin Perc.
604 Tabla1 Mute1 Latin Perc.
605 Tabla1 Mute2 Latin Perc.
606 Tabla1 Mute3 Latin Perc.
607 Tabla2 Tin a Latin Perc.
608 Tabla2 Tin b Latin Perc.
609 Tabla2 Na a Latin Perc.
610 Tabla2 Na b Latin Perc.
611 Tabla2 Na c Latin Perc.
612 Tabla2 Tun a Latin Perc.
613 Tabla2 Tun b Latin Perc.
614 Tabla2 Tele a Latin Perc.
615 Tabla2 Tele b Latin Perc.
616 Tabla2 Tele c Latin Perc.
617 Tabla2 Ti a Latin Perc.
618 Tabla2 Ti b Latin Perc.
619 Tabla2 Ti c Latin Perc.
620 Tabla2 Tera Latin Perc.
621 Tsuzumi Latin Perc.
622 Taiko Open Latin Perc.
623 Taiko Rim Latin Perc.
# Name Family

345Factory dataDrum Samples
App
endi
x
624 Timbales1 Lo Open mp Latin Perc.
625 Timbales1 Lo Open mf Latin Perc.
626 Timbales1 Lo Open mf GM Latin Perc.
627 Timbales1 Lo Edge mf Latin Perc.
628 Timbales1 Lo Edge f Latin Perc.
629 Timbales1 Lo RimShot Latin Perc.
630 Timbales1 Lo Abanico Latin Perc.
631 Timbales1 Lo Roll Latin Perc.
632 Timbales1 Lo Mute mf Latin Perc.
633 Timbales1 Lo Mute f Latin Perc.
634 Timbales1 Lo Paila mf Ethnic Perc.
635 Timbales1 Lo Paila f Ethnic Perc.
636 Timbales1 Hi Open Latin Perc.
637 Timbales1 Hi Edge Latin Perc.
638 Timbales1 Hi Edge GM Latin Perc.
639 Timbales1 Hi RimShot mf Latin Perc.
640 Timbales1 Hi RimShot f Latin Perc.
641 Timbales1 Hi RimShot ff Latin Perc.
642 Timbales1 Hi Abanico1 Latin Perc.
643 Timbales1 Hi Abanico2 Latin Perc.
644 Timbales1 Hi Mute Latin Perc.
645 Timbales1 Hi Paila mf Ethnic Perc.
646 Timbales1 Hi Paila f Ethnic Perc.
647 Timbales2 Lo Open Latin Perc.
648 Timbales2 Lo Mute Latin Perc.
649 Timbales2 Lo Rim Latin Perc.
650 Timbales2 Hi Edge Latin Perc.
651 Timbales2 Hi Rim1 Latin Perc.
652 Timbales2 Hi Rim2 Latin Perc.
653 Timbales2 Paila Ethnic Perc.
654 Cowbell1 Ethnic Perc.
655 Cowbell2 Ethnic Perc.
656 Cowbell3 Ethnic Perc.
657 Cowbell4 Open Ethnic Perc.
658 Cowbell4 Mute Ethnic Perc.
659 Cowbell5 Open a Ethnic Perc.
660 Cowbell5 Open b Ethnic Perc.
661 Cowbell5 Mute Ethnic Perc.
662 Cowbell6 Ethnic Perc.
663 Agogo Bell Ethnic Perc.
664 Chacha Bell Ethnic Perc.
665 Mambo Bell Ethnic Perc.
666 Recoreco short1 Ethnic Perc.
667 Recoreco short2 Ethnic Perc.
668 Recoreco long Ethnic Perc.
669 Triangle1 Open Ethnic Perc.
670 Triangle1 Mute Ethnic Perc.
671 Triangle2 Open Lp Ethnic Perc.
672 Triangle2 Closed Ethnic Perc.
673 Sleigh Bell Ethnic Perc.
674 Rap Sleigh Bell Ethnic Perc.
675 Jingle Bell Ethnic Perc.
676 Bells Open Ethnic Perc.
# Name Family
677 Finger Cymbal Ethnic Perc.
678 Marc Tree Ethnic Perc.
679 Marc Tree GM Ethnic Perc.
680 Marc Tree Lp Ethnic Perc.
681 Rainstick SFX
682 Flexatone Ethnic Perc.
683 Chinese Gong Cymbal
684 Claves1 Lo a Latin Perc.
685 Claves1 Lo b Latin Perc.
686 Claves1 Hi a Latin Perc.
687 Claves1 Hi b Latin Perc.
688 Claves2 Latin Perc.
689 Wood Block 1 a Latin Perc.
690 Wood Block 1 b Latin Perc.
691 Wood Block 2 a Latin Perc.
692 Wood Block 2 b Latin Perc.
693 Wood Block 3 a Latin Perc.
694 Wood Block 3 b Latin Perc.
695 Wood Block 4 a Latin Perc.
696 Wood Block 4 b Latin Perc.
697 Wood Block 5 a Latin Perc.
698 Wood Block 5 b Latin Perc.
699 Wood Block 6 a Latin Perc.
700 Wood Block 6 b Latin Perc.
701 Wood Block 7 Latin Perc.
702 Wood Block 8 Latin Perc.
703 Castanet 1 a Latin Perc.
704 Castanet 1 b Latin Perc.
705 Castanet 1 c Latin Perc.
706 Castanet 2 Latin Perc.
707 Castanet Single Latin Perc.
708 Castanet Single GM Latin Perc.
709 Castanet Double Latin Perc.
710 Cabasa 1 L a Down Ethnic Perc.
711 Cabasa 1 L a Up Ethnic Perc.
712 Cabasa 1 L b Down Ethnic Perc.
713 Cabasa 1 L b Up Ethnic Perc.
714 Cabasa 1 S a Down Ethnic Perc.
715 Cabasa 1 S a Up Ethnic Perc.
716 Cabasa 1 S b Down Ethnic Perc.
717 Cabasa 1 S b Up Ethnic Perc.
718 Cabasa 2 L Stack b Ethnic Perc.
719 Cabasa 2 L Stack a Ethnic Perc.
720 Cabasa 2 L Roll Ethnic Perc.
721 Cabasa 2 S Stack a Ethnic Perc.
722 Cabasa 2 S Stack b Ethnic Perc.
723 Cabasa 2 S Roll Ethnic Perc.
724 Cabasa 3 WS Ethnic Perc.
725 Cabasa 3 Up Ethnic Perc.
726 Cabasa 3 Down Ethnic Perc.
727 Cabasa 3 Tap Ethnic Perc.
728 Caxixi1 a Ethnic Perc.
729 Caxixi1 b Ethnic Perc.
# Name Family
730 Caxixi1 c Ethnic Perc.
731 Caxixi2 a Ethnic Perc.
732 Caxixi2 b Ethnic Perc.
733 Caxixi2 c Ethnic Perc.
734 Caxixi3 Hard Ethnic Perc.
735 Caxixi3 Soft Ethnic Perc.
736 Shaker1 Push a Ethnic Perc.
737 Shaker1 Push b Ethnic Perc.
738 Shaker1 Pull a Ethnic Perc.
739 Shaker1 Pull b Ethnic Perc.
740 Shaker1 Accent a Ethnic Perc.
741 Shaker1 Accent b Ethnic Perc.
742 Shaker1 Slow a Ethnic Perc.
743 Shaker1 Slow b Ethnic Perc.
744 Shaker1 Slow c Ethnic Perc.
745 Shaker1 Roll a Ethnic Perc.
746 Shaker1 Roll b Ethnic Perc.
747 Shaker1 Roll c Ethnic Perc.
748 Shaker2 Ethnic Perc.
749 Shaker3 Ethnic Perc.
750 Maracas Push Ethnic Perc.
751 Maracas Pull Ethnic Perc.
752 Dumbek a Latin Perc.
753 Dumbek b Latin Perc.
754 Dumbek c Latin Perc.
755 Dumbek d Latin Perc.
756 Dumbek e Latin Perc.
757 Dumbek f Latin Perc.
758 Dumbek g Latin Perc.
759 Dumbek h Latin Perc.
760 Dumbek i Latin Perc.
761 Dumbek j Latin Perc.
762 Dumbek k Latin Perc.
763 Djembe L Basstone a Latin Perc.
764 Djembe L Basstone b Latin Perc.
765 Djembe L Basstone c Latin Perc.
766 Djembe L Open Latin Perc.
767 Djembe L Open Slap Latin Perc.
768 Djembe L Closed Slap Latin Perc.
769 Djembe S Basstone a Latin Perc.
770 Djembe S Basstone b Latin Perc.
771 Djembe S Basstone c Latin Perc.
772 Djembe Open Latin Perc.
773 Djembe Mute Latin Perc.
774 Djembe Slap Latin Perc.
775 Djembe S Open Latin Perc.
776 Djembe S Open Slap a Latin Perc.
777 Djembe S Open Slap b Latin Perc.
778 Djembe S Closed Slap a Latin Perc.
779 Djembe S Closed Slap b Latin Perc.
780 Djembe S Closed Slap c Latin Perc.
781 Djembe Bass Latin Perc.
782 Udu Open a Latin Perc.
# Name Family

346 Factory dataDrum Samples
783 Udu Open b Latin Perc.
784 Udu Open c Latin Perc.
785 Udu Open d Latin Perc.
786 Udu Slide a Ethnic Perc.
787 Udu Slide b Ethnic Perc.
788 Udu Half Open a Latin Perc.
789 Udu Half Open b Latin Perc.
790 Udu Half Open c Latin Perc.
791 Udu Bell a Latin Perc.
792 Udu Bell b Latin Perc.
793 WD Brazillia1 Snare Drum
794 WD Brazillia2 Snare Drum
795 WD Ethno SD1 Snare Drum
796 WD Ethno SD2 Snare Drum
797 WD Ethno SD3 Snare Drum
798 WD Ethno SD4 Snare Drum
799 WD Ethno SD5 Snare Drum
800 WD Ethno SD6 Snare Drum
801 WD Kangaroo1 Snare Drum
802 WD Kangaroo2 SFX
803 WD Kangaroo3 SFX
804 WD Kangaroo4 SFX
805 WD Kangaroo5 SFX
806 WD Kangaroo6 SFX
807 WD Kangaroo7 SFX
808 WD Kangaroo8 SFX
809 Tambourine Push Ethnic Perc.
810 Tambourine Pull Ethnic Perc.
811 Tambourine Acc1 a Ethnic Perc.
812 Tambourine Acc1 b Ethnic Perc.
813 Tambourine Acc2 Ethnic Perc.
814 Tambourine Mute1 Latin Perc.
815 Tambourine Mute2 Latin Perc.
816 Tambourine Open Latin Perc.
817 M.E.1 Douf Rim Ak Latin Perc.
818 M.E.1 Douf Tek Ak1 Latin Perc.
819 M.E.1 Douf Tek Ak2 Latin Perc.
820 M.E.1 Pand Open Latin Perc.
821 M.E.1 Pand Pattern1 Latin Perc.
822 M.E.1 Pand Pattern2 Latin Perc.
823 M.E.1 Pand Pattern3 Latin Perc.
824 M.E.1 Pand Pattern4 Latin Perc.
825 M.E.1 Rek Dom Ak Ethnic Perc.
826 M.E.1 Rek Jingle Ethnic Perc.
827 M.E.1 Rik1 Latin Perc.
828 M.E.1 Rik2 Latin Perc.
829 M.E.1 Rik3 Latin Perc.
830 M.E.1 Sagat Half Open Ethnic Perc.
831 M.E.1 Sagat Close Ethnic Perc.
832 M.E.1 Surdo L Open Latin Perc.
833 M.E.1 Surdo L Mute Latin Perc.
834 M.E.1 Tabla Medium Latin Perc.
835 M.E.1 Tabla Dom Latin Perc.
# Name Family
836 M.E.1 Tabla Flam Latin Perc.
837 M.E.1 Tabla Rim Latin Perc.
838 M.E.1 Tabla Tak Latin Perc.
839 M.E.1 Timbales Ethnic Perc.
840 M.E.1 Udu f Open Latin Perc.
841 M.E.1 Alkis Latin Perc.
842 M.E.1 Bandir Open Latin Perc.
843 M.E.1 Bandir Closed Latin Perc.
844 M.E.1 Bongo Roll Latin Perc.
845 M.E.1 Darbuka1 Tek1 Latin Perc.
846 M.E.1 Darbuka1 Tek2 Latin Perc.
847 M.E.1 Darbuka1 Open Latin Perc.
848 M.E.1 Darbuka1 Closed Latin Perc.
849 M.E.1 Darbuka2 Latin Perc.
850 M.E.1 Darbuka3 Latin Perc.
851 M.E.1 Darbuka4 Latin Perc.
852 M.E.1 Darbuka5 D1 Latin Perc.
853 M.E.1 Darbuka5 D2 Latin Perc.
854 M.E.1 Darbuka5 D3 Latin Perc.
855 M.E.1 Darbuka6 Mute Latin Perc.
856 M.E.1 Darbuka6 Open Latin Perc.
857 M.E.1 Darbuka6 Rim Latin Perc.
858 M.E.1 Darbuka6 Dom Ak Latin Perc.
859 M.E.1 Davul Ethnic Perc.
860 M.E.1 Hollo1 Latin Perc.
861 M.E.1 Hollo2 Latin Perc.
862 M.E.1 Kup1 Latin Perc.
863 M.E.1 Kup2 Latin Perc.
864 M.E.1 Ramazan Davul1 Latin Perc.
865 M.E.1 Ramazan Davul2 Latin Perc.
866 M.E.1 Ramazan Davul3 Latin Perc.
867 M.E.1 Tef1 Ethnic Perc.
868 M.E.1 Tef2 Ethnic Perc.
869 M.E.1 Tef3 Ethnic Perc.
870 M.E.2 BD Kick Bass Drum
871 M.E.2 SD Snare Drum
872 M.E.2 Asagum Latin Perc.
873 M.E.2 Asmatek Latin Perc.
874 M.E.2 Bendirgum Latin Perc.
875 M.E.2 Bendirtek1 Latin Perc.
876 M.E.2 Bendirtek2 Latin Perc.
877 M.E.2 Dm1 Latin Perc.
878 M.E.2 Findik Latin Perc.
879 M.E.2 Gum Latin Perc.
880 M.E.2 Hollotokat Latin Perc.
881 M.E.2 Islik1 SFX
882 M.E.2 Islik2 SFX
883 M.E.2 Kapalit Latin Perc.
884 M.E.2 Kasik1 Latin Perc.
885 M.E.2 Kasik2 Latin Perc.
886 M.E.2 Kasik3 Latin Perc.
887 M.E.2 Kasik4 Latin Perc.
888 M.E.2 Kemik Latin Perc.
# Name Family
889 M.E.2 Kenar Latin Perc.
890 M.E.2 Kenartek Latin Perc.
891 M.E.2 Ramazangum Latin Perc.
892 M.E.2 Ramazantek Latin Perc.
893 M.E.2 Renk Latin Perc.
894 M.E.2 Renkbir Latin Perc.
895 M.E.2 Renkiki Latin Perc.
896 M.E.2 Tefacik Latin Perc.
897 M.E.2 Tefgum Latin Perc.
898 M.E.2 Teftek Latin Perc.
899 M.E.2 Teftokat Latin Perc.
900 M.E.2 Teftrill Latin Perc.
901 M.E.2 Tefzil Latin Perc.
902 M.E.2 Tek1 Latin Perc.
903 M.E.2 Tek2 Latin Perc.
904 M.E.2 Tekbir Latin Perc.
905 M.E.2 Tokat Latin Perc.
906 M.E.2 Toprgum Latin Perc.
907 M.E.2 Toprtek1 Latin Perc.
908 M.E.2 Toprtek2 Latin Perc.
909 M.E.2 Toprtokat Latin Perc.
910 M.E.2 Trill Latin Perc.
911 M.E.2 Zil1 Ethnic Perc.
912 M.E.2 Zil2 Ethnic Perc.
913 M.E.2 Zil3 Ethnic Perc.
914 M.E.2 Zilgit SFX
915 Orchestra Hit SFX
916 Band Hit SFX
917 Impact Hit SFX
918 Metal Hit SFX
919 Yeah! SFX
920 Yeah! Solo SFX
921 Uhh SFX
922 Hit It SFX
923 Uhhhh Solo SFX
924 Comp Voice Noise SFX
925 Stadium SFX
926 Applause SFX
927 Scream SFX
928 Laughing SFX
929 Footsteps1 SFX
930 Footsteps2 SFX
931 Bird1 SFX
932 Bird2 SFX
933 Dog SFX
934 Gallop SFX
935 Crickets SFX
936 Cat SFX
937 Growl SFX
938 Heart Beat SFX
939 Heart Beat GM SFX
940 Punch SFX
941 Tribe SFX
# Name Family

347Factory dataDrum Samples
App
endi
x
942 Door Creak SFX
943 Door Slam SFX
944 Car Engine SFX
945 Car Stop SFX
946 Car Pass SFX
947 Car Crash SFX
948 Train SFX
949 Helicopter SFX
950 Gun Shot1 SFX
951 Gun Shot2 SFX
952 Machine Gun SFX
953 Laser Gun SFX
954 Explosion SFX
955 Thunder SFX
956 Wind SFX
957 Stream SFX
958 Bubble SFX
959 Bubble GM SFX
960 Church Bell SFX
961 Telephone Ring SFX
962 Xylophone Spectr SFX
963 Cricket Spectrum SFX
964 Air Vortex SFX
965 Noise White SFX
966 Noise FM Mod SFX
967 Tubular Ethnic Perc.
968 Gamelan Ethnic Perc.
969 Tambura Ethnic Perc.
970 Gtr Cut Noise1 SFX
971 Gtr Cut Noise2 SFX
972 Power Chord SFX
973 Fret Noise SFX
974 Dist. Slide1 SFX
975 Dist. Slide2 SFX
976 E.Gtr Pick1 SFX
977 E.Gtr Pick2 SFX
978 Gtr Scratch1 SFX
979 Gtr Scratch2 SFX
980 Ac.Bs-String Slap SFX
981 Amp Noise SFX
982 Space Lore SFX
983 Swish Terra SFX
984 Hand Drill SFX
985 Mouth Harp SFX
986 Grv BD1 Bass Drum
987 Grv BD2 Bass Drum
988 Grv BD3 Bass Drum
989 Grv BD4 Bass Drum
990 Grv BD5 Bass Drum
991 Grv BD6 Bass Drum
992 Grv BD7 Bass Drum
993 Grv BD8 Bass Drum
994 Grv SD1 Snare Drum
# Name Family
995 Grv SD2 Snare Drum
996 Grv SD3 Snare Drum
997 Grv SD4 Snare Drum
998 Grv SD5 Snare Drum
999 Grv SD6 Snare Drum
1000 Grv SD7 Snare Drum
1001 Grv SD8 Snare Drum
1002 Grv SD9 Snare Drum
1003 Grv Rim1 Snare Drum
1004 Grv Rim2 Snare Drum
1005 Grv Rim3 Snare Drum
1006 Grv HH Closed1 Hi Hat
1007 Grv HH Closed2 Hi Hat
1008 Grv HH Closed3 Hi Hat
1009 Grv HH Closed4 Hi Hat
1010 Grv Hi Tom1 Tom
1011 Grv Hi Tom2 Tom
1012 Grv Ride Cymbal
1013 Grv Crash Cymbal
1014 Grv Fx1 SFX
1015 Grv Fx2 SFX
1016 Grv Fx3 SFX
1017 Grv Fx4 SFX
1018 Grv Fx5 SFX
1019 Grv Fx6 SFX
1020 Grv Fx7 SFX
1021 Grv Fx8 SFX
1022 Grv Fx9 SFX
1023 Grv Fx10 SFX
1024 Grv Fx11 SFX
1025 Grv Fx12 SFX
1026 Grv Fx13 SFX
1027 Grv Slice1 SFX
1028 Grv Slice2 SFX
1029 Grv Slice3 SFX
1030 Grv Slice4 SFX
1031 Grv Slice5 SFX
1032 Grv Slice6 SFX
1033 Grv Slice7 SFX
1034 Grv Slice8 SFX
1035 Grv Slice9 SFX
1036 Grv Slice10 SFX
1037 66 BD Bass Drum
1038 88 BD Bass Drum
1039 88 SD1 GM Snare Drum
1040 88 SD2 Snare Drum
1041 88 SD2 GM Snare Drum
1042 88 Rim Shot GM Snare Drum
1043 88 HH Close1 GM Hi Hat
1044 88 HH Close2 Hi Hat
1045 88 HH Close2 GM Hi Hat
1046 88 HH Open1 Hi Hat
1047 88 HH Open1 GM Hi Hat
# Name Family
1048 88 HH Open2 Hi Hat
1049 88 Tom1 Tom
1050 88 Tom2 Tom
1051 88 Crash Cymbal
1052 88 Crash GM Cymbal
1053 88 Congas Latin Perc.
1054 88 Claps Latin Perc.
1055 88 Claves Latin Perc.
1056 88 Cowbell Ethnic Perc.
1057 88 Maracas Ethnic Perc.
1058 99 SD Snare Drum
1059 99 HH Close Hi Hat
1060 99 HH Open Hi Hat
1061 99 Ride Dance Cymbal
1062 Click SFX
1063 Click GM SFX
1064 Seq Click SFX
1065 Empty (none)
# Name Family

348 Factory dataPads
Pads
You can assign the following Hits or Sequences to the four Pads. Older sounds might be still assigned to the Pads when loading musicalresources generated with an older operating system (see the following section).
# HIT - Drum # HIT - Percussion # HIT - World 1 # Hit - World 2 # HIT - Orchestral
1 88 Cowbell 1 Agogo 1 1 Baja 1 1 Kup 1 1 Brass Fall
2 88 Crash 2 Agogo 2 2 Baja 2 2 Kup 2 2 Orch.Cymbal 1
3 China 3 Castanet 1 3 China Gong 3 Kup 3 3 Orch.Cymbal 2
4 Crash 1 4 Castanet 2 4 Darbuka 1 4 Kup 4 4 Orch. Hit
5 Crash 2 5 Conga Hi 5 Darbuka 2 5 Ramazan 1 5 Orch. Snare
6 Rev. Cymbal 6 Conga Low 6 Darbuka 3 6 Ramazan 2 6 Orch. Sn. Roll
7 Ride 1 7 Conga Mute 7 Darbuka 4 7 Ramazan 3 7 Timpani 1
8 Ride 2 8 Conga Slap 8 Darbuka 5 8 Rek Dom Ak 8 Timpani 2
9 Ride Bell 9 Cowbell 9 Darbuka 6 9 Rik 1 9 Timpani 3
10 Splash 10 Cuica 1 10 Darbuka 7 10 Rik 2 10 Timpani 4
11 Sticks 11 Cuica 2 11 Darbuka 8 11 Rik 3 11 Orchestra Tutti
12 Rim-Shot 12 Jingle Bell 12 Davul 12 Sagat 1 12
13 Hi Tom Flam 13 Long Guiro 13 Douf Rim Ak 13 Sagat 2 13
14 Mid Tom Flam 14 Short Guiro 14 Dragon Gong 14 Tef 1 14
15 Low Tom Flam 15 Open Bells 15 Hollo 1 15 Tef 2 15
16 Tom Flam End 16 Rain Stick 16 Hollo 2 16 Tef 3 16
17 Drum Single A 17 Tamb. Acc. 1 17 17 Tef 4 17
18 Drum Single B 18 Tamb. Acc. 2 18 18 Tef 5 18
19 Drum Single C 19 Tamb. Open 19 19 Tef 6 19
20 Drum Single D 20 Tamb. Push 20 20 20
21 Drum Sing.HouseA 21 Timbale Hi 21 21 21
22 Drum Sing.HouseB 22 Timbale Low 22 22 22
23 Drum Sing.HouseC 23 Timbale Rim 1 23 23 23
24 Drum Sing.HouseD 24 Timbale Rim 2 24 24 24
25 Drum Kit A 25 Triangle 1 25 25 25
26 Drum Kit B 26 Triangle 2 26 26 26
27 Drum Kit C 27 Vibra Slap 27 27 27
28 Drum Kit D 28 Whistle 1 28 28 28
29 Drum Kit E 29 Whistle 2 29 29 29
30 Drum Kit F 30 Windchimes 1 30 30 30
31 31 Windchimes 2 31 31 31
32 32 Windchimes 3 32 32 32

349Factory dataPads
App
endi
x
# HIT - Synth&Pad HIT - Voice # HIT - Blocks # HIT - Misc&SFX 1 # HIT - Misc&SFX 2
1 Cosmic 1 Aah ! 1 Blk Funk 1 A 1 Applause 1 Bubble
2 VCF Modulation 2 Hit it ! 2 Blk Funk 1 B 2 Bird 1 2 Car Crash
3 Planet Lead 3 Laughing 3 Blk Funk 1 C 3 Bird 2 3 Car Engine
4 Brightness 4 Scream 4 Blk Funk 1 D 4 Cat 4 Car Pass
5 Crystal 5 Uuh ! 5 Blk Funk 2 A 5 Church Bell 5 Car Stop
6 New Age Pad 6 Yeah ! 1 6 Blk Funk 2 B 6 Crickets 6 Explosion
7 Fifths Lead 7 Yeah ! 2 7 Blk Funk 2 C 7 Dist. Slide 1 7 Gun Shot
8 Calliope 8 8 Blk Funk 2 D 8 Dist. Slide 2 8 Helicopter
9 Caribbean 9 9 Blk Organ A 9 Dog 9 Jet Plane
10 Rezbo 10 10 Blk Organ B 10 Door Creak 10 Laser Gun
11 Digital Polisix 11 11 Blk Organ C 11 Door Slam 11 Machine Gun
12 Motion Raver 12 12 Blk Organ D 12 Foosteps 1 12 Phone Ring
13 Moving Bell 13 13 Blk Choir A 13 Foosteps 2 13 Punch
14 Elastick Pad 14 14 Blk Choir B 14 Heart Beat 14 River
15 Rave 15 15 Blk Choir C 15 Horse Gallop 15 Seashore
16 Dance Remix 16 16 Blk Choir D 16 Lion 16 Siren
17 Vintage Sweep 17 17 17 Scratch 1 17 Starship
18 You Decide 18 18 18 Scratch 2 18 Thunder
19 19 19 19 Scratch 3 19 Train
20 20 20 20 Scratch 4 20 Wind
21 21 21 21 Scratch 5 21
22 22 22 22 Scratch 6 22
23 23 23 23 Stadium 23
24 24 24 24 24
25 25 25 25 25
26 26 26 26 26
27 27 27 27 27
28 28 28 28 28
29 29 29 29 29
30 30 30 30 30
31 31 31 31 31
32 32 32 32 32
# SEQ - Drum # SEQ - Percussion # SEQ - Groove # SEQ - Bass # SEQ - Piano
1 Drum DrumBasSolo 1 Perc FingerSnap 1 Grv Drum 1 1 Bass Pick Easy 1 Piano Accomp 1
2 Drum Snare Solo 2 Perc Triang.+HH 2 Grv Drum 2 2 Bass Pick Med. 2 Piano Accomp 2
3 Drum 8 Bt Easy 3 Perc Latin 1 3 Grv Brush 3 Bass Pick Busy 3 Piano Accomp 3
4 Drum 8 Bt Medium 4 Perc Latin 2 4 Grv Jazzy 4 Bass Finger Easy 4 Piano Accomp 4
5 Drum Rock 1 5 Perc Latin 3 5 Grv Latin 5 Bass Finger Med. 5 Piano Accomp 5
6 Drum Rock 2 6 Perc Mix 6 Grv HipHop 1 6 Bass Finger Walk 6 Piano Accomp 6
7 Drum Brush 1 3/4 7 Perc Soft 7 Grv HipHop 2 7 Bass Latin 7 Piano Accomp 7
8 Drum Brush 2 3/4 8 Perc Conga 8 Grv HipHop 3 8 Bass Slap 8 Piano Accomp 8
9 Drum Disco 1 9 Perc Conga+Ride 9 Grv HipHop 4 9 Bass Digital 9 Piano Accomp 9
10 Drum Disco 2 10 Perc Conga+Mix 10 Grv HipHop 5 10 Bass Synth 10 Piano Arpeg. 1
11 Drum Disco 3 11 Perc Conga+Bongo 11 Grv HipHop 6 11 Bass DigiFilter1 11 Piano Arpeg. 2
12 Drum Disco 4 12 Perc Conga+Tamb. 12 Grv Funk 1 12 Bass DigiFilter2 12 Piano Arp 1 3/4
13 Drum Funk 1 13 Perc Shaker 13 Grv Funk 2 13 Bass DigiFilter3 13 Piano Arp 2 3/4
14 Drum Funk 2 14 Perc Shak+Tamb 1 14 Grv Funk 3 14 14 Piano Arp Down
15 Drum Brush Shuff 15 Perc Shak+Tamb 2 15 Grv House 1 15 15 Piano Arp Up
16 Drum Latin 16 Perc Shak+Cong 1 16 Grv House 2 16 16 Piano Rhythm 1/8
17 Drum Progressiv1 17 Perc Shak+Cong 2 17 Grv Analog 17 17 Piano Rhythm1/8T
18 Drum Progressiv2 18 Perc Tambourine1 18 Grv Garage 1 18 18 Piano Latin Rock
19 Drum Fill 1 19 Perc Tambourine2 19 Grv Garage 2 19 19 Piano Salsa 1
20 Drum Fill 2 20 Perc Tamb+Conga1 20 Grv Dance 1 20 20 Piano Salsa 2
21 Drum Break 21 Perc Tamb+Conga2 21 Grv Dance 2 21 21 Pno GlissDwnWhit
22 Drum End 22 Perc Guiro+Bongo 22 Grv Techno 1 22 22 Pno GlissUpWhite
23 23 Perc Cowbel+Tamb 23 Grv Techno 2 23 23 Pno GlissDwnBlak
24 24 Perc 3/4 24 24 24 Pno GlissUpBlack
25 25 Perc 6/8 25 25 25 Honky End
26 26 26 26 26

350 Factory dataPads
27 27 27 27 27
28 28 28 28 28
29 29 29 29 29
30 30 30 30 30
31 31 31 31 31
32 32 32 32 32
# SEQ - Guitar # SEQ - Orchestral # SEQ - Solo # SEQ - Synth&Pad # SEQ - Misc&SFX
1 Gtr Steel Strum1 1 Timpani Roll 1 1 Solo Marimba 1 Synth Seq 1 1 Military 1
2 Gtr Steel Strum2 2 Timpani Roll 2 2 Solo Kalimba 1 2 Synth Seq 2 2 Military 2
3 Gtr Steel Strum3 3 Orch. Tutti 1 3 Solo Kalimba 2 3 Synth Seq 3 3 Military 3
4 Gtr Steel Strum4 4 Orch. Tutti 2 4 Solo Steel Drums 4 Synth Seq 4 4 Military 4
5 Gtr Steel Strum5 5 Orch. Tutti 3 5 Solo Vibes 5 Synth Seq 5 5 Horror 1
6 Gtr Steel Strum6 6 Orch. Tutti 4 6 Solo Gtr Dist. 6 Synth Seq 6 6 Horror 2
7 GtSteelStrum 3/4 7 Orch. Harp 1 7 Solo Slide Steel 7 Synth Seq 7 7 Horror 3
8 Gtr Steel Arp 1 8 Orch. Harp 2 8 Solo Banjo 8 Synth Seq 8 8 Horror 4
9 Gtr Steel Arp 2 9 Orch. Harp 3 9 Solo Violin 9 Synth Seq 9 9 Lullaby 1
10 Gtr Steel Arp 3 10 Orch. Harp 4 10 Solo Harpsi 3/4 10 Synth Seq 10 10 Lullaby 2
11 GtrSteel Arp 6/8 11 Orch. Harp 5 11 Solo Harpsi 4/4 11 Synth Seq 11 11 Nature - River
12 Gtr Steel Mute 1 12 French Horns 1 12 Solo Gtr Funk 12 Synth Portam. 1 12 Nature - Storm
13 Gtr Steel Mute 2 13 French Horns 2 13 Solo Piano 1 13 Synth Portam. 2 13 Metronome 3/4
14 Guitar Country 14 Strings 1 14 Solo Piano 2 14 Synth Portam. 3 14 PreCount 3/4
15 Gtr Nylon Strum1 15 Strings 2 15 Solo Piano 3 15 Synth Portam. 4 15 Metronome 4/4
16 Gtr Nylon Strum2 16 Strings 3 16 Solo Piano 4 16 Synth Filter 1 16 PreCount 4/4
17 Gtr Nylon Strum3 17 Strings 4 17 Solo Synth 1 17 Synth Filter 2 17 PreCount 4/4 Dbl
18 Gtr Nylon Strum4 18 Strings 5 18 Solo Synth 2 18 Synth Pad Panned 18 Toccata
19 Gtr Nylon Strum5 19 Strings 6 19 Solo Synth 3 19 Synth Master Pad 19 5th Intro
20 Gtr Nylon Strum6 20 Strings 7 20 Solo Synth 4 20 Synth Dark Pad 20 Primavera
21 Gtr Nylon Arp 1 21 21 Solo Synth 5 21 21 Circus 1
22 Gtr Nylon Arp 2 22 22 Solo Synth 6 22 22 Circus 2
23 Gtr Nylon Arp 3 23 23 Solo Guitar 1 23 23
24 GtrNylon Arp 3/4 24 24 Solo Guitar 2 24 24
25 25 25 Solo Guitar 3 25 25
26 26 26 26 26
27 27 27 27 27
28 28 28 28 28
29 29 29 29 29
30 30 30 30 30
31 31 31 31 31
32 32 32 32 32

351Factory dataEffects
App
endi
x
Effects
The following list shows all the Factory Effects. Detailed information on each effect’s parameter are contained in the“Effects” chapter(see page 357).
For FX Master 1/20 No Effect
1 Stereo Compressor
2 Stereo Limiter
3 Multiband Limiter
4 St.MasteringLimtr
5 Stereo Gate
6 St.Parametric4EQ
7 St. Graphic 7EQ
8 St.Exciter/Enhncr
9 Stereo Isolator
10 St. Wah/Auto Wah
11 St. Vintage Wah
12 St. Random Filter
13 St. MultiModeFilter
14 St. Sub Oscillator
15 Talking Modulator
16 Stereo Decimator
17 St. Analog Record
18 OD/Hi.Gain Wah
19 St. Guitar Cabinet
20 St. Bass Cabinet
21 Bass Amp Model
22 Bass Amp+Cabinet
23 Tube PreAmp Model
24 St. Tube PreAmp
25 MicModel+PreAmp
26 Stereo Chorus
27 Black Chorus/Flanger
28 St.HarmonicChorus
29 St. Biphase Mod.
30 Multitap Cho/Delay
31 Ensemble
32 Polysix Ensemble
33 Stereo Flanger
34 St. Random Flanger
35 St. Env. Flanger
36 Stereo Phaser
37 St. Random Phaser
38 St. Env. Phaser
39 Stereo Vibrato
40 St. Auto Fade Mod.
41 2Voice Resonator
42 Doppler
43 Scratch
44 Grain Shifter
45 Stereo Tremolo
46 St. Env. Tremolo
47 Stereo Auto Pan
48 St. Phaser + Trml
49 St. Ring Modulator
50 Detune
51 Pitch Shifter
52 Pitch Shifter BPM
53 Pitch Shift Mod.
54 Organ Vib/Chorus
55 Rotary Speaker
56 L/C/R Delay
57 Stereo/CrossDelay
58 St. Multitap Delay
59 St. Mod Delay
60 St. Dynamic Delay
61 St. AutoPanningDly
62 Tape Echo
63 Auto Reverse
64 Sequence BPM Dly
65 L/C/R BPM Delay
66 Stereo BPM Delay
67 St.BPM Mtap Delay
68 St.BPM Mod. Delay
69 St.BPMAutoPanDly
70 Tape Echo BPM
71 Reverb Hall
72 Reverb SmoothHall
73 Reverb Wet Plate
74 Reverb Dry Plate
75 Reverb Room
76 ReverbBrightRoom
77 Early Reflections
78 P4EQ - Exciter
79 P4EQ - Wah
80 P4EQ - Cho/Flng
81 P4EQ - Phaser
82 P4EQ - Mt. Delay
83 Comp - Wah
84 Comp - Amp Sim
85 Comp - OD/HiGain
86 Comp - P4EQ
87 Comp - Cho/Flng
88 Comp - Phaser
89 Comp - Mt. Delay
90 Limiter - P4EQ
91 Limiter-Cho/Flng
92 Limiter - Phaser
93 Limiter - Mt.Delay
94 Exciter - Comp
95 Exciter - Limiter
96 Exciter-Cho/Flng
97 Exciter - Phaser
98 Exciter - Mt.Delay
99 OD/HG - Amp Sim
100 OD/HG - Cho/Flng
101 OD/HG - Phaser
102 OD/HG - Mt.Delay
103 Wah - Amp Sim
104 Decimator - Amp
105 Decimator - Comp
106 AmpSim - Tremolo
107 Cho/Flng - Mt.Dly
108 Phaser - Cho/Flng
109 Reverb - Gate

352 Factory dataEffects
For FX Master 2 only110 St.Mltband Limiter
111 PianoBody/Damper
112 OD/HyperGain Wah
113 GuitarAmp + P4EQ
114 BassTubeAmp+Cab.
115 St. Mic + PreAmp
116 Multitap Cho/Delay
117 St. Pitch Shifter
118 St. PitchShift BPM
119 Rotary SpeakerOD
120 L/C/R Long Delay
121 St/Cross Long Dly
122 Hold Delay
123 LCR BPM Long Dly
124 St. BPM Long Dly
125 Early Reflections

353Factory dataMIDI Preset
App
endi
x
MIDI Preset
Default Master Kbd Player Acc ordion 1 Acc ordion 2 Acc ordion 3 Tablet
MIDI IN Channel
1 Ply Tr 1 Global Ply Tr 1 Global Upper 1 Upper 1 -
2 Ply Tr 2 Control Ply Tr 2 Lower Lower Lower -
3 Ply Tr 3 - Ply Tr 3 Bass - Bass -
4 Ply Tr 4 - Ply Tr 4 - Upper 2 Upper 2 -
5 Ply Tr 5 - Ply Tr 5 - Upper 3 Upper 3 -
6 Ply Tr 6 - Ply Tr 6 - - - -
7 Ply Tr 7 - Ply Tr 7 - - - -
8 Ply Tr 8 - Ply Tr 8 - - - -
9 Ply Tr 9 - Ply Tr 9 - Bass - -
10 Ply Tr 10 - Ply Tr 10 Drum Drum Drum -
11 Ply Tr 11 - Ply Tr 11 Percussion Percussion Percussion -
12 Ply Tr 12 - Ply Tr 12 Acc 1 Acc 1 Acc 1 -
13 Ply Tr 13 - Ply Tr 13 Acc 2 Acc 2 Acc 2 -
14 Ply Tr 14 - Ply Tr 14 Acc 3 Acc 3 Acc 3 -
15 Ply Tr 15 - Ply Tr 15 Acc 4 Acc 4 Acc 4 -
16 Ply Tr 16 - Ply Tr 16 Acc 5 Acc 5 Acc 5 Control
MIDI OUT Channel
1 Upper 1 Upper 1 Ply Tr 1 Upper 1 Ply Tr 1 Ply Tr 1 -
2 Upper 2 Upper 2 Ply Tr 2 Upper 2 Ply Tr 2 Ply Tr 2 -
3 Upper 3 Upper 3 Ply Tr 3 Upper 3 Ply Tr 3 Ply Tr 3 -
4 Lower Lower Ply Tr 4 Lower Ply Tr 4 Ply Tr 4 -
5 - - Ply Tr 5 - Ply Tr 5 Ply Tr 5 -
6 - - Ply Tr 6 - Ply Tr 6 Ply Tr 6 -
7 - - Ply Tr 7 - Ply Tr 7 Ply Tr 7 -
8 - - Ply Tr 8 - Ply Tr 8 Ply Tr 8 -
9 - - Ply Tr 9 - Ply Tr 9 Ply Tr 9 -
10 - - Ply Tr 10 - Ply Tr 10 Ply Tr 10 -
11 - - Ply Tr 11 - Ply Tr 11 Ply Tr 11 -
12 - - Ply Tr 12 - Ply Tr 12 Ply Tr 12 -
13 - - Ply Tr 13 - Ply Tr 13 Ply Tr 13 -
14 - - Ply Tr 14 - Ply Tr 14 Ply Tr 14 -
15 - - Ply Tr 15 - Ply Tr 15 Ply Tr 15 -
16 - - Ply Tr 16 - Ply Tr 16 Ply Tr 16 Control
Chord 1 Chann. Off 1 Off 2 2 2 Off
Chord 2 Chann. Off Off Off 3 3 Off Off
MIDI IN Velocity Normal Normal Normal 110 110 Normal Normal
MIDI IN Oct. Trp. On On On On On On On
MIDI IN Track Mute - On – – – – On
Upper er Oct. Trp. 0 0 0 0 0 0 0
Lower Oct. Trp. 0 0 0 0 0 0 0

354 Assignable parametersList of Pedal/Footswitch functions
List of Pedal/Footswitch functions
The following functions can be assigned to an Assignable Foot-switch or Pedal.
Assignable parameters
Function Meaning
Functions assignable to a Footswitch
Off No function assigned
Style Start/Stop Same functions of the control panel buttons with the same name Play Stop Player 1
Play Stop Player 2
Go to Beginning-Player 1
Go to Beginning-Player 2
Chord Seq. Record
Chord Seq. Play
Synchro Start
Synchro Stop
Tap Tempo/Reset
Tempo Lock
Ritardando Progressively decreases the Tempo value
Accelerando Progressively increases the Tempo value
Tempo Up Increases the Tempo value
Tempo Down Decreases the Tempo value
Intro 1 Same functions of the control panel buttons with the same name Intro 2
Intro 3/Count In
Ending 1
Ending 2
Ending 3
Fill 1
Fill 2
Fill 3
Fill 4
Auto Fill
Break
Variation 1
Variation 2
Variation 3
Variation 4
Variation Up Selects the next Variation
Variation Down Selects the previous Variation
Fade In/Out Same functions of the control panel buttons with the same name Memory
Bass Inversion
Manual Bass
Split
Style Up Selects the next Style
Style Down Selects the previous Style
STS Mode Same functions of the control panel buttons with the same name
STS1
STS2
STS3
STS4
STS Up Selects the next STS
STS Down Selects the previous STS
Perform. Up Selects the next Performance
Perform. Down Selects the previous Performance
Style Change Style number
Transpose (b) Same functions of the control panel buttons with the same name Transpose (#)
Upper Octave Up
Upper Octave Down
Punch In/Out Turns Punch Recording on/off
Style-Upper1 Mute
Style-Upper2 Mute
Style-Upper3 Mute
Style-Lower Mute
Style-Drum Mute
Style-Percussion Mute
Style-Bass Mute
Style-Acc1 Mute
Style-Acc2 Mute
Style-Acc3 Mute
Style-Acc4 Mute
Style-Acc5 Mute
Style-Acc1-5 Mute
Song-Melody Mute Mute of the Standard MIDI File’s track selected as the Melody track (Global:Mode Prefer-ence>Song & Seq.).
Vocal Remover Voice removal from the MP3 file
Song-Drum&Bass Mode Mute of all tracks, apart for track 2 (usually Bass) and 10 (usually Drum). It doesn’t work on MP3 files.
Solo Selected Track
Damper Pedal
Soft Pedal
Sostenuto Pedal
Bass&Lower Backing When the Style is not playing and you are in Split mode, you can play the Lower track with your left hand, while the Bass still plays the chord root. See “Bass & Lower Backing” on page 137 of the User’s Manual.
Ensemble
QuarterTone Turns Quarter Tone on/off
Global-Scale When the switch or footswitch is pressed, the Global > General Controls > Scale is recalled in the display.
Function Meaning

355Assignable parametersList of Assignable Knob functions
App
endi
x
List of Assignable Knob functions
The following functions can be assigned to the Assignable Knob.
SubScale Preset 1-SC1 Same functions of the SC Preset buttons in the display. SubScale Preset 2-SC2
SubScale Preset 3-SC3
SubScale Preset 4-SC4
Chord Latch Holds the recognized chord until the pedal is released
Chord Latch + Damper Holds the recognized chord until the pedal is released, and sustains the tracks where the Damper has been turned on
Glide When the pedal is pressed, affected notes on Upper tracks are bent down, according to set- tings for the Pitch Bend on the same tracks. When the pedal is released, notes return to the normal pitch, at the speed defined by the “Time” parameter (see “Glide” on page 202 of the User’s Manual).
Mic In Mute
Mic Talk Turns all Voice Processor effects down, to let you address the audience. See “Voice Proces- sor Setup: Talk” on page 99.
Mic Lead On/Off On/off switch controls assigned to the Voice Processor. Press to activate, press a second time to deactivate.
Mic Harmony On/Off
Mic FX On/Off
FX CC12 Switch Standard FX controllers
FX CC13 Switch
Rotary Spkr On/Off
Rotary Spkr Fast/Slow
Drawbar Perc On/Off
Text Page Down These options let you move to the previous or next page, when reading a text file loaded with a Song or Song Book entry (see “Text files loaded with Standard MIDI Files and MP3 files” on page 170 of the User’s Manual).
Text Page Up
SongBook Next Moves to the next SongBook entry in the selected Custom List.
Pad 1 Same functions of the control panel buttons with the same name Pad 2
Pad 3
Pad 4
Pad Stop
Sound Controller 1 To be used as triggers for two DNC parameter (transmit CC#80 or CC#81). When these func- tions are assigned to the selected physical controller, this latter becomes the corre- sponding Sound Controller (Sound Controller 1 or Sound Controller 2). You can then use this Sound Controller to control any of the DNC parameters.
Sound Controller 2
Functions assignable to a Pedal
Master Volume
Accompaniment Volume
Keyboard Expression
Pad Volume With this function assigned, you can control the proportional volume of all four Pads at the same time. Please note that the status of the Pad’s volume, after having been modified with a pedal or slider, is made current, and will be saved in a Performance or STS by using the rel-evant Write procedure.
Function Meaning
MP3 Volume
Joystick +X Joystick right
Joystick -X Joystick left
Joystick +Y Joystick forward
Joystick -Y Joystick backward
Upper VDF Cutoff Filter cutoff (for Sounds assigned to the Upper tracks)
Upper VDF Resonance Filter resonance (for Sounds assigned to the Upper tracks)
Mic In Volume
Mic Lead Voice Level Continuous controls assigned to the Voice Processor. Mic Harmony Level
Mic Lead to Delay
Mic Harmony to Delay
Mic Reverb Level
Mic FX Level
FX CC12 Ctl Standard FX controllers
FX CC13 Ctl
Function Meaning
Off No function assigned
Keyboard Expression
Pad Volume
MP3 Volume
Joystick +X
Joystick -X
Joystick +Y
Joystick -Y
Upper VDF Cutoff
Upper VDF Resonance
Mic Lead Voice Level Continuous controls assigned to the Voice Processor Mic Harmony Level
Mic Lead to Delay
Mic Harmony to Delay
FX CC12 Ctl
FX CC13 Ctl
Function Meaning

356 Assignable parametersList of Assignable Switches functions
List of Assignable Switches functions
The following functions can be assigned to the AssignableSwitches.
Scales
The following is a list of scales (or tunings) you can select in var-ious operating modes.
Equal Equal tuning, the standard scale for modernWestern music. It is made of 12 identical semi-tones.
Pure Major Major chords in the selected key are perfectlytuned.
Pure Minor Minor chords in the selected key are perfectedtuned.
Arabic An arabic scale, using quarters of tone. Set theKey parameter as follow:
C - for the “rast C/bayati D” scale
D - for the “rast D/bayati E” scale
F - for the “rast F/bayati G” scale
G - for the “rast G/bayati A” scale
A# - for the “rast Bb/bayati C” scale
Pythagorean Pythagorean scale, based on the music theories ofthe great Greek philosopher and matematician. Itis most suitable for melodies.
Werckmeister
Late Baroque/Classic Age scale. Very suitable forXVIII Century music.
Kirnberger Harpsichord scale, very common during theXVIII Century.
Slendro Scale of the Indonesian Gamelan. The octave isdivided in 5 notes (C, D, F, G, A). The remainingnotes are tuned as in the Equal tuning.
Pelog Scale of the Indonesian Gamelan. The octave isdivided in 7 notes (all white keys, when Key is =C). The black keys are tuned as in the Equal tun-ing.
Stretch Simulates the “stretched” tuning of an acousticpiano. Basically an equal tuning, the lowest notesare slightly lower, while the highest notes areslightly higher than the standard.
User User scale, i.e. scale programmed by the user forthe Style Play, Backing Sequence and Song Playmodes. The user scale can be saved to a Perfor-mance, Style Settings, STS or Song. You can’tselect a User scale in Global mode.
Function Meaning
Off No function assigned
Ritardando Progressively increases the Tempo value
Accelerando Progressively decreases the Tempo value
Style Up Selects the next Style
Style Down Selects the previous Style
Perform. Up Selects the next Performance
Perform. Down Selects the previous Performance
Style-Upper1 Mute
Style-Upper2 Mute
Style-Upper3 Mute
Style-Lower Mute
Style-Drum Mute
Style-Percussion Mute
Style-Bass Mute
Style-Acc1 Mute
Style-Acc2 Mute
Style-Acc3 Mute
Style-Acc4 Mute
Style-Acc5 Mute
Style-Acc 1-5 Mute
Song-Melody Mute Mute the Standard MIDI File’s track selected as the Melody track (Global > Mode Preferences > Song & Seq.)
Vocal Remover Voice removal from MP3 Songs
Song-Drum&Bass Mode Mute of all tracks, apart for track 2 (usually Bass) and 10 (usually Drum)
Solo Selected Track
Bass&Lower Backing Mutes all tracks, except for Bass and Lower
QuarterTone Turns Quarter Tone on/off
Global-Scale
Scale selection
SubScale Preset1-SC1
SubScale Preset2-SC2
SubScale Preset3-SC3
SubScale Preset4-SC4
Mic Talk Turns all Voice Processor effects down, to let you address the audience. See “Talk” on page 269.
Mic Lead On/Off On/Off controls assigned to the Voice Proces-sor. Press to activate, press a second time to deactivate.
Mic FX On/Off
FX CC12 SwitchStandard FX controllers
FX CC13 Switch
Rotary Spkr On/Off
Rotary Spkr Fast/Slow
Text Page Down These options let you move to the previous or next page, when reading a text file loaded with a Song (see “Text files loaded with Stan-dard MIDI Files and MP3 files” on page 305) or Song Book entry (see “On-the-fly TXT loading” on page 305).
Text Page Up
SongBook Next Moves to the next SongBook Entry in the selected Custom List.
Sound Controller 1 Controls assigned to selected Sounds parame-tersSound Controller 2
Function Meaning
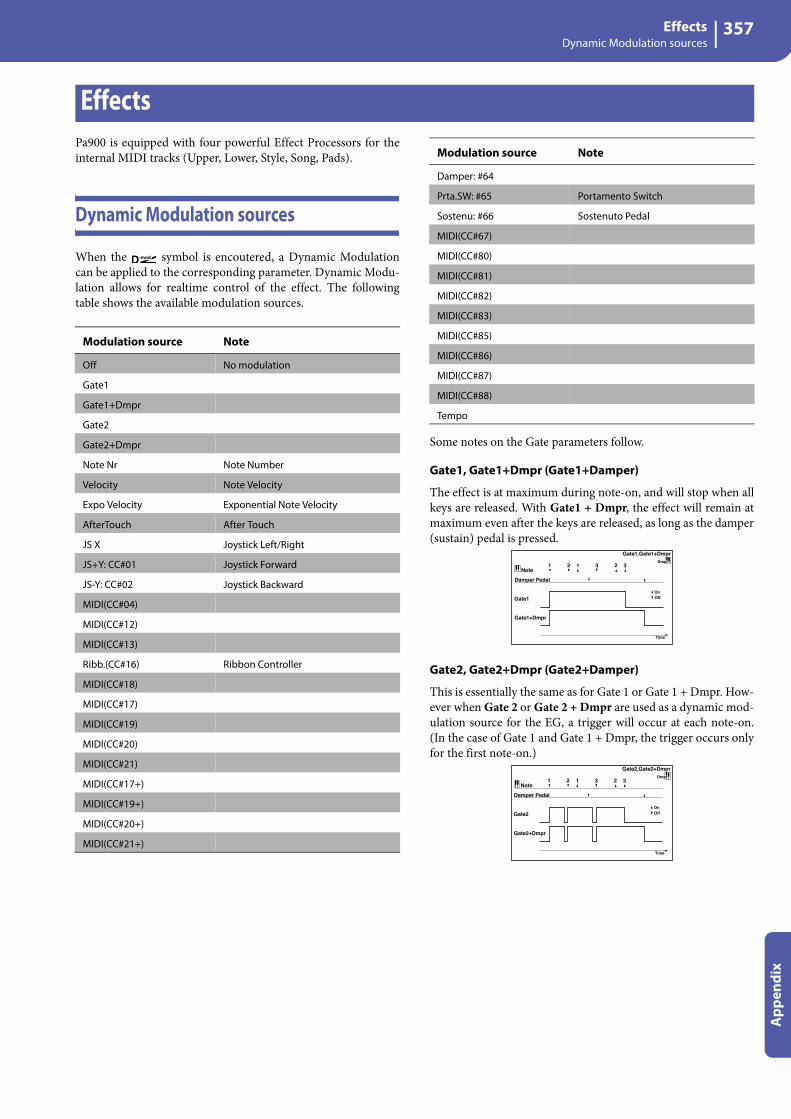
357EffectsDynamic Modulation sources
App
endi
x
Pa900 is equipped with four powerful Effect Processors for theinternal MIDI tracks (Upper, Lower, Style, Song, Pads).
Dynamic Modulation sources
When the symbol is encoutered, a Dynamic Modulationcan be applied to the corresponding parameter. Dynamic Modu-lation allows for realtime control of the effect. The followingtable shows the available modulation sources.
Some notes on the Gate parameters follow.
Gate1, Gate1+Dmpr (Gate1+Damper)
The effect is at maximum during note-on, and will stop when allkeys are released. With Gate1 + Dmpr, the effect will remain atmaximum even after the keys are released, as long as the damper(sustain) pedal is pressed.
Gate2, Gate2+Dmpr (Gate2+Damper)
This is essentially the same as for Gate 1 or Gate 1 + Dmpr. How-ever when Gate 2 or Gate 2 + Dmpr are used as a dynamic mod-ulation source for the EG, a trigger will occur at each note-on.(In the case of Gate 1 and Gate 1 + Dmpr, the trigger occurs onlyfor the first note-on.)
Effects
Modulation source Note
Off No modulation
Gate1
Gate1+Dmpr
Gate2
Gate2+Dmpr
Note Nr Note Number
Velocity Note Velocity
Expo Velocity Exponential Note Velocity
AfterTouch After Touch
JS X Joystick Left/Right
JS+Y: CC#01 Joystick Forward
JS-Y: CC#02 Joystick Backward
MIDI(CC#04)
MIDI(CC#12)
MIDI(CC#13)
Ribb.(CC#16) Ribbon Controller
MIDI(CC#18)
MIDI(CC#17)
MIDI(CC#19)
MIDI(CC#20)
MIDI(CC#21)
MIDI(CC#17+)
MIDI(CC#19+)
MIDI(CC#20+)
MIDI(CC#21+)
Damper: #64
Prta.SW: #65 Portamento Switch
Sostenu: #66 Sostenuto Pedal
MIDI(CC#67)
MIDI(CC#80)
MIDI(CC#81)
MIDI(CC#82)
MIDI(CC#83)
MIDI(CC#85)
MIDI(CC#86)
MIDI(CC#87)
MIDI(CC#88)
Tempo
Modulation source Note
�Gate1,Gate1+Dmpr
Gate1
Note
Dmpr1 2 31 2 3
Damper Pedal
Gate1+Dmpr
Time
OnOff
�Gate2,Gate2+Dmpr
Gate2
Note
Dmpr1 2 31 2 3
Damper Pedal
Gate2+Dmpr
Time
OnOff

358 EffectsDynamics (Dynamic)
Dynamics (Dynamic)
0: No EffectSelect this option when you do not use any effects.
1: Stereo CompressorThis effect compresses the input signal to regulate the level andgive a “punchy” effect. It is useful for guitar, piano, and drumsounds. This is a stereo compressor. You can link left and rightchannels, or use each channel separately.
a: Envelope Select
This parameter selects whether the left and right channels arelinked to control both signals simultaneously, or whether eachchannel is controlled independently.
b: Sensitivityg: Output Level
The “Sensitivity” parameter sets the sensitivity of the compres-sor. If this parameter is set to a higher value, lower level soundswill be boosted. With a higher Sensitivity, the overall volumelevel is higher. To adjust the final volume level, use the “OutputLevel” parameter.
c: Attack
This parameter controls the attack level.
2: Stereo LimiterThe Limiter regulates the input signal level. It is similar to theCompressor, except that the Limiter compresses only signals thatexceed the specified level to lower unnecessary peak signals. TheLimiter applies a peaking-type EQ to the trigger signal (whichcontrols the degree of the Limiter effect), allowing you to set anyband width to be covered. This effect is a stereo limiter. You canlink left and right channels, or use each channel individually.
a Envelope Select
L/R Mix, L/R Individ-ually
Determines whether the left and right channels are linked or used separately
b Sensitivity 1...100 Sets the sensitivity
c Attack 1...100 Sets the attack level
d EQ Trim 0...100 Sets the EQ input level
e
Pre LEQ Fc Low, Mid-Low
Selects the cutoff frequency (low or mid-low) of the low-range equalizer
Pre HEQ Fc High, Mid-High
Selects the cutoff frequency (high or mid-high) of the high-range equalizer
f
Pre LEQ Gain [dB] –15.0...+15.0 Sets the gain of the Low EQ
Pre HEQ Gain [dB] –15.0...+15.0 Sets the gain of the High EQ
g
Output Level 0...100 Sets the output level of the compressor
Src Off...Tempo Selects the modulation source for the compressor output level
Amt –100...+100 Sets the modulation amount for the compressor output level
h
Wet/Dry Dry, 1:99...99:1, Wet
Sets the Balance between the wet and dry signal
Src Off...Tempo Selects a modulation source for Wet/Dry
Amt –100...+100 Sets the modulation amount for Wet/Dry
Left
Right
FX Amt
FX Amt
Stereo In - Stereo Out
EQ Trim
EQ Trim
LEQ HEQ
LEQ HEQCompressor
Compressor
Envelope Select
Output Level
Output Level
Envelope - Control
Envelope - Control
a Envelope Select
L/R Mix, L Only, R Only, L/R Individ-ually
Selects from linking both channels, controlling only from left channel, only from the right channel, or controlling each channel individ-ually
b Ratio1.0 : 1…50.0 : 1,Inf : 1
Sets the signal compression ratio
c Threshold [dB] –40...0 Sets the level above which the compressor is applied
vAttack 1...100 Sets the attack time
Release 1...100 Sets the release time
e
Gain Adjust [dB]
–Inf, –38...+24 Sets the output gain
Src Off...Tempo Selects the modulation source for the output gain
Amt –63...+63 Sets the modulation amount of the output gain
fSide PEQ Insert Off, On Toggles between on/off of the
trigger signal’s EQ
Trigger Monitor Off, On Switches between effect output
monitor and trigger signal monitor
g
Side PEQ Cutoff [Hz] 20...12.00k Sets the EQ center frequency for the
trigger signal
Q 0.5...10.0 Sets the EQ bandwidth for the trigger signal
Gain [dB] –18.0...+18.0 Sets the EQ gain for the trigger signal
h
Wet/Dry Dry, 1:99...99:1, Wet
Balance between the wet and dry signal
Src Off...Tempo Table , “Dynamic Modulation sources,” on page 357
Amt –100...+100 Amount of modulation source
Sensitivity=100
Sensitivity=40Dry
Wet
Time
LevelCompressor - Sensitivity
Lo
ud
er
Dry
Wet
Time
Level
Attack=80
Attack=20
Compressor - Attack
Left
Right
FX Control BUS 1
FX Control BUS 2
FX Amt
FX Amt
Stereo In - Stereo Out
Limiter
Limiter
Envelope Source
Gain Adjust
Gain Adjust
Side PEQEnvelope - Control
Envelope - Control
Trigger Monitor+
Envelope Select

359EffectsDynamics (Dynamic)
App
endi
x
a: Envelope Select
When L/R Mix is selected for this parameter, the left and rightchannels are linked to control the Limiter using the mixed sig-nal. If L Only (or R Only) is selected, the left and right channelsare linked, and the Limiter is controlled via only the left (orright) channel.
With L/R individually, the left and right channels control theLimiter individually.
b: Ratioc: Threshold [dB]e: Gain Adjust [dB]
This parameter sets the signal compression “Ratio”. Compres-sion is applied only when the signal level exceeds the “Thresh-old” value.
Adjust the output level using the “Gain Adjust” parameter, sincecompression causes the entire level to be reduced.
d: Attackd: Release
These parameters set the attack time and release time. A higherattack time will cause the compression to be applied more slowly.
f: Trigger Monitor
Setting this parameter On will cause the trigger signal to be out-put, instead of the effect sound. Use this parameter to check thetrigger signal with EQ applied.
Usually, set this to Off.
f: Side PEQ Insertg: Side PEQ Cutoff [Hz]g: Qg: Gain [dB]
These parameters are used to set the EQ applied to the triggersignal.
The Limiter determines whether the compression is applied ornot, based on the post-EQ trigger signal. Setting the equalizerallows you to set the Limiter to respond to any frequency band.
3: Multiband LimiterThis effect applies the Limiter to the low range, mid range, andhigh range of the input signal. You can control dynamics for eachrange to adjust the sound pressure of the low range, mid range,and high range in a different way from the EQ.
e: Low Offset [dB]f: Mid Offset [dB]g: High Offset [dB]
These parameters set the gain of the trigger signal.
For example, if you do not want to apply compression to the highrange, reduce the “High Offset” value down below the “Thresh-old” level. In this way, the high range limiter will not respond,and compression will not be applied.
Input Level
Output Level
Threshold
Ratio=1.0 : 1
Ratio=2.0 : 1
Ratio=4.0 : 1
Ration=Inf : 1
Louder
Lo
ud
er
Time
Level
Threshold
Ratio=Inf : 1
Ratio=2.0 : 1Ratio=4.0 : 1
Dry Ratio=1.0 : 1
Limiter - Threshold / Ratio
Threshold
Ratio=Inf : 1Attack=1Release=1
Ratio=Inf : 1Attack=100Release=100
Dry
Wet
Wet
Release
Attack
Limiter - Attack / Release
a Ratio 1.0 : 1...50.0 : 1, Inf : 1 Sets the signal compression ratio
b Threshold [dB] –40...0 Sets the level above which the compressor is applied
c Attack 1...100 Sets the attack time
d Release 1...100 Sets the release time
e Low Offset [dB] –40...0 Gain of the low-range trigger signal
f Mid Offset [dB] –40...0 Gain of the mid-range trigger signal
g High Offset [dB] –40...0 Gain of the high-range trigger signal
h
Gain Adjust [dB]
–Inf, –38...+24 Sets the output gain
Src Off...Tempo Selects the modulation source for the output gain
Amt –63...+63 Sets the modulation amount of the output gain
i
Wet/Dry Dry, 1:99...99:1, Wet
Balance between the wet and dry signal
Src Off...Tempo Table , “Dynamic Modulation sources,” on page 357
Amt –100...+100 Amount of modulation source
Left
Right
FX Amt
FX Amt
FX Amt = 100: Mono In - Mono Out / FX Amt = 0: Stereo In - Stereo Out
Gain AdjustMid Offset
Low Offset
High Offset
Envelope - Control
Envelope - Control
Envelope - Control
Low
Mid
High
Band-Pass Filters
+ Limiter
Limiter
Limiter

360 EffectsDynamics (Dynamic)
4: St.MasteringLimtr(Stereo Mastering Limiter)
This is a stereo limiter that is optimized for mastering songs.
5: Stereo GateThis effect mutes the input signal when it falls below a specifiedlevel. You can also invert the on/off status of the gate, or usenote-on/off messages to turn the gate on/off directly.
c: Thresholdd: Attackd: Release
“Threshold” specifies the level at which gating occurs when“Envelope Select” is set to L/R Mix, L Only, or R Only.
“Attack” and “Release” specify the attack time and release time ofthe gate.
c: Polarity
This inverts the polarity of the gate on/off operation. With the “–” setting, the gate will close when the input signal exceeds thespecified level. The direction in which the modulation sourceopens or closes the gate will also be reversed.
e: Delay Time [msec]
This sets the delay time for the input to the gate. When usingshorter Attack Time settings, you can lengthen the Delay Timeso that the sound is input after the gate opens.
a Threshold [dB] –30.0...0.0 Sets the level above which the compressor is applied
b Out Ceiling [dB] –30.0...0.0 Sets the output gain
c Release [msec] 0.50...1000.0 Sets the release time
d
Wet/Dry Dry, 1:99...99:1, Wet
Balance between the wet and dry signal
Src Off...Tempo Table , “Dynamic Modulation sources,” on page 357
Amt –100...+100 Amount of modulation source
a Envelope Source D-mod, Input
Selects the source to control the gate: D-mod control, or use the input signal as a trigger
b
Envelope Select
L/R Mix, L Only, R Only
Selects the control signal: left and right linked, left only, or right only
Src Off...TempoSelects the source that will control the gate when Envelope Src = D-mod
cThreshold 0...100 Sets the level at which gating is
applied
Polarity +, – Switches the polarity of gating
dAttack 1...100 Sets the attack time
Release 1...100 Sets the release time
e Delay Time [msec] 0...100 Sets the delay time for the gate
input
fSide PEQ Insert Off, On Switches the trigger signal equalizer
on/off
Trigger Monitor Off, On Switches between monitoring the
effect output and the trigger signal
g
Side PEQ Cutoff [Hz] 20...12.00k Sets the center frequency of the
equalizer for the trigger signal
Q 0.5...10.0 Sets the bandwidth of the equalizer for the trigger signal
Gain [dB] –18.0...+18.0 Sets the gain of the equalizer for the trigger signal
h
Wet/Dry Dry, 1:99...99:1, Wet
Balance between the wet and dry signal
Src Off...Tempo Table , “Dynamic Modulation sources,” on page 357
Amt –100...+100 Amount of modulation source
Left
Right
FX Amt
FX Amt
Stereo In - Stereo Out
Limiter
LimiterOut Ceiling
Out Ceiling
Envelope - Control+
Left
Right
FX Control BUS 1
FX Control BUS 2
FX Amt
FX Amt
Stereo In - Stereo Out
Envelope Source
Gain Adjust
Gain Adjust
Side PEQEnvelope - Control
Envelope - Control
Trigger Monitor+
Envelope SelectGateDelay
GateDelay
D-mod
Input Level
Output Level
Threshold
Louder
Lo
ud
er
Threshold
Attack=1Release=1
Attack=100Release=100
Dry
Wet
Wet
Attack Release
Gate - Attack / Release
Gate - Threshold

361EffectsEQ and Filters (EQ/Filter)
App
endi
x
EQ and Filters (EQ/Filter)
6: St.Parametric4EQ(Stereo Parametric 4-Band EQ)
This is a stereo 4-band parametric equalizer. You can selectpeaking type or shelving type for Band 1 and 4. The gain of Band2 can be controlled by dynamic modulation.
b: Band1 Typec: Band4 Type
Selects a filter type for Band 1 and 4.
e, f, g, h: Q
These parameters set the bandwidth of each equalizer. Thehigher the value, the narrower the band becomes.
d: Band2 Dynamic Gain Srcd: Amt [dB]
You can control the gain of Band 2 using the modulation source.
7: St. Graphic 7EQ(Stereo Graphic 7-Band EQ)
This is a stereo 7-band graphic equalizer. The bar graph of thegain setting for each band gives you a clear, visual idea of fre-quency responses. You can select a center frequency setting foreach band from twelve types, according to the sound.
a Trim 0...100 Sets the input level
b Band1 Type Peaking, Shelving-Low
Selects the type of Band 1
c Band4 Type Peaking, Shelving-High Selects the type of Band 4
d
Band2 Dynamic Gain Src
Off...Tempo Selects the modulation source of the Band 2 gain
Amt [dB] –18.0...+18.0 Sets the modulation amount of Band 2 gain
e
Band1 Cutoff [Hz] 20...1.00k Sets the center frequency of Band 1
Q 0.5...10.0 Sets the bandwidth of Band 1
Gain [dB] –18.0...+18.0 Sets the gain of Band 1
f
Band2 Cutoff [Hz] 50...10.00k Sets the center frequency of Band 2
Q 0.5...10.0 Sets the bandwidth of Band 2
Gain [dB] –18.0...+18.0 Sets the gain of Band 2
g
Band3 Cutoff [Hz] 300...10.00k Sets the center frequency of Band 3
Q 0.5...10.0 Sets the bandwidth of Band 3
Gain [dB] –18.0...+18.0 Sets the gain of Band 3
h
Band4 Cutoff [Hz] 500...20.00k Sets the center frequency of Band 4
Q 0.5...10.0 Sets the bandwidth of Band 4
Gain [dB] –18.0...+18.0 Sets the gain of Band 4
i
Wet/Dry Dry, 1:99...99:1, Wet
Balance between the wet and dry signal
Src Off...Tempo Table , “Dynamic Modulation sources,” on page 357
Amt –100...+100 Amount of modulation source
Left
Right
FX Amt
FX Amt
Stereo In - Stereo Out
Band1 Band2 Band3 Band4PEQ PEQ PEQ PEQ
LEQ
LEQ
HEQ
HEQ
PEQ PEQ PEQ PEQ
Trim
Trim
D-mod
a Type
1:Wide 1, 2:Wide 2, 3:Wide 3, 4:Half Wide 1, 5:Half Wide 2, 6:Half Wide 3, 7:Low, 8:Wide Low, 9:Mid, 10:Wide Mid, 11:High, 12:Wide High
Selects a combination of center frequencies for each band
b Trim 0...100 Sets the input level
c Band1 [dB] –18.0...+18.0 Sets the gain of Band 1
d Band2 [dB] –18.0...+18.0 Sets the gain of Band 2
e Band3 [dB] –18.0...+18.0 Sets the gain of Band 3
f Band4 [dB] –18.0...+18.0 Sets the gain of Band 4
g Band5 [dB] –18.0...+18.0 Sets the gain of Band 5
h Band6 [dB] –18.0...+18.0 Sets the gain of Band 6
i Band7 [dB] –18.0...+18.0 Sets the gain of Band 7
3dB
3dB
Band1 Cutoff Band4 Cutoff
0dB
+Gain
–Gain Band1 Type=PeakingBand1 Type=Shelving Low
Band4 Type=PeakingBand4 Type=Shelving High
Parametric 4EQ - Band1, Band4 Type
Band2 Cutoff
Band2 Cutoff
0dB
+6dB
+15dB
Band2 Gain[dB]= +6.0Band2 Gain Mod Amount[dB]= +9.0
D-mod
0dB
+6dB
–�9dB
Band2 Gain[dB]= +6.0Band2 Gain Mod Amount[dB]= –15.0
D-mod
Parametric 4EQ - Band2 Gain Mod
Left
Right
FX Amt
FX Amt
Stereo In - Stereo Out
Band1 Band2 Band3 Band4Trim
Trim
Band5 Band6 Band7
Band1 Band2 Band3 Band4 Band5 Band6 Band7

362 EffectsEQ and Filters (EQ/Filter)
a: Type
This parameter selects a combination of center frequencies foreach band. The center frequency of each band is shown in theright of the screen.
You can configure a 21-Band Graphic EQ ranging from 80 Hz to18 kHz if you route three Graphic 7-Band EQ effects in series,with a setting of 7:Low, 9:Mid, and 11:High for each EQ.
8: St.Exciter/Enhncr(Stereo Exciter/Enhancer)
This effect is a combination of the Exciter, which adds a punchto the sound and the Enhancer, which adds spread and presence.
a: Exciter Blend
This parameter sets the depth (intensity) of the Exciter effect.Positive values give a frequency pattern (to be emphasized) dif-ferent from negative values.
b: Emphasis Freq
This parameter sets the frequency to be emphasized. Higher val-ues will emphasize lower frequencies.
c: Enhancer Delay L [msec]d: Enhancer Delay R [msec]
These parameters set the delay time for the Enhancer left andright channel. Specifying a slightly different delay time for theleft and right channel will add a stereo image, depth, and widthto the sound.
9: Stereo IsolatorThis is a stereo effect that separates the input signal into low,mid, and high-frequency bands, and controls the volume of eachband independently. For example you can separately boost or cutthe kick, snare, and hi-hat sounds from a drum signal in real-time.
j
Wet/Dry Dry, 1:99...99:1, Wet
Balance between the wet and dry signal
Src Off...Tempo Table , “Dynamic Modulation sources,” on page 357
Amt –100...+100 Amount of modulation source
a
Exciter Blend –100...+100 Sets the intensity (depth) of the Exciter effect
Src Off...Tempo Selects the modulation source of the Exciter intensity
Amt –100...+100 Sets the modulation amount of the Exciter intensity
b
Emphasis Freq 0...70 Sets the frequency to be empha-sized
Src Off...Tempo Selects the modulation source of the frequency to be emphasized
Amt –70...+70 Sets the amount of modulation of the frequency to be emphasized
c Enhancer Delay L [msec] 0.0...50.0 Sets the delay time for the Enhancer
left channel
d Enhancer Delay R [msec] 0.0...50.0 Sets the delay time for the Enhancer
right channel
e
Enhancer Depth 0...100 Sets the determines to what degree
the Enhancer effect is applied
Src Off...Tempo Selects the modulation source of the Enhancer width
Amt –100...+100 Sets the modulation amount of the Enhancer width
f EQ Trim 0...100 Sets the 2-band EQ input level
g
Pre LEQ Fc Low, Mid-Low
Selects the cutoff frequency (low or mid-low) of the low-range equalizer
Pre HEQ Fc High, Mid-High
Selects the cutoff frequency (high or mid-high) of the high-range equalizer
h
Pre LEQ Gain [dB] –15.0...+15.0 Gain of the Lo EQ
Pre HEQ Gain [dB] –15.0...+15.0 Gain of the High EQ
i
Wet/Dry Dry, 1:99...99:1, Wet
Balance between the wet and dry signal
Src Off...Tempo Table , “Dynamic Modulation sources,” on page 357
Amt –100...+100 Amount of modulation source
Left
Right
FX Amt
FX Amt
Stereo In - Stereo Out
EQ Trim
LEQ HEQ
EQ Trim
Delay
Delay
Depth
D-mod
Exciter
ExciterEnhancer
a Trim 0...100 Sets the input level
b Low/Mid [Hz] 100...500 Sets the frequency at which the low and mid bands are divided
c Mid/High [Hz] 2000...6000 Sets the frequency at which the mid and high bands are divided
d
Low Gain [dB] –Inf, –59...+12 Sets the low-frequency gain
Src Off...Tempo Selects the source that will modulate low-frequency gain
Amt –72...+72 Sets the amount by which the low-frequency gain will be modulated
e
Mid Gain [dB] –Inf, –59...+12 Sets the mid-frequency gain
Src Off...Tempo Selects the modulation source for mid-frequency gain
Amt –72...+72 Sets the amount by which the mid-frequency gain will be modulated
f
High Gain [dB] –Inf, –59...+12 Sets the high-frequency gain
Src Off...Tempo Selects the modulation source for high-frequency gain
Amt –72...+72 Sets the amount by which the high-frequency gain will be modulated
g
Wet/Dry Dry, 1:99...99:1, Wet
Balance between the wet and dry signal
Src Off...Tempo Table , “Dynamic Modulation sources,” on page 357
Amt –100...+100 Amount of modulation source
D-mod
D-mod
D-mod
Left
Right
FX Amt
FX Amt
Stereo In - Stereo Out
Trim
Isolator
Low
Mid
High
Trim
Low
Mid
High

363EffectsEQ and Filters (EQ/Filter)
App
endi
x
10: St. Wah/Auto Wah(Stereo Wah/Auto Wah)
This stereo wah effect allows you to create sounds from vintagewah pedal simulation to auto-wah simulation, and muchbroader range settings.
a: Frequency Bottoma: Frequency Top
The sweep width and direction of the wah filter are determinedby the “Frequency Top” and “Frequency Bottom” settings.
b: Sweep Mode
This parameter changes the wah control mode. Setting “SweepMode” to Auto will select an auto-wah that sweeps according toenvelope changes in the input signal level. Auto-wah is fre-quently used for funk guitar parts and clav sounds.
When “Sweep Mode” is set to D-mod, you can control the filterdirectly via the modulation source in the same way as a wahpedal.
When “Sweep Mode” is set to LFO, the effect uses LFO to sweepin cycle.
c: Envelope Sens
This parameter sets the sensitivity of auto-wah. Increase thevalue if the input signal is too low to sweep. Reduce the value ifthe input signal is so high that the filter is stopped temporarily.
c: Envelope Shape
This parameter determines the sweep curve for auto-wah.
d: LFO Frequency [Hz]e: MIDI Sync
When “MIDI/Tempo Sync”=Off, the LFO speed uses the LFOFrequency parameter setting. When “MIDI/Tempo Sync”=On,the LFO speed follows the “BPM”, “Base Note”, and “Times” set-tings.
e: BPMe: Base Notee: Times
One cycle of LFO sweep is obtained by multiplying the length ofa note (r…w) (selected for “Base Note”, in relation to the tempospecified in “BPM”, or the MIDI Clock tempo if “BPM” is set toMIDI) by the number specified in the Times parameter.
a
Frequency Bottom 0...100 Sets the lower limit of the wah
center frequency
Frequency Top 0...100 Sets the upper limit of the wah center frequency
b
Sweep ModeAuto, D-mod, LFO
Selects the control from auto-wah, modulation source, and LFO
Src Off...Tempo Selects the modulation source for the wah when Sweep Mode=D-mod
Respon 0...100 Sets the response speed when Sweep Mode = Auto or D-mod
cEnvelope Sens 0...100 Sets the sensitivity of auto-wah
Envelope Shape –100...+100 Sets the sweep curve of auto-wah
d
LFO Frequency [Hz] 0.02...20.00 Sets the speed of the LFO
Src Off...Tempo Selects a modulation source for LFO speed
Amt –20.00...+20.00
Sets the modulation amount of LFO speed
e
MIDI Sync Off, On When this is on, the LFO speed is set by BPM, Base Note, and Times, instead of Frequency
BPMMIDI, 40.00...300.00
MIDI syncs to the system tempo; 40–300 sets the tempo manually for this individual effect
Base Note r...w Selects the type of notes that specify the LFO speed
Times x1...x32 Sets the number of notes that specify the LFO speed
fResonance 0...100 Sets the resonance amount
Low Pass Filter Off, On Switches the wah low pass filter on and off
g
Output Level 0...100 Sets the output level of the effect sound
Src Off...Tempo Selects the modulation source that will control the effect output level
Amt –100...+100 Sets the modulation amount of the effect output level
h
Wet/Dry Dry, 1:99...99:1, Wet
Balance between the wet and dry signal
Src Off...Tempo Table , “Dynamic Modulation sources,” on page 357
Amt –100...+100 Amount of modulation source
Stereo In - Stereo Out
D-mod
Envelope Sens
Envelope ShapeResponse
FX Amt
WahSweep Mode
D-modAuto
Left
RightFX Amt
LFO
LFO
Wah
+
MaxD-mod
Frequency
Bottom=25
Top=75
Hig
her
MaxZeroHigher D-mod
Frequency
Bottom=60
Top=30
Hig
her
ZeroHigher
Frequency
Bottom=25
Top=75
Hig
her
Frequency
Bottom=75
Top=25
Hig
her
Sweep Mode=Auto
Envelope EnvelopeTime
Wah
Woo Woo
Woo
Envelope
Wah Wah
Time
Woo
Woo
Wah
Wah
Sweep Mode=D-mod
Time
Level
Envelope
value = 0...–100
value = 0...+100
Envelope Shape
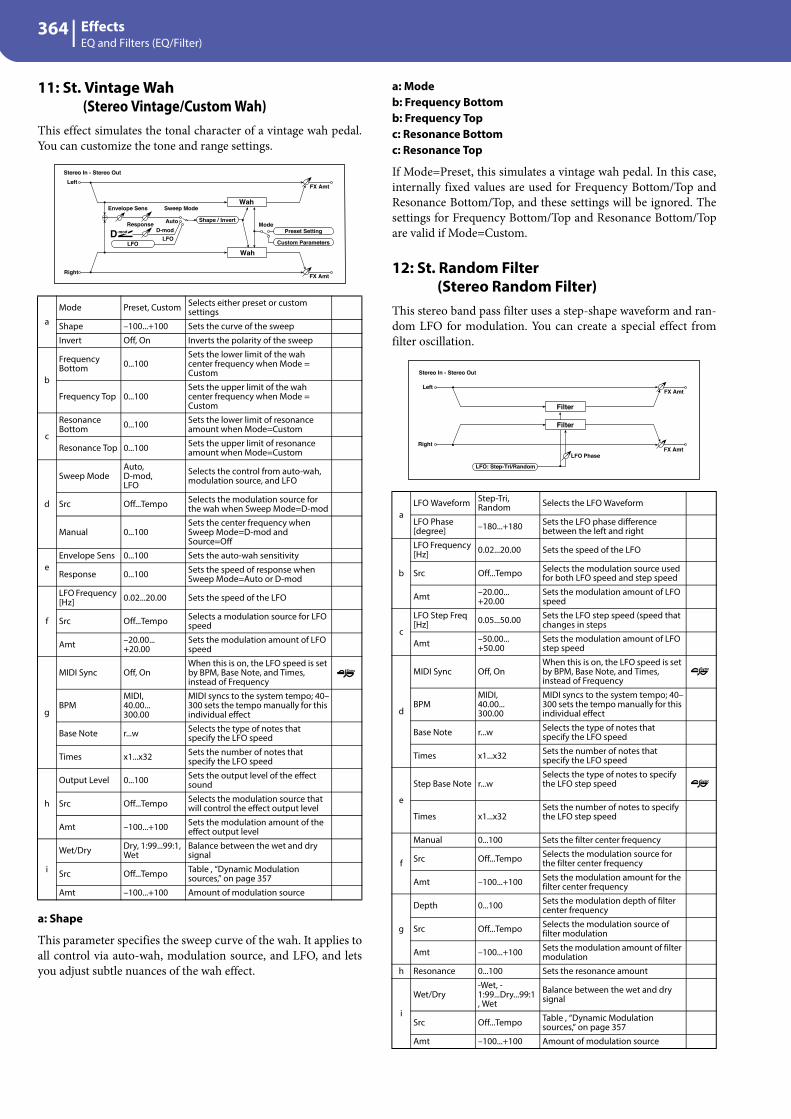
364 EffectsEQ and Filters (EQ/Filter)
11: St. Vintage Wah(Stereo Vintage/Custom Wah)
This effect simulates the tonal character of a vintage wah pedal.You can customize the tone and range settings.
a: Shape
This parameter specifies the sweep curve of the wah. It applies toall control via auto-wah, modulation source, and LFO, and letsyou adjust subtle nuances of the wah effect.
a: Modeb: Frequency Bottomb: Frequency Topc: Resonance Bottomc: Resonance Top
If Mode=Preset, this simulates a vintage wah pedal. In this case,internally fixed values are used for Frequency Bottom/Top andResonance Bottom/Top, and these settings will be ignored. Thesettings for Frequency Bottom/Top and Resonance Bottom/Topare valid if Mode=Custom.
12: St. Random Filter(Stereo Random Filter)
This stereo band pass filter uses a step-shape waveform and ran-dom LFO for modulation. You can create a special effect fromfilter oscillation.
a
Mode Preset, Custom Selects either preset or custom settings
Shape –100...+100 Sets the curve of the sweep
Invert Off, On Inverts the polarity of the sweep
b
Frequency Bottom 0...100
Sets the lower limit of the wah center frequency when Mode = Custom
Frequency Top 0...100Sets the upper limit of the wah center frequency when Mode = Custom
c
Resonance Bottom 0...100 Sets the lower limit of resonance
amount when Mode=Custom
Resonance Top 0...100 Sets the upper limit of resonance amount when Mode=Custom
d
Sweep ModeAuto, D-mod, LFO
Selects the control from auto-wah, modulation source, and LFO
Src Off...Tempo Selects the modulation source for the wah when Sweep Mode=D-mod
Manual 0...100Sets the center frequency when Sweep Mode=D-mod and Source=Off
eEnvelope Sens 0...100 Sets the auto-wah sensitivity
Response 0...100 Sets the speed of response when Sweep Mode=Auto or D-mod
f
LFO Frequency [Hz] 0.02...20.00 Sets the speed of the LFO
Src Off...Tempo Selects a modulation source for LFO speed
Amt –20.00...+20.00
Sets the modulation amount of LFO speed
g
MIDI Sync Off, On When this is on, the LFO speed is set by BPM, Base Note, and Times, instead of Frequency
BPMMIDI, 40.00...300.00
MIDI syncs to the system tempo; 40–300 sets the tempo manually for this individual effect
Base Note r...w Selects the type of notes that specify the LFO speed
Times x1...x32 Sets the number of notes that specify the LFO speed
h
Output Level 0...100 Sets the output level of the effect sound
Src Off...Tempo Selects the modulation source that will control the effect output level
Amt –100...+100 Sets the modulation amount of the effect output level
i
Wet/Dry Dry, 1:99...99:1, Wet
Balance between the wet and dry signal
Src Off...Tempo Table , “Dynamic Modulation sources,” on page 357
Amt –100...+100 Amount of modulation source
ModePreset Setting
Custom Parameters
Stereo In - Stereo Out
D-mod
Envelope Sens
Shape / InvertResponse
FX Amt
WahSweep Mode
D-mod
Auto
Left
RightFX Amt
LFOLFO
Wah
+
aLFO Waveform Step-Tri,
Random Selects the LFO Waveform
LFO Phase [degree] –180...+180 Sets the LFO phase difference
between the left and right
b
LFO Frequency [Hz] 0.02...20.00 Sets the speed of the LFO
Src Off...Tempo Selects the modulation source used for both LFO speed and step speed
Amt –20.00...+20.00
Sets the modulation amount of LFO speed
c
LFO Step Freq [Hz] 0.05...50.00 Sets the LFO step speed (speed that
changes in steps
Amt –50.00...+50.00
Sets the modulation amount of LFO step speed
d
MIDI Sync Off, On When this is on, the LFO speed is set by BPM, Base Note, and Times, instead of Frequency
BPMMIDI, 40.00...300.00
MIDI syncs to the system tempo; 40–300 sets the tempo manually for this individual effect
Base Note r...w Selects the type of notes that specify the LFO speed
Times x1...x32 Sets the number of notes that specify the LFO speed
e
Step Base Note r...wSelects the type of notes to specify the LFO step speed
Times x1...x32Sets the number of notes to specify the LFO step speed
f
Manual 0...100 Sets the filter center frequency
Src Off...Tempo Selects the modulation source for the filter center frequency
Amt –100...+100 Sets the modulation amount for the filter center frequency
g
Depth 0...100 Sets the modulation depth of filter center frequency
Src Off...Tempo Selects the modulation source of filter modulation
Amt –100...+100 Sets the modulation amount of filter modulation
h Resonance 0...100 Sets the resonance amount
i
Wet/Dry-Wet, -1:99...Dry...99:1, Wet
Balance between the wet and dry signal
Src Off...Tempo Table , “Dynamic Modulation sources,” on page 357
Amt –100...+100 Amount of modulation source
Filter
Left
Right
FX Amt
FX Amt
Stereo In - Stereo Out
Filter
LFO Phase
LFO: Step-Tri/Random

365EffectsEQ and Filters (EQ/Filter)
App
endi
x
a: LFO Phase [degree]
Offsetting the left and right phases alters how modulation isapplied to the left and right channels, creating a swelling affect.
a: LFO Waveformb: LFO Frequency [Hz]c: LFO Step Freq [Hz]
When “LFO Waveform” is set to Step-Tri, LFO is a step-shape,triangle waveform. The “LFO Frequency” parameter sets theoriginal triangle waveform speed. Changing the “LFO Step Freq”parameter enables you to adjust the width of the steps.
When “LFO Waveform” is set to Random, the “LFO Step Freq”parameter uses a random LFO cycle.
d: BPMe: Step Base Notee: Times
The width of an LFO step, or a cycle of random LFO, is obtainedby multiplying the length of a note (r…w) (selected for “StepBase Note”, in relation to the tempo specified in “BPM,” or theMIDI Clock tempo if “BPM” is set to MIDI) by the numberspecified in the “Times” parameter.
i: Wet/Dry
The effect sound’s phase will be reversed when you set thisparameter in the negative range of values.
13: St. MultiModeFilter(Stereo Multi Mode Filter)
This is a multi-mode filter with four types; low pass, high pass,band pass, and band reject. You can use LFO or dynamic modu-lation to vary the cutoff frequency or resonance.0 +90 +180 [degree]
0 [degree]–90–180
LFO Phase
Step Frequency
LFO Frequency
Step Frequency
Step-Tri Random
Random Filter LFO
aType LPF, HPF, BPF,
BRF Selects the type of filter
Trim 0...100 Sets the input level
b
Cutoff 0...100 Sets the cutoff frequency (center frequency)
Src Off...Tempo Selects the modulation source of the cutoff
Amt –100...+100 Sets the modulation amount of the cutoff
c
Resonance 0...100 Sets the resonance amount
Src Off...Tempo Selects the source that will modulate the amount of resonance
Amt –100...+100 Sets the amount by which the resonance will be modulated
d
LFO Waveform Triangle, Sine Selects the LFO Waveform
Phase [degree] –180...+180 Sets the LFO phase difference between the left and right
Depth 0...100 Sets the depth to which the LFO will modulate the cutoff frequency
e
LFO Frequency [Hz] 0.02...20.00 Sets the speed of the LFO
Src Off...Tempo Selects a modulation source for LFO speed
Amt –20.00...+20.00
Sets the modulation amount of LFO speed
f
MIDI Sync Off, On When this is on, the LFO speed is set by BPM, Base Note, and Times, instead of Frequency
BPMMIDI, 40.00...300.00
MIDI syncs to the system tempo; 40–300 sets the tempo manually for this individual effect
Base Note r...w Selects the type of notes that specify the LFO speed
Times x1...x32 Sets the number of notes that specify the LFO speed
gDrive SW Off, On Switches distortion on/off within
the filter
Output Level 0...100 Sets the output level
hDrive Gain 0...100 Sets the distortion amount
Low Boost 0...100 Sets the amount of low-range boost
i
Wet/Dry Dry, 1:99...99:1, Wet
Balance between the wet and dry signal
Src Off...Tempo Table , “Dynamic Modulation sources,” on page 357
Amt –100...+100 Amount of modulation source
Left
Right
FX Amt
FX Amt
Stereo In - Stereo Out
Multimode Filter Driver
Driver
Trim Output
OutputTrim
LFO Phase
LFO: Tri / Sine LFO Shape
LPF
HPF
BPF
BRF
Filter Type
Multimode Filter

366 EffectsEQ and Filters (EQ/Filter)
14: St. Sub Oscillator(Stereo Sub Oscillator)
This effect adds very low frequencies to the input signal. It isvery useful when simulating a roaring drum sound or emphasiz-ing powerful low range. This effect is different from the equal-izer in that you can add very low range harmonics. You can alsoadjust the oscillator frequency to match a particular note num-ber, for use as an octaver.
a: OSC Modeb: Note Intervalb: Note Fine
The “OSC Mode” parameter selects the oscillator operationmode. When Note (Key Follow) is selected, the oscillator’s fre-quency is determined based on the note number, allowing you touse it as an octaver. The “Note Interval” parameter sets the pitchoffset from the original note number by semitone steps. The“Note Fine” parameter allows you to fine-tune in steps of cents.
d: Envelope Pre LPF
This parameter sets the upper limit of the frequency range towhich very low harmonics are added. Adjust this parameter ifyou do not want to add lower harmonics to the higher range.
15: Talking ModulatorThis effect adds an unusual character, like a human voice, to theinput signal. Modulating the tone via dynamic modulation, youcan create an interesting effect that sounds as if the guitar or syn-thesizer is talking.
a OSC Mode Note (Key Follow), Fixed
Determines whether the oscillator frequency follows the note number or whether it is fixed
bNote Interval –48...0
Sets the pitch difference from the note number when OSC Mode=Note (Key Follow)
Note Fine –100...+100 Fine adjustment of the oscillator frequency
c
Fixed Frequency [Hz] 10.0...80.0 Sets the oscillator frequency when
OSC Mode=Fixed
Src Off...TempoSelects the modulation source for the oscillator frequency when OSC Mode=Fixed
Amt –80...+80Sets the oscillator frequency modulation amount when OSC Mode=Fixed
d Envelope Pre LPF 1...100
Sets the upper limit of the frequency range for which very low harmonics are added
eEnvelope Sens 0...100 Sets the sensitivity with which very
low harmonics are added
Envelope Shape –100...+100 Sets the oscillator’s volume
envelope curve
f
Wet/Dry Dry, 1:99...99:1, Wet
Balance between the wet and dry signal
Src Off...Tempo Table , “Dynamic Modulation sources,” on page 357
Amt –100...+100 Amount of modulation source
FX Amt
Note No.
OSC Mode
Fixed
Note (Key Follow)
Sine OscillatorFixed Frequency
Pitch
Note Interval, Fine
Stereo In - Stereo Out
Left
RightFX Amt
Envelope Sens
Envelope Shape
Envelope Shape
D-mod
Pre LPF
Envelope Sens Pre LPF
a Sweep Mode D-mod, LFO Switches between modulation source control and LFO control
b
Manual Voice Control
Bottom, 1...49, Center, 51...99, Top
Voice pattern control
Src Off...Tempo Selects the modulation source that controls the voice pattern
c Voice Top A, I, U, E, O Selects a vowel sound at the top end of control
d Voice Center A, I, U, E, O Selects a vowel sound in the center of control
e Voice Bottom A, I, U, E, O Selects a vowel sound at the bottom end of control
fFormant Shift –100...+100 Sets the frequency to which the
effect is applied
Resonance 0...100 Sets the Level of resonance of the voice pattern
g
LFO Frequency [Hz] 0.02...20.00 Sets the speed of the LFO
Src Off...Tempo Selects a modulation source for LFO speed
Amt –20.00...+20.00
Sets the modulation amount of LFO speed
h
MIDI Sync Off, On When this is on, the LFO speed is set by BPM, Base Note, and Times, instead of Frequency
BPMMIDI, 40.00...300.00
MIDI syncs to the system tempo; 40–300 sets the tempo manually for this individual effect
Base Note r...w Selects the type of notes that specify the LFO speed
Times x1...x32 Sets the number of notes that specify the LFO speed
i
Wet/Dry Dry, 1:99...99:1, Wet
Balance between the wet and dry signal
Src Off...Tempo Table , “Dynamic Modulation sources,” on page 357
Amt –100...+100 Amount of modulation source
FX Amt = 100: Mono In - Mono Out / FX Amt = 0: Stereo In - Stereo Out
Left
Right
FX Amt
FX Amt
+
D-modVoice Top: A
Voice Center: IVoice Bottom: U
A - I - U - E - OTalking Modulator
LFO
D-modLFO
Sweep Mode

367EffectsEQ and Filters (EQ/Filter)
App
endi
x
c: Voice Topd: Voice Centere: Voice Bottom
These parameters assign vowels to the top, center, and bottomposition of the controller.
E.g.: When “Voice Top”=A, “Voice Center”=I, and “Voice Bottom”=U:
If “Sweep Mode”is set to D-mod and Ribbon is selected as themodulation source, moving your finger from the right to left ofthe ribbon controller will change the sound from “a” to “i,” then“u.”
If Sweep Mode is set to LFO, the sound will change cyclicallyfrom “a” to “i,” “u,” “i,” then “a.”
f: Formant Shift
This parameter adjusts the frequency level to which the effect isapplied. If you wish to apply the effect to a higher-range sound,set this parameter to a higher value; to apply the effect to alower-range sound, set this to a lower value.
f: Resonance
This parameter sets the intensity of resonance for the voice pat-tern. A larger value will add more character to the sound.
16: Stereo DecimatorThis effect creates a rough sound like a cheap sampler by lower-ing the sampling frequency and data bit length. You can alsosimulate noise unique to a sampler (aliasing).
a: Pre LPF
If a sampler with a very low sampling frequency receives veryhigh-pitched sound that could not be heard during playback, itcould generate pitch noise that is unrelated to the original sound.Set “Pre LPF” to On to prevent this noise from being generated.
If you set the “Sampling Freq” to about 3 kHz and set “Pre LPF”to Off, you can create a sound like a ring modulator.
f: Resolutiong: Output Level
If you set a smaller value for the “Resolution” parameter, thesound may be distorted. The volume level may also be changed.Use “Output Level” to adjust the level.
+ MaxZeroD-mod
– Max
Voice Bottom Voice Center Voice Top
U
I
AA
O
E
JS X�Ribbon��JS +Y�JS –Y�etc…
Zero+ Max
Talking Modulator Control aPre LPF Off, On
Selects whether the harmonic noise caused by a decrease in sampling frequency is generated or not
High Damp [%] 0...100 Sets the ratio of cut of the high range
b
Sampling Freq [Hz]
1.00k...48.00k Sets the sampling frequency
Src Off...Tempo Selects the modulation source of the sampling frequency
Amt –48.00k...+48.00k
Sets the modulation amount of the sampling frequency
c
LFO Frequency [Hz] 0.02...20.00 Sets the speed of the LFO
Src Off...Tempo Selects a modulation source for LFO speed
Amt –20.00...+20.00
Sets the modulation amount of LFO speed
d
MIDI Sync Off, On When this is on, the LFO speed is set by BPM, Base Note, and Times, instead of Frequency
BPMMIDI, 40.00...300.00
MIDI syncs to the system tempo; 40–300 sets the tempo manually for this individual effect
Base Note r...w Selects the type of notes that specify the LFO speed
Times x1...x32 Sets the number of notes that specify the LFO speed
e
Depth 0...100 Sets the depth of the sampling frequency LFO modulation
Src Off...Tempo Selects the LFO modulation source of the sampling frequency
Amt –100...+100 Sets the LFO modulation amount of the sampling frequency
f Resolution 4...24 Sets the data bit length
g
Output Level 0...100 Sets the output level
Src Off...Tempo Selects the modulation source for the output level
Amt –100...+100 Sets the modulation amount of the output level
h
Wet/Dry Dry, 1:99...99:1, Wet
Balance between the wet and dry signal
Src Off...Tempo Table , “Dynamic Modulation sources,” on page 357
Amt –100...+100 Amount of modulation source
Left
Right
FX Amt
FX Amt
Stereo In - Stereo Out
Pre LPF
Pre LPF
High Damp Output Level
High Damp Output Level
Sampling Frequency
Decimator
Decimator
D-mod
LFO
Resolution
Resolution

368 EffectsOverdrive, Amp models, and Mic models (OD Amp Mic)
17: St. Analog Record(Stereo Analog Record)
This effect simulates the noise caused by scratches and dust onanalog records. It also reproduces some of the modulationcaused by a warped turntable.
b: Flutter
This parameter enables you to set the depth of the modulationcaused by a warped turntable.
e: Click Level
This parameter enables you to set the level of the click noise thatoccurs once every rotation of the turntable. This simulationreproduces record noise, and the noise generated after the musicon a vinyl record finishes.
Overdrive, Amp models, and Mic models(OD Amp Mic)
18: OD/Hi.Gain Wah(Overdrive/Hi.Gain Wah)
This distortion effect utilizes an Overdrive mode and a Hi-Gainmode. Controlling the wah effect, the 3-band EQ, and the ampsimulation will allow you to create versatile distortion sounds.This effect is suitable for guitar and organ sounds.
a Speed [RPM] 33 1/3, 45, 78 Sets the r.p.m. of a record
b Flutter 0...100 Sets the modulation depth
cNoise Density 0...100 Sets the noise density
Noise Tone 0...100 Sets the noise tone
d
Noise Level 0...100 Sets the noise level
Src Off...Tempo Selects the modulation source for the noise level
Amt –100...+100 Sets the modulation amount of the noise level
e
Click Level 0...100 Sets the click noise level
Src Off...Tempo Selects the modulation source for the click noise level
Amt –100...+100 Sets the modulation amount of the click noise level
f EQ Trim 0...100 Sets the EQ input level
g
Pre EQ Cutoff [Hz] 300...10.00k Sets the EQ center frequency
Q 0.5...10.0 Sets the EQ band width
Gain [dB] –18.0...+18.0 Sets the EQ gain
h
Wet/Dry Dry, 1:99...99:1, Wet
Balance between the wet and dry signal
Src Off...Tempo Table , “Dynamic Modulation sources,” on page 357
Amt –100...+100 Amount of modulation source
Left
Right
FX Amt
FX Amt
Stereo In - Stereo Out
Analog RecordSimulation
Pre EQ
Pre EQ
EQ Trim
EQ Trim
a
Wah Off, On Switches Wah on/off
Src Off...Tempo Selects the modulation source that switches the Wah on and off
Sw Toggle, Moment
Selects the switching mode for the modulation source that switches the Wah on and off
b
Wah Sweep Range –10...+10 Sets the range of Wah
Wah Sweep Src Off...Tempo Selects the modulation source that controls the Wah
c Drive Mode Overdrive, Hi-Gain
Switches between overdrive and hi-gain distortion
dDrive 1...100 Sets the degree of distortion
Pre Low-cut 0...10 Sets the low range cut amount of the distortion input
e
Output Level 0...50 Sets the output level
Src Off...Tempo Selects the modulation source for the output level
Amt –50...+50 Sets the modulation amount of the output level
fLow Cutoff [Hz] 20...1.00k Sets the center frequency for Low
EQ (shelving type)
Gain [dB] –18...+18 Sets the gain of Low EQ
g
Mid1Cutoff [Hz] 300...10.00k Sets the center frequency for Mid/
High EQ 1 (peaking type)
Q 0.5...10.0 Sets the band width of Mid/High EQ 1
Gain [dB] –18...+18 Sets the gain of Mid/High EQ 1
h
Mid2 Cutoff [Hz] 500...20.00k Sets the center frequency for Mid/
High EQ 2 (peaking type)
Q 0.5...10.0 Sets the band width of Mid/High EQ 2
Gain [dB] –18...+18 Sets the gain of Mid/High EQ 2
iDirect Mix 0...50 Sets the amount of the dry sound
mixed to the distortion
Speaker Simulation Off, On Switches the speaker simulation on/
off
j
Wet/Dry Dry, 1:99...99:1, Wet
Balance between the wet and dry signal
Src Off...Tempo Table , “Dynamic Modulation sources,” on page 357
Amt –100...+100 Amount of modulation source
Left
Right
FX Amt
FX Amt
FX Amt = 100: Mono In - Mono Out / FX Amt = 0: Stereo In - Stereo Out
+ Amp Simulation3 Band PEQ
Output Level
Direct Mix
Pre Low-cut
D-mod
Wah
Mode: Overdrive / Hi-GainDrive
Driver

369EffectsOverdrive, Amp models, and Mic models (OD Amp Mic)
App
endi
x
a: Wah
The Wah parameter switches the wah effect on/off.
a: Sw
This parameter sets how the wah effect is switched on and off viathe modulation source.
When “Sw” = Moment, the wah effect is usually turned off. It isturned on only when you press the pedal or operate the joystick.
When a value for the modulation source is less than 64, “off ” speed is selected, and when the value is 64 or higher, “on” is selected.
When “Sw” = Toggle, the wah effect is switched between on andoff each time you press the pedal or operate the joystick.
The switch will be turned on/off each time the value of the modulation source exceeds 64.
b: Wah Sweep Rangeb: Wah Sweep Src
This parameter sets the sweep range of the wah center frequency.A negative value will reverse the direction of sweep. The wahcenter frequency can be controlled by the modulation sourcespecified in the “Wah Sweep Src” parameter.
d: Pre Low-cut
Cutting the signal in the low range before it is input to the Dis-tortion will create a sharp distortion.
d: Drivee: Output Level
The degree of distortion is determined by the level of input sig-nal and the setting of “Drive”. Raising the “Drive” setting willcause the entire volume level to increase. Use the “Output Level”parameter to adjust the volume level. The “Output Level” param-eter uses the signal level input to the 3-Band EQ. If clippingoccurs at the 3-Band EQ, adjust the “Output Level” parameter.
19: St. Guitar Cabinet(Stereo Guitar Cabinet)
This simulates the acoustical character of a guitar amp’s speakercabinet.
20: St. Bass Cabinet(Stereo Bass Cabinet)
This simulates the acoustical character of a bass amp’s speakercabinet.
a Trim 0...100 Sets the input level
b Type
Selects the type of the cabinet
TWEED - 1x12 Open-back cabinet with one 12" speaker, typically used for blues
TWEED - 4x10 Open-back cabinet with four 10" speakers
BLACK - 2x10 Open-back cabinet with two 10" speakers
BLACK - 2x12 American open-back cabinet with two12" speakers
VOX AC15 - 1x12
Vox AC15 open-back cabinet with one 12" “Blue” speaker
VOX AC30 - 2x12
Vox AC30 open-back cabinet with two 12" “Blue” speakers
VOX AD412 - 4x12
VOX AD412 closed-back cabinet with four 12" speakers
UK H30 - 4x12 Closed-back classic cabinet with four 30W 12" speakers
UK T75 - 4x12 Closed-back cabinet with four 75W 12" speakers
US V30 - 4x12 Closed-back cabinet with four 30W 12" speakers
c Air 0...100 Sets the mic position
d
Wet/Dry Dry, 1:99...99:1, Wet
Balance between the wet and dry signal
Src Off...Tempo Table , “Dynamic Modulation sources,” on page 357
Amt –100...+100 Amount of modulation source
a Trim 0...100 Sets the input level
Left
Trim
Trim
Right
FX Amt
FX Amt
Stereo In - Stereo Out
Cabinet Simulator
Cabinet Simulator
Left
Trim
Trim
Right
FX Amt
FX Amt
Stereo In - Stereo Out
Cabinet Simulator
Cabinet Simulator

370 EffectsOverdrive, Amp models, and Mic models (OD Amp Mic)
21: Bass Amp ModelThis simulates a bass amp.
b Cabinet Type
Selects the cabinet type
LA - 4x10 Four 10" speakers / LA sound cabinet
MODERN - 4x10
Four 10" aluminum-cone speakers / modern cabinet
METAL - 4x10 Four 10" aluminum-cone speakers / modern cabinet
CLASSIC - 8x10 Eight 10" speakers / classic cabinet
UK - 4x12 Four 12" speakers / UK-manufac-tured cabinet
STUDIO - 1x15 One 15" speaker / studio combo cabinet
JAZZ - 1x15 One 15" speaker / jazz combo cabinet
VOX AC100 - 2x15
Two 15" speakers / cabinet for Vox AC100
US - 2x15 Two 15" speakers / US-manufac-tured cabinet
UK - 4x15 Four 15" speakers / UK-manufac-tured cabinet
LA - 1x18 One 18" speaker / LA sound cabinet
COMBI - 1x12 & 1x18
One 12" and one 18" speaker combi-nation cabinet
c
Wet/Dry Dry, 1:99...99:1, Wet
Balance between the wet and dry signal
Src Off...Tempo Table , “Dynamic Modulation sources,” on page 357
Amt –100...+100 Amount of modulation source
a Amp Type
Selects the amplifier type
LA STUDIO An amp that is typical of the LA sound.
JAZZ A combo amp favored by jazz bassists.
GOLD PANELAn amp distinctive for its eye-catching gold panel and clean sound.
SCOOPED An amp typical of 80’s sounds.
VALVE2 A tube amp suitable for rock.
VALVE A tube amp with the ULTRA LO switch turned ON.
CLASSICA tube amp whose basic character changes according to the setting of the value dial.
b
Volume 0...100 Sets the output level
Src Off...Tempo Selects the modulation source for the output level
Amt –100...+100 Sets the modulation amount of the output level
c Bass 0...100 Sets the bass (low range) level
dMiddle 0...100 Sets the middle (mid range) level
Mid Range 0...4 Sets the mid-frequency range
e Treble 0...100 Sets the treble (high range) level
f Presence 0...100 Sets the presence (high-frequency tone)
g
Wet/Dry Dry, 1:99...99:1, Wet
Balance between the wet and dry signal
Src Off...Tempo Table , “Dynamic Modulation sources,” on page 357
Amt –100...+100 Amount of modulation source
+
Left
Right
FX Amt
Volume
FX Amt
FX Amt = 100: Mono In - Mono Out / FX Amt = 0: Stereo In - Stereo Out
D-mod
Bass Amp Model

371EffectsOverdrive, Amp models, and Mic models (OD Amp Mic)
App
endi
x
22: Bass Amp+Cabinet(Bass Amp Model+Cabinet)
This simulates a bass amp and speaker cabinet.
a: Amp Typeh: Cabinet Type
Recommended Combinations of Bass Amp Models and Cabi-nets:
23: Tube PreAmp Model(Tube PreAmp Modeling)
This effect simulates a two-stage vacuum tube preamp. You canmake individual settings for two vacuum tubes connected inseries. This lets you create the warm sound typical of vacuumtubes.
a Amp Type
LA STUDIO, JAZZ , GOLD PANEL, SCOOPED, VALVE2, VALVE, CLASSIC
Selects the type of the amplifier
b
Volume 0...100 Sets the output level
Src Off...Tempo Selects the modulation source for the output level
Amt –100...+100 Sets the modulation amount of the output level
c Bass 0...100 Sets the bass (low range) level
dMiddle 0...100 Sets the middle (mid range) level
Mid Range 0...4 Sets the mid-frequency range
e Treble 0...100 Sets the treble (high range) level
f Presence 0...100 Sets the presence (high-frequency tone)
g Cabinet Simulater Off, On Switches the cabinet simulator on/
off
h Cabinet Type
LA - 4x10, MODERN - 4x10, METAL - 4x10, CLASSIC - 8x10, UK - 4x12, STUDIO - 1x15, JAZZ - 1x15, VOX AC100 - 2x15, US - 2x15, UK - 4x15, LA - 1x18, COMBI - 1x12 & 1x18
Selects the cabinet type
i
Wet/Dry Dry, 1:99...99:1, Wet
Balance between the wet and dry signal
Src Off...Tempo Table , “Dynamic Modulation sources,” on page 357
Amt –100...+100 Amount of modulation source
Amp Type Cabinet Type
LA STUDIO LA - 4x10, LA - 1x18
JAZZ JAZZ - 1x15
GOLD PANEL MODERN - 4x10
SCOOPED METAL - 4x10
VALVE2 CLASSIC - 8x10
VALVE CLASSIC - 8x10
CLASSIC COMBI - 1x12 & 1x18
+
Left
Right
FX Amt
Volume
FX Amt
FX Amt = 100: Mono In - Mono Out / FX Amt = 0: Stereo In - Stereo Out
D-mod
Bass Amp Model1 Cabinet Simulator
a
Tube1 Low Cut [Hz] Thru, 21...8.00k Sets the cutoff frequency for the low
cut filter of stage 1
High Cut [Hz] 53...20.00k, Thru
Sets the cutoff frequency for the high cut filter of stage 1
b
Tube1 Gain [dB] –24.0...+24.0 Sets the input gain for stage 1
Saturation [%] 0...100 Sets the input/output response for stage 1
c Tube1 Bias 0...100 Sets the bias voltage for stage 1
d Tube1 Phase Normal,Wet Invert Turns phase reversal on/off
e
Tube2 Low Cut [Hz] Thru, 21...8.00k Sets the cutoff frequency for the low
cut filter of stage 2
High Cut [Hz] 53...20.00k, Thru
Sets the cutoff frequency for the high cut filter of stage 2
f
Tube2 Gain [dB] –24.0...+24.0 Sets the input gain for stage 2
Saturation [%] 0...100 Sets the input/output response for stage 2
g Tube2 Bias 0...100 Sets the bias voltage for stage 2
h Tube2 Output Level [dB] –48.0...+0.0 Sets the output level
i
Wet/Dry Dry, 1:99...99:1, Wet
Balance between the wet and dry signal
Src Off...Tempo Table , “Dynamic Modulation sources,” on page 357
Amt –100...+100 Amount of modulation source
+ Tube Pre Amp1 Tube Pre Amp2
Left
Right
FX Amt
Output Level
FX Amt
FX Amt = 100: Mono In - Mono Out / FX Amt = 0: Stereo In - Stereo Out
–
+Invert

372 EffectsOverdrive, Amp models, and Mic models (OD Amp Mic)
b, f: Saturation [%]
With higher settings of this value, the waveform will change athigh gain levels, tending to cause distortion. Lower settings ofthis value will produce linear response.
c: Tube1 Bias
This expresses the effect that changes in vacuum tube bias haveon the distortion of the waveform. Higher settings of this valuewill produce distortion even at low gain levels. Since this willalso change the overtone structure, you can use it to control thetonal character.
d: Tube1 Phase
With the Wet Invert setting, the phase of the signal will beinverted between stage 1 and stage 2. Since “Bias” is applied tothe inverted signal in stage 2, this will change the tonal character.
24: St. Tube PreAmp(Stereo Tube PreAmp Modeling)
This is a stereo vacuum tube preamp simulator (See “Tube Pre-Amp Model (Tube PreAmp Modeling)” on page 371.).
25: Mic Model+PreAmp(Mic Modeling + PreAmp)
This effect simulates a mic and vacuum tube preamp. You canchoose from various types of mic and positions to create differ-ing sonic characters.
b: Mic Position
This expresses the effect that the mic position has on the sound.The Close setting is the closest mic position, and the Far settingis the farthest.
Mic/Pre Amp - Saturation
In
Out
Saturation = 0
Saturation = 50
Saturation = 100
Bias = 0
In
Out
Satulation = 50
Bias = 0Bias = 50Bias = 100
Mic/Pre Amp - Bias
a Mic Type
Vintage Dynamic, Multi Condenser, Percussion Condenser, Drums Dynamic, Vocal Dynamic, Multi Dynamic, Vocal Condenser, Vocal Tube, Kick Dynamic
Selects the type of mic
b Mic Position Close, On, Off, Far Sets the mic placement distance
c
Tube Low Cut [Hz] Thru, 21...8.00k Sets the frequency of the low cut
filter
High Cut [Hz] 53...20.00k, Thru
Sets the frequency of the high cut filter
dTube Gain [dB] –24.0...+24.0 Sets the input gain to the vacuum
tube preamp
Saturation [%] 0...100 Sets the input/output response of the preamp
e Tube Bias 0...100 Sets the bias level of the preamp
f Tube Output Level [dB] –48.0...+0.0 Sets the output level of the preamp
g
Wet/Dry Dry, 1:99...99:1, Wet
Balance between the wet and dry signal
Src Off...Tempo Table , “Dynamic Modulation sources,” on page 357
Amt –100...+100 Amount of modulation source
Left
Right
FX Amt
Output Level
FX Amt
Stereo In - Stereo Out
Tube Pre Amp1 Tube Pre Amp2
Tube Pre Amp1 Tube Pre Amp2
Left
Right
FX Amt
FX Amt
–�
+
–�
+
Invert
+ Tube Pre AmpMic Simulation
Left
Right
FX Amt
Output Level
FX Amt
FX Amt = 100: Mono In - Mono Out / FX Amt = 0: Stereo In - Stereo Out

373EffectsChorus, Flanger, and Phaser (Cho/Fln Phaser)
App
endi
x
Chorus, Flanger, and Phaser (Cho/FlnPhaser)
26: Stereo ChorusThis effect adds thickness and warmth to the sound by modulat-ing the delay time of the input signal. You can add spread to thesound by offsetting the phase of the left and right LFOs fromeach other.
d: L Pre Delay [msec]d: R Pre Delay [msec]
Setting the left and right delay time individually allows you tocontrol the stereo image.
27: Black Chorus/FlangerThis models a Danish-made stereo chorus + pitch modulator &flanger. Although this effect was originally intended for guitar, itwas also used by numerous keyboard players. Used with electricpiano, it produces a distinctive tone.
ModeIntensity
Increasing the “Intensity” value will strengthen the modulationeffect. This controls the effect, direct, and feedback values. Thevalues that are controlled will depend on the “Mode” setting.
aLFO Waveform Triangle, Sine Selects the LFO Waveform
LFO Phase [degree] –180...+180 Sets the LFO phase difference
between the left and right
b
LFO Frequency [Hz] 0.02...20.00 Sets the speed of the LFO
Src Off...Tempo Selects a modulation source for LFO speed
Amt –20.00...+20.00
Sets the modulation amount of LFO speed
c
MIDI Sync Off, On When this is on, the LFO speed is set by BPM, Base Note, and Times, instead of Frequency
BPMMIDI, 40.00...300.00
MIDI syncs to the system tempo; 40–300 sets the tempo manually for this individual effect
Base Note r...w Selects the type of notes that specify the LFO speed
Times x1...x32 Sets the number of notes that specify the LFO speed
d
L Pre Delay [msec] 0.0...50.0 Sets the delay time for the left
channel
R Pre Delay [msec] 0.0...50.0 Sets the delay time for the right
channel
e
Depth 0...100 Sets the depth of LFO modulation
Src Off...Tempo Selects the modulation source for the LFO modulation depth
Amt –100...+100 Sets the modulation amount of the LFO modulation depth
f EQ Trim 0...100 Sets the EQ input level
g
Pre LEQ Fc Low, Mid-Low
Selects the cutoff frequency (low or mid-low) of the low-range equalizer
Pre HEQ Fc High, Mid-High
Selects the cutoff frequency (high or mid-high) of the high-range equalizer
h
Pre LEQ Gain [dB] –15.0...+15.0 Gain of the Low EQ
Pre HEQ Gain [dB] –15.0...+15.0 Gain of the High EQ
i
Wet/Dry-Wet, -1:99...Dry...99:1, Wet
Balance between the wet and dry signal
Src Off...Tempo Table , “Dynamic Modulation sources,” on page 357
Amt –100...+100 Amount of modulation source
Chorus
Chorus
Left
Right
LFO Phase
FX Amt
FX Amt
Stereo In - Stereo Out
EQ Trim
EQ Trim
LEQ HEQ
LEQ HEQ
LFO: Tri / Sine
Speed [Hz] 0.10...10.0 Sets the LFO speed
Intensity 1...100 Sets the intensity of LFO modulation
Mode 0, 1, 2
Select a mode 0: Chorus1: Pitch Modulation2: Flanger
Width 0...2 Sets the LFO modulation depth
Input Gain 1...100 Sets the input gain
Output Mode 0, 1Select a output mode0: Mono1: Stereo
Wet/Dry Dry, 1:99 ... 99:1, Wet Balance between the wet and dry signal
Source Off...Tempo Table , “Selects a modulation source for Wet/Dry,” on page 358
Amount –100 ... +100 Table , “Sets the modulation amount for Wet/Dry,” on page 358
Left
Right
Wet / Dry
Wet / Dry
Wet: Mono In - Stereo Out / Dry: Stereo In - Stereo Out
+ Chorus
LFO
Input Gain
Mode & Intensity
Mono
StereoOutput Mode-
+
++

374 EffectsChorus, Flanger, and Phaser (Cho/Fln Phaser)
28: St.HarmonicChorus(Stereo Harmonic Chorus)
This effect applies chorus only to higher frequencies. This can beused to apply a chorus effect to a bass sound without making thesound thinner. You can also use this chorus block with feedbackas a flanger.
f: High/Low Split Point
This parameter sets the frequency that splits the high and lowrange. Only the high range will be sent to the chorus block.
g: Feedback
Sets the feedback amount of the chorus block. Increasing thefeedback will allow you to use the effect as a flanger.
29: St. Biphase Mod.(Stereo Biphase Modulation)
This stereo chorus effect adds two different LFOs together. Youcan set the Frequency and Depth parameters for each LFO indi-vidually. Depending on the setting of these LFOs, very complexwaveforms will create an analog-type, unstable modulatedsound.
aLFO Waveform Triangle, Sine Selects the LFO Waveform
LFO Phase [degree] –180...+180 Sets the LFO phase difference
between the left and right
b
LFO Frequency [Hz] 0.02...20.00 Sets the speed of the LFO
Src Off...Tempo Selects a modulation source for LFO speed
Amt –20.00...+20.00
Sets the modulation amount of LFO speed
c
MIDI Sync Off, On When this is on, the LFO speed is set by BPM, Base Note, and Times, instead of Frequency
BPMMIDI, 40.00...300.00
MIDI syncs to the system tempo; 40–300 sets the tempo manually for this individual effect
Base Note r...w Selects the type of notes that specify the LFO speed
Times x1...x32 Sets the number of notes that specify the LFO speed
d Pre Delay [msec] 0.0...50.0 Sets the delay time from the original
sound
e
Depth 0...100 Sets the depth of LFO modulation
Src Off...Tempo Selects the modulation source of the LFO modulation depth
Amt –100...+100 Sets the modulation amount of the LFO modulation depth
f High/Low Split Point 1...100 Sets the frequency split point
between the low and high range
gFeedback –100...+100 Sets the feed back amount of the
chorus block
High Damp [%] 0...100 Sets the high range damping amount of the chorus block
hLow Level 0...100 Sets the low range output level
High Level 0...100 Sets the high range (chorus) output level
i
Wet/Dry Dry, 1:99...99:1, Wet
Balance between the wet and dry signal
Src Off...Tempo Table , “Dynamic Modulation sources,” on page 357
Amt –100...+100 Amount of modulation source
Left
Right
Feedback
LFO Phase
LFO: Tri / Sine
FX Amt
FX Amt
High Damp
Stereo In - Stereo Out
Low Level
Low Level
High Level
High Level
High/Low Split PointHigh Damp
Chorus/Flanger
Chorus/Flanger
a
LFO1 Waveform Triangle, Sine Selects LFO1 waveform
LFO2 Triangle, Sine Selects LFO2 waveform
Phase Sw 0 deg, 180 deg
Switches the LFO phase difference between left and right
b
LFO1 Frequency [Hz] 0.02...30.00 Sets the LFO1 speed
Src Off...Tempo Selects the modulation source of LFO1&2 speed
LFO1 Amt –30.00...+30.00
Sets the modulation amount of LFO1 speed
c
LFO2 Frequency [Hz] 0.02...30.00 Sets the LFO2 speed
Amt –30.00...+30.00
Sets the modulation amount of LFO2 speed
d
Depth1 0...100 Sets the depth of LFO1modulation
Src Off...Tempo Selects the modulation source of LFO1&2 modulation depth
Amt –100...+100 Sets the modulation amount of LFO1 modulation depth
eDepth2 0...100 Sets the depth of LFO2
modulation
Amt –100...+100 Sets the modulation amount of LFO2 modulation depth
f
L Pre Delay [msec] 0.0...50.0 Sets the delay time for the left
channel
R Pre Delay [msec] 0.0...50.0 Sets the delay time for the right
channel
gFeedback –100...+100 Sets the feedback amount
High Damp [%] 0...100 Sets the damping amount in the
high range
h
Wet/Dry-Wet, -1:99...Dry...99:1, Wet
Balance between the wet and dry signal
Src Off...Tempo Table , “Dynamic Modulation sources,” on page 357
Amt –100...+100 Amount of modulation source
Chorus/Flanger
Left
Right
Feedback
180 [degree]
FX Amt
FX Amt
High Damp
Stereo In - Stereo Out
LFO1: Tri / Sine
LFO2: Tri / Sine
Chorus/Flanger
High Damp
LFO1
LFO2
Bi-Phase Modulation LFO
Depth1
Depth2
+

375EffectsChorus, Flanger, and Phaser (Cho/Fln Phaser)
App
endi
x
30: Multitap Cho/Delay(Multitap Chorus/Delay)
This effect has four chorus blocks with a different LFO phase.You can create a complex stereo image by setting each block’sdelay time, depth, output level, and pan individually. You canalso fix some of the chorus blocks to combine the chorus anddelay effects.
31: EnsembleThis Ensemble effect has three chorus blocks that use LFO tocreate subtle shimmering, and gives three dimensional depthand spread to the sound, because the signal is output from theleft, right, and center.
c: Shimmer
This parameter sets the amount of shimmering of the LFO wave-form. Increasing this value adds more shimmering, making thechorus effect more complex and richer.
a LFO Frequency [Hz] 0.02...13.00 Sets the speed of the LFO
b
Tap1 (000) [msec] 0...1000 Sets the Tap1 (LFO phase=0
degrees) delay time
Depth 0...30 Sets the Tap1 chorus depth
Level 0...30 Sets the Tap1 output level
Pan L6...L1, C, R1...R6 Sets the Tap1 stereo image
c
Tap2 (180) [msec] 0...1000 Sets the Tap2 (LFO phase=180
degrees) delay time
Depth 0...30 Sets the Tap2 chorus depth
Level 0...30 Sets the Tap2 output level
Pan L6...L1, C, R1...R6 Sets the Tap2 stereo image
d
Tap3 (090) [msec] 0...1000 Sets the Tap3 (LFO phase=90
degrees) delay time
Depth 0...30 Sets the Tap3 chorus depth
Level 0...30 Sets the Tap3 output level
Pan L6...L1, C, R1...R6 Sets the Tap3 stereo image
e
Tap4 (270) [msec] 0...1000 Sets the Tap4 (LFO phase=270
degrees) delay time
Depth 0...30 Sets the Tap4 chorus depth
Level 0...30 Sets the Tap4 output level
Pan L6...L1, C, R1...R6 Sets the Tap4 stereo image
f
Tap1 Feedback –100...+100 Sets the Tap1 feedback amount
Src Off...TempoSelects the modulation source of Tap1 feedback amount and effect balance
Amt –100...+100 Sets the Tap1 feedback amount and modulation amount
g
Wet/Dry Dry, 1:99...99:1, Wet
Balance between the wet and dry signal
Src Off...Tempo Table , “Dynamic Modulation sources,” on page 357
Amt –100...+100 Amount of modulation source
Left
Right
Feedback FX Amt
FX Amt
FX Amt = 100: Mono In - Stereo Out / FX Amt = 0: Stereo In -Stereo Out
+ Level
Level
Level
Level
Pan
Pan
Pan
Pan
LFO: Triangle
Tap1 Delay
Tap2 Delay
Tap3 Delay
Tap4 Delay
0 [degree]180 [degree]90 [degree]
270 [degree]
a
Speed 1...100 Sets the speed of the LFO
Src Off...Tempo Selects a modulation source for LFO speed
Amt –100...+100 Sets the modulation amount of LFO speed
b
Depth 0...100 Sets the depth of LFO modulation
Src Off...Tempo Selects the modulation source of the LFO modulation depth
Amt –100...+100 Sets the modulation amount of the LFO modulation depth
c Shimmer 0...100 Sets the amount of shimmering of the LFO waveform
d
Wet/Dry Dry, 1:99...99:1, Wet
Balance between the wet and dry signal
Src Off...Tempo Table , “Dynamic Modulation sources,” on page 357
Amt –100...+100 Amount of modulation source
Left
Right
FX Amt
FX Amt
FX Amt = 100: Mono In - Stereo Out / FX Amt = 0: Stereo In - Stereo Out
LFO
Shimmer
+ Ensemble
Time
LevelEnsemble LFO
Shimmer

376 EffectsChorus, Flanger, and Phaser (Cho/Fln Phaser)
32: Polysix EnsembleThis models the ensemble effect built into the classic Korg PolySix programmable polyphonic synthesizer.
33: Stereo FlangerThis effect gives a significant swell and movement of pitch to thesound. It is more effective when applied to a sound with a lot ofharmonics. This is a stereo flanger. You can add spread to thesound by offsetting the phase of the left and right LFOs fromeach other.
g: Feedbackh: Wet/Dry
The peak shape of the positive and negative “Feedback” value isdifferent. The harmonics will be emphasized when the effectsound is mixed with the dry sound if you set a positive value forboth “Feedback” and “Wet/Dry”, and if you set a negative valuefor both “Feedback” and “Wet/Dry”.
g: High Damp [%]
This parameter sets the amount of damping of the feedback inthe high range. Increasing the value will cut high-range harmon-ics.
a
Depth 0...100 Sets the depth of the effect
Src Off...Tempo Selects the modulation source that will control the effect depth
Amt –100...+100 Sets the amount by which the effect depth will be modulated
b
Wet/Dry Dry, 1:99...99:1, Wet
Balance between the wet and dry signal
Src Off...Tempo Table , “Dynamic Modulation sources,” on page 357
Amt –100...+100 Amount of modulation source
+ PolysixEnsemble
Left
Right
FX Amt
FX Amt
FX Amt = 100: Mono In - Mono Out / FX Amt = 0: Stereo In - Stereo Out
a Delay Time [msec] 0.0...50.0 Sets the delay time from the original
sound
bLFO Waveform Triangle, Sine Selects the LFO Waveform
LFO Shape –100...+100 Changes the curvature of the LFO Waveform
c LFO Phase [degree] –180...+180 Sets the LFO phase difference
between the left and right
d
LFO Frequency [Hz] 0.02...20.00 Sets the speed of the LFO
Src Off...Tempo Selects a modulation source for LFO speed
Amt –20.00...+20.00
Sets the modulation amount of LFO speed
e
MIDI Sync Off, On When this is on, the LFO speed is set by BPM, Base Note, and Times, instead of Frequency
BPMMIDI, 40.00...300.00
MIDI syncs to the system tempo; 40–300 sets the tempo manually for this individual effect
Base Note r...w Selects the type of notes that specify the LFO speed
Times x1...x32 Sets the number of notes that specify the LFO speed
f Depth 0...100 Sets the depth of LFOmodulation
g
Feedback –100...+100 Sets the feedback amount
High Damp [%] 0...100Sets the feedback damping amount in the high range
h
Wet/Dry-Wet, -1:99...Dry...99:1, Wet
Balance between the wet and dry signal
Src Off...Tempo Table , “Dynamic Modulation sources,” on page 357
Amt –100...+100 Amount of modulation source
Flanger
Flanger
Left
Right
Feedback
LFO Shape
LFO Phase
LFO: Tri / Sine
FX Amt
FX Amt
High Damp
Stereo In - Stereo Out

377EffectsChorus, Flanger, and Phaser (Cho/Fln Phaser)
App
endi
x
34: St. Random Flanger(Stereo Random Flanger)
The stereo effect uses a step-shape waveform and random LFOfor modulation, creating a unique flanging effect.
35: St. Env. Flanger(Stereo Envelope Flanger)
This Flanger uses an envelope generator for modulation. Youwill obtain the same pattern of flanging each time you play. Youcan also control the Flanger directly using the modulationsource.
c: Sweep Modec: Src
This parameter switches the flanger control mode. With “SweepMode” = EG, the flanger will sweep using the envelope genera-tor. This envelope generator is included in the envelope flanger,and not related to the Pitch EG, Filter EG, or Amp EG.
The “Src” parameter selects the source that starts the envelopegenerator. If you select, for example, Gate, the envelope genera-tor will start when the note-on message is received.
When “Sweep Mode” = D-mod, the modulation source can con-trol the flanger directly. Select the modulation source using the“Src” parameter.
The effect is off when a value for the modulation source specified for the “Src” parameter is smaller than 64, and the effect is on when the value is 64 or higher. The Envelope Generator is triggered when the value changes from 63 or smaller to 64 or higher.
d: EG Attackd: EG Decay
Attack and Decay speed are the only adjustable parameters onthis EG.
a Delay Time [msec] 0.0...50.0 Sets the delay time from the original
sound
bLFO Waveform Step-Tri,
Random Selects the LFO Waveform
LFO Phase [degree] –180...+180 Sets the LFO phase difference
between the left and right
c
LFO Frequency [Hz] 0.02...20.00 Sets the speed of the LFO
Src Off...Tempo Selects the modulation source used for both LFO speed and step speed
Amt –20.00...+20.00
Sets the modulation amount of LFO speed
d
LFO Step Freq [Hz] 0.05...50.00 Sets the LFO step speed (speed that
changes in steps)
Step Amt –50.00...+50.00
Sets the modulation amount of LFO step speed
e
MIDI Sync Off, On When this is on, the LFO speed is set by BPM, Base Note, and Times, instead of Frequency
BPMMIDI, 40.00...300.00
MIDI syncs to the system tempo; 40–300 sets the tempo manually for this individual effect
Base Note r...w Selects the type of notes that specify the LFO speed
Times x1...x32 Sets the number of notes that specify the LFO speed
f
Step Base Note r...w Selects the type of notes to specify the LFO step speed
Times x1...x32Sets the number of notes to specify the LFO step speed
g Depth 0...100 Sets the depth of LFOmodulation
hFeedback –100...+100 Sets the feedback amount
High Damp [%] 0...100 Sets the feedback damping amount in the high range
i
Wet/Dry-Wet, -1:99...Dry...99:1, Wet
Balance between the wet and dry signal
Src Off...Tempo Table , “Dynamic Modulation sources,” on page 357
Amt –100...+100 Amount of modulation source
LFO: Step-Tri/Random
Left
Right
Feedback
LFO Phase
FX Amt
FX Amt
High Damp
Stereo In - Stereo Out
Flanger
Flanger
a
L Dly Bottom [msec] 0.0...50.0 Sets the lower limit of the left-
channel delay time
L Dly Top [msec] 0.0...50.0 Sets the upper limit of the left-
channel delay time
b
R Dly Bottom [msec] 0.0...50.0 Sets the lower limit of the right-
channel delay time
R Dly Top [msec] 0.0...50.0 Sets the upper limit of the right-
channel delay time
c
Sweep Mode EG, D-mod
Determines whether the flanger is controlled by the envelope generator or by the modulation source
Src Off...Tempo
Selects the modulation source that triggers the EG (when Sweep Mode = EG), or the modulation source that causes the flanger to sweep (when Sweep Mode = D-mod)
dEG Attack 1...100 Sets the EG attack speed
EG Decay 1...100 Sets the EG decay speed
e Feedback –100...+100 Sets the feedback amount
f High Damp [%] 0...100Sets the feedback damping amount in the high range
g
Wet/Dry-Wet, -1:99...Dry...99:1, Wet
Balance between the wet and dry signal
Src Off...Tempo Table , “Dynamic Modulation sources,” on page 357
Amt –100...+100 Amount of modulation source
EG Attack/DecayEG
D-mod
Sweep ModeD-mod
Flanger
Flanger
Left
Right
Feedback
FX Amt
FX Amt
High Damp
Stereo In - Stereo Out

378 EffectsChorus, Flanger, and Phaser (Cho/Fln Phaser)
36: Stereo PhaserThis effect creates a swell by shifting the phase. It is very effectiveon electric piano sounds. You can add spread to the sound byoffsetting the phase of the left and right LFOs from each other.
h: Resonancei: Wet/Dry
The peak shape of the positive and negative Feedback value isdifferent. The harmonics will be emphasized when the effectsound is mixed with the dry sound, if you set a positive value forboth “Resonance” and “Wet/Dry”, and if you set a negative valuefor both “Resonance” and “Wet/Dry”.
h: High Damp [%]
This parameter sets the amount of damping of the resonance inthe high range. Increasing the value will cut high-range harmon-ics.
37: St. Random Phaser(Stereo Random Phaser)
This is a stereo phaser. The effect uses a step-shape waveformand random LFO for modulation, creating a unique phasingeffect.
aLFO Waveform Triangle, Sine Selects the LFO Waveform
LFO Shape –100...+100 Changes the curvature of the LFO Waveform
b LFO Phase [degree] –180...+180 Sets the LFO phase difference
between the left and right
c
LFO Frequency [Hz] 0.02...20.00 Sets the speed of the LFO
Src Off...Tempo Selects a modulation source for LFO speed
Amt –20.00...+20.00
Sets the modulation amount of LFO speed
d
MIDI Sync Off, On When this is on, the LFO speed is set by BPM, Base Note, and Times, instead of Frequency
BPMMIDI, 40.00...300.00
MIDI syncs to the system tempo; 40–300 sets the tempo manually for this individual effect
Base Note r...w Selects the type of notes that specify the LFO speed
Times x1...x32 Sets the number of notes that specify the LFO speed
e
Manual 0...100 Sets the frequency to which the effect is applied
Src Off...Tempo Selects the modulation source for the LFO modulation
Amt –100...+100 Sets the modulation amount of the LFO modulation
f
Depth 0...100 Sets the depth of LFO modulation
Src Off...Tempo Selects the modulation source for the LFO modulation depth
Amt –100...+100 Sets the modulation amount of the LFO modulation depth
h
Resonance –100...+100 Sets the resonance amount
High Damp [%] 0...100Sets the resonance damping amount in the high range
j
Wet/Dry-Wet, -1:99...Dry...99:1, Wet
Balance between the wet and dry signal
Src Off...Tempo Table , “Dynamic Modulation sources,” on page 357
Amt –100...+100 Amount of modulation source
Left
Right
Resonance
LFO Shape
LFO Phase
LFO: Tri / Sine
FX Amt
FX Amt
High Damp
Stereo In - Stereo Out
Phaser
Phaser
aLFO Waveform Step-Tri, Step-
Sin, Random Selects the LFO Waveform
LFO Phase [degree] –180...+180 Sets the LFO phase difference
between the left and right
b
LFO Frequency [Hz] 0.02...20.00 Sets the speed of the LFO
Src Off...TempoSelects the modulation source commonly used for LFO speed and step speed
Amt –20.00...+20.00
Sets the modulation amount of LFO speed
c
LFO Step Freq [Hz] 0.05...50.00 Sets the LFO step speed
Amt –50.00...+50.00
Sets the modulation amount of LFO step speed
d
MIDI Sync Off, On When this is on, the LFO speed is set by BPM, Base Note, and Times, instead of Frequency
BPMMIDI, 40.00...300.00
MIDI syncs to the system tempo; 40–300 sets the tempo manually for this individual effect
Base Note r...w Selects the type of notes that specify the LFO speed
Times x1...x32 Sets the number of notes that specify the LFO speed
e
Step Base Note r...wSelects the type of notes to specify the LFO step speed
Times x1...x32Sets the number of notes to specify the LFO step speed
f
Manual 0...100 Sets the frequency to which the effect is applied
Src Off...Tempo Selects the modulation source for the LFO modulation
Amt –100...+100 Sets the modulation amount of the LFO modulation
g Depth 0...100 Sets the depth of LFO modulation
h
Resonance –100...+100 Sets the resonance amount
High Damp [%] 0...100Sets the resonance damping amount in the high range
i
Wet/Dry-Wet, -1:99...Dry...99:1, Wet
Balance between the wet and dry signal
Src Off...Tempo Table , “Dynamic Modulation sources,” on page 357
Amt –100...+100 Amount of modulation source
LFO: Step-Tri/Random
Left
Right
Resonance
LFO Phase
FX Amt
FX Amt
High Damp
Stereo In - Stereo Out
Phaser
Phaser

379EffectsModulation and Pitch Shift (Mod./P.Shift)
App
endi
x
38: St. Env. Phaser(Stereo Envelope Phaser)
This stereo phaser uses an envelope generator for modulation.You will obtain the same pattern of phasing each time you play.You can also control the Phaser directly using the modulationsource.
Modulation and Pitch Shift (Mod./P.Shift)
39: Stereo VibratoThis effect causes the pitch of the input signal to shimmer. Usingthe AutoFade allows you to increase or decrease the shimmeringspeed.
a
L Manu Bottom 0...100
Sets the lower limit of the frequency range for the effect on the left channel
L Manu Top 0...100Sets the upper limit of the frequency range for the effect on the left channel
b
R Manu Bottom 0...100
Sets the lower limit of the frequency range for the effect on the right channel
R Manu Top 0...100Sets the upper limit of the frequency range for the effect on the right channel
c
Sweep Mode EG, D-mod
Determines whether the flanger is controlled by the envelope generator or by the modulation source
Src Off...Tempo
Selects the modulation source that triggers the EG (when EG is selected for Sweep Mode), or modulation source that causes the flanger to sweep (when D-mod is selected for Sweep Mode)
dEG Attack 1...100 Sets the EG attack speed
EG Decay 1...100 Sets the EG decay speed
e Resonance –100...+100 Sets the resonance amount
f High Damp [%] 0...100Sets the resonance damping amount in the high range
g
Wet/Dry-Wet, -1:99...Dry...99:1, Wet
Balance between the wet and dry signal
Src Off...Tempo Table , “Dynamic Modulation sources,” on page 357
Amt –100...+100 Amount of modulation source
EG Attack/DecayEG
D-mod
Sweep ModeD-mod
Phaser
Phaser
Left
Right
Resonance
FX Amt
FX Amt
High Damp
Stereo In - Stereo Out
a AUTOFADE Src Off...Tempo Selects the modulation source that starts AutoFade
b
Fade-In Delay [msec] 00...2000 Sets the fade-in delay time
Fade-In Rate 1...100 Sets the rate of fade-in
cLFO Waveform Triangle, Sine Selects the LFO Waveform
LFO Shape –100...+100 Changes the curvature of the LFO Waveform
d LFO Frequency Mod
D-mod, AUTOFADE
Switches between D-mod and AUTOFADE for the LFO frequency modulation
e
LFO Frequency [Hz] 0.02...20.00 Sets the speed of the LFO
Src Off...Tempo Selects a modulation source for LFO speed
Amt –20.00...+20.00
Sets the modulation amount of LFO speed
f
MIDI Sync Off, On When this is on, the LFO speed is set by BPM, Base Note, and Times, instead of Frequency
BPMMIDI, 40.00...300.00
MIDI syncs to the system tempo; 40–300 sets the tempo manually for this individual effect
Base Note r...w Selects the type of notes that specify the LFO speed
Times x1...x32 Sets the number of notes that specify the LFO speed
g
Depth 0...100 Sets the depth of LFO modulation
Src Off...Tempo Selects the modulation source of the LFO modulation depth
Amt –100...+100 Sets the modulation amount of the LFO modulation depth
h
Wet/Dry Dry, 1:99...99:1, Wet
Balance between the wet and dry signal
Src Off...Tempo Table , “Dynamic Modulation sources,” on page 357
Amt –100...+100 Amount of modulation source
Vibrato
Vibrato
Left
Right
FX Amt
FX Amt
Stereo In - Stereo Out
LFO: Tri / Sine LFO Shape
Fade-In Delay LFO FrequencyAutoFade

380 EffectsModulation and Pitch Shift (Mod./P.Shift)
a: AUTOFADE Srcb: Fade-In Delay [msec]b: Fade-In Rated: LFO Frequency Mod
When “LFO Frequency Mod” is set to AUTOFADE, you can usethe modulation source selected in “AUTOFADE Src” as a triggerto automatically fade in the modulation amount. When “MIDISync” is set to On, you cannot use this.
The “Fade-In Rate” parameter specifies the rate of fade-in. The“Fade-In Delay” parameter determines the time from AutoFademodulation source On until the fade-in starts.
The following is an example of fade-in where the LFO speed isincreased from “1.0Hz” to “4.0Hz” when a note-on message isreceived.
AUTOFADE Src=Gate1, LFO Frequency Mod=AUTOFADE,LFO Frequency [Hz]=1.0, Amt=3.0
The effect is off when a value for the dynamic modulation source specified for the “AUTOFADE Src” parameter is smaller than 64, and the effect is on when the value is 64 or higher. The AutoFade function is triggered when the value changes from 63 or smaller to 64 or higher.
40: St. Auto Fade Mod.(Stereo Auto Fade Modulatiom)
This stereo chorus/flanger effect enables you to control the LFOspeed and effect balance using auto fade, and you can spread thesound by offsetting the phase of the left and right LFOs fromeach other.
AUTOFADE AutoFade
Note On All Note Off
Fade-In Rate
Source=Gate1�LFO Freq. Mod=AUTOFADE�LFO Frequency[Hz]=1.0�Amount=+3.0
LFO Frequency�=1.0+3.0=4.0Hz
LFO Frequency�=1.0Hz
Gate1 Signal
AUTOFADEFade-In Dealy
a
AUTOFADE Src Off...Tempo Selects the modulation source that starts AutoFade
Fade-In Delay [msec] 00...2000 Sets the fade-in delay time
Rate 1...100 Sets the rate of fade-in
b
LFO Frequency Mod
D-mod, AUTOFADE
Switches between D-mod and AUTOFADE for the LFO frequency modulation
Wet/Dry Mod D-mod, AUTOFADE
Switches between D-mod and AUTOFADE for the effect balance modulation
cLFO Waveform Triangle, Sine Selects the LFO Waveform
LFO Shape –100...+100 Changes the curvature of the LFO Waveform
d LFO Phase [degree] –180...+180 Sets the LFO phase difference
between the left and right
e
LFO Frequency [Hz] 0.02...20.00 Sets the speed of the LFO
Src Off...Tempo Selects a modulation source for LFO speed
Amt –20.00...+20.00
Sets the modulation amount of LFO speed
f
L Delay Time [msec] 0.0...500.0 Sets the left channel delay time
R Delay Time [msec] 0.0...500.0 Sets the right channel delay time
g Depth 0...200 Sets the depth of LFO modulation
h
Feedback –100...+100 Sets the feedback amount
High Damp [%] 0...100Sets the feedback damping amount in the high range
i
Wet/Dry-Wet, -1:99...Dry...99:1, Wet
Balance between the wet and dry signal
Src Off...Tempo Table , “Dynamic Modulation sources,” on page 357
Amt –100...+100 Amount of modulation source
AutoFade LFO Frequency
FX Amt
Delay
Delay
Left
Right
Feedback
LFO Shape
LFO Phase
LFO: Tri / Sine
FX Amt
FX Amt
High Damp
Stereo In - Stereo Out

381EffectsModulation and Pitch Shift (Mod./P.Shift)
App
endi
x
41: 2Voice ResonatorThis effect resonates the input signal at a specified pitch. You canset the pitch, output level, and pan settings for two resonatorsindividually. You can control the resonance intensity via an LFO.
a: Control Modef: Voice 1: Resonanceh: Voice 2: Resonance
This parameter determines the resonance intensity.
When “Control Mode” = Manual, the “Resonance” parametersets the intensity of resonance. If the “Resonance” parameter hasa negative value, harmonics will be changed, and resonance willoccur at a pitch one octave lower.
When “Control Mode” = LFO, the intensity of resonance variesaccording to the LFO. The LFO sways between positive and neg-ative values, causing resonance to occur between specifiedpitches an octave apart in turn.
When “Control Mode” = D-mod, the resonance is controlled bythe dynamic modulation source. If JS X or Ribbon is assigned asthe modulation source, the pitch an octave higher and lower canbe controlled, similar to when LFO is selected for Control Mode.
a: LFO/D-mod Invert
When “Control Mode” = LFO or D-mod, the controlled phase ofeither Voice 1 or 2 will be reversed. When the resonance pitch isset for Voice 1 (Resonance has a positive value), Voice 2 will res-onate at a pitch an octave below (Resonance has a negativevalue).
f: Voice 1: Pitchf: Fine [cents]h: Voice 2: Pitchh: Fine [cents]
The Pitch parameter specifies the pitch of resonance by notename. The “Fine” parameter allows for fine adjustment in stepsof cents.
g: High Damp [%]i: High Damp [%]
This sets the amount of damping amount for the high frequen-cies of the resonant sound. Lower values create a metallic soundwith a higher range of harmonics.
aControl Mode Manual, LFO,
D-modSwitches the controls of resonance intensity
LFO/D-mod Invert Off, On Reverses the Voice 1 and 2 control
when LFO/D-mod is selected
b
LFO Frequency [Hz] 0.02...20.00 Sets the speed of the LFO
D-mod Src Off...Tempo Selects the modulation source that controls resonance intensity
c
MIDI Sync Off, On When this is on, the LFO speed is set by BPM, Base Note, and Times, instead of Frequency
BPMMIDI, 40.00...300.00
MIDI syncs to the system tempo; 40–300 sets the tempo manually for this individual effect
Base Note r...w Selects the type of notes that specify the LFO speed
Times x1...x32 Sets the number of notes that specify the LFO speed
dMod. Depth –100...+100 Sets the amount of resonance
intensity control via LFO/D-mod
Trim 0...100 Sets the input level at the resonator
e
Voice1: Pitch C0...B8 Sets the voice1 Pitch for resonance
Fine [cents] –50...+50 Fine-adjusts the voice 1 pitch for resonance
Level 0...100 Sets the Voice1 output level
f
Voice1: Resonance –100...+100 Sets the intensity of resonance
when Control Mode = Manual
High Damp [%] 0...100 Sets the damping amount of resonant sound in the high range
Pan L6...L1, C, R1...R6 Sets the Voice1 stereo image
g
Voice2: Pitch C0...B8 Sets the voice 2 Pitch for resonance
Fine [cents] –50...+50 Fine-adjusts the voice 2 pitch for resonance
Level 0...100 Sets the Voice2 output level
h
Voice2: Resonance –100...+100 Sets the intensity of resonance
when Control Mode = Manual
High Damp [%] 0...100 Sets the damping amount of resonant sound in the high range
Pan L6...L1, C, R1...R6 Sets the Voice2 stereo image
i
Wet/Dry Dry, 1:99...99:1, Wet
Balance between the wet and dry signal
Src Off...Tempo Table , “Dynamic Modulation sources,” on page 357
Amt –100...+100 Amount of modulation source
Left
Right
Resonance
FX Amt
FX Amt
FX Amt = 100: Mono In - Stereo Out / FX Amt = 0: Stereo In - Stereo Out
High Damp
High DampTrim
Trim
+
Level
Level Pan
Pan
Control Mode
D-mod
LFO
Manual
Invert: On/Off
Resonator
Resonator
Pitch, Fine [cents]

382 EffectsModulation and Pitch Shift (Mod./P.Shift)
42: DopplerThis effect simulates the “Doppler effect” of a moving soundwith a changing pitch, similar to the siren of an passing ambu-lance. Mixing the effect sound with the dry sound will create aunique chorus effect.
a: LFO Modea: Srcb: LFO Sync
The “LFO Mode” parameter switches LFO operation mode.When Loop is selected, the Doppler effect will be created repeat-edly. If “LFO Sync” is set to On, the LFO will be reset when themodulation source specified with the “Src” parameter is turnedon.
When “LFO Mode” is set to 1-Shot, the Doppler effect is createdonly once when the modulation source specified in the “Src”field is turned on. At this time if you do not set the “Src” param-eter, the Doppler effect will not be created, and no effect soundwill be output.
The effect is off when a value for the modulation source specified for the “Src” parameter is smaller than 64, and the effect is on when the value is 64 or higher. The Doppler effect is triggered when the value changes from 63 or smaller to 64 or higher.
e: Pitch Depth
With the Doppler effect, the pitch is raised when the soundapproaches, and the pitch is lowered when the sound goes away.This parameter sets this pitch variation.
f: Pan Depth
This parameter sets the width of the stereo image of the effectsound. With larger values, the sound seems to come and go frommuch further away. With positive values, the sound moves fromleft to right; with negative values, the sound moves from right toleft.
43: ScratchThis effect is applied by recording the input signal and movingthe modulation source. It simulates the sound of scratches youcan make using a turntable.
aLFO Mode Loop, 1-Shot Switches LFO operation mode
Src Off...Tempo Selects the modulation source of LFO reset
b LFO Sync Off, On Switches between LFO reset on and off when LFO Mode is set to Loop
c
LFO Frequency [Hz] 0.02...20.00 Sets the speed of the LFO
Src Off...Tempo Selects a modulation source for LFO speed
Amt –20.00...+20.00
Sets the modulation amount of LFO speed
d
MIDI Sync Off, On When this is on, the LFO speed is set by BPM, Base Note, and Times, instead of Frequency
BPMMIDI, 40.00...300.00
MIDI syncs to the system tempo; 40–300 sets the tempo manually for this individual effect
Base Note r...w Selects the type of notes that specify the LFO speed
Times x1...x32 Sets the number of notes that specify the LFO speed
e
Pitch Depth 0...100 Sets the pitch variation of the moving sound
Src Off...Tempo Selects the modulation source of pitch variation
Amt –100...+100 Sets the modulation amount of pitch variation
f
Pan Depth –100...+100 Sets the panning of the moving sound
Src Off...Tempo Selects the modulation source of panning
Amt –100...+100 Sets the modulation amount of panning
g
Wet/Dry Dry, 1:99...99:1, Wet
Balance between the wet and dry signal
Src Off...Tempo Table , “Dynamic Modulation sources,” on page 357
Amt –100...+100 Amount of modulation source
Left
Right
FX Amt
FX Amt
FX Amt = 100: Mono In - Stereo Out / FX Amt = 0: Stereo In - Stereo Out
Pan Depth
D-mod
+
Trigger LFO Mode = 1-Shot
Doppler
LFO
a Scratch Source Off...Tempo Selects the modulation source for simulation control
b Response 0...100 Sets the speed of the response to the Scratch Src
c
Envelope Select D-mod, Input
Selects whether the start and end of recording is controlled via the modulation source or the input signal level
Src Off...TempoSelects the modulation source that controls recording when Envelope Select is set to D-mod
d Threshold 0...100 Sets the recording start level when Envelope Select is set to Input
e Response 0...100 Sets the speed of the response to the end of recording
f Direct MixAlways On, Always Off, Cross Fade
Selects how a dry sound is mixed
g
Wet/Dry Dry, 1:99...99:1, Wet
Balance between the wet and dry signal
Src Off...Tempo Table , “Dynamic Modulation sources,” on page 357
Amt –100...+100 Amount of modulation source
Pitch
Hig
her
Doppler - Pitch / Pan Depth
Lo
wer
Original Pitch
Left Center Right
Pitch Depth
Pan Depth< < < < < <<<<<< >>>>>> > > > > >
VolumeLouder Louder
Pan Depth�= (–) value
Pan Depth�= (+) value
Input
D-mod
Envelope Select
D-modEnvelope Control
Left
Right
FX Amt
FX Amt
FX Amt = 100: Mono In - Mono Out / FX Amt = 0: Stereo In - Stereo Out
+ ScratchDirect
Mix
D-mod
Rec Control Scratch

383EffectsModulation and Pitch Shift (Mod./P.Shift)
App
endi
x
a: Scratch Sourceb: Response
The Scratch Source parameter enables you to select the modula-tion source that controls simulation. The value of the modula-tion source corresponds to the playback position. The Responseparameter enables you to set the speed of the response to themodulation source.
c: Envelope Selectc: Srcd: Threshold
When “Envelope Select” is set to D-mod, the input signal will berecorded only when the modulation source value is 64 or higher.
When “Envelope Select” is set to Input, the input signal will berecorded only when its level is over the Threshold value.
The maximum recording time is 2,730msec. If this is exceeded,the recorded data will start being erased from the top.
e: Response
This parameter enables you to set the speed of the response tothe end of recording. Set a smaller value when you are recordinga phrase or rhythm pattern, and set a higher value if you arerecording only one note.
f: Direct Mix
With Always On, a dry sound is usually output. With AlwaysOff, dry sounds are not output. With Cross Fade, a dry sound isusually output, and it is muted only when scratching.
Set Wet/Dry to 100 to use this parameter effectively.
44: Grain ShifterThis effect cuts extremely short samples (“grains”) from theinput signal waveform and plays them repeatedly, giving amechanical character to the sound.
a: Durationc: LFO Sample Cycle [Hz]
Duration sets the length of the sampled grain, and the LFOSample Cycle controls how often a new grain is sampled. Inbetween Sample Cycles, the current grain is repeated continu-ously.
+ MaxZero
Scratch!
D-mod
– MaxJS X�Ribbon
JS+Y�JS–Y�etc…
Zero + Max
Scratch Source
Recorded Sound
Scratch Source
Start Playback Position End
a
Duration 0...100 Sets the duration of the grain
Src Off...Tempo Selects the source that will modulate the duration of the grain
Amt –100...+100 Sets the amount by which the grain duration will be modulated
b LFO Sync Src Off...Tempo Selects the modulation source that will reset the LFO
c
LFO Sample Cycle [Hz] 0.02...20.00 Sets the frequency at which the
grain will be switched
Src Off...Tempo Selects a modulation source for LFO speed
Amt –20.00...+20.00
Sets the modulation amount of LFO speed
d
MIDI Sync Off, On When this is on, the LFO speed is set by BPM, Base Note, and Times, instead of Frequency
BPMMIDI, 40.00...300.00
MIDI syncs to the system tempo; 40–300 sets the tempo manually for this individual effect
Base Note r...w Selects the type of notes that specify the LFO speed
Times x1...x32 Sets the number of notes that specify the LFO speed
e
Wet/Dry Dry, 1:99...99:1, Wet
Balance between the wet and dry signal
Src Off...Tempo Table , “Dynamic Modulation sources,” on page 357
Amt –100...+100 Amount of modulation source
+
Left
Right
Sample Cycle
FX Amt
FX Amt
FX Amt = 100: Mono In - Mono Out / FX Amt = 0: Stereo In - Stereo Out
LFO
D-mod Trigger
Grain Shifter
In
Out
Sample Cycle / Duration
Sample Cycle
Duration

384 EffectsModulation and Pitch Shift (Mod./P.Shift)
45: Stereo TremoloThis effect modulates the volume level of the input signal. Theeffect is stereo, and offsetting the LFO of the left and right phasesfrom each other produces a tremolo effect between left andright.
a: LFO Waveform
This parameter sets the basic shape of the LFO. The Vintagewaveform models classic guitar-amp tremolo.
b: LFO Phase [degree]
This parameter determines the difference between the left andright LFO phases. A higher value will simulate the auto-paneffect in which the sound is panned between left and right.
46: St. Env. Tremolo(Stereo Envelope Tremolo)
This effect uses the input signal level to modulate a stereo trem-olo (LFO volume modulation). For instance, you can create atremolo effect that becomes deeper and faster as the input getsmore quiet.
d: LFO Frequency [Hz]d: Envelope Amount [Hz]e: Depthe: Envelope Amount
The graphic below shows an example of tremolo modulationwith negative modulation of both Depth and Frequency. At thestart of the note, the input is at maximum volume. This slowsdown the LFO Frequency to 1.0Hz, but also modulates theDepth to 0–so the tremolo doesn’t have any effect.
As the input volume dies down, the Frequency speeds up; theDepth also increases, making the tremolo effect increasinglyaudible. When the input volume approaches silence, the Depthis at its maximum (100) and Frequency is at 8Hz.
aLFO Waveform
Triangle, Sine, Vintage, Up, Down
Selects the LFO Waveform
LFO Shape –100...+100 Changes the curvature of the LFO Waveform
b LFO Phase [degree] –180...+180 Sets the LFO phase difference
between the left and right
c
LFO Frequency [Hz] 0.02...20.00 Sets the speed of the LFO
Src Off...Tempo Selects a modulation source for LFO speed
Amt –20.00...+20.00
Sets the modulation amount of LFO speed
d
MIDI Sync Off, On When this is on, the LFO speed is set by BPM, Base Note, and Times, instead of Frequency
BPMMIDI, 40.00...300.00
MIDI syncs to the system tempo; 40–300 sets the tempo manually for this individual effect
Base Note r...w Selects the type of notes that specify the LFO speed
Times x1...x32 Sets the number of notes that specify the LFO speed
e
Depth 0...100 Sets the depth of LFO modulation
Src Off...Tempo Selects the modulation source of the depth of modulation
Amt –100...+100 Sets the modulation amount of the depth of modulation
f
Wet/Dry Dry, 1:99...99:1, Wet
Balance between the wet and dry signal
Src Off...Tempo Table , “Dynamic Modulation sources,” on page 357
Amt –100...+100 Amount of modulation source
Left
Right
FX Amt
FX Amt
Stereo In - Stereo Out
LFO Phase
LFO: Tri/Sin/Vintage/Up/Down LFO Shape
Tremolo
Tremolo
Tremolo - LFO Waveform
Triangle Sine Vintage Up Down
aEnvelope Sens 0...100 Sets the envelope’s sensitivity to the
input signal
Envelope Shape –100...+100 Sets the envelope’s curvature
bLFO Waveform Triangle, Sine,
Vintage Selects the LFO Waveform
LFO Shape –100...+100 Changes the curvature of the LFO Waveform
c LFO Phase [degree] –180...+180 Sets the LFO phase difference
between the left and right
d
LFO Frequency [Hz] 0.02...20.00 Sets the speed of the LFO
Envelope Amount [Hz]
–20.00...+20.00
Sets the amount added to or subtracted from the Frequency when the envelope is at maximum
e
Depth 0...100 Sets the initial amount of tremolo
Envelope Amount –100...+100
Sets the amount added to or subtracted from the Depth when the envelope is at maximum
f
Wet/Dry Dry, 1:99...99:1, Wet
Balance between the wet and dry signal
Src Off...Tempo Table , “Dynamic Modulation sources,” on page 357
Amt –100...+100 Amount of modulation source
Left
Right
FX Amt
FX Amt
Stereo In - Stereo Out
LFO Phase
LFO Shape
Envelope Sens+ Envelope
LFO: Tri/Sin/Vintage
Envelope Shape
Tremolo
Tremolo
Level
Lo
ud
er
Time
Shimmer
LFO Frequency[Hz]=8.0�Envelope Amount[Hz]= –7.0Hz�Depth=100�Envelope Amount= –100
Dry Envelope

385EffectsModulation and Pitch Shift (Mod./P.Shift)
App
endi
x
47: Stereo Auto PanThis is a stereo-in, stereo-out auto-panner. The Phase and Shapeparameters lets you create various panning effects, such as mak-ing the left and right inputs seem to chase each other around thestereo field.
a: LFO Shape
You can change the panning curve by modifying the LFO’sShape.
b: LFO Phase [degree]
This determines the phase difference between the left and rightLFOs. When you gradually change the value away from 0, thesounds from the left and right channels will seem to chase eachother around. If you set the parameter to +180 or –180, thesounds from each channel will cross over each other.
You’ll only hear the effect of this parameter if the input is truestereo, with different signals in the left and right channels.
48: St. Phaser + Trml(Stereo Phaser + Tremolo)
This effect combines a stereo phaser and tremolo, with linkedLFOs. Swelling phaser modulation and tremolo effects synchro-nize with each other, creating a soothing modulation effect par-ticularly suitable for electric piano.
aLFO Waveform Triangle, Sine Selects the LFO Waveform
LFO Shape –100...+100 Changes the curvature of the LFO Waveform
b LFO Phase [degree] –180...+180 Sets the LFO phase difference
between the left and right
c
LFO Frequency [Hz] 0.02...20.00 Sets the speed of the LFO
Src Off...Tempo Selects a modulation source for LFO speed
Amt –20.00...+20.00
Sets the modulation amount of LFO speed
d
MIDI Sync Off, On When this is on, the LFO speed is set by BPM, Base Note, and Times, instead of Frequency
BPMMIDI, 40.00...300.00
MIDI syncs to the system tempo; 40–300 sets the tempo manually for this individual effect
Base Note r...w Selects the type of notes that specify the LFO speed
Times x1...x32 Sets the number of notes that specify the LFO speed
e
Depth 0...100 Sets the depth of LFO modulation
Src Off...Tempo Selects the modulation source of the depth of modulation
Amt –100...+100 Sets the modulation amount of the depth of modulation
f
Wet/Dry Dry, 1:99...99:1, Wet
Balance between the wet and dry signal
Src Off...Tempo Table , “Dynamic Modulation sources,” on page 357
Amt –100...+100 Amount of modulation source
Left
Right
FX Amt
FX Amt
Stereo In - Stereo Out
LFO Phase
LFO Shape
Pan
Pan
LFO: Tri / Sin
Depth
a Type
Phs - Trml, ...Phs LR - Trml LR
Selects the type of the tremolo and phaser LFOsPhaser - Tremolo, Phaser - Tremolo Spin, Phaser - Tremolo LR, Phaser LR - Tremolo, Phaser LR - Tremolo Spin, Phaser LR - Tremolo LR
LFO Phase [degree] –180...+180 Sets the phase difference between
the tremolo and phaser LFOs
b
LFO Frequency [Hz] 0.02...20.00 Sets the speed of the LFO
Src Off...Tempo Selects a modulation source for LFO speed
Amt –20.00...+20.00
Sets the LFO speed modulation amount
c
MIDI Sync Off, On When this is on, the LFO speed is set by BPM, Base Note, and Times, instead of Frequency
BPMMIDI, 40.00...300.00
MIDI syncs to the system tempo; 40–300 sets the tempo manually for this individual effect
Base Note r...w Selects the type of notes that specify the LFO speed
Times x1...x32 Sets the number of notes that specify the LFO speed
dPhaser Manual 0...100 Sets the phaser frequency range
Resonance –100...+100 Sets the phaser resonance amount
e
Phaser Depth 0...100 Sets the phaser modulation depth
Src Off...Tempo Selects the modulation source for the phaser modulation depth
Amt –100...+100 Sets the modulation amount for the phaser modulation depth
f Phaser Wet/Dry
–Wet, –2 : 98...Dry... 2 : 98, Wet
Sets the balance between the phaser effect and dry sounds
g Tremolo Shape –100...+100 Sets the degree of the tremolo LFO shaping
h
Tremolo Depth 0...100 Sets the tremolo modulation depth
Src Off...Tempo Selects the modulation source for the tremolo modulation depth
Amt –100...+100 Sets the modulation amount of the tremolo modulation depth
L-In
Left Center RightOutput Stereo Image
R-In
L-In
R-In
L-In
R-In
L-In
R-In
L-In
R-In
L-In
R-In
L-In
R-In
L-In
R-In
L-In
R-In
L-In
R-In
L-In
R-In
L-In
R-In
L-In
R-In
L-In
R-In
L-In
R-In
LFO Phase = 0 degrees LFO Phase = 90 degrees LFO Phase = 180 degrees
Stereo Auto Pan - LFO Phase
Phaser
Phaser
Left
Right
Resonance
LFO Type
FX Amt
FX Amt
Stereo In - Stereo Out
Phaser FX Amt
Phaser FX Amt
LFOLFO Phase
LFO Shape
Tremolo
Tremolo

386 EffectsModulation and Pitch Shift (Mod./P.Shift)
a: Typea: LFO Phase [degree]
Select the type of phaser LFO and tremolo LFO for the “Type”parameter. How the effect sound moves or rotates depends onthe type of LFO. Selecting “LFO Phase” enables you to offset thetiming of the phaser peak and control a subtle movement androtation of the sound.
f: Phaser Wet/Dryi: Wet/Dry
PHASER Wet/Dry sets the balance between the phaser outputand the dry sound. OUTPUT Wet/Dry sets the balance betweenthe final phaser and tremolo output level and the dry sound.
49: St. Ring Modulator(Stereo Ring Modulator)
This effect creates a metallic sound by applying the oscillators tothe input signal. Use the LFO or Dynamic Modulation to modu-late the oscillator to create a radical modulation. Matching theoscillator frequency with a note number will produce a ringmodulation effect in specific key ranges.
a: OSC Mode
This parameter determines whether or not the oscillator fre-quency follows the note number.
a: Pre LPF
This parameter enables you to set the damping amount of thehigh range sound input to the ring modulator. If the input soundcontains lots of harmonics, the effect may sound dirty. In thiscase, cut a certain amount of high range.
b: Fixed Frequency [Hz]
This parameter sets the oscillator frequency when “OSC Mode”is set to Fixed.
c: Note Offsetc: Note Fine
These parameters for the oscillator are used when “OSC Mode”is set to Note (Key Follow). The “Note Offset” sets the pitch dif-ference from the original note in semitone steps. The “NoteFine” parameter fine-adjusts the pitch in cent steps. Matchingthe oscillator frequency with the note number produces a ringmodulation effect in the correct key.
i
Wet/Dry Dry, 1:99...99:1, Wet
Balance between the wet and dry signal
Src Off...Tempo Table , “Dynamic Modulation sources,” on page 357
Amt –100...+100 Amount of modulation source
a
OSC Mode Fixed, Note (Key Follow)
Switching between specifying the oscillator frequency and using a note number
Pre LPF 0...100Sets the damping amount of the high range input to the ring modulator
b
Fixed Frequency [Hz] 0...12.00k Sets the oscillator frequency when
OSC Mode is set to Fixed
Src Off...TempoSelects the modulation source for the oscillator frequency when OSC Mode is set to Fixed
Amt –12.00k...+12.00k
Sets the modulation amount of the oscillator frequency when OSC Mode is set to Fixed
cNote Offset –48...+48
Sets the pitch difference from the original note when OSC Mode is set to Note (Key Follow)
Note Fine –100...+100 Fine-adjusts the oscillator frequency
d
LFO Frequency [Hz] 0.02...20.00 Sets the speed of the LFO
Src Off...Tempo Selects a modulation source for LFO speed
Amt –20.00...+20.00
Sets the modulation amount of LFO speed
Left
Right
FX Amt
FX Amt
Stereo In - Stereo Out
Pre LPF
Ring Modulator
Pre LPF
Ring Modulator
Note No.OSC Mode
Fixed
Note (Key Follow)
Fixed FrequencyPitch
Note Offset, Fine
Sine Oscillator
LFO
e
MIDI Sync Off, On When this is on, the LFO speed is set by BPM, Base Note, and Times, instead of Frequency
BPMMIDI, 40.00...300.00
MIDI syncs to the system tempo; 40–300 sets the tempo manually for this individual effect
Base Note r...w Selects the type of notes that specify the LFO speed
Times x1...x32 Sets the number of notes that specify the LFO speed
f
LFO Depth 0...100 Sets the depth of LFO modulation for the oscillator frequency
Src Off...Tempo Selects the modulation source of the depth of modulation
Amt –100...+100 Sets the modulation amount of the depth of modulation
g
Wet/Dry Dry, 1:99...99:1, Wet
Balance between the wet and dry signal
Src Off...Tempo Table , “Dynamic Modulation sources,” on page 357
Amt –100...+100 Amount of modulation source

387EffectsModulation and Pitch Shift (Mod./P.Shift)
App
endi
x
50: DetuneUsing this effect, you can obtain a detune effect that offsets thepitch of the effect sound slightly from the pitch of the input sig-nal. Compared to the chorus effect, a more natural sound thick-ness will be created.
d: Input Level Dmod [%]d: Src
This parameter sets the dynamic modulation of the input level.
51: Pitch ShifterThis effect changes the pitch of the input signal. You can selectfrom three types: Fast (quick response), Medium, and Slow (pre-serves tonal quality). You can also create an effect in which thepitch is gradually raised (or dropped) using the delay with feed-back.
a: Mode
This parameter switches the pitch shifter operating mode. WithSlow, tonal quality will not be changed too much. With Fast, theeffect becomes a Pitch Shifter that has a quick response, but maychange the tone. Medium is in-between these two. If you do notneed to set too much pitch shift amount, set this parameter toSlow. If you wish to change the pitch significantly, use Fast.
b: Pitch Shift [1/2tone]b: Srcb: Amtc: Fine [cents]c: Amt
The amount of pitch shift will use the value of the Pitch Shiftplus the Fine value. The amount of modulation will use the b:Amt value plus the c: Amt.
The same Modulation Source is used for both Pitch Shift andFine.
e: Feedback Positionf: Feedback
When Feedback Position is set to Pre, the pitch shifter output isagain input to the pitch shifter. Therefore, if you specify a higher
a
Pitch Shift [cents] –100...+100 Sets the pitch difference from the
input signal
Src Off...Tempo Selects a modulation source for pitch shift
Amt –100...+100 Sets the modulation amount for pitch shift
b Delay Time [msec] 0...1000 Sets the delay time
cFeedback –100...+100 Sets the feedback amount
High Damp [%] 0...100 Sets the damping amount in the high range
d
Input Level Dmod [%] –100...+100 Sets the modulation amount of the
input level
Src Off...Tempo Selects the modulation source for the input level
e
Wet/Dry Dry, 1:99...99:1, Wet
Balance between the wet and dry signal
Src Off...Tempo Table , “Dynamic Modulation sources,” on page 357
Amt –100...+100 Amount of modulation source
Left
Right
FX Amt
FX Amt
FX Amt = 100: Mono In - Mono Out / FX Amt = 0: Stereo In - Stereo Out
Input Level
Input Level
+High Damp
Delay
Feedback
Detune
Input Level
Lo
ud
er
MaxZero
Higher D-mod
Input Level
MaxZero
Higher D-mod
x1.0
x0.5 Input Level Dmod= +100
Input Level Dmod= +50
Lo
ud
er
x1.0
x0.5
Input Level Dmod= –100
Input Level Dmod= –50
Input Level Dmod
a Mode Slow, Medium, Fast
Switches Pitch Shifter mode
b
Pitch Shift [1/2tone] –24...+24 Sets the pitch shift amount by steps
of a semitone
Src Off...Tempo Selects the modulation source of pitch shift amount
Amt –24...+24 Sets the modulation amount of pitch shift amount
cFine [cents] –100...+100 Sets the pitch shift amount by steps
of a cent
Amt –100...+100 Sets the modulation amount of pitch shift amount
d Delay Time [msec] 0...2000 Sets the delay time
e Feedback Position Pre, Post Switches the feedback connection
fFeedback –100...+100 Sets the feedback amount
High Damp [%] 0...100 Sets the damping amount in the high range
g
Input Level Dmod [%] –100...+100 Sets the modulation amount of the
input level
Src Off...Tempo Selects the modulation source for the input level
h
Wet/Dry Dry, 1:99...99:1, Wet
Balance between the wet and dry signal
Src Off...Tempo Table , “Dynamic Modulation sources,” on page 357
Amt –100...+100 Amount of modulation source
Left
Right
FX Amt
FX Amt
FX Amt = 100: Mono In - Mono Out / FX Amt = 0: Stereo In - Stereo Out
Input Level
Input Level
+High Damp
Delay
Feedback
Pitch Shifter
Feedback Position
Pre Post

388 EffectsModulation and Pitch Shift (Mod./P.Shift)
value for the Feedback parameter, the pitch will be raised (orlowered) more and more each time feedback is repeated.
If Feedback Position is set to Post, the feedback signal will notpass through the pitch shifter again. Even if you specify a highervalue for the Feedback parameter, the pitch-shifted sound willbe repeated at the same pitch.
52: Pitch Shifter BPMThis pitch shifter enables you to set the delay time to match thesong tempo.
d: BPMe: Delay Base Notee: Times
The delay time is the duration of “Times” number of “Delay BaseNote” note values at the “BPM” tempo (or if “BPM” is set toMIDI, the tempo determined by MIDI Clock).
d: Time Over?
You can set the delay time up to 5,290msec. If the delay timeexceeds this limit, the error message “OVER!” appears on thedisplay. Set the delay time parameters so that this message willnot appear. “Time Over?” is only a display parameter.
53: Pitch Shift Mod.(Pitch Shift Modulation)
This effect modulates the detuned pitch shift amount using anLFO, adding a clear spread and width to the sound by panningthe effect sound and dry sound to the left and right. This is espe-cially effective when the effect sound and dry sound output fromstereo speakers are mixed.
a: Pitch Shift [cents]e: Depth
These parameters set the amount of pitch shift and amount ofmodulation by means of the LFO.
g: Panh: Wet/Dry
The Pan parameter pans the effect sound and dry sound to theleft and right. With L, the effect sound is panned left, and the drysound is panned right. With a Wet/Dry = Wet setting, the effectand dry sound will be output in a proportion of 1:1.
a Mode Slow, Medium, Fast
Switches Pitch Shifter mode
b
Pitch Shift [1/2tone] –24...+24 Sets the pitch shift amount in steps
of a semitone
Src Off...Tempo Selects the modulation source of pitch shift amount
Amt –24...+24 Sets the modulation amount of pitch shift amount
cFine [cents] –100...+100 Sets the pitch shift amount in steps
of one cent
Amt –100...+100 Sets the modulation amount of pitch shift amount
dBPM
MIDI, 40.00...300.00
MIDI syncs to the system tempo; 40–300 sets the tempo manually for this individual effect
Time Over? ---, OVER! Displays an error message when the delay time exceeds the upper limit
e
Delay Base Note r...w Selects the type of notes to specify
the delay time
Times x1...x32 Sets the number of notes to specify the delay time
f Feedback Position Pre, Post Switches the feedback
connection
gFeedback –100...+100 Sets the feedback amount
High Damp [%] 0...100 Sets the damping amount in the high range
h
Input Level Dmod [%] –100...+100 Sets the modulation amount of the
input level
Src Off...Tempo Selects the modulation source for the input level
i
Wet/Dry Dry, 1:99...99:1, Wet
Balance between the wet and dry signal
Src Off...Tempo Table , “Dynamic Modulation sources,” on page 357
Amt –100...+100 Amount of modulation source
BPMBPM Base Note x Times
Left
Right
FX Amt
FX Amt
FX Amt = 100: Mono In - Mono Out / FX Amt = 0: Stereo In - Stereo Out
Input Level
Input Level
+High Damp
Delay
Feedback
Pitch Shifter
Feedback Position
Pre Post
Tempo
a Pitch Shift [cents] –100...+100 Sets the pitch difference from the
input signal
b LFO Waveform Triangle, Square Selects the LFO Waveform
c
LFO Frequency [Hz] 0.02...20.00 Sets the speed of the LFO
Src Off...Tempo Selects a modulation source for LFO speed
Amt –20.00...+20.00
Sets the modulation amount of LFO speed
d
MIDI Sync Off, On When this is on, the LFO speed is set by BPM, Base Note, and Times, instead of Frequency
BPMMIDI, 40.00...300.00
MIDI syncs to the system tempo; 40–300 sets the tempo manually for this individual effect
Base Note r...w Selects the type of notes that specify the LFO speed
Times x1...x32 Sets the number of notes that specify the LFO speed
e
Depth –100...+100 Sets the LFO modulation depth for pitch shift amount
Src Off...Tempo Selects the modulation source of the depth of modulation
Amt –100...+100 Sets the modulation amount of the depth of modulation
f Pan L, 1 : 99...99 : 1, R
Sets the panning effect sound and dry sound separately
g
Wet/Dry Dry, 1:99...99:1, Wet
Balance between the wet and dry signal
Src Off...Tempo Table , “Dynamic Modulation sources,” on page 357
Amt –100...+100 Amount of modulation source
Left
Right
FX Amt
FX Amt
FX Amt = 100: Mono In - Stereo Out / FX Amt = 0: Stereo In - Stereo Out
LFO: Tri / Sqr
Pan
+ Pitch Shifter
Pitch
Hig
her
Pitch Shift Mod - Pitch Shift / Depth
Lo
wer
Original PitchPitch Shift (+ value)
LFO Waveform=Triangle�Depth (+value)
LFO Waveform=Square�Depth (–value)

389EffectsModulation and Pitch Shift (Mod./P.Shift)
App
endi
x
54: Organ Vib/Chorus(Organ Vibrato/Chorus)
This effect simulates the chorus and vibrato circuitry of a vintageorgan. The modulation speed and depth can be customized.
b: Control Modec: Preset Typed: Custom Mixe: Custom Depthf: Custom Speed [Hz]
If Control Mode=Preset, you can use c: Preset Type to select theeffect. In this case, the Custom Mix/Depth/Speed settings areignored. If Control Mode=Custom, the Custom Mix/Depth/Speed settings are valid, and the c: Preset Type setting is ignored.
c: Amt
If Preset Type=V1 and Src=JS+Y, you can set this to +5 andmove JS +Y to control the effect in the order ofV1 C1 V2 C2 V3 C3.
55: Rotary SpeakerThis effect simulates a rotary speaker, and obtains a more realis-tic sound by simulating the rotor in the low range and the hornin the high range separately. The effect also simulates the stereomicrophone settings.
a: Mode
This parameter sets how the modulation source switchesbetween rotation and stop.
When Mode = Toggle, the speaker rotates or stops alternatelyeach time you press the pedal or move the joystick. Via MIDI,rotation will switch between start and stop each time the modu-lation amount exceeds 64.
When Mode = Moment, the speaker rotates by default, andstops only when you press the pedal or move the joystick. ViaMIDI, modulation values above 64 make the speaker rotate, andvalues below 64 make it stop.
a Input Trim 0...100 Sets the input level
b Control Mode Preset, Custom Selects either preset or custom settings
c
Preset Type V1, C1, V2, C2, V3, C3
Selects the effect type when Mode=PresetV1/V2/V3 are variations of vibrato, and C1/C2/C3 are variations of chorus
Src Off...Tempo Selects the modulation source that will change the effect type
Amt –5...+5 Sets the modulation amount for changing the effect type
d
Custom MixVibrato, 1:99...99:1,Chorus
Sets the mix level of the direct sound when Mode=Preset
Src Off...TempoSelects the modulation source that will control the mix level of the direct sound
Amt –100...+100Sets the modulation amount for controlling the mix level of the direct sound
e
Custom Depth 0...100 Sets the vibrato depth
Src Off...Tempo Selects the modulation source that will control vibrato depth
Amt –100...+100 Sets the modulation amount for controlling the vibrato depth
f
Custom Speed [Hz] 0.02...20.00 Sets the vibrato speed
Src Off...Tempo Selects the modulation source for controlling the vibrato speed
Amt –20.00...+20.00
Sets the modulation amount for controlling the vibrato speed
g
Wet/Dry Dry, 1:99...99:1, Wet
Balance between the wet and dry signal
Src Off...Tempo Table , “Dynamic Modulation sources,” on page 357
Amt –100...+100 Amount of modulation source
+ Vibrato/Chorus
Mode
Preset Setting
Custom Parameters
Left
Right
FX Amt
FX Amt
FX Amt = 100: Mono In - Mono Out / FX Amt = 0: Stereo In - Stereo Out
a
Mode Switch Rotate, Stop Switches between speaker rotation and stop
Src Off...Tempo Selects a modulation source for Rotate/Stop
Mode Toggle, Moment
Sets the switch mode for Rotate/Stop modulation
b
Speed Switch Slow, Fast Switches the speaker rotation speed between slow and fast
Src Off...Tempo Selects a modulation source for Slow/Fast
Mode Toggle, Moment
Sets the switch mode for Slow/Fast modulation
c Manual Speed Ctrl Off...Tempo Sets a modulation source for direct
control of rotation speed
d
HoreAcceleration 0...100 How quickly the horn rotation
speed in the high range is switched
Hore Ratio Stop, 0.50...2.00
Adjusts the (high-range side) horn rotation speed. Standard value is 1.00. Selecting “Stop” will stop the rotation
e
Rotor Acceleration 0...100
Determines how quickly the rotor rotation speed in the low range is switched
Rotor Ratio Stop, 0.50...2.00
Adjusts the (low-frequency) rotor speed. Standard value is 1.00. Selecting “Stop” will stop the rotation
f Horn/Rotor Balance
Rotor, 1...99, Horn
Sets the level balance between the high-frequency horn and low-frequency rotor
gMic Distance 0...100 Sets the distance between the
microphone and rotary speaker
Mic Spread 0...100 Sets the angle of left and right microphones
h
Wet/Dry Dry, 1:99...99:1, Wet
Balance between the wet and dry signal
Src Off...Tempo Table , “Dynamic Modulation sources,” on page 357
Amt –100...+100 Amount of modulation source
Left
Right
FX Amt
FX Amt
FX Amt = 100: Mono In - Stereo Out / FX Amt = 0: Stereo In - Stereo Out
D-mod
D-mod
D-mod
Mode Switch: Rotate/Stop
Speed Switch: Slow/Fast
Manual Speed Control
Speaker Simulation
Mic DistanceMic Spread
Horn/RotorBalance
Horn
Rotary Speaker
Rotor
+

390 EffectsDelay
b: Speed Switch
This parameter controls how the rotation speed (slow and fast) isswitched via the modulation source.
When Mode = Toggle, the speed will switch between slow andfast each time you press the pedal or move the joystick. ViaMIDI, the speed will switch each time the modulation amountexceeds 64.
When Mode = Moment, the speed is usually slow. It becomesfast only when you press the pedal or move the joystick. ViaMIDI, modulation values above 64 set the speed to Fast, and val-ues below 64 set it to Slow.
c: Manual Speed Ctrl
If you wish to control the rotation speed manually, instead ofswitching between Slow and Fast, select a modulation source inthe Manual Speed Ctrl parameter. If you don’t want to use man-ual control, set this to Off.
d: Horn Acceleratione: Rotor Acceleration
On a real rotary speaker, the rotation speed accelerates or decel-erates gradually after you switch the speed. The Horn and RotorAcceleration parameters set the transition times between fastand slow speeds.
g: Mic Distanceg: Mic Spread
This is a simulation of stereo microphone settings.
Delay
56: L/C/R DelayThis multitap delay outputs three Tap signals to the left, right,and center respectively. You can also adjust the left and rightspread of the delay sound.
e: High Damp [%]e: Low Damp [%]
These parameters set the damping amount of high range and lowrange. The tone of the delayed sound becomes darker and lighteras it feeds back.
g: Spread
This parameter sets the pan width of the effect sound. The stereoimage is widest with a value of 50, and the effect sound of bothchannels is output from the center with a value of 0.
Mic SpreadMicrophoneMicrophone
Mic Distance Mic Distance
Rotary Speaker (Top View)
Rotary Speaker - Mic Placement
aL Delay Time [msec] 0...2730 Sets the delay time of TapL
Level 0...50 Sets the output level of TapL
bC Delay Time [msec] 0...2730 Sets the delay time of TapC
Level 0...50 Sets the output level of TapC
cR Delay Time [msec] 0...2730 Sets the delay time of TapR
Level 0...50 Sets the output level of TapR
d
Feedback (C Delay) –100...+100 Sets the feedback amount of TapC
Src Off...Tempo Selects the modulation source of the TapC feedback amount
Amt –100...+100 Sets the modulation amount of the TapC feedback amount
eHigh Damp [%] 0...100 Sets the damping amount in the
high range
Low Damp [%] 0...100 Sets the damping amount in the low range
f
Input Level Dmod [%] –100...+100 Sets the modulation amount of the
input level
Src Off...Tempo Selects the modulation source for the input level
g Spread 0...50Sets the width of the stereo image of the effect sound
h
Wet/Dry Dry, 1:99...99:1, Wet
Balance between the wet and dry signal
Src Off...Tempo Table , “Dynamic Modulation sources,” on page 357
Amt –100...+100 Amount of modulation source
C Delay
R Delay
Left
Right
Feedback
Spread
FX Amt
FX Amt
FX Amt = 100: Mono In - Stereo Out / FX Amt = 0: Stereo In -Stereo Out
Input Level D-mod
High Damp Low Damp
L DelayInput Level D-mod
+Level
Level
Level

391EffectsDelay
App
endi
x
57: Stereo/CrossDelayThis is a stereo delay, and can by used as a cross-feedback delayeffect in which the delay sounds cross over between the left andright by changing the feedback routing.
58: St. Multitap Delay(Stereo Multitap Delay)
The left and right Multitap Delays have two taps respectively.Changing the routing of feedback and tap output allows you tocreate various patterns of complex effect sounds.
a: Mode
You can change how the left and right delay signals are pannedby modifying the routing of the left and right delay as shown inthe figure above. You need to input different sounds to eachchannel in order for this parameter to be effective.
d: Tap1 Level
This parameter sets the output level of Tap1. Setting a differentlevel from Tap2 will add a unique touch to a monotonous delayand feedback.
a Stereo/Cross Stereo, Cross Switches between stereo delay and cross-feedback delay
b L Delay Time [msec] 0.0...1360.0 Sets the delay time for the left
channel
c R Delay Time [msec] 0.0...1360.0 Sets the delay time for the right
channel
d
L Feedback –100...+100 Sets the feedback amount for the left channel
Src Off...Tempo Selects the modulation source of feedback amount
Amt L –100...+100 Sets the modulation amount of the left channel feedback
eR Feedback –100...+100 Sets the feedback amount for the
right channel
Amt R –100...+100 Sets the modulation amount of the right channel feedback
f High Damp [%] 0...100 Sets the damping amount in the high range
g Low Damp [%] 0...100 Sets the damping amount in the low range
h
Input Level Dmod [%] –100...+100 Sets the modulation amount of the
input level
Src Off...Tempo Selects the modulation source for the input level
i Spread –50...+50Sets the width of the stereo image of the effect sound
j
Wet/Dry Dry, 1:99...99:1, Wet
Balance between the wet and dry signal
Src Off...Tempo Table , “Dynamic Modulation sources,” on page 357
Amt –100...+100 Amount of modulation source
Delay
Delay
Stereo/Cross
Left
Right
Feedback
FX Amt
FX Amt
Stereo In - Stereo Out
Input Level D-mod
Input Level D-mod
High Damp Low Damp
High Damp Low Damp
Spread
Stereo/Cross
a Mode
Normal, Cross Feedback, Cross Pan1, Cross Pan2
Switches the left and right delay routing
b Tap1 Time [msec] 0.0...1360.0 Sets the Tap1 delay time
c Tap2 Time [msec] 0.0...1360.0 Sets the Tap2 delay time
d Tap1 Level 0...100 Sets the Tap1 output level
e
Feedback (Tap2) –100...+100 Sets the Tap2 feedback amount
Src Off...Tempo Selects the modulation source of the Tap2 feedback amount
Amt –100...+100 Sets the modulation amount of the Tap2 feedback amount
f High Damp [%] 0...100 Sets the damping amount in the high range
g Low Damp [%] 0...100 Sets the damping amount in the low range
h
Input Level Dmod [%] –100...+100 Sets the modulation amount of the
input level
Src Off...Tempo Selects the modulation source for the input level
i
Spread –100...+100Sets the width of the stereo image of the effect sound
Src Off...TempoSelects the modulation source of the effect sound’s stereo image width
Amt –100...+100 Sets the modulation amount of the effect sound’s stereo image width
j
Wet/Dry Dry, 1:99...99:1, Wet
Balance between the wet and dry signal
Src Off...Tempo Table , “Dynamic Modulation sources,” on page 357
Amt –100...+100 Amount of modulation source
Left
Right
Feedback
Spread
FX Amt
FX Amt
Stereo In - Stereo Out
Input Level D-mod
Input Level D-mod
High Damp Low Damp
High Damp Low Damp
Delay
Delay
Feedback
Tap1 Level ModeMode(1)
(2)
(1)(2)
Tap1=(1)Tap2=(2)
Mode: Normal Mode: Cross Feedback Mode: Cross Pan1 Mode: Cross Pan2

392 EffectsDelay
59: St. Mod Delay(Stereo Modulation Delay)
This stereo delay uses an LFO to sweep the delay time. The pitchalso varies, creating a delay sound which swells and shimmers.You can also control the delay time using a modulation source.
b: D-mod Modulation
When the modulation source is used for control, this parameterreverses the left and right modulation direction.
d: LFO Syncd: Srcg: L LFO Phase [deg]h: R LFO Phase [deg]
If “LFO Sync” is On, the LFO will be reset by the modulationsource that is received.
The “Src” parameter sets the modulation source that resets theLFO. For example, you can assign Gate as a modulation sourceso that the sweep always starts from the specified point.
“L LFO Phase” and “R LFO Phase” set the phase obtained whenthe left and right LFOs are reset. In this way, you can createchanges in pitch sweep for the left and right channels individu-ally.
The effect is off when a value of the modulation source specified in the “Src” parameter is 63 or smaller, and the effect is on when the value is 64 or higher. The LFO is triggered and reset to the “L LFO Phase” and “R LFO Phase” settings when the value changes from 63 or smaller to 64 or higher.
60: St. Dynamic Delay(Stereo Dynamic Delay)
This stereo delay controls the level of delay according to theinput signal level. You can use this as a ducking delay that appliesdelay to the sound only when you play keys at a high velocity oronly when the volume level is low.
a Modulation Mode LFO, D-mod
Switches between LFO modulation control and modulation source control
b
D-mod Modulation
L/R:+/+, L/R:+/–
Reversed L/R control by modulation source
Src Off...Tempo Selects the modulation source that controls delay time
Response 0...30 Sets the rate of response to the modulation source
cLFO Waveform Triangle, Sine Selects the LFO Waveform
LFO Shape –100...+100 Changes the curvature of the LFO Waveform
dLFO Sync Off, On Switches LFO reset off/on
Src Off...Tempo Selects the modulation source that resets the LFO
e LFO Frequency [Hz] 0.02...20.00 Sets the speed of the LFO
f
MIDI Sync Off, OnWhen this is on, the LFO speed is set by BPM, Base Note, and Times, instead of Frequency
BPMMIDI, 40.00...300.00
MIDI syncs to the system tempo; 40–300 sets the tempo manually for this individual effect
Base Note r...w Selects the type of notes that specify the LFO speed
Times x1...x32 Sets the number of notes that specify the LFO speed
g
L LFO Phase [deg] –180...+180 Sets the phase obtained when the
left LFO is reset
L Depth 0...200 Sets the depth of the left LFO modulation
h
R LFO Phase [deg] –180...+180 Sets the phase obtained when the
right LFO is reset
R Depth 0...200 Sets the depth of the right LFO modulation
i
L Delay Time [msec] 0.0...1000.0 Sets the delay time for the left
channel
L Feedback –100...+100 Sets the feedback amount of left delay
j
R Delay Time [msec] 0.0...1000.0 Sets the delay time for the right
channel
R Feedback –100...+100 Sets the feedback amount of right delay
k
Wet/Dry-Wet, -1:99...Dry...99:1, Wet
Balance between the wet and dry signal
Src Off...Tempo Table , “Dynamic Modulation sources,” on page 357
Amt –100...+100 Amount of modulation source
Left
Right
Feedback
LFO Phase
FX Amt
FX Amt
Stereo In - Stereo Out
LFO: Tri / Sine
Modulation Mode
D-mod
LFO
D-mod
Delay
Delay
L/R: +/+ +/–�
LFO Shape
Response
LFO Sync
aControl Target None, Out, FB Selects from no control, output, and
feedback
Polarity +, – Reverses level control
bThreshold 0...100 Sets the level to which the effect is
applied
Offset 0...100 Sets the offset of level control
c Attack 1...100 Sets the attack time of level control
d Release 1...100 Sets the release time of level control
e L Delay Time [msec] 0.0...1360.0 Sets the delay time for the left
channel
f R Delay Time [msec] 0.0...1360.0 Sets the delay time for the right
channel
g Feedback –100...+100 Sets the feedback amount
hHigh Damp [%] 0...100 Sets the damping amount in the
high range
Low Damp [%] 0...100 Sets the damping amount in the low range
i Spread –100...+100Sets the width of the stereo image of the effect sound
j
Wet/Dry Dry, 1:99...99:1, Wet
Balance between the wet and dry signal
Src Off...Tempo Table , “Dynamic Modulation sources,” on page 357
Amt –100...+100 Amount of modulation source
Delay
Left
Right
Feedback Spread
FX Amt
FX Amt
Stereo In - Stereo Out
High Damp Low Damp
High Damp Low Damp
Threshold
Delay
FB Out
Control TargetAttack, ReleaseEnvelope+

393EffectsDelay
App
endi
x
a: Control Target
This parameter selects no level control, delay output control(effect balance), or feedback amount control.
a: Polarityb: Thresholdb: Offsetc: Attackd: Release
The “Offset” parameter specifies the value for the “Control Tar-get” parameter (that is set to None), expressed as the ratio rela-tive to the parameter value (the “Wet/Dry” value with “ControlTarget”=Output level, or the “Feedback” value with “ControlTarget”=Feedback).
When “Polarity” is positive, the “Control Target” value isobtained by multiplying the parameter value by the “Offset”value (if the input level is below the threshold), or equals theparameter value if the input level exceeds the threshold.
When “Polarity” is negative, Control Target value equals theparameter value if the input level is below the threshold, or isobtained by multiplying the parameter value by the “Offset”value if the level exceeds the threshold.
The “Attack” and “Release” parameters specify attack time andrelease time of delay level control.
61: St. AutoPanningDly(Stereo Auto Panning Delay)
This stereo delay effect pans the delay sound left and right usingthe LFO.
Dynamic Delay
ThresholdDry
Envelope
Wet��Target=Output Level�Polarity= (–)
Wet��Target=Output Level�Polarity= (+)
Delay Time
Time
(Ducking Delay)
Release
Attack
Level
a
L Delay Time [msec] 0.0...1360.0 Sets the delay time for the left
channel
L Feedback –100...+100 Sets the feedback amount for the left channel
b
R Delay Time [msec] 0.0...1360.0 Sets the delay time for the right
channel
R Feedback –100...+100 Sets the feedback amount for the right channel
cHigh Damp [%] 0...100 Sets the damping amount in the
high range
Low Damp [%] 0...100 Sets the damping amount in the low range
dLFO Waveform Triangle, Sine Selects the LFO Waveform
LFO Shape –100...+100 Changes the curvature of the LFO Waveform
e Phase [degree] –180...+180 Sets the LFO phase difference between the left and right
f Panning Freq [Hz] 0.02...20.00 Sets the panning speed
g
MIDI Sync Off, On Switches between using the frequency of the panning speed and using the tempo and notes
BPMMIDI, 40.00...300.00
MIDI syncs to the system tempo; 40–300 sets the tempo manually for this individual effect
Base Note r...wSelects the type of notes to specify the delay time for the panning speed
Times x1...x32Sets the number of notes to specify the delay time for the panning speed
h
Panning Depth 0...100 Sets the panning width
Src Off...Tempo Selects the modulation source for the panning width
Amt –100...+100 Set the modulation amount of the panning width
i
Wet/Dry Dry, 1:99...99:1, Wet
Balance between the wet and dry signal
Src Off...Tempo Table , “Dynamic Modulation sources,” on page 357
Amt –100...+100 Amount of modulation source
Left
Right
FX Amt
FX Amt
Stereo In - Stereo Out
LFO Phase
LFO Shape
Pan
Pan
LFO: Tri / Sin
Depth
Delay
Delay
High Damp Low Damp
High Damp Low Damp
Feedback

394 EffectsDelay
62: Tape EchoThis effect simulates a tape echo unit with three playback heads.The distortion and tonal change typical of magnetic tape are alsoreproduced.
a: Delay (Tap1) [msec]a: Srca: Amtb: Tap2 Position [%]b: Tap3 Position [%]
The delay time for Tap 2 and 3 is specified as a proportion (%)relative to “Delay (Tap1).” Even if you use dynamic modulationto control “Delay (Tap1),” Tap 2 and 3 will change at the sameproportion.
d: FB Amte: FB Amtf: FB Amtg: Feedback
The feedback output from Tap 1, 2, and 3 is mixed according tothe “FB Amt,” and then the final amount of feedback is specifiedby “Feedback.”
63: Auto ReverseThis effect records the input signal and automatically plays it inreverse (the effect is similar to a tape reverse sound).
a: Rec Modeb: Reverse Time [msec]
When “Rec Mode” is set to Single, you can set up to 2,640msecfor “Reverse Time.” If recording starts during the reverse play-back, the playback will be interrupted.
When “Rec Mode” is set to Multi, you can make another record-ing during the reverse playback. However, the maximumReverse Time is limited to 1,320msec.
If you wish to record a phrase or rhythm pattern, set “Rec Mode”to Single. If you record only one note, set “Rec Mode” to Multi.
The “Reverse Time” parameter specifies the maximum durationof the reverse playback. The part in excess of this limit will notbe played in reverse. If you wish to add short pieces of thereverse playback of single notes, make the “Reverse Time”shorter.
a
Delay (Tap1) [msec] 0...2700 Sets the delay time (tap1)
Src Off...Tempo Selects the modulation source of the delay time
Amt –2700...+2700
Sets the modulation amount of delay time
b Tap2 Position [%] 0...100
Sets the position of Tap 2 relative to the Tap 1 delay time the depth of pitch variation
c Tap3 Position [%] 0...100
Sets the position of Tap 3 relative to the Tap 1 delay time the depth of pitch variation
d
Tap1 Level 0...100 Sets the Tap1 output level
Pan L, 1...99, R Sets the stereo image of tap1
FB Amt –100...+100 Sets the Tap1 feedback amount
e
Tap2 Level 0...100 Sets the Tap2 output level
Pan L, 1...99, R Sets the stereo image of tap2
FB Amt –100...+100 Sets the Tap2 feedback amount
f
Tap3 Level 0...100 Sets the Tap3 output level
Pan L, 1...99, R Sets the stereo image of tap3
FB Amt –100...+100 Sets the Tap3 feedback amount
g
Feedback 0...100 Sets the amount of feedback for Taps 1, 2, and 3
Src Off...Tempo Selects the modulation source of feedback amount
Amt –100...+100 Sets the feedback amount
hHigh Damp [%] 0...100 Sets the damping amount in the
high range
Low Damp [%] 0...100 Sets the damping amount in the low range
i Saturation 0...100 Sets the distortion amount
jInput Trim 0...100 Sets the input gain
Pre Tone 0...100 Sets the tone of the input
k
Wow Flutter [Hz] 0.02...1.00 Sets the frequency at which pitch
variation will occur
Wow Flutter depth 0...100 Sets the depth of pitch variation
l
Wet/Dry Dry, 1:99...99:1, Wet
Balance between the wet and dry signal
Src Off...Tempo Table , “Dynamic Modulation sources,” on page 357
Amt –100...+100 Amount of modulation source
Wah Flatter
D-mod
Tap2/3Position
+ TapeSaturation
Left
Right
FX Amt
Trim
PanLevel
FX Amt
FX Amt = 100: Mono In - Stereo Out / FX Amt = 0: Stereo In - Stereo Out
Feedback
Feedback Amt
High / Low DampPre Tone
Delay
(1)
(2)
(3)
Delay Time
a Rec Mode Single, Multi Sets the recording mode
b Reverse Time [msec] 20...2640 Sets the maximum duration of the
reverse playback
c
Envelope Select D-mod, Input
Selects whether the start and end of recording is controlled via the modulation source or the input signal level
Src Off...TempoSelects the modulation source that controls recording when Envelope Select is set to D-mod
d Threshold 0...100 Sets the recording start level when Envelope Select is set to Input
e Response 0...100 Sets the speed of the response to the end of recording
f Direct MixAlways On, Always Off, Cross Fade
Selects how a dry sound is mixed
g
Wet/Dry Dry, 1:99...99:1, Wet
Balance between the wet and dry signal
Src Off...Tempo Table , “Dynamic Modulation sources,” on page 357
Amt –100...+100 Amount of modulation source
Input
D-mod
Envelope Select
D-modEnvelope Control
Left
Right
FX Amt
FX Amt
FX Amt = 100: Mono In - Mono Out / FX Amt = 0: Stereo In - Stereo Out
+ Auto ReverseDirect
MixRec/Reverse Play
Control

395EffectsDelay
App
endi
x
c: Envelope Selectc: Srcd: Threshold
These parameters select the source to control the start and endof recording.
When “Envelope Select” is set to D-mod, the input signal will berecorded only when the value of the modulation source selectedby the Src parameter is 64 or higher.
When “Envelope Select” is set to Input, the input signal will berecorded only when its level exceeds the Threshold level.
When recording is completed, reverse playback starts immedi-ately.
64: Sequence BPM Dly(Sequence BPM Delay)
This four-tap delay enables you to select a tempo and rhythmpattern to set up each tap.
a: BPMb: Rhythm Pattern
With the tempo specified by the “BPM” parameter (or the MIDIClock tempo if “BPM” is set to MIDI), the length of one beatequals the feedback delay time, and the interval between tapsbecomes equal. Selecting a rhythm pattern will automaticallyturn the tap outputs on and off. When “BPM” is set to MIDI, thelower limit of the “BPM” is 44.
RecRec
Mode/Reverse Time
Input
Mode = Single
Mode = Multi
Time
Reverse Time Reverse Time
Envelope Select = InputReverse Reverse
a BPMMIDI, 40.00...300.00
MIDI syncs to the system tempo; 40–300 sets the tempo manually for this individual effect
b Rhythm Pattern x...eee3 Selects a rhythm pattern
c
Tap1 Pan L, 1...99, R Sets the panning of Tap1
Tap2 Pan L, 1...99, R Sets the panning of Tap2
Tap3 Pan L, 1...99, R Sets the panning of Tap3
Tap4 Pan L, 1...99, R Sets the panning of Tap4
d
Feedback –100...+100 Sets the feedback amount
Src Off...Tempo Selects the modulation source of feedback amount
Amt –100...+100 Sets the feedback amount
eHigh Damp [%] 0...100 Sets the damping amount in the
high range
Low Damp [%] 0...100 Sets the damping amount in the low range
f
Input Level Dmod [%] –100...+100 Sets the modulation amount of the
input level
Src Off...Tempo Selects the modulation source for the input level
g
Wet/Dry Dry, 1:99...99:1, Wet
Balance between the wet and dry signal
Src Off...Tempo Table , “Dynamic Modulation sources,” on page 357
Amt –100...+100 Amount of modulation source
Delay
Left
Right
Feedback
FX Amt
FX Amt
FX Amt = 100: Mono In - Stereo Out / FX Amt = 0: Stereo In -Stereo Out
Input Level D-mod
High Damp Low Damp
Input Level D-mod
+
Tempo
BPMBPM
Rythm Pattern
Pan

396 EffectsDelay
65: L/C/R BPM DelayThe L/C/R delay enables you to match the delay time with thesong tempo. You can also synchronize the delay time with thearpeggiator or sequencer. If you program the tempo before per-formance, you can achieve a delay effect that synchronizes withthe song in real-time. Delay time is set by notes.
a: Time Over?
You can set the delay time up to 5,460msec. If the delay timeexceeds this limit, the error message “OVER!” appears in the dis-play. Set the delay time parameters so that this message will notappear. “Time Over?” is only a display parameter.
66: Stereo BPM DelayThis stereo delay enables you to set the delay time to match thesong tempo.
a: Time Over? L, R
You can set the delay time up to 2,730msec. If the delay timeexceeds this limit, the error message “OVER!” appears in the dis-play. Set the delay time parameters so that this message will notappear. “Time Over?” is only a display parameter.
aBPM
MIDI, 40.00...300.00
MIDI syncs to the system tempo; 40–300 sets the tempo manually for this individual effect
Time Over? ---, OVER! Displays an error message when the delay time exceeds the upper limit
b
L Delay Base Note r...w Selects the type of notes to specify
the delay time for TapL
Times x1...x32 Sets the number of notes to specify the delay time for TapL
Level 0...50 Sets the output level of TapL
c
C Delay Base Note r...w elects the type of notes to specify
the delay time for TapC
Times x1...x32 Sets the number of notes to specify the delay time for TapC
Level 0...50 Sets the output level of TapC
d
R Delay Base Note r...w Selects the type of notes to specify
the delay time for TapR
Times x1...x32 Sets the number of notes to specify the delay time for TapR
Level 0...50 Sets the output level of TapR
e
Feedback (C Delay) –100...+100 Sets the feedback amount of TapC
Src Off...Tempo Selects the modulation source for the TapC feedback
Amt –100...+100 Sets the modulation amount of the TapC feedback
fHigh Damp [%] 0...100 Sets the damping amount in the
high range
Low Damp [%] 0...100 Sets the damping amount in the low range
g
Input Level Dmod [%] –100...+100 Sets the modulation amount of the
input level
Src Off...Tempo Selects the modulation source for the input level
h Spread 0...50Sets the width of the stereo image of the effect sound
i
Wet/Dry Dry, 1:99...99:1, Wet
Balance between the wet and dry signal
Src Off...Tempo Table , “Dynamic Modulation sources,” on page 357
Amt –100...+100 Amount of modulation source
C Delay
Left
Right
Feedback
Spread
FX Amt
FX Amt
FX Amt = 100: Mono In - Stereo Out / FX Amt = 0: Stereo In -Stereo Out
Input Level D-mod
High Damp Low Damp
L DelayInput Level D-mod
+Level
Level
Level
Tempo
BPMBPM Base Note x Times
Base Note x Times
Base Note x Times
R Delay
a
BPMMIDI, 40.00...300.00
MIDI syncs to the system tempo; 40–300 sets the tempo manually for this individual effect
Time Over? L ---, OVER!Display the error message if the left channel delay time exceeds the upper limit
R ---, OVER!Display the error message if the right channel delay time exceeds the upper limit
b
L Delay Base Note r...w Selects the type of notes to specify
the left channel delay time
Times x1...x32 Sets the number of notes to specify the left channel delay time
Adjust [%] –2.50...+2.50 Fine-adjust the left channel delay time
c
R Delay Base Note r...w Selects the type of notes to specify
the right channel delay time
Times x1...x32 Sets the number of notes to specify the right channel delay time
Adjust [%] –2.50...+2.50 Fine-adjust the right channel delay time
d
L Feedback –100...+100 Sets the feedback amount for the left channel
Src Off...Tempo Selects the modulation source of feedback amount
Amt L –100...+100 Sets the modulation amount of the left channel feedback
eR Feedback –100...+100 Sets the feedback amount for the
right channel
Amt R –100...+100 Sets the modulation amount of the right channel feedback
f High Damp [%] 0...100 Sets the damping amount in the high range
g Low Damp [%] 0...100 Sets the damping amount in the low range
h
Input Level Dmod [%] –100...+100 Sets the modulation amount of the
input level
Src Off...Tempo Selects the modulation source for the input level
i
Wet/Dry Dry, 1:99...99:1, Wet
Balance between the wet and dry signal
Src Off...Tempo Table , “Dynamic Modulation sources,” on page 357
Amt –100...+100 Amount of modulation source
Left
Right
Feedback
FX Amt
FX Amt
Stereo In - Stereo Out
Input Level D-mod
Input Level D-mod
High Damp Low Damp
High Damp Low Damp
Tempo
BPMBPM Base Note x Times
Base Note x Times
Adjust [%]
Adjust [%]
Delay
Delay

397EffectsDelay
App
endi
x
67: St.BPM Mtap Delay(Stereo BPM Multi tap Delay)
This four-tap delay enables you to select a tempo and rhythmpattern to set up each tap.
68: St.BPM Mod. Delay(Stereo BPM Modulation Delay)
This is a stereo modulation delay that lets you synchronize thedelay time to the tempo of the song.
a Mode
Normal, Cross Feedback, Cross Pan1, Cross Pan2
Switches the left and right delay routing
b
BPMMIDI, 40.00...300.00
MIDI syncs to the system tempo; 40–300 sets the tempo manually for this individual effect
Time Over? 1 ---, OVER!Displays an error message when the delay time for Tap1 exceeds the upper limit
2 ---, OVER!Displays an error message when the delay time for Tap2 exceeds the upper limit
c
Tap 1 Base Note r...w Selects the type of notes to specify
the delay time for Tap1
Times x1...x32 Sets the number of notes to specify the delay time for Tap1
d
Tap 2 Base Note r...w Selects the type of notes to specify
the delay time for Tap2
Times x1...x32 Sets the number of notes to specify the delay time for Tap2
e Tap1 Level 0...100 Sets the Tap1 output level
f
Feedback (Tap2) –100...+100 Sets the Tap2 feedback amount
Src Off...Tempo Selects the modulation source of the Tap2 feedback amount
Amt –100...+100 Sets the modulation amount of the Tap2 feedback amount
gHigh Damp [%] 0...100 Sets the damping amount in the
high range
Low Damp [%] 0...100 Sets the damping amount in the low range
h
Input Level Dmod [%] –100...+100 Sets the modulation amount of the
input level
Src Off...Tempo Selects the modulation source for the input level
i
Spread –100...+100 Sets the width of the stereo image of the effect sound
Src Off...TempoSelects the modulation source of the effect sound’s stereo image width
Amt –100...+100 Sets the modulation amount of the effect sound’s stereo image width
j
Wet/Dry Dry, 1:99...99:1, Wet
Balance between the wet and dry signal
Src Off...Tempo Table , “Dynamic Modulation sources,” on page 357
Amt –100...+100 Amount of modulation source
Tempo
BPMBPM Base Note x Times
Base Note x Times
Left
Right
Feedback
Spread
FX Amt
FX Amt
Stereo In - Stereo Out
Input Level D-mod
Input Level D-mod
High Damp Low Damp
High Damp Low Damp
Delay
Delay
Feedback
Tap1 Level ModeMode(1)
(2)
(1)(2)
Tap1=(1)Tap2=(2)
a Modulation Mode LFO, D-mod
Switches between LFO modulation control and modulation source control
b
D-mod Modulation
L/R:+/+, L/R:+/–
Reversed L/R control by modulation source
Src Off...Tempo Selects the modulation source that controls delay time
Response 0...30 Sets the rate of response to the modulation source
cLFO Waveform Triangle, Sine Selects the LFO Waveform
LFO Shape –100...+100 Changes the curvature of the LFO Waveform
dLFO Sync Off, On Switches LFO reset off/on
Src Off...Tempo Selects the modulation source that resets the LFO
e LFO Frequency [Hz] 0.02...20.00 Sets the speed of the LFO
f
MIDI Sync Off, On When this is on, the LFO speed is set by BPM, Base Note, and Times, instead of Frequency
BPMMIDI, 40.00...300.00
MIDI syncs to the system tempo; 40–300 sets the tempo manually for this individual effect
Base Note r...w Selects the type of notes that specify the LFO speed
Times x1...x32 Sets the number of notes that specify the LFO speed
g
L LFO Phase [deg] –180...+180 Sets the phase obtained when the
left LFO is reset
Depth 0...200 Sets the depth of the left LFO modulation
h
R LFO Phase [deg] –180...+180 Sets the phase obtained when the
right LFO is reset
Depth 0...200 Sets the depth of the right LFO modulation
i
BPM(Delay)MIDI, 40.00...300.00
MIDI syncs to the system tempo; 40–300 sets the tempo manually for this individual effect
Time Over? L ---, OVER!Display the error message if the left channel delay time exceeds the upper limit
R ---, OVER!Display the error message if the right channel delay time exceeds the upper limit
j
L Delay Base Note r...w Selects the type of notes to specify
the left channel delay time
Times x1...x32 Sets the number of notes to specify the left channel delay time
Feedback –100...+100 Sets the feedback amount of left delay
k
R Delay Base Note r...w Selects the type of notes to specify
the right channel delay time
Times x1...x32 Sets the number of notes to specify the right channel delay time
Feedback –100...+100 Sets the feedback amount of right delay
Tempo
BPMBPM Base Note x Times
Base Note x Times
Left
Right
Feedback
LFO Phase
FX Amt
FX Amt
Stereo In - Stereo Out
LFO: Tri / Sine
Modulation Mode
D-mod
LFO
D-mod
Delay
Delay
L/R: +/+ +/–�
LFO Shape
Response
LFO Sync

398 EffectsDelay
i: Time Over? L, R
You can set the delay time up to 2,550msec. If the delay timeexceeds this limit, the error message “OVER!” appears in the dis-play. Set the delay time parameters so that this message will notappear. “Time Over?” is only a display parameter.
69: St.BPMAutoPanDly(Stereo BPM Auto Panning Delay)
This stereo auto panning delay enables you to set the delay timeto match the song tempo.
l
Wet/Dry-Wet, -1:99...Dry...99:1, Wet
Balance between the wet and dry signal
Src Off...Tempo Table , “Dynamic Modulation sources,” on page 357
Amt –100...+100 Amount of modulation source
a
BPMMIDI, 40.00...300.00
MIDI syncs to the system tempo; 40–300 sets the tempo manually for this individual effect
Time Over? L ---, OVER!Display the error message if the left channel delay time exceeds the upper limit
R ---, OVER!Display the error message if the right channel delay time exceeds the upper limit
b
L Delay Base Note r...w Selects the type of notes to specify
the left channel delay time
Times x1...x32 Sets the number of notes to specify the left channel delay time
Feedback –100...+100 Sets the feedback amount for the left channel
c
R Delay Base Note r...w Selects the type of notes to specify
the right channel delay time
Times x1...x32 Sets the number of notes to specify the right channel delay time
Feedback –100...+100 Sets the feedback amount for the right channel
dHigh Damp [%] 0...100 Sets the damping amount in the
high range
Low Damp [%] 0...100 Sets the damping amount in the low range
e
LFO Waveform Triangle, Sine Selects the LFO Waveform
Shape –100...+100 Changes the curvature of the LFO Waveform
LFO Phase –180...+180 Sets the LFO phase difference between the left and right
f Panning Freq [Hz] 0.02...20.00 Sets the panning speed
g
MIDI Sync Off, On When this is on, the pan LFO speed is set by BPM, Base Note, and Times, instead of Frequency
BPMMIDI, 40.00...300.00
MIDI syncs to the system tempo; 40–300 sets the tempo manually for this individual effect
Base Note r...wSelects the type of notes to specify the delay time for the panning speed
Times x1...x32Sets the number of notes to specify the delay time for the panning speed
h
Panning Depth 0...100 Sets the panning width
Src Off...Tempo Selects the modulation source for the panning width
Amt –100...+100 Set the modulation amount of the panning width
i
Wet/Dry Dry, 1:99...99:1, Wet
Balance between the wet and dry signal
Src Off...Tempo Table , “Dynamic Modulation sources,” on page 357
Amt –100...+100 Amount of modulation source
Tempo
BPMBPM Base Note x Times
Base Note x Times
Left
Right
FX Amt
FX Amt
Stereo In - Stereo Out
LFO Phase
LFO Shape
Pan
Pan
LFO: Tri / Sin
Depth
Delay
Delay
High Damp Low Damp
High Damp Low Damp
Feedback

399EffectsDelay
App
endi
x
70: Tape Echo BPMThis is a tape echo that lets you synchronize the delay time to thetempo of the song.
a: Tap1 Dmod Srcb: Tap1 Delay Noteb: Timesc: Tap1 Dmod Notec: Times
If “Tap1 Dmod Src” is Off or the selected modulation is at 0, thedelay time will be the length specified by “Tap1 Delay Note” and“Times.”
If “Tap1 Dmod Src” is other than Off, the delay time will changeso that it will be as specified by “Tap1 Dmod Note” and “Times”when the maximum modulation is reached.
b: Time Over?
You can set the delay time up to 5,400msec. If the delay timeexceeds this limit, the error message “OVER!” appears in the dis-play. Set the delay time parameters so that this message will notappear. “Time Over?” is only a display parameter.a
BPM (Delay)MIDI, 40.00...300.00
MIDI syncs to the system tempo; 40–300 sets the tempo manually for this individual effect
Tap1 Dmod Src Off...Tempo Selects the modulation source of the delay time
b
Tap1 Delay Note r...w Selects the type of notes to specify
the delay time (tap1)
Times x1...x32 Sets the number of notes to specify the delay time (tap1)
Time Over? ---, OVER! Displays an error message when the delay time exceeds the upper limit
c
Tap1 Dmod Note r...w
Selects the note value used to specify the delay time when the modulation is at maximum
Times x1...x32Specifies the number of notes used to specify the delay time when the modulation is at maximum
d Tap2 Position [%] 0...100
Sets the position of Tap 2 relative to the Tap 1 delay time the depth of pitch variation
e Tap3 Position [%] 0...100
Sets the position of Tap 3 relative to the Tap 1 delay time the depth of pitch variation
f
Tap1 Level 0...100 Sets the Tap1 output level
Pan L, 1...99, R Sets the stereo image of tap1
FB Amt –100...+100 Sets the Tap1 feedback amount
g
Tap2 Level 0...100 Sets the Tap2 output level
Pan L, 1...99, R Sets the stereo image of tap2
FB Amt –100...+100 Sets the Tap2 feedback amount
h
Tap3 Level 0...100 Sets the Tap3 output level
Pan L, 1...99, R Sets the stereo image of tap3
FB Amt –100...+100 Sets the Tap3 feedback amount
i
Feedback 0...100 Sets the amount of feedback for Taps 1, 2, and 3
Src Off...Tempo Selects the modulation source of feedback amount
Amt –100...+100 Sets the depth by which feedback amount will be modulated
jHigh Damp [%] 0...100 Sets the damping amount in the
high range
Low Damp [%] 0...100 Sets the damping amount in the low range
k Saturation 0...100 Sets the distortion amount
lInput Trim 0...100 Sets the input gain
Pre Tone 0...100 Sets the tone of the input
m
Wow Flutter [Hz] 0.02...1.00 Sets the frequency at which pitch
variation will occur
Wow Flutter depth 0...100 Sets the depth of pitch variation
n
Wet/Dry Dry, 1:99...99:1, Wet
Balance between the wet and dry signal
Src Off...Tempo Table , “Dynamic Modulation sources,” on page 357
Amt –100...+100 Amount of modulation source
Wah Flatter
D-mod
Tap2/3 Position
+ TapeSaturation
Left
Right
FX Amt
Trim
PanLevel
FX Amt
FX Amt = 100: Mono In - Stereo Out / FX Amt = 0: Stereo In - Stereo Out
Feedback
Feedback Amt
High / Low DampPre Tone
Delay
(1)
(2)
(3)
Delay TimeBPM
BPM
Base Note x TimesTempo

400 EffectsReverb and Early Reflections (Reverb ER)
Reverb and Early Reflections (Reverb ER)
71: Reverb HallThis hall-type reverb simulates the reverberation of mid-sizeconcert halls or ensemble halls.
72: Reverb SmoothHallThis hall-type reverb simulates the reverberation of larger hallsand stadiums, and creates a smooth release.
73: Reverb Wet PlateThis plate reverb simulates warm (dense) reverberation.
74: Reverb Dry PlateThis plate reverb simulates dry (light) reverberation.
b: Pre Delay [msec]b: Pre Delay Thru [%]
The “Pre Delay” sets the delay time to the reverb input, allowingyou to control spaciousness.
Using the “Pre Delay Thru” parameter, you can mix the drysound without delay, emphasizing the attack of the sound.
75: Reverb RoomThis room-type reverb emphasizes the early reflections thatmake the sound tighter. Changing the balance between the earlyreflections and reverb sound allows you to simulate nuances,such as the type of walls of a room.
a
Reverb Time [sec] 0.1...10.0 Sets the reverberation time
High Damp [%] 0...100 Sets the damping amount in the high range
b
Pre Delay [msec] 0...200 Sets the delay time from the dry
sound
Pre Delay Thru [%] 0...100 Sets the mix ratio of non-delay
sound
c EQ Trim 0...100 Sets the EQ input level
d
Pre LEQ Fc Low, Mid-Low
Selects the cutoff frequency (low or mid-low) of the low-range equalizer
Pre HEQ Fc High, Mid-High
Selects the cutoff frequency (high or mid-high) of the high-range equalizer
e
Pre LEQ Gain [dB] –15.0...+15.0 Sets the gain of Low EQ
Pre HEQ Gain [dB] –15.0...+15.0 Sets the gain of High EQ
f
Wet/Dry Dry, 1:99...99:1, Wet
Balance between the wet and dry signal
Src Off...Tempo Table , “Dynamic Modulation sources,” on page 357
Amt –100...+100 Amount of modulation source
Left
Right
FX Amt
FX Amt
FX Amt = 100: Mono In - Stereo Out / FX Amt = 0: Stereo In - Stereo Out
EQ Trim
+
EQ Trim
LEQ HEQPre Delay Reverb
Pre Delay Thru
Time
Reverb - Hall / Plate Type
Level
Lo
ud
er
Dry
Reverb
Pre Delay Thru
Pre Delay Reverb Time

401EffectsReverb and Early Reflections (Reverb ER)
App
endi
x
76: Reverb BrightRoomThis room-type reverb emphasizes the early reflections thatmake the sound brighter.
c: ER Leveld: Reverb Level
These parameters set the early reflection level and reverb level.
Changing these parameter values allows you to simulate the typeof walls in the room. That is, a larger “ER Level” simulates a hardwall, and a larger “Reverb Level” simulates a soft wall.
77: Early ReflectionsThis effect is only the early reflection part of a reverberationsound, and adds presence to the sound. You can select one of thefour decay curves.
a: Type
This parameter selects the decay curve for the early reflection.
a
Reverb Time [sec] 0.1...3.0 Sets the reverberation time
High Damp [%] 0...100 Sets the damping amount in the high range
b
Pre Delay [msec] 0...200 Sets the delay time from the dry
sound
Pre Delay Thru [%] 0...100 Sets the mix ratio of non-delay
sound
c ER Level 0...100 Sets the level of early reflections
d Reverb Level 0...100 Sets the reverberation level
e EQ Trim 0...100 Sets the EQ input level
f
Pre LEQ Fc Low, Mid-Low
Selects the cutoff frequency (low or mid-low) of the low-range equalizer
Pre HEQ Fc High, Mid-High
Selects the cutoff frequency (high or mid-high) of the high-range equalizer
g
Pre LEQ Gain [dB] –15.0...+15.0 Sets the gain of Low EQ
Pre HEQ Gain [dB] –15.0...+15.0 Sets the gain of High EQ
h
Wet/Dry Dry, 1:99...99:1, Wet
Balance between the wet and dry signal
Src Off...Tempo Table , “Dynamic Modulation sources,” on page 357
Amt –100...+100 Amount of modulation source
Left
Right
FX Amt
FX Amt
FX Amt = 100: Mono In - Stereo Out / FX Amt = 0: Stereo In - Stereo Out
EQ Trim
+
EQ Trim
LEQ HEQ
Pre Delay Reverb Reverb Level
ER Level
ER Level
Pre Delay Thru
ERs
ERs
Reverb - Room Type
Time
Level
Lo
ud
er
ER(Early Reflections)
Dry
Reverb
Pre Delay Thru
Pre Delay Reverb Time
a TypeSharp, Loose, Modulated, Reverse
Selects the decay curve for the early reflection
b ER Time [msec] 10...800 Sets the time length of early reflection
c Pre Delay [msec] 0...200 Sets the time taken from the original
sound to the first early reflection
d EQ Trim 0...100 Sets the input level of EQ applied to the effect sound
e
Pre LEQ Fc Low, Mid-Low
Selects the cutoff frequency (low or mid-low) of the low-range equalizer
Pre HEQ Fc High, Mid-High
Selects the cutoff frequency (high or mid-high) of the high-range equalizer
f
Pre LEQ Gain [dB] –15.0...+15.0 Gain of the Low EQ
Pre HEQ Gain [dB] –15.0...+15.0 Gain of the High EQ
g
Wet/Dry Dry, 1:99...99:1, Wet
Balance between the wet and dry signal
Src Off...Tempo Table , “Dynamic Modulation sources,” on page 357
Amt –100...+100 Amount of modulation source
Left
Right
FX Amt
FX Amt
FX Amt = 100: Mono In - Stereo Out / FX Amt = 0: Stereo In - Stereo Out
EQ Trim
+
EQ Trim
Pre Delay Early ReflectionsLEQ HEQ
Sharp
Loose
Modulated
Early Reflections - Type
Reverse
Dry Pre Delay ER Time

402 EffectsMono-Mono Serial (Mono-Mono)
Mono-Mono Serial (Mono-Mono)
78: P4EQ - Exciter(Parametric 4-Band EQ - Exciter)
This effect combines a mono four-band parametric equalizerand an exciter.
79: P4EQ - Wah(Parametric 4-Band EQ - Wah/Auto Wah)
This effect combines a mono four-band parametric equalizerand a wah. You can change the order of the connection.
P4EQ
a [E]Trim 0...100 Sets the parametric EQ input level
b
[E]B1 Cutoff [Hz] 20...1.00k Sets the center frequency of Band 1
Q 0.5...10.0 Sets the bandwidth of Band 1
Gain [dB] –18...+18 Sets the gain of Band 1
c
[E]B2 Cutoff [Hz] 50...5.00k Sets the center frequency of Band 2
Q 0.5...10.0 Sets the bandwidth of Band 2
Gain [dB] –18...+18 Sets the gain of Band 2
d
[E]B3 Cutoff [Hz] 300...10.00k Sets the center frequency of Band 3
Q 0.5...10.0 Sets the bandwidth of Band 3
Gain [dB] –18...+18 Sets the gain of Band 3
e
[E]B4 Cutoff [Hz] 500...20.00k Sets the center frequency of Band 4
Q 0.5...10.0 Sets the bandwidth of Band 4
Gain [dB] –18...+18 Sets the gain of Band 4
EXCITER
f [X]Exciter Blend –100...+100 Sets the intensity (depth) of the
Exciter effect
g [X]Emphasis Freq 0...70 Sets the frequency range to be
emphasized
h
Wet/Dry Dry, 1:99...99:1, Wet
Balance between the wet and dry signal
Src Off...Tempo Table , “Dynamic Modulation sources,” on page 357
Amt –100...+100 Amount of modulation source
Left
Right
FX Amt
FX Amt
FX Amt = 100: Mono In - Mono Out / FX Amt = 0: Stereo In - Stereo Out
Trim+ Exciter
Parametric 4Band EQ Exciter
P4EQ
a[E]Trim 0...100 Sets the parametric EQ input level
Routing P4EQ Wah,Wah P4EQ
Changes the order of the parametric equalizer and wah connection
b
[E]B1 Cutoff [Hz] 20...1.00k Sets the center frequency of Band 1
Q 0.5...10.0 Sets the bandwidth of Band 1
Gain [dB] –18...+18 Sets the gain of Band 1
c
[E]B2 Cutoff [Hz] 50...5.00k Sets the center frequency of Band 2
Q 0.5...10.0 Sets the bandwidth of Band 2
Gain [dB] –18...+18 Sets the gain of Band 2
d
[E]B3 Cutoff [Hz] 300...10.00k Sets the center frequency of Band 3
Q 0.5...10.0 Sets the bandwidth of Band 3
Gain [dB] –18...+18 Sets the gain of Band 3
e
[E]B4 Cutoff [Hz] 500...20.00k Sets the center frequency of Band 4
Q 0.5...10.0 Sets the bandwidth of Band 4
Gain [dB] –18...+18 Sets the gain of Band 4
WAH
f
[W]Frequency Bottom 0...100 Sets the lower limit of the wah
center frequency
Frequency Top 0...100 Sets the upper limit of the wah center frequency
g
[W]Sweep Mode
Auto, D-mod, LFO
Selects the control from auto-wah, modulation source, and LFO
Src Off...Tempo Selects the modulation source for the wah when Sweep Mode=D-mod
h
[W]LFO Frequency [Hz] 0.02...20.00 Sets the speed of the LFO
Resonance 0...100 Sets the resonance amount
LPF Off, On Switches the wah low pass filter on and off
i
[W] Wet/Dry Dry,1 : 99... 99 : 1, Wet Sets the wah effect balance
Src Off...Tempo Selects the Wet/Dry modulation source for the wah
Amt –100...+100 Sets the Wet/Dry modulation amount for the wah
j
Wet/Dry Dry, 1:99...99:1, Wet
Balance between the wet and dry signal
Src Off...Tempo Table , “Dynamic Modulation sources,” on page 357
Amt –100...+100 Amount of modulation source
Left
Right
FX Amt
FX Amt
FX Amt = 100: Mono In - Mono Out / FX Amt = 0: Stereo In - Stereo Out
Trim+
Parametric 4Band EQRouting
Wah/Auto Wah
D-mod
EnvelopeSweep Mode
D-modAuto
LFOLFO
Wah

403EffectsMono-Mono Serial (Mono-Mono)
App
endi
x
80: P4EQ - Cho/Flng(Parametric 4-Band EQ - Chorus/Flanger)
This effect combines a mono four-band parametric equalizerand a chorus/flanger.
i: Output Mode
When Wet Invert is selected, the right channel phase of the cho-rus/flanger effect sound is inverted. This creates pseudo-stereoeffects and adds spread.
However, if a mono-input type effect is connected after thiseffect, the left and right sounds may cancel each other, eliminat-ing the chorus/flanger effects.
81: P4EQ - Phaser(Parametric 4-Band EQ - Phaser)
This effect combines a mono four-band parametric equalizerand a phaser.
P4EQ
a [E]Trim 0...100 Sets the parametric EQ input level
b
[E]B1 Cutoff [Hz] 20...1.00k Sets the center frequency of Band 1
Q 0.5...10.0 Sets the bandwidth of Band 1
Gain [dB] –18...+18 Sets the gain of Band 1
c
[E]B2 Cutoff [Hz] 50...5.00k Sets the center frequency of Band 2
Q 0.5...10.0 Sets the bandwidth of Band 2
Gain [dB] –18...+18 Sets the gain of Band 2
d
[E]B3 Cutoff [Hz] 300...10.00k Sets the center frequency of Band 3
Q 0.5...10.0 Sets the bandwidth of Band 3
Gain [dB] –18...+18 Sets the gain of Band 3
e
[E]B4 Cutoff [Hz] 500...20.00k Sets the center frequency of Band 4
Q 0.5...10.0 Sets the bandwidth of Band 4
Gain [dB] –18...+18 Sets the gain of Band 4
CHORUS/FLANGER
f[F]LFO Frequency [Hz] 0.02...20.00 Sets the speed of the LFO
LFO Waveform Triangle, Sine Selects the LFO Waveform
g
[F]Delay Time [msec] 0.0...1350.0 Sets the delay time
Depth 0...100 Sets the depth of LFO modulation
Feedback –100...+100 Sets the feedback amount
h
[F]Cho/Flng Wet/Dry
-Wet, -1:99...Dry...99:1, Wet
Sets the effect balance of the chorus/flanger
Src Off...Tempo Selects the Wet/Dry modulation source for the chorus/flanger
Amt –100...+100 Sets the Wet/Dry modulation amount for the chorus/flanger
i [F]Output Mode
Normal, Wet Invert
Selects the output mode for the chorus/flanger
j
Wet/Dry Dry, 1:99...99:1, Wet
Balance between the wet and dry signal
Src Off...Tempo Table , “Dynamic Modulation sources,” on page 357
Amt –100...+100 Amount of modulation source
Left
Right
FX Amt
FX Amt = 100: Mono In - Stereo Out / FX Amt = 0: Stereo In - Stereo Out
Trim
+
Parametric 4Band EQ Chorus/Flanger
FX Amt
Chorus/Flanger
Feedback
LFO: Tri / Sine
Cho/Flng FX Amt
Normal
Wet InvertOutput Mode+
–�
P4EQ
a [E]Trim 0...100 Sets the parametric EQ input level
b
[E]B1 Cutoff [Hz] 20...1.00k Sets the center frequency of Band 1
Q 0.5...10.0 Sets the bandwidth of Band 1
Gain [dB] –18...+18 Sets the gain of Band 1
c
[E]B2 Cutoff [Hz] 50...5.00k Sets the center frequency of Band 2
Q 0.5...10.0 Sets the bandwidth of Band 2
Gain [dB] –18...+18 Sets the gain of Band 2
d
[E]B3 Cutoff [Hz] 300...10.00k Sets the center frequency of Band 3
Q 0.5...10.0 Sets the bandwidth of Band 3
Gain [dB] –18...+18 Sets the gain of Band 3
e
[E]B4 Cutoff [Hz] 500...20.00k Sets the center frequency of Band 4
Q 0.5...10.0 Sets the bandwidth of Band 4
Gain [dB] –18...+18 Sets the gain of Band 4
PHASER
f[P]LFO Frequency [Hz] 0.02...20.00 Sets the speed of the LFO
LFO Waveform Triangle, Sine Selects the LFO Waveform
g
[P]Manual 0...100 Sets the frequency to which the effect is applied
Depth 0...100 Sets the depth of LFO modulation
Resonance –100...+100 Sets the resonance amount
h
[P]Phaser Wet/Dry
-Wet, -1:99...Dry...99:1, Wet
Sets the phaser effect balance
Src Off...Tempo Selects the Wet/Dry modulation source for the phaser
Amt –100...+100 Sets the Wet/Dry modulation amount for the phaser
i [P]Output Mode
Normal, Wet Invert Selects the phaser output mode
j
Wet/Dry Dry, 1:99...99:1, Wet
Balance between the wet and dry signal
Src Off...Tempo Table , “Dynamic Modulation sources,” on page 357
Amt –100...+100 Amount of modulation source
Left
Right
FX Amt
FX Amt
FX Amt = 100: Mono In - Stereo Out / FX Amt = 0: Stereo In - Stereo Out
Trim+
Parametric 4Band EQ Phaser
Phaser
Resonance
LFO: Tri / Sine
Phaser FX Amt
Normal
Wet Invert
Output Mode–�+

404 EffectsMono-Mono Serial (Mono-Mono)
82: P4EQ - Mt. Delay(Parametric 4-Band EQ -
Multitap Delay)This effect combines a mono four-band parametric equalizerand a multitap delay.
83: Comp - Wah(Compressor - Wah/Auto Wah)
This effect combines a mono compressor and a wah. You canchange the order of the connection.
P4EQ
a [E]Trim 0...100 Sets the parametric EQ input level
b
[E]B1 Cutoff [Hz] 20...1.00k Sets the center frequency of
Band 1
Q 0.5...10.0 Sets the bandwidth of Band 1
Gain [dB] –18...+18 Sets the gain of Band 1
c
[E]B2 Cutoff [Hz] 50...5.00k Sets the center frequency of
Band 2
Q 0.5...10.0 Sets the bandwidth of Band 2
Gain [dB] –18...+18 Sets the gain of Band 2
d
[E]B3 Cutoff [Hz] 300...10.00k Sets the center frequency of
Band 3
Q 0.5...10.0 Sets the bandwidth of Band 3
Gain [dB] –18...+18 Sets the gain of Band 3
e
[E]B4 Cutoff [Hz] 500...20.00k Sets the center frequency of
Band 4
Q 0.5...10.0 Sets the bandwidth of Band 4
Gain [dB] –18...+18 Sets the gain of Band 4
MULTITAP DELAY
f
[D]Tap1 Time [msec] 0.0...1360.0 Sets the Tap1 delay time
Tap1 Level 0...100 Sets the Tap1 output level
g
[D]Tap2 Time [msec] 0.0...1360.0 Sets the Tap2 delay time
Feedback (Tap2) –100...+100 Sets the Tap2 feedback amount
h [D]High Damp [%] 0...100 Sets the damping amount in
the high range
i
[D]Mt.Delay Wet/Dry
Dry, 1:99...99:1, Wet
Sets the multitap delay effect balance
Src Off...TempoSelects the Wet/Dry modulation source for the multitap delay
Amt –100...+100 Sets the Wet/Dry modulation amount for the multitap delay
j
Wet/DryDry, 1:99...99:1, Wet
Balance between the wet and dry signal
Src Off...Tempo Table , “Dynamic Modulation sources,” on page 357
Amt –100...+100 Amount of modulation source
Left
Right
FX Amt
FX Amt
FX Amt = 100: Mono In - Mono Out / FX Amt = 0: Stereo In - Stereo Out
Trim+
Parametric 4Band EQ Multitap Delay
Feedback
High Damp
Delay(2)
(1)Mt.Dly FX Amt
COMPRESSOR
a [C]Sensitivity 1...100 Sets the sensitivity
b[C]Attack 1...100 Sets the attack level
Output Level 0...100 Sets the compressor output level
c [C]EQ Trim 0...100 Sets the EQ input level
d
[C]Pre LEQ Gain [dB] –15...+15 Sets the gain of Low EQ
Pre HEQ Gain [dB] –15...+15 Sets the gain of High EQ
WAH
e
[W]Frequency Bottom 0...100 Sets the lower limit of the wah
center frequency
Frequency Top 0...100 Sets the upper limit of the wah center frequency
f
[w]Sweep Mode
Auto, D-mod, LFO
Selects the control from auto-wah, modulation source, and LFO
Src Off...Tempo Selects the modulation source for the wah when Sweep Mode=D-mod
g
[W]LFO Frequency [Hz] 0.02...20.00 Sets the speed of the LFO
Resonance 0...100 Sets the resonance amount
LPF Off, On Switches the wah low pass filter on and off
h
[W]Wet/DryDry, 1 : 99...99 : 1, Wet
Sets the wah effect balance
Src Off...Tempo Selects the Wet/Dry modulation source for the wah
Amt –100...+100 Sets the Wet/Dry modulation amount for the wah
i Routing Comp Wah, Wah Comp
Switches the order of the compressor and wah
j
Wet/Dry Dry, 1:99...99:1, Wet
Balance between the wet and dry signal
Src Off...Tempo Table , “Dynamic Modulation sources,” on page 357
Amt –100...+100 Amount of modulation source
Left
Right
FX Amt
FX Amt
FX Amt
FX Amt = 100: Mono In - Mono Out / FX Amt = 0: Stereo In - Stereo Out
+
CompressorRouting
Wah/Auto Wah
Wah
D-mod
EnvelopeSweep Mode
D-modAuto
LFO
LFO
LEQ HEQEQ Trim
Output Level
Envelope - Control
Comp

405EffectsMono-Mono Serial (Mono-Mono)
App
endi
x
84: Comp - Amp Sim(Compressor - Amp Simulation)
This effect combines a mono compressor and an amp simula-tion. You can change the order of the effects.
85: Comp - OD/HiGain(Compressor - Overdrive/Hi.Gain)
This effect combines a mono compressor and an overdrive/high-gain distortion. You can change the order of the effects.
COMPRESSOR
a [C]Sensitivity 1...100 Sets the sensitivity
b[C]Attack 1...100 Sets the attack level
Output Level 0...100 Sets the compressor output level
c [C]EQ Trim 0...100 Sets the EQ input level
d
[C]Pre LEQ Gain [dB] –15...+15 Sets the gain of Low EQ
Pre HEQ Gain [dB] –15...+15 Sets the gain of High EQ
AMP SIM
e [A]Amplifier Type SS, EL84, 6L6 Selects the type of guitar amplifier
f Routing Comp Amp, Amp Comp
Switches the order of the compressor and amp simulation
g
Wet/Dry Dry, 1:99...99:1, Wet
Balance between the wet and dry signal
Src Off...Tempo Table , “Dynamic Modulation sources,” on page 357
Amt –100...+100 Amount of modulation source
Left
Right
FX Amt
FX Amt
FX Amt = 100: Mono In - Mono Out / FX Amt = 0: Stereo In - Stereo Out
+
CompressorRouting
Amp Simulation
Amp Simulation FilterLEQ HEQEQ Trim
Output Level
Envelope - Control
Comp
COMPRESSOR
a [C]Sensitivity 1...100 Sets the sensitivity
b[C]Attack 1...100 Sets the attack level
Output Level 0...100 Sets the compressor output level
OD/HI-GAIN
c
[O]Drive Mode
Overdrive, Hi-Gain
Switches between overdrive and high-gain distortion
Drive 1...100 Sets the degree of distortion
d
[O]Output Level 0...50 Sets the overdrive output level
Src Off...Tempo Selects the modulation source for the overdrive output level
Amt –50...+50 Sets the modulation amount of the overdrive output level
e[O]Low Cutoff [Hz] 20...1.00k Sets the center frequency for Low
EQ (shelving type)
Gain [dB] –18...+18 Sets the gain of Low EQ
f
[O]Mid1 Cutoff [Hz] 300...10.00k Sets the center frequency for Mid/
High EQ 1 (peaking type)
Q 0.5...10.0 Sets the band width of Mid/High EQ 1
Gain [dB] –18...+18 Sets the gain of Mid/High EQ 1
g
[O]Mid2 Cutoff [Hz] 500...20.00k Sets the center frequency for Mid/
High EQ 2 (peaking type)
Q 0.5...10.0 Sets the band width of Mid/High EQ 2
Gain [dB] –18...+18 Sets the gain of Mid/High EQ 2
h
[O]Wet/DryDry, 1 : 99...99 : 1, Wet
Sets the overdrive effect balance
Src Off...Tempo Selects the Wet/Dry modulation source for the overdrive
Amt –100...+100 Sets the Wet/Dry modulation amount for the overdrive
i RoutingComp OD/HG, OD/HG Comp
Switches the order of the compressor and overdrive
j
Wet/Dry Dry, 1:99...99:1, Wet
Balance between the wet and dry signal
Src Off...Tempo Table , “Dynamic Modulation sources,” on page 357
Amt –100...+100 Amount of modulation source
Left
Right
FX Amt
FX Amt
FX Amt = 100: Mono In - Mono Out / FX Amt = 0: Stereo In - Stereo Out
+
RoutingOverdrive / Hi-Gain
3 Band PEQ
Output Level
Mode: Overdrive / Hi-GainDrive
Driver
Compressor
Output Level
Envelope - Control
CompFX Amt

406 EffectsMono-Mono Serial (Mono-Mono)
86: Comp - P4EQ(Compressor - Parametric 4-Band EQ)
This effect combines a mono compressor and a four-band para-metric equalizer. You can change the order of the effects.
87: Comp - Cho/Flng(Compressor - Chorus/Flanger)
This effect combines a mono compressor and a chorus/flanger.You can change the order of the effects.
h: [F]Output Modei: Routing
When Wet Invert is selected, the right channel phase of the cho-rus/flanger effect sound is inverted. This creates pseudo-stereoeffects and adds spread.
However, if a mono-input type effect is connected after thiseffect, the left and right sounds may cancel each other, eliminat-ing the chorus/flanger effects.
When “Routing” is set to Flanger→ Comp, “[F]Output Mode”will be set to Normal.
COMPRESSOR
a [C]Sensitivity 1...100 Sets the sensitivity
b[C]Attack 1...100 Sets the attack level
Output Level 0...100 Sets the compressor output level
P4EQ
c [E]Trim 0...100 Sets the parametric EQ input level
d
[E]B1 Cutoff [Hz] 20...1.00k Sets the center frequency of Band 1
Q 0.5...10.0 Sets the bandwidth of Band 1
Gain [dB] –18...+18 Sets the gain of Band 1
e
[E]B2 Cutoff [Hz] 50...5.00k Sets the center frequency of Band 2
Q 0.5...10.0 Sets the bandwidth of Band 2
Gain [dB] –18...+18 Sets the gain of Band 2
f
[E]B3 Cutoff [Hz] 300...10.00k Sets the center frequency of Band 3
Q 0.5...10.0 Sets the bandwidth of Band 3
Gain [dB] –18...+18 Sets the gain of Band 3
g
[E]B4 Cutoff [Hz] 500...20.00k Sets the center frequency of Band 4
Q 0.5...10.0 Sets the bandwidth of Band 4
Gain [dB] –18...+18 Sets the gain of Band 4
h Routing Comp P4EQ, P4EQ Comp
Switches the order of the compressor and parametric EQ
i
Wet/Dry Dry, 1:99...99:1, Wet
Balance between the wet and dry signal
Src Off...Tempo Table , “Dynamic Modulation sources,” on page 357
Amt –100...+100 Amount of modulation source
Left
Right
FX Amt
FX Amt
FX Amt = 100: Mono In - Mono Out / FX Amt = 0: Stereo In - Stereo Out
+
RoutingCompressor
Trim
Parametric 4Band EQ
Output Level
Envelope - Control
Comp
COMPRESSOR
a [C]Sensitivity 1...100 Sets the sensitivity
b[C]Attack 1...100 Sets the attack level
Output Level 0...100 Sets the compressor output level
c [C]EQ Trim 0...100 Sets the EQ input level
d
[C]Pre LEQ Gain [dB] –15...+15 Sets the gain of Low EQ
Pre HEQ Gain [dB] –15...+15 Sets the gain of High EQ
CHORUS/FLANGER
e[F]LFO Frequency [Hz] 0.02...20.00 Sets the speed of the LFO
LFO Waveform Triangle, Sine Selects the LFO Waveform
f
[F]Delay Time [msec] 0.0...1350.0 Sets the delay time
Depth 0...100 Sets the depth of LFO modulation
Feedback –100...+100 Sets the feedback amount
g
[F]Cho/Flng Wet/Dry
-Wet, -1:99...Dry...99:1, Wet
Sets the effect balance of the chorus/flanger,
Src Off...Tempo Selects the Wet/Dry modulation source for the chorus/flanger
Amt –100...+100 Sets the Wet/Dry modulation amount for the chorus/flanger
h [F]Output Mode
Normal,Wet Invert
Selects the output mode for the chorus/flanger
i RoutingComp Flanger, Flanger Comp
Switches the order of the compressor and chorus/flanger
j
Wet/Dry Dry, 1:99...99:1, Wet
Balance between the wet and dry signal
Src Off...Tempo Table , “Dynamic Modulation sources,” on page 357
Amt –100...+100 Amount of modulation source
Left
Right
FX Amt
FX Amt
FX Amt = 100: Mono In - Stereo Out / FX Amt = 0: Stereo In - Stereo Out
+
RoutingCompressor Chorus/Flanger
Chorus/Flanger
Feedback
LFO: Tri / Sine
Cho/Flng FX Amt
Normal
Wet Invert
Output Mode–�+
LEQ HEQEQ TrimComp
Output Level
Envelope - Control

407EffectsMono-Mono Serial (Mono-Mono)
App
endi
x
88: Comp - Phaser(Compressor - Phaser)
This effect combines a mono compressor and a phaser. You canchange the order of the effects.
89: Comp - Mt. Delay(Compressor - Multitap Delay)
This effect combines a mono compressor and a multitap delay.You can change the order of the effects.
COMPRESSOR
a [C]Sensitivity 1...100 Sets the sensitivity
b[C]Attack 1...100 Sets the attack level
Output Level 0...100 Sets the compressor output level
c [C]EQ Trim 0...100 Sets the EQ input level
d
[C]Pre LEQ Gain [dB] –15...+15 Sets the gain of Low EQ
Pre HEQ Gain [dB] –15...+15 Sets the gain of High EQ
PHASER
e[P]LFO Frequency [Hz] 0.02...20.00 Sets the speed of the LFO
LFO Waveform Triangle, Sine Selects the LFO Waveform
f
[P]Manual 0...100 Sets the frequency to which the effect is applied
Depth 0...100 Sets the depth of LFO modulation
Resonance –100...+100 Sets the resonance amount
g
[P]Phaser Wet/Dry
-Wet, -1:99...Dry...99:1, Wet
Sets the phaser effect balance
Src Off...Tempo Selects the Wet/Dry modulation source for the phaser
Amt –100...+100 Sets the Wet/Dry modulation amount for the phaser
h [F]Output Mode
Normal,Wet Invert Selects the phaser output mode
i Routing Comp Phaser, Phaser Comp
Switches the order of the compressor and phaser
j
Wet/Dry Dry, 1:99...99:1, Wet
Balance between the wet and dry signal
Src Off...Tempo Table , “Dynamic Modulation sources,” on page 357
Amt –100...+100 Amount of modulation source
Left
Right
FX Amt
FX Amt
FX Amt = 100: Mono In - Stereo Out / FX Amt = 0: Stereo In - Stereo Out
+
RoutingCompressor
LEQ HEQEQ Trim
Comp
Output Level
Envelope - Control
Phaser
Phaser
Resonance
LFO: Tri / Sine
Phaser FX Amt
Normal
Wet InvertOutput Mode
–�+
COMPRESSOR
a [C]Sensitivity 1...100 Sets the sensitivity
b[C]Attack 1...100 Sets the attack level
Output Level 0...100 Sets the compressor output level
c [C]EQ Trim 0...100 Sets the EQ input level
d
[C]Pre LEQ Gain [dB] –15...+15 Sets the gain of Low EQ
Pre HEQ Gain [dB] –15...+15 Sets the gain of High EQ
MULTITAP DELAY
e
[D]Tap1 Time [msec] 0.0...1360.0 Sets the Tap1 delay time
Tap1 Level 0...100 Sets the Tap1 output level
f
[D]Tap2 Time [msec] 0.0...1360.0 Sets the Tap2 delay time
Feedback(Tap2) –100...+100 Sets the Tap2 feedback amount
g [D]High Damp [%] 0...100 Sets the damping amount in the
high range
h
[D]Mt.Delay Wet/Dry
Dry, 1 : 99...99 : 1, Wet
Sets the multitap delay effect balance
Src Off...Tempo Selects the Wet/Dry modulation source for the multitap delay
Amt –100...+100 Sets the Wet/Dry modulation amount for the multitap delay
i Routing
Comp Mt.Delay, Mt.Delay Comp
Switches the order of the compressor and multitap delay
j
Wet/Dry Dry, 1:99...99:1, Wet
Balance between the wet and dry signal
Src Off...Tempo Table , “Dynamic Modulation sources,” on page 357
Amt –100...+100 Amount of modulation source
Left
Right
FX Amt
FX Amt
FX Amt = 100: Mono In - Mono Out / FX Amt = 0: Stereo In - Stereo Out
+
RoutingCompressor
LEQ HEQEQ Trim
Output Level
Envelope - Control
Multitap Delay
Feedback
High Damp
Delay(2)
(1)Mt.Dly FX Amt
Comp

408 EffectsMono-Mono Serial (Mono-Mono)
90: Limiter - P4EQ(Limiter - Parametric 4-Band EQ)
This effect combines a mono limiter and a four-band parametricequalizer. You can change the order of the effects.
a: [L]Ratioa: Threshold [dB]c: [L]Gain Adjust [dB]
This parameter sets the signal compression “[L]Ratio”. Compres-sion is applied only when the signal level exceeds the “Thresh-old” value.
Adjust the output level using the “Gain Adjust” parameter, sincecompression causes the entire level to be reduced.
LIMITER
a
[L]Ratio 1.0 : 1...50.0 : 1, Inf : 1 Sets the signal compression ratio
Threshold [dB] –40...0Sets the level above which the compressor is applied
b[L]Attack 1...100 Sets the attack time
Release 1...100 Sets the release time
c [L]Gain Adjust [dB]
–Inf, –38...+24
Sets the limiter output gain
P4EQ
d [E]Trim 0...100 Sets the parametric EQ input level
e
[E]B1 Cutoff [Hz] 20...1.00k Sets the center frequency of Band 1
Q 0.5...10.0 Sets the bandwidth of Band 1
Gain [dB] –18...+18 Sets the gain of Band 1
f
[E]B2 Cutoff [Hz] 50...5.00k Sets the center frequency of Band 2
Q 0.5...10.0 Sets the bandwidth of Band 2
Gain [dB] –18...+18 Sets the gain of Band 2
g
[E]B3 Cutoff [Hz] 300...10.00k Sets the center frequency of Band 3
Q 0.5...10.0 Sets the bandwidth of Band 3
Gain [dB] –18...+18 Sets the gain of Band 3
h
[E]B4 Cutoff [Hz] 500...20.00k Sets the center frequency of Band 4
Q 0.5...10.0 Sets the bandwidth of Band 4
Gain [dB] –18...+18 Sets the gain of Band 4
i Routing Limiter P4EQ, P4EQ Limiter
Switches the order of the limiter and parametric EQ
j
Wet/Dry Dry, 1:99...99:1, Wet
Balance between the wet and dry signal
Src Off...Tempo Table , “Dynamic Modulation sources,” on page 357
Amt –100...+100 Amount of modulation source
Left
Right
FX Amt
FX Amt
FX Amt = 100: Mono In - Mono Out / FX Amt = 0: Stereo In - Stereo Out
+
RoutingLimiter
Trim
Parametric 4Band EQ
Limiter
Gain Adjust
Envelope - Control
Input Level
Output Level
Threshold
Ratio=1.0 : 1
Ratio=2.0 : 1
Ratio=4.0 : 1
Ration=Inf : 1
Louder
Lo
ud
er
Time
Level
Threshold
Ratio=Inf : 1
Ratio=2.0 : 1Ratio=4.0 : 1
Dry Ratio=1.0 : 1
Limiter - Threshold / Ratio

409EffectsMono-Mono Serial (Mono-Mono)
App
endi
x
91: Limiter - Cho/Flng(Limiter - Chorus/Flanger)
This effect combines a mono limiter and a chorus/flanger. Youcan change the order of the effects.
92: Limiter - PhaserThis effect combines a mono limiter and a phaser. You canchange the order of the effects.
LIMITER
a[L]Ratio 1.0 : 1...
50.0 : 1, Inf : 1 Sets the signal compression ratio
Threshold [dB] –40...0 Sets the level above which the compressor is applied
b[L]Attack 1...100 Sets the attack time
Release 1...100 Sets the release time
c [L]Gain Adjust [dB]
–Inf, –38...+24
Sets the limiter output gain
CHORUS/FLANGER
d[F]LFO Frequency [Hz] 0.02...20.00 Sets the speed of the LFO
LFO Waveform Triangle, Sine Selects the LFO Waveform
e
[F]Delay Time [msec] 0.0...1350.0 Sets the delay time
Depth 0...100 Sets the depth of LFO modulation
Feedback –100...+100 Sets the feedback amount
f [F]EQ Trim 0...100 Sets the EQ input level
g
[F]Pre LEQ Gain [dB] –15...+15 Sets the gain of Low EQ
Pre HEQ Gain [dB] –15...+15 Sets the gain of High EQ
h
[F]Cho/Flng Wet/Dry
-Wet, -1:99...Dry...99:1, Wet
Sets the effect balance of the chorus/flanger
Src Off...Tempo Selects the Wet/Dry modulation source for the chorus/flanger
Amt –100...+100 Sets the Wet/Dry modulation amount for the chorus/flanger
i
[F]Output Mode
Normal, Wet Invert
Selects the output mode for the chorus/flanger
Routing
Limiter Flanger, Flanger Limiter
Switches the order of the limiter and chorus/flanger
j
Wet/Dry Dry, 1:99...99:1, Wet
Balance between the wet and dry signal
Src Off...Tempo Table , “Dynamic Modulation sources,” on page 357
Amt –100...+100 Amount of modulation source
Left
Right
FX Amt
FX Amt
FX Amt = 100: Mono In - Stereo Out / FX Amt = 0: Stereo In - Stereo Out
+
RoutingChorus/Flanger
FeedbackCho/Flng FX Amt
Normal
Wet InvertOutput Mode
–�+
Limiter
Limiter
Gain Adjust
Envelope - Control
LEQ HEQEQ TrimChorus/Flanger
LFO: Tri / Sine
LIMITER
a[L]Ratio 1.0 : 1...
50.0 : 1, Inf : 1 Sets the signal compression ratio
Threshold [dB] –40...0 Sets the level above which the compressor is applied
b[L]Attack 1...100 Sets the attack time
Release 1...100 Sets the release time
c [L]Gain Adjust [dB]
–Inf, –38...+24
Sets the limiter output gain
PHASER
d[P]LFO Frequency [Hz] 0.02...20.00 Sets the speed of the LFO
LFO Waveform Triangle, Sine Selects the LFO Waveform
e
[P]Manual 0...100 Sets the frequency to which the effect is applied
Depth 0...100 Sets the depth of LFO modulation
Resonance –100...+100 Sets the resonance amount
f
[P]Phaser Wet/Dry
-Wet, -1:99...Dry...99:1, Wet
Sets the phaser effect balance
Src Off...Tempo Selects the phaser’s Wet/Dry modulation source
Amt –100...+100 Sets the phaser’s Wet/Dry modulation amount
g [P]Output Mode
Normal,Wet Invert Selects the phaser output mode
h RoutingLimiter Phaser, Phaser Limiter
Switches the order of the limiter and phaser
i
Wet/Dry Dry, 1:99...99:1, Wet
Balance between the wet and dry signal
Src Off...Tempo Table , “Dynamic Modulation sources,” on page 357
Amt –100...+100 Amount of modulation source
Left
Right
FX Amt
FX Amt
FX Amt = 100: Mono In - Stereo Out / FX Amt = 0: Stereo In - Stereo Out
+
RoutingLimiter
LimiterGain Adjust
Envelope - Control
Phaser
Phaser
Resonance
LFO: Tri / Sine
Phaser FX Amt
Normal
Wet InvertOutput Mode
–�+

410 EffectsMono-Mono Serial (Mono-Mono)
93: Limiter - Mt.Delay(Limiter - Multitap Delay)
This effect combines a mono limiter and a multitap delay. Youcan change the order of the effects.
94: Exciter - Comp(Exciter -Compressor)
This effect combines a mono exciter and a compressor. You canchange the order of the effects.
LIMITER
a[L]Ratio 1.0 : 1...
50.0 : 1, Inf : 1 Sets the signal compression ratio
Threshold [dB] –40...0 Sets the level above which the compressor is applied
b[L]Attack 1...100 Sets the attack time
Release 1...100 Sets the release time
c [L]Gain Adjust [dB]
–Inf, –38...+24
Sets the limiter output gain
MULTITAP DELAY
d[D]Tap1 Time [msec] 0.0...1360.0 Sets the Tap1 delay time
Tap1 Level 0...100 Sets the Tap1 output level
e[D]Tap2 Time [msec] 0.0...1360.0 Sets the Tap2 delay time
Feedback –100...+100 Sets the Tap2 feedback amount
f [D]High Damp [%] 0...100 Sets the damping amount in the
high range
g
[D]Mt.Delay Wet/Dry
Dry, 1:99...99:1, Wet
Sets the multitap delay effect balance
Src Off...Tempo Selects the multitap delay’s Wet/Dry modulation source
Amt –100...+100 Sets the multitap delay’s Wet/Dry modulation amount
h Routing
Limiter Mt.Delay, Mt.Delay Limiter
Switches the order of the limiter and multitap delay
i
Wet/Dry Dry, 1:99...99:1, Wet
Balance between the wet and dry signal
Src Off...Tempo Table , “Dynamic Modulation sources,” on page 357
Amt –100...+100 Amount of modulation source
Left
Right
FX Amt
FX Amt
FX Amt = 100: Mono In - Mono Out / FX Amt = 0: Stereo In - Stereo Out
+
RoutingMultitap Delay
Feedback
High Damp
Delay(2)
(1)Mt.Dly FX Amt
Limiter
LimiterGain Adjust
Envelope - Control
EXCITER
a [X]Exciter Blend –100...+100 Sets the intensity (depth) of the
Exciter effect
b [X]Emphasis Frequency 0...70 Sets the frequency range to be
emphasized
c [X]EQ Trim 0...100 Sets the EQ input level
d
[X]Pre LEQ Gain [dB] –15...+15 Sets the gain of Low EQ
Pre HEQ Gain [dB] –15...+15 Sets the gain of High EQ
COMPRESSOR
e [C]Sensitivity 1...100 Sets the sensitivity
f[C]Attack 1...100 Sets the attack level
Output Level 0...100 Sets the compressor output level
g Routing Exciter Comp, Comp Exciter
Switches the order of the exciter and compressor
h
Wet/Dry Dry, 1:99...99:1, Wet
Balance between the wet and dry signal
Src Off...Tempo Table , “Dynamic Modulation sources,” on page 357
Amt –100...+100 Amount of modulation source
Left
Right
FX Amt
FX Amt
FX Amt = 100: Mono In - Mono Out / FX Amt = 0: Stereo In - Stereo Out
+
RoutingCompressor
LEQ HEQEQ Trim
CompOutput Level
Envelope - Control
Exciter
Exciter

411EffectsMono-Mono Serial (Mono-Mono)
App
endi
x
95: Exciter - LimiterThis effect combines a mono exciter and a limiter. You canchange the order of the effects.
96: Exciter - Cho/Flng(Exciter - Chorus/Flanger)
This effect combines a mono limiter and a chorus/flanger.
EXCITER
a [X]Exciter Blend –100...+100 Sets the intensity (depth) of the
Exciter effect
b [X]Emphasis Frequency 0...70 Sets the frequency range to be
emphasized
c [X]Trim 0...100 Sets the EQ input level
d
[X]Pre LEQ Gain [dB] –15...+15 Sets the gain of Low EQ
Pre HEQ Gain [dB] –15...+15 Sets the gain of High EQ
LIMITER
e [L]Ratio 1.0 : 1...50.0 : 1, Inf : 1 Sets the signal compression ratio
f [L]Threshold [dB] –40...0 Sets the level above which the
compressor is applied
g [L]Attack 1...100 Sets the attack time
Release 1...100 Sets the release time
h [L]Gain Adjust [dB]
–Inf, –38...+24
Sets the limiter output gain
i RoutingExciter Limiter, Limiter Exciter
Switches the order of the exciter and limiter
j
Wet/Dry Dry, 1:99...99:1, Wet
Balance between the wet and dry signal
Src Off...Tempo Table , “Dynamic Modulation sources,” on page 357
Amt –100...+100 Amount of modulation source
Left
Right
FX Amt
FX Amt
FX Amt = 100: Mono In - Mono Out / FX Amt = 0: Stereo In - Stereo Out
+
Routing
LEQ HEQEQ Trim
Exciter
Exciter Limiter
Limiter
Gain Adjust
Envelope - Control
EXCITER
a [X]Exciter Blend –100...+100 Sets the intensity (depth) of the
Exciter effect
b [X]Emphasis Frequency 0...70 Sets the frequency range to be
emphasized
c [X]Trim 0...100 Sets the EQ input level
d
[X]Pre LEQ Gain [dB] –15...+15 Sets the gain of Low EQ
Pre HEQ Gain [dB] –15...+15 Sets the gain of High EQ
CHORUS/FLANGER
e[F]LFO Frequency [Hz] 0.02...20.00 Sets the speed of the LFO
LFO Waveform Triangle, Sine Selects the LFO Waveform
f
[F]Delay Time [msec] 0.0...1350.0 Sets the delay time
Depth 0...100 Sets the depth of LFO modulation
Feedback –100...+100 Sets the feedback amount
g
[F]Cho/Flng Wet/Dry
-Wet, -1:99...Dry...99:1, Wet
Sets the effect balance of the chorus/flanger
Src Off...Tempo Selects the Wet/Dry modulation source for the chorus/flanger
Amt –100...+100 Sets the Wet/Dry modulation amount for the chorus/flanger
h [F]Output Mode
Normal,Wet Invert
Selects the output mode for the chorus/flanger
i
Wet/Dry Dry, 1:99...99:1, Wet
Balance between the wet and dry signal
Src Off...Tempo Table , “Dynamic Modulation sources,” on page 357
Amt –100...+100 Amount of modulation source
Left
Right
FX Amt
FX Amt
FX Amt = 100: Mono In - Stereo Out / FX Amt = 0: Stereo In - Stereo Out
+
Chorus/Flanger
Chorus/Flanger
Feedback
LFO: Tri / Sine
Cho/Flng FX Amt
Normal
Wet InvertOutput Mode
–�+
LEQ HEQEQ Trim
Exciter
Exciter

412 EffectsMono-Mono Serial (Mono-Mono)
97: Exciter - PhaserThis effect combines a mono limiter and a phaser.
98: Exciter - Mt.Delay(Exciter - Multitap Delay)
This effect combines a mono exciter and a multitap delay.
EXCITER
a [X]Exciter Blend –100...+100 Sets the intensity (depth) of the
Exciter effect
b [X]Emphasis Frequency 0...70 Sets the frequency range to be
emphasized
c [X]Trim 0...100 Sets the EQ input level
d
[X]Pre LEQ Gain [dB] –15...+15 Sets the gain of Low EQ
Pre HEQ Gain [dB] –15...+15 Sets the gain of High EQ
PHASER
e[P]LFO Frequency [Hz] 0.02...20.00 Sets the speed of the LFO
LFO Waveform Triangle, Sine Selects the LFO Waveform
f
[P]Manual 0...100 Sets the frequency to which the effect is applied
Depth 0...100 Sets the depth of LFO modulation
Resonance –100...+100 Sets the resonance amount
g
[P]Phaser Wet/Dry
-Wet, -1:99...Dry...99:1, Wet
Sets the phaser effect balance
Src Off...Tempo Selects the Wet/Dry modulation source for the phaser
Amt –100...+100 Sets the Wet/Dry modulation amount for the phaser
h [P]Output Mode
Normal,Wet Invert Selects the phaser output mode
i
Wet/Dry Dry, 1:99...99:1, Wet
Balance between the wet and dry signal
Src Off...Tempo Table , “Dynamic Modulation sources,” on page 357
Amt –100...+100 Amount of modulation source
Left
Right
FX Amt
FX Amt
FX Amt = 100: Mono In - Stereo Out / FX Amt = 0: Stereo In - Stereo Out
+LEQ HEQEQ Trim
Exciter
Exciter Phaser
Phaser
Resonance
LFO: Tri / Sine
Phaser FX Amt
Normal
Wet InvertOutput Mode
–�+
EXCITER
a [X]Exciter Blend –100...+100 Sets the intensity (depth) of the
Exciter effect
b [X]Emphasis Frequency 0...70 Sets the frequency range to be
emphasized
c [X]Trim 0...100 Sets the EQ input level
d
[X]Pre LEQ Gain [dB] –15...+15 Sets the gain of Low EQ
Pre HEQ Gain [dB] –15...+15 Sets the gain of High EQ
MULTITAP DELAY
e[D]Tap1 Time [msec] 0.0...1360.0 Sets the Tap1 delay time
Tap1 Level 0...100 Sets the Tap1 output level
f
[D]Tap2 Time [msec] 0.0...1360.0 Sets the Tap2 delay time
Feedback(Tap2) –100...+100 Sets the Tap2 feedback amount
g [D]High Damp [%] 0...100 Sets the damping amount in the
high range
h
[D]Mt.Delay Wet/Dry
Dry, 1:99...99:1, Wet
Sets the multitap delay effect balance
Src Off...Tempo Selects the Wet/Dry modulation source for the multitap delay
Amt –100...+100 Sets the Wet/Dry modulation amount for the multitap delay
i
Wet/Dry Dry, 1:99...99:1, Wet
Balance between the wet and dry signal
Src Off...Tempo Table , “Dynamic Modulation sources,” on page 357
Amt –100...+100 Amount of modulation source
Left
Right
FX Amt
FX Amt
FX Amt = 100: Mono In - Mono Out / FX Amt = 0: Stereo In - Stereo Out
+
Multitap Delay
Feedback
High Damp
Delay(2)
(1)Mt.Dly FX Amt
LEQ HEQEQ Trim
Exciter
Exciter

413EffectsMono-Mono Serial (Mono-Mono)
App
endi
x
99: OD/HG - Amp Sim(Overdrive/Hi.Gain -
Amp Simulation)This effect combines a mono overdrive/high-gain distortion andan amp simulation. You can change the order of the effects.
100: OD/HG - Cho/Flng(Overdrive/Hi.Gain - Chorus/Flanger)
This effect combines a mono overdrive/high-gain distortion anda chorus/flanger. You can change the order of the effects.
OD/HI-GAIN
a[O]Drive Mode Overdrive, Hi-
GainSwitches between overdrive and high-gain distortion
Drive 1...100 Sets the degree of distortion
b
[O]Output Level 0...50 Sets the overdrive output level
Src Off...Tempo Selects the modulation source for the overdrive output level
Amt –50...+50 Sets the modulation amount of the overdrive output level
e[O]Low Cutoff [Hz] 20...1.00k Sets the center frequency for Low
EQ (shelving type)
Gain [dB] –18...+18 Sets the gain of Low EQ
f
[O]Mid1 Cutoff [Hz] 300...10.00k Sets the center frequency for Mid/
High EQ 1 (peaking type)
Q 0.5...10.0 Sets the band width of Mid/High EQ 1
Gain [dB] –18...+18 Sets the gain of Mid/High EQ 1
g
[O]Mid2 Cutoff [Hz] 500...20.00k Sets the center frequency for Mid/
High EQ 2 (peaking type)
Q 0.5...10.0 Sets the band width of Mid/High EQ 2
Gain [dB] –18...+18 Sets the gain of Mid/High EQ 2
AMP SIM
h [A]Amplifier Type SS, EL84, 6L6 Selects the type of guitar amplifie
i Routing OD/HG Amp, Amp OD/HG
Switches the order of the overdrive and amp
j
Wet/Dry Dry, 1:99...99:1, Wet
Balance between the wet and dry signal
Src Off...Tempo Table , “Dynamic Modulation sources,” on page 357
Amt –100...+100 Amount of modulation source
Left
Right
FX Amt
FX Amt
FX Amt = 100: Mono In - Mono Out / FX Amt = 0: Stereo In - Stereo Out
+
RoutingAmp Simulation
Amp Simulation Filter
Overdrive / Hi-Gain
3 Band PEQ
Output Level
Mode: Overdrive / Hi-GainDrive
Driver
OD/HI-GAIN
a[O]Drive Mode Overdrive, Hi-
GainSwitches between overdrive and high-gain distortion
Drive 1...100 Sets the degree of distortion
b
[O]Output Level 0...50 Sets the overdrive output level
Src Off...Tempo Selects the modulation source for the overdrive output level
Amt –50...+50 Sets the modulation amount of the overdrive output level
e[O]Low Cutoff [Hz] 20...1.00k Sets the center frequency for Low
EQ (shelving type)
Gain [dB] –18...+18 Sets the gain of Low EQ
f
[O]Mid1 Cutoff [Hz] 300...10.00k Sets the center frequency for Mid/
High EQ 1 (peaking type)
Q 0.5...10.0 Sets the band width of Mid/High EQ 1
Gain [dB] –18...+18 Sets the gain of Mid/High EQ 1
g
[O]Mid2 Cutoff [Hz] 500...20.00k Sets the center frequency for Mid/
High EQ 2 (peaking type)
Q 0.5...10.0 Sets the band width of Mid/High EQ 2
Gain [dB] –18...+18 Sets the gain of Mid/High EQ 2
CHORUS/FLANGER
h[F]LFO Frequency [Hz] 0.02...20.00 Sets the speed of the LFO
LFO Waveform Triangle, Sine Selects the LFO Waveform
i
[F]Delay Time [msec] 0.0...1350.0 Sets the delay time
Depth 0...100 Sets the depth of LFO modulation
Feedback –100...+100 Sets the feedback amount
j
[F]Cho/Flng Wet/Dry
-Wet, -1:99...Dry...99:1, Wet
Sets the effect balance of the chorus/flanger
Src Off...Tempo Selects the Wet/Dry modulation source for the chorus/flanger
Amt –100...+100 Sets the Wet/Dry modulation amount for the chorus/flanger
k
[F]Output Mode
Normal, Wet Invert
Selects the output mode for the chorus/flanger
Routing
OD/HG Flanger, Flanger OD/HG
Switches the order of the overdrive and chorus / flanger
l
Wet/Dry Dry, 1:99...99:1, Wet
Balance between the wet and dry signal
Src Off...Tempo Table , “Dynamic Modulation sources,” on page 357
Amt –100...+100 Amount of modulation source
Left
Right
FX Amt
FX Amt
FX Amt = 100: Mono In - Stereo Out / FX Amt = 0: Stereo In - Stereo Out
+
RoutingChorus/Flanger
Chorus/Flanger
Feedback
LFO: Tri / Sine
Cho/Flng FX Amt
Normal
Wet Invert
Output Mode–�+
Overdrive / Hi-Gain
3 Band PEQ
Output Level
Mode: Overdrive / Hi-GainDrive
Driver

414 EffectsMono-Mono Serial (Mono-Mono)
101: OD/HG - Phaser(Overdrive/Hi.Gain - Phaser)
This effect combines a mono overdrive/high-gain distortion anda phaser. You can change the order of the effects.
102: OD/HG - Mt.Delay(Overdrive/Hi.Gain - Multitap Delay)
This effect combines a mono overdrive/high-gain distortion anda multitap delay.
OD/HI-GAIN
a[O]Drive Mode Overdrive, Hi-
GainSwitches between overdrive and high-gain distortion
Drive 1...100 Sets the degree of distortion
b
[O]Output Level 0...50 Sets the overdrive output level
Src Off...Tempo Selects the modulation source for the overdrive output level
Amt –50...+50 Sets the modulation amount of the overdrive output level
e[O]Low Cutoff [Hz] 20...1.00k Sets the center frequency for Low
EQ (shelving type)
Gain [dB] –18...+18 Sets the gain of Low EQ
f
[O]Mid1 Cutoff [Hz] 300...10.00k Sets the center frequency for Mid/
High EQ 1 (peaking type)
Q 0.5...10.0 Sets the band width of Mid/High EQ 1
Gain [dB] –18...+18 Sets the gain of Mid/High EQ 1
g
[O]Mid2 Cutoff [Hz] 500...20.00k Sets the center frequency for Mid/
High EQ 2 (peaking type)
Q 0.5...10.0 Sets the band width of Mid/High EQ 2
Gain [dB] –18...+18 Sets the gain of Mid/High EQ 2
PHASER
h[P]LFO Frequency [Hz] 0.02...20.00 Sets the speed of the LFO
LFO Waveform Triangle, Sine Selects the LFO Waveform
i
[P]Manual 0...100 Sets the frequency to which the effect is applied
Depth 0...100 Sets the depth of LFO modulation
Resonance –100...+100 Sets the resonance amount
j
[P]Phaser Wet/Dry
-Wet, -1:99...Dry...99:1, Wet
Sets the phaser effect balance
Src Off...Tempo Selects the Wet/Dry modulation source for the phaser
Amt –100...+100 Sets the Wet/Dry modulation amount for the phaser
k
[P]Output Mode
Normal,Wet Invert Selects the phaser output mode
RoutingOD/HG Phaser, Phaser OD/HG
Switches the order of the overdrive and phaser
l
Wet/Dry Dry, 1:99...99:1, Wet
Balance between the wet and dry signal
Src Off...Tempo Table , “Dynamic Modulation sources,” on page 357
Amt –100...+100 Amount of modulation source
Left
Right
FX Amt
FX Amt
FX Amt = 100: Mono In - Stereo Out / FX Amt = 0: Stereo In - Stereo Out
+
RoutingOverdrive / Hi-Gain
3 Band PEQ
Output Level
Mode: Overdrive / Hi-GainDrive
Driver
Phaser
Phaser
Resonance
LFO: Tri / Sine
Phaser FX Amt
Normal
Wet InvertOutput Mode
–�+
OD/HI-GAIN
a[O]Drive Mode Overdrive, Hi-
GainSwitches between overdrive and high-gain distortion
Drive 1...100 Sets the degree of distortion
b
[O]Output Level 0...50 Sets the overdrive output level
Src Off...Tempo Selects the modulation source for the overdrive output level
Amt –50...+50 Sets the modulation amount of the overdrive output level
e[O]Low Cutoff [Hz] 20...1.00k Sets the center frequency for Low
EQ (shelving type)
Gain [dB] –18...+18 Sets the gain of Low EQ
f
[O]Mid1 Cutoff [Hz] 300...10.00k Sets the center frequency for Mid/
High EQ 1 (peaking type)
Q 0.5...10.0 Sets the band width of Mid/High EQ 1
Gain [dB] –18...+18 Sets the gain of Mid/High EQ 1
g
[O]Mid2 Cutoff [Hz] 500...20.00k Sets the center frequency for Mid/
High EQ 2 (peaking type)
Q 0.5...10.0 Sets the band width of Mid/High EQ 2
Gain [dB] –18...+18 Sets the gain of Mid/High EQ 2
MULTITAP DELAY
h
[D]Tap1 Time [msec] 0.0...1360.0 Sets the Tap1 delay time
Tap1 Level 0...100 Sets the Tap1 output level
i[D]Tap2 Time [msec] 0.0...1360.0 Sets the Tap2 delay time
Feedback –100...+100 Sets the Tap2 feedback amount
j [D]High Damp [%] 0...100 Sets the damping amount in the
high range
k
[D]Mt.Delay Wet/Dry
Dry, 1:99...99:1, Wet
Sets the multitap delay effect balance
Src Off...Tempo Selects the Wet/Dry modulation source for the multitap delay
Amt –100...+100 Sets the Wet/Dry modulation amount for the multitap delay
l
Wet/Dry Dry, 1:99...99:1, Wet
Balance between the wet and dry signal
Src Off...Tempo Table , “Dynamic Modulation sources,” on page 357
Amt –100...+100 Amount of modulation source
Left
Right
FX Amt
FX Amt
FX Amt = 100: Mono In - Mono Out / FX Amt = 0: Stereo In - Stereo Out
+
Multitap Delay
Feedback
High Damp
Delay(2)
(1)
Mt.Dly FX Amt
Overdrive / Hi-Gain
3 Band PEQ
Output Level
Mode: Overdrive / Hi-GainDrive
Driver

415EffectsMono-Mono Serial (Mono-Mono)
App
endi
x
103: Wah - Amp Sim(Wah - Amp Simulation)
This effect combines a mono wah and an amp simulation. Youcan change the order of the effects.
104: Decimator - Amp(Decimator - Amp Simulation)
This effect combines a mono decimator and an amp simulation.You can change the order of the effects.
WAH
a
[W]Frequency Bottom
0...100 Sets the lower limit of the wah center frequency
Frequency Top 0...100 Sets the upper limit of the wah center frequency
b
[W]Sweep Mode
Auto, D-mod, LFO
Selects the control from auto-wah, modulation source, and LFO
Src Off...Tempo Selects the modulation source for the wah when Sweep Mode=D-mod
c
[W]LFO Frequency [Hz] 0.02...20.00 Sets the speed of the LFO
Resonance 0...100 Sets the resonance amount
LPF Off, On Switches the wah low pass filter on and off
d
[W]Wet/Dry Dry, 1:99...99:1, Wet Sets the wah effect balance
Src Off...Tempo Selects the Wet/Dry modulation source for the wah
Amt –100...+100 Sets the Wet/Dry modulation amount for the wah
AMP SIM
e [A]Amplifier Type SS, EL84, 6L6 Selects the type of guitar amplifier
f Routing Wah Amp, Amp Wah
Switches the order of the wah and amp simulation
g
Wet/Dry Dry, 1:99...99:1, Wet
Balance between the wet and dry signal
Src Off...Tempo Table , “Dynamic Modulation sources,” on page 357
Amt –100...+100 Amount of modulation source
FX Amt
Left
Right
FX Amt
FX Amt
FX Amt = 100: Mono In - Mono Out / FX Amt = 0: Stereo In - Stereo Out
+
RoutingAmp Simulation
Amp Simulation Filter
Wah/Auto Wah
Wah
D-mod
EnvelopeSweep Mode
D-modAuto
LFO
LFO DECIMATOR
a[D]Pre LPF Off, On Turn the harmonic noise caused by
lowered sampling on and off
High Damp [%] 0...100 Sets the ratio of high-range damping
b[D]Sampling Freq [Hz] 1.00k...48.00k Sets the sampling frequency
Resolution 4...24 Sets the data bit length
c [D]Output Level 0...100 Sets the decimator output level
AMP SIM
d [A]Amplifier Type SS, EL84, 6L6 Selects the type of guitar amplifier
e RoutingDecimator Amp, Amp Decimator
Switches the order of the decimator and amp simulation
f
Wet/DryDry, 1:99...99:1, Wet
Balance between the wet and dry signal
Src Off...Tempo Table , “Dynamic Modulation sources,” on page 357
Amt –100...+100 Amount of modulation source
Left
Right
FX Amt
FX Amt
FX Amt = 100: Mono In - Mono Out / FX Amt = 0: Stereo In - Stereo Out
+
DecimatorRouting
Amp Simulation
Amp Simulation FilterPre LPF High Damp
Output Level
DecimatorResolution

416 EffectsMono-Mono Serial (Mono-Mono)
105: Decimator - Comp(Decimator - Compressor)
This effect combines a mono decimator and a compressor. Youcan change the order of the effects.
106: AmpSim - Tremolo(Amp Simulation- Tremolo)
This effect combines a mono amp simulation and a tremolo.
DECIMATOR
a[D]Pre LPF Off, On Turn the harmonic noise caused by
lowered sampling on and off
High Damp [%] 0...100 Sets the ratio of high-range damping
b[D]Sampling Freq [Hz] 1.00k...48.00k Sets the sampling frequency
Resolution 4...24 Sets the data bit length
c [D]Output Level 0...100 Sets the decimator output level
COMPRESSOR
d [C]Sensitivity 1...100 Sets the sensitivity
e[C]Attack 1...100 Sets the attack level
Output Level 0...100 Sets the compressor output level
f Routing
Decimator Comp,Comp Decimator
Switches the order of the decimator and compressor
g
Wet/Dry Dry, 1:99...99:1, Wet
Balance between the wet and dry signal
Src Off...Tempo Table , “Dynamic Modulation sources,” on page 357
Amt –100...+100 Amount of modulation source
Left
Right
FX Amt
FX Amt
FX Amt = 100: Mono In - Mono Out / FX Amt = 0: Stereo In - Stereo Out
+
DecimatorRouting
Pre LPF High Damp
Output Level
DecimatorResolution
Compressor
CompOutput Level
Envelope - Control
AMP SIM
a [A]Amplifier Type SS, EL84, 6L6 Selects the type of guitar amplifier
TREMOLO
b
[T]LFO Waveform
Triangle, Sine, Vintage, Up, Down
Selects the LFO Waveform
LFO Shape –100...+100 Changes the curvature of the LFO Waveform
c [T]LFO Frequency [Hz] 0.02...20.00 Sets the speed of the LFO
d [T]Depth 0...100 Sets the depth of LFO modulation
e
Wet/Dry Dry, 1:99...99:1, Wet
Balance between the wet and dry signal
Src Off...Tempo Table , “Dynamic Modulation sources,” on page 357
Amt –100...+100 Amount of modulation source
Left
Right
FX Amt
FX Amt
FX Amt = 100: Mono In - Mono Out / FX Amt = 0: Stereo In - Stereo Out
+
Amp Simulation Tremolo
Amp Simulation Filter Tremolo
LFO: Tri/Sin/Vintage/Up/Down LFO Shape

417EffectsMono-Mono Serial (Mono-Mono)
App
endi
x
107: Cho/Flng - Mt.Dly(Chorus/Flanger - Multitap Delay)
This effect combines a mono chorus/flanger and a multitapdelay.
108: Phaser - Cho/Flng(Phaser - Chorus/Flanger)
This effect combines a mono phaser and a chorus/flanger.
CHORUS/FLANGER
a[F]LFO Frequency [Hz] 0.02...20.00 Sets the speed of the LFO
LFO Waveform Triangle, Sine Selects the LFO Waveform
b
[F]Delay Time [msec] 0.0...1350.0 Sets the delay time
Depth 0...100 Sets the depth of LFO modulation
Feedback –100...+100 Sets the feedback amount
c [F]EQ Trim 0...100 Sets the EQ input level
d
[F]PreLEQ Gain [dB] –15...+15 Sets the gain of Low EQ
PreHEQ Gain [dB] –15...+15 Sets the gain of High EQ
e [F]Cho/Flng Wet/Dry
–Wet...–1 : 99, Dry, 1 : 99...Wet
Sets the effect balance of the chorus/flanger
MULTITAP DELAY
a
[D]Tap1 Time [msec] 0.0...1360.0 Sets the Tap1 delay time
Tap1 Level 0...100 Sets the Tap1 output level
b[D]Tap2 Time [msec] 0.0...1360.0 Sets the Tap2 delay time
Feedback –100...+100 Sets the Tap2 feedback amount
c [D]High Damp [%] 0...100 Sets the damping amount in the
high range
d
[D]Mt.DelayWet/Dry
Dry, 1:99...99:1, Wet
Sets the multitap delay effect balance
Src Off...Tempo Selects the Wet/Dry modulation source for the multitap delay
Amt –100...+100 Sets the Wet/Dry modulation amount for the multitap delay
e
Wet/Dry Dry, 1:99...99:1, Wet
Balance between the wet and dry signal
Src Off...Tempo Table , “Dynamic Modulation sources,” on page 357
Amt –100...+100 Amount of modulation source
Left
Right
FX Amt
FX Amt
FX Amt = 100: Mono In - Mono Out / FX Amt = 0: Stereo In - Stereo Out
+LEQ HEQEQ
Trim
Multitap Delay
Feedback
High Damp
Delay(2)
(1)
Chorus/Flanger
Cho/FlngFX Amt
Mt.DlyFX Amt
Chorus/Flanger
Feedback
LFO: Tri / Sine
PHASER
a[P]LFO Frequency [Hz] 0.02...20.00 Sets the speed of the LFO
LFO Waveform Triangle, Sine Selects the LFO Waveform
b
[P]Manual 0...100 Sets the frequency to which the effect is applied
Depth 0...100 Sets the depth of LFO modulation
Resonance –100...+100 Sets the resonance amount
c [P]Phaser Wet/Dry
-Wet, -1:99...Dry...99:1, Wet
Sets the phaser effect balance
CHORUS/FLANGER
d[F]LFO Frequency [Hz] 0.02...20.00 Sets the speed of the LFO
LFO Waveform Triangle, Sine Selects the LFO Waveform
e
[F]Delay Time [msec] 0.0...1350.0 Sets the delay time
Depth 0...100 Sets the depth of LFO modulation
Feedback –100...+100 Sets the feedback amount
f [F]EQ Trim 0...100 Sets the EQ input level
g
[F]PreLEQ Gain [dB] –15...+15 Sets the gain of Low EQ
PreHEQ Gain [dB] –15...+15 Sets the gain of High EQ
h
[F]Cho/Flng Wet/Dry
-Wet, -1:99...Dry...99:1, Wet
Sets the effect balance of the chorus/flanger
Src Off...Tempo Selects the Wet/Dry modulation source for the chorus/flanger
Amt –100...+100 Sets the Wet/Dry modulation amount for the chorus/flanger
i [F]Output Mode
Normal,Wet Invert
Selects the output mode for the chorus/flanger
j
Wet/Dry Dry, 1:99...99:1, Wet
Balance between the wet and dry signal
Src Off...Tempo Table , “Dynamic Modulation sources,” on page 357
Amt –100...+100 Amount of modulation source
Left
Right
FX Amt
FX Amt
FX Amt = 100: Mono In - Stereo Out / FX Amt = 0: Stereo In - Stereo Out
+
Chorus/Flanger
Cho/Flng�FX Amt
LEQHEQEQ�Trim
Chorus/Flanger
Feedback
Phaser
Phaser�FX Amt
Phaser
Resonance
LFO: Tri / Sine LFO: Tri / Sine
Normal
Wet InvertOutput Mode
–�+

418 EffectsMono-Mono Serial (Mono-Mono)
109: Reverb - GateThis effect combines a mono reverb and a gate.
f: [G]Envelope Selectf: Srcg: [G]Input Reverb Mixg: Threshold
The “[G]Envelope Select” parameter enables you to selectwhether turning the gate on and off is triggered by the input sig-nal level or controlled directly by the modulation source. Youcan select from Off to Tempo for the Src parameter to specify themodulation source.
When “[G]Envelope Select” is set to Input, the gate is controlledby the level of signals that are the combination of the dry soundand the reverb sound. When the signal level exceeds the thresh-old, the gate opens and the reverb sound is output.
Normally, set “[G]Input Reverb Mix” to Dry (the gate is con-trolled only by the dry sound). If you wish to extend the gatetime, set the “[G]Input Reverb Mix” value higher and adjust the“Threshold” value.
REVERB
a
[R]Reverb Time [sec] 0.1...10.0 Sets the reverberation time
High Damp [%] 0...100 Sets the damping amount in the high range
b [R]Pre Delay [msec] 0...200 Sets the delay time of the reverb
sound and gate control signal
c[R]EQ Trim 0...100 Sets the EQ input level
Reverb Balance 0...100 Sets the reverb effect balance
d
[R]PreLEQ Fc Low, Mid-Low
Selects the cutoff frequency (low or mid-low) of the low-range equalizer
Pre HEQ Fc High, Mid-High
Selects the cutoff frequency (high or mid-high) of the high-range equalizer
e
[R]PreLEQ Gain [dB] –15.0...+15.0 Sets the gain of Low EQ
Pre HEQ Gain [dB] –15.0...+15.0 Sets the gain of High EQ
GATE
f
[G]Envelope Select D-mod, Input
Switches between modulation source control and input signal control
Src Off...TempoSelects the modulation source that controls the gate when Envelope Select is set to D-mod
g
[G]Input Reverb Mix 0...100
Sets the balance between the dry and reverb sounds of the gate control signal
Threshold 0...100 Sets the gate threshold level
h [G]Polarity +, – Switches between non-invert and invert of the gate on/off state
i[G]Attack 1...100 Sets the attack time
Release 1...100 Sets the release time
j
Wet/Dry Dry, 1:99...99:1, Wet
Balance between the wet and dry signal
Src Off...Tempo Table , “Dynamic Modulation sources,” on page 357
Amt –100...+100 Amount of modulation source
Left
Right
FX Amt
FX Amt
ReverbBalance
FX Amt = 100: Mono In - Mono Out / FX Amt = 0: Stereo In - Stereo Out
+LEQ HEQ
EQ Trim
ReverbPre Delay
Envelope - ControlD-mod
Input
Envelope Select
Gate
Input Reverb Mix
Reverb
GateGate+Dmpr

419EffectsDouble Size
App
endi
x
Double Size
Double-size effects can only be assigned to the FX2 processors(either in the A or B FX group).
110: St. Mltband Limiter(Stereo Mltband Limiter)
This is a stereo multiband limiter.
111: PianoBody/Damper(PianoBody/Damper Simulation)
This effect simulates the resonance of the piano sound boardcaused by the string vibration, and also simulates the resonanceof other strings that are not being played when you press thedamper pedal. It will create a very realistic sound when appliedto acoustic piano sounds.
a: Sound Board Depth
This parameter sets the intensity of resonance of the pianosound board.
b: Damper Depthb: Src
This parameter sets the resonance intensity of the other stringscreated when the damper pedal is pressed. The “Src” parameterselects the modulation source from which the damper effect isapplied. Usually, select Damper #64 Pdl (Damper pedal).
The effect is off when a value for the modulation source specified for the “Src” parameter is 63 or smaller, and the effect is on when the value is 64 or higher.
c: Toned: Mid Shape
These parameters control the tonal quality of the effect sound.
e: Tune
Since this effect simulates the resonance of the strings, the soundvaries depending on the pitch. If you have changed tuning usingthe “Master Tuning” (Global > General Controls > Basic), adjustthis parameter value.
a Ratio 1.0 : 1...50.0 : 1, Inf : 1 Sets the signal compression ratio
b Threshold [dB] –40...0 Sets the level above which the compressor is applied
c Attack 1...100 Sets the attack time
d Release 1...100 Sets the release time
e Low Offset [dB] –40...0 Sets the low range gain of trigger signal
f Mid Offset [dB] –40...0 Sets the mid range gain of trigger signal
g High Offset [dB] –40...0 Sets the high range gain of trigger
signal
h
Gain Adjust [dB]
–Inf, –38...+24 Sets the output gain
Src Off...Tempo Selects the modulation source for the output gain
Amt –63...+63 Sets the modulation amount of the output gain
i
Wet/Dry Dry, 1:99...99:1, Wet
Balance between the wet and dry signal
Src Off...Tempo Table , “Dynamic Modulation sources,” on page 357
Amt –100...+100 Amount of modulation source
Left
Right
FX Amt
FX Amt
Stereo In - Stereo Out
Gain Adjust
Limiter
Limiter
Limiter
Envelope - Control
Envelope - Control
Envelope - Control
Gain Adjust
Limiter
Limiter
Low
Mid
High
Envelope - Control
Envelope - Control
Envelope - Control
Low
Mid
High
Offset
Band-Pass Filters
Limiter
a Sound Board Depth 0...100 Sets the intensity of resonance of
the sound board
bDamper Depth 0...100
Sets the intensity of the string resonance created when the damper pedal is pressed
Src Off...Tempo Selects the modulation source of damper effect
c Tone 1...100 Sets tonal quality of effect sound
d Mid Shape 0...36 Sets the mid range of tonal quality
e Tune –50...+50 Fine tuning
f
Wet/Dry Dry, 1:99...99:1, Wet
Balance between the wet and dry signal
Src Off...Tempo Table , “Dynamic Modulation sources,” on page 357
Amt –100...+100 Amount of modulation source
Left
Right
FX Amt
FX Amt
FX Amt = 100: Mono In - Stereo Out / FX Amt = 0: Stereo In - Stereo Out
D-mod
PianoBody/DamperSimulation
Damper
+

420 EffectsDouble Size
112: OD/HyperGain Wah(Overdrive/Hyper Gain Wah)
This distortion effect has two modes: overdrive and hyper-gainthat produces a strong distortion. A higher high-gain setting isrequired for this effect relative to a normal-size effect.
113: GuitarAmp + P4EQ(Guitar Amp Model +
Parametric 4-Band EQ)This combines a guitar amp simulation (which even faithfullyreplicates the distortion and tone control circuitry) with a four-band equalizer.
By using this in conjunction with “St. Guitar Cabinet (StereoGuitar Cabinet)” on page 369, you can obtain an even more real-istic guitar sound that simulates a guitar amp + speaker cabinet.
a
Wah Off, On Switches Wah on/off
Src Off...Tempo Selects the modulation source that switches the Wah on and off
Sw Toggle, Moment
Selects the switching mode for the modulation source that switches the Wah on and off
b
Wah Sweep Range –10...+10 Sets the range of Wah
Wah Sweep Src Off...TempoSelects the modulation source that controls the Wah
c Drive Mode Overdrive, Hyper-Gain
Switches between overdrive and hi-gain distortion
dDrive 1...120 Sets the degree of distortion
Pre Low-cut 0...10 Sets the low range cut amount of the distortion input
e
Output Level 0...50 Sets the output level
Src Off...Tempo Selects the modulation source for the output level
Amt –50...+50 Sets the modulation amount of the output level
fLow Cutoff [Hz] 20...1.00k Sets the center frequency for Low
EQ (shelving type)
Gain [dB] –18...+18 Sets the gain of Low EQ
g
Mid1 Cutoff [Hz] 300...10.00k Sets the center frequency for Mid/
High EQ 1 (peaking type)
Q 0.5...10.0 Sets the band width of Mid/High EQ 1
Gain [dB] –18...+18 Sets the gain of Mid/High EQ 1
h
Mid2 Cutoff [Hz] 500...20.00k Sets the center frequency for Mid/
High EQ 2 (peaking type)
Q 0.5...10.0 Sets the band width of Mid/High EQ 2
Gain [dB] –18...+18 Sets the gain of Mid/High EQ 2
iDirect Mix 0...50 Sets the amount of the dry sound
mixed to the distortion
Speaker Simulation Off, On Switches the speaker simulation on/
off
j
Wet/Dry Dry, 1:99...99:1, Wet
Balance between the wet and dry signal
Src Off...Tempo Table , “Dynamic Modulation sources,” on page 357
Amt –100...+100 Amount of modulation source
Left
Right
FX Amt
FX Amt
FX Amt = 100: Mono In - Mono Out / FX Amt = 0: Stereo In - Stereo Out
Amp Simulation3 Band EQ
Output Level
Direct Mix
Pre Low-cut
D-mod
Wah
Mode: Overdrive / Hyper-GainDrive
Driver+
aAmp Type
VOX AC15, VOX AC15TB, VOX AC30, VOX AC30TB, UK BLUES, UK 70'S, UK 80'S, UK 90'S, UK MODERN, US MODERN, US HIGAIN, BOUTIQUE OD, BOUTIQUE CL, BLACK 2x12, TWEED - 1x12, TWEED - 4x10
Selects the type of the amplifier
Drive Gain 0...100 Sets the input gain
b
Volume 0...100 Sets the output level
Src Off...Tempo Selects the modulation source for the output level
Amt –100...+100 Sets the modulation amount of the output level
cBass 0...100 Sets the bass (low range) level
Middle 0...100 Sets the middle (mid range) level
dTreble 0...100 Sets the treble (high range) level
Presence 0...100 Sets the presence (high-frequency tone)
e Post P4EQ Thru, On Selects through or on for the equalizer
e
Band1 Cutoff [Hz] 20...1.00k Sets the center frequency of
Band 1
Q 0.5...10.0 Sets Band 1’s bandwidth
Gain [dB] –18...+18 Sets the gain of Band 1
f
Band2 Cutoff [Hz] 50...5.00k Sets the center frequency of
Band 2
Q 0.5...10.0 Sets Band 2’s bandwidth
Gain [dB] –18...+18 Sets the gain of Band 2
g
Band3 Cutoff [Hz] 300...10.00k Sets the center frequency of
Band 3
Q 0.5...10.0 Sets Band 3’s bandwidth
Gain [dB] –18...+18 Sets the gain of Band 3
h
Band4 Cutoff [Hz] 500...20.00k Sets the center frequency of
Band 4
Q 0.5...10.0 Sets Band 4’s bandwidth
Gain [dB] –18...+18 Sets the gain of Band 4
i
Wet/Dry Dry, 1:99...99:1, Wet
Balance between the wet and dry signal
Src Off...Tempo Table , “Dynamic Modulation sources,” on page 357
Amt –100...+100 Amount of modulation source
+
Left
Right
FX Amt
Volume
FX Amt
FX Amt = 100: Mono In - Mono Out / FX Amt = 0: Stereo In - Stereo Out
Parametric 4Band EQ
D-mod
Guitar Amp Model

421EffectsDouble Size
App
endi
x
a: Amp Typed: Presence
If the Amp Type is VOX AC15...VOX AC30TB, this sets theattenuation of the high-frequency range. For other types, thissets the boost of the high-frequency range.
This corresponds to the Cut knob control of amps made by theVOX Corporation.
e: Post P4EQ
By chaining this with 19: St.Guitar Cabinet you can simulate thecombination of a guitar amp and speaker cabinet. In this case,we recommend that you set Post P4EQ to “Thru,” but if neces-sary you can turn it “On” and adjust the tone.
Recommended Combinations of Guitar Amp Models and Cab-inet Simulators:
114: BassTubeAmp+Cab.(Bass Tube Amp Model + Cabinet)
This simulates a bass amp (with gain and drive) and speaker cab-inet.
a: Amp Typei: Cabinet Type
Recommended Combinations of Bass Amp Models and Cabi-nets:
Amp Type Cabinet Type
VOX AC15 VOX AC15 - 1x12
VOX AC15TB VOX AC15 - 1x12
VOX AC30 VOX AC30 - 2x12
VOX AC30TB VOX AC30 - 2x12
UK BLUES UK H30 - 4x12
UK 70'S UK H30 - 4x12
UK 80'S UK T75 - 4x12
UK 90'S UK T75 - 4x12
UK MODERN UK T75 - 4x12, US V30 - 4x12
US MODERN US V30 - 4x12
US HIGAIN US V30 - 4x12, UK T75 - 4x12
BOUTIQUE OD UK H30 - 4x12
BOUTIQUE CL UK H30 - 4x12
BLACK 2x12 BLACK - 2x12
TWEED - 1x12 TWEED - 1x12
TWEED - 4x10 TWEED - 4x10
a Amp Type
Selects the type of the amplifier
STUDIO COMBO
A tube combo ideal for the Motown sound
VOX AC100 A 100W tube amp AC100 made by Vox
UK MAJOR A 200W tube amp made in the UK
b Drive Gain 0...100 Sets the input gain
c
Volume 0...100 Sets the output level
Src Off...Tempo Selects the modulation source for the output level
Amt –100...+100 Sets the modulation amount of the output level
d Bass 0...100 Sets the bass (low range) level
e Middle 0...100 Sets the middle (mid range) level
f Treble 0...100 Sets the treble (high range) level
g Presence 0...100 Sets the presence (high-frequency tone)
h Cabinet Simulator Off, On Switches the cabinet simulator on/
off
i Cabinet Type
LA - 4x10, MODERN - 4x10, METAL - 4x10, CLASSIC -8x10, UK - 4x12, STUDIO - 1x15, JAZZ - 1x15, VOX AC100 - 2x15, US - 2x15, UK - 4x15, LA - 1x18, COMBI - 1x12 & 1x18
Selects the cabinet type
j
Wet/Dry Dry, 1:99...99:1, Wet
Balance between the wet and dry signal
Src Off...Tempo Table , “Dynamic Modulation sources,” on page 357
Amt –100...+100 Amount of modulation source
Amp Type Cabinet Type
STUDIO COMBO STUDIO - 1x15
AC100 VOX AC100 - 2x15
UK MAJOR UK - 4x15, UK - 4x12
+
Left
Right
FX Amt
Volume
Drive
FX Amt
FX Amt = 100: Mono In - Mono Out / FX Amt = 0: Stereo In - Stereo Out
D-mod
Bass Amp Model2 Cabinet Simulator

422 EffectsDouble Size
115: St. Mic + PreAmp(Stereo Mic Modeling + PreAmp)
This is a stereo mic and preamp simulator (See “Mic Model+Pre-Amp (Mic Modeling + PreAmp)” on page 372.). For exampleyou might use this to simulate micing of a stereo source such as arotary speaker.
116: Multitap Cho/Delay(Multitap Chorus/Delay)
This effect has six chorus blocks with different LFO phases. Youcan produce a complex stereo image by setting a different delaytime and depth for each block. You can control the delay outputlevel via a modulation source.
b, c, d, e, f, g: Status
These parameters set the output status of each Tap.
Always On: Output is always on. (No modulation)
Always Off: Output is always off. (No modulation)
On→ Off (dm): Output level is switched from on to off depend-ing on the modulation source.
Off→ On (dm): Output level is switched from off to on depend-ing on the modulation source.
Combining these parameters, you can change from 4-phase cho-rus to two-tap delay by crossfading them gradually via the mod-ulation source during a performance.
h: Panning Preset
This parameter selects combinations of stereo images of the tapoutputs.
a LFO Frequency [Hz] 0.02...13.00 Sets the speed of the LFO
b
Tap1 (000) [msec] 0...2000 Sets the Tap1 (LFO phase=0
degrees) delay time
Depth 0...30 Sets the Tap1 chorus depth
Status
Always On, Always Off, On Off (Dm), Off On (Dm)
Selects on, off, or modulation source for the control of Tap1 output
c
Tap2 (180) [msec] 0...2000 Sets the Tap2 (LFO phase=180
degrees) delay time
Depth 0...30 Sets the Tap2 chorus depth
Status
Always On, Always Off, On Off (Dm), Off On (Dm)
Selects on, off, or modulation source for the control of Tap2 output
d
Tap3 (060) [msec] 0...2000 Sets the Tap3 (LFO phase=60
degrees) delay time
Depth 0...30 Sets the Tap3 chorus depth
Status
Always On, Always Off, On Off (Dm), Off On (Dm)
Selects on, off, or modulation source for the control of Tap3 output
e
Tap4 (240) [msec] 0...2000 Sets the Tap4 (LFO phase=240
degrees) delay time
Depth 0...30 Sets the Tap4 chorus depth
Status
Always On, Always Off, On Off (Dm), Off On (Dm)
Selects on, off, or modulation source for the control of Tap4 output
f
Tap5 (120) [msec] 0...2000 Sets the Tap5 (LFO phase=120
degrees) delay time
Depth 0...30 Sets the Tap5 chorus depth
Status
Always On, Always Off, On Off (Dm), Off On (Dm)
Selects on, off, or modulation source for the control of Tap5 output
Tube Pre AmpMic Simulation
Tube Pre AmpMic Simulation
Left
Right
FX Amt
Output Level
FX Amt
Stereo In - Stereo Out
Left
Right
Feedback FX Amt
FX Amt
FX Amt = 100: Mono In - Stereo Out / FX Amt = 0: Stereo In -Stereo Out
+
LFO: Triangle
0 [degree]180 [degree]60 [degree]
240 [degree]120 [degree]300 [degree]
Tap1 Delay
Tap2 Delay
Tap3 Delay
Tap5 Delay
Tap6 Delay
Tap4 Delay
D-mod On/Off Control
Panning Preset
g
Tap6 (300) [msec] 0...2000 Sets the Tap1 (LFO phase=300
degrees) delay time
Depth 0...30 Sets the Tap6 chorus depth
Status
Always On, Always Off, On Off (Dm), Off On (Dm)
Selects on, off, or modulation source for the control of Tap6 output
h Panning Preset
1 : L 1 2 3 4 5 6 R, 2 : L 135 246 R, 3 : L 1 3 5 2 4 6 R, 4 : L 1 4 5 6 3 2 R
Selects the stereo panning pattern for each tap
i
Tap1 Feedback –100...+100 Sets the Tap1 feedback amount
Src Off...TempoSelects the modulation source for the Tap output level, feedback amount, and effect balance
Amt –100...+100 Sets the modulation amount of Tap1 feedback amount
j
Wet/Dry Dry, 1:99...99:1, Wet
Balance between the wet and dry signal
Src Off...Tempo Table , “Dynamic Modulation sources,” on page 357
Amt –100...+100 Amount of modulation source

423EffectsDouble Size
App
endi
x
117: St. Pitch Shifter(Stereo Pitch Shifter)
This is a stereo pitch shifter. The pitch shift amount for the leftand right channels can be reversed from each other.
a: L/R Pitch
When you select Up/Down for this parameter, the pitch shiftamount for the right channel will be reversed. If the pitch shiftamount is positive, the pitch of the left channel is raised, and thepitch of the right channel is lowered.
118: St. PitchShift BPM(Stereo Pitch Shifter BPM)
This stereo pitch shifter enables you to set the delay time tomatch the song tempo.
aMode Slow, Medium,
FastSwitches Pitch Shifter mode
L/R Pitch Normal, Up/Down
Determines whether or not the L/R pitch shift amount is inverted
b
Pitch Shift [1/2tone] –24...+24 Sets the pitch shift amount in steps
of a semitone
Src Off...Tempo Selects the modulation source of pitch shift amount
Amt –24...+24 Sets the modulation amount of pitch shift amount
cFine [cents] –100...+100 Sets the pitch shift amount in steps
of one cent
Amt –100...+100 Sets the modulation amount of pitch shift amount
d L Delay [msec] 0...2000 Sets the delay time for the left channel
e R Delay [msec] 0...2000 Sets the delay time for the right channel
fFeedback –100...+100 Sets the feedback amount
High Damp [%] 0...100 Sets the damping amount in the high range
g
Feedback Position Pre, Post Switches the feedback connection
Spread –100...+100Sets the width of the stereo image of the effect sound
h
Input Level Dmod [%] –100...+100 Sets the modulation amount of the
input level
Src Off...Tempo Selects the modulation source for the input level
i
Wet/Dry Dry, 1:99...99:1, Wet
Balance between the wet and dry signal
Src Off...Tempo Table , “Dynamic Modulation sources,” on page 357
Amt –100...+100 Amount of modulation source
Left
Right
Feedback Spread
FX Amt
FX Amt
Stereo In - Stereo Out
High Damp
High Damp
Input Level
Input Level
Feedback Position
Pre
Pre
Post
Post
DelayPitch Shifter
DelayPitch Shifter
aMode Slow, Medium,
FastSwitches Pitch Shifter mode
L/R Pitch Normal, Up/Down
Determines whether or not the L/R pitch shift amount is inverted
b
Pitch Shift [1/2tone] –24...+24 Sets the pitch shift amount in steps
of a semitone
Src Off...Tempo Selects the modulation source of pitch shift amount
Amt –24...+24 Sets the modulation amount of pitch shift amount
c
Fine [cents] –100...+100 Sets the pitch shift amount in steps of one cent
Amt –100...+100
Sets the modulation amount of pitch shift amount Sets the modulation amount of pitch shift amount
d
BPMMIDI, 40.00...300.00
MIDI syncs to the system tempo; 40–300 sets the tempo manually for this individual effect
Time Over? L ---, OVER!Display the error message if the left channel delay time exceeds the upper limit
R ---, OVER!Display the error message if the right channel delay time exceeds the upper limit
e
L Delay Base Note r...w Selects the type of notes to specify
the left channel delay time
Times x1...x32 Sets the number of notes to specify the left channel delay time
f
R Delay Base Note r...w Selects the type of notes to specify
the right channel delay time
Times x1...x32 Sets the number of notes to specify the right channel delay time
g
Feedback Position Pre, Post Switches the feedback connection
Spread –100...+100 Sets the width of the stereo image of the effect sound
hFeedback –100...+100 Sets the feedback amount
High Damp [%] 0...100 Sets the damping amount in the high range
i
Input Level Dmod [%] –100...+100 Sets the modulation amount of the
input level
Src Off...Tempo Selects the modulation source for the input level
j
Wet/Dry Dry, 1:99...99:1, Wet
Balance between the wet and dry signal
Src Off...Tempo Table , “Dynamic Modulation sources,” on page 357
Amt –100...+100 Amount of modulation source
Tempo
BPMBPM Base Note x Times
Base Note x Times
Left
Right
Feedback Spread
FX Amt
FX Amt
Stereo In - Stereo Out
High Damp
High Damp
Input Level
Input Level
Feedback Position
Pre
Pre
Post
Post
DelayPitch Shifter
DelayPitch Shifter

424 EffectsDouble Size
119: Rotary SpeakerOD(Rotary Speaker Overdrive)
This is a stereo rotary speaker effect. It has an internal speakersimulator that simulates overdrive (recreating the amp distor-tion) and characteristics of the rotary speaker, producing a veryrealistic rotary speaker sound.
a: Sw
This parameter determines how to switch on/off the overdrivevia a modulation source.
When “Sw” = Toggle, overdrive is turned on/off each time thepedal or joystick is operated.
Overdrive will be switched on/off each time the value of the modulation source exceeds 64.
When “Sw” = Moment, overdrive is applied only when you pressthe pedal or operate the joystick.
Only when the value for the modulation source is 64 or higher, the overdrive effect is applied.
120: L/C/R Long DelayThis multitap delay outputs three Tap signals to left, right andcenter respectively. You can set a maximum of 5,460msec for thedelay time.
a
Overdrive Off, On Switches overdrive on/off
Src Off...Tempo Selects a modulation source to switch overdrive on/off
Sw Toggle, Moment
Sets the switch mode for overdrive on/off modulation
bOverdrive Gain 0...100 Determines the degree of distortion
Overdrive Level 0...100 Sets the overdrive output level
COverdrive Tone 0...15 Sets the tonal quality of the
overdrive
Speaker Simulator Off, On Switches the speaker simulation on/
off
d
Mode Switch Rotate, Stop Switches between speaker rotation and stop
Src Off...Tempo Selects a modulation source for Rotate/Stop
Sw Toggle, Moment
Sets the switch mode for Rotate/Stop modulation
e
Speed Switch Slow, Fast Switches the speaker rotation speed between slow and fast
Src Off...Tempo Selects a modulation source for Slow/Fast
Sw Toggle, Moment
Sets the switch mode for Slow/Fast modulation
f
Horn/Rotor Balance
Rotor, 1...99, Horn
Sets the volume balance between the high-range horn and low-range rotor
Manual SpeedCtrl Off...Tempo Sets a modulation source for direct
control of rotation speed
g
Horn Acceleration 0...100
Sets how quickly the horn rotation speed changes
Horn Ratio Stop, 0.50...2.00
Adjusts the (high-frequency) horn rotation speed. Standard value is 1.00. “Stop” stops the rotation
h
Rotor Acceleration 0...100 Sets how quickly the rotor speed
changes
Rotor Ratio Stop, 0.50...2.00
Adjusts the (low-frequency) rotor rotation speed. Standard value is 1.0. “Stop” stops the rotation
iMic Distance 0...100
Distance between the microphone and rotary speaker
Mic Spread 0...100 Angle of left and right microphones
j
Wet/Dry Dry, 1:99...99:1, Wet
Balance between the wet and dry signal
Src Off...Tempo Table , “Dynamic Modulation sources,” on page 357
Amt –100...+100 Amount of modulation source
Left
Right
FX Amt
FX Amt
FX Amt = 100: Mono In - Stereo Out / FX Amt = 0: Stereo In - Stereo Out
Mic DistanceMic Spread
Horn/RotorBalance
D-mod
D-mod
D-mod
D-mod
Mode Switch: Rotate/Stop
Speed Switch: Slow/Fast
Manual Speed Control
On/Off
Speaker Simulation
Overdrive
Horn
Rotary Speaker
Rotor
+
aL Delay Time [msec] 0...5460 Sets the delay time of TapL
Level 0...50 Sets the output level of TapL
bC Delay Time [msec] 0...5460 Sets the delay time of TapC
Level 0...50 Sets the output level of TapC
cR Delay Time [msec] 0...5460 Sets the delay time of TapR
Level 0...50 Sets the output level of TapR
d
Feedback (C Delay) –100...+100 Sets the feedback amount of TapC
Src Off...Tempo Selects the modulation source for the TapC feedback
Amt –100...+100 Sets the modulation amount of the TapC feedback
eHigh Damp [%] 0...100 Sets the damping amount in the
high range
Low Damp [%] 0...100 Sets the damping amount in the low range
f
Input Level Dmod [%] –100...+100 Sets the modulation amount of the
input level
Src Off...Tempo Selects the modulation source for the input level
g Spread 0...50Sets the width of the stereo image of the effect sound
h
Wet/Dry Dry, 1:99...99:1, Wet
Balance between the wet and dry signal
Src Off...Tempo Table , “Dynamic Modulation sources,” on page 357
Amt –100...+100 Amount of modulation source
C Delay
R Delay
Left
Right
Feedback
Spread
FX Amt
FX Amt
FX Amt = 100: Mono In - Stereo Out / FX Amt = 0: Stereo In -Stereo Out
Input Level D-mod
High Damp Low Damp
L DelayInput Level D-mod
+Level
Level
Level
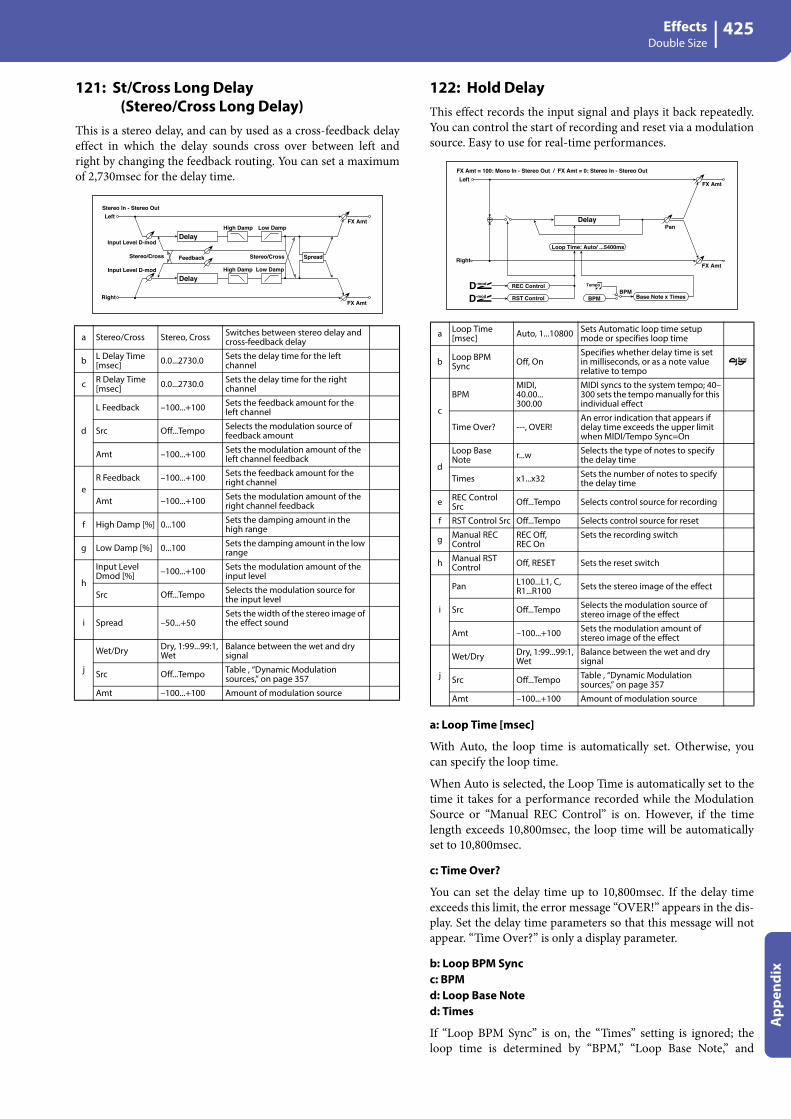
425EffectsDouble Size
App
endi
x
121: St/Cross Long Delay(Stereo/Cross Long Delay)
This is a stereo delay, and can by used as a cross-feedback delayeffect in which the delay sounds cross over between left andright by changing the feedback routing. You can set a maximumof 2,730msec for the delay time.
122: Hold DelayThis effect records the input signal and plays it back repeatedly.You can control the start of recording and reset via a modulationsource. Easy to use for real-time performances.
a: Loop Time [msec]
With Auto, the loop time is automatically set. Otherwise, youcan specify the loop time.
When Auto is selected, the Loop Time is automatically set to thetime it takes for a performance recorded while the ModulationSource or “Manual REC Control” is on. However, if the timelength exceeds 10,800msec, the loop time will be automaticallyset to 10,800msec.
c: Time Over?
You can set the delay time up to 10,800msec. If the delay timeexceeds this limit, the error message “OVER!” appears in the dis-play. Set the delay time parameters so that this message will notappear. “Time Over?” is only a display parameter.
b: Loop BPM Syncc: BPMd: Loop Base Noted: Times
If “Loop BPM Sync” is on, the “Times” setting is ignored; theloop time is determined by “BPM,” “Loop Base Note,” and
a Stereo/Cross Stereo, Cross Switches between stereo delay and cross-feedback delay
b L Delay Time [msec] 0.0...2730.0 Sets the delay time for the left
channel
c R Delay Time [msec] 0.0...2730.0 Sets the delay time for the right
channel
d
L Feedback –100...+100 Sets the feedback amount for the left channel
Src Off...Tempo Selects the modulation source of feedback amount
Amt –100...+100 Sets the modulation amount of the left channel feedback
eR Feedback –100...+100 Sets the feedback amount for the
right channel
Amt –100...+100 Sets the modulation amount of the right channel feedback
f High Damp [%] 0...100 Sets the damping amount in the high range
g Low Damp [%] 0...100 Sets the damping amount in the low range
h
Input Level Dmod [%] –100...+100 Sets the modulation amount of the
input level
Src Off...Tempo Selects the modulation source for the input level
i Spread –50...+50Sets the width of the stereo image of the effect sound
j
Wet/Dry Dry, 1:99...99:1, Wet
Balance between the wet and dry signal
Src Off...Tempo Table , “Dynamic Modulation sources,” on page 357
Amt –100...+100 Amount of modulation source
Delay
Delay
Stereo/Cross
Left
Right
Feedback
FX Amt
FX Amt
Stereo In - Stereo Out
Input Level D-mod
Input Level D-mod
High Damp Low Damp
High Damp Low Damp
SpreadStereo/Cross
a Loop Time [msec] Auto, 1...10800 Sets Automatic loop time setup
mode or specifies loop time
b Loop BPM Sync Off, On
Specifies whether delay time is set in milliseconds, or as a note value relative to tempo
c
BPMMIDI, 40.00...300.00
MIDI syncs to the system tempo; 40–300 sets the tempo manually for this individual effect
Time Over? ---, OVER!An error indication that appears if delay time exceeds the upper limit when MIDI/Tempo Sync=On
d
Loop Base Note r...w Selects the type of notes to specify
the delay time
Times x1...x32 Sets the number of notes to specify the delay time
e REC Control Src Off...Tempo Selects control source for recording
f RST Control Src Off...Tempo Selects control source for reset
g Manual REC Control
REC Off, REC On
Sets the recording switch
h Manual RST Control Off, RESET Sets the reset switch
i
Pan L100...L1, C, R1...R100 Sets the stereo image of the effect
Src Off...Tempo Selects the modulation source of stereo image of the effect
Amt –100...+100 Sets the modulation amount of stereo image of the effect
j
Wet/Dry Dry, 1:99...99:1, Wet
Balance between the wet and dry signal
Src Off...Tempo Table , “Dynamic Modulation sources,” on page 357
Amt –100...+100 Amount of modulation source
Left
Right
FX Amt
FX Amt
FX Amt = 100: Mono In - Stereo Out / FX Amt = 0: Stereo In - Stereo Out
PanDelay
D-mod
D-mod
Loop Time: Auto/ ...5400ms
+
Tempo
BPMBPM Base Note x Times
REC Control
RST Control

426 EffectsDouble Size
“Times.” Even in this case, the delay time cannot exceed 10,800msec.
“Hold” procedure (when Loop Time = Auto)
1. “Rec Src”JS +Y: #01“Reset Src”JS –Y: #02“Manual REC Control”REC Off“Manual RST Control”RESET“Loop Time [msec]”Auto“MIDI/Tempo Sync”OffIt should be noted that all recordings will be deleted whileReset is On.
2. “Manual RST Control”OffReset is cancelled and the unit enters Rec ready mode.
3. Push the joystick in the +Y direction (forward) and play aphrase you wish to hold. When you pull the joystick to itsoriginal position, the recording will be finished and thephrase you just played will be held.
Loop Time is automatically set only for the first recordingafter resetting. If the time length exceeds 10,800msec, LoopTime will be automatically set to 10,800msec. (If you haveset “Times” to 1–10,800msec, the specified loop time willbe used regardless of the time taken from pushing the joy-stick forward until it is pulled back. However, the recordingmethod remains the same. The phrase being played whilethe joystick is pushed forward will be held.)
4. If you made a mistake during recording, pull the joystick inthe –Y direction (back) to reset. In this way, the recordingwill be erased. Repeat step 4. again.
5. The recorded phrase will be repeated again and again. Youcan use this to create an accompaniment.
6. By pushing the joystick in the +Y direction (forward), youcan also overdub performances over the phrase that isbeing held.
e: REC Control Srcg: Manual REC Control
“REC Control Src” selects the modulation source that controlsrecording.
If this modulation is on, or if “Manual REC Control” is set to On,you can record the input signal. If a recording has already beencarried out, additional signals will be overdubbed.
The effect is off when a value for the modulation source specified for the “REC Control Src” parameter is 63 or smaller, and the effect is on when the value is 64 or higher.
f: RST Control Srch: Manual RST Control
The “RST Control Src” parameter specifies the modulationsource that controls the reset operation.
When you set this modulation source to On, or “Manual RSTControl” to RESET, you can erase what you recorded. If the LoopTime parameter has been set to Auto, the loop time is also reset.
The effect is off when a value for the modulation source specified for the “RST Control Src” parameter is 63 or smaller, and the effect is on when the value is 64 or higher.
123: LCR BPM Long DlyThe L/C/R delay enables you to match the delay time with thesong tempo.
a: Time Over?
You can set the delay time up to 10,920msec. If the delay timeexceeds this limit, the error message “OVER!” appears in the dis-play. Set the delay time parameters so that this message will notappear. “Time Over?” is only a display parameter.
aBPM
MIDI, 40.00...300.00
MIDI syncs to the system tempo; 40–300 sets the tempo manually for this individual effect
Time Over? ---, OVER! Displays an error message when the delay time exceeds the upper limit
b
L Delay Base Note r...w Selects the type of notes to specify
the delay time for TapL
Times x1...x32 Sets the number of notes to specify the delay time for TapL
Level 0...50 Sets the output level of TapL
c
C Delay Base Note r...w elects the type of notes to specify
the delay time for TapC
Times x1...x32 Sets the number of notes to specify the delay time for TapC
Level 0...50 Sets the output level of TapC
d
R Delay Base Note r...w Selects the type of notes to specify
the delay time for TapR
Times x1...x32 Sets the number of notes to specify the delay time for TapR
Level 0...50 Sets the output level of TapR
e
Feedback (C Delay) –100...+100 Sets the feedback amount of TapC
Src Off...Tempo Selects the modulation source for the TapC feedback
Amt –100...+100 Sets the modulation amount of the TapC feedback
fHigh Damp [%] 0...100 Sets the damping amount in the
high range
Low Damp [%] 0...100 Sets the damping amount in the low range
g
Input Level Dmod [%] –100...+100 Sets the modulation amount of the
input level
Src Off...Tempo Selects the modulation source for the input level
h Spread 0...50Sets the width of the stereo image of the effect sound
i
Wet/Dry Dry, 1:99...99:1, Wet
Balance between the wet and dry signal
Src Off...Tempo Table , “Dynamic Modulation sources,” on page 357
Amt –100...+100 Amount of modulation source
C Delay
R Delay
Left
Right
Feedback
Spread
FX Amt
FX Amt
FX Amt = 100: Mono In - Stereo Out / FX Amt = 0: Stereo In -Stereo Out
Input Level D-mod
High Damp Low Damp
L DelayInput Level D-mod
+Level
Level
Level
Tempo
BPMBPM Base Note x Times
Base Note x Times
Base Note x Times

427EffectsDouble Size
App
endi
x
124: St. BPM Long Dly(Stereo BPM Long Delay)
The stereo delay enables you to match the delay time with thesong tempo.
a: Time Over? L, R
You can set the delay time up to 5,460msec. If the delay timeexceeds this limit, the error message “OVER!” appears in the dis-play. Set the delay time parameters so that this message will notappear. “Time Over?” is only a display parameter.
125: Early ReflectionsThis early reflection effect has more precise early reflectionswith twice the maximum length of a normal-size effect (See“Early Reflections” on page 401.). You can create a very smoothand dense sound.
a
BPMMIDI, 40.00...300.00
MIDI syncs to the system tempo; 40–300 sets the tempo manually for this individual effect
Time Over? L ---, OVER!Display the error message if the left channel delay time exceeds the upper limit
R ---, OVER!Display the error message if the right channel delay time exceeds the upper limit
b
L Delay Base Note r...w Selects the type of notes to specify
the left channel delay time
Times x1...x32 Sets the number of notes to specify the left channel delay time
Adjust [%] –2.50...+2.50 Fine-adjust the left channel delay time
c
R Delay Base Note r...w Selects the type of notes to specify
the right channel delay time
Times x1...x32 Sets the number of notes to specify the right channel delay time
Adjust [%] –2.50...+2.50 Fine-adjust the right channel delay time
d
L Feedback –100...+100 Sets the feedback amount for the left channel
Src Off...Tempo Selects the modulation source of feedback amount
L Amt –100...+100 Sets the modulation amount of the left channel feedback
eR Feedback –100...+100 Sets the feedback amount for the
right channel
R Amt –100...+100 Sets the modulation amount of the right channel feedback
f High Damp [%] 0...100 Sets the damping amount in the high range
g Low Damp [%] 0...100 Sets the damping amount in the low range
h
Input Level Dmod [%] –100...+100 Sets the modulation amount of the
input level
Src Off...Tempo Selects the modulation source for the input level
i
Wet/Dry Dry, 1:99...99:1, Wet
Balance between the wet and dry signal
Src Off...Tempo Table , “Dynamic Modulation sources,” on page 357
Amt –100...+100 Amount of modulation source
Left
Right
Feedback
FX Amt
FX Amt
Stereo In - Stereo Out
Input Level D-mod
Input Level D-mod
High Damp Low Damp
High Damp Low Damp
Tempo
BPMBPM Base Note x Times Adjust [%]
Base Note x Times Adjust [%]
Delay
Delay
a TypeSharp, Loose, Modulated, Reverse
Selects the decay curve for the early reflection
b ER Time [msec] 10...1600 Sets the time length of early reflection
c Pre Delay [msec] 0...200 Sets the time taken from the original
sound to the first early reflection
d EQ Trim 0...100 Sets the input level of EQ applied to the effect sound
e
Pre LEQ Fc Low, Mid-Low
Selects the cutoff frequency (low or mid-low) of the low-range equalizer
Pre HEQ Fc High, Mid-High
Selects the cutoff frequency (high or mid-high) of the high-range equalizer
f
Pre LEQ Gain [dB] –15.0...+15.0 Sets the gain of Low EQ
Pre HEQ Gain [dB] –15.0...+15.0 Sets the gain of High EQ
g
Wet/Dry Dry, 1:99...99:1, Wet
Balance between the wet and dry signal
Src Off...Tempo Table , “Dynamic Modulation sources,” on page 357
Amt –100...+100 Amount of modulation source
Left
Right
FX Amt
FX Amt
FX Amt = 100: Mono In - Stereo Out / FX Amt = 0: Stereo In - Stereo Out
EQ Trim
+
EQ Trim
Pre Delay Early ReflectionsLEQ HEQ

428 Installing the Korg USB MIDI DriverConnecting Pa900 to a personal computer
The USB Device port can be used to transfer MIDI data betweenthe Pa900 and a personal computer (this is called the MIDI OverUSB function). This is useful when your computer is not fittedwith a MIDI interface.
USB can be used in parallel with the MIDI ports. For example,you can connect your Pa900 to a sequencer running on yourcomputer, and at the same time control another MIDI instru-ment connected to the MIDI ports of Pa900.
Connecting Pa900 this ways makes it, at the same time, a MIDIinput device, a controller, and a sound generator.
Connecting Pa900 to a personal computer
Please install the KORG USB-MIDI Driver, before connectingPa900 to a personal computer. Be sure your personal computermeets the requirement shown on “KORG USB-MIDI Driver sys-tem requirements” below.
KORG USB-MIDI Driver systemrequirements
WindowsComputer: A computer with an USB port, that satisfies therequirements of Microsoft Windows XP, Vista or 7.
Operating system: Microsoft Windows XP Home Edition / Pro-fessional / x64 Edition (a driver for the x64 Edition is in betarelease), Vista, 7.
MacintoshComputer: An Apple Macintosh with an USB port that satisfiesthe requirements of Mac OS X.
Operating system: Mac OS X version 10.3 or later.
Please note before use
Copyright to all software included in this product is the propertyof Korg Inc.
The license agreement for this software is provided separately.You must read this license agreement before you install this soft-ware. Your installation of this software will be taken to indicateyour acceptance of this agreement.
Windows: Installing the KORG USB-MIDIDriver
Please connect Pa900 to the computer via an USB cable onlyafter having installed the KORG USB-MIDI Driver Tools.
1. Insert the included Accessory DVD into the optical drive ofyour Windows PC.
2. Open the folder DVD-ROM\USB-MIDI Driver\Win -KORG USB-MIDI Driver v.n.nn\ and double-click on“KORG USB-MIDI Driver Tools Setup v.n.nn.exe” to runthe installer (“n.nn” meaning the version number).
3. Follow the instructions appearing on screen. At the end,the tools will be installed.
4. When installation is completed, connect the DEVICE USBport of your Pa900 to one of the USB ports of your Win-dows PC by using a standard USB cable. The Auto Installerwill immediately start.
5. When finished, the USB-MIDI driver will be installed, andPa900 will be able to communicate with your computer viaUSB.
You can access the tools and manuals from the Start menu.
6. Restart the computer, and turn on Pa900. Connect Pa900 tothe computer via an USB cable.
7. Select the following command from the task bar to openthe installation instructions:
Start > all programs > KORG > KORG USB-MIDI DriverTools > Installation manual
8. Select the following command from the task bar to openthe installation program:
Start > all programs > KORG > KORG USB-MIDI DriverTools > Install KORG USB-MIDI Device
9. Please follow the installation instructions appearing on-screen to install the KORG USB-MIDI Driver.
Driver’s portsAfter installation, the following ports will be shown in you MIDIapplication (e.g., sequencer) among the other MIDI devices:
Pa900 KEYBOARD: This allows for reception of MIDI messagesfrom the Pa900 (keyboard and controller’s data) to the MIDIapplication running on the computer.
Pa900 SOUND: This allows for transmission of MIDI messagesfrom the MIDI application running on the computer, to theinternal tone generator of Pa900.
Installing the Korg USB MIDI Driver

429Installing the Korg USB MIDI DriverMac OS X: Installing the KORG USB-MIDI Driver
App
endi
x
Mac OS X: Installing the KORG USB-MIDIDriver
1. Insert the included Accessory DVD into the optical drive ofyour Mac.
2. If the DVD content does not appear on screen, double-clickthe DVD icon to open a window in the Finder.
3. Open the folder /USB-MIDI Driver/Mac - KORG USB-MIDI Driver v.n.nn/ and double-click on “KORG USB-MIDI Driver v.n.n.n.dmg” to open a virtual drive in theFinder (“n.n.n” meaning the version number).
4. Double-click on “KORG USB-MIDI Driver.pkg” to run theinstaller.
5. Follow the instructions appearing on screen.
6. When installation is completed, eject the virtual drive, andconnect the DEVICE USB port of your Pa900 to one of theUSB ports of your Mac by using a standard USB cable.
Driver’s portsAfter installation, the following ports will be shown in you MIDIapplication (e.g., sequencer) among the other MIDI devices:
Pa900 KEYBOARD: This allows for reception of MIDI messagesfrom Pa900 (keyboard and controller’s data) to the MIDI appli-cation running on the Mac.
Pa900 SOUND: This allows for transmission of MIDI messagesfrom the MIDI application running on the Mac, to the internaltone generator of Pa900.

430 MIDI DataMIDI Controllers
page 430
MIDI Controllers
The following is a table including all Control Change messages,and their effect on various Pa900 functions. Note that not allcontrollers are available in all operative modes.
(*) The following NRPN messages are recognized by Pa900 inSong Play and Sequencer mode only:
Note: These controls are reset when stopping the Song, or choosinga new Song.
MIDI Data
CC# CC Name Pa900 Function
0 Bank Select Sound selection
1 Mod1 (Y+) Joystick forward
2 Mod2 (Y-) Joystick backward
3 Undef. ctl
4 Foot ctl
5 Port.time
6 Data ent.
7 Volume Track volume
8 Balance
9 Undef. ctl
10 Pan Pot Track panning
11 Expression Expression
12 Fx Ctl 1 CC#12
13 Fx Ctl 2 CC#13
14-15 Undef. ctlþ
16 Gen.pc.1
17 Gen.pc.2
18 Slider
19 Gen.pc.4
20-31 Undef. ctlþþ
Control Change #32-63 are the LSB (Least Significant Bytet) of Control Change #0-31, i.e. the MSB (Most Significant Byte), and are changed accord-ing to their MSB counterparts.
64 Damper Damper pedal
65 Portamento
66 Sostenuto Sostenuto pedal
67 Soft Soft pedal
68 Legato
69 Hold 2
70 Sustain level
71 F.Res.Hp Filter resonance
72 Release Release time
73 Attack Attack time
74 F.CutOff Filter cutoff (Brilliance)
75 Decay T. Decay time
76 Lfo1 Sp. Vibrato speed
77 Lfo1 Dpt Vibrato depth
78 Lfo1 Dly Vibrato initial delay
79 FilterEgþ
80 Gen.pc.5 Sound Controller 1
81 Gen.pc.6 Sound Controller 2
82 Gen.pc.7
83 Gen.pc.8
84 Port.ctl
85-90 Undef. ctl
91 Fx 1 depth A/B Master FX 1 (reverb) send level
92 Fx 2 ctl
93 Fx 3 depth A/B Master FX 2 (modul.) send level
94 Fx 4 ctl
95 Fx 5 ctl
96 Data Inc
97 Data Dec
98 NRPN Lsb See table below(*)
99 NRPN Msb* See table below(*)
100 RPN Lsb See MIDI Implementation Chart
101 RPN Msb See MIDI Implementation Chart
102-119 Undefined ctl
120 AllSOff
121 Res Ctl Reset All Controllers
122 LocalCt
123 NoteOff
124 OmniOff
125 Omni On
126 Mono On
127 Poly On
NRPNCC#99(MSB)
CC#98(LSB)
CC#06(Data Entry)
Vibrato Rate 1 8 0…127(a)
(a). 64 = No change to the original parameter’s value
Vibrato Depth 1 9 0…127(a)
Vibrato Decay 1 10 0…127(a)
Filter Cutoff 1 32 0…127(a)
Resonance 1 33 0…127(a)
EG Attack Time 1 99 0…127(a)
EG Decay Time 1 100 0…127(a)
EG Release Time 1 102 0…127(a)
Drum Filter Cutoff 20 dd(b)
(b). dd = Drum Instrument No. 0…127 (C0…C8)
0…127(a)
Drum Filter Resonance 21 dd(b) 0…127(a)
Drum EG Attack Time 22 dd(b) 0…127(a)
Drum EG Decay Time 23 dd(b) 0…127(a)
Drum Coarse Tune 24 dd(b) 0…127(a)
Drum Fine Tune 25 dd(b) 0…127(a)
Drum Volume 26 dd(b) 0…127
Drum Panpot 28 dd(b) 0…127(a)
Drum Rev Send (FX 1) 29 dd(b) 0…127(a)
Drum Mod Send (FX 2) 30 dd(b) 0…127(a)
CC# CC Name Pa900 Function

431Recognized chords
App
endi
x
The following pages show the most important chords recognized by the Pa900, when the selected Chord Recognition mode is Fingered(see “Chord Recognition” on page 252 of the User’s Manual).
Recognized chords
2-note
T
T
T
T
3-note
T
T
T T
T
Major2-note4-note
T
T
Major 6th
3-note
T
4-note
T
T
Major 7th2-note
T
T= constituent notes of the chord = can be used as tension
3-note
T
T
Sus 42-note 3-note
Sus 2
3-note
T T
T T
2-note
T T
T
4-note
T T
TT T
Dominant 7th
4-note
T
T
Dominant 7th Sus 43-note
T
T
3-noteFlat 5th
4-note
T
T
Major 7th Sus 4
T
4-noteMajor 7th 5
T T
T T
4-noteDominant 7th 5

432 Recognized chords
T= constituent notes of the chord = can be used as tension
4-note
T T
Minor 7th3-note
T
4-note
T T
Minor-Major 7th3-note
T
3-note
T
T
Diminished4-note
Diminished 7th4-note
T T
Diminished Major 7th
4-note
T T T
Minor 7th 5
3-note
T
T
Augmented4-note
TT T
T
Augmented 7th4-note
TT T
T
Augmented Major 7th
No 3rd, no 5thNo 3rd1-note2-note
3-note
T T
Minor2-note
T
4-note
T T
Minor 6th

433Replacing the clock backup batteryPrecautions
App
endi
x
You can replace the clock backup battery with a standard lithiumbattery (model CR2032). Do not use replacements differentthan the one suggested by Korg, or you risk to damage theinstrument! The battery can be replaced by the user. Korg is notresponsible for any data loss, damage or injury caused by theincorrect installation of this part.
Precautions
• Installation of the battery is done at the user’s own risk. Korgwill assume no responsibility for any damage or injury resultingfrom its improper installation or use.
• Be sure to disconnect the instrument from the AC plug, beforeopening it.
• To prevent your body’s static electricity from damaging theboard’s components, touch an unpainted metallic componentbefore proceeding with the installation.
Installation
For installation, you will need a cross-point and a flat-head screw-drivers (not supplied).
1. Disconnect the instrument from the AC power.
2. From the back of the instrument, use the cross-pointscrewdriver to remove the fixing screw (a).
3. Use the flat-head screwdriver to open the cover (b) to gainaccess to the inside of the battery slot, and keep the coverapart.
4. With the help of your fingernail, lift the exhausted battery(c) from its lower side, and remove it from the battery slot,being very careful not to let it fall inside the instrument.
Replacing the clock backup battery
ⓐ
ⓑ

434 Replacing the clock backup batteryInstallation
5. Insert the new battery (d) into the empty battery slot, beingsure the positive (+) side is facing up. Be very careful not tolet it fall inside the instrument.
6. Replace the cover (b) to the original position. Attach thecover to the back of the instrument by using the fixingscrew (a).
ⓓ
ⓑⓐ

435Installing a microSD cardPrecautions
App
endi
x
To expand the available onboard memory, you can install an(optional) microSD card inside Pa900. The card can be installedby the user. Korg is not responsible for any data loss, damageor injury caused by the incorrect installation of this part.
Precautions
• Be sure to disconnect the instrument from the AC plug, beforeopening it. Warning: Removing or inserting the microSD cardwhile the instrument is connected to the AC plug may damagethe instrument!
• To prevent your body’s static electricity from damaging theboard’s components, touch an unpainted metallic componentbefore proceeding with the installation.
Installation
For installation, you will need a cross-point and a flat-headscrewdrivers (not supplied).
1. Disconnect the instrument from the AC plug.
2. From the back of the instrument, use the cross-pointscrewdriver to remove the fixing screw (a).
3. Use the flat-head screwdriver to open the cover (b) to gainaccess to the inside of the microSD slot, and keep the coverapart.
4. Insert the microSD card (c) into the empty card slot, beingsure the connector side is facing down and toward theinstrument. Gently push the card, until you hear a clicksound meaning it is properly inserted. Warning: Be sure toinsert the card correctly, or it may slip inside the instru-ment!
Installing a microSD card
ⓐ
ⓑ
ⓒ

436 Installing a microSD cardAccessing the microSD card
5. Replace the cover (b) to the original position. Attach thecover to the back of the instrument by using the fixingscrew (a).
Accessing the microSD card
Once the microSD Key is installed, restart your Pa900. You canaccess the microSD card from any Media page, by using theDevice selector and choosing the “SD [KORG SD]” storagedevice.
Removal
To extract the microSD card from its slot, just follow the installa-tion instructions in reverse.
ⓑⓐ

437Shortcuts
App
endi
x
Shift functionsYou can keep the SHIFT button pressed, and press another but-ton on the control panel to directly jump to an edit page or dia-log box.
Long keypressYou can keep a button pressed for about one second to directlyjump to an edit page or dialog box.
Special functionsOther available shortcuts are the following ones.
Shortcuts
Shift + Functions
Any modes
Dial Tempo Change
Scroll Arrows When a list is shown: Goes to Next/Previous alpha-betical section of the currently selected column
Sound Sends the Sound assigned to the selected track to the Sound mode
Global Selects the Global > MIDI > General Controls page. This is a quick way to jump to MIDI editing pages.
Media Selects the Global > Mode Preferences > Media page
Start/Stop Panic
Fade In/Out Selects the Fade In/Out parameter in the Global > General Controls > Basic page
Synchro Selects the Clock Source parameter in the Global > MIDI > General Controls page
Tempo Lock Selects the Global > General Controls > Lock page
Metro Selects the Metronome section of the Global > General Controls > Basic page
SongBook Selects the SongBook > Custom List page
Transpose (either) Selects the Global > Tuning > Transpose Controls page
Style Play mode
Style Play Selects the Global > Mode Preferences > Style page
Chord Scan (either)
Memory
Variation Selects the corresponding Variation in the Style Play > Controls > Drum/Fill page
Ensemble Selects the Ensemble Type parameter in the Style Play > Keyboard/Ensemble > Ensemble page
Pad (any) Selects the Style Play > Pad/Assignable Switches > Pad page
Assignable Switch (any)
Selects the Style Play > Pad/Assignable Switches > Switch page
Upper Octave (either) Selects the Style Play > Mixer/Tuning > Tuning page
Style Record mode
Assignable Knob When the Sound/Expression page is shown: Adjusts the Expression level
Tempo+/- When the Sound/Expression page is shown: Adjusts the Expression level
Song Play mode
Song Play Selects the Global > Mode Preferences > Song & Seq page
Upper Octave (either) Selects the Song Play > Mixer/Tuning > Tuning page
Pad (any) Selects the Song Play > Pad/Assignable Switches > Pad page
Assignable Switch (any)
Selects the Song Play > Pad/Assignable Switches > Switch page
Play/Stop (either) Start both Players at the same time
Record Open the MP3 Record dialog box
JukeBox
>> Play the next Song in the JukeBox list
<< Play the previous Song in the JukeBox list
Lyrics
Display Load a TXT file
Sequencer mode
Sequencer Selects the Global > Mode Preferences > Song & Seq page
Upper Octave (either) Selects the Global > Transpose Controls > Tuning page
Long keypress Functions
Any operating modes
Split Opens the Split Point dialog box. Play a note to set the new Split Point.
Preset (Mic Setting) Opens the “Write Voice Preset” window
Style Play mode
Style Opens the “Write Current Style Settings” window
Performance Opens the “Write Performance” window
SongBook Create a "New SongBook" Entry and open the "Write Song" window (only if pressed outside the SongBook)
STS Opens the “Write STS” window
Song Play mode
Performance Opens the “Write Performance” window.
SongBook Create a "New SongBook" Entry and open the "Write Song" window (only if pressed outside the SongBook)
Global mode
Global Touch Panel Calibration
Style Play mode
Tempo +/– (together) Original Tempo
Transpose #/b (together)
Set the Master Transpose to 0
Upper Octave +/- (togheter)
Set the Upper Octave to the original setting
Record While recording MP3 Song, with MP3 Record Dialog Box closed, it stops the MP3 record and open the "Write Song Dialog)
Shift + Functions

438 Troubleshooting
TroubleshootingProblem Solution Page
General problems
Power does not turn on Make sure that (1) the power cable is plugged into the outlet, (2) the cable is plugged into the connector on the back of the instrument, (3) and is not damaged, (4) there are no problems with the mains.
Is the STANDBY LED turned on?
If the power still does not turn on, contact your dealer or the nearest KORG Service Center.
Power does not turn off Press the POWER button again and keep it pressed for a few seconds. At the end, the button’s LED will turn off, and the instrument will be set to standby.
No sound Is the MASTER VOLUME knob of the Pa900 set to a position other than “0”?
Is the Spearkers parameter turned off? Turn it on. 262
Check the connections to your amp or mixer.
Make sure that all the components of the amplifying system are turned on.
Is the Local parameter set to off? Turn it on. 259
Is the Attack parameter value too high? Set it to a lower value, to let the sound start faster. Is the Volume parameter too low? Set it to a higher value.
114, 122
Lowest note are not played When the SPLIT LED is turned on, the keyboard is divided into a Lower part (lower notes, below the split point) and an Upper part (higher notes, above the split point). Is the Lower track muted? Unmute it.
Wrong sounds Do the USER banks contain modified data? Load the appropriate data for the Song or the Style you wish to playback.
281
Has one of the USER Drum Kits been modified? Load the appropriate Drum Kits. 281
Have the Styles or Performances been modified? Load the appropriate data (Styles or Performances). 281
Sound does not stop Make sure that the Damper pedal calibration is correctly set. 256
The selected Style or Song cannot start
Make sure that the Clock parameter is set to Internal. If you are using the MIDI Clock of another device, you must set the MIDI Clock parameter to MIDI or USB (depending on the port the Pa900 is hooked to the other device through) and make sure that the external device transmits MIDI Clock data.
259
Does not respond to MIDI messages Make sure that all MIDI or USB cables are connected correctly. 308
Make sure that the external device is transmitting through MIDI channels enabled to receive in the Pa900. 260
Make sure that the MIDI IN Filters of the Pa900 do not prevent the reception of messages. 261
Percussive instruments are not played correctly
Make sure that the Drum track is set to Drum Mode and the external device has not transposition applied. 120, 192
Some “clicks” can be heard when playing a percussive instrument
This is part of the sound, and not a problem.
A background noise can be heard after selecting a Performance, Style or STS
The selected Performance, Style or STS recalled the effect “17 St. Analog Record”, simulating the noise of a old vinyl recording.
Media related problems
Cannot format a device Is the USB cable correctly connected?
Is the USB device correctly powered?
Is the device inserted correctly?
Is the write protect tab of the disk or card in the protect position? Unprotect it.
Cannot save data to a device Is the device formatted? 290
Is the device inserted correctly?
Is the write protect tab of the disk or card in the protect position? Unprotect it.
Cannot load data from a device Is the device inserted correctly?
Does the device contain data compatible with the Pa900? 278
The message “Over Current Condition Detected on USB port: please remove the USB media” appears in the display
The USB device is probably defective, due to a short circuit, and cannot be used. While this will not damage the Pa900, it is advisable to remove the device.

439Technical specifications
App
endi
x
Specifications and appearance are subject to change without notice for improvement.
Technical specificationsFeatures Pa900
Keyboard 61 keys semi–weighted with velocity and aftertouch
System Upgradable Operating System, RX (Real eXperience), DNC (Defined Nuance Control), Multitasking, Load while play feature
Display Color TouchView™, 7” TFT display
Tone Generator KORG EDS (Enhanced Definition Synthesis) sound generator, 128 Voices, 128 Oscillators, Filters with Resonance, Three band EQ for each track
Effects Up to 4 Stereo Digital Multi-Effects block system, 125 Master Effects types + 2 Global Effects
Voice Voice Processor Technology by TC Helicon. Three-part Harmonizer, Reverb, Delay, plus Compressor and EQ
Sounds / Drumkits More than 1100, including Stereo Piano and GM/GS compatibility; more than 70 Drum Kits.User area: 512 Sounds, 128 Drum Kits.Defined Nuance Control (DNC) Technology improved sounds.
Digital Drawbars 9 Footages
Sampling Load/Import of Korg, Wav, AIFF and Soundfont; Export of Wav and AIFF; Edit, Time SlicePCM User Memory: 192 MB
Styles More than 400 preloaded Styles, freely reconfigurable, 1200 available Style locations including Favorite and User banks.Eight Style tracks, 4 Single Touch Settings, 4 Pads and one Style Setting per Style, Guitar Track 2 mode, Parallel and Fixed NTT, Style Record with Step Record, Track and Event Edit functions.Style controls: 3 Intros, 4 Variations, 4 Fills, Break, 3 Endings, Synchro Start/Stop, Tap Tempo/Reset, Bass Inversion, Auto Fill, Manual Bass, Memory, Accompaniment Mute, Drum Mapping, Snare & Kick Designation, STS Mode
Chord Sequencer Realtime Style Chord Sequencer Recorder
Performance 320 Realtime Performance locations, “My Setting” function
STS Memorize Realtime tracks settings, up to 4 x Style, up to 4 x SongBook entries
Song Play Patented XDS Crossfade Dual Sequencer Player (supported formats: MID, KAR, MP3 + Lyrics, MP3+G).2 Players with separate Select, Start/Stop, Home, Rewind and Fast Forward controls, X-Fader Balance controlLyrics, Score, and Chord data can be displayed on screen, or on external video monitor.Markers, Jukebox function.
MP3 Player / Recorder Double MP3 Player and MP3 Recorder, Real Time Transpose (+6/-5 semitones), Tempo change (±30%), Vocal Remover.Record MP3 files including Styles, SMF, Real Time Tracks, Pads, Microphone and Effects.
Sequencer Quick Record (Backing Sequence), Multitrack and Step Record functions. Full-featured Sequencer, 16 tracks; up to 200,000 events, SMF native format
SongBook Fully programmable music database, based on Styles, SMF, Karaoke, MP3 with automatic selection of Style Play and Song Play modes. User-definable custom lists, Filtering and Ordering options.
Compatibility i-Series: Styles; Pa-Series: Style, Performance, Program/Sound, Song, SongBook, Pad
Multi Pad 4 Assignable Pads + Stop Button. Pad Record function
General Controls Master Volume; Fade In/Out; Keyboard-Acc/Song Balance Volume; Ensemble; Octave Transpose; Master Transpose; Style Change; Quarter Tone and Arabic Scale memorized inside Performance/STS; Realtime controllers: Joystick (pitch + modulation), Mic Volume, FX Level; Mic On/Off; Mic Preset; Harmony On/Off; 3 Assignable Switches; Tempo +/-; Tempo Lock; Dial; Search Function; Shift; Chord Scan; Split; Metronome On/Off; Sound Select
Control Inputs Damper (supports half-pedaling with the optional DS-1H pedal), Assignable Pedal/Footswitch
Clock Internal System Clock
Mass Storage/Disk SSD standard; microSD (optional, back panel slot)
MIDI In, Out; Standard MIDI connectors; USB to MIDI using the USB Device port. 8 user-definable MIDI Setups
Video Out RCA connector
USB 1 USB Host (front) and 1 USB Device (rear), 2.0 Hi Speed connections
Mic/Line Audio Inputs 2 Unbalanced Jacks; Left/Mono-Mic, with gain control and Right/Mono
Audio Outputs 2 Unbalanced Jacks; Left/Mono, Right/Mono Headphones (in the front panel)
Amplification 2 x 20 Watt; 2 x 100 mm Woofer in Bass Reflex Box and 2 x Tweeter
Consumption 20 Watt, 100-240 V, 50/60 Hz
Dimensions (W x D x H) 1030 x 378.3 x 138.8 mm / 40.55 x 14.89 x 5.46 inches (without music stand)
Weight 10.76 kg / 23.72 lbs
Accessories Printed Manual, AC Power Cable, Music Stand, DVD-ROM
Options EXP-2 - Expression/Volume Pedal, XVP-10 - Professional Expression/Volume Pedal, DS-1H - Damper Pedal, PS-1/PS-3 Switch Pedal

440 MIDI Implementation Chart
MIDI Implementation Chart
Function Transmitted Recognized Remarks
Basic ChannelDefault 1–16 1–16 Memorized
Changed 1–16 1–16
Mode
Default 3
Messages X X
Altered ****************
Note Number:
0–127 0–127
True Voice **************** 0–127
VelocityNote On O 9n, V=1–127 O 9n, V=1–127
Note Off O 8n, V=0–127 O 8n, V=0–127
AftertouchPoly (Key) O O Player data only *1
Mono (Channel) O O *1
Pitch Bend O O
Control Change
0, 32 O O Bank Select (MSB, LSB) *1
1, 2 O O Modulations *1
6 O O Data Entry MSB *1
38 O O Data Entry LSB *1
7, 11, 16 O O Volume, Expression, Ribbon *1
10, 91, 93 O O Panpot, A/B Master FX Send *1
64, 66, 67 O O Damper, Sostenuto, Soft *1
65, 5 O O Portamento On/Off, Portamento Time *1
71, 72, 73 O O Harmonic Content, EG time (Release, Attack) *1
74, 75 O O Brightness, Decay Time *1
76, 77, 78 O O Vibrato Rate, Depth, Delay *1
80, 81 O O Sound Controller (1, 2) *1
98, 99 O O NRPN (LSB, MSB) *1, 2
100, 101 O O RPN (LSB, MSB) *1, 3
120, 121 X O All sounds off, Reset all controllers *1
Program Change
O 0–127 O 0–127 *1
True # **************** 0–127
System Exclusive O O *4
SystemCommon
Song Position X X
Song Select X X
Tune X X
SystemReal Time
Clock O O *5
Commands O O *5
AuxMessages
Local On/Off X X
All Notes Off X O (123-124)
Active Sense O O
Reset X X
Notes
*1: Sent and received when MIDI Filters In and Out are set to Off in Global mode.*2: Drawbar settings, Sound parameters, Selection of SongBook entries, Drum Kit Family settings.*3: LSB, MSB = 00,00: Pitch Bend range, =01,00: Fine Tune, =02,00: Coarse Tune.*4: Includes Inquiry and Master Volume messages, FX settings, Quarter Tone settings. GM Mode On.*5: Transmitted only when the Clock Send parameter (Global mode) is set to on.
Mode 1:OMNI ON, POLYMode 3:OMNI OFF, POLY
Mode 2:OMNI ON, MONOMode 4:OMNI OFF, MONO
O: YesX: No
KORG Pa900OS Version 1.0 - March 01, 2013

441Index
Inde
x
AAIFF file format 242Amp EG 224AMS(Alternate Modulation Source)
Amp EG 224Filter Cutoff 219Filter EG 219Filter LFO 219Pan 222Pitch 214Pitch EG 216Resonance 217
Arabic Scale 112, 117Attack Level
Amp EG 224Attack Time
Filter EG 221Audio Inputs 17, 264Audio Outputs 22Auto Style/Perf/Sound Select 248
BBackup 7Balance (Keyboard/Style or Ply) 9, 21Balance (Player) 21Bank Select 311Bass & Lower Backing 253BPM
MIDI/Tempo Sync., LFO 226
CChord Scanning 15
Lock 250Contrast 14Cutoff Frequency 217
DDamper 22, 124Decay Time
Filter EG 221Delay
LFO 225Digital Drawbars 203Display contrast 14Double Player 12Drum tracks 120, 121, 126
EEffects
Copy 127, 176, 199, 227Sequencer mode 190, 191Song Play mode 172, 173Style Play mode 115, 119, 191
Ending 13Ensemble 123
FFade (Sound parameter)
LFO 225Fade In/Out 247Favorite Styles 129Filter
Cutoff Frequency 217Filter Type 217
Filter Cutoff 219Filter EG 219Filter LFO 219Footswitch 255Format 290
GGeneral MIDI 309Global 246–276Global channel 309
HHarmony track (Voice Processor)
MIDI channel 260Note Input Source 266
IInputs 17, 264Intro 13
JJukebox 170, 175
KKeyboard Mode (Split) 16
Lock 250KMP file format 242KSF file format 242
LLevel (Sound parameter)
Trim 217LFO
Waveform, LFO waveform 225
Index

442 Index
Local Off 259, 311Lower Lock 250
MMarkers 307Master Transpose 16, 256Master Tune 256Master Volume 21Media 277–294
Format 290Menu 15MIDI
Clock 165, 259General MIDI 309Global channel 309IN channels 260Interface 311OUT channels 261Preset 258, 309Standard MIDI File 166, 177
MIDI interface 311MIDI Preset 258, 309
Write 275Midifile 166, 177, 309Mode
Sampling 231–245Sequencer 177–200Song Play 165–168SongBook 295–303Sound 201–230Style Play 106–129Style Record 130–164
MP3 167, 175, 295, 304
OOctave Transpose 16, 116
Auto Octave 249Midi In 259
OffsetOffset, LFO 225
Operating Modes 10OS (Operating System)
Backup 7Update 7
Outputs 22
PPads 12, 125Pan
Pads 125Sound 213, 222Style tracks 114
PANIC (SHIFT+START/STOP) 14PCG file format 242Pedals 255Performance 106
Selecting 102Writing 128
Pitch 214Pitch Bend 117, 191Pitch EG 216Player
Transport controls 12, 13Portamento
AMS 229Program Change 311
QQuarter Tone 112, 117
RResonance 217RX 197
SSampling 231–245Sampling mode 231–245Scale
Main scale 257Sequencer mode 177–200Shift 12Single Touch 11, 12Single Touch Setting (STS) 12
Selecting 12, 103Writing 128
SongMarkers 307Play from disk 103, 199Recording 179–189Selecting 103, 199Standard MIDI File 309
Song Play mode 165–168SongBook 295–303Sound
Editing 122, 174, 192Selecting 101Writing 228
Sound mode 201–230Split (Keyboard Mode) 16
Lock 250Split Point 112, 309Standard MIDI File 166, 177, 309STS, See Single Touch SettingStyle
Ending 13Intro 13Recording 130–164Selecting 10, 100Style Settings 106Variation 13
Style Play mode 106–129Style Record mode 130–164Style Settings
Selecting, see StyleWriting 129
Sync.Key Sync., LFO 225MIDI/Tempo, LFO 226

443Index
Inde
x
Synchro Start/Stop 14
TTalk
Auto On/Off 269On/Off 113Settings 269
Tap Tempo 13Tempo/Value section 15Touch Panel
Calibration 274Track Select 11Tracks
Drum/Percussion 120, 121, 126Keyboard tracks 106, 166Octave Transpose 16Volume 114, 172, 190
Transpose 16, 116Auto Octave 249Midi In 259
Trinity 231, 242Triton 231, 242Tune
Tune (Sound parameter) 206
UUpper Volume Link 114USB 292
VVariation 13Velocity
AMS 229Velocity Intensity, Amp Mod. 223Velocity, Filter EG 218
Velocity Curve 255Video Interface 19, 264Voice Processor
Harmony TrackMIDI channel 260Note Input Source 266
Voice Processor PresetEditing 265
Voice Processor SetupEditing 269
VolumeBalance 106, 165Balance (Keyboard/Style or Ply) 9, 21Balance (Player) 21Individual tracks
Sequencer 190Song Play 172Style Play 114
Master 21, 106, 165
WWAVE file format 242

444 Index


AddressKORG ITALY SpAVia Cagiata, 85I-60027 Osimo (An)Italy
Webwww.korg.com
© KORG Italy 2014. All rights reserved