morpho user guide - avid.force.com
TRANSCRIPT

Version 3.1Morpho
User Guide October 2015

Copyright © 2015 by Avid-Orad. All rights reserved worldwide.No part of this publication may be reproduced, modified, transmitted, transcribed, stored in retrieval system, or translated into any human or computer language, in any form or by any means, electronic, mechanical, magnetic, chemical, manual, or otherwise, without the express written permission of Avid-Orad (www.orad.tv/www.avid.com).Avid-Orad provides this documentation without warranty in any form, either expressed or implied.Avid-Orad may revise this document at any time without notice.This document may contain proprietary information and shall be respected as a proprietary document with permission for review and usage given only to the rightful owner of the equipment to which this document is associated. This document was written, designed, produced and published by Avid-Orad.
Trademark Notice: Morpho 3D, 3Designer, 3DPlay, Maestro, Maestro Controller, Maestro PageEditor, JStation, JServer, ProSet, 3DPlay, DVG 2U, DVP-500, X-pecto, Morpho 3D are trademarks of Avid-Orad. All other brand and product names may be trademarks of their respective companies.
Please send any comments on this manual to [email protected].
If you require technical support services, contact Avid-Orad at [email protected].
October 7, 2015

Contents
1.Introduction ....................................................................7What is Morpho?.................................................................................8
What’s New in Version 3.0? ..................................................................9
System Requirements........................................................................11
2.Getting Started ..............................................................13Starting Morpho................................................................................14
Starting RenderEngine ...................................................................14
Main Application Window....................................................................15
The Storyboard .............................................................................16
The Preview Window......................................................................18
The Feature Editor.........................................................................18
The Media Manager .......................................................................19
Saving Favorites ....................................................................... 22
Menus .............................................................................................23
File Menu .....................................................................................23
Edit Menu.....................................................................................24
Insert Menu..................................................................................25
View Menu ...................................................................................26
Tools Menu...................................................................................28
Playback Menu..............................................................................29
Customize Menu............................................................................30
Help Menu....................................................................................30
Creating a Story ..............................................................................31
Inserting Pages ................................................................................32
3.Creating Graphics ..........................................................33Adding Items to a Page......................................................................34
Designing Graphics ...........................................................................35
Text Items ...................................................................................36
Editing 2D and 3D Text Items..................................................... 36
Color Setting Options ................................................................ 38
Crawl ...................................................................................... 39
Business Crawl ......................................................................... 40
Custom Crawl........................................................................... 41

Ticker and Custom Ticker........................................................... 42
Counters. ................................................................................ 42
2D and 3D Shapes.........................................................................44
Graphs: Bar Charts, Line Charts, and Area Charts..............................46
Pie Charts ....................................................................................48
Masks ..........................................................................................50
Page Properties ................................................................................51
Page Layering ...............................................................................52
Positioning Graphics ..........................................................................52
Mapping Textures .............................................................................53
Previewing Graphics ..........................................................................53
Importing a Photoshop Image.............................................................54
Importing a PowerPoint Presentation ...................................................55
Importing Images from the Internet ....................................................55
Importing from 3Designer ..................................................................56
Exporting to 3Designer ......................................................................57
Using Presets ...................................................................................58
Template Pages and Branched Pages ...................................................59
Templates ....................................................................................59
Template Groups ...................................................................... 60
Branched Pages ............................................................................60
Rendering a Page to Video Clip ...........................................................61
4.Effects and Timing .........................................................63Applying Animation Effects .................................................................64
Effects for Text Items ....................................................................65
Splitting Item Effects.........................................................................66
Setting Timing..................................................................................67
Recording Time with Mouse ............................................................68
Lighting Effects.................................................................................69
Adding Audio....................................................................................70
Adding Video Insertions and Effects.....................................................71
Creating Custom Effects.....................................................................72
Subtitles ..........................................................................................74
5.MOS Integration ............................................................75MOS Server Configuration ..................................................................76
The Newsroom Client.........................................................................78

Using Newsroom Rundowns in Morpho .................................................78
6.Using Databases ............................................................79Setting up a Database .......................................................................80
Text File.......................................................................................81
Excel File......................................................................................82
Excel ODBC ..................................................................................83
ODBC ..........................................................................................85
RSS.............................................................................................87
XML Table ....................................................................................88
Setting up Variables ..........................................................................89
Using Expressions .........................................................................91
Using Conditions ...........................................................................91
Using Variables.................................................................................93
7.Airing Graphics ..............................................................95Sending a Story to Air .......................................................................96
Using the Playback Controller and Fields ..............................................97
Limiting Page Broadcast.....................................................................99
Logging Page Visibility ..................................................................... 100
On-Air Editing................................................................................. 100
8.Customizing Morpho ....................................................101GUI Layout .................................................................................... 102
Setting Preferences ......................................................................... 103
RenderEngine ............................................................................. 103
Directories.................................................................................. 105
Region ....................................................................................... 106
Keyboard Shortcuts ..................................................................... 107
Appearance ................................................................................ 108
Save and Playout ........................................................................ 109
Miscellaneous ............................................................................. 111
Automation ................................................................................ 112
MOS .......................................................................................... 114
Page Visibility Time...................................................................... 115
Plug-in Components..................................................................... 116
Appendix: Possible Automation Commands .....................................117


1. Introduction
In this section:
What is Morpho? on page 8
What’s New in Version 3.0? on page 9
System Requirements on page 11

8
1. I
ntr
od
uct
ion
What is Morpho?
Morpho is an on-air graphics solution, integrated with a production controller application that runs on the DVG2U hardware platform.
The dual mode structure enables quick graphics creation and editing while in off-air mode; available items include 2D and 3D graphics, text crawl/ticker objects, bar charts, and pie charts. More complex graphics can be imported from a variety of graphics editing applications, such as Adobe Photoshop, Adobe After Effects, MS PowerPoint, 3Designer, 3dmax, Maya, or XSI. Effects and timing allow graphics to be displayed and removed with a polished and dynamic look.
Use On-Air mode to send stories and pages to air in real time with smooth transition, without having to switch between applications.
What is Morpho? |

1. In
trod
uctio
n
What’s New in Version 3.0?
Timeline available for effects
Create your own in- and out-effects or modify an existing effect using a timeline available in the Feature Editor. Effects can be saved as presets for future use.
For more information, see Subtitles on page 74.
New text animation options
Assign animation presets to text items and define animation origin to text object or letter.
For more information, see Effects for Text Items on page 65.
Dual channel configuration
Define separate render channels, either for PVW+PGM, or as two independent PGM channels. This enables you to broadcast different languages or split screens if you have a dual channel system.
For more information, see RenderEngine on page 103.
3D scene transitions
A new set of 3D scene transitions has been added to the existing set of alpha transitions.
Extended conditional playout
Define two sets of variables; one set for preprocessing, and another set for when the page is played. True/false conditions have been implemented for extended functionality.
For more information, see Setting up Variables on page 89.
Page branching
Branch pages while on-air for quicker and more versatile playout.
For more information, see Branched Pages on page 60.
Youtube to RenderEngine
Using the [third party] 1AVStreamer application, stream Youtube clips to a production by setting the texture type to Stream.
For more information, see File on page 44.
What’s New in Version 3.0? | 9

10
1. I
ntr
od
uct
ion
Additional text editor options
In the Text Editor you can now use multi-style text objects, emoticons, align text to the last line, use new capitalization settings, connect a text item directly to a data source, and wrap and mask crawl text.
For more information, see Text Items on page 36.
New crawl and ticker options
Crawl and ticker possibilities have been added to Morpho. For more information, see the following sections:
Crawl on page 39
Business Crawl on page 40
Custom Crawl on page 41
Ticker and Custom Ticker on page 42
Improved 3Designer integration
For better control of 3Designer content, you can now control and modify exports defined in the scene from within Morpho. Edit textures and text strings in the scene defined as exports in 3Designer. Select animation groups to be active in Morpho. Rename exports from Morpho for easy identification in 3Designer.
For more information, see Exporting to 3Designer on page 57.
Automation
Support for VDCP protocol has been implemented, and use of multiple automation connections. Several automation systems can use CII or VDCP to control Morpho simultaneously.
For more information, see Automation on page 112.
New chart options
Standard Line Graph and Line Area Graph charts are now available as objects in the Media Manager.
For more information, see Graphs: Bar Charts, Line Charts, and Area Charts on page 46.
What’s New in Version 3.0? |

1. In
trod
uctio
n
System Requirements
The optimum platform for Morpho uses a DVG2U on Microsoft Windows 7.
Recommended system requirements for Morpho:
• Windows 7 64 bit
• Intel 3.0Ghz quad core Core-i5
• 8 GB of physical memory on Windows and Linux
• 500 GB system disk
• NVidia 750 GTX card
• 1 X 1000 BASE-T Ethernet
• 1920x1080 resolution monitor (24/32 bit color)
• Keyboard and 3-button Mouse (or Mouse with wheel)
NOTE:MS PowerPoint is required in order to import PowerPoint presentations.
System Requirements | 11

12
1. I
ntr
od
uct
ion
System Requirements |

2. Getting Started
In this section:
This section provides general information on using Morpho and an overview of the Morpho GUI. It contains the following topics:
Starting Morpho on page 14
Main Application Window on page 15
Menus on page 23
Creating a Story on page 31
Inserting Pages on page 32

14
2. G
etti
ng
Star
ted
Starting Morpho
During installation, Morpho shortcuts are created on the desktop and in the Start menu.
To start Morpho:
• Double click the Morpho icon on the desktop,
-or-
Select Start > All Programs > Morpho > Morpho.
Starting RenderEngine
While working in Local mode, RenderEngine is launched automatically on Windows.
To start RenderEngine on the DVG2U, use the desktop icon.
There is also a corresponding icon on the desktop to stop RenderEngine on the remote DVG2U.
Starting Morpho |

2. G
etting Started
Main Application Window
The main window is divided into a number of areas:
• The Storyboard on page 16
• The Preview Window on page 18
• The Media Manager on page 19
• The Feature Editor on page 18
Storyboard
MediaManager
PreviewWindow
Feature Editor
Menus
Toolbars
Main Application Window | 15

16
2. G
etti
ng
Star
ted
The Storyboard
The Storyboard - Thumbnail View
The Storyboard displays all pages or items in the current story. The Outline tab displays text items from all the pages in the story. Click any text item for quick editing, and to disconnect or connect to the database.
When you first open a story, the page thumbnail view is displayed. The selected thumbnail is also displayed as a list item, to allow you to access the required Feature Editor settings. Each thumbnail displays the page name and ID number. (These can be changed in the page properties in The Feature Editor on page 18.)
To display a list of items in a page:
■ Double-click the thumbnail or page in the Storyboard.
The purple highlight indicates that you are inside a page, displaying the list of items.
The Storyboard - List of Items
Main Application Window |

2. G
etting Started
To return to the pages (thumbnail view):
■ Double-click the page title in the Storyboard.
The Storyboard – List of Pages
Within the Storyboard, you can use the CTRL or SHIFT keys for multi selection. However, the rows are context sensitive, so clicking in each column displays a different control in the Feature Editor.
The order in the Storyboard is significant. This is the playing sequence during playback. Items are played according to their order in a page, and pages are played according to their order in the story. Pages can be dragged to a new place in the storyboard in both edit and on-air modes.
Pages can be displayed as thumbnail images.
To display pages as items:
■ In the View menu, clear Thumbnail View.
The Storyboard – List of Pages
Main Application Window | 17
18
2. G
etti
ng
Star
ted
The Preview Window
The Preview window displays a preview of the render output, and allows horizontal and vertical positioning of items in off-air mode. You can also select an item in the Preview window for editing in the Feature Editor, and zoom in and out using the mouse wheel. For more information, see Miscellaneous on page 111 and Page Properties on page 51.
You can customize the Preview window display by changing the preferences. For more information, see Region on page 106.
The Feature Editor
The Feature Editor is used to edit the properties of the pages and items in the current story. This editor is context sensitive to the currently selected element and column in the Storyboard.
The Feature Editor is described in greater detail in Creating Graphics on page 33.
Page Information Displayed in the Storyboard
Layer The layering order of items within a page. Higher layer numbers represent foreground items, and lower numbers represent background items. For more information, see Designing Graphics on page 35.
Pages/Items Page name. F2, when the name is selected allows you to edit the name as required.
Visibility Show or hide the page in the output.
Lock Lock a page to prevent changes.
Effect Click this column to display a list of in-effects for the page in the Feature Editor.
Calendars Click this column to set a calendar for airing the page. For more information, see Limiting Page Broadcast on page 99.
Timing Click this column to set timing for the page. For more information, see Setting Timing on page 67.
Sound Click this column to set audio settings for a page. For more information, see Adding Audio on page 70.
Variables Click this column to set up variables. For more information, see Setting up Variables on page 89.
Registry Click this column to set a registry key. For more information, see To define a page registry ID: on page 100.
Info The accumulative time of all animations in the page, and the number of phases in the page.
Main Application Window |

2. G
etting Started
The Media Manager
The Media Manager
The Media Manager contains a number of libraries with graphic objects, materials, textures and other elements used to create a story. The Media Manager has its own toolbar for navigation and editing, that allows you to navigate, add, remove, cut, copy, and paste sub folders, and to search for media (see The Media Manager Toolbar on page 21).
Each library has a tab that groups the different types of items.
You can add your own libraries, as required.
To add a library in the Media Manager:
1. Right-click an existing tab.
A menu is displayed.
2. Select Add Group.
A new tab is created.
3. Type in the group name, and press ENTER.
Primitives Basic Morpho graphical elements, text, and charts.
Pages Samples of pre-prepared graphic templates, for News, Music and Sport.
Favorites A group for saving any item or page (and its properties) for repeated use.For more information, see Saving Favorites on page 22.
Designer Complex graphic objects, authored in 3Designer.
Collada Complex graphic objects, in Collada format.
Images Image files that are in the G:\Resources_en\Images folder. To add a new image, drag any image file from the Windows Explorer or the Internet browser to the Images tab, or save it to G:\Resources_en\Images.
Pictograms Pictogram items.
Gradients Textures with alpha, that can be used for masks.
Materials A directory of materials that can be applied to Morpho items.
MOS Used for saving templates that will be available in News Room plugin.
Main Application Window | 19

20
2. G
etti
ng
Star
ted
4. Right-click the new tab, and select Pick Icon from the menu.
A browser window opens.
5. Select the image file to use as an icon, and click Open.
The icon is added to the tab.
Main Application Window |

2. G
etting Started
The Media Manager Toolbar
The toolbar at the right side of the Media Manager allows you to navigate, add, remove, cut, copy, and paste sub folders, and to search for media, as described below:
Go to Parent
Group
Navigate up one level to the containing folder.
Create new
group
Create a new folder within the currently selected folder/tab.
Go to previous
group
Return to the previously opened folder.
Go to next
group
Go to the next folder (enabled only after navigating back).
Cut to clipboard
Cut the selected media or folder.
Copy to Clipboard
Copy the selected media to the clipboard.
Paste from
Clipboard
Paste the contents of the clipboard.
Delete selected
Delete the selected media or folder.
Search Show/Hide the Search panel.
To search for media:
1. Enter text from the name of the media file, or select Date/Time attributes.
When the Use Wildcards check box is selected, you can use an asterisk (*) to specify any alphanumeric character/s.
2. Select the required result types by selecting the appropriate check boxes.
3. Select the search area.
4. Click Find.
Change Asset
View
Click to display a detailed list of assets that can be sorted by various parameters, instead of the default thumbnail display.
Main Application Window | 21

22
2. G
etti
ng
Star
ted
Saving Favorites
Items and pages can be saved for reuse in the Media Manager. The Favorites library is generally designated for this purpose, although you can save to any folder.
You can also save other properties, such as effects, layers, audio and video files, and calendars.
To save a favorite:
After editing the required element:
1. Click the Favorites tab to open the Favorites library.
2. Drag the element to the Favorites library.
• For a page – drag the page name from the Storyboard.
• For an item – drag the item name from the Storyboard.
• For a property – drag the property from its respective column.
The element is saved in the Favorites library, as a thumbnail representing the page from which it is taken.
3. Right-click the saved element.
A menu is displayed.
4. Select Rename and type in the required name.
NOTE:The thumbnail image is not always a good indication of the type of element that has been saved. It is recommended to rename using an indicative name, or
right-click and select Pick Icon to assign a different image.
To place multiple media in the Media Manager you can also copy them directly to G:\Resources_en, and then restart Morpho.
Main Application Window |

2. G
etting Started
Menus
The following tables provide information on Morpho’s menus.
File Menu
New (CTRL+N)
Create a new story.For more information, see Creating a Story on page 31.
Open (CTRL+O)
Open an existing story.
Close(CTRL+W)
Close the current story.
Merge (CTRL+M)
Open a browser window to select a story that you want to merge with the current story.All pages from the selected story are added to the open story, beneath the selected page.
Save (CTRL+S)
Save the current story.
Save incremental(CTRL+Q)
Save a new version of the story with the same name, with a 001, 002, suffix.
Save as (CTRL+SHFT+S)
Save the current story under any name.
Export 3Designer - open a dialog box, to select the 3Designer folder to which you want to save the current story.Data collector - open the Browse for Folder dialog box, to select the folder to which all data related to the current story is saved. This includes the .sts file, data sources, textures, fonts, and clips used in the story.Exporting allows a story to be transferred between workstations as required.
Print Print the contents of the Storyboard, Outline, or Preview window.
Recent Stories
List of the ten most recently opened stories.
StoryVersions
List of version of the current story that were saved incrementally.
Quit (CTRL+SHIFT+W)
Close Morpho.
Menus | 23

24
2. G
etti
ng
Star
ted
Edit Menu
Undo (CTRL+Z)
Undo last action.
Redo (CTRL+Y)
Redo last action.
History (CTRL+H)
Open the History dialog box, that lists all previous actions, and allows undo and redo.
Clone (CTRL+SHIFT+C)
Open the Clone Selection dialog box, to set the number of copies (of the current item) to create, and the offset between the copies.
Cut (CTRL+X) Cut the selected item.
Copy (CTRL+C) Copy the selected item.
Paste (CTRL+V)
Paste a copied item.
Paste Format (CTRL+SHIFT+V)
Paste the format of the last copied text item to the currently selected text item.
Delete (DELETE)
Delete the selected item.
Lock (CTRL+ SHIFT+;)
Lock a story to prevent changes.
Unlock (CTRL+ SHIFT+’)
Unlock a story to allow changes.
Hide (CTRL+’) Hide a page when playing a story to air.
Show (CTRL+;) Show a page when playing a story to air.
Group Pages Group pages in the page display in the storyboard, to allow hiding or displaying pages in the group. All pages under the group heading belong to the group. Grouping has no bearing on how a story is played out.
Ungroup Pages Remove a grouping from the page display in the storyboard.
Find (CTRL+F) Open the Find Text dialog box to search for entered text according to definable parameters, in the current story.
Repeat Find Repeat the last search.
Text Apply one of the formatting options in the submenu to the selected text item.For more information, see Text Items on page 36.
Menus |

2. G
etting Started
Insert Menu
Subtitles Enable subtitling for the current story. Selecting this option displays the text editing properties in the Feature Editor, allowing you to set the appearance of the subtitle text.
Branch Page Create a linked duplicate of the currently selected page. This allows you to use any page as a template, allowing page-specific changes to text content and textures only. All other parameters are changed on all branched pages.For more information, see Branched Pages on page 60.
Separate Branched Page
Cancel the link between branched pages, to allow you to change parameters of duplicate pages independently.
New pageOpen the Select Template dialog box to insert a new page in the current story.For more information, see Inserting Pages on page 32.
Counter Insert different types of counters in a page.For more information, see Counters. on page 42.
2D Text (CTRL+F2)
Insert a 2D text object in the current page.For more information, see Adding Items to a Page on page 34 and 2D and 3D Shapes on page 44.
3D Text (CTRL+F3)
Insert a 3D text object in the current page.For more information, see Adding Items to a Page on page 34 and 2D and 3D Shapes on page 44.
Business Crawl
Insert Business Crawl, crawl with icons that are linked to a numeric value, see Business Crawl on page 40.
Crawl (CTRL+F4)
Insert a text crawl (ticker) object in the current page. For more information, see Adding Items to a Page on page 34 and Crawl on page 39.
Sphere (CTRL+F6)
Insert a 3D sphere object in the current page. For more information, see Adding Items to a Page on page 34.
Circle (CTRL+F7)
Insert a 2D circle object in the current page. For more information, see Adding Items to a Page on page 34 and 2D and 3D Shapes on page 44.
Rectangle (CTRL+F8)
Insert a 2D rectangle object in the current page. For more information, see Adding Items to a Page on page 34 and 2D and 3D Shapes on page 44.
Box (CTRL+F9)
Insert a 3D box object in the current page. For more information, see Adding Items to a Page on page 34 and 2D and 3D Shapes on page 44.
Triangle (CTRL+F10)
Insert a 2D triangle object in the current page.For more information, see Adding Items to a Page on page 34 and 2D and 3D Shapes on page 44.
Menus | 25

26
2. G
etti
ng
Star
ted
View Menu
Cone (CTRL+F11)
Insert a 3D cone object in the current page.For more information, see Adding Items to a Page on page 34 and 2D and 3D Shapes on page 44.
Pie Chart (CTRL+SHIFT+F12)
Insert a pie chart in the current page.For more information, see Adding Items to a Page on page 34 and Pie Charts on page 48.
Bar Chart (CTRL+F12)
Insert a bar chart in the current page. For more information, see Adding Items to a Page on page 34 and Graphs: Bar Charts, Line Charts, and Area Charts on page 46.
Complex object (CTRL+SHIFT+F5)
Inserts an item into the current page that allows you to import an external complex graphic object for use.
Image (CTRL+F5)
Insert an image into the current page that allows you to define an external image file for use.
Video 4x3 (CTRL+SHIFT+F8)
Inserts a 4x3 video object to reference a video clip.
Video 16x9 (CTRL+SHIFT+F9)
Insert a 16x9 video object to reference a video clip.
Special Event Insert an event into the storyboard sequence. This is a non-graphic item that can be used for activating audio effects, when a page is sent to air. You can set timing for the event as you would for any item.
On-Air Size Reset the preview window to the proportional on air size.
RenderEngine Docked
Open the Preview window as part of the Main window (default). When the option is cleared the Preview window opens as a separate window.
Preview Zoom Select an option to zoom the graphics in the Preview window.
Preview Variables (SHIFT+ESC)
Show the value of the defined variables (for items connected to a data source), or hides the value, and display the variable definition.
Alpha (F9) Display or hides the alpha channel output.
Show Safe Area(F12)
Display or hides a frame in the Preview window that indicates the safe area (edges of the broadcast frame).You can customize the safe area settings in the Preferences window. See Region on page 106.
Menus |

2. G
etting Started
Show Statistics(F11)
Display rendering performance statistics, overlaid on the rendered output.
Mixing Display or hide mixing of the video input in the DVG 2U, providing that mixing is enabled in the preferences for the current profile (see Video Format on page 104).
Thumbnail View (CTRL+T)
Change the page display in the Storyboard to thumbnails.
Current Page Filter
Display text content of the current page only in the Outline tab in the Storyboard. When cleared content of all pages is displayed.
View All Layers (CTRL+U)
Display/hide all layers in the Storyboard.
View Layers 1-7
Display/hide layers in the Storyboard, according to their number.
Snap to Preview background
Snap the selected page to the preview background. This allows you to view the page while editing other pages.
Clear Preview background
Clear a previously “snapped” page from the background.
Clear All Layers Clear all layers from the Storyboard.
Clear Layers 1-7 Clear layers from the Storyboard, according to their number.
Clear Subtitles Clear subtitles from air, immediately.
Stop All Sounds Stop all playing sound (files), immediately.
Go To Pages (BACKSPACE)
Show the list of pages in the Storyboard.
Go To Preview(CTRL+R)
Jump to the Preview window (allows you to work without a mouse).
Go To Media Manager (CTRL+SHIFT+G)
Jump to the Media Manager (allows you to work without a mouse).
Go To Storyboard (CTRL+G)
Jump to the Storyboard (allows you to work without a mouse).
Show/Hide Floating Windows
Show or hide all undocked windows.
Menus | 27

28
2. G
etti
ng
Star
ted
Tools Menu
Windows Display or hide any of the application windows listed in the submenu:
Storyboard
Outline
Media Manager
Feature Editor
Automation Log (when Automation is enabled)
Playback Controller
Page Control
Counter Control
Subtitle Control
Clip Control
Toolbars Display or hide any of the toolbars listed in the submenu.
Import Photoshop
Open a browser window, to import an Abobe Photoshop image. For more information, see Importing a Photoshop Image on page 54.
Import PowerPoint
Open a browser window, to import a PowerPoint presentation. Each slide in the presentation is imported as a separate page.
NOTE:PowerPoint must be installed on the system in order to use this feature.
For more information, see Importing a PowerPoint Presentation on page 55.
Data Source Wizard
(CTRL+D)
Open the Data Sources dialog box, to define a source from which data is taken for a page or item.For more information, see Setting up a Database on page 80.
CheckSpelling
(SHIFT+F12)
Open a spell-checker window in the Outline tab to check spelling of all pages in current story.
Take a Preview snapshot (CTRL+SHIFT+D)
Save the rendered output currently displayed in the Preview window to a graphic file.
Menus |

2. G
etting Started
Playback Menu
Take a Program snapshot (CTRL+SHIFT+E)
Save the rendered output currently displayed in the PGM output to a graphic file.
Render Video Clip
Render a page, including all page animations to video clip format.For more information, see Rendering a Page to Video Clip on page 61.
Take Video Snapshot
Take a snaphot of a single frame of the video feed. This option is available according to the number of the insertions.
Load Pages (F7)
Load all pages in the current story to the render output. Use Load when you want playback to begin immediately upon selecting Start Storyboard.
Start Storyboard
(F5)
Play the current story to the render output.
Start Storyboard
from Current (F4)
Play the current story from the selected page.
Stop Storyboard
(F8)
Stop and removes the current story from the render output.
Continue Storyboard
(F6 or SPACE)
Continue playing the story after a programmed pause.
Next Page(CTRL+.)
Display the next page during playback.
Previous Page
(CTRL+,)
Display the previous page during playback.
Playback Layout
Toggle the GUI layout between Playback and Edit layout. Each layout can be customized as required. (See Customize Menu on page 30).
On-air Lock (CTRL+
SHIFT+L)
By default, a story cannot be edited in On-Air mode.Select On-Air lock to enable editing while in On-Air mode.Changes will be sent to air the next time the story is loaded.
Try (CTRL+[NUM]
ENTER)
Play the current/selected page in the Preview window.
Menus | 29

30
2. G
etti
ng
Star
ted
Customize Menu
Help Menu
Preferences (CTRL+/)
Open the Preferences window, to set general program preferences. For more information, see Setting Preferences on page 103.
Restore Default Settings
Restore the default program preferences (as set in Custom > Preferences).
Restore Default Layout (CTRL+‘)
Restore the default layout of the main application window.
Load Layout Load a previously saved layout of the main application window. (Shortcuts for assigned layouts are listed in the menu).For more information, see GUI Layout on page 102.
Save Layout Save a customized layout of the main application window. (Shortcuts for assigned layouts are listed in the menu).For more information, see GUI Layout on page 102.
Contents (F1) Open Morpho’s user help.
Show Me How (CTRL+SHIFT+F1)
Open a list of available tutorials.
Update User Information
Register Morpho on the Orad website.
About Morpho
Open a splash screen to display information about the current version of Morpho and RenderEngine.
Menus |

2. G
etting Started
Creating a Story
In Morpho each project is referred to as a story.
Before you can begin working in Morpho, you must open a story that will contain the pages and items for your production. By default, when you start Morpho, a new story is loaded, containing a new, empty page.
To create a new story:
• Select File > New.
A new story opens in the Storyboard.
To edit a previously saved story:
• Select File > Open.
A browser window opens to allow you to browse to your story.
At this point, you can begin to edit the pages.
For more information, see Creating Graphics on page 33.
Creating a Story | 31
32
2. G
etti
ng
Star
ted
Inserting Pages
A page is a container for a set of graphic elements that are displayed sequentially, in the order in which they are listed. You can set properties for pages that are applied to all graphic items in the page, and you can set the layer to which a page is rendered, in order to allow pages to be displayed simultaneously.
In the Storyboard, click a page in the list to select it, and display and edit its properties in the Feature Editor. The gray highlight of the page name indicates that it is selected. Click inside a column in the Storyboard to display or edit the respective properties.
Double-click a page to display its items and edit them in the Feature Editor. The purple highlight of the page name indicates that you are viewing the list of items. When you want to return to the list of pages, double-click the page name.
To create a new page:
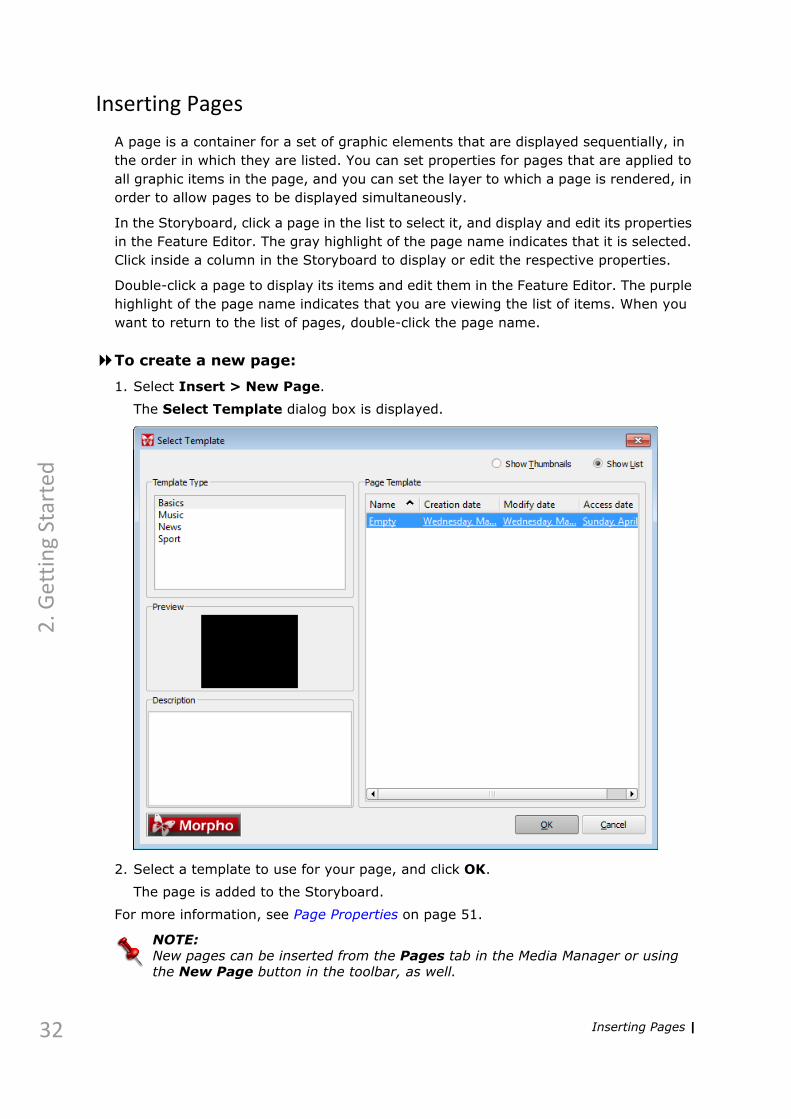
1. Select Insert > New Page.
The Select Template dialog box is displayed.
2. Select a template to use for your page, and click OK.
The page is added to the Storyboard.
For more information, see Page Properties on page 51.
NOTE:New pages can be inserted from the Pages tab in the Media Manager or using the New Page button in the toolbar, as well.
Inserting Pages |

3. Creating Graphics
Graphics creation in Morpho is done in off-air mode. You begin by adding pages to the Storyboard, as required. To each page you add graphics, effects, timing, sound, and other properties that will make up your story.
In this section:
Adding Items to a Page on page 34
Designing Graphics on page 35
Page Properties on page 51
Positioning Graphics on page 52
Mapping Textures on page 53
Previewing Graphics on page 53
Importing a Photoshop Image on page 54
Importing a PowerPoint Presentation on page 55
Importing Images from the Internet on page 55
Importing from 3Designer on page 56
Using Presets on page 58
Template Pages and Branched Pages on page 59
Rendering a Page to Video Clip on page 61

34
3. C
reat
ing
Gra
ph
ics
Adding Items to a Page
Morpho pages are user-defined graphic sets. A page can be previewed and sent to air, showing all the graphics it contains. A page can also be assigned to a layer. Pages are played to air according to their order in the Storyboard.
Items are the visual objects added to a page to create the graphic set. In Morpho, any graphic object, text objects, chart, pictogram, and any imported object, is considered an item. Items are listed in the Storyboard within a page and are played to air according to their order in the page and their grouping.
Grouping items allows you to edit certain properties, such as effect or placement, for all items in a group.
Item layout within a page is displayed immediately in the Preview window, when the
page is selected. You can preview effects using the Try option (see Previewing Graphics on page 53).
Items that can be added to a page are displayed in the Media Manager. In addition to being able to add items from the Insert menu, you can drag and drop items from the Media Manager directly into the Preview window or into the Storyboard.
To add a graphic item to a page:
1. Select a page in the Storyboard.
2. Drag the item from the Media Manager to the Preview window.
-Or-
Double-click the item in the Media Manager.
-Or-
Drag the item into the Storyboard until you see the blue line indicating the location of the item in the page.
It is a good idea to name items descriptively, to make on-air editing easier and less prone to errors. Text items are automatically renamed according to their content, but can be renamed manually.
To rename an item or page:
■ Right-click the item or page in the Storyboard, and select Rename, or select the page/item and press F2.
The name becomes editable. After you’ve entered the name, press ENTER.
To group items:
1. Select the required items in the Storyboard.
2. Right-click to open a context menu, and select Group Items.
Adding Items to a Page |

3. C
reating G
raph
ics
Designing Graphics
Graphics are edited in the Feature Editor. The Feature Editor is context sensitive, and changes according to the item selected in the Storyboard and according to the column you click in the Storyboard.
All items have common Effects, Order, and Placement properties:
Visible Show or hide the selected item.
Lock Prevent editing the placement properties of the selected item.
Blending Blending modes are used to add visual effects for displaying items together, with or without applied textures.Add - Increases the brightness of the foreground color by adding the value of the foreground to the background for each pixel.Clear - The foreground is changed entirely to black. All pixels are set to 0.Lighten - Lightens the blended image. Pixels of the foreground and the background are compared, and the lighter pixel in each set of pixels is displayed.Darken - Darkens the blended image. Pixels of the foreground and the background are compared, and the darker pixel in each set of pixels is displayed.Multiply - Darkens the blended image. Multiplies the foreground color by the background color for each pixel. Multiplying a color with black produces black; multiplying a color with white leaves the color unchanged.Subtract - Darkens the blended image. Subtracts the foreground color from the background color. If the result is less than 0, the color is set to 0.Normal - Uses the foreground color, and ignores the alpha channel.Override - This is the scene's default blending mode. Colors are mixed to reflect the lightness or darkness of the original color.Difference - Darkens the blended image. Subtracts the background color from the foreground color. If the result is less than 0, the color is set to 0.
Bring to Front Click this button to place the selected item on the front layer of the page.
NOTE:Layer order can be changed at any time, in both on-air and edit mode.
Send to Back Click this button to place the selected item on the back layer of the page.
Bring Forward
Click this button to move the selected item one layer forward, relative to other items in the page.
Send Backward
Click this button to move the selected item one layer back, relative to other items in the page.
Designing Graphics | 35

36
3. C
reat
ing
Gra
ph
ics
The Primitive items available in Morpho are the basic items used for page creation. These (and all other items) have Feature Editor tabs that change according to their type.
Text Items
Available text items are 2D Text, 3D Text, Crawl, Business Crawl, and Counter items.
Text items share presets. For more information, see Using Presets on page 58.
Editing 2D and 3D Text Items
2D text is used when you need simple, static text without depth. Use 3D text for text items that require depth. The effects set for 3D text are slightly different than 2D Text, and you can customize the shape of the beveling.
In Effect Click this button to display the in-effect controls for the selected item.For more information, see The Storyboard on page 16.
Out Effect Click this button to display the out-effect controls for the selected item.For more information, see The Storyboard on page 16.
Position Set the horizontal position of the selected item relative to the central axis.For more information, see Page Properties on page 51.
Position Set the vertical position of the selected item relative to the central axis.For more information, see Page Properties on page 51.
Perspective Turn the selected item around its vertical axis, in degrees.
Perspective Turn the selected item around its horizontal axis, in degrees.
Size Resize the selected item (uniform scale).
Size Adjust the depth of the selected item, for three dimensional items.
Proportion Adjust the proportion between the horizontal and vertical size of the selected item.
Proportion
Rotation Rotate the selected item.
Left-Center-Right Vertical alignment of the selected item at the Left or Right, of its center, or Center the selected item. (Available only for 2D and 3D shapes.)
Top-Center-Bottom Horizontal alignment of the selected item at the Top or Bottom of its center, or Center the selected item.(Available only for 2D and 3D shapes.)
Designing Graphics |

3. C
reating G
raph
ics
To create text items:
1. Drag a 2D or 3D text item from the Media Manager to the Preview window or Storyboard.
2. In the Feature Editor, edit Placement properties, as required.
For text items, you can set the baseline origin to align text items relative to the first or last line of text.
3. In the Appearance tab, set the text properties as required.
4. Set the Color and Opacity for each effect.
If required, set a texture to be used for the text or as an effect, and map it as required.
5. Enter the text you want sent to air, and format the selected text as required.Text Properties - Appearance tab
Preset If you want to use a predefined look, select it from the Preset list.For more information, see Using Presets on page 58.
Density Set the detail level of the text. Can be set to Poster (highest detail level), Base Title, Ticker and Pica (lowest detail level).
Font Size Set the size of the text. This value affects the font resolution and appearance.Linked to the Density parameter.
Skew Set the tilt (in degrees) of the text.
Pair Kerning
Enables pair kerning for text. Depending upon the pairing of letters, this may reduce the space between them. For example, A and V can be placed closer together so that the top left of the V is directly above the bottom right of the A.
Mono-spacing
Apply monospacing to the text. This applies uniform character size.
Fitting Set how the text within the item is displayed:Auto - Automatically scales the width of the text item according to the length of the entered text.Word - The entered text does not exceed the specified width. Set the required width in Width or as described in Page Properties on page 51.Shrink to fit - Fits all entered text into the specified width. Set the required width in Shrink Width or as described in Page Properties on page 51.
Leading Set the spacing between lines of text.
Kerning Set the spacing (overlap) between characters.
Select Font Select the default font for this item from the list.
Font size Set the font size for the text item.
Spacing Set the spacing between letters.
Direct Datasource Access
With a text item selected, select a data source and field to use for updating the text.
Designing Graphics | 37

38
3. C
reat
ing
Gra
ph
ics
Color Setting Options
There are a number of options for setting color:
• Select a color from the pallet to apply to the selected item.
• Click Custom Color to open a dialog box with sliders to set RGB and HSV values.
• Use the Color Picker to copy a color from any part of the screen.
To use the Color Picker:
■ Click and then click any color in the screen.
The color is applied to the selected item.
Setting the Text Bevel
A bevel is an effect that gives 3D text the appearance of a carved edge. For 3D text, Morpho 3D has nine predefined bevel profiles to choose from.
To set the bevel shape:
1. Select the 3D text.
The text properties are displayed in the Feature Editor.
Color Select or clear any check box to apply or remove a text effect. Click each button to set the required color and display additional properties. Color can be applied to individual characters. For more information, see Color Setting Options on page 38.
Texture Click ... to open a browser, and select a graphic file to apply as a text effect. (Not available for Bevel.)
Map Type Set the texture mapping type and properties.For more information, see Mapping Textures on page 53.
Text Properties - Appearance tab
Designing Graphics |

3. C
reating G
raph
ics
2. In the Appearance tab, click to select one of the predefined bevel shapes.
Crawl
A Crawl item can be used for horizontally moving text.
Crawls can take data from a data source, or from manually input text.
The graphic editing options for Crawl items are identical to the 2D or 3D text options, with the addition of the Crawl tab.
To create a text crawl:
1. Drag a Crawl item from the Media Manager to the Preview window or Storyboard.
2. In the Feature Editor, edit Placement properties, as required.
3. In the Appearance tab, edit the text as you would for any text item.
If required, set a texture to be used for the text or as an effect.
4. Enter the text you want sent to air (if this item is not linked to a data source).
5. Align and format specific text, as required.
6. In the Crawl tab, set the following properties:
Text Crawl Properties
Speed Set the speed at which the text moves through the visible area.
Gap Set the space between the last character of the last item and the separator.
Loop Count
Select this check box to loop the crawl text (or when using a data source—the selected column) as required.
Left to Right
By default, crawls move from right to left. Select this check box to set the text to move from left to right.
Use Item Effects to Show Ticker
Select this check box to turn the item into a Ticker item, that is, an item that displays content using in- and out-effects, rather than crawling across the page.
Data Source
Select the source of the text to be displayed in the crawl. For this a data source must be configured.To define a data source, see Setting up a Database on page 80.
Separator Set a graphic Icon or Text symbol or sequence (or spaces) that are used to separate text repetitions. Set its vertical position, size, and proportion.
Designing Graphics | 39

40
3. C
reat
ing
Gra
ph
ics
Business Crawl
A Business Crawl is for moving text that draws data from a data source, only. It uses basic logic that allows using graphic (or animated sequence) icons between items, determined by the numerical value of the preceding item. If the parameters set to use the graphic items are not numeric, no graphics are shown. The contents of a row of data are displayed as an item in the crawl.
To create a business crawl:
1. Drag a Business Crawl item from the Media Manager to the Preview window or Storyboard.
The item appears as an asterisk by default. (This is the default character used as a separator.)
2. In the Crawl tab, select an existing Data Source from the list. (To set up a data source, see Setting up a Database on page 80.)
The data is displayed beneath the data source name.
3. In the Feature Editor, edit the text parameters as described for a Crawl on page 39 item.
You can also change the graphics used within the content as required:
a. Select one of the controls under Change Icons (rising value, stable value, falling value).
b. For each value change, browse to select the required graphic or sequence.
c. Set icon size and vertical position.
4. Align and format specific text under Placement, as required.
5. Under Meaning of Columns, set how the content of each item in the crawl appears;
The order in which the contents appear is as shown here, provided its check box is selected: Name, Short Name, Value, Change, Change %. When the Change or Change % parameters are selected, the default (or selected) graphic is displayed before the final parameter.
6. Select the column with the data to display for each field.
7. Under Crop, set the display area of the crawl.
8. Set a text character or graphic (or animated sequence) to use as a Separator between items in the crawl.
9. Set the graphics to use within the crawl items, as required, and set their size and position.
To replace the graphic with an animation sequence:
1. In the Feature Editor, under Change Icons, browse for the required image sequence.
2. Select the Sequence check box.
Designing Graphics |

3. C
reating G
raph
ics
Custom Crawl
A Custom Crawl is for moving text that draws data from a data source (only) that contains links to graphics that are to be displayed in the crawl. When you add a Custom Crawl item to a page, it is connected to a default database.
To create a custom crawl:
1. Drag a Custom Crawl item from the Media Manager to the Preview window or Storyboard.
By default a custom crawl has a database already connected.
2. In the Crawl tab in the Feature Editor, select any existing Data Source from the list, as required. (To set up a data source, see Setting up a Database on page 80.)
The data is displayed beneath the data source name.
3. In the Feature Editor, under Crawl Control, edit the text parameters as described for a Crawl on page 39.
4. In the Appearance tab, align and format specific text, as required.
5. In the following table, select the Visibility check boxes of the columns to display, and specify whether to display Images and image Sequences. You can change column order according to the order set under Column Name.
6. Set additional parameters as required:
Prefix Specify the location of the data source image name.
Postfix Specify the file extension of the data source image name.
Size Set the size of the image coming from the data source.
Vertical Position
Set the vertical position of the data source image.
Proportion Set the proportions of the data source image.
Adjust Aspect
Click this to adjust the aspect according to the original data source image
Designing Graphics | 41

42
3. C
reat
ing
Gra
ph
ics
Ticker and Custom Ticker
A Ticker is a crawl item that is displayed with an in- and out-effect, replacing the actual “crawl”. A Custom Ticker can contain icons, as well.
Tickers can take data from a data source, or from manually input text, Custom tickers from data sources only.
The graphic editing options for Ticker items are identical to the Crawl options.
To create a ticker:
1. Drag a Ticker item from the Media Manager to the Preview window or Storyboard.
2. In the Feature Editor, edit Placement properties, as required.
3. In the Appearance tab, edit the text as you would for any text item.
If required, set a texture to be used for the text or as an effect.
4. Enter the text you want sent to air (if this item is not linked to a data source), or select the data source.
5. In the Crawl tab, set the properties, as described for a Crawl on page 39.
6. Edit the in- and out-effects, as required, as described in Applying Animation Effects on page 64.
7. For a Custom Ticker, set the icons as described for a Custom Crawl on page 41
Counters.
There are two types of counters that can be used in a story; new counters and preset counters.
• New counters can be controlled manually during a production (in the counter control panel), including starting, stopping, resetting and changing the counter parameters. This type of counter runs regardless of the story sequence, and can be added to multiple pages.
• Preset counters are added to a page and run only while the page is on-air. They do not appear in the counter control panel.
• Right-click Start, Stop, Reset, and Lap to assign a shortcut to each button.
To add a new manual counter:
1. From the Insert menu, select Counter > New Counter.A dialog box opens.
2. Type in the required Counter Name, and click OK.
This counter now exists for the story. It must be run manually, as follows:
3. Click to open the Counter Control panel.
The new counter is displayed in the panel. Multiple counters can be displayed in this panel. From here you can control the format and running of the counter.
Designing Graphics |

3. C
reating G
raph
ics
To add a preset counter to a page:
■ From the Insert menu, select Counter, and then the counter type. These counters start running automatically when a page is played.
To set a preset counter to count backwards:
1. Select the counter in the page.
2. In the Feature Editor, open the Text tab.
3. Add the time from which you want to countdown, after the counter text. The time must be added in seconds.
For example: %counterm:120% displays a countdown from two minutes in minute format, whereas %counters:120% displays a countdown from two minutes in second format.
Start Start the counter.
Stop Stop the counter.
Mark Freeze the counter display. The counter continues to count behind the scenes, and can be re-displayed by pressing Mark again.
(field) Counter name is automatically displayed here.
Format Click the arrow to select the counter format.
Start Set the counter’s start value.
End Select End to stop the counter, once the specified value is reached.
Up/Down Set the counter to run forwards (Up) or backwards (Down).
Autostart Select this check box to start counter automatically when page is played, clear to start counter manually.
Reset Reset counter (with current parameters).
Hour Counter
Uses the hh:mm:ss format, counts forward from 0.
Minute Counter
Uses the mm:ss format, counts forward from 0.
Second Counter
Uses the (s)s format, counts forward from 0.
Time Uses the (h)h:mm:ss AM/PM format, from the system.
Date Uses the (M)M/(D)D/YY format, from the system.
Designing Graphics | 43

44
3. C
reat
ing
Gra
ph
ics
2D and 3D Shapes
Available 2D shapes are circle, rectangle, and triangle items. The 3D shapes are sphere, box, and cone items. The Placement properties are described in Designing Graphics on page 35.
2D and 3D shapes share presets. For more information, see Using Presets on page 58.
To create shapes:
1. Drag a shape from the Media Manager to the Preview window or Storyboard.
2. In the Feature Editor, edit Placement properties, as required.
3. Set any of the additional item properties in the Feature Editor as follows: 2D and 3D Shape Properties - Appearance tab
Preset If you want to use a predefined look, select it from the Preset list.For more information, see Using Presets on page 58.
File Click ... to open a browser, and select a graphic file or video clip to apply as a texture. Once a texture is applied, click E to open the Image Editor (for more information, see Image Editor on page 46).To use a sequence of images as a flipbook-type texture, select the first image in the sequence, and then select Sequence (or the appropriate type) from the Texture type list.
NOTE:It is recommended to copy the images in the sequence to G:/Textures/
Mask Click ... to open a browser, and select a graphic file or file sequence to apply as a mask using a texture with alpha. Select its type from the Mask type list. Once a mask is applied, click E to open the Image Editor (for more information, see Image Editor on page 46)
Move Move the texture image or video clip horizontally or vertically within the boundaries of the layer.
Scale Resize the texture image or video clip horizontally or vertically within the boundaries of the layer.
Flip Flip the texture or video clip horizontally or vertically.
Angle Set a custom angle to rotate the texture or video clip.
Rotation Center
Set the offset of the texture from its original center.
Adjust Aspect
Click to adjust the proportions of the item to match the proportions of the inserted texture (not applicable for clips). This affects the Proportion settings.
Adjust Size
Click to adjust the size of the item to match the size of the inserted texture (not applicable for clips). This affects the Size and Proportion settings.
Repeat When this check box is selected, the texture or video clip is repeated by wrapping to allow you to move the texture within the item (when this check box is cleared, the last pixel is duplicated).
Designing Graphics |

3. C
reating G
raph
ics
Filter Select this check box to apply a filter that improves the quality of hi-resolution texture on small objects.
Crop Crop points off the texture image or video clip from the specified side.
Interlace Interlaced clips are field based, non-interlaced clips are frame based. When this check box is selected, clips are treated as interlaced, when cleared—clips are treated as non-interlaced.
Swap Polarity
When this check box is selected, the polarity of interlaced clips is changed to improve clip appearance.
Loop When this check box is selected, if a clip is defined for the item, it is played repeatedly.
Has Alpha For 32bit clips, select this check box to use the embedded alpha channel.
Has Audio When this check box is selected, the clip is defined as having an audio channel that will be played. Define the Audio Channel to which to play the audio.
Rate Division
Change the number in this field to change the speed at which the clip is played.
Keep Loaded
When this check box is selected, the clip is kept loaded in the memory during the entire production.
Keep Playing
When this check box is selected, the clip continues to play even if the page is off the air.
Cue Always
When this check box is selected, the clip is cued each time the clip is played.
Geometry Set the shape of the item, regardless of the item name and of the original type selected from the Media Manager. Click the appropriate button to change the shape.You can also switch the 2D/3D aspect of an item. Click the appropriate button.
Edit <item>
Set properties such as the diameter of the top of a cone, start and end angles, sides (for polygon shapes).
Color Select the color from the displayed palette, or click Custom color to open a dialog box and set color using the sliders, RGB or HSV values,
the color palette and opacity, or click the color picker (see Color Setting Options on page 38).By default, one color effect is enabled for a 2D shape, and four effects (Diffuse, Specular, Emission, and Ambient) for a 3D shape.If required, select/clear the check box next to Plain/Shaded to enable/disable color setting for Diffuse, Specular, Emission, and Ambient effects. For a 2D item, these effects will only be seen when the item is animated (during the in- and out-effects).
2D and 3D Shape Properties - Appearance tab
Designing Graphics | 45

46
3. C
reat
ing
Gra
ph
ics
Image Editor
Editing images applied as textures is done using the Image Editor. Click E next to File or Mask (in the Feature Editor) to open the Image Editor.
Graphs: Bar Charts, Line Charts, and Area Charts
Bar Charts are data items used for comparing numerical values. A Bar Chart is displayed with an animation that shows the bars climbing to show their values. Line and Area Charts are graphs for comparing numerical values. A Line Chart is displayed with an animation that shows the lines animating to show their values. An Area chart shows the line area filled in.
The Data Entry tab, available for a Bar Chart, displays a table. Table columns represent a data series in the chart, and rows represent values within each data series.
The Series tab is where you set the colors of the bars in the chart.
Adjust Adjust the following effects in the image editor, using the sliders, arrows, or by setting the numerical values:• Brightness• Contrast• Gamma• Hue• Saturation• Lightness• Sharpness
Deinterlace Discard one of the fields that compose a frame, by selecting one of the available options:Keep upperKeep lower
Flip Flip the image horizontally or vertically.
Resize Resize your image as required, using the required resampling algorithm from the Method list.
Crop Use the cursor to mark the required area, while pressing CTRL. Click Crop to crop the selected area. When an area is selected, you can resize it using the cursor while pressing CTRL.
NOTE:If the page aspect ratio is set to anything other than 0, a selection rectangle with the correct aspect ratio is marked.
Display For editing purposes, you can choose to fit the image in the image editor window, or display it at its normal size.
Reset Cancel all settings made in the editor.
Designing Graphics |

3. C
reating G
raph
ics
To create a Chart:
1. Drag a Bar Chart, Line Chart or Line Area Chart from the Media Manager to the Preview window.
2. Edit Placement properties, as required.
3. In the Data Entry tab, define a source or enter the data to be displayed manually.
4. In the Series tab, set the color and effects for each series, as follows:
Chart Properties - Data Entry tab
Source From the List, select the data source of the chart.None - if no source is selected, data is taken from the table below.If you want to use an external source, it must be defined first, using Tools > Data Sources Wizard.For more information, see Setting up a Database on page 80.
Limit Table Size
Select this check box to limit table to display of the first columns and rows in the table, as defined in Width and Height.The Left and Top parameters allow you to determine from which row (Top) and column (Left) to start reading the data, in order to read data from any part of a source.
Animation By default, when a chart is sent to air, the values are displayed with an animation.Clear this check box to prevent the animation when the chart is displayed, or select it (default) to show the animation.
Animation After Effect
By default, when a chart is sent to air, the chart’s animation begins as soon as the page is sent to air, regardless of the in-effect set for the chart.Select this check box to start the chart animation only when the in-effect is played out.
Time Set the duration of the chart’s animation.
Show Scale
Clear this check box to hide the scale background of the chart, or select the check box to display it.
Auto Scale Clear this check box to manually set the number of rows to display in the scale.Select this check box when you want the background rows to scale automatically according to the greatest input data value.
Width Bar Width - Set the width of the bars in the chart; in effect, this lets you display a wider gap between the bars. By default, bars are displayed at their full width (1.00). Possible range is 0-1.00.Line Width - Set the thickness of the value lines in the graph. Possible range is 0-1.00. Gap between the lines (on the Z axis) can be set separately under Line Gap.
Bar Profile Set the profile shape of the bars to Cylinder, Box, Line, or Area.
Chart Properties - Series tab
Data Series
The items in this column represent the bars in the chart. Select a bar, and then set its color as described in the following properties.
Designing Graphics | 47

48
3. C
reat
ing
Gra
ph
ics
Pie Charts
Pie Charts are data items used for illustrating relative quantities. A Pie Chart is displayed with an animation that shows the disc being filled.
The Data Entry tab, available for a Pie Chart, displays a one-row table. Table columns represent segments of the pie.
The Series tab is where you set the colors of the segments in the chart, and their label content.
The Label tab is where you set text effects for the labels (only when Labels is selected in the Series tab).
The Label Color tab is where you set colors for each text effect applied to the labels (only when Labels is selected in the Series tab).
To create a Pie Chart:
1. Drag a Pie Chart item from the Media Manager to the Preview window or Storyboard.
2. Edit Placement properties, as required.
3. In the Data Entry tab, define a source or enter the data to be displayed manually.
Each column defines a segment of the pie (color).
Name You can define a name to keep track of what each bar represents, for your own use only. In the current version, this name is not displayed or sent to air.
Shininess Define the degree of light reflection for the bars.Shininess is a combination of specular level and glossiness.
Color Set the color for the selected bar using the sliders, RGB or HSV
values, the color palette, or the color picker (see Color Setting Options on page 38).By default, only one color effect is enabled for a bar.If required, select the check box next to Plain to enable color setting for Diffuse, Specular, Emission, and Ambient effects.
Texture Browse to use any image file as a texture for the selected bar series.
Map Type Set the texture mapping type and properties.For more information, see Mapping Textures on page 53.
Source From the List, select the data source of the chart.None - if no source is selected, data is taken from the table below. The values in each column represent the segments in the chart.If you want to use an external source, it must be defined first, using Tools > Data Sources Wizard.For more information, see Setting up a Database on page 80.
Chart Properties - Series tab
Designing Graphics |

3. C
reating G
raph
ics
4. In the Series tab, set the color and effects for each pie segment.
5. If the Labels check box is selected, click Edit Label Style to set the properties for the segment labels.
Limit Table Size
Limits table to the display of the columns in the table, as defined in Left and Width.The Left parameter allows you to determine from which column to start reading the data, and Width determines the number of columns to be read, in order to read data from any part of a source.
Animation By default, when a pie chart is sent to air, the segments are displayed with an animation.Clear this check box to prevent the animation when the chart is displayed, or select it (default) to show the animation. When animated, you can set the maximal radius of the pie chart to display (Max Angle), the size of the gap between the segments (Pie Gap), and the shape of the chart profile (Pie Profile).
Animation After Effect
By default, when a pie chart is sent to air, the chart’s animation begins as soon as the page is sent to air, regardless of the in-effect set for the chart.Select this check box to start the chart animation only when the in-effect is played out.
Time Set the duration of the chart’s animation.
Name Type in the label of the segment that is displayed when the Labels check box is selected.
Labels Select this check box to display text labels for each pie segment (and to display the Labels and Label Color tabs), or clear the check box to hide them.
Use Values as Labels
Select this check box to display the numerical value of each segment, instead of the label text.
Position Set the offset of the label from the center of the Pie chart.
Shininess Define the degree of light reflection for the segments.Shininess is a combination of specular level and glossiness.
Color Set the color for the selected segment using the sliders, RGB or HSV values, the color palette, or the color picker (see Color Setting Options on page 38).By default, only one color effect is enabled for a segment.If required, select the check box next to Plain to enable color setting for Diffuse, Specular, Emission, and Ambient effects.
Texture Browse to use any image file as a texture for the selected segment.
Map Type Set the texture mapping type and properties.For more information, see Mapping Textures on page 53.
Select Font
Select the default font for this item from the list, and set its size, angle and weight.
Designing Graphics | 49

50
3. C
reat
ing
Gra
ph
ics
Masks
You can use a mask to hide an item or part of an item, as required. A mask is item-specific, but it’s settings are relative to the viewer window. This means that a mask must be applied to each item, as required. Masks do not appear in the Storyboard list, they are a property of their item, and are set in the Feature Editor.
To apply a mask:
1. Select the item to which the mask will be applied.
2. From the Media Manager, in the Primitives tab, drag the Static Square Mask to the item in the Preview window.
3. In the Feature Editor, select the Masking Active check box.
4. Set the offset value of the top, bottom, right, and left mask limits numerically, or using the arrow controls.
The value reflects the offset of the mask limit from the point of origin. If the item is moved, the mask is not moved with it.
Color Select or clear any check box to apply or remove a text effect. Click each button to open the Label Color tab and use the sliders to set the required color.For the Text (fill) and Outline of the text, you can set color.For Shadow, you can set color, Smooth the edge, and shadow Direction and Distance.For Glow, you can set color, and Smooth the edge.For Bevel, you can set Opacity and Direction.For Background, you can set the color and opacity or select a texture to use as the text background.
Opacity When a text effect is applied, you can set its opacity. Use the slider or enter the required value.
Size When a text effect is applied, enter a value between 0-10 to set the size of the effect.
Designing Graphics |

3. C
reating G
raph
ics
Page Properties
There are various properties that can be set for a page only, available in the Feature Editor.
Visible Select this check box to display the page when the story is played to air, or clear this check box to hide the page when the story is sent to air.
Lock Select this check box to prevent changes to the page properties, or clear this check box to open the page properties for editing.
Camera Change the camera settings for the page between Perspective (3D) and Orthogonal (2D).
Lighting Set the lighting direction for a page.For more information, see Lighting Effects on page 69.
Intensity Set the lighting intensity for a page.See also Lighting Effects on page 69.
Layer Set the layer the page is displayed on.For more information, see Page Layering on page 52.
Name Set the page name (displayed in the Storyboard).
ID Set the page identification number manually, if required.
Shortcut Shortcuts can be used to send a page to air. Set a keyboard key or combinations to use for quick play.For more information, see Using the Playback Controller and Fields on page 97.
Current Color
Set the background color for the page.For more information, see Color Setting Options on page 38.
Story Behavior
Set the current page to Play from the beginning or to Continue from a previous phase if part of it was played previously.
Page Comments
Add free text for a page, for any purpose. This text is displayed in the Select Template window, as the description.
Page Properties | 51

52
3. C
reat
ing
Gra
ph
ics
Page Layering
Morpho provides separate layers for displaying pages, enabling you to display pages simultaneously. When the list of pages is displayed in the Storyboard, the assigned layer is shown in the layer column.
The Morpho Standard version provides three layers to which you can assign a page.
The Morpho Advanced version provides seven layers to which you can assign a page.
To set a layer for a page:
1. Select the page in the Storyboard.
2. In the Feature Editor, under Layer, select the required layer (from 1 at the back to 7 at the front).
The layer is set, as indicated in the Layer column in the Storyboard.
Positioning Graphics
Graphics can be positioned using the placement properties (see Designing Graphics on page 35) in the Feature Editor. Morpho also provides other ways to manipulate graphics, for convenience.
Items can be moved in the Preview window by selecting the item, then dragging it to a new position. This changes horizontal and vertical placement only.
You can adjust the position of the selected items using the keyboard arrow keys.
• CTRL+Arrow Key moves the item by one pixel in the specified direction.
• The Arrow key moves the item by ten pixels in the specified direction.
• SHIFT+Arrow Key moves the item to the edge of the safe area via the center.
Additional options are available for text items. When you double-click a text item in the Preview window, a yellow frame is displayed around the item.
• If text fitting is set to Auto, the red corners allow free movement of the item, and the yellow handles allow you to move the item horizontally only, or vertically only.
• If text fitting is set to Word wrap or Shrink to fit, the red corners can be used to adjust the item boundaries, and the yellow handles allow you to move the item horizontally only, or vertically only.
Positioning Graphics |

3. C
reating G
raph
ics
Mapping Textures
Mapping a texture on an item defines how the texture looks when applied to an item. Morpho has a number of mapping options available for mapping textures;
• None - the texture is applied to every face of the item, and fitted as required.
• Object Linear - the texture is applied as though projected onto the item from one direction.
• Eye Linear - the texture is applied as though projected at the screen. It appears static, even when the item is moved. It is recommended to use this type with repeat texture wrapping.
• Sphere Map - is actually a type of environment mapping. The texture is displayed as if it is surrounding the item, and the item is reflective. Therefore, the texture’s appearance varies, depending on the shape and position of the item.
Previewing Graphics
Preview a selected page in the Preview window, when the page is selected in the Storyboard in the pages list, or when the items list is displayed.
To preview a page:
■ Select Playback > Try,
-Or-
Click Try in the Feature Editor or the Playback toolbar.
The page is played in the Preview window, but not sent to air.
For more information, see Airing Graphics on page 95.
NOTE:When previewing a page, you cannot continue playback if there is user interaction required.
Mapping Textures | 53

54
3. C
reat
ing
Gra
ph
ics
Importing a Photoshop Image
Photoshop images can be imported as pages in Morpho.
In the Morpho Standard version, all Photoshop layers are merged into a single layer and converted into a .PNG file.
In the Morpho Advanced version, Photoshop layers are converted into items (as .PNG files), and can be edited normally.
To import a Photoshop image:
1. Select Tools > Import Photoshop.
A browser window opens.
2. Browse to the required Photoshop file, and click Open.
The file is inserted in the Storyboard as a page.
3. Edit the page properties as required.
NOTE:Morpho 3D does not support layer effects. In order to import an image properly, flatten the layer effects.
Importing a Photoshop Image |

3. C
reating G
raph
ics
Importing a PowerPoint Presentation
PowerPoint slides can be played as pages in Morpho. After import, slides are displayed as flattened graphics, and do not play animations, movies, or sound effects applied in PowerPoint, nor can text be edited.
NOTE:For the import process, PowerPoint must be installed on the system. During the import PowerPoint opens. Do not close it before the import is completed. After
import the story can be run regardless of the presence of PowerPoint.
To import PowerPoint slides:
1. Select Tools > Import PowerPoint Presentation.
A browser window opens.
2. Browse to the required PowerPoint file, and click Open.
Each slide is inserted in the Storyboard as a page.
NOTE:Slides are converted into .PNG files.
Importing Images from the Internet
Morpho allows importing .JPG and .PNG images from the internet and direct mapping onto a 2D rectangle item. The image keeps its original resolution.
To import an image from the internet:
1. Open the site that contains the required image (in a web browser).
2. Drag the image to the Storyboard.
The image is mapped to an item.
NOTE:The dragged image must be embedded in the web page, and not a referenced image.Orad is not responsible for any violation of copyright laws.
Importing a PowerPoint Presentation | 55

56
3. C
reat
ing
Gra
ph
ics
Importing from 3Designer
Graphics authored in 3Designer can be imported and used in Morpho. You must create an asset library (bookmark) in 3Designer that links to the Designer library in the Media Manager (in Morpho). All graphics that you want to import must be placed as a group in this library.
NOTE:Morpho supports one animation per import.
To create the folder in 3Designer (Advanced version only):
1. In 3Designer, select Customize > Preferences > Asset Strip.
2. Right-click in the Bookmarks, and select New Bookmark.
For example, you can name this new bookmark “Morpho”.
3. In Root Folder, browse to G:/Resources_en/Designer.
4. Close the Preferences dialog box.
5. Open the new bookmark in the Asset Strip.
To save 3Designer models for Morpho 3D:
1. In 3Designer, verify that the required graphics are set as follows:
• Free camera
• Position: X=0, Y=0, Z=0
• Pan, tilt, and Roll are all set to 0
• FOV = 50
2. Place all the objects that you want to use in Morpho 3D in a group.
3. Select the required animation group in the Animation strip.
4. From the Object Tree, drag the group to the asset library that you linked to G:/Resources_en/Designer.
The model is available in the Designer library in Morpho 3D.
Importing from 3Designer |

3. C
reating G
raph
ics
Exporting to 3Designer
Morpho can export objects for use in 3Designer as required. You can give Morpho exports meaningful names for easier identification in 3Designer.
To create export objects:
1. Select one of the objects for export in the Storyboard.
2. In the text editor in the Feature Editor, right-click the object and select Create Exports.
The Exports Panel is displayed.
3. Edit the Export name and Type as required.
To select export destination:
1. Select File > Export > 3Designer.The Export to 3Designer Project window is displayed.
2. Select the project to which you want to export from the listed projects,or -click Add a Project to create a new project folder.
3. Click Save to save the objects specified in the export settings. For more information on export settings, see Export storyboard to 3Designer on page 110.
Exporting to 3Designer | 57

58
3. C
reat
ing
Gra
ph
ics
Using Presets
Morpho can save a set properties for one item, to apply to other items. These are called presets and are saved in Morpho to be used in any story.
Text items share presets. The properties that are saved for a text item are: color effects, text fitting, dimension (2D/3D), texture, font & font settings. You cannot save text content as a preset (you can save an item in the Favorites tab, and content will be preserved).
2D and 3D shapes share presets. The properties that are saved for shapes are: actual shape, dimension (2D/3D), color effects, texture, mask & texture settings.
Sounds also share presets (For more information, see Adding Audio on page 70.)
You can apply a shape preset to an image or a pictogram.
You cannot save placement or animation effect properties as a preset.
By default, Morpho has a number presets saved. You can save your own presets or delete any preset.
To apply a preset to an item:
■ In the Appearance tab, select a preset from the Presets drop-down list.
The preset properties are applied to the selected item.
To create a preset:
1. Set all the properties that you want to save as a preset for an item.
2. Enter the name of the preset in the Presets field. (Where it says [Untitled].)
Save Preset is enabled.
3. Click Save Preset.The preset is saved.
To delete a preset:
1. Select a preset from the Presets drop-down list.
2. Click Remove Preset .
The preset is removed from the list.
Using Presets |

3. C
reating G
raph
ics
Template Pages and Branched Pages
Two methods of page duplication are available in Morpho; templates and branching.
• When you save a page as a template, it is available for use at all times, in any story. Each page created from a template is loaded every time a story is sent to air.
• Branching can be used for any page within a single story. Branched pages are linked (indicated by a link icon beside the page name) so that text and textures can be changed for each page, while all other parameters remain identical. Changes made to one page (except text and texture changes), affect all branched pages. The advantage of using branched pages is that items used in the page are loaded once (not for each page). You can also separate a branched page to create a standalone page, in which case pages are loaded independently. pages can be brached while on-air.
Templates
To create a page template:
1. Create a page (see Inserting Pages on page 32).
2. Edit the page to include the required graphics (see Creating Graphics on page 33).
3. In the Storyboard, display the list of pages (see The Storyboard on page 16).
4. Drag the page to any folder in the Media Manager.
Or-
a. Right-click the page name to display a pop-up menu.
b. Select Add to Templates, and then select the template type to which you want to assign the page.
The page is added to the list of available templates, and is displayed when you open the Select Template dialog box.
The description shown for the template is taken from the Page Comments (in the Feature Editor) when the page is saved as a template. Changing the comments for the page does not affect the template.
To delete/rename a template:
1. In the Select Template dialog box, right-click the template.
2. In the pop-up menu, select the required option.
Remove Template Delete the selected template.
Rename Template Rename the selected template. The name becomes editable; type in the required name, and press ENTER.
Move To... Move the selected template to the one of the existing template groups.
Template Pages and Branched Pages | 59

60
3. C
reat
ing
Gra
ph
ics
Template Groups
You can group different template types, as required.
To create/remove a template type:
1. In the Select Template dialog box, right-click the list of template types.
2. In the pop-up menu, select the required option.
The new type is created, and appears in all pop-up menus where templates are relevant.
Branched Pages
Pages can be duplicated while retaining a dependency between all items except for text and textures. This is referred to as branching in Morpho.
For example, you can create a page with a title bar for interviews with name and title, and then branch the page for each interview, and change the name and title. All this can be done off- or on-air.
To branch a page:
1. In the storyboard, select the page to duplicate.
2. Select Edit > Branch Page.
A branched page is added to the storyboard.
The new page is linked to the original until the link is broken (Edit > Separate Branch Page).
Add Group Add a new template group. Type in the required name, and press ENTER.
Remove Group Delete the selected group and all its templates.
Rename Group Rename the selected group. The name becomes editable; type in the required name, and press ENTER.
Template Pages and Branched Pages |

3. C
reating G
raph
ics
Rendering a Page to Video Clip
Morpho provides the ability to save a page, with all its animations, as a video clip or sequence of images, for easy playing in any media player.
To render the current page to video clip:
1. Select Tools > Render Video Clip.
The Render Page To Video Clip dialog box opens.
Rendering a Page to Video Clip | 61

62
3. C
reat
ing
Gra
ph
ics
2. Set the options as follows.
3. Press Render.The page is redered to clip. Rendering is complete when the “Done” is displayed at the bottom of the dialog box.
You can use Break to stop page rendition.
Preset Select a video format preset from the list.
Show Only Codecs Supporting Alpha Channel
Show only codecs that support use of the alpha channel, in the list of codecs.
Disable Alpha Channel
Disable the Alpha channel when rendering the page to a clip.
Encoder Select the type of encoder to use for video clip (or image sequence) creation.
Codec Select the type of compression and decompression to use for video clip creation.
Quality Set the clip compression quality.
Resize Resize the clip display to the specified Width and Height.
Processing Set the type of processing to be used for clip creation: Interlace, De-Interlace, or Off.
Image Type
Set clip processing to Fields or Frames.
Field Order When processing is set to Interlace, select the field to display first.
Flicker Free Filter
Select this check box to apply the flicker optimization filter.
De-premu-ltiplication Filter
Select this check box to apply a filter to reverse premultiplication.
Time Set the total output clip time.
Frames Set the number of frames in the output clip. This value is linked to the output clip Time. Click Reset to Default, to use the default page time.
File path Specify the path and file name of the output file.
Confirm Overwrite
Select this check box to display a confirmation request when overwriting an existing clip.
Rendering a Page to Video Clip |

4. Effects and Timing
In this section:
Applying Animation Effects on page 64
Splitting Item Effects on page 66
Setting Timing on page 67
Lighting Effects on page 69
Adding Audio on page 70
Adding Video Insertions and Effects on page 71
Creating Custom Effects on page 72
Subtitles on page 74

64
4. E
ffe
cts
and
Tim
ing
Applying Animation Effects
You can set in and out animation effects for single items or set an in-effect for an entire page. The order in which the effects are played is taken from the order of the items and pages in the Storyboard. However, you can also split items to allow other items to play between the in and out-effect. For more information, see Splitting Item Effects on page 66.
To set the In/Out–Effect for an item:
1. Select an item.
2. In the Storyboard, display the list of items (see The Storyboard on page 16).
3. Click the In Effect or Out Effect column for the required item.The effect properties are displayed in the Feature Editor.
4. From the Effects directory, select the required effect.
5. Set the effect properties as described below:
To set the transition for a page:
1. In the Storyboard, display the list of pages (see The Storyboard on page 16).
2. Click the Effect column for the required page.
The effect properties are displayed in the Feature Editor.
3. From the Effects directory, select the required effect.
Speed/Time
Select one of these options to set the duration of the effect:Speed – set the duration (1=5 seconds, 5=1 second).Time – set the duration in hours, minutes, seconds, milliseconds.
Direction Set the angle at which the effect is played (when enabled).
Wait Until Effect Ends
When this check box is selected, Morpho waits for the previous effect to end completely before playing the next item.
Infinite Loop
This option is enabled for the following effects (available for items only):Fly-on effects: Left Spin (X, Y, Z), Right Spin (X, Y, Z), Down Spin (X, Y), and Up Spin (X, Y).Through effects: Blink (hard/medium/soft) and Cut blink (hard/medium/soft). These effects are all double-action effects that have an in/out action and a simultaneous (but secondary) spin action.Loop effects: All.When Infinite Loop is selected, the item comes in spinning, and continues to spin for its entire duration.When Infinite Loop is cleared, the item comes in spinning, and stops when it reaches its position.
NOTE:If infinite loop is selected for both the in effect and the out effect, then one effect might influence the appearance of the other.
Wait Until Effect Ends
If this option is selected, the next object is played after effect ends.
Applying Animation Effects |

4. Effe
cts and
Timin
g
4. Select an effect timing option:
• Speed – set the duration (1=5 seconds, 5=1 second).
• Time – set the duration in hours, minutes, seconds or milliseconds.
Effects for Text Items
In the current version there are additional options for tweaking in- and out-effects for a text item.
To edit the effect for a text item:
1. In the Feature Editor, select the Text Effect check box.
2. Set the following properties as required:
Direction Set the order in which the characters are displayed: Left to right to display the characters on the left first. Right to left to display the characters on the right first.
Progress Linear Time – animate the text with time shifts between the letters as set in the Time Shift parameter. Duration is calculated by the total, and cannot be set definitively.Shrink Time – animate the text for the length of the time set under Duration. Time shifts are reduced proportionately.Scale to Duration – animate the text for the duration of the time set under Duration. Time shifts and keyframes are extended proportionately.
Time Shift Set the pause between displaying each character in the text item, in seconds.
Duration Set the total duration of the text animation. This can only beused when using Scale to Duration or Shrink Time.
Origin Set the origin point for rotating text according to Text (rotate the entire text item) or Letter (rotate each character separately).
Offset X/Y This is enabled when Origin is set to Letter. Set the offset of each letter from its origin, for an effect apparent mostly in rotation effects.For Offset X, 0=horizontal center of the letter, -1=left side of the letter, 1=right side of the letter.For Offset Y, 0=bottom of the letter, 1=top of the letter, 0.5=vertical middle of the letter.
Applying Animation Effects | 65

66
4. E
ffe
cts
and
Tim
ing
Splitting Item Effects
Sometimes, between the in and out effect animation, you want other things to happen in your story. For example, you want a background to cut in, then you want text to zoom in, pause, and zoom out, and then the background to fade out. For this you must apply a split to the item, in this example—to the background.
Example: split item effect
To split an item’s in and out setting:
1. Right-click the item name in the Storyboard.
A context menu opens.
2. Select Split.An additional item is added to the Storyboard, linked to the original item, as indicated by an icon. [Out] is added to the item name.
3. Place the out-item in the required slot in the Storyboard.
Splitting Item Effects |

4. Effe
cts and
Timin
g
Setting Timing
You can set the timing for how pages and items are displayed, when in- and out-effects are applied. When no effect is applied, pages and items are displayed without effects or internal timing, until the next page is displayed.
To set timing:
1. Display the relevant view (pages/items) in the Storyboard.
2. Click the Timing column for the relevant page or item.
The Timing Control is displayed in the Feature Editor.
3. Select the required option:
See Page Properties on page 51 for additional timing options.
Pause For a page:This option adds the specified pause after the last (effect of the last) item on the page is played.For an item:This option adds the specified pause between the end of the in-effect, and the start of the next effect that is set (the current item’s out-effect or the next item’s in-effect). If no effect follows, the item remains displayed until the page is removed.
NOTE:If there is no in-effect set, the pause setting is disregarded.
Duration This option sets the total duration of the page or item display, regardless of any effects, from the time the page or item is displayed.
NOTE:This timing mode is applicable for an item only when an in or out-effect is applied to the item.
Wait on Interaction
This option allows you to add a pause to the story/page. The pause continues until the operator selects Playback > Continue Storyboard (in On-Air mode).
NOTE:You cannot preview the entire page using Try, when this type of pause is set.
Record Time with Mouse
This option allows you to record the timing of a page or item with mouse clicks or by pressing the SPACE bar.For more information, see Recording Time with Mouse on page 68.
Setting Timing | 67

68
4. E
ffe
cts
and
Tim
ing
Recording Time with Mouse
You can record timing with the mouse instead of setting pauses or durations. Mouse recorded timing is set as duration. Timing must be set in On-Air mode.
To record timing during playback:
1. After all graphic design has been completed, display the relevant view in the Storyboard.
2. Click the Timing column for the relevant page or item.
The Timing Control is displayed in the Feature Editor.
3. Select Record Time with Mouse.
A mouse icon is displayed in the Timing column.
4. Select Playback > Start Storyboard to switch to On-Air mode and play the Storyboard.
For pages: when the relevant page is played, it is displayed, and then waits for a command to continue to the next page.
For items: when the relevant item is played, it is displayed, and then waits for a command to continue to the next item.
5. Select Playback > Continue Storyboard to play the next page or item.
Once you switch to off-air mode, the new page/item duration is displayed in the Timing column of the Storyboard.
Timing is set to Duration, according to the time between playing the page/item and continuing to the next page/item.
Setting Timing |

4. Effe
cts and
Timin
g
Lighting Effects
Different lighting source/direction effects are available per page, for 3D item illumination. The available sources are:
• Top-left
• Top-middle
• Top-right
• Center-left
• Center-middle
• Center-right
• Bottom-left
• Bottom-middle
• Bottom-right
• Spectrum
• None (no lighting is used)
To set lighting:
1. Display the list of pages in the Storyboard (see The Storyboard on page 16).
2. Select a page.
3. In the Feature Editor, under Lighting, select the required option from the list.
The selection is applied to the page.
4. If required, set the Intensity of light for the page.
NOTE:The page must contain a 3D item, in order to see the lighting effect.
Lighting Effects | 69

70
4. E
ffe
cts
and
Tim
ing
Adding Audio
Audio effects can be added to any page, item, or special event to enhance a story.
The Morpho Standard version, has a sound channel, for playing sounds.
The Morpho Advanced version has eight available channels, on which you can play sounds. This provides control of different sounds, simultaneously.
To add audio to a page:
1. In the Storyboard, display the list of pages (see The Storyboard on page 16).
2. Click in the Sound column of the page.
The sound controls are displayed in the Feature Editor.
3. Select a channel for the sound you want to assign to the current page or item.
4. Set the Action Type as described below:
The icon in the Sound column changes according to the option selected for the item/page.
None No sound-related action is applied to the item/page.
Play The specified sound is played (on the selected channel) when the item/page is sent to air. You must define the file to play. All other settings use the system default unless otherwise specified.Sound File – the sound file to play when the item/page is sent to air.Volume – the volume of the sound.Pan – the balance of the sound.Repeat – the number of times the sound is repeated each time the item/page is sent to air.Fade-in Time – the time it takes the sound to increase from 0 (no sound) to the defined volume.
Stop Any sound playing on the selected channel is stopped when the item/page is sent to air.The default Fade-out Time is 0. This can be adjusted as required.
Volume The volume of the sound playing on the selected channel is adjusted when the item/page is sent to air. Specify the new Volume and the Fade Time between the previous setting and the new setting.
Pan Adjust the balance on the selected channel when the item/page is sent to air. Specify the new Pan and the Fade Time between the previous setting and the new setting.
Stop All All sounds playing on all channels are stopped when the item/page is sent to air.
Adding Audio |
4. Effe
cts and
Timin
g
Adding Video Insertions and Effects
You can apply visual filters that alter the appearance of textured items in Morpho, or add a video insertion to an item.
To add video effects:
1. In the Storyboard, display the list of items (see The Storyboard on page 16).
2. Select the item to which you want to apply a filter or a video insertion (or select one of the Video objects from the Media Manager).
3. Click in the Video column of the item.
The video controls are displayed in the Feature Editor.
4. Select one of the following:
5. Click a filter to apply to the item as described below. Only one filter is applied at a time.
Original Texture or Clip
Select this option to apply a visual effect to a texture or clip.
Video Input [SDI]
Select this option to add a video insertion object, and apply an effect, if required.
NOTE:You can configure Morpho to work with two video insertions. In this case, two video input option are displayed. For more information, see RenderEngine Preferences on page 103.
Blur Applies the specified blur settings.
Contrast Gamma
Applies the specified contrast and gamma settings.
Edge Applies the specified color filtering level to the edges of the image.
Emboss Applies the specified embossing level to the image.
Luminance Applies the specified luminance level to the image.
Negative Displays the image with negative coloring.
Sepia Displays the image with the specified sepia coloring.
Sharpen Applies a sharpening filter to the image.
Adding Video Insertions and Effects | 71

72
4. E
ffe
cts
and
Tim
ing
Creating Custom Effects
Create custom in- and out-effects in Morpho, if required. A custom effect can be based on an existing effect or created from scratch.
Effects are created using the timeline in the Custom tab.
In the timeline, effect animations (for placement properties) are displayed in channels. Each channel displays the property’s keyframes. A diamond keyframe indicates linear animation, a circle is accelerated/decelerated animation, and an S-joint is a jump (from one position to another without animation).
To create an effect based on an existing effect:
1. Click the appropriate effect column in the Storyboard for the required item.
2. Select an effect to apply.
3. Click Copy to Custom.
The Custom tab is opened. The timeline displays various keyframes where changes are made to the item.
4. Edit the effect as required. For more information, see For more information, see Applying Animation Effects on page 64.
5. Click Apply to Selection to apply the new animation to the select item and effect,
Or-
Click Add Preset to save this effect to be available for any item.
To create an effect from scratch:
1. In the Custom tab, click Empty.
The timeline displays a single keyframe with the position of the selected item.
2. Drag the Keyframe marker to the time that you want the effect to begin.
3. Edit the effect as required. For more information, see For more information, see Applying Animation Effects on page 64.
4. Click Apply to Selection to apply the new animation to the select item and effect,
Or-
Custom tabEmpty effect
Keyframe marker
KeyframesAnimation controls
Creating Custom Effects |

4. Effe
cts and
Timin
g
Click Add Preset to save this effect to be available for any item.
You can edit an effect in two ways; by recording the changes made to an item at different timeline positions, or by adding (or removing) keyframes manually and altering the properties.
To record effect parameters:
1. Move the keyframe marker to the required timeline position or enter the time manually.
2. Click Record in the Animation controls.
3. Edit the Position, Perspective, Scale, or Opacity parameters, as required.
4. Move the Keyframe marker to the next required frame.
5. Repeat steps 3 and 4 as required.
6. When you are finished editing, click Record again to stop the recording.
All keyframes are marked on the timeline, and you can click Try to see the effect.
To mark single keyframes:
1. Move the keyframe marker to the required timeline position or enter the time manually.
2. Edit the Position, Perspective, Scale, or Opacity parameters, as required.
3. Click Add Frames in the Animation controls.
4. Move the Keyframe marker to the next required frame.
5. Repeat steps 2 and 3 as required.
All keyframes are marked on the timeline, and you can click Try to see the effect.
Creating Custom Effects | 73

74
4. E
ffe
cts
and
Tim
ing
Subtitles
Morpho allows you to create subtitle text for use in a story. Subtitles can be saved or loaded from a text file.
NOTE:Subtitles are not saved as a part of the story, and therefore must be saved separately if required.
Morpho supports two types of subtitling:
• Manual subtitles that are entered in the Subtitle Control window or loaded from a text (.txt) file, and played out manually by the operator.
• Industry standard STL files that can be played out as part of the story. For this option, the MS Windows operating system must be configured to support multiple languages. Requires a separate license.
To set up text subtitles:
1. Open the Subtitle Control window , and then open the Manual tab.
• To enter subtitles manually:
a. In the lower pane, type one subtitle (line) to display.
b. Click Add Text.A line is added in the upper pane. You can add as many lines as required.
• To use a text file:
a. Click Load.
A browser window opens.
b. Select the required text file, and click Open.
3. Select Edit > Subtitles.
Text editting options are displayed in the Feature Editor.
4. Format the subtitle text, as required.
To send subtitles to air:
NOTE:Use caution before taking the next step. Subtitles are sent to air regardless of the mode that you are currently in (on/off-air).
1. Select the line to send to air, as required.
2. To send a subtitle to air, click Send Text.The text is sent to air.
Subtitles |
5. MOS Integration
The Media Object Server Communications (MOS) protocol is used in Morpho together with currently supported newsroom systems (iNews, Octopus, Dalet, ENPS).
In this section:
MOS Server Configuration on page 76
The Newsroom Client on page 78
Using Newsroom Rundowns in Morpho on page 78

76
5. M
OS
Inte
grat
ion
MOS Server Configuration
In order to work with MOS, the following conditions must exist:
• Morpho must be configured to used MOS.
For more information, see the MOS options in the automation setup in Automation on page 112.
• There must be an MSSQL database installed on the MOS server computer.
• The server must be configured as decribed below
To configure the MOS server:
1. Open the CygMOSServer application.
2. Select File > Settings.
The Settings dialog box is displayed.
3. In the MOS tab:
• The NCS IP must be the IP address of the iNews MOS gateway computer.
• The NCSID must be NRCS (in capital letters)
• The MOS IP must be the IP address of the computer where the CygMOS server is installed.
• The MOSID must be ORADMOS (in capital letters)
MOS Server Configuration |

5. M
OS In
tegratio
n
4. In the ActiveX DB tab:
• The Host must be the path of the MSSQL database.
5. In the CyG tab:
• The Maestro Controller IP must be the IP address of the Morpho computer.
MOS Server Configuration | 77

78
5. M
OS
Inte
grat
ion
The Newsroom Client
The MorphoMOSEditor ActiveX plugin is installed on each newsroom client, for working with the newsroom system and Morpho.
From the newsroom system, open the MorphoMOSEditor plugin. A window opens within the application.
In the newsroom application, Morpho’s G:/ drive must be mapped in the plugin settings, and the MOS ID must be the same as defined in the MOS Server Configuration on page 76.
The available Morpho pages are displayed in the plugin window.
To create events based on the Morpho pages:
1. Select the required page from the plugin window.
NOTE:Only variables that are defined as “external” can be edited.
2. Enter the required text in the right field.
3. Drag the new content to the Story (in the newsroom application).
Using Newsroom Rundowns in Morpho
The MOS-Morpho integration allows newsroom client users to access Morpho templates add content to any variable defined as “external”, and use it in a rundown (stored on the MOS server). Morpho can then take the filled-in templates from the MOS server and air them as required.
NOTE:Verify that MOS is enabled in the Morpho preferences.
To access the MOS server from Morpho:
1. Click Start MOS to connect to the MOS server.
2. Click Select Rundown to open a dialog box, and select the required rundown.
In Morpho, a story from the newsroom rundown is opened as a group/folder; an event is opened as a page.
The Newsroom Client |

6. Using Databases
In this section:
Setting up a Database on page 80
Setting up Variables on page 89
Using Variables on page 93

80
6. U
sin
g D
atab
ases
Setting up a Database
Data items such as text, bar charts, pie charts, and crawls, can use a database, text file, or RSS feed as an input source. The following source types can be used: Text file (.txt), Excel, Excel ODBC, ODBC, RSS, XML.
A data source must be set up properly before referring an item.
To set up a data source:
1. Select Tools > Data Sources Wizard.
The Data Sources dialog box opens.
2. Click Add.
Source Name is enabled
3. Enter a name for the new data source.
4. Select the Source Type from the list.
5. Fill in the required information for each source type:
• Text File on page 81
• Excel File on page 82
• Excel ODBC on page 83
• ODBC on page 85
• RSS on page 87
• XML Table on page 88
6. Select one of the Auto Update options, as required.
The data is displayed in the preview window.
7. Click Close to return to the main application window.
The data source is configured, and can be selected for a data item.
Manual Data is updated manually when you click Refresh.When this option is selected, you can open the Data Sources dialog box while on air and update a source (click Refresh).
On Show Page
Data is updated when page is loaded.
Periodic Data is updated at intervals defined here (Every). Minimum interval is every 1 second (however, if you define an interval less than 10 seconds, a warning is displayed that the defined interval might not be sufficient, depending on the amount of data to update).
Setting up a Database |

6. U
sing D
atabases
Text File
If your data Source Type is Text, define your data as follows.
To define Text data:
■ In the Data Sources dialog box, browse to the text File that you want to use as a data source.
The data is displayed in the Data Preview.
Setting up a Database | 81

82
6. U
sin
g D
atab
ases
Excel File
NOTE:For the import process, MS Excel must be installed on the system.
If your data Source Type is an Excel file, define your data as follows.
To define Excel data:
1. In the Data Sources dialog box, browse to the Excel File that you want to use as a data source.
2. Select the Worksheet that contains the relevant data.
The data is displayed in the Data Preview.
3. Clear the Range check box to set the range of the required rows and columns from the table to be used as a data source.
Setting up a Database |

6. U
sing D
atabases
Excel ODBC
ODBC data sources use only part of the data (the named range) in a database. The named range must be defined within Excel, as follows.
To define a named range in Excel:
1. Open the file in MS Excel.
2. Select all of the cells that will be used to provide the data, including column headings.
3. Select Formulas > Define Name.
The New Name dialog box opens.
4. Type a name, and click OK.
This is the name of the database read by Morpho, and used as the data source.
If your data Source Type is an Excel ODBC, define your data as follows.
Setting up a Database | 83

84
6. U
sin
g D
atab
ases
To define Excel ODBC data:
1. In the Data Sources dialog box, browse to the Excel File that you want to use as a data source.
2. Select the Defined Name of the block of data set in the Excel file.
(Use the Formulas > Define Name option in Excel.)
The data is displayed in the Data Preview.
Setting up a Database |

6. U
sing D
atabases
ODBC
If your data Source Type is ODBC, define your data as follows.
NOTE:An ODBC data source must be defined as such using the administrative tools in Windows. Select Start > Control Panel > Administrative Tools > Data
Sources (ODBC), and define your database as required.
To define ODBC data:
1. In the Data Sources dialog box, select the ODBC Source from the list.
If required, enter your Login name and Password.
2. In the Query Columns tab, select as many Table/Columns as you want available for Morpho, and move them to the right column, using the right arrow.
The data is displayed in the Data Preview.
3. Change the order of the columns as required, by selecting a column on the right, and clicking the up/down arrows.
4. In the Query Conditions tab, click Add Condition .
A query condition row is added.
5. Select the defining data from the Column list.
6. Select the operator from the Condition list.
7. Enter a value or select one from the Value list.
Setting up a Database | 85

86
6. U
sin
g D
atab
ases
8. In the Query Order tab, from the Column list, select the column by which to sort the data.
9. Click the Order field to toggle between ASC (ascending) and DESC (descending).
The SQL syntax of your query is displayed in the Textual Query tab. If you have conditions in SQL, you can copy and paste them directly to here.
Setting up a Database |

6. U
sing D
atabases
RSS
If your data Source Type is RSS, define your data as follows.
To define RSS data:
■ In the Data Sources dialog box, enter the URL of the RSS page that you want to use as a data source.
Select No Line Breaks to repress line breaks in the original text, or clear the check box to retain line breaks.
Setting up a Database | 87

88
6. U
sin
g D
atab
ases
XML Table
If your data Source Type is XML Table, define your data as follows.
To define XML data:
■ In the Data Sources dialog box, browse to the XML Table that you want to use as a data source.
The data is displayed in the Data Preview.
Setting up a Database |

6. U
sing D
atabases
Setting up Variables
A variable is defined for a page and implemented in a text item.
Variables can be configured only after a data source has been set up (see Setting up a Database on page 80).
The easiest way to connect a text item to a data source is by using the Direct Data Source property, see Direct Datasource Access on page 37.
NOTE:Variables are case-sensitive.
To configure a variable:
1. In the Storyboard, display the list of pages (see The Storyboard on page 16).
2. Click the Variables column of the required page.
The variable properties are displayed in the Feature Editor.
3. Click Add .
A new variable is added to the list.
4. From the Data Source drop-down list, select your data source.
5. From the Expression drop-down list, select the record to use as a variable.
For more information, see Using Expressions on page 91.
6. In the Variable field, assign a name for your variable.
7. Set a condition (see Using Conditions on page 91), as required.
8. Set whether you want to recalculate the variable each time the data source is updated.
NOTE:The Calculate on Update check box is available only if the data source is set to be updated periodically
The variable is now configured, and can be used in a text item.
Setting up Variables | 89

90
6. U
sin
g D
atab
ases
To use a variable in a text item:
1. In the Storyboard, display the list of items (see The Storyboard on page 16).
2. Select the text item in which you want to use a variable.
3. Open the Edit Text tab in the Feature Editor.
4. Enter a variable name, using the syntax described in Using Variables on page 93.
For example, if you assigned the name “Cell_A1” to a variable, enter %Cell_A1%, or enter %Time% to show the time.
5. Click View > Preview Variables to verify that the correct value is displayed.
To display variables (from a data source) sequentially:
1. Configure a variable and assign it to a text item as described previously.
2. Click the Variables column.
The variable properties are displayed in the Feature Editor.
3. Click Add .
A new variable is added to the list.
4. From the Data Source drop-down list, select your data source.
5. From the Expression drop-down list, select an option, as required.
For more information, see Using Expressions on page 91.
6. From the Variable list, select the variable used in the previous page.
7. Set whether you want to recalculate the variable each time the data source is updated.
NOTE:The Calculate on Update check box is available, only if the data source is set to be updated periodically
8. Under Action, select Go to Page.
9. Select the name of the new page from the list.
10.Set a condition (see Using Conditions on page 91), as required.
11.Create a text item in the page.
Enter the variable name syntax that you used in the Edit Text tab or select the name from the list.
Setting up Variables |

6. U
sing D
atabases
Using Expressions
The following expressions are available in the Expressions list, in addition to being able to select a specific value.
Using Conditions
If you want data to be displayed only when it is within defined parameters, you can set a condition. For the condition to work, a variable must be set up, as described in Setting up Variables on page 89.
To set a condition:
1. First, set up a variable:
a. Click the Variables column of the required page.
The variable properties are displayed in the Feature Editor.
b. Click Add .
A new variable is added to the list.
c. From the Data Source drop-down list, select your data source.
d. From the Expression drop-down list, select the record to use as a variable.
e. In the Variable field, assign a name for your variable.
f. Set whether you want to recalculate the variable each time the data source is updated.
NOTE:The Calculate on Update check box is available, only if the data source is set to be updated periodically
The variable is now configured.
7. In a subsequent page, click the Variables column in the storyboard.
8. Select the Use Condition check box.
9. On the left, enter the variable name, using the correct syntax.
For example, %Cell_A1%.
row/column next
To display data source values from the current row/column until its last value.
row/column next.loop
To display next values from the current row/column in an infinite loop.
row/column previous
To display data source values from the current row/column until its first value.
row/column previous.loop
To display previous values from the current row/column in an infinite loop.
row/column begin
To display the first value in the row/column.
row/column end
To display the first value in the row/column.
Setting up Variables | 91

92
6. U
sin
g D
atab
ases
10.Select the required operator from the list.
11.On the right, enter the limiting value.
The variable will be displayed only when it fulfills the condition.
Setting up Variables |

6. U
sing D
atabases
Using Variables
Variables are implemented in order to allow use of values taken from data sources.
The following variables can be taken from the system and displayed in text items by entering the syntax as text. Variables from data sources must be configured before they can be used (see Setting up Variables on page 89). Some of these variables are available as Counters. on page 42.
NOTE:The user defined and external variables can also be used to specify textures and clips to apply to items, by entering them as the file.
Syntax Result
%time% (h)h:mm:ss AM/PM
%hour% hh
%minute% mm
%second% ss
%date% (M)M/(D)D/YY
%year% YY
%month% MM
%day% DD
%counter% mm:ss, counts forward from 0.To count backwards, use %counter:<number of seconds in total>%
%counters% (s)s, counts forward from 0.To count backwards, use %counters:<number of seconds in total>%
%counterh% hh:mm:ssTo count backwards, use %counterh:<number of seconds in total>%
%<user defined>%
See Setting up Variables on page 89.
%external% Displays the text sent by an automation system. You can use as many “externals” as required, named %external1%, %external2%, etc. For more information, see Appendix: Possible Automation Commands on page 117.
Using Variables | 93

94
6. U
sin
g D
atab
ases
Using Variables |

7. Airing Graphics
In this section:
Sending a Story to Air on page 96
Using the Playback Controller and Fields on page 97
Limiting Page Broadcast on page 99
Logging Page Visibility on page 100
On-Air Editing on page 100

96
7. A
irin
g G
rap
hic
s
Sending a Story to Air
Once all your graphics and pages are arranged and edited as required, you are ready to send them to air. It is recommended to load your story first, rather than playing it directly, especially if your story contains many pages or graphics. When a story contains many pages and items, loading time can cause a delay in starting playback.
Your setup can be configured with a preview channel and a program channel. For more information, see Region on page 106.
Two numeric control fields in the Morpho toolbar display the PGM and PVW channels. These can be used to play a story, in addition to the playback buttons on the left. Various options for controlling how Morpho responds to play commands are available. See Miscellaneous on page 111.
To load a story to the DVG2U:
■ Select Playback > Load Pages (F7).
All pages in the story are loaded and ready to be played. Morpho is in On-Air mode.
To play a story to air:
■ Select Playback > Start Storyboard (F5).
Playback begins, and the first page in the Storyboard is sent to air (PGM). The next page is displayed in the preview channel.
To play a page:■ In On-Air mode, type the shortcut of the page.
The page is sent to air (PGM), and the next page is displayed in the preview.
NOTE:The Play Page Immediately When Page Shortcut is pressed option must be enabled (page 110).
Or-
1. In On-Air mode, type the number of the required page into the Preview numeric control field, and press ENTER.
The page is displayed in the preview.
2. Press SPACE.
The page is sent to air (PGM), and the following page is displayed in the preview.
NOTE:This method is affected by the Enable Numeric Keypad for Playback and Preview setting (page 110). If the setting is enabled, the page is sent to the preview first, and then to air, as described. If the setting is disabled, and you select the numeric control manually, the page is sent to the relevant channel.
There are additional ways to select a page to be played to air. For additional options, see Using the Playback Controller and Fields on page 97.
To return to off-air mode:
■ Select Playback > Stop Storyboard (F8).
Sending a Story to Air |

7. A
iring G
raph
ics
Using the Playback Controller and Fields
The Playback Controller and Playback Fields are separate windows that allow you to control separate pages while in On-Air mode. Use the Playback Controller instead of the Playback toolbar or menu, or set up the Playback Fields before sending your story to air, in order to have pages ready for spontaneous airing, as necessary.
NOTE:You can add pages to the Playback Fields in On-Air mode, if you disable the on-air lock.
Playing a page from the Playback Controller changes the order of the play list. You cannot play a page and then return to the point in the Storyboard where you left off, although you can change the order of the page by dragging.
To open the Playback Controller:
■ Select View > Windows > Playback Controller .
The Playback Controller opens.
Use the controls as described in Playback Menu on page 29.
To open the Playback Fields window:
■ Select View > Windows > Playback Fields .
The Playback Fields window opens.
Using the Playback Controller and Fields | 97

98
7. A
irin
g G
rap
hic
s
To place pages in the Playback Fields:
■ Drag pages from the current story.
To air a page on-demand:
1. In On-Air mode, select the page in the Playback Field.
The page is displayed in the preview.
2. Press SPACE to send it to air.
To set a shortcut within the Playback Field window:
1. In the Playback Field window, right-click the page for which you want to set a shortcut.
A menu is displayed.
2. Select Assign Shortcut.An editable field opens in front of the thumbnail.
3. Enter the required key or keyboard shortcut.
4. Press ENTER.
The shortcut is set.
NOTE:Shortcuts assigned in the Feature Editor are displayed in the Playback Controller, and can be used in On-Air mode.
Using the Playback Controller and Fields |

7. A
iring G
raph
ics
Limiting Page Broadcast
You can set a time range for airing pages using a calendar.
For example, set a page in a story to be played only on weekends, or between specified dates, or prevent pages from being played on Wednesdays.
It is important to understand the following principles:
• If a page has a calendar, it is enabled only as set in the calendar.
• Enabled times always take precedence over disabled times.
So, for example, if you set one calendar to disable a page between December 20 and January 3, and set another calendar to enable the page on January 1, then the page will be disabled during the specified dates, but active on January 1.
• If a time range is set, and weekdays are selected, the page is enabled/disabled only on the specified days within the specified range.
If no time range is specified, and weekdays are selected, the page is enabled on the specified weekdays.
If no weekdays are selected, the page is enabled/disabled regardless of the time range.
To limit pages:
1. In the Storyboard, display the list of pages (see The Storyboard on page 16).
2. Click the Calendars column for the required page.
The Calendar Control is displayed in the Feature Editor.
3. Click Add Calendar .
A new calendar is added to the list. You can add as many calendars for the page as required.
4. Click the calendar and rename it, as required.
5. Set the Range Dates and/or Days of Week, as required.
6. Select the Range Type from the list.
The calendar is set, and is in effect when the story is sent to air.
Starts Select this check box to specify the beginning of the time range. Clear to set a range that is valid until ended.
Ends Select this check box to specify the end of the time range. Clear to set a range that is open-ended.
Days of the Week
Select the weekdays for which you want to apply the selection you made in Range Type.
Page Enabled Inside Selected Range of Dates
The selected page will be played only during the time specified under Time Range.
Page Enabled Outside Selected Range of Dates
The selected page will not be played during the time specified under Time Range.
Limiting Page Broadcast | 99

100
7. A
irin
g G
rap
hic
s
Logging Page Visibility
Morpho can automatically log the number of times a page is sent to air, along with date and duration. This is done for all pages in a story. You can also assign a registry ID for a page. This ID appears in the log each time the page is sent to air.
To log on-air times:
1. Select Customize > Preferences.
2. See Page Visibility Time on page 115.
To define a page registry ID:
1. In the Storyboard, display the list of pages (see The Storyboard on page 16).
2. Click the Registry column of the required page.
The Registry ID field is displayed below the page comments in the Feature Editor.
3. Enter a unique ID for this page.
Now, each time the story is sent to air, the page display times are recorded in the log. Pages that have a registry ID assigned are identified in the log with the defined ID.
On-Air Editing
Morpho allows on-air editing of text content and textures applied to items. Changes are made in the output depending on the setting selected in the Preferences (see Update Changes in PGM Output Immediately while On-Air on page 110).
To edit while on-air:
1. Right-click the page to display the list of items.
2. Select the item to be edited.
3. Change the text or texture, as required.
Text can be changed in the Outline tab or in the Feature Editor. For more information, see The Storyboard on page 16.
Textures can be changed or applied only in the Feature Editor. For more information, see Text Items on page 36 and 2D and 3D Shapes on page 44.
Logging Page Visibility |

8. Customizing Morpho
In this section:
GUI Layout on page 102
Setting Preferences on page 103

102
8. C
ust
om
izin
g M
orp
ho
GUI Layout
Morpho’s main application window can be changed in a number of ways, as required. You can choose to show thumbnail or list format in the Storyboard, you can resize the Preview window, hide the Media Manager, hide or reposition toolbars, etc.
To customize the main application window:
■ Drag any main component (Storyboard, Preview window, Media Manager, Feature Editor) or toolbar from its dotted area to the required position.
■ If you want to display the main components as tabs (not including the Preview window), drag the component to the Storyboard.
Morpho uses the last-used GUI layout when it first opens. You can also set Morpho to start with an alternative, preprogrammed layout (see Miscellaneous on page 111).
To save a layout:
1. Configure the main application window as required (see above).
2. Select Customize > Save Layout > and the layout number to which you want to assign the current layout.
The layout is saved.
To load a layout:
■ Select Customize > Load Layout > and select a previously saved layout.
To restore Morpho’s default layout:
■ Select Customize > Restore Default Layout.
GUI Layout |

8. C
usto
mizin
g Mo
rph
o
Setting Preferences
Many of Morpho’s default settings can be customized for your needs.
NOTE:Changing preferences sometimes requires Morpho to be restarted.
To set your program preferences:
1. Select Customize > Preferences.
The Preferences window opens.
2. Select an item from the list on the left, and set your preferences, as required.
RenderEngine
RenderEngine Preferences
Preview None – do not preview the story. Local – preview the story in the Preview window.Remote – preview the story on a remote device. Specify the device name and the Port it is connected to.
Setting Preferences | 103

104
8. C
ust
om
izin
g M
orp
ho
External Preview
Select this check box to display the Preview window on an external display.Host name - Specify the device name and the Port of the external display (default is 8735).
NOTE:Both DVG2Us, with live signals, must be mounted to the same control PC, in order to display textures and clips correctly.
Program A None – do not send the story to air. (The system can still be used to test the Storyboard in On-Air mode, using the Preview window.)Remote – send the story to air on the specified device and Port (default is 8735).
Program B None - use only channel (program) A.Remote - send story to additional channel, as specified.
Video Format
Set the viewing options for the Preview window.Model - select the platform model.Standard – select the required video standard from the list or set the following Custom properties: Width, Height, Frame Rate, and Aspect.Layout - set the canvas layout.Here you can also set the DVG2U profile, Output routing, Divider behavior and the number of Video Inputs.Animation Enabled in Preview - When this check box is cleared, pages are displayed in the preview without animation effects. When this check box is selected, animation effects are displayed in the preview.
Create Profile/Load Profile
Click Create Profile to create a hardware profile on the system using the video format settings. When there is no profile, configure a profile manually using the HDVG control panel. Click Load Profile to load the default profile if you made changes that you don’t want to keep.
Clips Cache
Set the number of clips and frames that will be cached.
RenderEngine Preferences
Setting Preferences |

8. C
usto
mizin
g Mo
rph
o
Directories
Directory Preferences
Reference Directory
The directory used by Morpho for all application files, G:/ by default. It is recommended not to change this path.
Assets The folder in which all editable resources are stored.
Presets The folder in which all presets are stored.For more information, see Using Presets on page 58.
Fonts The folder in which all font resources are stored.
Temporary The folder where internal temporary files are stored.
Online textures
The folder to which all textures dragged from Internet Explorer or Windows Explorer are copied.
Clips Storage The folder in which all clips are stored.
Property Template
The folder where templates for creating default properties in pages and items are stored.
Setting Preferences | 105

106
8. C
ust
om
izin
g M
orp
ho
Region
Insert Page Template
The folder where all templates available in the Select Template dialog box are located.
Insert Items template
The folder where templates for insert menu are stored.
Help Contents The folder where help content and tutorials are stored.
Region Preferences
Date and Time Format
Choose one of the following options:Use System Format – use the date/time format defined for the DVG2U system.Use Custom Format – select a custom date/time format from the respective list.
Localization Select the required interface language from the list or select the Get from System check box to set Morpho to use the language defined for the system. Morpho must be restarted in order for changes to take effect.
Directory Preferences
Setting Preferences |

8. C
usto
mizin
g Mo
rph
o
Keyboard Shortcuts
You can set keyboard shortcuts for many actions in Morpho, and save your shortcuts to be loaded as required.
To customize program shortcuts:
1. Select Customize > Preferences > Shortcuts.
2. In the list on the left, select an action that is not connected to a shortcut.
3. In the list on the right, select a shortcut that is not in use.
4. Click Connect.The shortcut is connected to the action.
To save your shortcuts:
1. In the Shortcuts window, click Save Shortcuts.
A browser window opens.
2. Save your shortcuts using a unique name, in any location.
You can load the saved shortcuts as required, by clicking Load Shortcuts.
Setting Preferences | 107

108
8. C
ust
om
izin
g M
orp
ho
Appearance
Appearance Preferences
Screen Saver Select the Disable Screen Saver During Morpho Session check box, to disable the screen saver while Morpho is running, or clear to allow screen saver activation, as set for the system.
Page Control Control the size of the thumbnails in the Playback Fields panel. For more information, see Using the Playback Controller and Fields on page 97.
Row Height Set the height of each row, in points.
Show Page IDs When selected, the page ID is shown with the page thumbnail in the Storyboard.
Use Alternative Storyboard Layout
Select this check box to display the Storyboard on the entire left side of the main application window. Clear this check box to use the default application layout.
Use Zoom Tooltips in Thumbnail View
Select this check box to display an enlarged image, when pausing the cursor on a thumbnail image. Clear this check box to display the page name as a tooltip.
Time SpinBoxes Shows Frames Instead of Milliseconds
When selected time is displayed in frames in all time-related parameters. When cleared, time is displayed in milliseconds.
Setting Preferences |

8. C
usto
mizin
g Mo
rph
o
Save and Playout
Autosave Select the Autosave check box to enable automatic saving of the current story periodically. If selected, set the intervals at which you want to save, when application is active, and when system is idle.
Save Story Before Playout
Select the Save Story Before Playout check box to save the story each time it is played to air. If the Ask to Save Story Before Playout check box is cleared, the story is saved automatically and playout begins. (For a new story, you are asked for a name.) If the Ask to Save Story Before Playout check box is selected, you are asked if you want to save before playout begins.
On-Air Warning
Select this check box if you want an on-air warning to be displayed if you try to edit your story in On-Air mode. Clear this check box to display no warning. When selected, the Hide Warning After X seconds check box is enabled, and you can set the duration of the warning display.
Clear Output before Loading and Starting Playback
Select this check box to clear the output device before loading and playing new graphics. Clear this check box to allow new graphics to be played without clearing previous graphics.
Setting Preferences | 109

110
8. C
ust
om
izin
g M
orp
ho
Clear Output After Playback is Stopped
Select this check box to unload story from output immediately upon clicking Stop. Clear this check box if you want the last page played to remain on-air until a new story is loaded.
Play Page Immediately When Page Shortcut is pressed
Select this check box to play a page to air (PGM) immediately when its shortcut is entered (in on-air mode). The next page in the storyboard is sent to the preview.When this check box is cleared, pressing a page shortcut in on-air mode sends the page to Preview (press SPACE to send it to air.)
Do Not Continue until Previous Event is Finished
Select this check box to ensure that a page is played out before the following page begins. when this check box is cleared, pages are played according to the timing set for them.
Story Auto Advance
This option is selected by default; when playing a rundown, press SPACE to play the next page and send the following page to PVW. When this option is cleared, you must select a page and load it before playing.
Update Changes in PGM Output Immediately while On-Air
Select this check box to allow on-air editing to be seen in the PGM channel in real time. When this check box is cleared on-air editing can be seen only in PVW channel, and page must be replayed in order to see change in PGM output.
Enable Numeric Keypad for Playback and Preview
Select this check box to use the numeric keypad for immediate previewing of pages, and sending them to air, using the numeric control fields. (In Edit mode, this applies to preview, and in On-Air mode, to preview and program.)For more information, see To play a page: on page 96.When this check box is cleared, you can still use the numeric control fields, but must select them with the mouse, first.
Use Alternative GUI Layout When On-Air
Select this check box to switch to the Playback layout automatically, when Morpho is in On-Air mode. When this check box is cleared, the GUI layout remains the same, unless switched manually (using Playback Layout on page 29).
Export storyboard to 3Designer
Select from the list what elements to export when exporting a story to 3Designer: All Generic Exports, User Defined Exports (define in the Exports panel), or User defined exports and all remaining generic exports. See also Exporting to 3Designer on page 57.
Setting Preferences |

8. C
usto
mizin
g Mo
rph
o
Miscellaneous
Miscellaneous Preferences
Preferences Password
Enter a password (twice) to display a password request dialog box when opening the Preferences dialog box.
Preview Render Engine Zoom - Max. Width
Set the maximal width to which the Preview window can be zoomed using the mouse wheel.
History Set the number of undo/redo actions to be saved to memory.
Data Sources Merger
This parameter determines if the data source defined for a variable is renamed uniquely when working with more than one variable, or if the data source retains its original name.No Merging – a unique name is given to the same data source when used for multiple variables.Merge if Internal Identifiers are equal – display one data source name, as long as the source’s internal identifiers match.Merge if Data Sources refer the same data – display one data source name, as long as the source’s data is the same.Merge if Internal Identifiers fit & Data Sources refer the same data – display one data source name, as long as the source’s internal identifiers match and the data is the same.
Setting Preferences | 111

112
8. C
ust
om
izin
g M
orp
ho
Automation
Here you can set Morpho to accept external commands from an automation system and GPI devices, and to setup the connection to newsroom systems using MOS.
Branch Policy Branch All - Copy & Paste interaction works as branch page.Branch Only Branches - Copy & Paste interaction works as Branch Page only if copied pages was already a Template or a Branch, otherwise (if copied page was a single instance, means niether a branch nor template) it makes a regular copy.Do Not Branch - All pages are copied, so Copy & Paste works exactly as for assets: all pages are copied normally except the case when branches are copied without its template, in such case first branch is converted to template and other branches are attached to that new template.
Miscellaneous Preferences
Setting Preferences |

8. C
usto
mizin
g Mo
rph
o
To define an automation device:
1. Click Add.
A line is added to the list of devices.
2. Click the device Name to rename it, as required.
3. Select the device Type from the list; CII, VDCP, or GPIAdlink
The relevant properties are displayed under Device Settings.
Channel A/B Set which page layer to send to channel A and B. (Available for CII devices)
Charset Set the character set to use for communications between the automation system and Morpho. (Available for CII devices)
Use machine ID
Select this check box and define the ID of the DVG2U for automation systems that require a machine ID. (Available for CII devices)
Serial/Ethernet
Select the communication type required by your automation system, Serial or Ethernet, and configure the options, as required.
Trace Levels When automation is enabled, a log is created to record automation commands. Here you can set the items to be included in the log, by selecting them.
ID length Set the required length of the item IDs that the automation system can send to Morpho. (Available for VDCP devices).
IDList Command Response
Set which item IDs to send when the automation system requests a list of items; Return automation root folder content - list the item IDs that are in the root folder. Return playlist content - list the item IDs in the currently active playlist. (Available for VDCP devices)
Port to channel mapping
Assign a Morpho channel and Vslot to each automation system port. Click Add to add new ports, double click the port/channel/Vslot name to edit. (Available for VDCP devices)
Device Settings
Select a configured GPI/O device from the list (separate licence required), and define button function under Pin settings. (Available for GPIAdlink devices)
Setting Preferences | 113

114
8. C
ust
om
izin
g M
orp
ho
MOS
MOS Select this check box to enable use of the Media Object Server Communications (MOS) protocol, to allow connectivity with a newsroom system.
Listen Port It is recommended to leave the default. This parameterdefines the communication port between the Orad MOS Serverand Morpho. (Default = 6001)
roChannel(s) This parameter defines the label of the channel, defined in the newsroom system, that Morpho should listen to. If left empty,Morpho receives all active rundowns in the newsroom system.
DatabaseHost/UserName/Password
Used for accessing the MOS database. Host should be the location of MOS database, Username and password should be those of the newsroom system database.
Features Initialize MOS on application start - select check box to connect to MOS database whenever Morpho is started.Allow synchronization command - when selected, you can request the newsroom system to resend active rundowns.Manual rundown selection - when selected, you can manually select the rundown to be displayed, from all the active rundowns in the newsroom system.Manual rundown update - when selected, updates in the newsroom system rundown are not automatically reflected in Morpho, but notification is sent; You can update the changes in Morpho by selecting Tools> MOS> Update.
Setting Preferences |

8. C
usto
mizin
g Mo
rph
o
Page Visibility Time
Page Visibility Time Preferences
As-Run log When this check box is selected, the air time of each page is recorded in the log file (defined below), each time the story is sent to air.
NOTE:At least one page registry must be defined per story, in order for visibility times to be logged. See Logging Page Visibility on page 100.
Output Type This version supports page logs saved as comma-separated .csv files.
Filename Set the name and path of the log file.
Separator Set the character(s) to be used in the log file as a separator between lines.
Setting Preferences | 115

116
8. C
ust
om
izin
g M
orp
ho
Plug-in Components
The Plug-in Components window lists the plug-ins used by the current version of Morpho.
Setting Preferences |

Appendix:Possible Automation
Commands
The following syntax should be used for sending commands from an automation system to Morpho, using the CII protocol.
Opening a story M\<path>\\For example: M\G:/Storyboards/Story.sts\\, opens the story called “Story”, located in G:/Storyboards.
Creating a page with new data, based on an existing page
W\<virtual page>\<existing page>\<data input>\\For example: W\100\page1\Welcome to Morpho\\, creates a virtual page called “100” using “page1” as a template, and inserts “Welcome to Morpho” in the %external1% variable.
Loading a virtual page
Y\<virtual page>ø\\For example: Y\100ø\\ (using ASCII248) loads the virtual page “100” that was created previously, to the queue.
Playing the last loaded page
Y\ù\\ (using ASCII249)
Loading an existing page
Y\<existing page>ø\\For example: Y\page1ø loads page1 (does not input data in existing variables).
Updating variables Y\<data input>\\For example: Y\hello\\ replaces the content of the first variable in the current page without replaying the page.

118
Ap
pen
dix
: Po
ssib
le A
uto
mat
ion
Co
mm
and
s
|

Index
Numerics
2D & 3D shapes 442D text 25, 36, 372D/3D page 513D text 253Designer objects 56
A
addingaudio 70graphics 34item to page 34items 34tab in media manager 19video effects 71
airinggraphics 96page 98
alternative storyboard layout 108analog output 104animating bar/pie chart 47, 49animation effect 64applying
image to item 38in/out effect 64preset 58
aspect adjust 44audio effects 70auto
save 109scale 47update database 80
automatic counter 42
B
bar chart 26, 47animation 47, 49background 47
blending 35blur 71box 25, 44branching 60business crawl 40
C
calendar 99camera 51changing directories 105check spelling 28circle 25, 44clearing output after playback stops 110clip
looping 45clone 24Collada 19color picker 38comments for page 51complex object 26cone 26, 44continue storyboard 29, 67contrast 71counters 42, 93crawl 25, 39, 42creating
2D & 3D shapes 442D text 37bar chart 47graphic item 34page 32pie chart 48shapes 44story 31text 36text crawl 39, 42
customizations 102
D
data series 47data source
Excel 82, 84Excel ODBC 83ODBC 85RSS 87text 81, 88
data source wizard 28, 80database 80date format 106default layout 102defining presets 58designer 19
| 119

120
directionanimation 64text crawl 39
directories 105displaying
list of items 16list of pages 17, 27pages 17thumbnails 27time/date 90, 93values sequentially 90variables 90
dual mode 8duration 67
E
edge 71edit layout 29edit mode 96editing color 38effect
direction 64embedded alpha 45embossing 71Excel data source 82Excel ODBC data source 83exporting page 61exporting story 23
F
favorites 19, 22feature editor 18, 35find 24first line 37flipbook 44flipping texture on item 44
G
gamma 71genlock 104go to media manager 27go to pages 27go to preview 27go to storyboard 27graphic item, creating 34grouping items 34grouping templates 60GUI 15
H
has alpha 45hiding
page 24page layers 27
history 24hotkeys 107
I
illumination effects 69image 26image sequence 44images (in media manager) 19importing
3Designer objects 56internet images 55PhotoShop 28, 54PowerPoint 28, 55
in/out-effect split 66in-effect 35, 64inserting
items 34new page 32
interface language 106interlace 45internet images 55item 34
creating 34in/out effect 35layer 35order 35origin 35placement 35, 52size 36
K
keyboard shortcuts 107
L
label color tab 50labeling a pie chart 49labels 49last line 37layer
item 35page 27, 52
layout 29lighting effects 69list of items 16
|

list of pages 27load
layout 30pages 29story 96
lock 24log page visibility 115logging on-air times 100looping clips 45luminance 71
M
main window 15, 102making video clip 61manual counter 42manual pause 67mask 44, 50materials 19max. angle 49media manager 19merging stories 23miscellaneous preferences 111mixing 27mixing mode 104moving text 39
N
named range 83negative 71new page 25, 32next page 29numeric keypad 96, 110
O
ODBC data source 85off-air mode 8, 33, 96on-air
lock 29mode 8, 96warning 109
openingapplication 14playback controller 97story 31
order (layer) properties 35original texture or clip 71out-effect 35, 64
P
page 34comments 51creating 32layering 52list 17properties 51registry 100shortcut 98timing 67visibility 100visibility times 115
page transition 64paste format 24pausing
after page 67playout 67
perspective 51PhotoShop 28, 54pictograms 19pie chart 26, 48
animation 47, 49pie gap 49placement properties 35, 52placing texture within item 44play 29play from current 29playback controller 97playback layout 29plug-ins 116positioning graphics 52PowerPoint 28, 55preferences 30, 102presets 58preventing
changes to story 24page broadcast 99page playout 24
preview window 18, 52, 103previous page 29primitives 19programmed pause 67
Q
quick page 98
R
recording time with mouse 68rectangle 25, 44regional and language preferences 106registry 100
| 121

122
renaming 34RenderEngine 103rendering
to clip 61rendering to
image 29repeating
clips 45find 24texture 44
resizingitems 36texture on item 44
restoring defaultlayout 30settings 30
restoring default layout 102resuming playout 67RSS data source 87running text 39
S
savingcustomizations 102favorites 22incremental 23layout 30page as snapshot 29preferences 102story before playout 109
scalingitems 36texture on item 44
SDI video input 71search 24sending to air 96sepia 71sequence of images 44setting
broadcast dates 99color 38direction of text crawl 39in/out effect 64labels for chart 49media manager tab icon 19page shortcut 98page transition 64shortcuts 107speed of animation 64speed of text crawl 39storyboard row height 108timing 67variables 89
shapes 44
sharpen 71shininess 48, 49shortcuts 107show 24showing
list of items 16list of pages 17, 27pages 17scale (bar chart) 47statistics 27thumbnails 27
size adjust 44snapshot 28, 29sound effects 70source (of data) 47, 48special event 26speed
animation effect 64text crawl 39
spell checker 28sphere 25, 44splitting animation effects 66starting
Morpho 3D 14RenderEngine 14storyboard 29storyboard from current 29
stop storyboard 29stopwatch 93story
creating 31opening 31timing 67versions 23
storyboard 16, 27storyboard row height 108switching
to edit mode 96to on-air mode 96
system requirements 11
T
tab (media manager) 19taking a snapshot 28template grouping 60text
crawl 39data source 81, 88items 36
texture 38flipping 44placement 44scaling 44tiling 44
|

thumbnails 22, 27, 108ticker 39ticker item separator 39time format 106timed pause 67timing 67toolbars 28
media manager 21triangle 25, 44try 29
U
unlockingpage 24
updating the database 80user defined variable 93user preferences 102using
alternative storyboard layout 108PhotoShop files 28PowerPoint slides 28presets 58texture 38
V
variables 93video
effects 71input (SDI) 71object 26
video clip 61video inputs 104viewing page layers 27
W
wait on interaction 67windows 28
Z
zoom thumbnails 108zooming preview window 18, 111
| 123

124
|