mold making of the skull
TRANSCRIPT

Journal of Forensic Identification666 / 53 (6), 2003
Journal of Forensic Identification53 (6), 2003 \ 667
Technical Note
Mold Making of the Skull
Gloria Louise Nusse
Clay and BonesMill Valley, CA
Far from the maddening crowd’s ignoble strife,Their sober wishes never learned to stray;
Along the cool sequestered vale of lifeThey dept the noiseless tenor of their way.Yet ev’n these bones from insult to protect
Some frail memorial still erected nigh,With uncouth rhymes and shapeless sculpture deck’d,
Implores the passing tribute of a sigh.[Thomas Gray 1716-1771]
Introduction
There are times when making a mold of a skull is necessary and valuable. Creating a facial reconstruction on a casting leaves the real skull available for study and investigation. Having a casting of a skull can also be helpful for educational purposes, and it may be used in a courtroom exhibit. Often the bones of the skull are damaged, missing, or not always in the most ideal condition. In these instances, a mold may be the best way to proceed with a facial reconstruction.
This paper was presented at the 88th annual educational conference of the International Association for Identif ication held in Ottawa, Canada, July 6-11, 2003.

Journal of Forensic Identification666 / 53 (6), 2003
Journal of Forensic Identification53 (6), 2003 \ 667
Presented here are two scenarios offered as guidelines. Both scenarios follow similar steps to create a mold and utilize certain materials and supplies (see Appendix A). The first depicts making a mold of a skull that is intact (Figure 1); the second procedure shows a skull that is badly damaged and in pieces. In either of these scenarios, a choice must be made as to whether the mandible should be a separate component or included as a part in the mold of the cranium. If time and the condition of the skull permit, it is best to mold the mandible separately. Otherwise, the mandible can be attached to the skull prior to molding. Making the mold to include the mandible is faster and uses less material. For a beginner, it may be easier to use this method and will allow room for error as well. Practice and experience will reveal the best approach.
Figure 1
The skull with separated mandible.

Journal of Forensic Identification668 / 53 (6), 2003
Journal of Forensic Identification53 (6), 2003 \ 669
Skull Mold in Two Parts
Prepare the Skull
The first step is to prepare the skull for molding. The openings inside the orbits, nasal aperture, fossas, and suture lines must be filled if they are more than 2 to 3 mm wide.
To begin: Put a small ball of cotton inside the nasal aperture. Then fill in orbital f issures, lacrimal ducts, and nasal aperture with water-based clay. Use a small boxwood tool or tongue depressor for this. Be very light-handed using only enough clay to fill in large openings. Be especially careful not to break the delicate bones inside the nasal aperture and the thin bones of the inner eye. The silicone is very thick and it sets quite fast so it will not seep into very small openings less than 2 to 3 mm. The most important thing to remember is to keep the clay light in application and do not smudge it into the bone.
Build up the Clay
Next, build up around the skull to form a parting line between the upper and lower parts of the mold. The best placement is one that will not interfere with the facial plane. Figure 2 shows the parting line along the lower edge of the zygomatic bone, following above the external auditory meatus and the superior margin of the teeth. Be sure to fill in the space formed by the zygomatic bone and the temporal bone. This should form a f lat surface so that the opening is bridged between the two halves of the mold. It is also helpful, if the casting is to be used for a facial reconstruction, to strengthen the inside of the zygomatic arch and the lateral sphenoid bone.
If molding the mandible separately, build up clay around this as well (Figure 3). Place the parting line between the mental foramen and the inferior margin of the teeth.
Carve a line in the clay completely around the mandible and the skull (Figure 3). This line helps with the registration of the two halves of the silicone mold to be aligned.

Journal of Forensic Identification668 / 53 (6), 2003
Journal of Forensic Identification53 (6), 2003 \ 669
Figure 2
The parting line along the lower edge of the zygomatic bone is shown.
Figure 3
A line in the clay completely around the mandible and the skull.

Journal of Forensic Identification670 / 53 (6), 2003
Journal of Forensic Identification53 (6), 2003 \ 671
Apply the Silicone
Dermasil is mixed in equal parts A and B. Measure the silicone as you would measure shortening by filling up a small cup and then removing the excess with a tongue depressor. Mix the two parts together and stir until the color of the mix is uniform. You will have about 5 to 10 minutes before the silicone gets too stiff to use, so mix in small batches, making only what you can comfortably work with during this time frame. (Subsequent batches of Dermasil and layers will stick together.)
Use 2 or 3 coats over the entire skull. Try to keep the appli-cation as uniform in thickness as possible. You will have a few minutes of working time to pull drips back up over the skull, but when the material begins to drag, you must stop and let the drips just fall.
When the first coat has set up (about 20 to 30 minutes), begin the second coat. Mix as before. The second coat usually takes less material. Fill in any gaps in the silicone. Check the orbits and nasal aperture openings. Also, be sure the top of the cranium has a good thickness of material. This will help to prevent distor-tion in the cranium (Figure 4).
Trim the excess silicone from around the base, and mark a line down the center of the cranium (Figures 5 and 6).
Figure 4
The molds should have a good thickness of material.

Journal of Forensic Identification670 / 53 (6), 2003
Journal of Forensic Identification53 (6), 2003 \ 671
Figure 5
Trim the excess silicone from around the base.
Figure 6
Mark a line down the center of the cranium.

Journal of Forensic Identification672 / 53 (6), 2003
Journal of Forensic Identification53 (6), 2003 \ 673
Make the Case
The case for the mold is also called a mother mold. This is because it surrounds the silicone and holds the mold’s shape after the skull has been removed. Without a case or mother mold, the silicone would just f lop and distort. For our purposes, we are going to make the case out of a material called Varaform. This is a thermoplastic impregnated fabric that was originally devel-oped for medical use in making splints over broken bones.
This material is purchased by the yard and is 48 inches wide. About 1/3 to 1/2 yard will be needed. Cut the material into squares, rectangles, and long strips of about 2 to 6 inches. Prepare a pan of hot water to heat the pieces. I have found that an electric frying pan works well because the temperature of the water can be regulated. The temperature should be 140 to 160 °F. If the water is too hot, the plastic melts off of the fabric, and if it is too cool, it will not form properly.
Place a few strips into the hot water. Note: If the pieces of Varaform are allowed to overlap in the water, they will stick together! Use tweezers or pliers to remove the Varaform from the water when it has softened, which will take about 30 seconds or less. Working in a determined fashion, pull one piece out at a time and place over the silicone (Figure 7). Place the pieces on only one side of the line you have drawn. (We will be making the case one side at a time.) Press the plastic firmly over the silicone and gradually build up 2 to 3 layers over the whole side. Make the edges a little stronger and be sure to press each succeeding piece firmly over the underlying one so they stick together well (Figure 8).
Once the first side is done and cooled for a few minutes, start the other side. Note: Use tape or plastic wrap to keep the two halves from sticking to each other! I have placed bolts to hold the two parts together. The bolts are anchored using small strips of Varaform (Figure 9).

Journal of Forensic Identification672 / 53 (6), 2003
Journal of Forensic Identification53 (6), 2003 \ 673
Figure 7
Place single pieces of Varaform on the silicone.
Figure 8
Place the Varaform on only one side of the line.

Journal of Forensic Identification674 / 53 (6), 2003
Journal of Forensic Identification53 (6), 2003 \ 675
The Underside
Flip the mold over and carefully remove the clay that was built up to form the parting line. Do not remove any clay that is filling fissures or openings in the skull. At this stage you will also need to place a cylinder or cone of clay to create a pour spout. A natural place for this is the foramen magnum. This plug will not be covered with silicone or Varaform (Figure 10).
It is also helpful to place a toothpick or small stick or straw between the central incisors (Figure 11). This will create an air vent that will be helpful when casting the skull. Important! Coat the f irst layer of silicone with petroleum jelly. Otherwise, the two halves of silicone will stick together!
Mix and apply the silicone to this underside in the same way as before. It may not be necessary to trim the silicone (Figure 12).
Figure 9
Bolts can be used to anchor the two sides.

Journal of Forensic Identification674 / 53 (6), 2003
Journal of Forensic Identification53 (6), 2003 \ 675
Figure 10
Place a plug in the skull openingto create a pour spout.
Figure 11
Place a toothpick or small stick between thecentral incisors to create an air vent.

Journal of Forensic Identification676 / 53 (6), 2003
Journal of Forensic Identification53 (6), 2003 \ 677
Making the Case a Second Time Around
Proceed using the Varaform to create a case for this side. Note that you will have to use tape or plastic wrap around the edges of the Varaform to keep the parts of the case from sticking to each other. Be careful not to cover the pour spout plug or the air vent. Again, make the edges strong.
Demold and Cast
Gently separate the bottom Varaform case away from the upper section. The silicone may come along with the case. If it does not, then gently pull the silicone away form the skull, easing the silicone from the external auditory meatus, fossas, and other openings where it may get stuck. Then turn the mold over and gently pull the two halves of the cranial case away from the silicone.
Slide a tongue depressor underneath the drawn line on the silicone at the back juncture point along the occipital bone. Then carefully slice along this line moving from the back toward the front. (Keep the blade against the tongue depressor to avoid the bone.) The cut line will need to terminate at the uppermost point on the cranial vault.
Figure 12
Apply the silicone to the undersidein the same manner as before.

Journal of Forensic Identification676 / 53 (6), 2003
Journal of Forensic Identification53 (6), 2003 \ 677
While holding the skull f irmly from the back, gently pull the silicone up toward the face and away from the orbits and nasal aperture. Slide the silicone off, moving from bottom to top, until it is free from the skull. Place the silicone back into the mother mold. Always place the silicone into the mother mold (case) to store. The skull can now be cleaned and restored to its original condition.
To assemble the parts of the mold and case, hold them in place with a strap or large rubber bands. Balance the mold upside down so that the foramen magnum is upright and the air vent is clear. Pour in the casting material stopping occasionally to jiggle the mold to release trapped air bubbles.
Figure 13
Original skull and cast.

Journal of Forensic Identification678 / 53 (6), 2003
Journal of Forensic Identification53 (6), 2003 \ 679
Badly Damaged Skull Technique
More often than not, a skull will not be complete and may even be in many pieces. Consulting with an anthropologist will enable the artist to have a better idea of how the parts f it together.
The pieces of the skull displayed in Figure 14 had many unusual characteristics. There was a mushroomlike bony growth on the back of the parietal bone, as well two fine characteristic entrance and exit patterns left in the bone by a self-inf licted gunshot wound. We were interested in preserving these for educational purposes. The family wished to cremate the remains but allowed us to make a mold of the skull. Not all of the skull could be recovered. However, the pieces you see in Figure 14, as well as the maxilla, were what we had to work with. The bones were covered with dirt and detritus but were easily cleaned. The skull was rejoined using hot glue and small strips of card stock paper.
Figure 14
The pieces of the recovered skull.

Journal of Forensic Identification678 / 53 (6), 2003
Journal of Forensic Identification53 (6), 2003 \ 679
Figure 15
Frontal view of reconstructed skull.
Figure 16
Rear view of reconstructed skull.

Journal of Forensic Identification680 / 53 (6), 2003
Journal of Forensic Identification53 (6), 2003 \ 681
Build up the Clay
The inner cavity of the skull is f irst loosely filled with plastic saran wrap and cotton balls (Figures 17 and 18). Then the cavities are lightly bridged with water-based clay.
Clay is also built up around the lower edge of the skull to form a parting line. Place this line so as to not interfere with the facial plane. For this skull we created our parting line along the lower margin of the zygomatic and maxilla bones (Figures 19 and 20).
Figure 17 Figure 18
The inner cavity of the skull is first looselyfilled with plastic saran wrap and cotton balls.
Figure 19
Frontal view of the skull.
Figure 20
Rear view of the skull.
Journal of Forensic Identification680 / 53 (6), 2003
Journal of Forensic Identification53 (6), 2003 \ 681
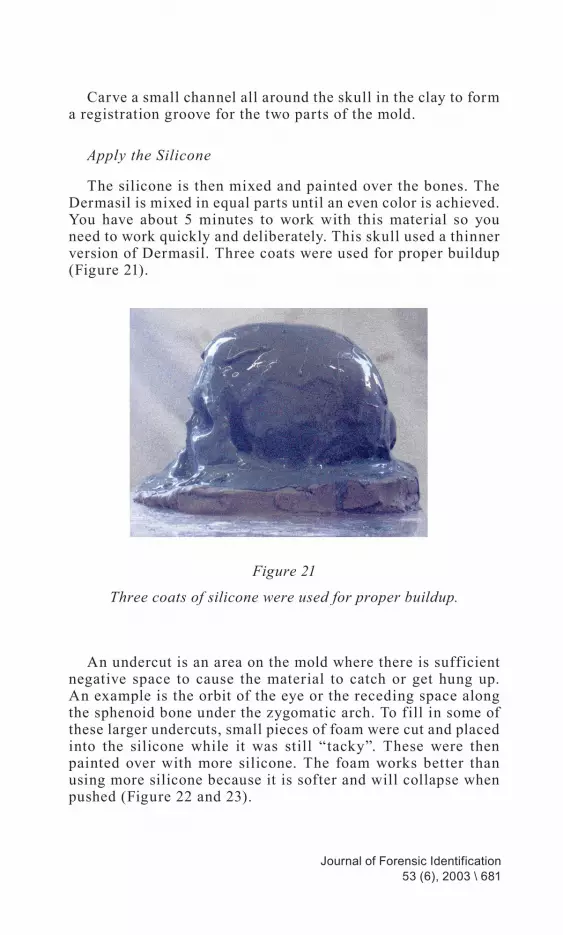
Carve a small channel all around the skull in the clay to form a registration groove for the two parts of the mold.
Apply the Silicone
The silicone is then mixed and painted over the bones. The Dermasil is mixed in equal parts until an even color is achieved. You have about 5 minutes to work with this material so you need to work quickly and deliberately. This skull used a thinner version of Dermasil. Three coats were used for proper buildup (Figure 21).
An undercut is an area on the mold where there is sufficient negative space to cause the material to catch or get hung up. An example is the orbit of the eye or the receding space along the sphenoid bone under the zygomatic arch. To fill in some of these larger undercuts, small pieces of foam were cut and placed into the silicone while it was still “tacky”. These were then painted over with more silicone. The foam works better than using more silicone because it is softer and will collapse when pushed (Figure 22 and 23).
Figure 21
Three coats of silicone were used for proper buildup.

Journal of Forensic Identification682 / 53 (6), 2003
Journal of Forensic Identification53 (6), 2003 \ 683
An undercut is an area on the mold where thereis sufficient negative space to cause the
material to catch or get hung up.
After the final coat of silicone has set, it is trimmed around the edges and a line is drawn down the center as a guide for the two parts of the mother mold or case (Figure 24).
Note that most of the undercuts have been filled. The under-cuts that are still visible will be accommodated by the two-part case. The number of parts of the mother mold will be determined by the placement of the parting line on the silicone. Rarely will there ever be more than two for the cranial vault.
Figure 22 Figure 23
Figure 24
A line is drawn down the center as a guide for the two parts.

Journal of Forensic Identification682 / 53 (6), 2003
Journal of Forensic Identification53 (6), 2003 \ 683
Making the Case
As before, the mother mold is made with heavyweight Varaform. Two or three layers are used. Care must be taken to make sure each layer is f irmly adhered to the last. Use small pieces (2 to 6 inches) and make sure the edges are reinforced. Work on only one side of the case at a time. When the first side is finished, place tape or plastic wrap between the two parts and begin the other side (Figures 25 and 26).
As shown in Figure 27, both sides of the mother mold are finished and bolts have been added for closing the mold. The bolts have been attached using strips of Varaform anchored to the case.
The bolts must be covered with tape or plastic wrap to keep the Varaform from sticking. Wing nuts make taking the mold apart much easier.
Figure 25 Figure 26Two or three layers of Varaform are used to cover each side.
Figure 27Both sides of the mother mold are finished and bolts
have been added for closing the mold.

Journal of Forensic Identification684 / 53 (6), 2003
Journal of Forensic Identification53 (6), 2003 \ 685
The Underside
Turn the mold over to reveal the underside (Figure 28). Clean off the clay used in the parting line, and turn the mold upside down and make it stable. Coat the silicone with petroleum jelly and cover the case edges with tape or plastic wrap.
Figure 28
The unfinished mother mold as seen from underside.
Figure 29
The finished mother mold as seen from underside.

Journal of Forensic Identification684 / 53 (6), 2003
Journal of Forensic Identification53 (6), 2003 \ 685
Mix one or two more batches of silicone and brush onto undersurface. When cured, trim away excess and repeat the steps taken on the topside to make the case for the bottom of the mold. Figure 29 is the finished mother mold as seen from underside. Bolts have been added for attaching parts together.
This mold has been prepared for slush casting (i.e., partially filling up the cranium section of the mold with a casting material and then slowly rotating the closed mold until the material inside hardens), thereby creating a hollow casting seen in Figures 30 through 35. If you wish to pour the casting material into the mold, simply cut an opening into the Varaform over the plug in the foramen magnum.
Figure 30
Anterior view of original skull.
Figure 31
Anterior view of casting.
Paint has been added to show partsof skull that have been reconstructed.

Journal of Forensic Identification686 / 53 (6), 2003
Journal of Forensic Identification53 (6), 2003 \ 687
Figure 34
Lateral view of original skull.
Figure 35
Lateral view of casting.
Figure 32
Posterior view of original skull.
Figure 33
Posterior view of casting.

Journal of Forensic Identification686 / 53 (6), 2003
Journal of Forensic Identification53 (6), 2003 \ 687
Conclusion
There are two terms that have been used in this article that bear repeating: mold and cast. The mold is the negative of the original and the cast is the resulting positive taken from the mold. Often these two terms can get mixed up and convoluted. As with anatomical terms (see Appendix B), the proper word describes the placement exactly. Two more terms are useful to know as well: parting line and undercut. The parting line is the site where the mold separates. It is the same term for the inner f lexible mold and the outer mother mold or case. The undercut is the negative space below a positive space, where a mold can get “hung up” in removal. Think of putting your hand on your upper lip and pulling it upwards; it will get “hung up” on your nose.
There are many ways to make any given mold, almost as many ways as there are mold makers. Presented in this paper is one method that is easy to understand and is feasible for most appli-cations. The silicone and Varaform used here are user-friendly and forgiving. It would take a textbook to describe all the other materials and methods that are available to the mold maker.
As we have seen in the recent case, to make a mold of the skull may be the only method the artist or investigator has to preserve unique evidence. For this reason, among others, it is worthwhile to learn this technique. Time and experience are the best teach-ers. You must have the right materials and the willingness to work until you get it right. Molding and casting are learned skills that anyone can acquire through patience and practice.
“That is best which lieth nearest; Shape from that thy work of art...” Longfellow
For more information, please contact:
Gloria Louise NusseClay and Bones129 Stanford AvenueMill Valley, CA [email protected]

Journal of Forensic Identification688 / 53 (6), 2003
Journal of Forensic Identification53 (6), 2003 \ 689
Appendix A
Steps to create a mold of a skull:
1. Prepare the skull.2. Build up the clay for the parting line.3. Mix and apply the silicone.4. Make the case or mother mold.5. Prepare the other side.6. Form the pour spout and air vent.7. Apply separating agents.8. Mix and apply silicone.9. Make case or mother mold.10. Remove skull and cast.
Materials and supplies:
1. Clay (5 pounds)2. Dermasil* (Silicone specially formulated for
molding on skin – 2-pint kit)3. Varaform* (Thermoplastic cloth – 1/3-1/2 yard)4. Clay tools5. Scissors or blades for cutting6. Cups and utensils for mixing7. Electric frying pan for a hot water bath8. Work board (12 to 15 inches square)
*Both Varaform and Dermasil are available from:
Douglas and Sturgess Inc. San Francisco:1-888-ART-STUF 510-235-8411 510-235-4211 fax www.artstuf.com

Journal of Forensic Identification688 / 53 (6), 2003
Journal of Forensic Identification53 (6), 2003 \ 689
Appendix B
Anatomical terms of the skull
1 Cranium
2 External auditory meatus
3 Inferior margin of teeth
4 Lacrimal ducts
5 Lateral sphenoid bone
6 Mandible
7 Maxilla
8 Mental foramen
9 Nasal aperture
10 Occipital bone
11 Orbital f issures
12 Parietal bone
13 Superior margin of teeth
14 Suture lines
15 Temporal bone
16 Zygomatic arch
17 Zygomatic bone