may 2021 - mass ingestion - informatica documents
TRANSCRIPT
Informatica® Mass IngestionMay 2021
Mass Ingestion
Informatica Mass Ingestion Mass IngestionMay 2021
© Copyright Informatica LLC 2019, 2021
This software and documentation are provided only under a separate license agreement containing restrictions on use and disclosure. No part of this document may be reproduced or transmitted in any form, by any means (electronic, photocopying, recording or otherwise) without prior consent of Informatica LLC.
U.S. GOVERNMENT RIGHTS Programs, software, databases, and related documentation and technical data delivered to U.S. Government customers are "commercial computer software" or "commercial technical data" pursuant to the applicable Federal Acquisition Regulation and agency-specific supplemental regulations. As such, the use, duplication, disclosure, modification, and adaptation is subject to the restrictions and license terms set forth in the applicable Government contract, and, to the extent applicable by the terms of the Government contract, the additional rights set forth in FAR 52.227-19, Commercial Computer Software License.
Informatica, Informatica Cloud, Informatica Intelligent Cloud Services, PowerCenter, PowerExchange, and the Informatica logo are trademarks or registered trademarks of Informatica LLC in the United States and many jurisdictions throughout the world. A current list of Informatica trademarks is available on the web at https://www.informatica.com/trademarks.html. Other company and product names may be trade names or trademarks of their respective owners.
Portions of this software and/or documentation are subject to copyright held by third parties. Required third party notices are included with the product.
The information in this documentation is subject to change without notice. If you find any problems in this documentation, report them to us at [email protected].
Informatica products are warranted according to the terms and conditions of the agreements under which they are provided. INFORMATICA PROVIDES THE INFORMATION IN THIS DOCUMENT "AS IS" WITHOUT WARRANTY OF ANY KIND, EXPRESS OR IMPLIED, INCLUDING WITHOUT ANY WARRANTIES OF MERCHANTABILITY, FITNESS FOR A PARTICULAR PURPOSE AND ANY WARRANTY OR CONDITION OF NON-INFRINGEMENT.
Publication Date: 2021-06-21
Table of Contents
Preface . . . . . . . . . . . . . . . . . . . . . . . . . . . . . . . . . . . . . . . . . . . . . . . . . . . . . . . . . . . . . . . . . . . . . . 9
Chapter 1: Introducing Mass Ingestion. . . . . . . . . . . . . . . . . . . . . . . . . . . . . . . . . . . . . . 10My Services page. . . . . . . . . . . . . . . . . . . . . . . . . . . . . . . . . . . . . . . . . . . . . . . . . . . . . . 10
Explore page. . . . . . . . . . . . . . . . . . . . . . . . . . . . . . . . . . . . . . . . . . . . . . . . . . . . . . . . . 11
Chapter 2: Getting Started. . . . . . . . . . . . . . . . . . . . . . . . . . . . . . . . . . . . . . . . . . . . . . . . . . . 14Secure Agent services. . . . . . . . . . . . . . . . . . . . . . . . . . . . . . . . . . . . . . . . . . . . . . . . . . 15
Database Ingestion service. . . . . . . . . . . . . . . . . . . . . . . . . . . . . . . . . . . . . . . . . . . . 15
Mass Ingestion (Files). . . . . . . . . . . . . . . . . . . . . . . . . . . . . . . . . . . . . . . . . . . . . . . 18
CMI Streaming Agent. . . . . . . . . . . . . . . . . . . . . . . . . . . . . . . . . . . . . . . . . . . . . . . . 19
Creating projects and project folders. . . . . . . . . . . . . . . . . . . . . . . . . . . . . . . . . . . . . . . . . 25
Editing your user profile. . . . . . . . . . . . . . . . . . . . . . . . . . . . . . . . . . . . . . . . . . . . . . . . . 26
Chapter 3: Connectors and Connections. . . . . . . . . . . . . . . . . . . . . . . . . . . . . . . . . . . . . 27Mass Ingestion connectors. . . . . . . . . . . . . . . . . . . . . . . . . . . . . . . . . . . . . . . . . . . . . . . 27
Mass Ingestion Databases connectors. . . . . . . . . . . . . . . . . . . . . . . . . . . . . . . . . . . . . 28
Mass Ingestion Files connectors. . . . . . . . . . . . . . . . . . . . . . . . . . . . . . . . . . . . . . . . . 30
Mass Ingestion Streaming connectors. . . . . . . . . . . . . . . . . . . . . . . . . . . . . . . . . . . . . 31
Mass Ingestion connection properties. . . . . . . . . . . . . . . . . . . . . . . . . . . . . . . . . . . . . . . . 32
Configuring a connection. . . . . . . . . . . . . . . . . . . . . . . . . . . . . . . . . . . . . . . . . . . . . . 32
Advanced FTP V2 connection properties. . . . . . . . . . . . . . . . . . . . . . . . . . . . . . . . . . . . 33
Advanced FTPS V2 connection properties. . . . . . . . . . . . . . . . . . . . . . . . . . . . . . . . . . . 34
Advanced SFTP V2 connection properties. . . . . . . . . . . . . . . . . . . . . . . . . . . . . . . . . . . 36
Amazon Redshift V2 connection properties. . . . . . . . . . . . . . . . . . . . . . . . . . . . . . . . . . 37
Amazon Kinesis connection properties. . . . . . . . . . . . . . . . . . . . . . . . . . . . . . . . . . . . . 39
Amazon S3 V2 connection properties. . . . . . . . . . . . . . . . . . . . . . . . . . . . . . . . . . . . . . 43
Db2 for i Database Ingestion connection properties. . . . . . . . . . . . . . . . . . . . . . . . . . . . . 47
Db2 for LUW Database Ingestion connection properties. . . . . . . . . . . . . . . . . . . . . . . . . . 48
Db2 for zOS Database Ingestion connection properties. . . . . . . . . . . . . . . . . . . . . . . . . . 49
Databricks Delta connection properties. . . . . . . . . . . . . . . . . . . . . . . . . . . . . . . . . . . . . 49
Flat file connection properties. . . . . . . . . . . . . . . . . . . . . . . . . . . . . . . . . . . . . . . . . . 54
Google BigQuery V2 connection properties. . . . . . . . . . . . . . . . . . . . . . . . . . . . . . . . . . 55
Google Cloud Storage V2 connection properties. . . . . . . . . . . . . . . . . . . . . . . . . . . . . . . 57
Google PubSub - Mass Ingestion Streaming Connection Properties. . . . . . . . . . . . . . . . . . . 60
Hadoop Files V2 connection properties. . . . . . . . . . . . . . . . . . . . . . . . . . . . . . . . . . . . . 61
JMS connection properties. . . . . . . . . . . . . . . . . . . . . . . . . . . . . . . . . . . . . . . . . . . . 62
Kafka connection properties. . . . . . . . . . . . . . . . . . . . . . . . . . . . . . . . . . . . . . . . . . . . 63
Microsoft Azure Blob Storage V3 connection properties. . . . . . . . . . . . . . . . . . . . . . . . . . 68
Microsoft Azure Data Lake Storage Gen2 connection properties . . . . . . . . . . . . . . . . . . . . 69
Table of Contents 3
Microsoft Azure Data Lake Storage Gen1 V3 connection properties. . . . . . . . . . . . . . . . . . 70
Microsoft Azure Event Hub connection properties. . . . . . . . . . . . . . . . . . . . . . . . . . . . . . 70
Microsoft Azure SQL Data Warehouse - Database Ingestion connection properties. . . . . . . . . 71
Microsoft Azure Synapse SQL connection properties. . . . . . . . . . . . . . . . . . . . . . . . . . . . 73
Microsoft Azure Synapse Analytics Database Ingestion connection properties. . . . . . . . . . . 74
Microsoft SQL Server connection properties. . . . . . . . . . . . . . . . . . . . . . . . . . . . . . . . . 76
MQTT connection properties. . . . . . . . . . . . . . . . . . . . . . . . . . . . . . . . . . . . . . . . . . . 78
MySQL connection properties. . . . . . . . . . . . . . . . . . . . . . . . . . . . . . . . . . . . . . . . . . . 79
Netezza connection properties. . . . . . . . . . . . . . . . . . . . . . . . . . . . . . . . . . . . . . . . . . 80
OPC UA connection properties. . . . . . . . . . . . . . . . . . . . . . . . . . . . . . . . . . . . . . . . . . 81
Oracle Database Ingestion connection properties. . . . . . . . . . . . . . . . . . . . . . . . . . . . . . 82
PostgreSQL connection properties. . . . . . . . . . . . . . . . . . . . . . . . . . . . . . . . . . . . . . . . 85
Snowflake Cloud Data Warehouse V2 connection properties. . . . . . . . . . . . . . . . . . . . . . . 87
REST V2 connection properties. . . . . . . . . . . . . . . . . . . . . . . . . . . . . . . . . . . . . . . . . . 93
Teradata connection properties. . . . . . . . . . . . . . . . . . . . . . . . . . . . . . . . . . . . . . . . . 94
Chapter 4: Mass Ingestion Databases. . . . . . . . . . . . . . . . . . . . . . . . . . . . . . . . . . . . . . . . 97Use cases. . . . . . . . . . . . . . . . . . . . . . . . . . . . . . . . . . . . . . . . . . . . . . . . . . . . . . . . . . 97
Mass Ingestion Databases source types. . . . . . . . . . . . . . . . . . . . . . . . . . . . . . . . . . . . . . . 98
Mass Ingestion Databases target types. . . . . . . . . . . . . . . . . . . . . . . . . . . . . . . . . . . . . . . 99
Mass Ingestion Databases architecture. . . . . . . . . . . . . . . . . . . . . . . . . . . . . . . . . . . . . . . 99
Mass Ingestion Databases limitations and guidelines. . . . . . . . . . . . . . . . . . . . . . . . . . . . . . 101
Mass Ingestion Databases source considerations. . . . . . . . . . . . . . . . . . . . . . . . . . . . . . . . 102
Db2 for i sources. . . . . . . . . . . . . . . . . . . . . . . . . . . . . . . . . . . . . . . . . . . . . . . . . . 102
Db2 for LUW sources. . . . . . . . . . . . . . . . . . . . . . . . . . . . . . . . . . . . . . . . . . . . . . . 102
Db2 for z/OS sources. . . . . . . . . . . . . . . . . . . . . . . . . . . . . . . . . . . . . . . . . . . . . . . 103
Microsoft SQL Server and Azure SQL Database sources. . . . . . . . . . . . . . . . . . . . . . . . . 103
MySQL sources. . . . . . . . . . . . . . . . . . . . . . . . . . . . . . . . . . . . . . . . . . . . . . . . . . . 105
Netezza sources. . . . . . . . . . . . . . . . . . . . . . . . . . . . . . . . . . . . . . . . . . . . . . . . . . 105
Oracle sources. . . . . . . . . . . . . . . . . . . . . . . . . . . . . . . . . . . . . . . . . . . . . . . . . . . 106
PostgreSQL sources. . . . . . . . . . . . . . . . . . . . . . . . . . . . . . . . . . . . . . . . . . . . . . . . 109
Teradata sources. . . . . . . . . . . . . . . . . . . . . . . . . . . . . . . . . . . . . . . . . . . . . . . . . . 111
Mass Ingestion Databases target considerations. . . . . . . . . . . . . . . . . . . . . . . . . . . . . . . . 112
Amazon Redshift targets. . . . . . . . . . . . . . . . . . . . . . . . . . . . . . . . . . . . . . . . . . . . . 112
Amazon S3, Flat File, Google Cloud Storage, and Microsoft Azure Data Lake Storage targets. 112
Kafka targets and Kafka-enabled Azure Event Hubs targets. . . . . . . . . . . . . . . . . . . . . . . 114
Microsoft Azure Synapse Analytics and SQL Data Warehouse targets. . . . . . . . . . . . . . . . 114
Snowflake targets. . . . . . . . . . . . . . . . . . . . . . . . . . . . . . . . . . . . . . . . . . . . . . . . . 115
Folder structure for Amazon S3, Google Cloud Storage, and Microsoft Azure Data Lake Storage Gen2 targets. . . . . . . . . . . . . . . . . . . . . . . . . . . . . . . . . . . . . . . . . . . . . . . 115
Handling source schema changes. . . . . . . . . . . . . . . . . . . . . . . . . . . . . . . . . . . . . . . . . . 118
Configuring a database ingestion task. . . . . . . . . . . . . . . . . . . . . . . . . . . . . . . . . . . . . . . 119
Before you begin. . . . . . . . . . . . . . . . . . . . . . . . . . . . . . . . . . . . . . . . . . . . . . . . . . 119
4 Table of Contents
Defining basic task information. . . . . . . . . . . . . . . . . . . . . . . . . . . . . . . . . . . . . . . . . 120
Configuring the source. . . . . . . . . . . . . . . . . . . . . . . . . . . . . . . . . . . . . . . . . . . . . . 121
Configuring the target. . . . . . . . . . . . . . . . . . . . . . . . . . . . . . . . . . . . . . . . . . . . . . . 126
Configuring runtime options. . . . . . . . . . . . . . . . . . . . . . . . . . . . . . . . . . . . . . . . . . . 139
Deploying a database ingestion task. . . . . . . . . . . . . . . . . . . . . . . . . . . . . . . . . . . . . . . . . 141
Running a database ingestion job. . . . . . . . . . . . . . . . . . . . . . . . . . . . . . . . . . . . . . . . . . 142
Stopping a database ingestion job. . . . . . . . . . . . . . . . . . . . . . . . . . . . . . . . . . . . . . . . . . 142
Aborting a database ingestion job. . . . . . . . . . . . . . . . . . . . . . . . . . . . . . . . . . . . . . . . . . 143
Resuming a database ingestion job. . . . . . . . . . . . . . . . . . . . . . . . . . . . . . . . . . . . . . . . . 143
Overriding schema drift options when resuming a database ingestion job. . . . . . . . . . . . . . . . . 144
Redeploying a database ingestion job. . . . . . . . . . . . . . . . . . . . . . . . . . . . . . . . . . . . . . . . 145
Undeploying a database ingestion job. . . . . . . . . . . . . . . . . . . . . . . . . . . . . . . . . . . . . . . . 145
Resynchronizing source and target objects. . . . . . . . . . . . . . . . . . . . . . . . . . . . . . . . . . . . 146
Restart and Recovery for Incremental Load Jobs. . . . . . . . . . . . . . . . . . . . . . . . . . . . . . . . . 146
Default Data Type Mappings. . . . . . . . . . . . . . . . . . . . . . . . . . . . . . . . . . . . . . . . . . . . . . 147
Db2 for i Source and Amazon Redshift Target. . . . . . . . . . . . . . . . . . . . . . . . . . . . . . . . 147
Db2 for i Source and Microsoft Azure SQL Data Warehouse or Synapse Analytics Target. . . . 148
Db2 for i Source and Snowflake Target. . . . . . . . . . . . . . . . . . . . . . . . . . . . . . . . . . . . 150
Db2 for Linux, UNIX, and Windows Source and Amazon Redshift Target. . . . . . . . . . . . . . . 151
DB2 for Linux, UNIX, and Windows Source and Microsoft Azure SQL Data Warehouse or Synapse Analytics Target. . . . . . . . . . . . . . . . . . . . . . . . . . . . . . . . . . . . . . . . . . . . . 152
DB2 for Linux, UNIX, and Windows Source and Snowflake Target. . . . . . . . . . . . . . . . . . . 153
Db2 for z/OS Source and Amazon Redshift Target. . . . . . . . . . . . . . . . . . . . . . . . . . . . . 154
Db2 for z/OS Source and Microsoft Azure SQL Data Warehouse Target. . . . . . . . . . . . . . . 155
Db2 for z/OS Source and Snowflake Target. . . . . . . . . . . . . . . . . . . . . . . . . . . . . . . . . 156
Microsoft SQL Server or Azure SQL Database Source and Amazon Redshift Target. . . . . . . . 157
Microsoft SQL Server or Azure SQL Database Source and Microsoft Azure SQL Data Warehouse or Synapse Analytics Target. . . . . . . . . . . . . . . . . . . . . . . . . . . . . . . . . . . 159
Microsoft SQL Server or Azure SQL Database Source and Snowflake Target. . . . . . . . . . . . 160
MySQL Source and Amazon Redshift Target. . . . . . . . . . . . . . . . . . . . . . . . . . . . . . . . . 162
MySQL Source and Microsoft Azure SQL Data Warehouse or Synapse Analytics Target. . . . . 163
MySQL Source and Snowflake Target. . . . . . . . . . . . . . . . . . . . . . . . . . . . . . . . . . . . . 165
Netezza Source and Amazon Redshift Target. . . . . . . . . . . . . . . . . . . . . . . . . . . . . . . . 167
Netezza Source and Microsoft Azure SQL Data Warehouse or Synapse Analytics Target. . . . 168
Netezza Source and Snowflake Target. . . . . . . . . . . . . . . . . . . . . . . . . . . . . . . . . . . . 169
Oracle Source and Amazon Redshift Target. . . . . . . . . . . . . . . . . . . . . . . . . . . . . . . . . 170
Oracle Source and Microsoft Azure SQL Data Warehouse or Synapse Analytics Target. . . . . 172
Oracle Source and Snowflake Target. . . . . . . . . . . . . . . . . . . . . . . . . . . . . . . . . . . . . 173
PostgreSQL Source and Amazon Redshift Target. . . . . . . . . . . . . . . . . . . . . . . . . . . . . 174
PostgreSQL Source and Microsoft Azure SQL Data Warehouse or Synapse Analytics Target. . 176
PostgreSQL Source and Snowflake Target. . . . . . . . . . . . . . . . . . . . . . . . . . . . . . . . . . 178
Teradata Source and Amazon Redshift Target. . . . . . . . . . . . . . . . . . . . . . . . . . . . . . . 181
Teradata Source and Microsoft Azure SQL Data Warehouse or Synapse Analytics Target. . . . 183
Table of Contents 5
Teradata Source and Snowflake Target. . . . . . . . . . . . . . . . . . . . . . . . . . . . . . . . . . . . 185
Cloud Mass Ingestion Databases Command-Line Interface. . . . . . . . . . . . . . . . . . . . . . . . . . 187
Chapter 5: Mass Ingestion Files. . . . . . . . . . . . . . . . . . . . . . . . . . . . . . . . . . . . . . . . . . . . 188Use cases. . . . . . . . . . . . . . . . . . . . . . . . . . . . . . . . . . . . . . . . . . . . . . . . . . . . . . . . . 188
Mass Ingestion Files source types. . . . . . . . . . . . . . . . . . . . . . . . . . . . . . . . . . . . . . . . . . 188
Mass Ingestion Files target types. . . . . . . . . . . . . . . . . . . . . . . . . . . . . . . . . . . . . . . . . . 189
Mass Ingestion Files schedule. . . . . . . . . . . . . . . . . . . . . . . . . . . . . . . . . . . . . . . . . . . . 190
File processing actions. . . . . . . . . . . . . . . . . . . . . . . . . . . . . . . . . . . . . . . . . . . . . . . . . 190
Mass Ingestion Files security. . . . . . . . . . . . . . . . . . . . . . . . . . . . . . . . . . . . . . . . . . . . . 191
Configuring a file ingestion task . . . . . . . . . . . . . . . . . . . . . . . . . . . . . . . . . . . . . . . . . . . 191
Before you begin. . . . . . . . . . . . . . . . . . . . . . . . . . . . . . . . . . . . . . . . . . . . . . . . . . 191
Defining basic task information. . . . . . . . . . . . . . . . . . . . . . . . . . . . . . . . . . . . . . . . . 192
Configuring the source. . . . . . . . . . . . . . . . . . . . . . . . . . . . . . . . . . . . . . . . . . . . . . 192
Configuring the target. . . . . . . . . . . . . . . . . . . . . . . . . . . . . . . . . . . . . . . . . . . . . . . 210
Defining a schedule and adding file actions. . . . . . . . . . . . . . . . . . . . . . . . . . . . . . . . . 228
Running a file ingestion task. . . . . . . . . . . . . . . . . . . . . . . . . . . . . . . . . . . . . . . . . . . . . . 229
Aborting a file ingestion job. . . . . . . . . . . . . . . . . . . . . . . . . . . . . . . . . . . . . . . . . . . . . . 229
Key ring command reference. . . . . . . . . . . . . . . . . . . . . . . . . . . . . . . . . . . . . . . . . . . . . 229
createKeyRing. . . . . . . . . . . . . . . . . . . . . . . . . . . . . . . . . . . . . . . . . . . . . . . . . . . . 230
createKeyPair. . . . . . . . . . . . . . . . . . . . . . . . . . . . . . . . . . . . . . . . . . . . . . . . . . . . 230
listKeys. . . . . . . . . . . . . . . . . . . . . . . . . . . . . . . . . . . . . . . . . . . . . . . . . . . . . . . . 231
importKeys. . . . . . . . . . . . . . . . . . . . . . . . . . . . . . . . . . . . . . . . . . . . . . . . . . . . . . 231
exportKeyPairs. . . . . . . . . . . . . . . . . . . . . . . . . . . . . . . . . . . . . . . . . . . . . . . . . . . 232
exportPublicKeys. . . . . . . . . . . . . . . . . . . . . . . . . . . . . . . . . . . . . . . . . . . . . . . . . . 233
deleteKeys. . . . . . . . . . . . . . . . . . . . . . . . . . . . . . . . . . . . . . . . . . . . . . . . . . . . . . 233
changePassphrase. . . . . . . . . . . . . . . . . . . . . . . . . . . . . . . . . . . . . . . . . . . . . . . . . 234
Mass Ingestion Files REST API. . . . . . . . . . . . . . . . . . . . . . . . . . . . . . . . . . . . . . . . . . . . 234
job. . . . . . . . . . . . . . . . . . . . . . . . . . . . . . . . . . . . . . . . . . . . . . . . . . . . . . . . . . . 235
tasks. . . . . . . . . . . . . . . . . . . . . . . . . . . . . . . . . . . . . . . . . . . . . . . . . . . . . . . . . . 235
Chapter 6: Mass Ingestion Streaming . . . . . . . . . . . . . . . . . . . . . . . . . . . . . . . . . . . . . . 246Use cases. . . . . . . . . . . . . . . . . . . . . . . . . . . . . . . . . . . . . . . . . . . . . . . . . . . . . . . . . 246
Mass Ingestion Streaming sources. . . . . . . . . . . . . . . . . . . . . . . . . . . . . . . . . . . . . . . . . 247
Amazon Kinesis Streams sources. . . . . . . . . . . . . . . . . . . . . . . . . . . . . . . . . . . . . . . 247
Azure Event Hubs Kafka sources. . . . . . . . . . . . . . . . . . . . . . . . . . . . . . . . . . . . . . . . 247
Flat File sources. . . . . . . . . . . . . . . . . . . . . . . . . . . . . . . . . . . . . . . . . . . . . . . . . . 248
Google PubSub sources. . . . . . . . . . . . . . . . . . . . . . . . . . . . . . . . . . . . . . . . . . . . . . 248
JMS sources. . . . . . . . . . . . . . . . . . . . . . . . . . . . . . . . . . . . . . . . . . . . . . . . . . . . . 249
Kafka sources. . . . . . . . . . . . . . . . . . . . . . . . . . . . . . . . . . . . . . . . . . . . . . . . . . . . 249
MQTT sources. . . . . . . . . . . . . . . . . . . . . . . . . . . . . . . . . . . . . . . . . . . . . . . . . . . . 249
OPC UA sources. . . . . . . . . . . . . . . . . . . . . . . . . . . . . . . . . . . . . . . . . . . . . . . . . . 250
REST V2 sources. . . . . . . . . . . . . . . . . . . . . . . . . . . . . . . . . . . . . . . . . . . . . . . . . . 250
6 Table of Contents

Mass Ingestion Streaming targets. . . . . . . . . . . . . . . . . . . . . . . . . . . . . . . . . . . . . . . . . . 250
Amazon Kinesis Data Firehose target. . . . . . . . . . . . . . . . . . . . . . . . . . . . . . . . . . . . . 251
Amazon Kinesis Streams target. . . . . . . . . . . . . . . . . . . . . . . . . . . . . . . . . . . . . . . . . 251
Amazon S3 target. . . . . . . . . . . . . . . . . . . . . . . . . . . . . . . . . . . . . . . . . . . . . . . . . 251
Databricks Delta target. . . . . . . . . . . . . . . . . . . . . . . . . . . . . . . . . . . . . . . . . . . . . . 252
Google Cloud Storage V2 target. . . . . . . . . . . . . . . . . . . . . . . . . . . . . . . . . . . . . . . . . 252
Google PubSub target. . . . . . . . . . . . . . . . . . . . . . . . . . . . . . . . . . . . . . . . . . . . . . . 253
Kafka target. . . . . . . . . . . . . . . . . . . . . . . . . . . . . . . . . . . . . . . . . . . . . . . . . . . . . 253
Microsoft Azure Data Lake Storage Gen2 target. . . . . . . . . . . . . . . . . . . . . . . . . . . . . . 254
Microsoft Azure Event Hubs target. . . . . . . . . . . . . . . . . . . . . . . . . . . . . . . . . . . . . . . 254
Transformations in Mass Ingestion Streaming. . . . . . . . . . . . . . . . . . . . . . . . . . . . . . . . . . 254
Supported data formats. . . . . . . . . . . . . . . . . . . . . . . . . . . . . . . . . . . . . . . . . . . . . . 255
Combiner transformation. . . . . . . . . . . . . . . . . . . . . . . . . . . . . . . . . . . . . . . . . . . . . 255
Filter transformation. . . . . . . . . . . . . . . . . . . . . . . . . . . . . . . . . . . . . . . . . . . . . . . . 256
Python transformation. . . . . . . . . . . . . . . . . . . . . . . . . . . . . . . . . . . . . . . . . . . . . . 256
Splitter transformation. . . . . . . . . . . . . . . . . . . . . . . . . . . . . . . . . . . . . . . . . . . . . . 257
Configuring a streaming ingestion task. . . . . . . . . . . . . . . . . . . . . . . . . . . . . . . . . . . . . . . 257
Before you begin. . . . . . . . . . . . . . . . . . . . . . . . . . . . . . . . . . . . . . . . . . . . . . . . . . 258
Defining basic task information. . . . . . . . . . . . . . . . . . . . . . . . . . . . . . . . . . . . . . . . . 258
Configuring a source . . . . . . . . . . . . . . . . . . . . . . . . . . . . . . . . . . . . . . . . . . . . . . . 258
Configuring a target . . . . . . . . . . . . . . . . . . . . . . . . . . . . . . . . . . . . . . . . . . . . . . . . 265
Configuring a transformation . . . . . . . . . . . . . . . . . . . . . . . . . . . . . . . . . . . . . . . . . . 272
Configuring runtime options. . . . . . . . . . . . . . . . . . . . . . . . . . . . . . . . . . . . . . . . . . . 275
Deploying a streaming ingestion task. . . . . . . . . . . . . . . . . . . . . . . . . . . . . . . . . . . . . 276
Undeploying a streaming ingestion job. . . . . . . . . . . . . . . . . . . . . . . . . . . . . . . . . . . . 276
Stopping and resuming streaming ingestion jobs. . . . . . . . . . . . . . . . . . . . . . . . . . . . . 277
Chapter 7: Monitoring Mass Ingestion jobs. . . . . . . . . . . . . . . . . . . . . . . . . . . . . . . . . 278Monitoring your ingestion jobs. . . . . . . . . . . . . . . . . . . . . . . . . . . . . . . . . . . . . . . . . . . . 278
Monitoring all ingestion jobs. . . . . . . . . . . . . . . . . . . . . . . . . . . . . . . . . . . . . . . . . . . . . . 279
Job properties. . . . . . . . . . . . . . . . . . . . . . . . . . . . . . . . . . . . . . . . . . . . . . . . . . . . . . . 282
Viewing details for an ingestion job. . . . . . . . . . . . . . . . . . . . . . . . . . . . . . . . . . . . . . . . . 283
Database ingestion job details. . . . . . . . . . . . . . . . . . . . . . . . . . . . . . . . . . . . . . . . . 283
File ingestion job details. . . . . . . . . . . . . . . . . . . . . . . . . . . . . . . . . . . . . . . . . . . . . 289
Streaming ingestion job details. . . . . . . . . . . . . . . . . . . . . . . . . . . . . . . . . . . . . . . . . 291
Chapter 8: Asset Management. . . . . . . . . . . . . . . . . . . . . . . . . . . . . . . . . . . . . . . . . . . . . 296Editing ingestion tasks. . . . . . . . . . . . . . . . . . . . . . . . . . . . . . . . . . . . . . . . . . . . . . . . . 296
Copying projects, folders, and tasks. . . . . . . . . . . . . . . . . . . . . . . . . . . . . . . . . . . . . . . . . 297
Moving folders and tasks. . . . . . . . . . . . . . . . . . . . . . . . . . . . . . . . . . . . . . . . . . . . . . . . 297
Renaming projects and folders. . . . . . . . . . . . . . . . . . . . . . . . . . . . . . . . . . . . . . . . . . . . 297
Renaming database ingestion tasks. . . . . . . . . . . . . . . . . . . . . . . . . . . . . . . . . . . . . . . . . 298
Renaming file ingestion tasks. . . . . . . . . . . . . . . . . . . . . . . . . . . . . . . . . . . . . . . . . . . . . 298
Table of Contents 7
Renaming streaming ingestion tasks. . . . . . . . . . . . . . . . . . . . . . . . . . . . . . . . . . . . . . . . 299
Deleting projects, folders, and tasks. . . . . . . . . . . . . . . . . . . . . . . . . . . . . . . . . . . . . . . . . 299
Tags. . . . . . . . . . . . . . . . . . . . . . . . . . . . . . . . . . . . . . . . . . . . . . . . . . . . . . . . . . . . . 300
Creating tags. . . . . . . . . . . . . . . . . . . . . . . . . . . . . . . . . . . . . . . . . . . . . . . . . . . . 300
Assigning tags to an ingestion task. . . . . . . . . . . . . . . . . . . . . . . . . . . . . . . . . . . . . . 301
Editing and deleting tags. . . . . . . . . . . . . . . . . . . . . . . . . . . . . . . . . . . . . . . . . . . . . 302
Asset dependencies. . . . . . . . . . . . . . . . . . . . . . . . . . . . . . . . . . . . . . . . . . . . . . . . . . . 302
Configuring user permissions on an ingestion task . . . . . . . . . . . . . . . . . . . . . . . . . . . . . . . 303
Asset migration. . . . . . . . . . . . . . . . . . . . . . . . . . . . . . . . . . . . . . . . . . . . . . . . . . . . . . 304
Dependent objects. . . . . . . . . . . . . . . . . . . . . . . . . . . . . . . . . . . . . . . . . . . . . . . . . 304
Schedules. . . . . . . . . . . . . . . . . . . . . . . . . . . . . . . . . . . . . . . . . . . . . . . . . . . . . . 305
Asset export. . . . . . . . . . . . . . . . . . . . . . . . . . . . . . . . . . . . . . . . . . . . . . . . . . . . . 305
Asset import. . . . . . . . . . . . . . . . . . . . . . . . . . . . . . . . . . . . . . . . . . . . . . . . . . . . . 308
Post-import tasks. . . . . . . . . . . . . . . . . . . . . . . . . . . . . . . . . . . . . . . . . . . . . . . . . . 310
Source control. . . . . . . . . . . . . . . . . . . . . . . . . . . . . . . . . . . . . . . . . . . . . . . . . . . . . . . 310
Source control actions. . . . . . . . . . . . . . . . . . . . . . . . . . . . . . . . . . . . . . . . . . . . . . 311
Source control and the Git repository. . . . . . . . . . . . . . . . . . . . . . . . . . . . . . . . . . . . . 311
Configuring repository access. . . . . . . . . . . . . . . . . . . . . . . . . . . . . . . . . . . . . . . . . . 312
Source control pulls. . . . . . . . . . . . . . . . . . . . . . . . . . . . . . . . . . . . . . . . . . . . . . . . 312
Checking out and checking in objects. . . . . . . . . . . . . . . . . . . . . . . . . . . . . . . . . . . . . 314
Deleting an object. . . . . . . . . . . . . . . . . . . . . . . . . . . . . . . . . . . . . . . . . . . . . . . . . 315
Reverting to an older version. . . . . . . . . . . . . . . . . . . . . . . . . . . . . . . . . . . . . . . . . . 315
Undoing a checkout. . . . . . . . . . . . . . . . . . . . . . . . . . . . . . . . . . . . . . . . . . . . . . . . 315
Unlinking an object. . . . . . . . . . . . . . . . . . . . . . . . . . . . . . . . . . . . . . . . . . . . . . . . . 316
Working with multiple objects. . . . . . . . . . . . . . . . . . . . . . . . . . . . . . . . . . . . . . . . . . 316
Viewing source control columns on the Explore page. . . . . . . . . . . . . . . . . . . . . . . . . . . 317
Source control best practices. . . . . . . . . . . . . . . . . . . . . . . . . . . . . . . . . . . . . . . . . . 317
Chapter 9: Troubleshooting. . . . . . . . . . . . . . . . . . . . . . . . . . . . . . . . . . . . . . . . . . . . . . . . 319Troubleshooting a database ingestion task. . . . . . . . . . . . . . . . . . . . . . . . . . . . . . . . . . . . 319
Troubleshooting a streaming ingestion task. . . . . . . . . . . . . . . . . . . . . . . . . . . . . . . . . . . . 321
Index. . . . . . . . . . . . . . . . . . . . . . . . . . . . . . . . . . . . . . . . . . . . . . . . . . . . . . . . . . . 323
8 Table of Contents
PrefaceRead Informatica Intelligent Cloud Services Mass Ingestion to learn how to create, run, monitor, and manage database ingestion tasks and streaming ingestion tasks in the Mass Ingestion service.
9
C h a p t e r 1
Introducing Mass IngestionUse the Informatica Intelligent Cloud Services Mass Ingestion service to ingest data at scale from selected database and streaming data sources and transfer the data with low latency to selected messaging systems and cloud targets.
Mass Ingestion provides the following ingestion solutions:
• Mass Ingestion Databases. Propagates data from source objects in a database management system (DBMS) to multiple types of targets. A database ingestion task can transfer a point-in-time snapshot of all source data in a schema to a target in a batch operation. A database ingestion task can also incrementally propagate DML data and schema changes in near real time from a database source to a target on a continuous basis. If you select the combined initial and incremental load type, the database ingestion task performs an initial load and then automatically switches to incremental load processing of data changes.
• Mass Ingestion Files. Transfers a large number of files of different types between on-premises and cloud repositories. You can use Mass Ingestion Files to track and monitor file transfers.
• Mass Ingestion Streaming. Transfers real-time streaming and machine data from selected sources to selected messaging systems and batch targets.
Make sure your organization has the Cloud Unified Mass Ingestion Subscription or Trial Edition, which covers all ingestion solutions.
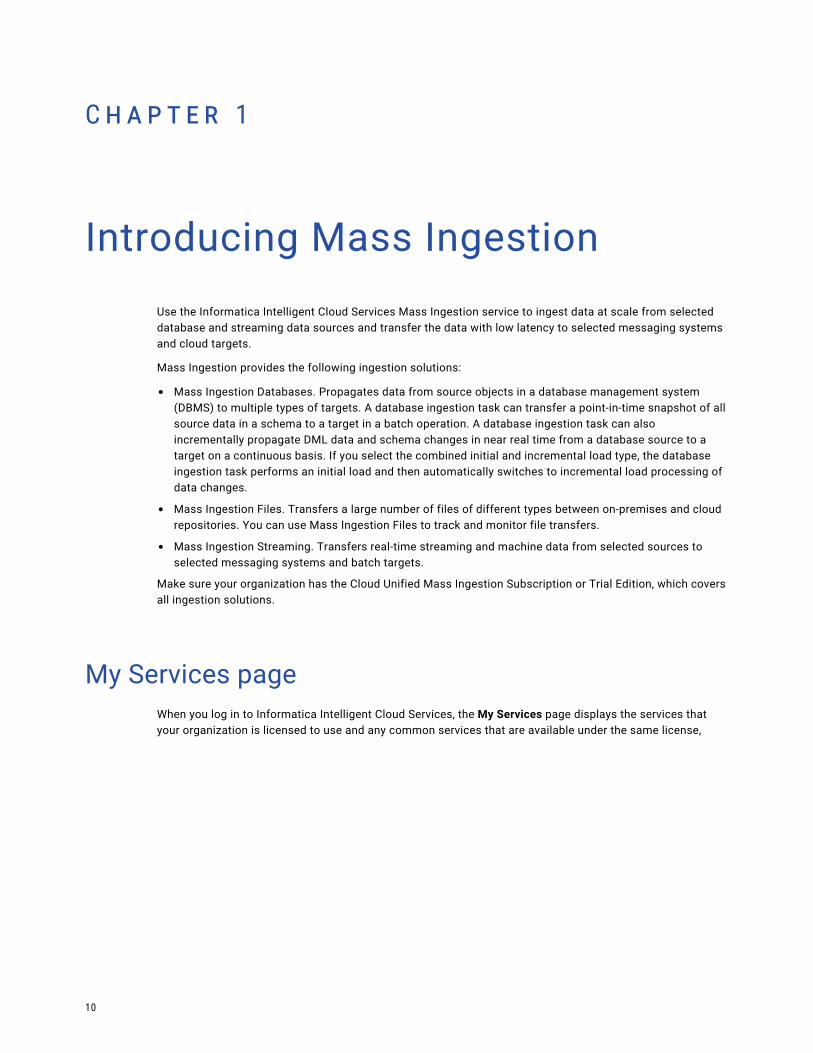
My Services pageWhen you log in to Informatica Intelligent Cloud Services, the My Services page displays the services that your organization is licensed to use and any common services that are available under the same license,
10
such as Administrator. If your organization has trial licenses for additional services, the page also displays those services.
The following image shows an example My Services page:
To use Mass Ingestion, click the Mass Ingestion box.
Explore pageUse the Explore page to work with your Informatica Intelligent Cloud Services projects and assets.
Finding projects and assets on the Explore page
Use any of the following methods to find your projects and assets on the Explore page:
• Explore by projects and folders. View all projects or select a particular project.
• Explore by asset types. View all assets or view assets of a particular type.
• Explore by tags. View assets associated with a particular tag.
• Search for projects or assets. To search all projects, folders, and assets in the organization, view the Explore page by All Projects, and then enter a name or description in the Find box. Or, to narrow your search, view the Explore page by Asset Types and select an asset type from the All Assets list. Then, in the Find box, enter a name or description in full or part.
• Sort the search results. Sort the Explore page by name, asset type, last update date, create date, or description. When you sort by type, the Explore page groups assets by asset type. It does not list the asset types in alphabetical order.
Explore page 11
• Filter the objects on the page. To filter objects, click the Filter icon. To apply a filter, click Add Field, select the property to filter by, and then enter the property value. The filters available depend on how you view the page. You can specify multiple filters.For example, to find all the assets in your organization with the tag SW Region, view the Explore page by All Assets and then click the Filter icon. Add the Tags filter and enter "SW Region."
Tip: Filtering is available on other pages in addition to the Explore page. For example, on the Import Assets page, you can filter by status to find the assets that imported successfully.
You can see projects, folders, and assets for all of the services that you use. If you select an asset to open it or perform an action, and the asset is created in a different service than the one you have open, the service opens in a new browser tab.
The following characters cannot be used on the Explore page:
# ? ' | { } " ^ & [ ] / \Working with projects and assets on the Explore page
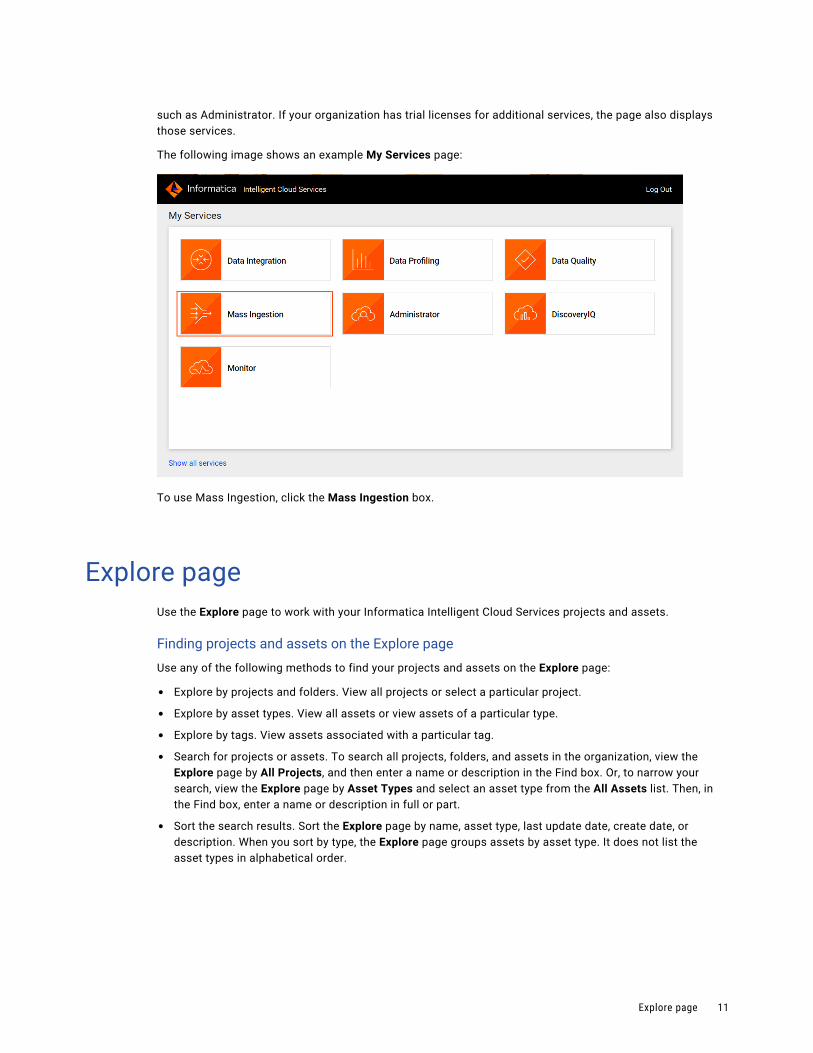
You can perform actions on projects and assets on the Explore page. Click the Actions menu in the row that contains the project or asset. The Actions menu lists the actions you can perform based on your user role privileges and the permissions for the selected objects. For example, your user role might have privileges to view and run tasks but not to delete tasks.
The following image shows the actions that you can perform on a project:
12 Chapter 1: Introducing Mass Ingestion
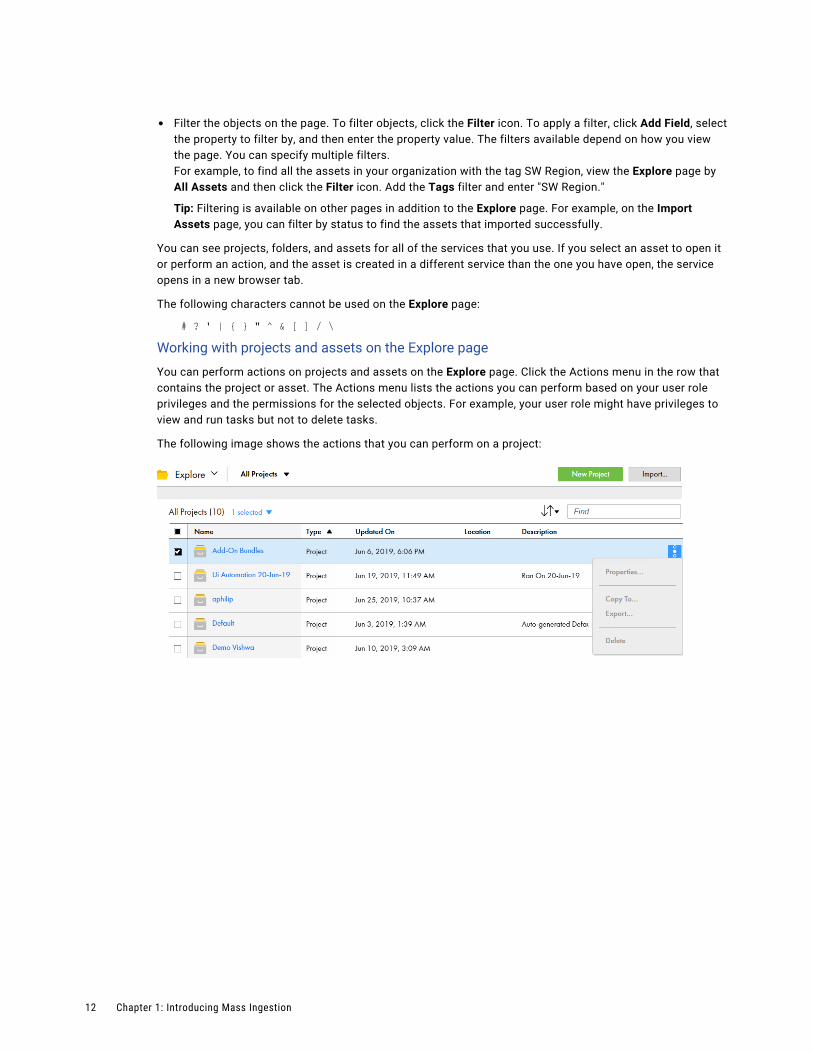
The following image shows actions that you can perform on a streaming ingestion task asset:
You can perform an action on multiple objects at one time. To select the objects individually, select the check box to the left of each object. To select all of the listed objects, select the check box at the top, next to the Name column heading. Then select an action from the n selected or All selected menu.
Customizing the Explore page
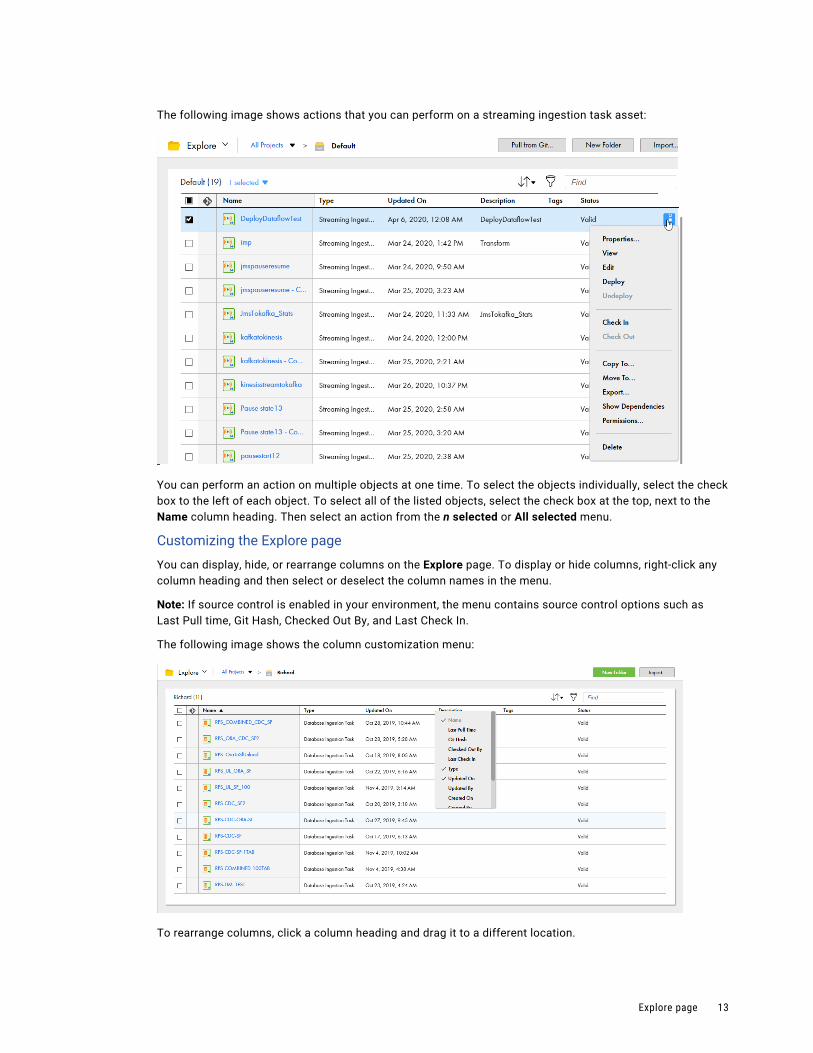
You can display, hide, or rearrange columns on the Explore page. To display or hide columns, right-click any column heading and then select or deselect the column names in the menu.
Note: If source control is enabled in your environment, the menu contains source control options such as Last Pull time, Git Hash, Checked Out By, and Last Check In.
The following image shows the column customization menu:
To rearrange columns, click a column heading and drag it to a different location.
Explore page 13
C h a p t e r 2
Getting StartedBefore you configure an ingestion task, verify that all prerequisite tasks have been completed.
Step 1. Check system requirements
Make sure you're using a browser that is compatible with Informatica Intelligent Cloud Services. Check the Informatica Intelligent Cloud Services Product Availability Matrix to verify the types of operating systems, databases, and source and target systems supported by Mass Ingestion.
Step 2. Set up an organization.
If you are the administrator, set up an organization from the Organization page in Administrator. An organization is a secure area within the Informatica Intelligent Cloud Services repository that stores your licenses, user accounts, ingestion tasks, and information about jobs and security.
If your organization has the Organization Hierarchy license, you can create one or more sub-organizations within your organization. Create sub-organizations to represent different business environments within your company. For example, you might create separate sub-organizations to represent your development, testing, and production environments.
Then, verify that your organization has a Cloud Unified Mass Ingestion Edition license, which covers all ingestion types. Also configure users, user groups, and user role permissions.
For more information, see the Administrator help.
Step 3. Download and install a Secure Agent
On the Runtime Environments page in Administrator, download a Secure Agent and install it. A Secure Agent is a lightweight program that runs tasks and enables secure communication across the firewall between your organization and Informatica Intelligent Cloud Services.
After you register the Secure Agent, it downloads the ingestion components and packages based on your licensing and creates an associated runtime environment. A runtime environment is the execution platform for running tasks. You must have at least one runtime environment in your organization for users to be able to run tasks. You can create another runtime environment and add an unassigned Secure Agent to it.
When you download and install a Secure Agent, a Secure Agent group is created. A Secure Agent group can contain one Secure Agent or multiple agents if your license allows it.
Note: For Mass Ingestion Streaming, you can add multiple agents to a Secure Agent group, provided that you have the Secure Agent Cluster license. Then an available agent is picked randomly from the active agent list for the Secure Agent group. However, for Mass Ingestion Databases, a database ingestion job must be deployed to a specific Secure Agent.
For more information about Secure Agents, see the Administrator help.
14
Step 4. Configure the runtime environment
On the Runtime Environments page in Administrator, select your runtime environment. Then configure Secure Agent service properties for the Database Ingestion or Streaming Ingestion service under System Configuration Details. For more information, see “Secure Agent services” on page 15.
Step 5. Configure connections
On the Add-On Connectors page in Administrator, download the add-on connectors that are required for your source and target types. Then, on the Connections page, configure source and target connection properties. See “Mass Ingestion connectors” on page 27 and “Mass Ingestion connection properties” on page 32.
Step 6. Create your project
From the Explore page in Mass Ingestion service, create projects and project folders to organize your ingestion tasks. A project can contain multiple subfolders. See “Creating projects and project folders” on page 25.
Secure Agent servicesSecure Agent services are pluggable microservices that the Secure Agent uses for data processing. Each Secure Agent service runs independently of the other services that run on the agent.
The independent services architecture provides the following benefits:
• The Secure Agent does not restart when you add a connector or package.
• Services are not impacted when another service restarts.
• Downtime during upgrades is minimized. The upgrade process installs a new version of the Secure Agent, updates connector packages, and applies configuration changes for the services. To minimize downtime, the old agent remains available and continues to run ingestion jobs during the upgrade. The new version of the Secure Agent runs jobs that start after the upgrade process completes.
The services that run on a Secure Agent vary based on your licenses and the Informatica Intelligent Cloud Services that your organization uses. For Mass Ingestion, the following Secure Agent services are available:
• Database Ingestion - for running database ingestion jobs
• CMI Streaming Agent - for running streaming ingestion jobs
• Mass Ingestion - for running file ingestion jobs
Each service has a unique set of configuration properties. You might need to configure a service or change the service properties to optimize performance or if you are instructed to do so by Informatica Global Customer Support.
Database Ingestion serviceThe Database Ingestion service (DBMI agent) enables you to define and run database ingestion tasks. You configure database ingestion tasks in the Mass Ingestion service.
After you download the Secure Agent to your runtime environment, the DBMI packages are pushed to the on-premises system where the Secure Agent runs, provided that you have custom licenses for both Mass Ingestion Databases and the DBMI packages. You can then optionally configure properties for the Database Ingestion service that runs on the Secure Agent.
Secure Agent services 15
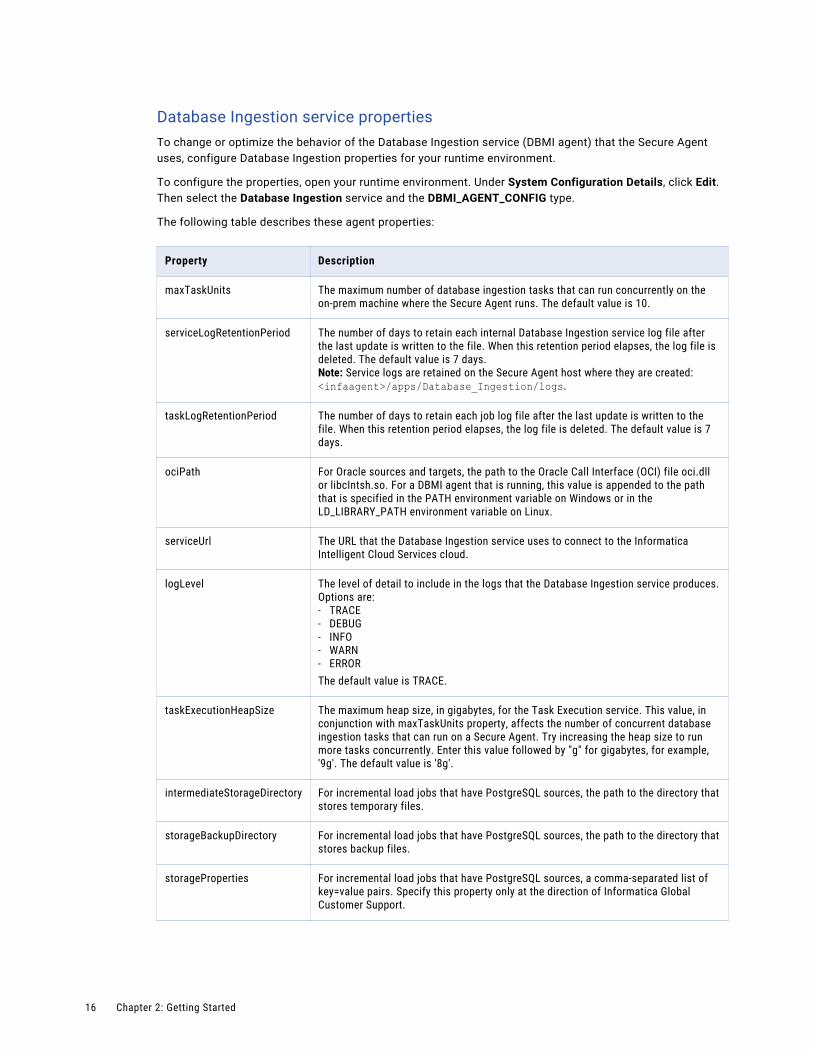
Database Ingestion service propertiesTo change or optimize the behavior of the Database Ingestion service (DBMI agent) that the Secure Agent uses, configure Database Ingestion properties for your runtime environment.
To configure the properties, open your runtime environment. Under System Configuration Details, click Edit. Then select the Database Ingestion service and the DBMI_AGENT_CONFIG type.
The following table describes these agent properties:
Property Description
maxTaskUnits The maximum number of database ingestion tasks that can run concurrently on the on-prem machine where the Secure Agent runs. The default value is 10.
serviceLogRetentionPeriod The number of days to retain each internal Database Ingestion service log file after the last update is written to the file. When this retention period elapses, the log file is deleted. The default value is 7 days.Note: Service logs are retained on the Secure Agent host where they are created: <infaagent>/apps/Database_Ingestion/logs.
taskLogRetentionPeriod The number of days to retain each job log file after the last update is written to the file. When this retention period elapses, the log file is deleted. The default value is 7 days.
ociPath For Oracle sources and targets, the path to the Oracle Call Interface (OCI) file oci.dll or libcIntsh.so. For a DBMI agent that is running, this value is appended to the path that is specified in the PATH environment variable on Windows or in the LD_LIBRARY_PATH environment variable on Linux.
serviceUrl The URL that the Database Ingestion service uses to connect to the Informatica Intelligent Cloud Services cloud.
logLevel The level of detail to include in the logs that the Database Ingestion service produces. Options are:- TRACE- DEBUG- INFO- WARN- ERRORThe default value is TRACE.
taskExecutionHeapSize The maximum heap size, in gigabytes, for the Task Execution service. This value, in conjunction with maxTaskUnits property, affects the number of concurrent database ingestion tasks that can run on a Secure Agent. Try increasing the heap size to run more tasks concurrently. Enter this value followed by "g" for gigabytes, for example, '9g'. The default value is '8g'.
intermediateStorageDirectory For incremental load jobs that have PostgreSQL sources, the path to the directory that stores temporary files.
storageBackupDirectory For incremental load jobs that have PostgreSQL sources, the path to the directory that stores backup files.
storageProperties For incremental load jobs that have PostgreSQL sources, a comma-separated list of key=value pairs. Specify this property only at the direction of Informatica Global Customer Support.
16 Chapter 2: Getting Started
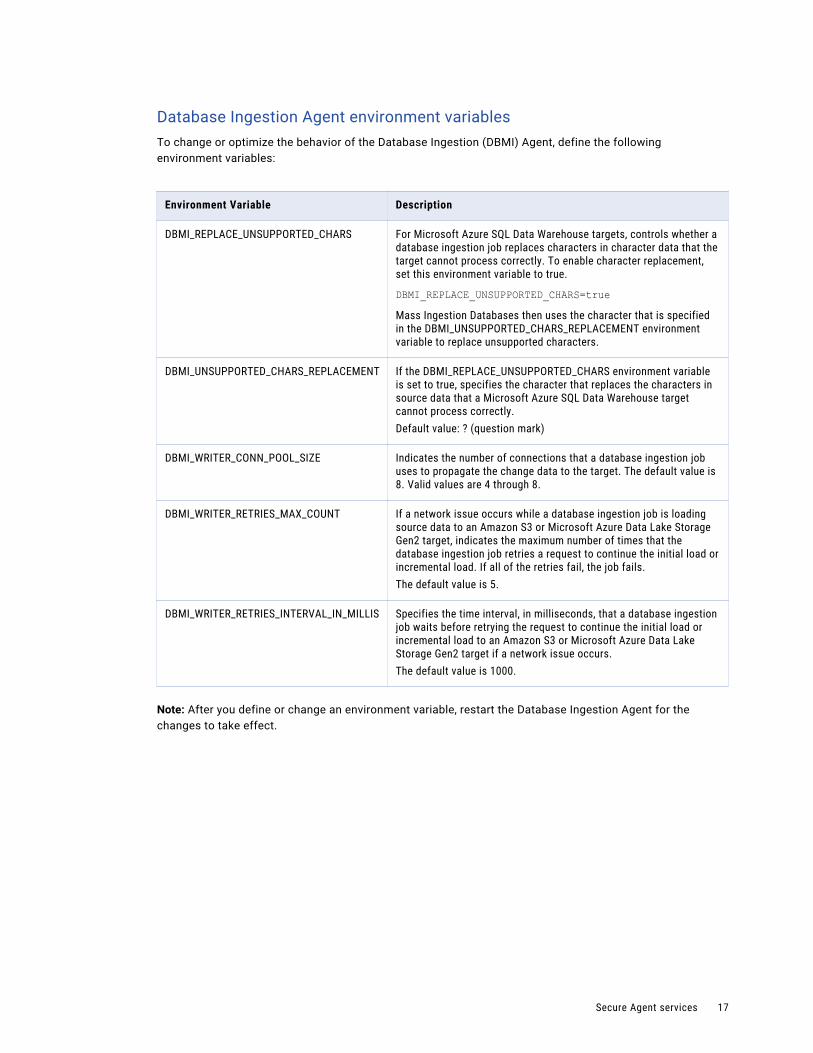
Database Ingestion Agent environment variablesTo change or optimize the behavior of the Database Ingestion (DBMI) Agent, define the following environment variables:
Environment Variable Description
DBMI_REPLACE_UNSUPPORTED_CHARS For Microsoft Azure SQL Data Warehouse targets, controls whether a database ingestion job replaces characters in character data that the target cannot process correctly. To enable character replacement, set this environment variable to true.
DBMI_REPLACE_UNSUPPORTED_CHARS=trueMass Ingestion Databases then uses the character that is specified in the DBMI_UNSUPPORTED_CHARS_REPLACEMENT environment variable to replace unsupported characters.
DBMI_UNSUPPORTED_CHARS_REPLACEMENT If the DBMI_REPLACE_UNSUPPORTED_CHARS environment variable is set to true, specifies the character that replaces the characters in source data that a Microsoft Azure SQL Data Warehouse target cannot process correctly.Default value: ? (question mark)
DBMI_WRITER_CONN_POOL_SIZE Indicates the number of connections that a database ingestion job uses to propagate the change data to the target. The default value is 8. Valid values are 4 through 8.
DBMI_WRITER_RETRIES_MAX_COUNT If a network issue occurs while a database ingestion job is loading source data to an Amazon S3 or Microsoft Azure Data Lake Storage Gen2 target, indicates the maximum number of times that the database ingestion job retries a request to continue the initial load or incremental load. If all of the retries fail, the job fails.The default value is 5.
DBMI_WRITER_RETRIES_INTERVAL_IN_MILLIS Specifies the time interval, in milliseconds, that a database ingestion job waits before retrying the request to continue the initial load or incremental load to an Amazon S3 or Microsoft Azure Data Lake Storage Gen2 target if a network issue occurs.The default value is 1000.
Note: After you define or change an environment variable, restart the Database Ingestion Agent for the changes to take effect.
Secure Agent services 17
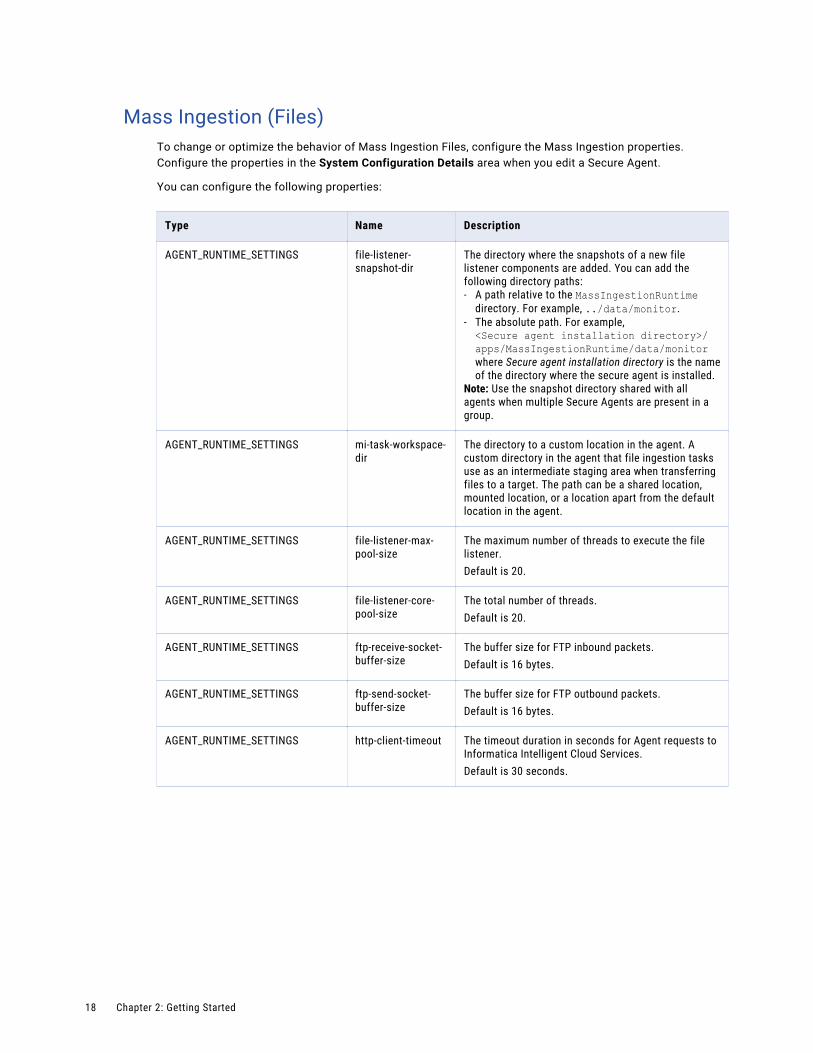
Mass Ingestion (Files)To change or optimize the behavior of Mass Ingestion Files, configure the Mass Ingestion properties. Configure the properties in the System Configuration Details area when you edit a Secure Agent.
You can configure the following properties:
Type Name Description
AGENT_RUNTIME_SETTINGS file-listener-snapshot-dir
The directory where the snapshots of a new file listener components are added. You can add the following directory paths:- A path relative to the MassIngestionRuntime
directory. For example, ../data/monitor.- The absolute path. For example,<Secure agent installation directory>/apps/MassIngestionRuntime/data/monitorwhere Secure agent installation directory is the name of the directory where the secure agent is installed.
Note: Use the snapshot directory shared with all agents when multiple Secure Agents are present in a group.
AGENT_RUNTIME_SETTINGS mi-task-workspace-dir
The directory to a custom location in the agent. A custom directory in the agent that file ingestion tasks use as an intermediate staging area when transferring files to a target. The path can be a shared location, mounted location, or a location apart from the default location in the agent.
AGENT_RUNTIME_SETTINGS file-listener-max-pool-size
The maximum number of threads to execute the file listener.Default is 20.
AGENT_RUNTIME_SETTINGS file-listener-core-pool-size
The total number of threads.Default is 20.
AGENT_RUNTIME_SETTINGS ftp-receive-socket-buffer-size
The buffer size for FTP inbound packets.Default is 16 bytes.
AGENT_RUNTIME_SETTINGS ftp-send-socket-buffer-size
The buffer size for FTP outbound packets.Default is 16 bytes.
AGENT_RUNTIME_SETTINGS http-client-timeout The timeout duration in seconds for Agent requests to Informatica Intelligent Cloud Services.Default is 30 seconds.
18 Chapter 2: Getting Started
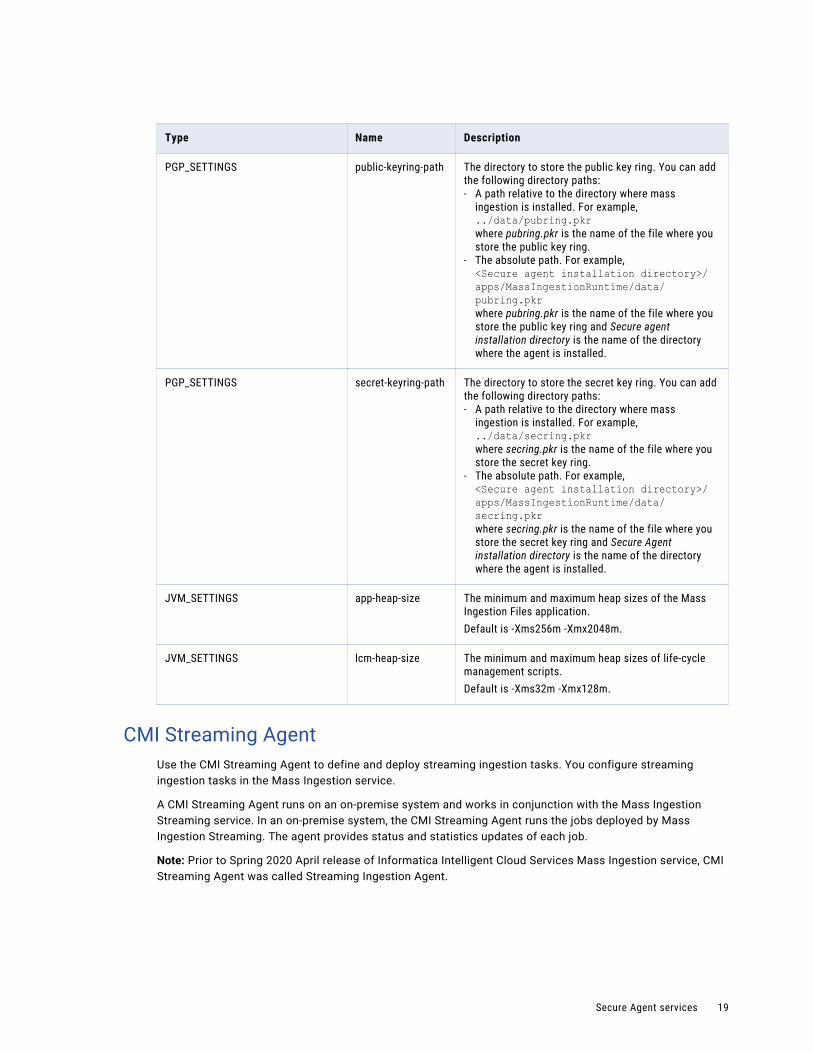
Type Name Description
PGP_SETTINGS public-keyring-path The directory to store the public key ring. You can add the following directory paths:- A path relative to the directory where mass
ingestion is installed. For example,../data/pubring.pkrwhere pubring.pkr is the name of the file where you store the public key ring.
- The absolute path. For example,<Secure agent installation directory>/apps/MassIngestionRuntime/data/pubring.pkrwhere pubring.pkr is the name of the file where you store the public key ring and Secure agent installation directory is the name of the directory where the agent is installed.
PGP_SETTINGS secret-keyring-path The directory to store the secret key ring. You can add the following directory paths:- A path relative to the directory where mass
ingestion is installed. For example,../data/secring.pkrwhere secring.pkr is the name of the file where you store the secret key ring.
- The absolute path. For example,<Secure agent installation directory>/apps/MassIngestionRuntime/data/secring.pkrwhere secring.pkr is the name of the file where you store the secret key ring and Secure Agent installation directory is the name of the directory where the agent is installed.
JVM_SETTINGS app-heap-size The minimum and maximum heap sizes of the Mass Ingestion Files application.Default is -Xms256m -Xmx2048m.
JVM_SETTINGS lcm-heap-size The minimum and maximum heap sizes of life-cycle management scripts.Default is -Xms32m -Xmx128m.
CMI Streaming AgentUse the CMI Streaming Agent to define and deploy streaming ingestion tasks. You configure streaming ingestion tasks in the Mass Ingestion service.
A CMI Streaming Agent runs on an on-premise system and works in conjunction with the Mass Ingestion Streaming service. In an on-premise system, the CMI Streaming Agent runs the jobs deployed by Mass Ingestion Streaming. The agent provides status and statistics updates of each job.
Note: Prior to Spring 2020 April release of Informatica Intelligent Cloud Services Mass Ingestion service, CMI Streaming Agent was called Streaming Ingestion Agent.
Secure Agent services 19

CMI Streaming Agent propertiesTo change or optimize the behavior of the CMI Streaming Agent, configure agent properties for your run-time environment. Configure CMI Streaming Agent properties in the System Configuration Details area when you edit a Secure Agent.
You can configure Engine, Agent, and Script properties of a CMI Streaming Agent.The following image shows some of the CMI Streaming Agent properties:
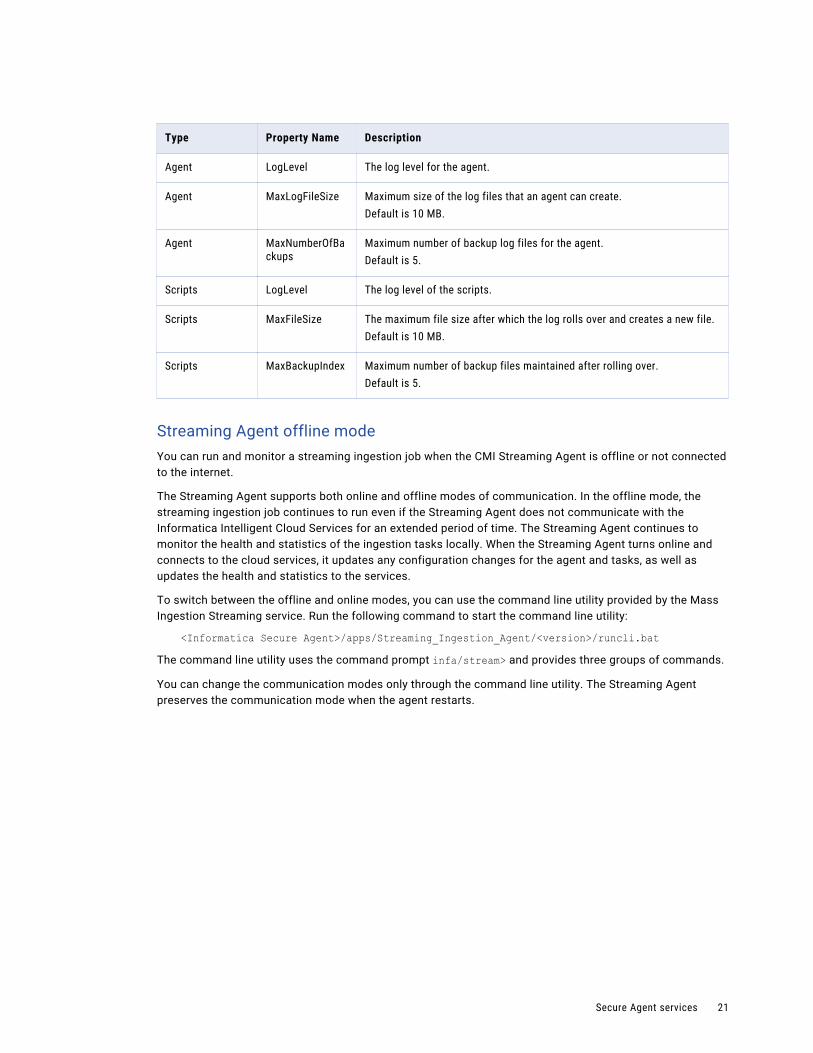
You can configure the following CMI Streaming Agent properties:
Type Property Name Description
Engine MaxLogFileSize The maximum size of the log file that the engine can create.Default is 5 MB.
Engine LogLevel The log level for the engine.
Agent DataflowPullInterval
The time interval after which the agent checks for updates in the task.Default is 60 seconds.
Agent JVM List of JVM properties for the agent. For example: [-Xms256M -Xmx256M]
20 Chapter 2: Getting Started
Type Property Name Description
Agent LogLevel The log level for the agent.
Agent MaxLogFileSize Maximum size of the log files that an agent can create.Default is 10 MB.
Agent MaxNumberOfBackups
Maximum number of backup log files for the agent.Default is 5.
Scripts LogLevel The log level of the scripts.
Scripts MaxFileSize The maximum file size after which the log rolls over and creates a new file.Default is 10 MB.
Scripts MaxBackupIndex Maximum number of backup files maintained after rolling over.Default is 5.
Streaming Agent offline modeYou can run and monitor a streaming ingestion job when the CMI Streaming Agent is offline or not connected to the internet.
The Streaming Agent supports both online and offline modes of communication. In the offline mode, the streaming ingestion job continues to run even if the Streaming Agent does not communicate with the Informatica Intelligent Cloud Services for an extended period of time. The Streaming Agent continues to monitor the health and statistics of the ingestion tasks locally. When the Streaming Agent turns online and connects to the cloud services, it updates any configuration changes for the agent and tasks, as well as updates the health and statistics to the services.
To switch between the offline and online modes, you can use the command line utility provided by the Mass Ingestion Streaming service. Run the following command to start the command line utility:
<Informatica Secure Agent>/apps/Streaming_Ingestion_Agent/<version>/runcli.batThe command line utility uses the command prompt infa/stream> and provides three groups of commands.
You can change the communication modes only through the command line utility. The Streaming Agent preserves the communication mode when the agent restarts.
Secure Agent services 21

The following table lists the commands of this command line utility:
Command Description Example
app-config Shows the current configuration of the Streaming Agent application.
infa/stream :>app-config deploy.pull.interval : 60health.poll.interval : 30minifi.ingester.file.location : ./conf siagent.communication.mode : Online siagent.monitoring.persist.dir : ../datasiagent.statistics.post.batchsize : 720siagent.statistics.post.concurrency : 60siagent.status.persist.dir : ../datastatistics.poll.interval : 30
app-setconfig Use this command to configure the following properties:- siagent.communication.mode.
Use to configure offline or online communication mode.
- siagent.statistics.post.batchsize. Use to define the number of snapshots in a batch.
- siagent.statistics.post.concurrency. Use to define the number of worker threads to post statistics.
The --key and --value tokens are optional.
infa/stream :>app-setconfig --key siagent.statistics.post.batchsize --value 20orinfa/stream :>app-setconfig siagent.statistics.post.batchsize 20
app-status Shows the current status of the Streaming Agent.The health status code and health error message indicates the status of the agent (service) shown on the Administrator.uptime indicates the number of seconds since the Streaming Agent application is available.
infa/stream :>app-status health error message : No errorshealth status code : RUNNING(0)uptime : 67828
app-statistics Shows metadata and status of overall statistics collection in the Streaming Agent.- collection interval. Interval of
statistics collection, in seconds.- post interval. Frequency of
statistics posted or attempted post.- max batch size. Maximum number
of snapshots posted in a single http post.
- last batch size. Number of snapshots in the last http post.
- last time collected. Timestamp when any statistics were last collected.
- last time posted. Timestamp when any statistics were last posted.
infa/stream :>app-statisticscollection interval : 30last batch size : 2last time collected : 7/3/20 10:19:03 AM ISTlast time posted : 7/3/20 10:18:53 AM ISTmax batch size : 20pending snapshots : 3post interval : 30
22 Chapter 2: Getting Started

Command Description Example
clear Clears the screen. -
exit, quit Quits the application. -
help Shows a summary of all the commands available.
infa/stream :>helpAVAILABLE COMMANDSAgent Application Commandsapp-config: Show agent application configurationapp-setmode: Set the communication mode [Online/Offline]app-status: Show agent application statusBuilt-In Commandsclear: Clear the shell screen.exit, quit: Exit the shell.help: Display help about available commands.Streaming Ingestion Task Commandstask-health: Show streaming ingestion task healthtask-list: Show streaming ingestion task listtask-metadata: Show streaming ingestion task metadata
task-list Shows the list of streaming ingestion jobs currently deployed on the Streaming Agent.
infa/stream :>task-list6e61e76f-2618-4292-ab3d-dd181f47ee91ad5053c7-5ac2-493f-8cbb-a24900b61f71
task-health Shows the health status of all streaming ingestion jobs in the Streaming Agent.Use the options --name or --id to specify a job.If none are specified, all jobs are listed.
infa/stream :>task-health --name aby_df4 processors : [{"id":"14a7a095-7fac-4fc3-ac5c-705369132516","status":"ERROR"},{"id":"821e6730-3aed-4d3f-b875-45f424b6b963","status":"RUNNING"}] status : ERROR timestamp : Sat May 09 06:04:08 IST 2020 infa/stream :>task-health 6e61e76f-2618-4292-ab3d-dd181f47ee91processors : [{"id":"2a0b8715-aa7a-46c5-9d6a-6a356f5a0102","status":"ERROR"},{"id":"1172f3a8-35dd-41ef-be4b-bc0cf37e3794","status":"RUNNING"}] status : ERROR timestamp : Sat May 09 06:04:08 IST 2020 ad5053c7-5ac2-493f-8cbb-a24900b61f71 processors : [{"id":"14a7a095-7fac-4fc3-ac5c-705369132516","status":"ERROR"},{"id":"821e6730-3aed-4d3f-b875-45f424b6b963","status":"RUNNING"}] status : ERROR timestamp : Sat May 09 06:04:08 IST 2020
Secure Agent services 23
Command Description Example
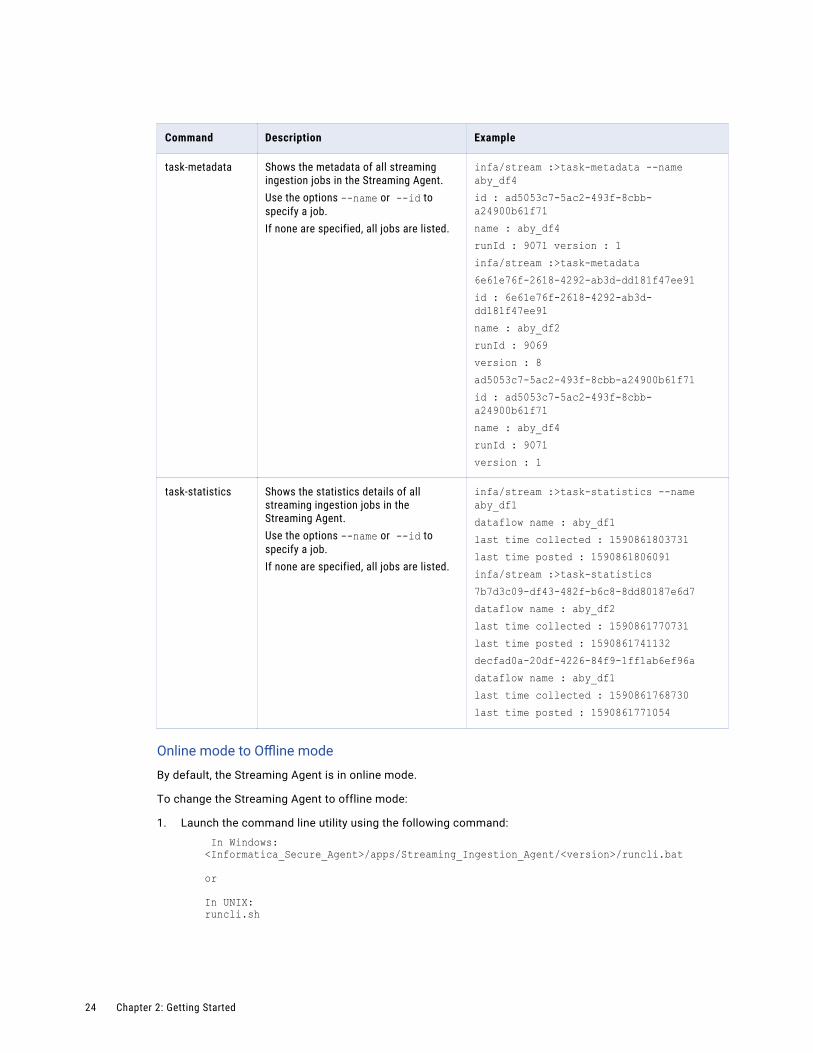
task-metadata Shows the metadata of all streaming ingestion jobs in the Streaming Agent.Use the options --name or --id to specify a job.If none are specified, all jobs are listed.
infa/stream :>task-metadata --name aby_df4 id : ad5053c7-5ac2-493f-8cbb-a24900b61f71 name : aby_df4 runId : 9071 version : 1 infa/stream :>task-metadata 6e61e76f-2618-4292-ab3d-dd181f47ee91 id : 6e61e76f-2618-4292-ab3d-dd181f47ee91 name : aby_df2 runId : 9069 version : 8 ad5053c7-5ac2-493f-8cbb-a24900b61f71 id : ad5053c7-5ac2-493f-8cbb-a24900b61f71 name : aby_df4 runId : 9071 version : 1
task-statistics Shows the statistics details of all streaming ingestion jobs in the Streaming Agent.Use the options --name or --id to specify a job.If none are specified, all jobs are listed.
infa/stream :>task-statistics --name aby_df1dataflow name : aby_df1 last time collected : 1590861803731 last time posted : 1590861806091infa/stream :>task-statistics 7b7d3c09-df43-482f-b6c8-8dd80187e6d7 dataflow name : aby_df2 last time collected : 1590861770731 last time posted : 1590861741132 decfad0a-20df-4226-84f9-1ff1ab6ef96a dataflow name : aby_df1 last time collected : 1590861768730 last time posted : 1590861771054
Online mode to Offline mode
By default, the Streaming Agent is in online mode.
To change the Streaming Agent to offline mode:
1. Launch the command line utility using the following command:
In Windows:<Informatica_Secure_Agent>/apps/Streaming_Ingestion_Agent/<version>/runcli.bat
or
In UNIX:runcli.sh
24 Chapter 2: Getting Started
2. Set the Streaming Agent to offline mode:
app-setconfig --key siagent.communication.mode --value Offlineorapp-setconfig siagent.communication.mode Offline
The Streaming Agent stops sending health updates and statistics of any streaming ingestion job.
Offline mode to Online mode
To change the Streaming Agent to online mode:
1. Launch the command line utility using the following command:
In Windows:<Informatica_Secure_Agent>/apps/Streaming_Ingestion_Agent/<version>/runcli.bat
or
In UNIX:runcli.sh
2. Set the Streaming Agent to online mode:
app-setconfig --key siagent.communication.mode --value Onlineorapp-setconfig siagent.communication.mode Online
The Streaming Agent starts sending health updates of all the streaming ingestion jobs and the updates appear in the Monitoring page. It starts sending statistics of all the streaming ingestion jobs including the statistics backlog collected while it was offline to the service. It also synchronizes the updates to the streaming ingestion jobs or adds the new streaming ingestion job deployed while it was offline to the service.
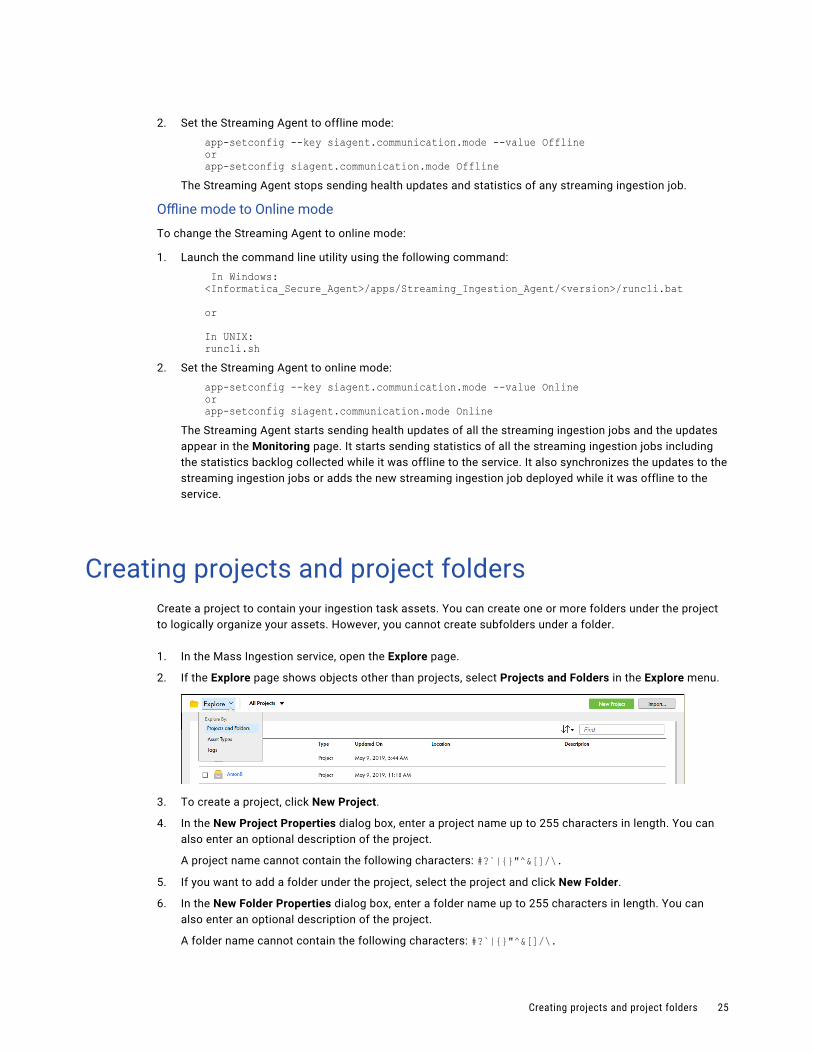
Creating projects and project foldersCreate a project to contain your ingestion task assets. You can create one or more folders under the project to logically organize your assets. However, you cannot create subfolders under a folder.
1. In the Mass Ingestion service, open the Explore page.
2. If the Explore page shows objects other than projects, select Projects and Folders in the Explore menu.
3. To create a project, click New Project.
4. In the New Project Properties dialog box, enter a project name up to 255 characters in length. You can also enter an optional description of the project.
A project name cannot contain the following characters: #?`|{}"^&[]/\.5. If you want to add a folder under the project, select the project and click New Folder.
6. In the New Folder Properties dialog box, enter a folder name up to 255 characters in length. You can also enter an optional description of the project.
A folder name cannot contain the following characters: #?`|{}"^&[]/\.
Creating projects and project folders 25
When you define an ingestion task, you must specify the project or project folder location to contain the task definition.
Editing your user profileYour user profile contains the details of your Informatica Intelligent Cloud Services user account.
You can update the following information in your profile:
• Email address
• Time zone (used in the job execution time stamps on the All Jobs, Running Jobs, My Jobs, Import/Export Logs, and My Import/Export Logs pages)
• Password
• Security question
To edit your user profile:
1. Click the User icon in the top right corner of the Informatica Intelligent Cloud Services window and then select Profile.
2. On the Profile page, add or edit personal information such as your name, job title, phone number, email address, and time zone.
3. Optionally, change your password or security question.
4. Click Save.
26 Chapter 2: Getting Started
C h a p t e r 3
Connectors and ConnectionsConnections provide access to data in cloud and on-premises applications, platforms, databases, and flat files. Before you can define a connection, ensure that the connector for the source or target type is installed in Informatica Intelligent Cloud Services.
If multiple connectors are available for a source or target type, get the one that your ingestion type supports. Some connectors are pre-installed. If you need a connector that is not pre-installed, you can download it from the Add-On Connectors page in Administrator.
Mass Ingestion connectorsYou must have the correct connectors to create connections for the sources and targets in your ingestion tasks.
Before you can create connections, your organization administrator must ensure that the connectors for the sources and targets are available in Informatica Intelligent Cloud Services.
Some connectors, such as Flat File, MySQL, and Microsoft SQL Server connectors, are pre-installed. You can add other add-on connectors from Administrator. Add-on connectors are created by Informatica or an Informatica partner. You can install a free trial version of an add-on connector or buy the connector from Informatica.
After you install an add-on connector, it becomes available as a connection type for the organization for which the connector license is enabled.
For more information about add-on connectors, see "Connections" in the Administrator help.
27
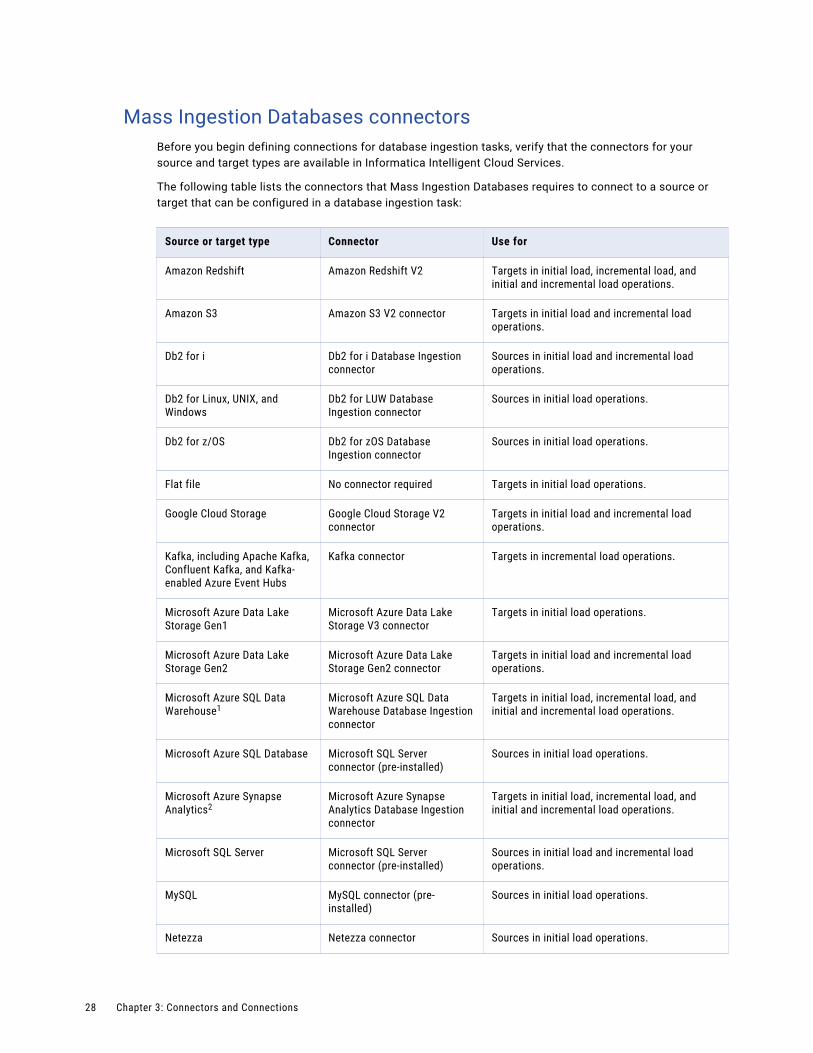
Mass Ingestion Databases connectorsBefore you begin defining connections for database ingestion tasks, verify that the connectors for your source and target types are available in Informatica Intelligent Cloud Services.
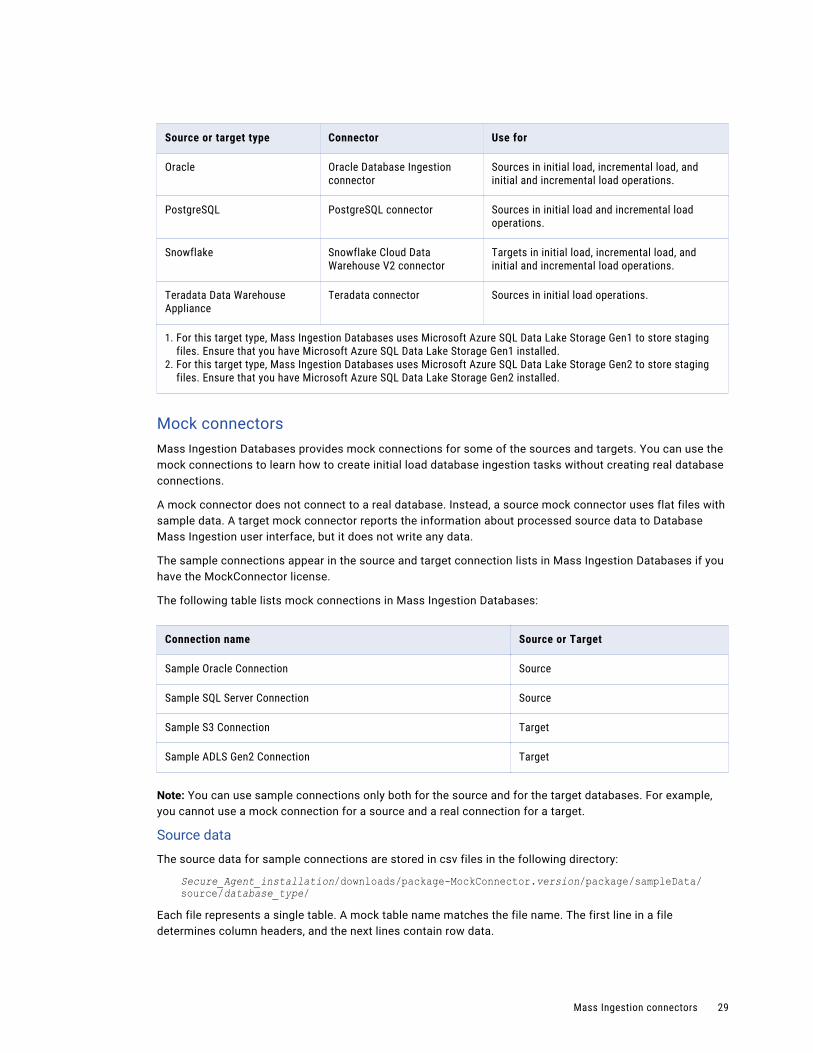
The following table lists the connectors that Mass Ingestion Databases requires to connect to a source or target that can be configured in a database ingestion task:
Source or target type Connector Use for
Amazon Redshift Amazon Redshift V2 Targets in initial load, incremental load, and initial and incremental load operations.
Amazon S3 Amazon S3 V2 connector Targets in initial load and incremental load operations.
Db2 for i Db2 for i Database Ingestion connector
Sources in initial load and incremental load operations.
Db2 for Linux, UNIX, and Windows
Db2 for LUW Database Ingestion connector
Sources in initial load operations.
Db2 for z/OS Db2 for zOS Database Ingestion connector
Sources in initial load operations.
Flat file No connector required Targets in initial load operations.
Google Cloud Storage Google Cloud Storage V2 connector
Targets in initial load and incremental load operations.
Kafka, including Apache Kafka, Confluent Kafka, and Kafka-enabled Azure Event Hubs
Kafka connector Targets in incremental load operations.
Microsoft Azure Data Lake Storage Gen1
Microsoft Azure Data Lake Storage V3 connector
Targets in initial load operations.
Microsoft Azure Data Lake Storage Gen2
Microsoft Azure Data Lake Storage Gen2 connector
Targets in initial load and incremental load operations.
Microsoft Azure SQL Data Warehouse1
Microsoft Azure SQL Data Warehouse Database Ingestion connector
Targets in initial load, incremental load, and initial and incremental load operations.
Microsoft Azure SQL Database Microsoft SQL Server connector (pre-installed)
Sources in initial load operations.
Microsoft Azure Synapse Analytics2
Microsoft Azure Synapse Analytics Database Ingestion connector
Targets in initial load, incremental load, and initial and incremental load operations.
Microsoft SQL Server Microsoft SQL Server connector (pre-installed)
Sources in initial load and incremental load operations.
MySQL MySQL connector (pre-installed)
Sources in initial load operations.
Netezza Netezza connector Sources in initial load operations.
28 Chapter 3: Connectors and Connections
Source or target type Connector Use for
Oracle Oracle Database Ingestion connector
Sources in initial load, incremental load, and initial and incremental load operations.
PostgreSQL PostgreSQL connector Sources in initial load and incremental load operations.
Snowflake Snowflake Cloud Data Warehouse V2 connector
Targets in initial load, incremental load, and initial and incremental load operations.
Teradata Data Warehouse Appliance
Teradata connector Sources in initial load operations.
1. For this target type, Mass Ingestion Databases uses Microsoft Azure SQL Data Lake Storage Gen1 to store staging files. Ensure that you have Microsoft Azure SQL Data Lake Storage Gen1 installed.
2. For this target type, Mass Ingestion Databases uses Microsoft Azure SQL Data Lake Storage Gen2 to store staging files. Ensure that you have Microsoft Azure SQL Data Lake Storage Gen2 installed.
Mock connectorsMass Ingestion Databases provides mock connections for some of the sources and targets. You can use the mock connections to learn how to create initial load database ingestion tasks without creating real database connections.
A mock connector does not connect to a real database. Instead, a source mock connector uses flat files with sample data. A target mock connector reports the information about processed source data to Database Mass Ingestion user interface, but it does not write any data.
The sample connections appear in the source and target connection lists in Mass Ingestion Databases if you have the MockConnector license.
The following table lists mock connections in Mass Ingestion Databases:
Connection name Source or Target
Sample Oracle Connection Source
Sample SQL Server Connection Source
Sample S3 Connection Target
Sample ADLS Gen2 Connection Target
Note: You can use sample connections only both for the source and for the target databases. For example, you cannot use a mock connection for a source and a real connection for a target.
Source data
The source data for sample connections are stored in csv files in the following directory:
Secure_Agent_installation/downloads/package-MockConnector.version/package/sampleData/source/database_type/
Each file represents a single table. A mock table name matches the file name. The first line in a file determines column headers, and the next lines contain row data.
Mass Ingestion connectors 29
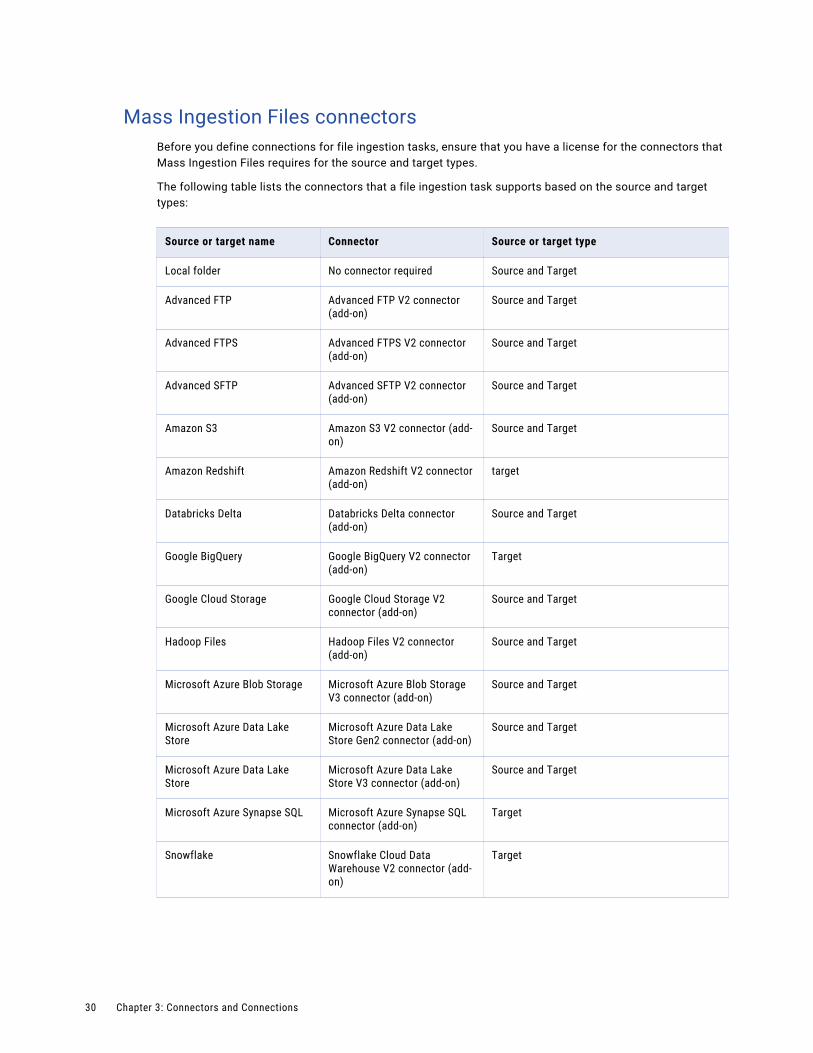
Mass Ingestion Files connectorsBefore you define connections for file ingestion tasks, ensure that you have a license for the connectors that Mass Ingestion Files requires for the source and target types.
The following table lists the connectors that a file ingestion task supports based on the source and target types:
Source or target name Connector Source or target type
Local folder No connector required Source and Target
Advanced FTP Advanced FTP V2 connector (add-on)
Source and Target
Advanced FTPS Advanced FTPS V2 connector (add-on)
Source and Target
Advanced SFTP Advanced SFTP V2 connector (add-on)
Source and Target
Amazon S3 Amazon S3 V2 connector (add-on)
Source and Target
Amazon Redshift Amazon Redshift V2 connector (add-on)
target
Databricks Delta Databricks Delta connector (add-on)
Source and Target
Google BigQuery Google BigQuery V2 connector (add-on)
Target
Google Cloud Storage Google Cloud Storage V2 connector (add-on)
Source and Target
Hadoop Files Hadoop Files V2 connector (add-on)
Source and Target
Microsoft Azure Blob Storage Microsoft Azure Blob Storage V3 connector (add-on)
Source and Target
Microsoft Azure Data Lake Store
Microsoft Azure Data Lake Store Gen2 connector (add-on)
Source and Target
Microsoft Azure Data Lake Store
Microsoft Azure Data Lake Store V3 connector (add-on)
Source and Target
Microsoft Azure Synapse SQL Microsoft Azure Synapse SQL connector (add-on)
Target
Snowflake Snowflake Cloud Data Warehouse V2 connector (add-on)
Target
30 Chapter 3: Connectors and Connections
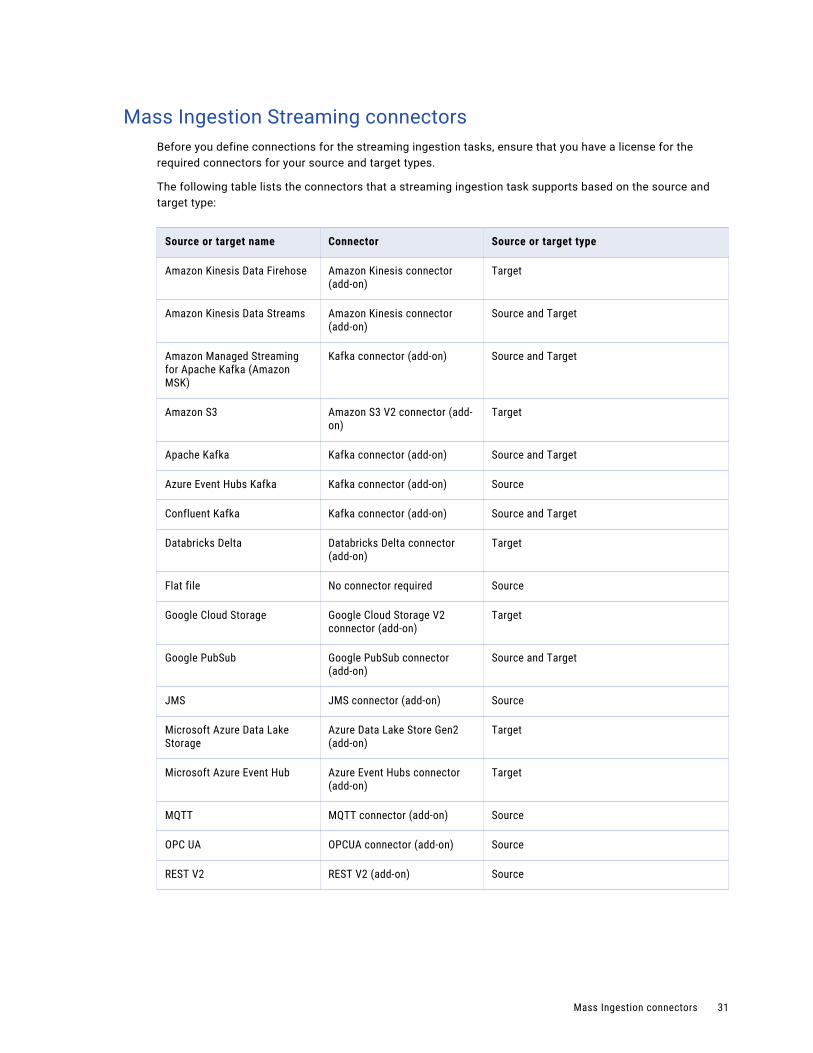
Mass Ingestion Streaming connectorsBefore you define connections for the streaming ingestion tasks, ensure that you have a license for the required connectors for your source and target types.
The following table lists the connectors that a streaming ingestion task supports based on the source and target type:
Source or target name Connector Source or target type
Amazon Kinesis Data Firehose Amazon Kinesis connector (add-on)
Target
Amazon Kinesis Data Streams Amazon Kinesis connector (add-on)
Source and Target
Amazon Managed Streaming for Apache Kafka (Amazon MSK)
Kafka connector (add-on) Source and Target
Amazon S3 Amazon S3 V2 connector (add-on)
Target
Apache Kafka Kafka connector (add-on) Source and Target
Azure Event Hubs Kafka Kafka connector (add-on) Source
Confluent Kafka Kafka connector (add-on) Source and Target
Databricks Delta Databricks Delta connector (add-on)
Target
Flat file No connector required Source
Google Cloud Storage Google Cloud Storage V2 connector (add-on)
Target
Google PubSub Google PubSub connector (add-on)
Source and Target
JMS JMS connector (add-on) Source
Microsoft Azure Data Lake Storage
Azure Data Lake Store Gen2 (add-on)
Target
Microsoft Azure Event Hub Azure Event Hubs connector (add-on)
Target
MQTT MQTT connector (add-on) Source
OPC UA OPCUA connector (add-on) Source
REST V2 REST V2 (add-on) Source
Mass Ingestion connectors 31

Mass Ingestion connection propertiesConnections provide access to data in cloud and on-premises applications, platforms, databases, and flat files. Connection definitions include the location of the source or target, the runtime environment, and the other properties specific to the connection type.
Before you can create a connection, ensure that the correct connectors for your sources and targets are available in Informatica Intelligent Cloud Services. The supported connectors vary by type of ingestion task.
To create a connection or search for an existing connection, use the Administrator service.
After you configure connection properties, the connection becomes available for use within the organization.
Configuring a connectionConfigure a source or target connection on the Connections page in Administrator.
1. In Administrator, select Connections.
2. On the Connections page, click New Connection.
3. Configure the following connection details:
Property Description
Connection Name The name of the connection.Each connection name must be unique within the organization. Connection names can contain alphanumeric characters, spaces, and the following special characters: _ . + -Maximum length is 100 characters. Connection names are not case sensitive.
Description A description of the connection.
Type The type of connection, such as Amazon S3.
After you select the connection type, additional properties that are specific to that type appear.
4. Configure the connection-specific properties.
For example, if you are configuring an Amazon S3 connection, enter the Amazon S3 connection properties. Click the Help icon for a description of each connection property.
5. To test the connection, click Test Connection.
The results of the test are displayed at the top of the page.
If a connection fails, contact the database administrator, or recheck your settings and verify that the selected runtime environment has the status of Up and Running.
6. Click Save to save the connection.
32 Chapter 3: Connectors and Connections
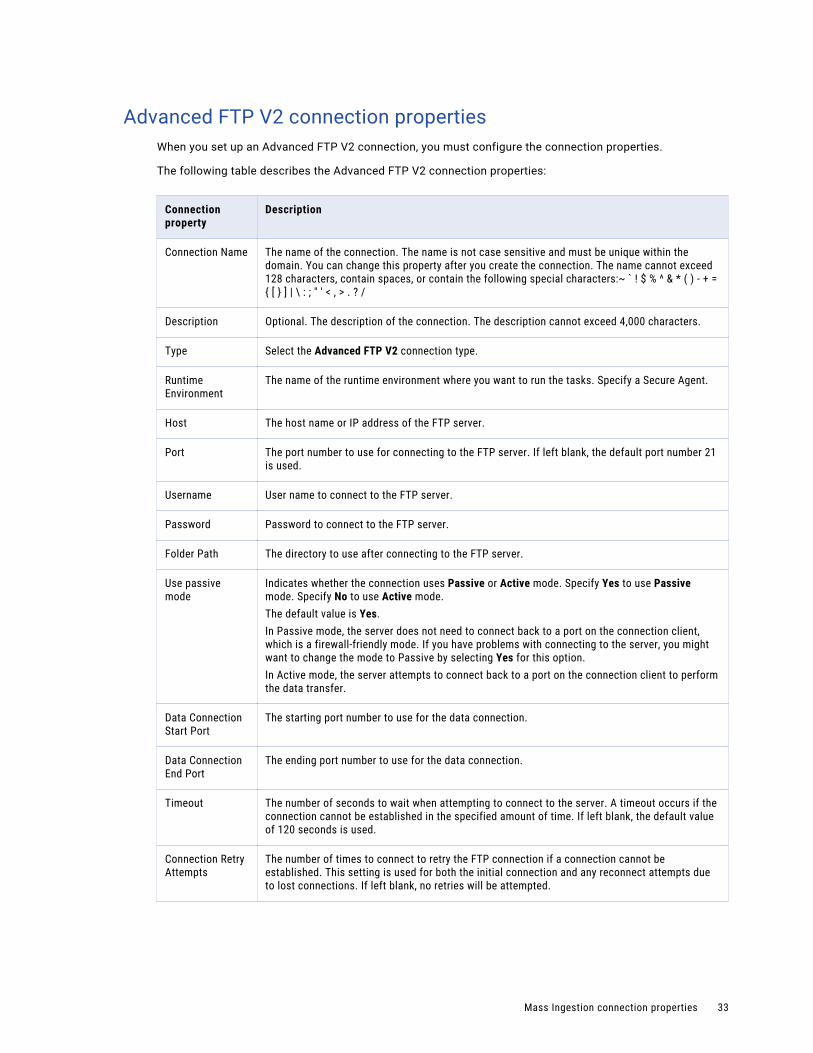
Advanced FTP V2 connection propertiesWhen you set up an Advanced FTP V2 connection, you must configure the connection properties.
The following table describes the Advanced FTP V2 connection properties:
Connection property
Description
Connection Name The name of the connection. The name is not case sensitive and must be unique within the domain. You can change this property after you create the connection. The name cannot exceed 128 characters, contain spaces, or contain the following special characters:~ ` ! $ % ^ & * ( ) - + = { [ } ] | \ : ; " ' < , > . ? /
Description Optional. The description of the connection. The description cannot exceed 4,000 characters.
Type Select the Advanced FTP V2 connection type.
Runtime Environment
The name of the runtime environment where you want to run the tasks. Specify a Secure Agent.
Host The host name or IP address of the FTP server.
Port The port number to use for connecting to the FTP server. If left blank, the default port number 21 is used.
Username User name to connect to the FTP server.
Password Password to connect to the FTP server.
Folder Path The directory to use after connecting to the FTP server.
Use passive mode
Indicates whether the connection uses Passive or Active mode. Specify Yes to use Passive mode. Specify No to use Active mode.The default value is Yes.In Passive mode, the server does not need to connect back to a port on the connection client, which is a firewall-friendly mode. If you have problems with connecting to the server, you might want to change the mode to Passive by selecting Yes for this option.In Active mode, the server attempts to connect back to a port on the connection client to perform the data transfer.
Data Connection Start Port
The starting port number to use for the data connection.
Data Connection End Port
The ending port number to use for the data connection.
Timeout The number of seconds to wait when attempting to connect to the server. A timeout occurs if the connection cannot be established in the specified amount of time. If left blank, the default value of 120 seconds is used.
Connection Retry Attempts
The number of times to connect to retry the FTP connection if a connection cannot be established. This setting is used for both the initial connection and any reconnect attempts due to lost connections. If left blank, no retries will be attempted.
Mass Ingestion connection properties 33

Connection property
Description
Connection Retry Interval
The number of seconds to wait between each connection retry attempt.Note: For instance, if you want to retry to connect up to 10 times with a five second delay between retries, then specify 10 for the Connection Retry Attempts and 5 for the Connection Retry Interval.
Control Encoding If left blank, the connection uses the ISO standard ISO-8859-1. If supported by the server, other encodings such as UTF-8 can be specified to support international characters.
List Parser The list parser to use for the server connection. If the field is left blank, the Advanced FTP V2 Connector attempts to use the MLSD parser. If the MLSD parser is not supported by the server, the UNIX parser is used. If you experience problems listing directories, select a different list parser.
Date Format This date format is applied if the server returns a date that is different from the selected list parser default. If your location requires a different date format (for example, d MMM yyyy), specify the date format in this field. Not all list parsers support the date format setting. List parsers that do not support the date format setting ignores any user specified value.
Recent Date Format
Specify the date format to use when parsing the recent last modified date for each file. The recent date format applies in UNIX-based systems and appears on entries less than a year old. If your location requires a specific date format (for example, d MMM HH:mm), specify that pattern in this field. Not all list parsers support the recent date format setting. List parsers that do not support the recent date format setting ignores any user-specified value.
Advanced FTPS V2 connection propertiesWhen you set up an Advanced FTPS V2 connection, you must configure the connection properties.
The following table describes the Advanced FTPS V2 connection properties:
Connection property Description
Connection Name The name of the connection. The name is not case sensitive and must be unique within the domain. You can change this property after you create the connection. The name cannot exceed 128 characters, contain spaces, or contain the following special characters:~ ` ! $ % ^ & * ( ) - + = { [ } ] | \ : ; " ' < , > . ? /
Description Optional. The description of the connection. The description cannot exceed 4,000 characters.
Type Select the Advanced FTPS V2 connection type.
Runtime Environment The name of the runtime environment that contains the Secure Agent that you want to run the tasks.
Host The host name or IP address of the server.
Port The port number to use for connecting to the server. If left blank, the default port number is 21.
Username User name to connect to the FTPS server.
Password Password to connect to the FTPS server.
34 Chapter 3: Connectors and Connections
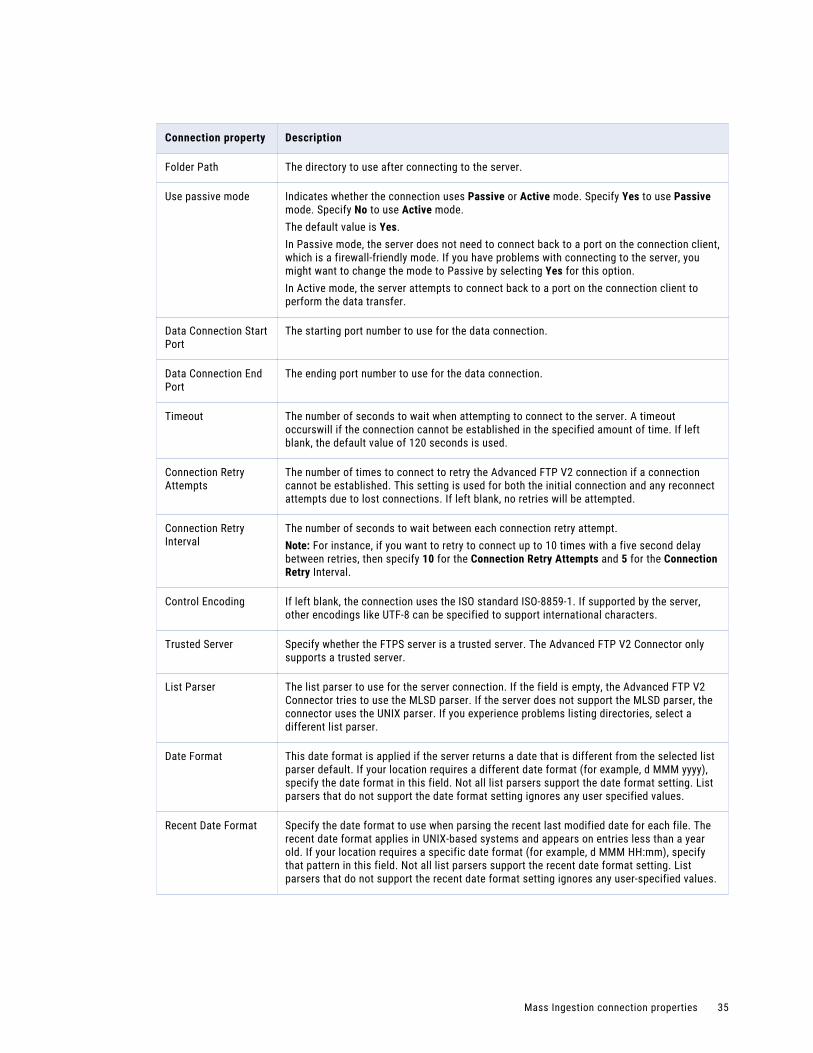
Connection property Description
Folder Path The directory to use after connecting to the server.
Use passive mode Indicates whether the connection uses Passive or Active mode. Specify Yes to use Passive mode. Specify No to use Active mode.The default value is Yes.In Passive mode, the server does not need to connect back to a port on the connection client, which is a firewall-friendly mode. If you have problems with connecting to the server, you might want to change the mode to Passive by selecting Yes for this option.In Active mode, the server attempts to connect back to a port on the connection client to perform the data transfer.
Data Connection Start Port
The starting port number to use for the data connection.
Data Connection End Port
The ending port number to use for the data connection.
Timeout The number of seconds to wait when attempting to connect to the server. A timeout occurswill if the connection cannot be established in the specified amount of time. If left blank, the default value of 120 seconds is used.
Connection Retry Attempts
The number of times to connect to retry the Advanced FTP V2 connection if a connection cannot be established. This setting is used for both the initial connection and any reconnect attempts due to lost connections. If left blank, no retries will be attempted.
Connection Retry Interval
The number of seconds to wait between each connection retry attempt.Note: For instance, if you want to retry to connect up to 10 times with a five second delay between retries, then specify 10 for the Connection Retry Attempts and 5 for the Connection Retry Interval.
Control Encoding If left blank, the connection uses the ISO standard ISO-8859-1. If supported by the server, other encodings like UTF-8 can be specified to support international characters.
Trusted Server Specify whether the FTPS server is a trusted server. The Advanced FTP V2 Connector only supports a trusted server.
List Parser The list parser to use for the server connection. If the field is empty, the Advanced FTP V2 Connector tries to use the MLSD parser. If the server does not support the MLSD parser, the connector uses the UNIX parser. If you experience problems listing directories, select a different list parser.
Date Format This date format is applied if the server returns a date that is different from the selected list parser default. If your location requires a different date format (for example, d MMM yyyy), specify the date format in this field. Not all list parsers support the date format setting. List parsers that do not support the date format setting ignores any user specified values.
Recent Date Format Specify the date format to use when parsing the recent last modified date for each file. The recent date format applies in UNIX-based systems and appears on entries less than a year old. If your location requires a specific date format (for example, d MMM HH:mm), specify that pattern in this field. Not all list parsers support the recent date format setting. List parsers that do not support the recent date format setting ignores any user-specified values.
Mass Ingestion connection properties 35

Connection property Description
Connection Type Indicates if the connection type is IMPLICIT_SSL or EXPLICIT_SSL.- IMPLICIT_SSL. The connection automatically starts as an SSL connection.- EXPLICIT_SSL. After initial authentication with the FTPS server, the connection is
encrypted with SSL or TLS depending on the security protocol you select.Default is IMPLICIT_SSL.
SecurityProtocol Indicates whether SSL or TLS is used for EXPLICIT_SSL connections.Default is SSL.
Key Store File The path and file name of the keystore file. The keystore file contains the certificates to authenticate the FTPS server.
Key Store Password The password for the keystore file required to access the Trusted Server Certificate Store.
Key Alias The alias of the individual key.
Key Store Type Indicates if the type of the keystore is Java KeyStore (JKS) or Public Key Cryptology Standard (PKCS12).Default is JKS.
Advanced SFTP V2 connection propertiesWhen you set up an Advanced SFTP V2 connection, you must configure the connection properties.
The following table describes the Advanced SFTP V2 connection properties:
Connection property
Description
Connection Name The name of the connection. The name is not case sensitive and must be unique within the domain. You can change this property after you create the connection. The name cannot exceed 128 characters, contain spaces, or contain the following special characters:~ ` ! $ % ^ & * ( ) - + = { [ } ] | \ : ; " ' < , > . ? /
Description Optional. The description of the connection. The description cannot exceed 4,000 characters.
Type Select the Advanced SFTP V2 connection type.
Runtime Environment
The name of the runtime environment that contains the Secure Agent that you want to run the tasks.
Host The host name or IP address of the server.
Port The port number to use for connecting to the server. If left blank, the default port number is 21.
Username User name to connect to the SFTP server.
Password Password to connect to the SFTP server.
Folder Path The directory to use after connecting to the server.
36 Chapter 3: Connectors and Connections
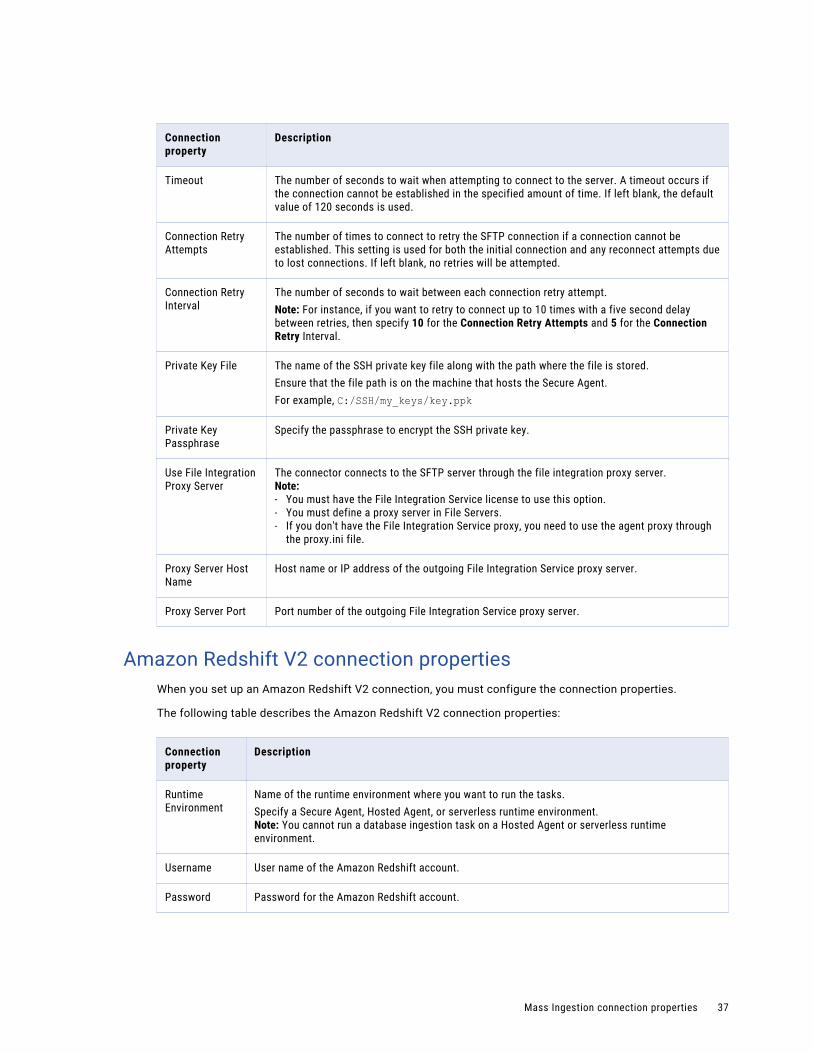
Connection property
Description
Timeout The number of seconds to wait when attempting to connect to the server. A timeout occurs if the connection cannot be established in the specified amount of time. If left blank, the default value of 120 seconds is used.
Connection Retry Attempts
The number of times to connect to retry the SFTP connection if a connection cannot be established. This setting is used for both the initial connection and any reconnect attempts due to lost connections. If left blank, no retries will be attempted.
Connection Retry Interval
The number of seconds to wait between each connection retry attempt.Note: For instance, if you want to retry to connect up to 10 times with a five second delay between retries, then specify 10 for the Connection Retry Attempts and 5 for the Connection Retry Interval.
Private Key File The name of the SSH private key file along with the path where the file is stored.Ensure that the file path is on the machine that hosts the Secure Agent.For example, C:/SSH/my_keys/key.ppk
Private Key Passphrase
Specify the passphrase to encrypt the SSH private key.
Use File Integration Proxy Server
The connector connects to the SFTP server through the file integration proxy server.Note: - You must have the File Integration Service license to use this option.- You must define a proxy server in File Servers.- If you don't have the File Integration Service proxy, you need to use the agent proxy through
the proxy.ini file.
Proxy Server Host Name
Host name or IP address of the outgoing File Integration Service proxy server.
Proxy Server Port Port number of the outgoing File Integration Service proxy server.
Amazon Redshift V2 connection propertiesWhen you set up an Amazon Redshift V2 connection, you must configure the connection properties.
The following table describes the Amazon Redshift V2 connection properties:
Connection property
Description
Runtime Environment
Name of the runtime environment where you want to run the tasks.Specify a Secure Agent, Hosted Agent, or serverless runtime environment.Note: You cannot run a database ingestion task on a Hosted Agent or serverless runtime environment.
Username User name of the Amazon Redshift account.
Password Password for the Amazon Redshift account.
Mass Ingestion connection properties 37
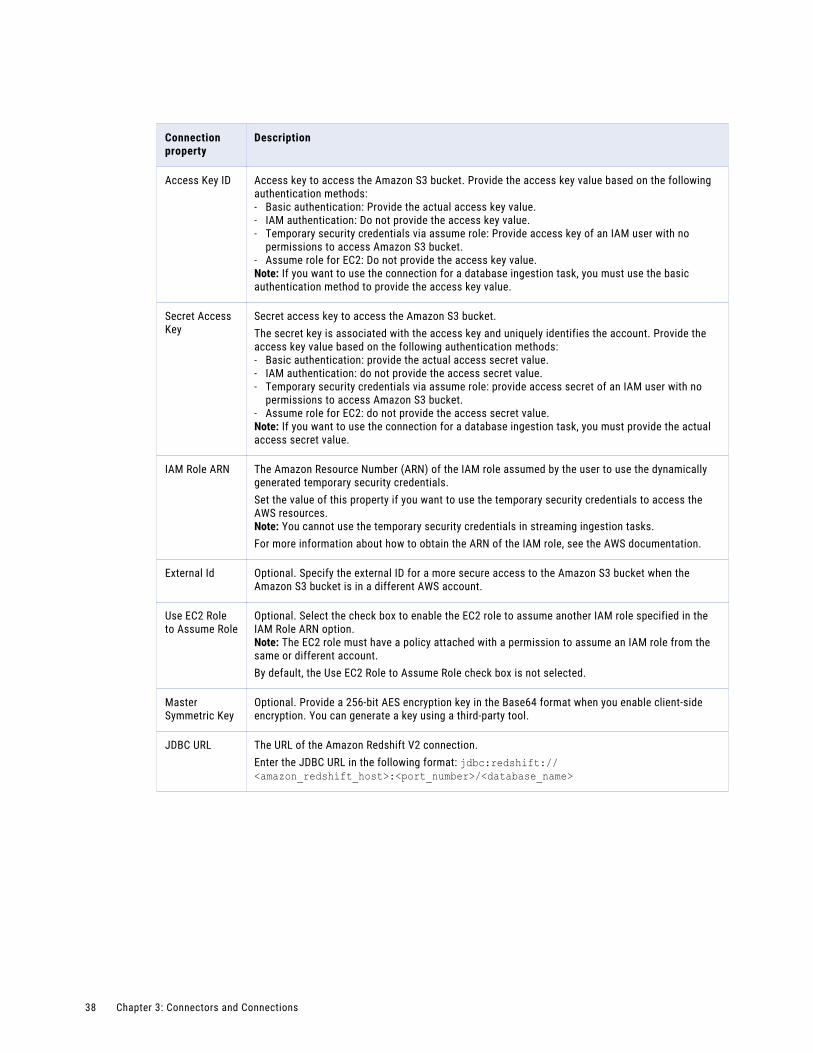
Connection property
Description
Access Key ID Access key to access the Amazon S3 bucket. Provide the access key value based on the following authentication methods:- Basic authentication: Provide the actual access key value.- IAM authentication: Do not provide the access key value.- Temporary security credentials via assume role: Provide access key of an IAM user with no
permissions to access Amazon S3 bucket.- Assume role for EC2: Do not provide the access key value.Note: If you want to use the connection for a database ingestion task, you must use the basic authentication method to provide the access key value.
Secret Access Key
Secret access key to access the Amazon S3 bucket.The secret key is associated with the access key and uniquely identifies the account. Provide the access key value based on the following authentication methods:- Basic authentication: provide the actual access secret value.- IAM authentication: do not provide the access secret value.- Temporary security credentials via assume role: provide access secret of an IAM user with no
permissions to access Amazon S3 bucket.- Assume role for EC2: do not provide the access secret value.Note: If you want to use the connection for a database ingestion task, you must provide the actual access secret value.
IAM Role ARN The Amazon Resource Number (ARN) of the IAM role assumed by the user to use the dynamically generated temporary security credentials.Set the value of this property if you want to use the temporary security credentials to access the AWS resources.Note: You cannot use the temporary security credentials in streaming ingestion tasks.For more information about how to obtain the ARN of the IAM role, see the AWS documentation.
External Id Optional. Specify the external ID for a more secure access to the Amazon S3 bucket when the Amazon S3 bucket is in a different AWS account.
Use EC2 Role to Assume Role
Optional. Select the check box to enable the EC2 role to assume another IAM role specified in the IAM Role ARN option.Note: The EC2 role must have a policy attached with a permission to assume an IAM role from the same or different account.By default, the Use EC2 Role to Assume Role check box is not selected.
Master Symmetric Key
Optional. Provide a 256-bit AES encryption key in the Base64 format when you enable client-side encryption. You can generate a key using a third-party tool.
JDBC URL The URL of the Amazon Redshift V2 connection.Enter the JDBC URL in the following format: jdbc:redshift://<amazon_redshift_host>:<port_number>/<database_name>
38 Chapter 3: Connectors and Connections
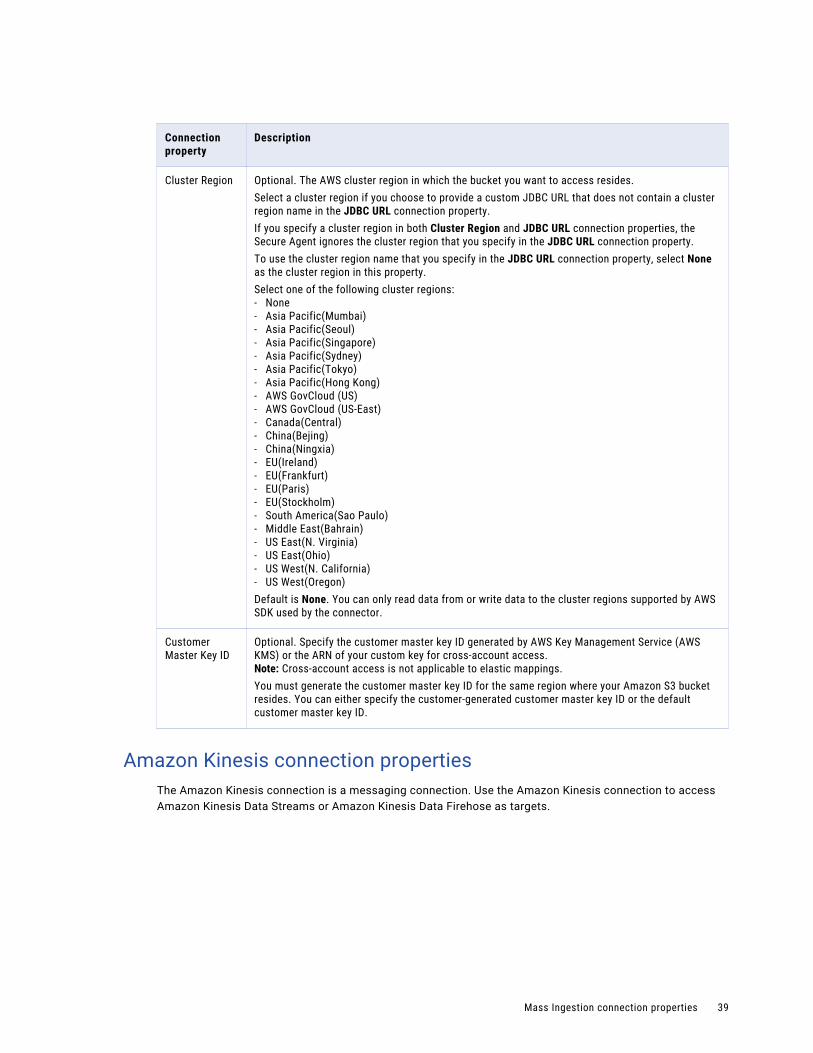
Connection property
Description
Cluster Region Optional. The AWS cluster region in which the bucket you want to access resides.Select a cluster region if you choose to provide a custom JDBC URL that does not contain a cluster region name in the JDBC URL connection property.If you specify a cluster region in both Cluster Region and JDBC URL connection properties, the Secure Agent ignores the cluster region that you specify in the JDBC URL connection property.To use the cluster region name that you specify in the JDBC URL connection property, select None as the cluster region in this property.Select one of the following cluster regions:- None- Asia Pacific(Mumbai)- Asia Pacific(Seoul)- Asia Pacific(Singapore)- Asia Pacific(Sydney)- Asia Pacific(Tokyo)- Asia Pacific(Hong Kong)- AWS GovCloud (US)- AWS GovCloud (US-East)- Canada(Central)- China(Bejing)- China(Ningxia)- EU(Ireland)- EU(Frankfurt)- EU(Paris)- EU(Stockholm)- South America(Sao Paulo)- Middle East(Bahrain)- US East(N. Virginia)- US East(Ohio)- US West(N. California)- US West(Oregon)Default is None. You can only read data from or write data to the cluster regions supported by AWS SDK used by the connector.
Customer Master Key ID
Optional. Specify the customer master key ID generated by AWS Key Management Service (AWS KMS) or the ARN of your custom key for cross-account access.Note: Cross-account access is not applicable to elastic mappings.You must generate the customer master key ID for the same region where your Amazon S3 bucket resides. You can either specify the customer-generated customer master key ID or the default customer master key ID.
Amazon Kinesis connection propertiesThe Amazon Kinesis connection is a messaging connection. Use the Amazon Kinesis connection to access Amazon Kinesis Data Streams or Amazon Kinesis Data Firehose as targets.
Mass Ingestion connection properties 39
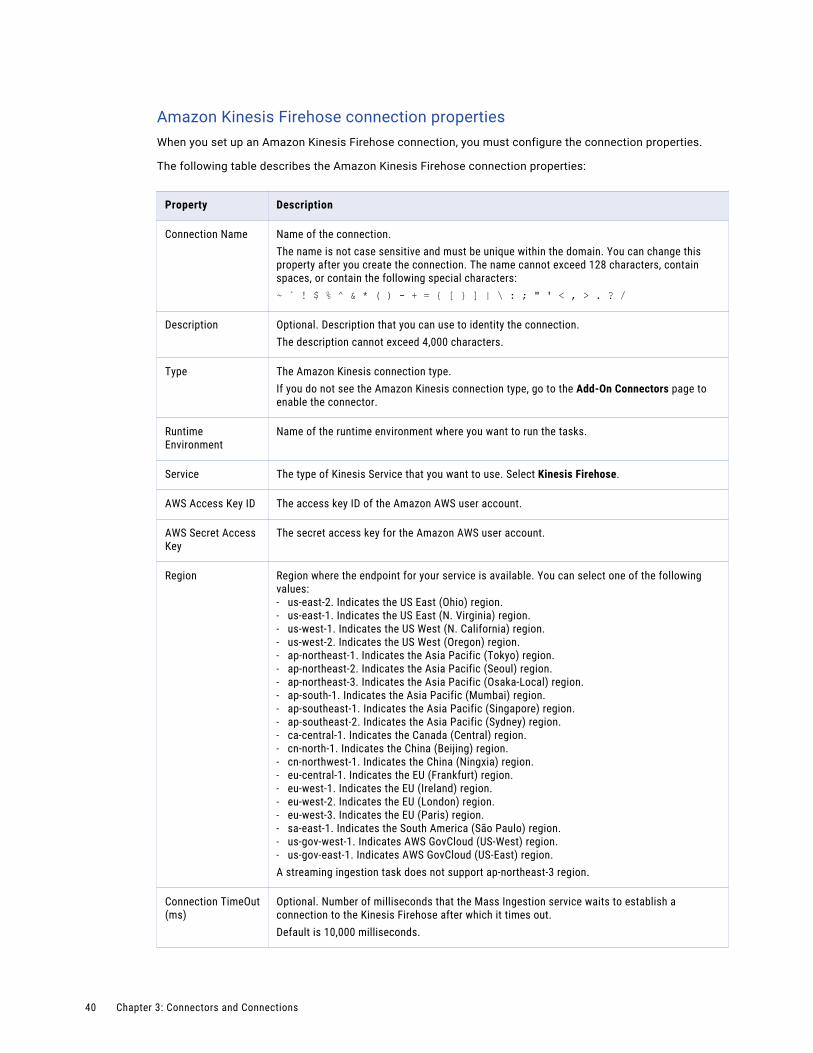
Amazon Kinesis Firehose connection propertiesWhen you set up an Amazon Kinesis Firehose connection, you must configure the connection properties.
The following table describes the Amazon Kinesis Firehose connection properties:
Property Description
Connection Name Name of the connection.The name is not case sensitive and must be unique within the domain. You can change this property after you create the connection. The name cannot exceed 128 characters, contain spaces, or contain the following special characters:~ ` ! $ % ^ & * ( ) - + = { [ } ] | \ : ; " ' < , > . ? /
Description Optional. Description that you can use to identity the connection.The description cannot exceed 4,000 characters.
Type The Amazon Kinesis connection type.If you do not see the Amazon Kinesis connection type, go to the Add-On Connectors page to enable the connector.
Runtime Environment
Name of the runtime environment where you want to run the tasks.
Service The type of Kinesis Service that you want to use. Select Kinesis Firehose.
AWS Access Key ID The access key ID of the Amazon AWS user account.
AWS Secret Access Key
The secret access key for the Amazon AWS user account.
Region Region where the endpoint for your service is available. You can select one of the following values:- us-east-2. Indicates the US East (Ohio) region.- us-east-1. Indicates the US East (N. Virginia) region.- us-west-1. Indicates the US West (N. California) region.- us-west-2. Indicates the US West (Oregon) region.- ap-northeast-1. Indicates the Asia Pacific (Tokyo) region.- ap-northeast-2. Indicates the Asia Pacific (Seoul) region.- ap-northeast-3. Indicates the Asia Pacific (Osaka-Local) region.- ap-south-1. Indicates the Asia Pacific (Mumbai) region.- ap-southeast-1. Indicates the Asia Pacific (Singapore) region.- ap-southeast-2. Indicates the Asia Pacific (Sydney) region.- ca-central-1. Indicates the Canada (Central) region.- cn-north-1. Indicates the China (Beijing) region.- cn-northwest-1. Indicates the China (Ningxia) region.- eu-central-1. Indicates the EU (Frankfurt) region.- eu-west-1. Indicates the EU (Ireland) region.- eu-west-2. Indicates the EU (London) region.- eu-west-3. Indicates the EU (Paris) region.- sa-east-1. Indicates the South America (São Paulo) region.- us-gov-west-1. Indicates AWS GovCloud (US-West) region.- us-gov-east-1. Indicates AWS GovCloud (US-East) region.A streaming ingestion task does not support ap-northeast-3 region.
Connection TimeOut (ms)
Optional. Number of milliseconds that the Mass Ingestion service waits to establish a connection to the Kinesis Firehose after which it times out.Default is 10,000 milliseconds.
40 Chapter 3: Connectors and Connections
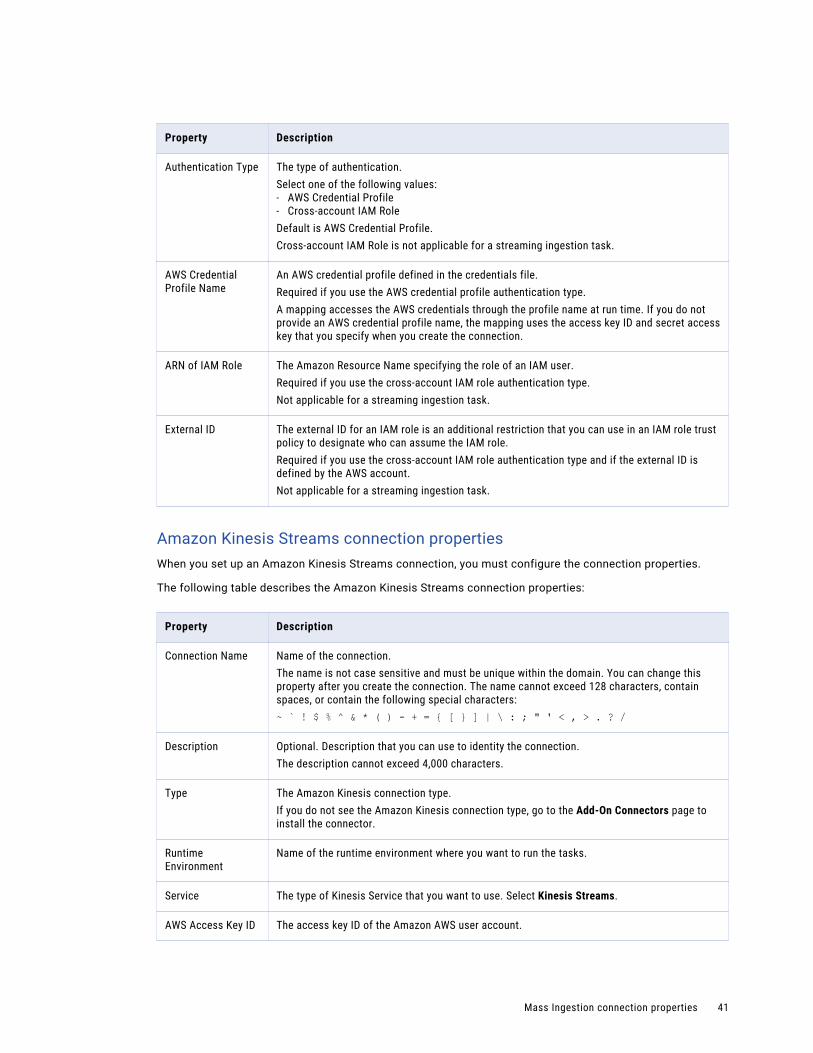
Property Description
Authentication Type The type of authentication.Select one of the following values:- AWS Credential Profile- Cross-account IAM RoleDefault is AWS Credential Profile.Cross-account IAM Role is not applicable for a streaming ingestion task.
AWS Credential Profile Name
An AWS credential profile defined in the credentials file.Required if you use the AWS credential profile authentication type.A mapping accesses the AWS credentials through the profile name at run time. If you do not provide an AWS credential profile name, the mapping uses the access key ID and secret access key that you specify when you create the connection.
ARN of IAM Role The Amazon Resource Name specifying the role of an IAM user.Required if you use the cross-account IAM role authentication type.Not applicable for a streaming ingestion task.
External ID The external ID for an IAM role is an additional restriction that you can use in an IAM role trust policy to designate who can assume the IAM role.Required if you use the cross-account IAM role authentication type and if the external ID is defined by the AWS account.Not applicable for a streaming ingestion task.
Amazon Kinesis Streams connection propertiesWhen you set up an Amazon Kinesis Streams connection, you must configure the connection properties.
The following table describes the Amazon Kinesis Streams connection properties:
Property Description
Connection Name Name of the connection.The name is not case sensitive and must be unique within the domain. You can change this property after you create the connection. The name cannot exceed 128 characters, contain spaces, or contain the following special characters:~ ` ! $ % ^ & * ( ) - + = { [ } ] | \ : ; " ' < , > . ? /
Description Optional. Description that you can use to identity the connection.The description cannot exceed 4,000 characters.
Type The Amazon Kinesis connection type.If you do not see the Amazon Kinesis connection type, go to the Add-On Connectors page to install the connector.
Runtime Environment
Name of the runtime environment where you want to run the tasks.
Service The type of Kinesis Service that you want to use. Select Kinesis Streams.
AWS Access Key ID The access key ID of the Amazon AWS user account.
Mass Ingestion connection properties 41
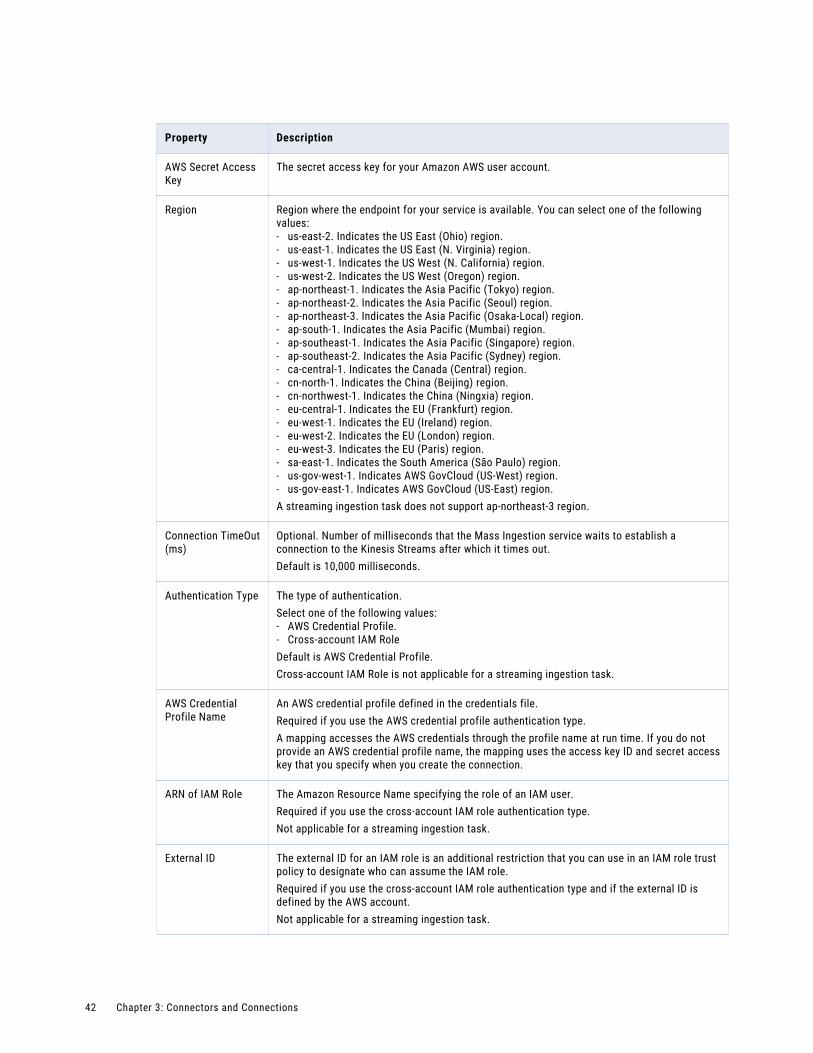
Property Description
AWS Secret Access Key
The secret access key for your Amazon AWS user account.
Region Region where the endpoint for your service is available. You can select one of the following values:- us-east-2. Indicates the US East (Ohio) region.- us-east-1. Indicates the US East (N. Virginia) region.- us-west-1. Indicates the US West (N. California) region.- us-west-2. Indicates the US West (Oregon) region.- ap-northeast-1. Indicates the Asia Pacific (Tokyo) region.- ap-northeast-2. Indicates the Asia Pacific (Seoul) region.- ap-northeast-3. Indicates the Asia Pacific (Osaka-Local) region.- ap-south-1. Indicates the Asia Pacific (Mumbai) region.- ap-southeast-1. Indicates the Asia Pacific (Singapore) region.- ap-southeast-2. Indicates the Asia Pacific (Sydney) region.- ca-central-1. Indicates the Canada (Central) region.- cn-north-1. Indicates the China (Beijing) region.- cn-northwest-1. Indicates the China (Ningxia) region.- eu-central-1. Indicates the EU (Frankfurt) region.- eu-west-1. Indicates the EU (Ireland) region.- eu-west-2. Indicates the EU (London) region.- eu-west-3. Indicates the EU (Paris) region.- sa-east-1. Indicates the South America (São Paulo) region.- us-gov-west-1. Indicates AWS GovCloud (US-West) region.- us-gov-east-1. Indicates AWS GovCloud (US-East) region.A streaming ingestion task does not support ap-northeast-3 region.
Connection TimeOut (ms)
Optional. Number of milliseconds that the Mass Ingestion service waits to establish a connection to the Kinesis Streams after which it times out.Default is 10,000 milliseconds.
Authentication Type The type of authentication.Select one of the following values:- AWS Credential Profile.- Cross-account IAM RoleDefault is AWS Credential Profile.Cross-account IAM Role is not applicable for a streaming ingestion task.
AWS Credential Profile Name
An AWS credential profile defined in the credentials file.Required if you use the AWS credential profile authentication type.A mapping accesses the AWS credentials through the profile name at run time. If you do not provide an AWS credential profile name, the mapping uses the access key ID and secret access key that you specify when you create the connection.
ARN of IAM Role The Amazon Resource Name specifying the role of an IAM user.Required if you use the cross-account IAM role authentication type.Not applicable for a streaming ingestion task.
External ID The external ID for an IAM role is an additional restriction that you can use in an IAM role trust policy to designate who can assume the IAM role.Required if you use the cross-account IAM role authentication type and if the external ID is defined by the AWS account.Not applicable for a streaming ingestion task.
42 Chapter 3: Connectors and Connections
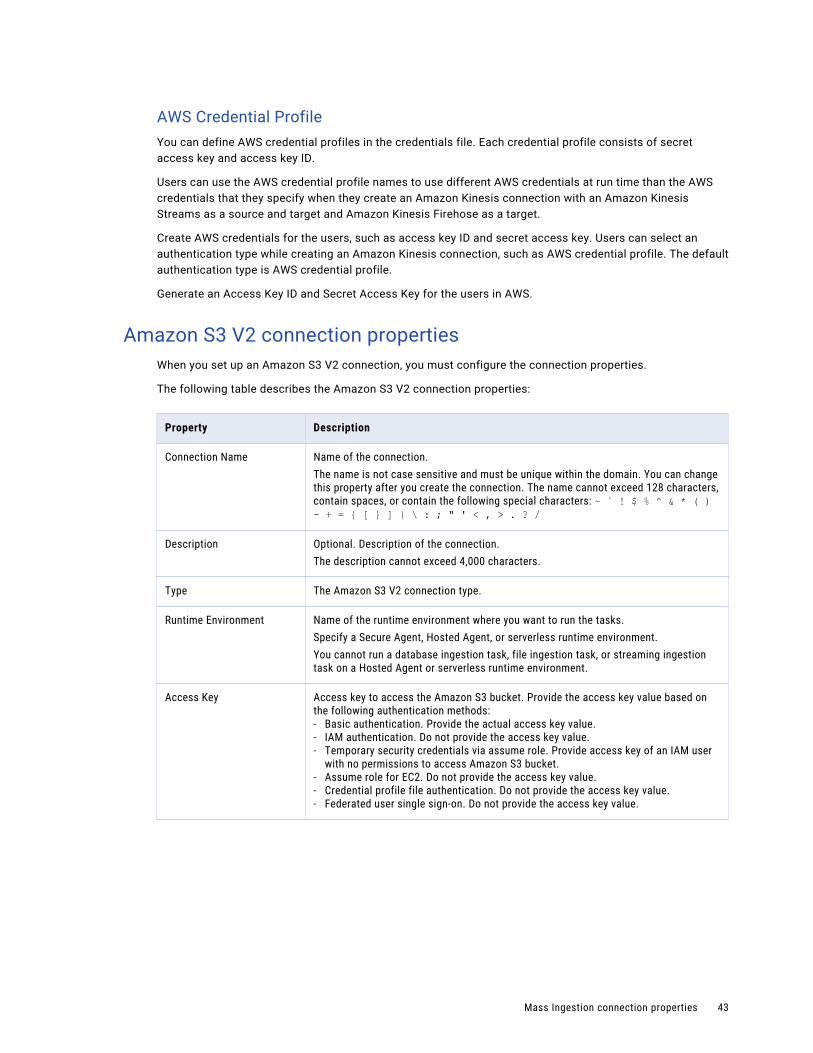
AWS Credential ProfileYou can define AWS credential profiles in the credentials file. Each credential profile consists of secret access key and access key ID.
Users can use the AWS credential profile names to use different AWS credentials at run time than the AWS credentials that they specify when they create an Amazon Kinesis connection with an Amazon Kinesis Streams as a source and target and Amazon Kinesis Firehose as a target.
Create AWS credentials for the users, such as access key ID and secret access key. Users can select an authentication type while creating an Amazon Kinesis connection, such as AWS credential profile. The default authentication type is AWS credential profile.
Generate an Access Key ID and Secret Access Key for the users in AWS.
Amazon S3 V2 connection propertiesWhen you set up an Amazon S3 V2 connection, you must configure the connection properties.
The following table describes the Amazon S3 V2 connection properties:
Property Description
Connection Name Name of the connection.The name is not case sensitive and must be unique within the domain. You can change this property after you create the connection. The name cannot exceed 128 characters, contain spaces, or contain the following special characters: ~ ` ! $ % ^ & * ( ) - + = { [ } ] | \ : ; " ' < , > . ? /
Description Optional. Description of the connection.The description cannot exceed 4,000 characters.
Type The Amazon S3 V2 connection type.
Runtime Environment Name of the runtime environment where you want to run the tasks.Specify a Secure Agent, Hosted Agent, or serverless runtime environment.You cannot run a database ingestion task, file ingestion task, or streaming ingestion task on a Hosted Agent or serverless runtime environment.
Access Key Access key to access the Amazon S3 bucket. Provide the access key value based on the following authentication methods:- Basic authentication. Provide the actual access key value.- IAM authentication. Do not provide the access key value.- Temporary security credentials via assume role. Provide access key of an IAM user
with no permissions to access Amazon S3 bucket.- Assume role for EC2. Do not provide the access key value.- Credential profile file authentication. Do not provide the access key value.- Federated user single sign-on. Do not provide the access key value.
Mass Ingestion connection properties 43
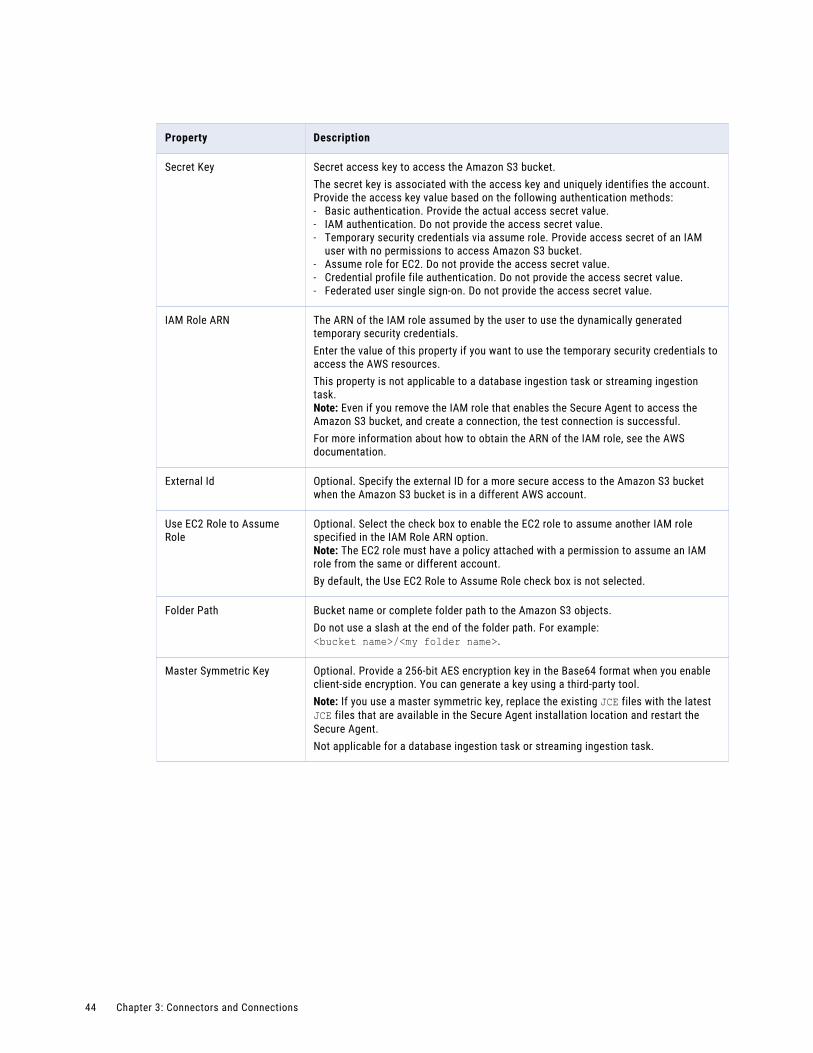
Property Description
Secret Key Secret access key to access the Amazon S3 bucket.The secret key is associated with the access key and uniquely identifies the account. Provide the access key value based on the following authentication methods:- Basic authentication. Provide the actual access secret value.- IAM authentication. Do not provide the access secret value.- Temporary security credentials via assume role. Provide access secret of an IAM
user with no permissions to access Amazon S3 bucket.- Assume role for EC2. Do not provide the access secret value.- Credential profile file authentication. Do not provide the access secret value.- Federated user single sign-on. Do not provide the access secret value.
IAM Role ARN The ARN of the IAM role assumed by the user to use the dynamically generated temporary security credentials.Enter the value of this property if you want to use the temporary security credentials to access the AWS resources.This property is not applicable to a database ingestion task or streaming ingestion task.Note: Even if you remove the IAM role that enables the Secure Agent to access the Amazon S3 bucket, and create a connection, the test connection is successful.For more information about how to obtain the ARN of the IAM role, see the AWS documentation.
External Id Optional. Specify the external ID for a more secure access to the Amazon S3 bucket when the Amazon S3 bucket is in a different AWS account.
Use EC2 Role to Assume Role
Optional. Select the check box to enable the EC2 role to assume another IAM role specified in the IAM Role ARN option.Note: The EC2 role must have a policy attached with a permission to assume an IAM role from the same or different account.By default, the Use EC2 Role to Assume Role check box is not selected.
Folder Path Bucket name or complete folder path to the Amazon S3 objects.Do not use a slash at the end of the folder path. For example: <bucket name>/<my folder name>.
Master Symmetric Key Optional. Provide a 256-bit AES encryption key in the Base64 format when you enable client-side encryption. You can generate a key using a third-party tool.Note: If you use a master symmetric key, replace the existing JCE files with the latest JCE files that are available in the Secure Agent installation location and restart the Secure Agent.Not applicable for a database ingestion task or streaming ingestion task.
44 Chapter 3: Connectors and Connections
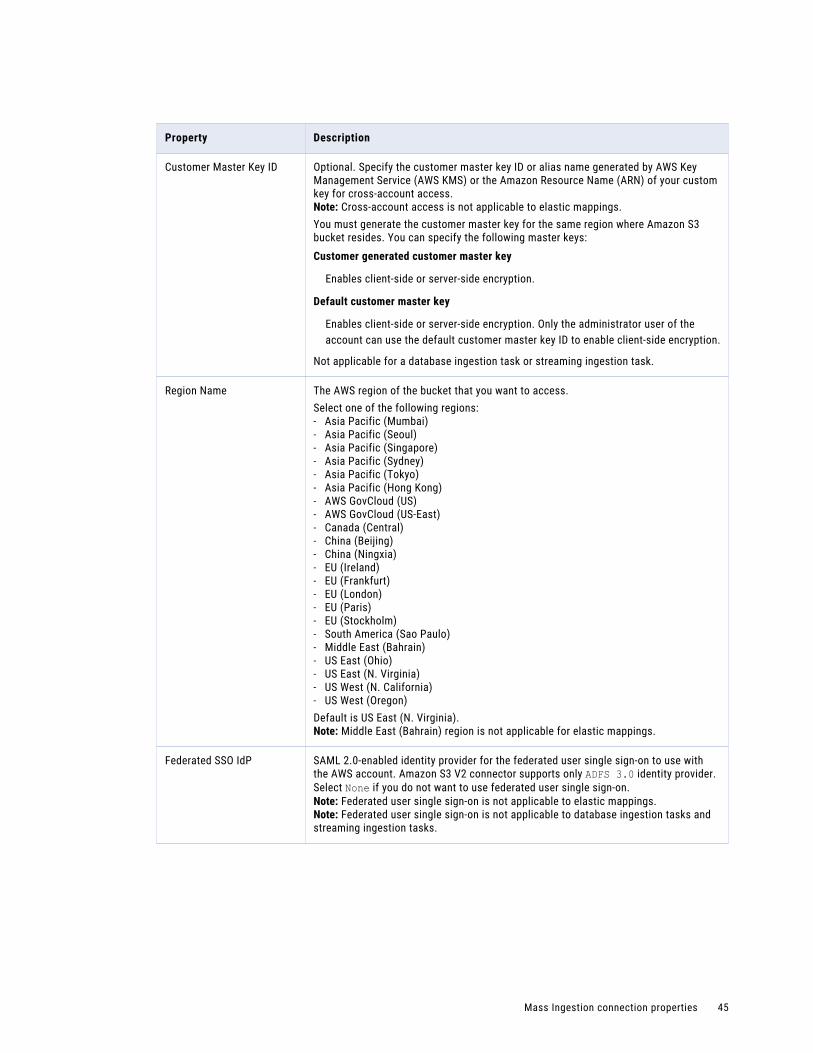
Property Description
Customer Master Key ID Optional. Specify the customer master key ID or alias name generated by AWS Key Management Service (AWS KMS) or the Amazon Resource Name (ARN) of your custom key for cross-account access.Note: Cross-account access is not applicable to elastic mappings.You must generate the customer master key for the same region where Amazon S3 bucket resides. You can specify the following master keys:Customer generated customer master key
Enables client-side or server-side encryption.
Default customer master key
Enables client-side or server-side encryption. Only the administrator user of the account can use the default customer master key ID to enable client-side encryption.
Not applicable for a database ingestion task or streaming ingestion task.
Region Name The AWS region of the bucket that you want to access.Select one of the following regions:- Asia Pacific (Mumbai)- Asia Pacific (Seoul)- Asia Pacific (Singapore)- Asia Pacific (Sydney)- Asia Pacific (Tokyo)- Asia Pacific (Hong Kong)- AWS GovCloud (US)- AWS GovCloud (US-East)- Canada (Central)- China (Beijing)- China (Ningxia)- EU (Ireland)- EU (Frankfurt)- EU (London)- EU (Paris)- EU (Stockholm)- South America (Sao Paulo)- Middle East (Bahrain)- US East (Ohio)- US East (N. Virginia)- US West (N. California)- US West (Oregon)Default is US East (N. Virginia).Note: Middle East (Bahrain) region is not applicable for elastic mappings.
Federated SSO IdP SAML 2.0-enabled identity provider for the federated user single sign-on to use with the AWS account. Amazon S3 V2 connector supports only ADFS 3.0 identity provider. Select None if you do not want to use federated user single sign-on.Note: Federated user single sign-on is not applicable to elastic mappings.Note: Federated user single sign-on is not applicable to database ingestion tasks and streaming ingestion tasks.
Mass Ingestion connection properties 45
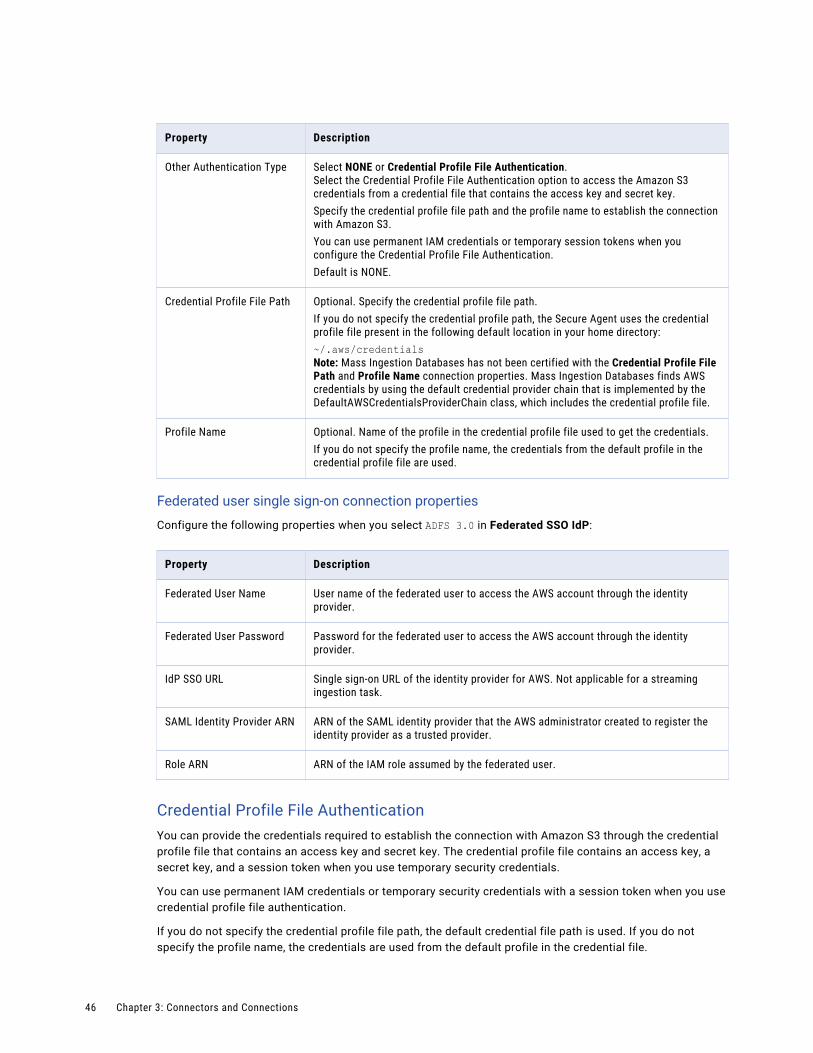
Property Description
Other Authentication Type Select NONE or Credential Profile File Authentication.Select the Credential Profile File Authentication option to access the Amazon S3 credentials from a credential file that contains the access key and secret key.Specify the credential profile file path and the profile name to establish the connection with Amazon S3.You can use permanent IAM credentials or temporary session tokens when you configure the Credential Profile File Authentication.Default is NONE.
Credential Profile File Path Optional. Specify the credential profile file path.If you do not specify the credential profile path, the Secure Agent uses the credential profile file present in the following default location in your home directory:~/.aws/credentialsNote: Mass Ingestion Databases has not been certified with the Credential Profile File Path and Profile Name connection properties. Mass Ingestion Databases finds AWS credentials by using the default credential provider chain that is implemented by the DefaultAWSCredentialsProviderChain class, which includes the credential profile file.
Profile Name Optional. Name of the profile in the credential profile file used to get the credentials.If you do not specify the profile name, the credentials from the default profile in the credential profile file are used.
Federated user single sign-on connection properties
Configure the following properties when you select ADFS 3.0 in Federated SSO IdP:
Property Description
Federated User Name User name of the federated user to access the AWS account through the identity provider.
Federated User Password Password for the federated user to access the AWS account through the identity provider.
IdP SSO URL Single sign-on URL of the identity provider for AWS. Not applicable for a streaming ingestion task.
SAML Identity Provider ARN ARN of the SAML identity provider that the AWS administrator created to register the identity provider as a trusted provider.
Role ARN ARN of the IAM role assumed by the federated user.
Credential Profile File AuthenticationYou can provide the credentials required to establish the connection with Amazon S3 through the credential profile file that contains an access key and secret key. The credential profile file contains an access key, a secret key, and a session token when you use temporary security credentials.
You can use permanent IAM credentials or temporary security credentials with a session token when you use credential profile file authentication.
If you do not specify the credential profile file path, the default credential file path is used. If you do not specify the profile name, the credentials are used from the default profile in the credential file.
46 Chapter 3: Connectors and Connections

Consider the following rules for a credential profile file:
• The credential file must be on the same machine where you installed the Secure Agent.
• The credential profile file name must end with .credentials.
• If you do not specify the credential profile path, the Secure Agent uses the credential profile file present in the following default location in your home directory:~/.aws/credentialsNote: On Windows, you can refer to your home directory by using the environment variable %UserProfile%. On Unix-like systems, you can use the environment variable $HOME.
A sample credential profile file:
[default]
aws_access_key_id = 1233333
aws_secret_access_key = abcabcabc
[test-profile]
aws_access_key_id = 1233333
aws_secret_access_key = abcabcabc
aws_session_token = jahaheieomdrtflmlioerpThe aws_access_key_id and aws_secret_access_key specify the AWS access key and secret key used as part of credentials to authenticate the user.
The aws_session_token specifies an AWS session token used as part of the credentials to authenticate the user. A session token is required only if you specify temporary security credentials.
Db2 for i Database Ingestion connection propertiesWhen you define a Db2 for i Database Ingestion connection, you must configure connection properties. You can use this connection type in database ingestion tasks, which you configure in the Mass Ingestion service.
The following table describes the connection properties:
Property Description
Connection Name A name for the connection. This name must be unique within the organization. Connection names can contain alphanumeric characters, spaces, and the following special characters: _ . + -Spaces at the beginning or end of the name are trimmed and are not saved as part of the name. Maximum length is 100 characters. Connection names are not case sensitive.
Description An optional description for the connection. Maximum length is 255 characters.
Type The type of connection. Ensure that the type is Db2 for i Database Ingestion.
Runtime Environment
The name of the runtime environment where you want to run database ingestion tasks. You define runtime environments in Administrator.
User Name The user name to use for connecting to the Db2 for i instance.
Password The password to use for connecting to the Db2 for i instance.
Host The name of the machine that hosts the database server.
Mass Ingestion connection properties 47
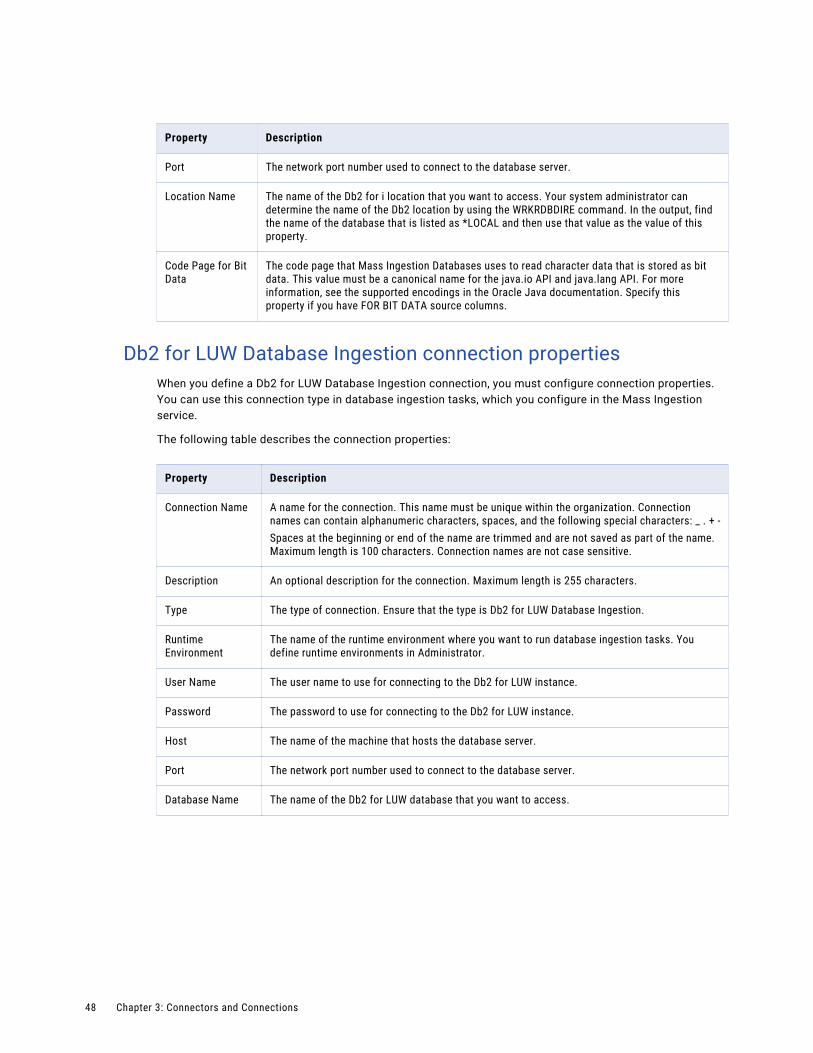
Property Description
Port The network port number used to connect to the database server.
Location Name The name of the Db2 for i location that you want to access. Your system administrator can determine the name of the Db2 location by using the WRKRDBDIRE command. In the output, find the name of the database that is listed as *LOCAL and then use that value as the value of this property.
Code Page for Bit Data
The code page that Mass Ingestion Databases uses to read character data that is stored as bit data. This value must be a canonical name for the java.io API and java.lang API. For more information, see the supported encodings in the Oracle Java documentation. Specify this property if you have FOR BIT DATA source columns.
Db2 for LUW Database Ingestion connection propertiesWhen you define a Db2 for LUW Database Ingestion connection, you must configure connection properties. You can use this connection type in database ingestion tasks, which you configure in the Mass Ingestion service.
The following table describes the connection properties:
Property Description
Connection Name A name for the connection. This name must be unique within the organization. Connection names can contain alphanumeric characters, spaces, and the following special characters: _ . + -Spaces at the beginning or end of the name are trimmed and are not saved as part of the name. Maximum length is 100 characters. Connection names are not case sensitive.
Description An optional description for the connection. Maximum length is 255 characters.
Type The type of connection. Ensure that the type is Db2 for LUW Database Ingestion.
Runtime Environment
The name of the runtime environment where you want to run database ingestion tasks. You define runtime environments in Administrator.
User Name The user name to use for connecting to the Db2 for LUW instance.
Password The password to use for connecting to the Db2 for LUW instance.
Host The name of the machine that hosts the database server.
Port The network port number used to connect to the database server.
Database Name The name of the Db2 for LUW database that you want to access.
48 Chapter 3: Connectors and Connections
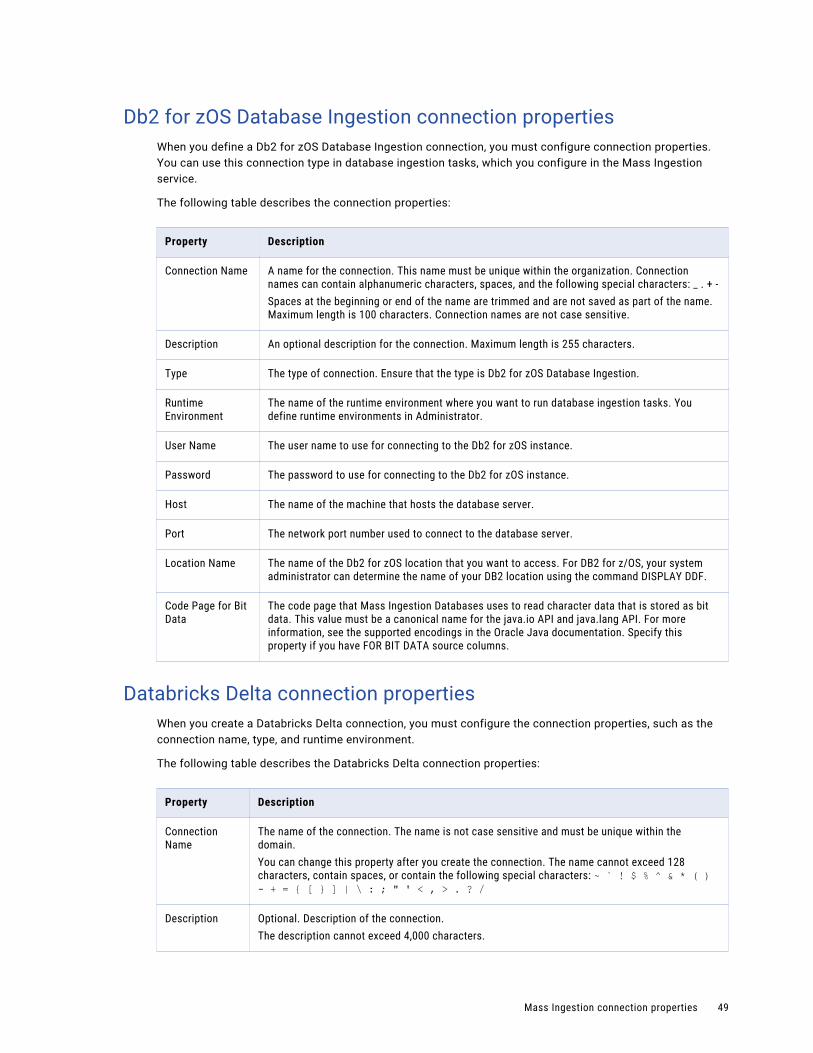
Db2 for zOS Database Ingestion connection propertiesWhen you define a Db2 for zOS Database Ingestion connection, you must configure connection properties. You can use this connection type in database ingestion tasks, which you configure in the Mass Ingestion service.
The following table describes the connection properties:
Property Description
Connection Name A name for the connection. This name must be unique within the organization. Connection names can contain alphanumeric characters, spaces, and the following special characters: _ . + -Spaces at the beginning or end of the name are trimmed and are not saved as part of the name. Maximum length is 100 characters. Connection names are not case sensitive.
Description An optional description for the connection. Maximum length is 255 characters.
Type The type of connection. Ensure that the type is Db2 for zOS Database Ingestion.
Runtime Environment
The name of the runtime environment where you want to run database ingestion tasks. You define runtime environments in Administrator.
User Name The user name to use for connecting to the Db2 for zOS instance.
Password The password to use for connecting to the Db2 for zOS instance.
Host The name of the machine that hosts the database server.
Port The network port number used to connect to the database server.
Location Name The name of the Db2 for zOS location that you want to access. For DB2 for z/OS, your system administrator can determine the name of your DB2 location using the command DISPLAY DDF.
Code Page for Bit Data
The code page that Mass Ingestion Databases uses to read character data that is stored as bit data. This value must be a canonical name for the java.io API and java.lang API. For more information, see the supported encodings in the Oracle Java documentation. Specify this property if you have FOR BIT DATA source columns.
Databricks Delta connection propertiesWhen you create a Databricks Delta connection, you must configure the connection properties, such as the connection name, type, and runtime environment.
The following table describes the Databricks Delta connection properties:
Property Description
Connection Name
The name of the connection. The name is not case sensitive and must be unique within the domain.You can change this property after you create the connection. The name cannot exceed 128 characters, contain spaces, or contain the following special characters: ~ ` ! $ % ^ & * ( ) - + = { [ } ] | \ : ; " ' < , > . ? /
Description Optional. Description of the connection.The description cannot exceed 4,000 characters.
Mass Ingestion connection properties 49
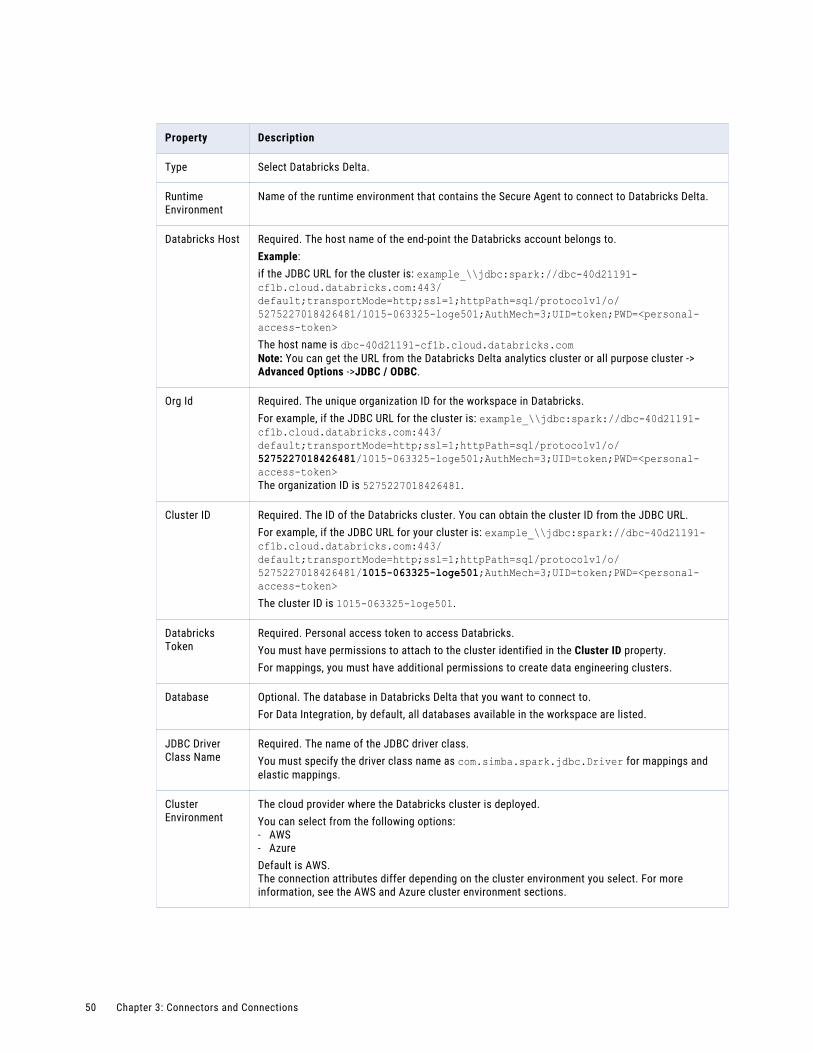
Property Description
Type Select Databricks Delta.
Runtime Environment
Name of the runtime environment that contains the Secure Agent to connect to Databricks Delta.
Databricks Host Required. The host name of the end-point the Databricks account belongs to.Example:if the JDBC URL for the cluster is: example_\\jdbc:spark://dbc-40d21191-cf1b.cloud.databricks.com:443/default;transportMode=http;ssl=1;httpPath=sql/protocolv1/o/5275227018426481/1015-063325-loge501;AuthMech=3;UID=token;PWD=<personal-access-token>The host name is dbc-40d21191-cf1b.cloud.databricks.comNote: You can get the URL from the Databricks Delta analytics cluster or all purpose cluster -> Advanced Options ->JDBC / ODBC.
Org Id Required. The unique organization ID for the workspace in Databricks.For example, if the JDBC URL for the cluster is: example_\\jdbc:spark://dbc-40d21191-cf1b.cloud.databricks.com:443/default;transportMode=http;ssl=1;httpPath=sql/protocolv1/o/5275227018426481/1015-063325-loge501;AuthMech=3;UID=token;PWD=<personal-access-token>The organization ID is 5275227018426481.
Cluster ID Required. The ID of the Databricks cluster. You can obtain the cluster ID from the JDBC URL.For example, if the JDBC URL for your cluster is: example_\\jdbc:spark://dbc-40d21191-cf1b.cloud.databricks.com:443/default;transportMode=http;ssl=1;httpPath=sql/protocolv1/o/5275227018426481/1015-063325-loge501;AuthMech=3;UID=token;PWD=<personal-access-token>The cluster ID is 1015-063325-loge501.
Databricks Token
Required. Personal access token to access Databricks.You must have permissions to attach to the cluster identified in the Cluster ID property.For mappings, you must have additional permissions to create data engineering clusters.
Database Optional. The database in Databricks Delta that you want to connect to.For Data Integration, by default, all databases available in the workspace are listed.
JDBC Driver Class Name
Required. The name of the JDBC driver class.You must specify the driver class name as com.simba.spark.jdbc.Driver for mappings and elastic mappings.
Cluster Environment
The cloud provider where the Databricks cluster is deployed.You can select from the following options:- AWS- AzureDefault is AWS.The connection attributes differ depending on the cluster environment you select. For more information, see the AWS and Azure cluster environment sections.
50 Chapter 3: Connectors and Connections

Property Description
Min Workers The minimum number of worker nodes to be used for the Spark job.Mandatory for mappings and minimum value is 1.Not applicable to elastic mappings.
Max Workers Optional. The maximum number of worker nodes to be used for the Spark job.If you do not want autoscale, set Max Workers = Min Workers or do not set Max Workers.Not applicable to elastic mappings.
DB Runtime Version
The Databricks runtime version.Select 7.3 LTS from the list.Not applicable to elastic mappings.
Worker Node Type
Required. The instance type of the machine used for the Spark worker node.Not applicable to elastic mappings.
Driver Node Type
Optional. The instance type of the machine used for the Spark driver node. If not provided, the value as in worker node type is used.Not applicable to elastic mappings.
Instance Pool ID Optional. The instance pool used for the Spark cluster.If you specify the Instance Pool ID to run mappings, the following connection properties are ignored:- Driver Node Type- EBS Volume Count- EBS Volume Type- EBS Volume Size- Enable Elastic Disk- Worker Node Type- Zone IDNot applicable to elastic mappings.
Enable Elastic Disk
Optional. Enable this option for the cluster to dynamically acquire additional disk space when the Spark workers are running low on disk space.Not applicable to elastic mappings.
Spark Configuration
Optional. The Spark configuration to be used in the Databricks cluster. The configuration must be in the following format:"key1"="value1";"key2"="value2";.... For example:"spark.executor.userClassPathFirst"="False"Not applicable to elastic mappings.
Spark Environment Variables
Optional. The environment variables that you need to export before launching the Spark driver and workers. The variables must be in the following format:"key1"="value1";"key2"="value2";....For example:"MY_ENVIRONMENT_VARIABLE"="true"Not applicable to elastic mappings.
AWS cluster environment
Mass Ingestion connection properties 51
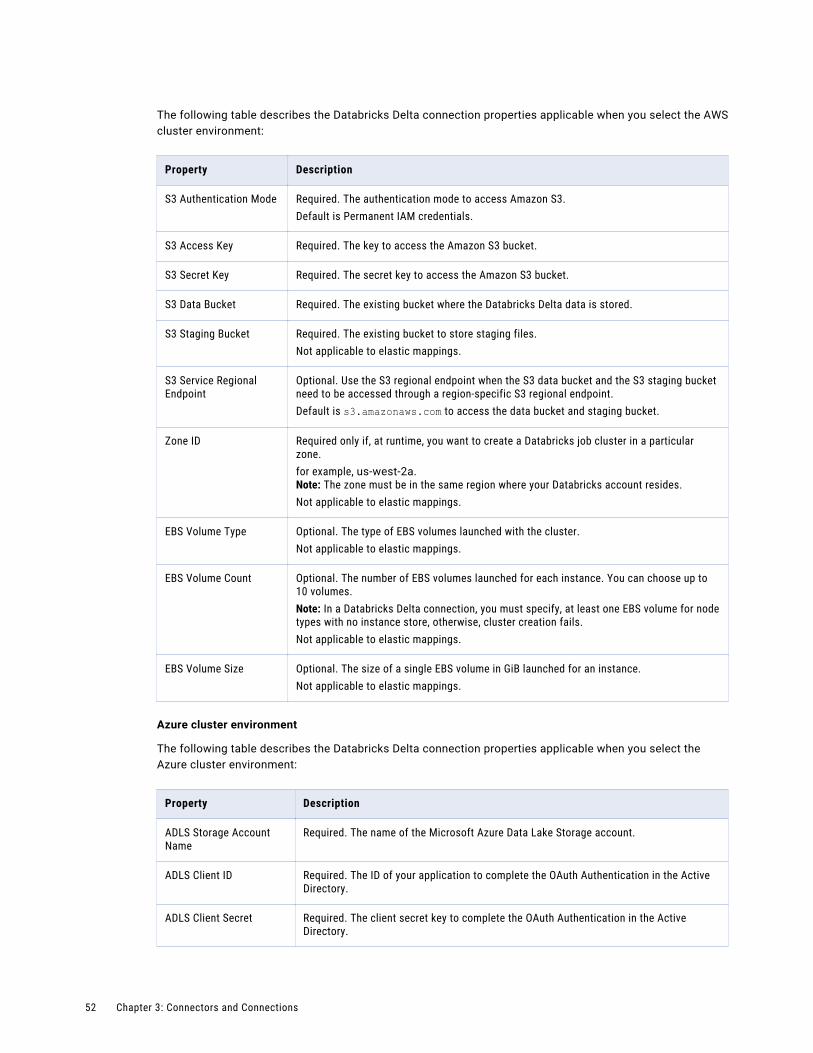
The following table describes the Databricks Delta connection properties applicable when you select the AWS cluster environment:
Property Description
S3 Authentication Mode Required. The authentication mode to access Amazon S3.Default is Permanent IAM credentials.
S3 Access Key Required. The key to access the Amazon S3 bucket.
S3 Secret Key Required. The secret key to access the Amazon S3 bucket.
S3 Data Bucket Required. The existing bucket where the Databricks Delta data is stored.
S3 Staging Bucket Required. The existing bucket to store staging files.Not applicable to elastic mappings.
S3 Service Regional Endpoint
Optional. Use the S3 regional endpoint when the S3 data bucket and the S3 staging bucket need to be accessed through a region-specific S3 regional endpoint.Default is s3.amazonaws.com to access the data bucket and staging bucket.
Zone ID Required only if, at runtime, you want to create a Databricks job cluster in a particular zone.for example, us-west-2a.Note: The zone must be in the same region where your Databricks account resides.Not applicable to elastic mappings.
EBS Volume Type Optional. The type of EBS volumes launched with the cluster.Not applicable to elastic mappings.
EBS Volume Count Optional. The number of EBS volumes launched for each instance. You can choose up to 10 volumes.Note: In a Databricks Delta connection, you must specify, at least one EBS volume for node types with no instance store, otherwise, cluster creation fails.Not applicable to elastic mappings.
EBS Volume Size Optional. The size of a single EBS volume in GiB launched for an instance.Not applicable to elastic mappings.
Azure cluster environment
The following table describes the Databricks Delta connection properties applicable when you select the Azure cluster environment:
Property Description
ADLS Storage Account Name
Required. The name of the Microsoft Azure Data Lake Storage account.
ADLS Client ID Required. The ID of your application to complete the OAuth Authentication in the Active Directory.
ADLS Client Secret Required. The client secret key to complete the OAuth Authentication in the Active Directory.
52 Chapter 3: Connectors and Connections

Property Description
ADLS Tenant ID Required. The ID of the Microsoft Azure Data Lake Storage directory that you use to read data or write data.
ADLS Endpoint Required. The OAuth 2.0 token endpoint from where authentication based on the client ID and client secret is completed.
ADLS Data Filesystem Name
Required. The name of an existing file system where the Databricks Delta data is stored.
ADLS Staging Filesystem Name
Required. The name of an existing file system where the staging data is stored.Not applicable to elastic mappings.
The following properties are required to launch the job cluster at run time for a mapping task:
• Min Workers
• Max Workers
• DB Runtime Version
• Worker Node Type
• Driver Node Type
• Enable Elastic Disk
• Spark Configuration
• Spark Environment Variables
• Zone ID
• EBS Volume Type
• EBS Volume Count
• EBS Volume Size
Mass Ingestion connection properties 53
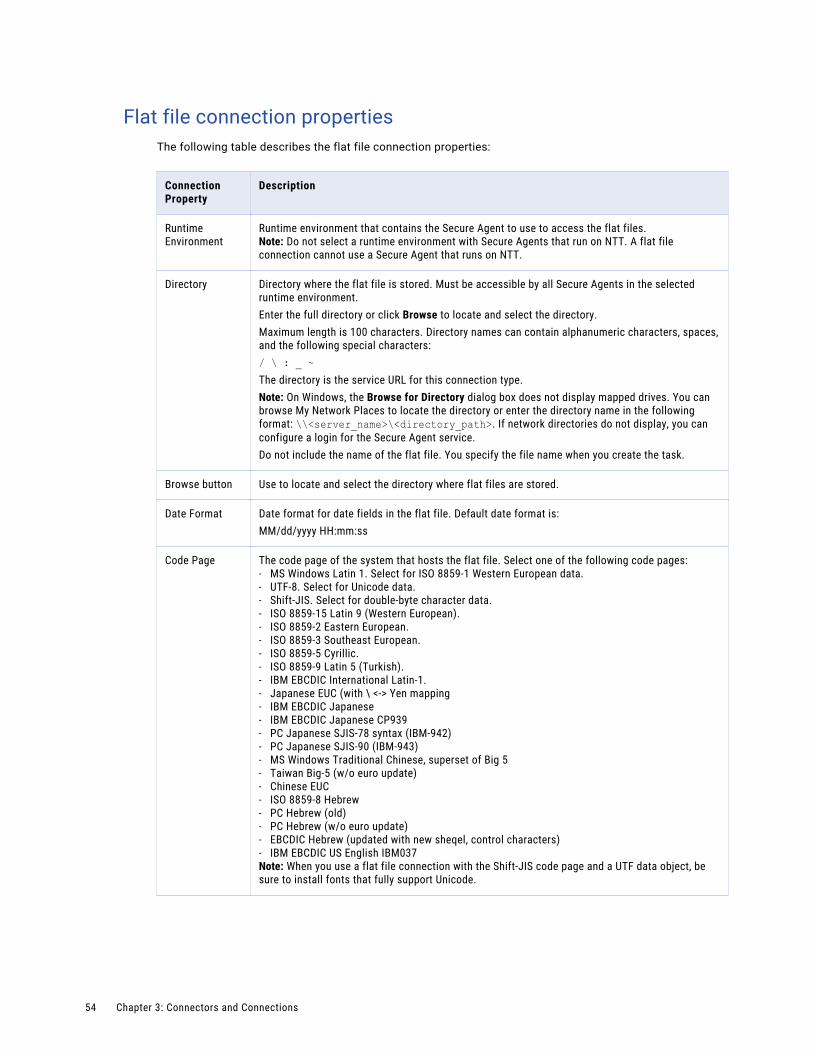
Flat file connection propertiesThe following table describes the flat file connection properties:
Connection Property
Description
Runtime Environment
Runtime environment that contains the Secure Agent to use to access the flat files.Note: Do not select a runtime environment with Secure Agents that run on NTT. A flat file connection cannot use a Secure Agent that runs on NTT.
Directory Directory where the flat file is stored. Must be accessible by all Secure Agents in the selected runtime environment.Enter the full directory or click Browse to locate and select the directory.Maximum length is 100 characters. Directory names can contain alphanumeric characters, spaces, and the following special characters:/ \ : _ ~ The directory is the service URL for this connection type.Note: On Windows, the Browse for Directory dialog box does not display mapped drives. You can browse My Network Places to locate the directory or enter the directory name in the following format: \\<server_name>\<directory_path>. If network directories do not display, you can configure a login for the Secure Agent service.Do not include the name of the flat file. You specify the file name when you create the task.
Browse button Use to locate and select the directory where flat files are stored.
Date Format Date format for date fields in the flat file. Default date format is:MM/dd/yyyy HH:mm:ss
Code Page The code page of the system that hosts the flat file. Select one of the following code pages:- MS Windows Latin 1. Select for ISO 8859-1 Western European data.- UTF-8. Select for Unicode data.- Shift-JIS. Select for double-byte character data.- ISO 8859-15 Latin 9 (Western European).- ISO 8859-2 Eastern European.- ISO 8859-3 Southeast European.- ISO 8859-5 Cyrillic.- ISO 8859-9 Latin 5 (Turkish).- IBM EBCDIC International Latin-1.- Japanese EUC (with \ <-> Yen mapping- IBM EBCDIC Japanese- IBM EBCDIC Japanese CP939- PC Japanese SJIS-78 syntax (IBM-942)- PC Japanese SJIS-90 (IBM-943)- MS Windows Traditional Chinese, superset of Big 5- Taiwan Big-5 (w/o euro update)- Chinese EUC- ISO 8859-8 Hebrew- PC Hebrew (old)- PC Hebrew (w/o euro update)- EBCDIC Hebrew (updated with new sheqel, control characters)- IBM EBCDIC US English IBM037Note: When you use a flat file connection with the Shift-JIS code page and a UTF data object, be sure to install fonts that fully support Unicode.
54 Chapter 3: Connectors and Connections
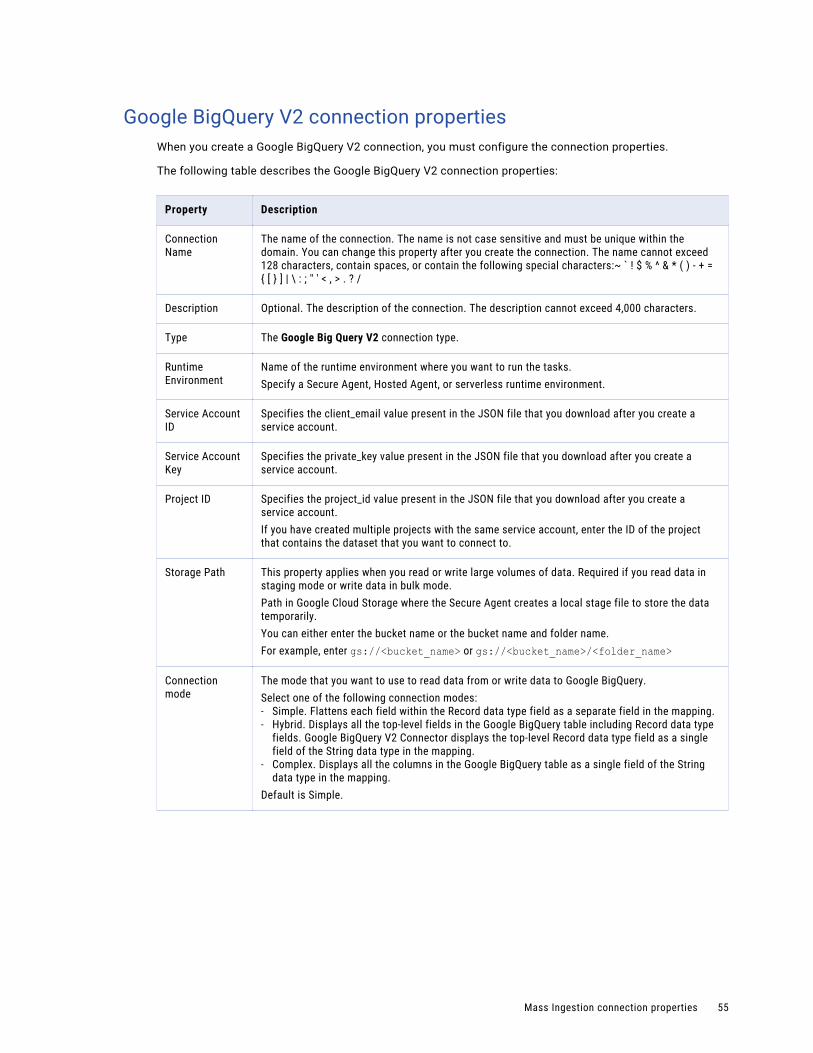
Google BigQuery V2 connection propertiesWhen you create a Google BigQuery V2 connection, you must configure the connection properties.
The following table describes the Google BigQuery V2 connection properties:
Property Description
Connection Name
The name of the connection. The name is not case sensitive and must be unique within the domain. You can change this property after you create the connection. The name cannot exceed 128 characters, contain spaces, or contain the following special characters:~ ` ! $ % ^ & * ( ) - + = { [ } ] | \ : ; " ' < , > . ? /
Description Optional. The description of the connection. The description cannot exceed 4,000 characters.
Type The Google Big Query V2 connection type.
Runtime Environment
Name of the runtime environment where you want to run the tasks.Specify a Secure Agent, Hosted Agent, or serverless runtime environment.
Service Account ID
Specifies the client_email value present in the JSON file that you download after you create a service account.
Service Account Key
Specifies the private_key value present in the JSON file that you download after you create a service account.
Project ID Specifies the project_id value present in the JSON file that you download after you create a service account.If you have created multiple projects with the same service account, enter the ID of the project that contains the dataset that you want to connect to.
Storage Path This property applies when you read or write large volumes of data. Required if you read data in staging mode or write data in bulk mode.Path in Google Cloud Storage where the Secure Agent creates a local stage file to store the data temporarily.You can either enter the bucket name or the bucket name and folder name.For example, enter gs://<bucket_name> or gs://<bucket_name>/<folder_name>
Connection mode
The mode that you want to use to read data from or write data to Google BigQuery.Select one of the following connection modes:- Simple. Flattens each field within the Record data type field as a separate field in the mapping.- Hybrid. Displays all the top-level fields in the Google BigQuery table including Record data type
fields. Google BigQuery V2 Connector displays the top-level Record data type field as a single field of the String data type in the mapping.
- Complex. Displays all the columns in the Google BigQuery table as a single field of the String data type in the mapping.
Default is Simple.
Mass Ingestion connection properties 55
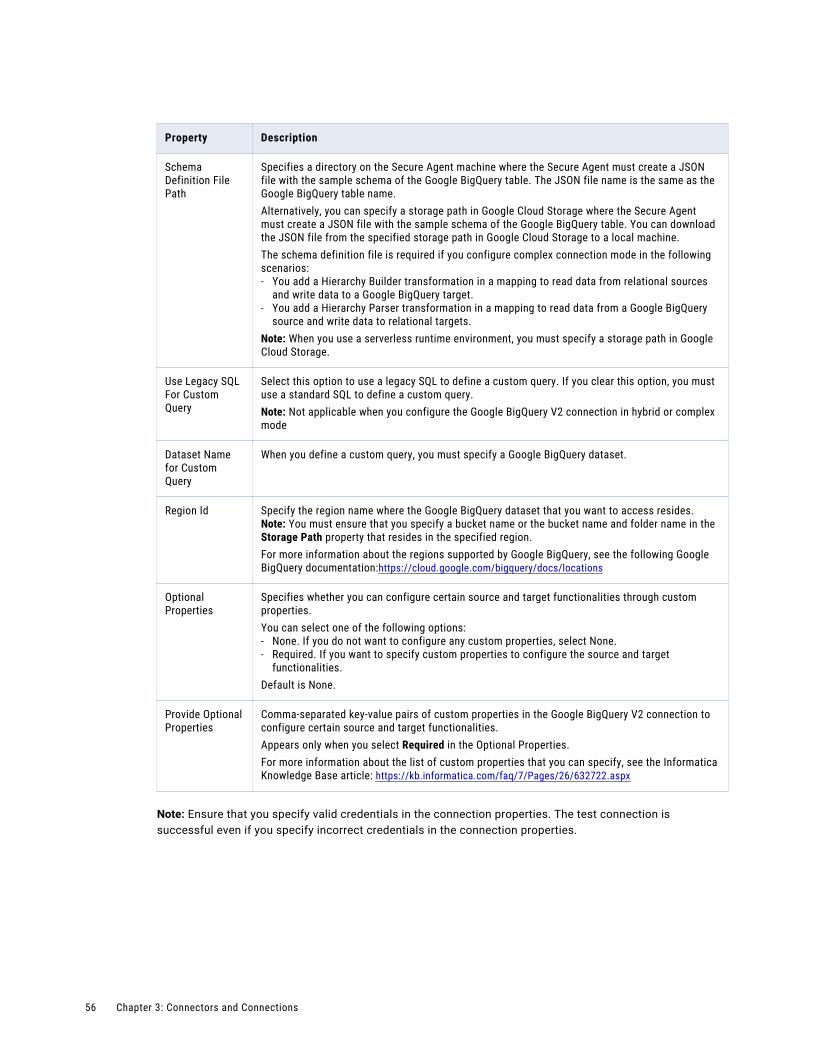
Property Description
Schema Definition File Path
Specifies a directory on the Secure Agent machine where the Secure Agent must create a JSON file with the sample schema of the Google BigQuery table. The JSON file name is the same as the Google BigQuery table name.Alternatively, you can specify a storage path in Google Cloud Storage where the Secure Agent must create a JSON file with the sample schema of the Google BigQuery table. You can download the JSON file from the specified storage path in Google Cloud Storage to a local machine.The schema definition file is required if you configure complex connection mode in the following scenarios:- You add a Hierarchy Builder transformation in a mapping to read data from relational sources
and write data to a Google BigQuery target.- You add a Hierarchy Parser transformation in a mapping to read data from a Google BigQuery
source and write data to relational targets.Note: When you use a serverless runtime environment, you must specify a storage path in Google Cloud Storage.
Use Legacy SQL For Custom Query
Select this option to use a legacy SQL to define a custom query. If you clear this option, you must use a standard SQL to define a custom query.Note: Not applicable when you configure the Google BigQuery V2 connection in hybrid or complex mode
Dataset Name for Custom Query
When you define a custom query, you must specify a Google BigQuery dataset.
Region Id Specify the region name where the Google BigQuery dataset that you want to access resides.Note: You must ensure that you specify a bucket name or the bucket name and folder name in the Storage Path property that resides in the specified region.For more information about the regions supported by Google BigQuery, see the following Google BigQuery documentation:https://cloud.google.com/bigquery/docs/locations
Optional Properties
Specifies whether you can configure certain source and target functionalities through custom properties.You can select one of the following options:- None. If you do not want to configure any custom properties, select None.- Required. If you want to specify custom properties to configure the source and target
functionalities.Default is None.
Provide Optional Properties
Comma-separated key-value pairs of custom properties in the Google BigQuery V2 connection to configure certain source and target functionalities.Appears only when you select Required in the Optional Properties.For more information about the list of custom properties that you can specify, see the Informatica Knowledge Base article: https://kb.informatica.com/faq/7/Pages/26/632722.aspx
Note: Ensure that you specify valid credentials in the connection properties. The test connection is successful even if you specify incorrect credentials in the connection properties.
56 Chapter 3: Connectors and Connections
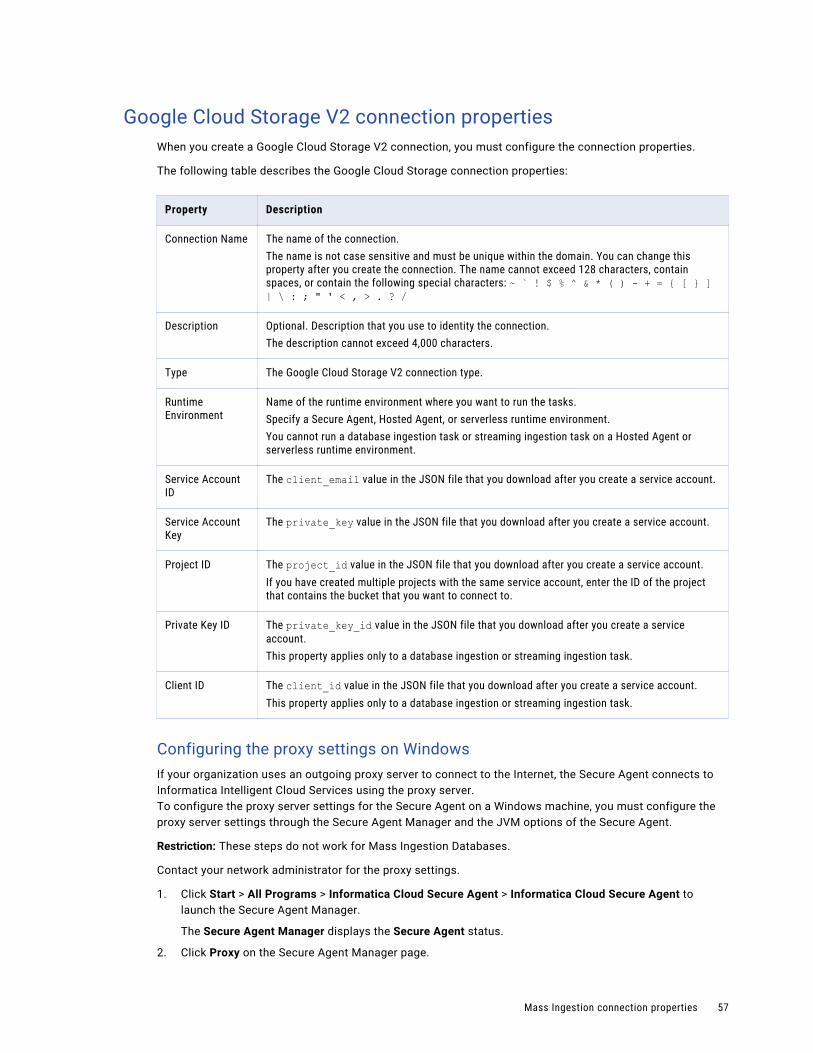
Google Cloud Storage V2 connection propertiesWhen you create a Google Cloud Storage V2 connection, you must configure the connection properties.
The following table describes the Google Cloud Storage connection properties:
Property Description
Connection Name The name of the connection.The name is not case sensitive and must be unique within the domain. You can change this property after you create the connection. The name cannot exceed 128 characters, contain spaces, or contain the following special characters: ~ ` ! $ % ^ & * ( ) - + = { [ } ] | \ : ; " ' < , > . ? /
Description Optional. Description that you use to identity the connection.The description cannot exceed 4,000 characters.
Type The Google Cloud Storage V2 connection type.
Runtime Environment
Name of the runtime environment where you want to run the tasks.Specify a Secure Agent, Hosted Agent, or serverless runtime environment.You cannot run a database ingestion task or streaming ingestion task on a Hosted Agent or serverless runtime environment.
Service Account ID
The client_email value in the JSON file that you download after you create a service account.
Service Account Key
The private_key value in the JSON file that you download after you create a service account.
Project ID The project_id value in the JSON file that you download after you create a service account.If you have created multiple projects with the same service account, enter the ID of the project that contains the bucket that you want to connect to.
Private Key ID The private_key_id value in the JSON file that you download after you create a service account.This property applies only to a database ingestion or streaming ingestion task.
Client ID The client_id value in the JSON file that you download after you create a service account.This property applies only to a database ingestion or streaming ingestion task.
Configuring the proxy settings on WindowsIf your organization uses an outgoing proxy server to connect to the Internet, the Secure Agent connects to Informatica Intelligent Cloud Services using the proxy server.To configure the proxy server settings for the Secure Agent on a Windows machine, you must configure the proxy server settings through the Secure Agent Manager and the JVM options of the Secure Agent.
Restriction: These steps do not work for Mass Ingestion Databases.
Contact your network administrator for the proxy settings.
1. Click Start > All Programs > Informatica Cloud Secure Agent > Informatica Cloud Secure Agent to launch the Secure Agent Manager.
The Secure Agent Manager displays the Secure Agent status.
2. Click Proxy on the Secure Agent Manager page.
Mass Ingestion connection properties 57
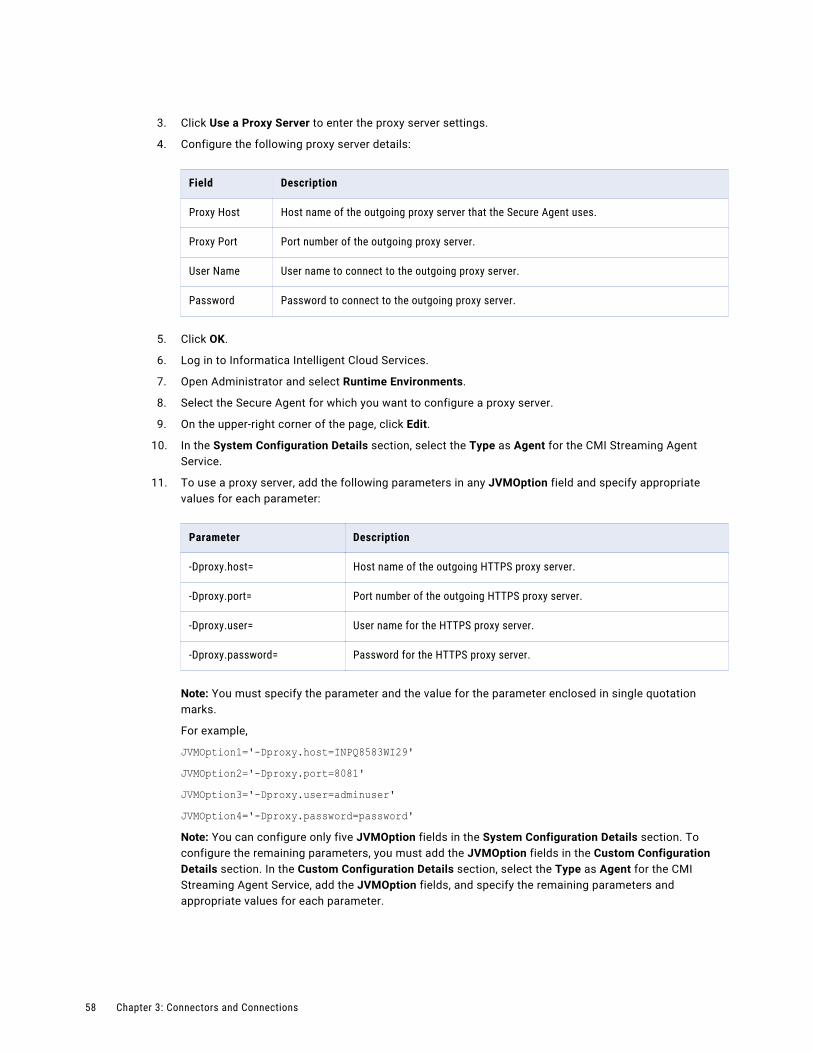
3. Click Use a Proxy Server to enter the proxy server settings.
4. Configure the following proxy server details:
Field Description
Proxy Host Host name of the outgoing proxy server that the Secure Agent uses.
Proxy Port Port number of the outgoing proxy server.
User Name User name to connect to the outgoing proxy server.
Password Password to connect to the outgoing proxy server.
5. Click OK.
6. Log in to Informatica Intelligent Cloud Services.
7. Open Administrator and select Runtime Environments.
8. Select the Secure Agent for which you want to configure a proxy server.
9. On the upper-right corner of the page, click Edit.
10. In the System Configuration Details section, select the Type as Agent for the CMI Streaming Agent Service.
11. To use a proxy server, add the following parameters in any JVMOption field and specify appropriate values for each parameter:
Parameter Description
-Dproxy.host= Host name of the outgoing HTTPS proxy server.
-Dproxy.port= Port number of the outgoing HTTPS proxy server.
-Dproxy.user= User name for the HTTPS proxy server.
-Dproxy.password= Password for the HTTPS proxy server.
Note: You must specify the parameter and the value for the parameter enclosed in single quotation marks.
For example,
JVMOption1='-Dproxy.host=INPQ8583WI29'JVMOption2='-Dproxy.port=8081'JVMOption3='-Dproxy.user=adminuser'JVMOption4='-Dproxy.password=password'Note: You can configure only five JVMOption fields in the System Configuration Details section. To configure the remaining parameters, you must add the JVMOption fields in the Custom Configuration Details section. In the Custom Configuration Details section, select the Type as Agent for the CMI Streaming Agent Service, add the JVMOption fields, and specify the remaining parameters and appropriate values for each parameter.
58 Chapter 3: Connectors and Connections
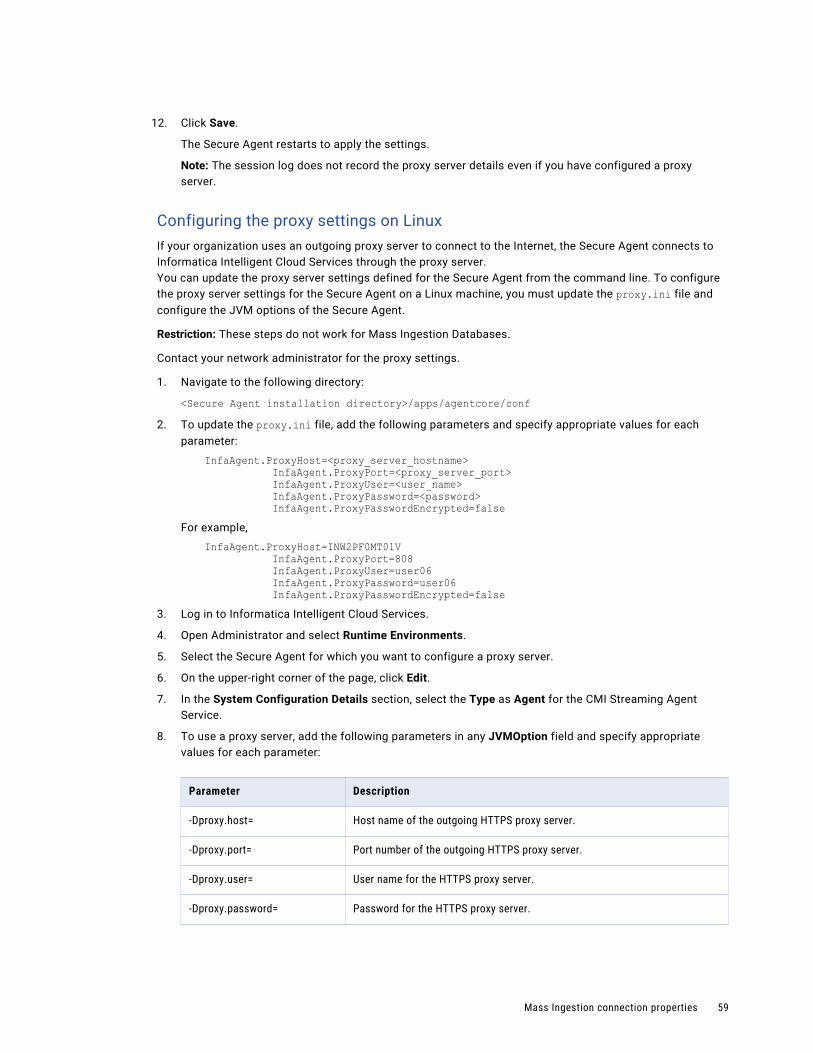
12. Click Save.
The Secure Agent restarts to apply the settings.
Note: The session log does not record the proxy server details even if you have configured a proxy server.
Configuring the proxy settings on LinuxIf your organization uses an outgoing proxy server to connect to the Internet, the Secure Agent connects to Informatica Intelligent Cloud Services through the proxy server.You can update the proxy server settings defined for the Secure Agent from the command line. To configure the proxy server settings for the Secure Agent on a Linux machine, you must update the proxy.ini file and configure the JVM options of the Secure Agent.
Restriction: These steps do not work for Mass Ingestion Databases.
Contact your network administrator for the proxy settings.
1. Navigate to the following directory:
<Secure Agent installation directory>/apps/agentcore/conf2. To update the proxy.ini file, add the following parameters and specify appropriate values for each
parameter:
InfaAgent.ProxyHost=<proxy_server_hostname> InfaAgent.ProxyPort=<proxy_server_port> InfaAgent.ProxyUser=<user_name> InfaAgent.ProxyPassword=<password> InfaAgent.ProxyPasswordEncrypted=false
For example,
InfaAgent.ProxyHost=INW2PF0MT01V InfaAgent.ProxyPort=808 InfaAgent.ProxyUser=user06 InfaAgent.ProxyPassword=user06 InfaAgent.ProxyPasswordEncrypted=false
3. Log in to Informatica Intelligent Cloud Services.
4. Open Administrator and select Runtime Environments.
5. Select the Secure Agent for which you want to configure a proxy server.
6. On the upper-right corner of the page, click Edit.
7. In the System Configuration Details section, select the Type as Agent for the CMI Streaming Agent Service.
8. To use a proxy server, add the following parameters in any JVMOption field and specify appropriate values for each parameter:
Parameter Description
-Dproxy.host= Host name of the outgoing HTTPS proxy server.
-Dproxy.port= Port number of the outgoing HTTPS proxy server.
-Dproxy.user= User name for the HTTPS proxy server.
-Dproxy.password= Password for the HTTPS proxy server.
Mass Ingestion connection properties 59
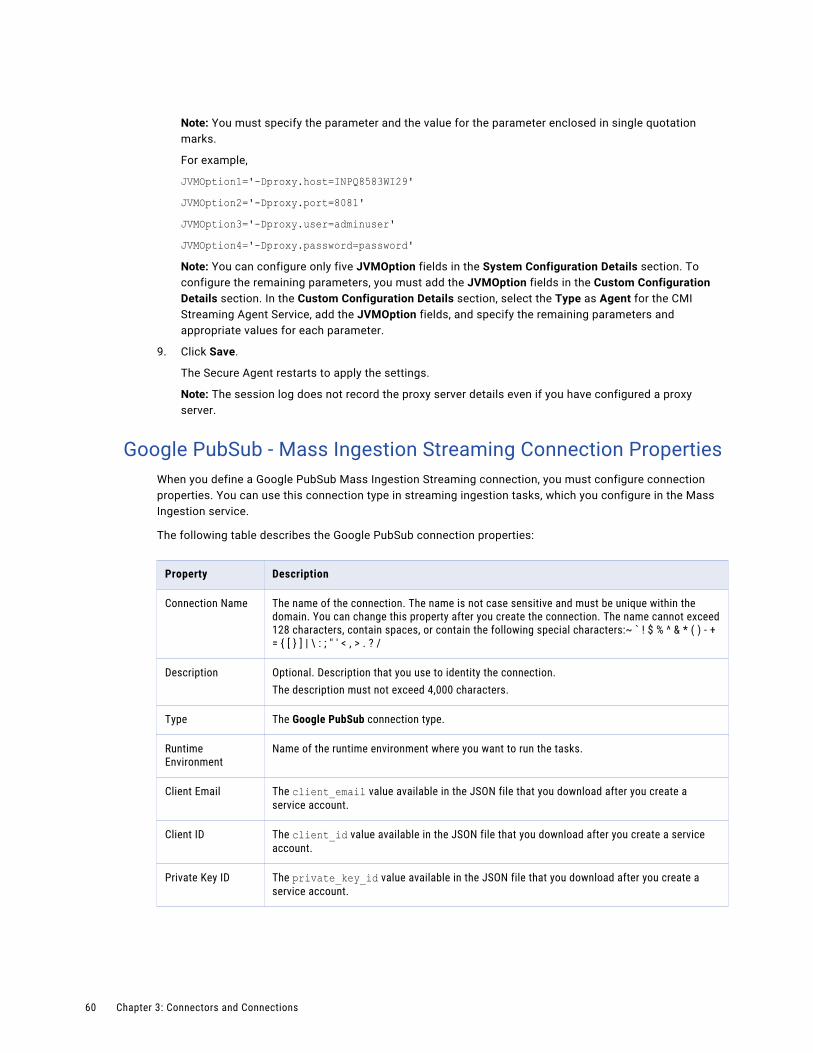
Note: You must specify the parameter and the value for the parameter enclosed in single quotation marks.
For example,
JVMOption1='-Dproxy.host=INPQ8583WI29'JVMOption2='-Dproxy.port=8081'JVMOption3='-Dproxy.user=adminuser'JVMOption4='-Dproxy.password=password'Note: You can configure only five JVMOption fields in the System Configuration Details section. To configure the remaining parameters, you must add the JVMOption fields in the Custom Configuration Details section. In the Custom Configuration Details section, select the Type as Agent for the CMI Streaming Agent Service, add the JVMOption fields, and specify the remaining parameters and appropriate values for each parameter.
9. Click Save.
The Secure Agent restarts to apply the settings.
Note: The session log does not record the proxy server details even if you have configured a proxy server.
Google PubSub - Mass Ingestion Streaming Connection PropertiesWhen you define a Google PubSub Mass Ingestion Streaming connection, you must configure connection properties. You can use this connection type in streaming ingestion tasks, which you configure in the Mass Ingestion service.
The following table describes the Google PubSub connection properties:
Property Description
Connection Name The name of the connection. The name is not case sensitive and must be unique within the domain. You can change this property after you create the connection. The name cannot exceed 128 characters, contain spaces, or contain the following special characters:~ ` ! $ % ^ & * ( ) - + = { [ } ] | \ : ; " ' < , > . ? /
Description Optional. Description that you use to identity the connection.The description must not exceed 4,000 characters.
Type The Google PubSub connection type.
Runtime Environment
Name of the runtime environment where you want to run the tasks.
Client Email The client_email value available in the JSON file that you download after you create a service account.
Client ID The client_id value available in the JSON file that you download after you create a service account.
Private Key ID The private_key_id value available in the JSON file that you download after you create a service account.
60 Chapter 3: Connectors and Connections
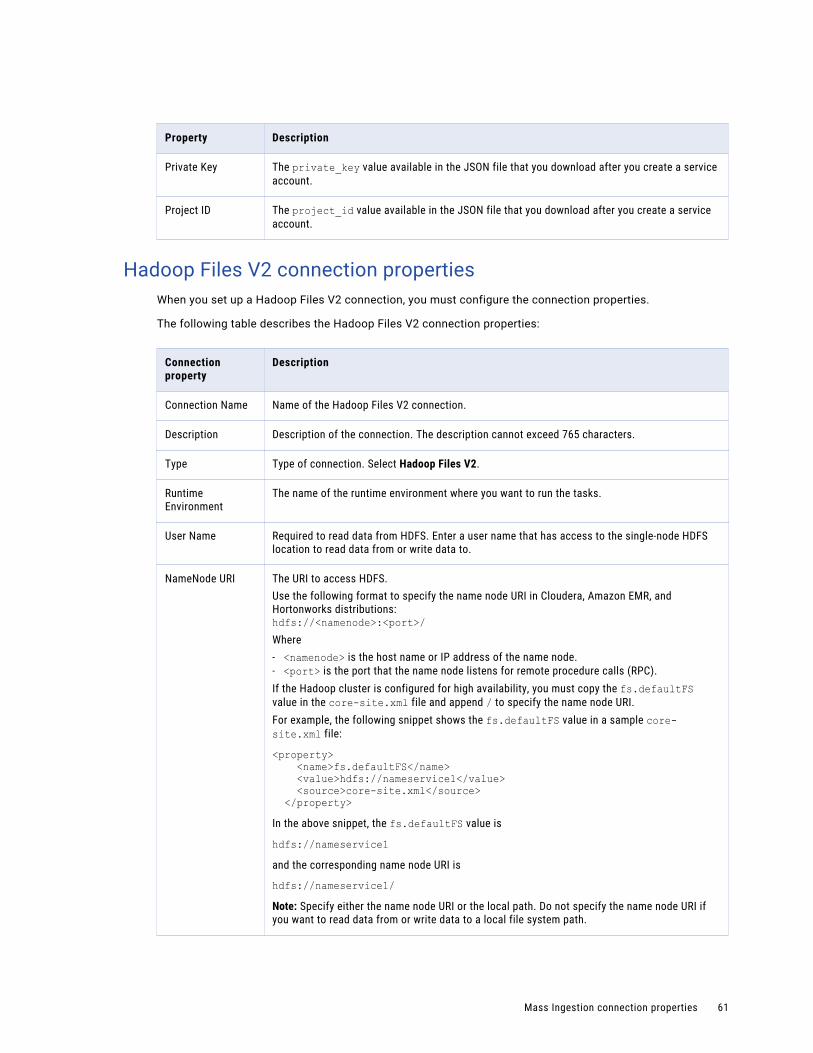
Property Description
Private Key The private_key value available in the JSON file that you download after you create a service account.
Project ID The project_id value available in the JSON file that you download after you create a service account.
Hadoop Files V2 connection propertiesWhen you set up a Hadoop Files V2 connection, you must configure the connection properties.
The following table describes the Hadoop Files V2 connection properties:
Connection property
Description
Connection Name Name of the Hadoop Files V2 connection.
Description Description of the connection. The description cannot exceed 765 characters.
Type Type of connection. Select Hadoop Files V2.
Runtime Environment
The name of the runtime environment where you want to run the tasks.
User Name Required to read data from HDFS. Enter a user name that has access to the single-node HDFS location to read data from or write data to.
NameNode URI The URI to access HDFS.Use the following format to specify the name node URI in Cloudera, Amazon EMR, and Hortonworks distributions:hdfs://<namenode>:<port>/Where- <namenode> is the host name or IP address of the name node.- <port> is the port that the name node listens for remote procedure calls (RPC).If the Hadoop cluster is configured for high availability, you must copy the fs.defaultFS value in the core-site.xml file and append / to specify the name node URI.For example, the following snippet shows the fs.defaultFS value in a sample core-site.xml file:
<property> <name>fs.defaultFS</name> <value>hdfs://nameservice1</value> <source>core-site.xml</source> </property>In the above snippet, the fs.defaultFS value is
hdfs://nameservice1and the corresponding name node URI is
hdfs://nameservice1/Note: Specify either the name node URI or the local path. Do not specify the name node URI if you want to read data from or write data to a local file system path.
Mass Ingestion connection properties 61
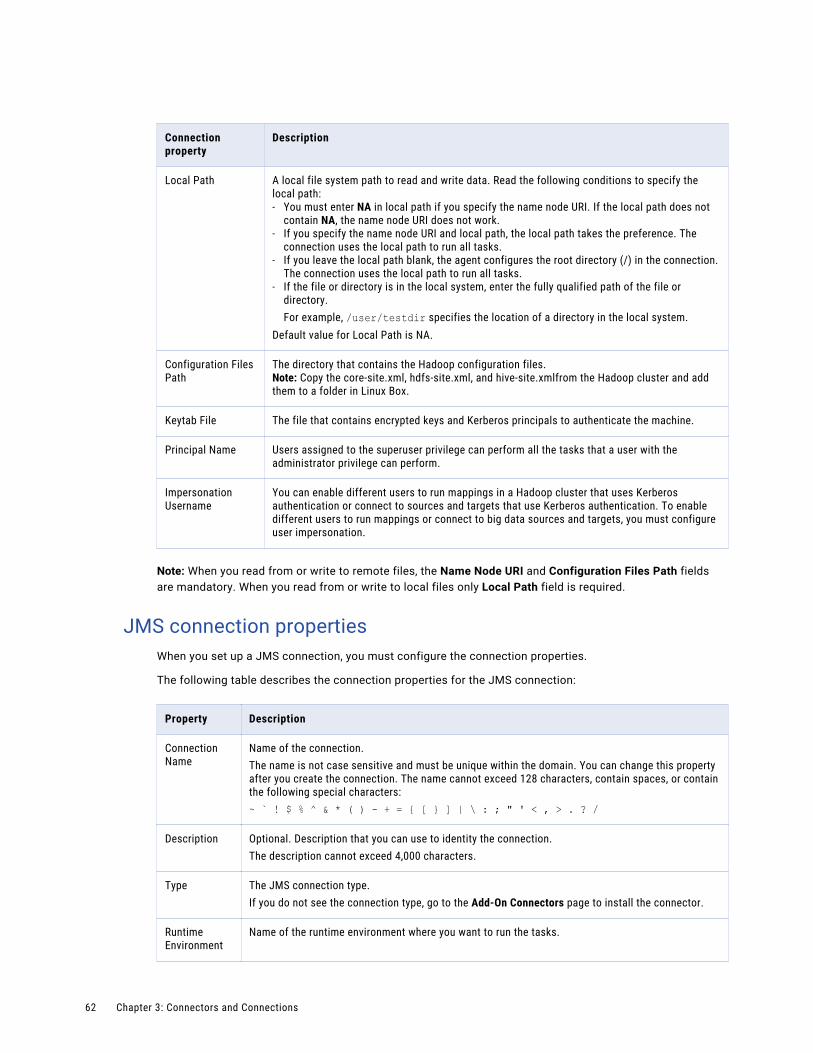
Connection property
Description
Local Path A local file system path to read and write data. Read the following conditions to specify the local path:- You must enter NA in local path if you specify the name node URI. If the local path does not
contain NA, the name node URI does not work.- If you specify the name node URI and local path, the local path takes the preference. The
connection uses the local path to run all tasks.- If you leave the local path blank, the agent configures the root directory (/) in the connection.
The connection uses the local path to run all tasks.- If the file or directory is in the local system, enter the fully qualified path of the file or
directory.For example, /user/testdir specifies the location of a directory in the local system.
Default value for Local Path is NA.
Configuration Files Path
The directory that contains the Hadoop configuration files.Note: Copy the core-site.xml, hdfs-site.xml, and hive-site.xmlfrom the Hadoop cluster and add them to a folder in Linux Box.
Keytab File The file that contains encrypted keys and Kerberos principals to authenticate the machine.
Principal Name Users assigned to the superuser privilege can perform all the tasks that a user with the administrator privilege can perform.
Impersonation Username
You can enable different users to run mappings in a Hadoop cluster that uses Kerberos authentication or connect to sources and targets that use Kerberos authentication. To enable different users to run mappings or connect to big data sources and targets, you must configure user impersonation.
Note: When you read from or write to remote files, the Name Node URI and Configuration Files Path fields are mandatory. When you read from or write to local files only Local Path field is required.
JMS connection propertiesWhen you set up a JMS connection, you must configure the connection properties.
The following table describes the connection properties for the JMS connection:
Property Description
Connection Name
Name of the connection.The name is not case sensitive and must be unique within the domain. You can change this property after you create the connection. The name cannot exceed 128 characters, contain spaces, or contain the following special characters:~ ` ! $ % ^ & * ( ) - + = { [ } ] | \ : ; " ' < , > . ? /
Description Optional. Description that you can use to identity the connection.The description cannot exceed 4,000 characters.
Type The JMS connection type.If you do not see the connection type, go to the Add-On Connectors page to install the connector.
Runtime Environment
Name of the runtime environment where you want to run the tasks.
62 Chapter 3: Connectors and Connections
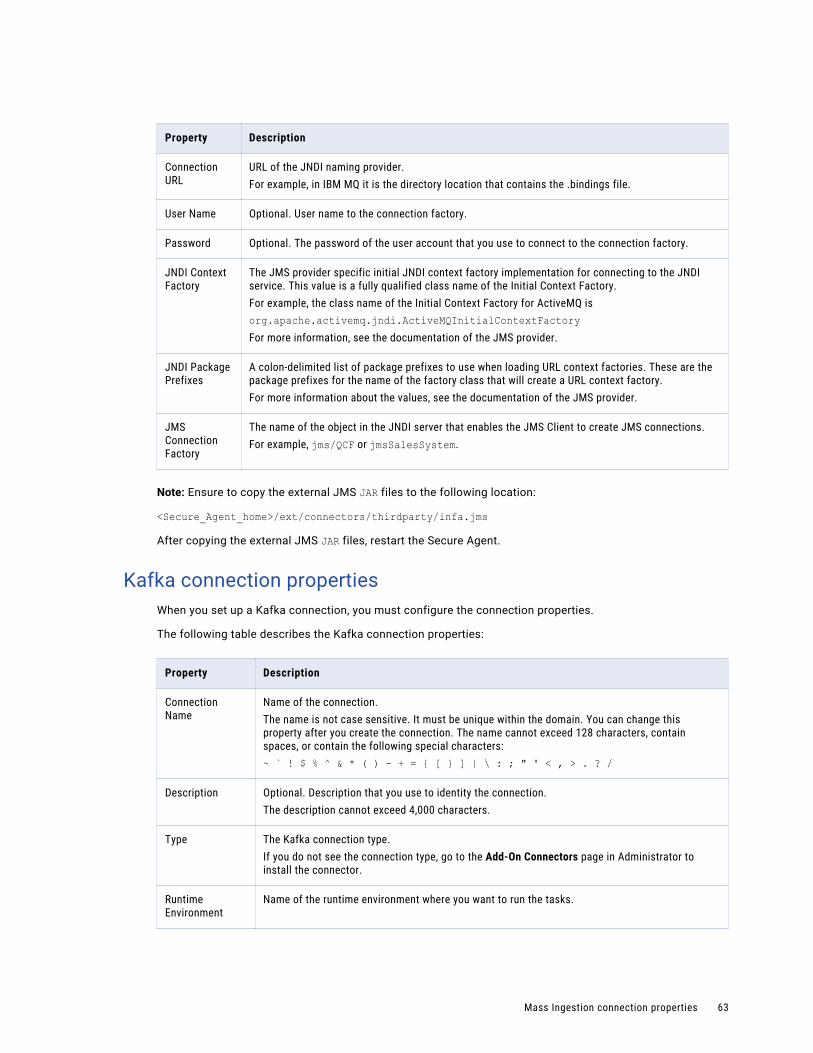
Property Description
Connection URL
URL of the JNDI naming provider.For example, in IBM MQ it is the directory location that contains the .bindings file.
User Name Optional. User name to the connection factory.
Password Optional. The password of the user account that you use to connect to the connection factory.
JNDI Context Factory
The JMS provider specific initial JNDI context factory implementation for connecting to the JNDI service. This value is a fully qualified class name of the Initial Context Factory.For example, the class name of the Initial Context Factory for ActiveMQ isorg.apache.activemq.jndi.ActiveMQInitialContextFactoryFor more information, see the documentation of the JMS provider.
JNDI Package Prefixes
A colon-delimited list of package prefixes to use when loading URL context factories. These are the package prefixes for the name of the factory class that will create a URL context factory.For more information about the values, see the documentation of the JMS provider.
JMS Connection Factory
The name of the object in the JNDI server that enables the JMS Client to create JMS connections.For example, jms/QCF or jmsSalesSystem.
Note: Ensure to copy the external JMS JAR files to the following location:
<Secure_Agent_home>/ext/connectors/thirdparty/infa.jms
After copying the external JMS JAR files, restart the Secure Agent.
Kafka connection propertiesWhen you set up a Kafka connection, you must configure the connection properties.
The following table describes the Kafka connection properties:
Property Description
Connection Name
Name of the connection.The name is not case sensitive. It must be unique within the domain. You can change this property after you create the connection. The name cannot exceed 128 characters, contain spaces, or contain the following special characters:~ ` ! $ % ^ & * ( ) - + = { [ } ] | \ : ; " ' < , > . ? /
Description Optional. Description that you use to identity the connection.The description cannot exceed 4,000 characters.
Type The Kafka connection type.If you do not see the connection type, go to the Add-On Connectors page in Administrator to install the connector.
Runtime Environment
Name of the runtime environment where you want to run the tasks.
Mass Ingestion connection properties 63
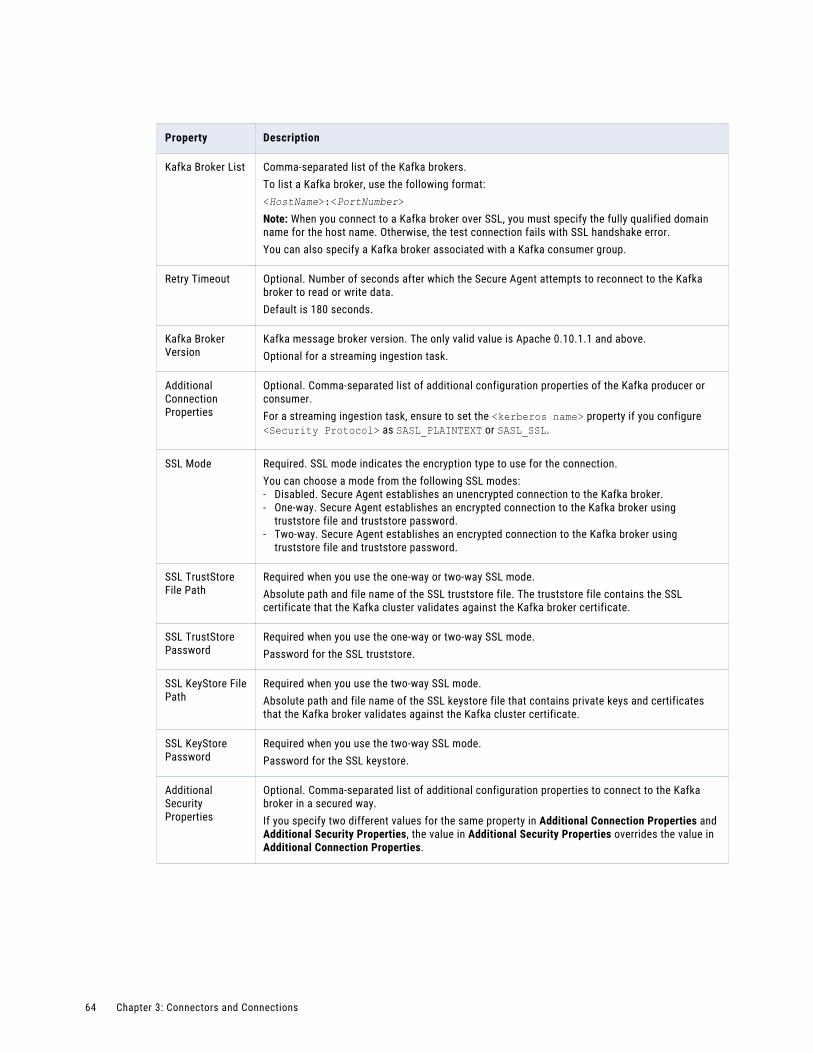
Property Description
Kafka Broker List Comma-separated list of the Kafka brokers.To list a Kafka broker, use the following format:<HostName>:<PortNumber>Note: When you connect to a Kafka broker over SSL, you must specify the fully qualified domain name for the host name. Otherwise, the test connection fails with SSL handshake error.You can also specify a Kafka broker associated with a Kafka consumer group.
Retry Timeout Optional. Number of seconds after which the Secure Agent attempts to reconnect to the Kafka broker to read or write data.Default is 180 seconds.
Kafka Broker Version
Kafka message broker version. The only valid value is Apache 0.10.1.1 and above.Optional for a streaming ingestion task.
Additional Connection Properties
Optional. Comma-separated list of additional configuration properties of the Kafka producer or consumer.For a streaming ingestion task, ensure to set the <kerberos name> property if you configure <Security Protocol> as SASL_PLAINTEXT or SASL_SSL.
SSL Mode Required. SSL mode indicates the encryption type to use for the connection.You can choose a mode from the following SSL modes:- Disabled. Secure Agent establishes an unencrypted connection to the Kafka broker.- One-way. Secure Agent establishes an encrypted connection to the Kafka broker using
truststore file and truststore password.- Two-way. Secure Agent establishes an encrypted connection to the Kafka broker using
truststore file and truststore password.
SSL TrustStore File Path
Required when you use the one-way or two-way SSL mode.Absolute path and file name of the SSL truststore file. The truststore file contains the SSL certificate that the Kafka cluster validates against the Kafka broker certificate.
SSL TrustStore Password
Required when you use the one-way or two-way SSL mode.Password for the SSL truststore.
SSL KeyStore File Path
Required when you use the two-way SSL mode.Absolute path and file name of the SSL keystore file that contains private keys and certificates that the Kafka broker validates against the Kafka cluster certificate.
SSL KeyStore Password
Required when you use the two-way SSL mode.Password for the SSL keystore.
Additional Security Properties
Optional. Comma-separated list of additional configuration properties to connect to the Kafka broker in a secured way.If you specify two different values for the same property in Additional Connection Properties and Additional Security Properties, the value in Additional Security Properties overrides the value in Additional Connection Properties.
64 Chapter 3: Connectors and Connections
Configuring the krb5.conf file to read data from or write to a Kerberised Kafka clusterTo read from or write to a Kerberised Kafka cluster, configure the default realm, KDC, and Kafka advanced source or target properties.
You can configure Kerberos authentication for a Kafka client by placing the required Kerberos configuration files on the Secure Agent machine and specifying the required JAAS configuration in the Kafka connection. The JAAS configuration defines the keytab and principal details that the Kafka broker must use to authenticate the Kafka client.
Note: This topic is not applicable to Mass Ingestion Databases. Mass Ingestion Databases does not yet support this functionality.
Before you read from or write to a Kerberised Kafka cluster, perform the following tasks:
1. Ensure that you have the krb5.conf file for the Kerberised Kafka cluster.
2. Configure the default realm and KDC. If the default /etc/krb5.conf file is not configured or you want to change the configuration, add the following lines to the /etc/krb5.conf file:
[libdefaults]default_realm = <REALM NAME>dns_lookup_realm = falsedns_lookup_kdc = falseticket_lifetime = 24hrenew_lifetime = 7dforwardable = true
[realms]<REALM NAME> = {kdc = <Location where KDC is installed> admin_server = <Location where KDC is installed> } [domain_realm].<domain name or hostname> = <KERBEROS DOMAIN NAME><domain name or hostname> = <KERBEROS DOMAIN NAME>
3. To pass a static JAAS configuration file into the JVM using the java.security.auth.login.config property at runtime, perform the following tasks:
a. Ensure that you have JAAS configuration file.
For information about creating JAAS configuration and configuring keytab for Kafka clients, see the Apache Kafka documentation at https://kafka.apache.org/0101/documentation/#security
For example, the JAAS configuration file can contain the following lines of configuration:
//Kafka Client Authentication. Used for client to kafka broker connectionKafkaClient {com.sun.security.auth.module.Krb5LoginModule requireddoNotPrompt=trueuseKeyTab=truestoreKey=truekeyTab="<path to Kafka keytab file>/<Kafka keytab file name>"principal="<principal name>"client=true};
b. Place the JAAS config file and keytab file in the same location on all the secure agents.
Informatica recommends that you place the files in a location that is accessible by all the secure agents in the runtime environment. For example, /etc or /temp.
c. Configure the following properties:
Mass Ingestion connection properties 65

Kafka connection
Configure the Additional Connection Properties in a Kafka connection and specify the value in the following format:
security.protocol=SASL_PLAINTEXT,sasl.kerberos.service.name=kafka,sasl.mechanism=GSSAPI
Sources
Configure the Consumer Configuration Properties in the advanced source properties to override the value specified in Additional Connection Properties in a Kafka connection. Specify the value in the following format:
security.protocol=SASL_PLAINTEXT,sasl.kerberos.service.name=kafka,sasl.mechanism=GSSAPI
Targets
Configure the Producer Configuration Properties in the advanced target properties to override the value specified in Additional Connection Properties in a Kafka connection. Specify the value in the following format:
security.protocol=SASL_PLAINTEXT,sasl.kerberos.service.name=kafka,sasl.mechanism=GSSAPI
4. To embed the JAAS configuration in the sasl.jaas.config configuration property, configure the following properties:
Kafka connection
Configure the Additional Connection Properties in a Kafka connection and specify the value in the following format:
security.protocol=SASL_PLAINTEXT,sasl.kerberos.service.name=kafka,sasl.mechanism=GSSAPI,sasl.jaas.config=com.sun.security.auth.module.Krb5LoginModule required useKeyTab=true storeKey=true doNotPrompt=true serviceName="<service_name>" keyTab="<location of keytab file>" client=true principal="<principal_name>";
Sources
Configure the Consumer Configuration Properties in the advanced source properties to override the value specified in Kerberos Configuration Properties in a Kafka connection. Specify the value in the following format:
security.protocol=SASL_PLAINTEXT,sasl.kerberos.service.name=kafka,sasl.mechanism=GSSAPI,sasl.jaas.config=com.sun.security.auth.module.Krb5LoginModule required useKeyTab=true storeKey=true doNotPrompt=true serviceName="<service_name>" keyTab="<location of keytab file>" client=true principal="<principal_name>";
Targets
Configure the Producer Configuration Properties in the advanced target properties to override the value specified in Kerberos Configuration Properties in a Kafka connection. Specify the value in the following format:
security.protocol=SASL_PLAINTEXT,sasl.kerberos.service.name=kafka,sasl.mechanism=GSSAPI,sasl.jaas.config=com.sun.security.auth.module.Krb5LoginModule required useKeyTab=true storeKey=true doNotPrompt=true serviceName="<service_name>" keyTab="<location of keytab file>" client=true principal="<principal_name>";
66 Chapter 3: Connectors and Connections
Configuring SASL PLAIN authentication for a Kafka clusterIn the Kafka connection, you can configure PLAIN security for the Kafka broker to connect to a Kafka broker. To read data from or write data to a Kafka broker with SASL PLAIN authentication, configure the Kafka connection properties. To override the properties defined in the Kafka connection, you can configure the advanced source or target properties.
You can configure SASL PLAIN authentication so that the Kafka broker can authenticate the Kafka producer and the Kafka consumer. Kafka uses the Java Authentication and Authorization Service (JAAS) for SASL PLAIN authentication. To enable SASL PLAIN authentication, you must specify the SASL mechanism as PLAIN. You must also provide the formatted JAAS configuration that the Kafka broker must use for authentication. The JAAS configuration defines the username, password, that the Kafka broker must use to authenticate the Kafka client.
Note: This topic is not applicable to Mass Ingestion Databases. Mass Ingestion Databases does not yet support this functionality.
Configure the following properties:Kafka connection
Configure the Additional Connection Properties or Additional Security Properties property in the Kafka connection and specify the value in the following format:
security.protocol=SASL_SSL,sasl.mechanism=PLAIN,sasl.jaas.config=org.apache.kafka.common.security.plain.PlainLoginModule required username=<username> password=<password>
In the Security Configuration Section, select One-Way as the SSL Mode and specify the SSL TrustStore File Path and SSL TrustStore Password.
Sources
Configure the Consumer Configuration Properties property in the advanced source properties to override the value that you specified in the Additional Connection Properties property in the Kafka connection. Specify the value in the following format:
security.protocol=SASL_SSL,sasl.mechanism=PLAIN,sasl.jaas.config=org.apache.kafka.common.security.plain.PlainLoginModule required username=<username> password=<password>
Targets
Configure the Producer Configuration Properties property in the advanced target properties to override the value that you specified in the Additional Connection Properties property in the Kafka connection. Specify the value in the following format:
security.protocol=SASL_SSL,sasl.mechanism=PLAIN,sasl.jaas.config=org.apache.kafka.common.security.plain.PlainLoginModule required username=<username> password=<password>
Configuring SASL PLAIN authentication for an Azure Event Hub Kafka broker
In the Kafka connection, you can configure PLAIN security for the Kafka broker to connect to an Azure Event Hub Kafka broker. When you connect to an Azure Event Hub Kakfa broker, the password defines the endpoint URL that contains the fully qualified domain name (FQDN) of the Event Hub namespace, shared access key name, and shared access key required to connect to an Azure Event Hub Kafka broker. Configure the SSL Mode as One-Way and provide the path to a trusted root certificate on your file system for SSL TrustStore File Path.
To connect to an Azure Event Hub Kafka broker, configure any of the above properties and specify the value in the following format:
security.protocol=SASL_SSL,sasl.mechanism=PLAIN,sasl.kerberos.service.name=Kafka,sasl.jaas.config=org.apache.kafka.common.security.plain.PlainLoginModule required username="$ConnectionString" password="Endpoint=sb://<FQDN>/;SharedAccessKeyName=<key name>;SharedAccessKey=<shared access key>=";
Mass Ingestion connection properties 67
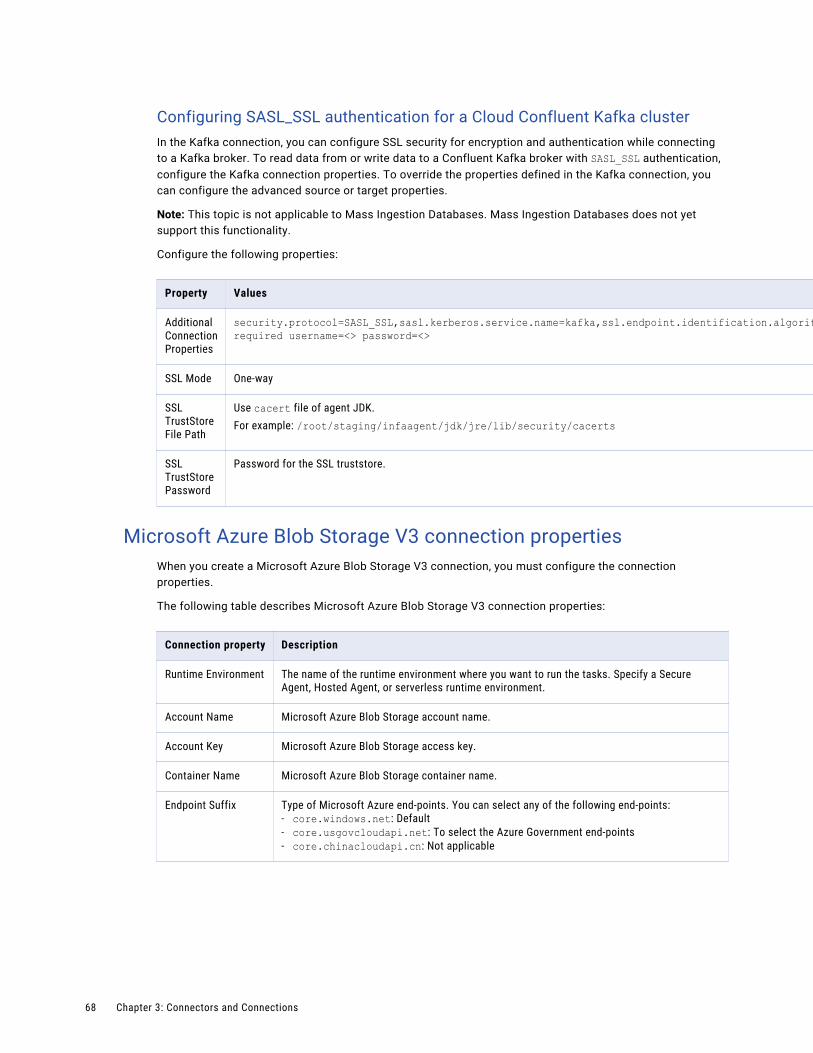
Configuring SASL_SSL authentication for a Cloud Confluent Kafka clusterIn the Kafka connection, you can configure SSL security for encryption and authentication while connecting to a Kafka broker. To read data from or write data to a Confluent Kafka broker with SASL_SSL authentication, configure the Kafka connection properties. To override the properties defined in the Kafka connection, you can configure the advanced source or target properties.
Note: This topic is not applicable to Mass Ingestion Databases. Mass Ingestion Databases does not yet support this functionality.
Configure the following properties:
Property Values
Additional Connection Properties
security.protocol=SASL_SSL,sasl.kerberos.service.name=kafka,ssl.endpoint.identification.algorithm=https,sasl.mechanism=PLAIN,sasl.jaas.config=org.apache.kafka.common.security.plain.PlainLoginModule required username=<> password=<>
SSL Mode One-way
SSL TrustStore File Path
Use cacert file of agent JDK.For example: /root/staging/infaagent/jdk/jre/lib/security/cacerts
SSL TrustStore Password
Password for the SSL truststore.
Microsoft Azure Blob Storage V3 connection propertiesWhen you create a Microsoft Azure Blob Storage V3 connection, you must configure the connection properties.
The following table describes Microsoft Azure Blob Storage V3 connection properties:
Connection property Description
Runtime Environment The name of the runtime environment where you want to run the tasks. Specify a Secure Agent, Hosted Agent, or serverless runtime environment.
Account Name Microsoft Azure Blob Storage account name.
Account Key Microsoft Azure Blob Storage access key.
Container Name Microsoft Azure Blob Storage container name.
Endpoint Suffix Type of Microsoft Azure end-points. You can select any of the following end-points:- core.windows.net: Default- core.usgovcloudapi.net: To select the Azure Government end-points- core.chinacloudapi.cn: Not applicable
68 Chapter 3: Connectors and Connections
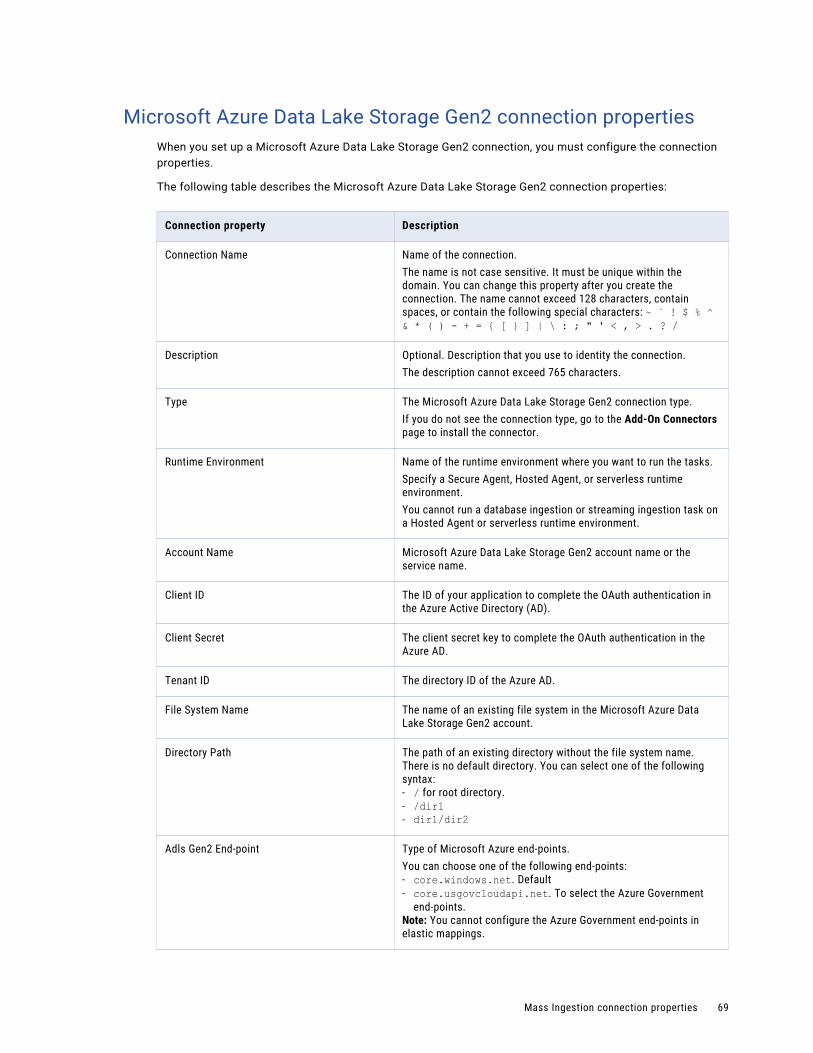
Microsoft Azure Data Lake Storage Gen2 connection propertiesWhen you set up a Microsoft Azure Data Lake Storage Gen2 connection, you must configure the connection properties.
The following table describes the Microsoft Azure Data Lake Storage Gen2 connection properties:
Connection property Description
Connection Name Name of the connection.The name is not case sensitive. It must be unique within the domain. You can change this property after you create the connection. The name cannot exceed 128 characters, contain spaces, or contain the following special characters: ~ ` ! $ % ^ & * ( ) - + = { [ } ] | \ : ; " ' < , > . ? /
Description Optional. Description that you use to identity the connection.The description cannot exceed 765 characters.
Type The Microsoft Azure Data Lake Storage Gen2 connection type.If you do not see the connection type, go to the Add-On Connectors page to install the connector.
Runtime Environment Name of the runtime environment where you want to run the tasks.Specify a Secure Agent, Hosted Agent, or serverless runtime environment.You cannot run a database ingestion or streaming ingestion task on a Hosted Agent or serverless runtime environment.
Account Name Microsoft Azure Data Lake Storage Gen2 account name or the service name.
Client ID The ID of your application to complete the OAuth authentication in the Azure Active Directory (AD).
Client Secret The client secret key to complete the OAuth authentication in the Azure AD.
Tenant ID The directory ID of the Azure AD.
File System Name The name of an existing file system in the Microsoft Azure Data Lake Storage Gen2 account.
Directory Path The path of an existing directory without the file system name. There is no default directory. You can select one of the following syntax:- / for root directory.- /dir1 - dir1/dir2
Adls Gen2 End-point Type of Microsoft Azure end-points.You can choose one of the following end-points:- core.windows.net. Default- core.usgovcloudapi.net. To select the Azure Government
end-points.Note: You cannot configure the Azure Government end-points in elastic mappings.
Mass Ingestion connection properties 69
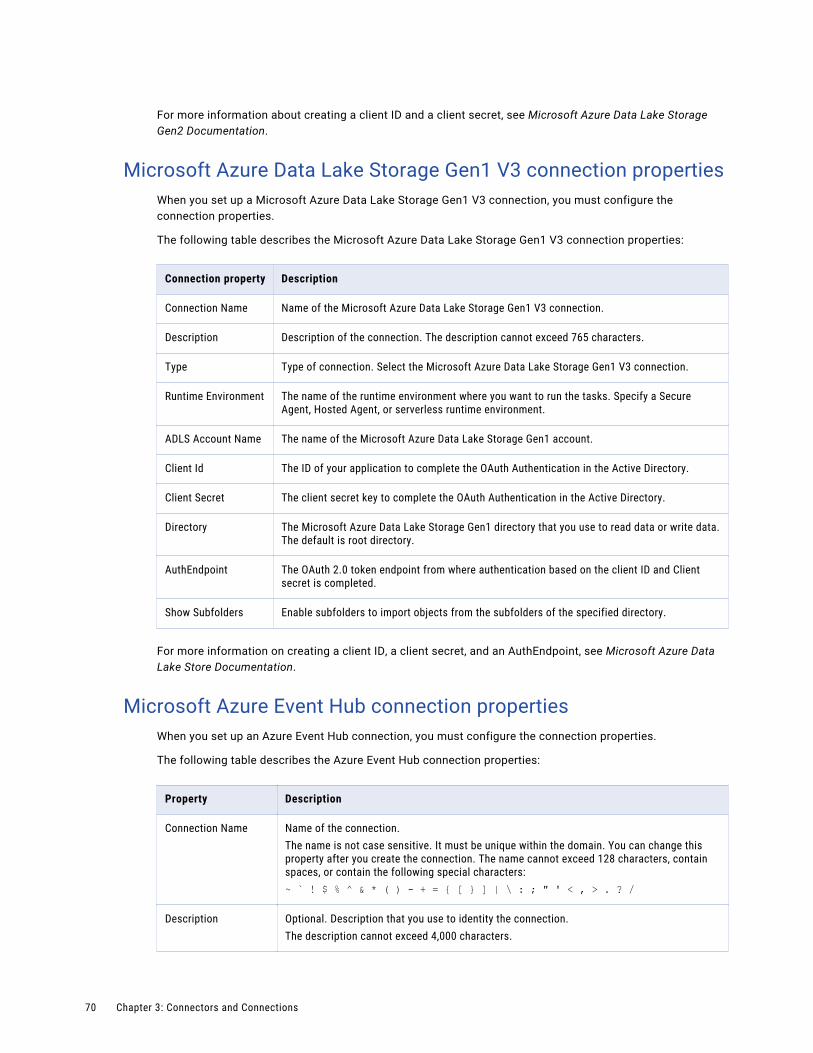
For more information about creating a client ID and a client secret, see Microsoft Azure Data Lake Storage Gen2 Documentation.
Microsoft Azure Data Lake Storage Gen1 V3 connection propertiesWhen you set up a Microsoft Azure Data Lake Storage Gen1 V3 connection, you must configure the connection properties.
The following table describes the Microsoft Azure Data Lake Storage Gen1 V3 connection properties:
Connection property Description
Connection Name Name of the Microsoft Azure Data Lake Storage Gen1 V3 connection.
Description Description of the connection. The description cannot exceed 765 characters.
Type Type of connection. Select the Microsoft Azure Data Lake Storage Gen1 V3 connection.
Runtime Environment The name of the runtime environment where you want to run the tasks. Specify a Secure Agent, Hosted Agent, or serverless runtime environment.
ADLS Account Name The name of the Microsoft Azure Data Lake Storage Gen1 account.
Client Id The ID of your application to complete the OAuth Authentication in the Active Directory.
Client Secret The client secret key to complete the OAuth Authentication in the Active Directory.
Directory The Microsoft Azure Data Lake Storage Gen1 directory that you use to read data or write data. The default is root directory.
AuthEndpoint The OAuth 2.0 token endpoint from where authentication based on the client ID and Client secret is completed.
Show Subfolders Enable subfolders to import objects from the subfolders of the specified directory.
For more information on creating a client ID, a client secret, and an AuthEndpoint, see Microsoft Azure Data Lake Store Documentation.
Microsoft Azure Event Hub connection propertiesWhen you set up an Azure Event Hub connection, you must configure the connection properties.
The following table describes the Azure Event Hub connection properties:
Property Description
Connection Name Name of the connection.The name is not case sensitive. It must be unique within the domain. You can change this property after you create the connection. The name cannot exceed 128 characters, contain spaces, or contain the following special characters:~ ` ! $ % ^ & * ( ) - + = { [ } ] | \ : ; " ' < , > . ? /
Description Optional. Description that you use to identity the connection.The description cannot exceed 4,000 characters.
70 Chapter 3: Connectors and Connections
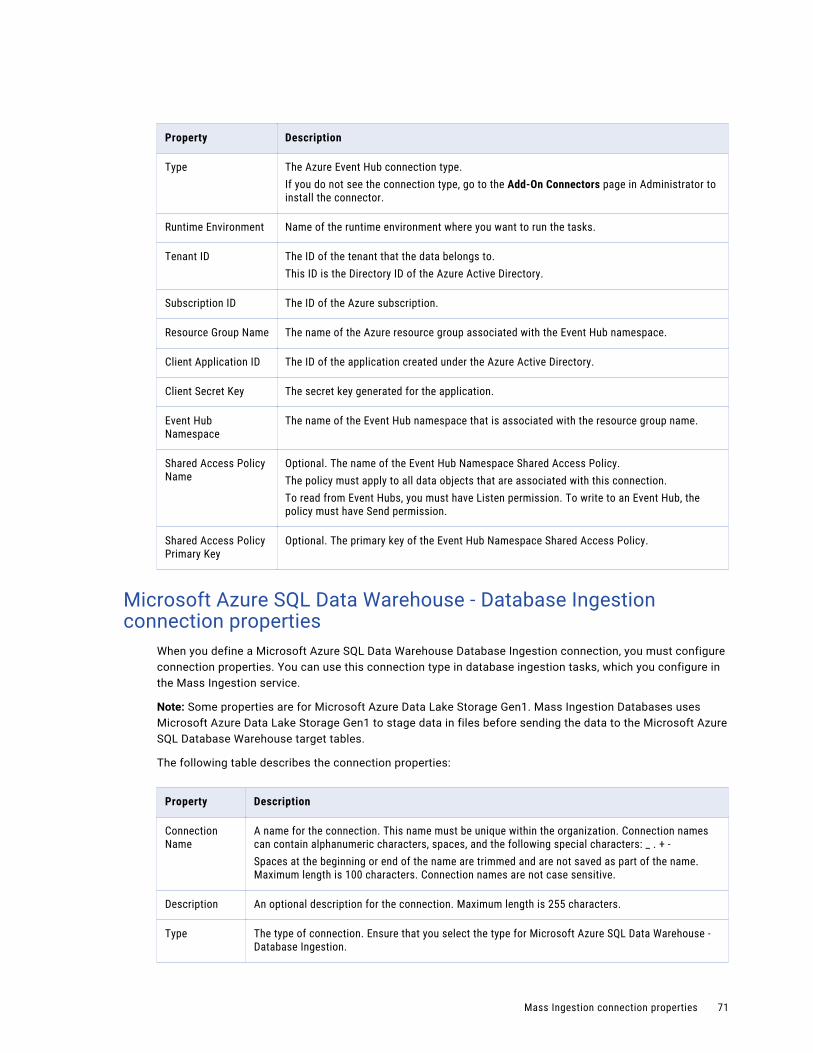
Property Description
Type The Azure Event Hub connection type.If you do not see the connection type, go to the Add-On Connectors page in Administrator to install the connector.
Runtime Environment Name of the runtime environment where you want to run the tasks.
Tenant ID The ID of the tenant that the data belongs to.This ID is the Directory ID of the Azure Active Directory.
Subscription ID The ID of the Azure subscription.
Resource Group Name The name of the Azure resource group associated with the Event Hub namespace.
Client Application ID The ID of the application created under the Azure Active Directory.
Client Secret Key The secret key generated for the application.
Event Hub Namespace
The name of the Event Hub namespace that is associated with the resource group name.
Shared Access Policy Name
Optional. The name of the Event Hub Namespace Shared Access Policy.The policy must apply to all data objects that are associated with this connection.To read from Event Hubs, you must have Listen permission. To write to an Event Hub, the policy must have Send permission.
Shared Access Policy Primary Key
Optional. The primary key of the Event Hub Namespace Shared Access Policy.
Microsoft Azure SQL Data Warehouse - Database Ingestion connection properties
When you define a Microsoft Azure SQL Data Warehouse Database Ingestion connection, you must configure connection properties. You can use this connection type in database ingestion tasks, which you configure in the Mass Ingestion service.
Note: Some properties are for Microsoft Azure Data Lake Storage Gen1. Mass Ingestion Databases uses Microsoft Azure Data Lake Storage Gen1 to stage data in files before sending the data to the Microsoft Azure SQL Database Warehouse target tables.
The following table describes the connection properties:
Property Description
Connection Name
A name for the connection. This name must be unique within the organization. Connection names can contain alphanumeric characters, spaces, and the following special characters: _ . + -Spaces at the beginning or end of the name are trimmed and are not saved as part of the name. Maximum length is 100 characters. Connection names are not case sensitive.
Description An optional description for the connection. Maximum length is 255 characters.
Type The type of connection. Ensure that you select the type for Microsoft Azure SQL Data Warehouse - Database Ingestion.
Mass Ingestion connection properties 71
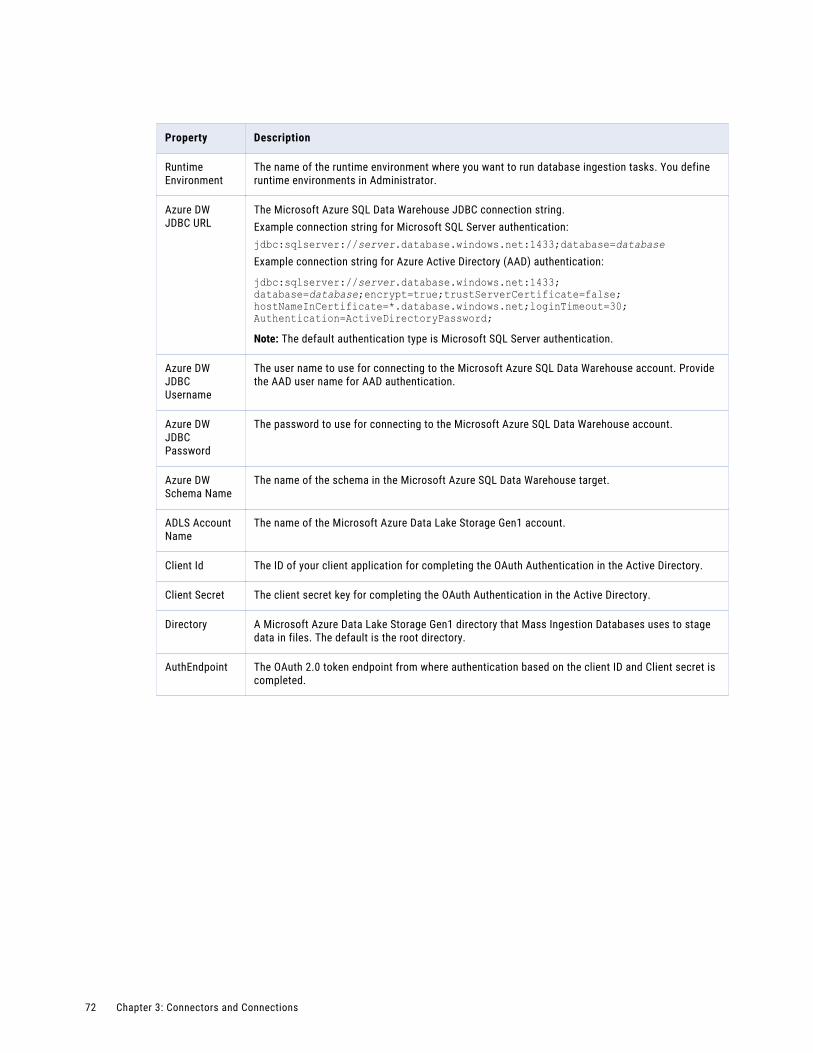
Property Description
Runtime Environment
The name of the runtime environment where you want to run database ingestion tasks. You define runtime environments in Administrator.
Azure DW JDBC URL
The Microsoft Azure SQL Data Warehouse JDBC connection string.Example connection string for Microsoft SQL Server authentication:jdbc:sqlserver://server.database.windows.net:1433;database=databaseExample connection string for Azure Active Directory (AAD) authentication:
jdbc:sqlserver://server.database.windows.net:1433;database=database;encrypt=true;trustServerCertificate=false;hostNameInCertificate=*.database.windows.net;loginTimeout=30;Authentication=ActiveDirectoryPassword;Note: The default authentication type is Microsoft SQL Server authentication.
Azure DW JDBC Username
The user name to use for connecting to the Microsoft Azure SQL Data Warehouse account. Provide the AAD user name for AAD authentication.
Azure DW JDBC Password
The password to use for connecting to the Microsoft Azure SQL Data Warehouse account.
Azure DW Schema Name
The name of the schema in the Microsoft Azure SQL Data Warehouse target.
ADLS Account Name
The name of the Microsoft Azure Data Lake Storage Gen1 account.
Client Id The ID of your client application for completing the OAuth Authentication in the Active Directory.
Client Secret The client secret key for completing the OAuth Authentication in the Active Directory.
Directory A Microsoft Azure Data Lake Storage Gen1 directory that Mass Ingestion Databases uses to stage data in files. The default is the root directory.
AuthEndpoint The OAuth 2.0 token endpoint from where authentication based on the client ID and Client secret is completed.
72 Chapter 3: Connectors and Connections
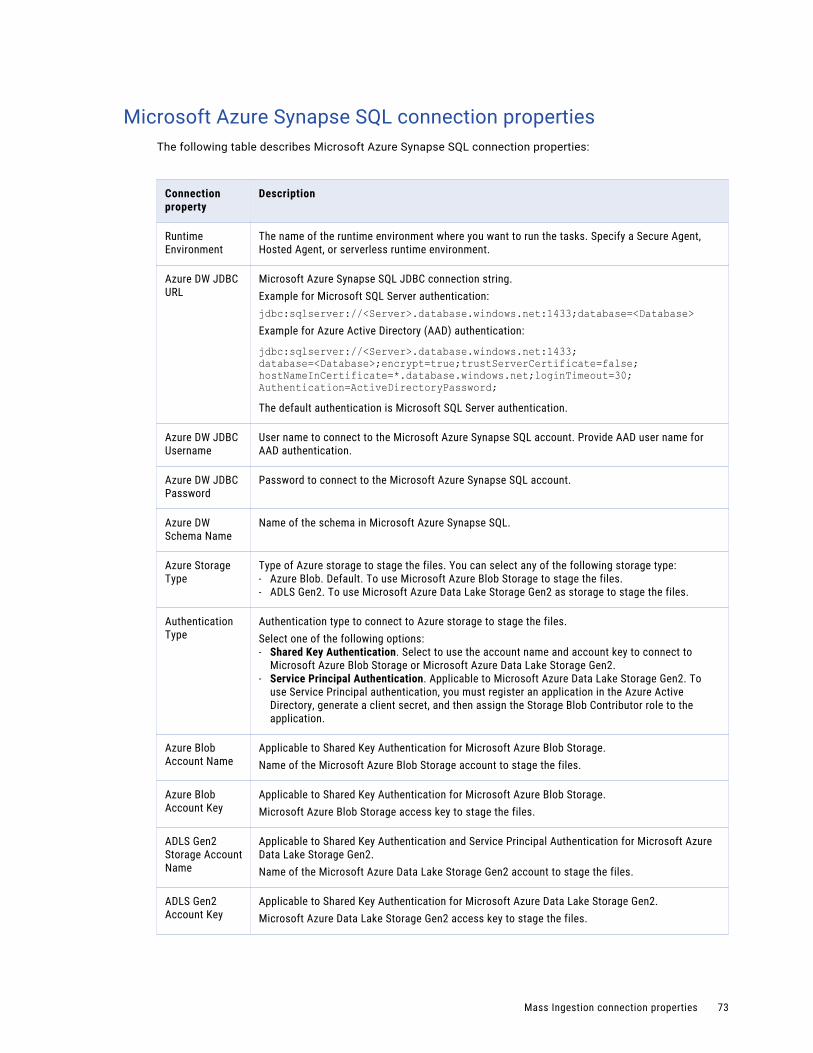
Microsoft Azure Synapse SQL connection propertiesThe following table describes Microsoft Azure Synapse SQL connection properties:
Connection property
Description
Runtime Environment
The name of the runtime environment where you want to run the tasks. Specify a Secure Agent, Hosted Agent, or serverless runtime environment.
Azure DW JDBC URL
Microsoft Azure Synapse SQL JDBC connection string.Example for Microsoft SQL Server authentication:jdbc:sqlserver://<Server>.database.windows.net:1433;database=<Database>Example for Azure Active Directory (AAD) authentication:
jdbc:sqlserver://<Server>.database.windows.net:1433;database=<Database>;encrypt=true;trustServerCertificate=false;hostNameInCertificate=*.database.windows.net;loginTimeout=30;Authentication=ActiveDirectoryPassword;The default authentication is Microsoft SQL Server authentication.
Azure DW JDBC Username
User name to connect to the Microsoft Azure Synapse SQL account. Provide AAD user name for AAD authentication.
Azure DW JDBC Password
Password to connect to the Microsoft Azure Synapse SQL account.
Azure DW Schema Name
Name of the schema in Microsoft Azure Synapse SQL.
Azure Storage Type
Type of Azure storage to stage the files. You can select any of the following storage type:- Azure Blob. Default. To use Microsoft Azure Blob Storage to stage the files.- ADLS Gen2. To use Microsoft Azure Data Lake Storage Gen2 as storage to stage the files.
Authentication Type
Authentication type to connect to Azure storage to stage the files.Select one of the following options:- Shared Key Authentication. Select to use the account name and account key to connect to
Microsoft Azure Blob Storage or Microsoft Azure Data Lake Storage Gen2.- Service Principal Authentication. Applicable to Microsoft Azure Data Lake Storage Gen2. To
use Service Principal authentication, you must register an application in the Azure Active Directory, generate a client secret, and then assign the Storage Blob Contributor role to the application.
Azure Blob Account Name
Applicable to Shared Key Authentication for Microsoft Azure Blob Storage.Name of the Microsoft Azure Blob Storage account to stage the files.
Azure Blob Account Key
Applicable to Shared Key Authentication for Microsoft Azure Blob Storage.Microsoft Azure Blob Storage access key to stage the files.
ADLS Gen2 Storage Account Name
Applicable to Shared Key Authentication and Service Principal Authentication for Microsoft Azure Data Lake Storage Gen2.Name of the Microsoft Azure Data Lake Storage Gen2 account to stage the files.
ADLS Gen2 Account Key
Applicable to Shared Key Authentication for Microsoft Azure Data Lake Storage Gen2.Microsoft Azure Data Lake Storage Gen2 access key to stage the files.
Mass Ingestion connection properties 73
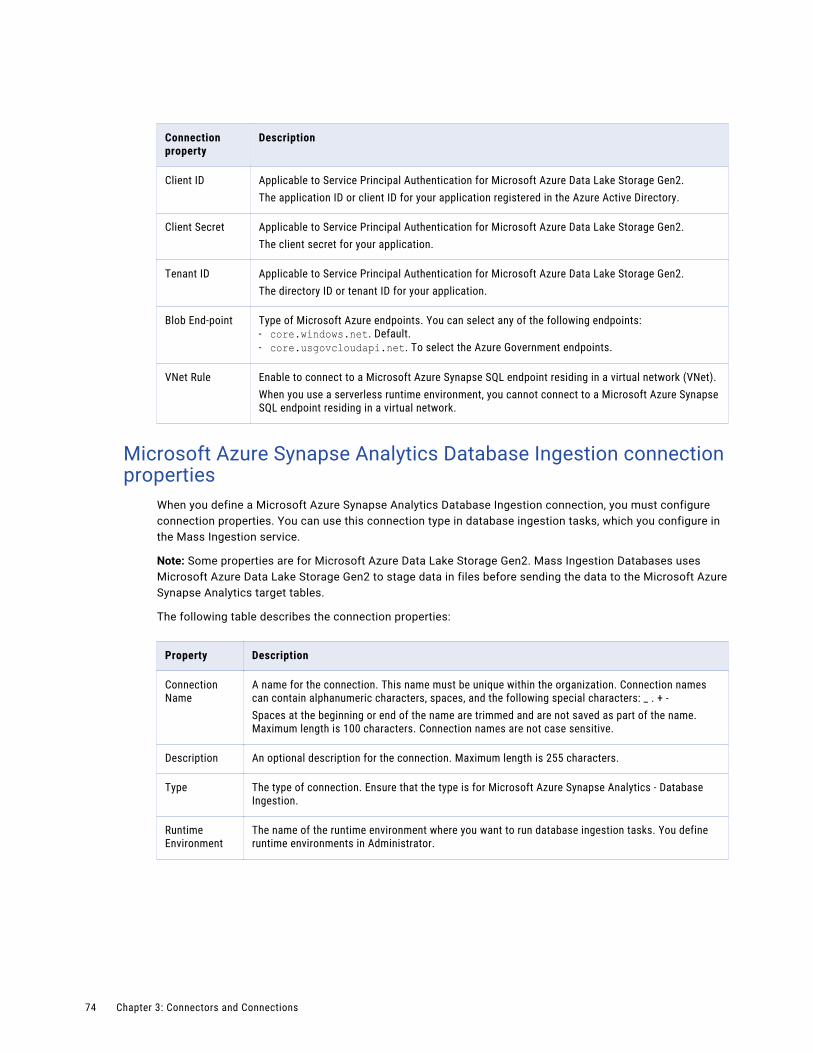
Connection property
Description
Client ID Applicable to Service Principal Authentication for Microsoft Azure Data Lake Storage Gen2.The application ID or client ID for your application registered in the Azure Active Directory.
Client Secret Applicable to Service Principal Authentication for Microsoft Azure Data Lake Storage Gen2.The client secret for your application.
Tenant ID Applicable to Service Principal Authentication for Microsoft Azure Data Lake Storage Gen2.The directory ID or tenant ID for your application.
Blob End-point Type of Microsoft Azure endpoints. You can select any of the following endpoints:- core.windows.net. Default.- core.usgovcloudapi.net. To select the Azure Government endpoints.
VNet Rule Enable to connect to a Microsoft Azure Synapse SQL endpoint residing in a virtual network (VNet).When you use a serverless runtime environment, you cannot connect to a Microsoft Azure Synapse SQL endpoint residing in a virtual network.
Microsoft Azure Synapse Analytics Database Ingestion connection properties
When you define a Microsoft Azure Synapse Analytics Database Ingestion connection, you must configure connection properties. You can use this connection type in database ingestion tasks, which you configure in the Mass Ingestion service.
Note: Some properties are for Microsoft Azure Data Lake Storage Gen2. Mass Ingestion Databases uses Microsoft Azure Data Lake Storage Gen2 to stage data in files before sending the data to the Microsoft Azure Synapse Analytics target tables.
The following table describes the connection properties:
Property Description
Connection Name
A name for the connection. This name must be unique within the organization. Connection names can contain alphanumeric characters, spaces, and the following special characters: _ . + -Spaces at the beginning or end of the name are trimmed and are not saved as part of the name. Maximum length is 100 characters. Connection names are not case sensitive.
Description An optional description for the connection. Maximum length is 255 characters.
Type The type of connection. Ensure that the type is for Microsoft Azure Synapse Analytics - Database Ingestion.
Runtime Environment
The name of the runtime environment where you want to run database ingestion tasks. You define runtime environments in Administrator.
74 Chapter 3: Connectors and Connections

Property Description
Azure Synapse Analytics JDBC URL
The Microsoft Azure Synapse Analytics (formerly SQL Data Warehouse) JDBC connection string.Example connection string for Microsoft SQL Server authentication:jdbc:sqlserver://server.database.windows.net:1433;database=databaseExample connection string for Azure Active Directory (AAD) authentication:
jdbc:sqlserver://server.database.windows.net:1433;database=database;encrypt=true;trustServerCertificate=false;hostNameInCertificate=*.database.windows.net;loginTimeout=30;Authentication=ActiveDirectoryPassword;Note: The default authentication type is Microsoft SQL Server authentication.
Azure Synapse Analytics JDBC Username
The user name to use for connecting to the Microsoft Azure Synapse Analytics account. Provide the AAD user name for AAD authentication.
Azure Synapse Analytics JDBC Password
The password to use for connecting to the Microsoft Azure Synapse Analytics account.
Azure Synapse Analytics Schema Name
The name of the schema in the Microsoft Azure Synapse Analytics target.
ADLS Gen2 Account Name
The name of the Microsoft Azure Data Lake Storage Gen2 account.
Client Id The ID of your client application for completing the OAuth Authentication in the Active Directory.
Client Secret The client secret key for completing the OAuth Authentication in the Active Directory.
Directory A Microsoft Azure Data Lake Storage Gen2 directory that Mass Ingestion Databases uses to stage data in files. The default is the root directory.
Filesystem Name
The name of an existing file system in the Microsoft Azure Data Lake Storage Gen2 account.
Tenant ID The Directory ID of the Azure Active Directory.
Mass Ingestion connection properties 75
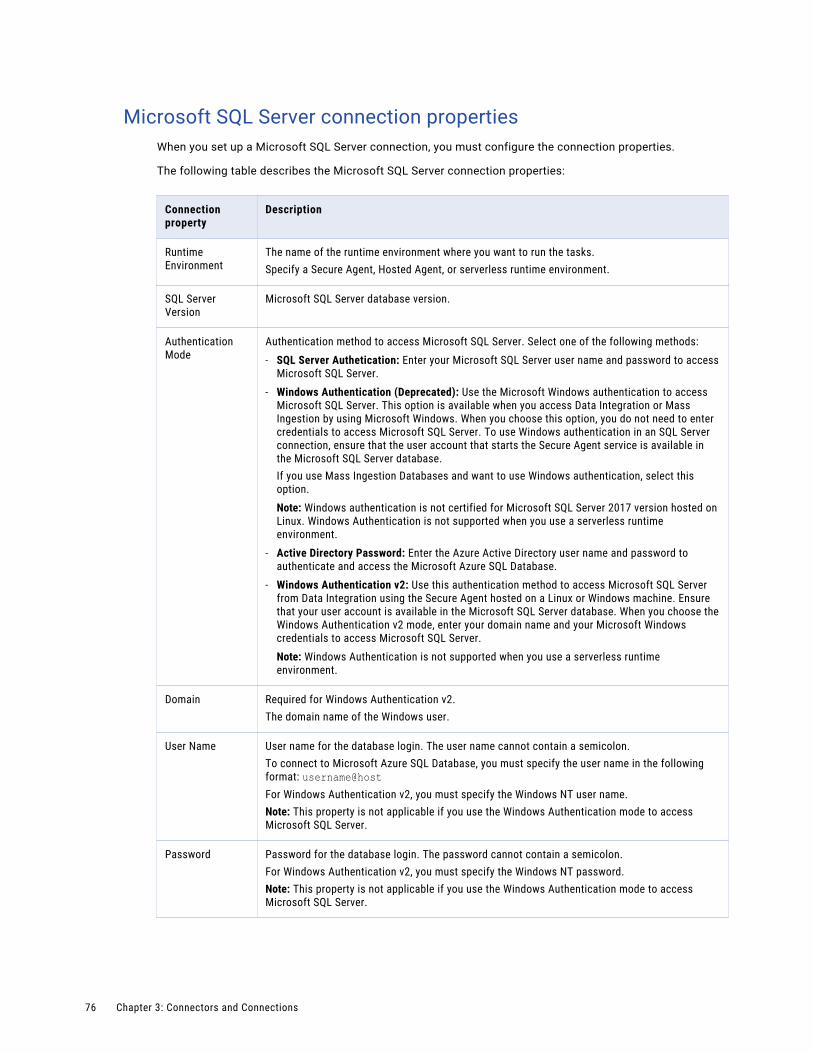
Microsoft SQL Server connection propertiesWhen you set up a Microsoft SQL Server connection, you must configure the connection properties.
The following table describes the Microsoft SQL Server connection properties:
Connection property
Description
Runtime Environment
The name of the runtime environment where you want to run the tasks.Specify a Secure Agent, Hosted Agent, or serverless runtime environment.
SQL Server Version
Microsoft SQL Server database version.
Authentication Mode
Authentication method to access Microsoft SQL Server. Select one of the following methods:- SQL Server Authetication: Enter your Microsoft SQL Server user name and password to access
Microsoft SQL Server.- Windows Authentication (Deprecated): Use the Microsoft Windows authentication to access
Microsoft SQL Server. This option is available when you access Data Integration or Mass Ingestion by using Microsoft Windows. When you choose this option, you do not need to enter credentials to access Microsoft SQL Server. To use Windows authentication in an SQL Server connection, ensure that the user account that starts the Secure Agent service is available in the Microsoft SQL Server database.If you use Mass Ingestion Databases and want to use Windows authentication, select this option.Note: Windows authentication is not certified for Microsoft SQL Server 2017 version hosted on Linux. Windows Authentication is not supported when you use a serverless runtime environment.
- Active Directory Password: Enter the Azure Active Directory user name and password to authenticate and access the Microsoft Azure SQL Database.
- Windows Authentication v2: Use this authentication method to access Microsoft SQL Server from Data Integration using the Secure Agent hosted on a Linux or Windows machine. Ensure that your user account is available in the Microsoft SQL Server database. When you choose the Windows Authentication v2 mode, enter your domain name and your Microsoft Windows credentials to access Microsoft SQL Server.Note: Windows Authentication is not supported when you use a serverless runtime environment.
Domain Required for Windows Authentication v2.The domain name of the Windows user.
User Name User name for the database login. The user name cannot contain a semicolon.To connect to Microsoft Azure SQL Database, you must specify the user name in the following format: username@hostFor Windows Authentication v2, you must specify the Windows NT user name.Note: This property is not applicable if you use the Windows Authentication mode to access Microsoft SQL Server.
Password Password for the database login. The password cannot contain a semicolon.For Windows Authentication v2, you must specify the Windows NT password.Note: This property is not applicable if you use the Windows Authentication mode to access Microsoft SQL Server.
76 Chapter 3: Connectors and Connections
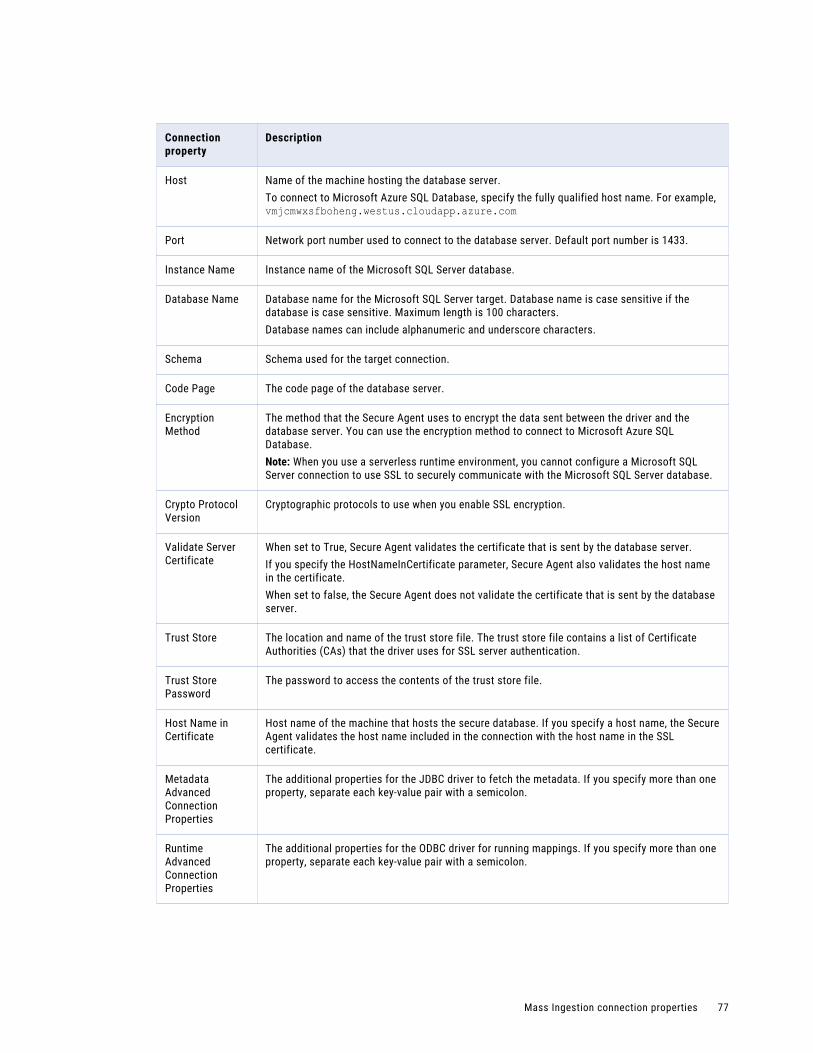
Connection property
Description
Host Name of the machine hosting the database server.To connect to Microsoft Azure SQL Database, specify the fully qualified host name. For example, vmjcmwxsfboheng.westus.cloudapp.azure.com
Port Network port number used to connect to the database server. Default port number is 1433.
Instance Name Instance name of the Microsoft SQL Server database.
Database Name Database name for the Microsoft SQL Server target. Database name is case sensitive if the database is case sensitive. Maximum length is 100 characters.Database names can include alphanumeric and underscore characters.
Schema Schema used for the target connection.
Code Page The code page of the database server.
Encryption Method
The method that the Secure Agent uses to encrypt the data sent between the driver and the database server. You can use the encryption method to connect to Microsoft Azure SQL Database.Note: When you use a serverless runtime environment, you cannot configure a Microsoft SQL Server connection to use SSL to securely communicate with the Microsoft SQL Server database.
Crypto Protocol Version
Cryptographic protocols to use when you enable SSL encryption.
Validate Server Certificate
When set to True, Secure Agent validates the certificate that is sent by the database server.If you specify the HostNameInCertificate parameter, Secure Agent also validates the host name in the certificate.When set to false, the Secure Agent does not validate the certificate that is sent by the database server.
Trust Store The location and name of the trust store file. The trust store file contains a list of Certificate Authorities (CAs) that the driver uses for SSL server authentication.
Trust Store Password
The password to access the contents of the trust store file.
Host Name in Certificate
Host name of the machine that hosts the secure database. If you specify a host name, the Secure Agent validates the host name included in the connection with the host name in the SSL certificate.
Metadata Advanced Connection Properties
The additional properties for the JDBC driver to fetch the metadata. If you specify more than one property, separate each key-value pair with a semicolon.
Runtime Advanced Connection Properties
The additional properties for the ODBC driver for running mappings. If you specify more than one property, separate each key-value pair with a semicolon.
Mass Ingestion connection properties 77

MQTT connection propertiesWhen you set up an MQ Telemetry Transport (MQTT) connection, you must configure the connection properties.
The following table describes the MQTT connection properties:
Property Description
Connection Name Name of the connection.The name is not case sensitive and must be unique within the domain. You can change this property after you create the connection. The name cannot exceed 128 characters, contain spaces, or contain the following special characters:~ ` ! $ % ^ & * ( ) - + = { [ } ] | \ : ; " ' < , > . ? /
Description Optional. Description that you can use to identity the connection.The description cannot exceed 4,000 characters.
Type The MQTT connection type.If you do not see the connection type, go to the Add-On Connectors page to install the connector.
Runtime Environment
Name of the runtime environment where you want to run the tasks.
Broker URI The connection URL of the MQTT broker. If specified, this value overrides the URL specified in the main portion of the URL.Sample URL: tcp://<IP Address>:<port>
Client Id Client identifier of your MQTT client.If this value is left blank, the MQTT server assigns a unique value.This property value must be unique for each MQTT client connecting to a specific MQTT server. Sharing projects without changing the Client ID can lead to connection issues, including disconnections and missing updates.
Username Username to use when connecting to the broker.
Password Password to use when connecting to the broker.
Connection Timeout
Maximum time interval the client will wait for the connection to the MQTT server to be established.Default timeout is 30 seconds.A value of 0 disables timeout processing. That is, the client waits until the network connection is made successfully or fails.
Use SSL Enable this option to use SSL for secure transmission.If you enable the SSL authentication, ensure to provide both keystore and truststore details for using the MQTT connection in a streaming ingestion task.
Keystore Filename Contains the keys and certificates required for secure communication.
Keystore Password
Password for the keystore filename.
78 Chapter 3: Connectors and Connections
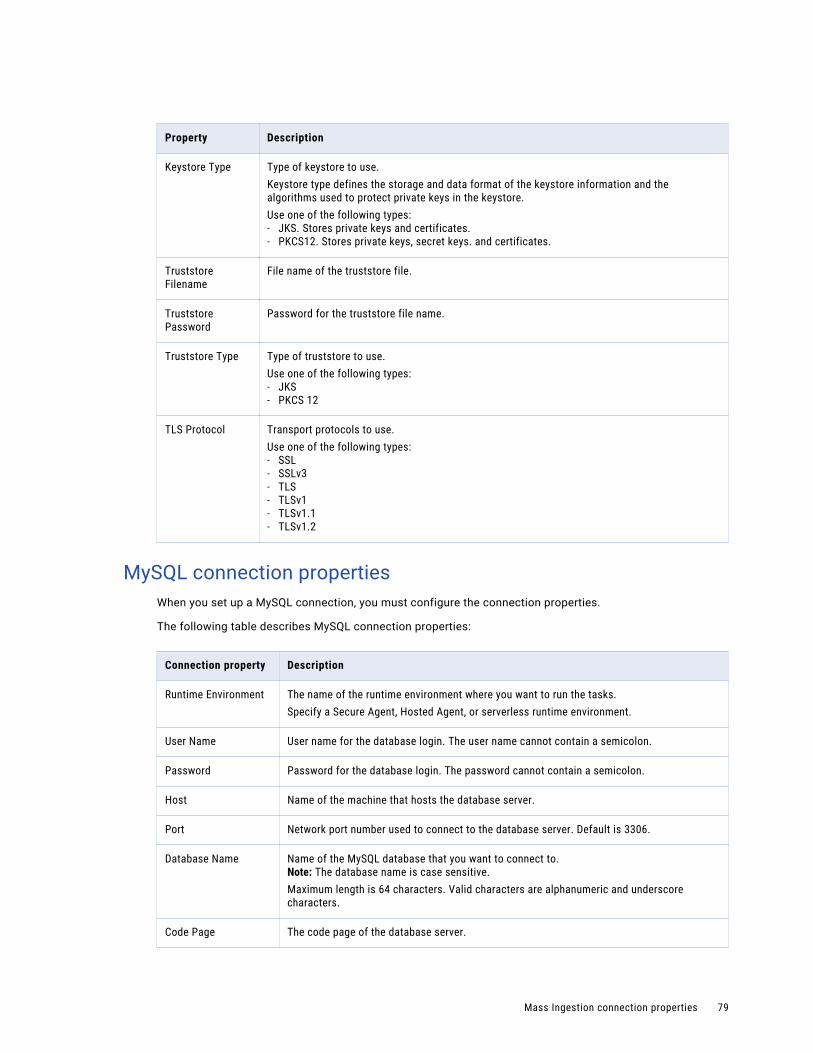
Property Description
Keystore Type Type of keystore to use.Keystore type defines the storage and data format of the keystore information and the algorithms used to protect private keys in the keystore.Use one of the following types:- JKS. Stores private keys and certificates.- PKCS12. Stores private keys, secret keys. and certificates.
Truststore Filename
File name of the truststore file.
Truststore Password
Password for the truststore file name.
Truststore Type Type of truststore to use.Use one of the following types:- JKS- PKCS 12
TLS Protocol Transport protocols to use.Use one of the following types:- SSL- SSLv3- TLS- TLSv1- TLSv1.1- TLSv1.2
MySQL connection propertiesWhen you set up a MySQL connection, you must configure the connection properties.
The following table describes MySQL connection properties:
Connection property Description
Runtime Environment The name of the runtime environment where you want to run the tasks.Specify a Secure Agent, Hosted Agent, or serverless runtime environment.
User Name User name for the database login. The user name cannot contain a semicolon.
Password Password for the database login. The password cannot contain a semicolon.
Host Name of the machine that hosts the database server.
Port Network port number used to connect to the database server. Default is 3306.
Database Name Name of the MySQL database that you want to connect to.Note: The database name is case sensitive.Maximum length is 64 characters. Valid characters are alphanumeric and underscore characters.
Code Page The code page of the database server.
Mass Ingestion connection properties 79
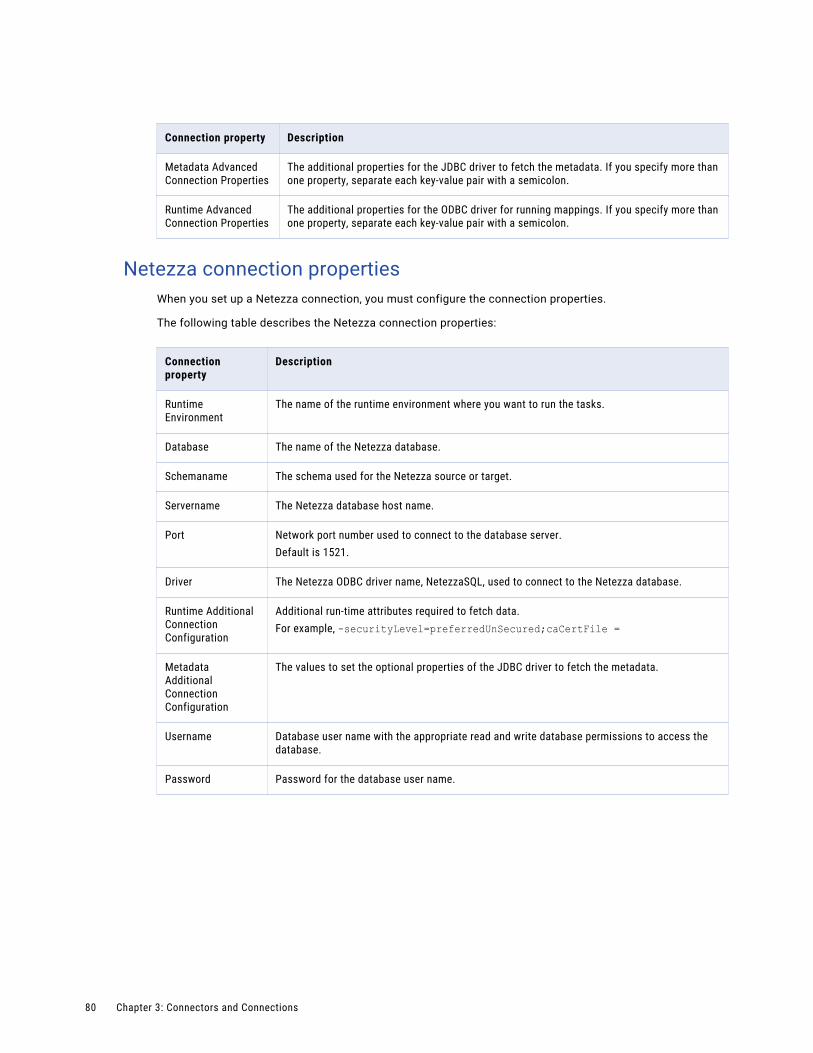
Connection property Description
Metadata Advanced Connection Properties
The additional properties for the JDBC driver to fetch the metadata. If you specify more than one property, separate each key-value pair with a semicolon.
Runtime Advanced Connection Properties
The additional properties for the ODBC driver for running mappings. If you specify more than one property, separate each key-value pair with a semicolon.
Netezza connection propertiesWhen you set up a Netezza connection, you must configure the connection properties.
The following table describes the Netezza connection properties:
Connection property
Description
Runtime Environment
The name of the runtime environment where you want to run the tasks.
Database The name of the Netezza database.
Schemaname The schema used for the Netezza source or target.
Servername The Netezza database host name.
Port Network port number used to connect to the database server.Default is 1521.
Driver The Netezza ODBC driver name, NetezzaSQL, used to connect to the Netezza database.
Runtime Additional Connection Configuration
Additional run-time attributes required to fetch data.For example, -securityLevel=preferredUnSecured;caCertFile =
Metadata Additional Connection Configuration
The values to set the optional properties of the JDBC driver to fetch the metadata.
Username Database user name with the appropriate read and write database permissions to access the database.
Password Password for the database user name.
80 Chapter 3: Connectors and Connections
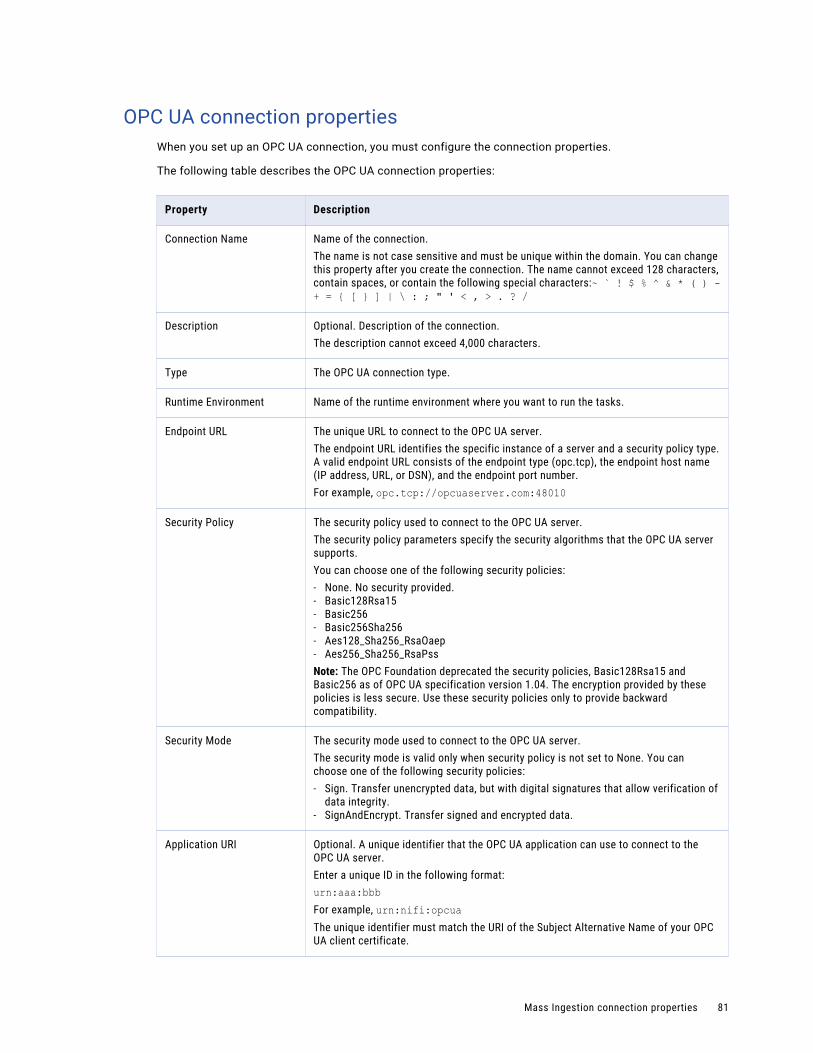
OPC UA connection propertiesWhen you set up an OPC UA connection, you must configure the connection properties.
The following table describes the OPC UA connection properties:
Property Description
Connection Name Name of the connection.The name is not case sensitive and must be unique within the domain. You can change this property after you create the connection. The name cannot exceed 128 characters, contain spaces, or contain the following special characters:~ ` ! $ % ^ & * ( ) - + = { [ } ] | \ : ; " ' < , > . ? /
Description Optional. Description of the connection.The description cannot exceed 4,000 characters.
Type The OPC UA connection type.
Runtime Environment Name of the runtime environment where you want to run the tasks.
Endpoint URL The unique URL to connect to the OPC UA server.The endpoint URL identifies the specific instance of a server and a security policy type. A valid endpoint URL consists of the endpoint type (opc.tcp), the endpoint host name (IP address, URL, or DSN), and the endpoint port number.For example, opc.tcp://opcuaserver.com:48010
Security Policy The security policy used to connect to the OPC UA server.The security policy parameters specify the security algorithms that the OPC UA server supports.You can choose one of the following security policies:- None. No security provided.- Basic128Rsa15- Basic256- Basic256Sha256- Aes128_Sha256_RsaOaep- Aes256_Sha256_RsaPssNote: The OPC Foundation deprecated the security policies, Basic128Rsa15 and Basic256 as of OPC UA specification version 1.04. The encryption provided by these policies is less secure. Use these security policies only to provide backward compatibility.
Security Mode The security mode used to connect to the OPC UA server.The security mode is valid only when security policy is not set to None. You can choose one of the following security policies:- Sign. Transfer unencrypted data, but with digital signatures that allow verification of
data integrity.- SignAndEncrypt. Transfer signed and encrypted data.
Application URI Optional. A unique identifier that the OPC UA application can use to connect to the OPC UA server.Enter a unique ID in the following format:urn:aaa:bbbFor example, urn:nifi:opcuaThe unique identifier must match the URI of the Subject Alternative Name of your OPC UA client certificate.
Mass Ingestion connection properties 81
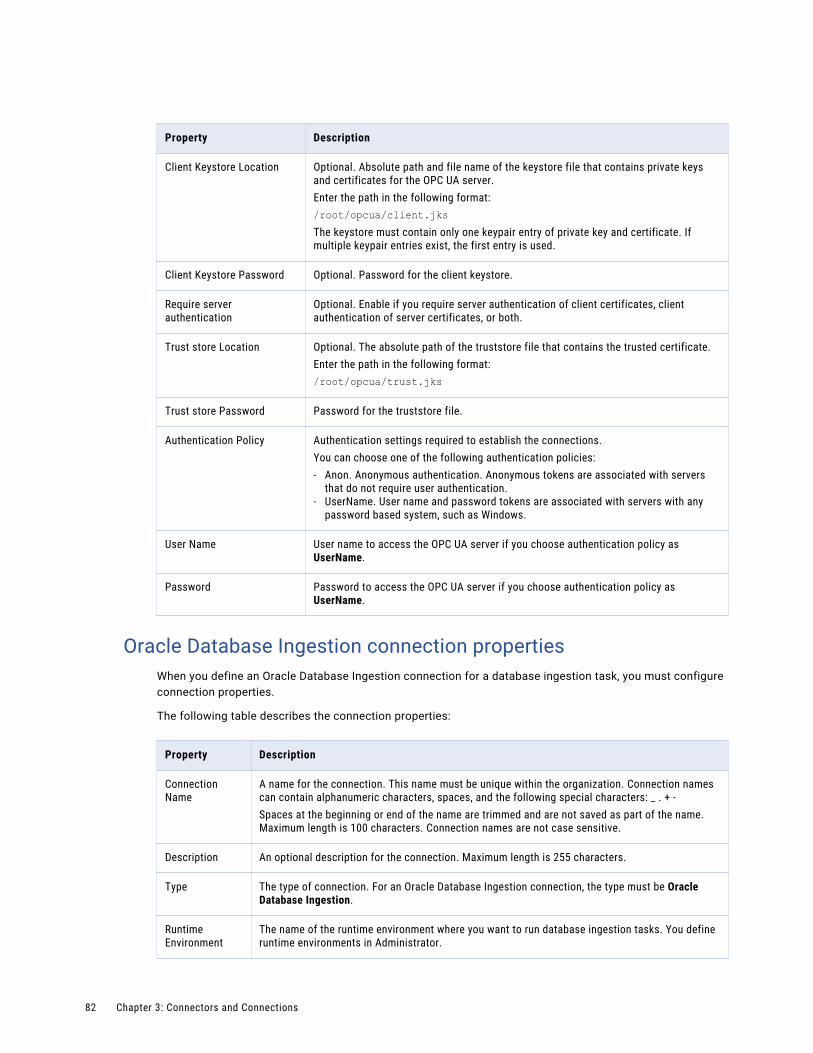
Property Description
Client Keystore Location Optional. Absolute path and file name of the keystore file that contains private keys and certificates for the OPC UA server.Enter the path in the following format:/root/opcua/client.jksThe keystore must contain only one keypair entry of private key and certificate. If multiple keypair entries exist, the first entry is used.
Client Keystore Password Optional. Password for the client keystore.
Require server authentication
Optional. Enable if you require server authentication of client certificates, client authentication of server certificates, or both.
Trust store Location Optional. The absolute path of the truststore file that contains the trusted certificate.Enter the path in the following format:/root/opcua/trust.jks
Trust store Password Password for the truststore file.
Authentication Policy Authentication settings required to establish the connections.You can choose one of the following authentication policies:- Anon. Anonymous authentication. Anonymous tokens are associated with servers
that do not require user authentication.- UserName. User name and password tokens are associated with servers with any
password based system, such as Windows.
User Name User name to access the OPC UA server if you choose authentication policy as UserName.
Password Password to access the OPC UA server if you choose authentication policy as UserName.
Oracle Database Ingestion connection propertiesWhen you define an Oracle Database Ingestion connection for a database ingestion task, you must configure connection properties.
The following table describes the connection properties:
Property Description
Connection Name
A name for the connection. This name must be unique within the organization. Connection names can contain alphanumeric characters, spaces, and the following special characters: _ . + -Spaces at the beginning or end of the name are trimmed and are not saved as part of the name. Maximum length is 100 characters. Connection names are not case sensitive.
Description An optional description for the connection. Maximum length is 255 characters.
Type The type of connection. For an Oracle Database Ingestion connection, the type must be Oracle Database Ingestion.
Runtime Environment
The name of the runtime environment where you want to run database ingestion tasks. You define runtime environments in Administrator.
82 Chapter 3: Connectors and Connections
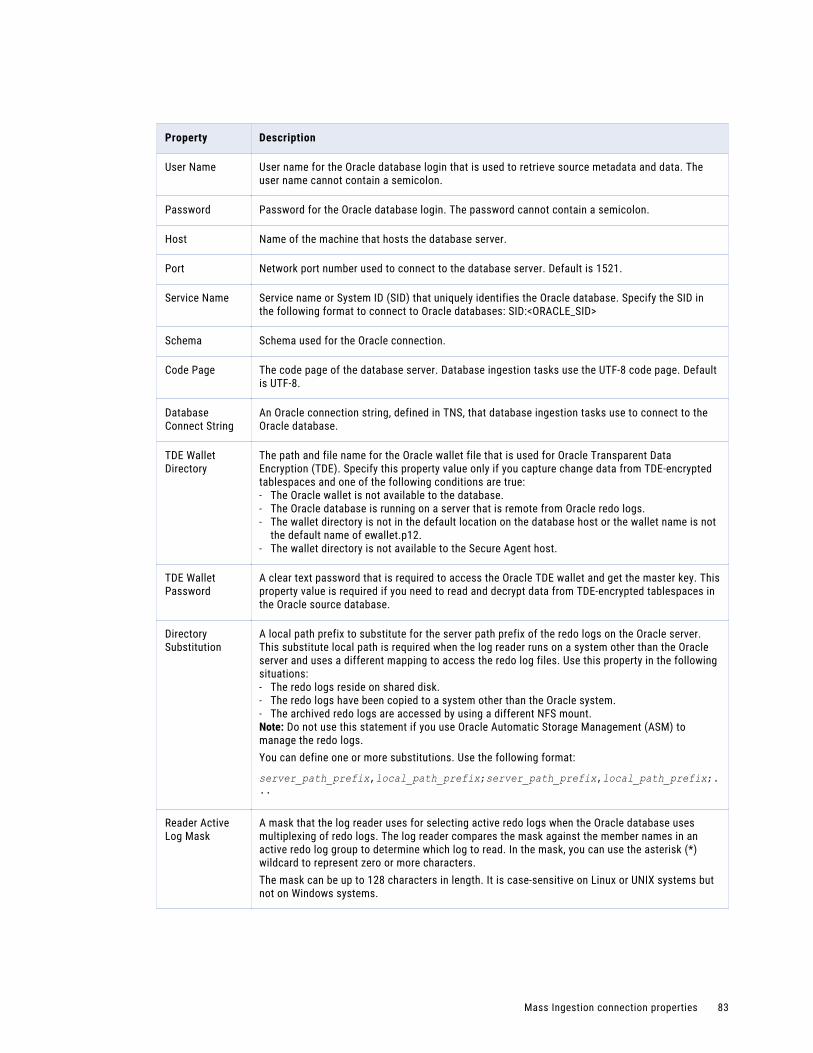
Property Description
User Name User name for the Oracle database login that is used to retrieve source metadata and data. The user name cannot contain a semicolon.
Password Password for the Oracle database login. The password cannot contain a semicolon.
Host Name of the machine that hosts the database server.
Port Network port number used to connect to the database server. Default is 1521.
Service Name Service name or System ID (SID) that uniquely identifies the Oracle database. Specify the SID in the following format to connect to Oracle databases: SID:<ORACLE_SID>
Schema Schema used for the Oracle connection.
Code Page The code page of the database server. Database ingestion tasks use the UTF-8 code page. Default is UTF-8.
Database Connect String
An Oracle connection string, defined in TNS, that database ingestion tasks use to connect to the Oracle database.
TDE Wallet Directory
The path and file name for the Oracle wallet file that is used for Oracle Transparent Data Encryption (TDE). Specify this property value only if you capture change data from TDE-encrypted tablespaces and one of the following conditions are true:- The Oracle wallet is not available to the database.- The Oracle database is running on a server that is remote from Oracle redo logs.- The wallet directory is not in the default location on the database host or the wallet name is not
the default name of ewallet.p12.- The wallet directory is not available to the Secure Agent host.
TDE Wallet Password
A clear text password that is required to access the Oracle TDE wallet and get the master key. This property value is required if you need to read and decrypt data from TDE-encrypted tablespaces in the Oracle source database.
Directory Substitution
A local path prefix to substitute for the server path prefix of the redo logs on the Oracle server. This substitute local path is required when the log reader runs on a system other than the Oracle server and uses a different mapping to access the redo log files. Use this property in the following situations:- The redo logs reside on shared disk.- The redo logs have been copied to a system other than the Oracle system.- The archived redo logs are accessed by using a different NFS mount.Note: Do not use this statement if you use Oracle Automatic Storage Management (ASM) to manage the redo logs.You can define one or more substitutions. Use the following format:
server_path_prefix,local_path_prefix;server_path_prefix,local_path_prefix;...
Reader Active Log Mask
A mask that the log reader uses for selecting active redo logs when the Oracle database uses multiplexing of redo logs. The log reader compares the mask against the member names in an active redo log group to determine which log to read. In the mask, you can use the asterisk (*) wildcard to represent zero or more characters.The mask can be up to 128 characters in length. It is case-sensitive on Linux or UNIX systems but not on Windows systems.
Mass Ingestion connection properties 83
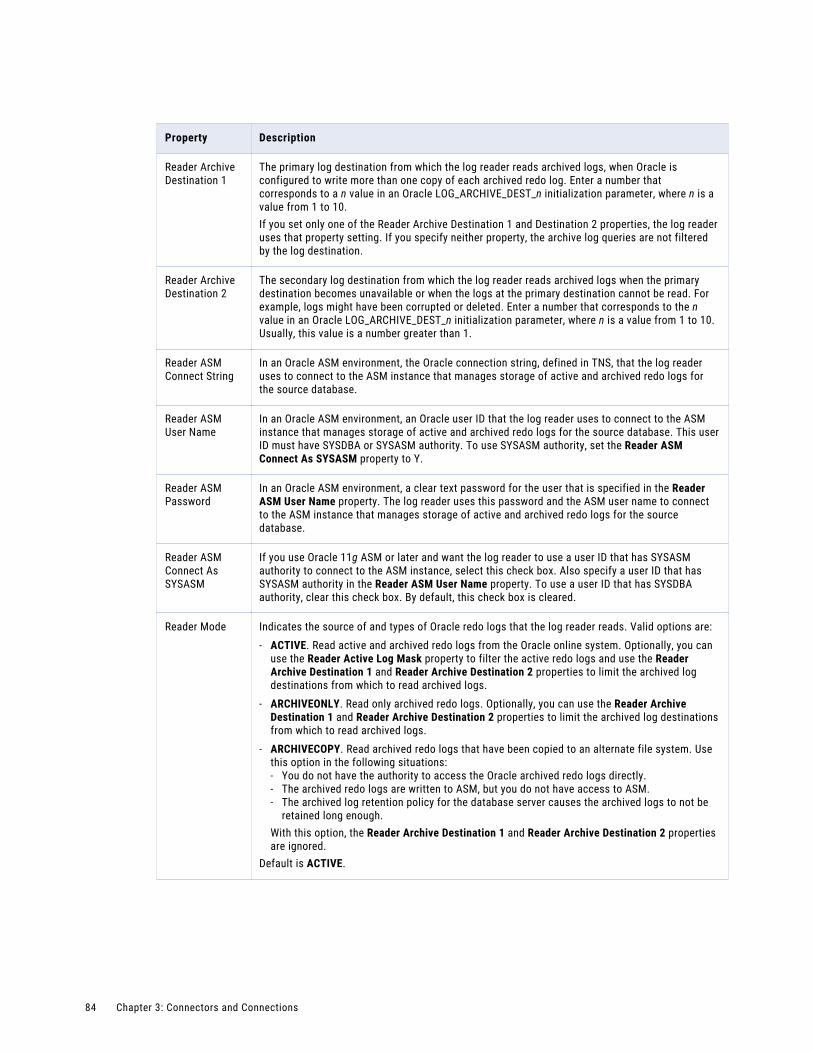
Property Description
Reader Archive Destination 1
The primary log destination from which the log reader reads archived logs, when Oracle is configured to write more than one copy of each archived redo log. Enter a number that corresponds to a n value in an Oracle LOG_ARCHIVE_DEST_n initialization parameter, where n is a value from 1 to 10.If you set only one of the Reader Archive Destination 1 and Destination 2 properties, the log reader uses that property setting. If you specify neither property, the archive log queries are not filtered by the log destination.
Reader Archive Destination 2
The secondary log destination from which the log reader reads archived logs when the primary destination becomes unavailable or when the logs at the primary destination cannot be read. For example, logs might have been corrupted or deleted. Enter a number that corresponds to the n value in an Oracle LOG_ARCHIVE_DEST_n initialization parameter, where n is a value from 1 to 10. Usually, this value is a number greater than 1.
Reader ASM Connect String
In an Oracle ASM environment, the Oracle connection string, defined in TNS, that the log reader uses to connect to the ASM instance that manages storage of active and archived redo logs for the source database.
Reader ASM User Name
In an Oracle ASM environment, an Oracle user ID that the log reader uses to connect to the ASM instance that manages storage of active and archived redo logs for the source database. This user ID must have SYSDBA or SYSASM authority. To use SYSASM authority, set the Reader ASM Connect As SYSASM property to Y.
Reader ASM Password
In an Oracle ASM environment, a clear text password for the user that is specified in the Reader ASM User Name property. The log reader uses this password and the ASM user name to connect to the ASM instance that manages storage of active and archived redo logs for the source database.
Reader ASM Connect As SYSASM
If you use Oracle 11g ASM or later and want the log reader to use a user ID that has SYSASM authority to connect to the ASM instance, select this check box. Also specify a user ID that has SYSASM authority in the Reader ASM User Name property. To use a user ID that has SYSDBA authority, clear this check box. By default, this check box is cleared.
Reader Mode Indicates the source of and types of Oracle redo logs that the log reader reads. Valid options are:- ACTIVE. Read active and archived redo logs from the Oracle online system. Optionally, you can
use the Reader Active Log Mask property to filter the active redo logs and use the Reader Archive Destination 1 and Reader Archive Destination 2 properties to limit the archived log destinations from which to read archived logs.
- ARCHIVEONLY. Read only archived redo logs. Optionally, you can use the Reader Archive Destination 1 and Reader Archive Destination 2 properties to limit the archived log destinations from which to read archived logs.
- ARCHIVECOPY. Read archived redo logs that have been copied to an alternate file system. Use this option in the following situations:- You do not have the authority to access the Oracle archived redo logs directly.- The archived redo logs are written to ASM, but you do not have access to ASM.- The archived log retention policy for the database server causes the archived logs to not be
retained long enough.With this option, the Reader Archive Destination 1 and Reader Archive Destination 2 properties are ignored.
Default is ACTIVE.
84 Chapter 3: Connectors and Connections
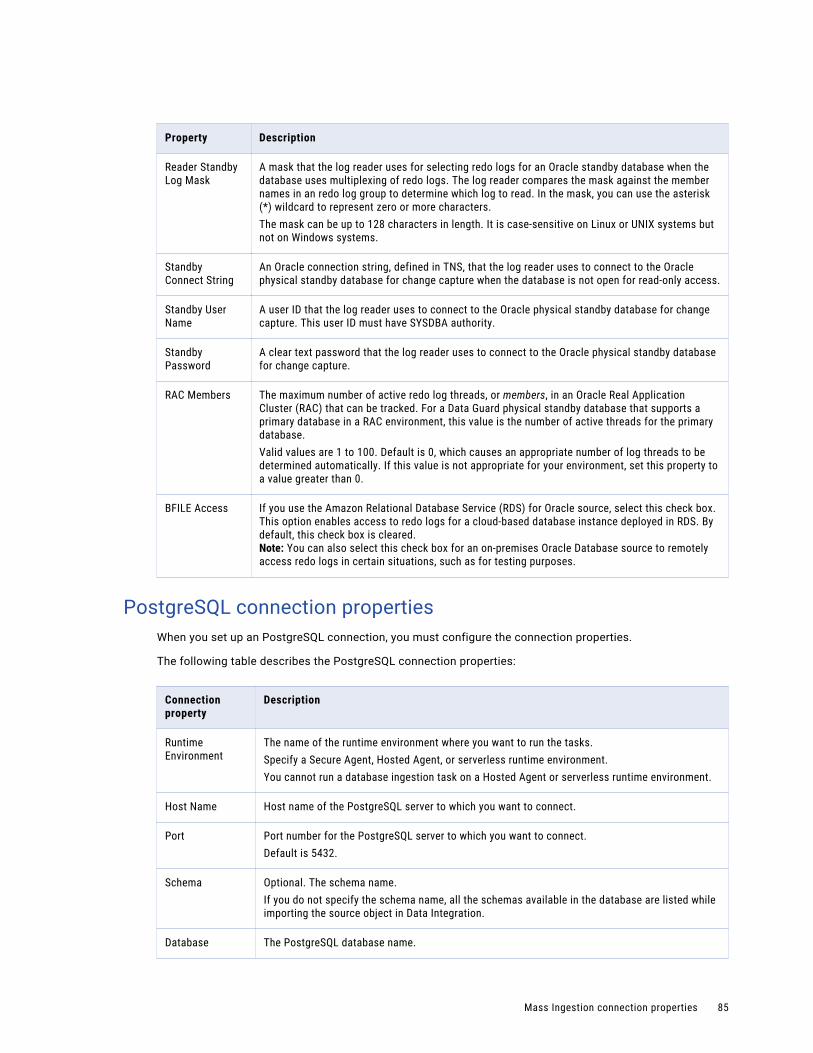
Property Description
Reader Standby Log Mask
A mask that the log reader uses for selecting redo logs for an Oracle standby database when the database uses multiplexing of redo logs. The log reader compares the mask against the member names in an redo log group to determine which log to read. In the mask, you can use the asterisk (*) wildcard to represent zero or more characters.The mask can be up to 128 characters in length. It is case-sensitive on Linux or UNIX systems but not on Windows systems.
Standby Connect String
An Oracle connection string, defined in TNS, that the log reader uses to connect to the Oracle physical standby database for change capture when the database is not open for read-only access.
Standby User Name
A user ID that the log reader uses to connect to the Oracle physical standby database for change capture. This user ID must have SYSDBA authority.
Standby Password
A clear text password that the log reader uses to connect to the Oracle physical standby database for change capture.
RAC Members The maximum number of active redo log threads, or members, in an Oracle Real Application Cluster (RAC) that can be tracked. For a Data Guard physical standby database that supports a primary database in a RAC environment, this value is the number of active threads for the primary database.Valid values are 1 to 100. Default is 0, which causes an appropriate number of log threads to be determined automatically. If this value is not appropriate for your environment, set this property to a value greater than 0.
BFILE Access If you use the Amazon Relational Database Service (RDS) for Oracle source, select this check box. This option enables access to redo logs for a cloud-based database instance deployed in RDS. By default, this check box is cleared.Note: You can also select this check box for an on-premises Oracle Database source to remotely access redo logs in certain situations, such as for testing purposes.
PostgreSQL connection propertiesWhen you set up an PostgreSQL connection, you must configure the connection properties.
The following table describes the PostgreSQL connection properties:
Connection property
Description
Runtime Environment
The name of the runtime environment where you want to run the tasks.Specify a Secure Agent, Hosted Agent, or serverless runtime environment.You cannot run a database ingestion task on a Hosted Agent or serverless runtime environment.
Host Name Host name of the PostgreSQL server to which you want to connect.
Port Port number for the PostgreSQL server to which you want to connect.Default is 5432.
Schema Optional. The schema name.If you do not specify the schema name, all the schemas available in the database are listed while importing the source object in Data Integration.
Database The PostgreSQL database name.
Mass Ingestion connection properties 85
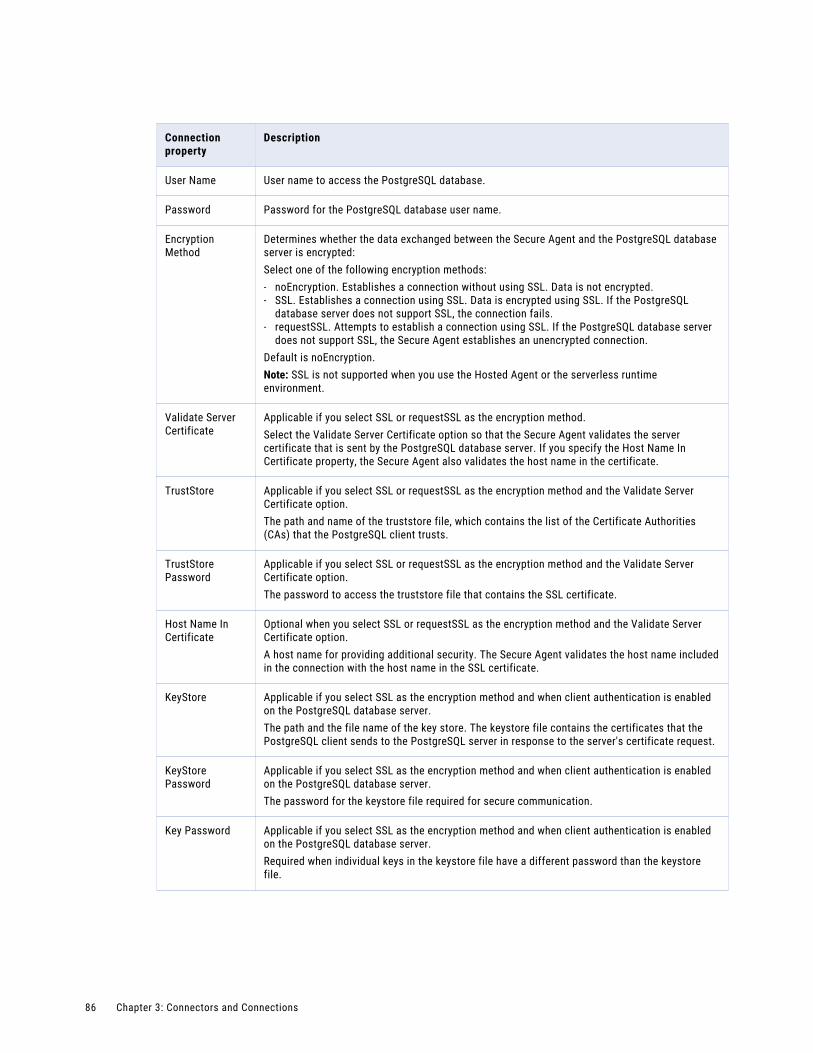
Connection property
Description
User Name User name to access the PostgreSQL database.
Password Password for the PostgreSQL database user name.
Encryption Method
Determines whether the data exchanged between the Secure Agent and the PostgreSQL database server is encrypted:Select one of the following encryption methods:- noEncryption. Establishes a connection without using SSL. Data is not encrypted.- SSL. Establishes a connection using SSL. Data is encrypted using SSL. If the PostgreSQL
database server does not support SSL, the connection fails.- requestSSL. Attempts to establish a connection using SSL. If the PostgreSQL database server
does not support SSL, the Secure Agent establishes an unencrypted connection.Default is noEncryption.Note: SSL is not supported when you use the Hosted Agent or the serverless runtime environment.
Validate Server Certificate
Applicable if you select SSL or requestSSL as the encryption method.Select the Validate Server Certificate option so that the Secure Agent validates the server certificate that is sent by the PostgreSQL database server. If you specify the Host Name In Certificate property, the Secure Agent also validates the host name in the certificate.
TrustStore Applicable if you select SSL or requestSSL as the encryption method and the Validate Server Certificate option.The path and name of the truststore file, which contains the list of the Certificate Authorities (CAs) that the PostgreSQL client trusts.
TrustStore Password
Applicable if you select SSL or requestSSL as the encryption method and the Validate Server Certificate option.The password to access the truststore file that contains the SSL certificate.
Host Name In Certificate
Optional when you select SSL or requestSSL as the encryption method and the Validate Server Certificate option.A host name for providing additional security. The Secure Agent validates the host name included in the connection with the host name in the SSL certificate.
KeyStore Applicable if you select SSL as the encryption method and when client authentication is enabled on the PostgreSQL database server.The path and the file name of the key store. The keystore file contains the certificates that the PostgreSQL client sends to the PostgreSQL server in response to the server's certificate request.
KeyStore Password
Applicable if you select SSL as the encryption method and when client authentication is enabled on the PostgreSQL database server.The password for the keystore file required for secure communication.
Key Password Applicable if you select SSL as the encryption method and when client authentication is enabled on the PostgreSQL database server.Required when individual keys in the keystore file have a different password than the keystore file.
86 Chapter 3: Connectors and Connections
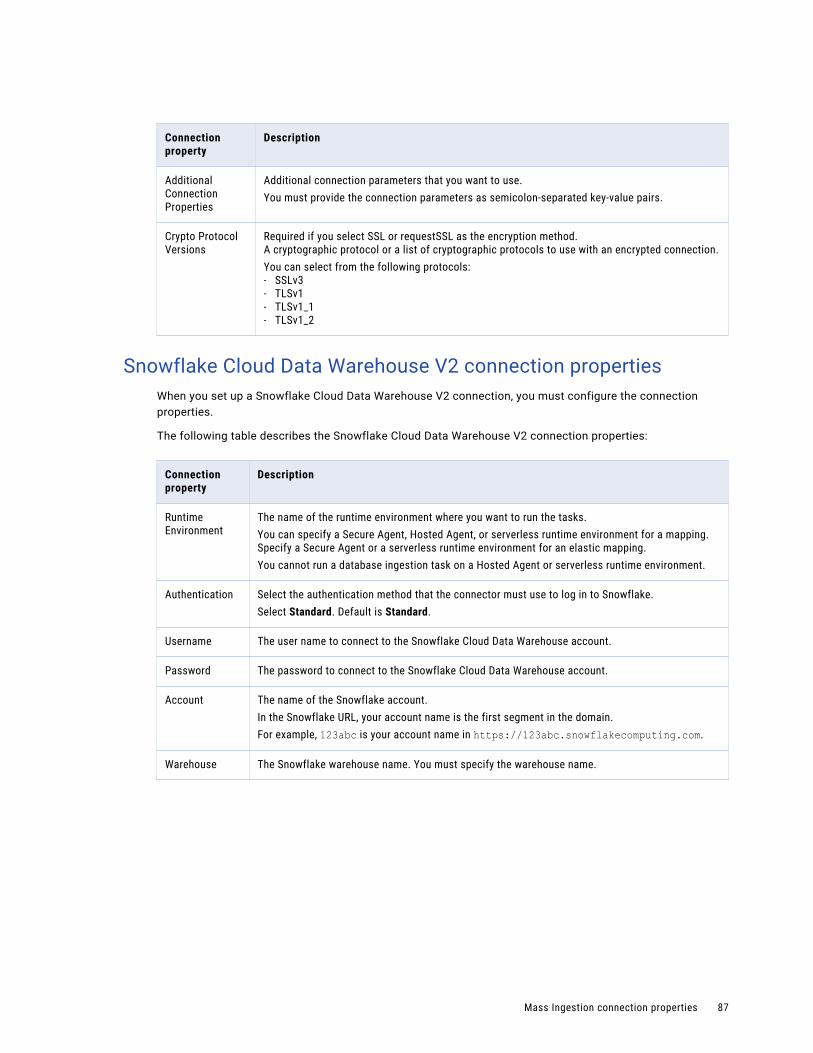
Connection property
Description
Additional Connection Properties
Additional connection parameters that you want to use.You must provide the connection parameters as semicolon-separated key-value pairs.
Crypto Protocol Versions
Required if you select SSL or requestSSL as the encryption method.A cryptographic protocol or a list of cryptographic protocols to use with an encrypted connection.You can select from the following protocols:- SSLv3- TLSv1- TLSv1_1- TLSv1_2
Snowflake Cloud Data Warehouse V2 connection propertiesWhen you set up a Snowflake Cloud Data Warehouse V2 connection, you must configure the connection properties.
The following table describes the Snowflake Cloud Data Warehouse V2 connection properties:
Connection property
Description
Runtime Environment
The name of the runtime environment where you want to run the tasks.You can specify a Secure Agent, Hosted Agent, or serverless runtime environment for a mapping. Specify a Secure Agent or a serverless runtime environment for an elastic mapping.You cannot run a database ingestion task on a Hosted Agent or serverless runtime environment.
Authentication Select the authentication method that the connector must use to log in to Snowflake.Select Standard. Default is Standard.
Username The user name to connect to the Snowflake Cloud Data Warehouse account.
Password The password to connect to the Snowflake Cloud Data Warehouse account.
Account The name of the Snowflake account.In the Snowflake URL, your account name is the first segment in the domain.For example, 123abc is your account name in https://123abc.snowflakecomputing.com.
Warehouse The Snowflake warehouse name. You must specify the warehouse name.
Mass Ingestion connection properties 87
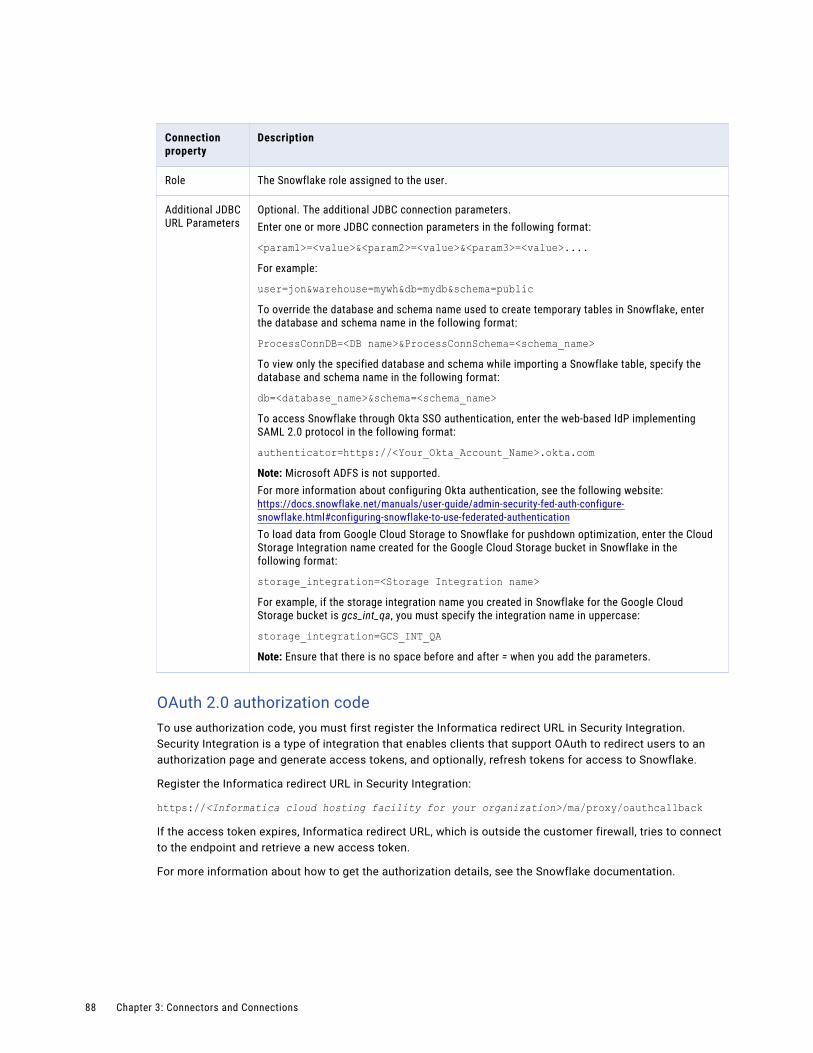
Connection property
Description
Role The Snowflake role assigned to the user.
Additional JDBC URL Parameters
Optional. The additional JDBC connection parameters.Enter one or more JDBC connection parameters in the following format:
<param1>=<value>&<param2>=<value>&<param3>=<value>....For example:
user=jon&warehouse=mywh&db=mydb&schema=publicTo override the database and schema name used to create temporary tables in Snowflake, enter the database and schema name in the following format:
ProcessConnDB=<DB name>&ProcessConnSchema=<schema_name>To view only the specified database and schema while importing a Snowflake table, specify the database and schema name in the following format:
db=<database_name>&schema=<schema_name>To access Snowflake through Okta SSO authentication, enter the web-based IdP implementing SAML 2.0 protocol in the following format:
authenticator=https://<Your_Okta_Account_Name>.okta.com Note: Microsoft ADFS is not supported.For more information about configuring Okta authentication, see the following website: https://docs.snowflake.net/manuals/user-guide/admin-security-fed-auth-configure-snowflake.html#configuring-snowflake-to-use-federated-authenticationTo load data from Google Cloud Storage to Snowflake for pushdown optimization, enter the Cloud Storage Integration name created for the Google Cloud Storage bucket in Snowflake in the following format:
storage_integration=<Storage Integration name>For example, if the storage integration name you created in Snowflake for the Google Cloud Storage bucket is gcs_int_qa, you must specify the integration name in uppercase:
storage_integration=GCS_INT_QANote: Ensure that there is no space before and after = when you add the parameters.
OAuth 2.0 authorization codeTo use authorization code, you must first register the Informatica redirect URL in Security Integration. Security Integration is a type of integration that enables clients that support OAuth to redirect users to an authorization page and generate access tokens, and optionally, refresh tokens for access to Snowflake.
Register the Informatica redirect URL in Security Integration:
https://<Informatica cloud hosting facility for your organization>/ma/proxy/oauthcallback
If the access token expires, Informatica redirect URL, which is outside the customer firewall, tries to connect to the endpoint and retrieve a new access token.
For more information about how to get the authorization details, see the Snowflake documentation.
88 Chapter 3: Connectors and Connections
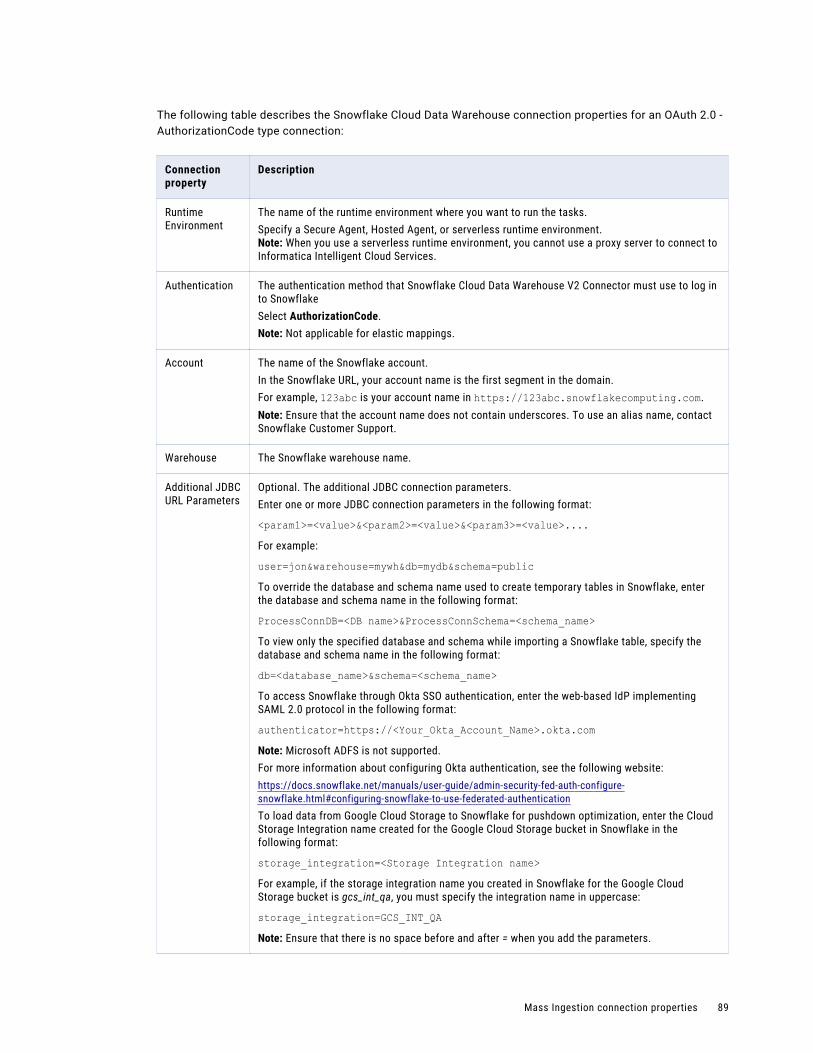
The following table describes the Snowflake Cloud Data Warehouse connection properties for an OAuth 2.0 - AuthorizationCode type connection:
Connection property
Description
Runtime Environment
The name of the runtime environment where you want to run the tasks.Specify a Secure Agent, Hosted Agent, or serverless runtime environment.Note: When you use a serverless runtime environment, you cannot use a proxy server to connect to Informatica Intelligent Cloud Services.
Authentication The authentication method that Snowflake Cloud Data Warehouse V2 Connector must use to log in to SnowflakeSelect AuthorizationCode.Note: Not applicable for elastic mappings.
Account The name of the Snowflake account.In the Snowflake URL, your account name is the first segment in the domain.For example, 123abc is your account name in https://123abc.snowflakecomputing.com.Note: Ensure that the account name does not contain underscores. To use an alias name, contact Snowflake Customer Support.
Warehouse The Snowflake warehouse name.
Additional JDBC URL Parameters
Optional. The additional JDBC connection parameters.Enter one or more JDBC connection parameters in the following format:
<param1>=<value>&<param2>=<value>&<param3>=<value>....For example:
user=jon&warehouse=mywh&db=mydb&schema=publicTo override the database and schema name used to create temporary tables in Snowflake, enter the database and schema name in the following format:
ProcessConnDB=<DB name>&ProcessConnSchema=<schema_name>To view only the specified database and schema while importing a Snowflake table, specify the database and schema name in the following format:
db=<database_name>&schema=<schema_name>To access Snowflake through Okta SSO authentication, enter the web-based IdP implementing SAML 2.0 protocol in the following format:
authenticator=https://<Your_Okta_Account_Name>.okta.com Note: Microsoft ADFS is not supported.For more information about configuring Okta authentication, see the following website:https://docs.snowflake.net/manuals/user-guide/admin-security-fed-auth-configure-snowflake.html#configuring-snowflake-to-use-federated-authenticationTo load data from Google Cloud Storage to Snowflake for pushdown optimization, enter the Cloud Storage Integration name created for the Google Cloud Storage bucket in Snowflake in the following format:
storage_integration=<Storage Integration name>For example, if the storage integration name you created in Snowflake for the Google Cloud Storage bucket is gcs_int_qa, you must specify the integration name in uppercase:
storage_integration=GCS_INT_QANote: Ensure that there is no space before and after = when you add the parameters.
Mass Ingestion connection properties 89

Connection property
Description
Authorization URL
The Snowflake server endpoint that is used to authorize the user request.The authorization URL is https://<account_name>.snowflakecomputing.com/oauth/authorize, where <account_name> specifies the full name of your account provided by Snowflake.For example, https://informatica.snowflakecomputing.com/oauth/authorizeNote: If the account name contains underscores, you must use the alias name.
Access Token URL
The Snowflake access token endpoint that is used to exchange the authorization code for an access token.The access token URL is https://<account_name>.snowflakecomputing.com/oauth/token-request, where <account_name> specifies the full name of your account provided by Snowflake.For example, https://informatica.snowflakecomputing.com/oauth/token-requestNote: If the account name contains underscores, you must use the alias name.
Client ID Client ID of your application that Snowflake provides during the registration process.
Client Secret Client secret of your application.
Scope Specifies access control if the API endpoint has defined custom scopes.Enter space separated scope attributes.For example, specify session:role:CQA_GCP as the scope to override the value of the default user role. The value must be one of the roles assigned in Security Integration.
Access Token Parameters
Additional parameters to use with the access token URL. Define the parameters in the JSON format.For example, define the following parameters:[{"Name":"code_verifier","Value":"5PMddu6Zcg6Tc4sbg"}]
Authorization Code Parameters
Additional parameters to use with the authorization token URL. Define the parameters in the JSON format.For example, define the following parameters:[{"Name":"code_challenge","Value":"Ikr-vv52th0UeVRi4"}, {"Name":"code_challenge_method","Value":"S256"}]
Access Token Populates the access token value.Enter the access token value or click Generate Access Token to populate the access token value.
Generate Access Token
Generates access token and refresh token based on the OAuth attributes you specified.
Refresh Token Populates the refresh token value.Enter the refresh token value or click Generate Access Token to populate the refresh token value. If the access token is not valid or expires, the Secure Agent fetches a new access token with the help of refresh token.Note: If the refresh token expires, you must either provide a valid refresh token or regenerate a new refresh token by clicking Generate Access Token.
90 Chapter 3: Connectors and Connections
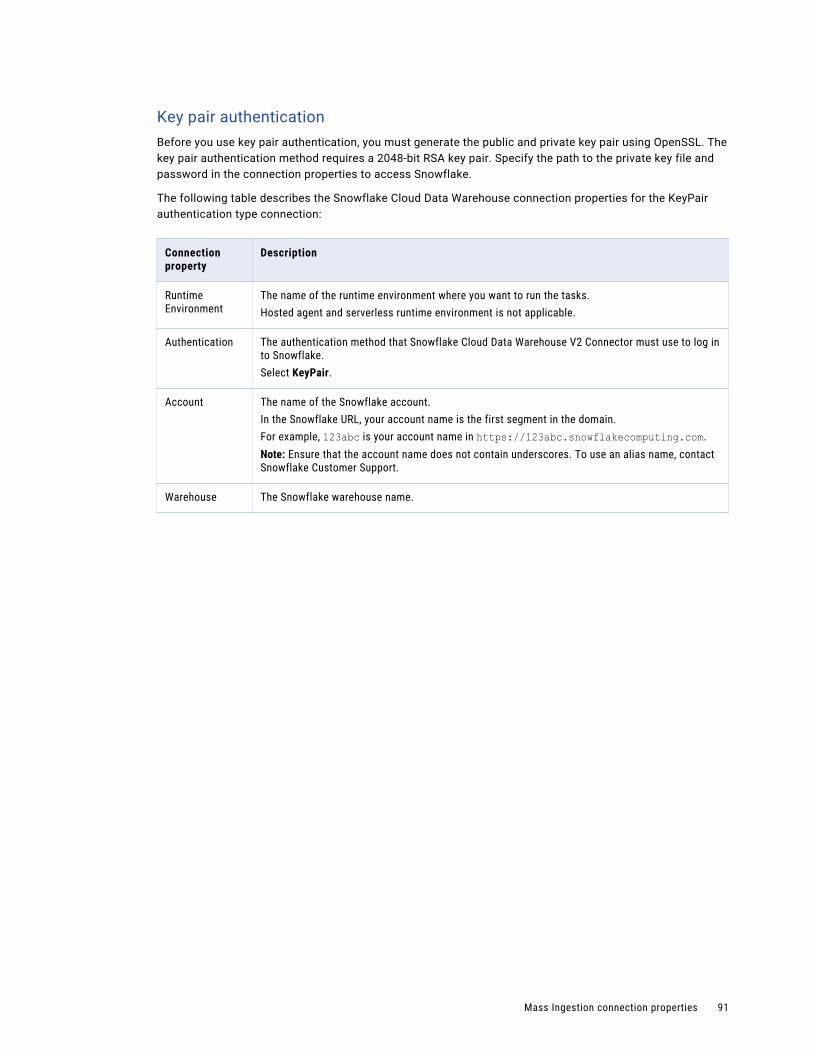
Key pair authenticationBefore you use key pair authentication, you must generate the public and private key pair using OpenSSL. The key pair authentication method requires a 2048-bit RSA key pair. Specify the path to the private key file and password in the connection properties to access Snowflake.
The following table describes the Snowflake Cloud Data Warehouse connection properties for the KeyPair authentication type connection:
Connection property
Description
Runtime Environment
The name of the runtime environment where you want to run the tasks.Hosted agent and serverless runtime environment is not applicable.
Authentication The authentication method that Snowflake Cloud Data Warehouse V2 Connector must use to log in to Snowflake.Select KeyPair.
Account The name of the Snowflake account.In the Snowflake URL, your account name is the first segment in the domain.For example, 123abc is your account name in https://123abc.snowflakecomputing.com.Note: Ensure that the account name does not contain underscores. To use an alias name, contact Snowflake Customer Support.
Warehouse The Snowflake warehouse name.
Mass Ingestion connection properties 91
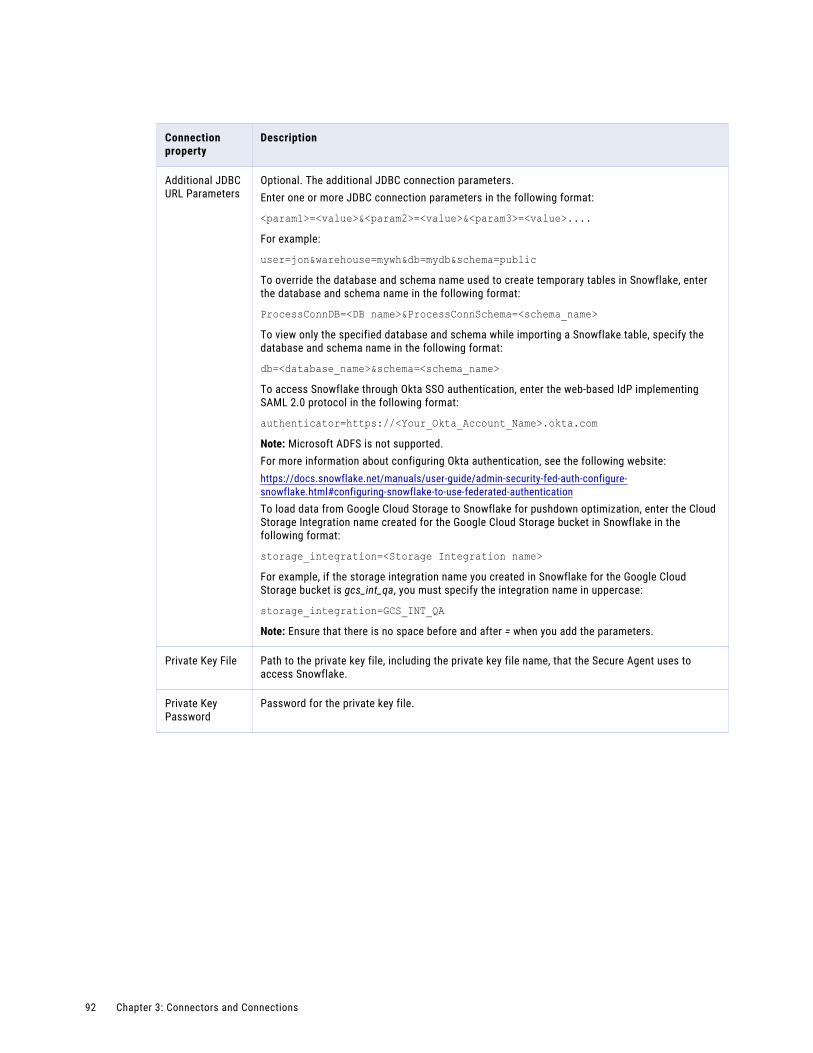
Connection property
Description
Additional JDBC URL Parameters
Optional. The additional JDBC connection parameters.Enter one or more JDBC connection parameters in the following format:
<param1>=<value>&<param2>=<value>&<param3>=<value>....For example:
user=jon&warehouse=mywh&db=mydb&schema=publicTo override the database and schema name used to create temporary tables in Snowflake, enter the database and schema name in the following format:
ProcessConnDB=<DB name>&ProcessConnSchema=<schema_name>To view only the specified database and schema while importing a Snowflake table, specify the database and schema name in the following format:
db=<database_name>&schema=<schema_name>To access Snowflake through Okta SSO authentication, enter the web-based IdP implementing SAML 2.0 protocol in the following format:
authenticator=https://<Your_Okta_Account_Name>.okta.com Note: Microsoft ADFS is not supported.For more information about configuring Okta authentication, see the following website:https://docs.snowflake.net/manuals/user-guide/admin-security-fed-auth-configure-snowflake.html#configuring-snowflake-to-use-federated-authenticationTo load data from Google Cloud Storage to Snowflake for pushdown optimization, enter the Cloud Storage Integration name created for the Google Cloud Storage bucket in Snowflake in the following format:
storage_integration=<Storage Integration name>For example, if the storage integration name you created in Snowflake for the Google Cloud Storage bucket is gcs_int_qa, you must specify the integration name in uppercase:
storage_integration=GCS_INT_QANote: Ensure that there is no space before and after = when you add the parameters.
Private Key File Path to the private key file, including the private key file name, that the Secure Agent uses to access Snowflake.
Private Key Password
Password for the private key file.
92 Chapter 3: Connectors and Connections
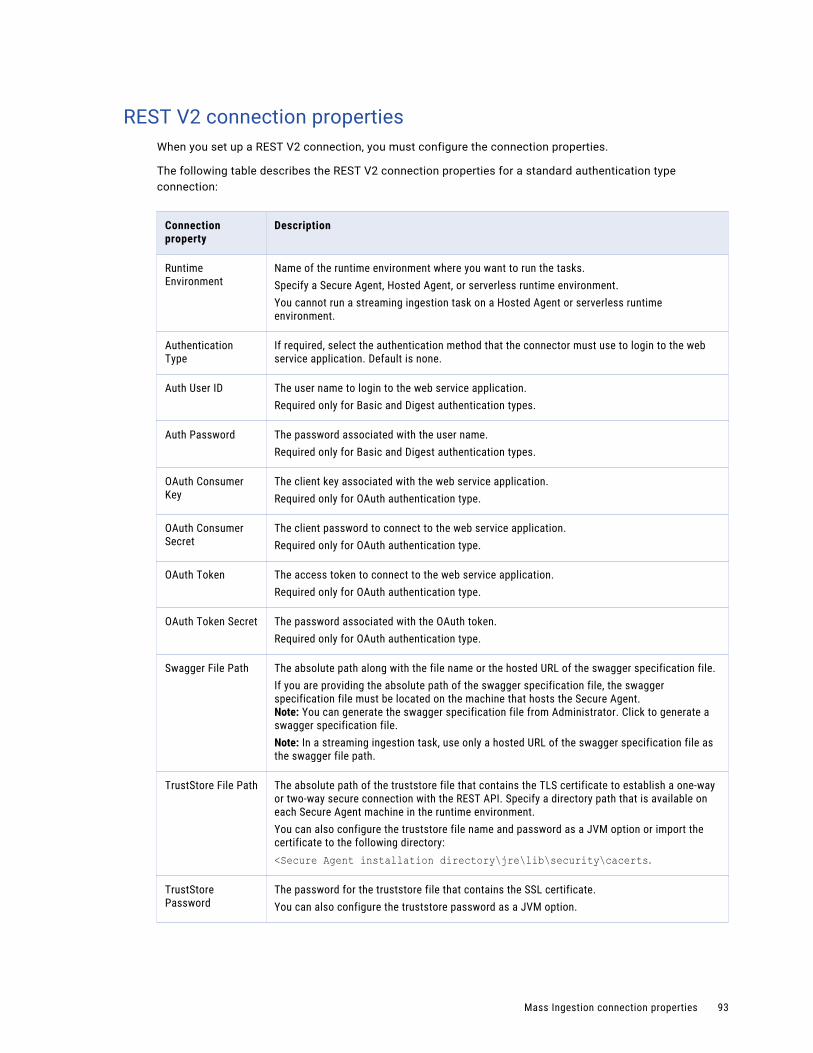
REST V2 connection propertiesWhen you set up a REST V2 connection, you must configure the connection properties.
The following table describes the REST V2 connection properties for a standard authentication type connection:
Connection property
Description
Runtime Environment
Name of the runtime environment where you want to run the tasks.Specify a Secure Agent, Hosted Agent, or serverless runtime environment.You cannot run a streaming ingestion task on a Hosted Agent or serverless runtime environment.
Authentication Type
If required, select the authentication method that the connector must use to login to the web service application. Default is none.
Auth User ID The user name to login to the web service application.Required only for Basic and Digest authentication types.
Auth Password The password associated with the user name.Required only for Basic and Digest authentication types.
OAuth Consumer Key
The client key associated with the web service application.Required only for OAuth authentication type.
OAuth Consumer Secret
The client password to connect to the web service application.Required only for OAuth authentication type.
OAuth Token The access token to connect to the web service application.Required only for OAuth authentication type.
OAuth Token Secret The password associated with the OAuth token.Required only for OAuth authentication type.
Swagger File Path The absolute path along with the file name or the hosted URL of the swagger specification file.If you are providing the absolute path of the swagger specification file, the swagger specification file must be located on the machine that hosts the Secure Agent.Note: You can generate the swagger specification file from Administrator. Click to generate a swagger specification file.Note: In a streaming ingestion task, use only a hosted URL of the swagger specification file as the swagger file path.
TrustStore File Path The absolute path of the truststore file that contains the TLS certificate to establish a one-way or two-way secure connection with the REST API. Specify a directory path that is available on each Secure Agent machine in the runtime environment.You can also configure the truststore file name and password as a JVM option or import the certificate to the following directory:<Secure Agent installation directory\jre\lib\security\cacerts.
TrustStore Password
The password for the truststore file that contains the SSL certificate.You can also configure the truststore password as a JVM option.
Mass Ingestion connection properties 93
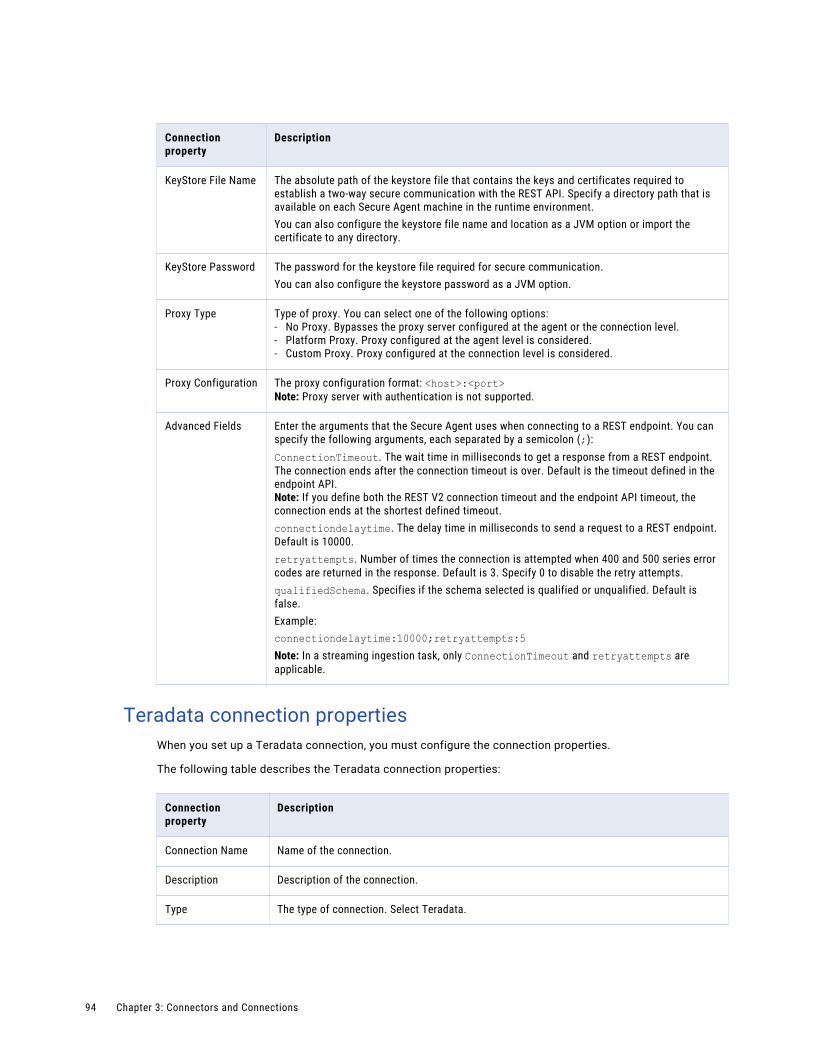
Connection property
Description
KeyStore File Name The absolute path of the keystore file that contains the keys and certificates required to establish a two-way secure communication with the REST API. Specify a directory path that is available on each Secure Agent machine in the runtime environment.You can also configure the keystore file name and location as a JVM option or import the certificate to any directory.
KeyStore Password The password for the keystore file required for secure communication.You can also configure the keystore password as a JVM option.
Proxy Type Type of proxy. You can select one of the following options:- No Proxy. Bypasses the proxy server configured at the agent or the connection level.- Platform Proxy. Proxy configured at the agent level is considered.- Custom Proxy. Proxy configured at the connection level is considered.
Proxy Configuration The proxy configuration format: <host>:<port>Note: Proxy server with authentication is not supported.
Advanced Fields Enter the arguments that the Secure Agent uses when connecting to a REST endpoint. You can specify the following arguments, each separated by a semicolon (;):ConnectionTimeout. The wait time in milliseconds to get a response from a REST endpoint. The connection ends after the connection timeout is over. Default is the timeout defined in the endpoint API.Note: If you define both the REST V2 connection timeout and the endpoint API timeout, the connection ends at the shortest defined timeout.connectiondelaytime. The delay time in milliseconds to send a request to a REST endpoint. Default is 10000.retryattempts. Number of times the connection is attempted when 400 and 500 series error codes are returned in the response. Default is 3. Specify 0 to disable the retry attempts.qualifiedSchema. Specifies if the schema selected is qualified or unqualified. Default is false.Example:connectiondelaytime:10000;retryattempts:5Note: In a streaming ingestion task, only ConnectionTimeout and retryattempts are applicable.
Teradata connection propertiesWhen you set up a Teradata connection, you must configure the connection properties.
The following table describes the Teradata connection properties:
Connection property
Description
Connection Name Name of the connection.
Description Description of the connection.
Type The type of connection. Select Teradata.
94 Chapter 3: Connectors and Connections

Connection property
Description
Runtime Environment
The name of the run-time environment where you want to run the tasks.You cannot use the Hosted Agent for Teradata Connector.
TDPID The name or IP address of the Teradata database machine.
Tenacity Amount of time, in hours, that Teradata PT API continues trying to log on when the maximum number of operations runs on the Teradata database.Specify a positive integer. Default is 4.
Database Name The Teradata database name.If you do not enter a database name, Teradata PT API uses the default login database name.
Code Page Code page associated with the Teradata database.Select one the following code pages:- MS Windows Latin 1. Select for ISO 8859-1 Western European data.- UTF-8. Select for Unicode and non-Unicode data.When you run a task that extracts data from a Teradata source, the code page of the Teradata PT API connection must be the same as the code page of the Teradata source.
Max Sessions Maximum number of sessions that Teradata PT API establishes with the Teradata database.Specify a positive, non-zero integer. Default is 4.
Min Sessions Minimum number of Teradata PT API sessions required for the Teradata PT API job to continue.Specify a positive integer between 1 and the Max Sessions value. Default is 1.
Sleep Amount of time, in minutes, that Teradata PT API pauses before it retries to log on when the maximum number of operations runs on the Teradata database.Specify a positive, non-zero integer. Default is 6.
Data Encryption Enables full security encryption of SQL requests, responses, and data.Default is disabled.
Block Size Maximum block size, in bytes, Teradata PT API uses when it returns data to the Secure Agent.Minimum is 256. Maximum is 64,000. Default is 64,000.
Authentication Type Method to authenticate the user. Select one of the following authentication types:- Native. Authenticates your user name and password against the Teradata database
specified in the connection.- LDAP. Authenticates user credentials against the external LDAP directory service.- KRB5. Authenticates to the Teradata database through Kerberos.Default is Native.
Kerberos Artifacts Directory
Directory that contains the Kerberos configuration files named krb5.conf and IICSTPT.keytab.Applicable when you select KRB5 as the authentication type.
Metadata Advanced Connection Properties
The values to set the optional properties of the JDBC driver to fetch the metadata.For example, tmode=ANSI.
Mass Ingestion connection properties 95
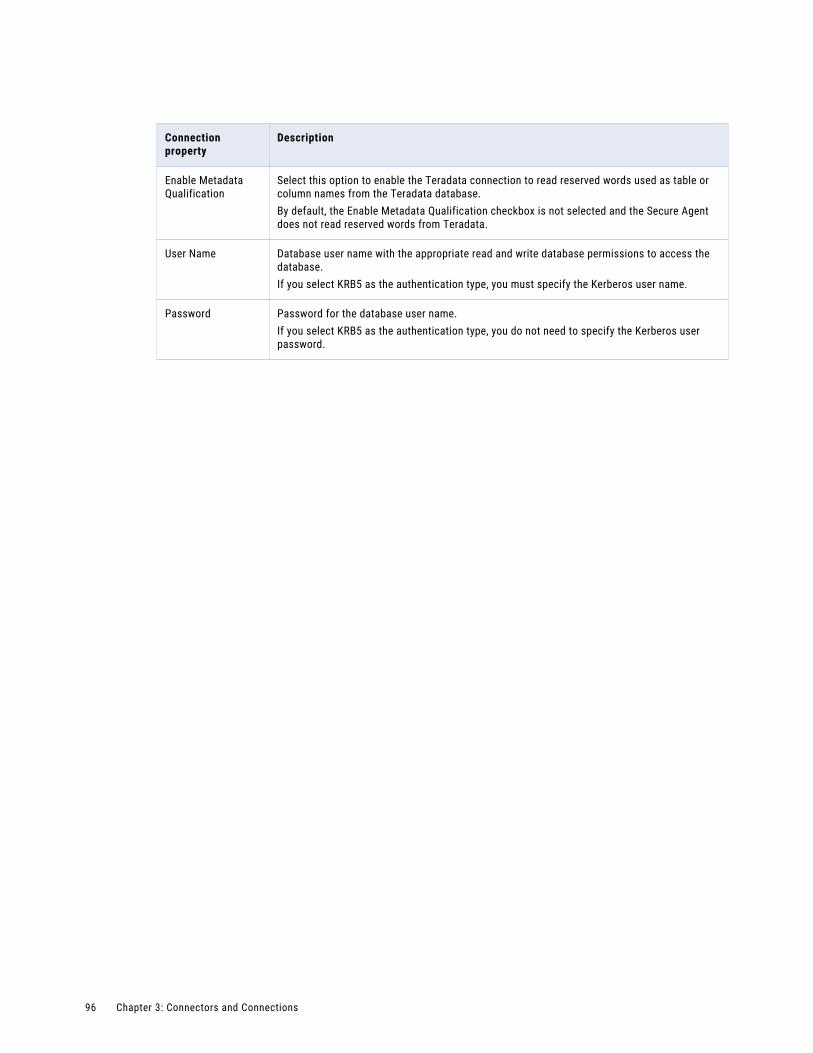
Connection property
Description
Enable Metadata Qualification
Select this option to enable the Teradata connection to read reserved words used as table or column names from the Teradata database.By default, the Enable Metadata Qualification checkbox is not selected and the Secure Agent does not read reserved words from Teradata.
User Name Database user name with the appropriate read and write database permissions to access the database.If you select KRB5 as the authentication type, you must specify the Kerberos user name.
Password Password for the database user name.If you select KRB5 as the authentication type, you do not need to specify the Kerberos user password.
96 Chapter 3: Connectors and Connections
C h a p t e r 4
Mass Ingestion DatabasesMass Ingestion Databases can ingest data at scale from common relational databases and propagate the data to multiple types of targets, including cloud-based targets and targets that can handle big data. Mass Ingestion Databases is a separately licensed feature of the Informatica Intelligent Cloud Services Mass Ingestion service.
The Mass Ingestion service provides an easy-to-use interface for configuring and deploying database ingestion tasks and for running and monitoring ingestion jobs. A job is an executable instance of an ingestion task.
Mass Ingestion Databases can perform the following types of load operations:
• Initial load. Loads source data read at a single point in time to a target. After the data is loaded, the ingestion job ends. You can use this load type to materialize a target to which incremental changes will be sent later, to migrate from an on-premises database system to a cloud-based system, or to add data to a data lake or data warehouse.
• Incremental load. Propagates data changes continuously or until the job is stopped or ends. The job propagates the changes that have occurred since the last time it ran or from a specific start point. You can use this load type to keep data in separate reporting and analytics systems up to date so that you can make informed decisions for your business or organization based on the latest data. You can also use this load type to feed the latest changes to data warehouses and cloud data lakes for big data processing.
• Initial and incremental load. Performs an initial load of point-in-time data to the target and then automatically switches to propagating incremental data changes made to the same source tables on a continuous basis. This load type is available for Oracle sources only.
For more information about the sources and targets supported for each load type, see “Mass Ingestion Databases source types” on page 98 and “Mass Ingestion Databases target types” on page 99.
Important: To be able to create and run incremental load and initial and incremental load jobs, ensure that the DBMI Initial Load Only license is disabled.
A database ingestion task automatically maps source tables and fields to target tables and fields based on name matching. You can define rules to customize the target table names.
Use casesMass Ingestion Databases can be used to solve multiple business problems.
You can use Mass Ingestion Databases in the following scenarios:
• Offline reporting. Move user reporting activity from a mission-critical production database system to a separate reporting system to avoid degrading database performance.
97
• Data warehousing. Help build out data warehouses by transferring data from multiple databases, including on-premises databases, to the data warehouse system. After an initial batch load of data to the data warehouse, Mass Ingestion Databases can propagate data changes continuously from a source database to keep the data in the data warehouse up to date.
• Real-time fraud detection. Run real-time fraud detection analytics against a replica database that Mass Ingestion Databases keeps up to date by providing change data continuously. Fraud detection processes can then run against the latest data without degrading the source system.
• Coordination with big data applications. Keep data lakes synchronized with on-premises sources in a database management system (DBMS) or provide data to Data Integration for at scale processing.
• Migration to cloud-based systems. Migrate data from on-premises database systems to cloud-based systems.
Mass Ingestion Databases source typesThe source types that Mass Ingestion Databases supports depend on whether database ingestion tasks are transmitting a point-in-time snapshot of data in a batch initial load operation or continuously propagating incremental change data from a specific start point.
For batch initial load operations, you can use the following source types:
• Db2 for i
• Db2 for Linux, UNIX, and Windows (LUW)
• Db2 for z/OS
• Microsoft Azure SQL Database
• Microsoft SQL Server
• MySQL
• Netezza
• Oracle
• PostgreSQL
• Teradata
For incremental load operations, you can use the following source types:
• Db2 for i
• Microsoft SQL Server
• Oracle
• PostgreSQL
For combined initial and incremental load operations, you can use the following source type:
• Oracle
You can download the connector for your source type and define connections in Administrator.
98 Chapter 4: Mass Ingestion Databases
Mass Ingestion Databases target typesThe target types that Mass Ingestion Databases supports depend on whether the database ingestion tasks are transmitting a point-in-time snapshot of data in an initial load operation or continuously propagating incremental change data from a specific start point.
For batch initial load operations, you can use the following target types:
• Amazon Redshift
• Amazon S3
• Flat file
• Google Cloud Storage
• Microsoft Azure Data Lake Storage Gen2
• Microsoft Azure SQL Data Warehouse
• Microsoft Azure Synapse Analytics
• Snowflake
For incremental load operations, you can use the following target types:
• Amazon Redshift
• Amazon S3
• Apache Kafka and Confluent Kafka
• Azure Event Hubs enabled for use with Kafka clients
• Google Cloud Storage
• Microsoft Azure Data Lake Storage Gen2
• Microsoft Azure SQL Data Warehouse
• Microsoft Azure Synapse Analytics
• Snowflake
For combined initial and incremental load operations, you can use the following target types:
• Amazon Redshift
• Microsoft Azure SQL Data Warehouse
• Microsoft Azure Synapse Analytics
• Snowflake
Mass Ingestion Databases architectureOn each system from which you plan to use Mass Ingestion Databases, you must install the Secure Agent.
After you start the Secure Agent the first time, the Mass Ingestion Databases agent and packages are installed locally. You then can use the Mass Ingestion to configure database ingestion tasks and to run and monitor database ingestion jobs.
Mass Ingestion Databases target types 99
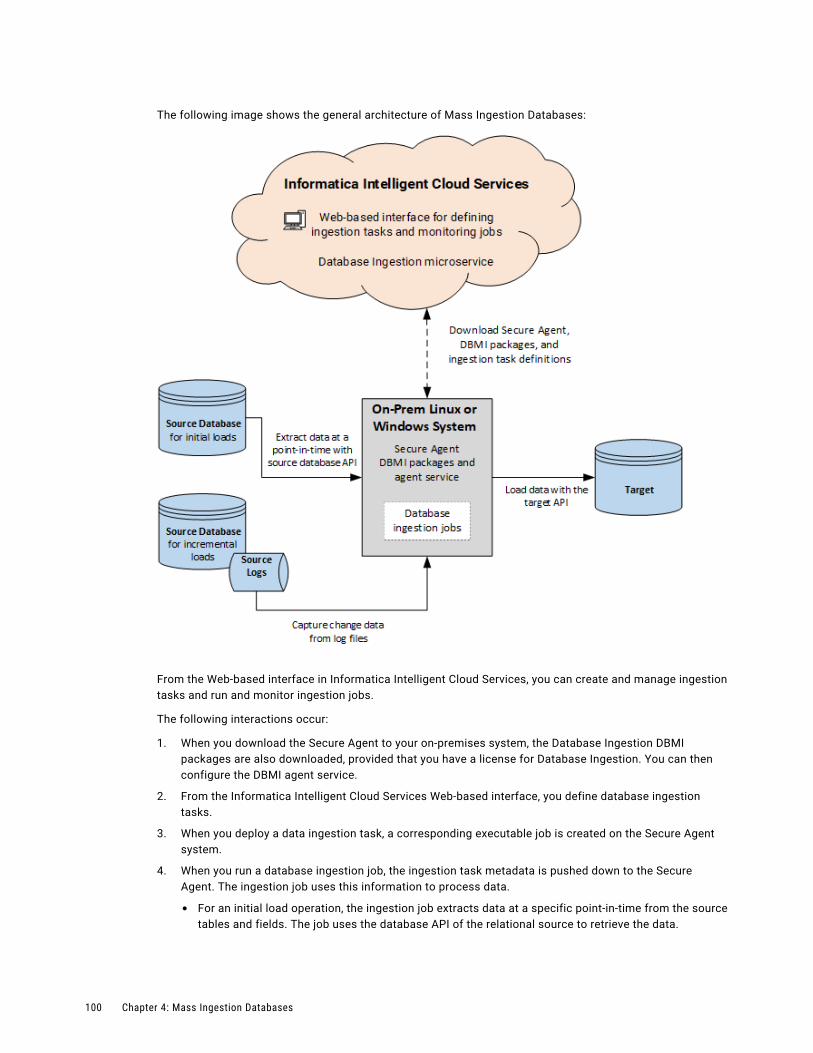
The following image shows the general architecture of Mass Ingestion Databases:
From the Web-based interface in Informatica Intelligent Cloud Services, you can create and manage ingestion tasks and run and monitor ingestion jobs.
The following interactions occur:
1. When you download the Secure Agent to your on-premises system, the Database Ingestion DBMI packages are also downloaded, provided that you have a license for Database Ingestion. You can then configure the DBMI agent service.
2. From the Informatica Intelligent Cloud Services Web-based interface, you define database ingestion tasks.
3. When you deploy a data ingestion task, a corresponding executable job is created on the Secure Agent system.
4. When you run a database ingestion job, the ingestion task metadata is pushed down to the Secure Agent. The ingestion job uses this information to process data.
• For an initial load operation, the ingestion job extracts data at a specific point-in-time from the source tables and fields. The job uses the database API of the relational source to retrieve the data.
100 Chapter 4: Mass Ingestion Databases
• For an incremental load operation, the ingestion job captures changes, such as inserts, updates, and deletes, for the source tables and fields from the source database logs. Change data capture runs continuously or until the job is stopped or ends.
The data is loaded to the target using the appropriate target API.
Mass Ingestion Databases limitations and guidelinesBefore you configure database ingestion tasks for initial, incremental, or combined initial and incremental load operations, review the following limitations and guidelines:
• Mass Ingestion Databases does not support Secure Agent groups that contain multiple agents or a Hosted Agent.
• If a Secure Agent in a runtime environment that is assigned to a database ingestion task terminates, you cannot undeploy the associated ingestion job, update the task to specify another runtime environment, and deploy the task again. In this situation, perform one of the following actions:
- Assign a different Secure Agent to the runtime environment. Ensure that the new Secure Agent is running. Then restart the associated ingestion job.
- Copy the task. In the task copy, specify another runtime environment that has an active Secure Agent. Then deploy the task and run the associated ingestion job.
• If you run a Secure Agent service on Windows and plan to use Flat File connections, ensure that the logon account for the Secure Agent is an Administrator account. Otherwise, an error occurs when you try to configure a Flat File connection.
• Mass Ingestion Databases uses UTF-8 as the code page. If you select another code page type when defining a connection, Mass Ingestion Databases ignores it.
• Mass ingestion jobs unload binary data in hexadecimal format when the data will be sent to an Amazon S3, Flat File, or Microsoft Azure Data Lake Storage target. Each hexadecimal column value has the "0x" prefix. If you want to use output files to load the data to a target, you might need to edit the files to remove the "0x" prefixes.
• If a source column has a numeric data type that is not compatible with any numeric data type on the target, Mass Ingestion Databases maps the source column to a target varchar column.
• Mass Ingestion Databases does not display error messages that are longer than 1024 characters in the user interface. Instead, Mass Ingestion Databases prompts you to see a log file with the error, which is automatically downloaded.
• Informatica recommends that source tables have primary keys. If a source table does not have a primary key, Mass Ingestion Databases treats all columns as part of the primary key. In this case, each Update operation is processed as a Delete followed by an Insert on any target. Also, if you change the source primary key and have an Amazon S3, Flat File, Google Cloud Storage, or Microsoft Azure Data Lake Storage target, Mass Ingestion Databases processes each Update operation as a Delete followed by an Insert on the target.
Mass Ingestion Databases limitations and guidelines 101
Mass Ingestion Databases source considerationsBefore you configure database ingestion tasks for initial load, incremental load, or combined initial and incremental operations, prepare the source database and review any usage considerations for your sources to avoid unexpected results.
Db2 for i sourcesTo use Db2 for i sources in database ingestion tasks, first prepare the source database and review the usage considerations.
Source preparation:
• For incremental load jobs, journaling must be active on each database physical file that corresponds to a selected source table. Also, each journal must be configured with the IMAGES(*BOTH) option to store both before and after images of change data.
If journaling is not active on a physical file for a source table, when you define a database ingestion task, you can generate a CDC script that activates it. The script issues the following command, which activates journaling and sets the IMAGES option to BOTH:
CALL QSYS2.QCMDEXC('STRJRNPF FILE(library/physical-file) JRN(library/journal-name)IMAGES(*BOTH)')
If journaling is already active for a physical file for a source table, the CDC script contains the following comment:
Table 'table_name' is skipped because journaling is already enabled.Usage considerations:
• When you define a database ingestion task, on the Source page, specify a journal name that is associated with the source tables that are enabled for journaling.
Important: Ensure that the case and spelling of the name in the Journal Name field and table selection rules match the journal and table name values in the D2 source catalog.
• Mass Ingestion Databases does not support the following Db2 for i data types:
- BLOB
- CLOB
- DATALINK
- DBCLOB
- GRAPHIC
- LONG VARGRAPHIC
- VARGRAPHIC
- XML
Database ingestion jobs propagate nulls for columns that have these data types.
For information about the default mappings of supported data types, see “Default Data Type Mappings” on page 147.
Db2 for LUW sourcesTo use Db2 for Linux, UNIX, and Windows (LUW) sources in database ingestion tasks, first prepare the source database and review the usage considerations.
102 Chapter 4: Mass Ingestion Databases
Usage considerations:
• Mass Ingestion Databases does not support the following Db2 for LUW data types:
- LONG VARCHAR
- LONG VARGRAPHIC
- LONG VARCHAR FOR BIT DATA
- BLOB
- CLOB
- DBCLOB
- NCLOB
- XML
Database ingestion jobs propagate nulls for columns that have these data types.
For information about the default mappings of supported data types, see “Default Data Type Mappings” on page 147.
Db2 for z/OS sourcesTo use Db2 for z/OS sources in database ingestion tasks, first prepare the source database and review the usage considerations.
Usage considerations:
• Mass Ingestion Databases does not support the following Db2 for z/OS data types:
- BLOB
- CLOB
- XML
Database ingestion jobs propagate nulls for columns that have these data types.
For information about the default mappings of supported data types, see “Default Data Type Mappings” on page 147.
Microsoft SQL Server and Azure SQL Database sourcesTo use Microsoft SQL Server or Microsoft Azure SQL Database sources in database ingestion tasks, first prepare the source database and review the usage considerations.
Source preparation:
• For SQL Server sources, verify that you use Microsoft SQL Server Enterprise Edition, Standard Edition, or Developer Edition. Other SQL Server editions, such as SQL Server Express, are not supported.
• To deploy and run a database ingestion task that has a SQL Server or Azure SQL Database source, the source connection must specify a database user who has the privileges required to perform an initial or incremental load operation.
For initial load operations with a SQL Server or Azure SQL Database source, use the following SQL statements to grant VIEW ANY DEFINITION and SELECT privileges to the user:
use [master]CREATE USER user_name FOR LOGIN login_name;GRANT VIEW ANY DEFINITION TO user_name;GRANT SELECT TO user_name;GO
Mass Ingestion Databases source considerations 103

For incremental load operations with SQL Server sources, the database user that you specify in the SQL Server source connection must have the sysadmin role, or have the db_owner role and the SELECT permission on the master.sys.fn_dblog function. Use the following SQL statements if you want the user to have the db_owner role:
use [master]GRANT SELECT ON master.sys.fn_dblog TO user_name;GOuse source_databaseCREATE USER user_name FOR LOGIN user_name; EXEC sp_addrolemember 'db_owner', 'user_name';GO
• If you plan to run database ingestion incremental load jobs that have SQL Server sources, you must enable SQL Server Change Data Capture (CDC) on the source database by running the sys.sp_cdc_enable_db stored procedure in the database context. To run the procedure, you must have the sysadmin role.
Also ensure that SQL Server CDC is enabled on the source tables.
Restriction: Mass Ingestion Databases cannot enable CDC for tables that contain more than 1019 columns.
When you create a database ingestion task, you have the option of generating a script that enables CDC on the database and on all columns in the selected source tables.
Usage considerations:
• Mass Ingestion Databases supports Microsoft Azure SQL Database sources only for initial loads. Although the database task wizard allows you to select an Azure SQL Database connection for an incremental load task, this configuration is not valid. However, the incremental load type is supported for SQL Server sources.
• Mass Ingestion Databases reads change data for incremental jobs from the SQL Server transaction log.
• Mass Ingestion Databases supports SQL Server page compression and row compression of source data.
• It is recommended that each source table have a primary key. Mass Ingestion Databases does not honor unique indexes in place of a primary key. If no primary key is specified, Mass Ingestion Databases treats all columns as if they are part of the primary key.
• Mass Ingestion Databases supports schema drift options for Microsoft SQL Server sources in database ingestion incremental load jobs. The following limitations apply:
- Microsoft SQL Server does not support renaming tables and columns for which Change Data Capture (CDC) is enabled.
- Microsoft SQL Server does not support changing primary keys for CDC tables.
- Database ingestion jobs cannot capture DML changes from source tables if the table partition IDs are changed.
• Mass Ingestion Databases does not support the following SQL Server data types:
- GEOGRAPHY
- GEOMETRY
- HIERARCHYID
- IMAGE
- NTEXT
- NVARCHAR(MAX)
- TEXT
- VARBINARY(MAX)
104 Chapter 4: Mass Ingestion Databases
- VARCHAR(MAX)
- XML
Database ingestion jobs propagate nulls for columns that have these data types.
For information about the default mappings of supported data types, see “Default Data Type Mappings” on page 147.
MySQL sourcesTo use MySQL sources in database ingestion tasks, first prepare the source database and review the usage considerations.
Source preparation:
• To deploy and run a database ingestion task that includes a MySQL source, the source connection must specify a database user who has the privileges that are required to perform an initial load operation. Use the following SQL statements to grant these privileges to the user:
GRANT SELECT ON database_name.* TO 'user_name'@'%';GRANT SELECT TABLES ON database_name.* TO 'user_name'@'%';
Usage considerations:
• Mass Ingestion Databases does not support the following MySQL data types:
- BLOB
- GEOMETRY
- GEOMETRYCOLLECTION
- JSON
- LINESTRING
- LONGBLOB
- LONGTEXT
- MEDIUMBLOB
- MEDIUMTEXT
- MULTILINESTRING
- MULTIPOINT
- MULTIPOLYGON
- POINT
- POLYGON
- TEXT
- TINYBLOB
- TINYTEXT
Database ingestion jobs propagate nulls for columns that have these data types.
For information about the default mappings of supported data types, see “Default Data Type Mappings” on page 147.
Netezza sourcesTo use Netezza sources in database ingestion tasks, first prepare the source database and review the usage considerations.
Mass Ingestion Databases source considerations 105
Source preparation:
1. Download and install the Netezza JDBC driver.
a. Download the Netezza JDBC driver from the IBM website.
b. Copy the Netezza JDBC driver jar file, nzjdbc.jar, to the following directory:
<Secure Agent installation directory>/apps/Database_Ingestion/ext/c. Restart the Secure Agent.
2. To deploy and run a database ingestion task that includes a Netezza source, the source connection must specify a database user who has the privileges that are required to perform an initial load operation. Configure SELECT permissions for the Netezza user account on the following system views:
• _V_JDBC_SCHEMA1
• _V_JDBC_SCHEMA3
• _V_ODBC_TABLES3
• _V_ODBC_COLUMNS3
• _V_ODBC_PRIMARYKEYS3
Usage considerations:
• Mass Ingestion Databases does not support the following Netezza data type:
- ST_GEOMETRY
Database ingestion jobs either fail to deploy or propagate nulls for columns that have this data type.
For information about the default mappings of supported data types, see “Default Data Type Mappings” on page 147.
Oracle sourcesTo use Oracle sources in database ingestion tasks, first prepare the source database and review the usage considerations.
Source preparation:
• Define the ORACLE_HOME environment variable on the Linux or Windows system where the Secure Agent runs for Mass Ingestion Databases to use the Oracle Call Interface (OCI) to communicate with the Oracle source database.
• Make sure the Mass Ingestion Databases user has the Oracle privileges that are required for the database ingestion load type to be performed. For more information, see “Oracle privileges” on page 107.
• Database ingestion jobs read incremental change data from Oracle redo logs. For the ingestion jobs to access redo logs that are remote from the on-prem system where the Secure Agent runs, make sure that the redo logs are managed by Oracle Automatic Storage Management (ASM) or mounted to a network file system (NFS).
• For incremental load or combined initial and incremental load operations, perform the following prerequisite tasks in Oracle:
- Enable ARCHIVELOG mode for the Oracle database. Also define an archive log destination.
- Enable Oracle minimal global supplemental logging on the source database.
106 Chapter 4: Mass Ingestion Databases

- If your Oracle source tables have primary keys, ensure that supplemental logging is enabled for all primary key columns. For source tables that do not have primary keys, ensure that supplemental logging is enabled for all columns from which change data will be captured.
Note: When you create a database ingestion task, you have the option of generating a script that implements supplemental logging for all columns or only primary key columns for the selected source tables.
If you do not have the authority to perform these tasks, ask your Oracle database administrator to perform them.
• Ensure that the Oracle Database Client or Instant Client is installed. Typically, the Database Client is installed when you install your Oracle version. If you do not have a client installed, you can download either client from the Oracle downloads web site.
Usage considerations:
• It is recommended that each source table have a primary key. Mass Ingestion Databases does not honor unique indexes in place of a primary key. If no primary key is specified, Mass Ingestion Databases treats all columns as if they are part of the primary key.
• If Oracle source CHAR or VARCHAR columns contain nulls, the database ingestion job does not delimit the null values with double-quotation (") marks or any other delimiter when writing data to a Amazon S3, Flat File, Microsoft Azure Data Lake, or Microsoft Azure SQL Data Warehouse target.
• Mass Ingestion Databases does not support the following Oracle source data types with any target type or any load type:
- INTERVAL
- LOBs
- LONG
- LONG RAW
- TIMESTAMP WITH LOCAL TIME ZONE
- TIMESTAMP WITH TIME ZONE
- UROWID
- XMLTYPE
Source columns that have these data types are excluded from the target definition.
For information about the default mappings of supported data types, see “Default Data Type Mappings” on page 147.
• Mass Ingestion Databases does not support invisible columns in Oracle source columns, regardless of the target type. For these columns, database ingestion incremental load jobs and combined initial and incremental load jobs propagate nulls to the corresponding target columns.
• For Oracle sources that use the multitenant architecture, the source tables must reside in a single pluggable database (PDB) within a multitenant container database (CDB).
Oracle privilegesTo deploy and run a database ingestion task that has an Oracle source, the source connection must specify a Mass Ingestion Databases user who has the privileges required for the ingestion load type.
For a database ingestion task that performs an incremental load or combined initial and incremental load, ensure that the user has been granted the following privileges:
GRANT CREATE SESSION TO <cmid_user>;
GRANT SELECT ON table TO <cmid_user>; -- For each source table created by user
Mass Ingestion Databases source considerations 107
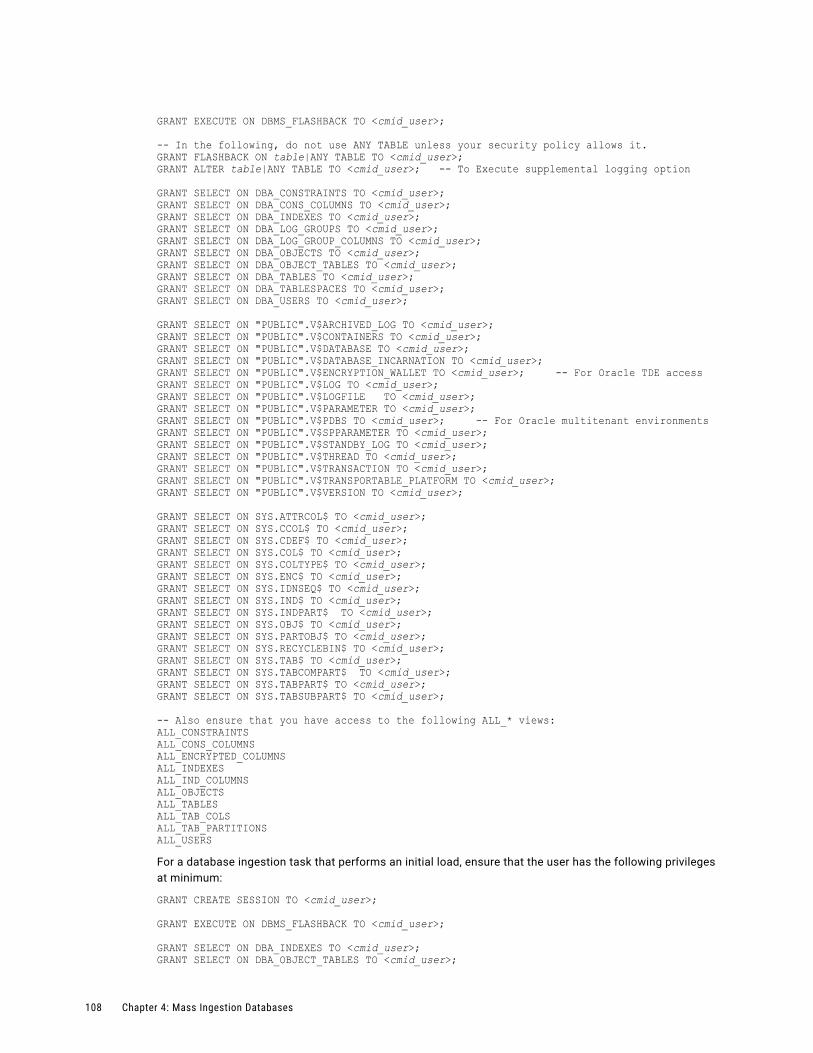
GRANT EXECUTE ON DBMS_FLASHBACK TO <cmid_user>;
-- In the following, do not use ANY TABLE unless your security policy allows it.GRANT FLASHBACK ON table|ANY TABLE TO <cmid_user>; GRANT ALTER table|ANY TABLE TO <cmid_user>; -- To Execute supplemental logging option
GRANT SELECT ON DBA_CONSTRAINTS TO <cmid_user>;GRANT SELECT ON DBA_CONS_COLUMNS TO <cmid_user>;GRANT SELECT ON DBA_INDEXES TO <cmid_user>;GRANT SELECT ON DBA_LOG_GROUPS TO <cmid_user>;GRANT SELECT ON DBA_LOG_GROUP_COLUMNS TO <cmid_user>;GRANT SELECT ON DBA_OBJECTS TO <cmid_user>;GRANT SELECT ON DBA_OBJECT_TABLES TO <cmid_user>;GRANT SELECT ON DBA_TABLES TO <cmid_user>; GRANT SELECT ON DBA_TABLESPACES TO <cmid_user>;GRANT SELECT ON DBA_USERS TO <cmid_user>;
GRANT SELECT ON "PUBLIC".V$ARCHIVED_LOG TO <cmid_user>;GRANT SELECT ON "PUBLIC".V$CONTAINERS TO <cmid_user>;GRANT SELECT ON "PUBLIC".V$DATABASE TO <cmid_user>;GRANT SELECT ON "PUBLIC".V$DATABASE_INCARNATION TO <cmid_user>;GRANT SELECT ON "PUBLIC".V$ENCRYPTION_WALLET TO <cmid_user>; -- For Oracle TDE accessGRANT SELECT ON "PUBLIC".V$LOG TO <cmid_user>;GRANT SELECT ON "PUBLIC".V$LOGFILE TO <cmid_user>;GRANT SELECT ON "PUBLIC".V$PARAMETER TO <cmid_user>;GRANT SELECT ON "PUBLIC".V$PDBS TO <cmid_user>; -- For Oracle multitenant environmentsGRANT SELECT ON "PUBLIC".V$SPPARAMETER TO <cmid_user>;GRANT SELECT ON "PUBLIC".V$STANDBY_LOG TO <cmid_user>;GRANT SELECT ON "PUBLIC".V$THREAD TO <cmid_user>;GRANT SELECT ON "PUBLIC".V$TRANSACTION TO <cmid_user>;GRANT SELECT ON "PUBLIC".V$TRANSPORTABLE_PLATFORM TO <cmid_user>;GRANT SELECT ON "PUBLIC".V$VERSION TO <cmid_user>;
GRANT SELECT ON SYS.ATTRCOL$ TO <cmid_user>;GRANT SELECT ON SYS.CCOL$ TO <cmid_user>;GRANT SELECT ON SYS.CDEF$ TO <cmid_user>;GRANT SELECT ON SYS.COL$ TO <cmid_user>;GRANT SELECT ON SYS.COLTYPE$ TO <cmid_user>;GRANT SELECT ON SYS.ENC$ TO <cmid_user>;GRANT SELECT ON SYS.IDNSEQ$ TO <cmid_user>; GRANT SELECT ON SYS.IND$ TO <cmid_user>; GRANT SELECT ON SYS.INDPART$ TO <cmid_user>;GRANT SELECT ON SYS.OBJ$ TO <cmid_user>;GRANT SELECT ON SYS.PARTOBJ$ TO <cmid_user>;GRANT SELECT ON SYS.RECYCLEBIN$ TO <cmid_user>;GRANT SELECT ON SYS.TAB$ TO <cmid_user>;GRANT SELECT ON SYS.TABCOMPART$ TO <cmid_user>;GRANT SELECT ON SYS.TABPART$ TO <cmid_user>;GRANT SELECT ON SYS.TABSUBPART$ TO <cmid_user>;
-- Also ensure that you have access to the following ALL_* views:ALL_CONSTRAINTS ALL_CONS_COLUMNS ALL_ENCRYPTED_COLUMNS ALL_INDEXESALL_IND_COLUMNSALL_OBJECTSALL_TABLESALL_TAB_COLSALL_TAB_PARTITIONSALL_USERSFor a database ingestion task that performs an initial load, ensure that the user has the following privileges at minimum:
GRANT CREATE SESSION TO <cmid_user>;
GRANT EXECUTE ON DBMS_FLASHBACK TO <cmid_user>;
GRANT SELECT ON DBA_INDEXES TO <cmid_user>;GRANT SELECT ON DBA_OBJECT_TABLES TO <cmid_user>;
108 Chapter 4: Mass Ingestion Databases
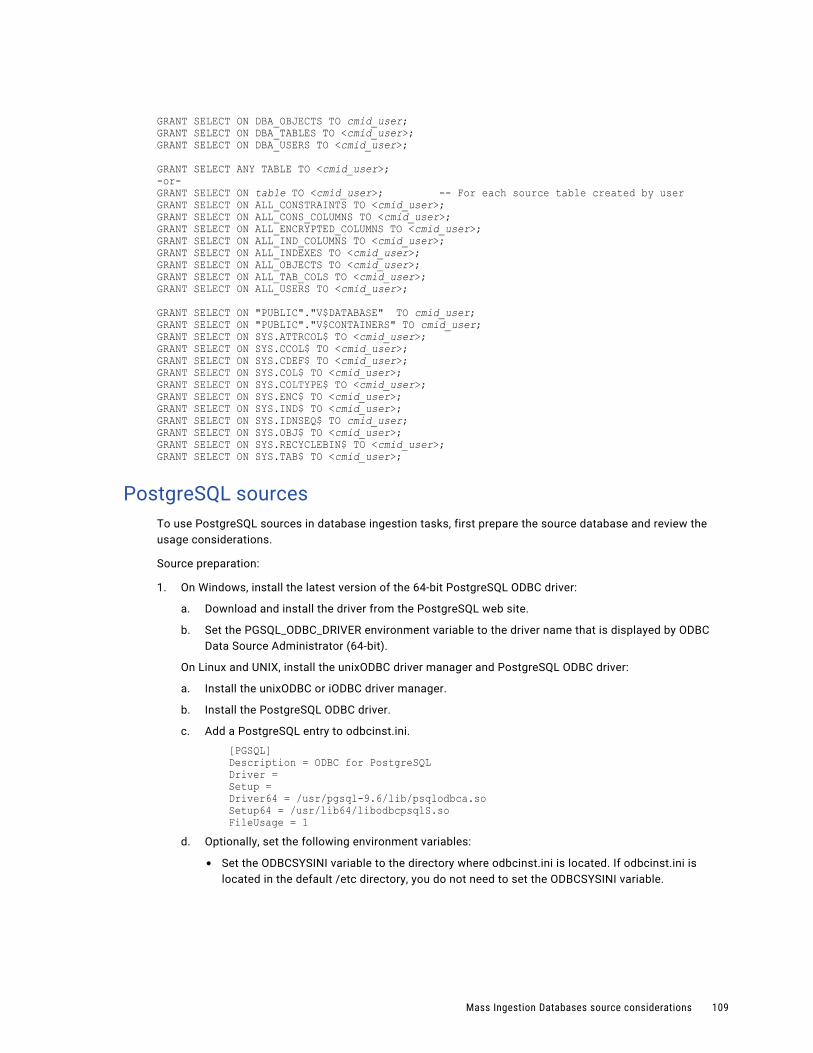
GRANT SELECT ON DBA_OBJECTS TO cmid_user;GRANT SELECT ON DBA_TABLES TO <cmid_user>;GRANT SELECT ON DBA_USERS TO <cmid_user>;
GRANT SELECT ANY TABLE TO <cmid_user>;-or-GRANT SELECT ON table TO <cmid_user>; -- For each source table created by user GRANT SELECT ON ALL_CONSTRAINTS TO <cmid_user>;GRANT SELECT ON ALL_CONS_COLUMNS TO <cmid_user>;GRANT SELECT ON ALL_ENCRYPTED_COLUMNS TO <cmid_user>;GRANT SELECT ON ALL_IND_COLUMNS TO <cmid_user>; GRANT SELECT ON ALL_INDEXES TO <cmid_user>; GRANT SELECT ON ALL_OBJECTS TO <cmid_user>;GRANT SELECT ON ALL_TAB_COLS TO <cmid_user>;GRANT SELECT ON ALL_USERS TO <cmid_user>;
GRANT SELECT ON "PUBLIC"."V$DATABASE" TO cmid_user;GRANT SELECT ON "PUBLIC"."V$CONTAINERS" TO cmid_user;GRANT SELECT ON SYS.ATTRCOL$ TO <cmid_user>;GRANT SELECT ON SYS.CCOL$ TO <cmid_user>;GRANT SELECT ON SYS.CDEF$ TO <cmid_user>; GRANT SELECT ON SYS.COL$ TO <cmid_user>;GRANT SELECT ON SYS.COLTYPE$ TO <cmid_user>;GRANT SELECT ON SYS.ENC$ TO <cmid_user>;GRANT SELECT ON SYS.IND$ TO <cmid_user>;GRANT SELECT ON SYS.IDNSEQ$ TO cmid_user;GRANT SELECT ON SYS.OBJ$ TO <cmid_user>;GRANT SELECT ON SYS.RECYCLEBIN$ TO <cmid_user>;GRANT SELECT ON SYS.TAB$ TO <cmid_user>;
PostgreSQL sourcesTo use PostgreSQL sources in database ingestion tasks, first prepare the source database and review the usage considerations.
Source preparation:
1. On Windows, install the latest version of the 64-bit PostgreSQL ODBC driver:
a. Download and install the driver from the PostgreSQL web site.
b. Set the PGSQL_ODBC_DRIVER environment variable to the driver name that is displayed by ODBC Data Source Administrator (64-bit).
On Linux and UNIX, install the unixODBC driver manager and PostgreSQL ODBC driver:
a. Install the unixODBC or iODBC driver manager.
b. Install the PostgreSQL ODBC driver.
c. Add a PostgreSQL entry to odbcinst.ini.
[PGSQL]Description = ODBC for PostgreSQLDriver =Setup =Driver64 = /usr/pgsql-9.6/lib/psqlodbca.soSetup64 = /usr/lib64/libodbcpsqlS.soFileUsage = 1
d. Optionally, set the following environment variables:
• Set the ODBCSYSINI variable to the directory where odbcinst.ini is located. If odbcinst.ini is located in the default /etc directory, you do not need to set the ODBCSYSINI variable.
Mass Ingestion Databases source considerations 109
• Add the directory where the PostgreSQL ODBC driver is installed to the LD_LIBRARY_PATH variable. If the driver is installed in the default directory of /usr/lib64, you do not need to add the path to the LD_LIBRARY_PATH variable.
• Set the PGSQL_ODBC_DRIVER parameter to the driver name that you specified in odbcinst.ini.
For example:
export ODBCSYSINI=/root/infaagentexport LD_LIBRARY_PATH=/usr/pgsql-9.6/libexport PGSQL_ODBC_DRIVER=PGSQL
2. Ensure that the PostgreSQL postgresql.conf configuration file specifies the wal_level=logical parameter.This parameter determines how much information PostgreSQL writes to the Write-Ahead Log (WAL). The setting of logical adds information that is required to support logical decoding.
To set wal_level to logical on Amazon Relational Database Service (RDS) for PostgreSQL sources, set the logical_replication parameter to 1 in the parameter group.
3. Ensure that the PostgreSQL database does not use the SCRAM-SHA-256 authentication method. You can use any other method, for example, MD5.
4. To deploy and run a database ingestion task that includes a PostgreSQL source, the source connection must specify a database user who has the required privileges.
• For initial load jobs, use the following SQL statements to create a user and grant the required privileges to the user:
CREATE USER dbmi_user WITH PASSWORD password;GRANT SELECT ON ALL TABLES IN SCHEMA schema TO dbmi_user;
• For incremental load jobs, use the following SQL statement to create a user that has the REPLICATION privilege:
CREATE USER dbmi_user WITH PASSWORD password REPLICATION;Also, if you use the pgoutput plugin, use the following SQL statement to grant ownership of the tables in the database that you want to add to the pgoutput publication to the dbmi_user that you created:
GRANT CREATE ON DATABASE database TO dbmi_user;5. If you plan to use wal2json, install this logical decoding output plugin.
6. If you plan to use the pgoutput plugin, create publications for database ingestion jobs. Use the following SQL statement:
CREATE PUBLICATION publication_name [FOR TABLE [ONLY] table_name [*] [,...] FOR ALL TABLES ]
Note: Ensure that the publication includes all tables that you want to propagate to the target.
7. For PostgreSQL 9.6, ensure that the max_replication_slots parameter in the postgresql.conf configuration file is greater than or equal to the number of concurrent database ingestion jobs that you plan to use.
Important: All replication slots must be unique across all concurrent jobs.
8. Ensure that the PostgreSQL sources that you use for incremental jobs use the UTF-8 encoding.
Usage considerations:
• Mass Ingestion Databases initial load jobs can replicate data from RDS for PostgreSQL sources to any target type supported for initial loads.
• For PostgreSQL 9.6, the pgoutput plugin is not available.
• Schema drift options are not supported for PostgreSQL sources in database ingestion incremental load jobs.
• For initial load jobs,Mass Ingestion Databases does not support the following PostgreSQL data types:
- ABSTIME
110 Chapter 4: Mass Ingestion Databases
- Array types
- BYTEA
- JSON
- NAME
- Object identifier types
- PG_LSN
- RELTIME
- TEXT
- Text search types:
- TSQUERY
- TSVECTOR
- User defined types
- XML
For incremental load jobs, Mass Ingestion Databases does not support the following PostgreSQL data types, in addition to those not supported for initial load jobs:
- MONEY
- Spatial types
- Box
- Circle
- Line
- LSeg
- Path
- Point
- Polygon
- Unbounded varying types
Database ingestion jobs either fail to deploy or propagate nulls for columns that have these data types.
For information about the default mappings of supported data types, see “Default Data Type Mappings” on page 147.
Teradata sourcesTo use Teradata sources in database ingestion tasks, first prepare the source database and review the usage considerations.
Source preparation:
• To deploy and run a database ingestion task that includes a Teradata source, the source connection must specify a database user who has the privileges that are required to perform an initial load operation. Use the following SQL statements to grant these privileges to the user:
GRANT SELECT ON database_name TO user_name/user_role;Usage considerations:
• Mass Ingestion Databases does not support the following Teradata data types:
- ARRAY
Mass Ingestion Databases source considerations 111

- BLOB
- CLOB
- JSON
- ST_GEOMETRY
- XML
For information about the default mappings of supported data types, see “Default Data Type Mappings” on page 147.
Mass Ingestion Databases target considerationsBefore you configure database ingestion tasks for initial load, incremental load, or combined initial and incremental load operations, review the following guidelines for your target types to avoid unexpected results:
Amazon Redshift targetsThe following list identifies considerations for preparing and using Amazon Redshift targets:
• Before writing data to Amazon Redshift target tables, database ingestion jobs stage the data in an Amazon S3 bucket. You must specify the name of the bucket when you configure the database ingestion task. The ingestion jobs use the COPY command to load the data from the Amazon S3 bucket to the Amazon Redshift target tables. For more information about the COPY command, see the Amazon Web Services documentation.
• When you define a connection for an Amazon Redshift target, provide the access key and secret access key for the Amazon S3 bucket in which you want the database ingestion jobs to stage the data before loading it to the Amazon Redshift target tables.
• The incremental load jobs and the combined initial and incremental load jobs generate a recovery table named INFORMATICA_CDC_RECOVERY on the target to store internal service information. The data in the recovery table prevents the jobs that are restarted after a failure from propagating previously processed data again. This recovery table is generated in the same schema as the target tables.
Amazon S3, Flat File, Google Cloud Storage, and Microsoft Azure Data Lake Storage targets
The following list identifies considerations for using Amazon S3, Flat File, Google Cloud Storage, and Microsoft Azure Data Lake Storage targets:
• If you selected CSV as the output format for an Amazon S3, Flat File, Google Cloud Storage, or Microsoft Azure Data Lake Storage target, Mass Ingestion Databases creates the following files on the target for each source table:
- A schema.ini file that describes the schema and includes some settings for the output file on the target.
- One or multiple output files for each source table, which contain the source data. Mass Ingestion Databases names these text files based on the name of the source table with an appended date and time.
112 Chapter 4: Mass Ingestion Databases
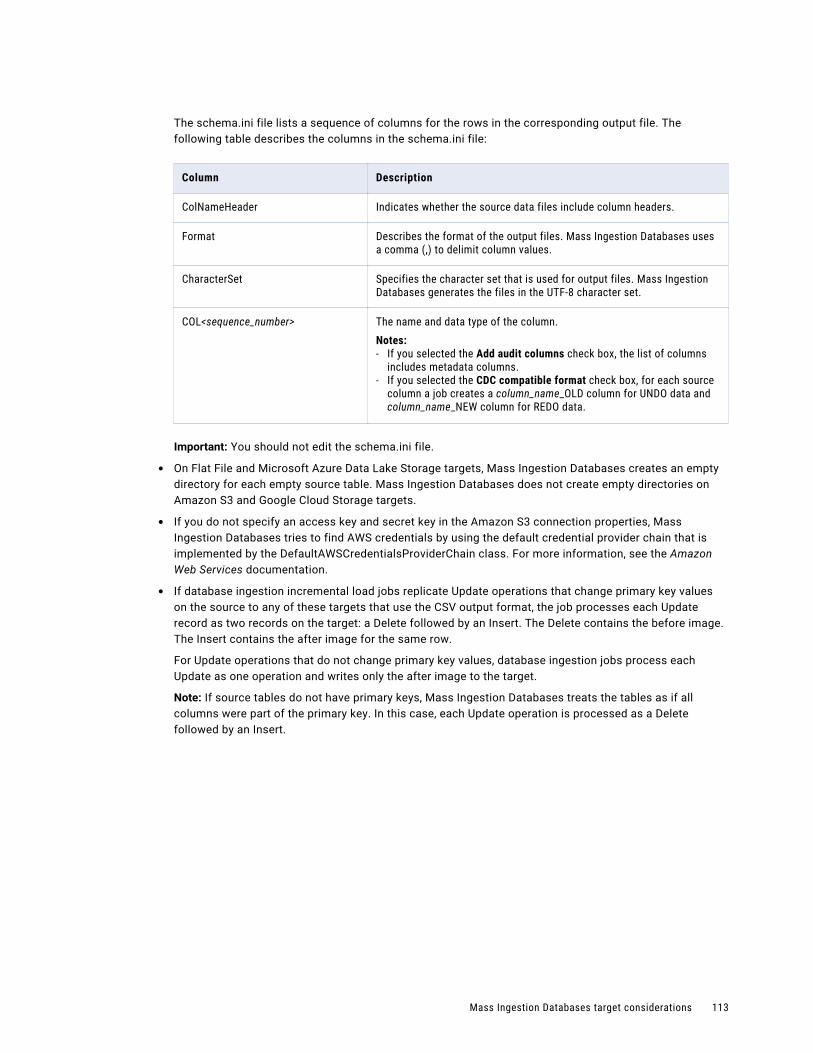
The schema.ini file lists a sequence of columns for the rows in the corresponding output file. The following table describes the columns in the schema.ini file:
Column Description
ColNameHeader Indicates whether the source data files include column headers.
Format Describes the format of the output files. Mass Ingestion Databases uses a comma (,) to delimit column values.
CharacterSet Specifies the character set that is used for output files. Mass Ingestion Databases generates the files in the UTF-8 character set.
COL<sequence_number> The name and data type of the column.Notes: - If you selected the Add audit columns check box, the list of columns
includes metadata columns.- If you selected the CDC compatible format check box, for each source
column a job creates a column_name_OLD column for UNDO data and column_name_NEW column for REDO data.
Important: You should not edit the schema.ini file.
• On Flat File and Microsoft Azure Data Lake Storage targets, Mass Ingestion Databases creates an empty directory for each empty source table. Mass Ingestion Databases does not create empty directories on Amazon S3 and Google Cloud Storage targets.
• If you do not specify an access key and secret key in the Amazon S3 connection properties, Mass Ingestion Databases tries to find AWS credentials by using the default credential provider chain that is implemented by the DefaultAWSCredentialsProviderChain class. For more information, see the Amazon Web Services documentation.
• If database ingestion incremental load jobs replicate Update operations that change primary key values on the source to any of these targets that use the CSV output format, the job processes each Update record as two records on the target: a Delete followed by an Insert. The Delete contains the before image. The Insert contains the after image for the same row.
For Update operations that do not change primary key values, database ingestion jobs process each Update as one operation and writes only the after image to the target.
Note: If source tables do not have primary keys, Mass Ingestion Databases treats the tables as if all columns were part of the primary key. In this case, each Update operation is processed as a Delete followed by an Insert.
Mass Ingestion Databases target considerations 113
Kafka targets and Kafka-enabled Azure Event Hubs targetsThe following list identifies considerations for using Kafka targets:
• Mass Ingestion Databases supports Apache Kafka, Confluent Kafka, and Kafka-enabled Azure Event Hubs as targets for incremental load jobs. All Kafka target types use the Kafka connection type.
To indicate the Kafka target type, you must specify Kafka producer properties in the task definition or Kafka connection properties. To specify these properties for a task, enter a comma-separated list of key:value pairs in the Producer Configuration Properties field on the Target page of the task wizard. To specify the producer properties for all tasks that use a Kafka connection, enter the list of properties in the Additional Connection Properties field in the connection properties. You can override the connection-level properties for specific tasks by also defining producer properties at the task level. For more information about producer properties, see the Apache Kafka, Confluent Kafka, or Azure Event Hubs for Kafka documentation.
• If you select AVRO as the output format for a Kafka target, Mass Ingestion Databases generates a schema definition file for each table with a name in the following format:
schemaname_tablename.txtIf a source schema change is expected to alter the target in an incremental load job, Mass Ingestion Databases regenerates the Avro schema definition file with a unique name that includes a timestamp:
schemaname_tablename_YYYYMMDDhhmmss.txtThis unique naming pattern preserves older schema definition files for audit purposes.
• If you have a Confluent Kafka target that uses Confluent Schema Registry to store schemas, you must configure the following settings on the Target page of the task wizard:
- In the Output Format field, select AVRO.
- In the Avro Serialization Format field, select None.
You must also specify the following Kafka producer properties in either the Producer Configuration Properties field on the Target page of the task wizard or in the Additional Connection Properties field in the Kafka connection properties:
schema.registry.url=http://abcxqa01:8081key.serializer=org.apache.kafka.common.serialization.StringSerializervalue.serializer=io.confluent.kafka.serializers.KafkaAvroSerializer
• Database ingestion incremental load jobs can replicate change data to Azure Event Hubs target namespaces that are enabled for use with Kafka clients. In Administrator, you must configure a Kafka connection that specifies the following Microsoft parameters in the Additional Connection Properties field for SASL access to Event Hubs:
bootstrap.servers=NAMESPACENAME.servicebus.windows.net:9093security.protocol=SASL_SSLsasl.mechanism=PLAINsasl.jaas.config=org.apache.kafka.common.security.plain.PlainLoginModule required username="$ConnectionString" password="{YOUR.EVENTHUBS.CONNECTION.STRING}";
For more information, see the Azure Event Hubs for Kafka documentation.
Microsoft Azure Synapse Analytics and SQL Data Warehouse targets
Note: Microsoft Azure Synapse Analytics is the next evolution of Microsoft Azure SQL Data Warehouse. Mass Ingestion Databases uses separate connectors for these targets.
114 Chapter 4: Mass Ingestion Databases
The following list identifies considerations for preparing and using Microsoft Azure Synapse Analytics or SQL Data Warehouse targets:
• To deploy and run a database ingestion task with a Microsoft Azure Synapse Analytics or SQL Data Warehouse target, the target connection must specify a database user who has the CONTROL permission on the target database. To grant the CONTROL permission to the user, use the following SQL statements:
USE database_name; GRANT CONTROL TO user_name;
This permission is required for initial load, incremental load, and combined initial and incremental load jobs. This permission allows Mass Ingestion Databases to create target tables and database objects such as external data source, external file format, and database scoped credential objects if they do not exist in the database. This permission is specifically required for creating external data source and database scoped credential objects.
Note: You must manually create the master key, which also requires that you have the CONTROL permission on the database.
• Database ingestion jobs first send data to a Microsoft Azure Data Lake Storage Gen1 or Gen2 staging file before writing the data to Microsoft Azure Synapse Analytics or SQL Data Warehouse target tables. The staging file uses the hexadecimal x1d separator as the field delimiter. After the data is written to the target, the entire contents of the table-specific directory that includes the staging files are deleted.
• If you use Microsoft Azure Data Lake Storage Gen2 with a Synapse Analytics connection, you must enable the Hierarchical namespace option in Microsoft Azure Data Lake Storage. With this setting, blob storage is not recommended.
• The number of columns in a source table that a database ingestion job can propagate to a Microsoft Azure Synapse Analytics or SQL Data Warehouse target must not exceed 508 columns.
• Database ingestion incremental load jobs and combined initial and incremental load jobs generate a recovery table named INFORMATICA_CDC_RECOVERY on the target to store internal service information that prevents jobs restarted after a failure from propagating previously processed data again. This recovery table is generated in the same schema as the target tables
• After a database ingestion job loads data to a Microsoft Azure SQL Data Warehouse target by using external tables, the job does not drop the log tables and external tables created on the target, even though these tables might be re-created when the job starts again.
Snowflake targetsThe following list identifies considerations for preparing and using Snowflake targets:
• Before writing data to Snowflake target tables, database ingestion jobs first write the data to an internal staging area that has the stage name you specified in the associated database ingestion task.
• When you define a connection for a Snowflake target, you must set the Additional JDBC URL Parameters field to database=target_database_name. Otherwise, when you try to define the target in the database ingestion task wizard, an error message reports that the list of schemas cannot be retrieved.
• Database ingestion incremental load jobs and combined initial and incremental load jobs generate a recovery table named INFORMATICA_CDC_RECOVERY on the target to store internal service information that prevents jobs restarted after a failure from propagating previously processed data again. This recovery table is generated in the same schema as the target tables.
Folder structure for Amazon S3, Google Cloud Storage, and Microsoft Azure Data Lake Storage Gen2 targets
Database ingestion jobs create folders on Amazon S3, Google Cloud Storage, and Microsoft Azure Data Lake Storage Gen2 targets to store information about change data processing.
Mass Ingestion Databases target considerations 115
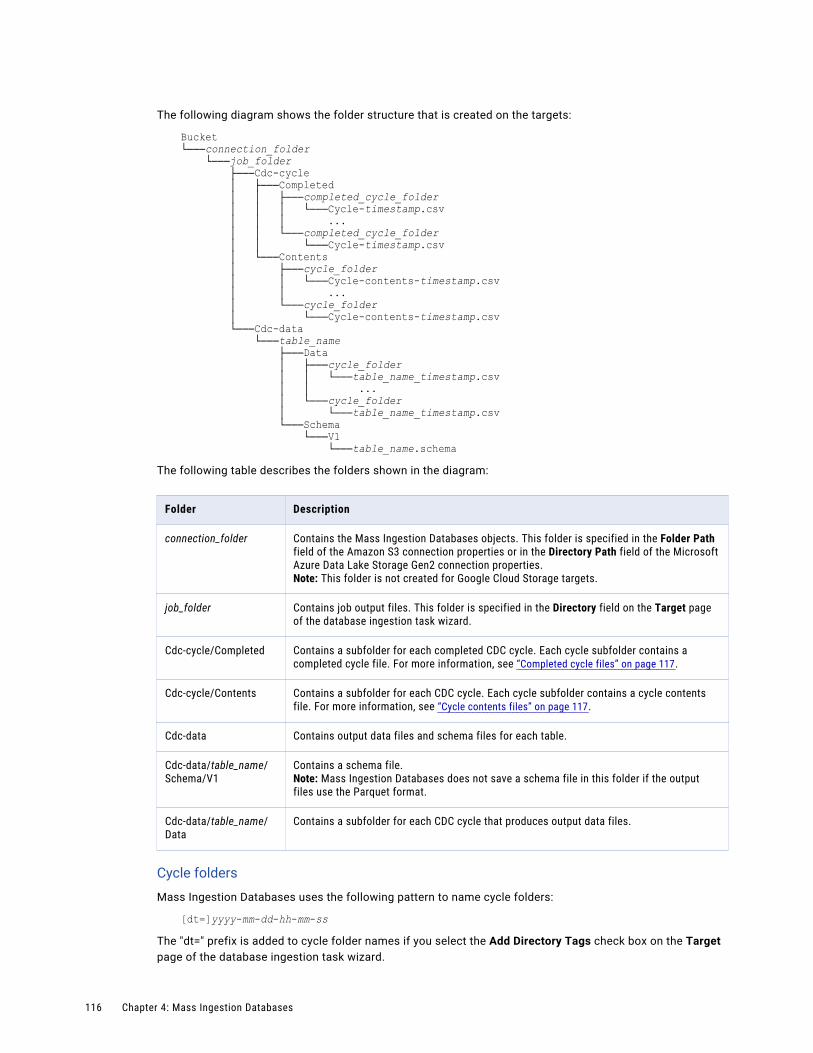
The following diagram shows the folder structure that is created on the targets:
Bucket└───connection_folder └───job_folder ├───Cdc-cycle │ ├───Completed │ │ ├───completed_cycle_folder │ │ │ └───Cycle-timestamp.csv │ │ │ ... │ │ └───completed_cycle_folder │ │ └───Cycle-timestamp.csv │ └───Contents │ ├───cycle_folder │ │ └───Cycle-contents-timestamp.csv │ │ ... │ └───cycle_folder │ └───Cycle-contents-timestamp.csv └───Cdc-data └───table_name ├───Data │ ├───cycle_folder │ │ └───table_name_timestamp.csv │ │ ... │ └───cycle_folder │ └───table_name_timestamp.csv └───Schema └───V1 └───table_name.schema
The following table describes the folders shown in the diagram:
Folder Description
connection_folder Contains the Mass Ingestion Databases objects. This folder is specified in the Folder Path field of the Amazon S3 connection properties or in the Directory Path field of the Microsoft Azure Data Lake Storage Gen2 connection properties.Note: This folder is not created for Google Cloud Storage targets.
job_folder Contains job output files. This folder is specified in the Directory field on the Target page of the database ingestion task wizard.
Cdc-cycle/Completed Contains a subfolder for each completed CDC cycle. Each cycle subfolder contains a completed cycle file. For more information, see “Completed cycle files” on page 117.
Cdc-cycle/Contents Contains a subfolder for each CDC cycle. Each cycle subfolder contains a cycle contents file. For more information, see “Cycle contents files” on page 117.
Cdc-data Contains output data files and schema files for each table.
Cdc-data/table_name/Schema/V1
Contains a schema file.Note: Mass Ingestion Databases does not save a schema file in this folder if the output files use the Parquet format.
Cdc-data/table_name/Data
Contains a subfolder for each CDC cycle that produces output data files.
Cycle folders
Mass Ingestion Databases uses the following pattern to name cycle folders:
[dt=]yyyy-mm-dd-hh-mm-ssThe "dt=" prefix is added to cycle folder names if you select the Add Directory Tags check box on the Target page of the database ingestion task wizard.
116 Chapter 4: Mass Ingestion Databases
Cycle contents files
Cycle contents files are located in Cdc-cycle/Contents/cycle_folder subfolders. Cycle contents files contain a record for each table that has had a DML event during the cycle. If no DML operations occurred on a table in the cycle, the table does not appear in the cycle contents file.
Mass Ingestion Databases uses the following pattern to name cycle content files:
Cycle-contents-timestamp.csvA cycle contents csv file contains the following information:
• Table name
• Cycle name
• Path to the cycle folder for the table
• Start sequence for the table
• End sequence for the table
• Number of Insert operations
• Number of Update operations
• Number of Delete operations
• Schema version
• Path to the schema file for the schema version
Note: If the output data files use the Parquet format, Mass Ingestion Databases does not save a schema file at the path that is specified in the cycle contents file. Instead, use the schema file in the folder that is specified in the Avro Schema Directory field on the Target page of the database ingestion task wizard.
Completed cycle files
Completed cycle files are located in Cdc-cycle/Completed/completed_cycle_folder subfolders. A database ingestion job creates a cycle file in this subfolder after a cycle completes. If this file is not present, the cycle has not completed yet.
Mass Ingestion Databases uses the following pattern to name completed cycle files:
Cycle-timestamp.csvA completed cycle csv file contains the following information:
• Cycle name
• Cycle start time
• Cycle end time
• Current sequence number at the time the cycle ended
• Path to the cycle contents file
• Reason for the end of cycleValid reason values are:
- NORMAL_COMMIT. A commit operation was encountered after the cycle had reached the DML limit or the end of the cycle interval. A cycle can end only on a commit boundary.
- NORMAL_EXPIRY. The cycle ended because the cycle interval expired. The last operation was a commit.
Mass Ingestion Databases target considerations 117
Output data files
The data files contain records that include the following information:
• Operation type. Valid values are:
- I for Insert operations
- U for Update operations
- D for Delete operations
• Sortable sequence number
• Data columns
Note: Insert and Delete records contain only after images. Update records contain both before and after images.
Handling source schema changesMass Ingestion Databases can be configured to automatically detect source schema changes, also called schema drift, and handle these changes on the target.
Mass Ingestion Databases can detect the following types of source schema changes:
• Add column
• Modify column
• Drop column
• Rename column
This feature is available for database ingestion incremental tasks and combined initial and incremental tasks that propagate change data from Microsoft SQL Server or Oracle sources to Amazon Redshift, Kafka, Microsoft Azure SQL Data Warehouse, or Snowflake targets. By default, this feature is not enabled.
When you define a task, on the Runtime Options page of the database ingestion task wizard, you can configure the types of source schema changes to propagate and how to handle them. For example, you can configure schema drift options to ignore the changes, replicate them, or stop the job or subtask when a schema change occurs. For more information, see “Configuring runtime options” on page 139.
Considerations:
• If you try to replicate a type of schema change that is not supported on the target, the database ingestion job ends with an error.
• Mass Ingestion Databases does not replicate source changes that add, remove, or modify primary key or unique key constraints. If these types of changes occur, you must resynchronize the target tables.
• Mass Ingestion Databases detects a schema change in a source table only after DML operations occur on the altered source table. If multiple schema changes occur without intervening DML operations, Mass Ingestion Databases detects all of the schema changes at one time, when a DML operation occurs. To ensure that Mass Ingestion Databases detects all of the supported schema changes correctly, Informatica recommends that you apply schema changes to source tables one by one, each followed by at least one DML change.
• Renaming columns is not supported for tasks that have Microsoft Azure SQL Data Warehouse targets.
118 Chapter 4: Mass Ingestion Databases
• Modifying columns is partially supported for tasks that have Snowflake targets. Snowflake targets cannot modify the scale of NUMBER columns. Also, Snowflake targets do not support changing the data type of an existing column to a different data type.
• If you choose to stop the job, you can use the Resume With Options command to resume the job with an override schema drift option.
Configuring a database ingestion taskIn Mass Ingestion, use the database ingestion task wizard to configure a database ingestion task.
On the wizard pages, complete the following configuration tasks:
1. Define basic task information, such as the task name, project location, runtime environment, and load type.
2. Configure the source.
3. Configure the target.
4. Configure runtime options.
Click Next or Back to navigate from one page to another. At any point, you can click Save to save the information that you have entered so far.
After you complete all wizard pages, save the information and then click Deploy to make the task available as an executable job to the Secure Agent.
Before you beginBefore you begin, complete the following prerequisite tasks in Administrator:
• Check that your organization has licenses for Mass Ingestion Databases and the DBMI packages.
• Verify that the Secure Agent in your runtime environment is running and that you can access the Mass Ingestion service.
• Define the source and target connections.
Also, if you plan to perform incremental load operations with Oracle sources, ensure that the ORACLE_HOME environment variable is defined on the Secure Agent system.
Configuring a database ingestion task 119
Defining basic task informationTo begin defining a database ingestion task, you must first enter some basic information about the task, such as a task name, project or project folder location, and load operation type.
1. In Data Ingestion, click New > Database Ingestion Task.
The Definition page of the Mass Ingestion Databases Task wizard appears.
2. Configure the following properties:
Property Description
Name A name for the database ingestion task.Task names can contain Latin alphanumeric characters, spaces, periods (.), commas (,), underscores (_), plus signs (+), and hyphens (-). Task names cannot include other special characters.Task names are not case sensitive.Maximum length is 50 characters.Note: If you include spaces in the database ingestion task name, after you deploy the task, the spaces do not appear in the corresponding job name.
Location The project or project\folder that will contain the task definition.
Runtime Environment
The runtime environment in which you want to run the task.A database ingestion task must run on a Secure Agent. The runtime environment can include a Secure Agent Group with only one agent. You cannot use a Hosted Agent.
Description An optional description for the task.Maximum length is 4,000 characters.
Load Type The type of load operation that the database ingestion task performs. Options are:- Initial Load. Loads data read at a specific point in time from source tables to a target in a
batch operation. You can perform an initial load to materialize a target to which incremental change data will be sent.
- Incremental Load. Propagates source data changes to a target continuously or until the job is stopped or ends. The job propagates the changes that have occurred since the last time the job ran or from a specific start point for the first job run.
- Initial and Incremental Loads. Performs an initial load of point-in-time data to the target and then automatically switches to propagating incremental data changes made to the same source tables on a continuous basis.
3. Click Next.
120 Chapter 4: Mass Ingestion Databases
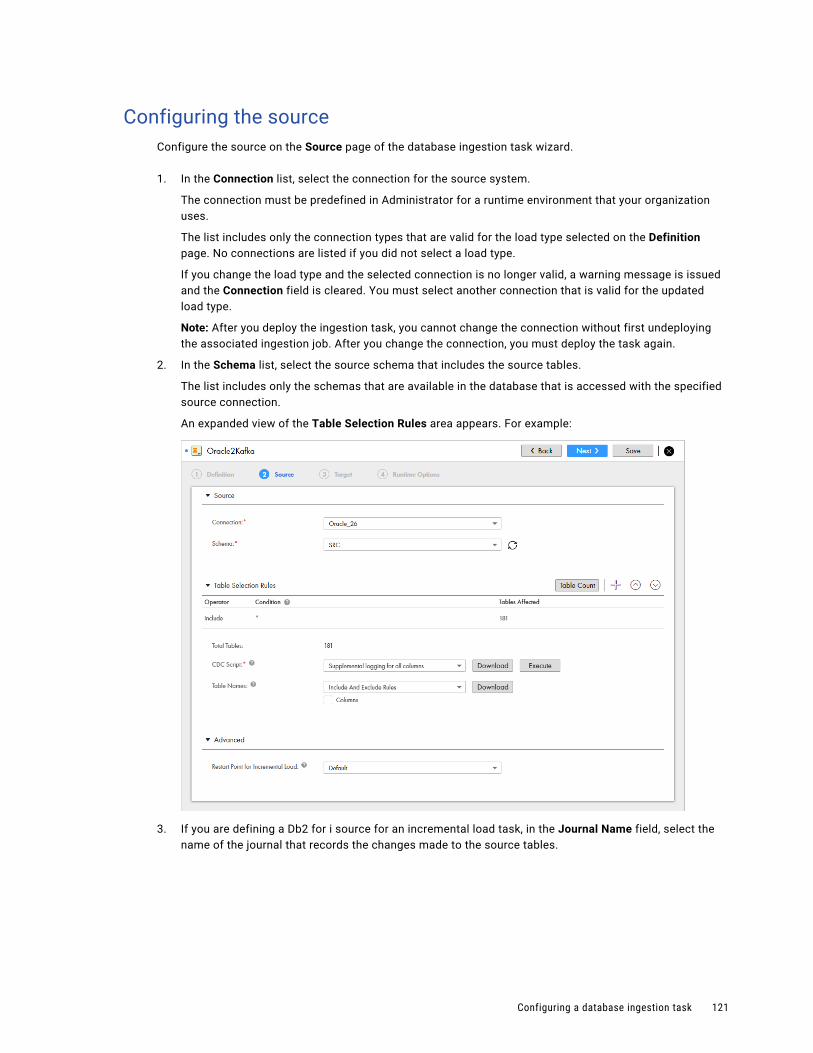
Configuring the sourceConfigure the source on the Source page of the database ingestion task wizard.
1. In the Connection list, select the connection for the source system.
The connection must be predefined in Administrator for a runtime environment that your organization uses.
The list includes only the connection types that are valid for the load type selected on the Definition page. No connections are listed if you did not select a load type.
If you change the load type and the selected connection is no longer valid, a warning message is issued and the Connection field is cleared. You must select another connection that is valid for the updated load type.
Note: After you deploy the ingestion task, you cannot change the connection without first undeploying the associated ingestion job. After you change the connection, you must deploy the task again.
2. In the Schema list, select the source schema that includes the source tables.
The list includes only the schemas that are available in the database that is accessed with the specified source connection.
An expanded view of the Table Selection Rules area appears. For example:
3. If you are defining a Db2 for i source for an incremental load task, in the Journal Name field, select the name of the journal that records the changes made to the source tables.
Configuring a database ingestion task 121
4. If you are defining a PostgreSQL source for an incremental load task, specify the following fields:
Field Description
Replication Slot Name
Specify the unique name of a PostgreSQL replication slot.A slot name can contain Latin alphanumeric characters in lowercase and the underscore (_) character.Maximum length is 63 characters.Important: Each database ingestion task must use a different replication slot.
Replication Plugin
Select a PostgreSQL replication plugin. Options are:- pgoutput- wal2json
Publication If you selected pgoutput as the replication plugin, specify the publication name that is used by this plugin.A slot name can contain Latin alphanumeric characters in lowercase and the underscore (_) character.Maximum length is 63 characters.
5. To select a subset of the source tables in the schema, you can define additional Include rules, Exclude rules, or both types of rules.
By default, this area contains a single Include rule with a condition that specifies only the asterisk (*) wildcard character. This rule selects all tables in the specified source schema.
To refine the selection, define additional rules in the order in which you want them to be processed. For more information, see “Rules for selecting source tables” on page 125.
When you are done, click Table Count to display the number of source tables that match each rule. The Total Tables field displays the total number of source tables that match all rules.
Important: Mass Ingestion Databases might exclude an unsupported type of table from processing even if this table matches the selection rules.
6. For an incremental load operation or a combined initial and incremental load operation, if the Microsoft SQL Server or Oracle database option for enabling change data capture is not configured for one or more of the selected source tables, Mass Ingestion Databases generates a script for setting the appropriate database option for the tables. For Microsoft SQL Server sources, the script enables CDC on the database and source tables, you generate a script for enabling it. For Oracle sources, the script enables unconditional supplemental logging on each source table.
To generate the script and download or execute it, perform the following steps:
a. In the CDC Script field, select one of the following options:
• Supplemental logging for all columns. Enables supplemental logging for all columns in the selected source tables. This option is the only valid option for a Db2 for i or SQL Server source.
• Supplemental logging for primary key columns. Enables supplemental logging for only primary key columns in the selected source tables. Do not select this option for a SQL Server source.
Note: For source tables without a primary key, including tables with unique indexes, supplemental logging for all columns is applied by default, regardless of which option is selected.
122 Chapter 4: Mass Ingestion Databases

b. For Microsoft SQL Server sources, complete the following fields:
• In the Capture Filegroup field, enter the name of the filegroup to be used for the change table that is created for the capture. If you leave this field empty, the change table is located in the default filegroup of the database.
• In the Gating Role filed, enter the name of the database role that is used to gate access to change data. If you leave this field empty, the database does not use the gating role.
c. To run the script, click Execute.
d. If you do not have a database role or privilege that allows you to run the script, click Download to download the script. Then ask your database administrator to run the script.
The script file name has the following format: cdc_script_taskname_number.txt.
Important: Make sure the script runs before you run the database ingestion task.
If you enabled supplemental logging for either all columns or primary key columns and then select the other supplemental logging option and run the CDC script again, the script first drops supplemental logging for the original set of columns and then enables supplemental logging for the current set of columns.
7. To create and download a list of the source tables that match the selection rules, perform the following steps:
a. In the Table Names list, select the type of defined rules that you want to use to select the source tables to list. Options are:
• Include Rules Only
• Exclude Rules Only
• Include And Exclude Rules
b. If you want to list the columns too, select the Columns check box.
c. Click Download.
The downloaded list has the following format:
status,schema_name,table_name,object_type,column_name,commentThe following table describes the information that is displayed in the downloaded list:
Field Description
status Indicates whether Mass Ingestion Databases excludes the source table or column from processing because it has an unsupported type. Valid values are:- E. The object is excluded from processing by an Exclude rule.- I. The object is included in processing.- X. The object is excluded from processing because it is an unsupported type of object. For
example, unsupported types of objects include columns with unsupported data types and tables that include only unsupported columns.The details are specified in the comment field.
schema_name
Specifies the name of the source schema.
table_name Specifies the name of the source table.
Configuring a database ingestion task 123
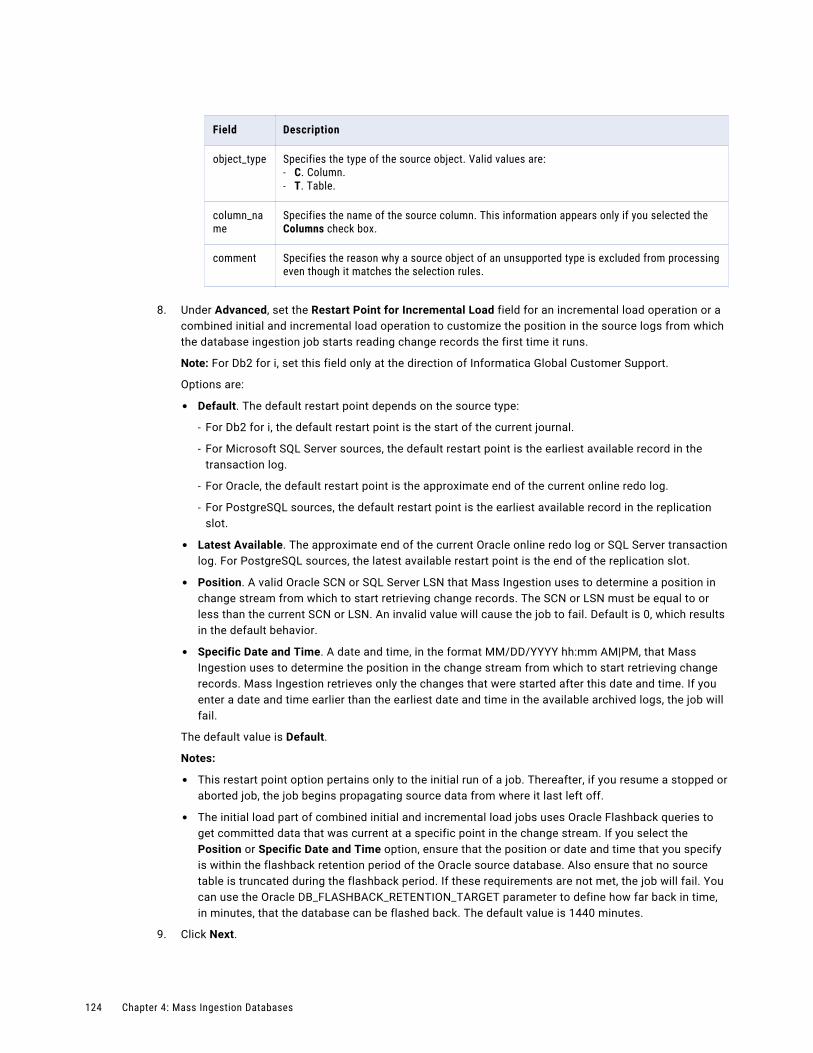
Field Description
object_type Specifies the type of the source object. Valid values are:- C. Column.- T. Table.
column_name
Specifies the name of the source column. This information appears only if you selected the Columns check box.
comment Specifies the reason why a source object of an unsupported type is excluded from processing even though it matches the selection rules.
8. Under Advanced, set the Restart Point for Incremental Load field for an incremental load operation or a combined initial and incremental load operation to customize the position in the source logs from which the database ingestion job starts reading change records the first time it runs.
Note: For Db2 for i, set this field only at the direction of Informatica Global Customer Support.
Options are:
• Default. The default restart point depends on the source type:
- For Db2 for i, the default restart point is the start of the current journal.
- For Microsoft SQL Server sources, the default restart point is the earliest available record in the transaction log.
- For Oracle, the default restart point is the approximate end of the current online redo log.
- For PostgreSQL sources, the default restart point is the earliest available record in the replication slot.
• Latest Available. The approximate end of the current Oracle online redo log or SQL Server transaction log. For PostgreSQL sources, the latest available restart point is the end of the replication slot.
• Position. A valid Oracle SCN or SQL Server LSN that Mass Ingestion uses to determine a position in change stream from which to start retrieving change records. The SCN or LSN must be equal to or less than the current SCN or LSN. An invalid value will cause the job to fail. Default is 0, which results in the default behavior.
• Specific Date and Time. A date and time, in the format MM/DD/YYYY hh:mm AM|PM, that Mass Ingestion uses to determine the position in the change stream from which to start retrieving change records. Mass Ingestion retrieves only the changes that were started after this date and time. If you enter a date and time earlier than the earliest date and time in the available archived logs, the job will fail.
The default value is Default.
Notes:
• This restart point option pertains only to the initial run of a job. Thereafter, if you resume a stopped or aborted job, the job begins propagating source data from where it last left off.
• The initial load part of combined initial and incremental load jobs uses Oracle Flashback queries to get committed data that was current at a specific point in the change stream. If you select the Position or Specific Date and Time option, ensure that the position or date and time that you specify is within the flashback retention period of the Oracle source database. Also ensure that no source table is truncated during the flashback period. If these requirements are not met, the job will fail. You can use the Oracle DB_FLASHBACK_RETENTION_TARGET parameter to define how far back in time, in minutes, that the database can be flashed back. The default value is 1440 minutes.
9. Click Next.
124 Chapter 4: Mass Ingestion Databases
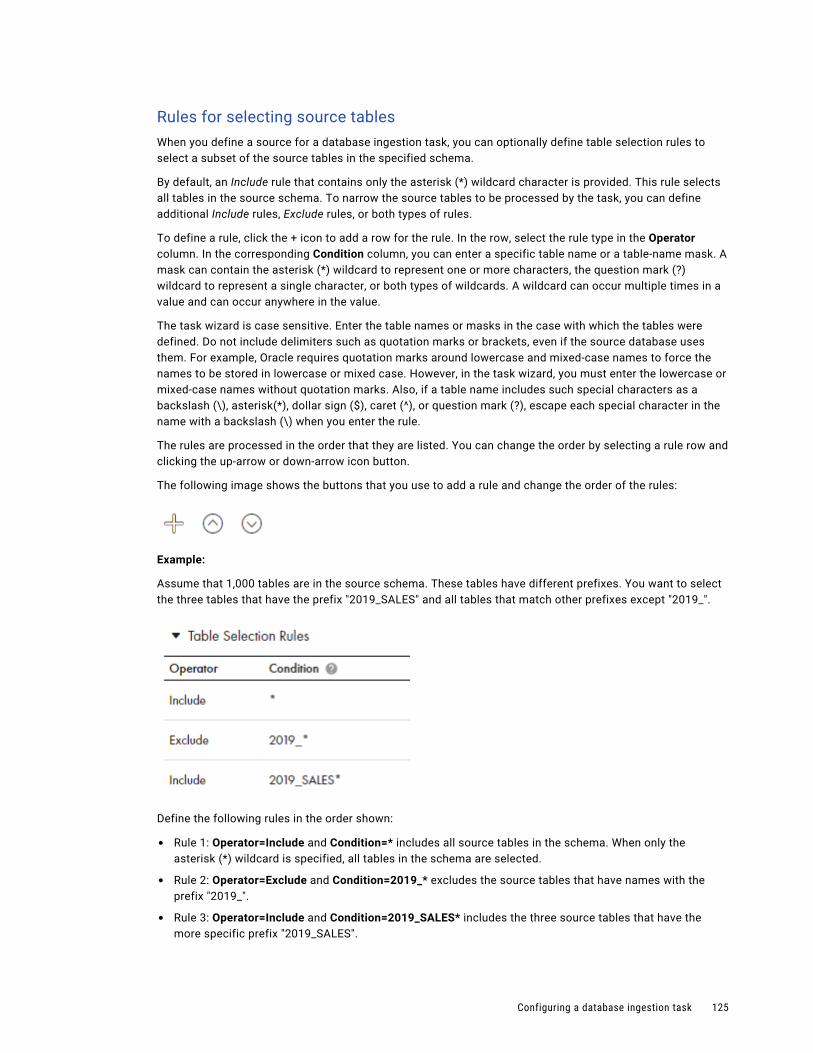
Rules for selecting source tablesWhen you define a source for a database ingestion task, you can optionally define table selection rules to select a subset of the source tables in the specified schema.
By default, an Include rule that contains only the asterisk (*) wildcard character is provided. This rule selects all tables in the source schema. To narrow the source tables to be processed by the task, you can define additional Include rules, Exclude rules, or both types of rules.
To define a rule, click the + icon to add a row for the rule. In the row, select the rule type in the Operator column. In the corresponding Condition column, you can enter a specific table name or a table-name mask. A mask can contain the asterisk (*) wildcard to represent one or more characters, the question mark (?) wildcard to represent a single character, or both types of wildcards. A wildcard can occur multiple times in a value and can occur anywhere in the value.
The task wizard is case sensitive. Enter the table names or masks in the case with which the tables were defined. Do not include delimiters such as quotation marks or brackets, even if the source database uses them. For example, Oracle requires quotation marks around lowercase and mixed-case names to force the names to be stored in lowercase or mixed case. However, in the task wizard, you must enter the lowercase or mixed-case names without quotation marks. Also, if a table name includes such special characters as a backslash (\), asterisk(*), dollar sign ($), caret (^), or question mark (?), escape each special character in the name with a backslash (\) when you enter the rule.
The rules are processed in the order that they are listed. You can change the order by selecting a rule row and clicking the up-arrow or down-arrow icon button.
The following image shows the buttons that you use to add a rule and change the order of the rules:
Example:
Assume that 1,000 tables are in the source schema. These tables have different prefixes. You want to select the three tables that have the prefix "2019_SALES" and all tables that match other prefixes except "2019_".
Define the following rules in the order shown:
• Rule 1: Operator=Include and Condition=* includes all source tables in the schema. When only the asterisk (*) wildcard is specified, all tables in the schema are selected.
• Rule 2: Operator=Exclude and Condition=2019_* excludes the source tables that have names with the prefix "2019_".
• Rule 3: Operator=Include and Condition=2019_SALES* includes the three source tables that have the more specific prefix "2019_SALES".
Configuring a database ingestion task 125
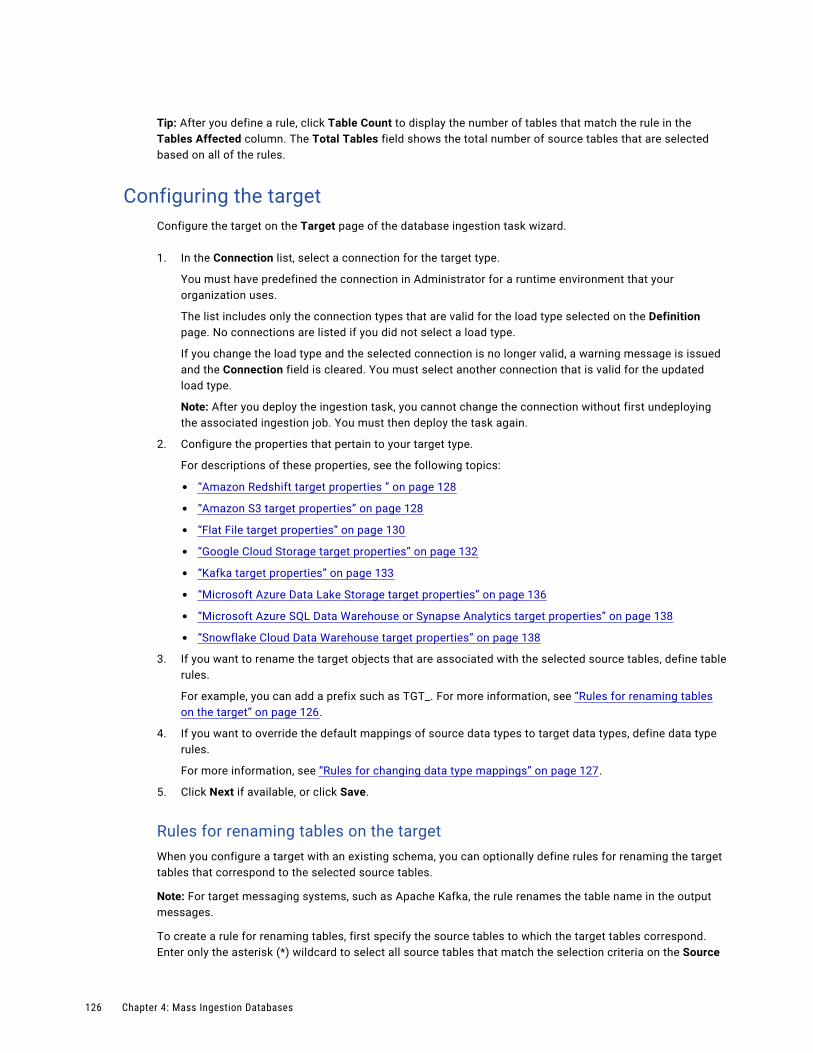
Tip: After you define a rule, click Table Count to display the number of tables that match the rule in the Tables Affected column. The Total Tables field shows the total number of source tables that are selected based on all of the rules.
Configuring the targetConfigure the target on the Target page of the database ingestion task wizard.
1. In the Connection list, select a connection for the target type.
You must have predefined the connection in Administrator for a runtime environment that your organization uses.
The list includes only the connection types that are valid for the load type selected on the Definition page. No connections are listed if you did not select a load type.
If you change the load type and the selected connection is no longer valid, a warning message is issued and the Connection field is cleared. You must select another connection that is valid for the updated load type.
Note: After you deploy the ingestion task, you cannot change the connection without first undeploying the associated ingestion job. You must then deploy the task again.
2. Configure the properties that pertain to your target type.
For descriptions of these properties, see the following topics:
• “Amazon Redshift target properties ” on page 128
• “Amazon S3 target properties” on page 128
• “Flat File target properties” on page 130
• “Google Cloud Storage target properties” on page 132
• “Kafka target properties” on page 133
• “Microsoft Azure Data Lake Storage target properties” on page 136
• “Microsoft Azure SQL Data Warehouse or Synapse Analytics target properties” on page 138
• “Snowflake Cloud Data Warehouse target properties” on page 138
3. If you want to rename the target objects that are associated with the selected source tables, define table rules.
For example, you can add a prefix such as TGT_. For more information, see “Rules for renaming tables on the target” on page 126.
4. If you want to override the default mappings of source data types to target data types, define data type rules.
For more information, see “Rules for changing data type mappings” on page 127.
5. Click Next if available, or click Save.
Rules for renaming tables on the targetWhen you configure a target with an existing schema, you can optionally define rules for renaming the target tables that correspond to the selected source tables.
Note: For target messaging systems, such as Apache Kafka, the rule renames the table name in the output messages.
To create a rule for renaming tables, first specify the source tables to which the target tables correspond. Enter only the asterisk (*) wildcard to select all source tables that match the selection criteria on the Source
126 Chapter 4: Mass Ingestion Databases
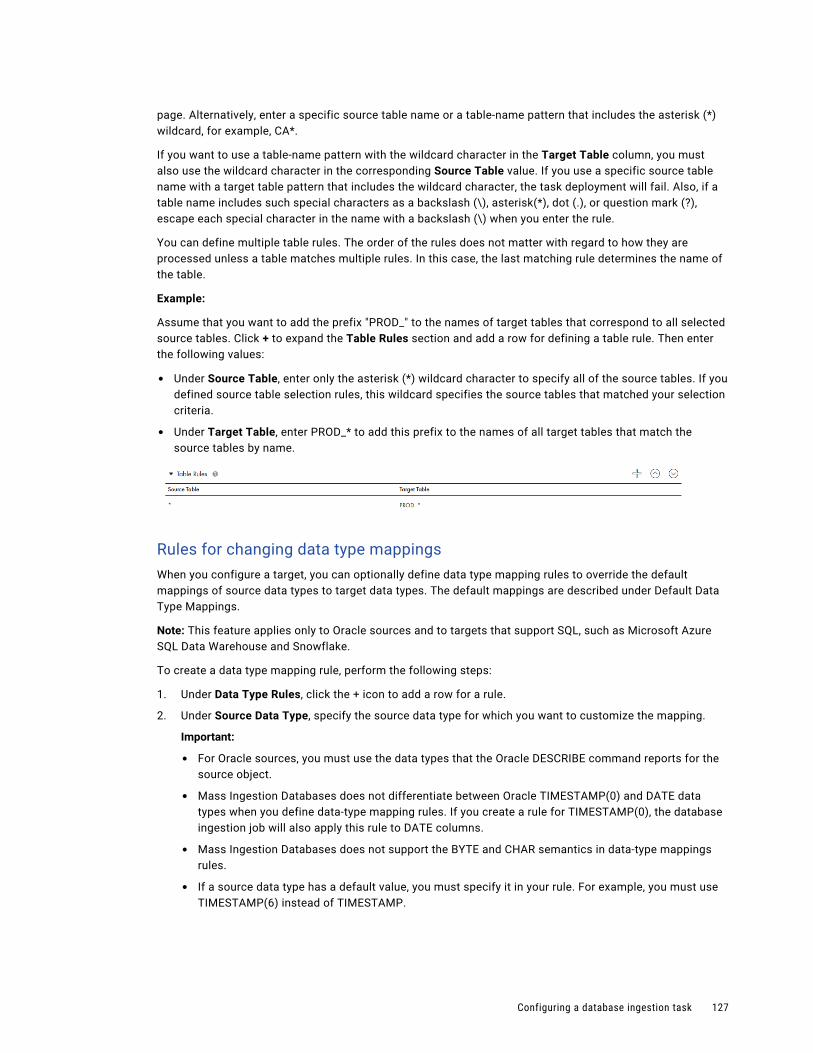
page. Alternatively, enter a specific source table name or a table-name pattern that includes the asterisk (*) wildcard, for example, CA*.
If you want to use a table-name pattern with the wildcard character in the Target Table column, you must also use the wildcard character in the corresponding Source Table value. If you use a specific source table name with a target table pattern that includes the wildcard character, the task deployment will fail. Also, if a table name includes such special characters as a backslash (\), asterisk(*), dot (.), or question mark (?), escape each special character in the name with a backslash (\) when you enter the rule.
You can define multiple table rules. The order of the rules does not matter with regard to how they are processed unless a table matches multiple rules. In this case, the last matching rule determines the name of the table.
Example:
Assume that you want to add the prefix "PROD_" to the names of target tables that correspond to all selected source tables. Click + to expand the Table Rules section and add a row for defining a table rule. Then enter the following values:
• Under Source Table, enter only the asterisk (*) wildcard character to specify all of the source tables. If you defined source table selection rules, this wildcard specifies the source tables that matched your selection criteria.
• Under Target Table, enter PROD_* to add this prefix to the names of all target tables that match the source tables by name.
Rules for changing data type mappingsWhen you configure a target, you can optionally define data type mapping rules to override the default mappings of source data types to target data types. The default mappings are described under Default Data Type Mappings.
Note: This feature applies only to Oracle sources and to targets that support SQL, such as Microsoft Azure SQL Data Warehouse and Snowflake.
To create a data type mapping rule, perform the following steps:
1. Under Data Type Rules, click the + icon to add a row for a rule.
2. Under Source Data Type, specify the source data type for which you want to customize the mapping.
Important:
• For Oracle sources, you must use the data types that the Oracle DESCRIBE command reports for the source object.
• Mass Ingestion Databases does not differentiate between Oracle TIMESTAMP(0) and DATE data types when you define data-type mapping rules. If you create a rule for TIMESTAMP(0), the database ingestion job will also apply this rule to DATE columns.
• Mass Ingestion Databases does not support the BYTE and CHAR semantics in data-type mappings rules.
• If a source data type has a default value, you must specify it in your rule. For example, you must use TIMESTAMP(6) instead of TIMESTAMP.
Configuring a database ingestion task 127
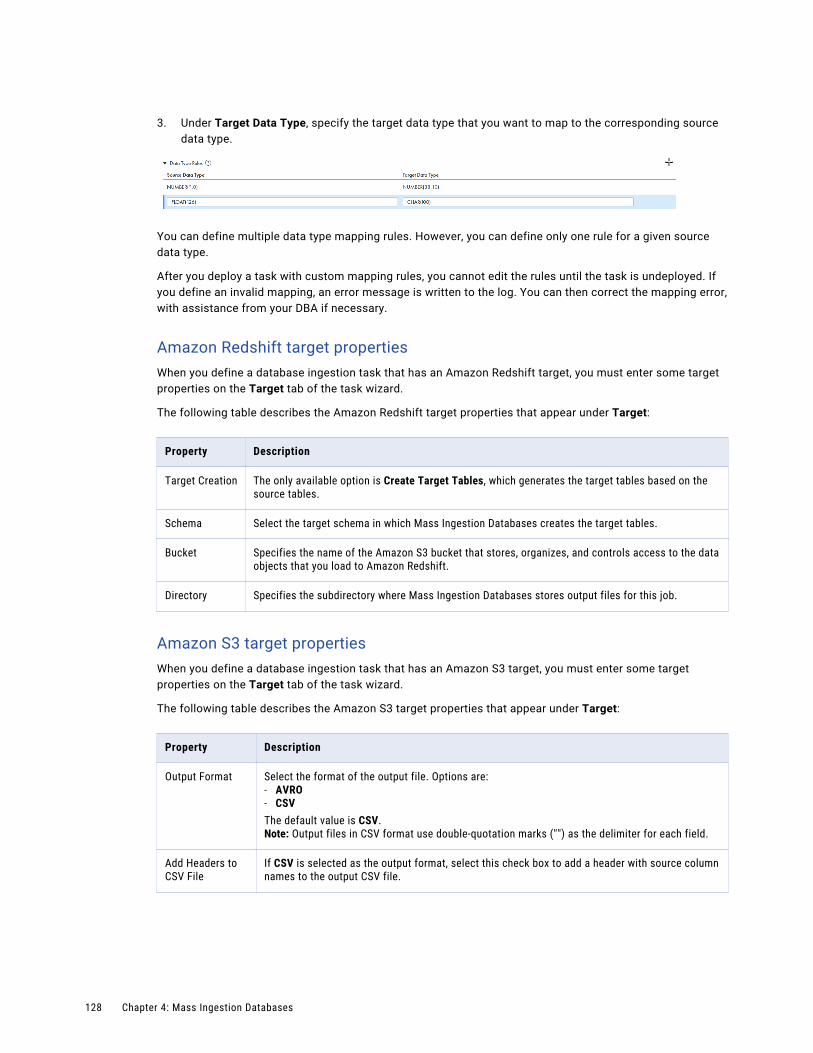
3. Under Target Data Type, specify the target data type that you want to map to the corresponding source data type.
You can define multiple data type mapping rules. However, you can define only one rule for a given source data type.
After you deploy a task with custom mapping rules, you cannot edit the rules until the task is undeployed. If you define an invalid mapping, an error message is written to the log. You can then correct the mapping error, with assistance from your DBA if necessary.
Amazon Redshift target propertiesWhen you define a database ingestion task that has an Amazon Redshift target, you must enter some target properties on the Target tab of the task wizard.
The following table describes the Amazon Redshift target properties that appear under Target:
Property Description
Target Creation The only available option is Create Target Tables, which generates the target tables based on the source tables.
Schema Select the target schema in which Mass Ingestion Databases creates the target tables.
Bucket Specifies the name of the Amazon S3 bucket that stores, organizes, and controls access to the data objects that you load to Amazon Redshift.
Directory Specifies the subdirectory where Mass Ingestion Databases stores output files for this job.
Amazon S3 target propertiesWhen you define a database ingestion task that has an Amazon S3 target, you must enter some target properties on the Target tab of the task wizard.
The following table describes the Amazon S3 target properties that appear under Target:
Property Description
Output Format Select the format of the output file. Options are:- AVRO - CSVThe default value is CSV.Note: Output files in CSV format use double-quotation marks ("") as the delimiter for each field.
Add Headers to CSV File
If CSV is selected as the output format, select this check box to add a header with source column names to the output CSV file.
128 Chapter 4: Mass Ingestion Databases
Property Description
Parquet Format If AVRO is selected as the output format, select this check box to write data in uncompressed Parquet format.When you select this check box, File Compression Type option is disabled.Important: If you select this check box, you must install Visual C++ Redistributable Packages for Visual Studio 2013 on the computer where the Secure Agent runs.
Avro Format If you selected AVRO as the output format, select the format of the Avro schema that will be created for each source table. Options are:- Avro-Flat. This Avro schema format lists all Avro fields in one record.- Avro-Generic. This Avro schema format lists all columns from a source table in a single array
of Avro fields.- Avro-Nested. This Avro schema format organizes each type of information in a separate
record.The default value is Avro-Flat.
Avro Serialization Format
If AVRO is selected as the output format, select the serialization format of the Avro output file. Options are:- Binary- JSONThe default value is Binary.
Avro Schema Directory
If AVRO is selected as the output format, specify the local directory where Mass Ingestion Databases stores Avro schema definitions for each source table. Schema definition files have the following naming pattern:
schemaname_tablename.txtNote: If this directory is not specified, no Avro schema definition file is produced.
Fixed Directory for Each Table
For initial load tasks, select this check box to use the source table names as the names of the directories to which Mass Ingestion Databases writes flat files that contain source data, for all job runs.Clear this check box to create a new set of directories for each job run by using the following naming pattern:
tablename_timestampBy default, this check box is selected.Note: This field does not appear for incremental load tasks that have Amazon S3, Google Cloud Storage, or Microsoft Azure Data Lake Storage Gen2 targets.
File Compression Type
Select the compression type for output files. Options are:- gzip- snappy- deflateIf no option is selected, the output files are not compressed.
Add Directory Tags
Select this check box to add the "dt=" prefix to the names of apply cycle directories to be compatible with the naming convention for Hive partitioning. This check box is cleared by default.
Directory Specifies the subdirectory where Mass Ingestion Databases stores output files for this job.
Configuring a database ingestion task 129
The following table describes the Amazon S3 advanced target properties that appear under Advanced:
Field Description
Add Operation Type Select this check box to add a metadata column that includes the operation type in the output that the job propagates to the target.
Add Operation Time Select this check box to add a metadata column that includes the operation time in the output that the job propagates to the target.
Add Operation Owner Select this check box to add a metadata column that includes the operation owner in the output that the job propagates to the target.
Add Operation Transaction Id
Select this check box to add a metadata column that includes the transaction ID in the output that the job propagates to the target.
CDC Compatible Format
Select this check box to include UNDO data in the output that a job writes to the target.By default, the check box is cleared.
Flat File target propertiesWhen you define a database ingestion task, you must enter some properties for your Flat File target on the Target page of the task wizard.
These properties apply to initial load operations only.
The following table describes the Flat File target properties that appear under Target:
Property Description
Output Format Select the format of the output file. Options are:- AVRO - CSVThe default value is CSV.Note: Output files in CSV format use double-quotation marks ("") as the delimiter for each field.
Add Headers to CSV File
If CSV is selected as the output format, select this check box to add a header with source column names to the output CSV file.
Avro Format If you selected AVRO as the output format, select the format of the Avro schema that will be created for each source table. Options are:- Avro-Flat. This Avro schema format lists all Avro fields in one record.- Avro-Generic. This Avro schema format lists all columns from a source table in a single array
of Avro fields.- Avro-Nested. This Avro schema format organizes each type of information in a separate
record.The default value is Avro-Flat.
Avro Serialization Format
If AVRO is selected as the output format, select the serialization format of the Avro output file. Options are:- Binary- JSONThe default value is Binary.
130 Chapter 4: Mass Ingestion Databases
Property Description
Avro Schema Directory
If AVRO is selected as the output format, specify the local directory where Mass Ingestion Databases stores Avro schema definitions for each source table. Schema definition files have the following naming pattern:
schemaname_tablename.txtNote: If this directory is not specified, no Avro schema definition file is produced.
Fixed Directory for Each Table
For initial load tasks, select this check box to use the source table names as the names of the directories to which Mass Ingestion Databases writes flat files that contain source data, for all job runs.Clear this check box to create a new set of directories for each job run by using the following naming pattern:
tablename_timestampBy default, this check box is selected.Note: This field does not appear for incremental load tasks that have Amazon S3, Google Cloud Storage, or Microsoft Azure Data Lake Storage Gen2 targets.
File Compression Type
Select the compression type for output files. Options are:- gzip- snappy- deflateIf no option is selected, the output files are not compressed.
The following table describes the Flat File target advanced properties that appear under Advanced:
Field Description
Add Operation Type Select this check box to add a metadata column that includes the operation type in the output that the job propagates to the target.
Add Operation Time Select this check box to add a metadata column that includes the operation time in the output that the job propagates to the target.
Add Operation Owner Select this check box to add a metadata column that includes the operation owner in the output that the job propagates to the target.
Add Operation Transaction Id
Select this check box to add a metadata column that includes the transaction ID in the output that the job propagates to the target.
CDC Compatible Format
Select this check box to include UNDO data in the output that a job writes to the target.By default, the check box is cleared.
Configuring a database ingestion task 131
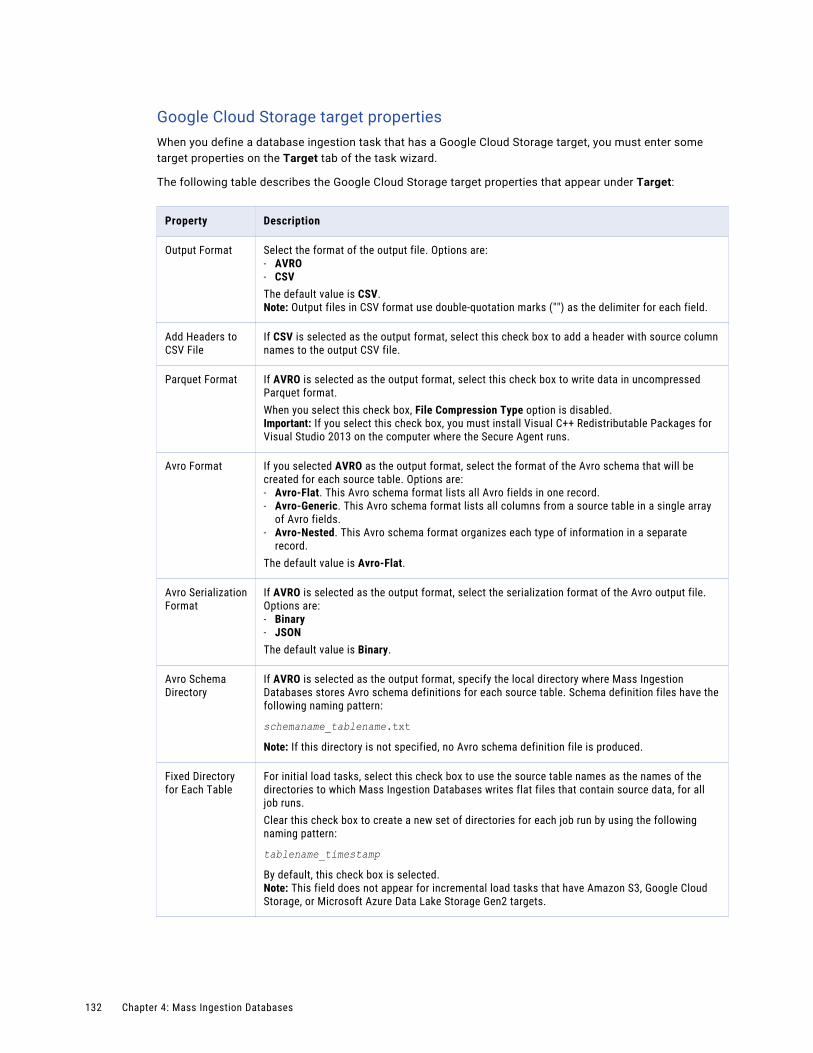
Google Cloud Storage target propertiesWhen you define a database ingestion task that has a Google Cloud Storage target, you must enter some target properties on the Target tab of the task wizard.
The following table describes the Google Cloud Storage target properties that appear under Target:
Property Description
Output Format Select the format of the output file. Options are:- AVRO - CSVThe default value is CSV.Note: Output files in CSV format use double-quotation marks ("") as the delimiter for each field.
Add Headers to CSV File
If CSV is selected as the output format, select this check box to add a header with source column names to the output CSV file.
Parquet Format If AVRO is selected as the output format, select this check box to write data in uncompressed Parquet format.When you select this check box, File Compression Type option is disabled.Important: If you select this check box, you must install Visual C++ Redistributable Packages for Visual Studio 2013 on the computer where the Secure Agent runs.
Avro Format If you selected AVRO as the output format, select the format of the Avro schema that will be created for each source table. Options are:- Avro-Flat. This Avro schema format lists all Avro fields in one record.- Avro-Generic. This Avro schema format lists all columns from a source table in a single array
of Avro fields.- Avro-Nested. This Avro schema format organizes each type of information in a separate
record.The default value is Avro-Flat.
Avro Serialization Format
If AVRO is selected as the output format, select the serialization format of the Avro output file. Options are:- Binary- JSONThe default value is Binary.
Avro Schema Directory
If AVRO is selected as the output format, specify the local directory where Mass Ingestion Databases stores Avro schema definitions for each source table. Schema definition files have the following naming pattern:
schemaname_tablename.txtNote: If this directory is not specified, no Avro schema definition file is produced.
Fixed Directory for Each Table
For initial load tasks, select this check box to use the source table names as the names of the directories to which Mass Ingestion Databases writes flat files that contain source data, for all job runs.Clear this check box to create a new set of directories for each job run by using the following naming pattern:
tablename_timestampBy default, this check box is selected.Note: This field does not appear for incremental load tasks that have Amazon S3, Google Cloud Storage, or Microsoft Azure Data Lake Storage Gen2 targets.
132 Chapter 4: Mass Ingestion Databases
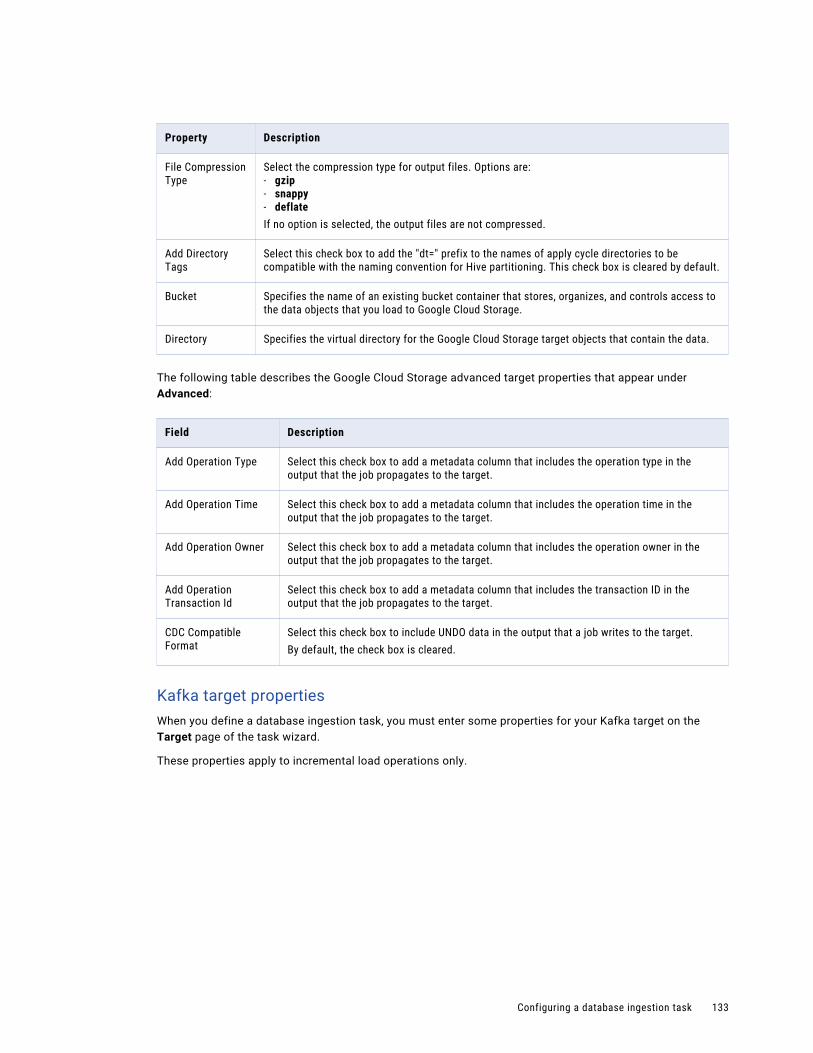
Property Description
File Compression Type
Select the compression type for output files. Options are:- gzip- snappy- deflateIf no option is selected, the output files are not compressed.
Add Directory Tags
Select this check box to add the "dt=" prefix to the names of apply cycle directories to be compatible with the naming convention for Hive partitioning. This check box is cleared by default.
Bucket Specifies the name of an existing bucket container that stores, organizes, and controls access to the data objects that you load to Google Cloud Storage.
Directory Specifies the virtual directory for the Google Cloud Storage target objects that contain the data.
The following table describes the Google Cloud Storage advanced target properties that appear under Advanced:
Field Description
Add Operation Type Select this check box to add a metadata column that includes the operation type in the output that the job propagates to the target.
Add Operation Time Select this check box to add a metadata column that includes the operation time in the output that the job propagates to the target.
Add Operation Owner Select this check box to add a metadata column that includes the operation owner in the output that the job propagates to the target.
Add Operation Transaction Id
Select this check box to add a metadata column that includes the transaction ID in the output that the job propagates to the target.
CDC Compatible Format
Select this check box to include UNDO data in the output that a job writes to the target.By default, the check box is cleared.
Kafka target propertiesWhen you define a database ingestion task, you must enter some properties for your Kafka target on the Target page of the task wizard.
These properties apply to incremental load operations only.
Configuring a database ingestion task 133

The following table describes the Kafka target properties that appear under Target:
Property Description
Use Table Name as Topic Name
Indicates whether Mass Ingestion Databases writes messages that contain source data to separate topics, one for each source table, or writes all messages to a single topic.Select this check box to write messages to separate table-specific topics. The topic names match the source table names, unless you add the source schema name, a prefix, or a suffix in the Include Schema Name, Table Prefix, or Table Suffix properties.By default, this check box is cleared. With the default setting, you must specify the name of the single topic to which all messages are written in the Topic Name property.
Include Schema Name
When Use Table Name as Topic Name is selected, this check box appears and is selected by default. This setting adds the source schema name in the table-specific topic names. The topic names then have the format schemaname_tablename.If you do not want to include the schema name, clear this check box.
Table Prefix When Use Table Name as Topic Name is selected, this property appears so that you can optionally enter a prefix to add to the table-specific topic names. For example, if you specify myprefix_, the topic names have the format myprefix_tablename. If you omit the underscore (_) after the prefix, the prefix is prepended to the table name.
Table Suffix When Use Table Name as Topic Name is selected, this property appears so that you can optionally enter a suffix to add to the table-specific topic names. For example, if you specify _mysuffix, the topic names have the format tablename_mysuffix. If you omit the underscore (_) before the suffix, the suffix is appended to the table name.
Topic Name If you do not select Use table name as topic name, you must enter the name of the single Kafka topic to which all messages that contain source data will be written.
Output Format Select the format of the output file. Options are:- AVRO - CSVThe default value is CSV.Note: Output files in CSV format use double-quotation marks ("") as the delimiter for each field.If your Kafka target uses Confluent Schema Registry to store schemas for incremental load jobs, you must select AVRO as the format.
Avro Format If you selected AVRO as the output format, select the format of the Avro schema that will be created for each source table. Options are:- Avro-Flat. This Avro schema format lists all Avro fields in one record.- Avro-Generic. This Avro schema format lists all columns from a source table in a single array of
Avro fields.- Avro-Nested. This Avro schema format organizes each type of information in a separate record.The default value is Avro-Flat.
134 Chapter 4: Mass Ingestion Databases
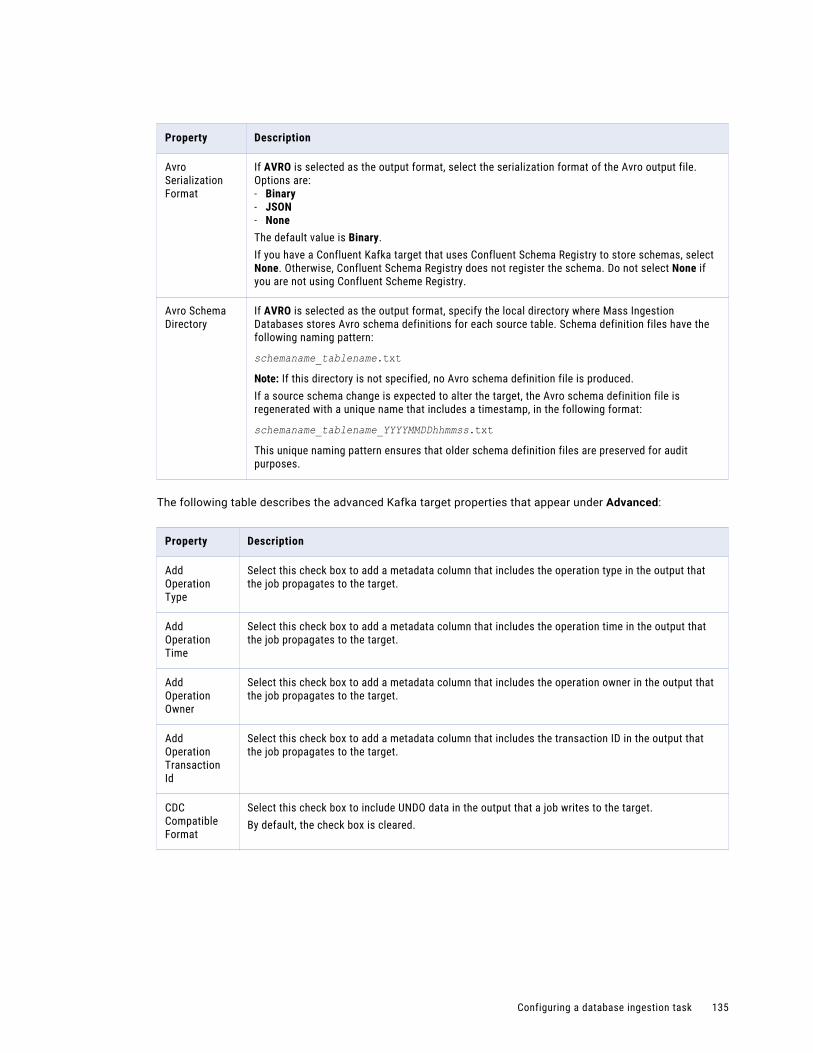
Property Description
Avro Serialization Format
If AVRO is selected as the output format, select the serialization format of the Avro output file. Options are:- Binary- JSON- NoneThe default value is Binary.If you have a Confluent Kafka target that uses Confluent Schema Registry to store schemas, select None. Otherwise, Confluent Schema Registry does not register the schema. Do not select None if you are not using Confluent Scheme Registry.
Avro Schema Directory
If AVRO is selected as the output format, specify the local directory where Mass Ingestion Databases stores Avro schema definitions for each source table. Schema definition files have the following naming pattern:
schemaname_tablename.txtNote: If this directory is not specified, no Avro schema definition file is produced.If a source schema change is expected to alter the target, the Avro schema definition file is regenerated with a unique name that includes a timestamp, in the following format:
schemaname_tablename_YYYYMMDDhhmmss.txtThis unique naming pattern ensures that older schema definition files are preserved for audit purposes.
The following table describes the advanced Kafka target properties that appear under Advanced:
Property Description
Add Operation Type
Select this check box to add a metadata column that includes the operation type in the output that the job propagates to the target.
Add Operation Time
Select this check box to add a metadata column that includes the operation time in the output that the job propagates to the target.
Add Operation Owner
Select this check box to add a metadata column that includes the operation owner in the output that the job propagates to the target.
Add Operation Transaction Id
Select this check box to add a metadata column that includes the transaction ID in the output that the job propagates to the target.
CDC Compatible Format
Select this check box to include UNDO data in the output that a job writes to the target.By default, the check box is cleared.
Configuring a database ingestion task 135
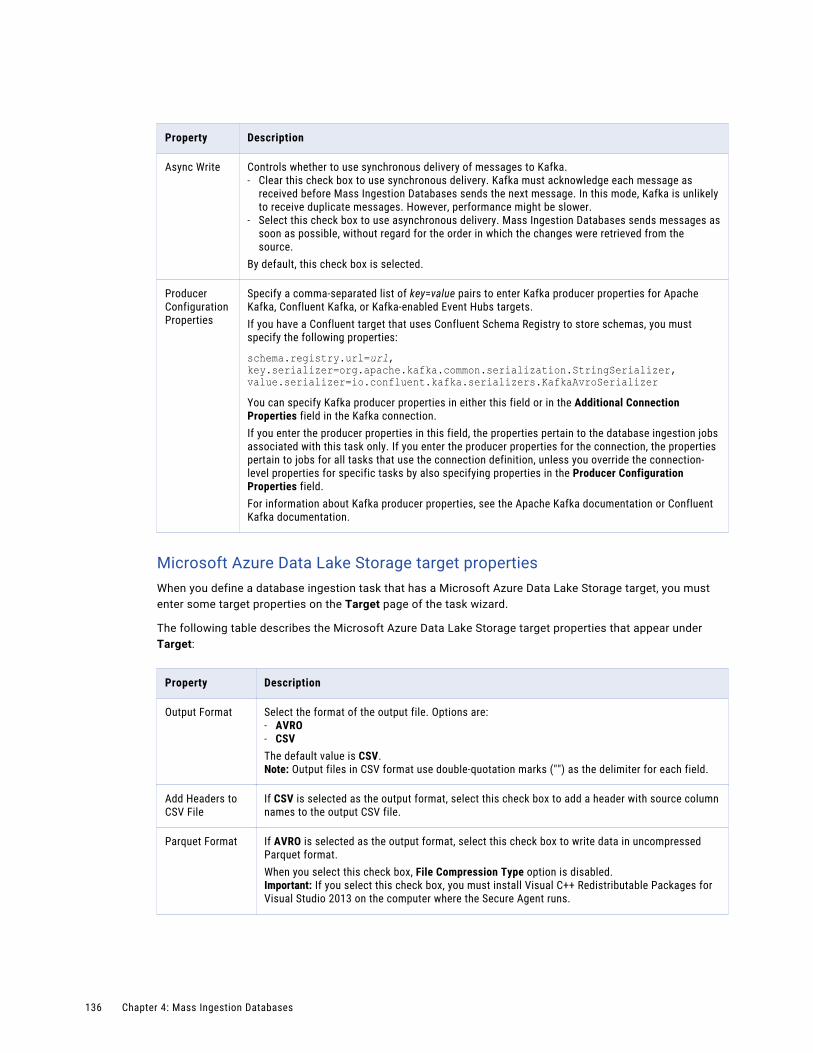
Property Description
Async Write Controls whether to use synchronous delivery of messages to Kafka.- Clear this check box to use synchronous delivery. Kafka must acknowledge each message as
received before Mass Ingestion Databases sends the next message. In this mode, Kafka is unlikely to receive duplicate messages. However, performance might be slower.
- Select this check box to use asynchronous delivery. Mass Ingestion Databases sends messages as soon as possible, without regard for the order in which the changes were retrieved from the source.
By default, this check box is selected.
Producer Configuration Properties
Specify a comma-separated list of key=value pairs to enter Kafka producer properties for Apache Kafka, Confluent Kafka, or Kafka-enabled Event Hubs targets.If you have a Confluent target that uses Confluent Schema Registry to store schemas, you must specify the following properties:
schema.registry.url=url,key.serializer=org.apache.kafka.common.serialization.StringSerializer,value.serializer=io.confluent.kafka.serializers.KafkaAvroSerializerYou can specify Kafka producer properties in either this field or in the Additional Connection Properties field in the Kafka connection.If you enter the producer properties in this field, the properties pertain to the database ingestion jobs associated with this task only. If you enter the producer properties for the connection, the properties pertain to jobs for all tasks that use the connection definition, unless you override the connection-level properties for specific tasks by also specifying properties in the Producer Configuration Properties field.For information about Kafka producer properties, see the Apache Kafka documentation or Confluent Kafka documentation.
Microsoft Azure Data Lake Storage target propertiesWhen you define a database ingestion task that has a Microsoft Azure Data Lake Storage target, you must enter some target properties on the Target page of the task wizard.
The following table describes the Microsoft Azure Data Lake Storage target properties that appear under Target:
Property Description
Output Format Select the format of the output file. Options are:- AVRO - CSVThe default value is CSV.Note: Output files in CSV format use double-quotation marks ("") as the delimiter for each field.
Add Headers to CSV File
If CSV is selected as the output format, select this check box to add a header with source column names to the output CSV file.
Parquet Format If AVRO is selected as the output format, select this check box to write data in uncompressed Parquet format.When you select this check box, File Compression Type option is disabled.Important: If you select this check box, you must install Visual C++ Redistributable Packages for Visual Studio 2013 on the computer where the Secure Agent runs.
136 Chapter 4: Mass Ingestion Databases

Property Description
Avro Format If you selected AVRO as the output format, select the format of the Avro schema that will be created for each source table. Options are:- Avro-Flat. This Avro schema format lists all Avro fields in one record.- Avro-Generic. This Avro schema format lists all columns from a source table in a single array
of Avro fields.- Avro-Nested. This Avro schema format organizes each type of information in a separate
record.The default value is Avro-Flat.
Avro Serialization Format
If AVRO is selected as the output format, select the serialization format of the Avro output file. Options are:- Binary- JSONThe default value is Binary.
Avro Schema Directory
If AVRO is selected as the output format, specify the local directory where Mass Ingestion Databases stores Avro schema definitions for each source table. Schema definition files have the following naming pattern:
schemaname_tablename.txtNote: If this directory is not specified, no Avro schema definition file is produced.
Fixed Directory for Each Table
For initial load tasks, select this check box to use the source table names as the names of the directories to which Mass Ingestion Databases writes flat files that contain source data, for all job runs.Clear this check box to create a new set of directories for each job run by using the following naming pattern:
tablename_timestampBy default, this check box is selected.Note: This field does not appear for incremental load tasks that have Amazon S3, Google Cloud Storage, or Microsoft Azure Data Lake Storage Gen2 targets.
File Compression Type
Select the compression type for output files. Options are:- gzip- snappy- deflateIf no option is selected, the output files are not compressed.
Add Directory Tags
Select this check box to add the "dt=" prefix to the names of apply cycle directories to be compatible with the naming convention for Hive partitioning. This check box is cleared by default.
Directory Specifies the subdirectory where Mass Ingestion Databases stores output files for this job.
The following table describes the Microsoft Azure Data Lake Storage advanced target properties that appear under Advanced:
Field Description
Add Operation Type Select this check box to add a metadata column that includes the operation type in the output that the job propagates to the target.
Add Operation Time Select this check box to add a metadata column that includes the operation time in the output that the job propagates to the target.
Configuring a database ingestion task 137

Field Description
Add Operation Owner Select this check box to add a metadata column that includes the operation owner in the output that the job propagates to the target.
Add Operation Transaction Id
Select this check box to add a metadata column that includes the transaction ID in the output that the job propagates to the target.
CDC Compatible Format
Select this check box to include UNDO data in the output that a job writes to the target.By default, the check box is cleared.
Microsoft Azure SQL Data Warehouse or Synapse Analytics target propertiesWhen you define a database ingestion task, you must enter some properties for your Microsoft Azure SQL Data Warehouse or Synapse Analytics target on the Target page of the task wizard.
These properties apply to initial load, incremental load, and combined initial and incremental load operations.
The following table describes the target properties that appear under Target:
Property Description
Target Creation The only available option is Create Target Tables, which generates the target tables based on the source tables.
Schema Select the target schema in which Mass Ingestion Databases creates the target tables.
Snowflake Cloud Data Warehouse target propertiesWhen you define a database ingestion task, you must enter some properties for your Snowflake Cloud Data Warehouse target on the Target page of the task wizard. The properties vary slightly by load type.
The following table describes the Snowflake target properties that appear under Target:
Property Description
Target Creation
The only available option is Create Target Tables, which generates the target tables based on the source tables.
Schema Select the target schema in which Mass Ingestion Databases creates the target tables.
Stage The name of internal staging area that holds the data read from the source before the data is written to the target tables. This name must not include spaces. If the staging area does not exist, it will be automatically created.
138 Chapter 4: Mass Ingestion Databases
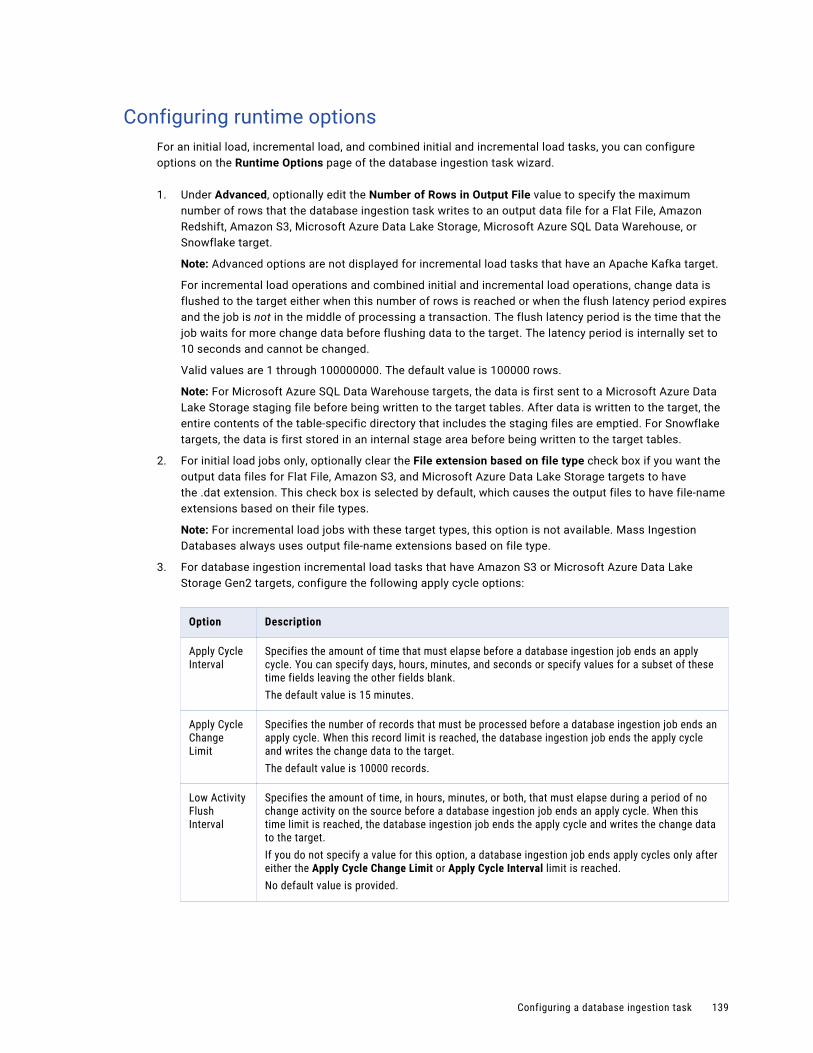
Configuring runtime optionsFor an initial load, incremental load, and combined initial and incremental load tasks, you can configure options on the Runtime Options page of the database ingestion task wizard.
1. Under Advanced, optionally edit the Number of Rows in Output File value to specify the maximum number of rows that the database ingestion task writes to an output data file for a Flat File, Amazon Redshift, Amazon S3, Microsoft Azure Data Lake Storage, Microsoft Azure SQL Data Warehouse, or Snowflake target.
Note: Advanced options are not displayed for incremental load tasks that have an Apache Kafka target.
For incremental load operations and combined initial and incremental load operations, change data is flushed to the target either when this number of rows is reached or when the flush latency period expires and the job is not in the middle of processing a transaction. The flush latency period is the time that the job waits for more change data before flushing data to the target. The latency period is internally set to 10 seconds and cannot be changed.
Valid values are 1 through 100000000. The default value is 100000 rows.
Note: For Microsoft Azure SQL Data Warehouse targets, the data is first sent to a Microsoft Azure Data Lake Storage staging file before being written to the target tables. After data is written to the target, the entire contents of the table-specific directory that includes the staging files are emptied. For Snowflake targets, the data is first stored in an internal stage area before being written to the target tables.
2. For initial load jobs only, optionally clear the File extension based on file type check box if you want the output data files for Flat File, Amazon S3, and Microsoft Azure Data Lake Storage targets to have the .dat extension. This check box is selected by default, which causes the output files to have file-name extensions based on their file types.
Note: For incremental load jobs with these target types, this option is not available. Mass Ingestion Databases always uses output file-name extensions based on file type.
3. For database ingestion incremental load tasks that have Amazon S3 or Microsoft Azure Data Lake Storage Gen2 targets, configure the following apply cycle options:
Option Description
Apply Cycle Interval
Specifies the amount of time that must elapse before a database ingestion job ends an apply cycle. You can specify days, hours, minutes, and seconds or specify values for a subset of these time fields leaving the other fields blank.The default value is 15 minutes.
Apply Cycle Change Limit
Specifies the number of records that must be processed before a database ingestion job ends an apply cycle. When this record limit is reached, the database ingestion job ends the apply cycle and writes the change data to the target.The default value is 10000 records.
Low Activity Flush Interval
Specifies the amount of time, in hours, minutes, or both, that must elapse during a period of no change activity on the source before a database ingestion job ends an apply cycle. When this time limit is reached, the database ingestion job ends the apply cycle and writes the change data to the target.If you do not specify a value for this option, a database ingestion job ends apply cycles only after either the Apply Cycle Change Limit or Apply Cycle Interval limit is reached.No default value is provided.
Configuring a database ingestion task 139
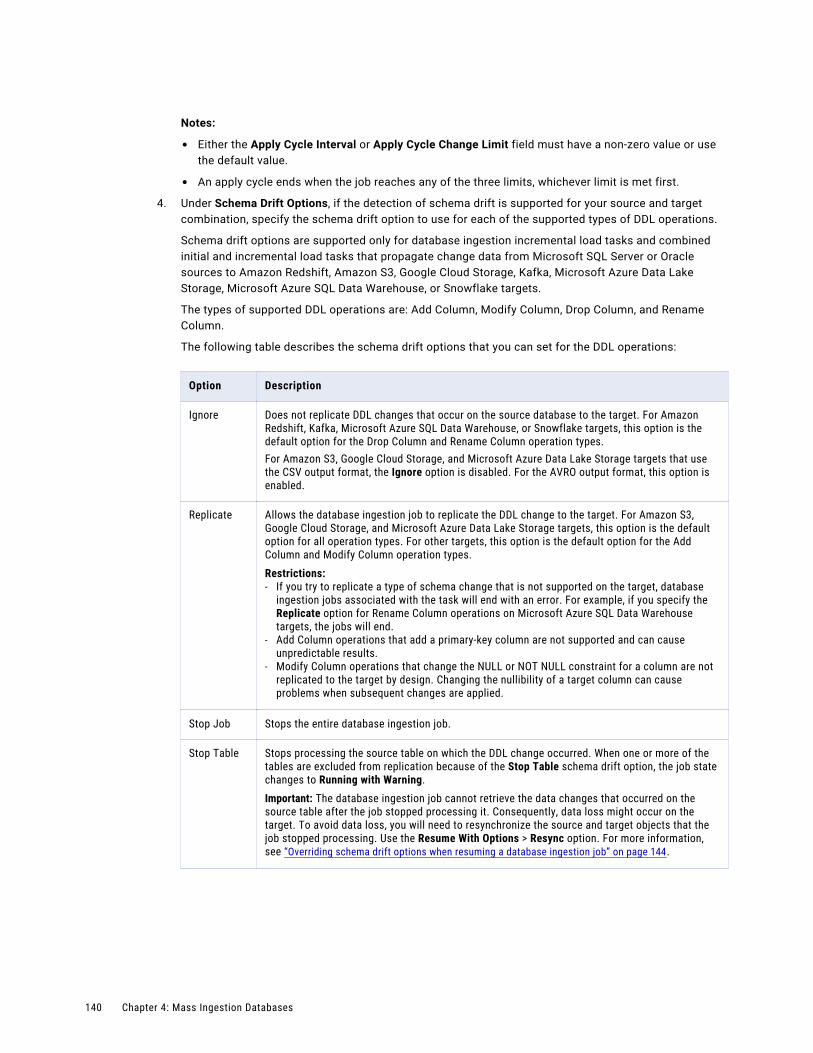
Notes:
• Either the Apply Cycle Interval or Apply Cycle Change Limit field must have a non-zero value or use the default value.
• An apply cycle ends when the job reaches any of the three limits, whichever limit is met first.
4. Under Schema Drift Options, if the detection of schema drift is supported for your source and target combination, specify the schema drift option to use for each of the supported types of DDL operations.
Schema drift options are supported only for database ingestion incremental load tasks and combined initial and incremental load tasks that propagate change data from Microsoft SQL Server or Oracle sources to Amazon Redshift, Amazon S3, Google Cloud Storage, Kafka, Microsoft Azure Data Lake Storage, Microsoft Azure SQL Data Warehouse, or Snowflake targets.
The types of supported DDL operations are: Add Column, Modify Column, Drop Column, and Rename Column.
The following table describes the schema drift options that you can set for the DDL operations:
Option Description
Ignore Does not replicate DDL changes that occur on the source database to the target. For Amazon Redshift, Kafka, Microsoft Azure SQL Data Warehouse, or Snowflake targets, this option is the default option for the Drop Column and Rename Column operation types.For Amazon S3, Google Cloud Storage, and Microsoft Azure Data Lake Storage targets that use the CSV output format, the Ignore option is disabled. For the AVRO output format, this option is enabled.
Replicate Allows the database ingestion job to replicate the DDL change to the target. For Amazon S3, Google Cloud Storage, and Microsoft Azure Data Lake Storage targets, this option is the default option for all operation types. For other targets, this option is the default option for the Add Column and Modify Column operation types.Restrictions: - If you try to replicate a type of schema change that is not supported on the target, database
ingestion jobs associated with the task will end with an error. For example, if you specify the Replicate option for Rename Column operations on Microsoft Azure SQL Data Warehouse targets, the jobs will end.
- Add Column operations that add a primary-key column are not supported and can cause unpredictable results.
- Modify Column operations that change the NULL or NOT NULL constraint for a column are not replicated to the target by design. Changing the nullibility of a target column can cause problems when subsequent changes are applied.
Stop Job Stops the entire database ingestion job.
Stop Table Stops processing the source table on which the DDL change occurred. When one or more of the tables are excluded from replication because of the Stop Table schema drift option, the job state changes to Running with Warning.Important: The database ingestion job cannot retrieve the data changes that occurred on the source table after the job stopped processing it. Consequently, data loss might occur on the target. To avoid data loss, you will need to resynchronize the source and target objects that the job stopped processing. Use the Resume With Options > Resync option. For more information, see “Overriding schema drift options when resuming a database ingestion job” on page 144.
140 Chapter 4: Mass Ingestion Databases

5. For incremental load jobs that have an Apache Kafka target, configure the following checkpointing options:
Option Description
Checkpoint All Rows
Indicates whether a database ingestion job performs checkpoint processing for every message that is sent to the Kafka target.Note: If this check box is selected, the Checkpoint Every Commit, Checkpoint Row Count, and Checkpoint Frequency (secs) options are ignored.
Checkpoint Every Commit
Indicates whether a database ingestion job performs checkpoint processing for every commit that occurs on the source.
Checkpoint Row Count
Specifies the maximum number of messages that a database ingestion job sends to the target before adding a checkpoint. If you set this option to 0, a database ingestion job does not perform checkpoint processing based on the number of messages. If you set this option to 1, a database ingestion jobs add a checkpoint for each message.
Checkpoint Frequency (secs)
Specifies the maximum number of seconds that must elapse before a database ingestion job adds a checkpoint. If you set this option to 0, a database ingestion job does not perform checkpoint processing based on elapsed time.
6. Click Save.
Deploying a database ingestion taskAfter you define a database ingestion task and save it, deploy the task to create an executable job instance on the on-premises system that contains the Secure Agent and the Mass Ingestion Databases agent and DBMI packages. You must deploy the task before you can run the job. The deploy process also validates the task definition.
If you undeploy a job and then want to run a job for the associated ingestion task again, you must deploy the task again to create a new job instance. The new job instance name ends with an incremented number in the format taskname-job_instance_number. The job instance number is incremented each time you deploy the ingestion task by adding 1 to the maximum instance number across all ingestion jobs.
Before you deploy a task with a Microsoft Azure SQL Data Warehouse or Snowflake target, drop any existing target tables that do not match the structure of the source tables, for example, because of added source columns, dropped source or target columns, or altered column null constraints or data types. When you deploy the task, the target tables are then generated based source table selections and target renaming rules.
u To deploy a task, in the database ingestion task wizard, save the completed task definition and then click Deploy.
Note: If you included spaces in the database ingestion task name, the spaces are omitted from the corresponding job name for the generated job instance.
After you deploy a task successfully, the task is in the Deployed state and you can run it from the My Jobs page in Mass Ingestion or from the All Jobs tab on the Mass Ingestion page in Monitor.
If the deployment process fails, the job state is Failed. To diagnose the error, download the error log from the My Jobs page in Mass Ingestion or the All Jobs tab on the Mass Ingestion page in Monitor. In the Actions
Deploying a database ingestion task 141
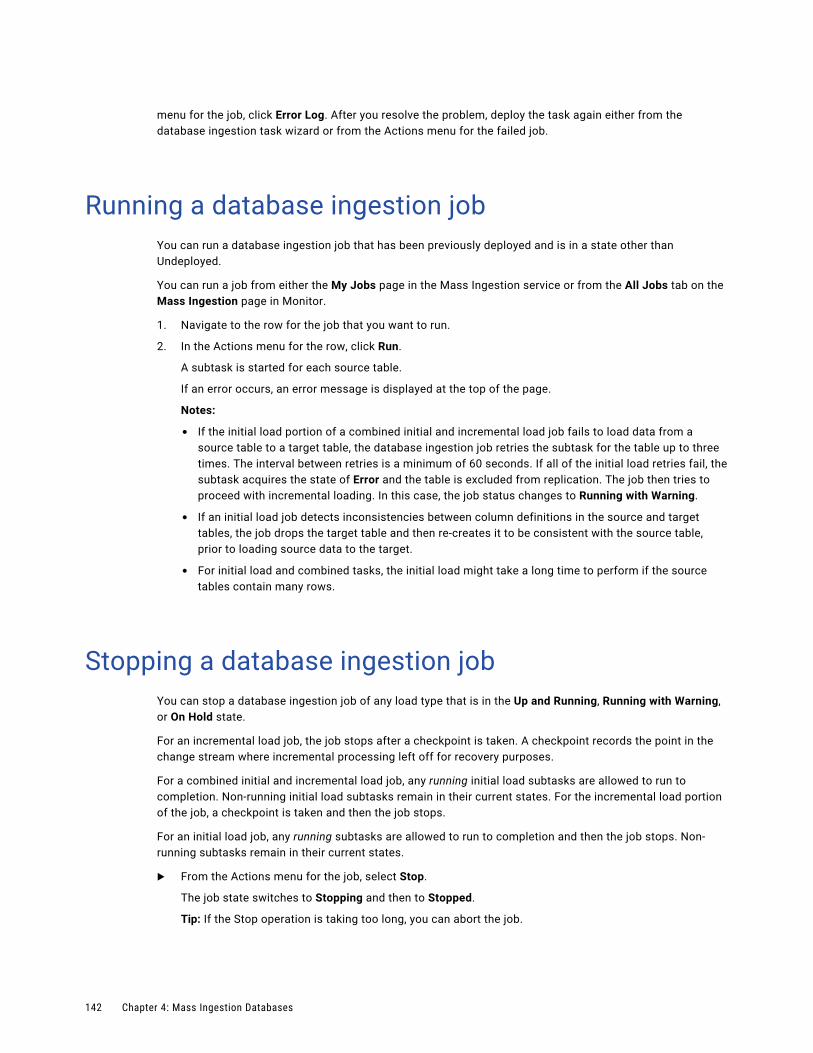
menu for the job, click Error Log. After you resolve the problem, deploy the task again either from the database ingestion task wizard or from the Actions menu for the failed job.
Running a database ingestion jobYou can run a database ingestion job that has been previously deployed and is in a state other than Undeployed.
You can run a job from either the My Jobs page in the Mass Ingestion service or from the All Jobs tab on the Mass Ingestion page in Monitor.
1. Navigate to the row for the job that you want to run.
2. In the Actions menu for the row, click Run.
A subtask is started for each source table.
If an error occurs, an error message is displayed at the top of the page.
Notes:
• If the initial load portion of a combined initial and incremental load job fails to load data from a source table to a target table, the database ingestion job retries the subtask for the table up to three times. The interval between retries is a minimum of 60 seconds. If all of the initial load retries fail, the subtask acquires the state of Error and the table is excluded from replication. The job then tries to proceed with incremental loading. In this case, the job status changes to Running with Warning.
• If an initial load job detects inconsistencies between column definitions in the source and target tables, the job drops the target table and then re-creates it to be consistent with the source table, prior to loading source data to the target.
• For initial load and combined tasks, the initial load might take a long time to perform if the source tables contain many rows.
Stopping a database ingestion jobYou can stop a database ingestion job of any load type that is in the Up and Running, Running with Warning, or On Hold state.
For an incremental load job, the job stops after a checkpoint is taken. A checkpoint records the point in the change stream where incremental processing left off for recovery purposes.
For a combined initial and incremental load job, any running initial load subtasks are allowed to run to completion. Non-running initial load subtasks remain in their current states. For the incremental load portion of the job, a checkpoint is taken and then the job stops.
For an initial load job, any running subtasks are allowed to run to completion and then the job stops. Non-running subtasks remain in their current states.
u From the Actions menu for the job, select Stop.
The job state switches to Stopping and then to Stopped.
Tip: If the Stop operation is taking too long, you can abort the job.
142 Chapter 4: Mass Ingestion Databases
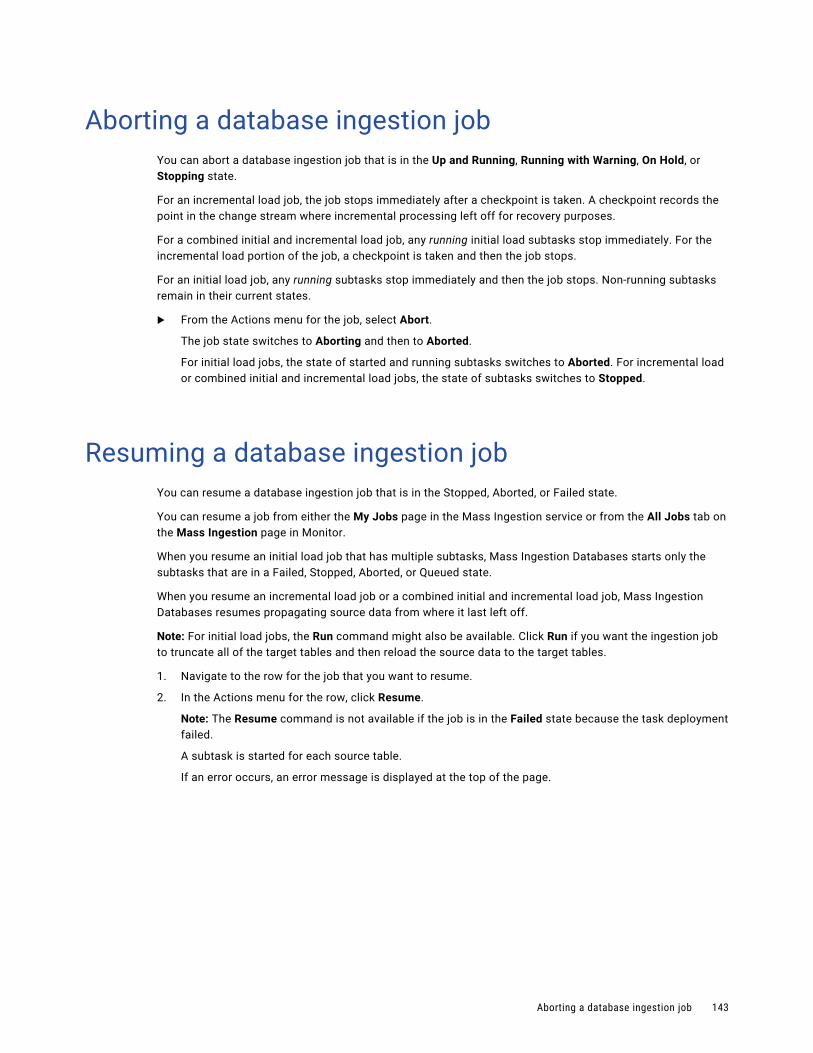
Aborting a database ingestion jobYou can abort a database ingestion job that is in the Up and Running, Running with Warning, On Hold, or Stopping state.
For an incremental load job, the job stops immediately after a checkpoint is taken. A checkpoint records the point in the change stream where incremental processing left off for recovery purposes.
For a combined initial and incremental load job, any running initial load subtasks stop immediately. For the incremental load portion of the job, a checkpoint is taken and then the job stops.
For an initial load job, any running subtasks stop immediately and then the job stops. Non-running subtasks remain in their current states.
u From the Actions menu for the job, select Abort.
The job state switches to Aborting and then to Aborted.
For initial load jobs, the state of started and running subtasks switches to Aborted. For incremental load or combined initial and incremental load jobs, the state of subtasks switches to Stopped.
Resuming a database ingestion jobYou can resume a database ingestion job that is in the Stopped, Aborted, or Failed state.
You can resume a job from either the My Jobs page in the Mass Ingestion service or from the All Jobs tab on the Mass Ingestion page in Monitor.
When you resume an initial load job that has multiple subtasks, Mass Ingestion Databases starts only the subtasks that are in a Failed, Stopped, Aborted, or Queued state.
When you resume an incremental load job or a combined initial and incremental load job, Mass Ingestion Databases resumes propagating source data from where it last left off.
Note: For initial load jobs, the Run command might also be available. Click Run if you want the ingestion job to truncate all of the target tables and then reload the source data to the target tables.
1. Navigate to the row for the job that you want to resume.
2. In the Actions menu for the row, click Resume.
Note: The Resume command is not available if the job is in the Failed state because the task deployment failed.
A subtask is started for each source table.
If an error occurs, an error message is displayed at the top of the page.
Aborting a database ingestion job 143
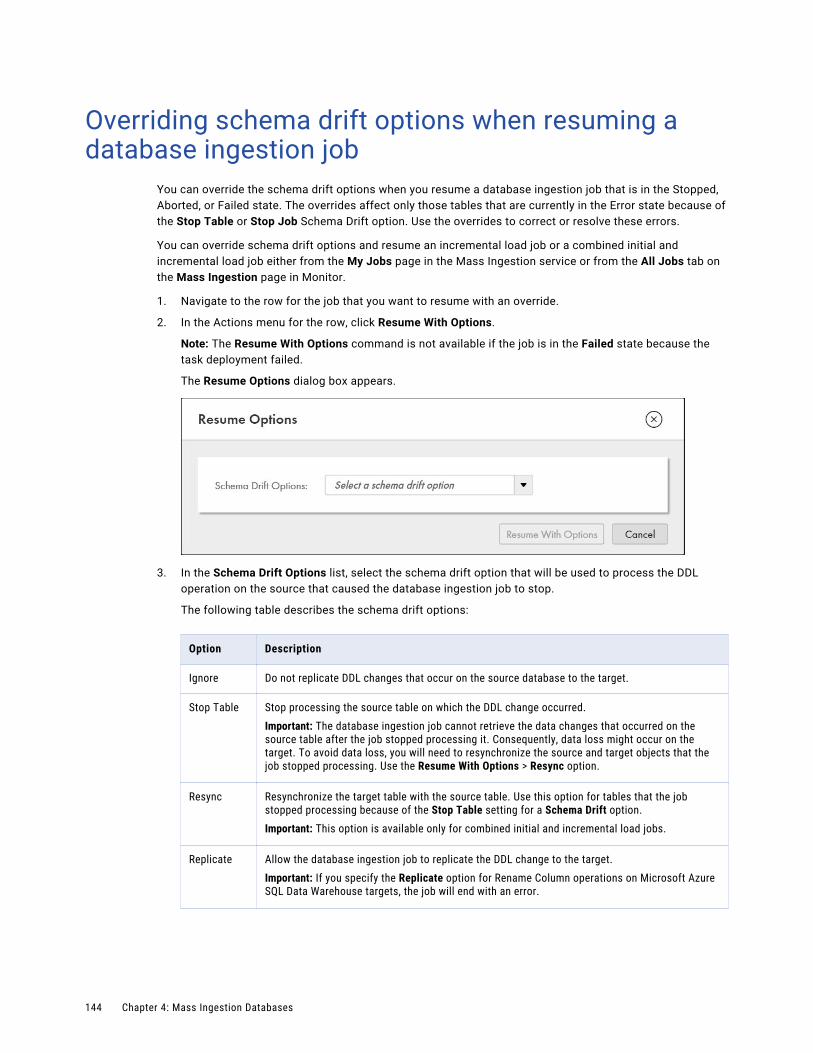
Overriding schema drift options when resuming a database ingestion job
You can override the schema drift options when you resume a database ingestion job that is in the Stopped, Aborted, or Failed state. The overrides affect only those tables that are currently in the Error state because of the Stop Table or Stop Job Schema Drift option. Use the overrides to correct or resolve these errors.
You can override schema drift options and resume an incremental load job or a combined initial and incremental load job either from the My Jobs page in the Mass Ingestion service or from the All Jobs tab on the Mass Ingestion page in Monitor.
1. Navigate to the row for the job that you want to resume with an override.
2. In the Actions menu for the row, click Resume With Options.
Note: The Resume With Options command is not available if the job is in the Failed state because the task deployment failed.
The Resume Options dialog box appears.
3. In the Schema Drift Options list, select the schema drift option that will be used to process the DDL operation on the source that caused the database ingestion job to stop.
The following table describes the schema drift options:
Option Description
Ignore Do not replicate DDL changes that occur on the source database to the target.
Stop Table Stop processing the source table on which the DDL change occurred.Important: The database ingestion job cannot retrieve the data changes that occurred on the source table after the job stopped processing it. Consequently, data loss might occur on the target. To avoid data loss, you will need to resynchronize the source and target objects that the job stopped processing. Use the Resume With Options > Resync option.
Resync Resynchronize the target table with the source table. Use this option for tables that the job stopped processing because of the Stop Table setting for a Schema Drift option.Important: This option is available only for combined initial and incremental load jobs.
Replicate Allow the database ingestion job to replicate the DDL change to the target.Important: If you specify the Replicate option for Rename Column operations on Microsoft Azure SQL Data Warehouse targets, the job will end with an error.
144 Chapter 4: Mass Ingestion Databases
4. Click Resume With Options.
The resumed job will use the schema drift option that you specified in step 3 to process the schema change that caused the job to stop. Thereafter, the schema drift options that you specified when creating the task take effect again.
Important: Mass Ingestion Databases processes a schema change to a source table only after a DML operation occurs on the table. Therefore, after you resume a job, the table subtask state remains unchanged until the first DML operation occurs on the table.
Redeploying a database ingestion jobRedeploy a database ingestion job after editing available fields in the associated database ingestion ingestion task so that the new settings can take effect.
You can edit some but not all of fields in an ingestion task definition that has been previously deployed, without first undeploying the job. You can add a source table and change any of the runtime and target options that are available for editing. For example, you might want to reset some target options to test the effects of different settings.
The redeploy operation stops each job subtask for a source table, deploys the updated ingestion task, and automatically starts the subtasks that were stopped and any new subtasks for added source tables.
Note: For incremental load jobs and combined initial and incremental load jobs, the redeploy operation does not change the list of selected tables that was created during the first deployment. To update the list of tables, edit the table selection rules in the associated task and then redeploy the job.
1. On the My Jobs page, navigate to the row for the job that you want to redeploy.
2. In the Actions menu for the row, select Redeploy.
The job instance automatically starts running.
If the job is running when you select Redeploy, Mass Ingestion Databases stops the job and then redeploys the ingestion task and restarts the job.
For jobs with Microsoft Azure SQL Data Warehouse or Snowflake Cloud Data Warehouse targets, the redeploy operation also validates that the target tables exist and creates new ones if table selection rules have changed.
Undeploying a database ingestion jobUndeploy a database ingestion job that was previously deployed if you no longer need to run the job or if you need to change a connection or property in the associated ingestion task that cannot be edited without first undeploying the job.
Before you attempt to undeploy a job, ensure that it is not running.
After the job is undeployed, you cannot run it again or redeploy it. If you want to run a job for the associated ingestion task again, you must deploy the task again from the task wizard to create a new job instance. For
Redeploying a database ingestion job 145

example, if you want to change the target connection, undeploy the job, edit the ingestion task to change the connection, deploy the task again, and then run the new job instance.
1. On the My Jobs page in Mass Ingestion or on the All Jobs tab of the Data Ingestion page in Monitor, navigate to the row for the job that you want to undeploy.
2. In the Actions menu for the row, click Undeploy.
The Undeploy command is not available for a Failed job if the job has not been previously deployed.
If the undeploy operation fails, the job state switches to Failed, even if it was in the Aborted state.
Resynchronizing source and target objectsYou can resynchronize source and target objects for a subtask that is part of a running database ingestion combined initial and incremental load job. The subtask must be in a state other than Queued or Starting.
For example, you might want to resynchronize the target with the source if initial load or incremental load processing failed or if you want to start the job over again from a specific restart point.
Important: To resynchronize tables that stopped and are currently in the Error state because of the Schema Drift setting of Stop Table, you must use the Resume With Options > Resync option in the Actions menu. For more information, see “Overriding schema drift options when resuming a database ingestion job” on page 144.
1. On the My Jobs page in the Mass Ingestion service or on the All Jobs tab of the Mass Ingestion page in Monitor, drill down on an ingestion job to display job details.
The job must be in the Up and Running state and be for a combined initial and incremental load operation.
2. Click the Object Detail tab.
3. In the subtask row for the source and target objects that you want to resynchronize, click the Actions menu and select Resync.
For the Actions menu and Resync option to be available, the subtask must be in a state other than Queued or Starting.
If the source table schema does not match the target table schema, the ingestion subtask drops the target table and creates a new table that matches the source schema. Regardless of whether the target tables are re-created, the subtask truncates the target tables and then reloads source data to the tables.
Important: If the source table contains many rows, the resynchronization might take a long time to perform.
Restart and Recovery for Incremental Load JobsMass Ingestion Databases can restart incremental load and combined initial and incremental load jobs that stopped because of an error or a user stop request without losing change data.
After the first job run, Mass Ingestion Databases continually records an identifier for the processing position in the change stream as changes are applied to the target. For file-based targets such as Amazon S3, Azure Data Lake Storage, Google Cloud Storage, and Kafka, the identifier is stored in a checkpoint file. For database targets, the identifier is stored in a generated recovery table, called INFORMATICA_CDC_RECOVERY, on the target.
146 Chapter 4: Mass Ingestion Databases
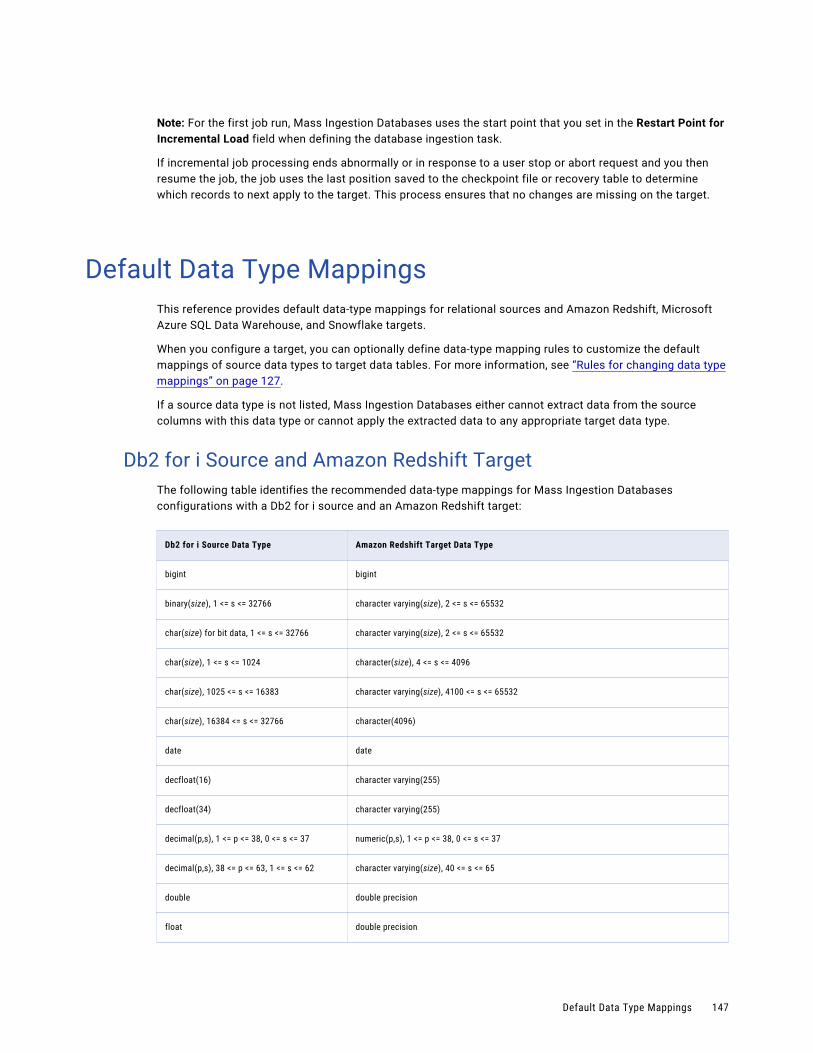
Note: For the first job run, Mass Ingestion Databases uses the start point that you set in the Restart Point for Incremental Load field when defining the database ingestion task.
If incremental job processing ends abnormally or in response to a user stop or abort request and you then resume the job, the job uses the last position saved to the checkpoint file or recovery table to determine which records to next apply to the target. This process ensures that no changes are missing on the target.
Default Data Type MappingsThis reference provides default data-type mappings for relational sources and Amazon Redshift, Microsoft Azure SQL Data Warehouse, and Snowflake targets.
When you configure a target, you can optionally define data-type mapping rules to customize the default mappings of source data types to target data tables. For more information, see “Rules for changing data type mappings” on page 127.
If a source data type is not listed, Mass Ingestion Databases either cannot extract data from the source columns with this data type or cannot apply the extracted data to any appropriate target data type.
Db2 for i Source and Amazon Redshift TargetThe following table identifies the recommended data-type mappings for Mass Ingestion Databases configurations with a Db2 for i source and an Amazon Redshift target:
Db2 for i Source Data Type Amazon Redshift Target Data Type
bigint bigint
binary(size), 1 <= s <= 32766 character varying(size), 2 <= s <= 65532
char(size) for bit data, 1 <= s <= 32766 character varying(size), 2 <= s <= 65532
char(size), 1 <= s <= 1024 character(size), 4 <= s <= 4096
char(size), 1025 <= s <= 16383 character varying(size), 4100 <= s <= 65532
char(size), 16384 <= s <= 32766 character(4096)
date date
decfloat(16) character varying(255)
decfloat(34) character varying(255)
decimal(p,s), 1 <= p <= 38, 0 <= s <= 37 numeric(p,s), 1 <= p <= 38, 0 <= s <= 37
decimal(p,s), 38 <= p <= 63, 1 <= s <= 62 character varying(size), 40 <= s <= 65
double double precision
float double precision
Default Data Type Mappings 147
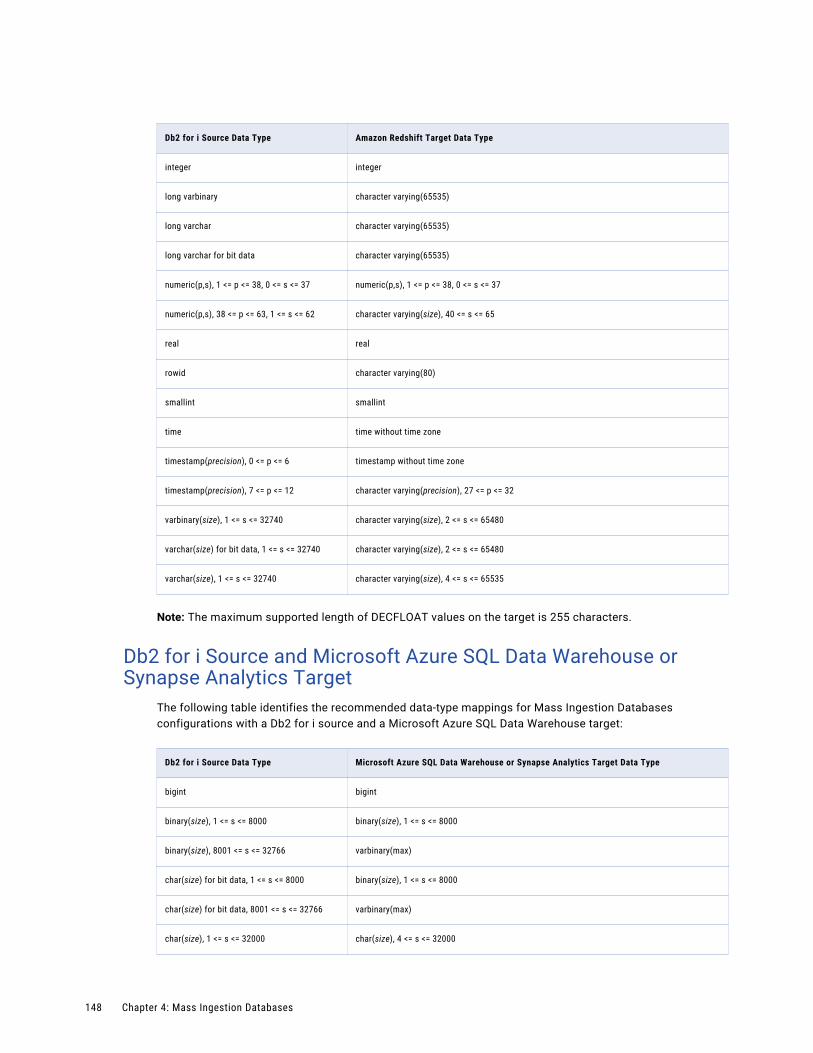
Db2 for i Source Data Type Amazon Redshift Target Data Type
integer integer
long varbinary character varying(65535)
long varchar character varying(65535)
long varchar for bit data character varying(65535)
numeric(p,s), 1 <= p <= 38, 0 <= s <= 37 numeric(p,s), 1 <= p <= 38, 0 <= s <= 37
numeric(p,s), 38 <= p <= 63, 1 <= s <= 62 character varying(size), 40 <= s <= 65
real real
rowid character varying(80)
smallint smallint
time time without time zone
timestamp(precision), 0 <= p <= 6 timestamp without time zone
timestamp(precision), 7 <= p <= 12 character varying(precision), 27 <= p <= 32
varbinary(size), 1 <= s <= 32740 character varying(size), 2 <= s <= 65480
varchar(size) for bit data, 1 <= s <= 32740 character varying(size), 2 <= s <= 65480
varchar(size), 1 <= s <= 32740 character varying(size), 4 <= s <= 65535
Note: The maximum supported length of DECFLOAT values on the target is 255 characters.
Db2 for i Source and Microsoft Azure SQL Data Warehouse or Synapse Analytics Target
The following table identifies the recommended data-type mappings for Mass Ingestion Databases configurations with a Db2 for i source and a Microsoft Azure SQL Data Warehouse target:
Db2 for i Source Data Type Microsoft Azure SQL Data Warehouse or Synapse Analytics Target Data Type
bigint bigint
binary(size), 1 <= s <= 8000 binary(size), 1 <= s <= 8000
binary(size), 8001 <= s <= 32766 varbinary(max)
char(size) for bit data, 1 <= s <= 8000 binary(size), 1 <= s <= 8000
char(size) for bit data, 8001 <= s <= 32766 varbinary(max)
char(size), 1 <= s <= 32000 char(size), 4 <= s <= 32000
148 Chapter 4: Mass Ingestion Databases
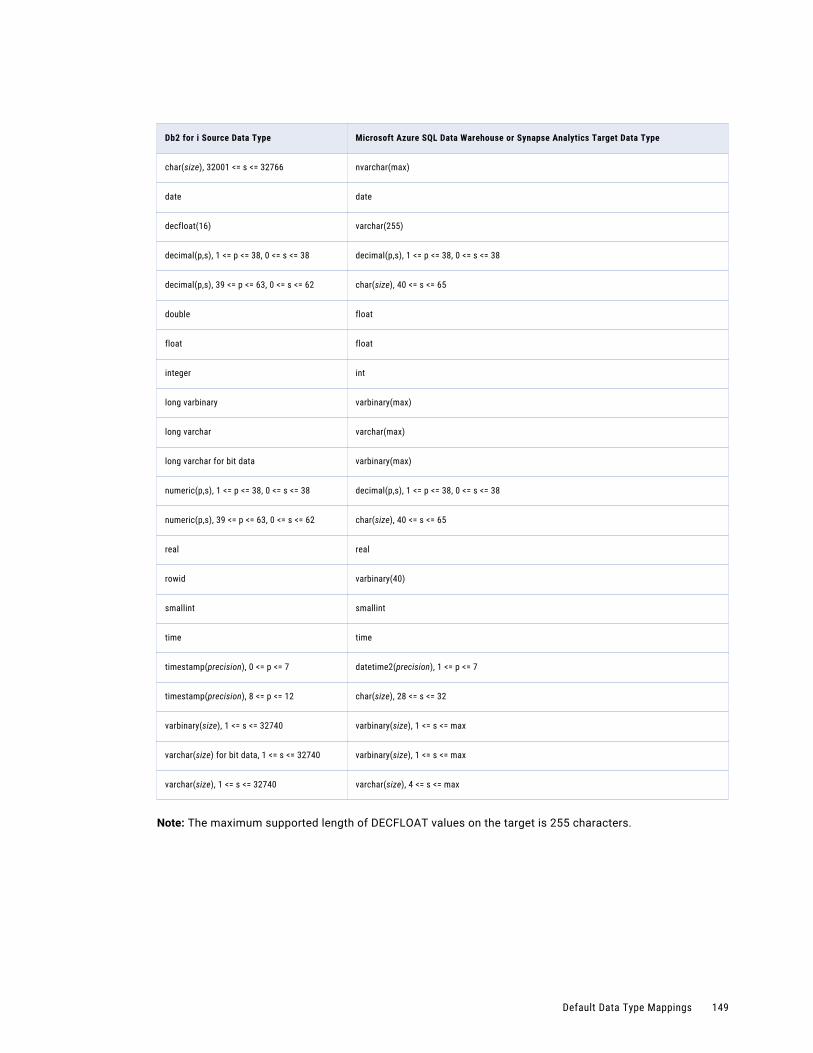
Db2 for i Source Data Type Microsoft Azure SQL Data Warehouse or Synapse Analytics Target Data Type
char(size), 32001 <= s <= 32766 nvarchar(max)
date date
decfloat(16) varchar(255)
decimal(p,s), 1 <= p <= 38, 0 <= s <= 38 decimal(p,s), 1 <= p <= 38, 0 <= s <= 38
decimal(p,s), 39 <= p <= 63, 0 <= s <= 62 char(size), 40 <= s <= 65
double float
float float
integer int
long varbinary varbinary(max)
long varchar varchar(max)
long varchar for bit data varbinary(max)
numeric(p,s), 1 <= p <= 38, 0 <= s <= 38 decimal(p,s), 1 <= p <= 38, 0 <= s <= 38
numeric(p,s), 39 <= p <= 63, 0 <= s <= 62 char(size), 40 <= s <= 65
real real
rowid varbinary(40)
smallint smallint
time time
timestamp(precision), 0 <= p <= 7 datetime2(precision), 1 <= p <= 7
timestamp(precision), 8 <= p <= 12 char(size), 28 <= s <= 32
varbinary(size), 1 <= s <= 32740 varbinary(size), 1 <= s <= max
varchar(size) for bit data, 1 <= s <= 32740 varbinary(size), 1 <= s <= max
varchar(size), 1 <= s <= 32740 varchar(size), 4 <= s <= max
Note: The maximum supported length of DECFLOAT values on the target is 255 characters.
Default Data Type Mappings 149
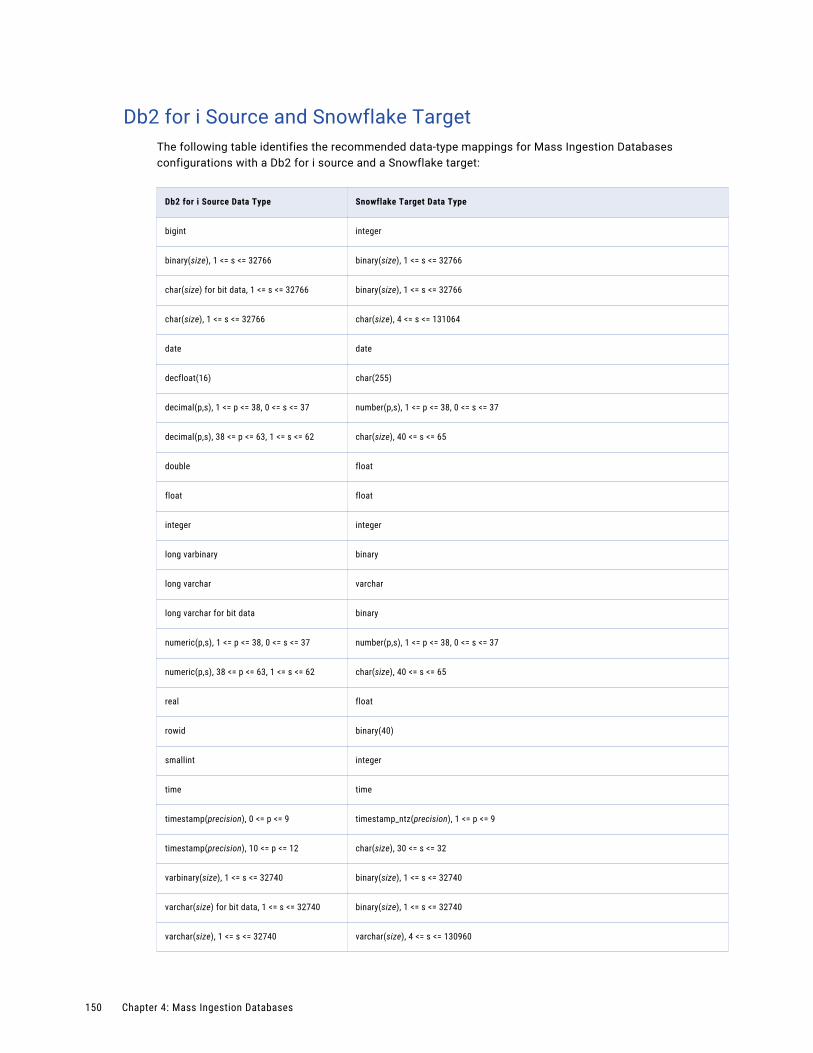
Db2 for i Source and Snowflake TargetThe following table identifies the recommended data-type mappings for Mass Ingestion Databases configurations with a Db2 for i source and a Snowflake target:
Db2 for i Source Data Type Snowflake Target Data Type
bigint integer
binary(size), 1 <= s <= 32766 binary(size), 1 <= s <= 32766
char(size) for bit data, 1 <= s <= 32766 binary(size), 1 <= s <= 32766
char(size), 1 <= s <= 32766 char(size), 4 <= s <= 131064
date date
decfloat(16) char(255)
decimal(p,s), 1 <= p <= 38, 0 <= s <= 37 number(p,s), 1 <= p <= 38, 0 <= s <= 37
decimal(p,s), 38 <= p <= 63, 1 <= s <= 62 char(size), 40 <= s <= 65
double float
float float
integer integer
long varbinary binary
long varchar varchar
long varchar for bit data binary
numeric(p,s), 1 <= p <= 38, 0 <= s <= 37 number(p,s), 1 <= p <= 38, 0 <= s <= 37
numeric(p,s), 38 <= p <= 63, 1 <= s <= 62 char(size), 40 <= s <= 65
real float
rowid binary(40)
smallint integer
time time
timestamp(precision), 0 <= p <= 9 timestamp_ntz(precision), 1 <= p <= 9
timestamp(precision), 10 <= p <= 12 char(size), 30 <= s <= 32
varbinary(size), 1 <= s <= 32740 binary(size), 1 <= s <= 32740
varchar(size) for bit data, 1 <= s <= 32740 binary(size), 1 <= s <= 32740
varchar(size), 1 <= s <= 32740 varchar(size), 4 <= s <= 130960
150 Chapter 4: Mass Ingestion Databases
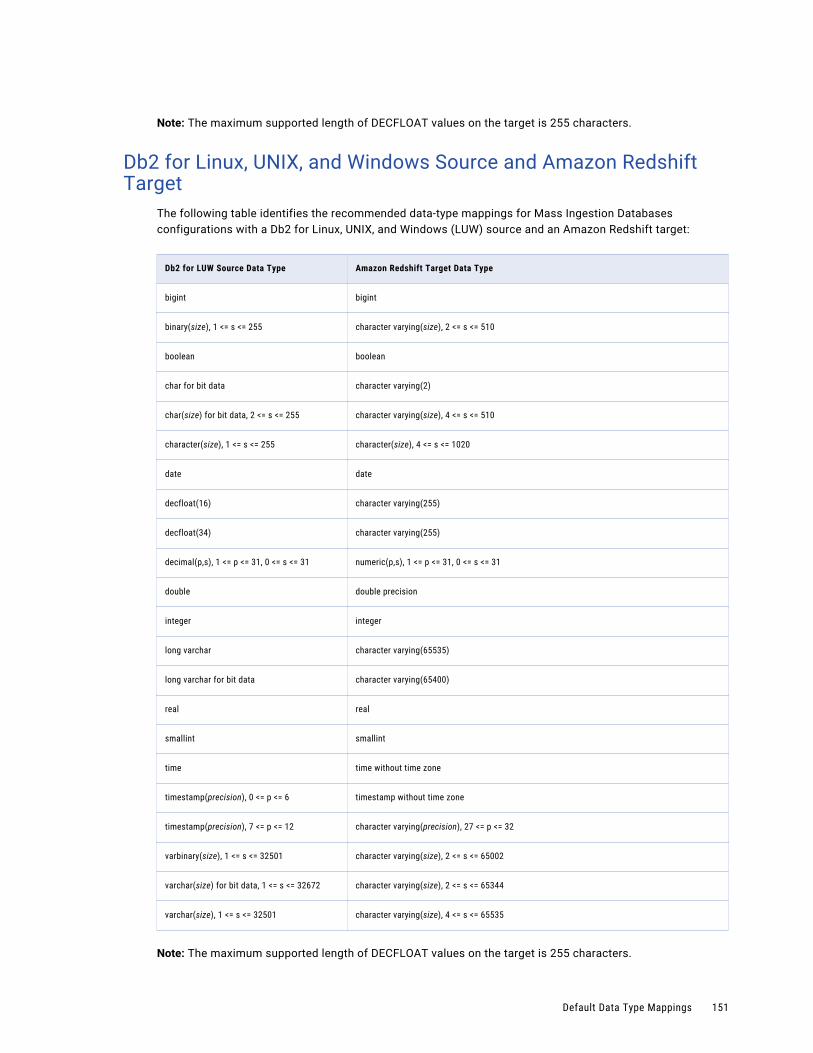
Note: The maximum supported length of DECFLOAT values on the target is 255 characters.
Db2 for Linux, UNIX, and Windows Source and Amazon Redshift Target
The following table identifies the recommended data-type mappings for Mass Ingestion Databases configurations with a Db2 for Linux, UNIX, and Windows (LUW) source and an Amazon Redshift target:
Db2 for LUW Source Data Type Amazon Redshift Target Data Type
bigint bigint
binary(size), 1 <= s <= 255 character varying(size), 2 <= s <= 510
boolean boolean
char for bit data character varying(2)
char(size) for bit data, 2 <= s <= 255 character varying(size), 4 <= s <= 510
character(size), 1 <= s <= 255 character(size), 4 <= s <= 1020
date date
decfloat(16) character varying(255)
decfloat(34) character varying(255)
decimal(p,s), 1 <= p <= 31, 0 <= s <= 31 numeric(p,s), 1 <= p <= 31, 0 <= s <= 31
double double precision
integer integer
long varchar character varying(65535)
long varchar for bit data character varying(65400)
real real
smallint smallint
time time without time zone
timestamp(precision), 0 <= p <= 6 timestamp without time zone
timestamp(precision), 7 <= p <= 12 character varying(precision), 27 <= p <= 32
varbinary(size), 1 <= s <= 32501 character varying(size), 2 <= s <= 65002
varchar(size) for bit data, 1 <= s <= 32672 character varying(size), 2 <= s <= 65344
varchar(size), 1 <= s <= 32501 character varying(size), 4 <= s <= 65535
Note: The maximum supported length of DECFLOAT values on the target is 255 characters.
Default Data Type Mappings 151

DB2 for Linux, UNIX, and Windows Source and Microsoft Azure SQL Data Warehouse or Synapse Analytics Target
The following table identifies the recommended data-type mappings for Mass Ingestion Databases configurations with a DB2 for Linux, UNIX, and Windows source and a Microsoft Azure SQL Data Warehouse or Synapse Analytics target:
DB2 for Linux, UNIX, and Windows Source Data Type
Microsoft Azure SQL Data Warehouse or Synapse Analytics Target Data Type
bigint bigint
binary(size), 1 <= s <= 255 binary(size), 1 <= s <= 255
boolean bit
char for bit data binary
char(size) for bit data, 2 <= s <= 255 binary(size), 2 <= s <= 255
character(size), 1 <= s <= 255 char(size), 4 <= s <= 1020
date date
decfloat(16) varchar(255)
decimal(p,s), 1 <= p <= 31, 0 <= s <= 31 decimal(p,s), 1 <= p <= 31, 0 <= s <= 31
double float
integer int
long varchar varchar(max)
long varchar for bit data varbinary(max)
real real
smallint smallint
time time
timestamp(precision), 0 <= p <= 7 datetime2(precision), 1 <= p <= 7
timestamp(precision), 8 <= p <= 12 char(size), 28 <= s <= 32
varbinary(size), 1 <= s <= 32501 varbinary(size), 1 <= s <= max
varchar(size) for bit data, 1 <= s <= 32672 varbinary(size), 1 <= s <= max
varchar(size), 1 <= s <= 32501 varchar(size), 4 <= s <= max
Note: The maximum supported length of DECFLOAT values on the target is 255 characters.
152 Chapter 4: Mass Ingestion Databases
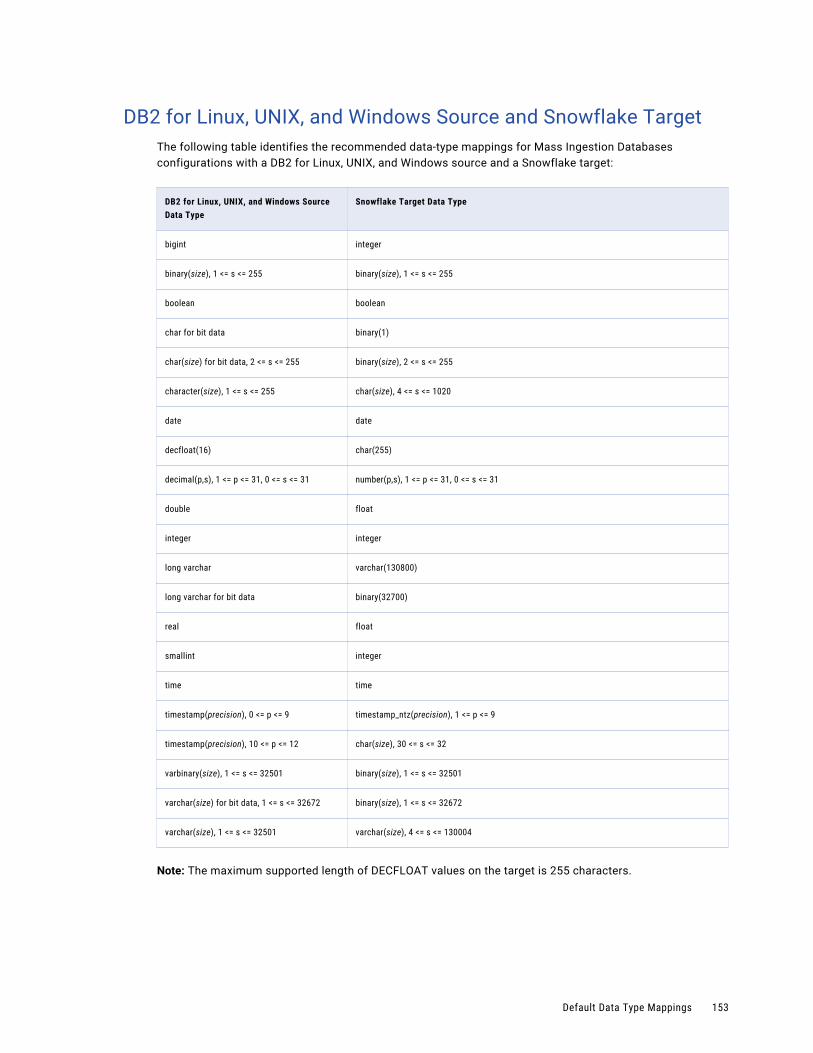
DB2 for Linux, UNIX, and Windows Source and Snowflake TargetThe following table identifies the recommended data-type mappings for Mass Ingestion Databases configurations with a DB2 for Linux, UNIX, and Windows source and a Snowflake target:
DB2 for Linux, UNIX, and Windows Source Data Type
Snowflake Target Data Type
bigint integer
binary(size), 1 <= s <= 255 binary(size), 1 <= s <= 255
boolean boolean
char for bit data binary(1)
char(size) for bit data, 2 <= s <= 255 binary(size), 2 <= s <= 255
character(size), 1 <= s <= 255 char(size), 4 <= s <= 1020
date date
decfloat(16) char(255)
decimal(p,s), 1 <= p <= 31, 0 <= s <= 31 number(p,s), 1 <= p <= 31, 0 <= s <= 31
double float
integer integer
long varchar varchar(130800)
long varchar for bit data binary(32700)
real float
smallint integer
time time
timestamp(precision), 0 <= p <= 9 timestamp_ntz(precision), 1 <= p <= 9
timestamp(precision), 10 <= p <= 12 char(size), 30 <= s <= 32
varbinary(size), 1 <= s <= 32501 binary(size), 1 <= s <= 32501
varchar(size) for bit data, 1 <= s <= 32672 binary(size), 1 <= s <= 32672
varchar(size), 1 <= s <= 32501 varchar(size), 4 <= s <= 130004
Note: The maximum supported length of DECFLOAT values on the target is 255 characters.
Default Data Type Mappings 153
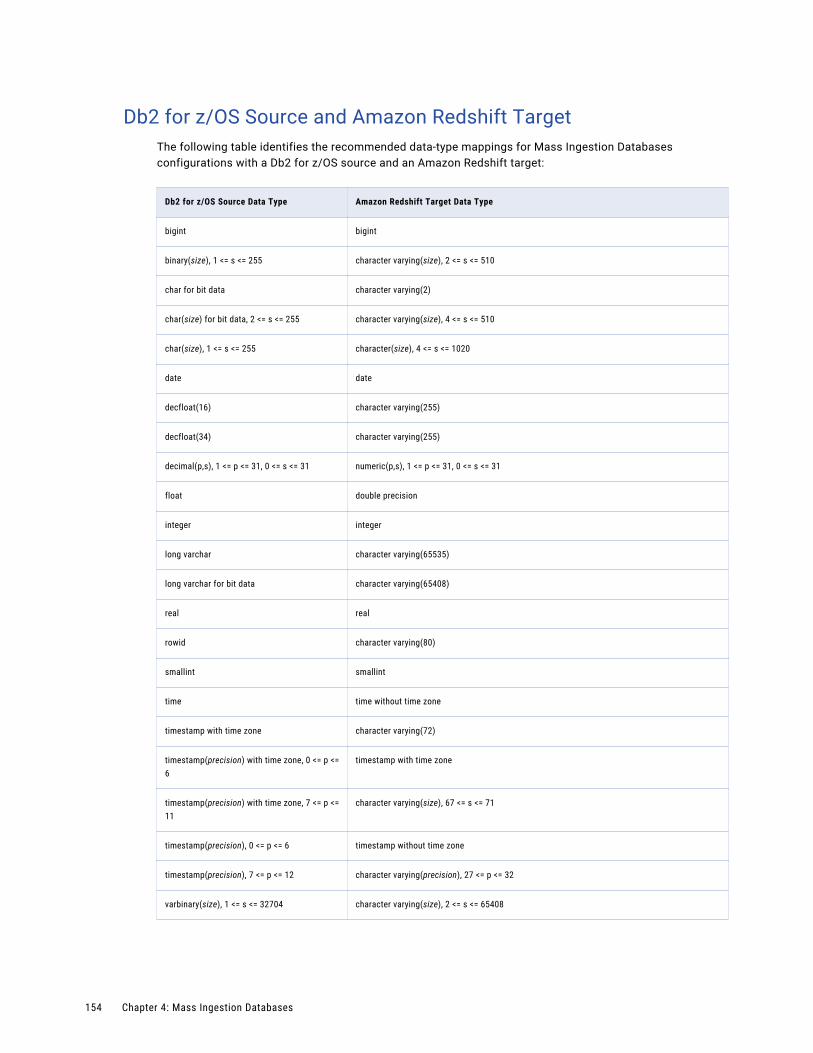
Db2 for z/OS Source and Amazon Redshift TargetThe following table identifies the recommended data-type mappings for Mass Ingestion Databases configurations with a Db2 for z/OS source and an Amazon Redshift target:
Db2 for z/OS Source Data Type Amazon Redshift Target Data Type
bigint bigint
binary(size), 1 <= s <= 255 character varying(size), 2 <= s <= 510
char for bit data character varying(2)
char(size) for bit data, 2 <= s <= 255 character varying(size), 4 <= s <= 510
char(size), 1 <= s <= 255 character(size), 4 <= s <= 1020
date date
decfloat(16) character varying(255)
decfloat(34) character varying(255)
decimal(p,s), 1 <= p <= 31, 0 <= s <= 31 numeric(p,s), 1 <= p <= 31, 0 <= s <= 31
float double precision
integer integer
long varchar character varying(65535)
long varchar for bit data character varying(65408)
real real
rowid character varying(80)
smallint smallint
time time without time zone
timestamp with time zone character varying(72)
timestamp(precision) with time zone, 0 <= p <= 6
timestamp with time zone
timestamp(precision) with time zone, 7 <= p <= 11
character varying(size), 67 <= s <= 71
timestamp(precision), 0 <= p <= 6 timestamp without time zone
timestamp(precision), 7 <= p <= 12 character varying(precision), 27 <= p <= 32
varbinary(size), 1 <= s <= 32704 character varying(size), 2 <= s <= 65408
154 Chapter 4: Mass Ingestion Databases
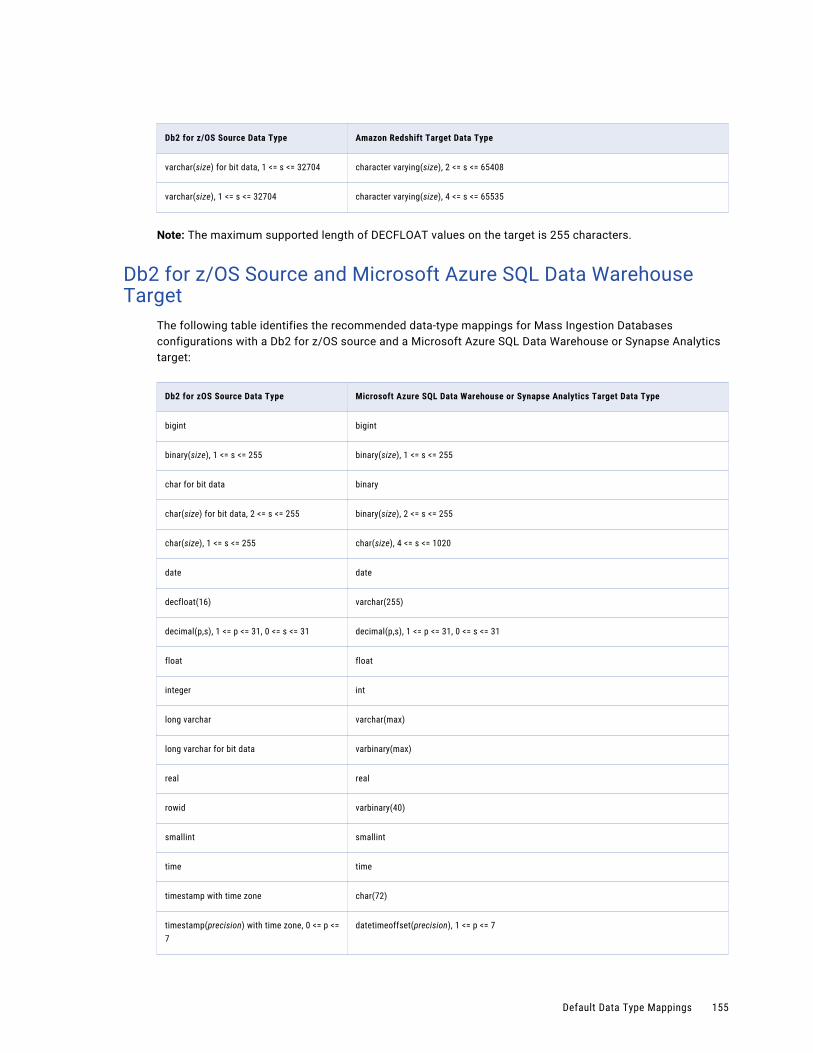
Db2 for z/OS Source Data Type Amazon Redshift Target Data Type
varchar(size) for bit data, 1 <= s <= 32704 character varying(size), 2 <= s <= 65408
varchar(size), 1 <= s <= 32704 character varying(size), 4 <= s <= 65535
Note: The maximum supported length of DECFLOAT values on the target is 255 characters.
Db2 for z/OS Source and Microsoft Azure SQL Data Warehouse Target
The following table identifies the recommended data-type mappings for Mass Ingestion Databases configurations with a Db2 for z/OS source and a Microsoft Azure SQL Data Warehouse or Synapse Analytics target:
Db2 for zOS Source Data Type Microsoft Azure SQL Data Warehouse or Synapse Analytics Target Data Type
bigint bigint
binary(size), 1 <= s <= 255 binary(size), 1 <= s <= 255
char for bit data binary
char(size) for bit data, 2 <= s <= 255 binary(size), 2 <= s <= 255
char(size), 1 <= s <= 255 char(size), 4 <= s <= 1020
date date
decfloat(16) varchar(255)
decimal(p,s), 1 <= p <= 31, 0 <= s <= 31 decimal(p,s), 1 <= p <= 31, 0 <= s <= 31
float float
integer int
long varchar varchar(max)
long varchar for bit data varbinary(max)
real real
rowid varbinary(40)
smallint smallint
time time
timestamp with time zone char(72)
timestamp(precision) with time zone, 0 <= p <= 7
datetimeoffset(precision), 1 <= p <= 7
Default Data Type Mappings 155
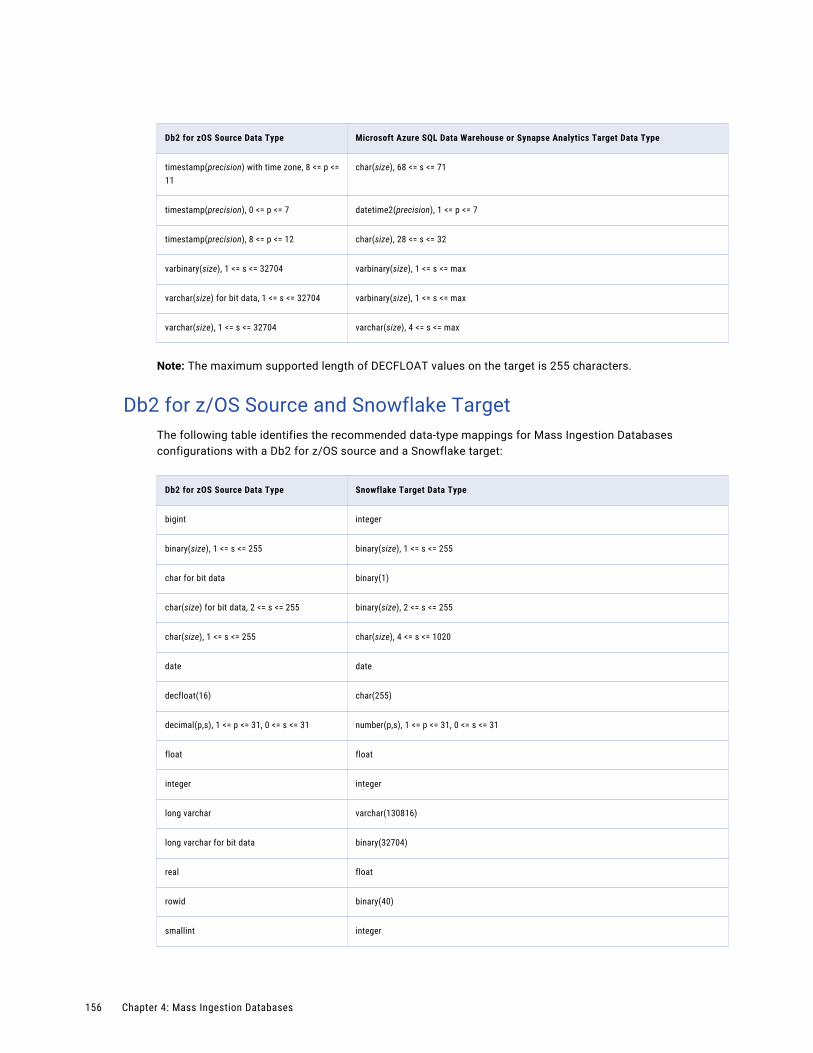
Db2 for zOS Source Data Type Microsoft Azure SQL Data Warehouse or Synapse Analytics Target Data Type
timestamp(precision) with time zone, 8 <= p <= 11
char(size), 68 <= s <= 71
timestamp(precision), 0 <= p <= 7 datetime2(precision), 1 <= p <= 7
timestamp(precision), 8 <= p <= 12 char(size), 28 <= s <= 32
varbinary(size), 1 <= s <= 32704 varbinary(size), 1 <= s <= max
varchar(size) for bit data, 1 <= s <= 32704 varbinary(size), 1 <= s <= max
varchar(size), 1 <= s <= 32704 varchar(size), 4 <= s <= max
Note: The maximum supported length of DECFLOAT values on the target is 255 characters.
Db2 for z/OS Source and Snowflake TargetThe following table identifies the recommended data-type mappings for Mass Ingestion Databases configurations with a Db2 for z/OS source and a Snowflake target:
Db2 for zOS Source Data Type Snowflake Target Data Type
bigint integer
binary(size), 1 <= s <= 255 binary(size), 1 <= s <= 255
char for bit data binary(1)
char(size) for bit data, 2 <= s <= 255 binary(size), 2 <= s <= 255
char(size), 1 <= s <= 255 char(size), 4 <= s <= 1020
date date
decfloat(16) char(255)
decimal(p,s), 1 <= p <= 31, 0 <= s <= 31 number(p,s), 1 <= p <= 31, 0 <= s <= 31
float float
integer integer
long varchar varchar(130816)
long varchar for bit data binary(32704)
real float
rowid binary(40)
smallint integer
156 Chapter 4: Mass Ingestion Databases
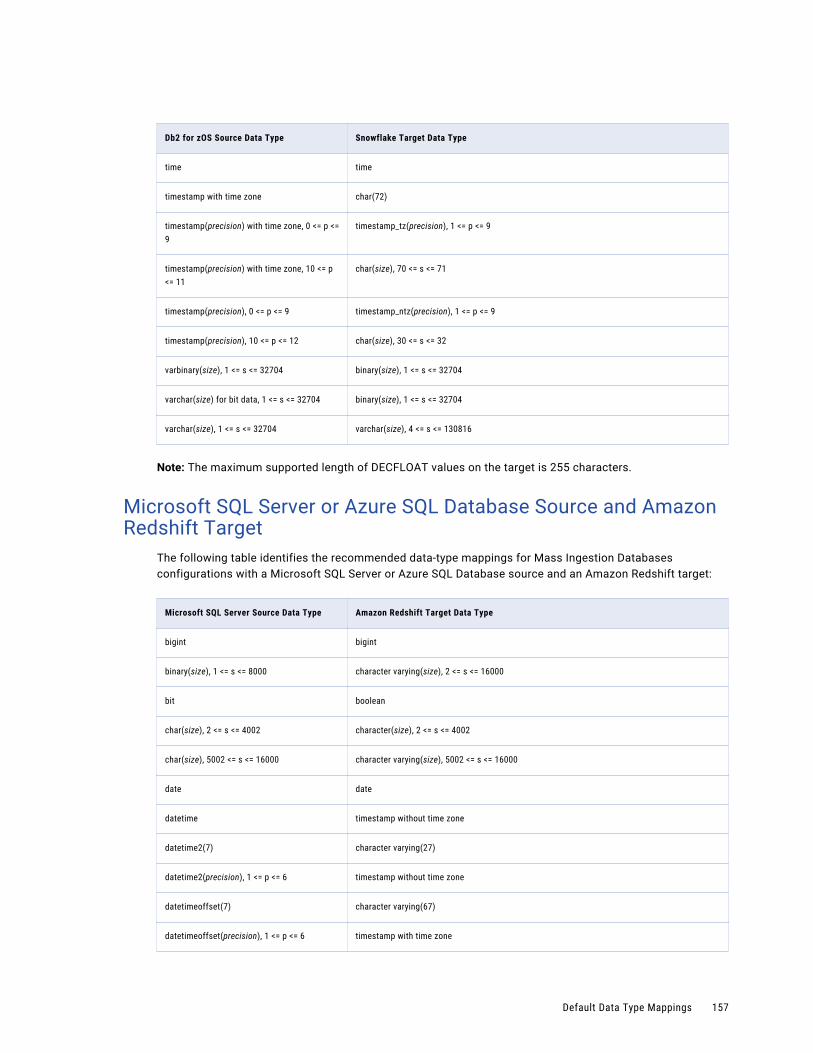
Db2 for zOS Source Data Type Snowflake Target Data Type
time time
timestamp with time zone char(72)
timestamp(precision) with time zone, 0 <= p <= 9
timestamp_tz(precision), 1 <= p <= 9
timestamp(precision) with time zone, 10 <= p <= 11
char(size), 70 <= s <= 71
timestamp(precision), 0 <= p <= 9 timestamp_ntz(precision), 1 <= p <= 9
timestamp(precision), 10 <= p <= 12 char(size), 30 <= s <= 32
varbinary(size), 1 <= s <= 32704 binary(size), 1 <= s <= 32704
varchar(size) for bit data, 1 <= s <= 32704 binary(size), 1 <= s <= 32704
varchar(size), 1 <= s <= 32704 varchar(size), 4 <= s <= 130816
Note: The maximum supported length of DECFLOAT values on the target is 255 characters.
Microsoft SQL Server or Azure SQL Database Source and Amazon Redshift Target
The following table identifies the recommended data-type mappings for Mass Ingestion Databases configurations with a Microsoft SQL Server or Azure SQL Database source and an Amazon Redshift target:
Microsoft SQL Server Source Data Type Amazon Redshift Target Data Type
bigint bigint
binary(size), 1 <= s <= 8000 character varying(size), 2 <= s <= 16000
bit boolean
char(size), 2 <= s <= 4002 character(size), 2 <= s <= 4002
char(size), 5002 <= s <= 16000 character varying(size), 5002 <= s <= 16000
date date
datetime timestamp without time zone
datetime2(7) character varying(27)
datetime2(precision), 1 <= p <= 6 timestamp without time zone
datetimeoffset(7) character varying(67)
datetimeoffset(precision), 1 <= p <= 6 timestamp with time zone
Default Data Type Mappings 157

Microsoft SQL Server Source Data Type Amazon Redshift Target Data Type
decimal(38,38) character varying(41)
decimal(p,s), 1 <= p <= 38, 0 <= s <= 37 numeric(p,s), 1 <= p <= 38, 0 <= s <= 37
float double precision
geography character varying(65535)
geometry character varying(65535)
hierarchyid character varying(1784)
image character varying(65535)
int integer
money numeric(19,4)
nchar(size), 2 <= s <= 4002 character(size), 2 <= s <= 4002
nchar(size), 5002 <= s <= 8000 character varying(size), 5002 <= s <= 8000
ntext character varying(65535)
numeric(38,38) character varying(41)
numeric(p,s), 1 <= p <= 38, 0 <= s <= 37 numeric(p,s), 1 <= p <= 38, 0 <= s <= 37
nvarchar(size), 2 <= s <= max character varying(size), 2 <= s <= 8000
real real
smalldatetime timestamp without time zone
smallint smallint
smallmoney numeric(10,4)
sql_variant character varying(16032)
text character varying(65535)
time(precision), 1 <= p <= 7 time(precision) without time zone, 0 <= p <= 6
timestamp(8) character varying(16)
tinyint smallint
uniqueidentifier character(36)
varbinary(size), 1 <= s <= 8000 character varying(size), 2 <= s <= 16000
158 Chapter 4: Mass Ingestion Databases
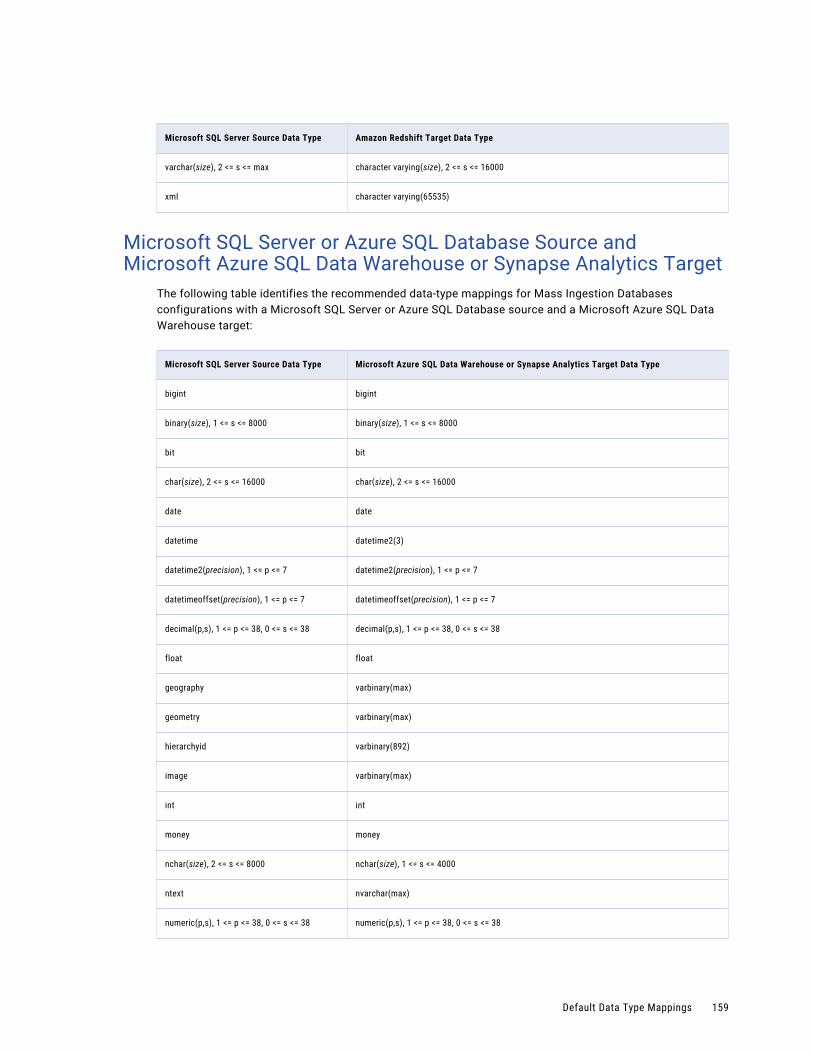
Microsoft SQL Server Source Data Type Amazon Redshift Target Data Type
varchar(size), 2 <= s <= max character varying(size), 2 <= s <= 16000
xml character varying(65535)
Microsoft SQL Server or Azure SQL Database Source and Microsoft Azure SQL Data Warehouse or Synapse Analytics Target
The following table identifies the recommended data-type mappings for Mass Ingestion Databases configurations with a Microsoft SQL Server or Azure SQL Database source and a Microsoft Azure SQL Data Warehouse target:
Microsoft SQL Server Source Data Type Microsoft Azure SQL Data Warehouse or Synapse Analytics Target Data Type
bigint bigint
binary(size), 1 <= s <= 8000 binary(size), 1 <= s <= 8000
bit bit
char(size), 2 <= s <= 16000 char(size), 2 <= s <= 16000
date date
datetime datetime2(3)
datetime2(precision), 1 <= p <= 7 datetime2(precision), 1 <= p <= 7
datetimeoffset(precision), 1 <= p <= 7 datetimeoffset(precision), 1 <= p <= 7
decimal(p,s), 1 <= p <= 38, 0 <= s <= 38 decimal(p,s), 1 <= p <= 38, 0 <= s <= 38
float float
geography varbinary(max)
geometry varbinary(max)
hierarchyid varbinary(892)
image varbinary(max)
int int
money money
nchar(size), 2 <= s <= 8000 nchar(size), 1 <= s <= 4000
ntext nvarchar(max)
numeric(p,s), 1 <= p <= 38, 0 <= s <= 38 numeric(p,s), 1 <= p <= 38, 0 <= s <= 38
Default Data Type Mappings 159
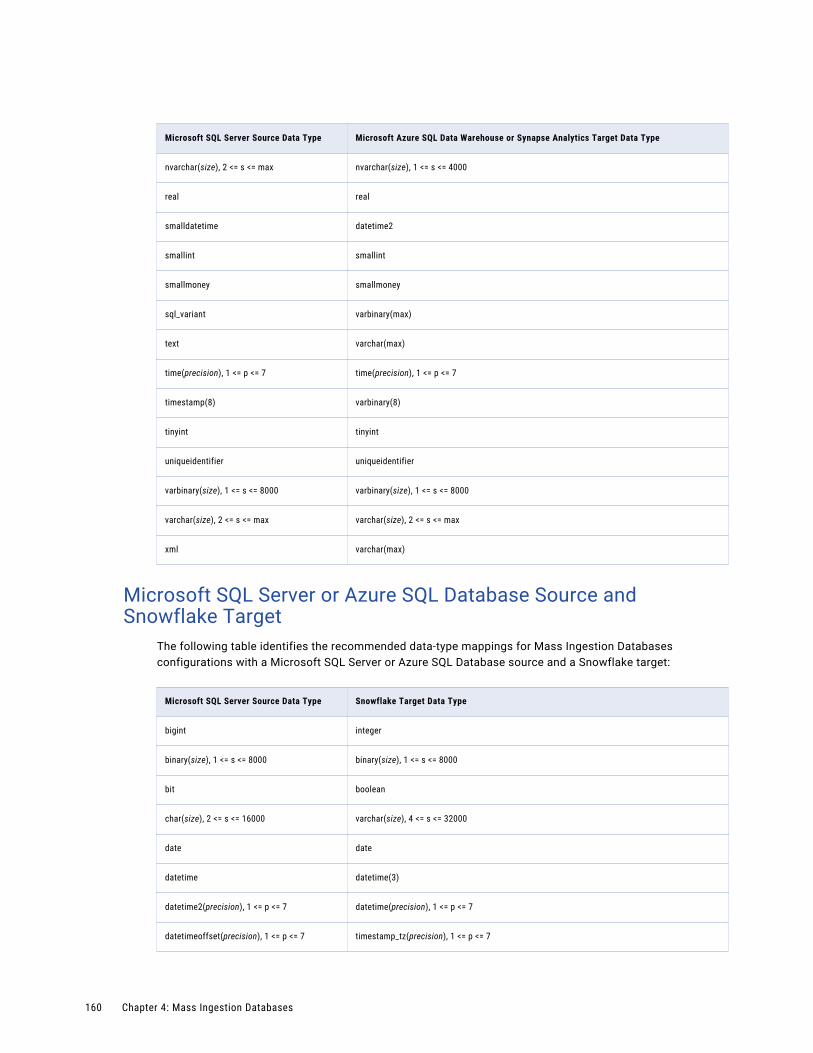
Microsoft SQL Server Source Data Type Microsoft Azure SQL Data Warehouse or Synapse Analytics Target Data Type
nvarchar(size), 2 <= s <= max nvarchar(size), 1 <= s <= 4000
real real
smalldatetime datetime2
smallint smallint
smallmoney smallmoney
sql_variant varbinary(max)
text varchar(max)
time(precision), 1 <= p <= 7 time(precision), 1 <= p <= 7
timestamp(8) varbinary(8)
tinyint tinyint
uniqueidentifier uniqueidentifier
varbinary(size), 1 <= s <= 8000 varbinary(size), 1 <= s <= 8000
varchar(size), 2 <= s <= max varchar(size), 2 <= s <= max
xml varchar(max)
Microsoft SQL Server or Azure SQL Database Source and Snowflake Target
The following table identifies the recommended data-type mappings for Mass Ingestion Databases configurations with a Microsoft SQL Server or Azure SQL Database source and a Snowflake target:
Microsoft SQL Server Source Data Type Snowflake Target Data Type
bigint integer
binary(size), 1 <= s <= 8000 binary(size), 1 <= s <= 8000
bit boolean
char(size), 2 <= s <= 16000 varchar(size), 4 <= s <= 32000
date date
datetime datetime(3)
datetime2(precision), 1 <= p <= 7 datetime(precision), 1 <= p <= 7
datetimeoffset(precision), 1 <= p <= 7 timestamp_tz(precision), 1 <= p <= 7
160 Chapter 4: Mass Ingestion Databases
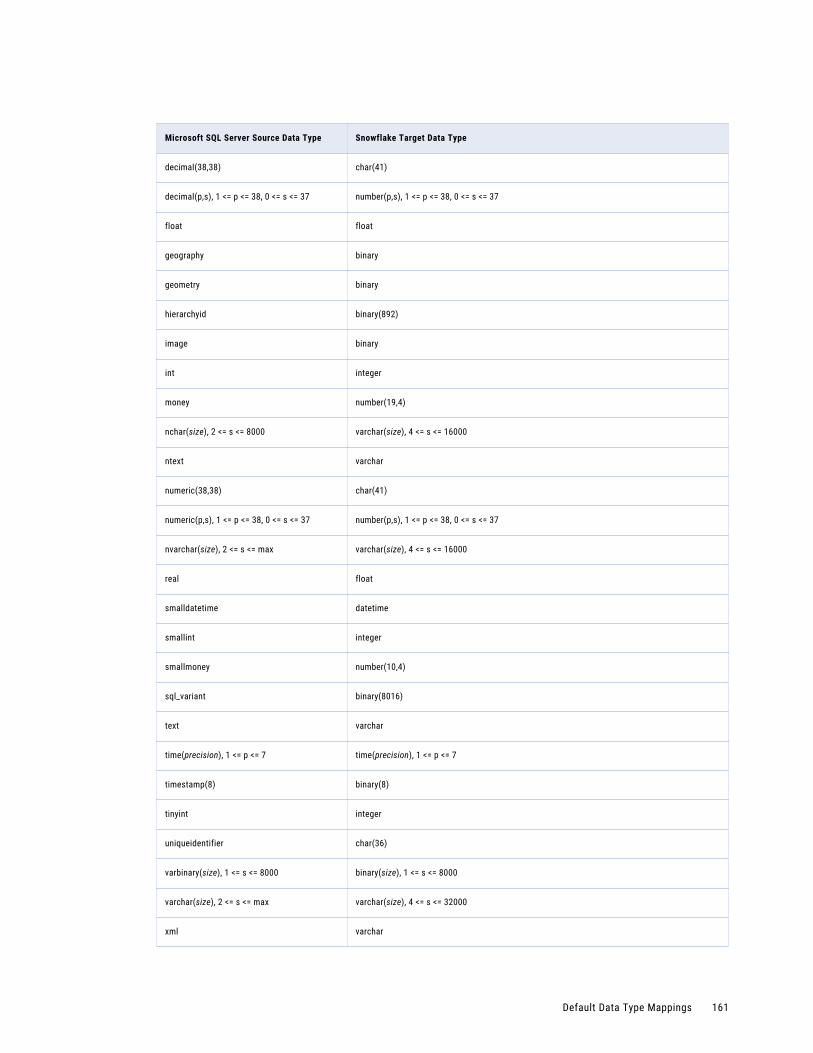
Microsoft SQL Server Source Data Type Snowflake Target Data Type
decimal(38,38) char(41)
decimal(p,s), 1 <= p <= 38, 0 <= s <= 37 number(p,s), 1 <= p <= 38, 0 <= s <= 37
float float
geography binary
geometry binary
hierarchyid binary(892)
image binary
int integer
money number(19,4)
nchar(size), 2 <= s <= 8000 varchar(size), 4 <= s <= 16000
ntext varchar
numeric(38,38) char(41)
numeric(p,s), 1 <= p <= 38, 0 <= s <= 37 number(p,s), 1 <= p <= 38, 0 <= s <= 37
nvarchar(size), 2 <= s <= max varchar(size), 4 <= s <= 16000
real float
smalldatetime datetime
smallint integer
smallmoney number(10,4)
sql_variant binary(8016)
text varchar
time(precision), 1 <= p <= 7 time(precision), 1 <= p <= 7
timestamp(8) binary(8)
tinyint integer
uniqueidentifier char(36)
varbinary(size), 1 <= s <= 8000 binary(size), 1 <= s <= 8000
varchar(size), 2 <= s <= max varchar(size), 4 <= s <= 32000
xml varchar
Default Data Type Mappings 161
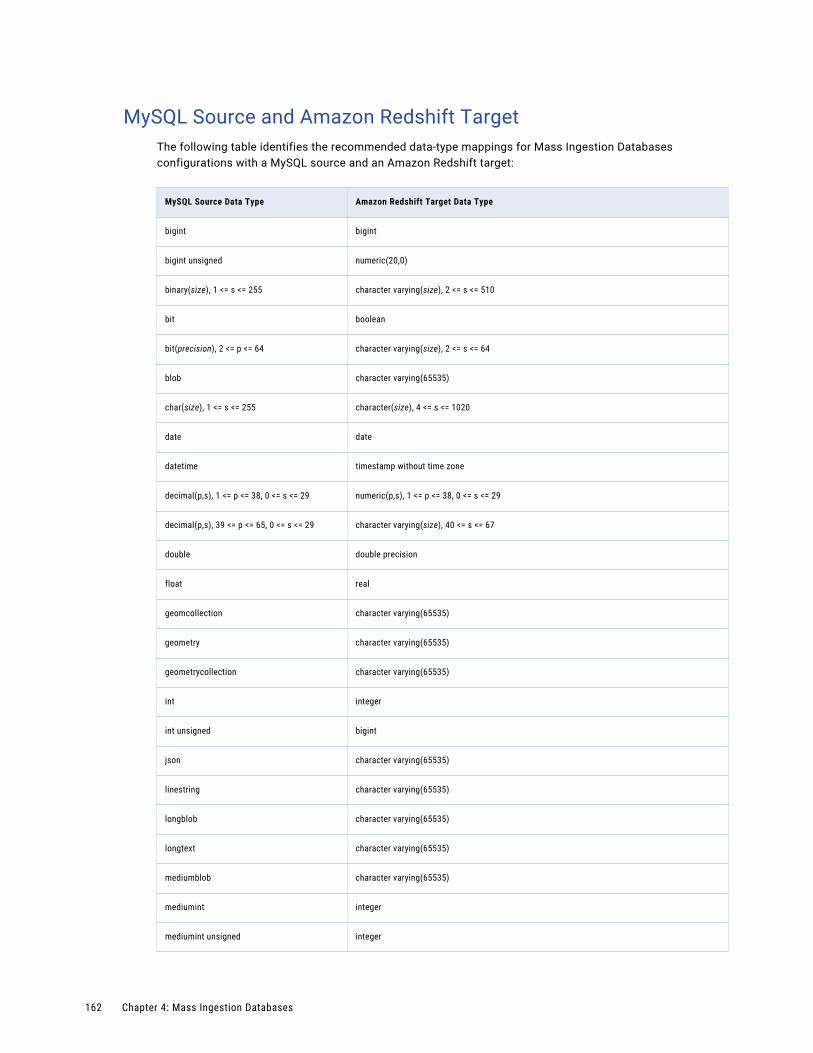
MySQL Source and Amazon Redshift TargetThe following table identifies the recommended data-type mappings for Mass Ingestion Databases configurations with a MySQL source and an Amazon Redshift target:
MySQL Source Data Type Amazon Redshift Target Data Type
bigint bigint
bigint unsigned numeric(20,0)
binary(size), 1 <= s <= 255 character varying(size), 2 <= s <= 510
bit boolean
bit(precision), 2 <= p <= 64 character varying(size), 2 <= s <= 64
blob character varying(65535)
char(size), 1 <= s <= 255 character(size), 4 <= s <= 1020
date date
datetime timestamp without time zone
decimal(p,s), 1 <= p <= 38, 0 <= s <= 29 numeric(p,s), 1 <= p <= 38, 0 <= s <= 29
decimal(p,s), 39 <= p <= 65, 0 <= s <= 29 character varying(size), 40 <= s <= 67
double double precision
float real
geomcollection character varying(65535)
geometry character varying(65535)
geometrycollection character varying(65535)
int integer
int unsigned bigint
json character varying(65535)
linestring character varying(65535)
longblob character varying(65535)
longtext character varying(65535)
mediumblob character varying(65535)
mediumint integer
mediumint unsigned integer
162 Chapter 4: Mass Ingestion Databases

MySQL Source Data Type Amazon Redshift Target Data Type
mediumtext character varying(65535)
multilinestring character varying(65535)
multipoint character varying(65535)
multipolygon character varying(65535)
numeric numeric(10,0)
point character varying(65535)
polygon character varying(65535)
smallint smallint
smallint unsigned integer
text character varying(65535)
time(6) time(precision) without time zone, 6 <= p <= null
timestamp timestamp without time zone
tinyblob character varying(510)
tinyint smallint
tinyint unsigned smallint
tinytext character varying(256)
varbinary(size), 1 <= s <= 65535 character varying(size), 2 <= s <= 65535
varchar(size), 1 <= s <= 21844 character varying(size), 4 <= s <= 65535
year smallint
MySQL Source and Microsoft Azure SQL Data Warehouse or Synapse Analytics Target
The following table identifies the recommended data-type mappings for Mass Ingestion Databases configurations with a MySQL source and a Microsoft Azure SQL Data Warehouse target:
MySQL Source Data Type Microsoft Azure SQL Data Warehouse or Synapse Analytics Target Data Type
bigint bigint
bigint unsigned decimal(20)
binary(size), 1 <= s <= 255 binary(size), 1 <= s <= 255
Default Data Type Mappings 163
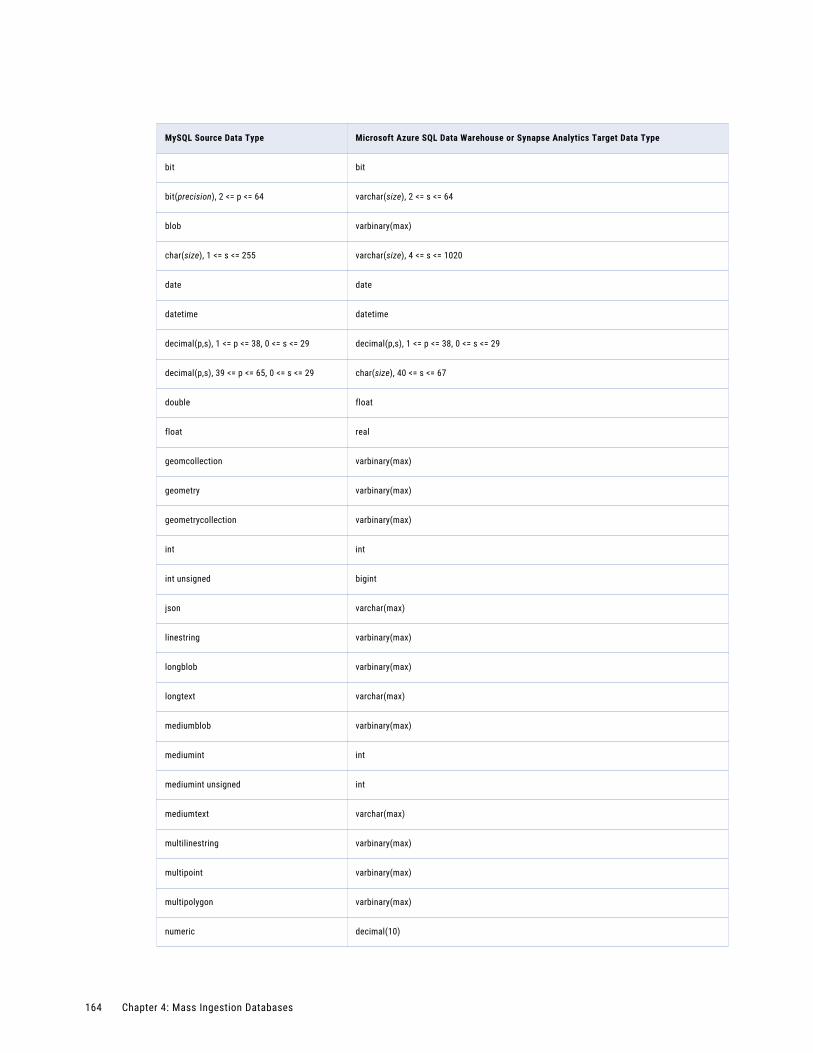
MySQL Source Data Type Microsoft Azure SQL Data Warehouse or Synapse Analytics Target Data Type
bit bit
bit(precision), 2 <= p <= 64 varchar(size), 2 <= s <= 64
blob varbinary(max)
char(size), 1 <= s <= 255 varchar(size), 4 <= s <= 1020
date date
datetime datetime
decimal(p,s), 1 <= p <= 38, 0 <= s <= 29 decimal(p,s), 1 <= p <= 38, 0 <= s <= 29
decimal(p,s), 39 <= p <= 65, 0 <= s <= 29 char(size), 40 <= s <= 67
double float
float real
geomcollection varbinary(max)
geometry varbinary(max)
geometrycollection varbinary(max)
int int
int unsigned bigint
json varchar(max)
linestring varbinary(max)
longblob varbinary(max)
longtext varchar(max)
mediumblob varbinary(max)
mediumint int
mediumint unsigned int
mediumtext varchar(max)
multilinestring varbinary(max)
multipoint varbinary(max)
multipolygon varbinary(max)
numeric decimal(10)
164 Chapter 4: Mass Ingestion Databases
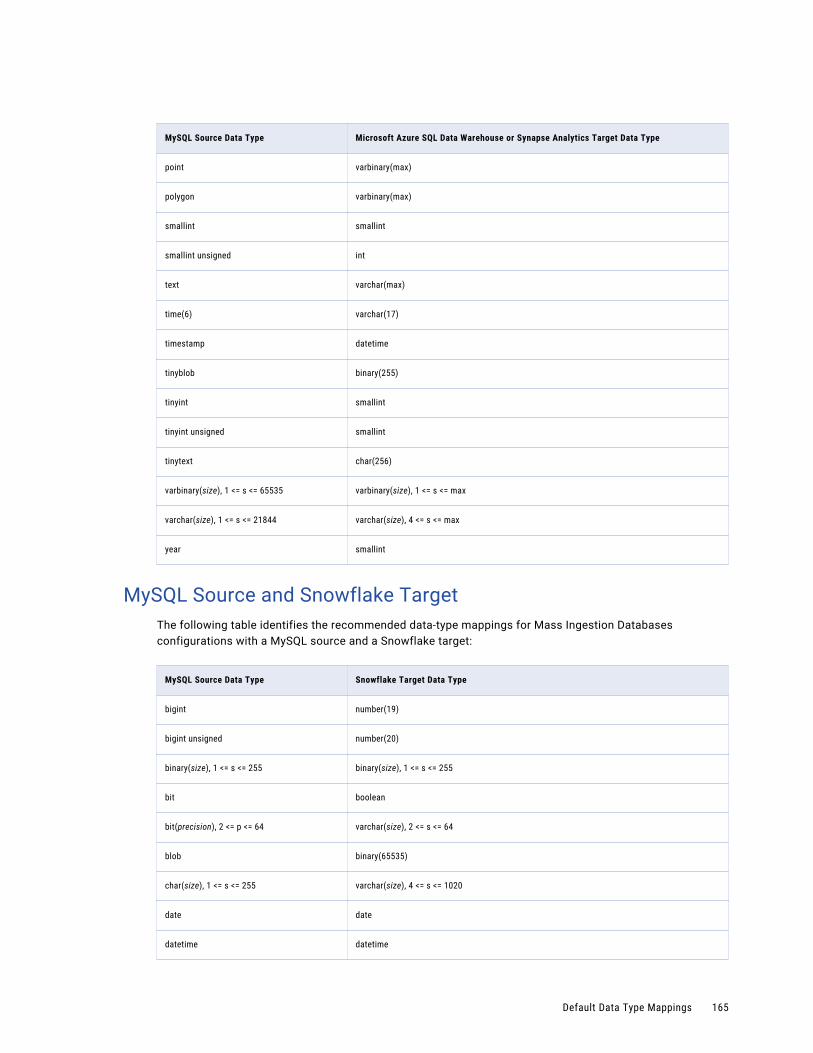
MySQL Source Data Type Microsoft Azure SQL Data Warehouse or Synapse Analytics Target Data Type
point varbinary(max)
polygon varbinary(max)
smallint smallint
smallint unsigned int
text varchar(max)
time(6) varchar(17)
timestamp datetime
tinyblob binary(255)
tinyint smallint
tinyint unsigned smallint
tinytext char(256)
varbinary(size), 1 <= s <= 65535 varbinary(size), 1 <= s <= max
varchar(size), 1 <= s <= 21844 varchar(size), 4 <= s <= max
year smallint
MySQL Source and Snowflake TargetThe following table identifies the recommended data-type mappings for Mass Ingestion Databases configurations with a MySQL source and a Snowflake target:
MySQL Source Data Type Snowflake Target Data Type
bigint number(19)
bigint unsigned number(20)
binary(size), 1 <= s <= 255 binary(size), 1 <= s <= 255
bit boolean
bit(precision), 2 <= p <= 64 varchar(size), 2 <= s <= 64
blob binary(65535)
char(size), 1 <= s <= 255 varchar(size), 4 <= s <= 1020
date date
datetime datetime
Default Data Type Mappings 165
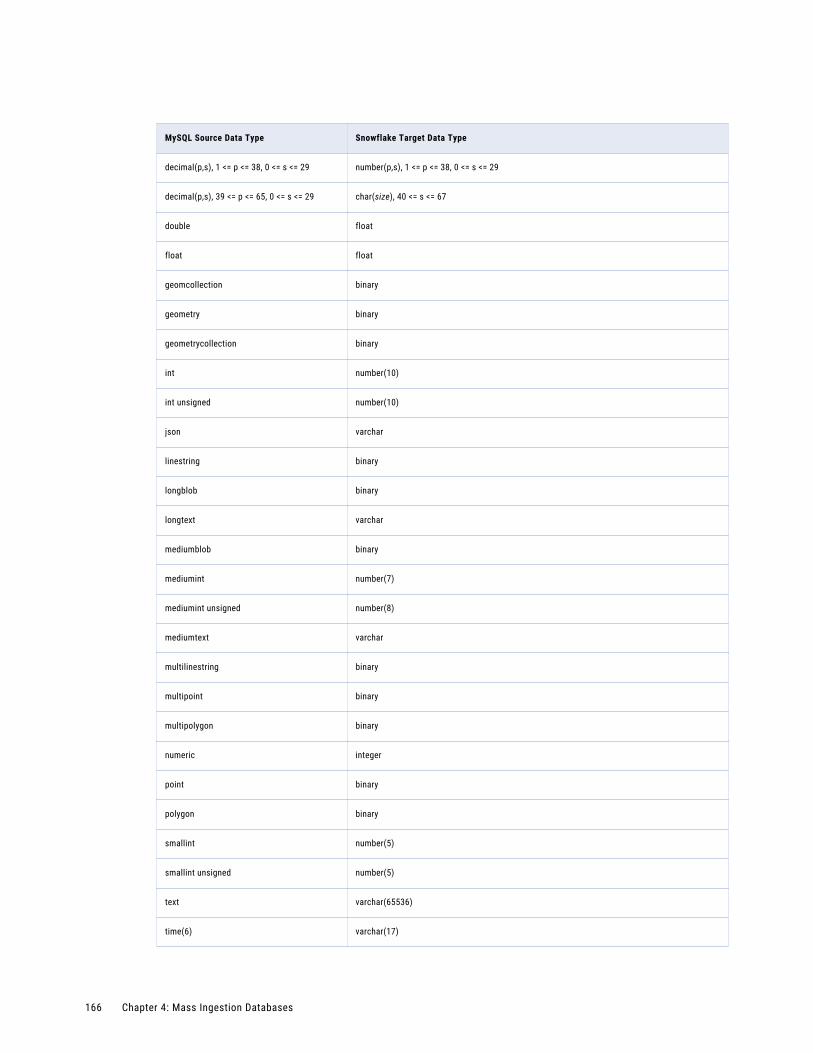
MySQL Source Data Type Snowflake Target Data Type
decimal(p,s), 1 <= p <= 38, 0 <= s <= 29 number(p,s), 1 <= p <= 38, 0 <= s <= 29
decimal(p,s), 39 <= p <= 65, 0 <= s <= 29 char(size), 40 <= s <= 67
double float
float float
geomcollection binary
geometry binary
geometrycollection binary
int number(10)
int unsigned number(10)
json varchar
linestring binary
longblob binary
longtext varchar
mediumblob binary
mediumint number(7)
mediumint unsigned number(8)
mediumtext varchar
multilinestring binary
multipoint binary
multipolygon binary
numeric integer
point binary
polygon binary
smallint number(5)
smallint unsigned number(5)
text varchar(65536)
time(6) varchar(17)
166 Chapter 4: Mass Ingestion Databases
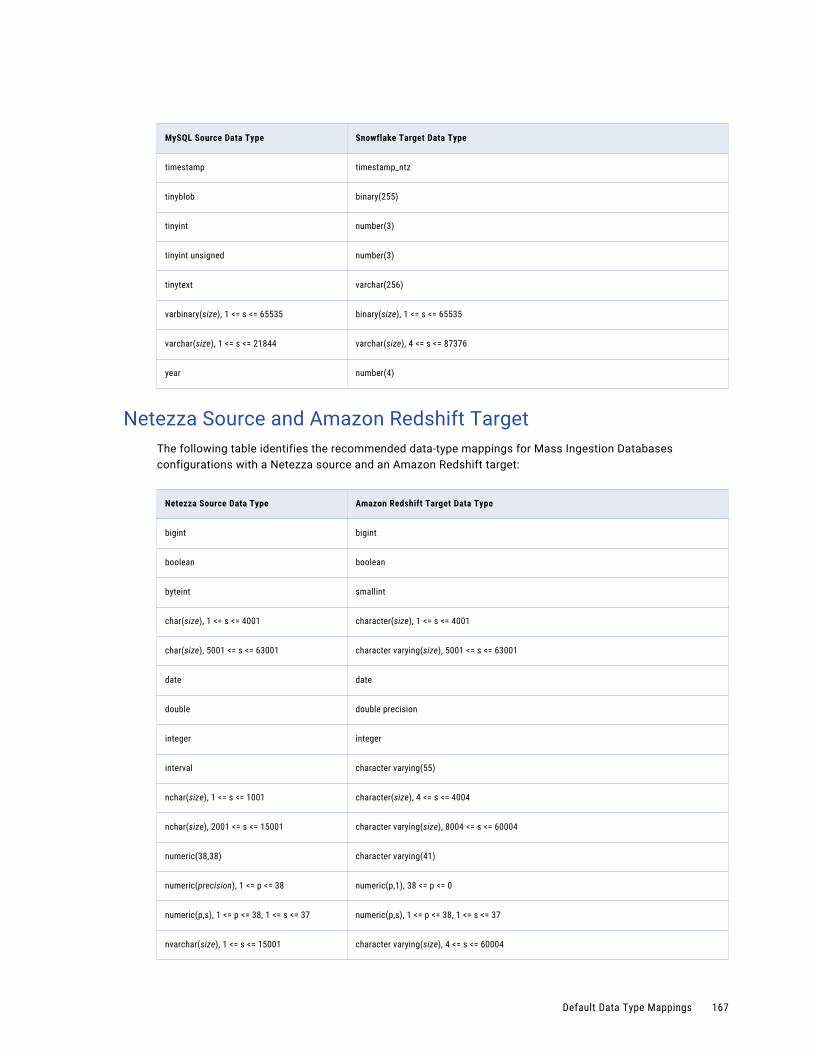
MySQL Source Data Type Snowflake Target Data Type
timestamp timestamp_ntz
tinyblob binary(255)
tinyint number(3)
tinyint unsigned number(3)
tinytext varchar(256)
varbinary(size), 1 <= s <= 65535 binary(size), 1 <= s <= 65535
varchar(size), 1 <= s <= 21844 varchar(size), 4 <= s <= 87376
year number(4)
Netezza Source and Amazon Redshift TargetThe following table identifies the recommended data-type mappings for Mass Ingestion Databases configurations with a Netezza source and an Amazon Redshift target:
Netezza Source Data Type Amazon Redshift Target Data Type
bigint bigint
boolean boolean
byteint smallint
char(size), 1 <= s <= 4001 character(size), 1 <= s <= 4001
char(size), 5001 <= s <= 63001 character varying(size), 5001 <= s <= 63001
date date
double double precision
integer integer
interval character varying(55)
nchar(size), 1 <= s <= 1001 character(size), 4 <= s <= 4004
nchar(size), 2001 <= s <= 15001 character varying(size), 8004 <= s <= 60004
numeric(38,38) character varying(41)
numeric(precision), 1 <= p <= 38 numeric(p,1), 38 <= p <= 0
numeric(p,s), 1 <= p <= 38, 1 <= s <= 37 numeric(p,s), 1 <= p <= 38, 1 <= s <= 37
nvarchar(size), 1 <= s <= 15001 character varying(size), 4 <= s <= 60004
Default Data Type Mappings 167
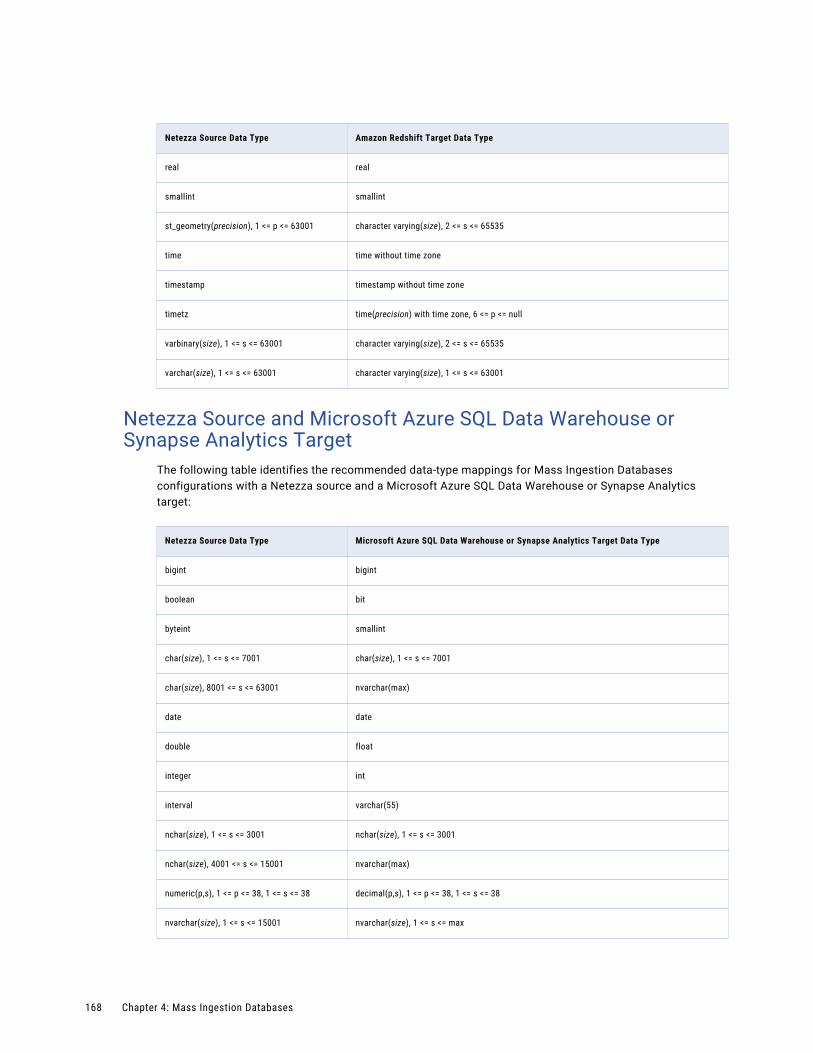
Netezza Source Data Type Amazon Redshift Target Data Type
real real
smallint smallint
st_geometry(precision), 1 <= p <= 63001 character varying(size), 2 <= s <= 65535
time time without time zone
timestamp timestamp without time zone
timetz time(precision) with time zone, 6 <= p <= null
varbinary(size), 1 <= s <= 63001 character varying(size), 2 <= s <= 65535
varchar(size), 1 <= s <= 63001 character varying(size), 1 <= s <= 63001
Netezza Source and Microsoft Azure SQL Data Warehouse or Synapse Analytics Target
The following table identifies the recommended data-type mappings for Mass Ingestion Databases configurations with a Netezza source and a Microsoft Azure SQL Data Warehouse or Synapse Analytics target:
Netezza Source Data Type Microsoft Azure SQL Data Warehouse or Synapse Analytics Target Data Type
bigint bigint
boolean bit
byteint smallint
char(size), 1 <= s <= 7001 char(size), 1 <= s <= 7001
char(size), 8001 <= s <= 63001 nvarchar(max)
date date
double float
integer int
interval varchar(55)
nchar(size), 1 <= s <= 3001 nchar(size), 1 <= s <= 3001
nchar(size), 4001 <= s <= 15001 nvarchar(max)
numeric(p,s), 1 <= p <= 38, 1 <= s <= 38 decimal(p,s), 1 <= p <= 38, 1 <= s <= 38
nvarchar(size), 1 <= s <= 15001 nvarchar(size), 1 <= s <= max
168 Chapter 4: Mass Ingestion Databases
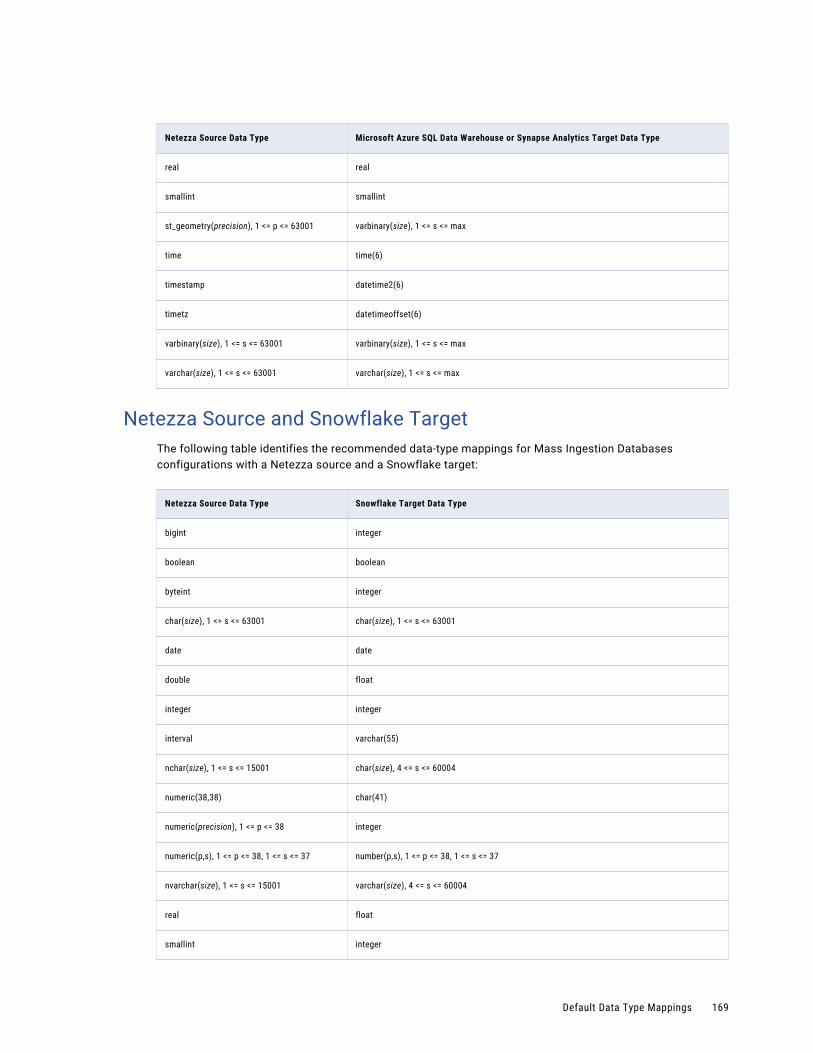
Netezza Source Data Type Microsoft Azure SQL Data Warehouse or Synapse Analytics Target Data Type
real real
smallint smallint
st_geometry(precision), 1 <= p <= 63001 varbinary(size), 1 <= s <= max
time time(6)
timestamp datetime2(6)
timetz datetimeoffset(6)
varbinary(size), 1 <= s <= 63001 varbinary(size), 1 <= s <= max
varchar(size), 1 <= s <= 63001 varchar(size), 1 <= s <= max
Netezza Source and Snowflake TargetThe following table identifies the recommended data-type mappings for Mass Ingestion Databases configurations with a Netezza source and a Snowflake target:
Netezza Source Data Type Snowflake Target Data Type
bigint integer
boolean boolean
byteint integer
char(size), 1 <= s <= 63001 char(size), 1 <= s <= 63001
date date
double float
integer integer
interval varchar(55)
nchar(size), 1 <= s <= 15001 char(size), 4 <= s <= 60004
numeric(38,38) char(41)
numeric(precision), 1 <= p <= 38 integer
numeric(p,s), 1 <= p <= 38, 1 <= s <= 37 number(p,s), 1 <= p <= 38, 1 <= s <= 37
nvarchar(size), 1 <= s <= 15001 varchar(size), 4 <= s <= 60004
real float
smallint integer
Default Data Type Mappings 169
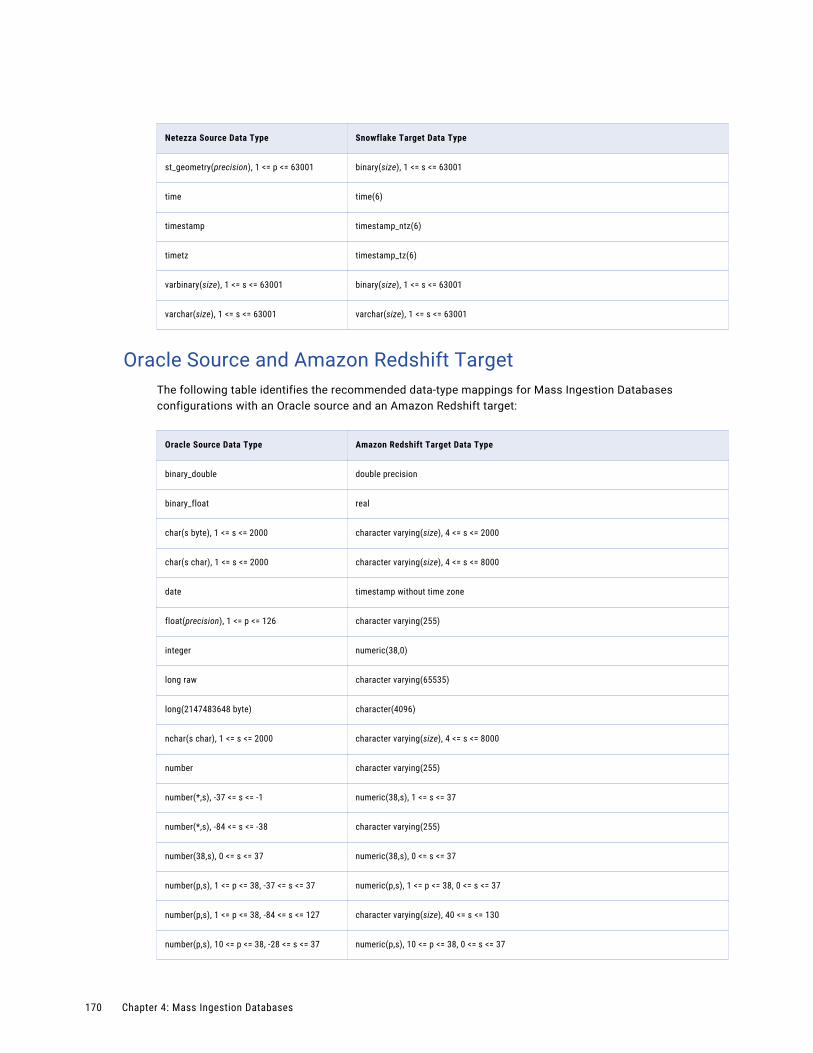
Netezza Source Data Type Snowflake Target Data Type
st_geometry(precision), 1 <= p <= 63001 binary(size), 1 <= s <= 63001
time time(6)
timestamp timestamp_ntz(6)
timetz timestamp_tz(6)
varbinary(size), 1 <= s <= 63001 binary(size), 1 <= s <= 63001
varchar(size), 1 <= s <= 63001 varchar(size), 1 <= s <= 63001
Oracle Source and Amazon Redshift TargetThe following table identifies the recommended data-type mappings for Mass Ingestion Databases configurations with an Oracle source and an Amazon Redshift target:
Oracle Source Data Type Amazon Redshift Target Data Type
binary_double double precision
binary_float real
char(s byte), 1 <= s <= 2000 character varying(size), 4 <= s <= 2000
char(s char), 1 <= s <= 2000 character varying(size), 4 <= s <= 8000
date timestamp without time zone
float(precision), 1 <= p <= 126 character varying(255)
integer numeric(38,0)
long raw character varying(65535)
long(2147483648 byte) character(4096)
nchar(s char), 1 <= s <= 2000 character varying(size), 4 <= s <= 8000
number character varying(255)
number(*,s), -37 <= s <= -1 numeric(38,s), 1 <= s <= 37
number(*,s), -84 <= s <= -38 character varying(255)
number(38,s), 0 <= s <= 37 numeric(38,s), 0 <= s <= 37
number(p,s), 1 <= p <= 38, -37 <= s <= 37 numeric(p,s), 1 <= p <= 38, 0 <= s <= 37
number(p,s), 1 <= p <= 38, -84 <= s <= 127 character varying(size), 40 <= s <= 130
number(p,s), 10 <= p <= 38, -28 <= s <= 37 numeric(p,s), 10 <= p <= 38, 0 <= s <= 37
170 Chapter 4: Mass Ingestion Databases

Oracle Source Data Type Amazon Redshift Target Data Type
number(p,s), 11 <= p <= 38, -27 <= s <= 37 numeric(p,s), 11 <= p <= 38, 0 <= s <= 37
number(p,s), 12 <= p <= 38, -26 <= s <= 37 numeric(p,s), 12 <= p <= 38, 0 <= s <= 37
number(p,s), 13 <= p <= 38, -25 <= s <= 37 numeric(p,s), 13 <= p <= 38, 0 <= s <= 37
number(p,s), 14 <= p <= 38, -24 <= s <= 37 numeric(p,s), 14 <= p <= 38, 0 <= s <= 37
number(p,s), 15 <= p <= 38, -23 <= s <= 37 numeric(p,s), 15 <= p <= 38, 0 <= s <= 37
number(p,s), 16 <= p <= 38, -22 <= s <= 37 numeric(p,s), 16 <= p <= 38, 0 <= s <= 37
number(p,s), 17 <= p <= 38, -21 <= s <= 37 numeric(p,s), 17 <= p <= 38, 0 <= s <= 37
number(p,s), 18 <= p <= 38, -20 <= s <= 37 numeric(p,s), 18 <= p <= 38, 0 <= s <= 37
number(p,s), 19 <= p <= 38, -19 <= s <= 37 numeric(p,s), 19 <= p <= 38, 0 <= s <= 37
number(p,s), 2 <= p <= 38, -36 <= s <= 37 numeric(p,s), 2 <= p <= 38, 0 <= s <= 37
number(p,s), 20 <= p <= 38, -18 <= s <= 37 numeric(p,s), 20 <= p <= 38, 0 <= s <= 37
number(p,s), 21 <= p <= 38, -17 <= s <= 37 numeric(p,s), 21 <= p <= 38, 0 <= s <= 37
number(p,s), 22 <= p <= 38, -16 <= s <= 37 numeric(p,s), 22 <= p <= 38, 0 <= s <= 37
number(p,s), 23 <= p <= 38, -15 <= s <= 37 numeric(p,s), 23 <= p <= 38, 0 <= s <= 37
number(p,s), 24 <= p <= 38, -14 <= s <= 37 numeric(p,s), 24 <= p <= 38, 0 <= s <= 37
number(p,s), 25 <= p <= 38, -13 <= s <= 37 numeric(p,s), 25 <= p <= 38, 0 <= s <= 37
number(p,s), 26 <= p <= 38, -12 <= s <= 37 numeric(p,s), 26 <= p <= 38, 0 <= s <= 37
number(p,s), 27 <= p <= 38, -11 <= s <= 37 numeric(p,s), 27 <= p <= 38, 0 <= s <= 37
number(p,s), 28 <= p <= 38, -10 <= s <= 37 numeric(p,s), 28 <= p <= 38, 0 <= s <= 37
number(p,s), 29 <= p <= 38, -9 <= s <= 37 numeric(p,s), 29 <= p <= 38, 0 <= s <= 37
number(p,s), 3 <= p <= 38, -35 <= s <= 37 numeric(p,s), 3 <= p <= 38, 0 <= s <= 37
number(p,s), 30 <= p <= 38, -8 <= s <= 37 numeric(p,s), 30 <= p <= 38, 0 <= s <= 37
number(p,s), 31 <= p <= 38, -7 <= s <= 37 numeric(p,s), 31 <= p <= 38, 0 <= s <= 37
number(p,s), 32 <= p <= 38, -6 <= s <= 37 numeric(p,s), 32 <= p <= 38, 0 <= s <= 37
number(p,s), 33 <= p <= 38, -5 <= s <= 37 numeric(p,s), 33 <= p <= 38, 0 <= s <= 37
number(p,s), 34 <= p <= 38, -4 <= s <= 37 numeric(p,s), 34 <= p <= 38, 0 <= s <= 37
number(p,s), 35 <= p <= 38, -3 <= s <= 37 numeric(p,s), 35 <= p <= 38, 0 <= s <= 37
Default Data Type Mappings 171
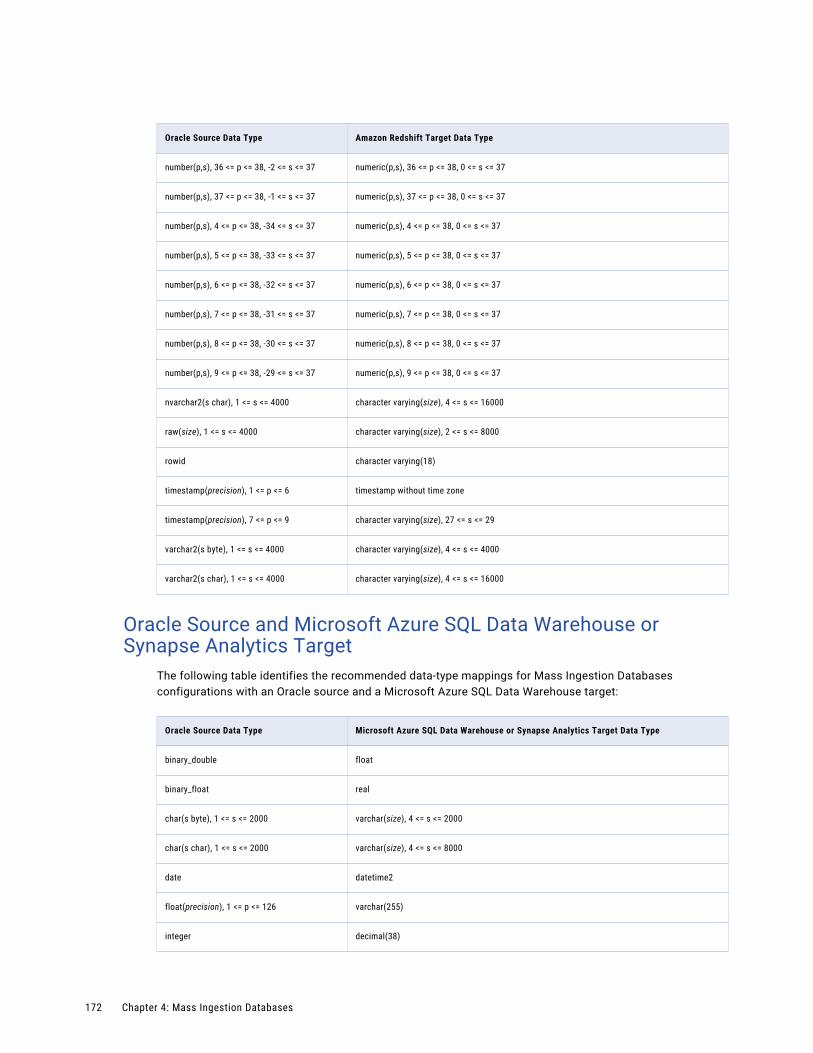
Oracle Source Data Type Amazon Redshift Target Data Type
number(p,s), 36 <= p <= 38, -2 <= s <= 37 numeric(p,s), 36 <= p <= 38, 0 <= s <= 37
number(p,s), 37 <= p <= 38, -1 <= s <= 37 numeric(p,s), 37 <= p <= 38, 0 <= s <= 37
number(p,s), 4 <= p <= 38, -34 <= s <= 37 numeric(p,s), 4 <= p <= 38, 0 <= s <= 37
number(p,s), 5 <= p <= 38, -33 <= s <= 37 numeric(p,s), 5 <= p <= 38, 0 <= s <= 37
number(p,s), 6 <= p <= 38, -32 <= s <= 37 numeric(p,s), 6 <= p <= 38, 0 <= s <= 37
number(p,s), 7 <= p <= 38, -31 <= s <= 37 numeric(p,s), 7 <= p <= 38, 0 <= s <= 37
number(p,s), 8 <= p <= 38, -30 <= s <= 37 numeric(p,s), 8 <= p <= 38, 0 <= s <= 37
number(p,s), 9 <= p <= 38, -29 <= s <= 37 numeric(p,s), 9 <= p <= 38, 0 <= s <= 37
nvarchar2(s char), 1 <= s <= 4000 character varying(size), 4 <= s <= 16000
raw(size), 1 <= s <= 4000 character varying(size), 2 <= s <= 8000
rowid character varying(18)
timestamp(precision), 1 <= p <= 6 timestamp without time zone
timestamp(precision), 7 <= p <= 9 character varying(size), 27 <= s <= 29
varchar2(s byte), 1 <= s <= 4000 character varying(size), 4 <= s <= 4000
varchar2(s char), 1 <= s <= 4000 character varying(size), 4 <= s <= 16000
Oracle Source and Microsoft Azure SQL Data Warehouse or Synapse Analytics Target
The following table identifies the recommended data-type mappings for Mass Ingestion Databases configurations with an Oracle source and a Microsoft Azure SQL Data Warehouse target:
Oracle Source Data Type Microsoft Azure SQL Data Warehouse or Synapse Analytics Target Data Type
binary_double float
binary_float real
char(s byte), 1 <= s <= 2000 varchar(size), 4 <= s <= 2000
char(s char), 1 <= s <= 2000 varchar(size), 4 <= s <= 8000
date datetime2
float(precision), 1 <= p <= 126 varchar(255)
integer decimal(38)
172 Chapter 4: Mass Ingestion Databases
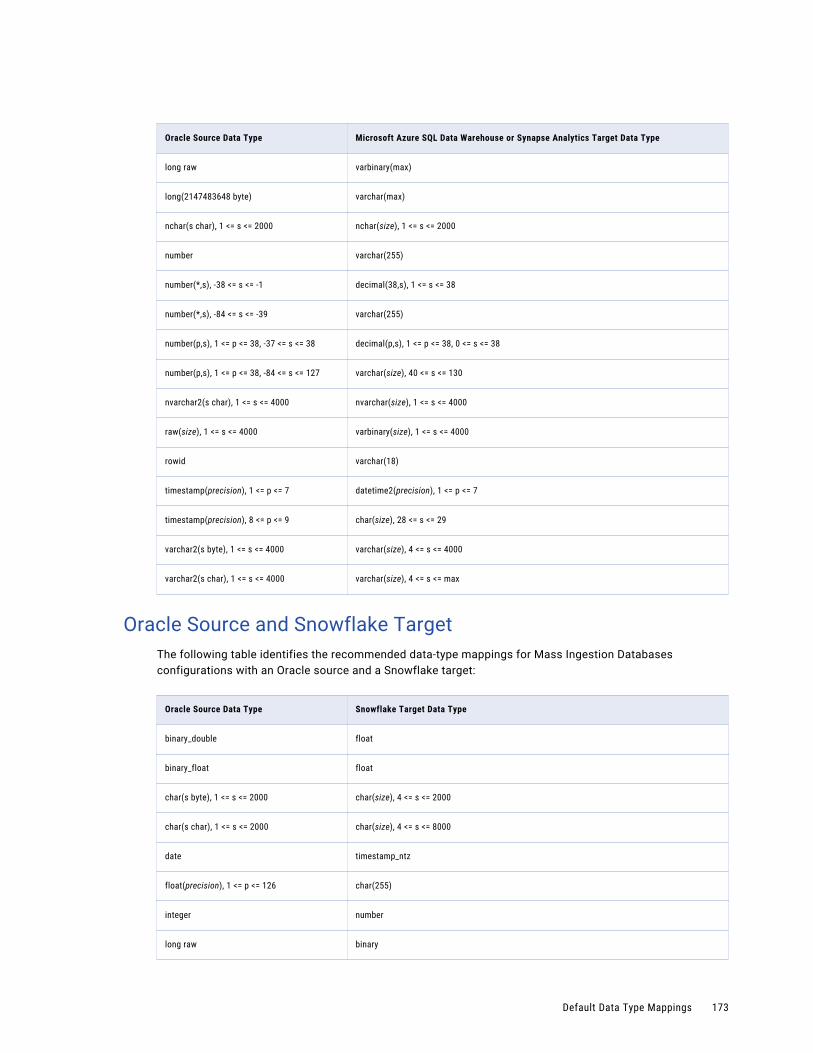
Oracle Source Data Type Microsoft Azure SQL Data Warehouse or Synapse Analytics Target Data Type
long raw varbinary(max)
long(2147483648 byte) varchar(max)
nchar(s char), 1 <= s <= 2000 nchar(size), 1 <= s <= 2000
number varchar(255)
number(*,s), -38 <= s <= -1 decimal(38,s), 1 <= s <= 38
number(*,s), -84 <= s <= -39 varchar(255)
number(p,s), 1 <= p <= 38, -37 <= s <= 38 decimal(p,s), 1 <= p <= 38, 0 <= s <= 38
number(p,s), 1 <= p <= 38, -84 <= s <= 127 varchar(size), 40 <= s <= 130
nvarchar2(s char), 1 <= s <= 4000 nvarchar(size), 1 <= s <= 4000
raw(size), 1 <= s <= 4000 varbinary(size), 1 <= s <= 4000
rowid varchar(18)
timestamp(precision), 1 <= p <= 7 datetime2(precision), 1 <= p <= 7
timestamp(precision), 8 <= p <= 9 char(size), 28 <= s <= 29
varchar2(s byte), 1 <= s <= 4000 varchar(size), 4 <= s <= 4000
varchar2(s char), 1 <= s <= 4000 varchar(size), 4 <= s <= max
Oracle Source and Snowflake TargetThe following table identifies the recommended data-type mappings for Mass Ingestion Databases configurations with an Oracle source and a Snowflake target:
Oracle Source Data Type Snowflake Target Data Type
binary_double float
binary_float float
char(s byte), 1 <= s <= 2000 char(size), 4 <= s <= 2000
char(s char), 1 <= s <= 2000 char(size), 4 <= s <= 8000
date timestamp_ntz
float(precision), 1 <= p <= 126 char(255)
integer number
long raw binary
Default Data Type Mappings 173
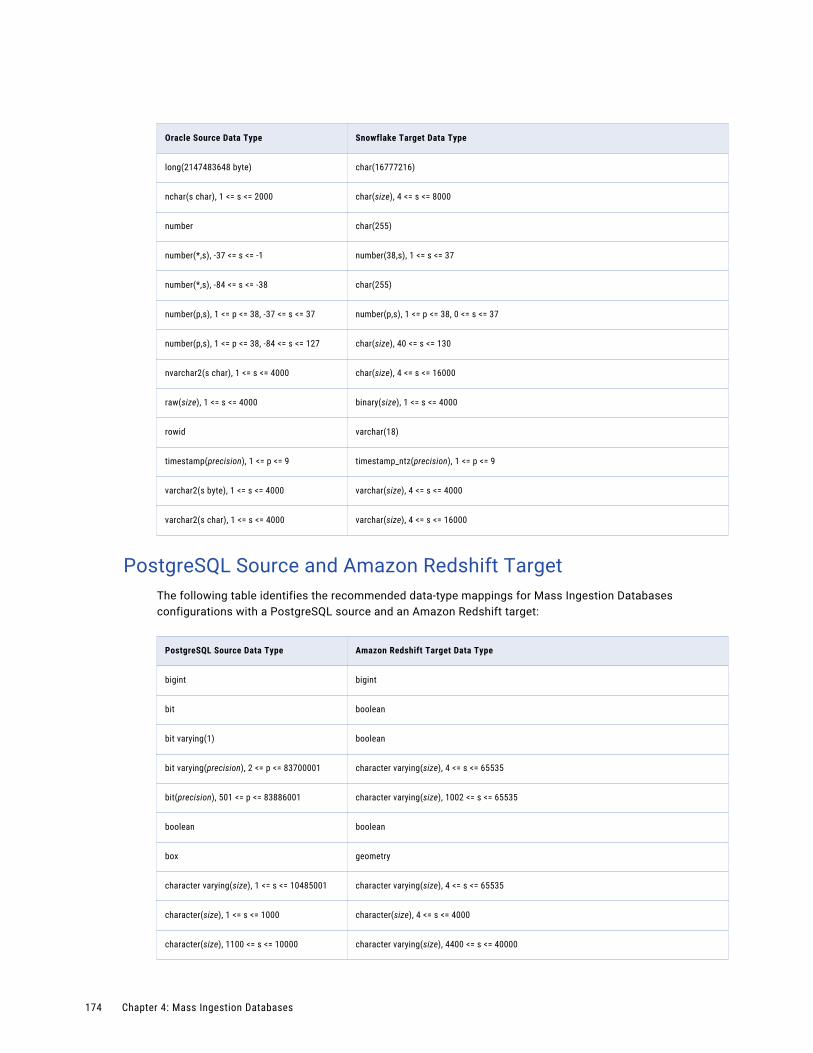
Oracle Source Data Type Snowflake Target Data Type
long(2147483648 byte) char(16777216)
nchar(s char), 1 <= s <= 2000 char(size), 4 <= s <= 8000
number char(255)
number(*,s), -37 <= s <= -1 number(38,s), 1 <= s <= 37
number(*,s), -84 <= s <= -38 char(255)
number(p,s), 1 <= p <= 38, -37 <= s <= 37 number(p,s), 1 <= p <= 38, 0 <= s <= 37
number(p,s), 1 <= p <= 38, -84 <= s <= 127 char(size), 40 <= s <= 130
nvarchar2(s char), 1 <= s <= 4000 char(size), 4 <= s <= 16000
raw(size), 1 <= s <= 4000 binary(size), 1 <= s <= 4000
rowid varchar(18)
timestamp(precision), 1 <= p <= 9 timestamp_ntz(precision), 1 <= p <= 9
varchar2(s byte), 1 <= s <= 4000 varchar(size), 4 <= s <= 4000
varchar2(s char), 1 <= s <= 4000 varchar(size), 4 <= s <= 16000
PostgreSQL Source and Amazon Redshift TargetThe following table identifies the recommended data-type mappings for Mass Ingestion Databases configurations with a PostgreSQL source and an Amazon Redshift target:
PostgreSQL Source Data Type Amazon Redshift Target Data Type
bigint bigint
bit boolean
bit varying(1) boolean
bit varying(precision), 2 <= p <= 83700001 character varying(size), 4 <= s <= 65535
bit(precision), 501 <= p <= 83886001 character varying(size), 1002 <= s <= 65535
boolean boolean
box geometry
character varying(size), 1 <= s <= 10485001 character varying(size), 4 <= s <= 65535
character(size), 1 <= s <= 1000 character(size), 4 <= s <= 4000
character(size), 1100 <= s <= 10000 character varying(size), 4400 <= s <= 40000
174 Chapter 4: Mass Ingestion Databases
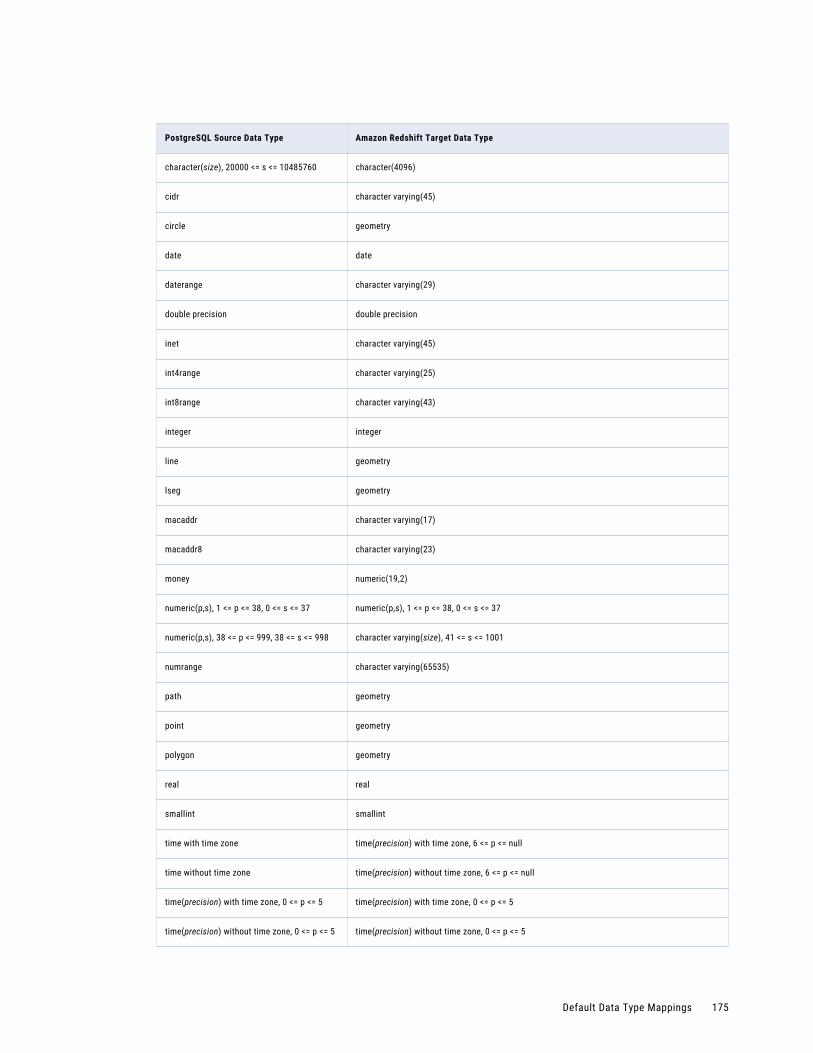
PostgreSQL Source Data Type Amazon Redshift Target Data Type
character(size), 20000 <= s <= 10485760 character(4096)
cidr character varying(45)
circle geometry
date date
daterange character varying(29)
double precision double precision
inet character varying(45)
int4range character varying(25)
int8range character varying(43)
integer integer
line geometry
lseg geometry
macaddr character varying(17)
macaddr8 character varying(23)
money numeric(19,2)
numeric(p,s), 1 <= p <= 38, 0 <= s <= 37 numeric(p,s), 1 <= p <= 38, 0 <= s <= 37
numeric(p,s), 38 <= p <= 999, 38 <= s <= 998 character varying(size), 41 <= s <= 1001
numrange character varying(65535)
path geometry
point geometry
polygon geometry
real real
smallint smallint
time with time zone time(precision) with time zone, 6 <= p <= null
time without time zone time(precision) without time zone, 6 <= p <= null
time(precision) with time zone, 0 <= p <= 5 time(precision) with time zone, 0 <= p <= 5
time(precision) without time zone, 0 <= p <= 5 time(precision) without time zone, 0 <= p <= 5
Default Data Type Mappings 175
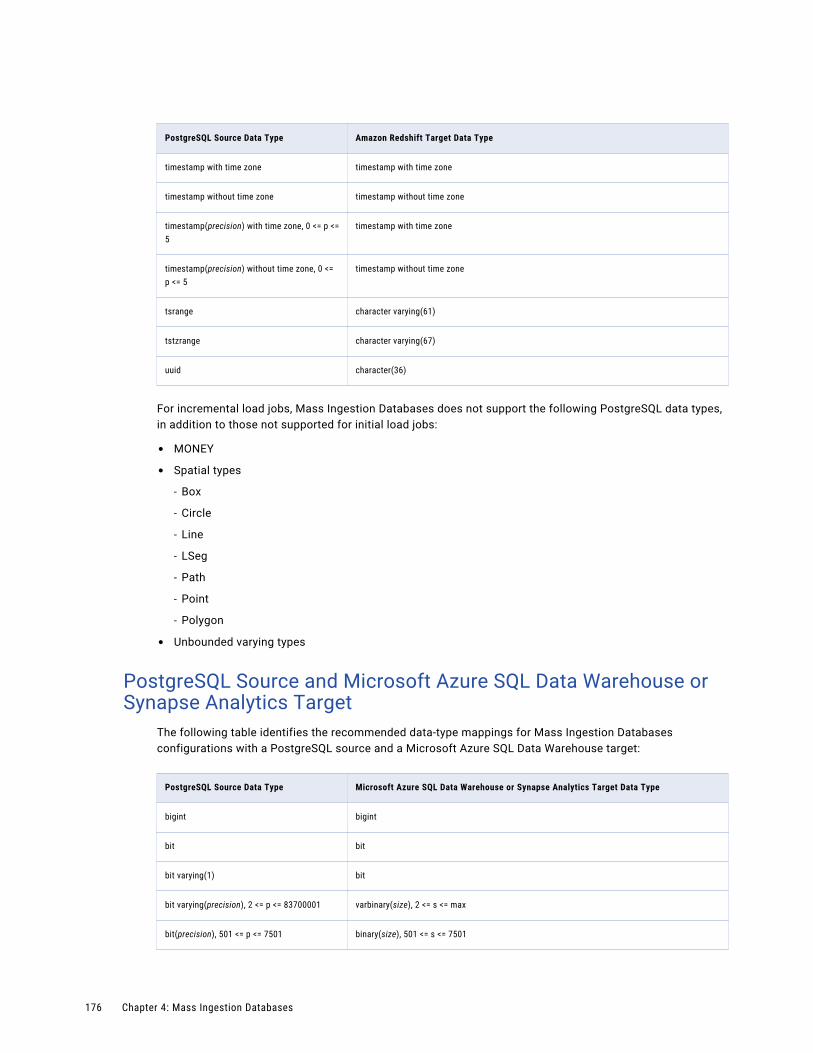
PostgreSQL Source Data Type Amazon Redshift Target Data Type
timestamp with time zone timestamp with time zone
timestamp without time zone timestamp without time zone
timestamp(precision) with time zone, 0 <= p <= 5
timestamp with time zone
timestamp(precision) without time zone, 0 <= p <= 5
timestamp without time zone
tsrange character varying(61)
tstzrange character varying(67)
uuid character(36)
For incremental load jobs, Mass Ingestion Databases does not support the following PostgreSQL data types, in addition to those not supported for initial load jobs:
• MONEY
• Spatial types
- Box
- Circle
- Line
- LSeg
- Path
- Point
- Polygon
• Unbounded varying types
PostgreSQL Source and Microsoft Azure SQL Data Warehouse or Synapse Analytics Target
The following table identifies the recommended data-type mappings for Mass Ingestion Databases configurations with a PostgreSQL source and a Microsoft Azure SQL Data Warehouse target:
PostgreSQL Source Data Type Microsoft Azure SQL Data Warehouse or Synapse Analytics Target Data Type
bigint bigint
bit bit
bit varying(1) bit
bit varying(precision), 2 <= p <= 83700001 varbinary(size), 2 <= s <= max
bit(precision), 501 <= p <= 7501 binary(size), 501 <= s <= 7501
176 Chapter 4: Mass Ingestion Databases
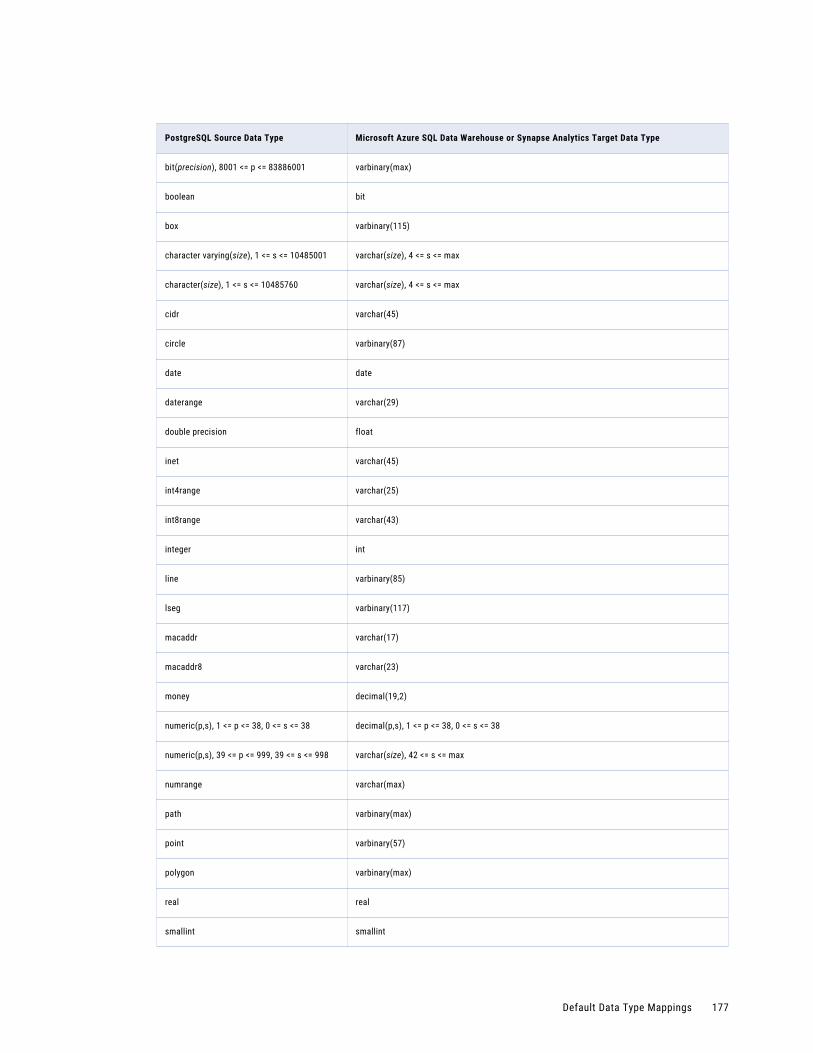
PostgreSQL Source Data Type Microsoft Azure SQL Data Warehouse or Synapse Analytics Target Data Type
bit(precision), 8001 <= p <= 83886001 varbinary(max)
boolean bit
box varbinary(115)
character varying(size), 1 <= s <= 10485001 varchar(size), 4 <= s <= max
character(size), 1 <= s <= 10485760 varchar(size), 4 <= s <= max
cidr varchar(45)
circle varbinary(87)
date date
daterange varchar(29)
double precision float
inet varchar(45)
int4range varchar(25)
int8range varchar(43)
integer int
line varbinary(85)
lseg varbinary(117)
macaddr varchar(17)
macaddr8 varchar(23)
money decimal(19,2)
numeric(p,s), 1 <= p <= 38, 0 <= s <= 38 decimal(p,s), 1 <= p <= 38, 0 <= s <= 38
numeric(p,s), 39 <= p <= 999, 39 <= s <= 998 varchar(size), 42 <= s <= max
numrange varchar(max)
path varbinary(max)
point varbinary(57)
polygon varbinary(max)
real real
smallint smallint
Default Data Type Mappings 177
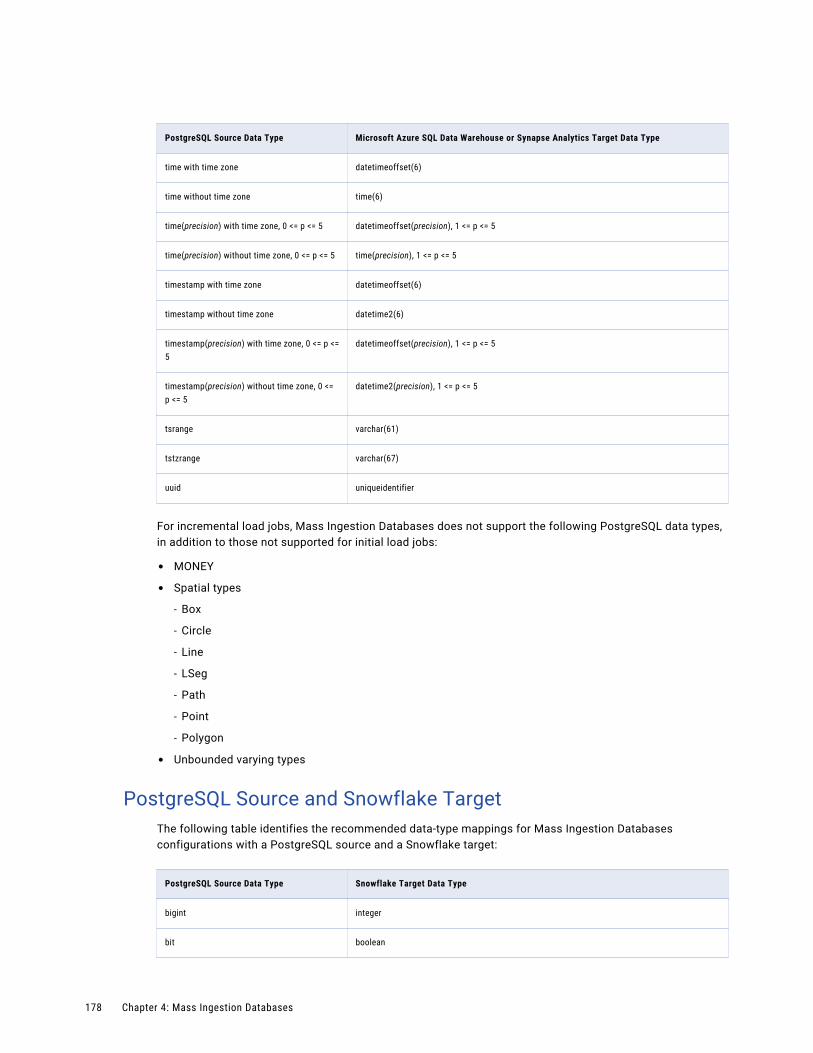
PostgreSQL Source Data Type Microsoft Azure SQL Data Warehouse or Synapse Analytics Target Data Type
time with time zone datetimeoffset(6)
time without time zone time(6)
time(precision) with time zone, 0 <= p <= 5 datetimeoffset(precision), 1 <= p <= 5
time(precision) without time zone, 0 <= p <= 5 time(precision), 1 <= p <= 5
timestamp with time zone datetimeoffset(6)
timestamp without time zone datetime2(6)
timestamp(precision) with time zone, 0 <= p <= 5
datetimeoffset(precision), 1 <= p <= 5
timestamp(precision) without time zone, 0 <= p <= 5
datetime2(precision), 1 <= p <= 5
tsrange varchar(61)
tstzrange varchar(67)
uuid uniqueidentifier
For incremental load jobs, Mass Ingestion Databases does not support the following PostgreSQL data types, in addition to those not supported for initial load jobs:
• MONEY
• Spatial types
- Box
- Circle
- Line
- LSeg
- Path
- Point
- Polygon
• Unbounded varying types
PostgreSQL Source and Snowflake TargetThe following table identifies the recommended data-type mappings for Mass Ingestion Databases configurations with a PostgreSQL source and a Snowflake target:
PostgreSQL Source Data Type Snowflake Target Data Type
bigint integer
bit boolean
178 Chapter 4: Mass Ingestion Databases
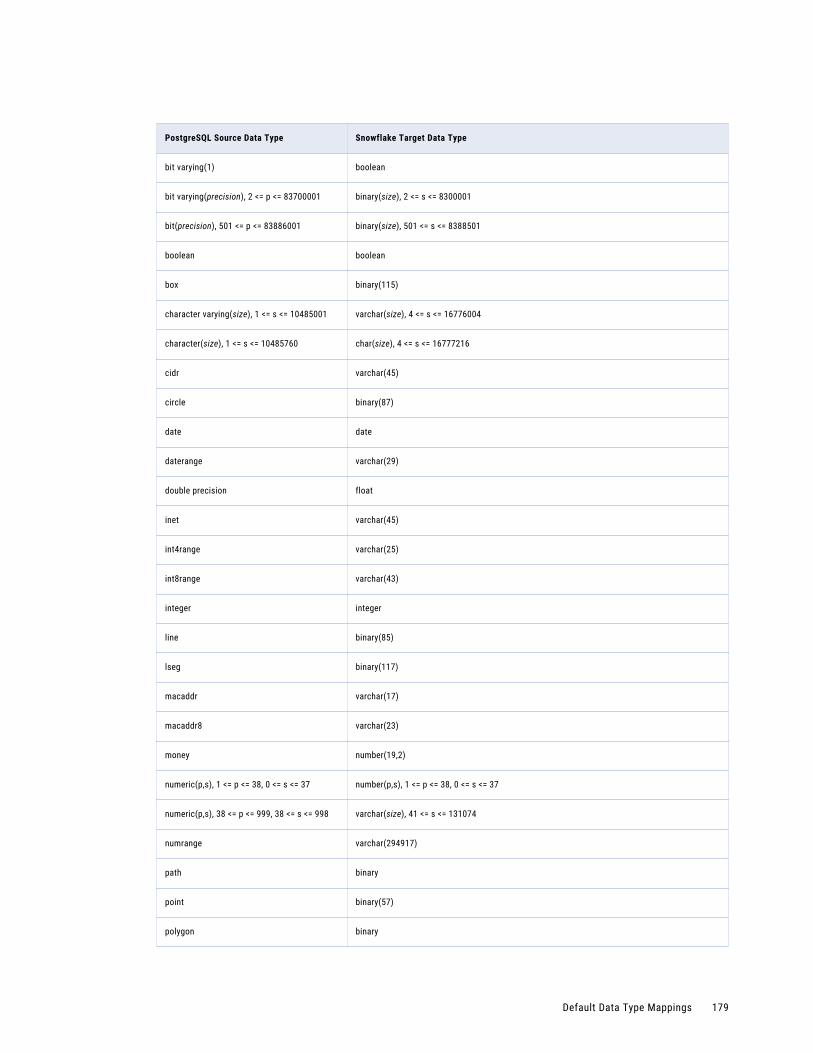
PostgreSQL Source Data Type Snowflake Target Data Type
bit varying(1) boolean
bit varying(precision), 2 <= p <= 83700001 binary(size), 2 <= s <= 8300001
bit(precision), 501 <= p <= 83886001 binary(size), 501 <= s <= 8388501
boolean boolean
box binary(115)
character varying(size), 1 <= s <= 10485001 varchar(size), 4 <= s <= 16776004
character(size), 1 <= s <= 10485760 char(size), 4 <= s <= 16777216
cidr varchar(45)
circle binary(87)
date date
daterange varchar(29)
double precision float
inet varchar(45)
int4range varchar(25)
int8range varchar(43)
integer integer
line binary(85)
lseg binary(117)
macaddr varchar(17)
macaddr8 varchar(23)
money number(19,2)
numeric(p,s), 1 <= p <= 38, 0 <= s <= 37 number(p,s), 1 <= p <= 38, 0 <= s <= 37
numeric(p,s), 38 <= p <= 999, 38 <= s <= 998 varchar(size), 41 <= s <= 131074
numrange varchar(294917)
path binary
point binary(57)
polygon binary
Default Data Type Mappings 179
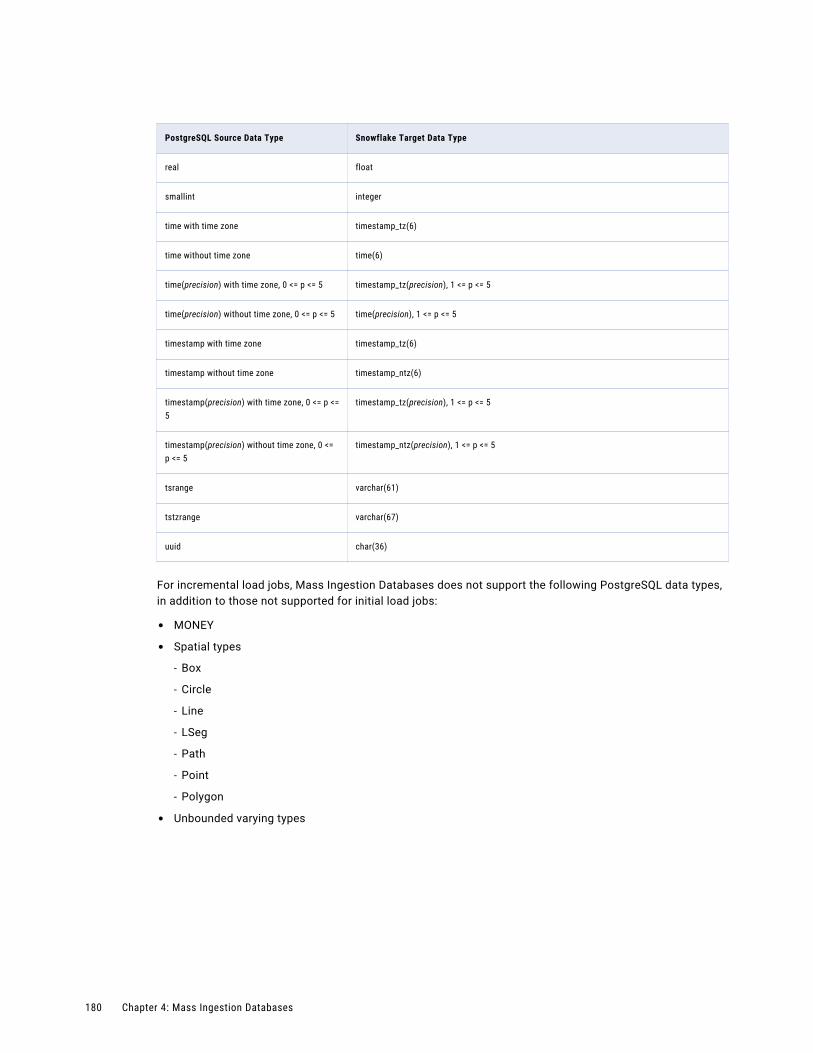
PostgreSQL Source Data Type Snowflake Target Data Type
real float
smallint integer
time with time zone timestamp_tz(6)
time without time zone time(6)
time(precision) with time zone, 0 <= p <= 5 timestamp_tz(precision), 1 <= p <= 5
time(precision) without time zone, 0 <= p <= 5 time(precision), 1 <= p <= 5
timestamp with time zone timestamp_tz(6)
timestamp without time zone timestamp_ntz(6)
timestamp(precision) with time zone, 0 <= p <= 5
timestamp_tz(precision), 1 <= p <= 5
timestamp(precision) without time zone, 0 <= p <= 5
timestamp_ntz(precision), 1 <= p <= 5
tsrange varchar(61)
tstzrange varchar(67)
uuid char(36)
For incremental load jobs, Mass Ingestion Databases does not support the following PostgreSQL data types, in addition to those not supported for initial load jobs:
• MONEY
• Spatial types
- Box
- Circle
- Line
- LSeg
- Path
- Point
- Polygon
• Unbounded varying types
180 Chapter 4: Mass Ingestion Databases
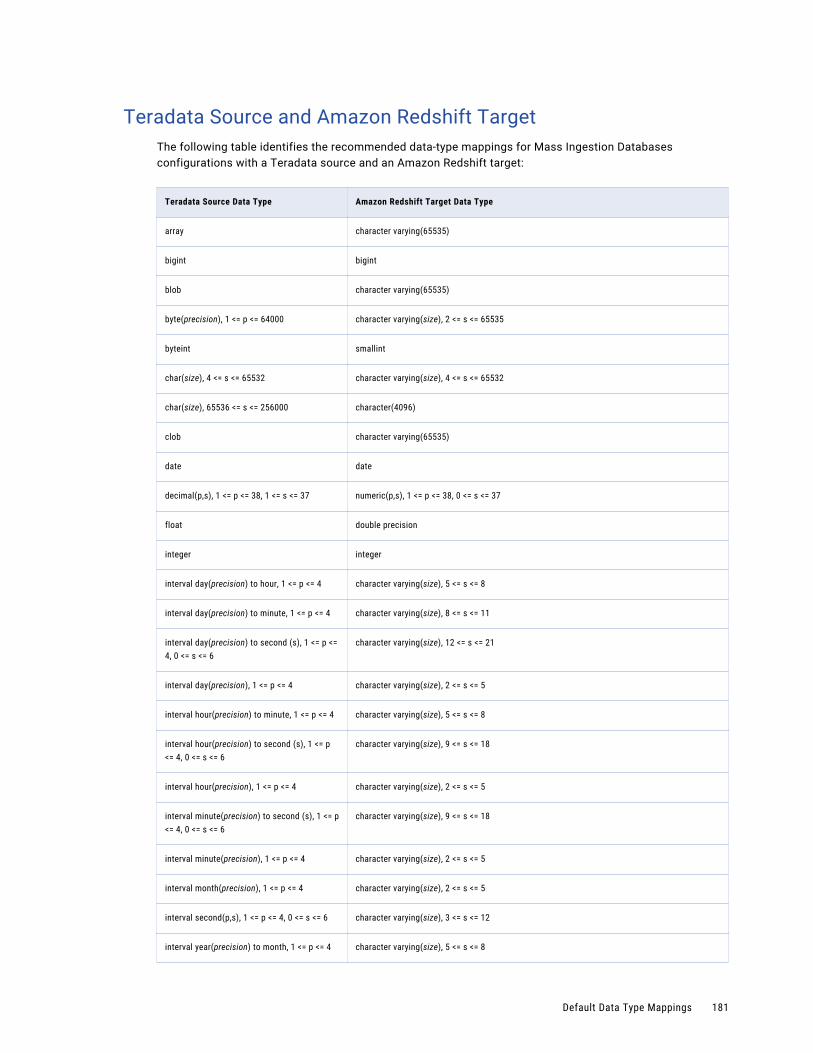
Teradata Source and Amazon Redshift TargetThe following table identifies the recommended data-type mappings for Mass Ingestion Databases configurations with a Teradata source and an Amazon Redshift target:
Teradata Source Data Type Amazon Redshift Target Data Type
array character varying(65535)
bigint bigint
blob character varying(65535)
byte(precision), 1 <= p <= 64000 character varying(size), 2 <= s <= 65535
byteint smallint
char(size), 4 <= s <= 65532 character varying(size), 4 <= s <= 65532
char(size), 65536 <= s <= 256000 character(4096)
clob character varying(65535)
date date
decimal(p,s), 1 <= p <= 38, 1 <= s <= 37 numeric(p,s), 1 <= p <= 38, 0 <= s <= 37
float double precision
integer integer
interval day(precision) to hour, 1 <= p <= 4 character varying(size), 5 <= s <= 8
interval day(precision) to minute, 1 <= p <= 4 character varying(size), 8 <= s <= 11
interval day(precision) to second (s), 1 <= p <= 4, 0 <= s <= 6
character varying(size), 12 <= s <= 21
interval day(precision), 1 <= p <= 4 character varying(size), 2 <= s <= 5
interval hour(precision) to minute, 1 <= p <= 4 character varying(size), 5 <= s <= 8
interval hour(precision) to second (s), 1 <= p <= 4, 0 <= s <= 6
character varying(size), 9 <= s <= 18
interval hour(precision), 1 <= p <= 4 character varying(size), 2 <= s <= 5
interval minute(precision) to second (s), 1 <= p <= 4, 0 <= s <= 6
character varying(size), 9 <= s <= 18
interval minute(precision), 1 <= p <= 4 character varying(size), 2 <= s <= 5
interval month(precision), 1 <= p <= 4 character varying(size), 2 <= s <= 5
interval second(p,s), 1 <= p <= 4, 0 <= s <= 6 character varying(size), 3 <= s <= 12
interval year(precision) to month, 1 <= p <= 4 character varying(size), 5 <= s <= 8
Default Data Type Mappings 181
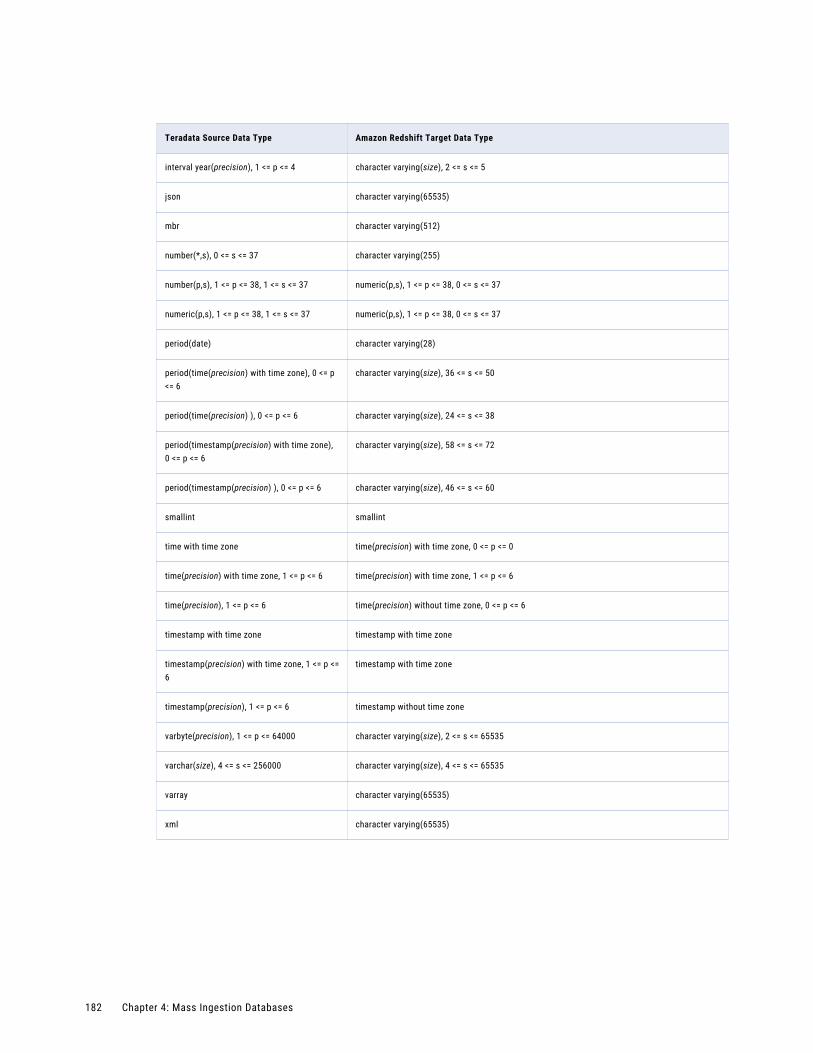
Teradata Source Data Type Amazon Redshift Target Data Type
interval year(precision), 1 <= p <= 4 character varying(size), 2 <= s <= 5
json character varying(65535)
mbr character varying(512)
number(*,s), 0 <= s <= 37 character varying(255)
number(p,s), 1 <= p <= 38, 1 <= s <= 37 numeric(p,s), 1 <= p <= 38, 0 <= s <= 37
numeric(p,s), 1 <= p <= 38, 1 <= s <= 37 numeric(p,s), 1 <= p <= 38, 0 <= s <= 37
period(date) character varying(28)
period(time(precision) with time zone), 0 <= p <= 6
character varying(size), 36 <= s <= 50
period(time(precision) ), 0 <= p <= 6 character varying(size), 24 <= s <= 38
period(timestamp(precision) with time zone), 0 <= p <= 6
character varying(size), 58 <= s <= 72
period(timestamp(precision) ), 0 <= p <= 6 character varying(size), 46 <= s <= 60
smallint smallint
time with time zone time(precision) with time zone, 0 <= p <= 0
time(precision) with time zone, 1 <= p <= 6 time(precision) with time zone, 1 <= p <= 6
time(precision), 1 <= p <= 6 time(precision) without time zone, 0 <= p <= 6
timestamp with time zone timestamp with time zone
timestamp(precision) with time zone, 1 <= p <= 6
timestamp with time zone
timestamp(precision), 1 <= p <= 6 timestamp without time zone
varbyte(precision), 1 <= p <= 64000 character varying(size), 2 <= s <= 65535
varchar(size), 4 <= s <= 256000 character varying(size), 4 <= s <= 65535
varray character varying(65535)
xml character varying(65535)
182 Chapter 4: Mass Ingestion Databases
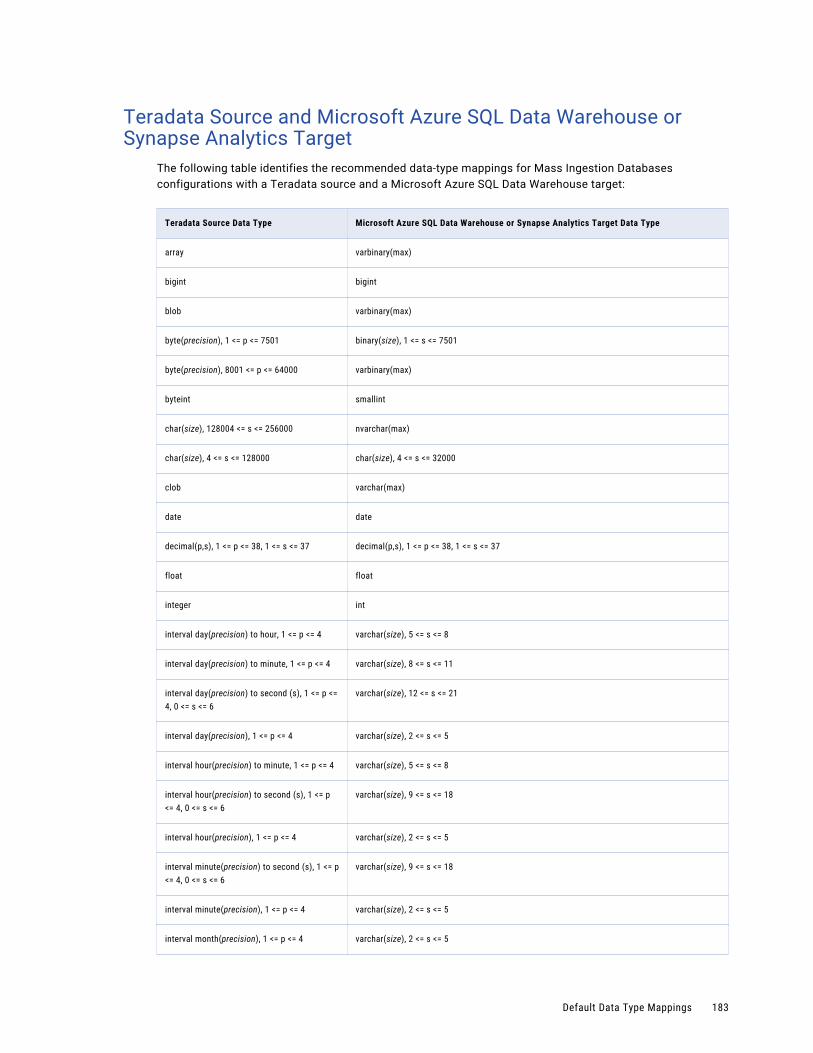
Teradata Source and Microsoft Azure SQL Data Warehouse or Synapse Analytics Target
The following table identifies the recommended data-type mappings for Mass Ingestion Databases configurations with a Teradata source and a Microsoft Azure SQL Data Warehouse target:
Teradata Source Data Type Microsoft Azure SQL Data Warehouse or Synapse Analytics Target Data Type
array varbinary(max)
bigint bigint
blob varbinary(max)
byte(precision), 1 <= p <= 7501 binary(size), 1 <= s <= 7501
byte(precision), 8001 <= p <= 64000 varbinary(max)
byteint smallint
char(size), 128004 <= s <= 256000 nvarchar(max)
char(size), 4 <= s <= 128000 char(size), 4 <= s <= 32000
clob varchar(max)
date date
decimal(p,s), 1 <= p <= 38, 1 <= s <= 37 decimal(p,s), 1 <= p <= 38, 1 <= s <= 37
float float
integer int
interval day(precision) to hour, 1 <= p <= 4 varchar(size), 5 <= s <= 8
interval day(precision) to minute, 1 <= p <= 4 varchar(size), 8 <= s <= 11
interval day(precision) to second (s), 1 <= p <= 4, 0 <= s <= 6
varchar(size), 12 <= s <= 21
interval day(precision), 1 <= p <= 4 varchar(size), 2 <= s <= 5
interval hour(precision) to minute, 1 <= p <= 4 varchar(size), 5 <= s <= 8
interval hour(precision) to second (s), 1 <= p <= 4, 0 <= s <= 6
varchar(size), 9 <= s <= 18
interval hour(precision), 1 <= p <= 4 varchar(size), 2 <= s <= 5
interval minute(precision) to second (s), 1 <= p <= 4, 0 <= s <= 6
varchar(size), 9 <= s <= 18
interval minute(precision), 1 <= p <= 4 varchar(size), 2 <= s <= 5
interval month(precision), 1 <= p <= 4 varchar(size), 2 <= s <= 5
Default Data Type Mappings 183
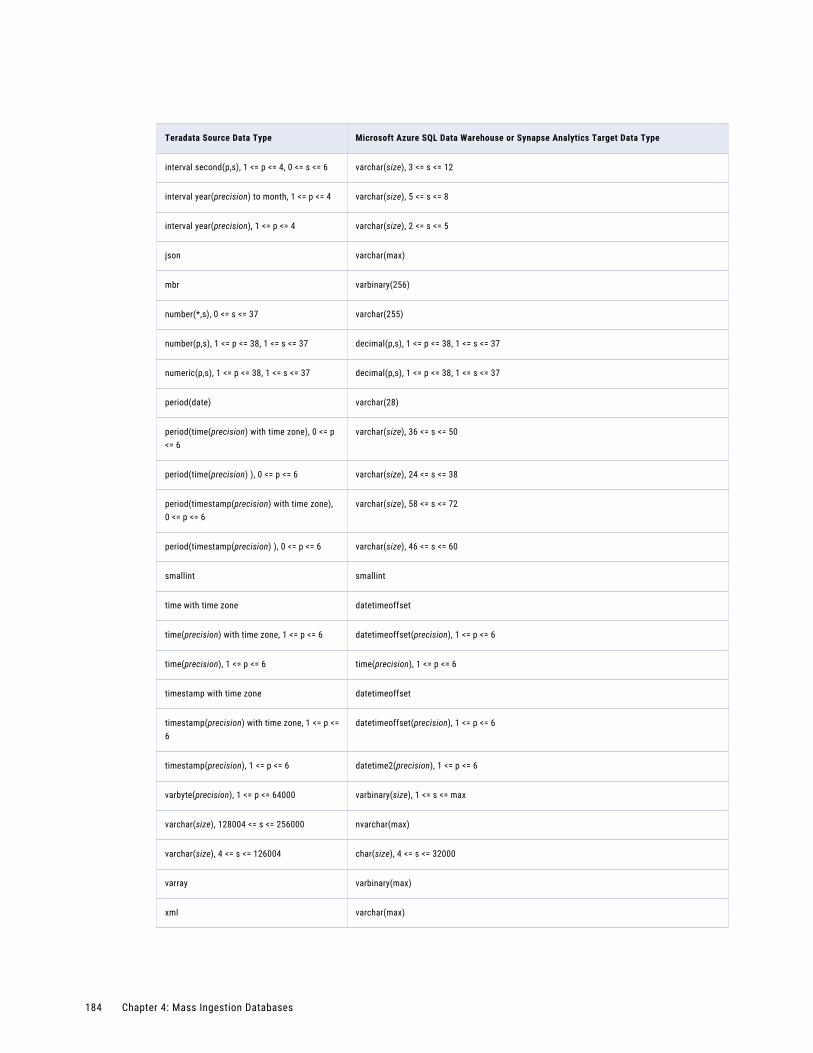
Teradata Source Data Type Microsoft Azure SQL Data Warehouse or Synapse Analytics Target Data Type
interval second(p,s), 1 <= p <= 4, 0 <= s <= 6 varchar(size), 3 <= s <= 12
interval year(precision) to month, 1 <= p <= 4 varchar(size), 5 <= s <= 8
interval year(precision), 1 <= p <= 4 varchar(size), 2 <= s <= 5
json varchar(max)
mbr varbinary(256)
number(*,s), 0 <= s <= 37 varchar(255)
number(p,s), 1 <= p <= 38, 1 <= s <= 37 decimal(p,s), 1 <= p <= 38, 1 <= s <= 37
numeric(p,s), 1 <= p <= 38, 1 <= s <= 37 decimal(p,s), 1 <= p <= 38, 1 <= s <= 37
period(date) varchar(28)
period(time(precision) with time zone), 0 <= p <= 6
varchar(size), 36 <= s <= 50
period(time(precision) ), 0 <= p <= 6 varchar(size), 24 <= s <= 38
period(timestamp(precision) with time zone), 0 <= p <= 6
varchar(size), 58 <= s <= 72
period(timestamp(precision) ), 0 <= p <= 6 varchar(size), 46 <= s <= 60
smallint smallint
time with time zone datetimeoffset
time(precision) with time zone, 1 <= p <= 6 datetimeoffset(precision), 1 <= p <= 6
time(precision), 1 <= p <= 6 time(precision), 1 <= p <= 6
timestamp with time zone datetimeoffset
timestamp(precision) with time zone, 1 <= p <= 6
datetimeoffset(precision), 1 <= p <= 6
timestamp(precision), 1 <= p <= 6 datetime2(precision), 1 <= p <= 6
varbyte(precision), 1 <= p <= 64000 varbinary(size), 1 <= s <= max
varchar(size), 128004 <= s <= 256000 nvarchar(max)
varchar(size), 4 <= s <= 126004 char(size), 4 <= s <= 32000
varray varbinary(max)
xml varchar(max)
184 Chapter 4: Mass Ingestion Databases
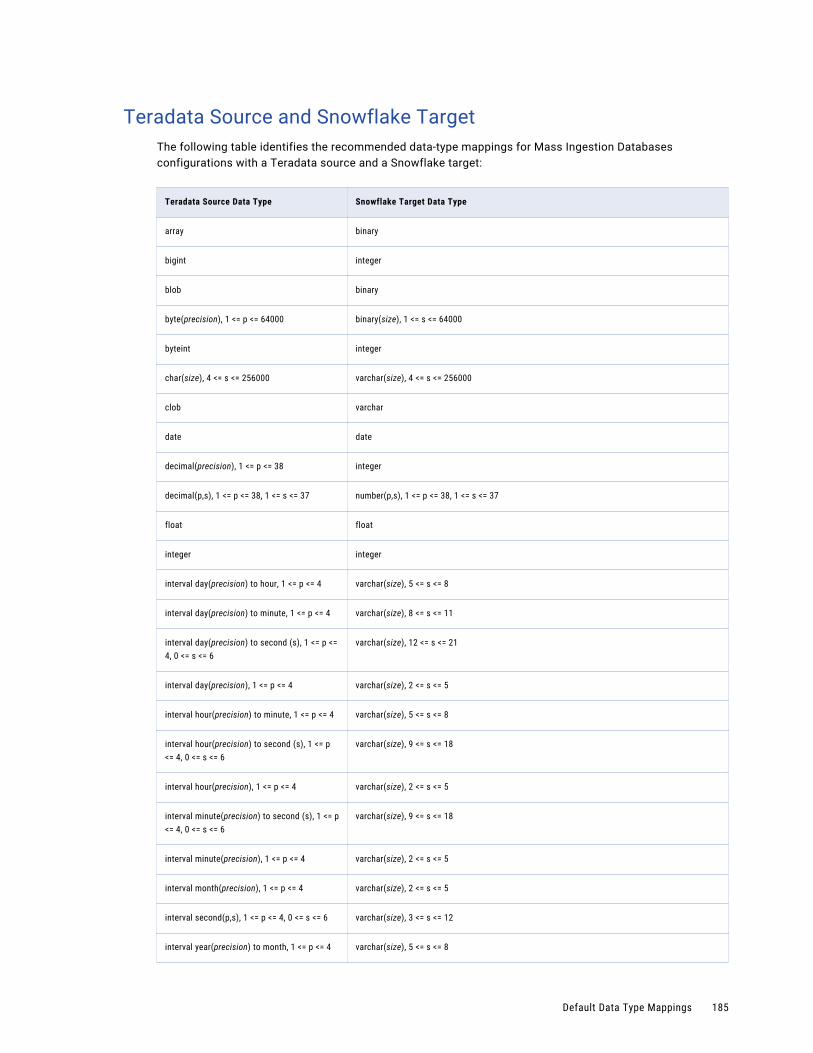
Teradata Source and Snowflake TargetThe following table identifies the recommended data-type mappings for Mass Ingestion Databases configurations with a Teradata source and a Snowflake target:
Teradata Source Data Type Snowflake Target Data Type
array binary
bigint integer
blob binary
byte(precision), 1 <= p <= 64000 binary(size), 1 <= s <= 64000
byteint integer
char(size), 4 <= s <= 256000 varchar(size), 4 <= s <= 256000
clob varchar
date date
decimal(precision), 1 <= p <= 38 integer
decimal(p,s), 1 <= p <= 38, 1 <= s <= 37 number(p,s), 1 <= p <= 38, 1 <= s <= 37
float float
integer integer
interval day(precision) to hour, 1 <= p <= 4 varchar(size), 5 <= s <= 8
interval day(precision) to minute, 1 <= p <= 4 varchar(size), 8 <= s <= 11
interval day(precision) to second (s), 1 <= p <= 4, 0 <= s <= 6
varchar(size), 12 <= s <= 21
interval day(precision), 1 <= p <= 4 varchar(size), 2 <= s <= 5
interval hour(precision) to minute, 1 <= p <= 4 varchar(size), 5 <= s <= 8
interval hour(precision) to second (s), 1 <= p <= 4, 0 <= s <= 6
varchar(size), 9 <= s <= 18
interval hour(precision), 1 <= p <= 4 varchar(size), 2 <= s <= 5
interval minute(precision) to second (s), 1 <= p <= 4, 0 <= s <= 6
varchar(size), 9 <= s <= 18
interval minute(precision), 1 <= p <= 4 varchar(size), 2 <= s <= 5
interval month(precision), 1 <= p <= 4 varchar(size), 2 <= s <= 5
interval second(p,s), 1 <= p <= 4, 0 <= s <= 6 varchar(size), 3 <= s <= 12
interval year(precision) to month, 1 <= p <= 4 varchar(size), 5 <= s <= 8
Default Data Type Mappings 185

Teradata Source Data Type Snowflake Target Data Type
interval year(precision), 1 <= p <= 4 varchar(size), 2 <= s <= 5
json varchar
mbr binary(256)
number(*,s), 0 <= s <= 37 char(255)
number(precision), 1 <= p <= 36 integer
number(p,s), 1 <= p <= 38, 1 <= s <= 37 number(p,s), 1 <= p <= 38, 1 <= s <= 37
numeric(precision), 1 <= p <= 36 integer
numeric(p,s), 1 <= p <= 38, 1 <= s <= 37 number(p,s), 1 <= p <= 38, 1 <= s <= 37
period(date) varchar(28)
period(time(precision) with time zone), 0 <= p <= 6
varchar(size), 36 <= s <= 50
period(time(precision) ), 0 <= p <= 6 varchar(size), 24 <= s <= 38
period(timestamp(precision) with time zone), 0 <= p <= 6
varchar(size), 58 <= s <= 72
period(timestamp(precision) ), 0 <= p <= 6 varchar(size), 46 <= s <= 60
smallint integer
time with time zone timestamp_tz
time(precision) with time zone, 1 <= p <= 6 timestamp_tz(precision), 1 <= p <= 6
time(precision), 1 <= p <= 6 time(precision), 1 <= p <= 6
timestamp with time zone timestamp_tz
timestamp(precision) with time zone, 1 <= p <= 6
timestamp_tz(precision), 1 <= p <= 6
timestamp(precision), 1 <= p <= 6 timestamp_ntz(precision), 1 <= p <= 6
varbyte(precision), 1 <= p <= 64000 binary(size), 1 <= s <= 64000
varchar(size), 4 <= s <= 256000 varchar(size), 4 <= s <= 256000
varray binary
xml varchar
Note: The Snowflake TIMESTAMP_TZ data type includes a default date that the source Teradata TIME WITH TIME ZONE data type does not include. For example, a database ingestion job will replicate the source value "12:59:59" as "1900-01-01 12:59:59".
186 Chapter 4: Mass Ingestion Databases
Cloud Mass Ingestion Databases Command-Line Interface
You can use the Cloud Mass Ingestion Databases Command Line Interface (CLI) to list, start, stop, and check the statuses of database ingestion jobs.
For more information, see the Cloud Mass Ingestion Databases Command-Line Interface.
Cloud Mass Ingestion Databases Command-Line Interface 187
C h a p t e r 5
Mass Ingestion FilesUse file ingestion tasks to transfer a large number of files of any file type between on-premises and cloud repositories and to track and monitor file transfers.
When you create a file ingestion task, you define the source and the target endpoints for file transfer. You can configure a file ingestion task to transfer multiple files in a batch to enhance performance.
You can define a schedule by which the task runs. You can also configure the task to perform actions, such as compression, decompression, encryption, or decryption of files.
Use casesMass Ingestion Files can help you to migrate data from on-premises or cloud-based systems to cloud-based systems.
Mass Ingestion Files source typesYou can transfer files from on-premises and cloud sources that Mass Ingestion Files support to supported targets.
You can add a source to a file ingestion task in the following ways:
Through data catalog discovery
If your organization administrator has configured Enterprise Data Catalog integration properties, you can perform data catalog discovery to find the source object in the catalog. You can discover Amazon S3 V2, Microsoft Azure Blob Storage V3, or Hadoop Files V2 objects to use as sources in new file ingestion tasks.
Search for the source object on the Data Catalog page, select the object in the search results, and then add it to a new file ingestion task.
When you configure the task
Select the source connection and source object on the Source tab when you configure the file ingestion task.
188
Mass Ingestion Files supports the following source types:
• Source Connection— Supports the following sources:
- Local folder
- Advanced FTP V2
- Advanced FTPS V2
- Advanced SFTP V2
- Amazon S3 V2
- Google Cloud Storage V2
- Hadoop Files V2
- Microsoft Azure Blob Storage V3
- Microsoft Azure Data Lake Store Gen2
- Microsoft Azure Data Lake Store V3
- Databricks Delta
• File Listener— Use a file listener component as a source.
For more information, see “Configuring the source” on page 192.
Mass Ingestion Files target typesYou can transfer files from any Mass Ingestion Files-supported sources to on-premises and cloud targets that Mass Ingestion Files supports.
Mass Ingestion Files supports the following targets:
• Local folder
• Advanced FTP V2
• Advanced FTPS V2
• Advanced SFTP V2
• Amazon S3 V2
• Amazon Redshift V2
• Google BigQuery V2
• Google Cloud Storage V2
• Hadoop Files V2
• Microsoft Azure Blob Storage V3
• Microsoft Azure Data Lake Store Gen2
• Microsoft Azure Data Lake Store V3
• Microsoft Azure Synapse SQL
• Snowflake Cloud Data Warehouse V2
• Databricks Delta
Mass Ingestion Files target types 189
Mass Ingestion Files scheduleInstead of manually running a file ingestion task, you can schedule the task to run at a specific time or when a file is ready. For more information about scheduling a file ingestion task, refer to “Defining a schedule and adding file actions” on page 228.
File processing actionsYou can perform the following file-processing actions on the files that the file ingestion task transfers:
When you configure a file ingestion task, you can enable the following file-processing actions, which are performed during the file transfer:
• Encryption. Uses the Pretty Good Program (PGP) method to encrypt files. The file ingestion job encrypts files and flattens the file structure in the target directory. The Gnu Privacy Guard (GPG) method is compatible with the PGP method to encrypt files.For more information about securing the files that the file ingestion job transfers, refer to “Mass Ingestion Files security” on page 191.
• Decryption. Uses the PGP method to decrypt files. The file ingestion task decrypts files and flattens the file structure in the target directory. The GPG method is compatible with the PGP method to decrypt files.For more information about securing the files that the file ingestion job transfers, refer to “Mass Ingestion Files security” on page 191.
• Compression. Uses one of the following methods to compress files: Zip, Tar, or Gzip. The file ingestion job compresses files and flattens the file structure in the target directory.
• Decompression. Uses one of the following methods to decompress compressed files: Unzip, Untar, or Gunzip. The file ingestion job decompresses files and flattens the file structure in the target directory.
• File structure flattening. Moves the files from multiple folders to a single folder in the target directory. File-structure flattening might result in the loss of files if files with the same file name exist in different folders. The session log displays the overridden files.
• Virus scanning. Identifies viruses and malware in the files that the file ingestion job transfers by using the Internet Content Adaptation Protocol (ICAP). The ICAP server scans the files and sends a response code of 200 when the scan does not identify any virus in the files. The file ingestion job fails when the scan detects a virus.
Note: The file ingestion task does not flatten the file structure if you do not configure any action.
The file ingestion job performs the file-processing actions in the order you configure them in the task definition. For more information about adding file-processing actions to a file ingestion task, see “Defining a schedule and adding file actions” on page 228.
For example, you want to compress and encrypt files prior to transferring them from a local repository to an FTP server.
In this scenario, add the following file processing actions:
1. Compress with an action type of Zip.
2. Encrypt with an action type of PGP.
190 Chapter 5: Mass Ingestion Files
Mass Ingestion Files securityUse the encryption and decryption methods to secure files that a file ingestion job transfers.
When you define the file ingestion task, you can specify the encryption and decryption methods to use. For more information, see “File processing actions” on page 190.
File ingestion jobs use the PGP method to encrypt and decrypt files. To encrypt files, you must provide a key ID. To decrypt files, you must provide a key passphrase.
If your user privileges allow you to update files in the agent location, you can use the key ring command line interface (CLI) to manage key IDs. For more information, see “Key ring command reference” on page 229. If you do not have the privilege to access the agent location, ask your administrator for the key ID and key passphrase.
Note: GPG method is compatible with the PGP method to encrypt and decrypt files.
Encryption
When you configure the encryption action for a file ingestion task, you provide a key ID. The key ID is the public key ID of the receiver who decrypts the file. You can also add your private key ID and key passphrase to sign the files.
Decryption
When you configure the decryption action for a file ingestion task, you provide a key passphrase. The key passphrase is the private key passphrase of the receiver who decrypts the file.
Configuring a file ingestion taskUse the task wizard to configure a file ingestion task.
In the wizard, perform the following actions:
1. Define the task.
2. Configure the source.
3. Configure the target.
4. Optionally, configure a schedule.
As you work through the task wizard, you can click Save to save your work at any time. When you have completed the wizard, click Finish to save the task and close the wizard.
Before you begin, verify that the prerequisites are met. For more information, see “Before you begin” on page 191.
Before you beginBefore you create file ingestion tasks, verify that the following conditions exist:
• The organization has Cloud Unified Mass Ingestion Edition or has the following licenses:
- Mass ingestion
- Mass ingestion Runtime
• The Mass ingestion application is running on the Secure Agent.
Mass Ingestion Files security 191

• Source and target connections exist, based on the sources from where you want to transfer files and the targets to where you want to transfer files.
Defining basic task informationTo begin defining a file ingestion task, you must first enter some basic information about the task, such as task name and project or project folder location.
1. To define a file ingestion task, click New > File Ingestion Task.
The Definition page of the File Ingestion Task wizard appears.
2. Configure the following properties:
Property Description
Task Name Name of the file ingestion task. The names of file ingestion tasks must be unique within the organization. Task names can contain alphanumeric characters, spaces, and underscores. Names must begin with an alphabetic character or underscore.Task names are not case sensitive.
Location Project or folder in which the task will reside.
Description Optional description of the task. Maximum length is 1024 characters.
Runtime Environment
Runtime environment that contains the Secure Agent used to run the task. The file ingestion application must run on the Secure Agent.
3. Click Next.
To edit a file ingestion task, on the Explore page, navigate to the task. In the row that contains the task, from the Actions menu, select Edit.
Configuring the sourceTo configure the source, select a source type and a source connection from which to transfer files and then configure source options.
1. On the Source page, select the source type.
2. Select a source connection type and a source connection.
The file ingestion task supports the following source connection types:
• Local folder
• Advanced FTP V2
• Advanced FTPS V2
• Advanced SFTP V2
• Amazon S3 V2
• Google Cloud Storage V2
• Hadoop Files V2
• Microsoft Azure Blob Storage V3
192 Chapter 5: Mass Ingestion Files
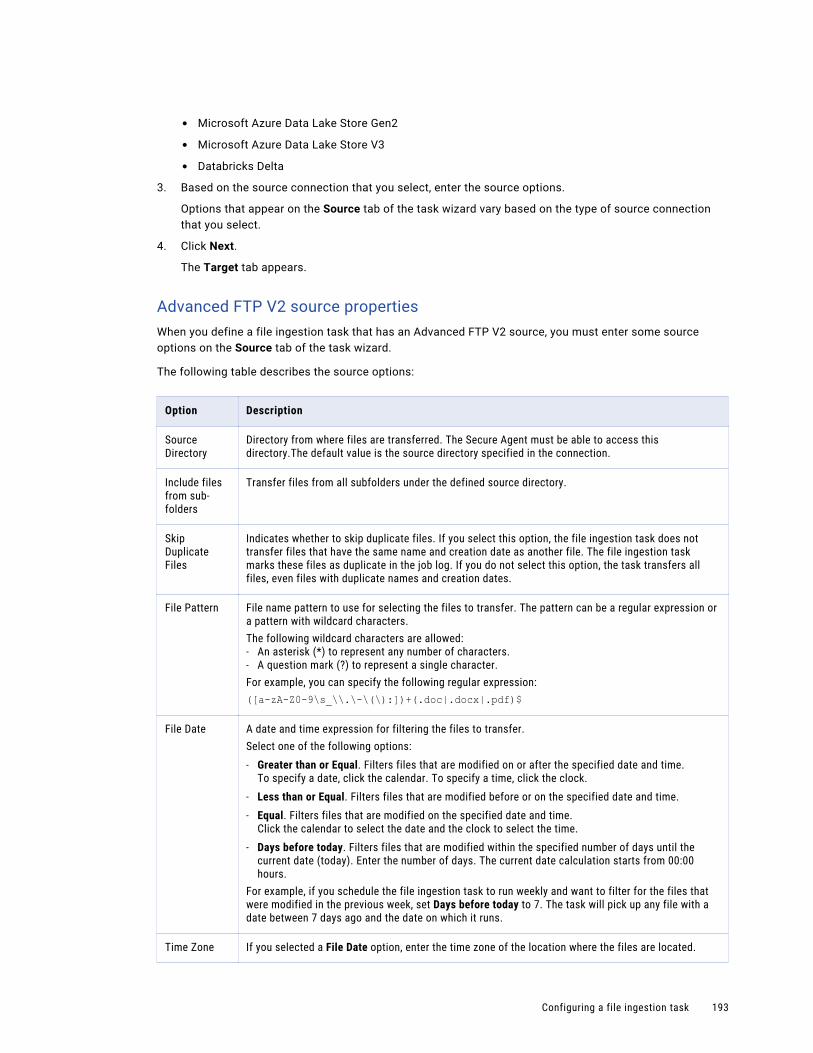
• Microsoft Azure Data Lake Store Gen2
• Microsoft Azure Data Lake Store V3
• Databricks Delta
3. Based on the source connection that you select, enter the source options.
Options that appear on the Source tab of the task wizard vary based on the type of source connection that you select.
4. Click Next.
The Target tab appears.
Advanced FTP V2 source propertiesWhen you define a file ingestion task that has an Advanced FTP V2 source, you must enter some source options on the Source tab of the task wizard.
The following table describes the source options:
Option Description
Source Directory
Directory from where files are transferred. The Secure Agent must be able to access this directory.The default value is the source directory specified in the connection.
Include files from sub-folders
Transfer files from all subfolders under the defined source directory.
Skip Duplicate Files
Indicates whether to skip duplicate files. If you select this option, the file ingestion task does not transfer files that have the same name and creation date as another file. The file ingestion task marks these files as duplicate in the job log. If you do not select this option, the task transfers all files, even files with duplicate names and creation dates.
File Pattern File name pattern to use for selecting the files to transfer. The pattern can be a regular expression or a pattern with wildcard characters.The following wildcard characters are allowed:- An asterisk (*) to represent any number of characters.- A question mark (?) to represent a single character.For example, you can specify the following regular expression:([a-zA-Z0-9\s_\\.\-\(\):])+(.doc|.docx|.pdf)$
File Date A date and time expression for filtering the files to transfer.Select one of the following options:- Greater than or Equal. Filters files that are modified on or after the specified date and time.
To specify a date, click the calendar. To specify a time, click the clock.- Less than or Equal. Filters files that are modified before or on the specified date and time.- Equal. Filters files that are modified on the specified date and time.
Click the calendar to select the date and the clock to select the time.- Days before today. Filters files that are modified within the specified number of days until the
current date (today). Enter the number of days. The current date calculation starts from 00:00 hours.
For example, if you schedule the file ingestion task to run weekly and want to filter for the files that were modified in the previous week, set Days before today to 7. The task will pick up any file with a date between 7 days ago and the date on which it runs.
Time Zone If you selected a File Date option, enter the time zone of the location where the files are located.
Configuring a file ingestion task 193
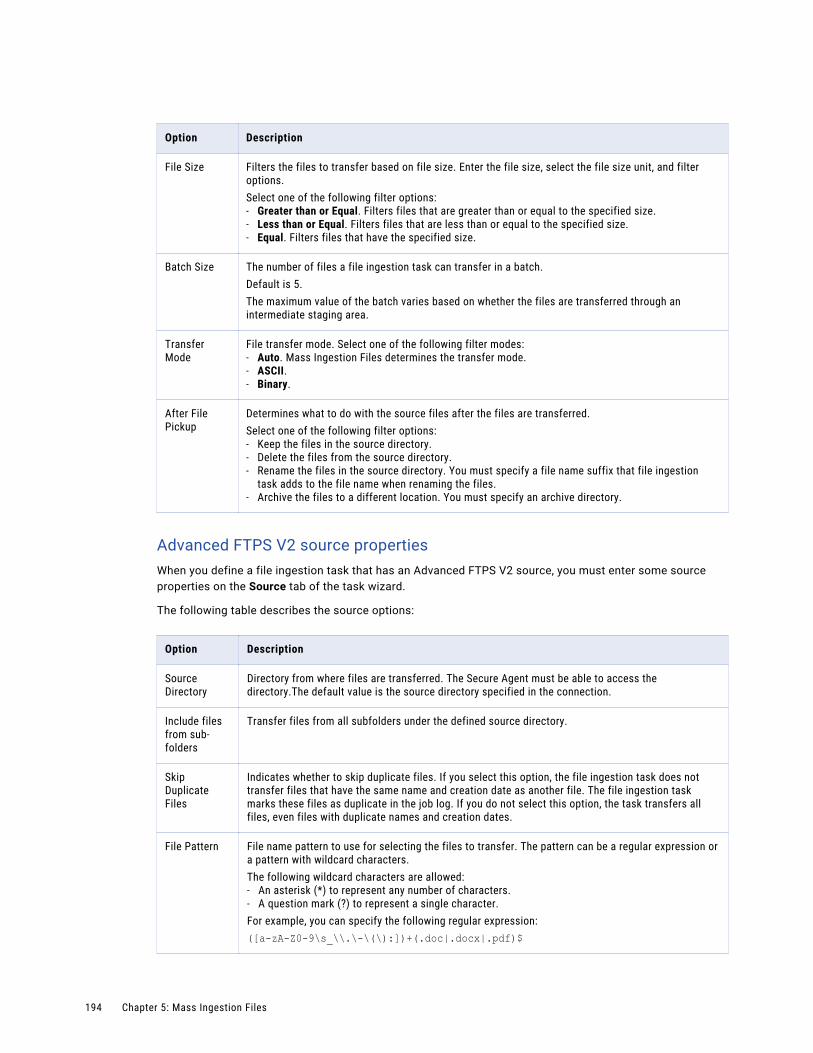
Option Description
File Size Filters the files to transfer based on file size. Enter the file size, select the file size unit, and filter options.Select one of the following filter options:- Greater than or Equal. Filters files that are greater than or equal to the specified size.- Less than or Equal. Filters files that are less than or equal to the specified size.- Equal. Filters files that have the specified size.
Batch Size The number of files a file ingestion task can transfer in a batch.Default is 5.The maximum value of the batch varies based on whether the files are transferred through an intermediate staging area.
Transfer Mode
File transfer mode. Select one of the following filter modes: - Auto. Mass Ingestion Files determines the transfer mode.- ASCII.- Binary.
After File Pickup
Determines what to do with the source files after the files are transferred.Select one of the following filter options:- Keep the files in the source directory.- Delete the files from the source directory.- Rename the files in the source directory. You must specify a file name suffix that file ingestion
task adds to the file name when renaming the files.- Archive the files to a different location. You must specify an archive directory.
Advanced FTPS V2 source propertiesWhen you define a file ingestion task that has an Advanced FTPS V2 source, you must enter some source properties on the Source tab of the task wizard.
The following table describes the source options:
Option Description
Source Directory
Directory from where files are transferred. The Secure Agent must be able to access the directory.The default value is the source directory specified in the connection.
Include files from sub-folders
Transfer files from all subfolders under the defined source directory.
Skip Duplicate Files
Indicates whether to skip duplicate files. If you select this option, the file ingestion task does not transfer files that have the same name and creation date as another file. The file ingestion task marks these files as duplicate in the job log. If you do not select this option, the task transfers all files, even files with duplicate names and creation dates.
File Pattern File name pattern to use for selecting the files to transfer. The pattern can be a regular expression or a pattern with wildcard characters.The following wildcard characters are allowed:- An asterisk (*) to represent any number of characters.- A question mark (?) to represent a single character.For example, you can specify the following regular expression:([a-zA-Z0-9\s_\\.\-\(\):])+(.doc|.docx|.pdf)$
194 Chapter 5: Mass Ingestion Files
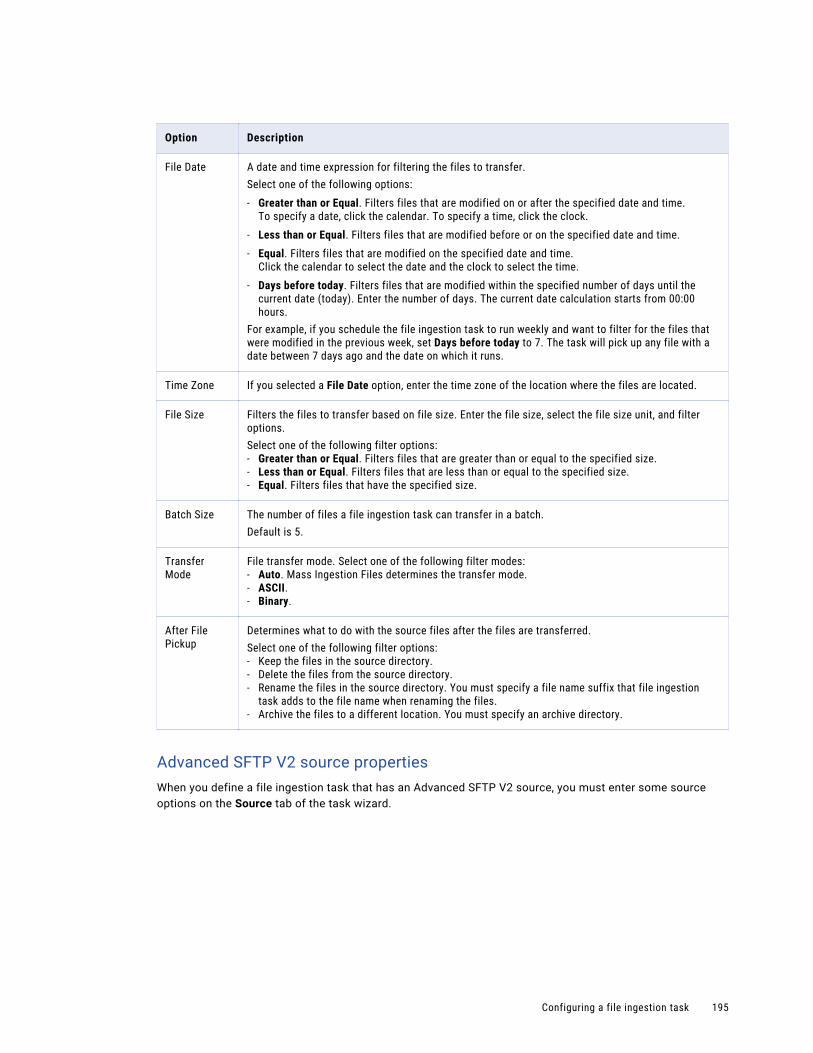
Option Description
File Date A date and time expression for filtering the files to transfer.Select one of the following options:- Greater than or Equal. Filters files that are modified on or after the specified date and time.
To specify a date, click the calendar. To specify a time, click the clock.- Less than or Equal. Filters files that are modified before or on the specified date and time.- Equal. Filters files that are modified on the specified date and time.
Click the calendar to select the date and the clock to select the time.- Days before today. Filters files that are modified within the specified number of days until the
current date (today). Enter the number of days. The current date calculation starts from 00:00 hours.
For example, if you schedule the file ingestion task to run weekly and want to filter for the files that were modified in the previous week, set Days before today to 7. The task will pick up any file with a date between 7 days ago and the date on which it runs.
Time Zone If you selected a File Date option, enter the time zone of the location where the files are located.
File Size Filters the files to transfer based on file size. Enter the file size, select the file size unit, and filter options.Select one of the following filter options:- Greater than or Equal. Filters files that are greater than or equal to the specified size.- Less than or Equal. Filters files that are less than or equal to the specified size.- Equal. Filters files that have the specified size.
Batch Size The number of files a file ingestion task can transfer in a batch.Default is 5.
Transfer Mode
File transfer mode. Select one of the following filter modes: - Auto. Mass Ingestion Files determines the transfer mode.- ASCII.- Binary.
After File Pickup
Determines what to do with the source files after the files are transferred.Select one of the following filter options:- Keep the files in the source directory.- Delete the files from the source directory.- Rename the files in the source directory. You must specify a file name suffix that file ingestion
task adds to the file name when renaming the files.- Archive the files to a different location. You must specify an archive directory.
Advanced SFTP V2 source propertiesWhen you define a file ingestion task that has an Advanced SFTP V2 source, you must enter some source options on the Source tab of the task wizard.
Configuring a file ingestion task 195
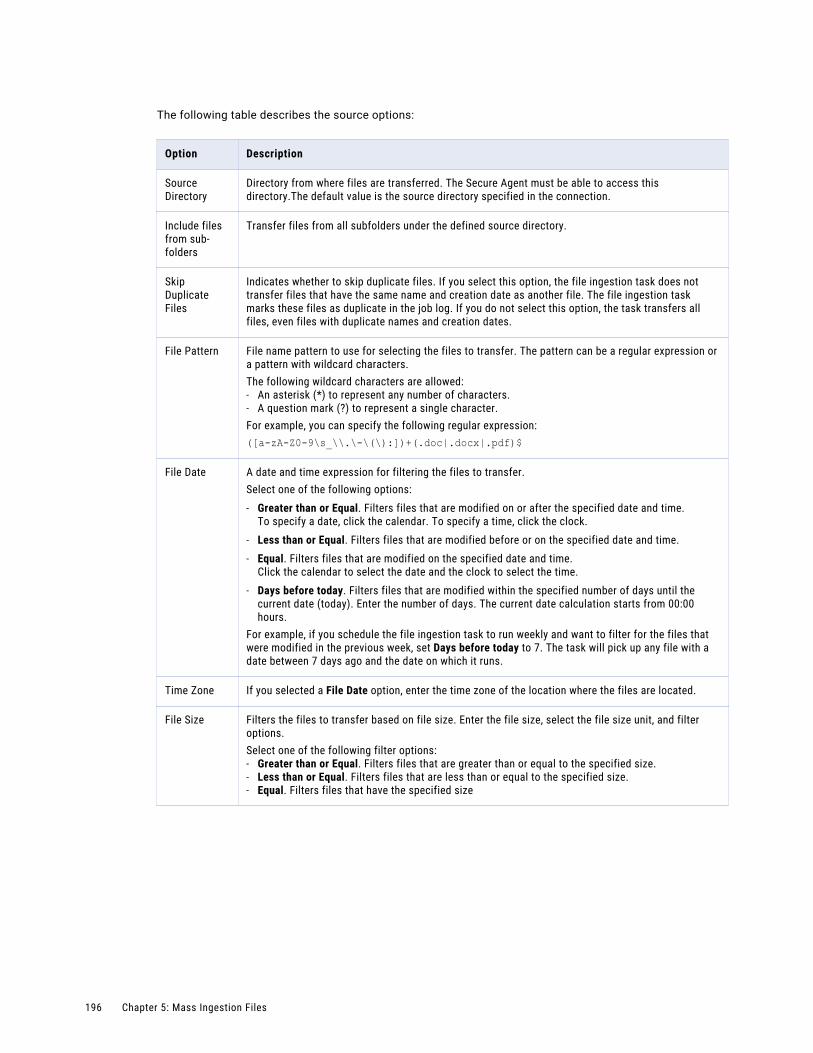
The following table describes the source options:
Option Description
Source Directory
Directory from where files are transferred. The Secure Agent must be able to access this directory.The default value is the source directory specified in the connection.
Include files from sub-folders
Transfer files from all subfolders under the defined source directory.
Skip Duplicate Files
Indicates whether to skip duplicate files. If you select this option, the file ingestion task does not transfer files that have the same name and creation date as another file. The file ingestion task marks these files as duplicate in the job log. If you do not select this option, the task transfers all files, even files with duplicate names and creation dates.
File Pattern File name pattern to use for selecting the files to transfer. The pattern can be a regular expression or a pattern with wildcard characters.The following wildcard characters are allowed:- An asterisk (*) to represent any number of characters.- A question mark (?) to represent a single character.For example, you can specify the following regular expression:([a-zA-Z0-9\s_\\.\-\(\):])+(.doc|.docx|.pdf)$
File Date A date and time expression for filtering the files to transfer.Select one of the following options:- Greater than or Equal. Filters files that are modified on or after the specified date and time.
To specify a date, click the calendar. To specify a time, click the clock.- Less than or Equal. Filters files that are modified before or on the specified date and time.- Equal. Filters files that are modified on the specified date and time.
Click the calendar to select the date and the clock to select the time.- Days before today. Filters files that are modified within the specified number of days until the
current date (today). Enter the number of days. The current date calculation starts from 00:00 hours.
For example, if you schedule the file ingestion task to run weekly and want to filter for the files that were modified in the previous week, set Days before today to 7. The task will pick up any file with a date between 7 days ago and the date on which it runs.
Time Zone If you selected a File Date option, enter the time zone of the location where the files are located.
File Size Filters the files to transfer based on file size. Enter the file size, select the file size unit, and filter options.Select one of the following filter options:- Greater than or Equal. Filters files that are greater than or equal to the specified size.- Less than or Equal. Filters files that are less than or equal to the specified size.- Equal. Filters files that have the specified size
196 Chapter 5: Mass Ingestion Files
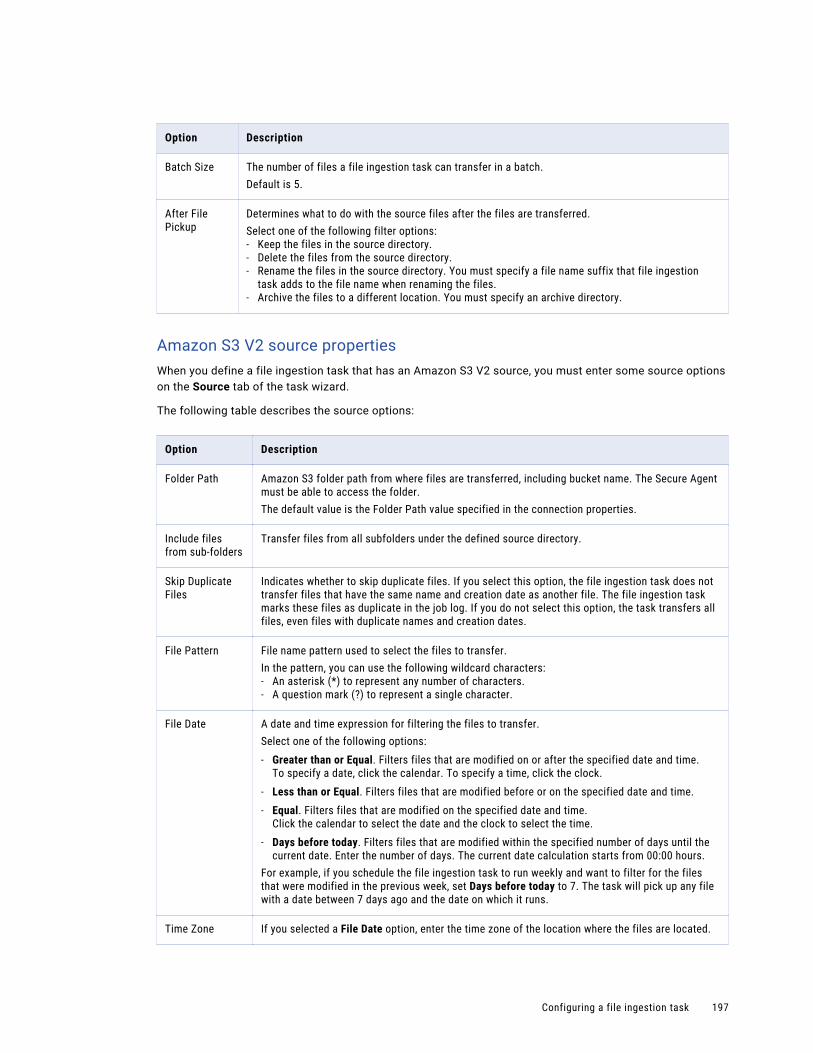
Option Description
Batch Size The number of files a file ingestion task can transfer in a batch.Default is 5.
After File Pickup
Determines what to do with the source files after the files are transferred.Select one of the following filter options:- Keep the files in the source directory.- Delete the files from the source directory.- Rename the files in the source directory. You must specify a file name suffix that file ingestion
task adds to the file name when renaming the files.- Archive the files to a different location. You must specify an archive directory.
Amazon S3 V2 source propertiesWhen you define a file ingestion task that has an Amazon S3 V2 source, you must enter some source options on the Source tab of the task wizard.
The following table describes the source options:
Option Description
Folder Path Amazon S3 folder path from where files are transferred, including bucket name. The Secure Agent must be able to access the folder.The default value is the Folder Path value specified in the connection properties.
Include files from sub-folders
Transfer files from all subfolders under the defined source directory.
Skip Duplicate Files
Indicates whether to skip duplicate files. If you select this option, the file ingestion task does not transfer files that have the same name and creation date as another file. The file ingestion task marks these files as duplicate in the job log. If you do not select this option, the task transfers all files, even files with duplicate names and creation dates.
File Pattern File name pattern used to select the files to transfer.In the pattern, you can use the following wildcard characters:- An asterisk (*) to represent any number of characters.- A question mark (?) to represent a single character.
File Date A date and time expression for filtering the files to transfer.Select one of the following options:- Greater than or Equal. Filters files that are modified on or after the specified date and time.
To specify a date, click the calendar. To specify a time, click the clock.- Less than or Equal. Filters files that are modified before or on the specified date and time.- Equal. Filters files that are modified on the specified date and time.
Click the calendar to select the date and the clock to select the time.- Days before today. Filters files that are modified within the specified number of days until the
current date. Enter the number of days. The current date calculation starts from 00:00 hours.For example, if you schedule the file ingestion task to run weekly and want to filter for the files that were modified in the previous week, set Days before today to 7. The task will pick up any file with a date between 7 days ago and the date on which it runs.
Time Zone If you selected a File Date option, enter the time zone of the location where the files are located.
Configuring a file ingestion task 197

Option Description
File Size Filters the files to transfer based on file size. Enter the file size, select the file size unit, and filter options.Select one of the following filter options:- Greater than or Equal. Filters files that are greater than or equal to the specified size.- Less than or Equal. Filters files that are less than or equal to the specified size.- Equal. Filters files that have the specified size.
Batch Size The number of files a file ingestion task can transfer in a batch.Default is 5.The maximum value of the batch depends on whether the files transfer through an intermediate staging server.A file ingestion task does not transfer files through an intermediate staging server if the files are transferred from the following source to target endpoints:- Amazon S3 to Amazon Redshift, if you choose to transfer files without using intermediate
staging.- Amazon S3 to SnowflakeNote: When you transfer files using a command line, the file ingestion task transfers files through an intermediate staging server.Consider the following guidelines when you define a batch size:- If files are transferred from the source to target without an intermediate staging server, the
maximum number of files you can transfer in a batch is 8000.- If files pass through an intermediate staging server, the maximum number of files you can
transfer in a batch is 20.- If you transfer files from any source to a Snowflake target, the maximum number of files you
can transfer in a batch is 1000.
File Encryption Type
Type of Amazon S3 file encryption to use during file transfer.Select one of the following options:- None. Files are not encrypted during file transfer. Default is None.- S3 server-side encryption. Amazon S3 encrypts the file by using AWS-managed encryption
keys.- S3 client-side encryption. Ensure that unrestricted policies are implemented for the AgentJVM,
and that the master symmetric key for the connection is set.
S3 Accelerated Transfer
Select whether to use Amazon S3 Transfer Acceleration on the S3 bucket.To use Transfer Acceleration, accelerated transfer must be enabled for the bucket. The following options are available:- Disabled. Do not use Amazon S3 Transfer Acceleration.- Accelerated. Use Amazon S3 Transfer Acceleration.- Dualstack Accelerated. Use Amazon S3 Transfer Acceleration on a dual-stack endpoint.
Minimum Download Part Size
Minimum download part size in megabytes when downloading a large file as a set of multiple independent parts.
Multipart Download Threshold
Multipart download minimum threshold in megabytes that is used to determine when to upload objects in multiple parts in parallel.
198 Chapter 5: Mass Ingestion Files
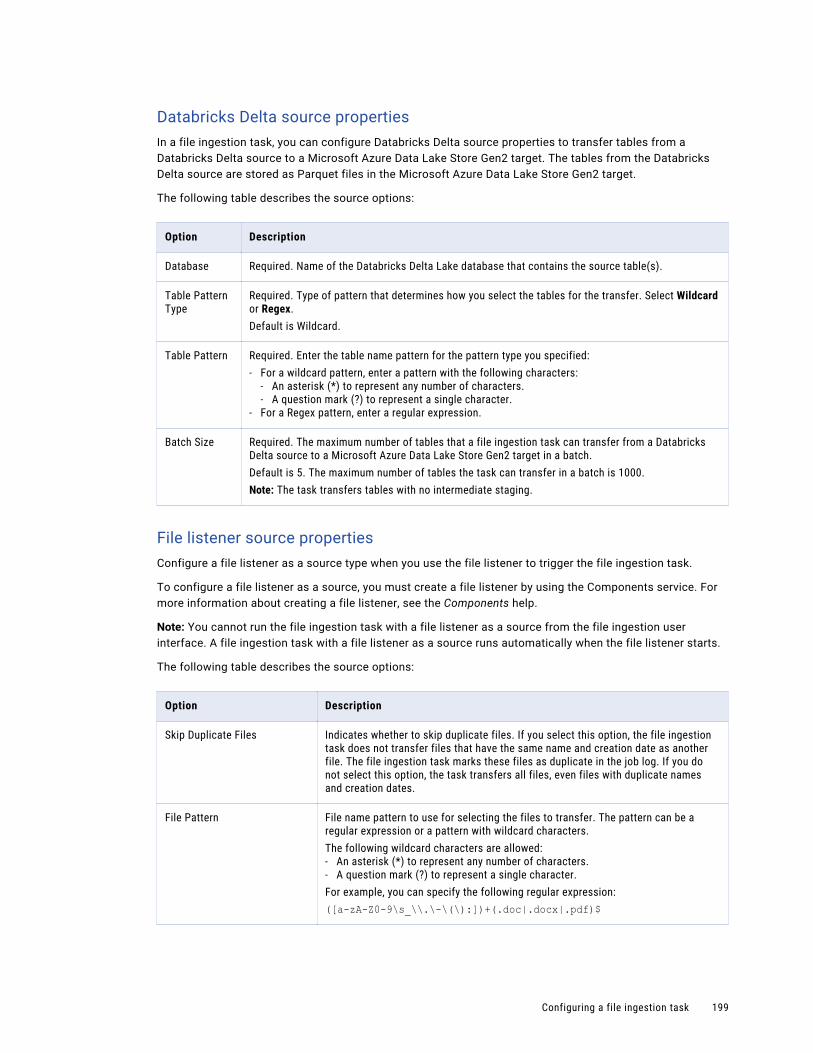
Databricks Delta source propertiesIn a file ingestion task, you can configure Databricks Delta source properties to transfer tables from a Databricks Delta source to a Microsoft Azure Data Lake Store Gen2 target. The tables from the Databricks Delta source are stored as Parquet files in the Microsoft Azure Data Lake Store Gen2 target.
The following table describes the source options:
Option Description
Database Required. Name of the Databricks Delta Lake database that contains the source table(s).
Table Pattern Type
Required. Type of pattern that determines how you select the tables for the transfer. Select Wildcard or Regex.Default is Wildcard.
Table Pattern Required. Enter the table name pattern for the pattern type you specified:- For a wildcard pattern, enter a pattern with the following characters:
- An asterisk (*) to represent any number of characters.- A question mark (?) to represent a single character.
- For a Regex pattern, enter a regular expression.
Batch Size Required. The maximum number of tables that a file ingestion task can transfer from a Databricks Delta source to a Microsoft Azure Data Lake Store Gen2 target in a batch.Default is 5. The maximum number of tables the task can transfer in a batch is 1000.Note: The task transfers tables with no intermediate staging.
File listener source propertiesConfigure a file listener as a source type when you use the file listener to trigger the file ingestion task.
To configure a file listener as a source, you must create a file listener by using the Components service. For more information about creating a file listener, see the Components help.
Note: You cannot run the file ingestion task with a file listener as a source from the file ingestion user interface. A file ingestion task with a file listener as a source runs automatically when the file listener starts.
The following table describes the source options:
Option Description
Skip Duplicate Files Indicates whether to skip duplicate files. If you select this option, the file ingestion task does not transfer files that have the same name and creation date as another file. The file ingestion task marks these files as duplicate in the job log. If you do not select this option, the task transfers all files, even files with duplicate names and creation dates.
File Pattern File name pattern to use for selecting the files to transfer. The pattern can be a regular expression or a pattern with wildcard characters.The following wildcard characters are allowed:- An asterisk (*) to represent any number of characters.- A question mark (?) to represent a single character.For example, you can specify the following regular expression:([a-zA-Z0-9\s_\\.\-\(\):])+(.doc|.docx|.pdf)$
Configuring a file ingestion task 199
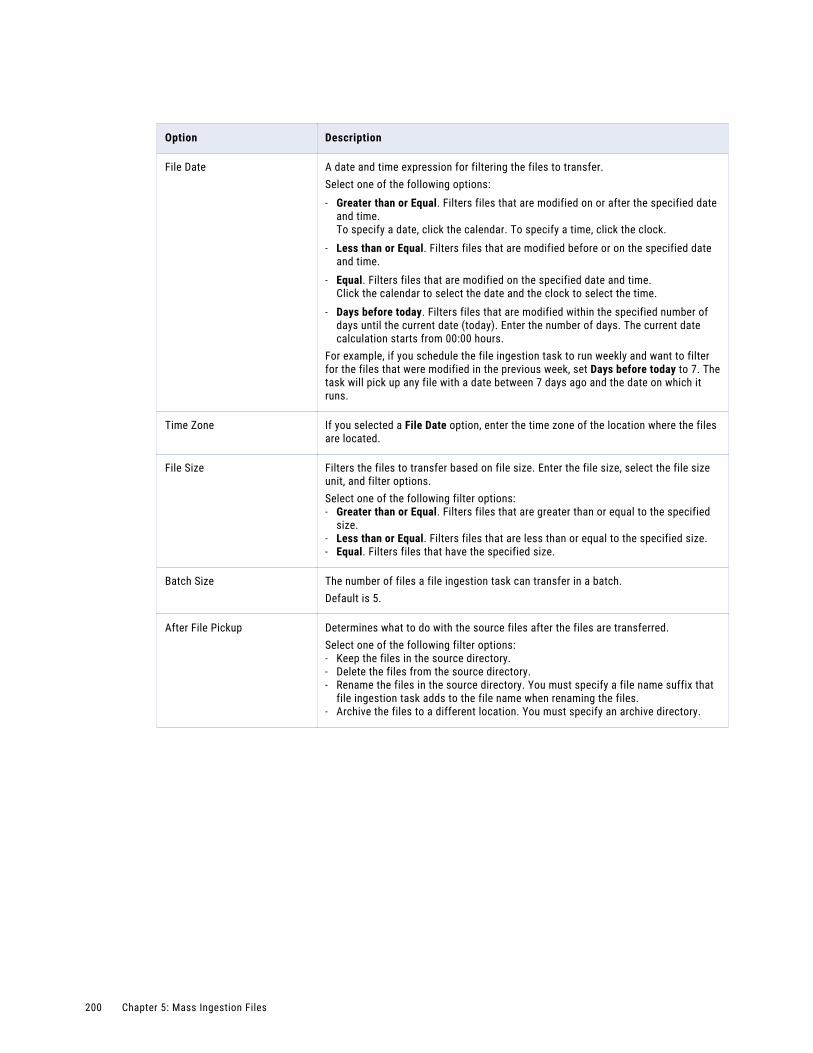
Option Description
File Date A date and time expression for filtering the files to transfer.Select one of the following options:- Greater than or Equal. Filters files that are modified on or after the specified date
and time.To specify a date, click the calendar. To specify a time, click the clock.
- Less than or Equal. Filters files that are modified before or on the specified date and time.
- Equal. Filters files that are modified on the specified date and time.Click the calendar to select the date and the clock to select the time.
- Days before today. Filters files that are modified within the specified number of days until the current date (today). Enter the number of days. The current date calculation starts from 00:00 hours.
For example, if you schedule the file ingestion task to run weekly and want to filter for the files that were modified in the previous week, set Days before today to 7. The task will pick up any file with a date between 7 days ago and the date on which it runs.
Time Zone If you selected a File Date option, enter the time zone of the location where the files are located.
File Size Filters the files to transfer based on file size. Enter the file size, select the file size unit, and filter options.Select one of the following filter options:- Greater than or Equal. Filters files that are greater than or equal to the specified
size.- Less than or Equal. Filters files that are less than or equal to the specified size.- Equal. Filters files that have the specified size.
Batch Size The number of files a file ingestion task can transfer in a batch.Default is 5.
After File Pickup Determines what to do with the source files after the files are transferred.Select one of the following filter options:- Keep the files in the source directory.- Delete the files from the source directory.- Rename the files in the source directory. You must specify a file name suffix that
file ingestion task adds to the file name when renaming the files.- Archive the files to a different location. You must specify an archive directory.
200 Chapter 5: Mass Ingestion Files
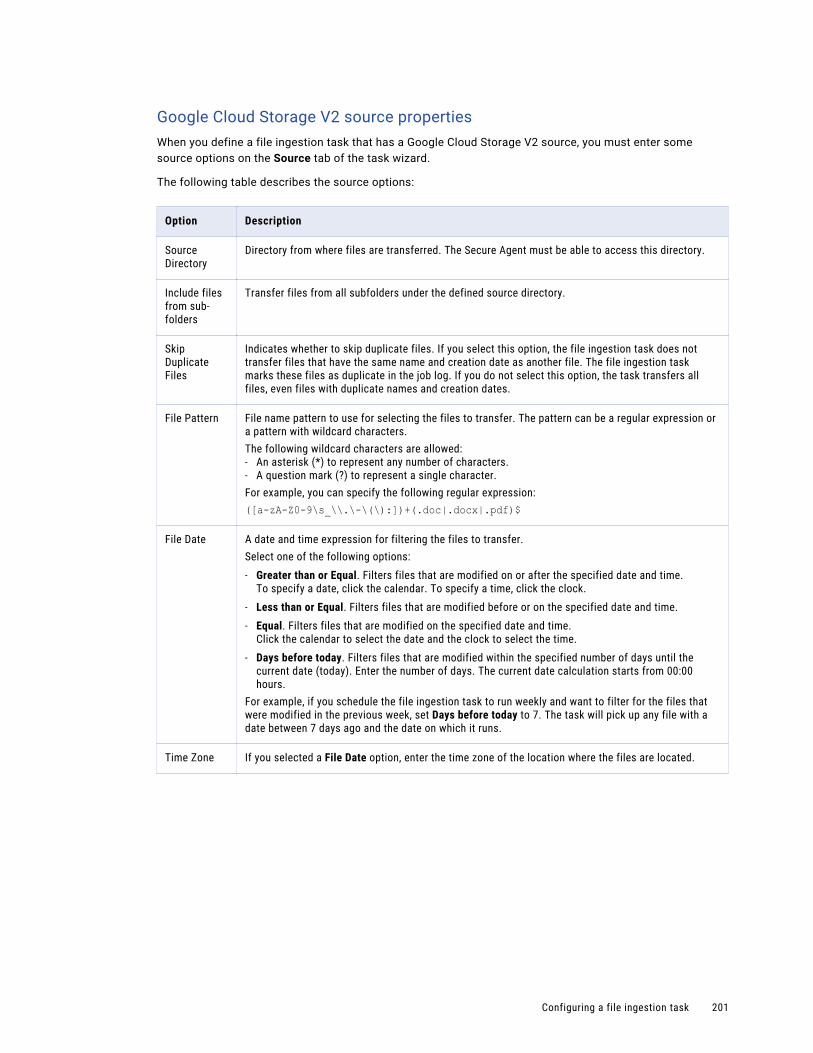
Google Cloud Storage V2 source propertiesWhen you define a file ingestion task that has a Google Cloud Storage V2 source, you must enter some source options on the Source tab of the task wizard.
The following table describes the source options:
Option Description
Source Directory
Directory from where files are transferred. The Secure Agent must be able to access this directory.
Include files from sub-folders
Transfer files from all subfolders under the defined source directory.
Skip Duplicate Files
Indicates whether to skip duplicate files. If you select this option, the file ingestion task does not transfer files that have the same name and creation date as another file. The file ingestion task marks these files as duplicate in the job log. If you do not select this option, the task transfers all files, even files with duplicate names and creation dates.
File Pattern File name pattern to use for selecting the files to transfer. The pattern can be a regular expression or a pattern with wildcard characters.The following wildcard characters are allowed:- An asterisk (*) to represent any number of characters.- A question mark (?) to represent a single character.For example, you can specify the following regular expression:([a-zA-Z0-9\s_\\.\-\(\):])+(.doc|.docx|.pdf)$
File Date A date and time expression for filtering the files to transfer.Select one of the following options:- Greater than or Equal. Filters files that are modified on or after the specified date and time.
To specify a date, click the calendar. To specify a time, click the clock.- Less than or Equal. Filters files that are modified before or on the specified date and time.- Equal. Filters files that are modified on the specified date and time.
Click the calendar to select the date and the clock to select the time.- Days before today. Filters files that are modified within the specified number of days until the
current date (today). Enter the number of days. The current date calculation starts from 00:00 hours.
For example, if you schedule the file ingestion task to run weekly and want to filter for the files that were modified in the previous week, set Days before today to 7. The task will pick up any file with a date between 7 days ago and the date on which it runs.
Time Zone If you selected a File Date option, enter the time zone of the location where the files are located.
Configuring a file ingestion task 201

Option Description
File Size Filters the files to transfer based on file size. Enter the file size, select the file size unit, and filter options.Select one of the following filter options:- Greater than or Equal. Filters files that are greater than or equal to the specified size.- Less than or Equal. Filters files that are less than or equal to the specified size.- Equal. Filters files that have the specified size.
Batch Size The number of files a file ingestion task can transfer in a batch.Default is 5.The maximum batch size varies, based on the following conditions:- If files are transferred from the source to target without an intermediate staging server, the
maximum number of files you can transfer in a batch is 8000.- If files pass through an intermediate staging server, the maximum number of files you can transfer
in a batch is 20.- If you transfer files from any source to a Snowflake target, the maximum number of files you can
transfer in a batch is 1000.Note: If you transfer files from Google Cloud Storage to Google BigQuery, the task transfers files with no intermediate staging server.
Hadoop Files V2 source propertiesWhen you define a file ingestion task that has an Hadoop Files V2 source, you must enter some source options on the Source tab of the task wizard. The Snowflake Cloud Data Warehouse V2, Microsoft Azure Synapse SQL, and Amazon Redshift V2 targets are not supported.
The following table describes the source options:
Option Description
Source Directory Directory from where files are transferred. The Secure Agent must be able to access this directory.
Include files from sub folders Transfer files from all subfolders under the defined source directory.
Skip Duplicate Files Indicates whether to skip duplicate files. If you select this option, the file ingestion task does not transfer files that have the same name and creation date as another file. The file ingestion task marks these files as duplicate in the job log. If you do not select this option, the task transfers all files, even files with duplicate names and creation dates.
202 Chapter 5: Mass Ingestion Files
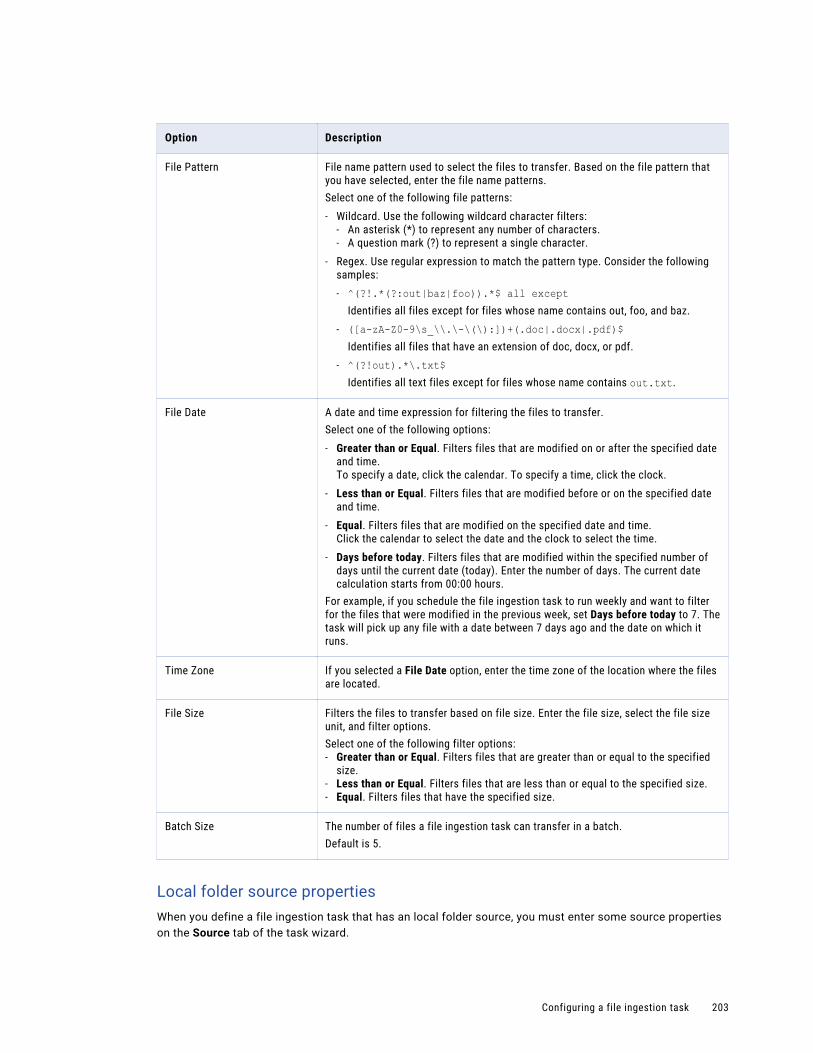
Option Description
File Pattern File name pattern used to select the files to transfer. Based on the file pattern that you have selected, enter the file name patterns. Select one of the following file patterns:- Wildcard. Use the following wildcard character filters:
- An asterisk (*) to represent any number of characters.- A question mark (?) to represent a single character.
- Regex. Use regular expression to match the pattern type. Consider the following samples:- ^(?!.*(?:out|baz|foo)).*$ all except
Identifies all files except for files whose name contains out, foo, and baz.- ([a-zA-Z0-9\s_\\.\-\(\):])+(.doc|.docx|.pdf)$
Identifies all files that have an extension of doc, docx, or pdf.- ^(?!out).*\.txt$
Identifies all text files except for files whose name contains out.txt.
File Date A date and time expression for filtering the files to transfer.Select one of the following options:- Greater than or Equal. Filters files that are modified on or after the specified date
and time.To specify a date, click the calendar. To specify a time, click the clock.
- Less than or Equal. Filters files that are modified before or on the specified date and time.
- Equal. Filters files that are modified on the specified date and time.Click the calendar to select the date and the clock to select the time.
- Days before today. Filters files that are modified within the specified number of days until the current date (today). Enter the number of days. The current date calculation starts from 00:00 hours.
For example, if you schedule the file ingestion task to run weekly and want to filter for the files that were modified in the previous week, set Days before today to 7. The task will pick up any file with a date between 7 days ago and the date on which it runs.
Time Zone If you selected a File Date option, enter the time zone of the location where the files are located.
File Size Filters the files to transfer based on file size. Enter the file size, select the file size unit, and filter options.Select one of the following filter options:- Greater than or Equal. Filters files that are greater than or equal to the specified
size.- Less than or Equal. Filters files that are less than or equal to the specified size.- Equal. Filters files that have the specified size.
Batch Size The number of files a file ingestion task can transfer in a batch.Default is 5.
Local folder source propertiesWhen you define a file ingestion task that has an local folder source, you must enter some source properties on the Source tab of the task wizard.
Configuring a file ingestion task 203
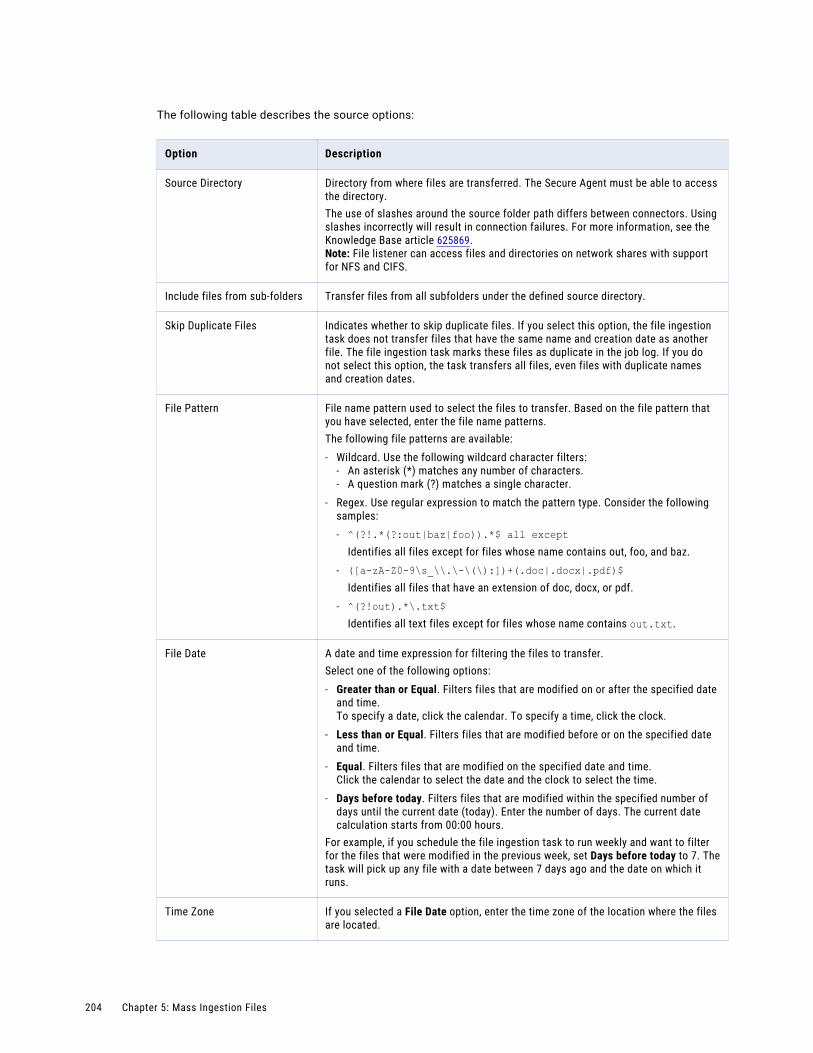
The following table describes the source options:
Option Description
Source Directory Directory from where files are transferred. The Secure Agent must be able to access the directory. The use of slashes around the source folder path differs between connectors. Using slashes incorrectly will result in connection failures. For more information, see the Knowledge Base article 625869.Note: File listener can access files and directories on network shares with support for NFS and CIFS.
Include files from sub-folders Transfer files from all subfolders under the defined source directory.
Skip Duplicate Files Indicates whether to skip duplicate files. If you select this option, the file ingestion task does not transfer files that have the same name and creation date as another file. The file ingestion task marks these files as duplicate in the job log. If you do not select this option, the task transfers all files, even files with duplicate names and creation dates.
File Pattern File name pattern used to select the files to transfer. Based on the file pattern that you have selected, enter the file name patterns. The following file patterns are available:- Wildcard. Use the following wildcard character filters:
- An asterisk (*) matches any number of characters.- A question mark (?) matches a single character.
- Regex. Use regular expression to match the pattern type. Consider the following samples:- ^(?!.*(?:out|baz|foo)).*$ all except
Identifies all files except for files whose name contains out, foo, and baz.- ([a-zA-Z0-9\s_\\.\-\(\):])+(.doc|.docx|.pdf)$
Identifies all files that have an extension of doc, docx, or pdf.- ^(?!out).*\.txt$
Identifies all text files except for files whose name contains out.txt.
File Date A date and time expression for filtering the files to transfer.Select one of the following options:- Greater than or Equal. Filters files that are modified on or after the specified date
and time.To specify a date, click the calendar. To specify a time, click the clock.
- Less than or Equal. Filters files that are modified before or on the specified date and time.
- Equal. Filters files that are modified on the specified date and time.Click the calendar to select the date and the clock to select the time.
- Days before today. Filters files that are modified within the specified number of days until the current date (today). Enter the number of days. The current date calculation starts from 00:00 hours.
For example, if you schedule the file ingestion task to run weekly and want to filter for the files that were modified in the previous week, set Days before today to 7. The task will pick up any file with a date between 7 days ago and the date on which it runs.
Time Zone If you selected a File Date option, enter the time zone of the location where the files are located.
204 Chapter 5: Mass Ingestion Files
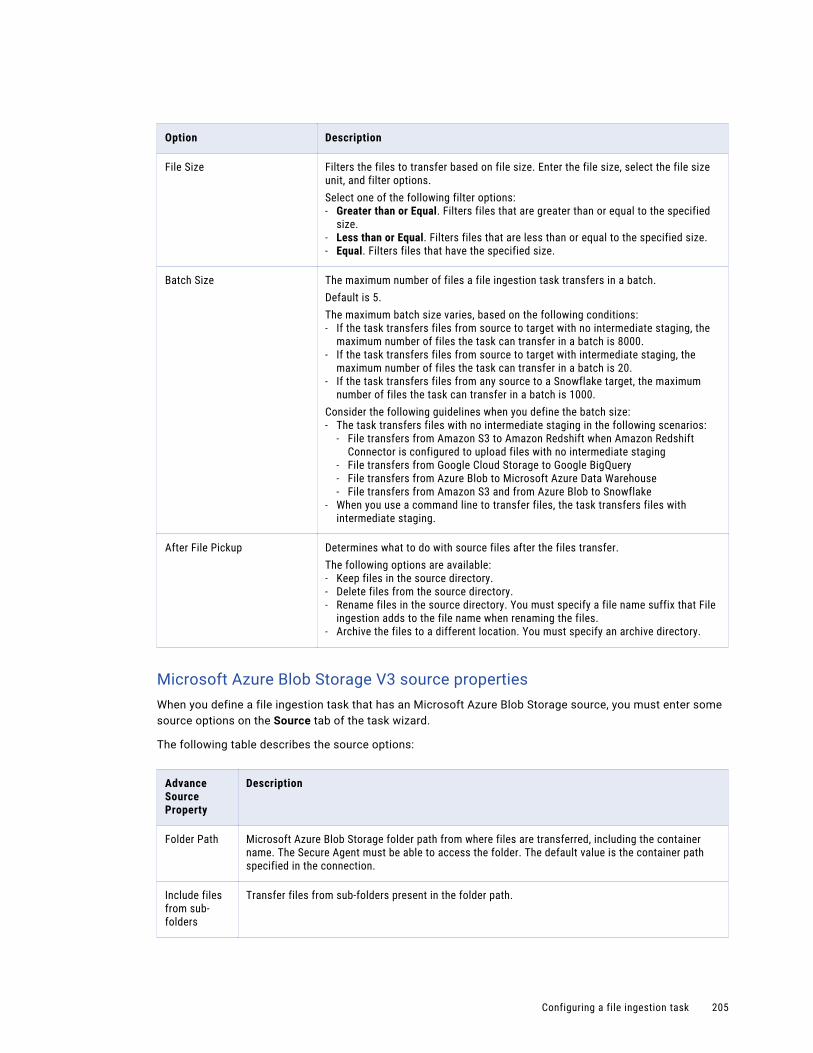
Option Description
File Size Filters the files to transfer based on file size. Enter the file size, select the file size unit, and filter options.Select one of the following filter options:- Greater than or Equal. Filters files that are greater than or equal to the specified
size.- Less than or Equal. Filters files that are less than or equal to the specified size.- Equal. Filters files that have the specified size.
Batch Size The maximum number of files a file ingestion task transfers in a batch.Default is 5.The maximum batch size varies, based on the following conditions:- If the task transfers files from source to target with no intermediate staging, the
maximum number of files the task can transfer in a batch is 8000.- If the task transfers files from source to target with intermediate staging, the
maximum number of files the task can transfer in a batch is 20.- If the task transfers files from any source to a Snowflake target, the maximum
number of files the task can transfer in a batch is 1000.Consider the following guidelines when you define the batch size:- The task transfers files with no intermediate staging in the following scenarios:
- File transfers from Amazon S3 to Amazon Redshift when Amazon Redshift Connector is configured to upload files with no intermediate staging
- File transfers from Google Cloud Storage to Google BigQuery- File transfers from Azure Blob to Microsoft Azure Data Warehouse- File transfers from Amazon S3 and from Azure Blob to Snowflake
- When you use a command line to transfer files, the task transfers files with intermediate staging.
After File Pickup Determines what to do with source files after the files transfer. The following options are available:- Keep files in the source directory.- Delete files from the source directory.- Rename files in the source directory. You must specify a file name suffix that File
ingestion adds to the file name when renaming the files.- Archive the files to a different location. You must specify an archive directory.
Microsoft Azure Blob Storage V3 source propertiesWhen you define a file ingestion task that has an Microsoft Azure Blob Storage source, you must enter some source options on the Source tab of the task wizard.
The following table describes the source options:
Advance Source Property
Description
Folder Path Microsoft Azure Blob Storage folder path from where files are transferred, including the container name. The Secure Agent must be able to access the folder. The default value is the container path specified in the connection.
Include files from sub-folders
Transfer files from sub-folders present in the folder path.
Configuring a file ingestion task 205

Advance Source Property
Description
Skip Duplicate Files
Do not transfer duplicate files. If files with the same name and creation date were transferred by the same file ingestion task, the task does not transfer them again, and the files are marked as duplicate in the job log. If this option is not selected the task transfers all files.
File Pattern File name pattern used to select the files to transfer. You can use a regular expression or wildcard characters.The following wildcard characters are allowed:- An asterisk (*) to represent any number of characters.- A question mark (?) to represent a single character.For example, you can specify the following regular expression:([a-zA-Z0-9\s_\\.\-\(\):])+(.doc|.docx|.pdf)$
File Date A date and time expression for filtering the files to transfer.Select one of the following options:- Greater than or Equal. Filters files that are modified on or after the specified date and time.
To specify a date, click the calendar. To specify a time, click the clock.- Less than or Equal. Filters files that are modified before or on the specified date and time.- Equal. Filters files that are modified on the specified date and time.
Click the calendar to select the date and the clock to select the time.- Days before today. Filters files that are modified within the specified number of days until the
current date (today). Enter the number of days. The current date calculation starts from 00:00 hours.
For example, if you schedule the file ingestion task to run weekly and want to filter for the files that were modified in the previous week, set Days before today to 7. The task will pick up any file with a date between 7 days ago and the date on which it runs.
Time Zone If you selected a File Date option, enter the time zone of the location where the files are located.
File Size Filters the files to transfer based on file size. Enter the file size, select the file size unit, and filter options.Select one of the following filter options:- Greater than or Equal. Filters files that are greater than or equal to the specified size.- Less than or Equal. Filters files that are less than or equal to the specified size.- Equal. Filters files that have the specified size.
Batch Size The number of files a file ingestion task can transfer in a batch.Default is 5.The maximum batch size varies, based on the following conditions:- If files are transferred from the source to target without an intermediate staging server, the
maximum number of files the task can transfer in a batch is 8000.- If files pass through an intermediate staging server, the maximum number of files the task can
transfer in a batch is 20.- If the task transfers files from any source to a Snowflake target, the maximum number of files the
task can transfer in a batch is 1000.Note: If you transfer files from Azure Blob Storage to Azure SQL Data Warehouse and Snowflake, the task transfers files with no intermediate staging.
206 Chapter 5: Mass Ingestion Files
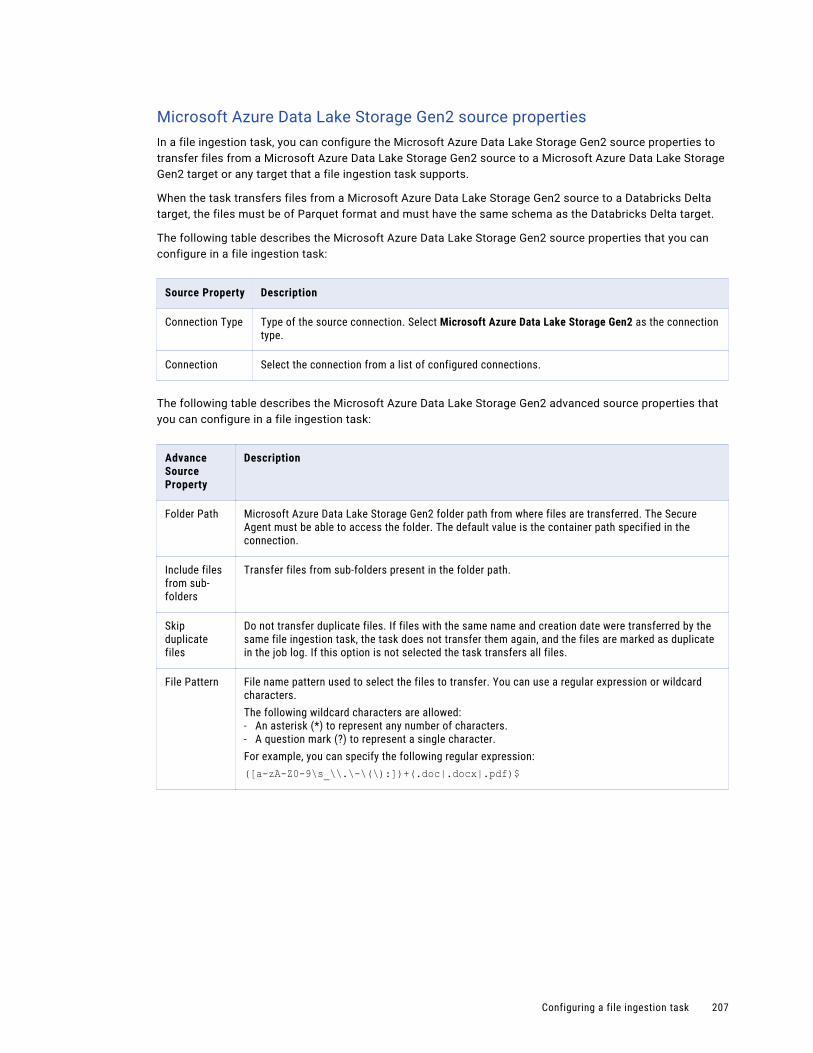
Microsoft Azure Data Lake Storage Gen2 source propertiesIn a file ingestion task, you can configure the Microsoft Azure Data Lake Storage Gen2 source properties to transfer files from a Microsoft Azure Data Lake Storage Gen2 source to a Microsoft Azure Data Lake Storage Gen2 target or any target that a file ingestion task supports.
When the task transfers files from a Microsoft Azure Data Lake Storage Gen2 source to a Databricks Delta target, the files must be of Parquet format and must have the same schema as the Databricks Delta target.
The following table describes the Microsoft Azure Data Lake Storage Gen2 source properties that you can configure in a file ingestion task:
Source Property Description
Connection Type Type of the source connection. Select Microsoft Azure Data Lake Storage Gen2 as the connection type.
Connection Select the connection from a list of configured connections.
The following table describes the Microsoft Azure Data Lake Storage Gen2 advanced source properties that you can configure in a file ingestion task:
Advance Source Property
Description
Folder Path Microsoft Azure Data Lake Storage Gen2 folder path from where files are transferred. The Secure Agent must be able to access the folder. The default value is the container path specified in the connection.
Include files from sub-folders
Transfer files from sub-folders present in the folder path.
Skip duplicate files
Do not transfer duplicate files. If files with the same name and creation date were transferred by the same file ingestion task, the task does not transfer them again, and the files are marked as duplicate in the job log. If this option is not selected the task transfers all files.
File Pattern File name pattern used to select the files to transfer. You can use a regular expression or wildcard characters.The following wildcard characters are allowed:- An asterisk (*) to represent any number of characters.- A question mark (?) to represent a single character.For example, you can specify the following regular expression:([a-zA-Z0-9\s_\\.\-\(\):])+(.doc|.docx|.pdf)$
Configuring a file ingestion task 207
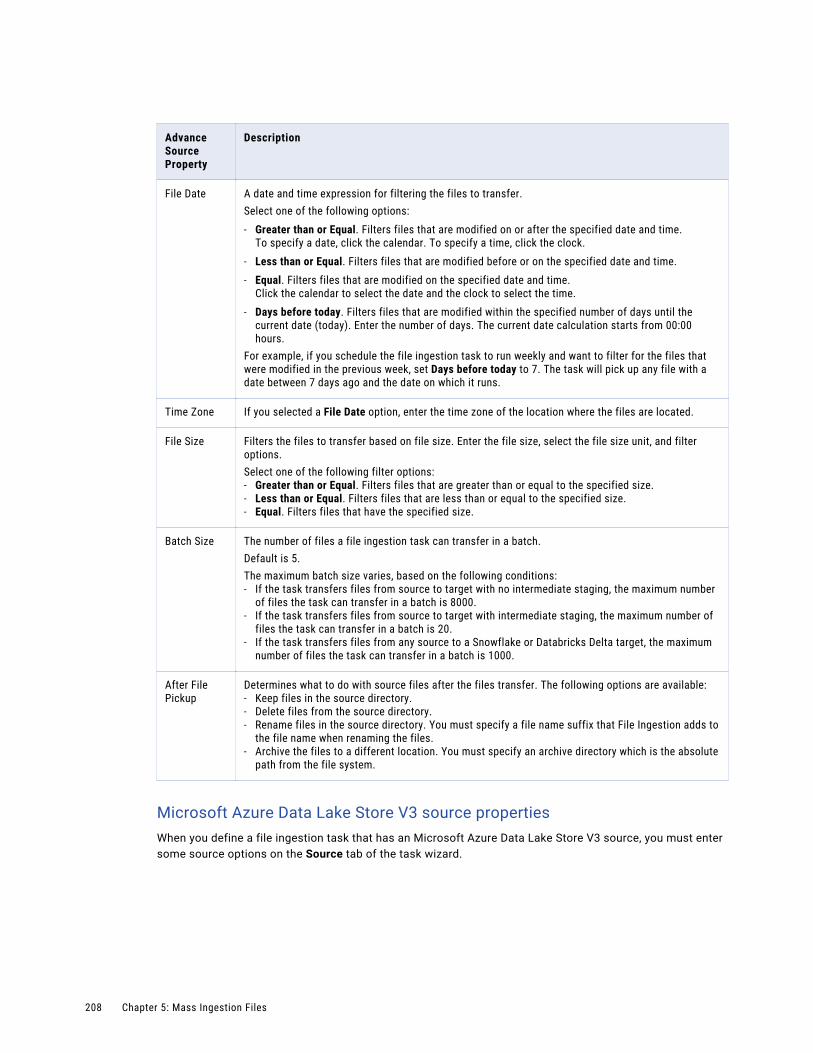
Advance Source Property
Description
File Date A date and time expression for filtering the files to transfer.Select one of the following options:- Greater than or Equal. Filters files that are modified on or after the specified date and time.
To specify a date, click the calendar. To specify a time, click the clock.- Less than or Equal. Filters files that are modified before or on the specified date and time.- Equal. Filters files that are modified on the specified date and time.
Click the calendar to select the date and the clock to select the time.- Days before today. Filters files that are modified within the specified number of days until the
current date (today). Enter the number of days. The current date calculation starts from 00:00 hours.
For example, if you schedule the file ingestion task to run weekly and want to filter for the files that were modified in the previous week, set Days before today to 7. The task will pick up any file with a date between 7 days ago and the date on which it runs.
Time Zone If you selected a File Date option, enter the time zone of the location where the files are located.
File Size Filters the files to transfer based on file size. Enter the file size, select the file size unit, and filter options.Select one of the following filter options:- Greater than or Equal. Filters files that are greater than or equal to the specified size.- Less than or Equal. Filters files that are less than or equal to the specified size.- Equal. Filters files that have the specified size.
Batch Size The number of files a file ingestion task can transfer in a batch.Default is 5.The maximum batch size varies, based on the following conditions:- If the task transfers files from source to target with no intermediate staging, the maximum number
of files the task can transfer in a batch is 8000.- If the task transfers files from source to target with intermediate staging, the maximum number of
files the task can transfer in a batch is 20.- If the task transfers files from any source to a Snowflake or Databricks Delta target, the maximum
number of files the task can transfer in a batch is 1000.
After File Pickup
Determines what to do with source files after the files transfer. The following options are available:- Keep files in the source directory.- Delete files from the source directory.- Rename files in the source directory. You must specify a file name suffix that File Ingestion adds to
the file name when renaming the files.- Archive the files to a different location. You must specify an archive directory which is the absolute
path from the file system.
Microsoft Azure Data Lake Store V3 source propertiesWhen you define a file ingestion task that has an Microsoft Azure Data Lake Store V3 source, you must enter some source options on the Source tab of the task wizard.
208 Chapter 5: Mass Ingestion Files

The following table describes the source options:
Advance Source Property
Description
Source Directory
Microsoft Azure Data Lake Store directory from where files are transferred. The Secure Agent must be able to access the folder. The default value is the container path specified in the connection.
Include files from sub-folders
Transfer files from sub-folders present in the folder path.
Skip Duplicate Files
Indicates whether to skip duplicate files. If you select this option, the file ingestion task does not transfer files that have the same name and creation date as another file. The file ingestion task marks these files as duplicate in the job log. If you do not select this option, the task transfers all files, even files with duplicate names and creation dates.
File Pattern File name pattern to use for selecting the files to transfer. The pattern can be a regular expression or a pattern with wildcard characters.The following wildcard characters are allowed:- An asterisk (*) to represent any number of characters.- A question mark (?) to represent a single character.For example, you can specify the following regular expression:([a-zA-Z0-9\s_\\.\-\(\):])+(.doc|.docx|.pdf)$
File Date A date and time expression for filtering the files to transfer.Select one of the following options:- Greater than or Equal. Filters files that are modified on or after the specified date and time.
To specify a date, click the calendar. To specify a time, click the clock.- Less than or Equal. Filters files that are modified before or on the specified date and time.- Equal. Filters files that are modified on the specified date and time.
Click the calendar to select the date and the clock to select the time.- Days before today. Filters files that are modified within the specified number of days until the
current date (today). Enter the number of days. The current date calculation starts from 00:00 hours.
For example, if you schedule the file ingestion task to run weekly and want to filter for the files that were modified in the previous week, set Days before today to 7. The task will pick up any file with a date between 7 days ago and the date on which it runs.
Time Zone If you selected a File Date option, enter the time zone of the location where the files are located.
Configuring a file ingestion task 209

Advance Source Property
Description
File Size Filters the files to transfer based on file size. Enter the file size, select the file size unit, and filter options.Select one of the following filter options:- Greater than or Equal. Filters files that are greater than or equal to the specified size.- Less than or Equal. Filters files that are less than or equal to the specified size.- Equal. Filters files that have the specified size.
Batch Size The number of files a file ingestion task can transfer in a batch.Default is 5.The maximum batch size varies, based on the following conditions:- If files are transferred from source to target with no intermediate staging server, the maximum
number of files the task can transfer in a batch is 8000.- If files are transferred from source to target with intermediate staging server, the maximum number
of files the task can transfer in a batch is 20.- If files are transferred from any source to a Snowflake target, the maximum number of files the
task can transfer in a batch is 1000.Note: If you transfer files from Azure Blob Storage to Azure SQL Data Warehouse and Snowflake, the task transfers files with no intermediate staging server.When you use a command line to transfer files, the task transfers files with intermediate staging server.
Configuring the targetTo configure the target, select a connection type and a connection to which to transfer files and then configure target options.
1. On the Target page, select a connection type.
The file ingestion task supports the following target connection types:
• Local folder
• Advanced FTP V2
• Advanced FTPS V2
• Advanced SFTP V2
• Amazon S3 V2
• Amazon Redshift V2
• Google BigQuery V2
• Google Cloud Storage V2
• Hadoop Files V2
• Microsoft Azure Blob Storage V3
• Microsoft Azure Data Lake Store Gen2
• Microsoft Azure Data Lake Store V3
• Microsoft Azure Synapse SQL
• Snowflake Cloud Data Warehouse V2
• Databricks Delta
2. Select a connection.
210 Chapter 5: Mass Ingestion Files
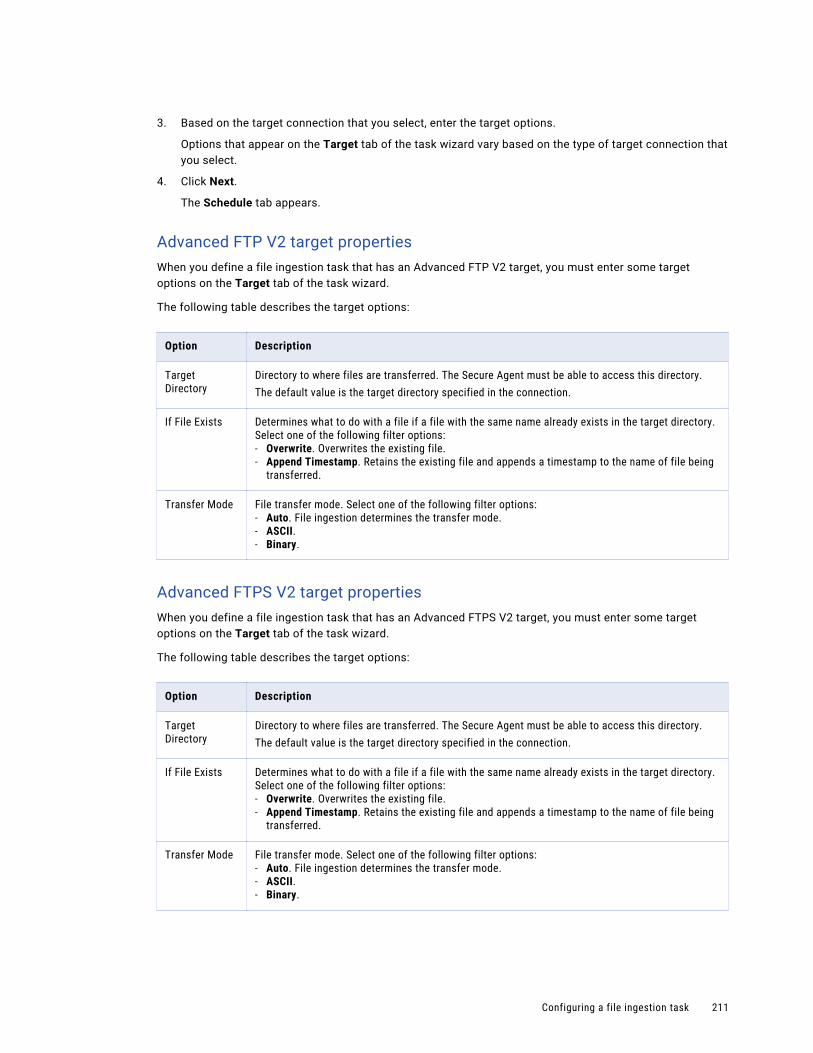
3. Based on the target connection that you select, enter the target options.
Options that appear on the Target tab of the task wizard vary based on the type of target connection that you select.
4. Click Next.
The Schedule tab appears.
Advanced FTP V2 target propertiesWhen you define a file ingestion task that has an Advanced FTP V2 target, you must enter some target options on the Target tab of the task wizard.
The following table describes the target options:
Option Description
Target Directory
Directory to where files are transferred. The Secure Agent must be able to access this directory.The default value is the target directory specified in the connection.
If File Exists Determines what to do with a file if a file with the same name already exists in the target directory. Select one of the following filter options:- Overwrite. Overwrites the existing file.- Append Timestamp. Retains the existing file and appends a timestamp to the name of file being
transferred.
Transfer Mode File transfer mode. Select one of the following filter options: - Auto. File ingestion determines the transfer mode.- ASCII.- Binary.
Advanced FTPS V2 target propertiesWhen you define a file ingestion task that has an Advanced FTPS V2 target, you must enter some target options on the Target tab of the task wizard.
The following table describes the target options:
Option Description
Target Directory
Directory to where files are transferred. The Secure Agent must be able to access this directory.The default value is the target directory specified in the connection.
If File Exists Determines what to do with a file if a file with the same name already exists in the target directory. Select one of the following filter options:- Overwrite. Overwrites the existing file.- Append Timestamp. Retains the existing file and appends a timestamp to the name of file being
transferred.
Transfer Mode File transfer mode. Select one of the following filter options: - Auto. File ingestion determines the transfer mode.- ASCII.- Binary.
Configuring a file ingestion task 211
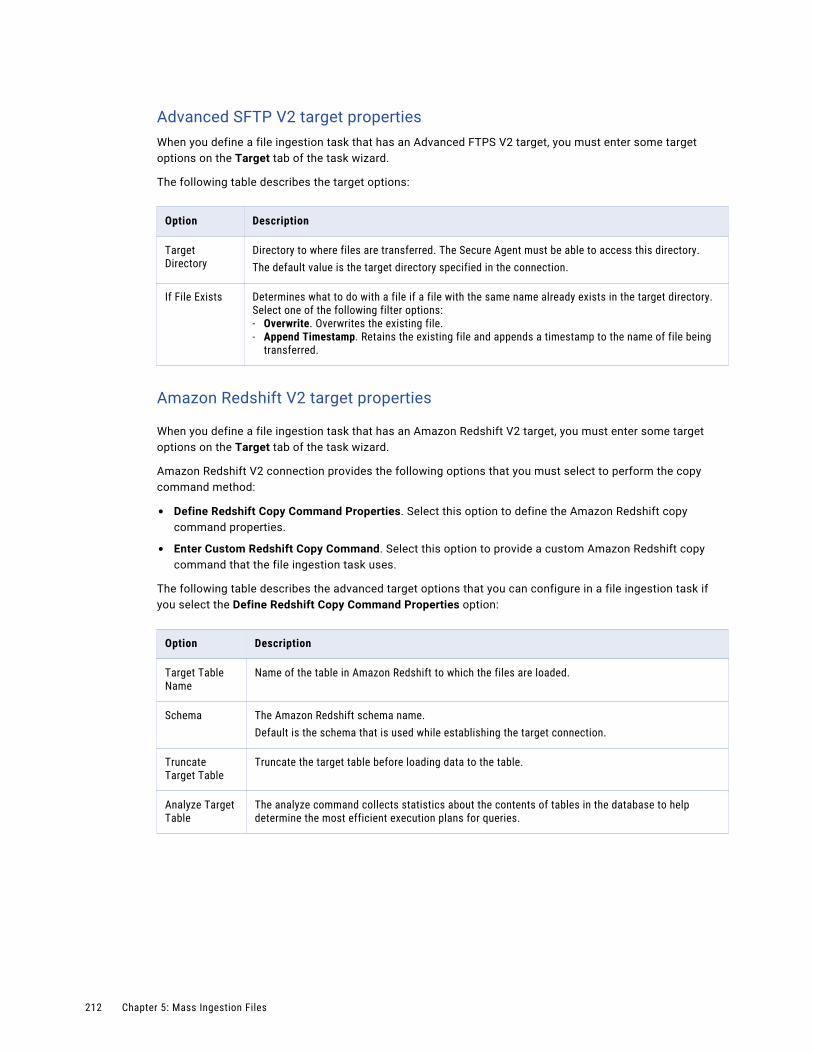
Advanced SFTP V2 target propertiesWhen you define a file ingestion task that has an Advanced FTPS V2 target, you must enter some target options on the Target tab of the task wizard.
The following table describes the target options:
Option Description
Target Directory
Directory to where files are transferred. The Secure Agent must be able to access this directory.The default value is the target directory specified in the connection.
If File Exists Determines what to do with a file if a file with the same name already exists in the target directory. Select one of the following filter options:- Overwrite. Overwrites the existing file.- Append Timestamp. Retains the existing file and appends a timestamp to the name of file being
transferred.
Amazon Redshift V2 target properties
When you define a file ingestion task that has an Amazon Redshift V2 target, you must enter some target options on the Target tab of the task wizard.
Amazon Redshift V2 connection provides the following options that you must select to perform the copy command method:
• Define Redshift Copy Command Properties. Select this option to define the Amazon Redshift copy command properties.
• Enter Custom Redshift Copy Command. Select this option to provide a custom Amazon Redshift copy command that the file ingestion task uses.
The following table describes the advanced target options that you can configure in a file ingestion task if you select the Define Redshift Copy Command Properties option:
Option Description
Target Table Name
Name of the table in Amazon Redshift to which the files are loaded.
Schema The Amazon Redshift schema name.Default is the schema that is used while establishing the target connection.
Truncate Target Table
Truncate the target table before loading data to the table.
Analyze Target Table
The analyze command collects statistics about the contents of tables in the database to help determine the most efficient execution plans for queries.
212 Chapter 5: Mass Ingestion Files
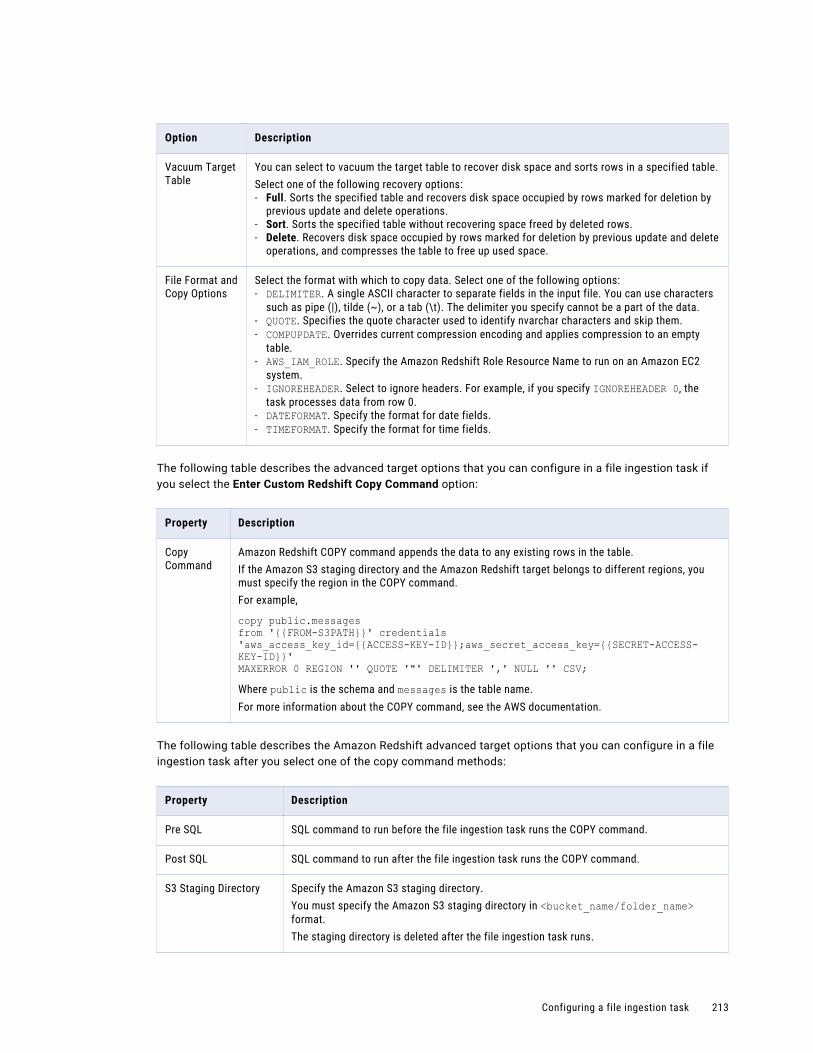
Option Description
Vacuum Target Table
You can select to vacuum the target table to recover disk space and sorts rows in a specified table.Select one of the following recovery options:- Full. Sorts the specified table and recovers disk space occupied by rows marked for deletion by
previous update and delete operations.- Sort. Sorts the specified table without recovering space freed by deleted rows.- Delete. Recovers disk space occupied by rows marked for deletion by previous update and delete
operations, and compresses the table to free up used space.
File Format and Copy Options
Select the format with which to copy data. Select one of the following options:- DELIMITER. A single ASCII character to separate fields in the input file. You can use characters
such as pipe (|), tilde (~), or a tab (\t). The delimiter you specify cannot be a part of the data.- QUOTE. Specifies the quote character used to identify nvarchar characters and skip them.- COMPUPDATE. Overrides current compression encoding and applies compression to an empty
table.- AWS_IAM_ROLE. Specify the Amazon Redshift Role Resource Name to run on an Amazon EC2
system.- IGNOREHEADER. Select to ignore headers. For example, if you specify IGNOREHEADER 0, the
task processes data from row 0.- DATEFORMAT. Specify the format for date fields.- TIMEFORMAT. Specify the format for time fields.
The following table describes the advanced target options that you can configure in a file ingestion task if you select the Enter Custom Redshift Copy Command option:
Property Description
Copy Command
Amazon Redshift COPY command appends the data to any existing rows in the table.If the Amazon S3 staging directory and the Amazon Redshift target belongs to different regions, you must specify the region in the COPY command.For example,
copy public.messagesfrom '{{FROM-S3PATH}}' credentials'aws_access_key_id={{ACCESS-KEY-ID}};aws_secret_access_key={{SECRET-ACCESS-KEY-ID}}'MAXERROR 0 REGION '' QUOTE '"' DELIMITER ',' NULL '' CSV;Where public is the schema and messages is the table name.For more information about the COPY command, see the AWS documentation.
The following table describes the Amazon Redshift advanced target options that you can configure in a file ingestion task after you select one of the copy command methods:
Property Description
Pre SQL SQL command to run before the file ingestion task runs the COPY command.
Post SQL SQL command to run after the file ingestion task runs the COPY command.
S3 Staging Directory Specify the Amazon S3 staging directory.You must specify the Amazon S3 staging directory in <bucket_name/folder_name> format.The staging directory is deleted after the file ingestion task runs.
Configuring a file ingestion task 213
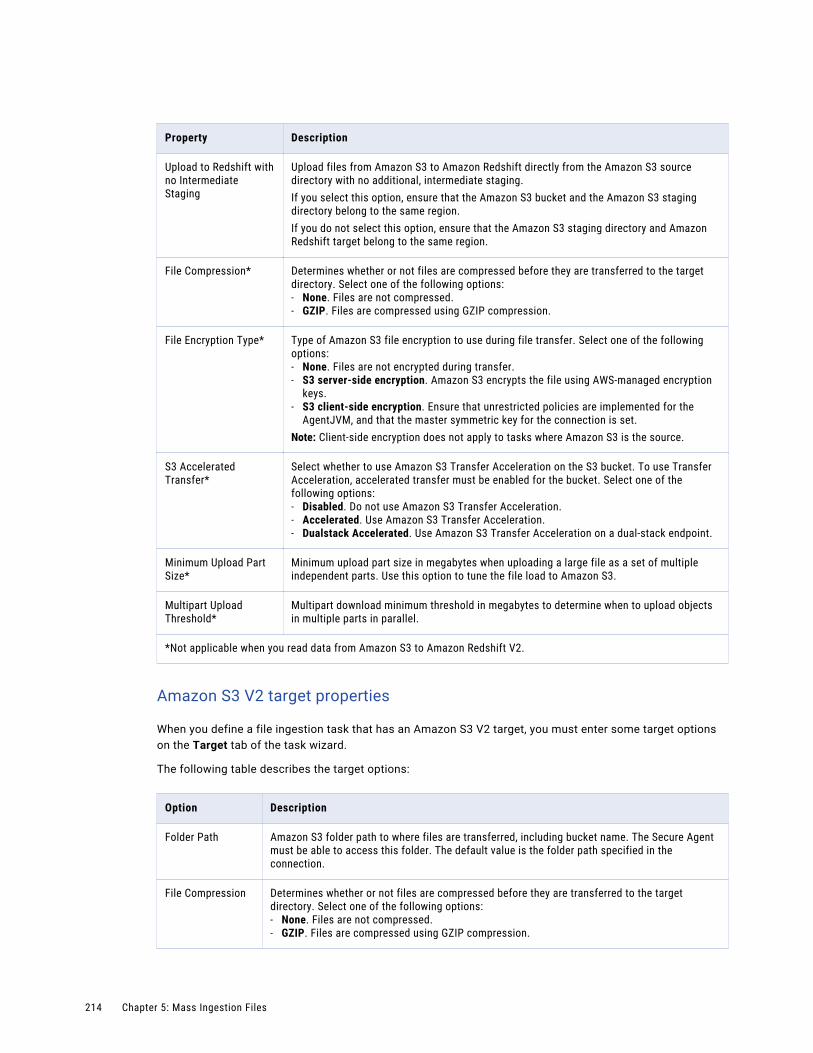
Property Description
Upload to Redshift with no Intermediate Staging
Upload files from Amazon S3 to Amazon Redshift directly from the Amazon S3 source directory with no additional, intermediate staging.If you select this option, ensure that the Amazon S3 bucket and the Amazon S3 staging directory belong to the same region.If you do not select this option, ensure that the Amazon S3 staging directory and Amazon Redshift target belong to the same region.
File Compression* Determines whether or not files are compressed before they are transferred to the target directory. Select one of the following options:- None. Files are not compressed.- GZIP. Files are compressed using GZIP compression.
File Encryption Type* Type of Amazon S3 file encryption to use during file transfer. Select one of the following options:- None. Files are not encrypted during transfer.- S3 server-side encryption. Amazon S3 encrypts the file using AWS-managed encryption
keys.- S3 client-side encryption. Ensure that unrestricted policies are implemented for the
AgentJVM, and that the master symmetric key for the connection is set.Note: Client-side encryption does not apply to tasks where Amazon S3 is the source.
S3 Accelerated Transfer*
Select whether to use Amazon S3 Transfer Acceleration on the S3 bucket. To use Transfer Acceleration, accelerated transfer must be enabled for the bucket. Select one of the following options:- Disabled. Do not use Amazon S3 Transfer Acceleration.- Accelerated. Use Amazon S3 Transfer Acceleration.- Dualstack Accelerated. Use Amazon S3 Transfer Acceleration on a dual-stack endpoint.
Minimum Upload Part Size*
Minimum upload part size in megabytes when uploading a large file as a set of multiple independent parts. Use this option to tune the file load to Amazon S3.
Multipart Upload Threshold*
Multipart download minimum threshold in megabytes to determine when to upload objects in multiple parts in parallel.
*Not applicable when you read data from Amazon S3 to Amazon Redshift V2.
Amazon S3 V2 target properties
When you define a file ingestion task that has an Amazon S3 V2 target, you must enter some target options on the Target tab of the task wizard.
The following table describes the target options:
Option Description
Folder Path Amazon S3 folder path to where files are transferred, including bucket name. The Secure Agent must be able to access this folder. The default value is the folder path specified in the connection.
File Compression Determines whether or not files are compressed before they are transferred to the target directory. Select one of the following options:- None. Files are not compressed.- GZIP. Files are compressed using GZIP compression.
214 Chapter 5: Mass Ingestion Files
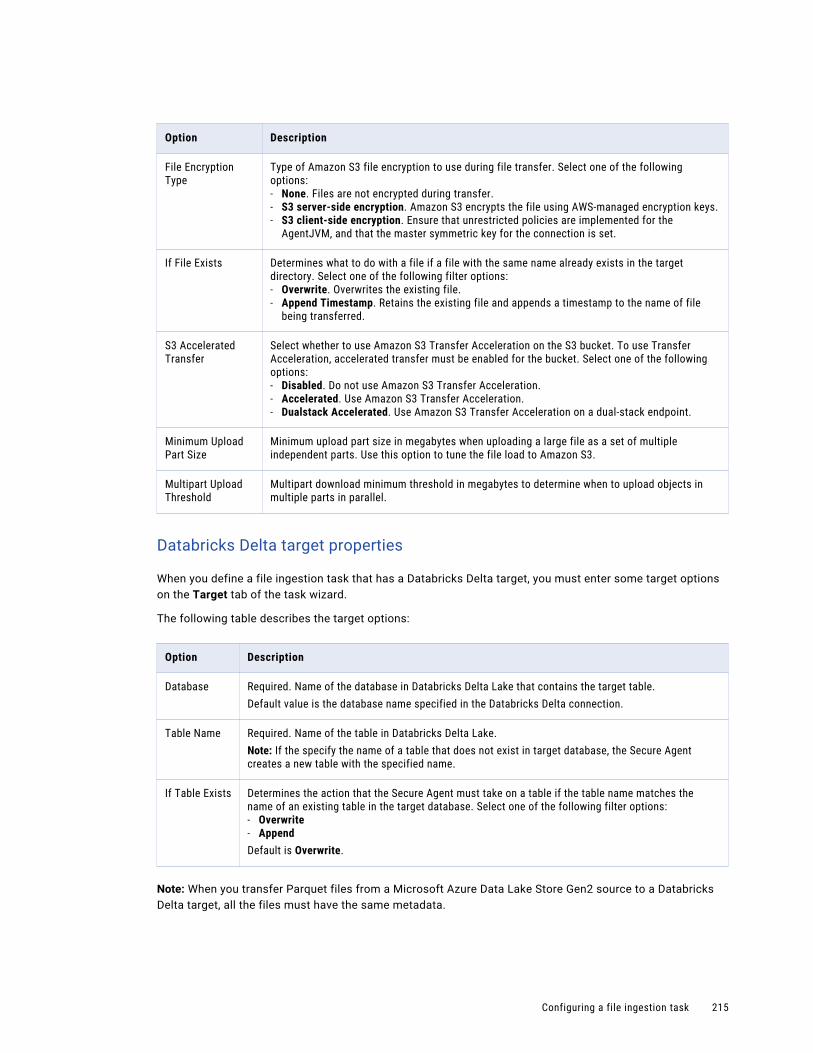
Option Description
File Encryption Type
Type of Amazon S3 file encryption to use during file transfer. Select one of the following options:- None. Files are not encrypted during transfer.- S3 server-side encryption. Amazon S3 encrypts the file using AWS-managed encryption keys.- S3 client-side encryption. Ensure that unrestricted policies are implemented for the
AgentJVM, and that the master symmetric key for the connection is set.
If File Exists Determines what to do with a file if a file with the same name already exists in the target directory. Select one of the following filter options:- Overwrite. Overwrites the existing file.- Append Timestamp. Retains the existing file and appends a timestamp to the name of file
being transferred.
S3 Accelerated Transfer
Select whether to use Amazon S3 Transfer Acceleration on the S3 bucket. To use Transfer Acceleration, accelerated transfer must be enabled for the bucket. Select one of the following options:- Disabled. Do not use Amazon S3 Transfer Acceleration.- Accelerated. Use Amazon S3 Transfer Acceleration.- Dualstack Accelerated. Use Amazon S3 Transfer Acceleration on a dual-stack endpoint.
Minimum Upload Part Size
Minimum upload part size in megabytes when uploading a large file as a set of multiple independent parts. Use this option to tune the file load to Amazon S3.
Multipart Upload Threshold
Multipart download minimum threshold in megabytes to determine when to upload objects in multiple parts in parallel.
Databricks Delta target properties
When you define a file ingestion task that has a Databricks Delta target, you must enter some target options on the Target tab of the task wizard.
The following table describes the target options:
Option Description
Database Required. Name of the database in Databricks Delta Lake that contains the target table.Default value is the database name specified in the Databricks Delta connection.
Table Name Required. Name of the table in Databricks Delta Lake.Note: If the specify the name of a table that does not exist in target database, the Secure Agent creates a new table with the specified name.
If Table Exists Determines the action that the Secure Agent must take on a table if the table name matches the name of an existing table in the target database. Select one of the following filter options:- Overwrite- AppendDefault is Overwrite.
Note: When you transfer Parquet files from a Microsoft Azure Data Lake Store Gen2 source to a Databricks Delta target, all the files must have the same metadata.
Configuring a file ingestion task 215
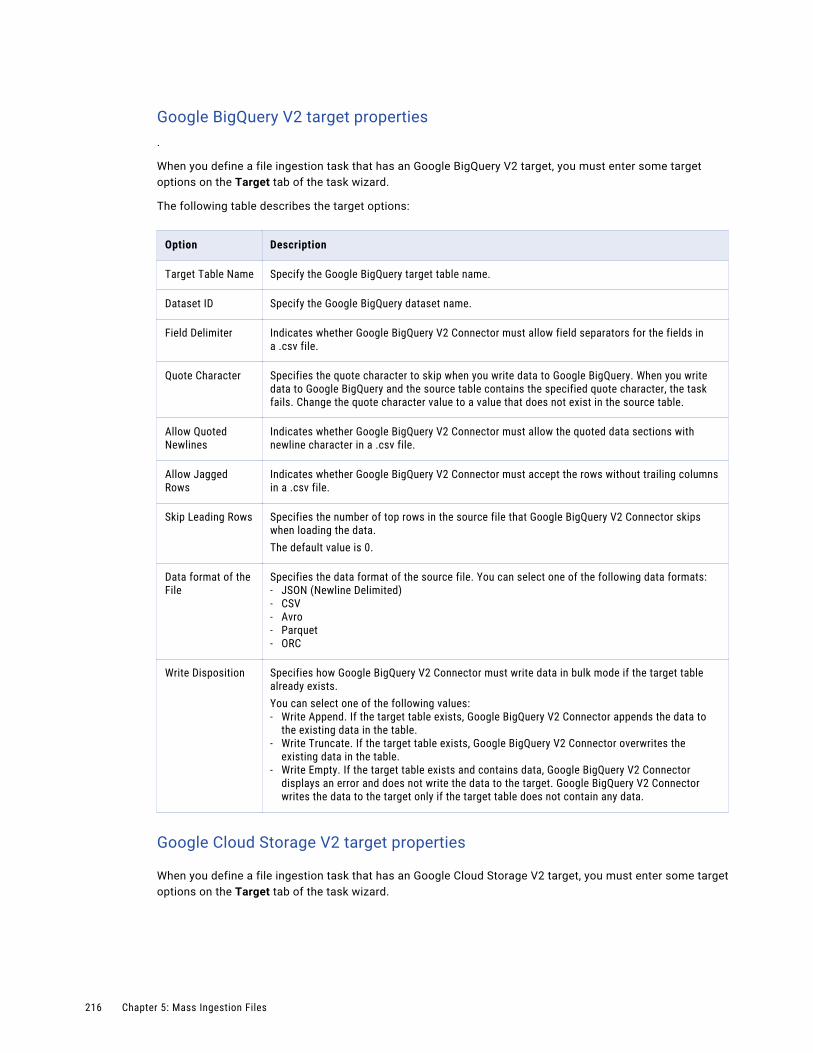
Google BigQuery V2 target properties.
When you define a file ingestion task that has an Google BigQuery V2 target, you must enter some target options on the Target tab of the task wizard.
The following table describes the target options:
Option Description
Target Table Name Specify the Google BigQuery target table name.
Dataset ID Specify the Google BigQuery dataset name.
Field Delimiter Indicates whether Google BigQuery V2 Connector must allow field separators for the fields in a .csv file.
Quote Character Specifies the quote character to skip when you write data to Google BigQuery. When you write data to Google BigQuery and the source table contains the specified quote character, the task fails. Change the quote character value to a value that does not exist in the source table.
Allow Quoted Newlines
Indicates whether Google BigQuery V2 Connector must allow the quoted data sections with newline character in a .csv file.
Allow Jagged Rows
Indicates whether Google BigQuery V2 Connector must accept the rows without trailing columns in a .csv file.
Skip Leading Rows Specifies the number of top rows in the source file that Google BigQuery V2 Connector skips when loading the data.The default value is 0.
Data format of the File
Specifies the data format of the source file. You can select one of the following data formats:- JSON (Newline Delimited)- CSV- Avro- Parquet- ORC
Write Disposition Specifies how Google BigQuery V2 Connector must write data in bulk mode if the target table already exists.You can select one of the following values:- Write Append. If the target table exists, Google BigQuery V2 Connector appends the data to
the existing data in the table.- Write Truncate. If the target table exists, Google BigQuery V2 Connector overwrites the
existing data in the table.- Write Empty. If the target table exists and contains data, Google BigQuery V2 Connector
displays an error and does not write the data to the target. Google BigQuery V2 Connector writes the data to the target only if the target table does not contain any data.
Google Cloud Storage V2 target properties
When you define a file ingestion task that has an Google Cloud Storage V2 target, you must enter some target options on the Target tab of the task wizard.
216 Chapter 5: Mass Ingestion Files

The following table describes the target options:
Option Description
Folder Path Path in Google Cloud Storage where files are transferred. You can either enter the bucket name or the bucket name and folder name. The Secure Agent must be able to access the folder.For example, enter <bucket name> or <bucket name>/<folder name>Note: Do not use a single slash (/) in the beginning of path.
File Compression Determines whether or not files are compressed before they are transferred to the target directory. Select one of the following options:- None. Files are not compressed.- GZIP. Files are compressed using the GZIP compression format.
If File Exists Determines the action that the Secure Agent must take with a file if a file with the same name exists in the target directory. Select one of the following options:- Overwrite- Append Timestamp
Hadoop Files V2 target properties
When you define a file ingestion task that has an Hadoop Files V2 target, you must enter some target options on the Target tab of the task wizard.
The following table describes the target option:
Option Description
Target Directory Directory to where files are transferred. The Secure Agent must be able to access the directory.
Local folder target propertiesWhen you define a file ingestion task that has a local folder target, you must enter some target properties on the Target tab of the task wizard.
The following table describes the target options:
Option Description
Target Directory Directory to where files are transferred. The Secure Agent must be able to access the directory. Note: File listener can access files and directories on network shares with support for NFS and CIFS.
If File Exists Determines what to do with a file if a file with the same name exists in the target directory. The following options are available: - Overwrite- Append Timestamp
Microsoft Azure Blob Storage V3 target properties
When you define a file ingestion task that has a Microsoft Azure Blob Storage target, you must enter some target options on the Target tab of the task wizard.
Configuring a file ingestion task 217
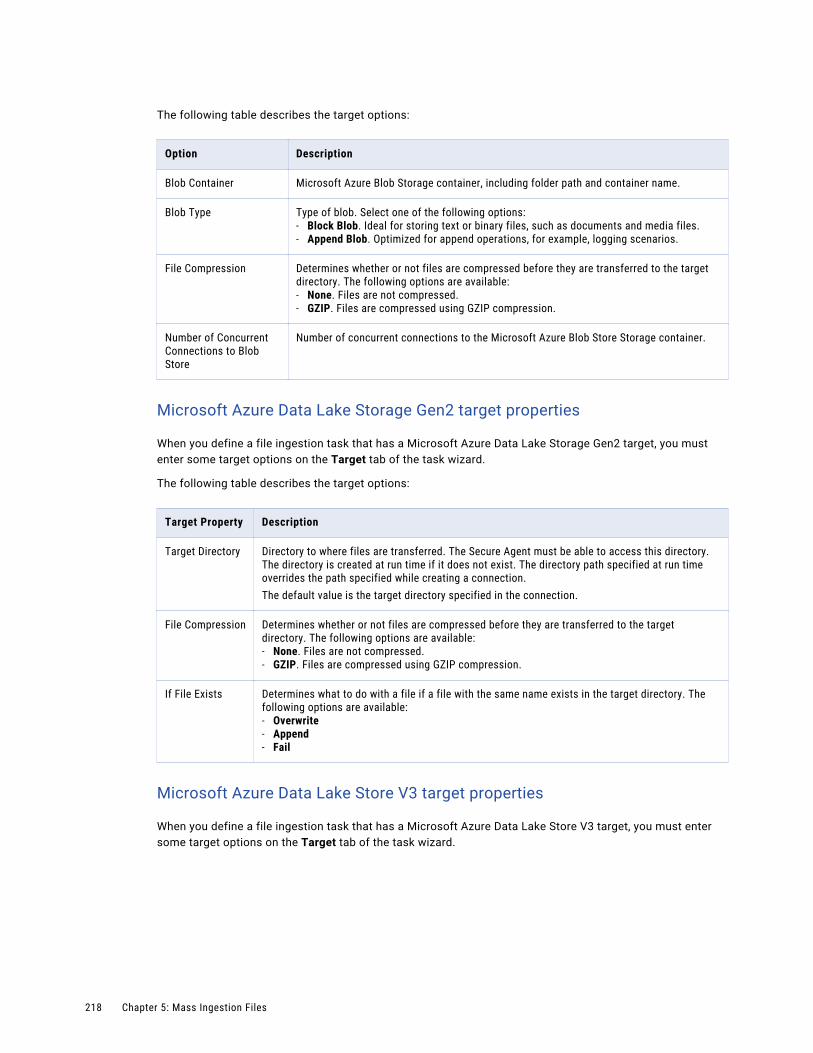
The following table describes the target options:
Option Description
Blob Container Microsoft Azure Blob Storage container, including folder path and container name.
Blob Type Type of blob. Select one of the following options:- Block Blob. Ideal for storing text or binary files, such as documents and media files.- Append Blob. Optimized for append operations, for example, logging scenarios.
File Compression Determines whether or not files are compressed before they are transferred to the target directory. The following options are available:- None. Files are not compressed.- GZIP. Files are compressed using GZIP compression.
Number of Concurrent Connections to Blob Store
Number of concurrent connections to the Microsoft Azure Blob Store Storage container.
Microsoft Azure Data Lake Storage Gen2 target properties
When you define a file ingestion task that has a Microsoft Azure Data Lake Storage Gen2 target, you must enter some target options on the Target tab of the task wizard.
The following table describes the target options:
Target Property Description
Target Directory Directory to where files are transferred. The Secure Agent must be able to access this directory. The directory is created at run time if it does not exist. The directory path specified at run time overrides the path specified while creating a connection.The default value is the target directory specified in the connection.
File Compression Determines whether or not files are compressed before they are transferred to the target directory. The following options are available:- None. Files are not compressed.- GZIP. Files are compressed using GZIP compression.
If File Exists Determines what to do with a file if a file with the same name exists in the target directory. The following options are available:- Overwrite- Append- Fail
Microsoft Azure Data Lake Store V3 target properties
When you define a file ingestion task that has a Microsoft Azure Data Lake Store V3 target, you must enter some target options on the Target tab of the task wizard.
218 Chapter 5: Mass Ingestion Files
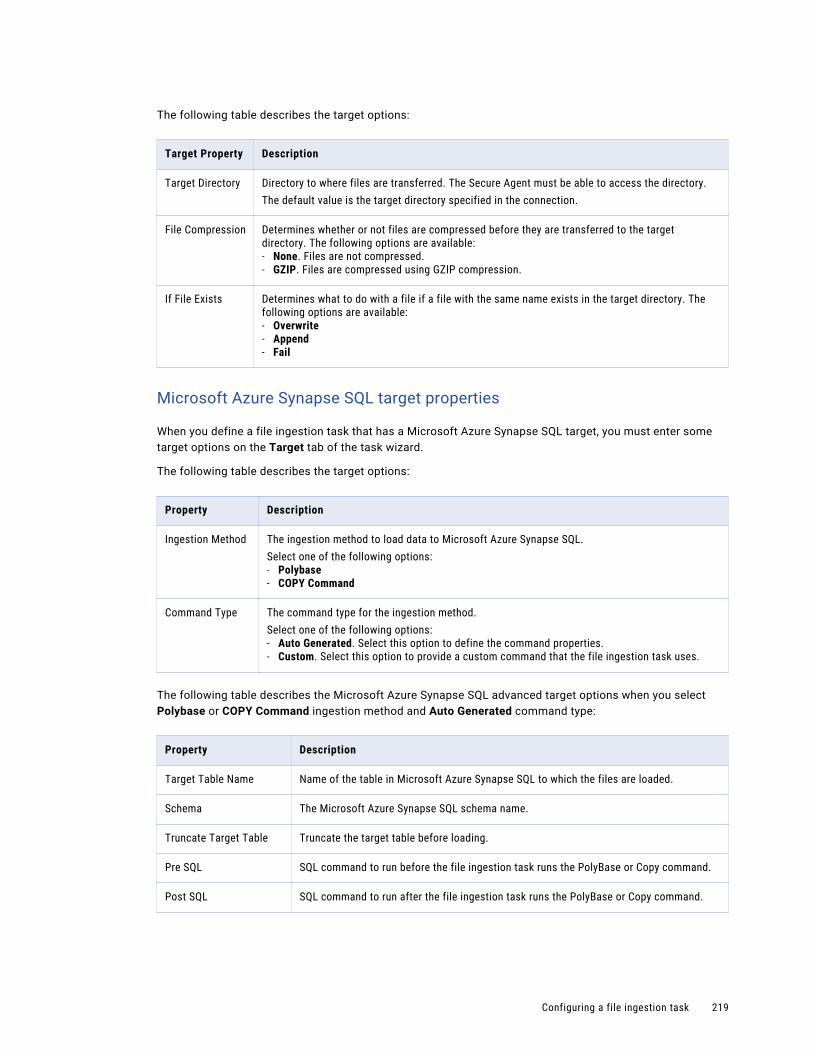
The following table describes the target options:
Target Property Description
Target Directory Directory to where files are transferred. The Secure Agent must be able to access the directory.The default value is the target directory specified in the connection.
File Compression Determines whether or not files are compressed before they are transferred to the target directory. The following options are available:- None. Files are not compressed.- GZIP. Files are compressed using GZIP compression.
If File Exists Determines what to do with a file if a file with the same name exists in the target directory. The following options are available:- Overwrite- Append- Fail
Microsoft Azure Synapse SQL target properties
When you define a file ingestion task that has a Microsoft Azure Synapse SQL target, you must enter some target options on the Target tab of the task wizard.
The following table describes the target options:
Property Description
Ingestion Method The ingestion method to load data to Microsoft Azure Synapse SQL.Select one of the following options:- Polybase- COPY Command
Command Type The command type for the ingestion method.Select one of the following options:- Auto Generated. Select this option to define the command properties.- Custom. Select this option to provide a custom command that the file ingestion task uses.
The following table describes the Microsoft Azure Synapse SQL advanced target options when you select Polybase or COPY Command ingestion method and Auto Generated command type:
Property Description
Target Table Name Name of the table in Microsoft Azure Synapse SQL to which the files are loaded.
Schema The Microsoft Azure Synapse SQL schema name.
Truncate Target Table Truncate the target table before loading.
Pre SQL SQL command to run before the file ingestion task runs the PolyBase or Copy command.
Post SQL SQL command to run after the file ingestion task runs the PolyBase or Copy command.
Configuring a file ingestion task 219
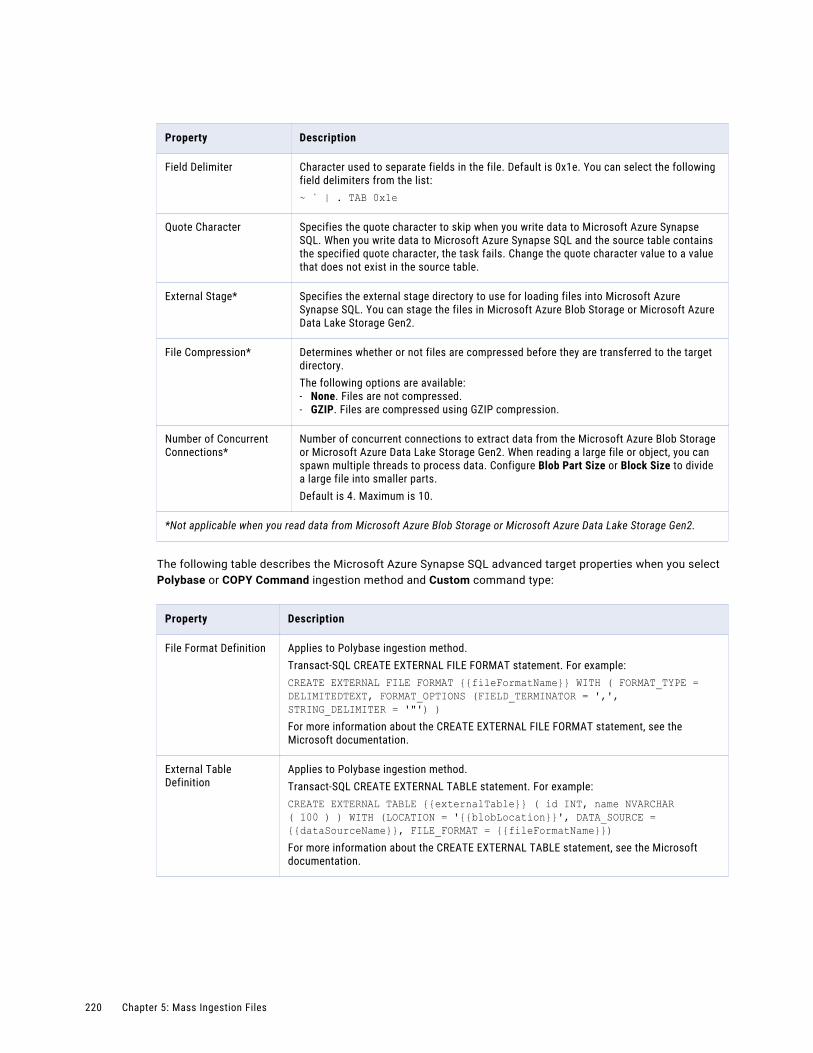
Property Description
Field Delimiter Character used to separate fields in the file. Default is 0x1e. You can select the following field delimiters from the list:~ ` | . TAB 0x1e
Quote Character Specifies the quote character to skip when you write data to Microsoft Azure Synapse SQL. When you write data to Microsoft Azure Synapse SQL and the source table contains the specified quote character, the task fails. Change the quote character value to a value that does not exist in the source table.
External Stage* Specifies the external stage directory to use for loading files into Microsoft Azure Synapse SQL. You can stage the files in Microsoft Azure Blob Storage or Microsoft Azure Data Lake Storage Gen2.
File Compression* Determines whether or not files are compressed before they are transferred to the target directory.The following options are available:- None. Files are not compressed.- GZIP. Files are compressed using GZIP compression.
Number of Concurrent Connections*
Number of concurrent connections to extract data from the Microsoft Azure Blob Storage or Microsoft Azure Data Lake Storage Gen2. When reading a large file or object, you can spawn multiple threads to process data. Configure Blob Part Size or Block Size to divide a large file into smaller parts.Default is 4. Maximum is 10.
*Not applicable when you read data from Microsoft Azure Blob Storage or Microsoft Azure Data Lake Storage Gen2.
The following table describes the Microsoft Azure Synapse SQL advanced target properties when you select Polybase or COPY Command ingestion method and Custom command type:
Property Description
File Format Definition Applies to Polybase ingestion method.Transact-SQL CREATE EXTERNAL FILE FORMAT statement. For example:CREATE EXTERNAL FILE FORMAT {{fileFormatName}} WITH ( FORMAT_TYPE = DELIMITEDTEXT, FORMAT_OPTIONS (FIELD_TERMINATOR = ',', STRING_DELIMITER = '"') )For more information about the CREATE EXTERNAL FILE FORMAT statement, see the Microsoft documentation.
External Table Definition
Applies to Polybase ingestion method.Transact-SQL CREATE EXTERNAL TABLE statement. For example:CREATE EXTERNAL TABLE {{externalTable}} ( id INT, name NVARCHAR ( 100 ) ) WITH (LOCATION = '{{blobLocation}}', DATA_SOURCE = {{dataSourceName}}, FILE_FORMAT = {{fileFormatName}})For more information about the CREATE EXTERNAL TABLE statement, see the Microsoft documentation.
220 Chapter 5: Mass Ingestion Files
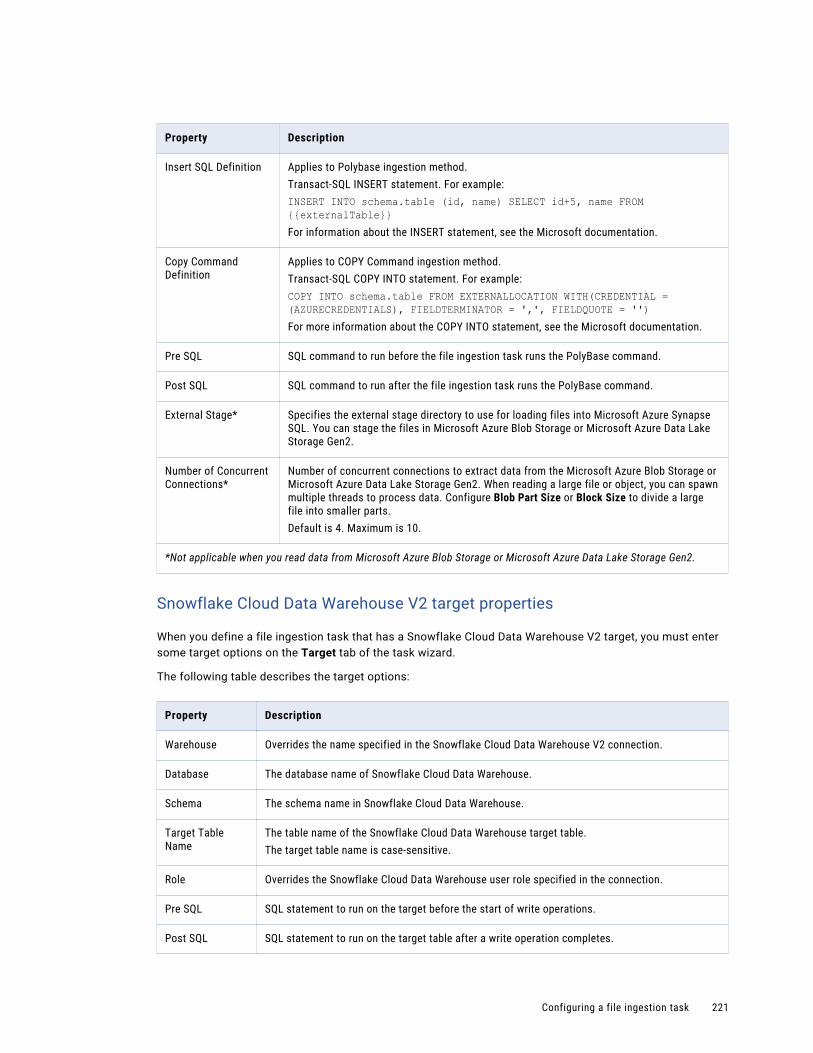
Property Description
Insert SQL Definition Applies to Polybase ingestion method.Transact-SQL INSERT statement. For example:INSERT INTO schema.table (id, name) SELECT id+5, name FROM {{externalTable}}For information about the INSERT statement, see the Microsoft documentation.
Copy Command Definition
Applies to COPY Command ingestion method.Transact-SQL COPY INTO statement. For example:COPY INTO schema.table FROM EXTERNALLOCATION WITH(CREDENTIAL = (AZURECREDENTIALS), FIELDTERMINATOR = ',', FIELDQUOTE = '')For more information about the COPY INTO statement, see the Microsoft documentation.
Pre SQL SQL command to run before the file ingestion task runs the PolyBase command.
Post SQL SQL command to run after the file ingestion task runs the PolyBase command.
External Stage* Specifies the external stage directory to use for loading files into Microsoft Azure Synapse SQL. You can stage the files in Microsoft Azure Blob Storage or Microsoft Azure Data Lake Storage Gen2.
Number of Concurrent Connections*
Number of concurrent connections to extract data from the Microsoft Azure Blob Storage or Microsoft Azure Data Lake Storage Gen2. When reading a large file or object, you can spawn multiple threads to process data. Configure Blob Part Size or Block Size to divide a large file into smaller parts.Default is 4. Maximum is 10.
*Not applicable when you read data from Microsoft Azure Blob Storage or Microsoft Azure Data Lake Storage Gen2.
Snowflake Cloud Data Warehouse V2 target properties
When you define a file ingestion task that has a Snowflake Cloud Data Warehouse V2 target, you must enter some target options on the Target tab of the task wizard.
The following table describes the target options:
Property Description
Warehouse Overrides the name specified in the Snowflake Cloud Data Warehouse V2 connection.
Database The database name of Snowflake Cloud Data Warehouse.
Schema The schema name in Snowflake Cloud Data Warehouse.
Target Table Name
The table name of the Snowflake Cloud Data Warehouse target table.The target table name is case-sensitive.
Role Overrides the Snowflake Cloud Data Warehouse user role specified in the connection.
Pre SQL SQL statement to run on the target before the start of write operations.
Post SQL SQL statement to run on the target table after a write operation completes.
Configuring a file ingestion task 221
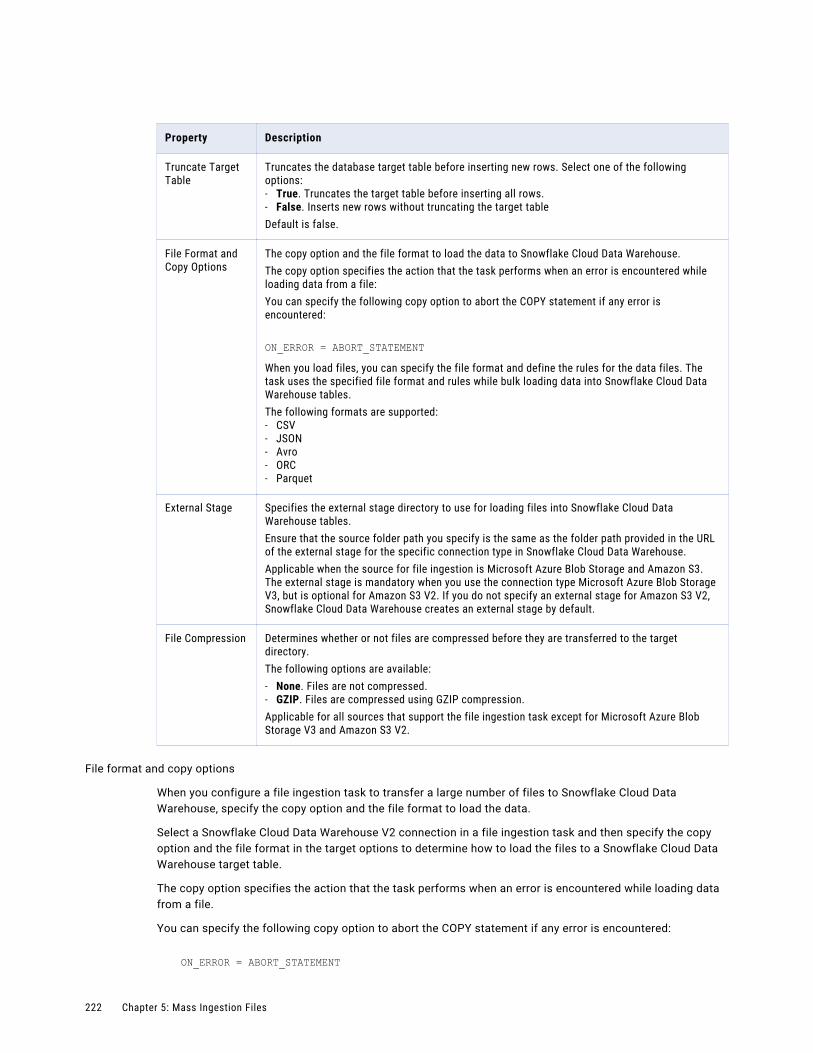
Property Description
Truncate Target Table
Truncates the database target table before inserting new rows. Select one of the following options:- True. Truncates the target table before inserting all rows.- False. Inserts new rows without truncating the target tableDefault is false.
File Format and Copy Options
The copy option and the file format to load the data to Snowflake Cloud Data Warehouse.The copy option specifies the action that the task performs when an error is encountered while loading data from a file:You can specify the following copy option to abort the COPY statement if any error is encountered:
ON_ERROR = ABORT_STATEMENTWhen you load files, you can specify the file format and define the rules for the data files. The task uses the specified file format and rules while bulk loading data into Snowflake Cloud Data Warehouse tables.The following formats are supported:- CSV- JSON- Avro- ORC- Parquet
External Stage Specifies the external stage directory to use for loading files into Snowflake Cloud Data Warehouse tables.Ensure that the source folder path you specify is the same as the folder path provided in the URL of the external stage for the specific connection type in Snowflake Cloud Data Warehouse.Applicable when the source for file ingestion is Microsoft Azure Blob Storage and Amazon S3. The external stage is mandatory when you use the connection type Microsoft Azure Blob Storage V3, but is optional for Amazon S3 V2. If you do not specify an external stage for Amazon S3 V2, Snowflake Cloud Data Warehouse creates an external stage by default.
File Compression Determines whether or not files are compressed before they are transferred to the target directory.The following options are available:- None. Files are not compressed.- GZIP. Files are compressed using GZIP compression.Applicable for all sources that support the file ingestion task except for Microsoft Azure Blob Storage V3 and Amazon S3 V2.
File format and copy options
When you configure a file ingestion task to transfer a large number of files to Snowflake Cloud Data Warehouse, specify the copy option and the file format to load the data.
Select a Snowflake Cloud Data Warehouse V2 connection in a file ingestion task and then specify the copy option and the file format in the target options to determine how to load the files to a Snowflake Cloud Data Warehouse target table.
The copy option specifies the action that the task performs when an error is encountered while loading data from a file.
You can specify the following copy option to abort the COPY statement if any error is encountered:
ON_ERROR = ABORT_STATEMENT
222 Chapter 5: Mass Ingestion Files
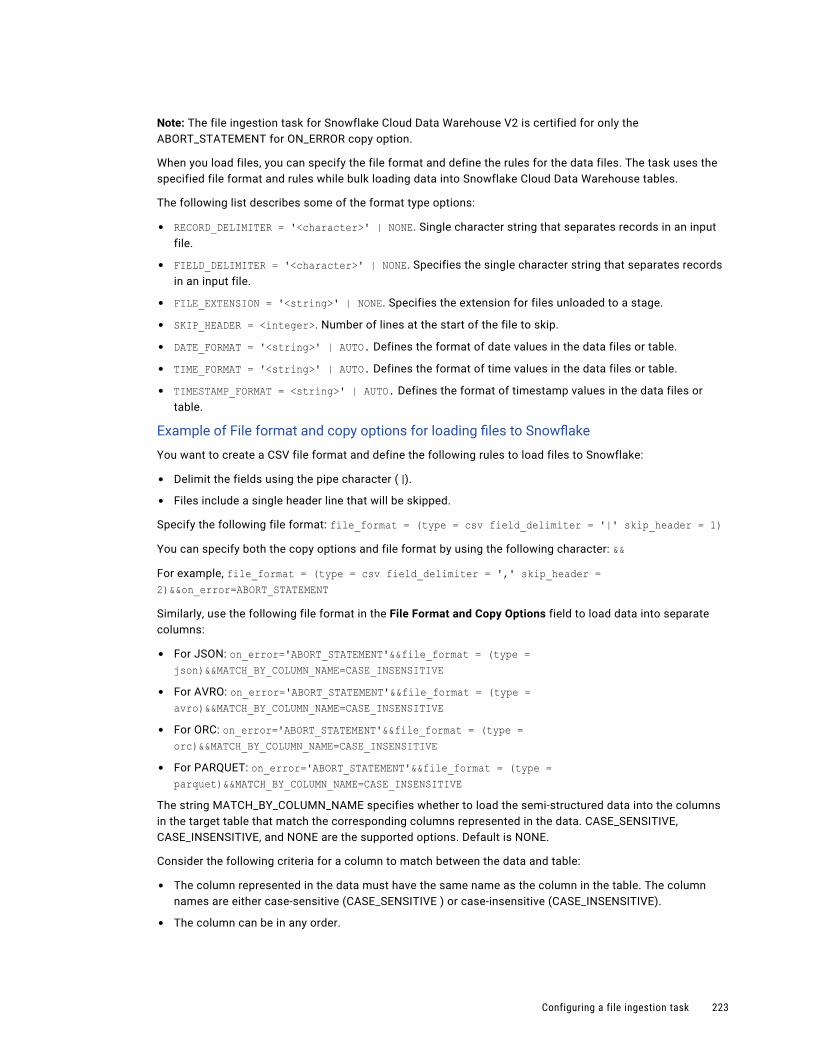
Note: The file ingestion task for Snowflake Cloud Data Warehouse V2 is certified for only the ABORT_STATEMENT for ON_ERROR copy option.
When you load files, you can specify the file format and define the rules for the data files. The task uses the specified file format and rules while bulk loading data into Snowflake Cloud Data Warehouse tables.
The following list describes some of the format type options:
• RECORD_DELIMITER = '<character>' | NONE. Single character string that separates records in an input file.
• FIELD_DELIMITER = '<character>' | NONE. Specifies the single character string that separates records in an input file.
• FILE_EXTENSION = '<string>' | NONE. Specifies the extension for files unloaded to a stage.
• SKIP_HEADER = <integer>. Number of lines at the start of the file to skip.
• DATE_FORMAT = '<string>' | AUTO. Defines the format of date values in the data files or table.
• TIME_FORMAT = '<string>' | AUTO. Defines the format of time values in the data files or table.
• TIMESTAMP_FORMAT = <string>' | AUTO. Defines the format of timestamp values in the data files or table.
Example of File format and copy options for loading files to Snowflake
You want to create a CSV file format and define the following rules to load files to Snowflake:
• Delimit the fields using the pipe character ( |).
• Files include a single header line that will be skipped.
Specify the following file format: file_format = (type = csv field_delimiter = '|' skip_header = 1)
You can specify both the copy options and file format by using the following character: &&
For example, file_format = (type = csv field_delimiter = ',' skip_header = 2)&&on_error=ABORT_STATEMENT
Similarly, use the following file format in the File Format and Copy Options field to load data into separate columns:
• For JSON: on_error='ABORT_STATEMENT'&&file_format = (type = json)&&MATCH_BY_COLUMN_NAME=CASE_INSENSITIVE
• For AVRO: on_error='ABORT_STATEMENT'&&file_format = (type = avro)&&MATCH_BY_COLUMN_NAME=CASE_INSENSITIVE
• For ORC: on_error='ABORT_STATEMENT'&&file_format = (type = orc)&&MATCH_BY_COLUMN_NAME=CASE_INSENSITIVE
• For PARQUET: on_error='ABORT_STATEMENT'&&file_format = (type = parquet)&&MATCH_BY_COLUMN_NAME=CASE_INSENSITIVE
The string MATCH_BY_COLUMN_NAME specifies whether to load the semi-structured data into the columns in the target table that match the corresponding columns represented in the data. CASE_SENSITIVE, CASE_INSENSITIVE, and NONE are the supported options. Default is NONE.
Consider the following criteria for a column to match between the data and table:
• The column represented in the data must have the same name as the column in the table. The column names are either case-sensitive (CASE_SENSITIVE ) or case-insensitive (CASE_INSENSITIVE).
• The column can be in any order.
Configuring a file ingestion task 223
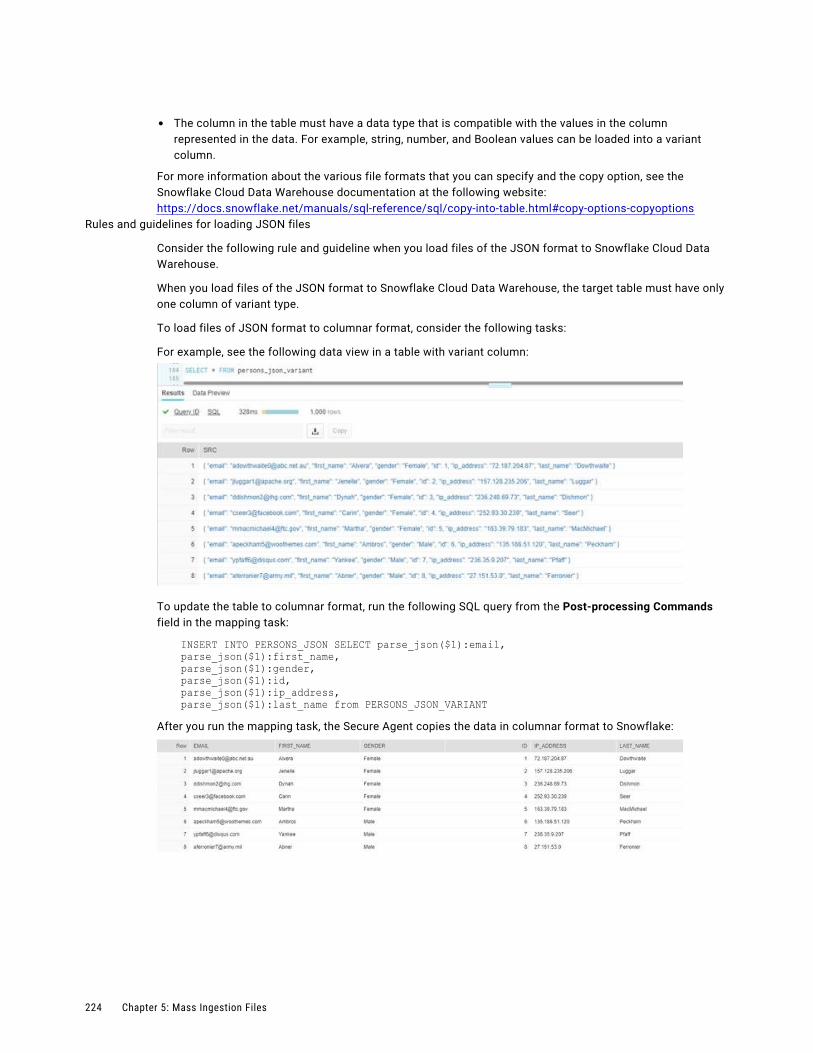
• The column in the table must have a data type that is compatible with the values in the column represented in the data. For example, string, number, and Boolean values can be loaded into a variant column.
For more information about the various file formats that you can specify and the copy option, see the Snowflake Cloud Data Warehouse documentation at the following website: https://docs.snowflake.net/manuals/sql-reference/sql/copy-into-table.html#copy-options-copyoptions
Rules and guidelines for loading JSON files
Consider the following rule and guideline when you load files of the JSON format to Snowflake Cloud Data Warehouse.
When you load files of the JSON format to Snowflake Cloud Data Warehouse, the target table must have only one column of variant type.
To load files of JSON format to columnar format, consider the following tasks:
For example, see the following data view in a table with variant column:
To update the table to columnar format, run the following SQL query from the Post-processing Commands field in the mapping task:
INSERT INTO PERSONS_JSON SELECT parse_json($1):email,parse_json($1):first_name,parse_json($1):gender,parse_json($1):id,parse_json($1):ip_address,parse_json($1):last_name from PERSONS_JSON_VARIANT
After you run the mapping task, the Secure Agent copies the data in columnar format to Snowflake:
224 Chapter 5: Mass Ingestion Files

External stage
When you configure a file ingestion task to load files from a Microsoft Azure Blob Storage or Amazon S3 source to the Snowflake Cloud Data Warehouse tables, specify the external staging directory to use in Snowflake.
You must specify the external stage name for the specific connection type that you want to use in the Target Options section in the file ingestion task.
The external stage field value is mandatory when you run a file ingestion task to load files from Microsoft Azure Blob Storage to Snowflake Cloud Data Warehouse where the connection type in the source is Microsoft Azure Blob Storage V2. When the source connection type is Amazon S3 V2, and you do not specify an external stage for Amazon S3 V2 in the Snowflake Cloud Data Warehouse target options, Snowflake creates an external stage directory by default.
Ensure that the source directory path in the Source Options of the file ingestion task is the same as the directory path provided in the URL of the external stage created for the Microsoft Azure Blob Storage V2 or Amazon S3 V2 connection in Snowflake Cloud Data Warehouse.
For example, an external stage for Microsoft Azure Blob Storage created using an Azure account name and a blob container with a folder path has the following stage URL: 'azure://<Blob SAS Token URL/<blob container>/<folder path>'. The stage uses the file format you specify in the Target Options of the file ingestion task.
The following image shows the stage name and the stage URL for a Microsoft Azure Blob Storage V2 connection in Snowflake Cloud Data Warehouse:
In the example, the stage URL is azure://adapterdevblob.blob.core.windows.net/snowflakemi/MI/ and the external stage name is MFT_BLOB1.
When you create a file ingestion job, in the Folder Path field in the Source Options of the Microsoft Azure Blob Storage V2 source, specify the following <Blob Container>/<folder path> path from the stage URL: /snowflakemi/MI
Configuring a file ingestion task 225

The following image shows the specified source folder path in the Source Options section:
In the Target Options for Snowflake Cloud Data Warehouse V2, specify the following name of the created external stage: MFT_BLOB1
226 Chapter 5: Mass Ingestion Files
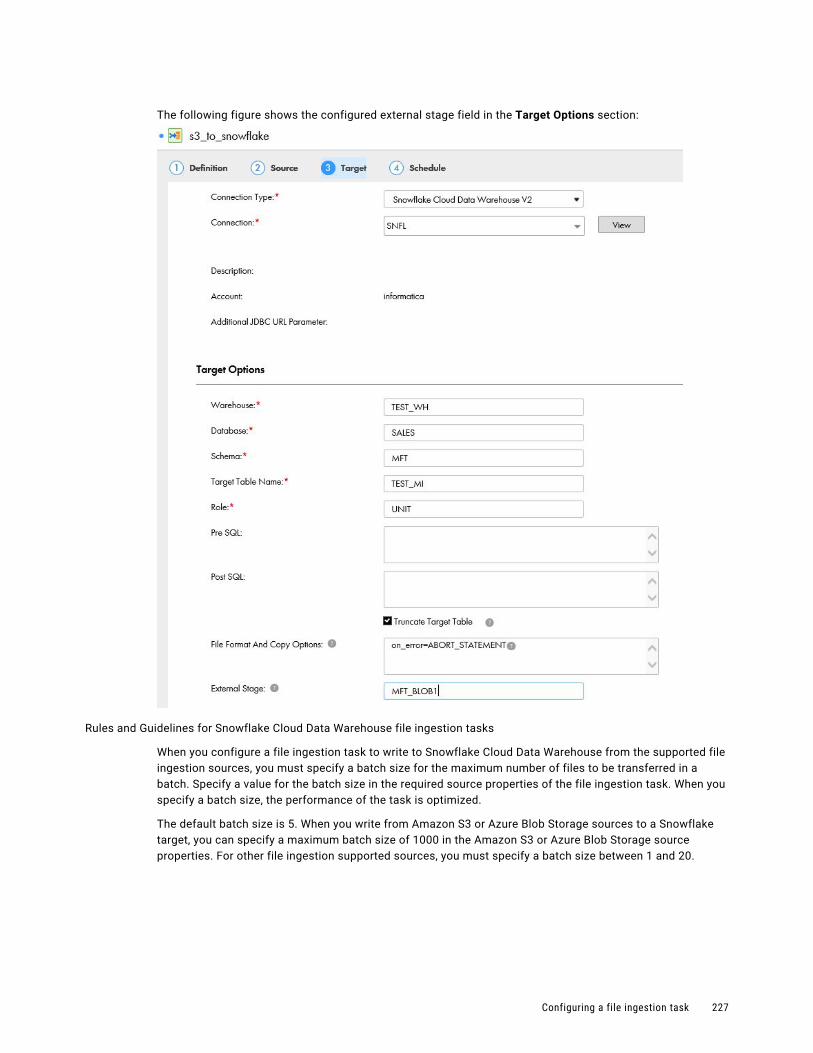
The following figure shows the configured external stage field in the Target Options section:
Rules and Guidelines for Snowflake Cloud Data Warehouse file ingestion tasks
When you configure a file ingestion task to write to Snowflake Cloud Data Warehouse from the supported file ingestion sources, you must specify a batch size for the maximum number of files to be transferred in a batch. Specify a value for the batch size in the required source properties of the file ingestion task. When you specify a batch size, the performance of the task is optimized.
The default batch size is 5. When you write from Amazon S3 or Azure Blob Storage sources to a Snowflake target, you can specify a maximum batch size of 1000 in the Amazon S3 or Azure Blob Storage source properties. For other file ingestion supported sources, you must specify a batch size between 1 and 20.
Configuring a file ingestion task 227

Defining a schedule and adding file actionsYou can run a file ingestion task manually, or you can schedule the task to run at a specific time or when a file is ready to transfer. Also, you can define file-processing actions, such as compress and encrypt, to be performed before transferring the files.
1. On the Schedule page, select one of the following options:
• Do not run this task on a schedule. The task does not run according to a defined schedule. You can run the task manually.
• Run this task on a schedule. Select a schedule by which the task runs.
• Run this task by file listener. The task runs when the file listener notifies the task of a file event. A file event occurs when files arrive to the monitored folder or the files in the monitored folder are updated or deleted.You must create a file listener that listens to the folder where files arrive. For more information about creating a file listener, see the section "File listeners" in the Mappings help.
2. Under Failure Management, select the Send a notification on failure option to receive a notification if the task fails. Enter a list of email addresses to which you want to send notifications if a task fails
Use commas to separate a list of email addresses.
3. If you want to add file-processing actions, click Add Action.
The Action Details window appears.
4. Perform the following file processing actions:
Action Description
Compress To compress the files, select Compress. Then select one of the following file compression methods:- Zip- Gzip- Tar
Decompress To decompress compressed files, select Decompress. Then select one of the following file decompression methods:- Unzip- Gunzip- Untar
Note: Use the method that corresponds to the compression method that was used to compress the file. For example, for a .zip file, use the Unzip method.
Encrypt To encrypt files by using the PGP encryption method, select Encrypt. Then select PGP and enter the key ID of the user who decrypts the file.- To add your sign key, select Sign.
The key ID and the key passphrase enables.- Enter your private key ID and key passphrase.
Note: For more information about securing files that file ingestion transfers, see “Mass Ingestion Files security” on page 191.
Decrypt To decrypt PGP-encrypted files, select Decrypt. Then select PGP and enter the key passphrase of the user of the target directory.
228 Chapter 5: Mass Ingestion Files
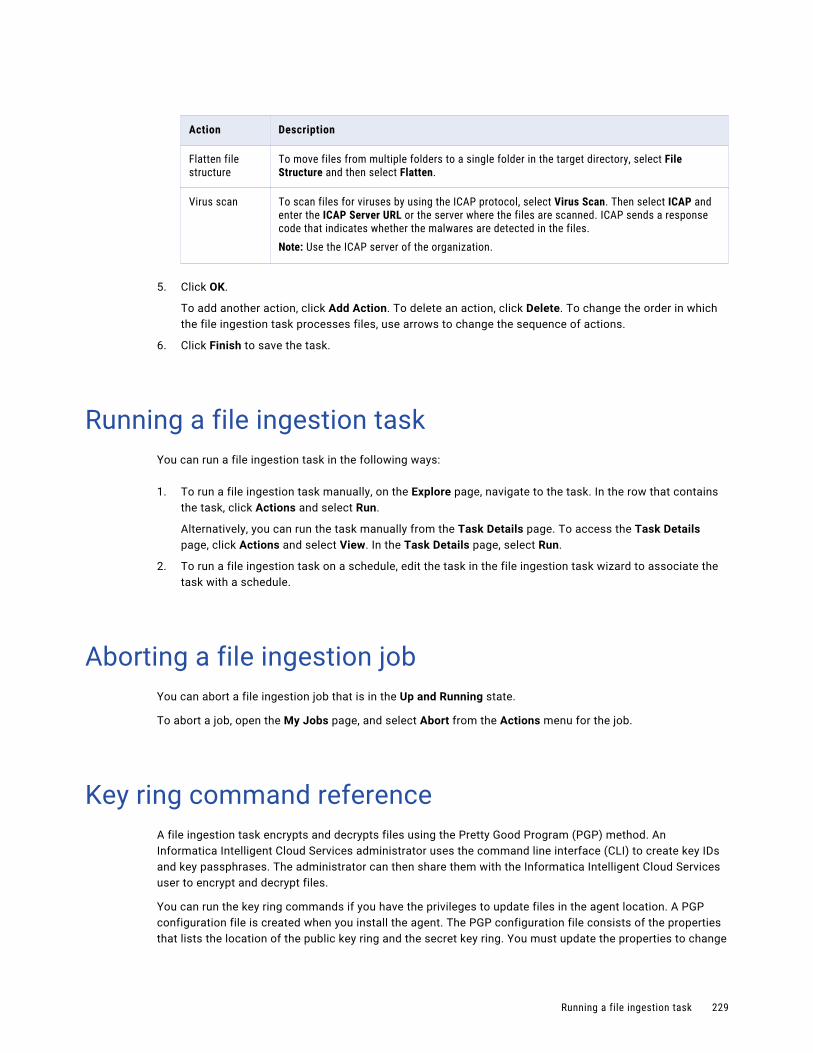
Action Description
Flatten file structure
To move files from multiple folders to a single folder in the target directory, select File Structure and then select Flatten.
Virus scan To scan files for viruses by using the ICAP protocol, select Virus Scan. Then select ICAP and enter the ICAP Server URL or the server where the files are scanned. ICAP sends a response code that indicates whether the malwares are detected in the files.Note: Use the ICAP server of the organization.
5. Click OK.
To add another action, click Add Action. To delete an action, click Delete. To change the order in which the file ingestion task processes files, use arrows to change the sequence of actions.
6. Click Finish to save the task.
Running a file ingestion taskYou can run a file ingestion task in the following ways:
1. To run a file ingestion task manually, on the Explore page, navigate to the task. In the row that contains the task, click Actions and select Run.
Alternatively, you can run the task manually from the Task Details page. To access the Task Details page, click Actions and select View. In the Task Details page, select Run.
2. To run a file ingestion task on a schedule, edit the task in the file ingestion task wizard to associate the task with a schedule.
Aborting a file ingestion jobYou can abort a file ingestion job that is in the Up and Running state.
To abort a job, open the My Jobs page, and select Abort from the Actions menu for the job.
Key ring command referenceA file ingestion task encrypts and decrypts files using the Pretty Good Program (PGP) method. An Informatica Intelligent Cloud Services administrator uses the command line interface (CLI) to create key IDs and key passphrases. The administrator can then share them with the Informatica Intelligent Cloud Services user to encrypt and decrypt files.
You can run the key ring commands if you have the privileges to update files in the agent location. A PGP configuration file is created when you install the agent. The PGP configuration file consists of the properties that lists the location of the public key ring and the secret key ring. You must update the properties to change
Running a file ingestion task 229
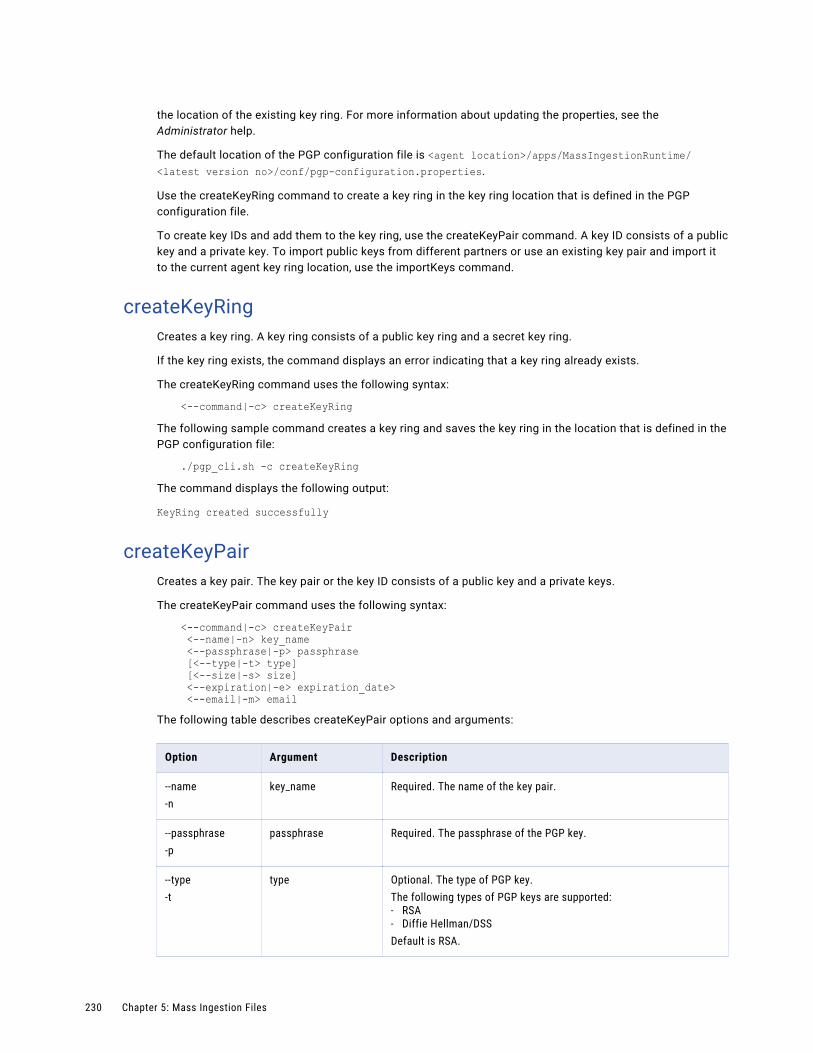
the location of the existing key ring. For more information about updating the properties, see the Administrator help.
The default location of the PGP configuration file is <agent location>/apps/MassIngestionRuntime/<latest version no>/conf/pgp-configuration.properties.
Use the createKeyRing command to create a key ring in the key ring location that is defined in the PGP configuration file.
To create key IDs and add them to the key ring, use the createKeyPair command. A key ID consists of a public key and a private key. To import public keys from different partners or use an existing key pair and import it to the current agent key ring location, use the importKeys command.
createKeyRingCreates a key ring. A key ring consists of a public key ring and a secret key ring.
If the key ring exists, the command displays an error indicating that a key ring already exists.
The createKeyRing command uses the following syntax:
<--command|-c> createKeyRingThe following sample command creates a key ring and saves the key ring in the location that is defined in the PGP configuration file:
./pgp_cli.sh -c createKeyRingThe command displays the following output:
KeyRing created successfully
createKeyPairCreates a key pair. The key pair or the key ID consists of a public key and a private keys.
The createKeyPair command uses the following syntax:
<--command|-c> createKeyPair <--name|-n> key_name <--passphrase|-p> passphrase [<--type|-t> type] [<--size|-s> size] <--expiration|-e> expiration_date> <--email|-m> email
The following table describes createKeyPair options and arguments:
Option Argument Description
--name-n
key_name Required. The name of the key pair.
--passphrase-p
passphrase Required. The passphrase of the PGP key.
--type-t
type Optional. The type of PGP key.The following types of PGP keys are supported:- RSA- Diffie Hellman/DSSDefault is RSA.
230 Chapter 5: Mass Ingestion Files

Option Argument Description
--size-s
size Optional. The size of the PGP key in bits.Enter one of the following values:- 512- 1024- 2048- 4096Default is 512.
--expiration-e
expiration_date Required. The date when the PGP key pair expires.Use the following date format: dd-mm-yyyy
--email-m
email Required. The email ID of the user.
The following sample command creates a key pair and adds the key pair to the key ring.
./pgp_cli.sh -c createKeyPair -n Mykeypair -p Mykeypassphrase -t RSA -s 1024 -e 10-12-2019 -m [email protected]
The command displays the following output:
12:09:2017 INFO Key pair was successfully created and added to your key ring. The key ID is '0x23149FC8C38658EA'.12:09:2017 INFO Key Pair created successfully.
listKeysLists all keys in key ring.
The listKeys command uses the following syntax:
<--command|-c> listKeysThe following sample command lists keys that are in the key ring:
./pgp_cli.sh -c listKeysThe command displays the following output:
12:10:38 INFO Default system locale: English (United States)12:10:38 INFO Listing Keys.12:10:38 INFO Total keys : 2Key ID : 0x23149FC8C38658EA User : Mykeypair <[email protected]./pgp_cli.sh> Description : Key Pair Key Type : RSA Key Size : 1024 Expiration Date : Tue Dec 10 23:59:59 IST 2019
Key ID : 0x7B1E52AFB29030A6 User : new <[email protected]> Description : Key Pair Key Type : RSA Key Size : 1024 Expiration Date : Sat Sep 28 23:59:59 IST 2019
importKeysImports keys from an external file to the key ring.
To import public keys from an external file or to use an existing key pair and import it to the current agent key ring location, use the importKeys command.
Key ring command reference 231
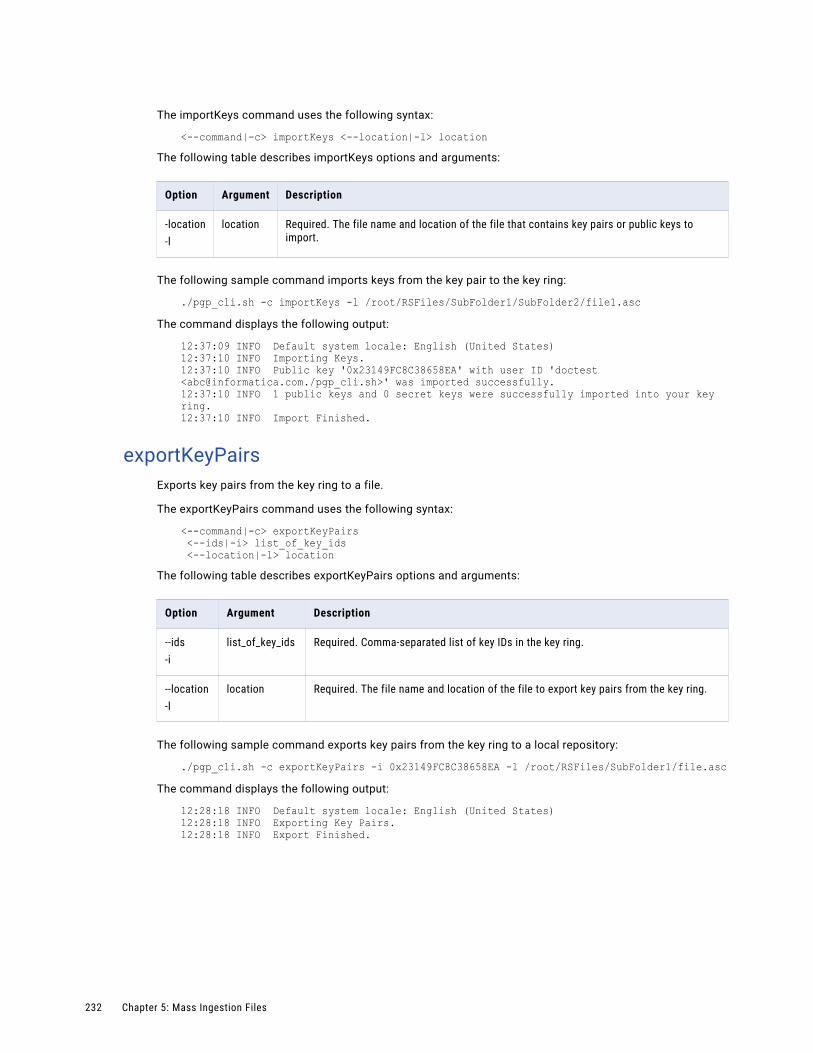
The importKeys command uses the following syntax:
<--command|-c> importKeys <--location|-l> locationThe following table describes importKeys options and arguments:
Option Argument Description
-location-l
location Required. The file name and location of the file that contains key pairs or public keys to import.
The following sample command imports keys from the key pair to the key ring:
./pgp_cli.sh -c importKeys -l /root/RSFiles/SubFolder1/SubFolder2/file1.ascThe command displays the following output:
12:37:09 INFO Default system locale: English (United States)12:37:10 INFO Importing Keys.12:37:10 INFO Public key '0x23149FC8C38658EA' with user ID 'doctest <[email protected]./pgp_cli.sh>' was imported successfully.12:37:10 INFO 1 public keys and 0 secret keys were successfully imported into your key ring.12:37:10 INFO Import Finished.
exportKeyPairsExports key pairs from the key ring to a file.
The exportKeyPairs command uses the following syntax:
<--command|-c> exportKeyPairs <--ids|-i> list_of_key_ids <--location|-l> location
The following table describes exportKeyPairs options and arguments:
Option Argument Description
--ids-i
list_of_key_ids Required. Comma-separated list of key IDs in the key ring.
--location-l
location Required. The file name and location of the file to export key pairs from the key ring.
The following sample command exports key pairs from the key ring to a local repository:
./pgp_cli.sh -c exportKeyPairs -i 0x23149FC8C38658EA -l /root/RSFiles/SubFolder1/file.ascThe command displays the following output:
12:28:18 INFO Default system locale: English (United States)12:28:18 INFO Exporting Key Pairs.12:28:18 INFO Export Finished.
232 Chapter 5: Mass Ingestion Files

exportPublicKeysExports public keys from the key ring to a file.
The exportPublicKeys command uses the following syntax:
<--command|-c> exportPublicKeys <--ids|-i> list_of_key_ids <--location|-l> location
The following table describes exportPublicKeys options and arguments:
Option Argument Description
--ids-i
list_of_key_ids Required. Comma-separated list of PGP key IDs in the key ring.
--location-l
location The file name and location file to export public key from the key ring.
The following sample command exports public keys to a local repository:
./pgp_cli.sh -c exportPublicKeys -i 0x23149FC8C38658EA -l /root/RSFiles/SubFolder1/SubFolder2/file1.asc
The command displays the following output:
12:32:10 INFO Default system locale: English (United States)12:32:10 INFO Exporting Public Keys.12:32:10 INFO Export Finished.
deleteKeysDeletes keys from the key ring.
The deleteKeys command uses the following syntax:
<--command|-c> deleteKeys <--ids|-i> list_of_key_idsThe following table describes deleteKeys options and arguments:
Option Argument Description
--ids-i
list_of_key_ids Required. Comma-separated list of key IDs in the key ring.
The following sample command deletes keys:
./pgp_cli.sh -c deleteKeys -i 0x23149FC8C38658EAThe command displays the following output:
12:36:46 INFO Default system locale: English (United States)12:36:46 INFO Deleting Key.12:36:47 INFO Key '0x23149FC8C38658EA' was deleted12:36:47 INFO Delete Finished.
Key ring command reference 233
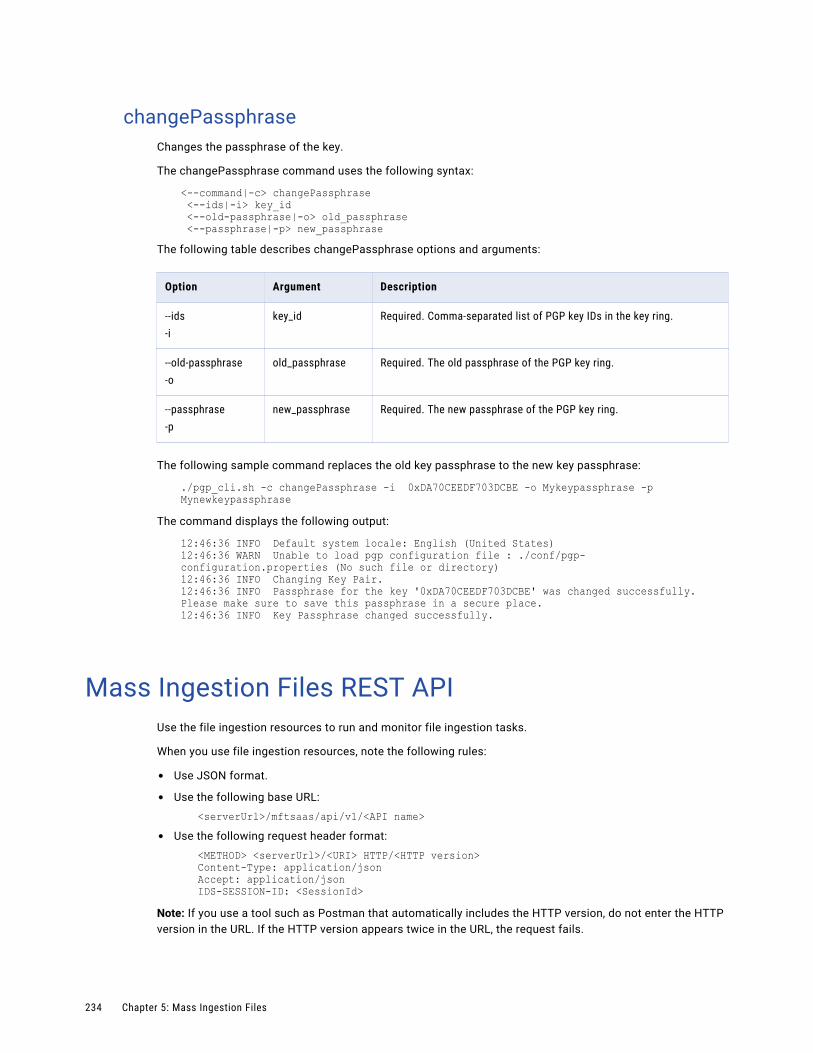
changePassphraseChanges the passphrase of the key.
The changePassphrase command uses the following syntax:
<--command|-c> changePassphrase <--ids|-i> key_id <--old-passphrase|-o> old_passphrase <--passphrase|-p> new_passphrase
The following table describes changePassphrase options and arguments:
Option Argument Description
--ids-i
key_id Required. Comma-separated list of PGP key IDs in the key ring.
--old-passphrase-o
old_passphrase Required. The old passphrase of the PGP key ring.
--passphrase-p
new_passphrase Required. The new passphrase of the PGP key ring.
The following sample command replaces the old key passphrase to the new key passphrase:
./pgp_cli.sh -c changePassphrase -i 0xDA70CEEDF703DCBE -o Mykeypassphrase -p Mynewkeypassphrase
The command displays the following output:
12:46:36 INFO Default system locale: English (United States)12:46:36 WARN Unable to load pgp configuration file : ./conf/pgp-configuration.properties (No such file or directory)12:46:36 INFO Changing Key Pair.12:46:36 INFO Passphrase for the key '0xDA70CEEDF703DCBE' was changed successfully. Please make sure to save this passphrase in a secure place.12:46:36 INFO Key Passphrase changed successfully.
Mass Ingestion Files REST APIUse the file ingestion resources to run and monitor file ingestion tasks.
When you use file ingestion resources, note the following rules:
• Use JSON format.
• Use the following base URL:
<serverUrl>/mftsaas/api/v1/<API name>• Use the following request header format:
<METHOD> <serverUrl>/<URI> HTTP/<HTTP version>Content-Type: application/jsonAccept: application/jsonIDS-SESSION-ID: <SessionId>
Note: If you use a tool such as Postman that automatically includes the HTTP version, do not enter the HTTP version in the URL. If the HTTP version appears twice in the URL, the request fails.
234 Chapter 5: Mass Ingestion Files
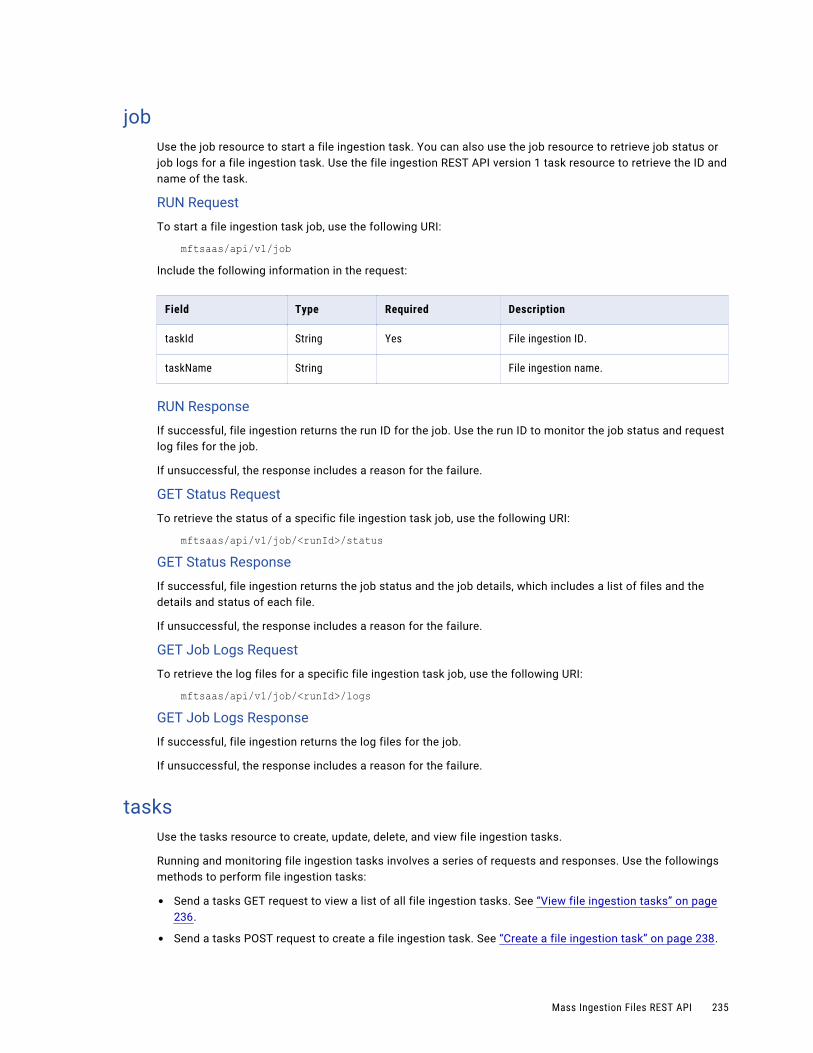
jobUse the job resource to start a file ingestion task. You can also use the job resource to retrieve job status or job logs for a file ingestion task. Use the file ingestion REST API version 1 task resource to retrieve the ID and name of the task.
RUN Request
To start a file ingestion task job, use the following URI:
mftsaas/api/v1/jobInclude the following information in the request:
Field Type Required Description
taskId String Yes File ingestion ID.
taskName String File ingestion name.
RUN Response
If successful, file ingestion returns the run ID for the job. Use the run ID to monitor the job status and request log files for the job.
If unsuccessful, the response includes a reason for the failure.
GET Status Request
To retrieve the status of a specific file ingestion task job, use the following URI:
mftsaas/api/v1/job/<runId>/statusGET Status Response
If successful, file ingestion returns the job status and the job details, which includes a list of files and the details and status of each file.
If unsuccessful, the response includes a reason for the failure.
GET Job Logs Request
To retrieve the log files for a specific file ingestion task job, use the following URI:
mftsaas/api/v1/job/<runId>/logsGET Job Logs Response
If successful, file ingestion returns the log files for the job.
If unsuccessful, the response includes a reason for the failure.
tasksUse the tasks resource to create, update, delete, and view file ingestion tasks.
Running and monitoring file ingestion tasks involves a series of requests and responses. Use the followings methods to perform file ingestion tasks:
• Send a tasks GET request to view a list of all file ingestion tasks. See “View file ingestion tasks” on page 236.
• Send a tasks POST request to create a file ingestion task. See “Create a file ingestion task” on page 238.
Mass Ingestion Files REST API 235
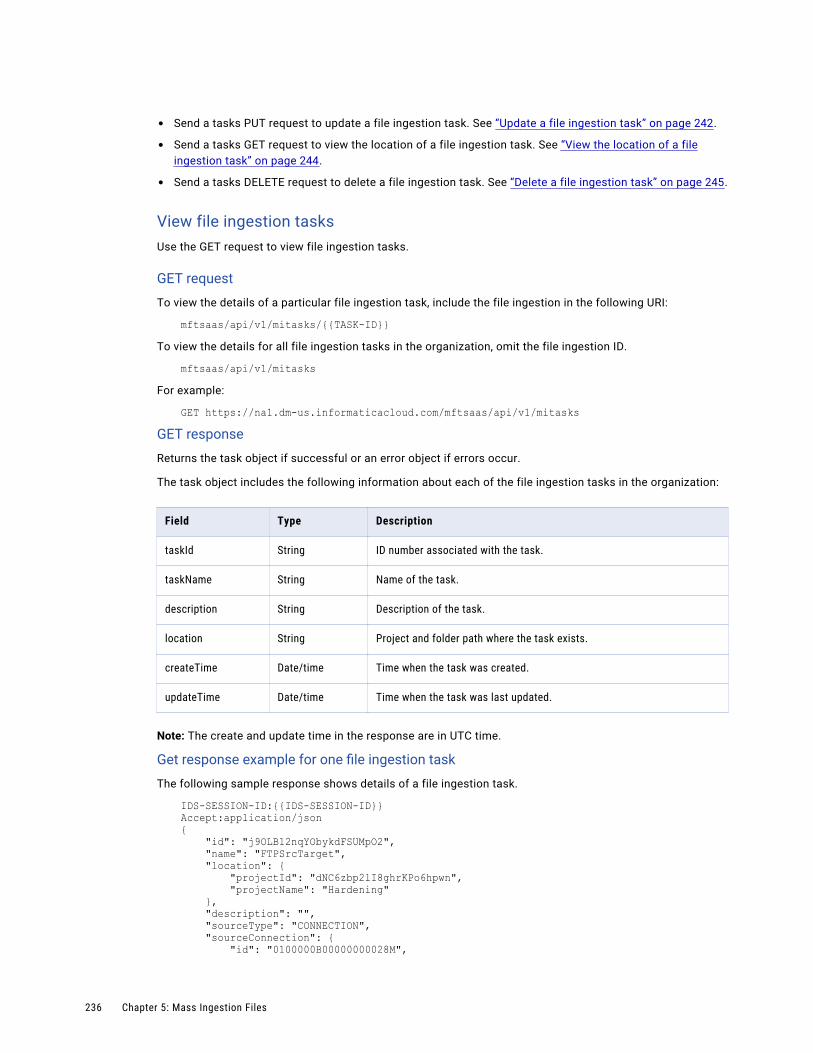
• Send a tasks PUT request to update a file ingestion task. See “Update a file ingestion task” on page 242.
• Send a tasks GET request to view the location of a file ingestion task. See “View the location of a file ingestion task” on page 244.
• Send a tasks DELETE request to delete a file ingestion task. See “Delete a file ingestion task” on page 245.
View file ingestion tasksUse the GET request to view file ingestion tasks.
GET request
To view the details of a particular file ingestion task, include the file ingestion in the following URI:
mftsaas/api/v1/mitasks/{{TASK-ID}}To view the details for all file ingestion tasks in the organization, omit the file ingestion ID.
mftsaas/api/v1/mitasksFor example:
GET https://na1.dm-us.informaticacloud.com/mftsaas/api/v1/mitasksGET response
Returns the task object if successful or an error object if errors occur.
The task object includes the following information about each of the file ingestion tasks in the organization:
Field Type Description
taskId String ID number associated with the task.
taskName String Name of the task.
description String Description of the task.
location String Project and folder path where the task exists.
createTime Date/time Time when the task was created.
updateTime Date/time Time when the task was last updated.
Note: The create and update time in the response are in UTC time.
Get response example for one file ingestion task
The following sample response shows details of a file ingestion task.
IDS-SESSION-ID:{{IDS-SESSION-ID}}Accept:application/json{ "id": "j9OLB12nqYObykdFSUMpO2", "name": "FTPSrcTarget", "location": { "projectId": "dNC6zbp2lI8ghrKPo6hpwn", "projectName": "Hardening" }, "description": "", "sourceType": "CONNECTION", "sourceConnection": { "id": "0100000B00000000028M",
236 Chapter 5: Mass Ingestion Files
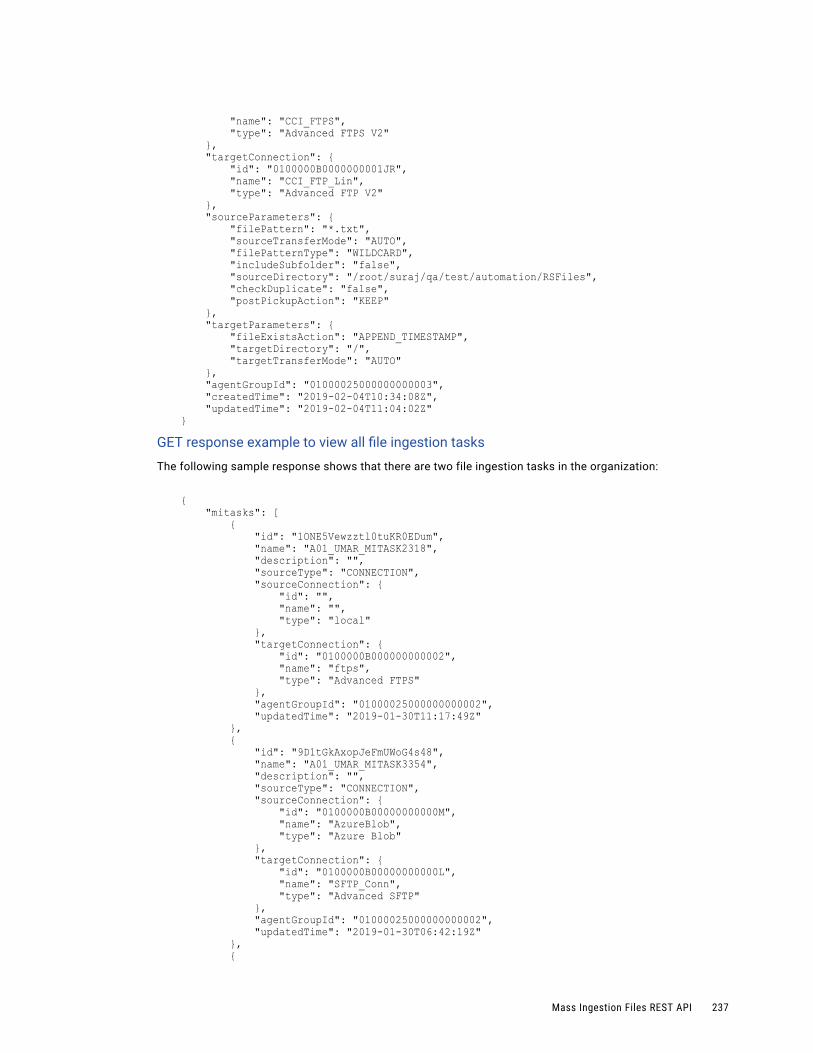
"name": "CCI_FTPS", "type": "Advanced FTPS V2" }, "targetConnection": { "id": "0100000B0000000001JR", "name": "CCI_FTP_Lin", "type": "Advanced FTP V2" }, "sourceParameters": { "filePattern": "*.txt", "sourceTransferMode": "AUTO", "filePatternType": "WILDCARD", "includeSubfolder": "false", "sourceDirectory": "/root/suraj/qa/test/automation/RSFiles", "checkDuplicate": "false", "postPickupAction": "KEEP" }, "targetParameters": { "fileExistsAction": "APPEND_TIMESTAMP", "targetDirectory": "/", "targetTransferMode": "AUTO" }, "agentGroupId": "01000025000000000003", "createdTime": "2019-02-04T10:34:08Z", "updatedTime": "2019-02-04T11:04:02Z"}
GET response example to view all file ingestion tasks
The following sample response shows that there are two file ingestion tasks in the organization:
{ "mitasks": [ { "id": "1ONE5Vewzztl0tuKR0EDum", "name": "A01_UMAR_MITASK2318", "description": "", "sourceType": "CONNECTION", "sourceConnection": { "id": "", "name": "", "type": "local" }, "targetConnection": { "id": "0100000B000000000002", "name": "ftps", "type": "Advanced FTPS" }, "agentGroupId": "01000025000000000002", "updatedTime": "2019-01-30T11:17:49Z" }, { "id": "9D1tGkAxopJeFmUWoG4s48", "name": "A01_UMAR_MITASK3354", "description": "", "sourceType": "CONNECTION", "sourceConnection": { "id": "0100000B00000000000M", "name": "AzureBlob", "type": "Azure Blob" }, "targetConnection": { "id": "0100000B00000000000L", "name": "SFTP_Conn", "type": "Advanced SFTP" }, "agentGroupId": "01000025000000000002", "updatedTime": "2019-01-30T06:42:19Z" }, {
Mass Ingestion Files REST API 237
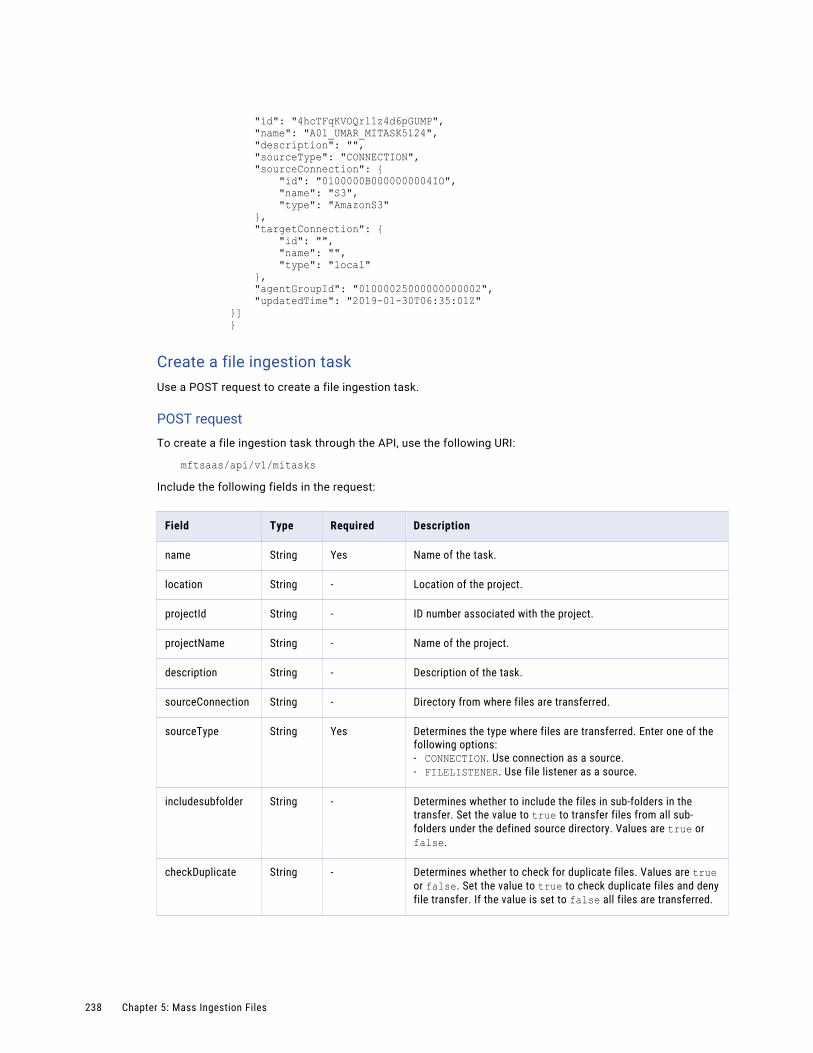
"id": "4hcTFqKVOQrl1z4d6pGUMP", "name": "A01_UMAR_MITASK5124", "description": "", "sourceType": "CONNECTION", "sourceConnection": { "id": "0100000B0000000004IO", "name": "S3", "type": "AmazonS3" }, "targetConnection": { "id": "", "name": "", "type": "local" }, "agentGroupId": "01000025000000000002", "updatedTime": "2019-01-30T06:35:01Z" }] }
Create a file ingestion taskUse a POST request to create a file ingestion task.
POST request
To create a file ingestion task through the API, use the following URI:
mftsaas/api/v1/mitasksInclude the following fields in the request:
Field Type Required Description
name String Yes Name of the task.
location String - Location of the project.
projectId String - ID number associated with the project.
projectName String - Name of the project.
description String - Description of the task.
sourceConnection String - Directory from where files are transferred.
sourceType String Yes Determines the type where files are transferred. Enter one of the following options:- CONNECTION. Use connection as a source.- FILELISTENER. Use file listener as a source.
includesubfolder String - Determines whether to include the files in sub-folders in the transfer. Set the value to true to transfer files from all sub-folders under the defined source directory. Values are true or false.
checkDuplicate String - Determines whether to check for duplicate files. Values are true or false. Set the value to true to check duplicate files and deny file transfer. If the value is set to false all files are transferred.
238 Chapter 5: Mass Ingestion Files

Field Type Required Description
filePatternType String Yes File pattern type used to select files to transfer. Enter one of the following options: - wildcard- regex
filePattern String Yes Enter file pattern types, depending on the file pattern that you have selected.- wildcard. You can use the following wildcard character filters:
- An asterisk (*) matches any number of characters.- A question mark (?) matches a single character.
- regex. Use regular expression to match the file pattern. Consider the following examples:- Use the following syntax to listen to all files except for files
with a name that contains out, foo, and baz: ^(?!.*(?:out|baz|foo)).*$ all except
- Use the following syntax to listen to all files with doc, docx, and pdf extensions: ([a-zA-Z0-9\s_\\.\-\(\):])+(.doc|.docx|.pdf)$
postPickupAction String - Determines what to do with source files after the transfer of files. The following options are available: - KEEP. Keep the files in the source directory.- DELETE. Delete the files from the source directory.- RENAME. Rename the files in the source directory. You must
specify a file name suffix that File ingestion adds to the file name when renaming the files.
- ARCHIVE. Archive the files to a different location. You must specify an archive directory.
targetConnection String Yes Directory details to which files are transferred.
taskActions String - Actions to process files in the file ingestion task. If you add multiple actions, file ingestion processes files in a sequence.
Mass Ingestion Files REST API 239
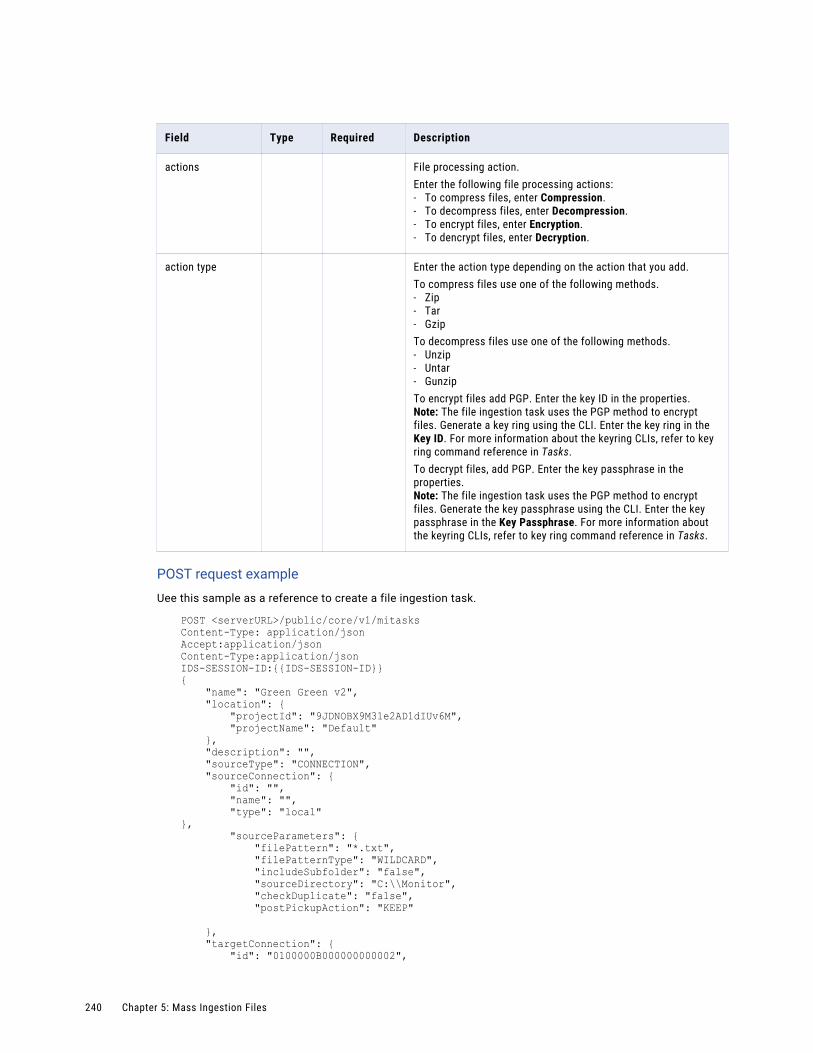
Field Type Required Description
actions File processing action.Enter the following file processing actions:- To compress files, enter Compression.- To decompress files, enter Decompression.- To encrypt files, enter Encryption.- To dencrypt files, enter Decryption.
action type Enter the action type depending on the action that you add.To compress files use one of the following methods.- Zip- Tar- GzipTo decompress files use one of the following methods.- Unzip- Untar- GunzipTo encrypt files add PGP. Enter the key ID in the properties.Note: The file ingestion task uses the PGP method to encrypt files. Generate a key ring using the CLI. Enter the key ring in the Key ID. For more information about the keyring CLIs, refer to key ring command reference in Tasks.To decrypt files, add PGP. Enter the key passphrase in the properties.Note: The file ingestion task uses the PGP method to encrypt files. Generate the key passphrase using the CLI. Enter the key passphrase in the Key Passphrase. For more information about the keyring CLIs, refer to key ring command reference in Tasks.
POST request example
Uee this sample as a reference to create a file ingestion task.
POST <serverURL>/public/core/v1/mitasksContent-Type: application/jsonAccept:application/jsonContent-Type:application/jsonIDS-SESSION-ID:{{IDS-SESSION-ID}}{ "name": "Green Green v2", "location": { "projectId": "9JDNOBX9M31e2AD1dIUv6M", "projectName": "Default" }, "description": "", "sourceType": "CONNECTION", "sourceConnection": { "id": "", "name": "", "type": "local"}, "sourceParameters": { "filePattern": "*.txt", "filePatternType": "WILDCARD", "includeSubfolder": "false", "sourceDirectory": "C:\\Monitor", "checkDuplicate": "false", "postPickupAction": "KEEP" }, "targetConnection": { "id": "0100000B000000000002",
240 Chapter 5: Mass Ingestion Files

"name": "ADLS", "type": "Azure Data Lake"}, "targetParameters": { "adlsTargetLocation": "/satyen/green" }, "agentGroupId": "01000025000000000002" taskActions":[ { "action": "Compression", "actionType": "Zip", "properties": {} } ]}
POST response example
If the request is successful, you might receive a response similar to the following example:
{ "id": "cEMWKpibm44bNf5aMjbJ4U", "name": "Green Green v2", "location": { "projectId": "9JDNOBX9M31e2AD1dIUv6M", "projectName": "Default" }, "description": "", "sourceType": "CONNECTION", "sourceConnection": { "id": "", "name": "", "type": "local"}, "sourceParameters": { "filePattern": "*.txt", "filePatternType": "WILDCARD", "includeSubfolder": "false", "sourceDirectory": "C:\\Monitor", "checkDuplicate": "false", "postPickupAction": "KEEP" }, "targetConnection": { "id": "0100000B000000000002", "name": "ADLS", "type": "Azure Data Lake"}, "targetParameters": { "adlsTargetLocation": "/satyen/green" }, "agentGroupId": "01000025000000000002", "createdTime": "2018-08-27T07:03:32Z", "updatedTime": "2018-08-29T12:14:58Z"" taskActions":[ { "action": "Compression", "actionType": "Zip", "properties": {} } ]}}
Note: The created and updated time in the response is displayed in the UTC time.
Mass Ingestion Files REST API 241
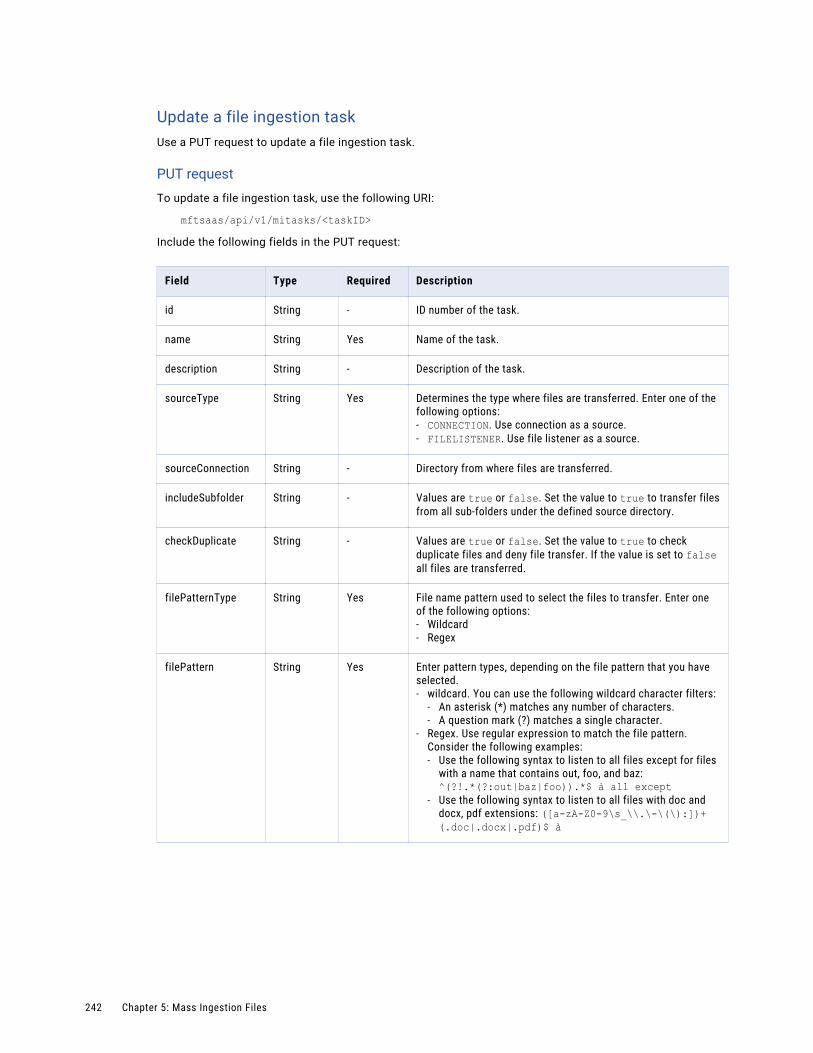
Update a file ingestion taskUse a PUT request to update a file ingestion task.
PUT request
To update a file ingestion task, use the following URI:
mftsaas/api/v1/mitasks/<taskID>Include the following fields in the PUT request:
Field Type Required Description
id String - ID number of the task.
name String Yes Name of the task.
description String - Description of the task.
sourceType String Yes Determines the type where files are transferred. Enter one of the following options:- CONNECTION. Use connection as a source.- FILELISTENER. Use file listener as a source.
sourceConnection String - Directory from where files are transferred.
includeSubfolder String - Values are true or false. Set the value to true to transfer files from all sub-folders under the defined source directory.
checkDuplicate String - Values are true or false. Set the value to true to check duplicate files and deny file transfer. If the value is set to false all files are transferred.
filePatternType String Yes File name pattern used to select the files to transfer. Enter one of the following options: - Wildcard- Regex
filePattern String Yes Enter pattern types, depending on the file pattern that you have selected.- wildcard. You can use the following wildcard character filters:
- An asterisk (*) matches any number of characters.- A question mark (?) matches a single character.
- Regex. Use regular expression to match the file pattern. Consider the following examples:- Use the following syntax to listen to all files except for files
with a name that contains out, foo, and baz: ^(?!.*(?:out|baz|foo)).*$ à all except
- Use the following syntax to listen to all files with doc and docx, pdf extensions: ([a-zA-Z0-9\s_\\.\-\(\):])+(.doc|.docx|.pdf)$ à
242 Chapter 5: Mass Ingestion Files
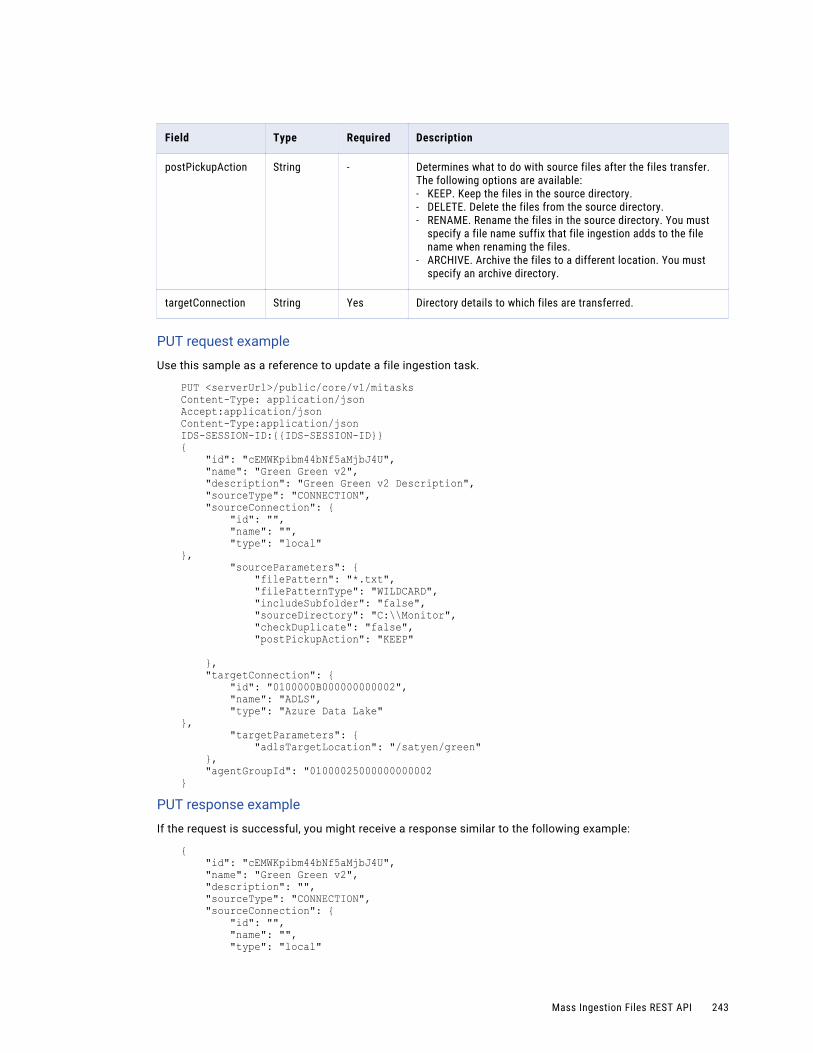
Field Type Required Description
postPickupAction String - Determines what to do with source files after the files transfer. The following options are available: - KEEP. Keep the files in the source directory.- DELETE. Delete the files from the source directory.- RENAME. Rename the files in the source directory. You must
specify a file name suffix that file ingestion adds to the file name when renaming the files.
- ARCHIVE. Archive the files to a different location. You must specify an archive directory.
targetConnection String Yes Directory details to which files are transferred.
PUT request example
Use this sample as a reference to update a file ingestion task.
PUT <serverUrl>/public/core/v1/mitasksContent-Type: application/jsonAccept:application/jsonContent-Type:application/jsonIDS-SESSION-ID:{{IDS-SESSION-ID}}{ "id": "cEMWKpibm44bNf5aMjbJ4U", "name": "Green Green v2", "description": "Green Green v2 Description", "sourceType": "CONNECTION", "sourceConnection": { "id": "", "name": "", "type": "local"}, "sourceParameters": { "filePattern": "*.txt", "filePatternType": "WILDCARD", "includeSubfolder": "false", "sourceDirectory": "C:\\Monitor", "checkDuplicate": "false", "postPickupAction": "KEEP" }, "targetConnection": { "id": "0100000B000000000002", "name": "ADLS", "type": "Azure Data Lake"}, "targetParameters": { "adlsTargetLocation": "/satyen/green" }, "agentGroupId": "01000025000000000002}
PUT response example
If the request is successful, you might receive a response similar to the following example:
{ "id": "cEMWKpibm44bNf5aMjbJ4U", "name": "Green Green v2", "description": "", "sourceType": "CONNECTION", "sourceConnection": { "id": "", "name": "", "type": "local"
Mass Ingestion Files REST API 243
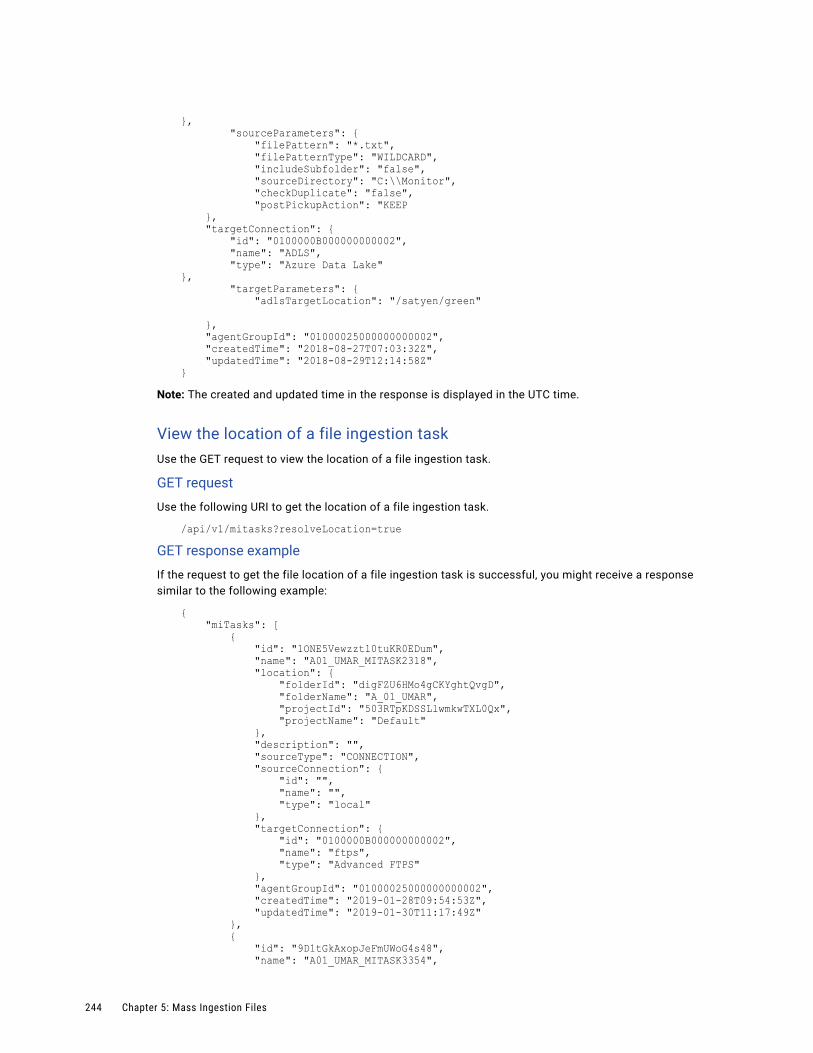
}, "sourceParameters": { "filePattern": "*.txt", "filePatternType": "WILDCARD", "includeSubfolder": "false", "sourceDirectory": "C:\\Monitor", "checkDuplicate": "false", "postPickupAction": "KEEP }, "targetConnection": { "id": "0100000B000000000002", "name": "ADLS", "type": "Azure Data Lake"}, "targetParameters": { "adlsTargetLocation": "/satyen/green" }, "agentGroupId": "01000025000000000002", "createdTime": "2018-08-27T07:03:32Z", "updatedTime": "2018-08-29T12:14:58Z"}
Note: The created and updated time in the response is displayed in the UTC time.
View the location of a file ingestion taskUse the GET request to view the location of a file ingestion task.
GET request
Use the following URI to get the location of a file ingestion task.
/api/v1/mitasks?resolveLocation=trueGET response example
If the request to get the file location of a file ingestion task is successful, you might receive a response similar to the following example:
{ "miTasks": [ { "id": "1ONE5Vewzztl0tuKR0EDum", "name": "A01_UMAR_MITASK2318", "location": { "folderId": "digFZU6HMo4gCKYghtQvgD", "folderName": "A_01_UMAR", "projectId": "503RTpKDSSLlwmkwTXL0Qx", "projectName": "Default" }, "description": "", "sourceType": "CONNECTION", "sourceConnection": { "id": "", "name": "", "type": "local" }, "targetConnection": { "id": "0100000B000000000002", "name": "ftps", "type": "Advanced FTPS" }, "agentGroupId": "01000025000000000002", "createdTime": "2019-01-28T09:54:53Z", "updatedTime": "2019-01-30T11:17:49Z" }, { "id": "9D1tGkAxopJeFmUWoG4s48", "name": "A01_UMAR_MITASK3354",
244 Chapter 5: Mass Ingestion Files
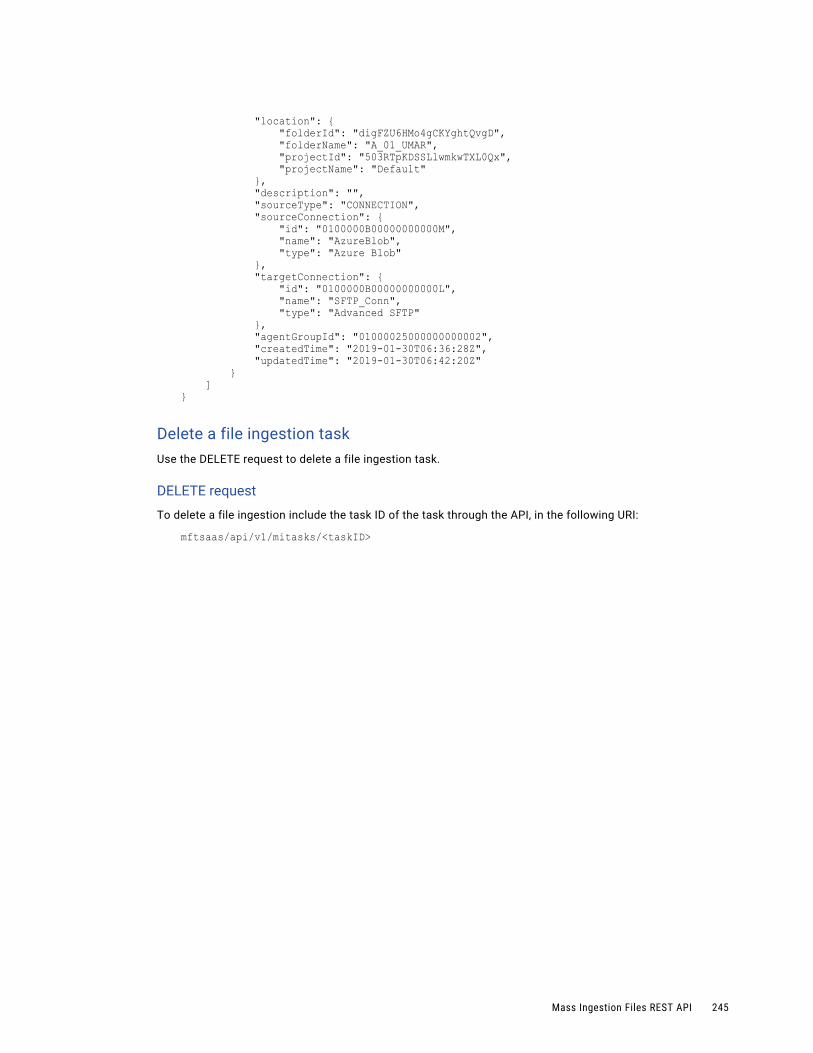
"location": { "folderId": "digFZU6HMo4gCKYghtQvgD", "folderName": "A_01_UMAR", "projectId": "503RTpKDSSLlwmkwTXL0Qx", "projectName": "Default" }, "description": "", "sourceType": "CONNECTION", "sourceConnection": { "id": "0100000B00000000000M", "name": "AzureBlob", "type": "Azure Blob" }, "targetConnection": { "id": "0100000B00000000000L", "name": "SFTP_Conn", "type": "Advanced SFTP" }, "agentGroupId": "01000025000000000002", "createdTime": "2019-01-30T06:36:28Z", "updatedTime": "2019-01-30T06:42:20Z" } ]}
Delete a file ingestion taskUse the DELETE request to delete a file ingestion task.
DELETE request
To delete a file ingestion include the task ID of the task through the API, in the following URI:
mftsaas/api/v1/mitasks/<taskID>
Mass Ingestion Files REST API 245
C h a p t e r 6
Mass Ingestion StreamingMass Ingestion Streaming is a separately licensed feature of the Mass Ingestion service. Mass Ingestion Streaming can ingest data at scale from any streaming data sources, such as logs, clickstream, social media, and IoT sources. Use Mass Ingestion Streaming to ingest high-volume, real-time data from streaming sources to on-premises and cloud storage. You can also track and monitor the progress of the ingestion.
To gather operational intelligence from streaming data or to perform real-time data warehousing, you need to collect and analyze the data before it becomes obsolete or corrupted. Use Mass Ingestion Streaming to combine or separate data from streaming sources in real time. You can apply simple transformations on the data to ensure the data ingested is ready for analytics.
The Mass Ingestion service has an easy-to-use interface that runs in Informatica Intelligent Cloud Services. Use the Mass Ingestion Streaming service to define, deploy, undeploy, and monitor ingestion jobs. A job is an executable instance of an ingestion task. You can collect streaming and IoT data from different sources, apply simple transformations to the data, and then ingest the data to different types of targets. You can ingest data from sources, such as Amazon Kinesis, event logs, Google PubSub, JMS, Kafka, MQTT, OPC UA, and REST V2. You can stream data to targets, such as Amazon Kinesis, Amazon S3, Azure Event Hubs, Databricks Delta, Google Cloud Storage, Google PubSub, Kafka, and Microsoft Azure Data Lake Storage.
Use casesMass Ingestion Streaming can help you fulfill multiple usage requirements.
Consider using Streaming ingestion in the following scenarios:
• Real-time analytics. Ingest streaming and IoT data into messaging systems, such as Apache Kafka or Amazon Kinesis, for real-time analytics. Real-time analytics can help companies identify business opportunities and revenue streams that can result in increased profits and improved customer service.
• Data integration. Ingest streaming and IoT data into cloud data lakes, such as Amazon S3, for integrating data in real-time to provide up-to-the-minute information.
246
Mass Ingestion Streaming sourcesYou can ingest high volume, real-time data from supported streaming sources to on-premises and cloud targets that Mass Ingestion Streaming supports. You can ingest data in the form of events or messages.
Mass Ingestion Streaming supports the following data sources:
• Amazon Kinesis Streams
• Azure Event Hubs Kafka
• Flat File
• Google PubSub
• JMS
• Kafka
- Apache Kafka
- Confluent Kafka
- Amazon Managed Streaming (Amazon MSK)
• MQTT
• OPC UA
• REST V2
Amazon Kinesis Streams sourcesUse a Kinesis Streams source to read data from an Amazon Kinesis Stream. To create a Kinesis Streams source connection, use the Kinesis connection type.
Kinesis Streams is a real-time data stream processing service that Amazon Kinesis offers within the AWS ecosystem. Kinesis Streams is a customizable option that you can use to build custom applications to process and analyze streaming data. As Kinesis Streams cannot automatically scale to meet data in-flow demand, you must manually provision enough capacity to meet system needs.
Before you use a Kinesis stream source, perform the following tasks:
1. In the Amazon Kinesis console, create and configure an Amazon Kinesis stream.
2. In the Amazon Web Services (AWS) Identity and Access Management (IAM) service, create a user.
3. Download the access key and secret access key that are generated during the user creation process.
4. Associate the user with a group that has permissions to write to the Kinesis stream.
Mass Ingestion Streaming does not support profile based and cross account authentication. Amazon Web Services credentials used for Amazon Kinesis must have permissions to access to Amazon DynamoDB and Amazon CloudWatch services.
Azure Event Hubs Kafka sourcesYou can configure a Kafka source to connect to Azure Event Hubs. To create an Azure Event Hubs Kafka source connection, use the Kafka connection type.
When you create a standard or dedicated tier Event Hubs namespace, the Kafka endpoint for the namespace is enabled by default. You can then use the Azure Event Hubs enabled Kafka connection as a source connection while configuring a streaming ingestion task. Enter the Event Hubs name as the topic name.
Mass Ingestion Streaming sources 247
The Azure Event Hubs source information that you enter while configuring a streaming ingestion task is same as that of a normal Kafka source configuration. For more information about Azure Event Hubs Kafka source properties, see “ Azure Event Hubs Kafka source properties” on page 259.
Configure the following properties while creating a Kafka connection in Administrator:
• Kafka Broker List: NAMESPACENAME.servicebus.windows.net:9093• Additional Connection Properties:
security.protocol=SASL_SSL,sasl.mechanism=PLAIN,sasl.kerberos.service.name=Kafka• SSL Mode: One-Way
• SSL TrustStore File Path: Path to a trusted root cert on your file system. For example, <AGENT_HOME>/jdk/jre/lib/security/cacerts
• SSL TrustStore Password: Trustore password.
• Additional Security Properties: sasl.jaas.config= org.apache.kafka.common.security.plain.PlainLoginModule required username="$ConnectionString" password="Endpoint=sb://mynamespace.servicebus.windows.net/;SharedAccessKeyName=XXXXXX;SharedAccessKey=XXXXXX";
For more information about creating an Azure Event Hubs Kafka source connection, see the Connections help.
Note: Event Hubs for Kafka is available only on standard and dedicated tiers. The basic tier doesn't support Kafka on Event Hubs.
Flat File sourcesUse a flat file as a source to read incoming real-time data. Configure a flat file connection to read data from flat files that are stored in the same directory.
A streaming ingestion task reads each row in a flat file source and ingests the data to a configured target. When a flat file is continuously updated in real time, the streaming ingestion task reads only the newly added content instead of reading the complete file again.
Streaming ingestion can read data from the delimited flat files. The delimiter character must be a carriage return (\r), a line feed (\n), or a combination of both.
Google PubSub sourcesUse a Google PubSub source to read messages from the configured Google Cloud PubSub subscription. To create a Google PubSub source connection, use the Google PubSub connection type.
Google PubSub is an asynchronous messaging service that decouples services that produce events from services that process events. You can use Google PubSub as a messaging-oriented middleware or for event ingestion and delivery for streaming analytics pipelines. Google PubSub offers durable message storage and real-time message delivery with high availability and consistent performance at scale. You can run Google PubSub servers in all the available Google Cloud regions around the world.
Before you use Google PubSub connector, you must ensure that you meet the following prerequisites:
• Your organization has the Google PubSub Connector license.
• You have a Google service account JSON key to access Google PubSub.
• You have the client_email, client_id, and private_key values for the Google service account. You need these details when you create a Google PubSub connection in Administrator.
In a streaming ingestion task, you can use a Google PubSub source to subscribe to messages from a Google PubSub topic.
248 Chapter 6: Mass Ingestion Streaming
JMS sourcesUse a JMS source to read data from a JMS provider queue. To create a JMS source connection, use the JMS connection type.
JMS providers are message-oriented middleware systems that send JMS messages. The JMS source connects to a JMS provider to read messages from a JMS queue. The JMS source can read messages of type BytesMessage and TextMessage. TextMessages can contain XML or JSON message data.
Kafka sourcesUse a Kafka source to read messages from a Kafka topic. To create a Kafka source connection, use the Kafka connection type.
Kafka is a publish-subscribe messaging system. It is an open-source distributed streaming platform that persists the streaming data in a Kafka topic. Any topic can then be read by any number of systems that need data in real-time. Kafka can serve as an interim staging area for streaming data that can be consumed by different downstream consumer applications can consume.
Kafka runs as a cluster comprised of one or more servers each of which is called a broker. Kafka brokers stream data in the form of messages. These messages are published to a topic. When you create a Kafka source, you create a Kafka consumer to read messages from a Kafka topic.
In a streaming ingestion task, you can use a Kafka source to subscribe to a stream of incoming data. When you configure a Kafka source to read from a Kafka topic, you can specify the topic name or use a Java supported regular expression to subscribe to all topics that match a specified pattern.
You can use the same Kafka connection to create an Amazon Managed Streaming for Apache Kafka (Amazon MSK) or a Confluent Kafka source connection. You can then use the Amazon MSK source or the Confluent Kafka source in a streaming ingestion task to read messages from an Apache Kafka or a Confluent Kafka topic.
MQTT sourcesUse an MQTT source to read data from an MQ Telemetry Transport (MQTT) broker. To create an MQTT source, use the MQTT connection type.
MQTT is a publish-subscribe messaging system. It is a simple, lightweight, and persistent messaging protocol. It is designed for constrained devices and low-bandwidth, high-latency, or unreliable networks. Both publishers and subscribers are MQTT clients. MQTT decouples the publisher from the subscriber, so a broker manages the client connections.
An MQTT broker receives all messages, filters the messages, determines which client subscribed to each message, and then sends messages to the subscribed clients. If multiple MQTT sources connect to one MQTT broker, each connection must have a unique identifier. When you run a streaming ingestion job to ingest data from an MQTT source, Streaming Ingestion first writes the data to an internal queue before writing the data to a target.
Note: An MQTT source must have a unique client identifier. If two MQTT sources have the same client identifier, the MQTT broker rejects both the clients and the streaming ingestion job gets into running with warning state.
Mass Ingestion Streaming supports MQTT Quality of Service (QoS) level 1. Level 1 indicates that the client sends the message to the broker at least once, but the message might be delivered more than once. After the broker acknowledges the message receipt, the client deletes the message from the outbound queue. The QoS Level is restricted to client to broker or broker to client communication.
Mass Ingestion Streaming sources 249
OPC UA sourcesUse an OPC UA source to read messages from an OPC UA application tag. To create an OPC UA source connection, use the OPCUA connection type.
Open Platform Communications (OPC) is one of the important communication protocols for Industry 4.0 and the IIoT (Industrial Internet Of Things). OPC Unified Architecture (OPC UA) is a machine-to-machine communication protocol used for industrial automation. OPC UA provides a flexible and adaptable mechanism to move data between enterprise systems, monitoring devices, and sensors that interact with real-world data. You can use OPC UA to establish communication for simple downtime status or for massive amounts of highly complex plant-wide information.
The OPC UA source is a client that collects data from OPC servers. Data points in OPC are tags that represent data from devices and provide real-time access to data. In a streaming ingestion task, you can create an OPC UA source to read the incoming data based on the list of tags that you provide. You must mention the tags in a JSON array format.
REST V2 sourcesUse a REST V2 source to read data from a web service application. To create a REST V2 source connection, use the REST V2 connection type.
REST V2 source connector is a generic connector for cloud applications with REST API. It supports swagger specification version 2.0. The swagger specification file contains operation ID, path parameters, query parameters, header fields, and payload details.
When you can create a REST V2 source connection for a streaming ingestion task, you can configure one of the following REST authentication types:
• Basic
• Digest
• OAuth1.0
• OAuth2.0 Client Credentials
• OAuth2.0 Authorization Code
• JWT bearer token authentication
Mass Ingestion Streaming targetsYou can ingest streaming data from a supported source to any on-premises and cloud targets that Mass Ingestion Streaming supports.
Mass Ingestion Streaming supports the following targets:
• Amazon Kinesis Data Firehose
• Amazon Kinesis Streams
• Amazon S3
• Databricks Delta
• Google Cloud Storage
• Google PubSub
250 Chapter 6: Mass Ingestion Streaming
• Kafka
- Apache Kafka
- Confluent Kafka
- Amazon Managed Streaming (Amazon MSK)
• Microsoft Azure Data Lake Store Gen2
• Microsoft Azure Event Hubs
Amazon Kinesis Data Firehose targetUse a Kinesis target to receive data from a source and write the data to an Amazon Kinesis Data Firehose target. To create a Kinesis target, use the Amazon Kinesis connection type.
Kinesis Firehose is a real-time data stream processing service that Amazon Kinesis offers within the AWS ecosystem. Use Kinesis Firehose to batch, encrypt, and compress data. Kinesis Firehose can automatically scale to meet system needs.
To configure access for Kinesis Firehose as a target, perform the following tasks:
• Create an AWS account with the required IAM permissions for the IAM user to use the AWS Kinesis Data Firehose service.
• Define a Firehose delivery stream. Configure source as Direct PUT or other sources.
• Grant required permissions to the IAM user credentials based on the target the user is writing to.For a list of permissions, see the AWS documentation at https://docs.aws.amazon.com/firehose/latest/dev/controlling-access.html#access-to-firehose.
Amazon Kinesis Streams targetUse a Kinesis target to receive data from source services and write the data to an Amazon Kinesis Stream. To create a Kinesis target, use the Amazon Kinesis connection type.
Kinesis Streams is a real-time data stream processing service that Amazon Kinesis offers within the AWS ecosystem. Kinesis Streams is a customizable option that you can use to build custom applications to process and analyze streaming data. As Kinesis Streams cannot automatically scale to meet data in-flow demand, you must manually provision enough capacity to meet system needs.
Before you use a Kinesis stream target, perform the following tasks:
1. In the Amazon Kinesis console, create and configure an Amazon Kinesis stream.
2. In the Amazon Web Services (AWS) Identity and Access Management (IAM) service, create a user.
3. Download the access key and secret access key that are generated during the user creation process.
4. Associate the user with a group that has permissions to write to the Kinesis stream.
Amazon S3 targetUse an Amazon S3 V2 connector to write the streaming data to an Amazon S3 target.
Amazon Simple Storage Service (Amazon S3) is storage service in which you can copy data from a streaming source and simultaneously move data to any target. You can use Amazon S3 to transfer the data from a list of configured source connections to an Amazon S3 target. You can accomplish these tasks by using the AWS Management Console web interface.
You can use an Amazon S3 object as a target in a streaming ingestion task. You can configure the Amazon S3 target and advanced properties for a target object.
Mass Ingestion Streaming targets 251

Databricks Delta targetUse a streaming ingestion task to write data to a Databricks Delta target. To create a Databricks Delta target, use the Databricks Delta connection type. The Databricks Delta target requires a Databricks cluster version 6.3 or later.
Databricks Delta is an open source storage layer that provides ACID transactions and works on top of existing data lakes. Databricks uses proprietary Delta software to manage stored data and allow fast access to the data.
You can access Delta Lake tables built on top of the following storage types:
• Azure Data Lake Storage (ADLS) Gen2
• Amazon Web Services (AWS) S3
The Databricks Delta target writes data to one or more Delta Lake tables on Databricks. You can use the Databricks Delta target in a streaming ingestion task for the following use cases:
• Ingest bulk data from all streaming sources into Databricks Delta tables
• Merge change data capture (CDC) from all streaming sources and write to Databricks Delta tables
The Databricks Delta connection uses a JDBC URL to connect to the Databricks cluster. When you configure the target, you specify the JDBC URL and credentials to use to connect to the cluster. You also define the connection information that the target uses to connect to the staging location in Amazon S3 or Azure Data Lake Storage Gen2.
You specify the tables in Delta Lake to which you want to write the data. The target writes data from record fields to table columns based on matching names.
Google Cloud Storage V2 targetUse a streaming ingestion task to write data to a Google Cloud Storage target. To create a Google Cloud Storage target, use the Google Cloud Storage V2 connection type.
You can use Google Cloud Storage to stream multimedia, store custom data analytics pipelines, or distribute large data objects to users through direct download. You can write data to Google Cloud Storage for data backup. In the event of a database failure, you can read the data from Google Cloud Storage and restore it to the database.
Google Cloud Storage offers different storage classes based on factors such as data availability, latency, and price. Google Cloud Storage has the following components:
• Projects. In Google Cloud Storage, all resources are stored within a project. Project is a top-level container that stores billing details and user details. You can create multiple projects. A project has a unique project name, project ID, and project number.
• Buckets. Each bucket acts like a container that stores data. You can use buckets to organize and access data. You can create more than one bucket but you cannot nest buckets. You can create multiple folders within a bucket and you can also nest folders. You can define access control lists to manage objects and buckets. An access control list consists of permission and scope entries. Permission defines the access to perform a read or write operation. Scope defines a user or a group who can perform the operation.
• Objects. Objects comprise the data that you upload to Google Cloud Storage. You can create objects in a bucket. Objects consist of object data and object metadata components. The object data is a file that you store in Google Cloud Storage. The object metadata is a collection of name-value pairs that describe object qualities.
252 Chapter 6: Mass Ingestion Streaming
Before you use Google Cloud Storage V2 Connector, you must complete the following prerequisite tasks:
1. Ensure that you have a Google service account to access Google Cloud Storage.
2. Ensure that you have the client_email, project_id, and private_key values for the service account. You will need to enter these details when you create a Google Cloud Storage connection in the Administrator.
3. Ensure that you have enabled the Google Cloud Storage JSON API for your service account. Google Cloud Storage V2 Connector uses the Google API to integrate with Google Cloud Storage.
4. Verify that you have write access to the Google Cloud Storage bucket that contains the target file.
5. Ensure that you have enabled a license to use a Cloudera CDH or Hortonworks HDP package in your organization.
When you deploy a streaming ingestion task, the Secure Agent uses the Google Cloud Storage API to perform the specified operation and writes data to Google Cloud Storage files. You can write data into a Google Cloud Storage target. You cannot perform update, upsert, or delete operations on a Google Cloud Storage target.
Google PubSub targetUse a streaming ingestion task to write data to a Google PubSub topic. To create a Google PubSub target, use the Google PubSub connection type.
Google PubSub is an asynchronous messaging service that decouples services that produce events from services that process events. You can use Google PubSub as a messaging-oriented middleware or for event ingestion and delivery for streaming analytics pipelines. Google PubSub offers durable message storage and real-time message delivery with high availability and consistent performance at scale. You can run Google PubSub servers in all the available Google Cloud regions around the world.
Before you use Google PubSub connector, you must ensure that you meet the following prerequisites:
• Your organization has the Google PubSub Connector license.
• You have a Google service account JSON key to access Google PubSub.
• You have the client_email, client_id, and private_key values for the Google service account. You need these details when you create a Google PubSub connection in Administrator.
In a streaming ingestion task, you can use a Google PubSub target to publish to messages to a Google PubSub topic.
Kafka targetUse a streaming ingestion task to write data to a Kafka target. To create a Kafka target, use the Kafka connection type.
Kafka is a publish-subscribe messaging system. It is an open-source distributed streaming platform. This platform allows systems that generate data to persist their data in real-time in a Kafka topic. Any topic can then be read by any number of systems who need that data in real-time. Kafka can serve as an interim staging area for streaming data that can be consumed by different downstream consumer applications.
Kafka runs as a cluster that comprises of one or more Kafka brokers. Kafka brokers stream data in the form of messages, publishes the messages to a topic, subscribes the messages from a topic, and then writes it to the Kafka target.
When you create a Kafka target, you create a Kafka producer to write Kafka messages. You can use each Kafka target in a streaming ingestion job that writes streaming Kafka messages. When you configure a Kafka target, specify the topic to publish the messages and the IP address and port on which the Kafka broker runs. If a Kafka topic does not exist in the target, instead of manually creating topics you can also configure your brokers to auto-create topics when a non-existent topic is published to.
Mass Ingestion Streaming targets 253
You can use the same Kafka connection to create an Amazon Managed Streaming for Apache Kafka (Amazon MSK) or a Confluent Kafka connection. You can then use the Amazon MSK or the Confluent Kafka target in a streaming ingestion task to write messages to an Apache Kafka or a Confluent Kafka target.
Microsoft Azure Data Lake Storage Gen2 targetUse a streaming ingestion task to write data to a Microsoft Azure Data Lake Storage Gen2 target. To create a Microsoft Azure Data Lake Storage Gen2 target, use the Microsoft Azure Data Lake Storage Gen2 connection type.
Microsoft Azure Data Lake Storage Gen2 is a next-generation data lake solution for big data analytics. You can store data in the form of directories and sub-directories, making it efficient for data access and manipulation. You can store data of any size, structure, and format. You can process large volumes of data to achieve faster business outcomes. Data scientists and data analysts can use data in the data lake to find out specific patterns before you move the analyzed data to a data warehouse. You can use big data analytics available on top of Microsoft Azure Blob storage.
The streaming ingestion task writes data to Microsoft Azure Data Lake Storage Gen2 based on the specified conditions.
For more information about Microsoft Azure Data Lake Storage Gen2, see the Microsoft Azure Data Lake Storage Gen2 documentation.
Microsoft Azure Event Hubs targetUse a streaming ingestion task to write data to an Azure Event Hubs target. To create an Azure Event Hubs target, use the Azure Event Hubs connection type.
Azure Event Hubs is a highly scalable data streaming platform and event ingestion service that receives and processes events. Azure Event Hubs can ingest and process large volumes of events with low latency and high reliability. It is a managed service that can handle message streams from a wide range of connected devices and systems.
Any entity that sends data to an event hub is an event publisher. Event publishers can publish events using HTTPS or Kafka 1.0 and later. Event publishers use a Shared Access Signature (SAS) token to identify themselves to an event hub and can have a unique identity or use a common SAS token.
For more information about Event Hubs, see the Microsoft Azure Event Hubs documentation.
Transformations in Mass Ingestion StreamingTransformations are part of a streaming ingestion task. Transformations represent the operations that you want to perform when ingesting streaming data.
Each transformation performs a specific function. For example, a Filter transformation filters data from the ingested data based on a specified condition.
When you create a streaming ingestion task, adding a transformation is optional. Each transformation type has a unique set of options that you can configure.
Streaming ingestion supports the following transformations:
• Combiner
• Filter
254 Chapter 6: Mass Ingestion Streaming

• Python
• Splitter
You can add multiple transformations to a streaming ingestion task. In such a case, the order of transformations is important because the source data undergoes each transformation in the given order. The output of one transformation becomes the input to the next one in the taskflow.
In a streaming ingestion task, you can add only one Combiner transformation. Ensure that the Combiner transformation is the last transformation in the taskflow.
Supported data formatsEach supported data format of the incoming streaming data supports only a specified transformation type.
Streaming ingestion transformations can process streaming data in the following formats:
• Binary. Any type of structured and unstructured data.
• JSON. Minimal, readable format for structuring data.
• XML. Structured text data.
If no transformation is configured for a task, the incoming data is consumed in its original format.
Combiner transformationA Combiner transformation combines multiple events from a streaming source into a single event based on the specified conditions.
A Combiner transformation processes binary data and JSON data. For JSON message formats, the Combiner transformation combines the incoming data into an array of data and returns JSON array objects as output. For binary message formats, it combines the incoming data based on the specified conditions.
In a streaming ingestion task, you can add only one Combiner transformation. Ensure that the Combiner transformation is the last transformation in the taskflow.
You can use one of the following conditions for a Combiner transformation:
• Minimum number of events
• Maximum aggregate size
• Time limit
For example, consider the following events:
• Record created
• Record published
If you use comma (,) as a delimiter, the Combiner transformation returns the following combined event:
Record created,Record Published
Note: When you process binary data with a Combiner transformation, you cannot use a regular expression as a delimiter.
Transformations in Mass Ingestion Streaming 255
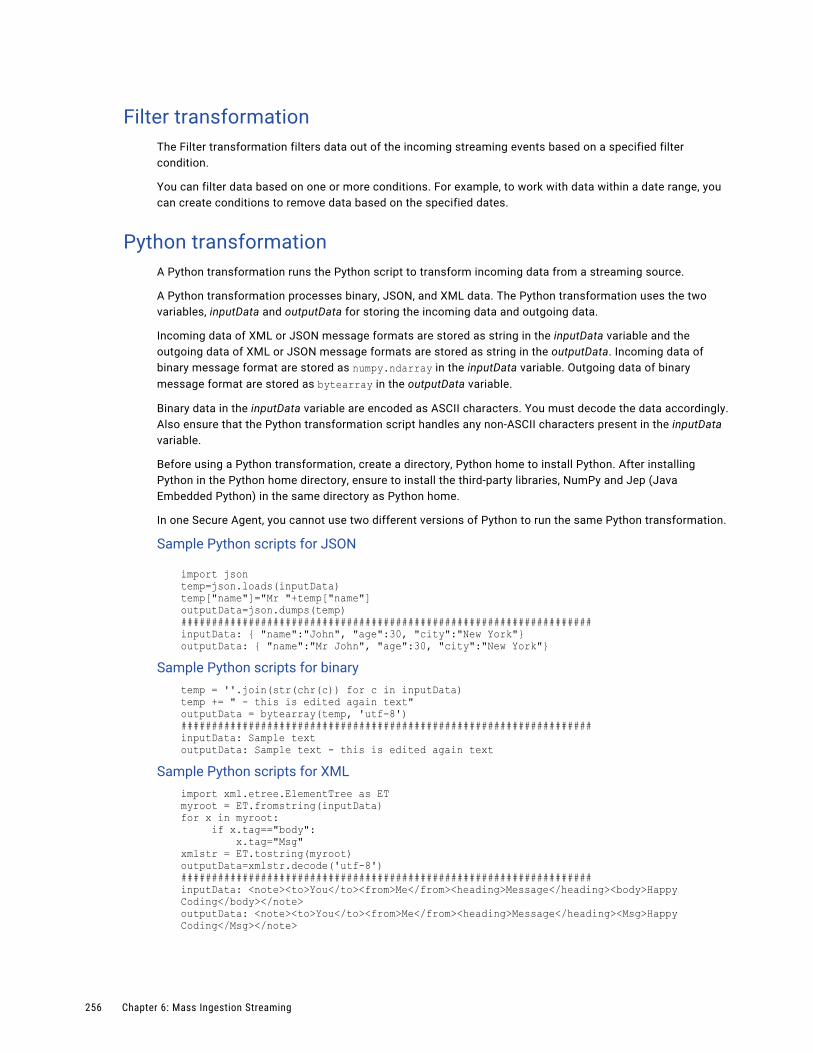
Filter transformationThe Filter transformation filters data out of the incoming streaming events based on a specified filter condition.
You can filter data based on one or more conditions. For example, to work with data within a date range, you can create conditions to remove data based on the specified dates.
Python transformationA Python transformation runs the Python script to transform incoming data from a streaming source.
A Python transformation processes binary, JSON, and XML data. The Python transformation uses the two variables, inputData and outputData for storing the incoming data and outgoing data.
Incoming data of XML or JSON message formats are stored as string in the inputData variable and the outgoing data of XML or JSON message formats are stored as string in the outputData. Incoming data of binary message format are stored as numpy.ndarray in the inputData variable. Outgoing data of binary message format are stored as bytearray in the outputData variable.
Binary data in the inputData variable are encoded as ASCII characters. You must decode the data accordingly. Also ensure that the Python transformation script handles any non-ASCII characters present in the inputData variable.
Before using a Python transformation, create a directory, Python home to install Python. After installing Python in the Python home directory, ensure to install the third-party libraries, NumPy and Jep (Java Embedded Python) in the same directory as Python home.
In one Secure Agent, you cannot use two different versions of Python to run the same Python transformation.
Sample Python scripts for JSON
import jsontemp=json.loads(inputData)temp["name"]="Mr "+temp["name"]outputData=json.dumps(temp)###################################################################inputData: { "name":"John", "age":30, "city":"New York"}outputData: { "name":"Mr John", "age":30, "city":"New York"}
Sample Python scripts for binarytemp = ''.join(str(chr(c)) for c in inputData)temp += " - this is edited again text"outputData = bytearray(temp, 'utf-8')###################################################################inputData: Sample textoutputData: Sample text - this is edited again text
Sample Python scripts for XMLimport xml.etree.ElementTree as ETmyroot = ET.fromstring(inputData)for x in myroot: if x.tag=="body": x.tag="Msg" xmlstr = ET.tostring(myroot)outputData=xmlstr.decode('utf-8')###################################################################inputData: <note><to>You</to><from>Me</from><heading>Message</heading><body>Happy Coding</body></note>outputData: <note><to>You</to><from>Me</from><heading>Message</heading><Msg>Happy Coding</Msg></note>
256 Chapter 6: Mass Ingestion Streaming
Splitter transformationA Splitter transformation splits multiline messages or message arrays into separate messages based on the conditions that you specify before ingesting them into targets.
The Splitter transformation splits binary, JSON, and XML messages based on the condition that you specify and passes the separated messages into new files before ingesting them into targets. Use the Splitter transformation to split complex messages into logical components. For example, if a message contains an error code and error message separated by a comma, you can use the comma to separate the code and message into different files.
Binary messages
In binary message format, the Splitter transformation divides the messages based on line boundaries or byte sequence. The maximum number of lines determines the line boundaries. Each output split file contains no more than the configured number of lines or bytes. The default value for the line boundaries is 1. The default for the byte sequence is ','.
JSON messages
In JSON message format, the Splitter transformation divides a JSON file into separate files based on the array element specified by a JSONPath expression. Each generated file is comprised of an element of the specified array. The generated file is transferred to the downstream target or transformation in the task. If the specified JSONPath is not found or does not evaluate to an array element, the original file is routed to failure and no files are generated. The default JSONPath Expression is '$'.
XML messages
In XML message format, the Splitter transformation splits an XML message into many files based on the level of input depth. Each of these files contain a child or descendant of the original file.
Configuring a streaming ingestion taskWhen you create a streaming ingestion task, you define a source and a target. You can optionally define a transformation to transform the data. Use the task wizard to configure streaming ingestion tasks.
To configure a streaming ingestion task, perform the following steps:
1. Define the basic information of a task.
2. Configure a source.
3. Configure a target.
4. Optionally, add a transformation.
5. Optionally, set the runtime options.
As you work through the task wizard, you can click Save to save your work at any time after you configure the target. When you have completed the wizard, click Save to save the task.
Before you begin, verify that the conditions that are described in “Before you begin” on page 258.
Configuring a streaming ingestion task 257
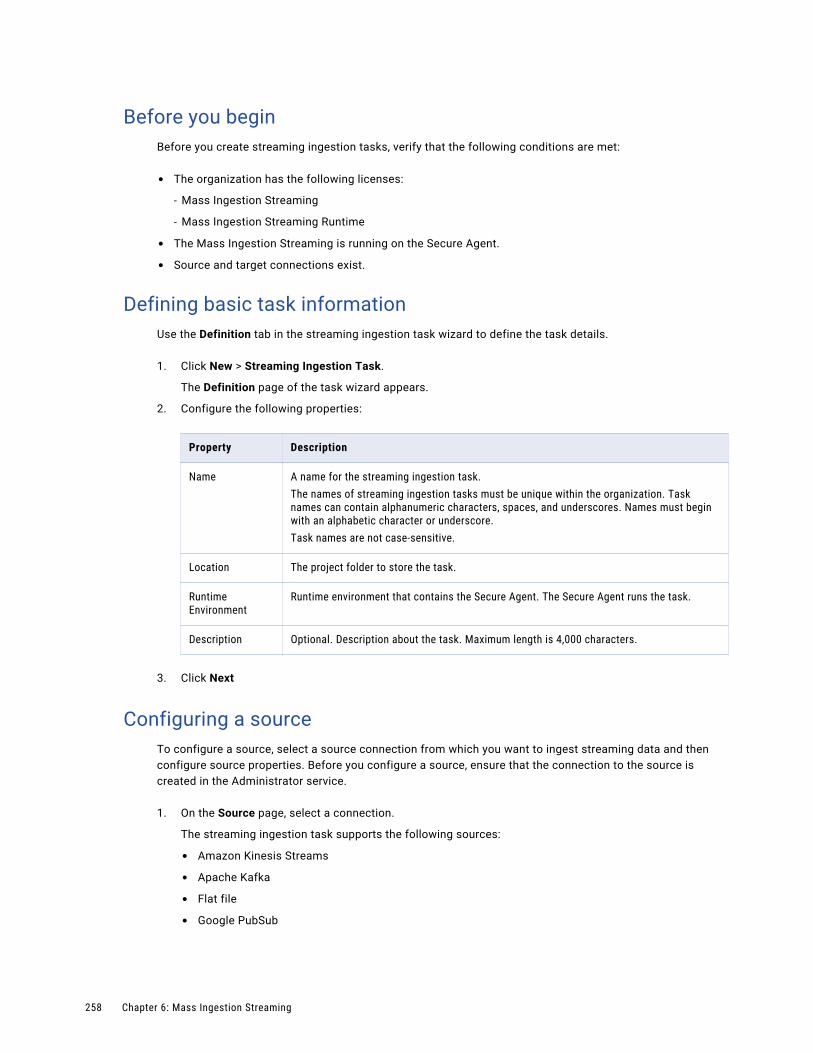
Before you beginBefore you create streaming ingestion tasks, verify that the following conditions are met:
• The organization has the following licenses:
- Mass Ingestion Streaming
- Mass Ingestion Streaming Runtime
• The Mass Ingestion Streaming is running on the Secure Agent.
• Source and target connections exist.
Defining basic task informationUse the Definition tab in the streaming ingestion task wizard to define the task details.
1. Click New > Streaming Ingestion Task.
The Definition page of the task wizard appears.
2. Configure the following properties:
Property Description
Name A name for the streaming ingestion task.The names of streaming ingestion tasks must be unique within the organization. Task names can contain alphanumeric characters, spaces, and underscores. Names must begin with an alphabetic character or underscore.Task names are not case-sensitive.
Location The project folder to store the task.
Runtime Environment
Runtime environment that contains the Secure Agent. The Secure Agent runs the task.
Description Optional. Description about the task. Maximum length is 4,000 characters.
3. Click Next
Configuring a sourceTo configure a source, select a source connection from which you want to ingest streaming data and then configure source properties. Before you configure a source, ensure that the connection to the source is created in the Administrator service.
1. On the Source page, select a connection.
The streaming ingestion task supports the following sources:
• Amazon Kinesis Streams
• Apache Kafka
• Flat file
• Google PubSub
258 Chapter 6: Mass Ingestion Streaming
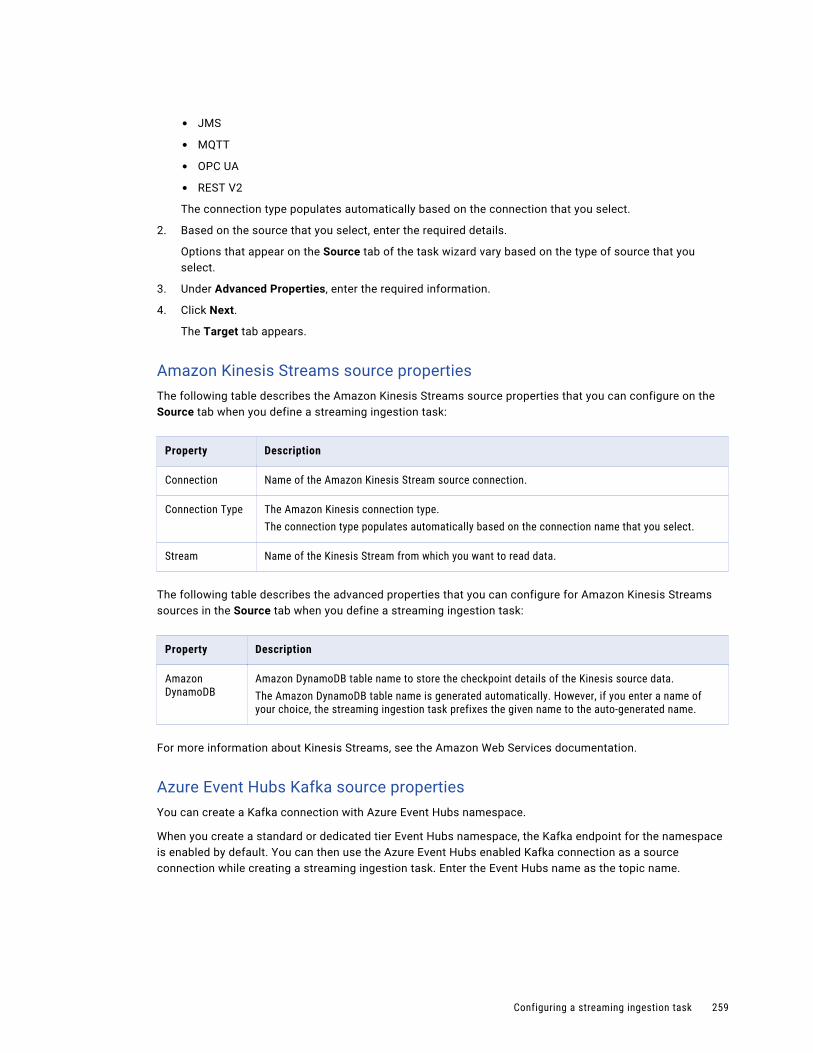
• JMS
• MQTT
• OPC UA
• REST V2
The connection type populates automatically based on the connection that you select.
2. Based on the source that you select, enter the required details.
Options that appear on the Source tab of the task wizard vary based on the type of source that you select.
3. Under Advanced Properties, enter the required information.
4. Click Next.
The Target tab appears.
Amazon Kinesis Streams source propertiesThe following table describes the Amazon Kinesis Streams source properties that you can configure on the Source tab when you define a streaming ingestion task:
Property Description
Connection Name of the Amazon Kinesis Stream source connection.
Connection Type The Amazon Kinesis connection type.The connection type populates automatically based on the connection name that you select.
Stream Name of the Kinesis Stream from which you want to read data.
The following table describes the advanced properties that you can configure for Amazon Kinesis Streams sources in the Source tab when you define a streaming ingestion task:
Property Description
Amazon DynamoDB
Amazon DynamoDB table name to store the checkpoint details of the Kinesis source data.The Amazon DynamoDB table name is generated automatically. However, if you enter a name of your choice, the streaming ingestion task prefixes the given name to the auto-generated name.
For more information about Kinesis Streams, see the Amazon Web Services documentation.
Azure Event Hubs Kafka source propertiesYou can create a Kafka connection with Azure Event Hubs namespace.
When you create a standard or dedicated tier Event Hubs namespace, the Kafka endpoint for the namespace is enabled by default. You can then use the Azure Event Hubs enabled Kafka connection as a source connection while creating a streaming ingestion task. Enter the Event Hubs name as the topic name.
Configuring a streaming ingestion task 259
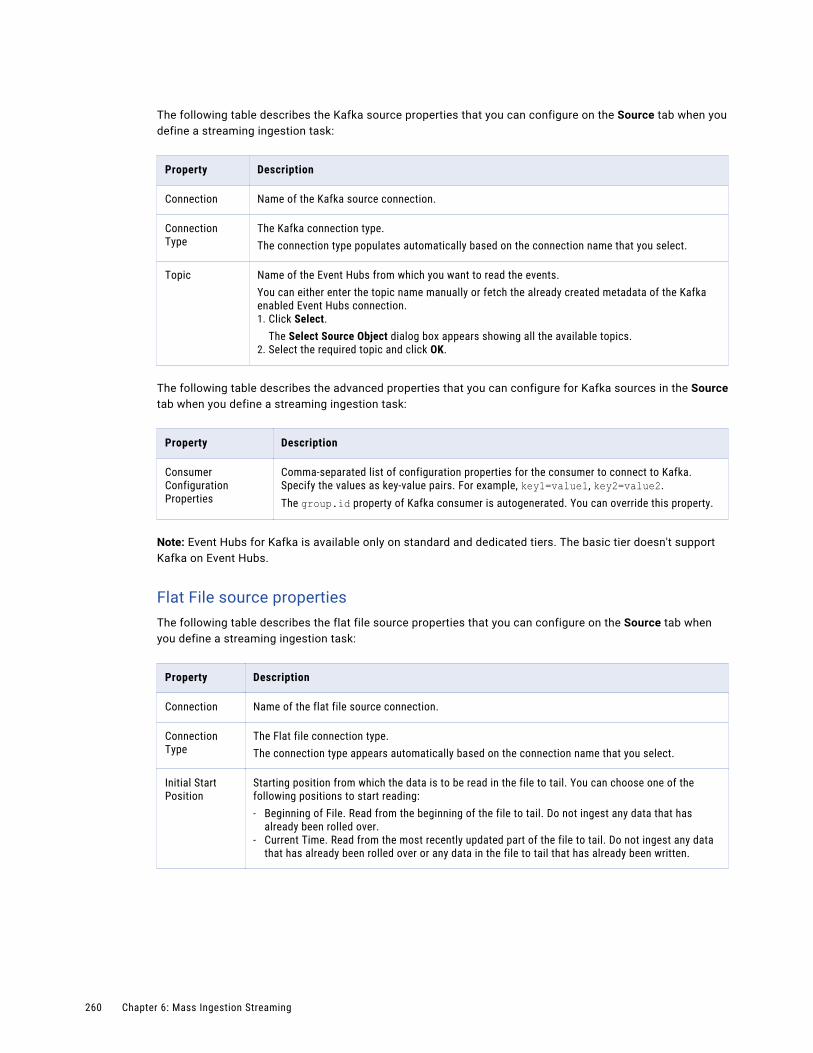
The following table describes the Kafka source properties that you can configure on the Source tab when you define a streaming ingestion task:
Property Description
Connection Name of the Kafka source connection.
Connection Type
The Kafka connection type.The connection type populates automatically based on the connection name that you select.
Topic Name of the Event Hubs from which you want to read the events.You can either enter the topic name manually or fetch the already created metadata of the Kafka enabled Event Hubs connection.1. Click Select.
The Select Source Object dialog box appears showing all the available topics.2. Select the required topic and click OK.
The following table describes the advanced properties that you can configure for Kafka sources in the Source tab when you define a streaming ingestion task:
Property Description
Consumer Configuration Properties
Comma-separated list of configuration properties for the consumer to connect to Kafka. Specify the values as key-value pairs. For example, key1=value1, key2=value2.The group.id property of Kafka consumer is autogenerated. You can override this property.
Note: Event Hubs for Kafka is available only on standard and dedicated tiers. The basic tier doesn't support Kafka on Event Hubs.
Flat File source propertiesThe following table describes the flat file source properties that you can configure on the Source tab when you define a streaming ingestion task:
Property Description
Connection Name of the flat file source connection.
Connection Type
The Flat file connection type.The connection type appears automatically based on the connection name that you select.
Initial Start Position
Starting position from which the data is to be read in the file to tail. You can choose one of the following positions to start reading:- Beginning of File. Read from the beginning of the file to tail. Do not ingest any data that has
already been rolled over.- Current Time. Read from the most recently updated part of the file to tail. Do not ingest any data
that has already been rolled over or any data in the file to tail that has already been written.
260 Chapter 6: Mass Ingestion Streaming
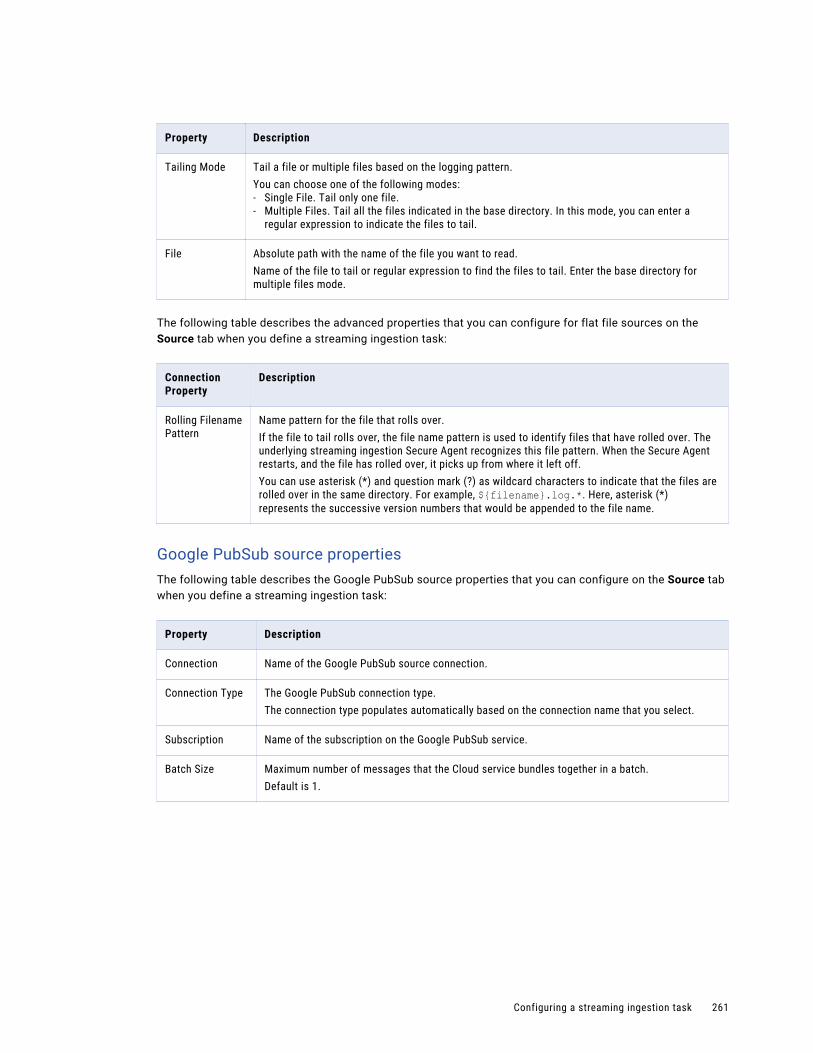
Property Description
Tailing Mode Tail a file or multiple files based on the logging pattern.You can choose one of the following modes:- Single File. Tail only one file.- Multiple Files. Tail all the files indicated in the base directory. In this mode, you can enter a
regular expression to indicate the files to tail.
File Absolute path with the name of the file you want to read.Name of the file to tail or regular expression to find the files to tail. Enter the base directory for multiple files mode.
The following table describes the advanced properties that you can configure for flat file sources on the Source tab when you define a streaming ingestion task:
Connection Property
Description
Rolling Filename Pattern
Name pattern for the file that rolls over.If the file to tail rolls over, the file name pattern is used to identify files that have rolled over. The underlying streaming ingestion Secure Agent recognizes this file pattern. When the Secure Agent restarts, and the file has rolled over, it picks up from where it left off.You can use asterisk (*) and question mark (?) as wildcard characters to indicate that the files are rolled over in the same directory. For example, ${filename}.log.*. Here, asterisk (*) represents the successive version numbers that would be appended to the file name.
Google PubSub source propertiesThe following table describes the Google PubSub source properties that you can configure on the Source tab when you define a streaming ingestion task:
Property Description
Connection Name of the Google PubSub source connection.
Connection Type The Google PubSub connection type.The connection type populates automatically based on the connection name that you select.
Subscription Name of the subscription on the Google PubSub service.
Batch Size Maximum number of messages that the Cloud service bundles together in a batch.Default is 1.
Configuring a streaming ingestion task 261
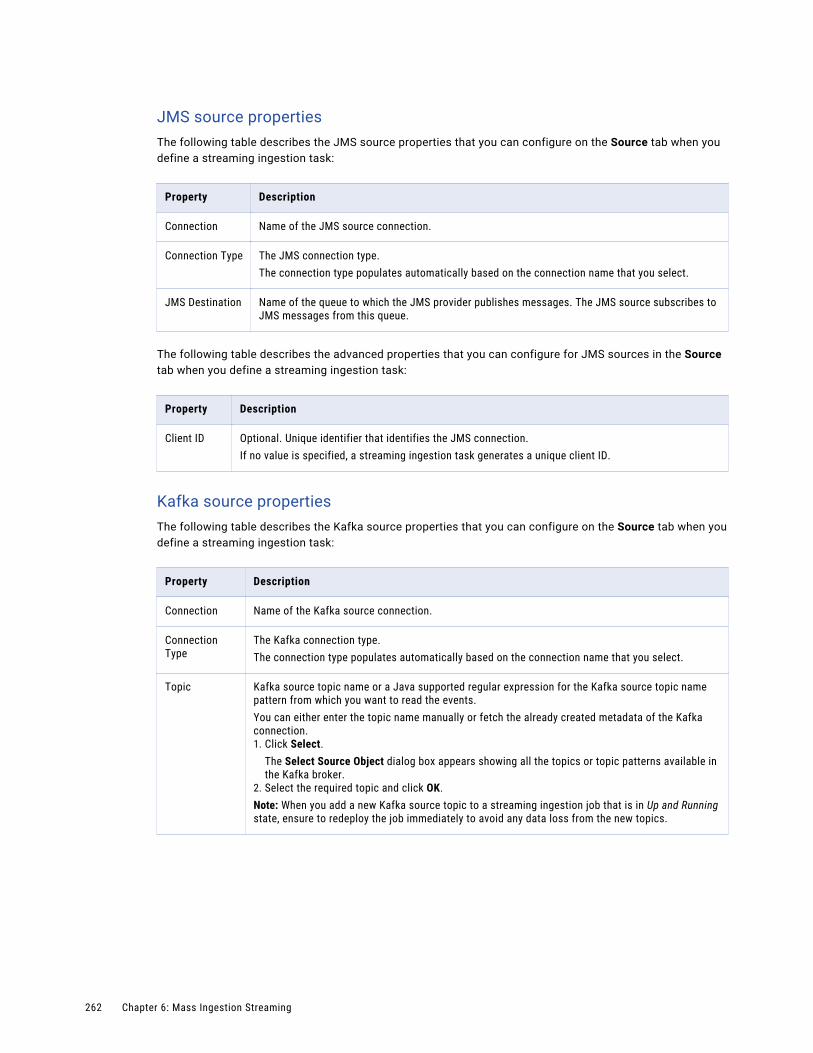
JMS source propertiesThe following table describes the JMS source properties that you can configure on the Source tab when you define a streaming ingestion task:
Property Description
Connection Name of the JMS source connection.
Connection Type The JMS connection type.The connection type populates automatically based on the connection name that you select.
JMS Destination Name of the queue to which the JMS provider publishes messages. The JMS source subscribes to JMS messages from this queue.
The following table describes the advanced properties that you can configure for JMS sources in the Source tab when you define a streaming ingestion task:
Property Description
Client ID Optional. Unique identifier that identifies the JMS connection.If no value is specified, a streaming ingestion task generates a unique client ID.
Kafka source propertiesThe following table describes the Kafka source properties that you can configure on the Source tab when you define a streaming ingestion task:
Property Description
Connection Name of the Kafka source connection.
Connection Type
The Kafka connection type.The connection type populates automatically based on the connection name that you select.
Topic Kafka source topic name or a Java supported regular expression for the Kafka source topic name pattern from which you want to read the events.You can either enter the topic name manually or fetch the already created metadata of the Kafka connection.1. Click Select.
The Select Source Object dialog box appears showing all the topics or topic patterns available in the Kafka broker.
2. Select the required topic and click OK.Note: When you add a new Kafka source topic to a streaming ingestion job that is in Up and Running state, ensure to redeploy the job immediately to avoid any data loss from the new topics.
262 Chapter 6: Mass Ingestion Streaming
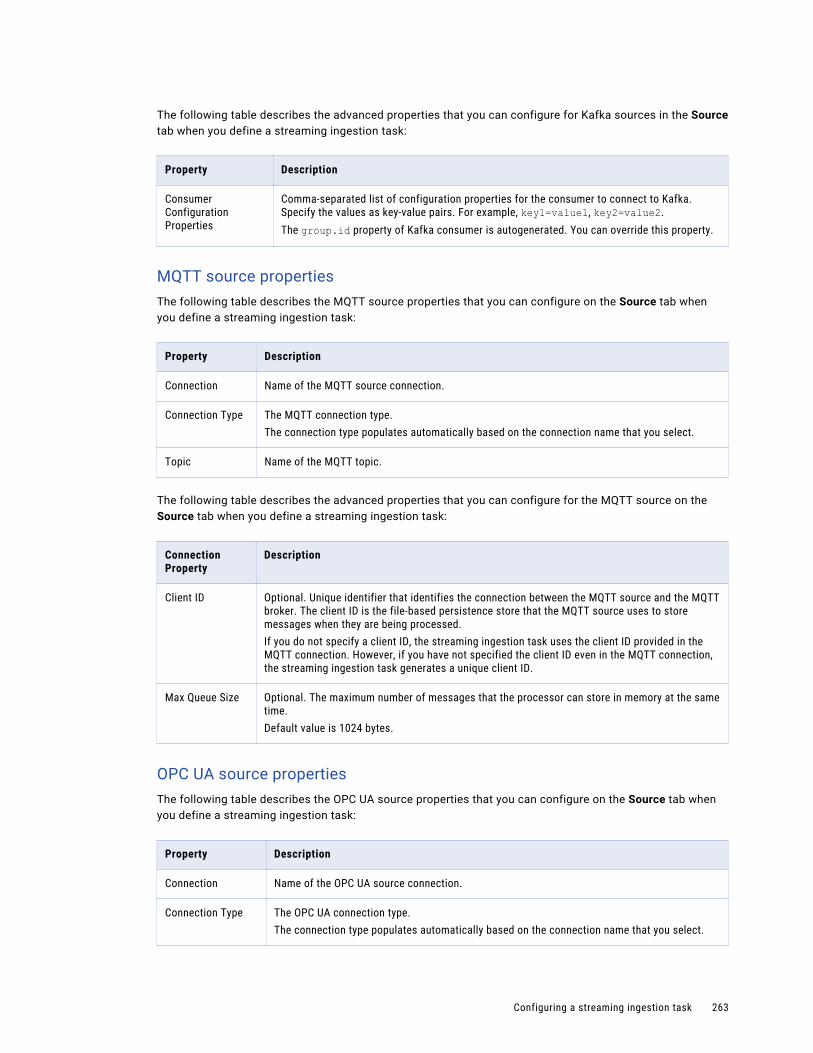
The following table describes the advanced properties that you can configure for Kafka sources in the Source tab when you define a streaming ingestion task:
Property Description
Consumer Configuration Properties
Comma-separated list of configuration properties for the consumer to connect to Kafka. Specify the values as key-value pairs. For example, key1=value1, key2=value2.The group.id property of Kafka consumer is autogenerated. You can override this property.
MQTT source propertiesThe following table describes the MQTT source properties that you can configure on the Source tab when you define a streaming ingestion task:
Property Description
Connection Name of the MQTT source connection.
Connection Type The MQTT connection type.The connection type populates automatically based on the connection name that you select.
Topic Name of the MQTT topic.
The following table describes the advanced properties that you can configure for the MQTT source on the Source tab when you define a streaming ingestion task:
Connection Property
Description
Client ID Optional. Unique identifier that identifies the connection between the MQTT source and the MQTT broker. The client ID is the file-based persistence store that the MQTT source uses to store messages when they are being processed.If you do not specify a client ID, the streaming ingestion task uses the client ID provided in the MQTT connection. However, if you have not specified the client ID even in the MQTT connection, the streaming ingestion task generates a unique client ID.
Max Queue Size Optional. The maximum number of messages that the processor can store in memory at the same time.Default value is 1024 bytes.
OPC UA source propertiesThe following table describes the OPC UA source properties that you can configure on the Source tab when you define a streaming ingestion task:
Property Description
Connection Name of the OPC UA source connection.
Connection Type The OPC UA connection type.The connection type populates automatically based on the connection name that you select.
Configuring a streaming ingestion task 263
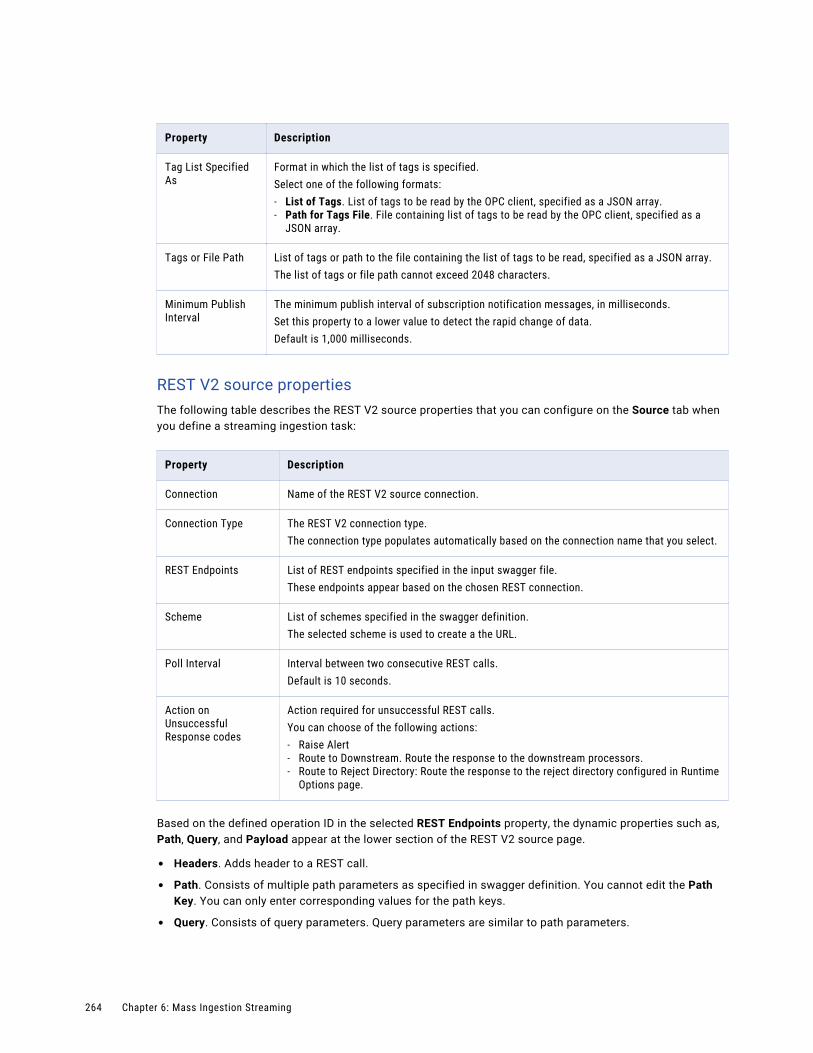
Property Description
Tag List Specified As
Format in which the list of tags is specified.Select one of the following formats:- List of Tags. List of tags to be read by the OPC client, specified as a JSON array.- Path for Tags File. File containing list of tags to be read by the OPC client, specified as a
JSON array.
Tags or File Path List of tags or path to the file containing the list of tags to be read, specified as a JSON array.The list of tags or file path cannot exceed 2048 characters.
Minimum Publish Interval
The minimum publish interval of subscription notification messages, in milliseconds.Set this property to a lower value to detect the rapid change of data.Default is 1,000 milliseconds.
REST V2 source propertiesThe following table describes the REST V2 source properties that you can configure on the Source tab when you define a streaming ingestion task:
Property Description
Connection Name of the REST V2 source connection.
Connection Type The REST V2 connection type.The connection type populates automatically based on the connection name that you select.
REST Endpoints List of REST endpoints specified in the input swagger file.These endpoints appear based on the chosen REST connection.
Scheme List of schemes specified in the swagger definition.The selected scheme is used to create a the URL.
Poll Interval Interval between two consecutive REST calls.Default is 10 seconds.
Action on Unsuccessful Response codes
Action required for unsuccessful REST calls.You can choose of the following actions:- Raise Alert- Route to Downstream. Route the response to the downstream processors.- Route to Reject Directory: Route the response to the reject directory configured in Runtime
Options page.
Based on the defined operation ID in the selected REST Endpoints property, the dynamic properties such as, Path, Query, and Payload appear at the lower section of the REST V2 source page.
• Headers. Adds header to a REST call.
• Path. Consists of multiple path parameters as specified in swagger definition. You cannot edit the Path Key. You can only enter corresponding values for the path keys.
• Query. Consists of query parameters. Query parameters are similar to path parameters.
264 Chapter 6: Mass Ingestion Streaming
• Payload.
- Sample Payload. A read-only text box that shows schema of request body for a PUT, POST, or PATCH request. For example, { "name" : "string", "salary" : "string", "age" : "string" }.
- Body. The request body to be sent incase of PUT, POST, or PATCH request. You can copy a sample request body from a sample payload and then can replace the values as appropriate.
You can define any of these properties as mandatory in the swagger specification file. Then the same property is considered mandatory while configuring a streaming ingestion REST V2 source. If you do not define a REST endpoint in the swagger specification file, the corresponding section does not appear in the streaming ingestion REST V2 page.
Configuring a targetTo configure a target, select a target connection to which you want to transfer the streaming data and then configure the target properties. Before you configure a target, ensure that the connection to the target is created in the Administrator service.
1. On the Target page, select a connection.
The streaming ingestion task supports the following targets:
• Amazon Kinesis Data Firehose
• Amazon Kinesis Streams
• Amazon S3 V2
• Apache Kafka
• Databricks Delta
• Google PubSub
• Google Cloud Storage V2
• Microsoft Azure Data Lake Storage Gen2
• Microsoft Azure Event Hubs
2. Based on the target that you select, enter the required details.
Options that appear on the Target tab of the task wizard vary based on the type of target that you select.
3. Under Advanced Properties, enter the required information.
4. Perform one of the following tasks:
• To add a transformation, click Next.The Transformation tab appears.
• To save the task, click Save.You can then deploy the streaming ingestion task. For more information about deploying the streaming ingestion task, see “Deploying a streaming ingestion task” on page 276.
.
Configuring a streaming ingestion task 265
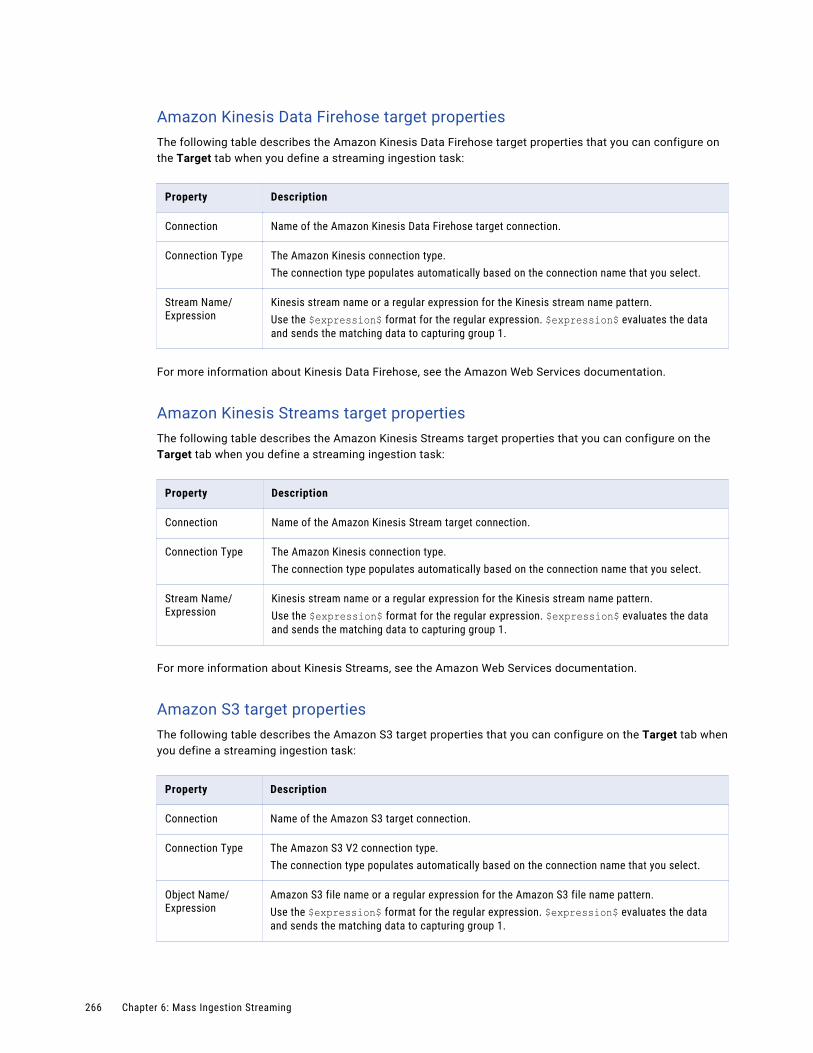
Amazon Kinesis Data Firehose target propertiesThe following table describes the Amazon Kinesis Data Firehose target properties that you can configure on the Target tab when you define a streaming ingestion task:
Property Description
Connection Name of the Amazon Kinesis Data Firehose target connection.
Connection Type The Amazon Kinesis connection type.The connection type populates automatically based on the connection name that you select.
Stream Name/Expression
Kinesis stream name or a regular expression for the Kinesis stream name pattern.Use the $expression$ format for the regular expression. $expression$ evaluates the data and sends the matching data to capturing group 1.
For more information about Kinesis Data Firehose, see the Amazon Web Services documentation.
Amazon Kinesis Streams target propertiesThe following table describes the Amazon Kinesis Streams target properties that you can configure on the Target tab when you define a streaming ingestion task:
Property Description
Connection Name of the Amazon Kinesis Stream target connection.
Connection Type The Amazon Kinesis connection type.The connection type populates automatically based on the connection name that you select.
Stream Name/Expression
Kinesis stream name or a regular expression for the Kinesis stream name pattern.Use the $expression$ format for the regular expression. $expression$ evaluates the data and sends the matching data to capturing group 1.
For more information about Kinesis Streams, see the Amazon Web Services documentation.
Amazon S3 target propertiesThe following table describes the Amazon S3 target properties that you can configure on the Target tab when you define a streaming ingestion task:
Property Description
Connection Name of the Amazon S3 target connection.
Connection Type The Amazon S3 V2 connection type.The connection type populates automatically based on the connection name that you select.
Object Name/Expression
Amazon S3 file name or a regular expression for the Amazon S3 file name pattern.Use the $expression$ format for the regular expression. $expression$ evaluates the data and sends the matching data to capturing group 1.
266 Chapter 6: Mass Ingestion Streaming

The following table describes the Amazon S3 advanced target properties that you can configure on the Target tab when you define a streaming ingestion task:
Property Description
Minimum Upload Part Size
Optional. Minimum upload part size when uploading a large file as a set of multiple independent parts, in megabytes. Use this property to tune the file load to Amazon S3.Default value is 5120 MB.
Multipart Upload Threshold
Optional. Multipart download minimum threshold to determine when to upload objects in multiple parts in parallel.Default value is 5120 MB.
Azure Event Hubs target propertiesThe following table describes the Azure Event Hubs target properties that you can configure on the Target tab when you define a streaming ingestion task:
Property Description
Connection Name of the Azure Event Hubs target connection.
Connection Type The Azure Event Hubs connection type.The connection type populates automatically based on the connection name that you select.
Event Hub The name of the Azure Event Hubs.
The following table describes the Azure Event Hubs advanced target properties that you can configure on the Target tab when you define a streaming ingestion task:
Property Description
Shared Access Policy Name
Optional. The name of the Event Hub Namespace Shared Access Policy.The policy must apply to all data objects that are associated with this connection.To read from Event Hubs, you must have Listen permission. To write to an Event Hub, the policy must have Send permission.
Shared Access Policy Primary Key
Optional. The primary key of the Event Hub Namespace Shared Access Policy.
Configuring a streaming ingestion task 267
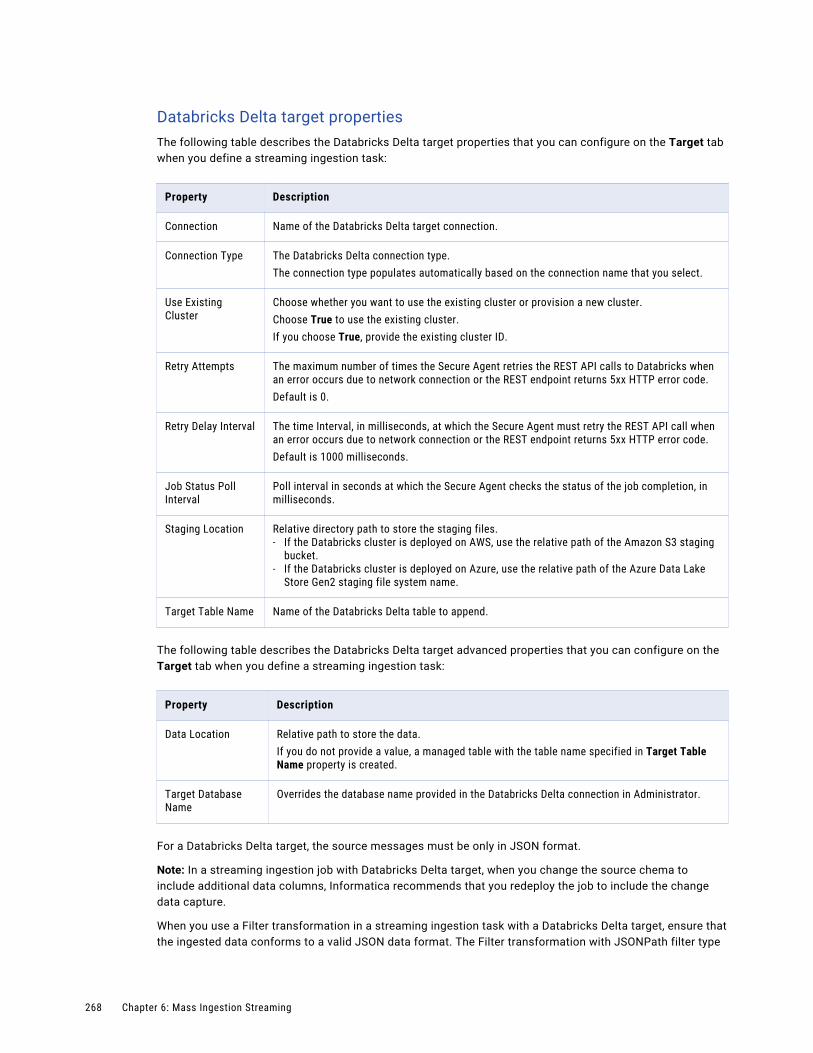
Databricks Delta target propertiesThe following table describes the Databricks Delta target properties that you can configure on the Target tab when you define a streaming ingestion task:
Property Description
Connection Name of the Databricks Delta target connection.
Connection Type The Databricks Delta connection type.The connection type populates automatically based on the connection name that you select.
Use Existing Cluster
Choose whether you want to use the existing cluster or provision a new cluster.Choose True to use the existing cluster.If you choose True, provide the existing cluster ID.
Retry Attempts The maximum number of times the Secure Agent retries the REST API calls to Databricks when an error occurs due to network connection or the REST endpoint returns 5xx HTTP error code.Default is 0.
Retry Delay Interval The time Interval, in milliseconds, at which the Secure Agent must retry the REST API call when an error occurs due to network connection or the REST endpoint returns 5xx HTTP error code.Default is 1000 milliseconds.
Job Status Poll Interval
Poll interval in seconds at which the Secure Agent checks the status of the job completion, in milliseconds.
Staging Location Relative directory path to store the staging files.- If the Databricks cluster is deployed on AWS, use the relative path of the Amazon S3 staging
bucket.- If the Databricks cluster is deployed on Azure, use the relative path of the Azure Data Lake
Store Gen2 staging file system name.
Target Table Name Name of the Databricks Delta table to append.
The following table describes the Databricks Delta target advanced properties that you can configure on the Target tab when you define a streaming ingestion task:
Property Description
Data Location Relative path to store the data.If you do not provide a value, a managed table with the table name specified in Target Table Name property is created.
Target Database Name
Overrides the database name provided in the Databricks Delta connection in Administrator.
For a Databricks Delta target, the source messages must be only in JSON format.
Note: In a streaming ingestion job with Databricks Delta target, when you change the source chema to include additional data columns, Informatica recommends that you redeploy the job to include the change data capture.
When you use a Filter transformation in a streaming ingestion task with a Databricks Delta target, ensure that the ingested data conforms to a valid JSON data format. The Filter transformation with JSONPath filter type
268 Chapter 6: Mass Ingestion Streaming
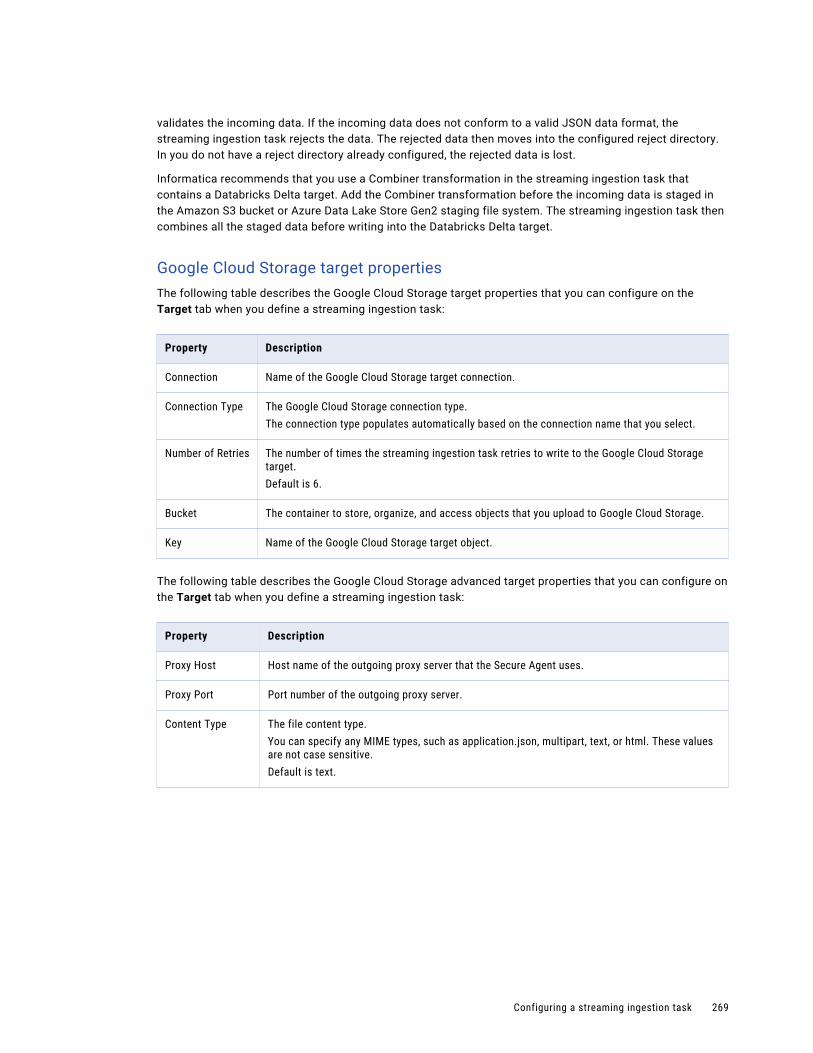
validates the incoming data. If the incoming data does not conform to a valid JSON data format, the streaming ingestion task rejects the data. The rejected data then moves into the configured reject directory. In you do not have a reject directory already configured, the rejected data is lost.
Informatica recommends that you use a Combiner transformation in the streaming ingestion task that contains a Databricks Delta target. Add the Combiner transformation before the incoming data is staged in the Amazon S3 bucket or Azure Data Lake Store Gen2 staging file system. The streaming ingestion task then combines all the staged data before writing into the Databricks Delta target.
Google Cloud Storage target propertiesThe following table describes the Google Cloud Storage target properties that you can configure on the Target tab when you define a streaming ingestion task:
Property Description
Connection Name of the Google Cloud Storage target connection.
Connection Type The Google Cloud Storage connection type.The connection type populates automatically based on the connection name that you select.
Number of Retries The number of times the streaming ingestion task retries to write to the Google Cloud Storage target.Default is 6.
Bucket The container to store, organize, and access objects that you upload to Google Cloud Storage.
Key Name of the Google Cloud Storage target object.
The following table describes the Google Cloud Storage advanced target properties that you can configure on the Target tab when you define a streaming ingestion task:
Property Description
Proxy Host Host name of the outgoing proxy server that the Secure Agent uses.
Proxy Port Port number of the outgoing proxy server.
Content Type The file content type.You can specify any MIME types, such as application.json, multipart, text, or html. These values are not case sensitive.Default is text.
Configuring a streaming ingestion task 269
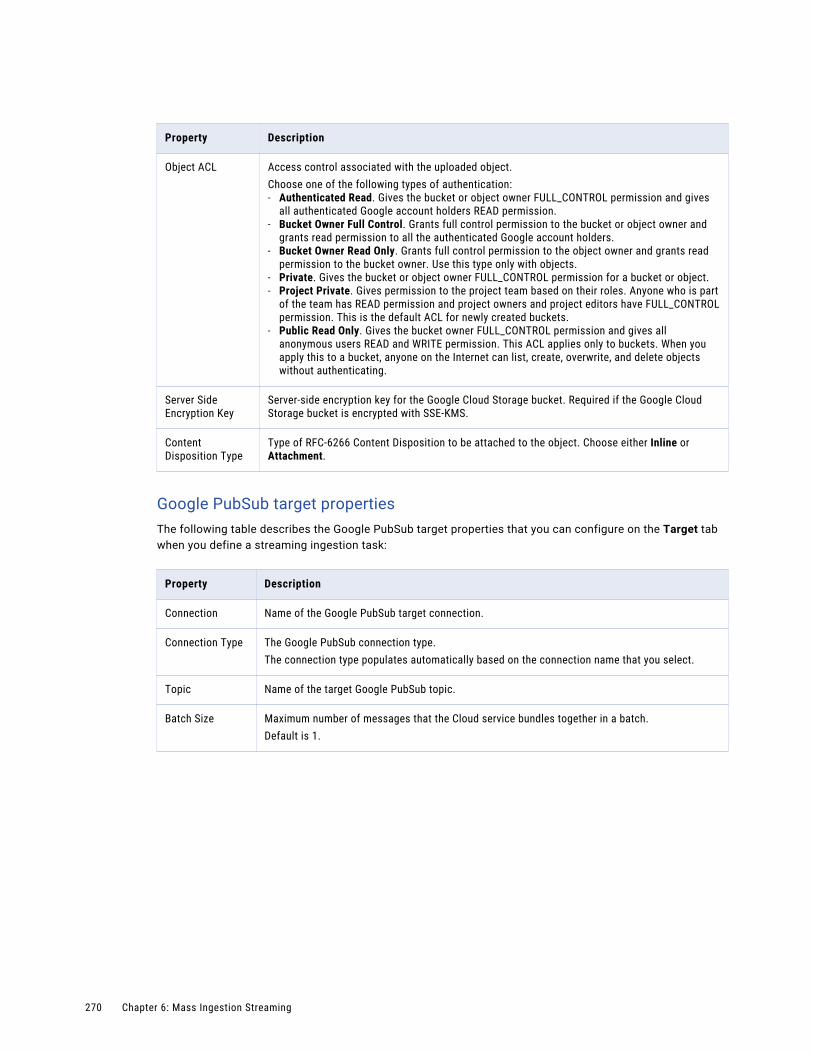
Property Description
Object ACL Access control associated with the uploaded object.Choose one of the following types of authentication:- Authenticated Read. Gives the bucket or object owner FULL_CONTROL permission and gives
all authenticated Google account holders READ permission.- Bucket Owner Full Control. Grants full control permission to the bucket or object owner and
grants read permission to all the authenticated Google account holders.- Bucket Owner Read Only. Grants full control permission to the object owner and grants read
permission to the bucket owner. Use this type only with objects.- Private. Gives the bucket or object owner FULL_CONTROL permission for a bucket or object.- Project Private. Gives permission to the project team based on their roles. Anyone who is part
of the team has READ permission and project owners and project editors have FULL_CONTROL permission. This is the default ACL for newly created buckets.
- Public Read Only. Gives the bucket owner FULL_CONTROL permission and gives all anonymous users READ and WRITE permission. This ACL applies only to buckets. When you apply this to a bucket, anyone on the Internet can list, create, overwrite, and delete objects without authenticating.
Server Side Encryption Key
Server-side encryption key for the Google Cloud Storage bucket. Required if the Google Cloud Storage bucket is encrypted with SSE-KMS.
Content Disposition Type
Type of RFC-6266 Content Disposition to be attached to the object. Choose either Inline or Attachment.
Google PubSub target propertiesThe following table describes the Google PubSub target properties that you can configure on the Target tab when you define a streaming ingestion task:
Property Description
Connection Name of the Google PubSub target connection.
Connection Type The Google PubSub connection type.The connection type populates automatically based on the connection name that you select.
Topic Name of the target Google PubSub topic.
Batch Size Maximum number of messages that the Cloud service bundles together in a batch.Default is 1.
270 Chapter 6: Mass Ingestion Streaming

Kafka target propertiesThe following table describes the Kafka target properties that you can configure on the Target tab when you define a streaming ingestion task:
Property Description
Connection Name of the Kafka target connection.
Connection Type
The Kafka connection type.The connection type populates automatically based on the connection name that you select.
Topic Name/Expression
Kafka topic name or a Java supported regular expression for the Kafka topic name pattern.Use the $expression$ format for the regular expression. $expression$ evaluates the data and sends the matching data to capturing group 1.You can either enter the topic name manually or fetch the already created metadata of the Kafka connection.1. Click Select.
The Select Target Object dialog box appears showing all the topics available in the Kafka broker. However, Kafka topic name patterns do not appear in the list.
2. Select the required topic and click OK.
The following table describes the Kafka advanced target properties that you can configure on the Target tab when you define a streaming ingestion task:
Property Description
Producer Configuration Properties The configuration properties for the producer.
Metadata Fetch Timeout in milliseconds
The time after which the metadata is not fetched.
Batch Flush Size in bytes The batch size of the events after which a streaming ingestion task writes data to the target.
Microsoft Azure Data Lake Storage Gen2 target propertiesThe following table describes the Microsoft Azure Data Lake Storage Gen2 target properties that you can configure on the Target tab when you define a streaming ingestion task:
Property Description
Connection Name of the Microsoft Azure Data Lake Storage Gen2 target connection.
Connection Type The Microsoft Azure Data Lake Storage Gen2 connection type.The connection type populates automatically based on the connection name that you select.
File Name/Expression
File name or a regular expression for the file name pattern.Use the $expression$ format for the regular expression. $expression$ evaluates the data and sends the matching data to capturing group 1.
Configuring a streaming ingestion task 271

The following table describes the Microsoft Azure Data Lake Storage Gen2 advanced target properties that you can configure on the Target tab when you define a streaming ingestion task:
Property Description
Filesystem Name Override
Overrides the default file system name provided in connection. This file system name is used write to a file at run time.
Directory Override
Overrides the default directory path.The Microsoft Azure Data Lake Store Gen2 directory that you use to write data. Default is root directory. The directory path specified while creating the target overrides the path specified while creating a connection.
Write Strategy The operation type to write data to Microsoft Azure Data Lake Storage Gen2 file.If the file exists in Microsoft Azure Data Lake Store Gen2 storage, you can select to overwrite, append, or fail the existing file.Default is append.- append. Adds data to an existing file inside a directory.- overwrite. Deletes existing data in an existing file and inserts newly read data.- fail. Writing data to an existing file fails..
Compression Format
Optional. Compression format to use before the streaming ingestion task writes data to the target file.Use one of the following formats:- None- Gzip- Bzip2- Zlib- DeflateDefault is None.To read a compressed file from the data lake storage, the compressed file must have specific extensions. If the extensions used to read the compressed file are not valid, the Secure Agent does not process the file.
Configuring a transformationYou can specify the data format of the streaming data. Based on the data format, you can configure a transformation.
1. On the Transformation page, select the format of the streaming data.
The streaming ingestion transformations support the following data formats:
• Binary
• JSON
• XML
2. Based on the selected data format, select one of the supported transformations, and configure it.
3. To add more than one transformation, click Add Transformations.
a. On the Transformation tab, click Add Transformation.
The New Transformation dialog box appears.
b. Based on the transformation type you select, enter the required properties.
272 Chapter 6: Mass Ingestion Streaming
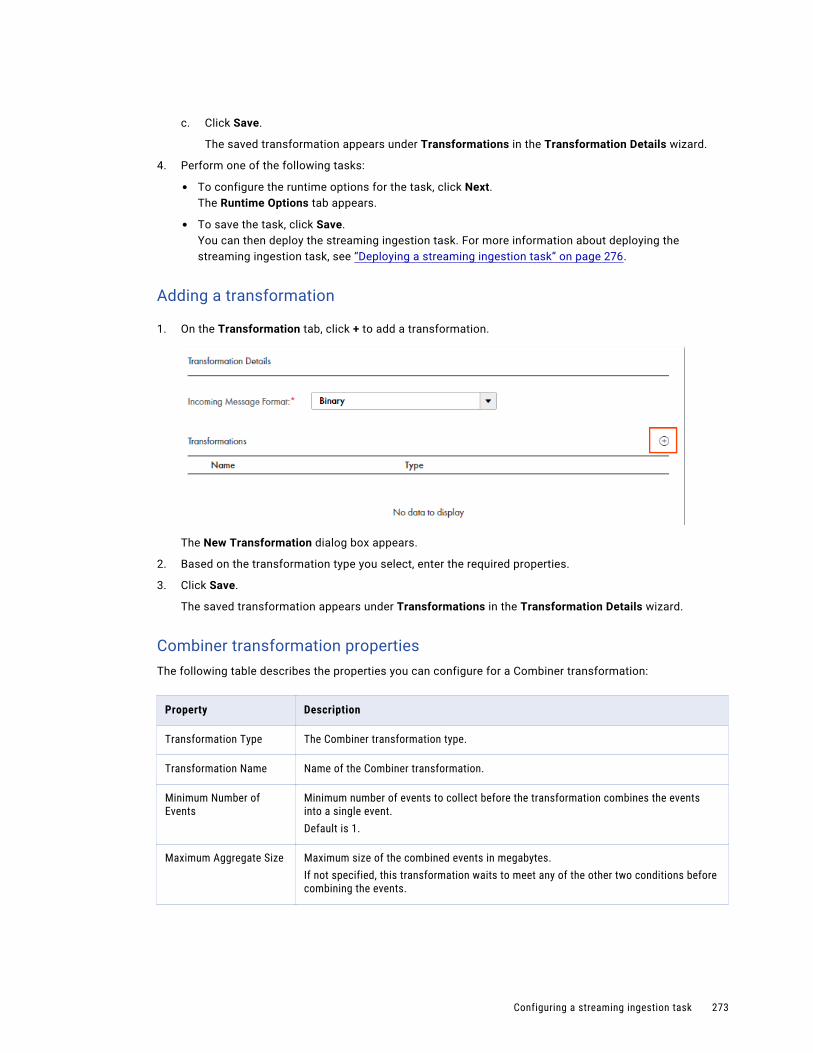
c. Click Save.
The saved transformation appears under Transformations in the Transformation Details wizard.
4. Perform one of the following tasks:
• To configure the runtime options for the task, click Next.The Runtime Options tab appears.
• To save the task, click Save.You can then deploy the streaming ingestion task. For more information about deploying the streaming ingestion task, see “Deploying a streaming ingestion task” on page 276.
Adding a transformation
1. On the Transformation tab, click + to add a transformation.
The New Transformation dialog box appears.
2. Based on the transformation type you select, enter the required properties.
3. Click Save.
The saved transformation appears under Transformations in the Transformation Details wizard.
Combiner transformation propertiesThe following table describes the properties you can configure for a Combiner transformation:
Property Description
Transformation Type The Combiner transformation type.
Transformation Name Name of the Combiner transformation.
Minimum Number of Events
Minimum number of events to collect before the transformation combines the events into a single event.Default is 1.
Maximum Aggregate Size Maximum size of the combined events in megabytes.If not specified, this transformation waits to meet any of the other two conditions before combining the events.
Configuring a streaming ingestion task 273

Property Description
Time Limit Maximum time to wait before combining the events.If not specified, this transformation waits for the other conditions before combining the events or waits forever.
Delimiter Symbols used to specify divisions between data strings in the transformed data.Applicable only for the binary data format.
Filter transformation propertiesThe following table describes the properties you can configure for a Filter transformation:
Property Description
Transformation Type The Filter transformation type.
Transformation Name Name of the Filter transformation.
Filter Type Type of filter to evaluate the incoming data.Use one of the following filter types:- JSON Path. An expression that consists of a sequence of JSON properties.- Regular Expression. A range or pattern of values.- XPath. An expression that selects nodes or node-sets in an XML document.
Expression Expression for the filter type that you select.
Python transformation propertiesThe following table describes the properties you can configure for a Python transformation:
Property Description
Transformation Type The Python transformation type.
Transformation Name Name of the Python transformation.
Script Input Type Python script input type. You can either enter the Python script in Script Body or provide the path to the Python script available in the Script Path.
Python Path Directory to the Python path libraries.
274 Chapter 6: Mass Ingestion Streaming
Splitter transformation propertiesThe following table describes the properties you can configure for a Splitter transformation for binary message format:
Property Description
Transformation Type The Splitter transformation type.
Transformation Name Name of the Splitter transformation.
Split Type Split condition to evaluate the incoming data.Use one of the following split types:- Line Split.- Content Split.
Line Split Count The maximum number of lines that each output split file contains, excluding header lines.
Byte Sequence Specified sequence of bytes on which to split the content.
The following table describes the properties you can configure for a Splitter transformation for JSON message format:
Property Description
Split Expression Split condition to evaluate the incoming data.Use one of the following split types:- Array Split.- JSONPath Expression.
JSONPath Expression
A JSONPath expression that specifies the array element to split into JSON or scalar fragments.The default JSONpath Expression is $.
The following table describes the properties you can configure for a Splitter transformation for XML message format:
Property Description
Split Depth The XML nesting depth to start splitting the XML fragments.The default split depth is 1.
Configuring runtime optionsYou can configure additional runtime options for the streaming ingestion task. Runtime options include settings to manage reject events and to notify users about errors.
1. On the Runtime Options page, under Notification Management, select to either disable the notifications or set the time limit after which you want to receive a notification if an error occurs.
You can set the time in minutes or hours. Default is 10 minutes.
2. Enter a list of email addresses to which you want to send notifications if a task runs with error.
Configuring a streaming ingestion task 275
Use commas to separate a list of email addresses. Note that email notification options configured for the organization are not used here.
3. Under Agent Parameters, perform the following tasks:
a. Specify a directory to store the rejected events.
Rejected events are not stored by default.
Note that filtered events in a regular expression are not moved to the reject directory.
b. To purge the log files, specify the maximum file size for the log file after which the log file is purged.
You can set the file size in megabytes or gigabytes. Default is 10 MB.
c. Choose the severity of an event that you want to log.
The default log level is Info.
The supported log levels are:
• Debug. Logs all messages along with additional debug level messages.
• Error. Logs only the error messages.
• Info. Logs all errors, warnings, and important informational messages.
• Warn. Logs all errors and warning messages.
4. To save the task, click Save.
You can then deploy the streaming ingestion task. For more information about deploying the streaming ingestion task, see “Deploying a streaming ingestion task” on page 276.
Deploying a streaming ingestion taskAfter you create a streaming ingestion task, you must deploy it on the Secure Agent for the task to run as a job. Before deploying the task, ensure that the Secure Agent configured for the task is running.
u To deploy a task, perform one of the following actions:
• After you save a task, click Deploy.
• On the Explore page, open the project that contains the task, and then select Deploy from the Actions menu for the task.
A message about successful deployment of the task appears. Your job is now queued to run.
When you edit or undeploy a job, deploying the job again does not affect any other jobs running on the same Secure Agent or Secure Agent group.
Undeploying a streaming ingestion jobYou can undeploy a streaming ingestion job from the Secure Agent.
u On the Explore page, open the project that contains the job, and then select Undeploy from the Actions menu for the job.
Alternatively, you can undeploy a streaming ingestion job from the action menu in a job row on the Mass Ingestion page in Monitor.
When you undeploy a streaming ingestion job, the Secure Agent does not save the previous state histories of the job. So, when you deploy the streaming ingestion task again, the task runs as completely new job.
276 Chapter 6: Mass Ingestion Streaming
Stopping and resuming streaming ingestion jobsYou can stop and resume streaming ingestion jobs. Stop or resume a job on the My Jobs page in Mass Ingestion or All Jobs page on the Mass Ingestion page in Monitor.
Stop a job.
You can stop a streaming ingestion job that is Up and Running, Running with Error, or Running with Warnings.
To stop a job, open the My Jobs page, and then select Stop from the Actions menu for the job.
Resume a job.
You can resume a stopped streaming ingestion job.
To resume a job, open the My Jobs page, and then select Resume from the Actions menu for the job.
Alternatively, you can stop or resume a streaming ingestion job from the Actions menu in a job row on the Mass Ingestion page in Monitor.
When you stop a streaming ingestion job, the Secure Agent saves the previous state histories of the job. When you resume the stopped streaming ingestion job, the job starts running from the last saved state.
Configuring a streaming ingestion task 277
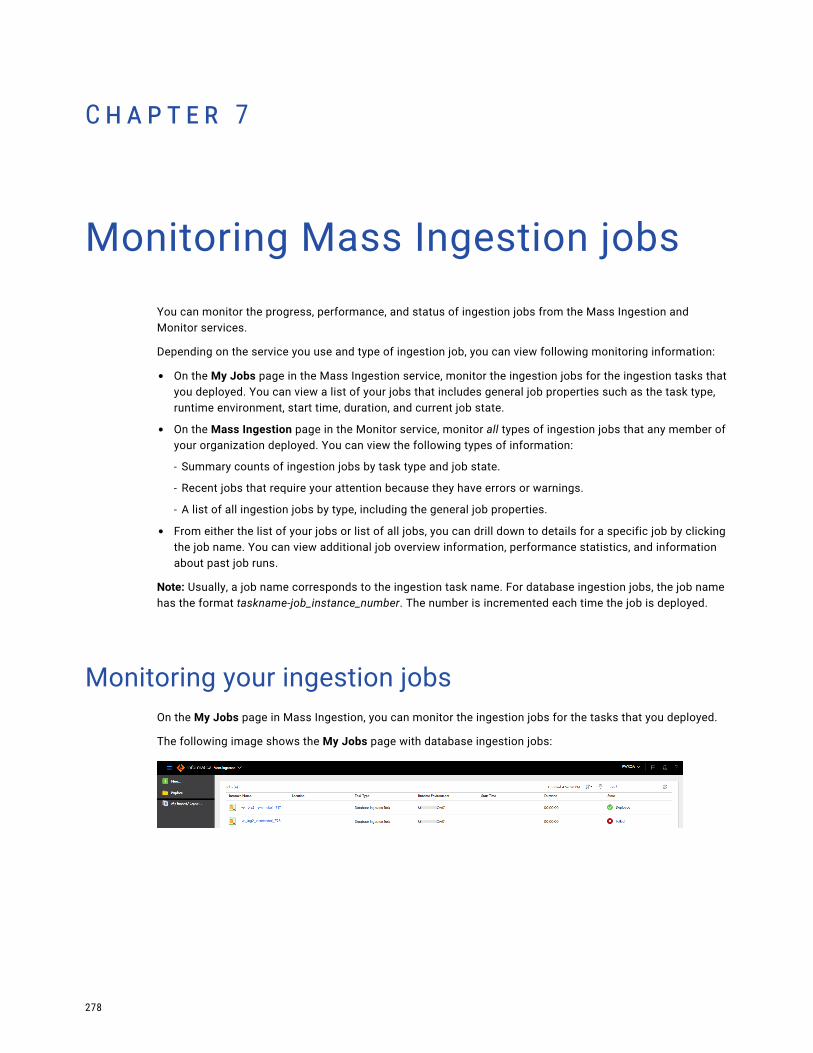
C h a p t e r 7
Monitoring Mass Ingestion jobsYou can monitor the progress, performance, and status of ingestion jobs from the Mass Ingestion and Monitor services.
Depending on the service you use and type of ingestion job, you can view following monitoring information:
• On the My Jobs page in the Mass Ingestion service, monitor the ingestion jobs for the ingestion tasks that you deployed. You can view a list of your jobs that includes general job properties such as the task type, runtime environment, start time, duration, and current job state.
• On the Mass Ingestion page in the Monitor service, monitor all types of ingestion jobs that any member of your organization deployed. You can view the following types of information:
- Summary counts of ingestion jobs by task type and job state.
- Recent jobs that require your attention because they have errors or warnings.
- A list of all ingestion jobs by type, including the general job properties.
• From either the list of your jobs or list of all jobs, you can drill down to details for a specific job by clicking the job name. You can view additional job overview information, performance statistics, and information about past job runs.
Note: Usually, a job name corresponds to the ingestion task name. For database ingestion jobs, the job name has the format taskname-job_instance_number. The number is incremented each time the job is deployed.
Monitoring your ingestion jobsOn the My Jobs page in Mass Ingestion, you can monitor the ingestion jobs for the tasks that you deployed.
The following image shows the My Jobs page with database ingestion jobs:
278
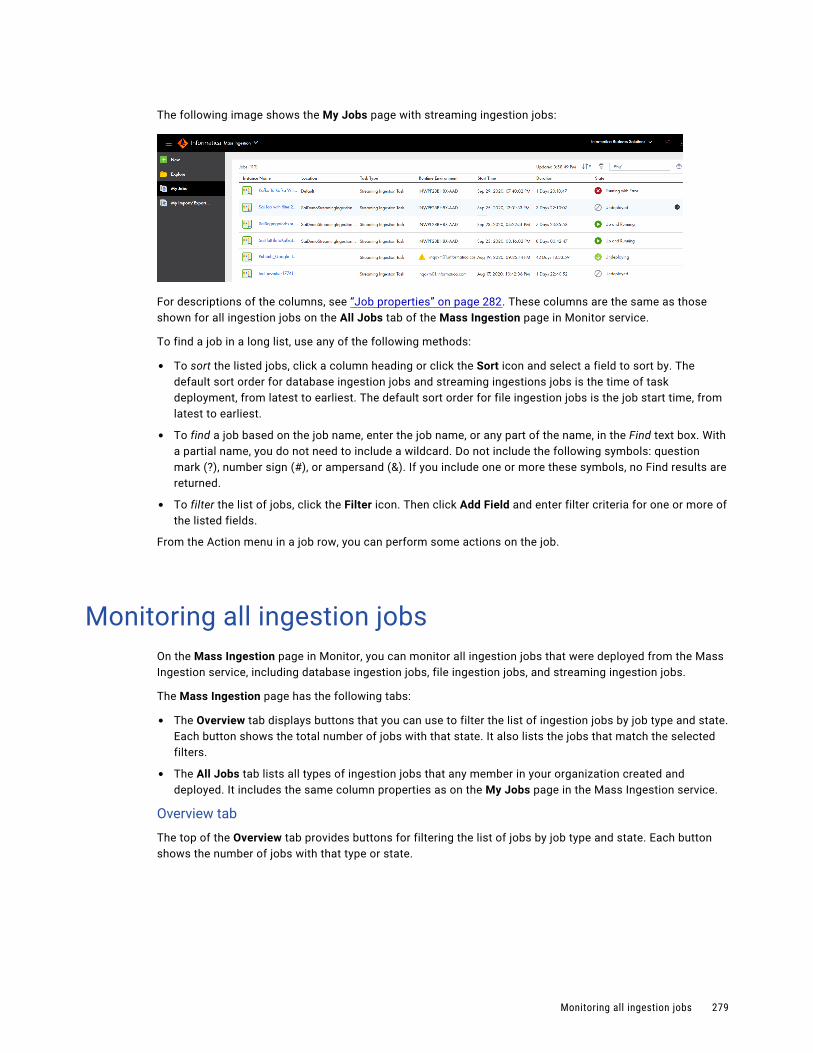
The following image shows the My Jobs page with streaming ingestion jobs:
For descriptions of the columns, see “Job properties” on page 282. These columns are the same as those shown for all ingestion jobs on the All Jobs tab of the Mass Ingestion page in Monitor service.
To find a job in a long list, use any of the following methods:
• To sort the listed jobs, click a column heading or click the Sort icon and select a field to sort by. The default sort order for database ingestion jobs and streaming ingestions jobs is the time of task deployment, from latest to earliest. The default sort order for file ingestion jobs is the job start time, from latest to earliest.
• To find a job based on the job name, enter the job name, or any part of the name, in the Find text box. With a partial name, you do not need to include a wildcard. Do not include the following symbols: question mark (?), number sign (#), or ampersand (&). If you include one or more these symbols, no Find results are returned.
• To filter the list of jobs, click the Filter icon. Then click Add Field and enter filter criteria for one or more of the listed fields.
From the Action menu in a job row, you can perform some actions on the job.
Monitoring all ingestion jobsOn the Mass Ingestion page in Monitor, you can monitor all ingestion jobs that were deployed from the Mass Ingestion service, including database ingestion jobs, file ingestion jobs, and streaming ingestion jobs.
The Mass Ingestion page has the following tabs:
• The Overview tab displays buttons that you can use to filter the list of ingestion jobs by job type and state. Each button shows the total number of jobs with that state. It also lists the jobs that match the selected filters.
• The All Jobs tab lists all types of ingestion jobs that any member in your organization created and deployed. It includes the same column properties as on the My Jobs page in the Mass Ingestion service.
Overview tab
The top of the Overview tab provides buttons for filtering the list of jobs by job type and state. Each button shows the number of jobs with that type or state.
Monitoring all ingestion jobs 279
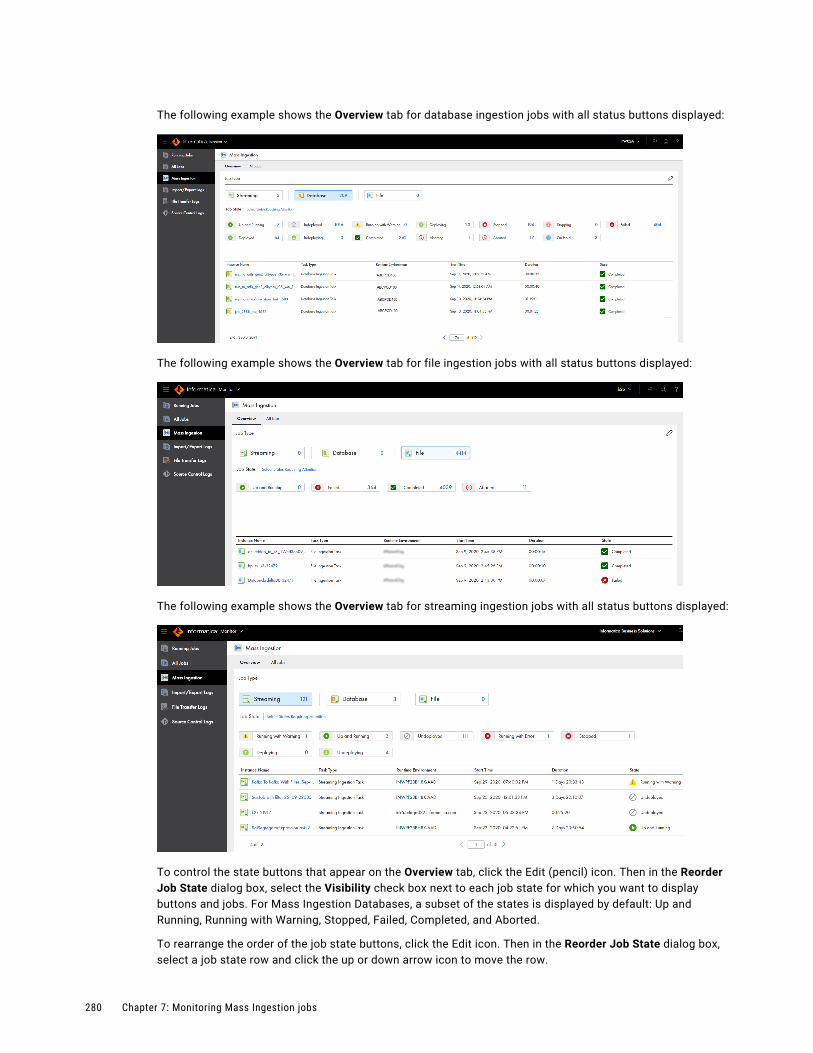
The following example shows the Overview tab for database ingestion jobs with all status buttons displayed:
The following example shows the Overview tab for file ingestion jobs with all status buttons displayed:
The following example shows the Overview tab for streaming ingestion jobs with all status buttons displayed:
To control the state buttons that appear on the Overview tab, click the Edit (pencil) icon. Then in the Reorder Job State dialog box, select the Visibility check box next to each job state for which you want to display buttons and jobs. For Mass Ingestion Databases, a subset of the states is displayed by default: Up and Running, Running with Warning, Stopped, Failed, Completed, and Aborted.
To rearrange the order of the job state buttons, click the Edit icon. Then in the Reorder Job State dialog box, select a job state row and click the up or down arrow icon to move the row.
280 Chapter 7: Monitoring Mass Ingestion jobs
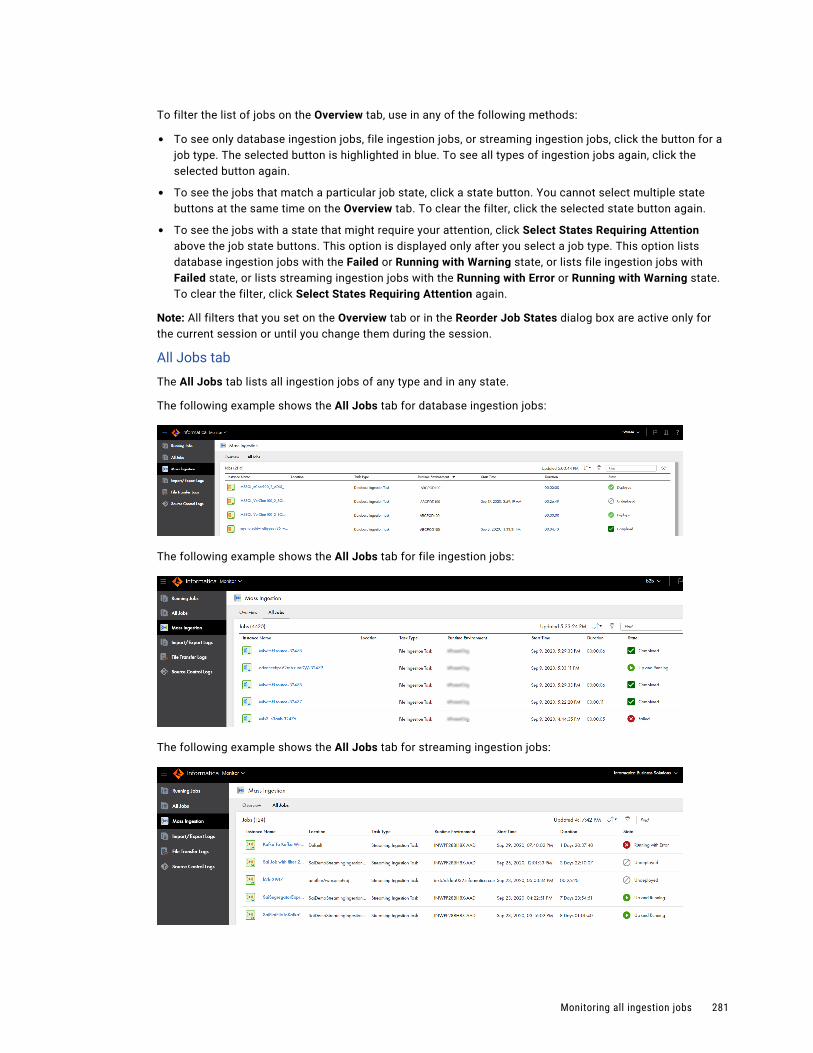
To filter the list of jobs on the Overview tab, use in any of the following methods:
• To see only database ingestion jobs, file ingestion jobs, or streaming ingestion jobs, click the button for a job type. The selected button is highlighted in blue. To see all types of ingestion jobs again, click the selected button again.
• To see the jobs that match a particular job state, click a state button. You cannot select multiple state buttons at the same time on the Overview tab. To clear the filter, click the selected state button again.
• To see the jobs with a state that might require your attention, click Select States Requiring Attention above the job state buttons. This option is displayed only after you select a job type. This option lists database ingestion jobs with the Failed or Running with Warning state, or lists file ingestion jobs with Failed state, or lists streaming ingestion jobs with the Running with Error or Running with Warning state. To clear the filter, click Select States Requiring Attention again.
Note: All filters that you set on the Overview tab or in the Reorder Job States dialog box are active only for the current session or until you change them during the session.
All Jobs tab
The All Jobs tab lists all ingestion jobs of any type and in any state.
The following example shows the All Jobs tab for database ingestion jobs:
The following example shows the All Jobs tab for file ingestion jobs:
The following example shows the All Jobs tab for streaming ingestion jobs:
Monitoring all ingestion jobs 281
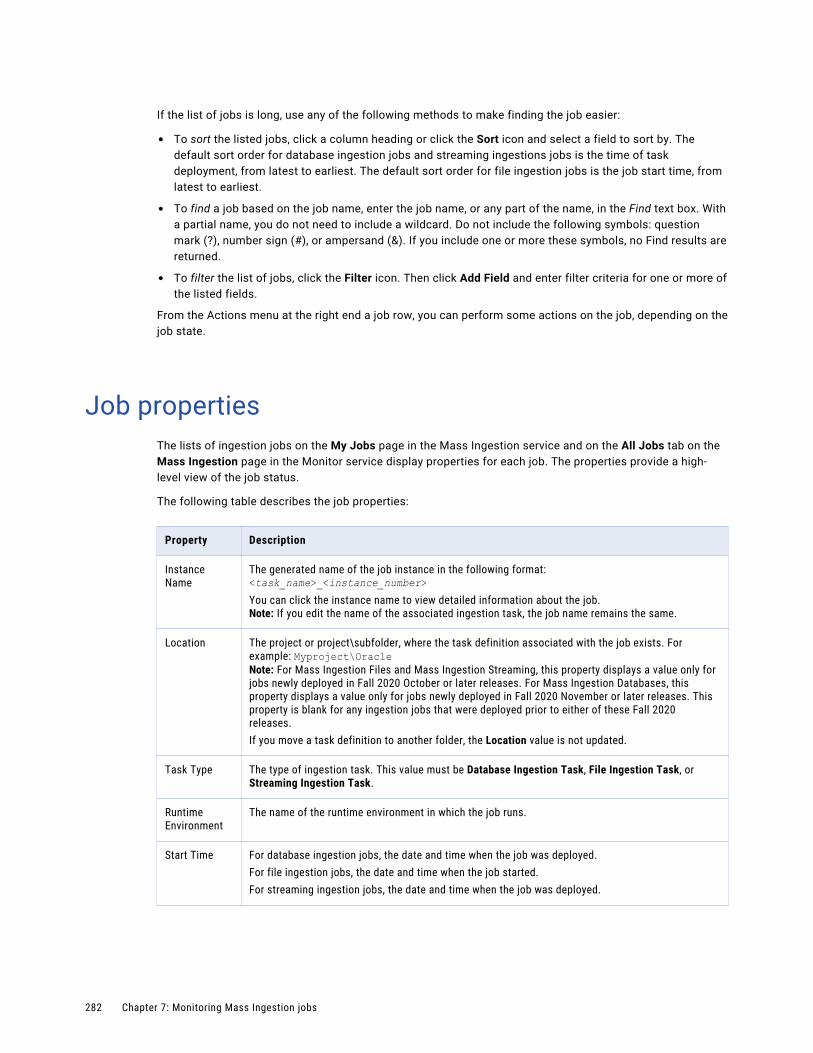
If the list of jobs is long, use any of the following methods to make finding the job easier:
• To sort the listed jobs, click a column heading or click the Sort icon and select a field to sort by. The default sort order for database ingestion jobs and streaming ingestions jobs is the time of task deployment, from latest to earliest. The default sort order for file ingestion jobs is the job start time, from latest to earliest.
• To find a job based on the job name, enter the job name, or any part of the name, in the Find text box. With a partial name, you do not need to include a wildcard. Do not include the following symbols: question mark (?), number sign (#), or ampersand (&). If you include one or more these symbols, no Find results are returned.
• To filter the list of jobs, click the Filter icon. Then click Add Field and enter filter criteria for one or more of the listed fields.
From the Actions menu at the right end a job row, you can perform some actions on the job, depending on the job state.
Job propertiesThe lists of ingestion jobs on the My Jobs page in the Mass Ingestion service and on the All Jobs tab on the Mass Ingestion page in the Monitor service display properties for each job. The properties provide a high-level view of the job status.
The following table describes the job properties:
Property Description
Instance Name
The generated name of the job instance in the following format: <task_name>_<instance_number>You can click the instance name to view detailed information about the job.Note: If you edit the name of the associated ingestion task, the job name remains the same.
Location The project or project\subfolder, where the task definition associated with the job exists. For example: Myproject\OracleNote: For Mass Ingestion Files and Mass Ingestion Streaming, this property displays a value only for jobs newly deployed in Fall 2020 October or later releases. For Mass Ingestion Databases, this property displays a value only for jobs newly deployed in Fall 2020 November or later releases. This property is blank for any ingestion jobs that were deployed prior to either of these Fall 2020 releases.If you move a task definition to another folder, the Location value is not updated.
Task Type The type of ingestion task. This value must be Database Ingestion Task, File Ingestion Task, or Streaming Ingestion Task.
Runtime Environment
The name of the runtime environment in which the job runs.
Start Time For database ingestion jobs, the date and time when the job was deployed.For file ingestion jobs, the date and time when the job started.For streaming ingestion jobs, the date and time when the job was deployed.
282 Chapter 7: Monitoring Mass Ingestion jobs
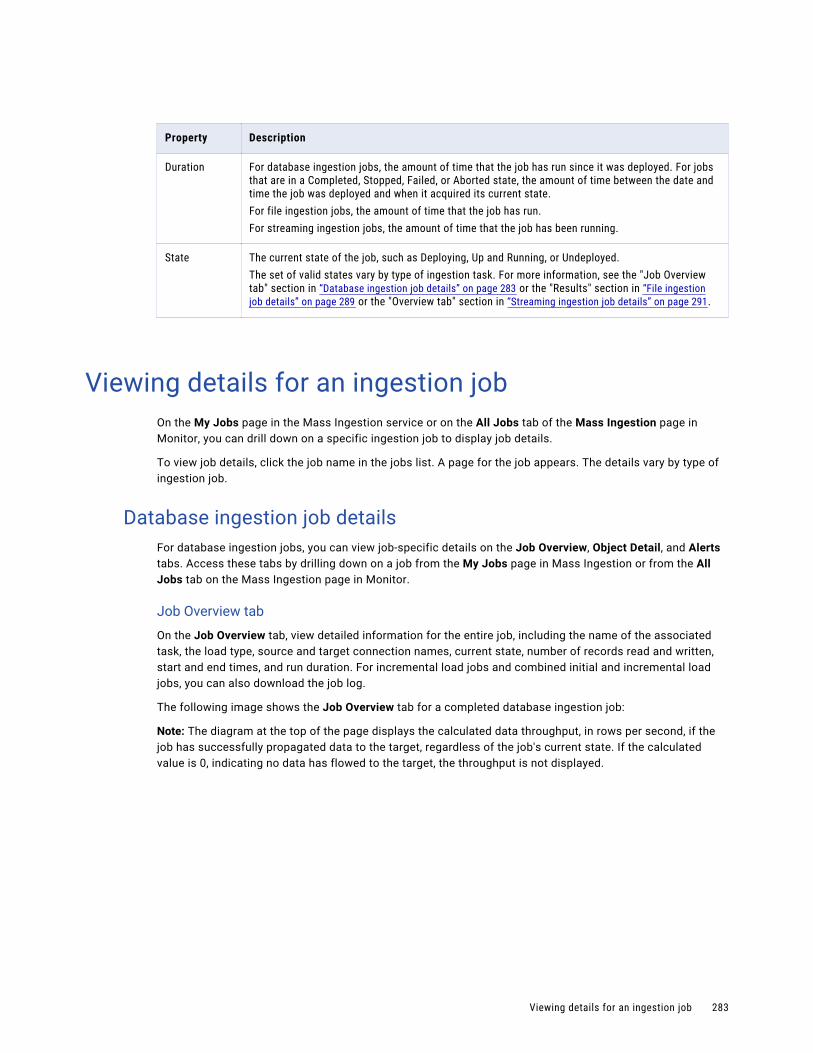
Property Description
Duration For database ingestion jobs, the amount of time that the job has run since it was deployed. For jobs that are in a Completed, Stopped, Failed, or Aborted state, the amount of time between the date and time the job was deployed and when it acquired its current state.For file ingestion jobs, the amount of time that the job has run.For streaming ingestion jobs, the amount of time that the job has been running.
State The current state of the job, such as Deploying, Up and Running, or Undeployed.The set of valid states vary by type of ingestion task. For more information, see the "Job Overview tab" section in “Database ingestion job details” on page 283 or the "Results" section in “File ingestion job details” on page 289 or the "Overview tab" section in “Streaming ingestion job details” on page 291.
Viewing details for an ingestion jobOn the My Jobs page in the Mass Ingestion service or on the All Jobs tab of the Mass Ingestion page in Monitor, you can drill down on a specific ingestion job to display job details.
To view job details, click the job name in the jobs list. A page for the job appears. The details vary by type of ingestion job.
Database ingestion job detailsFor database ingestion jobs, you can view job-specific details on the Job Overview, Object Detail, and Alerts tabs. Access these tabs by drilling down on a job from the My Jobs page in Mass Ingestion or from the All Jobs tab on the Mass Ingestion page in Monitor.
Job Overview tab
On the Job Overview tab, view detailed information for the entire job, including the name of the associated task, the load type, source and target connection names, current state, number of records read and written, start and end times, and run duration. For incremental load jobs and combined initial and incremental load jobs, you can also download the job log.
The following image shows the Job Overview tab for a completed database ingestion job:
Note: The diagram at the top of the page displays the calculated data throughput, in rows per second, if the job has successfully propagated data to the target, regardless of the job's current state. If the calculated value is 0, indicating no data has flowed to the target, the throughput is not displayed.
Viewing details for an ingestion job 283
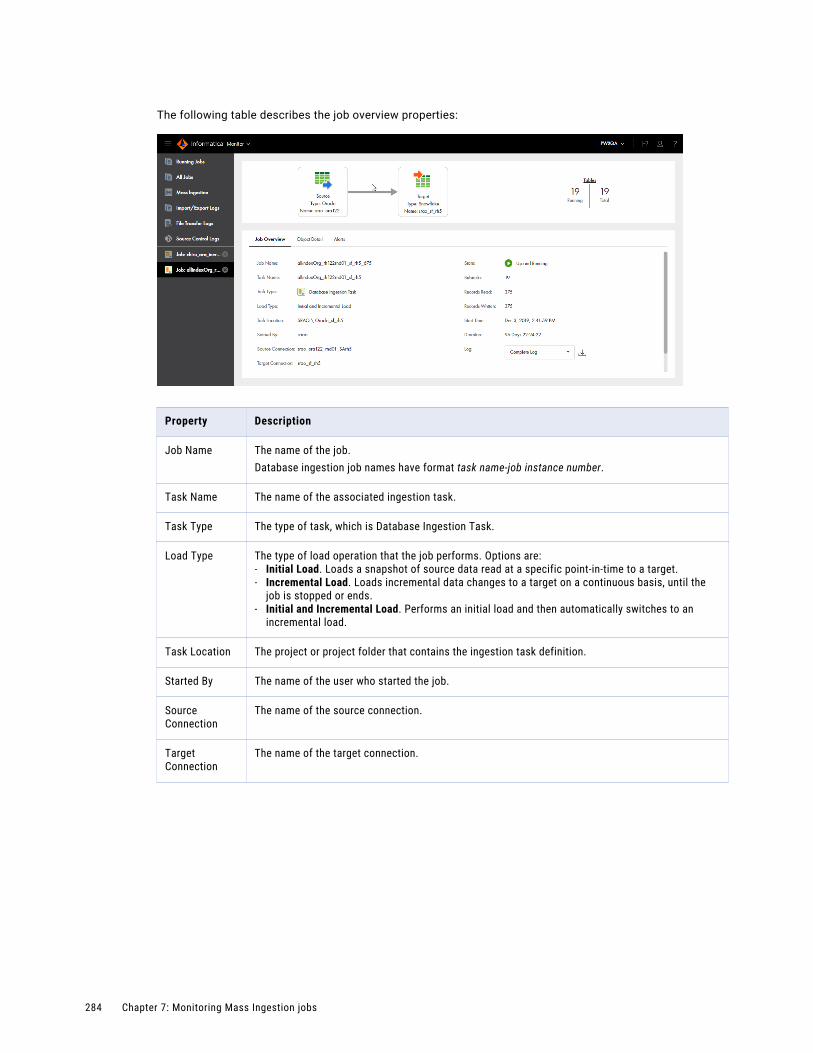
The following table describes the job overview properties:
Property Description
Job Name The name of the job.Database ingestion job names have format task name-job instance number.
Task Name The name of the associated ingestion task.
Task Type The type of task, which is Database Ingestion Task.
Load Type The type of load operation that the job performs. Options are:- Initial Load. Loads a snapshot of source data read at a specific point-in-time to a target.- Incremental Load. Loads incremental data changes to a target on a continuous basis, until the
job is stopped or ends.- Initial and Incremental Load. Performs an initial load and then automatically switches to an
incremental load.
Task Location The project or project folder that contains the ingestion task definition.
Started By The name of the user who started the job.
Source Connection
The name of the source connection.
Target Connection
The name of the target connection.
284 Chapter 7: Monitoring Mass Ingestion jobs

Property Description
State The state of the job, which can be one of the following values:- Up and Running. The job is running.- Running with Warning. The job is running with a warning. This state can also occur when one or
more table-specific subtasks fail but some subtasks are still running.- On Hold. The job is in a paused state while the Mass Ingestion Databases (DBMI) agent is being
updated.- Stopping. The job is stopping in response to a Stop request.- Stopped. The job was intentionally stopped.- Failed. The job ended abnormally, the task deployment to the job failed, or one or more table-
specific subtasks failed. Also, for an initial load job, the job was stopped.- Deploying. The job is being deployed.- Deployed. The job has been deployed.- Aborting. The job is stopping immediately in response to an Abort request.- Aborted. The job has been aborted.- Undeploying. The job is being undeployed.- Undeployed. The job has been undeployed.- Completed. The job completed successfully.
Subtasks The number of subtasks that the database ingestion job used to propagate data from source tables to the target. When a job runs, it uses a separate subtask to process each source table.
Records Read The number of records that were read from the source.Note: For a combined initial and incremental load job, this job-level read count might include CDC records read from the source and discarded prior to the start of initial load processing, which occurs when capture processing reaches end of log. In this case, the job-level count can be greater than the total of object-level DML counts.
Records Written
The number of records that were successfully propagated to an Amazon S3, Apache Kafka, flat file, or Microsoft Azure Data Lake Storage target.For a Microsoft Azure SQL Data Warehouse target, the number of records written to the intermediate Microsoft Azure Data Lake Storage files.For a Snowflake target, the number of records written to the internal staging area that is created when the job runs.
Start Time The date and time when the job was deployed.
End Time The date and time when the job ended because it completed processing, was stopped, or failed. This field is not displayed for running jobs
Duration The amount of time, in the hh:mm:ss format, that the job ran before it ended.
Log For incremental load jobs and combined initial and incremental load jobs, you can download the job execution log for the entire job run. Select one of the following log types:- Complete Log. The entire log, including all types of messages. It is available for any job that ran,
regardless of its state.- Error. The error log, which includes messages only for errors that occurred. It is available for
Failed jobs only. Use this log to determine the reason for the job failure, for example, the deployment failed. If the log file ends with an ellipsis (...), the log has been truncated because of its long length. In this case, download the Complete Log to see all error messages.
To download a log to your local system, click the Download icon.Note: For initial load jobs, you can get the job log for a specific source object from the Object Detail tab.
Object Detail tab
On the Object Detail tab, view statistics and status information by source object from the last run of a database ingestion job.
Viewing details for an ingestion job 285
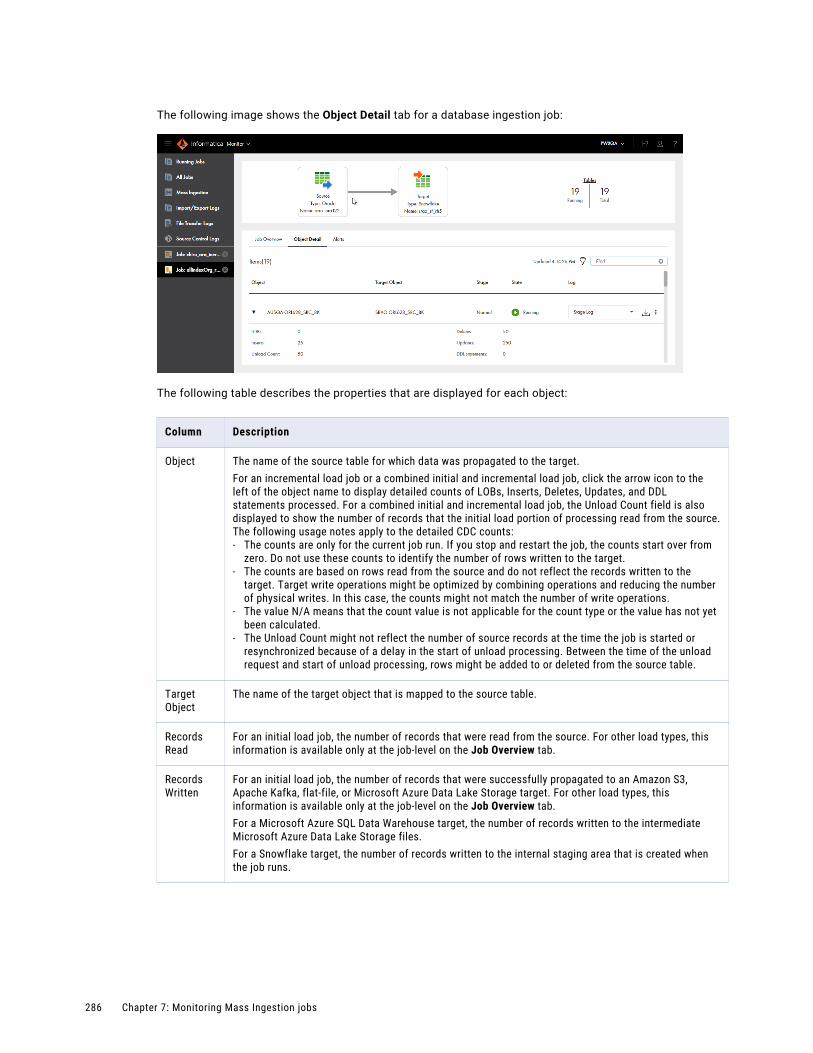
The following image shows the Object Detail tab for a database ingestion job:
The following table describes the properties that are displayed for each object:
Column Description
Object The name of the source table for which data was propagated to the target.For an incremental load job or a combined initial and incremental load job, click the arrow icon to the left of the object name to display detailed counts of LOBs, Inserts, Deletes, Updates, and DDL statements processed. For a combined initial and incremental load job, the Unload Count field is also displayed to show the number of records that the initial load portion of processing read from the source. The following usage notes apply to the detailed CDC counts:- The counts are only for the current job run. If you stop and restart the job, the counts start over from
zero. Do not use these counts to identify the number of rows written to the target.- The counts are based on rows read from the source and do not reflect the records written to the
target. Target write operations might be optimized by combining operations and reducing the number of physical writes. In this case, the counts might not match the number of write operations.
- The value N/A means that the count value is not applicable for the count type or the value has not yet been calculated.
- The Unload Count might not reflect the number of source records at the time the job is started or resynchronized because of a delay in the start of unload processing. Between the time of the unload request and start of unload processing, rows might be added to or deleted from the source table.
Target Object
The name of the target object that is mapped to the source table.
Records Read
For an initial load job, the number of records that were read from the source. For other load types, this information is available only at the job-level on the Job Overview tab.
Records Written
For an initial load job, the number of records that were successfully propagated to an Amazon S3, Apache Kafka, flat-file, or Microsoft Azure Data Lake Storage target. For other load types, this information is available only at the job-level on the Job Overview tab.For a Microsoft Azure SQL Data Warehouse target, the number of records written to the intermediate Microsoft Azure Data Lake Storage files.For a Snowflake target, the number of records written to the internal staging area that is created when the job runs.
286 Chapter 7: Monitoring Mass Ingestion jobs

Column Description
Task Duration
For an initial load job, the amount of time the subtask that processed the source table ran before it completed or was stopped. For other load types, this information is available only at the job-level on the Job Overview tab.When a job runs, it uses a separate subtask to process each source table.
Stage For a combined initial and incremental load job, this column shows the stage in the transition from initial load processing to CDC processing for the table-specific job subtask. This column does not appear for other load types.The stage can be one of the following values:- Not Started. Initial load processing has not yet started for the table, or if an error occurred and the
table is in the Error on Retry state, the next attempt to process the table has not yet started.- Started. Initial load processing has started.- Unloading. The subtask is unloading data from the table as part of initial load processing.- Unloaded. The subtask has finished unloading data from the table as part of initial load processing.- Completed. The subtask completed initial load processing of the table.- Normal. The subtask completed initial load processing of the table and has started CDC processing of
the table.- Cancelled. Initial load processing was cancelled or stopped.- Error. The subtask detected an error in the source table.
State The state of the job subtask for the source object.Note: If the job stops running, the subtask state reflects the state last collected before the job ended. For example, the job might be aborted but the subtask is in a Running state.The state can be one of the following values:- Queued. The subtask has not yet started running.- Starting. The subtask is starting.- Started. For a combined initial and incremental load job, the subtask has started.- Running. The subtask is running.- On Hold. The subtask, as well as the job, is in a paused state while the Mass Ingestion Databases
(DBMI) agent is being updated.- Completed. The subtask completed processing successfully.- Stopping. The subtask is stopping in response to a Stop request.- Stopped. The subtask has stopped.- Aborting. The subtask is ending immediately in response to an Abort request.- Aborted. The subtask has been aborted.- Failed. The subtask ended unexpectedly.- Error. The subtask is in error and no longer writing data to the target table. For a combined initial and
incremental load job, the subtask might be running and processing incremental change data but no data is being sent to the target.
- Error on Retry. An error occurred on the last retry of subtask processing, and now the subtask is waiting to retry processing again.
Note: If a DDL change occurs on a source table and then you resume the job, the table subtask state might not change as expected until the first DML operation occurs on the source table.
Viewing details for an ingestion job 287

Column Description
Log For initial load jobs, you can download the job execution log for a source object. Select one of the following log types:- Complete Log. The complete log for the object subtask from job execution.- Error. The log that contains error messages. This log type is available only for a Failed subtask.For incremental load jobs, you can get the complete log for the entire job run from the Job Overview tab.For combined initial and incremental load jobs, you can download the Stage Log. This log covers the transition from initial to incremental loading for a source object.To download a log locally, click the Download icon.Note: If you undeployed the job, you can download the log for a table only if the associated task has not been deleted.
Actions menu > Resync
For a subtask in a combined initial and incremental load job, if the subtask stage is Normal and the subtask state is any state other than Queued or Starting, the Actions menu is displayed on the right end of the subtask row. From the Actions menu, you can select Resync to resynchronize the source and target objects. For more information, see "Resynchronizing source and target objects" in Mass Ingestion help.
Note: This tab shows information on the latest job run. This tab is blank for jobs that have not run or are resuming.
Alerts tab
On the Alerts tab, view alert messages that appear for certain events.
Note: The Alerts tab displays alert messages when a source schema change is detected. Messages are displayed for all detected schema changes even if you set the schema drift options for the associated task to Ignore.
You can filter the list of alerts based on severity or a date range. To specify a date range, enter one of the following types of values in the Filter field:
• A Custom date range that consists of the beginning date and time and ending date and time that you select.
• Any Time for all stored alerts.
• Today for alerts issued today from midnight to 11:59 pm.
• Last Week, Last Month, or Last Year to show alerts from the beginning of last week, month, or year to present.
The following table describes the columns of information that are displayed for each alert message:
Column Description
Level Severity level of the alert message.
Code Alphanumeric code that identifies the alert type.
Details Description of the event that raised the alert message.
Time Date and time when the event occurred.
288 Chapter 7: Monitoring Mass Ingestion jobs
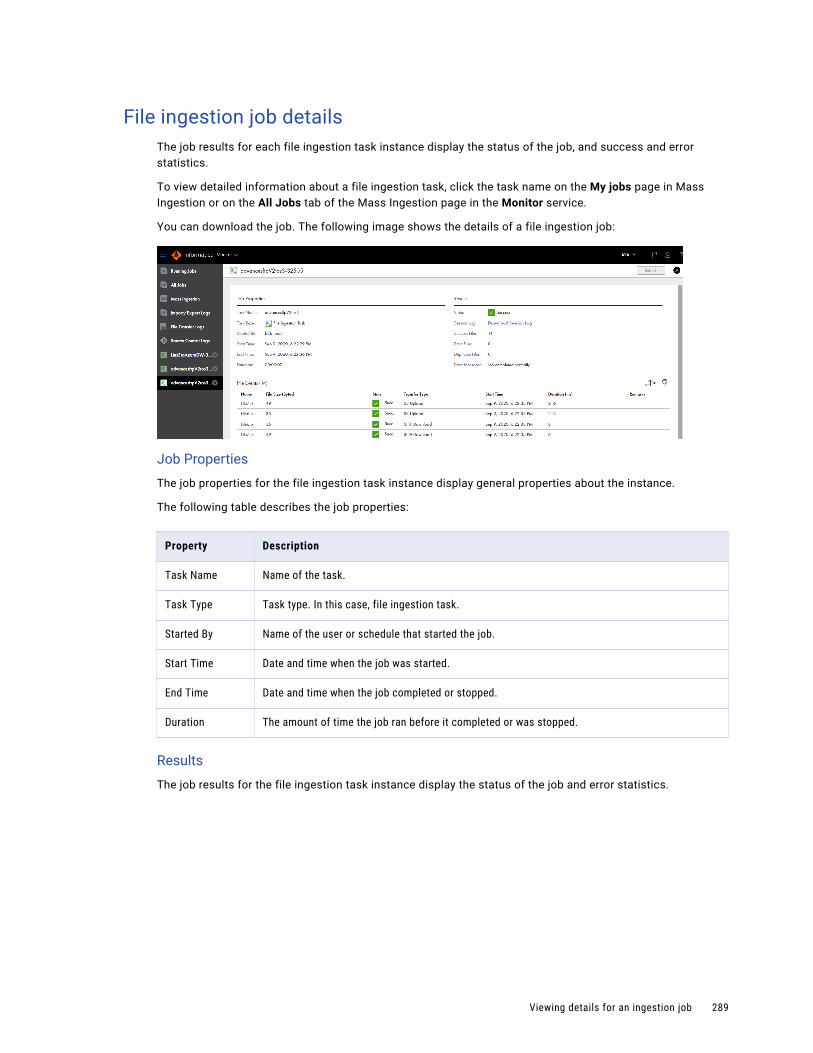
File ingestion job detailsThe job results for each file ingestion task instance display the status of the job, and success and error statistics.
To view detailed information about a file ingestion task, click the task name on the My jobs page in Mass Ingestion or on the All Jobs tab of the Mass Ingestion page in the Monitor service.
You can download the job. The following image shows the details of a file ingestion job:
Job Properties
The job properties for the file ingestion task instance display general properties about the instance.
The following table describes the job properties:
Property Description
Task Name Name of the task.
Task Type Task type. In this case, file ingestion task.
Started By Name of the user or schedule that started the job.
Start Time Date and time when the job was started.
End Time Date and time when the job completed or stopped.
Duration The amount of time the job ran before it completed or was stopped.
Results
The job results for the file ingestion task instance display the status of the job and error statistics.
Viewing details for an ingestion job 289

The job results include the following properties:
Property Description
State Job status. A job can have one of the following statuses:- Running. The job is still running.- Success. The job completed successfully.- Failed. The job did not complete because it encountered errors- Aborted. The job was aborted.
Session Log Allows you to download the session log file. By default, Informatica Intelligent Cloud Services stores session logs for 10 runs before it overwrites the logs with the latest runs.If you need the session logs for earlier runs, take a backup of the directory that holds the session log files.Session log files are written to the following directory:<Secure Agent installation directory>/apps/Data_Integration_Server/logs
Success Files Number of files that are successfully transferred, downloaded, and uploaded to the target.
Error Files Number of files that were not transferred to the target.
Duplicate Files Number of files that were identified as duplicates.
Error Message Error message, if any, that is associated with the job.
File Events
This section shows the total number of files that the file ingestion task has transferred with information about each file.
The File Events section is updated each time the file ingestion task transfers a file, and the state of the file updates throughout the file transfer process. You can track the progress of a file transfer based on the state of the file.
The File Events section displays the following properties for each file:
Property Description
Name The name of the file.
File size The size of the file in bytes.
State The state of the file transfer. A file can have one of the following states:- Success. The file transfer completed successfully.- Failed. The file transfer did not complete because it encountered errors.- Processing. The file transfer is still running.- Duplicate. The task previously transferred a file with the same name, directory location, and size.- Interrupted. The file transfer is interrupted because of network issues or changed server credentials
during the file transfer. Run the file ingestion task to resume the transfer of the interrupted files. This state is applicable when the file ingestion task transfers file from the advanced FTP, advanced SFTP, or advanced FTPS sources.
- In Doubt. The previous task instance encountered errors while transferring the file. Applicable for tasks where the source is configured to skip duplicate files.
You can monitor the State property to track the progress of the file transfer of each file.
290 Chapter 7: Monitoring Mass Ingestion jobs

Property Description
Transfer Type
The type of file transfer. A file can have one of the following transfer types:- <source_name>Download. The file is downloaded from source. <source_name> is the name of the
source.- <target_name>Upload. The file is uploaded to the target.<target_name> is the name of the
target.- Copy from Source. The file ingestion task is performing file processing actions.- Copy to Target. The file is transferred from a local directory to a local directory.
Start time Date and time when the file transfer started.
Duration The length of time to transfer the file, in milliseconds.
Remarks Applies to file events in Failed status. The message includes the reason for failure of the event based on the file transfer type.
Streaming ingestion job detailsTo view detailed information about a streaming ingestion job, click the job name on the My jobs page in Mass Ingestion or on the All Jobs tab of the Mass Ingestion page in the Monitor service.
Overview tab
The Overview tab displays general properties of the job. You can download the job log, too.
The following image shows the Overview tab for a streaming ingestion job:
Viewing details for an ingestion job 291
The following table describes the job overview properties:
Property Description
Job Name The name of the job.
Version The version number of the job.
Task Type The task type of streaming ingestion task.
Task Location The project or project folder that contains the streaming ingestion task.
Started By The name of the user who deployed the job.
Secure Agent The location where the Secure Agent is running.A warning symbol near the Secure Agent indicates that the Secure Agent is either offline or not reachable.
State The state of the job.A job can have one of the following states:- Deploying. The job is being deployed.- Up and Running. The job is running.- Running with Warning. The job is running with warnings.- Running with Error. The job is running with error. If a job continuously runs with warnings for
seven minutes or for the time specified in the runtime option, the state of the job changes to Running with Error.
- Undeployed. The job is undeployed.- Stopped. The job was intentionally stopped.
Duration Total time the job ran before it is undeployed. The total time is shown in hh:mm:ss format.
Start Time The date and time when the job was deployed.
Runtime Environment
Name of the runtime environment that the job uses to run.
Download Log Level of log that you want to download for a running job.You can download one of the following logs:- Complete Log. The entire log, including all types of messages. It is available for any job that
ran, regardless of its state.- Latest. Latest version of the log.To download a log to your local system, click the Download icon.
Alert tab
The Alert tab displays the alert messages when an event occurs.
292 Chapter 7: Monitoring Mass Ingestion jobs

The following image shows the Alert tab for a streaming ingestion job:
The following table describes the job alert properties:
Property Description
Alert The messages or a group of messages that the job returns when a deployed job encounters a warning.
Time The date and time when the event occurred.
Performance tab
The Performance tab displays graphs of throughput information for the source and target of the job.
Viewing details for an ingestion job 293
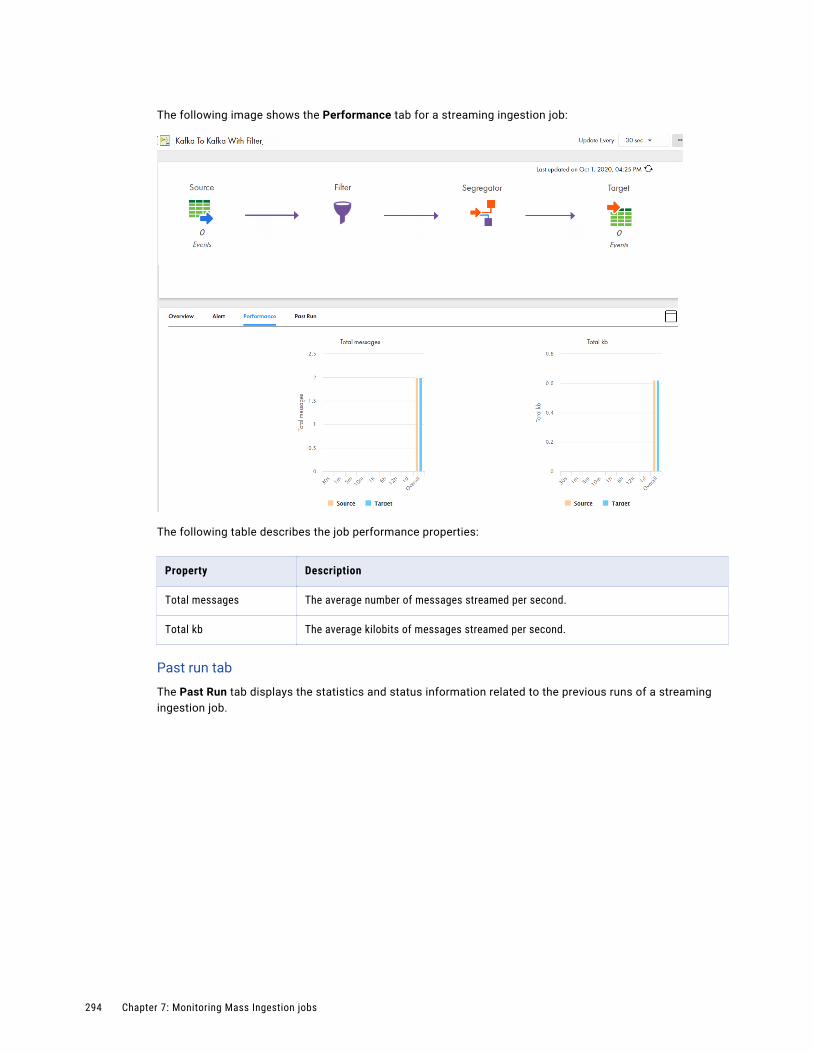
The following image shows the Performance tab for a streaming ingestion job:
The following table describes the job performance properties:
Property Description
Total messages The average number of messages streamed per second.
Total kb The average kilobits of messages streamed per second.
Past run tab
The Past Run tab displays the statistics and status information related to the previous runs of a streaming ingestion job.
294 Chapter 7: Monitoring Mass Ingestion jobs

The following image shows the Past Run tab for a streaming ingestion job:
The following table describes the past run properties:
Column Description
Version The version number of the job.
Start Time The date and time when the job was deployed.
End Time The date and time when the job was undeployed.
Duration Total time the job ran before it is undeployed. The total time is shown in hh:mm:ss format.
Viewing details for an ingestion job 295
C h a p t e r 8
Asset ManagementYou can manage Mass Ingestion assets such as projects, folders, and ingestion tasks from the Explore page.
You can perform the following management tasks depending on your user role and permissions:
• Edit ingestion tasks.
• Copy projects, folders, and ingestion tasks.
• Move folders and ingestion tasks.
• Rename projects, folders, and ingestion tasks.
• Delete projects, folders, and ingestion tasks.
• Apply tags so you can filter assets on the Explore page.
• Configure user permissions for projects, folders, or assets.
• Use source control to manage versions of projects, folders, and tasks.
• Migrate assets between organizations.
Editing ingestion tasksYou can edit an ingestion task from the Explore page.
1. In Mass Ingestion, open the Explore page.
2. If a list of projects is displayed, select the project or project folder that contains the ingestion task that you want to edit.
3. In the list of tasks, select the row for the ingestion task that you want to edit.
4. In the Actions menu for the selected row, click Edit.
The Definition page of the task wizard appears in edit mode.
5. Edit the available fields on the Definition, Source, Target, and Runtime Options pages.
6. When you are finished, click Save.
296
Copying projects, folders, and tasksYou can copy projects, folders, and tasks on the Explore page. You might want to copy an object to use as a template, or you might want to create a backup copy.
When you copy a project, the new project contains all of the folders and tasks that were in the original project. Similarly, when you copy a folder, the new folder contains all of the tasks that were in the original folder.
When you copy a task within the folder where the task exists, you have the option to keep both tasks or cancel the operation. When you copy a task into a different folder that contains a task with the same name, you have the option to keep both tasks, overwrite the task in the folder, or cancel the operation. If you choose to keep both tasks, Informatica Intelligent Cloud Services appends the new task name with "Copy x" where x is the sequential copy number.
Note: To avoid naming conflicts with duplicate tasks, rename assets with a "Copy x" suffix.
1. On the Explore page, navigate to the object that you want to copy.
2. In the list of assets, select one or more rows for the objects that you want to copy. Then perform one of the following actions:
• If you selected a single asset row, in the Actions menu for the row, click Copy To. Alternatively, right-click the row and click Copy To.
• If you selected multiple asset rows, right-click a highlighted row and click Copy To to copy all of the assets.
3. Browse to the new location and click Select.
Moving folders and tasksYou can move folders and tasks on the Explore page.
1. On the Explore page, navigate to the folder or task that you want to move.
2. In the list of assets, select one or more rows for the ingestion tasks or folders that you want to copy. Then perform one of the following actions:
• If you selected a single row, in the Actions menu for the row, click Move To. Alternatively, right-click the row and click Move To.
• If you selected multiple rows, right-click a highlighted row and click Move To to copy all of the assets.
3. Browse to the new location and click Select.
Renaming projects and foldersYou can rename projects and folders.
The following characters cannot be used on the Explore page:
# ? ' | { } " ^ & [ ] / \
Copying projects, folders, and tasks 297

Do not use these characters in project, folder, asset, or tag names.
1. On the Explore page, navigate to the project or folder that you want to rename.
2. In the row that contains the project or folder, click Actions and select Properties.
3. Enter the new name and click Save.
You cannot use special characters in a name or use the same name as another object that is in the same folder.
Renaming database ingestion tasksYou can rename database ingestion tasks.
The following characters cannot be used on the Explore page:
# ? ' | { } " ^ & [ ] / \Do not use these characters in project, folder, asset, or tag names.
1. On the Explore page, select the row for the ingestion task that you want to rename.
2. In the Actions menu for the selected row, click Edit.
The Definition page of the task wizard appears in edit mode.
3. In the Name field, enter the new name and click Save.
If you rename a database ingestion task, the task name and job name will no longer be synchronized. If you want the task name to correspond to the job name, undeploy the job and then deploy the task again. Any log history will be lost.
Renaming file ingestion tasksYou can rename file ingestion tasks.
The following characters cannot be used on the Explore page:
# ? ' | { } " ^ & [ ] / \Do not use these characters in project, folder, asset, or tag names.
1. On the Explore page, navigate to the task that you want to rename.
2. To rename a task, in the row that contains the task, click Actions and select Rename.
3. Enter the new name and click Save.
You cannot use special characters in a name or use the same name of another task that is in the same folder.
298 Chapter 8: Asset Management

Renaming streaming ingestion tasksYou can rename streaming ingestion tasks.
The following characters cannot be used on the Explore page:
# ? ' | { } " ^ & [ ] / \Do not use these characters in project, folder, asset, or tag names.
1. On the Explore page, navigate to the task that you want to rename.
2. To rename a task, in the row that contains the task, click Actions and select Rename.
3. Enter the new name and click Save.
You cannot use special characters in a name or use the same name as another task that is in the same folder.
Deleting projects, folders, and tasksYou can delete a project, folder, or task if you no longer need it. However, before you delete it, verify that no users in the organization plan to use it. You cannot retrieve projects, folders, or tasks after you delete them.
You cannot delete an asset in the following situations:
• The asset is a task that is associated with a deployed job.
Note: In Mass Ingestion Databases, if you undeploy the job, you can then delete the task.
• The asset is a folder that contains tasks.
Delete a project, folder, or task from the Explore page, as shown in the following image:
1. To delete a project, folder, or task, on the Explore page, navigate to the object that you want to delete.
2. In the list of assets, select one or more rows for the ingestion tasks or folders that you want to delete. Then perform one of the following actions:
Renaming streaming ingestion tasks 299
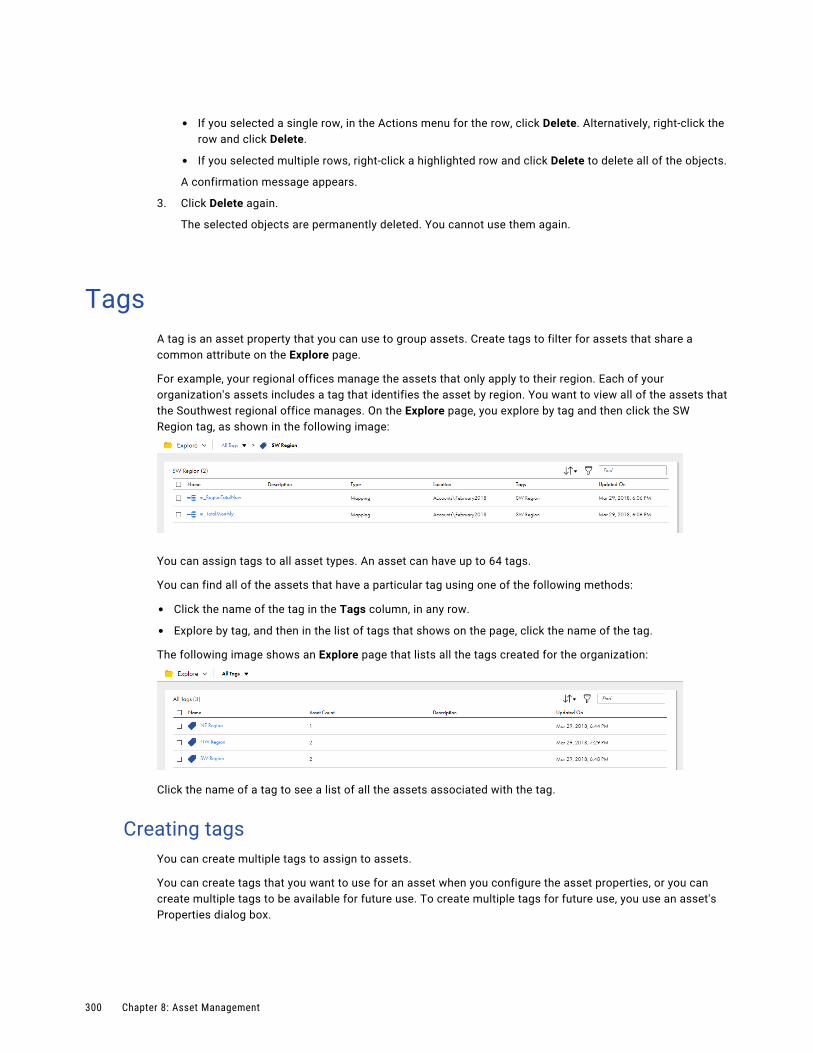
• If you selected a single row, in the Actions menu for the row, click Delete. Alternatively, right-click the row and click Delete.
• If you selected multiple rows, right-click a highlighted row and click Delete to delete all of the objects.
A confirmation message appears.
3. Click Delete again.
The selected objects are permanently deleted. You cannot use them again.
TagsA tag is an asset property that you can use to group assets. Create tags to filter for assets that share a common attribute on the Explore page.
For example, your regional offices manage the assets that only apply to their region. Each of your organization's assets includes a tag that identifies the asset by region. You want to view all of the assets that the Southwest regional office manages. On the Explore page, you explore by tag and then click the SW Region tag, as shown in the following image:
You can assign tags to all asset types. An asset can have up to 64 tags.
You can find all of the assets that have a particular tag using one of the following methods:
• Click the name of the tag in the Tags column, in any row.
• Explore by tag, and then in the list of tags that shows on the page, click the name of the tag.
The following image shows an Explore page that lists all the tags created for the organization:
Click the name of a tag to see a list of all the assets associated with the tag.
Creating tagsYou can create multiple tags to assign to assets.
You can create tags that you want to use for an asset when you configure the asset properties, or you can create multiple tags to be available for future use. To create multiple tags for future use, you use an asset's Properties dialog box.
300 Chapter 8: Asset Management
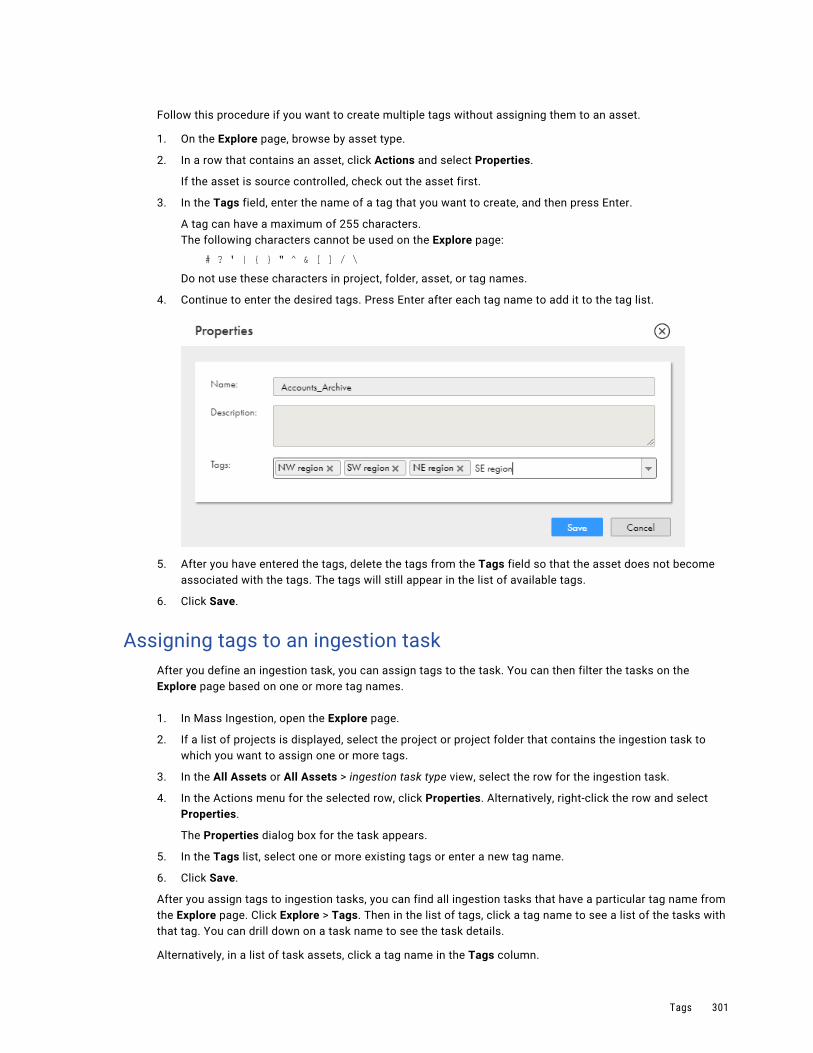
Follow this procedure if you want to create multiple tags without assigning them to an asset.
1. On the Explore page, browse by asset type.
2. In a row that contains an asset, click Actions and select Properties.
If the asset is source controlled, check out the asset first.
3. In the Tags field, enter the name of a tag that you want to create, and then press Enter.
A tag can have a maximum of 255 characters.The following characters cannot be used on the Explore page:
# ? ' | { } " ^ & [ ] / \Do not use these characters in project, folder, asset, or tag names.
4. Continue to enter the desired tags. Press Enter after each tag name to add it to the tag list.
5. After you have entered the tags, delete the tags from the Tags field so that the asset does not become associated with the tags. The tags will still appear in the list of available tags.
6. Click Save.
Assigning tags to an ingestion taskAfter you define an ingestion task, you can assign tags to the task. You can then filter the tasks on the Explore page based on one or more tag names.
1. In Mass Ingestion, open the Explore page.
2. If a list of projects is displayed, select the project or project folder that contains the ingestion task to which you want to assign one or more tags.
3. In the All Assets or All Assets > ingestion task type view, select the row for the ingestion task.
4. In the Actions menu for the selected row, click Properties. Alternatively, right-click the row and select Properties.
The Properties dialog box for the task appears.
5. In the Tags list, select one or more existing tags or enter a new tag name.
6. Click Save.
After you assign tags to ingestion tasks, you can find all ingestion tasks that have a particular tag name from the Explore page. Click Explore > Tags. Then in the list of tags, click a tag name to see a list of the tasks with that tag. You can drill down on a task name to see the task details.
Alternatively, in a list of task assets, click a tag name in the Tags column.
Tags 301

Editing and deleting tagsYou can edit or delete a tag on the Explore page.
Edit a tag name or description in the tag properties. When you edit a tag, the properties for associated assets update as well. For example, if your m_sales asset has the NorthWest tag and you change the name of the tag to NW, the name of the tag changes to NW in the m_sales asset properties.
If you delete a tag, the tag no longer appears in the asset properties.
1. On the Explore page, browse by tags.
2. In the row that contains the tag, perform one of the following tasks:
• To edit a tag, click Actions and select Edit. After you make your changes, click Save.
• To delete a tag, click Actions and select Delete.
Asset dependenciesYou can view object dependencies for an asset. You might want to view object dependencies before performing certain operations on an asset.
For example, you cannot delete an asset if another object depends on the asset. You must first delete the dependent objects and then delete the asset. You can find the dependent objects by viewing the asset dependencies.
You can view object dependencies for an asset on the Explore page. To view object dependencies for an asset, in the row that contains the asset, click Actions and select Show Dependencies. The Dependencies page opens showing the Uses tab by default.
The Uses tab lists the objects that the selected asset uses. A Mass Ingestion service task uses connections and a runtime environment.
Note: If a database ingestion task was last saved prior to the Mass Ingestion Spring 2020 April release, you must save the task again before you try to view object dependencies for it the first time. You need to perform this action only once. If the Save button is not available, make a minor edit to the task
The Used By tab lists the objects that use the selected asset.
To drill down to the lowest level dependency, you can continue to show dependencies for each asset that appears on the Dependencies page. At the top of the Dependencies page, a breadcrumb shows the chain of dependencies.
The following image shows that the asset mt_FilterArchCustRecords is dependent on m_FilterCustRecords, which is dependent on FF_USW1PF:
If you have the appropriate permissions, you can perform actions on the Dependencies page such as viewing or deleting assets. To view or delete an asset, in the row that contains the asset, click Actions and select the action.
302 Chapter 8: Asset Management
If you work with source controlled assets, you can view source control information such as the last pull time and the last check-in. To view source control information, you can add the following source control columns to the table:
• Last Pull Time
• Checked Out By
• Last Check in
• Git Hash
Configuring user permissions on an ingestion taskYou can configure permissions for an ingestion task if you are assigned a user role that has the Set Permission privilege for the asset type of Mass Ingestion Streaming Task.
Typically, the organization administrator assigns user roles to specific users of the Mass Ingestion service.
1. In Mass Ingestion, open the Explore page and navigate to the row for the ingestion task for which you want to set permissions.
2. In the Actions menu for the row, select Permissions.
The Permissions dialog box lists the users and user groups that have permissions set on the task. Other users cannot access the task.
If the Permissions dialog box lists no users or user groups, no permissions are configured for the task. In this case, any user can access the task without permission restrictions.
3. To add a user to the users list and grant permissions on the task to that user, perform the following steps:
a. On the Users tab, click Add.
b. In the Add User dialog box, select a user and click Add.
c. In the Permissions dialog box, select the permissions on the task that you want to grant to the user.
d. Click Save
4. To add a user group to the groups list and grant permissions on the task to that user group, perform the following steps:
a. On the Groups tab, click Add.
b. In the Add Group dialog box, select a group and click Add.
If no groups are listed, no user groups are defined.
c. In the Permissions dialog box, select the permissions on the task that you want to grant to the group.
d. Click Save.
5. To edit the permissions that are set for a listed user or user group, on the Users or Groups tab in the Permissions dialog box, select or clear the permission check boxes for the user or group. Then click Save.
6. To remove all of the permissions that you set for one or more users or user groups, on the Users or Groups tab in the Permissions dialog box, select the users or groups from which you want to remove all permissions. Then click Remove and click Save.
Configuring user permissions on an ingestion task 303
Asset migrationYou can migrate Informatica Intelligent Cloud Services assets from one organization to another organization. To migrate assets, you export the assets from the source organization and then import the assets into the target organization.
You can import and export the following types of assets:
• Tasks and their dependent objects
Note: If you want to export database ingestion tasks for which you cannot view object dependencies, you must save the tasks again before you try to export them. Otherwise, when you import the tasks into the target, any asset overrides that you specified for the import operation, such as an override connection or Secure Agent, will not be applied to the imported tasks. You need to perform this action only once for a task.
You can export single assets, groups of assets, or export all of the assets in a project. If you export a project or folder, the file structure remains intact so that when you perform the import in the target organization, you can duplicate the original structure.
Before you migrate an asset from one organization to another, ensure that you meet the following requirements:
• The source and target organizations must have the required license to import and export assets.
• The target organization must have the required licenses for the assets that you want to import.
• You must have a user account in the source and target organizations with a role that has import and export privileges, such as the Admin or Designer role.
To export or import assets in a sub-organization, log in to the sub-organization. If you have administrator privileges in the parent organization, you can also switch to the sub-organization and export or import assets.
Dependent objectsDependent objects are assets that are required by other assets.
When you set up an export, you have the option to include or exclude dependent objects in the export file. The dependent objects must exist either in the export file or in the target organization, else the import fails.
You might want to include dependent objects if they do not exist in the target organization. Or, you might want to include dependent objects if you want to replace the dependent objects in the target organization with updated versions from the source organization. If you choose to include dependent objects, the export file includes dependent objects for all of the assets that you include in the export. When you configure the import, you can choose which dependent assets to import.
You might want to exclude an asset's dependent objects if the objects exist in the target organization and you do not want to replace them.
Note: Schedules are not dependent objects and are not included when you export assets that use them.
Runtime environments and connectionsRuntime environments and connections are dependent objects.
If you configure an export to exclude dependent objects, be sure that a suitable connection and runtime environment for the assets exists in the target organization.
304 Chapter 8: Asset Management

If the export file does not contain dependent objects, and a dependent connection or runtime environment does not exist in the target organization, during the import operation you must select a connection or runtime environment that exists in the target organization.
If the export file contains dependent objects, you can use the source connections and runtime environments in the export file. Or, you can select connections and runtime environments that exist in the target organization. If the target organization has connections or runtime environments with the same name as those in the export file, Informatica Intelligent Cloud Services uses the connections or runtime environments that exist in the target organization.
Note: An export or import cannot include a Cloud Hosted Agent or shared agent. If an asset uses a Cloud Hosted Agent or a shared agent, you can select a runtime environment to use for the asset during import.
SchedulesYou can migrate schedules from one organization to another organization. You might want to migrate a schedule if you migrate an asset that uses it.
When you export an asset that uses a saved schedule, the schedule is not included in the export file.
To migrate a schedule, you export the schedule from the source organization using Administrator and import the schedule into the target organization using the service that will use the schedule. For example, to migrate a schedule that's used for Data Integration mapping tasks, you export the schedule from the source organization using Administrator and import the schedule into the target organization using Data Integration.
For information about exporting schedules, see the Administrator help. For information about importing schedules, see “Importing assets” on page 309.
Asset exportWhen you export assets, Informatica Intelligent Cloud Services creates an export ZIP file that contains the assets that you selected for export.
You can select individual assets to export, or you can select an entire project or folder. When you export a project or folder, the export file includes all of the assets in the project or folder.
To export an asset, you need the following privileges and permissions:
• Your user role must have privileges to export assets.
• You must have read permission on the asset.
Note: Informatica recommends that you include no more than 1000 objects in an export file.
Export FilesAn export .zip file contains multiple subfolders and files.
When you open the export file, the following high-level structure is initially displayed:
Asset migration 305
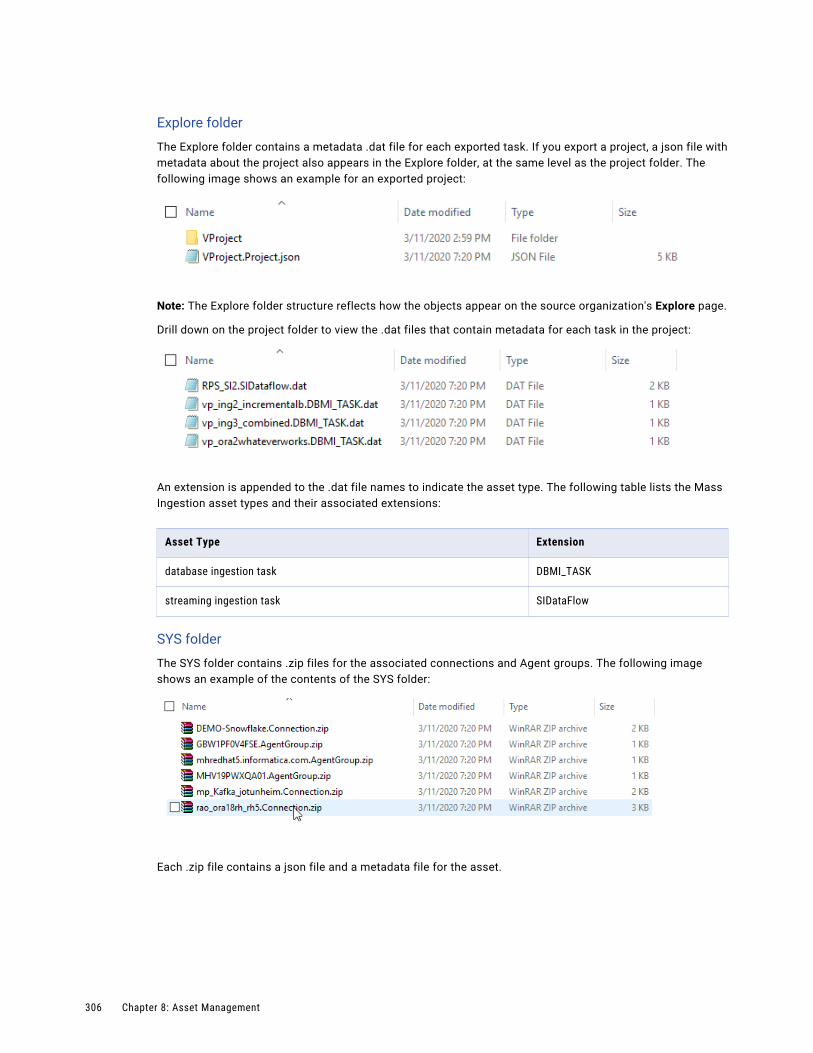
Explore folder
The Explore folder contains a metadata .dat file for each exported task. If you export a project, a json file with metadata about the project also appears in the Explore folder, at the same level as the project folder. The following image shows an example for an exported project:
Note: The Explore folder structure reflects how the objects appear on the source organization's Explore page.
Drill down on the project folder to view the .dat files that contain metadata for each task in the project:
An extension is appended to the .dat file names to indicate the asset type. The following table lists the Mass Ingestion asset types and their associated extensions:
Asset Type Extension
database ingestion task DBMI_TASK
streaming ingestion task SIDataFlow
SYS folder
The SYS folder contains .zip files for the associated connections and Agent groups. The following image shows an example of the contents of the SYS folder:
Each .zip file contains a json file and a metadata file for the asset.
306 Chapter 8: Asset Management
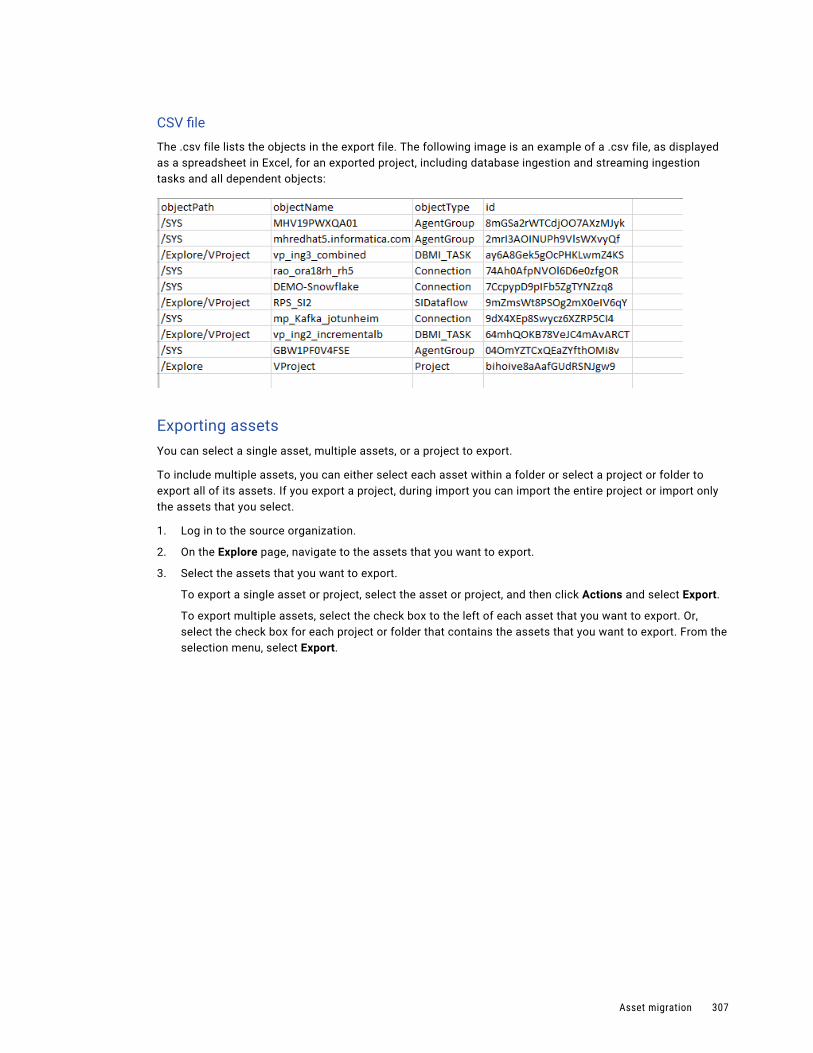
CSV file
The .csv file lists the objects in the export file. The following image is an example of a .csv file, as displayed as a spreadsheet in Excel, for an exported project, including database ingestion and streaming ingestion tasks and all dependent objects:
Exporting assetsYou can select a single asset, multiple assets, or a project to export.
To include multiple assets, you can either select each asset within a folder or select a project or folder to export all of its assets. If you export a project, during import you can import the entire project or import only the assets that you select.
1. Log in to the source organization.
2. On the Explore page, navigate to the assets that you want to export.
3. Select the assets that you want to export.
To export a single asset or project, select the asset or project, and then click Actions and select Export.
To export multiple assets, select the check box to the left of each asset that you want to export. Or, select the check box for each project or folder that contains the assets that you want to export. From the selection menu, select Export.
Asset migration 307
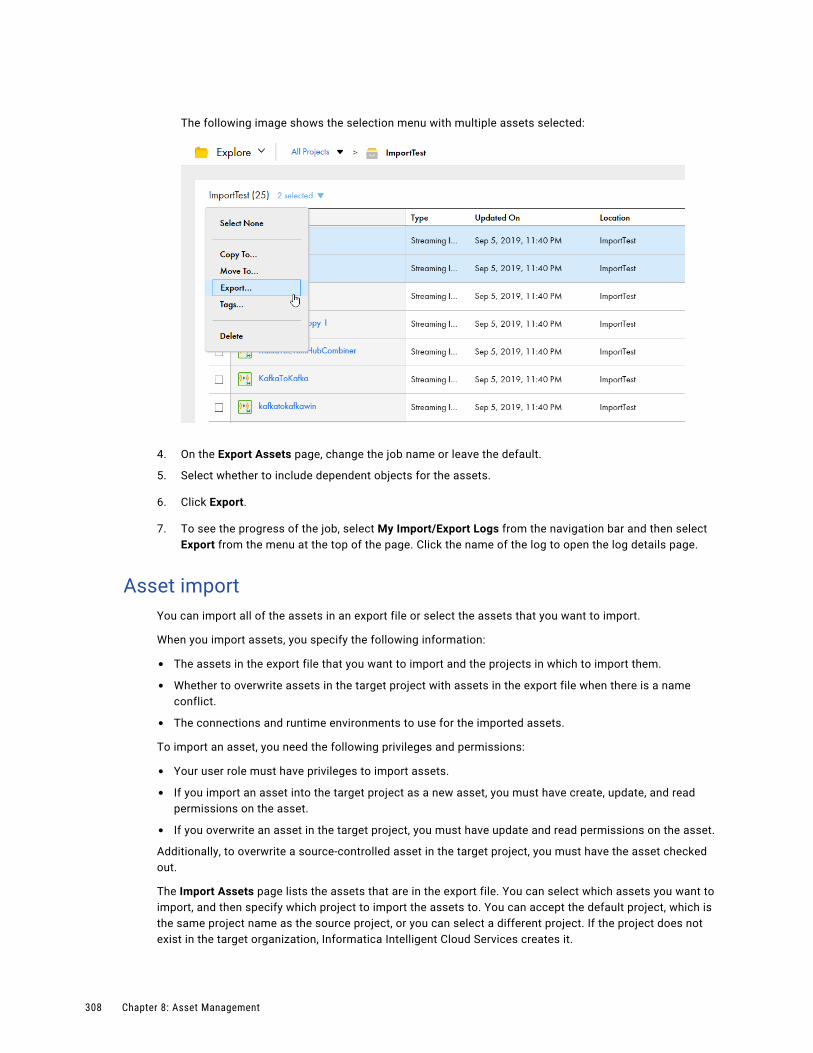
The following image shows the selection menu with multiple assets selected:
4. On the Export Assets page, change the job name or leave the default.
5. Select whether to include dependent objects for the assets.
6. Click Export.
7. To see the progress of the job, select My Import/Export Logs from the navigation bar and then select Export from the menu at the top of the page. Click the name of the log to open the log details page.
Asset importYou can import all of the assets in an export file or select the assets that you want to import.
When you import assets, you specify the following information:
• The assets in the export file that you want to import and the projects in which to import them.
• Whether to overwrite assets in the target project with assets in the export file when there is a name conflict.
• The connections and runtime environments to use for the imported assets.
To import an asset, you need the following privileges and permissions:
• Your user role must have privileges to import assets.
• If you import an asset into the target project as a new asset, you must have create, update, and read permissions on the asset.
• If you overwrite an asset in the target project, you must have update and read permissions on the asset.
Additionally, to overwrite a source-controlled asset in the target project, you must have the asset checked out.
The Import Assets page lists the assets that are in the export file. You can select which assets you want to import, and then specify which project to import the assets to. You can accept the default project, which is the same project name as the source project, or you can select a different project. If the project does not exist in the target organization, Informatica Intelligent Cloud Services creates it.
308 Chapter 8: Asset Management
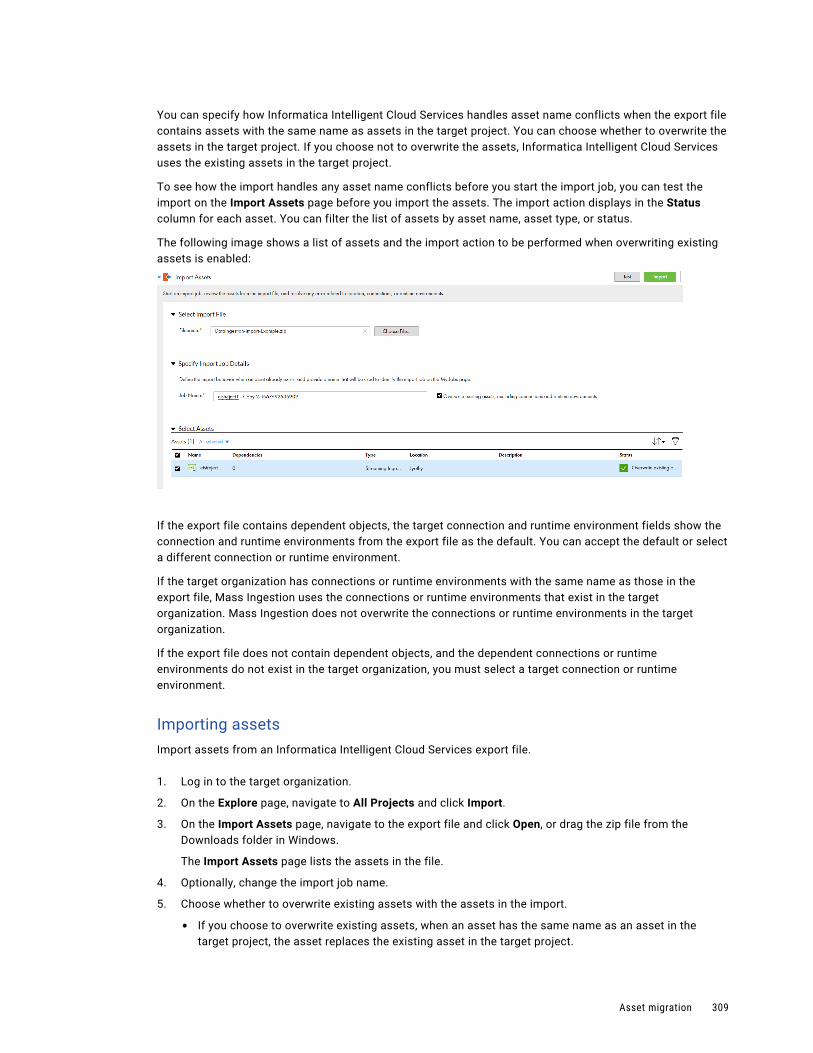
You can specify how Informatica Intelligent Cloud Services handles asset name conflicts when the export file contains assets with the same name as assets in the target project. You can choose whether to overwrite the assets in the target project. If you choose not to overwrite the assets, Informatica Intelligent Cloud Services uses the existing assets in the target project.
To see how the import handles any asset name conflicts before you start the import job, you can test the import on the Import Assets page before you import the assets. The import action displays in the Status column for each asset. You can filter the list of assets by asset name, asset type, or status.
The following image shows a list of assets and the import action to be performed when overwriting existing assets is enabled:
If the export file contains dependent objects, the target connection and runtime environment fields show the connection and runtime environments from the export file as the default. You can accept the default or select a different connection or runtime environment.
If the target organization has connections or runtime environments with the same name as those in the export file, Mass Ingestion uses the connections or runtime environments that exist in the target organization. Mass Ingestion does not overwrite the connections or runtime environments in the target organization.
If the export file does not contain dependent objects, and the dependent connections or runtime environments do not exist in the target organization, you must select a target connection or runtime environment.
Importing assetsImport assets from an Informatica Intelligent Cloud Services export file.
1. Log in to the target organization.
2. On the Explore page, navigate to All Projects and click Import.
3. On the Import Assets page, navigate to the export file and click Open, or drag the zip file from the Downloads folder in Windows.
The Import Assets page lists the assets in the file.
4. Optionally, change the import job name.
5. Choose whether to overwrite existing assets with the assets in the import.
• If you choose to overwrite existing assets, when an asset has the same name as an asset in the target project, the asset replaces the existing asset in the target project.
Asset migration 309
• If you do not choose this option, if an asset with the same name exists in the target project, the asset is not imported.
6. Select the assets that you want to import.
If the export file contains a project and you want to import the entire project, select all of the assets. Informatica Intelligent Cloud Services creates the project in the source organization.
7. Select the target project or accept the default.
8. Click Test to see the potential results of the import.
In the Select Assets area, the status for each asset shows the action that the service performs when you import the files.
9. If necessary, revise your selections to resolve any issues in the test results.
10. Click Import.
You can see the progress of the import on the Import tab of the My Import/Export Logs page. When the import process is complete, a message appears in Notifications. Click the link in the message to open the log details page and see the results of the import.
Post-import tasksTo complete the migration process you need to perform certain tasks based on the types of assets that you imported.
Perform the following tasks after you import assets:
• Configure connection passwords and security tokens. Informatica Intelligent Cloud Services does not include connection passwords and security tokens in imports for security reasons.
Source controlYou can use a GitHub or Azure DevOps Git source control repository with Informatica Intelligent Cloud Services to manage and track changes made to Informatica Intelligent Cloud Services objects such as projects, folders, and assets.
You can use source control to enable version management for the Informatica Intelligent Cloud Services objects that appear on the Explore page, except for Data Integration bundles. You cannot apply source control to objects that do not appear on the Explore page such as runtime environments or connections. The source control repository structure mirrors the structure in the organization, with Explore as the top level directory.
To use source control, the following prerequisites must be met:
• The organization has the appropriate Informatica Intelligent Cloud Services licenses to use source control.
• The organization administrator has configured a connection between the source control repository and the Informatica Intelligent Cloud Services organization.
• Your user role has privileges to use the Informatica Intelligent Cloud Services source control feature.
• You have entered your source control repository user credentials in Informatica Intelligent Cloud Services.
For information about configuring a connection between a GitHub or Azure DevOps Git source control repository and Informatica Intelligent Cloud Services, see the Administrator help.
310 Chapter 8: Asset Management
Note: Informatica recommends that you include no more than 1000 objects in a container such as a project or folder when you use a source control repository with Informatica Intelligent Cloud Services.
Source control actionsYou can perform the following actions on source-controlled objects such as projects, folders, and assets:
Pull an object.
Pull an object to add it to the organization or update a project with the version in the source control repository.
Check out an object.
Check out an object that you want to work on. When you check out an object, the object locks so that other users cannot make changes to it.
Check in an object.
Check in an object to add it to the source control repository or update the source control repository with the latest version of the object. When you check in an object, the lock releases.
Delete an object.
Delete an object from the organization and the source control repository. Before you can delete an object, you must check it out.
Restore an object version.
Restore an object to a previous version.
Undo a checkout.
Undo a checkout if you don't want to save the changes you made to the object. When you undo a checkout, the object reverts to the last source control version.
Unlink an object.
Unlink an object if you no longer want the object in the organization to stay in sync with the object in the source control repository.
Note: Some organizations do not have permission to update the source control repository. If your organization cannot update the repository, you can perform a pull action to get a specified version of the Informatica Intelligent Cloud Services objects. However, you cannot perform other source control actions such as checking out and checking in objects.
To check out, pull, unlink, or undo a checkout for an object, you must have update permissions on the object.
Source control and the Git repositoryIf you usually work directly in a Git source control repository, you might notice a few differences between using source control in Informatica Intelligent Cloud Services and working directly in the repository.
Note the following differences:
• A pull action in Informatica Intelligent Cloud Services is the same as a Git pull command. However, a pull in Informatica Intelligent Cloud Services cannot merge changes.
• A checkout action in Informatica Intelligent Cloud Services locks an object so that no one else can check it out or change it.
• A check-in action in Informatica Intelligent Cloud Services is the same as a Git commit command and push command combined. Use a check-in to add Informatica Intelligent Cloud Services objects to the source control repository and to commit changes to the repository.
Source control 311
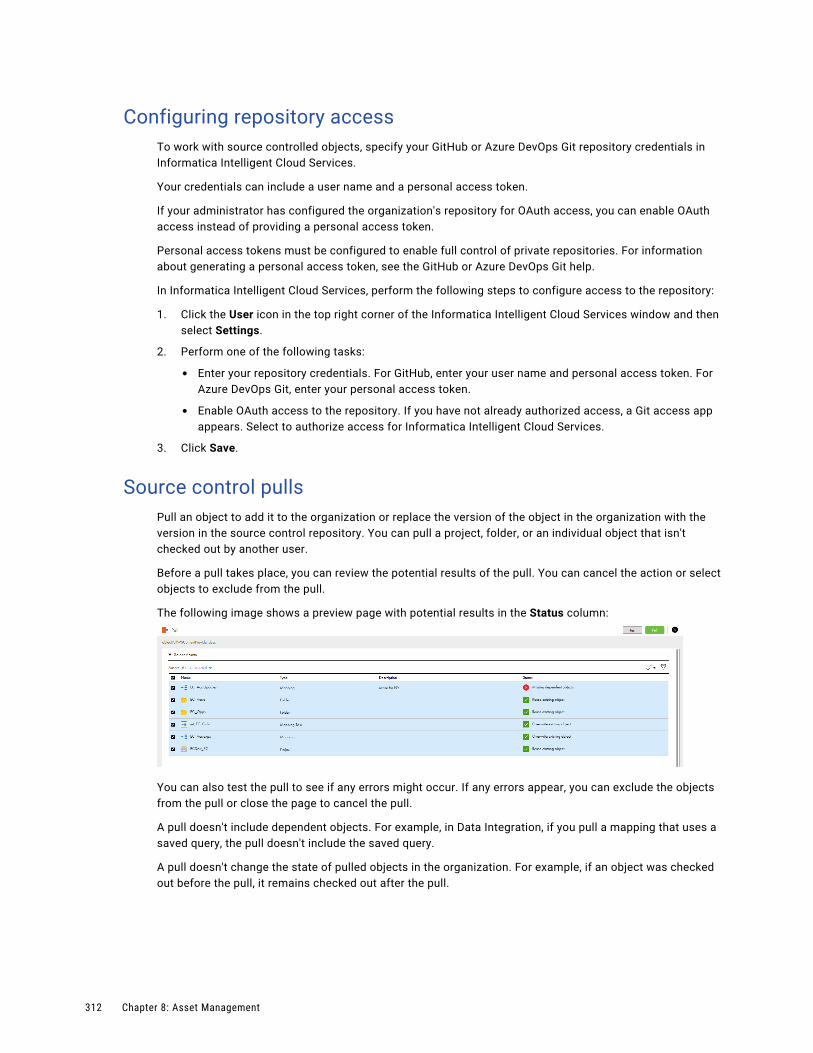
Configuring repository accessTo work with source controlled objects, specify your GitHub or Azure DevOps Git repository credentials in Informatica Intelligent Cloud Services.
Your credentials can include a user name and a personal access token.
If your administrator has configured the organization's repository for OAuth access, you can enable OAuth access instead of providing a personal access token.
Personal access tokens must be configured to enable full control of private repositories. For information about generating a personal access token, see the GitHub or Azure DevOps Git help.
In Informatica Intelligent Cloud Services, perform the following steps to configure access to the repository:
1. Click the User icon in the top right corner of the Informatica Intelligent Cloud Services window and then select Settings.
2. Perform one of the following tasks:
• Enter your repository credentials. For GitHub, enter your user name and personal access token. For Azure DevOps Git, enter your personal access token.
• Enable OAuth access to the repository. If you have not already authorized access, a Git access app appears. Select to authorize access for Informatica Intelligent Cloud Services.
3. Click Save.
Source control pullsPull an object to add it to the organization or replace the version of the object in the organization with the version in the source control repository. You can pull a project, folder, or an individual object that isn't checked out by another user.
Before a pull takes place, you can review the potential results of the pull. You can cancel the action or select objects to exclude from the pull.
The following image shows a preview page with potential results in the Status column:
You can also test the pull to see if any errors might occur. If any errors appear, you can exclude the objects from the pull or close the page to cancel the pull.
A pull doesn't include dependent objects. For example, in Data Integration, if you pull a mapping that uses a saved query, the pull doesn't include the saved query.
A pull doesn't change the state of pulled objects in the organization. For example, if an object was checked out before the pull, it remains checked out after the pull.
312 Chapter 8: Asset Management
Consider the following rules and guidelines:
• If you want to pull an object that uses a connection or runtime environment, be sure that the organization includes a connection and runtime environment before you perform the pull. When you select an object that uses a connection or runtime environment, you can select a runtime environment and connection to use on the test page.
• Informatica Intelligent Cloud Services doesn't consider capitalization in object names. As a result, you can't pull a project that contains multiple assets that have the same name with different capitalization. For example, if you try to pull a project that contains an asset named "sales" and an asset named "SALES", you receive an error because a project or folder can't contain multiple assets with the same name.
• You can pull objects regardless of whether your organization can or cannot update the source control repository.
Project and folder pullsYou can pull one or more projects or folders.
A pull includes all of the objects within the project or folder. If an object in the project or folder is not source-controlled, the pull does not affect the object.
You specify the version of the objects that you want to pull. The versions of an object that you can select are based on the object's current location in Informatica Intelligent Cloud Services. For example, you check out version 5 of the m_customers object and move it to a project called NewCustomers. When you pull the object, the available versions do not include the versions of the object from the previous location.
A pull updates the project or folder in the organization to be identical to the selected version of the project or folder in the repository. For example, if you pull an older version of a project and the project in the organization contains objects that were added in later versions, the pull deletes the objects.
Pulling an objectUse the pull action to update the organization with objects in the source control repository.
To pull a single asset, you can select the asset and then click Actions and select Pull. To pull a project, folder, or multiple assets, perform the following steps:
1. On the Explore page, click Pull from Git.
2. Select the project that contains the objects you want to pull and click Select.
The preview page appears with a list of available versions of the object. If the pull is for multiple objects, the preview page lists all of the versions in the repository.
3. Select the version that you want to pull and click Pull.
4. On the preview page, review the actions in the Status column for each object. These actions occur when the pull action is performed.
5. To exclude any objects from the pull, clear the check box by the object name.
6. Click Test to see if errors might occur as a result of the pull action.
7. If the test is successful, click Pull.
The pull action generates a log showing details of this action. You can view the log on the Source Control Logs page in Monitor.
Source control 313

Checking out and checking in objectsCheck out an object so you can make changes to it. Check in the object when you want to update the source control repository with your changes. You can also check in objects to add them to the source control repository.
When you check out an object, the object locks so that other users can't make changes to it. When you check in an object, a new version of the object is created in the source control repository.
If you check in an object that's in a folder or project that isn't source controlled, the folder or project becomes source controlled. An asset can't reside in a source control repository unless it's in a container such as a project or folder.
Note: The size of a check-in cannot exceed 50 MB.
Checking out an objectWhen you check out an object, the object is locked so that other users can't update it while you are making your changes.
You can check out individual objects, multiple objects, or a project or folder to check out all of the objects within the project or folder.
Before you check out an object, you might want to perform a pull to be sure you update the latest version of the object. For more information about the pull action, see “Source control pulls” on page 312
1. On the Explore page, navigate to the object you want to check out.
2. In the row that contains the object, click Actions and select Check Out.
3. If the checkout includes multiple objects, on the preview page, review the results in the Status column. If you want to exclude an object, clear the check box next to the object name.
4. Click Check Out.
Checking in an objectCheck in an object to add the object to the source control repository or to update the source control repository with the latest version of the object in the organization.
If no changes were made to the object, the check-in isn't reflected in the source control history and a new version of the object isn't created in the source control repository.
Note: The size of a check-in cannot exceed 50 MB.
1. On the Explore page, navigate to the object you want to check in.
2. In the row that contains the object, click Actions and select Check In.
3. If the check-in includes multiple objects, on the preview page, review the results in the Status column. If you want to exclude an object, clear the check box next to the object name. If you want to cancel the action, close the page.
4. Add a summary and optionally, a description.
A summary is required and has a max length of 255 characters.
A description is optional and has a max length of 500 characters.
5. Click OK.
314 Chapter 8: Asset Management
Deleting an objectTo delete a source controlled object, you delete it from the organization and from the source control repository.
You must check out an object before you can delete it.
You can't delete an object that's checked out by another user or delete a project or folder recursively.
1. On the Explore page, navigate to the object that you want to delete.
2. On the row that contains the object, click Actions and then click Delete.
3. To confirm that you want to delete the asset from the organization, click Delete.
4. Add a summary that describes the reason for the delete action and optionally, a description.
A summary is required and has a max length of 255 characters.
A description is optional and has a max length of 500 characters.
5. To delete the object from the repository and complete the delete action, click OK.
Reverting to an older versionYou might want to revert to a previous version of an object if you want to discard changes that were made to the object.
To revert to a previous version, perform a pull action and select the version that you want to restore in the organization.
If you revert the version of a project or folder and the project or folder in Informatica Intelligent Cloud Services contains objects that are not in the repository's project or folder, the pull action deletes the additional objects if they are source controlled. If the objects are not source controlled, the action doesn't delete the additional objects.
For more information about the pull action, see “Source control pulls” on page 312.
Undoing a checkoutWhen you undo a checkout, the object reverts to the last version in the source control repository. The object's version history will not include a record of the checkout and undo checkout actions.
You can undo the checkout of any object that you have checked out. You cannot undo the checkout of an object that has been checked out by another user unless you have the Admin role or your user role has the Force Undo Checkout feature privilege for the Administrator service.
An undo checkout is not recursive. If you undo the checkout of a project or folder, the lock for the project or folder is released but the objects within the project or folder remain locked.
1. On the Explore page, navigate to the object.
2. In the row that contains the object, click Actions and select Undo Check Out.
The undo checkout releases the lock so that the object is available for checkout.
Note: If an object was moved or renamed after it was checked out, undoing the checkout restores the object's name and location to its name and location before it was checked out.
Source control 315
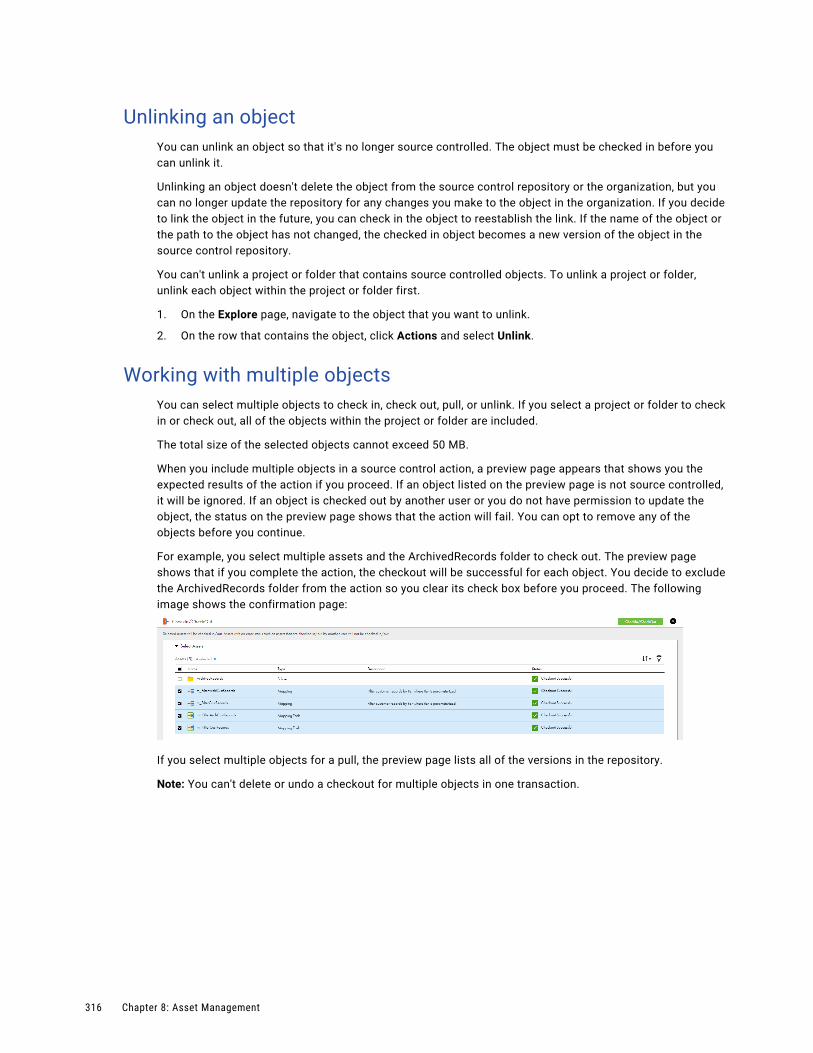
Unlinking an objectYou can unlink an object so that it's no longer source controlled. The object must be checked in before you can unlink it.
Unlinking an object doesn't delete the object from the source control repository or the organization, but you can no longer update the repository for any changes you make to the object in the organization. If you decide to link the object in the future, you can check in the object to reestablish the link. If the name of the object or the path to the object has not changed, the checked in object becomes a new version of the object in the source control repository.
You can't unlink a project or folder that contains source controlled objects. To unlink a project or folder, unlink each object within the project or folder first.
1. On the Explore page, navigate to the object that you want to unlink.
2. On the row that contains the object, click Actions and select Unlink.
Working with multiple objectsYou can select multiple objects to check in, check out, pull, or unlink. If you select a project or folder to check in or check out, all of the objects within the project or folder are included.
The total size of the selected objects cannot exceed 50 MB.
When you include multiple objects in a source control action, a preview page appears that shows you the expected results of the action if you proceed. If an object listed on the preview page is not source controlled, it will be ignored. If an object is checked out by another user or you do not have permission to update the object, the status on the preview page shows that the action will fail. You can opt to remove any of the objects before you continue.
For example, you select multiple assets and the ArchivedRecords folder to check out. The preview page shows that if you complete the action, the checkout will be successful for each object. You decide to exclude the ArchivedRecords folder from the action so you clear its check box before you proceed. The following image shows the confirmation page:
If you select multiple objects for a pull, the preview page lists all of the versions in the repository.
Note: You can't delete or undo a checkout for multiple objects in one transaction.
316 Chapter 8: Asset Management
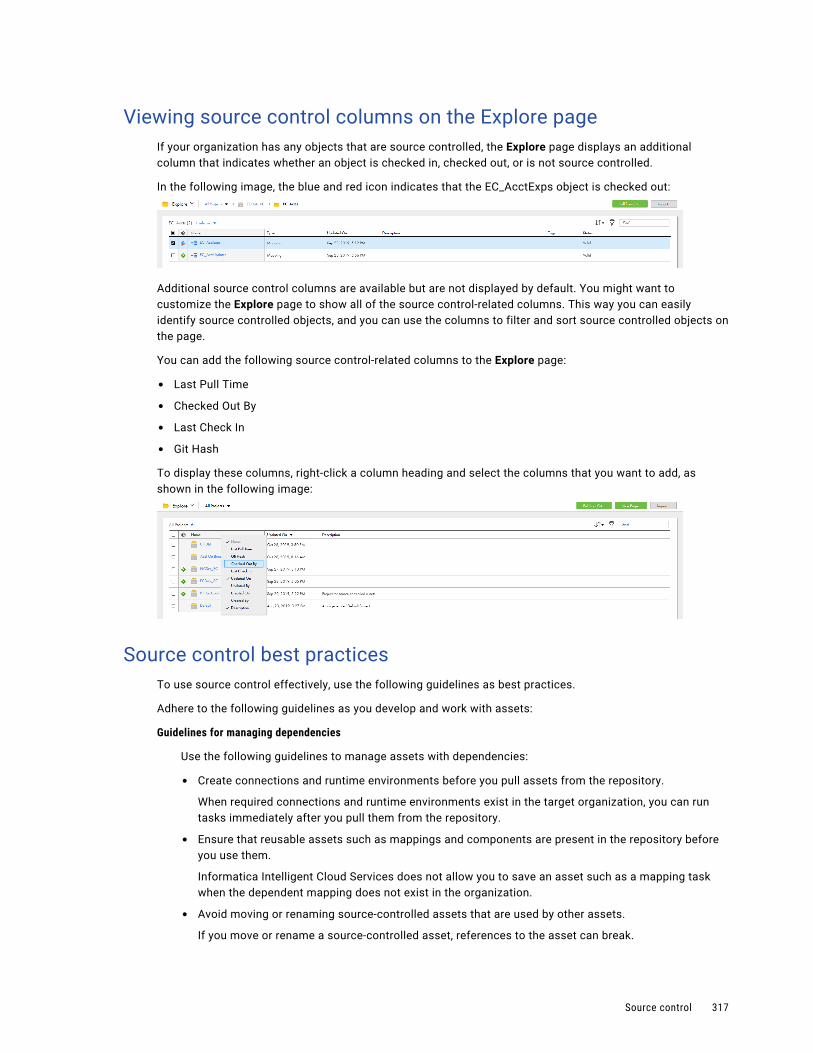
Viewing source control columns on the Explore pageIf your organization has any objects that are source controlled, the Explore page displays an additional column that indicates whether an object is checked in, checked out, or is not source controlled.
In the following image, the blue and red icon indicates that the EC_AcctExps object is checked out:
Additional source control columns are available but are not displayed by default. You might want to customize the Explore page to show all of the source control-related columns. This way you can easily identify source controlled objects, and you can use the columns to filter and sort source controlled objects on the page.
You can add the following source control-related columns to the Explore page:
• Last Pull Time
• Checked Out By
• Last Check In
• Git Hash
To display these columns, right-click a column heading and select the columns that you want to add, as shown in the following image:
Source control best practicesTo use source control effectively, use the following guidelines as best practices.
Adhere to the following guidelines as you develop and work with assets:
Guidelines for managing dependencies
Use the following guidelines to manage assets with dependencies:
• Create connections and runtime environments before you pull assets from the repository.
When required connections and runtime environments exist in the target organization, you can run tasks immediately after you pull them from the repository.
• Ensure that reusable assets such as mappings and components are present in the repository before you use them.
Informatica Intelligent Cloud Services does not allow you to save an asset such as a mapping task when the dependent mapping does not exist in the organization.
• Avoid moving or renaming source-controlled assets that are used by other assets.
If you move or rename a source-controlled asset, references to the asset can break.
Source control 317
Guidelines for checking in and checking out assets
Use the following guidelines when you check in and check out assets:
• Identify all dependencies before you check out reusable assets such as mappings, mapplets, and user-defined functions.
Source control operations such as check out, check in, and pull do not automatically include dependent assets.
• When you need to update a reusable asset such as a mapping or component, check out the asset and all dependent assets.
For example, when you need to update a mapping, check out the mapping and all mapping tasks that use it to ensure that changes to the mapping are propagated to the mapping tasks.
• Check in a reusable asset and all dependent assets in one operation.
This ensures that changes to the asset and dependent assets are committed to the source control repository at the same time. It also ensures that users get the latest versions of the dependent assets when they pull the assets.
• Enter comments when you check in assets.
When you check in assets, you might enter a release tag name in the Summary field and enter more descriptive comments in the Description field. When you do this, the Git Summary field in Informatica Intelligent Cloud Services shows the release tag that is associated with the asset.
• When you check in multiple assets at one time, limit the number of assets to 1000 or fewer.
Checking in more than 1000 assets at one time can degrade performance between Informatica Intelligent Cloud Services and the GitHub repository service.
318 Chapter 8: Asset Management
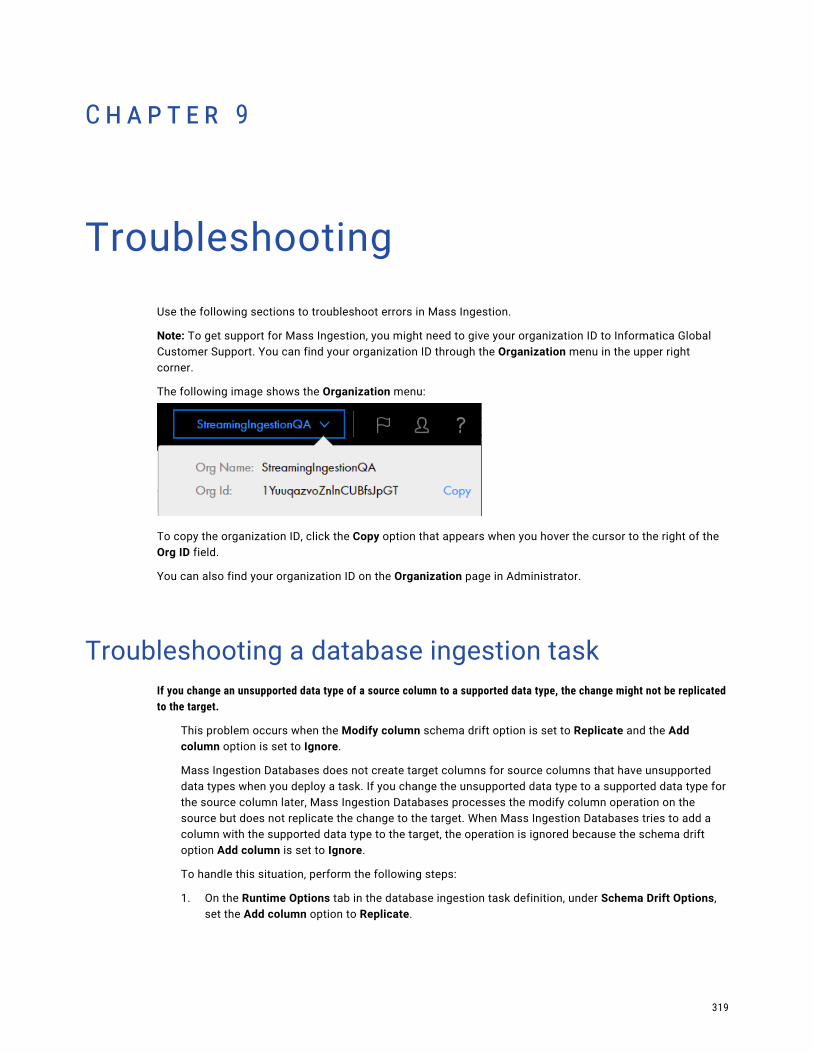
C h a p t e r 9
TroubleshootingUse the following sections to troubleshoot errors in Mass Ingestion.
Note: To get support for Mass Ingestion, you might need to give your organization ID to Informatica Global Customer Support. You can find your organization ID through the Organization menu in the upper right corner.
The following image shows the Organization menu:
To copy the organization ID, click the Copy option that appears when you hover the cursor to the right of the Org ID field.
You can also find your organization ID on the Organization page in Administrator.
Troubleshooting a database ingestion taskIf you change an unsupported data type of a source column to a supported data type, the change might not be replicated to the target.
This problem occurs when the Modify column schema drift option is set to Replicate and the Add column option is set to Ignore.
Mass Ingestion Databases does not create target columns for source columns that have unsupported data types when you deploy a task. If you change the unsupported data type to a supported data type for the source column later, Mass Ingestion Databases processes the modify column operation on the source but does not replicate the change to the target. When Mass Ingestion Databases tries to add a column with the supported data type to the target, the operation is ignored because the schema drift option Add column is set to Ignore.
To handle this situation, perform the following steps:
1. On the Runtime Options tab in the database ingestion task definition, under Schema Drift Options, set the Add column option to Replicate.
319
2. Change the source column data type to a supported data type again so that the database ingestion job can detect this schema change.The database ingestion job processes the DDL operation and creates the new target column.
Note: The database ingestion job does not propagate the column values that were added prior to changing the source column data type.
3. If you want to propagate all of the values from the source column to the target, resynchronize the target table with the source.
If you change a primary key constraint on the source, Mass Ingestion Databases stops processing the source table on which the DDL change occurred.
This problem occurs if you add or drop a primary key constraint, or if you add or drop a column from an existing primary key.
To resume processing the source table for combined initial and incremental jobs, resynchronize the target table with the source.
To resume processing the source table for incremental jobs, perform the following steps:
1. On the Source tab in the database ingestion task definition, add a table selection rule to exclude the source table.
2. Redeploy the task.Mass Ingestion Databases deploys the edited task and deletes the information about the primary keys of the excluded table.
3. Edit the task again to delete the table selection rule that excluded the source table.
4. Redeploy the task.
If a DDL column-level change causes a source table subtask to stop or be in error and then you resume the database ingestion job, the expected change in the table state is delayed.
If a DDL column-level change on a source table causes a table subtask to stop or be in error and then you resume the database ingestion job, the state of the table subtask might remain unchanged until a DML operation occurs on the table. For example, if you set a schema drift option to Stop Table for an incremental or initial and incremental database ingestion task and then deploy and run the job, when a DDL change occurs on a source table, the job monitoring details shows the table subtask to be in the Error state. If you stop the job and then resume it with a schema drift override to replicate the DDL change, the table subtask temporarily remains in the Error state until the first DML operation occurs on the source table.
Mass Ingestion Databases failed to deploy a task that has a Snowflake target with the following error:
Information schema query returned too much data. Please repeat query with more selective predicates.
This error occurs because of a known Snowflake issue related to schema queries. For more information, see the Snowflake documentation.
In Mass Ingestion Databases, the error can cause the deployment of a database ingestion task that has a Snowflake target to fail when a large number of source tables are selected.
To handle the deployment failure, drop the target tables. Then update the database ingestion task to select fewer source tables for generating the target tables. Then try to deploy the task again.
A database ingestion job that runs on Linux ends abnormally with the following out-of-memory error:
java.lang.OutOfMemoryError: unable to create new native threadThe maximum number of user processes that is set for the operating system might have been exceeded. If the Linux ulimit value for maximum user processes is not already set to unlimited, set it to unlimited or a higher value. Then resume the job.
320 Chapter 9: Troubleshooting
If you copy an asset to another location that already includes an asset of the same name, the operation might fail with one of the following errors:
Operation succeeded on 1 artifacts, failed on 1 artifacts.Operation did not succeed on any of the artifacts.
If you try to copy an asset to another location that already has an asset of the same name, Mass Ingestion Databases displays a warning message that asks if you want to keep both assets, one with a suffix such as "- Copy 1". Note that when you choose to keep both assets, Mass Ingestion Databases validates the name length to ensure that it will not exceed the maximum length of 50 characters after the suffix is added. If the name length will exceed 50 characters, the copy operation will fail. In this case, you must copy the asset to another location, rename the copy, and then move the renamed asset back to the original location.
Schema drift options on the Runtime Options page do not match the options in the job log
In the Mass Ingestion Databases Spring 2020 April release, the order of the Schema Drift options displayed on the Runtime Options page changed but their values remained in the original order. If you use a database ingestion task that was created after the Spring 2020 April release and before the Fall 2020 December release, the schema drift options that the associated job uses at runtime, as reported under "schemaChangeRules" in the job log, might not match the Schema Drift options displayed on the Runtime Options page. In this case, reset each of the Schema Drift options on the Runtime Options page and save the task again.
A Kafka consumer ends with one of the following errors:
org.apache.avro.AvroTypeException: Invalid default for field meta_data: null not a {"type":"array"...org.apache.avro.AvroTypeException: Invalid default for field header: null not a {"type":"record"...
This error might occur because the consumer has been upgraded to a new Avro version but still uses the Avro schema files from the older version.
To resolve the problem, use the new Avro schema files that Mass Ingestion Databases provides.
A database ingestion job that propagates incremental change data to a Kafka target that uses Confluent Schema Registry fails with the following error:
io.confluent.kafka.schemaregistry.client.rest.exceptions.RestClientException: Register operation timed out; error code: 50002
This problem might occur when the job is processing many source tables, which requires Confluent Schema Registry to process many schemas. To resolve the problem, try increasing the value of the Confluent Schema Registry kafkastore.timeout.ms option. This option sets the timeout for an operation on the Kafka store. For more information, see the Confluent Schema Registry documentation.
Troubleshooting a streaming ingestion taskA streaming ingestion job with Kinesis Streams source which consumes streams from Amazon DynamoDB fails to read the data ingested from Kinesis Streams. The streaming ingestion job runs with Up and Running status, but does not return any error.
Provide the following required permissions to the Amazon DynamoDB user:
dynamodb:CreateTable - dynamodb:DescribeTable - dynamodb:Scan - dynamodb:PutItem
Troubleshooting a streaming ingestion task 321
- dynamodb:GetItem - dynamodb:UpdateItem - dynamodb:DeleteItem Resource: - !Join ["", ["arn:aws:dynamodb:*:", !Ref 'AWS::AccountId', ":table/*"]]
Provide the following permissions for Amazon CloudWatch:
"Action": "cloudwatch:DescribeAlarms" "Action": "cloudwatch:PutMetricData"
While creating a Kafka connection, if the SSL mode is set as disabled, any other additional connection property values declared are not considered.
To override this issue, declare the additional connection properties in the Additional Security Properties field.
When you try to ingest high volume of data to a Kafka target, the streaming ingestion job runs with the error:
A message in the stream exceeds the maximum allowed message size of 1048576 byte.
You get this error message if the received message size is more than 1 MB, which is the maximum message size that a Kafka server can receive.
When you try to ingest high volume of data to an Amazon Kinesis Firehose or Amazon Kinesis Streams target, the streaming ingestion job runs with the error:
INFO - Mon Feb 04 07:01:44 UTC 2019PutKinesisStream[id=0421419e-b24f-4e3f-ad19-9a1fbc7b0f3c] Failed to publish to kinesis records StandardFlowFileRecord[uuid=36926fcd-dfed-46f9-ae41-a6d32c3d5633,claim=StandardContentClaim [resourceClaim=StandardResourceClaim[id=1549263211727-1, container=default, section=1], offset=2758, length=1067926],offset=0,name=testKinesis.2758-1070684.txt,size=1067926] because the size was greater than 1024000 bytes
You get this error message if the received message size is more than 1 MB, which is maximum message buffer size of Amazon Kinesis. Any message of size greater than 1 MB never reaches the target and is lost in the transition.
322 Chapter 9: Troubleshooting
I n d e x
AAdvanced FTP V2 connections
properties 33Advanced FTPS V2 connections
properties 34Advanced SFTP V2 connections
properties 36Amazon Kinesis
AWS credential profile 43Amazon Kinesis connection
overview 39Amazon MSK
target 253Amazon Redshift
target considerations for database ingestion 112Amazon Redshift targets
data types mapped to Amazon Redshift targets 157mappings with Db2 for i sources 147mappings with Db2 for Linux, UNIX, and Windows sources 151mappings with Db2 for z/OS sources 154mappings with Microsoft SQL Server sources 157mappings with MySQL sources 162mappings with Netezza sources 167mappings with Oracle sources 170mappings with PostgreSQL sources 174mappings with Teradata sources 181
Amazon Redshift V2 connection properties 37
Amazon Redshift V2 targets file ingestion task 212properties 212
Amazon S3 flat file
target considerations for database ingestion 112Google Cloud Storage
target considerations for database ingestion 112Microsoft Azure Data Lake Storage
target considerations for database ingestion 112target considerations for database ingestion 112
Amazon S3 V2 connection properties 43
Amazon S3 V2 sources file ingestion task 197properties 197
Amazon S3 V2 targets file ingestion task 214properties 214
Apache Kafka source properties 262target considerations for database ingestion 114
assets creating tags 300exporting 305, 307importing 308, 309managing ingestion assets 296
assets (continued)migrating between organizations 304source control 310tags 300
authentication OAuth 2.0 authorization code 88, 91
Azure Data Lake Storage Gen2 connection properties 69
Azure DevOps user credentials 312Azure Event Hub
target 254Azure Event Hubs
target considerations for database ingestion 114Azure Event Hubs Kafka
source 247
CConfluent Kafka
source 249target 253target considerations for database ingestion 114
connection Amazon Kinesis Firehose
connection properties 40Amazon Kinesis Streams
connection properties 41connections
Amazon Redshift V2 37Amazon S3 V2 43Azure Data Lake Storage Gen2 69
Azure Event Hub connection properties 70
creating connections for ingestion tasks 32Databricks Delta 49Db2 for i Database Ingestion 47Db2 for LUW Database Ingestion connection 48Db2 for zOS Database Ingestion 49flat file 54Google BigQuery 55Google Cloud Storage V2 57Google PubSub 60Hadoop Files V2 61importing 308
JMS connection properties 62
Kafka connection properties 63
Mass Ingestion connections overview 32Microsoft Azure Blob Storage V3 68Microsoft Azure Data Lake Storage Gen1 V3 70Microsoft Azure SQL Data Warehouse - Database Ingestion 71Microsoft Azure Synapse Analytics - Database Ingestion 74Microsoft Azure Synapse SQL 73Microsoft SQL Server 76
323
connections (continued)migrating 304
MQTT connection properties 78
MySQL 79Netezza 80OPC UA 81Oracle Database Ingestion 82PostgreSQL 85REST V2 93Snowflake V2 87Teradata connection 94testing connections for ingestion tasks 32
connectors Data Ingestion connectors overview 27
copying folders 297projects 297tasks 297
creating tags 300
DData Ingestion connectors
overview 27data type mappings
customizing the default mappings 127Database Ingestion
architecture 99overview 97troubleshooting 319use cases 97
database ingestion job details 283database ingestion jobs
overriding schema drift options 144redeploying a job 145resuming a job 143resynchronizing source and target objects 146running a job 142stopping 142undeploying a job 145
database ingestion tasks Amazon Redshift target properties 128Amazon S3 target properties 128configuration task flow 119configuring runtime options 139configuring the source 121configuring the target 126connectors 28Db2 for i sources 102Db2 for Linux, UNIX, and Windows sources 102Db2 for zOS sources 103defining basic information for a task 120deploying and ingestion task 141flat file target properties 130Google Cloud Storage target properties 132Kafka target properties 133limitations 101Microsoft Azure Data Lake Storage target properties 136Microsoft Azure SQL Data Warehouse target properties 138Microsoft Azure SQL Database source considerations 103Microsoft Azure Synapse Analytics target properties 138Microsoft SQL Server source considerations 103MySQL sources 105Netezza source considerations 105Oracle source considerations 106
database ingestion tasks (continued)Oracle source privileges 107PostgreSQL source considerations 109rules for renaming target tables 126rules for selecting source tables 125Snowflake target properties 138source considerations 102source types 98target considerations 112target types 99Teradata source considerations 111
Databricks Delta connection properties 49target 252target properties 268
Databricks Delta sources file ingestion task 199properties 199
Databricks Delta targets file ingestion task 215properties 215
Db2 for i Database Ingestion connections connection properties 47
Db2 for i sources data types mapped to Amazon Redshift targets 147mappings with Microsoft Azure SQL Data Warehouse targets 148mappings with Snowflake targets 150
Db2 for Linux, UNIX, and Windows sources data types mapped to Amazon Redshift targets 151
DB2 for Linux, UNIX, and Windows sources mappings with Microsoft Azure SQL Data Warehouse or Synapse Analytics targets 152mappings with Snowflake targets 153
Db2 for LUW Database Ingestion connection connection properties 48
Db2 for z/OS sources data types mapped to Amazon Redshift targets 154mappings with Microsoft Azure SQL Data Warehouse or Synapse Analytics targets 155mappings with Snowflake targets 156
Db2 for zOS Database Ingestion connections connection properties 49
deleting folders 299projects 299tags 302tasks 299
dependencies viewing dependencies 302
dependent objects in export files 304runtime environments and connections 304
Eediting
tags 302email addresses
for notification 26Explore page
source control columns 317tags 300
exporting assets 305, 307dependent objects 304export file structure and contents 305overview 304
324 Index
exporting (continued)projects 307
Ffile ingestion
schedule configuration 228file ingestion task
advanced FTP V2 source 193advanced FTP V2 target 211advanced FTPS V2 source 194advanced FTPS V2 target 211advanced SFTP V2 source 195advanced SFTP V2 target 212configuration 191defining 192description 188, 190file listener 199local folder source 203local folder target 217running 229source configuration 192target configuration 210
file ingestion tasks prerequisites 191REST API 236, 238, 242, 245sources 188targets 189
flat file connection properties 54
folders copying 297deleting 299for creating in a project in Mass Ingestion 25importing 309moving 297
GGetting Started
in Mass Ingestion 14GitHub user credentials 312Google BigQuery
connection properties 55Google BigQuery V2 targets
file ingestion task 216properties 216
Google Cloud Storage target 252target properties 269
Google Cloud Storage V2 connection properties 57
Google Cloud Storage V2 sources file ingestion task 201properties 201
Google Cloud Storage V2 targets file ingestion task 216properties 216
Google PubSub connection properties 60source 248source properties 261target 253target properties 270
HHadoop Files V2
connection properties 61Hadoop Files V2 sources
file ingestion task 202properties 202
Hadoop Files V2 targets file ingestion task 217properties 217
Iimporting
assets 308connections 308dependent objects 304name conflicts 308overview 304post-migration tasks 310projects 308
importing assets 309ingestion tasks
editing tasks from Explore page 296managing tasks 296setting user permissions on a task 303
JJMS
source 249
KKafka
source 249target 253
Kerberised Kafka prerequisites 65
LLinux
configuring proxy settings 59
MMass Ingestion
My Services page 11overview 10
Mass Ingestion connections overview 32
Mass Ingestion projects and assets 11Mass Ingestion Streaming
suborganization 14overview 246Secure Agent group 14System Configuration Details 14Transformations 254
Mass Streaming Ingestion use cases 246
mass streaming ingestion tasks Azure Event Hubs Kafka 247
Index 325
mass streaming ingestion tasks (continued)Google PubSub 247Kinesis 247OPC UA 247REST V2 247
source types Flat files 247JMS 247Kafka 247MQTT 247
Microsoft Azure Blob Storage V3 connection properties 68
Microsoft Azure Blob Storage V3 sources file ingestion task 205properties 205
Microsoft Azure Blob Storage V3 targets file ingestion task 217properties 217
Microsoft Azure Data Lake Storage Gen1 V3 connection properties 70
Microsoft Azure Data Lake Storage Gen2 target 254
Microsoft Azure Data Lake Storage Gen2 sources file ingestion task 207properties 207
Microsoft Azure Data Lake Storage Gen2 targets file ingestion task 218properties 218
Microsoft Azure Data Lake Store targets file ingestion task 218properties 218
Microsoft Azure Data Lake Store V3 sources file ingestion task 208properties 208
Microsoft Azure SQL Data Warehous target considerations for database ingestion 114
Microsoft Azure SQL Data Warehouse - Database Ingestion connections
connection properties 71Microsoft Azure SQL Data Warehouse or Synapse Analytics targets
mappings with DB2 for Linux, UNIX, and Windows sources 152mappings with Db2 for z/OS sources 155mappings with Netezza sources 168
Microsoft Azure SQL Data Warehouse targets mappings with Db2 for i sources 148mappings with Microsoft Azure SQL Database sources 159mappings with Microsoft SQL Server sources 159mappings with MySQL sources 163mappings with Oracle sources 172mappings with PostgreSQL sources 176mappings with Teradata sources 183
Microsoft Azure SQL Database sources data types mapped to Amazon Redshift targets 157mappings with Microsoft Azure SQL Data Warehouse targets 159mappings with Snowflake targets 160
Microsoft Azure Synapse Analytics target considerations for database ingestion 114
Microsoft Azure Synapse Analytics Database Ingestion connections connection properties 74
Microsoft Azure Synapse SQL connection properties 73
Microsoft Azure Synapse SQL Data targets properties 219
Microsoft Azure Synapse SQL targets file ingestion task 219
Microsoft SQL Server connection properties 76
Microsoft SQL Server sources data types mapped to Amazon Redshift targets 157mappings with Microsoft Azure SQL Data Warehouse targets 159mappings with Snowflake targets 160
migrating assets 307
migration assets 309of assets between organizations 304
monitoring ingestion jobs job properties in job lists 282monitoring all jobs from Monitor 279monitoring My Jobs from Mass Ingestion 278My Jobs and All Jobs pages 278viewing job details 283
moving tasks and folders 297
My Services page Mass Ingestion box 11
MySQL connection properties 79
MySQL sources data types mapped to Amazon Redshift targets 162mappings with Microsoft Azure SQL Data Warehouse targets 163mappings with Snowflake targets 165
NNetezza
connection properties 80Netezza sources
data types mapped to Amazon Redshift targets 167mappings with Microsoft Azure SQL Data Warehouse or Synapse Analytics targets 168mappings with Snowflake targets 169
Oobject migration 304OPC UA
connection properties 81source 250source properties 263
Oracle Database Ingestion connections connection properties 82
Oracle sources data types mapped to Amazon Redshift targets 170mappings with Microsoft Azure SQL Data Warehouse targets 172mappings with Snowflake targets 173
organization ID finding 319
organizations finding your organization ID 319
Ppasswords
changing 26PostgreSQL
connection properties 85PostgreSQL sources
data types mapped to Amazon Redshift targets 174mappings with Microsoft Azure SQL Data Warehouse targets 176mappings with Snowflake targets 178
326 Index
profiles editing 26
project folders creating in Mass Ingestion 25
projects copying 297creating in Mass Ingestion 25deleting 299exporting 307importing 308, 309
proxy settings configuring on Linux 59configuring on Windows 57
Rrenaming
folders 297projects 297tasks 298, 299
REST API create file ingestion tasks 238delete file ingestion tasks 245file ingestion tasks 236update file ingestion tasks 242
REST V2 authentication
standard 93connection properties 93
restart and recovery database ingestion incremental load jobs 146
runtime environments migrating 304
Sschedules
migrating 305Secure Agent services
CMI Streaming Agent Offline Agent 21Offline Mode 21
Database Ingestion agent environment variable 17Database Ingestion service properties 16DBMI agent properties 16
Secure Agents File Ingestion configuration properties 18
security questions editing 26
Snowflake target considerations for database ingestion 115
Snowflake Cloud Data Warehouse V2 connection properties 87
Snowflake Cloud Data Warehouse V2 targets file ingestion task 221properties 221
Snowflake targets mappings with Db2 for i sources 150mappings with DB2 for Linux, UNIX, and Windows sources 153mappings with Db2 for z/OS sources 156mappings with Microsoft Azure SQL Database sources 160mappings with Microsoft SQL Server sources 160mappings with MySQL sources 165mappings with Netezza sources 169mappings with Oracle sources 173mappings with PostgreSQL sources 178
Snowflake targets (continued)mappings with Teradata sources 185
source Amazon Kinesis Streams 247
source control actions 311best practices 317checking in and checking out objects 314checking in objects 314checking out objects 314configuring access to the repository 312deleting objects 315Explore page columns 317Git commands 311pulling objects 312pulling objects from the repository 313pulling projects and folders 313reverting to previous versions 315selecting multiple objects 316supported objects 310supported source control systems 310unlinking objects 316updating organization with repository versions 312
source properties flat file
rolling filename pattern 260MQTT
Client ID 263Max Queue Size 263
streaming ingestion data format
binary 255JSON 255XML 255
source Amazon MSK 249Azure Event Hubs Kafka 247Confluent Kafka 249flat file 248Google PubSub 248Google PubSub properties 261JMS 249
Kafka Azure Event Hubs
Azure Event Hubs source 259, 262namespace 259, 262
Kafka Azure Event Hub properties 259Kafka properties 262MQTT 249OPC UA 250OPC UA properties 263
target Databricks Delta properties 268Google Cloud Storage properties 269Google PubSub properties 270
Target Amazon MSK 253Azure Event Hub 254Confluent Kafka 253Databricks Delta 252Google Cloud Storage 252Google PubSub 253Kafka 253Microsoft Azure Data Lake Storage Gen2 254
transformations combiner transformation 255filter transformation 256Python transformation 256
Index 327
streaming ingestion (continued)transformations (continued)
Splitter transformation 257Streaming ingestion
secure agent 19Target
Amazon S3 251Amazon S3 properties 266
Streaming Ingestion target
Kinesis Firehose 251troubleshooting 321
streaming ingestion jobs 291streaming ingestion task
add transformation 272, 273Agent Parameters 275defining 258deploy 276email addresses 275Log level 275purge 275reject directory 275runtime options 275source configuration 258target configuration 265transformation configuration 272undeploy 276
streaming ingestion tasks Microsoft Azure Data Lake Storage Gen2 target properties 271prerequisites 258
streaming injestion resume 277stop 277
Ttags
adding to an ingestion task 301creating 300deleting 302editing 302properties 302
target Amazon Kinesis Streams 251
target properties for database ingestion Amazon Redshift target properties 128Amazon S3 target properties 128flat file target properties 130Google Cloud Storage target properties 132Kafka properties 133Microsoft Azure Data Lake Storage target properties 136
target properties for database ingestion (continued)Microsoft Azure SQL Data Warehouse target properties 138Microsoft Azure Synapse Analytics target properties 138Snowflake target properties 138
targets, database ingestion Amazon S3 112flat file 112Google Cloud Storage 112Microsoft Azure Data Lake Storage 112Microsoft Azure SQL Data Warehouse 114Microsoft Azure Synapse Analytics 114Snowflake 115
Targets, database ingestion Apache Kafka 114Confluent Kafka 114Kafka-enabled Azure Event Hubs 114
tasks copying 297deleting 299moving 297renaming 298, 299
Teradata connection connection properties 94
Teradata sources data types mapped to Amazon Redshift targets 181mappings with Microsoft Azure SQL Data Warehouse targets 183mappings with Snowflake targets 185
time zones changing user profile 26
Transformations combiner transformation 255filter transformation 256Python transformation 256Splitter transformation 257
Troubleshooting database ingestion task 319streaming ingestion task 321
Uuser permissions
setting permissions on an ingestion task 303user profiles
editing 26
WWindows
configuring proxy settings 57
328 Index